Microsoft which recently announced the opening of the first cloud regions of data centers in Spain is reportedly planning to invest billions of dollars to build new data centers in Aragon, Spain’s northeastern region.
The news comes via Reuters which first reported that Microsoft is planning to invest 6.69 billion euros ($7.16 billion). The news agency quotes a local newspaper, El Heraldo, which reported that the tech giant has already applied for a construction permit to build the data center with the approval of Aragon’s regional government.
The regional government has further informed that Microsoft has promised to spread out the investment over 10 years. As you may know, Aragon has been a major cloud computing hub within Europe, and Microsoft wants to tap that region to accelerate the development of the AI economy.
Microsoft’s move to build data centers in Aragon comes after Amazon’s recent announcement
You might be wondering why Microsoft is taking its interest in Aragon. To understand this, let’s go back a month. Microsoft’s biggest cloud computing competitor, Amazon Web Services, has already announced to invest 15.7 billion euros over 10 years to build a data center in Aragon, Spain. That’s the main reason why Microsoft is planning to build a data center in Aragon.
Amazon also announced that the data centers in the Aragon region of Spain would be fully powered by renewable energy. For the uninitiated, the Aragon region is popular for its large wind power capacity. And, Amazon wants to make the most of it, so does Microsoft.
Microsoft has been investing in various regions to capitalize on the increasing demand for cloud computing services. The company recently announced a $1 billion investment to build a data center in Thailand. Moreover, the Redmond giant announced the Datacenter Community Pledge to make data centers more sustainable earlier this month.
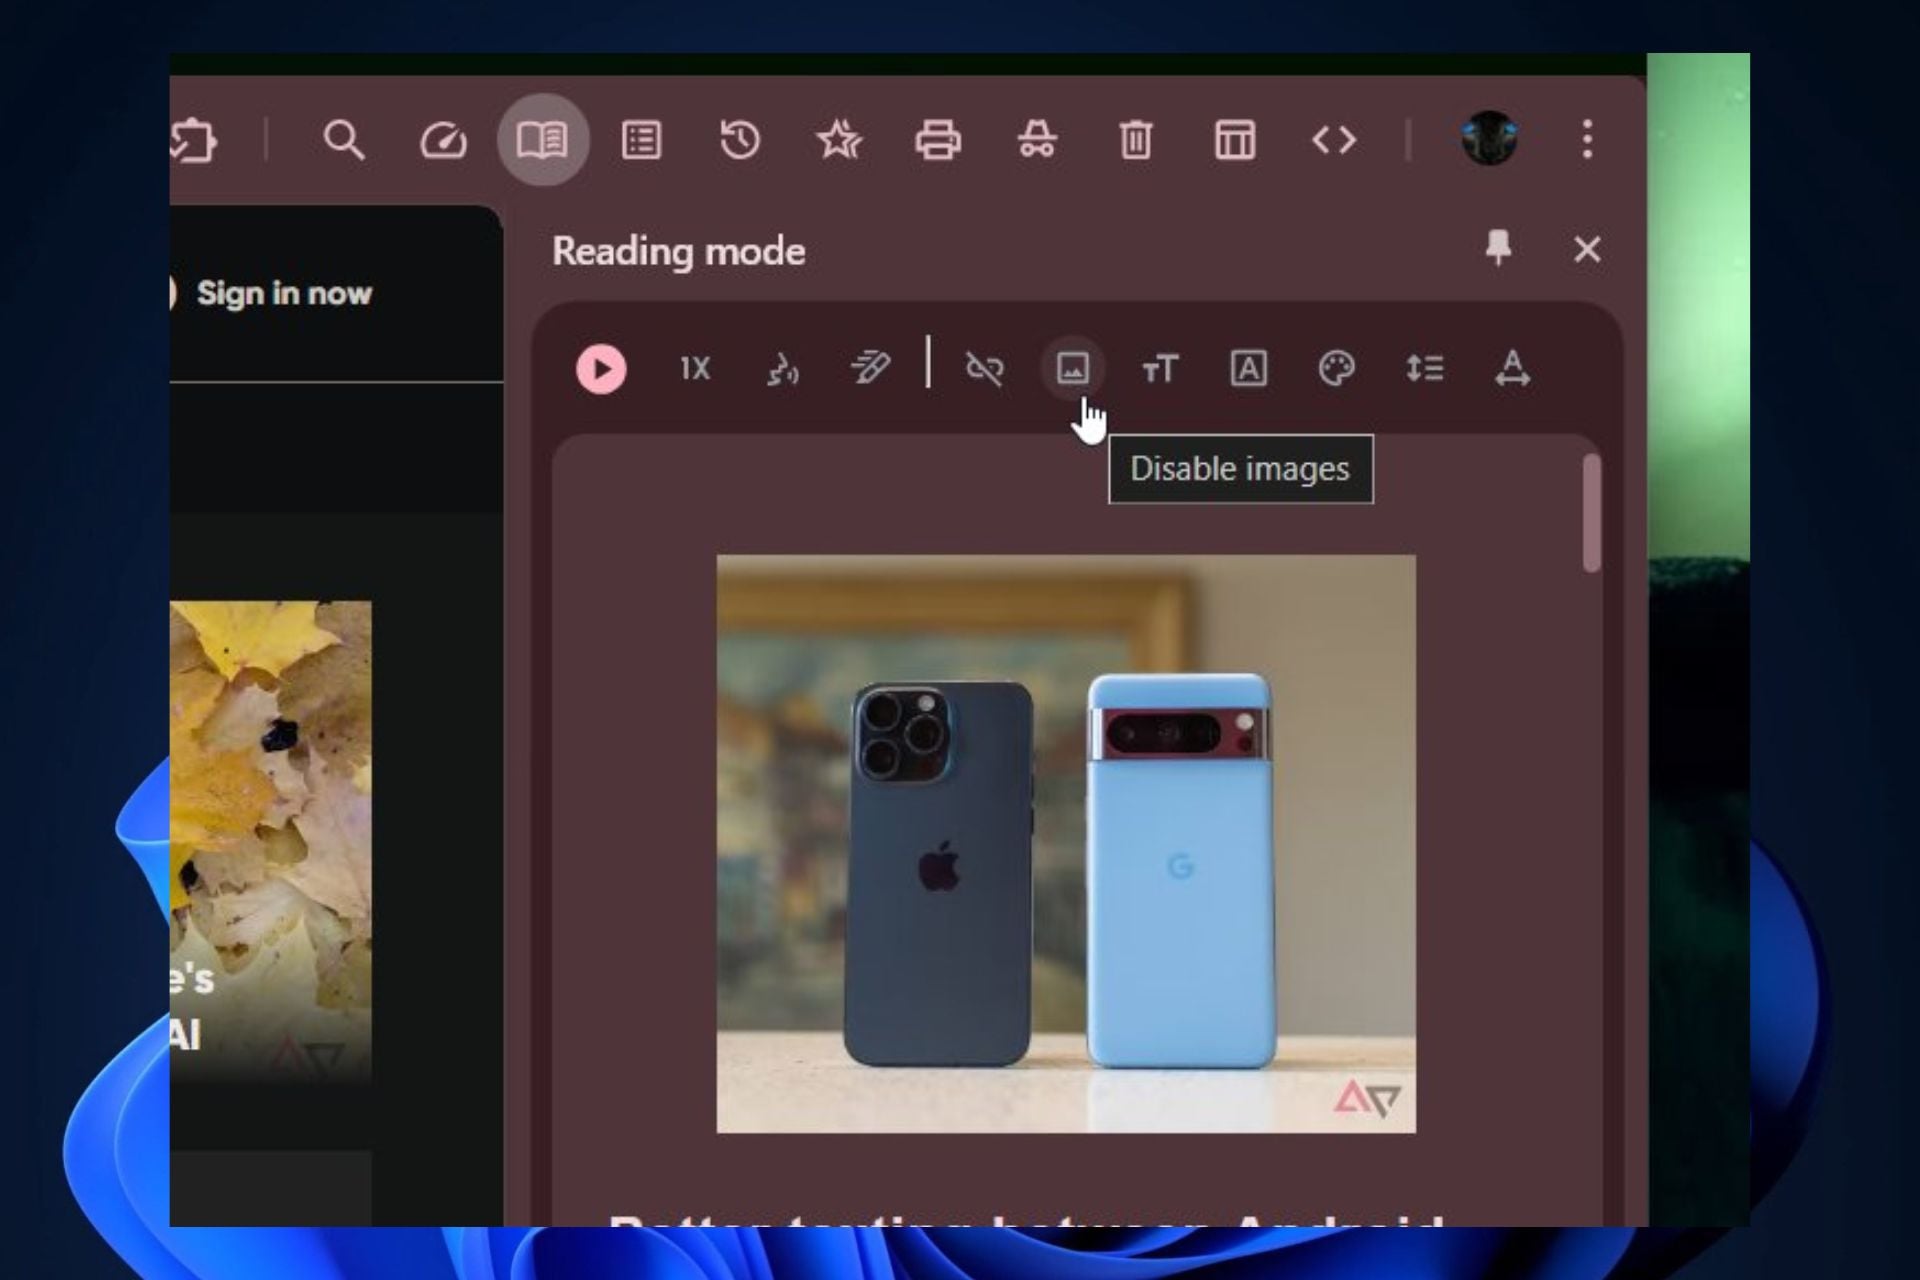
Google and AI, these days, go hand-in-hand, and that is fair enough. The company has been aggressively integrating AI features in most of its products and services. Last week only, there were reports about the company adding a new AI feature to Google Chrome which would reimagine what search history works down the line.
Not to forget, the details about the new Chrome’s AI history search feature were missing from previous reports. However, we do have some details now.
Google Chrome’s new AI search feature will help you dig deeper into your browsing history
Google Chrome is evolving continuously, and some minute changes are made here and there. Thankfully, an avid Chrome researcher @Leopeva64 on X (formerly Twitter) has spotted new details about the history search feature.
Google has added the description of the new Chrome feature "History search", and this description CONFIRMS that it will be possible to search based on the general content of the page and not just based on the title and URL:https://t.co/gP9L35bHlOpic.twitter.com/sJG8n18MVO
For the uninitiated, Google calls the new feature History search, powered by AI. The new feature would let you search for anything in your browser history window. With AI playing its part in Google Chrome, you can not only search the browsing history based on the title and URL of the webpage but also its content.
When you turn on this AI feature in Google Chrome, you’re most likely to see an improvement in search efficiency on the dedicated search history page. That’s further applicable when you use @history followed by a search query in Chrome’s address bar.
Google and human reviewers may access your search query data to improve the new AI-powered feature
While it may sound like a great feature that Chrome users will cherish, there’s always a privacy risk associated with it since Google could feed your data to train its AI model. Unlike other times, Google has been pretty straightforward about the AI training data this time around.
The Things to Consider section provides a disclaimer stating that Google and human reviewers may have access to your data. The exact wording is quoted below, please check.
Things to Consider
When you search browsing history, your history search terms, page content of best matches, and generated model outputs are sent to Google and may be seen by human reviewers to improve this feature. As you browse sites, their page contents are saved in an encrypted form on your device.
In other words, Google or human reviewers won’t have access to details about the sites you visited, rather they can access the search queries and all. Although we’ve seen Google giving AI touch to Chrome for some time now, the new feature is likely to take things to the next level.
On June 14, 2024, Microsoft announced Windows 11 Insider Preview Build 22635.3785 for Insiders in the Beta Channel. Notably the new build under KB5039319 brings a slew of improvements including bug fixes and addresses known issues.
The biggest of all is related to Window Share, the Start menu, and the Snipping tool. Let’s jump on to all the new improvements introduced by the Windows 11 Insider Preview Build 22635.3785.
The Beta Channel Preview Build 22635.3785 introduces several features and fixes several known issues
One of the biggest changes coming with Beta Preview Build 22635.378 is the ability to share content to an Android device using Windows Share. You can use this feature by pairing your Android device to your Windows PC using the Link to Windows app on Android. The Phone Link feature on your PC also allows you to use this feature seamlessly.
Talking of other changes in Beta Preview Build 22635.378, right-clicking on the app pinned to the Start Menu will display jump lists for apps that have them such as PowerPoint. Not to forget, Microsoft is also making some adjustments to the Windows Spotlight experience for desktop users. You can check the same in the image below.
Another big improvement is related to the Snipping Tool. Microsoft is rolling out an update for the Snipping Tool, version 11.2405.31.0 and newer. It introduces automatic save for screen recordings and is available for Insiders in the Beta and Release Preview Channel.
The new feature will ensure that your recordings are automatically saved to Screen Recording folders (Videos folder of your PC). If you want to turn this off from the settings of the Snipping Tool. Lastly, the Windows Insider Beta Preview Build 22635.378 brings the ability to make fast and safe checkout in the Store using Microsoft Wallet.
As mentioned earlier, this preview build further comes with several bug fixes related to Taskbar & System Tray, File Explorer, and Start Menu. It also addresses general issues and all those related to Widgets, Settings, and Start Menu. You can learn more about it by clicking here.
Many websites use geolocation to provide location-based services, like weather forecasts or nearby restaurants. But what happens when you’ve disabled geolocation on your Windows system and a website requests your location?
Previously, Chrome might not have provided a clear explanation for why it couldn’t access your location. This new update to Chrome integrates with Windows’ system-level location permission, offering a more informative message in these situations.
Chrome makes finding your location easier on Windows
Many websites use geolocation to provide location-based services This change is part of Google’s work to better “integrate Windows Location and Wi-Fi Permissions” with Chrome. When you’re on Windows and a website requests geolocation, Chrome’s geolocation bubble will now check your system-level settings.
If geolocation is disabled there, the bubble will display a clear message: “Turned off in Windows System Preferences” (sort of) and provide a helpful “Open Settings” button. Clicking this button takes you directly to the Windows privacy settings where you can enable geolocation if you choose to.
How to Check Your Location Settings
Chrome:
Open Chrome and click the three-dot menu in the top right corner.
Select “Settings” and then navigate to “Privacy and security.”
Click on “Site Settings” and then choose “Location.”
Here you can see which websites have permission to access your location and make changes as needed.
Windows 11
Open the Settings
Visit Privacy & security > Location
Ensure Location Services is enabled
Under “Let Apps access your location,” you can toggle the switch for individual apps, including Chrome.
This update will bring the following benefits to users:
The geolocation bubble now explains why Chrome can’t access your location, avoiding confusion.
With a single click, you can navigate to the relevant Windows settings to enable geolocation if needed.
The update lets you manage your privacy preferences more effectively when it comes to geolocation.
This change by Chrome can make a big difference for Windows users. By providing a more informative geolocation bubble and easier access to settings, Chrome provides users with a clearer understanding of their privacy options.
Wondering how to get a Chrome download offline installer? Setting up Chrome can be challenging in areas with unstable internet connections.
Luckily, with the offline installer, you can save time and bandwidth, especially when installing the browser on multiple devices. I’ll demonstrate the process below, so let’s jump right in!
Connect your PC to the internet to access the Chrome standalone setup page. The standalone setup tool is different from the regular online one, and it’s exactly what you need in this situation.
Scroll down and tap “Other Platforms.”
Select the appropriate version for your operating system (Windows, macOS, Android, iOS or Linux).
After selecting your Operating System, tap “Accept and Install.” The download will start automatically.
5. The file will be saved on your PC in the Downloads section.
Once the download is complete, you can transfer the file to another PC to install Chrome without worrying about an internet connection. Double-tap the installer file and follow the on-screen instructions.
After installing the browser, you can create a handy shortcut using our guide on how to add Chrome to the desktop for faster access.
Download from Third-Party Websites
You can get the offline installer for Chrome from reputable third-party websites like Softlay. However, it’s always best to first attempt downloading from the official website. You’ll want to avoid security risks associated with unreliable third-party sources that may infect you with malware.
How to Download Chrome Online Installer
You can also go for the traditional route and get the regular, online installer via official or third-party sources. However, it requires an internet connection.
Tap “Accept and install.” Wait for the download to complete.
Go to your downloads on your PC to access the ChromeSetup file.
Double-click on the file and follow the onscreen instructions to complete the installation.
Use a Third-Party Website
You can also download the Chrome online installer through a reputable third-party website like uptodown. However, I advise you to use the official website before you try any other sources.
It always provides the most up-to-date version of Chrome, including the latest features, security patches, performance improvements, and crash fixes.
FAQs
What is the Chrome offline installer?
The Chrome offline installer is a full standalone setup file that lets you install Google Chrome without an internet connection. It includes all required components in a single package.
When should I use the Chrome offline installer?
Use it when installing Chrome on multiple PCs, setting up a system without internet access, or avoiding issues caused by network restrictions, proxies, or unstable connections.
Where can I download the official Chrome offline installer?
You can download it from Google’s official Chrome download page by selecting the Download Chrome for another platform or Offline installer option. Always avoid third party sources to prevent malware risks.
Does the offline installer auto update Chrome?
Yes. After Chrome is installed, updates work normally through Google Update. The offline installer only affects the initial installation process.
By following these steps, you can easily get the Chrome download offline installer. Overall, you should prioritize downloading the app from the official website to get the latest version. Moreover, if you have any problems with uninstalling or opening the app, we’ve got you covered.
In the ever-evolving digital landscape, YouTube is once again at the forefront of innovation, testing two intriguing features that might change how we interact with the platform. Imagine jumping into a live chat with a quick summary of what’s been discussed or effortlessly sharing your favorite channels using a simple QR code.
That sounds handy, right? That’s exactly what YouTube is experimenting with, along with some other nifty additions to enhance user experience.
For starters, YouTube is experimenting with AI-generated live chat summaries. This feature is a godsend for those who’ve ever felt lost in a sea of messages during a livestream.
Using AI to summarize the chat’s highlights, newcomers can quickly catch up and dive into the conversation without missing a beat. However, it’s worth noting that this feature is currently limited to English and channels with super active chats.
To help you more quickly understand and participate in the exciting conversations that happen via YouTube live chat, we’re experimenting with AI-generated live chat summaries. If you’re in the experiment group, you’ll see a banner display at the top of the live chat when you join a live stream that’s accrued sufficient chat activity prior to you joining.
Then there’s the introduction of channel QR codes on YouTube, a straightforward yet effective way for creators to share their content widely.
Whether online or offline, QR codes can be easily scanned on YouTube, directing potential new followers straight to a creator’s channel. This simple tool could significantly lower the barrier to discovering new and exciting content.
To make it easier for creators to share their channels with others, we’re experimenting with channel QR codes. If you’re a creator in the experiment, you can share your channel QR code by navigating to the You tab on the bottom menu of the app > tapping the chip under your handle that says “Share your channel” > tapping “QR code” in the menu that pops up. Viewers can find and share your QR code by tapping the three-dot menu on your channel page > tapping Share > selecting the QR code ? The codes are scannable both online and offline. We’re testing this feature out with a small group of creators at first but we’ll let you know of our expansion plans in the future!
But YouTube isn’t stopping there. The platform also tests user-generated effects for YouTube Shorts, allowing creators to add a personal touch to their short-form videos.
And for those who’ve ever wished for a more intuitive way to search for content, YouTube is exploring the integration of Google Lens into its search bar. This would enable users to search for videos by simply snapping a picture of an item.
We’re experimenting with the ability to search on YouTube via Google Lens ? ? If you’re in the experiment, you’ll see a Lens button on in the search bar. From there, tap the Lens button to search what you see and receive relevant YouTube content as your search results.
While these features are currently in the testing phase and available to only a small group of users, the potential for a wider rollout is exciting.
YouTube’s commitment to innovation is clear, and these tests underscore the platform’s ongoing efforts to enhance the user experience, making the platform more interactive, accessible, and engaging for its billions of users worldwide.
It’s also worth mentioning that the company has been experimenting with horizontal video suggestions; frankly, it doesn’t look that bad.
So, what do you think? Would you be excited to use these features? YouTube’s experiments could shape how we interact with video content online, and I, for one, can’t wait to see what’s next.
I thoroughly tested this software and I’m here to discuss its standout features, interface, customer support, and pricing.
Sounds good? Let’s roll in!
Features
To write an authentic Revo Uninstaller Pro review, I tested this software and examined how well it performed.
Now let me share my experience with its features:
1. Forced Uninstall
This option is designed to tackle situations where the built-in uninstaller doesn’t work or is missing. To be more specific, it allows you to remove applications that are damaged, partially installed or removed, or lack an uninstaller.
In addition, Forced Uninstall can perform leftover scans on applications installed without using Revo Installer Pro. It uses an advanced scanning algorithm that ensures a thorough scan while maintaining high accuracy.
To test it, I clicked on the Forced Uninstall button from the main window.
Then, I typed “Driver Easy” as the program name.
As a result, Revo Uninstaller Pro automatically fetched some information like the complete Program Name, Type, and Uninstall Command.
To move ahead, I clicked Next.
Then, the software created a full Registry backup and System Restore Point, before initiating the built-in uninstaller.
I clicked Yes to confirm.
Within a few seconds, Revo uninstalled Driver Easy from my system.
However, I recommend using this feature as a last option after trying the standard uninstall process.
2. Quick Uninstall
Quick Uninstall is mainly useful if you want to uninstall multiple programs in one go. This feature helps to make the application removal process as simple as possible.
For instance, I navigated to the All Programs sub-window, selected the application, and clicked the Quick Uninstall button.
I clicked Yes to permit Revo to uninstall the selected programs quickly.
Before proceeding, Quick Uninstall first created a System Restore point and Registry backup for the complete programs queue.
It then executed the built-in uninstaller of each program and started automatic leftover scans.
Lastly, when I clicked Continue, Revo silently executed the uninstallers to speed up the process and minimize user involvement.
However, unlike removing programs individually, this feature doesn’t offer the same level of customization, such as choosing the uninstall order.
3. Uninstall Browser Extensions
Browser Extensions list all of the installed extensions, grouped by browser to provide a better overview. Specifically, it supports the following services:
Mozilla Firefox
Google Chrome
Microsoft Edge
Microsoft Internet Explorer
Opera.
To test it, I clicked on the Browser Extensions option from the left side panel, selected NordVPN, and clicked Remove.
Consequently, Revo asked me for permission and deleted the selected extension within minutes.
However, the software might not be able to remove all traces of a browser extension, such as its settings or the modified data.
4. Uninstall Windows Apps
Revo Uninstaller Pro lists all pre-installed Windows apps separately from the regular programs for better organization. This feature helps you to remove any desired software with a single click.
Additionally, you can get rid of multiple apps for all users with the Quick Uninstall feature.
For instance, I navigated to the Windows Apps section, selected the Dolby Audio Premium Windows app, and clicked Uninstall.
Then, I marked the checkboxes to create a System Restore Point and a full Registry Backup and clicked Continue.
Then, Revo executed a scan and displayed the leftover Registry items.
Likewise, it showed the found leftover files and folders.
As the last step, I clicked Finish to delete the selected leftover Registry items, files, and folders of Dolby Audio Premium.
Keep in mind that uninstalling certain Windows apps might require administrative privileges which Revo doesn’t have by default.
5. Logs Database
Revo Uninstaller Pro has an extensive collection of trace logs for different programs. Its developer team generates these logs using real-time monitoring features and stores the data on the related servers.
They behave like the trace logs you can create manually and allow you to perform additional cleanup.
To view them, I clicked on the Logs Database option from the left side panel.
As a result, the software displayed a list of programs including details like:
Program Name
Program Version
Windows Bits
Windows Version.
However, some users might be concerned about the logs being stored on Revo’s servers, even though they’re anonymized.
6. Hunter Mode
Hunter Mode is another stand-out feature that allows you to manage or uninstall automatic startup programs with ease.
Unlike Forced Uninstall or Quick Uninstall features, Hunter Mode is handy in situations where:
You don’t remember the exact name of the program.
The program isn’t listed in All Programs or Autorun Manager.
For instance, I clicked on the Hunter Mode from the left-side panel.
Consequently, Revo Uninstaller Pro’s windows disappeared and a new target icon appeared at the upper right corner of my desktop.
Next, I dragged and dropped the target over the OBS Studio app shortcut.
From the on-screen menu, I clicked on the option to Uninstall OBS Studio. Within a few seconds, Revo deleted the app using its official installer.
However, Hunter Mode might not be able to detect programs that run silently in the system background.
7. Additional Cleaning Tools
Some of the additional cleaning tools include:
Autorun Manager: Enables or disables the Windows startup application and displays their information
Windows Tools: Gives you one-click fast access to 10+ common Windows tools
Junk Files Cleaner: Finds and removes several types of unnecessary and junk files
Evidence Remover: Permanently erases the leftover files and folders from the hard disk
History Cleaner: Deletes temporary internet files
Unrecoverable Delete: Physically erases all of the selected files and folders
Backup Manager: Manages backup information that Revo stores.
Interface
Revo Uninstaller Pro has a well-organized and user-friendly interface. You’ll find most of its features on the left side panel. Even if you aren’t tech-savvy, you’ll find it easy to use.
Additionally, you can easily switch from one category to another without facing any navigational issues.
I’ve used several uninstallers to date. However, in my opinion, Revo stands out from its competitors because of its easy-to-navigate interface.
Customer Support
Revo Uninstaller Pro provides customer support through Email and Live Chat channels. Moreover, it maintains a knowledge base of user manuals, video tutorials, and a FAQ page.
Pricing
Revo offers both a Pro and Pro Portable version. Here’s a quick comparison table:
Feature
Pro
Pro Portable
Pricing Per License
$24.95
$29.95
Forced Uninstall
Yes
Yes
Quick Uninstall
Yes
Yes
Scanning for leftovers after the standard uninstall
Yes
Yes
Uninstall Windows Apps
Yes
Yes
Remove Browser Extensions
Yes
Yes
Free Professional Technical Support
Yes
Yes
Logs Database
Yes
Yes
Real-Time Monitoring of System Changes
Yes
Yes
Additional Cleaning Tools
Yes
Yes
Multi-level Backup System
Yes
Yes
Full Registry Backup
Yes
Yes
Suitable for use with a USB Stick
No
Yes
Support for Unlimited Devices
No
Yes
Revo Uninstaller Pro also offers a 30-day free trial to explore its features. Furthermore, you can purchase its subscription through PayPal, Visa, and Wire Transfer, with a 60-day money-back guarantee.
There isn’t a free trial for the Pro Portable version.
Notably, the service announced a 60% discount on its birthday. So grab it before it ends!
Revo’s primary use is the complete removal of programs from the system so you can free up space on your hard disk. Some of its significant features include Forced Uninstall, Quick Uninstall, Hunter Mode, Removing Windows Apps, Uninstalling Browser Extensions, Viewing Logs Database, etc.
However, some tools carry the risk of accidentally deleting important user data, if not used with caution.
Overall, I’d give it a solid 7.5/10.
Have you already used it? Feel free to share your feedback in the comments below!
Disk management in Windows 11 is a key tool for organizing your storage, letting you create, delete, or resize partitions without extra software.
Whether you want to open Disk Management the usual way or jump straight into the command line with CMD, knowing the shortcuts and how to run it as an administrator can save you time and headaches.
Handling partitions on Windows 11 might seem tricky at first, but once you get the hang of the built-in tools, managing your drives becomes a straightforward task.
Press Windows + S to open the Search menu, type Create and format hard disk partitions, and click on the relevant search result.
The Disk Management console will now instantly appear on the PC.
You don’t necessarily have to search for Create and format hard disk partitions. Even if you input Disk Management in the Search bar, this will be the top result. Ultimately, it’s the option that will launch Disk Management.
Also, anyone wanting to open Disk Management with administrator permissions won’t find a dedicated option for it. All you have to do is use an administrator account while opening the built-in utility.
2. Via the Power User menu
Press Windows + X to open the Power User menu, and select Disk Management from the list of options.
It will then launch right away.
3. Via Control Panel
Press Windows + S to open Search, type Control Panel, and click on the relevant result.
Click on System and Security.
Next, click on Create and format hard disk partitions under Windows Tools.
You should now see the Disk Management utility.
4. Via File Explorer
Press Windows + E to open File Explorer, paste the following path in the address bar and hit Enter: C:\Windows\System32\
Scroll down, locate the diskmgmt.msc entry, and double-click on it.
This will open Disk Management on your PC.
5. Via Run
Press Windows + R to open Run, type diskmgmt.msc in the text field, and hit Enter.
You should be able to perform operations using the Disk Management utility.
If you are already on an administrator account, pressing Ctrl + Shift before Enter won’t result in any additional privileges. So, you could simply press Enter or click OK!
6. Via Command Prompt
Press Windows + S to open Search, type Command Prompt, right-click on the relevant search result, and click on Run as administrator.
Click Yes in the UAC prompt.
Paste the following command in the address bar and hit Enter: diskmgmt.msc
The Disk Management utility will launch right away.
If you want to open Disk Management via PowerShell or Windows Terminal, the same diskmgmt.msc command will work.
7. Via Task Manager
Press Ctrl + Shift + Esc to open the Task Manager, and click the Run new task option.
Now, type diskmgmt.msc in the text field, and then click on OK.
8. Via Computer Management
Press Windows + S to open Search, type Computer Management in the text field, and click the relevant search result.
On the left, select Disk Management under Storage.
This will launch Disk Management within Computer Management.
9. Create a dedicated Disk Management desktop shortcut
Right-click on the desktop, choose New, and select Shortcut from the menu.
Enter diskmgmt.msc under Type the location of the item, and then click on Next.
Now, type Disk Management as the name for the shortcut, and click on Finish.
If you frequently use Disk Management, it’s best to create a desktop shortcut. This will allow you to seamlessly access the built-in utility without having to rely on Search or Run! Moreover, you can extend your disk volume with it. You can also recreate partitions and use it during file recovery.
FAQ
What can I do if Disk Management won’t open on Windows 11?
The built-in utility should launch and function properly on a healthy Windows installation. If Disk Management is not loading or opening, it’s either the corrupt system files, a bug in the installed version of Windows, incorrect date and time on the system, or issues with the user profile to blame. Repairing corrupt system files should work for most of you, given all the basic checks have been performed. If the problem persists, it’s best to perform an in-place upgrade or reinstall Windows 11.
Can I open Disk Management from the Command Prompt?
Yes, you can open Disk Management using the Command Prompt or PowerShell. Just type diskmgmt.msc and press Enter. This will launch the Disk Management tool without having to navigate through menus.
Is there a shortcut to open Disk Management?
Windows 11 doesn’t have a built-in shortcut for Disk Management, but you can easily create one yourself. Right-click on your desktop, choose “New,” then “Shortcut.” Type diskmgmt.msc as the shortcut location, give it a name like “Disk Management,” and finish. Now you have a quick way to open it anytime.
How can I open Disk Management as an administrator?
To open Disk Management with admin rights, type “Disk Management” into the search bar, then right-click on “Create and format hard disk partitions” and select “Run as administrator.” You can also open Command Prompt or PowerShell as an administrator and type diskmgmt.msc to launch it with full permissions.
What can I do with Disk Management?
Disk Management lets you handle all your storage needs. You can initialize new drives, create or delete partitions, format disks, change drive letters, and resize volumes by extending or shrinking them. It’s a handy tool for managing how your computer uses storage space
Have you heard the latest buzz about WhatsApp? They’ve taken our group calls and video chats and turned them into something straight out of a sci-fi movie. WhatsApp is rolling out some massive improvements to calling on all platforms, and let me tell you, it sounds like a game-changer.
Whether you’re glued to your desktop or can’t live without your mobile, these updates will make your experience much smoother.
First, imagine video calling with up to 32 people. Yes, you heard that right. Video calling is not just for those rare family gatherings anymore; it’s perfect for work meetings or catching up with all your friends at once.
And for those times when you’re trying to share a hilarious video or a new song, WhatsApp’s got you covered with the ability to share audio while screen sharing. It’s like being in the same room, even miles apart.
Now, let’s talk quality. We’ve all been there—straining to hear over background noise or dealing with a pixelated video that looks like a 90s game. WhatsApp is introducing a new codec to tackle these issues head-on.
Expect crisper audio and clearer video, even if your internet connection struggles. It’s all about making your calls as smooth as silk, no matter where or what device you use.
But wait, there’s more. Ever been in a group call, trying to figure out who’s talking? WhatsApp’s new speaker spotlight feature is like having a virtual spotlight, making it crystal clear who’s holding the floor. These little things can turn a chaotic group call into an organized discussion.
Meta, the powerhouse behind WhatsApp, is gradually rolling out these calling features over the next few weeks. They’re keeping mum on which regions will get the updates first, but it’s only a matter of time before everyone enjoys these enhancements. So, if you want to get ready to call your friends and family on WhatsApp from your Windows device, you can download and install it now.
What do you think? Will these updates change the way you use WhatsApp, or is there something else you’d like to see in the future?
Extensions in all browsers are welcome but when it comes to managing them, it may be slightly different. Arc browser is one of these browsers and here’s how to take charge for an optimal browsing experience.
How do I manage my Arc browser extensions?
1. Add extensions
If you haven’t already, navigate to your favorite browser, go to Arc’s official website and click the Download Arc for Windows 11 option.
Once downloaded, run the ArcInstaller.exe file and follow the on-screen instructions to complete the installation process.
Launch the browser and click on the Arc icon at the top left corner then select Extensions > Add extension.
You’ll be directed to the Chrome web store. Search for an extension you’d like to add, click on it and hit Add to Chrome.
Hit Add extension in the next dialog box to confirm and then check your Extensions tab to ensure it is installed.
2. Remove extensions
Launch the browser and click on the Arc icon at the top left corner then select Extensions > Manage extensions.
Locate the extension you’d like to remove then hit the Remove button.
Confirm the removal in the next dialog box.
3. Import extensions
Launch the browser and click on the Arc icon at the top left corner then select Import from another browser.
Next, choose one browser from the list where you’d like to import your extensions from and hit Next.
Select your Arc existing profile or create another one then hit Import. You can also check the Replace existing cookies with imported cookies box.
If you use a lot of extensions, installing them one by one can be a time-consuming task. Importing them from your select browser is much easier however, it may also take some time depending on the amount of data in your browser.
4. Pin extensions
Launch the browser and click on the Arc icon at the top left corner then select Extensions > Manage Extensions.
Locate the extension you’d like to pin and hit the Details button.
Scroll down and toggle on the Pin to toolbar option.
Pinning extensions allows you to place them on a quick-access toolbar so that you can manage them efficiently. If you need to quickly restart the extension, you don’t have to go through the long way.
Launch the browser and click on the Arc icon at the top left corner then select Extensions > Manage Extensions.
Hit Keyboard shortcuts and next to the extension you’d like to create a shortcut for, click on the edit pen-like icon.
Aside from pinned extensions, having a keyboard shortcut for your most used extensions can also come in handy.
6. Allow extensions in Incognito mode
Launch the browser and click on the Arc icon at the top left corner then select Extensions > Manage extensions.
Locate the extension you’d like to allow and hit the Details button.
Scroll down and toggle on the Allow in incognito option.
The main reason for going incognito is to keep your browsing activity private and without a trace. However, if you want to maintain a similar browsing experience, you can allow these extensions.
Just keep in mind that some browser extensions have access to your information and could compromise your privacy.
Additional tips and tricks
If you’re a power user, you can switch on the developer mode to extend the functionality of your Arc browser extensions. You can make some adjustments to the extensions for a tailored experience.
Keep your Arc browser updated for an enhanced browsing experience.
Avoid installing too many extensions as they can easily tank your browser’s performance and make it slow or unresponsive. Sometimes, they may prevent your Arc browser from closing.
There’s so much to do with Arc browser extensions but only if you try. The only way to discovery is trying so go ahead and unpack it. And what better way than catching up with our comprehensive Arc browser review?
That’s a wrap from us but we’d love to hear how you’re managing your Arc browser extensions. Are there any tips you can share with us that we may not know about? Leave a comment down below.
Do you ever pause and ponder how AI is subtly changing our surroundings? From waking up to working, relaxing, or selecting what to watch next for hours-long binge-watching sessions, artificial intelligence (AI) makes it all smoother, quicker, and honestly more engaging.
Microsoft is a big name in technology and has been leading AI research for more than thirty years. Interestingly, their work is now part of products and services we use every day, such as voice-to-text or auto-translation.
However, next-generation AI applications like Copilot and ChatGPT are causing excitement and shaping future developments.
Microsoft says Europe is on the verge of an AI revolution, with estimates suggesting that AI could increase the economic output of European organizations and entrepreneurs by around €2.7 trillion or 20% in 2030.
If Europe can catch up with its AI skills and digital innovation to match the U.S., the continent might add a further €900 billion to that sum. The EU is not sleeping; by the end of this decade, they want 75% of regional businesses to use AI, cloud, and big data solutions.
Why? A sustainable, productive, and prosperous future for all.
Europe is the biggest exporter of manufactured goods and services globally, and it has major trading partner status with 80 countries worldwide. Microsoft thinks this makes it well-positioned to utilize AI in innovation, competitiveness, and growth.
The potential of AI is limitless, from healthcare to retail sectors, as well as the manufacturing industry to financial services or sustainability; all these sectors can greatly benefit from this technology.
According to Microsoft, several European countries already have been testing AI in their businesses: Lithuania promotes its future with a national AI strategy to enhance economic growth and competitiveness. Estonia has given life to Bürokratt, the globe’s initial public service AI-based virtual assistant; this makes it simpler for its inhabitants to obtain digitized government help. In Romania, Agricloud uses drones and artificial intelligence to assist farmers in monitoring and handling their crops better.
Banks, retail stores, and companies all around Europe are employing AI to increase productivity, simplify operations, and provide customers with an uninterrupted experience.
However, it is not only about making life simpler or businesses more effective. The true power of AI lies in its capacity to release us from mundane tasks and direct our efforts toward creative and valuable actions.
With the steady decline in the worldwide working-age population, AI has the potential to help balance this trend by increasing global gross domestic product (GDP) by 7% over one decade. But, accepting AI is not free from troubles. Problems with data safety and the requirement for an organizations backing up require attention. Sustainability and power consumption are other issues related to the advancements of AI.
For Europe to fully grasp the AI opportunity, Microsoft says it is very important to encourage an ecosystem that can support AI and make it affordable and reachable by all organizations. A lively and competitive market for AI needs to exist so that we can use AI in different parts of the economy and make applications that really have an impact.
Also, issues such as misinformation, privacy, or environmental issues in our world, which is full of artificial intelligence power, are taken seriously by Microsoft. The company aims to design AI responsibly and ensure user safety: the company has already stated that many European data centers will be built to fit climate change standards.
Generative AI is a breakthrough. It can create new things and bring change in many areas. Using it will increase the importance of businesses and organizations. Those who use AI carefully will be the leaders in this time of change, pushing innovation and staying ahead.
Think about a situation where you are responsible for setting up and controlling many Teams Rooms on Windows. It may seem quite difficult, isn’t it? But there is some good news—Microsoft has introduced an important new feature that is causing excitement among people.
Autopilot and Autologin for Teams Rooms on Windows are officially here, aiming to make things easier for you. The feature, a big topic at the InfoComm event, permits easy setting up and arrangement of Teams Rooms with less difficulty—possibly saving time and energy.
Okay, so how does it work? In simple terms, you need to prepare your devices for Autopilot. This might seem like a lot of work, but there’s not much left once you do it. You’ll set up the requirements, register your devices (preferably with a partner or using Intune), and allocate needed management configurations.
After connecting the devices to the Teams Rooms Pro Management Portal and assigning them to their matching resource accounts, you are nearly ready.
You might ask yourself, “Why should I use Autopilot and Autologin?” The response is quite clear. These characteristics bring many advantages when creating new Teams Rooms or updating the ones already set up. Before they power on, you can manage the registration of devices to your tenant.
Think about this—everything is set up and prepared in the cloud before these devices come to your site. Fast, touchless provisioning during site installation also changes everything. The installers only need to connect the devices, and they will set up automatically—from Windows provisioning to the Teams Rooms application update and Autologin.
However, what if something goes wrong and you must redeploy or recover a Teams Room? Not to worry. You can reset the devices with some clicks in the Intune and Teams Rooms Pro Management portals to bring them back online, hopefully without disturbing your beach holiday.
And we can’t overlook the subject of logistics. The entire Autopilot and Autologin process begins with device registration, which partners with proper access and customer relationships can handle.
If you’re a Teams Rooms manager and haven’t explored Autopilot and Autologin, it’s time to do so. Microsoft is very excited about this feature—it’s all about making your work easier and saving time or resources. And who doesn’t want that?
In today’s world, where strategy games are plentiful, Ara: History Untold shines as a mark for uniqueness and thrill. It is scheduled to be launched on September 24, 2024, for PC and PC Game Pass. This game pledges to offer an experience in turn-based grand strategy that cannot be matched by any other game.
Oxide Games has brought the development of this game into reality while Xbox Game Studios took responsibility for its publication; since its announcement, it has been a focus of attention among those who enjoy playing strategic games.
The distinct features of Ara: History Untold are its beautiful appearance and its extensive range, including human history from ancient times to the present. It also stands out for having an exceptional multiplayer mode and striving for a “living world.”
In the game, all players can use the multiplayer function called “Simultaneous Turns. ” This means everyone can take action at once without waiting. It removes the need for turn-based games to have pauses between each player’s moves.
This new way of playing ensures success comes from strategy and prediction, not only luck in getting a good chance. The game also uses Microsoft’s Azure Cloud service as its host, guaranteeing unmatched flexibility in terms of speed and providing an environment where players can join or leave games without causing disturbance to others’ experiences.
Ara: History Untold also excels at depicting a “living world.” The game world is detailed, with changing environments showing time passing and players’ choices.
Each part, from planes in the sky to animals moving around jungles, adds more depth to the game experience. The game offers fresh variety every time because of its randomly created biomes and activities.
Ara: History Untold also emphasizes leadership. Players can select from various historical leaders, and every leader possesses distinct characteristics that impact the game.
These different kinds of leadership create various ways to win, such as military power or religious and cultural superiority. The game motivates players to create their own story and plan, making every time you play special.
In the lead-up to its release, Ara: History Untold is being eagerly awaited. The game’s combination of grand historical strategy, multiplayer elements, and a living world will likely attract strategic game enthusiasts with a fresh and enjoyable experience.
Having it available on PC Game Pass from day one could make it a new benchmark in this genre because many interested people can access and try out this title without additional cost.
For veteran tacticians and those who have just begun their journey into grand strategy games, Ara: History Untold is becoming a game everyone should experience in 2024.
The app was not dangerous as they mentioned; it was not meant to collect your data secretly or carry out activities in the background that you did not give permission for.
How do I get rid of the Copilot 8KB component?
To make this app totally out of your hair, you must update the Edge browser to the latest version released, which is Edge 126, which was just launched. And, as an additional precautionary measure, maybe restart your computer quickly after the update. Here’s the solution as presented by Microsoft:
Resolution: This issue is now resolved with Edge browser updates released on April 26, 2024, and June 13, 2024. Edge version 124.0.2478.67 was released on April 26 and removed the package ‘Microsoft chat provider for Copilot in Windows’ from all servers affected by this issue. Edge version 126.0.2592.56 was released on June 13, 2024, and removed the same package from all Windows client versions affected by this issue. The ‘Microsoft Copilot’ entry will not show in the Installed apps list in the Settings menu once the Edge browser is updated.
So, the Redmond giant has declared this issue as resolved. However, if the app is feeling like playing hide and seek, bring it to the comments below and to the Feedback Hub.
Picture a place where the strength of AI isn’t only an idea in the future but something you can feel and see, improving every part of how businesses work. This is the world Microsoft and ServiceNow are creating together as they unite to introduce a fresh time for generative AI creativity.
The main focus of this cooperation is to increase productivity and reshape it by incorporating AI into digital workflows without any interruptions. Microsoft’s collaboration with ServiceNow, a symbol of digital changes, is not only an alliance in technology but also shows the effect of AI on workplace transformation.
At Knowledge 2024, where more than 20,000 global tech leaders and fans came together, you could feel the harmony between Microsoft and ServiceNow. The gathering showed how these two big companies are partnering to smoother business processes and improve productivity with the help of generative AI solutions.
It’s interesting to imagine what could happen, right? Picture a scenario where you have one or two AI assistants at your service. They will help handle any task or question while you work and respond promptly to each request. This is not a look in the future but rather something happening now.
The combination of ServiceNow’s platform with Microsoft Copilot is at a new level. This teaming up merges the finest aspects from both sides, making it simple for organizations to use high-quality generative AI models without hassle.
The simplicity and effectiveness of this blending are quite remarkable. For example, when you want to purchase office supplies, Copilot can create the order with simple prompts. Then, Now Assist comes in and finishes it within ServiceNow. This smooth interaction saves time and improves productivity by eliminating the need to switch between platforms.
It shows a change to smarter, AI-based settings where technology cooperates with people to make workplaces better, more productive, and more creative.
ServiceNow is already experiencing these benefits by noticing less costs and more output with the help of AI. The possible change is very big, and it’s interesting to imagine how this alliance will keep growing and impacting the future of digital work processes.
When we think about the future progress in AI and automation, this partnership between Microsoft and ServiceNow will be seen as a milestone. It hints at what’s to come: generative AI that can make our work easier by handling repetitive tasks and freeing up time for more creative thinking.
This collaboration shows how big tech companies joining forces can greatly impact not just one sector but many fields. Whether you are inside the technology industry or someone who likes to learn about artificial intelligence at work, this partnership reveals that the future is here now—and it’s smarter than before.
In the active gaming world, where the excitement of a new virtual journey is only one click away, Lenovo has chosen to provide game lovers with an irresistible flash sale.
Lenovo offers significant price cuts on strong gaming laptops, creating a great opportunity for gamers to improve their equipment. Let’s see what they have prepared for us in this special event.
For starters, the Legion Pro 5 Gen 8 is now selling at $1,500, a reduction from its initial $2,000 price tag. It’s quite a powerhouse with its mobile RTX 4060 and an impressive 16-inch display featuring a speedy 280Hz refresh rate. It is great for people who are part of the fast-paced esports world or require a dependable partner in their creative tasks.
Next, we have Legion 7i Gen 9. It is priced at $1,830 now, a nice drop from the original $2,290. This one is a dream for anyone who needs top-tier CPU performance. It uses the Intel Core i9-14900HX processor and has the same RTX 4070 GPU as Legion Pro 5 Gen 8, promising the best gaming experience ever. Also, it has an impressive 16-inch display with a resolution of 2560 x 1600 and can achieve up to 240Hz in refresh rate.
But hey, if these two don’t quite fit your hope list, no worries. There are many more gaming laptop deals waiting for you to find them. Whether it’s about playing games, programming, or making content, each person has a suitable choice.
One cannot always buy a high-quality gaming laptop without spending too much money. If you are upgrading from an older model or entering the gaming world for the first time, glance at these offers. And if you don’t feel like Lenovo matches your vibes, look at this Dell Gaming laptop, another gem, now 30% off.
They’re the perfect laptops for starting a gaming career. We mean streaming career. You get it. Happy shopping and happy gaming!
The G15 laptop series has always been the workhorse for DELL in the gaming laptop department. That’s because it has a very balanced ratio between features and price, hence its popularity amongst PC gamers. Now, the balance is a bit broken because Dell has lessened the cost by $300 for G15, so now it is available at just $700 instead of previous amount which was $1,000.
Such a price reduction cannot be ignored and is particularly appealing for gamers who are looking to save money.
Why should I buy the DELL G15 gaming laptop?
The main star of this gaming laptop is the RTX 4050 graphics card. Yes, it may be considered as an entry-level GPU but it has some serious power inside. This will allow you to enjoy DLSS 3, which increases your frame rate in games that support it.
Moreover, it performs well for 1080p gaming. The display’s size is 15.6 inches and it has FHD resolution plus a maximum refresh rate of 165Hz which can give you an excellent gaming experience with smooth visuals that are very engaging; however getting up to this high level might mean turning off some graphical options in your game settings.
If you’re in a mood to spend more, then going for an RTX 4060 will not just improve your graphical quality but also give you a better CPU at $200 additional cost. Talking about CPUs, in this configuration, the G15 is fitted with an 13th gen Intel Core i5-13450HX CPU , which is a powerful option from mid-range that can handle most games and daily tasks effortlessly.
Paired with 16GB of DDR5 RAM, gaming experience will be smooth. Also, having 1TB storage is quite enough for your games and media. But still, it is advisable to look for a deal on an external hard drive to get more space.
Now, we move to the elephant in the room – battery life. It is common knowledge that gaming laptops do not have great stamina when it comes to battery life and this holds true for the G15 as well. On a good day, you should anticipate using it for somewhere around 3-5 hours which falls within what’s expected from a typical gaming laptop of its generation.
If you’re not into budget savvy gaming laptops, you can go through our list of the Copilot+ PC upcoming machines and see how much you have to save for that new AI PC.
Finally, the Dell G15 is a fantastic option for gamers on a budget, especially with the $300 discount offered by Dell. If you already own a Dell G15, feel free to share your experience in the comments below.
If you’re adding a new SSD or hard drive to your PC, you’ll likely need to initialize the drive in Windows 11 before you can format or use it. This process sets up the disk’s partition style (MBR or GPT) so the system can recognize and access it.
Below are the easiest and most reliable ways to initialize your disk, and no third-party tools are required.
Initializing a disk erases any files on it. If you have any important files, ensure you have a backup.
1. By using Disk Management
Press the Windows + R keys to open the Run command. Type diskmgmt.msc in the run dialog box to launch Disk Management.
You’ll see all connected hard drives listed when the Disk Management window opens. Look at the list, and find a drive listed as Disk 1, or Disk 10 (other names are possible, as well).
You’ll recognize this drive because it is not initialized and is listed as Unknown, and unallocated. Right-click on it and select the Initialize Disk option.
Right-click on that partition, and select Initialize Disk from the right-click context menu.``
Once you initiate the process, it will ask you to choose between a Master Boot Record (MBR) or a GUID Partition Table (GPT). We advise you to choose a GPT. Click OK.
Once you do this, you’ll get back to the main window, where your new drive will be listed as Basic and Online, but it will still have unallocated space.
To fix that, right-click on the stripped box, and select New simple volume…
Click Next, and assign a drive letter.
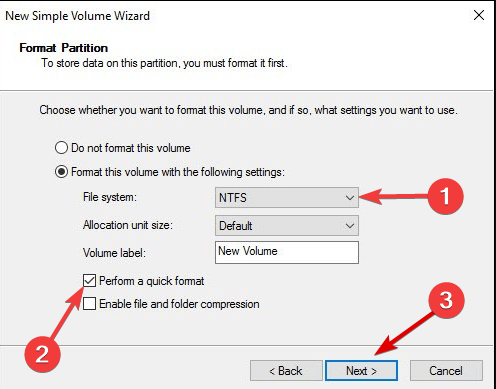
Now you need to format your new drive. For the best results, choose the NTFS file system, and Perform a quick format, then hit Next.
Finish the process.
2. By using the Command Prompt
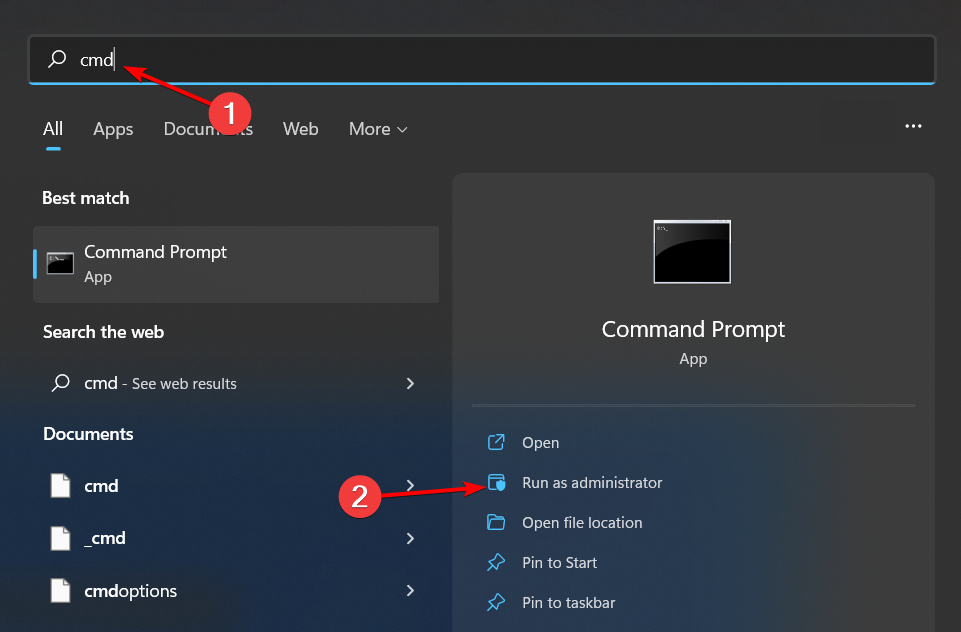
Press the Windows key, type cmd in the search bar and click Run as administrator.
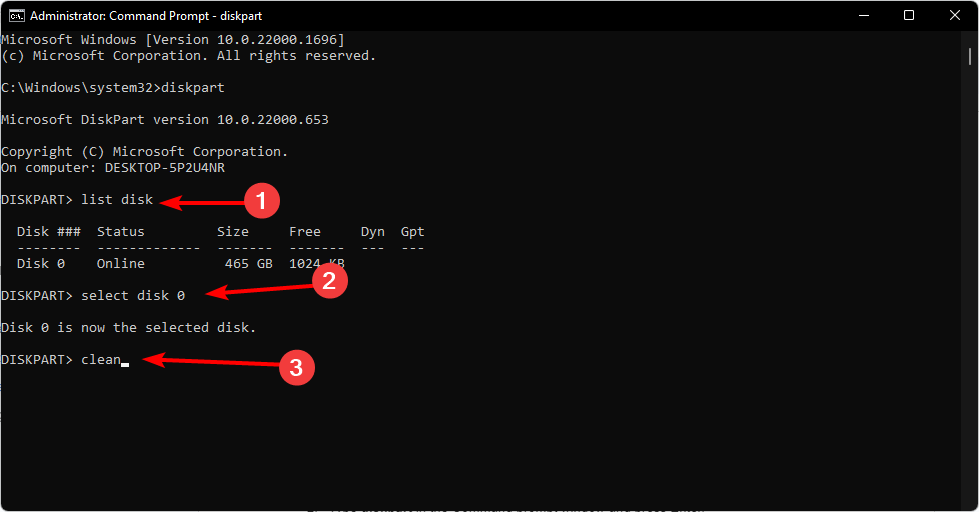
Type diskpart in the Command prompt window and press Enter.
Next, type list disk and press Enter. This will list all drives on your PC.
Type the following commands and press Enter after each one: Remember to replace X with the corresponding number matching the uninitialized hard drive: select disk Xcleanconvert gpt
3. By using Windows PowerShell
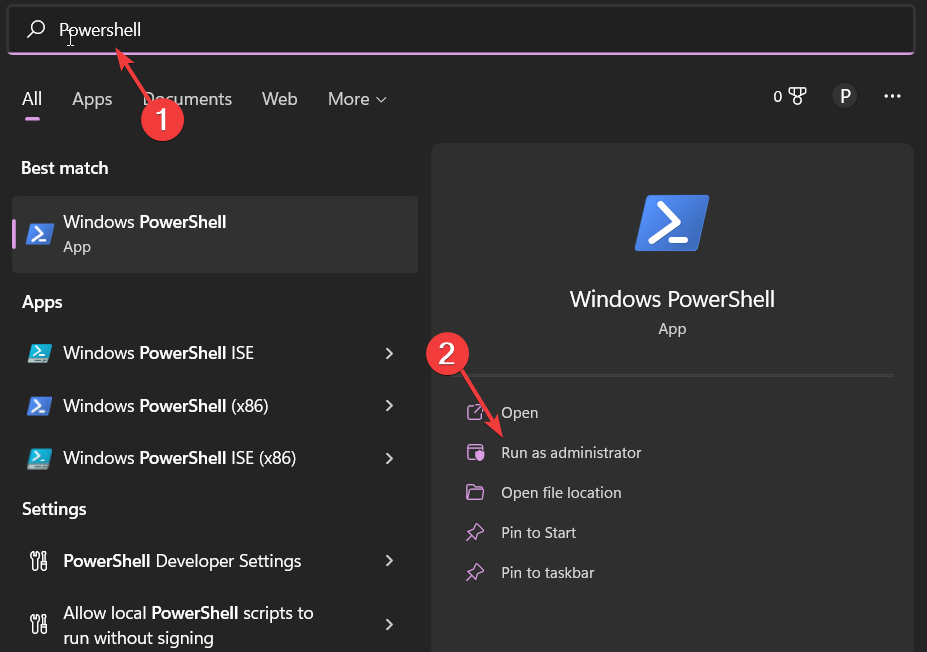
Press the Windows key, type Windows Powershell in the search bar and click Run as administrator.
Type and Enter the following command. get-disk
Your uninitialized disk should appear as RAW. Next, type the following command and hit Enter to initialize it. Remember to replace n with the actual number represented by the uninitialized disk: initialize-disk n
The disk will be initialized in the GPT partition style by default but if you wish to use the MBR style, type in this command: initialize-disk n –PartitionStyle MBR
In all these manual talks, it’s probably time-consuming to initialize a drive on your Windows 11. Luckily, you don’t have to go through this as there are a host of partition manager software that can do the job automatically and with fewer errors.
Further, these tools can help you out with partitioning and allocating space in your drive especially if you don’t know what partition style to use or Windows fails to create a partition. However, the main advantage over these manual methods is that they don’t wipe out your data.
5. Reboot and Let Windows Auto-Detect the Drive
Windows 11 can often detect and initialize newly connected storage automatically.
Steps:
Power off your PC completely (don’t just restart).
Connect the new SSD or HDD firmly using proper SATA or USB cables.
Turn the PC back on and wait 2–3 minutes.
Open This PC or File Explorer to see if the new drive shows up.
If it doesn’t, Windows might still recognize it in Device Manager.
6. Use Device Manager to Refresh Disk Drivers
If your new drive is detected but not accessible, driver issues may be to blame.
Steps:
Press Windows + X, then click Device Manager.
Expand the Disk drives category.
Right-click your new drive and choose Update driver.
Select Search automatically for drivers.
If that doesn’t help, uninstall the device and restart your PC to reinstall it.
In some cases, this step alone can make the system initialize the new disk.
7. Enable the Drive in BIOS or UEFI Settings
Sometimes, the drive isn’t initialized simply because it’s not active in your BIOS.
Steps:
Restart your PC and press F2, Del, or F10 (depending on your motherboard) to enter BIOS.
Go to the Storage Configuration or Drives tab.
Check if your new SSD or HDD is listed.
If the drive is disabled, enable it, then save and exit.
Windows 11 should now detect and auto-initialize the drive during boot.
8. Install Windows 11 Directly on the New Drive
If you want to use the new drive as a boot device, Windows will automatically initialize it during installation.
Steps:
Create a Windows 11 bootable USB using the Media Creation Tool.
Boot your PC using the USB installer.
During setup, select the unallocated space on the new drive.
Windows will initialize it and create the necessary partitions.
This method is ideal when installing Windows 11 on a new SSD that’s currently blank.
9. Use Device Manager to Scan for Hardware Changes
This method forces Windows to rescan all connected devices and can trigger automatic initialization.
Steps:
Open Device Manager via the Start menu.
Right-click your PC’s name at the top of the list.
Select Scan for hardware changes.
Wait for the scan to complete.
If successful, Windows will detect the uninitialized drive and prompt for setup.
10. Disconnect Other Drives Temporarily
Sometimes, too many connected drives can interfere with initialization.
Steps:
Power down your PC and disconnect all storage drives except the one you want to initialize.
Boot into Windows.
Wait a few minutes to see if the OS detects and configures the single drive.
Once initialized, you can reconnect your other drives.
This is particularly helpful when setting up multiple SSDs or cloned disks.
Should I initialize MBR or GPT?
Selecting MBR or GPT is not based on guesswork. You have to consider the OS version you’re on, the size of the drive and your PC’s BIOS mode. Also, if you plan to expand in future, you need to consider a partition table with more flexibility.
Further, MBR is used for older Windows systems and has a size limit. GPT is newer, supports a larger size limit and is more secure.
That’s a wrap from us but we’d love to hear your experiences with initializing your hard drives. How easy or difficult was it? Did you use Windows built-in tools or dedicated tools? Let us know in the comment section below.
Network issues are fairly common on the latest iteration of Windows, be it problems connecting to Wi-Fi or intermittent loss of connectivity. In all such cases, a network adapter reset on Windows 11 does the trick!
For the unversed, a network adapter is a physical device that allows your PC to communicate over the network and connect to the Internet. The process to reset the network adapter on HP, Dell, Lenovo, Asus, or any other laptop running Windows 11 is rather straightforward, and won’t take more than a minute!
How can I reset the network adapter in Windows 11?
1. Reset the network settings
Press Windows + I to open Settings, go to Network & Internet from the navigation pane, and click on Advanced network settings on the right.
Scroll down to the bottom and click on Internet options.
Go to the Advanced tab and then click on Restore advanced settings.
Click Apply and OK to save the changes.
Next, go back to Advanced network settings, and click on Network reset.
Click the Reset now button.
Next, click Yes in the confirmation prompt.
Wait for the computer to shut down, and upon restart, all network-related settings will be reset to default.
Resetting via Settings will reinstall all the network adapters, thus reconfiguring them back to their original state. It’s the quickest way to reset the network adapters in Windows 11!
2. Reset the adapter via Command Prompt
Press Windows + R to open Run, type cmd in the text field, and hit Ctrl + Shift + Enter.
Click Yes in the UAC prompt.
Paste the following commands individually and hit Enter after each: netsh advfirewall resetnetsh int ip resetnetsh int ipv6 resetnetsh winsock reset
Once done, restart the computer to ensure all the changes come into effect.
This isn’t exactly a network adapter reset, but it pertains to resetting the network settings that usually trigger issues on Windows 11.
For a network adapter reset, you will have to execute the following command: netcfg -d
The command basically removes all network-related devices from the PC.
If you absolutely have to run the command, create a restore point first to be on the safe side!
3. Reinstall the network adapter
Press Windows + X to open the Power User menu, and select Device Manager from the list of options.
Expand the Network adapters entry, right-click on the individual adapters here, and select Uninstall device.
If you see an Attempt to remove the driver for this device checkbox, tick it. Otherwise, simply click on Uninstall in the confirmation prompt.
Finally, click on the Action menu, and select Scan for hardware changes.
If the previous methods didn’t work, you can always reinstall the network adapters along with the drivers, which will effectively reset them to the default state. In case any of the adapters don’t work post reinstall, manually install the network adapter drivers.
Is it OK to reset network adapter?
As long as it’s done carefully, there’s no harm in resetting the network adapter on Windows 11. But you shouldn’t do it frequently as it erases all the network-related settings.
Perform a network reset only when facing major issues with the network adapter or connectivity and the Network and Internet troubleshooter doesn’t work!
Chrome has been by far the most popular browser in years, but lately, things are not going into the right direction. It has become bloated, the menus are huge, so you can barely find what you need. Lastly, Chrome is choking my laptop out of resources and started to freeze and crash with more than 40 tabs.
In the meantime, Microsoft kept updating Edge in all areas and it’s now showing a cleaner look, with tidy menus and everything started falling into place. And yeah, I also like the Copilot sidebar, but you can disable it quickly if you don’t want it.
And you know what? I’ve also tried Bing and it gave me a lot more relevant and trustworthy results than Google Search, which is constantly and blatantly favoring the major media brands instead of showing useful and accurate information.
Here is why I would choose Edge over Chrome
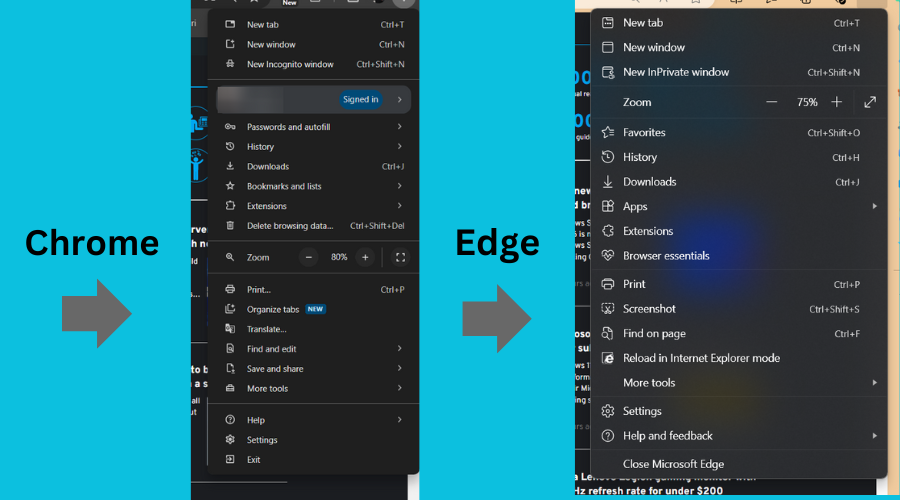
Both Chrome and Edge are Chromium browsers, which means that they are both built on the same engines. However, how they use the engine and resources are totally different. Let’s take a look at the first impression and at the menu button.
Although the main menu of Edge is slightly bigger, it is a lot less cluttered, showing only the tools you need, in a more elegant manner.
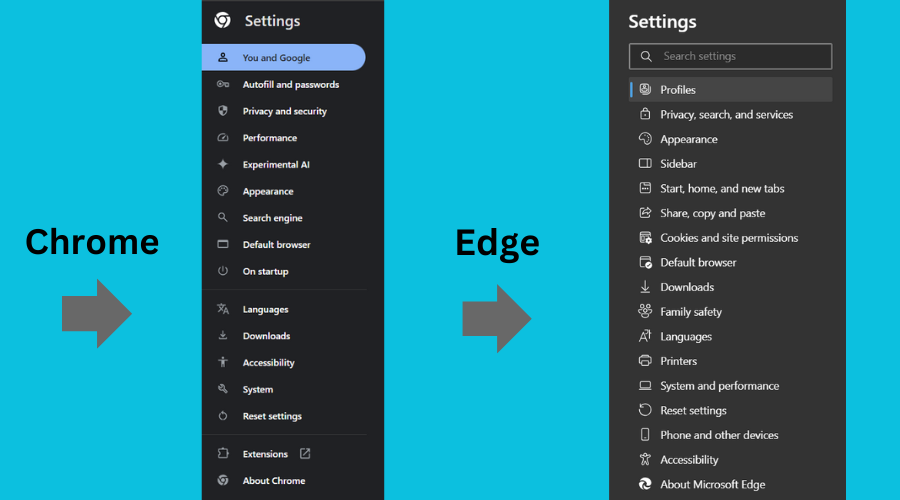
Let’s also look at the settings menus from both browsers. You will undoubtedly agree that the one from Microsoft Edge is a lot more straightforward and comprehensive than Chrome’s.
Edge simply has more description to show you exactly where to go according to what you may need to do. You and Google? On startup? I do know what they mean because I’ve browsed the option, but for a newer user, those might not ring any bells.
Chrome’s performance settings
Now, let’s look at something more important for any user, the performance settings of the browser.
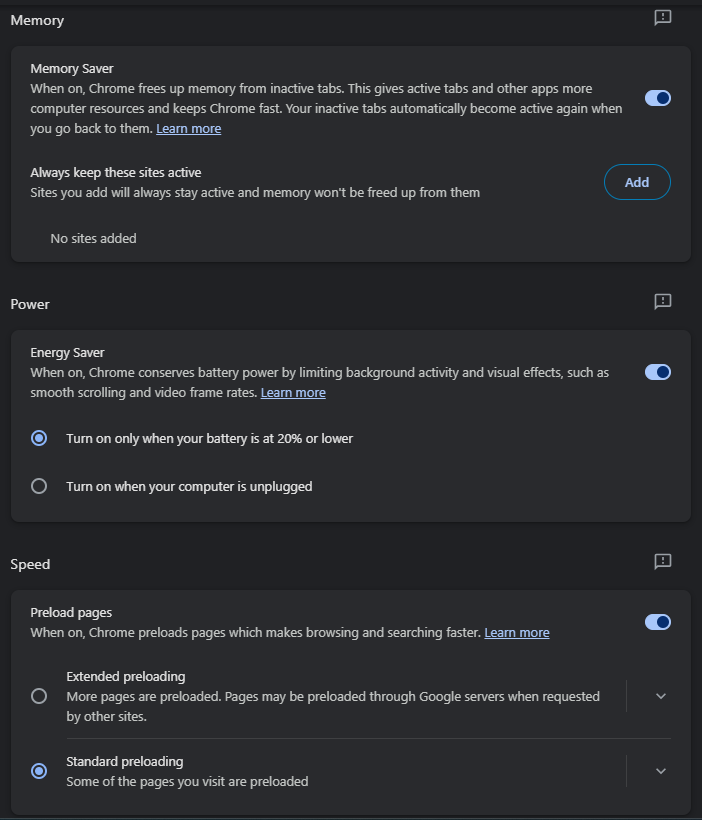
Chrome performance settings
If we look at the Google Chrome performance settings, we find a default memory saver that is meant to put inactive tabs to sleep and save you resources. Also, there is an option to turn on the energy saver when your laptop is at 20% or lower, or when the computer is unplugged. Lastly, you have the standard or extended preloading of the tabs, to make the browsing experience faster.
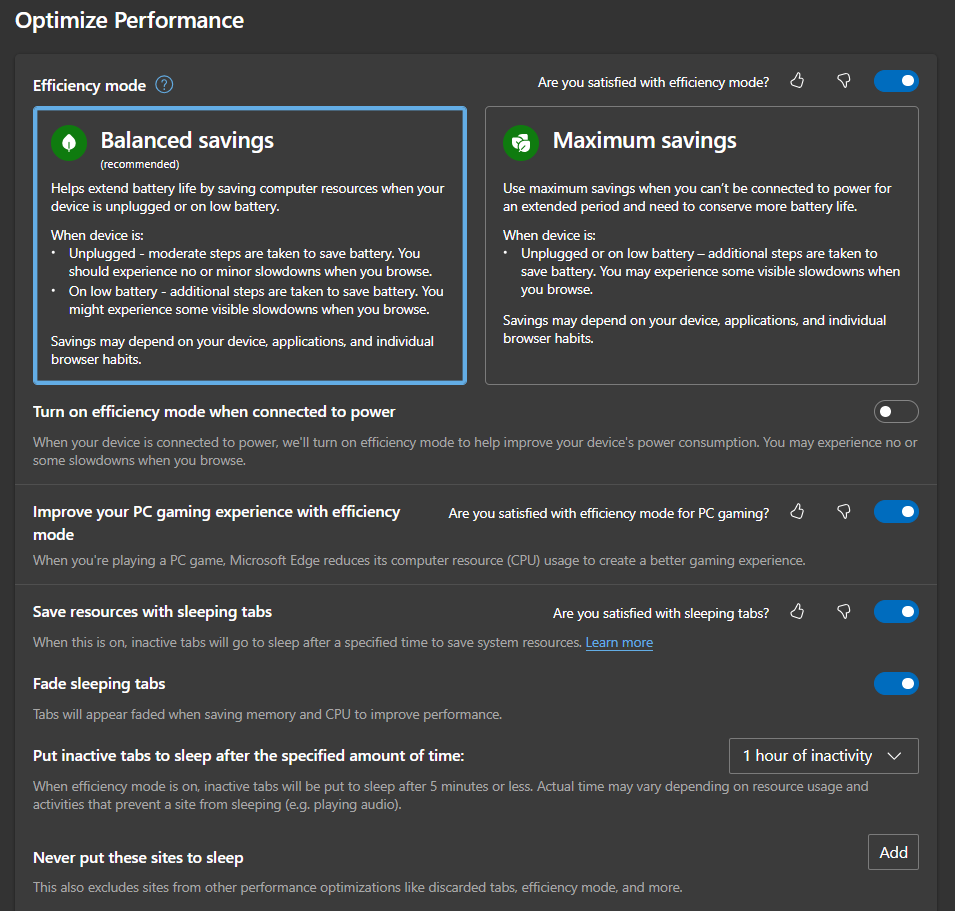
Edge system & performance settings
And now, let’s see the available options in Microsoft Edge in several steps, because you have a lot more complex selections available.
So, first, we have some system options, that can launch Edge on startup and continue running extensions and apps even when Edge is closed. We don’t like the second one at all, but it’s disabled by default, so there’s no need to get panicked.
Then, Edge is able to use graphics acceleration and enhance videos whenever possible, and that comes from the fact that the browser is optimized with Windows and knows how to manage those features. Chrome doesn’t have any such integration with your system and can’t do anything about hardware acceleration.
Now, the performance setting in Edge are something else. Apart from the energy savings options which are clearly outlined, you may also save energy when the laptop is connected to power. And hey, there’s a gaming option! When you’re playing a game but still need Edge, the browser will tone down its resource consumption to boost your game. Another option apart from putting tabs to sleep is to show them faded. So, the browser won’t close them, but they will have a ghostly appearance to save some extra energy. And Microsoft actually added a timer for when those tabs go to sleep.
Well, these are the main things that count from me, and that’s why Edge is performing faster than Chrome even with 40 tabs opened. I could go on and tell you why Edge would be a lot better for its Family safety features and how you could create a child profile. Or, we could go through the security features of Microsoft’s browser that are also a lot better than Chrome’s. And if you go through the menus, you will see many other improvements that Chrome lacks.
Again, I didn’t talk about Copilot and how it may help you in Edge, just because not everyone likes Microsoft’s bot. However, for me it turned out to be pretty helpful and I use it almost every day. And you can start right now, because Microsoft just released Edge version 126 in the stable channel.
It’s obviously your choice whether to use Chrome or Edge, but at this point, I feel like this option is more likely based on a general trend than on the user experience. If you’re not convinced, just give it a try for a week or two and see how it all turns out.
Your search for the best browser for your smart TV ends here!
Besides playing movies and TV shows and watching YouTube videos, you can also surf the web on your smart and Android TVs. But for that, you’ll need an internet browser.
I’ve tested 18 different options on an Android TV OS 14 from Google. After rigorous assessment of various use cases, like productivity, multi-tasking, TV control support, app downloads, movie downloads, and more, I singled out these seven tools.
Downloader is the most popular browser for Android and smart TVs because of its excellent support for app downloading. You can quickly save APKs by entering the direct download URL and shortcodes. Also, you can easily browse most websites.
The app takes up only 10 MB on the smart TV’s internal storage. It’s lightweight and compatible with most models. It requires Android OS 5.1 and better for smooth operation.
Furthermore, the browser directly integrates with the internal and external storage of the TV device. Once you download an APK or video file, you can access it using the native file browser or a third-party file manager app.
Other major features are as outlined below:
A basic in-app file browser.
Auto-installs downloaded APK files.
You can customize the default download location on the TV.
You can import or create Favorites.
Supports the URL Auto Follow feature for easy surfing.
You can enable JavaScript for specific websites.
Pros:
It’s a download-friendly web browser.
Comes with a basic file browser.
Cons:
There’s no incognito browsing mode.
You can’t import bookmarks and favorites from other browsers or devices.
If you’re looking for a general-purpose web browser for your Android or smart TV, try out the TV-Browser Internet app right away. Besides free web surfing, you can also stream free movies and TV shows from YouTube, PutLocker, Vimeo, Dailymotion, and so on.
By default, it comes with three popular search engines: Google, Baidu, Bing, and DuckDuckGo. You can choose which one you want to use from the Home Screen. You’ll have to activate Bing from the Settings screen, though.
Here are other important features:
Works on most x86-based Android and smart TV device architectures.
Requires Android 5.0 and better.
Only consumes up to 15 MB of space in the device storage.
Dedicated screens for Bookmarks and History.
Compatible with most smart TV remote controls.
Fully compatible with Google Account sign-in and device browsing synchronization.
Pros:
Separate tabs for different websites.
Customizable pointer speed and styles.
Cons:
The Bing search engine is hidden, and not available on the home screen.
BrowseHere is particularly suitable for TCL smart TVs and Android TVs. You can also install this app on Android set-top boxes and Android TV boxes. Its built-in ad-blocker lets you surf without any distractions on foreign and local streaming websites.
It also comes with an integrated software IPTV player. You can stream live TV without worrying about throttling imposed by ISPs and satellite TV providers. Therefore, if you’re looking for a free or affordable subscription for endless live TV channels, this should be your go-to app.
Find more features below:
Fully compatible with your TCL smart TV remote control.
The website shows trending free multimedia content streamed by other BrowseHere users anonymously.
Allows webpage bookmarking and internet surfing history.
Using QR-code-based technology, you can send websites from your smartphone to the smart TV.
Zoom in and out on web pages.
To swipe a page up and down, you can use Scroll Mode.
It runs on any Android 5.0 or better smart TV and requires only 15 MB of storage space.
Pros:
Offers full-functional voice-based surfing and downloading.
Built-in IPTV extension.
Automatically adds subscribed websites and OTT apps from the smart TV.
Cons:
Its default search engine is Google and you can’t change that.
Are you looking for the best browser for smart TVs with multitasking support? You should check out the Internet Web Browser. Moreover, it’s a super-lightweight Android TV browser given the app only needs up to 5 MB of space on the TV storage. It also runs on the latest models because it’s compatible with Android 6.0 and later operating systems.
Additionally, the browser includes the latest surfing and streaming technologies to use less data. Also, you can switch to the Dark Mode view to reduce strain on your eyes.
The developers are working on a new feature so you can export smart TV browser history, bookmarks, favorites, etc., to Chrome and Firefox on a PC or Mac.
Here are other prominent features:
Scroll Mode allows you to move up or down on the web page really fast.
Built-in incognito browsing.
Compatible with most downloads, like APK files, movies, web series, etc.
Zoom in and out on web page images and text.
Dedicated buttons to quickly delete browsing data, download history, and more.
If you’re looking for a browsing experience almost equivalent to a PC or Mac, you can go for TV Bro. Its home screen is similar to that of Opera or Chrome. There’s also a search engine field showing Google as the default search portal.
However, you can switch to other options, like Bing, Yahoo, Yandex, DuckDuckGo, and more. Furthermore, there’s a field for a custom search engine where you can add a URL for a different provider not available in the drop-down list.
Below the search engine space, there are speed dials (as in Opera) or shortcuts (as in Google Chrome) for quick navigation to the most visited or important websites.
Other major features are as outlined below:
There’s a dedicated Downloads icon so you can quickly navigate to the recently downloaded apps or multimedia.
Incognito mode to browse without saving browsing history, cookies, etc.
Works with most TV remote models.
Offers tabbed website browsing for multi-tasking.
You can search using voice commands if your smart TV remote supports voice inputs.
Requires at least Android 7.0 or better Android TV OS.
Pros:
Offers a built-in ad-blocking tool.
Supports zooming in and out from website content.
Cons:
Always resets the default search engine to Google.
Doesn’t support smartphone-based navigation.
It requires up to 200 MB of storage space, so it’s not the most lightweight app.
Browser is a popular and secure tool for Android and smart TVs. You can use most of the browsing features, like entering a URL in the address bar, downloading from direct links, saving bookmarks, and clearing history data, with the smart TV remote.
Also, if the remote is compatible with voice searching, you can surf on the Browser app via voice commands. It’s a lightweight app that runs on most TVs with Android 6.0and up and only requires up to 16 MB of internal storage space.
Moreover, it offers a sleek browsing interface with a left-side navigation panel for Home, Bookmark, Browsing History, Downloads, Settings, and Favorites. On the right side, you’ll find shortcut tabs on the top for popular sites like YouTube, Google Play, Facebook, Instagram, TikTok, etc. Beneath the shortcuts toolbar, there’s an address bar and voice search tool.
Other significant features include:
Virtual remote tool to convert your smartphone into the remote for the Browser app.
Custom cursor styles, sizes, and speeds.
Incognito browsing facility.
Pros:
Allows smartphone-based browser navigation.
Dedicated button to delete browsing history in one click.
If your preferred browsing app is Google Chrome, you can also enjoy the same on your smart TVs and Android TVs. However, it isn’t natively available on the smart TV app store.
You can side-load it on your Android TV by downloading its official APK from APKMirror for free. You’ll need to activate the app installation from Unknown Sources on the smart TV.
Once installed, sign in to your Google Account to import all the browsing data from your PC or Mac to the TV. Its user interface and browsing experience are similar to Chrome for PC and Mac.
Find below other notable features:
The voice search feature is compatible with the microphone of the TV or remote.
Shows trending news and events in the Discovery tab.
The Following tab shows you updates from the websites and apps you follow.
Dedicated buttons for Downloads, History, Incognito browsing, etc.
I’ve considered the following points to pick apps that stand out from the crowd:
1. Availability on the App Store
I’ve ensured that the best smart TV internet browsers are available on the built-in app store. Otherwise, installing a non-native web browser involves complex steps, like side-loading third-party APK files.
2. Compatibility
I checked that the browsers work with most smart TV models and operating systems. All of the apps mentioned above will run smoothly.
3. Remote Control Friendly
Typing and browsing on a tiny remote isn’t ideal, so I picked browsers with a user interface designed for easy navigation with arrow keys and buttons.
4. Voice Search
Does the browser support voice search? Speaking into your remote to search the web is a game-changer for hands-free browsing.
5. Performance
I’ve only listed options that are optimized for smart TVs so that websites load quickly and without lags.
6. Downloading Apps and Videos
These tools let you browse the internet freely, just like surfing the web from a computer, and download apps and multimedia smoothly.
7. Security
Just like on your computer, security matters. I’ve ensured that the apps I’ve listed come with built-in privacy and security features, like pop-up blockers, malware protection, adware blocking, etc.
8. Ad Blocking
Other than being annoying, ad trackers can steal sensitive content preference data from your smart TV. To help you prevent ads, I’ve chosen the best Android TV browsers that come with built-in ad blockers or let you install extensions.
9. Syncing
For multitasking and productivity, you often need to sync browser data between devices. I’ve listed smart TV browsers here that can sync your bookmarks, favorites, and more.
Summary
If you’re here, congratulations! You can now easily pick the best browser for your smart TV. So, give them a try and choose the one that suits your browsing style and preferences.
If the article helped you, feel free to comment below. If you’ve got critical feedback or suggestions, you can mention them as well. Moreover, if you need a browser for an older, 32-bit system, I’ve got you covered.
In the constant hunt for the best gaming setup, an incredible deal has appeared from Amazon’s huge range of products. The AMD Ryzen 7 5700G CPU, considered a powerful force in gaming processors, now comes with a large discount of 55%.
This isn’t just any sale; it’s an epic June Amazon deal that gamers and PC builders are discussing. But what about this deal that’s so unique, and why might you consider making the AMD Ryzen 7 5700G the main part of your gaming rig? Let us look into it.
The AMD Ryzen 7 5700G CPU can be obtained for a mere $162.37, noticeably less than the initial $359.00. Yes, you are correct: this signals a substantial saving of $196.63 if you make your move quickly enough! This offer is not simply beneficial but could be considered an opportunity too good to miss for those wishing to enhance their gaming arrangement without spending excessively on it.
What makes this processor stand out, you inquire? To begin with, it holds 8 cores and 16 processing threads, making it a monster for multitasking and gaming.
Furthermore, the AMD Wraith Stealth cooler is included in the package. This means your CPU will remain calm under pressure without requiring more money to purchase cooling solutions.
But wait, there’s more. The Ryzen 7 5700G comes with a 4.6 GHz Max Boost, paired with a 20 MB cache, and can also handle DDR4-3200 memory. This shows that you get great performance and can manage almost any game you play.
Also, for those who enjoy pushing their hardware to its maximum, this CPU is not locked and can be overclocked. This gives you the liberty to adjust your system’s performance.
An important advantage of this CPU is its built-in graphics card. It may sound surprising, but you can play well-liked games at 1080p without requiring an additional graphics card.
This game-changer is for anyone with a tight budget or wanting to build a small gaming computer.
But where can you find this unbelievable deal? Currently, the correct answer is Amazon. However, these types of deals vanish as fast as they emerge into view. So move quickly to get an AMD Ryzen 7 5700G at an amazing price.
If, by any chance, this CPU doesn’t fit what you need, no worries. Amazon has many other great offers for gaming CPUs. You can find everything from Ryzen 7 5700X to Ryzen 9 5950X – it suits every builder and budget.
The AMD Ryzen 7 5700G CPU deal is a special chance to enhance your gaming setup with a strong processor for just part of the price.
Whether making a new PC or improving an existing system, this Central Processing Unit provides a superb mix of power, cooling ability, and built-in graphics. However, always remember that deals such as these may not be around forever. Then, what holds you back from seizing this big June Amazon deal and elevating your gaming escapades?
In the past, Xbox was only a console—you know, the type of box that sits under your TV and lets you play games. But now? Now things are different! It has transformed into this huge multiplatform game development giant, changing over time yet shown off at Xbox Games Showcase 2024.
This occasion was more than a presentation of new titles; it signified that Xbox has evolved from its console’s initial stage to encompassing a future where it shines as the leader in gaming on all platforms.
Central to this transformation is the collection of acquisitions Microsoft has amassed in the last six years. The studios such as Obsidian, Compulsion Games, and Bethesda that they have absorbed all add to a line-up of varied and impressive games.
From grimy realms depicted in Doom: The Dark Ages through the vast universe of Starfield: Shattered Space – this display showed Xbox’s dedication to showcasing diverse content while maintaining high standards for excellence within its offerings. But it’s not only the games but how we play them.
The arrival of a disc-less Xbox Series X model suggests that physical media may become less important in the future compared to digital and streaming services. With the teasing of an Xbox handheld console, the company is ready to take on even more gamers.
However, what is the reason behind all these acquisitions, and why this strong effort towards a platform-agnostic future? The answer appears to be Game Pass, Microsoft’s subscription service that provides a variety of games for a monthly fee.
It is an audacious step, especially in today’s world, where PC gamers hold onto their Steam libraries like life-saving rafts. Nonetheless, it demonstrates that Microsoft has faith in the subscription method’s ability to reshape our approach to playing games.
But this change has not come without difficulties. The history of Microsoft’s relationship with PC gamers is like a wild ride, swinging from being ignored to overly controlling. However, more balance has been shown in the past few years, and attempts have been made for integration instead of domination into PC gaming.
This subtle balance of power is observed cautiously by gamers who value their freedom, yet they find Microsoft’s promises quite interesting.
The Xbox Games Showcase 2024 was not only about the games but also a window into a future where gaming is free from being limited to certain platforms, and adventures await us no matter how we decide to start them.
It’s an exciting yet unsure future, but one fact remains: Xbox is now more than just a console. It has become an entrance to a more reachable, varied, and absorbing gaming universe than ever before.
What’s your viewpoint? Are you prepared to enter into this fresh Xbox gaming period, or are you still clutching onto past practices? Let us interact in the remarks and express our enthusiasm (or concerns) concerning what comes next in the world of Xbox.
Have you ever felt the need to keep up with all the latest updates on Microsoft Edge but sometimes feel that too much technical talk is being used? Well, let’s review recent changes and features in Microsoft Edge 126. However, we will discuss it like a conversation over coffee rather than reading from a tech manual.
Lastly, Microsoft Edge is always changing. The most recent updates in the Stable Channel are part of this ongoing process. They include many different things, like fixing bugs and adding new features. It’s worth noting that these updates are not instantaneously available to everyone at once but rather roll out gradually over a span of a few days. So, if you don’t observe them right away, be patient, as they will appear soon on your device.
The AI theme generator is an especially interesting new feature in Microsoft Edge 126. Imagine typing a prompt and then receiving several theme images for your browser. Very cool, isn’t it? Remember that this feature is being introduced gradually, so it might not be accessible immediately to everyone.
There is some good news for corporate Edge managers. The Edge management service will have its own room for enhancing security settings. It remains in preview, but it’s coming soon.
Have you ever felt overwhelmed by a long article? The fresh Copilot summarization notification might change the game for you. It appears when you are on a page that can be read in mode and offers to summarize the content in the sidebar. Again, this is rolling out gradually.
A few new policies exist in Microsoft Edge 126, such as allowing proactive authentication and ensuring the Edge window stays in front when using Internet Explorer mode. However, just as it happens with all things tech-related – some policies are being retired, such as those related to Math Solver and Immersive Reader Grammar Tools.
Security is also an important focus, with numerous updates to fix vulnerabilities. It’s good to know they are working on making our browsing secure.
A prominent announcement is the withdrawal of the Microsoft Defender Application Guard extension. If you use this, you must look for other options, as it will not migrate to Edge Manifest V3 and will become inaccessible after May 2024.
For the neat types, updates have been made to fix browser crashes and improve reliability. One repair deals with an issue with the “View in File Explorer” option in SharePoint Online.
Finally, we talk about the future. Features such as the insecure downloads warning over HTTP are getting better, a sign that safer browsing practices are coming soon.
So, how about these latest features for Microsoft Edge? Do they sound thrilling to you, or is there something else that you hope to find in it? Keep in mind that technology keeps advancing, and being knowledgeable about it helps one fully utilize its potential.
Have you experienced getting lost on an overloaded webpage with many ads and disturbances while simply trying to read an article? Google Chrome’s reading mode has relieved numerous people by providing a cleaner version showing only text on web pages.
But there is exciting news coming soon. Not long after now, you can put images with text in Chrome’s reading mode. Just think about it: looking at relevant pictures and not getting bothered by ads everywhere – isn’t that cool?
According to tech enthusiast @Leopeva64, Google is slowing down the rollout and controlling how it is released. This means the feature will become widely accessible soon, but not everyone can use it simultaneously. This function aims to give users greater authority over their reading experience.
You may select a text-only version or add images if desired. Moreover, should the pictures bother you, an easy-to-find “Disable images” symbol is located at the uppermost part of the Reading Mode panel. The main thing here is tailoring your reading experience to your liking.
This change is one of the many adjustments Google has been making to Chrome’s reading mode. It shows that they are seriously considering improving readability on the internet.
And for people who enjoy exploring things in great depth, this function was noticed a few months back, but now it’s being formally introduced. The expectation is real for all of us who enjoy some visual aid with our text.
For those who love technology, you may wonder how to get a preview. This feature was seen in Chrome Canary, the version of Chrome that Google uses to test new features before they become available to everyone. It’s similar to getting an early look behind the scenes.
But remember that Canary builds might not be very stable. It’s a give-and-take situation.
In this age of information overload, it is crucial to have choices to personalize content consumption methods. Whether you are a visual learner who likes images or prefers the simplicity of text, Google’s update hopes to address your needs.
So, look out for this feature in your Chrome browser soon. It is a small but noticeable change in how technology advances to assist us with handling our digital world.
Geoff Keighley’s tweet about the Gears of War: E-Day trailer stirred up a recent storm in gaming news.
It is interesting to see how one tweet can start such an argument. Keighley, who has given much to gaming events, just expressed his opinions on how the trailer was made. He said CGI was made from in-game assets using Unreal Engine 5 technology. Little did he know this would create a chain reaction among fans.
The great Gears of War piece was a CG from Blur Studio, using in-game assets from UE5.
Game info: Gears of War: E-Day is the next mainline game in the Gears of War universe, set during the pivotal Emergence Day. Fourteen years before Gears of War, war heroes Marcus Fenix and Dom…
The main point of disagreement centered around the difference between “CG” and “in-engine footage,” a distinction that might appear small but turned into a warzone for console fans. Keighley’s comment was viewed by certain people as devaluing the effort put in by developers, an outlook that rapidly gained ground on the internet.
The debate spiraled, necessitating an explanation from Xbox’s marketing director, Guy Welch. Welch clarified how the trailer was made but didn’t completely remove uncertainty.
Finally, Microsoft came forward to clarify the situation and back Keighley by saying that the trailer was truly made using Unreal Engine 5 but not in real time—a small but crucial difference.
This incident underlines the continuous rivalry between gaming consoles, with Keighley getting entangled, sadly so, due to assumed loyalties. It’s an instance that reminds us of how passionate and at times too enthusiastic gaming followers can be.
In another area, YouTuber Plainrock124 criticized Geoff Keighley’s declaration about the Summer Game Fest 2025 for not making what they considered a strong impact on the industry.
The critique mentioned its “mid-show and overpriced ad spots,” stirring up a wider discussion about how gaming showcases are now. Although there were some good parts, people generally didn’t react that much to the 2024 Summer Game Fest. They wanted it to be more like how E3 used to be—with big effects and important news.
Glad you liked it!
Blur developed the trailer hand-in-hand with our team @CoalitionGears using @UnrealEngine 5. The trailer is developed with in-game models, textures, environments and props that players will see in the final game.
The gaming world faces a difficult junction, with layoffs, studio closures, and a perceived dip in game quality causing worry. Even events like the Summer Game Fest are being questioned about their role in this ecosystem—do they help or just add to the difficulties?
As we consider forthcoming gaming events, we hope there will be more focus on creativity and innovation—elements that have always pushed the best of gaming forward. Until then, did you like the new Gears of War E-Day trailer?
If you’re one of the Assassin’s Creed series fans, you’re going to be very excited about this! Rumors suggest that Patrice Désilets, who created Assassin’s Creed, could be working on a fresh game within Xbox Game Studios. Now, isn’t that something to get your gamer senses tingling?
According to Exputer, Désilets’ studio, Panache Digital Games, might be leading this mystery project. Allegedly, they are using the strong Unreal Engine 5 to make their plan real. The whispers go on to say that this could very well be the much-talked-about game called 1666: Amsterdam–a creation which has been sailing through a storm of legal disputes since its first publisher THQ went bankrupt back in 2013. But for now, details are as hard to grasp as a shadow in night, keeping us all waiting anxiously.
The rumor started from Exputer’s forum
What gives this news an extra layer of interest is the excitement it builds up. Seeing how Désilets has always been able to make deeply involved and detailed universes, it’s easy to understand why the gaming world is abuzz with guesses and anticipation.
But like any good story, patience is important here too. Don’t hold your breath as this might take a few years in the making, unless they managed to keep everything under wraps for longer that we could expect.
So, what’s your take? Is it a possibility that we are about to see the next major success in the gaming universe, or could this be starting of another incredible story being created? One thing is certain: the partnership of Patrice Désilets and Xbox Game Studios is a perfect match for gamers, and we are excited to discover what lies ahead.
You could be a Minecraft player who loves the game, dedicating many hours to creating, examining, and experiencing adventures in its large pixelated universes. Just picture yourself logging in one day only for your account – the key that opens up this world on which you have built so many memories – to vanish forever.
It is not just an idea; some people face this reality. Microsoft’s choice to delete Minecraft accounts that were not moved from Mojang until 2023’s conclusion has caused disappointment and annoyance within the game’s community.
The main problem is that players feel their rights to a game they purchased legally are being taken away. This situation has sparked renewed discussion about Digital Rights Management (DRM) in video games.
One player’s comment on Reddit summarizes this well: “The fact they can just take away your license to the game like that is insane.” It is not surprising that you feel this way because if a game has DRM, are you really owning it or only getting a short-term permit to play it?
Many platforms’ comments sections are fiercely contested. Microsoft gave enough warning, and some people say it was simple to move over accounts.
On the other hand, some people believe that if they paid for a game, they should be able to play it regardless of whether their account has been migrated. Some users even claim they received no warning about when their account would be deleted, but checking these statements is difficult.
This happening has shifted some players towards piracy, which is as debatable as it indicates their desperation. At present, Microsoft has not said anything about deleting Minecraft accounts.
Many people are left wondering what will happen to their digital purchases and how safe their gaming situations are.
This entire story makes us think about digital ownership and consumer rights in the era of technology. It is a memory that with DRM, the distinction between owning a game and only having permission to play it can blend uncomfortably.
What are your thoughts? Is it fair for customers to lose access to games they paid for due to account migrations, or should they be accountable for taking the necessary steps to secure their digital purchases?
Microsoft recently issued the June Patch Tuesday security updates, including the KB503921, KB5039217, KB5039214 and KB5039225 for Windows 10. However, the Redmond giant warned the Windows 10 21H2 users that those are the last security updates for the version as it just reached the end of service.
However, Microsoft wants to protect your systems whether you want it or not, with an automatic feature update, as written in their announcement board:
To help keep you protected and productive, Windows Update will automatically initiate a feature update for Windows 10 business devices not managed by IT departments when these are at, or within several months of reaching, end of servicing. Moving to Windows 10, version 22H2 keeps your device supported and receiving monthly updates that are critical to security and ecosystem health.
So, of course, you can still block the updates and stay on Windows 10 21H2, but you will have to deal with the potential security risks on your own. You might do just that if your PC is not compatible with Windows 22H2. Otherwise, we recommend updating your OS as soon as possible, even all the way to Windows 11. After all, Microsoft just recognized that Windows 11 shares 99.7% of Windows 10’s DNA.
Moreover, Microsoft has reiterated the distinctions between LTSC and non-LTSC by confirming that Windows 10 Enterprise LTSC 2021 and Windows 10 IOT Enterprise LTSC 2021 will retain mainstream backing until January of 2027, while the latter will enjoy an extended end support timeframe scheduled for the year 2032.
What do you think about the deprecation of Windows 10 21H2? Did you update your OS? Share your thoughts in the comments below.
Microsoft dropped some exciting news for Windows 11 enthusiasts, especially those enrolled in the Insider program.
The tech giant released new builds for Windows 11 versions 22H2 and 23H2, specifically builds 22621.3807 and 22631.3807 under KB5039302.
These updates are packed with features that were previously teased in early Insider channel builds, including a nifty way to pin Copilot to the taskbar, a new Game Pass recommendation card, and enhanced support for creating 7-Zip and Tape Archive (TAR) files.
First off, the Copilot experience is getting a major boost. It’s pinned to the taskbar and behaves like any other app, so you can resize, move, and snap the window to your heart’s content. Imagine having a virtual assistant right at your fingertips, ready to help with whatever task you have at hand.
And for gamers, the new Game Pass recommendation card on the Settings home page is a game-changer. This feature is for you if you’re signed in with your Microsoft account and actively play games on your PC.
But that’s not all. The update also returns the show desktop button on the taskbar by default. It’s a small change, but it’s a welcome return to a more intuitive desktop experience for many. Plus, File Explorer has received some love, too.
Emoji enthusiasts will be thrilled to hear that with KB5039302, Windows 11 now supports Emoji 15.1, which introduces a range of new emojis, such as the Horizontal and vertical head shake, Phoenix, Lime, Brown mushroom, and Broken chain.
For those who rely heavily on the Task Manager, this update promises better performance, improved accessibility, and an easier way to resize the window.
But it’s not just about new features. Microsoft has also tackled a number of bugs and performance issues, ensuring a smoother and more reliable experience overall.
These updates are all about improving your Windows 11 experience, from addressing issues with USB device ejection to enhancing the reliability of Task Manager and updating the units for DDR speed from MHz to MT/s.
So, whether you’re a gamer, a productivity powerhouse, or someone who loves staying on the cutting edge of technology, these new Windows 11 builds have something for everyone. And remember, while some features are rolling out gradually, it’s just a matter of time before all Release Preview Insider members can enjoy the full suite of improvements.
Opera GX is a browser dedicated to gamers, delivering a seamless browsing and gaming experience. With a built-in ad blocker and free VPN, it is one of the best-ever gaming browsers. To further enhance the browser functionalities, users tend to rely on Opera GX extensions, managing which is as straightforward as the browser itself.
Extensions in browsers are small add-ons that allow you to add features that are not natively present in the browser or aren’t as advanced and, subsequently, boost functionality. For instance, grammar checkers, ad blockers, volume boosters, web protection, and productivity tools.
How can I download extensions on Opera GX?
Launch Opera GX, open the Opera menu from the top left, choose Extensions, and then select Get extensions.
Now, search for an extension using the search bar near the top right.
Choose the most suitable extensions from the ones listed on the screen. If you are looking for a functionality add-on, pick from under Extensions and not Themes.
Click on Add to Opera and wait for the extension to install.
You can similarly add as many extensions as you need to Opera GX. To discover the best ones for you, check our top picks for Opera GX extensions.
Remember, while adding too many extensions to Opera GX will enhance the functionalities, it also tends to slow down the browser and consume more resources on the PC. So, only install the vital ones!
How can I remove extensions on Opera GX?
Launch Opera GX, click the Opera icon near the top-left corner, select Extensions, and then choose Extensions again.
You will now find a list of all the installed extensions, both available by default and the ones added manually.
To disable an extension, click the Disable button under it. You can similarly disable all extensions in Opera GX.
To uninstall an Opera GX extension, click the Remove button under it, and again choose Remove in the confirmation prompt.
If Opera GX is using 100% CPU or running slow, it’s a sign that you have too many extensions installed. Removing a few usually does the trick!
How can I manage extensions on Opera GX?
Launch Opera GX, paste the following path in the address bar and hit Enter: opera://extensions/
Click the Details button under the extension for which you want to manage the settings.
You can reconfigure all the extension settings, including Pin to toolbar, Allow in Incognito, Allow access to file URLs, and Allow access to search page results, amongst others.
Each extension has specific settings you can manually configure and manage from the Opera GX extensions page. This makes them all the more useful and streamlines the browsing experience!
What can I do if Opera GX extensions are not working?
Often, specific or all Opera GX extensions stop working, or you can’t open the Extensions page and get redirected to the browser settings. All these are signs of a conflicting extension, malware infection, misconfigured settings, or a bug in the installed version of Opera GX. To fix things:
Remove any unwanted extensions: If one of the Opera GX extensions is not working, you should first remove it and then reinstall the extension from the Opera Add Ons Store.
Scan the PC for malware: Press Windows + S to open Windows Security > click on Virus & threat protection > select Scan options > choose Full scan > click on Scan now > wait for the scan to complete. Alternatively, you could use an effective antivirus tool to remove malware.
Reset Opera GX to default settings: Launch the browser > open the Opera menu > choose Settings > scroll down to the bottom and select Restore settings to their original defaults > click on Reset to confirm.
Install an older version of Opera GX: If the problem started after installing an update for the browser, uninstall it, then download an older version of Opera GX from the official website, and finally, install it.
Resetting Opera GX to default
You now know how to effectively manage Opera GX extensions, be it adding, removing, or reconfiguring the individual settings. From now on, you will have better control over the browser and enjoy a personalized browsing experience.
Microsoft has released a new build for Windows 10 Insiders in what seems like a series of quick updates. This build is mainly aimed at people in the Beta and Release Preview channels.
It’s important to note that this update – tagged as build 19045.4593 under KB5039299 – includes several expected enhancements and fixes for the Windows Backup app, such as an easy way to save printer device settings and preferences.
It also addresses a hibernation issue linked with BitLocker encryption and makes other improvements. Let’s dive into the details, shall we?
If you are using the Beta Channel on Windows 10, there is good news for you. Microsoft has made some adjustments to improve the stability of searching for apps through the search box on your taskbar. Also, there has been a notable enhancement in the Windows Backup feature with KB5039299.
Finally, you can smoothly save and bring back personalization settings for Activity History and Printer Device Settings, which are not linked with any particular hardware or accessory. This allows preferences such as “Allow Windows to handle my default printer” and “Keep my activity history on this device” to be moved easily to a new PC, making the changeover more seamless.
Microsoft has additionally corrected some bugs to improve the backup and restore feature. A bug that caused backups to fail when desktop and lock screen backgrounds were backed up twice has been fixed.
For those who desire to be at the forefront, they need only turn ON the toggle within the settings menu. When accessible, updates will arrive instantly.
The improvement is not only for the Beta Channel. A set of additional features and fixes will be provided for both the Beta and Release Preview Channels.
These enhancements address a problem that impacted MSIX applications: an incomplete download from an HTTPS URI would make it impossible to open the application. The MDM client has been improved to send richer details about the device, assisting in its identification.
For those using a Japanese Input Method Editor (IME), the candidate window issue has been fixed. This means you will no longer encounter unexpected freezing or returning to a previous composition state.
Direct Composition batched presentations have also improved, reducing the number of brief flashes of triangles or boxes that appear on the screen. Additionally, this update brings Country and Operator Settings Asset (COSA) profiles for certain mobile operators up to date, resolves a hibernation problem linked with BitLocker, and makes various other refinements to improve your overall experience using it.
In simple terms, this update shows how Microsoft is serious about making Windows 10 better for people. They are working hard to improve the operating system in many ways, showing dedication to delivering an experience that matches and surpasses users’ expectations.
This advancement has something for everyone—from those who love technology and want new features as soon as possible to those who depend on Windows 10 every day for work activities; it will surely enhance your computer usage by providing smoother operation and increased consistency.
Here we go! The first batch of Qualcomm X Elite laptop reached the hands of some early adopters This includes Samsung Galaxy Book4 Edge and luckily we also have a first feedback posted by cponica23 on Reddit who eagerly started using it. Let’s say, the outcome was a blend of expectation and slight letdown.
Geekbench Results: The Qualcomm Snapdragon 8 Gen 1 chip, which is used in many high-end smartphones, did not reach the 3000 and 15000 scores for single-core and multi-core tests as promised. One core test score is 1,841 while multi-core result reaches 11,537. Comparing these numbers to Apple’s A14 processors of the previous year shows that they are lower.
Going into more details, the device’s maximum running speed was found to be limited at 2.5GHz only, a significant difference from the promised 3.4GHz. This inconsistency raised some possible speculations that Samsung could intentionally slow down CPU to lengthen battery life. But, these tests didn’t check NPU of device which is very important for Copilot+ experience.
Coming to the sunny part, battery life appeared hopeful with a promise of one full day’s use. However, it still could not beat Apple M2-powered MacBook Air that Microsoft has been aiming to surpass. Tests in gaming at first stages with games such as Resident Evil Village showed frame rates are playable yet pointed out Copilot+ PCs might not be ideal for people who are serious about gaming.
So, in the end, even though these initial tests were not ideal, there may be a possibility of future solutions to tackle the performance problems with a simple driver update from Qualcomm. We won’t jump to any conclusions yet, and we invite you to do the same.
Would you buy a Copilot+ PC? Let’s talk about this in the comments below.
Microsoft, showing its dedication to cybersecurity, has made a significant change in how it reviews workers. With worries increasing about cyber threats and the safety of online products, the big tech company will now include evaluations of cybersecurity contributions in its performance reviews for employees.
This decision follows a series of major cyberattacks that targeted Microsoft’s services, emphasizing the immediate requirement for improved security actions. It is important to mention that a Chinese group accessed Outlook email accounts all over the United States and Europe during the summer of 2023.
The method of Microsoft to enhance cybersecurity is a thorough assessment of the contributions made by every worker in this crucial field. The company’s interior “Connect” meetings and reviews, which all employees have with their manager, will now include one more “core priority” linked to cybersecurity.
This implies that each Microsoft worker will converse with the manager about his or her work associated with cybersecurity; this conversation will directly influence their yearly bonuses and pay. The motivation reaches the top leadership team, too, where one-third of their performance evaluation for bonuses is reliant on cybersecurity accomplishments.
This change in strategy shows how Microsoft understands the importance of each worker to protect their digital castle. They want to encourage a culture that values security everywhere by linking cybersecurity with performance assessments.
The emphasis on security by Microsoft’s top management, such as President Brad Smith, highlights a company-wide dedication to defending against cyber dangers.
While we are still waiting for the results from these fresh review methods, it is obvious that Microsoft is trying to tackle cybersecurity issues. Holding its workers and top-level staff responsible for security efforts sets a standard in the technology field, emphasizing the importance given to the digital safety of its products and services.
The intention is not only to improve Microsoft’s security but also to inspire other firms to elevate their focus on cybersecurity within their organizational aspects.
Do you remember when we used to write on paper and wished for a magic wand to transform our random scribbles into neat, typed text? Microsoft is making this fantasy true for OneNote users like us—particularly if we are part of the Microsoft 365 Insider program.
According to the official blog post, Microsoft’s work on improving OneNote for Windows with various digital ink characteristics has led to a new interactive ink tutorial feature to provide a better understanding and enjoyable experience using these improvements.
Just picture this: you start OneNote on your Windows device, and there’s a message about a fresh ink tutorial. If you want to know more (and who wouldn’t?), all it takes is clicking “Try it” to enter a scenario where ink encounters innovation.
This tutorial is not a regular one; it’s an interactive trip planned for you to learn about digital ink in OneNote. The tutorial uses a show-and-tell method, including videos and practical tasks that will improve your note-taking ability.
Now, I can hear your thoughts. What if you don’t own a stylus? Microsoft has considered this problem too. When the tutorial’s interactive part is in tune with a stylus, you can still participate even if you don’t have one.
You are able to engage with the non-interactive videos that explain features. However, if a stylus exists, the touchpad or mouse will be less involved during lesson time.
One hiccup to note: the tutorials won’t work with Windows N versions because they lack the necessary multimedia support. But there is a workaround. Downloading and installing the Windows Media Feature Pack will help you get back on track.
For eager people who want to try this, the fresh tutorials are ready for those using Microsoft 365 Insiders running Version 2405 (Build 17628.20006). It is similar to having your private teacher help you understand digital ink in OneNote; this makes capturing your ideas, drawings and notes simpler and more pleasant.
Are you prepared to give your notes a digital upgrade? If you are a Microsoft 365 Insider, this is the perfect opportunity to push the limits of what can be done with ink in OneNote.
We may witness the creation of something truly groundbreaking. This could be the start of a new era in which people can interact more intuitively and interestingly with their ideas and creations in the digital world.
Opera GX is known for its undeniable features that make it a reliable browser but since its extensions catalogue is limited, you might need to install Google extensions.
A lot of users are switching to Opera GX and lucky for you, it is fully compatible with Google extensions. Of course Opera GX extensions are available but Google has more to offer so installing them is bound to amplify your already great browsing experience.
Click on the Sign in button located in the top-right corner of the extension marketplace.
Enter your Google Account which you’ve been using in the Chrome browser.
Enter the password and authenticate the sign-in process with OTP, Android device, etc.
You should now see the Chrome Webstore home screen signed into your account.
Click on the Extensions tab and scroll down to install an extension you like. You can also search for a specific one by typing the name in the search bar.
Click the Add to Opera button to install it on Opera GX.
Once you’re done, click on the three-dots menu in the top right corner, near your Google Account profile picture and select My extensions & themes from the context menu. You should now see all the Chrome extensions you’ve installed so far.
Best practices for installing Google extensions on Opera GX
Keep your extensions up-to-date to avoid compatibility issues. Chrome extensions may work well with Opera GX but remember they’re not natively made for this browser so regular checks ensure they’re at optimal performance.
Keep an eye on the permissions requested by an extension. Some may request access to extremely personal information so ensure your privacy is not at risk.
Now that you can add Google extensions to your Opera GX browser, you may be wondering if you can to install Chrome extensions on Opera. If so, we lay it all down in our extensive article.
Have you tried Google extensions on your Oera GX browser? Did you experience any significant performance changes, compatibility issues or privacy and security concerns? We’d love to get your feedback so let us know in the comment section bellow.

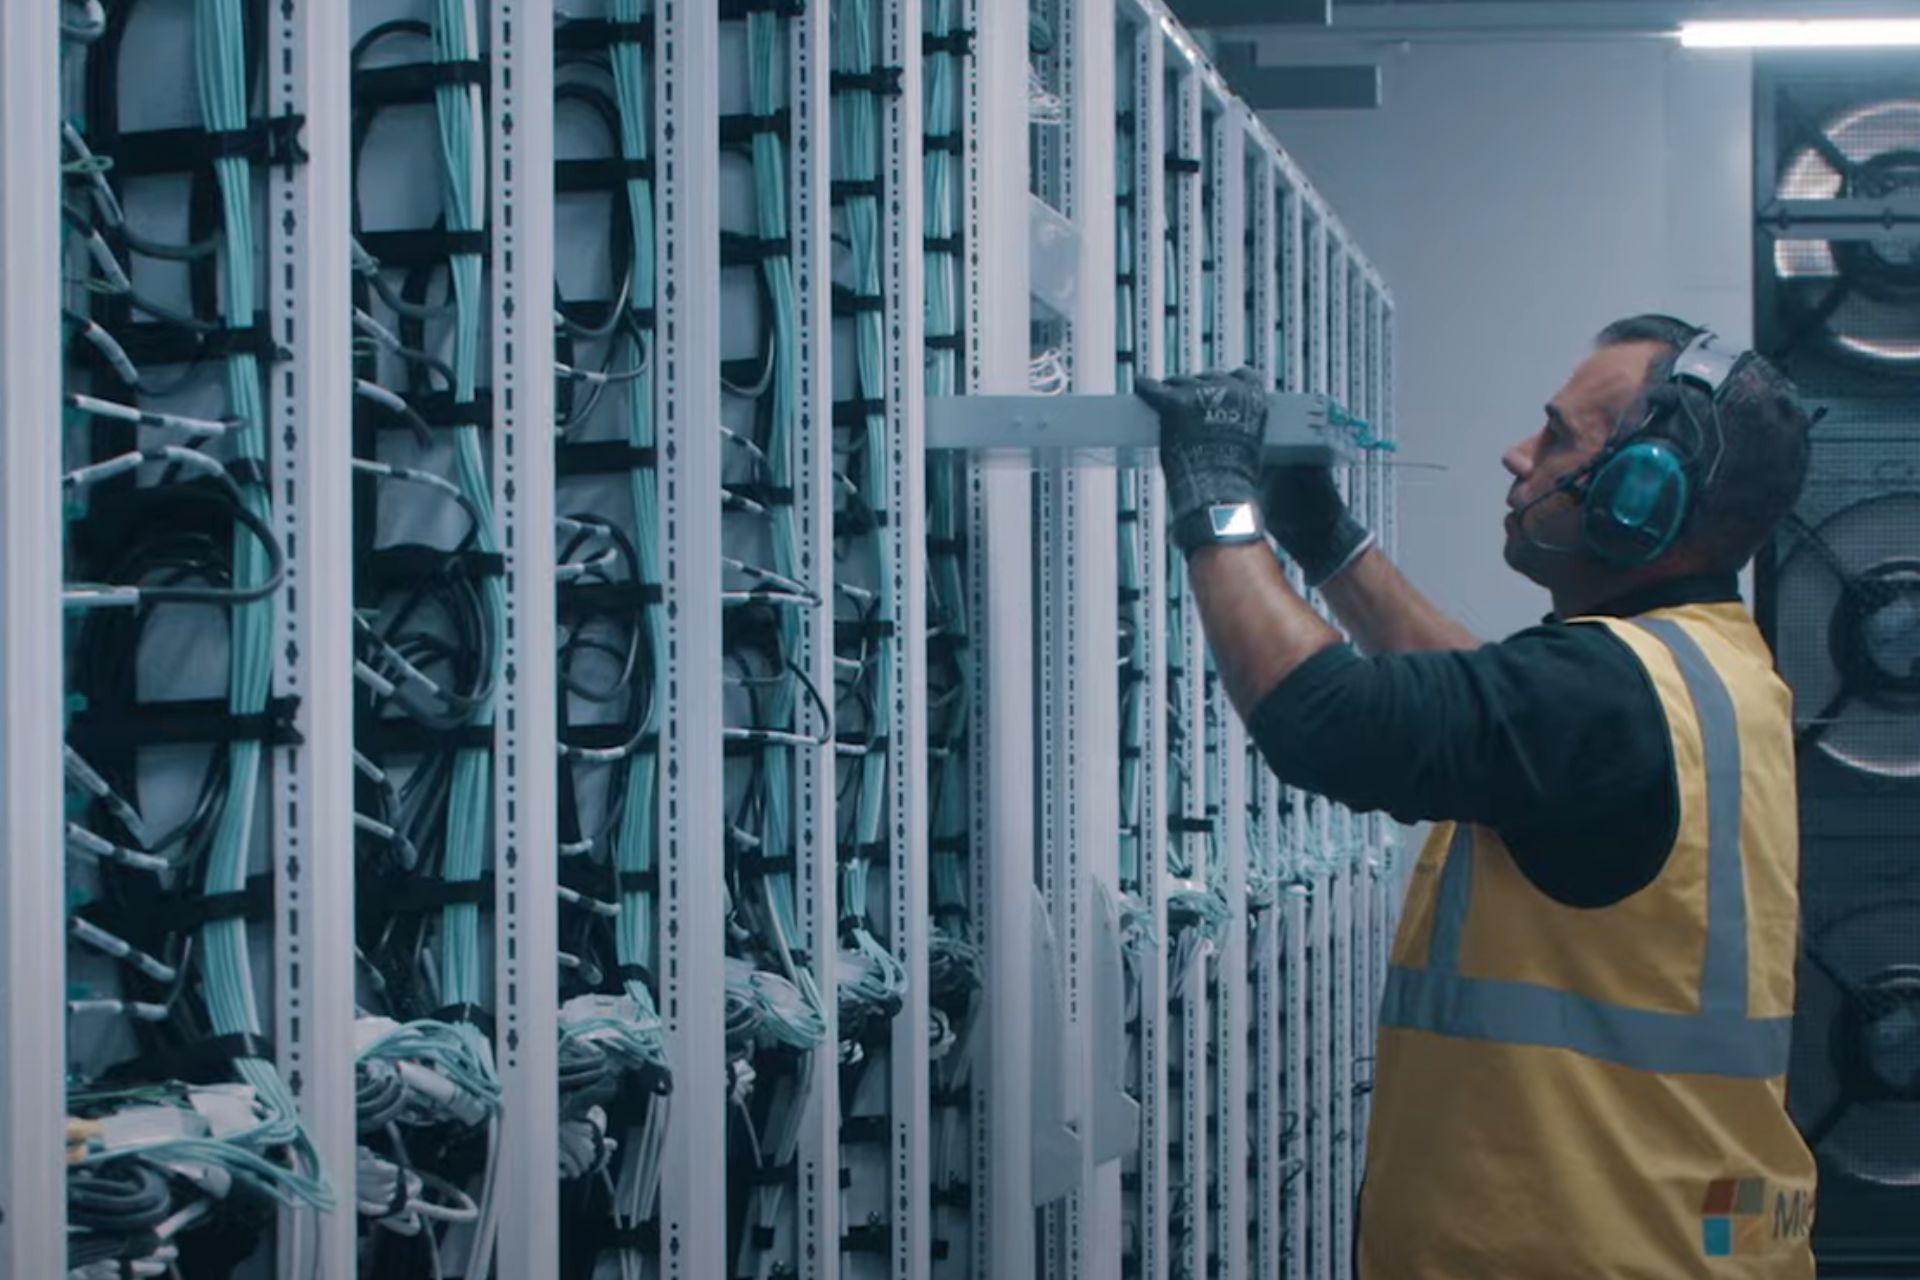


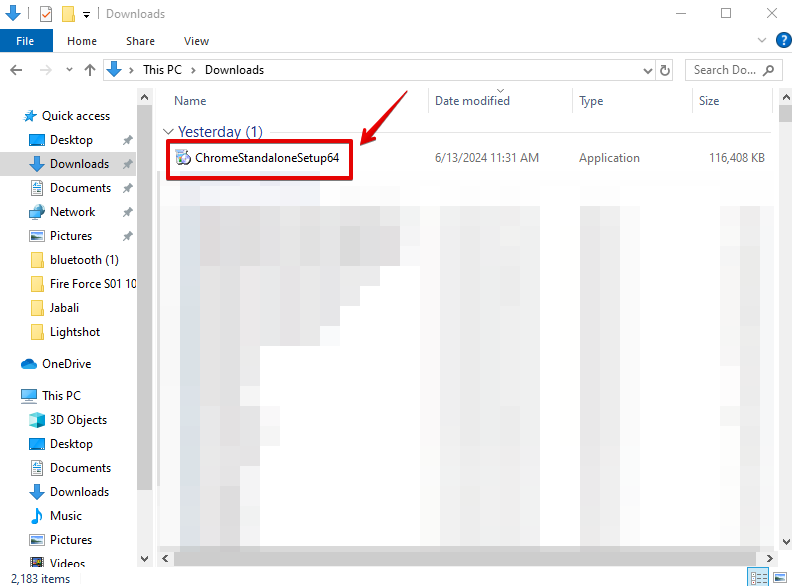


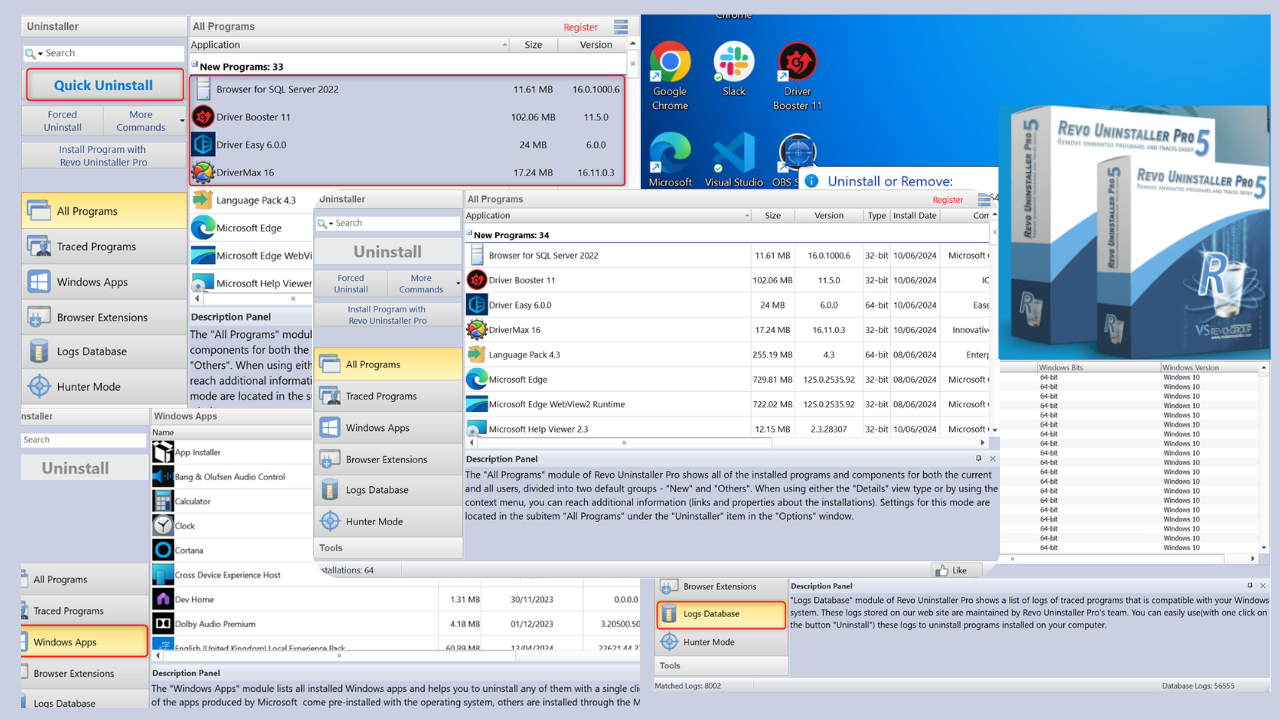


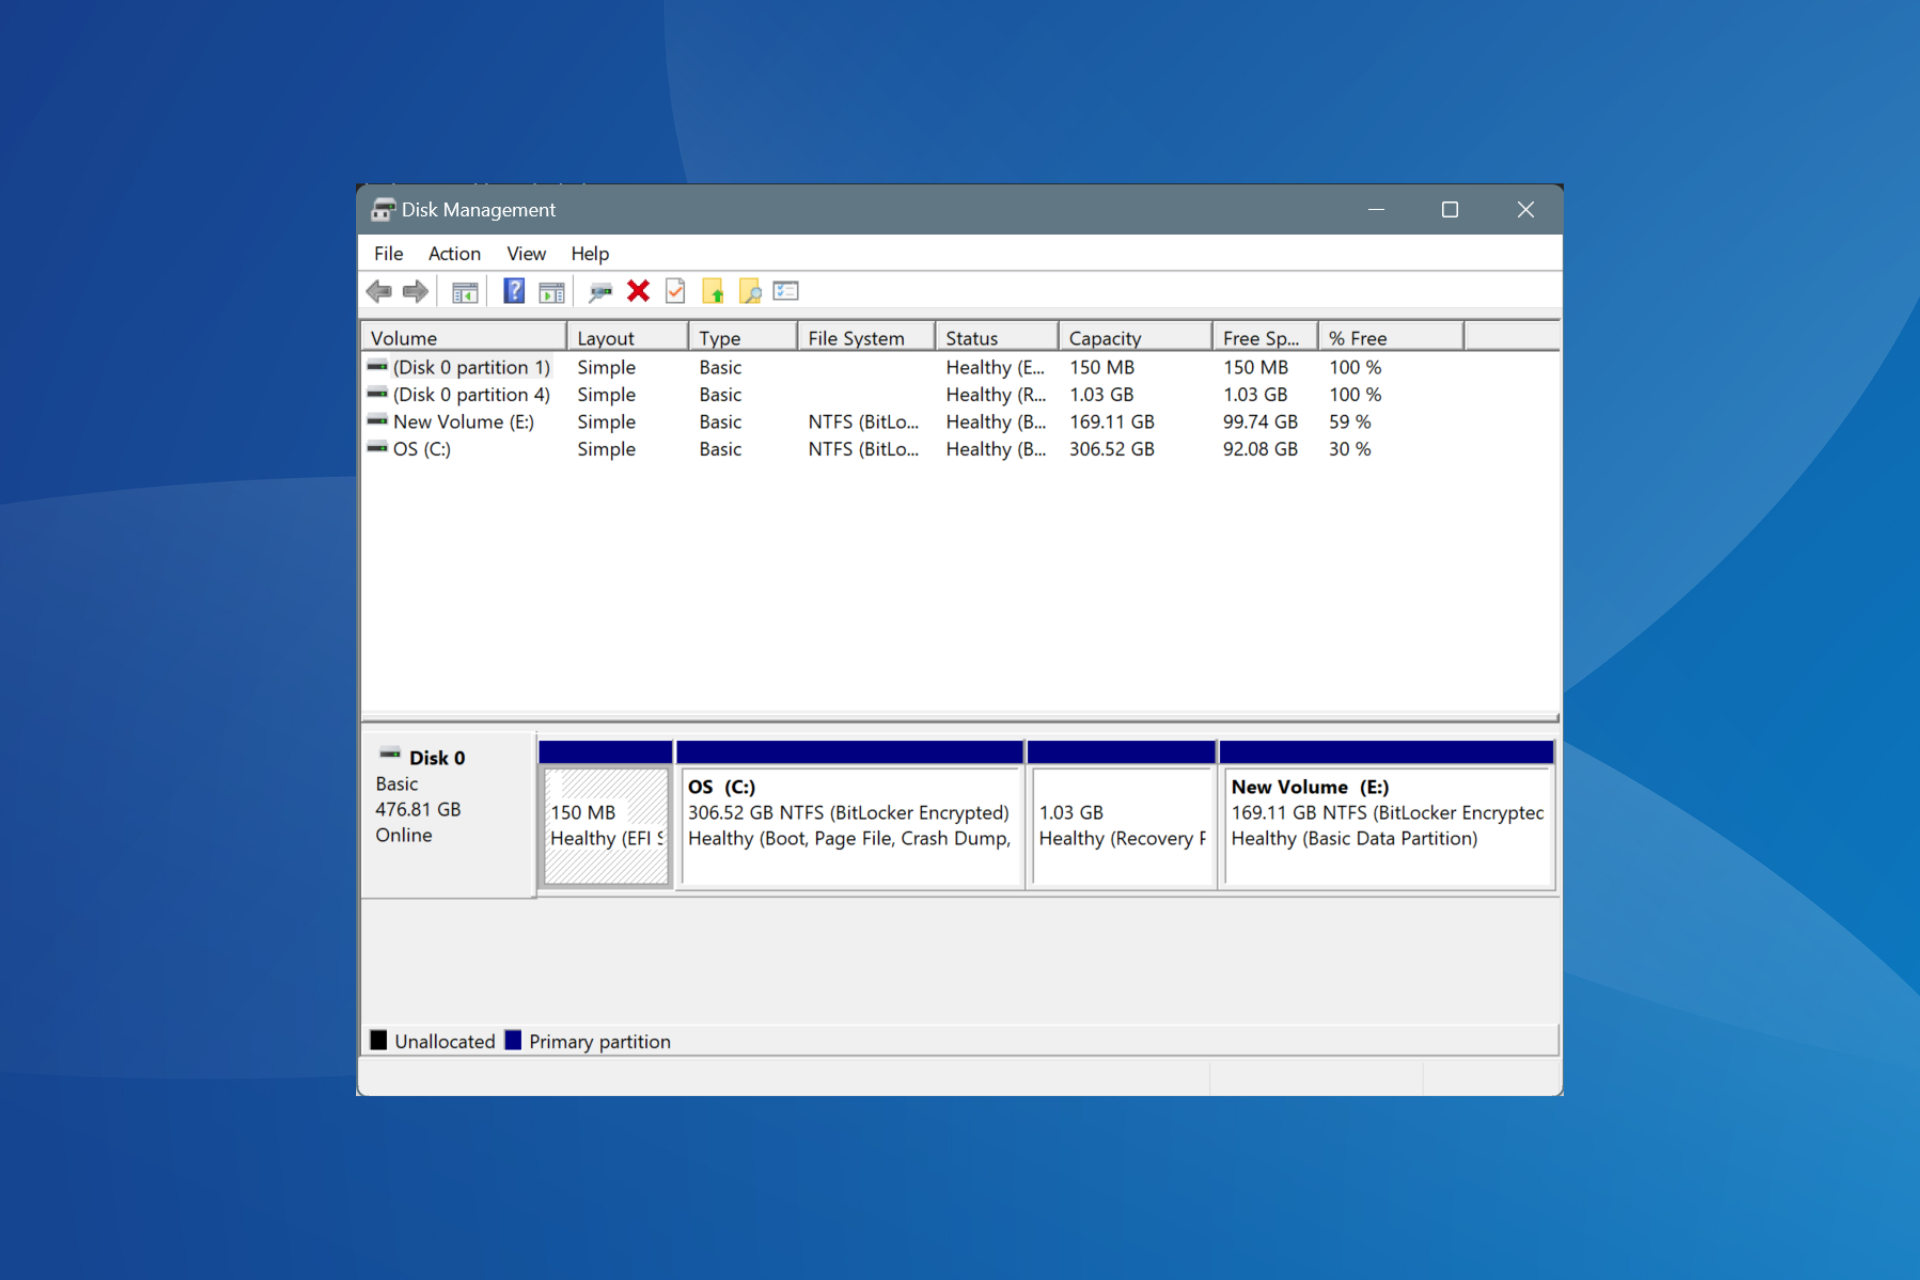


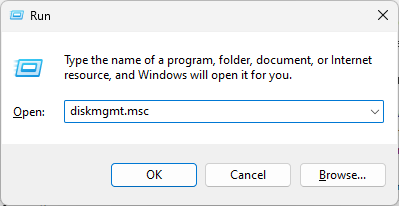
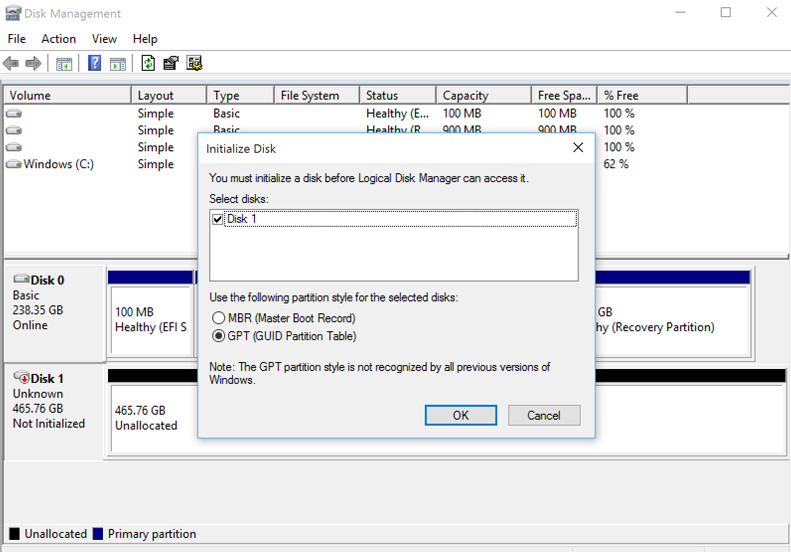
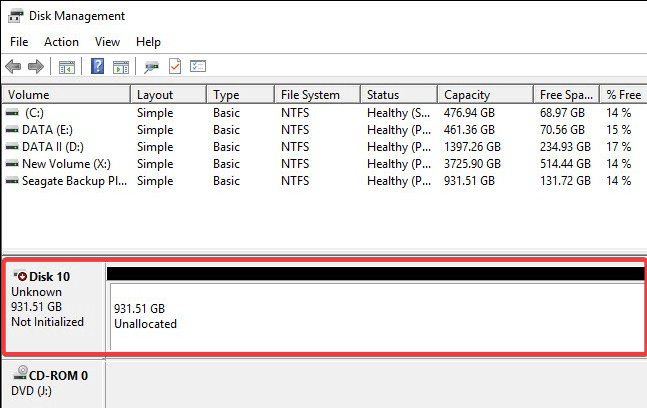
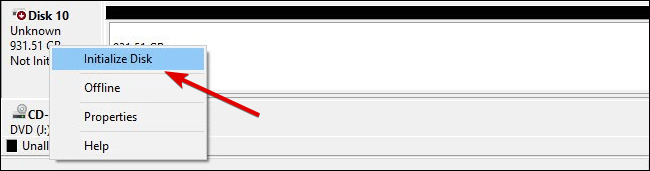 `