A few users reported that cncs32.dll is missing on their PC, and this will prevent certain software from running, so today we’ll show you a few ways to fix this issue.
What can I do if cncs32.dll is missing?
1. Reinstall the application
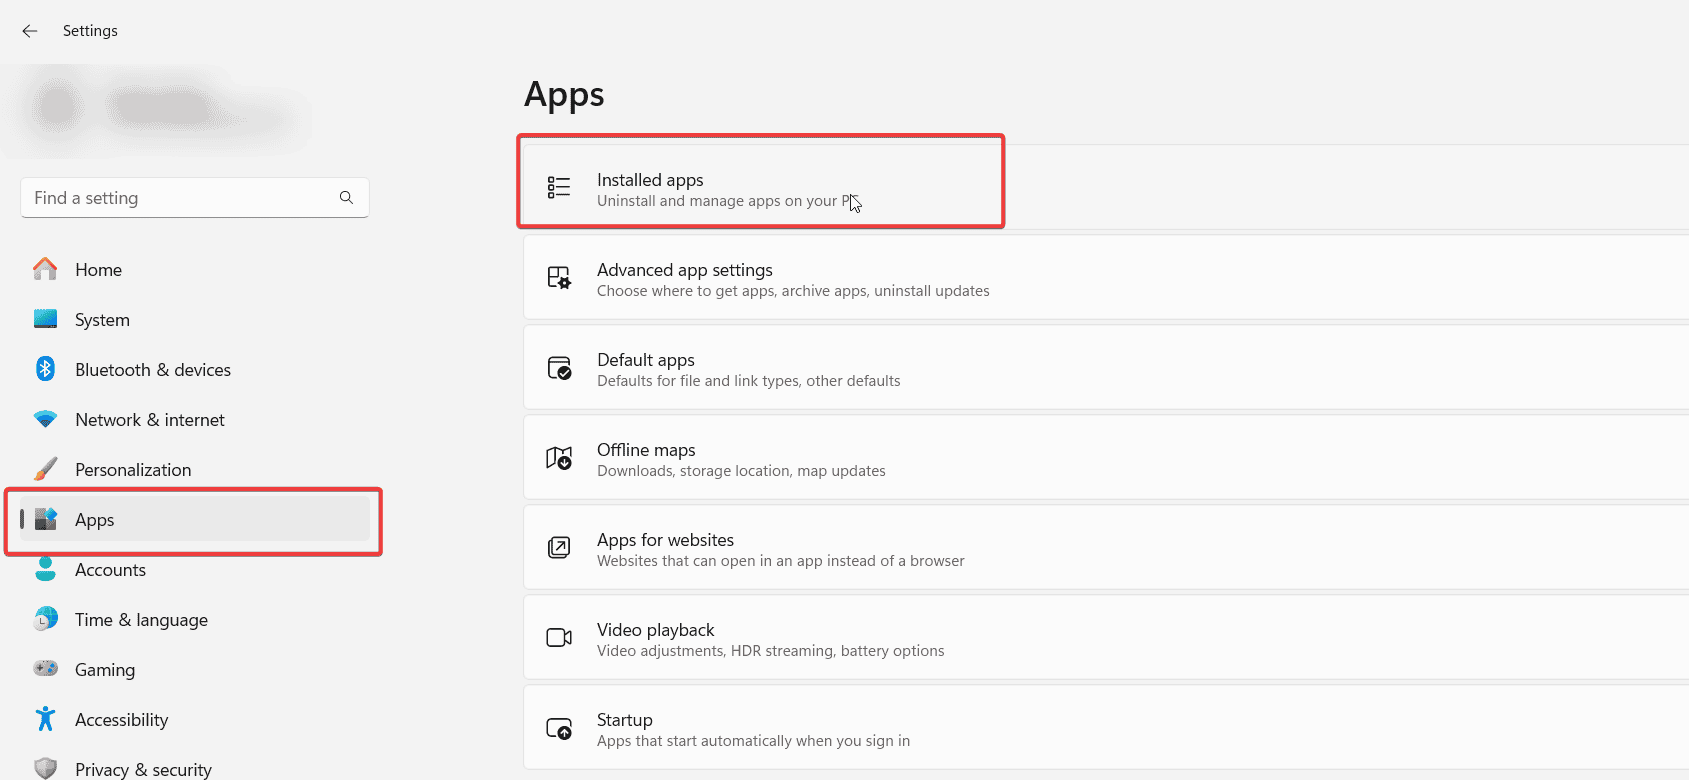
Press the Windows key + I to open the Settings app.
Go to the Apps and select Installed apps.
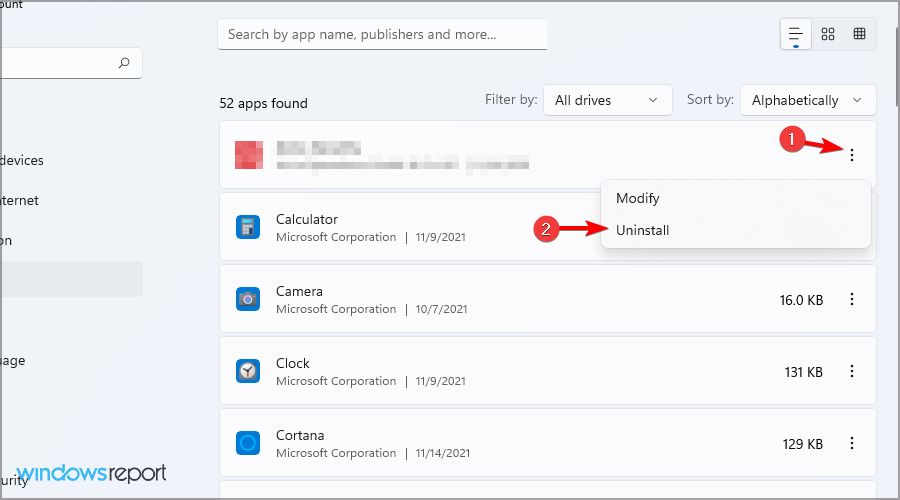
Next, locate the application that is giving you this error and click the three dots next to it. Choose Uninstall.
Wait for the process to finish.
Once removed, install the application again.
This can be helpful if you’re using Games Factory and cncs32.dll seems to be missing.
2. Download the file from the web
Find a reliable website that hosts this file.
Once you download cncs32.dll, move it to the application directory.
Check if the problem is resolved.
Downloading files from DLL websites is considered an unsafe practice, so use it at your own risk as a last resort.
This file is associated with the Cncs32 Image Compression Toolkit and it’s used by some applications to handle image compression tasks.
Cncs32.dll seems to be a legacy DLL, and it’s usually associated with older software that isn’t actively used anymore, so finding the missing DLL can be tricky.
Over the years, there have been reports that this file is malicious, but those turned about to be false positives by certain antivirus software.
The dev error 10493 that appears on your screen when you’re playing Call of Duty Black Ops 6 is usually triggered by corrupt game files. The game will load for a while before throwing you back to the opening screen.
You can restart the game or check for updates since beta games tend to have frequent updates critical to the game.
How do I fix Bo6 dev error 10493
1. Clear reserved data
Press the Windows key, type steam or in the search box, and click Open.
Go to Library, right-click the game, then select Manage game and addons from the context menu.
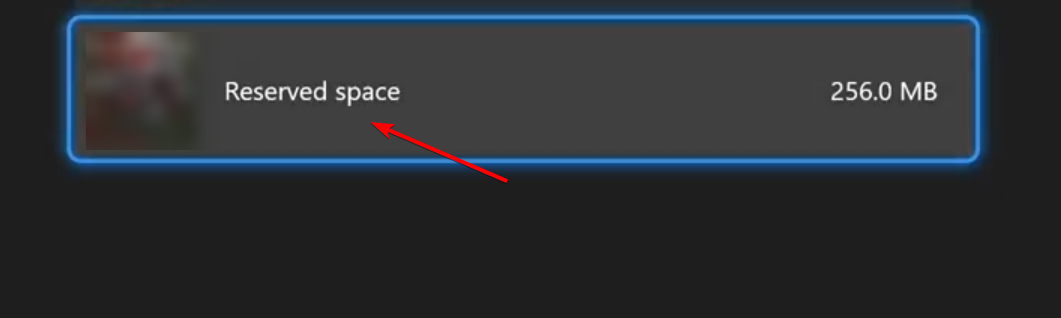
On the left side of the screen, scroll down to Saved data and click on it then select Reserved space.
Next, click on clear reserved space and you’ll be prompted to confirm the deletion of this game save data.
Once you relaunch Black Ops, the game fails will be recreated so if they were corrupt, deleting the reserved space data will simply refresh your data and ensure your game is more stable.
If Black Ops 6 is still not working after clearing reserved data, follow our complete guide on Black Ops 6 not working to fix crashes, freezes, and startup errors.
2. Run Black Ops as an Administrator
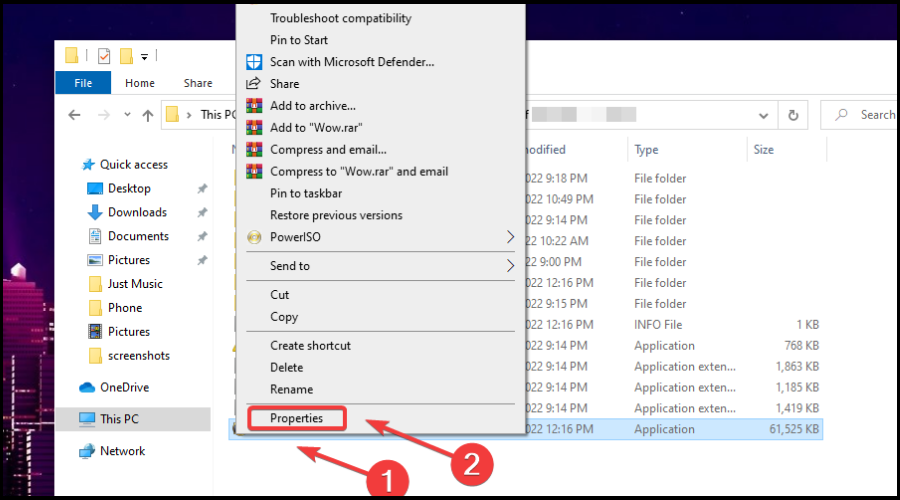
Locate the folder where Black Ops is installed.
Right-click on the executable and click on Properties.
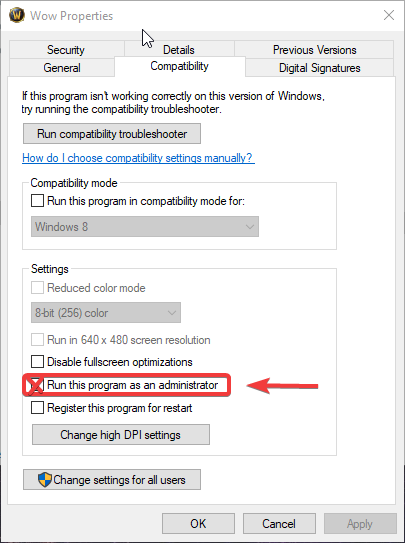
Select the Compatibility tab and check the Run this program as administrator box.
Run Black Ops 6 and see if the dev error 10493 persists.
3. Verify game files
3.1 Steam
Press the Windows key, type steam or in the search box, and click Open.
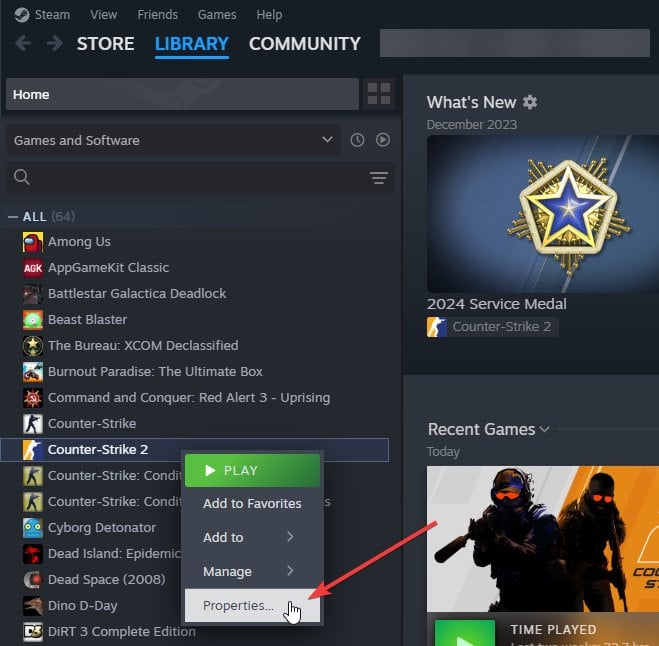
Go to Library, right-click the game, then select Properties from the context menu.
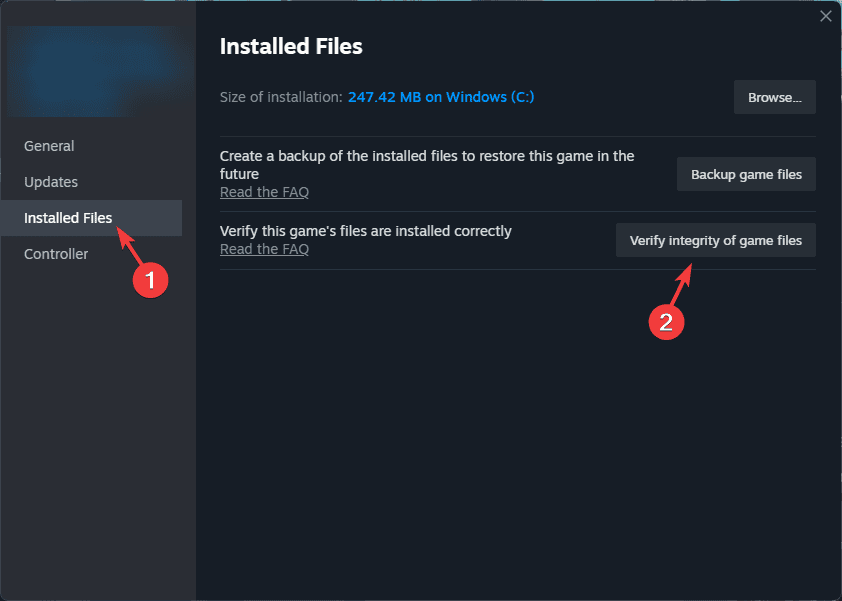
From the left pane, click Installed files, then click Verify Integrity of Game Files.
The scan will start, and all the missing or damaged game files will be replaced with healthy files.
3.2 Battlenet
Press the Windows key, type battlenet in the search box, and click Open.
Go to the Games tab, select Call of Duty, and click the Settings button located next to the Play button.
Now choose Scan and Repair.
Click Begin scan and wait for the process to complete. This scan will repair the damaged game files, and it may take some time.
While we can vouch for solution one as being your best bet, it doesn’t guarantee that it will work for you. After all, BO6 is still in the Open Beta phase so a lot of these bugs and problems are common and should be expected.
We’d also like to caution you against using GamePass shared accounts otherwise you may run into the BO6 error code 2901. In our latest guide, we wrote about the Puget Lakes error, so check it out for more information.
If none of these solutions fix the problem, check our full guide on Black Ops 6 not launching on Steam for more detailed troubleshooting steps.
That’s a wrap from us but we welcome any other solutions you may have that worked out for you. Drop us a line below.
Edit: According to a statement made by Microsoft for The Verge, the uninstallability of Windows Recall is a bug.
We are aware of an issue where Recall is incorrectly listed as an option under the ‘Turn Windows features on or off’ dialog in Control Panel. This will be fixed in an upcoming update.
Further edit: the same publication now confirms Microsoft will let users remove the Windows Recall entirely from their PCs if they wish so, with the Redmond-based tech giant stating:
The preview of Recall for Copilot Plus PCs has not yet been made available to Windows Insiders. However, information on Recall shared in David Weston’s blog from September, including confirmation that Recall is an opt-in experience and that users can also remove Recall, remains true.
Previously, the controversial Windows Recall, designed to capture screenshots of the PC screen every few seconds, has not only become an opt-in feature, but Microsoft also allowed users to uninstall it. This decision responded well to the increasing concerns about privacy and security raised by users and professionals.
With a simple tweak in Windows 11 version 24H2, users could uninstall Recall, marking a significant shift in Microsoft’s approach to user privacy and control. Previously, the only option was to disable Recall, but the latest update, KB5041865, introduced an option to remove it entirely from the system.
Firstly, Recall used to be included in the Copilot+ PC set created for Snapdragon X Series laptops. It was a screen capture feature that stored images to assist in AI-powered retrieval of past information.
The captured visuals were kept locally and not used to direct advertising campaigns. Still, their security was swiftly questioned after researchers discovered how to circumvent Windows’ safety measures and access these pictures, which led to further discussions about their safety and necessity.
In an update, Pavan Davuluri, the Vice President of Windows and devices, said that users must choose Recall by using Windows Hello to verify their identity. This change was made to increase the security of stored images so that search index databases would have more encryption protections.
Davuluri underlined the user control element, saying that internal Microsoft testers liked the ability to exclude certain apps from being captured and delete snapshots.
However, the main issue still exists even with these modifications: people are uneasy about their PCs recording and keeping pictures of what they do. Many share this sentiment, emphasizing a more comprehensive discussion about digital privacy and business monitoring.
The inventive characteristic touches on the sensitive equilibrium between technology ease and individual secrecy.
For people curious about this characteristic or may be interested in it, it is essential to know that not every PC will have Recall. It needs a device with neural processing units (NPUs) included, which are made for AI-heavy tasks and currently only found in the Copilot+ category of devices.
Even though there has been news about Recall getting activated on certain PCs lacking an NPU, we do not know how Microsoft will handle this feature later.
Microsoft’s decision to offer Windows Recall as an opt-in feature is a considerable move in dealing with privacy worries. However, it will be interesting to see if the capability, as it is now – unable to uninstall it – would be used by the community. On Reddit, for instance, the Windows community is not pleased at all:
No means no, Microsoft.
An employee tried to convince me that it’s harmless but so far all the things I’ve feared (and many others) are coming true, slowly, one by one. They will make this part of the OS, whether you want it or not (haven’t met anyone who does) and then start sending data online (not just storing it locally). But there’s little we can do except complain loudly.
linux is looking more attractive each day.
While you can opt-in/opt-out of Windows Recall, you’ll not be able to uninstall it. What’s your take on this? Let us know.
Microsoft has announced new Skin Tone Settings and reactions for Microsoft Teams. The new feature allows users to select a skin tone for their emojis and reactions in chats, meetings, and channels.
In a blog post by Katherine Lu, the company wrote: “Customizing your skin tone in emojis and reactions enables you to represent your physical appearance better and express yourself more authentically in virtual meetings and conversations. It contributes to a more inclusive, personalized, and engaging experience.”
The new feature is available in Microsoft Teams settings under Appearance and accessibility and lets users choose their preferred skin tone for emojis and reactions. Users can also customize the skin tone of an emoji or reaction by hovering over the emoji in the emoji menu and clicking the “Customize” button.
Microsoft says that the skin tone settings are consistent across various clients on Windows, macOS, web, Android, and iOS, ensuring a consistent experience for users regardless of their device.
The feature is available to users in the Teams public preview and Microsoft 365 targeted release on all platforms but only in the new Teams client for Windows, macOS, web, Android, and iOS.
The company notes that other meeting participants don’t have to be members of the Teams public preview to see customized emojis and reactions; however, they won’t be able to customize their own skin tones until the feature becomes generally available.
In other news, Microsoft Teams finally introduced the unified chat and channels experience, which will allow users to catch up more easily and quickly with all of the conversations going on in their organization.
Microsoft Photos is rolling out a preview of its super-resolution feature to Windows Insiders. The new feature will also be available to those testing Windows 11 on Snapdragon-powered Copilot+ PCs.
However, the much-coveted feature also appeared on x86 PCs. The Redmond-based tech giant has labeled this a bug and is currently fixing it.
UPDATE 10/24: We investigated and fixed an issue where super resolution was appearing on PCs it shouldn’t be. The fix is rolling out now.
Super-resolution uses AI to enhance and enlarge images up to 8x the original size in Windows’ Photos App. According to Microsoft, the feature is perfect for improving low-quality photos, preparing photos for large prints or displays, and tight cropping without sacrificing image resolution.
The feature was teased out earlier this year and takes advantage of the Neural Processing Unit (NPU) on Copilot+ PCs to deliver enhancements quickly and efficiently. All work is done locally on the PC. It can be accessed from the Photos Editor to enhance images within seconds.
Another feature coming to the Photos app is Optical Character Recognition (OCR). Today, OCR will be available in the Photos app for all Windows 11 and 10 PCs. It allows users to copy text from photos and paste it into other apps.
Microsoft also notes that it is launching single-click support in the Gallery in response to user feedback. With the update, users can open individual images with a single click. If double-clicking is preferred, users can still do that too.
Enhancements to the zoom feature include large images automatically resizing to fit within the Viewer window and improved synchronization between the zoom slider and the zoom selection display. To improve overall quality, bug fixes are also included for the Image creator and Restyle image features on Copilot+ PCs.
To get these new features, update your app to version 2024.11100.17007.0 or higher via the Microsoft Store.
Zoom offers two primary solutions for virtual events: Zoom Meetings and Zoom Webinars. Each is designed to cater to different types of online interactions and audiences. We outline a complete comparison between the two solutions to help you choose the right one for your needs.
Zoom Webinar vs. Meeting comparison
We will start by comparing the main features of Zoom Webinar and Zoom Meeting to establish a broad understanding of both solutions.
Feature
Zoom Meeting
Zoom Webinar
Audience Size
Up to 1,000 participants
Up to 100,000 attendees
Interaction Level
High (two-way communication)
Low (one-way communication)
Participant Roles
All participants can share video/audio
Only hosts and panelists can share
Breakout Rooms
Available
Not available
Q&A and Polling
Limited
Extensive
Screen Sharing
Any participant
Only hosts and panelists
Recording
Available
Available
Use Cases
Team meetings, online classes
Webinars, virtual conferences
So, right off the bat, Zoom Meeting is designed for general usage and small organizations. It encourages interactions between attendees and presenters and all the participants can take the role of leading the meeting and sharing their screens.
In contrast, Zoom Webinar is more like an auditorium where a large audience is attending presentations from 1-3 speakers. Basically, it’s the definition of a webinar or a virtual conference with one-way communication only.
Now that you have a broad understanding of what Zoom Meeting and Zoom Webinar are designed for, let’s break down their features in more detail.
Zoom Meetings key features
Participant Interaction: Everyone can interact freely through voice, chat and screen sharing.
Breakout Rooms: This feature available only in Zoom Meeting allows you to split participants into smaller groups for focused discussions. For instance, this is an ideal method to go from a general organization meeting to a department focused discussion later on.
Screen Sharing: Any participant can take the presenter role and share their screen with the audience.
Recording: Meetings can be recorded and shared later.
Video streaming resolution: In the standard free version, the streaming resolution is 640×360 pixels, but you can upgrade that to 720p with a Pro account.
Price and plans: Zoom Meeting has a free version, but it’s limited to 40 minutes/ meeting and has other limitations. The least expensive plan is Pro, which costs $13.32/user/month and includes 5GB of cloud storage, 30 hours meetings and more.
What is Zoom Meeting used for?
Zoom Meeting is designed for interactive and collaborative sessions. They are ideal for:
Small to medium-sized groups: Typically up to 1,000 participants with the Large Meetings add-on.
Two-way communication: All participants can share their video, audio, and screen.
Collaboration: Features like breakout rooms, whiteboarding, and screen sharing make it perfect for team meetings, online classes, and group discussions.
Zoom Webinars key features
Host control: Only the hosts and panelists control the audio and video.
Q&A and polling: While you don’t have a two way voice or video communication, the attendees can still interact by asking questions via a Q&A box and participate in polls set up by hosts or speakers.
Attendee management: As in any classic conference, the hosts can introduce and promote attendees to panelists if the situation requires that action.
Video streaming resolution: 720p video quality is used for the active speaker video in a webinar, and if you want to switch to 1.080p resolution, you will need a Zoom Events or Zoom Sessions account. However, The streaming resolution will also be adapted to the bandwidth and capabilities of the speaker’s connection and computer. For example, to receive a 1080p broadcast you will require a 3.0Mbps speed and to stream in Full HD, you will need at least a 3.8Mbps connection.
Price and plans: Zoom Webinar doesn’t have a free plan. First, it requires a Zoom Workplace license and the first available paid plan starts from $79/ month or $690/ year for unlimited webinars. The current prices were listed at the moment when we wrote this article. Make sure you check the plans before committing.
What is Zoom Webinar used for?
Zoom Webinars are tailored for large-scale events where the focus is on the host and panelists. They are best suited for:
Large audiences: Can accommodate up to 100,000 attendees and 1,000 panelists.
One-way communication: Attendees primarily listen and view the presentation, with limited interaction.
Formal presentations: Ideal for webinars, virtual conferences, and large training sessions.
Conclusion
We end here our Zoom Webinar vs. Meeting comparison. Choosing between Zoom Meetings and Zoom Webinars depends on the nature of your event and the level of interaction required. For collaborative and interactive sessions, Zoom Meetings are ideal. For large-scale presentations with limited interaction, Zoom Webinars are the better choice.
Error_Label_Too_Long often comes with the following message 154 (0x9A) The volume label you entered exceeds the label character limit of the target file system. This is an obscure error, but we have several ways to fix it.
How can I fix Error_Label_Too_Long?
1. Change Solaris sed
Open your code.
Break up labels as separate expressions.
Save changes.
2. Use the xpath command instead
Open your code.
Locate the sed command.
Replace it with the following code: xmllint --xpath 'string(//Resource[@auth="Container" and contains(@url, ":DB01")]/@password)' file.xml
If you use a modified version or a version that didn’t come from a legitimate source, you might encounter issues.
If possible, reinstall Windows and use the legitimate unmodified version.
This solution is suitable for non-developers since it appears only when a user installs a modified version of Windows.
Error_Label_Too_Long affects usually developers, but since it’s an obscure error, it’s not likely that you’ll encounter it.
This isn’t the only issue that can appear, and we wrote about ERROR_NO_VOLUME_LABEL and ERROR_DEV_NOT_EXIST in our previous guides, so don’t hesitate to check them out.
We also have a new guide on the Error_Is_Subst_Target message, so don’t miss it for more information. You also might be interested in ERROR_UNDEFINED_CHARACTER for more potential solutions.
Recently, we tacked ERROR_ILLEGAL_CHARACTER in another guide, so you might want to check it out for more information.
Did you manage to find a different solution to this problem? If so, feel free to share it with us in the comments section.
Select Call of Duty and click the drop-down arrow next to the Play button.
Select Uninstall.
Once removed, install the game again.
We advise you to try any other method to fix Dev error 614 in MW3 before reinstalling the game. Use this solution only if nothing else works.
We hope that you managed to fix this error using our solutions. This isn’t the only problem you can encounter and we wrote about BO6 error code 0x3 and BO6 error code 2901.
Also, don’t miss our latest Dev error 11152 article for more useful solutions. Many have recently encountered Puget Lakes error, and we have a guide that covers this issue, so feel free to visit it.
The ERROR_INVALID_LIST_FORMAT comes with the value 153 (0x99) and the message The DosMuxSemWait list is not correct. Typically, error code 153 is triggered by a software conflict. Basically, two or more programs are attempting to use the same system resource, causing a critical error. However, we can’t exclude driver issues or hardware malfunction. So, first, if possible, inspect the hardware components for any overheating or malfunctioning.
How do I fix the ERROR_INVALID_LIST_FORMAT BSoD?
1. Uninstall recently installed software
Click the Start button and select Settings or press Win + I for the same result.
Go to Apps > Installed apps, then look for any software you installed before the ERROR_INVALID_LIST_FORMAT started occurring.
Click on the dots button to its right and select Uninstall.
Be aware that sometimes, the classic uninstall approach might not uninstall a software completely. In this case, we recommend using an uninstaller tool that will wipe any trace of an app from your PC. We also have a complete guide on how to uninstall apps on Windows 11 that provides more methods of doing that.
2. Update or reinstall the problematic drivers
Right click the Start button and select Device Manager.
Expand the categories one by one and see if there is any exclamation marks next to one of the drivers.
You may also click on View and select Show hidden devices to make sure you see all of them.
Right-click on the component, and select Update driver.
Select Search automatically for drivers and allow the system to install any new ones.
If the yellow exclamation mark is still present, go to the manufacturer’s website and download the right driver for your component and system.
You may also try to select Uninstall device instead of Update driver in step 4.
After the process is complete, click on Action and select Scan for hardware changes.
The component will be reidentified by the system and a default driver will be installed.
If you don’t find any problematic driver in the list, the best action is to use a driver updater tool that automatically scans your system for missing or problematic drivers and updates them.
3. Run SFC and DISM scans
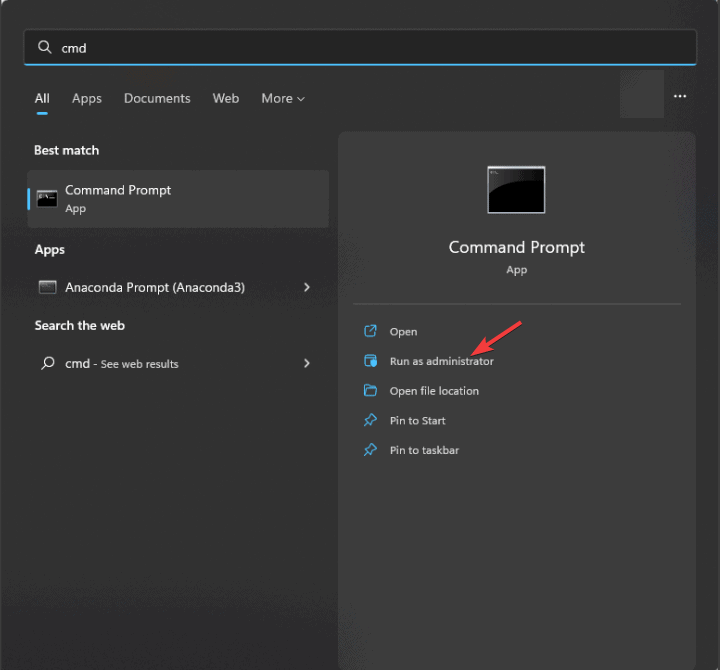
Click the Start button, type cmd and select Run as administrator from the search results.
Type or paste the following command to attempt a system repair: sfc /scannow
After the process is complete, type or paste the following command to repair the system image: DISM /Online /Cleanup-Image /RestoreHealth
4. Perform a System Restore
NOTE
Restoring your system to a previous point will uninstall any applications you installed from that point to present time. Also, keep in mind that you need to have a saved restore point for this to work.
Click the Start button, type system restore and select Create a restore point from the results.
Now, click on the System Restore button under System Protection.
Select a restore point that is dated before the ERROR_INVALID_LIST_FORMAT occurred.
Follow the prompts to restore your system.
If the BSoD still persists, as a last resort, you may try resetting Windows to factory settings. We hope that by applying the solutions above you managed to fix the ERROR_INVALID_LIST_FORMAT BSoD and now everything went back to normal.
Check our article on the causes of BSoD if you want to learn more about blue screen errors. Let us know if you have any questions on the comments section below.
The ERROR_INVALID_EVENT_COUNT bug check comes with the value of 0x00000097and it typically indicates an issue with the event count in a system or application. It may also be accompanied by the following message: The number of specified semaphore events for DosMuxSemWait is not correct.
This issue happens when the system is performing file operations that involve multiple threads or processes attempting to access shared resources. This BSoD typically doesn’t spawn from hardware issues, but it’s rather triggered by driver issues or software conflicts.
How do I fix ERROR_INVALID_EVENT_COUNT BSoD?
1. Update the drivers
Right click the Start button and select Device Manager.
Expand the categories and look for any exclamation marks next to any driver.
Right-click on the component, and select Update driver.
Select Search automatically for drivers and allow the system to install any new ones.
If the yellow exclamation mark is still present, go to the manufacturer’s website and download the right driver for your component and system.
If you don’t find any problematic driver in the list, we recommend using a driver updater tool that will automatically scan and update your drivers.
2. Run System File Checker (SFC) and DISM
Click the Start button, type cmd and select Run as administrator to open Command Prompt with full privileges.
Type or paste sfc /scannow and wait for the process to complete.
Now, type or paste DISM /Online /Cleanup-Image /RestoreHealth and wait for it to finish.
When you’re dealing with a BSoD, one of the most efficient methods to fix it is to run the SFC and DISM commands that will solve any potential issues with the system files.
3. Uninstall the conflicting application
Click the Start button and click on Settings.
Now, go to Apps > Installed apps, and look for the apps you installed prior to this BSoD occurrence.
Click the three dots icon to its right and select Uninstall.
Reboot your system and see if the problem persists.
4. Perform a System Restore
NOTE
Be aware that restoring your system to a previous point in time will also uninstall any applications you installed from that point to present time.
Click the Start button, type system restore and select Create a restore point from the results.
Now, click on the System Restore button.
Select a restore point that is dated before the ERROR_INVALID_EVENT_COUNT started showing up.
Follow the prompts to restore your system.
Restoring your system to a previous point will fix any software-related issues. If this doesn’t solve the problem, you may also reset Windows to factory settings.
We hope that by applying the solutions above you managed to fix the ERROR_INVALID_EVENT_COUNT BSoD and now your computer is running smoothly. We also have a new guide on ERROR_INVALID_FLAG_NUMBER message, so feel free to visit it for more information.
If you need more information, check our article on the causes of BSoD. We also have a great guide on ERROR_EVENT_DONE, so you might want to visit it as well.
Let us know if you have any questions in the comments section below.
Many Call of Duty fans experienced Dev error 6144, and this issue will disconnect you from the game, making you lose all your progress.
What is error code 6144?
This error most likely occurs when the game tries to add you to a match that’s already in progress but it’s not successful. Network issues can also cause this problem.
How can I fix Dev error 6144?
Before trying anything else, try restarting your game. If that doesn’t help, restart your PC or console. Also, ensure that your connection is stable and latency is low.
1. Verify the game files
Battle.net
Close the game and go to the Call of Duty tab.
Click the cog wheel next to Play.
Select Scan and Repair.
Click on Begin Scan.
Wait for the process to finish.
Steam
Make sure the game isn’t running.
Go to your Steam Library.
Right-click the game and choose Properties.
Next, head to the Installed Files tab.
Select Verify integrity of game files.
Wait for the scan to finish.
2. Reset game settings
Close the game.
Open File Explorer and go to Documents.
Locate the Call of Duty folder and remove it or move it to Desktop.
Try to start the game again.
This can help you if you’re getting Dev error 6144 in Warzone or MW3.
The Dev error 6144 can affect other platforms, including PS5, Xbox Series X, and even PS4. If you encounter it on these platforms, try clearing the game cache or reinstall the game.
This isn’t the only error you can encounter, and we wrote about Dev error 6146 and Dev error 6068 in previous guides.
We also have an article dedicated to Dev error 6041 so don’t miss it for more information.
Yes, you can use Copilot for social media apps. Whether you want to have a conversation with Copilot on WhatsApp or need to write a post for your social media account, this AI bot can help you.
Open WhatsApp on your device, and go to its Settings page.
Now, tap on the QR code scan icon from the top-right (on Android).
Scan the QR code from the Copilot for Social media page you opened earlier.
Copilot will be added in a new conversation on WhatsApp.
Accept the terms by tapping on Accept, then select the favorite topics of conversation or simply start writing.
2. Add Copilot to WhatsApp using a phone number
Open WhatsApp and click on Add Contact or New contact.
Enter the phone number +1 877-224-1042 and name the contact Copilot.
Search for Copilot in your list and start the conversation.
Of course, once you add Copilot on your mobile device, you will also see or pick up with the conversation on any device you run WhatsApp.
3. Add Copilot in Telegram
Open the Telegram app on your mobile device and click the Search icon from the top of the window.
Type @CopilotOfficialBot and tap on the first result.
To start the conversation with Copilot, you will have to agree to the terms and then share your mobile number with the AI bot.
It is interesting to know that Microsoft’s Copilot for Social Media page only shows WhatsApp as a supported social app.
How do I generate a post on social media using Copilot?
If you’re not looking for a Copilot conversation, you may still use the AI bot to compose new entries on your account. Of course, it will not provide specific information, but you will still have a starting point to edit the post and include the desired information. Here’s how to quickly do that:
Open Microsoft Edge and click on the Copilot icon from the top-right corner or start the Microsoft Copilot app on your PC.
Now, type your query according to your needs:
Ex.: Write a LinkedIn post for a new Fashion Podcast launch.
Ex.: Write a Facebook post to promote this article <URL>
Ex.: Write a Facebook post about the latest song of X artist.
Now, copy and paste the answer in your social media account, edit it with the correct information and hit the Post button.
If you don’t have inspiration to write your own post from scratch, Copilot may help you with a template that you can edit quickly. Using Copilot for social media apps will definitely make your job a lot easier.
So, this is how to use Copilot for social media apps. Right now, Copilot only has official integrations for WhatsApp and Telegram, but it will probably spread to others as well in the future.
To enhance your workflow even further, explore these AI social media management tools that automate scheduling, analytics, and creative content generation.
If you get libcrypto-1_1.dll was not found message, the application you’re trying to run will crash and you won’t be able to run it at all. Luckily, there are a few ways to fix this problem.
Libcrypto-1_1.dll what is it?
This file is associated with OpenSSL and used for secure communication so it’s most likely not malicious.
What can I do if libcrypto-1_1.dll is not found?
Before trying anything else, you can install Git since it comes with OpenSLL and it probably has this file available.
1. Add OpenSSL /bin directory to your path
Press the Windows key + S and type variables. Select Edit the system environment variables.
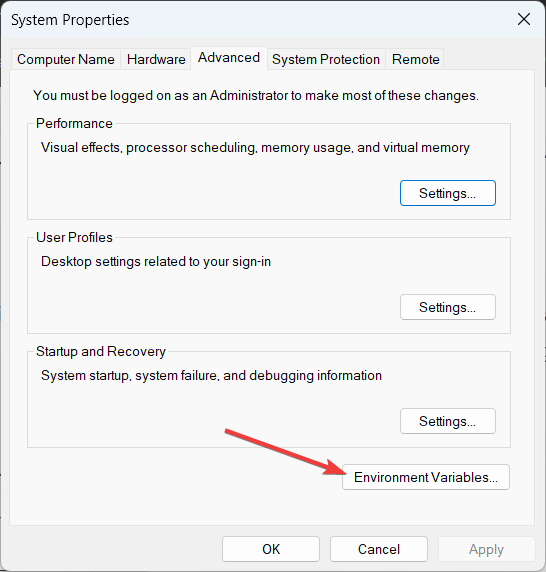
Click on the Environment Variables button.
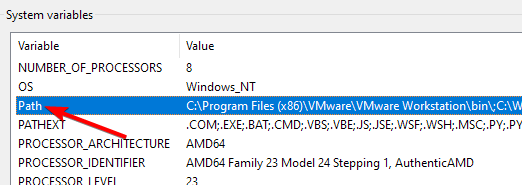
In System variables, locate Path and double-click it.
Click on new and paste the location to your OpenSSL bin directory, for example, C:\Program Files\OpenSSL-Win64\bin
Save changes.
This method is useful for developers who need libcrypto-1_1.dll in their projects.
2. Download the file manually
Download the file from a reputable source.
Paste it to the application directory that is giving you this error.
Try to run it again.
It’s not advised to download DLL files from random websites on the Internet, so always use reputable sources. Alternatively, ask the developer to provide you with the OpenSSL package.
As you can see, libcrypto-1_1.dll is a legitimate file, and it’s often used by games, mods, or developers to establish a secure connection to the server.
It is really hard to pick the best Windows XP games, because everyone has their favorites. I tried to pick from any genre and although your choices would be different or in another order, you will most likely agree that the Windows XP games below were truly awesome at their time.
Yes, I know, I am really subjective because I definitely love turn-based strategy game and there are not a lot of those to choose from. However, Heroes of Might and Magic III is still considered the best HOMM game in the series.
Moreover, you can play it even now on Windows XP and on Windows 11 as well, a testimony to its huge popularity.
The solo campaigns were really catchy and the resource management system is still excellent nowadays. However, this game was also shining in the hot seat multiplayer action and I used to spend quite a few sleepless nights on large maps battling my friends on HOMM III.
The HD version you can find on Steam is for Windows 10, but you will also find the older version for Windows XP.
You can’t possibly deny the huge popularity of Diablo II, a hack & slash legendary game that certainly made a mark on how the genre evolved afterward.
This game was so epic that Blizzard remastered it for the modern times as Diablo II Resurrected.
If you didn’t play it at its time, the link in the title or the one below will take you to the old installer. However, you may also use the link above to buy and play the new, remastered version with fancy graphics and game improvements.
Age of Empires II is still considered by many, one of the best games ever made. And that is for good reason because this game also shaped the path of the modern RTS titles that came after.
Just like HOMM III and Diablo II, AoE II was also remastered As Age of Empires II Definitive Edition that marks the popularity of the original title. However, even if the new game has a lot better graphics and dynamics, it is a totally different game, with original content.
As with the previous games in my top, the link in the title and the one below will take you to the old version that can be played on Windows XP, and we can thank Games Nostalgia for that. The link below will get you to buy the new title.
If you’re now playing Star Wars Battlefront 3, you should take a bit of time to get back to the origins with the first title of the series.
As a fan of the Star Wars saga, you were given the opportunity to get a blaster and step right in the battle with your favorite heroes in this action/shooter game.
You have access to different soldier types and drive the vehicles, man turrets and conquer the galaxy. However, you didn’t get to play with a light sword and that was a major downer to a lot of players.
The game is still available to buy and play from Steam, but they stress out that you need to run at least Windows 10 to install the Steam client.
Max Payne was such a popular game that not only it spawned a whole series around it, but also a movie.
This action adventure has it all, an outcast cop that goes haywire against the mafia, a great story, exciting plot twists and a legendary narrative that is hard to equal nowadays.
The surprise is that this 2001 is still available to buy on Steam and it still works on Windows XP and Windows 2000. Hey! Make sure you’ve got 128 MB of RAM to play this game smoothly, capisci?
I conclude the list of the best Windows XP games that are still available now. The time when Windows XP ruled the OS market was called the golden gaming age. That is because between 2000 and 2007 there were lots of popular games out there.
I know I missed huge titles such as Deus Ex, Star Trek Voyager: Elite Force, The Elder Scrolls III: Morrowind, Far Cry, The Witcher, Spore, Rollercoaster Tycoon 2, The Sims, Bioshock, NFS: Porche Unleashed and many many others.
While I couldn’t mention all of these here, I am sure that you will write about your best Windows XP games in the comments section below.
Often you might experience Dev error 12502 on Xbox Series X, PS5, or any other platform. In today’s guide, we’re going to show you how to properly fix this error, so let’s get started.
What is Dev error 12502 in MW3?
This error appears usually due to corrupted game files on your device.
How do I fix Dev error code 12502?
1. Install the latest updates
Ensure that your game is up to date.
If necessary, check for updates manually.
Once the game is up to date, the issue should be gone.
Many reported Dev error 12502 while playing MW3 offline, but after an update, the issue should be gone.
2. Go offline and delete reserved space on Xbox
Press the Xbox button on your controller.
Next, go to your profile icon and choose Settings.
Navigate to Network Settings.
Next, select Go Offline.
After doing that, delete the game’s reserved space by doing the following:
Open Settings and go to Storage Devices or Internal Storage.
Locate the game on the list and choose Manage Game and Add-Ons.
Select the option to clear Reserved Space or to Clear Local Saved Games.
Dev error 12502 usually affects consoles, and in most cases, it can be fixed with a game update. This isn’t the only issue you can encounter, and we wrote about Dev error 12744 and Dev error 6146 in our previous guides.
We also have an article on Dev error 841, so feel free to check it out.
In addition to its new chat and channel experiences, which are rolling out now to users, Microsoft Teams will also get a new unified Planner tab experience.
According to the latest entry in the Microsoft 365 Roadmap, this unified tab experience will allow Teams users to create and add basic or premium plans to a Planner tab in Microsoft Teams.
With this unified tab experience, you can now create and add any basic or premium plan to a Planner tab in Microsoft Teams. To try it, go to any Teams channel and search for Planner after selecting the Apps icon.
This new capability will be released in December. It will allow users to quickly upgrade a specific Planner tab to support more options and new settings. It will also be available on Surface devices.
Many users reported that nvtt.dll is missing on their PC, and that prevents them from running certain games. If you’re having this issue, you’re in luck, cause today we’re going to show you several ways you can use to fix this issue.
What is the meaning of nvtt.dll?
This file is associated with NVIDIA Texture Tools and it’s used for texture compression and processing in various games.
What can I do if nvtt.dll is missing?
Before trying anything else, restart your PC and check if this solves the problem.
Download the latest version or the one required by your game.
Install it and check if the problem is resolved.
Alternatively, you can find the necessary setup files in the _CommonRedist or redist directories. These directories are located in the game’s installation directory.
Next, click the Download button in the Game Ready Driver section.
Once downloaded, install the driver.
For detailed instructions, we have an in-depth guide on how to update NVIDIA drivers on Windows 11, so don’t miss it. Now that you know how to reinstall nvtt.dll, go ahead and give it a try.
Nvtt.dll is used by Mass Effect 2, Victoria 3, and many other games, and by following these steps you should be able to fix any issues that you might have with it.
The best N64 emulators for PC let you enjoy classic Nintendo 64 games right on your Windows computer without hassle. If you’re searching for a reliable N64 emulator for Windows that’s free and easy to set up, this list covers the top picks. You’ll find the best places for a safe Nintendo 64 emulator PC download and what each emulator brings to the table.
What are the best Windows N64 emulators?
Here’s a quick look at our top picks. Find more details down below.
Project64’s Nintendo 64 Emulator is certainly the best out there. It’s not something fancy, although the UI was adapted for Windows 11 with the round corners, as you can see in the caption above.
However, this app doesn’t come with ROMs, which are the actual games. You will need to provide your own and load it from File > Open ROM.
The games simply work and you also have a mapping tool to use the Windows keyboard if you don’t have an N64 gamepad. Did we mention that it’s totally free?
Retro Arch is a much more complicated emulator because it can load a myriad of console cores, including the Nintendo 64 (Mupen64Plus-Next and ParaLLEI N64).
In the main window, you first need to load a core. Luckily, you may also download a core straight from the app and load it. Next, you have to load your ROM (in our case, the Doom ROM we got for this test.
Long story short, in bout 30 seconds we were playing the old Doom N64 . But that is not all, you may even host a server and play your games with others, at least the ones that have multiplayer support.
Retro Arch has a ton on options and possible configurations and we didn’t go through all of them, but it’s a free emulator so you can download it and discover all of those yourself. And yes, it works flawlessly on Windows 11.
Nemu 64 is another simple Windows N64 emulator dedicated to replicate the Nintendo environment on PC.
To be honest, this emulator seems forgotten and it doesn’t have its own website but you can get it from third-party website and it works perfectly, even on Windows 11, as you can see in the caption above.
It has a very simple UI. After you download it and run its executable, just click on ROM and load your game. In just a few seconds we were reducing the number of monsters in Doom 64.
As simple as it is, Nemu 64 also has a Multiplayer option so you can enjoy some games with your friends. It’s completely free, but you have to supply your own ROM to play.
We tested other 7 emulators, but they either crashed or had missing DLLs, which made things more complicated than they should be. The three emulators above worked perfectly with our test ROM and are pretty well rated by the community as well.
If you want to try something else, check our list of the best all-in-one emulators for some retro gaming action.
Did you try the Windows N64 emulators above? Tell us which one worked best for you in the comments below.
Microsoft Teams, the popular workplace communication platform, is introducing a new chat and channel experience. The new experience, which will be available in a public preview in November, is designed to be simpler by default. It integrates chat and channels to bring them to the forefront without overwhelming users who might not need all that information.
At launch, a self-service, guided onboarding flow will help users discover and configure the new experience to their preferences. In contrast, new filters and views make it easier to focus on what’s important.
In a blog post, Jeff Teper, Microsoft’s corporate vice president for Microsoft 365, said that the new Teams experience also aims to empower users to organize their digital workspace in a way that makes sense to them.
For instance, users can create custom sections to bring conversations around a specific project or topic and use controls to display channels in a single list.
The new chat and channel experience will be available to customers in a limited capacity in November and will roll out more broadly in early 2025.
The platform recently introduced a unified experience, bringing personal and professional accounts together. It also enhanced many of its capabilities, including the useful Work and Location settings with a new Buildings option.
The Xbox app on Windows is getting a fresh look. Xbox Insiders, including those coming from PCs, will be the first to experience the new Home design.
The Xbox app on Windows is becoming faster and easier to navigate with the rollout of a new Home tab. The goal is to create a unified experience that combines the best and latest content from both the Game Pass and Microsoft Store tabs.
This all-in-one Home tab will show you the latest games, news, curated recommendations, free-to-play content, and deals. It’s rolling out to Xbox Insiders starting today and will be available to all Xbox players on Windows in the coming weeks.
The new Home tab has several sections, including Featured Games, Deals and Discounts, Curated Collections, and more. You can also quickly jump back into games you’ve been playing recently without navigating to different parts of the app.
The Xbox app on Windows has needed an update for some time now. It’s been slow and clunky, and the old design shows its age. The update has already been available to Xbox Insiders and will soon roll out to everyone.
Some users reported that Opera Private browsing is not working, and this can be a problem especially if you tend to use this feature frequently. However, there are ways to fix this, and in today’s guide, we’ll show you how to address it.
What can I do if Opera Private browsing not working?
1. Update the browser
Start Opera.
Open the Opera menu and choose Update & Recovery.
Check if there are any updates available.
Alternatively, you can download the latest version of Opera from the official website, run the setup and it will update the application.
2. Adjust your sync settings
Click the Opera icon and choose Settings.
Locate the Synchronization section and click on Advanced sync settings.
Open Settings and go to Apps. Select Installed apps.
Locate Opera and click the three dots next to it.
Next, choose Uninstall and follow the instructions on the screen.
Once removed, install it again and check if the problem is still there.
Keep in mind that this will remove all your bookmarks and browsing history, so it might be wise to export them beforehand.
If Opera Private browsing not working the issue is most likely caused by your sync settings, but that can be easily fixed by following our solutions. These steps can be incredibly helpful if you start Opera in Private browsing by default.
Microsoft Edge has recently removed the “Show shopping notifications” setting from Copilot in Dev and Canary channels. This feature, which automatically provides chat suggestions as notifications when shopping online, has been a helpful tool for many users to find deals, compare prices, and get personalized recommendations.
With the removal of this feature, users may no longer receive real-time, AI-powered shopping suggestions while browsing online. This could make it more difficult to find the best deals and products without actively searching for them. As a result, Microsoft Edge’s Copilot may no longer track your shopping activities online.
Show Shopping Notifications copilot Setting. Image credit: WindowsReport
Microsoft revamps Copilot, removes Shopping Notifications in Edge
Likewise, with previous changes to Copilot, Microsoft hasn’t officially announced anything about this. While this may be good news for privacy-conscious users, it also means that users are losing some control over the Copilot feature. Shopping notifications might still show up in the Copilot sidebar, causing some inconvenience.
New Copilot Settings in Microsoft Edge dev canary. Image Credit:WindowsReport.
There could be several reasons behind Microsoft’s decision to remove this feature: If users found the notifications intrusive or not particularly useful, Microsoft might have decided to remove them to improve the overall Copilot experience.
Users might have had concerns about data privacy and how their browsing data was being used, prompting Microsoft to remove the feature to address this. The Copilot’s shopping notifications feature still exists in beta and release, but it could be just a matter of time before Microsoft pulls it.
While Microsoft has chosen to remove the explicit shopping notifications, Copilot will likely continue to evolve and offer shopping-related assistance in more subtle ways. This change could result in fewer interruptions and fewer data collection, which could mean more privacy for users.
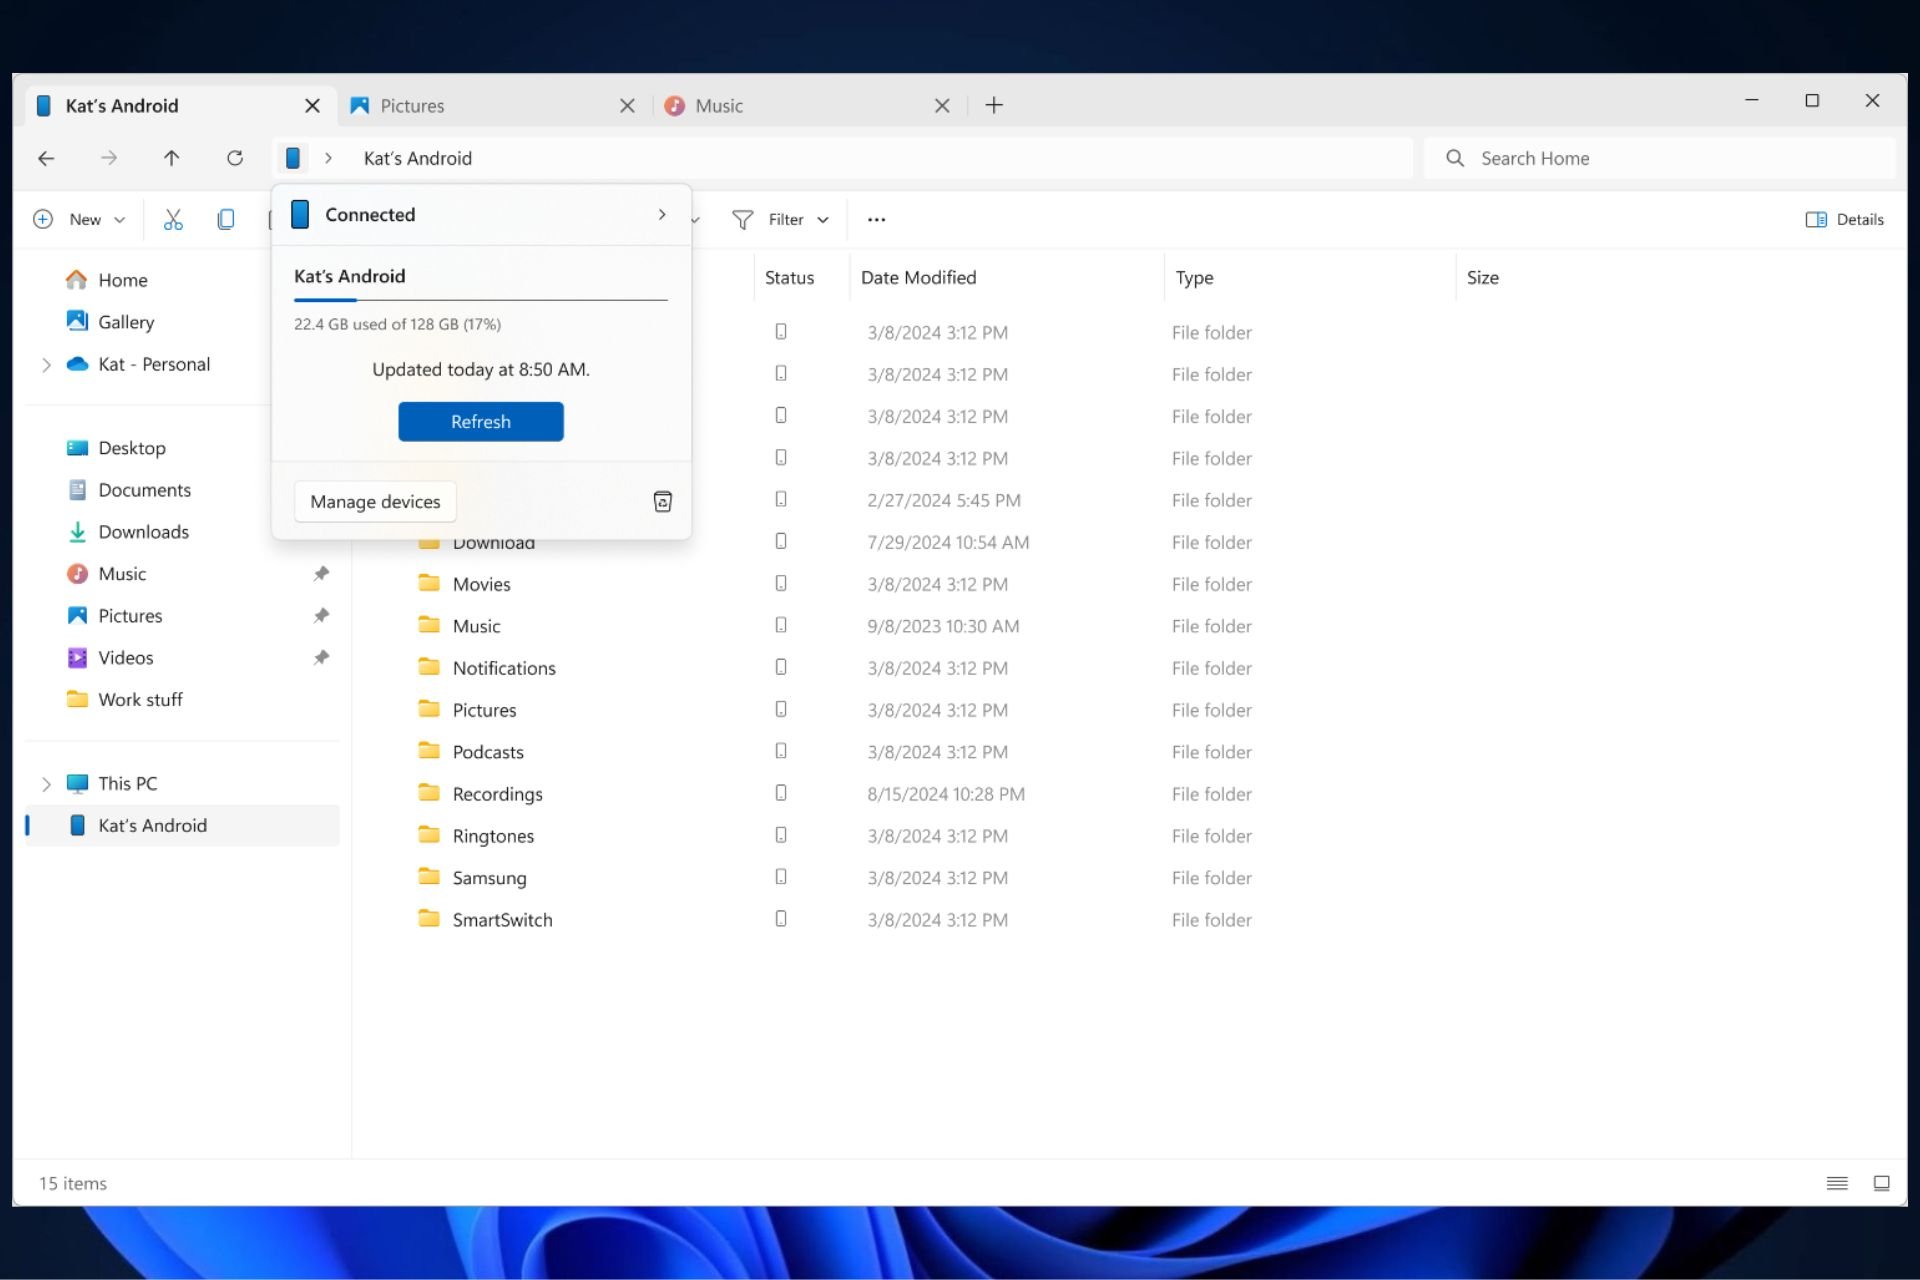
Thanks to a new update, Microsoft is finally making it possible to access files on Android phones remotely from your Windows PC. You no longer need to email files to yourself or deal with annoying cables.
Announced earlier this year in a blog post, the Redmond-based tech giant says users with access to Android 11 would be able to connect their phones to Windows 11 seamlessly. The Redmond-based tech giant initially announced the feature only for this Windows version. However, it seems that Windows 10 users will also be getting it. Additionally, your phone must have the Link to Windows app’s beta variant (version 1.24071 or newer).
Once these conditions are met, go to Settings on your Windows 11/10 PC and proceed towards Bluetooth & devices > Mobile Devices. Nowadays, in the Settings app on your phone, you should see an option for “Your Phone Companion.” Open it and follow the necessary steps to connect your phone and PC. Once finished, proceed to link your Microsoft account with both devices.
With this new experience, you will be able to wirelessly browse through all your folders and files, including media that is on your Android phone. You can open them, copy them to your PC, copy PC files to your phone, rename files, move them, and delete them.
Microsoft
As soon as this process is completed successfully, you can manage devices. Find your Android phone here and toggle on its entry. This will display the toggle switch for showing your phone in File Explorer.
If you see this toggle switch, you are ready to use your phone app and all its features. If not yet visible in settings, please be patient because Microsoft is slowly rolling out this feature for everyone.
You can wirelessly browse all folders and files on your Android phone from a PC. You can open them, copy them back and forth, rename or move them, and delete as many as you like.
However, there were some known issues with it. Removing phone files from your PC places them in a fresh Recycle Bin folder on the phone that will continue to exist for five days – not 30, as stated in the dialog box. Microsoft is working on it, and they will soon be automatically deleted after 30 days. If some actions are not syncing to your phone, log out and log in again to your Windows account.
It would also be better if you download the latest Windows 11 version, the 24H2 patch, as it will greatly improve the connection between the desktop and mobile devices
Have you attempted accessing your Android phone files on your Windows 11 PC? What do you think?
The Dev error 11152 can appear pretty often in Modern Warfare 3 and Warzone 2 on any platform and it is usually caused by a integrity issue due to file corruption or an incomplete update. Often, it’s easily fixed by restarting the device after allowing the game to fully install the update. Before anything else, make sure that you have a stable internet connection on your device and check the Activision server’s status.
How do I fix Dev error 11152 on MW3 and Warzone 2?
1. Verify the game files
On Steam
Go to Library, right click on your game and select Properties.
Go to Local Files and click on Verify integrity of game files.
Allow the process to complete and start the game.
On Battle.net
Go to your game and click on the gear icon near the play button.
Select Scan and Repair and allow the tool to fix the game files.
On PlayStation or Xbox, you can’t verify the game files so first, try restarting the console and try updating the game. If the Dev error 11152 persists, you will need to reinstall the game.
2. Reinstall the game
Click the Start button and start Settings.
Now, click on Apps from the left and Installed apps from the right pane.
Look for the game, click the dots to its right and select Uninstall.
Wait for the game to uninstall, then go to the developer’s website and redownload and install the latest version.
Reinstalling the game will definitely fix the Dev error 11152 for MW3 or Warzone 2.
That’s it! To avoid this problem in the future, make sure to update the game over a stable internet connection and check if the servers are online. If you’ve set the updates to automatic, simply restart your device and try updating the game once more and let it fully complete the process.
Did you manage to fix the Dev error 11152? Let us know in the comments below. Before you go, visit our latest guide on Dev error 614 or our Dev error 5820 article for more information.
Many have encountered Our level fastfile is different from the server in MW3, and the same error seems to be affecting BO6 as well. Luckily, this issue is pretty simple to resolve, and in this guide, we’ll show you how to do it.
How can I fix Our level fastfile is different from the server?
Before trying anything else, ensure that your game is up to date.
1. Restart your game
Close the game entirely. You can also close your game client as well.
Next, start the game and check if the issue is gone.
If not, go ahead and restart your device and try again.
2. Verify game files
Xbox app
Start the Xbox App.
Next, locate Black Ops 6 on the list.
Right-click it and choose Manage.
Navigate to Files and select Verify and Repair.
Steam
Open your library.
Right-click Black Ops 6 and choose Properties.
Navigate to Installed Files and click on Verify integrity of game files.
As you can see, Our level fastfile is different from the server in BO6 is pretty vague, but in most cases, a quick restart is all that is needed to fix it.
The whole point of opening incognito tabs in Chrome is to ensure there’s no record of your browsing history but sometimes, you need to go back and open those tabs so we’ll show you how to export them.
Most users don’t want tracking cookies hence why you’d opt to browse privately. However, you may find valuable information that you’d like to reference later so exporting these tabs can keep them in your history because you sure won’t remember all the specific tabs.
On your incognito window, click on the address bar and press Ctrl + C to copy the URL.
Next, open a new window then on the address bar, paste the URL you’ve just copied in 1 above.
Go back to the incognito window and copy again a URL for the next tab, open a new tab in the window in 2 above, click + to add a new tab and paste the URL.
Repeat this process until you’ve copied and pasted all your incognito tabs into your new window in Chrome. Use the Ctrl + Tab keyboard shortcut to quickly switch between tabs.
2. Bookmark the tabs
Click on the three ellipses at the top right corner of your Chrome browser.
Select Bookmarks, then select Bookmark all tabs.
Now, whether you close a tab accidentally or your browser crashes in the middle of loading, all your tabs will be saved into your bookmarks bar.
Launch your browser and in the address bar, type chrome.google.com/webstore and hit Enter.
Next, type Incognito saver in the search bar and from the results, hit the Add to Chrome button.
Confirm installation in the next dialog box then restart your browser.
You will see the Incognito saver icon on your top right corner.
Next, click on the ellipsis near the top right, hover the cursor over Extensions, and select Manage Extensions from the flyout menu. Alternatively, you can go to: chrome://extensions
Now, click the Details button under the Incognito saver extension.
Finally, enable the toggle for Allow in Incognito.
A pop-up warning will appear cautioning you that allowing the extension in incognito mode can affect your privacy. Click Allow and you’re good to go to start exporting your tabs.
All these steps are for desktop users as the incognito mode on your Android device has the option of keeping your incognito window with your tabs open. You can choose to lock your open tabs from other users but you can still access them since the window does not automatically close when you exit Chrome.
Firefox users can also benefit from saved tabs in private mode because there’s a way to restore incognito tabs. The incognito mode is a useful feature on Chrome so if you’d like to access it much quicker, here’s the incognito shortcut to save you some time.
Also, keep in mind that sometimes incognito mode keeps an account of your browsing activity so if you’re not comfortable with this, we have a guide on how to stop Chrome incognito from remembering your history.
Many gamers are getting BO6 error code 0x1, and this error will prevent you from running the game, but there are a few methods you can use that will help you fix this issue.
How can I fix BO6 error code 0x1?
1. Repair the installation
Open the Settings app.
Next, go to Apps and then choose Installed apps.
Select Black Ops 6, and click on Repair.
Follow the instructions on the screen to fix the problem.
2. Set up Randgrid service
Press the Windows key + S and type cmd. Select Run as administrator.
Run the following to check if the service exists: sc query atvi-randgrid_msstore
If it does, remove it with the following command: sc delete atvi-randgrid_msstore
For this step, you need to provide the correct path to BO6 installation folder. If necessary, adjust the path to the Content folder so that it matches the one from your PC. In our case, the command was: sc create atvi-randgrid_msstore type= kernel binPath= "C:\XboxGames\Call of Duty\Content\randgrid.sys"
Now you need to set service permissions. For Windows 11: sc sdset atvi-randgrid_msstore D:(A;;CCLCSWRPWPDTLOCRRC;;;SY)(A;;CCDCLCSWRPWPDTLOCRSDRCWDWO;;;BA)(A;;CCLCSWRPWPLOCRRC;;;IU)(A;;CCLCSWLOCRRC;;;SU)S:(AU;FA;CCDCLCSWRPWPDTLOCRSDRCWDWO;;;WD) For Windows 10: sc sdset atvi-randgrid_msstore D:(A;;CCLCSWRPWPDTLOCRRC;;;SY)(A;;CCDCLCSWRPWPDTLOCRSDRCWDWO;;;BA)(A;;CCLCSWLOCRRC;;;AU)(A;;CCLCSWRPWPDTLOCRRC;;;PU)
After doing that, BO6 error code 0x1 should be gone.
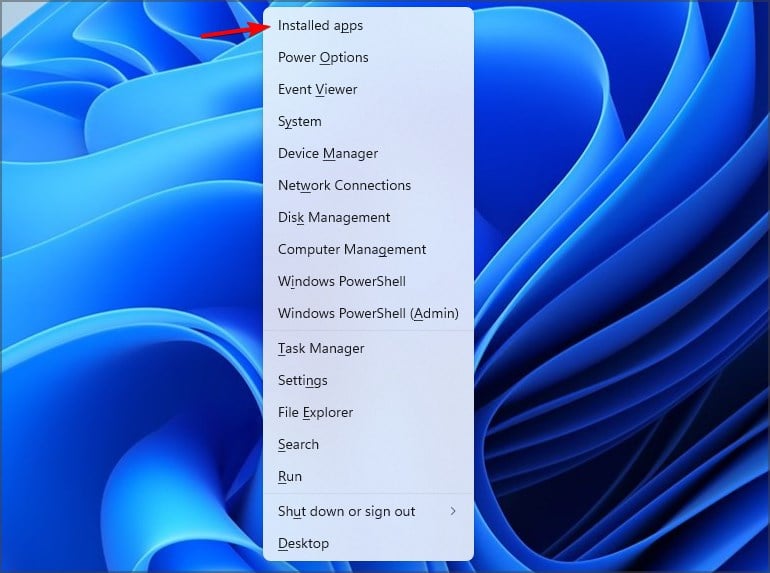
Press the Windows key + X and choose Installed apps.
Locate Faceit Anti cheat, REWASD, or RAV Cybersecurity software.
Click on the three dots next to it and choose Uninstall.
Follow the instructions on the screen to complete the process.
These are the most common applications that can cause this issue, but they aren’t the only ones.
BO6 error code 0x1 can cause a lot of trouble, but in most cases, you can fix it by repairing the installation or by manually installing the necessary services.
Google Search Console users have recently encountered issues accessing performance data. A bug appears to be impacting the performance report, causing it to show very limited or no data for the current day.
There's a GSC bug going on, don't be too stressed out when opening your Google Search Console today pic.twitter.com/qD7JjKZwva
The issue seems to impact multiple Search Console properties. Users on social media are already discussing the problem and asking for help. Some speculate that Google is now just showing the data it has for the current day, which might explain why there’s almost no data yet.
Google Search Console performance report showing almost ZERO data today – this has to be a bug – hopefully Google will confirm soon – everyone is seeing the same thing https://t.co/g9USEP2xHOpic.twitter.com/zGnrqwPqPu
Google confirmed the bug, and one of its executives, John Mueller, said on LinkedIn that the issue is indeed a bug.
It’s an issue on our side – the team is looking into it. Thanks to everyone for noticing & letting us know, this wasn’t meant to replace your traditional morning wake-up beverage :-).
So, if you see almost no data in Google Search Console’s performance report for today, don’t worry. Google is already working on it.
Windows 11 allows users to set the default PDF viewer to the application or browser they prefer, and since the majority of them use Chrome, this browser also opens such files.
However, many users have started to report that Windows’ File Explorer no longer shows the PDF label on the icon when managing PDF files. Instead, it shows up a blank icon, leaving users confused and frustrated.
As of yesterday, 10/22/2024, the icon for .pdf is no longer showing up as the Chrome icon when my default .pdf viewer is set as Chrome. I do not know why the icon disappeared but it makes navigating folders extremely difficult. I have tried deleting my icon cache and restarting, changing my default viewer to something else and back, and replacing the Chrome icon. What is going on Windows? I know that Windows updates happen on Tuesday evenings, so why did this change?
This is not entirely new. Microsoft is known for its schemes to trick Chrome users into switching to Edge, from promoting the Rewards system to downright stealing Chrome tabs.
However, this might be a bug caused by the latest updates. While changing the default PDF viewer won’t do anything, updating your Chrome browser or uninstalling/installing it again might. It has done it for some users, so you might as well make sure your Chrome is updated to the latest version if you’re currently dealing with this issue.
To check for Chrome updates, go to Settings > About Chrome. The browser will then update itself automatically.
To uninstall it, go to Settings > Apps > Installed Apps > Uninstall Google Chrome browser in the list. And then reinstall Google Chrome.
Let us know if these solutions fixed the Chrome PDF icon on your Windows device.
Portable hard drives are nothing new, but the UnifyDrive UT2 takes things up a notch. It’s a portable NAS (Network Attached Storage) drive that supports up to two NVMe SSDs, allowing for a potential total capacity of 16TB.
With one-tap backup functionality from CF cards, SD cards, and USB drives, along with Wi-Fi and Ethernet connectivity, a built-in UPS battery, AI photo-tagging, and even HDMI and USB-C video output, the UT2 is packed with features.
What exactly is the UnifyDrive UT2?
The UnifyDrive UT2 is primarily aimed at creatives who need fast, portable backup options for their media files. However, it’s more than just a storage device; it functions similarly to a mini PC. You can connect to it via your phone to browse and preview files, and it integrates into your home network via gigabit Ethernet. Alternatively, it can serve as a Wi-Fi hotspot, allowing others to access files and collaborate.
The UT2 doubles as a portable media player. With HDMI output, you can connect it to a projector or monitor and play your media files. The USB-C port also supports video output, in theory making it handy to use with AR glasses or personal cinema setups.
As a NAS, it offers private cloud functionality and can run Docker containers—though that feature wasn’t available yet at the time of writing. The app refers to Virtual Android, and it’s not clear if this is a separate function or perhaps just a curious way to refer to Virtualized Docker apps.
The UT2 is ambitious, promising a lot of features. The real question is, can it deliver?
A word of caution: It’s a Kickstarter product
Before you get too excited, I should offer a quick disclaimer that the UT2 is currently raising funds on Kickstarter. While I’ve been sent a unit for testing, this article isn’t sponsored, and I can only comment on the version I’ve received. The product feels polished, but as with any crowdfunded project, there are no guarantees on delivery timelines or final production quality.
UnifyDrive is a new company with no previous Kickstarter projects. The U.S. address they list on their website is actually Incorporating Services Ltd., a company that registers businesses on behalf of others. However, the team behind this project appears to be part of Z-Space, a Chinese company that already offers NAS products to the local market. In fact, the UT2 seems to be an upgraded version of their original T2 product.
There are no obvious red flags, and the hardware I received works (mostly) as advertised, with proper packaging and branding. However, as with any Kickstarter, don’t spend money you can’t afford to lose. At the time of writing, the super early bird price is $400, but this will increase to $500 after the initial run.
Design and build
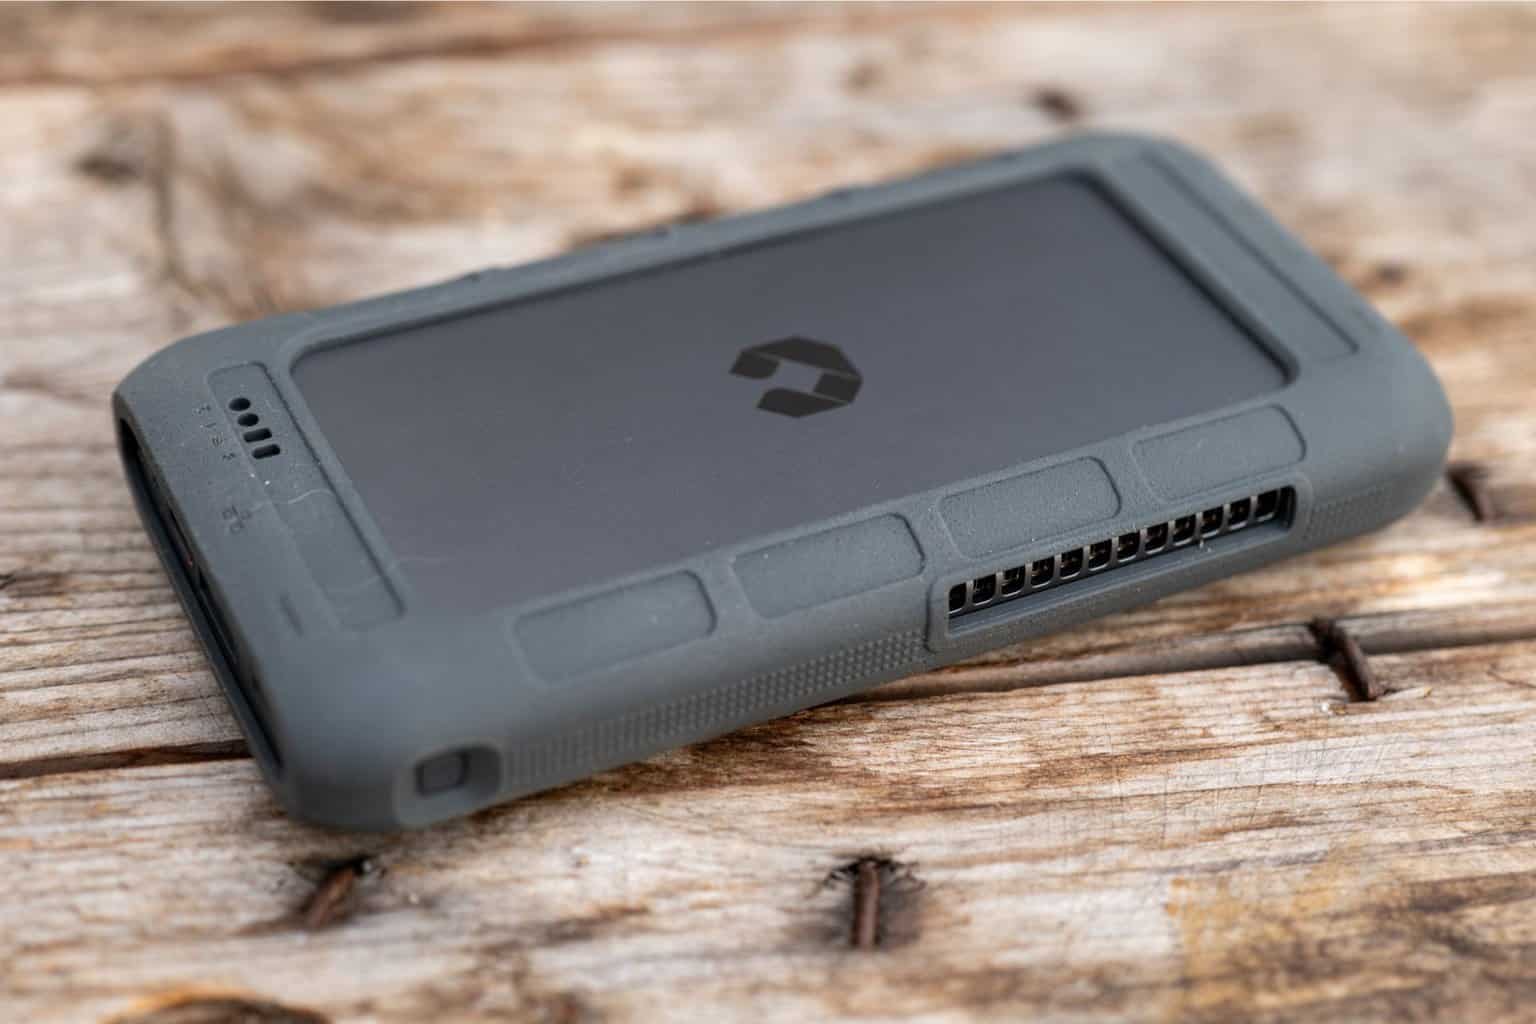
The UT2 is roughly the size of a large phablet (175 x 90 x 28mm), with a rubber bumper that gives it a rugged, outdoor-friendly look, reminiscent of the now discontinued Lacie rugged drives. However, despite the design, it isn’t waterproof or dustproof, with plenty of exposed ports and circuitry.
The rubber bumper may help it survive small drops, especially since it uses SSDs, which are less fragile than traditional hard drives. It weighs just under 400g with the bumper or just over 300g without.
The package includes a Type-C cable (labeled as 8K), an Ethernet cable, an HDMI cable (also 8K), a remote control, batteries, and a power adapter.
Specifications
The UnifyDrive UT2 is powered by an RK 3588C, an eight-core CPU with 8GB of RAM, a G610 GPU, and a 6 TOPS (Trillion Operations per Second) NPU for AI features. While the marketing claims up to 16TB of storage, this depends on the SSDs you install. The model I tested came with a 512GB SSD, but you’ll need to factor in the cost of M.2 2280 SSDs, as the $500 price is just for the bare drive.
SSD speeds max out at around 800MB/s, while CFExpress and SD card speeds reach up to 312MB/s.
Ports and connectivity
The UT2 has a power button on the front, a WiFi button on the side to toggle the hotspot, and a backup button alongside various output and storage ports. You can connect via a WiFi hotspot, join an existing network, or use Ethernet for more reliable operation, especially during initial setup.
All configurations are managed through the smartphone app or via a web browser; the HDMI port is strictly for media playback and doesn’t offer access to any management interface. The app is functional but suffers from some clunky English. It’s not the worst I’ve seen, but it could do with some simplification.
Key features
Flash Drive Mode
The UT2 can act as a flash drive when plugged into your PC, just like any other USB storage device. However, enabling this feature requires partitioning off part of the drive, creating a virtual USB device host. This takes storage away from your main volume, and it can’t dynamically expand as needed; the entire amount is allocated immediately.
Unfortunately, this means your PC can only access the partitioned section, not the entire NAS storage–and the UT2 still needs to be plugged into a power source in addition to the USB-C data connection. Once safely ejected, the virtual flash drive is available over the network.
While useful, it’s slower than a dedicated USB-C flash drive.
Backup from SD, CF Cards, and USB
The UT2 excels at its plug-and-play backup feature. After enabling it through the app, you can configure various settings, such as choosing the backup folder and whether to delete files after transfer.
In the field, this feature is straightforward: press the Plug Backup button twice, and two beeps will indicate the start of a copy; three indicate it’s finished. You can preview files directly in the app, which is great for checking if your shots are in focus while your camera is charging.
The only downside to this otherwise outstanding feature is the …
Battery life: 30 minutes to an hour
The UT2 includes a built-in UPS battery, but it’s not designed for regular operation. Ideally, you should provide a steady power source via USB-C. The internal battery lasts about 30 to 60 minutes, which which may not be long enough for large file transfers. During testing, a 150GB transfer took roughly 15 minutes.
The battery is best treated as a UPS backup for when you accidentally pull out the power cable, not as a primary power source.
Media playback: It’s no VLC
The UT2 offers media playback through its smartphone app or over HDMI, as well as a Plex-like app for managing larger libraries (though that needs a TVDB API key, which I wasn’t going to sign up for).
While the app worked well for previewing files, HDMI output was less reliable. Out of four random test video files (two full-length movies and two very short home movies), one played perfectly, one was jittery, and one wouldn’t play at all. The other played fine, but wouldn’t display subtitles over HDMI, though they appeared in the app.
In my experience, the UT2 media player is finicky, and you shouldn’t expect the same universal compatibility that VLC has spoiled us with.
If the HDMI interface offered a full Google TV experience, it would be a different story. Hopefully, there’ll be some choice of media playback app by the final release.
AI photo tagging
Like many recent NAS systems, the UT2 includes AI photo-tagging. Once enabled, the model is downloaded, and your media is scanned for faces and scenes. Separately, you can enable a natural language search engine.
Feeding a random year of data from my archives, it worked well, accurately identifying people and scenes, while the natural language AI search provided similar functionality to Google Photos. It’s worth emphasizing for privacy-conscious folks that all processing is done locally on the device thanks to the powerful NPU, with no data sent to the cloud.
While it’s a neat feature, I have to wonder if it fits in with the “portable NAS” concept; I wouldn’t use this as a primary storage device for all my family photos. But as a backup for my smartphone to quickly recall a recent image I took? That could be handy (assuming your phone doesn’t already do that).
Should you buy the UnifyDrive UT2?
The UnifyDrive UT2 is a mixed bag. While it has many useful features, including a killer SD card backup function, it can be unintuitive. The app interface feels disjointed, and some features, like the virtual USB disk partitioning, are confusing.
It’s not the best choice for home use or as a media player, but for its intended audience, the UT2 has some outstanding features. If you’re a mobile creative who regularly fills SD cards with footage and would like to aggregate and make it available over a network, the UT2 could be a valuable tool. It’s a little more niche than I had hoped it would be coming into this review, but I can’t think of a better, more innovative product that attempts everything the UT2 has.
If you’re comfortable with the Kickstarter risks and need a portable backup NAS, and you’re prepared to put some time into learning the workflows and configuring it exactly how you need it to work, the UT2 is worth a look.
How do you feel about UnifyDrive UT2? Let us know in the comments below.
Microsoft has enhanced its native Windows app, Paint, with a Share button that lets users share their images and pictures on other devices without opening additional context menus.
The recently added feature works similarly to Windows Share. You’ll have the option to share the image in the app on your phone (Android ones), other Windows PCs, or specific apps, such as Snipping Tool, for further editing.
You can also send it to others through Outlook or email or email it to yourself.
The new Share button has been around for a while, but as tech enthusiast @phantomofearth noted, it might be flying under the radar for many of us. Well, not anymore. It should be available to mostly all Windows 11 users. We checked it out on a Stable and an insider version of the operating system, and the new Share button was there.
Small changes in recent inbox app updates you might not have noticed, part 1: Paint now has a share button in the top left (next to save/undo). pic.twitter.com/l9K7F8TjLq
Microsoft enhanced the Paint app to support AI through Cocreator, background eraser, and layers, making it suitable for more complex image editing. With Cocreator (now Image Creator), especially, available now to all who own a Copilot+ PC and gradually rolling out to Windows 11 24H2 users, Microsoft gives us the tools to create our art with minimal effort.
Photo credits: @phantomofearth
What do you think about Microsoft Paint’s new Share button? Have you noticed it yet?
Sometimes you might encounter BO6 Error loading player stats, and this message comes with the error code Niamey Moines. This error will prevent you from playing the game, so today going to show you a couple of fixes that might work for you.
How to fix the Black Ops 6 error loading player stats Niamey Moines?
Before we try anything else, try running the game as administrator and check if that helps.
1. Try pressing Esc during loading
Start the game.
Once the logo appears twice, press the Esc key.
Now try connecting again.
2. Delete the Players folder
Navigate to C:\Users\YOURUSERNAME\Documents\Call of Duty
Next, locate the Players folder.
Delete it.
Launch the game again.
Did you ever encounter BO6 Error loading player stats error code Niamey Moines? If so, what solutions did you use to fix this problem? Don’t hesitate to share them with us in the comments section.
These aren’t the only issues you can encounter, we wrote about BO6 error code 0x3 and BO6 error code 2901 in our previous guides, so feel free to check them out.
If you’re looking to try the game, you can play BO6 early on Xbox with a single trick, so don’t miss it. Just keep an eye out for BO6 error code 0x1, since it’s a pretty common issue.
The BO6 error code 0x3 is usually caused by game file corruption or various anti-cheat software. The same error also appears in Call of Duty MW3. The solutions below will also fix the Error Code 0x1 and 0x8.
How do I fix BO6 error code 0x3?
1. Repair and/or reset the game
Click the Start button and select Settings.
Click on Apps from the left and select Installed apps from the right.
Search for Call of Duty or scroll down until you find it in the list of installed apps.
Click on the three dots to its right and select Advanced options.
Scroll down and select Repair. Try starting BO6 and see if the error 0x3 reappears.
If so, go back to the Advanced options screen and click on Reset.
Launch Black Ops 6.
Repairing and resetting Black Ops 6 usually fixes the BO6 error code 0x3 for most of the gamers having this issue and it’s easy to try it out.
2. Exit Riot Vanguard
Make sure that Call of Duty: Black Ops 6 is closed. You may also check if the process is closed in Task Manager.
Click on the ⌃ icon on the Taskbar on your PC and access the running apps.
Right-click Riot Vanguard if it’s running and select Exit Vanguard, then click Yes.
Launch Black Ops 6.
Riot Vanguard has been known for causing such issues on MW3 as well and closing it may fix this problem quickly.
3. Uninstall reWASD and Faceit anti-cheat
Click the Start button and select Settings.
Click on Apps from the left and select Installed apps from the right.
Look for the reWASD app, click on the three dots to its right, select Uninstall, and skip the questionnaire.
Do the same for the Faceit app if you’ve installed it willingly or by mistake.
Launch Black Ops 6 and see if the error code 0x3 reoccurs.
Another software that is know to mess with Call of Duty is reWASD and uninstalling it makes everything right.
4. Run the Call of Duty Randgrid service setup script
NOTE
Take note that the link below leads to a public cloud download. We downloaded and tested the file on our system but we can’t guarantee for the safety of the file. Download and run it on your own risk.
After you download the file, right-click cod_service_setup.bat and select Run as administrator.
Select More info, select Run anyway, and select Run.
Find, copy, and paste your Call of Duty content folder location (ex.: C:\XboxGames\Call of Duty\Content) into the Command Prompt.
Press Enter and wait for the script to complete.
Launch Black Ops 6 and see if the error reoccurs.
Applying the solutions above, you will fix the BO6 error code 0x3 on PC. Most gamers will only need one of the first three solutions, but if they don’t work, you may also apply the last one or reinstall your game.
If the problem persists even after these steps, take a look at our full guide on Black Ops 6 not working for more ways to fix crashes and errors.
If the problem persists even after these steps, take a look at our full guide on Black Ops 6 not launching on Steam for more ways to fix crashes and errors.
Did the solutions above fixed the BO6 Error Code 0x3? Let us know in the comments below.
Microsoft has announced a new Windows 11 Insider Preview Build 22635.4435 (KB5044377) for users in the Beta Channel. The update includes several new features and changes, including a new feature that allows you to launch an app as an administrator when you click it from the Start menu or taskbar.
Similar to the build released in the Dev Channel, the Redmond-based tech giant has also made several improvements to Windows 11’s Dynamic Lighting feature. This feature syncs the lighting on your keyboard, mouse, and other compatible devices with what’s on your screen. It has also fixed several bugs related to the taskbar, input devices, and more.
In a separate section of the blog post, Microsoft breaks down the changes and improvements to all Beta Channel users (not just those who have turned on the feature to receive updates as soon as they are available). These include a new settings page for configuring the Copilot key Windows 11 PCs with supported hardware, a bunch of bug fixes, and a note about what to expect with feature rollouts in general.
It’s worth noting that the new features and experiences in KB5044377 might never be released to the public and that some features may change over time, be removed, or be replaced.
Many users are wondering if is it possible to restore Incognito tabs in Firefox, and in this guide, we’re going to show you everything you need to know.
How can I restore Incognito tabs in Firefox?
Does Firefox save incognito history?
No, Firefox doesn’t save Incognito history, which means that there’s no native way to restore private tabs in Firefox after a crash.
Is there a way to recover incognito history in Firefox?
Next, open the Private Browsing window and click on Tab Session Manager. Next, click on the Settings icon.
Make sure to check the Save private window option. You can also change the autosave frequency if you want.
Start your private browsing session.
Once you open the private browser again, you should be able to restore the private browsing session in Firefox by opening the extension and using the Open button.
If you’re not a fan of this tool, there are other OneTab alternatives for Firefox, that might be able to work in private browsing mode.
Keep in mind that this method only works after you install the extension, and it won’t be able to restore any previous sessions that you already lost.
As you can see, it’s not possible to restore Incognito tabs in Firefox natively, but with extensions, you can add this functionality for future browsing sessions. Chrome users can also export tabs in incognito mode and keep track of their browsing history.
Microsoft released the latest Windows 11 Insider Preview Build 26120.2200 (KB5044376) to the Dev Channel. The update includes various changes, improvements, and fixes, as well as the addition of the much-coveted Windows Studio Effects.
Windows Studio Effects is a new feature in Build 26120 that delivers AI-based camera and audio enhancements on devices equipped with a Neural Processing Unit (NPU). It can now be accessed in Quick Settings from the taskbar’s system tray, and an icon will appear in the system tray when using any application with a Studio Effects-enabled camera. Hovering over the icon displays a tooltip indicating which application utilizes the camera.
Another feature in today’s build is Dynamic Lighting, which lights up your keyboard and mouse with immersive, dynamic effects based on what’s happening on your screen. When no compatible devices are attached, the Dynamic Lighting settings page will show a placeholder message and the Brightness and Effects controls will be disabled. On the Dynamic Lighting settings page, Microsoft has added Forward, Backward, Outward, and Inward direction options to the Wave effect and the Forward direction option to the Gradient effect.
In terms of fixes, KB5044376 addresses an issue where the All apps list in the Start menu may break if you click or tap on a letter, as well as an issue where explorer.exe was crashing for some Insiders when hovering over certain open apps in the taskbar. The update also fixes an issue where there was a blank entry in Privacy & Security in Settings that, when clicked, would crash Settings and update the mouse option “Show location of pointer when I press the CTRL key”, so that the circles displayed are now DPI-aware, and aren’t small on high DPI monitors.
KB5044376 also includes a couple of new known issues:
You may see an unexpected spacing between items in the Start menu apps list.
Microsoft is working on a fix for an underlying issue that could prevent Dev Drives from being accessible within WSL.
For more on this build’s new features, improvements, fixes, and known issues, read Microsoft’s full blog post at the Windows Insider Blog.