Microsoft Planner Templates: How to Create and Use Them

Managing projects can be a hassle without the right tools. Thankfully, Microsoft Planner offers several ways to create and use templates, making project management a breeze. Here are some top methods to create templates in Microsoft Planner for effortless project management.

How do I find Microsoft Planner templates?

1. By creating a new plan

  1. Go to the Microsoft Planner page and log in with your Microsoft account.
  2. Click on New Plan from the menu on the left.
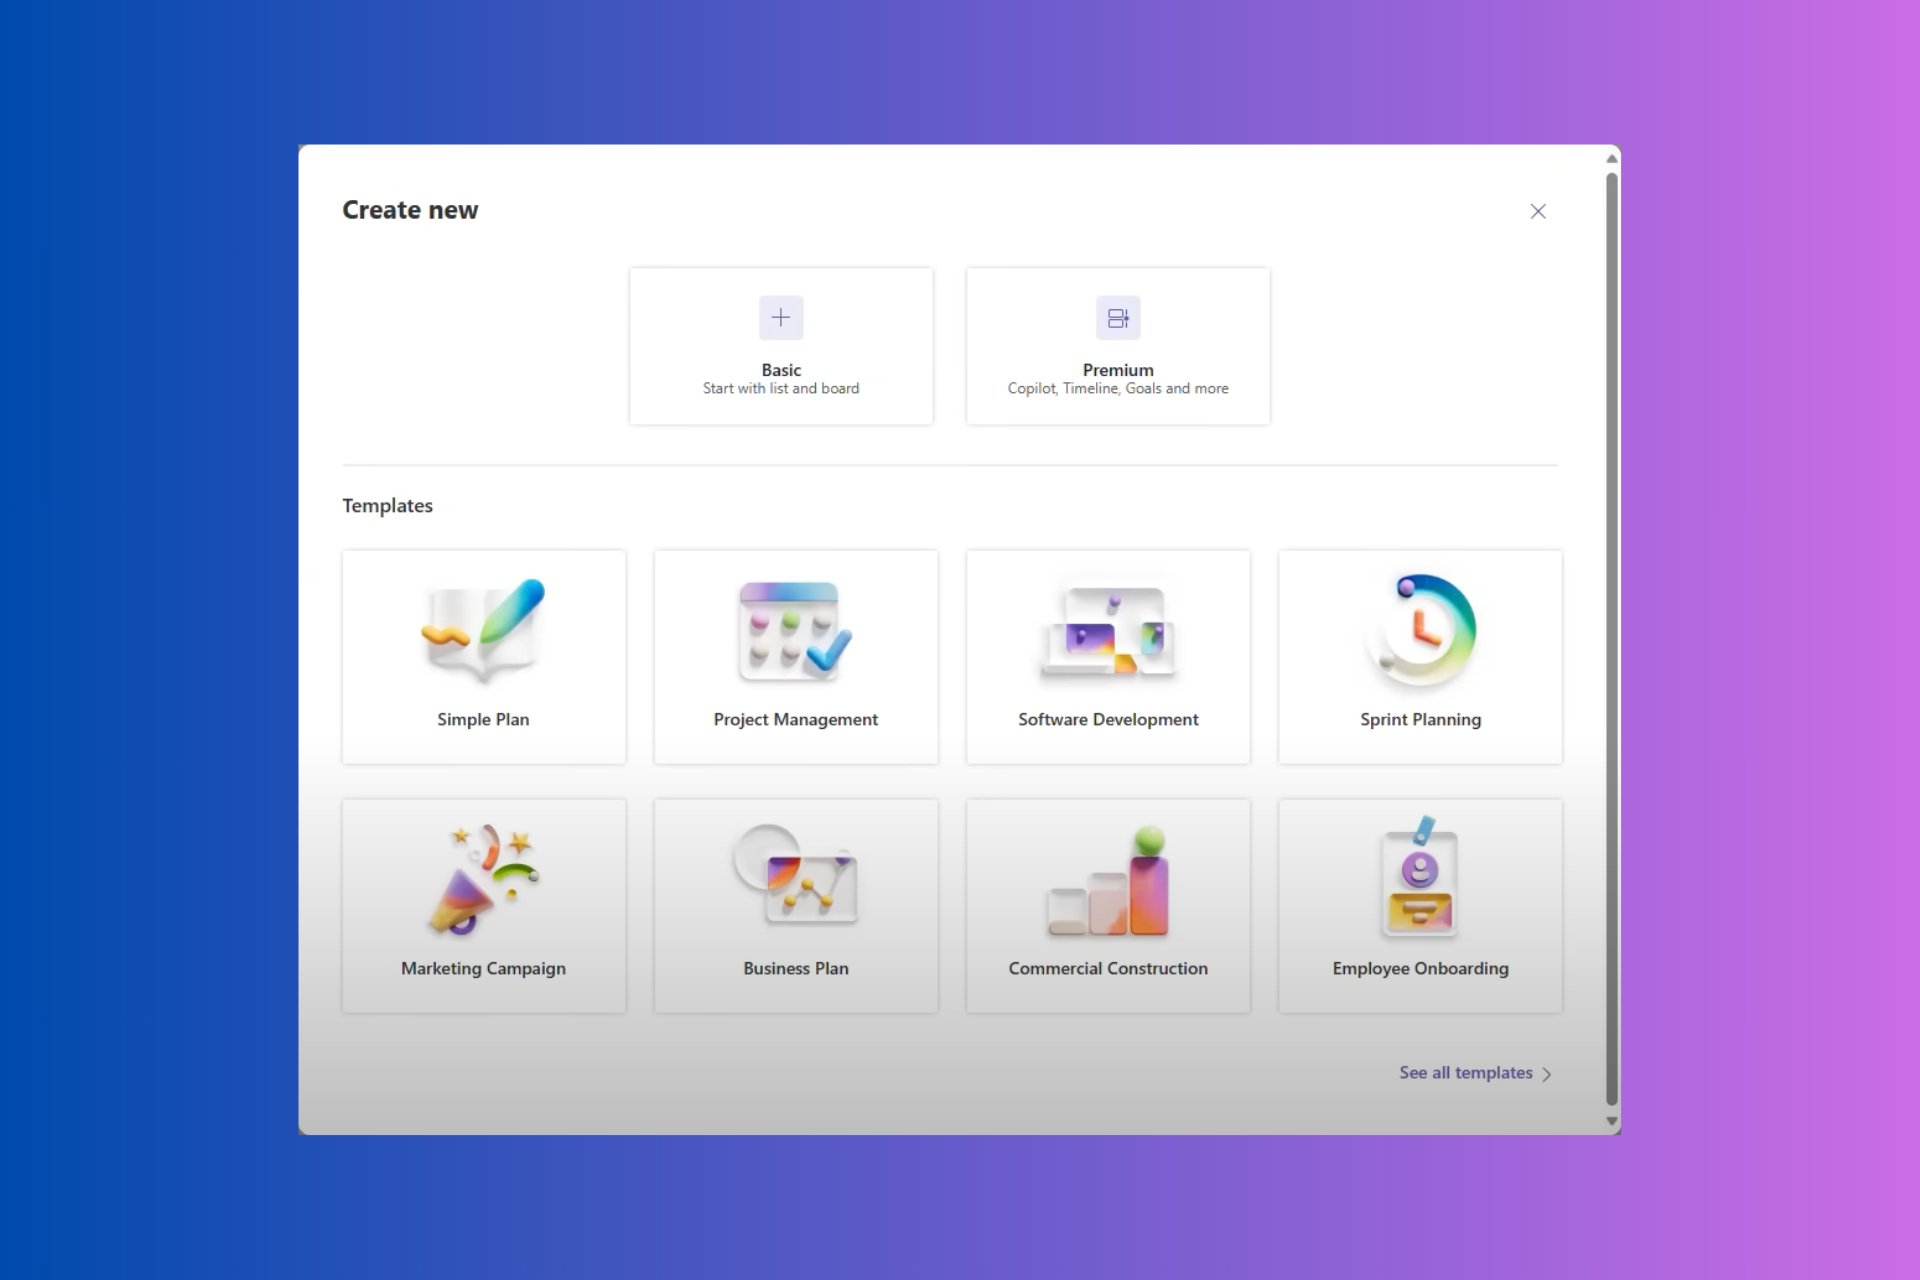
  3. Now, you can either create one from scratch or choose from the recommended templates shown in the window below.
  4. Of course, you may also click on List all templates to see all of them and select the one that suits you better.

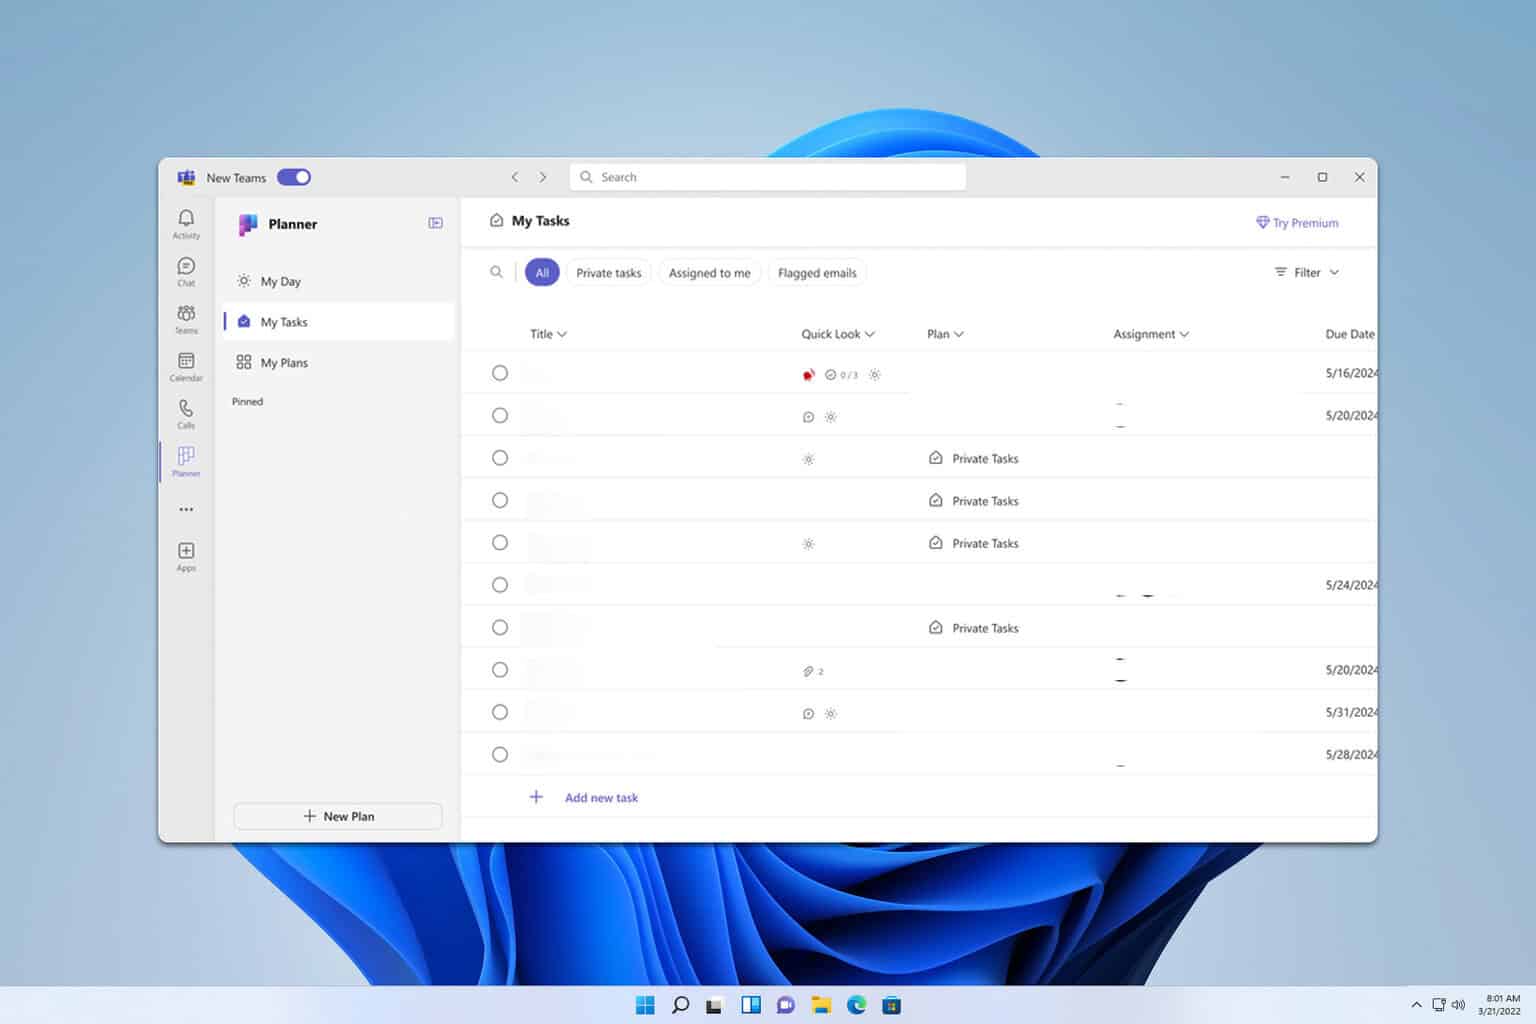
You should note that at the moment this piece was written, the new Microsoft Planner version with this feature was just rolling out. Therefore, it might not be available to all users yet. Check if you have the latest version. Also, you may access the templates from Teams, within the Planner app inside.

2. Using the Copy Plan feature

  1. Go to the Microsoft Planner page and log in with your Microsoft account.
  2. In the Planner Hub, locate the plan you want to use as a template.
  3. Click the three dots (…) in the upper right-hand corner of the plan card.
  4. Select Copy plan from the dropdown menu.
  5. Name your new plan and choose which elements to include (Priority, Dates, Description, Checklist, Labels).
  6. Decide whether to create a new group or add the plan to an existing Microsoft 365 Group.
  7. If creating a new group, click New Group. For an existing group, select it from the dropdown list.
  8. Click Copy Plan.
  9. Wait for the copying process to complete, which might take a few minutes.

This solution allows you to duplicate a full plan, including its structure and tasks, without manually re-creating each task.

3. Creating Teams Templates with pre-built Planner tabs

  1. Open Microsoft Teams and create a new team intended for template use (e.g., Template Team).
  2. Within this team, set up the channels and tabs, including Planner tabs, as needed.
  3. Each time you need a new project team, copy the Template Team:
    • Go to Teams > Join or create a team > Create team > Create from… > Team.
    • Select Template Team (the one you created in the first step) from the list.
  4. Add or remove members, and adjust any settings or tasks as necessary for the new project.

This method creates a consistent starting point for new projects, ensuring all necessary Planner tabs and configurations are included.

4. Using Power Automate to copy plans

  1. Go to the Power Automate website and sign in with your Microsoft account.
  2. Click Create in the left-hand menu.
  3. Choose Automated flow and set the trigger (e.g., When a new channel is created in Teams).
  4. Add an action to copy an existing Planner plan.
  5. Customize the flow to include the specific tasks, assignments, and due dates you want to replicate.
  6. Run the flow manually or trigger it with the specified action to ensure it works as expected.

Using Power Automate enables automated plan duplication, especially useful for recurring projects or tasks.

5. Manual template creation and usage

  1. Set up a plan in Microsoft Planner with all the specific tasks and configurations.
  2. Name this plan something indicative, like Template Plan.
  3. When you need to use the template:
    • Go to the Template Plan.
    • For each task, click the three dots (…) and select Copy task.
    • Assign the copied tasks to the new plan.

This straightforward method leverages manual copying and ensures each new plan starts from a consistent base. It is a bit more tedious, especially if you have many tasks, but you will get to the desired result.

6. Using Microsoft Lists for Task Management

  1. Access Microsoft Lists and create a new list based on your required project structure.
  2. Include columns for task name, assignee, due date, and other relevant details.
  3. Each time you start a new project, export the list to Planner:
    • Open the list and select Export to Excel.
    • Use the imported tasks to quickly set up your Planner.
  4. Manually adjust any tasks or details after exporting to ensure everything conforms to the specific project’s needs.

Using Microsoft Lists provides a flexible template system that integrates seamlessly with Planner, ensuring tasks are organized and easy to track.

These solutions provide various ways to create, manage, and utilize templates in Microsoft Planner, ensuring you can streamline your project management processes efficiently. Whether through direct copying, leveraging Teams or Power Automate, or using Microsoft’s new template features, each method caters to different organizational needs and technical proficiencies.

Did you know that Microsoft Planner Copilot helps you manage projects even faster? You may also create custom fields in Microsoft Planner. Click the highlighted links for more information.

Moreover, you can check out alternatives if Planner doesn’t suit you completely.

If you have any questions or suggestions, don’t hesitate to access the comments section below.

Microsoft adds more commute points to Bing Maps

In August 2023, Microsoft added a special surprise to the Bing mobile app for Android. This was not just any feature; it let users check out traffic, travel times, and issues for their work commutes using Bing Maps. Now, the Redmond-based tech giant has decided to improve its capabilities.

Microsoft recently updated its app based on users’ input that their commutes involve more than just the journey from home to work. With this change, people can now add extra stops to their commute. In the Bing Android app, you can include locations such as your kids’ school or other work sites.

It is simple to use. According to Microsoft, you only need to tap the “+” symbol in Bing Maps on the commute screen, and it will ask you for a location that can be added by typing or selecting from the map.

There is a straightforward method for those excited to express their thoughts about the Bing app. Shake your mobile phone when you have the app open, and it will offer an opportunity for feedback.

You can find out more here.

The new Outlook for Windows is now generally available to commercial users

The new Outlook app for Windows is officially accessible to business users. Microsoft announced it around mid-July, saying it would prepare the app for general release on August 1st. The Redmond-based tech giant followed through with this, and currently, businesses can choose to experience this new offering.

This app is not just a fresh look for the classic Outlook; it’s a game-changer in handling our emails and schedules. However, it’s worth mentioning that the transition is optional. Microsoft wants businesses to shift willingly, so they are providing an opt-in experience for now. They have also provided reassurance and support for those who follow this new Outlook trend.

With this update, we are not changing any settings for you or your organization. New Outlook is still an opt-in experience, so it’s ready for you when you are. See our migration timeline to help with your planning.

This action is a step in a larger plan to slowly eliminate the “classic” edition with an upcoming upgrade to set the new app as the default pick. Yet, they have assured us they will provide a one-year notice before any obligatory changeovers.

Switching to the benefits, Microsoft is not asking customers to change just for the sake of change. The company has done a study and surveyed with Forrester Consulting, which showed some interesting advantages. Businesses that utilize the new Outlook can anticipate a 65% decrease in support tickets and an overall 27% reduction in energy and storage expenses.

The new Outlook also contains many functionalities that enhance productivity, such as Microsoft Copilot. The AI model assists in composing emails, summarizing discussions, and conveying your message better than before. Additionally, it is constructed on modern architecture, which decreases the utilization of device resources and quickens the process of providing fixes and fresh capabilities.

If you are concerned about people adapting to the changes, don’t worry—Microsoft is prepared. They have many materials ready for users to learn about the new features. The new Outlook guarantees simpler policy management and faster deployment of features and fixes due to its shared code and typical architecture.

Let us know your experience with the new Outlook for Windows.

Microsoft Edge Bookmarks Location: How to Access it

Finding your Microsoft Edge bookmarks can be a bit tricky, but you can easily discover the Microsoft Edge bookmarks location on Windows if you follow the steps from this guide.

How can I find the Microsoft Edge bookmarks location?

Where are Edge bookmarks stored?

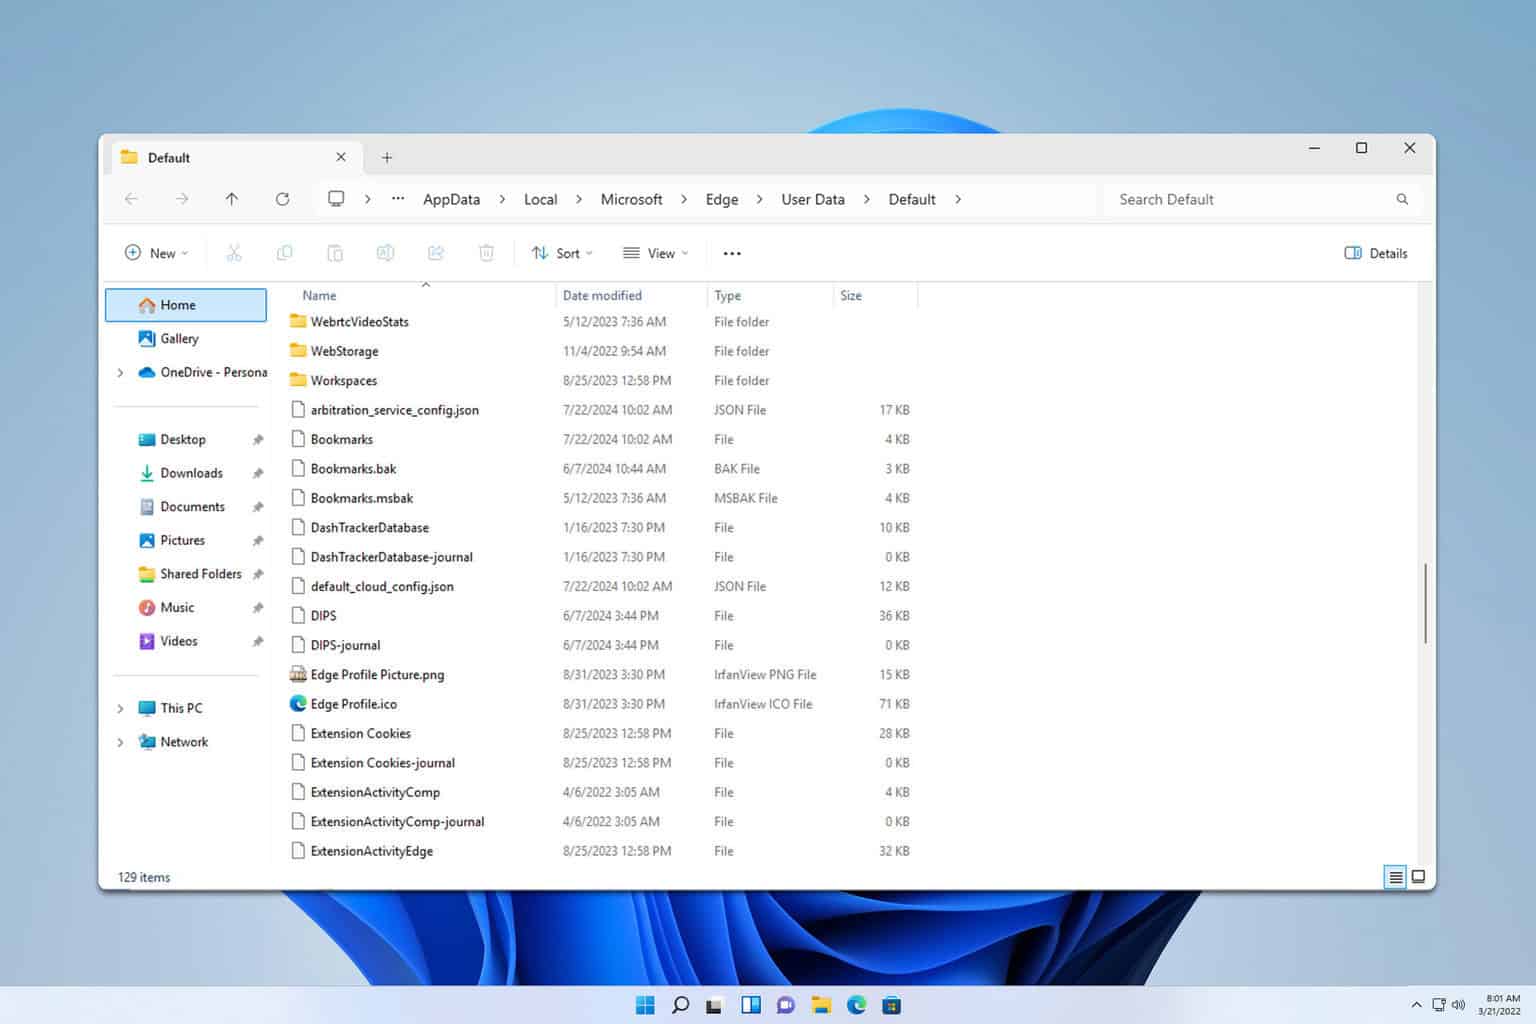
  1. Press the Windows key + R.
  2. Enter %localappdata%\Microsoft\Edge\User Data\Default
    default appdata
  3. Locate the Bookmarks file.
    bookmarks file edge

If you have more than one profile, sometimes the Bookmarks file can be in other directories in the User Data folder. The folders are usually named Profile 1, Profile 2, etc.

How do I get all my bookmarks from Edge?

  1. Open Microsoft Edge.
  2. Click the Favorites icon.
     favorites icon in edge
  3. Click the three-dot menu in the Favorites tray. Select Export Favorites.
    export favorites edge
  4. Save the export file to the desired location.

Alternatively, you can just locate the Bookmarks file as we showed you earlier and copy it to a different location. For more detailed information, visit our dedicated guide to learn how to export favorites from Microsoft Edge.

Does Microsoft Edge have a bookmark manager?

Yes, Edge has a bookmark manager and you can access it with a Ctrl + Shift + O shortcut or by clicking the favorites icon in the toolbar.

To access the full-size bookmark manager, visit the following in the browser: edge://favorites/

edge://favorites/ page

Does Microsoft Edge sync bookmarks?

Yes, Edge will sync bookmarks and other data if you sign in to Edge with your Microsoft profile. You can also restore missing bookmarks with this guide on how to recover lost favorites in Microsoft Edge.

Where is my bookmarks bar in Edge?

If the bookmarks bar isn’t showing in Edge, just use Ctrl + Shift + B keyboard shortcut to reveal it.

Alternatively, you can open the Favorites panel, go to the Show favorites menu and select when to show it.

We also have a guide that can help you learn how to show the Microsoft Edge favorites toolbar, so visit it for more information. If you’re having trouble with your news feed not updating, we can help out.

As you can see, it’s pretty simple to access Microsoft Edge’s bookmarks location. If you’re planning to switch to Edge, we also have a great guide on how to import favorites from another browser to Edge, so don’t miss it.

OpenAI released GPT-4o Long Output, an AI model suitable for developers who are building apps

OpenAI unveiled GPT-4o Long Output, an edition of the leading model that can handle up to 64,000 output tokens in one request. The tool transforms developers’ lives: They can now build applications with longer completions. On the same day, Microsoft announced the launch of GPT-4o mini API with vision support.

OpenAI’s GPT-4o Long Output is for those who require more words, more ideas – put, more of everything. The rates have been changed to $6.00 for each million input tokens and $18.00 for every million output tokens. Although it may appear high-priced at first glance, given the benefits it provides, numerous people find it well worth their money.

OpenAI is offering an experimental version of GPT-4o with a maximum of 64K output tokens per request. We hope this experiment helps you explore new use cases that are unlocked by longer completions. 

On the other side, the GPT-4o mini API from Microsoft is causing a stir with its inclusion of vision. Picture being capable of examining pictures and movies in applications could introduce an entirely different range of potentials. Azure users get direct access to the Azure OpenAI Studio Playground to try out this technology.

If you are a developer who wants to build the next popular application or part of business and is trying to redefine how consumers experience things, then you might want to try the new models.

The pricing model for the GPT-4o mini has a special appeal. It offers developers an affordable option, making it easier for them to create high-quality applications. The model is available in worldwide and local standard deployments, giving flexibility and effectiveness that can be adjusted to specific requirements.

GeForce NOW will no longer be supported on Windows 7, and Windows 8.1

Nvidia announced that the GeForce NOW app will stop backing Windows 7 and 8.1 from November 2024 onwards. In a blog post, the tech giant, which has recently become the biggest company in the world for a while, said this choice also applies to older macOS models.

This news may be stunning to individuals still using Windows 7 or 8.1. But it’s an honest reality that technology progresses swiftly, and keeping current is a necessary element of the process.

Nvidia’s support page mentioned this week that updates for the GeForce NOW app will no longer be supported on these old systems (legacy). What does this imply for you? Well, if GeForce NOW is already set up on your device, you cannot update to the newest version of the app.

Nvidia recommends switching to a wholly supported operating system so that you can continue receiving and enjoying all updates and fulfill future demands for playing games on GeForce NOW.

If GeForce NOW is already installed on Windows 7, or any other legacy operating system, you will be unable to update to the latest GeForce NOW app.  We recommend using a fully supported operating system to continue playing, not just to have the latest GeForce NOW app updates but also because it may become required to play games on GeForce NOW in the future. 

However, this is a positive point for those unprepared to update their operating system. You can still reach GeForce NOW using a supported web browser on its official site. Yet, it is essential to note that not every web browser in these older operating systems will back up the most recent versions and security upgrades. While there’s a workaround, it’s not without limitations.

Nvidia’s action is a vital sign that the tech world is progressing, and keeping up is very important. People who are using older operating systems may need to think about upgrading their systems not only for gaming but also for security and performance reasons. Remember that technology constantly changes, and adjusting to new things is crucial for survival.

Gamescom 2026: What to expect and How to attend?

August is the month for Gamescom 2024, a place where game lovers from all over come together. This time, Microsoft will make it massive – according to the official blog post, this will be an Xbox experience like no other we have seen yet. In Cologne, Germany, from August 21 to 25, the gaming world will focus its attention as Microsoft displays many Xbox and PC game previews and other events that promise to amaze all present.

At the Xbox booth, you can try out more than 50 titles. These include a mix from Xbox Game Studios, Blizzard, Bethesda, and many third-party partners. Imagine playing games like “Age of Mythology: Retold” or “Diablo IV: Vessel of Hatred” before they are released to everyone else. The booth is not only for playing games; it provides an experience where you can take photos, watch unique theater presentations, and even visit a Gear Shop to buy special merchandise.

Here’s what you should expect:

Help DeskPhoto OpportunityTheatre PresentationHands-OnGame Pass HubXbox Gear ShopCommunity HubExperience

Xbox Game Studios

  • Age of Mythology: Retold (Hands-On, Photo Opportunity)
  • Ara: History Untold (Hands-On, Photo Opportunity)
  • Avowed (Theatre Presentation, Photo Opportunity)
  • Towerborne (Hands-On, Photo Opportunity)
  • Forza Horizon 5 (Hands-On)
  • Microsoft Flight Simulator (Hands-On)
  • Sea of Thieves (Experience, Photo Opportunity)

Bethesda

  • Indiana Jones and the Great Circle (Theatre Presentation, Photo Opportunity)
  • Starfield Shattered Space (Theatre Presentation, Photo Opportunity)
  • The Elder Scrolls Online: Gold Road (Hands-On, Photo Opportunity)
  • Fallout 76: Milepost Zero (Hands-On, Photo Opportunity)
  • DOOM: The Dark Ages (Photo Opportunity)

Blizzard Entertainment

  • World of Warcraft: The War Within (Experience, Prescheduled Creator Streaming, Photo Opportunity)
  • Diablo IV: Vessel of Hatred (Hands-On, Photo Opportunity)
  • Diablo: Immortal (Daily Tournament Play, Photo Opportunity)

Games from Partner Studios

  • Valorant (Hands-On)
  • Star Wars Outlaws (Hands-On, Experience)
  • Little Nightmares 3 (Hands-On, Photo Opportunity)
  • Date Everything (Hands-On)
  • Space Marines 2 (Hands-On)
  • S.T.A.L.K.E.R. 2: Heart of Chornobyl (Hands-On)
  • Dustborn (Hands-On)
  • Commandos: Origins (Hands-On, Photo Opportunity)
  • Farming Simulator 25 (Hands-On)
  • Fortnite Festival (Hands-On)
  • Marvel Rivals (Hands-On)
  • Mecha BREAK (Hands-On)
  • Planet Coaster 2 (Hands-On)
  • Atomfall (Hands-On)
  • Visions of Mana (Hands-On)

Indie Selects from ID@Xbox

  • Squirrel with a Gun (Hands-On)
  • The Alters (Hands-On)
  • Descenders 2 (Hands-On)
  • Winter Burrow (Hands-On)
  • Voidtrain (Hands-On)
  • REPLACED (Hands-On)
  • Overthrown (Hands-On)
  • Parcel Corps (Hands-On)
  • KILL KNIGHT (Hands-On)
  • Tails of Iron 2: Whiskers of Winter (Hands-On)
  • All You Need is Help (Hands-On)
  • Creatures of Ava (Hands-On)
  • Train Sim World 4 (Hands-On)
  • Star Trucker (Hands-On)
  • Let’s Build a Dungeon (Hands-On)
  • Spirit of the North 2 (Hands-On)
  • Funko Fusion (Hands-On)

But what if I’m not in Cologne? No problem! Microsoft has also considered this. They are organizing live broadcasts from Gamescom 2024. This ensures you can keep up with everything happening, even if you can’t be there in person. The fortunate ones who are there can participate in interactive setups to win things such as Game Pass tokens and gaming accessories.

Here are the links you need to know (and bookmark):

Here’s the schedule:

Wednesday, August 21  

  • Xbox @ gamescom 2024
    • Start: 6am PDT / 9am EDT / 2pm BST / 3pm CEST 
    • Featuring S.T.A.L.K.E.R. 2: Heart of Chornobyl, Atomfall, Age of Mythology, plus others  
  • Bethesda MainStream 
    • Start: 5am PDT / 8am EST / 1pm BST / 2pm CEST  

Thursday, August 22  

  • Xbox @ gamescom 2024 
    • Start:  6am PDT / 9am EDT / 2pm BST / 3pm CEST 
    • Featuring Star Wars Outlaws, World of Warcraft: The War Within, Towerborne plus others
  • Bethesda MainStream 
    • Start: 5am PDT / 8am EST / 1pm BST / 2pm CEST

Friday, August 23  

  • Xbox @ gamescom 2024
    • Start: 6am PDT / 9am EDT / 2pm BST / 3pm CEST
    • Featuring Avowed, Ara: History Untold, plus others
  • Bethesda MainStream 
    • Start: 5am PDT / 8am EST / 1pm BST / 2pm CEST 

The Xbox booth at Gamescom strongly focuses on accessibility and inclusivity. It has made sure it is welcoming for all, with features like wheelchair access, Xbox Adaptive Controllers, and even ASL along with German Sign Language interpreters; it is committed to ensuring that everyone can experience the joy of gaming.

For the gamers who love community participation, a unique event called Xbox FanFest starts off the Gamescom week. This gathering allows fans to unite and enjoy their shared interest in gaming. It might allow them to bond, exchange stories, or form new friendships.

Gamescom 2024 is on track to become a memorable event for gamers worldwide. In essence, Microsoft will be at the forefront. Whether you are present or observing from a distance, the thrill of gaming, novelty, and a sense of community will be shown in all its glory. So, are you prepared to experience the core of gaming with Xbox at Gamescom?

Simple Ways to Fix Firefox Not Loading Websites

Many users have complained about Firefox not loading websites. It could be due to an unstable network connection, browser cache, third-party software interference, or unwanted browser extensions.

To begin with, let’s first check the internet connection by opening the same websites on another browser to rule out unreliable internet connections. You can also try temporarily disabling your security software and opening the websites.

How can I fix the Firefox not loading website issue?

Note icon NOTE
We will discuss different scenarios and suggest solutions according to the problem.

1. Scenario 1: Internet security software blocking Firefox

If you have started facing these issues after updating the browser or third-party security software, the internet security software might be causing the issue.

1. Check Firefox connection settings

  1. Launch Firefox, locate & click the Menu button from the top-right corner and select Settings.Settings - firefox not loading websites
  2. Go to General, scroll down to find Network Settings.
  3. Click the Settings button.Network settings
  4. Choose No Proxy if you don’t use a proxy to connect to the Internet. However, if you use it, compare the settings with those of other browsers that don’t have the issue.Proxy - firefox not loading websites
  5. Once done, click OK, then close the Settings window.

2. Disable DNS prefetching

  1. In the address bar of Firefox, type about:config and hit Enter.
  2. You may get a warning page; click Accept the Risk and Continue to open the Configuration page.Agree and continue
  3. Type network.dns.disablePrefetch in the search box and click the Toggle button next to the preference. This will set the preference value to true.network.dns.disablePrefetch - true - firefox not loading websites
  4. If you don’t get any results after typing it, select Boolean, then click the Add button.

3. Disable IPv6

  1. In the address bar of Firefox, type about:config and hit Enter.
  2. You may get a warning page; click Accept the Risk and Continue to open the Configuration page.Agree and continue
  3. Type network.dns.disableIPv6 in the search box.
  4. Once you see the option, click the Toggle button next to it to set its value to true.network.dns.disableIPv6- true - firefox not loading websites

4. Clear DNS cache

  1. Press the Windows key, type cmd in the search box, and click Run as administrator.CMD elevated - firefox not loading websites
  2. Type the following command to clear the DNS cache from your computer, then hit Enter:  ipconfig /flushdnsflush DNS
  3. Once done, restart your computer to let the changes take effect.

5. Allow Firefox through Windows Firewall

  1. Press the Windows key, type control panel in the search box, and click Open.Control Panel start menu - firefox not loading websites
  2. Select View by as Category, then select System and Security.System and security
  3. Next, under Windows Defender Firewall, click Allow an app through Windows Firewall.aLLOW AN APP THROUGH FIREWALL - firefox not loading websites
  4. Click Change settings, then select Allow another app.Change app and allow an app
  5. In the Add an App window, click Browse.Browse1
  6. Locate the .exe file of Firefox from your system drive; the path could look like this – C:\Program Files\Mozilla Firefox\firefox.exe
  7. Select firefox.exe and click Open.
  8. Click Add.
  9. Ensure both Private and Public checkboxes are marked.Public and Private
  10. Click OK to save the changes.

2. Scenario 2: Firefox can’t load certain websites

1. Delete cache & cookies

  1. Launch Firefox, locate & click the Menu button from the top-right corner, and select History.history
  2. Select Clear recent history.clear recent history - firefox not loading websites
  3. On Clear browsing data and cookies pop-up, select Everything for When from the drop-down.clear -  firefox not loading websites
  4. Select History, Cookies and site data, Temporary cached files and pages, then select Clear.

Deleting caches and cookies to your browser can also help you fix issues like the Firefox browser not working; read this guide for more details.

2. Choose Standard Enhanced Tracking Protection

  1. Launch Firefox, locate & click the Menu button from the top-right corner and select Settings.Settings - firefox not loading websites
  2. Go to Privacy & Security and locate Enhanced Tracking Protection.Enahnced protection - forefox not loading websites
  3. Select Standard and close Settings.

3. Refresh Firefox

  1. Launch Firefox, locate & click the Menu button from the top-right corner, and select Help.  Help - firefox not loading websites
  2. Select More Troubleshooting information.More troubleshooting information
  3. In the following windows, click the Refresh Firefox button.Refresh Firefox

Refreshing Firefox can also help you fix other browser issues, such as Firefox not responding on Windows 10 or 11 computers; check out this detailed guide for more solutions.

3. Scenario 3: An extension/theme is the problem

1. Disable/Remove extension

  1. Launch Firefox, locate & click the Menu button from the top-right corner, and select Addons and themes.add-on and themes - firefox not loading websites
  2. Select Extensions from the left pane.
  3. Locate the unwanted extension and click the toggle button to disable it.Toggle off to disable
  4. However, to remove it, click the three-dot icon and select Remove from the context menu.Remove extensions

2. Remove themes

  1. Launch Firefox, locate & click the Menu button from the top-right corner, and select Addons and themes.Add-ons and themes
  2. Select Themes from the left pane.
  3. Go to the theme and click Disable.Disable
  4. However, to remove it, click the three-dot icon and select Remove from the context menu.Manage - Remove - firefox not loading websites

You can remove any themes you’ve installed on your browser, but please note that default themes can only be disabled, not deleted.

Disabling an add-on from Firefox can also help you fix the Encountered unexpected problem on Windows issue; read this guide to learn about more solutions.

4. Reinstall Firefox – The Last Resort (for all scenarios)

  1. Press Windows + I to open the Windows Settings app.
  2. Go to Apps, then select Installed apps.Apps, installed apps - firefox not loading websites
  3. Locate Firefox, click the three-dot icon, and select Uninstall from the context menu.Uninstall Firefox
  4. Follow the onscreen instructions to complete the uninstallation.
  5. Go to Firefox’s official website and click Download Firefox.Download firefox - Apps, installed apps - firefox not loading websites
  6. Double-click the installation file and follow the on-screen prompts to complete the installation process.

If you can’t install Firefox on your Windows computer, a corrupted or incomplete installer file could be the reason. Download the file again, then try installing the browser. Read this guide to learn more.

Remember to run a malware scan on your computer to ensure no malware infection on the device. Also, clearing cache and cookies timely from your browser can help you avoid any loading issues.

If you are facing other issues with Firefox, like the browser keeps crashing, we have a detailed guide with solutions for you. You can also learn how to block websites.

Did we miss a step that helped you fix this issue? If so, don’t hesitate to share the solution with us in the comments section below, and we will add it to the list.

Outlook for Mobile is finally allowing users to choose their preferred fonts

For those who find themselves changing and experimenting with fonts when writing emails, we have some wonderful news. According to the latest entry in the Microsoft 365 Roadmap, Outlook Mobile for Android and iOS will be enhanced to support fonts after users long requested the feature.

Microsoft answered, and the Redmond-based tech giant will allow users to choose their preferred font when composing emails in Outlook for iOS and Android. Additionally, alongside the option to choose, Microsoft will also improve the support for fonths in the reading pane.

Here’s what the entry says:

We heard feedback from you, our customers, and are adding support for choosing fonts while you compose in Outlook for iOS and Android. There is also improved support for fonts in the reading pane.

Microsoft

Like any other emailing app, regular Outlook already lets users choose from multiple fonts, and it’s pretty simple to do so. However, Outlook for Mobile lets people choose their preferred fonts. It was about time, right?

How To Keep Slack Active Effortlessly – 5 Tips

Wondering how to keep Slack active? You’re in the right place then.

It can be challenging, especially when you’re away from your desk or busy with other tasks. If you don’t feel like moving your mouse periodically just to keep your status active, read on!

How To Keep Slack Active

Before trying out these methods, ensure you’re reliably connected to the internet. An unstable connection will make it look like you’re not online on Slack.

Now, check out these five tips:

Adjust Your Status Settings

Follow the below steps:

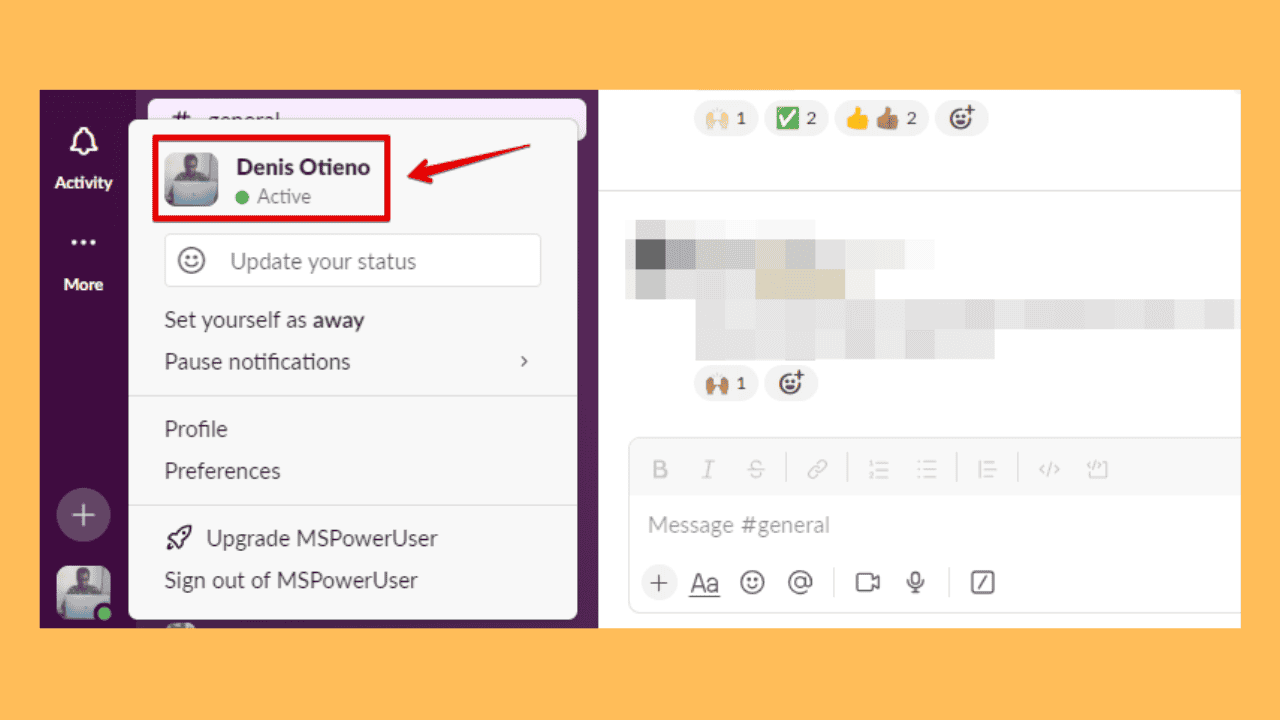
  1. Open Slack and tap on your profile picture or initials.
Slack profile
  1. Tap Set yourself as active.
Set yourself as active
  1. Your status will change from Away to Active with a green dot.
Active on Slack

Use Slack in Split View

Split view can help you stay active by allowing you to multitask. Here are the steps to set it up:

  1. Open Slack on your desktop.
  2. Add a new tab and go to any platform, for example, YouTube.
Open a new tab
  1. Right-click on the tab, select Move tab to another window, and click New Window.
Move tab to another window
  1. Click the Restore Down buttons for the YouTube and Slack windows.
Restore-down button
  1. Drag one window to the left and the other to the right.
Use both windows

Adjust Sleep Mode and Turn Off Power-Saving on Your PC

To keep Slack active, prevent your computer from going into sleep status and turn off the power-saving mode. Here’s how to do it on a desktop:

  1. Press the Windows icon + I to open Settings, then tap System.
System
  1. In the left sidebar, click on Power & sleep. Under the Screen section, set both “On battery power, turn off after” and “When plugged in, turn off after” to a longer duration or “Never.” 
  2. Under the “Sleep” section, set both “On battery power, PC goes to sleep after” and “When plugged in, PC goes to sleep after” to a longer duration or “Never.”
Power & sleep settings
  1. Tap the Battery section and toggle off the battery saver button.
Battery saver

This should always keep you online on Slack.

Use the Mobile Slack App

You can adjust your display settings to keep the app open and active on your phone. Here are the steps for both Android and iOS:

  • On Android: Go to Settings > Display > Screen timeout or “Sleep > set it to “Never” or the maximum available duration.
  • On iOS: Go to Settings > Display & Brightness > Auto-Lock > set it to Never.

Make sure the Slack app is open and running in the background. Also, be aware that these settings can lead to faster battery drain. Remember to change them back to save your battery when needed.

Use Third-Party Apps

Move Mouse

Moving your mouse periodically helps keep you active on Slack. However, it won’t work if you’re away from your PC. You can use tools like mouse simulators that imitate mouse movements to prevent your PC from sleeping and keep you online. Apps such as Move Mouse are excellent choices for PC users. 

So, now you know how to keep Slack active. This ensures you stay online and respond to your team’s needs as soon as possible. Also, learn how to fix Slack notifications if they aren’t working on your PC.

Moreover, if you want to leave a channel for good or log out, we have just the guide for you.

The CrowdStrike incident cost Delta Air Lines $500 million

Think about being the CEO of Delta Air Lines, steering your company through the sky, and unexpectedly; a storm comes—not a real one, but a technological tempest that stops thousands of flights from taking off and leaves many people stuck.

It’s not just in movies; it was an actual situation Ed Bastian, Delta’s CEO, experienced this month. A significant information technology (IT) failure happened because of a problem with CrowdStrike’s program change; according to the latest reports, this cost Delta Air Lines $500 million. A massive IT outage caused by this glitch in the CrowdStrike update affected both operations and Delta Airlines’ budget, as it spent a whopping $500 million due to these technical issues.

Delta’s difficult situation started from a wrong update, which impacted numerous Microsoft systems worldwide and triggered a series of disturbances like falling dominos. The company had to cancel more than 5,000 flights, which is higher than the total number of cancellations in one year in 2019.

They were forced to reset 40,000 servers by hand, showing how massive the problem was and emphasizing its magnitude. Financial damage was not limited to lost earnings; it also encompassed spending millions of dollars daily to pay passengers and give them places to stay.

The effect of the outage was not only practical but also related to reputation. Delta, famous for its dependability and service, encountered an unexpected situation where it had to handle a disruption similar to what Southwest Airlines faced in the 2022 holiday season. The U.S. Department of Transportation formally investigated this matter, showing how severe things became.

Regarding the crisis, Bastian has expressed that Delta will look for damages. He stressed the significance of testing technology carefully, mainly when it is crucial for the airline’s functioning. Crowdstrike has not offered any money to Delta, but they give free consulting advice after an incident. We have yet to observe Microsoft’s response; however, Delta is taking this situation very seriously and has hired famous lawyer David Boies as its representative in the quest for compensation.

The Azure Edition Preview Build 26257 is now available to download

Microsoft just released the Windows Server Datacenter: Azure Edition preview build 26257. This fresh preview build is made particularly for the Azure setting. Yes, it’s adjusted to work well and effectively in the cloud. If you’re wondering how to access it, then know that you can get hold of it through the Microsoft Server Operating Systems Preview offer in Azure.

Build 26257 has some optimization for Azure. It has been made to utilize the advantages of cloud computing at its best; thus, it suits individuals using or planning to use Azure for their server requirements well.

However, there is a small bump – the release of the Core version for this build is late. The team is doing their best to fix this issue, and they assure us that the Core version will be released as soon as possible. It’s just a tiny problem, but they are handling it.

If you are a technical person or want to know more details, the official changelog for the Azure Edition preview build 26257 has enough information. You can also visit Microsoft Docs and see the Preview: Windows Server VNext Datacenter (Azure Edition) for Azure Automanage.

Dark Reader For Firefox: How to Install & Use it

Many pages don’t have dark mode, and this can make reading in low-light environments difficult. Luckily, extensions such as Dark Reader for Firefox can help you fix that.

How do I download and use Dark Reader on Firefox?

How to install Dark Reader on Firefox?

  1. Visit the Dark Reader extension page.
  2. Click on Add to Firefox.
     dark reader add to firefox
  3. Next, click on Add.
    add dark reader firefox

What is Dark Reader used for?

Dark Reader is used to reduce eye strain on certain pages by inverting their colors and making them easier on the eyes.

You can easily switch between dark or light mode on any page, and even adjust settings such as brightness, contrast, sepia, and grayscale for all or individual pages.

dark reader settings

Lastly, you can adjust the font type and its thickness, or you can switch between several available themes.

How do I activate the Dark Reader?

As soon as you install Dark Reader, it will be automatically activated. However, you can manually turn it on or off using the switch in the extension. If needed, you can even configure it to automatically start or turn off depending on the time of the day.

dark reader switch

What is the shortcut for Dark Reader in Firefox?

You can toggle Dark Reader quickly by using the Shift + Alt + A shortcut.

Is Dark Reader open source?

Yes, Dark Reader is an open-source project and you can find its code available on GitHub.

Is Dark Reader private?

Dark Reader is private, and according to the developer’s privacy statement, the extension doesn’t collect any personal data or browsing history.

Is Dark Reader free?

Yes, the extension is free to use, but you’ll see a message from developers asking for a donation in the extension window.

Is Dark Reader safe?

Dark Reader is safe, and it’s one of the highest-rated Firefox extensions, and it is even recommended by Mozilla, so it’s perfectly safe to use.

Overall, Dark Reader for Firefox is an amazing extension, especially if you’re not happy with the dark theme in Firefox, so don’t hesitate to try it.

Speaking of extensions, in the past, we covered BetterTTV for Firefox as well as Reddit Enhancement Suit for Firefox, so don’t miss them.

If you’re a gamer, you might be interested in Steam Inventory Helper for Firefox which will make online trading faster and simpler.

How to Change the Microsoft Planner Background

Changing the background in Microsoft Planner can give your workspace a fresh and personalized look, making it more enjoyable to use. If you’re wondering how to change the Microsoft Planner background, follow these straightforward solutions to customize your Planner to your liking.

How do I change the background of Microsoft Planner?

1. Changing backgrounds in Microsoft Planner

  1. Go to the Microsoft Planner page and log in with your Microsoft account.
  2. Choose the specific plan where you want to change the background.
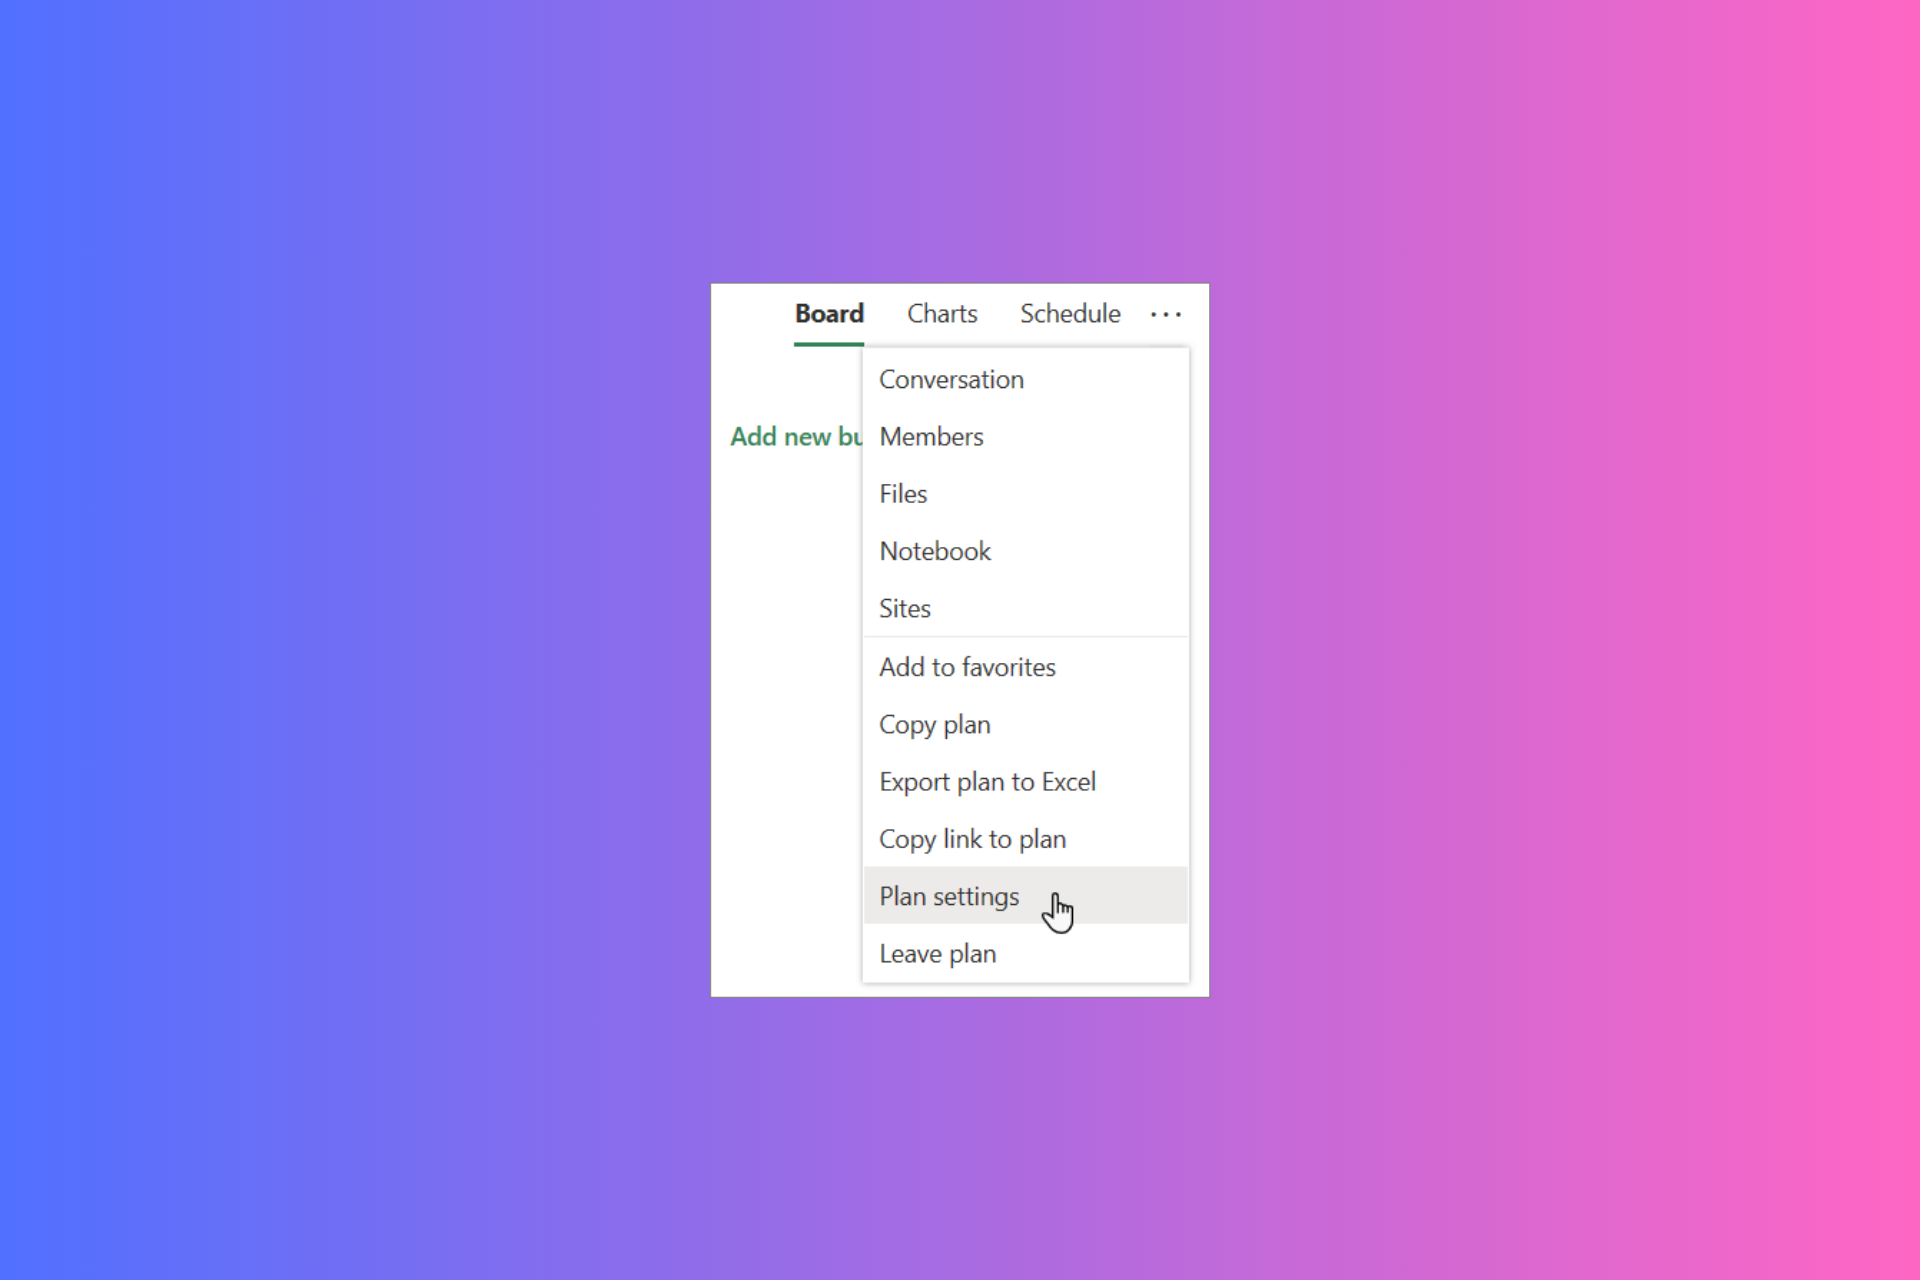
  3. Click the More button, which looks like three dots (…), at the top of the plan screen.
  4. From the dropdown menu, select Plan settings.
  5. On the right side of the screen, the General tab will appear. You can now choose from a variety of recommended background images provided by Planner.
  6. Click on the preferred background to apply it to your plan. The new background will enhance the visual appeal of your Planner board.

By following these steps, you can easily customize the appearance of your Planner board, making it more visually appealing and easier to identify among other plans.

2. Changing the theme in Microsoft Planner

  1. Go to the Microsoft Planner page and log in with your Microsoft account.
  2. Click the Settings button located in the top-right corner of the screen.
  3. Under the Themes section, choose from a variety of available themes.
  4. To see more theme options, click on View all.
  5. Select the theme you prefer by clicking on it. The theme will be applied to your Planner interface, giving it a fresh look.

Changing the theme enhances the overall user experience by allowing you to personalize the look and feel of your Planner, making it more enjoyable to use.

So, now you know how to change the Microsoft Plan background and theme and customize it to your needs. If you’re looking for more tips, here’s how to create custom fields in Microsoft Planner.

Did you know that Microsoft Planner Copilot helps you create and track your projects faster? Click the highlighted link for more information.

If you have any questions or know about different ways to change the background of Microsoft Planner, let us know in the comments below.

Google adds App-Bound Encryption to Chrome for Windows, greatly increasing its security

Google is aiming to make Chrome users on Windows more secure. The tech giant has created a new defense method that seeks to protect users’ data better than ever before.

Chrome has consistently employed the most potent security capabilities the operating systems provide to safeguard user data. In macOS, it’s the Keychain services, and in Linux, systems such as kwallet or gnome-libsecret are used. With Windows users, Chrome has been using Data Protection API (DPAPI) to secure data while at rest. Yet, DPAPI’s incapability to safeguard against malicious applications that run code as the logged-in user has been a worry. These loopholes have provided opportunities for infostealers to take advantage and reach essential data.

However, according to the latest announcement, Chrome 127 is a significant step forward for the Windows community. This version introduces Application-Bound (App-Bound) Encryption, an innovative protection mechanism that enhances DPAPI by tying data encryption to applications’ identities. The concept is similar to the security model found on macOS with Keychain. While starting with cookies, Google plans to expand this safeguarding method to include passwords, payment details, and other lasting authentication tokens in upcoming versions of Chrome.

The intelligence of App-Bound Encryption is found in its strategy to encode the app’s identity into the encrypted data, ensuring that only the planned application can decode it. This approach makes a big difference for attackers because they must now surpass extra obstacles such as getting system privileges or injecting code into Chrome; these actions are likely to attract attention from antivirus software.

This safeguard is especially helpful for businesses. It combats malware that tries to circumvent security by asking for elevation privileges, a usual move in situations where users have limited permissions. However, remember that App-Bound Encryption intends to tie the encryption key to the machine. This means it might not be suitable for places where Chrome profiles frequently move among many devices.

Google’s introduction of App-Bound Encryption is a big step forward in the battle against data theft. This makes it more complicated and more accessible to detect when someone tries to get unauthorized access to essential data, thus improving security for Chrome on Windows and setting new expectations about protection from web browsers.

In other news, Google will soon let Chrome users organize their Tabs into Groups with AI. We spotted the upcoming feature earlier this week, and it should be released to the general public with the next update patches.

Anaconda is now letting users use Excel to run their own Python code locally

Another big step has been taken to connect Python’s strong abilities with popular Microsoft Excel. As you might already know, Python in Excel was first introduced in 2023, and users were shown how to blend Python’s analytics with Excel’s interface—even though calculations using Python were executed in Microsoft Cloud.

However, Anaconda, a popular AI operating system, has allowed people who use Excel to run their own Python code on their computers (PCs). This offers an extra level of flexibility and authority.

This fresh feature is integrated into the Anaconda Toolbox for Excel’s public beta, which includes Anaconda Code. What makes this development interesting is its utilization of WebAssembly-based technology. According to the announcement, it enables Python execution without requiring discrete installations or managing complicated environment setups.

You can now write, save, and distribute Python code inside Excel. This boosts work efficiency and teamwork by allowing you to stay in your workbook while collaborating on projects in real time with others with access to the same file(s).

If you think about it, the Anaconda Toolbox in Excel has an Anaconda Assistant for people scared to dive into Python coding. This feature uses AI to study tables and propose data-dealing methods, making Python coding simpler for all levels of users. The toolbox also provides sophisticated data visualization and handling abilities, boosting your ability to work with new datasets swiftly and accurately.

In its public beta version, the Anaconda Toolbox can be downloaded for free by users from Microsoft’s add-in marketplace, making Python accessible to everyone within Excel’s environment.

Anaconda connects traditional spreadsheets with advanced coding methods, which helps expand the scope of studying and showing data. Whether you are an expert in Python or a fan of Excel, this combination of Python and Excel through Anaconda’s Toolbox represents an essential advancement towards making data science more straightforward for everyone.

YouTube Slowing Down Firefox? Here’s How to Fix it

Firefox is a decent browser but when you open some sites like YouTube and notice your browser slowing down, lagging or freezing frequently, you need to address it.

For the most part, you probably have too many media browser tabs open or too many programs running in the background.

It is also possible that there are some problematic browser extensions or some settings that have been recently configured that conflict with the normal functioning of your Firefox browser.

How do I stop YouTube from slowing down Firefox?

1. Update and restart your browser

1.0 End browser processes

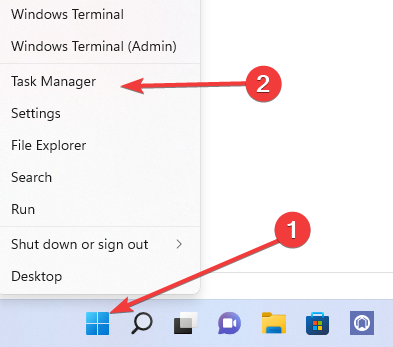
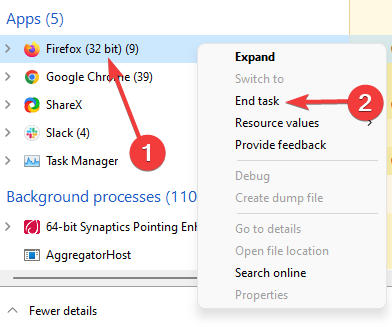
  1. Right-click on the Start menu and select Task Manager from the option list.
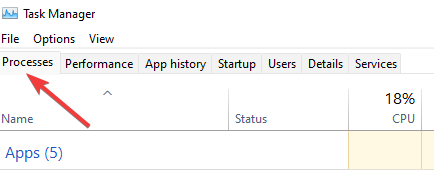
  2. Click on the Processes tab.
    Firefox is already running but is not responding
  3. On the left pane, search for the Firefox process, right-click on it, and choose the End task option.

1.1 Check for browser updates

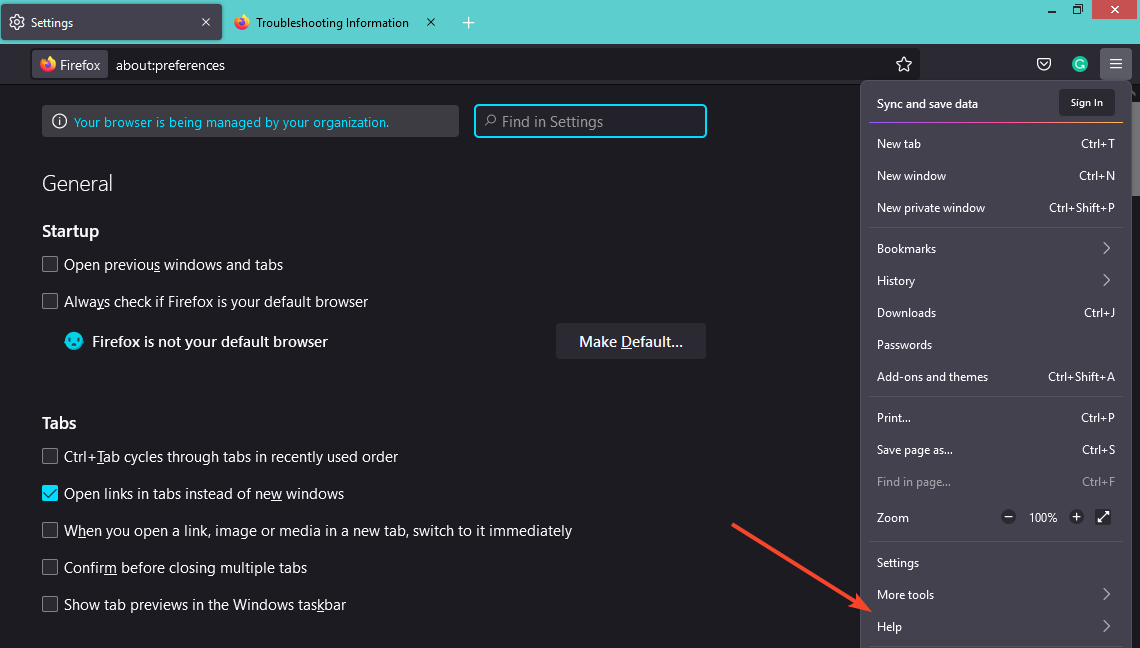
  1. Launch your Firefox browser and click on the three horizontal ellipses in the top right corner.
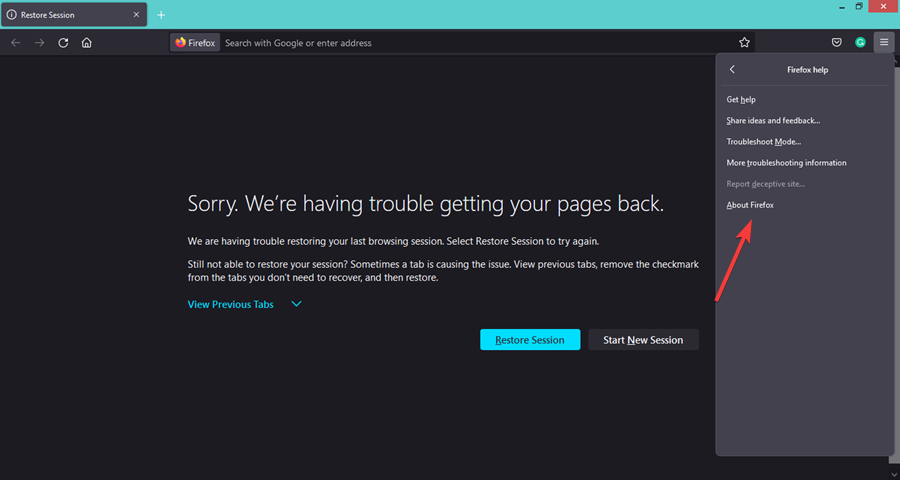
  2. Select Help.
  3. Click on About Firefox.
  4. If your browser is up-to-date, you will get the following dialog box.

2. Clear the Cache and Cookies

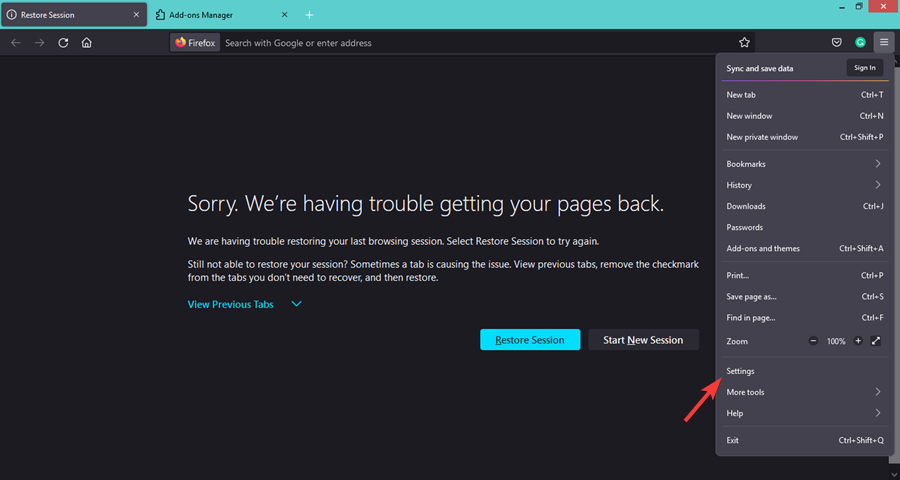
  1. Launch your Firefox browser and click on the three horizontal ellipses in the top right corner.
  2. Click on Settings.
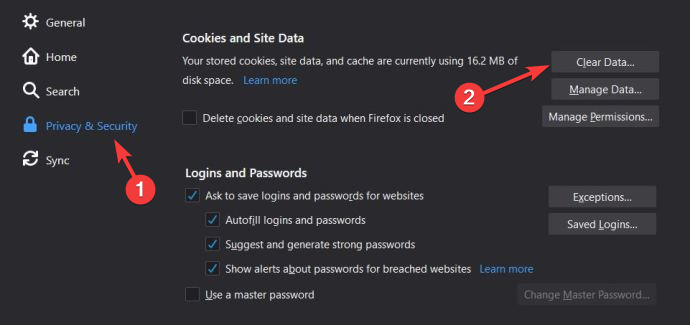
  3. Select Privacy & Security and click on Clear Data under Cookies and Site Data.
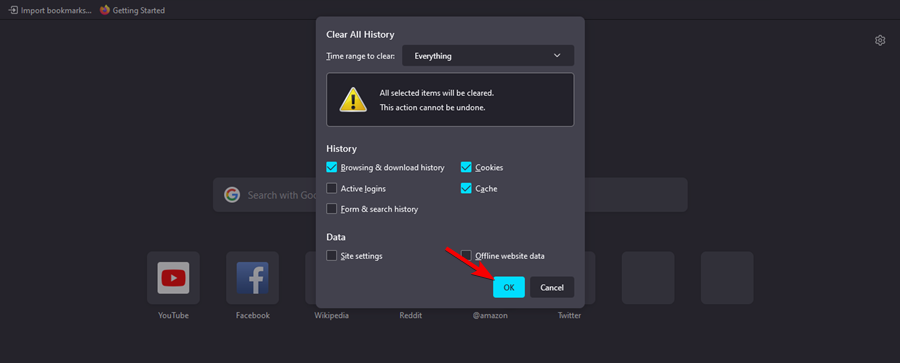
  4. Check Everything from the dropdown and hit OK.

3. Disable extensions

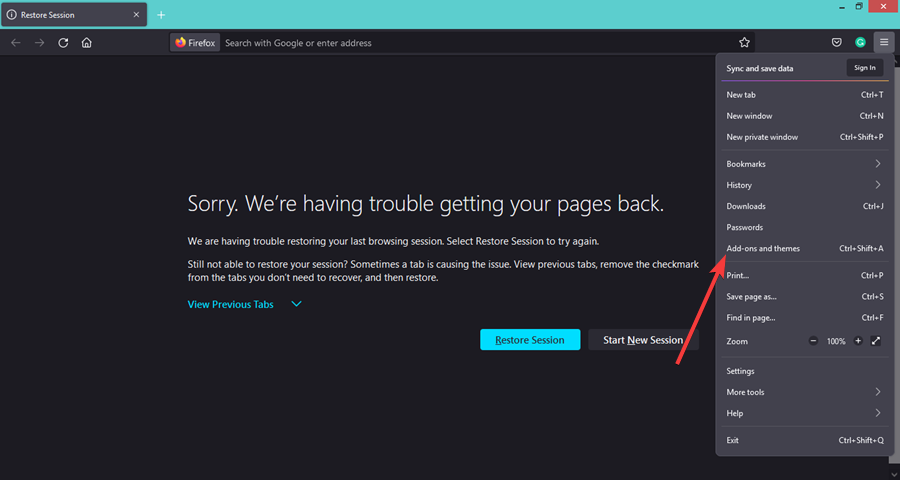
  1. Launch your Firefox browser and click on the three horizontal ellipses in the top right corner.
  2. Click the Add-ons and themes.
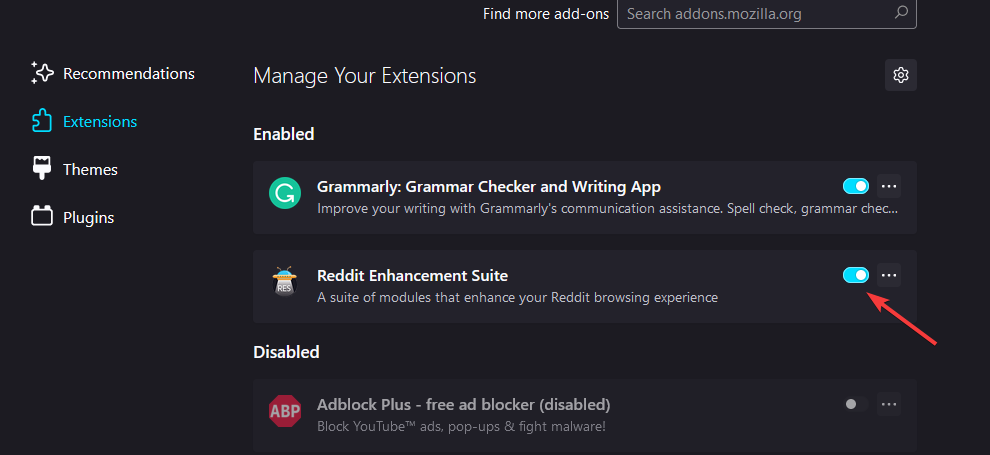
  3. Select Extensions and toggle Disable extensions then try reloading the page until you find the culprit.

Extensions generally slow down your browser but AdBlockers are the most notorious especially since YouTube started flagging them off. Disable all your ad extensions, restart your browser and see whether YouTube is still slowing down your Firefox browser.

If ads are increasingly becoming intrusive, we have tips on how to enjoy an ad-free YouTube experience.

4. Disable hardware acceleration

  1. Launch your Firefox browser and click on the three horizontal ellipses in the top right corner.
  2. Select Settings.firefox-settings firefox freezing windows 11
  3. Click on General, scroll down to Performance, and uncheck Use recommended performance settings.
  4. Next, uncheck Use hardware acceleration when available.

If you’re running a lot of GPU-intensive tasks, they may be competing for the limited resources hence why opening a YouTube tab on your Firefox browser causes a slowdown. And if your GPU is unable to handle all these tasks, your CPU usage will be high causing performance issues.

5. Adjust video settings

  1. Open the video that is giving you this problem.
  2. Now, click the gear icon in the bottom right corner of the video and choose Quality.quality to fix Video is not available at the moment
  3. Select the desired quality. As a rule of thumb, try using 360p or 480p and check if that solves the problem.change quality

6. Reset Firefox

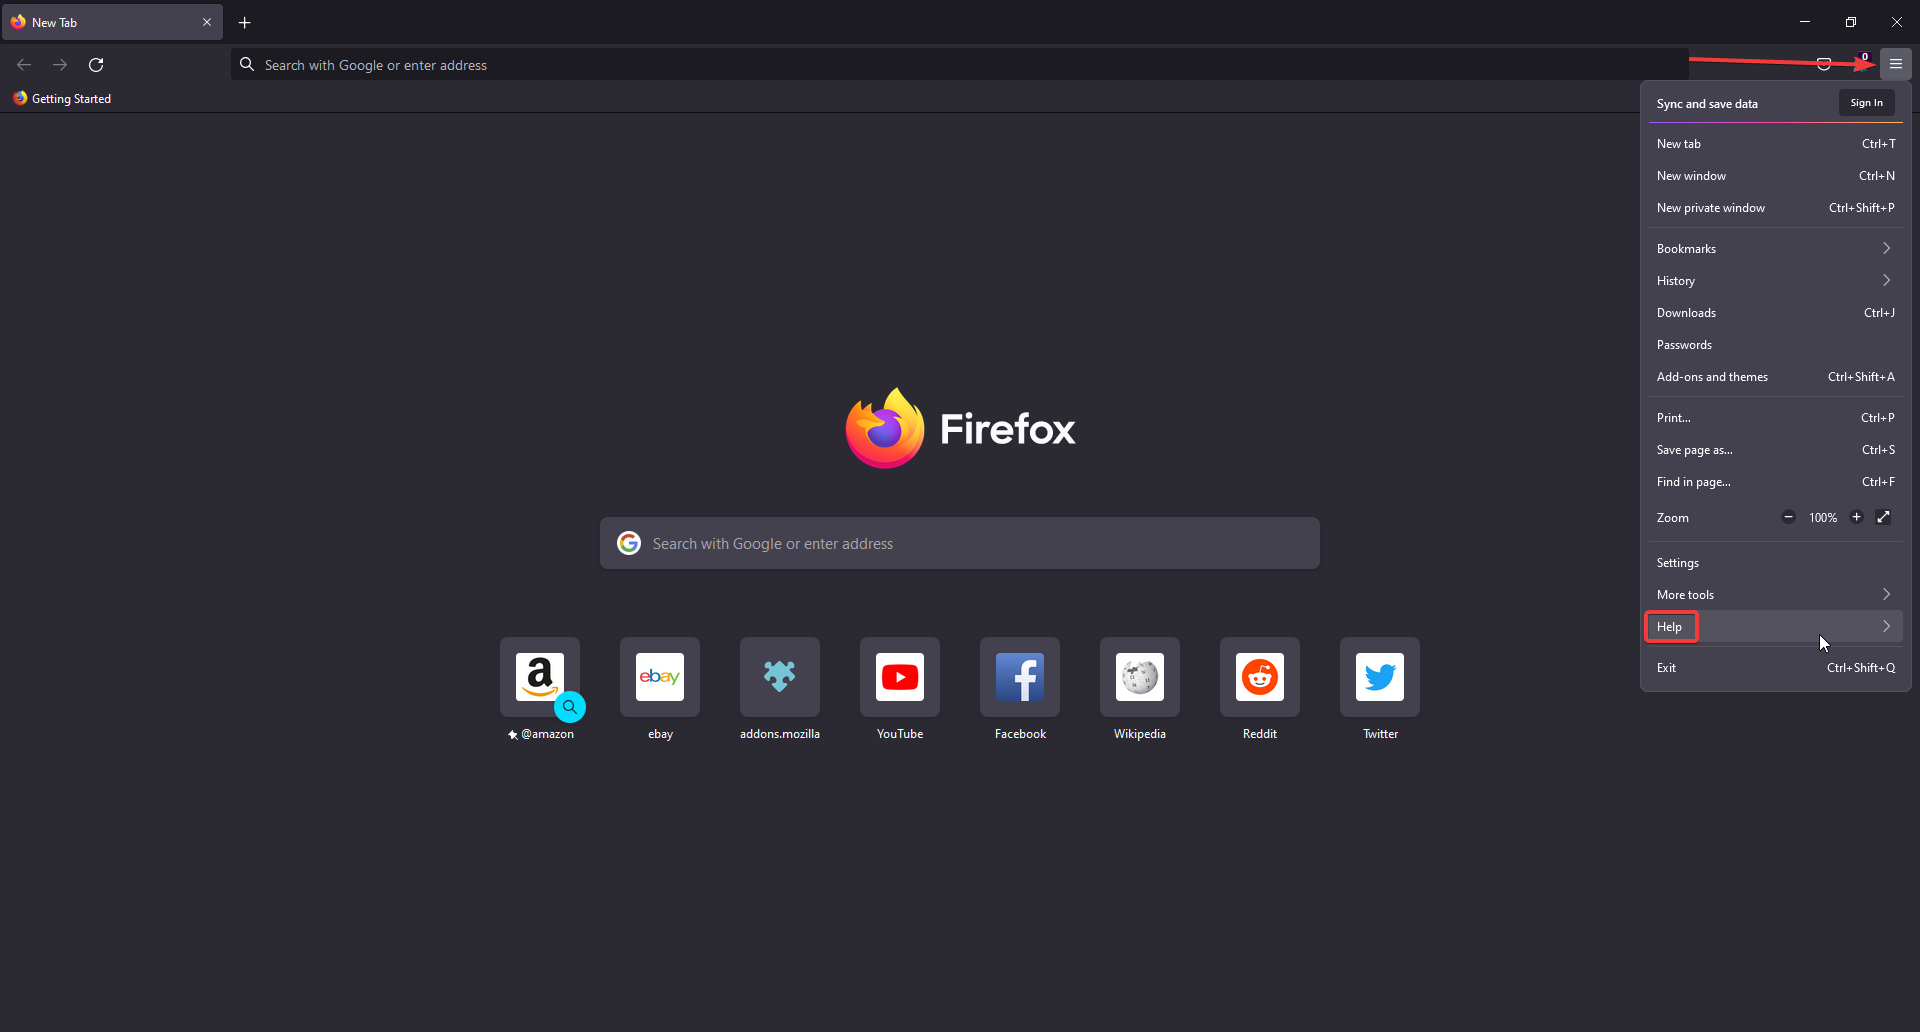
  1. Launch your Firefox browser and click on the three horizontal ellipses on the top right corner.
  2. Select Help.
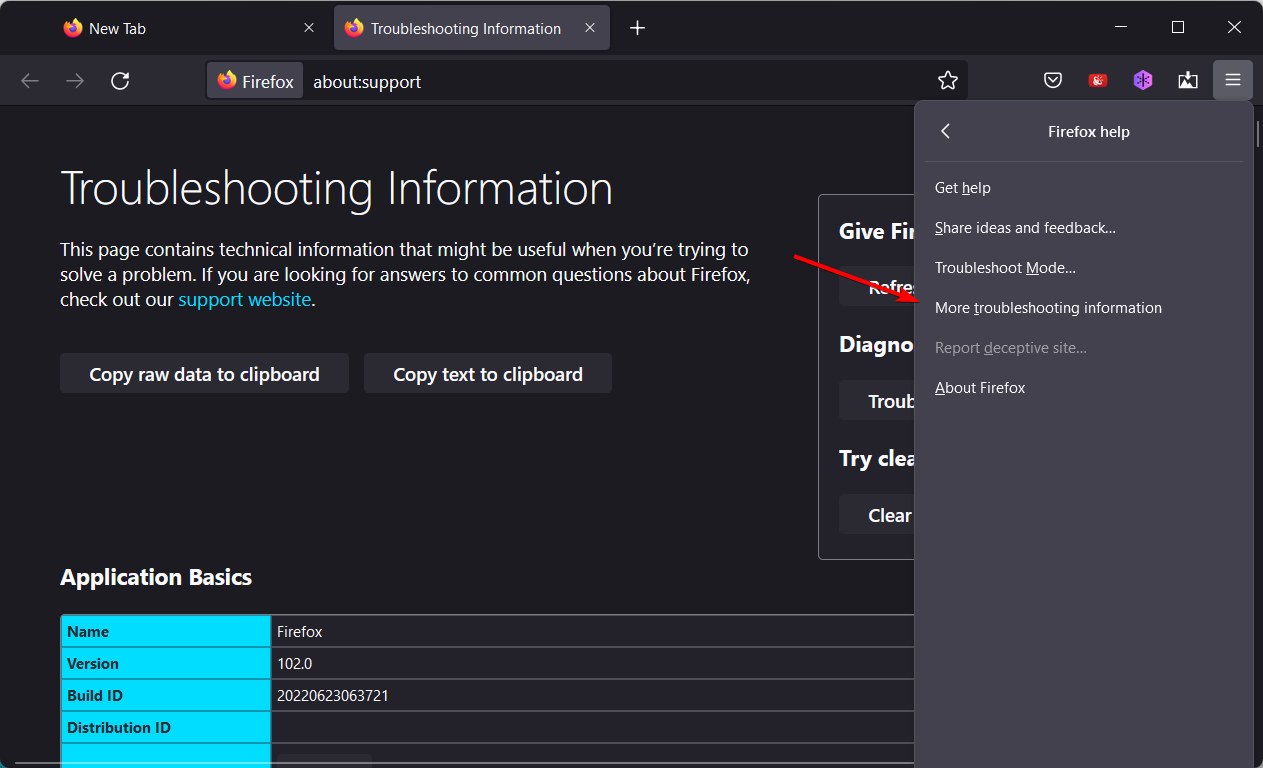
  3. Click on More troubleshooting information.more-troubleshooting-firefox firefox freezing windows 11
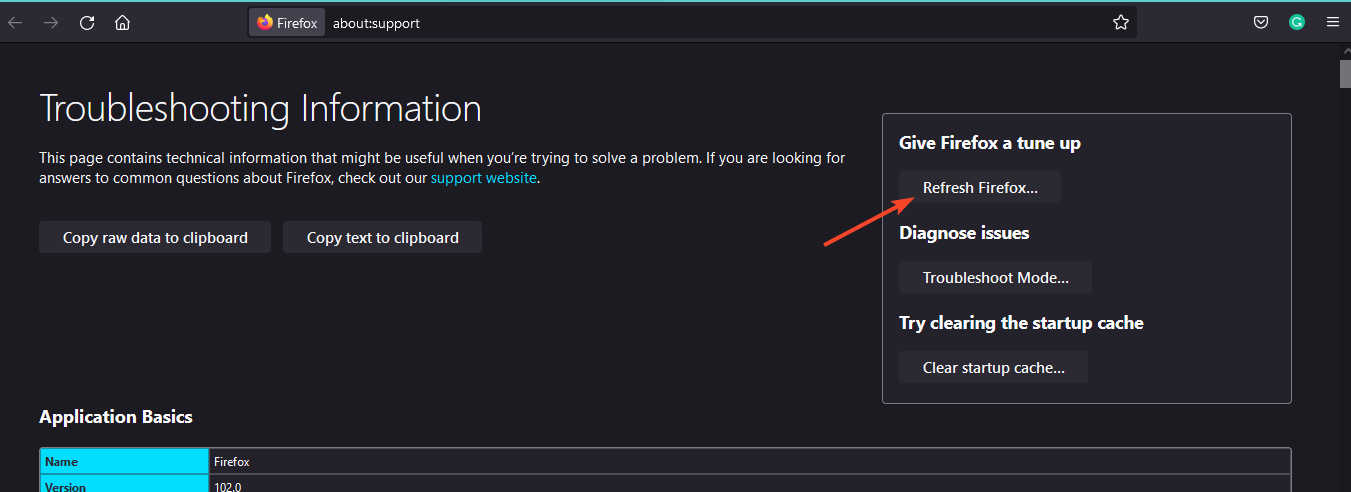
  4. Select Refresh Firefox under Give Firefox a tune up.
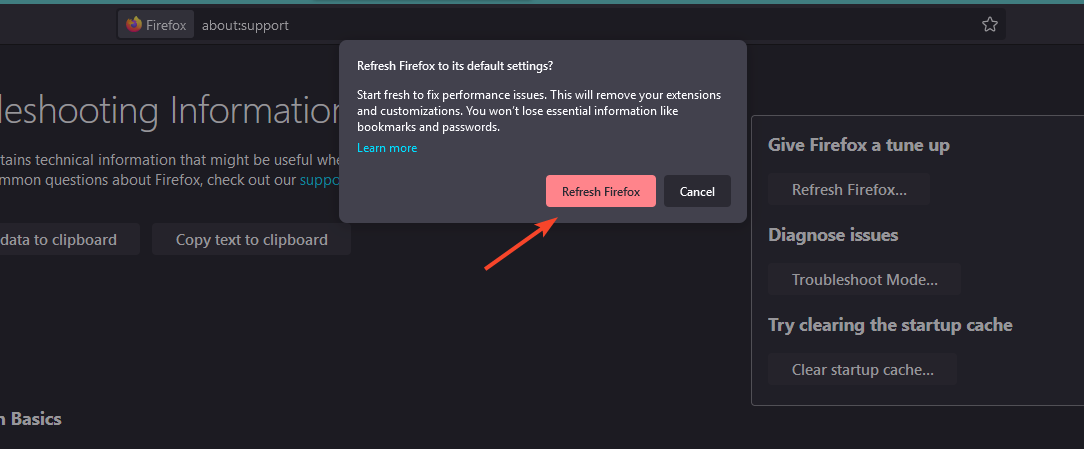
  5. Confirm Refresh Firefox in the dialog box that pops up.

7. Open Firefox in troubleshoot mode

  1. In Firefox, click the three lines in the top right corner to open the menu and select Help. Firefox help settings.
  2. Click Troubleshoot Mode. Firefox Troubleshoot Mode.
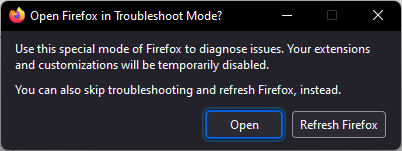
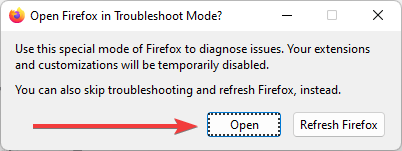
  3. Selecting Open will start Firefox in its default form and temporarily disable all add-ons. Clicking Refresh Firefox will reset the browser to its default state and remove all customization features and extensions.

Firefox’s troubleshooting mode serves the same purpose as Windows Safe Mode. It runs the browser without the extensions to isolate the issue. If your Firefox browser’s speed improves, you can conclude your extensions are slowing down your browser.

8. Uninstall and reinstall Firefox

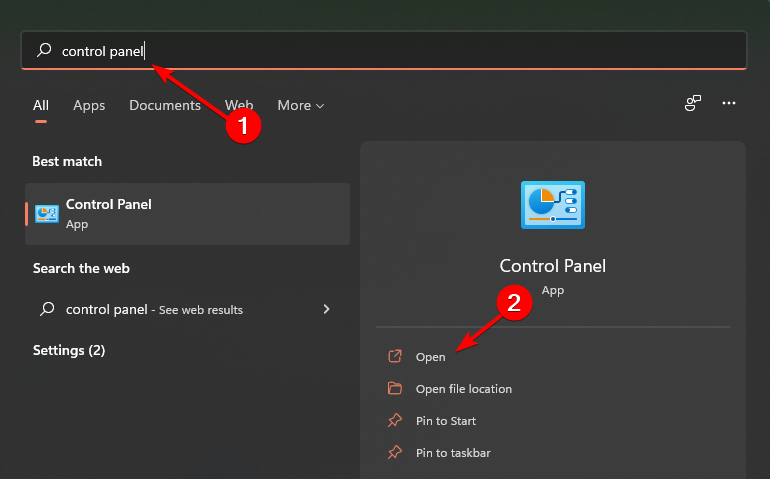
  1. Press the Windows key, type Control Panel and click Open.
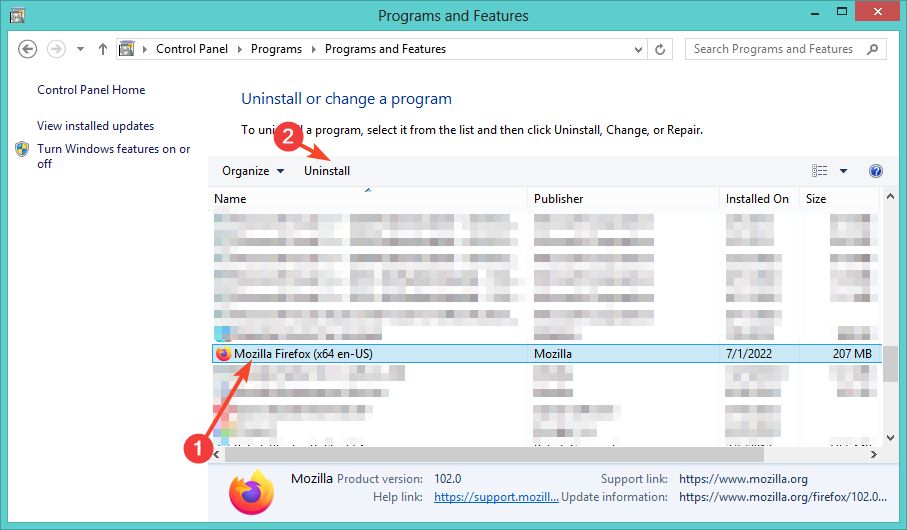
  2. Click on Uninstall a program under Programs.
  3. Find Mozilla Firefox, right-click and select Uninstall.
  4. Launch another browser and download Mozilla Firefox.

Alternatively, you can roll back to a previous Firefox version or try another browser like Opera GX to see if it’s a YouTube or browser-related issue.

Firefox may have its own issues where it slows down because of a bug but YouTube also tends to perform better on some browsers so you can pick one of the YouTube-recommended browsers for an optimized experience.

This isn’t the only issue, and we recently wrote an article on what to do if YouTube is not working in Firefox, so don’t miss it.

That’s all we had for this article but let us know if any of these solutions helped resolve the issue of YouTube slowing down your Firefox browser. Also, if you have any other solution you think will be helpful, let us know in the comment section below.

How to Export Microsoft Planner to PDF: 5 Easy Methods

Exporting your Microsoft Planner data to a PDF can be a bit tricky, but it’s definitely doable with the right steps. Whether you prefer using Excel, a PDF printer, PowerShell, third-party tools, or even a manual method, there’s a solution that fits your needs.

How do I export Microsoft Planner projects to PDF?

1. Export Microsoft Planner to Excel and convert to PDF

  1. Go to the Microsoft Planner page and log in with your Microsoft account.
  2. Choose the plan you want to export from the left-hand side panel.
  3. Click on the ellipsis (…) at the top of the plan window.
  4. Select Export plan to Excel.
  5. The Excel file will be downloaded to your computer.
  6. Navigate to your downloads folder and open the newly downloaded Excel file.
  7. If needed, format the Excel data to make it look better when converted to PDF.
  8. Click on File in Excel and choose Save As.
  9. In the Save as dropdown, select PDF.
  10. Click Save.

This solution lets you use Excel’s extensive data handling to customize your Planner data before converting it to PDF.

2. Use a PDF printer

  1. Go to the Microsoft Planner page and log in with your Microsoft account.
  2. Choose the desired plan from the left-hand side panel.
  3. Press Ctrl + P to open the print dialog box.
  4. Select Save as PDF as your printer.
  5. Adjust the settings as needed to include all necessary information.
  6. Click Save and choose the location to store your PDF file.

This method provides a straightforward way to save your Planner data directly as a PDF from the web app.

3. Using PowerShell to export data and convert to PDF

  1. Type PowerShell in the Windows Search bar, right-click on Windows PowerShell and select Run as administrator.
  2. Use the following command and replace the user ID with the actual one: Export-PlannerUserContent -UserAadIdOrPrincipalName <user's AADId or UPN> -ExportDirectory <output location>
  3. Example: Export-PlannerUserContent -UserAadIdOrPrincipalName [email protected] -ExportDirectory C:\PlannerExport
  4. Open the exported JSON files in a text editor or another software that supports JSON.
  5. Copy the content into a Word document (or convert directly if using a tool).
  6. Save the document as a PDF.

This solution provides a method to export detailed Planner data and convert it to PDF without using Excel.

4. Using third-party tools

  1. Select a tool that supports exporting Planner data to PDF. Some popular tools include:
    • Power Automate (formerly Flow)
    • Integrations with Microsoft Flow and Power BI
    • Specialized task management tools with export functions
    • PDF readers and editors that can be integrated with Microsoft Planner
  2. Configure the export method:
    • Follow the tool’s instructions to connect to your Microsoft Planner.
    • Set up an export process to generate a PDF document.
  3. Execute the export process and download the PDF file.

Using third-party tools, such as Soda PDF, can provide more advanced options and automation capabilities for exporting Planner data to PDF.

⇒ Get Soda PDF

5. Explore the Planner data as images

  1. Open Microsoft Planner and navigate to the relevant plan.
  2. Use the Snipping Tool or Snip & Sketch on Windows to take screenshots of the plan content.
  3. Open a Microsoft Word document.
  4. Paste the screenshots into the Word document.
  5. Click File, select Save As and choose PDF as the file type and save.

This method is useful for creating a visual representation of your Planner plan in a PDF format.

Each solution offers a unique approach to exporting Microsoft Planner data to PDF, catering to different levels of technical proficiency and specific needs.

If you want to know about the latest Microsoft Planner Copilot, hit the highlighted link for more information. You might also be interested in our guide on how to create custom fields in Microsoft Planner. You can learn how to create a Gantt chart as well.

For any questions you might have, go below this post to find the comments section.

Microsoft Planner Copilot: Everything You Need to Know

If you’re a project manager or part of a collaborative team, you definitely need to know all about Microsoft Planner Copilot. This AI-driven tool is designed to make project planning, management, and tracking more efficient and less stressful.

What is Microsoft Planner Copilot?

Microsoft Planner Copilot is a generative AI tool integrated into Microsoft Planner, designed to assist users in planning, managing, and tracking projects more efficiently. It leverages AI to help teams streamline processes, set goals, generate tasks, and stay informed about progress and priorities.

What are the key features of Microsoft Planner Copilot?

  1. Planning with AI
    • Generate Task Lists: Open Microsoft Teams and launch Planner. Select an existing plan or create a new one. Click on the Copilot icon located at the top right and enter a prompt like Create a marketing campaign plan. Copilot will generate a list of tasks, goals, and buckets based on your instructions.
    • Set Goals: Use Copilot to define specific project goals by providing natural language prompts. For example, type Set a goal for achieving 100,000 social media impressions to create tailored goals within the plan.
    • Create Comprehensive Plans: Copilot can put together complete project plans, breaking down work into manageable tasks and goals, automating the initial planning stage. This feature helps you quickly set up a structured project plan, saving you time and ensuring nothing important is missed.
  2. Managing Projects:
    • Task breakdown: When you have a large task, ask Copilot to break it into smaller, actionable steps. For instance, type Break down the social media campaign into daily tasks.
    • Identify next steps: If unsure what to do next, prompt Copilot with a question like What should be my next task? and it will provide appropriate suggestions.
    • Adjust the plans as needed: Use Copilot to modify existing plans based on new requirements. Prompt it with Add a new task for the upcoming webinar and it will integrate the change smoothly. Managing your projects becomes easier as Copilot helps keep the workflow organized and adaptable to changes.
  3. Tracking Progress:
    • Monitor the status of a project: Ask Copilot questions like What is the status of our marketing campaign? and get a quick overview of progress, priorities, and upcoming deadlines.
    • Check the workload: Use prompts like Who has the highest workload? to identify team members who might be overburdened.
    • Follow up on the tasks: Type Show me tasks that are behind schedule to quickly see which tasks need attention. This feature ensures you stay on top of your projects, with clear visibility into progress and potential bottlenecks.

Now, the question is: can you do all that with just clicking on the menus? Of course. However, obviously, as you go on using Copilot and just asking for these action, you will find it a lot easier and faster.

How do I access Microsoft Planner Copilot?

  1. License Requirements:
    • Copilot is available for users with Project Plan 3 or Project Plan 5 licenses. If you don’t have a premium license, you can start a free 30-day trial by clicking the diamond icon in the Planner app.
  2. Enabling Copilot:
    • Open Microsoft Teams and launch the Planner app.
    • Create or open an existing premium plan.
    • Locate and click the Copilot icon at the top right corner to start using the AI features.

With the correct license, accessing and utilizing Copilot’s powerful features is straightforward and enhances your project management capabilities immediately.

What are the benefits of using Microsoft Planner Copilot?

  • Efficiency: Automates repetitive tasks, saving you and your team considerable time.
  • Organization: Helps keep projects well-structured and ensures all team members are on the same page.
  • Adaptability: Easily adjust to changes in project scope or priorities with AI-driven suggestions.
  • Visibility: Provides clear insights into project progress and team workload, helping managers make informed decisions.

The bottom line is that by using Microsoft Planner Copilot you can manage projects easier, making the process more intelligent, collaborative, and efficient. Basically, Copilot becomes a quick assistant to track and evaluate your projects.

We also have a best practice guide on how to use Microsoft Planner if you need more information. If you want to know how to create custom fields in Microsoft Planner Copilot, hit the highlighted link to find out all about that.

For any other questions you might have, we are one click away in the comments section below.

PCI Express Root Port Driver Windows 11: Installation/Update Guide

Are you wondering how to install the PCI Express Root Port driver in Windows 11? You’ll find the steps in this detailed guide.

If your PCI Express Root Port driver is outdated or corrupted, you’ll mostly face the following issues:

PCI Express Root Port Driver Windows 11 error
  • Error Code 10 prevents new or existing hardware from using the problematic PCI Express Root Port. The hardware or its software user interface might stop working unexpectedly or won’t start at all.
  • Error Code 12 indicates that multiple hardware or virtual devices use the same PCI Express Root Port. This is usually because of the outdated driver.
  • Blue Screen of Death (BSOD) issues with error messages like, “SYSTEM_SERVICE_EXCEPTION” and “DRIVER_IRQL_NOT_LESS_OR_EQUAL“.
  • Your Windows 11 PC won’t recognize the new or existing hardware despite installing all the necessary device drivers provided by the manufacturer.
  • The PCI Express hardware might show extensively reduced performance.

However, if you’re seeing warnings from a third-party driver updater but there are no apparent issues related to the PCI Express hardware, you can rest easy.

probable fakes

In this scenario, you don’t need to take any action. The driver updater is likely just trying to get you to buy a subscription.

How To Install PCI Express Root Port Driver Windows 11

I’ve organized various ways to download and update the driver, starting with the simplest ones:

Via Windows 11 Device Manager Tool

If the PC is connected to the internet, try these steps:

  1. Open the Device Manager tool from the Start menu.
device manager start
  1. Scroll down to System devices.
  2. Click on the tiny arrow to the left of the item to expand its tree of dependent devices.
  3. You might need to scroll down to find the problematic PCI Express Root Port.
scroll more
  1. Once you’ve located the device, right-click on that.
  2. From the context menu, select the Update driver option.
update driver
  1. Choose the Search automatically for drivers option on the next dialog box.
windows folder
  1. Windows 11 should automatically locate the source driver online and update it.

If you’re not connected to the internet, follow these instructions until step 7 and select the Browse my computer for drivers option.

You should see the file browsing interface. Hit Browse and select the Windows directory within the Windows 11 setup drive.

Using the Intel Chipset Driver Package

All motherboard manufacturers provide the relevant Intel Chipset driver as a DVD or in digital form online.

For example, if your PC is running on a Gigabyte B660M DS3H AX motherboard, you can download the compatible Intel Chipset driver from Gigabyte’s official website.

First, you’ll have to find out its make and model from the System Information tool in the Start menu.

An information window will open where you’ll find details including the BaseBoard Manufacturer and Product names.

system info

Now, search Google with phrases like Gigabyte B660M DS3H AX chipset driver. It should show you the driver download portal at the top of the search results.

Once there, download and install the following driver files:

  • Intel Chipset driver: Always pick the latest edition. There should be more than one available with dates and version numbers.
  • Intel INF Installation: Download and install all the versions available in the portal.

Via Windows 11 Updater

If you haven’t updated the PC for quite a while, your system might be missing the latest PCI Express Root Port drivers. So, update by following these steps:

  1. Press Windows + I on the keyboard to launch the Settings app.
  2. Click on the Windows Update menu on the left side navigation panel.
  3. Select Resume updates or Check for updates on the right.
Windows update

Using the PowerShell Terminal

If you’ve downloaded the required PCI Express Root Port driver files from a third-party source and you’re wondering how to install them, follow these steps:

  1. Open the Start menu and type PowerShell.
  2. Select the Run as Administrator option available on the right.
powershell run as admin
  1. Now, execute any of the following scripts in the PowerShell terminal:
pnputil -i -a path\to\your\driver.inf

Or

pnputil -i -a C:\driver.inf
install driver script

Or

pnputil -i -a C:\driver.exe
  1. Make sure you edit the script to include the correct file locations. For example, path\to\your\driver.inf with a driver location like C:\driver.inf.
  2. Once installed, verify the action by running this script:
Get-WmiObject Win32_PnPSignedDriver | Where-Object {$_.DeviceName -like "*PCI Express Root Port*"}
verify driver

Run the SFC and DISM Scans

You might not need to install a driver to fix the yellow triangle warnings for multiple PCI Express Root Ports in the Device Manager. Instead, you can simply run an SFC scan to fix the existing driver files:

  1. Press Windows + X on the keyboard to launch the Power User menu.
  2. Click on the Terminal (Admin) option.
  3. PowerShell with elevated privileges will open.
  4. In the console, enter the following command and hit Enter:
sfc /scannow
  1. Wait for the scanning process to complete.
sfc scan

Restart the PC so that the changes can take effect.

successful sfc scan

However, if you see the following message, you’ll also have to do a DISM scan:

  • Windows Resource Protection found corrupt files but was unable to fix some of them.

Here’s how to perform a DISM scan:

  1. Open PowerShell with admin rights by following the steps mentioned earlier.
  2. Copy and paste this command into the terminal and hit Enter:
DISM /Online /Cleanup-Image /RestoreHealth
  1. Wait for the result.
dism restorehealth

Usually, you’ll get the following result.

  • Component store corruption detected: DISM will attempt to restore the Windows 11 files including crucial PCI Express drivers.

You can reboot the PC and check if the relevant hardware or software is working now.

Perform a System Restore

Has the newly added or existing PCI Express hardware worked as expected before? If so, you don’t necessarily need to troubleshoot the PCI Express Root Port driver issue separately. A system restore can fix the issue for good.

  1. Go to the Start menu and type Restore.
  2. Select the Create a restore point option.
restore start
  1. The System Properties dialog box will open.
  2. There, click on the System Restore button in the System Protection tab.
system restore tab
  1. Now, you’ll see the System Restore wizard.
  2. Click Next and choose a restore point created near a date when the hardware worked properly.
system restore option
  1. Select Next.
  2. Hit the Finish button to start the system restore process.

This method is applicable only if you’ve enabled the Windows System Restore feature previously.

Repair the Windows 11 OS

First, make sure you have Windows 11 Bootable USB installation media at hand. Now, follow these steps:

  1. Connect the bootable USB media to the PC.
  2. Restart the PC.
  3. Access the UEFI or BIOS menu.
  4. During POST, you’ll see the dedicated key you must press to access UEFI or BIOS, like the F8, F2, or Delete keys.
  5. Change the default boot media to the USB stick you’ve connected.
change boot order
  1. Now, save and exit the UEFI or BIOS.
  2. The PC will boot from the bootable USB media.
  3. You should see the Windows 11 setup screen.
  4. Click on the Repair your computer option at the bottom.
  5. Follow on-screen instructions to repair the PC.

Summary

So, there you have it! These are the tried and tested methods to update or download the PCI Express Root Port driver for Windows 11.

If you keep seeing warnings from third-party driver updater tools without experiencing real issues, you can ignore this. However, if you’re facing device PCI problems for real, these troubleshooting ideas are worth checking out.

Edge 128.0.2739.1 finally solves the frustrating printing issue that crashed the browser repeatedly

The newest update of Microsoft Edge in the Dev Channel, version 128.0.2739.1, has arrived with many solutions for fixing problems that aim to enhance user experience—especially regarding printing crashes, which can be annoying sometimes.

If you have been dealing with your browser crashing every time you attempt to print something, this update might improve things. There is a bug that crashes many pages and shows a ‘Status Access Violation’ mistake. This bug has been dealt with in the Canary Channel and hints at a coming solution.

The application should now not crash when opened in a different window from the history page on Android or while installing a new theme in gamer mode.

The browser’s stability has been improved when closing the final tab on Android or printing through an extension. The ‘More options’ menu has been changed. The Zoom menu item has been altered. The gradient in vertical tabs is now placed differently.

If you are using Android or iOS, they also have specific issues that were fixed with the Edge 128.0.2739.1 update. If you use Android, then authenticated pages should open as expected after this update, and the field Name for photos in the Recent tab gets defined now, too. But it should be better now if you use iOS when opening a new tab in landscape mode. There is also a fix for the problem of the search icon on the reward page disappearing when switched to dark mode.

The update is available on various platforms, such as Windows 10, 11, macOS, Linux, and Android. Nevertheless, some people might want to switch to a steadier channel for now due to the’ Status Access Violation’ bug in this specific release.

In other news, if your Edge bar doesn’t automatically open up anymore, don’t worry. Microsoft has disabled it temporarily and offered some fixes until a more permanent solution is released.

Slack Block Kit: Everything You Need to Know

Unlocking the potential of Slack Block Kit can transform your Slack applications into interactive and engaging experiences. Whether you’re a developer or a power user, understanding how to leverage Slack’s Block Kit components can make a significant difference.

What is Slack Block Kit?

Slack Block Kit is a UI framework designed to help developers create rich and interactive content within Slack applications. It comprises reusable components called blocks that can be stacked and arranged to form sophisticated layouts for various Slack surfaces like messages, modals, and Home tabs.

1. Understanding Blocks and Block elements

  1. Blocks: Visual components used to build layouts.
    • Types: Section, Image, Context, Divider, Actions, etc.
    • Usage: Each block type has specific use cases like displaying text, images, or interactive elements.
    How it Helps: Blocks enable a structured and visually appealing presentation of information within Slack apps.
  2. Block Elements: Interactive components within blocks.
    • Examples: Buttons, Select menus, Date pickers, etc.
    • Usage: Add interactivity to your messages by including these elements within appropriate blocks.
    How it Helps: Users can interact with your app directly from Slack, enhancing usability and engagement.
  3. Composition Objects: Define the content and properties within blocks and block elements.
    • Examples: Text objects, Option objects, etc.
    • Usage: Offer granular control over the data displayed and the way it is formatted.
    How it Helps: Ensures that messages are not only interactive but also clearly structured and easy to read.

2. Creating a Basic Block Kit message

  1. Open the Block Kit Builder from Slack’s official documentation.
  2. Select the block types you need (e.g., Section, Image, Button).
  3. Configure and preview each block.
  4. Combine blocks into a single JSON payload.

Example JSON:

{
  "blocks": [
    {
      "type": "section",
      "text": { "type": "mrkdwn", "text": "*Welcome to Slack Block Kit!*" }
    },
    {
      "type": "image",
      "image_url": "https://example.com/my-image.png",
      "alt_text": "Example image"
    },
    {
      "type": "actions",
      "elements": [
        {
          "type": "button",
          "text": { "type": "plain_text", "text": "Click me" },
          "action_id": "button_click"
        }
      ]
    }
  ]
}

How it Helps: This provides a structured way to start creating complex messages with rich formatting and interactivity.

3. Enhancing messages with interactivity

  1. Adding Buttons:
    • JSON Configuration: Add a button element within an actions block.
    { "type": "button", "text": { "type": "plain_text", "text": "Learn More" }, "url": "https://example.com" }
    • How it Helps: Buttons allow users to take immediate action, such as opening a link or submitting a form.
  2. Using select menus:
    • JSON Configuration: Add a select menu for user choices.
    { "type": "static_select", "placeholder": { "type": "plain_text", "text": "Choose an option" }, "options": [ { "text": { "type": "plain_text", "text": "Option 1" }, "value": "option_1" }, { "text": { "type": "plain_text", "text": "Option 2" }, "value": "option_2" } ] }
    • How it Helps: Select menus simplify choices, improving the user experience.

4. Building and prototyping with Block Kit Builder

  1. Accessing Block Kit Builder:
    • Navigate to Block Kit Builder on Slack’s official site.
    • Use the drag-and-drop interface to add and arrange blocks.
  2. Testing and Previewing:
    • Make real-time adjustments to the JSON payload.
    • Preview how your message will look in Slack.
    How it Helps: The visual interface makes it easier to prototype and iterate on your designs without diving deep into code immediately.

5. Handling user interactions

  1. Setup Interactive Components:
    • Define action_id for each interactive element.
    • Example for a button:
    { "type": "button", "text": { "type": "plain_text", "text": "Submit" }, "action_id": "submit_action" }
  2. Setting Up Backend:
    • Create an endpoint to handle user interactions.
    app.post('/slack/actions', (req, res) => { const payload = JSON.parse(req.body.payload); if (payload.actions[0].action_id === 'submit_action') { // Handle action } });
    • How it Helps: Ensures that your application can respond to user inputs, making it truly interactive.

By following this guide, you can effectively utilize Slack’s Block Kit to create engaging, interactive, and accessible Slack applications. Always remember to test your interactive elements thoroughly and keep accessibility in mind to provide the best user experience.

While you’re at this, you may also learn how to integrate Salesforce in Slack. You may also find useful our guide on how to create and add a poll in Slack.

Did you manage to start with the Slack Block Kit? Let us know in the comments below.

Microsoft Teams’ new Gallery features make sure no one is feeling left behind in meetings

Microsoft Teams released significant updates in July. From a new gallery view during meetings to custom emojis for chats, these improvements focused on making virtual interactions smoother and more tailored to individual needs.

Microsoft Teams’ Gallery Design ensures fairness for everyone, no matter if their camera is switched on or off. It creates tiles of equal size for all meeting participants, enhancing the inclusive atmosphere. You can also adjust how many people you want to see on your screen, with a maximum of 49 participants at once.

Event organizers, get ready for a surprise. The ability to drag and drop presenters gives you more control over your event’s sequence and offers a fresh twist in managing how things run. Also, switching a presenter’s video on and off gives you more control over the visual emphasis of your event.

If you adore the universe of 3D avatars and virtual settings, Microsoft Mesh technology has also gotten some love. Additional reactions for Mesh avatars mean you can express yourself fresh and amusingly during meetings.

For those communicating with emojis and reactions, you can now add your personal touch to chats with custom emojis and reactions. Think about showing your team’s special vibe by using just the perfect emoji. Also, improved sound notification controls allow you to personalize how each type of message alerts you, helping you keep focus on what matters most.

The new meeting gallery in Teams meetings offers an organized, customized, and more foreseeable experience. Whether you want to concentrate on individuals on camera or alter the appearance of certain participants, these adjustments aim to improve engagement and connection during meetings.

For event organizers, having a feature to control presenter visibility and order in webinars and town halls is very beneficial. People from the Government Community Cloud will be glad about the new town hall events, as they promise broad involvement among organizations.

In terms of devices, Teams Rooms and Devices have also received improvements. With new certifications, audio and video experiences are confirmed to be high quality. For Teams Phone, updates such as explicit consent recording and private line support provide more privacy control, too.

Microsoft’s July changes show they are dedicated to making Teams progressive and adaptable for all users. Whether you’re hosting a webinar, joining a virtual meeting, or simply chatting with your team members, these updates aim to enhance your experience by offering more smoothness, customization, and enjoyment. So, what is your opinion? Are these updates going to change the way you use Teams?

You can read more about it here.

The new Sky Cipher Xbox Controller might actually look better than the Deadpool/Wolverine duo ones

Less than a week after introducing the Deadpool and Wolverine Xbox Controllers, Microsoft has attracted attention again with its new creation: the Sky Cipher Special Edition Xbox Wireless Controller. This is not just an ordinary controller; it’s a stylish item that mixes usefulness and attractiveness.

The controller features a semi-transparent sea blue cover, giving gamers an inside look at their device. The controller has a D-pad and triggers in the color of sky-blue. The thumbsticks are also styled with a sky-blue base, topped by dark blue tops. The rubber hand grips also have this serene sky-blue shade, creating an aesthetically pleasing piece of hardware.

But the appearance is not the only thing that makes it special. According to the announcement, Microsoft has taken a big step towards sustainability with this release. The packaging of the Sky Cipher controller shows a change from the usual way, trying to lessen environmental effects.

Sky Cipher introduces a new packaging design for Xbox controllers that embodies our commitment to reducing product carbon footprint. Single-use plastics have been removed from the packaging and the traditional paper manual has been replaced with a QR code for a digital quick start guide.

Single-use plastics are no longer used; instead, a QR code for a digital quick-start guide and packaging is 22% smaller and 21% lighter. This change shows the increasing tendency in tech to adopt more earth-friendly approaches.

Also, the Sky Cipher is not just good-looking. It is made to improve your gaming enjoyment and can be used with Windows 10/11 PCs, Xbox consoles, and modern smartphones.

You might be moving through a dense virtual world of your beloved role-playing game or fighting energetically in an important first-person shooter match—this controller assures that it has enough power to last up to 40 hours so you can continue playing without interruption. And with its Bluetooth technology, you can play games just about anywhere.

This special edition controller is available for $69.99 and will be delivered on August 13th.

What do you think about this new Sky Cipher Xbox Controller? You can read more about it here.

How to Delete a Plan in Microsoft Planner?

Organizing projects in Microsoft Planner also includes deleting plans that are no longer needed. This could help you tidy up your workspace. In this guide, we will discuss the steps to delete a task and plan in Microsoft Planner. Read on!

How can I delete a plan in Microsoft Planner?

Remember, only plan owners have the right to delete plans from the Planner app. Plan members can leave the plan to remove their membership.

1. Delete plans (Plan owners)

  1. To delete a plan, locate the three dots from the right side of the plan name, click it, and then select Plan settings. Some of you might have Plan details instead of Plan settings.
  2. In the Plan settings, choose Delete this plan.Plan settings - microsoft planner delete plan
  3. On the Delete plan window, place a checkmark to select the I understand that this plan and all of its tasks will be permanently deleted option, and then click Delete.

However, if you are the plan owner but want to leave the plan without deleting it, you need to hand over or assign the group owner role to someone else.

If you are unable to receive notifications from your Microsoft Planner app, check your notification settings or follow these steps to fix it.

2. Leave plans to remove them (for Members)

  1. To leave a plan, locate and click the three dots from the right side of the plan name.LEave plan - microsoft planner delete plan
  2. From the drop-down menu, select Leave plan.

How can I delete a task in Microsoft Planner?

Remember, if you accidentally delete a task, there is no way to recover it, and you need to create it from scratch. So, you should be very careful when deleting a task.

1. Delete the task from the board

  1. To delete a task on the Board, locate and click the three dots from the right side of the task card.task delete - microsoft planner delete plan
  2. Next, choose Delete.

2. Delete the task from the task’s details

  1. To delete a task from its details, locate and click the three dots at the top right corner.Delete from withn task
  2. Now, choose Delete to remove it.

If you want to learn how to keep track of your tasks when working remotely, we have a step-by-step guide for you.

To conclude, you can delete a plan very easily from Microsoft Planner; all you need is to be a Plan owner. However, if you are just a member, you can leave the plan to make it disappear from your Planner app.

In case you are not able to see Microsoft Planner in Teams, it could be a glitch in the Teams app or problems with the cache; read this guide to learn solutions.

If you have any questions or suggestions about deleting a plan in Microsoft Planner, feel free to leave them in the comments section below.

Salesforce Slack Integration: Everything you Need to Know

Integrating Salesforce with Slack can significantly streamline your workflows and enhance team collaboration. If you’re looking to master this integration, here’s a step-by-step guide to help you get started and make the most out of these powerful tools.

How do I integrate Salesforce into Slack?

1. Install and configure the Salesforce app for Slack

  1. Verify with a Salesforce System Administrator that the Slack app for Salesforce is installed and configured in Salesforce.
  2. Visit the Salesforce page in the Slack App Directory.
  3. Click the Add button. You will be redirected to the Salesforce app’s landing page.
  4. Click Add to Slack again on the landing page.
  5. Follow the prompts to authenticate your Salesforce account and complete the installation of the app in Slack.

Installing and configuring the Salesforce app for Slack ensures that you can seamlessly connect Salesforce records with Slack, enhancing workflow and communication within your team.

2. Connect Salesforce and Slack accounts

  1. Open the Slack desktop app and click on Apps in the left sidebar. If not visible, click More to find it.
  2. Search for and select Salesforce.
  3. Click on the app’s Home tab and then click Connect Account.
  4. Follow the prompts to authenticate your Salesforce account with Slack.
  5. You can also connect by clicking on a Salesforce alert in a Slack channel and following the authentication prompts.

Connecting your Salesforce and Slack accounts allows for real-time updates and seamless data sharing between platforms, enhancing productivity and visibility.

3. Search and share Salesforce records in Slack

  1. Click the + icon next to the message field in Slack.
  2. Select Find and share a record from the menu.
  3. Enter the name of the Salesforce record you are looking for (or choose from the drop-down menu).
  4. Click View record and then click Share.
  5. Choose a Slack conversation and click Share again.
  6. Click Done to complete the process.

Being able to search and share Salesforce records directly in Slack enables quick access to important information and facilitates easy collaboration among team members.

4. Set up Salesforce alerts in Slack

  1. Click Apps in the left sidebar of Slack or click More if it’s not visible.
  2. Search for and select Salesforce.
  3. From the app’s Home tab, click Set Up My Alerts.
  4. Check the boxes next to each alert you want to receive and click Save.

Setting up Salesforce alerts in Slack ensures you and your team stay updated on key changes to Salesforce records, reducing the risk of missing important updates.

5. Manage channel alerts

  1. Click the + icon next to the message field in Slack.
  2. Select Add/edit alerts for a channel from the menu.
  3. Choose a channel from the drop-down menu and click Add a record.
  4. Select a record from the drop-down menu, then click View record.
  5. Click Add to [channel name] and check the boxes for each alert you want to post in the channel.
  6. Click Save.

Setting up channel alerts in Slack allows you to keep your team informed about changes to specific Salesforce records or objects in a shared workspace.

6. Create bulk alerts

  1. Click Apps in the left sidebar or More if not visible.
  2. Search for and select Salesforce.
  3. From the app’s Home tab, click Add Bulk Alert.
  4. Choose a channel from the drop-down menu, then click Next.
  5. Select a record type and click Next.
  6. Click Add to [channel name] and uncheck any changes you do not want to post to the channel.
  7. Click Save to finalize.

Creating bulk alerts in Slack ensures updates for all records of a particular type are posted to a channel, facilitating comprehensive monitoring and communication.

7. Troubleshoot alerts

  1. If Salesforce alerts stop working, disconnect and reconnect your Salesforce account from Slack.
  2. Ask your Salesforce System Administrator to reauthorize your connection to Slack in Salesforce.
  3. Reconfigure your channel alerts as needed.

Troubleshooting alert issues helps you maintain consistent communication and ensures that important Salesforce updates are received in Slack.

8. Send Slack messages to Salesforce

  1. Find the Slack message you want to send to Salesforce.
  2. Click the three dots icon, then choose Add to Salesforce.
  3. Search for a Salesforce record and select it from the drop-down menu.
  4. Click Add to attach the Slack message to the Salesforce record.

Sending Slack messages to Salesforce allows you to attach relevant Slack conversations to Salesforce records, keeping all pertinent information accessible in one place.

9. Send Salesforce records to Slack

  1. Find the Salesforce record you want to send to Slack.
  2. At the top of the page, click the Send to Slack button.
  3. Select a workspace and choose the channel or person to send the record to.
  4. Click Send to Slack.

Sending Salesforce records to Slack streamlines the process of sharing Salesforce data with your team, simplifying collaboration and communication.

10. Disconnect your account

  1. From the Slack desktop app, click Apps in the left sidebar. If not visible, click More.
  2. Search for and select Salesforce.
  3. From the app’s Home tab, click Disconnect Account.
  4. Click Disconnect to confirm.

Disconnecting your Salesforce account from Slack is a straightforward process that helps manage access and tidy up integrations you no longer need.

By following these steps, you can master the Salesforce Slack integration, ensuring seamless workflows and improved team collaboration. To avoid future issues, regularly check for updates and maintain clear communication with your Salesforce System Administrator.

If Salesforce is not working in Chrome, check out the highlighted guide for ways to fix it. You might also be interested in our guide on how to create and delete reminders in Slack.

Did you manage to integrate Salesforce with Slack by using our methods? Let us know in the comments below.

AMD Ryzen AI 9 HX 370: Everything You Need to Know

The Ryzen AI 9 HX 370 chip, part of the Ryzen AI 300 series, is AMD’s bold step into the future, marrying the cutting-edge Zen 5 microarchitecture with the RDNA 3.5 graphics architecture. Here, we’ll see what makes this chip stand out in a sea of processors clamoring for attention.

AMD Ryzen AI 9 HX 370 specifications and performance

First, let’s take a look at the Ryzen AI 9 HX 370 tech specs provided by AMD:

FeaturesValue
NameAMD Ryzen AI 9 HX 370
FamilyRyzen
SeriesRyzen AI 300 Series
Form FactorLaptops, Desktops
AMD PRO TechnologiesNo
Consumer UseYes
Regional AvailabilityGlobal
Former CodenameStrix Point
Architecture4x Zen 5, 8x Zen 5c
# of CPU Cores12
Multithreading (SMT)Yes
# of Threads24
Max. Boost ClockUp to 5.1 GHz
Base Clock2 GHz
L2 Cache12 MB
L3 Cache24 MB
Default TDP28W
AMD Configurable TDP (cTDP)15-54W
Processor Technology for CPU CoresTSMC 4nm FinFET
Package Die Count1
AMD EXPO Memory Overclocking TechnologyYes
Precision Boost OverdriveYes
Curve Optimizer Voltage OffsetsYes
CPU SocketFP8
Supported ExtensionsAES, AMD-V, AVX, AVX2, AVX512, FMA3, MMX-plus, SHA, SSE, SSE2, SSE3, SSE4.1, SSE4.2, SSE4A, SSSE3, x86-64
Max. Operating Temperature (Tjmax)100°C
OS SupportWindows 11 – 64-Bit Edition, RHEL x86 64-Bit, Ubuntu x86 64-Bit

The Ryzen AI 9 HX 370 is powered by AMD’s latest Zen 5 CPU microarchitecture, which promises notable performance enhancements not just from higher clock speeds. This signifies a crucial approach: rather than depending on increased clock rates, AMD emphasizes the efficiency of each core to deliver more performance per watt. Moreover, in our current era where power efficiency is equally essential to pure power, such method may prove to be a game-changer for notebooks.

However, AMD did not only do this. They also understand that Artificial Intelligence (AI) is becoming more crucial in computing. Therefore, they have given the Strix Point an XDNA 2-based NPU which can deliver performance of up to 50 TOPS. This addition is not just a symbol for future; it’s a clear answer to the rising need for AI abilities in regular devices. Imagine your laptop being smarter and more intuitive, all thanks to this chip.

The shift to RDNA 3.5 for the integrated graphics is an additional good point. The choice of AMD to enhance its graphics structure in the Strix Point chip implies improved visuals and more effective rendering. Whether you play games or work on projects that have heavy graphics demands, this chip is made for handling it all without difficulty.

However, why is it important for you to pay attention to all these technical terms? The reason is that they directly relate to tangible advantages. Reduced processing time, improved graphics performance and better AI incorporation equates to a notebook which not only functions as a device but also possesses the strength required for coping with present-day existence. Also, AMD is highlighting its focus on portable computing by introducing mobile chips before Intel.

Laptops equipped with AMD Ryzen AI 9 HX 370

ASUS Zenbook S 16, which carries the Ryzen AI 9 HX 370, shows what this new chip can achieve. It has a configurable TDP, Lumina OLED display and set of features made for both portability and performance making it like looking into future notebooks. Starting from $1699 as its base cost, this laptop is seen to be a high-quality choice for people who want the finest available options.

Summing up, AMD’s Ryzen AI 9 HX 370 is a pretty good CPU to have in your laptop, bringing all the latest tech to your fingertips. And it’s not just about the specs; it’s about what those specs enable you to do.

If you want to know if your laptop has an NPU, check out the highlighted guide for reference.

For any other questions, you can check the comments section below and leave us a line there.

Reddit blocked Microsoft from searching its site and using the data to train their AIs

Reddit’s CEO, Steve Huffman, highlighted Microsoft’s secret habit in a tech-world twist. The executive made an interesting statement about how Microsoft used Reddit’s extensive data collection to teach its AI services without Reddit’s knowledge.

In an interview with The Verge, Huffman mentioned that Microsoft, Anthropic, and Perplexity are among the AI businesses that acted like the Internet was their oyster by freely utilizing content for training their AI. This came after Reddit decided to take a strong stand in demanding search engines pay if they want to access its data—only Google has paid up until now.

Huffman used a clear analogy to explain how difficult it is to prevent these big tech companies from accessing Reddit’s data. He said blocking them feels like trying to keep squirrels away from a bird feeder. Even though Microsoft provided options for webmaster crawling controls, Reddit decided to use another search engine, which Huffman didn’t mention.

This situation is not solely about Reddit and Microsoft. Instead, it offers a small look at the broader discussion regarding how tech firms utilize public data for their AI objectives. Microsoft AI CEO Mustafa Suleyman’s comment that internet data has been “freeware” stokes more discussion, implying a long-established understanding that data can be used for training artificial intelligence.

Huffman’s position suggests changing how content creators perceive their connection with search engines and AI firms. The old arrangement of exchanging data for traffic appears to be changing. As AI’s data hunger increases, the conditions for interaction are being redefined. Reddit’s decision could create a first instance, motivating additional content providers and preventing crawlers from agreeing.

This ongoing story of Reddit versus Microsoft is more significant than just a dramatic disagreement between two companies. It represents a crucial matter of our times, showing the intricate connection between data privacy, artificial intelligence development, and the fundamental principles on which the Internet functions.

Microsoft SQL Server Management Studio Download & Install

If you’re looking to manage your SQL Server databases efficiently, downloading Microsoft SQL Server Management Studio (SSMS) is a must. Whether you’re a beginner or a seasoned DBA, this guide will walk you through various methods to get SSMS up and running on your machine.

How do I download Microsoft SQL Server Management Studio?

1. Download directly from Microsoft

  1. Go to the SQL Server Management Studio download page.
  2. Find the link that says Download for SQL Server Management Studio (SSMS) and click on it.
  3. Find the file in the Downloads section of your browser and launch it.
  4. If prompted to allow the app to make changes to your device, click Yes.
  5. If the computer needs to be restarted before setup can continue, click Restart. After your computer restarts, navigate back to the downloaded file and open it again.
  6. Launch the installer and click Install. If prompted again, allow the app to make changes by clicking Yes.
  7. If the setup asks for a restart upon completing the installation, click Restart.

By following these steps, you’ll have SSMS installed and ready to use on your machine.

2. Installing with PowerShell (Unattended Install)

  1. Click the Start button, type powershell and click on Run as administrator from the results.
  2. Type the following commands one by one:
    • $media_path = "<path where SSMS-Setup-ENU.exe file is located>"
      $install_path = "<root location where all SSMS files will be installed>"
      $params = " /Install /Quiet SSMSInstallRoot=
      $install_path" Start-Process -FilePath
      $media_path -ArgumentList $params -Wait
  3. For example:
    • $media_path = "C:\Installers\SSMS-Setup-ENU.exe"
      $params = "/Install /Quiet SSMSInstallRoot=`"C:\Program Files\SSMS`"" Start-Process -FilePath
      $media_path -ArgumentList
      $params -Wait

This PowerShell approach allows you to install SSMS silently without GUI prompts, making it ideal for automated deployment scenarios.

3. Step-by-step installation guide

  1. Visit the SQL Server Downloads page.
  2. Click on Download now under the Developer edition for non-production use.
  3. Open the downloaded file and choose the Basic installation type.
  4. Accept the License Agreement and follow the prompts to complete the installation.
  5. Upon completion, click “Install SSMS” on the SQL Server completion screen.
  6. This action will redirect you to the SSMS download page. Download the SSMS setup file.
  7. Open the SSMS-Setup-ENU.exe file from your downloads folder and follow the installation prompts.
  8. After installation, go to the Start menu, find the Microsoft SQL Server Tools folder, and launch SQL Server Management Studio.

Following these detailed steps ensures a smooth installation process for SSMS and SQL Server.

4. Downloading previous versions

  1. Navigate to the Previous SSMS releases page.
  2. Browse and select the version you want to download and install.
  3. Follow the same steps as mentioned in Solution 1 to complete the installation.

This allows you to download and install previous versions of SSMS in case you need a specific version for compatibility reasons.

By following any of these solutions, you’ll be able to successfully download and install Microsoft SQL Server Management Studio. Remember to keep your SSMS updated for the latest features and security improvements.

We also have a complete guide on how to get SQL Server 2019 for Windows 11. If you can’t install SQL Server on Windows 11, click the highlighted link to fix it!

For any other questions, feel free to hit the comments section below.

Google Chat vs Slack: Find Your Ultimate Communication Companion

When it comes to communication tools, effectiveness and efficiency are at the top of the list so we put a Google Chat vs Slack comparison to see which one reigns supreme.

What is the difference between Google Chat and Slack?

1. Google Chat

1. User interface

Google Chat offers a simple and minimalistic user interface. All you have to do is log into your Gmail account and access Chat from the apps listed. You’ll then see your direct message chats on the left and other tools like the calendar, tasks and contacts on the right side.

2. Collaboration tools

Google Chat benefits from Google’s ecosystem of apps and you can collaborate within Google Docs, Sheets, and Slides. This makes collaboration so much easier because you don’t have to leave the app for most tasks.

3. Security and privacy

Google chat leverages the TLS security protocol which makes sure your messages are encrypted and secure from prying eyes. You can also enable the SSO feature for convenience so that you don’t have to enter your credentials any time you’re using a different device.

To do so, follow the steps below:

  1. Sign in to your Google Admin console with an administrator account.
  2. From the Admin console Home page, go to Devices, then Chrome.devices
  3. On the left, click Settings, then Users & browsers. 
  4. To apply the setting to all users and enrolled browsers, leave the top organizational unit selected.
  5. Under Single sign-on, select Enable SAML-based single sign-on for Chrome devices from the list.chrome sso
  6. Click Save.

As an additional layer of protection, you can also enable the 2FA feature for verification whenever you’re using a new device.

When it comes to privacy, if you’re part of a workspace, the admins can configure your account to keep communications limited to the organization. However, if you’re on a personal account, anyone on your contact list can message you unless you block them.

4. Pricing

Google Chat has a subscription fee where it charges per user with the lowest subscription going for $6 and the most expensive at $18.

The good thing is that when you subscribe to the workspace, all the other apps. For instance, you’ll get access to secure cloud storage, a digital whiteboard and ad-free mail among other benefits.

And just so that you get a feel of what you’re in for, you can start with the free trial of the plan you wish to subscribe to before you commit.

2. Slack

1. User interface

Slack is almost similar to Google Chat, but it is a little bit packed. You’ll access your direct messages, channels, and private groups from your left sidebar. It has quite the pomp and color making it a little more inviting.

The user interface is the same on the desktop and the web versions with slight variations on the Android app.

2. Collaboration tools

Slack has a host of apps you can add to the app directory. WebEx, Google Calendar, Google Drive, Microsoft Teams, Trello, Adobe and Canva among others. This makes it quite easy for file sharing and task management.

3. Security and privacy

Slack also leverages the TLS protocol for data encryption and has also enabled the 2FA verification feature to lock out unauthorized persons.

For privacy, you must be part of a workspace to access Slack. There are no personal accounts but you can always create your own workspace and invite members to join. You can then create shared channels within the workspace to limit communication between certain members.

4. Pricing

Slack has three subscription plans with the cheapest going for $6.50 and the most expensive at $12.50. The difference is negligible compared to Google Chat but for Slack, the premium features you’ll have access to are only within the program.

Unlike its counterpart Google Chat where other apps in the ecosystem are also included. Further, Slack does not provide a free trial with any of the plans.

In summary, the main differences are as below:

Google ChatSlack
Simple interfaceHighly intuitive interface
Integration with Google appsIntegration with an extensive list of third-party apps
Free trial with an all-inclusive Google Workspace subscriptionFree limited version and paid subscription plans
Limited featuresHighly customizable with advanced features
Video-calling integrated with Google MeetVideo calls available via Huddles
No message limitLimited message history on free version

What are the pros and cons of using Google Chat and Slack?

Google Chat

Pros

  • Easy-to-use interface – The Google Chat interface is one of the simplest and cleanest interfaces that make navigation a walk in the park.
  • Seamless integration – Since Google Chat is a product of Google, you get the added advantage of integration with other Google products for a unified experience that makes working easier.
  • Built-in security – Another advantage is that you benefit from Google’s robust security system that secures your data.

Cons

  • Limited features – The simple interface comes at the cost of limited features. There’s little to no customization and advanced functionalities.
  • Highly dependent on Google – While being part of the Google ecosystem enables a unified experience, it makes it vulnerable to downtimes. A service shutdown on Google affects all its services.

Slack

Pros

  • Feature-rich – Slack has an extensive list of features and functionalities that make it a top choice for communication. Its integration with a host of other apps also delivers a unified experience.
  • Highly customizable – You can easily customize your theme, notifications and other settings to your preferences. You can even create your own custom themes on Slack.
  • No distractions – Slack only allows members from your workspace to message you. Any external parties do not have access which limits spam and any other unwanted messages.

Cons

  • Expensive – Although you’ll get a decent set of features on the free version of Slack, most organizations prefer the paid version because it does not delete messages. This can be an expensive subscription.
  • Message expiry – As mentioned. the free version of Slack only keeps messages for 90 days. You might have a hard time retrieving crucial messages or data after a lapse of this period.

Finally, the choice between Google Chat and Slack will depend on your communication needs. If your organization benefits from the Google integration, you’re better off with Google Chat.

However, if you enjoy advanced features, more customizations and integration with a host of apps, Slack is the way to go. Of course, Slack won’t open at times and messages may fail to send on Google Chat but these are all part of the errors that occur from time to time and can easily be solved from our fix guides.

Having the side-by-side comparison, if you were to start a workspace, which one of the two would you go for and why? Share your thoughts with us in the comment section below.

If you’re still exploring alternatives, you can also check our full Slack vs Teams comparison to see how Microsoft’s platform measures up against Slack.

What are the Best Practices Of Using Microsoft Planner?

Microsoft Planner is an easy-to-use work management application that is a part of Microsoft 365. It helps you organize teamwork visually and is suitable for business teams of all sizes. To help you maximize the benefits of Microsoft Planner, we have discussed the best practices for using the workflow management tool to help your team stay productive.

What are the best practices for using Microsoft Planner?

1. Set clear goals

Whether you are managing an event, completing a product launch or coordinating with your team on daily tasks, define your objectives at the start.

Along with this, you must also set expectations about the end results and how will you measure the completion or success of the task.

2. Organize tasks with buckets and labels

In order to group your tasks, you can use buckets and labels. Grouping can rearrange the clusters of tasks on the plan page for further analysis.

The default grouping is done by bucket and the advantage of using buckets for grouping is that you can define these categories of tasks.

You can also add up to six colorful labels and indefinite buckets for each plan. While adding bucket and label categories, think of priority, quality, task types, connection, distribution, and delivery methods.

3. Setup notifications and reminders

Make sure that team members get notifications about task assignments, changes and due dates. This can help keeping the team in loop and prevent them from missing deadlines.

Also, ensure to set reminders for future deadlines or progress changes, so that the tasks can get completed on time.

If your Microsoft Planner notifications are not working., it could be because notifications aren’t properly configured; read this guide to know more.

4. Use Checklist and Subtasks

You can add checklists to tasks to outline the steps that are needed to complete them. This approach will make tracking progress easier than ever.

If you think the task is complex, try breaking it into subtasks. This will help you managing even minute details of a task to ensure nothing is overlooked.

5. Be Specific

You should write tasks clearly with detailed information as it can set the right expectations.

Every task should be assigned to a team member, this will increase accountability. And, accountability can help track progress and is a good way to manage tasks effectively.

Also, mention due dates for all the tasks assigned to keep tasks on track and help the assignee prioritize work. You should always set realistic deadlines as this could motivate the team members and prevent them from being overburdened.

6. Integrate with Microsoft 365

You can integrate Microsoft Planner with Microsoft Teams, and it can help you manage tasks directly within you team’s communication hub. This will also allow you to keep tabs on task updates and have tasks related discussions in team chats.

Moreover, you can sync Planner with Outlook to keep an eye on your tasks and deadlines right in your calendar. This can help you manage your time effectively and makes sure you are on top of your schedule.

To create workflows that automate repetitive tasks and processes, you can use Power Automate.

7. Review regularly

It is advised to schedule periodic meetings to review tasl progress, address any issues, and adjust plans if required. This will help you keep your project on track.

You should always be flexible and update the task, deadlines, and change priorities according to the project’s needs.

8. Collaboration and communication

You can use comment feature to communicate updates, ask questions or provide feedbacks on a task. This can help keep the relevant information within the task.

Make sure you attach files related to a tasks and give all the connected people access to them, thereby streamlining the workflow and reducing the need to search for files.

If you want to learn how to use Microsoft Planner to keep track of tasks when working remotely, check out this guide for the details.

What are the other things that you can keep in mind?

Managing tasks

  • Add a due date – Adding a deadline or a Due Date field can set the expectations right. The team members can choose to focus on a task depending on the due date mentioned.
  • Include Progress field – You must add Progress field, it comes with three options – Not started, In Progress and Completed. This will help you track the progress of the task at hand.
  • Add Labels – Planner comes with 25 color-coded labels which can help you organize tasks based on information specific to each plan.
  • Priority – Another way to set the expectations and set priority is to add a Priority field, which comes with four options Low, Medium, Important, and Urgent.

Finding right tasks

  • Filter – Filter is a combination of six attributes, Due date, Progress, Priority, Label, Bucket, and Assignment. You can use this to find the right task for you.
  • Buckets – It is one of the primary categories to organize tasks. You can create as many Buckets as required to sort tasks by criteria like client names, process stages, or departments.
  • Organize – You can also organize tasks using options like Due Date, Progress, Priority, Label, and Assignee.

Keep tracks of tasks

  • Use built-in notiifcations– The notifications help you keep a track of tasks assigned to you along with upcoming deadlines
  • Explore the Charts view – You can access it at the top of the plan. It can provide you visual representations of task status such as Tasks due tomorrow, marked as Urgent or pending review.

Microsoft Planner is a powerful tool that helps managing tasks and projects effectively and to get the most of it, you must set clear goals, write down the task clearly, use buckets and labels, and review the tasks regularly.

In case you want to learn how to create custom fields in Microsoft Planner, we have a detailed guide with instructions for you. You can also export data to Excel. Moreover, you can check out alternatives if Microsoft Planner doesn’t suit you completely.

If there is any other best practices for using Microsoft Planner that you use and you think could benefit others, feel free to share them in the comments section below. We will add it to the list.

How to Create Custom Fields in the New Microsoft Planner

Microsoft Planner lets teams manage projects effectively; however, sometimes, you need more customization to fit your workflow. That’s why custom fields come into play. Custom fields capture unique data points like priority levels, project phases, and more.

In this guide, we will discuss how to create custom fields in Microsoft Planner. These fields will help you tailor tasks to better meet your team’s needs and improve project tracking.

How can I create custom fields in Microsoft Planner?

  1. Once you have a Premium Plan, go to the Grid view, choose Add column, then New field.Add column - microsoft planner custom fields
  2. Select an appropriate field Type:Type
  3. Enter a Field name, and select Create.

With the premium plan, you can create up to 10 custom fields. If you want to learn how to use Microsoft Planner to keep track of tasks when working remotely, you can check out this guide.

What are the types of custom fields?

types of custom field
  • Text – It can contain any character. You can utilize it to add columns for notes, justifications, or other details.
  • Number – It can only have numbers. You can also rollup options in subtasks with Min, Max, Average, and Sum calculations. When you create the number field, select the Rollup type. For instance, create an Estimate column with a Sum calculation to calculate the total work required.
  • Date – Accepts any date, you can either type the date or choose it from a calendar. You can use it to track important dates, like approval dates.
  • Yes/No -You can add a drop-down list with Yes and No options, which can help track progress and quality checks.
  • Choice – It allows you to create a drop-down list with 2 to 20 options, including emojis and characters. For instance, you can add a Risk field with choices like High, Medium, and Low.

You can add emojis on Windows using Windows +; and on Mac, you need to press Control + Command + Space.

Furthermore, you can also use the paint bucket icon to add colors to each choice for easier visual identification. However, if you want to remove the colors, you can delete them by selecting the trash can icon.

If you want to edit any custom field you added, all you need to do is choose Edit from the custom column menu in the Grid view. You can also choose to add custom coloring or filtering based on the content in the custom fields.

If you often work remotely and want to learn how to assign tasks while working out of the office using Microsoft Planner, check out this guide.

How can I get started with Microsoft Planner in Teams?

If you are already using Microsoft 365 and Microsoft Teams, you should try out the new Planner app in Teams.

To check out the premium capabilities from within the Planner app, you can opt for a free 30-day trial of these advanced capabilities by clicking the diamond icon in the app. Once the trial is over and you decide to go with the premium license, you can request it.

If you want to understand the differences between Microsoft Project, Microsoft Planner, and Microsoft To-Do, we have a separate guide available.

Some users complained about Microsoft Planner notifications not working. If you are facing the same issue, read this guide to learn the solutions.

If you have any questions or suggestions about creating custom fields in Microsoft Planner, feel free to let us know in the comments section below. We’re happy to help!

Microsoft Planner Not Showing in Teams: 4 Ways to Get it

Having trouble with Microsoft Planner not showing up in Teams? You’re not alone. Many users face this issue, but don’t worry—I’ve got a few solutions that should help you get Planner up and running in no time.

Why can’t I see the Planner app in Teams?

This can occur due to glitches with Teams or problems with cache. If Planner isn’t enabled in the Admin Center, you’ll also encounter this issue.

What can I do if Microsoft Planner is not showing in Teams?

1. Quit and restart Teams

  1. Find the Microsoft Teams icon on the taskbar (usually at the bottom of your screen).
  2. Right-click on the Teams icon and select Quit.
    quit teams systray
  3. Open the Microsoft Teams app again to see if Planner is loading.

2. Verify Planner is enabled by admin

  1. If you have admin access, go to the Microsoft 365 Admin Center.
  2. Navigate to Settings > Services & add-ins.
    services and add-ins
  3. Ensure that Microsoft Planner is toggled on.
  4. Lastly, ensure that the person adding the planner has permission to add Groups in the tenant.

3. Add plan as website

  1. Go to Planner on the web.
  2. Click on New Plan.
  3. Set a name and make the plan Private.
  4. Add members that you want to access the plan.
  5. Copy the link to the plan.
  6. Open your channel in Teams and click on Add a new tab.
    add teams new tab
  7. Select the Website and paste the plan link.

This method is a workaround if your plan isn’t showing in a private channel.

4. Clear Teams cache

  1. Ensure Microsoft Teams is completely closed. You can do that by following the steps from Solution 1.
  2. Press Win + R and paste %appdata%\Microsoft\Teams  
    appdata teams
  3. Select all files and folders inside the directory (usually by pressing Ctrl + A).
  4. Right-click and select Delete.
  5. Open Microsoft Teams again to see if Planner is now showing.

If that doesn’t work, you might have to reinstall Teams to fix the problem. Sadly, this isn’t the only problem, many reported that Microsoft Planner is not working for them at all.

This isn’t the only problem, and many reported that notifications aren’t working in Planner as well that Planner isn’t saving comments, but we already tackled these issues in separate guides.

Microsoft Viva is getting Copilot-based summarization and assistance and will allow members to re-use existing content

Microsoft Viva, the work-oriented social media platform where organizations can keep in touch with their employees, will soon be enhanced with a couple of handy features.

According to the latest entries in the Microsoft 365 Roadmap, the platform will facilitate users’ interactions and work completion.

First, there is AI, and more specifically, Copilot. One entry says that Microsoft Viva will add Copilot to its summarization capability in the following months (approximately January to June 2025), allowing the AI to generate a comprehensive summary using the preferred tone or length. The summarization can then be used to catch up with other organization members, such as managers, shareholders, or specific teams. Here’s what the entry says:

Copilot in Viva Goals helps you save time by generating a comprehensive summary with tone, length of your preference for one or more goals in the view, allowing you to quickly catch up on and share your goal status and progress with leaders, stakeholders, and your team.

Microsoft

Another Copilot-based feature coming to Microsoft Viva is the AI model, which will help users find and catch up on documents, meetings, chats, and emails, all within the platform.

Copilot in Viva Goals helps you save time by generating a comprehensive summary with tone, length of your preference for one or more goals in the view, allowing you to quickly catch up on and share your goal status and progress with leaders, stakeholders, and your team.

Microsoft

The first feature will be available starting June 2025, while the second will be available in April 2025. However, another capability is coming to Microsoft Viva, which will be released next month.

Viva users can copy a publication within an existing campaign with just a few clicks, effectively streamlining their content creation process. The capability will allow them to easily reuse existing content across other Microsoft 365 apps, such as SharePoint, Outlook, and Teams. Here’s what the entry says:

Gone are the days where you must rewrite or manually copy and paste content from an old publication to a newly drafted one to reuse it. Soon in Viva Amplify, you will be able to copy a publication within an existing campaign with just a few clicks. This new feature streamlines the content creation process, enabling communicators to easily reuse existing content across SharePoint, Outlook, and Teams, including all channel-specific customizations and related audiences, saving you time and effort.

Microsoft

What do you think about these new capabilities coming to Viva?

5 Simple Ways to Fix PS4 Error Code NW-31194-8

Many players encountered an error message saying the connection to the server has been terminated with code NW-31194-8 on PS4. The error could occur due to an unstable internet connection or server maintenance. First, check the PSN (PlayStation Network) service status, then restart your router and ensure it has the latest firmware installed.

How can I fix error code NW-31194-8 on PS4?/h3

1. Restart the PS4 console

  1. Press the PS button on your controller and select the Power option.
  2. Choose Restart PS4.Restart PS4-nw-31194-8
  3. Once the console is rebooted, check if the error still shows up.

2. Check network connection using the inbuilt tool in PS4

  1. Go to Settings on the home screen.
  2. Navigate to Network.Network - nw-31194-8 
  3. Click Test Internet Connection.test your connection
  4. When the test is completed, you will get the network status. If there is a problem with the network, follow other methods.

3. Change DNS on console

  1. Go to Settings on the home screen.
  2. Select Network.Network
  3. Click Set Up Internet Connection.Set up internet connection - nw-31194-8
  4. Choose Wi-Fi or LAN Cable, depending on the option you are using.Wi-fi or LAN cable
  5. Click Custom, choose Automatic for IP address settings, then choose Do Not Specify for DHCP host name.Custom -  
  6. On the DNS Settings screen, select Manual.
  7. For Primary DNS, type 8.8.8.8, and for the Secondary DNS, type 8.8.4.4. DNS settings
  8. Once done, test the network connection.

Setting up the DNS manually can also help fix NW-31473-8 error code; check out this guide to learn more on the topic.

4. Change the MTU Settings on Your Console

  1. Go to Settings on the home screen.
  2. Select Network, then click Set up Internet connection.Set up internet connection - nw-31194-8
  3. Choose Wi-Fi or LAN Cable, according to the option you are using.Wi-fi or LAN cable
  4. Click Custom, choose Automatic for IP address settings, then choose Do Not Specify for DHCP host name.Custom -
  5. Select Automatic in the MTU settings screen.
  6. Choose Do not use for Proxy server.

5. Update the PS4 software using your computer

Note icon NOTE
Make sure you have a PC with a reliable internet connection and a FAT32 or exFAT USB flash device.
  1. Download the update file from this link from the PS4 System Software Update page.
  2. Connect the USB flash drive on your computer and press Windows + E to open File Explorer.
  3. Navigate to the USB drive, click New, then Folder from the drop-down menu, and name it PS4.
  4. Double-click the PS4 folder to open it, then click New Folder, and name it UPDATE.
  5. Double-click the UPDATE folder and copy & paste the file you downloaded in the first step in the folder. Ensure the name of the file is PS4UPDATE.PUPFolder - file - nw-31194-8
  6. Go to the system tray, right-click the pen, and choose to Eject it safely.
  7. Now plug the USB drive into your PS4 console.
  8. Press and hold the power button, and release it after you hear a second beep to start the PS4 in safe mode.
  9. Connect the DualShock 4 controller to the console with its USB cable, and press its PS pairing button.
  10. Choose System Software Update.System Software Update
  11. Select Update from USB Storage Device, then click OK.USB storage - nw-31194-8
  12. Choose Next to continue and follow the on-screen instructions to complete the process.

If the PS4 console is unable to recognize the files, check the folder and file names and ensure they are in uppercase, then try again.

Updating the system software can help fix the not able to sign in to your PS4 error as well; to learn more you can check out our detailed guide on the issue.

For more PS4 network errors like the ce-33743-0 or the wc-40383-8-ps4 error code check out our detailed articles.

If you have any other questions or suggestions about PS4 Error Code NW-31194-8, feel free to leave them in the comments section below.

The Edge bar won’t automatically open anymore, but Microsoft is working on a fix. However, you can try this

You could be one of the many Windows 10 users who is confused as to why Edge Bar’s auto-start function has stopped working. In case you didn’t notice, this convenient tool that automatically appears to assist in making life simpler no longer starts on its own.

However, it seems that Microsoft is handling it. They have recognized that the Edge Bar doesn’t appear automatically when you start your computer. They might have temporarily shut down this feature, but efforts are being made to restore it.

So, what do you do in the meantime? You can still manually launch the Edge Bar. Go to the Edge sidebar, click on the gear icon at the bottom right corner, and there you have it.edge bar

If you can’t find your sidebar, it’s okay. Go to Settings, then Sidebar, and ensure that “Always show sidebar” is activated.edge bar

Are you facing this issue?