Microsoft Teams is set to introduce Administrative Units for Teams Administration, which could greatly reduce admins’ workload. According to the latest entry in the Microsoft 365 Roadmap, the new capability will be added to Teams starting in August 2024.
The Administrative Units in Microsoft Teams will be available on Desktop, iOS, Mac, and Android devices, allowing admins to make important organizational changes from anywhere. With Administrative Units in Teams, admins can delegate other admin roles or administration to a specific subset of users in their organization.
The good thing is that you can choose between a series of criteria, such as department, location, or business unit.
According to Microsoft, admins can create detailed management scenarios for their Teams environment. They can also assign the following roles, which can be used to manage only the users, groups, or devices within their Administrative Units.
We are excited to announce the availability of administrative units (AUs) for Teams administration. AUs are a way to delegate admin roles and administration to a subset of users in your organization based on attributes such as department, location, or business unit. With AUs, you can create more granular and flexible management scenarios for your Teams environment. You can assign the following roles, allowing them to manage only the users, groups, and devices within their AU: Teams Administrator.
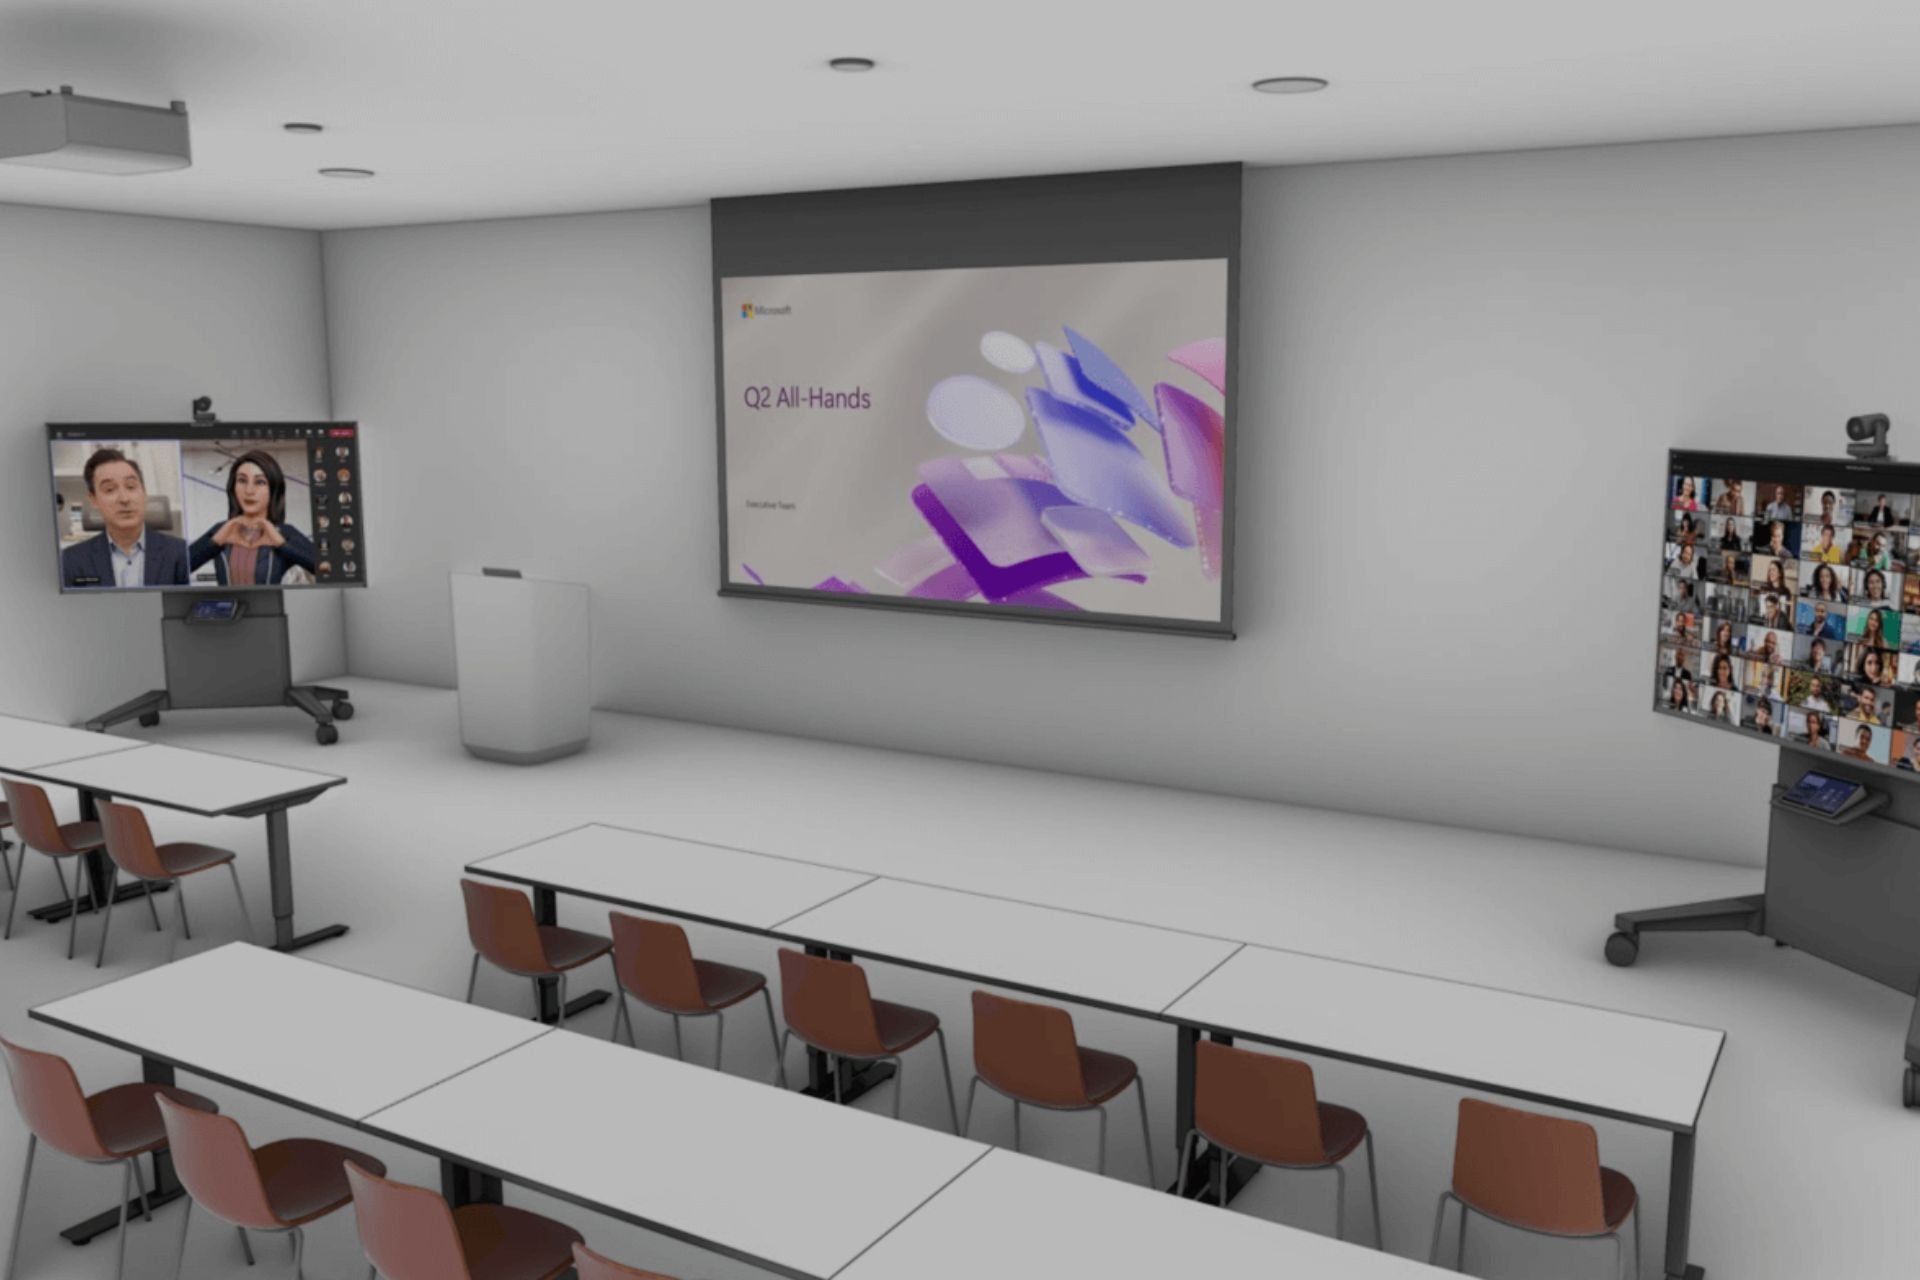
Regarding Teams Rooms, Microsoft will also update Teams to support multiple camera views for hybrid meetings, making remote participants feel as if they’re physically present in the meeting room.
What do you think about these new enhancements? Are you excited about them? Let us know in the comments section below.
Microsoft Teams will enhance the Teams Rooms on Windows to support multiple camera views for users. According to the latest entry to the Microsoft 365 Roadmap, the enhancement will also go live on Desktop and Mac devices.
With this feature, IT admins and managers play a crucial role in setting up four single-stream cameras. This setup offers a comprehensive view of the meeting, benefiting remote attendees and colleagues.
This feature will give those attending remotely access to each camera so they can follow all the action happening in the Teams Room. They can also toggle between views if they want a certain perspective.
Teams Room on Windows will support up to four single stream cameras that will be shown to remote meeting attendees. With multiple camera view, remote meeting attendees will have the ability to follow all the action in the room and manually toggle between views from the room that they want to see.
Microsoft
This capability is useful for those working remotely because it creates a seamless experience in hybrid meetings so attendees can feel they’re attending them in person.
The Redmond-based tech giant has been interested in offering as many solutions as possible to this idea, such as the hybrid meeting. The company is about flexibility, from intelligent shared spaces to Microsoft Mesh.
What do you think about the new multiple-camera views coming to Microsoft Teams?
In a time when digital safety is crucial, Microsoft’s Windows Hello for Business has made a big leap to improve it. This new capability substitutes passwords with powerful two-factor confirmation.
Signing in requires an enrolled device and a PIN or biometric input, such as fingerprint or face recognition. This strategy boosts security and smooths the user’s experience. Just think about it: You no longer need to recall or alter intricate passwords frequently. It sounds handy.
According to the official blog post, Windows Hello for Business fits well with Microsoft’s current identity structure, making remote entry solutions simple. This system is a component of Microsoft’s wider Zero Trust security plan, which focuses on ensuring user identity security by using strong authentication and completely removing passwords.
It’s simple yet powerful in its approach. It uses public key or certificate-based authentication, which is more robust against breaches, thefts, and phishing.
If you are curious about the technical aspect, Windows Hello for Business can authenticate users to a Microsoft or Active Directory account. It is also possible to have a Microsoft Azure Active Directory (Azure AD) account.
This feature works well on devices with a trusted platform module (TPM) chip because the PIN is supported by strong security hardware called TPM. Additionally, certificate renewals occur automatically, making this procedure simple for users.
Microsoft’s use of Windows Hello for Business spread across more than 100,000 devices running on Windows 10. They utilized present infrastructure such as Intune, System Center Configuration Manager, Public Key Infrastructure, and Azure Active Directory.
This large-scale use demonstrates Microsoft’s dedication to improving security without causing difficulty for users.
Enrollment of users can happen in different ways, depending on the scenario. Some might need a smart card or multi-factor authentication for creating PINs.
The system can handle several enrollment scenarios, such as on-premises Active Directory domain-joined devices and Microsoft Azure AD-joined devices managed by Microsoft Intune.
The physical structure and server tasks necessary to activate “Windows Hello” as a company credential are detailed. They include elements like a Microsoft Azure AD subscription, Microsoft Intune for enrolling devices, AD FS handling federated identities, etc.
This complex arrangement ensures that all parts of the process verifying user identity are secure and effective.
Establishing policies for Windows Hello for Business requires setting up domain-based Group Policies on devices joined to a Windows 10 domain and Intune policies on non-domain-joined devices. These policies help you specify the complexity and length of PINs and control whether Windows Hello is enabled.
The user experience should be easy to use and understand. For domain-joined computers operating on Windows 10 Anniversary Update or later, Group Policy settings will start the certificate enrollment process and Windows Hello for Business policies.
When users sign in, they are asked to make a PIN, which starts the setup of Windows Hello for Business.
Microsoft’s actions with Windows Hello for Business show its commitment to security and progress. It is using powerful two-factor authentication, which is a big move in ensuring the safety of access to business resources.
This change not only improves security but also makes the experience better for users, showing an important advancement in the battle against online dangers.
Opera is a darling browser to many and for good reason because the developers have factored in even those with lower-end hardware with Opera mini extreme mode.
Opera Mini is largely used on mobile phones but you can also download Opera Mini for PC. The main reason for using the extreme mode is to optimize performance in areas where 4G and 5G networks are unavailable.
Since the network infrastructure is not as advanced, this mode allows faster loading of pages while minimizing data. Images are compressed to a lower resolution for fast load times and data is compressed from the server to reduce the amount transmitted to the user.
How do I turn on the extreme mode in Opera Mini?
On your phone, launch the Opera Mini browser.
Tap on the Opera icon at the bottom right corner and select the Settings icon.
Scroll down and tap on Data savings.
In the drop-down menu, select Extreme.
You can also switch it off by selecting the Off option.
What are the benefits of using extreme mode in Opera Mini?
Data savings – If you’re on a limited data plan, switching on extreme mode will allow you to use your data sparingly.
Battery savings – If your phone drains battery fast especially when browsing, the extreme mode will allow you to extend your browsing hours without draining the battery too fast.
Optimized performance – Lower-end devices are the biggest beneficiaries because this mode allows faster load times.
Built-in ad blocking – With built-in ad blocking, pages load faster and save data.
Additional tips and troubleshooting in extreme mode
Extreme mode not working – When you turn on extreme mode, pages may fail to load. In such cases, try reloading, restarting or updating your browser.
Low-quality images – Switching to extreme mode means sacrificing on quality. Images and videos may be in low quality but you can always download in high quality if necessary.
Limited websites – The extreme mode is stringent on compression so some sites may fail to load properly with these measures in place. You can switch to a lower setting or switch it off for special cases.
Conflict with security protocols – Accessing secure sites such as banking websites may be impossible because extreme data compression may compromise SSL protocols.
With so many variations of the browser, it can be difficult to select the most appropriate version. Lucky for you, we have a breakdown on Opera vs Opera One so you can get familiar.
That’s all we had for this article but we’d like to get your feedback on your experience with Opera Mini extreme mode. How were the data savings? How fast were the pages loading? Did you experience any issues? Let us know in the comment section below.
Google Sheets is now extra powerful on Chrome and Microsoft Edge browsers, and believe me when I say it’s long overdue. If you’ve ever sat at your desk tapping your fingers while waiting for formulas to calculate or pivot tables to update – this one’s for you!
According to the official changelog, Google has enhanced the speed of these operations by twofold, making data-crunching tasks a delight. However, you may be wondering how they accomplished this magical feat. The secret lies in a clever web technology called WasmGC (WebAssembly Garbage Collection).
This tech sorcery enables quicker code running, implying that your spreadsheets will match your thinking pace from now on – it’s not the reverse.
Google is not only working to make the calculations quicker. They are also attempting to decrease the initial loading time of Sheets and better the functioning of other characteristics such as copy/paste and filtering. It feels as if they have read our thoughts and are addressing all our small complaints about Sheets.
When you find yourself stuck in front of a white spreadsheet, not knowing where to start, Google now offers pre-built tables for tasks that occur often, such as project handling or planning an event. It means no more getting stuck with “spreadsheet paralysis.”
Additionally, the new tables feature enhanced design, including column types, filters, color coding, and drop-down menus. Google has given us the keys to a more orderly and visually attractive data kingdom.
Lastly, the new feature of conditional notifications is a game-changer. You can now create custom rules to send email alerts when certain conditions are met. Picture receiving an email when a task gets the ‘Completed’ status in your project management spreadsheet. It’s like having a personal assistant keeping tabs on your data.
Google Sheets is no longer simply about spreadsheets. It’s more focused on helping you utilize your data faster and more intelligently. Whether you use it on Microsoft Edge or Google Chrome (although Edge is better than Chrome these days), whether you are a small business owner, finance expert, or someone who wants to organize a community event, these updates have been designed to simplify life for everyone. Thus, it is time to test these fresh elements and observe how they enhance efficiency.
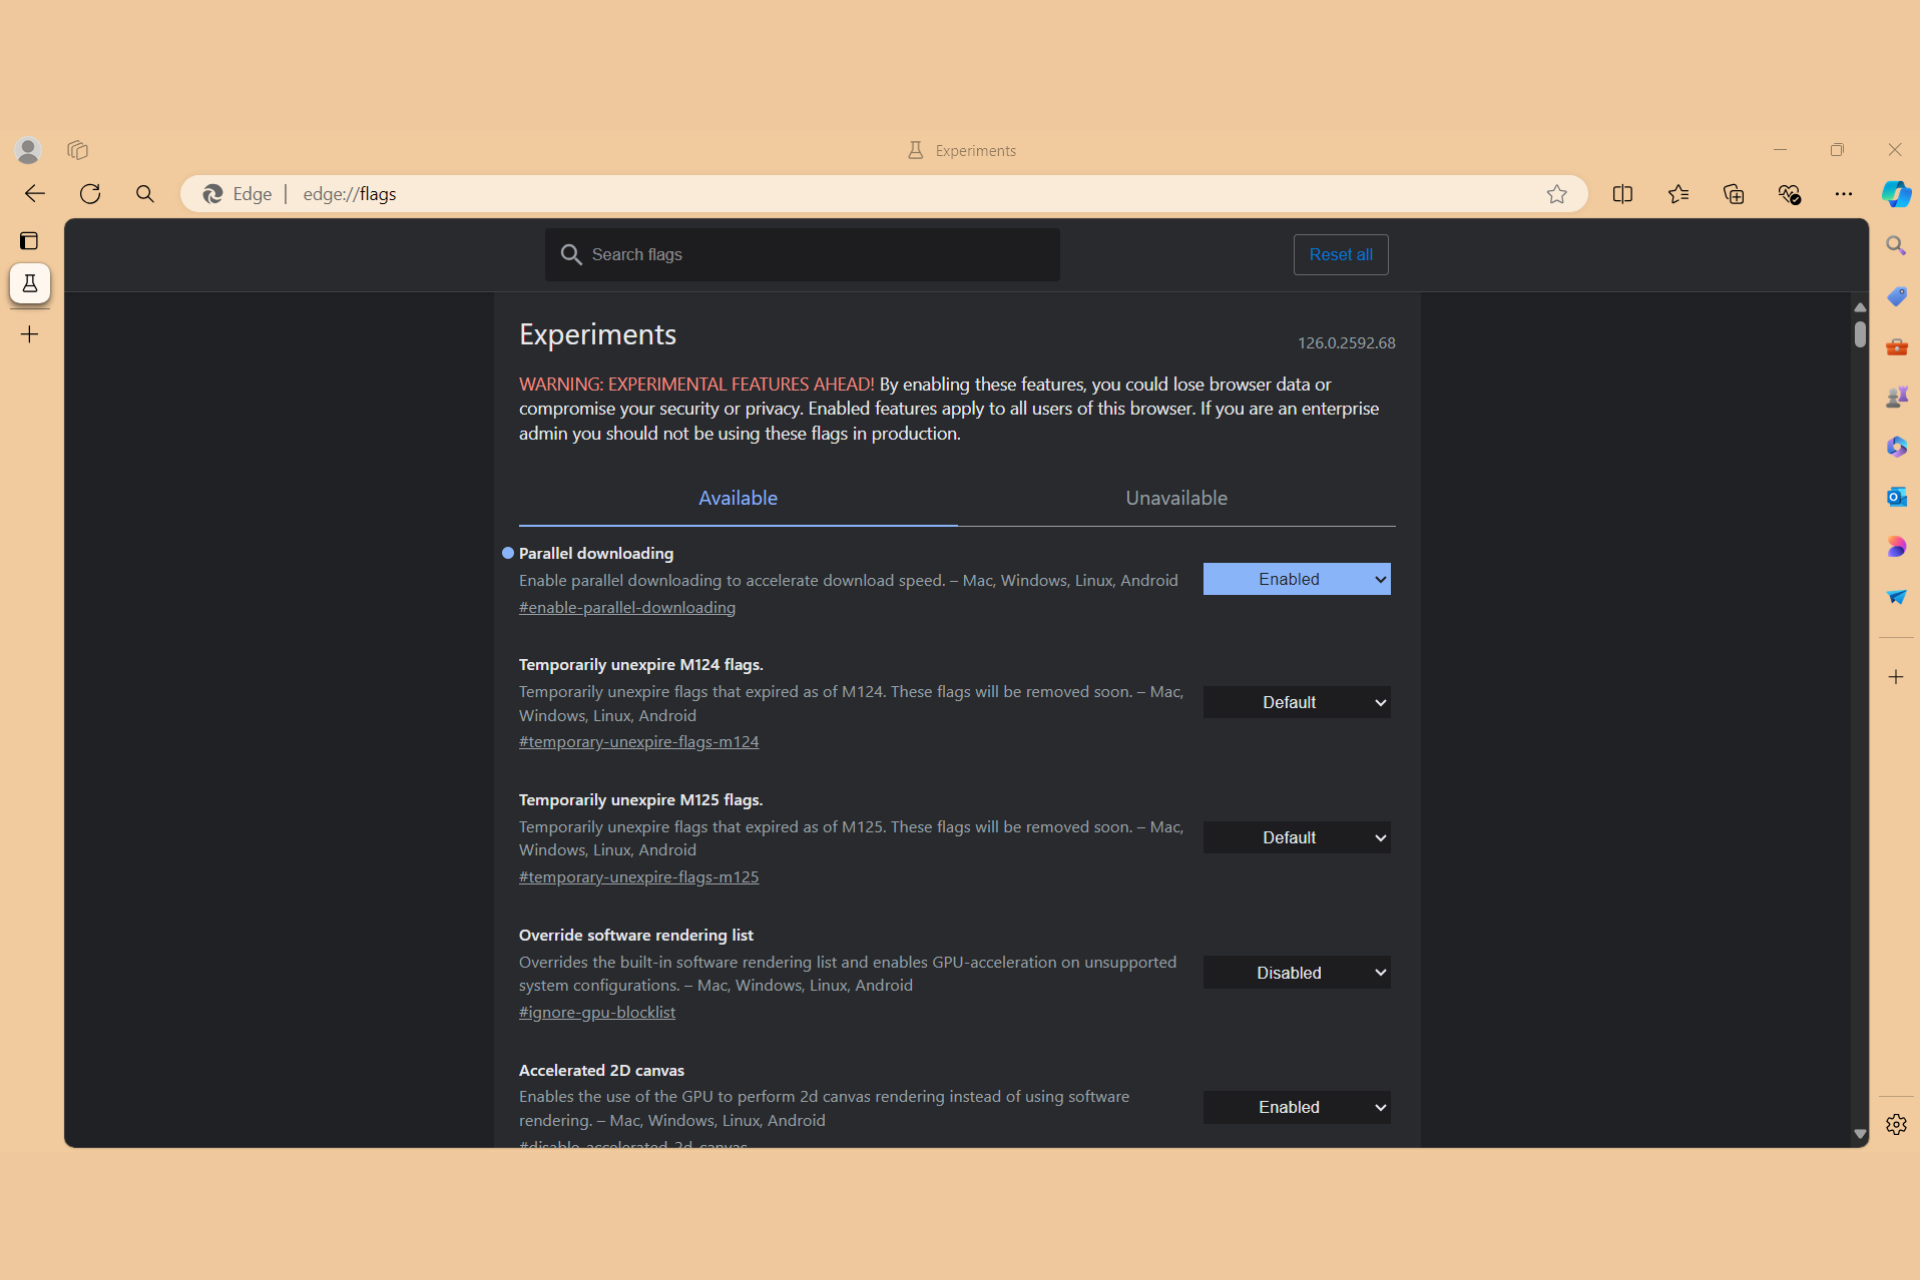
If you’re looking to boost your Microsoft Edge browser’s performance, enabling specific Edge flags can make a significant difference. These experimental features can enhance speed, responsiveness, and overall browsing experience. To enable Edge flags just type or paste edge://flags in the address bar and hit Enter.
What are the best Edge flags to enhance performance?
1. Enable experimental JavaScript
Improves JavaScript performance, making browsing faster.
How to Enable:
Search for Experimental JavaScript in the flags menu.
Enable the flags: Experimental JavaScript and Experimental JavaScript shared memory.
Restart Edge.
This flag can help your browser process JavaScript-heavy websites more efficiently, reducing load times and improving responsiveness.
2. Enable Future V8 VM Features
Enhances JavaScript engine performance by enabling upcoming V8 features.
How to Enable:
Search for V8 in the flags menu.
Enable the Future V8 VM features.
Restart Edge.
Enabling this flag allows Edge to use the latest JavaScript engine optimizations, which can significantly speed up web applications.
3. Enable Parallel downloading
Speeds up downloads by splitting files into smaller parts and downloading them simultaneously.
How to Enable:
Search for Parallel downloading in the flags menu.
Enable Parallel downloading.
Restart Edge.
This flag is particularly useful for users who frequently download large files, as it can significantly reduce download times.
4. Enable GPU Rasterization
Accelerates rendering by using the GPU for rasterization.
How to Enable:
Search for GPU in the flags menu.
Enable GPU rasterization.
Restart Edge.
By shifting rasterization tasks from the CPU to the GPU, this flag can improve the speed and smoothness of web page rendering.
5. Enable WebAssembly Tiering
Boosts performance of web apps by compiling WebAssembly code more efficiently.
How to Enable:
Search for WebAssembly in the flags menu.
Enable the WebAssembly baseline compiler and WebAssembly tiering.
Restart Edge.
WebAssembly is used by many advanced web apps, and enabling these flags can lead to a noticeable improvement in their performance.
6. Enable VP8 Hardware Acceleration
Enhances video quality and performance by leveraging hardware acceleration.
How to Enable:
Search for VP8 in the flags menu.
Enable Toggle hardware accelerated VP8 video encoding for Cast Streaming.
Restart Edge.
This flag can improve video playback performance, especially for video streaming services that use the VP8 codec.
7. Enable ANGLE Graphics Backend
Uses the GPU more effectively to render web content.
How to Enable:
Search for ANGLE or OpenGL in the flags menu.
Enable Choose ANGLE graphics backend and select OpenGL if you have an NVIDIA GPU.
Restart Edge.
This flag can improve the rendering speed of web pages, especially on systems with powerful GPUs.
8. Enable Smooth scrolling
Makes scrolling smoother and more responsive.
How to Enable:
Search for Smooth scrolling in the flags menu.
Enable Smooth scrolling and Edge refresh rate boost on scroll.
Restart Edge.
This flag enhances the scrolling experience, making it feel more fluid and less choppy, especially on high-refresh-rate displays.
9. Enable Auto Dark Mode for Web Contents
Forces dark mode across all webpages.
How to Enable:
Search for Enable force dark in the flags menu.
Enable Auto Dark Mode for Web Contents.
Restart Edge.
This flag ensures a consistent dark mode experience across all websites, reducing eye strain during nighttime browsing.
10. Enable Heavy Ad Privacy Mitigations
Reduces resource consumption by ads, enhancing privacy and performance.
How to Enable:
Search for Heavy ad privacy mitigations in the flags menu.
Enable Heavy ad privacy mitigations.
Restart Edge.
Enabling this flag can reduce the impact of resource-heavy ads on your browsing performance, leading to a smoother and faster experience.
By tweaking these Edge flags, you can significantly enhance your browsing experience. Of course, you can still reverse these settings by using the same method or by hitting the Reset all button in edge://flags.
To learn more, don’t miss our guide on how to use edge://flags page for more useful information.
Remember to keep your browser updated to benefit from the latest performance improvements and security patches. Let’s hear about your questions or suggestions in the comments below.
In a world full of progress and change in technology, it is thrilling to learn about companies that are leading the way and making big accomplishments. Lenovo has attracted attention recently by securing the esteemed 2024 Microsoft Device Partner of the Year Award.
This honor is not a small achievement; according to the official press release, it positions Lenovo at the apex of worldwide appreciation within Microsoft’s extensive partner network. The award signifies Lenovo’s outstanding skills in creating and applying customer solutions using Microsoft technology.
Lenovo today announced it has won the 2024 Microsoft Device Partner of the Year Award. The company was honored among a global field of top Microsoft partners for demonstrating excellence in innovation and implementation of customer solutions based on Microsoft technology.
Lenovo
Lenovo’s accomplishments result from its powerful strategic partnership with Microsoft. Che Min Tu, who holds the role of SVP and Group Operations Officer at Lenovo, has shown great pride in the recognition it has received.
This achievement emphasizes Lenovo’s dedication to offering devices, infrastructure, and solutions that bring good results to customers worldwide. This prize is not only for technology but also for the way it enables business and leads to a smarter future that includes everyone.
The Microsoft Partner of the Year Awards is a major event in the tech industry. It honors partners with exceptional abilities to deliver Microsoft Cloud applications, services, devices, and AI innovation.
With more than 4,700 nominations from over 100 countries around the globe, being acknowledged as a winner demonstrates leadership and inventive qualities within this field.
In the Devices group, Lenovo was recognized for its excellent solutions and services. This highlights its skill in creating and implementing third-party Windows devices and incorporating Microsoft Cloud plus AI Services.
Lenovo is not only about computers; it’s a worldwide technology giant that aims for Smarter Technology for All. Lenovo has variety in its portfolio, including PCs to AI-enabled devices and infrastructure. The company is committed to investing in innovation, which creates a more equitable, trustworthy, and smarter future.
This award marks an important step on Lenovo’s path but is still far from being finished. Lenovo focuses on changing operations and guiding businesses toward smarter AI, and it will keep leading in technology creation.
In a realm where the click-clack noise from keyboards and precise mouse movements have always been symbols of PC gaming, a noticeable change is happening. Many gamers are putting down their usual tools for more relaxed playing methods – using controllers.
Valve, the massive company controlling the Steam game platform, has provided some insights into this trend by providing numbers that show how PC gamers’ tastes are changing over time.
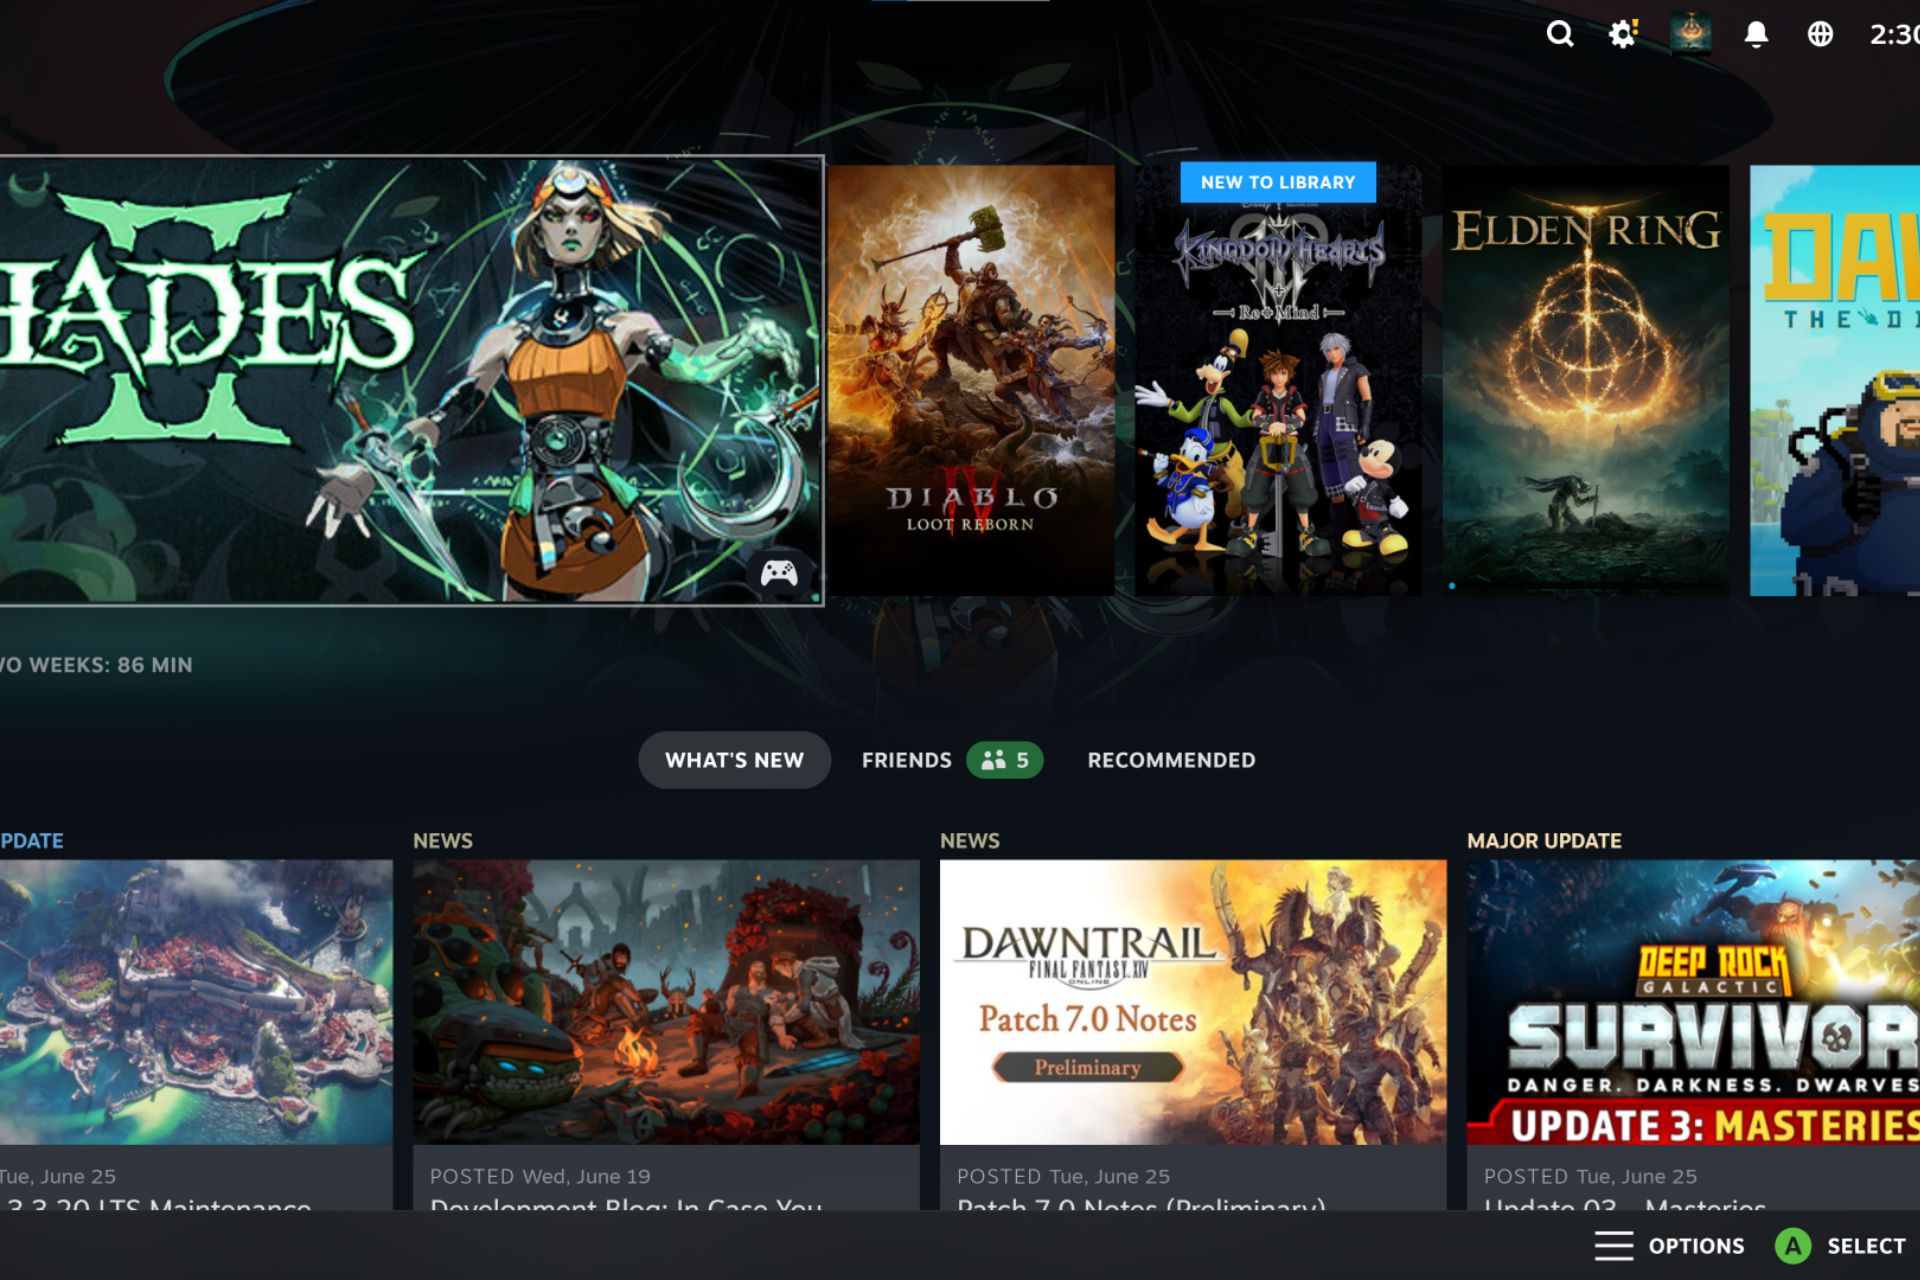
Almost 60% of these controller enthusiasts on Steam are devoted to Xbox controllers. This shows their high demand and maybe also the comfort they provide during extended gaming periods, as people like using them.
Valve’s latest discoveries highlight that controller usage on Steam has significantly increased, moving from only 5% to 15% daily over six years. This increase indicates a wider acceptance and inclusion of controllers in the PC gaming world.
59% of sessions are using Xbox controllers
26% are using PlayStation controllers
10% are on Steam Decks
Valve
And it’s not just any controller that’s spearheading this movement. Controllers from Xbox, which have a comfortable design and work with many things, are liked by 59% of the people who use a controller on Steam. This liking is not limited to one particular Xbox generation but includes all of them, such as the old Xbox 360 up until the newest model like Xbox Series X|S.
When it comes to controller usage, PlayStation controllers have a significant share. They are used by 26% of Steam gamers. Valve’s own controller, the Steam Deck, which is both a handheld gaming device and also functions as a controller, holds 10% of this market.
The variety in the use of different types of controllers shows how varied the gamer community’s tastes and preferences are. Valve’s work to better support these controllers, such as teaming up with Sony for PlayStation controllers and enhancing Xbox controller compatibility, has surely contributed to this movement.
Indeed, the increased controller usage on Steam is not simply a matter of numbers. It mirrors the shifts occurring in gaming customs and likings.
Be it about sitting comfortably in a chair with a controller or enjoying the physical sensations of pressing buttons, this alteration towards controllers demonstrates an overall yearning for an adaptable and cozy gaming encounter.
Valve’s dedication to accommodating numerous controllers, encompassing more than 300 types through Steam Input, guarantees that players can enjoy their games as they prefer.
In the world of gaming, the trend towards using controllers by PC gamers is expected to keep growing. Valve is leading this change and making it easier for players to adopt, which means we can expect a future in PC gaming that is diverse and open to all gamers.
If you love using a keyboard and mouse or if you enjoy a relaxed controller-playing style, one thing’s certain: how we play video games is changing, and new ways are available.
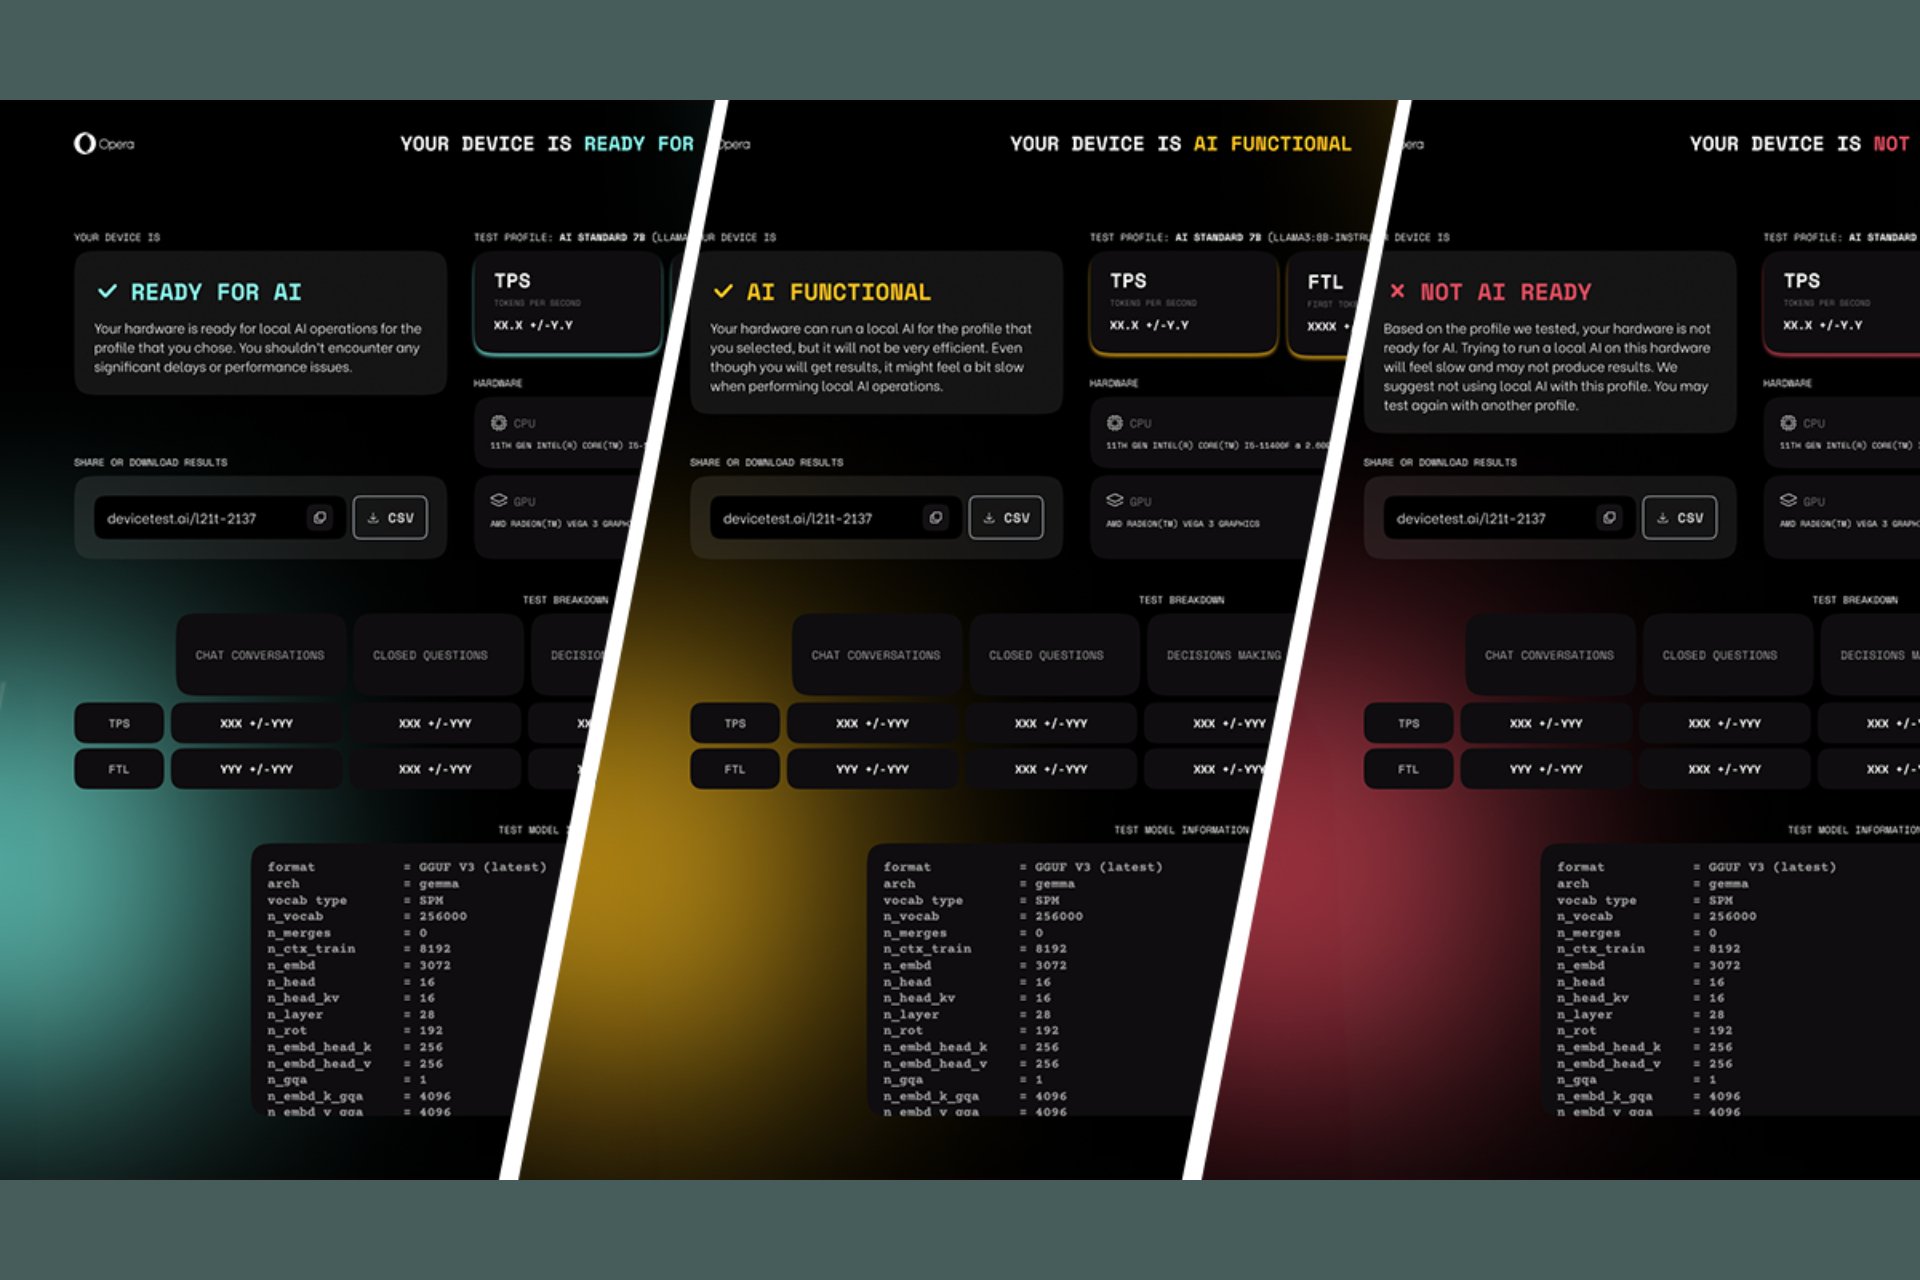
Copilot+ PC and AI-ready PC are two terms that is on a lot of people’s minds right now. We all know that you need to have a NPU coprocessor to run AI tasks locally. Otherwise, you may use the online bots such as GchatGPT, Copilot and Gemini. However, with the launch of the Opera One R2 browser, now you can know exactly if your PC is AI ready or not by using the AI-ready PC test.
How do I use Opera to check if my PC is AI ready?
Launch Opera One R2 and log into your account using an email account, Google account, Apple ID etc.. If you don’t log in, you won’t be able to use Aria AI.
Click on the Aria icon and then on the Menu button from the top-left corner.
Now, select Settings from the bottom of the window.
Here, click on Local AI Models and hit the Go to test button under AI Benchmark.
You will be redirected to a new tab where you can click on Run test to start.
Finally, select the AI profile you want to test and click on Start Test.
Unless you bought one of the latest Copilot+ PCs, we recommend starting with the AI Ready profile first.
Once you click the blue Start button, the browser will run the AI test for your PC.
The web app will download a LLM and run several tests to assess the AI capabilities of your PC.
For these tests, you will need between 2GB and 7.5GB of free space on your drive and a graphics card capable of software acceleration. You will get a full report if your PC is AI ready or not.
Have you been looking at gaming laptops and feeling surprised by the high prices? Many people have experienced this when they looked into buying an HP Omen gaming laptop. The HP Omen Transcend 16 was originally sold for $1,600, but now it’s down to its lowest price at $1,100. Indeed, a reduction of $500 from its initial cost. You surely don’t want to miss scrolling over this price cut.
Now, knowing the details is important. At this price point, you may wonder what makes it so cheap. There’s no trick here. This device has an RTX 4050, 16GB RAM, and 512GB SSD storage.
If you are unfamiliar with tech language, it’s a good deal and offers great value for money, especially when compared to other similar deals. Now, about the screen. It has a 165Hz refresh rate at 1200p, and you can easily enhance it to 240Hz at 1600p.
So, what makes the HP Omen Transcend 16 worth considering? First, apart from the incredible discount, it’s a laptop that doesn’t force you to pick between performance and cost. It is a special type of laptop that provides top-notch features without requiring an extravagant amount. This makes it ideal for gamers restricted by their budget or individuals wanting a better model but unwilling to spend too much money.
But if the HP Omen does not truly fit your desire, there is no need to fret. The variety in gaming laptops is wide-reaching; choices exist to accommodate each requirement and financial plan. Be it for a greater amount of RAM, another GPU, or merely a dissimilar appearance; you can potentially find a deal that satisfies your yearning. Also, the holiday season is coming soon. We can’t predict what other discounts may appear during this period.
Would you like to seize the opportunity to get your hands on the HP Omen Transcend 16 at this special price? It’s a tempting deal, indeed. What are you waiting for? Is it time to upgrade your gaming setup without emptying your wallet?
In a time when recording and sharing amazing gaming moments is just as important as playing the game itself, Valve presents its game-changer: Steam Game Recording. This fresh feature allows players to record, edit, and distribute gaming clips within a single location—the Steam client.
This function could be revolutionary for PC gamers who are searching for an easy way to display their abilities, triumphs, or incredible instantaneous moments.
Now that the beta version is out, it’s as if Valve has given gamers a magical tool to immortalize their gaming abilities.
This is not just any feature; it’s a system made to capture your game moments without giving you trouble. Are you in a serious battle, or do you only want to show your friends an amusing mistake? This tool handles all situations. And the greatest part? Very easy to use.
According to Steam, you can begin and cease recording by yourself or permit the Background Recording function to do it for you, saving footage as you become absorbed in game universes. Additionally, the Replay ability enables you to swiftly scrub through your recent recordings without ever exiting from your game.
But are you concerned about editing? Valve has also considered this aspect. They provide easy, not heavy, editing instruments for cutting the finest segments in your gameplay and distributing them as MP4 videos.
Consider how convenient it would be to bring attention to that impossible shot or a last-second win. With the help of Steam Timeline, you can mark important events such as achievements and screenshots. This makes finding and sharing those highlights easier for everyone involved.
Now, you might ask, “What about the performance impact?” Valve has designed Steam Game Recording to use fewer resources as much as feasible. It uses NVIDIA and AMD graphics cards for recording with less impact on performance.
It also works nicely on the Steam Deck. You can capture and show off game videos from your preferred handheld gaming gadget.
If you want to jump on this bandwagon, go to the Steam Beta client settings, choose to be in beta, and there you go! You are all set for recording. Valve is very interested in hearing from users like yourself, so give your feedback on the Steam forums.
Steam Game Recording is a delight for gamers who want to showcase their virtual experiences. Whether you are an expert or playing for enjoyment, this characteristic offers fresh opportunities.
Have you tested it? Tell me, what is the very first moment you ever captured? Let us commemorate our gaming milestones unitedly, one clip at a time.
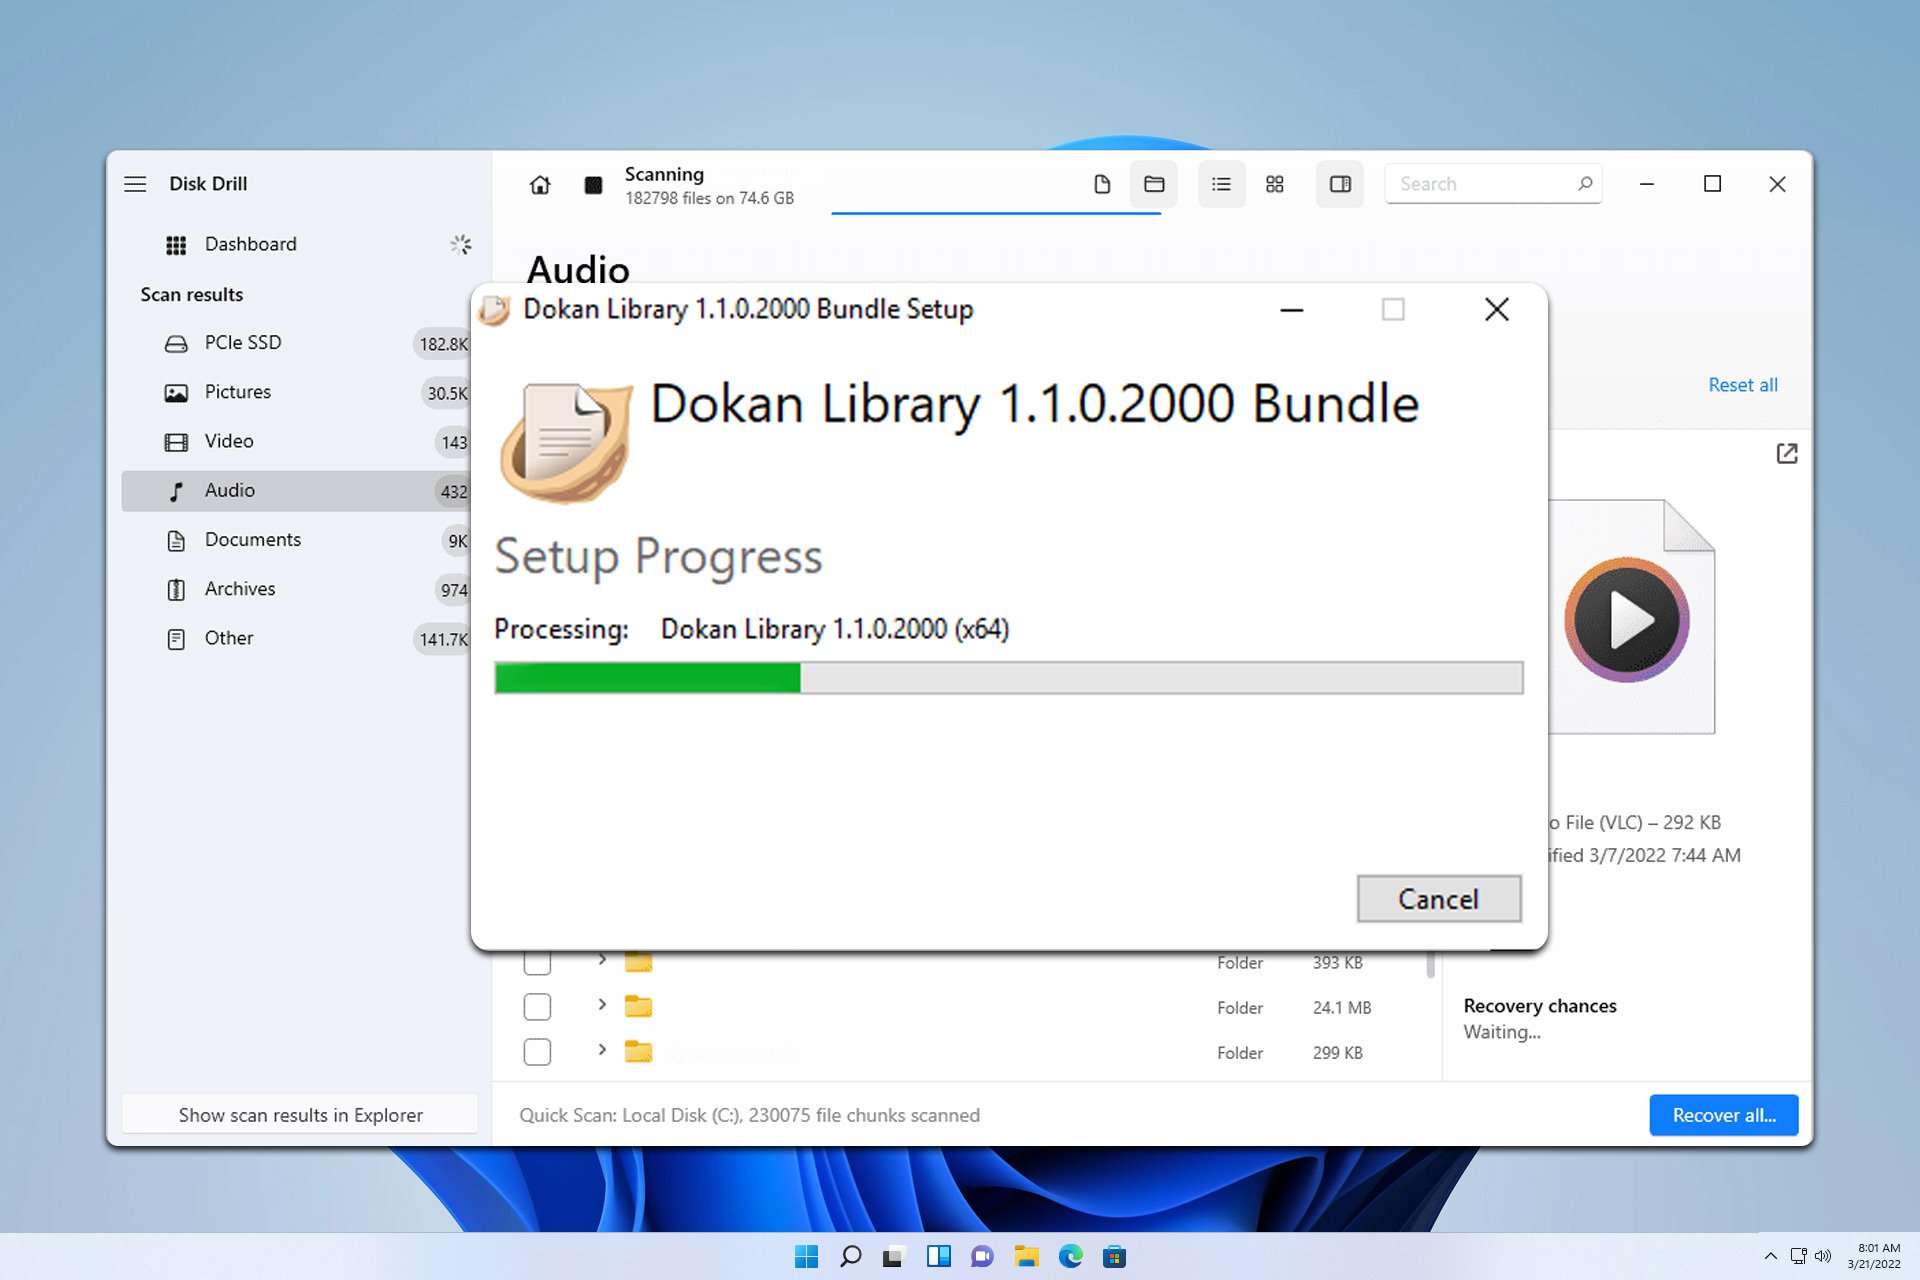
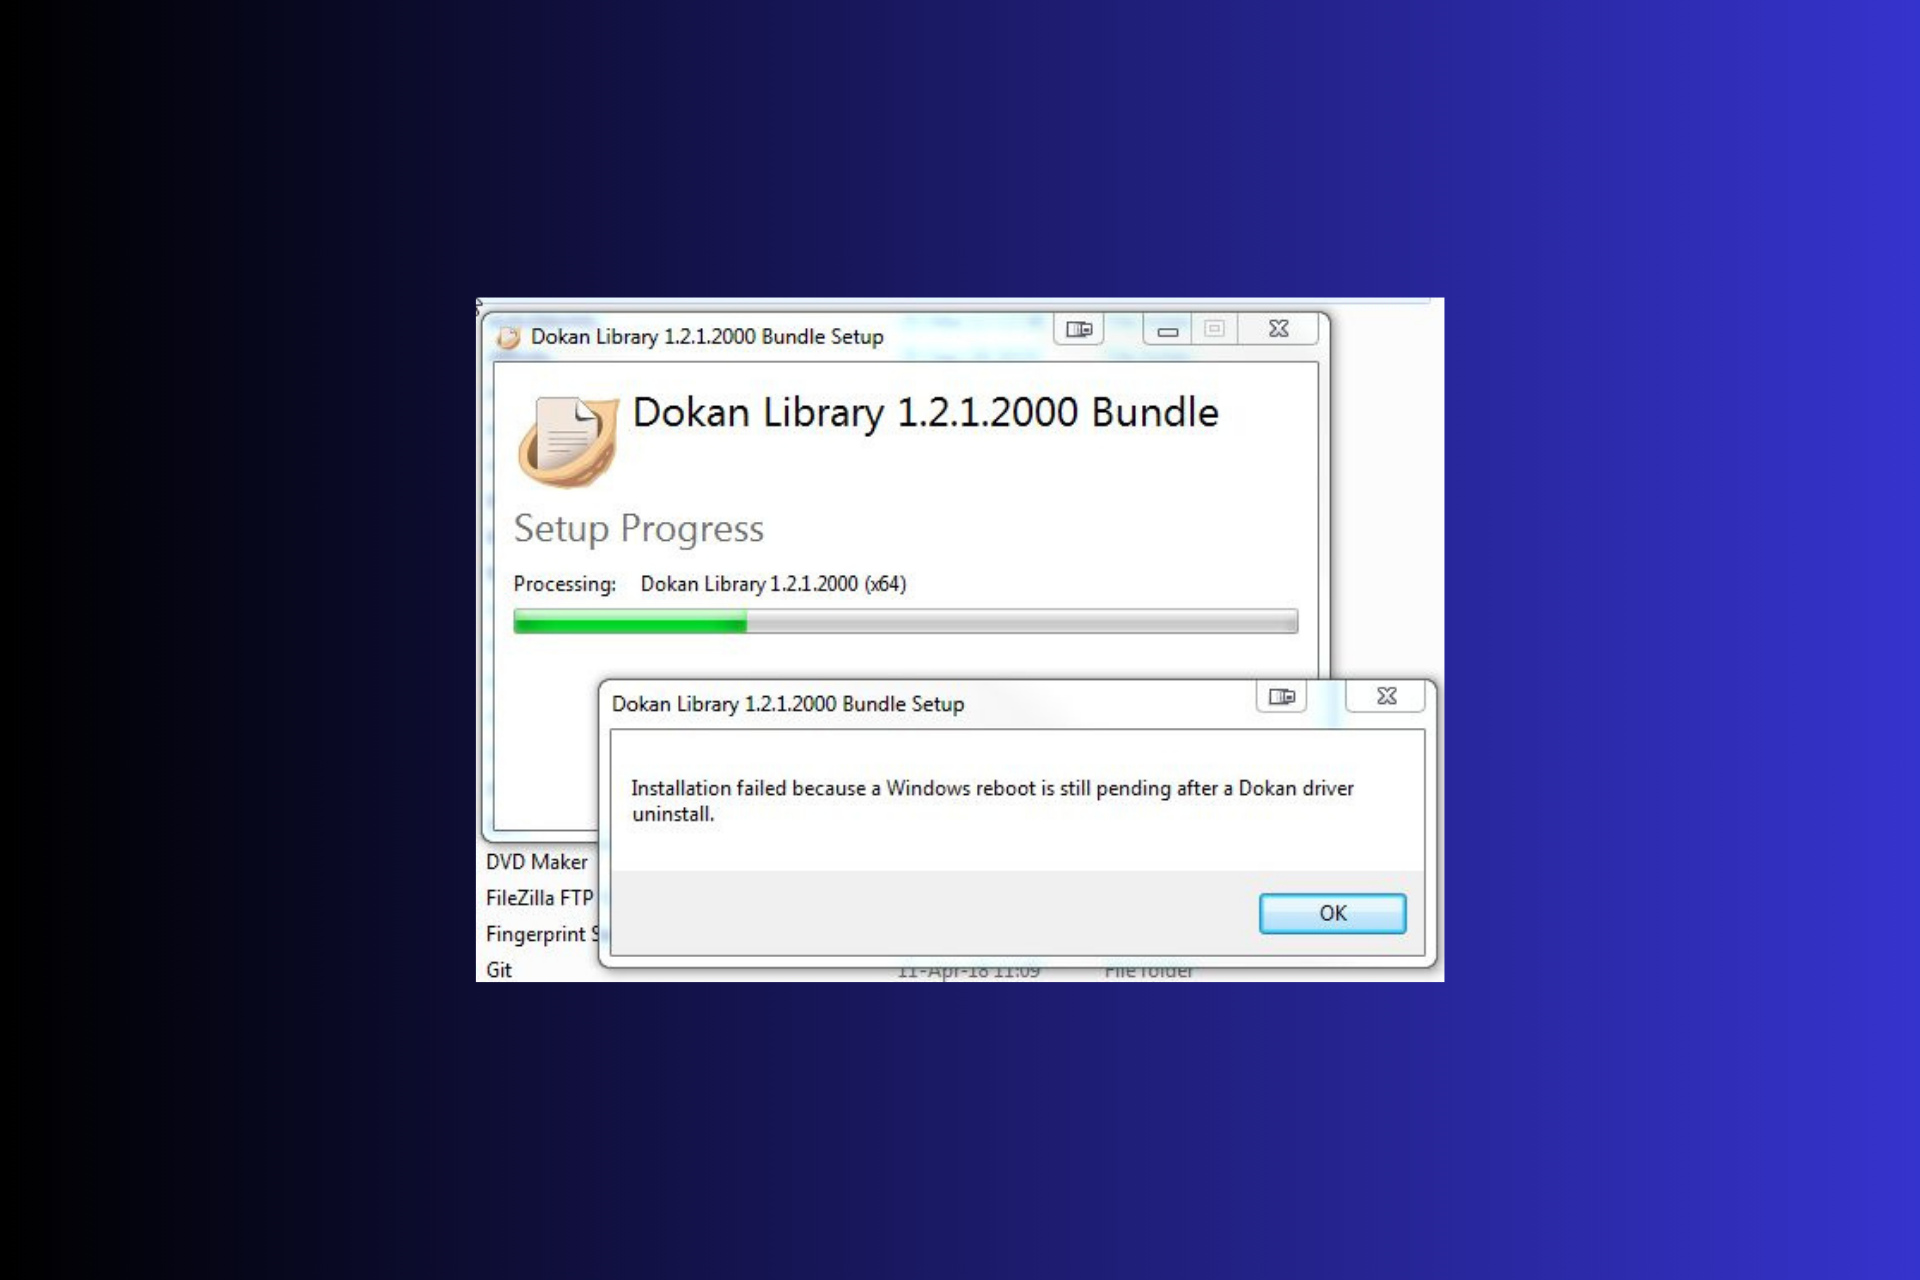
Disk Drill is a popular software, however, many users reported Dokan Library on their PC after installing Disk Drill. What is this application and is it harmful? Keep on reading to find out!
What is Dokan Library and can I remove it after installing Disk Drill?
Why is the Dokan library installed?
If you have Dokan Library installed on your PC, it’s probably installed by another third-party software, such as Disk Drill.
What is Dokan used for?
Dokan is used by developers to create new file systems on Windows. Creating a file system requires you to develop a file system driver, but Dokan allows you to create file systems without creating one.
We have an entire guide dedicated to Dokan Library so be sure to check it out if you want to learn more.
Is it okay to delete Dokan Library?
Yes, it’s okay to delete Dokan Library and you can remove it just like any other application. However, by removing Dokan certain applications that rely on it, such as Disk Drill, might not work properly.
Yes, Disk Drill is safe to use as long as you download it from a legitimate source. While it might not be the best file recovery software, it’s perfectly safe to use.
As you can see, Disk Drill is a well-known data recovery software, and while it may install Dokan Library, the library is probably used for the file recovery process so it’s not a security risk and it shouldn’t be removed.
Have you ever encountered Dokan Library on your PC? Let us know in the comments below!
In a surprising situation that has caused discussion among tech world members, Microsoft was forced to pause launching a certain Windows 11 update because of this. Picture yourself waiting excitedly for the new update and then discovering that your PC is stuck in an endless cycle of restarting.
The update KB5039302, as it happens, has become more of an issue than assistance – leading some PCs into infinite restarts. Microsoft reacted quickly, swiftly recognizing the problem and halting the update to avoid more disorder.
This hiccup had a major impact on systems operating with Windows 11 versions 22H2 and 23H2, particularly those utilizing virtual machines and nested virtualization combined with tools like CloudPC, DevBox, or Azure Virtual Desktop.
For people who may ask, “What’s the fuss about virtual machines?” I would say they are like a computer inside your computer. You can use them for various tasks, such as running different operating systems or protected environments.
These things are useful for developers and IT professionals but sometimes hard to handle. Users who depend on such setups found this bug troublesome, causing Microsoft to carefully examine the problem before continuing the update distribution.
It is notable that this bug was not frequently encountered by those using Windows 11 Home Edition. This may be because virtualization is less common in home setups.
However, Microsoft didn’t leave anything to chance and advised everyone to avoid the update until they could fix it. They are now putting effort into resolving this matter and have committed to keeping users informed about their progress.
This issue is more likely to affect devices utilizing virtual machines tools and nested virtualization features, such as CloudPC, DevBox, Azure Virtual Desktop. We are investigating to determine the precise conditions under which this issue can trigger. Users of Windows Home edition are less likely to experience this issue, as virtualization is less common in home environments.
Microsoft
This KB5039302 issue shows how software updates can be full of surprises. They are designed to improve our systems by providing new features and solving problems, but sometimes, they don’t work as planned, resulting in unexpected issues.
This reminds us that it’s crucial to have recovery plans and backups in place—particularly for individuals who enjoy staying up-to-date with the latest technological advancements. Microsoft’s prompt action to halt the deployment and handle the issue is praiseworthy, indicating their dedication to user satisfaction and system reliability.
We anticipate that a remedy will be accessible shortly, allowing everyone to fully relish the fresh functions and enhancements provided by Windows 11 without any anxiety about constant restarts.
Think about coming across an old Xbox console from the start of the 2000s to become a modern gaming powerhouse. A person on Reddit who is creative – Subject-Historian-70 made this happen.
Nearly 25 years after its first release, this modder has transformed the original Xbox into a new gaming PC. It can now run many games in high or ultra settings. This shows how old technology can be used creatively, bringing about possibilities not thought of when it was first introduced.
The transformation process involved more than just changing hardware pieces. It involved careful modifications, like swapping the controller ports with USB ones and cutting into the Xbox’s body to enhance air circulation.
The modder used different tools for these adjustments, such as a Dremel, pliers, and a Stanley knife. The outcome? A smooth, working gaming computer kept inside the sentimental body of an initial Xbox.
The selection of parts grabs attention. The modified original Xbox PC utilizes an Nvidia RTX A2000 GPU, an AMD Ryzen 5 3600 CPU, and a large 2TB SSD for data storage.
These internal components are considerably more advanced than those inside original Xbox systems, demonstrating how much technology has progressed. The modder keeps the original Xbox’s power button, maintaining a sense of history with this modern setup.
However, what does it matter? The answer is not easy. For some, it could be a dedication to preserving gaming history. Others might see it as an opportunity to push the boundaries and explore new possibilities within this realm of technology modification or experimentation with hardware, as we’ve seen with another mod for this console earlier this year.
The modding culture is built on these challenges; people constantly find ways to give old equipment fresh life and purpose to create unique experiences. Transformation:
The project has received praise from critics and people who love it. They appreciate the technical abilities shown but also acknowledge the effort to maintain what makes the original Xbox special.
It’s a clear message that technology never becomes completely outdated as long as imaginative minds are ready to discover its possibilities.
So, what’s your take? Does this seem like a cool project to you? Or does it make you reconsider the value of your old gadgets freshly? That dusty console sitting in your attic might become your next significant do-it-yourself endeavor.
Opera One R2 is a limited developer version of the Opera One browser that enhances the AI capabilities, introduces split screen tabbing and a lot more. However, anyone can download, install and use its early access version. Here’s how to do that!
How do I download and install Opera One R2?
Open the browser of your choice and go to the official Opera One R2 download page and click on the Download now button.
Run the installer and click on Accept and Install button to begin installation.
The installer will next ask you to accept the collection of data. You can configure the option in setting if you want to keep things private.
Next, click on Get started to begin the configuration process.
In the next windows, you will get to choose the theme and the mood: Light, Dark or System.
You may also turn on the ad blocker or to leave it off for the moment. You may also set that up afterwards.
Next, include the social apps of your choice. They will be shown on the sidebar on the left.
Finally, you can import the browsing data from the other browsers you’re using, but make sure to close them before this step, or Opera won’t be able to retrieve them.
That’s it, now you can use Opera One R2 and test all its new features. Of course, you can skip the steps 5 to 8 and configure everything later. For instance, if you don’t want to import browsing data, that’s no problem. For instance, by logging into Opera with your Google account, you will automatically import all the settings and data from Chrome.
In fact, we do recommend setting up an Opera account or logging into the browser with another account. This way, you will be able to use the Aria AI tool from Opera One R2, that allows you to load up any local LLM you may have installed on your computer. Moreover, Opera One R2 also has a tester to see if your PC is AI-ready.
Opera One R2 is free and its still in development, so don’t expect it to run smoothly right now. Opera will actually follow your input to find possible bugs and issue to better the browser.
What do you think about Opera One R2? Let’s discuss in the comments below.
With the new One R2 developer version, Opera introduced the Split Screen tabs feature to allow you to see two tabs simultaneously, side by side, in a split screen window. It’s very easy to enable and use it, here’s what to do!
How do I enable and use split screen tabs in Opera?
1. Enable split screen in Opera
Open Opera One R2.
Click on the Opera menu icon from the top-left corner and select Settings, or use the Alt + P shortcut.
Type split screen in the Search bar from the top of the window.
Make sure that Enable split screen and Enable a split screen by drag and drop are both On.
Both split screen features should be enabled by default, but if they are not, you now know how to do that. Of course, you may also use this method to disable split screen in Opera if you want to.
2. Use split screen tabs in Opera
Open Opera One R2.
Launch two web pages in two separate tabs.
Pick one with your mouse and drag it over the other.
The browser will automatically split the window to allow you to insert the additional page.
You can drag it to the left or right of the current screen and you will now have both tabs you can browse independently on the same window.
As you can see, the Opera screen split is very easy easy to do, just by dragging and dropping existing tabs on each other.
How do I exit split screen tabbing in Opera?
After splitting the screen with two tabs, you will see on the top that the tabs appear connected to each other.
However, if you want to exit the split screen scenario in Opera, click on the three dots icon between the tabs and select Exit split screen.
Another simple way to do that is to right-click on any of the tabs included in the split screen and select Exit split screen from the menu.
After exiting the split screen, the Opera tabs will be separated again in their own window. If you were wondering, no, you can’t split the screen horizontally, like you may do on Arc Browser, for example. And you can’t split the screen with more than two tabs, at least for the moment.
Splitting the window with two tabs in Opera is a great feature, especially because you can do it with a simple drag and drop technique. If you don’t have it yet, here’s how to download and install the Opera One R2 browser.
What do you think about Opera One’s new split screen feature? Let us know in the comments below.
Google Maps is a popular service, and many are wondering if they can download the Google Maps app for Windows 7 PC. In this guide, we’ll try to answer that question.
How can I get the Google Maps app for Windows 7 PC?
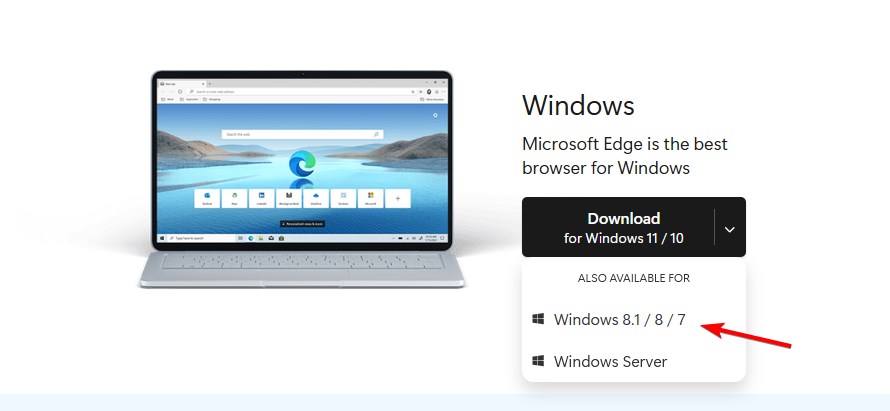
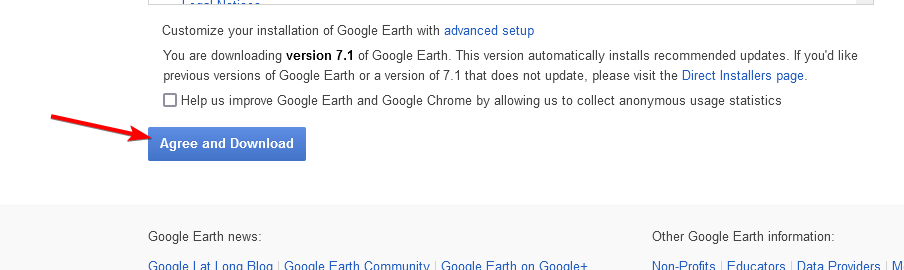
Click the down arrow next to the Download button and select Windows 8.1 / 8 / 7.
Wait for the application to download and install it.
Start Edge and go to Google Maps.
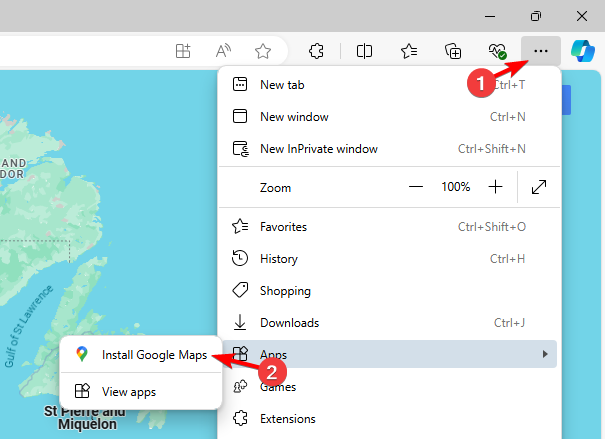
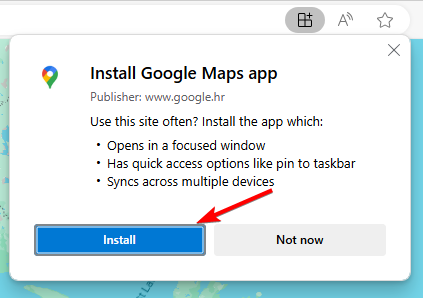
Click the three dots in the top right, and expand Apps. Select Install Google Maps.
Lastly, click on Install.
You should now be able to use Google Maps in its own window, similar to a regular app. If you have Chrome installed, you can achieve similar results using the Create shortcut option in the More tools section.
Google Earth is available for Windows 7, so it should work out of the box without any issues.
Is there a Google Maps app for PC?
There is no Google Maps app for PCs. However, you can install Google Maps on Windows by using an Android emulator and downloading it from the Play Store.
Does Google Earth work on Windows 7?
According to Google, Google Earth works on Windows 7, so you can use it instead of Google Maps.
Yes, you can use Google Maps from any modern web browser on any operating system.
As you can see, with no Google Maps being available on PC, you need to use various workarounds. Instead of looking for a dedicated app, you can always use the web version, since it offers the same features.
If you found this guide interesting, don’t miss our other guide on how to use the Fitbit app on Windows 10 after its discontinuation.
Picture a world in which your tongue manages not only the taste of an ice cream you adore but also controls your computer or smartphone. It seems like a scene from a science fiction movie. Microsoft is making this futuristic concept come to life with its latest patent.
They have been developing a remarkable technology that uses tongue movements to communicate with computing devices. This is not only about exploring the upcoming gaming stage or making your work-from-home arrangement more fascinating. It provides hope for people who struggle with conventional input methods due to physical restrictions.
Microsoft’s clever method involves applying inertial sensors that can catch motion signals made by our tongue. These picked-up signals are then sent into models for machine learning.
These models have been trained to identify particular gestures, be it a basic touch of the tongue on teeth or a more intricate movement, and convert them into commands for a computing device. Moreover, this technology is not restricted to just one kind of device. It can be combined with head-worn displays, earbuds, headphones, and even cochlear implants; thus, it becomes multipurpose and reachable.
But what is the process? It begins by training machine learning models to comprehend the special language of tongue movements. People carry out certain hand movements, and the system records the motion signals linked to these actions.
The models learn to distinguish various gestures through supervised learning and other methods like principal component analysis. The learning process is not solely focused on identifying a gesture by itself. It also involves comprehending the gesture and how it varies when performed by diverse people, making our system stronger and easier for users.
The possible uses for this technology are very wide and diverse. Think about managing your virtual reality world only by moving your tongue or giving silent orders to your smartphone without touching any button. It could change how we interact with our devices, making technology open to all in a new way.
Inertial sensors also make it possible to use this technology without invasive or bulky equipment. It is a discreet and effective solution that could be smoothly added to current devices. Additionally, with the help of machine learning, the system can keep getting better and more flexible in recognizing or understanding gestures more accurately as time progresses.
Microsoft’s patent on the inertial sensing of tongue gestures is an excellent technical advancement and a move toward a more inclusive and available technological future, one of the company’s main drives. Using machine learning and the adaptability of inertial sensors, this technology presents fresh opportunities for controlling devices without using hands.
Whether for playing games, aiding accessibility, or simply making it easier to interact with gadgets differently, the prospect of recognizing tongue movements holds real promise.
Opera’s newest One R2 is now out, and it seeks to redefine what we know of AI-focused browsers and the way we consume media content on the Internet.
This is not an ordinary update; it signifies a significant advancement for the browser-centered on artificial intelligence that initially fascinated us back in 2023. In a press release, the company says Opera One R2 is a multimedia-focused web browser, and it’s now open for developers and those who love browsers to try.
With Opera One, we revolutionized their browsing by adding AI and a new way of working with tabs to the experience. With Opera One R2, we are focusing specifically on the multimedia experience.
Joanna Czajka, Opera
Opera’s commitment to changing how we experience the internet is not recent. Do you recall when Opera One was presented, bringing an artificial intelligence partner named Aria and showing us its new modular appearance? This marked only the start. With Opera One R2, they’re leveling up their game to concentrate on multimedia playback, tab handling, and an out-of-the-box style that will attract attention.
Today’s world is all about music streaming and video content, so Opera One R2 takes it a notch higher by making its multimedia player more intuitive. Picture being able to halt or pass over a song without changing tabs or applications. Also, there is the Video Pop-out feature that allows you to watch your preferred content while doing other tasks. These features are made to provide a smooth browsing experience.
Opera is getting a fresh appearance, with customizable themes and sound effects that make your browsing experience unique. For people who enjoy doing many things at once, the innovative Split Screen lets you see two tabs together in one window. It’s all about improving productivity and making your browsing experience uniquely yours.
Tabs also show a playful side by adding tab emojis. You can now select from over a thousand emojis to give your tabs a unique, amusing, and useful touch. If you have many tabs open, Opera One R2 can show the ones you just visited, so it’s easier to find them.
Next, let’s explore the AI capabilities. Opera One R2 is boosting Aria’s power with Image Generation and Voice Output, allowing you to create images from prompts or make Aria read answers out loud. These features are built to improve your browsing experience by making it easier and more efficient.
Image Understanding is another skill that Aria is learning. You can give her pictures to look at and understand, for instance, identifying a specific car model or solving math problems.
Are you ready to try and see how it can change your web browsing experience? With its attention to multimedia, productivity, and superior AI abilities, Opera is once more establishing high standards for what a browser should offer.
If you’re struggling with the WIC Reset tool not working, you’re not alone. Many users encounter issues when trying to reset their printer’s waste ink counter. First, you should know that the app doesn’t work for all printers. Before buying a key to use the software, check the WIC Reset supported printer list and see if yours is present.
How do I fix WIC Reset if it’s not working?
1. Use a USB cable
Ensure your printer is connected using a USB cable instead of a Wi-Fi connection.
If the error persists, unplug and reconnect the USB cable on both ends.
Restart the WIC Reset tool and try resetting your waste ink counter again.
Using a direct USB connection can prevent communication issues that occur over Wi-Fi, ensuring a stable connection to reset your printer’s waste ink counter successfully.
2. Check WIC Reset service status
Visit the OctoInkjet site and check the status of the WIC Reset service.
If the service is down for maintenance, wait and try again later.
Ensure no firewalls are blocking the WIC Reset tool from accessing the internet.
Ensuring the WIC Reset service is active and not blocked by firewalls will help maintain a continuous connection for the reset process.
Install both the x86 and x64 versions of Microsoft Visual C++ 2017-2022 packages.
Restart your computer after installation.
Run the WICReset tool again.
Installing the necessary Visual C++ packages ensures that all required dependencies for the WIC Reset tool are met, allowing it to run correctly.
5. Try a different USB cable and port
Replace your current USB cable with a new one.
Connect the new USB cable to a different USB port on your computer and your printer.
Restart your printer and computer.
Run the WIC Reset tool again.
Sometimes, faulty USB cables or ports can cause communication errors. Using a different cable and port can resolve these issues.
6. Disable the antivirus temporarily
Open your antivirus software and locate the settings menu.
Find an option to disable the antivirus protection temporarily (usually for 10-30 minutes).
Run the WIC Reset tool while the antivirus is disabled.
After completing the reset, re-enable your antivirus protection.
Antivirus programs can sometimes block the WIC Reset tool from accessing necessary files or performing operations. Disabling it temporarily can help avoid these conflicts.
7. Clear the pending print jobs
Go to Printers & scanners from Settings on your computer.
Click on your printer then click on Open print queue.
Cancel all pending print jobs.
Restart your printer and computer.
Run the WICReset tool again.
Clearing pending print jobs ensures that no remaining tasks interfere with the connection process while using the WICReset tool.
8. Install the right driver for your printer (for Epson printers)
Search for your printer model and download the latest driver.
Install the driver on your computer.
Restart your computer and printer.
Run the WIC Reset tool again.
Installing the latest printer driver from Epson ensures that your printer is correctly recognized and communicates effectively with the reset tool. You may also use the Epson Connect Printer software that will automatically detect your printer and install the right driver for your device.
9. Check your internet connection
Make sure your computer is connected to a stable internet network.
If using Wi-Fi, ensure you have a strong signal or connect directly using an Ethernet cable.
Run the WICReset tool again to see if connectivity issues are resolved.
A stable internet connection is essential for the WIC Reset tool to authenticate and complete the reset process successfully.
10. Refresh the detected printer list
Open the WIC Reset tool.
Press the Refresh detected printer list button to scan for your printer.
Ensure your printer is connected using a USB cable.
Run the reset process again.
Refreshing the detected printer list helps the WIC Reset tool recognize your printer if it was not initially detected, allowing the reset process to proceed smoothly.
By following these steps, you should be able to resolve the issues with the WIC Reset tool and reset the waste ink counter on your printer. You might also be interested how to reset the Epson Ink Pad by reading our highlighted guide.
Did you manage to fix it using our solutions? Let us know how it went in the comments below.
Steam Deck can run both Linux and Windows, but the latter isn’t fully supported, so today we’ll show you how to download Stem Deck Bluetooth driver for Windows 11.
How can I download the Steam Deck Bluetooth driver for Windows 11?
How many Bluetooth devices can connect to Steam Deck at once?
According to users, Steam Deck can have up to seven devices simultaneously connected to it. However, using more than four devices can cause issues.
What Bluetooth controllers work with Steam Deck?
Almost any Bluetooth controller should work with Steam Deck. This includes controllers from other gaming consoles as well as third-party Bluetooth controllers.
Hopefully, this guide has answered all your questions regarding the Windows 11 Bluetooth driver on Steam Deck.
Even though you can install Windows on Steam Deck, Valve doesn’t offer full support for it, and certain drivers aren’t officially available. In case you want to use multiple operating systems, you can even dual-boot Steam Deck.
When managing servers, you might encounter an Error 1460 cluster shared volume message. Today we’re going to take a closer look at this error and show you how to fix it.
How can I fix error 1460 cluster shared volume?
1. Install the missing protocols
Press Windows key + R and type ncpa.cpl. Click OK.
Next, locate your connection, right-click it, and choose Properties.
Check if the following protocols are on the list and enabled: Client for Microsoft Networks, File and Printer Sharing for Microsoft Networks.
If not, click on the Install button and follow the instructions on the screen to add them.
After doing that, the Event ID 5142 cluster shared volume error should be gone.
2. Other checks to perform
Perform a cluster validation.
Ensure that MPIO is configured correctly and that NetApp tools are installed on hosts.
Check if all hosts can see all storage paths.
Ensure that CSV ownership isn’t moved from a different node. This can sometimes cause problems. Changing the ownership of CSV can sometimes also help.
Disable the use of the hardware VSS provider and go back to Microsoft one.
Check if CSV is formatted with ReFS. This can sometimes cause issues.
Lastly, check the switch and storage logs for additional information.
These are just some general tips that you can try if you’re getting Cluster shared volume has entered a paused state because of c00000b5 error.
Error 1460 cluster shared volume message can be difficult to tackle, so be sure that the necessary protocols are installed and enabled and perform detailed checks.
Have you ever been trapped in a location without an internet connection, longing to watch YouTube Shorts but unable to do so? YouTube has launched a new experiment for you. They are introducing a feature that will download Shorts videos automatically on your device.
This smart inclusion is from the Smart Downloads feature on YouTube, where you can save suggested videos for watching without the internet. But there’s a slight twist to this—it’s available solely for YouTube Premium users on Android and will last until July 15th.
If you are a Premium user, joining in on this experiment is easy. Open the YouTube app, go to Your Premium benefits, and try experimental new features. After selecting it, YouTube will download recommended Shorts according to your watching patterns. You will see these downloads organized in the Smart Downloads area of your profile page.
Now, if you are pondering, “Haven’t I witnessed this earlier?” perhaps your memory is correct. Some sharp observers on Reddit had noticed a comparable characteristic in April. YouTube’s choice to make Shorts more widespread might have come after conducting a small trial.
This can significantly impact people like me who enjoy short-form content but frequently lack Wi-Fi or need to economize data.
But think about it: What comes after? YouTube’s choice to make this a short-term trial implies that they dipped their toes in the water. YouTube Smart Downloads for Shorts’ future might be based on how we, the users, react to it. After all, the company is considering users, with features such as Hype or Notes easing the way they can impact video creators on YouTube.
What are your thoughts? Do you think YouTube should keep this as a permanent feature? Your response might influence the fate of offline video binging. So, it’s time to have fun with those short and amusing videos whenever you want – no need for an internet connection.
The “Services.msc Access Denied” error can be frustrating, especially when you’re managing your system services. Usually, you’re blocked due to insufficient permissions.
Common causes include not running the console as an administrator, interference from third-party security software, corrupted system files, or incorrect user account permissions. Luckily, I’ve encountered this problem before and I know how to deal with it.
Here’s a detailed guide to help you troubleshoot it!
How To Fix Services.msc Access Denied
Follow these instructions to resolve this error in no time:
Check User Account Permissions
Your user account must have the necessary permissions to access and modify system services. Here’s how to enable them:
Press Windows Icon + R, type compmgmt.msc, and press Enter to open Computer Management.
Click “Local Users and Groups” then double-tap “Users.”
Double-click “Administrator.”
Go to the Member Of tab and ensure that your account is a member of the Administrators group. If not, click Add.
Add Administrators as the object name, and click Check Names followed by OK.
Log out and log back in to apply the changes. You can now try accessing services.msc.
Change User Account Control (UAC) Settings
User Account Control (UAC) can sometimes prevent access to certain system utilities, including services.msc. Adjusting the UAC settings might resolve the error.
Here are the steps:
Tap the Windows Icon and open the Control Panel.
Click “System and Security.”
Hit “Security and Maintainance.”
Click on Change User Account Control settings.
In the UAC settings window, move the slider to the second notch from the top, which is “Notify me only when apps try to make changes to my computer (default)”.
Click OK and confirm any prompts.
Restart your computer to apply the changes and try accessing services.msc again.
Take Full Ownership of Windows Registry Keys
This error can be related to specific registry keys that control the services. To grant yourself ownership, do this:
Press Window + R, type regedit, and press Enter to open the Registry Editor. If prompted to allow the app to make changes, tap “Yes.”
Navigate to the following path: HKEY_LOCAL_MACHINE\SYSTEM\CurrentControlSet\Services.
Right-click on the service and tap Permissions.
Click on Advanced.
Change the owner to your user account by clicking Change. Then, enter the object name, and click Check Names.
Click OK, then check “Replace owner on subcontainers and objects” and click Apply.
Go back to the Permissions window, select your user account, and grant it Full Control. Click OK to apply the changes.
Use the Registry Editor to Modify the Service
You can directly modify the service’s settings in the Registry Editor to solve the access issues related to services.msc.
Here’s what to do:
Press Windows Icon + R, type regedit, and press Enter to open the Registry Editor.
Go to the service you want to modify using the following path: HKEY_LOCAL_MACHINE\SYSTEM\CurrentControlSet\Services\
Tap on the service you want to change.
Double-tap on Start then edit the value data to “2” to allow it to run automatically. Tap OK.
Close the Registry Editor and restart your computer to apply the changes.
Repair Install Windows
A repair install, also known as an in-place upgrade, can fix many system issues without affecting your files or applications. This process will reinstall Windows, potentially resolving any underlying problems causing the “Access Denied” error.
Here are the steps:
Download the latest Windows 10 ISO from the official Microsoft website.
Mount the ISO file by right-clicking on it and selecting Mount.
Open the mounted drive and run setup.exe.
Follow the on-screen instructions and choose the option to keep personal files and apps.
Complete the installation process and check if the issue persists.
Uninstall Third-Party Security Software
Sometimes, third-party security software like an antivirus can interfere with Windows services and cause access issues. You can temporarily uninstall these programs to identify if they’re the culprit:
Press Windows Icon + I to open the Settings app.
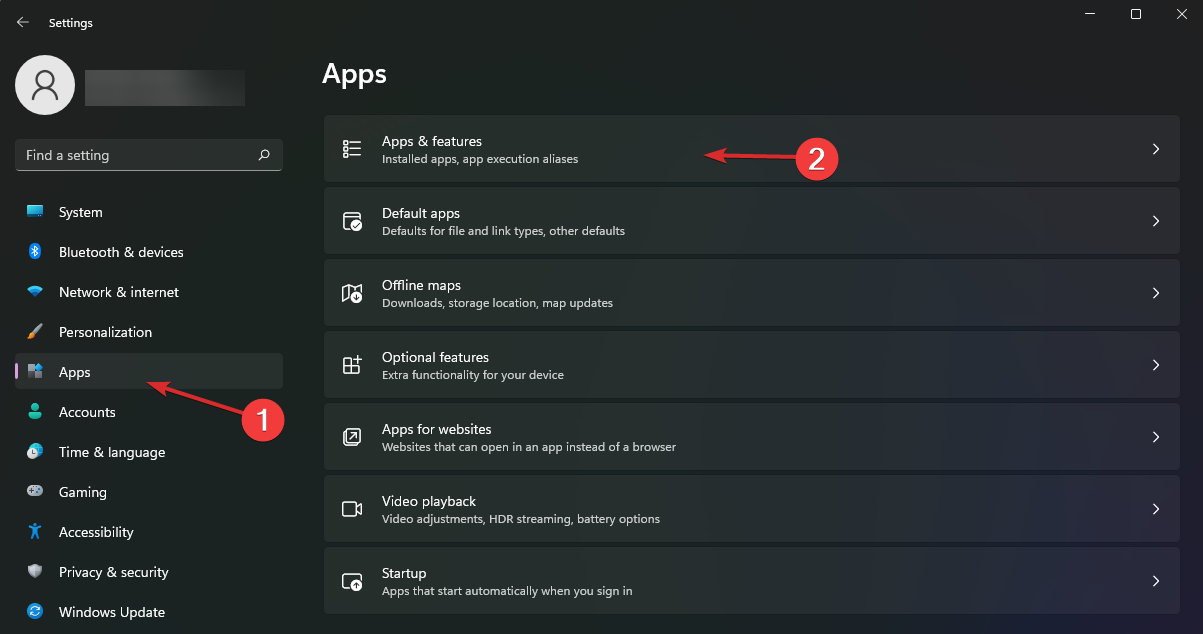
Tap “Apps.”
Locate your third-party antivirus or security software in the list, click on it, and select Uninstall.
Follow the prompts to complete the uninstallation process.
Restart your computer and try accessing services.msc again.
With these steps, you should be able to resolve the “Services.msc Access Denied” error and gain the necessary access. If the problem persists, it might be a deeper system issue, so you’ll have to seek further assistance from a professional.
On Friday, Playground Games mentioned that Forza Horizon 4, their open-world racing game, will disappear from the Microsoft Store and Steam starting December 15th. This game is also being removed from Xbox Game Pass, but people who have purchased it can still play it.
Playground mentions that this shift is due to “licensing and agreements with our partners,” which can be assumed to be the car companies whose vehicles are shown in-game.
The last event inside the game will happen from the 25th of July until the 22nd of August; after this, certain achievements will no longer be unlockable.
The game’s DLC starts being removed today, but according to the FAQ on Playground’s website, people who already bought it can still access it.
Also, if you played Forza Horizon 4 using Xbox Game Pass and purchased the game’s DLC, then you are eligible for a token that lets you download the complete game and keep playing it beyond December 15th.
This code will be sent to players who qualify and have a fully paid Xbox Game Pass subscription in the upcoming days. It must be used by June 25th, 2026.
The developer states, “From December 15, 2024 onward, Forza Horizon 4 will not be for sale on digital stores, and it will be taken off the Xbox Game Pass.” But those players who already possess this game can still get its download and play it regularly with all its offline and online features, including multiplayer.”
When it is removed from the store, Forza Horizon 4 will be six years old. This game was launched in October 2018.
Although Playground Games’ more recent offering Forza Horizon 5 could be seen as a natural replacement, it’s always melancholic to observe digital games essentially becoming unavailable for purchase – even though in this scenario at least players can still play them and servers will remain up.
Dokan Library is a software is installed through some freeware software bundles and it’s used to creating your own file systems. No wonder why everyone wants to uninstall it. Although Dokan Library is harmless, it takes unnecessary space on your drive.
How do I uninstall Dokan Library?
1. Using the uninstaller
Press the Windows + E keys to launch File Explorer.
Navigate to the following path in the File Explorer window to access the Dokan Uninstaller. C:\ProgramFiles (x86)\Dokan\DokanLibrary\DokanUninstall.exe
Double-click the uninstaller to launch it and follow the step-by-step process to uninstall Dokan Library.
2. Using a MsiExec command
Press the Win + R keys to start the Run console.
Paste the following command and press Enter to run it: MsiExec.exe /X{9A7325EA-D3C9-0200-0005-220704082610}
Click Yes to confirm the uninstallation.
This command will uninstall Dokan Library 2.0.5.1000 (x64) completely from your Windows OS. If you completely uninstalled it by using the first solution, this command will return an error.
3. Clean your PC from Dokan Library leftover files
Unfortunately, Dokan Library’s uninstaller doesn’t always remove all the files from your PC. Here’s a list of files and Registry keys that you must look for manually to make sure that Dokan Library is completely removed.
Check for and remove the following files using Files Explorer(Win + E)
As you can see, uninstalling Dokan Library manually takes a bit of work. Using a professional and dedicated uninstaller will do that in a fraction of the time and just a few clicks.
A fresh mod has been launched for the space RPG Starfield, enabling players to utilize lightsabers designed after the renowned weapons from Star Wars. The Immersive Sabers mod offers three lightsabers – Combatech Polaris, Old Earth Photonsaber, and Arboron Novabeam Saber – each with a special color, sound, and effect.
You can also modify the colors of lightsaber beams and improve these at workbenches. The mod also includes a fresh perk, Saber Training, which helps players better deflect incoming attacks with their lightsabers.
As per Starfield’s setting, the lightsabers can be discovered in the wild or taken from those you defeat. This is similar to how other weapons are obtained within the game’s universe. But amusingly enough, for world-building purposes – lightsabers have been thought up to be made by companies inside Starfield like Laredo Firearms., Allied Armaments, and Kore Kinetics.
The Immersive Sabers mod, which adds lightsabers to the Starfield game, was released with the opening of the Creation Club mod platform this week. This is among the first group of third-party Creation Club mods for Starfield. The mod is free for PC players (for Xbox, you can find it here), but those who play on a console will require 1,000 Creation Club credits (equivalent to approximately $10) to access these lightsabers.
After Starfield was first released at the end of 2023, it quickly became a top choice for modders. They utilized third-party tools to incorporate various items into the game, such as fresh alien types and customized player houses.
The Creation Club from Bethesda provides these modders with a formal method of sharing their work and simultaneously receiving part of the earnings from it.
But one area of Starfield mods isn’t so sunny. Many players are unhappy because the end of the game’s main mission line, Trackers Alliance questline, can only be accessed by paying money. A few even suggest that this task was purposely made to be sold as paid DLC.
In another place, Starfield players have been having fun with the game’s recent patch. It added fresh things like city maps, new ship interiors, and a harder difficulty setting that makes enemies even stronger. The patch has prepared for Starfield’s first big addition, Shattered Space—it should come out at some point this year.
Starfield is available now on PC and Xbox Series X/S.
Microsoft released a fresh update to Edge in the Dev Channel, moving it up to version 128.0.2661.0 a few days after it released Edge 127. This update includes a few new features and many reliability improvements, making it one of the most notable Dev Channel updates we’ve seen lately.
According to the official changelog, A major feature in Edge 128 is a fresh Copilot button. It can be found in the area selection menu for web capture/screenshot features. There are also a few other features, like more lively responses and fresh character traits for Microsoft’s Copilot AI assistant, which you can explore by requesting it to “show something new.”
Additionally, there are a group of reliability enhancements, such as fixing a bug where Edge might crash after taking a photo on Android and similar issues that lead to crashes on iPhones. The update also resolves Edge’s inability to open links after signing into Azure Active Directory on iOS.
Another situation is addressed; if you change your screen orientation from horizontal to vertical while in the Copilot tab, there will be an abrupt change in page size because of this bug fix they made, too!
Regarding changed behavior, Edge must not crash when attempting to “magnify” an image on a webpage that does not have any bigger version of the said image.
The update also includes a label in settings for the “Block Third-party cookies” toggle and resolves an issue where using the Enter or Space key could not activate the close button on a tab.
The new features and reliability improvements in this release are as follows:
Added Features:
Added a Copilot button in the area selection menu for web capture/screenshot features.
More magical experiences from AI-powered Edge to personalize and streamline the way you browse.
Improved Reliability:
Resolved a problem that caused browser to crash after capturing a photo on Android.
Fixed an issue that caused browser to crash during operation on iOS devices.
Changed Behavior:
Fixed an issue where the ‘Close’ button could not be activated using the ‘Enter’ or ‘Space’ keys on the keyboard when interacting with the ‘Magnify image’ feature.
Resolved an issue where the background color of the History search box was black instead of the expected blue.
Resolved the issue where deleting a tab from a group or window would cause the group or window to collapse.
Fixed the cluttered appearance of the Send Feedback popover and aligned the radio buttons to the left.
Fixed an issue where it was not possible to drag certain sites to the pin area in one attempt.
Resolved an issue where the animation was not appearing during the initial launch of Copilot.
Resolved a problem where a new tab would automatically open upon conducting a search in the Search app.
Fixed an issue where the ‘Block Third-party cookies’ toggle was missing a label.
Android:
Fixed an issue when turning off the ‘dark theme for all web pages’ would prevent changing the theme on Bing.com on Android.
Resolved an issue when altering the screen orientation from horizontal to vertical caused a significant change in the page size on the Copilot page.
iOS:
Resolved an issue where the browser was unable to open links after signing into AAD on iOS.
You can check for the update by heading to Menu > Help and Feedback > About Microsoft Edge. If you’re not yet part of the Edge Insider program, you can sign up (or download the latest Edge Beta, Dev, and Canary releases) here.
According to the Microsoft Edge release schedule, Edge 128 should be released into the stable channel during the week of August 22, 2024.
Have any of you tried the new Edge Dev build? What are your thoughts?
The end of Windows Phone in 2017 was a huge blow for many in the Microsoft community. The platform has been dying for some time, but fans and companies supporting it still wish that Microsoft would come back one day.
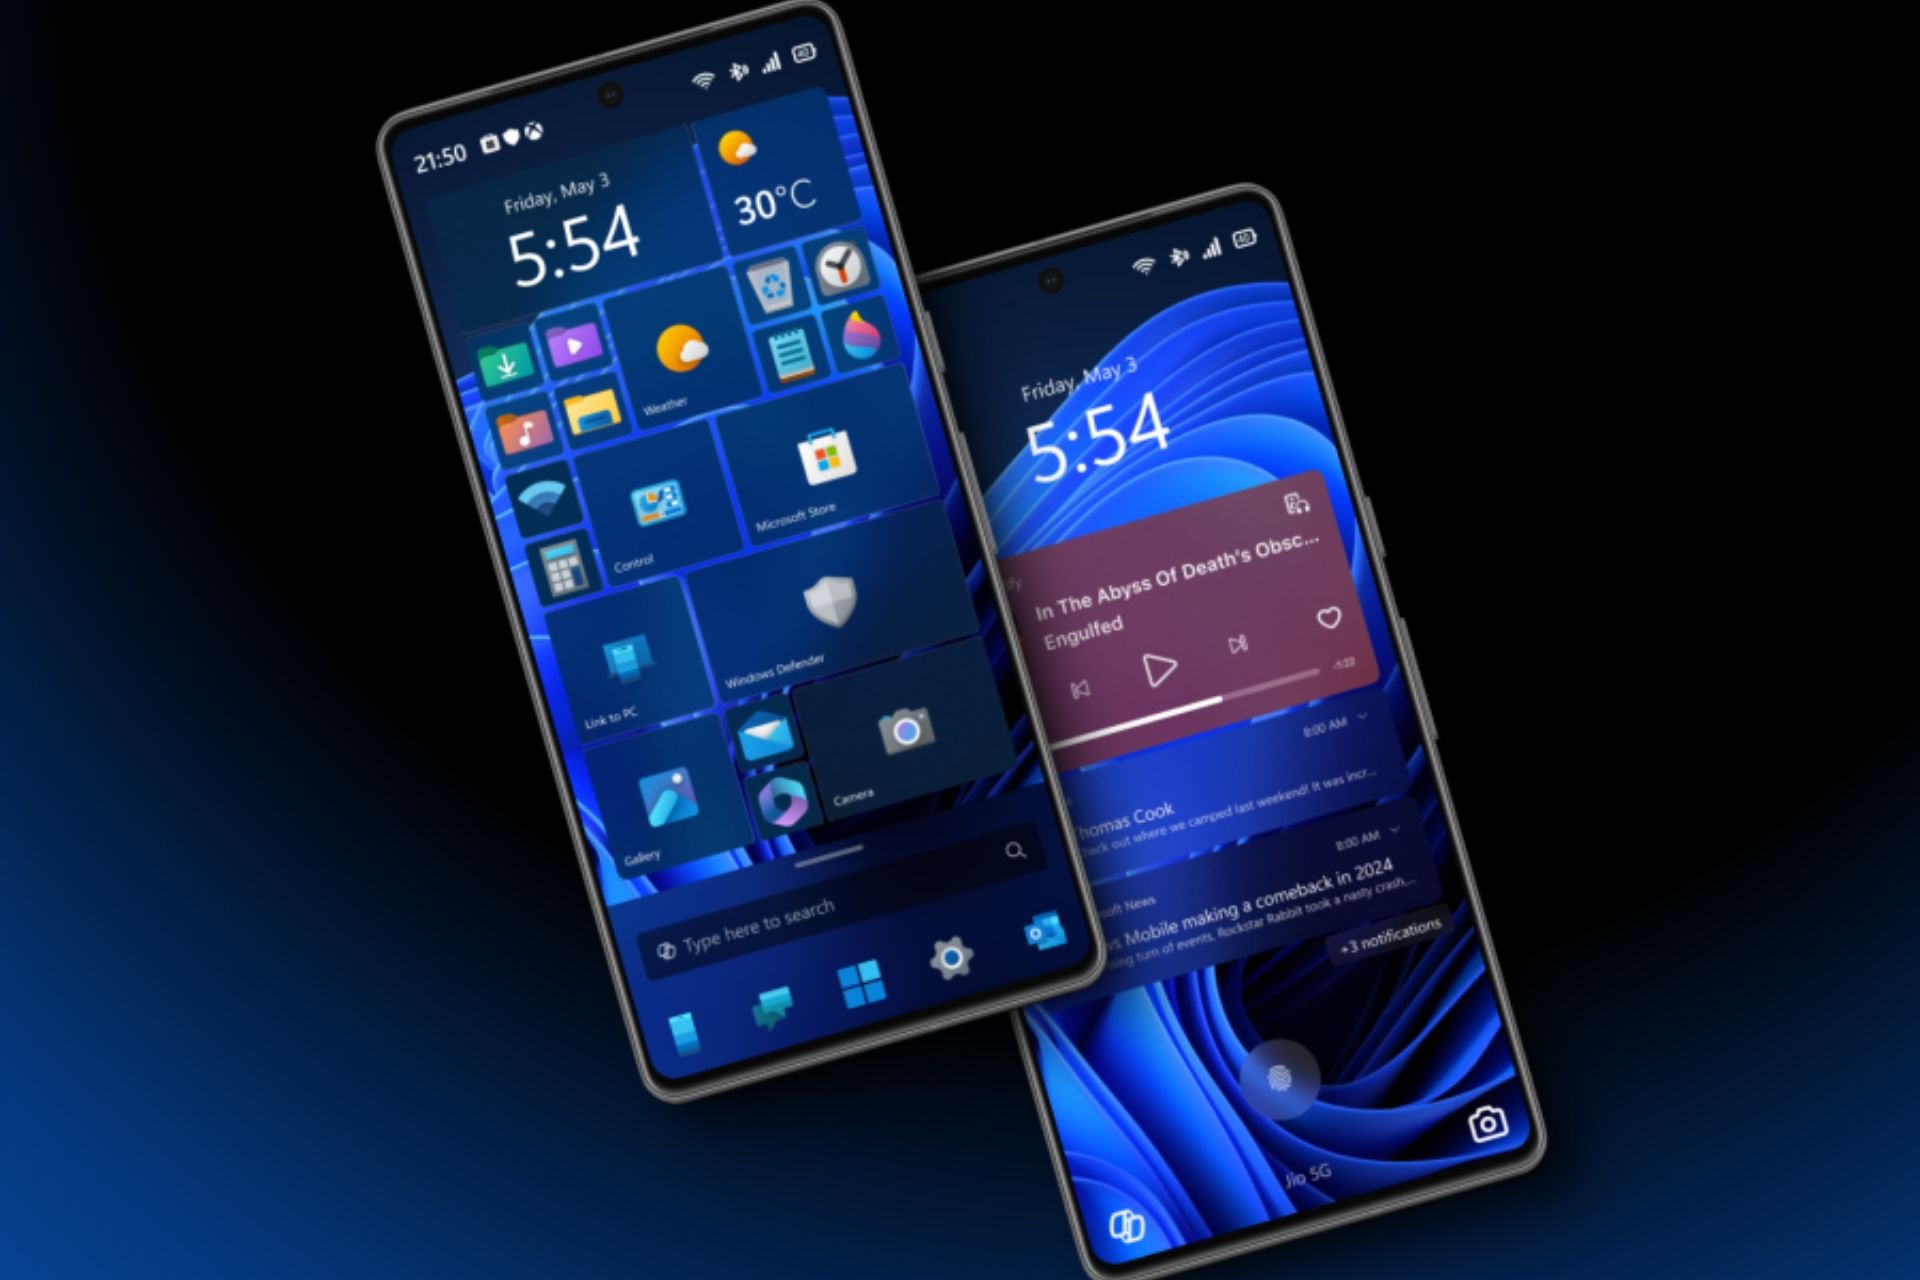
Proloy Karmakar, a graphic artist from India, put up many concept pictures for how Windows 11 Mobile might look like in the year 2024. And they are quite good indeed.
Karmakar quickly started using Figma and created an entire design idea for Windows 11 Mobile—it offered fresh interfaces, along with widgets, and even resurrected the previous Windows Phone starting display.
Hey everyone! ? Ever wondered what Windows Mobile would look like in 2024? I've reimagined it, and it's more innovative than ever! Check out the figma community link in the end ?
Karmakar’s creativity did not stop at the new appearance. He further conceptualized Windows 11 Mobile operating on a Surface Phone, making fun of forthcoming features such as backing up the latest AI and AR applications and improved blending into Windows 11 on desktop computers.
The designer visualized a Home ScreenSwipe, a Lockscreen with Copilot Quick access, a Notification Panel, a Settings Page, a File Manager, a Volume panel with advanced controls, and a Windows-themed call dialer.
It’s a cool idea, and I feel Microsoft may have tried this if they hadn’t abandoned Windows Phone completely. You can see Karmakar’s complete concept on Figma, so please share your thoughts in the comments. Do you long for Windows Phone, or do you believe it was best to end its life?
For Windows 10 users, Microsoft has released a new non-security update, KB5039299, which fixes bugs linked to the taskbar and jump lists, including the Open with issue. This update is applicable for Windows 10, version 22H2.
When you right-click on an app in your taskbar, it shows an “Open with” dialog instead of what should be there—a context menu. This issue could affect any app that has tasks on a context menu.
Moreover, the update also fixes an issue related to jump lists in the taskbar. Microsoft explains that “completing actions from that list might fail.” A jump list is a menu that pops up when you right-click an application icon in either your taskbar or start menu.” It gives you quick access to recently or frequently used app items.”
This issue was resolved in updates released June 25, 2024 () and later. We recommend you install the latest security update for your device. It contains important improvements and issue resolutions, including this one.
Microsoft
Additionally, the update fixes a problem related to the taskbar. If you have positioned your taskbar somewhere other than its default location, there could be an issue with it. Furthermore, Microsoft has resolved another problem related to Microsoft Connected Cache. Nonetheless, they acknowledge that some recognized problems are still present.
As we reported earlier this month, one problem that is still being worked on is that you can’t change the profile picture for local accounts. These are the other known problems which have not yet been fixed:
It won’t work if the taskbar is moved from its usual location.
Microsoft Connected Cache is broken
Error 0x80070643
Microsoft states that solutions for these problems will come with upcoming updates, except the 0x80070643 mistake which necessitates handling it manually.
KB5039299 is available for download through Windows Settings. You can find it by going to Windows Update and downloading the optional updates listed there. Another way to get this update is from the Microsoft Update Catalog, where it can be installed manually.
The Palworld Timeout Error appears when trying to join an ongoing session, not when joining server hosts. To fix this issue quickly, after you get the host’s IP address, click on Join Multiplayer Game from the main menu. On the bottom, replace the IP with the host’s before the :8211 port string.
How do I fix the Palworld Timeout error?
1. Play the game on DirectX 12
On Steam
Open Steam and go to your library.
Right-click Palworld and select Properties.
Type -dx12 in the Launch Options field.
OnPC Game Pass
Right-click on your Palworld shortcut and click Properties.
In the Target field, you will see the game’s location and .exe file in quotation marks.
Press Space after the segment with quotation marks, and then type -dx12
Click on Apply and OK to make the change, then use the modified shortcut to launch Palworld.
2. Forward the ports 27015 and 8211 in Firewall
Open Windows Defender Firewall and click on Advanced Settings.
Click on Inbound Rules from the left pane and select New Rule.
Choose the Port option, then click Next.
Select UDP, then choose Specific local ports, type 27015, 8211 and click Next.
Select Allow the connection and click Next.
Don’t change anything in the next window, just click Next.
Write a profile name that you can remember.
This will ensure that Palworld has now two dedicated ports for multiplayer in Firewall. However, if you still get the Timeout error or you can’t connect to the multiplayer games, trackback this solution and delete this rule.
Additional solutions to fix the Palworld Timeout Error
Most of the gamers will fix the Palworld timeout error by using the solution from the intro of this guide or the two solutions below. However, this is a typical connection error so you can’t rule out local connection problems.
Restart your PC and the game.
Restart your router and make sure you have a steady internet connection.
Verify the game files integrity if you’re playing on Steam.
Also, keep Palworld updated and make sure that your system meets the minimum requirements to play the game.
So, to fix the Timeout error in Palworld, join the multiplayer server with the host’s IP, play the game using DirectX 12 and forward the right ports in Windows Defender Firewall. And because we’re talking about multiplayer options, check our guide on how to cross play Palworld on PC and Xbox.
The Spotify login error code 409 may appear when you attempt to log into your account after some time. It could also be a server error so you can give it some time and try later.
For the most part, you don’t have to log out of Spotify but if you’re using a VPN, you may be logged out after 14 days and you’ll be required to log in back again to verify your location. During such situations, the Spotify login error code 409 may make an appearance.
However, this is not the only reason. If there’s a server outage or you’re trying to log in from multiple devices and there are synchronization issues from other active sessions, this error may also appear.
How do I fix Spotify login error code 409?
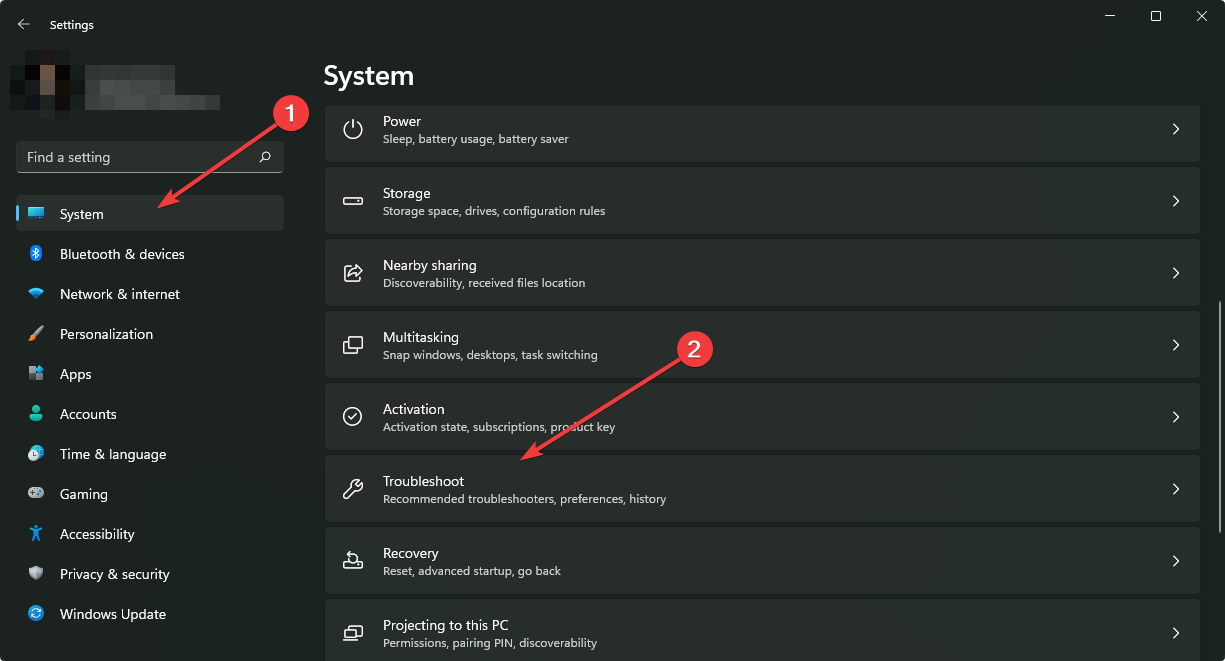
1. Run the Windows Store troubleshooter
Hit the Windows key and select Settings.
Select System on the left pane then click on Troubleshoot on the right pane.
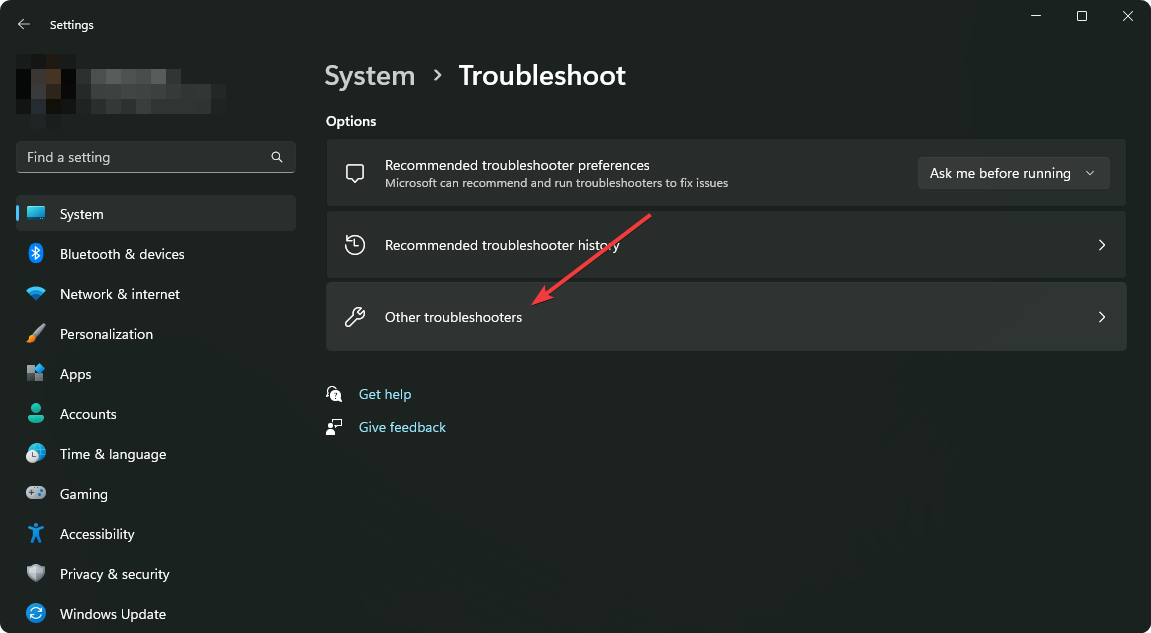
Click on Other troubleshooters.
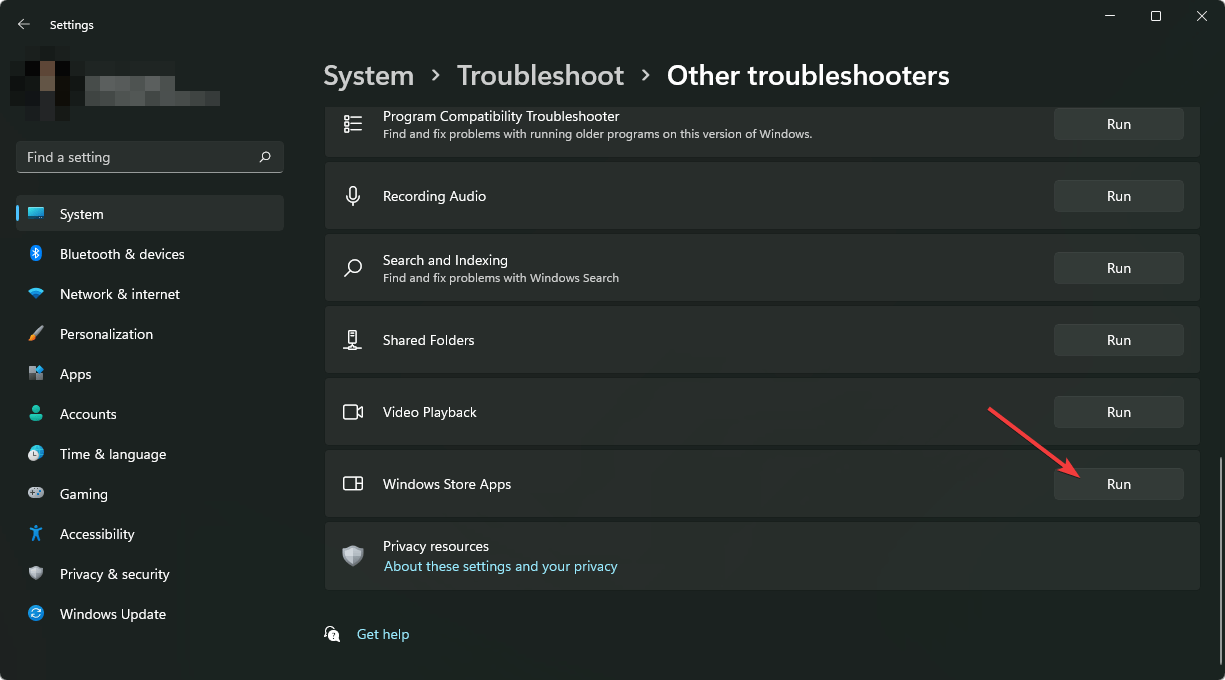
Navigate to Windows Store Apps and hit the Run button next to it.
If there are no issues, check Spotify’s official platforms for any reported outages or the server status whether there is a scheduled maintenance.
2. Clear Spotify cache
2.1 Windows app cache
Hit the Windows + E keys to open File Explorer.
Navigate to the following location by pasting it on the address bar. Note that because this is the cache folder, it may be hidden. If so, follow the steps to reveal hidden folders: AppData > Local > Packages > SpotifyAB.SpotifyMusic_zpdnekdrzrea0 > LocalCache
Right-click on the Spotify folder and select the Delete icon to clear the cache.
2.2 Android app cache
Tap on settings on your phone.
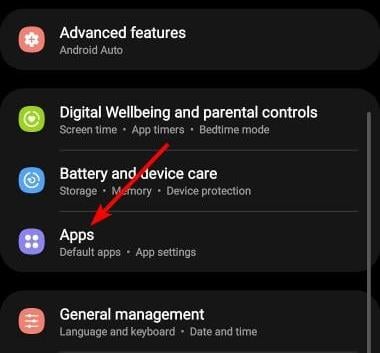
Next, tap on Apps.
Find the Spotify app and tap on it.
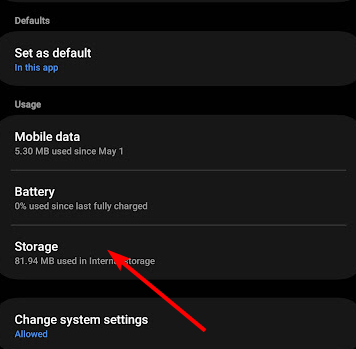
Scroll down and select Storage.
Tap on Clear data and Clear cache,then try again.
2.3 iOS cache
Locate Settings on your iPhone and tap on it.
Go to General>iPhone Storage.
Find the Spotify app, tap on it, and select Offload App.
3. Flush the DNS cache
3.1 Flush the DNS cache for Windows
Press the Win + R keys together to open the Run console.
In the search bar, type the following command and hit Enter: ipconfig /flushdns
This will reset the internet connectivity settings on your system.
The Spotify web player should be working fine now.
3.2 Flush the DNS cache for Chrome
Launch Chrome and open a new tab.
Type the following line in the address bar and hit Enter: chrome://net-internals/#dns
Now, on the page that you see, click on the Clear host cache button on the right.
4. Change the current location
4.1 Switch locations
Open the Spotify web browser on your preferred browser and based on your location.
For example, replace US at the end of the URL with UK.
In the Spotify window, click on your Spotify ID at the top right and click on Account.
As you reach Account Overview, click on Edit profile on the left.
Now, on the right side, scroll down and select your current country and click on Save profile.
4.2 Disable/enable VPN
Press the Windows key and select Settings.
Next, select Network & internet and click on VPN in the right-side menu.
Select the VPN connection you want to disable, click on the drop-down and select Remove.
5. Repair and reset Spotify
Hit the Windows key and select Settings.
Click on Apps on the left pane then select Apps & features on the right pane.
Locate Spotify, click on the three vertical ellipses and select Advanced options.
Click the Repair button.
Go back and click Reset.
6. Reinstall Spotify
6.1 Windows
Hit the Windows key, type Control Panel in the search bar, and click Open.
Navigate to Uninstall a program under Programs.
Locate Spotify, right-click on it, and select Uninstall.
Launch the Microsoft Store and download Spotify.
6.2 Android
Tap on settings on your phone.
Next, tap on Apps.
Find the Spotify app and tap on it.
Scroll down and select Storage.
Tap on Uninstall, confirm on the next prompt then try again.
6.3 iOS
Locate Settings on your iPhone and tap on it.
Go to General>iPhone Storage.
Find the Spotify app, tap on it, and select Delete App.
Other related errors include the Spotify overlay not working but we’ve already covered ways on what settings to play with for it to make a comeback.
All in all, Spotify is not all about errors. We also have some great Spotify extensions you can install on your browser and have an immersive listening experience. There’s also the Spotify AI playlist that will curate a list of songs based on your vibe and mood.
And if you’re done with Spotify, we have an amazing list of alternative music players both online and offline.
Have you managed to resolve this error? What solution did it for you? Let us know in the comment section below.
Lenovo, a well-known technology brand, offers a big discount on its ThinkPad T14 Gen 3 laptop. This laptop belongs to the company’s main series. The regular price was $2,370, but now, during Lenovo’s clearance sale, you can buy it for only $700, which is a discounted rate of 70%.
The ThinkPad series is famous for its balance between portability, strength, and period of battery. The ThinkPad T14 Gen 3 shows this characteristic perfectly. It works on an AMD Ryzen 5 PRO 6650U CPU with AMD Radeon 660M GPU. The laptop is also equipped with a RAM size of 16GB and an internal storage capacity of 512GB, allowing it to handle many different types of tasks.
The laptop has a 14-inch WUXGA IPS display with a 1080p HD resolution. The panel offers 300 nits of peak brightness and is anti-glare. It also features a 1080p FHD webcam, equipped with a privacy shutter that lets you switch off the camera when not in use.
Regarding connectivity options, the T14 Gen 3 possesses HDMI and USB-C ports, Ethernet, USB-A, and a 3.5mm headphone jack. This laptop supports Qualcomm Wi-Fi 6E for wireless performance, which provides a speedy and consistent connection. The laptop can keep working for a long time, with its battery lasting up to 15.3 hours.
The Lenovo ThinkPad T14 Gen 3 is a powerful choice for business users. This deal should not be overlooked if you are looking for a fresh work laptop. Buy now? You can order the Lenovo ThinkPad T14 Gen 3 at a lower cost from Lenovo’s web store.
Hotkey for Dev Home Project Ironsides is related to Dev Home, and the latest update changed how this app works, thus adding it to the startup. This has occurred on all PCs, and even for users that have never used Dev Home in the past.
If you’re wondering if you should remove it, the answer depends on your needs. If you’re a developer who benefits from its range of tools and integrations, keeping it might be worthwhile. However, if your system experiences performance issues and you don’t use its features, uninstalling could free up resources.
How can I remove Hotkey for Dev Home Project Ironsides?
Press the Windows key + S and type PowerShell. Choose the Run as administrator option.
Next, run the following command: Get-AppxPackage *DevHome* | Remove-AppxPackage
This application isn’t harmful and it won’t cause any damage to your PC, so don’t be too alarmed if you notice it among startup apps. If you don’t use Dev Home, go ahead and remove it altogether by using the steps above.
This isn’t the only app that can appear without your knowledge, and many reported DevHome.PI.exe on their PC as well.
Farming means painstaking work, a lot of mess, but a lot of joy in return by being surrounded by breathtaking nature scenery and farm range animals. Well, you can enjoy all that from the comfy chair near your PC or gaming console.
The well-known Farming Simulator series has made a big return, with GIANTS Software revealing Farming Simulator 25. This new version of the game adds many fresh elements such as Asian farming, improvements to gameplay and technology plus a collection of special editions for this game.
The launching date for the game is set on November 12th, and it will be accessible on PC, Mac, PlayStation 5 as well as Xbox Series X|S. According to GIANTS Software, you can pre-order now through certain avenues.
Farming Simulator 25’s new features
Asian Farming: Cultivate rice fields and other farms in a fresh East Asian setting, or choose North American surroundings with wide open space, or Central Europe having green fields among ponds and rivers.
New Crops: Grow two types of rice, spinach, and other new crops – there are well over 20 overall to choose from.
Animals: Buffalos and other animals join the livestock pens.
More business opportunities: New production chains and constructions extend business opportunities.
Upgraded visuals and machines
GIANTS Software states that Farming Simulator 25 will have more than 150 international top brands, providing over 400 authentic vehicles, tools & items.
With Asian farming, new types of specialized machines get introduced.
Tech Upgrade: A general tech upgrade that has better graphics and physics, based on the newest GIANTS Engine 10 which is friendly for modding. It adds distance fog, improved shadows, dynamic effects from weather changes along with ground deformation among other things.
GIANTS Software gives a unique Farming Simulator 25 Collector’s Edition for PC. This has a USB ignition lock to start the engines of in-game tractors, along with game’s 16-bit Mega Drive-inspired version and also soundtrack CD containing 15 original tracks from Chris Hülsbeck. A concept art book is there too as well as three posters.
Simultaneously, the digital Farming Simulator 25 Tech Select Edition can be played on PS5, Xbox Series X and Xbox Series S. This edition encompasses everything found in Collector’s Edition except for physical goods.
The Farming Simulator 25 will come out in two usual physical and digital editions. These are the game’s standard edition plus another called Farming Simulator 25 Tech Edition, which has a case themed around farming for each season; an in-game tractor that is special and lastly, there’s also this version of the game known as Winter Wonderland.
Mega Drive Version
The Mega Drive version is a retro style of Farming Simulator 25. It comes in an old-school Genesis-style cartridge with a Genesis-style box. As per the description given by GIANTS Software, you will need to have a Mega Drive cartridge slot for playing this particular version (GIANTS Software). They also mention that this specific cartridge is neither a functional memory card nor a data storage medium and it cannot be used to save progress in the game.
What are the Farming Simulator 25 PC requirements?
GIANTS Software also issued the PC requirements for the game, and, as you can see below, they are not so high:
Farming Simulator 25 is available for preorder for $50 right now and we can’t wait until it’s out in November. So, whether you’re preparing to start your own farm or just want to know something about farming from a distance, Farming Simulator 25 is a great way to do it.
What do you think about Farming Simulator 25? Let us know in the comments below.
At present, Walmart has a significant discount for the HP Laptop 14. The initial cost was $519, but it’s now reduced to only $279, which means you save $240. We can’t be sure how long this offer will stay active, so if it interests you, we recommend acting swiftly.
The HP Laptop 14 is a decent all-rounder, appropriate for many tasks. It has an Intel Core i3-N305 CPU, 16GB RAM, and 256GB storage space. It may not be the strongest in gaming, but its screen size is around 14 inches with HD quality, which gives clear colors and brightness – perfect for watching movies or shows on your laptop at home!
The HP Laptop 14 is not lacking in connectivity. It provides two USB-A ports, a USB-C port, HDMI, and an ethernet port, as well as a 3.5mm headphone jack for audio purposes. The laptop also includes Wi-Fi 6 and Bluetooth 5.3 support to help you stay connected wirelessly.
If you need to move around often, the HP Laptop 14 is light at 3.2 pounds. It can last without charging for up to 10 hours and 45 minutes, so you probably won’t need a charger during the day.
If you want to buy the HP Laptop 14 at a discounted price, go to Walmart through this web link.