In one of this year’s coolest announcements, Microsoft has teamed up with Deadpool, one of Marvel’s most popular characters, to release a Deadpool-themed Xbox controller that will catch everyone’s attention.
The customized Xbox Wireless Controller matches the comedy and uniqueness of this well-liked antihero. Doing its best impersonation of Deadpool’s famously firm ‘buns of steel,’ this controller aims to be more than just a gaming device. Fans and collectors alike eagerly predict they will want this item for their collection.
Plus, Microsoft has a special edition controller that matches the design of Marvel Studios’ “Deadpool & Wolverine” movie. To honor its release, enthusiasts can win this unique gamepad through worldwide sweepstakes.
Visualize yourself having a superhero glory in your hands while playing games you adore on this distinct controller. And, if you’re one of the fortunate 1,000 individuals who bought an Xbox Elite Wireless Controller Series 2 – Core from the Microsoft store initially, then there is a unique Xbox Deadpool Controller Holder waiting for you.
Make his finest asset yours
Follow & Repost with #XboxCheekyControllerSweepstakes for a chance to win a custom Xbox Series X console & 2 Cheeky Controllers designed by Deadpool.
The Xbox controller is a marvel of design, showing Deadpool’s famous red and black suit with tactical patterns and belts. However, it’s not just about the looks—the controller also assures a comfortable grip that might make you feel superheroic.
For those who are ready to join in on all this excitement, entering into this lucky draw is quite simple: merely follow Xbox on X (formerly known as Twitter) and share their official sweepstakes post again. The victors could also get custom Xbox hardware like a Deadpool-inspired Xbox Series X, a stand with foam katanas named Bea and Arthur, and two Xbox Wireless Controllers.
Fans can watch Twitch Xbox on July 22 for a live transmission from the “Deadpool & Wolverine” red carpet premiere to add more thrill. This is not just about controlling; it’s also about joining a bigger community of enthusiasts and players who enjoy their affection towards these famous characters.
If you are a fan of Deadpool or Xbox, this opportunity should not be missed.
Speaking about Xbox, don’t forget that the 360 Store will be gone forever at the end of the month, but there are huge discounts for games right now. And, since we’re being cool, download the latest Xbox 360 Blades background for the current consoles.
Seems as if Microsoft is exploring a possibility of integrating Windows 11/10’s built-in Energy saver with Edge Efficiency mode to boost device battery life. This feature is being tested in Edge Canary channel.
If you are using a laptop for browsing with multiple open tabs, watching videos, and playing games, the battery may run out quickly. To address this, Microsoft Edge browser offers Efficiency mode.
The new feature under development in Edge Canary suggests Microsoft is working on a way to intelligently connect these two battery-saving options. Here’s what we might see:
If Energy Saver is available on your Windows 11 device but not enabled, Edge might prompt you to activate it for optimal battery savings.
When Energy Saver is already turned on, Edge might inform you that Windows 11’s power-saving features are already in effect.
We found Microsoft is testing an Edge feature that may improve battery life hidden behind these three flags:
msEdgeSyncEfficiencyModeWithWindowsEnergySaver: This flag likely controls whether Edge attempts to synchronize its Efficiency mode with Windows Energy Saver settings.
msEdgeWindowsEnergySaverAvailable: This flag might indicate whether Edge detects that Windows Energy Saver is available on your system.
msEdgeWindowsEnergySaverActivatedTrigger: This flag could be responsible for triggering notifications based on the status of Windows Energy Saver (enabled or disabled).
Overall, this new integration between Microsoft Edge and Windows 11 Energy Saver looks promising for laptop users. By working together, these features could help you maximize your battery life and enjoy uninterrupted browsing for longer.
Please note: This information is based on features under development in the Edge canary channel and may not reflect the final implementation details.
If you’re a multitasker, you obviously have multiple tabs open at any given time so why not have OneTab on your Firefox make it easier for you?
One Tab allows you to convert your tabs into a list and restore them as and when needed. When you open too many tabs at once, some may get lost from the view and as the list grows and you may find yourself unintentionally closing some.
One Tab helps with consolidating all tabs that will not fit on your browser window. It then converts them to a list for easier management. Once in a list, you can quickly scroll through it and restore one or all when you need it.
The main reason for all this is to reduce the CPU and memory load on your browser and speed it up. You already know too many open tabs can slow down your browser so this is a much-welcome solution to faster load times and prevent your Firefox browser from becoming unresponsive.
When it comes to safety, you can rest assured that One Tab will not be collecting any information from your tabs to unauthorized parties. As a bonus, it also has a 4.2 rating which implies it’s a pretty solid choice.
If you’re against adding extensions to your browser, you don’t have to. There are lots of browsers with tab management capabilities that you can explore. Granted, they may not have the additional features that One Tab has, but they get the job done.
Speaking of tabs, you can also introduce tabs to Windows on your desktop for efficient time management.
If you’re looking for more extensions, you might want to check the Rikaikun extension for Firefox especially if you’re learning Japanese. We also have a fresh guide on how to list all tabs in Firefox, so don’t miss it.
We also have a great guide on the Vimium Firefox extension, so don’t miss it for more useful information.
Have you tried the One Tab extension on Firefox? Was it effective in tab management? Share your experience with us down below.
Wondering how to check your Firefox version? Whether you’re troubleshooting an issue, verifying compatibility, or ensuring you have the latest updates, finding your Firefox version is a simple but important task.
By tracking your version, you can keep up-to-date with the latest security patches and more. I’ll show you the steps on both desktop and mobile devices.
Let’s get into it!
How To Check Firefox Version
Simply follow these instructions:
On PC
Openthe Firefox browser on your computer.
Click on the menu button (three horizontal lines) located in the top-right corner of the browser window.
Scroll down and tap the “Help” option.
Click on “About Firefox.”
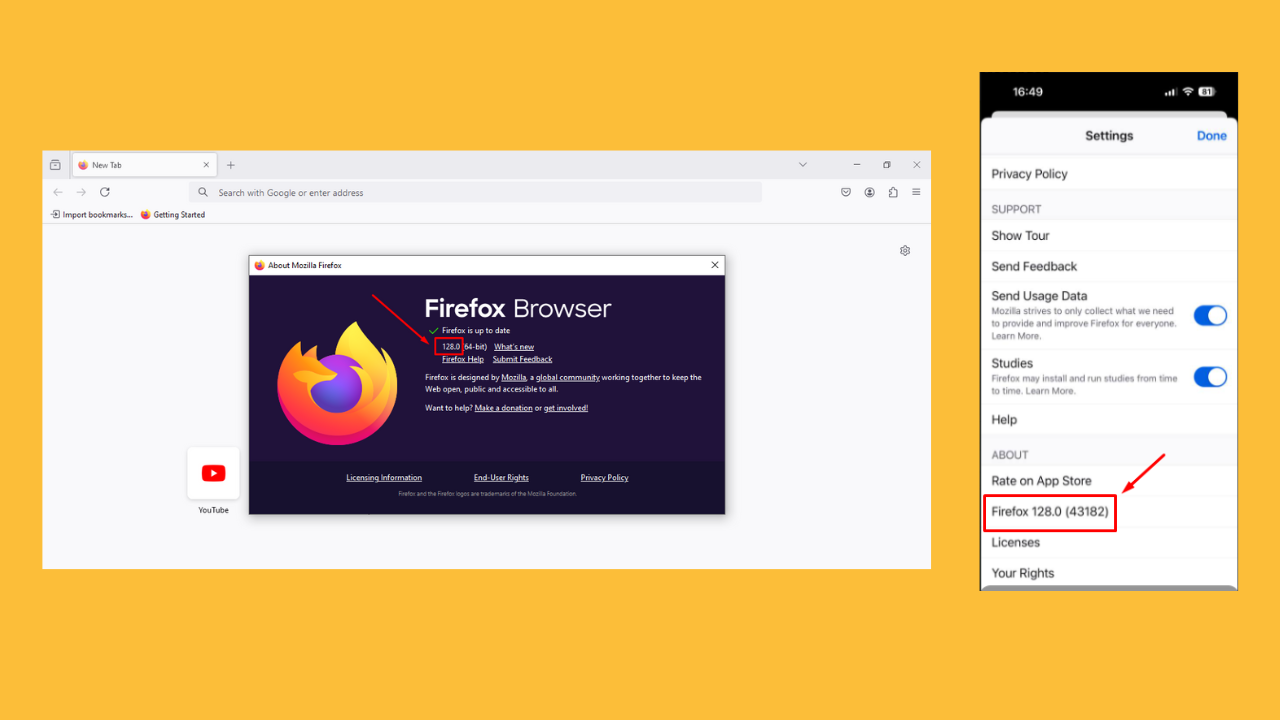
A new window will open, displaying the version number. This window will also automatically check for updates and download them if available.
On Mobile
Open the Firefox app on your mobile device.
Tap on the menu button (three horizontal lines) located at the top-right corner on Android or the bottom-right on iOS.
Scroll down and tap on “Settings.”
On the Settings page, find the “About” section. It’ll display your Firefox app’s version number.
So, now you know how to check your Firefox version! Whether you’re using a desktop or mobile device, knowing your browser version ensures you’re always up-to-date and ready to take full advantage of what Firefox has to offer.
There are many versions of Office, and some of them offer different types of applications, so in today’s guide, we’re going to show you the list of programs for the latest Microsoft Office versions.
Microsoft Office programs list, here’s what’s available
Microsoft Office 2021
Office Home & Student 2021
Office Home & Business 2021
Office Professional 2021
Office Professional Plus 2021
Word, Excel, PowerPoint, OneNote
Yes
Yes
Yes
Yes
Outlook
No
Yes
Yes
Yes
Publisher
No
No
Yes
Yes
Access
No
No
Yes
Yes
Teams
No
No
No
Yes
All editions of Microsoft Office 2021 come with core apps that include Word, Excel, PowerPoint, and OneNote.
To get access to Outlook users would have to go for Home & Business edition instead. The Professional edition brings access to Publisher and Access, while the Professional Plus edition has Teams.
Microsoft Office 2019, 2016
Home & Student
Home & Business
Standard
Professional
Professional Plus
Word, Excel, PowerPoint, OneNote
Yes
Yes
Yes
Yes
Yes
Outlook
No
Yes
Yes
Yes
Yes
Publisher
No
No
Yes
Yes
Yes
Access
No
No
No
Yes
Yes
Skype for Business
No
No
No
No
Yes
Unlike the latest edition, Office 2019 and 2016 have the same choice of apps across the editions. It’s worth noting that these versions have a Standard edition that includes Publisher alongside Outlook and core apps.
One major change is that these two editions used Skype for Business since Teams hadn’t been released back then. However, in the later version Skype for Business was replaced by Microsoft Teams due to its discontinuation.
Microsoft Office 2013
Home & Student
Home & Business
Standard
Professional
Professional Plus
Word, Excel, PowerPoint, OneNote
Yes
Yes
Yes
Yes
Yes
Outlook
No
Yes
Yes
Yes
Yes
Publisher
No
No
Yes
Yes
Yes
Access
No
No
No
Yes
Yes
Info Path
No
No
No
No
Yes
Lync
No
No
No
No
Yes
Office 2013 didn’t offer many changes, and the editions and the available applications remained the same. You may notice that Skype for Business is gone, and that’s because it was called Lync before rebranding.
Another discontinued application was InfoPath, which was used for filling and submitting forms. The good news is that you can still download Microsoft InfoPath if you want.
Lastly, we’ll focus on Microsoft Office 2010. Unlike its successors, it also had a Personal edition that only included the basic apps.
For this version only Word and Excel were core apps, which means that PowerPoint or OneNote weren’t available in the Personal edition and instead users had Outlook.
If you wanted to get access to PowerPoint and OneNote, you had to use the Home & Student edition or any other one. Interestingly, Outlook was missing from this edition but you could access it from the Home & Business edition instead.
Other editions remained the same, with SharePoint Workspace being used as a collaboration tool instead of Lync.
We also have to mention that this version of Office had Picture Manager in all editions except for Personal. If you want to give this software a try, you can still download Office Picture Manager.
How many Microsoft Office programs are there?
This depends on the version of Office, but modern versions have 4 core apps and an additional 4 depending on the edition.
These were all the applications that were included in Microsoft Office in the previous decade, and over the years Microsoft cut down on the number of available apps and editions, allowing users to get access to essential office apps even in the basic editions.
Microsoft Office is one of the most widely used productivity tools worldwide, known for reliability and innovation. Since its inception (October 1, 1990), Microsoft has been working on adding new features, improving performance, and creating a new user interface apt for the modern age.
Here, we will discuss the critical distinctions between Microsoft Office 2019 and its latest iteration, Office 2021, to help you decide which version is better.
Microsoft Office 2019 vs 2021: What’s the Difference?
Understanding the basics
Before discussing the differences between Microsoft Office 2019 and 2021, let’s examine their similarities and list of products.
Both Microsoft Office versions are standalone and come with perpetual licenses, different from subscriptions like Microsoft 365.
Useful for those who prefer to make a one-time purchase instead of subscription fees.
Both versions have classic Word, Excel, PowerPoint, Outlook, and OneNote versions.
They are compatible with Windows and macOS, and the user interfaces are similar, with familiar menus, toolbars, and ribbons.
Both integrate with other Microsoft services and applications such as OneDrive, SharePoint, and Teams.
Available in English, German, French, Italian, Spanish, Russian, etc.
Both are intended to be used offline and are ideal for people who don’t have constant access to the internet.
Both support various file formats, including doc, docx, odt, rtf, pdf, xml, xls, csv, html, pps, ppsx, etc.
Microsoft Office 2019 vs 2021: What is different?
Office 2019
Office 2021
Release Cycle
September 2018
October 2020
Support Duration
Support ends on October 13, 2026. It is likely to have a longer support duration, as it was released recently and will have frequent updates and improvements
Support ends in October 13, 2026. It is likely to have a longer support duration, as it was released recently and will have frequent updates and improvements
Design
Classic design of Office apps
Design is adapted to the newer and modern look of Windows 11
Dark mode
Basic dark mode
Extensive dark mode with darkened background areas, and light font
New functions
–
Dynamic Arrays, visual refresh, and new Excel functions like XMATCH, XLOOKUP, and a better comment function (Modern Comments)
Apps
Word, Excel, Outlook, PowerPoint, Access, Publisher, Skype for Business
Word, Excel, Outlook, PowerPoint, Access, Publisher, Skype for Business, Teams, OneNote
Languages
English, German, French, Italian, Spanish, Russian and more
English, German, French, Italian, Spanish, Russian and more
Collaboration
Limited
Real-time collaboration and file sharing with Microsoft Teams
Price
Starts at $149.99 at Microsoft
Starting at $149.00 at Microsoft
What’s new in Office 2021?
Microsoft Office 2021 is a step-up to Office 2019, which comes with several enhancements across the offered applications:
Microsoft Teams: chat client included – The 2021 version of Microsoft Office includes Microsoft Teams, so you don’t have to install it. However, you need to buy a subscription to use the Business version of MS Teams.
Outlook: Automated translation – The email client allows you to translate email messages into more than 70 languages directly. The translation is instantly displayed next to the original message in the mailbox.
Excel: New functions &dynamic arrays – The 2021 version of Excel includes new functions, including XLOOKUP (which allows targeted search for multiple variables and keywords), XMATCH (which allows targeted position search of keywords and variables), and Let (which assigns names to specific calculation results). It also includes dynamic arrays, enabling receiving an array of multiple values with a single formula.
Word: Text predictions – Gives you suggestions based on the first few letters of the word you are typing, which can improve writing speed.
PowerPoint: New and improved record SlideShow – With 2021, you can make a video recording of a PowerPoint presentation with narration, ink gestures, slide timing, and pointer movements. You can also get a sketching feature, which lets you draw freehand in presentations. It also comes with option to export presentations in video format.
New look – Office 2021 has an up-to-date look that matches the latest operating system, seamlessly integrating with the OS.
Focused Inbox (Outlook 2021) – Focused Inbox feature lets you focus on the most important messages by automatically sorting your messages into two categories. The Focused inbox contains the important emails, and the Other inbox includes the rest.
It also comes with support for OpenDocument format (ODF) 1.3 microsoft office 2019 vs 2021
Is Office 2019 a reliable option?
Office 2019 was released in September 2018 and will only have support until October 2025, which means it will get security updates until 2025 but will not have the new features and improvements coming with the newer version.
If you don’t need MS Teams or any of the other new features mentioned above, you can choose Office 2019.
What are the minimum requirements for Microsoft Office 2021?
System Requirements
Processor
1.6GHz 2-core processor
Memory or RAM
4 GB (64-bit), 2 GB (32-bit) for PC; 4 GB RAM for Mac
Storage space needed
Minimum 4 GB for PC, 10 GB for Mac
Display
1024 x 768 resolution for PC, 1280 x 800 for Mac
Graphics
DirectX 10 graphics card for graphics hardware acceleration for PC
Operating system
Windows 10 or newer, macOS
Microsoft Office 2019 vs 2021: Which one should you choose?
While choosing between Office 2019 and Office 2021, you should consider these things:
Stability – If you prefer stability and reliability over the latest features, enhancements, and improvements of Office 2021, you can choose Office 2019, which has been stable and well-tested.
Features – In case you think the features for creating documents, spreadsheets, and presentations are enough with the older version, Office 2019, then you can go for it. However, if you need the new features and functions like Dynamic array, you should go for Office 2021.
Extended Support – Office 2021 will provide support until October 2026, while Office 2019 will provide support until October 2025, so if you need more extended support, go for Office 2021.
Integration – If you want seamless collaboration through improved integration with cloud services such as OneDrive, SharePoint, and Teams, Office 2021 is the go-to choice.
Budget – If you are on a budget and don’t care for the fancy features, Office 2019 is a better option for you
If you want to learn more about Microsoft Office 2021 and its latest features, then check out this separate guide.
Conclusion
Now that you know the differences between the two versions of Microsoft Office and what each one brings, it must be easier for you to choose. If you want a simple document and presentation-creating version without the latest features, the Office 2019 license should be the choice.
However, if you want the latest features and enjoy support till 2026 with refreshed Office apps, the choice should be Office 2021.
It’s been a week since the Patch Tuesday updates were released, but many Windows users cannot install the patch.
KB5040442, which brings dozens of improvements to Windows 11 and fixes about 142 CVEs, doesn’t want to download and install, and many Windows users are either stuck or encountering an issue, with many blaming the 0x80070017 error.
In my settings it says that the 2024-07 Cumulative Update for Windows 11 Version 23H2 for x64-based Systems (KB5040442) and the 2024-07 Cumulative Update for .NET Framework 3.5 and 4.8.1 for Windows 11, version 23H2 for x64 (KB5039895) is ready to be downloaded and installed but as I proceed with the update it keeps saying there was an error and the update will not install. I have tried restarting my PC and looking in my bios to find a problem but my troubleshooting has not worked.
Windows user
Microsoft hasn’t said anything about it yet, even though hundreds of users are running into this frustrating bug on the official Windows forums.
However, until the Redmond-based tech giant comes with an official answer or workaround for KB5040442, you can try these solutions:
Run Disk Cleanup: This process initiates a brief cleaning session for your computer to eliminate temporary files that may interfere with the update process. You can easily do it, but we have a comprehensive guide here if you need help.
Use the Windows Update Troubleshooter: This tool can automatically detect issues with Windows Update and resolve them on its own. Type Troubleshoot in the search bar, choose Other troubleshooters, and start the Windows Update troubleshooter. You can also follow our steps here.
Execute the sfc /scannow command. This method will eliminate any corrupted files in Windows 11 that might interrupt the installation of KB5040442. Although executing this command might be difficult for casual Windows users, you can follow our step-by-step guide here.
Check Windows Services: Look for important services like Windows Update and BITS; they should function correctly. In the Services window, locate these services and confirm that their Startup type is set to Automatic. This is how you can do it.
Reset Windows Update Components: This is similar to pressing the restart button for your update process. You must go to Command Prompt, open it as an administrator, execute a group of commands that halt the update services, and then restart them. You’ll find out how to do it here.
Disable Anti-Virus Software Temporarily: If you rely on Windows Defender, the program can sometimes enter conflicts with Windows Update. Disable it, and try to install KB5040442 again.
Restart Your Computer: This obvious method might untangle conflicts. If you can’t install KB5040442 on your Windows 11 system, restart it and try again.
Let us know if any of these solutions worked for you.
This feature allows participants to go through different sets of questions depending on the answer they choose at the branching point. So, if your online form is targeted to a wide range of audiences, it’s quite helpful.
Since branching is an advanced feature, you might face challenges in routing survey takers in their own pathways of questions. Below, I’ve listed the tried and tested solutions you can try.
How To Fix Microsoft Forms Branching Not Working
I’ve organized the methods by complexity, starting with the easiest.
Switch Off Multiple Answers Toggle
Microsoft Forms branching works when the user selects one answer for the given question. Then, questions specific to the branching logic start to appear.
If a survey participant can choose more than one answer in a branching question, the feature won’t work.
Branching won’t work when Multiple answers are active
So, you should disable multiple correct answers. You’ll find the Multiple answers toggle button just below the question, near the Required toggle.
Then, refresh the form and branching will work.
Use a Different Browser
If you’re unable to use the branching logic of MS Forms in Google Chrome or Mozilla Firefox, try opening the same content in Microsoft Edge.
Verify Branching Logic
If the branching logic seems off for a specific question, you can identify that easily by going through all the questions where you’ve added branching.
Replicate the steps your survey participants should take when attempting branched questionnaires. Identify the appropriate question and accurately enter the answer that’ll initiate a branching.
Simplify Complex Branching
Here’s an example of a complicated branching logic that impairs the feature at a certain question-answer stage:
Question: What type of pet did you buy (Dog, Cat, Other)?
Branching Logic:
If “Dog,” go to the question “What breed of dog?” (Q4)
If “Cat,” go to the question “What type of cat food did you buy?” (Q5)
If “Other,” go to the question “What type of pet did you buy (specify)?” (Q3a)
Branch from Q3a:
If “Fish,” go to the question “What type of fish food?” (Q6)
If “Bird,” go to the question “What type of birdseed?” (Q7)
In the above example, the Other branch will create a loop. If a survey participant selects Other in Q1, they’re sent back to Q3a to specify the pet type. This may confuse the participants and break the branching logic.
To simply the branching logic, you can end branching in Q3a and introduce a new question like the one below:
What type of food did you buy for your pet? (Q8)
Branching Logic for Q8:
If the answer in Q3a is “Fish,” display “What type of fish food?”
If the input in Q3a is “Bird,” show the question “What type of birdseed?”
If the Q3a answer is something else, show a generic “Other food” option.
That way, you can simplify multiple branching logic and provide a smooth question-answer experience for the survey respondents.
Verify Branching Destination
When you deal with multiple branching scenarios in one form, you might mistakenly choose the wrong question for the current branching step.
Now, if a wrong question contains another branching logic, then the chain might break or the participant will get confused.
It often happens because the Go to drop-down box shows all the available questions in the document except the one selected for branching.
In the following screenshot, when I click the Go to box for Math, the list shows questions from both Biology and Math. It’s my responsibility to select the right question for the branching to work logically and smoothly.
Check for Duplicates
Microsoft Forms’ branching rules often break due to duplicate questions and answer options. Duplicates interfere because they have the same content, text, and symbols.
To avoid them, do the following checks:
Review all branching points and Go to questions to link to.
Create a flow chart somewhere else and follow that when creating a branched survey form.
Use unique identifiers if you have to ask similar questions in a branched questionnaire, like putting a serial number.
You can also modify question options and titles to make similar questions appear differently.
After editing questions, test your form yourself before circulating it among your audience.
Clear Cache and Cookies
If you’re completely unable to see the Add branching option for a question or everything is checked and still branching won’t work, try the following steps:
Click on the padlock or the View site information icon in the top left corner of the browser address bar.
You’ll see the Cookies and site data option. Click on that.
Click on the Manage on device site data hyperlink.
A pop-up will open on the browser near the top of the page.
Click the bin icons for all the items shown in the pop-up.
You’ll need to log in to your Microsoft 365 account after performing these steps.
Use an Alternative Form-Making Tool
If you’re still unable to use the branching feature in MS Forms, you can try Google Forms. The introduction of branching logic is much easier.
In Google Forms, this feature is known as Go to section based on answer.
Also, the functionality is available in multiple answer types:
Multiple choice
Dropdown.
When you enable it, Google Forms creates a completely new section of questions below the branched question.
Therefore, you can choose the new set of questions easily from the next section and avoid confusion.
Summary
Now you know how to fix Microsoft Forms branching not working.
You might also want to go through this Microsoft Forms vs Google Forms comparison before shifting entirely to Google Forms. Moreover, if you’re having trouble with Forms not updating Excel properly, we have just the guide for you.
If the article helped you in fixing branching problems in MS Forms, acknowledge it by commenting below.
In the quest to find a browser that meets all your needs, we tried out the Thorium browser and bring you our unadulterated review.
What are the main features of the Thorium browser?
Overview of Thorium Browser
Thorium is an open-source browser which makes its source code open to the general public. Unlike proprietary browsers, users have to wait for developers to release updates if there are any bugs or glitches.
It is also based on Chromium so you can be assured of getting core features with other like browsers only with the added advantage of modifying the source code.
User Interface
First impressions give a very Chrome-like appearance. Everything down from the launch page where you are to sign in and create an account with a browser profile. The default page has the web store pinned so you can get started with installing any extensions you may need.
You won’t need a tutorial on how to use it if you’re a Chrome user because all settings are similar.
Performance and speed
For context, I’m on Windows 11 Pro and the following are my hardware specs:
Processor – Intel Core i5 with 4 cores at 2.50GHz speed (not overclocked)
RAM – 8GB
GPU – Intel
PC model – Lenovo
Other notable factors that may play a part include internet speed and mine is at 23 and 24 for download and upload speed respectively.
I put the Thorium browser to test in comparison to Chrome to load two sites; WindowsReport and YouTube. WindowsReport took 2-3 seconds to load on Thorium while on Chrome it was almost instant.
While the response time was fairly fast, it did lag a bit behind Chrome. As for performance, Thorium had a higher CPU consumption. This is despite having two separate Chrome profiles with multiple tabs open on both.
My Chrome profiles also have a few extensions while Thorium only has the pre-installed ones; uBlock and Google Docs offline. This means the introduction of add-ons could potentially strain its resources even more and make the browser a CPU hogger.
On memory consumption, Thorium was surprisingly low which implies it’s built for efficient memory management. On the downside, the load time for websites could be slow because of this but other than that, navigation even on graphic-intensive sites was smooth.
If you have a problem with the load time, Thorium also has the memory saver option which frees up memory from inactive tabs and enable faster load times. For frequently used sites, you can add them as an exception from memory saver.
Another tip to speed up the loading of pages is to enable the Preload pages feature.
If you regularly click on unknown links, you’ll be happy to know Thorium has a safety check feature. Regularly checking will scan for any viruses, or threats and ensure safe browsing.
2. Secure connections
Thorium has a HTTPS encryption feature that ensures your data is protected whenever you visit a site. Any data that is exchanged between the browser and the site you’re visiting will be encrypted preventing interception by cyber hackers.
3. Security keys
Since you can use Thorium browser on multiple devices, you can manage who uses your profile by using one of the signed devices. For instance, if you’re on a shared computer, you can choose one as a security key to remotely lock out unauthorized users and secure your privacy.
For more security features, we have compiled a list of browser security settings we think you should enable for all-rounded protection.
Privacy features
1. Secure DNS
Browsing exposes you to a myriad of internet attacks so Thorium makes it easier for you to hide your activity. With the secure DNS feature, you will be able to spoof the sites you visit and prevent hijacking attempts.
You’ll be able to maintain your privacy because any attempts of man-in-the-middle attacks will be difficult when the DNS data is encrypted.
2. App permissions
You’re in total control of the apps that you give permission to access your location, microphone, camera and any other tools. Any attempts to spy on you by third-party apps would require your exclusive permission.
Additional features
Other features worth mentioning include:
Auto-verify – Most sites usually have a prompt asking you to verify that you’re not a robot. With Thorium’s auto-verify feature, it can help verify you’re a real person without your input making browsing more efficient and faster.
V8 optimizer – This is a feature meant to optimize sites for improved performance.
Customized fonts and spell check – You’re at liberty to change your font and size. You can also enable spell check to minimize grammatical mistakes.
Import feature – If you have bookmarks and other settings you’d like to import from a different browser, you can easily do so within the Thorium browser.
Pros and Cons
Pros
Open source – As an open-source browser, Thorium prioritizes privacy and security features.
Customizable – Aside from the ability to install extensions from the web store, you can also customize your browsing experience by beefing up security and enhancing the appearance.
High-performance – Thorium has built-in features that enhance the speed and performance of the browser.
Widely compatible – Thorium is compatible with older OSes. For instance, you can download Thorium on Windows 7. Also, since it is Chromium-based, it works well with multiple sites and web apps.
Community support – Thorium is regularly getting updates because of a large community of developers because of its open-source nature. This makes bug fixes and improvements done in record time.
Cons
Replica of Chrome – Thorium is a replica of Chrome and it is not a bad thing. However, it makes it another browser one would not be interested in because of too many similarities.
Limited features – Although Thorium delivers a solid list of features, when compared to other browsers, it lags behind.
CPU hogger – Thorium has a high CPU consumption which could make it extremely slow on older hardware.
Chromium-based – When a browser is Chromium-based, it shares the good and bad side. For Thorium, it may suffer from high memory usage and instability issues which is the norm for most browsers based on Chromium.
Complicated download process – Downloading Thorium browser is not as straightforward as getting it from the Microsoft Store. You’ll have to check for certain specifications but we have an easy download guide for Thorium browser.
Compatibility issues – Although Thorium uses extensions from the Chrome web store, some may be limited in functionality because of some internal configurations.
Late updates – Thorium does not receive browser updates regularly. This can expose it to vulnerabilities.
Finally, if we were to give our final thoughts, we’d say Thorium is a good browser. If not for its security features, at least give it up to its dedicated privacy features. All in all, whatever you decide, ensure it meets your needs. After all, everyone has their preferences but just give it a spin before you bin it.
Have you tried the Thorium browser? What features stood out for you? Would you make it your default browser? Share your thoughts with us in the comment section below.
If you’re looking for something different, we also have a guide on how to install Pheonix Browser for PC that you might want to check out.
Microsoft will make some important changes to the new Outlook for Windows and web, which will impact those using the platform’s calendar surface.
According to the latest entry in the Microsoft 365 Roadmap, the Redmond-based tech giant will add a classic Outlook feature to the new version of the platform: the ability to quickly replace compose pop-ups with inline appointment creation.
What does this mean? Well, when users click on an empty time slot on the calendar surface, instead of the regular quick compose pop-up, a new option to create an appointment in the time slot on the calendar grid will appear.
It’s worth mentioning that this works as it does in classic Outlook, meaning you’ll only have to single-click on the time slot, not double-click it.
Here’s what the entry says:
When single-clicking on an empty time slot on the calendar surface, the quick compose pop-up will no longer be shown. Instead, you will be able to create an appointment by typing directly in the time slot on the calendar grid, just as you can in classic Outlook for Windows. There will be no change to double-click behavior; the full compose form will still open as it does today.
Microsoft
Speaking of the calendar grid in Outlook, another entry in the Microsoft 365 Roadmap says the Redmond-based tech giant will update the platform to support keyboard navigation via arrow keys to navigate the calendar grid more easily.
When focused on the calendar grid, you will be able to navigate the time slots on the calendar via left/right/up/down arrow keys in day, week, and work week views.
Microsoft
The new Outlook for Windows and Web will be generally available to users on August 1st, 2024. However, Microsoft doesn’t plan to retire the classic Outlook. Instead, the company will enhance it with new AI capabilities.
A while ago, the Redmond-based tech giant added Copilot to classic Outlook, effectively bringing AI capabilities to all those users who don’t want to try the new version of the popular emailing app.
However, it seems that Microsoft won’t stop here. The company will enhance Copilot in classic Outlook to select and rewrite specific pieces of text in an email.
Well, when composing an email, users can select portions of texts and use Copilot to rewrite them. The AI model will consider your prompts and rewrite those passages as best it can while modifying tone and length to suit your style.
Here’s what the entry says:
In classic Outlook for Windows, when composing an email, customers can select portions of text in an email and use Copilot to rewrite it. Users can give detailed instructions on how to rewrite and also able to modify tone and length.
Microsoft
The classic Outlook will still be around for a while, although it’s hard to know when it will be deprecated. We thought it would be deprecated in 2025, but Microsoft has other plans.
Until then, Copilot, which already has this capability in the new Outlook, will continue to be updated in the classic version.
New Snapdragon CPUs are gaining popularity, but everybody wants to know how they compare to other models on the market, so today we’re going to compare the Snapdragon X Elite vs Intel Core Ultra 7 and see which one is better.
Snapdragon X Elite vs Intel Core Ultra 7, hardware and performance difference
Hardware comparison
Snapdragon X Elite X1E-84-100
Intel Core Ultra 7 155H
Cores
12
16
Cache
42MB
24 MB
Frequency
3.8 GHz
3.8 GHz
Maximum frequency
4.3 GHz
4.8 GHz
Memory
LPDDR5x 8448 MT/s
Up to LPDDR5/x 7467 MT/s Up to DDR5 5600 MT/s
GPU
Qualcomm Adreno
Intel Arc graphics
NPU
Qualcomm Hexagon
Intel AI Boost
Max TDP
80 W
115 W
Judging by the specs, Intel outperforms X Elite by the number of caches and maximum frequency, but X Elite has better memory bandwidth, almost twice as much cache, as well as lower maximum TDP.
Performance
When it comes to performance, according to CPU Benchmark, the Intel Core Ultra 7 155H outperforms the Snapdragon X Elite X1E-84-100 in CPU Mark rating by 1.5%.
However, when it comes to single-thread performance, Snapdragon has a 9.8% advantage.
Single core
Multi core
Samsung Galaxy Book4 Edge (Snapdragon X Elite)
2769
14807
Samsung 960QGK (Intel Core Ultra 7 155H)
2336
12282
Dell XPS 14 9440 (Intel Core Ultra 7 155H)
2229
11826
ASUS Vivobook Pro 15 (Intel Core Ultra 7 155H)
2250
10954
Judging by the Geekbench performance, Snapdragon X Elite outperforms Intel Core Ultra 7 in both multi-core and single-core results. The difference is about 18% in multi-core and about 16% in single-core performance in favor of Snapdragon X Elite.
As for Cinebench 2024 CPU single-core results, Snapdragon had a 36.7% single-core advantage and a 38% advantage in multi-core results.
Snapdragon X Elite X1E-84-100
Intel Core Ultra 7 155H
Cinebench 2024 CPU Single Core
128.5
88.6
Cinebench 2024 CPU Multi Core
1085
737
Is Snapdragon Elite better than Intel?
Even though the Intel Core Ultra 7 155H has higher frequency and more cores, the Snapdragon X Elite outperforms it in almost all tests, so it’s safe to say that the Snapdragon X Elite is a better CPU.
Do keep in mind that we tested the Snapdragon X1E-84-100 model, but to learn how other models from the series compare, check our Snapdragon X Elite comparison guide for more benchmark results.
Knowing how to sign out of a Google account on Chrome is important for maintaining your online privacy and security. Whether you’re using a shared computer, accessing your account on a public device, or switching between accounts, signing out protects your personal information.
I’ll show you how on the desktop and mobile versions of Chrome.
So, let’s begin!
How To Sign Out of a Google Account on Chrome
Follow these steps:
Signing Out Through a PC
Go to Google Chrome on your computer.
Click on your profile picture or initials at the top right corner of the browser window. A dropdown menu will open.
Scroll down the dropdown menu and click on “Sign out” at the bottom.
You’ll automatically be signed out of your current Google account.
Signing Out on Your Phone
Open the Google Chrome app on your mobile device.
Tap the profile icon in the top right corner of the browser.
Click on the profile in the settings.
Scroll down the menu that appears and tap “Sign out” at the bottom. If prompted, confirm your action.
You’ll be signed out of your Google account on Chrome.
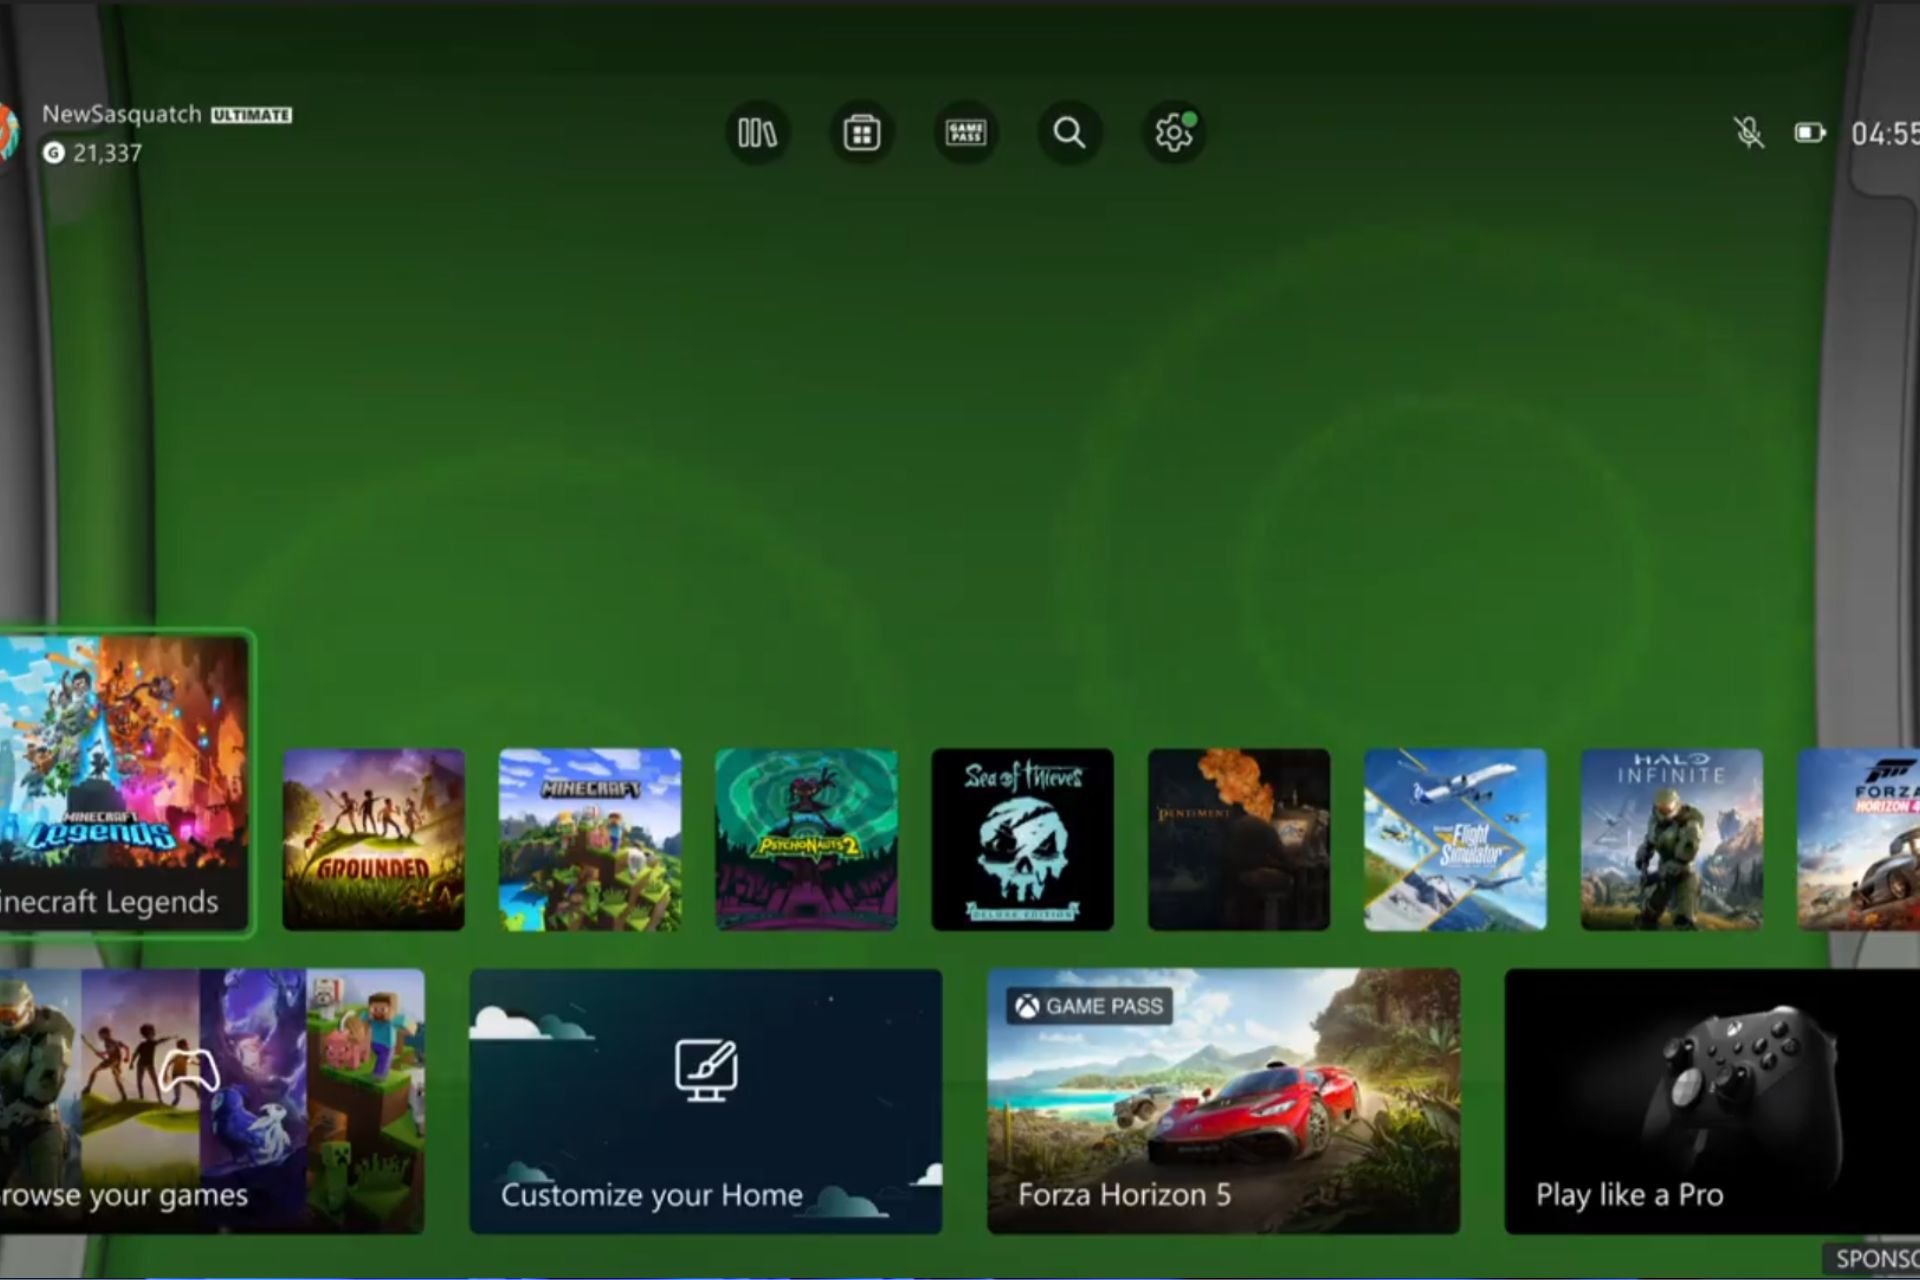
Xbox has introduced a new way to install games, and users of the Xbox Insider program, particularly in the Alpha and Alpha Skip-Ahead rings, can now access it. The focus is on providing enhanced control and ease for users.
In the official changelog, Xbox says users will be provided a few options before installing games: there will be additional items or features you can download. You can select what to install. You can choose to customize your game installations if you want to save some room, reduce the time it takes to download, or not be fascinated by certain content.
We’ve added a new option that will appear before installing games with additional downloadable content or features. Choose what to install! Whether you want to save some space, reduce the time it takes to download, or you’re just not interested in the content, this new option provides more control over your game installations before you even start.
Microsoft
The latest insider builds also brought some updates to the Xbox Accessories app. It’s easier to turn off your connected devices now. Open the Xbox Accessories app if you have a device turned on and linked to your Xbox console. Go to the More options menu for this specific device and choose Turn off device from it. It’s a small but significant quality-of-life improvement that many will appreciate.
When it comes to fixes, Xbox has dealt with a bug that caused uninstalling various titles to create unexpected errors, and they’ve updated the console so local languages are correctly shown. They have also observed a recognized problem in seeing HDR screenshots inside the Captures application, which they are now examining.
Although there isn’t a specific date for when all Xbox Series X|S owners will have access to these features, Beta Ring members can begin exploring them with the newest update. Meanwhile, make sure to download the latest Xbox 360 Blades background for Xbox Series X|S, as well as take a look at the final discounts from the Xbox 360 Store before it’s gone forever.
For me, who has experienced different gaming consoles, I feel a touch of nostalgia when the Xbox 360 is mentioned. It’s similar to meeting an old buddy you haven’t seen in years. Microsoft has given this good friend a fitting farewell by releasing one last compilation of reduced-price digital games.
However, a small thing can touch your emotions for those gaming on the Xbox Series X|S—an active background with famous Xbox 360 Blades.
Takes you back, doesn’t it?
Enjoy some sweet nostalgia with the new Xbox 360 Blades dynamic background, available today. pic.twitter.com/AYElkktM9K
Do you recall the Blades? They were the cool user interface that made it simple to browse through Xbox 360, and many Xbox users have been requesting it on newer Xbox consoles ever since. Now, it’s back with a new look. It’s an excellent method of recalling the past while using new gaming technology. To obtain the Xbox 360 Blades, enter your Xbox Series X|S settings.
Press the Xbox button on your controller to open the guide.
Navigate to Profile & system > Settings > General > Personalization > My background > Dynamic backgrounds.
Choose Xbox 360 Blades under Featured or Xbox dynamic backgrounds
Select the background art you want using the A button.
Microsoft
While we’re here, the Xbox 360 digital store will close soon (on July 29, to be exact). Starting in August, it won’t be possible for you to buy any games, DLC packs, or other content from the Xbox 360 store anymore. Truly, this marks the end of an era. Nevertheless, until the doors shut permanently, Microsoft will give substantial discounts on digital games. This can be a wonderful chance to obtain specific titles you may have overlooked or go back to old loves that are incompatible with the newer consoles.
This news could be good or bad for people who have kept their Xbox 360 with them. It provides a chance to grow your assortment at lower prices but also symbolizes the end of the console era in digital time.
You can check out the complete list of all the discounted games on the Xbox 360 digital store here. And don’t forget to change your background to that of the Xbox 360 Blades. Let us know in the comments how you like it.
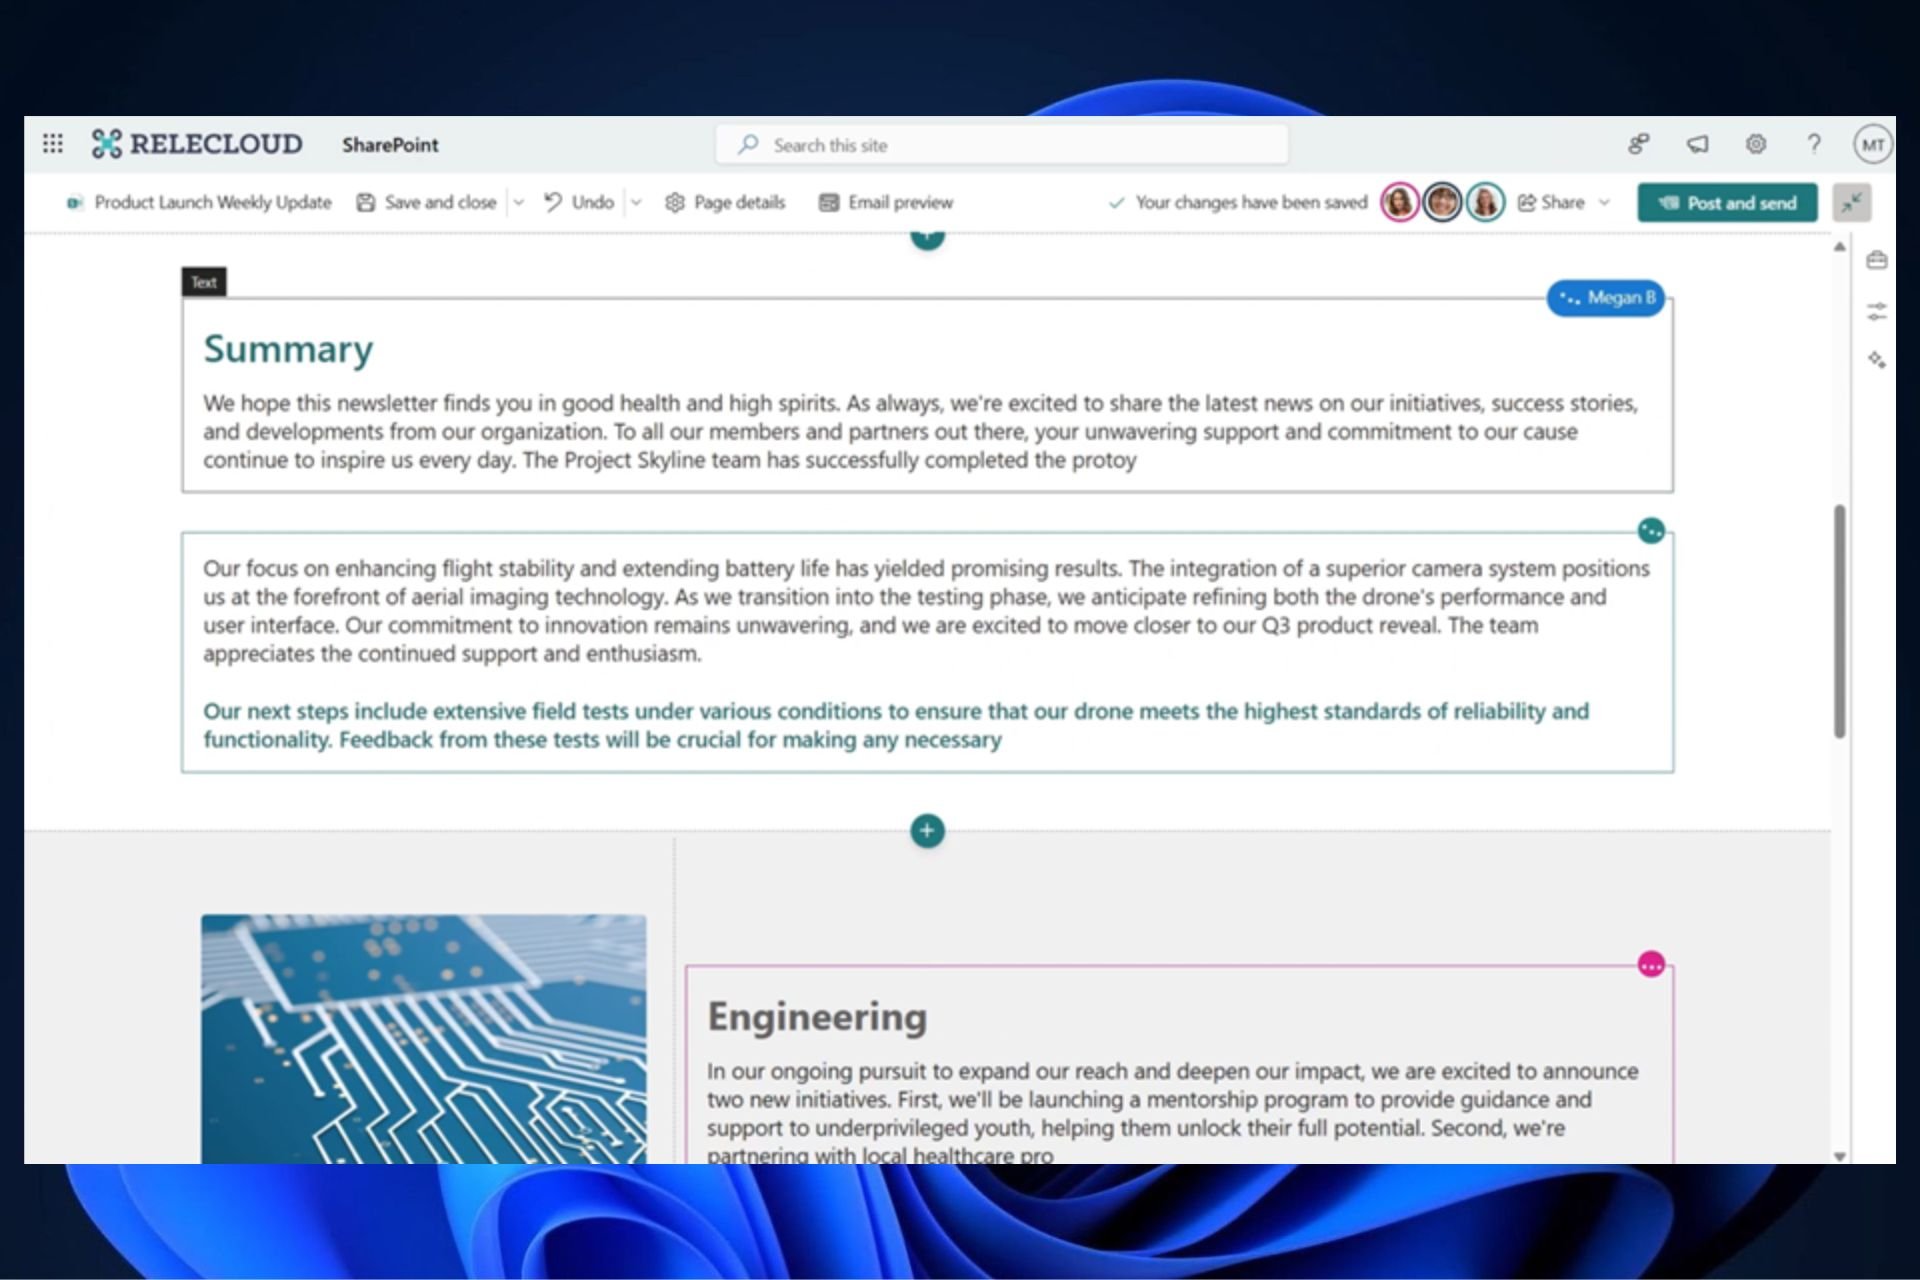
Microsoft has updated SharePoint to support co-authoring, meaning multiple users can author SharePoint Pages and News simultaneously. This feature blends their ideas without waiting for one another.
In a blog post, Microsoft says it is simple to co-author now, with multiple authors getting the chance to edit the same page or news post simultaneously. There’s no need for people to wait their turn when it comes time to add their perspectives – once you start editing mode, avatars will appear in the command bar, showing who else is working on this item with you. And the best part? Your changes are saved automatically every few seconds.
The Redmond-based tech giant says SharePoint’s co-authoring capability also supports a version history, and users can undo undesired changes with just a few clicks. The feature will be rolled out for SharePoint-targeted release tenants by the end of July, with a general availability coming in August.
Moreover, it’s not only about adding more. Microsoft also intends to close the SharePoint News Connector service for Teams business and enterprise users. They expect a complete shutdown by the end of August. This might make people wonder, but it seems that Microsoft is simplifying its services to focus on improving main functions such as co-authoring.
So, what does this signify for organizations that use SharePoint? It’s notable progress in enabling more lively and effective teamwork. There will be no more congestion or postponements when sending content. Furthermore, teams can collaborate simultaneously on page and news post creation and updates.
If your organization uses SharePoint, it is important to ensure your team understands the added abilities. Co-authoring’s strength can only be fully utilized when all members are involved and actively participating.
You can read more about this upcoming capability here. What do you think about it? Let us know your opinion in the comments section below.
Besides working on improving Chrome performance when switching to background tabs, Google is taking a significant step towards protecting users from harmful downloads with a new feature currently under development. This change, aimed at improving security, will replace the current method of warning users about potentially dangerous downloads on thechrome://downloads page. Instead of a small dialog box, users will see a full-page warning (interstitial).
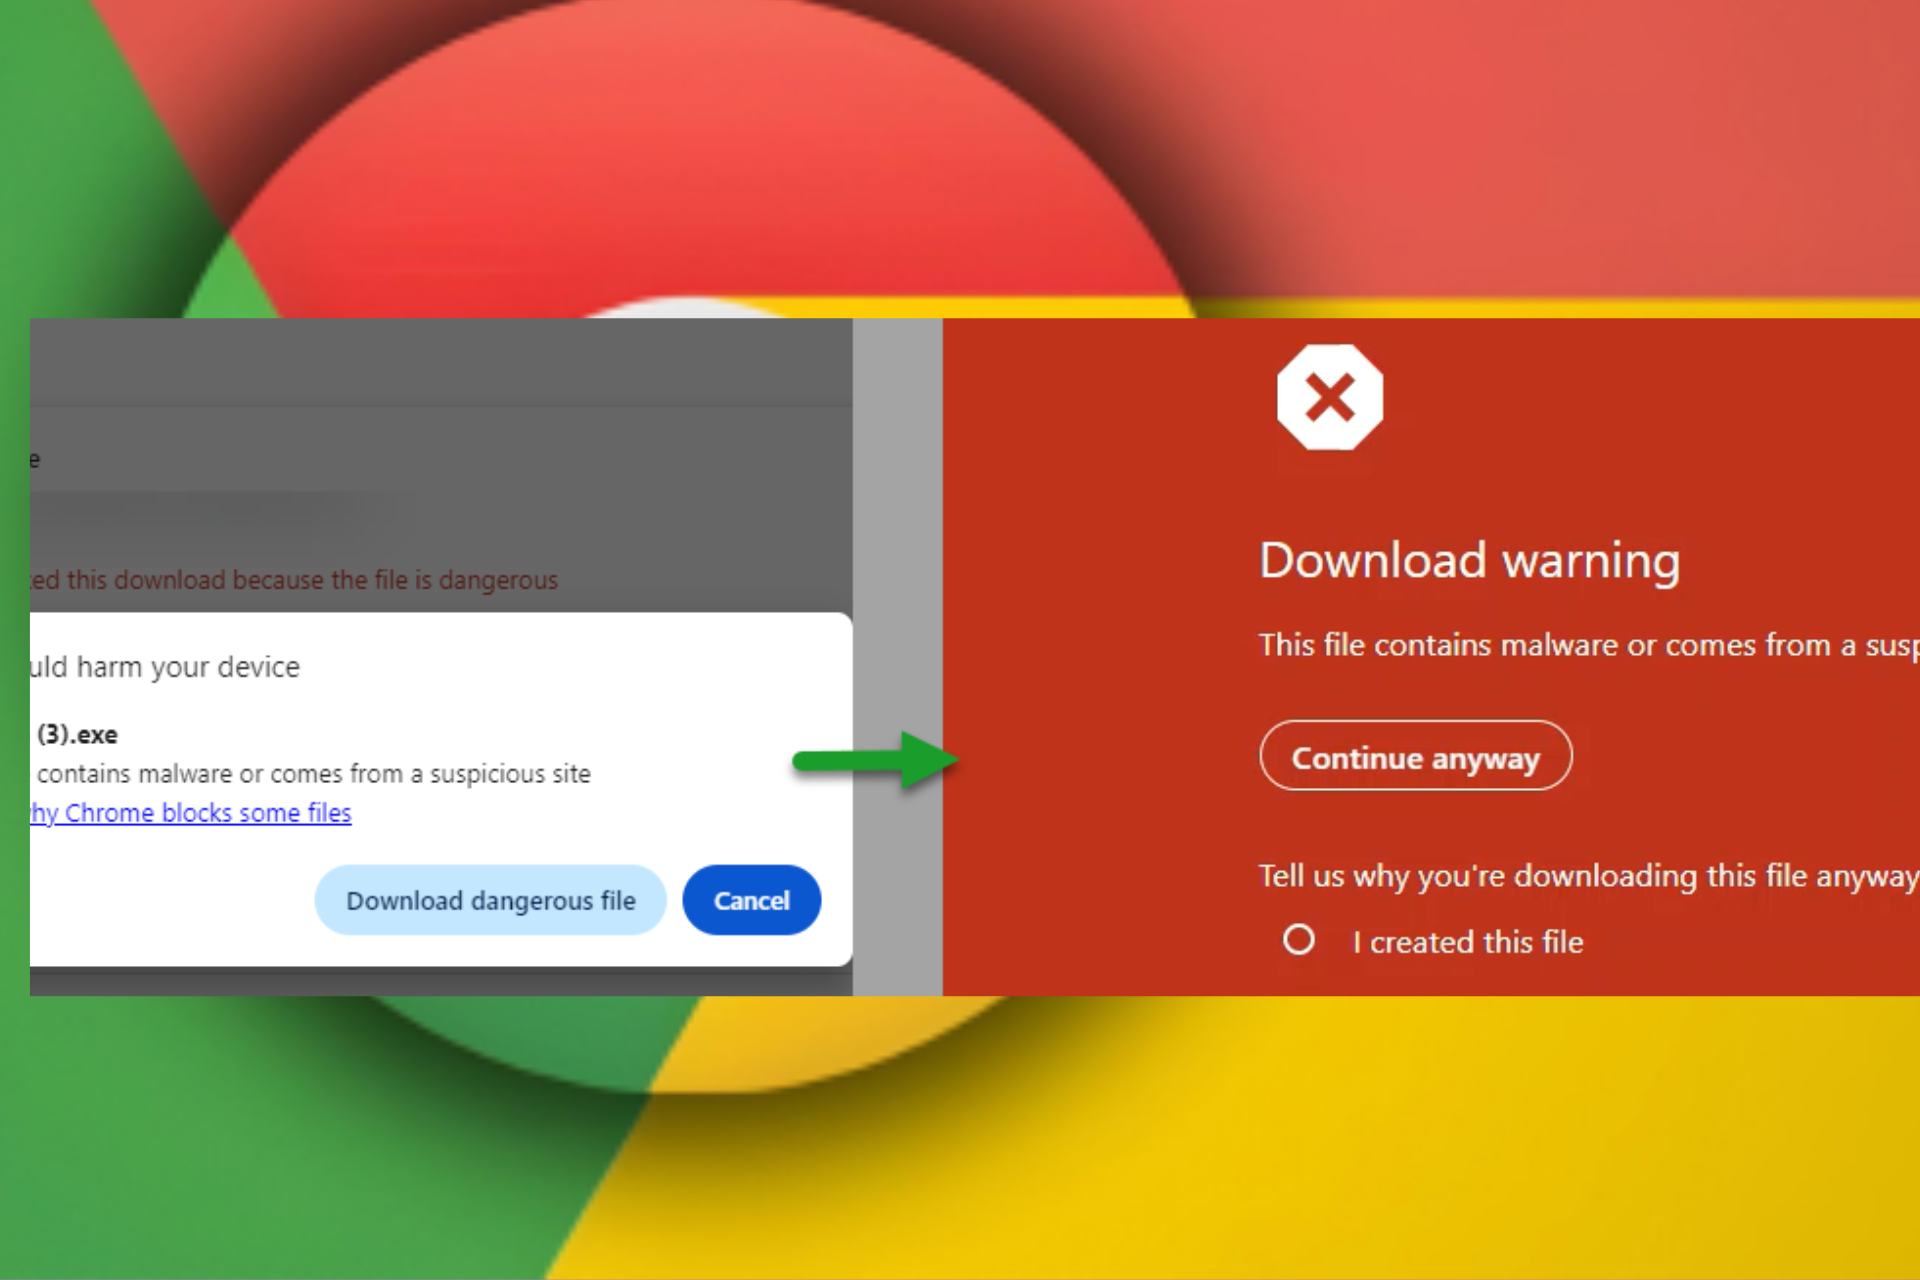
Google Chrome, powered by Google’s Safe Browsing, already protects users from phishing attempts, malware, and dangerous downloads.Even if you try to download a file despite the warning, you’ll be alerted with a dialog box that says:
“This file could harm your device. This file contains malware or comes from a suspicious site.” It also provides a link to learn more about why Chrome blocks some files. You can still choose to “download the dangerous file” or click “Cancel” to protect your device.
Present dangerous download warning dialog. Image credit: Windows Report
To further improve download safety, Google is working on a full-page warning called DangerousDownloadInterstitial that will replace the current dialog box in the downloads page.
With the updated Safe Browsing feature in place for Chrome, if you try to download a classified-as-dangerous file, a red-colored interstitial will be displayed as a “download warning.” It will show the same message as the current dialog:
New dangerous download warning interstitial. Image Credit: Windows Report
“This file could harm your device. This file contains malware or comes from a suspicious site.” It will offer options to “continue anyway” or “get back to safety.” Additionally, the warning page will include a survey asking why you are downloading the file despite the warning and offer a download button if you still choose to proceed.
Two weeks after Microsoft updated Excel for the Web with a modernized look, the Redmond-based tech giant continues to release the latest set of enhancements to the platform. From hyperlink previews to changing sheet names without any hassle, all these improvements focus on making your work with data easier and more natural.
In a blog post, Microsoft says users can see what’s behind the link before clicking on it. When you hover over a hyperlink with your mouse pointer, it will show you a small preview of the webpage it leads to. This gives more context and helps you decide whether or not to follow the link before doing so.
Renaming sheets is now more straightforward. You are no longer required to go through several steps to rename a sheet. Just click on the sheet tab twice, and it’s done. It might look like a tiny change, but it’s about simplifying things and saving time.
Opening local files is no longer a problem. With the new option of “Open files from this device,” it has become simple to upload an Excel file from your PC onto OneDrive and then access it through the Excel web edition without any difficulties. This combination makes switching between local and online work areas easier, ensuring that all your files can always be accessed easily.
Zoom adjustments and keyboard shortcuts have been improved. The status bar permits swift edits to zoom values, personalizing your grid zoom more easily. For people who are fond of efficiency, accelerator keyboard shortcuts (like Alt, E, Alt, V, Alt, I, and Alt O) plus over 120 legacy shortcuts are a significant improvement, making moving around and taking action much quicker.
All of these changes are now available for all Excel web users. You can visit the official blog post if you want to know how exactly these new capabilities work. On this note, will you try them out?
Picture a world where pairing electronic accessories with devices is as easy as taking a photo. It sounds futuristic, but this is precisely what Microsoft is thinking about. Their newest patent makes connecting things like styluses, headphones, and keyboards to computing devices easier.
This is how it works: you snap a photo of the accessory you want to link with your device; the device then recognizes and links with it. You no longer need to navigate complex settings or push small buttons on the accessory to initiate pairing.
This Microsoft technology is very useful, especially in places with many electronic devices you need to pair. Consider a packed office area and your attempt to connect the fresh stylus to your tablet. Instead of seeing every possible device that can be paired with that long list on your device, Microsoft wants to filter options based on what’s seen in the image you captured. This speeds up the pairing and decreases the possibility of mistakenly linking to another person’s device.
But if the device you’re trying to pair isn’t in the camera’s view, Microsoft says the device can still detect other accessories using traditional Bluetooth or RF signals. However, the one you captured in a picture is the priority during the pairing procedure. This makes it more convenient to choose from a list if necessary.
The system’s design allows it to understand the setting where an accessory is being used. If, for instance, you hold a stylus in your hand, then the system will deduce that soon enough, you will likely employ it and prioritize its pairing. The way you and your device can intuitively interact not only improves the user experience but also gives a glimpse into how technology will be in the future.
This technology is clever because it’s simple and works well: using image identification and intelligent filtering, Microsoft makes linking devices more easily. It becomes quicker, more natural, seamless, and without mistakes. For people who love technology or just like smart things, this patent could change how we use electronic accessories in a big way.
It’s worth mentioning that with all Microsoft patents (have you read the one that describes a technology that allows you to control your Windows devices using your tongue?), this one might never see the light of day in this form. But the Redmond-based tech giant could release it one way or the other.
Many users complained that they encountered the We couldn’t sign you into Xbox Live. Sorry, something went wrong. Try again in a while (0x89235107) error when logging in anywhere connected to Xbox. The issue could occur due to a corrupted Xbox app or outdated gaming services.
Before moving to the detailed steps, ensure you have a proper internet connection and that your Windows is updated to the latest version.
How can I fix the We Couldn’t Sign You into Xbox Live (0x89235107) issue?
1. Update apps on the Microsoft Store
Press the Windows key, type store, and click Microsoft Store to launch it.
On the left pane, go to Library, then click the Get updates button.
If you see any pending updates, click Update all to install them.
2. Make sure all essential services are running
Press Windows + R to open the Run window.
Type services.msc and click OK to open the Services app.
Locate Microsoft Store Install Service, check the status to know if it is running.
Right-click and select Restart from the context menu.
If it is not, double-click it to open Properties.
Under Start type, select Automatic from the drop-down menu.
Locate Service status, and click the Start button.
Click Apply, then OK to save the changes.
Repeat steps 4 to 8 for these services
Xbox Live Network Service Xbox Live Saved Games Xbox Live Authentication Manager
Xbox Accessory Management
Once done, restart your PC to save the changes.
3. Run the Wsreset command
Press the Windows key, type cmd, and click Run as administrator.
Type the following command and hit Enter: WSReset.exe
You will notice that Microsoft Store will open and close on its own. This command clears the cache and resets the app state.
4. Repair/reset the Xbox app, Microsoft Store and Gaming Services
Press Windows + I to open the Settings app.
Go to Apps, then click Installed apps.
Locate the Xbox app, click the three-dot icon, and select Advanced options.
Navigate to the Reset section and click Repair. This will try to repair the app, but the data related to your app will not be affected.
If this doesn’t help, click Reset. This will reset the app, and the data related to the app will be deleted.
Repeat steps 3 to 5 for Microsoft Store and Gaming Services apps to reset them.
Type the following command and hit Enter: start ms-windows-store://pdp/?productid=9MWPM2CQNLHN
This will launch the Microsoft Store with the Gaming Services app page; click Get to install it.
Just like the 0x89235107 error, reinstalling the Gaming Services can also fix the Xbox app, which won’t let them sign in on Windows 10; read this guide to learn other solutions.
6. Repair the Microsoft Edge & Microsoft Edge WebView apps
Press the Windows key, type control panel, and click Open.
Go to View by and select Category, then under Programs, select Uninstall a program.
From the list of installed programs, locate and right-click Microsoft Edge and choose Change from the top bar.
On the following dialog box, select Repair.
Follow the on-screen instructions to complete the process.
Once done, follow steps 3 to 5 for Microsoft Edge WebView and then restart your PC.
7. Run the SFC & DISM scans
Press the Windows key, type cmd, and click Run as administrator.
Type the following command to let the SFC tool check for and repair corrupted or missing system files causing functionality issues and hit Enter: sfc /scannow
Once executed, copy & paste the following commands one by one and press Enter after every command to check for component store corruption and replace corrupted files using Windows update:
Once the commands are executed, reboot your computer to let the changes take effect.
8. Perform clean boot
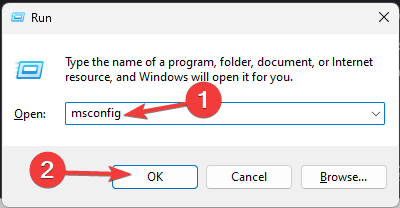
Press Windows + R to open the Run dialog box.
Type msconfig and click OK to open System Configuration.
On the System Configuration window, navigate to the Services tab, place a checkmark next to Hide all Microsoft services, and then click Disable all. This will ensure only non-Microsoft services are disabled.
Switch to the Startup tab and click the Open Task Manager link.
On the Task Manager window, select each Enabled item one by one and click Disable. Remember all the startup items you have disabled so that you can turn them back on later.
Close Task Manager.
On the System Configuration window, click Apply, then OK.
Click Restart to reboot your PC.
9. Re-register all Windows apps
First, check if the Xbox and Microsoft Store apps are closed. Then, press the Windows key, type powershell, and click Run as administrator.
Click Yes on the UAC prompt.
Copy & paste the following command and hit Enter: Get-AppXPackage | Foreach {Add-AppxPackage -DisableDevelopmentMode -Register“$($_.InstallLocation)\AppXManifest.xml”}
Restart your computer.
Remember to avoid the 0x89235107 error, keep your Windows operating system and store apps up to date, and have a reliable internet connection.
With the release of the first AMD-based Copilot+ PC, the company has also reintroduced its newest offering to the tech market: the Ryzen AI 300 series. This remarkable advancement ushers in an era of AI PCs and displays AMD’s dedication to continuously expanding what can be achieved with personal computing. The Ryzen AI 300 series represents a revolutionary improvement, combining the fresh Zen 5 CPU core structure with cutting-edge graphics and artificial intelligence abilities.
AMD’s new chips were first made for PCs to boost AI abilities. It does not matter if it is about tasks in AI on the GPU, CPU, or dedicated NPU—AMD has shown progress in every area. What stands out? The RDNA 3.5 GPU and XDNA 2 NPU integration offer a performance of up to 50 TOPS. This ensures improved smartness in applications and general enhancement in computing efficiency.
But AMD’s work hasn’t finished yet. They have rethought the fundamental design of these processors’ cores. They don’t use a uniform core design but mix eight Zen 5c cores and four Zen 5 cores, each set with its cache. This fresh method seeks to find a middle ground between top performance and effective throughput, even if it does cause some concern about possible latency in accessing distinct caches. It’s a daring step that AMD thinks will benefit coming designs.
AMD’s new series is very strong for content creation and gaming. The processors are made to do well in content tasks, with AMD suggesting a big increase in performance compared to other brands. Gaming also benefits from the RDNA 3.5 graphics, which gives better frame rates and a more engaging experience.
However, the most important aspect differentiating the Ryzen AI 300 series is its dedication to AI. AMD sees AI as a crucial motivator for upcoming PC purchases, and its design decisions show this belief. The fact that they have added XDNA 2 NPU illustrates their commitment to making AI a significant part of computing’s future. This emphasis on AI isn’t just about better performance today; it also sets the stage for more intelligent and flexible PCs in the future.
The AMD’s Ryzen AI 300 series is a daring move toward the future of computing. Its powerful artificial intelligence features, inventive core structure, and improved content creation and gaming performance are ready to change our expectations from personal computers. However, one important aspect worth mentioning is that these processors only support Windows 11.
If you love playing games or making content with your computer, or if you’re simply someone who adores top-notch technology, then watch for the Ryzen AI 300 series. The future of computing looks bright, and AMD is leading the charge.
Microsoft wants to improve the development of Windows drivers by providing Windows Driver Kit (WDK) NuGet, which aims to make it easier and more efficient for driver developers. In a recent blog post, the company says Windows Driver Kit (WDK) offers various benefits over traditional MSI and ISO file formats, like smaller size, better portability, and improved integration with continuous integration/continuous deployment (CI/CD) pipelines.
Microsoft’s Windows Driver Kit is all about making developers’ lives easier. It’s not just about updating a tool; it’s changing how drivers for Windows are developed by providing WDK as a NuGet package. The size of the NuGet package is now much smaller, making it faster to download and set up. Also, its portability feature has improved greatly, allowing developers to work on various machines and environments without issues.
Microsoft has given a detailed step-by-step guide for installing WDK through NuGet. This process is simple and starts with the installation of Visual Studio 2022. The next sections walk developers through getting Visual Studio ready with needed components and installing the WDK Visual Studio extension. This careful method ensures even beginners in driver development can join without being too much on them.
The WDK NuGet is especially exciting because of its integration abilities. This new format matches the agile release model well for developers who work in big CI/CD pipelines and source control systems. It lets them make fast updates to get the newest features and corrections.
The public can access the WDK NuGet on nuget.org. It provides both the newest and old versions of this package. For people who wish to build their initial driver project, Microsoft has made thorough documentation available on Microsoft Learn. This learning resource is very helpful as it assists developers in every step, from setting up to more advanced topics after installation.
Microsoft is also trying to improve the developer experience through Visual Studio. With WDK becoming a separate workload in Visual Studio, updating and handling the WDK NuGet package will become easier.
We are also working on improving the developer experience while developing their driver projects from Visual Studio by adding WDK as a Visual Studio individual workload. This will make it easier to install and update the WDK NuGet package from the Visual Studio installer.
Microsoft
The arrival of the WDK NuGet package is a big improvement in Windows driver development. Its size reduction, improved portability, and easier integration with CI/CD pipelines will all likely have substantial effects.
Whether you are an experienced developer or starting new work in this field, Microsoft’s latest tool seems ready to simplify and improve things for everyone involved.
Wondering how to optimize your PC for video editing? It’s a must if you want to ensure a smooth and efficient workflow in video production. Proper modifications enable your PC to handle resource-intensive video editing tasks without lag or crashes. Otherwise, you might want to stick to lightweight tools.
First, I recommend you try out these basic tips:
Invest in a high-performance graphics card.
Uninstall apps you no longer require to create space.
Add more RAM for faster processing of data.
Upgrade to a solid-state drive (SSD).
Now, let’s proceed to the more detailed instructions!
How To Optimize PC for Video Editing
Try these steps in the order they appear in:
Enable Write Cache on Capture Drive
Write caching improves the speed of your hard drive by using high-speed volatile memory (RAM) to collect write commands sent to the hard drive. Here’s how to activate it:
Press the Windows icon + X and select Device Manager from the menu.
In the Device Manager window, expand the Disk drives category. Right-click on your capture drive and select Properties.
In the Properties window, go to the Policies tab. Check the Enable write caching on the device box, then click OK to apply the changes.
Restart your computer to ensure the changes take effect.
Set Your Power Settings to High Performance
High Performance mode lets your PC use its full potential, which is crucial for video editing. Follow the below steps:
Press the Windows Icon + X and select Power Options.
Click on Additional power settings.
Tap Create a power plan.
Select High performance and tap Next.
Adjust the settings. Set the display and sleep options to Never when plugged in and on battery. Tap Create to apply the new power plan.
Close Background Applications
Closing unnecessary background applications frees up system resources for video editing. Here are the steps:
Press Ctrl + Shift + Esc to open Task Manager.
Tap the Processes tab, and look for any applications or processes that aren’t needed for video editing.
Right-click on each unnecessary process and select End task.
Go to the Startup tab in Task Manager. Right-click and select Disable on any programs that don’t need to run at startup.
Update Your Windows Operating System
Updating your operating system ensures you have the latest features, performance improvements, and security patches.
Press the Windows Icon + I to open Settings.
Click on Windows update. Windows will search for and download any available updates.
Tap Check for updates and wait. If any are available, install them.
Restart your computer to ensure all updates are fully applied.
So, now you know how to optimize your PC for video editing. Each modification contributes to a smoother and more efficient editing experience, so you can focus on creating high-quality content.
Moreover, if you want to get started with the best free tools, we’ve got you covered!
August will be a busy month for Outlook users, as the Redmond-based tech giant will introduce Copilot to Outlook for mobile; however, another exciting feature is coming to the platform.
According to the latest entry in the Microsoft 365 Roadmap, the Redmond-based tech giant wants to enhance the platform with the ability to add an account to Outlook mobile using a QR code. This feature will be very handy for students or professionals who want to access their Microsoft 365 accounts on their mobile phones.
Instead of using regular usernames and passwords, they can scan the QR code and add their accounts.
Microsoft says this experience will roll out first to Outlook on the web in the entry. Once there, users will have to click on the Outlook mobile button, which will generate a QR code. By scanning the code, they will be able to add their account.
Microsoft is simplifying how users can add their Microsoft 365 for work or school accounts to Outlook mobile by allowing them to use a QR code instead of typing their username and password. This experience will roll out first to Outlook on the web. From there, users will see a new button in Help labeled “Outlook mobile.” Once they click it, a QR code will appear. Users can scan the QR code from within Outlook mobile following the steps for “Add account” to add their account without the need to type their usernames and passwords.
Microsoft
Undoubtedly, the feature will be practical to all those wanting to keep up with their emails on their mobile phones. There are no words to indicate whether the feature will be released gradually, but all Outlook users should be able to add their accounts using QR codes by the end of next month.
In recent months, there have been countless reports of users being unable to create a meeting in Microsoft Teams. The error message reads, Unable to create meeting. Something went wrong. Please try again. No matter how many times you try, Microsoft Teams continues to throw the same error!
According to information shared by affected users who were able to rectify the issue, it’s usually a corrupt Teams cache, incorrect time zone, or conflicts with other versions of Microsoft Teams to blame.
If you can’t schedule meetings in the new Microsoft Teams for personal use, it’s an ongoing issue, and Microsoft is working on a fix. You can track the resolution status of the issue on the official website. This, however, doesn’t affect the Meet now option, so use that!
What can I do if Microsoft Teams is unable to create meeting?
1. Clear Microsoft Teams cache
Press Windows + E to open File Explorer, paste the following path in the address bar and hit Enter: %appdata%\Microsoft\Teams
Once there, press Ctrl + A to select all the files, and then hit Delete to remove them.
Finally, relaunch Microsoft Teams and check for improvements.
If you are unable to create or schedule meetings in Microsoft Teams on Mac, clear the cache in the following folder: /Library/Application Support/Microsoft/Teams/Cache
2. Set the correct time zone in Microsoft Teams
For some users, it was the incorrect time zone to blame for the inability to create meetings in Microsoft Teams. All you have to do is select the correct time zone on the New meetings screen.
Time zone in Microsoft Teams
To do that, go to the Calendar section > select a date for the meeting > choose the time zone you are in from the dropdown menu > fill out the other details > click on Save.
3. Uninstall any other versions of Microsoft Teams
Press Windows + I to open Settings, navigate to Apps from the left pane, and click on Installed apps.
Search for Microsoft Teams, identify all the installed versions, and if you have both Teams for Work and Teams for Home, click on the ellipsis next to the one you don’t need, and then select Uninstall.
Again, click Uninstall in the confirmation prompt.
After the additional version is removed, reboot the PC and check for improvements.
For some users, deleting all versions of Microsoft Teams from the PC and then reinstalling the one they needed, whether for work or home use, helped when they were unable to create or schedule meetings.
In this case, I will recommend using an effective software uninstaller tool to clear any leftover files and Registry entries, which might trigger issues on reinstallation.
4. Enable the Microsoft Teams add-in in Outlook
Tip
If you are facing issues with creating Microsoft Teams meetings on Outlook, reboot the PC, launch the Microsoft Teams app, sign in, then run Outlook and create a meeting. Do it in the same order. In case that doesn’t work, try the solutions listed below.
Launch the Outlook app, click on the File menu, and then on Options.
Go to the Add-ins tab, select Disabled Items from the Manage dropdown menu, and click on Go.
Finally, select the Microsoft Teams add-in (teamsaddin.fastconnect), and click on Enable.
If you can’t create a Microsoft Teams meeting in Outlook, the Teams meeting add-in, a critical requirement, might be disabled. For a few, the add-in kept disabling automatically on subsequent reboots, in which case, you will have to modify the Registry as listed next.
5. Reconfigure the Registry to never disable Outlook’s Microsoft Teams add-in
Press Windows + R to open Run, type regedit in the text field, and hit Enter.
Click Yes in the UAC prompt.
Paste the following path in the address bar and hit Enter: Computer\HKEY_CURRENT_USER\Software\Microsoft\Office\16.0\Outlook\Resiliency\DoNotDisableAddinList
Look for a TeamsAddin.FastConnect DWORD on the right. If it doesn’t exist, right-click on the empty space, choose New, then select DWORD (32-bit) Value, and name it TeamsAddin.FastConnect.
Double-click on the TeamsAddin.FastConnect DWORD.
Enter 1 under the Value data field, and click OK to save the changes.
Reboot the PC, and check if you can now create Microsoft Teams meetings in Outlook.
If you were unable to create meetings in Microsoft Teams, whether via the dedicated app or Outlook, one of these fixes should have helped resolve the issue.
In case the problem persists, it, most likely, has to do with the bug acknowledged by Microsoft, and you should wait for a resolution from Microsoft’s end. For the time being, you can use Microsoft Teams Web (the web version)!
Which fix worked for you? Share with our readers in the comments section.
Copilot has been available in Outlook (both the new and classic versions) for quite a while now. It is capable of summarising, going through emails, editing, and even composing email drafts on its own by following the users’ style.
However, those who use Outlook on mobile devices are in for a treat. Why? According to the latest entry in the Microsoft 365 Roadmap, Copilot will be available in Outlook Mobile starting in August.
And this is not all: both Android and iOS users will have access to the AI tool, and now it will be easier than ever to work from your mobile device, which is assisted by AI, of course.
Here’s what the entry says:
The same Microsoft Copilot experience available in new Outlook for Windows, web, and classic Outlook soon will be available in Microsoft Outlook for iOS and Android through the module switcher.
Microsoft
What are your thoughts about Copilot in Outlook Mobile?
If you’re diving into the world of machine learning and AI, Vertex AI by Google Cloud is a powerful platform that can streamline your workflow. This guide covers everything you need to know about Vertex AI, from setting up your environment to deploying and monitoring your models.
Everything about Vertex AI and its usage
1. What is Vertex AI and what is it for?
Vertex AI is a machine learning platform by Google Cloud designed for developing, deploying, and managing ML models including Gemini AI and AI applications. It provides an end-to-end solution integrating data engineering, data science, and ML engineering workflows. This tool is particularly beneficial for those wanting to build AI solutions effortlessly with minimal coding.
Vertex AI will help you:
Collaborate on a common toolset for better team efficiency.
Train and deploy ML models quickly using Google’s infrastructure.
Use pre-built models and tools from the Model Garden to expedite ML projects.
Navigate to Vertex AI under the AI and ML section.
Ensure billing is enabled for your project.
Create or select a project.
Create a dataset:
In the Vertex AI dashboard, click on Datasets.
Choose your data type (e.g., tabular, image, text, video).
Follow the prompts to upload and label your data.
Train the model:
Click on Train new model.
Select AutoML for easy training without coding.
Customize the training settings (e.g., budget, objective).
Start the training process.
With AutoML, you can create high-quality custom models with minimal effort, making it perfect for users with limited ML expertise.
3. Deploying custom models with Vertex AI
Register your model:
In Vertex AI, click on Models.
Select Register new model.
Upload your trained model files.
Deploy the model:
Click on the registered model.
Select Deploy to endpoint.
Configure deployment settings like machine type and scaling options.
Deploy the model.
Get predictions:
Obtain the endpoint URL.
Use the endpoint URL to send HTTP requests with your input data.
Receive real-time predictions from the deployed model.
Deploying models using Vertex AI enables you to scale and serve predictions efficiently with Google’s managed infrastructure.
4. Hyperparameter Tuning with Vertex AI Vizier
Set up a tuning job:
In Vertex AI, navigate to Hyperparameter Tuning.
Click on New Tuning Job.
Define the search space for hyperparameters (e.g., learning rate, number of layers).
Specify the objective metric for optimization (e.g., accuracy, loss).
Run the tuning job:
Start the tuning job.
Monitor the job as it tests different hyperparameter combinations.
Review the results to identify the best-performing hyperparameters.
Using Vertex AI Vizier for hyperparameter tuning improves model performance by automating and optimizing the tuning process efficiently.
5. Model monitoring with Vertex AI
Set up model monitoring:
In Vertex AI, go to Model Monitoring.
Select Create monitoring job.
Choose the model and endpoint to monitor.
Configure alert thresholds for metrics like prediction drift and latency.
Review monitoring reports:
Analyze the generated reports for insights on model performance.
Adjust your model or data as needed based on the monitoring alerts.
Model monitoring ensures your deployed models maintain high performance and adapt to any changes in incoming data patterns.
6. Using Vertex AI for Generative AI applications
Explore Model Garden:
In Vertex AI, navigate to Model Garden.
Browse pre-trained generative AI models for tasks like text, image, and speech generation.
Customize and deploy models:
Select a model from the Model Garden.
Fine-tune the model using your specific data.
Deploy the customized model for your application.
Integrate generative AI into your app:
Use the deployed model’s API to integrate it into your application.
Create features like content generation, automated responses, or personalized recommendations.
Generative AI capabilities in Vertex AI allow for innovative applications by leveraging state-of-the-art models and Google’s AI infrastructure.
Each solution ensures a seamless experience when using Vertex AI, catering to different aspects of the ML lifecycle from data preparation and model training to deployment and monitoring.
To keep your Vertex AI projects running smoothly, regularly update your datasets and monitor model performance to adapt to new data trends. Happy modeling!
If you’re more into image generation, we have a comprehensive article on Ideogram AI so feel free to check it out.
What do you think about Google’s Vertex AI? Let’s talk about it in the comments below.
Data rule today’s world, and Microsoft has made a big move forward with its new invention, SpreadsheetLLM. This is an AI model made especially for spreadsheets, and it’s not just any kind of progress; it changes everything for users of Excel, Google Sheets, or similar programs.
Picture talking to your sheets using normal language inputs, making data analysis and handling as simple as chatting back and forth. That’s the future Microsoft is envisioning with SpreadsheetLLM.
SpreadsheetLLM is unique because it’s made to understand the specific layouts, formatting, and cell addresses familiar to people using spreadsheet programs. This is significant because, let’s be honest, spreadsheets can become tangled up.
They don’t simply deal with numbers; they depict connections among those numbers via an intricate web of cells, formulas, and formats.
At this point, traditional AI models often have difficulty understanding and handling spreadsheets due to their complexity. Take Copilot in Excel, an AI model that is constantly updated to keep up with current technologies. However, SpreadsheetLLM is designed to handle this without any problems.
Yet, in essence, how does it function? The core of SpreadsheetLLM is what we term SheetCompressor. As the title implies, it compresses spreadsheets. It’s not only about making file sizes smaller—it’s the process of turning spreadsheets into data that AI can understand and analyze.
The researchers have found an intelligent method for keeping the important parts of the spreadsheet while greatly lessening the computational load needed to process it.
SpreadsheetLLM can be used in many ways. It can automate data analysis, carry out routine tasks, and produce reports with insights from spreadsheet information. It vows to make spreadsheet data friendlier for more people. Think about asking queries to your data in normal English, not needing to be a master of intricate formulas or coding languages. SpreadsheetLLM is striving towards this user-oriented future.
However, it’s worth mentioning that SpreadsheetLLM has difficulties in understanding specific spreadsheet functions such as background colors and borders. Still, the researchers behind the project are working on finding solutions for it.
Ultimately, SpreadsheetLLM might become a game-changer when working with data. It starts shifting towards making data analysis available for all, not just those with technical skills—a concept known as “democratization of insights.”
Although the project is not entirely functional, it has many advantages, and the team behind it believes it might be the lifejacket we require to comprehend data in a world immersed in data.
Firefox as a browser is a great choice but when choosing which version to download, some like ESR can offer you more stability compared to others.
Firefox ESR (Extended Support Release) is unlike the regular Firefox. It is designed for huge organizations that value uninterrupted workflow. Updates are released over a period of three months to allow updates to be tested and fix any bugs before they’re deployed to this version.
It also provides extended support such that if you were to upgrade, you have a grace period of up to one year to ensure a seamless migration.
When you compare the two browsers, Firefox offers regular updates with new features while the ESR version offers extended support and more stability making it a reliable browser.
Both sides of the coin have their own advantages and disadvantages so your final choice will be based on your preferences and whether you’re an individual or organization. As an individual, you need the latest security updates and for the browser to be compatible with your web apps.
Organizations also need extended support to plan their deployment process and maintain a sustainable workflow by assuring stability and reliability.
If you cannot settle on one, you’ll be happy to know that you can install both versions. Sometimes Firefox has issues installing so feel free to check out other enterprise-based browsers and compare the features to make an informed decision.
Have you used the Firefox ESR version? Are there any major differences you’ve spotted that make it stand out? Would you choose it over the original Firefox? Share your thoughts with us in the comments section below.
Navigating the world of video content can be overwhelming, but Microsoft Azure AI Video Indexer is here to simplify the process. This cloud-based application leverages over 30 AI models to extract rich insights from your videos, making it easier to search, create, and distribute content.
Everything you need to know about Azure AI Video Indexer
1. What is Azure AI Video Indexer?
Azure AI Video Indexer is a cloud application, part of Azure AI services, enabling you to extract insights from your videos using Azure AI Video Indexer video and audio models. It allows you to analyze video and audio content by running over 30 AI models, generating rich insights.
This solution assists you in understanding the content of your media files better, making it easy to search, create, and distribute content.
2. Core features of Azure AI Video Indexer
Deep Search:
Index spoken words and faces to enable search experiences across video libraries.
Enhance search functionalities for industries like news agencies, educational institutes, and entertainment content owners.
Deep search enhances your ability to find specific moments and people in large video libraries, improving the efficiency of media management.
Content Creation:
Create trailers, highlight reels, and social media content based on keyframes, scenes, markers, and timestamps.
Content creation tools streamline video editing, making it easy to compile essential footage and create engaging content.
Accessibility:
Transcription and translation of video content into multiple languages, including closed captioning for the deaf and hard-of-hearing.
Accessibility features ensure your content reaches a broader audience, including those with disabilities or non-native language speakers.
Monetization:
Increase ad revenues by delivering relevant ads using extracted insights.
Using video insights for targeted advertisements helps in optimizing ad placements and increasing revenue.
Content Moderation:
Detect and handle inappropriate content using textual and visual content moderation models.
Content moderation tools help maintain a safe and compliant media environment.
User Engagement:
Improve user engagement by highlighting relevant video moments and recommending related content.
Enhanced recommendations and highlighted moments keep users engaged with your content for longer periods.
3. Key video models in Azure AI Video Indexer
Face Detection:
Detects and groups faces appearing in the video.
Face detection groups similar faces, making it easy to identify and track individuals across videos.
Celebrity Identification:
Identifies over 1 million celebrities worldwide.
Recognition of celebrities adds value to your content by identifying famous personalities.
Optical Character Recognition (OCR):
Extracts text from images within videos.
OCR helps in indexing textual content in videos, facilitating search and analysis.
Scene and Shot Detection:
Determines scene changes and shot transitions in videos.
Scene and shot detection aids editors and creators in navigating through long video files.
4. Key audio models in Azure AI Video Indexer
Audio Transcription:
Converts speech to text in over 50 languages.
Transcribing audio makes content searchable and accessible to a wider audience.
Speaker Identification:
Identifies and maps different speakers in an audio track.
Speaker identification helps in understanding dialogue distribution and context.
Text-Based Emotion Detection:
Detects emotions like joy, sadness, anger, and fear within the transcript.
Emotion detection provides deeper insights into the sentiment and tone of conversations.
Evaluate, configure, and manage your account without coding skills required.
The web interface provides a user-friendly platform to start analyzing your videos without the need for technical expertise.
Use Azure AI Video Indexer API for more complex integrations into applications or workflows.
Azure AI Video Indexer provides powerful tools to analyze, search, and manage video and audio content, making it indispensable for media-intensive industries. With features that support content creation, accessibility, monetization, and more, it helps to unlock the full potential of your media assets.
Are you already using Azure AI Video Indexer? Tell us about your experience in the comments below.
Joining a meeting should be as easy as clicking a link and with Microsoft Teams, here’s how to create a meeting link with easy-to-follow steps.
How do I create a Microsoft Teams meeting link?
1. Create link
1.1 Desktop app
Launch your Teams app and click on the Calendar icon on the left.
Select a time slot for your meeting, enter other details like the meeting title and people you’d like to invite to the meeting then hit Save.
Click on the Chat icon and your meeting should be listed here. Hit the three ellipses and select Copy link. You can now share this link with other participants.
1.2 Web browser
On your browser, log into your Teams account.
Click on the New meeting icon on the top right and enter relevant details. When done, click on Save.
You’ll be directed to your chat with a message that your meeting has been created. Right-click on the link then copy it and share with other participants.
1.3 Android
Launch your Teams app on your phone.
Tap on the Meet button.
Select Share meeting invite and click on the contacts you’d like to invite to the meeting.
2. Joining a Teams Meeting
2.1 Joining a Teams Meeting with the desktop app
Go to the meeting invite and select Click here to join the meeting.
If you have the desktop app, a pop-up will appear; click Open Microsoft Teams app. If not, click Download it now.
Follow the steps to install the app.
Next, click Allow, then Continue to permit the microphone and camera.
Enter your name and click Join now. Now, you will be in the lobby and can join it as the meeting host approves.
2.2 With a Web Browser
Go to the meeting invite and click on the Click here to join the meeting link.
You will get two options on the default web browser: Join on the Teams app or Continue on this browser.
Click Allow to permit Teams to use your microphone and camera if prompted.
When ready, click Join now to attend the meeting without an account on Teams.
You will now be in the meeting lobby and can join as soon as the organizer lets you in.
Download & install the app and click OK to let it access the Microphone and Camera.
Tap the meeting link again to launch the app.
Next, you will have two options: Join as a guest and Sign in and join. Select the former.
Type in your name and click Join meeting.
You will be in the lobby and can access it once the meeting organizer allows.
How do I create a short link for Microsoft Teams meeting?
Once you’ve created a Microsoft Teams meeting link, you’ll realize that it may be too long. If you’d like to shorten it, the Short.y UWP app is a handy tool to help you do this.
There are still so many things you can do with this app so here is our Teams tell-all guide in case there are some features you’re unaware of. You can also read about Teams Essentials.
Have you managed to create a meeting link on Microsoft Teams? Have you encountered any challenges? Let us know in the comments section below.
Are you looking for Microsoft Forms download options?
If you often use it, you might want to add it as a standalone PC app for convenient access to the Forms portal without logging in to a Microsoft 365 account. Often, you’ll also want to save a filled-up form for offline access.
In this article, you’ll learn how to get a standalone desktop app for MS Forms, download filled-up forms, and more.
Microsoft Forms Download as a Standalone App
You can get Microsoft Forms for free from the Microsoft Store by looking it up in the Search apps field.
Once you locate the app, click on the Get button to download and install it on your PC.
You should see the Microsoft Forms user interface when the download and installation is over. It’ll also show a pop-up dialog box from which you can choose any of the following options for easy access:
Pin to taskbar
Pin to Start
Create Desktop shortcut
Auto-start on device login
Now that you’re done choosing the app access options, click on the Allow button to save the changes.
Hit Continue on the Microsoft Forms splash screen to access the Home Screen.
You should now see all the available online form types you can create on the tool. These are as outlined below:
Survey
Quiz
Invitation
Check-in.
When you use any of the above, the form editing interface will open in Microsoft Edge.
How To Download an Offline Document
Depending on whether you’re the recipient or form owner, there are different ways to download a completed or blank form.
As a Participant
Navigate to the online form and enter your responses.
Submit the filled-up form.
You should see the Your response was submitted message on the next page.
Click on the Save my response button.
You’ll see the Microsoft 365 or Office sign-in page.
Enter your credentials there and validate log-in with two-factor authentication.
You should enter the Forms app home page.
Below the Recent tab, you should see a saved copy of the form you’ve just responded to.
Click on the form to open it in a new tab.
You should now see the header image of the form. Click on the View response button.
The web version of the form will open.
Press Ctrl + P on your keyboard.
You’ll see the Print dialog box with a preview of the form and print options.
Click on the Destinationdrop-down arrow in the right-side navigation panel and choose any PDF printer, like Save to PDF, Foxit PhantomPDF Printer, Microsoft Print to PDF, etc.
Click Save.
Pick a directory on the local PC storage in the Save As dialog box.
A PDF copy of the online form will appear in the directory where you saved it.
As a Form Owner
Navigate to Microsoft Forms using the account you used to create the form.
You should see the active form under the Recent tab.
Click on that to open the form control interface.
You’ll find the Responses tab on the menu bar in the top left corner.
This page should show the number of responses received so far.
Click on the View results button on the Result Summary page.
You should now be on the View results page.
Click on the left or right arrows to cycle through the form responses.
Once you’ve selected the right form for downloading, click on the three-dot menu on the right side of the form preview page.
Click on the Print response option in the context menu.
You can now print the content of the form using the Print dialog box as explained in the previous method.
How To Download as an Excel File
If you’re the owner of MS Forms, you can download the inputs submitted by the survey participants as raw data in an Excel workbook. However, this feature isn’t available to the participants.
Open the form control page and navigate to the Responses tab.
On the form header, you should see an Excel file button.
If you click on this button, MS Forms will redirect you to an online Excel workbook portal.
If you wish to get an offline copy of the Excel file, click on the drop-down menu and choose Download a copy option.
Microsoft Forms Download Using Power Automate
If you’re running multiple surveys or quizzes, it’s harder to manually download form content. In this scenario, you can use Power Automate to automatically download form responses as new inputs are received from participants.
Here’s how to create a Power Automate flow:
Ensure you’ve logged in to your Microsoft Office or Microsoft 365 subscription using the same email you used to create those forms.
Click on the Create button on the left side navigation panel.
Under the Start from blank section click on the Automated cloud flow card.
You should see the Build an automated cloud flow wizard.
Enter a name in the Flow name field.
Under the Choose your flow’s trigger section, choose When a new response is submitted item for Microsoft Forms.
Click the Create button.
The flow editing canvas will open.
Click on the trigger item to open a left-side navigation panel.
In the Form ID field, choose the survey form you want to link.
Click on the plus sign below the trigger card and choose Add an action.
Choose Excel Online for Business.
On the Excel Online for Business actions list, choose the Add a row into a table option.
It’ll be added below the trigger item.
Now, set the following inputs for the Add a row into a table parameters:
Location: OneDrive for Business.
Document Library: OneDrive.
File: Actual name of the Excel file of the form.
Table: Choose the table where you’d like to enter the data rows, like OfficeForms.Table.
You can now interact with your form and submit some random data to trigger the new flow.
On Power Automate, you’ll see that the flow is ready for execution.
Click on the Test button.
Select the Manually option and click on the Test button.
Submit the form again to see the Your flow ran successfully message.
Now, navigate to the My flows menu on the left side panel.
On the right side, you should see the flow you just created. If it says Automated below the Type section, it means the flow will run automatically.
It’ll now automatically download MS Forms content to the backend Excel workbook.
Summary
So far, you’ve learned about various Microsoft Forms download options. I covered manual, semi-automatic, and automatic methods.
These techniques will help you aggregate form responses effortlessly. Not to mention, you can now organize data at a granular level. Moreover, if you keep encountering errors in Forms or problems with branching, we’ve got you covered!
There are several versions of Firefox available, and in this article, we’re going to show you how to download Firefox Developer Edition, so without further ado, let’s get started.
The installation process is pretty simple, you just need to run the setup file, and the installation is fully automated from that point.
Is Firefox Developer Edition free?
Yes, the Developer Edition of Firefox is completely free, just like any other version of Firefox.
Is Firefox Developer Edition better than regular Firefox?
If you’re a web developer, then this edition of Firefox might be better for you. For regular users, it doesn’t offer any benefits, since the two versions share the same features.
What are the benefits of Firefox Developer Edition?
Developer Edition gets updates more frequently, and you’ll get access to new features and web standards faster than regular users.
It also allows you to run unsigned add-ons and it keeps the developer features available in a single menu.
This version is based on Firefox Beta, and in theory, it’s less stable than the regular version. However, stability issues, if any, are incredibly rare.
Is Firefox Developer Edition better than Chrome?
This depends on your personal preferences. The Developer version doesn’t offer any unique features, so it’s almost the same as comparing Chrome and the regular version of Firefox.
Should I use Firefox Developer Edition?
If you’re a web developer who wants to test the latest web features and standards, then yes, the Firefox Developer version might be a good choice for you.
Regular users or developers who aren’t interested in the latest web standards won’t benefit too much from using this version of Firefox.
Microsoft has enhanced the digital document creation process with its newest update: Draft with Copilot in Word. With this new feature, you can enhance any part of your text with a simple click and make adjustments for various formats or languages and market requirements. It could be a game-changer for those who invest considerable time into document creation.
Why? With Draft, Copilot empowers you to rewrite or redefine text selections in your Word documents. Just choose the text that needs changing and instruct Copilot to perform its magic. Do you wish to transform a packed paragraph into a brief list of bullets? Perhaps you must change a document for another audience by modifying the language or currency. Copilot can help with this.
In a blog post, Microsoft says this tool is not only about converting how things are displayed or the language used. It is more focused on boosting productivity. Now, you can quickly refer to and link fresh content from other files into your present document—an improved method for managing tasks.
Plus, Microsoft has promised to enhance Draft with Copilot in the future. Let’s not forget that it started as an Outlook feature, so, we can anticipate that they will keep adding more features and improvements over time.
Draft with Copilot in Microsoft Word could change the way we create documents, and it is helpful for many people, such as students, professionals, or anyone who wants to express themselves clearly and efficiently through writing.
Did you experience Draft with Copilot? If not, you should try it. If you do so, let us know your experience with it.
It seems that Titanfall 2, released in 2016, hasn’t been getting much attention from developers of late. I am saying this because players keep seeing the Code 429 error in Titanfall 2 on all three platforms, PC, Xbox, and PlayStation. The error message reads, The connection to the matchmaking server failed!
As to what causes error code 429 in Titanfall 2, it’s usually a server outage, misconfigured network settings, driver issues, or DNS problems. Since the error message doesn’t list the underlying cause, we will have to check each of these aspects.
How can I fix the Titanfall 2 error code 429?
1. Check the Titanfall 2 server status
Your primary approach when faced with Code 429 should be to check the Titanfall 2 server status using a real-time monitoring service. Every massive server outage should be reported here. For instance, when Titanfall 2 servers were down on July 15, 2024, the monitoring service was quick to report it!
If there’s an outage, I suggest you wait for 24-72 hours since this is the expected timeline for a resolution with Titanfall 2. Although, if there’s no server outage, it’s a problem with your device to blame for the error, and the solutions listed next should do the trick.
2. Reset the network settings
Press Windows + I to open Settings, go to Network & Internet from the left pane, and click on Advanced network settings.
Click on Network reset.
Click the Reset now button.
Finally, click on Reset in the confirmation prompt, then reboot the PC and check for improvements.
If you are facing the Titanfall 2 error code 429 on Xbox or PS, reset the network settings on the console instead. It’s just as straightforward!
3. Update the network driver
Press Windows + X to open the Power User menu, and select Device Manager from the list.
Expand the Network adapters entry, right-click on the active network adapter, and choose Update driver.
Choose Search automatically for drivers and wait for the OS to install the best locally available driver.
If a newer version is installed, restart the computer for the changes to come into effect.
If it’s the network connectivity to blame for Titanfall 2 error code 429 on Windows, updating the network drivers should help. As for PlayStation and Xbox, you should check for any pending OS updates and install them!
4. Change the DNS server address
Press Windows + R to open Run, type ncpa.cpl in the text field, and hit Enter.
Right-click on the active network adapter and choose Properties.
Select Internet Protocol Version 4 (TCP/IPv4) from the and click on Properties.
Select Use the following DNS server addresses option, and enter Google’s Public DNS in the text fields:
Preferred DNS server: 8.8.8.8
Alternate DNS server: 8.8.4.4
Tick the checkbox for Validate settings upon exit, and click on OK to save the changes.
5. Use the Northstar mod
If none of these solutions work, perhaps consider using Northstar, a mod developed by the Titanfall 2 community that allows players to join and host custom servers. Remember, the playerbase on Northstar is lower than the official servers.
One of these solutions should have helped with the Titanfall 2 error code 429 across devices. However, if it’s a server issue affecting the game, you will have to wait. Besides, you can contact Titanfall 2 support for more help!