How to fix the Microsoft Teams error code 4c7 [Quick Guide]

If you’re seeing the error code 4c7 inside Microsoft Teams, you are not the only one experiencing this issue. A wide range of users with different setups has complained about seeing this error.

The problem is caused by users trying to sign in to Microsoft Teams from a corporate network where Active Directory Federation Services (ADFS) is running.

This will not allow you to log in, and will also display the follwoing error message:

Modern authentication failed here, but you’ll still be able to sign in. Your status code is 4c7.  

This setting is not enabled by default for deploying ADFS on the Intranet, so it needs to be activated manually. Read on to find out exactly what to do to activate it.


How can I fix the 4c7 error in Microsoft Teams?

1. Enable Forms Authentication

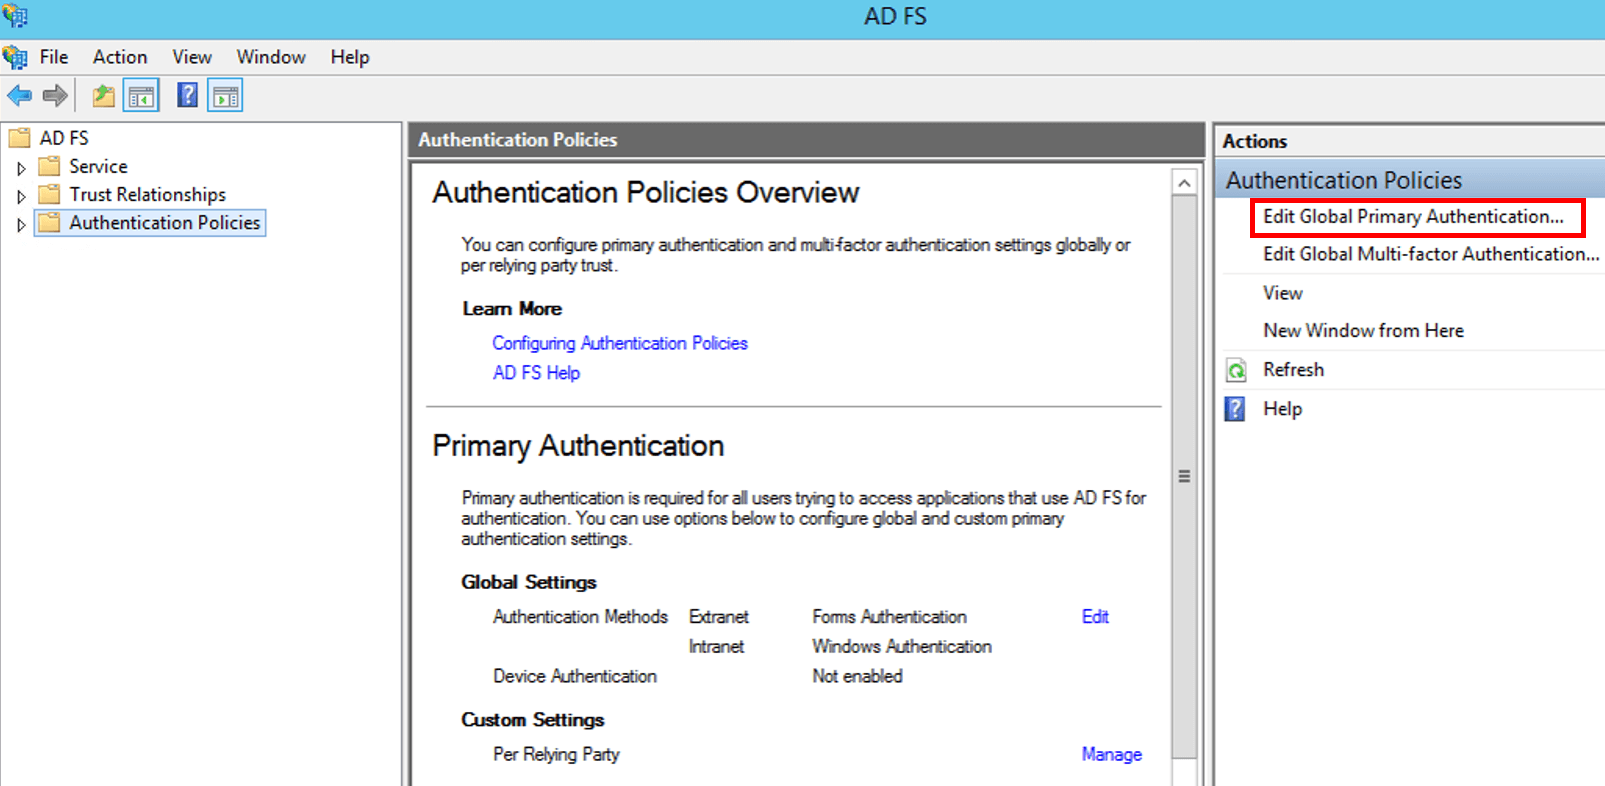
  1. Open the ADFS Microsoft Management Console.
  2. Click the Authentication Policies option found inside the panel to the left of your screen.
  3. Under the Actions section, select Edit Global Primary Authentication from the right-side menu.global authentication policy microsoft management console
  4. Click on the Intranet tab, and choose Forms Authentication.
  5. Select Ok to apply the settings.

To solve this issue once and for all, you will need to enable Forms Authentication by using the ADFS Microsoft Management Console (MMC).

You can find this snap-in on the computer where the local Active Directory is located.

Plus, you can always have the alternative in mind. Take a closer look at our dedicated guide to the best collaboration software for small businesses, and find the right one for your needs.


2. Verify if Microsoft Teams is turned off

  1. Go to the Microsoft 365 admin portal and sign in with your account credentials.
  2. Navigate to Settings, and search for Microsoft Teams.
  3. Activate it for user types, and click Save.

Microsoft Teams is part of the Microsoft Office 365 suite and is intended for team collaboration of members. Of course, companies have control over the applications that are offered to employees.

Therefore, when you see the 4c7 error code in Microsoft Teams, it is good to check if Teams was accidentally disabled.


Wondering how to activate a Microsoft 365 product key? Check out our quick guide!


In this quick fix article, we explored the best way to deal with the Modern authentication failed here, but you’ll still be able to sign in. Your status code is 4c7 error message inside Microsoft Teams.

We hope that this guide managed to solve your problem and that now you can log into your Microsoft Teams account without any issues.

Please feel free to let us know if you found this guide helpful. You can do so by leaving a comment in the section found below this article.


Latest update to the Microsoft Store brings hints of ‘Sun Valley’ design

After about eighteen hours of confusion, we’re finally getting the real story behind what Microsoft’s latest visual update to its app store represents. Midday yesterday the Twitter handle @Alumia_Italia posted a gif that showed a visually improved version of the Update settings area in the Microsoft app store which included a new pinned icon, improved cursor highlights, new drop-down menus, a progression circle, and a secondary compact viewing option of the store as well.

For an app that’s seen incremental improvement over the past two years, the visual improvements have understandably been seen as a big deal, to the point of being misidentified as an entirely new effort from Microsoft.

The internet ran with the theory that, ahead of the long rumored ‘Sun Valley’ visual refreshed expected in the Fall, Microsoft would also be extending its redesign efforts to building an entirely new app store experience. The theory that Microsoft would introduce a new app Store to coincide with its reported ‘Sun Valley’ update was short-lived.

Fortunately, Microsoft isn’t tossing the baby out with the bathwater, (I don’t even know how that became a saying) instead, according to vocal Windows Insider Program team member Brandon LeBlanc, it’s merely an update to the current store. LeBlanc’s response to the confusion does downplay some of the visual differences that are very apparent in the gif, but ultimately reinforce the common sense of the Windows team which probably doesn’t want to have to redo a ton of work on its app store that’s both in Windows 10 and its Xbox, especially leading up to a design refresh of its flagship operating system.

While LeBlanc reiterates that what people were reporting on is only a minor update to the Store, it should be pointed out that many if not most have yet to actually receive or test this latest iteration of the app Store. In fact, he adds an addendum to his earlier clarification by explaining that it’s rolling out and “It’s a normal update to Store with some improvements…”

For anyone interested in getting some hands-on time with the new look and feel of the Updates Settings in the Store, @ALumia_Italia footnotes that it’s an update on the Dev channel of the Windows 10 Insider program is not being offered to all Dev Insiders but is being held as a staggered rollout. So, if enroll your device into the Dev Insider channel and cross your fingers basically. LeBlanc does not mention that it’s a test of any sort, so seems eventually this minor update should hit all devices at some point.

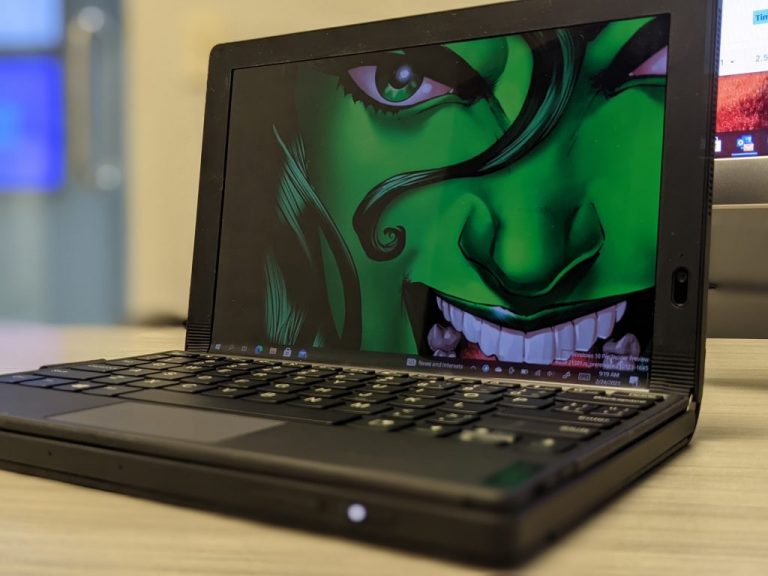
Lenovo ThinkPad X1 Fold: When hardware and software don’t mix

Lenovo announced its ThinkPad X1 Fold over a year and a half ago, and since then, nothing meaningful has occurred in the space. Sadly, Microsoft abandoned the sector of foldable screen support with its famed Windows 10 X being put on ice, and as much as partners such as Lenovo tried to accommodate the absence with its own patchwork digital services, foldable screen interest has reduced to a simmer of its former interest level.

Unfortunately, Lenovo was either saddled with excess hardware or didn’t get the industry memo that full-scale foldable workstations are taking a hiatus for now. Yet here we are with the ThinkPad X1 Fold, and while I think in many ways the hardware is ahead of its time, without the software layer in place, reviewing this device was a disjointed experience.

Design

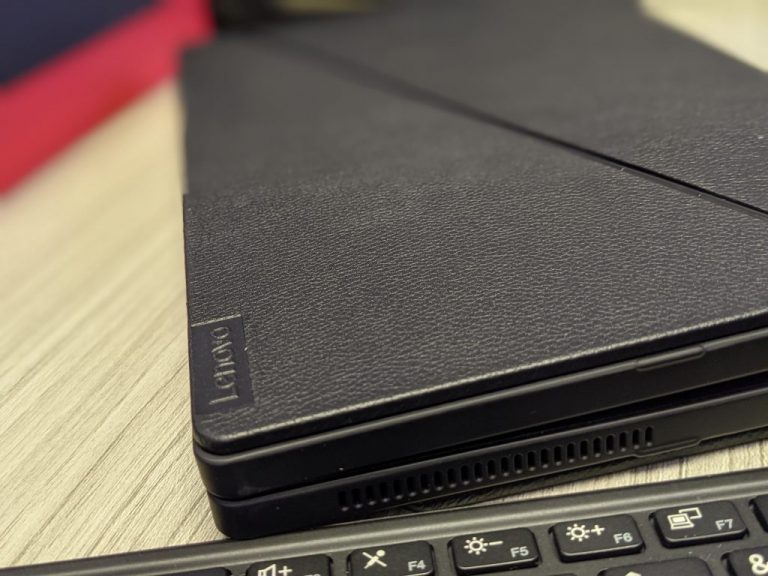
Starting at $2,499 and $2,749 for the review unit I tested, the Lenovo ThinkPad X1 Fold is admittedly a niche device aimed at seeding the market for lower-cost alternatives in the future. With that being said, every dollar spent is reflected in the design, materials, and architecture that went into completing the Fold’s final offering. Despite experimenting with temperamental OLED display technology, the X1 Fold feels every bit as sturdy, reliable, and environmentally tested as any other ThinkPad device. In most ways, the X1 feels sturdier than a Microsoft Surface Pro, even when the keyboard cover is attached, and that’s thanks in large part to its casing. The outer portions of the X1 Fold are a thicker plastic material covered in what I think is faux leather. The leather could be real, and that might account for the extra nickels and dimes added to the final purchasing price.

Pxl 20210128 151216247.portrait

The leather covering acts as a flexible skin for the X1 Fold which slides in and out of place when the device is folded or not. In addition to being a single slab of protection for the Fold, the leather cover also doubles as a built-in kickstand. About one-seventh of the leather protector folds outward to help prop up the X1 Fold in a semi-horizontal orientation. The integrated design takes what Microsoft did with the Surface Pro one step further. Instead of having to attach a secondary cover to protect the screen as well as engineer another mechanical moving part, Lenovo combined both functions into a slick single point of user friction. Unfortunately, the X1 Fold’s origami only works in landscape or vertical orientations, when in vertical perspectives, users are reliant on the folding of the screen to prop up portions of their view.

In 2021, screens are increasingly becoming bezel-less but the X1 Fold leans hard into its bezels, almost flagrantly. However, when holding the device, it’s apparent why the bezels remain. In addition to almost cartoonish bezels at this point, Lenovo also coated the X1 Fold’s in a rubberized foam-like material that helps users firmly keep a grip on the 2.2lb tablet computer while also protecting the screen from smacking itself when it’s folded onto itself or dropped, both potential situations further highlight the foresight and attention paid to the X1 Fold’s hardware.

Pxl 20210224 142701690.portrait

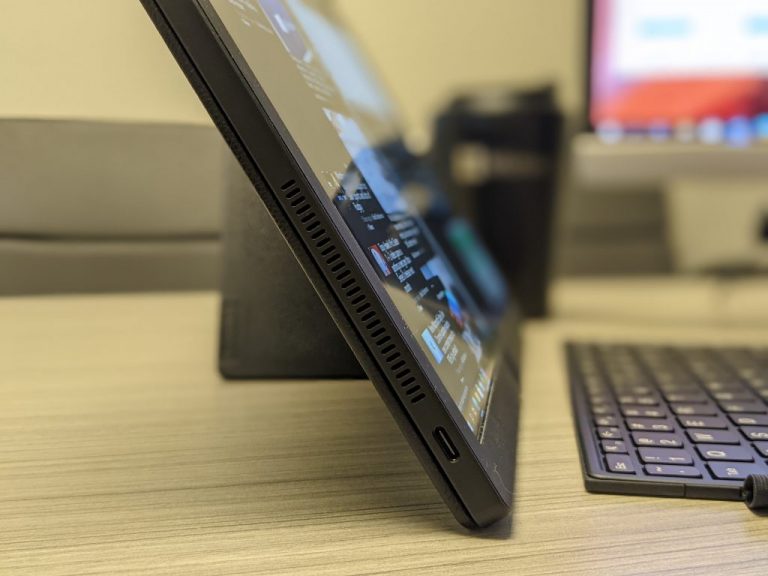
On the outer brim of the device are the power button, volume rocker, and two USB-C ports that sit catacorner to one another towards the bottom right corner of the device. According to Lenovo, both USB-Cs can push 10Gbps and one can be used as a display portal to connect to the X1 Fold to a second monitor. Aside from the gen 2 USB-C 3.2 ports, the X1 Fold sacrifices connectivity for portability. There are no other ports, and the placement of the current I/O really discourages the use of dongles to extend connectivity.

Keyboard

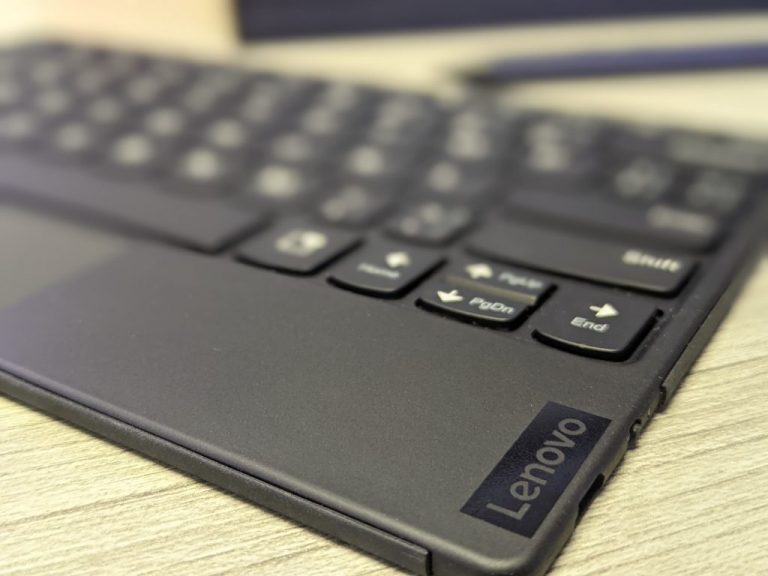
I wanted to review this separately from the main hardware of the Lenovo X1 Fold because, well, it’s its own engineering marvel. While it’s a bit cramped for how I’m accustomed to using a keyboard, the fact that it connects through Bluetooth rather than pogo pins is something that should be standard in 2021 for detachable PCs. I get that introducing Bluetooth connectivity introduces another failure point, but having used several Surface Pro keyboards, having a pogo pin setup isn’t always a guaranteed experience either. Lenovo list the keyboard on its site as the optional: Lenovo Fold Mini Keyboard, but just like the Surface Pro, it’s implicitly needed and comes in the box thankfully.

Pxl 20210224 141852430.portrait

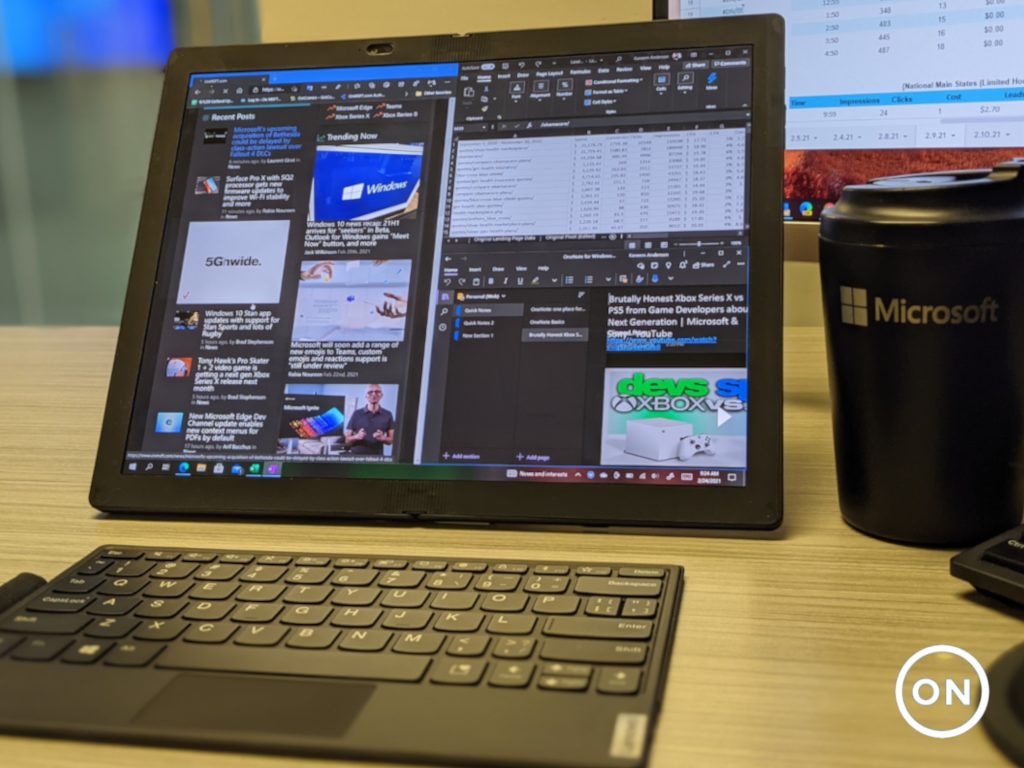
Once again, Lenovo flexes its engineering prowess by subtly adding magnetic connectors to the bezel of the X1 Folds screen that helps secure the keyboard in place when tucked into the folded device. The entire carrying setup of the X1 Fold is seamless and intuitive. Furthermore, the keyboard becomes ultra-handy when touch typing becomes exhaustive. In the L-shape fold of the X1 Fold, you can split the screen between a 9.7-inch viewable area and a 9.7-inch typing experience. Some people can make use of the onscreen keyboard but with some of the software glitches that come with this version of Windows 10 on the Fold, it’s just more convenient to toss the keyboard on the screen and begin typing. When a user is done with the keyboard just leave it on top of the screen and fold the X1 around it and everything fits nice and snug in place. My only complaint is that the keyboard uses a micro-USB as a port for connecting power.

Pxl 20210128 151245895.portrait

The disjointed charging experience is noticeable upon the first charging session. The computer portion of the X1 Fold uses USB-C while users need to scrounge around for a micro-USB to charge the keyboard. One last note about the keyboard is that unlike the Surface Pro, it can’t be positioned beyond a flat 180 degrees, so lap typing or typing on anything other than a completely flat surface is practically out of the question.

Hardware

The Lenovo X1 Fold comes with configurations of up to 1TB PCIe M.2. SSD storage is great for quickly uploading files if you can find a USB-A to USB-C converter. There is also an 8GB LPDDR4X 4267MHz memory that comes equipped. Sadly, due to some software issues, I’ll talk about shortly, every bit of that 8GB crawls on the X1 Fold. Intel chucked a Core i5-L16G7 chip into the X1 Fold capable of up to 3.00 GHz Turbo Boost with 5 cores, 5 threads, and 4MB Cache as well as integrated graphics. The battery on the X1 Fold is about average for a detachable device. Lenovo claims up to 10.4 hours of battery use when testing video playback and while that might be true, I was getting 6 hours steadily for regular computer use. Thankfully, there is a 50Wh battery in the device as well as Rapid Charge Technology onboard.

Pxl 20210224 145157808.portrait

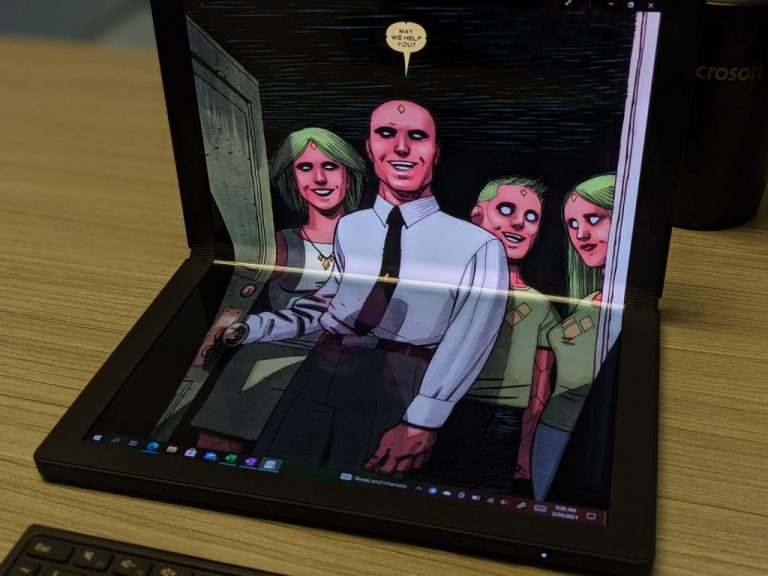
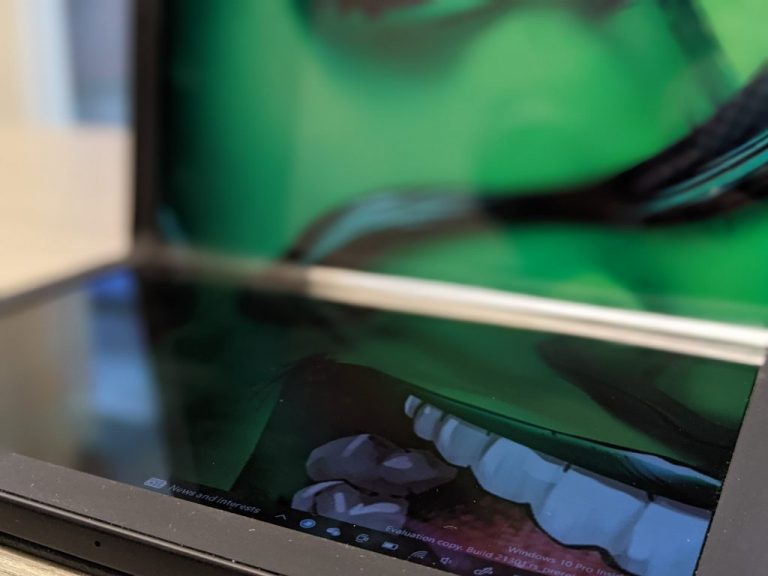
As for the guest of honor, the screen, Lenovo uses a 13.3-inch QXGA foldable 2K OLED, DCI-P3 95% touch, and pen-enabled panel that can push upwards of three hundred nits of brightness. It’s not the brightest panel in 2021 or even in 2019 when it was first engineered but it gets the job done and does it looking like a normal screen when it’s fully unfolded. Perhaps, because of its foldability, the screen does not feel like normal glass to the touch but instead a smooth plastic and it becomes further pronounced when the device is folded and the crease in the middle is visible.

Experience

The actual hardware experience of the X1 Fold is the most intuitive of all detachable or foldable devices in the market, in large part due to its chunky book-like design. The feel in the hand is very reminiscent of a leather-bound book that invites the folding and unfolding of the device. Closing the X1 Fold also comes with a muffled but satisfying click when the two magnet points on opposite bezels connect. Opening and closing the X1 Fold is a treat amongst itself and could constitute a stress-relieving activity (albeit an expensive one) thanks to the smooth hinge process that allows for a measured fold and unfold experience each time. I’m not sure how the folding mechanism would hold over time, but I did a cursory fold test of over three hundred folds in a single sitting and the device responded the same throughout the process.

Speaking of the X1 Fold’s folding experience, it began and ended with opening and closing the device for me. Other reviewers were able to persevere operating the device in an almost seated-L position to get work done, but the crease obscured too much of the viewing for me to concentrate on my work. I found myself simply opening the device-wide to take full advantage of the 13.3-inch screen. I understand the selling point is the folding nature of the screen, but nothing in Windows really takes advantage of that mechanism and in practice, it really only served as a neat new way to condense my workstation.

Pxl 20210224 141940356.portrait

While it may seem like a negative, having the X1 Fold unfurled in all of its 13.3-inch glory also worked in forcing me to use Windows 10 in tablet mode often. When I wasn’t banging out articles, triage emails, or writing ad copy, I found myself using the Fold in tablet mode 80 percent of the time. Which was a newish experience for me, even coming from a Surface Pro 7 Plus. While it’s not the lightest tablet-PC on the market, the leather on the back feels more inviting to the touch than other alternatives, and being able to quickly snap it close without having to scurry for a keyboard cover just reinforced my tablet use of the device.

However, that’s where things mostly fell apart for me.

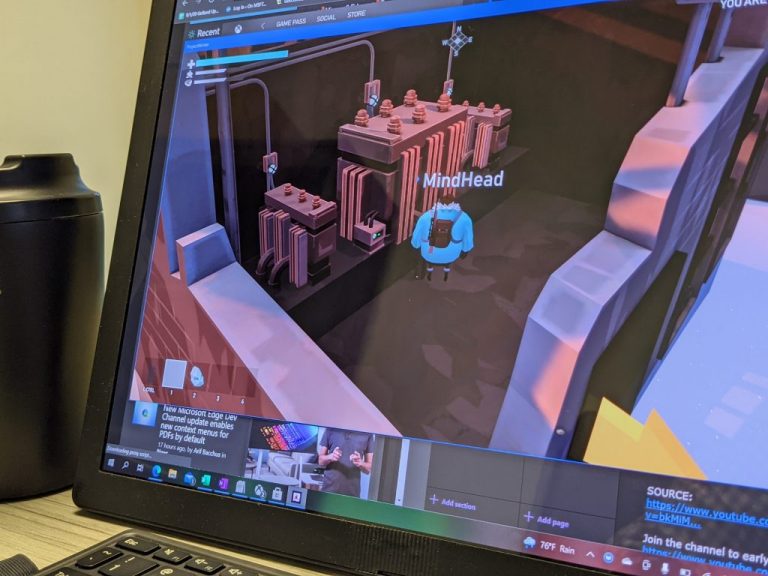
I’m not sure who to assign blame here, so I won’t, but the Windows 10 experience on the Fold is janky at best and often unusable at worst. Rotation recognition on the X1 Fold is spotty and slow which means that if you found a position to consume media in, don’t lose it because there is a decent chance you may need to restart the device to get back to that orientation. If you’re not fighting the gyroscope, you might numb your fingers double and triple pressing touch points on the screen because they’re registering a touch. A quick but risky fix for the lack of touch response in a particular app could be rotating the app to place the touchpoint in a spot the screen is recognizing at the time, but we know how that could end.

Pxl 20210224 142427894.portrait


More disappointing than some software glitches with Windows 10 is that Microsoft doesn’t seem to be working on its tablet-mode at all. As an Insider, I could weather the development storm of a broken tablet experience if I had some assurance that a solution is in the works. The X1 Fold was designed specifically with Microsoft’s original dual-screen Windows 10X vision in mind but the software company, unfortunately, pulled the rug from underneath its partner. Worse yet, it’s retooling that Windows 10 X for a single screen experience going forward which ostensibly obsoletes the X1 Fold out of the box. Lenovo attempts to cover up the lack of Windows 10X with its own mode-identifying software that will float windows to the middle of the screen and allow a user to toss it to one of the corners in the desktop. However, Windows 10 tablet mode relies heavily on a vertical split-screen paradigm when windowing. For a device that folds in the middle, Microsoft needs to rethink windowing as well as the gestures of the operating system when touch is the primary interface.

Thankfully, touch and type aren’t the only inputs. Lenovo includes a pen with the X1 Fold that has a better registration rate on the screen, so I found myself navigating the OS mostly with a pen that I had to remind myself not to bite as I fidgeted during work hours.

Summary

The technology behind the folding aspect of the X1 Fold is fascinating, but actual productivity from this device is middling, especially for its price. At close to $3,000, users are paying a $1,500 premium for the convenience of being able to fold up their laptops in a semi-new way. With only 8GB and a Core i5 chip, it’s not meant to be a workhorse or even a mainstream creativity device for mass adoption. Couple those points with this janky Windows 10 experience, the X1 Fold at best is an engineering reference device.

On the other side, it’s a ThinkPad with a high price tag which means it’s destined for some executive’s desk who might say why don’t we have our company email client outfitted for my shiny new toy. With that being the case, hopefully, the X1 seeds the land for a flourishing batch of foldables in the future. Lenovo is only half of this equation with Microsoft being the other who needs to figure out Windows 10 X or its Sun Valley update. Windows 10 needs to revisit its tablet mode in a major way that addresses the future of intuitive touch-first thin clients that connect to its robust cloud platform. If it doesn’t it could end up watching some other company capitalizing on its early Windows 8 work.

Dev type stories: How Windows app development has changed, and what I would do differently today – Part 4

This is a four part piece feature story on my Windows Development journey; the good, bad and ugly. This is the final Part 4 of my Windows development journey which focuses on how Windows app development has changed, and what I would do differently today.

How Windows app development changed

Windows app development has changed from a desktop PC centric environment to a mobile first, cloud first world in the world of global servers and online consumption. Traditional app development has peaked, the most popular app category gaming has peaked, business model has changed on how apps are monetised.

App development models has changed from desktop oriented to some lightweight web based, cloud backend PWA apps that is popularised under Microsoft competitors such as Chromebooks which is now being considered to be part of the “New Windows” under Windows 10X platform. This shift of mobile first and cloud first has accelerated further during covid-19 where quarantines and lockdowns has affected many during the crisis. Therefore, app developers have had to adjust. This is to accommodate the changing ties as well to support the users in different app categories that has shifted from the traditional dominated social media apps and gaming to essential and emergency apps for mostly health, basic needs and vital supplies.

Adjustments were pretty quick in coming. Websites and app developers had taken note and adapted to the changing situation. Such as up to date covid-19 news for students, workers and small business owners making adjustments to changing environment in the workplace. Larger emphasis on e-commerce for online shopping to virtual classrooms in time of lockdowns and quarantines.

The boom in contact tracing apps that has emphasis of the phone, where most users use as a communication and information tool today rather than a Pager device, PDAs or a Pocket PC from 20 years ago. These types of mobile focused apps leaves traditional desktop PCs and tablets in the dust with no mobile first world use. Education apps on the rise due to staying indoors which has been the call of the medical community. Because of this, some schools have chosen to close their doors. This is to due to the amount of socializing involved inside campus.

Fortunately for students, education centric apps have been around for while. Apps like Microsoft Teams for virtual classrooms, Canvas for homework projects etc. have been serving the education sector for a while now. The diversity of learning modes and styles allows for more innovation due to students having different learning styles.

Food and beverage delivery apps has increased in consumption with people staying indoors. Have forced establishments to adjust that depended on foot traffic. Now, that has shifted leading them to create online app services that cater to their customers. Since, stores have now increased priority with online presence. Food delivery demands have allowed some of the more fortunate establishments to survive. Some of the establishments in the market have even grown during the crisis.

The necessity of delivery and logistics industries have allowed industry to survive. With social distancing rules implemented, the necessity of delivery services became more obvious for more people. Utilising delivery apps allow business establishments to even smaller brick mortar retail businesses with shorter hours to stay active for longer. Meaning they can maintain a higher rate of sales compared to physical presence. Peer-to-peer delivery also allows small online businesses to survive. These are businesses that depend on online traffic to make sales.


What I would do differently today with Windows app development

I would focus on creating not only a hobby for myself. I would create a tool that people would mostly likely use in situations such as covid-19 that could have a huge impact on many industries to reverse businesses that were put on hold during the crisis.

Because app developers essentially develop tools. Due to the crisis, people are more dependent and more appreciative on these tools. Be it for their everyday needs or the future of their children.

Have a long term mindset with these apps because the long term effects of these apps mean that their utility does not end with the pandemic. Things under app development will change post covid-19 and would not go back to where it was pre-covid 19.

Windows app developers need to specifically focus on education where it comes at a great responsibility when access to schools is limited for many. To fill that role, Windows app developers have to consider the needs of both students and teachers.

App development model has changed too where data, analytics will play a role in a more inter-connected environment with the world of cloud and servers. This is where web based lightweight apps comes to play such as PWA in harnessing data, people’s behaviour and interaction with the app that is useful for teachers monitoring students, doctors monitoring their patients etc.

Summary

At the end of the day, having a robust application that is data driven, contextually aware, basic in nature and lightweight for the changing data driven web based app world such as PWA. Bring opportunities for new developers with new tools and some tools that mostly stayed the same in native. However, the most fundamental changes of Windows app development, and app development in general is the end users needs whether it is a student, patient, doctor, teacher, worker or parents etc.

This is the area and opportunity as a Windows developer should focus on building tools people need from education to logistics that can have an impact and can change how things are done in changing times under covid-19.

Inspired by my Windows development journey? Learn more about Windows development here. Share your experience with Windows app development in the comments below!

10 Best Online Scheduling Tools to keep your agenda organized

If most of your work is done online and you need to schedule meetings with other people, you really should do yourself and your client a favor — ditch the back and forth emails by using an online calendar or appointment scheduling tool. We promise you that this will make both your lives much easier.

Scheduling software will allow you, your secretary and your associates to view and access the master calendar and schedule time efficiently to meet with your customers and colleagues.

Check out the tools that we have prepared for you because each one has its unique cool features.

Here are the best online scheduling tools

SimplyBook.me – Setup custom features

SimplyBook.me is an online booking system that works for most service-based industries like beauty salons, fitness centers, consultants, schools, medical centers, and more.  

What differentiates SimplyBook.me from other booking systems is that it is based on custom features.  So you can pick the custom features that you would like to include in your booking system and then pay accordingly.

The clients, the ones booking the service, will always get sent booking reminders either by email or sms, which will reduce no-shows.

With the system, users can also connect with Facebook, Instagram or Google and thereby add a Book Now button there to allow clients to book an appointment from those channels or even offer the clients to book via a branded mobile app.

It is super easy to manage all bookings and clients. Users can download the admin app, and be notified every time a new booking comes in.

You can see the calendar for the day, access clients, and of course add, change or delete a booking if needed. Here you can see a list of their most popular custom features:

  • Facebook/Instagram integration
  • Instagram photo gallery sharing
  • Google My Business integration
  • Coupons & Gift cards
  • Related Resources
  • Accept payments
  • Video Meetings
SimplyBook.me

SimplyBook.me

Schedule tasks and manage your time in a more efficient manner with this great productivity tool!
Check priceVisit website

Transwide – Improves tracking

online scheduling tools

Transwide is a cloud-based solution. It features a suite of integrated modules that offers all the necessary tools for carriers to source, plan, settle, execute, and analyze all kinds of operations.

Transwide’s appointment scheduling app is twSlot and it offers a platform for planning and visibility with loading and unloading activities. It is available as a standalone app or as part of a broader Transwide suite.

Transwide is the ideal option for users who want to automate their transportation and logistics operations and processes with minimum risks and achievable deployment objectives.

Here are its most important features:

  • It is an excellent tool for scheduling loads, and it’s very user-friendly.
  • It reduces phone calls to carriers, and it improves tracking.

Its support, implementation, and sales staff have offices in more locations, and they are trusted partners with over 200 companies on four continents.

The tool’s downside as noticed by users involves the fact that the screen changes a bit slowly.

⇒ Get Transwide twSlot

Acuity – Automate appointment bookings

online scheduling tools

Acuity is a cloud-based appointment scheduling software solution that offers business owners the opportunity to manage their appointments online. The tool is ideal for the needs of small and midsize business and individual professionals.

Its most important and useful features include the following:

  • It allows users to automate appointment bookings by offering a real time view of their available time.
  • It can automatically sync calendars according to users’ time zone.
  • It can send regular alerts and reminders to users about their appointments and schedules.
  • The scheduling feature of this tool includes customizable intake forms, embeddable calendars, third party application calendar synchronizing, and group scheduling for workshops.

The tool provides a free basic module, and it’s also available as a monthly subscription.

The downside of the tool is the fact that the company plan doesn’t cover a lot of users, so the corporate package is not suitable for businesses with lots of employees. Other users have complained about the lack of an app to go along with the tool because the website seems a bit confusing.

⇒ Get Acuity Scheduling

DocMeIn – Drag-and-drop interface

online scheduling tools

DocMeIn is a cloud-based appointment scheduling solution that is perfect especially for the needs of medical and healthcare service practitioners. The tool is ideal for small and midsize healthcare setups and individual practitioners as well.

Here are its key-features:

  • The tool provides color-coded calendars and a drag-and-drop interface for managing appointments.
  • It can schedule recurring appointments at intervals that are defined by the users.
  • It allows users to configure flexible business hours including breaks and days off.
  • It reminds customers of pending appointments via SMS, emails, or voice calls.
  • It lets users automatically recall meeting invitations and enable import or export of data into Microsoft Excel or Google Drive.
  • The tool offers integration with third-party calendar management solutions including Google Calendar, Microsoft Outlook and more.

Most users who have used the tool appreciated it greatly, and the only minus seems to be the fact that it’s a standalone program so it cannot be integrated into a billing program.

⇒ Get DocMeIn

Schedulista – SMS-based reminders

online scheduling tools

Schedulista is a cloud-based scheduling app that lets users schedule and reschedule appointments online, generate notifications and manage customer information as well.

The most important features of this tool are listed below:

  • It provides SMS-based reminders.
  • It allows online payment processing via credit card integration.
  • Users can customize their working hours, and the software will use this to authorize appointment bookings.
  • The tool offers social media integration, side-by-side calendar views, data export in CSV format, analytics and reporting and role-based access permissions.

Schedulista provides integration with third-party apps including Microsoft Outlook and Google Calendar.

Users have noticed a few mysterious error messages sometimes, but other than that, the tool turned out to be extremely helpful.

⇒ Get Schedulista

OnSched – Automated marketing capabilities

online scheduling tools

OnSched is also a cloud-based scheduling app that provides users the possibility to book appointments online, to automate marketing campaigns, to capture and segment customers data and engage with their clients by providing custom deals based on usage.

Check out the tool’s essential features below:

  • It provides SMS and email reminders and also a dashboard for reporting and analytics.
  • The tool provides automated marketing capabilities that include managing appointment wait lists, multi resource logins and also configuring deals.
  • The tool offers advanced reporting and analytics capabilities including a suite of standard reports, email digests of daily activities and the ability to create custom visual reports.

The tool is ideal for pros in IT services, massage, car rentals, consulting and healthcare segments.

⇒ Get OnSched

ScheduFlow – See schedules in 3D

online scheduling tools

This is an employee scheduling solution that helps users create, view and edit schedules in real-time. It is accessible from any device including Windows Phone mobile devices.

Here are the key features of the product:

  • It also features a carousel card view that lets users see schedules in 3D.
  • It offers one-time and recurring appointments, customizable time scales and automatic reminders.
  • The tool deploys as a desktop app for ease of installation and upgrade.

The service is perfect for small to midsize businesses that have fewer than 100 employees and that are in any industry.

A downside of the service according to its users is the fact that once you delete something there is no undo button available and this can be quite annoying in case you have made a mistake.

⇒ Get ScheduFlow

PetalMD Software – Provides walk-in appointment management

online scheduling tools

PetalMD Software is an online appointment scheduling platform that is best used by small and midsize health care practices of all kinds including hospitals, clinics, and individual departments.

Here are its essential features:

  • Physicians can offer online booking from their websites, and they can give their patients lots of booking options, and this will result in a reduced number of phone calls.
  • The tool can sync with the user’s existing EMR to avoid double booking.
  • The tool sends automated reminders to patients to reduce no-shows.
  • The tool also provides walk-in appointment management and open slots can be provided in case of last-minute bookings either online or over the phone.

The service is available on a subscription basis, and there’s a fee charged for every appointment booked.

⇒ Get PetalMD Software

BookSteam – Manage customer and client contact info

online scheduling tools

BookSteam is an online appointment scheduling tool that provides business and customer-facing functionalities for clients and customers to schedule their appointments online. Businesses can manage these appointments on the backend.

Check out the most important features of this solution:

  • It creates a custom website for businesses that will show business details, a list of services, client reviews, and a “book now” button for accessing and scheduling appointments.
  • It allows companies to collect and manage customer and client contact info appointment data and history.
  • The service uses email and text reminders to keep customers up-to-date and connected, even while they’re on the go.
  • It allows clients and staff members to receive instant notifications for a scheduled appointment.

Users enjoy using this app and the only minus most of them have found is the fact that they think that customers should be able to book multiple staff in one room instead of separate schedules. You can try the service for free for a month.

⇒ Get BookSteam Software

Timely – Integration with third-party apps

Timely is targeted at individual pros and also small to midsize businesses such as hair salons, beauty salons, health clinics, personal trainers, therapists and so on.

Here’s a list of the most useful features of this service:

  • Users can run their appointment schedules from anywhere.
  • Users can generate reports and then send notifications and reminders as well.
  • More features include calendar management allowing users to book and rebook their appointments, manage recurring bookings, and more.
  • The service provides automated SMS and email reminders.

With this service, you’ll get integration with third-party apps such as Google Calendar, Xero, and more.

The service’s minuses include the following: it doesn’t support calls, it cannot have different times zones for various calendars, and you also have to pay extra cash for text alerts and new appointments.

⇒ Get Timely

For businesses providing appointment-based services to their customers, tracking the status of those appointments is vital as it will optimize operations and attract more clients.

Appointment scheduling software will help your business achieve high goals by enabling users to manage reservations, schedule appointments and take bookings.

After browsing through the list of tools above, you can choose whatever tool fits your business’ needs best.

New Alexa for Xbox app discovered for Xbox One and Xbox Series X consoles

A new app called Alexa for Xbox has been discovered in the Microsoft Store app store. While Microsoft’s Xbox One and Xbox Series X (and S) consoles already have built-in support for the Alexa virtual assistant that allows for basic voice commands for controlling media playback and turning the console on an off, this app appears to bring the full Alexa experience to Xbox users, essentially turning their TV into a giant screen for viewing Alexa-related content.

According to the description and screenshots on the Alexa for Amazon app page, the app will allow users to listen to music and view Smart Camera footage on screen in addition to managing a variety of Alexa tasks such as editing shopping lists, etc.

While the app page is live in the Microsoft Store, the app itself doesn’t appear to have been activated yet as claiming it on the web version of the store didn’t trigger a download on my Xbox Series X console. The Alexa for Xbox app also doesn’t appear to be discoverable on consoles yet either even when searching for its full name. It will likely launch soon though.

What do you think about this Alexa for Xbox app? Is it something that you’d use? Let us know in the comments below and then follow us on Pinterest and Twitter for more Xbox news.

Alexa for Xbox
Alexa for Xbox

Microsoft Teams support comes to Vuzix’s M400 and M4000 smart glasses

Vuzix announced today that their M400 and M4000 smart glasses have now added support for Microsoft Teams video conferencing.

“Microsoft Teams is a widely used video conferencing applications with approximately 115 million average daily users as of October 2020 and a user base that spans a wide array of enterprise market verticals,” Vuzix’s president and chief executive officer said in a statement. “Offering hands-free Microsoft Teams interoperability with our M400 and M4000 Smart Glasses, this implementation will enable Vuzix to address a new and significant segment of enterprise customers that wish to use Microsoft Teams as their platform.”

Vuzix is a company that’s heavily invested in both augmented reality technology and smart glasses hardware. Their M400 and M4000 smart glasses are part of the Longevity Series of products targeted at companies for long-term usage. While impressive, they’re definitely not intended for the casual consumer with the M400 costing $ 1,799.99 and the M4000 going for $2,499.99.

A special webinar focusing on Microsoft Teams integration with Vuzix smart glasses is set for 2:00 PM (ET) tomorrow, March 4th. Those interested can register here.

Do you see a future for smart glasses? Share your thoughts with us in the comments below and then follow us on Twitter for more tech news.

[Fixed] lenovobatterygaugepackage.dll is missing or not found

The LenovoBatteryGaugePackage.dll is a file that will sometimes become the source of an error.

There can be instances when, at the computer startup, the user will receive a message stating LenovoBatteryGaugePackage.dll is missing or not found.

Read the next section and learn how to solve the issues with the LenovoBatteryGaugePackage.dll on your PC.

How can I fix LenovoBatteryGaugePackage.dll is missing error?

1. Uninstall Lenovo Vantage and Lenovo System Interface Foundation

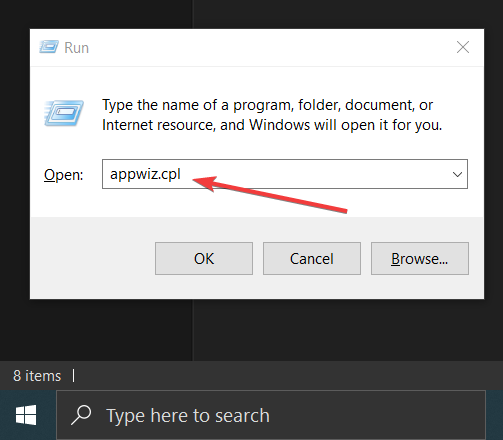
  1. Press Windows key + R to open Run, type in appwiz.cpl, and hit Enter.Launch Windows Programs and Features
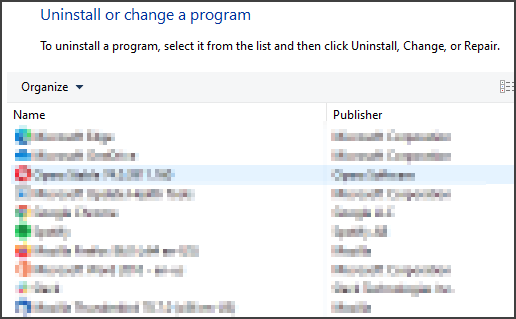
  2. In Programs and Features find Lenovo Vantage (LV), and choose Uninstall. 
    uninstall program
  3. After the process has ended, navigate back to Programs and Features.
  4. Locate Lenovo System Interface and Foundation, and choose Uninstall.
  5. After both Lenovo utilities have uninstalled, restart your computer.
  6. Download Lenovo System Bridge and Lenovo System Update.
  7. Install both utilities and ensure every Lenovo component is fully updated.
  8. Restart the computer again.

These elements are legacy components that have been replaced by the producer with Lenovo System Bridge and Lenovo System Update.

If you have them available in your operating system, this can cause the error LenovoBatteryGaugePackage.dll is missing or not found.

To completely remove certain software, it’s advised to run a PC scan using cleaning software such as CCleaner. The tool will be able to detect and remove any residual files and registry entries.

2. Apply the Lenovo solution

  1. Visit the download section from Lenovo’s website.
  2. Download the Battery Gauge app. 
  3. Open it using WinZip.
  4. After extracting the files right-click Fix-Battery_Gauge.bat and select Run as administrator.
  5. Select Yes for granting administrative privileges in the User Account Control (UAC) section.
  6. Apply the fix, restart the computer, and verify if the problem has been solved.

This solution applies if you have installed the Lenovo Vantage Toolbar on your computer, but have not updated it.

As a result, Windows 10 will display the LenovoBatteryGaugePackage.dll error.

In this regard, Lenovo has released a script that must be run with admin access to repair the registry and solve the problem.

3. Restore the DLL file

Most of the time, DLL-related errors can be resolved if you use specialized software, as it’s the safest method.

By choosing repairing tools, you gain ample capacity to find missing DLLs and repair broken ones from your PC.

With a comprehensive scan of your system, dedicated software automatically detects the issues with your system files and replaces them right away with functional ones.

Plus, it will also optimize your operating system with cleaning tools and other useful processes present within the app.

4. Edit permissions

  1. Open File Explorer and navigate to the following location:  C:ProgramDataLenovoImControllerPluginsLenovoBatteryGaugePackagex64
  2. Locate and right-click on lenovobatterygaugepackage.dll, and choose Properties.
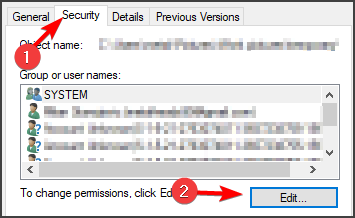
  3. Choose Security, click Edit, and navigate to the permission screen.
  4. Click Add, type in Everyone in the text box, click OK, and then Apply.
  5. From Permissions for Everyone, select Full Control and then Allow.
  6. Restart the computer and verify if the issue has been solved.

In some instances, a permission issue might prevent some user accounts to access the LenovoBatteryGaugePackage.dll, but after making these changes, the issue should be gone.

5. Update BIOS

  1. Open the browser and navigate to Lenovo’s System Update page.
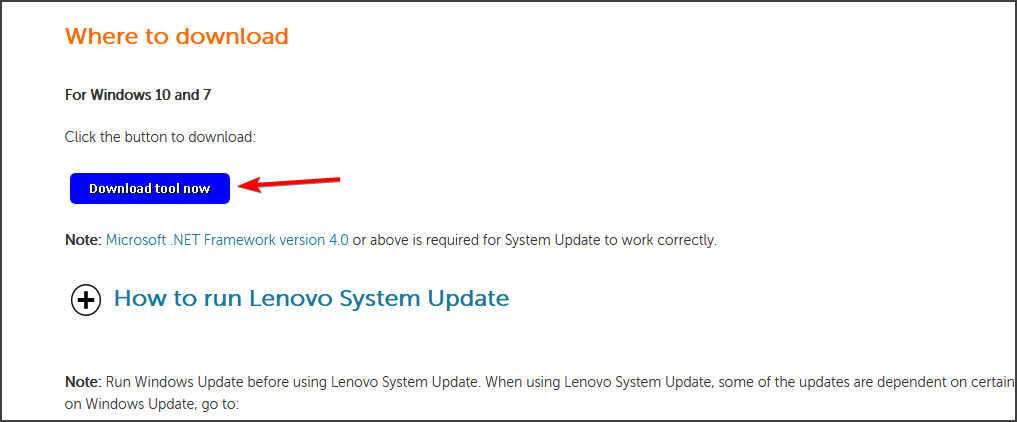
  2. Locate the Where to download section and click Download tool now.
  3. Enter your Lenovo PC serial number.
  4. Click on System Update and wait for the download to complete.
  5. Open the installer and click Yes when prompted by User Account Control (UAC).
  6. Follow the setup process to complete the installation of the utility.
  7. Install the BIOS update and every other pending update.
  8. Once this setup is over, your computer will restart and the new BIOS version will be installed.

After you have entered your PC’s serial number, the Lenovo utility will identify the specific download for your particular model.

Fixing the LenovoBatteryGaugePackage.dll is missing or not found error is not as hard as you think, and you should be able to do it with our solutions.

If you found a solution that we didn’t mention in our guide, feel free to share it with us in the comments section.

How to Fix Downloader.dll is Missing / Not Found Error

Windows and various applications rely heavily on DLL files to work properly, and one of those files is downloader.dll.

Before we start fixing the issue, let’s familiarize ourselves with the DLL file in question.

What is downloader.dll used for?

Downloader.dll is associated with various applications, and in case you have any issues with this file, those applications won’t be able to run.

However, there’s a way to fix this issue, and if downloader.dll is missing on your PC, just use one of our solutions to fix it.

How can I fix the downloader.dll is missing/not found error?

1. Use a professional third-party software

When you encounter the Program can’t start because downloader.dll is missing from your computer error, this may be the consequence of file corruption.

These types of issues are usually complicated to fix manually, but there’s specialized software that can do that automatically.

2. Update Windows device drivers

  1. Type in Device Manager in the taskbar’s search box and hit Enter.
  2. Choose a category to verify the names of the devices.
  3. Select and right-click on the device that needs an update.
  4. Select Search automatically for updated driver software.
    driver update automatically
  5. Choose Update driver.

Keep in mind that this method might not be the most effective one, so if you’re having issues with downloader.dll, it’s usually better to use a specialized software.

To update all your drivers quickly and automatically, we suggest using a specialized driver updating tool.

3. Launch System File Checker (SFC)

  1. Type in Command Prompt in taskbar box, and right-click on the result.
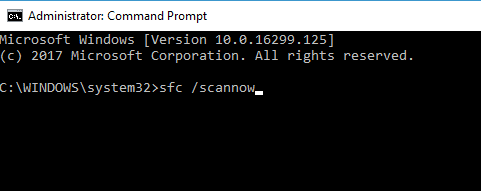
  2. Select Run as administrator and type in sfc / scannow
  3. Hit Enter and wait until the scanning process has ended.

After you have performed these steps, you will be notified that Windows Resource Protection found corrupt files and successfully repaired them.

Otherwise, you will receive the message Windows Resource Protection found corrupt files but was unable to fix some of them.

The System File Checker is able to fix integrity errors only for those files that are not in use by Windows.

To scan those files already in use, you must perform some additional steps.

Scan files already in use

  1. Press the Windows key, choose Settings, and then Update & Security.
  2. Select Recovery, navigate to Advanced startup and click Restart Now.
  3. Close Command Prompt and restart the computer.

After performing the scan, check if the problem with downloader.dll is gone.

4. Use System Restore

  1. Press Windows key + R to launch Run, and type in rstrui.Activate System Restore
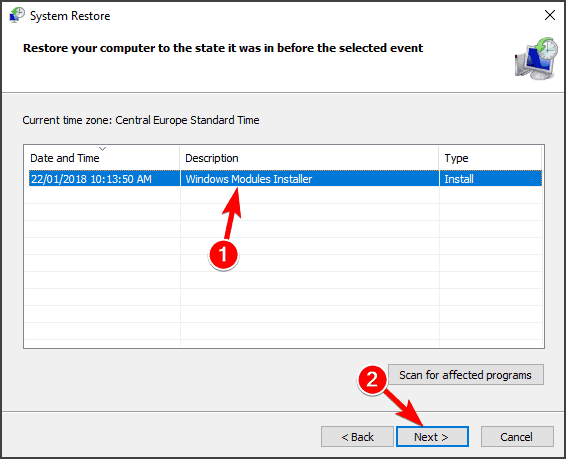
  2. Click OK, select Choose a different restore point, and click Next.
  3. Check the box from Select more restore points for the list with dates.
  4. Choose a date to restore Windows 10, click Next and then Finish.

When you will choose a date, be careful to select one before the downloader.dll error appeared. After you have followed these steps, your computer will restart.

After rebooting with the restored version of your operating system, Program can’t start because downloader.dll is missing from your computer error should be gone.

When you encounter the error about the download.dll file, there are several tested solutions that can fix it.

Be sure to try all of our solutions, and let us know which one worked for you.

Windows 10/11: Edge not working on VPN? Try these solutions

Using a VPN has been proven to eliminate or at least curb privacy issues when we go online. A VPN creates a secure tunnel that all your traffic is routed through.

However, sometimes even foolproof solutions such as VPN can fail. Even the best corporate VPNs are flawed.

For instance, an alarming number of users complain that Edge, the popular net browser signed by Microsoft, suddenly stops working when using a VPN.

The issue seems to arise most often on Windows 10, but Windows 11 users also experience it.

In the following sections, we’re going to see what can be done in this situation. But first, you have to make sure of the following:

If you’ve checked everything off this list and Edge still won’t work, it’s time to see some potential fixes to your situation.

How do I make Edge work with my VPN?

1. Disable the default gateway on the remote network

  1. Go to the Settings app
  2. Access Network and InternetSettings app network and Internet
  3. Select Change adapter options Network configuration Change adapter settings
  4. Right-click your VPN adapter and click PropertiesChange properties VPN adapter
  5. Access its Networking tab
  6. Select Internet Protocol version 4
  7. Click PropertiesProperties button IPv4
  8. In the new window click the Advanced buttonAdvanced IPv4 settings
  9. Make sure that Use default gateway on remote network is not selectedUse default gateway on remote network deselected

2. Change your VPN media status settings

  1. Head to your network connections
  2. Right-click your VPN connection
  3. Select Properties
  4. Click the Configure buttonVPN adapter Configure button
  5. Go to the Advanced tab
  6. Select the Media Status option in the Property list
  7. Set it to Always Connected from the Value dropdown menuMedia Status Always Connected VPN
  8. Click OK

3. Use a stable, efficient VPN provider

  1. Decide on a good VPN for Edge.
  2. For great security and a low error rate, we use ExpressVPN. Get an ExpressVPN subscription.
  3. Install it on your PC.
  4. Connect to the desired server
  5. Launch Edge.
  6. Access your favourite websites.

ExpressVPN is an excellent VPN service that passed all of our tests with flying colours. In case you can’t make Microsoft Edge connect to the Internet while using a VPN, try giving ExpressVPN a try. We experienced no such issue and we bet you won’t, either.

Not only it doesn’t trigger errors, but it also provides you with an unmatched level of security and privacy, offers high-speed servers, and can unblock a broad variety of geo-restricted services.

ExpressVPN

Keep your VPN connection up all times, with no hiccups with this fast, reliable, and modern VPN!
Free trial Visit website

In conclusion, if you’re having trouble with your VPN connection on Microsoft Edge, try the hassle-free solutions above and get back to viewing your favourite websites in no time.

And, if you’re having trouble with slow VPN connections, don’t panic since you can easily fix those, too. It’s nothing out of the ordinary since even corporate VPNs are sometimes slow.

Microsoft starts pushing Windows 10 version 21H1 to all Insiders in the Beta channel

As we’re getting closer to the public release of Windows 10 version 21H1, Microsoft has started pushing the update to all Insiders in the Beta Channel. Until now, Insiders could opt in to install the first 21H1 build 19043.844 that was released on February 17, but that’s changing starting today.

“21H1 is now being offered as a recommended update to all Windows Insiders in the Beta Channel. Insiders who previously didn’t choose to install 21H1 will now automatically receive 21H1 in the Beta Channel,” the Windows Insider team said today.

Windows 10 21H1 is another service pack-like update just like the version 20H2 was. The only new feature is the multicamera support for Windows Hello, and this update will also bring performance improvements for Windows Defender Application Guard.

Microsoft is planning bigger changes later this year for Windows 10 version 21H2. Earlier today, Microsoft’s Panos Panay said during an Ignite 2021 session that “it’s going to be a massive year” for Windows, and there have been some rumors about an upcoming Windows press event coming soon. With the first Windows 10X devices expected for this Spring, we hopefully won’t have to wait too long to see what’s next for Windows.

[Fixed] bcp47mrm.dll is Missing From Your Computer Error

The bcp47mrm.dll is a DLL file that has critical importance for your operating system, making it work properly. Whenever it is missing from your computer, Windows will show you an error message.

As with many other dll files, bcp47mrm is usually installed on your computer by software or a game that requires it.

What is bcp47mrm.dll used for?

The presence of bcp47mrm.dll in your operating system allows Windows to function properly. This is a common feature for dll files. Also, there are certain games or software programs that require this specific file.

However, issues with this DLL file can occur, and in today’s guide, we’ll show you how to fix them.

How can I fix bcp47mrm.dll missing error?

1. Use professional software

When you encounter DLL file-related errors, this is proof that there might be issues with your registry. There are instances when your Windows 10 registry files are corrupted, missing, or need to receive updates.

Any of these potential scenarios will launch if the bcp47mrm.dll is missing from your computer error.

Can I automatically fix missing DLL files in Windows 10?

Many users are usually tempted to download the missing dll file from different websites.

However, there is a better and faster way to automatically fix the missing DLL files.

Using a specialized tool to find your missing DLL files will do the job. You can employ an effective repairing software that can find the bcp47mrm.dll file and install it properly on your computer. 

2. Restart the computer

  1. Press and hold the Power button for 5 seconds.
  2. Wait 30 seconds and push the Power button to turn the computer on.

The easiest way to solve the bcp47mrm.dll error is to restart your computer. Your device may have cache problems, and a restart should automatically fix that issue.

This is the simplest solution that can help you if bcp47mrm.dll is missing from your computer.

3. Perform a driver update

  1. Type in Device Manager in the search box and press Enter. 
  2. Select a category from the device list to check the one that needs an update.
  3. Right-click on it and select Update driver.
  4. Choose Search automatically for updated driver software.

Alternatively, you can download bcp47mrm.dll by using driver update software. This software is designed to automatically download and install missing drivers, so it’s worth checking out.

Updating your drivers is essential to keep your system healthy and running smoothly, so with the best driver update tools you can actually protect your PC from system problems. 

Plus, you can manage all your drivers from the same platform and update or find the missing ones with ease, in a few clicks.

The process is almost entirely automated, and you will just select what drivers need to be updated or installed in your system.

4. Scan for malware

Malware files are any type of program that was designed with the purpose to cause damage to computers. In this category, we may encounter worms, viruses, trojans, and any other harmful programs.

If your computer has been infected with malware, that can cause the bcp47mrm.dll error to appear. Using a dedicated program for malware removal should help you solve this problem.

Our suggestion is to use the most efficient anti-malware software tools in order to be highly protected against advanced malware. 

Users are now able to protect their devices, data, and privacy from their homes or on the go. Always be a step ahead in terms of cybersecurity and protection using professional antivirus tools.

The bcp47mrm.dll missing from your computer is an error that can be fixed by using several approaches.

Install a third-party solution that will replace any damaged files, perform a forced restart on your computer or update your Windows device drivers.

Did our solutions work for you? Let us know in the comments below!

Ignite 2021: Panos Panay hints at a big year for Windows

Big news: Panos Panay is pumped! Today at a mini session at Ignite, Microsoft’s Chief Product Officer for Windows and Devices, joined Roanne Sones in a “fireside chat” about Windows. While much of the quick 15 minute session centered on current features of Windows, Panay couldn’t resist letting slip a little hint at the future:

Look I have not talked about the next generation of Windows and what’s coming next, but I can tell you I am SO PUMPED.”

Panay went on to say that “it’s going to be a massive year” for Windows. As we know, both Windows 10X and a refresh of Windows code named “Sun Valley” are slated to arrive this year, and although Microsoft has been largely quiet about either or both, that could soon change.

As we noted earlier, Tom Warren over at The Verge is hearing about a Windows-focused event coming soon:

The Windows Experience Blog did try to keep the fires burning with a recap of Windows sessions happening at Ignite, but it’s clear that Microsoft wants to keep the focus on Microsoft Mesh, the Power Platform, security, and Azure this week. From the sound of things, however, the focus could soon turn to Windows, and indeed the beginning of a “massive year.”

Avatar Making Software: 5 Best to Create Avatars from Photos

There are many ways to create a memorable avatar, but the best one is by using software that can create an avatar from a photo.

If you wish to create your own personalized avatars independently from social media websites, then you should consider using specialized software.

We have prepared the best software recommendations that you can use to create avatars. Read the next section and learn what are the best programs for this task.

What is the best software to create avatar from photo?

Adobe Photoshop – Best class photo editor

Adobe Photoshop

Develop your skill in composition, photo editing, digital painting, graphic design, and animation. Use Photoshop to master all of these artistic skills and use iPad and desktop to bring your ideas to life.

Use live streaming together with Photoshop not only to learn new skills but to share your projects too. Turn a portrait into a masterpiece and improve the quality of expressions with this professional Adobe software.

Create awesome images using features such as removing objects, retouch, and recolor. Transform a simple image into art using Photoshop’s intelligent new features and smart editing tools.

Enrich your images and improve what your camera can do using your imagination. Just use Photoshop’s one-click selection, combined with unlimited layers and easy masking functions.

Photoshop is an amazing tool, and it’s the best app to create avatar from photo if you’re skilled enough to use it.

Adobe Photoshop

Use Adobe Photoshop, the world’s best photo editing software to create amazing avatars!
Check price Visit website

Maya Software – Complex character edits

Maya Software to create avatar from photo

Maya Software is another app that can create avatars from photos. However, the original purpose of the software is computer animation, modeling, simulation and rendering.

If you want to learn how to create complex characters and awesome avatars, try out Maya Software. You can use it to create expansive worlds and amazing effects.

Sharpen your photo editing skills using Maya’s engaging animation tools and bring characters to life. Use Maya software for modeling to shaping 3D objects and scenes.

Go beyond creating an avatar for your social media account and learn how to create realistic effects, such as explosions. Learn about Maya Software’s unique tools and features and create excellent visual content.

Maya Software

Use Maya, a software created especially for 3D computer animation, rendering, simulation and modeling to create amazing avatars.
Free trial Visit website

Avatar + Anime Maker – Ideal for anime fans

Avatar + Anime Maker is an app that can create avatar from photo with ease. Use this face changer application to create funny, cute, or scary anime faces.

Built as a very user-friendly app, Avatar + Anime Maker contains everything you need. Create stunning pictures using the instant blending of an anime face mask, hairstyles, beards, and various awesome stickers.

Create your ultimate avatar by setting a mask, dragging it to rotate left or right, and scaling it horizontally or vertically. Choose what to use from a rich gallery of masks, faces, emojis, and many more.

Avatar + Anime Maker

This great face-changer app that allows you to modify your pictures and create funny or scary avatars.
Get it free Visit website

Avatoon – Suitable for business or casual

Avatoon software to create avatar from photo

Avatoon is an interesting app that can create avatars from photos without hassle. You will be amazed by the end result: an awesome custom hand-drawn portrait.

Every step of the process was designed to be very simple. Initially, you must upload your photo and fill out a short form. As soon as your new portrait is ready, Avatoon team contacts you and sends you your new avatar.

You will receive your cartoon drawing in a vector format that can be redimensioned to any size you desire.

Use Avatoon pictures for more than a simple profile picture for social media accounts, and insert them in your project for a better impact on your viewers.

⇒ Get Avatoon

Befunky – Creative graphic designs

befunky software to create avatar from photo

This is a friendly mobile app that transforms pictures into art using several editing features. It will be very easy for you to crop photos, create a transparent background, and retouch portraits for you and your friends.

Befunky allows users to create their desired avatars using only a few simple steps. This software to create avatars from photos also contains different filters allowing you to customize your photos.

⇒ Get Befunky

Creating an avatar is simple, as long as you use good software to create an avatar from photo. In this guide we showed you our top picks, so be sure to check them all.

What is your favorite avatar making software? Let us know in the comments below.

How to fix PUBG Lite is unavailable in your region error

PUBG Lite is the free version of the popular game PlayerUnknown’s Battlegrounds. The Lite edition is quite frankly the best way to experience PUBG without paying a dime.

Although free services are a great ramp for increasing user base, the main focus doesn’t revolve around them. Therefore, sometimes, free users might experience issues that premium/paid users don’t.

One of the most common errors PUBG Lite players complain about is the PUBG Lite is unavailable in your region error. What makes it more annoying is that it appears to occur entirely random.

While some players experience it at launch, other have this issue immediately after finishing a game, or while configuring their settings. It doesn’t seem to follow a pattern, either. Fortunately, you can bypass geoblocks quite easily and we’ll show you exactly how.

How to fix PUBG Lite is unavailable in your region error?

1. Use a VPN

  1. Download and install Private Internet Access on your PC.
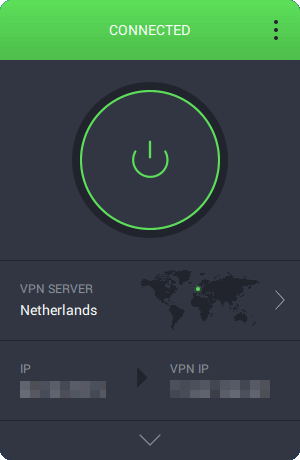
  2. Launch the VPN and connect to a secure serverPIA is connected to Netherlands
  3. Run PUBG Lite on your PC and check if it works

Private Internet Access is a stable, efficient VPN that can help you keep your privacy safe while playing PUBG Lite.

Additionally, it can help you eliminate or curb ping issues and even spoof your location to avoid the infamous PUBG Lite is unavailable in your region error.

Private Internet Access

Did you get the PUBG Lite is unavailable in your region error? PIA can help you avoid it by spoofing your location.
Check price Visit Website

This VPN service has a network of over 3,000 servers distributed all around the world, covering 66 locations in 46 countries.

Note: if you’re seeing the same error after enabling the VPN, disconnect from the server you chose and select another one. You might want to use a different location, as the error is apparently location-related.

2. Configure your time zone correctly

  1. Hit the Win key on your keyboard
  2. Type Location privacy settings and select the option from the menu
  3. Make sure that you’ve enabled Location for your PC and that apps are allowed to access itLocation enable Windows 10
  4. Hit the Win key on your keyboard once more
  5. Type Change the date and time and click the option with the same nameWindows 10 changing date and time
  6. Toggle the following options to ON:
    1. Set time automatically
    2. Adjust for daylight saving time automatically
    3. Set time zone automaticallyConfiguring date and time settings
  7. Check that the auto-set time zone is real and accurate
  8. Launch PUBG Lite and check if you still get the error

Note: the time zone configuration method won’t work with a VPN. VPNs usually spoof your location and assign you different times (and sometimes even dates) based on your virtual location.

Conclusion

To wrap it up, if you’ve had enough of region errors while playing PUBG Lite, using a VPN such as Private Internet Access (buy here) might be your strongest bet.

This service can help you spoof your location so that the game won’t trigger any errors due to client-server time zone/date discrepancies.

Even if PUBG Lite starts acting up while you’re connected to your favorite VPN server, you can still fix the issue easily by choosing a different server.

The process doesn’t take too long and it’s also very intuitive and user-friendly.

More so, using a VPN might even eliminate ping-related issues and will also give you a privacy boost.

VyprVPN Review: A Lightning-Fast Secure VPN Client?

Your online security should be your priority, and if you want to ensure your privacy online, you should use a VPN.

Many great VPN services are available on the market, but if you’re looking for a reliable, trusted, and audited No Log VPN, you should consider using VyprVPN.

VyprVPN review: speed, security, and privacy tested

What is VyprVPN?

VyprVPN is a VPN client that prioritizes user privacy and safety, and it was developed by the Golden Frog team from Switzerland.

In case you didn’t know, Switzerland has strict privacy laws, and the Swiss Federal Constitution guarantees the right to privacy.

As a Swiss company, Golden Frog has to comply with strict privacy laws, meaning that your personal information won’t be stored or sold to third parties.

In fact, VyprVPN became the first publicly audited no-log VPN service in November 2018, verifying that the company doesn’t store any user information, including your IP address.

What features does VyprVPN offer?

VyprVPN


Advanced user privacy

As briefly mentioned in the introduction, Golden Frog has a strict no-logs policy, meaning the company won’t store your personal information.

In fact, the company has its own servers and infrastructure, so they don’t rely on any third parties to provide its service.
It’s important to mention that VyprVPN has its own zero-knowledge and encrypted DNS server.

While third-party DNS servers might log your information and queries, the VyprDNS server fully encrypts your traffic without logging any personal information or queries.

In addition to protecting your privacy, VyprDNS will also prevent any DNS filtering and censorship attempts.

Download VyprVPN for Windows

⇒ Get now VyprVPN

VyprVPN is compatible with the following Windows versions:

  • Windows 10
  • Windows 8.1
  • Windows 8
  • Windows 7
VyprVPN

VyprVPN

VyprVPN is currently one of the best VPNs on the market. Give it a try and you'll see why.
$1.66/mo. Buy it now

Servers with worldwide coverage

VyprVPN has 700+ servers available across different countries around the globe, from North and South America, to Europe, Asia, Africa, and even Oceania. Thanks to its impressive network, you can easily access any geo-restricted content with VyprVPN.

As previously mentioned, VyprVPN doesn’t use third-party servers, so you can rest assured that your personal information won’t be made available to third parties.

Maximum speed, without throttling

VyprVPN offers maximum speed to its users so that you can enjoy multimedia with ease. Many ISPs tend to throttle your speed or block certain websites completely, but thanks to traffic encryption, your ISP won’t be able to see your traffic and throttle it.

Encryption protocols and NAT Firewall

VyprVPN offers standard encryption protocols, including PPTP, L2TP/IPsec, OpenVPN, and Chameleon.

However, there’s also a special Chameleon Protocol for premium users. This protocol is based on the OpenVPN 256-bit protocol, and thanks to the metadata scrambling, it prevents VPN blocking and throttling.

It’s worth mentioning that VyprVPN supports NAT Firewall that blocks unrequested inbound traffic while you’re connected to VyprVPN.

This feature is incredibly useful if you’re using a wireless router and you have your smart devices connected to it.

Availability on multiple platforms

In order to provide you with maximum protection, VyprVPN is available on all major platforms. This includes Windows, Mac, Android, and iOS. The service is also available on Blackphone, Anonabox, QNAP, and smart TVs.

If needed, you can also get VyprVPN for your router and protect all devices on your network with ease.

Simple and easy-to-use interface

Unlike some other VPN clients on the market, VyprVPN has a simple and friendly user interface that allows you to connect almost instantly to any VPN server.

The application has a simple but friendly design, and the central part of the application is the speed graph.

Thanks to the speed graph, you can be sure that the server is using it fast enough for all your needs. You can also detach the graph and view it in a separate window if needed.

The main window will also show you important information, such as your current IP address and time spent connected.

Information regarding the current protocol and firewall is also there, so you can rest assured that you’re completely protected.

How to choose a server on VyprVPN

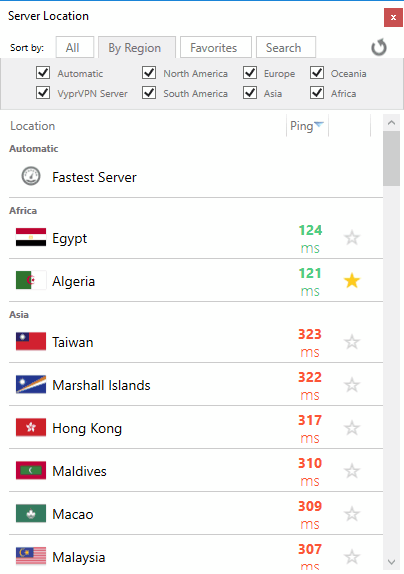
servers vyprvpn review


Connecting to a server is quite simple, and you can do it basically with a single click. Just press the big Connect button, and VyprVPN will automatically choose your fastest server. Of course, you can manually select your server if you want.

As for manual selection, you can see the ping time of each server, so you should be able to always connect to the fastest one. If needed, you can add servers to favorites and connect to a specific server in the future with just two clicks.

It’s worth mentioning that there’s server sorting by region, so you can only show servers from the region you want. If you want to find a specific location quickly, you can use the search feature.

Fine-tune your VyprVPN settings

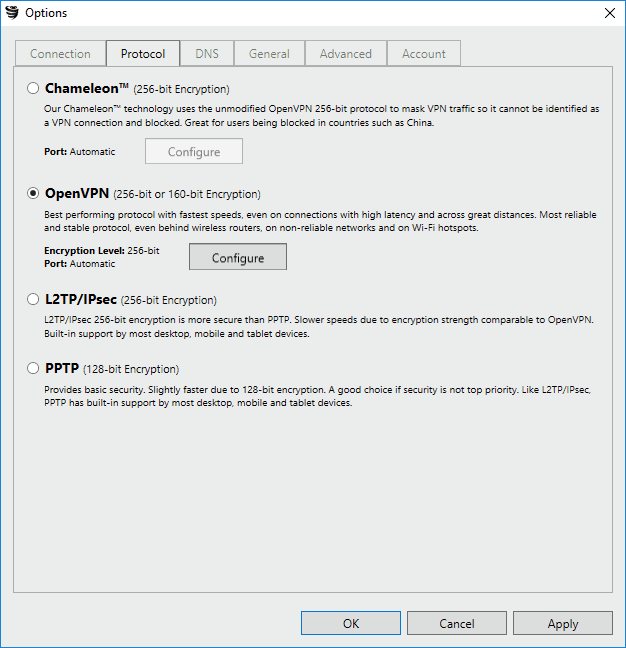
options window vyprvpn review


VyprVPN also supports extensive configuration, and you can easily set the frequency of desktop notifications or set the application to start automatically with Windows. All VyprVPN’s features can be configured from the Options window, allowing you to modify your settings easily.

All features that VyprVPN offers are neatly organized in the Options window, and even first-time users should be able to configure them without too much trouble.

Overall, VyprVPN offers a sleek and straightforward user interface that both first-time and advanced users will be able to use.

VyprVPN vs VyprVPN Premium — which one to choose?

VyprVPN is available in two different plans, and the basic VyprVPN plan is available for up to 3 devices. This plan has almost all VPN features but doesn’t have Chameleon Protocol and VyprVPN Cloud feature.

On the other hand, VyprVPN Premium is available on up to 5 devices, and it has full support for both Chameleon Protocol and VyprVPN Cloud.

Although the basic plan doesn’t have certain features, it will be more than enough for basic users, but if you’re an advanced user that wants maximum protection, you might want to consider getting a Premium plan.

Update:

Until recently VyprVPN offered two plans, VyprVPN, and VyprVPN Premium, but now these two plans have been condensed into one. All plans now include:

  • Unlimited high-speed bandwidth
  • 5 simultaneous user connections
  • 70+ global server locations
  • Chameleon™
  • Protocol Apps for all devices
  • Risk-free 3-day trial

VyprVPN is a great VPN client that focuses heavily on user privacy.

With its servers, zero-knowledge DNS server, and a strict no-log policy, VyprVPN is a perfect choice if you’re looking for a reliable and truly private VPN.

Posted in VPN

How to sign PDF with timestamp [Best Solutions]

Signing your documents is important, and in this guide we’ll show you how to sign PDF with timestamp.

This process requires third-party software, but once you obtain a reliable PDF editor, you just need to follow these simple solutions.


How can I electronically sign a PDF with a timestamp?

1. Sign PDF with timestamp using a dedicated Adobe software

  1. Open or create a new document in the dedicated Adobe software.
  2. Click on the Sign tab and then choose Work with certificates.
  3. From Certify, select Visible or Not Visible.
  4. Click and drag where your signature to where it should appear on the page.
  5. Select the option Sign As that will display your Digital ID.
  6. Click on Info in the dialog box to verify certificate details.
  7. Click Appearance to select a previously used signature.
  8. Click on Create your own to add an image,  change size and font or to include or exclude other information.
  9. Check Permitted Actions under Certifying tab to limit or expand actions for other people.
  10. Click Sign.

This solution is simple and intuitive, and it’s the best way to sign a PDF with a timestamp. Get it from the link below.

Adobe Acrobat

Adobe Acrobat

Use Adobe Acrobat to stay connected with your team and simplify your workflows!
Free trialVisit website

2. Sign PDF with timestamp using third-party software

use pdf/x standard to fix pdf printing error
  1. Download and install the software from the link provided below.
  2. Open File, navigate to Preferences and expand Digital Signature.
  3. Choose Time Stamp Servers, and go to Available Servers.
  4. Click New to add a new timestamp server, enter name and URL for it, and then optional login information.
  5. Click OK to save the settings you made. 

The next steps are the part when you must set correctly an already existent timestamp server.

  1. Select Acquire timestamp from attestable server and tick its checkbox.
  2. Select a timestamp server from Available servers.
  3. Click Edit and enter new information in the Time Stamp Server.
  4. Click Set Default to use a specified timestamp server.
  5. Click OK.

If you want to use the default timestamp server and it is unavailable, do not worry. This tool will use the first available timestamp server from your list. 

We advise you to list the server in an order according to your preferences. This is another great method that you can use to sign PDF with timestamp, so be sure to try it out.

⇒ Get Nitro PDF


3. Use a dedicated tool to sign the PDF

PDF signer how to sign pdf with timestamp
  1. Download and install the software from the link provided below.
  2. Tick the Time stamp document checkbox.
  3. Press Time Stamp Settings.
  4. Check box from Time Stamp Server requires authentication, and insert username and password.
  5. Check the Use Nonce box to include Nonce on a time-stamping request.
  6. Check the Time Stamp Server Policy box and enter a valid OID.
  7.  Verify the Hash Algorithm to have the SHA1 option or change it to SHA256/384/512.
  8. Check the box from option Apply verification according to PAdES-LTV. 

The third step is only to be used if the Time Stamp Server requires authentication. The Nonce is a number that allows you to check the timeliness of response when there isn’t a local clock available.

The TSA requests may require a Timp Stamp Server Policy that contains a valid OID in the form of 1.3.6.1.4.1.13762.3, for example.

Once you have performed these settings, you will not have to sign each document individually.

This applies when you choose the recommended tool below, a product that allows you to sign quickly multiple PDF files. This software is useful for signing a large number of corporate documents.

⇒ Get PDF Signer


To sign PDF with timestamp, we recommend using a program such as the dedicated Adobe software. You also have two alternatives in this article so make sure you try them out and see which one fits better to your needs.

Try out these above-mentioned solutions from this guide and leave us a message in the comments section if you found them helpful.

6 Best VPNs For Google Chrome To Use [Trusted]

When you’re browsing, the first thing you think of or consider is your safety, plus that of your data and information.

Google Chrome may not be one of the most lightweight browsers for Windows and other operating systems, but it surely is the most used.

But when it comes to building privacy on this cherished browser, choosing the right VPN can make all the difference.

Google Chrome offers a lot in terms of being user-friendly, stable, versatile, and secure, and it’s a browser that can open blocked sites if managed correctly.

This, in addition to the numerous customization options it offers by using extensions, you can actually enjoy Chrome as a personal browser that fits your needs and preferences.

Among these extensions are those from VPN providers, but it is kind of hard to pick one from the many available to use today.

Besides security and online safety, you also need a VPN that can bypass censorship and unblock geo-restricted content, plus strong encryption and performance.

Here are our top choices for the best VPN for Google Chrome.

Which VPN works best with Chrome?

Private Internet Access – Best for multiple port forwarding

Our recommendation goes also to PIA, a trusted VPN client perfectly suited to seamlessly blend in with Chrome.

Chrome-friendly PIA owns the perfect leverage when it comes to your safety on the web. But it does not just secure your browser, it extends its protection to all your apps thanks to the TCP/IP interface level.

This world-class VPN provider relies on tunneling technology to provide multi-layered security, which basically means that it uses encrypted tunnels to create multiple layers of privacy around you.

Besides its massive gateway network that stretches worldwide (45+ countries), the service is your number 1 choice for confidentiality with a strict zero-logs policy.

It might also be worth mentioning that these advanced features are packed in a very intuitive and easy-to-use interface allowing you to connect your VPN client with just one click, literally.

Compatible with all major operating systems and browsers, PIA will do more than protect your identity and guarantee your anonymity, it will also provide unrestricted access to the internet by bypassing IP-based censorships.

Let’s quickly look at its key features:

  • Best-in-class encryption technology
  • P2P, Torrenting, and Streaming optimized
  • Protects up to 10 devices simultaneously
  • Block ads, trackers, and malware
  • Multiple VPN gateways
  • Unlimited Bandwidth, ultra-fast download speeds
  • No traffic logs and IP cloaking for supreme privacy
  • Instant setup and easy-to-use interface

Private Internet Access

Supports WireGuard, PPTP, OpenVPN, and L2TP/IPSec protocols plus SOCKS5 Proxy.
Check price Visit website

NordVPN – Best for the Double VPN

This is the best VPN for Google Chrome when it comes to ad-free and malware-free browsing. It features over 5500 servers in 59 locations and supports a maximum of 6 devices connected at the same time.

Its server coverage is huge, plus you get ad and malware blocking to lock out any popups and threats while using the Chrome browser.

While it has no free Chrome extension, you can set up an account and benefit from the CyberSec feature to block ads and malware sites, for a more secure and streamlined browsing experience.

NordVPN is lightweight and user-friendly, with solid speeds and a zero-logs privacy policy, plus its price plans are very affordable.

It also comes with an automatic kill switch, and live customer support. If you’re looking for unrestricted internet access with privacy and double-data encryption, this is your VPN for the Chrome browser.

Let’s quickly look at its key features:

  • Encryption of the future
  • Strict log-free policy
  • Threat defense
  • DoubleVPN
  • Kill Switch
  • DNS leak protection
  • Onion over VPN
  • Support for streaming

NordVPN

Enjoy privacy and security without the dread of prying eyes.
Check price Visit website

ExpressVPN – Best for the flexibility

The ExpressVPN browser extension aids in the spoofing of your HTML5 geolocation and ensures that you use the encrypted HTTPS versions of websites whenever possible.

It also allows you to control the ExpressVPN app remotely from your Chrome browser. HTTPS Everywhere, powered by the Electronic Frontier Foundation, connects you to a website’s more secure HTTPS version whenever it is available.

You can use an ExpressVPN browser extension to change your location on any device, including Roku TV, Apple TV, and Samsung TV.

In Chrome, we tested the ExpressVPN extension to change the broadcast location and it worked flawlessly.

Examine the security settings before connecting to a server. You can usually get to them by clicking a gear symbol or a hamburger menu (three horizontal lines), as ExpressVPN does.

To improve your online security, enable WebRTC Leak Blocking and use HTTPS everywhere.

Let’s quickly look at its key features:

  • Works with all major platforms
  • 30-day money-back guarantee
  • Chrome, Firefox, and Edge extensions
  • Optimized for private and secure downloads
  • No user logs and data leaks
  • 3,000 servers in 94 countries

ExpressVPN

Reliable match for Chrome based on the same principles of not tracking data and offering security.
Check price Visit website

CyberGhost – Best for the optimized servers

CyberGhost VPN has more than 6479 servers in 90 countries, plus it is super affordable.

You can surf the internet on Google Chrome privately and with complete security, plus it has extra features that are also easy to use, and install on your computer.

With the CyberGhost Free Anonymous Proxy, which you can use whenever you have a privacy concern, by typing in your preferred website the proxy works its magic.

But if you seek 100 percent anonymity for your daily online activities, like surfing or unblocking streaming websites like Netflix, Hulu, Amazon Prime, or BBC iPlayer, or torrenting privately, install the full CyberGhost VPN.

The proxy protects against spying by encrypting your HTTP web traffic, allows you to search the web anonymously without keeping track of your habits or preferences, and replaces your IP with an anonymous one so no one knows who you are.

Let’s quickly look at its key features:

  • Compatible with all major platforms
  • Connection to up to 7 devices
  • Unlimited bandwidth
  • Anti-fingerprinting
  • NoSpy Servers
  • Browser Extensions

Cyberghost

You get an effortless way to access websites without being tracked.
Check price Visit website

Hotspot Shield VPN – Best for the add-blocker

Hotspot Shield is another popularly used VPN for Google Chrome with 3200 servers in 70 locations and support for a maximum of 5 devices.

Other advantages based on its features include ease of use, secure and anonymous browsing, fast streaming, access to global content, and security for your Wi-Fi. It also gives you access to a variety of encrypted IP addresses.

Its VPN protocol is patented – Catapult Hydra – and it compresses your data allowing it to move faster than other VPNs in the market. It also has anti-malware protection an ad-blocker for ad-free browsing and unlimited bandwidth.

You can also get a free version of this VPN, which supports major operating systems and devices.

Let’s quickly look at its key features:

  • Fast download speeds
  • Intuitive setup and installation
  • Automatic server assignment
  • Optimal servers to browse anonymously
  • Malware Protection
  • Public Wi-Fi protection

Hotspot Shield

This VPN uses 256-bit encryption and has frequent updates on its browser add-on.
Check price Visit website

Windscribe – Best for dynamic IPs

There are numerous advantages to using the Windscribe VPN browser extension for Chrome in addition to the desktop app.

Windscribe goes above and beyond most VPNs by providing its own R.O.B.E.R.T. (Remote Omnidirectional Badware Eliminating Robotic Tool) anti-malware and anti-phishing security.

When upgrading to the Pro version you get the ad-blocking and anti-tracking functionalities.

As soon as you log in, the Windscribe extension will connect you automatically. When the extension icon turns green and you see ON in the top-left corner, you are connected.

Your IP address will also change from your personal IP to the IP of the VPN server you have chosen.

Let’s quickly look at its key features:

  • Servers in 63 countries and 110 cities
  • Split tunneling
  • Port forwarding
  • Simple user interface
  • Dynamic and static IPs
  • No identifying logs
  • Blocks WebRTC to prevent leaks

Windscribe

Spoofs your GPS to the location of the connected proxy thus allowing a safe browsing environment.
Check price Visit website

Is there a free VPN for Chrome?

Based on our VPN advocates’ research, we defined ProtonVPN as the best free VPN for Chrome.

With 100+ servers in three countries (the United States, the Netherlands, and Japan) and a medium VPN speed, ProtonVPN provides a limited VPN connection with a strict no-logs policy.

We tested it while watching YouTube videos and it successfully blocked the most annoying ads without interruptions.

If you want a browser with a free VPN, you should look into the Opera browser that comes along with extra security measures.

The free VPN is built into the Opera browser for Android and desktop, and there are no subscription, payment, login, or additional extensions required.

Which VPN for Google Chrome do you use? Share with us in the comments section below.

How to Create a Fillable PDF with Electronic Signature [Easy Guide]

When creating a PDF file, sometimes you need to have a signature field, and in this guide, we’ll show you how to make a PDF fillable with a signature.

Adding a signature requires only a couple of clicks, and you can do it in most PDF editors, but in this guide, we’ll focus on the most popular ones.

How can I make a PDF fillable with a signature?

1. Use Adobe Acrobat software

How to create a fillable PDF with an electronic signature

  1. Open the PDF file, choose View, and then Tools.
  1. Find Prepare Form and click Create form.
  2. Choose the Add Signature option.
  3. Select a file or scan a document.
  4. Add new form fields by clicking on the Add a signature field button and then clicking on the document where the field should appear.
  5. Save the document.

Use Type to type your name in cursive format or to change the style of your signature. The Draw option allows you to draw your signature using a mouse or touchpad.

You can also use a pen if this software is installed on a touchscreen device.

How to create a fillable PDF with multiple signatures?

The process is the same as in the previous section; you just need to create multiple signature fields, and that’s it.

Also, check that additional fields aren’t being locked or set to read-only.

This is the easiest way to add a digital signature block to a PDF, but you’ll need a dedicated solution. Luckily, you can get the software from the link below.

Adobe Acrobat

Use the performant Adobe Acrobat to view, create, use, and print PDF files.
Free trial Visit Website

2. Use a dedicated signature software

An E-Signature is a person’s digital signature used to validate the integrity and validity of a signed document in electronic form. E-signature software enables many receivers in various places to sign documents online.

You can also fill out the form before signing it. E-Signatures are legally enforceable. Professional signature software is a type of technology that allows you to sign papers online and create a PDF that can be filled up with your signature.

It employs an electronic signature and eliminates the need for paper, printing, scanning, or faxing your papers.

It is a simple-to-use software and a great way to add a signature field to a PDF.

3. Use an online tool for document signature

  1. Choose the free trial option from the DocuSign website.
  1. Upload your PDF document.
  2. Add the following: comments, customized tags, and signature.
  3. Create PDF files and save templates for your most used forms.
  4. Send your signed PDF file to your recipients.

Once you have used this solution, DocuSign will automatically save your PDF document in the cloud. You can access the file from there whenever you need to use it again.

After you upload your document in Step 2, the tool will convert its fields into digital fillable ones. If the uploaded form does not have fields, you will have to add them manually. 

After you reach the final step of this solution, you will no longer have to print, scan, fax, or mail your document. You can just send it directly from the web app.

We have created this concise guide to show you how to make a PDF fillable with a signature. You should use dedicated software and follow a simple process to create your desired document.

Two other programs can also help you achieve your goal, so make sure you try them and decide which is the best option for your needs. Elsewhere, you can also create a Microsoft Word fillable form.

Consult our previous section to see what steps you should follow with our recommended software. Feel free to leave us a comment about the one that you enjoy using the most.

Error 0x0000000F [Complete Troubleshooting Guide]

The 0x000000F BSOD (blue screen of death) is the reason why some users avoid putting their computers to sleep or waking it up.

This is a blue screen that comes in various forms when you attempt to boot or wake your machine. Some 0x0000000F error messages include the following:

  • Your PC needs to be repaired 0x0000000F – this issue is related to your computer’s Windows boot manager, meaning that Windows OS is not able to read the booting configuration data
  • Startup error 0x0000000F – most common caused is that some important system files are corrupted
  • SPIN_LOCK_ALREADY_OWNED (0x0000000F) – you might have installed an incompatible version of BIOS and you need to install back the previous version
  • Access violation reading location 0x0000000F – this is an error related to a software issue
  • Status 0x0000000F with netowork boot – the error states that the configuration data for your PC is missing or contains errors
  • UEFI boot error 0x0000000fF – it appears when there is a hardware issue or corrupted or missing files
  • UNEXPECTED_KERNEL_MODE_TRAP 0x0000000F ntkrnlpa.exe 3f476 – this is a bug related to your Intel CPU

If you get a BSOD with any of these error messages, repair your machine with this guide.

How do I get rid of the startup error 0x000000F?

1. Enable Windows default BSOD troubleshooter

  1. Open Settings on Windows. You can do this using the Windows key + I combination.
  2. In Settings, select the Update & Security group.0x0000000f-bsod-windows-settings
  3. Next, select Troubleshoot from the left-hand panel.
  4. Click on Blue Screen on the right-hand area.
  5. Finally, select the Run the troubleshooter button.

After fixing the found errors, reboot your machine. If you still get the 0x0000000F BSOD screen, then it may be a problem with your RAM. Proceed to the next solution below.

2. Use a third-party PC repair software

Many third-party tools can help you troubleshoot BSoD errors. The software will scan for issues and try to solve them.

In the first place, using such a PC repair tool will offer a free scan and detect potential functionality issues in your system. Afterward, you may obtain a detailed report with the errors that need to be fixed.

Hence, such software repairs existent BSoD errors that cause this startup issue by replacing damaged system files with functional ones. In this way, you have effective assistance with no technical knowledge required from you.

3. Test your RAM’s health using Windows Memory Diagnostic

  1. Press the Windows key to reveal the Start menu.
  2. On the Start menu, begin to type windows memory and then select Windows Memory Diagnostic from the results.
  3. Next, Windows will give you two options – choose Restart now and check for problems.windows-memory-diagnostic-uefi-boot-error-0x0000000f
  4. At this point, your machine will restart and take you to a blue screen while the system detects memory problems.
  5. On completion of the memory check, the computer will reboot again.
  6. Finally, when the system successfully boots into Windows, click on the Notification area from the System tray to view the results of the diagnostics.

Although these results do not repair the 0x0000000F BSOD issue, it gives you useful pointers to the cause of the problem.

4. Boot into Windows Safe Mode to bypass 0x0000000F BSOD

  1. Open the Run dialog box by pressing the Windows key and R.
  2. In Run, type msconfig and press Enter to launch the System Configuration wizard.

  3. Next, navigate to the Boot tab and go to the Boot options section.
  4. Here, check the box labeled Safe boot and make sure the Minimal radio button is selected.use-safe-boot-0x0000000f-bsod
  5. Now, hit the Apply button and then click on OK to save your changes.
  6. Next, restart your computer. Immediately the screen lights up, press the F8 key (or the function key for your computer model) continuously.
  7. You will arrive now at the Startup Settings screen. Here, various startup modes are listed.
  8. Press the number that corresponds to the Enable Safe Mode option to boot your system into Safe Mode.

In Safe Mode, the system loads with no unnecessary programs or processes. If you get the 0x0000000F BSOD and are unable to start up your PC, Safe Mode lets you get into Windows without errors.

5. Recover missing driver files and reset any corrupt components

  1. Right-click on the Windows taskbar to begin.
  2. From the contextual menu, choose Task Manager.access Task Manager from the taskbar
  3. Next, from the upper left-hand side of the screen, go to the File tab and click on Run new task.recover-missing-files-uefi-boot-error-0x0000000f
  4. After that, type in cmd in the empty field.
  5. Now, mark the box labeled Create this task with administrative privileges.
  6. Hit the OK button now to launch Command Prompt as an Admin user.
  7. In Command Prompt, type -sfc /scannow and press Enter to run the command.

Your PC will now begin to investigate the cause of the 0x0000000F BSOD and attempt to fix the issue. After completing the troubleshooting process, the machine will reboot.

6. Do a clean Windows installation to clear the 0x0000000F issue

reinstall-windows-0x0000000f-bsod

When your computer gives you the SPIN_LOCK_ALREADY_OWNED (0x0000000F) error, the machine may become unusable.

Of course, replacing your computer is not a troubleshooting solution. However, reinstalling Windows is close. Make a backup of your data first, so that you don’t lose everything.

Making a clean Windows install will remove your pc needs to be repaired 0x0000000f message, but without guidance, you can complicate the process.

Mostly, this 0x0000000F BSOD occurs due to drivers’ poor handling of power state transition requests. We have covered the various solutions for resolving the issue.

If you found this guide helpful, we appreciate your feedback. How did you fix the UEFI boot error 0x0000000f?

Samsung becomes official TV partner for Xbox Series X consoles in the US and Canada

Microsoft has renewed its partnership with Samsung to make the Korean company the official TV partner for its Xbox Series X consoles in the US and Canada. If you got your hands on Microsoft’s next-gen Xbox console, the company is now recommending Samsung Neo QLED and QLED TVs to get the most of its new hardware.

The relationship between Xbox and Samsung started back in 2017 with the release of the Xbox One X, when Microsoft recommended Samsung QLED TVs for the best 4K HDR gaming experience. It’s true that Samsung’s quantum dot technology remains a great alternative to the more expensive OLED screens from LG and other TV manufacturers, even though QLED TVs still use LED-backlit panels that can’t provide the same perfect blacks as OLED screens.

Still, there’s a lot to like about Samsung’s Neo QLED and QLED TVs, which support HDMI 2.1 features including 4K gameplay at 120FPS with a low 5.8ms response time. Some of Samsung’s new QLED TVs also come with Variable Refresh Rate support in the form of AMD Freesync Premium Pro, allowing these TVs to reduce stutter and tearing by adjusting their refresh rate in real-time to match what the console can output. But that’s not all.

“Samsung’s 2021 Neo QLED and QLED line-up features the new and intuitive Game Bar in Game Mode, allowing players to easily adjust the screen’s aspect ratio, check input lag, connect wireless headsets, and more. Game Mode also optimizes gameplay with its next-gen Samsung Neo Quantum Processor, utilizing AI based deep-learning to elevate your gaming experience,” added Chris Munson, Sr. Xbox Global Brand Partnerships Lead.

It will be interesting to see how Microsoft’s partnership with Samsung will evolve in the coming weeks. Not so long ago, Xbox head Phil Spencer said that he wanted to bring Xbox Cloud Gaming to other platforms including Smart TVs, and it wouldn’t be surprising if the cloud gaming service comes first to Samsung’s new Neo QLED and QLED screens.

Ignite 2021: Microsoft Mesh sessions announced after Alex Kipman’s keynote unveiling

This morning, Microsoft spent most of the Ignite 2021 keynote unveiling Microsoft Mesh, the new Virtual Reality platform taking HoloLens and virtual reality to a whole new level. Now, after the announcements are over, Microsoft has released a set of new sessions at Ignite, all scheduled for today, Tuesday March 2nd.

Here are the sessions:

  • An Introduction to Microsoft Mesh
  • Ask the Experts: Microsoft Mesh
  • Introducing Microsoft Mesh | New platform to deliver collaborative mixed reality experiences

If you’re interested in learning more about Microsoft Mesh, you can check these sessions out, and you can learn more in this blog post Microsoft Mesh – A Technical Overview

FIX: BSoD error after upgrade [Windows 10 v2004]

Windows 10 released its latest feature update on 27 May 2020 called Windows 10 v2004.

Unfortunately, like all new feature updates that hit live, not everything went all that smoothly, as many users reported having issues with getting the latest update.

However, new reports have been coming in where users are experiencing BSoD errors with a variety of software after they upgraded their OS to the latest version.

That is precisely why we’ve decided to write this step-by-step guide on how to fix BSoD errors related to the latest Windows 10 feature update.


How do I fix BSoD errors after the Windows 10 v2004 update?

1. Use a dedicated tool

For BSoD errors and for various other computer issues you can try to use a dedicated tool that scans your computer, finds the problems, and solves them.

2. Update your software

Many reports have been coming about a variety of software causing BSoD errors after the latest feature update.

One good example is that of a variety of ESET products, such as ESET endpoint products versions 7.2 and ESET Windows home products versions 13.1.

If you too are experiencing such issues, then your best bet is to uninstall the software that is giving you issues, and then perform a clean install of the latest version available.

More so, It would be a good idea do make sure you already have the latest versions of your software already installed before considering upgrading to Windows 10 v2004.


3. Update your drivers

Updating to Windows 10 v2004 has already been reported to have issues when your drivers aren’t the latest version.

However, if you do somehow manage to perform the upgrade, the lack of the latest drivers will surely be the cause of any ensuring BSoD errors.

As such, if you just updated your OS but you know it’s been a long time since you last updated your drivers, then that’s where you should start off with.

You can update the driver manually from Device Manager, or by searching them on the manufacturer website. This task might be time-consuming and sometimes errors can appear.

Instead of doing this manually, you can use a dedicated software that automatically find the best drivers for all your computer parts, and keeps your system up to date.

⇒ Get Outbyte Driver Updater


4. Scan your PC for malware

Malware has always been a common cause for BSoD errors, and this may also include the one related to the Windows 10 v2004 update.

That being said, make sure that you perform a full system scan with Windows Defender or a third-party antivirus tool so that you can remove any possible malware from your system.


Looking for a solid antivirus tool? Check out this article for our top picks!


5. Check your hard drive for errors

Constantly installing and uninstalling programs, as well as copying and deleting files can take a toll on your hard drive over time, and can lead to the appearance of bad sectors.

Since this means that your system files can also end up badly written, hard drive issues are yet another common cause for BSoD errors.

If you want to avoid BSOD errors caused by faulty hard drives, your best bet is to buy a new one, especially if yours is already old or filled with bad sectors.


6. Make sure your hardware is still compatible

While a newer feature update isn’t the same as an entirely new OS, it is possible that some of your hardware components may no longer be compatible with the newer versions of Windows 10.

One good thing about BSoD errors is that they also come with a  troubleshooter, and knowing how to read and interpret the logs inside can give you an idea of what the problem may be.

Most often than naught, the issues may be resolved by replacing the faulty hardware component, and if it isn’t the hard drive, then the culprit is most likely the graphics card.


7. Use System Restore

One good method of getting rid of BSoD errors is performing a System Restore back to a version that was as clean as possible (preferably right after an OS install).

Once you’ve performed a restore, upgrade your drivers to the latest version and try updating to Windows 10 v2004 again.

For more information on how to perform this task, check out our guide on how to use System Restore in Windows 10.

It would be a good idea if you have a backup of all of your data before performing the OS update to Windows 10 v2004. This can be done far easier when you use dedicated third-party tools.


8. Reset your PC

If all the methods mentioned above failed, then your only option is to perform a full system reset.

However, keep in mind that if you want to make sure that all of your data is safe and sound during this process, then you need to perform a backup before-hand.

You can even consider using a third-party backup tool to do this, as they usually save time, and will always do a much better job.


By following these steps you should no longer encounter any more BSoD errors after installing the Windows 10 v2004 feature update.

Let us know which of the methods mentioned above helped you most by leaving us a message in the comments section below.

Ignite 2021: Microsoft Dynamics gets seamless integration with Teams

Microsoft has been building tight integrations between platforms on their road to providing a comprehensive business solution. Teams is at the core of collaboration and it provides first class integration with most Microsoft 365 offerings. Now that goodness is coming to Microsoft Dynamics 365. There are huge productivity and collaborative improvements coming to many areas of the platform.

Sales teams now have the ability to track career movements using LinkedIn Sales navigator as well as share sales records with Microsoft Teams without leaving Dynamics 365 Sales.

Customer service is also getting nod with access to Teams chat directly from Dynamics 365 Marketing. This means users don’t have to leave the platform keeping them in their flow as they collaborate with stakeholders and members of their team providing a smooth and seamless experience.

Now users will also be able to self service and interact with Dynamics 365 Human Resources directly from Teams. This feature means users will be able to take care of many Human Resource related questions on their own freeing valuable time for the Human Resources team and managers.

Another exciting feature coming to the platform is Dynamics 365 Intelligent Order Management, this new configurable artificial intelligence (AI)-powered software-as-a-service (SaaS) application is designed to help customers scale their order management process maintaining compatibility with legacy enterprise resource planning systems. A feature worth mentioning is the ability for businesses to adjust and change order paths based on recommendations given by the system in order to achieve optimal efficiencies for stock levels and cash flow.

A dedicated Windows press event is coming soon, but there’s still Windows 10 sessions at Ignite 2021 — check them out there

Microsoft Ignite is typically an event for IT professionals and developers, and we usually don’t hear about the latest Windows 10 innovations during the annual extravaganza. But that doesn’t mean Windows isn’t mentioned at all, though, as our list of most interesting sessions pointed to.

Indeed, even though Microsoft is apparently planning a dedicated Windows press event soon, (according to Tom Warren) there are still some Windows-themed things at Ignite 2021 you might not want to miss. Here’s a look!

A Windows fireside chat with Panos Panay and Roanne Sones: Tuesday, March 2 – 11:30 AM PST

Panos Panay Surface Duo Brief (custom)

First up, there’s the biggest session of them all. This one features Microsoft Chief Product Officer Panos Panay. He’ll be sitting down with Platform CVP Roanne Sones, and will talk about the recent Windows innovations for commercial customers and the IT community. It’s unlikely that he’ll mention Windows 10X, or Sun Valley, but since 10X is catered for commercial and education users, you might never know. This one is worth keeping an eye on!

Engineer to engineer: Let’s talk Windows: Wednesday, March 3 – 4 PM PT

Second on the list is this breakout session dedicated to the engineering behind Windows 10. This session is set to feature Windows CVP Aidan Marcuss. Along with the security and endpoint management engineering team, Marcuss is apparently going to chat about “shiny new things that will help prepare commercial organizations for the future and ensure that IT receives the hero’s welcome it deserves.” Microsoft’s Ramya Chitrakar, David Weston, Gabe Frost will also make appearances, too.

This session also has a live Q&A, so you might not want to miss it if you’re an IT folk. Keep in mind that it’s also available on-demand as a replay on Thursday, March 4 at 1:30 AM PT, if you’re in other parts of the world and can’t make it for the first.

Ask the Experts: Windows & Devices: Wednesday, March 3, 5 PM PT & 11:30 PM PT

Final on the list is this ask the experts session. Set for Wednesday, this session will have members of the Windows engineering team, as well as the Microsoft Endpoint Manager team. Microsoft is also promising members of the Surface, Microsoft Edge team to appear, too. It’s a great chance to network and meet the folks who work on Windows!

Other sessions

As we covered before, there are tons of other sessions that you can find at Ignite which relate to consumer products like Windows. One of them is an ask the experts session on Edge, set for Tuesday, March 2 at 11:30 PM PT. Another is a session about Surface and security, and, the final one relates to the top reasons why customers love Edge. You won’t want to miss a single minute of the news coming out of Microsoft Ignite, so be sure to stay tuned to OnMSFT for more all week long!

Ignite 2021: Microsoft announces Azure Percept – AI technologies on the edge, simplified

Microsoft has launched a new hardware and software platform called Azure Percept in the public preview today. The latest offering makes it easier for customers to develop and implement AI solutions for scenarios such as anomaly detections, object detection, shelf analytics, and more.

Azure Percept is an entire platform that aims to simplify the ways customers can enable AI capabilities at the edge. It seamlessly integrates with other Azure services, including Azure Machine Learning, Azure Live Video Analytics, Azure Cognitive Services, and more to provide vision and audio detailed insights to customers in real-time.

According to Microsoft, Azure Percept offers useful features like pre-built AI models and solution management for developing prototypes and an end-to-end edge AI platform. It also helps to protect sensitive and high-value assets of an edge AI solution with built-in security measures.

“We’ve started with the two most common AI workloads, vision and voice [and] sight and sound, and we’ve given out that blueprint so that manufacturers can take the basics of what we’ve started,” Microsoft VP Roanne Sones said today. “But they can envision it in any kind of responsible form factor to cover a pattern of the world.”

For starters, the Azure Percept platform comes with a couple of additional offerings, including a hardware development kit, Azure Percept Audio, and Azure Percept Studio. You can find more details about these tools below:

  • Azure Percept DK: A pilot-ready development kit with a carrier board, mounting tools, and Azure Percept Vision, a camera-enabled system on module (SoM) for rapid scenario-based customization.
  • Azure Percept Audio: A voice-enabled system on module (SoM) with a 4-mic linear array to apply custom commands, far field speech and anomaly detection.
  • Azure Percept Studio: A new experience that guides customers through the entire AI lifecycle, including developing, training and deploying proof-of-concept ideas.

Microsoft says that it is also collaborating with some third-party “silicon and equipment manufacturers” to develop an entire ecosystem of solutions that will run on the Azure Percept platform. In addition, the Azure Percept team is also working with select customers to gather some early feedback.

If you’re interested to learn more about the Azure Percept platform, be sure to check out the official blog post, and pricing details are available on this page.

Ignite 2021 – Watch the keynote with Satya Nadella, Alex Kipman and more

As you might remember, Microsoft Ignite 2020 was split into two separate events: Part 1 took place in late September, and the follow up will kick off this morning. The all-digital event will last through March 4, and there will be plenty of news for IT Pros, developers, data professionals, and decision makers. The Day 1 introducing keynote will kick off at 8:30 AM PT and will feature Microsoft CEO Satya Nadella and HoloLens inventor Alex Kipman.

As Microsoft’s focused has shifted to the cloud in recent years, so has, for the most part, the content of the conference. Azure is expected take center stage, though there should also be news about Microsoft 365 and business applications such as Dynamics 365 and Power Platform. Join us and thousands of others across the globe get the latest news about Azure, Microsoft 365, Windows and beyond.

The Ignite 2021 introducing keynote will be Microsoft’s first keynote experience designed for HoloLens devices and other VR headsets. If you have a Windows Mixed Reality headset or or an HTC Vive, Oculus Rift or Oculus Quest, you can watch the keynote in Microsoft’s AltspaceVR platform. We invite you to visit this page to download what you need to get ready for the VR experience.

After the keynote is over, will be followed at 9:45 AM by another interesting session with CVP of Microsoft 365 Jared Spataro titled “The Hybrid workplace.” You can find the full agenda for the conference on this page, make sure to register so that you can create your personalized agenda for the next 3 days of Ignite 2021. You can check out our recommendations for some of the more interesting sessions, too.

Ignite 2021: Microsoft promotes Zero Trust security mindset

At Ignite 2021, Microsoft is promoting the Zero Trust security mindset. With recent security breaches in mind, Microsoft believes the Zero Trust security mindset helps address and encompass “all types of threats, both outside in and inside out,” and is the “right approach is to address security, compliance, identity, and device management as an interdependent whole.”

For those who aren’t familiar with Microsoft’s terminology, the Zero Trust security news means that Microsoft is basically pushing four security innovations across what it is calling “identity, security, compliance, and skilling.”

To get there, Microsoft says the first step is to start with a cloud identity foundation, which includes strong authentication, protecting user credentials, and devices that are essential. Some of these things are coming to Azure Active Directory, as seen below.

  • Passwordless authentication, which eliminates one of the weakest links in security today, is now generally available for cloud and hybrid environments. Now you can create end-to-end experiences for all employees, so they no longer need passwords to sign in to the network
  • Passwordless authentication, which eliminates one of the weakest links in security today, is now generally available for cloud and hybrid environments. Now you can create end-to-end experiences for all employees, so they no longer need passwords to sign in to the network
  • Azure AD verifiable credentials is entering public preview in just a few weeks. Verifiable
    credentials let organizations confirm information—like their education or professional
    certifications someone provides—without collecting and storing their personal data.

As for the second security aspect, there are a bunch of improvements to Microsoft’s products coming here, too. Microsoft believes that they are taking a “holistic approach” to security, unlike other vendors which face “time-consuming challenge” to integrate both SIEM tools and endpoint or email protection. Their solutions are built from the ground up, with these new advancements, as seen below.

  • Microsoft Defender for Endpoint and Defender for Office 365 customers can now investigate and remediate threats from the Microsoft 365 Defender portal.
  • Incidents, schema, and user experiences are now common between Microsoft 365 Defender and Azure Sentinel.
  • New Threat Analytics provides a set of reports from expert Microsoft security
    researchers that help you understand, prevent and mitigate active threats.
  • Secured-core is coming to Windows Server and edge devices to help minimize risk from
    firmware vulnerabilities and advanced malware in IoT and hybrid cloud environments.

When it comes to the third aspect, Microsoft is also working on compliance protections, too. This relates to managing risks related to data, as well as third parties, too. This is why Microsoft is introducing the following. Full details are in this blog post.

  • Co-authoring of documents protected with Microsoft Information Protection
  • Microsoft 365 Insider Risk Management Analytics, which can identify potential insider risk activity within an organization and help inform policy configurations
  • Microsoft 365 now offers data loss prevention (DLP) for Chrome browsers and on-premises server-based environments such as file shares and SharePoint Server.
  • Azure Purview is integrated with Microsoft Information Protection, enabling you to apply the same sensitivity labels defined in Microsoft 365 Compliance Center to data residing in other clouds or on premises

Microsoftsecurity

The approach ends with the final aspect of skilling. This is one of the most simple, to help keep people up to date with the latest security issues, with learning resources. Microsoft is introducing four new security, compliance, and identity certifications tailored to specific roles and needs, regardless of where someone can be in their skilling journey. This includes the Security, Compliance, and Identity Fundamentals certification,  Information Protection Administrator Associate certification, Security Operations Analyst Associate certification, as well as the Identity and Access Administrator Associate certification. More information about today’s news is available here.

[Update] Ignite 2021: Microsoft unveils new features coming to Teams, Outlook and other Microsoft 365 services

Microsoft is kicking off its virtual Ignite 2021 conference today, and as you would expect, there’s a lot that’s new. The company is introducing a whole bunch of new capabilities and features for Teams, and other Microsoft 365 services. Here’s a look at everything you need to know.

Microsoft Teams

Microsoft Teams Presenter Mode

Microsoft has unveiled a slew of updates for its Teams collaboration platform, and the list includes new employee experiences, meetings enhancements, and a lot more. The first set of capabilities introduces some new tools for presenters to improve meetings in the remote work era. With the general availability of PowerPoint Live in Teams, presenters will now be able to see notes, slides, meeting chat, and participants all in a single view. Microsoft Teams meetings feature is launching a new Presenter mode and Dynamic view later this month. (Update #1: The Presenter mode will begin rolling out later this month, and the new Dynamic view will become generally available in April (via Microsoft)).

The collaboration service is picking up new Webinar features, and organizers will now be able to create interactive webinars for up to 1,000 attendees. The Teams app is also introducing view-only broadcast support for up to 20,000 attendees, and this limit will be in place through June 30, 2021. (Update #2: The 20,000-person broadcasts limit will be in place through the end of this year).

Coming to Teams later this year is a new export webinar contacts feature, which will enable users to export their webinar contacts directly into Dynamics 365 Marketing. In addition, the ability to deliver webinars as part of Dynamics 365 Marketing campaigns is now generally available for everyone.

Finally, the app is introducing Teams Connect in private preview, and some existing features like Microsoft Viva modules are rolling out more broadly. These features and other highlights, including Microsoft Teams Rooms as well as new security and compliance-related updates for Teams, can be seen in our separate post.

Microsoft Outlook

Next up, Microsoft announced a couple of new Outlook features to make it easier for users to manage their schedule tasks, and calendars. Now, with the calendar board view in Outlook on the web, users will be able to better organize and manage files, calendars, to-do lists, reminders.

The Outlook mobile apps are also adding some notable improvements for business customers. With a new Suggested times feature, the app will now use AI to automatically determine the availability of participants for meetings. This capability will begin rolling out later this month.

Security, Compliance, and Identity features

There are several important announcements with regards to all Microsoft 365 services to promote the Zero Trust security mindset across the board. Some major highlights are listed below:

  • The ability to co-author documents protected with Microsoft Information Protection
    (MIP) is now available in preview.
  • New Threat Analytics service is available in public preview for Microsoft 365 Defender.
  • Passwordless authentication in Azure Active Directory (Azure AD) is now generally available for employees.
  • Microsoft 365 is introducing data loss prevention (DLP) for Chrome browsers and on-premises server-based environments in preview.

Microsoft Universal Print, and other updates

Microsoft universal printer service

To end the recap, we’ll look at some updates for Microsoft Universal Print and the other Microsoft 365 services. The software giant launched a new Microsoft 365 cloud print solution, Universal Print, in public preview last year. The subscription-based service that enables organizations to centralize print management through the Universal Print portal is now generally available.

Lastly, Microsoft is expanding the availability to Microsoft 365 Multi-Geo to Teams. Coming in Spring, this update will let organizations control the storage location of their Teams data in specific data centers.

Ignite 2021: Microsoft 365 expands Teams as work moves to the cloud

Microsoft will kick off its second Ignite 2021 conference this morning, with lots of news about Azure, business applications, and Microsoft 365 apps. As you can expect, the company has some updates for Microsoft Teams, an app that has been enjoying some unprecedented momentum with the rise of remote work since the beginning of the COVID-19 pandemic.

Microsoft Teams has become a great Zoom alternative with an increasing number of tools to help presenters keep participants more engaged. The app can now be used to create interactive webinars for up to 1,000 attendees, and it will support view-only webinars with up to 20,000 attendees later this month. PowerPoint Live is also generally available in Teams, combining slides, notes, and meeting chat in a single view.

The new Dynamic view for Teams meetings is also coming next month, and it should make video conferences even more engaging for attendees by dynamically adjusting the elements of your meeting, as seen below. A new Presenter mode is also coming soon and will allow meeting organizers to use three different modes to display their content next to their video feed.

Dynamic View.gif

Microsoft Teams will also get improved security with invite-only meetings controls, end-to-end encryption for 1:1 calls, and multi-geo support for Teams data. Microsoft will also be expanding Teams later this year with Microsoft Teams Connect, which will allow companies to create shared channels with external partners. Shared channels are currently in private preview and will be available later this year.

Microsoft also announced new features for Microsoft Teams Rooms, the integrated meeting room solutions for business customers. These devices now support the new Together Mode and large gallery view for meetings, allowing meeting participants to seamlessly see all meeting content. The software giant also announced today that intelligent speakers that use AI to identify speakers and apply their name and profile to live meeting transcripts will be available in private preview later this year.

thumbnail image 11 of blog post titled What's New in Microsoft Teams | Microsoft Ignite 2021

In case you missed it last month, Microsoft is building a new employee experience platform in Teams named Microsoft Viva. Viva Insights was the first Viva module to launch in public preview last month, along with the Viva Topics module available as an add-on to Microsoft 365 commercial plans. Viva Connections, a curated portal providing access to relevant news, conversations, and other resources from SharePoint and Yammer will be generally available on the desktop later this month, with a mobile experience to follow this summer. The Viva Learning module will also enter public preview in April.

To learn more about these new Microsoft Teams features, we invite you to check out Microsoft’s Modern Work and Teams featured sessions. Jared Spataro, CVP of Modern Work at Microsoft will present a session titled “The Hybrid workplace” today, and Nicole Herskowitz, General Manager, Microsoft Teams Marketing will follow up with “The Latest Innovations with Microsoft Teams” tomorrow.

Ignite 2021: Microsoft announces new capabilities for Azure Arc for hybrid management

Microsoft announced this morning some important updates for Azure Arc, the company’s new management tool for hybrid cloud application infrastructures. First of all, the Azure Arc enabled Kubernetes, which has been in preview since last year, has finally become generally available.

“We are excited to see Microsoft bringing Azure Arc to manage cloud native applications on any infrastructure. With Azure Arc, we can easily deploy our applications across the cloud and on-premises to meet regulatory and compliance requirements while ensuring consistent management and governance, delivering a huge benefit to our business,” Martin Sciarrillo, Multi-Cloud Expansion Lead, EY Technology said today.

The service allows customers to easily manage and control their Kubernetes clusters from Azure across data centers, Azure Stack Hub, and multi-cloud environments. It offers some essential Azure features to customers, including Azure Policy, Azure Monitor, and Azure Resource Graph. Azure Arc enabled Kubernetes is currently supported in the East US and West Europe Azure regions.

Next up, the software gaint has announced that Azure Arc-enabled machine learning is now available in public preview. The latest addition will drive innovation in machine learning by enabling data scientists to develop new machine learning models, deploy and manage them without learning Kubernetes.

It should help to meet security and compliance requirements, as well as reduce network latency and data movement simultaneously. To get started, customers can sign up here to opt into the public preview today and check out this page for more details.

Lastly, Microsoft has built a new hybrid datacenter with Azure Stack HCI and Azure Arc for large enterprises or highly regulated industries. It has also partnered with some popular Kubernetes platforms in order to test and verify their implementations with its Azure Arc service. The list includes Canonical’s Charmed Kubernetes, RedHat OpenShift, Rancher Kubernetes Engine (RKE), and more.

Ignite 2021: Microsoft opens another data center in China, announces new tools for Azure Data and AI

Microsoft’s annual Ignite 2021 conference is underway, and there’s a lot of Azure and cloud news coming out of the event. The biggest of them all is the announcement that Microsoft is opening a new datacenter region in northern China. Of course, there are also new tools for Azure Data and AI, too.

First off, there’s the news about the new datacenter region. Despite strict laws set forth by the Chinese government, Microsoft has managed to establish another new datacenter region in northern China. Details are scarce, but the company says that the region will enable more Chinese customers to experience Azure and the rest of Microsoft 365. This brings their total Azure regions in China up to five, in addition to China East, China East 2, China North, and China North 2.

Now, for the rest of the stuff. There are some new improvements for Azure Data. These are all designed to ease customer deployments, improve reliability, as well as cross-platform capabilities. The big one here is the launch of Azure Synapse Pathway, which will allow Microsoft’s customers to simplify and accelerate migrating legacy cloud data warehouse to Azure Synapse Analytics. Other changes announced are below.

  • Azure Stream Analytics, now generally available, has been updated
    to provide support for single tenant dedicated clusters
  • Multiple updates are available for Azure Purview, a unified data governance
    service that facilitates the mapping and control of organizational data
    no matter where it resides
  • Enterprise and Enterprise Flash tiers of Azure Cache for Redis are now
    generally available. The Enterprise tiers of Azure Cache for Redis
    expand upon existing product capabilities by adding powerful features such
    as real-time search and time-series capabilities.
  • Four new updates for Azure Cosmos DB (Azure Synapse Link for Azure Cosmos DB, Mongo v4.0 server support in Azure Cosmos DB API for Mongo DB, Azure Cosmos DB Continuous Backup and Point-in-Time, and Cosmos DB role-based access control (RBAC)
  • Azure Managed Instance for Apache Cassandra, a new semimanaged service
    offering, is now available in preview. THis helps remove the need for database administrators and developers to manage infrastructure or manage
    and update their version of Cassandra.

Finally, we end with Azure AI. The new features for Azure AI are, of course, catered for developers. Microsoft is introducing a new semantic search capability in Azure Cognitive Search. They believe this new search capability should deliver results based on user intent as opposed to a keyword-based searced used by others in the industry. Also introduced is a new SharePoint connector for Azure Cognitive Search, to ingest and explore SharePoint content from within the service. The list below will cover some other changes.

  • Form Recognizer, an Azure Cognitive Service, is introducing support for
    pre-built identification documents (IDs) and invoice extraction
  • Data extraction from invoices will further help customers extract text,
    key-value pairs and tables from documents
  • Role-based access control (RBAC) is now generally available in Azure Machine LEarning
  • There’s a new integration with Azure Synapse Analytics in preview for large-scale interactive data preparation tasks
  • Azure Percept, a family of devices and services, is now available in preview.
  • Azure Arc now supports Azure Machine Learning

There’s still a lot of news coming out of Microsoft Ignite. We remind you to stay tuned to OnMSFT all week long for the biggest news coming out of the annual IT and developer extravaganza. We’ll be watching right alongside you!

Ignite 2021: Microsoft extends Power Platform with Power Fx, more

At Ignite 2021, Microsoft is announcing some updates for Power Platform. The updates cover the entire range of products, with new features coming to help IT admins, as well as businesses.

We’ll be starting first with the introduction of Microsoft Power Fx. This is the first low-code programming language, according to Microsoft, with origins coming from Excel. It’s set to be available on GitHub, too, with the plans of Microsoft using it as the consistent language across the Power Platform. Here’s how Microsoft describes it

Power Fx leverages the knowledge of Excel users to reduce barriers for
citizen developers getting started with low-code development. Professional
developers can accelerate their app development with the simplicity of
formulas and code using their favorite professional developer tools.

Next up, there are some new AI capabilities for Power Virtual Agents. It’s now in preview, with the goal of building smart chatbots. Two features include Topic overlap detection, which can help find overlaps between topics to avoid clarifying questions, as well as topic suggestions from chat transcripts. The second feature is able to analyze chat transcripts from previous conversations to suggest new topics. Here’s a deeper explanation.

These new AI-infused features enable chatbots to engage more naturally
and more accurately and are designed to help organizations and citizen
developers feel more confident about addressing customer and employee
needs with chatbots at scale.

Third on the list is an important update for Power BI premium. Microsoft says there are lots of new under the hood improvements for performance, stability, and security. Known as “Premium Gen 2” the updates are catered for flexibility to license per user or per capacity, a 16x performance boost with Microsoft managed architecture, the ability to autoscale to automatically add capacity when needed, and Consistent and reliable cost management with utilization metrics. Here’s Microsoft’s description.

For enterprises and IT admins, the new Power BI Premium offers major improvements in governance and scale with features like Microsoft-owned resource management, utilization
metrics, autoscale and integrated security

The final updates for Power Platform cover Power Automate Desktop as well as e a new Power Platform admin center and capabilities. With Power Automate Desktop, you’ll be able to use it on Windows 10 for no additional cost. As for the admin center and capabilities, Microsoft says these are centered around data loss prevention and new controls for reporting and security standards.

Google Docs superscript not working [Fixed]

The superscript from Google Docs allows you to navigate, edit, and format using different keyboard shortcuts.

This tool is available for computer, Android, iOS, and iPad devices.

The Google Docs superscript not working is a common problem among Internet users.

Why does superscript not work in Google Docs?

Even though Google Docs is a flexible tool, this issue usually appears if you use an outdated version of your browser.

Other causes of the Google Docs superscript not working issue are conflicting browser extensions, and if your cache or cookies are corrupted.

Many users have reported this issue on the Microsoft forums:

My superscript doesn’t work in either Office Word or Google Docs. I try to use Ctrl and >. My subscript function (Ctrl and < works), however, my superscript does not. How can I fix it?

How do I turn on superscript in Google Docs?

We have prepared four solutions that will allow you to have an error-free experience in Google Docs. They will allow you to use the superscript function.

So, check out the next section of this article to see these solutions explained in a few simple steps.


How can I fix Google superscript not working in Google Docs?

1. Update your Google Chrome

fix msvcr100 dll msvcp100 dll-missingafter windows 10 upgrade
  1. Open Google Chrome.
  2. Open the menu and choose Settings.
  3. Click the About Chrome tab.
  4. Select Update Chrome for the latest version.
  5. Click on the Restart button.

After restarting your computer make sure you check if the issue named superscript not working Google Docs has been solved. This solution is useful if you are using an outdated version of your browser.

As a consequence, there are chances that compatibility issues between the browser and Google Docs might disappear.


2. Remove interfering browser extensions

  1. Open Google Chrome.
  2. Select the Extensions icon.
  3. Click on Manage Extensions.
  4. Disable all extensions.

Note: the Google Docs superscript shortcut not working is one of the issues usually caused by the AdBlock extension. If you experience this situation, then by pausing or reinstalling the extension in Google Chrome, you will solve the Google Docs superscript not working issue.


3. Clear cache and cookies from your browser

  1. Open Google Chrome.
  2. Click on Customize and Control showed by the icon with three dots.
  3. Select More Tools.
  4. Click on the Clear Browsing Data option.
  5. Click on Sign Out.
  6. Go to Time Range.
  7. Select All Time and check all categories. superscript is not working Google Docs
  8. Click the Clear Data option.
  9. Restart Google Chrome.

The cash and cookies are important elements used by browsers to boost performance and improve the user experience.

If they are corrupt, then you will encounter this issue. For this reason, when you clear cache and cookies, that will fix this problem.

The second step allows you to delete the Chrome data from your device, and yet keep it in your account. It is very important after you restart Google Chrome to verify if your Google Docs section is working fine. 


4. Restore Google Chrome to its default settings

  1. Open the menu from the Google Chrome browser.
  2. Click on Settings. Fix the issue superscript not working in google docs
  3. Expand the Advanced tab. Google Docs superscript shortcut not working
  4. Click on Reset and clean up.
  5. Choose the option Restore Settings to Their Original Defaults.
  6. Click on Reset Settings. How to turn on superscript in Google Docs
  7. Restart Google Chrome.

When one of the customized browser settings is the cause of the superscript not working in Google Docs issue, this solution should be useful to you. You will have to reset your Google Chrome browser to its default settings.

Before using it, you must create a backup of your data or information for your browser.

Restart your device to exclude any temporary err or, if it is your personal device. When using a managed device from your school or workplace, please notify the IT administrator of that organization.

Also, ensure you are using the right keyboard combination in your shortcut: press Ctrl + Command keys simultaneously.

Note: If you use a browser different than Google Chrome, then use the following command to superscript the text: FN + Command/Ctrl + Period. Kindly check our following solutions if you have encountered the Google Docs superscript shortcut not working problem.


Google Docs superscript not working is a common issue that many Windows users have encountered.

If you are among them, then you should know that it is caused by one of the following reasons: your browser is not updated, conflicting browser extensions or the cache and cookies from your browser are corrupted.

We recommend you try out our fixes and leave us a comment in our section with your feedback. We hope that the Google Docs superscript shortcut not working issue will become a thing of the past for you.

Disney Plus Plays no Video Only Sound: 5 Ways to Fix it

Many reported that Disney Plus shows no video only sound, which can be a problem since you won’t be able to enjoy multimedia.

This issue can be solved, and we have a couple of solutions to help you, so keep reading.

What can I do when Disney Plus streams no video only sound?

1. Reinstall the Disney Plus app 

First, remove the app from your device and then download it again from the official source.

Once you’ve reinstalled the app, you can finally view your favorite Disney movies and TV shows without any more audio issues.

2. Downgrade the resolution and restart Fire Stick

  1. Open the Home screen and go to Settings.
  2. Next, choose Display & Sounds.
  3. Now choose Display.
  4. Select Video Resolution and set it to 2160p at 60Hz or lower.
  5. Save changes and restart your Fire Stick. To do that, go to Settings choose My Fire TV, and then Restart.

3. Switch from HDR to SDR

  1. Open Settings on Apple TV.
  2. Next, go to Video and Audio.
  3. Set the Format to SDR. You can use 1080 SDR or 4K SDR.
  4. Disable dynamic range matching.
  5. Save changes.

4. Clear the cache on Roku

  1. On your Roku remote, press the following in a sequence: Home 5 times, Up 1 time, Rev Scan 2 times, Forward Scan 2 times.
  2. If performed correctly, the screen should go black.
  3. Wait for the device to restart.

5. Turn off hardware acceleration in the browser

  1. Click the Menu button in the top right corner and choose Settings.
     
  2. Select System and disable Use graphics acceleration when available.
  3. Restart your browser.

If this didn’t solve your problem, we have a guide dedicated to Disney Plus not working on Chrome, so don’t miss it.

You can also restart your device. If you’re using Fire TV, ensure that it’s connected to the UHD port on the TV, enable UHD color, and switch to 4K resolution. If nothing else works, use your web browser as a workaround.

If you’re having this issue on your phone, disabling the night light feature and using natural colors can solve the issue. Also, try to start the next episode manually to avoid this issue.

You can do that to make video work again in Disney Plus. This isn’t the only issue. Many reported black screens in Disney Plus, while others complain that Disney Plus keeps buffering. Luckily, we tackled these issues in separate guides.

If you know other ways to solve this problem, share them in the comments section.

Disney Plus is not Mirroring to TV? Here’s what to do

Despite its unquestionable success, there are quite a few different issues that could arise in your usage with Disney Plus. If you are already subscribed, you’ll most likely want to watch your favorite shows on a big screen. This turns into a huge problem when Disney Plus is not mirroring to TV.

Disney Plus is already available as a standalone app on select Samsung, LG, and Sony smart TVs. This is definitely good news if you already own one of these models.

However, if you don’t, it is also supposed to work on pretty much everything you have in your house today. This includes Android phones and tablets or iPhones, Google Chromecast and Amazon Fire Stick, as well as Roku and Apple TV streaming video players.

Gaming consoles like the Xbox One series along with PlayStation 4 are included in the list too, so mirroring to TV should work like a breeze.

In this article, we will discuss the best options to apply in this situation and make sure this eventually happens.

Quick Tip:

One of the best solutions to solve this issue quickly and pain-free is to install ApowerMirror on your PC and TV. The TV app is available on Google Play, most modern TVs are compatible with the Android System, installing it on your TV will not take more than 2-3 minutes.

ApowerMirror allows you to screen crystal clear images on your TV, be it from your PC, Android or iPhone, the app also lets you mirror from PC to PC and Android to Android.

⇒ Get ApowerMirror

What can I do if Disney Plus is not mirroring to TV?

1. Reinstall Disney Plus

One of the simplest solutions that you should start off with is to simply reinstall the Disney Plus App, or you can also try to cancel your current subscription and create a new one.

Note that Disney Plus is available as both a web app via your browser, as well as a Microsoft Store App, so go ahead and uninstall and then reinstall the app, and if that doesn’t work, cancel your subscription and make a new one using the link below.

Disney Plus

Subscribe to one of the biggest streaming services in the world, and enjoy family-friendly entertainment.
Subscribe now Visit website

2. Tips for mirroring Disney Plus from computer to TV

mirror Disney Plus from computer to TV

Are you trying to display your small laptop display on the TV? In theory, you are able to play Disney Plus on most computers made in the last few years.

The truth is that the computer’s screen with Mickey Mouse cartoons or original movies and television series from Disney Plus often refuses to appear on your TV. You could also get an extreme lag between TV and laptop, so do the following:

  • Perhaps the easiest way to attempt to fix this is to reboot your computer.
  • Then, check out different movies to identify if you’re having issues with one item or all of them. If it happens with all of them, remember that Disney Plus requires a minimum speed of 25 Mbps. Use one of the best tools to test Internet speed on Windows 10 to rule out this cause.
  • Update all major drivers. This includes the chipset, sound, video, or network drivers.
  • Try uninstalling the Microsoft Wireless Display Adapter driver. Then, let Windows 10 install it back.
  • In some rare instances, this mirroring problem can be caused by your antivirus. There’s a chance to fix it simply by disabling certain antivirus features. If that makes no difference, remove your antivirus altogether by using the best uninstaller software.

3. Tips for mirroring Disney Plus from your mobile device to TV

Screen mirroring also allows you to view fresh Disney Plus content from your mobile device on the TV screen. Take a better look at the following requirements.

3.1 Screen mirror Disney Plus wirelessly

screen mirror Disney Plus app

To be able to screen mirror Disney Plus wirelessly, your TV needs to support a Wi-Fi connection.

  • The first basic solution when this doesn’t work is to simply toggle the Wi-Fi on and then off for your devices.
  • Check for any new updates. This can be done by entering into the Settings app, selecting Software Updates, and then tapping on Check for Updates. If an update is available, then let it download and try again to mirror Disney Plus.
  • Quit all apps on your smartphone, turn it off and then back on. Finally, just try to open Disney Plus again and mirror it to TV.
  • Some users have reported success when reinstalling the app as well.

3.2. Stream Disney Plus with Chromecast or Amazon Fire TV Stick

If you don’t have a smart TV, streaming can be achieved through a casting device such as Chromecast or Amazon FireStick.

To stream Disney with Google Chromecast:

  • Set up the app on your device and create an account. Connect and set up the Chromecast device on your TV, then search for a movie you’re eager to watch. Open the content, tap on the Chromecast icon and select your TV from the list of available devices.

To stream Disney with Amazon FireStick:

  • Just as Google Chromecast, Amazon’s Fire TV Stick connects to your TV through HDMI and allows you to wirelessly stream content from mobile devices to your TV. Once you’ve installed the Fire TV Stick, remotely install the app on your device.

When mirroring fails:

  • Plug your device into a different HDMI input. In case of having an older TV that only has a single HDMI plug, changing out the cable altogether could help.
  • When it comes to streaming in 4K, note that you must use a cable compatible with HDCP 2.2.
  • To make sure your current TV supports HDCP 2.2 standard, enter into Settings > Display & Sounds > Display and the set Video Resolution to Auto. You should immediately get a notification saying if HDCP 2.2 standard is supported.

Let’s hope that you can start watching your favorite movie on your commute and immediately continue it on the big screen when you reach home.

Enjoy!