Best internal hard drives for Toshiba laptop [SSD & HDD]

Laptops with internal SSDs offer better performance compared to the traditional HDD and SSHD laptops. If you need a storage solution, that is fast, reliable, and durable, then an SSD is an ideal storage drive.

To ensure you can easily carry your data across the globe without issues a 1TB external hard drive will surely come in handy.

HDDs, on the other hands, are cheaper, 7200 RPM drives can be relatively fast (compared to 5400 RPM HDD) and offer multiple storage options, that SSDs usually don’t offer.

Toshiba laptops come with HDDs as the standard storage drive. However, you can use the SATA SSDs to replace the HDDs to gain access to plenty of performance without compromising on the storage space.

In this article, we have listed the best internal hard drives – SSDs and HDDs – for Toshiba laptops to improve app loading time and booting time.

If you’re interested in devices with NAS support, check out our external hard drives with a NAS support guide.

What are the best Best internal hard drives for Toshiba laptop?

WD Blue 3D NAND

  • Good value for money
  • Excellent storage options
  • Good performance
  • Free cloning and backup software
  • TBW varies on storage options

The WD Blue 3D NAND is one of the best SATA SSDs with multiple storages capacity available today. This variant offers 500GB of storage space for an excellent price.

WD Blue 3D NAND is available in multiple storage options from 250GB to 4TB. This 2.5″ drive can replace your SATA HDD and offers 560 MB/s read speed. For enhanced reliability, it claims an industry-leading 1.75M hrs of MTTF and up to 500 TBW.

Western Digital also offers five years of manufacturer warranty along with free downloadable software to monitor the status of your drive that can also clone your HDD and create a backup.


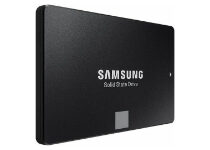
Samsung 860 EVO 500GB

  • Increased performance
  • Multiple storage options
  • Good value for money
  • Reliable
  • SATA III protocol limits its potential

Dubbed as the exceptional evolution of Samsung’s budget SSD line, the Samsung 860 EVO improves on its predecessors with faster speeds and greater reliability all while retaining its affordable price tag.

Samsung 860 EVO feature the innovating V-Nand technology, offering optimized performance for everyday computing as well as storage-intensive tasks such as rendering.

The newer version comes with an enhanced read-write speed that goes up to 550MB/s and 520MB/s respectively. Additionally, most of the encryption protocols, including AES 256-bit encryption to protect your data.


Samsung 860 QVO

  • Affordable 1TB SSD drive
  • Comes in multiple capacity options
  • Supports hardware encryption
  • Durable and reliable
  • SATA only

If you want a bigger storage space, the Samsung 860 QVO offers a lot of fast storage capacity for nominal money. It is an excellent internal solid-state drive for budget upgraders.

Samsung 860 QVO claims the read speed of 550 MB/s and writes speed of 520 MB/s offering exceptional boot time and boost rendering tasks. 

Intelligent Turbowrite accelerates write speeds and maintains long-term high performance with a large variable buffer.

It also supports hardware encryption include AES 256-bit and compliant with TCG Opal and IEEE 1667 protocol.


WD Blue Mobile WD10SPZX 1TB

  • Plenty of storage space for the affordable price tag
  • Multiple storage options
  • Reliable
  • SATA 6.0 Gb/s HI support
  • Slow 5400 RPM speed

WD Blue Mobile WD10SPZX 1TB internal HDD allows you to store more, compute faster on a gaming computer or work desktop setup. From music to video to photo editing, this internal hard drive offers enough storage for all the applications.

WD Blue Mobile WD10SPZX comes in multiple storage options from 250GB to 2TB and uses the SATA 6.0 Gb/s hardware interface. It also comes included with the Free Acronic True Image WD Editing cloning software.


Seagate BarraCuda 1TB

  • Affordable 1TB HDD
  • Strong performance
  • Quality build
  • SATA 6.0 Gb/s HI support
  • Slow 5400 RPM speed

Coming in a 2.5″ form factor, the Seagate BarraCuda 1TB drive offers plenty of space to store your music, videos, and large files from video editing or gaming without spending a fortune.

Seagate BarraCuda comes in multiple capacities ranging from 500GB to 2TB. It also features specialized caching technology for optimized data flow and fast loading of applications and games.


All the SSDs and HDDs listed in this article are compatible with Toshiba laptops.

Feel free to share your suggestions and opinions with us by using the comment section found below this guide.

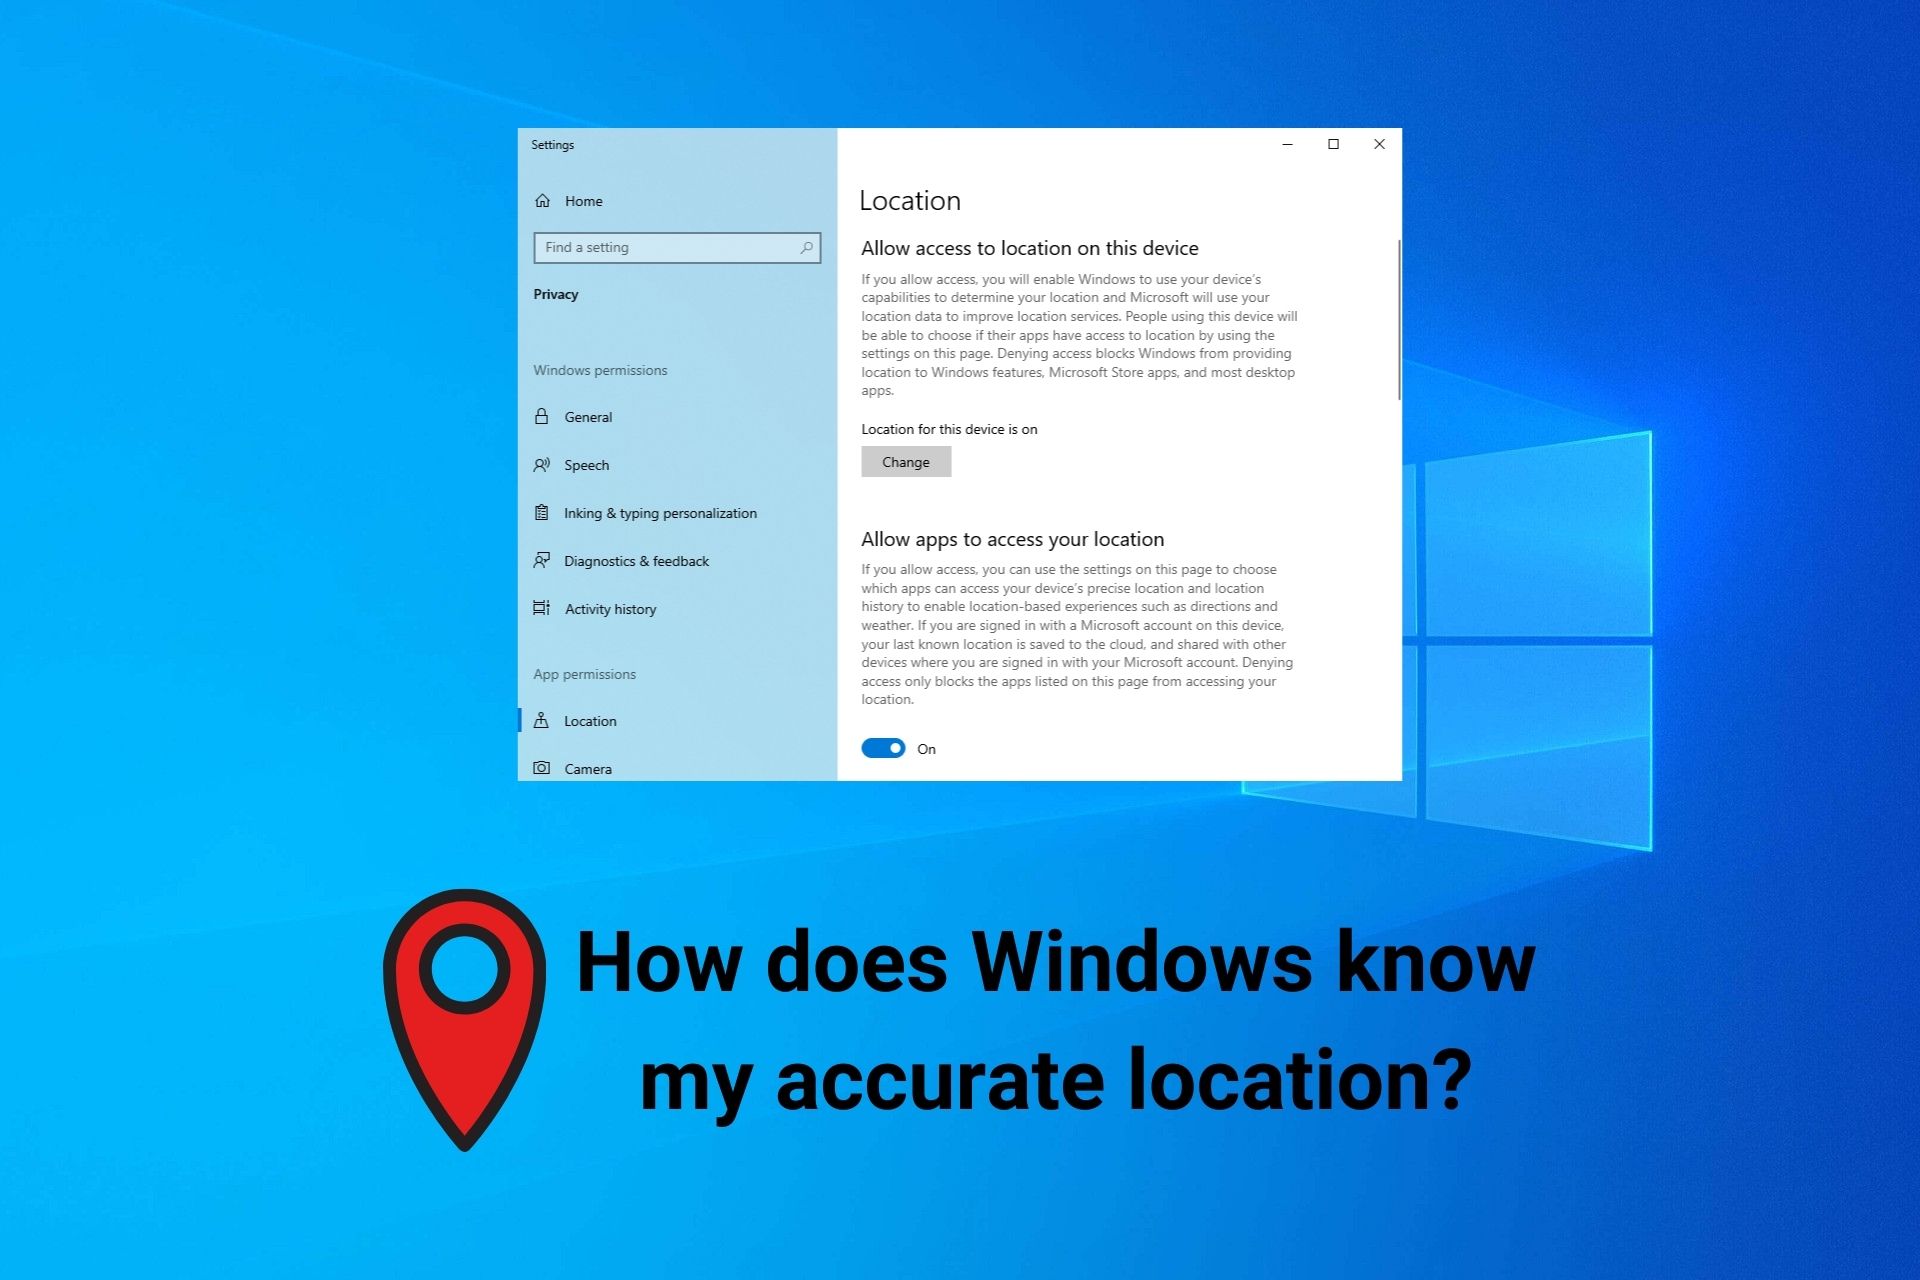
How does Windows know my location accurately?

Starting with Windows 8, Microsoft introduces location services and personalized content, which made a lot of privacy-users angry.

Still, many people wonder how Windows knows their accurate location. It shouldn’t be possible without GPS tools, right?

Wrong. Microsoft is smarter than that.

So, how can Windows track my location?

According to Microsoft, your current location is tracked by taking into account all available services: GPS, nearby Wi-Fi hotspots, cell towers, and your IP address.

To determine its accuracy, just take a look at how modern your computer is.

Basically, if it’s new enough to run Windows 10, then it’s good enough to track you down using all supported services.

Is it dangerous?

Not according to Microsoft.

It says that it removes all personal information that can be used to identify you. It does this before receiving your location details.

But a lot of users don’t buy it, not even after disabling location services.

Why should I let Windows know my accurate location?

  • Setting your time zone automatically
  • Track your stolen laptop
  • Get personalized content based on your browsing history
  • Take advantage of location-aware services, like city navigation
  • Use Cortana with more accurate results

How do I disable Windows location services?

disable Windows location services
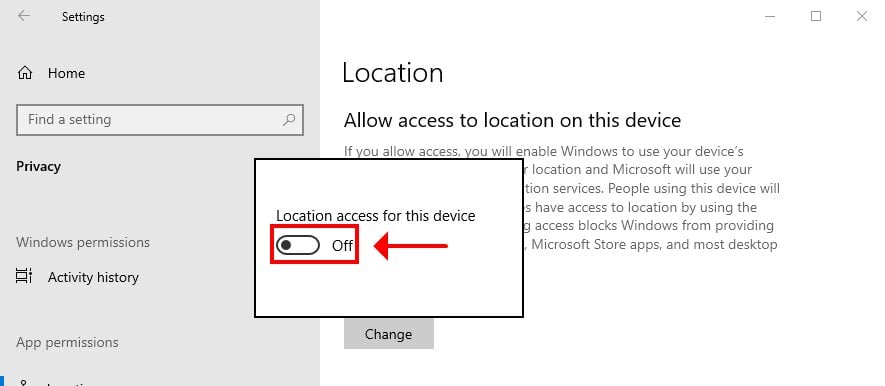
  1. On Windows 10, go to Settings
  2. At App permissions, select Location
  3. At Allow access to location on this device, click Change
  4. Set the slider to Off

Using the steps above, you can get rid of the Your location is currently in use message.

Alternatively, you can manage permissions for every app you want to use Windows location services.

What else can I do to improve my online privacy?

We recommend using a reliable VPN service to change your IP address and prevent Microsoft from tracking your true location.

It encrypts your data traffic and helps you bypass firewalls. And we can’t think of a better solution than Private Internet Access.

It’s wrapped in a super-intuitive interface for Windows, Mac, Linux, Android, and iOS. You can even set it up on your router.

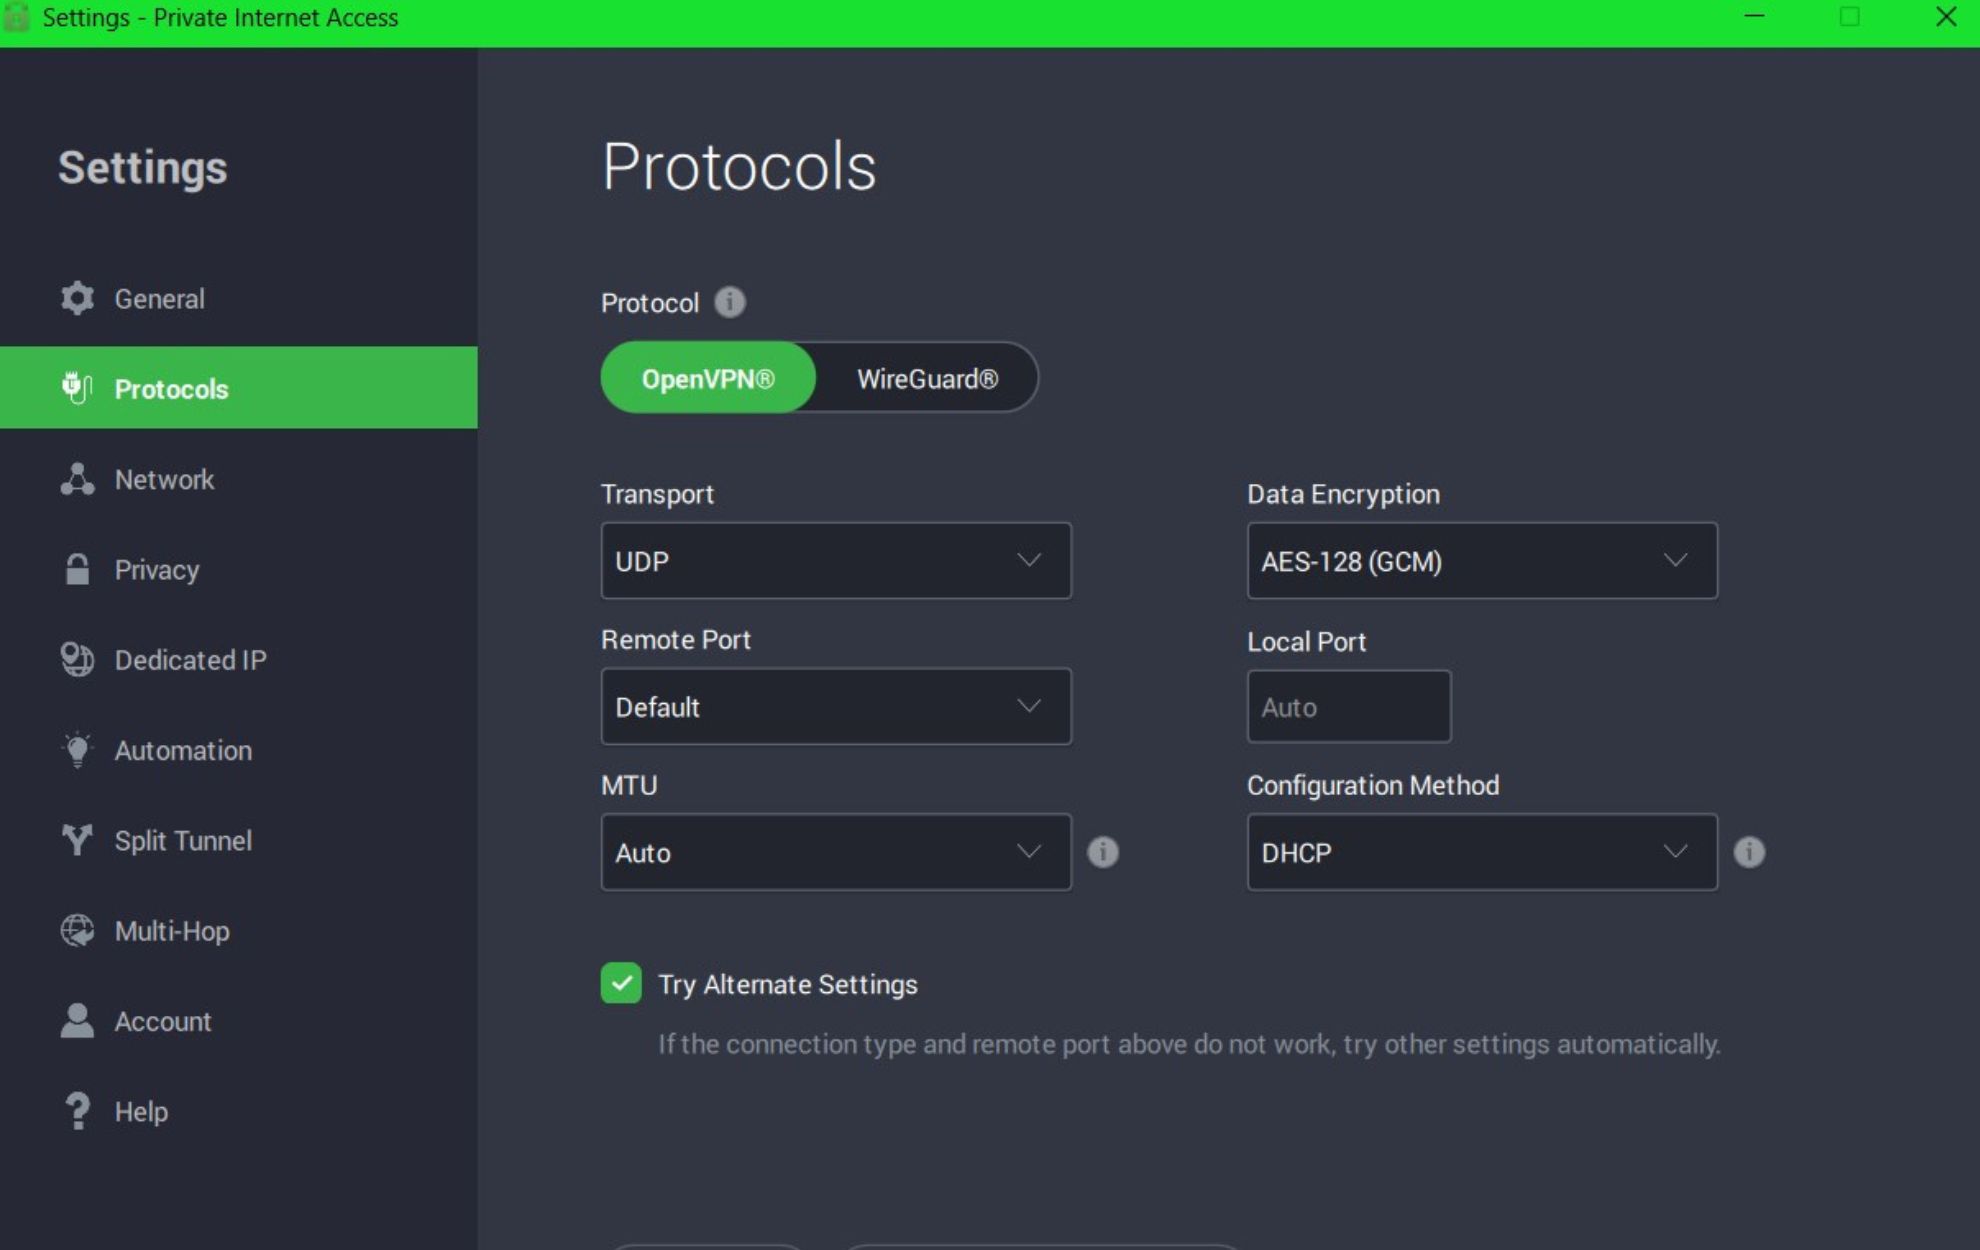
PIA allows 10 simultaneous connections. It supports the WireGuard and OpenVPN protocols with up to 256-bit military-grade encryption, private DNS servers, and Shadowsocks proxy.

You can use PIA change your location with a VPN, unblock Netflix US anywhere in the world and stay safe from tracking services like Microsoft when browsing the web.

By the way, you can also use a VPN to change your GPS location, but not on Windows PC.

Conclusion

To sum up, Windows knows your accurate location by taking into account multiple aspects, including your GPS, nearby Wi-Fi towers, and your IP address.

If you’re worried about your privacy, you can turn off the Windows location services but there are no guarantees.

However, you can amp up your security and privacy level by turning to a trustworthy VPN like Private Internet Access. It’s one of the best tools for stopping online tracking.

How to Protect Your Windows 10 Device on Public Wi-Fi

Public Wi-Fi networks are usually great, as they provide just about everyone with free access to the Internet.

However, public Wi-Fi networks also have a dark side. Even though free Wi-Fi is great, it’s not always safe.

For instance, you may encounter malicious users on the same public Wi-Fi network you use.

These agents can be hazardous to your safety and privacy since most are out to get your personal data.

But enough chit-chat, you’re here to discover how to keep safe on public Wi-Fi networks, and that’s exactly what we’re going to teach you.

How to keep your PC safe on a public Wi-Fi Network?

1. Use a VPN

  1. Download and install Private Internet Access.
  2. Launch it and log in to your account.
  1. Connect to any server you want.
  2. Enjoy private, secure browsing on public Wi-Fi.

A VPN does wonders when it comes to protecting your traffic from various agents who would just love snooping around and through it.

Not only does a VPN such as PIA re-route your traffic through its private servers (secure tunnel), but it also encrypts it.

Thus, even if someone intercepts your traffic from inside the public Wi-Fi network, it would all look like gibberish, thanks to encryption.

Private Internet Access

Looking for a reliable VPN to use on public Wi-Fi networks? Private Internet Access is a great choice.
Free Trial Visit Website

2. Turn off sharing and network discovery

Turning on file sharing and network discovery is not unheard of, especially if you’re on a trusted network.

However, note that this feature should be only used at home/work or wherever you can trust all the users on the network.

With that in mind, we recommend you only use this feature in safe environments and if it’s absolutely necessary.

It goes without saying that you should never ever use it on public Wi-Fi networks. Therefore, we’re going to teach you how to disable it.

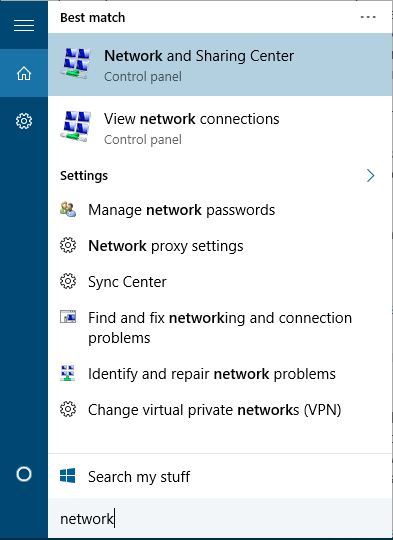
  1. Press the Win Key on your keyboard
  2. Type network
  3. Select Network and Sharing Center
    network-and-sharing-center
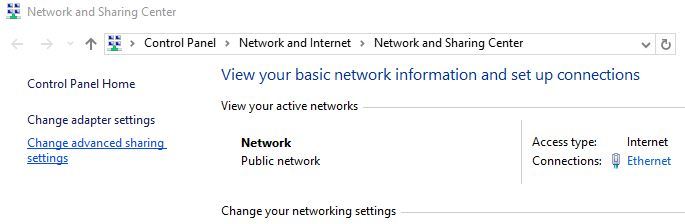
  4. Click on Change advanced sharing settings.
    advanced-sharing
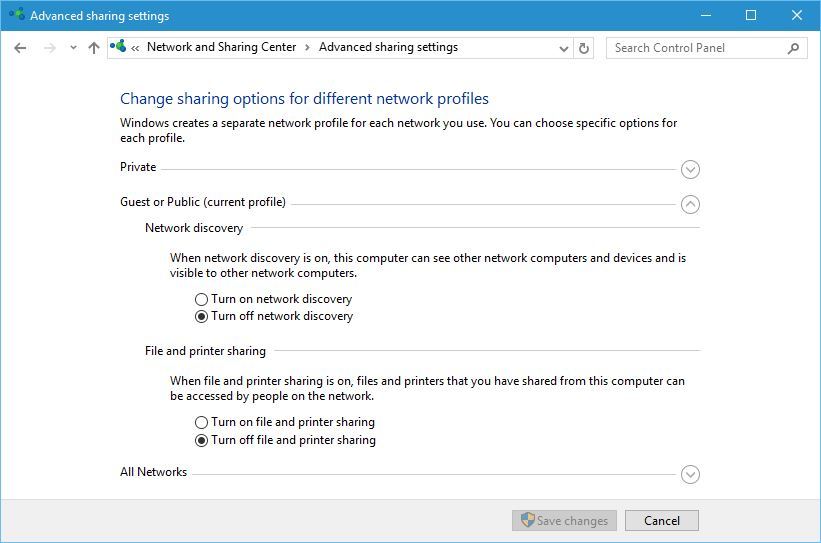
  5. Locate your current network profile
  6. While using a public network, you should always select the Guest or Public profiles
  7. In the Network discovery section select Turn off network discovery
  8. Select Turn off file and printer sharing in the File and printer sharing section
    file-sharing-off
  9. Click Save changes

It goes without saying that turning off network discovery will make other devices unable to see you on the current network.

3. Enable your firewall

Windows 10 has a built-in firewall, so if you’re not using a third-party solution, you can at least make sure that your Windows one is active.

A firewall’s purpose is to regulate the incoming and outcoming network traffic, thus keeping your computer safe from attackers.

This is how you can check if your Windows Firewall is running:

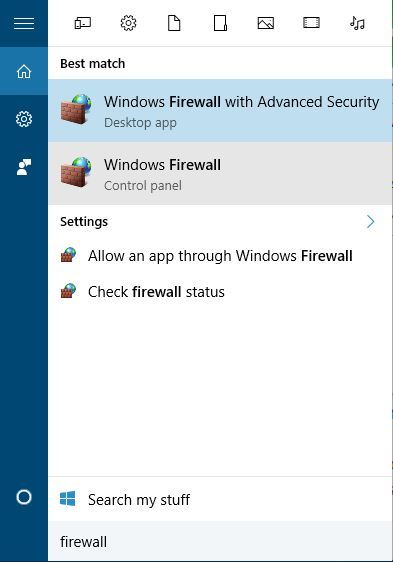
  1. Press the Win key on your keyboard
  2. Type firewall
  3. Choose Windows Defender Firewall from the list
    firewall
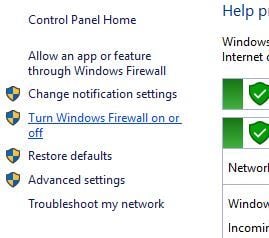
  4. Click the Turn Windows Firewall on or off button
    turn-firewall-on-or-off
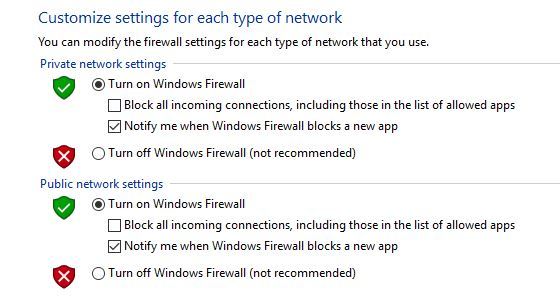
  5. Make sure Turn on Windows Firewall is selected in both Private and Public network settings sections
    turn-on-windows-firewall
  6. Click OK to save changes

If you have a third-party firewall installed, Windows Firewall will turn itself off automatically, and there’s no need to enable it.

4. Always use HTTPS

Whenever you interact with your web browser, you’re sending data that malicious users on the same network could intercept.

If you’re not using a VPN to encrypt your whole traffic, you should at least make sure you’re using an encrypted connection in your browser.

It’s really easy to spot an encrypted connection since HTTPS marks it. HTTPS is an extension of HTTP, and it’s used for security purposes.

Of course, this doesn’t apply to apps or any other services where you can’t see what’s going on or whether or not your traffic is encrypted.

However, checking the protocol in your browser is a simple and quite effective thing to do to ensure you’re alright.

Remember, HTTPS – good, HTTP – bad.

5. Turn off your Wi-Fi if you’re not using it

Various apps and services maintain connections and make requests in the background, even if you’re not actively using them.

So, to avoid any accidental data leaks, turning off your Wi-Fi when you’re not actively using it turns out to be a wise decision.

6. Disable automatic Wi-Fi connections

Here’s the thing: over the years, your device got more intelligent and smarter, and all of a sudden it thinks it could decide everything for you.

One example is connecting to any public, unsecured Wi-Fi if the signal is strong enough.

Yeah, that saves you just about 2 precious seconds, but it may also connect to a trick hotspot created by a malicious hotspot.

Those are called Hotspot Honeypots. Do you want to know why? Because they make monitoring traffic of unsuspecting victims look like child’s play.

7. Protect your accounts

There are a lot of reasons why a seasoned hacker or a script kiddie would want to grab your private browsing data.

However, one of the most common reasons is stealing accounts. All of them, if possible: your social media, bank accounts, cloud storage, you name it.

It’s wise to take a step back and consider that these accounts are not fair game. No, they have passwords to protect them.

So, what’s the first step you need to take to protect them? That’s right, choose a strong password that’s generated automatically if possible.

Can’t remember all the mixed characters and symbols? You could use a password manager. But wait, there’s more!

In addition to using strong, uncrackable passwords for your accounts, you could also activate multi-factor authentication.

That way, if the attacker manages to get your password, it will also need an additional confirmation to access your account.

We advise against using your email address as a 2FA for obvious reasons. If the attacker grabs hold of your email address, it has access to everything you linked.

8. Update your security software

You need to keep security software in top shape, whether it’s an antivirus, firewall, anti-malware, anti-ransomware, or all of the above.

They’re responsible for your device’s well-being, after all, especially when you’re connected to a public Wi-Fi network.

Just make sure everything is running smoothly by checking for updates every now and then.

Well, you should do that a lot more often than occasionally, but you get the picture.

Conclusion

All things considered, there are several ways to stay protected while using public Wi-Fi networks.

Without a doubt, using a VPN is just about the best way you can go about it. A VPN will re-route your connection and encrypt your traffic, keeping potential traffic monitoring enthusiasts at bay. The only downside is that you may not be able to bypass captive portals on some networks.

Additionally, you can learn how to deal with rogue Shenzhen devices connected to your network.

However, if you’re not ready to commit to purchasing a VPN plan, there are plenty of other ways you can tackle public Wi-Fi security.

Download Cyberpunk 2077 today [PC]

Cyberpunk 2077 has been on the market for only a brief period of time and it already became the talk of the entire gaming community.

Despite being launched with a number of glitches, especially aimed at last-gen consoles such as the Xbox One and PS4, it is still regarded as a very successful game from a financial standpoint.

Brought by the developers of another beloved RPG series, The Witcher, this fantastic Sci-Fi adventure promises you the time of your life in a alternative 2077 timeline, where crime is abundant, and cyber-augmentations are more common than tattoos.

Basically, think of it as GTA meets The Witcher with atmosphere from Blade Runner.

⇒ Amazon

⇒ Kinguin

⇒ G2A


Why should I download Cyberpunk 2077?

In-depth character customization

One of the biggest selling points of Cyberpunk 2077, besides the fact that it was developed by CD Projekt Red, is the sheet number of things you can change about your avatar during the initial character creation.

These features range from the avatar’s voice, face, hairstyles, body type and modifications to things such as his background, and clothing.

Then you have the generic RPG elements that also come into play such as the character stats, although entire Strength/ Agility / Intellect routine was abandoned for much more updated once such as Body, Intelligence, Reflexes, Technical, and Cool.


Familiar gameplay mechanics

Those familiar with RPG games will notice that a lot of the mechanics are present in this game as well, although with a more modern twist.

Gear is partially replaced with cybernetic implants, while weapons are found all over the place, and can even be bought from the black market for the right price.

Consumables are also present, with soft drinks serving as healing potions, player housing is an integral part of the game and vehicle theft is something you’ll be doing daily.


A fantastic story set in the distant future

The core of any RPG is to be the most fantastic version of yourself in a story that makes you feel alive, and that is precisely what Cyberpunk 2077 offers.

You’ll experience love, betrayal, adventure, adrenaline-filled fuel rides, you’ll be able to connect to NPCs at a level that you’ve never thought possible, and more.

Most importantly, your choices do matter, and they have dire consequences in the long run, such as how the story unfolds, who lives and who dies, who you end un befriending and who ends up hating you.

The story is amazing, and offers great replay value, so even if the game is indeed massive to go through that first time, you’ll want to do it again for sure.

Cyberpunk 2077 is currently available on Windows 10 PC, Xbox One, PS4, and Google Stadia. The game has tons of potential, and amazing replay value, so go ahead and give it a try today!


Have you considered giving Cyberpunk 2077 a try? Let us know what your expectations are by leaving us your feedback in the comments section below.

Lenovo Yoga 9i Intel EVO 14 & 15″: Better batteries, better performance

Starting at $1,179.99

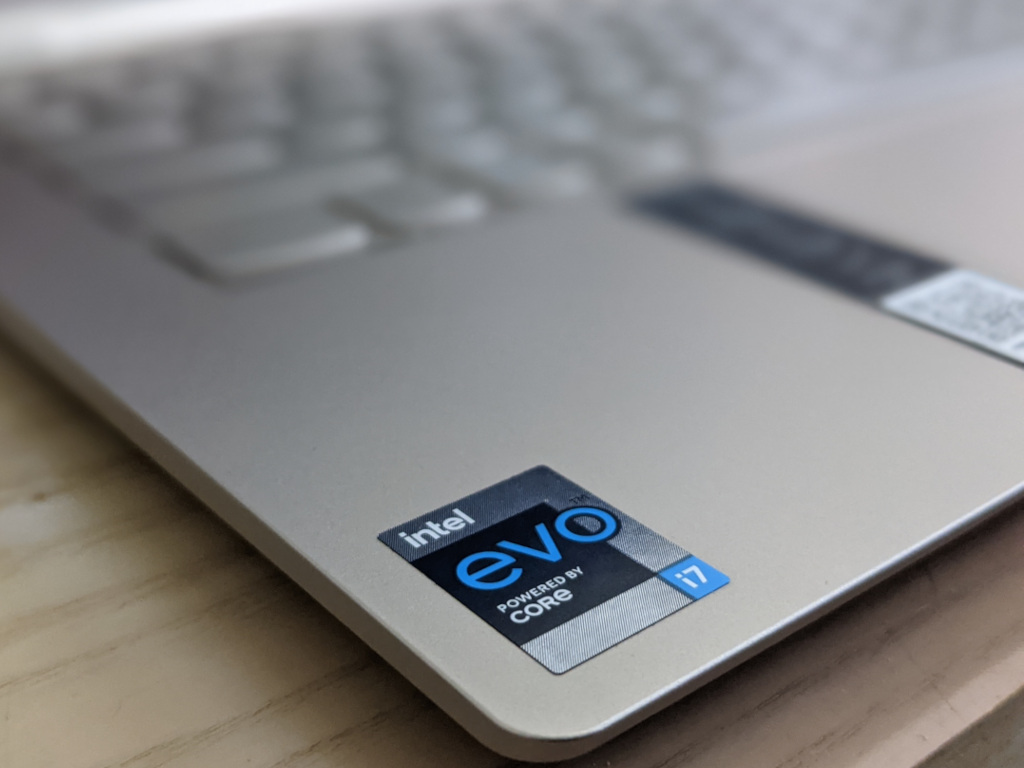
Intel introduced its Evo laptop specs back in ate 2019 as Project Athena when the company publicly laid out the roadmap for its upcoming chipsets. However, it wasn’t until September 2020, that PC manufacturers began shipping devices with Intel’s famed new Ultrabook base KEI features that include:

  • Consistent responsiveness on battery.
  • Wake from sleep in less than 1 second.
  • 9 or more hours of real-world battery life on laptops with a Full HD display.
  • 4 or more hours of battery life in a 30-minute charge on laptops with a Full-HD display.

With that being said, OnMSFT has gotten its hands on not one, but two Intel Evo powered laptops in the Lenovo Yoga 9i 14 & 15-inch PCs. In addition to upgrading the processors in the lineup, Lenovo has also adjusted its naming convention, changing its former title of Yoga C940 to 9i. Whether or not the naming change results in a more streamlined business presentation for customers remains to be proven.

For anyone, who had been acquainted with Lenovo’s Yoga 900 series, both the 14 & 15-inch 9i’s follow a similar industrial design as their predecessors, with the infamous rotating soundbar hinge, slim bezels, built-in Wacom supported pen and tapered chassis for a slim metal notebook feel in the hand.
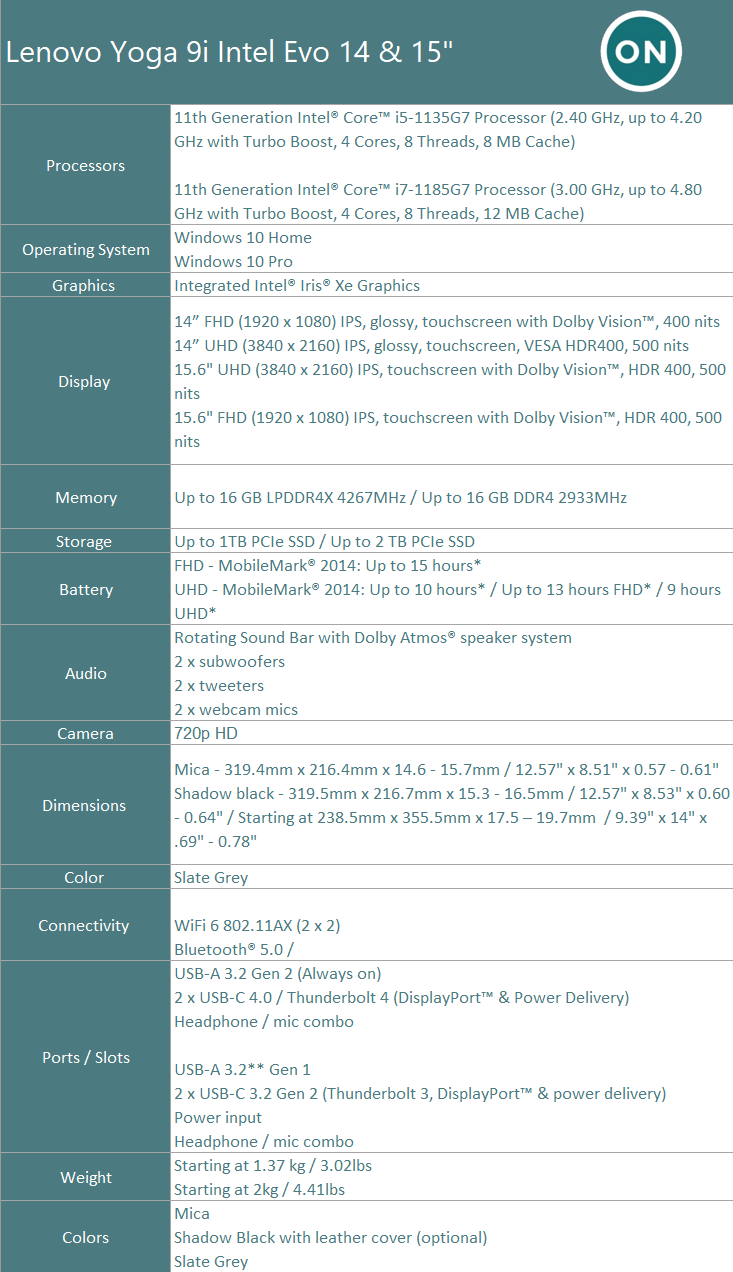
9i Specs Sheet

Look & Feel (Design)

The Lenovo Yoga 9i remains relatively unchanged from the previous Yoga 900 series. The Slate Grey that OnMSFT was issued, keeps the sleek tapered design and the iconic high polish rotating soundbar. While I would have preferred to try out the black leather top 14-inch version of the laptop, unfortunately, we were sent the very familiar Slate Grey that’s become a customary Ultrabook look these days.

Pxl 20201217 135911242

With an aluminum chassis build the 9i in both models boast a premium feeling weight them. The 14-inch version doesn’t feel too much heavier than the comparable HP Spectre, Dell XPS, or MacBook, but it is noticeable upon the first unboxing.

With this familiar design comes familiar port placements as well for the Yoga 9i, in both variants. Lenovo did not deviate from where it placed its Thunderbolt 3 ports and USB-C connections this go around. On the right-hand side, customers will find a single USB-A 3.2 Gen 2 port, the power button, and the pen garage in two places along that side depending on the model. In the 14-inch, the pen garage is tucked away in the back on the righthand side while on the 15-inch is place 2/3 of the way down from the USB-A and power button sitting flush along the chamfered edge. In addition to being conveniently housed in the body of the laptop, Lenovo also makes use of a charging interior setup that keeps the pen recharged when docked. Gone are the days of fiddling with AAA batteries to take notes, sign documents, or draw. With that being said, the downside to its convenient recharging solutions is that when the pen does lose its charge there is a refractory period a user will need to wait as it recharges.

Pxl 20201217 140852346.portrait

On the more exciting left-hand side, there are two Thunderbolt 3 ports supporting display and power. Interestingly enough, the 14-inch model uses USB-C power out while the 15-inch makes do with a proprietary USB-A looking connection as well as the 3.5mm headphone jack and mic combo. With the 15-inch model being a beefier rig, the 153W proprietary power adapter connector makes a bit more sense but still a bit annoying as USB-C use becomes more prevalent.

As is customary of recent Lenovo offerings, its Thunderbolt 3 ports support DisplayPort 1.4 which should enable 8K display connections and/or multiple 4K monitors for those burgeoning home offices.

The Sound

I only highlight this in this review because it’s more than worth mentioning. Usually, my review of laptop sounds includes the word tiny or bass-less, but since Lenovo put so much engineering into its soundbar hinge for the Yoga 9i models, customers will receive a pretty robust soundscape. I’ve written about the soundbar in previous Yoga reviews and I will try not to rehash too many of the same points as the soundbar remains mostly unchanged from previous models, for good reason. Lenovo crammed four 2W speakers, 2 subwoofers, 2 tweeters into and support for Dolby Atmos Audio into a relatively small package.

Pxl 20201217 140938042.portrait

Bottom line, the Yoga 9i’s sound is the best of any laptop of any size. Come at me.

The Display

The display design, like the rest of the laptop, remains relatively unchanged with the reverse notch top, slim bezels, and manual shutter over the 720p webcam. Depending on the model, customers can get either an FHD or UHD resolution display which outputs a crisp visual. With that said, I kind of wish that Lenovo bumped up the display offering just a bit more because I personally like filling my screen with as much content as possible and I would love to shrink down the elements a bit more.

Pxl 20201217 140818806.portrait

Again, that’s a personal preference, most people should find the Yoga 9i’s display with Dolby Vision support more than adequate, boarding on impressive on either model. The 4K resolution paired with flexible viewing modes and unobstructed soundbar makes the 9i a media consumption dream. I personally don’t make use of the ‘tent’ and ‘yoga’ positions but for anyone who does, they are readily available and probably perfect for longer stay-at-home binge sessions.

On the Deck

Lenovo is bringing its legendary U-shaped chicklet keys to both models which seemingly contour around the fingers. Spacing between the keys is nice and on the 15-inch model, users are greeted with a full-size number pad. Both the 14 and 15-inch models make use of dual-stage backlighting that gets pretty bright in very dark settings. However, Lenovo offsets its Precision trackpad on the 15-inch Yoga 9i to the left side, which took some getting used to for me. On the 14-inch model, the deck is designed like most other laptops with the relatively large trackpad front and center of the experience. The speed and responsiveness of both the keys and mouse are nice. Scrolling and flying around the scene were intuitive and enjoyable.

Pxl 20201217 141128635.portrait

Lenovo loves to load its deck with all manner of partnership stickers, and on the Yoga 9i both 14 and 15-inch models don the traditional smattering of stickers to the left of the trackpad, while the right remains bare except for a single fingerprint reader. The fingerprint reader is pretty quick, but is still, no match for IR enabled Windows hello experience on a Microsoft Surface device.

Performance

OnMSFT was given the 16GB DDR4 memory options for both devices which weighs heavy on the particular performance I’m writing about. On the 15-inch model, customers get 2933MHz while the 14-inch pushes 4267MHz. Paired with 11th generation i7 Intel Core chips, things just flew on both machines. The 15-inch model stands out a bit more because of its additional NVIDIA GeForce GTX 1650 GPU with its own 4GB GDDR6 memory. Where I was able to do some medium weight video and graphics editing on the 14-inch model, I was able to crunch encoding and exporting of videos, multi-channel DAW setups, virtualize and test Windows 10X as well as my normal day to day marketing workflow with ease. I did not do a lot of 4K video editing, so I can attest to the performance of the laptops when handling multiple edits on 4K video streams of any length, but for the 1080p recordings I managed, there were few hiccups or stutters when applying layers or multiple transitions or visual elements.

Pxl 20201217 141118974.portrait

When it comes to drawbacks, there is fan noise associated with this level of performance, and both the 14 and 15-inch can whirl when pushed. However, the engineering of the 14-inch model differs from its larger brother in battery performance. The 15-inch model, for whatever reason, tops out at a modest six hours of mixed-worked use while the 14-inch pushes well beyond eight hours routinely. Presumably, the additional NVIDIA horsepower is putting a bit of strain on the 135W battery.

Not everything done on the Yoga 9i was work. I managed to get some gaming done on both devices, but as expected with only Intel Iris X graphics, the 14-inch 9i was limited in what it could push out. Games such as State of Decay 2 hit 38fps with medium to high settings while Rainbow Six Siege struggled at 24-30fps when multiple enemies were on screen.

On the flip side, the 15-inch with its GeForce GPU handled most games on medium settings with decent outcomes. CoD Warzone was playable but did present some stutters during congested onscreen elements. Neither of the 9i models are gaming PCs and as such, shouldn’t be bought with those ambitions. For the occasional game, the 15-inch does an excellent job of handling most graphics requirements, the 14-inch can provide some respite from work but only for select titles.

Summary

Intel’s EVO spec push has made an already nice laptop from Lenovo, that much nicer. There weren’t huge leaps in performance and Lenovo seemingly played it safe with a design framework that’s a proven commodity in the latest of its Yoga 900 series.

For anyone in the market for a new laptop, there aren’t many other choices that top this year’s offering from Lenovo. I would also recommend getting the black leather option of the 14-inch if available because it just looks amazingly different in a sea of slate grey laptops.

 

The Witcher 3 patch history: Clues to Cyberpunk 2077’s future

Cyberpunk 2077 has managed to solidify a legacy of not only being one of the most anticipated games in recent years, but also being one of the biggest let-downs in recent years as well, as proven by the rocky start that its been through since the December 10 launch.

The games was still a financial success due to the initial expectations, and it managed to become profitable since day 1, but that was soon to change after players got a taste of the final product.

Cyberpunk 2077 had already been delayed twice so that developers can polish out the bugs, which only begs the question as to what exactly would the state of the game have been if it were launched when it was first promised.


The Witcher 3’s patch history may give clues as to what to expect

For those of you that are familiar with CR Projekt Red’s past title, The Witcher 3: Wild Hunt, you may remember that it didn’t start out too well either, being just as a bug riddled mess as Cyberpunk 2077, only with a fantasy theme.

Users haven’t forgotten that either, and  are considering that CD Projekt Red use the same scheme they did in the past in order to fix Cyberpunk 2077.

  • 05/18/2015 – Witcher 3 released with day 1 patch

  • 05/21/2015 – 1.03 – performance/bugs

  • 05/25/2015 – 1.04 – performance/bugs

  • 06/05/2015 – 1.05 – performance/bugs, but now also many gameplay rebalances, QoL, and easy to develop content

  • 07/18/2015 -1.07 – performance/bugs, QoL , content (player stash)

  • 08/07/2015 – 1.08 – performance/bugs

The list goes on and on, but the main idea is that patches where being rolled out on a monthly basis for well over a year, and they all focused on fixing bugs, with the occasional DLC or new features thrown in here and there.


Players want to know CD Projekt Red’s plans with the game

Comparing Cyberpunk 2077 to Witcher 3 came in light of yet another player request, as many users are asking for CD Projekt Red to release a roadmap of the upcoming patches and fixes.

This would be a great incentive for players, especially those that haven’t yet considered the possibility of refunding the game:

A roadmap needs to be given to the public, Not talking about another 3 release dates or whatever. I want to know what CDPR priorities are for the future of this game.

  • Which patches are coming first?
  • What content is getting revamped?
    • (AI / multitude of other unpolished game features)
  • What bugs are getting addressed?

All in all, this is merely what the public wants, but CD Projekt Red has shown in the past that customer satisfaction is a pillar of their work etiquette, so hopefully they will take this into consideration.

However, if you do want your money back with the intent of purchasing the game later when it is finally done (again), know that you may encounter some difficulties getting your money back, especially if you’re playing on certain platforms.

What do you think the future holds for Cyberpunk 2077? Let us know by leaving us your feedback in the comments section below.

[wl_navigator]


Microsoft Flight Simulator crosses over 2 million PC players since launch

The new Microsoft Flight Simulator game released on PC in August is officially the fastest growing entry in the series, Microsoft announced today. Over 2 million PC gamers have played Microsoft Flight Simulator since launch, and that also represents the biggest game launch in Xbox Game Pass for PC history.

“The community have piloted more than 50 million flights and have logged more than 3.5 billion miles flown to date – the equivalent of flying 19 times roundtrip from the Earth to the Sun, or around the world over 400 thousand times. It’s been humbling to see the positive reactions to Microsoft Flight Simulator and we feel incredibly fortunate and blessed to have such a highly engaged community that continually helps us improve the simulation with their ongoing and insightful feedback,” wrote Jorg Neumann, Head of Microsoft Flight Simulator.

Microsoft Flight Simulator Numbers December 2020

Along with Halo: The Master Chief Collection, Microsoft Flight Simulator is one of Microsoft’s biggest PC games in recent years, as well as one of the most impressive from a technical standpoint. The game combines a custom engine from Developer Asobo Studio, Bing data, and the power of Microsoft’s Azure Cloud to deliver some truly amazing graphics on high-end PCs with a solid Internet connection.

For Xbox gamers, Microsoft Flight Simulator will make its debut on Xbox Series X and Series S consoles in Summer 2021, and we hope the game will be able to truly demonstrate what Microsoft’s next-gen consoles are really capable of. Unlike 343 Industries’ Halo Infinite which will ship in Fall 2021, Microsoft Flight Simulator apparently isn’t coming to Xbox One consoles, and that’s probably for the best.

If you have yet to try Microsoft’s Xbox Game Pass Ultimate subscription service, you can get your first 3 months for just $1 for a limited time and get access to Microsoft Flight Simulator for free on PC. Over 100 other games will also be available for you on Xbox, PC, and Android devices thanks to Microsoft’s new Xbox Cloud Gaming technology.


Xbox Game Pass Ultimate

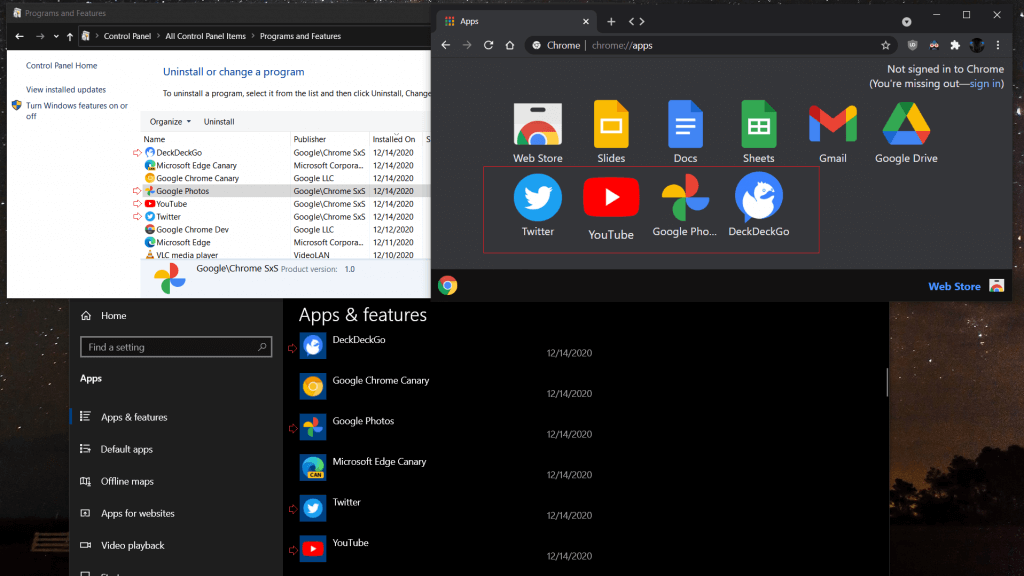
You can uninstall Chrome PWAs from the Windows 10 Settings app with a flag in Edge

Microsoft’s Edge team continues to make transitioning from Google’s Chrome browser over to their new Chromium-based browser easier. A tip from Redditor u/Leopeva64-2 shows that further customizations and functionality for the new Edge have been baked into the native Settings app in Windows 10, even for Chrome PWA apps.

Chrome Edge Settings App

In Chromium Edge, the installed PWAs appear in the control panel and in the Settings app and therefore you can uninstall them like any other program or app, this is an option that has been available in Edge for more than a year and since then, the Chromium developers have been working to implement that same option in Chrome (as I explained in this post), well, this new feature is now available in the Dev and Canary versions:

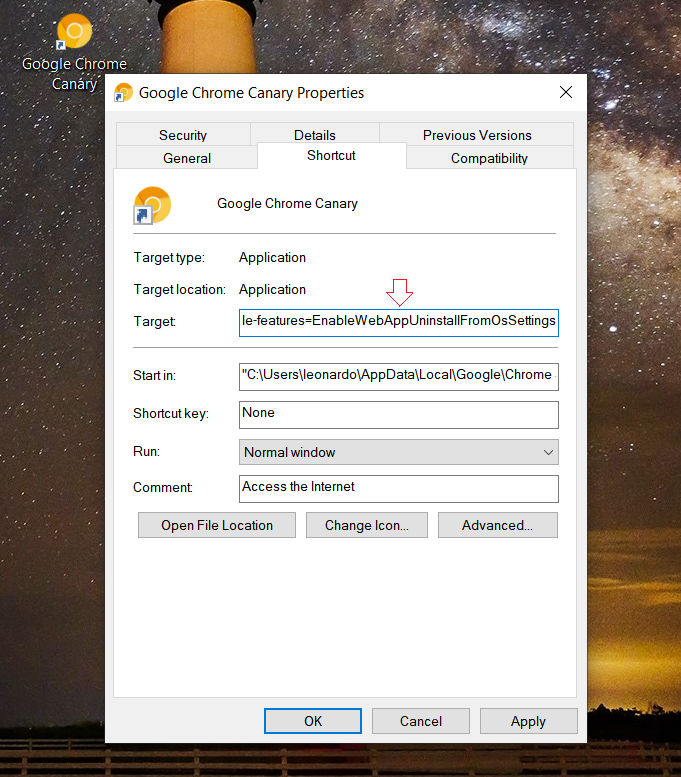
Even as Chrome Dev and Canary testers, enabling this new functionality isn’t as straightforward as updating to the latest version.

Edge Settings App Command Line

Unlocking this new accessibility should be left to people who are comfortable navigating a command line. Information about the merging of this new Settings App integration and a walkthrough on how to apply it can be read on the Chromium Gerrit documentation page.

However, once set up properly, the functionality of uninstalling PWAs from Chrome in the Settings page should be as easy as uninstalling any other UWP app from Windows 10.

Thank you, u/Leopeva64-2 for the tip!

How to add Zoom to Microsoft Teams, and why you might want to

Zoom and Microsoft Teams are two of the most popular video conferencing solutions right now. However, despite their differences, did you know that the two play nicely together?

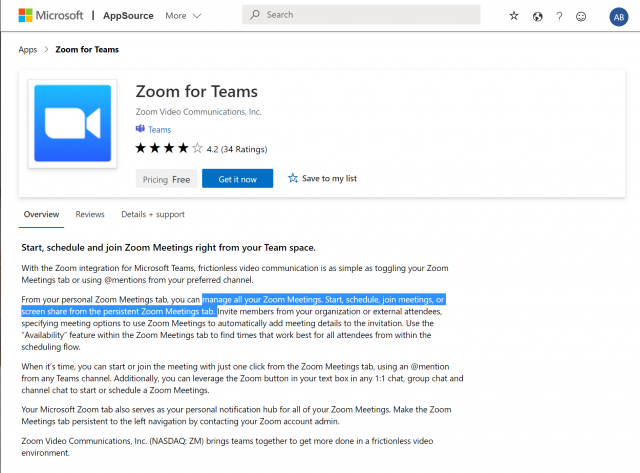
It recently became possible to integrate Zoom right into Teams, allowing you to manage all your Zoom Meetings, start, schedule, join meetings, or screen share from the persistent Zoom Meetings tab in Teams. That’s why, in our latest Microsoft 365 guide, we’ll show you how you can add Zoom to Teams.

Step 1: Check the Prerequisites

Before even thinking about adding Zoom to Teams, you’ll need a couple of things. Of course, you’ll need an active Zoom account so you can add the Teams plugin to configure things in your actual Zoom account to begin. You’ll also need to add Zoom to your Teams account too. Just be aware, that Zoom for Teams is not supported for Microsoft Teams in Microsoft 365 Government GCC.

Finally, you’ll also need a zoom email account such as a work email, or a Google login. In some cases, you’ll also need pre-approval of the Microsoft Teams integration in the Zoom Marketplace.

Please be aware, though, that a lot of this is up to your IT Admin. It’s not generally something you can do yourself, unless you have the right permissions, of course. Zoom also notes that you’ll need a paid Pro, Business, Education, or API plan to use the Zoom bot in a Team channel. Any other account, including free plans, will work with the  Zoom bot in a one-on-one.

In our testing, though, we managed to add a free-tier Zoom to our Teams account and into a Team channel. It works for us, but it’s best to check with your IT Admin to see if your accounts are truly compatible.

Step 2: Configuring Zoom for Teams

Zoom Pre Req

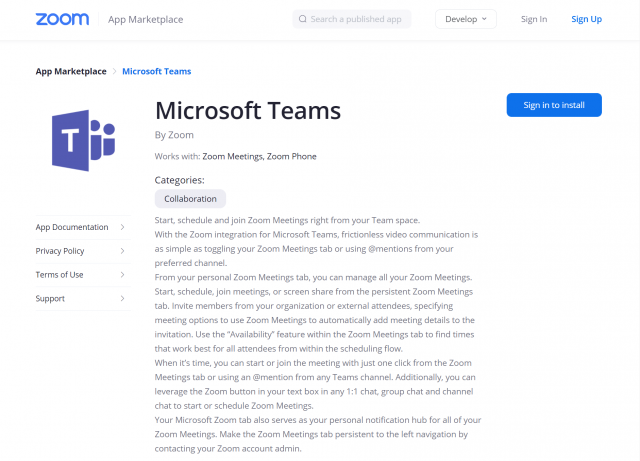
Next up in this process, you’ll need to configure Zoom for Microsoft Teams. To do this, log in with your Zoom account and navigate to the Zoom Marketplace. Search for Microsoft Teams, and then click the app. In some cases, the Teams app will need to be pre-approved. If it’s not, please contact your IT admin. Anyway, you’ll then want to click the Install button to confirm the permissions for the app and then choose Authorize. You’ll then be taken to your Teams account.

Step 3: Configuring Teams for Zoom

Teams Zoom Pre Req

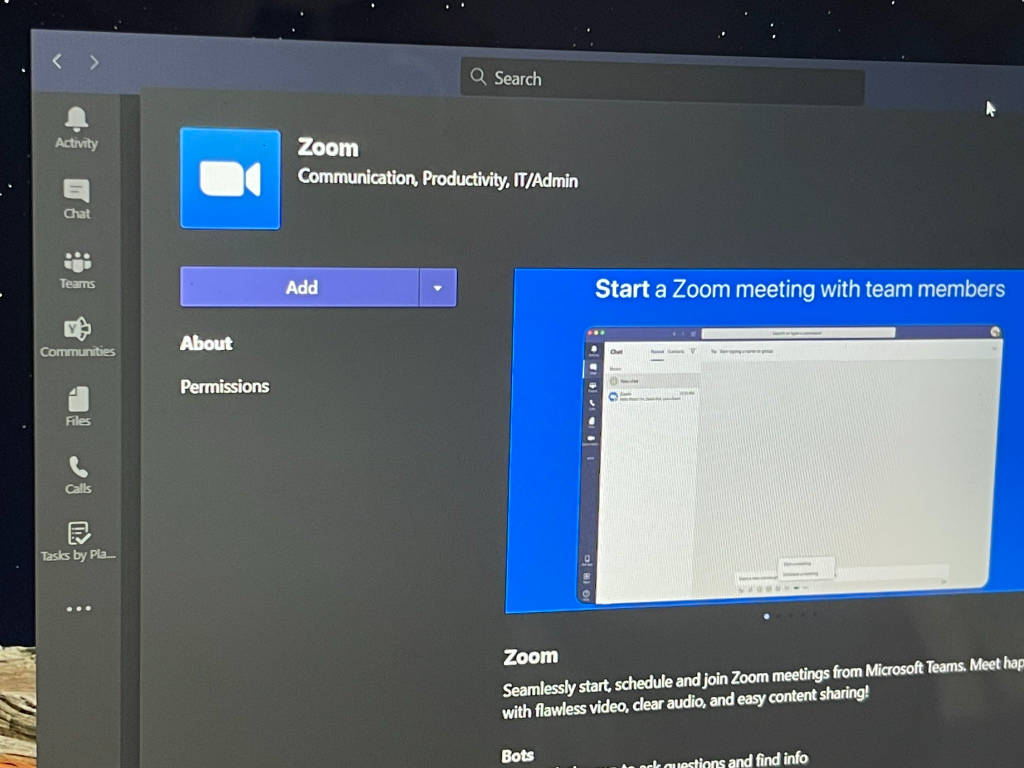
With Zoom configured for Teams, you can now move on to configuring Teams for Zoom. Head into Microsoft Teams, and click the Apps button in the sidebar. Where it says Search all apps you can type in Zoom. If you’re not finding it, then you can click this link here to visit the Microsoft App Source, followed by Get it now. This should open the listing in Teams.

Anyway, once you have the Zoom listing open in Teams, click the Add button. Or, you can click the down arrow and choose to Add to team or Add to chat so you can add it to a specific channel or chat in Teams. If you want to do this, then search and select the channel or team you would like to use with the Zoom Meeting integration. Then, choose Set up a bot and this will install both the Zoom Tab and the Zoom Bot for Microsoft teams.

Be sure to follow the Bot’s instructions, and once finished, you’ll be able to use the integration. You might be prompted to log in again with both your Office 365 and Zoom accounts.

Using the integration

Zoom In Teams

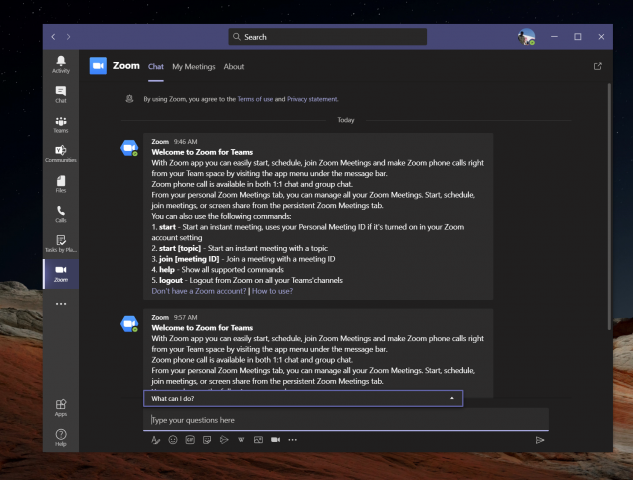
To use the Zoom integration in Teams, you can do a couple of things. First off, you’ll want to click the Zoom Meetings icon in the left toolbar. If you don’t see it, click the . . . and then choose Zoom. Then, click My Meetings. From there, you can sign in with your credentials.

With My Meetings, you’ll be able to schedule or start a meeting with anyone in your Teams organization that also has the Zoom app installed. Just click the My Meetings and then click Start a Meeting to set it up. Your Zoom meeting will then be started from your web browser. Your participants will then receive a notification that you have started a meeting and will give them the option to join.

In addition to starting meetings, you also can schedule meetings, too. Just choose to Schedule a Meeting. Once scheduled, you’ll be able to see the meeting on the upcoming meetings page in the Zoom tab, and the meeting will also be added to your Exchange calendar, too.

Zoom Meeting

Some other functions of the Zoom integration with Teams will let you share your screen. Again, you’ll input the meeting ID to share, and then the meeting will start via the web browser. Any meetings that you have scheduled or been invited to will show on the My Meetings page in the Zoom Tab.

We also want to touch on the Zoom Messaging Extension. The messaging extension is the Zoom button in the textbox toolbar next to any 1:1 chat, group chat, and channel chat. This button allows you to start or schedule a Zoom Meeting with participants in the chat.

Finally, there’s the Zoom Meetings Bot. Navigate to a channel with the bot installed, and you can type various commands. @zoom logout will log you out of your Zoom Account. @Zoom will show all commands. You can start an Instant meeting with @Zoom, and then Start. A full list of commands is available here, at Zoom.

Why you might want to zoom the Zoom meeting extension

If your company is using both Zoom and Teams, or you use Zoom for certain clients, and Teams internally, then this integration is great. Your Microsoft Zoom Meetings tab in Teams will be your personal notification hub, without having to go directly to the Zoom app or the web. It’s a nice integration that’s quite convenient.

6 Heavy-Duty Laptop Stands that are Adjustable & Ergonomic

Laptops are great portable computers offering excellent power and performance in small portable chassis. However, most of us end up using our laptops on the desk or bed for better comfort.

Keeping your laptops on the desk does come with its own issues. One of them is overheating. Due to the lack of breathing space, laptops on desks and beds get hot in no time.

The best way to fix this issue is to invest in heavy-duty laptop stands that are adjustable and ergonomic.

In this article, we have listed the best heavy-duty laptop stands that are adjustable and ergonomically excellent to reduce neck and shoulder pain.

What is the best laptop stand with keyboard support?

Roost Laptop Stand

  • Fully collapsable laptop stand
  • Durable and sturdy construction
  • Supports all sizes of laptops
  • 6-12 inch lift reducing neck and shoulder pain
  • Expensive

Roost Laptop Stand can hold nearly all weights of laptops. Unlike our first feature, this stand is all rubber and polycarbonate material making it lightweight without compromising the build quality.

It comes with rubber insets to secure your computer, and you can fully collapse it and carry it around when traveling in your backpack.

The universal fit on this laptop stands to support laptops of all sizes. It also offers from 6-12 inches of lit, elevating the laptop to your eye level.

UGREEN Laptop Stand

  • Smart and elegant design
  • Can accommodate laptops of up to 17.3 inch
  • Adjustable 360-degrees rotating base
  • Made of premium aluminum alloy
  • May be harder to carry with you on a trip

With a great design and build, the UGREEN Laptop Stand will make the perfect support base even for 17.3-inch screen laptops.

We tested the product and it felt sturdy, without wobbling motions. The grip strips hold the laptop in place while the swiveling movement of the base is smooth, allowing you to share the screen with anyone in the room.

You may tilt and raise the laptop so it can meet any possible viewing need and the venting holes allow the laptop to cool down perfectly.

The high-grade aluminum alloy makes the UGREEN stand very durable, yet light enough to be carried around when needed.

Soundance Laptop Stand

  • Fits laptops of all sizes
  • Detachable stand requires no tools for installation
  • Aluminum alloy construction
  • Durable and lightweight
  • May not support thin-base device

With its aluminum alloy construction, the Soundance Laptop Stand is a heavy-duty laptop stand suitable for laptops from 10″ to 15.6″. The solid metal construction means the stand is sturdier and has less wobble.

The rubber on the holder’s hands sticks tightly and ensures your laptop is stable on the stand. The rubber feet prevent the stand from slipping on your desk.

Moreover, the stand is detachable, making it easier to install and carry around without any tools. The ergonomic design elevates your laptop by 6 inches to your eye level and reduces neck and shoulder pain.

Rain Design mStand360

  • Suitable for laptops and MacBook
  • Can hold up to 8 pounds
  • Keyboard stash underneath
  • Anti-skid rubber protection offers good grip
  • Can be wobbly

Rain Design mStand360 is an ergonomically designed laptop stand that offers high screen height. It also brings the tilt design to improve airflow around laptops.

A super-slim 360 degrees rotating comes in handy if you want to quickly share your screen with your colleague or client without having to turn the laptop around.

Rain Design mStand360 features a single-piece aluminum design providing solid stability. Included cable outlet keeps your desk neat and organized.

AIRUIHE Tripod Stand

  • Sturdy metal frame
  • Multiple adjustable angles
  • Easy to organize cables
  • Sturdy tray with enough protection
  • Inconvenience placed keepers

AIRUIHE Tripod Stand is a laptop tripod stand that is perfect for studio and stage use. This metal stand can handle 11″ to 15.6″ laptops with its 9.5 x 7.5 platform.

The ergonomic design features a heavy-duty tray with support lips, sponge gasket, and elastic bands to protect electronics. You can adjust the height in multiple positions up to 42 inches as needed.

This rugged laptop desk works well as a portable laptop or notebook computer, projector, or audio equipment holder and can be used for various tasks.

Starument Laptop DJ Tripod Stand

  • Small desk footprint
  • Excellent air circulation
  • Minimal and good looking design
  • Easy to assemble and disassemble
  • A little wobbly at times

The Starument Laptop Stand is a laptop and mixer stand. It can elevate the laptop screen up to 52″, providing valuable real estate for the keyboard and mouse.

This all-in-one tripod stand can be used for laptops as well as projectors. It offers a sturdy, practical, and space-saving stand mixer for the equipment.

Working on a laptop by keeping it on your lap or desk can cause discomfort after a few hours. To get the best ergonomics, it is important to set-up the laptop at the right angle and height level.

All the heavy-duty laptops standard listed in this article are height adjustable, comes with good ergonomics and portability. Explore the list and let us know your pick in the comments.

Google may look to turn Windows 10 PCs and Macs into Chromebooks with CloudReady acquisition

Google has quietly acquired Neverware, a company developing CloudReady, a variant of Google’s Chrome OS to install on Chromebooks, Windows PCs and Macs. The acquisition was announced on Neverware’s website earlier this week (via ComputerWorld), and the company says that it has now joined Google’s Chrome OS team.

CloudReady is currently free to install for consumers on select devices certified by Neverware, but the Chromium-based OS is also available as a subscription with management capabilities for Education and Enterprise customers. Prices start at $20 per device annually for education customers and $49 per device per year for Enterprise customers.

“CloudReady will continue to be available as-is, and we’re committed to supporting and maintaining existing customers. Over the long term CloudReady will become an official Chrome OS offering, and existing customers will be upgraded seamlessly as that happens,” the company explained in an FAQ.

Since it’s based on Chromium OS, the open-source version of Google’s Chrome OS running on Chromebooks, CloudReady provides a familiar Chrome OS-like experience free of all the Google software you usually find on Chromebooks, including the Google Play Store. However, the “CloudReady will become an official Chrome OS offering” part of the announcement suggests that things could change in a pretty big way.

What if Google is planning to eventually turn CloudReady into a feature-complete version of Chrome OS that can be installed on Windows PCs and Macs? As of today, the only way to use Chrome OS is to purchase a Chromebook from Google or its hardware partners, but CloudReady could soon evolve into Chrome OS for everyone, complete with millions of Android apps to install from the PlayStore and the same management capabilities already provided by ChromeOS and CloudReady.

Chromebook Running Chrome Os
Chrome OS is no longer a glorified web browser.

In recent years, Chrome OS has been enjoying some real momentum in the US Education market, giving a real challenge to Windows PCs, Macs, and iOS devices. Microsoft is still working on its own alternative to Chrome OS with Windows 10X, a lightweight version of Windows 10 that will only ship on new devices starting next year. Windows 10X won’t support legacy Win32 apps at launch to focus on web and UWP apps, though Microsoft is still working on making Win32 apps run in containers on Windows 10X.

According to Windows Central, the first Windows 10X devices may launch in Spring 2021 for commercial markets, with consumer devices to follow in 2022. The new OS was expected to make its debut on Microsoft’s dual-screen Surface Neo this year, but this device has now been delayed and still has no release date. Windows 10X is reportedly being built for Chromebook-like devices, but again, it’s not something that consumers will be able to install on existing Windows 10 PCs, according to Windows Central.


windows 10x
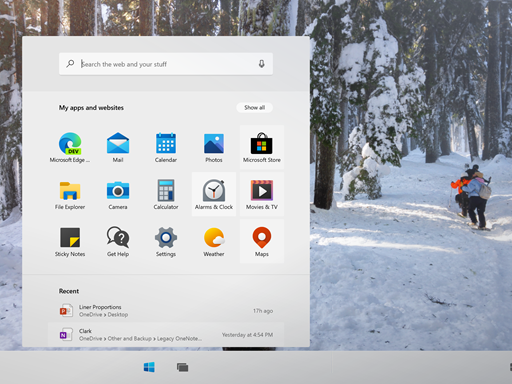
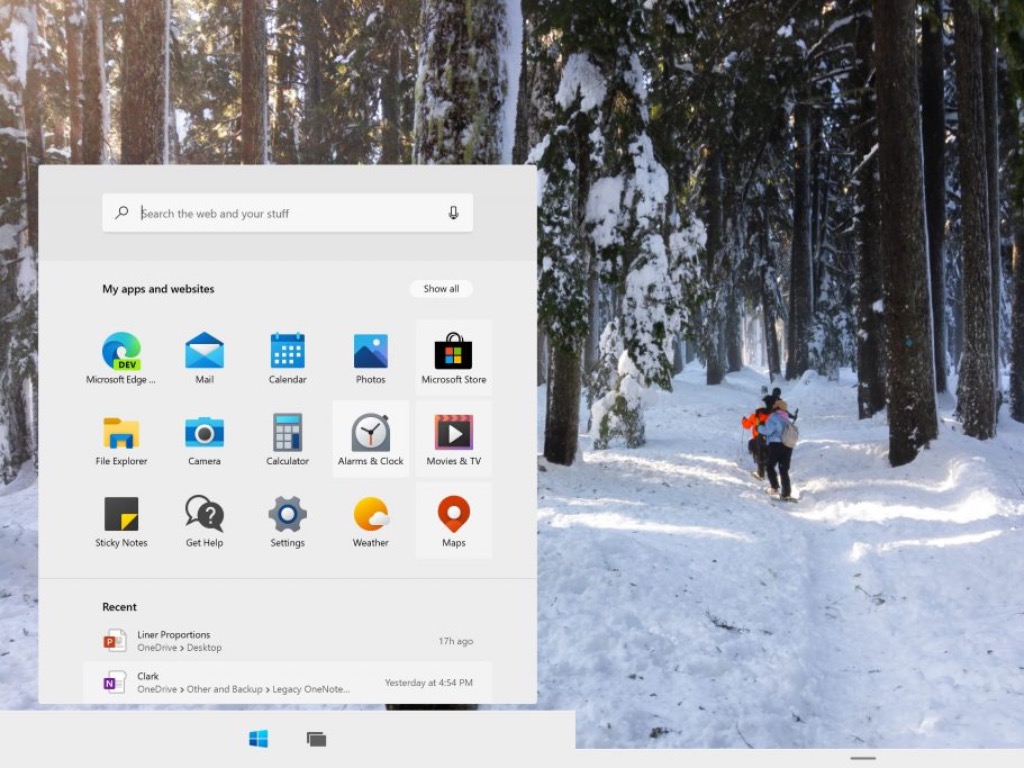
Windows 10X will introduce a new Start menu and desktop experience.

It’s too early to tell if Google is planning to take over the PC world with Chrome OS and CloudReady, but there’s certainly a demand for a lightweight OS that includes Google Chrome and Android apps, is secure by design and easy to manage for IT admins. This Neverware acquisition by Google could be a pretty big deal in the long run, and it suggests that Google is getting really serious about Chrome OS and the PC market.

Microsoft has been trying for years to compete with Chromebooks with initiatives like Windows 10 in S Mode, and it remains to be seen if Windows 10X can really appeal to commercial customers and the Education market. We’ll see what happens, but it took literally years for Chromebooks to really take off, and Google could finally speed up Chrome OS adoption with the help of CloudReady. With Windows 10X only shipping on new devices coming next year, Microsoft may have a difficult time convincing customers to adopt this new version of Windows 10 that will lack the huge ecosystem of apps that made Windows a real juggernaut in the PC market.

Best heavy duty laptop cases for extra protection

Laptop OEMs usually bundle their computers with a protective case. However, these cases usually don’t offer the extra protection that you need when travelling with your laptop.

Whether you have top-of-the-line high-end gaming or video editing laptop, or a basic word processing system, having a heavy-duty laptop cases goes a long way offering protection to your work tool.

In this article, we have listed the best heavy-duty laptop cases that are best for different types of users all offering excellent protection for your laptop.

What is the best heavy duty laptop case with pick foam?

Nacuwa Protective Case

  • 4 player protection for your laptop and accessories
  • Water, Dust, and Shockproof
  • Plenty of internal sleeves
  • Secure zip closure
  • Zipper close can be smooth

Nacuwa Protective Case is a computer carrying sleeve that is compatible with the new MacBook Air, Pro, Microsoft Surface and Chromebooks. It is a well-padded case that is also water-resistant.

Note that this case works with any 13.3″ laptop or below. The hard shell on top provides shock resistance form accidental drops, collisions and other impacts. It is also water and dustproof.

Nacuwa Protective Case features internal sleeves to carry your laptop, mouse, notepads, and other accessories in their own pouch. It comes with four layers of protection that include soft-touch coating, PU leather layer, heat-molded crush-proof layer, and shock-absorbing layer.


DOMISO Laptop Case

  • Multi-zipper closer
  • Shockproof and waterproof
  • Good for large size laptops
  • Plenty of storage space
  • Strap installation can be tricky

This DOMISO laptop case offers similar features as the Nacuwa case, except that you can fit in up to a 17-inch laptop in this case. Large screen laptops from Dell, MSI, Lenovo, LG and HP can fit in easily.

DOMISO comes in multiple patterns and colours. It is a shockproof and waterproof case where the outer shell is protected by premium thickened EVA material.

Inside the case, you have plenty of space. You can not only keep your laptop, but it also has sleeves and straps to keep your smartphone and laptop accessories. The multi-zipper design offers durable and smooth access to your laptop.


Pelican 1085

  • IP67 rated for water and dust protection
  • Removable shoulder strap
  • Easy open latch
  • Excellent foam protection
  • Latch feels flimsy

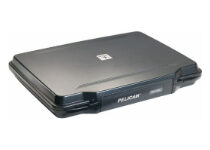
Pelican 1085 is a hard shell laptop case that can protect your laptops from accidental drops, dust, and water spills. It comes with an interior O-ring gasket that keeps it dry and free.

Pelican 1085 features Pick N Pluck cushioned foam that you can configure for a precise fit to your laptop for safe travel. The easy-open Throw Latch will keep the case shut even if the case is dropped.

It can fit a notebook computer up to 14 inches and comes with an automatic pressure equalization valve that keeps water and dust out. The included Shoulder strap is detachable as well.


Pelican 1095

  • Hardshell case for 15.6 inch laptops
  • Convoluted lid foam protection
  • IP67 rating for water and dust protection
  • Easy latch opening
  • Included straps are flimsy

Pelican 1095 is another foam coated laptop case that comes with IP67 water-resistant and dust protection rating from the company. It is designed to fit 15.6″ notebooks with ease with Pick N Pluck with convoluted foam.

The case creates a tight seal when it is shut using the Waterlight Gasket. Other features of the case include an automatic purge valve to keep water and dust out while balancing air pressure, a removable shoulder strap, and an easy-open latch that remains shut under pressure or after impact.


Casematix Waterproof Case

  • Hard and crushproof shell
  • Multiple protective foam layers
  • Water and dust resistant
  • Can fit large size laptops
  • Average foam quality

Casematix Waterproof Case is a hard shell laptop case that offers crushproof protection for 15″-17″ laptop and accessories including chargers, keyboards, mice, tablets and more.

Casematix case features a shock-absorbing foam interior that offers ultimate protection during accidental drops and collisions. It is also water-resistant.

Case’s hard shell is constructed from durable hard polymer composite plastic that offers maximum protection for your laptops and accessories.


Laptops are usually an expensive investment, so having a heavy-duty case can prevent damages due to accidental drops, collision or water spills to your laptop.

All the heavy-duty cases listed above offer shockproof and waterproof casing with plenty of space to carry your laptop and related accessories in one case. Go through the products and let us know what you pick in the comments below.

Refunding Cyberpunk 2077 may not be as easy as it sounds

It’s no longer a secret that Cyberpunk 2077 was the most anticipated game release in recent years, and neither is the fact that the launch managed to fall extremely short of expectations.

After being delayed and launched with a number of bugs under the belt, the game developers took action so that their customer’s satisfaction could still be (somewhat) guaranteed.

This ranged from urgent patch fixes such as update 1.04, to a reconsidering of their refund policy whereas they offered players the option of refunding the game on any of the platforms should they not be satisfied with the product.


Cyberpunk 2077 players are having trouble getting a refund

A few days ago CD Projekt Red officials stated that:

We would appreciate it if you would give us a chance, but if you are not pleased with the game on your console and don’t want to wait for updates, you can opt to refund your copy.

Unfortunately, CD Projekt Red most likely forgot that each individual store has different refund policies, and platforms such as Sony have a much different approach when it comes to the matter compared to Microsoft.

As an example, Microsoft refund policies for the Xbox platform state that:

Most purchases are not eligible for a refund after 14 days.

While the time frame is mentioned, there is no mentioning about wether the game can be refunded or not, and that the possibility of refund is open for debate from case to case.

On the flipside, Sony’s official refund policy states that:

If you have started to download or stream the purchased content you will not be eligible for a refund unless the content is faulty.


While this may make it sound like things are pretty clear, there have been posts on the Internet where users claimed that they got refunds from Sony even after playing a good couple of hours:

I had to file a support claim online and sit on hold for over an hour to speak with someone, however they were quick to issue the refund and then delete the game off my library.

They added that Sony was issuing a business complaint to CD Projekt Red about the issues, and that they weren’t the first ones to call for refunds.

On the other hand, there are those that have been refused a refund, and they even posted the conversations they had with Sony representatives.


Physicals copies of the game will be treated differently

However, this confusing situation is only for the digitally-purchased copies, since the refund policy for the boxed copies is controlled by the store that you’ve purchased it from.

That being the case, those of you that have boxed copies will need to visit your store‘s website and check out whether you’re eligible for a refund or not.


All in all, no one has a clear answer as to how the refunds for this game should be treated at a global scale, not CD Projekt Red, nor Microsoft, or even Sony.

Fortunately, you don’t have to feel sorry for CD Projekt Red, since they made more than enough revenue to compensate for the incoming refunds.


Have you tried refunding Cyberpunk 2077? If so, let us know how your refund request was treated by leaving us a message in the comments section below.

[wl_navigator]

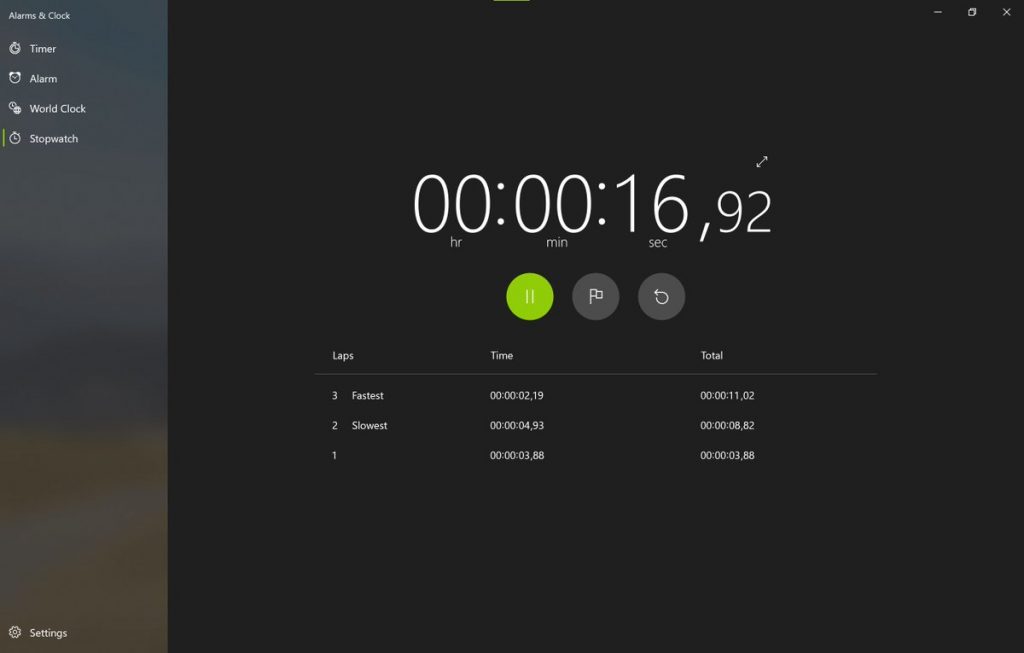
Windows 10 Insiders get Alarms & Clocks in-box app design refresh

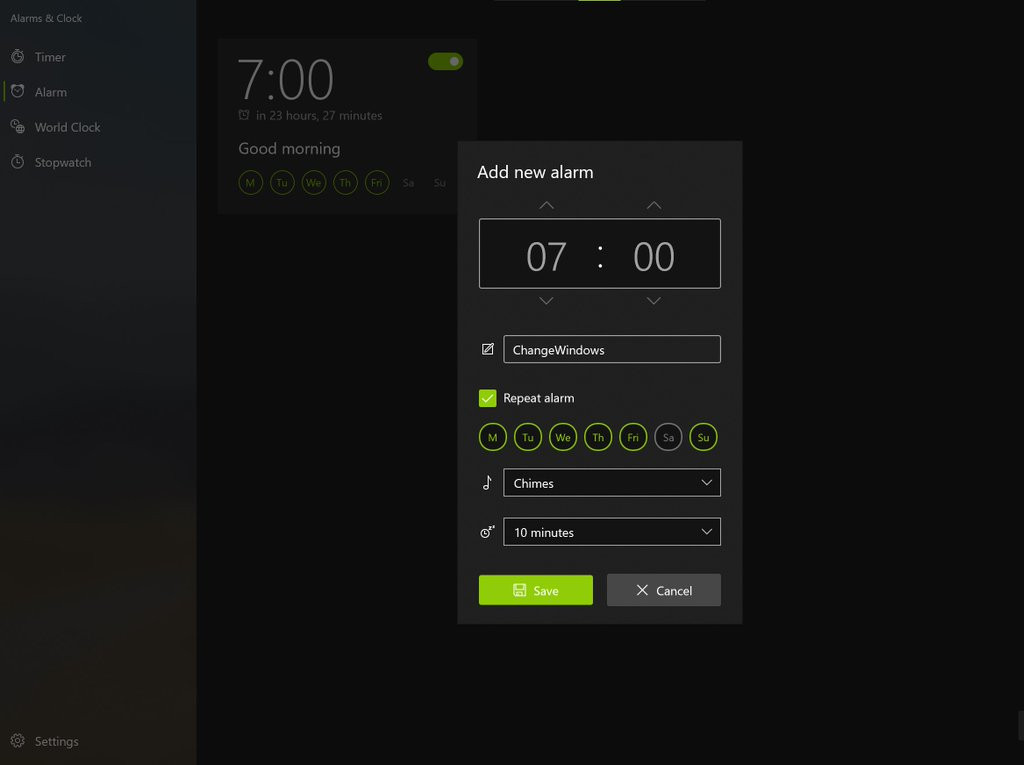
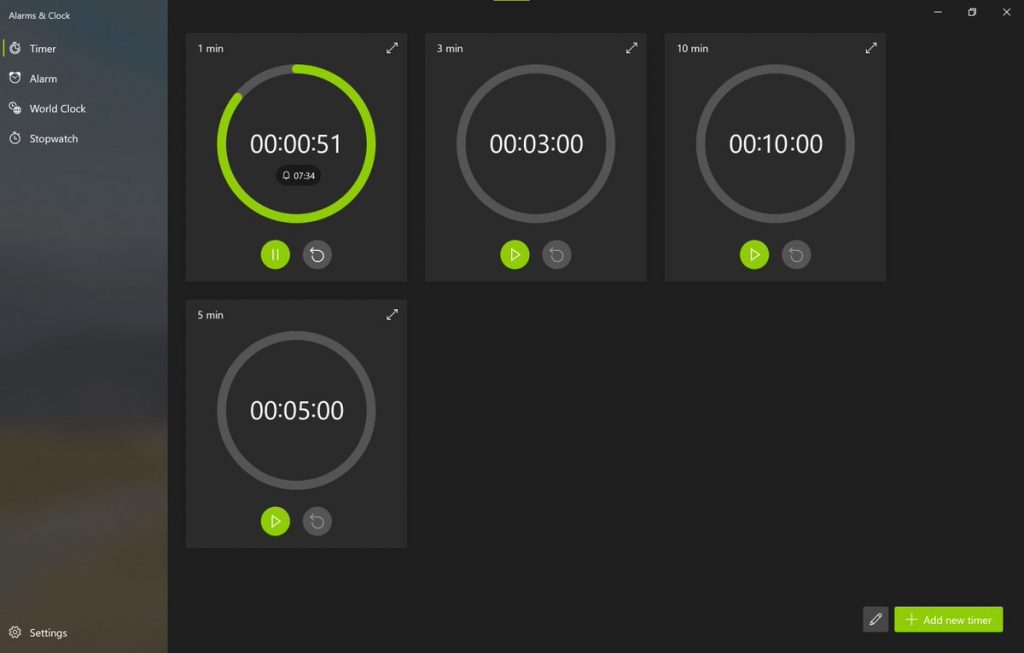
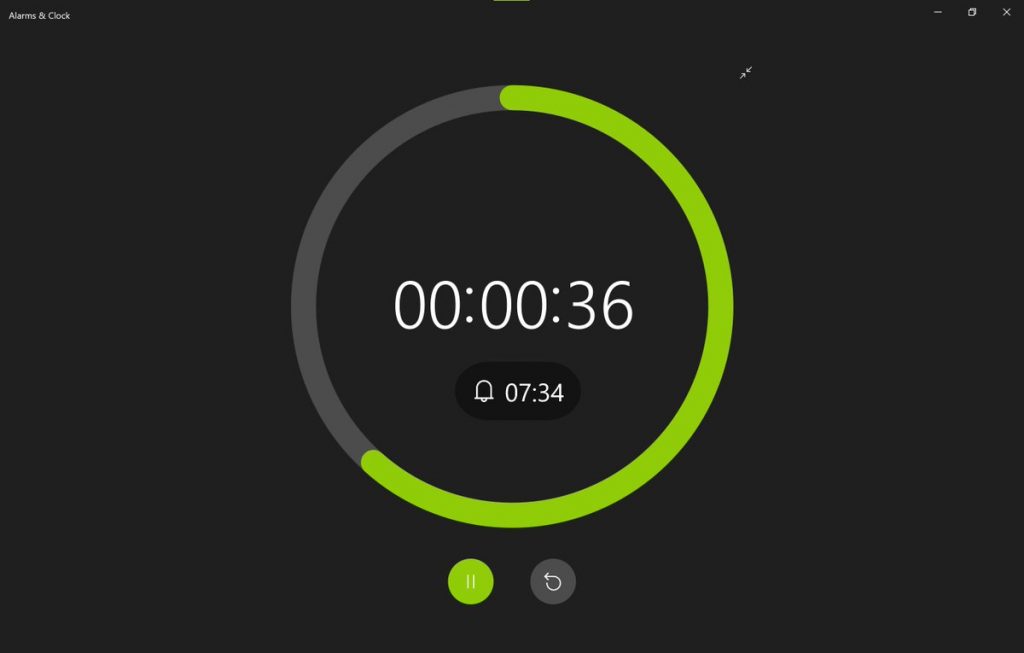
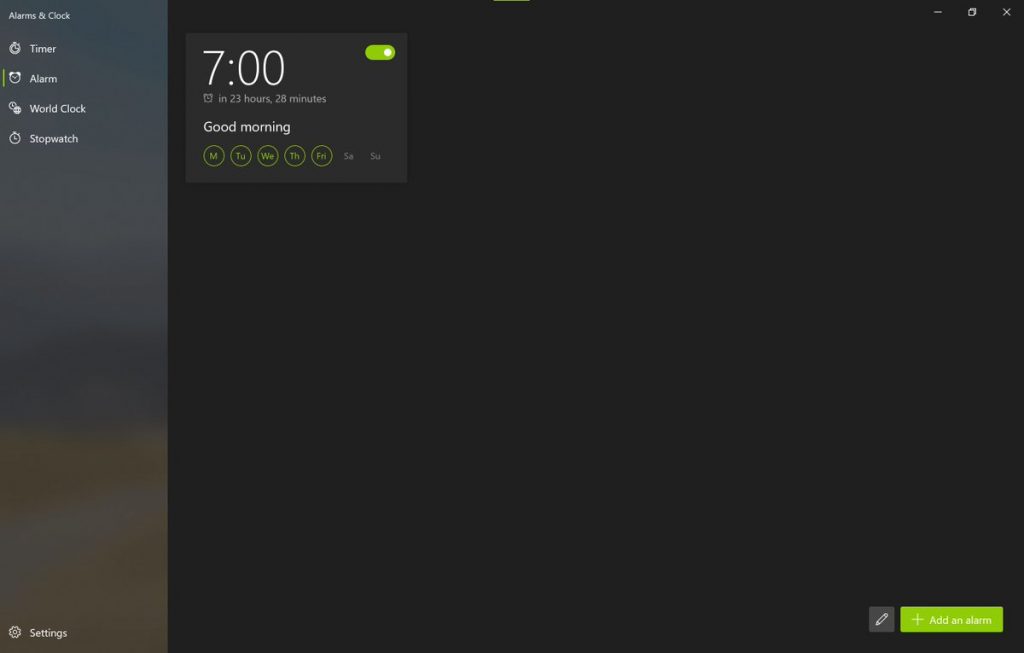
Microsoft’s in-box Alarm Clock app is getting a new UI design. Earlier today, images of the new design began surfacing on the internet with reports that version 10.2012 is bringing a more organized segmentation of functions.

A Medium post from ChangeWindows was among the first sites to start circulating images of the updated UI. The update appears to be part of rollout to Windows 10 Insiders and thus, some have had the update long enough to review the new updates while others (ourselves) are still waiting for it to hit their machines via a Microsoft Store update.

According to ChangeWindows, there is more than just a visual update to the app such as “Microsoft has added a few new default timers; 1, 3, and 5 minutes join the 10-minute timer in fresh installations.”

Other new niceties include:

  • The “Edit” button that you can see in the bottom right will allow you to quickly delete existing timers. Previously you’d have had to open them or right-click on them.
  • the alarms now show how long it takes before they go off (previously, you could only see this when editing an alarm
  • the edit and create UI has been condensed into a small and well-designed modal pin got a redesign, and their popups now show you if its night or day through an icon.
  • The light theme doesn’t use white as a background color anymore, it’s now light grey

Today’s update appears to be in line with reporting from a couple a months ago about Microsoft’s big Windows 10 redesign codename ‘Sun Valley.’

“I understand that this refreshed design will be an evolution of Fluent Design, and likely still called Fluent Design. Microsoft isn’t introducing a new design language with Sun Valley, it’s simply refreshing and refocusing the current one on desktop, and trying to apply it more consistently throughout the OS, a big feat for the legacy Windows desktop,” Bowden wrote.

As mentioned, the update is gradually hitting Insider devices so, be patient if you don’t see it immediately.

How to hide your IP address while browsing the Internet

There are countless reasons why someone would consider changing their IP address while navigating the Internet.

One obvious one is to avoid being detected by various malevolent agents.

Another good reason is that your online whereabouts should remain your own private business, and not available for anyone with an itch to see.

The bottom line is that nowadays it makes a lot of sense to cloak your digital identity from just about anyone, and the best way you can do that is by hiding your IP address.

Seasoned privacy veterans may already have a batch of tools and methods to achieve this, but less tech-savvy users need privacy too.

For that reason, we’ll carefully explain to you how IP addresses work, why you may want to change yours, and how to achieve this quickly and without effort.

What is an IP address?

To put it simply, an IP address is but a number that’s used to identify your device (e.g. computer, smartphone) on a network.

All Internet-enabled devices have two sets of IP addresses: a public address, and a private one.

The private one is used to identify your device on your local network, while the public one is available for a wider clientele.

Picture these IP addresses as parts of your physical home address:

  • Private IP address – the name of the recipient, which is ideally only known in the local network (neighborhood) and used for identification purposes
  • Public IP address – the actual address part which is used to pinpoint the recipient on the map

If you want to learn more about IP addresses and the way they work, you should take a look at our comprehensive guide.

Why should you change your IP address?

Changing your IP address may turn out to be a wise decision nowadays, what with all the privacy violations and cyber-attacks on the rise.

Mainly, you should change your IP address if you care about your privacy and security.

Privacy because not sharing your real IP address with anyone online gives you the upper hand.

Trust us, if done right, your IP spoofing could make even your ISP scratch their head when asked about your online whereabouts.

Now come security: if you play a game, or join an IRC chatroom, or do something that might expose your IP address, this piece of info could be easily exploited by a skillful hacker.

Thus, changing your IP address will basically redirect the attacks toward another machine.

How do I hide my IP address while browsing?

VPN

  • Purchase a VPN subscription plan (we recommend PIA)
  • Download the VPN client to your PC
  • Install the VPN and launch it
  • Log into your account
  • Connect to just about any server
  • Enjoy private, secure online browsing

A VPN is often deemed as the best way to spoof your IP address.

It requires minimum technical knowledge; after you deploy the VPN client and log into your account, all you have to do is select a server.

The VPN will route your connection through a secure tunnel and encrypt your traffic to protect you against traffic monitoring.

Additionally, a VPN does more than simply changing your IP address. It also unblocks geo-restricted content, changes your virtual location, and even blocks ads, malware, and trackers.

Private Internet Access (PIA) is one of the most popular and effective VPNs on the market.

It has a huge network of servers (over 22,000 and growing), so even if one server is full or doesn’t work as intended, you can easily switch.

Private Internet Access

Private Internet Access

Looking for a VPN that can hide your IP easily? PIA is exactly what you need.
Check priceVisit website

Proxy servers

Proxy servers are quite effective when it comes to changing your IP address, away from prying eyes.

Their operation mode is quite similar to that of VPNs. Meaning that using a proxy will route your traffic through the server you chose.

However, there are a few key differences. Most important, proxy servers work as gateways, which makes them ideal for browsing.

More often than not, a proxy server will only encrypt and hide the traffic for the apps you configure it with (e.g. your web browser, your torrenting client). Unless you configure a system-wide proxy, that is.

By comparison, VPNs encrypt all of your network traffic, regardless of your online activity (e.g. playing online games, browsing the Internet, streaming videos).

On the bright side, there are a lot of free proxy servers online, so if you need to change your IP quickly and without paying a dime, they’re a good alternative.

On the other hand, since they’re free, there’s a good chance that these proxy servers are already overcrowded and might slow your connection speed down to a pulp.

Tor

Tor is a popular way to anonymize your Internet browsing by changing your IP address.

Probably the best part about Tor is that it’s completely free and doesn’t require any rocket science degree to operate.

You just deploy the Tor Project kit on your computer, connect to the Tor network, and use the bundled browser to access the Internet.

However, note that Tor has gained some notoriety for letting users access forbidden content, which is why it’s probably (still) under surveillance.

Our suggestion is go ahead and try it, but make sure to steer away from any shady-looking website that hosts questionable content.

Psiphon

use Psiphon

Psiphon is not exactly popular among those who seek to change their IP address, and we keep wondering why.

You can download it and use it completely free, there’s no hidden fee associated with this service.

To some degree, its functionality resembles that of a VPN, but in reality, Psiphon has a slightly different operating mode.

Meaning that it combines various technologies, such as SSH, proxy servers, and VPNs to hide your real identity and bypass geoblocking.

On the other hand, Psiphon is subject to the same limitation as free proxy servers: overcrowded servers, which usually translates into slow connection speeds.

Furthermore, it also has a narrow network of servers, but that could be easily overlooked, considering it’s a free service.

Conclusion

All things considered, if you’re in need to change your IP address in a quick, effective manner, feel free to try any of our suggested methods.

Both paid and free alternatives we’ve depicted above work great at IP spoofing.

However, it’s worth mentioning that only a premium VPN service such as PIA will provide you with the maximum level of privacy and security you’re looking for.

FIX: VPN client unable to create interprocess communication

Cisco AnyConnect is a complex VPN tool that helps remote workers access enterprise resources in a secure, effortless manner, from any supported device.

This software utility also integrates advanced protection in order to block malware at endpoints, thus ensuring a safe work environment.

Despite Cisco AnyConnect’s straight-forwardness, certain users reported having a difficult time while trying to install or launch the program.

To be more specific, during installation or while trying to launch Cisco AnyConnect, users would be prompted with an error message:

VPN client agent was unable to create the interprocess communication depot.

As it turns out, this issue is not uncommon and has a couple of easy-to-follow fixes. Check them out below:

How can I fix the VPN client agent interprocess communication error?

Disable ICS (Internet Connection Sharing)
  1. Press the Win + R key combination on your keyboard
  2. Type control.exe /name Microsoft.NetworkAndSharingCenterRun accessory VPN Client agent was unable to create the interprocess communication depot
  3. Press Enter on your keyboard or click the OK buttonThe Network and Sharing Center VPN Client agent was unable to create the interprocess communication depot
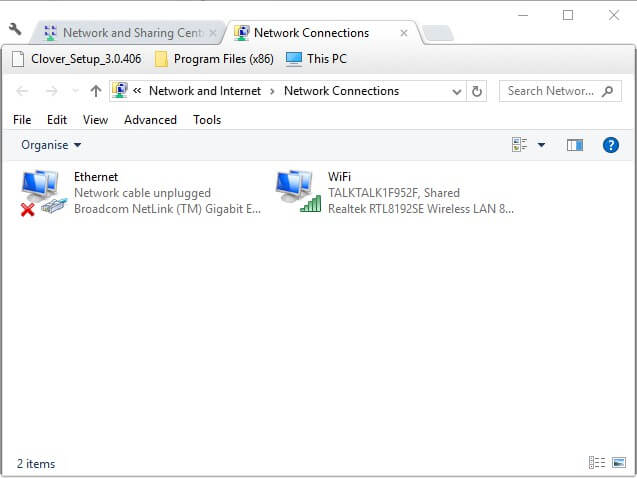
  4. Click the Change adapter settings button
  5. Right-click the shared network connection and select Properties
    Network Connections VPN Client agent was unable to create the interprocess communication depot
  6. Navigate to the Sharing tabconnection sharing options VPN Client agent was unable to create the interprocess communication depot
  7. Uncheck the Allow other users to connect through this computer’s internet connection box
  8. Click the OK button
  9. Repeat the steps above for every shared network connection
  10. Restart your Windows PC when you’re done

The Internet Connection Sharing feature is not compatible with Cisco AnyConnect.

Therefore, trying to run or install the VPN client on a system with shared network connections may end up prompting you with the error above.


Can’t install Cisco AnyConnect on your Windows 10 PC? Check out our guide and learn how you can fix this issue.


For that reason, make sure you’ve disabled ICS on all of your active network connections before installing/launching Cisco AnyConnect.

If the method above doesn’t seem to work for you, proceed to our second suggested fix below.

Disable the ICS Service

  1. Press the Win + R key combination on your keyboard
  2. Type services.msc and hit Enter on your keyboardServices window VPN Client agent was unable to create the interprocess communication depot
  3. Locate the Internet Connection Sharing service
  4. Right-click the service and select Stop from the context menu
  5. Double-click the Internet Connection Sharing serviceInternet Connection Sharing properties window VPN Client agent was unable to create the interprocess communication depot
  6. Select the Disabled option from the Startup type drop-down menu
  7. Click the Apply button then click OK
  8. Restart your Windows 10 PC after performing the steps above

Conclusion

All things considered, it’s easy to see that both solutions revolve around disabling the Internet Connection Sharing feature.

Most of the time, disabling the ICS straight from the shared connection should restore Cisco AnyConnect’s functionality.

However, if the issue has deeper roots, you may need to get your hands dirty and disable the ICS service altogether.

You can now enjoy Windows 10 Conexant audio drivers again

Conexant or Synaptics audio devices often fail to install correctly when updating your Windows 10 computer.

Therefore, it comes as no surprise the fact that Microsoft has partially addressed these known issues. The Conexant audio driver is an essential part of a software program that gives instructions to the operating system.

The instructions basically allow the operating system to process sound outputs and inputs from your sound card to the speakers and microphone.

Here’s what Microsoft reveals when it comes to these latest changes:

To safeguard your update experience, we have applied a compatibility hold on Windows 10 devices with affected Conexant or Synaptics audio drivers installed from being offered Windows 10, version 2004 or Windows Server, version 2004 until the driver has been updated.

Is there a resolution for safeguard IDs 25702617 and 25702660?

audio drivers

Windows 10 PCs with affected Conexant or Synaptics audio drivers usually received a stop error with a blue screen. This happens during or after updating to Windows 10, version 2004.

A corrupt driver will eventually stop sound from working. That’s why it’s great to hear that Microsoft partially fixed Windows 10 Conexant audio driver issues.

To be more precise, the problem was resolved for safeguard IDs 25702662 and 25702673. If there are no other safeguards that affect your PC, it can take up to 48 hours before the update to Windows 10, version 2004/version 20H2 is offered.

Moreover, Microsoft and Synaptics are working on a resolution for safeguard IDs 25702617 and 25702660 as well. We expect an update in an upcoming release.

In the meantime, to avoid further issues, you must not manually update using the Update now button. However, you can take a look at this quick guide on how to Conexant HD audio not working in Windows 10.

With these being said, let us know if you’re excited about this fix coming from Microsoft and if you’re ready to enjoy the update to Windows 10, version 2004/20H2 as well.

8 best tech Christmas gifts for parents [Creative ideas]

Are you still looking for a nice Christmas gift for your loved ones? If the answer is yes and the recipients are your parents who also happen to be retired, then look no further.

In this quick buying guide, we’ll list a few great gift ideas for tech-savvy parents. We carefully selected these items to compile a list that’s as helpful as possible.

What tech gifts would suit your parents?

A multifunctional Bluetooth speaker

Retired people have an awful lot of time to do whatever they want. Many choose to spend long quiet mornings listening to their favorite music.

In order to enjoy the best possible audio experience, they need a top-notch speaker. And this is a really good Christmas gift idea for your retired parents.

We did the heavy lifting work for you and found a few speakers that your parents will love:

  • 100ft wireless range
  • 10+ watt volume booster
  • 14hrs playtime
  • Flimsy USB charging port

  • Waterproof
  • 20 hrs of playtime
  • Powerful bass
  • The sound rendering is not very accurate

  • 30ft wireless range
  • 8 hrs of playtime
  • Bose technology
  • A wide variety of design colors
  • No set-up instruction provided in the package

A nice tablet for watching movies

Everyone wishes they had more time to watch movies. So a nice tablet that your parents can carry around and binge watch some series might be a good gift for this Christmas. 

Here are four Windows 10 tablets with top-notch displays that are perfect for watching video content:

  • 8'' HD display
  • 32/64GB internal storage
  • Up to 12hrs of battery life
  • Poor customer service

  • 10.1'' FHD display
  • Strong Wi-Fi connection
  • 64GB expandable memory
  • Short charging cable

A compact camera to snap quick photos

Offer your parents a reliable camera so that they can take pictures wherever they go. This gift will remind them of their first film camera and will bring back fond memories.

  • 180-degree flip screen
  • 32GB microSD card included
  • Cheaper than similar products
  • Poor picture quality

  • 4.2x optical zoom
  • Wi-Fi enabled
  • Touch tilt LCD screen
  • Video autofocus issues

  • Waterproof, shockproof, dustproof
  • 4x optical zoom
  • Wi-Fi connectivity
  • Poor quality for zoomed pics

There you have three Christmas gift ideas for your parents. If you have any suggestions or gift ideas, let us know in the comments below.

New features ease adding SharePoint content to Teams

Microsoft has announced that they have made further steps into a deeper integration of their two main collaboration tools. As a result, it is now possible to bring Teams into your SharePoint site, as well as the other way round – pin certain documents or lists to be added to the Teams channel separately, via the improved SharePoint tab.

All these recent changes focus on a stronger collaboration experience and ease team members’ access to all the important files that are work-in-progress in one application or the other.

This is not only making it more comfortable for team members to collaborate on the same resources, but it also encourages organizations to adopt the Microsoft suite on a larger scale, given such transparency and clarification features.

How to add Teams to your SharePoint space?

  1. While logged into SharePoint, select the lists, files, or pages that you want to add to Teams as tabs.
  2. Click the Add Teams button.
  3. Your team site home page will be selected by default, but you can change it according to your needs.
  4. If you need to navigate through the document library for selection, use the breadcrumbs.
  5. To collaborate in Teams on the recently added resources, make sure that all team members open the same document.

Using the SharePoint tabs into Teams

In addition to the mentioned new feature, same-team members can also pin  pages, library news, or lists to their Teams channel by clicking the “+” button and choosing SharePoint and the content.

Users will also see a new Recommended tab which contains the most relevant SharePoint content their team is working on, for a more direct access and selection.

add sharepoint content to teams

On this occasion, the SharePoint pages app in Teams also brings a few changes. Namely, users can now add a page from any SharePoint site link and then paste the URL of the page or news post that has to be added as a tab. Upon permission verification, users will either be taken to the respective page or offered the possibility to request access.

With such useful options, it is likely that SharePoint will become even more popular than the benchmark 200 million daily users announced recently.

The Gears 5: Hivebusters campaign DLC is now available on Xbox consoles and PC

Gears 5 is getting its first campaign DLC today, a little more than a year after the game’s release on Xbox One and PC. The new Hivebusters DLC adds a 3 hours campaign featuring Lahni, Mac, and Keegan, the three new characters first introduced in Gears 5’s Escape mode last year.

“Set in the Galangi islands, your adventures will take down treacherous lava flows, into dense jungles, and across sandy beaches all while fighting the Swarm and the Wakaatu, a deadly and never before seen predator. And to ramp up the action even further, each of our three heroes gets to use their Ultimate Abilities from Escape – yes, it’s time for some of Lahni’s sweet Electroblade action,” developer The Coalition explained today.

This new expansion adds 16 new achievements to Gears 5, and it takes advantage of the recent Xbox Series X|S optimizations including reduced load times, Quick Resume, and 4K HDR Ultra visuals on Series X. The Hivebusters campaign also supports 3 players co-op as well as cross-play between Xbox consoles and PC.

If you’re an Xbox Game Pass Ultimate subscriber, you can play this new campaign DLC for free on Xbox or PC with your subscription. For everyone else, the Hivebusters DLC can be purchased for $19.99 USD in the Microsoft digital store and Steam.

Gears 5: Hivebusters
Developer:
Xbox Game Studios
Price:
Free

FIX: Can’t install my language in Cyberpunk 2077 [Xbox]

In terms of gaming, few titles have ever had as much hype as Cyberpunk 2077, and even if the launch was plagued by all sorts of bugs and issues, it still managed to maintain a solid player base on all platforms.

However, many players have reported having issues with the game, meaning that they reportedly cannot install their regional languages on the Xbox console, especially those from Brazil.

Since Cyberpunk 2077 is a game of international proportions, we have taken it upon ourselves to create the below guide that will help you with your trouble.


How do I install my language on Cyberpunk 2077 properly?

Make sure you’re in the right region

By default, Cyberpunk 2077 will download and install itself based on the region you are currently it.

To install other than the primary language available to your region of the game, you’ll have to download it manually.

  1. Start your Xbox
  2. In Main Menu access Settings
  3. Go to Language
  4. Choose a language appearing as Not Installed
  5. Select the icon next to it
    • Make sure you have enough storage space

Remember that you can only download languages that are available to a given region, and that languages from other regions will not be available.

If that seems to be the case with you, then carry on to the next step for an instant fix.


On that note, here is a language breakdown for both physical and digital download versions of the game on Xbox One:

  • Americas
    • VO – English, Brazilian Portuguese, French
    • Text – English, Brazilian Portuguese, Latin American Spanish, French, Polish
  • Europe + Asia + Africa + Middle East 
    • VO – English, Russian, Polish
    • Text – Russian, Czech, Hungarian, English, Polish, Arabic, Turkish
  • Europe + Oceania + South Korea
    • VO – English, French, Italian, German, Spanish
    • Text – English, French, Italian, German, Spanish, Polish, Korean
  • Japan 
    • VO – English, Japanese
    • Text – English, Japanese
  • Asia
    • VO – English, Chinese
    • Text – English, Traditional Chinese, Simplified Chinese, Thai

Use a VPN

If you realize that your Xbox‘s region is the reason why you have issues with the language packs, then the obvious solution would be to change your Xbox region.

However, using a VPN is much easier than instantly traveling a thousand miles, so we recommend that you give Private Internet Access a shot.

This VPN is developed and maintained by Kape Technologies, the same developers that brought your other great VPNs, such as CyberGhost.

With over 23000 servers available in all regions around the world, PIA offers unparalleled coverage, and it will give your Xbox everything it needs in order to download the language packs your desire.

Simply install PIA on your Xbox, select a region that will allow you to download the language pack that you desire, and start downloading.

Private Internet Access

Change the region of your Xbox instantly with the help of a VPN that has near-global coverage. Take advantage of this amazing offer now!
Check price Visit Website

By following these steps, you should be able to install any language of Cyberpunk 2077 without any further issues.

Let us know how helpful this article was for you by leaving us your feedback in the comments section below.

Microsoft has been using Windows Insiders to test the Windows 10X code base, according to report

Microsoft released yesterday the Windows 10 build 20279 for Insiders in the Dev channel, which was a rare Monday flight from the Windows Insider team. The new bits bring no new features or bug fixes, and the team said that it just “wanted to test our ability to quickly follow-up a flight with another flight.”

Build 20279 is coming from the fe_release branch, which will soon disappear once all Dev channel Insiders start receiving builds from the rs_prerelease branch after the holidays. The Windows Insider team has never really explained the purpose of these two separate branches, and kept saying that builds coming from them were not tied to a specific Windows 10 release. However, Windows Central’s Zac Bowden is now reporting that Dev Channel Insiders have yet to test the upcoming 21H1 update for Windows 10 coming in the first half of next year.

According to Bowden, Microsoft has been using the fe_release branch to test the “Iron” codebase for Windows 10X, even though Dev Channel Insiders are currently not aware of it. “Microsoft is finalizing Windows 10X (and ultimately, the Iron codebase) with build 20279, so they’ve been pumping out bug fixes and changes big time internally, but none of that really translates to the desktop builds,” Bowden wrote.
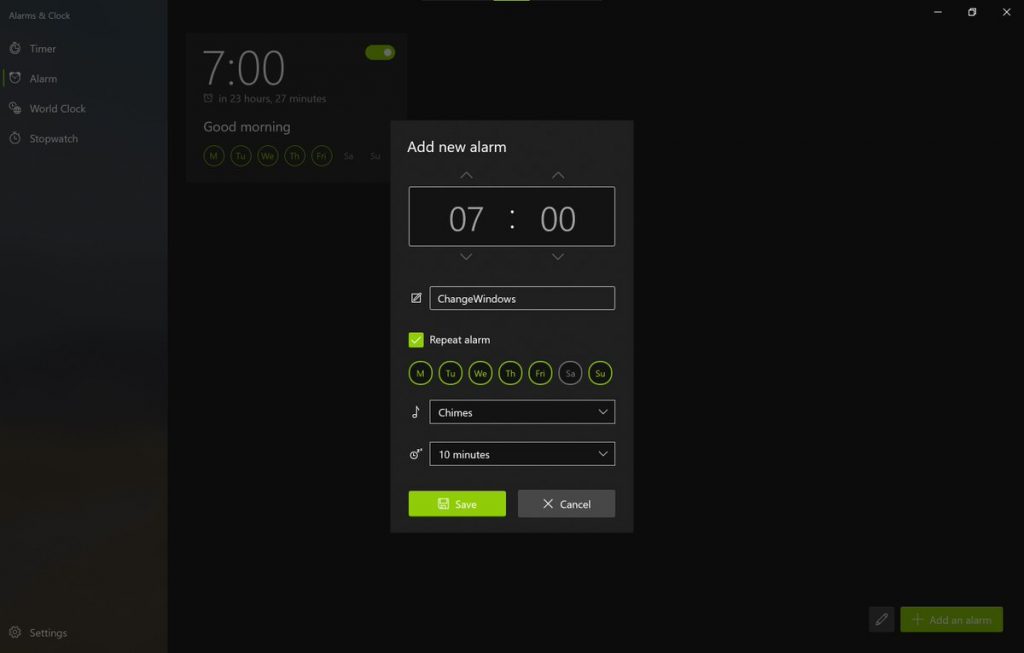
Windows 10X, which Microsoft is testing internally, is expected to launch on new devices in the first half of 2021. In the meantime, the Windows Insider team has reportedly used the “Iron” fe_release branch to test builds for the new OS, but Windows Insiders in the Dev Channel have yet to test 21H1 builds for the next Windows 10 update to be released in the first half of 2021.

“Windows 10 desktop will get its own 21H1 release, but it won’t be based on the Iron codebase. Instead, 21H1 for desktop will be based on the Vibranium codebase (version 2004) just like the 20H2 update released a few weeks ago,” Bowden explained yesterday. If 21H1 should be another minor update for Windows 10 next year, Microsoft could be planning bigger changes for 21H2 with a big design update codenamed “Sun Valley.”  

It’s not clear why the Windows Insider team isn’t being more transparent about what’s happening in the background, but shipping a series of builds with very minor changes for several months surely doesn’t help to keep Insiders engaged in the long run. Maybe the Windows Insider team has good reasons for keeping some of its secrets under wraps, but we hope it won’t be too long before Microsoft explains what’s happening with Windows 10X and future Windows 10 updates.

Microsoft’s Yammer app gains new image gallery and live event improvements with latest update

The Android and iOS versions of the Yammer app both received updates recently. Both versions included a redesign of the way multiple images are displayed in communications while the Android version also received support for a new fullscreen experience for live events.

Here’s the Android release notes:

  • We have updated the multiple image gallery layouts to improve the viewing of image previews on a post.
  • Ready to watch your live event in full screen? Now you can with our latest Android experience! Click fullscreen when watching your live event to see an immersive view!

And here’s the iOS release notes:

  • We have updated the multiple image gallery layouts to improve the viewing of image thumbnails in a conversation.
  • This update also has other improvements and fixes.

Do you use Yammer? Let us know what you think of this latest update in the comments below and then follow us on Pinterest and Twitter for more Microsoft app content.


‎Viva Engage
‎Viva Engage
Price:
Free

Xbox app updates on Android and iOS with new chat media functionality

Microsoft’s official Xbox app updated on both iOS and Android smart devices today. The update, which brought it to Version 2012.1207.2321 on iOS and Version 2012.1207.2233 on Android, didn’t make anywhere near as many changes as its recent major design revamp update but it did add some extra functionality to the direct messaging feature which users had been wanting for a very long time now.

Here’s the full release notes which are identical on both platforms:

Send custom images in Chats! You can now send photos from your device or directly from your camera to your Xbox friends via a Chat message.

Do you use the Xbox app on your iPhone or Android smartphone? Will you use this new image feature in chats? Share your thoughts with the community in the comments below and then follow us on Twitter and Facebook for more Xbox gaming news.

‎Xbox
‎Xbox
Price:
Free


Xbox
Xbox
Price:
Free

Fortnite video game updates with support for 120 FPS gameplay on Microsoft’s Xbox Series X console

Today’s update for the popular Fortnite video game is set to be an exciting one for players on all of its supported platforms as it adds a variety of seasonal items and activities to be enjoyed over the Christmas season in addition to some gameplay enhancements for both PC and new gen console owners.

After this update rolls out over the next few hours, those playing on Microsoft’s newly launched Xbox Series X and Xbox Series S consoles will be able to play Fortnite in 120 frames-per-second (FPS) if they so choose. Both consoles already supported 60 FPS so this will be yet another gameplay option for fans to experiment with.

It is worth noting that while the 60 FPS mode plays in 4K resolution on the Xbox Series X, playing in 120 FPS will bring the visuals down to 1440p. Both 60 and 120 FPS modes on the cheaper Xbox Series S console are locked at 1080p resolution.

On the other end of the technology spectrum, those playing Fortnite on a Windows PC with older or slower hardware can now try out a new performance mode via the game’s settings which will prioritise gameplay and speed over visuals.

December has been a big month for Fortnite. This month saw the end of the Marvel-themed Chapter 2 Season 4, the first ever Fortnite Crew monthly subscription, the addition of The Mandalorian’s Din Djin and Grogu with the launch of Season 5, and the arrival of Master Chief from the Xbox Halo video game franchise.

Are you a Fortnite fan? Let us know what’s excited you the most this month in the comments below and then follow us on Pinterest and Twitter for more gaming news.

Fortnite
Fortnite
Developer:
Epic Games Inc.
Price:
Free


Fortnite - 1,000 V-Bucks


Fortnite - Powerhouse Pack

FIX: TAP-Windows Adapter V9 error (4 foolproof solutions)

The TAP-Windows Adapter V9 is a network driver that’s essential for VPN connections.

More often than not, this network driver gets automatically installed along with VPN clients.

Usually, the driver’s default path is: C:/Program Files/Tap-Windows

However, certain users noticed that their internet connections don’t always work while the TAP-Windows Adapter driver is enabled.

What’s even more strange is that even disabling it wouldn’t work, as the TAP network driver would re-enable itself shortly after.

Therefore, users were still unable to establish a connection.

If that ever happened to you, check out some easy-to-follow suggestions that could fix your TAP-Windows Adapter V9 error.

How can I fix the TAP-Windows Adapter v9 error?

Use the Internet Connections Troubleshooter

The easiest fix would be using Windows’ built-in Internet Connections troubleshooter.

This tool can usually fix various connectivity issues, so it might be worth checking out.

Here’s what you need to do:

  1. Press the Win key
  2. Type troubleshoot
  3. Select Available Recommended troubleshooting
  4. Click the Available troubleshooters hyperlink
    troubleshoot TAP Windows Adapter V9 error
  5. Select Internet Connections and click Run the troubleshooter
    troubleshooter TAP Windows Adapter V9 error
  6. Select Troubleshoot my connection to the internet
  7. Go through the troubleshooting wizard’s steps

Reset the TAP-Windows Adapter Connection

Disabling and re-enabling the TAP adapter driver will (or better yet should) reset its network functions.

Furthermore, it may also fix the TAP-Windows Adapter V9 error and it’s a really simple task.

All you have to do is:

  1. Press the Win key on your keyboard
  2. Type network
  3. Select Network status
  4. Click on the Network and Sharing Center buttonnetwork and sharing center TAP-Windows Adapter V9 error
  5. Select the Change adapter settings optionnetwork connections
  6. Right-click the TAP-Windows Adapter
  7. Select Disable
  8. Right-click the TAP-Windows Adapter once more
  9. Select Enable
  10. Restart your PC and check if there’s any improvement

Reinstall TAP-Windows Adapter and VPN client

The best resolution for the TAP-Windows Adapter V9 error might be to reinstall the driver altogether.

However, considering that most TAP adapter drivers are a dependency for VPN clients, most VPN providers come with their own version.

Thus, it would be easier to just uninstall the TAP driver and your VPN client, and perform a clean install of both services after you’re done.

This is how you should reinstall your TAP driver and VPN client:

  1. Right-click the Start button
  2. Select Device Managerdevice manager TAP Windows Adapter V9 error
  3. Expand the Network adapters category
  4. Right-click the TAP-Windows Adapter V9
  5. Click on Uninstall device
  6. Select Uninstall to confirm
  7. Press the Windows key + R key combination
  8. Type appwiz.cpl and press Enterprograms and features TAP Windows Adapter V9 error
  9. Select your VPN software in the window
  10. Press the Uninstall button to remove it
  11. Proceed with the uninstallation
  12. Restart your PC shortly after uninstalling both services
  13. Reinstall your VPN software + TAP adapter driver

If you notice that reinstalling your VPN client and TAP adapter driver didn’t work, you might consider switching to a better alternative.

Private Internet Access, for instance, is an excellent VPN service that comes with its own TAP driver.

Furthermore, even if it stops working at some point, you can easily reinstall it directly from the VPN client’s configuration screen.

Private Internet Access

Private Internet Access

Did your TAP adapter driver stop working? Try using PIA as an alternative.
Check priceVisit website

Reset Windows 10

Apparently, resetting Windows 10 fixes the TAP-Windows Adapter V9 error in most cases.

You can reset Windows 10 and also keep your files. However, you’ll need to reinstall all the apps and drivers, as those will be swept clean from your PC.

Additionally, you’ll lose any configuration you did before resetting your PC.

Granted, this method is one of the most drastic ones, but it also gets the job done most of the time.

Follow these steps to reset your Windows 10 PC:

  1. Press the Win key on your keyboard
  2. Type Reset PC
  3. Click on the Reset this PC optionreset this PC Adapter V9 error
  4. Select Get startedchoose an option TAP-Windows Adapter V9 error
  5. Press the Keep my files button
  6. Click the Next button
  7. Select the Reset option to proceed
  8. Wait for the process to complete

Conclusion

To wrap things up, if you notice that your TAP-Windows Adapter V9 triggers various connectivity errors, there are some things you could try.

More often than not, reinstalling the TAP driver and VPN client will fix the issue.

However, you may need to go as far as resetting your PC altogether, so buckle up and don’t lose hope.

FIX: Hotspot Shield VPN stopped working (9 solutions)

Hotspot Shield has a huge fanbase, thanks to its blazing-fast speeds and the fact that it offers a free version.

So it’s not hard to imagine how devastating it must be for users when Hotspot Shield VPN stops working on their device.

Don’t worry: we thoroughly explored the functionality issues of this VPN service to help you repair the app and connect to a VPN server in no time.

How do I fix Hotspot Shield VPN if it stopped working?

Update the app

update Hotspot Shield VPN in Microsoft Store

It’s crucial to keep your VPN app updated to the latest version.

In addition to benefiting from the newest features, improvements and bug fixes, it’s also a good way to fix Hotspot Shield VPN if it stopped working on your device.

Users who downloaded the Hotspot Shield client from the official page can skip this step. That’s because the app gets updated automatically.

However, if you downloaded it from Microsoft Store, you might have to perform this checkup manually.

  • Open Microsoft Store
  • Click the three-dots button on the upper-right part
  • Select Downloads and Updates
  • Click the update button next to Hotspot Shield VPN

If you can’t update Store apps or encounter any other issues there, visit our Microsoft Store Troubleshooting Hub to fix any problem.

Check your Internet connection

A VPN service will have trouble connecting to the Internet if your network connection isn’t stable enough.

So you should verify your Internet speed and run multiple tests to determine the quality of your connection.

You might also want to consider switching to Ethernet mode if the Wi-Fi signal is poor on your notebook.

Hotspot Shield VPN has an integrated Internet speed tester that you can access from the main window. It measures your ping time, jitter and packet loss.

Make an exception for Hotspot Shield VPN in your firewall

Allow traffic for Hotspot Shield VPN in the Windows Firewall
  1. Press the Start button, type firewall, and select Firewall & network protection
  2. Click Allow an app through firewall
  3. Click Change settings (you need admin rights)
  4. Locate Hotspot Shield Free VPN in this list
  5. Enable the Private and Public options for its entry
  6. If the app isn’t listed here, click Allow another app to find it

Normally, Hotspot Shield VPN creates an exception for itself in the Windows Firewall when you install it.

However, if you’ve recently made significant changes to your security options, follow the easy instructions above to allow VPN traffic in your firewall for Hotpot Shield VPN.

Check if another VPN or proxy is running

fix VPN network adapter is being used by another VPN error in Hotspot Shield VPN

Hotspot Shield VPN won’t connect to a server if you have another VPN or proxy service running in the background. You can easily tell from the red banner that appears in the main window of the app.

To fix this problem, check if any other VPN or proxy apps are running in the background.

Keep in mind that manual VPN or proxy configurations you added using the Windows built-in features don’t apply here, so there’s a need to delete those.

We’ve noticed that the VPN network adapter is being used by another VPN. Disconnect the other VPN and try again message also appears if your TAP drivers are being used by the other VPN, even if the other VPN isn’t currently running.

In this case, you must completely uninstall the other VPN service before trying to connect with Hotspot Shield VPN again.

Change your DNS settings

  1. Right-click the Windows Start button and select Network Connections
  2. Click Change adapter options
  3. Right-click your Internet connection and go to Properties
  4. Double-click Internet Protocol Version 4 (TCP/IPv4)
  5. Select Use the following DNS server addresses
  6. Set Preferred DNS server to 8.8.8.8
  7. Set Alternate DNS server to 8.8.4.4
  8. Click OK
  9. Try to connect to a Hotspot Shield VPN server

Your DNS resolver might be not working properly, which could be why Hotspot Shield VPN isn’t connecting either. But you can easily fix this issue by changing your DNS servers on Windows.

In the example above, we listed the DNS servers of Google Public DNS. You can also try Cloudflare or OpenDNS.

Connect to another Hotspot Shield VPN server

connect to Hotspot Shield VPN locations

There might be a problem with the VPN server you’re targeting: too many connected users, the server is down for maintenance, or something else.

In that case, you can try to get Hotspot Shield VPN to work by simply connecting to another server. Make sure to explore multiple server options.

Reinstall the TAP-Windows driver

uninstall TAP Windows Adapter V9 from Device Manager
  • Right-click the Start button and select Device Manager
  • Expand Network Adapters
  • Right-click TAP-Windows Adapter V9
  • Select Uninstall device
  • Right-click any part of the screen and select Scan for hardware changes
  • Reinstall Hotspot Shield VPN
  • Launch the app and try to connect to a VPN server

If there’s a problem with the Windows TAP driver, it will prevent Hotspot Shield VPN from working properly. Using the steps above, you will force Microsoft to reinstall the TAP driver.

Then, you can reinstall Hotspot Shield VPN and try to connect to a server.

Flush your DNS and reset Winsock

flush DNS servers in Windows 10
  1. Run Command Prompt with elevated rights: press Ctrl + R, type cmd, hold Ctrl + Shift and press Enter
  2. Copy and paste the next lines (press Enter between each line)
ipconfig /flushdns

ipconfig /registerdns

ipconfig /release

ipconfig /renew

NETSH winsock reset catalog

NETSH int ipv4 reset reset.log

NETSH int ipv6 reset reset.log

exit

Restart your computer and try connecting to Hotspot Shield VPN.

The commands above are useful for quickly refreshing your network settings. It might be the reason why Hotspot Shield VPN stopped working properly on your Windows PC.

Switch to an alternative VPN service

PIA

If you can’t get Hotspot Shield to work, no matter what you try, perhaps it’s not 100% compatible with your device.

In that case, consider switching to an alternate VPN service that works with Windows, Mac, Android, iOS, Linux, and even routers: Private Internet Access.

PIA has a next-generation network of more than 21,800 VPN and proxy servers spread across 97 locations (76 countries).

It runs its exclusive DNS servers to protect your DNS queries and speed up your Internet connection.

More about PIA:

  • WireGuard and OpenVPN with up to 256-bit encryption
  • Unblock Netflix US for unlimited streaming
  • No IP, DNS or WebRTC leaks
  • A zero-logging privacy policy
  • 24/7 live chat support
  • 30-day money-back guarantee (no free trial)

Private Internet Access

If you are tired of fixing connection problems in Hotspot Shield VPN, consider switching to a more reliable VPN service like PIA.
Check price Visit Website

Conclusion

To sum up, you can try fixing Hotspot Shield VPN connection problems by updating the app to the latest version, checking the quality of your Internet connection, and ensuring that your firewall allows VPN traffic for this service.

Also, make sure that you don’t have another VPN or proxy running in the background.

Plus, you can change your DNS settings, connect to a different VPN server, reinstall the TAP-Windows driver, as well as refresh your network settings using CMD.

At the end of the day, if you still can’t get Hotspot Shield VPN to work, even after asking tech support for assistance, consider switching to a more reliable VPN service for your home network, such as Private Internet Access.

FIX: Can’t access TCP/IPv4 properties on PPTP VPN connection

Windows 10 may be a great operating system overall, but it also has its fair share of flaws.

Reportedly, some users can’t access TCP/IPv4 properties on a PPTP VPN connection.

Although this issue is not exactly common nowadays and is specific to older versions of Windows 10, it can still happen.

With that in mind, let’s see how we can restore the functionality of the TCP/IPv4 properties button with minimum hassle.

How to fix TCP/IPv4 properties button disabled

Update Windows to the latest version

Microsoft is aware of most major problems on Windows 10, and its development team is constantly working on fixes.

If you encounter the TCP/IPv4 properties button disabled issue, make sure you download and install the latest updates for Windows 10.

As with many other issues, installing the latest updates usually fixes this problem.

Thus, you can use Windows 10’s built-in Check for Updates tool to see if there’s any update available and apply it quickly.

Edit the rasphone.pbk file

All your VPN connection settings are stored in a certain file on your Windows 10 PC, called rasphone.pbk.

In order to fix the TCP/IPv4 properties button disabled problem, you can edit the file mentioned above.

Here’s how you can do that:

  1. Press Windows Key + R, type %appdata%, and press Enter
    tcp-ipv4-properties-pptp-vpn-appdata-run
  2. Navigate to the following path:
    • \Microsoft\Network\Connections\Pbk
  3. Locate rasphone.pbk and right-click it
  4. Open it with any text editor
  5. Edit the IpDnsAddress and IpDns2Address values
  6. Change the IpPrioritizeRemote=1 value to 0

If this seems a bit complicated, you can also create a rasphone.pbk file on another PC and transfer it to your computer.

Just create a VPN connection as you normally would on a different system and replace the rasphone.pbk file on your Windows 10 PC.

Create a new VPN connection

If none of the steps we’ve described above doesn’t seem to work, you can try creating a new VPN connection.

This doesn’t mean that you need to give up on using a PPTP VPN connection.

Just create a new one using the same credentials as your old VPN connection, and remove the previous, broken one.

After doing so, try accessing the TCP/IPv4 properties button on the new connection to check if everything is alright.

Use PowerShell

There’s another possible scenario where you can fix this issue by using PowerShell.

However, you should bear in mind that PowerShell is an extremely powerful tool.

If you’re not careful enough of have absolutely no idea what you’re doing, you could cause permanent damage to your operating system.

This is why we recommend you to sit this one out if you’re not confident in your PC skills.

If you’re ready to proceed and try to fix this problem using PowerShell, follow these steps:

  1. Press the Windows Key + S keys on your keyboard
  2. Type powershell
  3. Locate PowerShell on the list and right-click it
  4. Select the Run as administrator option
    tcp-ipv4-properties-pptp-vpn-powershell-admin
  5. Type Get-VpnConnection and press Enter
    tcp-ipv4-properties-pptp-vpn-powershell-1
  6. PowerShell should display a list of all the VPN connections on your PC
  7. Locate your current VPN connection and note it down it
  8. Type Set-VpnConnection -Name xxxxx -SplitTunneling $True (replace xxxxx with the name of your connection) and press Enter
    tcp-ipv4-properties-pptp-vpn-powershell-2
  9. Close PowerShell
  10. Restart your PC and check if there’s any improvement

Reportedly, this method only works for VPN connections that don’t allow other people to use it.


Want to learn more about split tunneling? Check out our comprehensive guide on enabling it on Windows 10.


If your connection is configured in another manner, you might have to delete it and create one that meets the requirement described above.

Otherwise, you won’t be able to fix the TCP/IPv4 properties button not displayed by using the PowerShell method.

Conclusion

To wrap things up, if you can’t access TCP/IPv4 properties on a VPN connection on Windows 10, there are a few things you could do about it.

First and foremost, we advise you to download the latest updates, as it may be the best way to solve the issue.

If you notice that applying the latest Windows 10 updates didn’t work, make sure to try any or all of our remaining suggestions.

Google services are down, including Gmail, Drive and YouTube

In a world where everything goes to and from Google, it’s hard to imagine what it would be like if all of their services would suddenly collapse.

Well, this unlikely scenario has just become very very, as pretty much all Google services, along with YouTube, seem to no longer be operational.


Google services are experiencing a total failure

According to DownDetector, the service disruption have barely begun less than an hour ago, but the number of reports have easily exceeded 2000 already.

Of course, not only Google is down, but its services are as well, including Google Drive and Gmail.

Those using Google Drive are met by an error code 500, an error message that we’ve covered before in this step-by-step guide.

Gmail users have even more problems, since they are met with a variety of error messages, all of which were also covered in the articles below:

Lastly, those of you looking for some online multimedia entertainment will also have to wait it out, since YouTube has also been affected by this total Google collapse, so don’t be surprised if you encounter the Something went wrong error.


Google and YouTube had a similar outage back in August, and the outage lasted for several hours.

This occurrence does nothing more than to remind us of how dependent we are of Google as a service, especially now in the context of a global pandemic when Internet use is higher than ever before.

Unfortunately, no word has come out yet from any Google official regarding the issue, but we hope that it will be short-lived.

How have you been affected by Google‘s services being down? Let us know by leaving us your messages in the comments section below.

[wl_navigator]

How to troubleshoot Google Drive error 500

Google Drive error 500 is an internal server error. That is usually a general server-side error that arises on websites. Google Drive users often complain about internal server 500 errors on support forums.

When that issue arises, users can’t open Google Drive in their browsers. If that issue arises when you try to open Google Drive in a browser, follow the troubleshooting steps below.

How can I fix Google Drive error 500?

1. Refresh the page

First, try refreshing the Google Drive page by clicking the Reload button on your browser. The button is usually on the left or right side of browser URL bars.

Moreover, if you happen to be a Google Chrome user, then don’t hesitate to press the F5 hotkey to refresh the page.

Reload button google drive error 500

2. Enter an alternative Google Drive URL

Google Drive users have said they’ve fixed error 500 by entering the following line in the address bar:

https://drive.google.com/drive/

So, copy it with the Ctrl + C hotkey. Then, click in your browser’s URL bar, and press the Ctrl + V hotkey to paste that URL in.

Google Drive URL google drive error 500

3. Clear the browser’s cache

  1. Start by pressing the Ctrl + Shift + Del hotkey in the browser.
    Cached images and files option google drive error 500
  2. Then select the All-time option in the drop-down menu.
  3. Select the Cached images and files option.
  4. In addition, select the Cookies and other site data checkbox.
  5. Press the Clear data button.

Try clearing your browser’s cache, which will also clear the cached version of the Google Drive page. Therefore, refer to the above procedure in that regard.


4. Open Google Drive in another browser

Try opening Google Drive in an alternative browser. Chrome, Firefox, Internet Explorer, Edge, and Safari are browsers that are fully compatible with Google Drive.

So, make sure you’re utilizing Google Drive with one of these browsers as well.

The Google Drive page google drive error 500

If you are looking for a browser that emphasizes speed and keeps you away from such errors, then check out this dedicated list.


5. Is Google Drive down?

If none of the above suggestions resolve error 500 for Google Drive, there is a chance that Google services are down.

To check if that’s the case, open the G Suite Status Dashboard page. That page shows the current status of Google services.

A red circle for Google Drive will highlight that there’s currently a wider service outage for Google Drive.

G Suite Status Dashboard google drive error 500

If there is a service outage, there’s nothing you can really do to fix the matter. Wait for Google to resolve a server-side error. However, the above resolutions might occasionally fix Google Drive error 500 for some users.

Let us know which of the previously mentioned methods worked best for you by leaving us a message in the comments section below.

Office 365 admins can now exclude specific files from OneDrive sync

Last month, we reported that Microsoft was working on a new Office 365 policy that would allow admins to prevent users from uploading specific files to OneDrive or SharePoint. The Microsoft 365 roadmap entry indicates that a new OneDrive update (version 20.201) that supports this new policy is now rolling out for all users globally.

To block the upload of specific file types, you’ll need to go to the OneDrive Admin Center and click the “Sync” option available in the left pane. Now, select the “Block syncing of specific file types” option, and type all the file name extensions you want to block. Finally, hit the “Save” button on the Sync page, and restart the OneDrive sync app.

The Sync page of the OneDrive admin center

“If you enable this setting, the sync app doesn’t upload new files that match the keywords you specified. No errors appear for the skipped files, and the files remain in the local OneDrive folder. In File Explorer, the files appear with an “Excluded from sync” icon in the Status column. The OneDrive sync app must be restarted after this setting is enabled for the setting to take effect,” the company explained.

File explorer

Once this Group policy is enabled, users will still be able to upload excluded files from their local OneDrive folder by using the OneDrive for Business web app. However, the company recommends users to delete the excluded local file in the OneDrive folder to prevent a sync conflict with that skipped file. You can learn more details about this new Group Policy on this support page.

You can now sync passwords from Edge for Windows to Android

The Microsoft Authenticator app is regularly updated with new capabilities. With the latest beta build for Android devices, users can synchronize their passwords stored in the Edge browser for Windows.

The new feature makes it possible to securely transfer passwords between more devices that are linked to the same Microsoft account.

All passwords entered on Edge for desktop are automatically suggested on the smartphone as well. So, your precious passwords are now available pretty much everywhere you need to go.

There’s no wonder that users all over the world are excited to discover this new feature. Here’s what one of them says:

If you use the Microsoft Edge on PC and save your passwords on it, the Authenticator now can get these passwords and use on any app or browser on Android.

What should I know about securely syncing my Edge passwords?

passwords saved in Edge

Microsoft Edge already syncs bookmarks across your PC, Android, and iOS devices. Therefore, synchronizing passwords with Microsoft Authenticator is a nice addition.

After all, this is the new default browser on Windows 10. Plenty of users are already enjoying it on their PCs.

As a current Microsoft Authenticator, keep though in mind that the feature is still being tested. At the moment, not all users of the beta version have the chance to sync the passwords saved in their browser.

That’s a matter of waiting, assuming that you’ve registered for the beta program. As for those of you worried about their safety, the Authenticator app provides a high level of security when it comes to managing passwords.

What do you think about the fact that credentials that are saved on your Windows 10 PC can be available on your Android smartphone too? Let us know your opinion in the comments area below.

5 of the best rolling laptop bags for easy transportation

Standard laptop bags might be ok for short trips. However, users who frequently travel with their laptops might need rolling bags that they can pack more into.

This type of laptop bag features wheels and additional storage compartments that you can take it through airports and train stations with ease.

Rolling laptop bags come in different shapes and sizes. The best rolling laptop bags have nice aesthetic designs, organizer compartments, durable builds with quality fabrics, and plenty of storage space. These are some of the rolling laptop bags that are worth noting.

What are the best lightweight rolling laptop bags?

AmazonBasics Laptop bag

  • Good value
  • Lightweight and easy to carry
  • Spacious inner compartment
  • It doesn't quite fit 17.3-inch laptops

The AmazonBasics Laptop bag is among the more lightweight and slim-rolling laptop bags. This is a versatile bag that can fit 15.6-inch laptops.

Its velcro strap fully secures laptops. The AmazonBasics Laptop bag also includes an especially spacious inner compared that users can pack a lot into.


Solo Classic New York Bryant

  • Fits the biggest laptops
  • Comes with a five-year warranty
  • Good durability
  • Doesn’t include lockable zippers

The Solo Classic is a very stylish rolling briefcase bag that incorporates a padded compartment that can fit 17.3-inch laptops.

So, this bag can fit almost all laptops; and it includes additional front pockets to fit files, pens, notepads and more besides.

This is also a durable, long-lasting bag thanks to its polyester exterior.


Targus Compact Rolling Backpack

  • Durable polyester backpack
  • Secure storage side compartment
  • Includes a tablet pocket
  • Elastic straps included for clothing
  • Limited warranty

The Targus Compact Rolling Backpack is a bit different from the other bags with briefcase designs. This is a rolling laptop bag that’s also a backup. So, you can carry it as a backup or roll it around travel stations when it gets a bit too heavy.

This bag includes a padded sleeve that fits 15-inch laptops and a smaller pocket for tablets. Its main compartment can fit large folders and books.

The Targus Compact Rolling Backpack also has a front outer compartment and a zippered side pocket that are ideal for holding stationery items and phones.


Solo New York Walker

  • Premium leather design
  • Includes internal dividers for items
  • Lengthy five-year warranty period for the bag
  • It’s pricey

The Solo New York Walker is a rolling briefcase with a premium and stylish Colombian leather design.

It incorporates an expansive main compartment that can hold 15-inch laptops. This bag’s organizer section has a handy pen, card, and mobile slots. You can also fit additional items in its front section.


Heritage Travelware Streeterville

  • Durable 1680D polyester body
  • Includes lockable zipper compartments
  • Big enough to fit two laptops
  • Includes an organizer compartment
  • Its wheels can jam

The Heritage Travelware Streeterville is a large laptop roller bag that’s ideal for holidays and longer trips. This bag is large enough to hold a 17-inch laptop and an additional 15-inch laptop. This bag’s central compartment incorporates a padded PC pocket and straps for larger 17-inch laptops.

The Travelware Streetervile’s six compartments provide plenty of storage for clothes and other things. It incorporates extra mesh pockets for smaller items. Yet, this bag remains surprisingly lightweight (about 7.5 Ibs) for one of its size with many compartments.


Those are five of the best rolling laptop bags you can carry portable PCs and other things with. With their retractable handles and wheels, multiple storage compartments, and durable builds, they’re ideal bags for travelers or commuters.

Cyberpunk 2077 is reportedly profitable since day 1

There’s no denying that many players have been waiting for Cyberpunk 2077 to be launched ever since it was first announced 2 years ago.

The game has been through a lot of development, and the marketing around it has been extensive, drawing players ever closer to a world created by the same developers that brought your the Witcher series.

The product was then polished and tested extensively, which inadvertedly lead to delays, and despite being still being launched with numerous bugs, it still managed to break several records.

Well, all that hard work has apparently paid off, and we say that in a very literal sense.


Cyberpunk 2077 made it’s money’s worth back since launch day

CD Projekt Red has really outdone themselves this time, as they have announced in their 65/2020 financial report how the development and marketing costs for Cyberpunk 2077 have already been covered through pre-purchases and purchases made since the first day of launch:

The Management Board of CD PROJEKT S.A. with a registered office in Warsaw (hereinafter referred to as “the Company”) hereby announces that the estimated licensing royalties receivable by the Company in association with pre-order sales of Cyberpunk 2077 across all of its digital distribution channels have exceeded the sum of the following:

– total development expenditures related to the game, and

– the game’s marketing and promotional costs borne by the Company – either already incurred or anticipated for the remainder of 2020.


This report says a lot about the game, especially given how bug-riddled it turned out to be on all platforms.

However, CD Projekt Red took responsibility of the entire matter and have taken extensive measures to make sure that players are still satisfied with their product. 

This includes offering refunds, creating dedicated help pages for their most frequently found issues, launching hotfix after hotfix, and more.

All in all, one thing is clear: CD Projekt Red is pure profit from now on, even if the margin is slower due to the state of the game during release.


Were you expecting Cyberpunk 2077 to be so successful? Let us know what your expectations for the future are by leaving us your opinion in the comments section below.

[wl_navigator]

Xbox teams up with PlayStation and Nintendo to promote safer gaming

As video games are undoubtedly going to play a big role in the upcoming holidays, Xbox, PlayStation, and Nintendo are joining hands today to promote safer gaming. It’s not often that we see the three brands come together to push the video games industry forward, though the days when Sony blocked cross-play on Minecraft to protect younger players are now way behind us.

“At Xbox, we are aligned with both Nintendo, on behalf of the community of Nintendo Switch players, and PlayStation in our belief that protecting players online requires a multidisciplinary approach – one that combines the benefits of advanced technology, a supportive community, and skilled human oversight. We can accomplish more when we work toward the same goal, and so we will each continue investing in, evolving, and amplifying our approaches to user safety” wrote Dave McCarthy, Corporate Vice President, Xbox Operations.

Microsoft recently launched an Xbox Family Settings app to make it easier for parents to manage child accounts on the go, and Xbox consoles currently provide various controls to protect children playing games online. Sony and Nintendo also provide similar controls to protect vulnerable players using their consoles, though the three companies believe they can do even better by working together on making gaming safer for everyone.

Going forward, Xbox, PlayStation, and Nintendo have agreed on the following three principles that will guide all of their future work on safety features:

  • Prevention: Empower players and parents to understand and control gaming experiences.
  • Partnership: We commit to partnering with the industry, regulators, law enforcement, and our communities to advance user safety.
  • Responsibility: We hold ourselves accountable for making our platforms as safe as possible for all players.

“While the video game industry has a long history of taking steps to protect gamers, especially children, we recognize that no one company or industry will solve these challenges alone. We welcome others to make and share similar commitments to players everywhere,” McCarthy said today.

There are certainly more things that Xbox, PlayStation and other companies can do at the platform level to protect gamers, and in the case of Microsoft, Xbox online safety and privacy settings let you decide who can see your Xbox profile details and how people interact with you and your content. You can learn more about how to manage Xbox online safety and privacy settings on this support page.

What’s going on with the Tasks app in Microsoft Teams? Here’s a look at the renaming and the new changes

If you found yourself using the Microsoft Planner app in Microsoft Teams a lot, then we have an important update for you that you might or might not have already noticed. As part of a move for Microsoft to better align its products, there’s a big name change happening.

Even further, not only the name is changing. The icon is changing, too. So, what’s the big deal? Today, we’re going to explain the changes, and what it means for you in the long run.

What’s up with the name change?

Microsoft Planner In Teams Name Change

First things first, we’re going to explain the phases of Microsoft changing the name for the Planner app inside Microsoft Teams. According to Microsoft, this name change is coming in three stages, which you can see in the chart above.

The first stage renames the mobile version of Planner in Teams to Tasks. This stage is now complete, and we’re now in the second stage of the changes. As part of this second stage, the desktop version of the Planner app in Teams is being renamed from Planner to Tasks by Planner and To Do. Eventually, the renaming will hit stage three, where it gets renamed to Tasks.

But why change the name now? According to Microsoft, this name change comes “help all customers easily find the new hero task management app in Teams.” Basically, Microsoft wants to put emphasis on all of its task management tools, and not just Planner. With the name change, Microsoft combines team tasks from Planner and individual tasks from To Do. Essentially, one hub for all your tasks.

What does this mean for me?

Okay, so what does this name change mean for you? Well, on the surface, there’s not a lot that you didn’t already enjoy. The name change does not affect the core functionality of Planner or Tasks in any way. According to Microsoft, the name and icon changes are just cosmetic. It doesn’t impact the Planner or the To Do standalone app. This name change is just about Teams, and putting both Planner and To Do, front and center on the collaboration platform.

We do want to note that the Tasks app in Teams does have some benefits over the old Planner experience, too. As we just explained, the Tasks app in Microsoft Teams brings together individual tasks from To Do and Outlook with your team tasks from Planner so you can more efficiently cross them off your lists. We’ll get into those in the next section.

What can I do in the Tasks app in Teams?

Microsoft Tasks App Microsoft Teams

So, what can you do with the new Tasks app in Teams? The answer to that question is, a lot! Once you get the Tasks app in Teams, you’ll see the two core experiences — My Tasks, and Shared Plans. My Tasks will have your lists from your To Do app (work accounts only) and the tasks you’ve added to To Do and Outlook, or anything you’ve been assigned in Planner. The Shared plans, meanwhile, includes everything you’ve added in Microsoft Planner, that have been added to Teams.

We’ve previously explained how the Tasks apps works with Teams, so we invite you to check that out here, for more information. But, we do have a quick summary or why you might want to use it. Keep in mind that the Tasks app in Teams has a List view. It displays tasks and information from both To Do and Planner and anything associated with them in rows and columns. This also allows you to change many tasks at once. This wasn’t possible in either To Do or Planner before.

The final stage coming soon, so get used to it now!

Now that you know what’s going on with Tasks in Teams, we have a final note for you. The third stage of the icon and name change rollout of Tasks in Teams desktop is coming soon. It’s a good time to get used to it, as this is the new thing for Microsoft moving forward. Again, check out our guide for more about the Tasks app in Teams, and let us know your thoughts in the comments below.