FIX: Error 421 cannot connect to SMTP server in Outlook

The server responded: 421 cannot connect to SMTP server error is basically associated with Microsoft Outlook accounts.

It occurs most often while trying to send an email message via the platform.

Although the most common cause is improper SMTP configuration, there are many other factors that could cause this error.

However, we’ll only focus on some of the most common ones, with emphasis on how to resolve the issue.

Read about our solutions in detail below.

How can I fix Error 421 cannot connect to SMTP server in Outlook?

Reconfigure SMTP settings

SMTP banner

The most probable cause, as stated earlier, is improper SMTP configuration.

Hence, checking the configuration is the first method we recommend in this guide.

To reconfigure your SMTP settings in Microsoft Outlook, follow the steps outlined below:

  1. Launch MS Outlook
  2. Click the File buttonoutlook file
  3. Click the Account Settings buttonoutlook account settings
  4. Select your account and then click the Change buttonoutlook account settings change
  5. Locate “Outgoing mail server (SMTP)” and enter the address (as provided by your web host)outlook Outgoing mail server (SMTP)
  6. Locate and click on More Settings.
  7. Navigate to the Outgoing Server tab
  8. Check the My outgoing server (SMTP) requires authentication option
  9. Select the Use the same settings as my incoming mail server optionoutlook Outgoing mail server (SMTP) use same settings as my incoming mail server
  10. Go back to the More Settings window and click the Advanced tab
  11. Under the Advanced tab, locate and change your port number, as provided by your Internet Service Providererror 421 cannot connect to smtp server outlook
  12. Save settings and close the program
  13. Check if the error is fixed: open Outlook and try sending an email

If the problem persists, we recommend you try our next fix.

Note: The above-outlined steps can be used with Microsoft Outlook 2016 and above.

Check your VPN

VPNs are basically used to mask locations and gain access to geo-blocked/geo-restricted sites and services, especially from restricted areas.

To some extent, this may interfere with your browsing behavior, including your access and transmission of emails in Outlook.

While VPNs have little or no direct influence on email transmission, VPN interference with Internet-based programs like Outlook is not uncommon.

Hence, you can check if the error is caused due to interference from your VPN by simply disabling it for a moment.

After disabling your VPN service, you can try to send an email; if the email goes through without an issue, the VPN is probably the cause of the error.

In this case, we recommend you try a different VPN service.  The best VPNs for Windows 10 PCs are up-to-date and continuously optimized to be as error-free as possible.

Check your antivirus

Most advanced antivirus and other security programs are pre-configured to perform checks on Internet-based activities and even set restrictions.

In rare cases, this could be the issue when The server responded: 421 cannot connect to SMTP server error occurs.

You can check, to ascertain the culpability of a security program on your system, by disabling it, and then try sending an email.

If the email goes through without a hitch, the security program (antivirus, firewall, antimalware) is obviously the cause of the error.

To resolve this, you can reconfigure your AV or security program to grant permissions or exclude the email SMTP server from all advanced security checks and restrictions.

If you have no idea how to go about this, you can easily disable the firewall or AV anytime you want to send an email and re-enable it shortly after.

Conclusion

All things considered if you’re getting The server responded: 421 cannot connect to SMTP server error while using Outlook, there are a few ways you can fix it.

Our recommendation is to try all of our suggested fixes one by one and don’t skip either one of them.

Check out our Outlook Hub to learn more about this Microsoft product.

Visit our Outlook Troubleshooting section for more fixes and easy-to-follow guides.

Have you successfully fixed the error? Which of our suggestions worked best for you? Tell us all about it in the comments section below.

FIX: Computer is stuck on 169 IP address [detailed guide]

If you find your computer stuck with a 169 IP address, it could generally mean either of the following:

  • The DHCP server is temporarily unavailable
  • The computer is not connected properly to the network
  • The computer is not authorized to connect to the network
  • The computer itself was unable to communicate with a DHCP server
  • Your router is wedged or jammed, and thus needs a reboot
  • WiFi or Internet connection isn’t working

The 169 IP range is reserved by Microsoft for private network addressing.

With that in mind, if your computer is configured to obtain an IP automatically, you may get one of those (169).

If this happens, the APIPA (automatic private IP addressing) checks to configure itself automatically with an IP address and a default class B subnet mask.

If you tried to reboot your computer/router and still find your PC stuck with a 169 IP address, we have a few solutions you could try.

What can I do if the Computer is stuck with a 169 IP address?

Check your system’s configuration

repairing boot configuration data

Some PC users might have made certain configuration changes to their systems.

Whether by updating the OS, upgrading to a major OS release, migrating to a new system, or performing a system restore, these can all affect your PC.

With that in mind, check for any recent changes on your system and try to roll them back one-by-one.

If you see no improvement, you can move to our other suggestions.

Reset your firewall

TinyWall firewall

One of the reasons that the 169 IP address is assigned is to let the network interface create an ad-hoc network without an established network.

This only happens if the network detects a proper hardware connection but can’t communicate with the DHCP server to get an IP address.

In this situation, more often than not, the culprit is the system’s firewall.

Therefore, it makes sense that resetting your firewall preferences and rebooting your system could fix this issue.

Reinstall the LAN network adapter

1. Right click your Start menu

2. Select Device Manager

computer stuck on 169 IP address

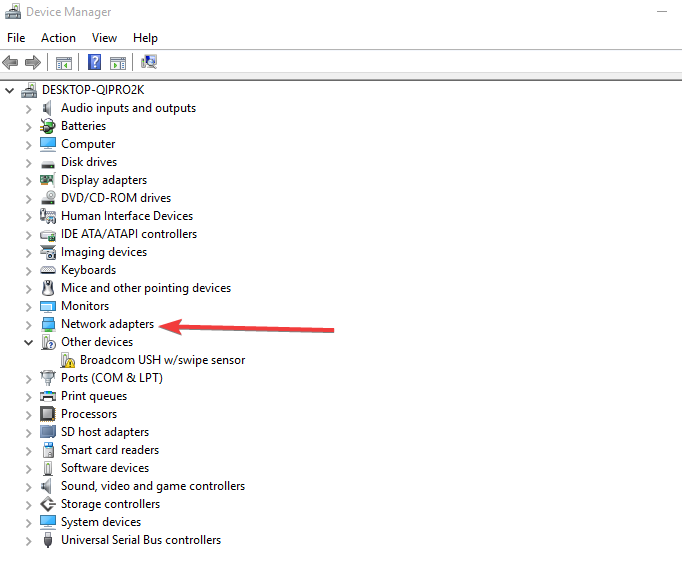
3. Find Network Adapters

computer stuck on 169 IP address

4. Expand the list

5. Right-click the LAN Ethernet adapter

6. Select Properties

7. Go to the Driver tab

computer stuck on 169 IP address

8. Click the Uninstall button

computer stuck on 169 IP address

9. Restart your computer

Reconfigure your IP

Wireless key mismatch error

1. Right click the Start menu

2. Select Run

computer stuck on 169 IP address

3. Type compmgmt.msc and press Enter

4. Select Device Manager

computer stuck on 169 IP address

5. Expand the Network Adapters list

computer stuck on 169 IP address

6. Right-click the troublesome Ethernet or Wireless Adapter driver (it may have an exclamation mark or error mark next to it)

7. Click the Uninstall button

computer stuck on 169 IP address

8. Right click the Network Adapters category

9. Select Scan for Hardware Changes

computer stuck on 169 IP address

10. Right-click the Start menu

11. Select Run

12. Type ncpa.cpl and click OK

13. Right-click your computer’s Network Adapter

14. Click the Properties button

15. Uncheck the Internet Protocol Version 6 (TCP/IPv6) box then click OK

computer stuck on 169 IP address

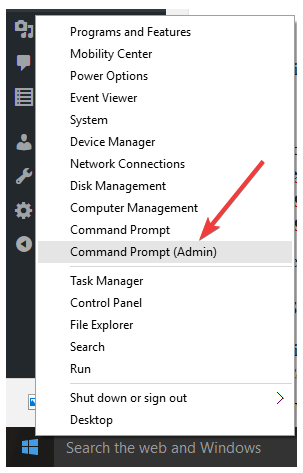
16. Right click Start

17. Select Command Prompt (Admin)

computer stuck on 169 IP address

18. In the command prompt window type the following commands, followed by Enter (for each of them):

  • netsh winsock reset catalog
  • netsh int ip reset reset.log
  • ipconfig /release
  • ipconfig /renew

19. Restart your computer and try to connect again

Use a VPN

  1. Buy a VPN subscription
  2. Download the VPN client
  3. Install it on your PC
  4. Launch the VPN client
  5. Log in to your account
  6. Connect to a server of your choice (regardless of location)
  7. Check if you’re still stuck with a 169 IP address

What a VPN does is it allows you to surf the web anonymously by assigning you a different IP address than your ISP-assigned one.

Thus, a VPN can not only keep you away from traffic monitors, spies, and hackers, but it can also prevent this type of error from occurring.

The best VPNs for Windows 10 have a large number of servers across the globe, allowing you a seamless connection at all times.

Disable fast startup

1. Right-click the Start menu

2. Select Control Panel

3. Go to the Power Options category

computer stuck on 169 IP address

4. Select the Choose what the power buttons do option

computer stuck on 169 IP address

5. Click the Change settings that are currently unavailable button

6. Scroll down to Shutdown settings

computer stuck on 169 IP address

7. Uncheck the Turn on fast startup option

computer stuck on 169 IP address

8. Click Save changes

Restart DNS service

1. Right click your Start Menu

2. Select Run

3. Type services.msc and press enter

4. Go to the Services section

computer stuck on 169 IP address

5. Select DNS client

computer stuck on 169 IP address

6. Right click and select Restart

computer stuck on 169 IP address

Run a SFC scan

This is useful especially if your computer has an infection with a proxy redirection, thus scanning your system will check these issues.

1. Click Start

2. Go to the search field box and type CMD

3. Right-click Command Prompt

4. Select Run as Administrator

computer stuck on 169 IP address

5. Type sfc/scannow

run sfc/scannow

6. Press Enter

7. Restart your computer and try to connect again

Reset IP address and subnet mask

1. Right click Start

2. Select Control Panel

3. Go to the Network and Internet category

computer stuck on 169 IP address

4. Click the Network and Sharing center button

computer stuck on 169 IP address

5. Select the Manage Network Connections option

7. Right-click your Local Area Network and select Properties (make sure that the device listed refers to a Realtek RTL Ethernet card)

8. Go to the Networking tab

9. Uncheck the Internet Protocol Version 6 (IPv6) option

10. Highlight (click) the Internet Protocol Version4 (IPv4) option

11. Click Properties

12. Go to the General tab

13. Select Use the following IP address and type the following:

  • IP Address: 192.168.0.1
  • Subnet mask: 255.255.255.0
  • Default Gateway: nothing (leave it blank)

14. Under the Alternate Configuration tab, set to Automatic private IP address

15. Click OK for both windows to save and exit

Rerun the automatic configuration for your network connection. If it does not complete successfully, set up the network information to:

  • IP Address: 168.0.2
  • Subnet mask: 255.255.0
  • Default Gateway: 168.0.1

Save and then test your connection once again.

Conclusion

To wrap things up, if you discover that your PC is stuck with a 169 IP address, there are many ways you can fix this issue.

We recommend you to try our methods one by one and avoid skipping any of them; the one you skip may be the very one that would’ve solved your issue.

Has any of our suggested fixes worked for you? Tell us how you managed to solve the problem in the comments section below.

Fix: uTorrent not responding in Windows 10/11 [Quick Guide]

uTorrent is one of the world’s most used software that eases downloading and distributing of large amounts of files.

Its convenience is coupled with the fact that you don’t need to worry about link breakdowns or having to wait to shut down your machine until all downloads are complete.

These characteristics and many others make uTorrent a favorite among over 150 million monthly users.

As soon as your internet connection is back up, uTorrent, which relies on peer-to-peer sharing, resumes the download process from wherever it stopped or was interrupted.

It is highly recommended to secure your personal info while downloading uTorrent files.

However, there have been some complaints about uTorrent not responding in Windows 10. This article outlines a few troubleshooting issues and solutions to resolve them.

What to do if uTorrent won’t respond?

1. Change security settings

1.1. Disable or uninstall firewall

One solution to fixing uTorrent not responding is to disable the firewall and reboot your computer.

In case you already have a strong antivirus then you need to uninstall unnecessary firewall software that usually causes uTorrent to crash regularly. The problem might be caused by tool such as V-Com System Suite, Norman Personal Firewall, NVIDIA Firewall or Cybersitter.

1.2. Adjust antivirus settings

For those who have Avast antivirus, you need to disable the P2P shield feature, in order to enjoy your uTorrent download sessions.

The Spyware Doctor 5 tool usually causes uTorrent to freeze during the installation process. To solve this issue you can uninstall it and choose an antivirus that doesn’t interfere with uTorrent, such as TotalAV.

If you are using an antimalware software like Outpost Pro, you need to exclude uTorrent from its rules in order to fix the issue

2. Change the copy of the torrent

There are also instances when you may encounter that uTorrent is stuck at a certain percent of the download process. A problem like that is caused by the fact that your copy of the torrent is incomplete, unavailable or it lacks seeders. In this case, you might need to get another version of the file you want to download.

3. Modify uTorrent associations

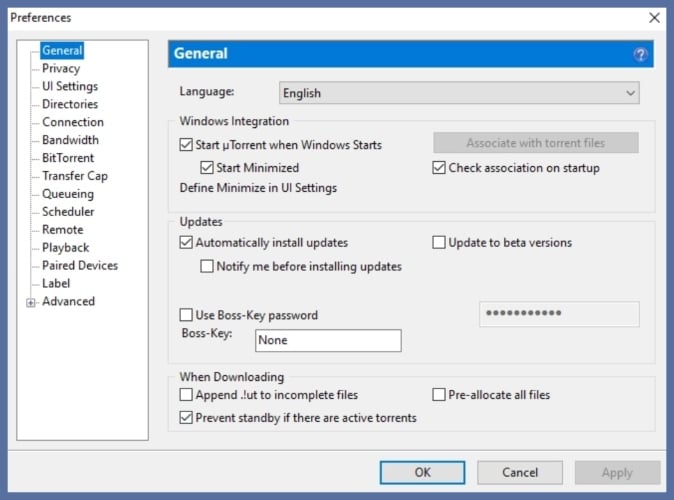
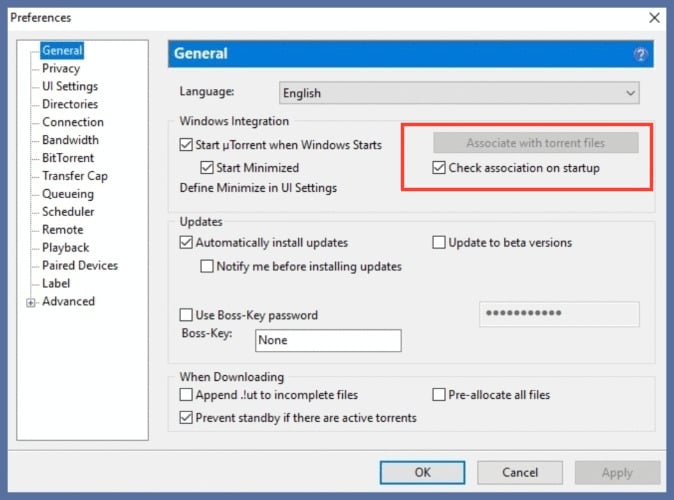
  1. Open uTorrent, got to Options.
  2. Open Preferences, choose General.

3. Click Associate with torrent files.

4. Back up uTorrent settings

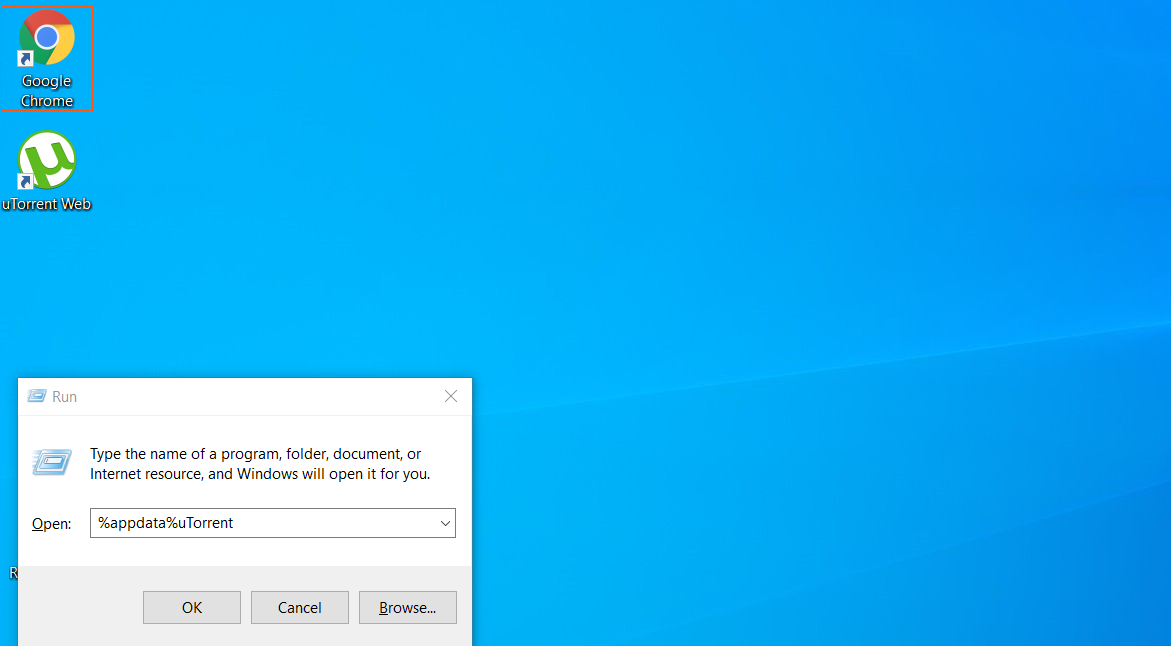
  1. Press Windows+R to open Run.
  2. Type %appdata%uTorrent.

3. Press Enter, the torrent files are moved from the Roaming folder into the AppData folder.

4. Follow this guide to Uninstall uTorrent.

5. Reinstall uTorrent

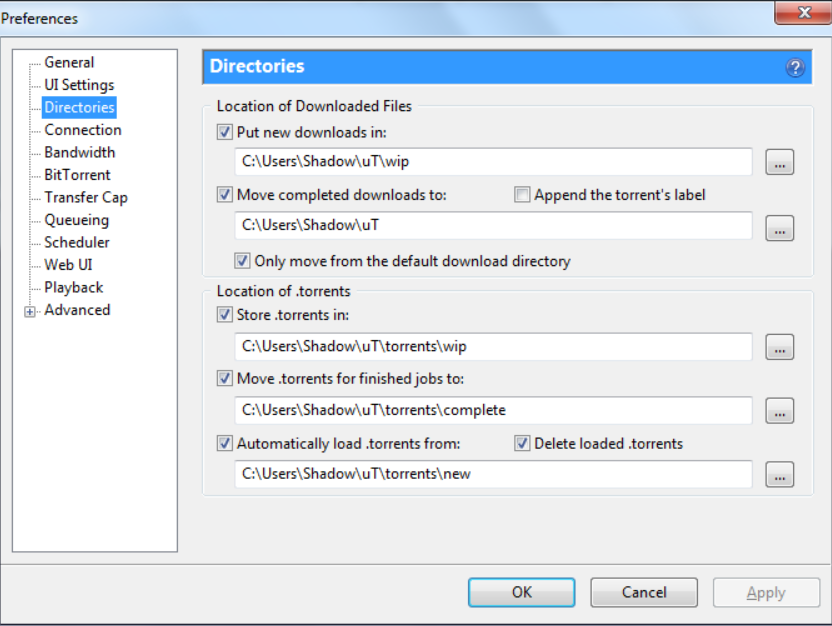
6. Access the Preferences option under the File menu to set download location as the folder for incomplete downloads.

7. Open all .torrent files using uTorrent

There are various causes that might be at the root of uTorrent not responding and we presented you with the most common ones as well as the solution to each of them.

We’d like to hear more from you on this subject, so drop us a comment by accessing the section below.

5 best alternatives to Cyberpunk 2077 that you should try

CD Projekt Red’s Cyberpunk 2077 has the gaming community divided. On one hand, you have those that praise the game for what it delivers and how fantastic it is, while on the other hand there are those that just can’t get past the fact that it was rushed and released with many bugs.

Well, if you belong to the latter, and just can’t play the game until it has finally been fixed, here are a few great gaming alternatives for you to try while you wait.


Which are the best Cyberpunk 2077 alternatives that I should try?

Witcher III: Wild Hunt

With all the backlash CD Projekt Red received for Cyberpunk 2077, players have still forgiven them and are giving them the benefit of the doubt thanks to this little gem that they released back in 2015.

Widely perceived as one of the best RPG games in recent history, the Witch III: Wild Hunt follows the journey of Geralt of Rivia, a monster Hunter that has to face many challenges in a fictionalized version of Medieval Poland.

Just like Cyberpunk 2077, the game is praised for its fantastic graphics, intricate story, and engaging RPG elements that make you customize pretty much every aspect of Geralt’s fighting proess.

While game lacks Cyberpunk’s in-depth character customization features (since you play as Geralt), it more than makes up for it thanks to the story and sidequests that have the potential to keep you glued to your screen for well over 100 hours.

⇒ PC

⇒ Xbox

⇒ PlayStation


Assassin’s Creed: Valhalla

Few can talk about action-adventure games and not mention any entry from the Assassin’s Creed franchise.

Back when the first game was released, it revolutionized the way you environment can be used to your benefit, and stealth kills had never been so much fun to execute and plan out.

Well, 2020’s Valhalla abandoned the hooded assassin motif and went for the more Ragnar-like action combat style, and this is something that Cyberpunk 2077 also shines at.

So, until they manage to patch up Cyberpunk 2077 properly, and if you don’t mind Nordic forests and berserkers in the place of futuristic cities and cyber junkier, Assassin’s Creed: Valhalla is a great alternative.

⇒ PC

⇒ Xbox

⇒ PlayStation


Doom Eternal

Another great feature about Cyberpunk 2077 is the use of futuristic guns that make our current weapons look like sticks with a pointy rock tied to one end.

Well, if you’re into that, along with the burning desire to obliterate hordes and hordes of monsters that are inherently evil, then Doom Eternal is yet another great alternative.

While you will lack the same in-depth dialogs and story, you will still get a somewhat futuristic setting.

More so, the classic arcade shooting style combined with the myriad of guns to use and way to reduce your enemies to minced meat is especially appealing to games that just want to blow off some steam.

⇒ PC

⇒ Xbox

⇒ PlayStation


Watch Dogs: Legion

Another entry on our list is another 2020 title that features futuristic premises, GTA-like gameplay, and a pageant for hacking and the use of technology.

Watch Dogs: Legion had been anticipated by many, and just like Assassin’s Creed: Valhalla, it was another anticipated Ubisoft title that was a roaring success.

Walk the streets of modern-day London, and use the same gameplay mechanics as with the previous two entries in the series and play as a member of DedSec to fight an oppressive government that uses AI and modern technology to more or less control the world.

The graphics are amazing, and while the setting isn’t as futuristic and as Blade Runner-ish as Cyberpunk 2077, it will still give you a certain degree of satisfaction as far as your RPG with a futuristic setting needs are concerned.

⇒ PC

⇒ Xbox

⇒ PlayStation


Mafia: Definitive Edition

The last entry on our list is a game that, just like Assassin’s Creed: Valhalla, is a throwback to times long gone.

This action adventure game is set in a time that is reminiscent of the great Depression of the 1930s, and has a lot of similarities with Cyberpunk 2077 in terms of what it can do.

For example, you belong to a certain faction, you can ride cars, you can talk your way through fights, explore the city, grow as a character as the story progresses, and more.

For all intents and purposes, Mafia: Definitive Edition is basically Cyberpunk 2077, but with a different time setting, and without Keanu Reeve’s Johnny Silverhand.

⇒ PC

⇒ Xbox

⇒ PlayStation


This pretty much wraps up our list of most popular games that you can play instead of Cyberpunk 2077.

Keep in mind that these are not games that are intended to replace Cyberpunk 2077, but rather games that have been met with positive reviews that also happen to contain the same vibe as Cyberpunk, either because of the setting, the mechanics, or both.

What other games do you play as an alternative to Cyberpunk 2077? Let us know by leaving us you opinion in the comments section below.


Wondershare Document Cloud: Legally-binding documents made easy

We now live in a time where we need online services more than ever, and the cloud software business is booming.

However, with so much software to choose from, it becomes hard to tell apart the ones that are truly worth it from the ones that aren’t.

For example, collaborative tools are plenty, and one of them is Wondershare Document Cloud.

Which are Wondershare Document Cloud’s top features?

Cloud storage capabilities

You can’t have a product with the word Cloud in the name without actually offering actual cloud storage capabilities, and Wondershare offers plenty of it.

A single subscription will grant you 100 GB of cloud storage, which is more than enough considering that you will be using it for document storage.

This cloud can be accessed from any device at any time, and the only requirement is to have the credentials and an Internet connection.

One question that comes to mind when discussing cloud storage is the security of the stored data, and Wondershare Document cloud offers plenty of that, boasting the highest level of privacy protection to keep your documents safe.

Electronic signature support

Documents are only valid the moment they are signed by both parties, and Wondershare makes this easier by facilitating the creation of electronic signatures across all browsers.

This process is made to be even faster thanks to the fact that individual signers can access and sign the documents without actually having to register or download anything.

However, those that frequently have to send and receive documents to one another should have accounts themselves.

Easy contract creation, sharing, signing, and tracking

The entire cycle of having documents signed is very simple, as you can see below:

  1. Upload the document to the cloud
  2. Use Wondershare Document Cloud to create your own electronic signature
  3. Add fillable field in the PDF document
  4. Send the PDF to each recipient via email
  5. The Wondershare server will now send the email to the recipients
  6. The recipients can now sign the document from any device

One great feature is that you get real-time tracking of the document.

This includes:

  1. Getting notifications when someone signs the document
  2. Keep track of the signing process
  3. Details about the signers, including:
    • Timestamps
    • Email address
    • IP address

Try it before you buy it

If you’re still not convinced of how much potential this service has, try it out for yourself for free.

The free trial will provide you with the same exact functionality as the paid versions, except that you’ll only get 1GB of cloud storage and a 5-document limit, but other than that, all features are available for free.

Wondershare Document Cloud

Wondershare Document Cloud

Collaborate with your team better, faster, and in a more flexible manner with Wondershare Document Cloud!
Subscribe nowVisit website

This service isn’t something new, since it has been already included in plenty of other Wondershare products, such as Wondershare PDFelement.

Lastly, know that this service is not limited to the corporate environment, as you can download it for individual use as well, and the price plans vary based on your exact needs.

All in all, if you want to speed up productivity in a safe and efficient manner, Wondershare Document Cloud is the right step.

The Group Policy Client Service Failed the Logon [Fixed]

Windows 10 users may face different types of errors while trying to login to the user account. One such error is The group policy client service failed the logon. Access is denied while trying to log into your user account.

Strangely enough, the error does not occur when the user tries to login with an administrator account. If you are facing a similar error, here are a couple of ways to fix this error on Windows 10 systems.

How do I fix denied group policy client service logon access?

1. Restore your PC to an earlier point

  1. Type Restore Point in search/Cortana and open Create a Restore Point option.
    system restore main window The group policy client service failed the logon
  2. Click on the System Restore button.
  3. Select Choose a different system restore point option.
    System Restore Point Select The group policy client service failed the logon
  4. Click on Show more restore points option.
  5. Select one of the restore points listed and click on Next.
    Confirm your System Restore point
  6. Click on the Finish button to initiate the System Restore process.

Windows will restore the system to the selected Restore Point and probably fix the login error.

Additionally, to ensure that everything works properly, we recommend using a system optimization tool to scan your device.

2. Use admin account to edit the registry

  1. Login to your PC using the administrator account.
  2. Press Windows Key + R to open Run dialogue box.
  3. Type regedit and hit enter / OK to open the Registry Editor.
    registry editor Group policy client service failed logon Registry Editor 1
  4. In the Registry Editor, navigate to the following location. You can copy and paste the path directly in the registry editor as well.
    HKEY_LOCAL_MACHINESYSTEMCurrentControlSetServicesgpsvc
  5. Here you don’t need to modify anything but make sure the key exists.
  6. If it does, navigate to the following location:
    HKEY_LOCAL_MACHINESOFTWAREMicrosoftWindows NTCurrentVersionSvchost
  7. Right-click on Svchost. Go to New > Multi-String Value.
    SCVCgroup - new Multi-string value The group policy client service failed the logon
  8. Right-click on the new value, select Rename and rename it as  GPSvcGroup.
    Edit Multi-string value data The group policy client service failed the logon
  9. Double-click on GPSvcGroup and enter GPSvc as Value data. Click OK.

Next, you need to create a new key (Folder) under SVcHost key. Follow these steps do the same.

  1. Right-click on SVCHost, select New > Key. Rename it as GPSvcGroup.
    New - Key - Regedit The group policy client service failed the logon
  2. Click on the GPSvcGroup folder and create two DWORD value.
    new DWORD 32-bit value The group policy client service failed the logon
  3. Right-click in the right pane and select New > DWORD (32-bit) Value. Rename it as AuthenticationCapabilities.
    Edit DWORD value authenticationCapatibilities
  4. Double-click on the DWORD value and enter 12320 as the Data value. Click OK. Make sure you select the Decimal option (set to Hexadecimal by default).
  5. Right-click again and select New > DWORD (32-bit) Value.
  6. Rename it as CoInitializeSecurityParam. Double-click on the value and enter 1 in Value Data.D-word value colinitializesecurityparam 2 The group policy client service failed the logon
  7. Close the Registry Editor and restart your PC.

After the restart, you should be able to log in to your Windows 10 standard account without any issues.

3. Take ownership of GPSvc key in the registry editor

  1. Press Windows Key + R. Type regedit and hit enter.
  2. In the Registry Editor, navigate to the following location:
    HKEY_LOCAL_MACHINESYSTEMCurrentControlSetServicesgpsvc
  3. Right-click on the GPSvc key and select Permissions.
    GPSvc permissions regedit The group policy client service failed the logon
  4. Click on the Advanced button.
    GPSvc Change permission owner Advanced The group policy client service failed the logon
  5. The owner should be System or TrustedInstaller by default. Click on the Change link.
    GPSvc Change permission owner Advanced - Change owner link The group policy client service failed the logon
  6. In the Select User or Group window, type the user account name that is not allowing you to log in. Click on Check names to find the user account.
    GPSvc Change permission owner Advanced - Change owner link- check name The group policy client service failed the logon
  7. If found, click OK to save the changes.
  8. Next, right-click on the Start button and select Windows PowerShell (admin).
    PowerShell admin DWORD value The group policy client service failed the logon
  9. In the PowerShell Admin window, copy and paste the following line of code and hit enter:reg add “HKLMSYSTEMCurrentControlSetServicesgpsvc” /v Type /t REG_DWORD /d 0x10 /f

That’s it. Once you have successfully changed the user permission for the GPSvc key in the registry editor, close the permission window and the registry editor.

Restart your PC to apply the changes. Try to log in using the standard account. Check if the group policy client service failed. The login error is resolved.

4. Restart Group Policy service

  1. Press Windows + R to open the Run dialogue box.
  2. Type services.msc and hit enter.
    Group Policy Client Properties The group policy client service failed the logon
  3. In the Services window, look for Group Policy Client.
  4. Right-click on Group Policy Client and select Properties.
  5. Change the Startup type to Automatic.
  6. Click Apply and click OK to save the changes.
  7. Close the Services window and restart your PC.

5. Reset network adapter using PowerShell

  1. Right-click on Start and select Windows PowerShell (admin).
    Netsh winsock reset - group policy client failed to logon
  2. In the PowerShell window type the following command and hit Enter:
    netsh winsock reset

Close the Powershell window and restart your PC.

There you go, these are some solutions that you might want to try if you’re getting The group policy client service failed the logon Access is denied error message.

In case you have additional issues, you can say goodbye to SAP GUI’s Logon Balancing Error 88 with our comprehensive guide.

This isn’t the only problem you can encounter with Group Policy, and we wrote about Please wait for the GPSVC message in one of our other guides.

If our solutions worked for you, please let us know by using the comments section below.

FIX: ExpressVPN won’t connect after update (7 solutions)

ExpressVPN is one of the most popular VPN services on the web. However, many users have trouble connecting to VPN servers after updating ExpressVPN to the latest version.

This type of error isn’t new, since ExpressVPN often gets stuck when trying to connect. Don’t worry since you can quickly resolve this matter by following the troubleshooting steps below.

What can I do if ExpressVPN won’t connect after update?

Check your Internet connection

VPN slowing down Internet

Quit ExpressVPN, fire up your web browser, and try to access any page.

If you can’t visit any site, it means that you’re experiencing network connectivity issues that have nothing to do with the VPN service itself (before or after upgrade).

Here are some fixes you could try:

Try connecting to another ExpressVPN server

ExpressVPN servers

If you have Internet access when you’re not connected to the VPN, then try switching VPN servers.

It’s possible that the exact server you’re trying to reach is currently down for maintenance.

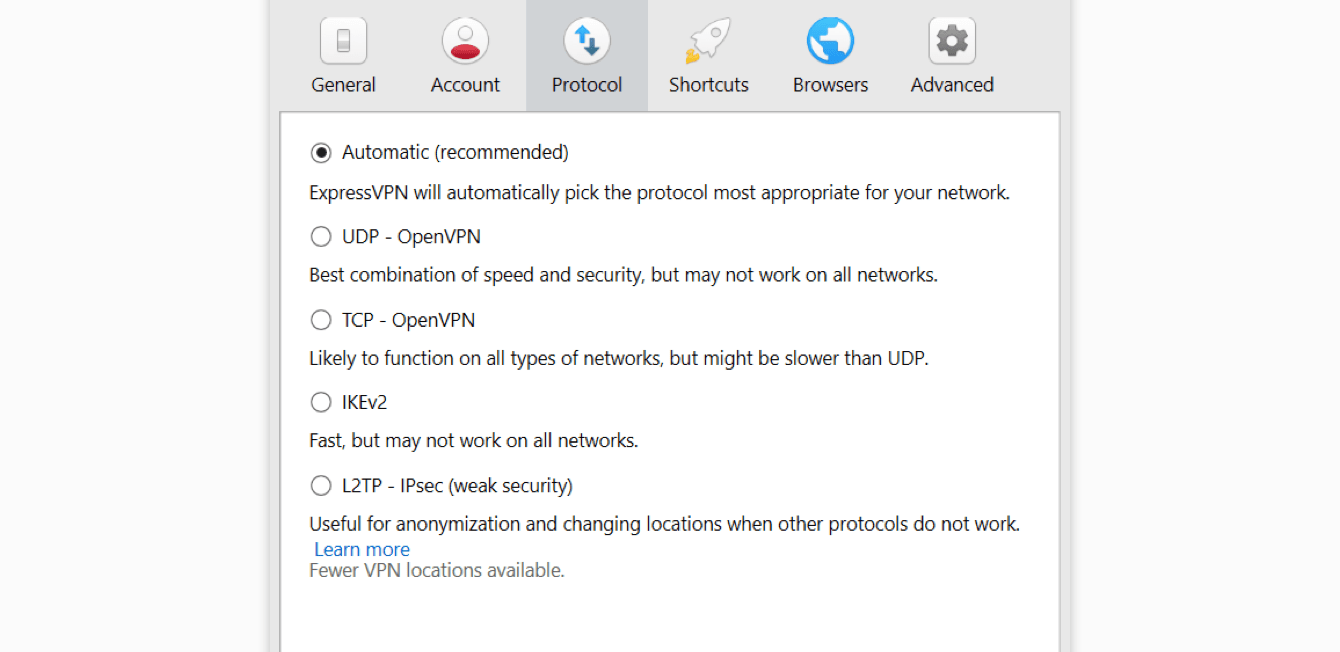
Use a different VPN protocol

switch ExpressVPN protocols
  1. Open the hamburger menu (≡) in the main window of ExpressVPN
  2. Click Options
  3. Go to the Protocol tab
  4. Select a VPN protocol
  5. Click OK
  6. Try to connect to a VPN server

The VPN protocol decides how ExpressVPN will connect to the VPN server, based on technical factors such as encryption, authentication and authorization.

If you have problems connecting to ExpressVPN after updating the app to the newest version, then change the VPN protocol.

You can choose from OpenVN over UDP, OpenVPN over TCP, IKEv2, and L2TP over IPsec (in this order, recommended).

Keep in mind that L2TP/IPsec is now considered an obsolete protocol due to weak security. You should only use it when computer safety is not a priority.

Disable your firewall and anti-malware program

Temporarily turn off your firewall and antivirus solution and try connecting to an ExpressVPN server again.

If the connection is successful, it means that your firewall, anti-malware tool, or both are blocking VPN traffic.

The permanent solution is to explore the settings of your firewall and antivirus application in order to make an exception for ExpressVPN.

Reinstall ExpressVPN and its network adapters

If the previous resolutions won’t help, then remove ExpressVPN from your computer and set it up again.

Besides the VPN app, you will be also reinstalling the TAP drivers responsible for creating the secure tunnel every time you attempt to connect to a VPN server.

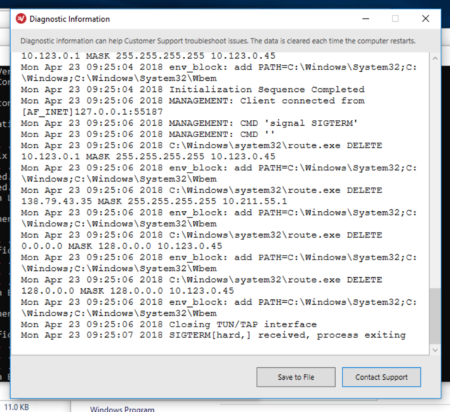
Send diagnostic files to the ExpressVPN team

send ExpressVPN diagnostics
  1. Click the hamburger menu (≡)
  2. Go to Help & Support and select Diagnostic Information
  3. Click Contact Support
  4. Enter detailed information about the problem
  5. Check the box for Include details about recent connection errors or Include diagnostic information
  6. Sit back and relax until you receive feedback via email

If you’re not experienced enough to troubleshoot errors mentioned in the diagnostic files, then it’s time to contact the support team.

There might be a serious error with the ExpressVPN package which can only be resolved by its makers.

Switch to an alternative VPN service

PIA

If you keep receiving errors from ExpressVPN no matter what you try, consider switching to another premium VPN solution, such as Private Internet Access.

PIA has an impressive network of more than 22,500 VPN and proxy servers in 98 locations and 77 countries.

In addition to OpenVPN with up to 256-bit military-grade encryption, you can try the newer WireGuard protocol, which is faster.

And, if you purchased ExpressVPN within the last month, you shouldn’t have a problem with changing VPN providers since it offers a no-questions-asked 30-day money-back guarantee.

Plus, Private Internet Access is a lot cheaper than ExpressVPN.

More about PIA:

  • Kill switch, port forwarding, and exclusive DNS servers
  • Unblock Netflix US, HBO Max, and other streaming services
  • A zero-logging privacy policy
  • Protect up to 10 devices using the same account
  • 24/7 live chat support
  • 30-day money-back guarantee (no free trial)
Private Internet Access

Private Internet Access

If you got tired of dealing with ExpressVPN connection issues, consider switching to Private Internet Access, which is cheaper.
Check priceBuy it now

Conclusion

To recap, if ExpressVPN is not connecting to the Internet after the app updates itself, get started by checking the quality of your Internet connection.

You can also try to connect to another ExpressVPN, use a different VPN protocol, and reinstall ExpressVPN and its network adapters.

If that doesn’t work either, it’s time to contact the ExpressVPN support team and send diagnostic files for troubleshooting.

However, if you’re thinking of switching VPN providers, consider using Private Internet Access (buy here). It’s just as reliable as ExpressVPN but significantly cheaper.

Cyberpunk 2077 review: An enjoyable RPG despite some technical issues

Cyberpunk, one of the most-anticipated games of the year finally launched on PC, Xbox, and PlayStation consoles two weeks ago on December 10. While the initial PC reviews were generally very good despite some technical issues, developer CD Projekt has been facing some intense backlash since console players got their hands on the game.

Despite multiple delays, there’s no doubt that Cyberpunk 2077 shouldn’t have been released in that state on old-gen consoles. It’s easy to make fun of the game’s various glitches, but performance on the base Xbox One and PlayStation 4 consoles is so bad that Sony went as far as removing the game from its PlayStation Store.

CD Projekt has previously apologized for the game’s poor performance on 8th gen consoles and the developers already released a couple of patches, the latest one being released yesterday. It’s too bad to see a developer shoot itself in the foot by releasing an unfinished game, though CD Projekt Red can hopefully turn things around next year. The developer’s critically-acclaimed game The Witcher 3 was also not great at launch, but it went to become one of the best open-world RPGs following months of patches and the release of two excellent DLCs.

Reviewing Cyberpunk 2077 hasn’t been an easy task, though I did my best to ignore all the bad buzz to judge the game for what it really is today. I’ve been playing the game on Xbox Series X and Series S exclusively, and so far I’ve had a good experience with very few bugs. My colleague Arif has been playing it on PC with an Nvidia RTX GPU with ray-tracing on, and this is currently the best way to play the game until Cyberpunk 2077 is fully optimized for PlayStation 5 and Xbox Series X|S consoles next year.

Cyberpunk 2077 01

Why you should play Cyberpunk 2077 on Xbox Series X|S consoles

As of this writing, I wouldn’t recommend anyone to play Cyberpunk 2077 on the base Xbox One and PlayStation 4 consoles. The game really struggles to reach 30FPS on these now seven years old machines, and even the more powerful PlayStation 4 Pro and Xbox One X can’t run the game very well. It’s a different story on PlayStation 5 and Xbox Series X|S consoles, and Cyberpunk 2077 actually isn’t running like the rest of backwards-compatible games on next-gen hardware.

Usually, Xbox Series X owners get to run the Xbox One X version of backwards-compatible games, while Xbox Series S users get to play the Xbox One S version of games without 4K textures and other enhancements. However, a technical analysis from Digital Foundry revealed that Cyberpunk 2077 does things differently, and the game’s code seems to be aware that it’s running on next-gen console.

On Xbox Series X, Cyberpunk 2077 uses a 1080p/60FPS Performance mode by default that isn’t available on Xbox One X consoles. Players on Xbox Series X can also choose a Quality mode in Settings that applies a 30FPS cap, but with a dynamic resolution that can go up to 1800p. The Xbox Series S apparently uses a tweaked version of this Xbox Series X Quality Mode, with a 30FPS cap and a dynamic resolution that can go up to 1296p.

Again, CD Projekt Red is working on true next-gen versions of Cyberpunk 2077 that should be available next year on Xbox Series X|S and PlayStation 5 consoles, and this will be a free upgrade for those who already own the game. While CD Projekt Red has yet to share details about what to expect from these next-gen updates, I hope that a 4K/60FPS Performance mode and a Quality mode with ray-tracing at 30FPS is feasible on Xbox Series X.

Overall, Cyberpunk 2077 is a good-looking game on Microsoft’s next-gen consoles, and I’d say that it looks and better than Watch Dogs Legion, a game that’s already optimized for Xbox Series X|S with support for ray-tracing on both consoles. Watch Dogs Legion is locked to 30FPS even on the Series X, but Cyberpunk 2077 isn’t and it makes a big difference.

Cyberpunk 2077 02

Night City is a fascinating setting

Cyberpunk 2077 is set in Night City, a dystopian megacity that makes you feel like you’re in Blade Runner when it’s raining during night time, or in a futuristic version of Los Angeles or other sunny cities from the US West Coast during the day. Night City is pretty big, and I still have a lot to discover beyond the Japanese district, the business center, the not so shiny suburbs, and the surrounding Badlands.

You play the game as V, a cybernetically enhanced mercenary taking various jobs that will often have a violent outcome. Cyberpunk 2077 starts with a very detailed character creator where you’ll also get to choose between three life paths: Corporate, Nomad, and Street Kid. These life paths will determine your background, providing different dialogue options throughout the game. I opted for the Street Kid life path for my first playthrough, and each life path also has its own prologue mission.

I’ll do my best to avoid spoilers, but the story of Cyberpunk 2077 really gets interesting once you encounter Johnny Silverhand, a character played by A-list actor Keanu Reeves. In the game, Silverhand is a former rock star and terrorist who died while trying to take down the corrupt Arasaka corporation. During an infiltration mission where V attempts to steal a mysterious biochip from the same Asaraka company, the chip’s protective case is damaged and you’ll have no choice but to insert it in your brain to keep it working, without knowing that the chip hides the digital ghost of Silverhand.

Cyberpunk 2077 Johnny Silverhand

Silverhand first appears as a seemingly evil character trying to take over your body, and you’ll soon learn that the damaged chip inserted in your brain will ultimately kill you. This death sentence will ultimately force V and Silverhand to cooperate, and Keanu Reeves’s character, who can only be seen and heard by you, will interact with you during missions and your various interactions with secondary characters.


Overall, Keanu Reeves does a great job at playing the cynical and nihilistic Silverhand, a character you’ll never really know for sure if you can trust him or not. Besides Silverhand, Cyberpunk 2077 also has a great cast of secondary characters including Judy, the braindance editor you meet early on in the gaùe. Braindances in Cyberpunk 2077 are a form of VR experience used mostly for entertainment, but you’ll often use these 3D recordings in the game to investigate crime scenes.

CD Projekt Red is known for crafting immersive worlds with well-written quests and characters, and Cyberpunk 2077 shouldn’t disappoint fans of The Witcher 3. There are some truly memorable quests in the game, and in some of them, you’ll get to make important choices that can put the life of secondary characters in danger. Cyberpunk 2077 also includes multiple romance options throughout the game, and the game also has multiple endings.

Just like The Witcher 3, the game deals with adult themes and you can expect a good deal of violence, sex, drugs, and other themes inspired by the original material, a dystopian tabletop game originally released in 1988. CD Projekt Red probably went a bit over the top with the amount of dildos that can be seen in the game and which serve no real purpose, though the developer has already promised to fix it.

Cyberpunk 2077 Judy The Braindance Editor

A good mix of the best open-world RPGs

Cyberpunk 2077 was originally announced back in 2012, and expectations went pretty much through the roof after years of teasing and the release of the critically-acclaimed The Witcher 3 in 2015. What I was personally expecting is a more open version of Deus Ex: Mankind Divided, a game that also deals with cyberpunk themes but didn’t get the same AAA production quality as CD Projekt Red’s take on the genre.

Overall, Cyberpunk 2077 isn’t really pushing many boundaries, but it takes a lot of inspiration from other open-world games and adds CD Projekt Red unique’s storytelling expertise to offer something really unique. The gunfights, driving, and hacking aren’t that great in the game, but exploring Night City is never boring and you’ll always have lots of things to do. If you found the world of The Witcher 3 overwhelming, Night City seems just as intimidating at first with lots of optional quests to discover by visiting the various “?” symbols on the map.

The game’s missions are pretty varied, and most of them will allow you to try different approaches. I had the most fun playing games like Deus Ex: Mankind Divided and Dishonored 2 without killing anyone, though I believe it’s not possible to do that in Cyberpunk 2077. In some situations, enemies will start shooting at you or hold you at gunpoint, and avoiding combat just doesn’t seem possible. However, the game does encourage stealth, and you can use hacking to deactivate security cameras, distract enemies, or even blind them temporarily.

Gunfights are pretty good in Cyberpunk 2077, and with the right implants, you can use special weapons with homing ammo, bullets that can ricochet off walls, and more. Blades and other blunt weapons can also be quite powerful, allowing you to kill unaware enemies in just one blow.

Cyberpunk 2077 01

The more you’ll use a certain type of weapons, the more you’ll get deadly with them, but Cyberpunk also comes with a pretty complex skill tree with lots of specialization options. Every three levels, you earn an attribute point that you can use to improve one of your core attributes (Body, Reflexes, Cool, Technical Ability, intelligence), but you also gain a Perk point with every level that you can use on the Skill tree to get passive bonuses.

In addition to the classic level system, Cyberpunk 2077 also has Street Cred, which is a measure of your reputation in Night City. You’ll gain Street Cred by completing missions, and reaching higher levels will grant you access to new vendors, items, and side missions.

While implants are optional and will cost you money, they can really make a difference, giving you passive bonuses or allowing you to use new hacks and weapons. One of the most expensive implants I purchased allows V to perform a double jump midair, which really helps to apprehend the verticality of Night City. You can also do street fights in Cyberpunk 2077, and the Gorilla Arms implant that deals bonus damage can make your character really deadly.

There’s a lot of loot in Cyberpunk 2077 as well, and there’s also a crafting system for creating new objects and upgrading your existing equipment. Overall, it certainly takes some time to understand how to optimize your character, though it’s possible to ignore crafting, hacking, and implants and play the game like a regular loot shooter. However, some of the best missions are probably those where there’s no action at all. I particularly liked the few missions where you get to act as a detective looking for clues on a crime scene or in a virtual “braindance” VR experience.

Cyberpunk 2077


So many things can break the immersion

If CD Projekt Red succeeded in creating a fantasy world with some very detailed urban areas in The Witcher 3, GTA V’s Los Santos really raised the bar for urban open worlds. There’s no denying that Night City really shows CD Projekt Red’s attention to details, but car traffic, pedestrian AI, and so many other things can break the immersion when exploring Night City.

In general, driving vehicles doesn’t feel great in Cyberpunk 2077, though motorcycles are a bit easier to handle. For some reason, you can’t shoot guns while driving like in GTA, which is a really weird omission. While you can purchase many cars in the game, you can’t customize any of them, not even give them a fresh coat of paint, and that’s quite frustrating.

Cyberpunk 2077 is a first-person game, and you’ll only see your character while looking in the mirror or driving vehicles. Once you’re done creating your character at the beginning of the game, you won’t be able to change your haircut, or get some tattoos or jewelry. Equipment and some implants will change your appearance, but that’s pretty much it.
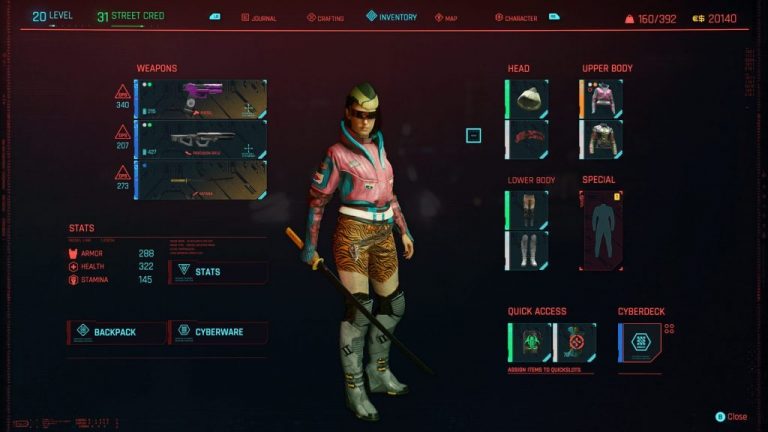
 

Cyberpunk 2077 inventory

When you think that The Witcher 3 was one of the first RPGs where your character could grow a beard and go to the barber, the absence of hair salons, tattoo parlors, and other places where you can change your appearance is really weird. I should add that most equipment in the game looks pretty bad, though that doesn’t really matter for a game using a first-person camera.

A lot of reviews have already pointed out the game’s lackluster AI, and I sadly have to agree with them. Enemy AI is pretty dumb in general, and it’s the same thing for pedestrians or cars who will struggle to go around you when you’re blocking the passage. Cars and pedestrians can also disappear or be replaced with others when you look the other way, and we really shouldn’t see such things in a game with such a big budget.

Just like in GTA V, your character in Cyberpunk 2077 has a phone that can be a great source of distraction. Your Phone is how you’ll get most of your missions, and you’ll usually get alerts when you visit a new area in Night City. A new character will call you or send you a message to ask for your services, and new missions and activities will be added to the world map, which can get intimidating really quickly. You’re free to ignore side missions to focus on the main quests, but it’s hard not to get overwhelmed every time you look at the world map.
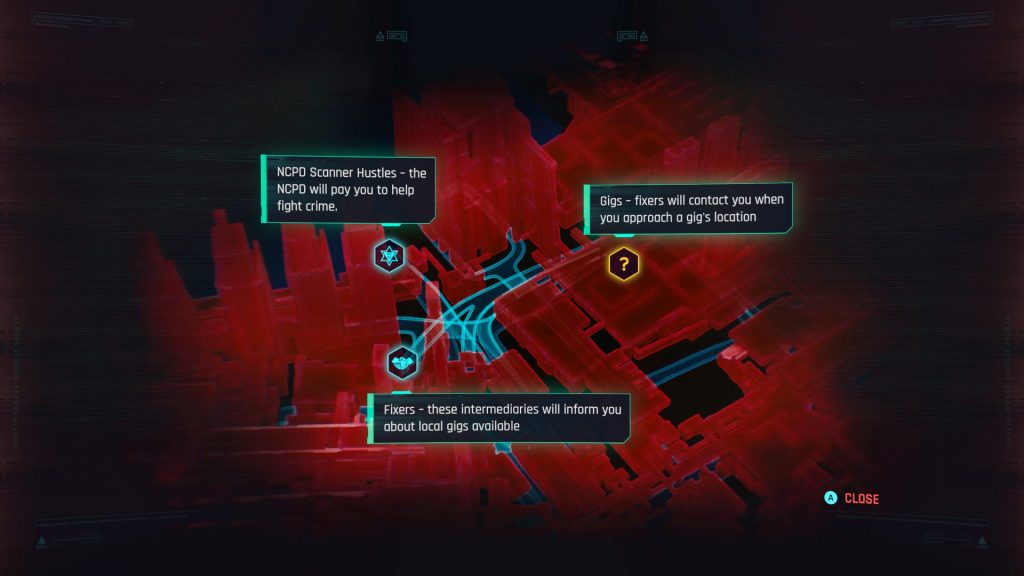
Cyberpunk 2077 Map

Should you buy Cyberpunk 2077?

Cyberpunk 2077 has been released at a very busy time of the year for the video games industry, and there are many other blockbuster games to check out this holiday. Ubisoft just released three blockbuster games in a row with Watch Dog Legion, Assassin’s Creed Valhalla, and Immortal Fenyx Rising, while established open world games like Destiny 2 and Borderlands 3 just received new content. There are also new J-RPGs on the market such as like Yakuza: Like a Dragon and Dragon Quest XI S: Echoes of an Elusive Age, the latter being free to play with Xbox Game Pass.

I wish CD Projekt Red had delayed Cyberpunk 2077 to next year to fix all the bugs and the performance issues on base Xbox One and PlayStation 4 consoles, though the game is already a best-seller with 13 million copies sold as of December 20. The developer announced two big patches coming in January and February, and Cyberpunk 2077 will also get new DLCs as well as a multiplayer mode in the near future.

I’m usually fine with waiting a couple of years for games to get patched and receive more additional content before playing them, but I’ve been having a lot of fun with Cyberpunk 2077 so far. I really couldn’t put it down during the first 10 hours of gameplay, and if you’re playing on next-gen consoles like me, you probably won’t immediately notice the game’s lack of polish. Cyberpunk 2077 makes a very good first impression, and I find this world much more interesting than the dystopian London from Ubisoft’s Watch Dogs Legion.

 

Cyberpunk 2077

I’m looking forward to seeing how CD Projekt can fix the game in the coming months, but I’m confident Cyberpunk 2077 will end up just as good as The Witcher 3 did in the past decade. Actually, I think Cyberpunk 2077 is probably CD Projekt Red’s most accessible game ever, even more so than The Witcher 3 which I found pretty hard to get into. Creating successful and impactful new IPs is a very difficult thing to do, but I think CD Projekt Red pulled it off and we’ll probably continue to talk about Cyberpunk 2077 for many years to come.

If you expect to find the same level of freedom as in games like Fallout 3 or The Elder Scrolls V: Skyrim, you’re likely going to disappointed: Where Cyberpunk 2077 really shines is in its storytelling, immersive setting, with some truly unforgettable quests and supporting characters you’ll really care about. That’s enough for me to make it a really good game, and one I’d easily recommend next to the relatively uninspired Watch Dogs Legion. Cyberpunk 2077 also offers lots of replay value if you’re willing to choose another life path at the beginning of the game, and make different decisions during the few missions where your choices can make a real difference.

Cyberpunk 2077 is currently priced at $69.99 on the Xbox Store, and Microsoft recently announced an extension of its refund policy for all Xbox players dissatisfied with the game. The company also added a warning message to the store listing for players on base Xbox One consoles, though the hotfix 1.06 released yesterday should bring “improved memory management and stability” resulting in fewer crashes on all consoles.

If you got the opportunity to play Cyberpunk 2077 on console or PC since launch, feel free to share your thoughts about the game in the comments. Do you think it’s still one of the best games of the year despite all the bad buzz? Let us know below.

Cyberpunk 2077
Cyberpunk 2077
Developer:
CD PROJEKT RED
Price:
$29.99

FIX: Origin error code 14-1 & error code 14-7 (5 methods)

Origin is a popular game publishing and distribution platform from EA.

Some users complained that the Origin client for Windows has some recurrent errors that can affect its functionality.

Some of the most frequent issues are Origin error code 14-1 & error code 14-7.

Both of them are installation-related issues and they already have a lot of user complaints on Reddit.

How to Fix Origin error code is 14-1 & error code 14-7

Run the Installer as Admin

  1. Right-click the Origin installer executable
  2. Select Run as Administrator
  3. Check if you are able to install the app now

If you haven’t already, try running the Origin installer as Admin.

Depending on your system’s configuration, some actions may be reserved for system administrators.

If your system is restricted and you lack admin rights, try asking your sysadmin to install Origin for you.

Disable your VPN & antivirus

Although a VPN is great at keeping your online identity anonymous and secure your connection, it could interfere with Origin.

Not saying that’s 100% the case here, but just to make sure, disable your VPN client and check if there’s any improvement.

In order to rule off VPNs completely as a cause, you may try closing the VPN client, and even uninstalling it temporarily from your PC.

Make sure to remove any VPN-related components as well, such as additional drivers.

If you are using any antivirus software in your system, try disabling the antivirus temporarily and see if there’s any improvement.

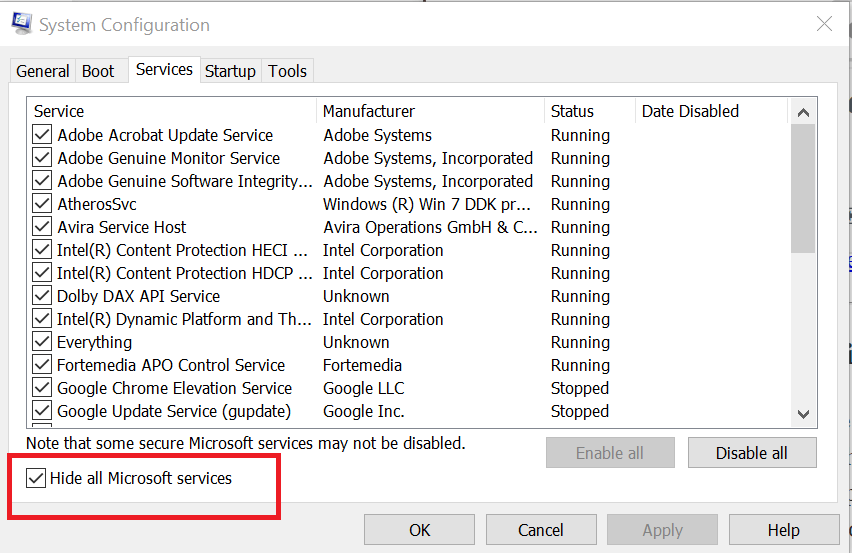
Perform a clean boot

  1. Press the Win Key on your keyboard
  2. Type msconfig and click OK
  3. Go to the Services tab
    Origin error code 14-1
  4. Check the Hide all Microsoft Services option
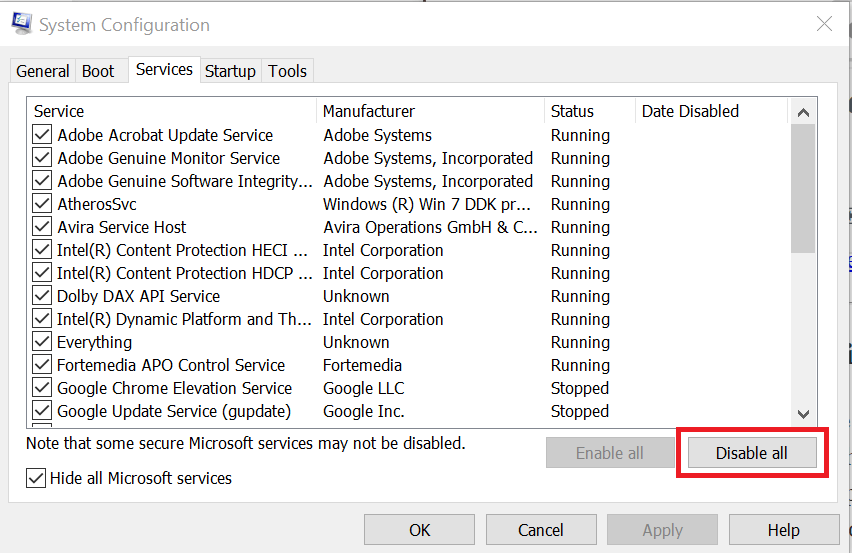
  5. Click the Disable all button
  6. Go to the Startup tab
  7. Click the Open Task Manager button
    Origin error code 14-1
  8. Go to the Startup tab in Task Manager
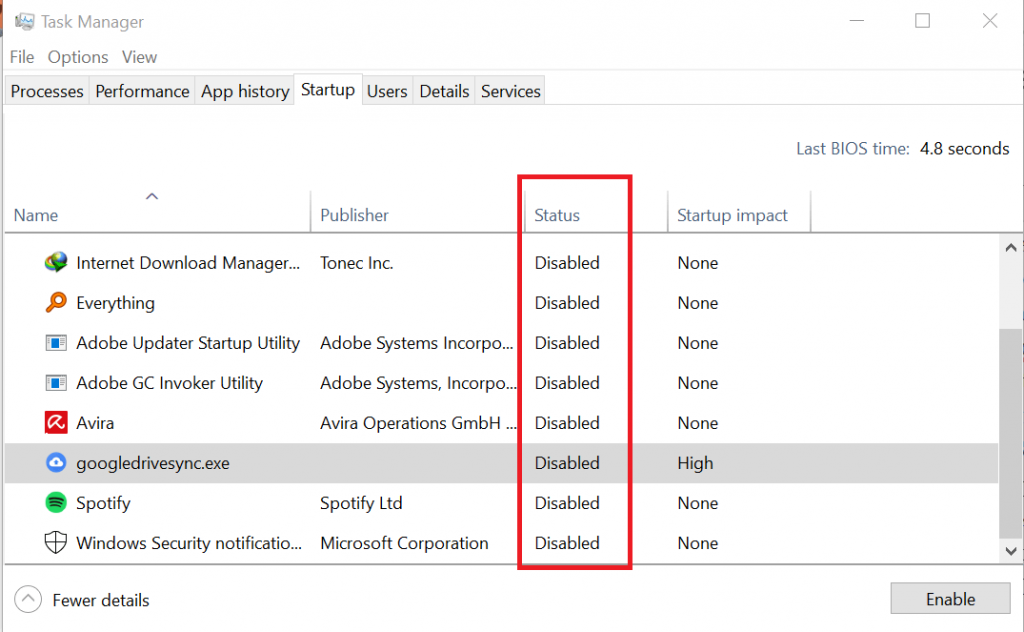
  9. Select all the startup apps and disable them
  10. Go back to the System Configuration window
  11. Click Apply and then OK to save the changes
  12. Restart your computer
  13. After the restart, run the Origin installer again and check if the Origin error code 14-1 & error code 14-7 issue is still there

Run the System File Checker

Run Windows troubleshooter scans
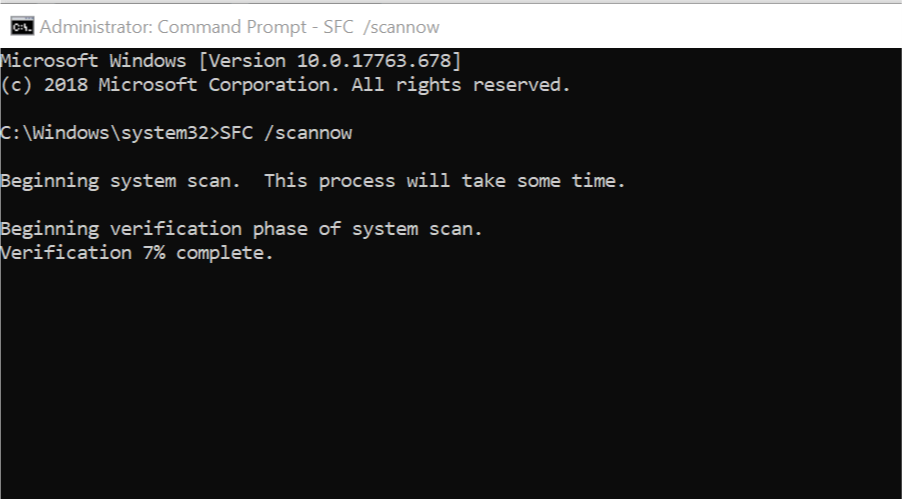
  1. Launch a CMD instance with Admin rights
    Origin error code 14-1
  2. Type SFC /scannow
  3. Wait for the system file checker to scan and repair corrupted files
  4. Reboot your PC
  5. Run the installer again.

Reinstall Origin Client

  1. Press the Win key on your keyboard
  2. Type control
  3. Select Control Panel
  4. Go to Programs and Features in the Programs category
  5. Select and uninstall Origin
  6. Clean any remaining files manually, if necessary
  7. Reinstall Origin
  8. Check if the Origin error code 14-1 & error code 14-7 issue is resolved

Conclusion

To sum it up, if you’re encountering the Origin error code 14-1 & error code 14-7 issue on your PC, there are plenty of things to try.

This issue, which covers both error codes, is likely caused by a faulty installation, so it’s not that big a deal.

Our suggestion is to try all of the methods we explained in this guide, one by one, without skipping either one.

We’re confident you’ll eventually find the one that does the trick.

Microsoft Teams is getting a new History Menu in February

The desktop version of Microsoft Teams is about to receive a new History menu, which will allow users to easily navigate back and forth between frequently visited sections of the platform. The Microsoft 365 Roadmap entry indicates that the feature is expected to launch in February 2021 (via Windows Central).

“The History Menu for Teams desktop clients displays your recently visited locations when hovering over the backward and forward navigation options. Using the menu you can quickly jump back to previous locations, making it much easier to quickly get back to nested locations like tabs or documents. The menu is also accessible via keyboard shortcut,” the company explained.

Although many people have coped admirably with the disruption caused by the ongoing pandemic, there have still been challenges along the way. The new navigation experience will aid users by decreasing the time and effort needed to search for an important file or document while collaborating with their colleagues.

Microsoft keeps adding new features regularly to Microsoft Teams, and the company has released a bunch of new features this month. The list includes Breakout rooms, end of meeting notifications, new Together mode scenes, and more. If you’re interested, we invite you to check out our separate posts for more information.

Office Insiders can test simplified Microsoft Editor assistant in Word for Windows

Microsoft has announced an important update for its Microsoft Editor tool in Word for Windows, though these features are limited to Office Insiders at this time. The new capabilities include an upgraded Editor pane, a simplified view for suggestions, and a one-click reviews experience.

The first new feature that the company highlighted today is the ability to view spelling and grammar suggestions with one click. With this new experience, users will be able to click (either left or right) on an underlined word to display Editor suggestions. There is also an option to press the Shift+F10 or Alt+Down keys to view these recommendations.

Microsoft Editor

Microsoft is also making some improvements to the way the Editor displays suggestions. On this front, the company is introducing a simplified and dedicated Editor’s suggestions view in Word for Windows, allowing users to display additional information if required.

Wrapping up the list of announcements is the introduction of an upgraded Editor pane, which will provide a more accessible and contextual review experience. Users will be able to open the Editor pane directly from the ribbon or by pressing the F7 key to view suggestions.

Microsoft Editor Pane

The company is bringing the full Editor pane experience to Outlook for Windows and Outlook for Mac soon. It is important to note that all these new capabilities are already available in Microsoft Editor for Word on the web. However, there’s no word on when the new update will be rolled out to the browser extension.

FIX: Internet browser working but not apps

Sometimes you may notice that your Internet works with one of your web browsers, but not with other Internet-enabled apps.

More often than not, this issue is likely caused by an incorrect proxy configuration on your PC.

According to users who have experienced this problem, their Internet connection worked great in Firefox.

However, it didn’t work at all while using Chrome, Edge, and other apps installed on their PCs, such as Microsoft Store.

If you’ve been also affected by this issue, check out our suggestions below and learn how to fix it with ease.

What can I do if my Windows 10 apps can’t connect to the Internet?

Run Windows Store troubleshooter

where are my windows 10 games stored

Windows’ built-in apps troubleshooter can help you fix issues with Microsoft Store and any of its apps.

Check out how you can use it in this situation:

  1. Open the Start Menu
  2. Select Settings
  3. Go to Updates and Security
  4. Navigate to the Troubleshoot tab
  5. Scroll down and select Windows Store Apps
    browser working but not apps
  6. Click the Run the Troubleshooter button
  7. Wait for the troubleshooter to scan your system for issues that
  8. Apply any fixes recommended by the troubleshooter
  9. Check if the apps are able to connect to the Internet

Disable VPN and Firewall

  1. Open your VPN client
  2. Disconnect from the VPN server you’re connected to
  3. Check if your apps have Internet access
  4. If not, continue following these steps
  5. Open the Start Menu
  6. Select Settings
  7. Go to Update and Security
  8. Head to Windows Security
    browser working but not apps
  9. Click the Firewall and network protection button
  10. Select your currently active network
    browser working but not apps
  11. Toggle the little switch under Windows Defender Firewall off
  12. Launch the Microsoft Store app
  13. Check for any improvements.

Disable proxy for LAN

Disable proxy for LAN

  1. Press the Win Key + R combination on your keyboard
  2. Type control and click OK to open the Control Panel
  3. Go to Network and Internet
    Fix proxy server error
  4. Select Internet Options
  5. Go to the Connections tab
    Fix proxy server error
  6. Click the LAN Settings button in the Local Area Network (LAN) settings section
  7. Make sure the Automatically detect settings box is checked.
    Fix proxy server error
  8. Uncheck the Use a proxy server for your LAN (These settings will not apply to dial-up or VPN connections) box
  9. Click OK to save the changes
  10. Click Apply and OK again
  11. Disconnect and reconnect to your network
  12. Check if the issue is resolved

Improper proxy configurations can mess with your PC’s ability to use an Internet connection outside of your browser.


Can’t disable proxy on your Windows 10 PC? Check out our guide and learn how you can fix this issue quickly.


So it makes sense that disabling proxy on your network for a while can help turn things back to normal.

Conclusion

All things considered, if you notice that your Internet connection works on a certain web browser, but not with other apps on your PC, you’re in the right place.

The issue is most likely caused by an incorrect proxy configuration on your computer and our guide can help you fix it in no time.

FIX: Failed to initialize connection subsystem – Cisco

Cisco AnyConnect is more than just a VPN, as it empowers your workforce to be able to work from any location, on any device, and at any time.

However, this doesn’t mean that it’s free of errors. In fact, it has quite a few issues, but thankfully none of them is without a solution.

One of the most common problems is the failed to initialize the connection subsystem in Cisco AnyConnect error.

Apparently, it mostly occurs for Windows users, but it also happens in the following scenarios:

  • Establishing VPN connections with Cisco AnyConnect Secure Mobility Client app on Windows 8.1, RT 8.1, or Windows Server 2012 R2
  • After installing Windows update 3023607 on your computer

Microsoft has confirmed that the failed to initialize connection subsystem in Cisco AnyConnect error is related to Microsoft products.

Namely:

Windows Server 2012 R2 Datacenter, Standard, Essentials and Foundation, Windows 8.1 Enterprise and Pro, Windows 8.1, and Windows RT 8.1.

Check out some solutions that can help you work around this error and fix it on your computer.

Failed to initialize connection subsystem in Cisco AnyConnect error fix

Go to Microsoft Update

You can install the most recent cumulative security update for Internet Explorer directly from Windows’ built-in update tool.

Alternatively, you could download and apply the update manually.

However, if you choose the latter, you should check the Affected Software table in Microsoft’s Security Bulletin MS15-018 for download links.

If this didn’t do the trick, move on to our next suggested fix.

Run compatibility troubleshooter on Cisco AnyConnect

The failed to initialize connection subsystem in Cisco AnyConnect error usually has to do with a recent Windows Update.


Having issues while installing Cisco AnyConnect? Check out our guide and learn how to bypass them easily.


However, you can also use Cisco AnyConnect’s proprietary troubleshooter tool to try and solve it.

All you have to do is follow these steps:

  1. Close Cisco AnyConnect
  2. Go to the Cisco AnyConnect Secure Mobility Client folder:
    • C:\Program Files (x86)\Cisco\Cisco AnyConnect Secure Mobility Client
  3. Right-click vpnui.exe
  4. Click Run compatibility troubleshooter
  5. Select Try recommended settings
  6. Go with the wizard’s suggestion (Windows 8 compatibility)
  7. Click Test Program to open the program
  8. Close

Note: For vpnagent.exe – the local service that supports the client user interface – you may need to repeat these steps.

Disable Internet Connection Sharing

Sometimes the failed to initialize the connection subsystem in Cisco AnyConnect error could happen because the Internet Connection Sharing (ICS) is enabled on your LAN.

Here’s how to resolve this:

  1. Click on Start
  2. Go to Settings
    failed to initialize connection subsystem in Cisco AnyConnect
  3. Click the Network and Internet button
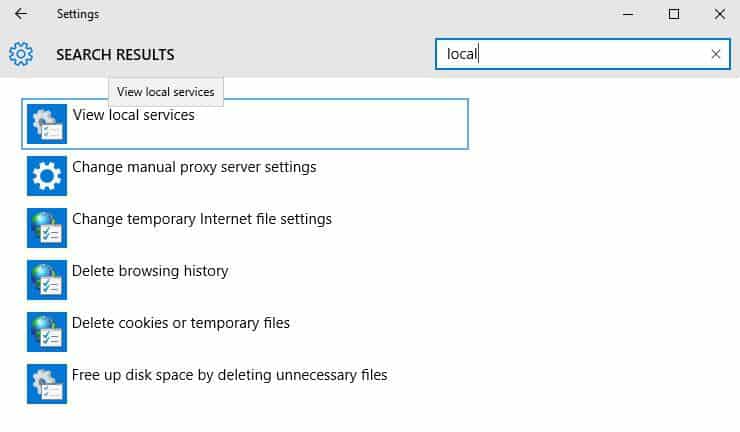
  4. In the search box, type Local
    failed to initialize connection subsystem in Cisco AnyConnect
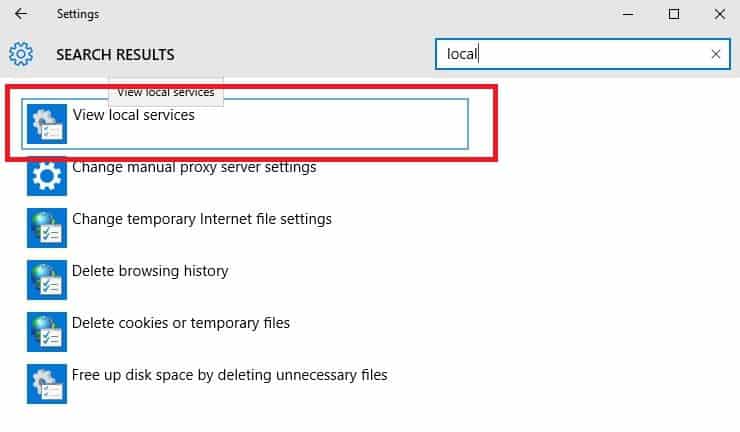
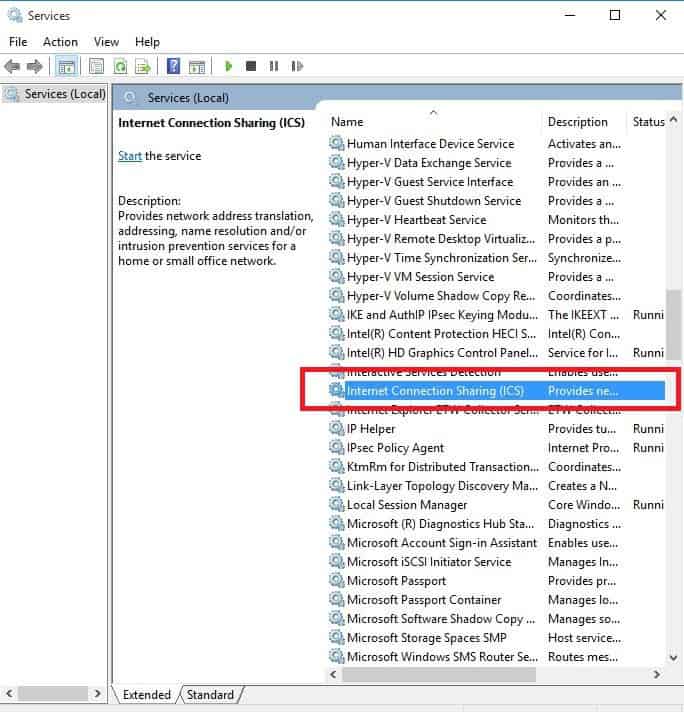
  5. Select View Local Services
    failed to initialize connection subsystem in Cisco AnyConnect
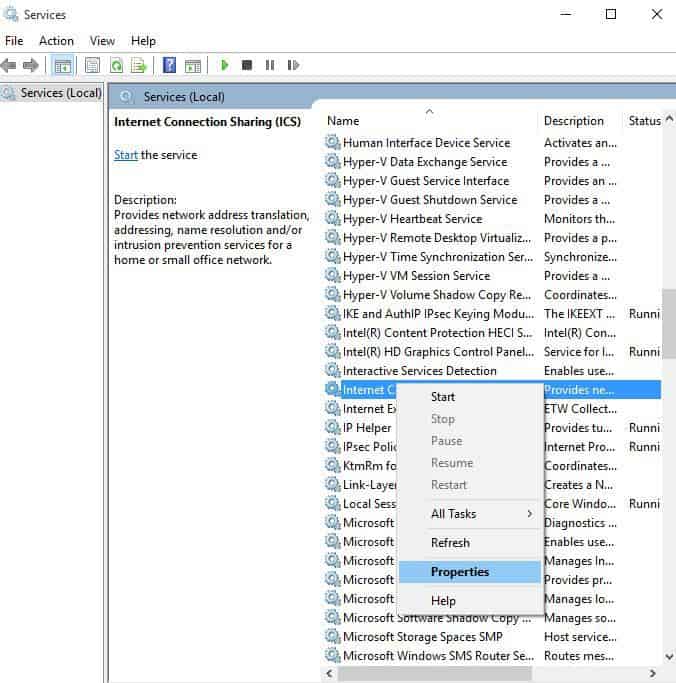
  6. Right click on Internet Connection Sharing
    failed to initialize connection subsystem in Cisco AnyConnect
  7. Select Properties
    failed to initialize connection subsystem in Cisco AnyConnect
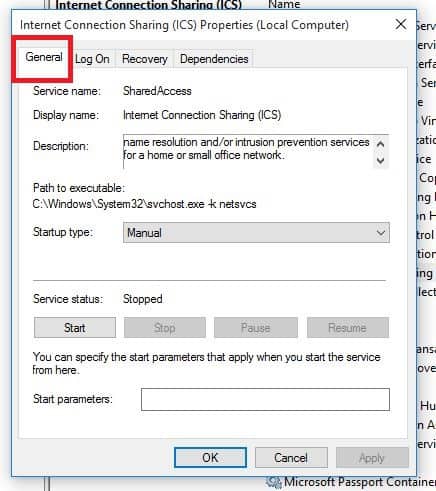
  8. Go to the General tab
    failed to initialize connection subsystem in Cisco AnyConnect
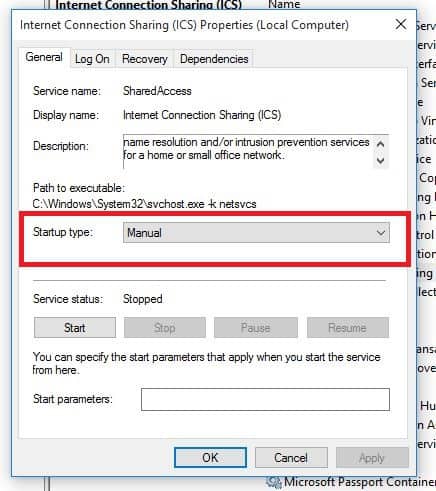
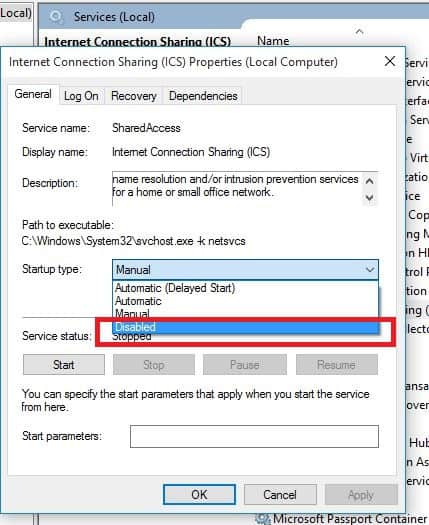
  9. Go to Startup Type
    failed to initialize connection subsystem in Cisco AnyConnect
  10. Click the drop-down menu and select Disabled
    failed to initialize connection subsystem in Cisco AnyConnect
  11. Click OK

Use the registry editor

If you have the failed to initialize connection subsystem in Cisco AnyConnect error, you can fix it by making a small edit to the registry using the steps below:

  1. Right-click Start
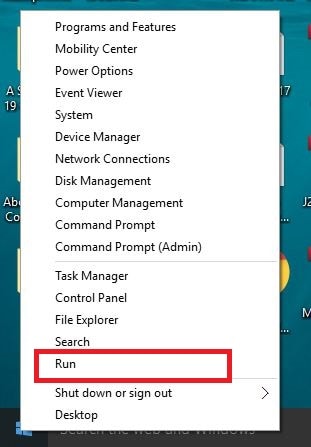
  2. Select Run
    failed to initialize connection subsystem in Cisco AnyConnect
  3. Type regedit
  4. Press Enter
  5. Go to HKEY_CURRENT_USER\Software\Microsoft\Win
  6. Create a new key called GlobalOfflineUser
  7. Give it 1 as the value
  8. Restart your computer and load the VPN

Check whether you are able to connect.

Conclusion

All things considered, if you encounter the failed to initialize the connection subsystem in Cisco AnyConnect error, there are ways to fix it.

We recommend you try our suggested methods one by one. We’re confident you’ll find one that eventually does the trick.

Which one of our suggested fixes worked best for you? Let us know by dropping a comment in the section below.

Sent Items not Showing in Outlook? 4 Fixes to See Them Again

Outlook usually saves sent emails within a Sent Items folder. That folder can come in handy as it shows you what emails you’ve sent with the application.

However, some users can’t always view recently sent emails in Outlook when the application has stopped saving the emails in the Sent Items folder.

If you can’t view sent items in Outlook anymore, check out the resolutions below.

How can I fix sent items are not showing in Outlook?

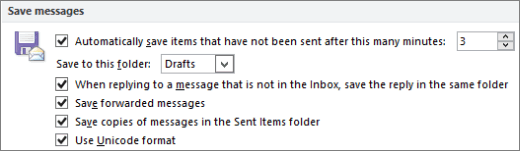
1. Select the Save Copies of Messages in the Sent Items Folder Option

The Save copies of messages in the Sent Items folder setting in Outlook does exactly what it says on the tin!

Thus, you can’t view sent emails in Outlook when that option isn’t selected. It is selected by default in Outlook, but somebody might have adjusted the setting.

This is how you can check if that option is selected in Outlook 2016 and 2013.

  • First, open your Outlook mailbox.
  • Click File > Options to open an Outlook Options dialog.
  • Click Mail on the left of the Outlook Options window.
  • Then select the Save copies of messages in the Sent Items folder option under Save messages.
  • In addition, select the Save forwarded messages checkbox if that’s not selected.
  • Click the OK button to save the changes.

2. Check the Outlook Group Policy Setting

Group Policy Editor also includes a Save copies of messages in Sent Items folder option in the Outlook Group Policy setting.

You can check that option is selected in Windows 10 Pro and Enterprise. This is how you can check the GPO’s Save copies option for Outlook 2016.

  • Press the Windows key + R keyboard shortcut to open Run.
  • Enter ‘gpedit.msc’ in Run’s Open text box, and press the OK button.
  • Then click Configuration > Administrative Templates > Microsoft Outlook 2016 > Outlook Options > Preferences and E-mail Options on the left of the Group Policy Editor window.
  • Double-click Message handling on the right of the window.
  • Select Enabled on the Message handling window if that isn’t currently selected.
  • Then select the Save copies of messages in Sent Items folder check box on the Message handling window.
  • Press the Apply button to save the chances, and click OK to close the window.

3. Select an Alternative Folder for Sent Emails

You can select an alternative folder to include a sent email when you send it. If emails aren’t in Sent Items, you might at least be able to view sent items in an alternative folder.

This is how you can select an alternative folder for a sent email.

  • Click the New Email button to open Outlook’s email text editor.
  • Select the Options tab.
  • Click the small arrow on the Save Sent Item button to open a small drop-down menu.
  • Select the Other folder option on the menu.
  • Click the New button on the Select Folder window to set up a new folder to save the sent email in.
  • Then press the OK button. Note that you’ll need to set up an Outlook rule to automatically save all sent emails to an alternative folder.

4. Delete Older Emails From the Sent Items Folder

The Sent Items folder has a maximum of two GB storage for emails. So recently sent emails don’t get saved when your Sent Items folder is full.

As such, try deleting some older emails in Sent Items to free up space. You can do that by selecting the Archive this folder using these settings option as follows.

  • Right-click the Sent Items folder in Outlook and select Properties. Note that you can also select a Delete All option on the context menu to quickly clear out the Sent Items folder.
  • Select the AutoArchive tab.
  • Then select the Archive this folder using these settings radio button.
  • Configure the Clean out items older than setting as required.
  • Then select the Permanently delete old items radio button.
  • Press the Apply and OK buttons.

So that’s how you can configure Outlook to save sent emails, save sent emails in alternative folders, and free up some storage space in Sent Items.

Any of those resolutions might ensure that you can view your most recently sent emails in Outlook again.

MS Teams supports live events with 20k users until mid-2021

If you’re running a large organization and use Microsoft Teams on a daily basis for meetings and working sessions, you’ll be pleased to find out that the app can now be used with extended usage limits until end-June 2021.

This is the third time Microsoft increases temporary usage limits for Teams, the previous ones being announced back in April and June 2020.

Temporary usage limits for live events still available

teams to support 20,000 attendees until mid-2021

In an attempt to respond to the current teleworking demands, and also to resist competition against Zoom, Microsoft has been continuously improving their collaboration app.

Ever since the epidemic breakout, Teams has seen a steady increase in its daily user base, with a notable boom in the first week of the stay-at-home rules. According to recent figures, Teams is being used by over 100 million people on a daily basis, while Zoom – by over 300 million. So it’s only natural that Microsoft is trying to stay attractive and ease communication and collaboration across all its services.

As a result, live events hosted in Teams, Yammer or Stream will continue within the following limits:

  • Up to 250 participants in Teams Meetings
  • Up to 20,000 attendees in live events through Teams, Stream, and Yammer
  • Up to 100,000 attendees in Stream when planned through live events assistance program
  • On-demand recordings for unlimited numbers of viewers for those who cannot attend
  • 50 simultaneous events hosted across a tenant
  • 16 hours event broadcast time

It must be mentioned that interactive meetings are available for up to 1,000 participants, while the rest of the participants (up to 20,000) will enjoy just a view-only experience.

Also, event hosts must have the Advanced Communications option added to their Microsoft 365 or Office 365 plan.

With such great news for large companies, one surely has to be on the lookout for app improvements. The latest one allows users to transfer calls from PC to mobile.

Does this announcement work for your company? Tell us in the comments.

Outlook on the web will soon support suggested replies in more languages

Microsoft introduced a new suggested replies feature for Outlook on the web back in 2018. This feature launched first in the US for English-speaking users, but it will be coming to customers worldwide in January 2021.

According to the Microsoft 365 roadmap, the company is adding support for new languages, including Spanish, Portuguese, French, Italian, and German. Microsoft says that Outlook on the web will provide suggested replies to international users if they have a conversation in any of those languages.

Outlook’s suggested replies is a nifty feature that makes it easier for users to respond to emails based on their context. When users receive an email that can be answered with a short response, they can quickly choose pre-set replies to send a response without typing it out. The feature uses machine learning and natural language processing techniques to help users compose emails.

As a reminder, Suggested replies are already available for Outlook for Android and iOS in various languages such as English, Spanish, Portuguese, Italian, and French. While the feature should begin rolling out worldwide in January, it will not be available to all users straight away. The company will gradually roll out the new capability to all tenants.


Best desktop 4k wallpapers to customize your device

Your desktop background doesn’t have to look boring. It’s possible to make it come alive. Lots of wallpapers are frequently created to enhance the appearance of your Windows machine.

Some of the best Windows 10 wallpapers 4kmay require supporting apps to run them.

Although live wallpapers are a total charm, they are resource-intensive, and some PCs might suffer. An option is using a PC with sufficient power to run them smoothly.

Another choice is to go with the best Windows 10 4K wallpapers.

Install DesktopHut, a supporting app, which will help you download and enjoy the listing of some of the best Windows 10 wallpaper 4k.


Quick tip:

If you own a dual-monitor setup, and most of us do especially if you’re looking for 4K wallpapers, then you’ll definitely like what DisplayFusion has to provide.

Not only will it make multi-monitor management easier, but it also comes with access to 25+ online wallpaper website included directly into the app!

DisplayFusion

DisplayFusion

Gain access to over 25 different websites and customize your 4K wallpaper the way you want it with DIsplayFusion!
Check priceVisit website

Where can I download 4k wallpapers?

DesktopHut

DesktopHut is a very cool wallpaper website that enables you to find a variety of high quality and different resolution wallpapers that will surely make your device look incredible.

This website offers you quick access to any category of wallpapers you might be interested in, by using some very intuitive and good-looking buttons to enable it.

No matter if you’re into cyberpunk, science-fiction, heroes, or simple and crisp one-color wallpapers, this website offers you a great selection.

⇒ Visit DesktopHut


DeviantArt Wallpapers

Even though DeviantArt allows you to share and sell your artwork or digital creations, the website also has a specific wallpaper section in which you can get lost for days.

The variety of high-quality wallpapers is unmatched by any other website because of the constant stream of new creations from users both experienced, and beginners.

If you want to find a one-of-a-kind wallpaper in 4K quality for your Windows 10 device, you will surely find it here!

⇒ Visit DeviantArt Wallpapers


HDwallpapers.net

HDwallpapers.net is another amazing source for HD and 4K-quality wallpapers for your Windows 10 device.

Covering an incredible amount of categories that include anything from cartoon characters to amazing real-life nature scenery, you are sure to find the perfect match for your PC on this great website.

You can choose to search for a specific keyword, or simply use the Latest, Featured, or Popular buttons to pick a perfect wallpaper.

What makes it stand out from the other options presented in this guide, is the fact that once you have chosen an image, you get the option to choose from a wide range of formats that are custom-designed for a device.

For example, you can choose to download 4K wallpapers for your Windows 10 device or choose from Apple, Google, Samsung, Lenovo, LG, HTC, etc.

⇒ Visit HDwallpapers.net


WallHaven

WallHaven is a must in a list of the best sources for 4K wallpapers, offering you an incredibly vast array of options that include numerous categories and sub-categories.

Featuring some great buttons on the main page, this website enables you to quickly find the latest wallpaper released, browse through the best-ranked options, and even to see a random image.

Beyond this, each of the images has tags attached to them, so if you find one that fits your needs, you can simply get some more suggestions that look similar.

This makes it easier than ever to browse through thousands of wallpaper images for your Windows 10 PC with ease.

⇒ Visit WallHaven


Wallpino

Even though not as complex as the other mentions found in this guide, Wallpino does a pretty good job when it comes to the wallpapers offer.

Featuring over 10.000 wallpapers on a variety of subjects, this website will surely help you choose one that fits your taste.

After searching for a specific type of wallpaper, you can simply use the tags included in the pages to narrow your search down to whatever type of images you’re interested in.

Even though the website build is not as complex as others, Wallpino doesn’t fail to produce good results when searching for a good 4K wallpaper for your Windows 10 device.

⇒ Visit Wallpino


Wallpapers help you personalize your desktop screen, so feel free to download choose from any of the broad listings of wallpapers on DesktopHut.

Let’s know your thoughts on our list of the best Windows 10 wallpapers 4k.


[wl_navigator]

Wallpaper Engine brings your Windows desktop to life

Spice up your desktop with this cheap Wallpaper Engine app from Steam.

Steam Workshop, the distribution tool for the Wallpaper Engine app

Not everybody likes Steam, but there is a good reason why Wallpaper Engine is distributed through Steam: the Steam Workshop.

In it, users can add their own contributions to Wallpaper Engine app. For small developers, this is a pretty cool way to get new content into the application.


Wallpaper Engine breathes life into your desktop

The app’s effects are quite impressive. Start by clicking a wallpaper from the collection to select it. You will also get some options for altering playback speed, volume and the theme colors of the desired wallpaper.

You can have the Wallpaper Engine change your Windows accent color with the wallpaper automatically. You’re also able to modify the frame rate and you’ll notice that it can go up to 60FPS.

To reach 60FPS, you really have to own a great set of graphics hardware if you want that things will go as smoothly as possible.


System requirements

  • OS: Windows 10
  • Processor: 2.0 GHz Intel i7 or equivalent
  • Memory: 2048 MB RAM
  • Graphics: NVIDIA GeForce GTX 660, AMD HD7870, 2 GB VRAM or above
  • DirectX: Version 11
  • Storage: 1024 MB available space

Wallpaper Engine

Wallpaper Engine

Your desktop is your landing page, and your wallpaper defines it. Bring it to life with Wallpaper Engine!
Check priceVisit website

Wallpaper for Windows 10: Best of 2026

Windows 10 S brings enhanced security, preventing users from downloading apps and programs from outside the Microsoft Store. In this manner, Microsoft hopes to reduce the risk of getting malware infections from third-party app installs.

At the same time, this new strategy also limits user access to apps and programs.

One such example is downloading wallpapers. There are many websites out there that allow Windows 10 users to download high-quality images on their computers.

However, Windows 10 S users won’t be able to do that as the OS is built in such a manner so as to prevent non-Microsoft Store app installs.

If you’re looking for the best wallpapers to install on Windows 10 S, you’re in the right place. We scoured all the wallpaper apps available in the Microsoft Store and we’ll list the best of them below.


Quick tip:

Many users have dual-monitor setups, and finding wallpapers for them can be hard.

However, if you use a service such as DisplayFusion, you will also gain access to 25+ different online image providers, some of which are usually hidden behind paywalls!

DisplayFusion

DisplayFusion

Gain access to a multitude of wallpaper providers and enhance your desktop with DisplayFusion!
Check priceVisit website

Which are the best wallpapers for Windows 10 S?

3Planesoft 3D screensavers

3planesoft 3D screensavers

3Planesoft 3D screensavers offer a really great collection of screensavers and wallpapers for your Windows 10.

There are 8 main categories from which you can choose: nature, adventure, holidays, fish, fantasy, space, clock, and fireplace.

Just when you thought things couldn’t get any better, if you want to feel close to nature, the screensavers from this category comes with sounds of swings, chases, bicycle, basketball hoop, and even the beloved dog of any family. Makes you feel you are there. 

Every time you want to download a screensaver there you’ll have information regarding the size of it, so there won’t be a situation when you don’t have enough space on your device.

Let us just say that these screensavers are not only extremely beautiful but also informative. You actually get to find a fascinating amount of information about the wonders of the world, depending on which category you choose. Definitely worth giving them a try!

3Planesoft 3D screensavers

3Planesoft 3D screensavers

Get 3Planesoft 3D screensavers and personalize your device by choosing from an amazing collection of wallpapers and customizable wallpapers.
Check price Get it now

Wallpaper Studio 10

windows 10 S wallpaper

Wallpaper Studio 10 offers a huge collection of wallpapers for your Windows 10 PC. This app also allows you to synchronize your favorite wallpapers on all your Windows 10 and Android devices.

You can also share your own collection of wallpapers with other users. They can upvote your collection and you can become one of the top wallpaper publishers.

This app is extremely versatile, allowing you to create individual folders and slide shows. Various search criteria and tags let your categorize your wallpapers so that you can quickly find the ones that you need.

If you really like a particular wallpaper you can rate it to let others know they should check it out too. You can also add comments to wallpapers.

As it happens with every free app and program, there is a price that you must pay to access all these wallpapers and this constitutes a source of frustration for many users.

According to users, the app does offer a great collection of wallpapers and good functionalities, but the auto-play video ads block them from exploring different wallpapers.

Sometimes, the pop-up ads may appear when players are in the middle of a game — which is, of course, very annoying.

⇒ Get Wallpaper Studio 10


Backgrounds Wallpapers HD

background wallpapers HD windows 10 S

Backgrounds Wallpapers HD is an app that offers a rich collection of wallpapers and background images for Windows 10 S. There are more than 30 wallpaper categories available, so you’re definitely going to find the right wallpaper for you.

You can use these images as lock screen wallpapers, account pictures, and more. You can also create your own slide show and enjoy your favorite wallpapers in rotation.

If you’ve run out of ideas, use the “Wallpaper of the Day” section to find a nice image that you can set on your screen that day. The app also supports a Random Wallpaper feature.

⇒ Get Backgrounds Wallpapers HD


Best HD Wallpapers and Backgrounds

best-hd-wallpapers-and-backgrounds-windows-10-S

As its title suggests, this app brings one of the best wallpaper collection for PC our there.

You no longer need to spend hours browsing the Internet in order to find the perfect wallpapers. Actually, you’ll have a hard time deciding which wallpapers to use.

The app features a huge collection of wallpapers filtered into many categories, such as cars and auto, cities, landscapes, abandoned buildings, sky, space, nature, and many more.

⇒ Get Best HD Wallpapers and Backgrounds


WW Wallpapers

WW Wallpapers windows 10 S

If you’re looking for a simple and straightforward wallpaper app for your Windows 10 S computer, then WW Wallpapers is the right choice for you.

You can select your favorite wallpaper from a collection of thousands of HD wallpapers.

You can check what are the top downloads and top votes, as well as browse wallpapers through categories. If you’re looking for one particular type of wallpaper, you can search photos by keyword.

If you really like one particular wallpaper, you can download it to your Photos Library.

⇒ Get WWW Wallpapers

That brings us to the end of our list. If you’re looking for an app that features a huge collection of wallpapers, install Wallpaper Studio 10. On the other hand, if you want a simple app, WW Wallpapers is the right choice for you.


5 best custom wallpaper makers [Desktop & Online]

Generic backgrounds are no fun for your desktop. However, getting the right wallpaper design software will bring you closer to the formal look that you’re after or the fun, bright one, with dramatic patterns.

Many of you probably used similar software in the past. You had some folders containing wallpaper files, then you’ve selected the wallpaper change frequency for the desktop.

How about creating your own wallpapers instead? We’ll be focusing on software tools that are friendly towards beginners as well, so don’t get scared if you’re not intuitively technical.

Follow along and you will be sure to find the perfect wallpaper maker software for you.

What’s the best wallpaper maker software to get?

Adobe Photoshop

Photoshop-CC-2020

The top pick on this list is the very best imaging and graphic design software you can get your hands on today.

Adobe Photoshop won’t empty your pocket yet you will get richer in terms of enthusiasm and even entertainment when taking a look at your currently boring desktop.

As far as your freedom of creation is concerned, the huge canvas size is a clear sign that there’s nothing standing in your way.

To make your own desktop wallpaper, all you need to do is to create a new document in the size of the target desktop wallpaper, then open all the images that will become desktop wallpapers.

Drag them into the original sized document, resize the layers if required, and go to File > Export > Layers to Files. This will make each layer its own file in a matter of seconds.

Here are what key features you will get with Adobe Photoshop:

  • Integrated Image Library to avoid spending countless hours looking for interesting pictures on the Internet
  • Various plug-ins to add special effects and features
  • Unlimited layers and masks
  • OpenType SVG fonts support
  • Convenient video and animation editing

Adobe Photoshop

Wallpapers can be easily created using Photoshop’s wide library of tools and plugins. Make your desktop your own today!
Check price Visit website

Fotor

Fotor is all-in-one software with functions for editing photos, image retouching, and graphic design. However, it can also help you create unique wallpapers.

Actually, you could make beautiful desktop wallpapers in just a few minutes. The process requires no more than an easy drag and drop operation of your photos on the template and a quick change of the script.

When you make any changes, just keep in mind that it’s essential to manage your overlays to maximize your wallpaper’s visual impact.

Here’s what key features you will get with Fotor:

  • Multiple pre-installed filters and onefold photo editing tools
  • Advanced HDR technology
  • Fast RAW file converter
  • Growing Fotor social network
  • Both desktop and mobile versions of Fotor photo editor are available for users

Fotor

If you’re not satisfied with the wallpapers found on the Internet, easily make your own with Fotor!
Check price Visit website

Canva

grab Canva

Canva is a versatile software tool for creating wallpapers. It’s all up to you – start creating amazing wallpapers from scratch or browse through hundreds of wallpaper templates if you’re running out of ideas.

There’s nothing stopping you from adding a truly unique message by choosing from hundreds of free fonts. Then, download or even share your custom wallpaper so that others can see how creative you are!

Here’s what key features you will get with Canva:

  • User-friendly interface
  • Impressive library of over 2 million images
  • Intuitive GIFs creation, series of Instagram stories, and more
  • Team sharing options, with built-in social sharing and presentation mode

⇒ Get Canva

Visme

grab Visme

A great desktop wallpaper design experience is also offered by this fully customizable wallpaper maker software.

Click Create right away, navigate to the Web Graphics tab and hit Wallpapers to wander around some amazing template options.

Moreover, Visme has a seemingly endless array of photos, graphics, icons, and more to rely on when you want to create interesting wallpapers.

After all, the included templates are infinitely customizable.

Here’s what key features you will get with Visme:

  • Thousands of high-resolution stock photos to create amazing backgrounds
  • Easy drag-and-drop design tools
  • Hundreds of popular fonts to choose from, serif and sans serif included
  • Built-in brand kit for uploading your own fonts

⇒ Get Visme

Wallpaper Engine

try out Wallpaper Engine

Do you want to use animated wallpapers? Then, Wallpaper Engine is our recommendation since it makes your desktop dynamic in no time thanks to its impressive 2D and 3D wallpapers.

The program not only gives you access to a large collection of animated wallpapers but also provides a huge range of features to add special effects to cut, paste or move different elements of the wallpaper.

Here’s what key features you will get with Wallpaper Engine:

  • Thousands of wallpapers to get you started
  • Multi-monitor support
  • Full Steam community integration
  • Browse and filter with lots of options if you know precisely what you’re looking for

⇒ Get Wallpaper Engine

There are plenty of options if you’re looking to find the best wallpaper maker software. Which one is your choice today?

Don’t hesitate to let us know by using the comments area below.

FIX: VPN domain’s tap device is down on Hamachi VPN

Hamachi by LogMeIn is one of the most popular VPN services for teams, commonly used by the gaming community.

It allows users to create LAN-like private networks for work or gaming purposes.

However, the service has had some hard time transitioning to Windows 10, as the VPN domain’s tap device is down error affected a lot of users.

If you’ve been (ore currently are) in the situation depicted above, don’t fret. We have a few easy methods to fix it in no time.

What to do if VPN domain’s tap device is down?

Run Diagnostic Tool

From the get-go, make sure to run Hamachi‘s Diagnostic Tool. This built-in utility should point to the exact cause of the problem.

When it comes to the VPN domain’s tap device is down error, the Adapters section should show the yellow exclamation mark.

Here’s how you can access and run the Diagnostic Tool from the LogMeIn Hamachi client:

  1. Start the LogMeIn Hamachi client
  2. Click the Help button
  3. Select Diagnostic ToolLogMeIn Hamachi Diagnostic Tool
  4. Click the Start button

Reinstall Hamachi

Let’s move to the reinstall procedure of the Hamachi service client on your PC.

Reinstalling a piece of software or restarting your computer is more often than not overlooked. Not on our watch.

It’s advised to remove all traces of Hamachi from your PC, including drivers.


Does Hamachi not work on your Windows 10 PC? Check out our guide and learn how you can fix it.


This helps us make sure that the reinstallation process won’t use some of the old, potentially corrupted files or settings.

After removing everything Hamachi-related from your PC, you can safely download and install the latest version of the client and move from there.

Here’s the entire process, step-by-step:

  1. Right-click your Start Menu
  2. Select Apps and Features from the menu
  3. Uninstall the Hamachi client
  4. Right-click your Start Menu once more
  5. Select Device Manager
  6. Remove all associated virtual Network adapters
  7. Restart your PC
  8. Download the latest version of the Hamachi client
  9. Install the client on your PC

If you’re still experiencing issues, try running the Setup again but this time without uninstalling Hamachi.

After the reinstallation process is complete, make sure to restart your PC and check if you’re still getting the error.

Uninstall recent Windows 10 updates

Some users noticed that the error occurred after certain Windows cumulative updates were deployed.

Reportedly, their Hamachi client was working flawlessly until installing the latest system updates.

The obvious step you’ll need to take in this situation is to uninstall them manually and, hopefully, the issue will go away.

Here’s what you need to do:

  1. Press the Win key + I key combination on your keyboard
  2. Select Update & Securitysettings win 10 update & security
  3. Navigate to the Windows Update section
  4. Click the View update history buttonwindows update settings view update history
  5. Select Uninstall updateswindows update settings uninstall updates
  6. Remove any recent updates
  7. Restart your PC

We recommend to uninstall recent updates one by one, and not in bulk.

That way, you can keep track of the update that was rendering Hamachi unusable.

Furthermore, once you discover the culprit, you could go ahead and reinstall updates that were not causing the VPN error.

Reinstall drivers while Hamachi is running

Last, but not least, we have a solution that might appear strange at first sight, but it may just be the most reliable fix to date.

Apparently, after some meddling with the installation and associated network drivers tinkering, users managed to find the resolution.

First of all, you need to start Hamachi and make sure it’s running.

After that, head over to your Device Manager and uninstall all LogMeIn virtual ethernet drivers (in the Network adapters section).

Once you’ve dealt with drivers, just reinstall Hamachi again (method 2) and everything should get back to normal.

This fix is quite peculiar indeed, but hey, at least it gets the job done.

Conclusion

All things considered, if your Hamachi client prompts you with the VPN domain’s tap device is down error, there are a few ways you can fix it.

We recommend you to try each of our methods, one at a time. We’re quite confident you’ll restore Hamachi‘s functionality in no time.

If this guide helped you fix the VPN domain’s tap device is down error, tell us what worked for you in the comments section below.

FIX: Windows needs the TAP-Win32 adapter name

The Windows needs the TAP-Win32 adapter name error appears in OpenVPN files (ovpn format). It’s generated by Windows when attempting to connect to the secure tunnel.

Here’s the complete error message:

. # Windows needs the TAP-Win32 adapter name

. # from the Network Connections panel

. # if you have more than one

If you’re not familiar with how VPNs and OpenVPN work, this error message could prevent you from successfully using a virtual private network solution.

How can I fix the Windows needs the TAP-Win32 adapter name error?

Rename the OpenVPN TAP adapters

Rename the network connection in Windows 10

Skip this step if you have only one TAP-Win32 adapter for OpenVPN installed.

However, if there are two or more interfaces, you need to tell Windows which one to use when creating a secure tunnel.

Keep in mind that you need admin rights for the following steps:

  1. On Windows 10, right-click the Start button and select Network Connections
  2. Click Change adapter options
  3. Right-click the TAP-Win32 adapter interface associated with OpenVPN
  4. Give it a unique name (keep in mind that it’s case sensitive)
  5. Do this for every TAP-Win32 adapter interface associated with OpenVPN
  6. Open the OVPN file
  7. Locate the dev-node line and set the new TAP-Win32 adapter name
  8. Save changes and try to reconnect

It indicates that you have two or more TAP-Win32 adapters installed for OpenVPN, so you need to specify the adapter that should be used.

This solution should help fix OpenVPN connection issues on your PC.

Reinstall the OpenVPN network adapter

uninstall TAP drivers from Device Manager

If you have only one TAP-Win32 adapter for OpenVPN installed, it’s a good idea to reinstall it.

Here’s what you need to do:

  1. Right-click the Start button and select Device Manager
  2. Expand the Network adapters section
  3. Locate and right-click the OpenVPN adapter
  4. Select Uninstall device
  5. Open the Action menu and select Scan for hardware changes
  6. Try to reconnect through OpenVPN

Use a commercial VPN with OpenVPN support

PIA

Instead of using the OpenVPN client, consider using a commercial VPN like Private Internet Access because it fixes any OpenVPN configuration issues on its own.

Plus, you can effortlessly switch VPN servers and reinstall the OpenVPN adapter from the Help menu if you encounter any issues.

PIA comes with some extra cool features, such as private DNS servers, static and dynamic IP addresses, split tunneling mode, kill switch, and native port forwarding.

More about PIA:

  • Made for Windows, Mac, iOS, Android, Linux, and routers
  • Protect up to 10 devices at once
  • A zero-logging privacy policy
  • 24/7 live chat support
  • 30-day money-back guarantee (no free trial)
Private Internet Access

Private Internet Access

Use this reliable VPN service to avoid TAP driver issues caused by improper OpenVPN configuration settings.
Check priceBuy it now

Conclusion

To recap, you can fix the Windows needs the TAP-Win32 adapter name error by renaming or reinstalling the OpenVPN network adapters.

But we suggest using a commercial VPN service like Private Internet Access since it simplifies the way you connect to a secure tunnel using OpenVPN.

Did you manage to fix the error using the solutions above? Let us know in the comment section below.

How to group shortcuts on the taskbar by using TaskbarGroups

TaskbarGroups is a great Windows 10 utility that can easily bundle multiple shortcuts on the taskbar for better organization and extra space.

That’s essential, especially if you tend to pin your most used applications, the folders, or even the recycle bin.

Given your actions, the taskbar could become crowded in no time. However, you can now avoid that by simply grouping the shortcuts on the taskbar.

TaskbarGroups was developed by Jack Schierbeck. He just released the source code on Github and revealed the following about the actual tool:

Lightweight application that lets user create and pin groups to the Windows taskbar och desktop

How can I group shortcuts on the taskbar?

  1. At first, download the TaskbarGroups app.
  2. Extract the TaskbarGroups archive and run the executable file that it contains from the folder the contents got extracted to.
  3. To create a group for the taskbar, just select the Add taskbar group option.Add taskbar group option
  4. Give it an appropriate title and set a group icon for it.
  5. You may now add program shortcuts to the group.
  6. With the group pinned to the taskbar, feel free to click on the pinned group and open the overlay including all grouped programs.
  7. Finally, just click on the desired program in order to launch it.

There is no secret that the Windows 10 taskbar is customizable in terms of design, location, included items, and more.

Being able to group shortcuts on the taskbar is helpful, especially given the fact that you can create additional groups and associate different shortcuts.

Even better, do note that TaskbarGroups currently supports all taskbar layouts you may think of using, including on the side and even multi-monitor setups.

If that’s your wish as well and you like the idea of showing the taskbar on both monitors in Windows 10, check out this detailed guide right away.

Let us know in the comments area if you want to give a try to TaskbarGroups as well.

How to remove Anatova ransomware from Windows 10 PCs

Nowadays, cyber-attacks are becoming more and more common and there’s no sign of stopping them any time soon. Not without a proper strategy, that is.

Anatova ransomware, for instance, is a popular (in the infamous kind of way) attack that affected several machines in 2019.

This ransomware was first discovered on a private peer to peer network by  McAfee’s security researchers.

The researchers studied the prepared modular extension of the ransomware and warned its users about its potential to become a serious threat.

Now here’s why it’s hazardous for any device it reaches: Anatova compels PC users to infect their machines by replicating the icon of an application or a game.

Once your device is infected, two things happen: your local files will get encrypted and all the files on network shares will share the same fate.

In the worst-case scenario, where the attacker wins, the victims have to pay a ransom of 10 Dash coins (valued at roughly $700) to get their files decrypted. 

How to get rid of Anatova ransomware?

Enable Safe mode with Networking

It’s possible to stop Anatova ransomware dead in its tracks by using Windows’ Safe mode.

Follow the steps explained below to access Safe Mode and get rid of this piece of malware:

  1. Open the Start Menu
  2. Click the Power button
  3. Hold Shift on your keyboard and select Restart
  4. Go to Troubleshoot
  5. Select Advanced options
  6. Click the Startup Settings button
  7. Press RestartComputer Stuck On Ctrl Alt Delete Screen
  8. Enable the Safe Mode with Command Prompt mode in Startup Settings

Restore system files and settings

  1. Launch a CMD instance with Administrator rights
  2. Type cd restore and hit the Enter button
  3. In the same CMD window type rstrui.exe and hit the Enter button
  4. Locate the newly-opened System Restore window
  5. Click the Next button
  6. Select the restore point that was created before the Aanatova attack
  7. Click the Next button
  8. Hit the Yes button to initiate the restoration process

How can I prevent Anatova ransomware?

Now that you got rid of the Anatova ransomware, you’ll need to make sure it won’t come back.

As usual, prevention is better than cure. Therefore, it’s wise to follow a few safety measures whenever you use your PC, especially while online.

  • Always use official, confirmed sources whenever you download games, apps, or any other document
  • Avoid shady websites, especially ones that are full of ads and pop-ups, or those that ask for notification permissions
  • Don’t open emails that look particularly suspicious
  • Avoid clicking attachments in email messages, especially if your email client flagged them as spam and blocked their content
  • Use trustworthy antivirus, antimalware, and firewall solutions on your PC
  • Don’t ignore any security warning you may see while navigating to a suspicious website

Ransomware is usually dangerous because it can lock you out of important documents on your computer.

With that in mind, it’s easy to see why making backup copies of everything important on your machine can be a good way to fight Anatova ransomware.

Even in the worst-case scenario where your files get locked beyond recovery you won’t have to pay a dime to the attacker, knowing well that you have backup copies.

It goes without saying that the backup copies should never ever reside on the same machine or in the same location as the original files.

Otherwise, you’ll face the risk of losing them to ransomware, as well.

Just use a memory stick or an external HDD and disconnect it once the backup is complete.

Conclusion

All things considered, if you’ve been affected by Anatova ransomware, you can easily get rid of it, granted that you have enabled the system restore option on your PC.

If you manage to get rid of Anatova ransomware, don’t forget to backup your files and take all necessary steps to prevent it (or any other similar malware) from ever returning to your PC.

How to Fix Common Disney Plus Error Codes

You don’t need to wait for another episode of The Simpsons or Star Wars. Disney Play owns an extensive portfolio of amazing content that you can enjoy over and over again. That’s why we’re here – to help you fix the most common Disney Plus error codes.

Both monthly and annual fees are reasonable, and Disney seems promising, but the service is still in its early stages. Until the updates address the growing glitches, sometimes you can tackle the issues you’re experiencing.

Let’s examine how some issues manifest themselves and what solutions may be applied.

How can I fix common Disney Plus error codes?

1. Create a new account

A lot of error codes and other generic issues with your Disney+ viewing experience can be caused by faulty account settings.

Sometimes, there is an issue with your email address, or maybe it is because you have a profile on someone else’s account, or it can even be caused by the location from which you first created your account.

It can even be caused by issues with the credit card you are paying from.

2. Error Code 4: Issues trying to complete your transaction

Well, when getting this error it means that Disney has some issues trying to complete your transaction. First, check your billing details and ZIP code to ensure the transaction succeeds.

Besides this, make sure you own a US-based card. If all card details are correct, try again after a few minutes.

3. Error Code 5: Account information issue

Account information issue

This error is a sign that Disney Plus could not update your account information since there is something wrong with your entered data. Please check that you have entered the correct information and try to update your account details once more.

4. Error Code 8: Invalid email or password

This shows up when you’ve used an incorrect email or password while trying to log in to your Disney Plus profile. This also applies to a password that doesn’t meet Disney’s requirements.

To fix this error code, ensure you have the correct details. Use the email and password you entered while creating your Disney Plus profile, and consider using a password manager.

If you want one of the latest Windows 10 password managers, check out our best picks!

5. Error Code 9: Login or payment issue

Just like error 4, in this error, your transaction is being canceled due to some wrong info about ZIP or postal code, security code, card expiration date, or non-US-based card.

Double-check your details for good measure. Making sure you haven’t been logged out by accident is also recommended.

6. Error Code 11: Content availability restrictions

TV shows and movies in a certain region may not be available in yours. If you attempt to watch one of those titles, you will face error 11. First, try resetting your Internet connection.

If this makes no difference, remember that a premium streaming VPN can provide you with instant access to any content despite your current location.

7. Error Code 13: Device limit issue

Are you trying to download videos on more devices with the same account? Disney is clear about the number of devices you can use at one time to watch content with a premium account.

The service allows up to four devices simultaneously logged in at a time, so you may need to sign out of a few before you can resume streaming past the error code 13. Further, try to remove all downloads from a previously loaded device.

8. Error Code 22: Restricted content

Error Code 22

Disney Plus is available in a limited number of countries for now. If you already have a Disney Plus account, but you are in a country where the service is not available, you may end up running into Error Code 22.

The easiest way to resolve this issue is by connecting to a Disney Plus-compatible VPN. Change your location to the US to evade all these limitations.

9. Error Code 30: Device registration issue

This indicates that your device couldn’t be added to your Disney Plus account. Make sure that you haven’t reached the 10-device limit account and double-check that your device is compatible with Disney Plus.

If the device happens to be already linked, simply try to log in again.

10. Error Code 32: Login or password issue

If you are using an incorrect password, you will most likely face this error. It is essential to keep your password safe and to have the correct login details for your account.

Then, sign out and back in. If you don’t remember your password, feel free to reset it.

11. Error Code 38: Time settings error

When the time and date settings are incorrect on your streaming device, this will lead to issues when you try to access content on Disney Plus. That’s an easy one, though – check the time settings on your clock or set it to Automatic and try again.

12. Error Code 42: Issues connecting to the service

This error message appears when there are connectivity issues like the no valid bitrates error. The quickest fix is restarting your streaming device and ensuring the Internet works fine.

Perhaps it gets disconnected due to the VPN you’re using, or Disney Plus is having issues. For these cases, we’ve got a dedicated guide on what to do when the Internet is disconnected when a VPN connects.

13. Error Code 83: App-related issue

If your device does not pass the compatibility test or is running on unsupported configurations, you may encounter the error code 83 on Disney Plus. this can be resolved by updating the app from official sources.

14. Error Code 86: The account has been blocked

Disney Plus can block your account due to inappropriate usage or if you are somehow violating their policies. Also, make sure the main account holder’s email isn’t associated with someone under the age of 18. You may have to follow up with Disney Support to resolve your issue.

15. Error Code 1026: Authentication issue

Disney Plus may fail to log you into your account if the server is busy, you’ve not updated your subscription, or you’re trying to access content from a restricted location. You’ll see the error code 1026 when you launch the app, and to resolve it, you can enable your VPN.

Before you leave, find out about Disney Plus Error code 14, a simple sign-in issue.

Reinstalling the Disney Plus app is a standard solution to many other issues related to the app, including error code 73.

For additional help, do not hesitate to learn how to fix Disney Plus keeps crashing. Rest assured that our guide offers effective troubleshooting steps.

Feel free to ask any questions and let us know how it goes.

How to get Disney Plus with Verizon [Free / Limited Deal]

Disney launched the Disney+ streaming service toward the end of 2019. This is a streaming channel exclusively for Disney content.

If you’re a big Disney fan, then Disney+ is the channel for you. In the U.S., it has a $69.99 membership fee that provides access to all the channel’s content.

However, Verizon is offering free one-year Disney+ membership to those subscribed to one of its Unlimited plans. So, Go Unlimited, Above Unlimited, Get More Unlimited, Do More Unlimited, Play More Unlimited, and Start Unlimited subscribers can add Disney+ to their accounts.

If you’re subscribed to an alternative Verizon plan, you can switch to Unlimited to activate Verizon’s subscription offer. Verizon also offers free one-year Disney+ membership to new 5G and Fios subscribers.

Quick tip:
Regardless of streaming service, watching directly through the original provider is always the better option, since it eliminates the possibility of logion issues, account syncing, and more.

Disney+

View Disney+ straight from their app to have the best viewing experience. Create an account and subscribe today!
Check price Visit website

How can I get a one-year Disney Plus membership with Verizon?

1. For current Verizon Unlimited subscribers

  1. If you’re currently subscribed to a Verizon Unlimited plan, click Get Disney+ under the Already have unlimited heading? on the Disney+ offer page.
  2. Next, enter your login details.
    Verizon signin page disney plus verizon
  3. Click the Sign-in button.
  4. Click the Get Disney+ button under the 1st year on the $6.99/month heading.
  5. Select the accept Terms and Conditions option.
  6. Press the Enroll in Disney+ button to get your one-year channel subscription.

2. For Verizon users who need to switch to an Unlimited plan

  1. If you need to switch to an Unlimited plan, click Change your plan on Verizon’s Disney+ offer page.
    Change your plan link disney plus verizon
  2. Next, input your login details in the text boxes.
  3. Click Sign in to log in.
  4. Then you’ll need to switch to one of the Unlimited plans, such as Go Unlimited.
  5. Thereafter, return to Verizon’s Disney+ offer page.
  6. Click Get Disney+ on that page to add the channel to your Unlimited account.

3. With the Verizon app

  1. You can also claim your one-year Disney+ subscription with the Verizon app. To do so, add the Verizon app to your mobile device from its Google Play page.
    My Verizon page disney plus verizon
  2. Open the Verizon app.
  3. Tap Menu to select Account.
  4. Then enter your login details.
  5. Select the Entertainment tab.
  6. Tap the Learn more option for the Disney+ offering.
  7. Tap Confirm to accept terms and conditions.
  8. Tap Continue to proceed with Disney+ enrollment.

Once you’ve added Disney+ to your Verizon account, you can watch a great collection of CGI animated films and TV series for one year! This is an amazing offer from Verizon, so don’t hesitate to take advantage of it.

Disney Plus is not downloading on Xbox One? Try this

Disney Plus had a bumpy launch with logging-in errors and overloaded servers, but most of these seem to be a part of the past. Sadly, this doesn’t apply to those trying to get to the amazing Disney Plus content on their Xbox One.

Disney Plus isn’t the only streaming service where you can watch Disney content but it’s the most popular one these days.

If you’re an Xbox One owner impatient to start watching your favorite Disney, Pixar, Marvel, Disney Channel, National Geographic, or Star Wars movies no downloading errors should stop you.

When you are troubled by this issue, here are a couple of troubleshooting tips to help you download the app on your Xbox One in no time.

What can I do if Disney Plus is not downloading on Xbox One?

1. Create a new account

Sometimes issues with your login credentials can cause difficulties downloading the app. It can be because of your registered email address, or because of the servers in your area.

As such, create a new Disney+ account using a different email address, while also using a VPN.

Disney+

Starting off with a clean slate is usually the go-to solution for any problem. Create a new account, download the app and start enjoying Disney+!
Check price Visit website

2. Ensure you signed up for the streaming service

First of all, as eager to take a peek at The Mandalorian you might be, note that you need to sign up for this streaming service before downloading it to your console.

There are two plans to choose between: you can either pay $6.99 per month or go for the annual plan that will save you a few bucks.

3. Double-check your download steps

  1. Once you’re signed up, turn on your Xbox and sign in to your profile.
  2. Open search by hitting the Y button.
  3. Type in Disney Plus.
  4. Then, hitting A will direct you to the Microsoft Store where you can find Disney Plus.
  5. In the Apps section, select Disney Plus.
  6. You might need to search it if you don’t see Disney Plus from the start.
  7. Select Install to add the app to your Xbox One.
  8. You’ll be notified as soon as the download is finished.
  9. Open the Disney Plus app by holding the middle button on your Xbox controller.
  10. Next, log-in using your Disney Plus credentials to get access to access to endless movies and TV series.
  11. When you find the video you want to watch, just hit A to start playing.

4. Check Internet download speed

Are you still unable to download Disney Plus on your Xbox One? Check your Internet download speed as soon a possible. If it’s slower than 5 Mbps, that could be your issue.

We don’t want to break you the bad news but after a successful download, there’s a catch with playing the videos in 4K resolution. Unlike Amazon Video, you won’t be able to enjoy this feature on Xbox One as only Xbox One X and Xbox One S support Disney’s 4K for now.

What’s also essential in this case is a good connection speed: it needs to be 35Mbps or more to stream Disney Plus.

5. Disconnect and reconnect from the Internet

Disconnecting the Xbox One from the Wi-Fi Internet connection has often helped users in a similar situation to fix the issue. Wait 30 to 60 seconds, and then reconnect.

Sometimes all you need is to refresh your connection and the download will complete or act fast when your Xbox One doesn’t see Wi-Fi at all. Most users don’t know what to do in a situation like this. Don’t be one of them and read this quick guide to learn how to solve the problem in no time.

6. Switch to a different device

As frustrating as it sounds, you might be getting a device compatibility issue like Error 83. This means the Disney Plus app is having an issue with the specific Xbox One you’re using. To clear out any doubts, you should be able to watch Disney Plus on your Xbox One, Xbox One S, or Xbox One X.

These are the models that support the channel itself, while other models, such as Xbox 360, cannot stream Disney Plus for now. Switching to a smart TV, a PC, or even a different Xbox model should yield a different result.

Follow the steps in this guide and see which one helps you resolve the error. Finally, don’t leave aside the fact that you may watch Disney Plus on other devices at the same time. There’s no need to get involved in a quarrel about your tonight’s movie choice with other family members!

For any other questions and suggestions, reach to the comments area below.

Fix Disney Plus Login Issues [Fool Proof Solutions]

Connecting with people all over the world has never been a challenge for Disney. In spite of that, plenty of social media users said they had trouble logging in to Disney Plus the first day when it went live.

Disney failed to anticipate the high level of demand for their service on launch day, yet Disney Plus users are still not able to log in properly. Running into login issues when you’re trying to access Disney’s amazing content can be annoying. One user stated:

I’ve been having issues with logging in, upon login I was given an error code 83 and told to contact support. I don’t know if it’s completely fixed yet or not but my service is back up and running after not working at all.

Whether you are that lucky or not, Error 83 is by far one of the most common errors you come across. Let’s see how you can fix these login issues.

What can I do when I can’t login to Disney Plus account?

1. Delete the app and reinstall

delete Disney Plus and reinstall
  1. Delete your Disney Plus app by following the standard protocol for the device you’re using.
  2. Then, power off your device and turn it back on.
  3. Navigate to your device’s digital app storefront and search for Disney Plus.
  4. Download the app to your device.
  5. Log in with your account email and password.

When all else fails, delete the Disney Plus app, download it from your device’s app store and try to log in again. Fortunately, it’s incredibly easy to do that, so just follow the above steps.

Disney+

A bad app install can cause a myriad of problems, including login issues with your Disney+ app
Check price Visit Website

2. General login fixes

login to Disney Plus
  • Make sure you use the very same email address you used to subscribe and select the option that matches the one you used when you first signed up to Disney Plus.
  • If you’ve previously logged in using Facebook or Google, and haven’t yet switched your login over to your email address, do that as soon as possible.
  • You could be trying to log in without previously proving your payment details. You cannot do that as these details are needed to complete your subscription.

3 Perform a power cycle

turn off the device
  1. Turn off the device you’re using to watch Disney Plus.
  2. Turn off your modem and router at the power button and disconnect it from the power source.
  3. Restart both your modem and router.
  4. Then, restart your streaming device.
  5. Finally, launch Disney Plus back and try to look for your Disney Plus account again.

Note that many users state that the error code appears while being on their university or office Wi-Fi. If they’re on cellular data, then it’s completely fine. Oddly, others report having issues only when they’re on a cellular connection. Switching to Wi-Fi does the trick for them.

This inconsistency leads to one conclusion only. A power cycle is needed. So, shut down your streaming device completely and then, restart it. As often we’re recommending this, you don’t even imagine how a basic power cycle refreshes your connection and solves most of your tech woes.

With so much content to choose from, you cannot stop troubleshooting this. There has also been some limited success in turning off Wi-Fi and streaming over LTE instead at times, but that’s useful only when having an Unlimited plan.

Moreover, Disney Plus doesn’t play so nicely with VPNs. It might be the safest solution for getting access to that enormous content library when Disney Plus isn’t yet available in your country, but don’t hesitate to keep track of the next releases. Also, take a look at the best VPN routers you may use to ease the process.

After resolving login problems, if you encounter inconveniences with the app crashing, our article including simple ways to resolve Disney Plus crashing issues offers additional solutions to enhance your streaming experience.

Did our solutions help you? If you’ve found a solution we haven’t discovered yet, let us know in the comments below. We’ll most likely appreciate it!

Windows 10 news recap: Google acquisition raises hopes of turning Windows 10 PCs into Chromebooks, no more Insider builds for 2020, and more

Welcome back to our Windows 10 news recap, where we go over the top stories of the past week in the world of Microsoft’s flagship operating system.

Microsoft reportedly designing its own chips for servers, Surface devices

According to a new report, Microsoft is working on creating some independence from Intel, with claims it is working on its own chips, mainly designed for servers, but potential for other devices, such as its Surface lineup.

Surface Device Cropped

No more Windows 10 Insider builds for the rest of 2020 as the team “recharges for what’s in store for 2021”

As 2020 nears its end, it has been announced that there will be no further Windows 10 Insider builds this year, as the team takes a break until 2021.

Windows Insider Program sign

Google may look to turn Windows 10 PCs and Macs into Chromebooks with CloudReady acquisition

Google has quietly acquired a company called CloudReady, a variant of Chrome OS that can be installed on Chromebooks, Windows PCs, and Macs.

That’s it for this week. We’ll be back next week with more Windows 10 news.

Igfxtray.exe: what is it and should you disable it?

Your computer has hundreds of system files, and sometimes you might encounter one of these unknown files and mistake it for malware.

One of these files is Igfxtray, and in this guide, we’re going to take a closer look at this file and explain to you what it actually is and can it damage your PC.

How do I fix Igfxtray exe error?

What is Igfxtray?

what is igfxtray

Igfxtray module is a component of Intel Common User Interface, and it’s developed by Intel. The file is a part of Graphics Media Accelerator Driver.

Igfxtray.exe will display the Intel icon in the system tray that you can use to quickly access the Intel Graphics configuration.


Igfxtray has stopped working

igfxtray has stopped working

If you’re getting a message saying that Igfxtray has stopped working, you might want to try uninstalling and updating your Intel Graphics drivers. This can be a tedious process, but you can speed it up with Outbyte Driver Updater.

The software will scan your system and give you a list of all outdated drivers. Now you just need to select the drivers that you want to update, and they will be downloaded automatically.

The software has over 18 million drivers available, so it should be able to update any driver without issues. With its simplicity, Outbyte Driver Updater is the best choice for your driver-related issues, so be sure to try it out.

Other great features:

  • Fast scanning
  • Download manager for drivers
  • Driver backup
  • Database of 18 million driver files
  • Scheduled updates and scans
Outbyte Driver Updater

Outbyte Driver Updater

To update your drivers quickly and fix problems with Igfxtray, be sure to use Outbyte Driver Updater.
Check priceVisit website

Is Igfxtray necessary at startup?

igfxtray startup

No, Igfxtray.exe isn’t necessary to run at startup. The software allows you to quickly access the Intel Graphics configuration utility, and unless you need to frequently change your settings, there’s no need for Igfxtray to run at startup.


Should I disable Igfxtray?

If you’re low on memory or if your system is slow to start, you can then disable Igfxtray. This isn’t essential software, and it basically works as a shortcut for Intel Graphics configuration software.

To disable this software, do the following:

  1. Press Ctrl + Shift + Esc to open Task Manager.
  2. Go to the Startup tab and locate Igfxtray. Right-click it and choose Disable.
    igfxtray disable startup

After doing this, the Igfxtray won’t start with your PC anymore.


Is Igfxtray EXE safe?

igfxtray remove

Yes, igfxtray.exe file is 100% legitimate and safe. The application is made by Intel, and it’s used to launch Intel Graphics utility software, so it’s perfectly safe to use.

Igfxtray file is associated with Intel Graphics, and as such, it’s completely safe, but unless you’re configuring Intel graphics frequently, you don’t need to have Igfxtray in the startup.

Cisco AnyConnect Failed to Load Preferences: How to Fix

Using a VPN client like Cisco AnyConnect should allow for unprecedented end-point access for both your employees and you.

The benefits of using a service like this are more than obvious, as you can access the company network remotely from any PC or mobile device.

Nonetheless, even though a rare issue might cast some shade upon the overall functionality, they’re usually simple to sort out.

The one we’re addressing today is the VPN failed to load preferences error. It prevents users from connecting to the VPN.

How can I fix Cisco AnyConnect if the VPN failed to load preferences?

Reinstall Cisco AnyConnect

The first rather obvious step is to try and reinstall Cisco AnyConnect. Some users suggest that a certain version of AnyConnect won’t work, so you might get it working after acquiring a more recent release.

You won’t start from scratch as the ProgramData configuration and profile files will stay untouched.

If reinstalling Cisco AnyConnect won’t fix the VPN failed to load preferences error, proceed to the following step.

Delete the Cisco folder

Possible corruption in the configuration files can lead to issues like this. As the “VPN failed to load preferences” error states, the client is unable to get the preferences by which the client is configured.

In order to resolve this, you can try and delete all involved preference files from a few locations.

Here are the files you should delete:

%ProgramData%CiscoCisco AnyConnect Secure MobilityClientProfile
%AppData%LocalCiscoCisco AnyConnect Secure Mobility Client

Deleting this folder will remove all settings. Some users suggest reinstalling the client afterward, but you can try it out first and then act accordingly if the issue persists.

If Cisco VPN failed to enable the virtual adapter, find out how to fix this problem.

Change the AnyConnect security settings

There seems to be another possible reason for the “VPN failed to load preferences” error.

Namely, it seems that it plagues only users who don’t have the necessary access permissions enabled. You can correct this and, hopefully, this will resolve the problem.

Here’s what you need to do:

  1. Navigate to the Cisco AnyConnect Secure Mobility Client folder
  2. Right-click on the Profile folder and open Properties
  3. Choose the Security tab
  4. Click Edit (you need admin rights)
  5. Check the Full control box and confirm changes

Remove XML Profile

Finally, if none of the previous solutions proved fruitful in resolving the error at hand, we have another thing you can try.

Of course, there’s always an option to contact the support and send them all the necessary logs in order for them to help you.

Just, before doing that, give these steps a try:

  1. Enable Group-alias or Group-URL for tunnel-groups
  2. Back up the XML Profile and remove it from Adaptive Security Appliance
  3. Now, remove the following files from the affected machine:
    • Preferences.xml
    • preferences_global.xml
    • XML Profile in the Profiles folder
  4. Finally, reconnect the client

Switch to an alternative VPN service

use Perimeter 81

It’s not exactly a solution, but we think it deserves your attention. If you get recurring errors on Cisco AnyConnect, such as the VPN failed to load preferences error, look into alternative VPN solutions.

When it comes to enterprises, we can’t think of a better option than Perimeter 81. It has an intuitive cloud management platform that facilitates access between the server and remote clients.

More about Perimeter 81:

  • Made for 5 or more team members
  • Impressive security features
  • Integrates with AWS, Azure, Google Cloud, Salesforce, and others
  • 24/7 chat support
  • 30-day money-back guarantee (no free trial)

Perimeter 81

Check out one of the best alternatives to Cisco AnyConnect.
Check price Buy it now

Conclusion

To sum up, you can fix Cisco AnyConnect if the VPN failed to load preferences by reinstalling the application, deleting its folder, or changing the security settings.

If the problem is still there, go ahead and download Cisco AnyConnect on Windows 11 again.

However, if you’re interested in a great alternative to Cisco AnyConnect, consider using Perimeter 81.

8 best encryption software tools for using free Wi-Fi

It’s dangerous to connect to free Wi-Fi, even when using your personal laptop, smartphone, or tablet. Hackers are always looking for their next target.

If the public wireless network you’re trying to use isn’t protected with a password, then it will expose your to security vulnerabilities, such as man-in-the-middle attacks.

That’s where encryption comes into play. You can take the necessary precautions to defend your computer from account hijackers and identity thieves using security solutions.

What are the best Wi-Fi encryption tools to protect your data?

A premium VPN service

PIA

A VPN service creates a secure tunnel between your unprotected wireless network and the Internet to encrypt all data that passes through. It’s one of the best and easiest ways to protect your online privacy and computer security.

But you shouldn’t use a free VPN service because it has limited functionality and a low server count. Besides, most free VPNs are ad-supported, exposing yourself to malware risks. Some even monitor and sell your data.

Instead, turn to a reliable, paid VPN service like Private Internet Access. It offers 256-bit military-grade encryption through the OpenVPN protocol. Or you can switch to WireGuard to experience a faster Internet connection.

Here’s what you get with PIA:

  • Kill switch
  • Private DNS servers
  • PIA MACE (malware blocker)
  • No logs or leaks
  • 24/7 live chat support
  • 30-day money-back guarantee (no free trial)
Private Internet Access

Private Internet Access

Use this reliable VPN service to encrypt your entire data traffic when connecting to free Wi-Fi.
Check priceBuy it now

Out of all the virtual private network solutions we tested, we think that Private Internet Access is the safest VPN for hotel Wi-Fi.

A secure web browser

use Tor Browser

The next best thing to using a VPN is Tor. It’s a completely free and super-secure anonymity network maintained by a huge community of privacy-concerned individuals.

Tor was specially built as an anti-censorship tool for people living in countries with severe government policies that restrict Internet access.

But Tor is also one of the best ways to protect yourself on free Wi-Fi using multiple layers of encryption.

All you have to do is download the Tor Browser and use it instead of your regular browser when connecting to public hotspots.

An HTTPS enforcer

HTTP websites don’t have SSL certificates, so they create security loopholes.

A cyber-criminal could intercept your connection, set itself in the middle of your PC and the remote server, and steal your email credentials or credit card info.

It’s essential to visit only HTTPS websites because they provide end-to-end encryption. It’s one of the best ways to protect your PC over public Wi-Fi.

Some web browsers have an HTTPS only mode, such as Firefox, so make sure to explore browser settings and turn on that feature.

Otherwise, you can set up extensions that force your web browsers to always load HTTPS pages. We suggest using HTTPS Everywhere.

A secure email service

email privacy software

We’re not saying that Gmail, iCloud Mail or Yandex Mail aren’t secure. But you can do better when it comes to using encryption tools over free Wi-Fi.

ProtonMail is an excellent example. It’s a highly secure email service based in Switzerland, which uses end-to-end encryption to make your emails anonymous.

Here’s what you get from ProtonMail:

  • No logs: zero access to your data
  • Open-source cryptography: AES, RSA, OpenPGP
  • Full disk encryption for storing your data
  • Self-destructing emails
ProtonMail

ProtonMail

Make your emails anonymous when connecting to free Wi-Fi to protect your data from hacker interceptions.

We think that ProtonMail is the best email service with encryption.

A secure messaging tool

use Signal

Facebook Messenger and WhatsApp provide end-to-end encryption. But privacy-concerned users aren’t too comfortable about sharing their private messages with the world’s biggest social media network.

If you’re one of them, check out Signal. It’s a free instant messenger that uses military-grade encryption to secure your data, even over free, unprotected Wi-Fi.

We believe that Signal is the top messaging tool that uses encryption. And, if you need more convincing, you should know that the service is backed by Edward Snowden.

An antivirus with Wi-Fi protection

tweak antivirus settings to allow emails

You probably don’t need to hear again how important it is to secure your device with a powerful anti-malware service. So we’re going to skip that part.

What you may not know is that a few antivirus solutions feature Wi-Fi protection to keep you safe when connecting to public wireless networks.

Bitdefender stands out in the crowd. It has a special feature called Wi-Fi Security Advisor, which exposes network vulnerabilities and tells you if it’s safe to connect.

Bitdefender has numerous benefits against hackers, including anti-ransomware, an integrated password manager, webcam protection, and an Internet filter.

Bitdefender

Bitdefender

Use the powerful antimalware solutions provided by Bitdefender to stay safe when connecting to public Wi-Fi networks.
Check offersBuy it now

Feel free to check out more antivirus tools with Wi-Fi protection.

A password manager

52% of people reuse the same password across multiple accounts, and only 24% use a password manager, according to an online security survey conducted by Google.

Using a password manager to keep track of all your passwords is essential. Especially if you must often connect to free Wi-Fi.

It stores all those long and elaborate keys in a single place so that you just have to remember a single password to access the manager.

LastPass is arguably the best in the business. It has a free version with plenty of features for most casual users.

Here’s what you can expect from LastPass:

  • Keep track of passwords, credit card data, and other info
  • Multi-factor authentication
  • Random password generator
  • Free, Family, and Premium versions
LastPass

LastPass

Keep track of all your passwords to avoid hacker attempts, especially when using free Wi-Fi networks.
Free versionDownload now

If you prefer alternatives to LastPass, check out the best password managers for Windows 10 PC that we picked out.

A file encryption tool

Assuming that hackers breach your computer’s security defenses, it’s important to prepare yourself by encrypting all important files on your PC: photos, work documents, videos, and so on.

You might be surprised by what we recommend using in this case: WinZip. In addition to compressing files and extracting data from archives, the tool supports bank-level encryption.

Furthermore, WinZip integrates with cloud services like Dropbox, Google Drive and OneDrive, making it an excellent ally for encrypted file sharing.

WinZip

WinZip

Compress and encrypt your files when connecting to free, unprotected Wi-Fi, thanks to this reliable tool.
Free trialDownload now

Conclusion

To summarize, you can ensure your computer’s security when connecting to public Wi-Fi and seeing the Other people might see info you send over this network message using dedicated tools.

We recommend arming your device with a premium VPN service, a secure web browser, an HTTPS enforcer, as well as an encrypted email service and messaging tool.

But you should also get a powerful antivirus with Wi-Fi protection, a password manager, and a file encryption progam.

What tools do you personally use to protect your data from hackers over public Wi-Fi? Let us know in the comment section below.

Flight Simulator’s 2020 growth: 2M players in 4 months

Microsoft’s most recent Flight Simulator version has managed to reach an important benchmark of 2 million players up to date; this also marks an all-time record as the fastest growing entry title in the Xbox games portfolio.

Despite the rough start, with many functionality bugs, the developers managed a good interaction with their community.

This quickly led to stability and final patches meant to bring the game to a steady evolution.

Along with announcing the news, Xbox also gave thanks to all those who have contributed to the achievement:

This was possible thanks to the incredible community of fans, real-world pilots, flight enthusiasts, and virtual travelers who have embraced the new simulation since its arrival on August 18 and made it the biggest game launch in Xbox Game Pass for PC history. 

[wr_responsive_video_embed url=”https://www.youtube.com/watch?v=GdGB0cv6i8I&feature=emb_logo&ab_channel=Xbox”]

What lies ahead for Flight Simulator?

Big plans, surely, for the biggest winner in the Xbox Game Pass history; but first, let’s see some encouraging numbers:

  • Best Sim / Strategy 2020 Award
  • 2 million pilots
  • 50 million total flights
  • Round-the-world tour completed 400 thousand times
  • JFK Airport (New York City) named the favorite destination
  • Airbus A320NEO – most popular aircraft

Plans for 2021

flight simulator plans 2021

First and foremost, on December 22nd, 2020, the developers are planning a VR update launch. So all those looking forward to taking it to the skies during the winter holidays from the comfort of their homes will have the chance to do so even more realistically than before.

Then, Xbox announced that Flight Simulator will be launched on Xbox Series X|S in the summer of 2021. Add to this 3 major game updates, plus 4-5 world updates, and you’ve got a busy upcoming year for Flight Simulator.

What do you think the developer should improve in the simulator? Tell us in the comments.

[Solved] Can’t create Recovery drive on Windows 10/11

Fixing computer problems is always easier if you have the proper tools available. One of the common tools that users like to use is Recovery drive, but it seems that users can’t create Recovery drive on Windows 10.

How do I fix the Recovery drive feature on Windows 10?

Recovery drive can be useful if you need to restore your Windows, however, certain issues with this feature can appear. Speaking of issues, these are the common problems that users reported:

  • Can’t create Recovery drive some files are missing – If this problem occurs, you might be able to fix it simply by performing both SFC and DISM scans on your PC.
  • A problem occurred while creating the Recovery drive Windows 8 – This issue can occur on older versions of Windows as well, but even if you don’t use Windows 10, you should be able to apply some of our solutions.
  • Create Recovery drive stuck – Sometimes the creation process can become stuck. If that happens, be sure to disable your antivirus and check if that solves the problem.
  • Recovery drive not working – According to users, sometimes your Recovery drive might not work at all. If this happens, you might have to fix this problem by using Command Prompt and diskpart tool.
  • Recovery drive a problem occurred – Sometimes this error message can appear if Windows.old directory is still present on your PC. To fix the problem, be sure to remove Windows.old and try to create the recovery drive again.

1. Remove the problematic software

According to users, certain backup software can create issues with the Recovery drive. Users reported that after uninstalling Symantec Ghost 15 or Comodo backup the issue was completely fixed.

It seems that Symantec Ghost 15 uses its own version of VSS that interferes with Recovery drive creation, but after the software was removed, there were no problems with the Recovery drive.

Although these two applications are the common cause of this problem, it’s worth mentioning that almost any backup software can interfere with Recovery drive creation, therefore if you have any problems try removing all third-party backup software from your PC.

If you want to completely remove a certain application from your PC, it’s advised to use uninstaller software. In case you’re not familiar, uninstaller software is special software that can completely remove any program from your PC.

If you’re looking for uninstaller software, we recommend you try CCleaner, a comprehensive and easy-to-use tool to remove leftover files.

CCleaner

Eliminates registry items and junk from the hard disk that are left over after deleting stubborn programs.

2. Disable your antivirus

Your antivirus tool is important for your security, but sometimes antivirus tools can interfere with Windows and cause various problems to appear. If you can’t create Recovery drive on Windows 10, the issue might be caused by your antivirus software.

If removing the antivirus solves the problem, it’s advised to switch to a new antivirus solution. There are many great antivirus tools available, and when choosing the right fit for your need, make sure it not only does it protect your PC, but also if it is easy to manage, especially when it comes to enabling and disabling it.

3. Disable Secure boot

  1. While your computer boots keep pressing F2 or Del to enter BIOS.
  2. Once you enter BIOS, look for the Secure boot option and disable it.
  3. After disabling this option save the changes and restart your system.

Bear in mind that you can also access BIOS by doing the following:

  1. Open the Settings app and go to Update & Security section.
    Recovery drive a problem occurred
  2. Go to Recovery tab and click the Restart now button.
    Can't create Recovery drive some files are missing
  3. When your computer restarts choose Troubleshoot > Advanced options > UEFI Firmware Settings and click the Restart button.

Secure boot is a useful feature designed to protect your PC from malicious users, but sometimes this feature can interfere with Recovery drive creation, and the only solution is to disable Secure boot.

Alternatively, you can just hold the Shift key and click the Restart button and follow the instructions above.

For more details on how to access BIOS and how to disable Secure boot, we advise you to check your motherboard manual.

4. Disable certain services from running

  1. Press Windows Key + S and enter services. Select Services from the menu.
    A problem occurred while creating the Recovery drive Windows 8
  2. Once the Services window opens you need to locate and disable Application Virtualization Client, Client Virtualization Handler and Application Virtualization Service Agent. To stop a service simply right click it and choose Stop from the menu.
    Create Recovery drive stuck

Apparently, certain services related to Microsoft Word and Excel can cause problems with Recovery drive on Windows 10, therefore you need to find and disable those services.

5. Use third-party solutions

If you can’t create Recovery drive on Windows 10, you might want to consider using a third-party solution. There are many great third-party applications that allow you to back up and restore your Windows in case anything goes wrong.

If you’re looking for tools that can easily clone your Windows installation, you might want to consider using Acronis Cyber Protection Home. All these applications offer similar features, so feel free to use any of them if you can’t get Recovery drive to work.

6. Try using a larger USB flash drive

Users reported that they are unable to create a Recovery drive in Windows 10 due to size of their USB flash drive.

According to users, after using a 32GB or larger flash drive the issue was resolved. Users reported mixed results after using a larger USB flash drive, but that doesn’t mean that you can’t try this solution out.

7. Use Command Prompt

  1. Press Windows Key + X to open Win + X menu. Now select Command Prompt (Admin).
  2. Enter diskpart and press Enter to run it. Now enter list volume and press Enter.
  3. You should see a drive that has the Recovery label assigned to it. Enter select volume X to select that volume.
  4. Once you select the volume, enter detail volume command to see the disk on which the volume is located. In our example, that’s Disk 0, but it might be different on your PC.
  5. Select the disk from Step 4. To do that, enter select disk X command and replace X with the correct number.
  6. You should see the list of all available partitions. Enter select partition X and be sure to select the recovery partition.
  7. Once you confirm that this is your recovery partition, enter exit to exit diskpart.
  8. Now enter the following command:
    • reagentc /setreimage /path ?GLOBALROOTdeviceharddisk Xpartition YRecoveryWindowsRE 
  9. Now run reagentc /enable command.
  10. Lastly, check if everything is in order by using reagentc /info command.

Many users reported that they can’t create Recovery drive on their Windows 10 PC. This can be a big problem for some users, however, you should be able to fix the problem using Command Prompt and diskpart.

This is an advanced solution, and we advise you to be extra cautious while using it. If you find it confusing, be sure to read it once again carefully. If you don’t understand how to use this solution, maybe you should try a different one.

8. Remove Windows.old

If you recently installed or updated Windows 10, it’s possible that you have Windows.old directory on your PC. If you’re not familiar, this directory holds all your files from the previous Windows installation allowing you to return to the older version of Windows if need be.

This is a great feature to have, but sometimes Windows.old directory can prevent you from creating a Recovery drive. If you can’t create Recovery drive on your PC, be sure to remove Windows.old directory from your PC.

9. Convert your drive to FAT32

  1. Open This PC, locate your USB flash drive, right click it and choose Format.
    Create Recovery drive stuck
  2. Select FAT32 or exFAT as File system. Now click on Start to format your drive.
    Recovery drive not working

According to users, sometimes this problem can occur if your flash drive isn’t formatted as a FAT32 device. As you know, there are several file systems, and while NTFS offers better features that FAT32, sometimes recovery drive might need a FAT32 flash drive in order to work.

According to users, if you can’t create Recovery drive on your Windows 10 PC, you might want to format your USB flash drive as a FAT32 device.

Once the formatting process is finished, try to create the Recovery drive again.

Having a Recovery drive is useful if you want to fix problems on Windows 10, but if you can’t create a Recovery drive on Windows 10 be sure to check some of our solutions to see how to fix this problem.

5 Best Agenda Management Software for PC in 2026

Meetings are a part of working culture and whether you like it or not when the boss calls you don’t want to see a Missed Call notification. All the meetings have some agenda to discuss and also a great way to make sure that you and your team are on the same page.

One effective way of conducting a meeting is to make sure that the host comes well prepared with the meeting agenda. However, creating an effective meeting agenda requires the host to organize, communicate and follow up with other members of the team.

This way you can make sure that the conversations are limited to the agenda and everyone knows their part in the meeting room.

In this article, we have tested and listed the best agenda automation software that can help you to plan, organize, and conduct a productive meeting in less time to achieve intended outcomes.

What are the best agenda automation tools for Windows 10?

Efficient Calendar

efficient calendar efficient software

Efficient Calendar is a task scheduler, planner, and reminder that is available for Windows as well as smartphones. It is a cross-platform application which means you can access the task created on PC on your smartphone and vice versa.

Calendar events are easy to create. It also comes with tasks and event modules to help you manage time efficiently. The multiple calendar views allow you to better arrange and track events by Days, Week, Month and Year view. The task reminder can be configured and scheduled to be reminded at the exact time and day.

The mobile application is free to download and it enables you to schedule and manage events from anywhere. The synchronization works in real-time keeping everything synced wherever you need it.

Efficient Calendar uses the First Thing First principle that allows you to prioritize tasks and events based on importance. The built-in document editor can be used to write comments for events and tasks.

In case any of the events are deleted by accident, Efficient Calendar keeps the events in its Recycle Bin that can be restored with a single click. To share the calendar with other team members, the software has a server solution but requires access to Efficient Calendar Network plan.

Efficient Calendar is a simple but solid calendar tool that is best for calendar and task management.

Efficient Calendar

Efficient Calendar

Handy scheduler, planner and reminder that you can use on all your devices.
Free downloadVisit website

OrgScheduler

OrgScheduler

OrgScheduler is a universal task scheduling and agenda meeting software for individuals, offices, business events with flexible features. It is premium software, but you can use the free trial to test the software.

The user interface of OrgScheduler resembles the UI of Microsoft Outlook which gives it a familiar look.

You can import events and reminders from Outlook and export it to Outlook, Text, HTML, XML, and  Excel formats. Unlike Efficient Calendar, OrgScheduler allows you to exchange data with other applications including Apple iCal, Microsoft Exchange Server and Android apps, etc.

Other features in the app include over 149 events coloring to prioritize events based on importance, event start and end time reminder, multiple themes and event recurrence tool.

OrgScheduler allows you to send appointments, reminders, and invitations over e-mail and SMS to colleagues and friends. You can protect the data through an encrypted password and print reports using the Print Designer with elegant designs.

⇒ Get OrgScheduler


MeetingBooster

MeetingBooster

MeetingBooster is a meeting management software used by mid-large size businesses to handle scheduling, agenda editing, time tracking and to streamline meeting procedures.

MeetingBooster offers a free trial; however, there is no clear-cut pricing on the official website. The interested users can begin with a free trial or book a webinar to get pricing details.

It is a cloud-based meeting management system that simplifies pre-meeting, in-meeting, and post-meeting tasks.

For meeting preparation, it offers scheduling features, integration with Outlook and Google Calendar, a professional agenda editor to make last-minute changes as well as the ability to assign preparation tasks to team members.

The software can be used in your office boardroom or remotely for a virtual meeting. You can capture notes quickly, allocate action items that include Outlook task list integration, project tags, task status dashboard, and automated action item reminders.

MeetingBooster is an enterprise solution designed to streamline meeting procedures and drive accountability for your staff without having to follow up consistently.

⇒ Get MeetingBooster


nTask

nTask

If you have used Trello and Asana for task management, try nTask. It is a free cloud-based task and meeting management software that allows you to create checklists and also collaborate with project teams, sharing files and more.

The free plan offers five workspaces, up to 10 members access to per workspace, up to 5MB file attachment, 200 MB of storage, unlimited task and meetings, team timesheets, up to 5 project creation, and more.

If you upgrade to the pro plan, all the features are upgraded to the unlimited plan while the file attachment size is increased to 200 MB.

nTask offers a simple taskboard that allows you to create Calendar events, assign tasks to team members, generate easy reports, set task priority, create once and repeat recurring tasks and color code task for easier classification.

You can share the task list with other people with a public link. The handy to-do checklist allows you to list items that need to be completed with the due date.

You can check the task status, add comments for feedback, create task issues and assign risk and add task reminders to complete the project before the deadline.

nTask is a simple yet powerful task and meeting management software, and the fact it offers a free account with all the features of the premium plan (even though limited to an extent) makes it an ideal choice for small teams and startups. You can always upgrade to the pro plan as your team starts growing in the future.

⇒ Get nTask


Meeting.gs

meeting software

From scheduling and organizing meets to managing meeting materials, agenda and action points, Meeting.gs is probably the user favorite for agenda meeting features and third-party app integration.

The taskboard allows your team members to schedule meeting with you. The personal scheduling page can be shared over email or on a website. With the calendar integration, all the new task and meeting schedules are synchronized with your calendar app.

Being a web-based solution Meeting.gs can be accessed from your computer as well as smartphones, tablet and another device with a modern web browser and Internet connectivity. The team members can receive notifications on meeting updates and respond to meeting requests on the go.

Meeting.gs supports third-party integration including Google Docs apps such as Google Calendar, Google Contacts, and Google Drive, and Microsoft Office 365 that includes Outlook, Live People, and Microsoft OneDrive.

For remote communication, Meeting.gs can be used with live communication tools such as Skype for conference calls, Microsoft Lync calls, Google Hangouts, and other online meeting tools with public links.

All the meeting are organized and divided between Upcoming and Past tabs. You can keep track of meetings and manage them on timeline, view task related to the meeting as well as preview and respond to meeting requests.

The meeting agendas can be edited to add comments and upload attachments by the members. Managers can also view the currently active users and previously visited members profile on the page.

Meeting.gs is said to be the best meeting scheduler solution. However, it offers more than just meeting scheduling and task management features. Take the software for a spin using the free trial to see if this can end your hunt for a meeting agenda software.

⇒ Get Meeting.gs

We have tried to keep the list short and not to confuse you with too many choices but made sure to include enterprise level as well as startup level meeting management software based on their use.

What problem are you trying to solve with task and meeting management software? Do let us know in the comments below.

How to get a full refund for Cyberpunk 2077 on any platform

Cyberpunk 2077 is a game that offers a lot when it comes to premise and design, with the only real problem being the hasted execution.

The game already made CD Projekt Red’s revenues soar way past the $1-billion mark, and this is all due to the company’s history of making outstanding games.

Well, this time player anticipation got the better of them, and the continuous pressure of releasing the game sooner and sooner ended with them releasing a half-baked title that is complete from a feature and story standpoint, but faulty from a stability point of view.

That being said, more and more players are going towards getting a refund, with the intend of buying back the game only when it is deemed as being playable.


How do I refund Cyberpunk 2077?

Cyberpunk 2077 on PC

As you may know, Cyberpunk 2077 for PC can be played on 3 different platforms: GOG, Steam and Epic Games.

Well, refunding the game on each of these platforms is possible as long as you fall under certain conditions:

GOG refund policy states that any game can be refunded within 30 days of purchase, even if it was downloaded and played.

This is probably the most flexible of all refund policies, and getting your money back is guaranteed in the case of Cyberpunk 2077, especially since GOG is owned by CD Projekt Red after all.

To apply for a refund, visit this website.


Steam refund policy states that you can get a refund within 14 days of purchase, and only if you played less than 2 hours.

However, Steam noted that in the case of Cyberpunk 2077, they will be more flexible with the terms, especially since many of the bugs are encountered way into the game.


Epic Games refund policy is exactly the same as with Steam, although they noted that:

Products that include virtual currency, skins, or other consumables and products or games that are marked as non-refundable are not eligible for refund


Cyberpunk 2077 on Xbox

If you bought Cyberpunk 2077 for the Xbox One, or the Xbox Series X|S, you can refund it within 14 days of purchase.

However, Microsoft does not guarantee a refund just because you made the request.

Nonetheless, the refund request can be made from here.


Cyberpunk 2077 on PS4

In general, Sony has never been great with refunds, and this can be seen from the sheer number of users that tried getting refunds on Cyberpunk 2077 and failed.

Fortunately, this all changed as Sony made an exception for this particular title, and they are offering complete refunds for anyone that bought the game.

Get your Cyberpunk 2077 for the PS4 refund here.


Physical copies of Cyberpunk 2077 (PC, Xbox & PlayStation)

Amazon refund policy states that any game can be returned within 30 days.

However, game boxes that have been opened or user will incur a restoking fee.


Gamestop refund policy dictates that buyers can return any game within 30 days, and they will also get a full refund as long as the game is within its original packaging.

Take note that, if you opened the game, this refund window is shortened to only 7 days.


That pretty much covers up our list of al major game platforms and retailers that you may have bought Cyberpunk 2077 from, and their respective return policy.

If you yourself bought the game, take note that this is merely the current state, and that other previous CD Projekt Red titles had a similar history.

That being the case, if you did see the true potential of this game, try to hold on to it a little longer, since things can only get better.


Let us know where you got your copy of the game from, and how did the refund process go for you by leaving us your feedback in the comments section below.

[wl_navigator]