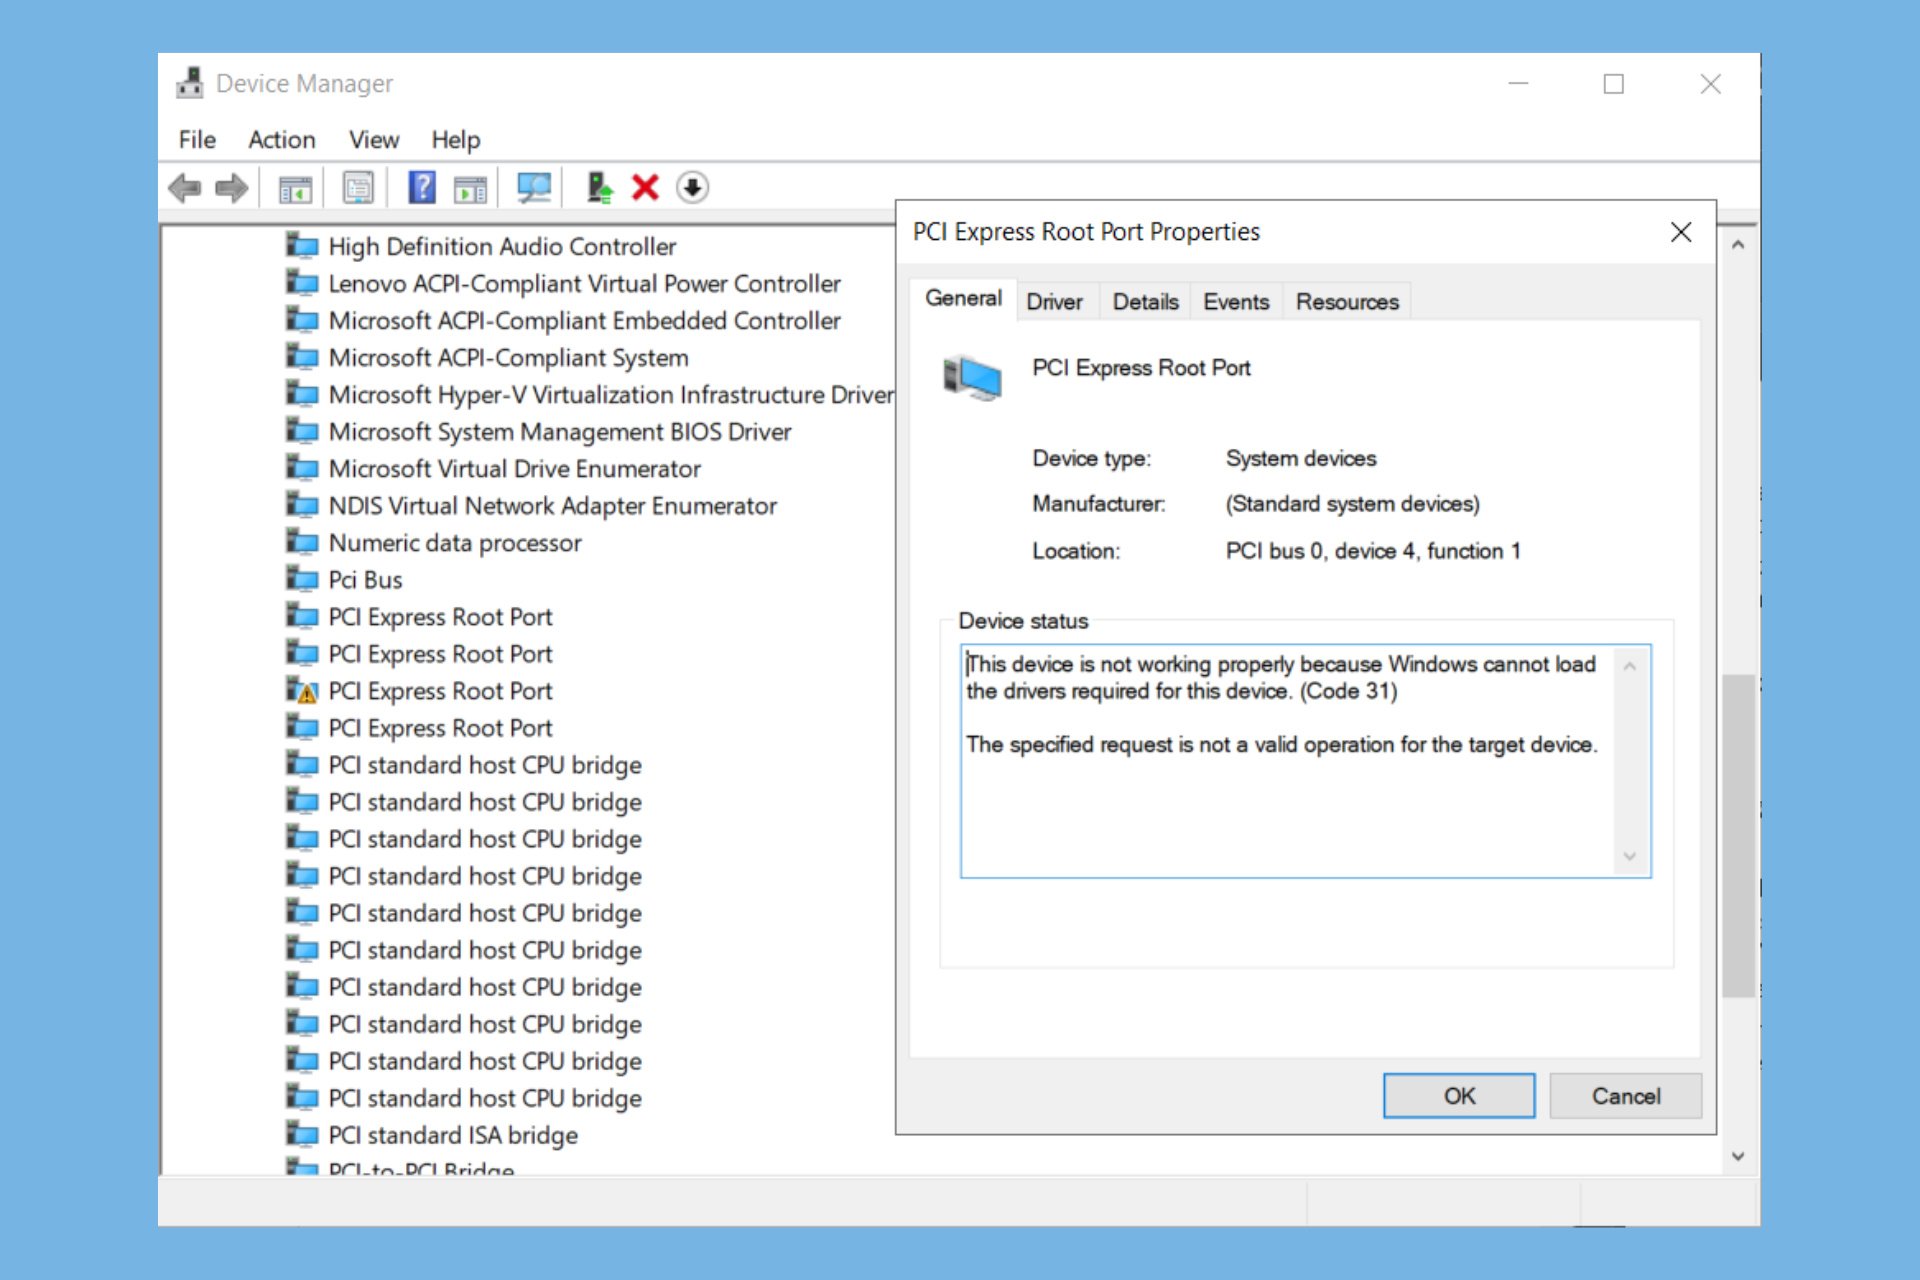
Starting with version 128, Microsoft Edge will only run on devices with an SSE3 instruction

Microsoft is revising the hardware requirements for its Edge web browser and plans to change them in the coming months.

To continue to run Microsoft Edge, personal computers must have an SSE3 instruction, and this change will be made with the release of Edge 128; previously, Microsoft wanted to start this new hardware setup with the release of Edge 126, but the Redmond-based tech giant has chosen to postpone this demand.

The change is most likely a means to give users the necessary time to change their devices. In the message on their M365 Admin Center app, Microsoft said that devices that do not have SSE3 support would begin showing a banner in Edge versions 126 and 127 to alert users about ending support soon.

According to reports, although Edge 128 will continue working on these older machines, it won’t get any fresh characteristics or safety improvements. Microsoft’s position is obvious: it’s advised not to use Edge 128 if SSE3 support is absent.

The change of requirements shows a broader pattern in the tech field to reduce the use of old hardware. The SSE3 instruction set was included around 2004, so it’s not new technology. The devices impacted by this alteration are essentially technological dinosaurs in the swiftly changing world of personal computing. The reality is that this change will affect only a small fraction of PCs.

But this change makes us think about finding an equilibrium between advancement and availability. One side shows that updating software to use new hardware capabilities can improve performance and safety. The other side is that it leaves behind people who have older devices. Microsoft’s choice to postpone the hardware requirement alteration for Edge indicates how tech firms still struggle with such issues.

What do you think about these changes? Let us know your opinion below.

The free Camomile app claims it makes Windows devices cooler by greatly lessening power usage

A brand-new platform called Camomile, which is also free, guarantees that it will help make your Windows 10 or 11 system cooler and more energy-effective. How, you may wonder? It does this by boosting your CPU’s performance to lessen power usage by up to 34%, helping lower carbon emissions.

Camomile does its wizardry by adjusting the voltage and frequency of your CPU so that it doesn’t work harder than necessary. This stops power spikes, which cause overheating, from annoyingly happening while also letting your fans rest more often – reducing noise while boosting your efficiency.

Outbyte, the creators of Camomile, say that if 100,000 PCs used this application for eight hours daily, they could save energy equal to 675,528 gallons of gasoline or the yearly electricity use in 1,185 houses.

However, gamers should be careful. There will be a small decrease in performance during intense gaming sessions as Camomile throttles back a little to avoid overheating in Windows. However, for normal tasks such as browsing, streaming, or working on documents, there is essentially no noticeable change apart from the cooler system and quieter fans.

It’s worth mentioning that certain antivirus programs, such as Malwarebytes, signal the Camomile app site as possibly harmful. So, if you are worried about the safety of your device, it might be time to use those built-in power-saving choices or continue with reliable utilities such as Core Temp.

Ultimately, it’s up to you. You can try out this free app, which claims to calm and quiet your Windows PC while also saving energy.

You can get it for free on the official website.

How to Remove Watermark From PPT: 4 Simple Methods

Dealing with watermarks in your PowerPoint presentations can be a real hassle, especially when you’re trying to make your slides look professional. Fortunately, there are several straightforward methods to remove these unwanted marks.

How do I remove watermark from PowerPoint?

1. Use Slide Master in PowerPoint

  1. Start by opening your PowerPoint file where you want to remove the watermark.
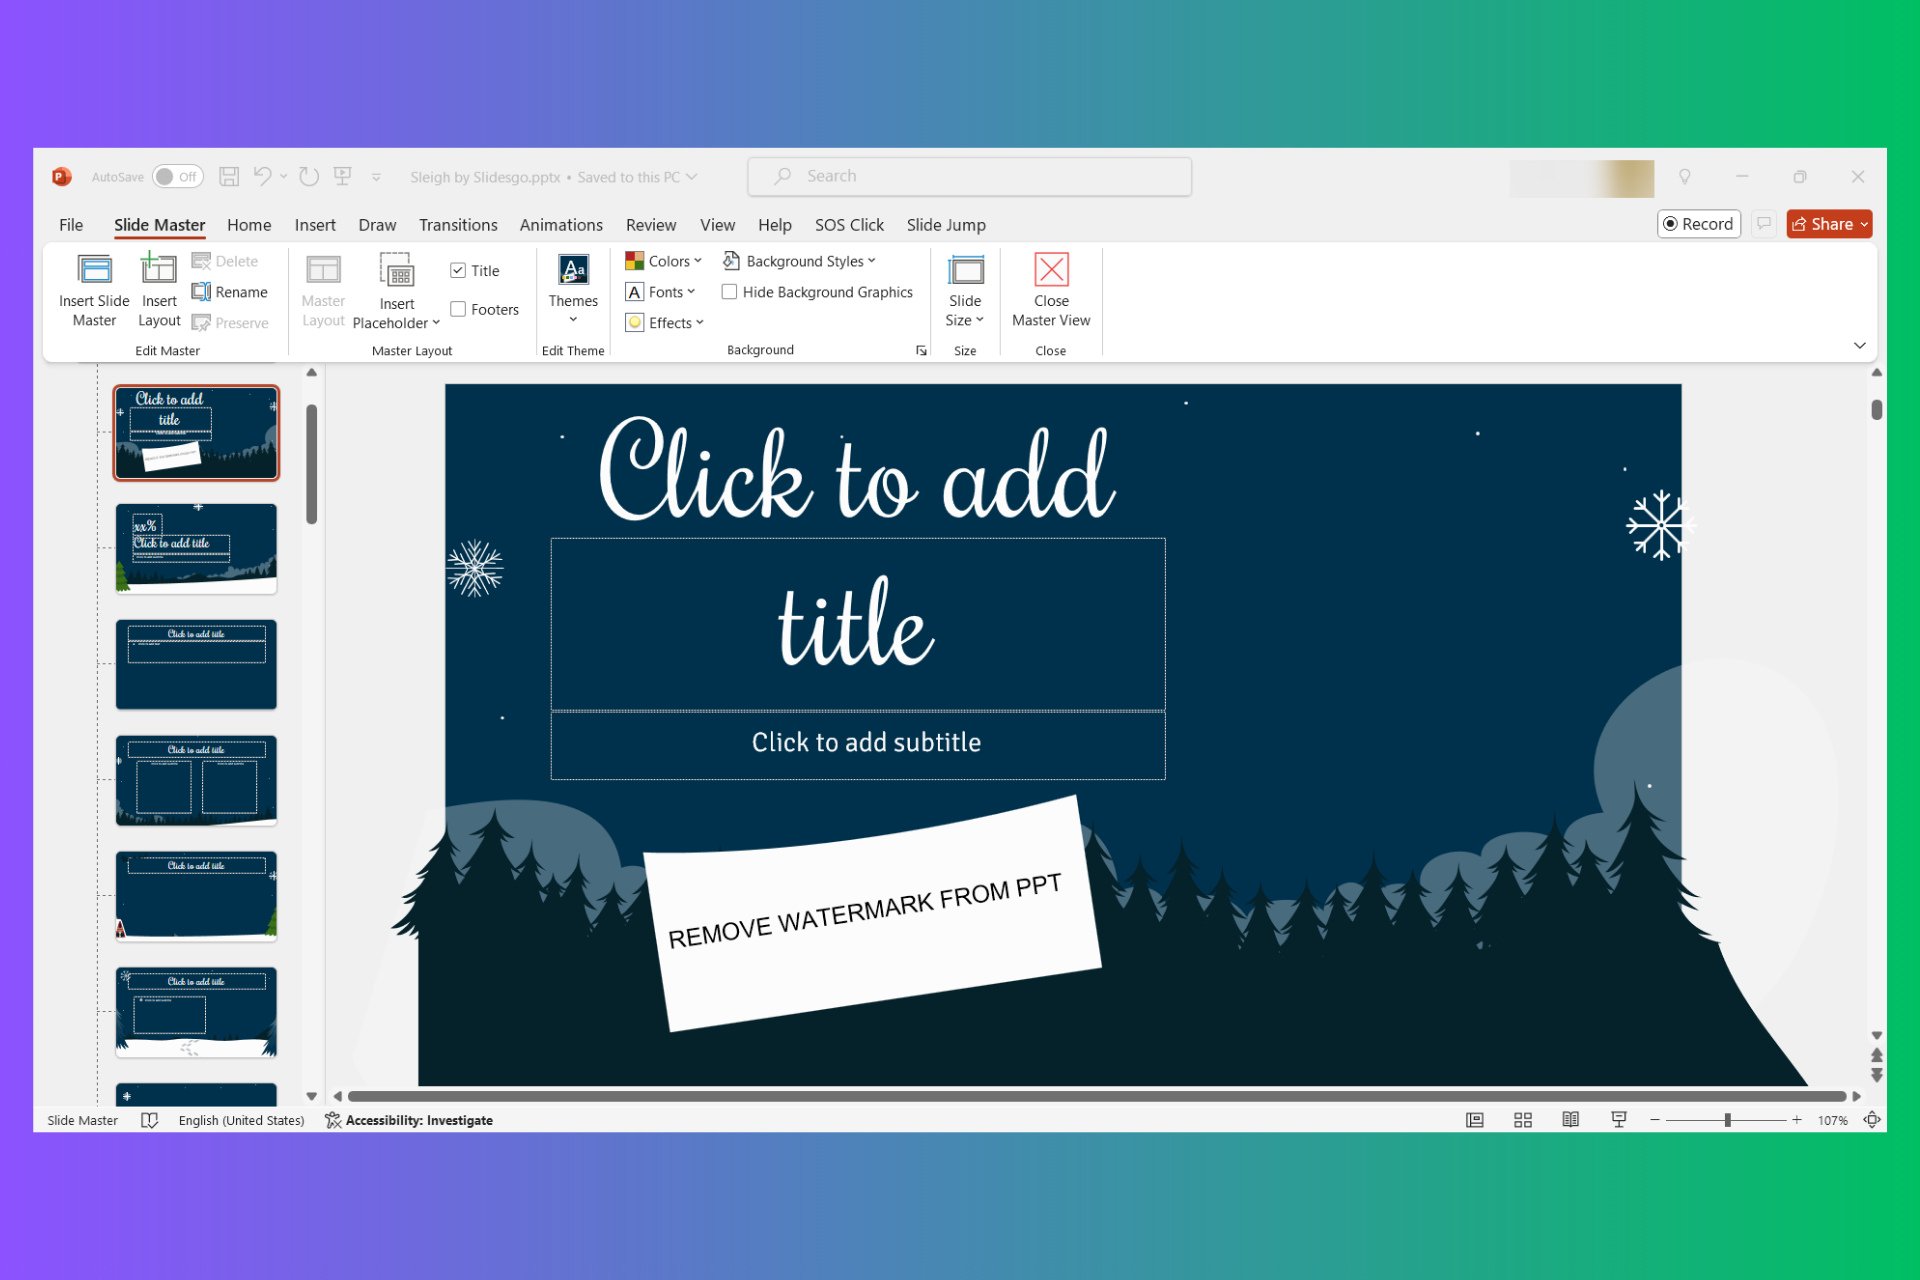
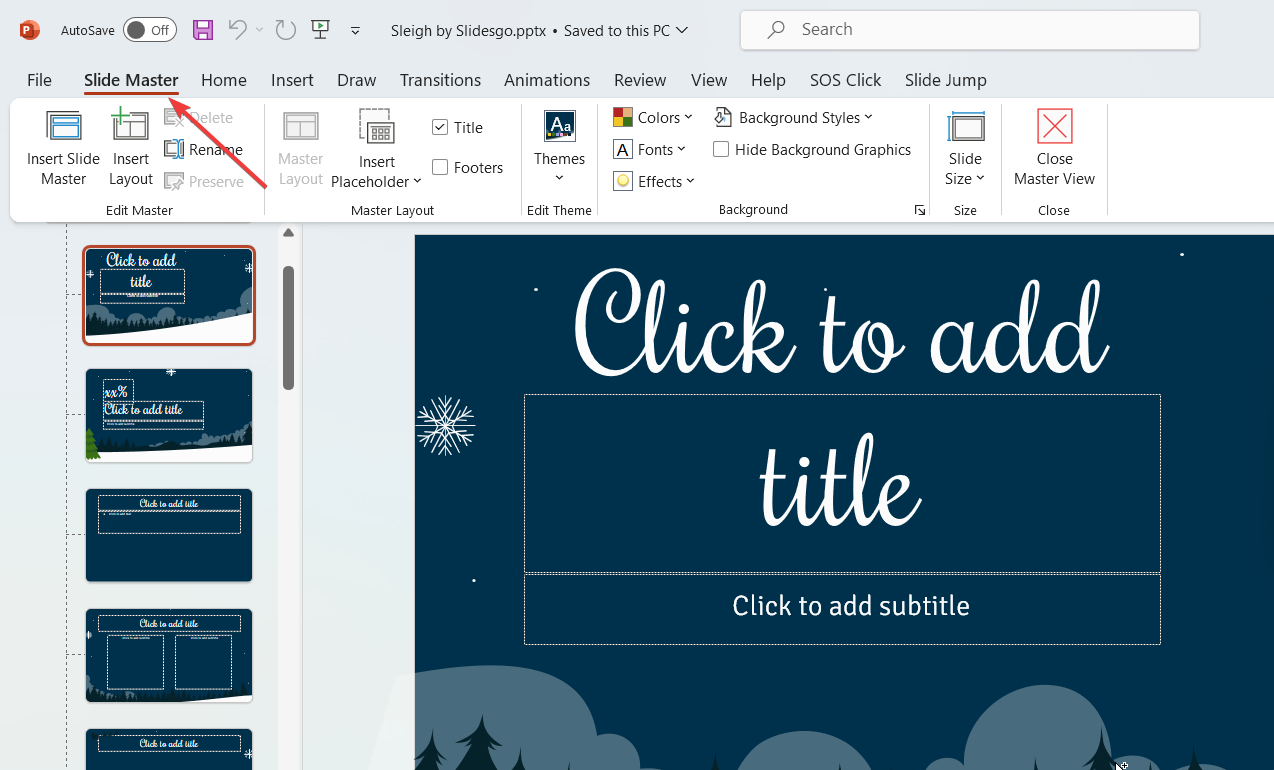
  2. Click on the View tab at the top of the PowerPoint window and select Slide Master. This will display the master slides and layouts on the left side.
  3. In the thumbnail pane on the left, click on the topmost slide.
  4. Click on the watermark text or image you want to remove. This might be a text box or an image.
  5. Press the Delete key on your keyboard to remove the watermark.
  6. Click on Close Master View in the toolbar. This will return you to the normal slide view and the watermark should be removed from all slides.

Using Slide Master will help you remove watermarks that are applied to the entire presentation efficiently by editing a single slide layout.

2. Removing watermark from a Picture in PowerPoint

  1. Save the watermarked image from the PPT document to your computer. Right-click on the image and select Save as Picture.
  2. Go to a site like Aiseesoft Free Watermark Remover Online.
  3. Click on the Upload Photo button and select the saved image file from your computer.
  4. Use the selection tools like the brush or lasso tool to highlight the watermark on the image.
  5. Click the Remove button to process the image and remove the watermark.
  6. Click the Save button to download the edited image without the watermark.
  7. Go back to your PowerPoint document, delete the original watermarked image, and insert the new image without the watermark.

This method is helpful when the watermark is embedded into an image and cannot be removed directly within PowerPoint.

3. Using an online tool

  1. Go to the DocHub site, click on Create free account, and sign up using your email or a Google account.
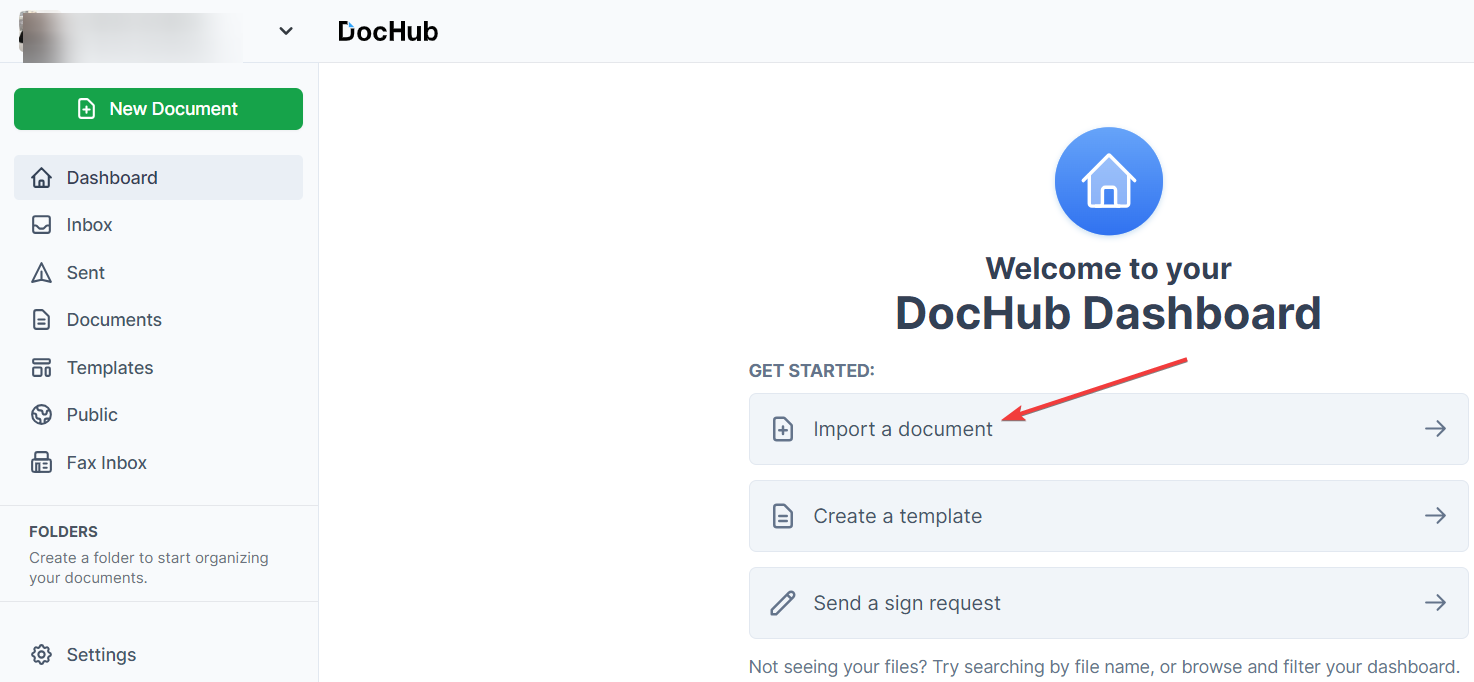
  2. From your dashboard, click Import a document and select the PowerPoint file with the watermark.
  3. Click on the uploaded file to open it in editing mode.
  4. Use the toolbar to select the watermark text or image, and then delete it using the tools provided.
  5. Save the edited file in your documents, download it, or share it directly from DocHub.

DocHub provides an easy-to-use interface for modifying documents without switching between multiple programs.

4. Use a photo editor

AI photo editors often provide more advanced features for removing watermarks and other unwanted elements from images.

Luckily, we have a great selection of the best AI photo editing tools and many of them have a one-click watermark removal feature you can use.

We do need to remind you that third-parties use watermarks to protect their context against editing and you should respect their intellectual property. Only remove watermarks on owned media or with the consent of their owner.

By following these steps, you can ensure your PowerPoint presentations are free from distracting watermarks. To prevent future issues, always save a copy of your original files and consider using watermark-free templates.

We also have full guides on how to remove watermark in Windows 10, and how to add watermark in Word if you need additional information.

In the same respect, you may address any question or suggestion in the comments below.

Microsoft will retire the Virtual Network Injection in Azure, a feature that lets users manage network traffic

Microsoft plans to retire the Virtual Network Injection feature for its customers using Azure Data Explorer. This functionality enabled users to incorporate their Azure Data Explorer cluster into a virtual network, managing how network traffic moved towards and away from the cluster.

However, Microsoft has recognized some problems with this feature, such as the need for a specific subnet for every cluster and the heavy upkeep it demands.

Because of these issues, the Virtual Network Injection feature will not be available for any new Azure Data Explorer customer, and those who already use it must switch by February 1st, 2025.

In a blog post, Microsoft says maintenance tasks like refreshing firewall lists or utilizing public IP addresses have burdened end-users. These difficulties have led Microsoft to suggest a change towards a private endpoint method, providing better security and less complex handling of network connections.

A private endpoint is like a network interface that lets users connect with Azure services in a private and protected way. It uses an IP address from the user’s virtual network, ensuring they can only access this endpoint via their virtual network.

This method enhances security by not needing a public IP or outbound internet connection for communication between the client and service. At the same time, it simplifies network layout because many clusters/services can share one subnet.

Microsoft says it will help people who are worried about migration at every step. The company has created a process for moving that aims to reduce time when systems are not working. There are also office hours where customers can ask questions or get advice. Now, Customers should begin planning their migration to avoid any difficulties before the February 2025 deadline.

This action aligns with Microsoft’s general move to simplify its Azure services. Only a week ago, they declared that the functions of Azure Lab Services would be retired, which would direct users toward other virtual network services.

Reddit Enhancement Suite for Firefox: How to Download & Use

Reddit experience can sometimes lack certain features, and this is why many use extensions to improve it. Speaking of which, today we’re going to show you how to download and use Reddit Enhancement Suite for Firefox.

Reddit Enhancement Suite in Firefox, here’s what you should know

How can I download Reddit Enhancement Suite?

  1. Visit the Reddit Enhancement Suite page.
  2. Click on Add to Firefox.
     add to firefox reddit enhacement suite
  3. Next, click on Add again to confirm.
    add button reddit enhacement suite

How to use Reddit Enhancement Suite?

Reddit Enhancement Suite works with the old version of Reddit, so you’ll need to switch to it before using it.

With it, you’ll be able to preview comments before posting them, thus ensuring that everything is properly formatted and linked. There’s even a full-screen text editor if you’re making larger posts.

comment preview reddit

With Reddit Enhancement Suite it’s easier to preview parent comments since there’s a window with parent comments that will appear as soon as you hover over the parent link.

preview parent comment reddit

The tool also allows you to tag users, so you can tag users who post interesting content, or you can label problematic users. You can even mute certain users so their comments will automatically collapse.

tagging users reddit

This extension can also show all images for posts or comments, and quickly toggle them, or you can show individual ones using the image icon next to embedded images. This feature also works for video, so it can be incredibly useful.

show embedded images reddit

Another great feature is the powerful filter that lets you highlight or hide comments based on their score, read status, type of content, post date, and more.

Reddit Enhancement Suite comment filter

You can also use these filters to navigate comments more easily, so you can rest assured that you never miss a comment.

comment navigation reddit

These are some of the features that we found useful in Reddit Enhancement Suite, but the extension has a lot more to offer, so if you’re a Reddit user, this is a must-have extension.

Do keep in mind that it only works on old Reddit, so you’ll probably have to change your preferences to switch to old Reddit permanently.

What happened to the Reddit Enhancement Suite?

According to the developers, the extension is in maintenance mode, so this means that no active support or new features will be available in the future. However, the developers will continue to fix bugs and other issues whenever possible.

While this is an amazing extension many reported that Reddit Enhancement Suite is not working, but we have a guide that addresses this issue.

It’s not just this extension, sometimes Reddit won’t work in Firefox, and in some instances, Reddit won’t load in Chrome, but we also have articles that address these problems.

For more useful extensions, don’t miss our guide on Dark Reader for Firefox, if you want to bring full dark mode to all web pages.

Google Chrome to Speed Up Browsing with faster website Security checks

Security doesn’t have to come at the cost of Performance. After recent announcement of Real-time safe browsing protection for all Chrome users, Google is now laying out plans for further improvements to Chrome’s security features. Specifically, the company is focusing on improving Safe Site Check, a feature that helps protect users from visiting harmful websites.

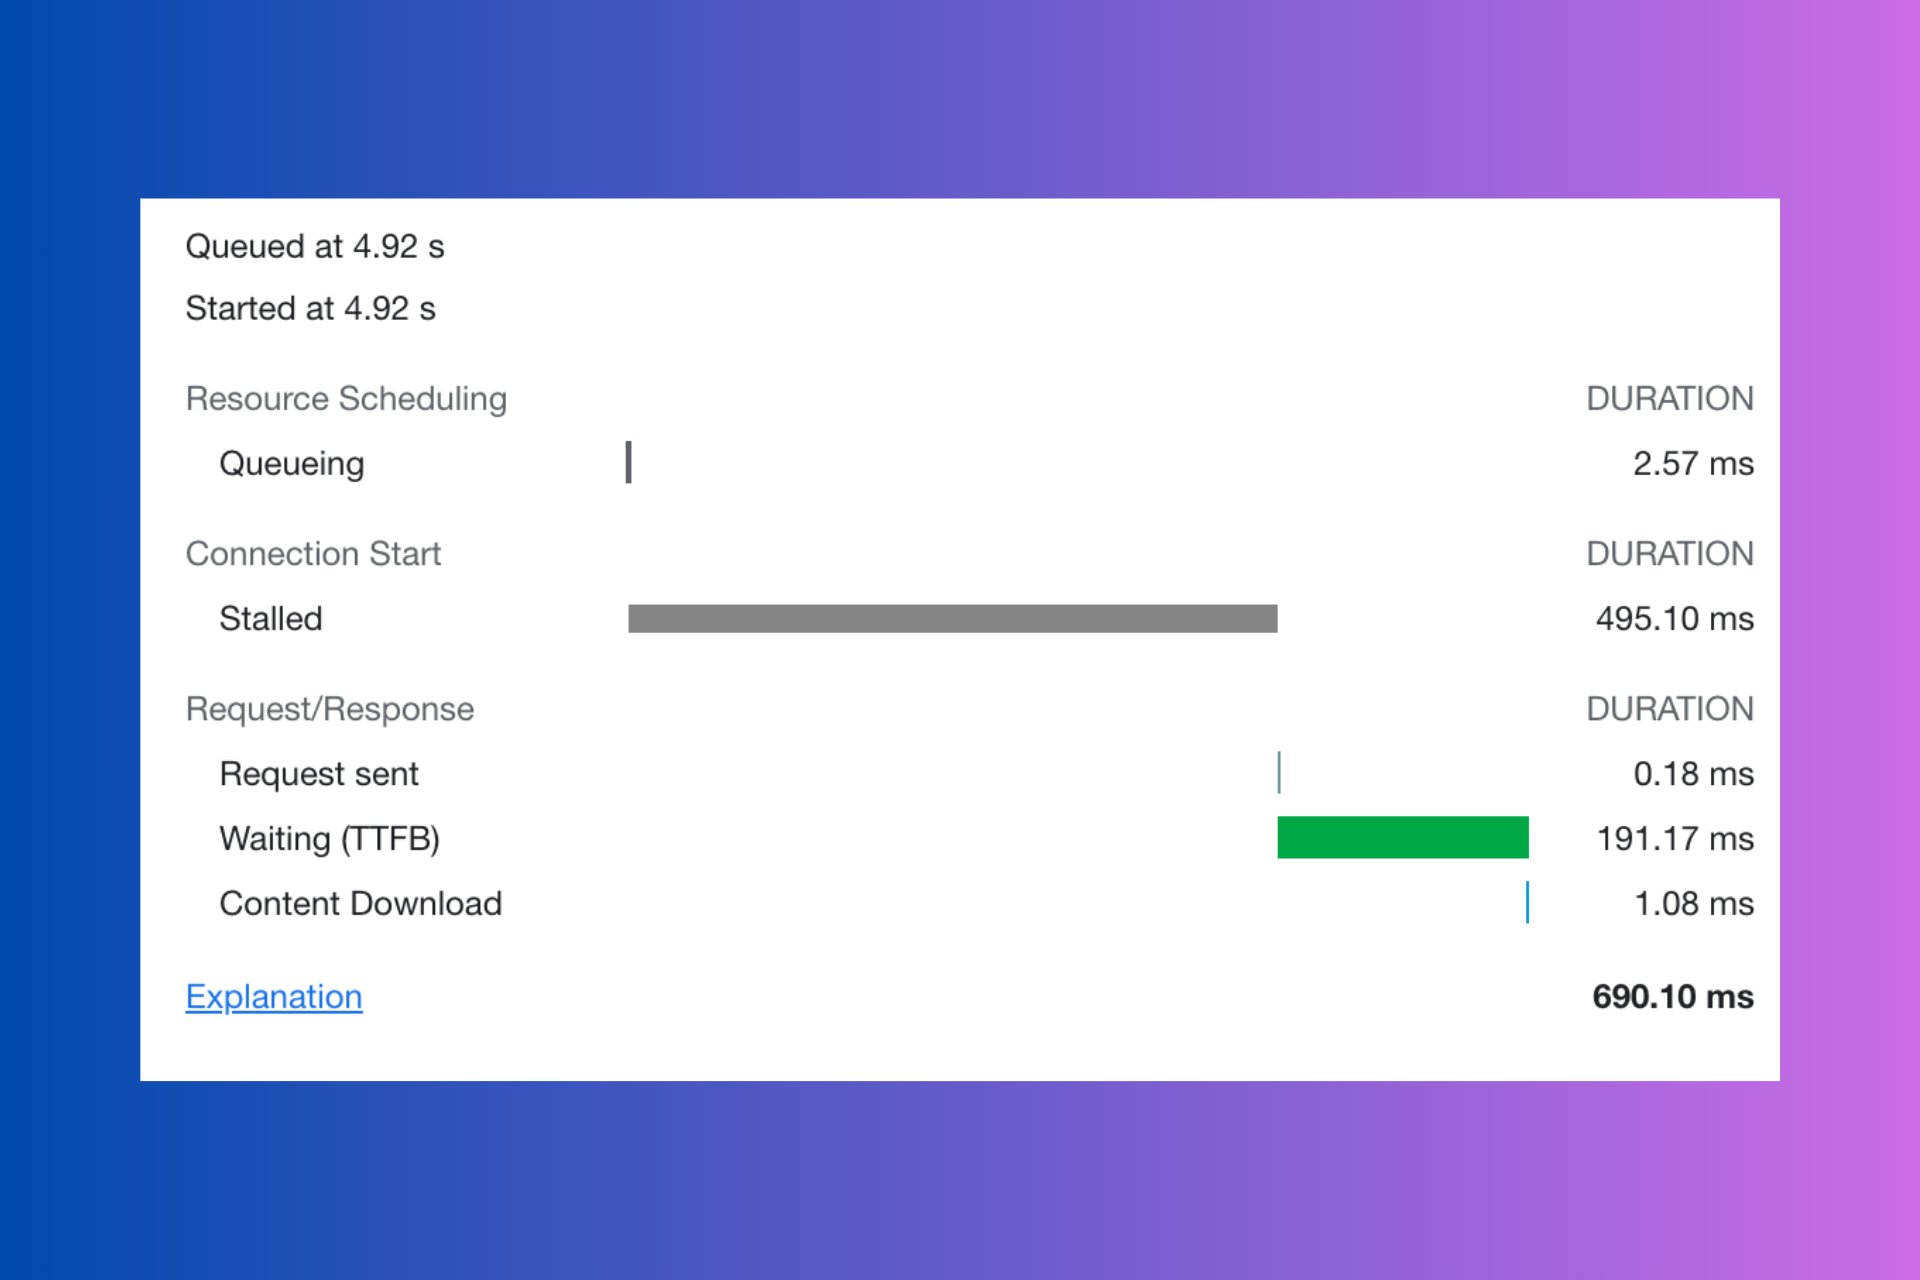
Currently, when Safe Site Check is enabled, it can slow down loading times, particularly for websites with unpredictable URLs like those on Google Search. This slowdown occurs because Safe Site Check pauses navigation until it finishes verifying the website’s safety.

To address this performance issue, Google proposes changes (spotted by Windows Report in a document titled “Safe Site Check Optimization” and corresponding commit) that would make Safe Site Check run concurrently with the website loading process. This means that Chrome would check the safety of a website at the same time it begins loading the site’s content.

Here’s how the current behavior would change: At present, Safe Site Check pauses navigation upon initiating a safety check. This can lead to a noticeable delay as users wait for the check to complete before they can interact with the website.

The proposal modifies this behavior. Instead of pausing, Chrome would proceed with loading the website while the safety check runs in the background. Only if the safety check identifies an issue after the website starts loading would Chrome then block navigation. This ensures a smoother browsing experience without compromising on security.

Prerendering (Future Exploration):This step involves introducing a new feature called prerendering. Prerendering allows Safe Site Check to begin verifying a website’s safety even before a user clicks on a link to that website. This proactive approach could further improve the perceived performance of Safe Site Check, as users wouldn’t experience any delay while Chrome waits for the safety check to complete.

Timeline:

The proposed changes are planned for a staged rollout:

  • M128: Launch Step 1 (deferring on response)
  • M129: Experiment with the prerendering approach
  • M130 (if successful): Launch prerendering approach

By implementing these changes, Google aims to enhance the user experience within Chrome by ensuring both safety and browsing speed.

The document also suggests a connection between these proposed changes and Chrome’s Enhanced Protection setting.

While Enhanced Protection is not the default setting, it offers additional security features, and it’s likely that Enhanced Protection uses the improved Safe Site Checks happening in the background. This means users who have opted-in for Enhanced Protection would benefit from this improved browsing experience with faster loading times and continued background safety checks.

Besides looking to improve Chrome Security and fix its performance bottle necks and out of memory errors, Google is recently started working to allow users to unload resource consuming tabs on demand in Chrome via chrome://discards page.

Snapdragon X Elite on Linux: How Does it Work?

Curious about how the Snapdragon X Elite performs with Linux? You’re not alone. Many users are eager to see how this new CPU fares in the Linux ecosystem. Let’s dive into the current state of compatibility, performance, and community support for Snapdragon X Elite on Linux.

How does Snapdragon X Elite work with Linux?

1. Compatibility and initial support

  1. Qualcomm has started adapting its new Snapdragon X Elite laptop CPU for Linux use.
  2. The Linux kernel version 6.9 includes critical functions for Snapdragon X Elite, such as UEFI-based boot support, standard bootloaders, and dual-boot capabilities.
  3. Qualcomm continues to work on support for battery management, display connectivity, sleep/wake functions for the GPU, and other multimedia features, which are expected in Linux kernel 6.10 and 6.11.
  4. A six-month roadmap includes hardware video decoding, GPU/CPU performance optimizations, and easy installations of Ubuntu and Debian.

So, Qualcomm is preparing a gradual Linux support for Snapdragon X Elite machines, but it’s not really there yet. Additional to the kernel support, a big piece of the puzzle are the Linux hardware drivers that right now are a hit and miss. At the moment we are publishing this piece, you might get a laptop that is ready for Linux

2. Experimental Disk Image

  1. Qualcomm has provided an experimental raw disk image for a Debian installer specifically for Snapdragon X Elite processors.
  2. This disk image allows users to test Linux on Snapdragon X Elite devices at their own risk, providing early access to Linux functionality.

Using this experimental disk image can help users experience Linux on their Snapdragon X Elite devices ahead of full official support.

3. Issues with graphics and display

  1. The latest Linux patch for the Snapdragon X Elite disables the integrated GPU (iGPU) by default due to OEM key signing issues.
  2. Without the iGPU, there is no display output on Linux unless external GPU docks/enclosures are supported. And if you will read the highlighted article, you will learn that eGPU support is also a work in progress.
  3. Developers are working to enable the iGPU on production models that are not fused with OEM-specific keys.

You should be aware of current graphics limitations and follow updates for potential fixes enabling full display functionality.

4. Windows Subsystem for Linux (WSL) on Snapdragon X Elite

  1. WSL offers seamless integration between Windows and Linux on Snapdragon X Elite platforms.
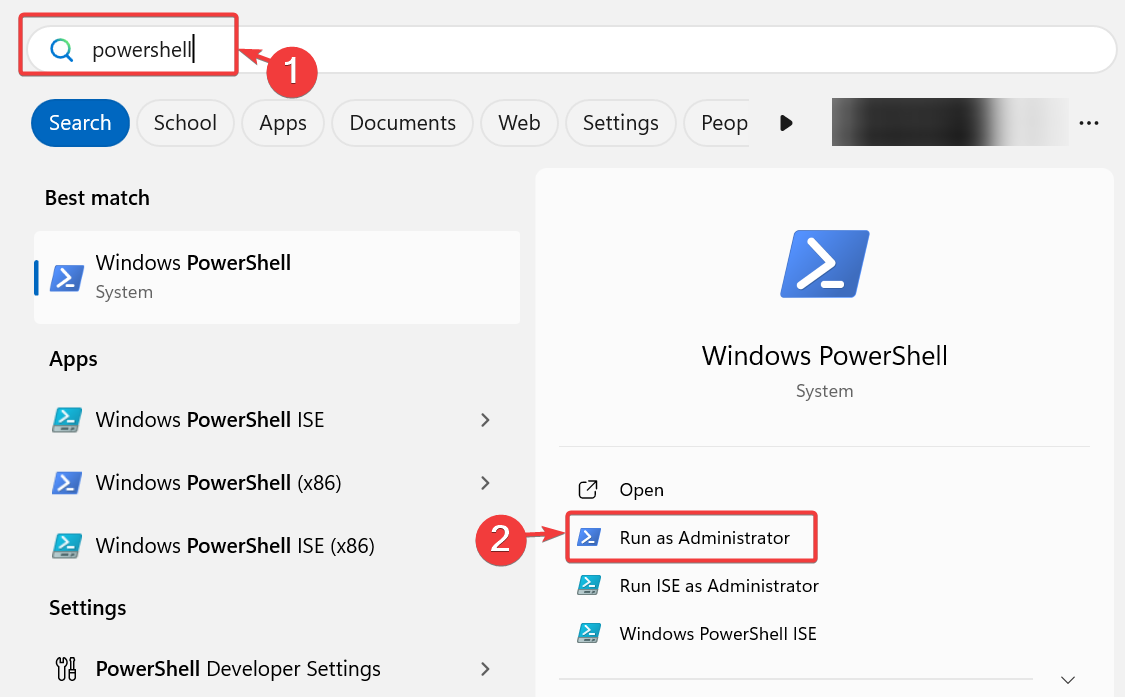
  2. You can install WSL using the wsl –install command in PowerShell, which pulls the ARM64 version of Ubuntu automatically.
  3. Docker Desktop for Windows has a beta ARM64 client that hooks into WSL2, allowing use of Docker on these devices.
  4. Visual Studio Code has an ARM64 version, ensuring compatibility with WSL setups.

This solution provides an alternative if you prefer using Linux tools and environments through WSL on your Snapdragon X Elite devices.

5. Community support and feedback

  1. The Linux community is actively discussing and monitoring the performance of Snapdragon X Elite chips on Linux.
  2. Users report that Linux often outperforms Windows on ARM and expect better support as Qualcomm focuses on Linux development.
  3. Community forums and platforms such as Reddit and Phoronix are valuable resources for updates, troubleshooting, and shared experiences.

6. TUXEDO Computers’ ARM laptop

  1. TUXEDO Computers is developing a Linux ARM laptop based on the Snapdragon X Elite SoC.
  2. The prototype, showcased at Computex, runs an ARM port of their Ubuntu-based TUXEDO OS with the KDE Plasma desktop.
  3. It aims to provide a powerful, energy-efficient Linux laptop experience comparable to Apple’s M-series chips.

If you’re looking for a dedicated Linux ARM laptop, you can consider TUXEDO Computers’ upcoming devices for optimized performance and support.

To keep your Snapdragon X Elite running smoothly with Linux, stay updated with the latest kernel releases and participate in community discussions. This will ensure you get the best performance and support for your device.

To summarize our findings, Qualcomm’s Snapdragon X Elite laptops don’t run Linux distributions yet, but they will soon be able to. As long as the Linux community will push the chip maker in that direction, things will happen. However, Qualcomm will primarily focus on the main market that consists of Windows users. Still, as of February 2024, Linux gained an important 1.10% market share growth in only 5 months, reaching 4.03%, thanks to Microsoft’s WSL, and Qualcomm will not ignore this trend.

What do you think about Snapdragon X Elite working on Linux? Let’s discuss in the comments below.

Xbox Game Pass might be modeled to include a variety of cloud gaming perks

Microsoft is starting to show its Xbox Game Pass as a future indication that cloud gaming will become more important in its plan. A report published by Windows Central said that the giant technology company is looking into a subscription plan only for the cloud.

The goal behind this could be to make it easier for people who don’t want or can’t afford an Xbox console but still wish they could play games on one; this might create chances in different markets, particularly those areas where finding Xbox consoles is more difficult.

However, the hints about an ad-based tier and the talk of bringing back the Xbox Game Pass Friends and Family plan show Microsoft’s strong interest in expanding variety. If these alterations happen, it might make Xbox Game Pass more tempting for players worldwide.

Now, let us look further into the details. Imagine being able to play your preferred Xbox games even if you do not possess the console. This is what a cloud-only Xbox Game Pass plan could provide. It’s a game-changer for those who find the cost of a console too high or prefer gaming on other devices. In countries where an Xbox console is uncommon, this could be their way into the large world of Xbox gaming.

But what if we play Xbox games without paying anything at the start? This is when an ad-based subscription model can be used. It’s still being considered and is not yet in active development. Still, it could attract more users to the platform, particularly those hesitant about committing to a monthly fee.

Do you remember the Xbox Game Pass Friends and Family plan? It appears that Microsoft has not abandoned this idea completely. After testing, there are discussions about reintroducing it into the market. This might make it more economical for families and groups of friends to access an extensive collection of games. Considering the growing demand for shared digital experiences, it’s smart.

You may be thinking about the future of Xbox Game Pass and its implications. Microsoft wants to increase its influence and attract a broader range of customers. With the focus on investigating fresh membership plans, such as the now ill-fated Xbox Game Pass Standard, and enhancing gaming reach, Xbox Game Pass is ready for expansion. Its goal is to maintain satisfaction among present gamers and appeal to new ones who might be coming from areas without console availability or those new to the Xbox environment.

In simple words, Microsoft’s actions can change gaming in a big way. Xbox Game Pass could be made into something for everyone, everywhere; this might mean new possibilities for cloud gaming and ad-supported tiers along with family plans in future times ahead of us.

Microsoft releases the new Reflect app, a tool for teachers to engage with students emotionally

In the fast-changing realm of technology, Microsoft has moved ahead to aid the mental health of students and teachers with its new Microsoft Reflect app. This application, which can be downloaded from the Microsoft Store, helps create connections, expressions, and well-being for educational environments.

Reflect has been accessible on the web, Microsoft Teams, and OneNote Class Notebook. The app’s function as a complete package of the website experience is confirmed by the fact that it has all features and information, similar to viewing through web browsers. It is important to note that a standalone app offers clearer navigation and quicker access, which could benefit students using well-being practices within their daily digital tools in classrooms.

Reflect’s method of understanding the emotional landscape of a classroom is through check-ins that educators can make. They can assess how students and staff feel about different subjects. These check-ins are more than just surveys; they provide interaction and interest, with responses possible via emojis or the Feelings Monster.

This character, with research support, shows 60 different emotions. This can help students in showing their feelings more easily. The knowledge gathered from these check-ins is very important for teachers to identify areas of achievement and areas that require attention.

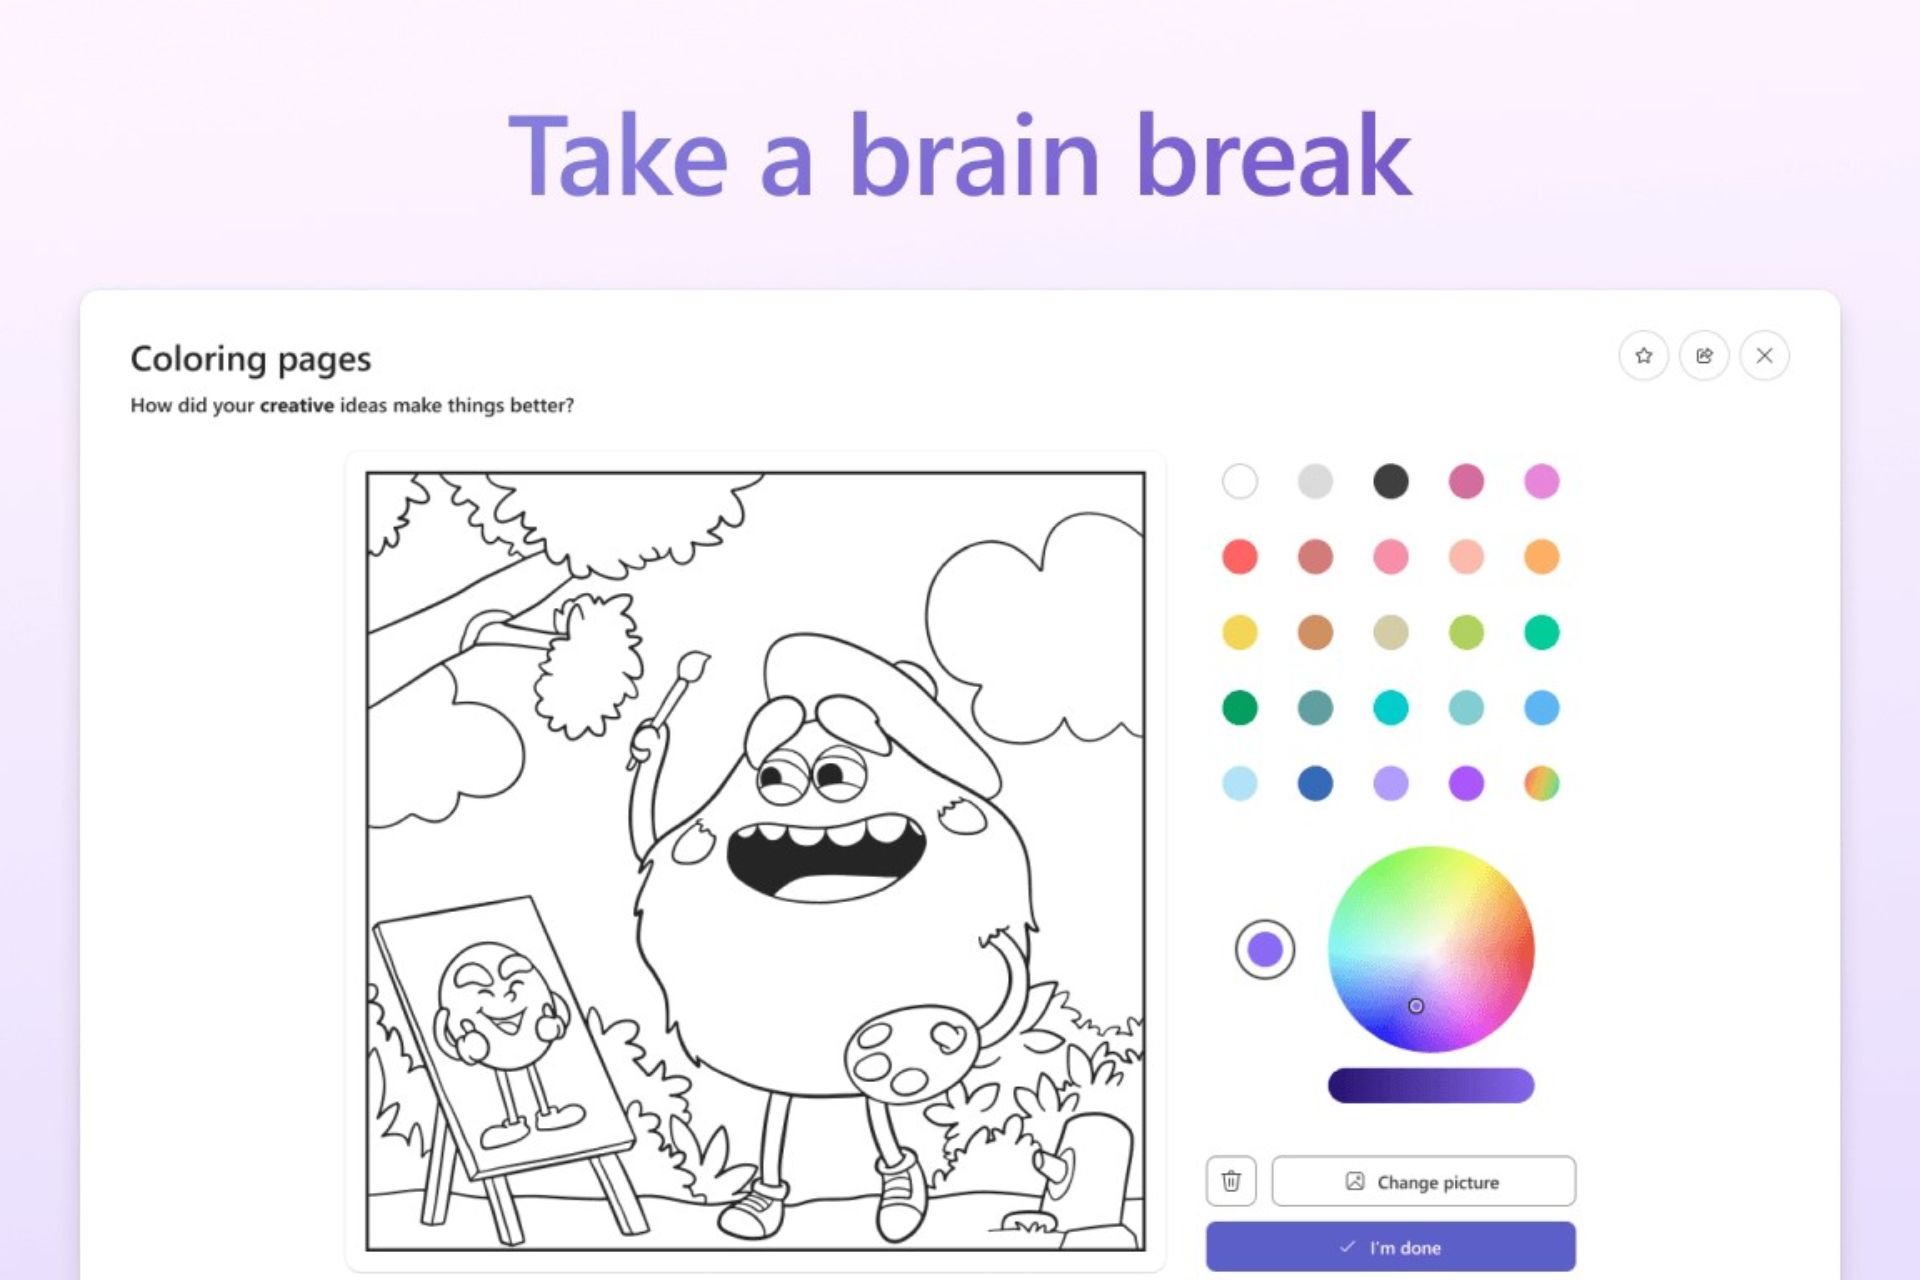
However, it is not just about keeping track. The app motivates users to have “brain breaks,” offering a selected variety of activities for mental fitness. These include breathing exercises and movement tasks, along with guided videos on mindfulness and audio meditations, among other things. The addition of focus music tracks, soundscapes, and even short podcasts and games ensures that no matter what students like, they can always find a way to refresh and refocus.

Microsoft’s promise to improve the Reflect platform is shown in its frequent updates. One noticeable improvement has been integrating with different Learning Management Systems (LMS), like Canvas and Google Classroom. This makes it easier for teachers to use Reflect in their digital systems.

You need to go to the Microsoft Store to get the Reflect app. This is easy and also free. However, having a valid Microsoft school account is necessary to download it. This ensures that the app remains secure and remains part of Microsoft’s educational tools. When launched, Reflect will quickly become an essential tool in classrooms as it provides fresh support for emotional welfare among students and educators alike.

KB5040535 to the Windows 11 Beta Channel brings a new way to open folders

Have you ever found yourself clicking through your computer, trying to open a file, and suddenly facing the “Open with” dialog box, looking slightly different than before? If you’re part of the Windows Insider Program and dabbling in the Beta Channel, you might have noticed something new. Microsoft has just rolled out a fresh Windows 11 build, numbered 22635.3936 under KB5040535, and it’s bringing some changes to the table, including a redesigned “Open with” dialog.

First, the “Open with” dialog has been updated. Microsoft decided it was time to simplify things, removing group headers, among other tweaks. It’s all part of their effort to make Windows more user-friendly. Have you seen it yet? It’s quite a subtle change but an improvement.

Remember the simplified system tray and the shortened date/time change that started appearing with Build 22635.3930? Well, they’ve hit pause on that for a bit. Due to some issues, Microsoft temporarily disabled it, promising to bring it back in a future update. If you caught a glimpse of it before, don’t be surprised if it vanishes after this latest update.

Now, onto the fixes. Microsoft has been busy squashing bugs, especially around text suggestions for hardware keyboards and those pesky ctfmon.exe crashes that could mess with your ability to input text. And for those who’ve had trouble with certain mice and keyboards not working in safe mode, there’s good news: that issue should now be fixed.

But, as with any update, there are some known issues. Microsoft is investigating an uptick in explorer.exe crashes and some problems with the Notification Center getting stuck. Plus, if you’re using the updated Recent, Favorites, and Shared sections in File Explorer, there might be a few glitches to watch out for.

For the Beta Channel insiders, there’s something else that’s new. The Microsoft Store is getting an update, too, with improved search suggestions and more straightforward navigation through game categories. It’s a small change, but it could make finding what you’re looking for easier.

If you’re in the Beta Channel of the Windows Insider Program, you’re seeing some of the changes and improvements Microsoft is experimenting with for Windows 11. It’s a mixed bag of updates, from interface tweaks to bug fixes, and even though there are some known issues, it’s all part of the process of making Windows better. Have you experienced any of these changes yet? What do you think?

You can read KB5040535’s full changelog here.

Microsoft says Europe might partially be guilty of the CrowdStrike incident

In a new situation, Microsoft has shifted blame to the European Union for preventing them from fully “locking down” Windows and improving its security. This was revealed after an incident involving CrowdStrike, a vendor of security software, that unintentionally damaged millions of Windows PCs worldwide.

According to the latest reports, Microsoft’s argument is based on its agreement with the European Commission in 2009, which says it has to give security software makers equal access to what they enjoy on Windows. Without intention, this choice for fairness has created a chance for possible security weaknesses.

Microsoft cannot do much to strengthen Windows’ security because it is bound by a contract from ten years ago. This contract was created to address worries about fair competition, but it has unintentional impacts on system safety.

Unlike Microsoft, businesses such as Apple and Google don’t have this restriction that lets them control access to their operating systems more strictly. This discrepancy highlights the complex balance between competition and security in the tech industry.

The European Union’s actions show how careful it is in controlling anti-competitive behavior from big tech companies. Although the EU’s purpose was likely to promote competition, the unintentional effect on security is a big hurdle to handle. Is it time we reevaluate these agreements? Maybe, but this is a difficult matter that needs thoughtful thinking about competition and security requirements.

Considering these advancements, Microsoft created an auto-fix tool for users impacted by this situation. This emphasizes their dedication to user safety within the boundaries of regulations.

This occurrence strongly reminds us of how complex and delicate the relationship between rules, competition, and safety is in the digital era. As we progress, it becomes extremely important to locate an equilibrium that safeguards competition and security factors equally.

Best Color Picker Extensions for Firefox

If you are a developer, designer, or someone who likes consistency across interfaces, various extensions can help you get hands-on tools for selecting, copying, and managing colors. In this guide, we bring the best color picker extensions for Firefox to inspire your creativity.

What are the best color picker extensions for Firefox?

Color Picker by Mark Lumnert – Easy to use

Color Picker = best color picker extensions

Color Picker by Mark Lumnert is an add-on that allows you to search for the color you want in a pop-up window.

To use it, go to Extensions, then select Color Picker. A new window will open, and it will have several categories, such as Artistic Colors, UI Design Colors, Game Colors, Favorite Colors, Popular Colors, Monitor Colors, and more.

At the top, you will see a big color palette icon, which you can use to render the native color picker UI. You can click on this icon to pick a new color.

When you start it for the first time, open the color picker UI and click on the Basic colors section to select and save your color.

More features of Color Picker:

  • All picked colors are saved in the memory, and you can access them from the popup
  • Access colors in six different formats from the right-hand side
  • Allows you to copy selected color format automatically to the clipboard
  • Available for other browsers such as Chrome and Opera on Windows, Linux, and Mac

⇒ Get Color Picker

ColorZilla by Alex Sirota – Comes with a lot of features

ColorZilla

ColorZilla by Alex Sirota can help you get color reading from any point in your browser, adjust the color, and paste it into any program you like.

The eyedropper tool can be used to get the color of any pixel or area on the page. It comes with an advanced color picker similar to Photoshop.

ColorZilla addon also has an ultimate CSS gradient generator and a webpage color analyzer, which allows you to get a color palette for any website.

It also comes with Palette Viewer and seven pre-installed palettes. The add-on shows the color history of recently picked colors.

More features of Color Picker:

  • Displays element information like class ID, tag name, size, etc
  • Allows copy-picked colors automatically to the clipboard
  • Can analyze the page and inspect a palette of its colors
  • Allows you to create advanced multi-stop CSS gradients

⇒ Get ColorZilla

Colorpick Eyedropper by Sam Larison – Promising but still in beta

Colorpick Eyedropper - best color picker extensions

Colorpick Eyedropper by Sam Larison is an eye-dropper and color-picker tool that allows you to select color values from web pages.

The add-on allows you to manage and organize picked colors and sort and remove duplicate colors in the palette.

You can save or print the color palette for reference and keep a record of previously picked colors as well.

The extension is in its beta phase, and the developer has warned you that you should not install the add-on if you don’t want bugs.

More features of Colorpick Eyedropper :

  • Allows you to start picking colors each time the popup is clicked
  • Lets you track daily color usage statistics
  • Can integrate with web standards seamlessly
  • Show color values in different formats

⇒ Get Colorpick Eyedropper

Color by Fardos – Color Picker by Fardoss – Advanced features

Color by Fardos

Color by Fardos – Color Picker by Fardos comes with a color pick that uses zoom technology and allows you to save multiple colors from any website. You only need to press Ctrl + Shift + E to use the add-on.

It allows you to save your favorite colors and gradients. Click any color, and the HEX is saved to your clipboard.

The add-on comes with Color Search, which helps you quickly find matching color combos for Shades, Tints, Complementary, Triadic, Analogous, Split Complementary, and Tetradic colors.

You can create linear or radial gradients with unlimited stops, and it enables you to browse hundreds of beautiful gradients, edit, save, and copy them in CSS whenever you need them.

More features of Color by Fardos – Color Picker:

  • Allows you to get color palettes from any gradient you create
  • Can add the color picker as the default in the options page
  • Can customize the color type when copying automatically
  • Color chooser automatically changes the selected color within the entire extension

⇒ Get Color by Fardos – Color Picker

ColorFish Color Picker by UI Vision RPA Software

ColorFish Color Picker - best color picker extensions

ColorFish Color Picker by UI Vision RPA Software is an advanced open-source eyedropper and color picker that can select color values from websites and desktops.

It lets you get a color reading from any point in your browser and desktop. This is the only browser extension that allows you to select a desktop color.

The website eyedropper and desktop eyedropper features allow you to see the color of any pixel on a page, app, or image on your desktop.

This color picker extension allows you to save the recently picked colors in the color history and retrieve the colors of dynamic hover elements.

More features of ColorFish Color Picker:

  • Lets you drag & drop local images or PDFs on your browser window and can use the extension on it
  • Allows you to single-click to start color-picking
  • Enables you to pick colors from flash objects
  • Allows you to pick colors at any zoom level

⇒ Get ColorFish Color Picker

What things to keep in mind before choosing a color picker extension?

  • Download source – To avoid downloading malicious files, you are advised to get the extension from the Firefox add-on store.
  • User reviews and ratings – Check the Firefox Add-ons website for ratings and reviews so you can rely on the extension and get more information from the user’s point of view.
  • Features – Go through the list of features to ensure they have the functions and features you need in the color picker add-on.
  • Privacy and security – Make sure you check the privacy policy to understand what data they will collect and how they will use it. Extensions with good reputations have clear policies and are transparent about data policies.
  • Support & updates – Check whether the extension is actively maintained, gets regular updates, and is supported by the developer. This will make it compatible with the newer version of the browser.

How can I add the color picker extension on Firefox?

  1. Once you have selected an extension from the above list, go to the Firefox Browser add-ons website and search for it.
  2. Select the one you want from the search results, then click Add to Firefox. 
  3. The extension will be downloaded and installed. Click Add to allow the extension to access browser tabs and browser activity during navigation.
  4. You might also get a prompt to allow this extension to work in a private session. To enable it, place a checkmark and click Okay.

Selecting the right color picker extension for Firefox will enhance your creativity and enable you to enjoy streamlined color management right in your browser. Moreover, if you need an extension for Amazon price tracking, or for hiding Youtube thumbnails, we can help out.

If you are looking for color picker software for Windows, there are several apps that we have listed in this separate guide.

For Windows, you can also use the PowerTools color picker utility to find the perfect color; we have a detailed guide on how to use it.

Which color picker extension did you choose for Firefox? Share your choice with our readers in the comments section below.

Install NVM on Windows – Step-by-Step Guide

Want to install NVM on Windows? Node Version Manager (NVM) is a popular tool for managing multiple versions of Node.js. I’ll show you how to simplify switching between them. 

Let’s begin!

How To Install NVM on Windows

Here are the steps:

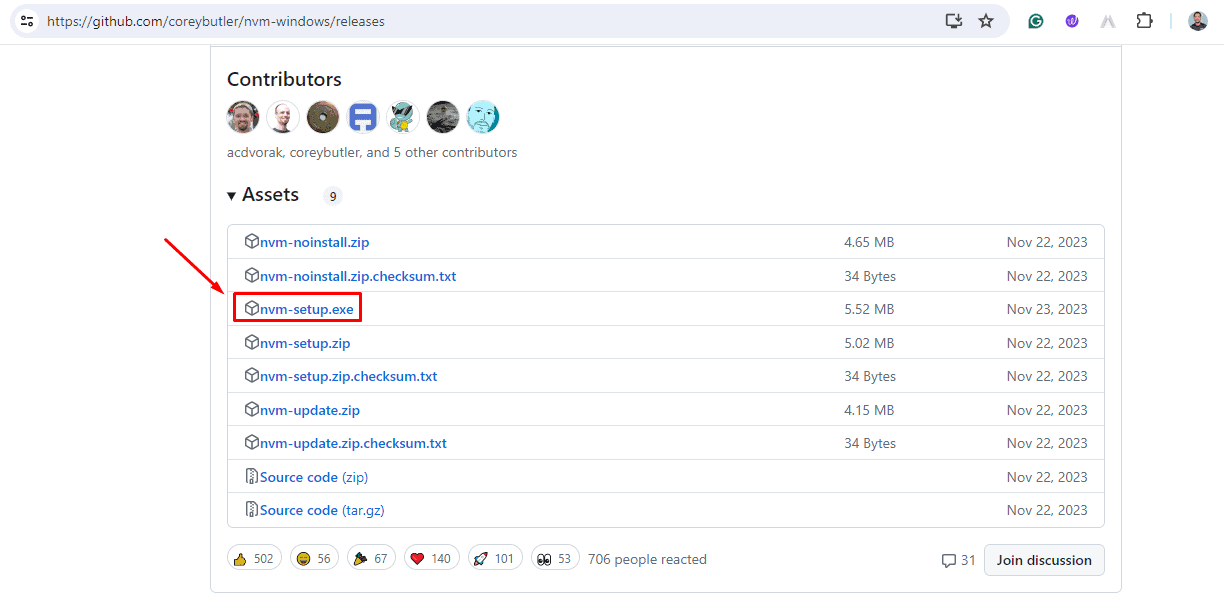
  1. Open your browser and go to the NVM for Windows GitHub releases page.
  2. Tap on the setup file to download it.
NVM setup
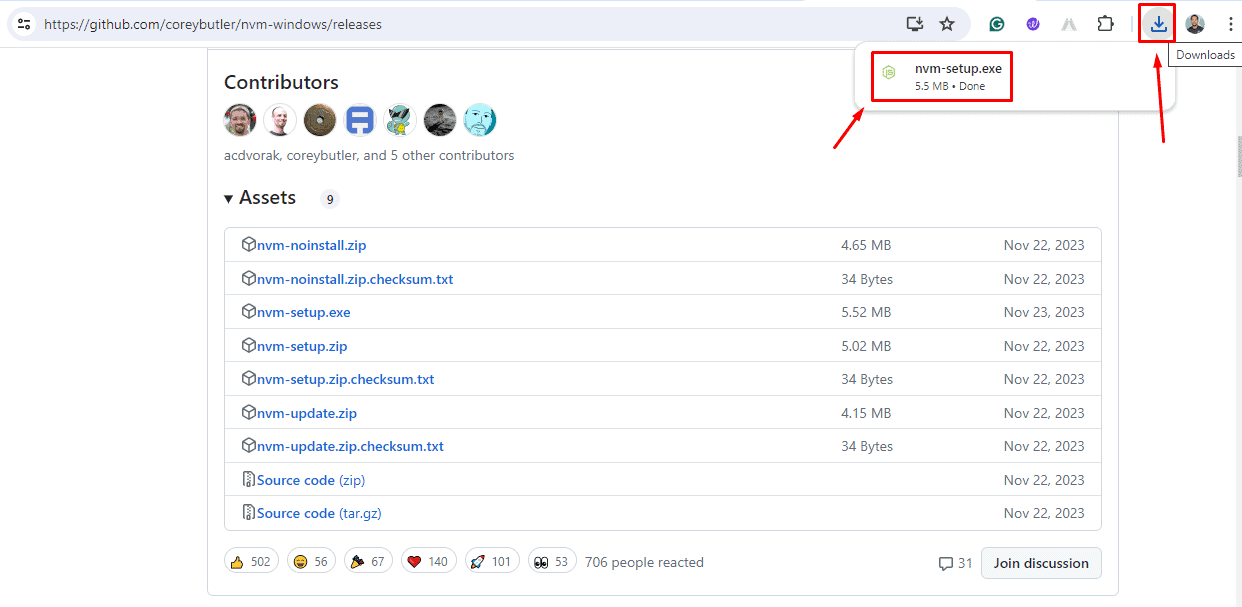
  1. Click on the download icon on the top right corner of your screen to access the installer. Double-click on it to start the installation process.
Open the file
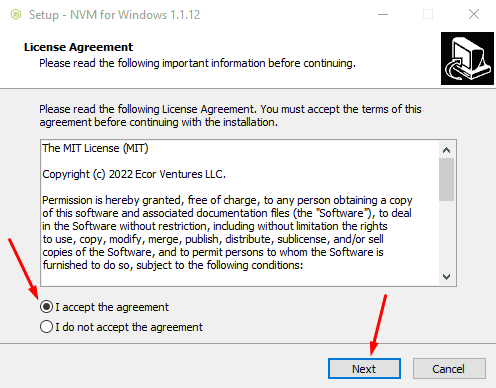
  1. Read and accept the license agreement, then click “Next.”
Accept the license agreement
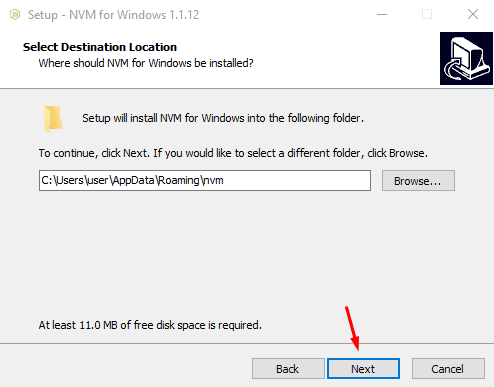
  1. Select a destination location and tap Next.
Select a destination location
  1. Pick a folder where the setup should create the symlink. The default is usually fine, but you can change it if needed. Then hit Next.
Pick a folder
  1. Click “Install“, then hit Finish once complete.
Finish installation
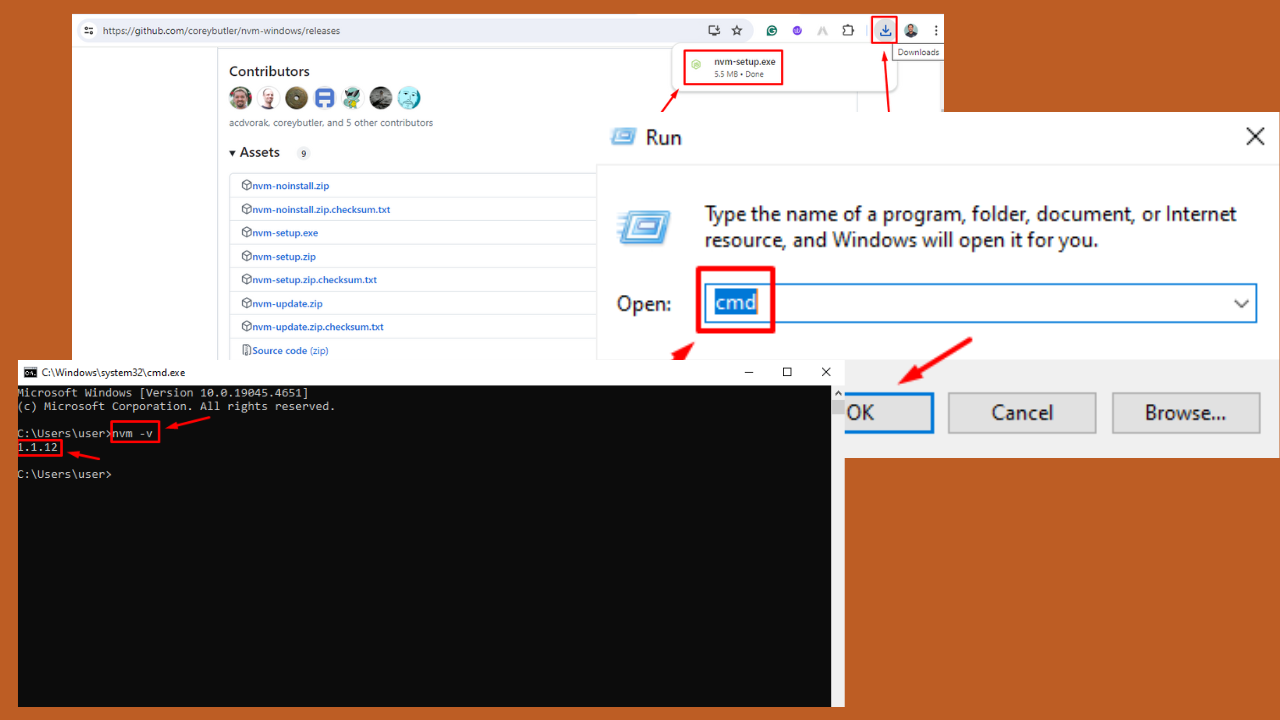
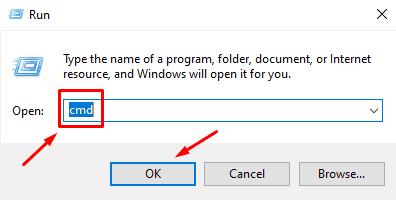
  1. After installation, tap the Windows Icon + R, then type cmd to run a prompt command. 
Run a prompt command
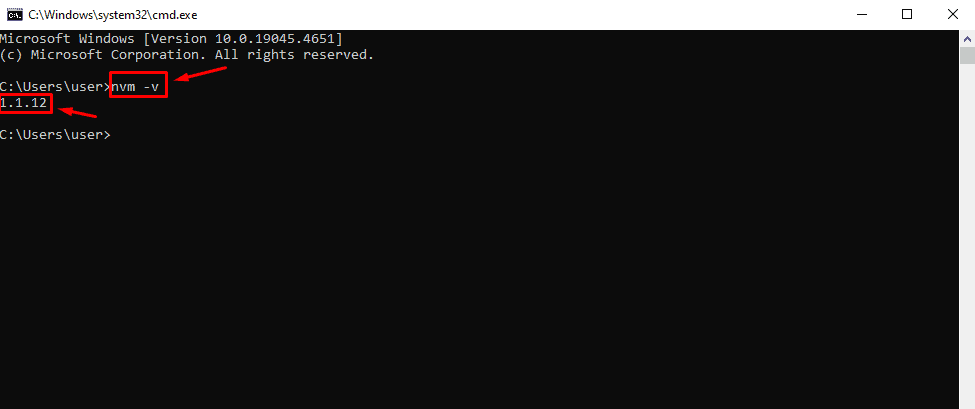
  1. Type nvm -v and press Enter. You should see the installed version of NVM, confirming that the installation was successful.
Type nvm -v

You’re done!

So, now you know how to install NVM on Windows. By following these steps, you can easily switch between different Node.js versions to suit your project’s needs.

Additionally, if you want to update your Node version, we have just the guide for that.

After Deadpool, get ready for a Wolverine Xbox controller. Here’s what you need to do to win this unpurchasable device

In a world where superheroes come alive from the big screen into our homes, Microsoft has stepped up again with a Wolverine-inspired Xbox controller. This strong-as-nails mutant’s Adamantium skeleton has nothing on it.

Just when we believed that the Xbox Cheeky Controller–fashioned after Deadpool’s famous derriere–had stolen all attention from other gamepads in town, now this! The new controller boasts an “Adamantium-tough tush,” paying tribute to Wolverine’s invincible character and reflecting his yellow uniform with texture, color, and blue highlights.

And now comes the surprise element: this special gaming gear cannot be purchased. Microsoft is organizing an Instagram sweepstakes where followers can win it.

You may ask yourself, “How can I obtain this masterpiece?” The answer is quite simple. According to Xbox, if you are older than 18 and have a talent for social media, proceed to @Microsoft on Instagram. Then, locate the post with #MicrosoftCheekySweepstakes and express your liking by giving it a thumbs up and leaving a comment containing the identical hashtag.

Apart from being a hardware product, this Wolverine Xbox controller is a collectible that symbolizes the forthcoming “Deadpool & Wolverine” movie, featuring an unmatched alliance. Shawn Levy directed this film, which has top cast members such as Ryan Reynolds and Hugh Jackman; it guarantees to be an ultimate match.

So, take part in this excitement now! It’s time for you to test your luck – who knows if you might become a small part of it yourself? You may be the fortunate fan to hold this Adamantium-strong controller and express your Wolverine-like skills while playing games.

Microsoft defends its new Xbox Game Pass subscription model against FTC

In the bustling gaming and tech world, Microsoft was at the center of a heated debate with the Federal Trade Commission (FTC) over changes to its Xbox Game Pass subscription service. The FTC raised concerns that the recent adjustments, including a price hike and introducing a new Standard plan lacking Day One game releases, amounted to “product degradation.”

Microsoft, however, didn’t just sit back. According to Tom Warren of The Verge, The tech giant filed a counter-complaint, arguing that the FTC’s portrayal was misleading and that the new Standard plan, priced at $14.99 a month and including Xbox online multiplayer, offers more value than before.

This move sparked a broader conversation about the evolving dynamics of gaming subscriptions and the implications for gamers and the industry at large.

Microsoft’s stance is clear: the company believes that the FTC’s claims are misleading and overlook the added value the new Game Pass Standard plan brings. By including multiplayer functionality—a feature previously an additional cost—Microsoft argues that it’s enhancing, not degrading, the service for its subscribers.

This defense is part of a larger narrative as the tech giant seeks to navigate regulatory challenges and market dynamics following its acquisition of Activision Blizzard.

On the other hand, the FTC perceives these changes as potentially harmful to consumers. It suggests that Microsoft’s strategy could limit access to new games on Day One, a key selling point for many Game Pass subscribers. This concern reflects broader anxieties about market consolidation and the impact of major acquisitions on competition and consumer choice.

As gamers and industry observers await the US Court of Appeals’ final decision, questions linger about the future of subscription services and their role in the gaming ecosystem. Will Microsoft’s adjustments to Game Pass set a new precedent for the industry?

Or will regulatory pushback prompt a reevaluation of how companies structure these services? Only time will tell, but one thing is certain: the outcome of this dispute could have far-reaching implications for how games are distributed and monetized in the digital age.

In the meantime, gamers are left to ponder the value of their subscriptions and the evolving landscape of a beloved pastime. As Microsoft defends its new pricing strategy and the FTC champions consumer interests, the debate underscores the complex interplay between innovation, regulation, and pursuing a fair and competitive marketplace.

Microsoft Forms Not Accepting Responses: 8 Best Fixes

Is Microsoft Forms not accepting responses? Read on to find the proven troubleshooting methods that actually work.

Usually, this problem occurs because you didn’t correctly set up the end date. However, there could be other technical issues that are beyond your control.

Microsoft Forms Not Accepting Responses

I’ve researched what might stop new responses from being recorded and singled out the fixes that worked for me. So, let’s go through them together, shall we?

How To Fix Microsoft Forms Not Accepting Responses

I’ve organized the solutions based on complexity. Try out the basic ones first before moving on to the more advanced ones on the list:

Check These Basic Settings to Allow Responses

If you wish to share an online form with the public and receive responses over a longer period, double-check these settings:

  1. Who can fill out this form: Select Anyone can respond. This configuration will allow anonymous responses without requiring sign-in to a Microsoft account.
Anyone can respond
  1. Options for responses: Keep the Accept responses setting checked and the Start date and End date unchecked.
  2. Hide Submit another response: If you’re okay with receiving multiple responses from the same participant, keep this unchecked. Otherwise, the users won’t get a reattempt and might complain that your form isn’t accepting responses.
Accept responses

If you choose Only people in MSFT can respond, then users within your organization’s Microsoft 365 domain can submit data through the form. For this setting, if you select One response per person, users will be limited to one response only.

Only people in MSFT can respond

Contrarily, the Specific people in MSFT can respond setting will only let users access the form if you’ve added them in an allow list. So check these settings first if someone tells you that they can’t open your form.

Specific people in MSFT can respond

Check the Service Health Status

If you’re unable to receive responses in your form or can’t access a form shared with you, check the service status first.

Go to the Service health portal if you’re an individual user or survey participant.

If you’re a Microsoft 365 admin, log in to the Microsoft 365 admin center Service health portal. Scroll down to the Service status section.

Here, you’ll find a list of Microsoft 365 services and their current working statuses. Look up the Microsoft Forms service and check its status. If it shows Healthy, the form tool is working. Contrarily, if you see any text, like 1 advisory, 3 advisories, etc., wait a few hours and check back again.

Check the Service Health Status

Don’t use the form until its status is Healthy.

Reset Response Limits for the Form

Here are the limits that Microsoft imposes on receiving responses through a quiz or form:

  • For Microsoft 365 Apps for business and Office 365 Education up to 5,000,000 responses.
  • For U.S. Government Community Cloud (GCC), DoD environments, and GCC High the maximum response numbers can be 50,000.
  • For Hotmail, Microsoft personal, Live, Outlook.com, and other free accounts, the maximum response count is 200. However, if you’re a paid subscriber, you can get up to 1,000 responses.

So, if you’re planning to circulate the form within a large audience, create small groups of survey participants.

Now, share the form with these groups one after the other. Ensure you don’t send the form link to more than 5,000,000 users at once. If you do, some users will see the “Microsoft Forms not accepting responses” error due to the response limit issue.

If you’ve done this already and want to fix the form, create a duplicate and delete the original copy after saving its backend Excel file. You’ll find the steps to duplicate a form later in this article.

Then, share the duplicate with the people who can’t open the original copy.

Delete Microsoft Forms Cache and Cookies

This method applies to survey participants, not form owners. If you’ve confirmed that you didn’t submit data through the form before and you don’t need to log in with your Microsoft account, do this:

  1. Click the View site information button on the browser address bar. It’s located on the left edge.
  2. On the next dialog, select Cookies and site data.
Cookies and site data
  1. Now, choose the Manage on-device site data option.
Manage on-device site data
  1. You’ll see the On-device site data dialog box.
  2. There, click on all the bin or delete icons to get rid of cache and cookies.
On-device site data

Access the Form in the Private Browsing Mode

Conflicting browser add-ons might interfere with the Microsoft Forms file and prevent you from submitting survey responses. Do the following to open the form in the Incognito mode:

  1. Right-click on the Google Chrome or Mozilla Firefox shortcut icon.
  2. Select the New Incognito window for Chrome and the New private window for Firefox.
New incognito window
  1. A private browsing session will open.
  2. Copy and paste the form URL into the address bar and hit Enter.
  3. If the form doesn’t require you to log in and hasn’t reached any limit yet, you can access it now.
private browsing session
  1. If the form requires you to log in to your Microsoft account, do so to be able to submit responses through the online form.

Browser extensions usually don’t work in Incognito mode. Hence, you can access the form without third-party add-ons interfering.

Duplicate the Existing Form

It’s likely the hyperlink or the code of the original form got corrupted. So, follow these steps to create a duplicate and test if the issue persists or not:

  1. Go to the original form and click on the More form settings or the three-dots menu located near the Present button in the top-right corner.
  2. Choose Collaborate or Duplicate from the context menu.
Collaborate or Duplicate
  1. Click on the Copy button below the Share as a template section.
Share as a template
  1. Open a new tab in the browser and paste the URL in the address bar.
  2. Click on the Duplicate it button at the top of the survey.
Duplicate it
  1. A copy of the original form will appear in a few seconds.
copy of the original form
  1. Microsoft Forms also saves the item in your account.

Try Accessing From a Different Device

If you’ve received the form through Messenger, Telegram, WhatsApp, or email on your smartphone, copy the form URL to your PC’s web browser. Then, try to access it from the PC and see if it works.

Similarly, if you’ve received the form on your computer, try to open it on a smartphone.

Contact Microsoft Technical Support

If none of the above works for you, you must seek advanced technical support from the Microsoft 365 admin support team. Here’s how you can contact them:

  1. Log in to the Microsoft 365 admin center using your credentials.
  2. Click on the headphone icon above the Give Feedback card in the bottom right corner of the portal.
support icon
  1. Enter the issue description into the How can we help? field.
  2. Click on the blue right arrow.
contact support
  1. Click on the Contact support button at the bottom.
  2. Choose an option between Phone and Email.
  3. Fill up the details in the Contact support form on the next page and click the Contact me button.
contact me
  1. The Contact me button will only become active if you’ve supplied enough data related to the issue.
  2. Wait for a callback or email from the support team.

Summary

Now you know how to deal with Microsoft Forms not accepting responses. Once you fix the problem, you’ll start receiving new responses or you’ll be able to access the form.

If this article helped you send or receive Microsoft Froms response or if it’s missing a major fix, let me know in the comments.

Fix: The Provided HLS Document Could not be Loaded

Running into the The Provided HLS document could not be loaded error can be a real headache, especially when you’re trying to enjoy or share a seamless streaming experience.

How do I fix The provided HLS document could not be loaded?

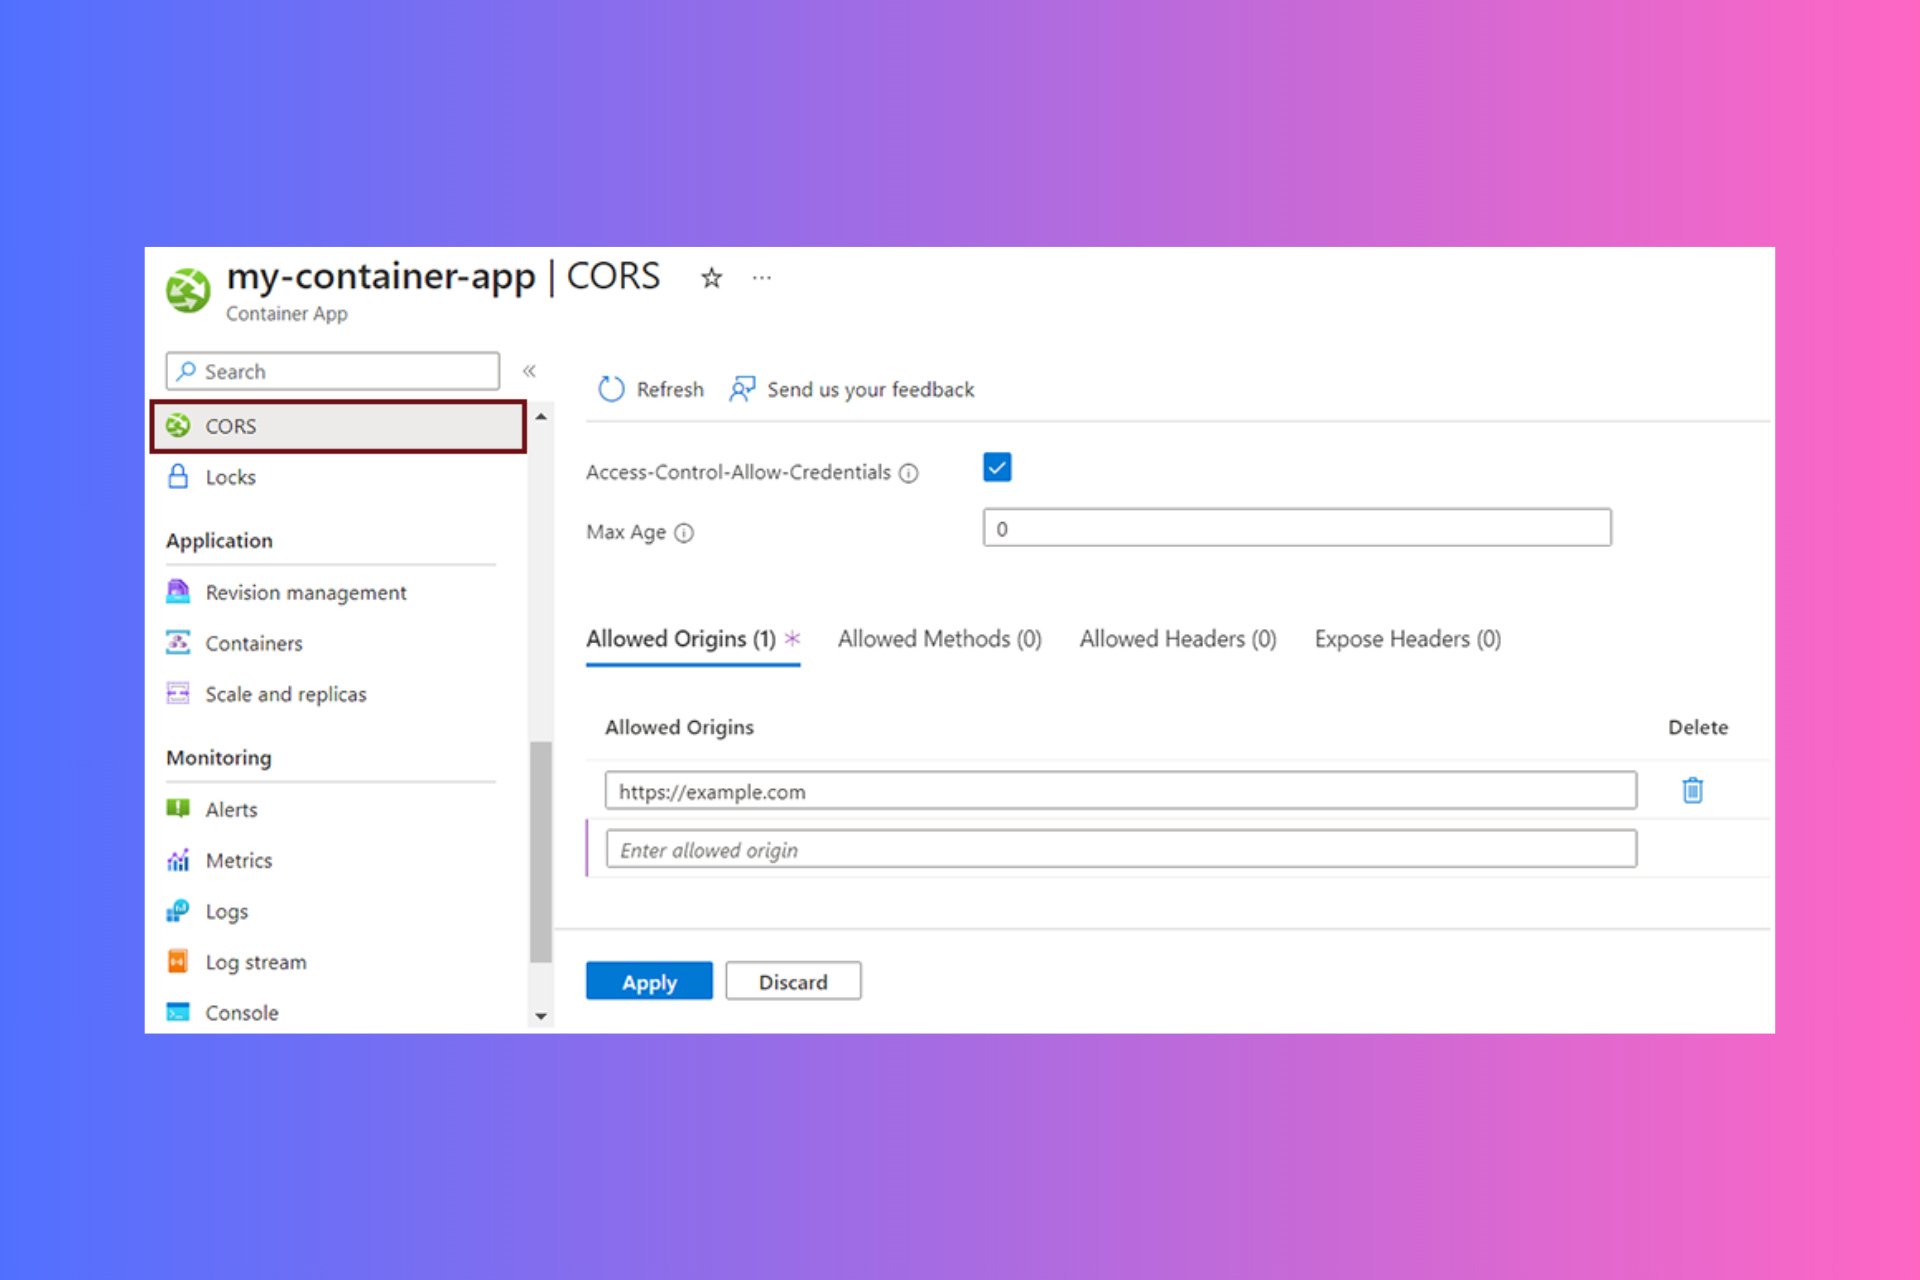
1. Verify cross-origin resource sharing (CORS) settings

  1. Open the configuration files for your web server (like Apache or Nginx) or the settings in your cloud storage (like AWS S3).
  2. Add or update your CORS settings to allow the domain from which your HLS stream is being accessed. For example, in AWS S3:
    • Go to your S3 bucket and click on the Permissions tab.
    • Choose CORS Configuration.
    • Add the necessary CORS rule: <CORSConfiguration> <CORSRule> <AllowedOrigin>*</AllowedOrigin> <AllowedMethod>GET</AllowedMethod> <AllowedMethod>HEAD</AllowedMethod> <AllowedHeader>*</AllowedHeader> </CORSRule> </CORSConfiguration>
  3. Save the changes and test your HLS stream again.

This solution ensures that your streams can be accessed from different domains without CORS errors, making your HLS playlists load correctly.

2. Check your URL and MIME type

  1. Verify that the URL you’re using for your HLS stream is correct and accessible.
  2. Ensure you are using the correct MIME type for HLS streams. The MIME type should be application/vnd.apple.mpegurl for HLS m3u8 files.
  3. If the URL includes query parameters or complex paths, ensure these are encoded correctly.

Properly setting up the URL and MIME type allows your media player to recognize and load the HLS stream without errors.

3. Temporarily disable browser extensions

  1. Open your browser (e.g., Chrome).
  2. Click on the menu button (three dots in the upper right corner) and go to More tools > Extensions.
  3. Disable all extensions by clicking the toggle next to each one.
  4. Refresh your HLS stream and see if the problem is resolved.

Extensions can sometimes interfere with media playback. Disabling them helps in identifying if an extension is the cause of the HLS loading issue.

4. Clear the browser cache

  1. Open your browser (e.g., Chrome).
  2. Click on the menu button (three dots in the upper right corner) and go to More Tools > Clear browsing data.
  3. Choose All time in the time range.
  4. Select all the options including cookies, cache, and history.
  5. Click on Clear data and restart your browser.

Clearing the cache ensures that your browser loads the latest version of your HLS playlist and other web resources, preventing any caching issues.

5. Test on different browsers and devices

  1. Open your HLS stream on multiple browsers (Chrome, Firefox, Safari).
  2. Test the stream on different devices (desktops, laptops, mobile devices).
  3. Compare the results and note any browser or device where the issue persists.

Testing on various platforms helps identify if the issue is browser-specific or device-specific, guiding you towards more targeted troubleshooting.

6. Use a backup stream URL

  1. In your streaming platform’s settings or encoder configuration, find the backup stream URL.
  2. Replace your primary stream URL with the backup URL.
  3. Test the HLS stream again to see if it resolves the issue.

Using a backup stream URL ensures that if the primary URL has issues, the backup can take over seamlessly, providing uninterrupted streaming.

7. Verify the firewall and port settings

  1. Ensure that the necessary ports (80, 443, 1935) are open on your firewall.
  2. Check your network’s firewall settings to make sure they aren’t blocking the HLS stream.
  3. If using a third-party firewall or antivirus, temporarily disable it to test the stream.

This solution helps in identifying and resolving network-level issues that might be blocking the HLS stream from loading.

8. Update or reinstall your media player

  1. Check for any available updates for your media player (e.g., VLC, JW Player).
  2. If an update is available, install it and test your HLS stream again.
  3. If the issue persists, uninstall the media player completely.
  4. Download and reinstall the latest version of the media player.

Keeping your media player updated ensures compatibility with the latest streaming technologies and can resolve many playback issues. You may also try a better video player to enjoy your content without any issues.

By following these steps, you can methodically troubleshoot and resolve the error indicating that the provided HLS document could not be loaded, ensuring a smooth streaming experience across all platforms and devices. For future prevention, regularly update your media player and check your network settings to avoid similar issues.

If you know other feasible solutions for this issues, make sure you drop a line in the comments bellow.

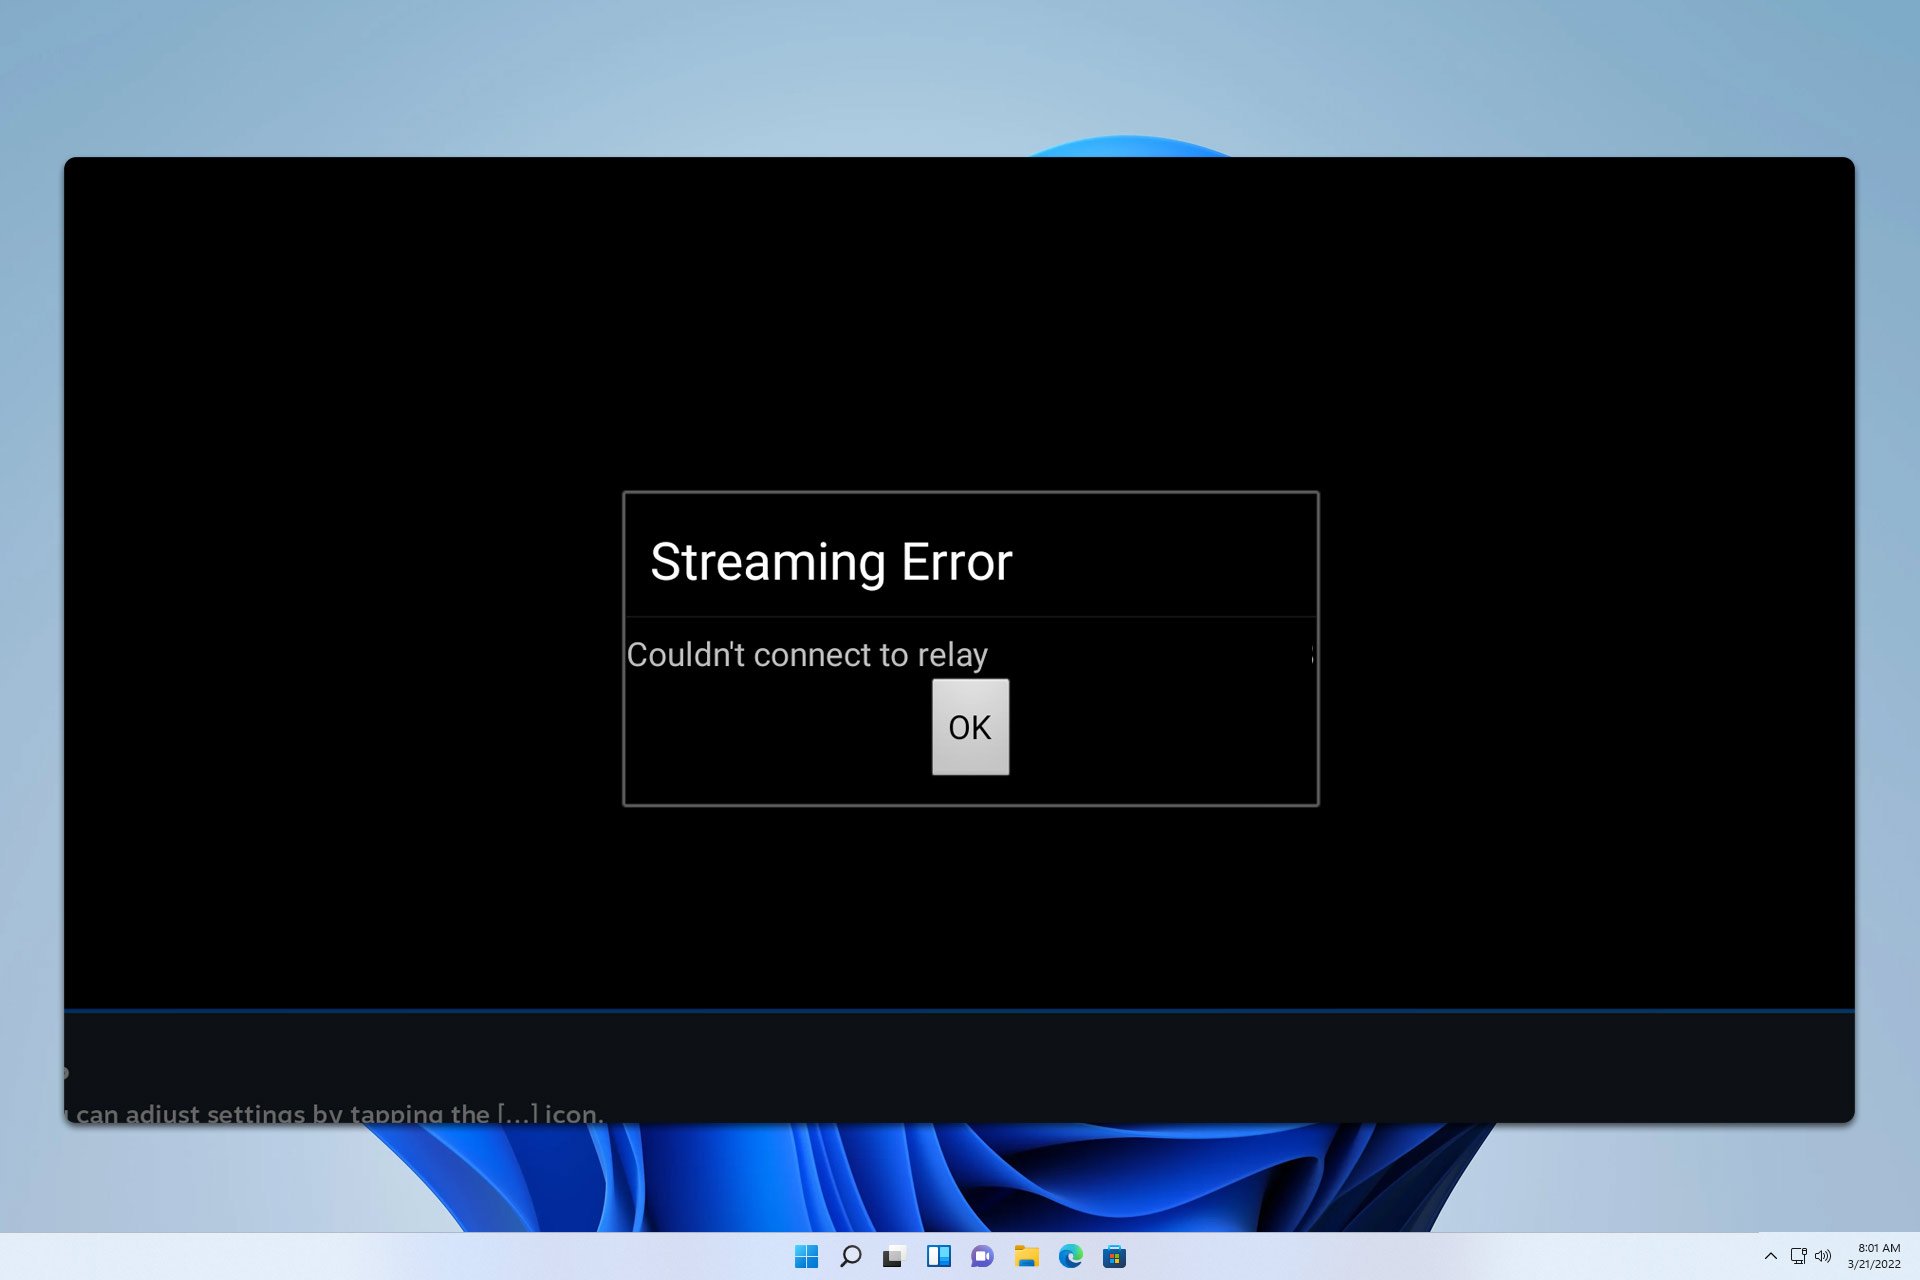
Streaming Error Couldn’t Connect to Relay: 3 Ways to Fix

Many experienced Streaming error couldn’t connect to relay while trying to stream Steam games, and this can prevent you from playing games remotely. Luckily, fixing this problem is easier than you think.

Why could Steam Remote Play not connect?

This can happen due to your network settings, such as using a Public network type or due to IPv6.

How can I fix the Streaming error couldn’t connect to relay?

1. Change the network type

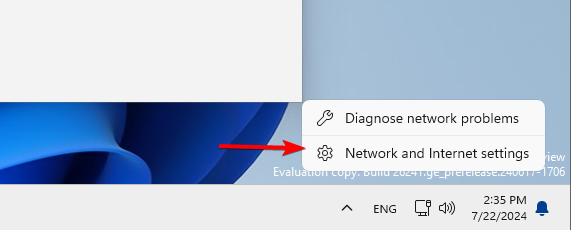
  1. Right-click on the network icon in your system tray and choose Network and Internet settings.
     network and internet settings
  2. When the Settings app opens, click on Properties.
    network properties settings app
  3. Select Private network and save changes.
    private network selected

2. Disable IPv6

  1. Open Network settings like in the previous solution.
  2. Next, click on Advanced network options.
    advanced network settings
  3. Select your connection and click on Edit next to More adapter options.
    more adapter options edit
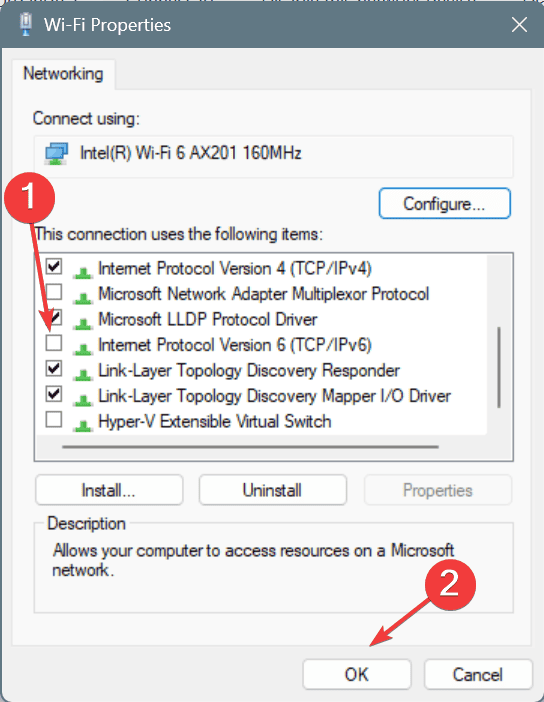
  4. Locate Internet Protocol Version 6 (TCP/lPv6) and uncheck it.
    uncheck IPv6
  5. Save changes.

3. Restart Steam

  1. Use any remote control software to connect to your PC.
  2. Close Steam completely.
  3. Start it again and check if that solves the problem.

Do keep in mind that we have special guides if Steam Link is not working or if Steam Link isn’t going full screen, so don’t hesitate to check them out.

Many also experienced lag, but if that’s the case, we have a guide that will reduce input lag on Steam Link, so be sure to visit it if you have any issues.

Microsoft decided to stop the rollout of the simplified tray area in Windows 11

Just as you believed everything was revealed in Windows 11, Microsoft has chosen to retreat on one of its newest aspects. In the past week, this technology company introduced another preview build into Beta Channel, which exhibits a simplified tray area in Windows 11, among other alterations.

The latest tray is designed to improve your desktop experience. It allows hiding the notification bell icon and switching to a more compact date-time format. However, as fate would have it, not everything went according to plan.

Microsoft had to pause the rollout because some issues that were not explicitly named had arisen. Even though the build can still be taken, the simplified tray area feature has been temporarily put on hold.

In a blog post, Microsoft said that they have turned off the updated tray due to certain problems and will make it active again in a future flight.

No worries for people who were expecting this. You can still reach your notifications by tapping the Notification Center’s date and time. And if you miss the previous appearance, go back to the old style with a long form of date/time and bell icon visuals from Settings. It’s all about giving users options to customize their experience.

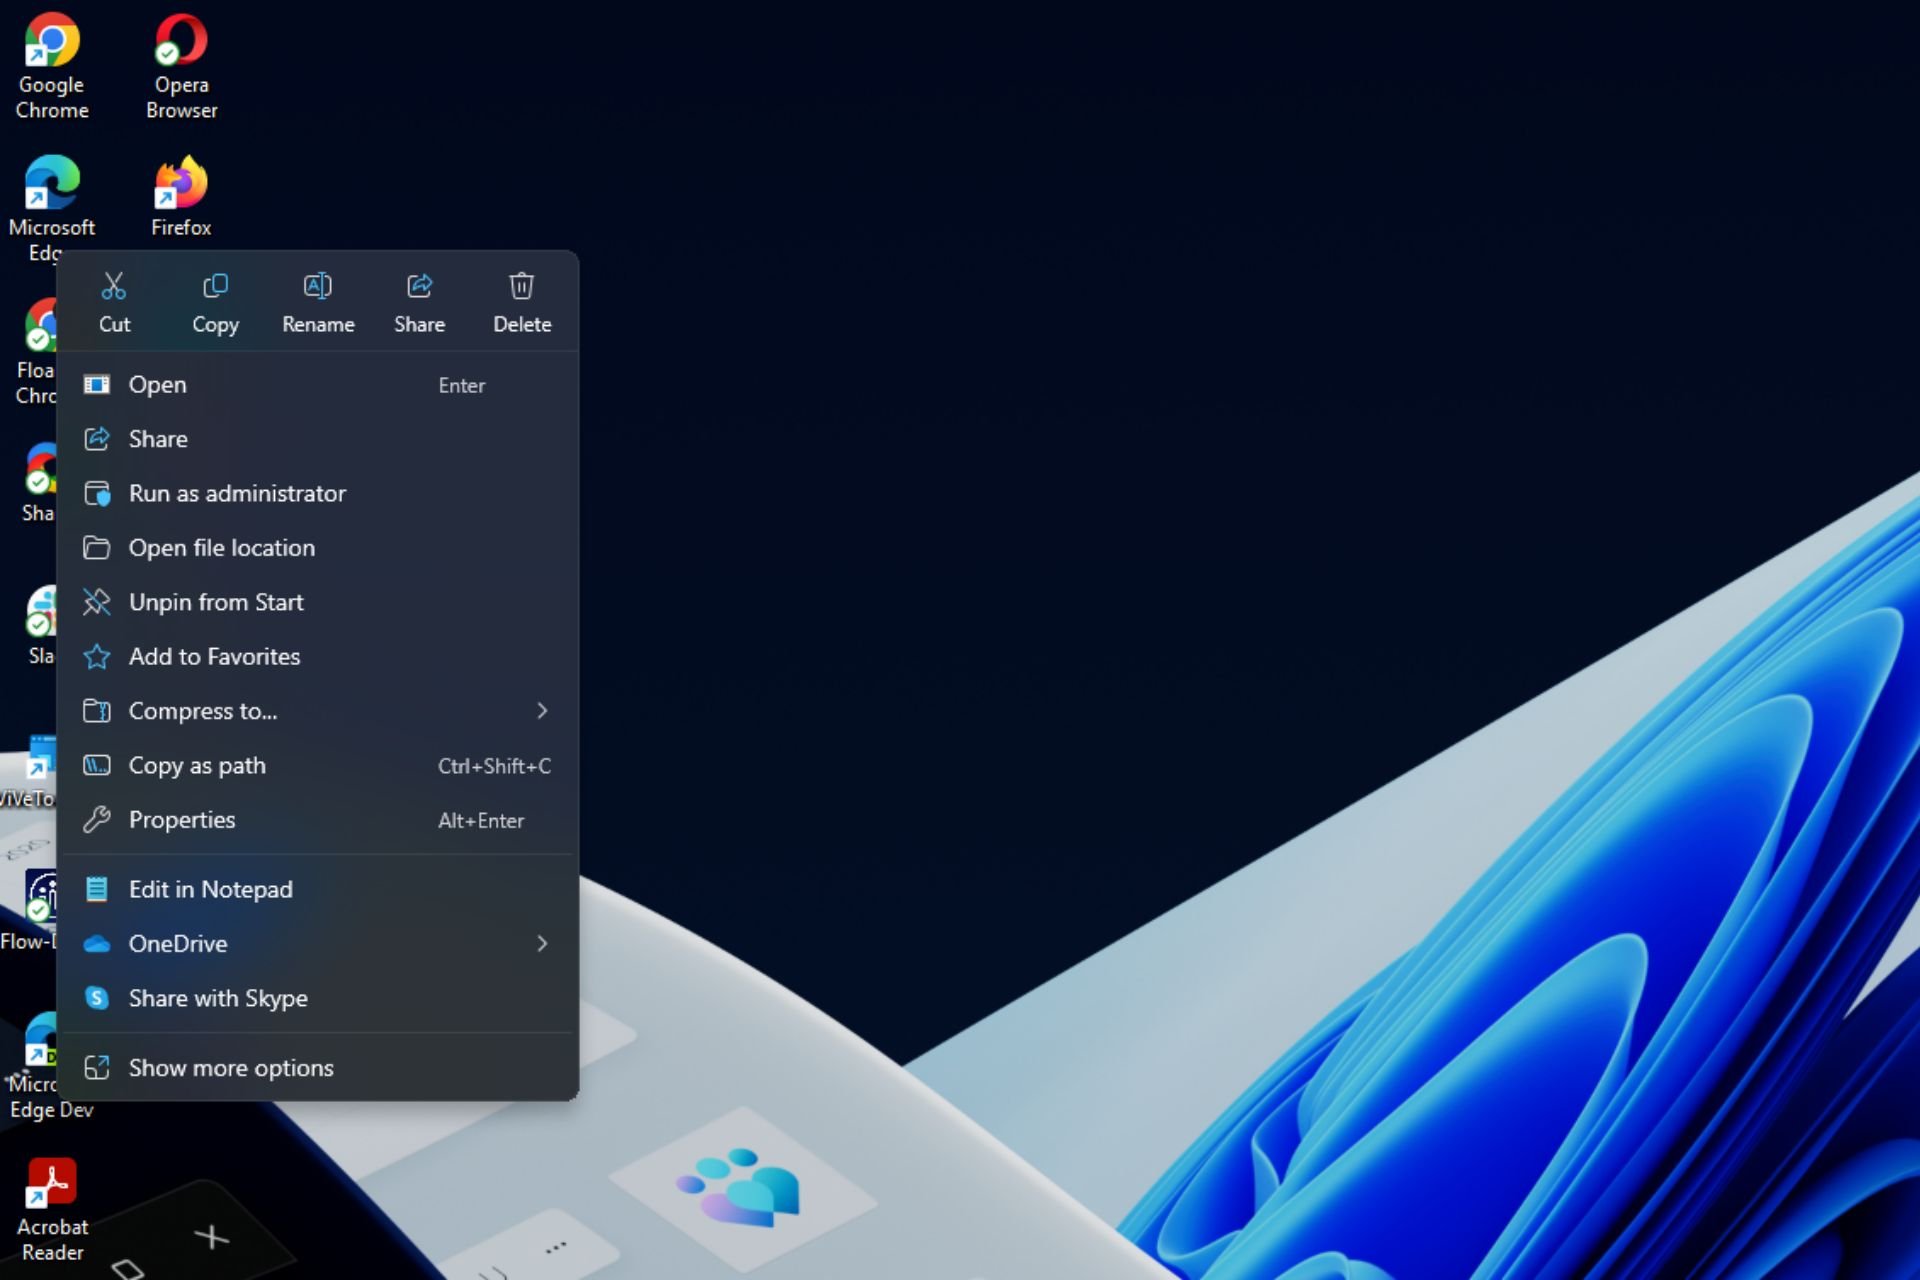
However, the change mentioned might not function as intended in building 22635.3930. Other alterations, like taskbar thumbnail animations, shared content in File Explorer, and new taskbar shortcuts, are still active. Microsoft is introducing these features step by step, and those who don’t want to wait can manually turn them on with the ViVeTool app.

Microsoft’s decision to stop and solve problems before they become big temporarily indicates that quality must always remain high. For the people who use it, this gives us a chance to understand and experience other characteristics of Windows 11 as we anticipate the return of a more straightforward tray area.

CrowdStrike fixed a significant number of Windows PCs, while the rest will be brought back online faster

Last week, CrowdStrike was at the center of a storm when a faulty update to its Falcon Sensor agent on Windows caused quite the chaos. Imagine the scene: banks, airlines, and media companies worldwide face the dreaded Blue Screen of Death (BSOD), with nearly 8.5 million PCs stuck in a continuous reboot loop. The error codes? 0x50 and 0x7E. CrowdStrike and Microsoft have been on their toes, offering guidance and support to help recover the affected PCs. But let’s face it: the recovery process they initially provided was no quick fix.

CrowdStrike didn’t just sit back; according to a post on X (formerly known as Twitter), they’ve been testing a new technique to speed up the recovery process of the impacted systems. They’re even considering opting in for this method. A CrowdStrike employee on Reddit mentioned they’ve seen significant success with a cloud remediation they released. For those eager to know more, keeping an eye on CrowdStrike’s official guidance page might be a good idea.

Together with customers, we tested a new technique to accelerate impacted system remediation. We’re in the process of operationalizing an opt-in to this technique. We’re making progress by the minute.

CrowdStrike

Meanwhile, Microsoft wasn’t far behind. They updated their recovery tool with two repair options to help IT admins speed up the repair process. One option helps create boot media for device repair, while the other allows devices to boot safely for manual remediation.

Seeing an opportunity in the chaos, cybercriminals started a phishing campaign targeting CrowdStrike customers with a malicious ZIP file named “crowdstrike-hotfix.zip.” It’s a wild world out there, and in times like these, sticking to official channels for communication and guidance is more important than ever.

Fix: This Experience Cannot be Visited at This Time on Roblox

Roblox is a fantastic platform for gaming, but encountering the This Experience Cannot Be Visited error can be quite frustrating. First, check the Roblox server status, because that’s the main reason for this error.

What do I do if This experience cannot be visited error?

1. Ensure your game is not banned or restricted

  1. Open the Roblox app or go to the Roblox website.
  2. Log in to your account using your username and password.
  3. Search for the game you are trying to play.
  4. Check if the game has been banned or restricted by looking for any notices or messages on the game’s page.

If the game is banned or restricted, you won’t be able to play it until the restrictions are lifted by Roblox.

2. Clear your browser or app cache

For browser users:

  1. Open your web browser (Chrome, Firefox, etc.).
  2. Go to the browser’s settings (usually found in the menu or by clicking on the three vertical dots).
  3. Find the option for clearing browsing data or cache.
  4. Select the time range to clear (to be safe, choose All time).
  5. Make sure to check Cached images and files and Cookies and other site data.
  6. Click Clear data or a similar button.

For Roblox app users:

  1. Close the Roblox app completely.
  2. Go to your device’s settings.
  3. Find the Apps or Applications section.
  4. Locate the Roblox app in the list.
  5. Tap on the Roblox app, then find and select Storage.
  6. Tap Clear cache and confirm if prompted.

Clearing the cache can resolve many issues related to corrupted or outdated data, ensuring a smoother gaming experience.

3. Reinstall Roblox

For PC users:

  1. Press the Windows key and type Control Panel, then press Enter.
  2. Go to Programs and then Programs and Features.
  3. Find Roblox in the list of installed programs, right-click on Roblox and select Uninstall.
  4. Follow the uninstallation steps to remove Roblox from your computer.
  5. Go to the Roblox website.
  6. Log in to your account and download the Roblox installer.
  7. Run the installer and follow the instructions to reinstall Roblox.

For mobile users:

  1. Go to your device’s home screen.
  2. Find the Roblox app icon.
  3. Tap and hold the app icon until options appear.
  4. Tap Uninstall or Remove.
  5. Go to your app store (Google Play Store or Apple App Store).
  6. Search for Roblox and download the app again.
  7. Install the app and log in to your account.

Reinstalling Roblox can fix various issues, including those related to corrupted installation files.

4. Disable VPN or proxy

  1. If you are using a VPN, open the VPN application.
  2. Turn off the VPN by clicking on the disconnect button.
  3. If you are using a Proxy, go to your device’s network settings.
  4. Locate the Proxy settings and turn them off or set them to “No proxy.”

Using a VPN or Proxy can sometimes interfere with your connection to Roblox servers. Disabling them can restore your access to the game.

5. Update your device and drivers

For Windows users:

  1. Press the Windows key and type Update, then press Enter.
  2. Click on Check for updates.
  3. Install any available updates for your system.

For Mobile users:

  1. Go to your device’s settings.
  2. Find the System or Software Update section.
  3. Check for updates and install any available.

For graphics drivers (PC users):

  1. Press the Windows key and type Device Manager, then press Enter.
  2. Expand the Display adapters section.
  3. Right-click on your graphics card and select Update driver.
  4. Follow the prompts to search for and install the latest driver.

Keeping your device and drivers updated ensures compatibility with the latest games and applications, minimizing errors.

By following these steps, you should be able to troubleshoot and resolve the This experience cannot be visited error on Roblox. To prevent future issues, regularly check for updates and maintain a clean cache.

If you’re facing errors while starting Roblox, check the highlighted guide to help you. We also have a complete guide to fix the authentication failed error code 0 on Roblox.

For any other suggestions or questions, feel free to let us know about them in the comments below.

Azure OpenAI Service now supports GPT-4o mini, the company’s fastest AI to date

Artificial intelligence is constantly changing, and Microsoft has made new improvements to the Azure OpenAI Service. The platform now integrates GPT-4o mini, OpenAI’s most cost-effective model yet, surpassing previous ones in many AI tests. It’s now accessible for users of Azure OpenAI Service.

In a blog post, Microsoft says the Azure AI Content Safety features, such as prompt shields and protected material detection, are now automatically turned on for GPT-4o mini. This ensures a safer experience with AI from the beginning. Also, Microsoft’s Customer Copyright Commitment protects against claims of intellectual property by third parties and offers confidence for those using GPT-4o Mini’s abilities.

Azure OpenAI Service has also made data residency available in all 27 regions. This advancement gives people more choice and control over where their AI-related data is kept and handled. It helps to match regional rules and personal inclinations for data storage and use.

The global pay-as-you-go deployment of GPT-4o mini is revolutionary for accessibility and efficiency. Its cost rivals other models in its class and boasts high throughput, making it an appealing choice for many uses. The capacity to upgrade from current models without changing regions simplifies transferring to newer, more sophisticated models.

Combining GPT-4o mini and the Azure Batch Service is helpful for people who want to use AI in large amounts. This service permits jobs with high throughput at a lower price by utilizing capacity during non-peak times, which gives cost-effective solutions without affecting performance.

This month, the fine-tuning feature for GPT-4o mini was added. This makes the model even more attractive, letting users adjust and adapt it to their particular requirements and situations. The possibility of customization and moving towards token-based billing when training happens on Azure OpenAI Service makes this platform very economical for using AI solutions.

Azure AI already has more than 53,000 customers, and many Fortune 500 companies are making applications using Azure OpenAI Service. The improvements brought by GPT-4o mini are ready to speed up innovation and push the limits of what is achievable in AI.

Google Workspace Sync for Microsoft Outlook for Multiple Accounts [Guide]

Do you want to carry out a Google Workspace Sync for Microsoft Outlook for multiple accounts?

You might need to add multiple Google Workspace emails mainly in the following situations:

  • To keep all Google emails under one client app, especially when working with multiple freelance clients who also use Google Workspace.
  • If you need to access Google emails from multiple accounts as a department head or manager.
  • If you’re a member of shared Google Workspace resources for multiple projects in the same or different organizations.
Google Workspace Sync for Microsoft Outlook Multiple Accounts

Whatever the reason, you should first know if Google Workspace Sync for multiple accounts in Outlook is available.

In this article, I’ve addressed all of your questions related to GWSMO and multiple account handling.

Is Google Workspace Sync for Microsoft Outlook for Multiple Accounts Available?

No, the GWSMO tool doesn’t support seamless syncing of multiple Google Workspace emails in Outlook. It means you can’t add multiple emails through GWSMO in Outlook and use them all in real-time.

You can add as many Google emails as you want. However, Outlook will assign individual profiles for them. Then, you can use the Outlook profile switcher to swap between your Google Workspace accounts.

How To Add Multiple Accounts Using GWSMO

Find below a few tricks to sync multiple Google Workspace emails in Outlook desktop and web app:

Using Separate Profiles

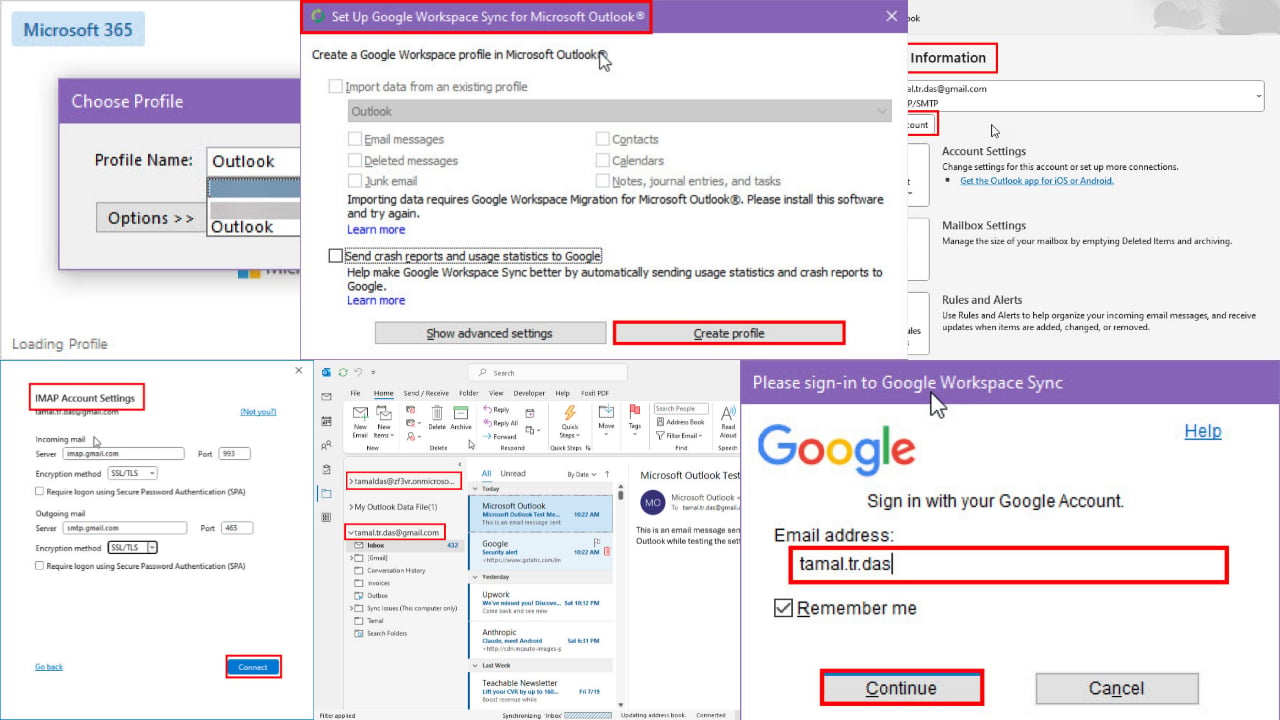
  1. Launch the Google Workspace Sync tool and enter the first email you want to set up in Outlook.
  2. Click Continue.
GWSMO email field
  1. The Sign in with Google page will open in your default web browser.
  2. Complete the sign-in process using your email and password.
  3. Follow on-screen guidance until you reach and hit the Allow button.
  4. The Set Up GWSMO dialog box will open.
  5. There, click on the Create profile button.
create profile
  1. GWSMO will automatically create an Outlook profile for you.
  2. Click on the Start Microsoft Outlook button on the next dialog box.
  3. You should now see the Choose Profile dialog box.
choose profile
  1. At this phase, there will be only two profiles. One is for the Outlook email and the other is for the recently added Google Workspace email.
  2. Click the Close button.
close button
  1. Now, repeat the steps from the beginning to add the next Google Workspace email.
  2. Again, Outlook will assign a profile for the second Google email.
  3. When you launch Outlook, the profile picker will show up by default.
  4. You can click on the drop-down menu to select the profile you want to log on with.
profile picker

Let’s say you’re using your first Google email and you’d like to switch to the second one. Here’s how you can achieve that:

  1. Click on the File tab.
  2. Below the Account Information section, click on the Account Settings drop-down menu.
  3. Click on the Change Profile option.
change profile
  1. Click OK on the Outlook will close box.
  2. Now, open Outlook again from the Start Menu or Desktop to see the profile picker dialog box.
  3. Change the profile before loading Outlook.
close outlook

Using IMAP and POP Configurations

  1. Open the Outlook desktop app and click on the File tab on the ribbon menu.
  2. This will open the Account Information page.
  3. Click the Add Account button just below the Microsoft Exchange email.
add account
  1. The Outlook splash screen will show up.
  2. Type in the email you want to sync with Outlook in the Email address field.
  3. Click the Connect button.
connect
  1. If Sign in with Google shows up, close the dialog box.
  2. You should now see the Something went wrong dialog box.
  3. There, click on the Change Account Settings button.
change account settings
  1. The IMAP Account Settings dialog will open.
  2. It should automatically select the best IMAP settings for Gmail.
  3. Click the Connect button.
imap settings
  1. Now, follow the on-screen instructions to complete the IMAP configuration for your Google Workspace email.

If you face any issues while using IMAP and POP sync, make the following changes in your Google Account:

  1. Open a new tab in Google Chrome.
  2. Click on the Google apps icon in the top-right corner of the blank tab.
  3. Now, click on your profile picture or the Account button.
Google account chrome
  1. Select the Security menu on the left-side navigation panel.
  2. Now, type App Password in the Search Google Account field.
  3. Choose the App passwords option from the search results.
app password search
  1. Enter a random name, like Windows 10 Outlook in the App name field.
  2. Click the Create button.
Create app password
  1. You’ll find the generated app password in a pop-up dialog box on the screen.
generated app password
  1. Copy the password and paste it into the IMAP sign-in field instead of the Gmail account password.

Using the Gmail Sign-In Dialog

  1. Go to the Info screen of Outlook by clicking on the File tab in the ribbon menu.
  2. Hit the Add Account button below the Account Information section on the right of the Info menu.
Info add account
  1. The new account sync dialog box will show up. It’ll take a few minutes to show the email address field.
  2. Enter the Google Workspace email there and click Connect.
Connect after email
  1. You’ll see the Google Account sign-in page.
Google sign in
  1. Follow all the instructions to complete the sign-in process into Outlook.
  2. When you see the Account successfully added dialog, click the Done button.
Account added successfully
  1. You should see the newly added Google email alongside the existing Outlook or Gmail addresses.
Emails alongside

Outlook also gives you the option to collapse the items of a synced email by simply clicking the right arrow button next to the address.

expand emails

However, the above feature isn’t available with the GWSMO tool. You must switch profiles when you want to change the currently signed-on Google Workspace email.

Summary

So, these are some of the methods you can follow if you want to do a Google Workspace Sync for Microsoft Outlook for multiple accounts.

Choose the one you find the most intuitive depending on the situation and the number of Google emails you must sync.

Did this article help you become productive when managing both Google Workspace and Microsoft 365 emails in Outlook? If you know a better trick, feel free to share it in your comment to let others know about it.

Streameast Error Code HTML5: 10 Tested Fixes

Running into the Streameast Error Code HTML5 can be frustrating, especially when you’re all set for a match or other exciting sport transmission. First of all, make sure that your browser is updated to the latest version and you have a stable internet connection. Also, verify that your system supports H.264 video decoding. If not, this might be the cause for the Streameast HTML5 error.

How do I fix the Streameast error code HTML5?

1. Update the browser

  1. Open your browser.
  2. Click the three dots (Ellipsis icon) in the upper-right corner.
  3. Select Help and then click on About [Your Browser].
  4. The browser will automatically check for updates. Click Update if an update is available.

Updating your browser ensures you have the latest features and security updates, which often fixes issues with HTML5 video playback.

2. Clear browser cookies and cache

  1. Open your browser settings.
  2. Navigate to the Advanced section.
  3. Click Privacy and Security and then select Clear Browsing Data.
  4. Check the boxes for Cookies and other site data and Cached images and files.
  5. Click Clear Data.

Clearing cookies and cache can remove corrupted or stale data that may be causing video playback issues.

3. Deactivate the hardware acceleration

  1. Open your browser settings.
  2. Scroll to the Advanced section and click on it.
  3. Go to the System tab.
  4. Toggle off Use hardware acceleration when available.

Turning off hardware acceleration can resolve issues where the GPU is causing HTML5 videos to lag or not play.

4. Use HTML5 supported codecs

  1. Contact the browser’s support team to request the installation of codecs like OGG, WebM, and MP4.
  2. Follow their instructions to install the necessary codecs.

Using HTML5-supported codecs ensures that the video can be decoded and played by the browser.

5. Open HTML5 Video in incognito Mode

  1. Open your browser and press Ctrl + Shift + N to enter Incognito Mode (or New Private Window in Firefox).
  2. Attempt to play the HTML5 video in this window.

Incognito Mode disables extensions and clears cookies and cache, which can help you identify if these are causing the issue.

6. Disable browser extensions

  1. Open your browser settings.
  2. Navigate to the Extensions section.
  3. Toggle off each extension individually to identify which one might be causing the issue.

Disabling extensions can help you figure out if an extension is conflicting with HTML5 video playback.

7. Check pre-roll video settings (for Streameast pre-events)

  1. Go to your media upload settings and navigate to the pre-event video section.
  2. Ensure the pre-roll video is still listed in your account.
  3. If it has been deleted, re-upload it to fix the error.

Ensuring the pre-roll video is present and correctly linked can resolve issues specific to video pre-rolls on Streameast.

8. Repair corrupted HTML5 video files

Using a video repair tool can fix corrupted files that refuse to play in HTML5. Such tools will automatically clear any problems with HTML5 video files.

9. Verify encoder settings for Live Streams

  1. Check the Stream URL and Stream Name in your encoder settings.
  2. Ensure login and password are correct if required.
  3. Verify other settings like keyframe interval (2 seconds), frame rate (30 FPS), and ensure H.264 video encoding and AAC audio encoding.

Proper encoder settings ensure that your live streams are properly configured, reducing errors.

10. Contact Streameast support

  1. If none of the above solutions work, reach out to Streameast support for assistance.
  2. Provide details of the error and any troubleshooting steps you have already taken.

Contacting support can provide you with targeted solutions specific to Streameast’s platform.

These solutions should cover a wide range of potential issues causing the Streameast Error Code HTML5, helping you get back to enjoying your videos without interruptions. To avoid future issues, keep your browser updated and clear your cache regularly. In case Streameast doesn’t want to let you use it, you can always use a good Streameast alternative.

In case issue continues, check our full guide on how to fix Streameast not working for more solutions. We also have a guide on how to fix Streameast if it’s not working on Xbox.

If you have any questions or suggestions, feel free to drop them in the comments below.

Microsoft updates its CrowdStrike Recovery Tool with two new options

Following the global tech outage later last week, when over eight million Windows PCs were affected by a CrowdStrike update, Microsoft quickly released a recovery tool. The Redmond-based tech giant has updated the tool with two fresh repair choices to speed up recovery.

Based on user feedback, Microsoft ensured that the CrowdStrike recovery tool now includes a safe boot recovery option, generating an ISO or USB for recovery and fixing issues related to ADK detection and USB disk size check.

A local administrator is also needed for the recovery process. However, if you choose the WinPE mode, this requirement is not necessary. In this case, you only have to manually enter the BitLocker recovery key.

On the other hand, the Safe Mode option can work even without having a BitLocker key. Still, it will ask for an account on your computer with elevated privileges and not connected to any domain or network service provider (local account).

For those in a USB-less world, Microsoft suggests PXE or a reimaging device at the end stage. Before deploying this fix, Microsoft wisely advises testing on some machines first to ensure the path to digital resurrection is clear.

Windows Alt R Not Working: How to Make it Record Again

Windows has a built-in screen recorder, but many reported that the Windows Alt R shortcut is not working. This can make screen recording a bit harder, so let’s see how we can fix this.

What can I do if the Windows Alt R shortcut is not working?

Before we start, make sure that you don’t have any applications running in the background that might interfere with this shortcut.

1. Repair or reset the Xbox Game Bar

  1. Press the Windows key + I to open Settings.
  2. Go to System and select System components.
     system components settings app
  3. Locate the Game Bar. Click the three dots next to it and choose Advanced options.
    game bar advanced options
  4. Click the Repair button and follow the instructions.
  5. If the problem persists, click the Reset button and follow the steps on the screen.
    repair reset game bar app

2. Reinstall Game Bar

  1. Press Windows key + S, type powershell, and then choose Run as administrator.
    run windows powershell as administrator
  2. Run the following command: Get-AppxPackage -PackageTypeFilter Bundle -Name "*Microsoft.XboxGamingOverlay*" | Remove-AppxPackage
    remove gamebar command
  3. Go to the Game Bar download page. This will open the Microsoft Store.
  4. Click on Get and wait for the Game Bar to download.

How to screen record without Windows Alt+R?

  1. Press the Windows key + G to open the Game Bar.
  2. Next, click the Capture button to start recording.
    game bar record button
  3. Tap the same button to stop recording.

We have an entire guide on how to record gameplay on Windows 11, so feel free to check it out for more information.

A few users also reported that the Capture button is grayed out in Game Bar, but we covered that issue in one of our earlier guides.

If you ever encounter issues we have an entire guide dedicated to Game Bar not working, so don’t miss it.

Network Request Stalled for Chrome: 13 Ways to Fix it

Dealing with network request stalled issues in Chrome can be incredibly frustrating, because your server cannot cope with the requests. Fortunately, there are several effective solutions to tackle this problem and ensure a smoother browsing experience.

How do I fix the stalling network request for Chrome?

1. Distribute files across multiple domain names

  1. Distribute static assets like images, CSS, and JavaScript files across different subdomains or servers.
  2. Ensure you configure CORS headers appropriately if necessary.
  3. Update your web application to reference these new paths.

This solution reduces the number of simultaneous connections to a single domain, effectively bypassing the HTTP/1.1 limit on the number of concurrent connections. This can minimize the incidence of requests getting stalled.

2. Use the HTTP/2 protocol

  1. Ensure your server supports HTTP/2.
  2. Configure your server to serve content over HTTP/2.
  3. Test your application to confirm that it utilizes the HTTP/2 protocol.

HTTP/2 allows multiple requests to be multiplexed over a single connection, which significantly reduces stalling compared to HTTP/1.1. This makes your web application faster and more efficient.

3. Bundle resources

  1. Combine multiple JavaScript files into a single bundle.
  2. Do the same for CSS files.
  3. Use build tools like Webpack, Gulp, or Grunt to automate the bundling process.

Bundling reduces the number of requests your web application makes, which can help prevent stalling. This method also minimizes the overhead of establishing multiple connections.

4. Upgrade the server capacity

  1. Check your server logs for errors related to inadequate resources.
  2. Increase the number of worker threads or processes your server can handle.
  3. Optimize server configurations for better performance.

If your server runs out of worker threads, it can cause requests to stall. Ensuring your server has enough capacity can greatly reduce stalling issues.

5. Disable the QUIC protocol in Chrome

  1. Open Chrome and navigate to chrome://flags.
  2. Search for QUIC using the search bar.
  3. Disable the Experimental QUIC protocol setting.
  4. Relaunch Chrome.

If the QUIC protocol is causing issues, disabling it can resolve stalling problems. This protocol is still experimental and might have compatibility issues with certain servers.

6. Avoid unnecessary requests

  1. Use lazy loading for images and other resource-intensive assets.
  2. Implement code splitting to load only necessary scripts initially.
  3. Remove or defer non-critical third-party scripts.

By reducing the number of requests made, you can minimize the chances of stalling. Lazy loading and code splitting ensure that only essential resources are loaded first.

7. Reset the TCP/IP settings

  1. Open Command Prompt as Administrator.
  2. Run the command netsh int ip reset c:\resetlog.txt
  3. Then run ipconfig /flushdns
  4. Restart your computer.

Resetting TCP/IP settings can resolve networking issues that might be causing Chrome to stall. This can especially help after changes to your network setup.

8. Check for IPv6 issues

  1. Test your IPv4 and IPv6 configuration.
  2. Visit https://icmpcheck.popcount.org/ and https://icmpcheckv6.popcount.org/ to run tests.
  3. If IPv6 tests fail, consider disabling IPv6 or fixing the configuration.

IPv6 configuration issues can cause Chrome to stall. Ensuring your IPv6 setup is correct or temporarily disabling it can resolve stalling.

9. Debug using Chrome’s NetLog

  1. Navigate to chrome://net-export/
  2. Start logging network events.
  3. Replicate the issue by browsing pages that stall.
  4. Stop the logging and analyze the .har file using tools like https://netlog-viewer.appspot.com.

Using Chrome’s NetLog can provide detailed insights into network events and help pinpoint the exact cause of stalling, which is vital for more technical troubleshooting.

10. Recreate user profiles

  1. Backup the user’s profile data.
  2. Delete the user profile from the system.
  3. Have the user log in again to create a fresh profile.
  4. Restore the backed-up data if needed.

This can resolve profile-specific issues that may be causing Chrome to stall. A fresh profile can eliminate corrupted settings or configurations.

11. Check and update DNS settings

  1. Open your network adapter settings.
  2. Change your DNS server addresses to use public DNS servers like Google’s (8.8.8.8 and 8.8.4.4).
  3. Apply the changes and restart your computer.

Incorrect DNS settings can cause delays in initial network requests. Using reliable public DNS servers can improve connection speeds and reduce stalling.

12. Disable the keep-alive in fetch API

  1. Locate the code where fetch API is used.
  2. Remove or set keep-alive to false in the request options.

Disabling the keep-alive property in fetch API requests can sometimes resolve stalling issues that occur due to persistent connections.

13. Ensure that there are no multiple parallel fetches

  1. Avoid making multiple fetch requests to the same URL at the same time.
  2. If necessary, disable caching by setting { cache: ‘no-store’ } in the fetch request options.

This prevents fetch requests from stalling due to waiting for the same resource to be fetched.

By following these solutions, you can effectively troubleshoot and resolve stalling issues with network requests in Chrome, ensuring smoother and faster browsing experiences. To prevent future issues, regularly update your browser and server configurations, and monitor your network performance.

Microsoft will retire Azure Lab Services in 2027, and here’s what you can do

Microsoft has decided to retire Azure Lab Services, a development that has caused quite a buzz in the tech world. This platform enables individuals with an Azure subscription to generate labs for different reasons, such as classes, hackathons, training sessions, and simple experimentation with fresh concepts.

However, according to the announcement, the retirement won’t happen right away. Microsoft has given users until June 28, 2027, to move to other services, giving present users enough opportunity to consider other choices.

If you are an existing customer of Azure Lab Services, you can continue to use the service till June 28, 2027. New customers, however, will not be allowed to sign up for the service starting July 15, 2024. We are committed to support you till June 28, 2027 for the service. After this date Azure Lab Services won’t be supported, and you will not have access to your lab accounts, lab plans, or labs.

Microsoft

Microsoft has provided some in-house options for those who are making a decision. Azure Virtual Desktop, Windows 365, Azure DevTest Labs, and Microsoft Dev Box could fill the gap left by Azure Lab Services.

All these selections have unique qualities that may match or surpass what users liked about Azure Lab Services. In cases where what Microsoft offers does not match perfectly, there is a group of third-party substitutions like Apporto, CloudLabs by Spektra Systems, Nerdio Manager for Enterprise (NME), and Skillable.

Microsoft has not completely abandoned its existing users. Although they ceased taking on new subscribers on July 15, if you have been using Azure Lab Services between July 2023 and July 2024, you are regarded as an existing customer.

You can make a fresh lab plan, but opening new lab accounts might be restricted. Microsoft will help these present subscribers until the service is retired.

Moreover, the Azure compute gallery of devoted customers in Azure Lab Services – even images stored there – will remain available after the service is retired. It’s a small comfort for people who like this platform, but it’s better than nothing.

Microsoft’s decision to phase out Azure Lab Services might initially feel intimidating, but it offers an opportunity to investigate fresh and potentially more sophisticated services. Whether you choose to shift towards a different Microsoft service or explore outside solutions, what’s important is to begin thinking about your transition now. The year 2027 will arrive sooner than we expect.

SmartCast Home is Not Available on Vizio TV: Quick Fixes

Dealing with the SmartCast Home not available issue on your Vizio TV can be quite frustrating and it may also come with the NETWORK_ERROR_NAVBAR code on your screen. First, check online to see if Vizio’s servers are down. Usually, you can see downtime announcements on their support page when that happens. Otherwise, Vizio blames this on a slow internet connection, so here’s what to do.

How can I fix the SmartCast Home not available error?

1. Power cycle your Vizio TV

  1. Unplug your TV from the wall socket.
  2. Press and hold the Power button on the TV for 15-30 seconds. This helps discharge any remaining electricity.
  3. Plug the TV back into the wall socket and turn it back on.

Power cycling can help clear any temporary glitches that may be causing issues with SmartCast Home on your Vizio TV.

2. Check your Wi-Fi or internet connection

  1. Go to Menu > Network > Test Connection on your TV.
  2. If the speed is shown as 0 or unavailable, this indicates a problem with your internet connection.
  3. Make sure that the TV is connected to the right hotspot

Ensuring a stable Wi-Fi or internet connection will help SmartCast function properly.

3. Restart your router

  1. Unplug your router from its power source.
  2. Wait for 2 minutes to allow any internal cache to clear.
  3. Plug the router back in and turn it on.

Sometimes, a simple router restart can resolve connectivity issues affecting SmartCast.

4. Check your Wi-Fi password

  1. Go to Menu > Network on your TV.
  2. Retype your Wi-Fi password carefully, ensuring correct capitalization and characters.

Usually, the TV remembers the hotspot login Verifying your Wi-Fi password prevents connection issues due to incorrect login credentials.

5. Refresh SmartCast Home

  1. Go to Menu > System > Menu Language.
  2. Change the language to Spanish or French and wait for SmartCast Home to reload.
  3. Switch back to English.

Refreshing the SmartCast cache can clear minor glitches affecting its performance.

6. Re-enable DHCP settings of your network

  1. Turn off your Vizio TV.
  2. Open a web browser on your computer and log into your router’s settings (URL can usually be found on the router).
  3. Go to the Network Setup or Advanced Setup section.
  4. Find the DHCP settings and ensure it is Enabled. If already enabled, disable and then re-enable it.

Re-enabling DHCP settings can resolve issues caused by incorrect network configurations.

7. Factory reset your Vizio SmartCast TV

  1. Press the Menu button on your TV remote.
  2. Navigate to System > Reset & Admin > Reset TV to Factory Settings.
  3. Confirm and wait for the reset process to complete.

A factory reset will erase all custom settings but can resolve persistent issues with SmartCast Home. It’s a last resort solution, so we hope that you fixed the problem with the previous ones.

Applying these solutions will help you address the SmartCast Home not available issue by addressing potential connectivity problems and clearing software glitches. To prevent future issues, ensure your TV firmware is always up-to-date and maintain a stable internet connection.

If you need more information, you can also access our guide on what to do if SmartCast is not working.

We also have a useful guide that will help you fix the Visio TV remote if it’s not working.

For any other questions and suggestions, feel free to use the comments section right below this post.

How To Screenshot on Google Chrome Effortlessly

Knowing how to screenshot on Google Chrome allows you to capture your screen, save important information, or share something interesting with friends. Chrome offers several methods to capture screenshots, ranging from built-in tools to extensions.

I’ll show you the simplest and most efficient ones below, so let’s get started!

How To Screenshot on Google Chrome

Follow these instructions:

Use Keyboard Shortcuts

Keyboard shortcuts are a quick and efficient way to take screenshots. The method varies slightly depending on your operating system. I’ll use Windows for this example:

  1. Full Screen: Press the Windows key + PrtScn (Print Screen). The screenshot will be saved automatically in the “Screenshots” folder.
Windows key + PrtScn (Print Screen)
  1. Active Window: Press Alt + PrtScn. This captures the active window and saves it to your clipboard. You’ll need an image editor to save the screenshot.
Alt + PrtScn
  1. Selected Area: Press the Windows key + Shift + S. This opens the Snipping Tool, allowing you to select the area you want to capture.
Windows key + Shift + S

Using a Chromebook? Follow our complete guide on how to screenshot on Chromebook for full screen, window, and partial captures.

Use Google Chrome’s Developer Tools

These tools offer a built-in way to capture screenshots. Here’s how to do it:

  1. Tap the three dots on the top right corner of Google Chrome, select More Tools, and click Developer Tools. Alternatively, tap Ctrl + Shift + I.
Developer Tools
  1. Press Ctrl + Shift + P to open Chrome’s developer menu. Type screenshot after Run >
Ctrl + Shift + P
  1. You can select the type of screenshot you want from the options.
Select the type of screenshot
  1. I’ll use the capture area screenshot option.
capture area screenshot
  1. After taking the screenshot, the tool automatically saves it in Downloads. Tap the download icon at the top right of your screen to access it.
screenshot

Use Chrome Flags

Chrome Flags are experimental features you can enable to enhance your browsing experience. One such feature is the “Screenshot” flag. Follow the below steps:

  1. Type chrome://flags into the address bar and press Enter.
  2.  Type “Screenshot” in the search bar. Enable the flags for Desktop Screenshots.
Enable Desktop Screenshots
  1. Click the “Relaunch” button to restart Chrome and apply the changes.
Relaunch Chrome
  1. After relaunching Chrome, tap the three dots in the top right corner, click Save and share, and hit the Screenshot button.
save and share
  1. Select an area you want to capture.
Take screenshot

Use Google Chrome Extensions

Several Chrome add-ons can help you capture screenshots with additional features such as annotations, editing, and cloud storage. Here’s how to use them:

  1. Go to the Chrome Web Store and search for “screenshot extension.”
Google Web Store
  1. Select one of your choice. I’ll use Lightshot for this example. After selecting, tap Add to Chrome.
Add to Chrome
  1. Tap Add Extension if prompted.
Add Extension
  1. Tap on the extension button, select Lightshot, and capture your screen.
Extension button

So, now you know how to screenshot on Google Chrome easily. Whether you prefer the simplicity of keyboard shortcuts or the more advanced features of extensions, Google Chrome provides various options.

On the other hand, if you’re having trouble with Chrome capturing your screen, or would like to take screenshots in Incognito mode, we can help you out! You can also learn how to create shortcuts to your favorite websites.

Microsoft will end support for .NET6 in November

Microsoft revealed that .NET 6 will be deprecated on November 12th, 2024. This date signifies the end of a free, open-source developer platform that was first introduced during February’s preview version and officially launched in November of the same year.

This particular date is important not only because it signifies “the end” when we talk about .NET 6 but also because it is when Microsoft has its monthly Patch Tuesday updates—hinting at one last update if critical issues are found before then.

The support for .NET 6, released under Microsoft’s Long-Term Support (LTS) time frame, lasted for three years. In a blog post, Microsoft says that after November 12th, even though applications made using .NET 6 will keep working fine, they will be entering a future without new updates—this could potentially make them more susceptible to security risks.

Additionally, the usual technical assistance might no longer be accessible. If developers are utilizing Visual Studio, they can anticipate having “gold bar” cautionary messages appear when targeting .NET 6 after support ends.

After .NET 6, Microsoft quickly presented the next version, .NET 7. However, it had a shorter support time and reached the end of support in May 2024. Now, Microsoft is slowly pushing developers towards .NET 8, which was released in November 2023 as the main version for their applications. People who use apps built on .NET 6 are advised to contact developers or vendors to request upgrades to .NET 8 for ongoing assistance and protection.

Regarding the future, Microsoft is not simply stopping at this point. The preview edition of .NET 9 premiered in February 2024, and an official release is planned for November 2024.

This notice is a very important message for developers and organizations still using .NET 6: They need to move on to newer versions to prevent possible security problems and utilize new characteristics and enhancements.
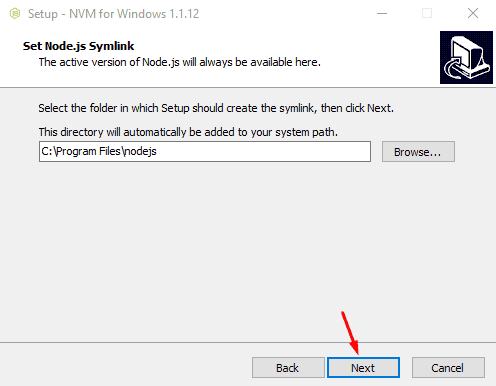
CrowdStrike’s cybersecurity issues were swiftly tailored to support cyberattacks by dangerous threat actors

In the recent whirlwind of digital chaos, cybercriminals seized a golden opportunity to prey on the confusion surrounding a problematic update released by cybersecurity giant CrowdStrike.

Unfortunately, this update, intended for the Falcon Sensor agent on Windows, led to a massive disruption. Imagine banks, airlines, and media outlets, among others, find their operations in a tailspin as nearly 8.5 million Windows PCs were caught in an endless loop of reboots, displaying the dreaded Blue Screen of Death (BSOD) errors.

CrowdStrike and Microsoft swiftly stepped in, offering guidance to help affected customers recover their systems. But here’s where it gets even more intriguing.

While the tech world was busy patching things up, cybercriminals launched a cunning attack. They distributed a malicious ZIP archive, cunningly named crowdstrike-hotfix.zip, which was anything but a solution.

In a blog post, CrowdStrike says this archive was laced with a HijackLoader payload that ultimately loaded RemCos, a notorious piece of malware. Given the Spanish filenames and instructions within the ZIP archive, this attack seems particularly aimed at Latin America-based CrowdStrike customers.

But the cybercriminals didn’t stop there. They also embarked on phishing campaigns, impersonating CrowdStrike cybersecurity support through emails and phone calls. They even sold fake scripts to automate recovery from the update issue.

CrowdStrike has since issued warnings, advising customers to only communicate through official channels and adhere to the guidance provided by both CrowdStrike and Microsoft. For its part, Microsoft has updated its guide to offer an automated recovery method involving recovery drives.

Despite these efforts, the persistence of phishing and malware campaigns is a stark reminder of cybercriminals’ relentless pursuit of exploiting any situation to their advantage.

IT managers are advised to always verify the sources of any software updates or fixes, especially after widespread technical issues. Cybercriminals are always looking for opportunities to exploit chaos, and a critical eye can be the difference between safety and compromise.

Unpinned Apps Keep Coming Back on Windows 11: How to Stop it

Many users remove the default apps from the Taskbar, however, some complain that unpinned apps keep coming back on Windows 11, so today we’re going to show you how to fix this issue.

Why can’t I unpin an app from the Taskbar?

This can happen if there’s a problem with your profile, specifically with the DefaultLayouts file.

What can I do if unpinned apps keep coming back on Windows 11?

Edit DefaultLayouts file

  1. Press the Windows key + R, paste the following and press Enter: %localappdata%\Microsoft\Windows\Shell\
     windows shell run dialog
  2. When a new window opens, locate the DefaultLayouts file, right-click it and choose Edit with Notepad.
    edit in notepad
  3. When Notepad opens, press Ctrl + F and search for taskbar:TaskbarPinList.
    taskbar pin list find in notepad
  4. Remove apps that you don’t want between the following lines: <taskbar: TaskbarPinList> </taskbar:TaskbarPinList>
    taskbarpinlist remove
  5. Save changes and restart your PC.

As you can see, you can easily fix the problem with unpinned apps if they keep coming back on Windows 11. However, covered a similar issue where users reported that they can’t unpin items from Taskbar, so don’t miss it.

To learn more about pinning, we have a great guide on how to pin apps to the Start Menu in Windows 11 as well as an article on how to hide running apps from Taskbar, so don’t hesitate to check them out to learn more.

PCI Express Root Port Error: 7 Tested Ways to Fix

Dealing with PCI Express Root Port errors can be a real headache, especially when they disrupt your workflow or gaming sessions. This issue can be caused by a lot of problems, from a malfunctioning driver to hardware failure, but we have the right solutions to troubleshoot and fix it.

How do I fix the PCI Express Root Port error?

1. Update the PCI Express Root Port driver

  1. Press Win + X and select Device Manager from the menu.
  2. Expand the System devices category, and find entries named something like PCI Express Root Port or similar.
  3. Right-click on each PCI Express Root Port entry and select Update driver.
  4. Choose Browse my computer for drivers.
  5. Select Let me pick from a list of available drivers on my computer.
  6. Choose PCI Express Standard Root Port and click Next to install it.

Updating the driver ensures you have the most compatible drivers, which can resolve conflicts and errors related to the PCI Express Root Port. You may also try to select Uninstall device instead of updating, then restart your PC. The system will find and install a suitable driver.

2. Change the BIOS settings

  1. Restart your computer and repeatedly press the key (often Del, F2, F12, or Esc) to enter the BIOS setup.
  2. Use the arrow keys to navigate to the section related to PCI settings. This might be under Advanced or Chipset configurations, depending on your BIOS.
  3. Find PCIe Link Speed or CPU PCIe Link Speed and switch the setting from Auto to Gen3.
  4. Press the key to save changes (usually F10) and exit the BIOS.

Changing the PCIe Link Speed to Gen3 can resolve issues caused by incompatibilities or instabilities with Gen4 settings.

3. Disable PCI Express Native Power Management

  1. Restart your computer and enter the BIOS setup just like in the previous solution.
  2. Navigate to the section related to power management.
  3. Locate PCI Express Native Power Management and disable it.
  4. Save the changes and exit the BIOS setup (often it’s the F10 key).

Disabling PCI Express Native Power Management can prevent the system from entering low-power states that might cause errors.

4. Check and reconnect the hardware

Note icon NOTE
Apply this solution only if you don’t have the risk of voiding the warranty of the machine and have the necessary tools and skills.
  1. Shut down your computer and unplug it from the power source.
  2. Carefully open your computer case to access the hardware components.
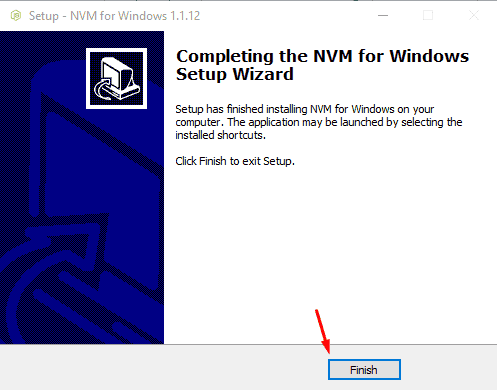
  3. Remove and then firmly reinsert your graphics card, RAM, and any other PCIe devices.
  4. Ensure all power cables and connections are secure.
  5. Close the computer case, plug in the power, and restart the computer.

Reseating components and securing connections can resolve issues caused by loose or improper connections.

5. Reinstall or update the chipset drivers

  1. Visit your motherboard manufacturer’s website and download the latest chipset drivers.
  2. Run the downloaded installer and follow the on-screen instructions to install the latest drivers.
  3. After the installation is complete, restart your computer.

Updating chipset drivers ensures that all components communicate effectively, minimizing conflicts and errors.

6. Use PowerShell to identify problematic devices

  1. Press Win + X and select Windows PowerShell (Admin). If it’s not on the list, you can use the Search tool to find it.
  2. Enter the command to list all devices within the System class: pnputil /enum-devices /class System
  3. Look for the device with the specific hardware ID that matches the error logs, such as PCI\\VEN_8086&DEV_….
  4. Note the problematic device and update or reinstall its driver as needed.

Using PowerShell helps you pinpoint the exact device causing the error, allowing for targeted troubleshooting.

7. Replace the hardware if necessary

  1. Based on error logs and troubleshooting, determine if a specific hardware component (like an SSD or GPU) is likely faulty.
  2. If possible, replace the suspected faulty component with a known working one.
  3. Monitor the system to see if the errors persist.
  4. If replacing the component resolves the issue, consider making this a permanent change.

Sometimes, the root cause is a hardware failure, and replacing the faulty component is the only solution.

By following these steps, you should be able to resolve most PCI Express Root Port errors. To avoid future issues, keep your drivers up to date and regularly check your hardware connections.

While we are at PCI driver issues, check out the highlighted guide if the Device PCI Requires Further Installation.

If you have any other questions or suggestions, leave them in the comments below.

CrowdStrike releases a Remediation and Guidance Hub for the Windows PCs’ BSOD issues

Did you experience the frightening blue screen of death (BSOD) on your Windows PC? Many businesses and enterprises were gazing at this disturbing screen due to an update problem with CrowdStrike Falcon sensor software: over 8 million Windows PCs were affected, and many departments, from healthcare sectors to airports and banks, experienced the issue.

The problem made BSODs show up with the error message “csagent.sys (PAGE_FAULT_IN_NONEPAGED_AREA). ” CrowdStrike, a company famous for its endpoint security solutions that prevent malware and cyberattacks, teamed up with Microsoft to react promptly to this worldwide blackout.

Microsoft and CrowdStrike continue to work on resolving the issue. They have issued guidance and tools that can assist IT and system admins get systems back online. Microsoft has made a Recovery Tool available, while CrowdStrike has put up a “Remediation and Guidance Hub” on its website.

This hub is a gold mine of information about how to find out which hosts are affected, fix problems, and retrieve lost Bitlocker keys. It’s the place where admins can go for answers.

Now, for those who are not so technical. If your system functions as it should, there will be no direct effect on your protection with the Falcon sensor in place.

Both companies have stressed that they have found the problem, limited its impact, and applied a solution. Crucially, this was not caused by a cyberattack. It is a small comfort amid chaos.

For those affected, it is straightforward what to do. You should check if this issue impacts your hosts, follow the remediation steps, and watch for more updates on official channels.

Meanwhile, CrowdStrike’s CEO has apologized and assured customers that they will work hard to solve the incident while remaining transparent during this period.

Microsoft releases recovery tool for the PCs affected by the CrowdStrike outage issues

Microsoft is introducing a fresh tool to address an issue causing blue screens of death (BSOD) on Windows PCs. This problem, caused by a CrowdStrike outage, had affected over 8 million Windows PCs globally.

In a blog post, Microsoft says the tool works as a recovery wizard that can help automate fixing those PCs affected by the CrowdStrike outage. You must have another working PC with 64-bit Windows and a minimum RAM of 8GB to use it. You also require a USB drive with at least 1 GB of storage and administrative rights on the system being fixed; for systems that use BitLocker encryption, you must possess BitLocker recovery keys, too.

The main concept behind this recovery tool is to generate a bootable USB drive that, when booting up the system experiencing issues, will automatically apply required fixes and execute issue-remediation scripts as recommended by CrowdStrike.

You must get the Microsoft Recovery Tool from the Microsoft Download Center. Then, after you extract the PowerShell script in the downloaded solution, run it from an elevated PowerShell prompt. The process goes through a few stages. You can choose the driver directory for image import, but often, you don’t need to do this. When the USB creation is finished, it’s time to use it on your system and follow the boot instructions. If BitLocker is turned on, you will be asked about the recovery key.

The tool is not only a blessing for IT admins who are already struggling with an overwhelming number of systems showing BSOD, but it also simplifies the process. The official guide presents the process in straightforward steps that everyone can comprehend, ensuring that even people without much technical knowledge can handle the recovery process effortlessly.

This new recovery tool from Microsoft is a more permanent solution to the CrowdStrike outage issues. Right after the outage, some Windows users quickly devised temporary fixes for the issue, which seemed to work, but they were too much to handle, even for IT managers. However, this new solution is easier to implement.