Microsoft announces Teams Webinars – HubSpot integration for better marketing strategies

In the fast-paced realm of digital marketing and online events, an innovative partnership is destined to transform how organizations engage with their audience. Picture the might of Microsoft Teams webinars smoothly merged with HubSpot’s marketing automation.

Yes, it is possible! This update isn’t a regular one. According to the latest blog post, it’s like a game-changer for Teams webinar customers who want to find new methods for improving their marketing methods and handling leads.

In today’s rapidly evolving digital landscape, organizations are constantly seeking innovative solutions to enhance their marketing strategies and lead management processes. The integration of HubSpot with Microsoft Teams webinars represents a significant new advancement in this domain for Teams webinar customers, offering a seamless blend of lead scoring and marketing automation capabilities that cater to the dynamic needs of our combined customers. 

Microsoft

The center of this union is the fresh Microsoft Teams webinar APIs in Microsoft Graph. HubSpot, a powerful name in B2B marketing automation, has recently enhanced lead scoring and prioritization.

This indicates that sales teams can easily identify and interact with potential high-value customers. The Teams webinar connector is the secret tool; it allows data to move easily into HubSpot and improves lead qualification by including in-depth details about webinar involvement.

So, what is the significance for your organization? It’s about changing marketing events into powerful resources for producing leads and involving customers. With the help of event data from Teams webinars, businesses can create tailored marketing plans that ring with their viewership.

This will result in conversions like never seen before. The connection between webinar registration and attendance details with HubSpot marketing events brings a new level of contact segmentation.

Therefore, how can you join this movement? If you have been making webinars in Microsoft Teams, the time of finding it hard to import webinar details into HubSpot is finished. Now, with just a few clicks, syncing webinar events and activity data becomes simple and helps centralize your marketing work, make new contacts possible, and start customer outreach based on data.

The setup is simple and direct. All you need to do is link HubSpot with Microsoft Teams, and then it’s time to sync your webinars. Just like that, the power of HubSpot turns every webinar into a marketing event loaded with valuable data – ready for action. But if you don’t want that, you can always enable the option to stop attendees from sharing your webinars on their socials.

It’s not only about making things simpler for marketers. This is about increasing income by aiming precisely and cultivating leads.

The feature allowing one to view event-level information in HubSpot, such as the number of people who registered, those who attended, and cancellations made afterward, is crucial for businesses to deliver personal experiences that engage the audience and encourage genuine interactions.

Combining Microsoft Teams webinars and HubSpot’s marketing automation platform goes beyond a simple technical change. It becomes a competitive edge for businesses. When webinar data gets smoothly synced, organizations can use focused marketing methods based on information to improve lead creation and customer connection.

You could earn money by clicking on a Banana on Steam

In a world where video games are praised for their complexity and deep narratives, a surprisingly basic game has become the second-most-played title on Steam. Banana, which centers around clicking on bananas, is only surpassed in popularity by Counter-Strike 2.

This free game from Sky publisher has gathered an amazing number of players; it reached its highest number at once, with 858,915 people playing simultaneously.

The game’s idea is simple: you click on a banana repeatedly, gather many bananas, and might even trade or sell unusual ones using the Steam market. Due to its basic nature, Banana has become quite popular – it’s now competing with old favorites on Steam’s leaderboard.

What is interesting about Banana is the game itself and the community it has created. People are attracted to this simple game, using it for stress relief or as a casual activity while doing other things.

How rare banana skins can be produced and sold on the Steam Community Market for actual funds adds another element of strategy and benefit to the experience. A few of these uncommon skins have been sold for $500, converting a basic clicker game into a possible money-earner.

So, forget Microsoft Rewards. You can endlessly click on a Banana for hours, and you can earn some good money in a short amount of time.

Banana’s rise proves the unpredictable direction that gaming trends can take. It questions the idea that complexity and high production values are conditions for success. Instead, Banana’s triumph shows how a plain idea, when done nicely, can connect with many people.

The reason for its fame is not temporary but shows the variety of likes and choices in the gaming world. At present, Banana is more than a game where you click on a fruit; it has become an unexpected cultural event within this industry.

If you’ve been having issues with Windows 10 crashing when selecting the Open with option, you’re not alone

Have you ever experienced a situation where you right-click on an app icon, but instead of displaying the normal list of options, a peculiar “Open With” dialogue box appears in Windows 10?

If this has happened to you and your system is running the operating system with recent updates installed, rest assured that it’s not just happening to you. This peculiar issue is tied to the KB5036979 and KB5037768 updates for versions 22H2 and 21H2 of Windows 10, impacting users utilizing the New Teams and New Outlook.

Microsoft has recognized this bug. It appears to happen after the previous updates, resulting in a small issue where users face difficulty accessing the right-click context menu for these applications from the Start menu or Taskbar.

When attempting to right-click on the New Teams or New Outlook icons, it is similar to expecting options such as “Open,” “Run as administrator,” or “Unpin from the taskbar.”

Instead, you are asked how you want to open this file. It is like planning to make a swift coffee, and your coffee machine now inquires which beans you want to plant. Microsoft’s Windows health dashboard has verified this problem, stating that it is not only limited to these apps but possibly impacts others.

The relief? Microsoft is handling it. They suggest a temporary solution that requires you to manually move across the application’s interface to accomplish desired tasks, which feels similar to taking the scenic route back home. But hey, there is a path! They also assure a resolution in the next release, so hope is finally visible.

The good news is that the necessary fix has already been identified and prepared and will ship in a future update for Windows 10 22H2 soon. 

Microsoft

For Teams users, there’s a little more help. Corbin Meek, a Senior Supportability Program Manager for Teams and Skype for Business at Microsoft, has offered advice on how to solve problems with Teams. It gives some comfort: the issue isn’t very big, but still annoying.

So, what do we learn from this? You are not alone if you are confused about why your right-click doesn’t work as it should on New Teams or New Outlook.

Microsoft knows about the issue and is trying to solve it. Have you been dealing with the Open with issue in Windows 10? Let us know your experience with it.

Arc Browser Developer Tools – Can You Use It for Your Projects?

If you want to learn more about Arc browser developer tools and how they can benefit you, you’ve come to the right place.

Your web browser application is equally important as your IDE if you’re a website and web app developer. It allows you to visualize, improve, test, debug, and review your codes. Your browser should allow advanced developer integrations, extensions, and code optimization features.

So, if you’ve been using Google Chrome or Mozilla Firefox for website development and you’re looking for a change, check out Arc browser. I’ll cover its developer tools and capabilities so you can see if it fits your needs. Ready?

What Is Arc Browser Developer Mode?

Arc Developer Mode offers various tools for website and app development projects.

This mode transforms the selected tab entirely by adding new UI elements, assistive tools for website development, a full-length website address bar, a screenshotting tool, etc. It also automatically enables the JSON Formatter extension so you can review website codes efficiently.

What Is Arc Browser Developer Mode

Moreover, Arc browser includes a dedicated Developer mode for browser extensions. You can test your custom add-ons without switching to a different browser. You can load unpacked add-ons, pack them, and more.

Developer mode for extensions

In a nutshell, Development mode removes the bottlenecks of frontend development by covering all the necessary features in one app.

On a Mac computer, you can enjoy all the features of Arc browser developer tools. However, if you’re using a Windows 11 PC, the following functionalities won’t be available:

  • Full URL
  • Portrait Mode
  • Capture a Portion
  • Boost
  • Arc Max AI.

How To Enable Arc Browser Developer Tools in Mac

You must enable Developer Mode to get access to the tools for each tab individually:

  1. Click on the Site Settings icon in the URL Bar, located above the sidebar.
site settings bar
  1. Select the Developer Mode setting in the context menu to enable the feature.
  2. A blue address bar will appear at the top of the website tab.
view of developer mode

If you’d like to use Arc browser commands, press Command + T on the browser interface and type Developer in the Arc Command Bar. Now, click on the Turn on Developer Mode command.

developer mode with commands

How To Enable Arc Browser Developer Tools in Windows 11

  1. Click on the Arc Settings icon in the top-right corner.
  2. Hover the cursor over the Developer menu.
Arc Browser Developer Tools in Windows 11
  1. Choose the developer tool you need from the overflow context menu, as outlined below:
    • View Source
    • Developer
    • Inspect Elements
    • JavaScript Console
    • Network Inspector.

Standout Arc Browser Developer Features and Tools

Here are some must-have tools you should know about:

Full URL Address Bar

Developer Mode in Arc offers a full-size URL bar across the top of your window. This makes it easy to see long website addresses. Also, you can navigate complex URLs with ease. No more squinting or mistyping!

Full URL Address Bar

Capture in Portrait Mode

Arc lets you capture website screenshots in two ways in dev projects. The first one is the Capture in Portrait Mode which allows you to grab a full-page screenshot. It’s perfect for sharing website layouts or saving long articles for later.

Capture in Portrait Mode

Capture a Portion

You can also use the Capture a Portion feature. Simply select the area you want and Arc saves it as an image – ideal for grabbing code snippets or specific visuals.

Capture a Portion

Toggle Console

Do you want to see the code behind a website? Use the Toggle Console feature to bring up a developer console with website codes. It allows you to view error messages, run JavaScript code, and interact with the web page’s background code.

Toggle Console

Toggle Network Panel

Are you curious about how fast a page loads? The Toggle Network Panel displays information about all the files a website uses. It helps you to pinpoint the bottlenecks so you can optimize loading times.

Moreover, you can use this developer tool to get a sneak peek into competitors’ websites that load faster than yours and compare strategies.

Network Panel

Inspect Element

Do you ever wonder what font a website uses, or how to change a button color? Arc’s Inspect Element lets you hover over any part of a webpage to see the HTML and CSS code behind it. You can even make temporary changes to the code and see the effects live in the browser.

Inspect Element

Split View

For a truly immersive experience, you can use the Split View feature.

Split View

For example, in the following image, I’m reviewing the underlying code of the Google Maps app side by side with the Google Maps portal. This split view makes it easy to see how changes in the code translate to visual changes on the webpage.

What Is Arc Browser Developer Mode

Boost

Boost is a visual method to customize the graphical and textual website elements for multiple editions for fun or a client review. You can save the customized view of a website so you can share it with collaborators. However, the actual website won’t change.

Boost includes a smart color wheel so you can change the shades. For color editing, there are additional controls, like Invert lightness, Advanced color controls, and Reset to original colors. It also makes font customization easy. You can pick a typeface from 20 choices and edit the font Size and Case.

Arc Boost

To delete elements and content from a website for A/B testing purposes, you can use the Zap feature. It creates a visual and interactive layer on the existing website so you can remove things with a simple click.

Explain or Complete Codes With AI

If you’ve activated Arc Max you can use the Arc browser ChatGPT integration to ask questions. Also, you can use AI to write codes from scratch or auto-complete scripts you optimize in the Console, Network Panel, and Inspect Element.

For example, I’ve copied a short segment of the underlying HTML script for Google Maps.

ask chatgpt 1

Then, I used the Ask ChatGPT feature to learn more about it. I could see the Console, the visual website, and explanations.

ask chatgpt 2

Arc Browser Developer Mode vs. Google Chrome & Firefox

I’ve compared the Arc browser developer tools with Firefox and Chrome by testing experimental development projects. With first-hand practical experience with these three browsers, I’m outlining Arc’s advantages and disadvantages for website development:

Pros

FeatureArc Developer Mode (Chromium)Google ChromeFirefox
SpeedFast & efficient, just like ChromeVery fastFast
PrivacyBuilt-in ad & tracker blockerExtensions neededExtensions needed
Level of CustomizationExtensive UI customizationHighHigh
WorkspacesAllows multiple workspaces through Arc SpacesNot available as a native feature, extensions neededNot available as a native feature, extensions needed
Tab ManagementPuts tabs to sleep for efficiency of memory and CPUReduces resource usage when tabs are inactive but not as efficiently as Arc; Tab Groups feature availableYou can manually unload inactive tabs; color-coded containers for tab management
Source Code AccessOpen source for contribution or inspection through the Chromium projectGoogle has licensed Chrome as a proprietary freeware app; You can’t access its source codeAvailable for the public
Access to Chrome Web StoreComplete access to Chrome extensionsBuilt-in accessLimited access

Cons

FeatureArc Developer Mode (Chromium)Google ChromeFirefox
Full URL ViewYou’ll have to activate Development Mode individually for separate tabs; needs manual interventionEasy accessEasy access
Dev Tools AccessYou must first activate Developer Mode Native access to all development toolsNative access to all development tools
Access to FeaturesMight lack some Chrome DevTools featuresFull accessFull access
StatusA newcomer with potential bugs for custom development projectsWell-established development toolsWell-established development tools

Moreover, if you’re wondering how it competes with Opera, look no further.

Summary

According to my evaluations, the Arc browser developer tools can handle high-profile website and app development projects.

If the article helped you to switch to Arc for advanced development needs, give a shout-out in the comments below!

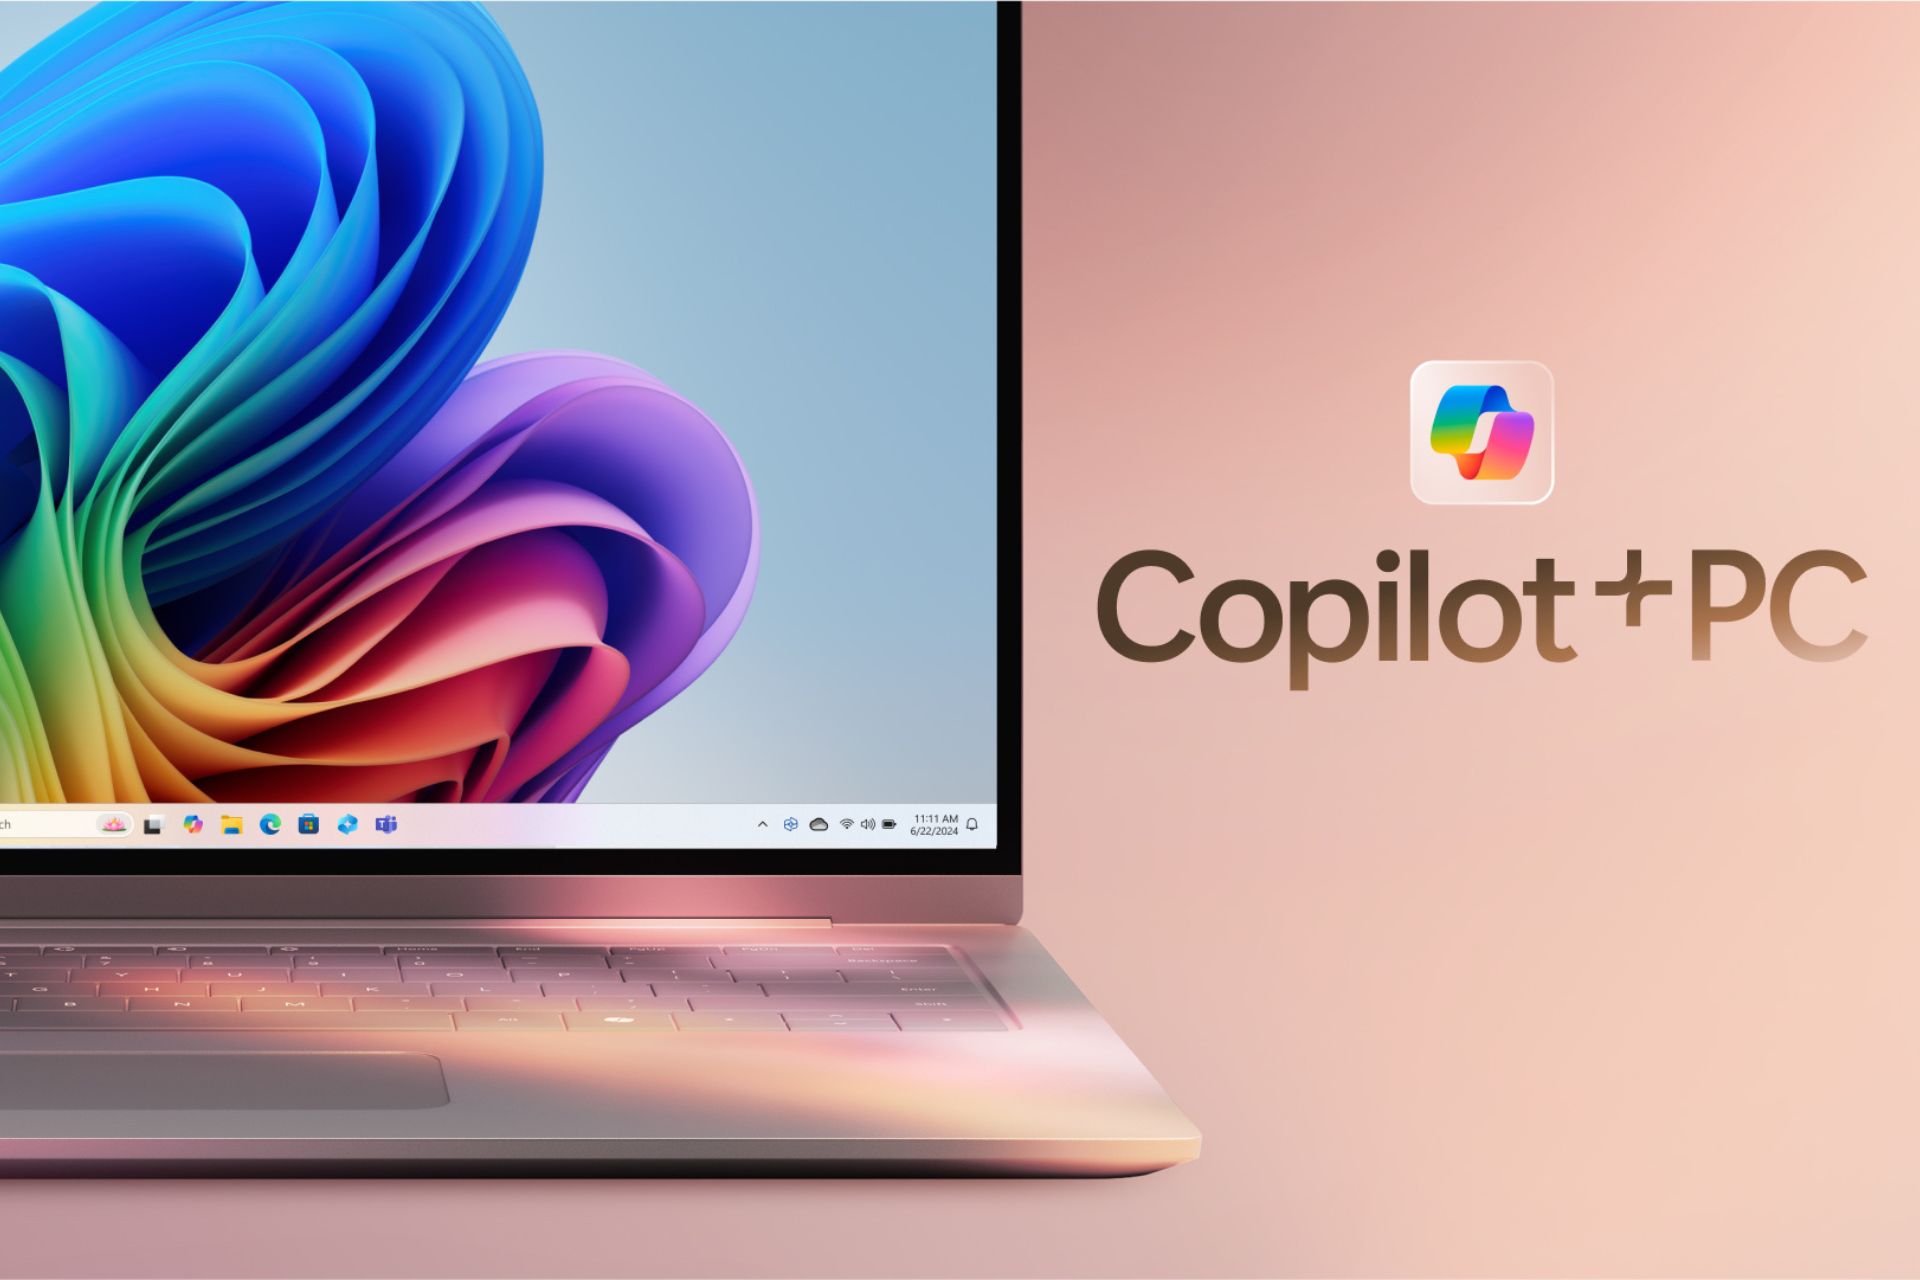
Copilot+ PCs might be doomed to fail, ultimately

Microsoft was sailing smoothly in the fast-paced realm of technology but soon entered a storm. Only one month back, the tech giant appeared unbeatable with an upcoming vision for Windows that pledged innovation and thrill. 

However, the excitement shifted when worries about its Copilot+ PCs’ AI features and legal issues with Qualcomm emerged, clouding their debut.

The Recall feature of Microsoft’s AI was a plan to change how we communicate with our PCs, creating a search that could access every app and website visited. It sounds convenient, but one thing: having a computer that knows all your activities is creepy and makes people worry about privacy and safety. 

The situation became more serious when it was discovered that accessing all the data collected by Recall wasn’t tricky. Because of this, Microsoft made Recall an opt-in feature instead of automatic. However, this action couldn’t undo what happened, and trust in Microsoft’s dedication to security was disrupted.

Microsoft’s move to Arm, strengthened by Qualcomm’s Snapdragon X chips, became very important for the Copilot+ PCs. But Arm’s case against Qualcomm, which involved license problems, put everything at risk of being stopped completely. The disagreement, which has been going on for over a year, might postpone or even stop the release of these eagerly expected gadgets.

But despite all these hurdles, Microsoft’s aspiration for the Copilot+ PCs was clear. They wanted to combine the strength of AI with the effectiveness of Arm-based chips for a fresh era in laptops. 

The ability to do tasks like live translation and Cocreator Paint suggested the many things these PCs could do, not only the limited by their Recall function, which caused disagreement among us.

But we should not overlook the competition. Apple, a competitor for quite some time, has recently made big announcements about AI. They talk much about security and privacy – their stock value exceeded that of Microsoft at one point! These events have increased the urgency for Microsoft to tackle its problems head-on and rebuild trust in its roadmap for computing’s future. I’m going to mention some competitive elements. 

Apple is a rival that has lately announced significant things regarding AI as well; they are focusing on safety and private matters very much—at one point, surpassing even Microsoft in terms of stock value! These occurrences have amplified Microsoft’s need for action to address its problems and restore belief in what it envisions as computing’s future roadmap.

The story of Copilot+ PCs reflects technology’s uncertainties and ups and downs. It also shows how persistence in innovation can eventually pay off. Now, we will observe Microsoft’s path through these stormy waters and what comes next for its big project.

Services.msc Has Been Blocked For Your Protection: Easy Fix

When you try to restart Windows services, you may see the error services msc has been blocked for your protection.

This happens when security measures prevent you from opening the Services Manager. Common causes include missing administrative privileges, your system administrator setting policies to prevent installation, high UAC settings, strict Group Policy rules, or an overprotective antivirus. For more details on accessing it, see how to open services.msc.

What can I do if services.msc has been blocked for your protection message appears?

1. Run services.msc as admin

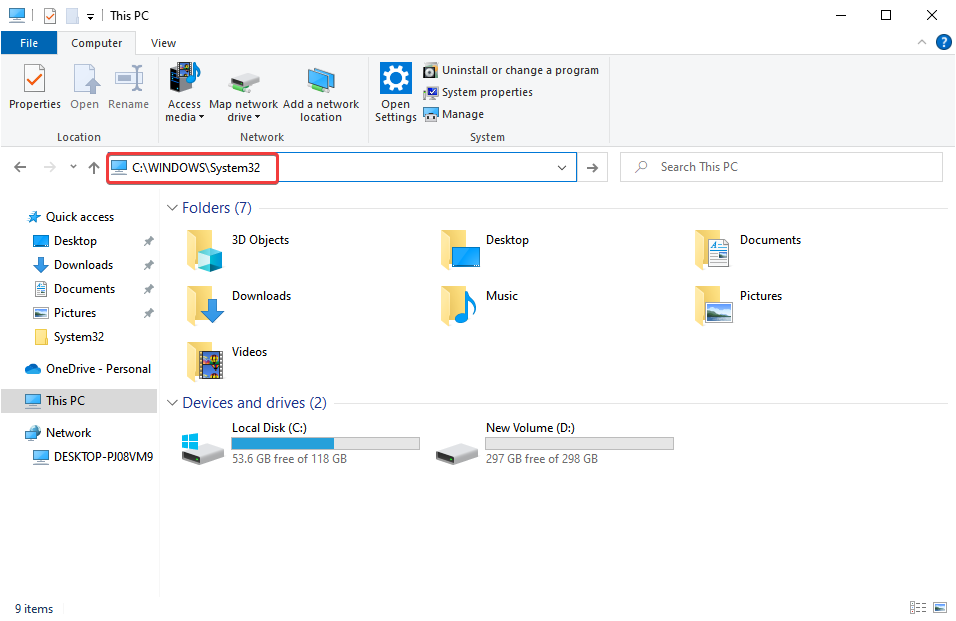
  1. Press Windows + E to open File Explorer, paste the following path in the address bar, and hit Enter:C:\WINDOWS\System32path
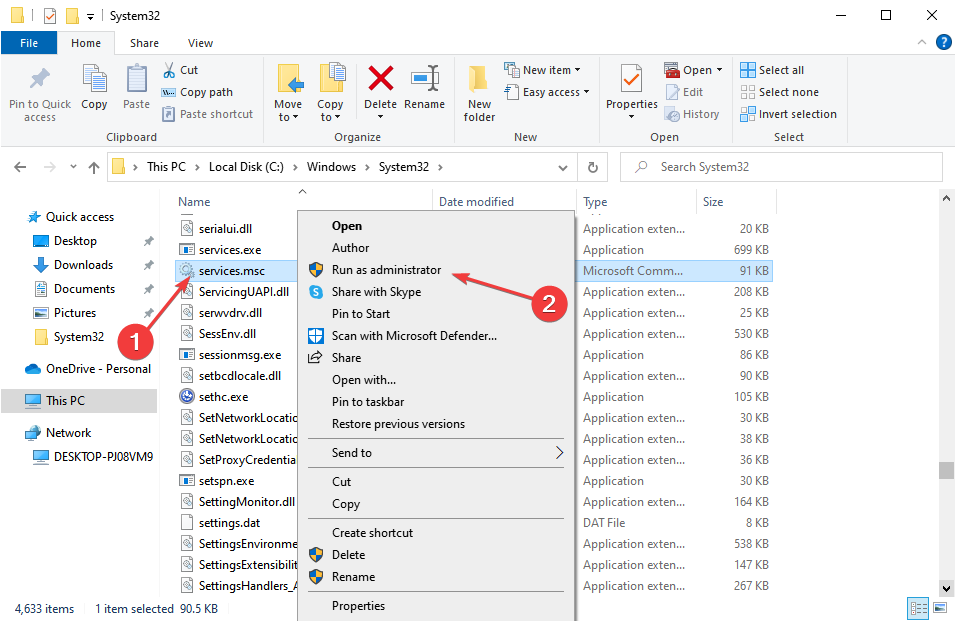
  2. Right-click on the services.msc file, and select Run as administrator.services.msc
  3. If you are still getting the services.msc has been blocked for your protection message, try to force activate your admin account.
  4. Hit the Windows key, type cmd in the search bar, and click Run as administrator.cmd-run-admin-w11 unexpected kernel mode trap windows 11
  5. Type the following command and hit Enter: net user administrator /active:yes

In case Run as administrator is not working, you’ll need to address this issue first.

2. Disable your antivirus temporarily 

  1. Hit the Start menu icon, type Windows Security in the search bar and click Open.
  2. Click on Firewall & network protection, then select Public network.league of legends black screen after champion select
  3. Locate Microsoft Defender Firewall and toggle the off button.turning off Microsoft Defender Firewall Windows

3. Disable UAC settings

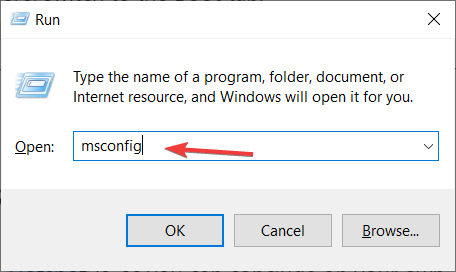
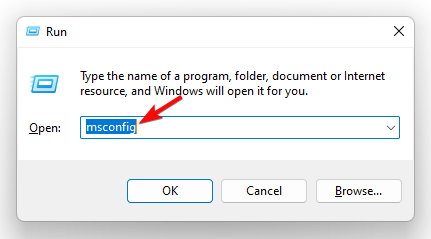
  1. Press the Win + R keys to launch the Run console. Then type msconfig in the search bar and hit Enter to open the System Configuration window.
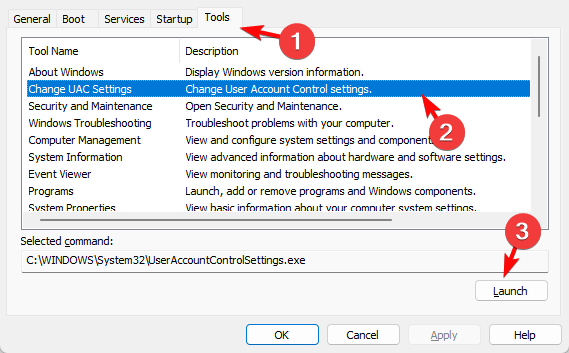
  2. Next, go to the Tools tab in the System Configuration window, select Change UAC Settings, and press Launch.Change UAC Settings
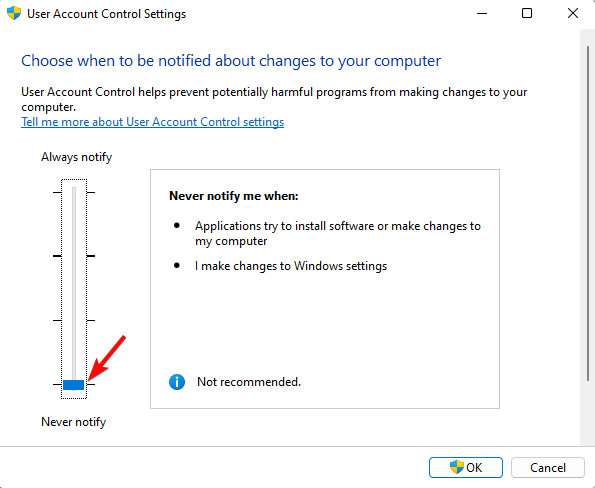
  3. This will open the User Account Control Settings window. Here, move the slider on the left to Never notify, and press OK to save the changes.set UAC to never notify

4. Scan for viruses

  1. Press the Windows key, search Windows Security, and click Open.
  2. Select Virus & threat protection.
  3. Next, press Quick scan under Current threats.
  4. If you don’t find any threats, proceed to perform a full scan by clicking on Scan options just below Quick scan.Scan options
  5. Click on Full scan, then Scan now to perform a deep scan of your PC.Full Scan Scan Now
  6. Wait for the process to finish and restart your system.

An excellent tool for this task is TotalAV. With this software, you can run a more comprehensive scan and better identify any threats that might affect your Services.msc.

5. Adjust Group Policy Settings

  1. Press the Windows key + R, type gpedit.msc, and click OK.
    gpedit
  2. Navigate to Computer Configuration > Windows Settings > Security Settings > Local Policies > Security Options.
  3. In the right pane, double click on User Account Control: Run all administrators in Admin Approval Mode.
    Your system administrator has blocked this program Avast
  4. When the Properties window opens, select Disabled and click on Apply and OK to save changes.
    Your administrator has blocked this application because it potentially poses a security risk

6. Tweak your registry settings

  1. Before you edit the registry, ensure you have a backup or create a restore point to cushion your device from any catastrophic failures.
  2. Type regedit in the Run text box and click OK.regedit command run window
  3. Then browse to the path below in the left pane: HKEY_LOCAL_MACHINE\SOFTWARE\Microsoft\Windows\CurrentVersion\Policies\System
  4. Select the System key on the left of the window.
  5. Double-click the EnableLUA DWORD in the right pane.
    enable lua
  6. Set the Value data to 0, and click the OK button.Your system administrator has blocked this program AVG

The EnableLua key is enabled by default which means you’ll be prompted whenever Windows needs consent for performing administrative functions. By disabling it, you may be able to circumvent the issue of services.msc has been blocked for your protection error.

However, note that disabling it exposes your PC to security risks.

7. Create a new user profile

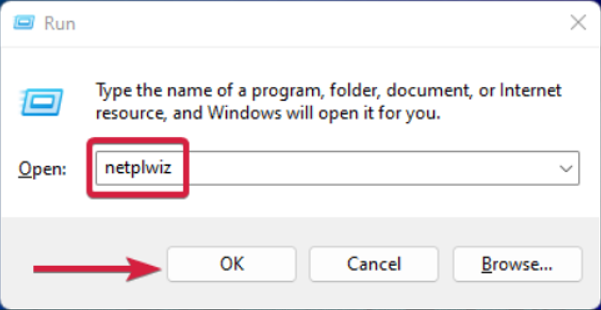
  1. Press Windows + R to launch the Run console, enter netplwiz in the text field, and click OK.
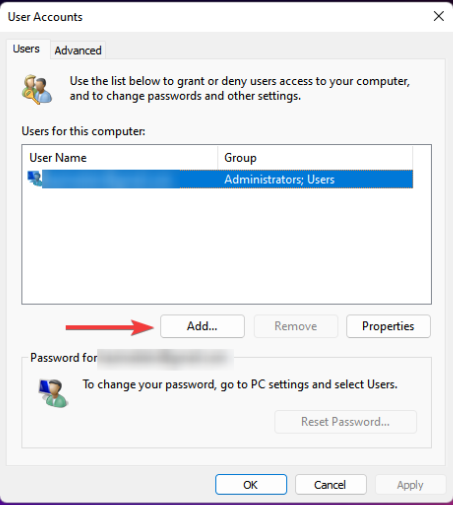
  2. Click Add in the User Accounts window.
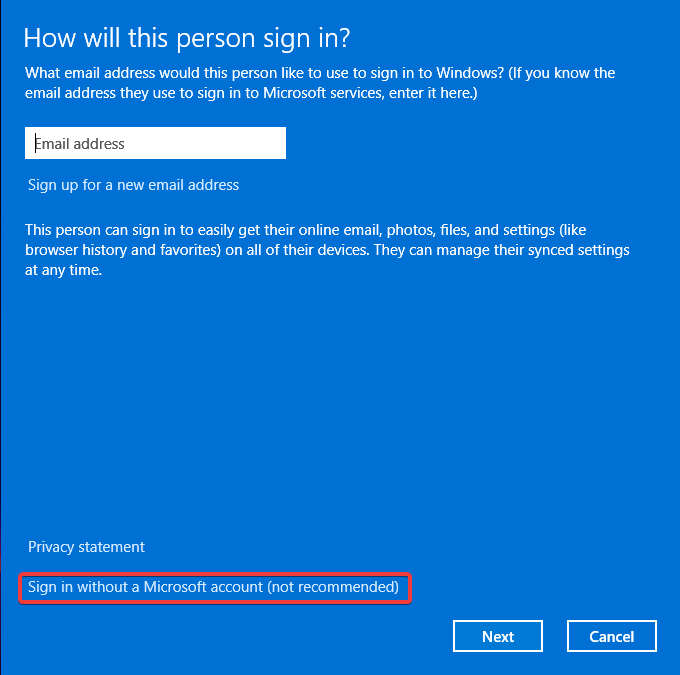
  3. Select Sign in without a Microsoft account (not recommended).
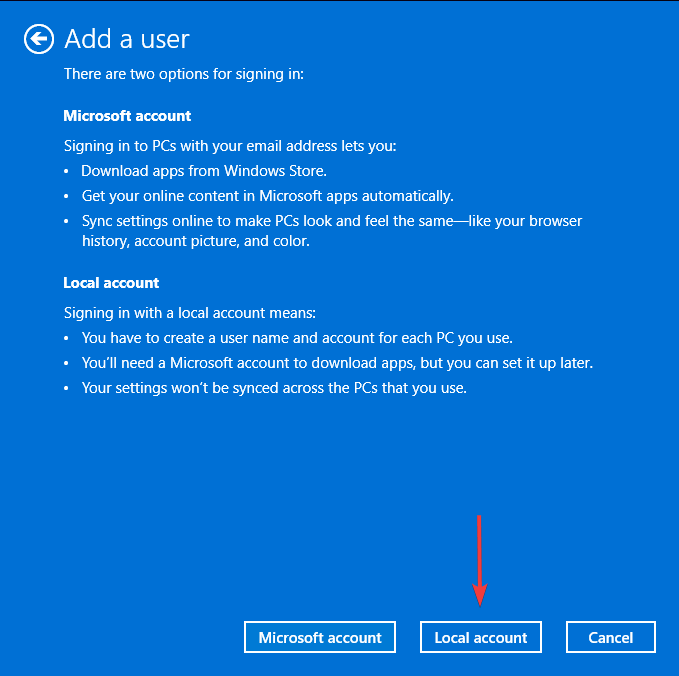
  4. Click on Local account button.
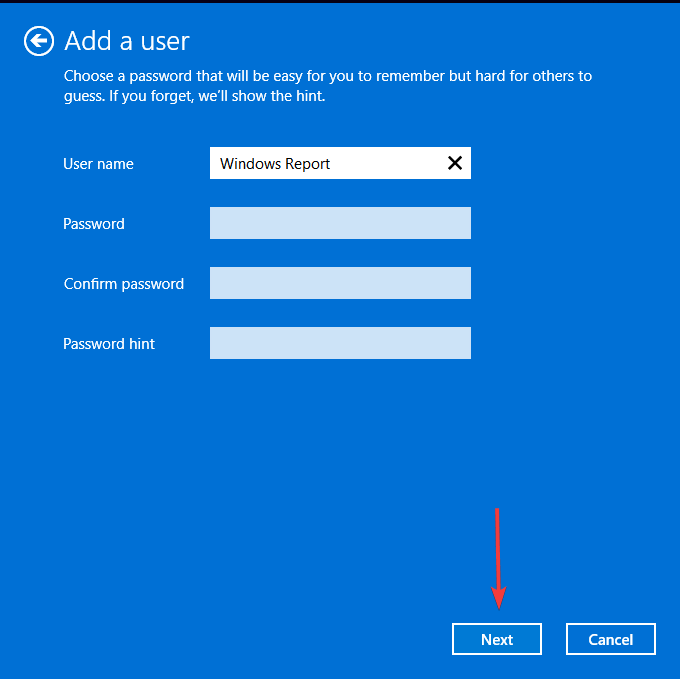
  5. Enter a username and password (optional) for the new user account, and a hint, in case you set a password. Once done, click on Next.
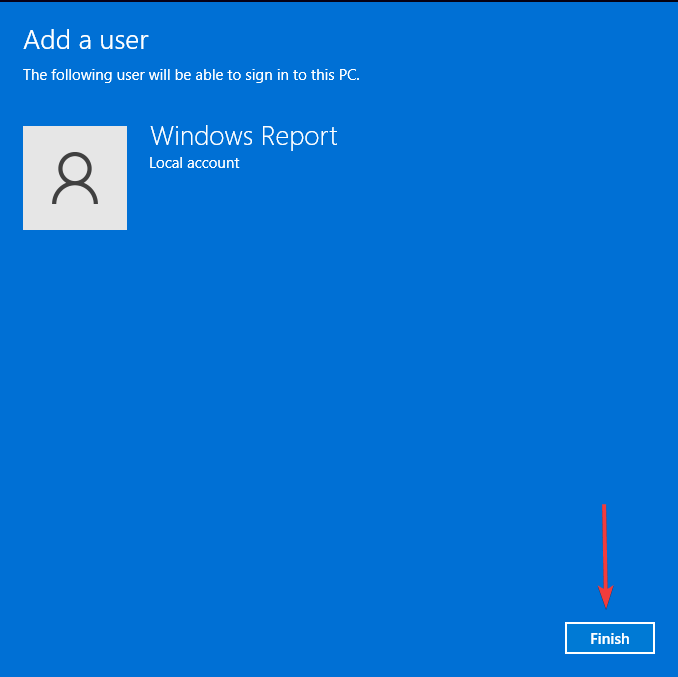
  6. Click on Finish to create the Local account.

Unfortunately, some issues may be profile-related and only unique to a court profile. To test his theory, you can create a new user profile and if you don’t get the services.msc has been blocked for your protection message, there lies the issue. The next cause of action should be to reset your PC.

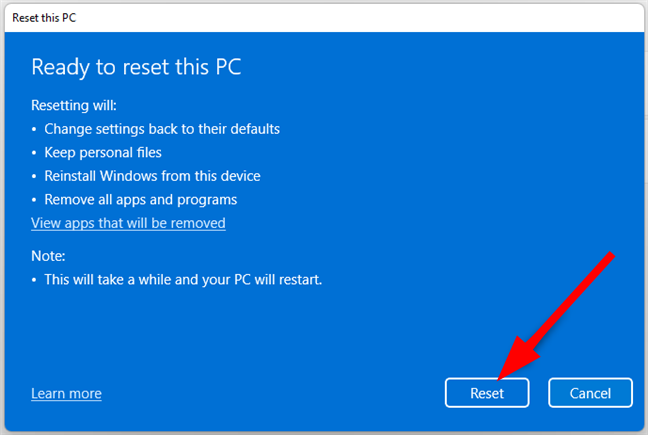
8. Reset your PC

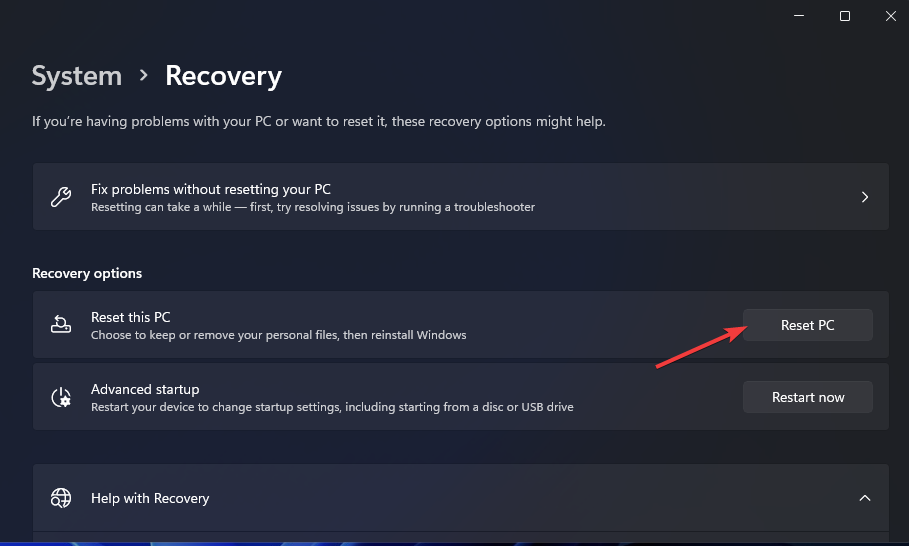
  1. Hit the Windows key and select Settings.settings windows 11
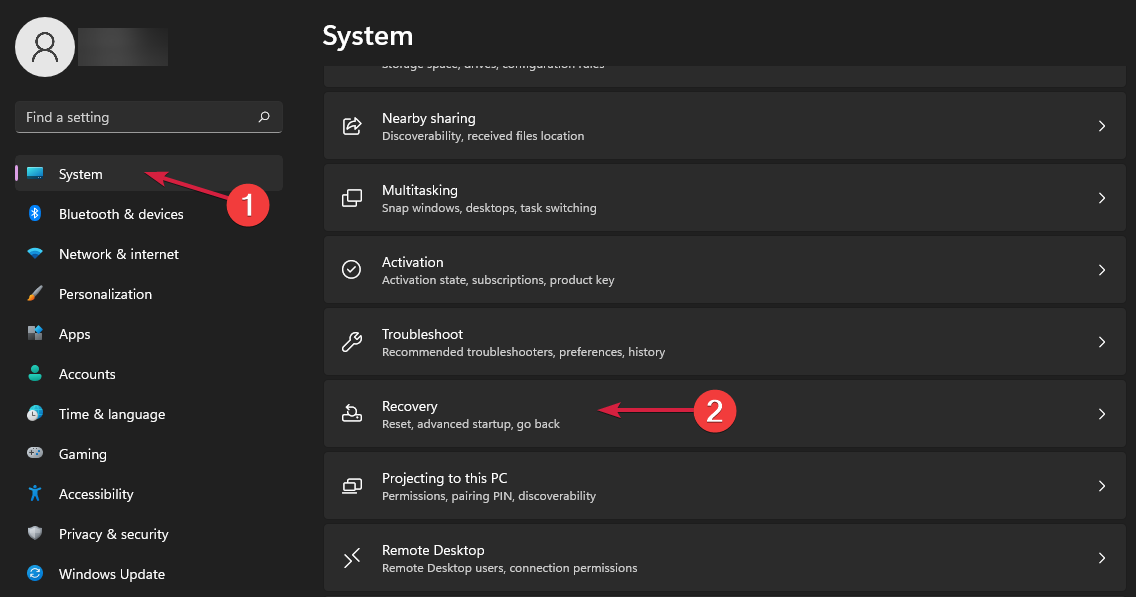
  2. In the left window pane, select System, then click on Recovery on the right pane.
  3. Click on Reset PC from the right side.reset
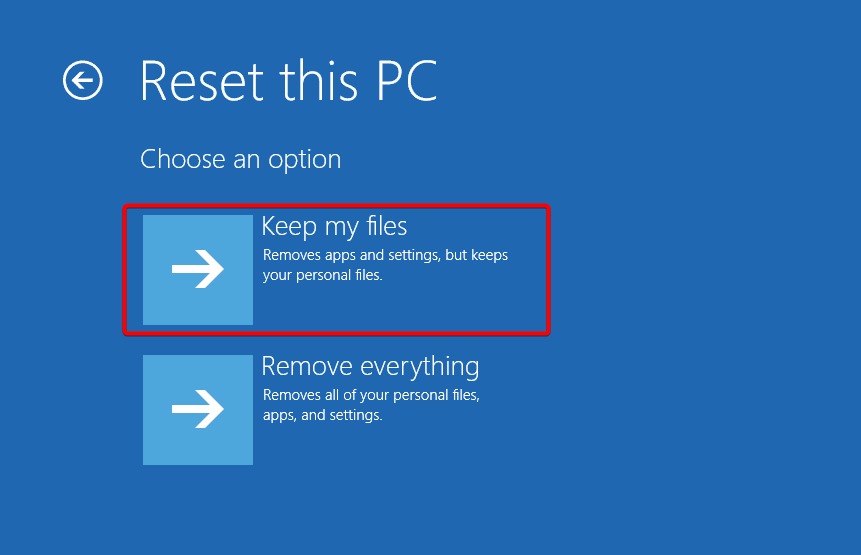
  4. Choose the type of factory reset you need. You can keep your files or completely delete all the files, apps, and settings on the PC.keep-files sfc scannow not working
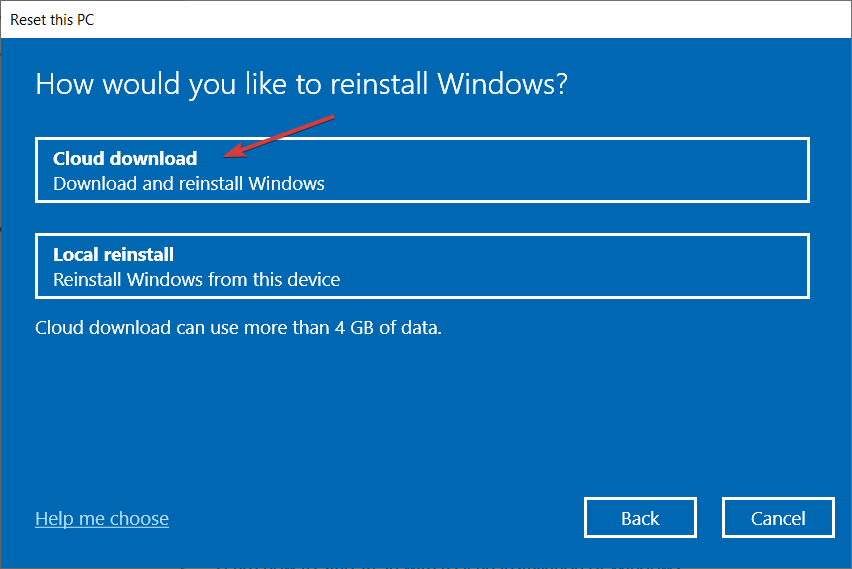
  5. Select the option you want to reinstall Windows: Cloud download or Local reinstall.choose cloud download windows 10
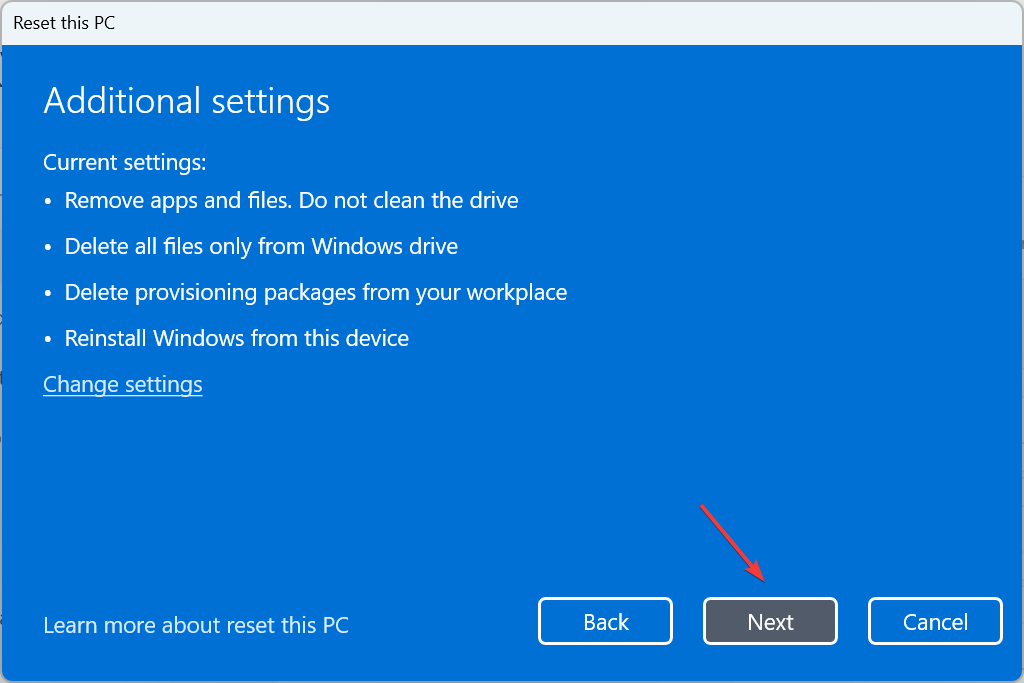
  6. Click on Next.verify details
  7. Finally, press the Reset button.

Additional tips and troubleshooting

  • Always keep your system and drivers up-to-date to ensure compatibility and the smooth running of all services.
  • Run critical services as an administrator to ensure you have all the requisite permissions for full access.
  • Check your system files regularly to ensure they’re not corrupted as this could hinder access to critical Windows features and services.

Ultimately, it all boils down to a permission issue. Always check whether your IT administrator has limited access especially if you’re on a work or school account. An extra layer of security is always welcomed but not at the cost of accessing even critical services.

Sometimes, even drivers are blocked from loading and we all know their integral role in Windows systems.

You can always block potentially unwanted apps on your own and install a comprehensive antivirus if you’re looking for extra security.

This isn’t te only issue you can experience, and many reported that services.msc remembers the last computer it was connected to, but we have a guide that tackles this problem.

Hopefully, one of these solutions has resolved this issue and you can access services.msc again. If you have any other solution that worked for you but not mentioned in our list, we’d like to hear about it. Leave your comment down below.

The latest Edge ad in Windows 11? A 3D banner

Sometimes, when using Microsoft Edge on Windows 11, a 3D banner appears. It’s designed to encourage users who navigate via this browser and view webpages in full-screen mode to set Edge as their default browser. 

Microsoft has tried this method to convince people to change their default browser to Edge. Its advantages are emphasized, especially in safeguarding against phishing and malware attacks. Windows Latest, the first to notice this action, highlights a new section in Microsoft’s continuous endeavors to boost Edge.

Microsoft’s strategy is also a bit sparkling and full of persuasion. When you don’t have Edge as your default browser and open a PDF or even launch Edge, this 3D banner comes into view. 

It’s not an ordinary banner; it’s made to attract attention and persuade users to change their browser preference to Edge. The banner’s meaning is straightforward: with Edge, you can feel protected from dangers on the internet. 

However, to begin using it as your primary browser, you must first click “Set default” and then validate this selection again in the Windows settings application.

It’s important to highlight that Microsoft has a history of using pop-ups to promote Edge. They have utilized different alerts within the browser, such as those that appear when you try to download Google Chrome. 

There was even a full-screen prompt urging users to stay or switch to Edge after installing new Windows updates. If you disregard these reminders, do not be shocked if they appear again when you launch Edge next time.

Edge is becoming more intelligent, and the team intends to include AI-driven website suggestions. 

Picture this: you launch your browser and see site recommendations tailored for you under the search box because ChatGPT technology is also in use there! In the testing phase, this feature briefly hints at how Microsoft uses AI to improve our browsing.

Does a 3D banner and assurance of improved security entice you to switch to Edge, or does it seem like merely a digital nudge in an already crowded world? Microsoft’s methods are undoubtedly daring, combining visual attractiveness with valuable advantages. 

Still, it raises the issue of how much companies should push their products within their environments. Whether this will result in a large rise in Edge users is uncertain, but Microsoft does not appear to be hesitant about innovating (or perhaps nagging) to persuade people.

NVIDIA Graphics Card Code 45 in Windows 11 [Solved]

Often, the NVIDIA graphics card stops working and is suddenly moved to hidden devices, and when you head to Properties in the Device Manager, the Device Status reads, Currently, this hardware device is not connected to the computer. (Code 45). To fix this problem, reconnect this hardware device to the computer.

The error usually appears due to connection issues, running an outdated driver, a bug in the installed driver, corrupt system files, and low power input.

Before you start with the slightly complex solutions, make sure the NVIDIA GPU is properly seated (in the case of a desktop), restart the computer, and switch to a different power source. A user reported in the Microsoft forum that plugging the laptop into another socket fixed things, as the earlier one didn’t meet the power requirements!

How do I fix NVIDIA GPU Code 45 on Windows 11?

1. Run the Hardware and Devices troubleshooter

  1. Press Windows + R to open Run, type msdt.exe -id DeviceDiagnostic in the text field, and click OK.run command
  2. Click on Next to proceed and follow the on-screen instructions to complete the troubleshooting.hardware and devices troubleshooter to fix nvidia code 45 windows 11

2. Update the NVIDIA graphics card’s driver

  1. Press Windows + X to open the Power User menu, and select Device Manager from the list.
  2. Expand the Display adapters entry, right-click on the NVIDIA GPU, and select Update driver.update graphics to fix nvidia code 45 windows 11
  3. Choose Search automatically for drivers and let Windows install the best locally available driver.automatic driver update
  4. Restart the computer and check whether it now detects the NVIDIA graphics card.
  5. In case the NVIDIA GPU is not listed here, click on the View menu, and choose Show hidden devices.device manager

When trying to fix NVIDIA error code 45 in Windows 11, you should update the graphics driver. Also, check for newer drivers on NVIDIA’s official website.

In many cases, I observed that the installed driver had a bug or the files got corrupted over time, leading to connectivity issues with the GPU even though it was properly seated.

If Windows can’t find a better version, use an effective driver update tool for Windows 11.

3. Reinstall the NVIDIA driver

  1. Press Windows + R to open Run, type devmgmt.msc in the text field, and hit Enter.devmgmt.msc
  2. Double-click on Display adapters, right-click on the NVIDIA graphics card, and select Uninstall device.uninstall NVIDIA GPU
  3. Tick the checkbox for Attempt to remove the driver for this device, and click on Uninstall.uninstall NVIDIA driver to fix nvidia code 45 windows 11
  4. Once done, restart the computer, and Windows will automatically install a fresh copy of the graphics driver.

4. Repair corrupt system files

  1. Press Windows + S to open Search, type Command Prompt, and click on Run as administrator.command prompt as admin
  2. Click Yes in the UAC prompt.
  3. Paste the following DISM commands individually and hit Enter after each: DISM /Online /Cleanup-Image /CheckHealth DISM /Online /Cleanup-Image /ScanHealth DISM /Online /Cleanup-Image /RestoreHealth
  4. Once done, execute the following command: sfc /scannowsfc scan to fix nvidia code 45 windows 11
  5. Finally, restart the computer and verify whether the NVIDIA GPU error code 45 is fixed

5. Switch to Standard GPU mode in Armoury Crate (Asus devices)

  1. Launch the Armoury Crate application, go to Device from the navigation pane on the left, and then choose your system from the list.
  2. Head to the GPU Power Saving tab, and finally, select Standard as the GPU Mode.standard GPU mode
  3. Once done, reboot the PC, and check for improvements.

Many Asus laptop users took to forums to find a fix for NVIDIA code 45 in Windows 11. In most of these cases, the underlying cause turned out to be misconfigured GPU power settings. So, make sure to verify that!

If nothing works, I recommend contacting a hardware expert. At this point, the connections or a baked GPU are to blame. And it’s best to contact a professional in these cases.

Before you leave, discover our expert-recommend tips to boost gaming performance in Windows 11!

Do you know more fixes for the error? If so, share them with our readers in the comments section.

SyncToy on Windows 7: How to Download & Setup

SyncToy was a rather popular sync software from Microsoft, and if you’re still using a legacy version of Windows, today we’re going to show you how to download and use SyncToy for Windows 7.

How to download and install SyncToy on Windows 7?

Can you still download SyncToy?

  1. Visit the SyncToy Internet Archive page and click on Download.
     download button synctoy
  2. Select your version and click Next.
    synctoy 64-bit version select
  3. Wait for the download to start.

SyncToy is no longer available from official sources, so using third-party sources or the Internet Archive is your only option.

How to setup SyncToy?

  1. Run the setup file you previously downloaded.
  2. Select I have read and understand the warning above. Click Next.
    synctoy setup i understand
  3. Click on I agree and choose Next.
    agree to terms of service synctoy setup 
  4. Choose the installation directory and click Next.
    select installation directory synctoy
  5. Click Next to start the installation.
    next start installation synctoy
  6. Wait for the installation to finish.

The software will now be installed and ready to use.  If you’re not familiar with the software, check our guide on how to use SyncToy for file backup to learn more.

What replaced SyncToy?

Microsoft has moved towards cloud sync and OneDrive, but if you want to sync files locally, there are many great sync software for Windows 7 that you can use.

As you can see, it’s pretty simple to download and install SyncToy on Windows 7, as long as you have a reliable source to download the software.

If you encounter any problems, we have an entire guide dedicated to what to do if SyncToy is not working that can help you fix all your issues.

AMD finally released new chipset drivers for Windows 11 24H2. Find out if yours is one of them

In the constantly changing world of technology, it’s very important to update your system so everything can run smoothly. AMD has launched new chipset drivers for Windows 11 24H2, and this action is causing excitement among tech lovers and regular users. 

These drivers are similar to unsung heroes in the computing world; they ensure the motherboard (your computer’s heart) communicates well with the operating system. This update isn’t only about maintenance; it also prepares for future enhancements and characteristics in Windows 11.

To people who may not know, your PC’s performance and stability greatly rely on chipset drivers. They are like the adhesive that connects communication between your operating system and motherboard’s parts. 

The latest from AMD, version 6.05.28.016, is made to guarantee it goes well with the next feature update of Windows 11, which makes it necessary for anyone desiring to remain at the forefront technology-wise.

The update includes various AMD motherboard series, from the top-tier AMD WRX90/TRX50 to the more typical AMD B350 and A320 series. It is a “wide-ranging effort,” like a support layer for almost all Ryzen processor series, ensuring that most AMD users enjoy the latest enhancements. 

Yet, it’s important to mention that this chipset driver update won’t be given to the processors in the Ryzen 1000 series, which came out in 2016. Even though it may disappoint some users of these older models, it is a usual procedure in the tech industry to gradually stop assisting with outdated hardware.

The process of downloading and installing these drivers is made simple by AMD’s official download link and a guide that provides detailed steps. 

However, it may not always be smooth. AMD has pointed out some problems you could encounter during installation, like seeing driver names in English on non-English operating systems or an incorrect ‘Failed’ status displayed on the uninstall summary. However, these are minor problems, and AMD promises to fix them in the following updates.

Furthermore, in 2024, AMD will also launch Copilot+ PC-compatible processors, which respond to Qualcomm’s latest AI chips, which are very good at NPU tasks. AMD and Intel have been playing the game of AI PCs for some time now, but their NPU performance has not quite reached what Qualcomm is offering with its new lineup. 

Yet, AMD has not given up. They have announced the Ryzen AI 300 PCs (will only support Windows 11, by the way), which will provide an even better NPU performance. Even though they may not be Copilot+ certified when launched, AMD assures that the sought-after AI experiences will be possible with a forthcoming Windows 11 update.

In this age of constantly advancing technology, it’s convenient and necessary to be up-to-date. So, the newest chipset drivers from AMD for Windows 11 24H2 show a dedication to innovation and user experience that can’t be denied. 

If you are interested in technology and want to explore the latest features, or if your goal is simply to ensure your PC runs as smoothly as possible, this update signals an important step forward. Moreover, AMD’s commitment to pushing boundaries and providing better products inspires optimism for the future, making it an exciting time to be involved in the AMD community.

How to Hide Local Drives Using Gpedit.msc, Registry Editor and Disk Management

Ever wanted to hide specific drives on your Windows computer to keep your data secure or just to declutter your File Explorer? Using gpedit.msc and other methods, you can easily hide local drives without much hassle.

How do I use Gpedit.msc to hide local drives?

1. Hide drives using Local Group Policy Editor

  1. Press Win + R to open the Run dialog box, type gpedit.msc and press Enter.
  2. In the Local Group Policy Editor, go to User Configuration > Administrative Templates > Windows Components > File Explorer.
  3. Find and double-click on the policy named Hide these specified drives in My Computer.
  4. In the window that appears, select the Enabled option.
  5. Under the Options section, use the drop-down menu to select the drives you want to hide. Available options include:
    • Restrict A and B drives only.
    • Restrict C drive only.
    • Restrict D drive only.
    • Restrict A, B, and C drives only.
    • Restrict A, B, C, and D drives only.
    • Restrict all drives.
    • Do not restrict drives.
  6. Click Apply and then OK.
  7. To check if the procedure worked, open File Explorer and check that the specified drives are no longer visible.

This method hides the drives from appearing in File Explorer. However, users can still access the drives through other means such as the Run command.

2. Hide drives using Registry Editor

  1. Press Win + R to open the Run dialog box, type regedit and press Enter.
  2. Navigate to the following location: HKEY_LOCAL_MACHINE\Software\Microsoft\Windows\CurrentVersion\Policies\Explorer
  3. Right-click on Explorer, select New, and then DWORD (32-bit) Value. Name the new DWORD as NoDrives.
  4. Double-click on NoDrives and select Decimal as the base.
  5. Enter the value corresponding to the drive you wish to hide:
    • A = 1
    • B = 2
    • C = 4
    • D = 8
    • E = 16
    • F = 32
  6. Close Registry Editor and restart your computer for the changes to take effect.

This method effectively hides the specified drives and makes it harder for users to access them unintentionally.

3. Hide drives using Disk Management

  1. Press Win + R to open the Run dialog box, type diskmgmt.msc and press Enter.
  2. Right-click on the drive you want to hide and select Change Drive Letter and Paths.
  3. Click the Remove button and confirm the action by selecting Yes when prompted.
  4. Open File Explorer and check if the drive is visible.

This method removes the drive letter, effectively hiding the drive from standard user interfaces.

You may also use third-party tools such as AOMEI Partition Assistant to hide your drives. It has a graphical interface, which might be preferred by less technical users.

By following any of these methods, you can successfully hide local drives on your Windows machine, enhancing your data security and preventing unauthorized access.

You might also be interested in reading our guide on how to hide files and folders on Windows 11, because it’s much easier than hiding a whole drive.

Was our guide helpful? Let us know in the comments below.

Help Mozilla Crackdown on 3rd-Party Firefox Installer Sources

Mozilla to run the “Firefox 3rd Party Installer” Campaign from June to July to protect users from potentially harmful downloads. While some third-party websites might offer legitimate Firefox downloads, there are some risks involved.

Firefox 3rd Party installer campaign

While you can download Firefox from the official Mozilla site, downloading Firefox from unofficial sources can lead to several problems:

Outdated Versions: You might unknowingly download an older version of Firefox, missing critical security updates and bug fixes.
Incorrect Locale: The downloaded version might not be in your preferred language, making browsing difficult.
Malware Risk: In worst-case scenarios, malicious actors could distribute tampered versions of Firefox containing malware that could steal your data or harm your computer.

Mozilla is calling on the community to help identify websites involved in the “Firefox 3rd Party Installer” campaign. By participating before July 14th, you’ll be contributing to a safer browsing experience for everyone.

Here’s how you can help Mozilla act on Risky Firefox Installer websites

  1. Use various keywords in your language (e.g., “download Firefox,” “install mozilla Firefox”) to find websites offering Firefox downloads outside of Mozilla.org.
  2. Look for websites that don’t redirect you to the official Mozilla download page. These are the potential culprits.
  3. Use the provided form to submit reports about these websites, allowing Mozilla to investigate further.

Rewards and Recognition: Active contributors will receive Mozilla swag for their efforts. If you submit 10 valid reports, you’ll be recognized on the Mozilla blog!

Download Firefox Safely:

The safest way to download Firefox is always from the official Mozilla website: https://www.mozilla.org/en-US/firefox/.

The bug and Campaign pages mention different timelines, June 17–July 8, 2024, and June 14 – July 14, 2024, respectively.

Anyway, let us hope that through this campaign, Mozilla can ensure in the future that everyone has access to the latest and safest version of Firefox. So, join the fight against “Firefox 3rd Party Installer” websites and become a Firefox Hero!

Mozilla is also testing alt text generation for images in PDFs using AI and weather widget on NTP and Netflix support in Private browsing mode. The company confirmed Firefox will get tab groups, vertical tabs, sidebar.

TIKTAG ravishes Google Chrome and Linux systems

In a world heavily dependent on digital security, an emerging speculative execution attack is called “TIKTAG.” It focuses on ARM’s Memory Tagging Extension (MTE) for leaking data with a success rate of over 95%. 

This finding, from a group of researchers in Korea who come from well-known places such as Samsung, Seoul National University, and the Georgia Institute of Technology, has created waves within the tech community. 

The attack explicitly affects Google Chrome and Linux systems. It uses speculative execution to bypass the protections provided by MTE, which is designed to identify and stop memory corruption by assigning tags to memory parts.

Memory Tagging Extension (MTE) was created to protect against memory corruption attacks and first appeared in the ARM v8.5-A structure. Yet, the researchers managed to misuse this system by employing two gadgets known as TIKTAG-v1 and TIKTAG-v2. 

The result of their attempt showed a leak in MTE memory tags with a high success rate within a short period. Even though this leakage doesn’t directly reveal sensitive information such as passwords or encryption keys, it could let attackers evade the safety characteristic, making it useless for fighting against hidden memory corruption attacks.

The effects of this finding are strong. From November to December 2023, the research results were known to the affected groups, such as ARM and Google. Even though everyone agrees there is a problem, they have not done anything to solve it yet. ARM issued a bulletin stating that while they recognized the seriousness of the situation, it was not viewed as a compromise of the feature. 

The Chrome security team admitted problems but chose not to fix vulnerabilities, explaining that the V8 sandbox is not meant to ensure the confidentiality of memory data and MTE tags.

As suggested by the researchers, the proposed mitigations against TIKTAG attacks consist mainly of altering hardware design to stop speculative execution from changing cache states according to tag check results.

Another idea is improving sandboxing mechanisms to reduce the effect of such attacks. However, the industry’s reaction is not clear. There has been no immediate response or action to fix these vulnerabilities.

This finding shows the continuous fight between improving technology and attackers’ persistent attempts to discover new methods to exploit weaknesses. You might want to reconsider if you’ve been considering migrating to Linux, as many have.

As more people start using MTE, tech community members must remain watchful and cooperate in dealing with these fresh dangers so that our digital world remains secure and trustworthy.

Arc Browser Export Spaces – All You Need To Know

The Arc browser export Spaces feature allows you to send one browsing workspace from one device to another. You can also share it with a collaborator, client, or friend. Sounds cool?

Read on as I explain how to use it to your advantage!

What Is a Space in Arc Browser?

An Arc browser Space is a container that holds all the websites you visit for a specific purpose. It also contains all split views, folders, and settings pages you open during a specific browsing session.

Arc Browser Export Spaces

Arc lets you create different customizable Spaces to help you stay organized and focused.

Think of it like having different folders for your work, hobbies, and personal browsing. In Arc, a Space can group all the tabs and bookmarks related to that area of your life.

For instance, you can have a “Work” space that holds all the websites you need for your job, like your company email, project management tools, and internal wikis. You can also have a “Personal” space for online shopping, social media, and entertainment websites.

What’s exciting is you can export these Spaces from your existing device to another one. Since the exporting works as sharing a Google Docs’ link with someone, you can also send them to co-workers, acquaintances, or family members.

Arc Browser Export Spaces on a Mac

The process slightly differs depending on your OS, but I’ve covered all options below:

Sending a Space

  1. On the Arc browser window, press Command + T to bring up the Arc Command Bar.
  2. Enter this Arc browser command: Open Library.
  3. When the appropriate search item appears, click on that.
  4. The Arc Library will open.
  5. Go to the Spaces menu from the left-side navigation panel.
  6. You’ll see all of your Spaces in vertical columns.
  7. Click on the three-dots menu at the bottom right corner for the Space you want to export or share.
  8. On the context menu that opens, click on the Share Space button.
Share Space
  1. Hit the Copy Link to Space button on the next pop-up.
  2. Now, send the link to another device or user via WhatsApp, Messenger, Telegram, Gmail, or any other media you prefer.

Receiving or Opening a Shared Space

Now that you’ve clicked the Copy Link to Space button, macOS has saved it to the device clipboard.

If you want to export it to a second party, you must DM them. Contrarily, if you’re exporting between your own devices, send the link via an email or any other means.

Now, you or your co-worker can follow these steps to receive or open exported Arc Spaces:

  1. Open Arc or any other web browser.
  2. Paste the shared Space link in the address bar.
shared Space link
  1. Hit Return.
  2. On the Arc browser, the Add Space to Arc dialog box will pop up.
shared Space test
  1. It’ll show the details of the sender and the name of the Space.
  2. Click on a Folder to list all the web pages, bookmarks, settings pages, and more.
  3. If you find it appropriate to receive the Space, click on Add Space to Arc button.
Add Space to Arc
  1. Arc browser will add the shared Space to your Sidebar.
  2. If you open the link in a different browser, say Safari, you’ll see a browsing environment similar to Arc. The exported Space’s contents will show up in a virtual Arc browser and Sidebar.
different browser

Arc Browser Export Spaces on Windows 11

The Arc Library or Arc browser commands aren’t compatible with the Windows 11 operating system. So, you’ll need to follow these steps to export a Space:

  1. While on the Arc browser window, hover the mouse cursor over the Space name on the sidebar.
  2. The Edit text will show up to the right of the tiny Space name field.
  3. Click on Edit.
  4. This action will open a context menu with the Share Space option. Click on that.
Share space windows
  1. Your PC will copy the link to its clipboard.
  2. Paste it into any texting app and send it to the recipient.

After you’ve created a shareable link, follow the steps mentioned in the Mac section above to open or receive a shared Space.

Expert Tips for Arc Browser Export Spaces

If you’re using Arc Spaces a lot and want to stay productive, check out these tips:

  1. Space shareable links open on both Arc and third-party browsers. However, the user experience is better on Arc compared to Safari, Chrome, Firefox, etc. You can add the whole Space as is to the Sidebar. This isn’t possible on other browsers.
  2. The links you share to export an Arc Space are hosted by its native servers. Although the developer generally follows stringent security and privacy practices, take extra precautions if you’re sharing personal or highly confidential business data.
  3. You can’t control the shareable Space links. Once shared, they’ll exist on the Arc server even if you delete the original Space.
  4. Also, you can’t delete a link to a Space. If you’ve accidentally created and shared one, ask the recipient not to use it. Alternatively, send an email to the Arc Help team to delete the link from their server.
  5. All encrypted websites, content, and web apps in a shared Space must be re-authenticated on the recipient’s end. For example, if you were working on a WordPress blog and shared its Space with a client for review, they must use their own WordPress credentials to log in again.

Summary

So, now you know how to use the Arc browser export Spaces feature on a Mac or Windows 11 PC. Give the techniques a try to stay productive and share browsing experiences in style.

However, be careful not to accidentally share an inappropriate Space. Think whether you actually want to add the Space to the Arc server for sharing. If yes, consider whether you’re sharing with the right recipient.

Comment below if you find the article helpful or if you want to give some feedback.

How to Get Arc Browser on your Linux System in 6 Easy Steps

Getting Arc Browser up and running on Linux might seem daunting, but with the right steps, it’s a breeze. This guide will walk you through the process of downloading, building, and running Arc Browser on your Linux system.

1. Download Arc Browser for Linux using git clone

  1. Open your terminal by pressing Ctrl + Alt + T.
  2. Type the following command to clone the Arc Browser repository and press Enter: git clone --recursive https://chromium.googlesource.com/arc/arc
  3. This command will download all the necessary files from the repository to your local machine.

This will help you get all the necessary files to build Arc Browser from the source, allowing you to have the most updated version directly from the developers.

2. Installing ARC dependencies

  1. If you are using Ubuntu 12.04 or 14.04, execute the following commands to ensure your dependencies are up to date:./src/build/install-arc-deps.sh # For Ubuntu 12.04 ./src/build/install-build-deps.sh # For Ubuntu 14.04

This step ensures that all the libraries and tools required to build Arc Browser are installed on your system, avoiding any build errors due to missing dependencies.

3. Configuring the build

  1. For a 64-bit architecture, run:./configure
  2. For a 32-bit architecture, run:./configure --target=nacl_i686
  3. For ARM architecture, run:./configure --target=bare_metal_arm

These commands configure the build environment according to your system architecture, ensuring that the resulting binaries are compatible with your hardware.

4. Building the ARC Browser

To start the build process, enter the following command and press Enter: ninja

The ninja command will compile the Arc Browser source code, creating the executable binaries you will use to run the browser on your Linux machine.

5. Cleaning the build (optional)

If you need to clean up your build files, use the following command and press Enter: ninja -t clean

This command will remove all the build artifacts, which is useful if you need to start the build process from scratch without any old files causing conflicts.

6. Running Arc Browser

  1. Navigate to the directory with the built binaries: cd out/target/<your_target_architecture>/lib
  2. Execute the browser binary:./arc_browser_executable # Replace with the actual binary name

These final steps let you run the Arc Browser on your Linux machine be it Ubuntu or other iterations. This is allowing you to experience its features and interface.

Following these steps will help you download, build, and run the Arc Browser on your Linux machine, ensuring you have a smooth and compatible setup. For future builds, always ensure your dependencies are up-to-date and clean your build files to avoid conflicts.

Now you can start setting it up with personalized preferences, extensions, and more.

Did you know that you can also install and use Arc Browser on a Chromebook? Click the highlighted link for instructions.

If you have any trouble, hit the comments section below and let us know.

Hitting 60 FPS in Starfield on Xbox Series S is now a possibility thanks to this method

Imagine being curious about the experience of pushing gaming boundaries on more affordable consoles. Well, gamers have discovered a method to improve their time with Bethesda’s Starfield on Xbox Series S. 

This device is usually fixed at 30 FPS, but now it can reach 60 or even 120 FPS in Starfield on Xbox Series S. The question arises: You might have to make a trade-off regarding visual quality. 

This could mean losing some details, like the richness of landscapes, and being content with decreased resolution. Nevertheless, for certain people, gameplay is more important than graphics.

Starfield was set free in September 2023, and it started its trip with many different feelings from fans and reviewers. A procedural generation made the game’s big universe, and missing features like a 60 FPS setting for Xbox Series X/S left players wanting more. 

Bethesda took the feedback seriously and released updates that improved in-game life quality. They also introduced support for higher frame rates on Xbox Series X. However, the Series S was forgotten, and fans decided to do it themselves.

Step into the realm of mods. In a YouTube video shared by Fuzion Xbox Testing, you can see how seven Console Mods from Creation Club are used on an Xbox Series S to achieve higher frame rates, such as 60 FPS.

These mods include one that removes the game’s FPS cap and another that removes grass, enabling a more seamless gaming experience. However, the visual quality suffers as it becomes blurry and less detailed. However, for gameplay, there is an improvement in smoothness when moving around—particularly when you are exploring on foot.

However, if we increase the frame rate to 120 FPS, then the Series S and game optimization show their limits with performance not being steady, especially in scenes set in space. 

This is a balance of appearance and performance, yet for those desiring that super smooth frame rate, it’s a deal they could accept.

This way of fixing the issue makes one wonder: Is it possible for Bethesda to officially provide such options in a later update? Certainly, playing Starfield at a lower resolution might not be what the developer initially intended. 

However, this workaround from the modding community shows how much people desire flexibility in their gaming experience. Even as we break away from the usual limits set by publishers or developers, mods have shown once more that they are useful for tailoring gameplay to individuals’ tastes.

The amazing Alienware x16 R2 gaming laptop is now $650 OFF

Picture yourself searching for a gaming laptop that doesn’t just talk about performance but shouts it out through every smooth, silver line and key lit by LEDs. This is precisely where the Alienware x16 R2 comes in, a monster among machines attracting attention and gaining approval from the gaming community. It starts at $2,294.99 – $650 OFF its original price, and this isn’t merely any laptop; it’s an expense in unmatched gaming quality. But what makes it stand out? Let’s dive in.

Inside the Alienware x16 R2, you will find a selection of Intel® Core™ Ultra processors. They offer up to 9th-gen models with 16 cores and speeds ranging from 2.30 to 5.10 GHz. Gaming dreams are made of this kind of power – or, more accurately, powered by this kind of power. You can pair it with Windows 11 Pro for gaming, creating, working, and going beyond what you thought was possible on a laptop.

Graphics? Oh, it’s having graphics. The NVIDIA GeForce RTX 4070 with 8GB GDDR6 memory ensures that each pixel is a part of the picture that fits perfectly, offering stunning visuals whether you are in an intense fight or lost in a film marvel. And, ranging up to the RTX 4090, it’s not about what you can play. The question is: What can’t you play?

But the memory and storage are also stunning. You can have a configuration with 32GB of LPDDR5X RAM and up to an incredible 8TB SSD storage, achieved via different RAID setups. Picture it – area and quickness that mock loading screens or buffering bars.

However, what about the display? The Alienware x16 doesn’t compromise on this aspect either, providing a 16.0″ FHD+ screen with a 480Hz refresh rate and complete coverage of DCI-P3 colors. This is not merely a view into the game; it feels like entering another realm where even the most minor elements are displayed so crisply and seamlessly that you might mistake them for reality.

Also, design matters. The x16 has a Lunar Silver chassis and is quite the statement. It’s not only about the RGB backlit keyboard (though that’s a nice touch); it’s more so because of its premium, low-profile mechanical keys, which transform each command into an announcement. Also, it is not as heavy as one might think. The weight starts at just under 6 lbs.

Connectivity is a must, and the x16 has all you need. It comes with USB 3.2, USB-C, Thunderbolt 4, HDMI, and other ports to connect to anything and everything. Want to game on the go? With the Intel Killer™ wireless card, you will not worry about your online battles. It guarantees they are as smooth and lag-free as your single-player adventures.

Gaming laptops frequently suffer from a weak battery life. However, the x16’s 6-cell, 90 Wh battery guarantees you are not always tied to an electrical socket. And when it must be plugged in, its 240W adapter guarantees you will return to the game quickly.

The Alienware x16 R2 is not only a gaming laptop. It’s a statement of what can be achieved when performance combines with design and portability matches power. Speaking of games, you’ll probably want to consider the amazing Turtle Beach Stealth 700 Gen 2 Max headset, now just $129 until the end of the month.

This device poses the question: “Why accept anything less?” Then, it answers the same question with every spec, every feature, and every glowing review. Whether you are a gamer, a creator, or simply someone who demands the best, x16 is here to redefine your expectations. So, will you take that leap?

Get it now from Dell.

How to Use Arc Browser on a Chromebook

Exploring new browsers on your Chromebook can be an exciting way to enhance your browsing experience. If you’re curious about the Arc browser but can’t find a native version for ChromeOS, don’t worry. Although Arc wouldn’t normally run on a Chromebook, we have a few solutions to do just that.

How do I use Arc Browser on a Chromebook?

1. Use CrossOver to run Windows apps on Chromebook

  1. Open ChromeOS Settings by clicking the time at the bottom right of your screen and selecting the cogwheel icon.
  2. Scroll down and click on Advanced to expand the menu.
  3. Click on Developers under the Advanced section.
  4. If you don’t already have Linux enabled, click Turn On next to the Linux development environment (Beta) and follow the on-screen prompts.
  5. Once Linux is set up, open the Chrome browser and navigate to the CrossOver download page.
  6. Download the .deb file for CrossOver.
  7. Open the Files app, navigate to the Downloads folder, and right-click the downloaded .deb file.
  8. Choose Install with Linux from the context menu, follow the installation prompts and wait for the installation to complete.
  9. Open CrossOver from your Linux Apps folder and follow the setup instructions to configure a Windows environment on your Chromebook.
  10. Download the Arc for Windows installer from the Arc browser’s official website.
  11. Use CrossOver to install and run Arc in the Windows environment on your Chromebook.

This solution allows you to run Arc browser in a Windows environment on your Chromebook using CrossOver, giving you access to Arc’s features without needing a native ChromeOS version.

2. Install Sidekick Browser on Chromebook

  1. Open ChromeOS Settings by clicking the time at the bottom right of your screen and selecting the cogwheel icon.
  2. Scroll down and click on Advanced to expand the menu.
  3. Click on Developers under the Advanced section.
  4. Enable Linux on your Chromebook, exactly the same as instructed in Solution 1.
  5. Once Linux is set up, open your Chrome browser and go to the Sidekick download page.
  6. Select the Linux (deb) option to download the Sidekick installation file.
  7. Open the ChromeOS Files app, navigate to the Downloads folder, and right-click the downloaded .deb file.
  8. Choose Install with Linux from the context menu.
  9. Follow the installation prompts and wait for the installation to complete.
  10. Once installed, you can find the Sidekick browser in your Linux Apps folder within your ChromeOS Launcher.

This solution enables you to use the Sidekick browser, which offers similar features to Arc, such as sessions and an application dock, on your Chromebook by leveraging the Linux environment.

3. Use a Remote Desktop to Access Arc Browser

  1. Ensure you have a Mac or Windows PC with Arc browser installed.
  2. On your Chromebook, open the Chrome browser and go to the Chrome Web Store.
  3. Search for and install the Chrome Remote Desktop extension.
  4. On your Mac or Windows PC, visit the Chrome Remote Desktop website and set up remote access following the on-screen instructions.
  5. Open the Chrome Remote Desktop extension on your Chromebook and connect to your Mac or Windows PC.
  6. Once connected, you can use the Arc browser installed on your remote PC directly from your Chromebook.

This solution provides a way to access and use the Arc browser through a remote desktop connection, enabling Chromebook users to benefit from Arc’s features without needing a native installation.

4. Switch to a browser with similar features

  1. Open your Chromebook and launch the Chrome browser.
  2. Go to the Sidekick website and download the Linux version if you don’t have it installed.
  3. Install the browser by following the steps mentioned in Solution 1.
  4. Alternatively, you can explore other browsers like Vivaldi or Brave, which offer multiple productivity features and customization options.
  5. Install your chosen browser and import your bookmarks and settings from Chrome.

This solution covers using an alternative browser that offers similar organizational and productivity features while waiting for Arc to become available on ChromeOS.

By trying these solutions, you can enjoy a fresh browsing experience on your Chromebook. Did you know that you can open multiple Arc windows and even split a window into multiple ones?

If you’re facing the Unknown Server Error in Arc, click this highlighted guide to fix it.

Always keep your system updated and explore new tools to enhance your productivity.

Similar to X, YouTube is adding community notes to videos

In our planet, where internet videos are the main way to get information and enjoy oneself, YouTube is improving its system by introducing a feature that permits viewers to include notes in videos. 

This creative method intends to enhance the viewer’s experience by supplying more context or details directly from them. Picture yourself watching a video, and then you see a note at the bottom explaining that this song is just making fun of another one or saying when there’s a newer version for the product being reviewed. It’s like having a knowledgeable friend whisper helpful insights in your ear.

YouTube starts with a test group of participants selected using a complex bridging-based algorithm. 

In a blog post, YouTube says this method ensures that only the most useful notes are included in this feature. It finds agreement among viewers’ thoughts and prefers those bridging gaps between various viewpoints. It’s a clever way to filter the noise and highlight useful information.youtube notes videos

Notes will appear publicly under a video if they’re found to be broadly helpful. People will be asked whether they think a note is “helpful,” “somewhat helpful,” or “unhelpful” and why – for example, whether it cites high-quality sources or is written clearly and neutrally.

YouTube

But there’s a condition: for you to contribute, your YouTube channel must be at least six months old and have had no community guideline strikes in the last year. 

This is done so those contributing to the conversation can be seen as accountable and trustworthy YouTube community members. Initially, YouTube will use third-party evaluators to judge how valuable notes are. But later on, it’s planned that this role will be given to the general public for evaluation.

This move is a component of YouTube’s more extensive campaign to fight against false information and increase the information given with videos. The platform has been working on various alterations, such as displaying panels containing data above search results and necessitating labels for content made by AI. 

With notes, YouTube’s goal goes beyond informative videos—it also aims to ensure its platform can be trusted. With more experimental features coming up, like channel QR codes or AI-created chat summaries, big changes are happening in how we engage with video content on YouTube.

In the end, it comes down to your opinion. Do you believe these notes will improve your watching experience, or are they just another thing we scroll past? Only time can answer this question for sure. 

However, what is clear from all of this discussion and speculation is that YouTube does not fear innovation. It always looks for fresh methods to make its platform more engaging and knowledgeable for the billions who use it regularly.

How to Use Arc Browser’s Bookmarks or Pinned Tabs

The Arc browser, often praised for its revolutionary and clutter-free user interface, has taken a unique approach when it comes to Bookmarks, a feature available in every browser to save the frequently used pages for quick access.

The approach hasn’t been widely appreciated, as discussed later. Nevertheless, the lack of information about bookmarks makes things difficult for users who just downloaded the Arc browser. So, let’s find out all about it!

Does Arc have bookmarks?

No, the Arc browser doesn’t feature Bookmarks. Instead, it introduces the concept of Pinned Tabs, which are specific to each space within the browser.

The Pinned Tabs are accessible via Arc’s sidebar, where all the active tabs, spaces, and folders are listed. You can add them independently within the sidebar if there are just a few or under a folder for easy management when there are many. Also, Pinned Tabs, unlike unpinned ones, are never automatically archived!

How do I add bookmarks in Arc?

  1. Open the webpage or website you want to add as a bookmark in Arc.
  2. Now, use the mouse to hold and drag it to the top of the sidebar, i.e., above the Tabs section, and it will be automatically added to Pinned Tabs.pin tabs
  3. Alternatively, open the webpage/website you want to add as a bookmark and press Cmd + D (for macOS) or Ctrl + D (for Windows) to add it to Pinned Tabs.
  4. All added Bookmarks or Pinned Tabs can be accessed from the sidebar (two are under a dedicated folder), as highlighted below.all pinned tabs

Similarly, to remove a website/webpage from Bookmarks or Pinned tabs in the Arc browser, you simply need to access it from the sidebar and press Ctrl + T (for Windows) and Cmd + T (for macOS)!

How can I import Chrome bookmarks in Arc?

  1. To import bookmarks from Google Chrome, click the Arc menu near the top-left corner, and choose Import from Another Browser.import bookmarks arc
  2. Select Chrome from the list of browsers, then choose the desired profile that you want to export data (including bookmarks) from, and click on Next.choose profile
  3. Now, choose whether to import the data to the existing Arc profile (first option) or a new browser profile (second option), and click on Import. I choose My Existing Arc Profile.import data options
  4. Next, either individually pick the bookmarks you want to import to Chrome or choose Select all, and then click on Finish.import
  5. Once done, you will find a new folder titled Imported from Chrome in the sidebar. Expand it, and you will find all the imported bookmarks listed under the Bookmarks bar entry.bookmarks in arc browser

You can similarly import bookmarks in Arc from other browsers, including Microsoft Edge, Mozilla Firefox, Opera, OperaGX, Brave, and Vivaldi.

Tips to effectively manage Pinned Tabs in the Arc browser

  • Do not add too many Pinned Tabs: Arc is designed for a clutter-free experience, and adding too many Pinned Tabs negates the whole idea. So, pin only the vital ones.
  • Create folders for easy management: If you have to bookmark several web pages/websites, create folders. For instance, add all work-related Pinned Tabs to a Work folder or research-related ones to the Research folder.
  • Divide Pinned Tabs between Spaces: In addition to folders, you can also create more spaces, each designed for a specific use case. For instance, a different space for work and home use will allow you to effectively divide and manage the Pinned Tabs.

Are Pinned Tabs better than Bookmarks?

Honestly speaking, Pinned Tabs aren’t as seamless and straightforward as the developers the developers initially imagined them to be. Arc took a feature that’s identical across browsers and drastically transformed it into something with no real benefits.

Getting used to the new UI, understanding the concept of Pinned Tabs, and discovering optimal management will take time if you are new to the browser. However, our top Arc browser commands will streamline tasks and get you up-to-speed with the browser! You can also export Spaces to share bookmarks with other devices.

If you don’t like the Pinned Tabs functionality in the Arc browser, I recommend you install an effective bookmark manager extension like Evernote Web Clipper and RainDrop.io.

In case you have any doubts about bookmarks in Arc, drop a comment below, and we will get back to you at the earliest!

Qualcomm will develop cheaper Snapdragon Elite X chipsets for Copilot+ PC

In the busy tech world, where competition to fuel future devices is intense, Qualcomm has been a hot topic. This big player is increasing its efforts to rival Intel, AMD, and Apple, particularly when it comes to notebooks.

As we approach the official shipment day of Windows 11 laptops running on Qualcomm’s Snapdragon X chips, there’s an exciting atmosphere around us. But here comes the twist: Qualcomm is not standing idle.

Tech analyst Ming-Chi Kuo states they are cooking up something that might further stir things. It seems they’re creating cheaper forms of their Snapdragon chips for Windows to make upcoming notebooks less costly but still powerful.

Now, you might be thinking, “How will they make it less expensive?” Kuo’s ideas indicate that these altered chips, which they call Snapdragon X Elite and Plus, might decrease the end product cost. This implies we may see cheaper laptops while still maintaining high-performance levels.

And there’s more to come. In the fourth quarter of 2025, Qualcomm plans to introduce a new processor for Windows on ARM known as Canim. This chip, created with TSMC’s N4 node, is made for mainstream PCs and priced from $599 to $799. This is significant because if the lowest-priced Qualcomm X-based notebook that will be released soon starts at $999, then this new device from Tuxedo Computers can offer a more affordable alternative.

The X Elite and X Plus chips, used for Windows on ARM (WOA), will reach about 2 million unit shipments in 2024, with expected year-on-year growth of at least 100–200% in 2025. The X Elite and X Plus will have modified versions in 2025, with a reduction in end product prices.

Ming-Chi Kuo

But here’s the kicker: even at a lower cost, the Canim processor should have around 40 TOPS processing power, just like its pricier equivalents. This implies that people might soon be able to buy cheaper PCs without compromising performance. Qualcomm’s action has the potential to greatly enhance the attractiveness of Windows on ARM devices, making them affordable for more people.

In this world of fast technological progress, the most welcome thing is having affordability and quality simultaneously. If Qualcomm’s plan to bring cheaper chips remains successful with no drop in performance, it could change the game and make future computing an exciting prospect for all.

It does not matter if you are a tech lover or student or simply someone who wants to find a good deal on their new laptop; these plans from Qualcomm will surely catch your attention.

SyncToy: Use it For Seamless File Backup [How to]

Backing up your files is important since you don’t want to lose them by accident, and speaking of which, today we’re going to show you how to use SyncToy to backup all your important files.

How can use SyncToy to back up files?

Create a new folder pair

  1. Start SyncToy on your PC.
  2. When the application opens, click the Create new folder pair button.
    create new folder pair synctoy   
  3. In the left pane, select the source directory. In the right one, choose the destination directory and click Next.
    synctoy select folder
  4. Choose one of the available sync methods.
    synchronization type select synctoy
  5. Set the name for the folder pair.
  6. Optional: If needed, you can change the options and exclude certain files or folders from being synced.
    advanced synchronization options synctoy
  7. Select the newly created folder pair from the left panel.
  8. Click on Preview All to view the changes or Run All to apply the changes.
    synctoy run button

Keep in mind that you’ll have to manually run the last two steps every time you want to sync two folders. Many are wondering how to change the folder path in SyncToy, and we have a guide that shows you how to do it.

It’s also possible to exclude folders in SyncToy if you don’t want to back them up, and we have a whole guide dedicated to it. Moreover, you can run it automatically.

Can you still download SyncToy?

No, SyncToy is no longer available to download from Microsoft’s website. If you want to install SyncToy, you’ll need to get it from reliable third-party sources.

Is SyncToy being discontinued?

Yes, the software has been discontinued since January 2021.

Can you use SyncToy with Windows 11?

SyncToy works with Windows 11 if you install .NET Framework 3.5 (includes .NET 2.0 and 3.0) as an optional feature. The application has bugs on Windows 11, and you’ll need to manually enter source and destination folders to use it.

What is the replacement for SyncToy?

Many are suggesting OneDrive as an alternative, but if you’re not a fan of the cloud, you can use any file sync software instead.

As you can see, it’s pretty simple to use SyncToy, if you can get it from a reliable source. If SyncToy is not working, we have a dedicated guide that can help you with it.

If you’re using a legacy operating system, we have a great guide on how to get SyncToy for Windows 7, so don’t miss it. If all else fails, you try our recommended alternatives.

Can’t Share the Google Meet Screen in Arc Browser: 5 Easy Fixes

Navigating Google Meet in the Arc Browser can sometimes be tricky, especially regarding screen sharing. Here’s a quick guide to help you seamlessly use Google Meet in Arc Browser without hiccups.

What can I do if I can’t share the Google Meet screen in Arc?

1. Restart the Arc Browser

  1. Close all tabs in the Arc browser.
  2. Exit the Arc browser completely.
  3. Reopen the Arc browser.
  4. Launch Google Meet and try screen sharing again.

Restarting the browser can often clear up temporary issues and glitches, improving screen-sharing performance.

2. Turn off any installed Chrome plugins

  1. Open the Arc browser.
  2. Click on the menu button and select Extensions from the menu.
  3. Locate any installed plugins, particularly those related to cookies or ad-blocking.
  4. Toggle the switch to disable these plugins.
  5. Restart the Arc browser and try screen sharing again on Google Meet.

Disabling any cookie pop-up blockers or similar plugins might help as these can interfere with browser functionality related to screen sharing.

3. Try a different browser

  1. Download and install a different browser if you don’t have it yet.
  2. Open Google Meet using the newly installed browser.
  3. Share your screen via Google Meet.

Sometimes switching to a different browser can resolve compatibility issues and improve screen-sharing performance.

An excellent choice in this case is Opera One. This browser is properly optimized and comes with many built-in tolls that will allow you to run Google Meet smoothly.

4. Update or reinstall the browser

  1. Ensure that the Arc browser is up-to-date with the latest version.
  2. If the issue persists, try reinstalling the browser.
  3. Download the latest version from the official website of the browser.
  4. Install and restart your computer.

5. Use Picture-in-Picture Mode on Google Meet

  1. Start or join a Google Meet session.
  2. Click on the three-dot menu at the bottom of the Google Meet screen.
  3. Select Open picture-in-picture.
  4. Move and resize the small floating Meet window to keep it visible while navigating to other applications.

Using picture-in-picture mode can help you stay engaged in the meeting while navigating between different content, ensuring you don’t miss any reactions or interactions.

By following these steps, you can enhance your Google Meet experience in the Arc Browser. For future reference, regularly updating your software and disabling unnecessary plugins can help prevent similar issues. Happy meeting!

How to Open Multiple Windows in Arc Browser

Mastering multitasking can significantly boost your productivity, especially when using the Arc Browser’s multiple windows feature. If you often find yourself juggling between different tasks and need separate browsing sessions, these solutions will help you open multiple Arc Browser windows on your Windows system.

How do I open multiple windows in Arc browser?

1. Add a split view in the same window

  1. Click on the split view icon on any window to open two pages on the same screen.
  2. You can create a right or left split, or choose to have a bottom or top split.
  3. Click-in on the same icon on a split window will help you create additional split windows, convert it into a horizontal split or move the split windows around.

This is a great feature when you have a big monitor and you want to work on multiple websites at the same time, but on the same instance, on the same time. It will allow you to compare different information or simply browse multiple websites at the same time.

2. Open another Arc window

You can actually open more instances of the browser. While Arc Browser is started, just right-click the icon on the Taskbar and select New window.

You can do do the exact same time in Arc directly, by clicking on the menu button and selecting New window from the drop-down menu.

Finally, you may also open a new instance of Arc by launching the following command into a Terminal (Admin) window: start Arc.exe --new-instance

All these methods will help you keep multiple instances open across different monitors. It’s also useful if you need to keep different browsing sessions separate for multitasking across various monitors.

3. Create a shortcut for a New Instance

  1. Right-click on Desktop: Choose New and then Shortcut.
  2. Type the location of the item: Enter C:\Program Files\Arc\Arc.exe –new-instance (replace with the correct path if Arc is installed elsewhere).
  3. Name your shortcut: Type a recognizable name like Arc – New Window and click Finish.

This shortcut allows you to quickly open a new Arc window without needing to use the Command Prompt each time. This method is convenient for quickly opening multiple Arc windows with just a couple of clicks.

4. Open multiple profiles simultaneously on Arc

  1. Open Arc: Launch Arc as you normally would.
  2. Access Arc Settings: Click on the Arc logo in the top-left corner and navigate to Profiles.
  3. Create New Profiles: Click Add profile, enter the required information, and complete the setup.
  4. Launch new windows with different profiles: After setting up, you can open a new Arc window and switch to a different profile by clicking the Profile icon in the top-right corner. You may also press Alt + number of the profile to change quickly between them.

Using multiple profiles allows you to segregate your browsing data while keeping multiple Arc windows open. This solution is great if you need different sessions for work, personal use, or specific projects, all running concurrently.

5. Create a Batch file for opening multiple instances of Arc

  1. Press Win + R, type notepad, and press Enter.
  2. Copy and paste the following line into Notepad: @echo off \n start "" "C:\Program Files\Arc\Arc.exe" --new-instance
  3. Save the file as OpenArcInstances.bat (ensure you select All files in the Save as type dropdown).
  4. Double-click the .bat file you just created to open multiple Arc windows.

This script is handy for power users who need to open multiple instances frequently and want to automate the process.

By following these methods, you can effectively use Arc Browser with multiple windows, enhancing your productivity and taking full advantage of your multi-monitor setup.

If you’re curios about Arc Browser ChatGPT integration, click the highlighted guide to learn all about it.

Remember to regularly update your browser and manage your profiles to keep your browsing experience smooth and efficient.

Download Opera Gaming Themes in 6 Simple Steps

Wondering how to download Opera Gaming Themes? If you’re a gamer looking to personalize your browser experience, these themes are worth checking out. But before you can start customizing, you’ll have to install Opera GX, the gaming browser. 

Whether you’re a fan of classic retro vibes or sleek modern designs, you’ll find something that fits your style. So, let’s begin!

How To Download Opera Gaming Themes

  1. Go to the official Opera GX website and click the “Download Opera GX” button to get the installer.
Opera GX
  1. Once the download is complete, open the installer.
  2. Launch the Opera GX browser and click on the settings icon on the sidebar on the left side of the browser. 
Opera GX settings
  1. Scroll down until you find the “Themes” section. You can also use the side arrows to scroll and access them.
Scroll
  1. Click on any theme that catches your eye to see a preview of how it’ll look once applied.
Themes
  1. After selecting the theme, the changes will apply automatically. You can also select Light, Auto, or Dark mode.
Apply theme

That’s it!

So, now you know how to download Opera gaming themes. It’s a straightforward process that can enhance your browsing experience. Whether you prefer dark and edgy themes or bright and colorful designs, Opera GX has something for everyone. Additionally, it’s more suited for gaming than Firefox due to lower CPU usage.

Moreover, if you keep encountering issues while streaming on Twitch or with Opera GX specifically, I’ve got you covered.

How to Fix Network Connection Issues in Windows 11

Stable Internet has become a vital part of our lives, and network connection issues in Windows 11 often come in the way of it, necessitating the need to identify and fix the problem!

Network connection issues with Wi-Fi or Ethernet in Windows 11 often arise due to outdated or buggy drivers, misconfigured network settings, a problem with a recent Windows update, and third-party software conflicts.

Before you start with the complex solutions, restart the PC and router, run the Network and Internet troubleshooter in Windows 11, disconnect and then reconnect to the affected network, switch to another network band (from 2.4 GHz to 5 GHz and vice versa), and if nothing works, move the PC closer to the router (if on a wireless network).

How can I fix network connection issues in Windows 11?

1. Update the network adapter drivers

  1. Press Windows + X to open the Power User menu, and select Device Manager from the list of options.
  2. Expand the Network adapters entry, right-click on the Wi-Fi or Ethernet adapter (the one having problems), and select Update driver.driver update to fix network connection issues in windows 11
  3. Choose Search automatically for drivers and wait for Windows to automatically detect and install the best locally available driver version.automatic driver update

Since the problem mostly lies with the driver when you can’t connect to a network in Windows 11, updating the network driver should get things up and running in no time.

If Windows can’t find a better one, use a dedicated driver updater software to install the latest version!

2. Switch to a generic network driver

  1. Press Windows + R to open Run, type devmgmt.msc in the text field, and hit Enter.device manager
  2. Double-click on Network adapters, right-click on the problematic adapter (Wi-Fi or Ethernet), and select Update driver.
  3. Choose Browse my computer for drivers.driver
  4. Select Let me pick from a list of available drivers on my computer.
  5. Pick the driver that has Microsoft listed next to it instead of the official manufacturer, and click on Next.install generic driver to fix network connection issues in windows 11
  6. Once done, click on Close and then restart the PC for the changes to come into effect.

3. Uninstall the conflicting application

  1. Press Windows + R to open Run, type appwiz.cpl in the text field, and hit Enter.
  2. Select any network-related application installed, updated, or modified around the same the problem first appeared, and click on Uninstall.remove conflicting app
  3. Follow the on-screen instructions to complete the process.
  4. Restart the computer and check for improvements.

In my research, VPNs, third-party antivirus software, and firewalls were often the underlying cause. So, if you have any of these, uninstall the app.

If the problem persists, I recommend you use an effective software uninstaller tool to get rid of any leftover files and Registry entries that might still be triggering conflicts.

4. Set the default network adapter settings

  1. Press Windows + R to open Run, type ncpa.cpl in the text field, and click OK.
  2. Right-click on the problematic adapter facing network connection issues, and then choose Properties.network adapter
  3. Double-click on the Internet Protocol Version 4 (TCP/IPv4) entry.
  4. In the General tab, make sure you have the Obtain an IP address automatically and Obtain DNS server address automatically settings selected, and click OK to save the changes.automatic DNS and IP selection to fix network connection issues in windows 11

If this doesn’t work, set network settings to default or reset the network adapter!

5. Uninstall the recent Windows 11 update

  1. Press Windows + I to open Settings, go to Windows Update from the navigation pane, and click on Update history.update history
  2. Scroll down to the bottom and click on Uninstall updates.
  3. Click on Uninstall next to the update downloaded right before the problem first appeared.uninstall to fix network connection issues in windows 11
  4. Again, click Uninstall in the confirmation prompt, wait for the process to complete, then restart the PC and check for improvements.

In the recent past, we have seen network connection issues in Windows 11 due to KB5037771, and uninstalling the update fixed things in no time!

This also helps fix the No Internet, secured network error in Windows 11.

6. Modify the Registry

Tip icon Tip
Do not reconfigure any entries in the Registry other than the ones explained below. Also, before you start making the changes, create a restore point in Windows 11 since this way, you can always revert to the previous stable configuration.
  1. Press Windows + R to open Run, type regedit in the text field, and hit Enter.
  2. Click Yes in the UAC prompt.
  3. Paste the following path in the address bar and hit Enter: HKEY_LOCAL_MACHINE\SOFTWARE\Policies\Microsoft\Windows\NetworkConnectivityStatusIndicatorpath
  4. If you don’t find a NoActiveProbe DWORD listed here, right-click on the empty portion, hover the cursor over New, select DWORD (32-bit Value), and name it NoActiveProbe.DWORD
  5. Double-click on the NoActiveProbe DWORD, enter 0 under Value data, and click OK to save the changes.NoActiveProbe to fix network connection issues in windows 11
  6. Similarly, create a DisablePassivePolling DWORD and set its Value data to 1.New DWORD

7. Perform a repair upgrade

  1. Go to Microsoft’s official website, choose the edition, and then download the Windows 11 ISO.windows 11 iso
  2. Once downloaded, right-click on the ISO file, choose Mount, and then click Open. The File Explorer may hang for a minute, but it’s alright. Let the process complete.
  3. Run the setup.exe file, and click Yes in the UAC prompt.setup.exe file
  4. Click on Next to proceed.
  5. Click Accept on the Applicable notices and license terms page.
  6. Make sure the setup reads Keep personal files and apps, and click on Install.repair to fix network connection issues in windows 11
  7. Wait for the in-place upgrade to complete. It may take up to 2-3 hours.

When nothing else helps fix network connection issues in Windows 11 or slow Internet, an in-place upgrade does the trick. It’s basically like re-installing Windows, but without affecting any of the personal files and apps!

In case your Wi-Fi keeps disconnecting or the Ethernet is not working, our experts have already curated a tested set of solutions that will come to your aid.

Which fix worked for you? Let us know in the comments section below.

Xbox’s marketing head, Jerret West, is leaving the company for Roblox

Microsoft’s Xbox division, a well-known name in the gaming world, is changing hands. According to the latest reports, Jerret West, who serves as Xbox’s chief marketing officer, is now moving from Microsoft to Roblox.

This shift sparks interest and speculation among gaming fans and those involved professionally in this industry, as the announcement came days after Xbox’s biggest Games Showcase in a while. It’s not only a different job for West but also possible signs of changes happening at a larger scale across marketing teams within Xbox and potentially holds promise for what might come next with Roblox.

West’s path from Netflix to Microsoft and now Roblox reveals a career focused on molding the future of entertainment and gaming.

Microsoft’s Xbox marketing teams are preparing for a major reorganization set in motion by West’s exit. It is a change that has left many wondering about the future of Xbox. The intention behind this restructuring is to make operations more efficient: games marketing will combine with Studios, Xbox marketing will be incorporated into the Xbox team, and international marketing will merge into Consumer Sales Org.

This planned move is a strategic rearrangement that aims to align marketing activities with the related products and interested customers, possibly resulting in more integrated and effective campaigns.

Kirsten Ward takes over as the head of Xbox Central Gaming’s Marketing team, using her knowledge from Integrated Marketing. Now, she will work under Phil Spencer, Microsoft Gaming’s CEO, which shows how important marketing strategies are for Xbox’s future plans.

At the same time, the Bethesda Publishing Marketing team and 1P Games Marketing team—which includes Xbox Game Studios and Mojang—will be part of the Game Content and Studios division led by Matt Booty. Now, the Xbox Marketing team will provide reports to Xbox President Sarah Bond. This proposal hints at a consolidated manner of promoting Xbox’s various offerings.

Regarding Roblox, West’s appointment as chief marketing officer and head of market expansion is interesting. The company’s big platform, which relies on users creating content, might find value in West’s marketing and market growth skills.

This action could show Roblox’s hopes to grow and attract different audiences or try new partnerships or features. Considering West’s history, thinking about the paths he could guide Roblox toward is thrilling.

The gaming community is observing with interest as these alterations occur. The reorganization of Xbox’s marketing highlights the company’s dedication to adjust and grow in an extremely rivalrous sector. For Roblox, this could start a fresh era in its already remarkable narrative with West’s entrance.

In their paths of change, these groups show limitless potential for creativity and expansion. People wonder how these shifts will affect the gaming world in future years.

Arc Browser is Not Working? Here’s how to Fix it Quickly

When your Arc Browser isn’t working as expected, it can be incredibly frustrating, especially if you rely on it for daily tasks. Here are some quick fixes and solutions to get your browser back on track.

How do I fix Arc Browser if it’s not working?

1. Reset the Arc Browser settings

  1. Open the Arc Browser.
  2. Type or paste arc://settings/reset into the address bar and press Enter.
  3. In the new tab, click on Restore settings to their original defaults.
  4. Confirm by clicking Reset settings in the popup dialog box.

Resetting the browser settings can resolve many issues by restoring the default settings and disabling any conflicting extensions or settings.

2. Clear browser cache and cookies

  1. Open Arc Browser.
  2. Type or paste arc://settings/privacy and press Enter.
  3. Now, select Delete browsing data, select the Time range (we suggest choosing All time), make sure to check the boxes below and hit the Clear data button.
  4. Restart the browser and see if it now works.

Clearing the cache and cookies can resolve issues related to outdated or corrupted data that may be causing the browser not to work.

3. Update Arc Browser

Arc Browser on Windows is checking for new update automatically when you start the app. However, you may also do a manual check.

To do that, click the Arc (Menu) button and select Check for Updates to update the browser. If it has any updates, wait for the browser to finish, restart it and check if it works.

Keeping your browser up to date ensures you have the latest features and security fixes, which can resolve many functional issues.

4. Disable conflicting extensions

  1. Open the Arc Browser.
  2. Click on the Menu button in the upper left corner and select Settings.
  3. Click on Extensions. A new window will pop up.
  4. Review the list of installed extensions and click the toggle to disable any extensions you suspect might be causing the issue. You may also remove them completely.
  5. Restart the browser to see if the problem is resolved.

Some extensions may interfere with browser performance or the functioning of other extensions, so disabling them one by one can help identify the culprit.

5. Disable hardware acceleration

  1. Open the Arc Browser, type or paste arc://settings in the address bar and hit Enter.
  2. Click on System and ensure that Use hardware acceleration when available is toggled off (if it’s on).
  3. Restart the browser.

Conflicts with other installed software, such as antivirus or system optimization tools, can cause the browser to behave unexpectedly. Disabling hardware acceleration can sometimes resolve these conflicts.

6. Reinstall Arc Browser

  1. Uninstall the Arc Browser by going to the Control Panel (Windows) or Applications folder (Mac), right-clicking on Arc, and selecting Uninstall or Move to Trash.
  2. Download the latest version of the Arc Browser from the official website.
  3. Install the browser by following the on-screen instructions.
  4. Open the freshly installed browser and set up your preferences.

Reinstalling the browser ensures you have a clean installation, which can resolve issues stemming from corrupted files or settings.

7. Contact Browser Support

  1. Open the Arc Browser Support page.
  2. Scroll down to the support form.
  3. Fill in your information and describe the issue you are experiencing in detail.
  4. Submit the form and wait for a response from the support team.

If all else fails, contacting the support team directly can provide you with specialized assistance and potential solutions tailored to your specific issue.

Make sure you also check our guide on how to fix Arc browser if it’s not syncing if you’re in that particular situation.

Many also reported that the Arc browser keeps crashing, but we have a dedicated guide that solve this issue.

To avoid future issues, keep your browser updated and regularly clear cache and cookies. If you encounter persistent problems, consider using alternative extensions or contacting support for further assistance.

Arc Browser is Not Syncing? Here’s How to Fix it on PC, Mac & iPhone

Struggling with Arc Browser not syncing can be incredibly frustrating, but we’ve had this problem ourselves so we know how to fix it.

But first, you should know that Sync on Arc for Windows uses the new end-to-end encrypted syncing method and is not compatible with iCloud Sync on Arc for macOS. Also, the Sync function on Arc for Windows will only synchronize the Spaces, Folders and Tabs on your browser. This is not effective for syncing history, passwords, extensions or profiles.

What can I do if Arc browser is not syncing?

1.Verify Arc browser’s sync settings

  1. Open Arc Browser on your PC.
  2. Click on the Arc (Menu) button from the top-left corner and select Settings from the dropdown. menu.
  3. Go to the Sync section and ensure that Arc Sync is turned on by toggling the switch to the On position.
  4. If it’s On, turn it Off and back On.

Enabling Arc Sync ensures that your data like spaces, folders, and tabs are being synchronized across devices. However, remember that full sync capabilities such as history, passwords, and extensions are still in development.

Also, make sure that you have a steady internet connection. It’s mandatory for the sync feature to work.

2. Update Arc Browser

When it’s attempting to sync, you might see the message Oops! Sync has been disabled as one of your devices is running an old version of Arc. Update to keep syncing! or Please update Arc to keep syncing.

In that case, click the Arc (Menu) button and select Check for Updates to update the browser, then try syncing again.

3. Clear the Arc Browser cache

  1. Open Arc Browser.
  2. Type or paste arc://settings/privacy and press Enter.
  3. Now, click on Delete browsing data, select the Time range, make sure to check the boxes below and hit the Clear data button.
  4. Restart the browser and see if it now syncs.

Clearing the browser’s cache can resolve issues related to outdated or corrupted files that may be interfering with the sync process. Please note that this will delete the browsing data for a current profile. Change the profile using Alt + number of the profile and repeat the steps above to delete the data on every profile.

4. Re-login to Arc Browser (on Mac)

  1. Click on the three dots in the top-right corner of Arc Browser.
  2. Select Settings from the dropdown menu.
  3. Find and click on Account, then click Sign Out.
  4. Restart Arc Browser, and go back to Account and sign back in using your credentials.

Logging out and back in can refresh your sync settings and resolve any temporary issues causing synchronization problems.

5. Check iCloud Drive settings (on iPhone)

  1. Open the Settings app on your iPhone.
  2. Tap on your Apple ID at the top and select iCloud.
  3. Ensure iCloud Drive is turned on by toggling the switch to the On position.
  4. Go back to the main Settings page and tap Privacy.
  5. Tap Location Services and make sure it’s enabled.

iCloud Drive must be enabled for Arc to sync successfully. This step is crucial if your sync involves iCloud, ensuring that Arc can access the cloud services it needs.

6. Reset Arc Browser Sync Data (on Mac)

  1. Open Arc Browser.
  2. Click on the three dots in the top-right corner to open the menu.
  3. Select Settings from the dropdown menu.
  4. Navigate to Sync and click on Reset Sync Data.
  5. Confirm the action.

Resetting your sync data can help if there’s a conflict or corruption in the current sync data. This will clear the existing data and start a fresh sync cycle.

7. Contact Arc Support

  1. Open Arc Browser.
  2. Click on the menu button, hover over Help and select Contact the Team.
  3. Fill in the support form with details of your sync issue and submit it.

If none of the above solutions work, reaching out to Arc Browser’s support team for personalized assistance can help resolve more complex or unique issues.

Keeping your browser updated and regularly clearing your cache can prevent many syncing issues in the future. In the meantime, you might also be interested in what to do if you can’t create an Arc account.

If you still have issues leave a note in the comments below.

HyperTerminal Private Edition: A Terminal Emulator to connect & manage remote devices

HyperTerminal Private Edition is a Windows Terminal emulator that lets you connect to various systems using protocols TCP/IP Networks like Telnet, COM ports, and Dial-Up Modems. It is available for Windows 11, 10, 8, 7, and Vista. Let’s learn more about it!

What are primary features of HyperTerminal Private Edition?

HyperTerminal, the emulation program by Hilgraeve, allows you to configure network devices, access remote servers, or perform serial communication between routers, switches, and other industrial equipment. Here are some of its main features:

  • Protocol support – Supports such as Telnet, SSH, Rlogin, and Serial connections.
  • Terminal emulation – Emulates several terminals, including, ANSIW, ANSI, VT100, VT52, VT100J, VT220, TTY, VT320, ViewData, and Minitel which allows compatibility with different systems and devices.
  • Scripting – Comes with scripting capabilities, which lets you automate login sequences, perform repetitive tasks and facilitate testing and troubleshooting procedures.
  • File transfer – Supports file transfer protocols such as Zmodem, Xmodem, Ymodem, and Kermit, which allow you to exchange files between connected systems.
  • Session logging – Lets you keep logs of interactions with remote systems and lets you review them for troubleshooting issues.

How are the system requirements for HyperTerminal Private Edition?

To download HyperTerminal Private Edition, you need Windows Vista, Windows 7, 8, 10, 11, or Windows Server 2003, 2008, 2012, 2016.

This emulation program is not free, but you can download a free trial. If you like the tool, you can purchase it for $69.99.

How to download and install HyperTerminal Private Edition?

  1. Download the HyperTerminal Private Edition installer from the official website.
  2. Double-click the downloaded file to run the installer.
  3. Click Yes on UAC if prompted.
  4. On the next screen, click Next.
  5. Select Agree on the license agreement page, and click Next.Agree - HyperTerminal Private Edition: A Terminal Emulator to connect & manage remote devices
  6. Choose the default location or mention a location and click Next.Next
  7. Click Proceed to initiate the installation.Proceed - HyperTerminal Private Edition: A Terminal Emulator to connect & manage remote devices
  8. Now, click Finish.

What are some alternatives to Hyper Terminal?

Since HyperTerminal Private Edition is a paid software, it might not be the ideal tool for everyone. You can try popular alternatives like PuTTY (free and open-source), Tera Term, Royal TSX, SecureCRT, CuteCom JuiceSSH, and CoolTerm.

Remember to run HyperTerminal Private Edition; you should have the correct protocol settings according to the remote system.

Also, monitor session logs for troubleshooting and documentation purposes and keep the software updated.

In case you want to use the terminal emulator on your Windows 7, we have a separate guide with installation instructions, check it out!

If you have been using HyperTerminal Private Edition and are facing issues like not opening on your device, we have a detailed guide for you.

Have you tried using HyperTerminal Private Edition? If so, share your experience with our readers in the comments section below.

How Do You Access Google Password Manager on the Arc browser?

Arc browser is one of the newest browsers available on Windows 11 and macOS. It has gained traction due to its unique intuitive interface and comes with its password manager.

However, if you have migrated from Chrome to Arc browser but still want to access your credentials stored in Google Password Manager, you can. Let’s walk you through simple steps to access Google Password Manager on the Arc browser.

How can I access Google Password Manager on the Arc browser?

  1. Launch the Arc browser, or if you haven’t downloaded it yet, visit the official Arc website. Click the Download Arc on Windows 11 button to download the installation file, and double-click the file to install the browser.Arc download Windows 11
  2. Click the New tab option from the left pane, and type passwords.google.com in the browser’s search bar.Open New tab, Google Password Manager Arc browser
  3. Click the Sign in button.Sign in - Google Password manager in Arc
  4. Enter the email address associated with your Google account and click Next.Google sign in 1
  5. Now, enter your password, and click Next.Google sign in 2
  6. Click Continue.Continue Gmail.com
  7. Once logged in, you can check the saved password list in the password manager. You can view, update, or delete any of the credentials.

How can I import passwords from Google Password Manager to Password Manager on Arc?

  1. Launch Google Chrome, click the three dots icon, then select Settings.Settings CHrome - Select How Do You Access Google Password Manager on the Arc browser?	
How Do You Access Google Password Manager on the Arc browser
  2. From the left pane, click Autofill and passwords, then select Google Password Manager.Google Password manager
  3. Go to the left pane again, choose Settings, locate Export passwords, and click Download file.Download the file
  4. Next, open the Arc browser, click the Arc icon from the top left corner, and select Settings.Arc Settings - How Do You Access Google Password Manager on the Arc browser?
  5. On the next window, locate and click Default or the Profile you want to use under Profiles.Go to profile
  6. Click Passwords from the bottom of the pop-uppasswords
  7. On the next page, click select a CSV file, then choose the file and click Open.Save the csv file
  8. Once done, you will get the Import successful message. You will also get the option to Delete the .csv file, click the checkmark if you want, then select View passwords to check the credentials.View passwords - access Google Password Manager Arc browser

So, this is how you can open your Google Password Manager on your Arc browser and manage or export them without any loss.

Google Password Manager is quite popular. Although it is available through the Google Chrome browser, it can be run on any device and any available browser. Also, it comes as something other than a stand-alone app or extension.

If you want to explore other password managers for better security and safety, you can look at the best offline password managers that can help you manage your passwords.

And if you want cross-platform availability, check our guide on how to access Google Password Manager anywhere.

Also, if you are interested in knowing more about this browser, check out our detailed review on the Arc browser.

Have you tried using Google Password Manager on the Arc browser? If so, share your experience with our readers in the comments section below.

Windows 10 Disk Management: How to Open?

Disk Management is a system utility app on Windows 10 that can perform advanced storage operations. It shows details for every drive on your PC and all partitions for each drive. Here, we will discuss how to open Disk Management utility and talk briefly about the functions of this system utility.

How can I open Disk Management on Windows 10?

1. Using the Power User menu

  1. Press Windows + X to open the Power User menu.Disk Management open Windows 10
  2. From the options available, select Disk Management to open the Disk Management app.

2. Using the Run dialog box

  1. Press Windows + R to open the Run window.Disk management run window - Windows 10 open
  2. Type diskmgmt.msc and click OK to open the Disk Management app.

3. Using the Control Panel app

  1. Press the Windows key and type control panel in the search box.Control Panel - Windows 10 disk management open
  2. In the Control Panel app, select View by as Category, then click System and Security.System and security
  3. Click Administrative Tools.Administrative tools
  4. Double-click the Computer Management option.Computer management - open disk management Windows 10
  5. From the left pane, select Storage, then click Disk Management.Disk Management

4. Using the search menu

  1. Press the Windows key and type disk management in the search box.Open Disk Management Windows 10
  2. Select Create and format hard disk partitions to open the Disk Management app.

5. Using Command Prompt

  1. Press Windows + R to open the Run window.diskmgmt.msc
  2. Type cmd and press Ctrl + Enter to open Command Prompt with administrative privileges.cmd - diskmgmt.msc
  3. In the command prompt window,  type diskmgmt.msc and press Enter.

What can I do using Disk Management?

On Disk Management, you can

  • Set up a new drive – You can replace or get a new drive; you need to initialize it before using it on your PC.
  • Convert MBR disk partition to GPT or vice versa.
  • Change a dynamic disk to a basic one.
  • Extend the basic volume.
  • Shrink a partition or basic volume.
  • Change or assign a new drive letter.
  • Manage virtual disk – You can enable the creation and attachment of VHD.
  • Check the disk properties.
  • Manage basic volumes, including shrinking, extending, deleting, and formatting a volume
  • Set partition as active.
  • Create a simple volume.

If the disk management app is not loading or you have issues extending or shrinking a partition on Windows 10, check out these articles for solutions.

However, suppose you want to perform advanced disk or partition tasks, such as operating system migration, disk/partition copy, partition recovery, and more. In that case, you need a third-party disk management app.

What do you use Disk Management on Windows 10 for? Share your thoughts with our readers in the comments section below.

How to Repair Apps and Programs in Windows 11

Sometimes, apps and programs on your Windows 11 computer don’t work as they should. The reason could be missing files or incorrect installation. To fix this, you need to repair or reinstall apps on your computer. You can use the Control Panel, the Windows Settings app, or a third-party tool.

How can I repair apps and programs in Windows 11?

1. Using the Settings app

  1. Press Windows + I to open the Settings app.Apps - Installed apps = Repair app or program in Windows 11
  2. From the left pane, go to Apps, then click Installed apps.
  3. You will get the list of Installed apps, go through the list, and locate the app or program you want to repair.
  4. Once located, click the three dots icon and select Advanced options.Advanced options
  5. Go to the Reset section on the next page and click the Repair button. This will repair the program, and will not affect your data related to the app, including login credentials.Repair - Repair app and programs on Windows 11
  6. If this doesn’t help, you can use the Reset button, which will delete all the app’s data.

However, if you don’t find the Advanced options option for the app you want to repair, you need to uninstall it instead. To do so, locate the app, click the three-dot icon, and choose Uninstall. Once done, restart your PC if prompted.

2. Using the Control Panel app

  1. Press Windows + R to open the Run window.Control Panel - Repair Apps and Programs in Windows 11
  2. Type appwiz.cpl and click OK to launch the Programs and Features page on the Control Panel app.
  3. You will get the list of installed apps. Locate the app you want to repair, select it, and then click Change the appChange from the banner above the list.
  4. Follow the on-screen instructions to repair the app or program.
  5. If you don’t get the Change button, click the Uninstall button and follow the steps to complete the uninstallation process.
  6. Restart your computer if prompted.

You can also use third-party uninstaller tools to uninstall the programs or apps on your Windows 11 computer.

These programs uninstall the app from your computer and eliminate the junk files and related registry entries from your PC.

Do you like using Windows Settings or Control Panel to repair an app or program from Windows 11? Share your thoughts with our readers in the comments section below.

2 Ways to Repair Apps and Programs on Windows 10

If apps on your Windows 10 are not running correctly, you need to repair the apps and programs on your device. You can use the Windows Settings app, Control Panel, or a third-party app for this. Let’s examine the process in detail.

How can I repair apps and programs in Windows 11?

1. Using the Settings app

  1. Press Windows + I to open the Settings app.
  2. On the Windows Settings home page, go to Apps.Apps - Repair Apps and Programs on Windows 10
  3. From the left pane, click Apps & features.
  4. On the right side, you will see a list of installed apps. Go through the list and locate the app or program you want to repair.
  5. Once located, select the app, and click Advanced options.Advanced options
  6. On the next page, scroll it to find the Reset section. Click the Repair buttonRepair app -  How to Repair Apps and Programs in Windows 10

  7. This will repair the program, and your app-related data, including login credentials, will not be affected.
  8. If this doesn’t help, you can use the Reset button, which will delete all the app’s data.

However, if you don’t find the Advanced options option for the app you want to repair, you need to uninstall the program. To do so, locate the app, click the three-dot icon, and choose Uninstall. Once done, restart your PC if prompted.

2. Using the Control Panel app

  1. Press Windows to open the search menu.Control Panel  app - repair app and program Windows 10
  2. Type control panel and select the first entry to launch the Control Panel app.
  3. On the home page, click Uninstall program under the Programs option.Uninstall a program
  4. Next, on the Programs and Features page, select the app you want to repair and click Change from the banner above the list.Change - Repair Apps and Programs in Windows 10
  5. Follow the on-screen instructions to repair the app or program.
  6. If you don’t get the Change button, click the Uninstall button to remove the app and follow the steps to complete the uninstallation process.
  7. Restart your computer if prompted.

You can also try third-party uninstaller tools to uninstall the programs or apps on your Windows 11 computer.

These tools allow you to delete an app from your computer and remove associated junk files and registry entries, thereby optimizing PC performance and retrieving storage space.

Which method do you prefer for repairing or uninstalling apps or programs from a Windows 11 PC? Share your thoughts with our readers in the comments section below.

ARC Browser Not Closing? Try These 5 Solutions

Closing a browser should be as simple as clicking the X button but sometimes, the Arc browser does not respond in kind and you may experience some difficulty.

Your browser failing to close may be due to multiple instances of the browser that are open, an accumulated cache that has become corrupt over time, or insufficient system resources needed for the browser to close.

What can I do if the Arc browser is not closing?

1. End the task in Task Manager

  1. Find the Arc browser icon on your Taskbar with multiple active programs open.
  2. Right-click on its taskbar icon, then select the Close all windows option.

  3. If this fails, hit the Windows key, type Task Manager in the search bar, and click Open.task manager search
  4. Navigate to the Processes tab, and find processes related to the Arc browser.
  5. Right-click on all of them and select End task.

In some rare cases, some tasks won’t be killed even after you click on End task. Should this happen, we have a detailed article on how to force kill a task.

2. Clear browser cache and cookies

  1. Launch the browser and click on the Arc icon at the top left corner then select Settings.
  2. Next, click on Default profile.
  3. Select the Privacy & Security option.
  4. Next, click on Delete browsing data.
  5. Now check all the boxes and hit Delete data.

3. Disable/remove extensions

  1. Launch the browser and click on the Arc icon at the top left corner then select Extensions > Manage extensions.
  2. Locate the extension you’d like to remove then hit the Remove button. Adblockers are notorious for causing issues so start with these.
  3. Confirm the removal in the next dialog box.

You can also take better control of your Arc browser extensions to ensure you’re getting the most out of your browser without them interfering with its performance.

4. Delete the cache folder

  1. Hit the Windows + E keys to open File Explorer.
  2. Go to the following location: AppData\Local\Packages\TheBrowserCompany.Arc\LocalCache\Local\Arc
  3. Find and delete StorableArchive.json and StorableWindows.json files.
  4. Locate the last StorableArchive.{DATETIME}.json from a date before the problem started and change the name to StorableArchive.json.

The cache folder is where your Arc browser stores all its files so if you haven’t cleared it in a while, the data may become corrupt or outdated hence interfering with the proper functioning of the browser. Once you delete these files, they’ll be recreated.
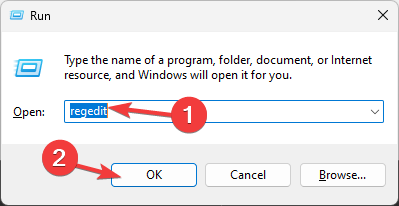
5. Reinstall the browser

  1. Hit the Windows + I keys simultaneously to open Settings.
  2. Navigate to Apps on the left pane then select Apps & features on the right pane.
  3. Click on Installed apps, find Arc browser, click the three horizontal dots and select Advanced options.
  4. Scroll down and click on Uninstall.
  5. Confirm uninstallation in the next dialog box.
  6. Before you install the browser again, remove all software leftovers.
  7. Open any of the installed browsers, go to Arc’s official website, and click the Download Arc for Windows 11 option.arc browser download for Windows 11
  8. Once downloaded, run the ArcInstaller.exe file and follow the on-screen instructions to complete the installation process.

Additional tips and tricks

  • Keep your Arc browser up-to-date. This ensures any bugs or glitches don’t interfere with normal operations. Also, keep your OS updated to avoid compatibility issues.
  • Clear your browser cache regularly as accumulated cache can interfere with how your browser functions.
  • Keep your add-ons and number of tabs open to a minimum. Too many extensions can slow down your browser or make it unresponsive. The same goes for too many browser tabs.
  • Monitor your system resources and ensure they are sufficient for your browsing activities. A Disk Cleanup once in a while will ensure you have enough storage space and memory.

Unfortunately, Arc is one of those browsers you love to hate. It’s packed with amazing features but has bugs that make you want to opt out. But it’s not all bad. There are Arc browser shortcut commands that make your browsing experience enjoyable and faster.

It also has the Browse for me AI feature that unloads all the manual work of searching and scanning for information on the Internet.

However, if these features don’t convince you, you can always get similar or even more advanced features in Arc browser alternatives, so explore what’s out there if the situation worsens.

Just keep in mind that the issue of Arc not closing is not unique to the browser. Even Opera fails to close and Microsoft Edge refuses to shut down at times.

This isn’t the only issue, as many reported that the Arc browser keeps crashing, but luckily this can be fixed with ease.

That’s all we had for this article but if you have any other solutions that were successful, we’d like to hear about them. Drop us a comment down below.

Arc Browser Commands – 11 Best Shortcuts for Fast Surfing

Do you want to learn the best Arc browser commands or shortcuts for quick navigation? Keep reading!

Arc browser lets you zip around the web with special hotkeys that make browsing much faster and easier on your hands.

Arc Browser Commands

Besides using shortcuts like other browsers, you can also type in simple text commands in a special Arc Command Bar.

I’ll break down some of the coolest commands, demonstrate how to use them, and even show you how to customize shortcuts to fit your needs.

What Are Arc Browser Commands?

Arc browser commands are hotkeys or text commands that allow you to perform quick actions. These shortcuts are organized into three major categories: Everyday Use, Quick Navigation, and Other.

They include all of the following app modules:

  • Tab and window hotkeys
  • Arc app feature hotkeys
  • Webpage shortcuts
  • Address bar hotkeys
  • Shortcuts that require input from the mouse.

They’re particularly popular due to their two-way usability as keyboard keys or text combinations.

For example, you can use the keyboard shortcut (Ctrl + N) to open a new Arc browser window. However, you can also press Ctrl + L on Windows 11 and Command + T on macOS to bring up the Arc Command Bar. You can then simply type New Window and hit Enter or Return to open it.

It’s easier to use the text commands on a Mac than on a Windows 11 PC. The Arc Mac edition comes with a dedicated settings interface for commands and their respective shortcuts. There’s also an Essential Keyboard Shortcuts dialog that shows the five most used commands and their hotkeys.

Essential Keyboard Shortcuts

Moreover, you can view all of the commands and hotkeys so it’s easier to implement the shortcuts.

view all of the commands

Contrarily, for Windows 11, there are no dedicated settings or menus. You’ll have to remember the hotkeys. However, you can bookmark the Command Bar Actions portal for reference.

Arc browser commands windows 11 1

When you enter any of the browser commands from the list into the Arc Commands Bar, it’ll show the specific hotkeys for it.

Arc browser commands windows 11 2

Best Arc Browser Commands for Everyday Use

Arc developers have created commands and corresponding keyboard shortcuts for various use cases, like Navigation, Tab Organization in Spaces, Tools, Split View, Settings, and more.

Here are some of the most useful Arc commands along with their hotkeys:

New Window

This syntax will open a new fresh window and minimize all other tabs.

New Window

New Incognito Window

It opens a new private browsing session.

New Incognito Window

Toggle Sidebar

Detaches and re-attaches the Arc browser Sidebar. When detached, you’ll browse a website in full screen.

Toggle Sidebar 1

To bring up the sidebar again, hover the mouse cursor on the left edge of the browser.

show sidebar

View Downloads

This command will show you all the downloads done through the Arc browser app.

View Downloads

Switch to Dark Mode

Switch to Dark Mode doesn’t have an assigned hotkey by default. However, if you need to use this setting frequently, you can assign a custom keyboard shortcut. The method has been discussed below.

Switch to Dark Mode

To go back to the light mode, use the command Switch to Light Mode.

Manage Extensions

This syntax opens the My Extensions setting instantly. This also doesn’t have a mapped hotkey.

Manage Extensions

Preferences

This command opens the Settings dialog for the Arc app on a Mac. It also shows you the search options for Open Max Preferences and Open Link Preferences commands.

Preferences

Open Library

This short text opens a media browsing interface.

Open Library

The UI contains a media browsing sidebar, a top search field, and a preview panel.

media interface

Here, you can look up any documents and files saved on your Mac and all downloads done on Arc, Arc Easels, Arc Spaces, Arc Boosts, and Arc Archived Tabs.

Add Top Split

Use this to create a split view on the Arc browser with two browsing sessions stacked on each other.

Add Top Split

Searching for this command on the Arc Commands Bar will also show other syntaxes, like Add Left Split, Add Right Split, Add Bottom Split, and Add Vertical Split View.

Add Top Split 1

Collapse All Folders

This command will minimize all expanded folders on an Arc browser Space to give you more room on the sidebar for new website tabs.

Collapse All Folders

To undo this, use the Expand All Folders syntax.

Force Refresh the Page

If your current website is malfunctioning, lagging, or not responding to instructions and clicks, use this command to refresh it. This is similar to what you do with Option + Command + E keys on Safari for hard refresh.

Force Refresh the Page

I’ve explained and demonstrated the above Arc commands on a macOS device. To use the same commands on a Windows 11 PC, simply replace the Command key with the Ctrl key.

How To Manage Arc Browser Commands

Here’s how you can finetune them further:

How To Add a Shortcut for a Command

  1. When the Arc browser is open, press Command + , to launch the Arc Settings dialog box.
  2. Navigate to the Shortcuts tab.
  3. Browse through the commands on the left-side list.
  4. Syntaxes with no mapped keyboard shortcuts are empty commands.
  5. So, let’s say you use the View Archive command a lot and would like to create a hotkey for it.
view archive 1
  1. Click on it and the shortcut box next to it will become solid white.
  2. Press the hotkey directly on the Mac keyboard, say Shift + Ctrl + A.
  3. Arc will map the shortcut key combination you pressed.
  4. You’ll see a new list on the top named Customized Shortcuts.
View archive 2

How To Customize Arc Browser Commands

If an Arc command shortcut is interfering with a macOS hotkey, here’s what you can do:

  1. Go to the Shortcuts tab in the Arc Settings dialog.
  2. Find the command you want to modify, like Capture.
  3. Click on the Prefer Websites on the right-side menu just below the shortcut key images.
  4. Choose Prefer Arc from the drop-down list.
Prefer arc
  1. Now, if you use the same hotkey on Arc, it’ll not become effective for the macOS.
  2. If you wish to change it, click on the three dots menu near the Reset Shortcut to Default box.
  3. Click on the Remove Shortcut option in the context menu and add the preferred hotkey combination.
Remove shortcut

Summary

So far, you’ve learned about the most helpful Arc browser commands, how these syntaxes are linked to browser hotkeys, how to customize them, and more.

So, give them a try in day-to-day web surfing, creating content, website scrapping, etc. Additionally, you can integrate ChatGPT for an even more streamlined approach or use these commands to export Spaces.

Did the article help you to learn new skills on the Arc browser? If you know some extra commands, feel free to share them in the comments below.