Microsoft recently gave the Windows 10 icons a new look, but one Windows 10 fan is taking it to the next level. In a new concept, Twitter user @vastglad recently showcased their own vision for Windows 10 with a new look inspired by Fluent Design and Windows 10X. The concept reimagines the Start Menu, app loading screens, and much more (via Tom Warren).
Seen above, the most interesting area of the concept gives the Windows 10 Start Menu an amazing new look. In @vastglad’s vision, we can see a more rounded Start Menu, with various sections for search, tasks, pins, and recent files. A bit similar to Windows 10X, there also appears to be a hub on the top of the Start Menu with the weather and a greeting for the user and a link to the settings. Overall, the Start Menu also has more touches of Fluent Design’s Acrylic effects, which really bring out the new-style Windows 10 icons Microsoft recently revealed.
Other areas of this concept highlight new splash screens for apps. Oddly enough, we see one for the Windows 10 Weather app. In this splash screen, the new icon for the Weather app appears on top of an acrylic window that features the Microsoft logo. Even the Weather app itself looks a bit different, in this concept, as it has a lighter look and touch, blending nicely with the rest of Windows 10. You’ll also likely notice the taskbar looks a bit different, with no search box or task view button. There are also more traditional icons for the network status, inking, sound, and the touch keyboard.
Concepts like these are not new and are quite fun. We’ve seen concepts for a new Windows 10 Task Manager, the battery meter, and even Windows 10 20H1. It obviously might not ever come to life, but they’re really cool to look at. What are your thoughts? Let us know in the comments below.
One thing many complain about PowerShell is that it often can’t scroll up, or the scrolling is not working altogether. PowerShell might be incredibly versatile, but encountering difficulties with basic functions like scrolling makes some second-guess its very purpose.
This can be an issue that takes some serious time to get past for some PowerShell users. That’s why we’ve created this guide that will give detailed information on the matter!
What can I do when PowerShell can’t scroll up?
1. Increase the Screen Buffer Height
While in a PowerShell session, right-click the upper left corner, and select Properties.
Go to the Layout tab, and change the Height of the Screen Buffer Size.
Confirm the change by clicking OK.
First, you need to increase the the PowershellScreen Buffer Size. Just set it to something over 1000. The choice is all yours! Then, experiment with a value that works for you.
Remember, the value you set controls how far you can scroll vertically after a command has finished running. Finally, let us add something that might just sound like music to your ears. The larger the number, the further the scrolling can get before data is overwritten.
The maximum you can scroll on a PowerShell window, though, is no more than 9999 lines.
2. Use the More command
As you might already know, this legacy command-line tool pages the output one screen at a time. It was originally intended as a way to page through large text files, so all you need to do is run your command and pipe it to more:PS Scripts:> get-process | moreg
A break is found at the end of each page: … 398 19 4796 11920 107 1.59 1628 OpenDNSUpdater 143 8 3196 10980 46 2.93 4896 OSPPSVC 767 73 176020 197744 820 29.23 4192 powershell -- More --
Next, choose one of the following options:
Enter – it will advance one line of data at a time.
S – this will skip the next X number of lines.
Space bar – it will advance to the next page.
P – you will be prompted for the next X number of lines to advance.
F – it will display the next file or page of data.
Q – Quit.
If PowerShell can’t scroll up, this could be the way to go!
3. Make sure all actions are logged into the log file
If you want to enjoy extra space in a session, we have a quick tip for you. Open a new session, then run this command:Start-Transcript -Path "[YourPath]PowershellSession.log"
This will ensure all the actions you perform and see in the window are logged into the log file.
That’s all! If you earlier found that PowerShell can’t scroll up further, things should be running fine now.
If you enjoyed this tutorial, you’ll also like to read more about other fixes for some of the most common PowerShell errors.
Windows Live Mail and Outlook Express by default support email signatures. Adding an email signature allows you to embed a snippet of information with all the emails sent from your email account.
Now, what if you want to edit a Windows Live Mail signature? It’s actually pretty easy. You can edit the existing Windows Live Mail signature from the Options.
In this article, we show you how to edit and add Windows Live Mail signatures.
How can I edit the Windows Live Mail’s signature?
1. Edit the Windows Live Mail signature
Open Windows Live Mail app.
Click on File and select Options, then Mail.
If you don’t see the File option, click on Tools and select Options.
Open the Signatures tab.
Here you can see all the previously created email signatures.
Click on the signature you want to edit.
You can edit plain text signatures directly from the Live Mail editor.
If not, note the path and file name in the box.
Open File Explorer and navigate to the path you noted earlier.
On older versions, click Tools and choose Options instead.
Open the Signatures tab.
Select New from the Signatures section.
Under the Edit Signature section, create your email signature.
Click OK to save the signature.
Open the Signature tab again and make sure the option Add signatures to all outgoing messages is checked.
3. Add a signature to an email
After composing an email message, you can select which signature you want to use:
In the Compose window, go to Insert and click on Signature.
Press and hold the Alt key if you can’t see the menu bar.
Choose the signature you want to use and send the email.
While creating email signatures, make sure it is short and precise. Try to limit the email signature to a maximum of 3-4 lines to keep it professional.
If you don’t want to add a signature to replies and forwards, then follow these steps:
Go to File.
Select Options.
Go to the Signature tab.
Uncheck Don’t add signatures to Replies and Forwards option.
By following the steps in this article, you can add and edit email signatures in Windows Live Mail.
Do you prefer plain text or HTML enriched signatures? Leave your answer along with any other questions and suggestions in the comments section below.
Microsoft is now investigating cases of cracked Surface Laptop 3 screens
Following reports of Surface Laptop 3 screens spontaneously cracking, Microsoft has now said that it is investigating the reports, but it has not admitted that there is a fault in the production at this time.
That’s it for this week. We will be back next week with more Windows 10 news!
Windows Insiders play a critical role in ensuring that Microsoft releases high-quality software that caters to the requirements of all users. But their utility to the program suffers when a preview build causes some of their machines or system services to act up.
Microsoft’s latest Windows 10 Insider Preview Build addresses a couple of such issues.
Build 19569 solves OneDrive malfunction
OneDrive should not be a CPU-intensive application. After all, it is a hard drive on the internet that does not rely a lot on your machine’s processing power.
Nonetheless, a Windows upgrade error may cause the cloud storage service to demand more computing power than necessary. Some insiders discovered that after installing the previous build, but Microsoft has already addressed the problem.
We fixed an issue resulting in OneDrive not working and using an unexpectedly high amount of CPU for some Insiders on the previous build.
Incompatibility with third-party virtual machines (VMs)
It is not unusual for a Windows 10 update to fail because it is incompatible with an existing driver. That was the case when some insiders upgraded their OS only for SCSI drivers to malfunction.
As a result, some third-party VMs failed to work. The latest preview build has fixed that problem.
Still, it appears that Microsoft has not quite got on top of the driver incompatibility situation that its preview builds are causing. As such, other devices besides VMs may still be affected. The company is looking into the problem, though.
The green screen of death (GSOD)
Most PC users do not associate the GSOD issue with Windows. But some recent Windows 10 builds have been causing this error, which prevents their PCs from booting.
Driver or device incompatibility may cause the GSOD error. If you ever encounter the Windows 10 malfunction, here is a guide to some practical solutions.
Start menu flaw
Microsoft has also fixed a Start menu problem that affected some insiders after upgrading their OS.
New Windows 10 icons
New colorful app icons are probably the most conspicuous feature that Build 19569.1000 introduced to Windows 10. Insiders in the First ring can test the new icon designs, which Microsoft will be rolling out over time.
While using PowerShell, there is very little tolerance for error. Even so, sometimes users discover that PowerShell is not showing the full output. If they don’t take quick measures, they’ll never stop it from truncating the output.
If that’s your case as well, don’t let this turn into an unexplored area that isn’t worthy of any attention. Here are some troubleshooting tips you may try instead.
What can I do when PowerShell is not showing the full output?
1. Pipe to Out-String and add the width parameter
You should first use this simple trick to rectify any column width problem. All you have to do is to go to Out-String and add the -Width parameter.
Keep in mind that the -Width parameter of Out-File cmdlet specifies the number of characters in each line of output. Any other characters will simply be truncated, not wrapped.
2. Pipe the results through the Format-List cmdlet
PowerShell’s default is to cut off the output to fit your screen. That’s precisely why you are currently seeing the ellipse. If you want to view complete information for an object, you should try piping the results of Get-Acl through the Format-List cmdlet.
As an example, the following command retrieves the security descriptor for the folder C:Scripts, then displays all info as a list: Get-Acl c:scripts | Format-List
3. Change the $FormatEnumerationLimit value
Another thing that’s really simple, once you know the answer, is how to fix the issue when the object you’re looking at is an array. In this case, PowerShell is only showing the first few entries in that array, rather than all of them.
To be more specific, you just need to change the $FormatEnumerationLimit value. If you type it on its own into PowerShell, then the current value will be returned. The default value of $FormatEnumerationLimit is 4, which can be limited when generating a large file.
Increase this value to something large enough to show more items. You may also change the value to -1 and be sure that it will output all entries in your collection from the very start.
So, the next time you feel overwhelmed when seeing that PowerShell starts to truncate the output, here’s a comprehensive troubleshooting guide that may be followed easily.
If you’re aware of another way to solve this problem, don’t hesitate to share it in the comments section below.
What was once thought of as the impenetrable giant in Amazon’s AWS market share seemed to be a bit under fire in 2019 by the continued enterprise adoption of Azure.
According to a market analysis report from Canalys, Microsoft’s Azure cloud business encroached on AWS’s market share growth in 2019.
Canalys reports that AWS went from 33.4% of the global market share in Q4 2018 down to 32.4% during the same timeframe in 2019 while Microsoft increased from 14.5% in Q4 2018 to 17.6% in 2019. Over the entirety of 2019, AWS sat at 32% while Microsoft grew from 14.2% to 16.9%.
Despite the seeming back and forth between AWS and Azure during 2019, the year turned out to be a relatively positive one for all cloud service providers, proving that there continues to be a high ceiling on revenue and profits for businesses in the near future.
“Competition among the leading cloud service providers continued to intensify. AWS still outpaced its competitors in real US dollar terms. Its business was US$2.4 billion bigger in Q4 than in the same period in 2018. Its investment in new enterprise sales and marketing resources combined with the general availability of AWS Outposts and the launch of AWS Local Zones will drive further growth.
Microsoft Azure’s growth rate was higher in the quarter, as it gained traction in enterprise accounts and benefited from its extensive channel reach. Microsoft stepped up its messaging to partners to drive Windows Server 2008 workloads to Azure as support comes to an end.
Google Cloud continued to make progress in penetrating new enterprise customers and developing its network of channel partners. It has substantially grown its internal enterprise salesforce over the last year and brought partners under its field organization for closer alignment.
Alibaba Cloud remained the leader in China as its growth re-accelerated. It aims to expand its enterprise customer base across the rest of Asia Pacific and Europe, where it is using two-tier distribution.”
The increased demand is evident by the Canalys’ summary of capital expenditures businesses reported in 2019 that include Alibaba, Amazon, Baidu, Facebook, Google, Microsoft and Tencent-collectively spending upwards of $60 billion in data center infrastructure for the year.
Interestingly enough, Canalys’ principal analyst Matthew Ball notes that despite the increasing market share of competitors in the industry, the biggest buyers in the sectors remain providers such as Amazon, Google, Microsoft, and others. With an 8% increase in spending, up from 2018, “cloud service providers will remain the largest buyers of servers and related components over the next five years.”
Windows Live Mail is a popular email client before Microsoft replaced it with the new Mail app. That said, the app is still popular among Windows users with many new users trying it as well.
If you are new to Windows Live Mail, you may want to make a few changes to the default app settings to tune it as per your preference.
In this article, we show you how to change Windows Live Mails settings to change the folder location, mail view, font color, account from POP3 to IMAP, change the mail notification sound, themes, and the display name.
How do I change Windows Live Mail settings in Windows?
1. Change Windows Live Mail folder location
Launch Windows Live Mail.
Press the ALT key to bring up the Menubar.
Click on Options and select Tools.
In the 2011 version of Live Mail, go to File > Options > Mail.
Open the Advanced tab.
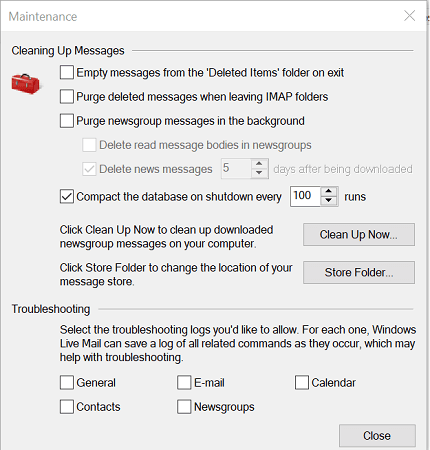
Click on the Maintenance button.
Again click on the Store Folder button.
Click the Change button and select the folder where you want to save your email messages.
Click OK to save the changes.
Restart Windows Live Mail to apply changes.
2. Change Windows Live Mail view
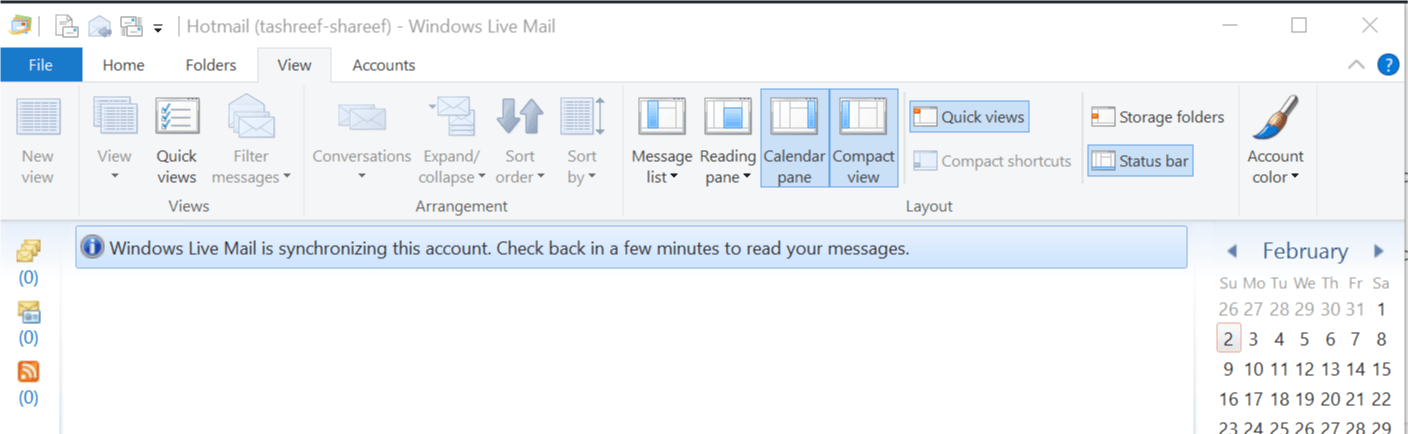
Start Windows Live Mail.
Open the View tab and select Compact View.
To add the folders to Compact view do the following: In Regular View: When you are in regular view, right-click on any folder/subfolders and select Add to compact view. In Compact view: When you are in the compact view, click the + icon and click on Add to compact view option. Select the item you want to access from the view tab and click OK to save the changes.
3. Change Windows Live Mail font color
Launch Windows Live Mail.
Click on File and select Options > Mail.
In the Options window, open the Compose tab.
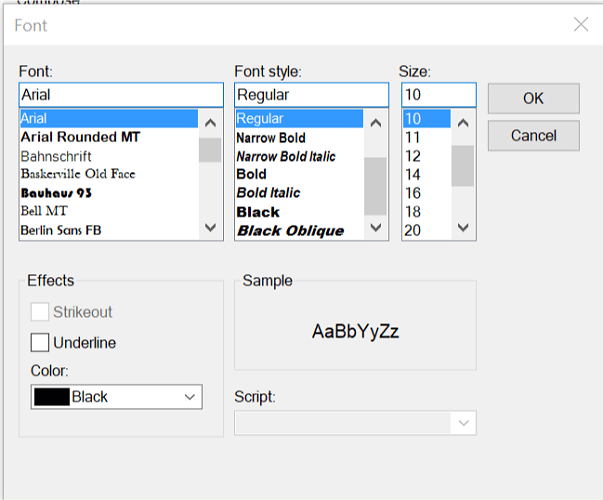
Under the Compose section, click on the Font Settings button.
On the Font window, you can select the font and font size.
Under Color, click the drop-down menu to select the font color you want to apply to Windows Live Mail.
Click Apply and OK to save the changes.
4. Change Windows Live Mail account from POP3 to IMAP
Start Windows Live Mail.
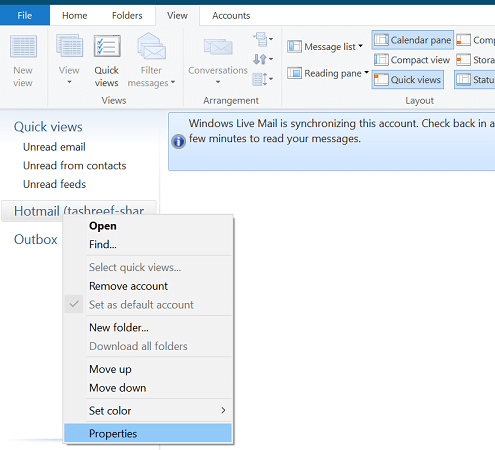
Right-click on your account from the left pane.
Select Properties.
Open the Advanced tab.
Here change the STMP, IMPA or POP ports in this section. You can also specify the SSL settings.
In the Properties window, open the Server tab.
Enter your Outgoing server needs authentication.
Also, change your IMAP and SMTP server addresses from the Server tab.
Click Apply and OK to save the changes.
5. Change Windows Live Mail notifications sound
Exit Windows Live Mail if running.
Press Windows key + R to open Run.
Type control and click OK to open Control Panel.
Click on Hardware and Sound.
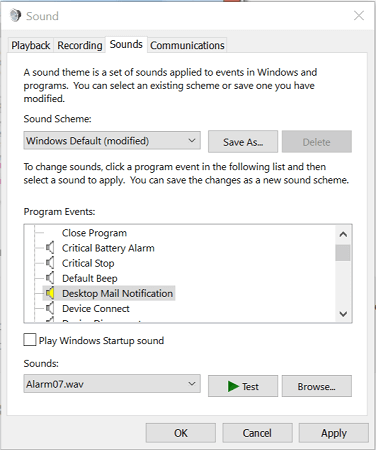
Under the Sound section, click on the Change system sound option.
Under Program Events, select Windows and click on Desktop Mail Notification.
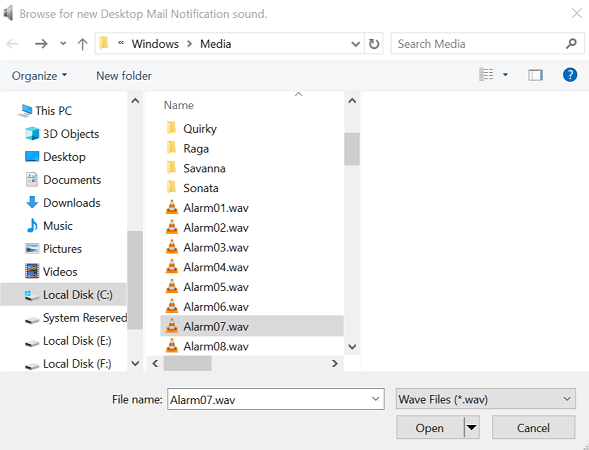
Click the Browse button.
In the Media window, scroll down and select one of the pre-downloaded sounds.
Click Open.
Click the Test button to hear the sound.
Click Apply and OK to save the changes.
Apply sound to Windows Live Mail
Open Windows Live Mail.
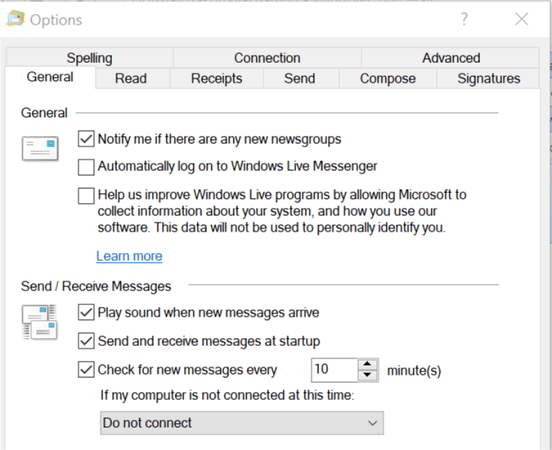
Click File > Options > Mail.
Open the General tab.
Under Send / Receive Messages check Play sound when new messages arrive box.
Click Apply and OK to save the changes.
6. How to change Windows Live Mail themes
Windows Live Mail does not support changing themes. So any theme that you apply to your desktop will be applied to Windows Live Mail as well.
To change the theme on your desktop, follow these steps.
Click on Start and select Settings.
Open Personalization.
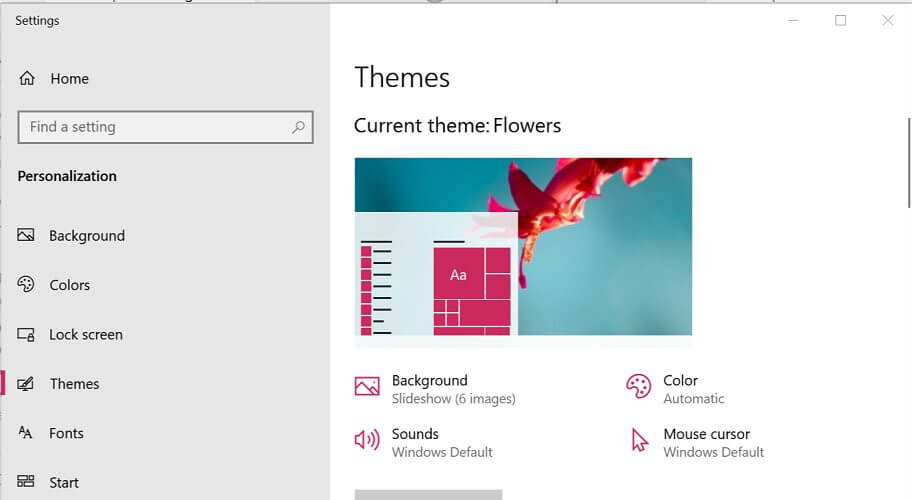
Click on the Themes tab in the left pane.
Scroll down to the Change themes section and select one of the default themes.
If you want to customize your theme, click on the Use custom themes button.
Now you can modify the Background, Sounds, Color and Mouse cursor properties as per your preference.
If you’re having trouble opening the Setting app, take a look atthis article to solve the issue.
7. Change Windows Live Mail display name
Open Windows Live Mail.
On Windows Live Mail go to Tools > Accounts. In Windows Live Mail 2012 go to File > Options > Mails.
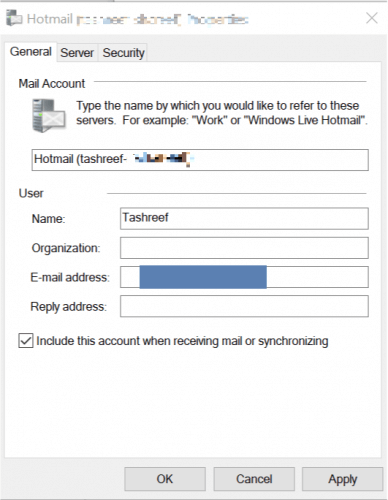
In the Account window, click the Properties button.
In Windows Live Mail, under User Information, enter your name in the Name field. In Windows Live 2012, in the Accounts window, select your Email account and click the Properties button.
Under User, enter your name in the Name field.
Click Apply and OK to save the changes.
Depending on whether you are using Windows Live Mail 2011/2012 or older version, some settings may vary. In this article, we have tried to cover all the basic settings that a new user would like to change on the Windows Live Mail client.
If you need help modifying other settings, leave a comment, and we will update the article with the necessary steps.
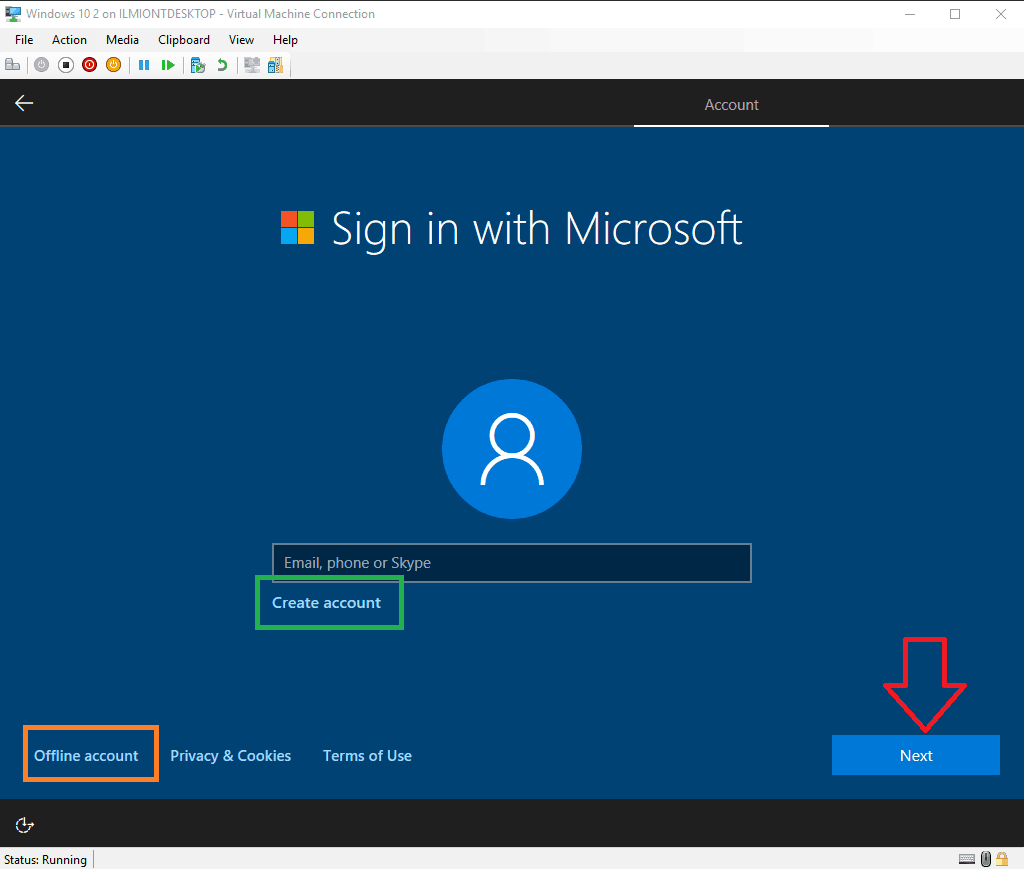
Once again, Microsoft is fiddling with the local accounts settings in Windows 10 and this new iteration is the company’s most flagrant attempt.
Back in late 2019, Microsoft began testing a Windows 10 startup process that would forego the tradition of offering an alternative to establishing a Microsoft Account during setup that involved users simply signing in with a Local/”Offline” account.
Instead of offering the option during the initial setup process, users would essentially be forced to create an MSA and the could retroactively disable their MSA and revert to a local account by going back into Account Settings once the OS was up and running. Another workaround to the MSA pandering is to simply boot the system up when offline or disable Wifi connectivity.
There is recent evidence that Microsoft may be doubling down on this new approach and exporting the new tactic to regions outside of North America.
According to the German tech blog, Dr. Windows, Microsoft is rolling out, or at least A/B testing its Local/Offline startup omission to users in Germany.
Similar to its implementation in the US, Dr.Windows notes that users are given a reprieve on the MSA sign up after the initial boot-up of Windows, or by using the WiFi/Internet connectivity workaround.
Microsoft seems to be constantly trying to get Windows users comfortable with the idea of syncing their system settings with a Microsoft account by continuously tweaking the setup model in newer versions of its operating system, similar in fashion with Google and Chrome or Chromebooks and Apple with iOS and MacBook devices.
Push back on the idea of requiring a Microsoft ID/account to access Windows features typically has been vocal and swift with each subtle encroachment that Microsoft introduces getting roundly panned by its community.
In the lead up to Surface Neo and Duo devices that will presumably follow a similar linked ID or Account device setup, it’ll be interesting to see if Microsoft continues to push forward the requirement of an MSA to fully take advantage of the integrated hardware and software experiences.
Microsoft is continuing its efforts to promote social good (and to promote the use of Microsoft technologies in those efforts), announcing today a new program aimed at startups focused on social projects like a smartphone-based cholera detection system, devices to skim trash from our oceans, and competitions that yield valuable artificial intelligence solutions from participating data scientists.
The new program, launching in 140 countries, will “actively seek to support underrepresented founders with diverse perspectives and backgrounds. The criteria to qualify for the program include a business metric that measures impact on an important social or environmental challenge; an established product or service that will benefit from access to enterprise customers; and a commitment to the ethical and responsible use of AI.”
Microsoft is offering social enterprises that join the program up to $120,000 in Azure credits, as well as technical support and guidance, including a dedicated program manager to help startups market and sell solutions, and to connect with potential customers. The Social Entrepreneurship program will also offer grants to participants focused on sustainability, accessibility, and skills and employability.
Windows Live Mail 2011 offers a Group Distribution function that allows users to send multiple emails in Windows Live Mail client. However, in Windows Live Mail 2012 version, this function does not work the same.
Some of our readers reported a similar issue about not being able to find the option in the newer version of Windows Live Mail client.
In this article, we discuss how to send multiple emails in Windows Live Mail 2012.
How I can send multiple emails in Windows Live Mail?
1. Use the Add button to add groups
1.1 Create a group of contacts
Start the Windows Live Mail client.
Click on the Address book icon on the bottom left of the screen. You can also press Ctrl + 3 to access the Addressbook option.
Press the Category option from the ribbon at the top of the window.
On the Create a new category window, enter your group name in the text field.
Scroll down to the alphabetic list of your email contacts.
Select all the email contacts that you want to add to the group.
Click the Save button at the end of the page to save the group contacts.
1.2 Using group contacts to send multiple emails
Start Windows Live Mail.
Click on the Email message button in the upper left corner.
Click the To: button. This will open a new dialogue box called Send an Email.
Now choose a category and then select To, Cc or Bcc button to send an email to your group.
In the group/category options, press the + button next to the name of your group.
Click OK to proceed.
Compose an email that you want to send to all the contacts in the group.
In the To, Cc, or Bcc fields you will see all the recipients with your groups who will receive the email.
Click the Send button to send the email to all the contacts in the group.
Sign in to Windows Live Mail if not already logged in.
Click the Email message button on the upper left corner of its window.
Click the To: button.
Press and hold the Ctrl key on your keyboard and select the contact to which you want to send emails.
Click the To button, then compose and send your email.
As discussed earlier, Microsoft did not remove the Group Distribution feature in Windows Live Mail 2012. What they did was they simply rearranged it to make it user-friendly.
By following the steps in this article, you can send multiple emails in Windows Live Mail.
Don’t forget to leave any other questions or suggestions that you may have in the comments section below.
This software was a part of the Microsoft Office programs list, but as you can see, it’s still available for independent download.
Do let us if you prefer the Photos app or Picture Manager in the comments. Also, don’t forget to leave there any other questions or suggestions that you may have.
Windows PowerShell is incredibly easy to administrate once you learn the basics of the scripting language. Despite that, users might encounter a few hiccups here and there. Many of them have reported that PowerShell is not accepting the Ctrl+R shortcut to show the command history search.
Since this essentially means that users can no longer enjoy the history function, it’s definitely unpleasant. PowerShell has a pretty great built-in command history to help you out with those complex lists that you have entered over time, but if you can’t use it, that’s a big problem.
If you are troubled by this issue too, to get around it we recommend the following.
What can I do when PowerShell history won’t work?
1. Check the PSReadLine assembly
Many others have experienced the same problem after upgrading to Windows 10. You might not know that you’ve installed PSReadLine, but it comes bundled with Windows 10, so accept that it’s there.
Like it or not, it pretty much replaces the old-style command history features with more sophisticated functionality. The command history function in PowerShell is not built into the Windows Management Framework itself, but it’s based precisely on the third-party PSReadLine module.
To confirm it has any involvement this time, try to run Get-PSReadLineOption and note if you get this error regarding the PSReadLine assembly:
Get-PSReadLineOption : The type initializer for ‘Microsoft.PowerShell.PSConsoleReadLine’ threw an exception. At line:1 char:1 + Get-PSReadLineOption + ~~~~~~~~~~~~~~~~~~~~ + CategoryInfo : NotSpecified: (:) [Get-PSReadLineOption], TypeInitializationException + FullyQualifiedErrorId : System.TypeInitializationException,Microsoft.PowerShell.GetPSReadLineOption
If you see the above lines too, close PowerShell, then change keyboard layout to en-US. Open it back and check if PowerShell history works again.
2. Downgrade PSReadLine to 1.2
Upgrading PSReadLine to a new version could also cause this error you’re getting. This mostly happens if you are running PowerShell with a non-en-US keyboard layout.
However, if the above steps made no difference, you could also try to downgrade PSReadLine to 1.2.
3. Try out alternative cmdlets to view the history
Suppose you typed and executed some complicated PowerShell commands and you want to take a peek now. You should be able to browse the entire history of PowerShell commands using the up / down arrows.
As always, you can also use several included cmdlets to work with your history. To view the history of commands you’ve typed, run the following cmdlet: Get-History
You may further search your history by piping the resulting output to the Select-String cmdlet. Don’t forget to replace “Search” in the cmdlet below with the actual text you want to search for: Get-History | Select-String -Pattern “Search”
In order to view more detailed information about previously executed commands, including the command status or start/end time, run this command instead: Get-History | Format-List -Property *
No less important, if things do work and you want to export commands from the current session to a file, use the Export-Clixml cmdlet: Get-History | Export-Clixml -Path c:pscommands_hist.xml
Remember that the command line buffer keeps only the last 50 commands you typed. If wanting more is the actual problem you’re facing, just increase this number.
To make it happen, right-click the title bar of the PowerShell prompt window, select Properties, then simply change the value of Buffer Size under Command History.
A potential cause of this error is that Powershell‘s history is turned off. Here’s where you might have entered before: %userprofile%AppDataRoamingMicrosoftWindowsPowerShellPSReadlineConsoleHost_history.txt
You could have turned it off with: Set-PSReadlineOption –HistorySaveStyle SaveNothing
Does it ring any bells? The same goes if you’re looking for something after you fully clear the memory in the hope of a fresh start.
Just be careful: the Clear-History cmdlet can’t really be used to clear the history of commands. It simply clears the list of commands that the Get-History cmdlet displays.
Following the procedures mentioned in this article should help you to resolve the issue you were experiencing. If you’re aware of any other way to make PowerShell history work again, do tell us about it in the comments section below.
Microsoft announced today that Mexico will get its first cloud datacenter region as part of the company’s ambitious “Innovate for Mexico” plan. Over the next five years, the software giant plans to invest $1.1 billion in the country, with an education and skilling program to complement the new cloud infrastructure.
“Microsoft’s new cloud datacenter region in Mexico will provide highly available, scalable and secure cloud services across Mexico with the option of data residency in country,” the company explained today. “This local datacenter infrastructure benefits small, medium and large business and the startups ecosystem and stimulates economic development for both customers and partners alike, enabling companies, governments, and regulated industries to realize the benefits of the cloud for innovation and new projects, as well as bolstering the technology ecosystem that supports these projects.”
In addition to this new local datacenter, which will bring Microsoft’s global cloud infrastructure to 57 cloud regions in 22 countries, Microsoft also plans to support AI projects that can benefit the Mexican population. The company highlighted today the project “Artificial Intelligence to Monitor Pelagic Sharks in the Mexican Pacific Ocean” that aims to protect Mako shark species. Lastly, the company will also ask CEOs of local innovative companies to join a new Advisory Board that will focus on new opportunities for digital transformation in the country.
“Few places in the world today are as dynamic and diverse as Mexico. In this landscape, we see enormous opportunity for the cloud to accelerate innovation, support people across the country working to transform their businesses, explore new entrepreneurship opportunities and help solve some of the country’s most difficult challenges,” Microsoft said today.
There is another trio of Xbox One game titles coming this weekend as part of Xbox Free Play Days. Naruto to Boruto: Shinobi Striker, Shining Resonance Refrain, and Valkyria Chronicles 4 are being offered free to play this weekend on Xbox One for Xbox Live Gold and Xbox Game Pass Ultimate subscribers.
Xbox Free Play Days are regularly offered to Xbox Live Gold and Xbox Game Pass subscribers as a “try-before-you-buy” experience. You have the whole weekend to play the game and at the end of the weekend, if you want to keep the Xbox One game, you can buy it from Microsoft at a reduced price point. Any progress you made in-game when you played during the Xbox Free Play Days will be carried over when you buy the Xbox one game.
The biggest Xbox One game discount available is for Naruto to Boruto: Shinobi Striker, being offered for 85% off the purchase price for $8.99. The other two are being offered at 50% off, at $14.99 apiece. Oddly enough, Naruto to Baruto: Shinobi Striker is already offered for free to Xbox Game Pass subscribers. Although, it seems like a good game deal for Xbox Live Gold members.
Check out all three games in the Microsoft Store in the links below.
If you’ve just finished a call in Microsoft Teams, you can go back and read a transcript of what just happened by going to Microsoft Stream. If your administrator has enabled the ability to transcribe meetings, and you’ve already recorded your call, you can also go back to the transcript to highlight important points and to provide a more finalized copy for distribution within your organization.
Of course, it’s best to keep your organization policies and compliance in mind when doing this. You don’t want to be misleading your coworkers who will be reading the transcript. Anyway, to get started, you’ll want to visit the chat history for the meeting or call that just occurred. You should see an entry for the meeting, with a play icon over it. You can easily play it right away by clicking, however, you will want to edit it. You’ll want to click the … next to the meeting, choose Open in Microsoft Stream.
Once the Microsoft Stream portal is open, you’ll then want to click Edit under the video. Under Options, you’ll then want to go to Captions and choose Download File. You’ll then want to download the VTT caption file and check to see, edit it to see that it is reflective of what happened in the call. When you are done reading it, you can go back to your browser to Microsoft Stream and uncheck the option to Autogenerate a caption file. You’ll then want to click Upload a caption file, choose Select file, find your caption file, and then click OK. You can end by clicking Apply.
Keep in mind that only the person who started a meeting can edit the closed caption transcript after the recording has been uploaded to Microsoft Stream. The same rules for recording meetings also apply to transcriptions too. This means that you only can get a transcript for meetings and group calls, and not in one-to-one calls. Recording meetings are also only available under accounts with Office 365 Enterprise E1, E3, or E5 licenses, so this might not be an option for everyone.
Depending on the language package installed on your Windows computer, Microsoft apps like Windows Live Mail tend to set the system language as the default language.
Since Windows Live Mail comes bundled with Windows Essentials, we need to change the language preference for Windows Essentials.
If you want to change the language settings of your Windows Live Mail client, you can do it by following the steps in this article.
How can I change the Windows Live Mail language?
Press Windows key + R to open Run.
In the Run box type the following and click OK: langselector.exe
This will open the language settings for Windows Essentials.
On the Windows Essential language setting window click the drop-down menu.
Locate and choose your desired language from the list, then click OK to save the changes.
Restart your computer to apply the changes.
After the restart, open the Windows Live Mail client and check if the language is changed to your preferred option.
Changing the language preference for Windows Live Essentials will only affect the Windows Live app such as the Windows Live Mail client. However, if you want to change the language of your system completely, then you need to have a multi-language Windows license.
Most of the Windows license that comes pre-installed with the computer are single-language license. The user must upgrade or purchase a multi-language license separately to be able to use the system in different languages.
How can I change the Live Mail language without upgrading the Windows license?
Click on Start and select Settings.
Go to Time and Language and from the left pane, open the Language tab.
Under Preferred languages click on the Add a preferred languagebutton.
On the Choose a language to install window, search for your preferred language and click Next.
Click on Install. Windows will now download and install the selected language pack.
Once the language pack is installed open the Language section again.
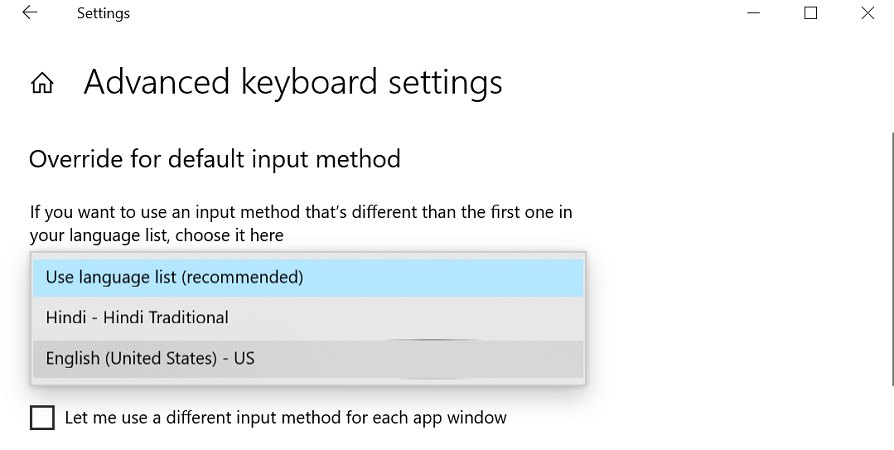
Under Preferred languages, click on Choose an input method to always use as default.
Under Override for default input method click the drop-down menu and select the newly installed language.
To change the input language again, repeat steps 6 and 7.
If you’re having trouble opening the Setting app, take a look atthis article to solve the issue.
Being able to change the Windows Live Mail language setting can come in handy for users who prefer to use the email client in their native language. Follow the steps in this article to successfully change the Windows Live Mail language.
If you have any other questions or suggestions, don’t hesitate to reach for the comments section below.
PowerShell is both a command-line shell and a scripting language. There’s no surprise that it’s preferred by many for tasks they want to run automatically. But some reported that PowerShell closes after running a script.
They wish to run a script and want PowerShell not to close immediately. This is a must for remotely logging into another server using the requested credentials when they run the script. Keep reading to find out the solutions!
How do I stop PowerShell from closing after running a script?
1. Initiate a remote connection
Create a file called execute.ps1 on the desktop.
Paste this content in it: clear-Host $br = "`n";$br Write-Output 'Step1: Press 1 for Powershell to reload' Write-Output 'Step2: Press 2 to start remote session' $br Write-Host 'This script will' -NoNewline -ForegroundColor Green Write-Host ' not ' -ForegroundColor Red -BackgroundColor Black -NoNewline Write-Host 'indicate which step you are on,' -ForegroundColor Green Write-Host 'if you are not sure, rather press 1 again and then 2.' -ForegroundColor Green $br $input = Read-Host 'Enter your choice' switch($input){ # Change the name of the execute.ps1 if you want to 1{powershell.exe -noexit "C:users$env:usernameDesktopexecute.ps1" -noprofile} # 2{ Clear-Host;Write-Warning 'You are about to connect to the remote server' # Change the 'RemoteServerName' to the name of your server and change the 'domainname' to your actual domain name Enter-PSSession -ComputerName RemoteServerName -Credential "domainname$env:username" } default{Write-Warning 'An error has occurred'} }
Once done, run the file.
The first time you do that, press 1 to open it up again with the No exit switch.
The second time, press 2 to initiate the remote connection to the remote computer.
2. Use the Pause command
Why not try the Pause command at the end of execution? It will immediately cause a new command interpreter to start and run in the background. All you have to do is execute the following command:cmd /c pause
This makes the PowerShell window wait until you decide to press the Enter key further.
3. Add a line to the end of your script
Another quick yet effective solution is to add a line like this to the end of your script:Read-Host -Prompt "Press Enter to exit"
This is guaranteed to work if PowerShell closes after running a script, and it works in PS-ISE. However, be careful that it accepts only the Enter key.
4. Execute a PowerShell script locally to run on a remote computer
You may also try to create an open.ps1, like the one you see here:powershell.exe -noexit c:remote.ps1
This calls the remote.ps1:Enter-PSSession -ComputerName YourExchangeServer -Credential Get-Credential
5. Use the Start-Sleep cmdlet
When faced with the problem of looking for a way to stop PowerShell from closing after running a script, another effective yet underrated PowerShell cmdlet:Start-Sleep -s 15
For those who don’t know, this Start-Sleep cmdlet or the sleep alias suspends the activity in a script for a specified period. You can use it for many other tasks, such as pausing before repeating an operation or waiting to complete it.
It’s up to you to decide if it’s good enough for your case. Just remember to use the Ctrl + Ckeyboard hotkey when you’re ready to break out of Start-Sleep.
These are all the ways you can stop PowerShell from closing after running a script. And one of these should come in handy when facing the problem!
Earlier this week, the UK-based company Emperion announced they were working on a Windows 10 on ARM smartphone with the additional capability of running Android apps. Although the company didn’t have a website running at the time, it pointed out that one was on the way.
Richard Hay of Windows Observer was able to get an early glimpse of the website before it was pulled, and provided some interesting screenshots on Twitter. Interestingly, the device features a nearly identical taskbar to Windows 10X, an unreleased version of the desktop OS for foldables like the Surface Neo.
I found their website for the Nebulus ARM based device. It appears to be a merging of Live Tiles (which Windows 10X does not have) and the Windows 10X Taskbar. #ThingsThatMakeYouGoHmmmmpic.twitter.com/orHoOvjhmQ
As Hay pointed out, the company explained that the brief access of the site to the public was the result of an “internal error.” While available, the site included a functioning order system, including order forms and option to pay with PayPal, although the company denied that any GDPR rules were broken “because the site was not live” and that the data collected has been purged.
That said, the company told Hay that it is continuing to work on its device. Interestingly, the company noted that its phone was initially going to be built with an Intel-based CPU, but cited “partner supply issues and cost effectiveness” as the reason to go with ARM:
“Yes, it is Windows 10 on ARM, it was initially designed to be x86 using an Intel based SoC but due to partner supply issues and cost effectiveness, we were forced to change course.”
The company also provided two of its partners that helped them with the project—Amzetta and Wingtech—although it wasn’t able to talk about its other partners due to nondisclosure agreements.
In any case, it’ll be interesting to see if the device does make its way to the market. What do you think?
On March 19, 2020, GTA IV: Complete Edition is coming to Steam as a free upgrade for those who already own the game. It will also launch for the first time on Rockstar Games’ new launcher for Windows. As noted in a post on Eurogamer, Rockstar Games decided to release GTA IV Complete Edition as a free upgrade due to issues experienced on Steam with the deprecated Games for Windows Live infrastructure from Microsoft.
Rockstar removed GTA IV from Steam while the game developer tried to figure out how to get around generating “additional keys needed to continue selling the current version of the game.” Microsoft ended support for Games for Windows Live some time ago, but GTA IV was one of the last few games that still use it, along with the PC version of Fallout 3.
In order to work around this issue, Rockstar has decided to replace all versions of GTA IV and GTA: Episodes from Liberty City with GTA IV: Complete Edition on Steam. In order to work around issues with Games for Windows Live, multiplayer mode and leaderboards will not be available in GTA IV: Complete Edition, at least for the time being. In addition, gamers will lose access to some GTA IV radio stations in Episodes from Liberty City, including RamJam FM, Self-Actualization FM, and Vice City FM.
For those that activated GTA IV through Games for Windows Live, it gets complicated. GTA IV activated through Games for Windows Live will require you to create and/or link to their GTA Social Club accounts to replace the Games for Windows Live account connection to update to GTA IV: Complete Edition.
More details are available on the GTA IV Steam Page. What do you think about Rockstar’s choice to re-release GTA IV with this new Complete Edition? Let us know in the comments!
Microsoft is once again having to deal with a buggy “Patch Tuesday” update after Windows 10 users started complaining about missing desktop files. The first bug reports started to surface last week, with users reporting that their desktop files had disappeared, or that the Start Menu layout and desktop wallpaper had been reset to default after installing this month’s Patch Tuesday for Windows 10 version 1909 or 1903.
The bug is apparently caused by a bug during the update process, which creates a temporary profile on Windows 10 PCs that don’t come with personal desktop files or shortcuts on the Start Menu. Microsoft’s support team has now confirmed to Windows Latest that the issue is now being investigated and a fix:
“Microsoft is aware of this known issue and our engineers are working diligently to find a solution for it,” a staff stated.
Microsoft’s support team says they were able to resolve the problem on affected PCs by creating a new user account and manually transferring the data from the temporary user profile to a new one.
“[We] create a new local account user then transfer the personal files from the temporary account to the new account. After that, we can just delete the temporary account,” Microsoft employee said.
It’s still unclear if this bug is currently affecting many Windows 10 users who installed this month’s Patch Tuesday, but it’s really unfortunate to see Microsoft landing once again in hot waters because of problematic Windows 10 patches. The company may be able to avoid these snafus by making better use of Windows Insiders on the Release Preview ring, which previously contributed to reporting serious bugs in Windows 10 updates.
Have you been affected by this bug, and if so will you be more cautious going forward regarding monthly Patch Tuesday updates. Sound off in the comments below.
Myntra has a portfolio of 7,00,000 styles from more than 3,000 international and domestic brands available on its store. Indian e-commerce major, Flipkart (owned by Walmart) is the parent company of Myntra.
Myntra has worked closely with Microsoft to migrate its platform – from supply chain management to inventory to site capabilities – to Azure. The elasticity of Azure is helping Myntra scale rapidly for big spikes that occur routinely during festive seasons. Since the deployment of Azure, Myntra has recorded a 50 percent rise in orders in the latest edition of its biennial End of Reason Sale.
“The Microsoft Azure platform provides our teams the ability to deliver innovative and personalized capabilities for our customers with speed supported by a strong depth of technology expertise from the Microsoft team.”
– Amar Nagaram, CEO, Myntra
By building and centralizing its data platform on Azure, Myntra is also applying advanced analytics and machine learning to gain a comprehensive understanding of customers and deliver highly personalized products, marketing, and service for them. The company is using Microsoft Power BI to empower its employees to visualize and act on real-time feedback.
This first-of-its-kind partnership with Myntra in the company’s digital transformation is a pretty good showcase for Microsoft in the e-commerce space in India.
Saving passwords in your browser can be a time saver as it gives you quick access to websites or online portals you sign into every day. But there is always a catch!
When you need to copy a password via the password manager in most browsers, you have to make it visible first, exposing it to prying eyes. Now Google Chrome is set to enforce some level of privacy to your secret combinations when you are transferring them to another service or application on Windows 10.
Chrome to have a copy password feature
A note by a Google Chrome dev team member indicates that a future version of the browser will let you copy your saved passwords to the clipboard without first revealing them to bystanders.
This change adds a “Copy password” menu item to the Password Settings in Chrome and adds a relevant string. So far clicking the button is a no-op, actually copying the password will be implemented in a future CL.
How the stealth, straightforward copy function might work
You can copy your saved credentials in Chrome via the browser’s built-in password manager. Simply type chrome://settings/passwords into the address bar to quickly get there.
Currently, copying your secret combination begins with clicking the eye icon or Show password button. Next, you have to highlight the visible characters in the password box to the right of your email address (or username).
You then right-click and choose copy. The entire process is a bit lengthy.
When the password privacy feature comes into effect in Chrome, you will no longer have to click the eye icon to copy passwords. Instead, you will be utilizing a stealth and more straightforward process.
Google has not revealed how exactly you may access or use the feature once it is available in Chrome. One way they could implement it is by including copy password alongside the details and remove options, which come up when you click the three small dots next to the eye icon.
The browser currently lets you export saved passwords in bulk for use with other applications.
Recently, Google announced that it is working to make Chrome more energy efficient on your Windows 10 PC. Its move to protect your saved passwords from prying eyes is certainly another step in the right direction.
At first glance, this issue may seem like something far beyond what a beginner can handle. However, by following these steps, you should handle them without any issues.
Some HP printer users have posted on support forums about HP printer documents waiting errors. In an MS forum post, one HP printer user stated:
On pressing ‘Print’ I get Error: 1 document waiting.
HP printer document waiting errors usually arise when the print queue gets stuck. Consequently, the documents are left waiting and don’t print. If you need to fix an HP printer document waiting error of some description, check out the potential resolutions below.
How can I fix the HP printer error documents waiting?
1. Clear the Print Spooler
Turn off your HP printer, and then unplug it.
Launch Run with the Windows key + R hotkey.
Input services.msc in Run’s Open box
Click OK to open the window in the snapshot directly below.
Right-click the Print Spooler service and select the Stop option.
Open File Explorer, which you can do by pressing the Windows key + E keyboard shortcut.
Open this folder path in File Explorer: C:\Windows\System 32\Spool\Printers.
Press Ctrl + A to select all the files in the Printers folder.
Click the Delete button.
Open the Services window again.
Right-click the Print Spooler to select Start.
Thereafter, shut down Windows.
Plug the printer back in, and turn it on.
2. Reinstall the printer drivers
Open Run
Input control /name Microsoft.DevicesAndPrinters’and click OK
This will open the Devices and Printers applet.
Right-click your HP printer and select the Remove device option.
Then click the download link for the driver installation software.
Open the downloaded driver installation file to install the software.
3. Check if the Use Printer Offline setting is enabled
Open Run’s window.
Input control /name Microsoft.DevicesAndPrinters in Run, and press the Enter button.
Right-click the HP printer to select See what’s printing.
Click the Printer menu.
Deselect the Use Printer Offline option if it’s selected.
4. Run the HP Print and Scan Doctor
Click Download Now on HP Print and Scan Doctor’s page to save the setup wizard for it.
Open HP Print and Scan Doctor’s installer to add the software to Windows.
Turn your HP printer on.
Then open the HP Print and Scan Doctor utility.
Click Start on the software’s window.
Select the HP Printer you need to fix the documents waiting error for.
Select the Fix Printing option to initiate a scan.
HP Print and Scan Doctor will then display the scan results.
If it displays X marks, follow the utility’s guidelines to fix the detected issues.
The above resolutions will fix the document waiting error for most HP printer users. After that, the printer will promptly print all documents in its queue.
Which one of these fixes worked for you? Let us know the best solution by leaving a message in the comments section below.
Even in an age of technology where everything changes from one day to another, there is always room for a bit of nostalgia.
For example, while Microsoft‘s Chromium-based Edge may have replaced Internet Explorer in Windows 10, users are still longing for some features that they liked in the old browser.
One such feature is the Menu Bar which Internet Explorer users can easily navigate to items like File, View, History with just a single click.
Internet Explorer’s menu bar is coming back as an extension
If the Menu Bar is the only thing still keeping you from migrating to a newer browser, then you don’t need to stay with it any longer. An independent developer has created an extension that will bring Internet Explorer’s Menu bar to all the modern web browsers.
The extension is called Proper Menubar and it brings all the functionality of Internet Explorer‘s Menu bar to newer browsers.
Here’s a list of all of the supported browsers:
Google Chrome
Microsoft Edge
Maxthon
Firefox
Yandex
Vivaldi
Safari
Opera One
Brave
UC
Of course, unlike the traditional Menu Bar, this extension does offer a degree of customizability. For example, you can change the positioning of the Menu Bar, or even the color scheme to match the rest of your browser’s theme.
You can download the extension from the developer’s official webpage, and the best part is that it is completely free of charge.
This isn’t the only extension that the developer has created, as you can see for yourself on this page.
What other features from Internet Explorer would you like to see in Microsoft Edge? Let us know in the comments section below.
Microsoft’s specialized voting software is making its stateside debut ahead of the February 18, 2020, Supreme Court elections for the state of Wisconsin.
Back in May of 2019, Microsoft announced ElectionGuard alongside a list of partnerships that included DARPA and Columbia University that were all working together to enable end-to-end verifiable components as well pilot testing leading to an eventual real-world application.
In a relatively quick amount of time, Microsoft and voting machine vendors have worked to implement ElectionGuard in real-world testing that will consist of few hundred votes using a pretty seamless process.
First, ElectionGuard provides each voter a tracker with a unique code that can be used to follow an encrypted version of the vote through the entire election process via a web portal provided by election authorities. During the process of vote-casting, voters have an optional step that allows them to confirm that their trackers and encrypted votes accurately reflect their selections. But once a vote is cast, neither the tracker nor any data provided through the web portal can be used to reveal the contents of the vote. After the election is complete, the tracker codes can be used by voters to confirm that their votes were not altered or tampered with and that they were properly counted.
Second, ElectionGuard also includes an open specification – or a road map – which allows anyone to write an election verifier. Voters, candidates, news media and any observers can run verifiers of their own or downloaded from sources of their choosing to confirm tabulations are as reported. The combination of the tracker – which allows individual voters to verify that their votes have been accurately recorded – and the verifier – which allows anyone to verify that the recorded votes have been accurately counted – enables full “end-to-end verification” of the correctness of election results. It will not be possible to “hack” the vote without detection.
Microsoft’s VP of Customer Security & Trust Tom Bur sums up the process rather succinctly,
“First, a voter will select candidates on a touchscreen and verify their choices. Second, the voter will print and review for accuracy a paper ballot and simultaneously receive a separate tracking code. Third, the voter will deposit their ballot into a ballot box for counting.”
Following the events of the 2020 Iowa caucuses, the infusion of new technology into the American voting system is under additional scrutiny this year. Microsoft’s ElectionGuard will not only need to make sure it’s safeguarding selections from being electronically altered but also doing an impeccable job of simply tallying votes correctly.
Fortunately, Microsoft’s open-sourced software leverages Homomorphic encryption which specializes in counting votes as well as simultaneously encrypting them. Burt sees the Fulton, Wisconsin Supreme Court votes as yet another test pilot for the ElectionGuard program as it presumably prepares for participation in the 2020 presidential election later this year.
PowerShell is very popular among system administrators. Despite the fact that it is developed by Microsoft and is widely available, a major drawback of using Windows PowerShell is that its autocomplete function suddenly stops working at times.
Plenty of users have been reporting this problem on forums:
Lately after my latest update of Windows 10 my PowerShell ISE stopped giving me the little popup that autocompletes commands … I used to click on “ctrl + space” to see the little popup but it’s not working anymore instead it gives me an error “an unexpected error has occurred and Windows PowerShell ISE must close”.
If you discovered that PowerShell’s autocomplete is not working for you either, there are several steps that you can take to make things right again.
What can I do when PowerShell autocomplete is not working?
1. Make sure IntelliSense Complete Word is invoked
Go to the Edit menu and click Start Snippets. Hit Start IntelliSense, if it happens not to be set this way anymore.
IntelliSense is a code-completion aid that includes a number of useful features. Complete Word is one of them and can be easily invoked by entering into Edit > IntelliSense > Complete Word, or by choosing the Complete Word button on the editor toolbar.
After that, it should start completing the rest of a variable, command, or function name after entering enough characters to disambiguate the term.
2. Install PowerShell ISE Preview
ISE Preview has fixed this issue, so you can try to install it as well. This module is distributed via the PowerShell Gallery. That’s why the Install-Module cmdlet – which is part of the PowerShellGet module – is used to install the ISE preview module from the PowerShell Gallery.
There is also a Scope parameter if you’d rather install the module only for the current user and not in the all users path: Install-Module -Name PowerShellISE-preview
Up next, the Install-ISEPreviewShortcut cmdlet creates shortcuts in the Start menu for the ISE preview: Install-ISEPreviewShortcuts #
Finally, in order to launch the Windows PowerShell ISE Preview edition, type isep #.
3. Try using VSCode
You could also consider using VSCode. Visual Studio Code is notorious for its usability for PowerShell. The reason is really simple: it’s not only much more powerful than PowerShell IDE but also gives a sense of freshness.
Just don’t forget to configure your VSCode environment to make PowerShell the default language. If you look in the right-hand corner of the editor, it will tell you what language is currently set to.
Moreover, some users state that this only happens on their Windows 7 computer while being on a different location. PowerShell autocomplete always works while used on their Windows 10 PC at home, so it may be a Windows 7 related issue.
In that regard, it’s a great time to migrate to Windows 10.
Did our solutions work for you? How do you solve problems such as this one? If you’re aware of another fix, share it in the comments section below so that other users can try it as well.
There have been many battles in Microsoft’s history. Windows vs MacOS, iPad vs Surface, but now there is Teams vs Slack. This is a topic we’ve covered extensively, but recently, a tweet from Microsoft Cloud Advocate Sonia Cuff has set off a new Teams vs Slack debate: What does Team lack that Slack offers?
Going to open the floodgates here: give me your one feature request or annoyance that bugs you about Microsoft Teams but is amazing in Slack. *braces* No debates – pure feature feedback.
In the reply to the tweet, many people who use both Teams and Slack, including our own Abhishek Baxi, give their take on the controversial question. At the heart of the debate for many, it would appear, is Teams’ lack of support for multiple identities and switching between them. This is something Teams does not yet support, and users who need to switch between multiple Teams accounts and workspaces have to run the desktop app and the web version at the same time. This feature has actually been requested since 2017, but it has yet to be implemented.
Other users also point out some minor user interface imperfections, like the “Start a new thread” box being too close to the one which lets you reply to an existing thread. Some have also had issues with the white space in conversation view, and find it way too irritating, along with buggy scrolling. Christina Warren, a senior cloud advocate at Microsoft, was also quick to point out that Teams’ notifications system is a bit flawed, and had her own suggestions on how to make them more granular.
Sonia’s Twitter thread is full of lots of thoughtful responses as to what Teams slacks that Slack offers, which we can’t possibly cover in just this one post. These include more than 6 emoji responses, custom emojis, the “bananas” business of hiding and unhiding channels, and the way search works. Oh, and we’d also like to mention our personal favorite, native ARM support on Windows, native notifications on Windows and Mac, and a store version of the app.
Microsoft is always looking for Feedback on Teams, and as it becomes just as popular as Slack, for many, there’s still a bit more that it has to go before becoming truly perfect. There are many features planned for Teams in the months ahead, which we’ve previously talked about here, so there could be hope for those who hold Slack close to their hearts.
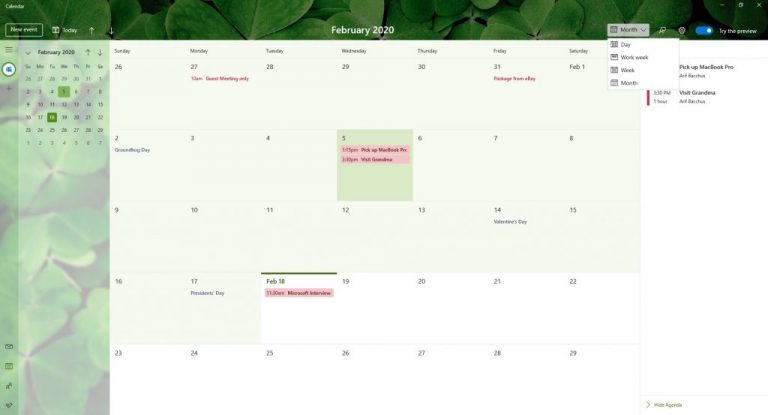
For the first time in a while, Microsoft has given the Windows 10 Calendar App a new look, and Windows Insiders are invited to test it out by toggling a “Try the Preview” switch at the top of the app. The new and improved Calendar app in Windows 10 is different from before and is much cleaner, easier to use, and so much more efficient. We spent some time with it over the past week, and here’s a hands-on look at the experience.
Choose your theme
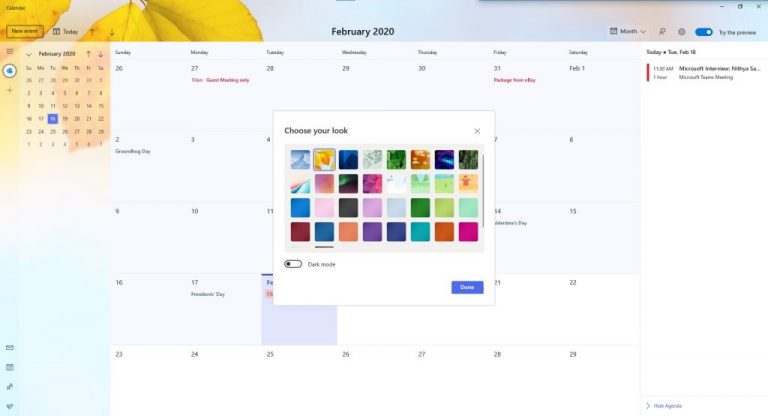
One of the first things you’ll experience when opting into the Calendar beta is the ability to switch between themes. In the beta version of the Calendar app, selecting one of the preset themes will change the image you see in the background of your calendar. You’ll get a default image with some mountains, but there are many others to choose from. There are 34 total images, and the positioning of these images is much different from before. Now, the image you choose will show up in top left corner of the screen and will appear in the background, with an acrylic effect inspired by Fluent Design. There’s even an option to switch to a dark theme if need be.
A clean user interface
Another thing you’ll notice with the new Calendar beta is the cleaner user interface. The sidebar, which has previews of your calendars, now features more touches of Fluent Design, and you’re able to see more of your background image behind it. Microsoft also introduced a new option in the sidebar for you to add more accounts and switch between them with the click of a button. Before, this ability was hidden beneath a settings menu.
The top of the calendar app has also changed, as the buttons for Today, Day, Week, Month, and Year views are now gone. Instead, Microsoft has replaced it with a drop-down menu, leaving more room for you to see the imagery in the background. There’s even a clean “New Event” button right above the calendar, helping you create meetings more quickly.
Finally, the search box has disappeared, slimming up the top of the app a bit. Search functions have apparently been removed in this early beta. Instead, you’ll find a new agenda view, which can be summoned from the sidebar on the right side of the app. This agenda view will show you some of the items on your list for the day, including meetings and reminders.
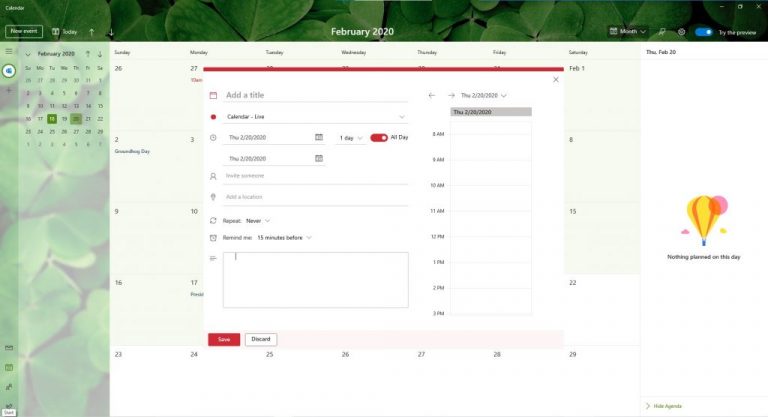
A cleaner pop-out menu for creating meetings and events
The final aspect to note in this version of the Calendar app is the pop-out menu for creating events. Much like the rest of the calendar, Microsoft has given it a redesign. When creating events directly from the calendar by right-clicking in an open space, you now can add more information. You’ll be able to choose which calendar you want it on or have it repeat.
Additionally, clicking the “More Details” link at the bottom of the create event space no longer opens up a full-screen view. Instead, you’ll now get a slimmer pop-out menu, still showing your calendar underneath. This, too, has changed, as it now offers you a slice of time from your day on the right side, showing you when the event or meeting will take place. It’s so much cleaner and concise when compared to previous versions of the Calendar app on Windows 10.
A change for the good
It is important to note that this beta version of the Windows 10 Calendar App is still a work in progress. Microsoft will continue to add more features to it over time, and it is much appreciated. Overall, it now fits in well with the rest of Windows 10, and we really do hope the mail app and other inbox Windows apps can get a similar redesign as well. From the clean and concise look, to new personalization options, this is how the calendar app should have always been.
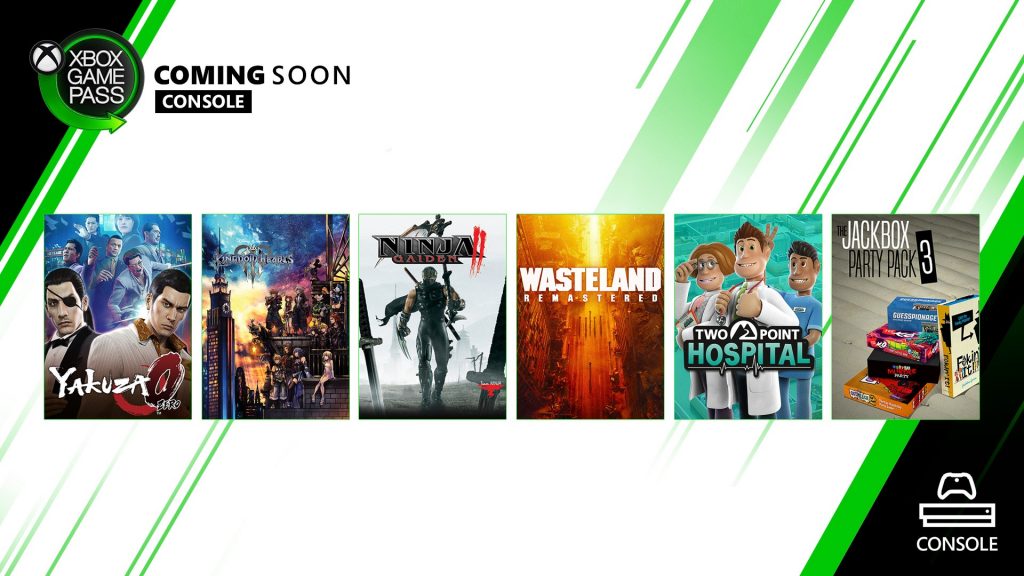
Indeed, three more games will be added on February 25 with the Xbox Play Anywhere title Wasteland Remastered, the business simulation game Two Points Hospital (coming to Xbox Game Pass on its release day), and the action-RPG title Kingdom Hearts III. The latter was the first game in the popular series that mixes various Disney characters to be released on Xbox One, until the release of Kingdom Hearts HD 1.5+2.5 today.
Yakuza 0 will follow on February 26, and Jackbox Party Pack 3 will be the last game to join Xbox Game Pass this month on February 27. This is a pretty great selection of games overall, especially with Rise of the Tomb Raider, Just Cause 4 and more about to leave Xbox Game Pass very soon.
We’ve reached a digital age where creating art or graphics is no longer something that is limited by how much talent you have.
There are a wide variety of products out there that can be used to create graphic designs, each with its own unique features and approaches.
However, that in itself is also a problem, since too many options can make it difficult to choose which is the best, especially if you have a specific set of needs in mind.
On that note, we’ve decided to look over the pros and the cons of two very popular graphics design tools, and then compare the two to see which is the best.
As such, we’ve decided to compare Adobe Illustrator, a world-renowned software tool used by professionals everywhere, and Inkscape, a free and open-source program that anyone can use.
This article is great for those who also searched fo the following:
Adobe Illustrator vs Inkscape
Illustrator vs Inkscape
Inkscape vs Adobe Illustrator: Which is better?
1. Adobe Illustrator
1.1 What is Adobe Illustrator?
Adobe Illustrator is a vector graphics editor created by Adobe, and it was originally created for the Mac OS, but it slowly managed to make its way to the Windows platform as well.
It was created after Adobe Photoshop and was supposed to be the vector-based variant of the program since graphic design using raster-based programs did come with its own limitations.
This was especially noticeable when dealing with large-scale projects such as banners and billboards where enlarging the image would eventually lead to it becoming pixelated.
The UI is designed to be quite intuitive, and anyone familiar with Adobe Photoshop will have no problem whatsoever transitioning to this program as well.
All the tools that you may ever need are present in a sidebar that appears on the left of the screen. These tools allow you to select, create, and manipulate objects or artworks in Illustrator.
Of course, you also have access to sets of tools, each of which acts as menus for other more niche tools:
Selection tools
Paintbrush tools
Pen tools
Pencil tools
1.3 Pros and Cons of Adobe Illustrator
Pros:
Having skills with using Adobe Illustrator is currently a must-have if you want to land a job as a graphic designer
The program has plenty of features that automate many of the tasks that you would otherwise have to do manually
It is constantly developed, and micro-patches are automatically delivered once any type of bug is reported
Since Adobe is an industry-standard, you won’t have to worry about dealing with incompatible file formats
Files created in Illustrator can be easily imported into After Effects, Premiere Pro, Photoshop and all other Adobe tools
Cons:
The monthly subscription is only worth it if you yourself make money off of graphics design
It is a bit more resource-intensive than other similar tools
Inkscape is also a vector-based graphic design tool, but unlike Adobe Illustrator, it is completely free and open-source.
It works on Linux, Windows, and MacOSX and comes with a host of tools used for both artistic and technical illustrations such as cartoons, clip art, logos, typography, diagramming, and flowcharting.
Because it too is a vector-based graphic design tool, it allows for sharp printouts and renderings at unlimited resolutions, even for works like giant banners or roadside billboards.
2.2 What features does Inkscape have?
As far as tools are concerned, Inkscape offers almost as many tools as Adobe Illustrator, but the highlit is actually the way you use the program.
The interface is designed to be extremely simple and accessible, even to users that have no background experience using such tools.
More so, the fact that it is open-source makes it available in a wide variety of languages, and it also lets users customize Inkscape’s functionality with add-ons.
Admittedly, you may consider the fact that it is free and the open-source licensing as a big plus, but this too comes with its own set of drawbacks.
2.3 Pros and Cons of using Inkscape
Pros
Free and open-source
Uses fewer system resources
User-friendly UI
Works on Windows, Linux, and MacOSX
The community is quite active and extremely friendly
Cons:
Doesn’t support CMYK color format, so printable materials aren’t something Inkscape can handle
Most industries use Adobe Illustrator, so you’ll have to frequently deal with working with their files anyway
Frequent bugs and issues due to the open-source licensing
Since Adobe Illustrator is the industry standard, having Inkscape skills will not help you get a job as a graphic designer
2.4 Are Adobe Illustrator and Inkscape compatible?
Those of you that want a more hands-on approach at comparing the programs should know that they can do it quite easily since the two have a high degree of compatibility.
For example, Inkscape’s native format is SVG (Scalable Vector Graphics), which is a format also supported by Adobe Illustrator. Unfortunately, the two implementations are not fully compatible.
More so, Inkscape also exports to PS, EPS and PDF, formats that Illustrator can recognize.
3. Inkscape vs Adobe Illustrator: The final verdict
Both tools are great, and while Inkscape’s non-existent price-tag and open-source license may seem like the reason we would call it the winner, it is actually the very thing that makes Adobe Illustrator take our vote.
In a world where everything is standardized and jobs are hard to come by, investing in a program that will greatly increase your chances of success is better in the long run.
More so, Adobe Illustrator is used everywhere, it is always patched and updated, and the customer support is always available for you with the best answers.
Thus, if you want quality and reassurance, there is no way you could go wrong with Adobe Illustrator.
Basically speaking, everything you could ever do with Inkscape you can do with Illustrator, but you cannot say the same about the other way around.
If you are still undecided, you can also explore more options in this detailed Adobe Illustrator alternative guide, which covers additional tools beyond Illustrator and Inkscape.
In a recent conversation with Windows Central, Rainbow Six Siege’s director, Leroy Athanassof, revealed that a new version of the popular game would be made for Microsoft’s next gen console, the Xbox Series X.
“We are going to be on [the consoles] from launch,” Athanassof says. “When they will release the consoles; but it’s up to them to agree that. For Siege, our target is to be available right at launch.”
While the Xbox Series X will likely support Xbox One video games such as the current gen version of Rainbow Six Siege, it appears as if a separate version of the game, designed for the Xbox Series X gen of Xbox consoles, is planned. Luckily, crossplay with those playing the Xbox One version is incredibly likely. “We don’t want to break our community,” he reassures. “So, we want people who buy the new system right away to play it with their friends.”
A next gen version for Sony’s PlayStation 5 is also planned.
Cross-platform progression is being worked on though isn’t a guarantee just yet. Also, while many would like PlayStation and PC crossplay, players shouldn’t hold their breath just yet.
“This is more a discussion between Microsoft and Sony. We would love to be fully cross-play — have Xbox players matchmaking against the PlayStation players. We are ready to support that. And hopefully, this will happen because as I said, it’s a general move in the industry, and there is nothing that can prevent that. It’s just a matter of time before it happens,” Athanassof explains before adding that “I don’t think there will ever be console cross-play with PC.”
Are you excited for an Xbox Series X version of Rainbow Six Siege or are you happy with the Xbox One version? Share your thoughts with us in the comments below and then follow us on Pinterest and Facebook for more Xbox news.
This release is rather significant as it’s the first time that Kingdom Hearts Final Mix, Re:Chain of Memories, 358/2 Days, Kingdom Hearts II Final Mix, Birth by Sleep Final Mix, and Re:coded have been playable on an Xbox console.
All six Kingdom Hearts video games have received a visual upgrade and will also play in 4K Ultra HD when played on an Xbox One X console.
This second bundle contains three additional tales from the Kingdom Hearts franchise. Included are the Kingdom Hearts 0.2 Birth by Sleep – A Fragmentary Passage – and Kingdom Hearts Dream Drop Distance HD games and the Kingdom Hearts χ Back Cover animated movie.
When it comes to graphics cards, few brands are as well-known as Nvidia. Their powerful line of GPUs are some of the best on the market, and they constantly launch updates for them to keep them at cutting-edge speeds.
However, some users have issues with installing various Nvidia components. For example, some users have reported having issues installing the Nvidia Control Panel:
I have the Geforce Experience and I tried downloading the new driver but the installer only redirected me to Geforce experience. I tried reinstalling the driver from there multiple times, still no control panel.
The Nvidia Control Panel is an important component, as it lets you adjust the video settings of your GPU. Because of its importance, this issue is quite severe, and that is why we’ve created this step-by-step guide that will allow you to download it again.
I can’t download the Nvidia Control Panel from MS Store
Type in disk cleanup, and select Disk Cleanup from the list of results
Select the drive you want to clean, and then select OK
Choose Cleanup system files
Select the file types to get rid of
To get a description of the file type, select it
Select OK
Perform a full cleanup which will delete the temporary files
You can now try to download the Nvidia Control Panel and this time it should install without errors. Once completed you will have the right-click option back to customize your Graphics settings.
2. Update Windows 10
Press Start
Select Settings
The cogwheel-shaped button
Select Update & Security
Click on Check for Updates
If updates are already pending, select Download now
Normally, any Nvidiadriver updates should also come with any Windows 10 updates you perform. However, if this doesn’t happen, you can manually update them by following these steps:
Press Windows + X
Select Device Manager
Expand the Display Adapters tree
Right-click your Nvidia GPU
Select Update Driver
4. Download the Nvidia DCH driver
Perform an Advanced Search on Nvidia’s website and download the DCH version of the driver that you need. This component is just like the standard driver, just that it no longer includes the Nvidia Control panel.
[…] the NVIDIA Control Panel is no longer included in the base DCH driver package and is instead distributed exclusively through the Microsoft Store and seamlessly installed following the completion of the NVIDIAdriver installation.
As such, download and install the appropriate driver, then simply reboot the PC and try installing the Nvidia Control Panel from the Microsoft Store again.
By following the steps listed above, you should no longer have any issues with downloading and installing the Nvidia Control Panel from the Microsoft Store.
Some HP printer users have posted on support forums about an ERROR:/.SFCompactDisplay-Heavy error. That error message appears on the printers’ status displays. As a consequence, users can’t print documents. If you need to fix that error, check out of the potential resolutions for it below.
This is how you can fix ERROR:/.SFCompactDisplay-Heavy
1. Reset the printer
First, try resetting the HP printer with a hard reset.
Turn on the printer if it’s off.
Then unplug the power cable from the printer and wall.
Wait a few minutes. Plug the power cable back into the wall.
Connect the power cable with the back of the printer.
Turn the printer back on.
Thereafter, run a test print after the printer’s warm-up period.
2. Update the printer’s firmware
ERROR:/.SFCompactDisplay-Heavy can be due to outdated printer firmware.
Thereafter, the software will detect any printer errors and display its findings. Go through the software’s guidelines to resolve any detected errors.
Those are a few resolutions that might fix this error for most users. For further fixes, you can get in touch with an HP customer support agent with an HP Customer Support account.
If you know of any other fix for this issue that we may have missed out on, leave us a message in the comments section below.