Windows 10X 18941: the Windows 10 that almost looked like Windows 11

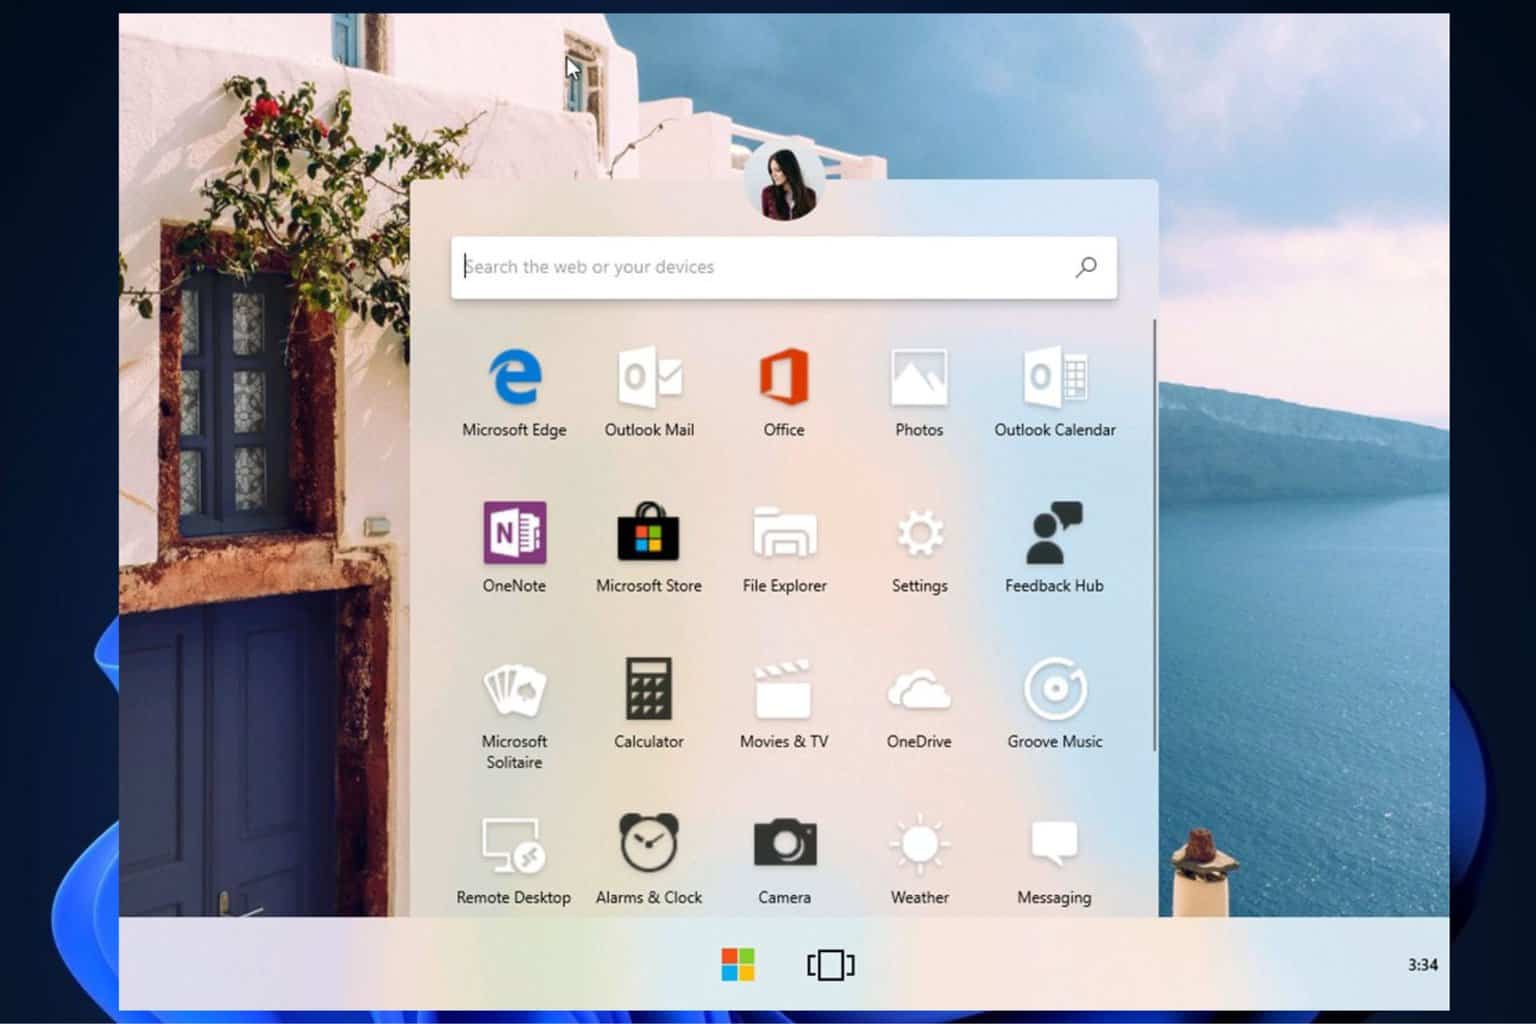
Windows 10X 18941 has been leaked, and at a first look you’ll be surprised just how similar it looks to Windows 11. Thanks to Windows Insider enthusiast, @techosarusrex, who spotted this Windows 10 iteration, we have some images of it.

Based on Windows 10 1903, the Windows 10X 18941 version sports a taskbar similar to the one currently present in Windows 11: centered, with a squared Windows logo and a Desktop Manager button. When clicked, the Start button opens a Start page virtually identical to the one in Windows 11, although with slightly modified app icons.

The taskbar is very light: we can only see the hour and two icons. The Settings area, however, does not resemble the one from Windows 11. Instead, it follows the design of Windows 10.

Elsewhere, the same enthusiast posted images of the leaked Windows 10X 18985, based on version 1903. It features a similar design that brings it closer to Windows 11 but keeps the classic Windows 10 theme for its Settings page and some of its icons.

Windows 10X was still a version of Windows 10 that was supposed to be released in 2020 after Microsoft announced in 2019 that it would be an operating system for dual-screen devices, such as the Surface Neo, a now-unreleased touchscreen 2-in-1 PC.

In May 2021, Microsoft canceled it, but as you can see, many of its designs were incorporated into Windows 11, which would be released later that year.

However, if we are to trust the numbers, Windows 11 is still performing poorly three years after its release. With Windows 10 reaching EOS in less than a year, it seems that Windows 10X might have been a good idea after all—if not for the general audience, then maybe as a bridge between Windows 10 and 11.

Photo credits: @techosarusrex

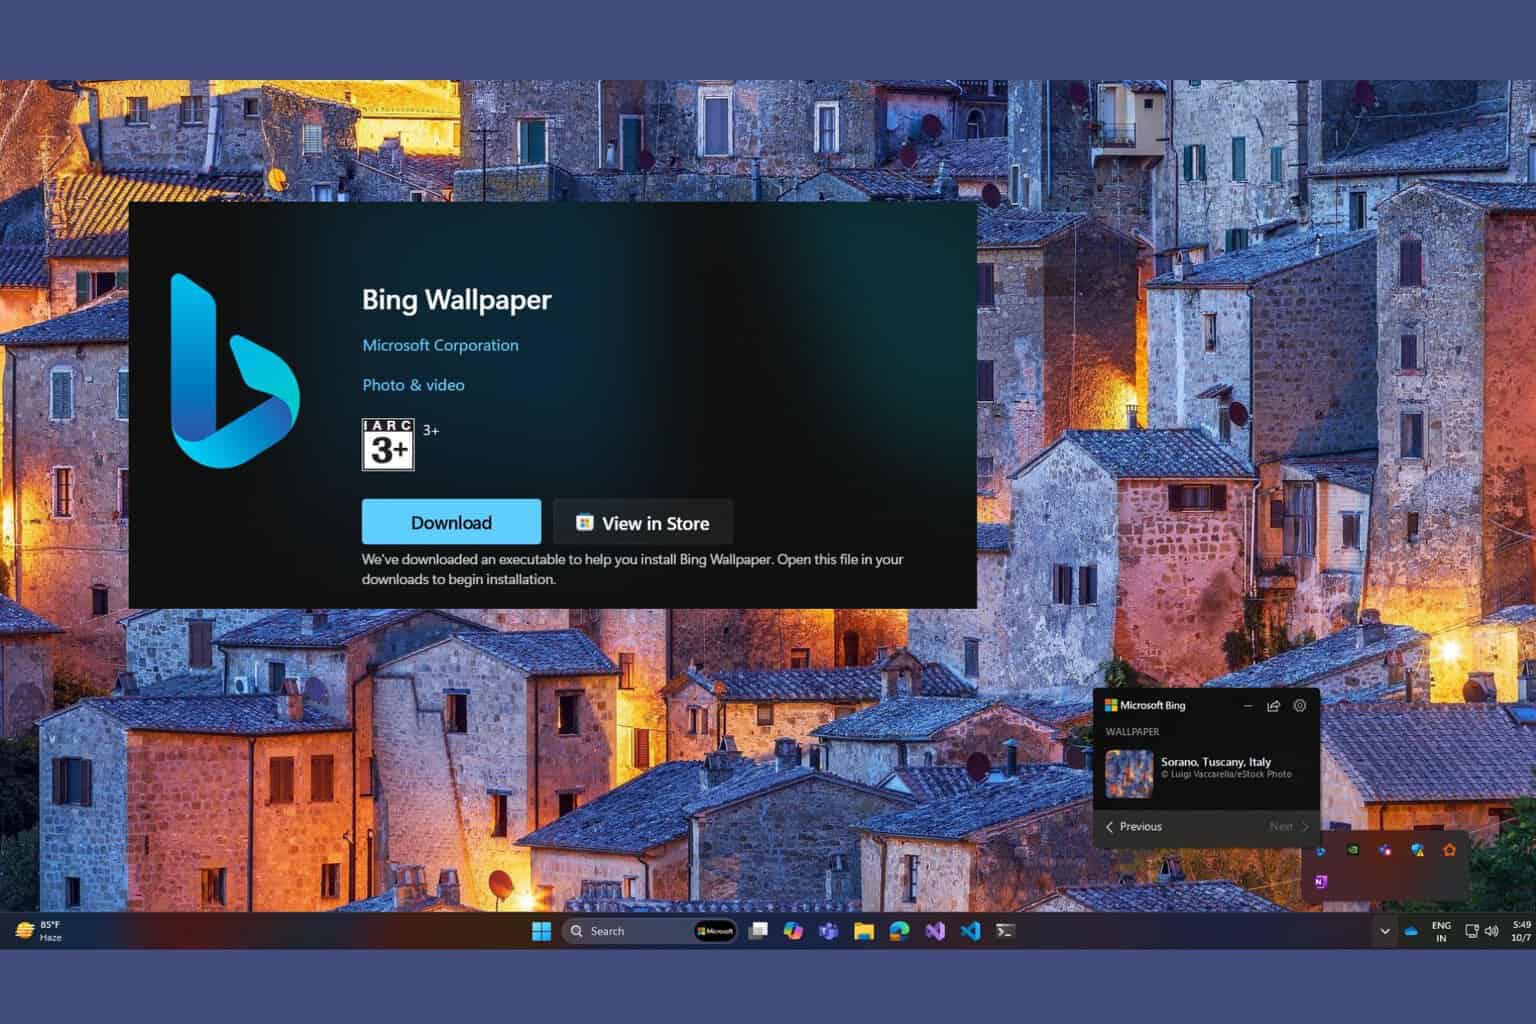
The Bing Wallpaper app is now available in Microsoft Store

The Bing Wallpaper app has a long history, and it’s the best and quickest way to get those wonderful Microsoft Bing wallpapers you see on the search service every day. If you didn’t know about that, Bing changes the wallpaper every day and they are free original images from contributors around the world.

Unfortunately, the Bing Wallpaper app is not that popular, mainly because it was not advertised much and not many users know about it. Now, Microsoft added Bing Wallpaper in Microsoft Store, so it’s a lot easier to spot and get.

The app is free and it has a couple of interesting benefits, besides getting a new fresh wallpaper on your desktop. You can open the image in Bing Search and learn about the context behind it.

Microsoft also included Bing Wallpaper in the Microsoft Rewards program. In other words, if you use it, you get points every day.

We also need to mention that although the wallpapers are free for personal usage, you can’t use them for professional purposes such as advertisement, product placement and other.

During the installation, the app will ask if you want to set Bing as the default search engine so don’t rush into hitting the next buttons if you don’t want that.

The Bing Wallpaper app dates back to Windows 8, but now it only works on Windows 10 and 11.

We also have a list of the best 4K wallpapers you can use to customize your devices. Also, if Bing Wallpaper doesn’t change the desktop image, check the highlighted guide to fix the problem for your PC.

If you enjoy beautiful desktop wallpapers, Bing Wallpapers is right down your alley. If you’re using it already, let us know about your experience in the comments below.

Signal Desktop Database Error: 5 Ways to Fix it

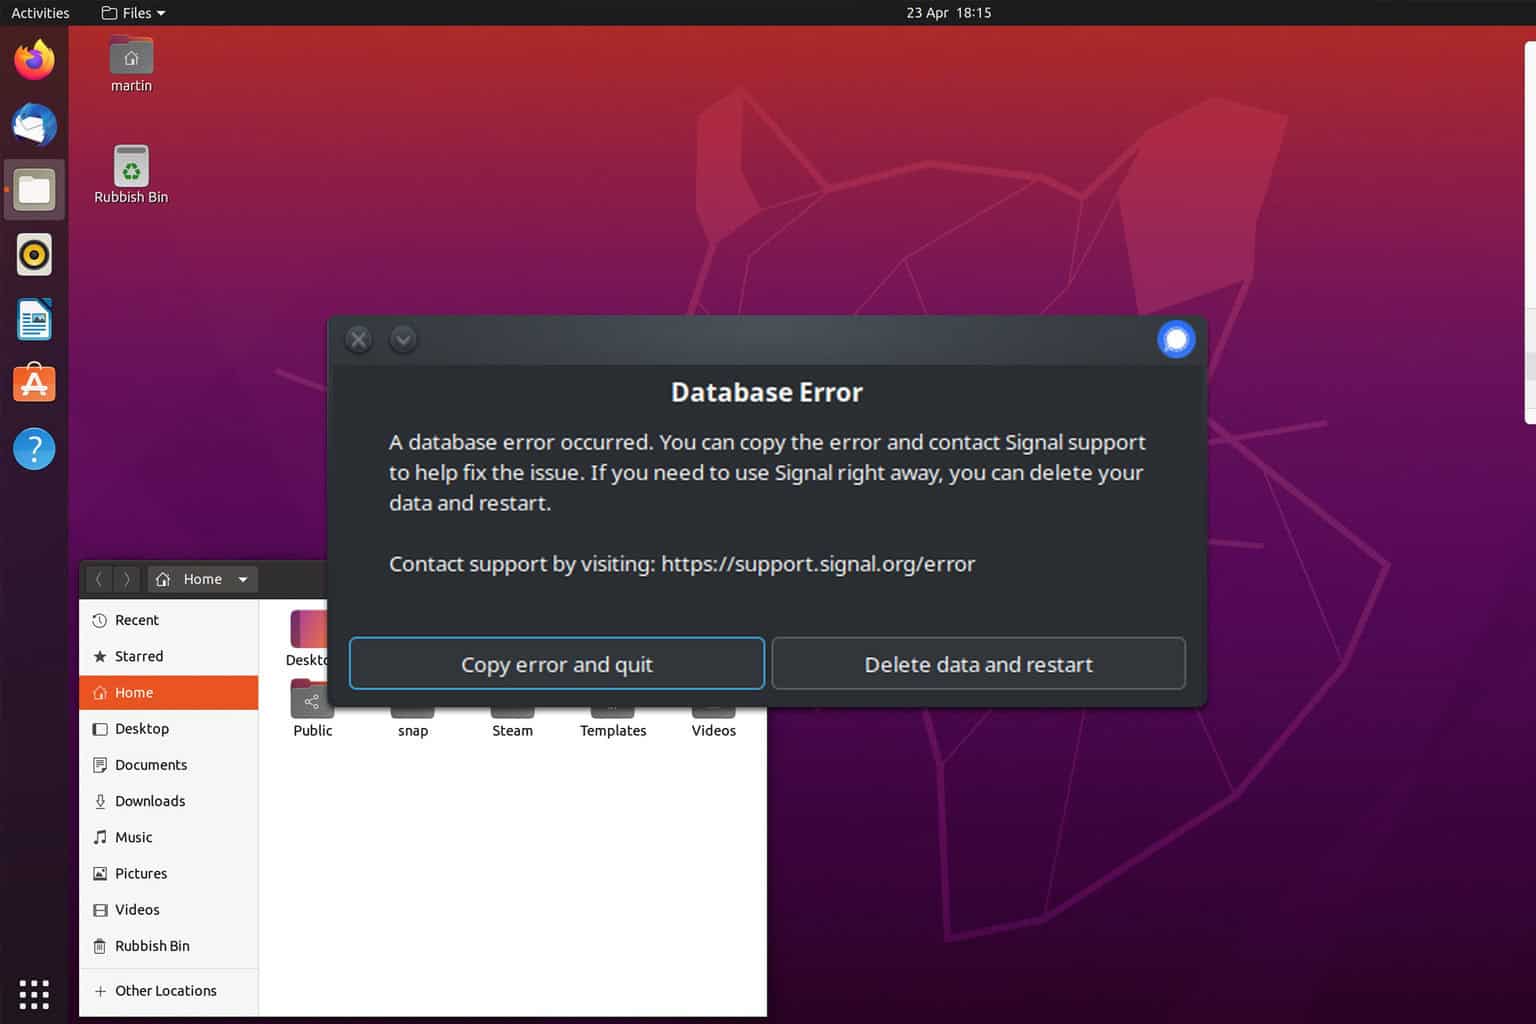
Database error on Signal desktop usually affects Linux users, and it will prevent you from starting the app and seeing your messages. However, there are a few ways you can fix this problem.

How can I fix the Database error on the Signal desktop?

1. Ensure that KDE Wallet is enabled

  1. Navigate to Settings and choose System Settings.
  2. Select KDE Wallet.
  3. Now choose Wallet Preferences and ensure that Enable the KDE wallet subsystem is enabled.
    kde wallet subsytem

2. Use gnome-libsecret parameter

  1. Open the Terminal.
  2. Run flatpak run org.signal.Signal --password-store="gnome-libsecret"
    flatpack run orgsignal
  3. Check if the problem is resolved.

Some users had to use flatpak override org.signal.Signal --user --env=SIGNAL_PASSWORD_STORE=gnome-libsecret

Keep in mind that you might have to use kwallet, kwallet5, or kwallet6 depending on your implementation.

Another command that might work is: flatpak install flathub org.signal.Signal

3. Change Signal’s config.json file

  1. Open /home/USER_NAME/.config/Signal/config.json
  2. Next, locate "safeStorageBackend": "kwallet5"
  3. Set it to "safeStorageBackend": "kwallet6"
  4. Save changes.

This method worked for Gentoo users, so don’t hesitate to try it.

4. Use the old key instead of encryptedKey in config.json

  1. Navigate to ~/.var/app/org.signal.Signal/config/Signal/config.json
  2. In there, you should find a copy of the old key.
  3. Replace the encryptedKey with the old key.

Keep in mind that this is a temporary workaround, and the issue will appear after closing Signal. Also, this method requires you to have a backup of config.json to work.

5. Other solutions to try

  1. Remove the Signal folder at the following location: ~/.config/Signal
  2. Delete Signal:
    1. Run flatpak override org.signal.Signal --user --unset-env=SIGNAL_PASSWORD_STORE
    2. Stop Signal.
    3. Run rm -r "$HOME/.var/app/org.signal.Signal"
    4. Start Signal.
  3. Add flatpack and reinstall Signal:
    1. Verify Signal is installed via snap: which signal-desktop
    2. Run sudo snap remove --purge signal-desktopsudo dnf install flatpackflatpak remote-add --if-not-exists
    3. After that, run flathub https://flathub.org/repo/flathub.flatpakrepo
    4. Lastly, run flatpak install flathub org.signal.Signal

All of these solutions will reinstall Signal and cause you to lose your data, so use them if nothing else works.

Database error in Signal Desktop appears on Linux due to bugs in keystore implementation, but hopefully, these solutions should help you fix it.

This isn’t the only error you can encounter, and we wrote about the Signal desktop is not working and  This version of Signal desktop has expired errors in our other guides, so don’t miss them.

Did you know that you can restore a backup on Signal Desktop? Although not officially supported, it’s still possible, and we have a guide that shows you how to do it. For more advanced users, we have a guide on how to use command line options in Signal Desktop, so don’t miss it.

Before you leave, don’t miss our latest guide on how to export Signal Desktop messages. We also have an article how to fix Signal Desktop high CPU usage, so feel free to visit it.

5 Quick Ways to Fix Dell SupportAssist Not Working

If you own a Dell device you know how the SupportAssist comes in handy when diagnosing and troubleshooting common problems so if it’s not working, you’re now facing twice the hassle.

The Dell SupportAssist tool can freeze, fail to launch or be extremely slow when you try to use it. Common causes include outdated software or drivers. Your internet connection also needs to be fast and stable and no conflicting programs are installed.

What can I do if Dell SupportAssist is not working?

1. Restart Dell services

  1. Press Windows + S to open the Search menu, type Services in the text field, and click on the relevant search result.
    services.msc
  2. Locate all the Dell services here (listed together in alphabetical order), and double-click on one.
    properties
  3. Select Disabled from the Startup type dropdown menu, and then click on the Stop button.
    stop to fix DellInstrumentation.sys
  4. If a confirmation prompt pops up saying that another linked Dell service(s) will stop, click Yes to proceed since we anyway are disabling these later.
    confirm
  5. Finally, click Apply and OK to save the changes.
    save changes to fix DellInstrumentation.sys
  6. Similarly, disable the other Dell services that are currently running.
  7. Now repeat the same process but this time, click on Automatic as the Startup type.

Restarting critical services can also help re-establish the connection if Dell SupportAssist is not connecting to the internet.

2. Clear corrupt/cached files

  1. Hit the Windows + E keys to open File Explorer.
  2. Navigate to the following locations and delete the contents from each folder: C:/ Program Data/ PCDR C:/ Program Data/Supportassist C:/ Program Data/Dell/Dell data volt C:/ Program Files/ Dell/Supportassist C:/ Program Files/ Dell/ Dell data Volt C:/ windows/Temp 
  3. Restart your computer and relaunch SupportAssist to recreate the folders and their contents afresh.

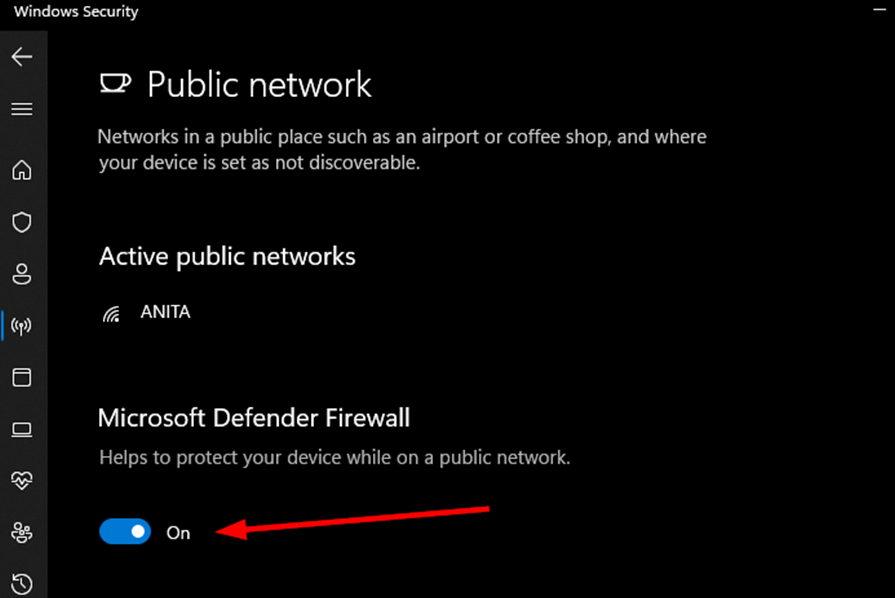
3. Temporarily disable Windows Firewall and run as admin

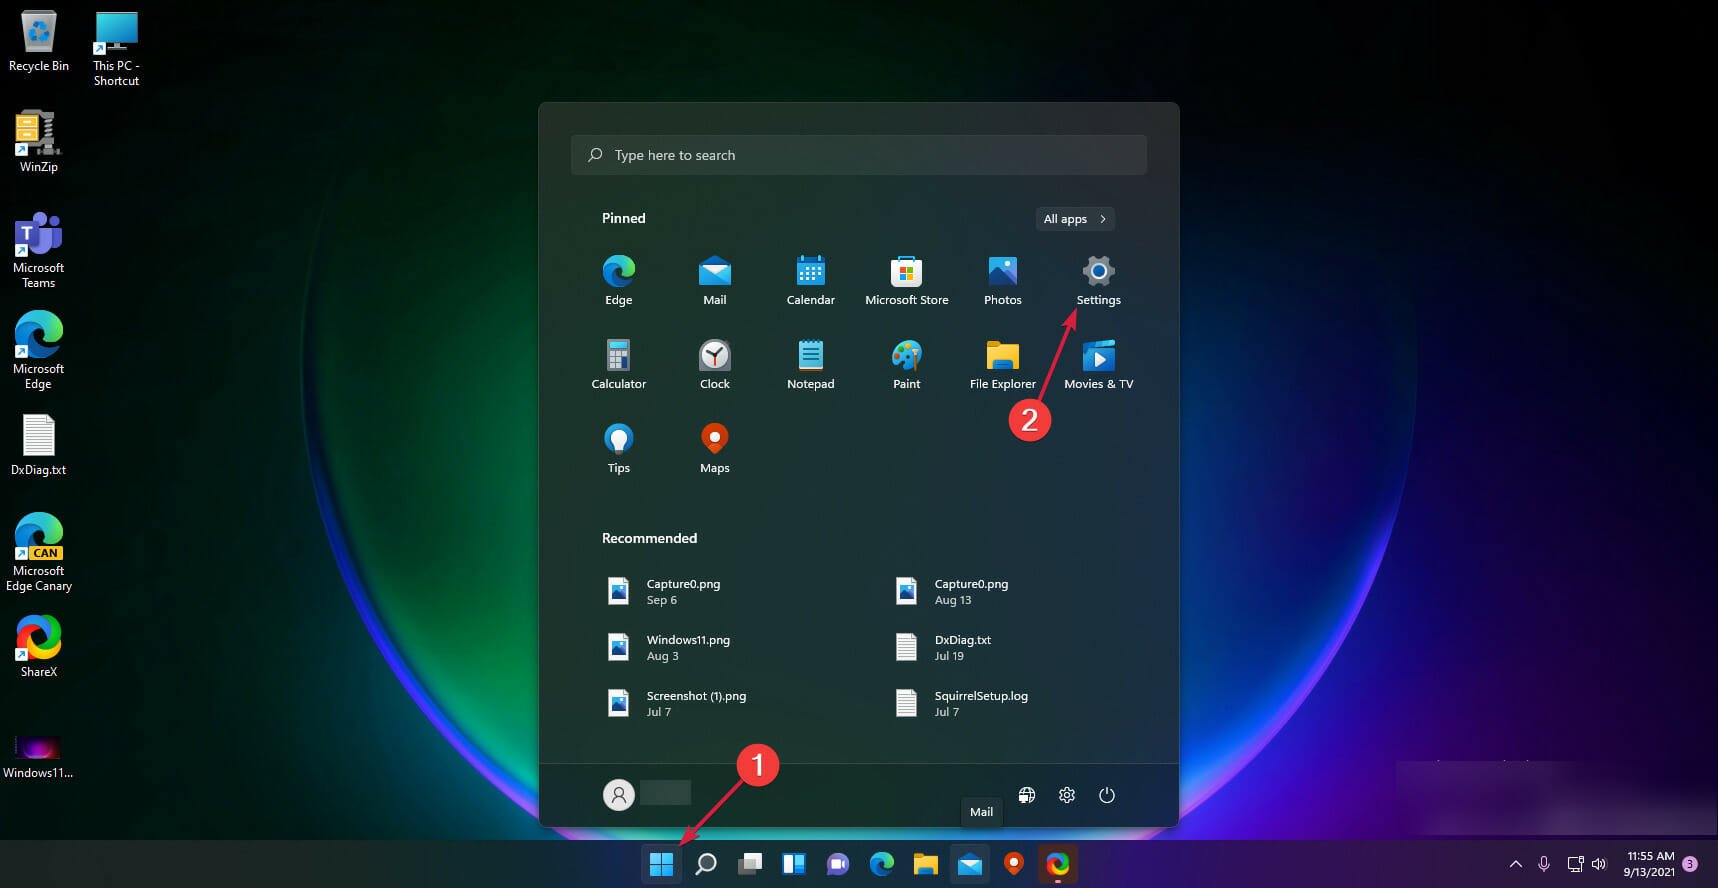
  1. Hit the Windows key and click on Settings.
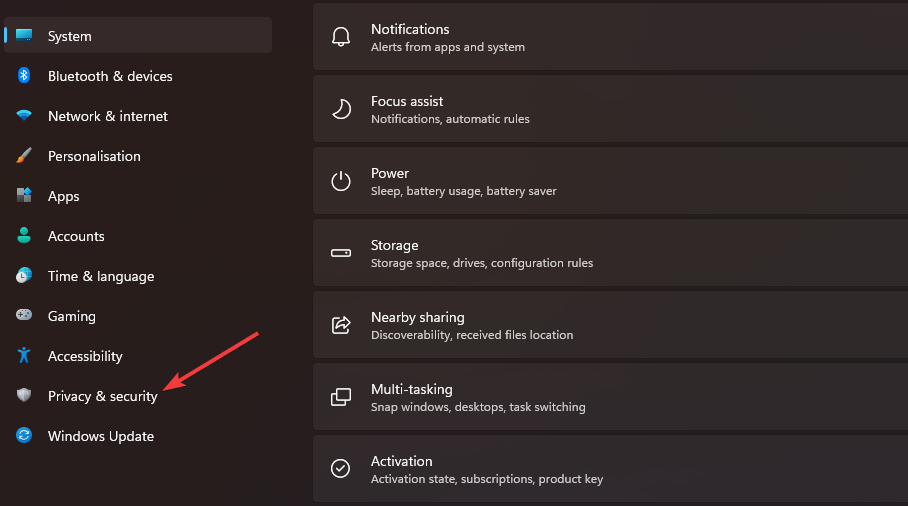
  2. Select Privacy & security.
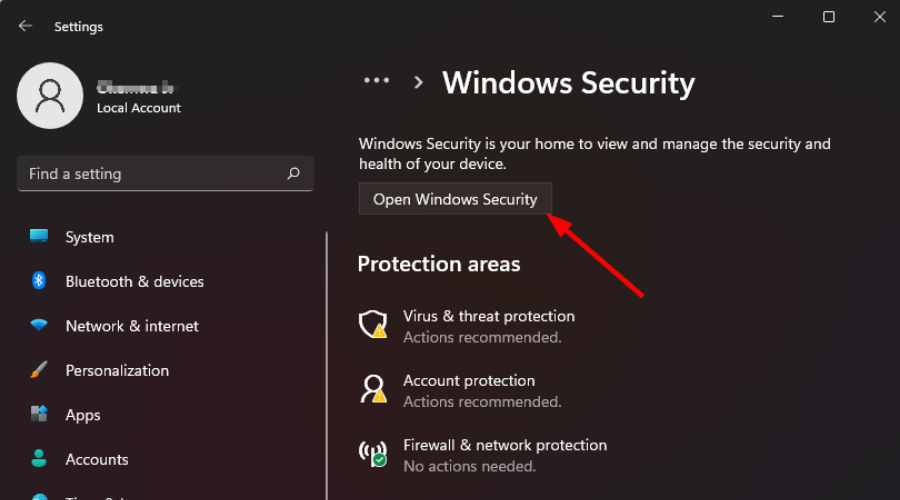
  3. Click on Open Windows Security.
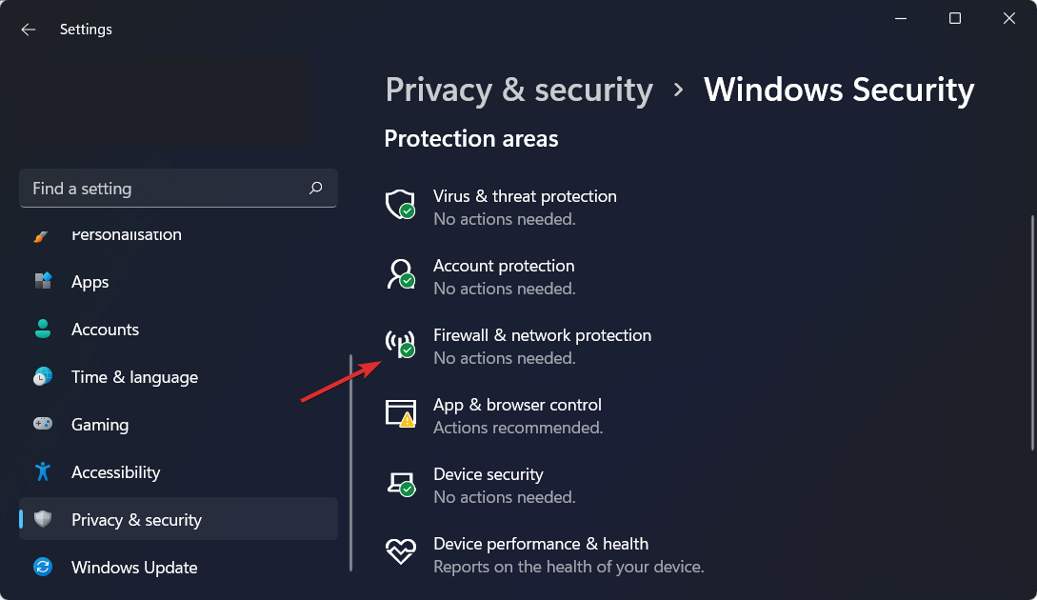
  4. Select Firewall & network protection.firewall-and minecraft not installing windows 11
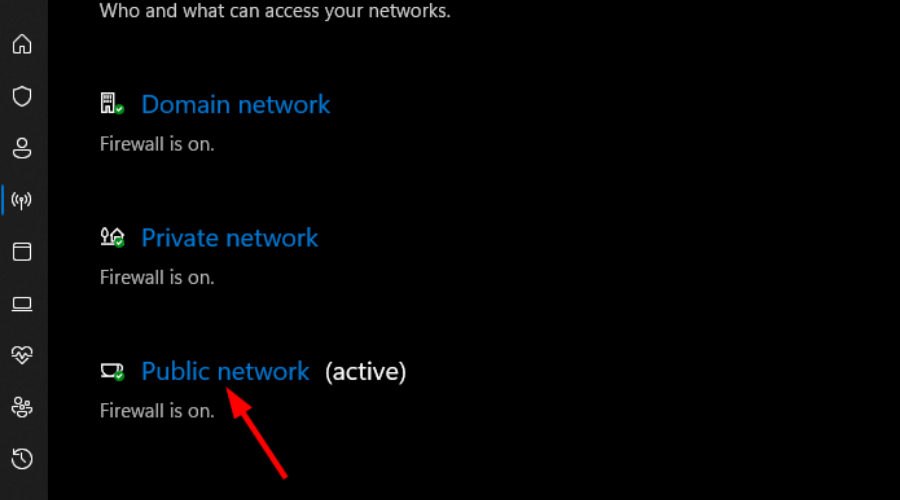
  5. Click on Public network.
  6. Next, toggle Microsoft Defender Firewall off.
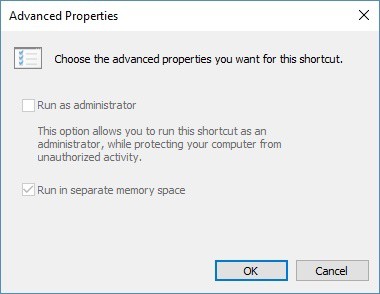
  7. Navigate to Dell SupportAssist, right-click on the program’s icon, select Properties on the menu and click on Shortcut.                                                                                                                     
  8. Next, click on Advanced.
  9. Select the box that says Run As Administrator and click on Apply.                                      
  10. Try launching Dell SupportAssist and see if it is working.

4. Delete Registry keys

  1. Before you edit the registry, ensure you have a backup or create a restore point to cushion your device from any catastrophic failures.
  2. Hit the Windows + R keys to open the Run command.
  3. Type regedit in the dialog box and hit Enter to open the Registry Editor.
  4. Navigate to the following location depending on your Office version: HKEY_LOCAL_MACHINE\SYSTEM\CurrentControlSet\Services
  5. Find the following keys and delete them: Dell hardware service Dell client management service Dell updates
  6. Close the Registry Editor and restart your PC. When you open SupportAssist, it should be working.

5. Reinstall the Dell SupportAssist app

  1. Press Windows + R to open Run, type appwiz.cpl in the text field, and hit Enter.
    appwiz.cpl
  2. Select Dell SupportAssist from the list of apps, and then click Uninstall.
    uninstall to fix DellInstrumentation.sys
  3. Click Yes in the confirmation prompt and follow the on-screen instructions to complete the uninstall process.
    confirm
  4. Similarly, uninstall the Dell SupportAssist Remediation and Dell Power Manager Service apps as well.
  5. Go to Dell’s official website, and click on SupportAssist for Home PCs if your computer is not a part of any organization.home pcs
  6. Click on the Download Now button to get Dell SupportAssist 64-bit for Windows 11.download dell supportassist for windows 11
  7. Head to the Downloads folder and run the SupportAssistInstaller.exe file then click Yes in the UAC prompt.
  8. Follow the on-screen instructions to complete the process.

In case you experience other issues like Dell SupportAssist blank screen and don’t want to deal with this software anymore, we have a great guide on how to uninstall Dell SupportAssist.

Similarly, Dell is not the only manufacturer whose diagnostics tool has mishaps from time to time. HP also has its own share of these issues when the HP Support Assistant fails to open but this is a problem we’ve already tackled in our guide.

You can also try other PC hardware diagnostic tools that do the same job as Dell SupportAssist or find other ways to optimize your Windows PC and make it faster.

That’s it from us but do let us know if you’ve managed to get your diagnostic tool working again. To learn more about this tool, don’t miss our latest article on Dell SupportAssist OS Recovery.

Error Delete Pending 303 (0x12F): How to Fix it

ERROR_DELETE_PENDING is a developer error, and it usually comes with 303 (0x12F) The file cannot be opened because it is in the process of being deleted message. This is not a common issue, but if you ever encounter it, this guide will show you how to fix it.

How can I fix ERROR_DELETE_PENDING?

1. Use the wmi

  1. Run the following code:
    $crg = Get-WmiObject -Class MSCluster_resourcegroup -Namespace root\mscluster -Filter "Id = 'd1b7ea06-ed2f-4efc-95d8-c874e8425ad9'"
    $crg.DestroyGroup(2)

    crg destroygroup
  2. After the command is executed, check if the problem is gone.
  3. Keep in mind that the Id should be set to your cluster group ID.

This issue can appear when working with fallover clustered managed by VMM.

2. Use –net none parameter

  1. Configure your docker command line this:
    docker run --net none hello-world
    docker run net none hello world
  2. Try to run it again.
  3. Check if the problem is gone.

Keep in mind that this method works only for hello-world and if you use it you won’t be able to expose ports from the container.

3. Other tips to try

  1. Try to restart the cluster MMC or restart the server.
  2. Restore the VM and then try removing the VM from the cluster GUI.

As we already mentioned, ERROR_DELETE_PENDING is a rare error, and if you’re not a developer or system administrator, you likely won’t ever encounter it.

But if you do, the solutions from this guide might be able to help you. There are many similar issues you can encounter, and we wrote about Error_Not_Joined and ERROR_NOT_SUBSTED in our previous guides, so don’t miss them.

Our latest guide covers the Error_no_More_Items issue, so don’t hesitate to check it out for more solutions.

How to Fix the Normaliz.dll Not Found Error on Windows 11?


Many users have complained about getting the Normaliz.dll not found error if the Unicode Normalization DLL file is removed or corrupted. You might also see the DLL missing error if the system files are damaged, or the DLL file is not registered.

To begin with, ensure your Windows is up to date, check the Recycle Bin to ensure the DLL file is not accidentally deleted, and run a malware scan using a reliable antivirus tool.

How can I fix the Normaliz.dll not found error?

1. Reinstall the affected app

  1. Press Windows + I to open the Settings app.
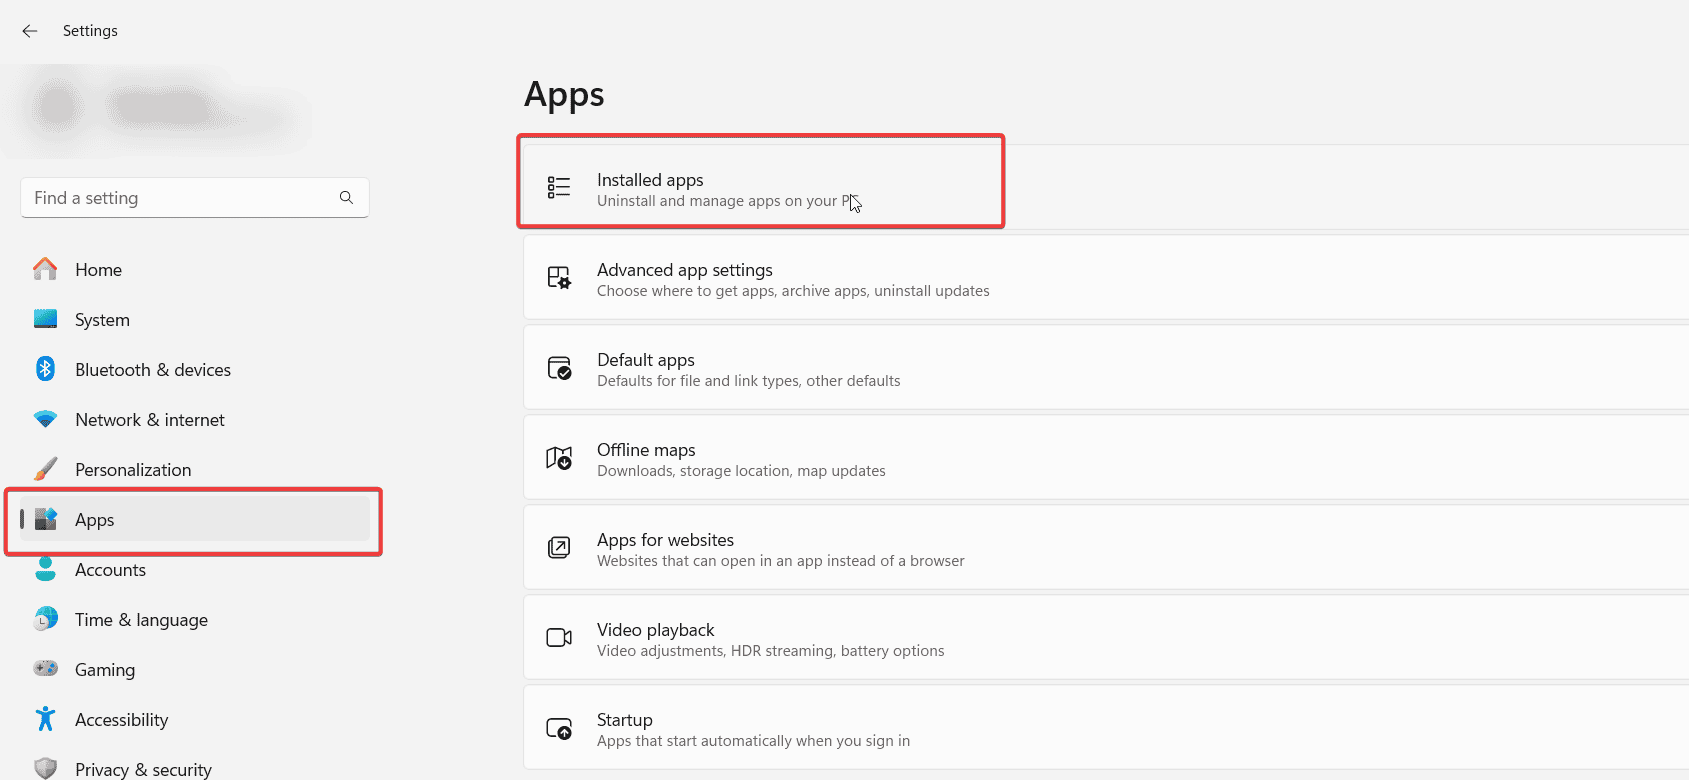
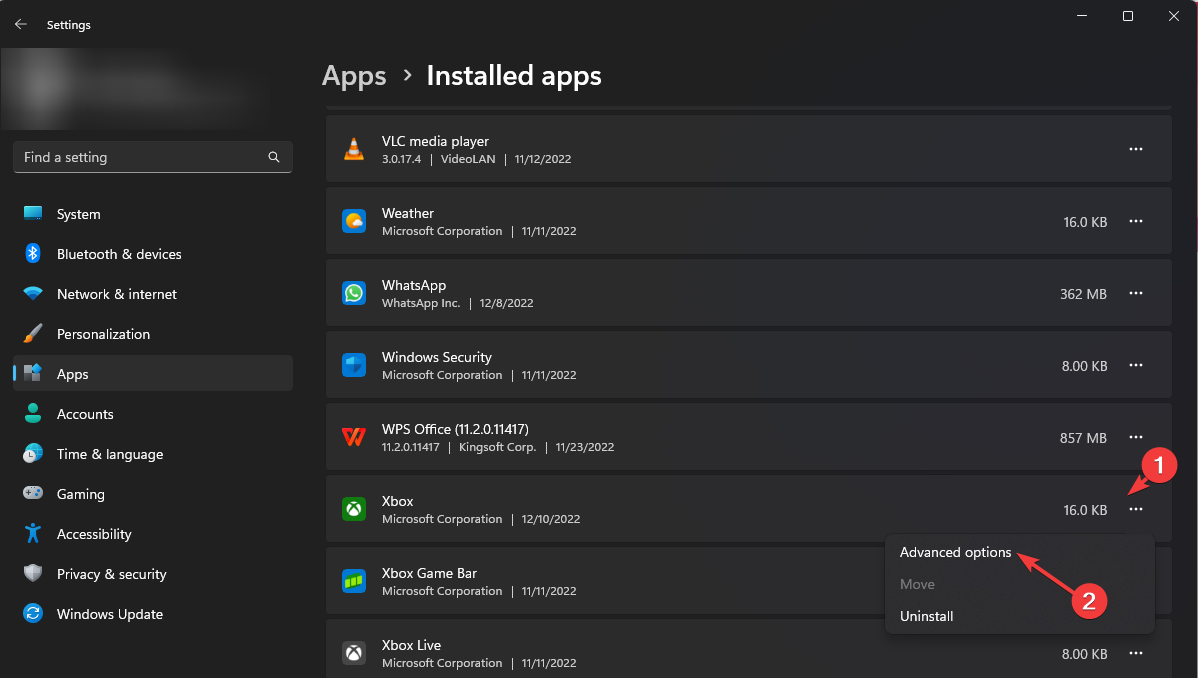
  2. Go to Apps, then click Installed apps.Apps - Installed apps normaliz.dll
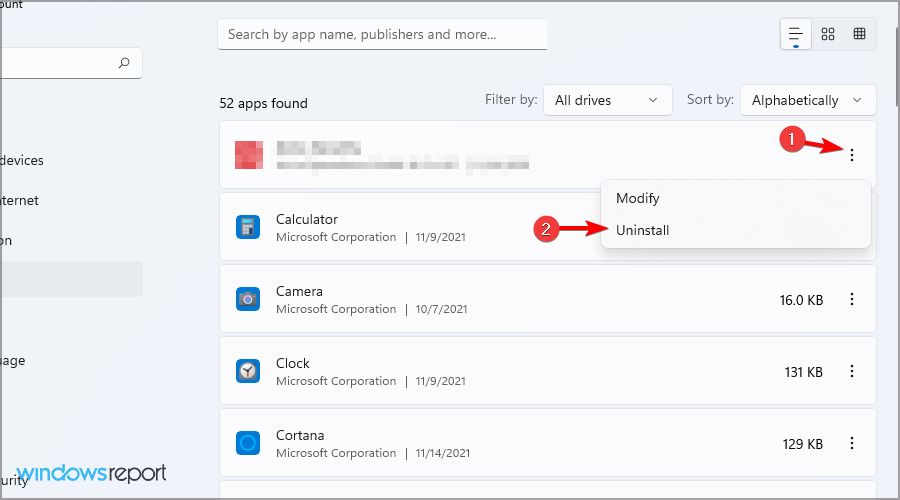
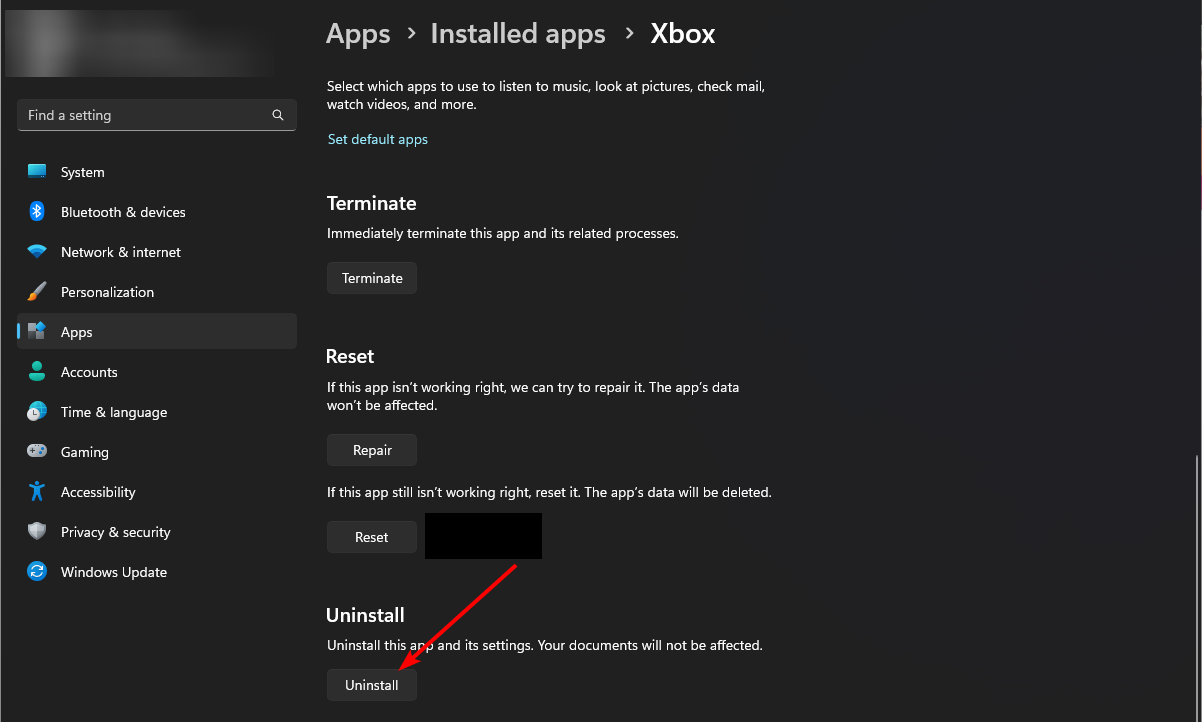
  3. From the list of apps, locate the affected app, then click the three-dot icon and click Uninstall from the context menu.Uninstall (2)
  4. Click Uninstall on the following window to confirm.uninstall confirmation app normaliz.dll 
  5. Once uninstalled, go to the app’s official website or Microsoft Store to install the app.
  6. Follow the on-screen instructions to complete the process.

2. Download a DLL fixer tool

If you have more than one computer running on the same Windows version, copy the DLL file from this location: C:\Windows\System32\; then paste it into the affected PC at the exact location.

However, as Normaliz.dll is a part of the Windows system files and is important for Windows’ functioning, we recommend you use a third-party DLL fixer tool. All you need to do is download and install the tool, then run it to keep all the DLL-related issues at bay.

3. Re-register the DLL file

  1. Press the Windows key, type cmd in the search box, and click Run as administrator to launch Command Prompt with elevated rights.
  2. To re-register the normaliz.dll, copy & paste the following command and hit Enter:regsvr32 normaliz.dll
  3. Click OK when prompted and reboot your PC to save the changes

This method will help you fix the normaliz.dll missing error if the DLL file is already present on your computer.

4. Run SFC & DISM scans

  1. Press the Windows key, type cmd in the search box, and click Run as administrator from the list of options to launch Command Prompt with administrator rights.   CMD elevated normaliz.dll
  2. Copy & paste the following command to repair or recover the corrupted system files on your Windows PC and press Enter: sfc /scannowSFCSCANNOW CMD
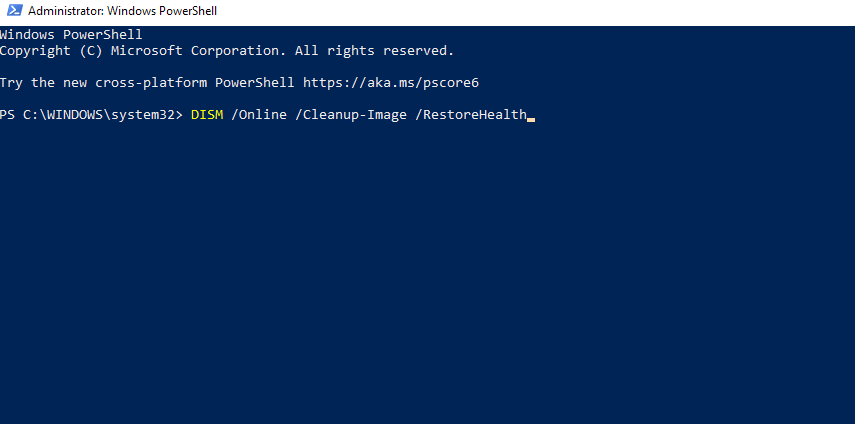
  3. Wait for the command to complete, then type the following command to scan the Windows image for corruption and repair it using Windows Update, and hit Enter: Dism /Online /Cleanup-Image /RestoreHealthRestore health
  4. Once the scan is executed, restart your computer to let the changes take effect.

5. Restore your system to an older version

  1. Press Windows + R to open the Run window.   sysdm.cpl   
  2. Type sysdm.cpl and click OK to launch the System Properties window.
  3. Go to the System Protection tab, and click the System Restore button.System Restore - normaliz.dll
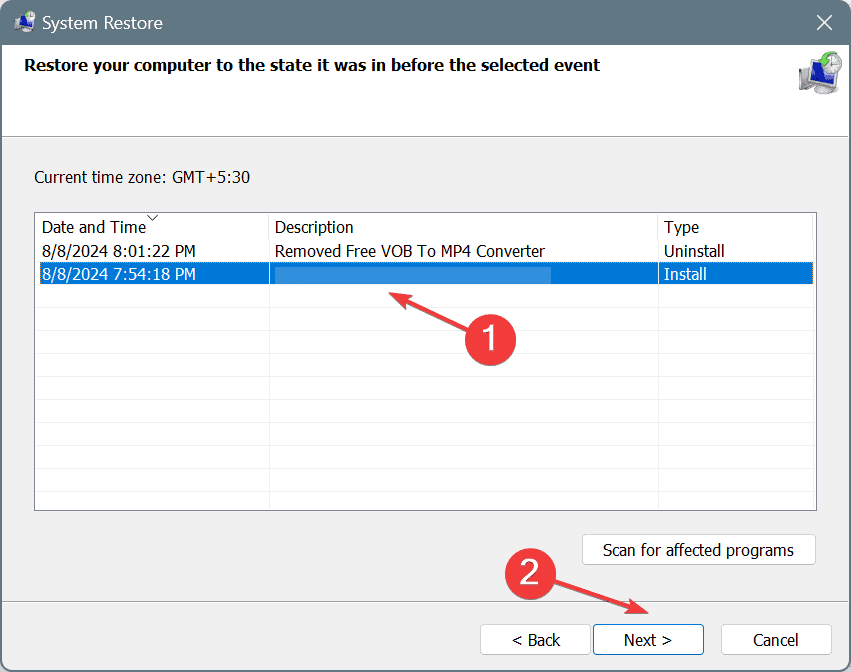
  4. Select Choose a different restore point on the System Restore window, then click Next.Next Choose a different restore point normaliz.dll
  5. Choose the oldest or newest restore point from the list of available restore points, and click Next to proceed.Choose a point
  6. Click Finish.Finish - normaliz.dll

Windows will restart and restore the system settings to the selected version. If you see the System Restore is not working message after restart, then we have a detailed guide for you to fix this issue.

6. Download the DLL file manually

Note icon NOTE
If nothing has worked for you, you can download and add the DLL file to the System32 folder from a reliable third-party website like DLL-FILES, which has been tested and verified by WR experts.
  1. Click the DLL-FILES website link to open the normaliz.dll page, then click Download.
  2. Double-click the downloaded folder to open, locate the .dll file, then copy it.
  3. Go to this path and paste the DLL file after replacing C with the system drive letter:C:\Windows\System32\
  4. Reboot your computer to let the changes take effect.

To conclude, you can fix the normaliz.dll not found error by repairing the system files, reinstalling the affected app, re-registering the DLL file if it is already present on your device, or using a DLL fixer tool.

Do you often encounter errors or pop-up messages related to missing DLL files? Then, you must read this guide to learn the reasons for preventing them.

If you are facing the same issue due to any other DLL file on your PC, check out the common ways to quickly recover the DLL file.

Before you go, don’t forget to check out our latest guide on what to do if Api-ms-win-crt-heap-11-1-0.dll is missing from your computer.

Did we miss a step that helped you fix this DLL missing error? If so, share the method in the comments section below, and we will add it to the list.

How to Fix the WIN32K_CALLOUT_WATCHDOG_BUGCHECK Error

The WIN32K_CALLOUT_WATCHDOG_BUGCHECK with the bug check code 0x000001A2 is a Blue Screen of Death (BSoD) stop error that occurs due to a watchdog timeout in the win32k.sys driver appears due to hardware, driver issues, or software bugs.

The win32k.sys file is an important part of the Windows kernel, which handles graphical user interface operations, user input, and Windows management. To begin with, run a full system scan with a Windows Defender tool or any other reliable antivirus tool.

How can I fix the WIN32K_CALLOUT_WATCHDOG_BUGCHECK error?

1. Update the graphics driver

  1. Press Windows + R to open the Run window.Device Manager Run command -  WIN32K_CALLOUT_WATCHDOG_BUGCHECK
  2. Type devmgmt.msc and click OK to open the Device Manager app.
  3. Locate and click the Display adapters category to expand it, then right-click the graphics driver and select Update driver from the context menu. Graphics Driver update
  4. Click Search automatically for drivers and Windows will try to find the best version of driver.Search automatically WIN32K_CALLOUT_WATCHDOG_BUGCHECK

If Windows is not able to find the latest version of the driver, head to the manufacturer’s website and get the updates installed. Alternatively, you can download & install a reliable driver updater tool to ensure all the drivers on the computer are up to date.

If this doesn’t work, you can roll back display driver to fix the WIN32K_CALLOUT_WATCHDOG_BUGCHECK BSoD error by following these steps:

  1. Open the Device Manager app, then click Display adapters to expand.
  2. Right-click the graphics driver and select Properties from the context menu.  Properties WIN32K_CALLOUT_WATCHDOG_BUGCHECK
  3. Go to the Driver tab, then click the Roll Back Driver button.Click thr Rolback driver button
  4. On the following screen, select the reason and click Yes.Select the reason and click OK

2. Check for Windows Updates

  1. Press Windows + I to open the Windows Settings app.
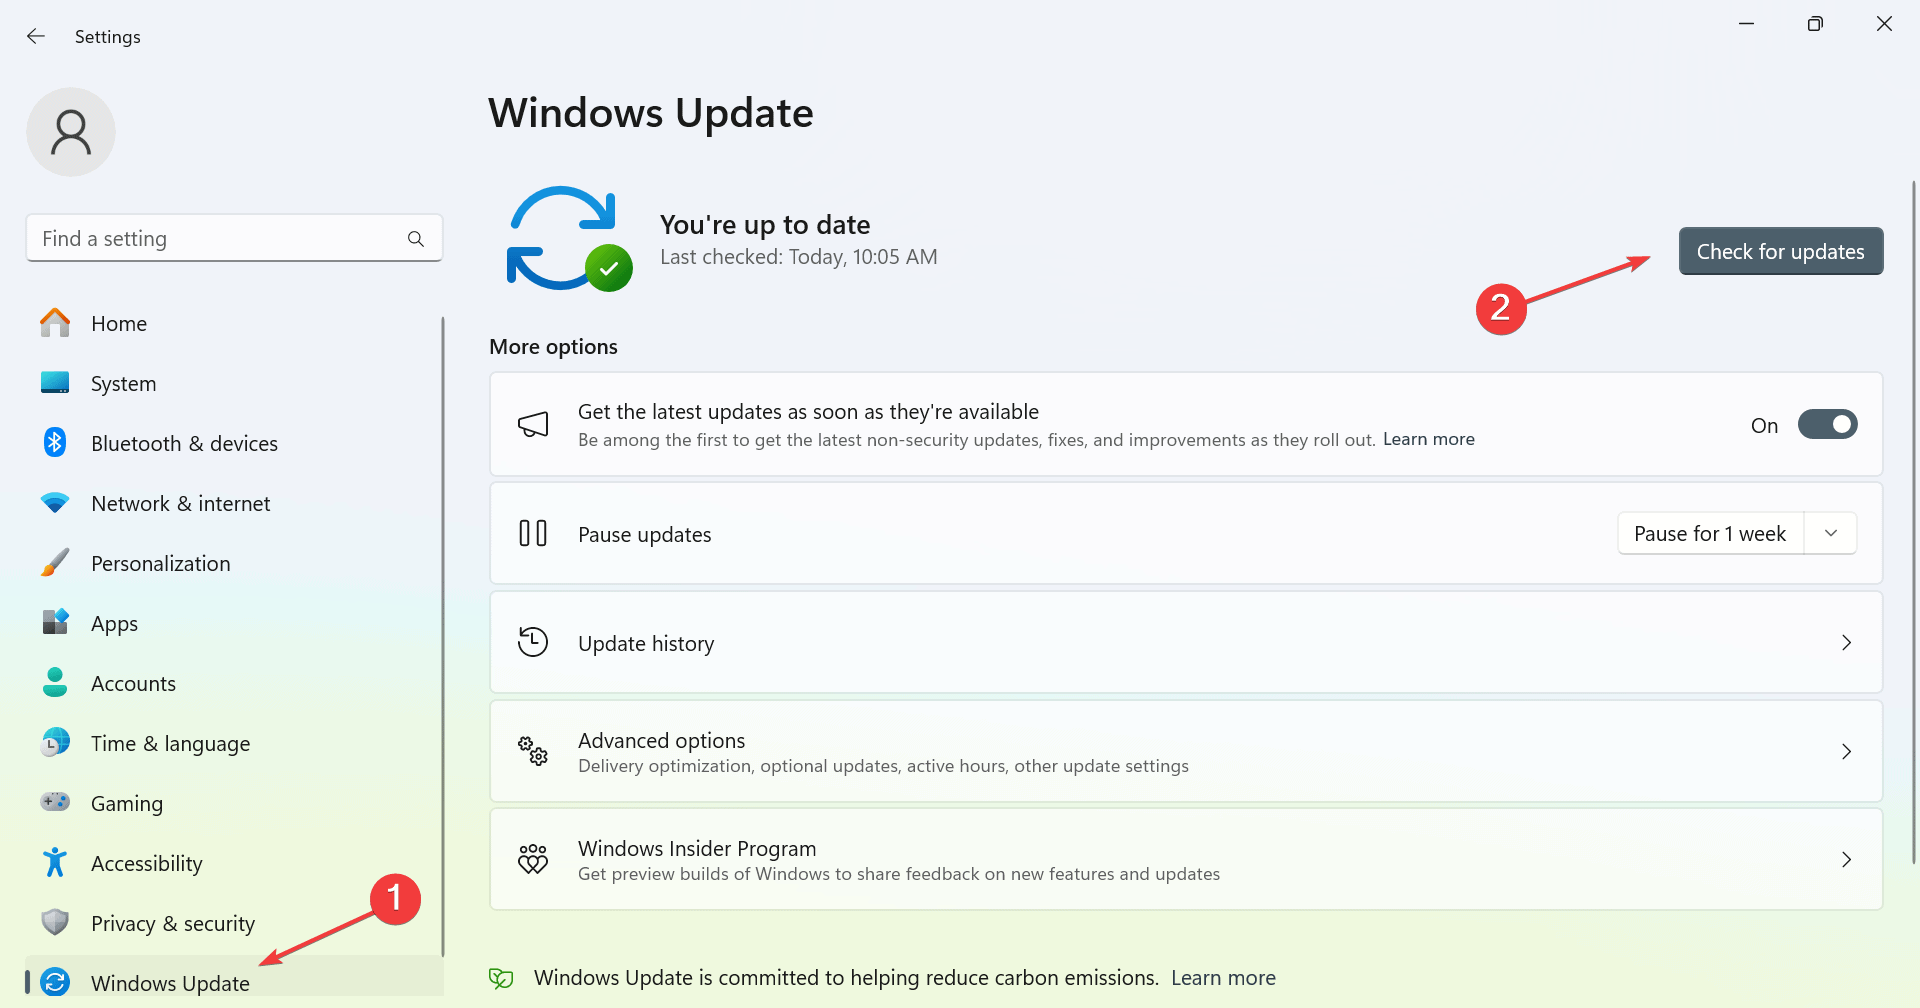
  2. Navigate to Windows Update, and click the Check for updates button.Windows Update Check for updates
  3. If there is an update available, click Download & install to install the latest updates.

3. Perform a system file check scan

  1. Press the Windows key, type cmd in the search box, and click Run as administrator from the list of options to launch the Command Prompt with elevated rights.CMD elevated - WIN32K_CALLOUT_WATCHDOG_BUGCHECK
  2. To scan and repair corrupted system files, type the following command and hit Enter: sfc /scannowSFCSCANNOW CMD
  3. Wait for the scan to complete, reboot your computer to let the changes take effect.

4. Check your PC for disk issues

  1. Press the Windows key, type windows diagnostic tool in the search box, and click Open from the list of options.Memory diagnostic tool - WIN32K_CALLOUT_WATCHDOG_BUGCHECK 
  2. Click Restart now and check for problems.Restart now - WIN32K_CALLOUT_WATCHDOG_BUGCHECK
  3. Make sure you have saved all your work, then reboot your PC.

If issues are found in RAM, you may need to reseat your memory modules. Now, follow the steps again to scan your disk, and if the issues persist, you might need to replace your RAM or one of the modules.

5. Restart your PC in a clean boot environment

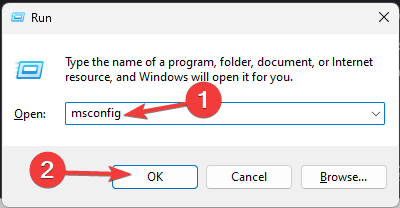
  1. Press Windows + R to open the Run window.msconfig - WIN32K_CALLOUT_WATCHDOG_BUGCHECK
  2. Type msconfig and click OK to open the System Configuration window.
  3. Go to the Services tab, then place a checkmark next to Hide all Microsoft services, then click the Disable all button.Clean boot Disable all
  4. Switch to the Startup tab, click Open Task Manager.Open task Manager
  5. On the Task Manager window, select Enabled items one by one and click Disable, then close the window.Disable Third party startup apps WIN32K_CALLOUT_WATCHDOG_BUGCHECK
  6. Back on the System Configuration window, click Apply, then OK to save the changes.Open task manager click OK and apply - WIN32K_CALLOUT_WATCHDOG_BUGCHECK
  7. Click Restart.Restart

Once your computer restarts without third-party startups and services, you can try to enable services and startup apps one by one to look for the culprit conflicting with your computer’s functioning. If none of these are responsible, reverse engineer these steps to boot your PC normally.

6. Reinstall Windows on your PC

Note icon NOTE
Before proceeding with the steps below to fix the BSoD error, back up your essential data, including photos, documents, and files. You also need a USB drive with 8 GB of free space.

Create an installation media

  1. Go to the Microsoft software download website on another PC and click Download Now.    Download now   
  2. Once the mediacreation.exe file is downloaded, double-click to open it and click Yes on the UAC prompt.
  3. On the Windows 11 Setup wizard, click Accept to agree to the license terms and agreements.Accept Setup Windows 11 step1 - SECURE_FAULT_UNHANDLED
  4. Plug in your flash drive, and choose the USB flash device option, and click Next.USB drive
  5. Select the language, edition, and architecture, then click Next.NExt
  6. Choose the USB device and click Next.
  7. Follow the on-screen steps, click Finish, and remove the USB device safely from the PC.

Reinstall Windows

  1. Plug your USB drive into the affected computer, then press Windows + E to open File Explorer.
  2. On the USB drive’s folder, look for the setup.exe file, double-click it, and then click Yes on the UAC prompt.
  3. Choose Change and select any of these options as per your preference:
    • Keep personal files and apps – Keeps personal data, apps & settings
    • Keep personal files only – Preserves data & settings, but apps are deleted
    • Keep nothing – Deletes all the settings, data, and apps.
  4. On the following screen, click Install to reinstall Windows 11 on your computer to fix the WIN32K_CALLOUT_WATCHDOG_BUGCHECK error.

Your PC will restart several times, and once it is done, it will take you to the login screen. You can log in to your PC, check for Windows updates, configure your device, and then use it as usual.

In conclusion, to fix the WIN32K_CALLOUT_WATCHDOG_BUGCHECK 0x000001A2 error, ensure Windows is up to date, run the SFC scan, look for bad RAM sectors, update all graphics drivers, restart your PC in clean boot, or reinstall Windows.

If you often see BSoD errors on your computer, we recommend you check out this guide to learn the common reason for their occurrence.

Did we miss any step that helped you fix the BSoD error? Please share it with our readers in the comments section below.

How to Register a DLL: 3 Ways to Quickly do it

It’s often recommended to force register a corrupted DLL file when you replace it with a fresh one. Learn how to register a DLL on Windows 10 or Windows 11 PCs by following our simple steps!

How do I register a DLL file?

1. Using the Command Prompt

  1. Click on the Start menu and type Command. Right-click on the Command Prompt tool and select Run as administrator.
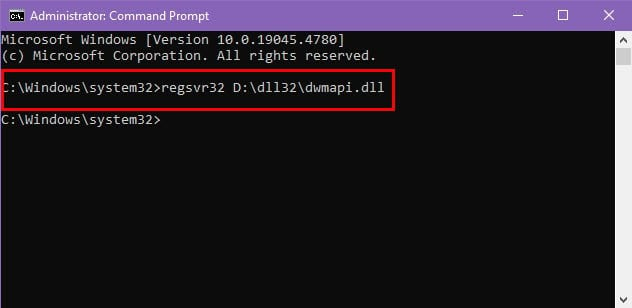
  2. Type in this command: regsvr32 D:\dll32\dwmapi.dll
  3. Replace the path shown above with the actual location of the DLL file on your system.
  4. Hit Enter to execute.
    register dll same architecture
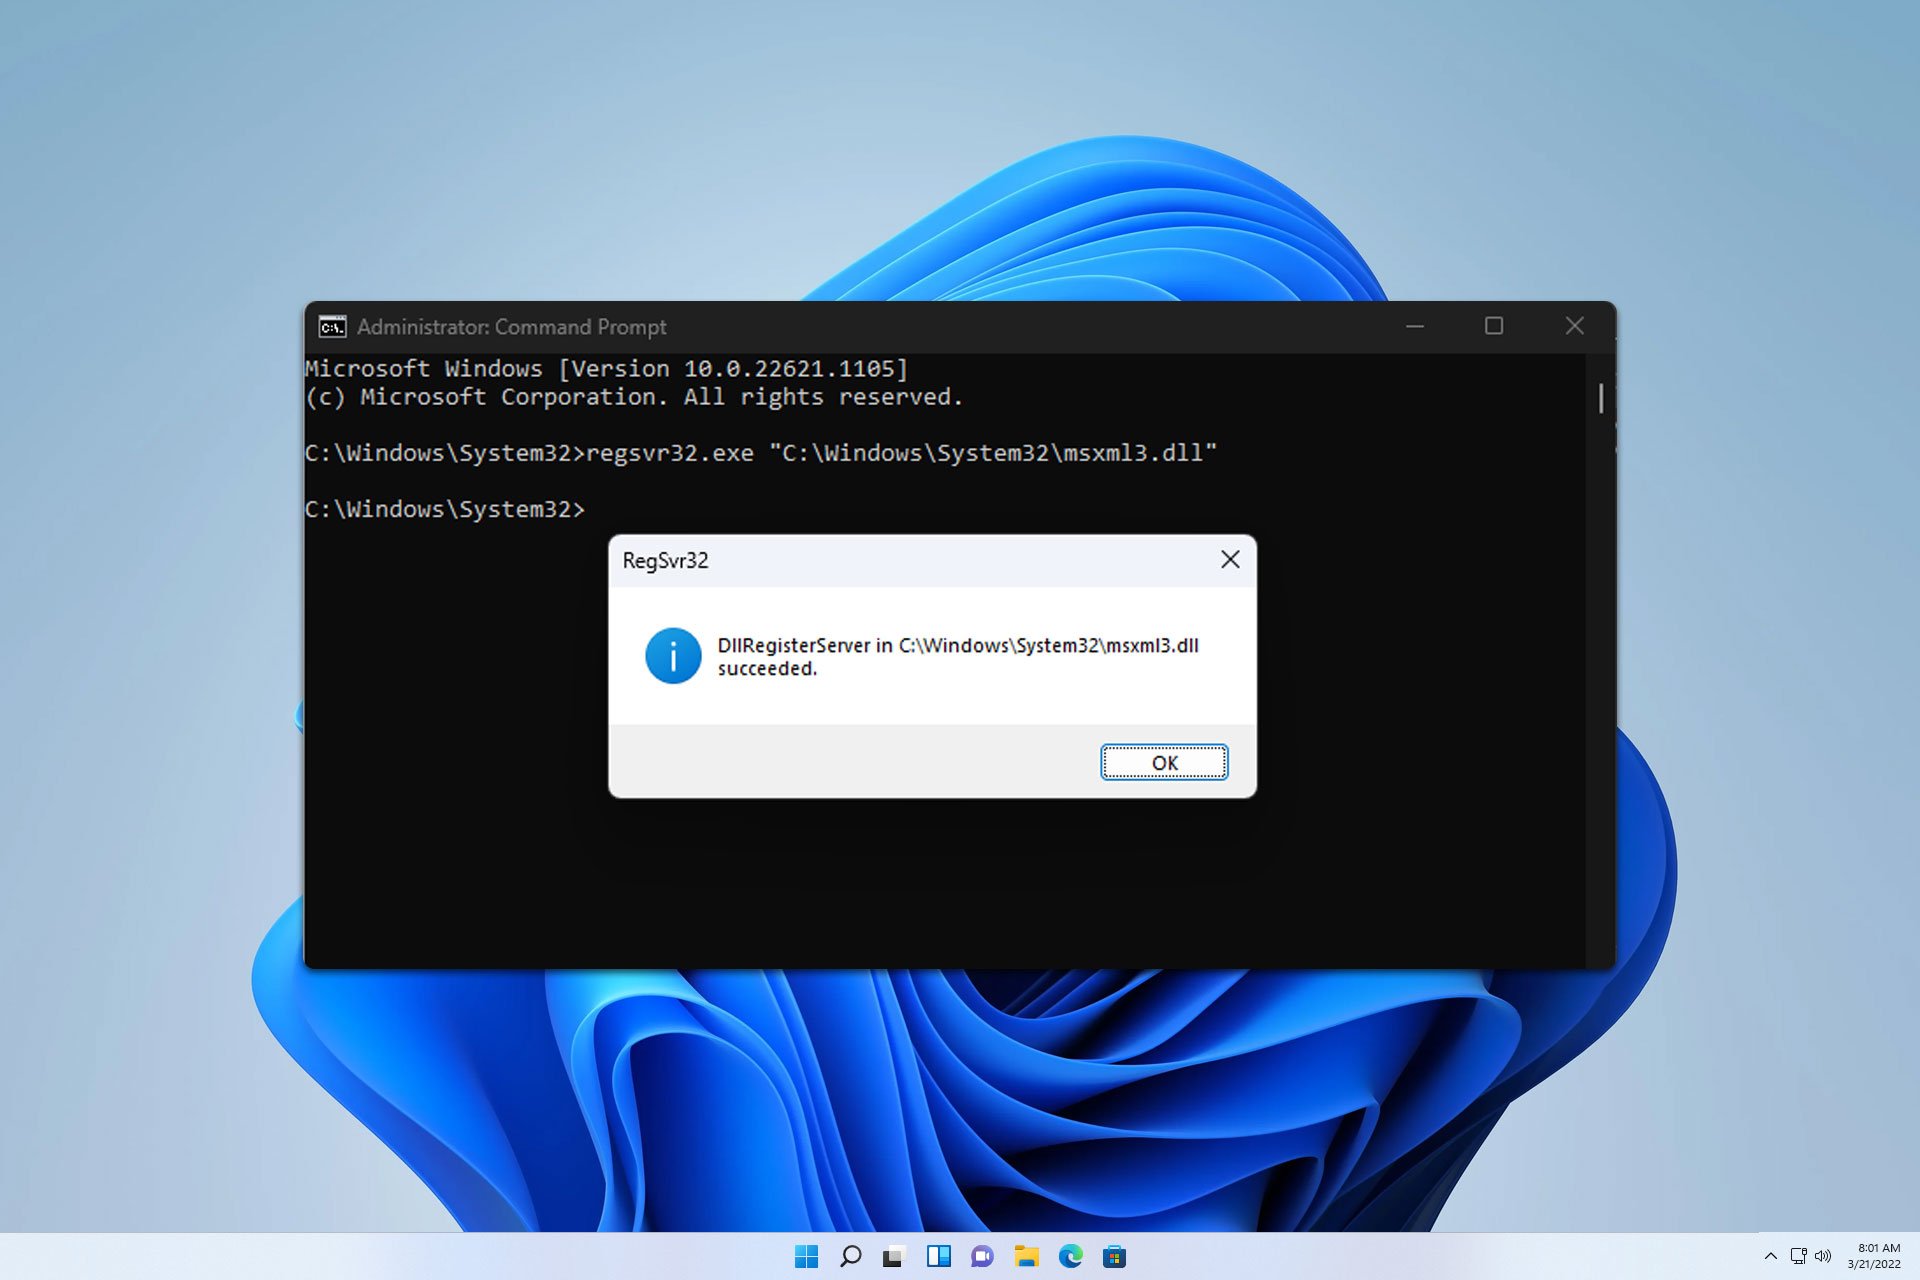
  5. The dialog box will appear informing you whether the process was successful.

There are a few other commands to register a DLL file for special situations.

When you want to register a 32-bit DLL file on a 64-bit PC, use the following syntax in the CMD:

C:\Windows\SysWOW64\regsvr32 D:\dll32\dwmapi.dll

If the DLLs you’re trying to install are .NET DLL files, use this command:

regasm D:\dll32\dwmapi.dll

In most cases, you’ll require an admin account to register a DLL file on a Windows PC.

However, if you’re not an admin user and would like to register a DLL file that allows per-user registration, you can use the following script in CMD:

regsvr32 /n /i:user D:\dll32\dwmapi.dll

2. Using a PowerShell script

  1. Type PowerShell in the Start menu and click on the Run as administrator button below the app card on the right.
  2. Into the terminal, type in the following script:
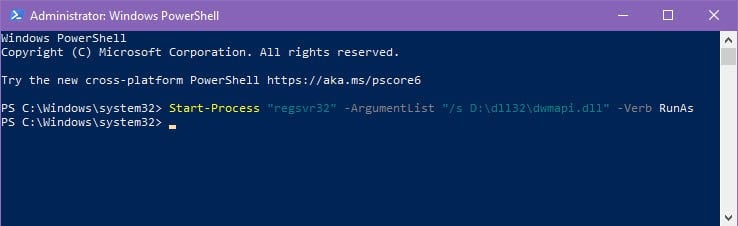
    Start-Process "regsvr32" -ArgumentList "/s D:\dll32\dwmapi.dll" -Verb RunAs
  3. Replace the following with the path to the DLL file: D:\dll32\dwmapi.dll
  4. Hit Enter to execute the PowerShell script.
    PowerShell script

3. Using the drag and drop method

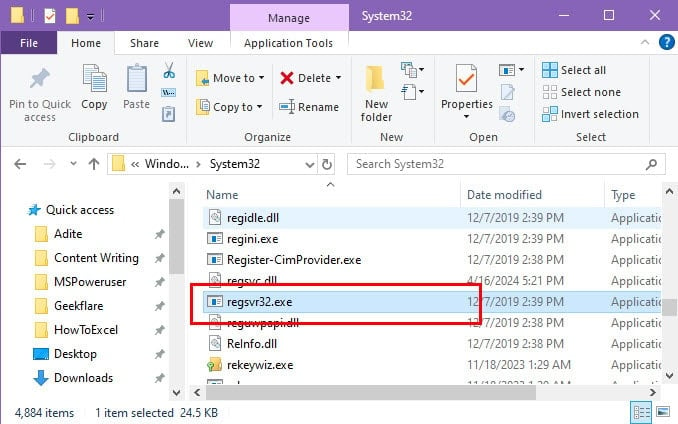
  1. Navigate to the location of the regsvr32.exe file in Windows > System32.
  2. Minimize the window for later.
    restore down
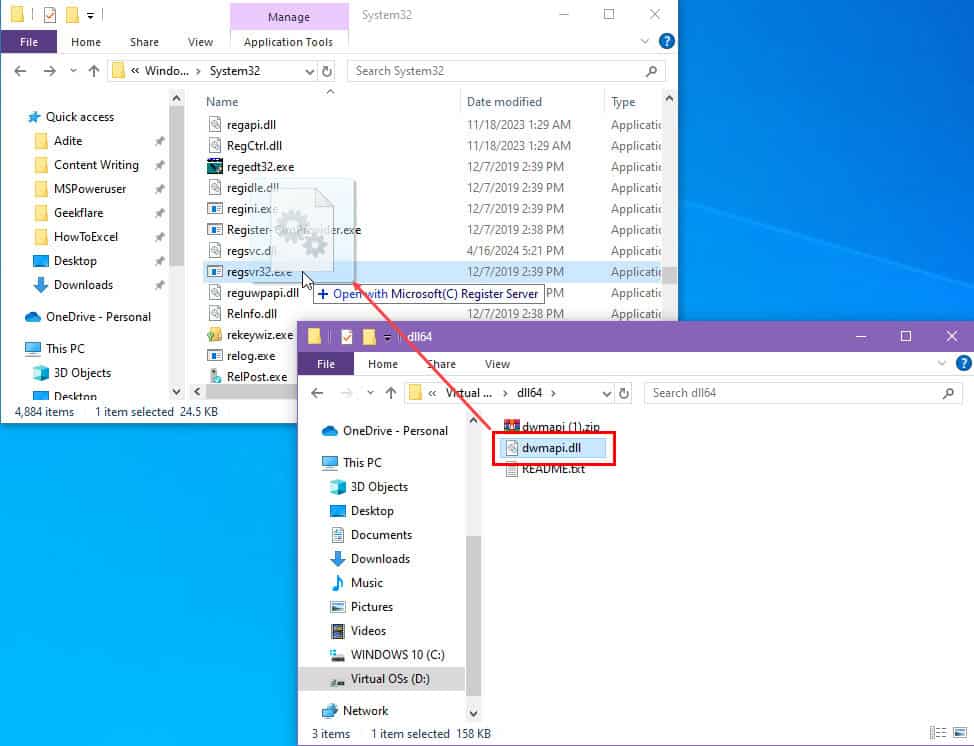
  3. Now, go to the location where you saved the DLL file.
  4. Click on the DLL file and drag it onto the regsvr32.exe file.
    drag and drop
  5. You should now see a dialog box confirming the selected DLL file has been loaded successfully.
  6. If you’re registering a 32-bit DLL file on a 64-bit PC, use the regsvr32.exe file in the following location:
    C:\Windows\SysWOW64

While you’re here, you can also go through the missing DLL files in Windows 11 if you face any DLL file errors. If you’re on an older version, we also have a guide on how to fix missing DLL files in Windows 10.

Were you able to register your DLL file using any of the methods outlined in this guide? Do you know of a better method to achieve the same task much faster in easy steps? Do share your feedback and reply in the comment box at the end.

Microsoft Teams will provide Extensibility for PSTN calls, allowing professionals to access apps beyond the call experience

Microsoft Teams will extend the PSTN calling experience well beyond the call itself, allowing users to access contextual information and provide efficient insight without leaving the call experience.

This means third-party application developers can tweak their apps to integrate this extensibility in Teams: basically, any app within the platform can be opened and used during a call.

The Redmond-based tech giant is bringing this new capability to Teams on all platforms, including Desktop and Mac, to streamline workflows.

In a recent entry to the Microsoft 365 Roadmap, the company says this new experience will make customer-facing professionals, especially those working in customer support, more efficient and provide more useful insight.

However, the new extensibility for PSTN calls in Microsoft Teams can be used by developers to integrate their applications into Teams and even add new functionalities and features to the calling experience.

Third-party application developers will be able to extend the PSTN calling experience in Teams with contextual information, making it possible for Teams users to have access to relevant data without leaving the call experience. This brings additional context and workflow integration into calling experiences and makes customer facing professionals more efficient by having data from line of business applications readily available. This functionality is available for developers to integrate their applications and add new functionality to calls.

The new capability will be released in January 2025.

Microsoft released similar experiences for professionals using Teams in customer-facing careers. Earlier this year, the Redmond-based tech giant announced and released Copilot for Sales, an AI agent specifically tailored to help professionals deliver more insightful advice to customers.

These capabilities, along with the new PSTN extensibility, which will be available in January, should greatly improve customer support activities.

Solved: ERROR_NOTIFICATION_GUID_ALREADY_DEFINED

The error code ERROR_NOTIFICATION_GUID_ALREADY_DEFINED 309 (0x135) with the error message, ” The specified file already has a notification GUID associated with it“, appears when an application or service tries to register a GUID (Globally Unique Identifier) for notifications or other operations, but the GUID has already been in use.

This can occur in scenarios including file system notifications, event subscriptions, or other Windows notifications. To fix it, first, reboot your computer to clear any resource locks, then check the Windows Event Viewer logs to understand the error.

How can I fix the ERROR_NOTIFICATION_GUID_ALREADY_DEFINED?

1. Identify the context & check for duplicated GUIDs

If you are working with an app or service that registers a GUID, ensure you are not registering the same GUID more than once, as the GUID should be unique within its scope. You can also check the source code in the configuration files to make sure there are no duplicate entries.

You can also review the application’s logic and check if you find any bugs in the application’s flow. If found, you can restart your relevant services.

2. Check the notification settings

  1. Press Windows + I to open the Settings app.
  2. Go to System, then clcik Notifications. System - Notifications - ERROR_NOTIFICATION_GUID_ALREADY_DEFINED 309 (0x135)
  3. Check if any apps or services are causing problems sending notifications and whether there is an issue with the GUID.Notifications

3. Check the duplicate entries in the registry

  1. Press Windows + R to open the Run window.Regedit RUN COMMAND ERROR_NOTIFICATION_GUID_ALREADY_DEFINED
  2. Type regedit and click OK to open the Registry Editor.
  3. Press Ctrl + F to look for GUID related to the error.GUIDs
  4. Next, check for duplicate entries, and if found one, remove it or rename it.

4. Check for Updates

  1. Press Windows + I to open the Settings app.
  2. Go to Windows Update, and click the Check for updates button.Windows Update Check for updates  - ERROR_NOTIFICATION_GUID_ALREADY_DEFINED
  3. If there is an update available, click Download & install to get the latest updates.

5. Reset/reinstall the app

  1. Press Windows + I to open the Settings app.
  2. Go to Apps, then click Installed apps.  
  3. Locate the affected app, then click the three-dot icon and select Advanced options from the context menu.Advanced options - ERROR_NOTIFICATION_GUID_ALREADY_DEFINED
  4. On the following page, go to the Reset section, then click the Reset button. Remember that resetting the app will remove its data, so you need to login the app again.Reset

If this doesn’t help, use these steps to reinstall the app:

  1. Go to Apps, then select Installed apps again.
  2. Click the three-dot icon next to the affected app, then select Uninstall from the context menu.Uninstall 
  3. Click Uninstall to confirm.uninstall confirmation app ERROR_NOTIFICATION_GUID_ALREADY_DEFINED 309 (0x135)
  4. Now, go to the official website or Microsoft Store to reinstall the app.

6. Run the SFC & DISM scans

  1. Press the Windows key, type cmd in the search box, and click Run as administrator from the list of options.CMD elevated ERROR_NOTIFICATION_GUID_ALREADY_DEFINED 309 (0x135)
  2. To scan and repair corrupted system files, copy & paste the following command and hit Enter: sfc /scannow SFCSCANNOW CMD
  3. Wait for the scan to complete, to check and restore Windows images via Windows Update, type the following command and press Enter: Dism /Online /Cleanup-Image /RestoreHealthRestore health
  4. Once the scan is successfully completed, restart your computer to save the changes.

If the issue persists, you need to contact support for the app or service causing the error.

In conclusion, to fix ERROR_NOTIFICATION_GUID_ALREADY_DEFINED BSoD error, you need to check the details, including logs, error code, then check GUID and notification settings related to the app. Now, reset or reinstall the app and run the system file check and DISM scan to repair the system files.

If you encounter BSoD errors way too often, you must know the reasons for their occurrence. Check out this guide for more information. Before you go, don’t miss our latest guide to learn more about the Error_no_More_Items issue.

If you have any suggestions or questions about the BSoD error, feel free to mention them in the comments section below.

Outlook’s new None color will make the app look like the soon-to-be deprecate Mail and Calendar

Outlook will introduce a neutral color category called “None, ” previously featured on the soon-to-be deprecated Mail and Calendar app. The new color will be available on the New Outlook for Windows and Web.

Microsoft says it decided to bring this color in Outlook to provide more flexibility and customization in categorizing emails and calendar events. According to a recent entry to the Microsoft 365 Roadmap, the new None option should be neutral in tone, allowing users to have items without a designated color.

The company hopes this could provide a cleaner and more organized layout of emails.

Here’s what the entry says:

We’ve introduced a new “None” color category for Mail and Calendar in the New Outlook for Windows and Web. This update provides more flexibility and customization in categorizing your emails and calendar events. By selecting the “None” option, users can now choose to have items without a designated color, allowing for cleaner organization and more control over which items stand out visually. #newoutlookforwindows

The entry says the rollout for the new None option in Outlook will start in December 2024, which is just in time, given that the Mail and Calendar app will be deprecated by then.

Microsoft is most likely releasing this feature to help Mail and Calendar users migrate to the New Outlook more easily, and I can see why. If Outlook resembles the soon-to-be-deprecated app even in design, then people will find it easier to accommodate it.

What’s your take on this? Are you still using the Mail and Calendar app?

Error Invalid Lock Range 307 (0x133): How to Fix it

ERROR_INVALID_LOCK_RANGE usually comes with the following message: 307 (0x133) A requested file lock operation cannot be processed due to an invalid byte range. This is an obscure error, but if you ever encounter it, this guide will help you fix it.

How can I fix ERROR_INVALID_LOCK_RANGE?

Before we try anything else, try using a different network and check if the problem is still present.

1. Check your firewall

  1. Press Windows key + S and type firewall. Choose Windows Defender Firewall from the list of results.
  2. Click on Allow an app or feature through Windows Defender Firewall.
    firewall
  3. Click on Change settings and then on Allow another app.
    allow another app
  4. Select the app that is giving you this error and be sure to check private on the list.
  5. Click OK to save changes.

If you use another software firewall, you’ll need to change its settings accordingly. The same applies if you’re using a hardware firewall.

2. Perform a clean boot

  1. Press Windows key + R and type msconfig.
    msconfig command
  2. Navigate to the Services tab. In there, check Hide all Microsoft services and then click on Disable all.
    Clean boot Disable all SECURE_FAULT_UNHANDLED
  3. Click Apply and OK, but don’t restart your PC yet.
  4. Press Ctrl + Shift + Esc to open Task Manager.
  5. Next, go to the Startup tab, select each application on the list and click on Disable.
    clean boot to fix ERROR_TOO_MANY_MODULES
  6. Restart your PC.

If the issue doesn’t appear after the restart, it means one of the disabled apps or services is causing the issue. To fix this enable services and apps one by one until you find the culprit.

3. Reinstall the affected software

  1. Click on the Start button and choose Settings.
  2. Go to Apps and select Installed apps.
    installed apps settings
  3. Locate the app that is experiencing this issue and click the three dots next to it.
  4. Select Uninstall.
    uninstall app w11
  5. Follow the instructions on the screen to complete the process.

Once you remove the application, install it again and check if the issue is resolved.

These are just some methods you can use to fix the ERROR_INVALID_LOCK_RANGE error. As previously stated, this is a rare error, but if you encounter it, be sure to try our solutions.

This is just one of many issues you can encounter, and we wrote about Error_Eas_Didnt_Fit and Error_EA_Table_Full in our previous guides.

Many also reported Error_Pipe_Busy, but we covered it in our earlier guides, so don’t miss it.

Microsoft Clipchamp will soon rival complex video editors out there

Microsoft Clipchamp was never our go to video editor, but lately, to be honest, the tool has seen lots of improvements that may change our opinions. Recently, we reported about Clipchamp getting a pretty useful importing capability. But that’s not all, in the beginning of the year, the editor got significant improvements to its brand kit capability.

Clipchamp is moving forward in a fast pace and lately, we found that the Microsoft 365 Roadmap covers some amazing updates for the app in the next year.

What are the future Clipchamp improvements?

1. Clip highlight sharing

Microsoft is preparing some really important additions to the video editor that will roll out in March and June next year and we’re going to take them one by one.

Clipchamp allows authors and viewers alike to share a portion of a video without changing the original media. Using draggable handles on the playback timeline, a link containing the desired clip start and end is put on the clipboard for easy sharing. Opening this link will play only the specified clip, and viewers can easily pop out to view the full video if desired. This will allow users to share the most relevant portion of their content.

So, with this feature, you can actually share only a portion of the video. This is excellent when you want to point out a certain part of a long clip and you don’t want to waste the time of the viewer. You just set a beginning and and end to the portion, and share the link for that portion. Of course, the viewer can still watch the whole video if they want to.

This feature is set to rollout in March 2025, so we’re still a bit long to wait.

2. Transcript editing

Another amazing feature is to edit the videos in your Clipchamp project based on the transcript. Let’s see how Microsoft describes this feature:

We are introducing a novel and streamlined method to quickly and accurately remove any unwanted sections from your Clipchamp projects by leveraging the transcript. With transcript-based editing, browsing text, selecting unwanted words, and removing them will remove them from the video without the need to navigate the timeline. We are looking into making video editing more productive by providing a more intuitive and straightforward editing experience.

So, Clipchamp will get a transcript-based editing feature that will allow you to edit the clip based on the transcript. Instead of watching the actual video and cutting the parts where the subjects say some words you don’t want to include, you simply delete the words in the transcript and they will also be removed from the video.

3. New admin management features

Although Clipchamp has been designed with the average user in mind, Microsoft 365 users also need some business-oriented features. In fact, we’re talking about administrator tools to manage the content safer and easier.

Admin controls will be updated for enterprise customers to better manage the new unified video experience, onboarding new admin policies to enable/disable camera, screen record, and audio record.

So, if you’re an enterprise customer, soon (June 2025 rollout), you will be able to set camera usage, screen recording and audio recording policies for your organization. Therefore, even if selected users will be able to use Clipchamp, admins will be able to set distinct rights and limitation for certain users according to the organization’s needs.

If you’re already using Clipchamp, you might want to read our Clipchamp tips and tricks article.

What do you think about the future Clipchamp updates? Let us know in the comments below.

Microsoft wants you to use Windows 11’s Snap Layout more and it has a plan to make you do it

Windows 11 users will soon be able to learn how to use the snap assist flyout in the operating system for the best snap layout possible. If you haven’t used this Windows 11 feature, Microsoft will enhance it with text-based tutorials on how to get the most out of it.

Spotted by tech enthusiast @phantomofearth in the latest Beta build, these text-based tutorials will assist the user in arranging the snap layout to fit their style. Text such as “Choose where to move this windows” or “Choose an app layout for your screen” is among the examples.

The capability will also be enhanced with a new shortcut, Win + Z, which will most likely ease the process of changing the snap layout in Windows 11. However, for now, both of these capabilities are disabled by default.

But thanks to the talented insider, you can enable them using ViveTool, a third-party app used to enable hidden Windows features.

vivetool /enable /id:53655156 /variant:X

Replace X with:
0: no additional text, Win + Z hint only
1: “Choose where to move this window”
2: “Choose where to arrange this window”
3: “Choose where to snap this window”
4: “Choose an app layout for your screen”

(Many thanks to @phantomofearth).

Snap layouts have been around for a while in Windows 11, and they’re quite useful, especially when dealing with multitasking. These new capabilities should encourage more users to use them.

Microsoft’s Autofill Chrome Extension will be entirely deprecated in December, affecting thousands of users

Microsoft is retiring its Chrome extension, Microsoft Autofill, which will affect over 100,000 users next month. Autofill allows users to save their passwords, addresses, and payment information and automatically fill them in on sites they visit.

On November 14, 2024, Microsoft disabled saving new information and editing existing information. After December 14, 2024, users can use the Microsoft Account info in the Edge browser for autofill. It will also be available for export, and it can be used in another browser, as well.

However, payment information saved on the Autofill Chrome Extension will not be available in the Microsoft Account.

Why is Microsoft Retiring the Extension? The Redmond-based tech giant published a support document explaining why it’s retiring the Autofill Chrome Extension:

We regularly review our offerings to ensure we deliver the highest value experiences for our users. As part of this review process, we are retiring this extension to simplify our offerings better.

As we mentioned earlier, the Autofill Chrome Extension deprecation next month will affect over 100,000 users. Time is short for finding an alternative, meaning most users won’t be able to use autofill for a while.

Microsoft moved the Resume/ Hands Off feature in Apps, where it belongs

For those of you who are less familiar with the latest Windows 11 experimental features, Microsoft is testing a feature called Resume, otherwise known as Hands Off, which will allow you to start an app on another device, including an Android phone and continue using it on your PC.

This hidden experimental feature was previously spotted in the Settings > System menu. Now, according to an X post from phantomofearth the Resume option was moved to the Settings > Apps menu in Windows 11 22635.4510.

Obviously, since the Resume feature is all about controlling certain apps beyond your device, it’s natural to have its settings under the Apps category.

Once you click the Resume option, the new window will be populated with the list of apps that can be used in such a way.

If you’re an insider running the Windows 11 22635.4510 beta build, you can enable or disable this feature using the following commands in Vivetool:

  • vivetool /enable /id:49527529​
  • vivetool /disable /id:49527529

Right now, you may use it for OneDrive, to pick up your work from an Android or iPhone device on your PC.

We don’t know when this feature will appear on a general distribution version of Windows 11, but it looks promising.

What do you think about the Resume feature on Windows 11? Let us know in the comments below.

Windows 10’s Recovery Environment updates are now available to download

Microsoft recently rolled out a batch of Windows 10 updates, including KB5048239, KB5046911, KB5046912, KB5046913, KB5046914, KB5047135, and KB5046905.

According to Microsoft, the KB5048239 update automatically applies a Safe OS Dynamic Update (KB5046913) to the Windows Recovery Environment (WinRE) on a running PC. It is available for Windows 10 versions 21H2 and 22H2.

KB5046911, KB5046912, and KB5046913 are Safe OS Dynamic Updates for Windows 10 versions 1607, 1809, 21H2, and 22H2. They improve the Windows recovery environment. The KB5046914 update improves the recovery environment for the ancient Windows 10 version 1507.

Finally, KB5047135 and KB5046905 are Setup Dynamic Updates for Windows 10 versions 1809, 21H2, and 22H2. They improve Windows setup binaries or any files that setup uses for feature updates in Windows 10 Enterprise, version 1809, and Windows Server 2019, as well as Windows 10 versions 21H2 and 22H2.

The Recovery Environment updates for Windows 10 are being distributed via Windows Update and can be manually installed by downloading from the Microsoft Update Catalog, as follows:

Microsoft also released Windows 11 updates, including KB5046915, KB5046910, and KB5046906, which improve the OS’s setup and recovery experience.

TTM Watchdog Timeout 0x000001A0: How to Fix it

BSOD errors such as TTM_WATCHDOG_TIMEOUT will cause your PC to crash, but there are ways to fix them, and in today’s guide we’re going to show you a couple of methods that you can use.

How can I fix the TTM_WATCHDOG_TIMEOUT error?

1. Install the latest updates

  1. Press the Windows key + I to open the Settings app.
  2. Navigate to Windows Update. Click on Check for updates.
    check for updates
  3. If any updates are available, they will be downloaded automatically.
  4. Once the system is up to date, check if the problem is resolved.

2. Update your drivers

  1. Visit your motherboard manufacturer’s website.
  2. Next, locate your model on the list and go to the Drivers section.
    driver and utility
  3. Download the latest drivers for your motherboard.
  4. Do the same for other major hardware components, such as your GPU for example.

Once updated, check if the problem is gone. For more information, we have a great guide on how to update drivers on Windows 11, so feel free to check it out.

3. Run SFC and DISM scan

  1. Press the Windows key + S and type cmd. Choose Run as administrator.
    CMD elevated nvoglv64.dll
  2. After that, run sfc /scannow
    SFCSCANNOW CMD
  3. Wait for the scan to finish.
  4. Next, run the following commands:
    DISM /Online /Cleanup-Image /CheckHealth
    DISM /Online /Cleanup-Image /ScanHealth
  5. If any of the previous two commands reports an error, run the following command:
    DISM /Online /Cleanup-Image /RestoreHealth
  6. Wait for the scan to finish.

Keep in mind that each of these commands can take a while to complete, so don’t interrupt them.

4. Restore your system

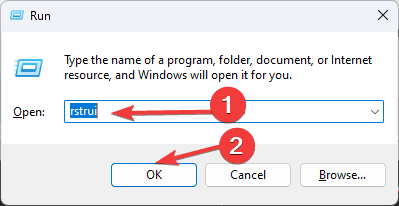
  1. Press the Windows key + R and type rstrui.
    rstrui command Restore point - TTM_FATAL_ERROR
  2. Select the desired restore point.
    restore point
  3. Follow the instructions on the screen to complete the process.

If the problem is still there, you might want to check your hardware or any issues. Alternatively, you can factory reset Windows 11, but that will remove all your files and apps from the system drive.

Hopefully, you managed to fix the TTM_WATCHDOG_TIMEOUT 0x000001A0 error by following the steps from this guide.

This isn’t the only error you can encounter, we wrote about Watchdog.sys crash and DPC_Watchdog_Violation in our previous guides, so don’t miss them.

We also have an article on Clock_Watchdog_Timeout, so don’t miss it for more useful information.

Microsoft releases KB5046906/KB5046910/KB5046915 for WinRE

Microsoft has revealed a new batch of Windows 11 recovery and setup updates. Last week’s Patch Tuesday contained several dynamic updates for WinRE, also known as Windows Recovery Environment, and setup updates.

The new Windows 11 setup binary update, KB5046906, is available for Windows 11 versions 22H2 and 23H2. According to the patch notes, the update makes “improvements to Windows setup binaries or any files that setup uses for feature updates in Windows 11, version 22H2 and Windows 11, version 23H2. “

Microsoft has also released safe OS WinRE updates for Windows 11 24H2 and 22H2/23H2. The notes say KB5046910 and KB5046915 “make improvements to the Windows recovery environment in Windows 11, version 24H2” and “make improvements to the Windows recovery environment in Windows 11, version 22H2 and Windows 11, version 23H2. “

The dynamic update packages must be applied to existing Windows images before deployment. Microsoft recommends that users download the updates from the Update Catalog website.

Windows 11’s latest KB5046716 to the Beta Channel makes Widgets functional again

Microsoft has announced the release of Windows 11 Insider Preview Build 22635.4510 (KB5046716) to the Beta Channel. The latest build comes with several improvements. For instance, Windows 11 now lets you share files directly from the jump lists on the taskbar, and a new Gamepad keyboard layout for the on-screen keyboard in Windows 11 that supports using your Xbox controller to navigate and type is also available.

KB5046716 also brings new functionalities to Narrator scan mode. Users will now be able to skip past links and jump to lists. Windows 11 users will also see improvements to speech-to-text and text-to-speech.

In addition to new features, Microsoft has fixed several issues in the latest build. For example, Windows 11 will no longer display a message saying “You’re offline. Widgets are unavailable” on the lock screen when connected to the internet.

Microsoft says that Windows Insiders in the Beta Channel will receive updates based on Windows 11, version 23H2, via an enablement package. However, some features in the Beta Channel are rolled out using Control Feature Rollout technology, starting with a subset of Insiders and ramping up over time as Microsoft monitors feedback to see how they land before pushing them out to everyone in this channel.

The Redmond-based tech giant is gradually adding new features to the Beta Channel, so you may not see them immediately. If you want to be one of the first to get the new features, you can turn on the toggle to get the latest updates, as they are available via Settings > Windows Update.

You can read KB5046716’s full changelog here.

Speaking of the Beta Channel, Microsoft has decided to end it in the Windows 10 Insider Program; the company released the last build to it last week. If you’re enlisted in that program, you might want to consider leaving it entirely.

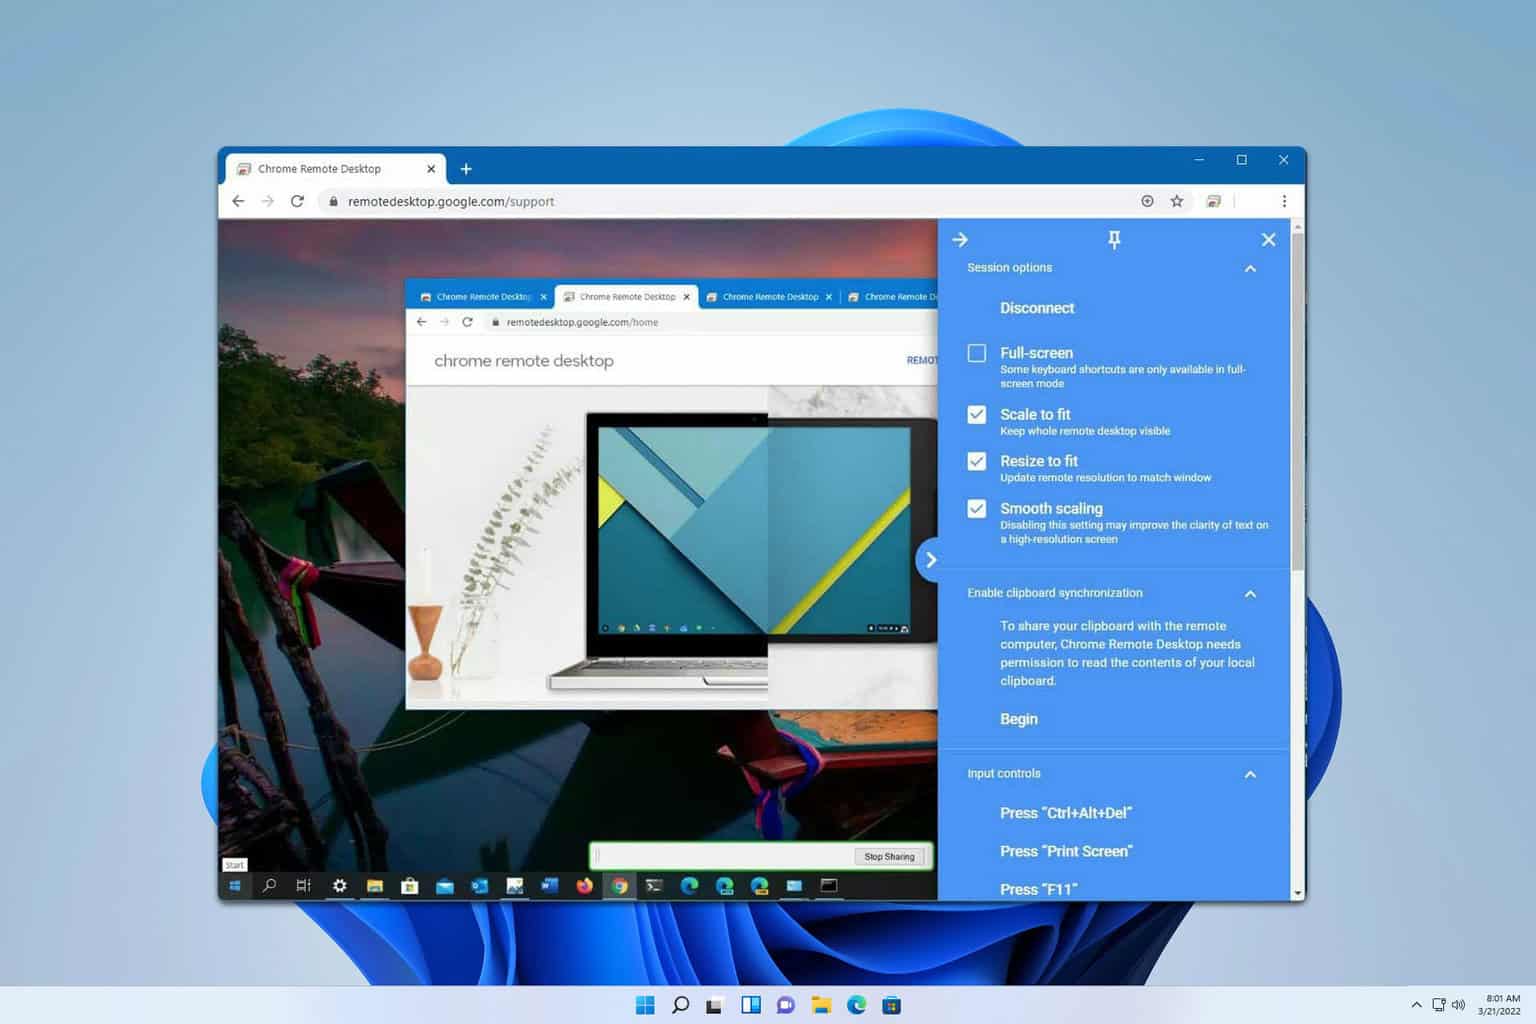
Enable Curtain Mode in Chrome Remote Desktop [How to]

If you want to have a private remote session, then you might be interested in Chrome Remote Desktop Curtain Mode. This feature isn’t enabled by default, but you can access it with a few tweaks.

How can I enable Chrome Remote Desktop Curtain Mode?

1. Modify your registry

  1. Press the Windows key + R and type regedit.
    registry editor
  2. Once Registry Editor opens, navigate to HKEY_LOCAL_MACHINE\Software\Policies\Google\Chrome\
  3. Right-click the right pane and choose New and then DWORD (32-bit value).
  4. Enter RemoteAccessHostRequireCurtain as the name of the new DWORD.
  5. Lastly, double-click it and set its value to data to 1.
  6. Next, navigate to HKEY_LOCAL_MACHINE\SYSTEM\CurrentControlSet\Control\Terminal Server
     terminal server registry
  7. Double-click fDenyTSConnections and set it to 0.
  8. After that navigate to HKEY_LOCAL_MACHINE\SYSTEM\CurrentControlSet\Control\Terminal Server\WinStations\RDP-Tcp
    rdp tcp
  9. Set UserAuthentication to 0
  10. For Windows 10, inside of the RDP-Tcp key, locate the SecurityLayer key and set it to 1.
    securitylayer key

Keep in mind that Google and Chrome keys in Step 2 might not be available, so you’ll have to create them manually.

2. Use Command Prompt

  1. Press Windows key + S, type cmd, and choose Run as administrator.
    CMD elevated with rights
  2. Paste the following code and run it: reg add HKLM\Software\Policies\Google\Chrome /v RemoteAccessHostRequireCurtain /d 1 /t REG_DWORD /f && reg add "HKLM\SYSTEM\CurrentControlSet\Control\Terminal Server" /v fDenyTSConnections /d 0 /t REG_DWORD /f && reg add "HKLM\SYSTEM\CurrentControlSet\Control\Terminal Server\WinStations\RDP-Tcp" /v SecurityLayer /d 1 /t REG_DWORD /f && reg add "HKLM\SYSTEM\CurrentControlSet\Control\Terminal Server\WinStations\RDP-Tcp" /v UserAuthentication /d 0 /t REG_DWORD /f && net stop chromoting && net start chromoting
  3. Close Command Prompt.

This method will achieve the same results as the previous solution but with less user input.

How do I disable Chrome Remote Desktop Curtain Mode?

To disable this feature, you need to reverse the changes from above, so be sure to revert changes to their original values.

Can Chrome Remote Desktop do unattended access?

Yes, Chrome Remote Desktop allows you to obtain unattained access by using the Remote Access feature.

Does Chrome Remote Desktop work when the computer sleeps?

No, you can’t log in remotely to a computer that is sleeping. For Chrome Remote Desktop to work, your PC needs to be up and running.

As you can see, it’s pretty simple to enable Curtain Mode in Chrome Remote Desktop on Windows 11 and other versions of Windows. Do keep in mind that this is possible only on Professional, Ultimate, Enterprise, or Server versions of Windows.

Keep in mind that certain issues can occur and we already wrote on what to do if Chrome Remote Desktop is not working.

If it’s display issues such as a black screen in Chrome Remote Desktop or a green screen on Chrome Remote Desktop, we also know a way out.

Keep in mind that sometimes Chrome Remote Desktop can be blocked by admin, especially if you’re a member of an organization. Before you leave, check our latest guide on how to use Chrome Remote Desktop in Guest Mode without your Google account.

First look at Chrome’s new Tabbed Task Manager with Search Feature on Desktop

Recently, we reported that Google Chrome’s Task Manager was undergoing a redesign after a long time. This new version is now live in the Canary version, featuring a tabbed interface and a search function.

Google Chrome’s integrated Task Manager helps you monitor browser performance on Windows, Mac, Linux, and ChromeOS. The “CPU” and “Memory” columns help identify which tabs, extensions, or processes are using the most resources;

You can also monitor network usage and identify potential performance issues by looking at the “Network” column. If a website is slowing down or making Chrome unresponsive, you can open the Task Manager and end its process.

Google is redesigning various built-in Chrome features, including Picture-in-Picture and the PDF Viewer. The Task Manager is also on this list. The current Task Manager displays all processes, memory usage, CPU utilization, network activity, and process IDs in individual columns.

Hands-on with Chrome’s New tabbed Task Manager redesign

The redesign of the Task Manager aims to improve usability, making it easier for users to navigate and monitor their browser’s performance. The new features, such as the tabbed interface and search functionality, help users quickly locate specific processes and manage resources more effectively.

The new Task Manager brings significant improvements over the old version. In the past, all processes were displayed in a single view, making managing harder. The redesigned version introduces dedicated tabs for system processes, extensions, and tabs, along with a search bar to quickly find specific processes, improving overall functionality.

Chrome old vs new task manager comparison in one frame. Image Credit: WindowsReport.
Chrome New Task Manager with Tabs and search bar. Image Credit: WindowsReport.

Tabs: This tab displays all tab processes in Chrome.

Extensions: This tab displays all extension processes.

Image Credit:WindowsReport.

System: This tab displays all core Chrome processes, including Browser, GPU Process, Network Service, Audio Service, and Storage Service.

Chrome new Task Manager System Tab. Image Credit:WindowsReport

Currently, the search feature is not functional, and dark mode is unavailable.

How to enable the New Task Manager in Chrome on your Desktop.

  1. Launch Chrome Canary.
  2. Visit chrome://flags.
  3. Find “Task Manager Desktop Refresh.”
  4. Select Enabled from the dropdown.
  5. Restart Chrome.

After that, use Shift+Esc (on Windows) or click on Menu > More tools > Task Manager to see the changes firsthand.

We are yet to know what Google has in store for Task Manager in the future, and we don’t know the performance impact of the New Task Manager compared to the old Task Manager in Chrome.

So, there are still a lot of questions to be answered, and the search box and dark mode need to be functional for the whole Task Manager to be complete feature-wise.

In summary, the desktop Chrome’s new Task Manager redesign in Canary introduces a more user-friendly interface with dedicated tabs and a search function, providing better resource management.

Apart from this, Google has dropped Windows Scrolling personality improvements implemented by Microsoft in Chromium. Additionally, Chrome to allow users to run legacy extensions such as UBO using a temporary flag until June 2025.

Solved: Microsoft Ultimate Word Games Not Loading

When you launch Microsoft Ultimate Word games and it is not loading, it could be a connection issue or a system incompatibility issue.

Start by checking your connection and ensure you have a fast and stable internet connection. If you’ve ruled this out, check Microsoft servers and ensure it’s not a server issue then proceed to troubleshoot.

How do I fix Microsoft Ultimate Word Games not loading?

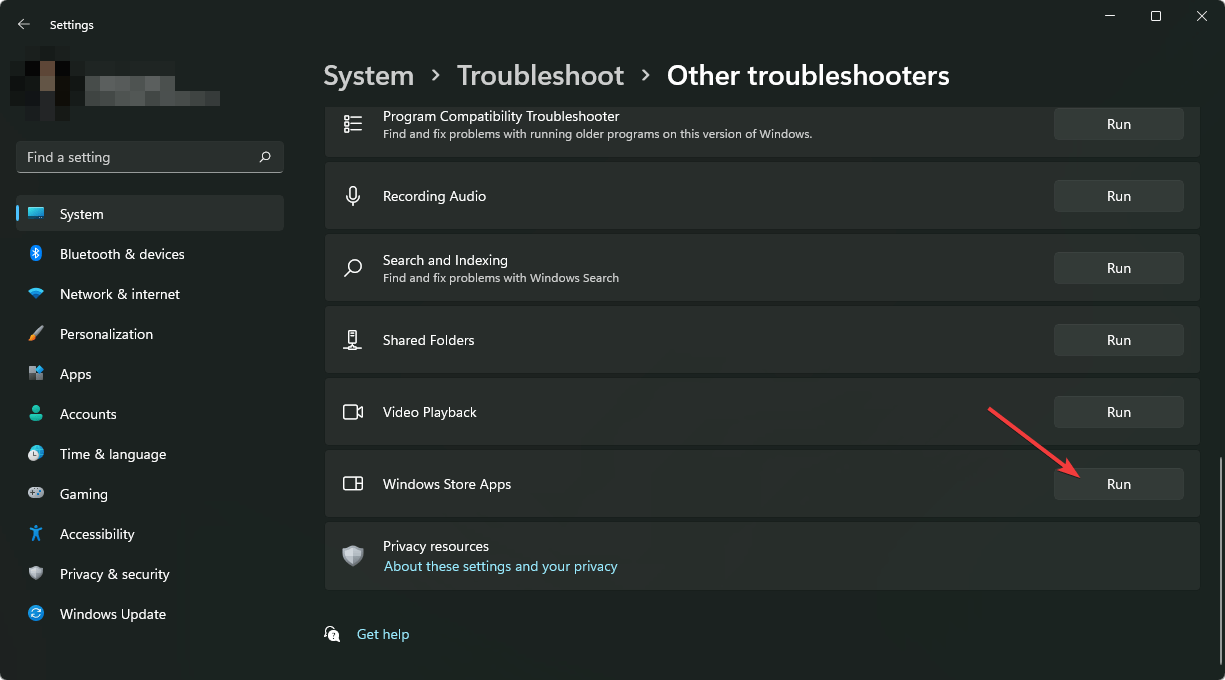
1. Run the Windows Store Apps troubleshooter 

  1. Hit the Windows key and click on Settings.
    settings windows 11
  2. Click on System and select Troubleshoot.
    Open system troubleshooter
  3. Navigate to Other troubleshooters.
    other troubleshooters
  4. Click the Run option for the Windows Store Apps troubleshooter.
    clicking run windows store apps troubleshooter

2. Temporarily disable Windows Firewall

  1. Hit the Windows key and click on Settings.
  2. Select Privacy & security.
  3. Click on Open Windows Security.
  4. Select Firewall & network protection.firewall-and minecraft not installing windows 11
  5. Click on Public network.
  6. Next, toggle Microsoft Defender Firewall off.
  7. Try launching the game again.

If it does load, your firewall may have quarantined it as a risk so make sure you whitelist Microsoft Ultimate Word games and enable your firewall.

3. Reset the Microsoft Store cache 

  1. Hit the Windows key, type cmd in the search bar, and click Run as administrator.
    cmd-run-admin-w11 unexpected kernel mode trap windows 11
  2. Type the following command and hit Enter: WSreset.exe

4. Repair/reset the app

  1. Hit the Start Menu icon and click on Settings.
    settings windows 11
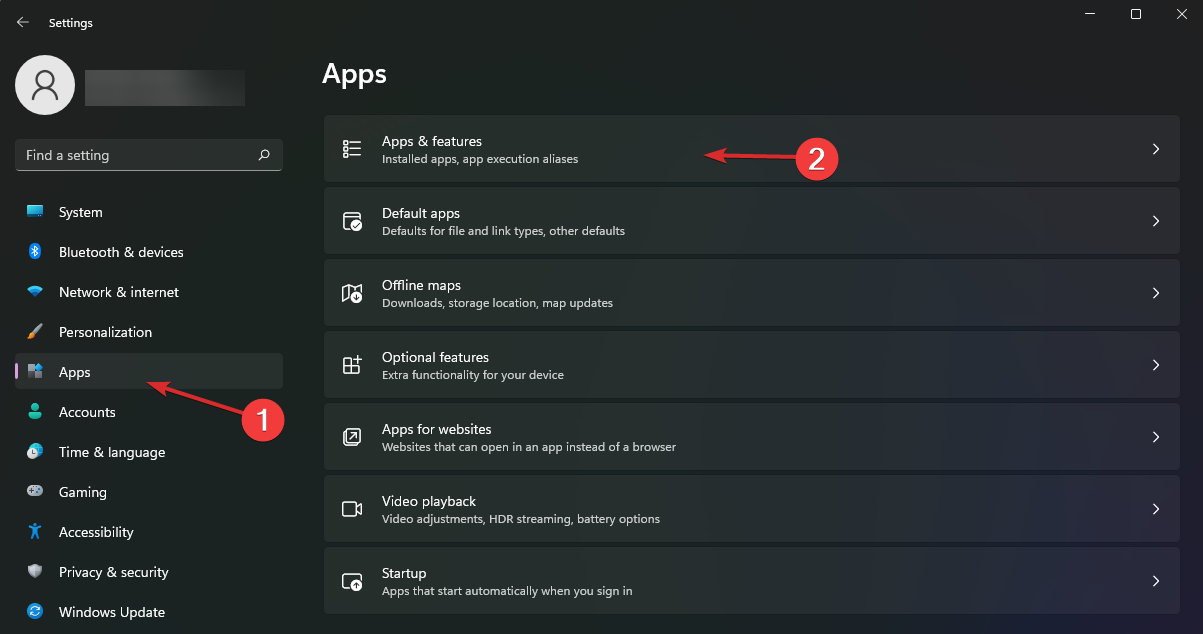
  2. Click on Apps on the left pane then select Apps & features on the right pane.
  3. Locate the Microsoft Ultimate Word Games app, click on the three ellipses, and select Advanced options.
  4. Click on the Repair button.
  5. Check if the issue is resolved then go back and click on the Reset button.

5. Re-register the store app

  1. Hit the Windows key, type Powershell in the search bar, and click Run as administrator.
  2. Type the following command and hit Enter: Get-AppXPackage *WindowsStore* -AllUsers | Foreach {Add-AppxPackage -DisableDevelopmentMode -Register "$($_.InstallLocation)\AppXManifest.xml"}

6. Reinstall the app

  1. Hit the Start Menu icon and click on Settings.
    settings windows 11
  2. Click on Apps on the left pane then select Apps & features on the right pane.
  3. Locate the Microsoft Ultimate Word Games app, click on the three ellipses, and select Advanced options.
  4. Click on the Uninstall button.
  5. Go to the Microsoft Store, search for the Microsoft Ultimate Word Games app and install it.
  6. Try launching it and see if the issue persists.

7. Set up a proxy server

  1. Press the Start Menu icon and select Settings.settings windows 11
  2. Click on Network & Internet on the left pane, then scroll down and click Proxy on the right pane.Network proxy settings
  3. Select Edit next to Use a proxy server option in the Manual proxy setup section, toggle on Use a proxy server, enter the IP address and Port if available and click on Save.Disable proxy server

8. Create a new user profile

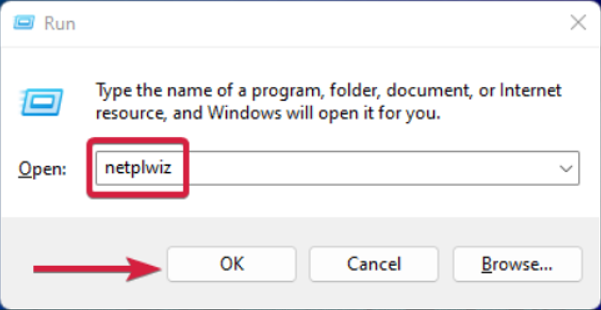
  1. Press Windows + R to launch the Run console, enter netplwiz in the text field, and click OK.
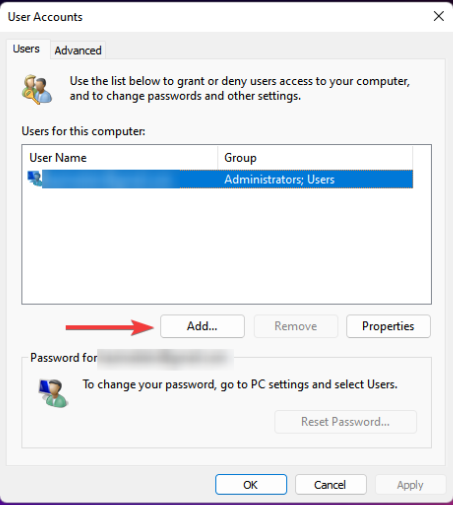
  2. Click Add in the User Accounts window.
  3. Select Sign in without a Microsoft account (not recommended).
  4. Click on Local account button.
  5. Enter a username and password (optional) for the new user account, and a hint, in case you set a password. Once done, click on Next.
  6. Click on Finish to create the Local account.

If the Microsoft Ultimate Word games load in the new user profile, the old one may have been corrupt.

Finally, it goes without saying that you should always keep your OS and apps updated for compatibility purposes. Further, ensure your device never runs low on memory or storage space to give apps sufficient resources to load properly.

Alternatively, if you own an Xbox, Microsoft Ultimate Word games is also available here so try playing it on this platform and see if you experience the same issue.

And while you’re here, you don’t have to rely on online games at all times. The Microsoft Store also has some cool and fun offline games that are less likely to develop loading problems like Microsoft Ultimate Word games so give them a try and see if you like them.

If you have any other troubleshooting recommendations for this issue, we’d love to hear about them. Drop us a line below.

6 Ways to Fix the Error Code 42 on Disney Plus

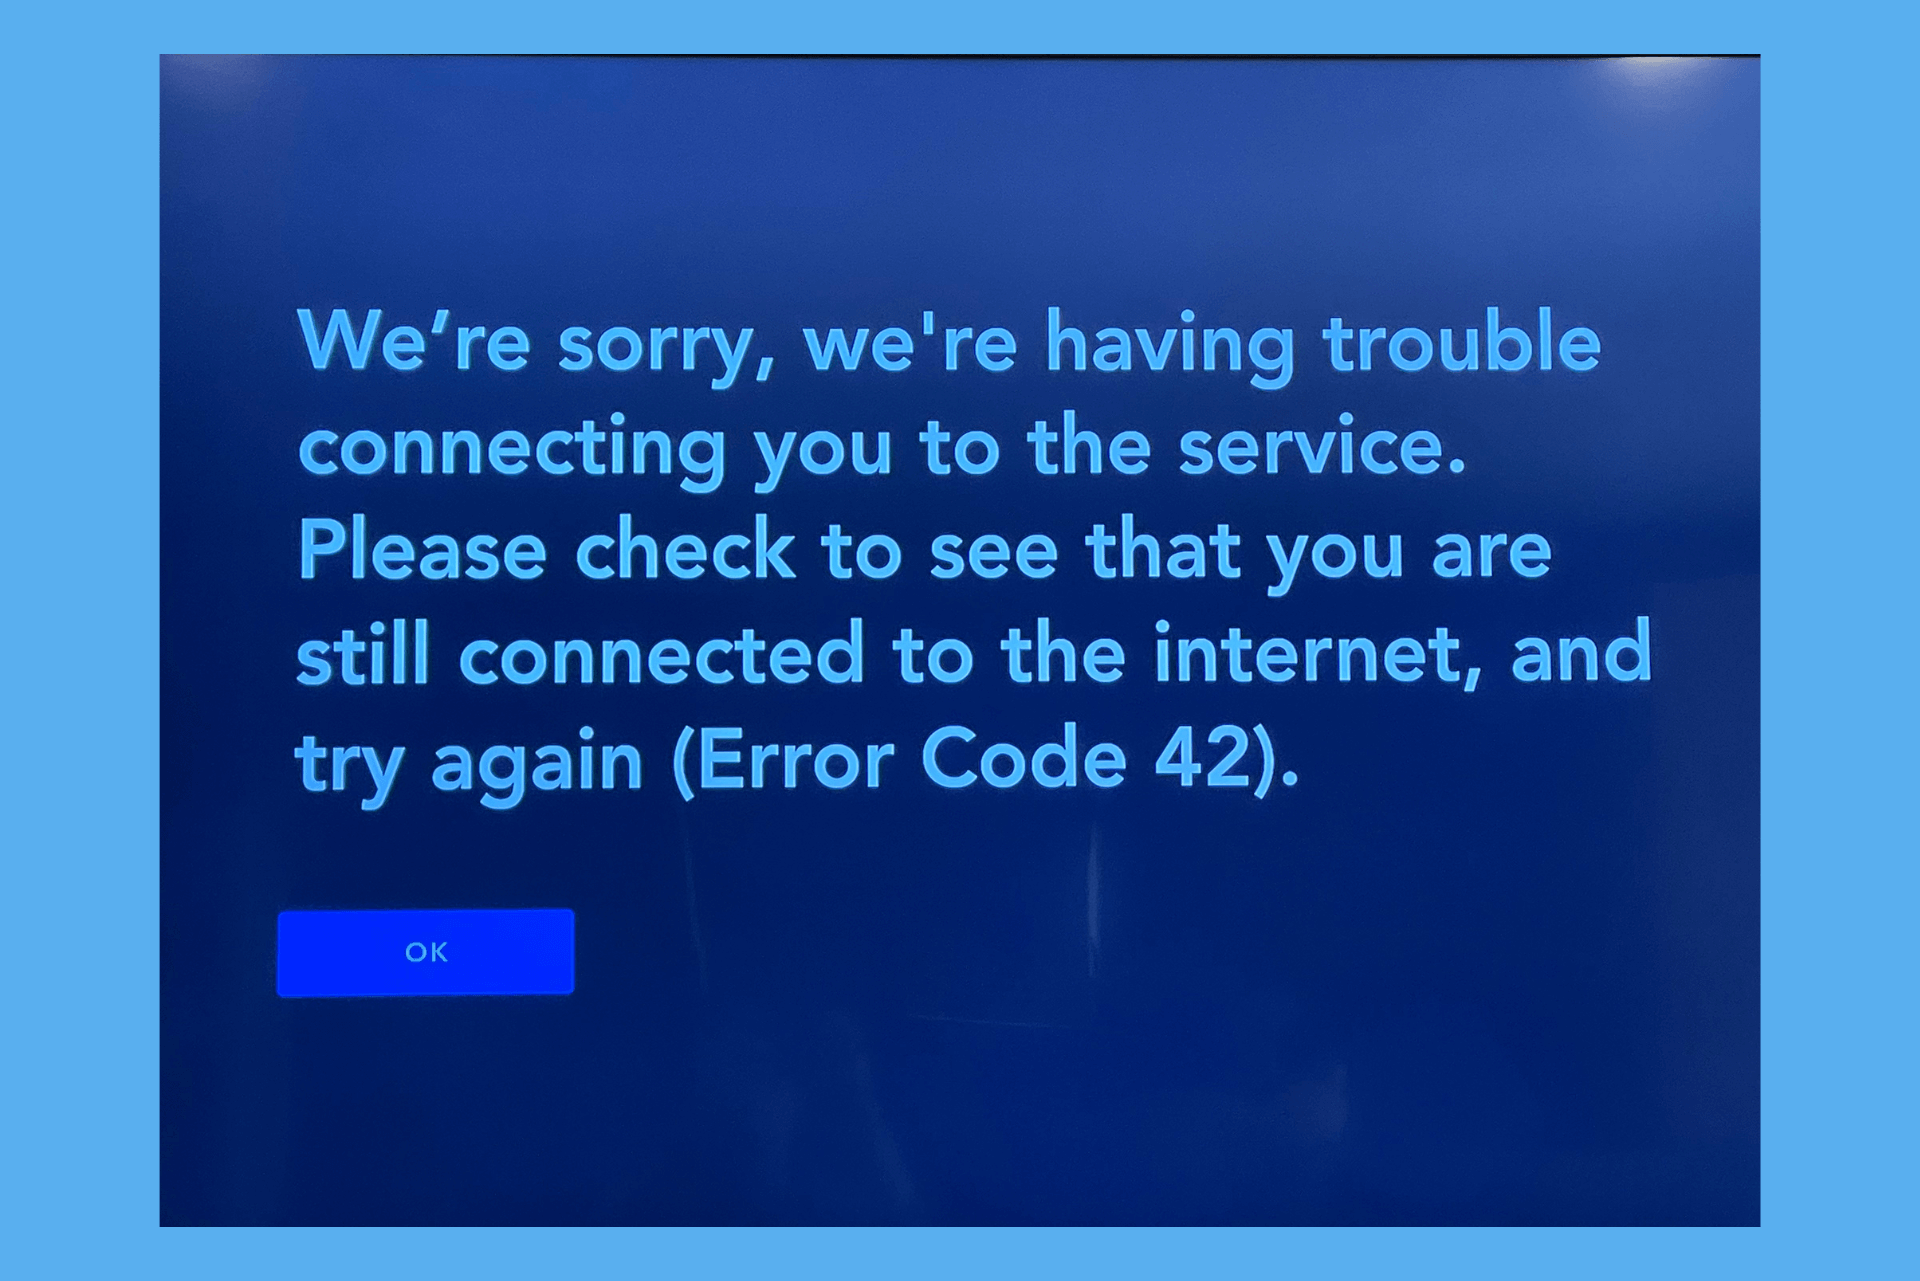
Many of our readers have complained about getting error code 42 on Disney Plus, which says: We’re sorry; we’re having trouble connecting you to the service. Please check to see that you are still connected to the internet and try again (Error code 42).

The error usually occurs when your internet connection or Disney Plus server is down, your browser cache is outdated, or your DNS settings are misconfigured. To begin with, restart your computer and ensure your internet is stable, then check if Disney servers are up and running.

How can I fix the error code 42 on Disney Plus?

1. Power cycle your router

  1. Remove the power cable from the router.
  2. Leave it as is and wait for 30 seconds to a minute, as this will allow the router to reset any internal processes.
  3. Reconnect the power cable.
  4. Now wait 2 minutes for the router to restart and lights to stabilize. Once it is fully turned on, try accessing Disney Plus on your device again.

2. Update your Disney app

TV

  1. From the home screen, locate and click Apps.
  2. Select the Open Google Play Store option.
  3. Locate Disney Plus from the list of apps or use the search function.
  4. Click to check if an update is available and install it.

Windows PC

  1. Press the Windows key, type microsoft store in the search box, and click Open from the list of options.Microsoft Store - error code 42 Disney plus 
  2. Go to Downloads from the left pane, and click Get Updates from the right pane.get updates
  3. If an update is available for Disney Plus, it will be downloaded and installed.

Android

  1. Launch the Play Store, and type Disney Plus in the search bar.
  2. If an update is available, click the Update button.

iOS

  1. Open the App Store, then click the profile icon.
  2. Tap Apps.
  3. Select My Apps.
  4. Look for Disney Plus and click the Update button if available.

3. Sign out and sign in to your Disney account

  1. Open the Disney Plus app on any of your devices.
  2. Go to My Space and click Help & Settings. Help & settings  
  3. Click Log Out to sign out.Log out
  4. Click the Log Out button again to confirm.Log out - error code 42 Disney Plus
  5. Now, click My Space again and click Log in.Login - error code 42
  6. Enter your email address or phone number followed by password or OTP to sign in successfully.

This trick can also help if the Disney Plus app is not working on any of your devices; however, there are methods to fix the issue as well; take a look!

4. Reinstall the Disney app

TV

  1. From the home screen, locate and click Apps.
  2. Select the Open Google Play Store option.
  3. Locate Disney Plus from the list of apps or use the search function.
  4. Click the Uninstall button.
  5. Now, search for Disney Plus and click Install.

Windows PC

  1. Press the Windows + I to open the Settings app.
  2. Go to Apps, then click Installed apps.Apps - Installed apps error code 42 Disney Plus
  3. Locate the Disney Plus, click the three-dot icon, and select Uninstall.Uninstall
  4. Click Uninstall to confirm the action.uninstall confirmation app
  5. Press the Windows key, type microsoft store in the search box, and click Open from the list of options.Microsoft Store - error code 42 Disney plus
  6. Search for Disney Plus, select it, and click the Install button.Install Disney Plus app

Android

  1. From the home screen, locate and tap Disney Plus and choose Uninstall.
  2. Launch the Play Store, and type Disney Plus in the search bar.
  3. If an update is available, click the Install button.

iOS

  1. From the home screen, locate and tap Disney Plus and select Remove app.
  2. Tap the Delete app option.
  3. Open the App Store, search for Disney Plus, and click the Install icon.

Reinstalling the Disney Plus app can also help you fix other issues on the app, like error code 14; read this guide to learn more.

5. Clear browser cache

  1. Launch your preferred browser; here, we are demonstrating the steps using Google Chrome.
  2. Click the three-dot icon and click Settings from the drop-down menu.  Settings CHrome
  3. Click Privacy and security from the left side and click Delete browsing data.Delete browsing data
  4. Select All time from the Time range. Place a checkmark next to the Browsing history, Cookies and other site data, Cached images and files options.Delete data -  error code 42 disney plus
  5. Click the Delete data button.

6. Change your DNS settings


PC

  1. Press the Windows key, type control panel in the search box, then select Open from the list of options.Control Panel start menu - error code 42 disney Plus
  2. Select Large icons for View by then select Network and Sharing Center.Network and sharing center 
  3. Click the Change adapter settings link from the left pane.Change adapter settings
  4. Right-click the active internet connection and select Properties.Active connection properties error code 42 disney plus
  5. Click Internet Protocol Version 4 (TCP/IPv4), and select the Properties button.Internet Protocol Version 4
  6. Place a checkmark next to Use the following DNS server addresses; then for Preferred DNS Server, type 8.8.8.8, then for Alternate DNS Server, type 8.8.4.4.DNS settings error code 42 Disney Plus
  7. Click OK, then OK again.

TV

  1. On the home screen, click the Settings icon.
  2. Select Network & Internet.
  3. Choose the Wi-Fi network or Ethernet connection to which you are connected.
  4. Look for Advanced or IP settings, then change the DHCP(automatic) to Static.
  5. Under Static IP, you will see IP Address, Gateway, and DNS 1 / DNS 2.
  6. For DNS 1, enter 8.8.8.8; and for DNS 2, enter 8.8.4.4.
  7. Click Save.

In conclusion, if you encounter error code 42 on Disney Plus on any of your devices, check the internet connection and ensure the Disney Plus server is up and running. Then, update or reinstall the Disney app, clear the browser cache, or change the DNS settings on your PC or TV.

While discussing errors on Disney Plus, don’t forget to check our guide on error code 1017, which mostly occurs due to a weak internet connection. You can also check our guide explaining error code 73, which states that Disney+ is Only Available in Certain Regions.

If you have any other questions or suggestions about this error, feel free to mention them in the comments section below.

How to Fix Error Code 1017 on Disney Plus?

Many of our readers have encountered SERVICES_STARTUP_FAILURE with error code 1017 on Disney Plus, especially on Samsung TV, but it can also appear on your browser, Android, or iOS phone. The error occurs when the Disney Plus app cache or installation files are corrupted. You might also see this error if your router’s DNS settings are misconfigured.

How can I fix the error code 1017 on Disney Plus?

1. Clear app cache

Android TV or Phone

  1. From the home screen, click Settings.
  2. Select Apps from the list of settings.
  3. Locate Disney Plus from the list of apps, then tap it.
  4. You will get a list of options; select Storage > Clear app cache.
  5. Click Clear cache to confirm.

PC

  1. Press the Windows + I to open the Settings app.
  2. Go to Apps, then click Installed apps.  Apps - Installed apps error code 1017 Disney Plus
  3. Locate the Disney Plus, click the three-dot icon, and select Advanced options.Advanced Options error code 1017 Disney Plus
  4. Scroll down to the Reset section and click the Reset button. This will delete the app data, and you will have to sign in to the app again.Reset app

2. Power cycle your devices

  1. Remove the power cable from the router.
  2. Leave it as is and wait for 30 seconds to a minute, as this will allow the router to reset any internal processes.
  3. Reconnect the power cable.
  4. Now wait 2 minutes for the router to restart and the lights to stabilize. Once fully turned on, try accessing Disney Plus on your device again.

3. Change the DNS settings on your device

PC

  1. Press Windows + R to open the Run window.ncpa.cpl - error code 1017 Disney Plus
  2. Type ncpa.cpl and click OK to open the Network Connections window.
  3. Right-click the active internet connection and select Properties.Network Connection properties  
  4. Click Internet Protocol Version 4 (TCP/IPv4), and select the Properties button.Internet Protocol Version 4(TCPIPv4) Properties
  5. Place a checkmark next to Use the following DNS server addresses; then for Preferred DNS Server, type 8.8.8.8, then for Alternate DNS Server, type 8.8.4.4.DNS server
  6. Click OK, then OK again.

TV

  1. On the home screen, click the Settings icon.
  2. Select Network & Internet.
  3. Choose the Wi-Fi network or Ethernet connection to which you are connected.
  4. Look for Advanced or IP settings, then change the DHCP(automatic) to Static.
  5. Under Static IP, you will see IP Address, Gateway, and DNS 1 / DNS 2.
  6. For DNS 1, enter 8.8.8.8; for DNS 2, enter 8.8.4.4.
  7. Click Save.

4. Reinstall the app

TV

  1. From the home screen, locate and click Apps.
  2. Select the Open Google Play Store option.
  3. Locate Disney Plus from the list of apps or use the search function.
  4. Click the Uninstall button.
  5. Now, search for Disney Plus and click Install.

Windows PC

  1. Press the Windows + I to open the Settings app.
  2. Go to Apps, then click Installed apps.Apps - Installed apps error code 1017 Disney Plus
  3. Locate the Disney Plus, click the three-dot icon, and select Uninstall.Uninstall (2)   
  4. Click Uninstall to confirm the action.uninstall confirmation app
  5. Press the Windows key, type microsoft store in the search box, and click Open from the list of options.
  6. Search for Disney Plus, select it, and click the Install button.Install Disney Plus app

Android

  1. From the home screen, locate and tap Disney Plus and select Uninstall.
  2. Launch the Play Store, and type Disney Plus in the search bar.
  3. If an update is available, click the Install button.

iOS

  1. From the home screen, locate and tap Disney Plus and select Remove app.
  2. Tap the Delete app option.
  3. Open the App Store, search for Disney Plus, and click the Install icon.

Reinstalling the Disney Plus app can also help you fix other issues on the app, like error code 14; read this guide to learn more.

In conclusion, to fix the error code 1017 on Disney Plus, you need to power cycle your router, reinstall the app, clear the app cache, or change the DNS settings on the affected device.

While discussing errors on Disney Plus, don’t forget to take a look at our guide on error code 42, which mostly occurs due to a weak internet connection. You can also take a look at our guide explaining error code 73, which states that Disney+ is Only Available in Certain Regions.

Did we miss a step that helped you fix the error code 1017 on Disney Plus? If so, share it in the comments section with our readers, and we will add it to the list.

How To Blur The Background in CapCut: 3 Ways to do it

Sometimes you need to blur a background on a video, and in this guide, we’ll show you how to blur the background in CapCut in a few easy steps.

How do I blur the background in CapCut?

1. Using the CapCut web app

  1. Log in to the CapCut video editor using a Google Account or personal email.
  2. Click on the New video card and drag and drop the source video into the video editing space that pops up.
    import media
  3. Select the imported video file in the timeline, right-click, and select Duplicate.
    duplicate video

Now, you’ll extract the character from the copied video:

  1. Click on the duplicate video just below the source video, select the Smart tools option on the right-side panel, and click on the Remove background option.
    Remove BG
  2. In the new context menu that opens, toggle the Auto removal button.
    auto removal
  3. CapCut will remove the video background. You can adjust the duplicate video’s frame in the preview pane to check the quality.
    background removed

Then, it’s time to blur the source video file:

  1. Select the source video in the timeline and select Effects in the left-side navigation panel.
  2. Click on the blur filter to show only bokeh effects. Select any blur mode from the left panel.
  3. Adjust the blur effect on the timeline to cover the entire length of the source video.
    Apply blur

Creating the overlay and final output video:

  1. Click on the duplicated video below the source file and drag it to the top of the timeline.
  2. Now, adjust the video frame to perfectly align with the background.
    Shift duplicate video
  3. Click Export in the top right corner and select Download in the Export menu to get an MP4 video file.
    export video

2. Using the CapCut desktop app

  1. Click the New project button on the Home page to open the video editor. Drag and drop the source video onto the Drag material here… timeline strip.
    drag and drop content
  2. Right-click on the imported video and choose Copy from the context menu.
  3. Press Ctrl + V on the timeline to insert the duplicate video.
    duplicate video file

Now, you must apply blur to one file and remove the background from the other:

  1. Select the original video file on the timeline and click Effects on the top CapCut toolbar.
  2. Type in Blur in the search field and hit Enter. Select a blur effect. Adjust the blur effect’s length on the timeline to match the original file.
    apply blur on desktop
  3. Click on the duplicate video, select Video in the right-side panel, choose Remove BG, and checkmark the Auto removal option.
    Remove BG in desktop

Overlaying images appropriately on the desktop app:

  1. There are two videos stacked on each other. Select the duplicate or transparent video and click Video in the right-side panel.
  2. Select the Basic tab and scroll down to the Blend menu, click on that to expand.
  3. Change the Mode to Overlay and reduce the opacity level until you’re satisfied with the visuals in the preview section.
    Export video in desktop
  4. Hit the Export button in the top right corner, configure the output file on the Export dialog, and click Export again to download your video.
    Export video in desktop

3. Using the CapCut Web image editor

  1. Navigate to the CapCut video editor web app and click on the Image button.
  2. Select the New image card to open a new project.
    Image option
  3. Click on the Upload image button and select the source picture from your PC or any cloud storage.
    upload picture
  4. Select the imported picture, right-click, and select Duplicate.
    duplicate picture

Applying a bokeh effect to the base image:

  1. Click on the original or base image, select Effects in the right side panel, and choose a Blur effect.
    Applying blur
  2. Now, select the duplicate image, click Remove background on the right, and activate Auto removal.
    Remove BG image
  3. Finally, just align the transparent image with the portrait over the blurry image to get the final render of your input picture.
    Adjust the overlayed images

I’ve also created this excellent guide on how to blur the background in Canva. You can read it too if you often use Canva.

We also have a great guide on how to remove background from video, so don’t miss it for more solutions.

Which method to blur a video background in CapCut did you like from this article? Type your reply in the comment box. If you know any secret method to blur the background in the same video editor mention that in your comment.

4 Best Microsoft Teams Kanban Boards to Organize Tasks

Kanban board will help you organize and visualize tasks with ease, and in this guide, we’ll show you the best kanban board for Microsoft Teams that you can use.

What is the best Kanban board for Microsoft Teams?

1. Kanban Task Board – Best minimalistic interface

Kanban Task Board UI

The Kanban Task Board app for Teams offers a classical and minimalistic Kanban board user interface. You’ll need to add it as a Teams channel tab for one of the channels. Then, you can add it to other group or individual chats as tabs using the Add a tab feature on the top of each channel or chat.

The default view comes with the three standard Kanban boards. These are the To Do, In Progress, and Done boards. However, you can use the Add new list button to create more custom boards to manage your tasks and projects.

A task in the Kanban Task Board app can have multiple fields for convenience in management, visualization, filtering, etc. The fields you can add are Due Date, Cover Image, Description, Assigned people, Label, and Checklist.

When managing tasks and projects for a team, you can add your team members as collaborators. By using the access control customizations in the Settings menu, you can add admins and users with edit and view accesses respectively. However, this feature is part of the premium subscription.

⇒ Get Kanban Task Board

2. Kanban Tool – Offers easy task imports

Kanban Tool user interface

Next on our list is the Kanban Tool app for MS Teams. This integration allows you to import tasks directly from an Excel worksheet or through a CSV file. Also, when the project is over and you want to archive it to a worksheet, you can use the Export tool.

Another truly useful feature of this app is it can read tasks from an email for importing purposes. Also, you can export your tasks and projects to calendar apps, like Google Calendar, Outlook, iCal, etc.

Furthermore, there’s an AI assistant that’ll help you set up a completely new project directly on Teams. You can simply explain the project or workflow and the AI will create the necessary Kanban boards.

It also has an Analytics function that automatically creates data visualizations, like a Breakdown Chart, Lead and Cycle Time, and Cumulative Flow.

⇒ Get Kanban Tool

3. Workstreams.ai – Best for project management

best Microsoft Teams Kanban board apps Workstreams.ai

Workstreams.ai creates a full-service project management environment in the Microsoft Teams user interface. Its Workspaces tab allows you to sign in to multiple Microsoft Teams accounts. If you manage multiple clients or business accounts, this is the way to go.

The Home tab gives you a glimpse into the open tasks assigned to you. Besides tasks and sub-tasks, you can also find mostly used taskboards and workflows in the Home tab. For a more focused view of your work for the day, you can also view the My tasks tab. It shows exclusively tasks assigned to you, followed by you, and those team tasks to which you were added.

Workstreams.ai offers many fields for detailing tasks. These fields also allow you to automate many parts of task management on a Kanban board. The task fields include more than 15 fields, but Assigned to, Status, Description, Start/due date, Subtasks, Labels, Attachments, Change status, etc., are the major ones.

It also comes with a built-in calendar app. You can use the Board view switcher button to toggle between the Calendar view and the Board view of your Kanban boards. Moreover, to change task statuses, you can drag and drop tasks from one board to the other.

⇒ Get Workstreams.ai

4. Huddo Boards – Great for making PM templates

Kanban board of Huddo

Huddo Boards is another easy-to-use Kanban board app for MS Teams. It installs as an independent Teams app. However, you can also use it as a channel tab if you need to discuss a project when in a meeting with specific team members.

The best thing about this Kanban app is ready to use templates created by professional project managers. There are more than 10 types of project management boards to select from, like Agile Team Projects, Customer Key Account Plans, Customer Success Boards, Marketing Campaigns, Meeting Agendas, and so on.

A basic Kanban board will start with the three standard task cards. These are Todo, Doing, and Done. There’s an additional Add a list card to the right of the standard boards. You can use that to create custom lists, like Waiting for Dependencies, Waiting for Input, etc.

Huddo Boards’ task card comes with all the standard fields that you’d need to explain your tasks and sub-tasks appropriately. The fields include a description box, Dates with Start date and Due date buttons, Colors for labeling, Assigned Members, Sub Cards, Add a comment, and so on.

⇒ Get Huddo Boards

Now you know which are the best Microsoft Teams Kanban board apps for task and project management purposes.

These apps work smoothly with the MS Teams desktop installation and allow for full-service task management and improvement of workflows without you needing to hop between apps.

If you’re finding it hard to visualize project timelines, check out this guide to see how the Microsoft Planner Gantt Chart can help. We also have a great guide on the best whiteboard apps for Microsoft Teams, so don’t miss them.

The Grammarly Extension for Chrome issue, that caused sites to constantly refresh or bounce, is now fixed

The Grammarly Extension for Chrome was unusable last Friday due to a bug that causes the sites it’s used to refresh or bounce constantly. We noticed it as well, and after several hours of troubleshooting, we initially thought screen bugs caused the issue, but then we discovered the Grammarly Extension installed on the browser.

When enabled, the screen constantly refreshes or bounces, making editing the site impossible. The issue was widespread. On Reddit, for example, users reported it.

Nothing, aside from disabling the extension altogether, fixed it. After updating Chrome, the extension didn’t work at all.

However, there is one thing you can do: switch to Edge, for now, or any other browser of your choice. The issue seems only to affect the Grammarly Extension for Chrome. However, in our tests, Edge and Opera were safe.

Grammarly, through its Support community, acknowledged the issue and released an update over the weekend that effectively fixed it. The plugin should now automatically update itself when opening Google Chrome.

Hey! Sorry for the trouble. It should be all good now—just make sure you’re on the latest version of the Grammarly browser extension. Let us know if you’re still having issues!

But if you’re unsure about it, you can go to the Extensions page in Chrome and update the plugin manually.

Unwind on Invalid Stack BSOD: 4 Ways to Fix it

UNWIND_ON_INVALID_STACK 0x000001AB is a blue screen error, but it usually affects developers. However, if you encounter it, we have a couple of solutions that can help you fix it.

How can I fix the UNWIND_ON_INVALID_STACK error?

1. Update Windows and your drivers

  1. Press the Windows key + I to open the Settings app.
  2. Navigate to Windows Update and click on Check for updates.
    check for updates
  3. If any updates are available, they will be downloaded automatically.

In addition to updates, you must update your motherboard and GPU drivers. We have a great guide on how to update drivers on Windows 11, so we encourage you to check it out for detailed instructions.

2. Use Safe Mode

  1. Open the Start menu and click the Power button. Press and hold the Shift key and click on Restart.
  2. Choose Troubleshoot and then Advanced options. Select Startup settings and click the Restart button.
  3. You’ll be presented with a list of options. Select Safe Mode with Networking by pressing F5 on the keyboard.
    Enable safe mode with networking
  4. Once the Safe Mode starts, check if the problem still appears.

If not, it means that one of your applications or drivers is causing the issue, so you’ll need to find it and remove it.

3. Perform a clean boot

  1. Press Windows key + R and type msconfig.
    msconfig command
  2. Navigate to the Services window. Check Hide all Microsoft services and click on the Disable all button.
    Clean boot Disable all SECURE_FAULT_UNHANDLED
  3. Click Apply and OK, but don’t restart your PC yet.
  4. Press Ctrl + Shift + Esc and choose Startup.
  5. Select each item on the list and choose Disable.
    disable startup app
  6. After doing that, restart your PC.

If the problem doesn’t appear, it means that one of the services or applications is causing it. To pinpoint the source of the problem, enable services and applications in groups until you manage to replicate the issue and find the root cause.

4. Use System Restore

  1. Press the Windows key + R and type rstrui.
  2. Select the desired restore point and click on Next.
    restore point
  3. Follow the steps on the screen to complete the process.

Once the system is restored, check if the UNWIND_ON_INVALID_STACK error is gone. If not, you might have to perform a repair upgrade or factory reset Windows 11.

Fixing the driver overran stack buffer error usually involves updating drivers, checking RAM, and repairing system files. If you are still experiencing issues on Windows 10 specifically, follow the solutions provided in the driver overran stack buffer Windows 10 article for more detailed guidance.

This isn’t the only stack error you can encounter, and we have guides on Exception_on_Invalid_Stack and Kernel_Stack_Locked_At_Exit, so don’t miss them.

Microsoft releases a new update for Edge 131 and it brings major changes to the browser’s policies

Microsoft has released a significant update for its browser, Edge, in the Stable Channel with Version 131. It is now available to all users with many improvements, updates, policy changes, security fixes, and more.

Microsoft Edge changed the behavior of the cancel dialog for the beforeunload event. Calling event.preventDefault in a beforeunload event handler won’t prevent the dialog from being shown. Instead, event.returnValue = ” it needs to be called in the beforeunload event handler to prevent the cancel dialog. The BeforeunloadEventCancelByPreventDefaultEnabled policy is obsolete and no longer works after Microsoft Edge version 130.

The Kyber algorithm was standardized with minor technical changes and renamed to the Module Lattice Key Encapsulation Mechanism (ML-KEM). ML-KEM is implemented in the BoringSSL cryptography library, allowing it to be deployed and utilized by services that depend on this library. The changes to the final version of ML-KEM make it incompatible with the previously deployed version of Kyber. Due to this incompatibility, the following changes in Microsoft Edge will be made:

  • Edge switches from supporting Kyber to ML-KEM.
  • Edge offers a key share prediction for hybrid ML-KEM (codepoint 0x11EC).
  • The PostQuantumKeyAgreementEnabled flag and the PostQuantumKeyAgreementEnabled policy applies to Kyber and ML-KEM. Note: The PostQuantumKeyAgreementEnabled policy is scheduled for removal in Edge version 141.
  • Edge will no longer support hybrid Kyber (codepoint 0x6399).

The EdgeSidebarAppUrlHostAllowList policy allows admins to define a list of sites, based on URL patterns, that are not subject to the EdgeSidebarAppUrlHostBlockList. When the policy is configured, the apps listed in the allow list can be opened in the sidebar even if they are listed in the block list. For more information, see Manage the sidebar in Microsoft Edge.

You can read the whole changelog to Microsoft Edge 131 here.

In other news, the Redmond-based tech giant is adding a new feature usage capability to Microsoft Edge, allowing users to aggregate data on their Edge usage across all platforms in one single place.

Windows 11 on Arm ISO is now available for download

Microsoft has finally launched multi-edition ISO files for Windows 11 on Arm, offering users more flexibility when installing and managing the OS.

The new ISO files can be used to create virtual machines, perform upgrades within a running copy of Windows, or create bootable media for installation on other PCs.

The ISO files, available directly from Microsoft, have a download size of around 6GB. The company notes that users may need to include drivers from hardware OEMs for the installation media to be successfully bootable.

Snapdragon X Series processor-based Copilot+ PC users can get this ISO to install Windows, but the operating system won’t have the OEM’s drivers, at first, although they’ll be there after a few updates.

The Windows 11 on Arm ISO is compatible with the following products:

  • Microsoft Surface Pro X
  • Samsung Galaxy Book S
  • Lenovo Flex 5G
  • Asus NovaGo
  • HP Envy x2

You can get the Windows 11 on Arm ISO here.

Let us know if the installation process went all well.

Xbox launches the This is an Xbox campaign focusing on cloud gaming

Xbox has officially launched the This is an Xbox marketing campaign, with a series of ads that showcase what it and it is not an Xbox. With it, the company focuses on cloud gaming, and the ability to play Xbox games on virtually any device that has an internet connection and a screen.

This means you can play your games not only from your Xbox console but also from your PC, Samsung Smart TV, handheld console, mobile phone, Amazon Fire TV, or Meta Quest.

The trick? You’ll need Game Pass Ultimate, and you’re all set.

We also believe that gaming should be easy to access and available for everyone, so whether you have an Xbox console, play on PC, with Samsung Smart TVs, handhelds, mobile phones, Amazon Fire TV, or a Meta Quest headset with Game Pass Ultimate, you can play with Xbox.

The company goes on to describe objects that can, or can’t be Xbox, with some additional funny insertions that use the word box.This is an Xbox

Xbox has been placing a lot of bets of cloud gaming thanks to this model’s proximity to Game Pass, one of the most popular services (if not the most popular) of its kind. Although, only popular on Game Pass Ultimate, the cloud gaming offers unrestricted access to a library of Xbox games that can be played virtually everywhere. You don’t even need an Xbox to play Xbox games.

The Game Pass model is so popular that Xbox recently introduced a Standard version which offers access to a limited library of games for a much lower price.

Chrome Remote Desktop Blocked by Admin: How to Unlock it

Many users reported that Chrome Remote Desktop is blocked by the admin and that they can’t use it to connect to a remote device. This can be a problem, but there are a few ways you can fix it.

What can I do if Chrome Remote Desktop is blocked by admin?

1. Change your settings

  1. Locate the group that is having trouble accessing Chrome Remote Desktop in the Admin console.
  2. Open the group settings.
  3. Change the setting that indicates that all users are over 18.
  4. Alternatively, you can make a new group and label all users over 18.
  5. Save changes.

Keep in mind that this method works only if you’re the system administrator.

2. Toggle access to additional services

  1. Open Admin console.
  2. Next, go to Additional Google Services.
     additional google services
  3. Set Access to additional services without individual control for all organizational units is turned to On.
    access to additional services without individual control

If Chrome Remote Desktop is blocked by the admin, then the only way to enable it is to contact the administrator and ask them to remove the restriction.

If you’re an admin, you can try the solutions from above and they should help you restore this functionality to users.

This isn’t the only issue, many reported that Chrome Remote Desktop is not working for them. If you never used this feature before, go ahead and download Chrome Remote Desktop for Windows 11 and take it for a test run.

If you want a bit more privacy when using this tool, our latest guide shows you how to enable Curtain Mode in Chrome Remote Desktop, so don’t miss it.

The ChatGPT app is now available to all Windows users out there

OpenAI has made its ChatGPT app for Windows PCs available to all users after initially being accessible to ChatGPT Plus, Team, Enterprise, and Edu users. In a post to X (formerly known as Twitter) the AI company broke the news.

The company has made several improvements to the app since its launch, including allowing users to take a photo with their PC or laptop’s webcam and attach it to their conversation with ChatGPT.

OpenAI has added keyboard shortcuts for text scaling, the ability to customize certain shortcuts, and a new button specifically dedicated to updates.

Earlier this month, the company officially released Advanced Voice Mode, which provides more natural, real-time conversations with ChatGPT. You’re also able to search through the chat history.

Are you thinking of using the ChatGPT app on your Windows PC?

You’ll be able to fix the thumbstick of your Xbox Elite Controller thanks to a new guide on the console

Xbox has announced a new update to its ecosystem, including the Xbox console, Xbox app on Windows, and accessories.

In a blog post, the company says the Xbox Elite Wireless Controller Series 2 now has thumbstick calibration, and the Xbox Wireless Controller and Elite Wireless Controller Series 2 have self-calibration for triggers. The Xbox Accessories app, meanwhile, now lets you map thumbstick movement to keyboard inputs and mouse clicks, and allows you to use hat switches on the Xbox Adaptive Controller to control a different axis.

The update brings back the ability to send and receive Friend Requests. It also introduces the ability to follow other players without a mutual connection.

The search functionality on Xbox consoles and the Xbox app on Windows has been updated, with Microsoft using AI to improve accuracy and relevance.

The Xbox app on Windows is also getting the new Home experience, which brings together the latest games, news, recommendations and more in a “compact” format.

Xbox consoles are getting new customization features, including the ability to create a gamerpic from an achievement art or screenshot, and to zoom and crop images for use as a home background.

With KB5046740, Microsoft solves a huge chunk of Windows 11 bugs

Microsoft has announced the release of Windows 11 Build 26100.2448 (KB5046740) to the Release Preview Channel. This update introduces a range of fixes and improvements and a set of features that will gradually become available to users of Windows 11, version 24H2 (Build 26100).

Gradual Rollout

As the name implies, the features and improvements listed here will roll out slowly to users in the Release Preview Channel. Here’s what to expect:

Start menu: Right-clicking apps pinned to the Start menu now displays jump lists for apps with them.

Taskbar: The system tray now shows an abbreviated date and time, and the notification bell icon might not show if you have the “Do not disturb” toggle turned on. If the bell icon doesn’t appear, click the date and time to view your messages in the notification center. You can restore the longer date and time format by going to Settings -> Date and time and turning on “Show time and day in the system tray.” To show the bell icon, go to Settings -> System -> Notifications. You can access these settings via the context menu by right-clicking the system tray clock or bell icon.

Touchscreen: Windows 11 now offers a new section for touchscreen edge gestures in the Settings app under Bluetooth & devices -> Touch. You can turn off the left or right screen edge touch gesture there.

Task Manager: The Disconnect and Logoff dialogs in Task Manager now support dark mode and text scaling. Additionally, the Performance section of Task Manager now shows the type of disk each entry is referencing.

Input Method Editor (IME): After you install this update, the IME toolbar will hide when apps are in full-screen mode. This applies only when the IME toolbar is active and you’re typing Chinese or Japanese characters.

File Explorer: You can now share content to an Android device from the context menu in File Explorer and on the desktop. To use this feature, you must install and configure Phone Link on your PC.

IFilters: Windows Search now runs IFilters in Less Privileged App Containers (LPAC). LPACs are like app containers but restrict more permissions by default. Processes in an LPAC can only access the resources they need and don’t have access to sensitive system components and data, reducing the potential damage a compromised process can cause.

Dynamic Lighting Settings page: If there’s no compatible device attached to your computer, the Dynamic Lighting Settings page will show a placeholder message and turn off the Brightness and Effects controls. Additionally, this update adds the Forward, Backward, Outward and Inward direction options to the Wave effect and the Forward direction option to the Gradient effect.

Narrator: Microsoft has added new functionalities to Narrator’s scan mode, which helps people navigate Windows using only their keyboard. “Skip past links” (shortcut: N’) lets you jump to the text after a link. This is particularly useful when navigating long emails, news articles and wiki pages. “Jump to lists” (shortcut: L’) lets you quickly access a list on a webpage or in a document. To try these new features, turn on Narrator first (Windows key + Ctrl + Enter), then turn scan mode on by pressing Caps Lock + Spacebar and use the new shortcuts.

Speech in Windows: Microsoft has improved the speech-to-text and text-to-speech experience in Windows. Users of Narrator, voice access, live captions, live translations and voice typing might see a message asking them to update their language files manually. The language files will be released separately via the Microsoft Store.

Settings: “Tailored Experiences” is now “Personalized offers” in the out-of-box experience (OOBE). You can find it on the Recommendations and offers page under Settings -> Privacy & security. You can turn off the setting that sends data about your device to enhance Windows.

Jump lists: If you hold Shift and CTRL and click a jump list item, this opens the item as an administrator.

DISM: Microsoft has addressed an issue causing the StartComponentCleanup task in Deployment Image Servicing and Management (DISM) to stop at 71% and display error 6842.

PowerShell: The Get-WindowsCapability command shouldn’t fail and require a restart anymore.

Windows Update: Microsoft has fixed an issue causing error 0x800f0905 to appear when you install an update.

JPG files: An API can once again be used to find rotation information in JPG files.

Display: App windows should no longer collect in the corner of a monitor when your device goes to sleep, and the Mica material should display correctly when using a slideshow background.

Mouse: On some displays, the circles that appear when you enable the “Show location of pointer when I press the CTRL key” setting shouldn’t be tiny anymore.

Clipboard: Microsoft has resolved an issue causing clipboard history to show no content (even though it should) when you’ve copied text and images. Microsoft also fixed a bug causing the search box in File Explorer to be cut off when the window is small.

Taskbar: If you have the taskbar set to automatically hide, the search box should appear as a search box rather than an icon.

File Explorer: The See more menu in File Explorer should expand downward rather than upward, and there should be less space between items in the left pane of File Explorer. Microsoft also fixed an issue causing the search box to be cut off in File Explorer.

Normal Rollout

The following features and improvements are rolling out to all users in the Release Preview Channel as part of this update:

File Explorer: When you select the “See more” button in the command bar in File Explorer, the menu now expands downward (if there’s space) rather than upward.

HTML Applications (HTA): Optional components (OC) for HTML Applications (HTA) are now included in ARM64 Windows Preinstallation Environment (Windows PE).

Task Manager: Microsoft has fixed an issue causing Task Manager to stop responding when you navigate to the Users page using only your keyboard.

Graphics Device Interface Plus (GDI+): GDI+ once again allows you to get the properties of image files and re-encode images without making them appear at the wrong scale.

RAW format images: RAW format images should no longer appear in the wrong orientation in Windows apps.

Exporting chart objects: An app should no longer stop responding when it exports chart objects in PDF and XLSX format.

Mouse and Xbox Game Bar: On devices with multiple monitors, your mouse shouldn’t “unlock” from a game window when you open and close the Xbox Game Bar.

Check out KB5046740’s full changelog here.

In other news, Windows 11 also received new settings for mouse, and you should be able to navigate the operating system easier now.