Even in an age of technology where everything changes from one day to another, there is always room for a bit of nostalgia.
For example, while Microsoft‘s Chromium-based Edge may have replaced Internet Explorer in Windows 10, users are still longing for some features that they liked in the old browser.
One such feature is the Menu Bar which Internet Explorer users can easily navigate to items like File, View, History with just a single click.
Internet Explorer’s menu bar is coming back as an extension
If the Menu Bar is the only thing still keeping you from migrating to a newer browser, then you don’t need to stay with it any longer. An independent developer has created an extension that will bring Internet Explorer’s Menu bar to all the modern web browsers.
The extension is called Proper Menubar and it brings all the functionality of Internet Explorer‘s Menu bar to newer browsers.
Here’s a list of all of the supported browsers:
Google Chrome
Microsoft Edge
Maxthon
Firefox
Yandex
Vivaldi
Safari
Opera One
Brave
UC
Of course, unlike the traditional Menu Bar, this extension does offer a degree of customizability. For example, you can change the positioning of the Menu Bar, or even the color scheme to match the rest of your browser’s theme.
You can download the extension from the developer’s official webpage, and the best part is that it is completely free of charge.
This isn’t the only extension that the developer has created, as you can see for yourself on this page.
What other features from Internet Explorer would you like to see in Microsoft Edge? Let us know in the comments section below.
Microsoft’s specialized voting software is making its stateside debut ahead of the February 18, 2020, Supreme Court elections for the state of Wisconsin.
Back in May of 2019, Microsoft announced ElectionGuard alongside a list of partnerships that included DARPA and Columbia University that were all working together to enable end-to-end verifiable components as well pilot testing leading to an eventual real-world application.
In a relatively quick amount of time, Microsoft and voting machine vendors have worked to implement ElectionGuard in real-world testing that will consist of few hundred votes using a pretty seamless process.
First, ElectionGuard provides each voter a tracker with a unique code that can be used to follow an encrypted version of the vote through the entire election process via a web portal provided by election authorities. During the process of vote-casting, voters have an optional step that allows them to confirm that their trackers and encrypted votes accurately reflect their selections. But once a vote is cast, neither the tracker nor any data provided through the web portal can be used to reveal the contents of the vote. After the election is complete, the tracker codes can be used by voters to confirm that their votes were not altered or tampered with and that they were properly counted.
Second, ElectionGuard also includes an open specification – or a road map – which allows anyone to write an election verifier. Voters, candidates, news media and any observers can run verifiers of their own or downloaded from sources of their choosing to confirm tabulations are as reported. The combination of the tracker – which allows individual voters to verify that their votes have been accurately recorded – and the verifier – which allows anyone to verify that the recorded votes have been accurately counted – enables full “end-to-end verification” of the correctness of election results. It will not be possible to “hack” the vote without detection.
Microsoft’s VP of Customer Security & Trust Tom Bur sums up the process rather succinctly,
“First, a voter will select candidates on a touchscreen and verify their choices. Second, the voter will print and review for accuracy a paper ballot and simultaneously receive a separate tracking code. Third, the voter will deposit their ballot into a ballot box for counting.”
Following the events of the 2020 Iowa caucuses, the infusion of new technology into the American voting system is under additional scrutiny this year. Microsoft’s ElectionGuard will not only need to make sure it’s safeguarding selections from being electronically altered but also doing an impeccable job of simply tallying votes correctly.
Fortunately, Microsoft’s open-sourced software leverages Homomorphic encryption which specializes in counting votes as well as simultaneously encrypting them. Burt sees the Fulton, Wisconsin Supreme Court votes as yet another test pilot for the ElectionGuard program as it presumably prepares for participation in the 2020 presidential election later this year.
PowerShell is very popular among system administrators. Despite the fact that it is developed by Microsoft and is widely available, a major drawback of using Windows PowerShell is that its autocomplete function suddenly stops working at times.
Plenty of users have been reporting this problem on forums:
Lately after my latest update of Windows 10 my PowerShell ISE stopped giving me the little popup that autocompletes commands … I used to click on “ctrl + space” to see the little popup but it’s not working anymore instead it gives me an error “an unexpected error has occurred and Windows PowerShell ISE must close”.
If you discovered that PowerShell’s autocomplete is not working for you either, there are several steps that you can take to make things right again.
What can I do when PowerShell autocomplete is not working?
1. Make sure IntelliSense Complete Word is invoked
Go to the Edit menu and click Start Snippets. Hit Start IntelliSense, if it happens not to be set this way anymore.
IntelliSense is a code-completion aid that includes a number of useful features. Complete Word is one of them and can be easily invoked by entering into Edit > IntelliSense > Complete Word, or by choosing the Complete Word button on the editor toolbar.
After that, it should start completing the rest of a variable, command, or function name after entering enough characters to disambiguate the term.
2. Install PowerShell ISE Preview
ISE Preview has fixed this issue, so you can try to install it as well. This module is distributed via the PowerShell Gallery. That’s why the Install-Module cmdlet – which is part of the PowerShellGet module – is used to install the ISE preview module from the PowerShell Gallery.
There is also a Scope parameter if you’d rather install the module only for the current user and not in the all users path: Install-Module -Name PowerShellISE-preview
Up next, the Install-ISEPreviewShortcut cmdlet creates shortcuts in the Start menu for the ISE preview: Install-ISEPreviewShortcuts #
Finally, in order to launch the Windows PowerShell ISE Preview edition, type isep #.
3. Try using VSCode
You could also consider using VSCode. Visual Studio Code is notorious for its usability for PowerShell. The reason is really simple: it’s not only much more powerful than PowerShell IDE but also gives a sense of freshness.
Just don’t forget to configure your VSCode environment to make PowerShell the default language. If you look in the right-hand corner of the editor, it will tell you what language is currently set to.
Moreover, some users state that this only happens on their Windows 7 computer while being on a different location. PowerShell autocomplete always works while used on their Windows 10 PC at home, so it may be a Windows 7 related issue.
In that regard, it’s a great time to migrate to Windows 10.
Did our solutions work for you? How do you solve problems such as this one? If you’re aware of another fix, share it in the comments section below so that other users can try it as well.
There have been many battles in Microsoft’s history. Windows vs MacOS, iPad vs Surface, but now there is Teams vs Slack. This is a topic we’ve covered extensively, but recently, a tweet from Microsoft Cloud Advocate Sonia Cuff has set off a new Teams vs Slack debate: What does Team lack that Slack offers?
Going to open the floodgates here: give me your one feature request or annoyance that bugs you about Microsoft Teams but is amazing in Slack. *braces* No debates – pure feature feedback.
In the reply to the tweet, many people who use both Teams and Slack, including our own Abhishek Baxi, give their take on the controversial question. At the heart of the debate for many, it would appear, is Teams’ lack of support for multiple identities and switching between them. This is something Teams does not yet support, and users who need to switch between multiple Teams accounts and workspaces have to run the desktop app and the web version at the same time. This feature has actually been requested since 2017, but it has yet to be implemented.
Other users also point out some minor user interface imperfections, like the “Start a new thread” box being too close to the one which lets you reply to an existing thread. Some have also had issues with the white space in conversation view, and find it way too irritating, along with buggy scrolling. Christina Warren, a senior cloud advocate at Microsoft, was also quick to point out that Teams’ notifications system is a bit flawed, and had her own suggestions on how to make them more granular.
Sonia’s Twitter thread is full of lots of thoughtful responses as to what Teams slacks that Slack offers, which we can’t possibly cover in just this one post. These include more than 6 emoji responses, custom emojis, the “bananas” business of hiding and unhiding channels, and the way search works. Oh, and we’d also like to mention our personal favorite, native ARM support on Windows, native notifications on Windows and Mac, and a store version of the app.
Microsoft is always looking for Feedback on Teams, and as it becomes just as popular as Slack, for many, there’s still a bit more that it has to go before becoming truly perfect. There are many features planned for Teams in the months ahead, which we’ve previously talked about here, so there could be hope for those who hold Slack close to their hearts.
For the first time in a while, Microsoft has given the Windows 10 Calendar App a new look, and Windows Insiders are invited to test it out by toggling a “Try the Preview” switch at the top of the app. The new and improved Calendar app in Windows 10 is different from before and is much cleaner, easier to use, and so much more efficient. We spent some time with it over the past week, and here’s a hands-on look at the experience.
Choose your theme
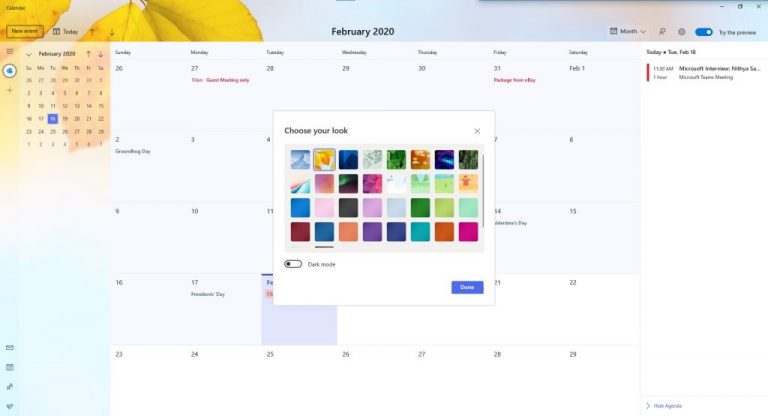
One of the first things you’ll experience when opting into the Calendar beta is the ability to switch between themes. In the beta version of the Calendar app, selecting one of the preset themes will change the image you see in the background of your calendar. You’ll get a default image with some mountains, but there are many others to choose from. There are 34 total images, and the positioning of these images is much different from before. Now, the image you choose will show up in top left corner of the screen and will appear in the background, with an acrylic effect inspired by Fluent Design. There’s even an option to switch to a dark theme if need be.
A clean user interface
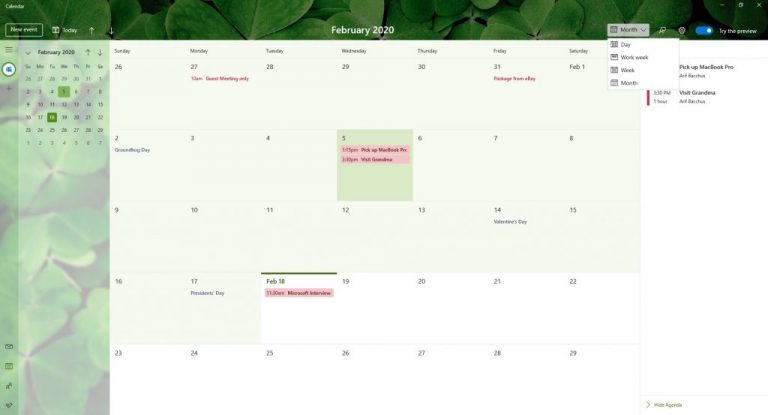
Another thing you’ll notice with the new Calendar beta is the cleaner user interface. The sidebar, which has previews of your calendars, now features more touches of Fluent Design, and you’re able to see more of your background image behind it. Microsoft also introduced a new option in the sidebar for you to add more accounts and switch between them with the click of a button. Before, this ability was hidden beneath a settings menu.
The top of the calendar app has also changed, as the buttons for Today, Day, Week, Month, and Year views are now gone. Instead, Microsoft has replaced it with a drop-down menu, leaving more room for you to see the imagery in the background. There’s even a clean “New Event” button right above the calendar, helping you create meetings more quickly.
Finally, the search box has disappeared, slimming up the top of the app a bit. Search functions have apparently been removed in this early beta. Instead, you’ll find a new agenda view, which can be summoned from the sidebar on the right side of the app. This agenda view will show you some of the items on your list for the day, including meetings and reminders.
A cleaner pop-out menu for creating meetings and events
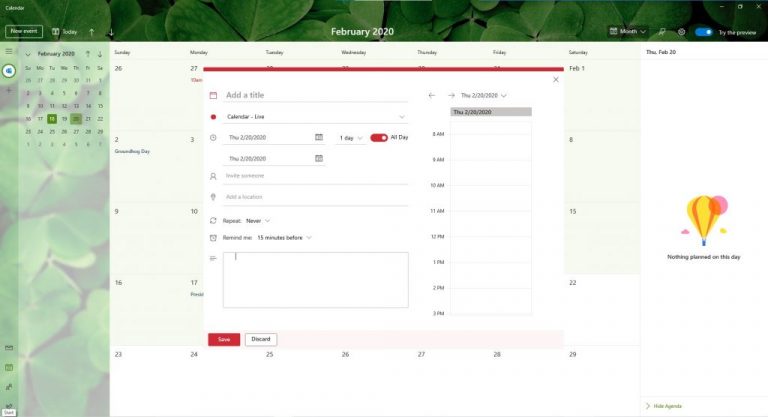
The final aspect to note in this version of the Calendar app is the pop-out menu for creating events. Much like the rest of the calendar, Microsoft has given it a redesign. When creating events directly from the calendar by right-clicking in an open space, you now can add more information. You’ll be able to choose which calendar you want it on or have it repeat.
Additionally, clicking the “More Details” link at the bottom of the create event space no longer opens up a full-screen view. Instead, you’ll now get a slimmer pop-out menu, still showing your calendar underneath. This, too, has changed, as it now offers you a slice of time from your day on the right side, showing you when the event or meeting will take place. It’s so much cleaner and concise when compared to previous versions of the Calendar app on Windows 10.
A change for the good
It is important to note that this beta version of the Windows 10 Calendar App is still a work in progress. Microsoft will continue to add more features to it over time, and it is much appreciated. Overall, it now fits in well with the rest of Windows 10, and we really do hope the mail app and other inbox Windows apps can get a similar redesign as well. From the clean and concise look, to new personalization options, this is how the calendar app should have always been.
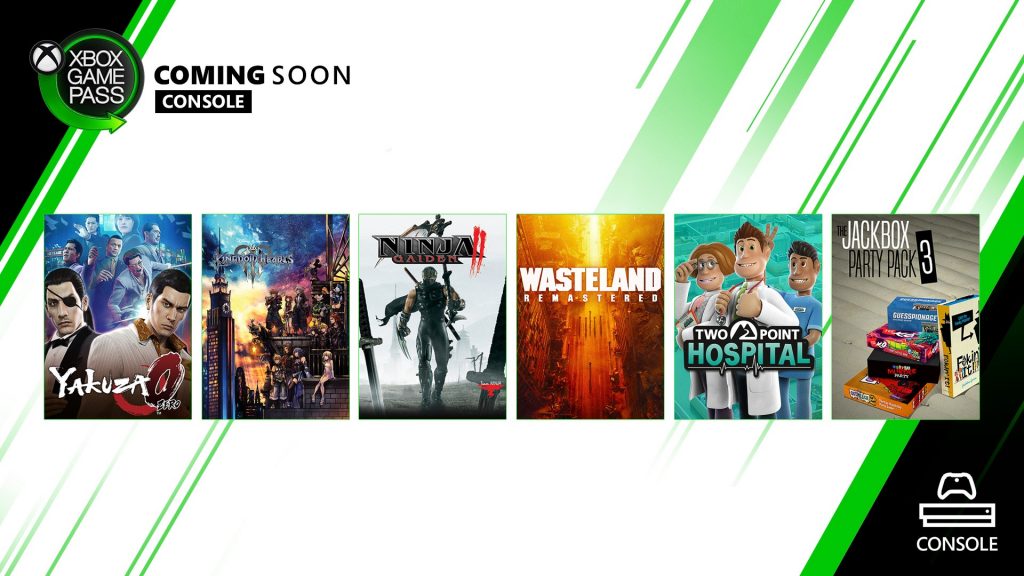
Indeed, three more games will be added on February 25 with the Xbox Play Anywhere title Wasteland Remastered, the business simulation game Two Points Hospital (coming to Xbox Game Pass on its release day), and the action-RPG title Kingdom Hearts III. The latter was the first game in the popular series that mixes various Disney characters to be released on Xbox One, until the release of Kingdom Hearts HD 1.5+2.5 today.
Yakuza 0 will follow on February 26, and Jackbox Party Pack 3 will be the last game to join Xbox Game Pass this month on February 27. This is a pretty great selection of games overall, especially with Rise of the Tomb Raider, Just Cause 4 and more about to leave Xbox Game Pass very soon.
We’ve reached a digital age where creating art or graphics is no longer something that is limited by how much talent you have.
There are a wide variety of products out there that can be used to create graphic designs, each with its own unique features and approaches.
However, that in itself is also a problem, since too many options can make it difficult to choose which is the best, especially if you have a specific set of needs in mind.
On that note, we’ve decided to look over the pros and the cons of two very popular graphics design tools, and then compare the two to see which is the best.
As such, we’ve decided to compare Adobe Illustrator, a world-renowned software tool used by professionals everywhere, and Inkscape, a free and open-source program that anyone can use.
This article is great for those who also searched fo the following:
Adobe Illustrator vs Inkscape
Illustrator vs Inkscape
Inkscape vs Adobe Illustrator: Which is better?
1. Adobe Illustrator
1.1 What is Adobe Illustrator?
Adobe Illustrator is a vector graphics editor created by Adobe, and it was originally created for the Mac OS, but it slowly managed to make its way to the Windows platform as well.
It was created after Adobe Photoshop and was supposed to be the vector-based variant of the program since graphic design using raster-based programs did come with its own limitations.
This was especially noticeable when dealing with large-scale projects such as banners and billboards where enlarging the image would eventually lead to it becoming pixelated.
The UI is designed to be quite intuitive, and anyone familiar with Adobe Photoshop will have no problem whatsoever transitioning to this program as well.
All the tools that you may ever need are present in a sidebar that appears on the left of the screen. These tools allow you to select, create, and manipulate objects or artworks in Illustrator.
Of course, you also have access to sets of tools, each of which acts as menus for other more niche tools:
Selection tools
Paintbrush tools
Pen tools
Pencil tools
1.3 Pros and Cons of Adobe Illustrator
Pros:
Having skills with using Adobe Illustrator is currently a must-have if you want to land a job as a graphic designer
The program has plenty of features that automate many of the tasks that you would otherwise have to do manually
It is constantly developed, and micro-patches are automatically delivered once any type of bug is reported
Since Adobe is an industry-standard, you won’t have to worry about dealing with incompatible file formats
Files created in Illustrator can be easily imported into After Effects, Premiere Pro, Photoshop and all other Adobe tools
Cons:
The monthly subscription is only worth it if you yourself make money off of graphics design
It is a bit more resource-intensive than other similar tools
Inkscape is also a vector-based graphic design tool, but unlike Adobe Illustrator, it is completely free and open-source.
It works on Linux, Windows, and MacOSX and comes with a host of tools used for both artistic and technical illustrations such as cartoons, clip art, logos, typography, diagramming, and flowcharting.
Because it too is a vector-based graphic design tool, it allows for sharp printouts and renderings at unlimited resolutions, even for works like giant banners or roadside billboards.
2.2 What features does Inkscape have?
As far as tools are concerned, Inkscape offers almost as many tools as Adobe Illustrator, but the highlit is actually the way you use the program.
The interface is designed to be extremely simple and accessible, even to users that have no background experience using such tools.
More so, the fact that it is open-source makes it available in a wide variety of languages, and it also lets users customize Inkscape’s functionality with add-ons.
Admittedly, you may consider the fact that it is free and the open-source licensing as a big plus, but this too comes with its own set of drawbacks.
2.3 Pros and Cons of using Inkscape
Pros
Free and open-source
Uses fewer system resources
User-friendly UI
Works on Windows, Linux, and MacOSX
The community is quite active and extremely friendly
Cons:
Doesn’t support CMYK color format, so printable materials aren’t something Inkscape can handle
Most industries use Adobe Illustrator, so you’ll have to frequently deal with working with their files anyway
Frequent bugs and issues due to the open-source licensing
Since Adobe Illustrator is the industry standard, having Inkscape skills will not help you get a job as a graphic designer
2.4 Are Adobe Illustrator and Inkscape compatible?
Those of you that want a more hands-on approach at comparing the programs should know that they can do it quite easily since the two have a high degree of compatibility.
For example, Inkscape’s native format is SVG (Scalable Vector Graphics), which is a format also supported by Adobe Illustrator. Unfortunately, the two implementations are not fully compatible.
More so, Inkscape also exports to PS, EPS and PDF, formats that Illustrator can recognize.
3. Inkscape vs Adobe Illustrator: The final verdict
Both tools are great, and while Inkscape’s non-existent price-tag and open-source license may seem like the reason we would call it the winner, it is actually the very thing that makes Adobe Illustrator take our vote.
In a world where everything is standardized and jobs are hard to come by, investing in a program that will greatly increase your chances of success is better in the long run.
More so, Adobe Illustrator is used everywhere, it is always patched and updated, and the customer support is always available for you with the best answers.
Thus, if you want quality and reassurance, there is no way you could go wrong with Adobe Illustrator.
Basically speaking, everything you could ever do with Inkscape you can do with Illustrator, but you cannot say the same about the other way around.
If you are still undecided, you can also explore more options in this detailed Adobe Illustrator alternative guide, which covers additional tools beyond Illustrator and Inkscape.
In a recent conversation with Windows Central, Rainbow Six Siege’s director, Leroy Athanassof, revealed that a new version of the popular game would be made for Microsoft’s next gen console, the Xbox Series X.
“We are going to be on [the consoles] from launch,” Athanassof says. “When they will release the consoles; but it’s up to them to agree that. For Siege, our target is to be available right at launch.”
While the Xbox Series X will likely support Xbox One video games such as the current gen version of Rainbow Six Siege, it appears as if a separate version of the game, designed for the Xbox Series X gen of Xbox consoles, is planned. Luckily, crossplay with those playing the Xbox One version is incredibly likely. “We don’t want to break our community,” he reassures. “So, we want people who buy the new system right away to play it with their friends.”
A next gen version for Sony’s PlayStation 5 is also planned.
Cross-platform progression is being worked on though isn’t a guarantee just yet. Also, while many would like PlayStation and PC crossplay, players shouldn’t hold their breath just yet.
“This is more a discussion between Microsoft and Sony. We would love to be fully cross-play — have Xbox players matchmaking against the PlayStation players. We are ready to support that. And hopefully, this will happen because as I said, it’s a general move in the industry, and there is nothing that can prevent that. It’s just a matter of time before it happens,” Athanassof explains before adding that “I don’t think there will ever be console cross-play with PC.”
Are you excited for an Xbox Series X version of Rainbow Six Siege or are you happy with the Xbox One version? Share your thoughts with us in the comments below and then follow us on Pinterest and Facebook for more Xbox news.
This release is rather significant as it’s the first time that Kingdom Hearts Final Mix, Re:Chain of Memories, 358/2 Days, Kingdom Hearts II Final Mix, Birth by Sleep Final Mix, and Re:coded have been playable on an Xbox console.
All six Kingdom Hearts video games have received a visual upgrade and will also play in 4K Ultra HD when played on an Xbox One X console.
This second bundle contains three additional tales from the Kingdom Hearts franchise. Included are the Kingdom Hearts 0.2 Birth by Sleep – A Fragmentary Passage – and Kingdom Hearts Dream Drop Distance HD games and the Kingdom Hearts χ Back Cover animated movie.
When it comes to graphics cards, few brands are as well-known as Nvidia. Their powerful line of GPUs are some of the best on the market, and they constantly launch updates for them to keep them at cutting-edge speeds.
However, some users have issues with installing various Nvidia components. For example, some users have reported having issues installing the Nvidia Control Panel:
I have the Geforce Experience and I tried downloading the new driver but the installer only redirected me to Geforce experience. I tried reinstalling the driver from there multiple times, still no control panel.
The Nvidia Control Panel is an important component, as it lets you adjust the video settings of your GPU. Because of its importance, this issue is quite severe, and that is why we’ve created this step-by-step guide that will allow you to download it again.
I can’t download the Nvidia Control Panel from MS Store
Type in disk cleanup, and select Disk Cleanup from the list of results
Select the drive you want to clean, and then select OK
Choose Cleanup system files
Select the file types to get rid of
To get a description of the file type, select it
Select OK
Perform a full cleanup which will delete the temporary files
You can now try to download the Nvidia Control Panel and this time it should install without errors. Once completed you will have the right-click option back to customize your Graphics settings.
2. Update Windows 10
Press Start
Select Settings
The cogwheel-shaped button
Select Update & Security
Click on Check for Updates
If updates are already pending, select Download now
Normally, any Nvidiadriver updates should also come with any Windows 10 updates you perform. However, if this doesn’t happen, you can manually update them by following these steps:
Press Windows + X
Select Device Manager
Expand the Display Adapters tree
Right-click your Nvidia GPU
Select Update Driver
4. Download the Nvidia DCH driver
Perform an Advanced Search on Nvidia’s website and download the DCH version of the driver that you need. This component is just like the standard driver, just that it no longer includes the Nvidia Control panel.
[…] the NVIDIA Control Panel is no longer included in the base DCH driver package and is instead distributed exclusively through the Microsoft Store and seamlessly installed following the completion of the NVIDIAdriver installation.
As such, download and install the appropriate driver, then simply reboot the PC and try installing the Nvidia Control Panel from the Microsoft Store again.
By following the steps listed above, you should no longer have any issues with downloading and installing the Nvidia Control Panel from the Microsoft Store.
Some HP printer users have posted on support forums about an ERROR:/.SFCompactDisplay-Heavy error. That error message appears on the printers’ status displays. As a consequence, users can’t print documents. If you need to fix that error, check out of the potential resolutions for it below.
This is how you can fix ERROR:/.SFCompactDisplay-Heavy
1. Reset the printer
First, try resetting the HP printer with a hard reset.
Turn on the printer if it’s off.
Then unplug the power cable from the printer and wall.
Wait a few minutes. Plug the power cable back into the wall.
Connect the power cable with the back of the printer.
Turn the printer back on.
Thereafter, run a test print after the printer’s warm-up period.
2. Update the printer’s firmware
ERROR:/.SFCompactDisplay-Heavy can be due to outdated printer firmware.
Thereafter, the software will detect any printer errors and display its findings. Go through the software’s guidelines to resolve any detected errors.
Those are a few resolutions that might fix this error for most users. For further fixes, you can get in touch with an HP customer support agent with an HP Customer Support account.
If you know of any other fix for this issue that we may have missed out on, leave us a message in the comments section below.
If your POP3 server or mail server is not configured properly, you may encounter the Windows Live Mail 0x800CCC90 error. The issue can be with your mail server or the mail client files may have been corrupted.
Several users have reported similar errors in the Microsoft community as well:
My husbands Windows Live Mail keeps showing this error message. ‘Unable to send or receive messages for the *** ***** account
An incorrect password was entered
The next time you send or receive messages, you’ll be asked to enter your user name and password for this account
Server error :0x800CCC90
If you are also troubled by this error, here are a couple of troubleshooting tips to help you resolve Windows Live Mail 0x800CCC90 error in no time.
How do I fix Windows Live Mail 0x800CCC90 error?
1. Delete multiple accounts
Start the Windows Live Mail client.
Open the account you want to remove.
Right-click on its header and select Remove Account from the context menu.
A pop-up will appear asking to confirm the action.
Click on Yes to remove the account.
Now repeat the steps with all the accounts but the one you use primarily.
Close and launch the app again. Try accessing the account and check for any improvements.
2. Change Internet Options settings
Press Windows Key + R to open Run.
Type control and click OK open the Control Panel.
Click on Network and Internet.
Select Internet Options.
On the Internet Properties window, open the Security tab.
Select Trusted Sites under Select a zone to view or change security settings.
Click on the Sites button.
In the Trusted Sites window, add your URL with a wild card.
Uncheck Require server verification (https:) for all the sites in this zone box.
Click OK to save the changes.
Start the Windows Live Mail app and add the account and check for any improvements.
On Control Panel, go to Programs > Programs and Features.
Select Windows Essentials or Windows Live Mail if you have installed the app manually.
Click on Change/Uninstall.
This will open the Windows Live Mail repair tool and uninstaller.
Click on the Repair all Windows Live Program option.
Windows will now scan the Windows Live Mail files and try to repair them if required.
Once the repair is done, close the Control Panel and start the email client. Check if the Windows Live Mail 0x800CCC90 error is resolved.
The Windows Live Mail 0x800CCC90 error usually occurs due to incorrect configuration or if the Windows Live Mail client is corrupted. Follow all the steps in this article to resolve the issue.
If you know of any other way to solve this problem, share it in the comments section below so that other users can try it, as well.
The second round of Patch Tuesday updates hit live last week, and it brought mostly fixes to all versions of Windows 10. However, not everything went ll that well. It seems that one particular KB, namely KB4524244 has been causing plenty of issues with a variety of system features.
KB4524244 was supposed to fix issues with the UEFI boot manager, but for many people, the patch had problems during installation, and for others, it led to system freezes.
In fact, the problems were so great, both in terms of severity and how often they occurred, that Microsoft decided to pull back KB4524244 altogether.
This standalone security update has been removed due to an issue affecting a subset of devices. It will not be re-offered from Windows Update, Windows Server Update Services (WSUS) or Microsoft Update Catalog. Note: Removal of this standalone security update does not affect successful installation or any changes within any other February 11, 2020 security updates, including Latest Cumulative Update (LCU), Monthly Rollup or Security Only update.
This happens to be the same page that once held KB4524244’s changelog, but has since been updated to reflect the current changes.
More so, Microsoft stated that it will not be reintroduced through any of the conventional update methods, including:
Windows Update
Windows Server Update Services
Microsoft Update Catalog
As an added measure, the page also provides a step-by-step guide on how to remove KB4524244 for those that have already installed it.
Thankfully enough, there is nothing special about uninstalling this particular update. Simply visit the Control Panel and navigate to Installed Updates where all other updates will be listed. You then just search for KB4524244 and choose to uninstall it.
Microsoft also added that an improved version of this cumulative update will be available soon. However, no specific launch date was given yet.
What’s your take on Microsoft’s decision to remove a troublesome cumulative build? Share your thoughts in the comments section below and we’ll continue the talk.
At the end of last month, Microsoft quietly announced that they would sunset their Ad Monetization Platform for UWP apps on June 1, 2020. It’s safe to say that the news took UWP developers by surprise, especially since Microsoft didn’t provide a decent alternative except for developers looking to monetize their apps with ads.
Well, Sam Kaufmann, developer and CEO of Random Salad Games is stepping up with the launch of his own ad network named Pubfinity. Kaufman has some expertise about app monetization through ads as his company published various ad-supported casual games on the Microsoft Store over the years such as the popular Simple Solitaire.
Speaking with CNBC, Kaufman explained that his company is already using Pubfinity for their in-house games. Moreover, Kaufman said that he saw it coming that Microsoft would soon shut down its Ad Monetization Platform for UWP apps due to a general lack of interest in the Microsoft Store. Work on the Pubfinity SDK started months ahead of Microsoft’s announcement, Kaufmann said.
“My immediate need was to monetize my own apps,” said Kaufmann, adding that “the ultimate goal is to position Pubfinity as a replacement for the Microsoft SDK going away.” For now, Kaufmann is willing to let select developers of high-quality apps and games use Pubfinity before making the SDK accessible to all. “We’ll have a very strict review process,” he said. “We want it to be an improvement and make it a place where developers can make money but not sacrifice the quality of their offerings.”
It’s worth reminding that app developers still have other ways to monetize their apps on the Microsoft Store, including in-app purchases and subscriptions. Most app developers apparently prefer these alternative solutions, which are said to be more effective than banner promotions.
Four games are leaving Xbox Game Pass soon, including the Square Enix titles Just Cause 4 and Rise of the Tomb Raider. Shadow of the Tomb Raider, the sequel to Rise of the Tomb Raider also left Xbox Game Pass earlier this month, and that will soon leave just Tomb Raider: Definitive Edition in the catalog.
Just Cause 3 will also remain available with Xbox Game Pass for console for now, along with many other Square Enix games including Life is Strange 2, Deus Ex: Mankind Divided, or the freshly-added Final Fantasy XV. The removal of Rise of the Tomb Raider is a bit more curious as the game was actually co-published by Xbox Game Studios, and it was also a timed exclusive when it launched on Xbox One and Xbox 360 back in November 2015.
The two other games announced as “leaving soon” in the Xbox Game Pass mobile app are Batman: Return to Arkham and the Xbox Play Anywhere title Snake Pass. We remind you that you can take advantage of exclusive member discounts on all games before they leave the catalog.
When you’re getting close to an important meeting at work or just planning an important event, things can get messy. From looking for emails, meetings, schedules, important documents, and more, you’ll need to dive through various menus and places across Outlook to find it all. Well, with Outlook Spaces, Microsoft is looking to change that, and give you one central hub for all things Outlook. Here’s a hands-on look at the experience.
Getting Started
It’s important to note that Outlook Spaces hasn’t officially yet launched yet. This experience is still a work-in-progress, but thanks to a tip from Microsoft leaker WalkingCat, we were able to get it working, and you can too. We won’t get into the technicalities here, but it involves opening the developer menu in your web browser and adding a line of code. Check out WalkingCat’s tweet for more.
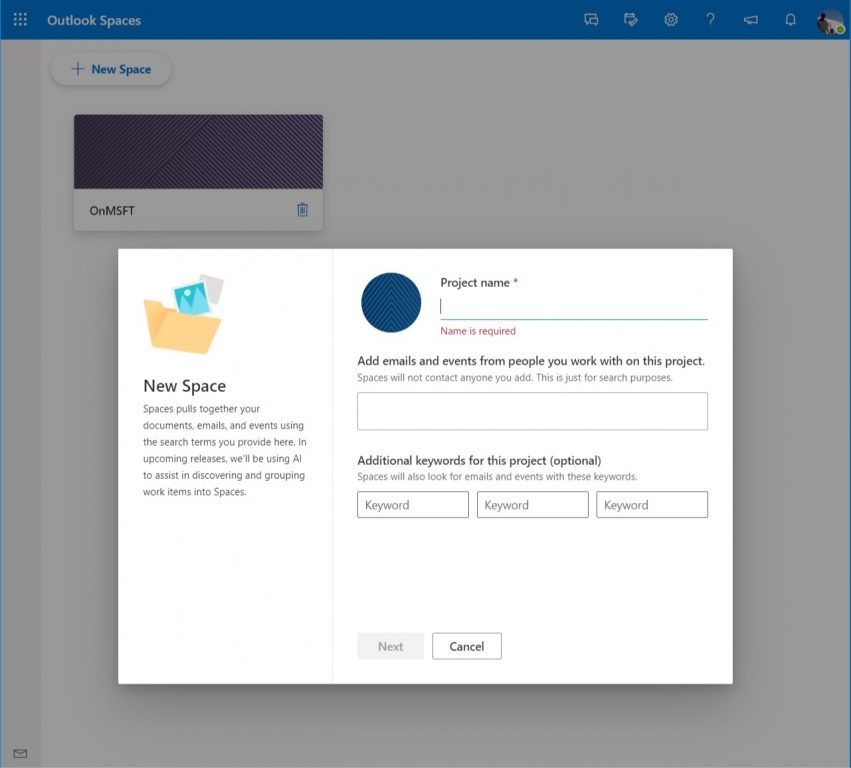
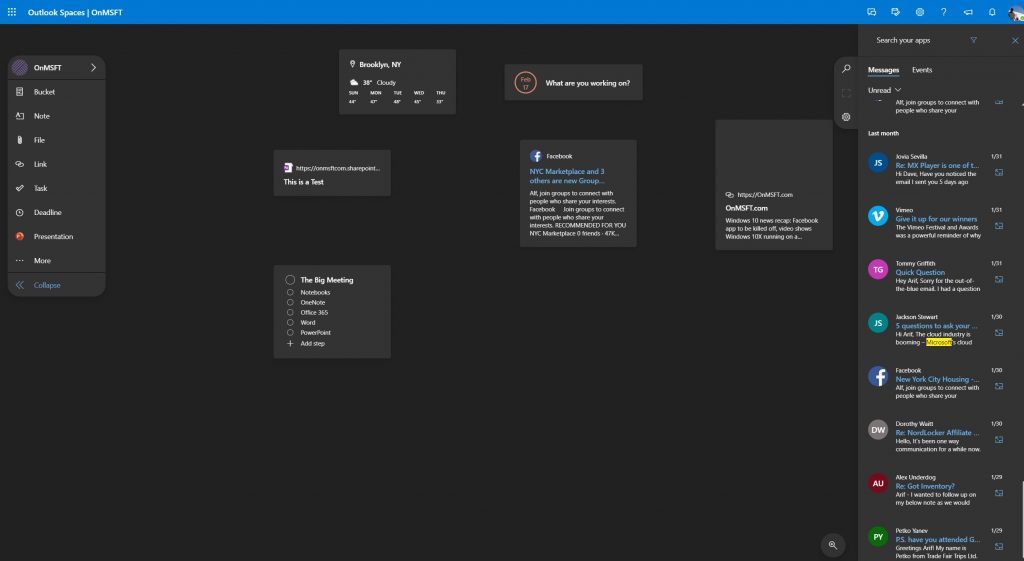
Anyway, once you enable the experience, you’ll get greeted with the main page, and a video explaining how things work. You can then create your new space with the “New Space” button on the top left corner of the screen. You’ll be able to name your project, and add emails and events from Outlook into the project. You also can add certain keyboards to help Outlook Spaces find the right emails and events for your new project.
If you’re someone that likes dark mode, you also can turn on the dark mode for Outlook Spaces by clicking the settings icon at the top right corner of the screen. You’ll then want to click the toggle switch for Dark mode. It will make everything a bit easier to read.
The Project Space
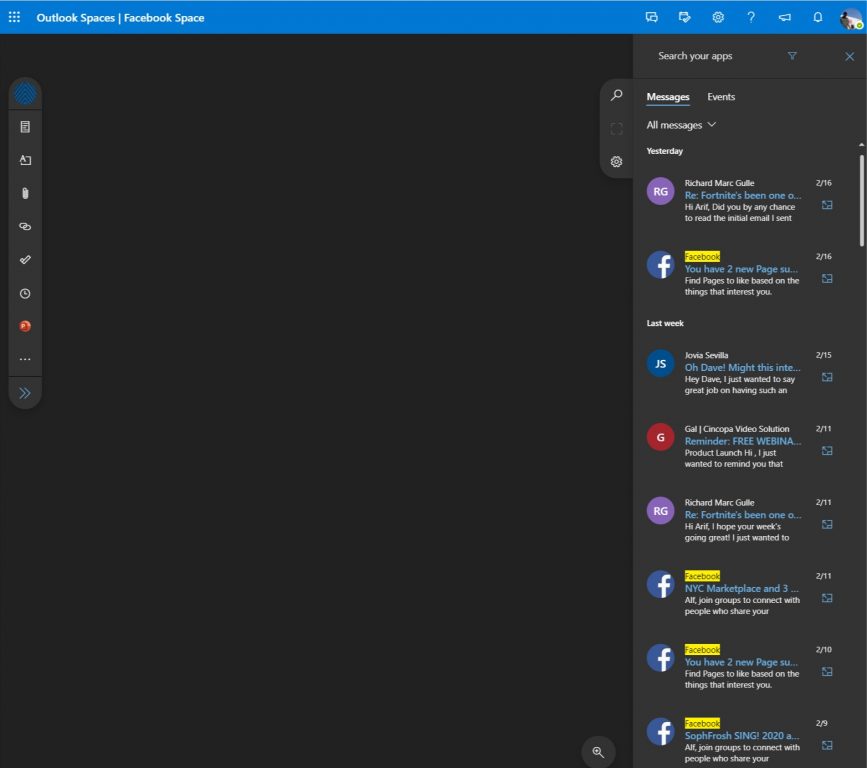
Once you create your project, you’ll be greeted with a new project space. This is the canvas area where you’ll be working in Outlook Spaces. By default, you’ll see a bar open up on the right side on the screen. This bar has tabs for you to see your messages and events from Outlook. You can click on any message or event and drag it out into the open project space on to the left of the bar. Once you do that, you can collapse the bar by pressing the magnifying glass. If you need to change the project space or search for more content, you can click the magnifying glass or the settings gear.
Adding content to your Project Space
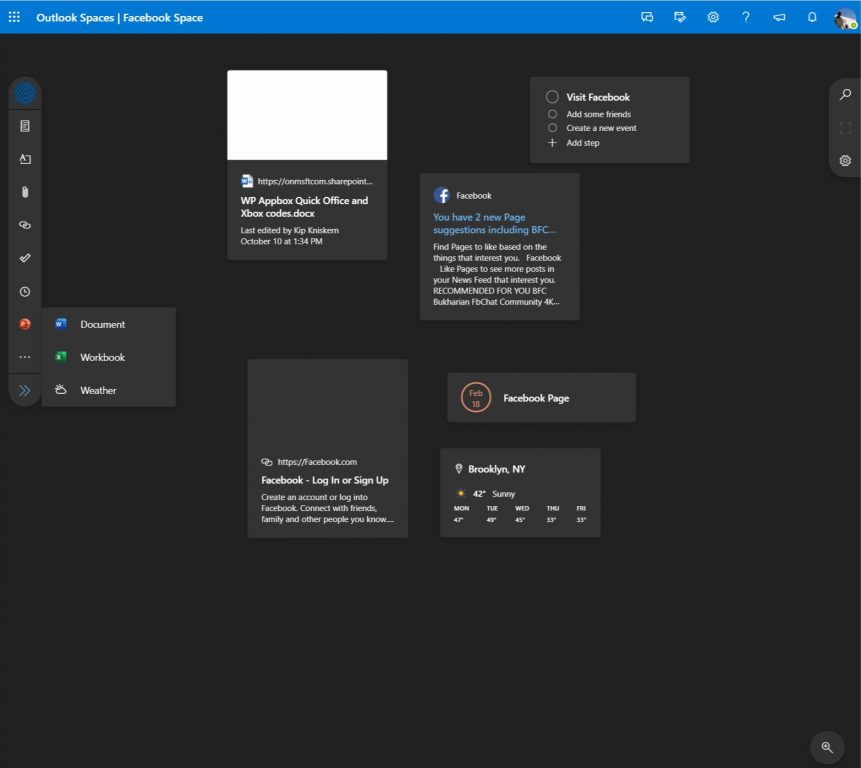
Emails and events are not the only things you can add to a project space in Outlook Spaces. As we hinted before, you also can add other items from across Outlook and Office 365 so you can have one hub for all things related to your important email or event. You can add these items with the menu running along the left side of the screen.
The top of the menu is home to the switcher for your project spaces. If you click it, you’ll be able to switch between spaces or create a new one. Under that, are the other items you can add to your space. Some of these aren’t yet available yet, such as Bucket, Presentation, Document or Workbook. However, the bulk of the experience is there. You’ll be able to add things such as Notes, Files, Links, Tasks, Deadlines, or even the Weather. Once you create any of these items, you can drag them around the space as needed. You also can zoom in or out with the magnifying glass at the bottom of the screen.
A nifty experience
Microsoft has yet to announce Outlook Spaces, but this experience is quite nifty. But it is not to be confused with Windows Live Spaces, Microsoft’s old blogging and social networking platform. It’s a lot like a version of Trello, mixed with the Dashboard in MacOS or sidebar gadgets in Windows 7 and Vista. You’re able to create mini representations of important things from your Outlook inbox, drag it around, and have everything you need in one, clean, and easy to understand space. We’ll be keeping an eye on this, and will update you once Outlook Spaces officially launches. But, for now, we’re fairly impressed.
However, after three years of steady refinement and improvement in the category sector, Microsoft may be in dire need of tweaks to its quality control processes as users of its Surface Laptop 3 model are reporting issues of “cracking” screens as of late.
Brought to our attention by Rafael Rivera on Twitter, it seems Reddit threads within the Microsoft and Surface communities are filling up with complaints about Surface Laptop 3 screens cracking.
Bunch of reports coming in of spontaneously cracking Surface Laptop 3 screens. No warranty coverage or acknowledgement yet.????
As of now, there hasn’t been an official word from Microsoft regarding warranties, recalls or replacement procedures. Victims in the Reddit threads are filling them in with anecdotal experiences ranging from having the whole computer comp’d to arguing for extended warranties. There doesn’t appear to be a clear method to addressing the issue with Microsoft right now, but we’ll update if things change.
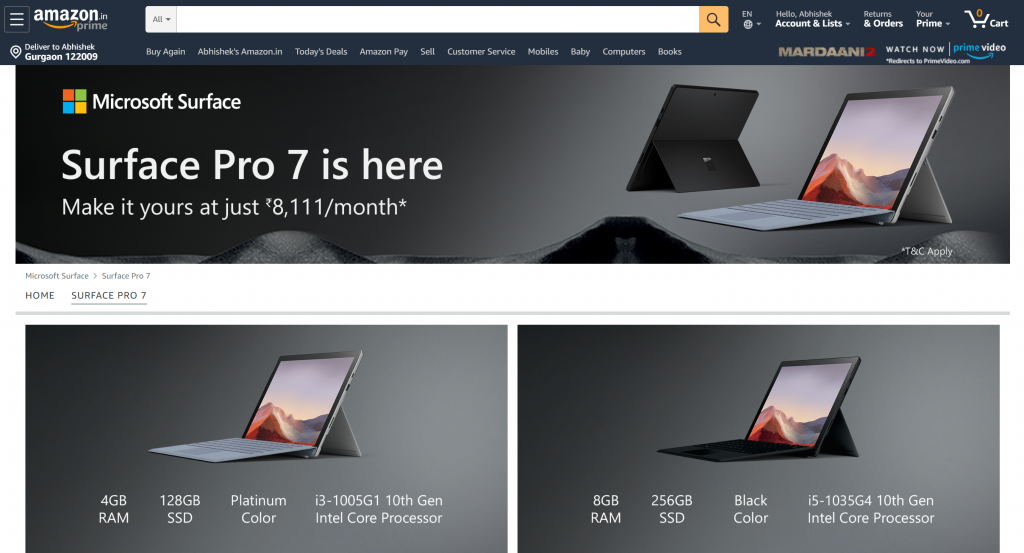
The new Surface Pro 7 devices have gone on sale in India.
A Microsoft India spokesperson responded to my query and informed me that there will be a broader announcement about the same soon, and the accessories that are listed but not available at the moment, will soon be available.
It’s likely that the official launch announcement is made on the sidelines of Microsoft’s Future Decoded summit that will be held next week in Mumbai and Bengaluru in India. Microsoft CEO Satya Nadella will be in both the cities for delivering the keynote. [UPDATE: I’ve now learned that the device will definitely not be launched at the summit but at a later date.]
The Surface Pro 7 portfolio is available for purchase on both Amazon and Flipkart. Both Amazon and Flipkart offer no-cost EMIs for purchasing Surface devices available via a variety of credit/debit cards. Of course, once officially launched, the Surface Pro 7 will also be available at offline stores that already sell Surface devices.
From the listings, it is apparent that Surface Pro 7 in India will be available starting at ₹70,990 ($994) in the following configurations:
4GB/128GB – 10th Gen Intel Core i3
8GB/128GB – 10th Gen Intel Core i5
8GB/256GB – 10th Gen Intel Core i5
16GB/256GB – 10th Gen Intel Core i7
The devices will be available in both Platinum and Matte Black color variants. The only new Type Cover listed is the Surface Pro 7 Signature Type Cover (priced at ₹14,999). Amongst the accessories, both Surface Pen and Surface Arc Mouse along with the dock, power supply, and adapters are available – although, these have been available already for the previous generation devices.
Microsoft’s now discontinued but popular email client, Windows Live Mail, has an annoying issue that results in the client creating duplicate folders and emails for Sent Items, Drafts, Deleted Items, and Junk Emails.
So, if you’re wondering how to remove Windows Live Mail duplicate folders and emails, then you’ve come to the right place.
This issue occurs because the Windows Live Mail client automatically creates special folders to store emails on the mail server, which leads to duplication issues.
If you are troubled by this issue and want to get rid of duplicate folders and emails, here is how to do it.
How can I remove Live Mail duplicate folders and emails?
1. Manually delete duplicate folders
Start Windows Live Mail client if not running already.
Right-click on the email account header and select Properties.
In the Properties window, open the IMAP tab.
Uncheck Store special folders on IMAP server option under the Special Folders section.
Click OK to save the changes. You will be prompted to Refresh the folder, click on Yes.
Windows Live Mail will take a few minutes to download and refreshing the folders list.
Now that you have disabled the Special Folders feature, it is time to delete the existing duplicate folders manually.
Under your email account, right-click on each duplicate folder one by one and click on Delete.
Do it for all the duplicate folders and you are done. Windows Live Mail will not create duplicate folders again until you enable the Special Folder feature again.
2. Check system date and time
Right-click on the Time and Date option on the Taskbar.
Select Adjust Time/Date option from the context menu.
In the Date and Time window, check if the date and time is set correctly.
If not, turn off Set time automatically and Set time zone automatically option.
Click the Change button under Set the date and time manually.
Click on Change to save the changes.
Make sure you turn on Set time automatically and Set time zone automatically option again and close the Settings window.
Start Windows Live Mail and check for any improvements.
Open File Explorer and navigate to the following location: C:Users<your username>AppDataLocalMicrosoftWindows Live Mail
Copy all the files in the location and paste it in a separate folder as a backup.
Now delete all the files in the Windows Live Mail folder.
Delete the following Windows Live Mail program related files: Mail.MSMessageStore edb.chk ebd*.txt edb*.jrs Mail.pat oeconfig RssFeeds XML tmp.edb WindowsLiveMail.txt
3.2 Import sorted mail
Start Windows Live Mail. The app will create all the necessary files and folders that were deleted in the earlier steps.
Click the Tools icon and select Import Messages. Or Click File > Import Messages.
Select Windows Live Mail in the new window and click Next.
Click the Browse button and navigate to the Messages folder. Select the folder and click OK.
Select All folders and then click Next.
Click Finish to import all the emails.
The Windows Live Mail duplicate folders and email issues occur if you have the Special Folder feature enabled. By following the steps in this article, you can fix the problem with ease.
Don’t forget to leave any other questions or suggestions that you may have in the comments section below.
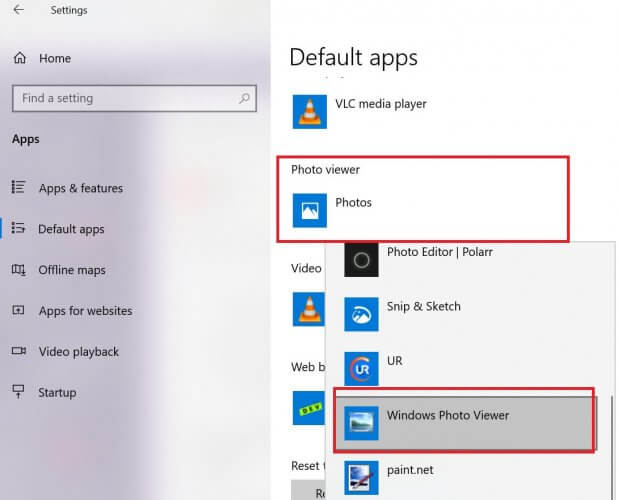
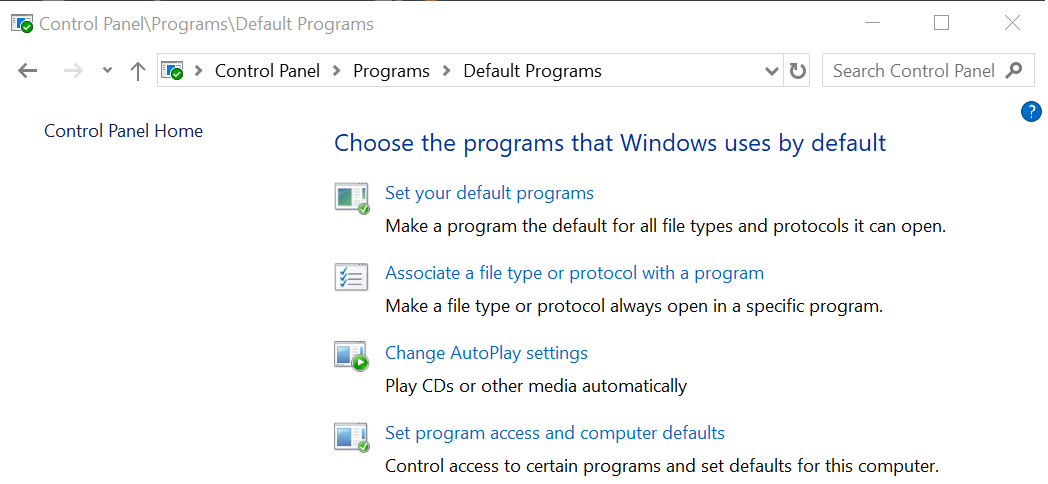
The newer version of Windows comes with Photos, a built-in photo editor and viewer app for Windows 10. With that, Microsoft Photos app has replaced the popular Picture Manager app that came bundled with the older version of Microsoft Office.
Microsoft does not include the Picture Manager app with Office 2013 and later versions. However, the users can still download and install the Picture Manager app manually from the official sources.
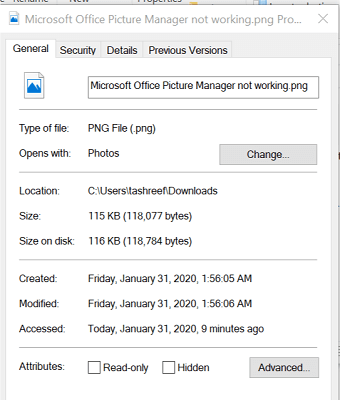
That said, some users who had downloaded and installed the app are unable to set Microsoft Office picture manager as default in Windows 10.
In this article, we show you how to set Microsoft Office Picture Manager as default in Windows 10 to view and edit your photos and reason why you are unable to set it as default.
Why I can’t set Picture Manager as default in Windows 10?
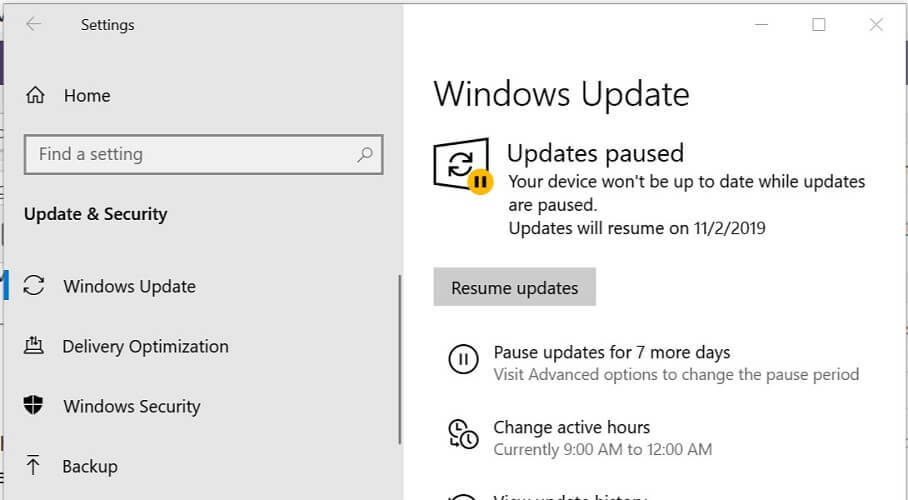
File association issues were reported with an older version of the Windows 10 release. Since then Microsoft has released an update to fix the problem. Try to update your Windows computer to the latest available version and check for any improvements.
By following these steps you can set Microsoft Office Picture Manager as default in Windows 10. Make sure you install all the pending Windows updates to fix any issues that may occur due to bugs in the Windows release.
For what seems like forever, PowerShell has been your rock to get the job done. That’s why you’re surprised to see that the PowerShell module you’re working on cannot be loaded.
To deal with this issue, be sure there is more than one solution available. Keep reading the lines below and check out three quick ways you can make your PowerShell module easily load again.
What can I do when the PowerShell module cannot be loaded?
1. Set Execution Policy to Unrestricted
Select Start > All Programs > Windows PowerShell version > Windows PowerShell.
Type Set-ExecutionPolicy Unrestricted to set the policy to Unrestricted.
The system will prompt to confirm the change. Enter the letter Y or press the Enter key to change the execution policy setting.
To verify that the execution policy has been configured correctly, type Get-ExecutionPolicy.
If you get back the following value RemoteSigned, then type Exit.
While rolling up your sleeves to prepare for the worst is certainly one way to go about it, there are easier ways to handle this problem. A simple command to set the Execution Policy to Unrestricted could fix the error.
Do keep in mind that this makes unsigned scripts free to run. Therefore, there is a high risk of running malicious scripts at a certain point.
2. Set Execution Policy to RemoteSigned
Remember that PowerShell‘s Execution Policy settings dictate what PowerShell scripts can run on a Windows system. If setting it to Unrestricted seems a bit too much for you, there is another less restrictive option that allows PowerShell modules to load properly.
In the PowerShell window, you need to set the Execution Policy using the Set-ExecutionPolicy RemoteSigned command this time. Instead of not getting prompted to confirm the installation of every module out there, you will need at least a digital signature from a trusted publisher.
This applies to all scripts and configuration files that are downloaded from the Internet. However, the rule doesn’t include scripts that are written on the local computer.
3. Remove the target from the adapter configuration
If your command is running on the local peer host where an adapter is enabled, another quick way to fix this is to remove the target from the adapter configuration and retry.
Do recall that the Powershell adapter cannot run as Local System. The peer with the adapter needs to run as a user with the ability to communicate externally and utilize a communication interface.
These are some of the potential resolutions that might fix this PowerShell module loading error for some users. You could also try to upgrade PowerShell to the newest version if nothing has changed after applying them
Don’t forget to leave any other questions or suggestions that you may have in the comments section below.
Outlook is a pretty versatile email and calendar app, but Microsoft is looking to make it more useful. Spotted by WalkingCat, Microsoft is working on a new “Outlook Spaces” experience for Outlook on the Web, which will help you organize your emails, meetings, and documents into one clean space.
This new experience is still a work-in-progress and is not yet easily accessible. Although Microsoft has yet to announce it, you can enable it in an Office 365 Outlook mailbox with a workaround, as noted by WalkingCat. It appears to be only available for Office 365 users, though, and doesn’t apply to those with Office 365 Personal or Home subscriptions.
Once enabled, Outlook Spaces can bring together most content from an Outlook mailbox into an area known as a “project space.” For instance, if you were getting ready for a big event at work, you can take a specific email that you were looking for and drag it into, and create a dedicated space for it. You can then add items relating to the event in the space, such as a checklist, notes, links, images, online events, and more. There even is an ability to insert word documents, notes, and deadlines. You even can input specific search terms to have the space organized around whatever you’re looking for.
Microsoft also promises that A.I. will be used in upcoming releases to help in discovering and grouping items into spaces. It’s not yet clear when this feature will roll out, but now that we’ve seen it in the light of day, it may be coming soon. We’ll stay on top of the news and will keep you updated.
If you find that you are not sure about how to redeem codes on the Arc game platform, your search is now over.
Being able to redeem the codes that the developer’s release can get you some really awesome perks. For this reason, it is very important to know how to do this.
Arc codes are unique sequences of numbers and letters that allow you to get access to cool in-game items. These codes are released on special occasions like game anniversaries and real-world holidays.
Beyond this, Arc codes allow you to gather even gold, which can be used in the Even Boutique to buy exclusive items.
In today’s how-to article, we will discuss how you can get access to these codes, and how to use them to get all the benefits. Read on to find out more.
Here’s how to redeem your codes on Arc
Where to find the Arc codes?
In order for you to be able to redeem the codes released by Arc on special occasions, you will first need to be able to have access to them.
The developers of Arc will use different mediums to release the codes. Here are some of them:
Press Enter to activate it and get access to cool items.
Conclusion
In today’s guide, we talked about the best methods to find the Arc codes, and also how to use them efficiently.
If you follow the steps presented to you in this list, you will never miss any codes released by the Arc developers, and you will surely get access to some awesome in-game items.
Please feel free to let us know if you found this guide helpful. You can contact us by simply leaving a comment in the section found below this article.
Nikon cameras use SD cards to read and write clicked pictures. But, sometimes, things don’t pan out as you want them to. Several users have reported their Nikoncamera is not reading the SD card.
Nikoncamera‘s issue with the SD card seems to be a common affair, and it affects the ability to store and transfer pictures. Fret not! The problem is easily fixable. Keep reading to find out.
What can I do if my Nikon camera is not reading the SD card?
Before we proceed, here are a few quick things to check:
Take the memory card out of the camera. Reinsert the SD card and make sure you are inserting it correctly. You should hear a click sound when the SD card is inserted.
Check if the company approves the SD card you are using.
Take out the memory card and check if the memory card’s contact pins are clean. Use a soft dry cloth to clean any dust, then reinsert the card and check for any improvements.
If none work, move to the fixes listed next.
1. Check and reformat the card
Tip
Before formatting the card, check if it works fine using a computer. Insert the card into a card reader of your laptop or external card reader and check if it is detected. And create a backup of the data in the card to your computer.
1.1 On the PC
Right-click on the SD card and select Format.
For the File system, select FAT, and click the Start button.
Once the format is complete, eject the SD card.
Insert it into your Nikoncamera and check if the camera can read the SD card.
That’s it! If formatting the SD card didn’t work, updating the camera’s firmware should get things up and running when your Nikon camera is not reading the SD card.
In Windows, there are multiple ways to remove apps. And speaking of which, many reported that uninstall-package is not working in PowerShell.
This command allows you to remove even system apps, and if it’s not working you won’t be able to debloat Windows or uninstall apps that are giving you trouble.
Luckily, there are few fixes that can help with this issue.
How do I force uninstall a program in PowerShell?
Start PowerShell as admin.
Run the command: Get-AppxPackage
Type the command and press Enter: Remove-AppxPackage <App Name>
What can I do if uninstall-package is not working in PowerShell?
1. Use the cmdlet called Uninstall-Package
Open PowerShell as administrator.
You have to get a list of the applications that are installed on the computer via the following command: Get-WmiObject -Class Win32_Product | Select-Object -Property Name
Then, map a variable to the application in question: $MyApp = Get-WmiObject -Class Win32_Product | Where-Object{$_.Name -eq "Free Tools"}
At this point, uninstalling by calling the Uninstall method usually works like a breeze: $MyApp.Uninstall()
If this doesn’t happen and you cannot find the app listed, use the Get-Package cmdlet instead. If you want to find the application named Camera, for example, enter this command: Get-Package -Provider Programs -IncludeWindowsInstaller -Name "Camera".
PowerShell will now be able to locate it. You can further use the cmdlet called Uninstall-Package. Broken down simply, you can get away with specifying the -Name parameter, followed by the package name most of the time.
2. Alternative PowerShell command to uninstall apps
NOTE
This is an advanced solution, and it requires a basic knowledge of PowerShell in order to be used properly.
Alternatively, you can create a PowerShell script using the same commands to automate the process.
Is Windows PowerShell unable to uninstall a certain program? We get your frustration, but let us offer this bit of wisdom. Some built-in apps are really integrated into the operating system and removing them will most likely cause more harm than good.
Your attempts eventually lead to getting the same message that reads This app is part of Windows and cannot be uninstalled on a per-user basis.
Windows 10 users are complaining about missing desktop files after installing this month’s Patch Tuesday
The latest Patch Tuesday update has been met with some complaints as users are complaining that some desktop files have gone missing.
Surface Book 3 and Surface Go 2 details leaked, along with news of springtime hardware event
Reports suggest that Microsoft is planning a Spring announcement event in New York to announce new Surface devices and discuss other Surface products. At the same time, details of a Surface Book 3 and Surface Go 2 have leaked. You can see the details here.
That’s it for this week. We will be back next week with more Windows 10 news.
Google Stadia is a cloud gaming service that is operated by Google. Because it is a cloud gaming service, you don’t need any additional hardware to play any of the games in the library.
Your only requirement in order to use the service is to have a stable Internet connection. However, you also need to use the Google Chrome web browser on desktop computers or have a Pixel smartphone, Chrome OS tablet, and Chromecast if you want to stream the service.
Since the second requirement is a must, your only variable in terms of what performance you will get remains your Internet connection.
Normally, if you are playing single-player games over Stadia, latency wouldn’t be that much of an issue. However, Stadia’s library also includes multi-player games, and any type of latency in these titles can mean the difference between winning or losing.
As such, connectivity may be a priority for some Google Stadia users. That is why we created this guide, to show you what you can do in order to maximize your connectivity.
How do I maximize my Google Stadia connectivity?
1. Choose Ethernet over Wi-Fi
No matter how good your Internet subscription plan is, there is always a major difference in terms of performance between an Ethernet connection and a Wi-Fi connection.
This is because Ethernet connections don’t suffer from any issue that may affect connectivity, such as the distance between devices, or interferences with other electronics.
Additionally, and the old router has decreased performance, while a cable will either deliver the same top-notch speed or not work at all.
If an Ethernet cable is not an option, but your router supports both a 2.4 GHz and a 5 GHz connection, always go for the 5 GHz one. Since not many household devices currently support 5 GHz connectivity, there is little chance that this channel will be occupied too much.
As such, always make sure that your Google Stadia Console is connected to the 5 GHz band.
3. Choose the Official Stadia Controller
As of now, the Stadia Controller is the only controller that is supported. While a mouse and keyboard input is possible, it was revealed that even they have more latency than the controller.
This is because unlike the other peripherals that could connect to a console that uses either a USB cable or Bluetooth, the Stadia Controller connects directly to the same Wi-Fi as the console.
4. Use the Nest Router’s Gaming mode
Google released a new line of specialized router called Nest, and they also include a built-in gaming mode called Gaming preferred mode. This is a very simple setting that simply sets the Google Stadia console as a priority over other devices in terms of connectivity.
Thus, even if the channel has many devices on it, the Stadia console will still get the best connection.
5. Manually set the Stadia console as a router priority
Not everyone can afford a Nest router, but that doesn’t mean that you have anything to worry about. Many other budget-friendly routers have a built-in priority setting inside.
Choosing this setting varies from one device to another, so make sure you check up on your device’s specifications to see if it has anything similar, and how to access it.
6. Enhance Wi-Fi signal with mesh systems
Since we already mentioned that Wi-Fi signals vary based on distance and obstacles, a good idea is to have a mesh Wi-Fi system spread throughout the house in order to provide a stable connection everywhere.
7. Lower the video quality
In normal gaming, lowering the video quality means the game will look bad because of bad textures, lack of shadows and bad lighting. However, In Google Stadia this simply means that the streaming quality is lowered.
Thus, instead of streaming 4K gaming at the cost of around 20 GB/h, you will only be streaming at 720p for only 4.5 GB/h. This setting is also extremely useful if you have a limited monthly data plan.
If you choose Chromecast to use Google Stadia via a Smart TV, try activating the device’s Game Mode. This will reduce image enhancement in order to provide a better and smoother framerate.
Note: Not all TVs have this option, so check up on your device’s specs to see whether this is a good option or not.
Closing thoughts
By following these steps, you should be able to get a better connection to your Google Stadia console. While some of these solutions do involve a bit of an investment, it is definitely worth it if you truly value a high-quality gaming experience.
How do you improve your connectivity to Google Stadia? Let us know by leaving a message in the comments section below.
One of the best ways an IT Administrator can organize your company’s users, computers and more is through the use of an Active Directory. It organizes your company’s complete hierarchy from which computers belong on which network.
This ranges from meaningless things such as what your profile picture looks like to more complex matters such as which users have access to a certain file.
However, things don’t always go as planned with Active Directories, as some users have reported having issues with certain folder replications:
In my company’s AD, we have three DC’s (two in 2008R2 standard, one in 2012R2 standard core).
I’ve found that NETLOGON folder content is not replicated correctly across them
Thankfully enough, users went into further details as to how the issue manifested itself, and a solution was quickly figured out. If you too are having similar issues, continue reading the article below for a step-by-step guide on how to fix the issue.
How do I make the NETLOGON folder replicate properly?
You first have to identify which folder has the latest contents, or which folder which has scripts that run without issues.
You then take that Domain Components and declare it as Master while the other Domain Components are declared as Slaves, and then you just program a replication from Master to Slave.
In the ADSIEDIT.MSC tool modify the following distinguished name (DN) value and attribute on each of the domain controllers that you want to make non-authoritative:
CN=SYSVOL Subscription
CN=Domain System Volume
CN=DFSR-LocalSettings
CN=<the server name>
OU=Domain Controllers
DC=<domain>
msDFSR-Enabled=FALSE
1.1 Force Active Directory replication throughout the domain.
Run the following command from an elevated command prompt on the same servers that you set as non-authoritative:
DFSRDIAG POLLAD
You will see Event ID 4114 in the DFSR event log indicating SYSVOL is no longer being replicated.
On the same DN from Step 1, set:
msDFSR-Enabled=TRUE
1.2 Force Active Directory replication throughout the domain.
Run the following command from an elevated command prompt on the same servers that you set as non-authoritative:
DFSRDIAG POLLAD
You will see Event ID 4614 and 4604 in the DFSR event log indicating SYSVOL has been initialized. That domain controller has now done a “D2” of SYSVOL.
In the ADSIEDIT.MSC tool, modify the following DN and two attributes on the domain controller you want to make authoritative:
CN=SYSVOL Subscription
CN=Domain System Volume
CN=DFSR-LocalSettings
CN=<the server name>
OU=Domain Controllers
DC=<domain>
msDFSR-Enabled=FALSE
msDFSR-options=1
Modify the following DN and single attribute on all other domain controllers in that domain:
CN=SYSVOL Subscription
CN=Domain System Volume
CN=DFSR-LocalSettings
CN=<each other server name>
OU=Domain Controllers,DC=<domain>
msDFSR-Enabled=FALSE
2.1 Force Active Directory replication throughout the domain and validate its success on all DCs
Start the DFSR service set as authoritative
You will see Event ID 4114 in the DFSR event log indicating SYSVOL is no longer being replicated
On the same DN from Step 1, set:
msDFSR-Enabled=TRUE
2.2 Force Active Directory replication throughout the domain and validate its success on all DCs
Run the following command from an elevated command prompt on the same server that you set as authoritative:
DFSRDIAG POLLAD
You will see Event ID 4602 in the DFSR event log indicating SYSVOL has been initialized.
That domain controller has now done a “D4” of SYSVOL.
Start the DFSR service on the other non-authoritative DCs.
You will see Event ID 4114 in the DFSR event log indicating SYSVOL is no longer being replicated on each of them
Modify the following DN and single attribute on all other domain controllers in that domain:
CN=SYSVOL Subscription
CN=Domain System Volume
CN=DFSR-LocalSettings
CN=<each other server name>
OU=Domain Controllers,DC=<domain>
msDFSR-Enabled=TRUE
Run the following command from an elevated command prompt on all non-authoritative DCs:
DFSRDIAG POLLAD
Conclusion
By following these steps you should be able to now make all folders withing the Active Directory’s Domain Components replicate themselves properly without any further issues.
Note: This guide is targeted towards those that have experience modifying Active Directory settings. If you are unsure how to follow these steps, better leave it to the experts.
If you have any further questions or know of a solution we may have missed out on, leave us a message in the comments section below.
Microsoft launched its Edge browser on January 15 to much fanfare, but it was still missing features like history syncing. Well, as the upcoming versions of the browser are still being beta tested, some users in the Canary channel can now enjoy the long-awaited extension syncing feature (via Windows Central.)
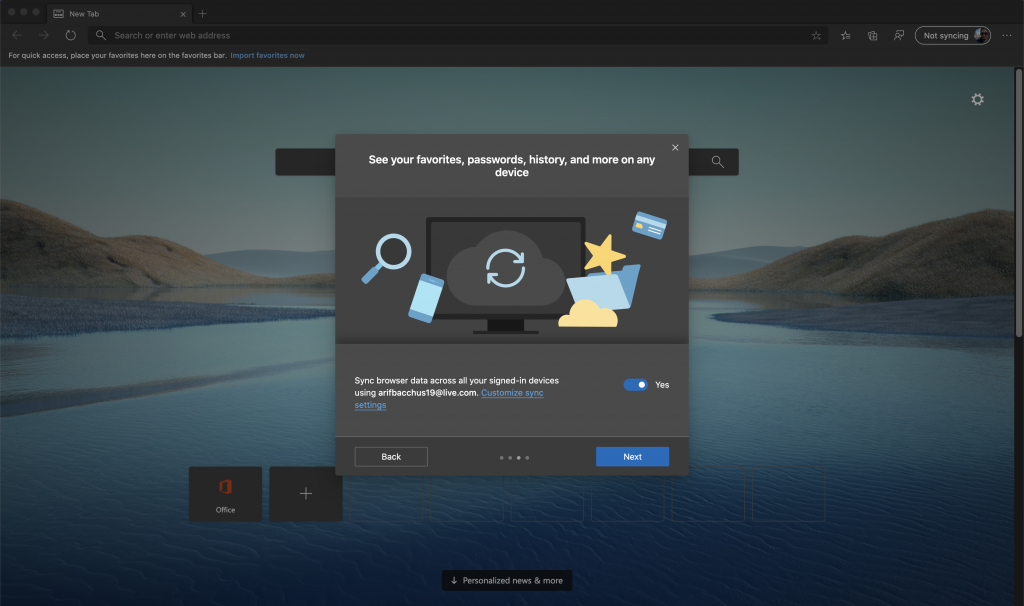
As reported by a user in the Microsoft Tech Community, this extension sync feature is now rolling out in version 82.0.424.0 of Edge Canary. The feature is apparently not available for everyone yet, though, as we’re not seeing it on our end. However, if available, you should get a pop-up “Sync Updates” image similar to the one below, telling you that you can now sync your extensions across your signed-in devices.
This extension sync feature will likely be appreciated for those who are using Microsoft Edge on multiple devices. It eliminates the need to manually downloaded extensions one by one every time you clean-install Edge on a new device.
Users of Edge in the Canary and Dev channel can also look forward to performance improvements too, thanks to new toolchain optimizations. Measuring Speedometer 2.0 in ten consecutive runs on Microsoft Edge 79, Microsoft claims Microsoft Edge build 81.0.389.0 on 64-bit Windows 10 measured an up to 13% performance improvement when compared to Microsoft Edge 79.
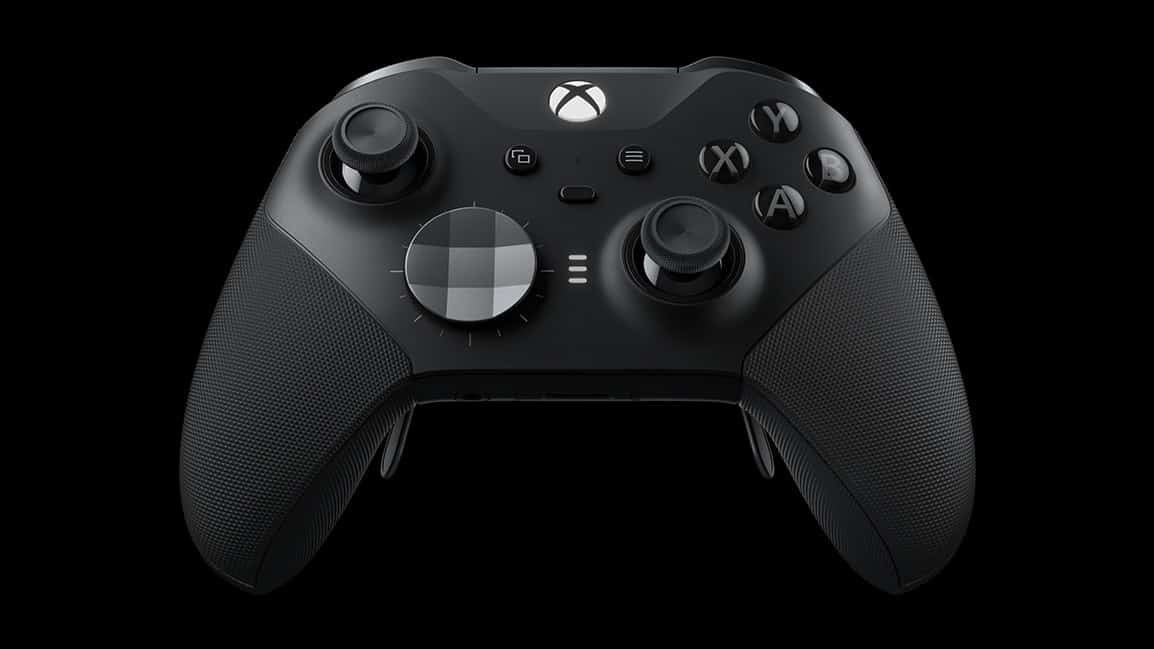
Microsoft’s new Xbox Elite Series 2 controller is a hit in the US according to new data from The NPD Group (via VentureBeat). Video Games Industry Analyst Mat Piscatella revealed today that the premium controller was the best-selling video game accessory in the US for the third month in a row. This a bit surprising considering the Nintendo Switch remains the best-selling console in the country, so you would think it would have the best selling accessories.
US NPD ACC & GC – The Xbox Elite Series 2 Wireless Controller was the best-selling video game accessory for the third consecutive month. With three months in market, It is the fifth fastest-selling video game accessory in U.S. history.
According to The NPD Group, the Xbox Elite Series 2 controller has already become the fifth-best selling accessory in the US after just 3 months in the market, with the Xbox 360 Kinect with Kinect Adventures remaining #1. At $180, the Xbox Elite Series 2 controller a bit more expensive than the first Xbox Elite controller, but there was clearly a demand for a revision. The latest iteration brought a refined designed with more customization options, Bluetooth support, as well as a built-in battery that can be recharged via a new USB-C port.
With Microsoft announcing last year that all existing Xbox accessories will continue to work on the next-gen Xbox Series X, the Xbox Elite Series 2 controller should continue to sell well in the coming months. Back in December, Microsoft did reveal that the next-gen Xbox will come with a slightly redesigned controller with a dedicated Sharing button, but the Xbox Elite Series 2 controller should remain great value thanks to its superior build quality and interchangeable components.
Ever since its unveiling at Build 2019, Microsoft has been on a journey to perfect the new Windows Terminal command-line app based on feedback from the community. It’s gone through many preview updates, and on February 13, Microsoft announced the last Windows Terminal preview before the v1 release.
With this release, there are quite a few tweaks that developers are likely to enjoy. To begin, the wt execution alias now supports command line arguments. According to Microsoft, this means developers can “launch Terminal with new tabs and panes split just how you like, with the profiles you like, starting in the directories you like.” In addition, this release makes it so that the Windows Terminal will now detect any version of PowerShell and automatically create a profile for you. Finally, there is a new global setting that will allow you to hide the “Close All Tabs” confirmation dialog.
Along with the above new features, this release also has some other improvements. Developers can now navigate word-by-word using Narrator, and can also drag and drop a file into the Terminal to have the file path printed. Other bug fixes and improvements are seen below.
Ctrl+Ins and Shift+Ins are bound by default to copy and paste respectively
You can now hold Shift and click to expand your selection
VS Code keys used for key bindings are now supported
Terminal won’t crash when Narrator is running
Terminal won’t crash when you provide an invalid background image or icon path
Our popup dialogs all now have rounded buttons
The search box now works properly in high contrast
Some ligatures will render more correctly
The news about this preview means that Microsoft is close to its original promise of launching the Windows Terminal application around the first half of 2020. The company originally mentioned that it might come around February or March, and that timing is now here.
As fun as it might be for fans to pitch conspiracy theories about how Microsoft and Sony are in a game of cat-and-mouse regarding next-gen console pricing, the reality may be a bit blander.
Scarce components have pushed the manufacturing costs for Sony Corp.’s next PlayStation to around $450 per unit, forcing a difficult price-setting decision in its battle with Microsoft Corp., according to people with knowledge of the matter.
Sony’s biggest pricing issues comes as the company attempts to procure a sustainable supply of memory for the console, specifically NAND and DRAM components. Unfortunately, for console makers, not only are high-end laptops encroaching on memory demand, but companies such as Samsung are putting in massive orders of RAM requests for their flagship phones.
Individuals familiar with the matter have voiced dueling opinions on whether or not Sony should attempt to undercut Microsoft again this console generation. Game staff within Sony have pitched the position that “it should sell the new console at a loss if necessary to match Microsoft’s price,” meanwhile other Sony executives would “prefer to make money,” as it did the last generation, right off the bat.
While component sourcing and price management isn’t unique to Sony this time around, there are some things the company is splurging on that may have its PS5 production in a bit more of a bind than Microsoft’s Xbox Series X. This time around Sony is opting for a more elaborate cooling system that is “unusually” pricer at a few dollars per unit rather than the under one dollar price from prior productions. Sony is also looking to release a follow up to its PlayStation VR which may also eat into component pricing with both products being in the market at roughly the same time.
Regardless of the component issue, Sony is scheduled to release some sort of guidance on its games division to board members sometime around the end of April, which will presumably include revenue based on pricing and sunk-costs calculations. On the other side of the globe, Microsoft is expected to do an official unveiling of the Xbox Series X at E3 2020 in June and fans should expect to see prices listed during the event.
With two months between Sony’s gaming guidance and Microsoft’s expected price reveal, the PlayStation team will have its work cut out for itself as it attempts to balance the bill of materials alongside the number of units produced, all while trying to be competitive with whatever price Microsoft throws against the wall.
Microsoft is working on a strategy to create a separate business unit within large IT companies in India to accelerate its India business, Economic Times reports.
Called the ITeS 360 solution, the business unit helps in selling the entire stack of Microsoft offerings ranging from AI solutions to business applications to Indian multi-national corporations spread across the globe. The resident business unit leader will ensure that the local Microsoft office in that particular location works with the organization in rolling out the solution.
Microsoft India president Anant Maheshwari told ET that this was part of the ‘One Microsoft’ strategy, which was a brainchild of Satya Nadella. This is a major overhaul in terms of strategy, under which the local Microsoft official would only be concerned with sales at the India operations.
Tata Consultancy Services (TCS) and HCL Technologies, two of the top IT companies in India, have already partnered with Microsoft on this initiative.
“(The Indian) IT (industry) is today roughly a $180 billion industry. There is a significant value that they can provide in driving cloud solutions as part of this $180 billion. That’s what they’re doing when they go and drive digital transformation in different parts of the world. They need cloud solutions and Microsoft is able to provide them with not just cloud solutions, but also with very significant value adds like data, artificial intelligence, modern workplace solutions like business applications, etc.”
– Anant Maheshwari, President, Microsoft India
Microsoft Azure is on a high growth clip in the country, has and Maheshwari claims that it has nearly “doubled” in 2019, and Microsoft is the number one cloud player in the country. The company is now moving forward to deploying new business models in India like ITeS 360.
Your AOL account is an important tool when it comes to work and career, and you want to have the best looking profile possible. Incase you’re wondering on the steps to edit my AOL profile, we have listed them. You can easily change your AOL profile if you need an update, or if you realized you made a mistake.
Steps in editing my AOL profile
It is actually quite easy to change your profile in AOL. Let us look at the steps to do so. But first, you need to log in to your account in AOL.
Go to settings
Once you are logged in, click on the “Options” button that is found at the upper right corner of your screen. And then choose the option “Mail Settings”.
Change your personal information
Under the Mail Settings you will find three options, and the first one is “Personal Info”. In this page you can change your nickname, first name, last name, and gender. And you do have an option not to disclose your gender, though you absolutely need to fill in your name information.
Modify your account security
After you have modified your personal information, you can proceed to the next tab which is “Account Security”. In this page you can change your password to something more secure and hard to guess by other people. You also have the option to update your phone number, and you have the view of your email address. In here you can change your verification process and have the option to allow or not allow apps that offer low security in logging in.
Save your profile changes
Now that you are done updating your personal information and security options, you must save your changes. Simply click on the save button and wait for the saving to complete, and then you’re good to go.
Changing my AOL profile picture
If updating your information isn’t enough, you can change your photo before you close the mail settings.
Photo requirements
Before you upload a new photo, you need to know the photo requirements first. AOL does not accept all kinds of photo. You can only upload the photo in the following image requirements:
5MB max image file size
File format of .jpg, .jpeg, or .png
192 x 192 min image resolution size
Click on your photo section
A key part of editing my AOL profile is changing the photo. To change your photo,
Click on mail settings
Go to the personal information section. You will find a camera image circle if there is no photo yet. Or you can see your own image if you have uploaded a photo already.
Click on that photo option
Upload your new photo.
Just make sure that you follow the exact requirements for an image before you upload. Choose a recent photo of yours, though you can also upload an image of a landscape, animal, or anything else you like. But refrain from using another person’s photo.
Once you have uploaded your new photo on your AOL profile, you can edit the image by simply rotating it or cropping it to your liking.
And then the last step is to save your changes. Log out of your account, and log back in to check if the new changes took effect.
Note: It is possible that you will be prompted to key in the answer to your Account Security Question. This could happen once you try to change your profile name, or change your profile photo.
This new edition contains the full base game of The Division 2 and also comes with the new Warlords of New York expansion which will unlock on March 3rd. The Warlords of New York content expands the main game significantly with new story content, missions, weapons, and more.
Those who buy the Warlords of New York Edition of The Division 2 before April 3rd will also receive a level 40 weapon and a special outfit.
New players uninterested in the New York content may want to check out the vanilla version of The Division 2 which is now selling for a ridiculous $2.99 on Xbox One for the next 10 days. That’s a whopping 95% off. Note that The Division 2: Warlords of New York Edition is also selling with its own discount right now with 45% off its usual price those who think they may want the content in the future should at least consider buying this new version.
During the latest Microsoft 365 Developer Day, a lot came out about how the company’s futuristic operating system will function on dual-screen devices. It emerged that Windows 10X updates will be superfast, taking less than 90 seconds to complete.
How Microsoft pulls it off
Windows 10X sports a superior architecture that facilitates a smooth and quick upgrade process. Windows 10 updates, which are way too slow, are delivered differently.
According to Microsoft, separation makes a critical difference here. That is why its upcoming OS puts apps, drivers, and system files in separate containers. As such, Windows 10X has a high level of autonomy that shields its files and data from external interference.
Similarly, the OS hosts the Win32 container, which also has a reasonable level of independence. Since the “OS within an OS” has its own kernel, it can “run things” internally without outside interference, except for when capturing/outputting data or accessing system hardware resources.
Separating apps and data from the host OS allows upgrades to take place in the background and rebooting your device completes the shift to the latest version of Windows 10X. Microsoft describes this new update delivery system as “non-intrusive.”
So, are Windows update mishaps coming to an end at last?
Traditional Windows updates do take time to complete, and yes, 90 seconds for Windows 10X is a massive, welcome improvement. But download time is not the real reason why you may sometimes hesitate to get the latest Windows 10 enhancements even when they are meant to address a mission-critical issue.
Lately, it appears that each Windows 10 update that Microsoft delivers leaves behind a trail of user complaints, from unexpected reboots to missing OS features/functions. Could containerization solve such problems in Windows 10X or even in Windows 10?
It depends. For starters, Microsoft only promised that Windows 10X updates would be fast. It did not guarantee that such OS changes will always be perfect.
Secondly, is a flawed delivery system causing some Windows updates to fail, or are the updates themselves inherently defective?
Putting apps in a separate partition or container from system files changes the way Microsoft delivers OS updates. But a superior delivery technique will certainly not fix an update whose code is intrinsically flawed.