FIX: SharePoint Online calendar not syncing with Outlook

Syncing calendars between multiple accounts and unifying them into a single thread is a way to go for most users. Some things won’t work as well, as a Document Library sync, but syncing SharePoint Online calendar with Outlook should be a simple task.

However, some users are, allegedly, unable to make it work. Namely, SharePoint Online calendar is not syncing with Outlook for an unknown reason.

How to fix syncing issues between SharePoint Online and Outlook calendars

Using multiple applications for calendars for reminders and meeting schedules might be a burden sometimes. Navigating between one to another app, configuring and meddling with options is something you could easily avoid, especially in this case.

Both SharePoint and Outlook are part of Microsoft ecosystem and, as you already know, you can sync SharePoint to Outlook and do everything from a single app.

This method is so successful that every change you’ve made in one or another application is 2-way sync, meaning that the changes will be unified. Whether you’re making them in SharePoint or Outlook — it doesn’t matter. In general, this is quite a simple task nowadays. Back in the days, users had to use an alternative approach to connect Outlook with SharePoint, but not anymore.

Just open SharePoint > Calendar and, under the Connect & Export section, click Connect to Outlook.

This, of course, relies on the fact that the calendar will successfully sync with Outlook. And it doesn’t for some. The first thing you should know is that this will work only with the Outlook for the desktop. The web-based Outlook doesn’t have this option. If the problems emerge, make sure that you’ve granted all necessary permissions to SharePoint to access your Outlook account.

The complete authorization is of the utmost importance. If the problem is persistent, consider deleting the calendar from Outlook (this won’t delete any events) and sync it again with the aforementioned procedure. In addition, try deleting a browser cache or, alternatively, switching browsers for the time being.

That’s it. If you are still bothered by the same error, feel free to tell us in the comments section below. We might be able to provide you with additional help or point you in the right direction.

RELATED STORIES YOU SHOULD CHECK OUT:

New driver updates are available for Microsoft’s Surface Laptop 2 and Surface Go LTE

Microsoft has released new driver updates for its Surface Laptop 2 and Surface Go LTE this week (via Neowin). The new bits should improve Surface Pen reliability on both devices, and several driver updates for the Surface Laptop 2 should also improve system stability.

Here are all the details for the Surface Laptop 2 driver updates:

  • Surface Pen Firmware Update – System devices – 3.0.10.1: Ensures reliability of Pen top button click on Surface Pen with no clip-on Windows 10 October 10 2018 Update, version 1809. Use the Surface Pen Checker Tool to verify that the Pen’s firmware was successfully updated.
  • Surface Pen Integration Device – Human Interface Devices: 1.0.9.0 Enables firmware update to Surface Pen with no clip.
  • Surface Integration Service Device: 4.18.139.0 Improves system stability.
  • Surface ME – Firmware: 11.8.56.3522 Improves system stability.
  • Surface System Aggregator: 145.106.139.0 Improves system stability.
  • Surface Touch – Firmware: 145.106.139.0 Improves system stability.
  • Surface UEFI – Firmware: 137.2439.769 Improves system stability.

If you own the Surface Go LTE, this variant is getting its first driver updates this month, which will also allow the installation of the Windows 10 October 2018 Update. You can find all details below:

  • Surface Pen Firmware Update – System devices: 3.0.10.1 resolves intermittent Pen top button click failure on Surface Pen with no clip, post Windows 10 October 2018 Update. Use the Surface Pen Checker Tool to verify that the Pen’s firmware was successfully updated
  • Surface Pen Integration Device – Human Interface Devices: 1.0.9.0 enables firmware update to Surface Pen with no clip.
  • Generic IO & Memory Access – System: 1.5.4.0 improves compatibility issue and enables update to Windows 10 October 2018 Update.

Microsoft says that it’s not aware of any known issues with these latest driver updates, but as usual let us know in the comments if you encounter any problems after installing them on your devices.

Xbox Insider Hub adds an easy way to close your account and delete your data

Microsoft is now making it possible for Xbox Insiders to leave the program by closing their Xbox Insider account. While it was already possible to remove a console from the Xbox Insider program to stop getting preview builds, closing an Xbox Insider Account will delete all personal information and restore the console to the latest publicly available OS.

The new feature can be found in the Settings section of the Xbox Insider Hub app, and there’s also an option for exporting your personal data before closing your account. “Please note that the ‘Close account’ feature is permanent and deletes all Xbox Insider details, including flight enrollments, survey and poll responses, ratings, problem reports (including screenshots and game DVR clips), program level, and XP,” the Xbox team explained.

The Xbox Insider Program is mostly for people looking to get early access to new OS features, but you can actually join the program without installing any Xbox One preview builds. Indeed, the Xbox Insider Hub is also the place where you can install beta updates for Xbox apps and games you already own, or sign up for public betas for upcoming games. By closing your Xbox Insider account, be aware that you’ll also lose access to all of this.

OneDrive file sharing is now generally available in Skype

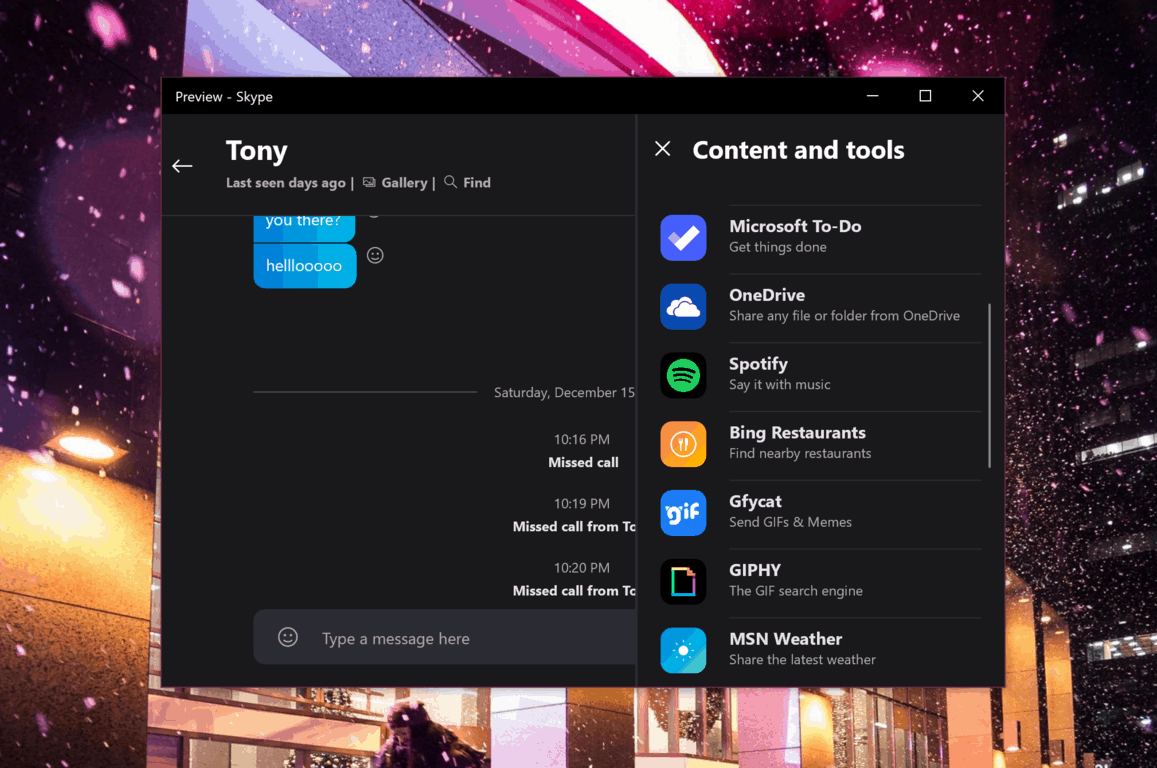
Microsoft’s cross-platform Skype now lets you easily share files with OneDrive right from your conversations. This is thanks to a new Skype add-in that has been in testing with Skype Insiders since November.

OneDrive joins the growing list of Skype add-ins that already includes Microsoft To-Do, Spotify, and YouTube. You can access the add-in by clicking the “+” Add-ins button in a conversation, and after signing into your Microsoft account you’ll be able to share any file stored in OneDrive. This will send a OneDrive link to the recipient, which is more convenient than having to share large files (Skype currently has a 300 MB file size limit for shared files).

Curiously, this OneDrive add-in for Skype is available on all platforms except macOS and Linux, and Microsoft didn’t say if it will come to these platforms at a later date. For now, the workaround is to use the new Skype for Web preview, which currently only works on Google Chrome and Microsoft Edge on Windows 10.

Microsoft acquires Citus Data, another open source addition for Azure

Citus Data is an open source extension that will help bring scale to Postgre SQL databases and it seems Microsoft’s interest lay in the fact that customers will have no need to re-architect their existing applications because of its extension nature, versus other fork-like scaling solutions.

According to Sudhakar Sannakkayala, the general manager of Azure Data, Microsoft also saw benefit in Citus Data in particular because “customers can take advantage of all the innovations in community PostgreSQL with queries that are significantly faster compared to proprietary implementations of PostgreSQL.”

In the announcement of the Citus Data acquisition, Sannakkayala reaffirms the notion that Microsoft’s pivot to the cloud is expanding customer base beyond the walled-garden of Windows and that this approach speaks to the longevity of the company.

As open source relational databases grow on Azure, we continue to see accelerated adoption from customers across various industry verticals serving diverse, mission-critical application patterns ranging from complex analytical applications for digital marketing to machine learning based IoT applications. These applications demand low latency and high query processing throughput, and our investment in Citus Data is a powerful accelerant to deliver high performance and scalable distributed databases.

Aside from a potential future where Azure customers have access to high profile scaling solution that supports multi-tenant SaaS applications and accelerated real-time analytics, Microsoft seems to be betting on the rapid and diverse development of the open source community for its own future.

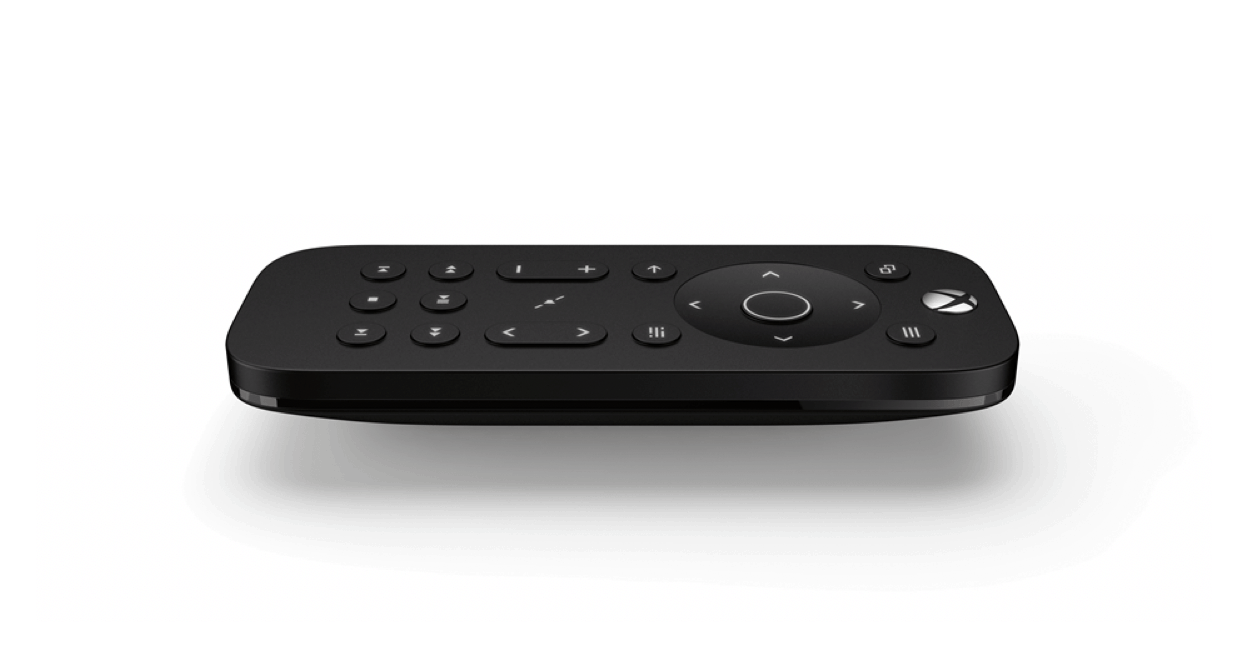
Xbox One Media remote to get new Programmable Buttons feature in upcoming 1904 system update

If you use the official Xbox One Media Remote to navigate your Xbox One and control your entertainment, a new feature coming in the 1904 system update will let you choose what happens when you press the dedicated OneGuide button. The latest Xbox One 1904 preview build, which is now available to download for Skip Ahead and Preview Alpha Xbox Insiders lets you assign your favorite app to this OneGuide button, and that includes popular entertainment apps like YouTube or Netflix.

For those unfamiliar, OneGuide is the built-in TV listings guide that brings together your favorite TV channels and entertainment apps on your Xbox One. OneGuide is one of the last remnants of Microsoft’s initial ambition to make its console an all-in-one entertainment system, but it hasn’t evolved much in recent years with the company shifting its focus on new gaming features.

The dedicated OneGuide button on the Xbox Media Remote is still really useful for those who use the feature a lot, but it looks like Microsoft has finally started thinking about everybody else. After installing this latest preview build, you can reprogram this OneGuide button on the Xbox Media Remote by going into Settings>Kinect & devices>Media remote.

This Media Remote programmable buttons feature is the second noteworthy addition we’ve seen in 1904 builds so far, following the the virtual mini keyboard that shipped to Insiders last week. The Xbox One 1904 system update is expected to ship in April, and it will be preceded by the 1902 system update which will bring under the hood changes but no new features.

Check out this official G.O.A.T Xbox One console and ring!

Microsoft has just unveiled a very rare Xbox One X console that it’s giving away as part of a new Super Bowl-related competition.

The Xbox One X console is G.O.A.T. (Greatest Of All Time) themed with giant green letters on the top and on the side. Its controller also appears to be slightly customized as can be seen by the green triggers in the above image.

In addition to the custom console and controller, the solo winner of this new competition will also get an Xbox G.O.A.T ring that “features 10 carat premium gold (plated black) and weighs over 1.5 ounces, with 188 black diamonds and 46 green tsavorite stones,” a G.O.A.T merchandise pack, a football jersey autographed by Antonio Brown, and the Madden NFL 19 video game.

Unfortunately, this competition is only open to residents of the 50 United States and the District of Columbia but it can be entered without having to buy anything.

Here’s the two entry methods:

  1. To enter by making a qualifying purchase, you must visit www.microsoft.com and make a qualifying purchase of a 3-month Xbox Live Gold membership (a “Qualifying Purchase”) during the Sweepstakes Period to earn one (1) entry into the Sweepstakes and one (1) Offer subject to terms and conditions and eligibility, as listed below. You must be logged into your existing Microsoft account information at the time of purchase to earn one (1) entry into the Sweepstakes. If you do not have an existing Microsoft account, you must create a new, free account.
  2. To enter by e-mail, without making a purchase, you must draft an e-mail with the subject line “Xbox Madden NFL 19 G.O.A.T. Prize Pack Sweepstakes” and include in the body of the e-mail your first name, last name, state, date of birth, e-mail address, and daytime phone number and send the e-mail to [email protected]. E-mail entries must be received during the Sweepstakes Period to be eligible.

Full details and rules for the competition can be read here.

What do you think of this custom console and ring? Are you going to enter the competition? Let us know in the comments below and then follow us on Pinterest for more Xbox gaming content.

4 Xbox 360 Command and Conquer video games go Xbox One back compat

The Xbox 360 video games, Command and Conquer 3 Tiberium Wars, Command and Conquer 3 Kane’s Wrath, Command and Conquer Red Alert 3, and Command and Conquer Red Alert 3 Commander’s Challenge are all now backwards compatible with the newer Xbox One consoles.

Each game can now be purchased and downloaded digitally on the Xbox One and the original Xbox 360 disks are now also supported.

Here’s the official descriptions for each game.

Command and Conquer 3 Tiberium Wars

Control massive armies and wage war as one of as one of three rival factions in Command and Conquer 3 Tiberium Wars. Embark on an adrenaline-fueled single-player campaign that features explosive 3D special effects, an unparalleled Hollywood cast, and over 90 minutes of live-action video. Then, head onto Xbox Live for devastating multiplayer battles with five exclusive modes and Xbox Live Vision support. You alone can decide the fate of the planet in the epic war over Tiberium. Welcome back, Commander.

Command and Conquer 3 Kane’s Wrath

Kane Lives! Download this map pack and wreck havoc on 4 new maps that can be used in both Skirmish or against other commanders in Xbox LIVE. Choose your army and conquer the world in Command & Conquer 3: Kane’s Wrath, the follow up to 2007’s best selling real-time strategy game, C&C 3 Tiberium Wars. This standalone game features the new CommandStick interface, making RTS easier to pick up and play than ever before. Kane’s Wrath includes all the units, structures, and superpowers from Tiberium Wars, giving you over 100 units and structures to command and 9 unique armies, each with its own play style!

Command and Conquer Red Alert 3

After years of conflict, the Allies are finally on the brink of victory. Cowering behind the walls of the Kremlin, the Soviets decide to turn to one last act of desperation – the use of an experimental time travel device. The mission: to go back in time to eliminate Albert Einstein before he creates the technologies that will lead the Allies to ultimate victory. After a successful mission, the Soviets return to the present, discovering the Allied position has indeed been weakened. But before they can truly celebrate, they find out their actions have spawned a new threat and global superpower, the mysterious, technologically advanced Empire of the Rising Sun. Welcome to World War III.

Command and Conquer Red Alert 3 Commander’s Challenge

Fight for world domination in the all-new Red Alert 3 Commander’s Challenge! Do you have what it takes to withstand the brutal onslaught and relentless taunting of the world’s toughest commanders, including Ric Flair as Commander Hill? Find out as you attempt to conquer the world in 50 challenges featuring explosive new units such as the Giga Fortress, Desolator, and Cryo Legionnaire!

January has seen a lot of classic Xbox 360 video games come to the Xbox One. FUEL racing was the first to jump to the Xbox One at the beginning of the month and it was soon joined by Rayman Raving Rabbids and Battlestations Pacific. Ace Combat 6 also gained Xbox One backwards compatibility last week.

Do you play any Xbox 360 backwards compatibility games on your Xbox One? Are you happy to see these Command and Conquer titles added? Let us know which ones in the comments below and then follow us on Pinterest for more Xbox gaming content.


Linux Emulator for Windows: Best We Tested in 2026

Have you ever wondered if it’s possible to access the great development capabilities or the powerful command-line tools of Linux, without having to format your PC ? Running Linux on your PC can be achieved by either installing the Full Linux OS beside your Windows installation, or by using a virtual machine in order to run it. In case you choose to install the full Linux OS, the speed at which it will operate will be greater than if you used a virtual machine software. On the other hand, running Linux in a virtual machine software allows you to test any app or feature you want without worrying about your data’s safety or the possibility of data corruption. There is a wide range of Linux based operating systems on the market, and they are known as distros. Here are some of the most popular Linux distro options include:
  • Linux Mint – based on Ubuntu, designed to be easy to use, and also come with an utility called mint4win which allows you to install Linux on your PC without affecting your base system in any way.
  • OpenSUSE (Novell) and Fedora (Red Hat) – free and user-friendly Linux distros
  • Xandros Home Edition – designed for beginners with the ability to run Microsoft Office, Adobe Photoshop, etc.
  • Ubuntu (Desktop edition) – great option for beginner Linux users, with great support for hardware devices, a 6 months release cycle, and you can also choose to make Ubuntu ship your installation DVDs for free across the globe
In this article, we will focus on the Ubuntu distro and see how you can use them on Windows. Read on to find out more.

4 tools to run Linux on your Windows PC

KNOPPIX: Run Linux from a USB stick or CD

knoppix - linux emulator

KNOPPIX is a great software that allows you to boot in Linux directly from a physical CD/DVD or USB flash drives.

This app contains a great set of GNU/Linux software options, can automatically detect your hardware capabilities, and offers support for a wide range of graphics cards, sound cards, SCSI and also USB devices.

KNOPPIX can be used in order to run Linux on your desktop PC, and can also help you rescue your system in the case that Windows won’t start.

Using this software as a rescue tool allows you to extract all the data you need from your malfunctioning Windows PC, and store them in a secure environment, before reinstalling it.

Download KNOPPIX

— RELATED: Here’s how to fix Windows 10 Bootloader from Linux

WUBI: Install Linux as software

WUBI - install Linux on Windows

WUBI is a great tool that allows you to easily install Linux as a software on your Windows PC. Using this technique allows for greater processing speeds and it can be uninstalled in the same way that you would uninstall a normal Windows application.

It’s incredibly easy to set up and start installing, all you need to do is choose the right options for your system, and then click install.

Download WUBI

Another way to run a Linux based OS on your Windows PC is by using a virtual machine software. We’ll list some of the best tools below.

Virtual machines for running Linux on Windows PCs

Virtual Box

VirtualBox - for running Linux on Windows

VirtualBox is a great software option that allows you to create virtual Linux machines and run them in a window from your Windows desktop. This app is based on a x86 architecture and supports AMD64/Intel64 virtualization.

This software can run on a variety of hosts – Linux, Mac, Windows, Solaris – and also has a large number of guest OS compatibility – all versions of Windows, Linux, etc.

Download Virtual Box

VMware

vmware - running linux on windows

VMware is another great virtualization software that allows you to create a virtual Linux OS on your PC with ease. This is a more simple alternative than having to install a full Linux OS, but offer a slower perfomance.

You can create multiple virtual machines with as many OS options as you want. There are no limits to the number of virtual machines that you can create, but this feature is limited only by your hardware’s capacity to deal with the request.

You can find a good guide explaining how to use VMware to run Linux on your PC. If you want to run your installation from a CD, click here.  If you want to run the installation from an virtual image file (.bin, .iso), you can reffer to this page.

Download VMware

Conclusion

In this article, we listed some of the best Linux based operating systems and then we talked about the most efficient way to run them on your PC.

We would love to know which solution you chose and how it worked out for you. Feel free to comment below.

RELATED GUIDES YOU NEED TO CHECK OUT:
How to uninstall Atom Windows (Step-by-step guide with screenshots)

Developed by GitHub, Atom is regarded as one of the best visual text editors for cross-platform apps development.

Besides being free, Atom is especially adaptive and super easy to customize amongst a whole load of other benefits. But if there’s one bone to pick with Atom, it’s the difficult uninstallation process in Windows.

That’s because when you go to the uninstall/remove programs option in control panel/settings, the Atom uninstall option doesn’t work like other uninstallers and will tend to leave some program folders intact.

This means the application is only partially uninstalled. Yet you need to completely get rid of such folders to discard Atom.

Now, this article covers how to successfully uninstall Atom in windows including the said folders. So, without further ado, let’s see how to uninstall Atom Windows.

Steps to remove Atom Windows

In Windows 7

The first step is to remove Atom from the control panel .

Steps:

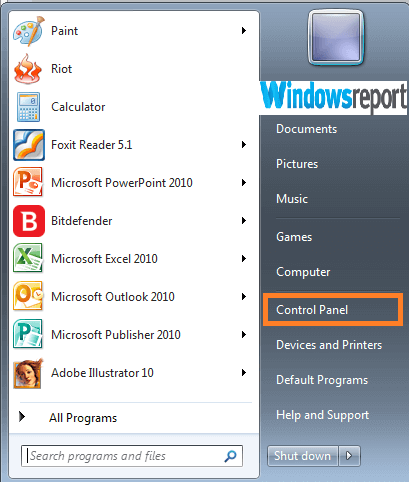
  1. Click the start button
  2. Choose Control Panel.

atom uninstall package windows

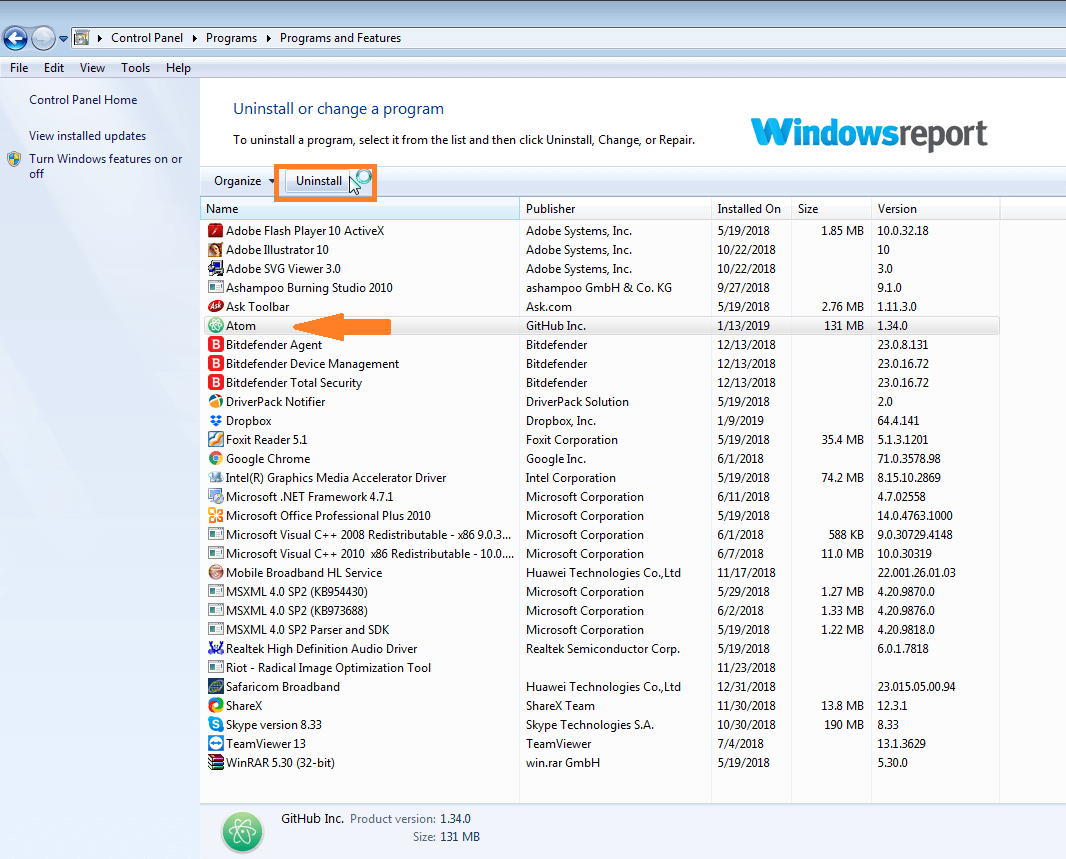
3. Locate the programs tab and click uninstall a program.

4. Choose Atom then uninstall.How do I completely remove an atom?

Atom will be silently removed from your PC.

  • ALSO READ: Skype’s real-time code editor lets you test your job candidates’ coding skills

The second stage involves deleting all the Atom-related folders to ensure that none of the App’s configurations remain.

Here are the concerned folders:

  • C:UsersUserName.atom
  • C:UsersUserNameAppDataLocalatom
  • C:UsersUserNameAppDataRoamingAtom

Steps:

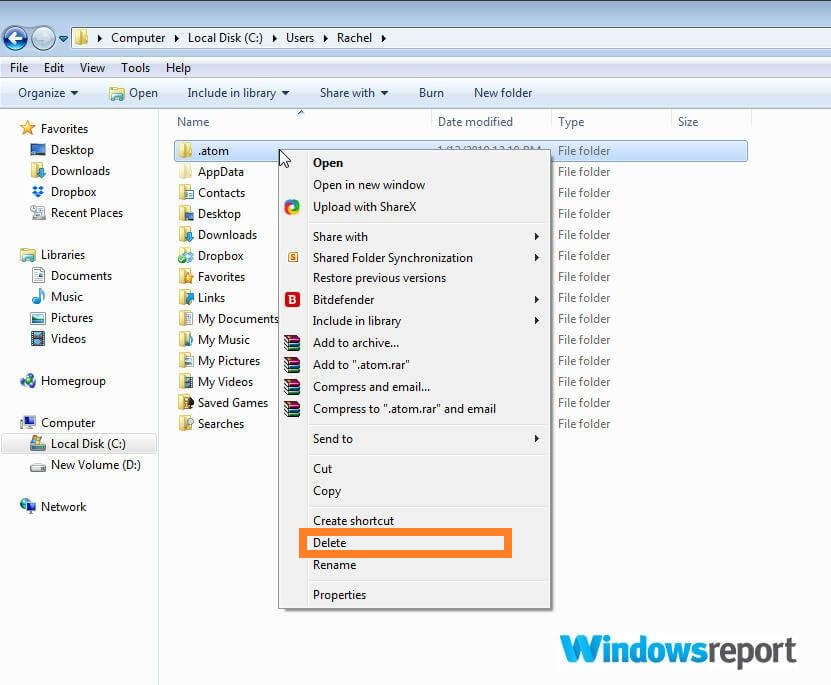
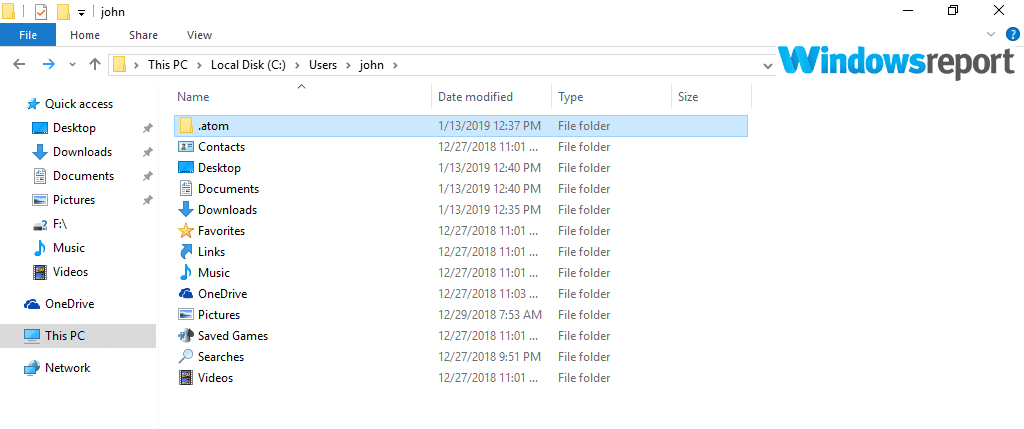
  1. Navigate to the path C:UsersUserName
  2. Look for the folder .atom
  3. Right click and press delete.

How do I uninstall GitHub on Windows 10?

  1. Now go to the location C:UsersUserNameAppDataLocal.
  2. Again identify the folder atom then press delete.

How do I uninstall GitHub on Windows 10?

6. Using the previous steps, find your way to C:UsersUserNameAppDataRoaming.

7. Once there, find the atom folder and erase it.

Please note that in some instances, the Appdata folder is not available in Windows 7 and you have to unhide first.

Here is how:

  1. Click the start button.
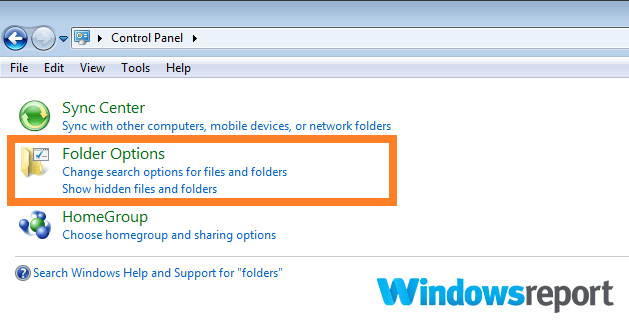
  2. Press control panel.
  3. Type “folders” in the search button then click Folder options.How to uninstall metrics package in Atom.io editor?
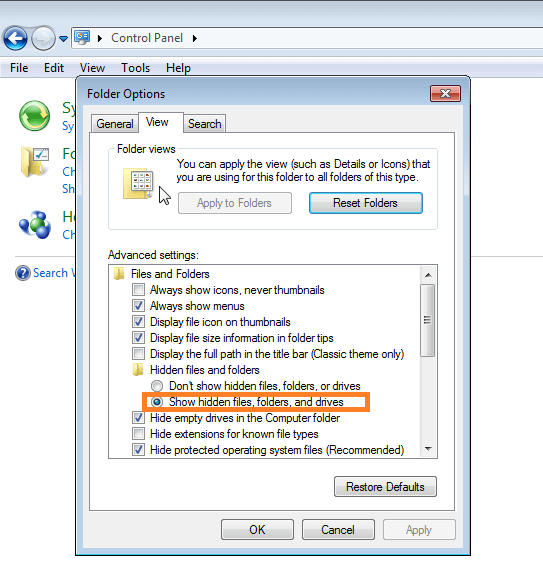
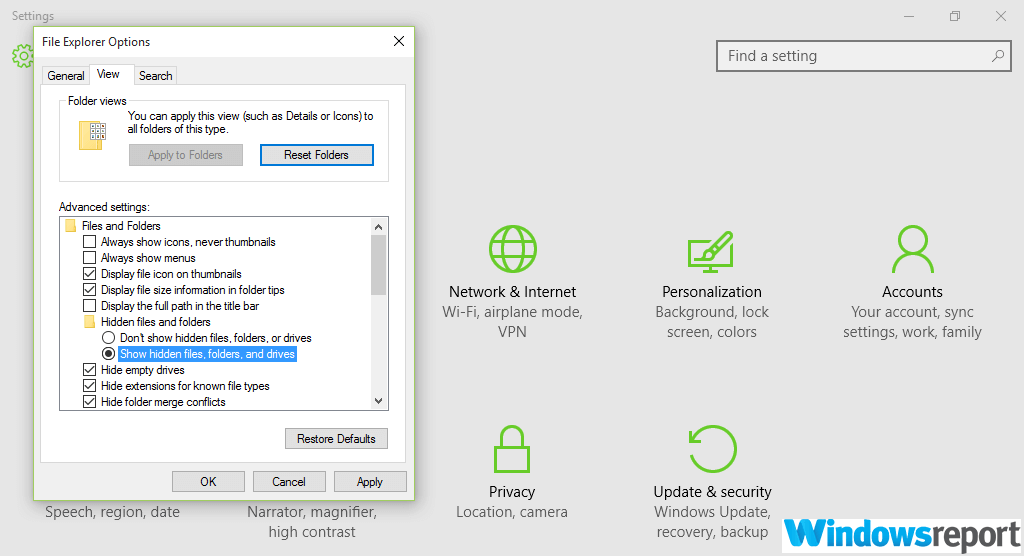
  4. Click show hidden files and folders under folder options.
  5. Then press OK. how to uninstall atom windows

In Windows 8/8.1

  1. Go to the control panel by right-clicking on the PC’s Start button. (In Windows 8.1 you simultaneous-press the Windows key and X. Then press “programs and features” from the menu)
  2. Select uninstall a program under programs (in the control panel).
  3. A list of all the applications installed in your computer appears. Click on atom then press uninstall.

You still have to delete the .atom folder as discussed here below.

  1. Search for the local disk by typing “C:” in Windows’ 8 start screen. The search results will have a link to C:
  2. Open the link to the drive by clicking it.
  3. Proceed to the users folder, then onwards into your user account.
  4. Look for the .atom folder and delete it.
  5. You also have to go to C:UsersUserNameAppDataRoaming as seen earlier and find then erase the atom folder

How To unhide the AppData folder in Windows 8/8.1:

  1. Find the Control Panel using the steps I highlighted above.
  2. Type “folder” in the provided search bar and click “Show hidden files and folders” in the results.
  3. Click the View option near the top of the current window.
  4. Look for “Hidden files and folders” under the advanced settings.
  5. Click OK.

In Windows 10

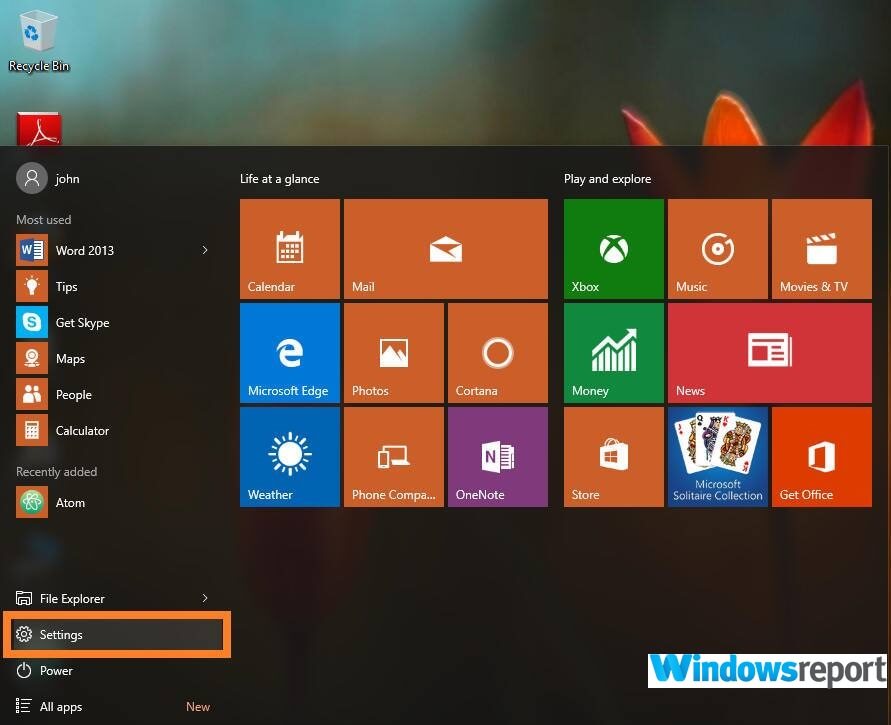
  1. Click on the start button.
  2. Click settings.how to uninstall atom text editor on windows
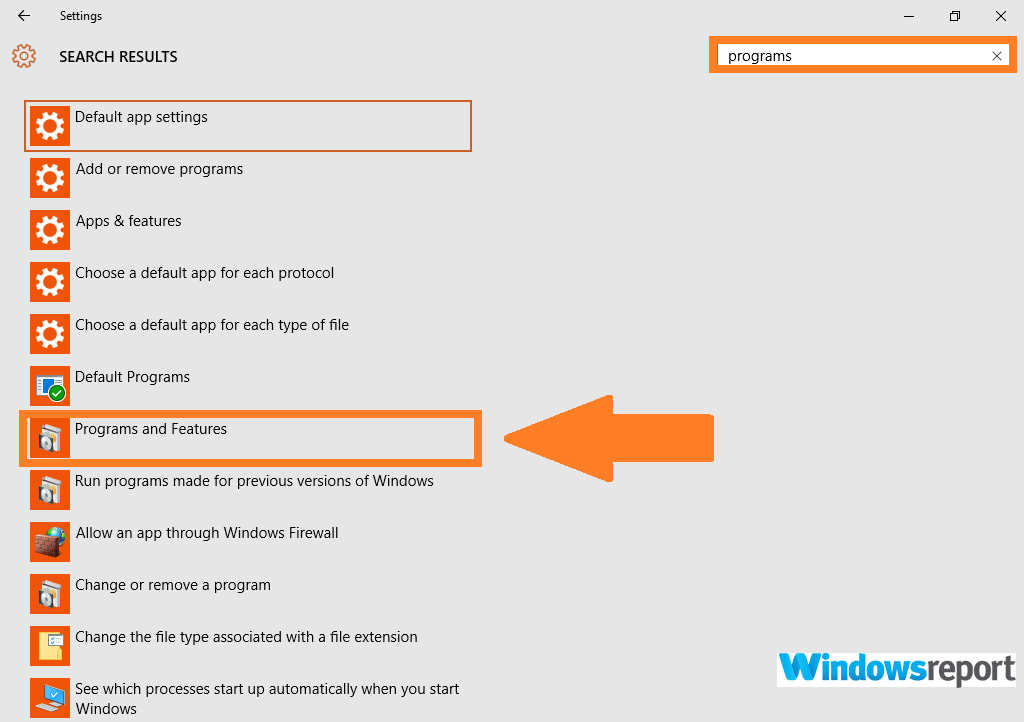
  3. Type “programs” in the search box.
  4. Select “program and features”.how to uninstall atom windows
  5. Choose Atom from the shown list of Apps & features.
  6. Click on atom then press uninstall.

That should do away with the basic installation.

Finally do away with the setup files by deleting the .atom folder.

Steps:

  1. Click on the file explorer icon on the task bar.
  2. Select This PC on the left-hand side of the menu.Uninstall Atom
  3. Navigate to the Users folder then your user account.
  4. Delete the .atom folder.
  5. You also have to go to C:UsersUserNameAppDataRoaming as seen earlier, find then erase the atom folder.

How To unhide the AppData folder in Windows 10:

  1. Click start.
  2. Then setting.
  3. Type “folder” and observe the results.
  4. Click “Show hidden files and folders”.
  5. Again click on “Show hidden files, folders, and drives”.how to uninstall atom windows
  6. Click OK.

RELATED STORIES

Update Malwarebytes to fix system crashes on Windows 7

Is your Windows 7 PC often freezing all of a sudden? Malwarebytes recently rolled out an update for the machines that are not responding to keyboard or mouse input.

Keep in mind that only the PCs who had the Web Protection Feature enabled are affected by this problem.

The issue was reported earlier this month by the users who are running the Premium Malwarebytes versions. 

The only workaround for them to get out of the frozen screen was to hold down the power button.

Malwarebytes efforts towards fixing the issue

The issue was first reported by Windows 7 users in the middle of December 2018. As soon as users installed Malwarebytes version 1.0.508, they started experiencing frozen screen issues.

The bug affected only a small number of machines. Therefore, Malwarebytes did not come up with a quick workaround for the bug.

Instead, the company requested users to provide its engineers with logs and data from Windows 7‘s event reports to help them troubleshoot the issue. 

Who needs to install the latest update?

Malwarebytes recommends Windows 7 users to update to the latest version as soon as possible. 

The latest release should be installed specifically by those users who were affected as a result of the Malwarebytes update in December last year.

You can install the latest update in the following ways:

  • Automatic Update

The update has already been automatically rolled out to all the users who have turned on the automatic update mechanism.

  • Manual Update

You can use the link on the Box storage service for installing the update manually.

The good news is that although Windows 7 reached the end of life, Malwarebytes still supports it. That’s why this malware removal tool is on our list with the best anti-malware software.

However, the link might disappear very soon, so you need to run a manual check and manually install the latest version using the Malwarebytes‘ interface.

You simply need to navigate to the Settings menu and then to Install Application Updates.

Posted in Fix

The blog post is up! the blog post is up! Here’s what’s new, and what’s fixed in Windows 10 Insider build 18323

Ok well this has been fun… Microsoft released Windows 10 Insider build 18323 today, the first reports of it coming almost an hour ago (sorry I was stuck on the phone talking health insurance provider, go figure), but it’s taken that long to get the blog post announcing the build and the changes coming along with it, but the post is now up.

This build is not without its problems, at least in getting it out and getting the word out, and the blog post starts out with a word of caution:

Hello Windows Insiders, today we are releasing Windows 10 Insider Preview Build 18323 (19H1) to Windows Insiders in the Fast ring. Please note that due to a small outage in our build publishing system, this build will be rolling out to Windows Insiders over the next few hours so it may not be immediately available at the time of publish of this blog post.

As far as what’s new with 18323, as expected the new features list is becoming shorter as 19H1 gets closer to release. However this build does include improvements to RAW image format support:

Improved RAW image format support

Do you like taking pictures in Raw image formats and wish that the Raw files from your camera were natively supported by Windows?

Good news! Targeting 19H1, we’ve been working hard to release a new store-delivered Raw codec package that dramatically improves native raw file format support in Windows.

By downloading the new Raw Image Extension (Beta) package from the store, you can now view image thumbnails, previews, and camera metadata of previously unsupported raw files right in File Explorer. You can also view your raw images – at full resolution – in apps such as Photos or any other Windows app that uses Windows Imaging Component framework to decode raw images.

How to test

Please note – to install the package, 19H1 Build 18323 or later is required. Open the following link in Edge to install the current beta package: https://www.microsoft.com/store/apps/9NCTDW2W1BH8. We have also created a 19H1 Bug Bash quest for directions. If you are running Build 18323 or later, click on this link to open the quest in Feedback Hub.
Known issues

Exposing camera properties stored as EXIF/XMP metadata is not currently working for some raw image formats.
File Explorer hangs when the view state is changed to “Details Pane” and a raw file that activates the new raw codec package is selected.
Opening some raw images in Photos app using the new store-delivered raw codec pack gets stuck at low resolution thumbnail image.

How to provide feedback

We would love to get your feedback. Please send your feedback through Feedback Hub under “Devices and Drivers > Video Playback” category.

This new build also gets more Light Theme love:

Improving Light Theme

We introduced the new Light Theme in Windows 10 with Build 18282 and today’s build has some improvements to Light Theme worth taking note of based on your feedback:

  • fixed an issue where the text in the battery flyout might become unreadable in light theme due to it being white.
  • We fixed an issue where the scrollbar in the network flyout wasn’t visible in light theme.
  • We fixed an issue where the autoplay icon in the systray wasn’t visible in light theme.
  • We fixed an issue where impacting the network and volume icons in the notification area where after switching to light theme they wouldn’t update from white to black until explorer restarted.
  • We fixed a similar issue where not all supported app icons in the taskbar would switch colors on the taskbar when switching between light and dark theme (particularly on the secondary monitor).
  • We’ve made some adjustments to address issues where when using light theme white icons in notifications weren’t readable.
  • We’re updating the Settings icon to now be dark grey in the taskbar when light theme is enabled rather than black.

Again, as is usual as we get close to release, the inbox apps, the ones that will ship with the release of 19H1, have been locked down, and you may notice that they’re missing some features from recent builds:

REMINDER: Getting the latest Windows 10 app updates

We have locked down the inbox apps in 19H1. These simplified versions of some of the inbox apps are what will ship with 19H1 when it is released. As a result, Insiders may have noticed that some features have disappeared from these apps. This was probably most noticeable with the Photos app. Insiders can get these features back by going into the settings of an inbox app like Photos and clicking the “Join preview” button.

As usual, too, there’s a long list of changes, fixes, and known issues:

General changes, improvements, and fixes for PC

  • REMINDER: The new tamper protection setting in the Windows Security app protects your device by helping to prevent bad actors from tampering with the most important security settings. You may see a new recommendation in the Windows Security app suggesting you turn this setting on.
  • We fixed an issue causing Update Orchestrator Service to stop working periodically. As a result of this issue, you might have seen an error on Windows Update Settings saying that the update failed to restart. This issue also resulted in restart using Update and Restart to sometimes just restart you back into the base OS.
  • Clicking your account in Cortana Permissions doesn’t bringing up the UI to sign out from Cortana (if you were already signed in) for some users in this build.
  • We fixed an issue resulting in night light not working recently.
  • We fixed an issue where the quick actions section of Action Center would be missing sometimes recently.
  • We fixed an issue where closing an open Excel window from the taskbar might cause Excel to go non-responsive.
  • We fixed an issue an issue where the WIN + Ctrl + <number> hotkey wasn’t working.
  • When using your accent color on the taskbar has been enabled, the taskbar and start jump lists will now also be accent-themed.
  • For the time being we’re returning the Volume Mixer link in the volume button context menu to its October 2018 behavior while we look at improving the experience based on feedback.
  • We fixed an issue where themes and Microsoft Edge extensions downloaded from Microsoft Store wouldn’t appear in their respective locations after the download finished.
  • We fixed an issue impacting Action Center reliability in recent builds.
  • We fixed an issue where you might see multiple Focus Assist notifications in the Action Center at a particular time.
  • We’re adding Nearby Sharing to the list of default Focus Assist exceptions.
  • We fixed a recent issue where if you used the screen snip quick action in the Action Center then the resulting screenshot would have the Action Center in it.
  • We fixed a recent issue that could result in not being able to launch UWP apps from the Start menu sometimes.
  • We fixed a recent regression resulting in File Explorer sometimes hanging when interacting with MP4s and folders that had MP4s in them.
  • We fixed an issue where Cortana would close immediately if opened from the Start screen when using tablet mode.
  • We fixed an issue impacting Snipping Tool reliability.
  • We fixed an issue resulting in Ctrl + P not activating the Print command in Snip & Sketch in recent flights.
  • We fixed an issue resulting in Snip & Sketch potentially crashing when closing many Snip & Sketch windows in a row.
  • We fixed an issue where rebooting would set Nearby Sharing back to an off state if it had been turned on.
  • We fixed an issue where the lock screen preview in Lock Screen Settings wasn’t showing in recent builds.
  • We fixed an issue where the scrollbar in Settings was overlapping the text fields when manually configuring your IP address.
  • We fixed a rare issue that could result in the screen locking up when using the Surface Dial.
  • We fixed an issue where the tooltips in the Emoji Panel were truncated on the bottom.
  • We fixed an issue where the Windows feature update might fail but would still be listed as a successful update in Windows Update history page.
  • We fixed an issue where you might see a Windows Update icon in the notification area saying there was an update when no update was available.
  • We fixed an issue where you couldn’t type on the touch keyboard when “Turn on Activate a window by hovering over it with the mouse” since focus would move away from the text field and set to the keyboard itself.
  • We fixed an issue on certain devices that could sometimes result in the screen staying black on boot until CTRL + Alt + Del was pressed.
  • We fixed an issue resulting in certain devices experience increased battery drain on the last few flights when in Disconnected Standby Mode.
  • We fixed an issue for devices with multiple monitors resulting in Task View (WIN + Tab) sometimes showing UWP app thumbnails on the primary monitor rather than the monitor where the app was open.
  • We fixed an issue where some key labels were cut off in Armenian full touch keyboard layout.
  • We fixed an issue when using the full touch keyboard layout in Korean where pressing the FN key unexpectedly highlighted the IME ON/OFF key. We also fixed an issue for this language where tapping the tab key wouldn’t insert a tab.
  • Thanks everyone who shared feedback about the new Japanese Microsoft IME we’ve been working on. With today’s build the IME and settings pages are returning to the ones that we shipped with the October 2018 Update, while we take your feedback into consideration.
  • We fixed an issue where Narrator sometimes did not say anything when reopening Action Center after it was dismissed using the Esc key.
  • We fixed an issue where Narrator did not speak the volume level value when using the hardware volume button to change the volume setting.
  • We fixed an issue where Narrator command read from current location did not work when on a heading in Wikipedia.
  • We fixed an issue where Narrator announced read-only at the end for links.
  • We fixed an issue where Narrator continuous reading command read the last word of a sentence twice on a web page in Microsoft Edge.
  • We fixed an issue impacting a small number of users enrolled in Microsoft Intune where they might not receive policies.
  • We fixed an issue where signing out from inside Windows Sandbox resulted in a blank white window.
  • We fixed an issue resulting in running c:\windows\syswow64\regedit.exe not launching regedit in recent builds.
  • Settings header rollout update: This is now available across most regions for Insiders in Fast using Home edition and Pro editions of Windows that are not domain joined.
  • Small app update: Thanks everyone who reached out about the grid alignment issue in the Calculator – this has been fixed with the 1812 version of the app.

Known issues

  • While with Build 18323 we fixed the recent spike in Update Orchestrator Service crashes, if you’re on a base OS that’s impacted by the crash, you will still see the symptoms described above until you’re on 18323.
  • The Windows Security app may show an unknown status for the Virus & threat protection area, or not refresh properly. This may occur after upgrade, restart, or settings changes.
  • Launching games that use anti-cheat software may trigger a bugcheck (GSOD).
  • Creative X-Fi sound cards are not functioning properly. We are partnering with Creative to resolve this issue.
  • While night light functionality is back up and running, you may still find issues with other blue light reduction software not working.
  • When performing Reset this PC and selecting Keep my files on a device that has Reserved Storage enabled the user will need to initiate an extra reboot to ensure Reserved Storage is working again properly.
  • Some Realtek SD card readers are not functioning properly. We are investigating the issue.
  • USB devices, including mice and keyboards, may no longer work after updating. Possible workarounds are to change which USB port it is plugged into or connect the device through a USB hub.
  • You may consistently see black screens when using Remote Desktop, DisplayLink, or Miracast if you are on an AMD or Nvidia driver. We’re working on a fix, but in the meantime, you can work around this issue by enabling the following registry key and rebooting: reg add HKLM\Software\Microsoft\Windows\Dwm /v EnableFrontBufferRenderChecks /t REG_DWORD /d 0 /f.
  • The value in Narrator Settings “Change the level of detail Narrator provides about text and control” might be empty. To work around this issue, use the Narrator command Narrator key + v to change the verbosity level, then close and reopen Settings app again.
  • After upgrade, there might be two Narrator voices talking at the same time. Reboot the machine once, this issue will go away.
  • Windows Sandbox may launch to a black screen for some users.
  • The Insider Program Settings pages currently have a bug preventing Narrator and Screen Reader programs from properly reading the page. A fix will be available in an upcoming build.
  • Taskbar icons may stop loading and appear blank.
  • Desktop Window Manager will crash if multiple Office and/or video playback applications are running on the same screen on devices that have Multiplane Overlay Support.

Try out Chrome’s new Dark Mode on Windows 10/11 [Sneak peek]

Have you already tried out the new Dark Mode on Google Chrome? Well yeah, after YouTube, Google also appeared in dark and it looks stunning! If you’re running Window 10, then Dark Canary Google Chrome is for you.

You might be curious to learn more about it, aren’t you? So, let’s learn how can you grab this new Chrome version and how it works.

Download the new Dark Mode on Google Chrome

To enjoy the new features, you need to download Chrome Canary.

Chrome Canary is the experimental version of Google’s web browser and it is an early release. It is mainly designed for early adopters and developers, and it can undergo breakdown sometimes.

Canary demonstrates the experimental features of the four versions of Chrome (stable, dev, beta and canary) as it’s built without thorough usage and testing by the engineers of Google.

What’s new in Google Canary?

Google offers you a new dark mode for:

  • Download pagesnew dark mode chrome
  • Historychrome history dark mode
  • New Tab page

Keep in mind that these new features are available  only for Window 10.

There is a feature of heavy page capping in the Chrome Canary. You never know how much data a web page uses before you click on it. With this feature, a notification will appear when the web page crosses a particular limit.

Most of the web pages, especially those with videos or images, are usually above the data limit or threshold that you set up. When you decide to block data from loading, images that have not loaded yet will not appear.

Demonstrated as “bleeding edge” version of Google Chrome, Chrome Canary consists of new tools and tweaks, and you can try them out before they are released officially – if they make it into the official version of the browser that is.

The good news is that you can keep the Stable and Canary versions of Chrome at the same time on your system.

How enable Dark Mode on Google Chrome Canary

  1. Place your cursor on the Chrome Canary shortcut > right click on Shortcut.
  2. Add the following string after “chrome.exe” in the Target field –enable-features=WebUIDarkMode –force-dark-modeenable dark mode chrome canary

Note: Don’t delete the original string in the Target field otherwise the command won’t work.

Make sure that you are using Chrome Canary. Contradictory to Dev and Beta Chrome channels, Canary requires separate installation. The new version can be installed along with the regular version of Chrome, and it utilizes its Chrome profile.

As a result, the apps, accounts, sync profiles, and preferences remain unaltered. It is available for download for Windows 32-bit and 64-bit, Android operating systems and Mac.

 RELATED POSTS TO CHECK OUT:

Life is Strange 2 episodes to join Xbox Game Pass 3 months after their debut

The first episode of Life is Strange 2 was released in the Xbox Game Pass library of free games earlier this month, and today the release dates for future episodes have been revealed. According to the official Xbox Twitter account, future episodes of the series are expected to be available free for Game Pass subscribers 90 days after their official releases on the Microsoft Store.

That’s definitely good news because the second episode is launching today, so anyone who has been eager to see what it has in store can do so later today. Additionally, with 90 days until the game’s free availability in the Game Pass library, that puts its release date to those members on April 24.

If you want to go ahead and buy all of the episodes now, anyone with a Game Pass subscription can save 20% by bunding all of them together. Here’s the game’s description for those interested:

Two brothers Sean and Daniel Diaz, are forced to run away from home after a tragic incident in Seattle. In fear of the police, Sean & Daniel head to Mexico while attempting to conceal a sudden & mysterious supernatural power.

If you’re not sure you want to invest the money, the first episode is already free for subscribers, so you’ll have a chance to see for yourself if its worth the money now or if its better to wait until its free availability. In the meantime, feel free to share your thoughts down below.

Play Shadow of Mordor and Saints Row The Third today with Xbox Game Pass

Middle-earth: Shadow of Mordor and Saints Row The Third are now both playable on Xbox One for free as part of Xbox Game Pass.

Middle-earth: Shadow of Mordor is an absolutely massive game set within the same Middle-earth of Lord of the Rings and The Hobbit fame. It won a number of awards after its initial release on Xbox One back in late-2014 and was generally praised for its visuals and gameplay.

Saints Row The Third is a light-hearted, yet violent and provocative, open-world game that first came out on the Xbox 360 in 2011. Like Shadow of Mordor, it was also well-received by most players and critics with many mentioning its wacky adult-themed sandbox nature as being its highlight.

Xbox Game Pass is a monthly subscription service that gives Xbox One owners access to around 100 full video games. Last week, We Happy Few and The LEGO Movie Video Game were also added to the library.

Are you an Xbox Game Pass subscriber? Let us know which game you’ll be playing first in the comments below and then follow us on Pinterest for more Xbox gaming content.


Saints Row®: The Third™
Developer:
Koch Media
Price:
$14.99

Mixer’s Embers are now live on Xbox One and web to help streamers get rich

After launching on the official iOS and Android Mixer apps just over a week ago, Embers are finally live on Xbox One consoles and the web version of the Mixer streaming service.

Embers are a new kind of digital currency that users on Mixer need to buy with real-world money. After purchasing Embers, users can use them to buy animated emotes or colorful text messages to use in chat rooms while watching streamers on the Mixer platform. Streamers earn money when Embers are used within their channel’s chat room.

https://twitter.com/WatchMixer/status/1087824494419501062

Mixer streamers can also earn money on the platform through paid subscriptions (similar to Twitch) and by reaching Spark milestones. Sparks are another form of currency on Mixer but, unlike Embers, can be earned by streaming or watching someone else stream. Sparks are typically used to activate static emotes or gifs in chat rooms.

Do you use Mixer and have you tried using Embers yet? Share you impressions on them with the community in the comments below and then follow us on Pinterest for more gaming content.

Count Dooku is now live in Star Wars Battlefront II on Xbox One, Anakin Skywalker teased

The Star Wars Prequel villain, Count Dooku, is now live and playable in Star Wars Battlefront II on Xbox One, PC, and PlayStation 4.

The Count Dooku character, or Darth Tyranus as he’s also known, is completely free for all owners of the video game though must be unlocked with Credits, the in-game currency that can be earned by playing. He only costs 35,000 Credits, though, which can easily be earned within a week of casual gameplay.

Count Dooku’s default appearance is his Sith Lord skin, as seen in the above image (screenshot credit goes to Cinematic Captures). His secondary skin, Dark Ritual, has been delayed and is expected to arrive via a hotfix sometime over the coming days.

A special video showcasing Count Dooku has been released by EA. In it, viewers can see all of Dooku’s special moves and attacks in addition to being given a small audio preview of Anakin Skywalker, the next character coming to the game, towards the end. You can watch the video right here.

In addition to Count Dooku, the latest Star Wars Battlefront II update also added the planet Geonosis to the Heroes Versus Villains, Blast, and Custom Arcade game modes. The Coruscant Guard appearances, which were expected to arrive with this week’s update, have been pushed back to February to coincide with a small revamp of the skin system.

The next free update, which is planned for late-February, will add Anakin Skywalker, a variety of new character appearances, and a whole new mode which is said to be the bigger than any existing experience within Star Wars Battlefront II.

Very little has been announced concerning post-February plans for the game, however datamining has revealed references to Padme and Ahsoka which could mean that these two characters may be coming to the game sometime in 2019.

Are you playing Star Wars Battlefront II on your Xbox One console? Let us know what you think of Count Dooku in the comments below and then follow us on Pinterest for more Xbox gaming content.

Here is how to uninstall After Effects permanently

Adobe After Effects (AE) is one of the most advanced digital visual effects and motion graphics applications and has become an ever-present in most studios. Non-technical users love it even more because of its simple installation process and highly interactive user interface.

However, like most of the creative cloud apps, matters are not that straightforward if for some reason you want to uninstall the software.

Now, as we always do, we did a bit of digging on how to uninstall after effects seamlessly and grabbed a few working solutions. And we will be discussing them next. As usual, ensure you have administrative rights to the PC before attempting the uninstall.

How To Uninstall After Effects on Windows PCs

Here now is the step by step guide   to help you get rid of the application:

Method 1: Uninstall After Effects From Creative Cloud

  1. Go to your taskbar and click the Creative Cloud app icon.
  2. The Creative Cloud center opens. Remember to sign in using your usual Adobe ID plus password. The system may also automatically sign you in depending on the settings, in which case you are spared the signing in step.
  3. Click on the Apps  A list of all the installed apps appears.
  4. Head to the Installed Apps area and locate the After Effects software.
  5. Now click on the arrow right next to the options Open or Update. A new list of choices pops up.
  6. Click on Manage.
  7. Then click Uninstall.
  8. Now follow the sequence of the on-screen instructions to complete the uninstallation.
  9. Restart your PC.

Method 2: Uninstall After Effects Via The Programs and Features Option

These steps show you how to remove the older Adobe After Effects CC software versions on Windows 10, Windows 8/8.1 and Windows 7 computers. The process is especially very beneficial for Users who have Adobe After Effects CC 2014, 2015, 2016, 2017, and 2018 in their computers.

Again you need to have the Administrative permissions on your computer to proceed.

On Windows 10 PCs:

  1. Click on the Start menu.
  2. Click on Settings.
  3. Look for the System tab under the Settings menu.
  4. Select the Apps and features option on the left pane.after effects won t uninstall
  5. Select the Adobe After Effects CC
  6. The Uninstall button appears. Click on it to proceed with the uninstallation.
  7. Restart the PC.

 On Windows 8/ 8.1 PCs:

  1. Either Press the Windows Key to view the start button. Those with Windows 8.1 can directly click the Start button (it’s on the lower left-hand corner) to access the starting screen.
  2. Select or search for Settings then click Control Panel.
  3. Click Uninstall a program. You can also tab on the Programs and Features alternative under Control Panel.
  4. Locate the After Effects application then right click on its icon. The software will be highlighted.
  5. Press on the Uninstall tab
  6. Confirm that you want to completely uninstall After Effects by clicking yes when and if prompted by the User Account Control
  7. Wait for the uninstall to complete then restart your PC.

— RELATED: How to Uninstall Programs and Apps in Windows 10

On Windows 7 PCs:

  1. Click on the start button.
  2. Choose control panel.
  3. Click uninstall a program.
  4. Again identify your Adobe After CC app. and click on it.how to uninstall after effects cs6
  5. You will still choose uninstall as above to move on.
  6. Wait for the computer to finish up then reboot.
  • ALSO READ: The latest Adobe updates fix 47 major security vulnerabilities

How To Uninstall Adobe After Effects CS6 (And Other CS Editions)

The process of uninstalling adobe after effects CS6, CS7, and every other CS Version is almost identical to that of After Effects CC software versions.

Indeed, the only difference is that this time you will be looking for an app. labeled After Effects CS X (where X stands for the edition instead of After Effects CC 2017 or otherwise):

You should hence refer to the steps of uninstalling the After Effects CC software mentioned above and replace the CC with CS6, CS7, or your specific copy depending on your installed Windows.

can t uninstall after effects cc

What To Do If Adobe After Effects CS6 Uninstall Failed

Sometimes you receive an error that the After Effects uninstall failed or that the PC has encountered various uninstallation errors.

 can t uninstall after effects cc
Other potential problems including the creative cloud refusing to launch and further complications when you attempt to uninstall AE from your computer’s control panel.

This means you will need to troubleshoot the system before retrying. Here are some actions to take in order to eliminate the emerging errors:

Troubleshooting Tip 1: Stop All Other Applications

Programs removal is sometimes affected by other running applications especially where the involved software share some background processes. The key here is to stop all presently running programs before starting to uninstall After Effects.

Troubleshooting Tip 2: Restart your computer

In most cases, common After Effects uninstallation issues are solved by simply restarting the computer. You may thus restart the PC then re-launch the uninstall process.

Troubleshooting Tip 3: Stop The Antivirus Temporarily

Uninstallations typically involve an Uninstaller software behind the scenes so your antivirus may block the launching of the concerned uninstaller by mistaking it for malware in some cases.

Luckily, most antivirus software including BitDefender allows you to pause their activities temporarily. You should, therefore, halt your antivirus even for a couple of minutes to allow you to complete the uninstall.

Troubleshooting Tip 4: Turn off The Firewall

A Firewall including two-way firewalls for Windows 10 can also interfere and may need to be turned off to successfully run through all the uninstallation steps.

There you go, we hope these quick solutions helped you to fix this issue.

RELATED STORIES TO CHECK OUT:
Windows Core OS might feature open-source elements

Microsoft has numerous OS versions currently in use all over the world. These operating systems are updated periodically for the best possible user experience and system performance. At the same time, new features are added with every new major version.

Microsoft is working on a newer version of its operating system codenamed Windows Core OS that will turn the desktop operating system into a “modular” one.

This means that the OS can be mounted on any devices including dual screen mobile phones and computer systems. It can also be developed according to the structure and functionality of the end-devices.

Windows Core OS will feature open source code

Most importantly, it will also include open source code. Microsoft is already recruiting computer specialists who are up to the task. There is an active job offer on LinkedIn revealing more information about the job:

Confidential Program requiring Machine Learning/Data Science knowledge and Program Management skillset to ensure the Security of Windows Core OS from malicious actors and code. Improved the security posture of Windows Open Source Components through initiatives that investigate vulnerabilities found and establish a process for remediation.

The Windows Core Operating System is mainly developed for manufacturers and developers in order to build custom designed OS versions, apps and software. One can also made it proprietary software as it is developed according to developers’ needs.

Microsoft’s Windows Core OS is reportedly being designed with multiple editions in mind (Home, Pro and Enterprise edition which will be subscription based).

By launching the very first Windows open source operating system platform, perhaps there will come one day when devices running Windows Core OS will be more popular than Android.

RELATED STORIES TO CHECK OUT:

How to use the new Reset this PC utility in Windows 10 19H1

Microsoft has just showed users a little more of what the 19H1 update has in store for Windows 10. Revamped storage is one of the notable new additions. This is a modified Reset this PC utility for users to try out.

Reset this PC is something users can restore Windows 10 to its default settings with. The utility reinstalls the OS and uninstalls most apps (except those that came pre-installed). Thus, Reset this PC can come in handy for troubleshooting Windows.

In addition, it provides a quick way for users to erase data when they abandon an antiquated desktop or laptop.

Microsoft has made a few modifications to Reset this PC. The utility has undergone some relatively slight UI changes. However, the utility is still a wizard. This is how Windows Insider users can reset Win 10 with the new Reset this PC feature. This feature will be available to all Windows 10 users later this year.

  • First, click the Type here to search Cortana button to open the app’s search box.
  • Then click Reset this PC to open the window shown directly below.

  • Click Get Started to open the Reset this PC window.
  • At first, Reset this PC seems much the same as before as users can select either Keep my files or Remove everything. Users who need to retain their files should select the Keep my files option.
  • However, Reset this PC isn’t entirely the same after users select one of the first two options. Now users can click Change settings to open additional options.
  • Thereafter, users can toggle Data erasure and Data drives settings on or off. Users can toggle Data erasure on to erase files and clean the drive.
  • Users can also select to remove data from just one drive or erase files from all their partitions. Toggle Data drives on to erase files from all drive partitions.
  • Press the Confirm button.
  • Click Next > Reset to reset Windows 10. Thereafter, Windows will reset, which can take quite a few hours.

So Reset this PC is now a little more flexible than it was before as users can toggle a couple of options on/off. The Data drives option is also a new setting that users can’t select in current Windows 10 versions.

That extra setting will come in handy for users who have partitioned their hard drives. The revamped Reset this PC utility will be included in Windows 10 version 1903 when the 19H1 update rolls out in spring 2019.

RELATED ARTICLES TO CHECK OUT: 

How to safely uninstall Steam games on Windows 10

We live in an era of digital game distribution, and Steam is most likely the king of the hill. However, as the games become significantly larger, deleting some titles you rarely play is an obvious step.

This, of course, means you’ll need to download them again later through Steam, and if you have a data cap, this might be an issue.

If not and you’re indeed low on space because a darn game takes 70 GB, here’s how to safely uninstall Steam games.

How can I safely uninstall Steam games?

1. Use the Steam client

  1. Open Steam client.
  2. Open Library.
  3. Right-click on the game you want to uninstall, and choose Uninstall from the contextual menu.
  4. Confirm selection and you should be good to go.

Uninstalling games through the Steam client is as simple as the installation is. You’ll still get to keep your save games, but you might as well back them up.

Don’t worry about your games, as they’ll still be available to download in the library.

Once you’ve deleted all local content, and considering how large modern titles are, this will get you a lot of free storage space.

But, without further ado, you can follow the above steps to safely uninstall a Steam game via the Steam desktop client.

2. Try the manual approach

  1. Close the game and Steam client.
  2. Navigate to Program Files (stored in System partition, usually C:).
  3. Open Steam, then steamapps and, finally, Common.
  4. Delete the folder of the game you want to remove.

On the other hand, if you prefer avoiding Steam desktop clients, uninstalling games from the Windows Control Panel is not an option.

However, as they are still stored on your HDD, you can delete them like any other folder or file. The only thing worth knowing is the location where Steam is storing games locally.

And if you want to reinstall the game you’ve uninstalled before, follow these steps:

  1. Open the Steam client for Windows.
  2. Open Library.
  3. Choose the game you want to install from your Library. All the purchased games are in the left-pane list.
  4. Click on the game, and then click Install.
  5. Wait until the client downloads and installs the game.

3. Use a professional uninstaller

Manually deleting a game is a time-consuming task, and sometimes it can be hard to remove the leftovers.

A professional third-party uninstalling tool can perform this process in a fast and efficient way.

This type of software has powerful capabilities, and it can delete all the unnecessary files left behind by the game with just a few clicks.

Hence, if you need to completely delete any games from your PC, perform it using efficient uninstaller software and complete the job efficiently.

Alternatively, you can just search for the game in the Store section and install it from there.

That’s it. The only remaining thing is to open Steam again and focus on something else worth acquiring. Hopefully, this was a helpful read and if that’s indeed the case, tell us in the comments section below.

Also, if you have more solutions or other questions on this topic, feel free to leave them in the comments.

DuckDuckGo traffic is exploding but can it replace Google?

You must be sick of advertising trackers that are constantly monitoring your each and every move over the internet. The latest security breaches have spooked most of the people to be concerned about their privacy more than ever before. If you are one of them, don’t worry DuckDuckGo is here to take care of your privacy.

What is DuckDuckGo?

DuckDuckGo is a search engine that does not track its customers. The search engine assures its users that it is not going to follow them by using cookies. The search engine makes sure that it does not collect the personal information of its users.  The privacy is further ensured due to the fact that user IP addresses are also hidden.

How it differentiates itself from Bing & Google?

You might not be aware of the fact that the users’ search terms are shared with the website that they are visiting.  It is done as soon as users click on the links from Bing and Google.  The HTTP referrer header is used for that purpose even if the user is clicking the links from Bing and Google in private mode. Your IP address is also automatically shared by your computer. The information is then used by the website for identifying each user.

The process is termed as “search leakage” by DuckDuckGo. It prevents sending the search terms to other websites through redirection in a particular way. DuckDuckGo restricts the websites from identifying users based on their personal information, neither do they have information about your search terms.

Moreover, an encrypted version of DuckDuckGo is available as well. The links from various websites (Facebook, Amazon, Twitter, and Wikipedia) are changed automatically to offer encrypted versions for each of them.


In case you want to be secure while surfing the internet, you will need to get a full-dedicated tool to secure your network.  Install now Cyberghost VPN and secure yourself. It protects your PC from attacks while browsing, masks your IP address and blocks all unwanted access.


DuckDuckGo reaches 800 million monthly searches

DuckDuckGo has gained the trust of users in a short span of time. The privacy features of DuckDuckGo are compelling enough for the users to make a permanently ditch Google.

 Its popularity can be understood by the fact that 800 million monthly direct views have been recorded during September last year. 

Some of the users turned to Reddit to share their experiences about the search engine. 

“I tried DDG for a few weeks since it seemed like a better option. The search results were different when I compared them to Google, but I wouldn’t say they were much better or worse.”

Most of the users prefer DuckDuckGo because unlike Google their advertisements are not personalized or customized by your search history. Instead, the search engine uses keywords that are entered by the users to display ads. One of the users expressed his views about the same on Reddit:

“Yes. When you look up, for example, office desk prices on DDG, you’ll be served with ads for office desk on that search and that search alone, as opposed to Google which will still try to sell you office desks for the rest of eternity.”

It is worth mentioning that some of the users are still concerned about the fact that tthe founder of DuckDuckGo has sold user’s data in the past. He is being criticized for not apologizing for his unethical actions to the general public. DuckDuckGo needs to take care of the situation otherwise it can be a serious problem for the emerging search engine. 

While another user had to switch back to Google after using DuckDuckGo for almost 6 months. He was compelled to do so because the search results were not good in his native language. Even though he wanted to switch from Google due to privacy concerns, the search results made him stick to the world’s biggest search engine. 

Verdict

Finally, we cay say that DuckDuckGo is such as privacy-focused search engine that is definitely going to be a tough competition for Google Search. The search engine is named after a popular game for the kids. DuckDuckGo should consider improving its existing features if it wants to stay in the search engine space. DuckDuckGo has still a long way to go!

FIX: Outlook Meeting updates not updating in the Calendar

Outlook is a vital part of the Microsoft workspace, used by millions of satisfied users. By unifying the e-mail client with calendar and tasks, Outlook revamp was welcomed as a positive change and a step forward for sure. When it works, it works great, both for home or professional users. On the other hand, when it fails, it fails miserably.

That seems to be the case with Outlook Meetings which, based on many user reports, are not updating in the Calendar. We made sure to shed some light and provide possible solutions for this below.

How to fix update issues with Outlook calendar meetings

Using Outlook to set meetings with your contacts is quite a usual and a rather useful feature. It’s an important piece of software for so many users who require organization and scheduling, including meetings with anyone from your contacts list.

To make it even better, Outlook is a multiplatform solution so it can sync on a plethora of devices, PCs and smartphones alike. There’s a lot of competition in this field, but it seems Microsoft has hit a soft spot with Outlook.

On the other hand, everything falls apart if Outlook won’t sync or update meetings in the calendar. This is, seemingly, a grave problem for a hefty number of users. The worst thing about it is that these occurrences are selective.

Scheduled meetings are updated on some devices and not on others. This gets peculiar when scheduled meetings successfully update changes on the web-based Outlook while the desktop app fails to do so.

There are no official solutions provided by Microsoft at the moment, but we can suggest a few steps based on the app version. For the desktop app, you can try running two commands. The first one should reset roaming preferences while the second will reset client processing.

Outlook for desktop

In order to run these two, follow the steps below:

  1. Open Windows Search bar and copy-paste the following command:
    • Outlook.exe /cleanroamedprefs
  2. Press Enter. If that fails, try copy-pasting this command and press Enter afterward:
    • Outlook.exe /sniff

Outlook for web

With that said, we can conclude this article. Hopefully, these steps helped you address the problem at hand. If that’s the case, give us a shout-out in the comments section below.

Posted in Fix

Skype users cannot sign back in unless they update the app [Updated]

So, this morning, I powered up my computer and grabbed a cup of coffee as I was getting ready for a new work day. I heavily rely on Skype for both work purposes and keeping in touch with family and friends but, boy, was I in for a big surprise!

Apparently, Microsoft decided that I can no longer use my current version of Skype and I need to update if I ever want to sign back in.

Just a few seconds after I launched Skype, the app closed down automatically with the following alert:

It looks like Skype hasn’t been update for some time.
What happens if I don’t update now?
The next time you sign in or restart your computer, you’ll need to update Skype before you can sign back in.

And here’s the visual proof of this:

update skype

Microsoft leaves users no choice but to update Skype

As you can see, starting from this day, if you want to use Skype, you need to install the latest app version. Personally, I really don’t like this pushy approach but I need Skype for work. As a result, I did hit the ‘Update Skype’ button.

At the same time, I’m also looking for a reliable Skype alternative. I believe users should have the right to choose whether to update Skype or not. If Microsoft doesn’t offer me this option, I’ll look elsewhere.

What’s your take on this? Were you met with this Skype alert as well? Let me know in the comments below.

Update: Three of my colleagues just got the same Skype alert.

Update 2: We contacted Skype Support asking for more information about this alert. We also asked them whether more users should expect to see this alert today or these are only isolated cases. We’ll update this post as soon as we have an answer.

Update 3: We just got a response from Skype. Microsoft is indeed retiring older Skype versions in batches, hence the alerts that me and my colleagues received recently.

Hi Madeleine! From time to time we retire older versions of Skype to introduce new features, improve existing ones and fix bugs. When this happens, you won’t be able to sign in until you upgrade to the latest version.

And now you know.

These DJI drones are learning to recognize objects with help from Microsoft AI technology

With Azure Cognitive Services, Microsoft is using AI and the power of the cloud to allow apps to process natural language, identify objets, and even persons. We’ve already seen the power of these technologies in apps like Bing Visual Search and Seeing AI, an iPhone app that can help the visually impaired to recognize text, people, and objects around them

DJI, the world’s biggest drone manufacturer has now teamed up with Microsoft to create drones that can recognize objects, including different types of fruits (via Tech in Asia). Both companies recently organized the AI x Drones Joint University Competition, where students had to build AI models so that DJI drones would be able to recognize fruits that had been scattered in a specific area.

In the image below, you can see how an AI model built by students was able to label different fruits, and add a number next to each of them to indicate if the results could be really trusted or not.

Image credit: Abacus.

According to Winnie Chu, Business Group Lead, Cloud and Enterprise at Microsoft Hong Kong, the intelligent edge (the ability to run AI closer to the physical word) really helps to make AI models more effective on these drones. “Once a drone detects something, it can send the message or the results back to the computer, and it will make the whole performance and user experience much better,” said Chu.

If it doesn’t seem very useful to have drones that can recognize fruits, there could be many more interesting use cases for this technology, such as checking stocks in massive warehouses or explore other areas inaccessible to frontline workers. “We see drones as empowering workers and becoming a new tool in the toolbox,” explained Kevin On, Global Marketing and Communications director of DJI.

Feature image credit: Abacus.

YouTube TV, one of Xbox One’s best TV apps, is now available broadly in the US

YouTube TV is now available to 98% of people in the United States (via The Verge), and the majority of those users will be able to enjoy at least three of the big four local broadcast giants (ABC, CBS, FOX, NBC) depending on their area. Google promises the remaining area will get access soon, the wait primarily being due to negotiations with local broadcast stations, since local stations are a big part of the service.

YouTube TV has become my primary means of entertainment on the Xbox One, especially given I have access to all four of the local options. It’s probably the best option out there and the only one that gives up to six family members their own unlimited DVR storage (although recordings expire after 9 months) for just $40 a month. The only downside is the lack of Viacom and Discovery networks, so that means no Comedy Central, Nickelodeon, BET, or Discovery channels.

YouTube TV screenshots on Xbox One

That said, there are other options out there for those who do need the extra channels or features. Sling TV allows users to build their own plan, and Hulu brings their entire on-demand library to subscribers of their live TV service. Then there’s also cable though OneGuide for those who need a lot of channels. However neither of those services offer the incredibly useful unlimited DVR storage that YouTube TV offers.

If you’re interested, you can download the app on the Microsoft Store for your Xbox One, and if you’re on Windows 10 its available on the Chrome and Firefox web browsers. Unfortunately that leaves out S Mode users, at least until Edge becomes powered by Chromium. Additionally, anyone on iOS and Android can download the app on their respective app stores to enjoy live TV, DVR, and on-demand content from anywhere they wish.

YouTube TV
YouTube TV
Developer:
Google LLC
Price:
Free


‎YouTube TV
‎YouTube TV
Developer:
Google
Price:
Free


YouTube TV: Live TV & more
Developer:
Google LLC
Price:
Free


Microsofts decouples Search and Cortana in Windows 10 v1901

New features and updates in technology play a very important role for users. The same is valid for Window Insiders. As a matter of fact, Windows 10 Insiders can now test a new ‘feature’ where Cortana and Search are separated.

So, how is this new feature different from the previous Cortana-Search combo and how can users utilize it in a better way? In this new update, Search and Cortana are decoupled in the taskbar which means that these two features can be used separately and independently.

This has been one of most popular requests in the Feedback Hub. Some of the Insiders are already running this new OS update. They tested the separated Cortana-Search feature and they’re quite satisfied with it.

This will enable each experience to innovate independently to best serve their target audiences and use cases. […]
Some Insiders have had this update for a few weeks now, and we appreciate all the feedback we’ve received about it so far!

Here is also the tutorial for those of you who want to learn more on how to  use Cortana and Search separately.

How to use Cortana and Search separately

cortana search separated
In the taskbar, there will be a separate search icon which is a new addition brought by the latest update. On the left side of the taskbar, an icon stands for Cortana and by clicking on it, the voice-first digital assistant will be automatically launched for you.

The privacy and search settings of Search and Cortana are also segregated in two parts. Microsoft introduced this separated settings policy in order to improve the search results. You can also tweak the design of the search box (that can be unique and different for all users) and you can also integrate the Microsoft To-Do with Cortana easily.

So these are the main advantages that one can have by installing the new update. If you’re not an Insider but you want to test the new feature, you can enroll in the Windows Insider Program via the Settings page.

If you have any question about this update, feel free to comment below.

Note: For now you can get Cortana on supported markets only.

RELATED STORIES:

Windows Server vNext Insider build 18317 and Windows Admin Center Preview 1812 are now available

Microsoft has just announced the release of the preview build 18317 for the Windows Server vNext Semi-Annual channel release, as well as Windows Admin Center Preview 1812. The new Windows Server build brings the ability to support multiple code integrity policies through three different scenarios, in addition to a couple of bug fixes.

Windows Admin Center, the new graphical management tool for Windows Server is also getting some love in this 1812 release. New features include a new dark theme UI, the addition of Power configuration tab on the server settings page, and the ability to configure Windows Admin Center using PowerShell.

This new Windows Server build is now available to download for Insiders on the Windows Server Insider Preview download page. Microsoft noted in the release notes that in-place upgrade will fail for this build, so you’ll have no choice but doing a clean install.

Microsoft’s new Classroom Pen is designed for K-8 students and optimized for Surface Go

Microsoft is using the Bett education conference in London to announce some interesting hardware news this morning. In addition to the seven new Windows 10 PCs for education, the company also unveiled the Microsoft Classroom Pen, which is designed for K-8 students and optimized for Surface Go tablets.

The Microsoft Classroom Pen has a design similarity with the company’s Surface Pen, but it’s just over 4 inches long with two buttons on the side. According to Microsoft, the new Classroom Pen is “designed for students who put their learning tools through heavy wear and tear and features a durable, hardened pen tip and a replacement tip for each pen included in the box. Plus, a built-in slot at the end makes for easy tethering to students’ device cases, so the pen doesn’t get lost.”

The Microsoft Classrom Pen is just over 4 inches long.

The Microsoft Classroom Pen will be offered exclusively to EDU institutions in all 36 Surface Go markets starting in February. It will only be sold in packs of 20 for a cost of $799.80, which represents approximately $39.99 per pen. The company plans to share more details about the new pen on Friday.

Mortal Kombat 11 could get crossplay between Xbox One and other consoles

It appears NeatherRealm Studios, the company that is developing the upcoming Mortal Kombat XI fighting game, is interested in enabling cross-platform multiplayer in their new game, due for release this Spring. This could enable users on various platforms such as Xbox One, PC and Mac to not just play with each other, but also interact with cross-platform profiles, friends, voice communication, and match-making, cloud saves and even achievements could work between the different platforms

All of this could be possible in part due to Epic Games’ release of their API tools, as spotted by the writers at Wccftech. The gaming company that develops the heavily popularized and highly cross-compatible Fortnite game will make new cross-platform features free for all developers, and the APIs will be released over a period of several months for any developer wishing to incorporate them into their own titles.

  • Cross-Platform Login, Friends, Presence, Profile, and Entitlements (coming Q2-Q3 2019 to PC, other platforms throughout 2019): Provides the core functionality for persistently recognizing players across multiple sessions and devices; identifying friends; and managing free and paid item entitlements. This will support all 7 major platforms (PC, Mac, iOS, Android, PlayStation, Xbox, Switch) to the full extent each platform allows per-title.
  • PC/Mac Overlay API (coming Q3 2019): Provides a user interface for login, friends, and other features in a game-agnostic, engine-agnostic way.
  • Cross-Platform Voice Comms (coming Q3 2019 to all platforms): Epic is building a new in-game voice communications service supporting all platforms, all stores, and all engines, which will be available for free. (For developers needing an immediately-available voice solution, check out Discord, Vivox, TeamSpeak, Ventrilo, and Mumble.)
  • Cross-Platform Parties and Matchmaking (coming Q3-4 2019 to all platforms)
  • Cross-Platform Data Storage, Cloud-Saved Games (coming Q2 2019)
  • Cross-Platform Achievements and Trophies (coming Q3 2019)

Cross-platform multiplayer is unlikely to be available in the game’s initial release in April 23, and the developers haven’t addresses much, including whether the game could work between PS4 and other platforms. This is likely due to Sony’s strict policies against cross-play, however lately it seems to be willing to soften its stance on the issue.

If you’re interested, the game is available for pre-order right now on the Microsoft Store, and will be an Xbox One X Enhanced title and supports HDR10 for anyone who is sporting a supported TV and Xbox One S or X system.

Microsoft Launcher version 5.2 now available for beta testers with several new features

Microsoft Launcher has begun rolling out its second major update since the app’s v5 launch on the Google Play Store, bringing the beta to version 5.2 to those who wish to preview the update ahead of its official release. The app’s development head Gordon Lin took to the app’s Google+ community to give users the full changelog of the update, which includes UI enhancements to give them app improved design consistency and ease of use especially on larger-screened devices.

These changes include an option to disable full screened folders as seen in the image above, and improvements to the font size so that it now reflects the phone’s system settings. Additionally, the launcher’s Cortana integration will now only be able to access calls and messages when set as the phone’s default assistant due to a policy change on the Play Store, which could disappoint users of the dedicated Cortana app. Here’s the full list of changes:

– Non-full screen folders for easier one-handed use and large-screen devices
– Microsoft Rewards daily deal card now allows you to earn Rewards points for using Microsoft Launcher and completing other tasks!
– Long-press shortcuts now work on home screen icons even when the home screen is locked.
– Microsoft Launcher no longer asks for Calls/SMS permissions by default per Google Play Store policies.
– Customers can now send a CPU profile through “Contact Us” in Settings in case of device performance issues
– Adaptive font- Launcher font size will now respect the system font size

If you’re interesting in previewing the update, Lin points out that anyone can do this simply by heading to the app’s beta testing page on Google Play, and signing up to ‘Become a tester.” Signing up give users early access to the launcher’s updates, bringing new features to them ahead of everyone else.

PlayerUnknown’s Battlegrounds (PUBG) gets new Vikendi Edition on Xbox One

To help promote the launch of the new Vikendi map in the PlayerUnknown’s Battlegrounds (PUBG) video game today, a new special Vikendi Edition of the popular game has just gone live on Xbox One.

This new PlayerUnknown’s Battlegrounds: Vikendi Edition comes with the base PUBG game, access to the public test server, 2,300 G-Coins, the Survivor Pass: Vikendi, and a Military Uniform Set which can be worn by both male and female characters.

To complement the new Vikendi Edition of the main game, a Vikendi Pack has also been made available for those that want the new digital content but don’t wish to re-buy the full game. The Vikendi Pack comes with the bonus 2,300 G-Coins, the Survivor Pass: Vikendi, and the Military Uniform Set.

The Military Uniform Set is exclusive to both of these bundles and won’t be available anywhere else. Each bundle will also be extremely limited and will be removed from the Xbox storefront on March 28th.

Are you tempted to buy either of these PUBG Vikendi bundles? Let us know which ones in the comments below and then follow us on Pinterest for more PUBG content.


Microsoft AI is powering digital transformation in India to fuel economic and social growth

At its annual Media & Analyst Days event in India, Microsoft India shared details about its progress on its vision to democratize AI in the country to fuel economic and social growth.

“A tectonic shift is happening in AI. Nearly 85% of enterprises globally will use AI in some form or the other by 2020, and Indian firms are now fast catching up,” Anant Maheshwari, President, Microsoft India, said in his opening keynote.

  • Analytics: $200 billion global market by 2020
  • Data: 44 zettabytes annually by 2020
  • Cloud: Cloud shift will affect more than $1 trillion in IT spending by 2020

He pointed out that while 8% of GDP components in India are impacted by digital technologies today, this number is expected to go up to 60% by 2021.

At the event, Microsoft shared that over 700 business and government organizations have adopted its AI solutions to drive digital transformation with 60% of these customers being large manufacturing and financial services enterprises.

Amongst the top 500 organizations on Bombay Stock Exchange (BSE), 97% of the top banks, 75% of the top retailers, 81% of the top auto firms, 75% of the top pharma firms, and 67% of the top healthcare firms are Microsoft’s customers in India. In addition, Microsoft is working with new-age organizations that are leapfrogging and disrupting industries.

Out of the 9,500 Microsoft Partners in India, there 2,995 Cloud partners with 88 own IP-ready partners helping Indian organizations to inlock the full potential of AI, Cloud, and data.

Microsoft recently introduced the Intelligent Cloud Hub program in India with an aim to help build AI and cloud computing skills required for future jobs. The company aims to equip research and higher education institutions with AI infrastructure as well as build curriculum and faculty capability to skill students in AI and cloud technologies.

According to a LinkedIn survey, US, China, and India have the highest penetration of AI skills among the workforce, in that order.

Last year, Microsoft India announced an agreement with NITI Aayog to leverage the benefits of AI for the growth of the nation. The NITI Aayog, also National Institution for Transforming India, is a policy think tank of the Government of India.

As part of the agreement, Microsoft India will support NITI Aayog by combining the cloud, AI, research and its vertical expertise for new initiatives and solutions across several core areas to advance agriculture, healthcare, natural language computing, and a sustainable environment Microsoft will also accelerate the use of AI for the development and adoption of local language computing.

We believe AI will enable Indian businesses and more for India’s progress, especially in education, skilling, healthcare and agriculture. Microsoft also believes that it is imperative to build higher awareness and capabilities on security, privacy, trust and accountability. The power of AI is just beginning to be realized and can be a game-changer for India.

– Anant Maheshwari, President, Microsoft India

In 2016, Microsoft created the global Artificial Intelligence and Research (AI & R) group with the goal to bring AI to every person, organization, and company.

The company now offers a broad framework for integrating AI with Azure, Azure Stack, Azure IoT Edge, and Azure Sphere. With 54 Azure regions globally, Microsoft has more cloud regions than both Amazon (AWS) and Google (Google Cloud) combined.

Telegram updates on Windows 10 with new useful group chat settings

The official Telegram app for Windows 10 devices updated today with some improvements for groups. With this update, group admins can now place limits on the type of content members post, access to the group settings has been significantly streamlined, and all groups can now have up to 200,000 members (up from the previous 100,000 limit).

Other changes made with this update include an option to select emoji sets in chat settings, support for automatic media downloads, and new input and output settings.

Here’s the full release notes:

  • Global permissions for groups. Restrict all members in any group from posting certain types of content.
  • Unified group settings. Make groups public, set admins with granular permissions and toggle persistent history in just a few clicks in any group.
  • Choose the emoji set you would like to use in Chat Settings.
  • Choose input and output devices for Telegram Calls in Settings > Advanced > Call Settings.
  • Support for automatically downloading files and music.

Telegram is a popular chat service that has official apps on all major platforms including Windows phone. Its recent updates on Windows 10 added features such as anonymous polls and support for custom-made languages.

Are you a Telegram user? Let us know why or why not in the comments below and then follow us on Pinterest for more tech content.

Telegram Desktop
Telegram Desktop
Price:
Free

Guacamelee! 2 video game launches on Xbox One and Windows 10

The sequel to the hit platformer Guacamelee!, Guacamelee! 2, is now live on Xbox One and Windows 10 devices. The game is very much in the same vein as the original with a bright Mexican-influenced design aesthetic, eccentric characters, Metroidvania-style platforming challenges, and support for local multiplayer.

Here’s the official Guacamelee! 2 game description:

Brawling has never been more beautiful! The long-awaited sequel to the smash hit action-platformer is here: Guacamelee! 2 brings luchador Juan Aguacate out of retirement for a stunning new Metroidvania-style adventure, where he must face his greatest challenge yet – one that threatens to tear apart the very fabric of the Mexiverse!

Explore a huge, hand-crafted world inspired by Mexican culture and folklore, filled with sassy new villains and weirdos (and a few old friends!). Learn a deep repertoire of bone-crunching wrestling moves to fend off the skeletal hordes and overcome skillful platforming challenges… and who said anything about a Chicken Illuminati? Certainly not us!

Guacamelee! 2 supports Microsoft’s Xbox Play Anywhere initiative which means that buying it on Xbox One will unlock it for free on Windows 10 and vice versa. Game saves will also transfer between devices using the same Microsoft/Xbox account and players will be able to unlock Xbox Achievements wherever they choose to play. The game will also play in 4K Ultra HD on the Xbox One X console.

Are you a fan of the original Guacamelee! video game and have you played Guacamelee! 2 yet? Let us know in the comments below and then follow us on Pinterest for more Xbox gaming content.

Guacamelee! 2
Guacamelee! 2
Developer:
Drinkbox Studios
Price:
$19.99

KB4480977 comes with a total of 14 fixes for Windows 10 v1607

LTSC branch devices just got the KB4480977 update for Windows 10 Anniversary Update (version 1607) that upgraded the OS build number to 17134.556. 

Windows 10 cumulative update KB4480977 has released a handful of bug fixes that existed in the previous OS releases. A reliability issue in the File Explorer has been fixed.

The issue that caused the RemoteApp Windows to intermittently appear and disappear on Windows Server 2016 has also been fixed. Microsoft also addressed the issue for third-party applications that were no longer able to authenticate hotspots. 

You can read more about the complete list of bug fixes and improvements on KB4480977’s official support page.

Known issues in KB4480977

Microsoft has also reported several known issues in the recent cumulative update. Some of them have been mentioned below:

  • Those applications may fail to open that are using Microsoft Jet database along with the Microsoft Access 97 file format. The error may only occur in the case if the column names in the database exceed 32 characters.
  • The installation of this update on Windows Server 2016 results in the error “Outlook cannot perform the search” , while performing an instant search in Microsoft Outlook Client.
  • Some icons appear incorrectly in the taskbar as soon as the file association defaults are changed.
  • Lenovo systems having less than 8 GB of RAM, may fail to startup after the installation of KB4480977.
  • Soon after VMM refresh, Infrastructure management issues are reported for System Center Virtual Machine Manager (SCVMM) managed workloads. The issue arises because Windows Management Instrumentation (WMI) class around network port is not being registered on Hyper-V hosts.

It is worth mentioning that Microsoft has already ended its support for Windows 10 version 1607 in April last year. The update is no longer available for Windows 10 Home and Windows Pro. However, the support for the LTSC versions has been extended until October 2016. The Intel Clovertrail chipset systems will continue receiving updates until January 2023. 

Microsoft is continuously improving the general performance of old operating system versions by resolving issues reported in the previous releases. The tech giant recommended its users to upgrade their devices to a supported OS version to enjoy the full features offered by Windows 10.

RELATED ARTICLES: