Crunchyroll Error Code Shak-1001: 10 Tested Fixes

Encountering the Crunchyroll Error Code SHAK-1001 can be frustrating, especially when you’re in the middle of an exciting anime episode. This error typically indicates issues with server connectivity, internet stability, or even app glitches. Here are some quick solutions to help you get back to streaming without any interruptions.

How do I fix the Crunchyroll Error Code Shak-1001?

1. Check the server status

Launch the web browser you use most frequently to access Crunchyroll and go to the server status page. Look for any updates on server status on their main page, or visit their social media accounts for real-time updates on any server issues.

By checking the server status, you can determine if the problem is on Crunchyroll’s end or your own. This helps you avoid unnecessary troubleshooting if the server is indeed down.

2. Verify your internet connection

  1. Use a speed testing website like Ookla’s Speedtest to check your internet speed.
  2. Unplug your router from the power source, wait 30 seconds, then plug it back in.
  3. Ensure your device is properly connected to the network and avoid using VPNs or proxies that might interfere.

A stable internet connection is crucial for streaming services. Verifying and stabilizing your connection can resolve many streaming issues, including Error Code SHAK-1001.

3. Disable Windows firewall and antivirus

  1. Click on the Start menu, type Control Panel, and press Enter.
  2. Click on System and Security, then Windows Defender Firewall.
  3. Click Turn Windows Defender Firewall on or off and select Turn off Windows Defender Firewall.
  4. If you’re using a third-party antivirus, open its settings, and temporarily disable the protection.

Disabling your firewall and antivirus temporarily can help identify if they are blocking Crunchyroll. Just remember to turn them back on after testing.

4. Clear your watch queue

  1. Open Crunchyroll and log into your account.
  2. Click on your profile and navigate to Queue.
  3. Delete any titles you no longer watch or plan to watch soon.

Clearing your watch queue can reduce the load on your account, potentially resolving the SHAK-1001 error caused by an overloaded queue.

5. Clear the browser cache

  1. Click on the three-dot menu in the top right corner (for Chrome, Edge) and select Settings.
  2. Find and click on Privacy and security or equivalent.
  3. Select Clear browsing data, choose the time range All time, check Cached images and files, and click Clear data.

Clearing your browser cache ensures that any corrupted data is removed, which could be causing the error.

6. Clear the app’s cache (for mobile users)

  1. Navigate to the settings app on your mobile device.
  2. Select Apps or Applications.
  3. Tap on Crunchyroll in the list of apps.
  4. Go to Storage and tap Clear Cache.

Clearing the app cache on your mobile device removes any corrupted temporary data that might be causing the problem.

7. Update the Crunchyroll app (for mobile users)

  1. Launch Google Play Store or App Store on your device.
  2. Type Crunchyroll in the search bar.
  3. If an update is available, you’ll see an Update button. Tap it to update the app.

Updating the app ensures you have the latest bug fixes and features that can resolve many common issues, including Error Code SHAK-1001.

8. Reinstall the Crunchyroll app

  1. On PC, go to Settings > Apps > Installed apps, find Crunchyroll, then click on the three dots button to its right and select Uninstall.
  2. Go to Microsoft Store’s Crunchyroll page, and install it again.

Reinstalling the app can fix corrupted installation files that might be causing the error.

9. Use different devices or browsers

  1. Try using Crunchyroll on another device like a smartphone, tablet, or another computer.
  2. If you’re using a web browser, switch to another one such as Opera.

Testing on different devices or browsers can help you identify if the error is device-specific or related to your current browser setup.

10. Disable browser extensions

  1. Click the three-dot menu in the top right corner and go to Settings.
  2. Navigate to Extensions or Add-ons.
  3. Toggle off all extensions, then restart your browser and try accessing Crunchyroll again.

Certain browser extensions can interfere with streaming services. Disabling them can help resolve the issue.

By following these steps, you should be able to resolve the Crunchyroll Error Code SHAK-1001 and get back to enjoying your favorite shows.

Did you manage to get rid of the Crunchyroll Error Code SHAK-1001? Let us know in the comments below.

Microsoft Bluetooth Enumerator Driver on Windows 11 Explained

Windows uses various drivers to communicate with other devices, and speaking of which, today we’ll tell you everything you need to know about the Microsoft Bluetooth Enumerator driver for Windows 11.

What is the Microsoft Bluetooth Enumerator driver and how to use it on Windows 11?

What is a Microsoft Bluetooth Enumerator?

Microsoft Bluetooth enumerator installs the necessary driver when a connected Bluetooth device doesn’t have its Bluetooth driver.

By doing so, the device is controlled by the Microsoft Bluetooth Enumerator and not the third-party driver.

How to install Microsoft Bluetooth Enumerator?

This driver is installed by default with Windows and it should appear as soon as you connect a Bluetooth device to your PC.

Alternatively, try to install a Bluetooth driver for your device from the manufacturer’s website.

Can I remove the Microsoft Bluetooth enumerator?

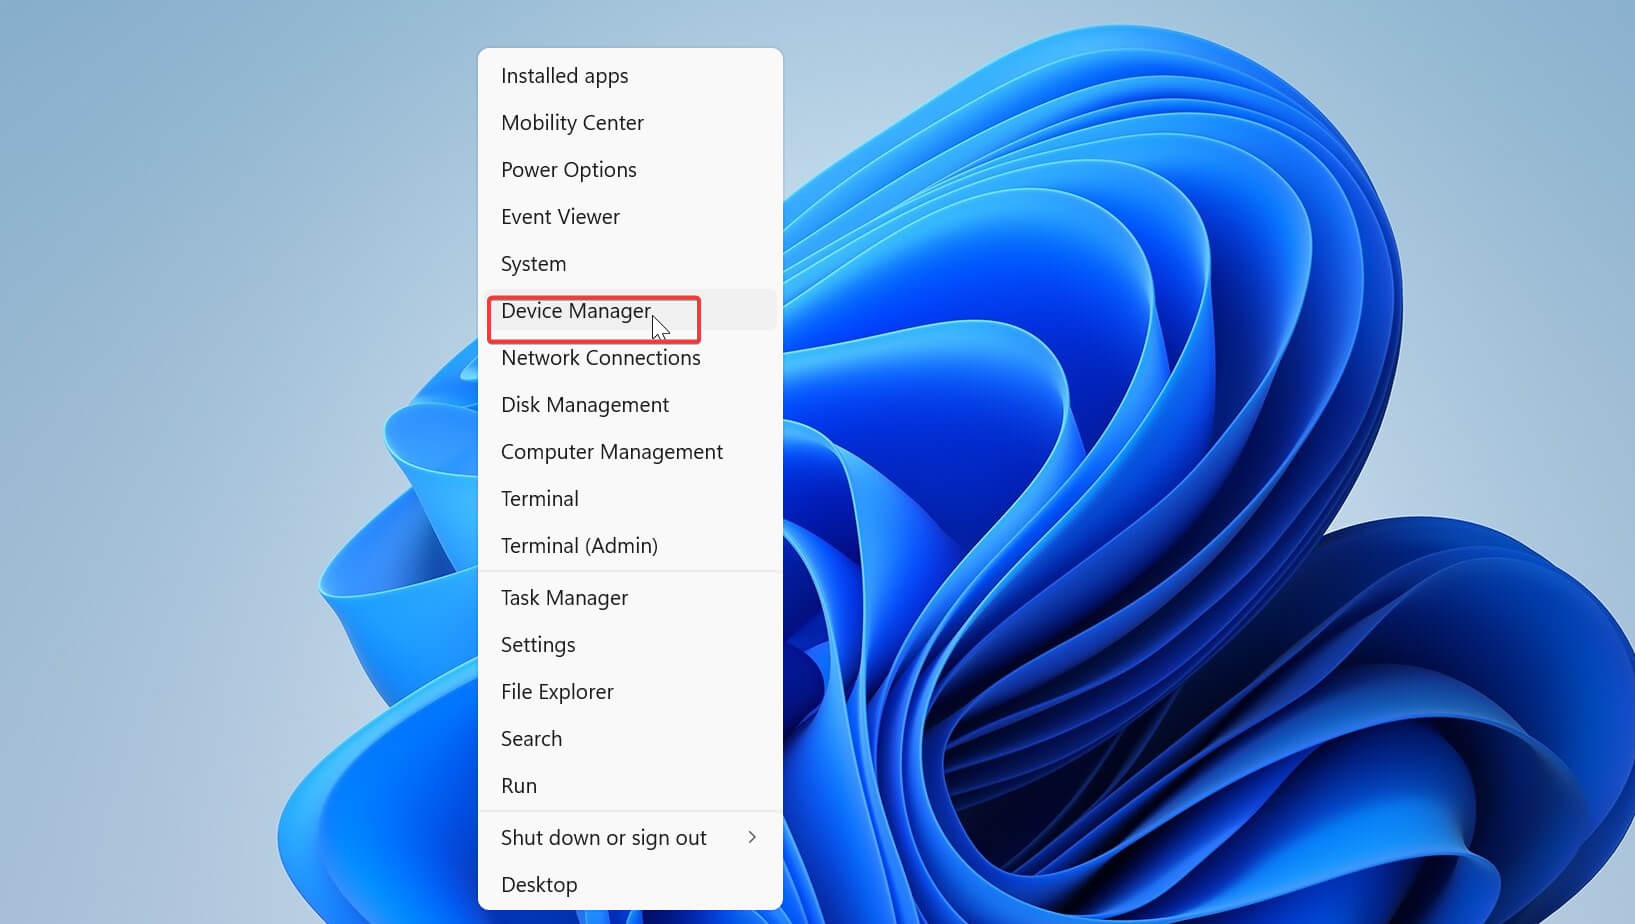
  1. Press the Windows key + X and choose Device Manager.
    device manager windows 11 win+x menu
  2. Next, go to View and choose Show hidden devices.
    show hidden devices device manager windows 11
  3. Expand the Bluetooth section and locate the Microsoft Bluetooth Enumerator.
  4. Right-click it and choose Uninstall device.
    uninstall device context menu windows 11 device manager
  5. Click on Uninstall to confirm.

Do you need a Microsoft Bluetooth Enumerator?

Yes, Microsoft Bluetooth Enumerator is needed if you’re using devices that don’t have Bluetooth drivers. Therefore this driver shouldn’t be removed or disabled, unless you’re having issues with it.

How do I fix the Microsoft Bluetooth Enumerator?

If Microsoft Bluetooth Enumerator is not working on Windows 11, you can try reinstalling it or check the instructions from our Bluetooth not working guide.

We hope that you now understand how the Microsoft Bluetooth Enumerator driver works on Windows 11. If you have any issues with it, you might experience a Bluetooth unknown device error, but it can be easily fixed.

Caps Lock is Not Working: 10 Tested Fixes for Windows

Dealing with a Caps Lock key that’s not working can be quite frustrating, especially when you’re in the middle of important tasks. Whether you’re using a desktop, laptop, or an external keyboard, here are some practical solutions to get your Caps Lock key back in action.

Before starting, check if the key is not working or the light indicator is not functioning. If the Caps Lock button is stuck, use the highlighted guide to fix it.

1. Check for Physical Keyboard Issues

  1. Connect to Another Device:
    • Disconnect your keyboard from your current computer and connect it to another computer.
    • If you are using a laptop, connect an external keyboard and check if the Caps Lock key works.
  2. Enter BIOS Settings:
    • Restart your computer and enter BIOS settings by pressing a specific key like F2, F10, Del during startup (check your laptop manual for the exact key).
    • Look at the Caps Lock LED in BIOS to see if it lights up when you press the Caps Lock key.

Checking your keyboard on another device or in BIOS can help you determine if the problem is with the keyboard itself or your computer settings. If the Caps Lock works elsewhere, it’s likely a software issue on your computer.

2. Update the keyboard drivers

  1. Press Windows key + X and select Device Manager from the list.
  2. Expand the Keyboards section, right-click on your keyboard device and select Update driver.
  3. Search Automatically for Updated Driver:
    • Let your system search automatically for updated driver software.
    • If Device Manager doesn’t find an update, you may need to download the driver manually from the manufacturer’s official website.

Updating the keyboard drivers ensures you have the latest and most compatible drivers installed, which can resolve Caps Lock indicator issues caused by outdated or corrupt drivers.

3. Undo problematic updates

For Windows 11:

  1. Press Windows + I to open Settings and select Windows Update.
  2. Click on Update history and scroll to Related settings.
  3. Select Uninstall updates and double-click the update to remove it.

For Windows 10:

  1. Press Windows logo key + I to open Settings and select Update & Security.
  2. Click on Update history and take note of the last update installed.
  3. Select Uninstall updates and double-click the update you want to remove.

Undoing a problematic update can resolve issues that started occurring after a recent update, restoring the functionality of your Caps Lock indicator.

4. Use third-party software

  1. Download and install software like TrayStatus or Keyboard LEDs from their respective websites.
  2. Set the software to show the Caps Lock status in the taskbar or via on-screen notifications.

Using third-party software can provide visual or auditory notifications for the Caps Lock status, bypassing the need for the physical indicator light.

5. Enable Caps Lock sound via Accessibility settings

  1. Press Windows key + U to open Accessibility settings.
  2. Scroll down and select Keyboard under the Interaction section.
  3. Toggle the switch for Toggle keys to turn it on.

Enabling a sound notification via accessibility settings will help you know when Caps Lock is turned on or off through an audio cue.

6. Open the On-Screen keyboard

For Windows 11:

  1. Press Windows + U to open Accessibility settings.
  2. Scroll down to Interaction and click on Keyboard, then turn on the On-Screen keyboard option.

For Windows 10:

  1. Press Windows logo key + I to open Settings.
  2. Turn on the On-Screen Keyboard toggle.
  3. Go to Ease of Access and select Keyboard.

Using the on-screen keyboard can help you identify if the issue is with your physical keyboard. You can see the Caps Lock status indicator on the on-screen keyboard.

7. Use an external keyboard

  1. Connect an external USB or Bluetooth keyboard to your computer.
  2. Check if the Caps Lock key works on the external keyboard.

Using an external keyboard can be a temporary solution if your internal keyboard’s Caps Lock key or indicator is not functioning correctly.

8. Configure Lenovo Keyboard Settings (For Lenovo Users)

  1. Press the Windows key, type Control Panel, and press Enter.
  2. Select Hardware and Sound, then View devices and printers.
  3. Right-click on your PC and select Keyboard Settings.
  4. In the Mouse and Keyboard center, find the option to Display Caps Lock status on the screen and enable it.

Configuring the settings for Lenovo keyboards allows you to enable on-screen displays for the Caps Lock status, making it easier to know when Caps Lock is active.

9. Reinstall the keyboard driver

  1. Press Windows key + X and select Device Manager from the list.
  2. Expand the Keyboards section, right-click on your keyboard device and select Uninstall device.
  3. Restart your computer to allow Windows to reinstall the correct keyboard driver automatically.

Reinstalling the keyboard driver can resolve issues caused by corrupted drivers, ensuring proper functionality of all keyboard features, including the Caps Lock indicator.

10. Check the BIOS settings

  1. Restart your computer and press a specific key (usually Del, F2, or F10) to enter BIOS settings during startup.
  2. Navigate to the keyboard settings and ensure they are configured correctly.

Checking and correcting BIOS settings can solve deeper hardware-level issues that may impact the Caps Lock indicator.

By following these detailed solutions, you should be able to fix the Caps Lock not working issue on your Windows 10 or 11 computer.

Caps Lock Turns Off With Shift Key [Solved]

If you ever find that Caps Lock turns off with the Shift key, it’s usually the misconfigured settings or keyboard mapping to blame. Of all the instances I have seen, there is a higher likelihood of the former. So, let’s get straight to what you should do when pressing Shift turns off Caps Lock.

What can I do if Caps Lock turns off with the Shift key?

1. Reconfigure Advanced Key Settings

  1. Press Windows + I to open Settings, go to Time & language from the navigation pane, and then click on Typing.typing settings
  2. Click on Advanced keyboard settings.
  3. Click on Language bar options.
  4. Now, head to the Advanced Key Settings tab, and choose Press the CAPS LOCK key under To turn off Caps Lock.reconfigure settings if caps lock turns off with shift key
  5. Finally, click on Apply and OK to save the changes and then reboot the PC.

If you have to press Shift to turn off Caps Lock in Windows 10 or 11, your primary approach should be to check the language bar options and verify that things are correctly set. Also, if you can’t turn off Caps Lock, this is a setting you might want to look at!

Besides, in case you want to turn off Caps Lock without the Caps Lock key, set the Shift key to perform the function.

Learn more about how to use the Shift key to turn off Caps Lock in Windows by following this step-by-step guide on Windows Report. It explains in detail how the feature works and what settings to check when your keyboard behaves unexpectedly.

2. Remove any keyboard mapping software

If you earlier used keyboard mapping software to create a custom keyboard layout, it’s time you delete it, create a new layout, or uninstall the app altogether.

In the several instances I came across, the layout introduced a ShiftLock-like situation, which led to this unique behaviour.

3. Repair the corrupt system files

  1. Press Windows + S to open Search, type Command Prompt in the text field, and click on Run as administrator.command prompt
  2. Click Yes in the UAC prompt.
  3. Paste the following DISM commands individually and hit Enter after each:DISM /Online /Cleanup-Image /CheckHealth DISM /Online /Cleanup-Image /ScanHealth DISM /Online /Cleanup-Image /RestoreHealth
  4. Next, use the following command to run the SFC scan: sfc /scannowsfc scan to fix caps lock turns off with shift key
  5. Finally, reboot the PC to apply the changes.

If nothing else works, you can always repair the corrupt system files.

In case that too fails, the last option is to reset the PC. This will wipe out all the apps, configured settings, and stored data, thus ensuring that Caps Lock doesn’t turn off with the Shift key. I recommend you move critical files to external storage before the reset to avoid data loss!

Which fix worked for you? Share with our readers in the comments section.

Microsoft releases Dev Home Preview v0.15

Microsoft recently released a new version of Dev Home, i.e., v0.15; it is available by default and is open source on GitHub.

What’s new?

Improved functionality of Machine configuration tool

The machine configuration tool in Dev Home helps you set up your developer machine instantly; now, with the improvements introduced in v0.15, bring WinGet DSC integration.

This will let you generate a configuration file after going through the setup flow; then, Dev Home will detect the file in a repo after cloning. You will also get new summary and details view when running configuration files.

Furthermore, Quickstart Playground, a new experimental feature is added to the machine configuration tool. It allows you to start a development project using AI quickly.

Different environments to choose

You get different environment types in one place, you can click Create Environment and, create, connect, and configure environments, including  Hyper-V virtual machines and Microsoft Dev Boxes all in one view.

Windows customization

With the Windows customization tool, you can modify additional settings within Windows to get a customized experience. You can tweak File Explorer, alter Dev Drive insights, initiate a quiet background processes session and more.

The Dev Drive insights option offers information on your Dev Drive volumes and suggests increasing performance within them.

The Quiet background processes feature is experimental and, as the name suggests, allows you to start a session with limited background processes, thereby freeing space for development tools.

A session can run up to two hours, and once it ends, you will get an analytic summary of CPU usage. Microsoft mentioned that the Windows customization tool is currently under development, which means we can expect more features in the future.

Utilities

The last tool in Dev Home’s kit is Utilities, which contains additional developer tools for Windows. Registry Editor, Hosts File Editor, Project Ironsides, and Environment Variables Editor are currently available under this category.

However, we can expect more tools to be listed in this area soon. Microsoft also asked users to file a feature request on GitHub if they want any specific tool included.

Project Ironsides is another experimental feature listed under Dev Home’s utilities. It lets you peek into the apps running on your device, monitor their performance, and fix any issues instantly.

You get information like window handle, process ID, and loaded modules list, including crash dumps from Windows Error Reporting (WER), Event Log, and Event Tracing for Windows (ETW). It examines the data for known failure patterns and suggests actions to fix the issues.

Apart from this, the version comes with quality improvements; here is the changelog available on GitHub:

Accessibility fixes

  • Narrator should now announce proper content within the Environments flow.
  • The Winget configuration and app install flows should be much more accessible now.
  • Text in the add widget dialog and environments page should no longer get cut off.
  • Narrator should now announce errors in widgets.
  • Machine configuration should now be fully navigable with arrow keys.

Changes

  • You can now configure the SSH keychain widget with using a file picker, rather than manually typing in the path.
  • SSH keychain widget now shows entries with multiple Host aliases
  • You can now use the application install flow via a URI protocol, allowing you to programmatically install apps through Dev Home.
  • Project Ironsides is now available as an experimental feature, intended to help you identify problems with applications and help provide solutions.
  • You should now see an error in Dev Home if an environment fails to be created.

Bug fixes

  • Launching a project from Quickstart Playground should no longer launch to a stale project.
  • Sentence structure is now more consistent throughout Dev Home
  • Environments search area should now be properly vertically aligned
  • Dev Home should no longer crash when opening a content dialog at 200% text scaling.

The preview of Microsoft Dev Home 0.15 is available in its GitHub repository. You can also download the app from the Microsoft Store. Alternatively, you can press Windows + X select Windows Terminal from the context menu and use winget install –id Microsoft.DevHome -e command to install the app.

Have you downloaded the new version of Dev Home yet? If so, share your experience with our readers in the comments section below.

Files v3.5 comes with a refreshed design and improved stability

Files app, developed by Yair A, is one of the best file managers for Windows. It is popular for its intuitive design, which makes navigating through files and other documents easy.

The app has been upgraded to version 3.5, with a revamped design, widget for network drives, and more. Here is what the official blog post says:

The latest update, Files v3.5, introduces a refreshed design, a new widget for network drives, improved multitasking with dual-pane enhancements, and better crash reports to help us improve stability, among others. Continue reading to learn more about these enhancements.

What’s new in v3.5?

Rounded corners

Rounded corners - Files v3.5

To increase the app’s aesthetic appeal, the developer added rounded corners to UI surfaces, such as the content area, toolbar, and preview pane.

Furthermore, with the newer version, the Dual pane has a more pronounced shadow on the active pane, and there are expanded spaces between panes, making the active pane visually prominent.

Batch files: Edit in Notepad option in the Toolbar

Edit in notepad - Files v3.5

If you want to edit a batch (.bat) file, navigate to it via the Files app, then select it. You will get the Edit in Notepad option in the toolbar, which will open the file instantly and eliminate the step to go to the context menu and select Notepad.

Hover over images to view dimensions and other details

Hover over

With the latest version of Files, you can check the dimensions, file size, modification details, and name of an image by just hovering over it. This gives you a quick peek at the information.

Network Locations widget

Network locations widget

Now, with the Network Locations widget on the home page of the app, you can easily navigate and organize network locations seamlessly

Shows OneDrive sync status

This could be a useful feature if you often sync your files on OneDrive. The sync icon shows the file’s current sync status, giving a detailed snapshot of data synchronization.

Other than this, Files now allows you to close the left pane in Dual Pane mode and an option that shows the total duration of videos when you select them. Furthermore, the app now supports the Belarusian language.

Here is the list of changes and improvements introduced with Files v3.5, as mentioned in the release notes:

Improvements to crash reporting and metrics

While enhancements in performance and stability typically occur behind the scenes, we often get a lot of questions about our work in this area and we wanted to share some highlights.

  • We’ve adopted Sentry for more robust crash reporting (shoutout to Sentry for their support of open-source projects), and we aim to extend its use to monitor performance metrics, ensuring Files gets faster with each update.
  • Our main challenge with startup speed has been the absence of Native AOT in WinAppSdk. Fortunately, Microsoft is working to address this, and we hope to integrate these advancements later in the year.
  • We recently started a new effort to eliminate unnecessary dependencies and streamline app resources, effectively shrinking the app’s footprint on your device.

Changes and Improvements

  • Added an action to switch focus between panes
  • Added an “Edit in notepad” option to the right click context menu
  • Added a setting to configure the “Open in ide” button on the status bar
  • Added support for “Thin acrylic” system backdrop
  • Added support for running AHK files as admin
  • Added support for hiding the toolbar
  • Opening the log location will now close the Settings Dialog when Files is the default file manager
  • Fixed crash that would occur when two paths were entered from the command line
  • Fixed crash that would occur when ungrouping from zoomed out view
  • Fixed an issue where a resize cursor was incorrectly shown at titlebar edges when Files was maximized
  • Fixed an issue where empty folders could not be compressed into an archive
  • Fixed an issue where it didn’t work to switch between panes using a touch screen
  • Fixed an issue where text on the Actions page wasn’t responsive on smaller screens
  • Fixed an issue where the focus was changed when quickly switching between tabs
  • Fixed an issue with launching programs from the Address Bar
  • Fixed an issue where search results would stop loading after switching between tabs
  • Fixed an issue where the Toolbar didn’t display properly in High Contrast
  • Fixed an issue in Column View where the chevron didn’t support High Contrast
  • Fixed an issue where the Files logo was displayed incorrectly in High Contrast
  • Fixed an issue where the app could crash when changing the theme
  • Fixed an issue where entering certain commands into the Address Bar would change the format
  • Fixed an issue with Nutstore cloud drive detection
  • Fixed an issue where certain keys couldn’t be mapped to Actions
  • Fixed an issue where setting the desktop wallpaper didn’t work on multiple monitors
  • Fixed an issue where changing icons didn’t work when admin access was required
  • Fixed an issue with deleting items from zip files
  • Fixed a potential crash when trying to locate the Libraries folder
  • Fixed a potential crash when clicking items in the Quick Access widget
  • Fixed a potential crash from occuring when deleting items

How can I get the latest version of Files?

If you already use the Files app, look for a notification on the toolbar to install the update. However, if you want to try it for the first time, you can download it from the official website, Microsoft Store, or GitHub page.

What do you think about the Files v3.5? Share your experience with our readers in the comments section below.

Copilot in Forms can now help you boost audience engagement

Microsoft has been working to enhance Copilot’s form creation and distribution capabilities. In a recent development, the Redmond tech giant has added more capabilities for distributing forms, which will boost audience engagement & improve response rates.

What’s new?

Microsoft has added an option to rewrite the invitation and follow-up messages with non-responders using Copilot. Let’s know more!

Allows you to rewrite the invitation message

rewrite the invitation message - Copilot in Forms  boost audience engagement

The invitation message is the first thing a recipient sees when receiving a form, so it should be compelling and grab their attention. So, when your form is ready, go to the Send and collect responses dialog box and click the Rewrite with Copilot button. Copilot will generate suitable text with details, including the form’s topic, completion time, and due date, which can help you get a quicker response. If you like the suggested text, click Replace to use it and click Send.

Customized invitation message in Outlook

When the recipient receives the invitation in Teams or Outlook with this message, they can click Start now to complete the form.

Follow-up message to the non-responders

Send a nudge email

If you haven’t received enough responses after sending out forms, you can click Rewrite with Copilot to draft reminder messages via Copilot to prompt respondents to reply. It will give you various options; you can pick any of them and send them with one click.

Recipients will receive a personalized nudge email in their inbox, and with a single click, they can start filling out the form.

You must have a Copilot for Microsoft 365 license to avail of these features. What do you think about Copilot’s new capabilities in Forms? Share your views on boosting audience engagement with our readers in the comments section below.

Avoid using this phrase in your text file; Microsoft Defender could consider it a threat

Microsoft Windows Defender has improved greatly since the inception of Windows 10 and is considered a reliable security tool for the average user.

However, a bug spotted by yappy, an X user, indicates that Microsoft Windows Defender can act faster than necessary in an attempt to secure your computer.

Here is what the post by Yappy says:

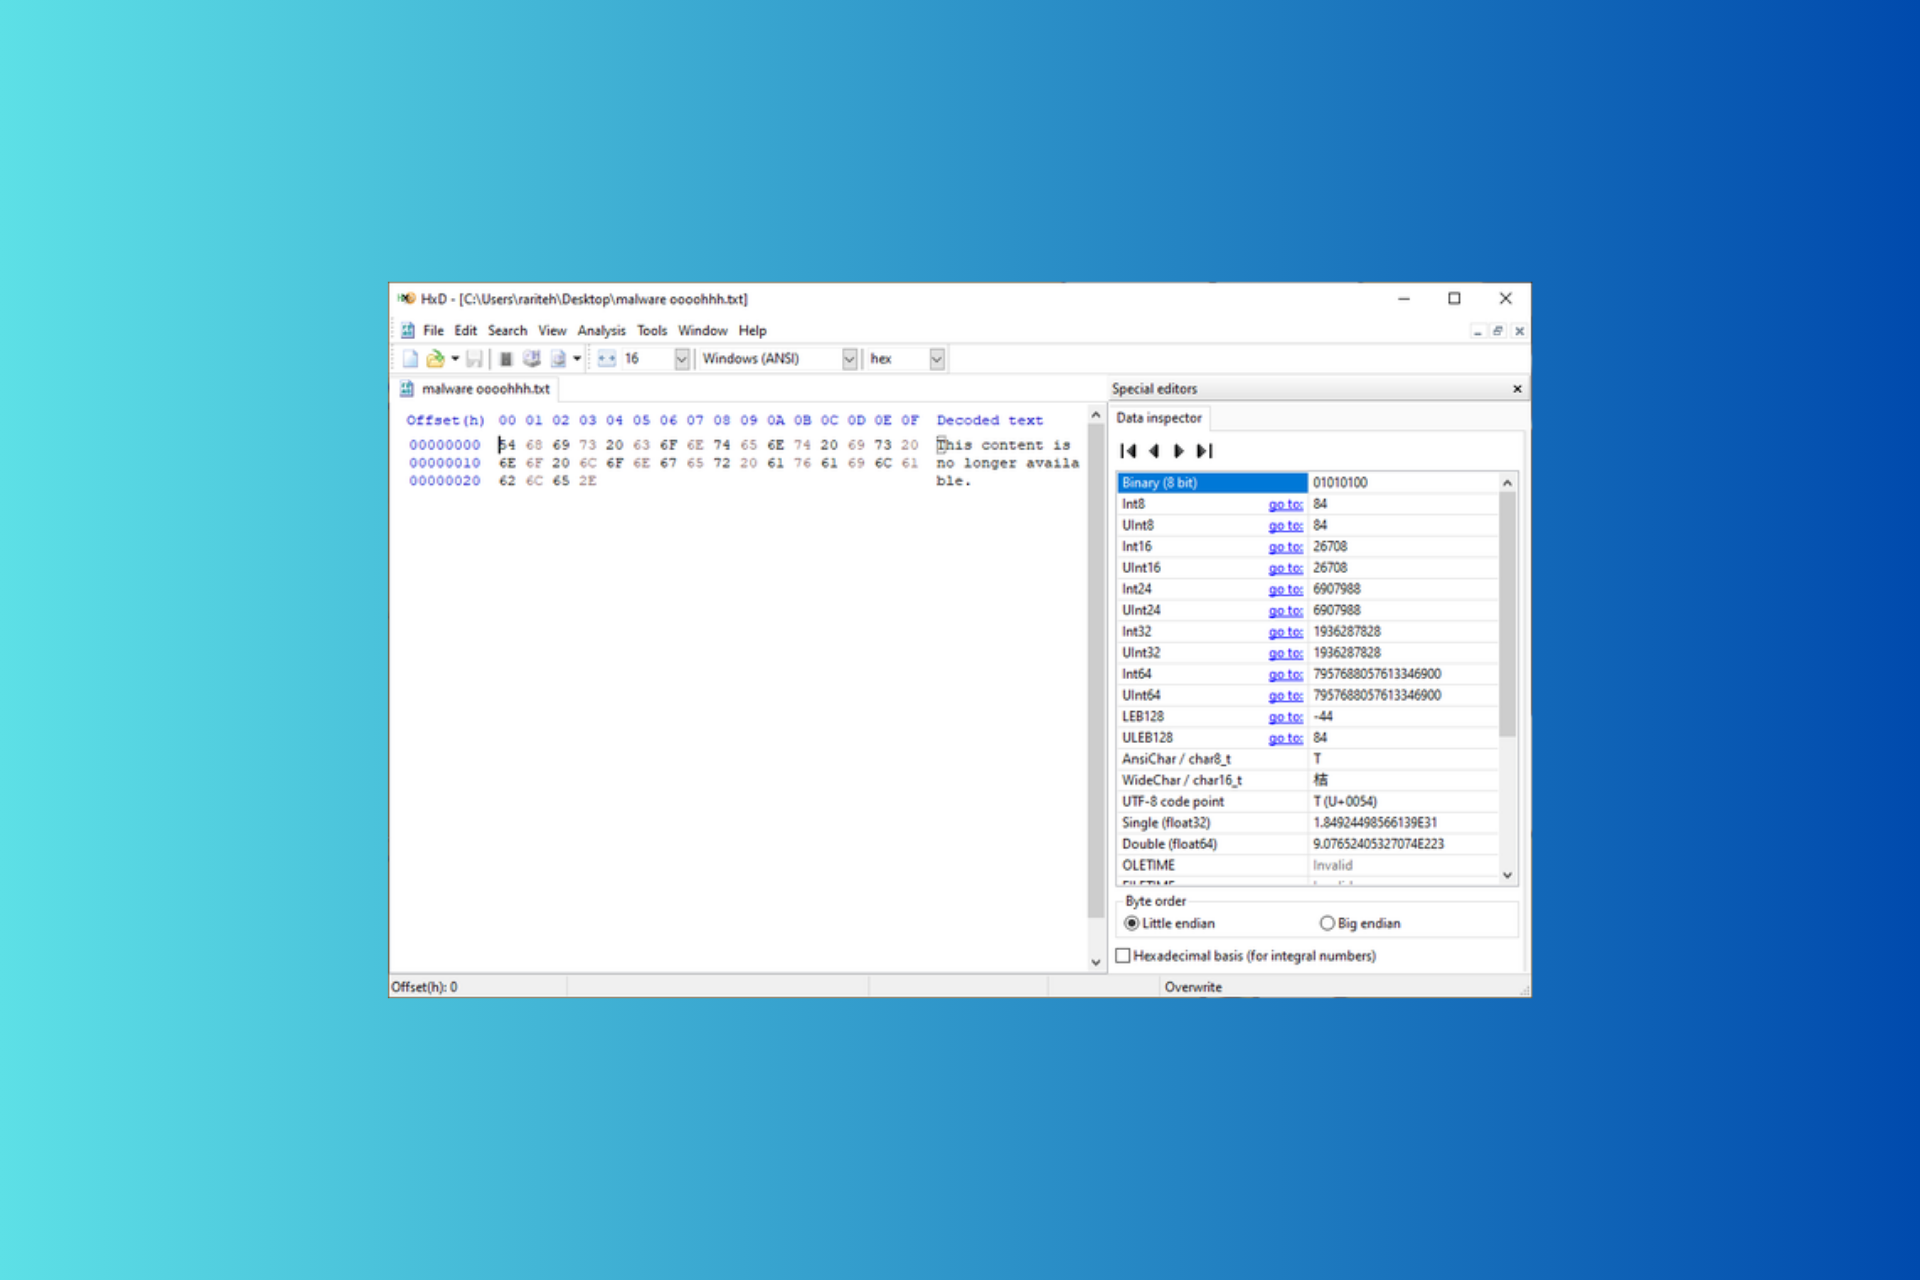
my gf just found out that a text file solely containing the string “This content is no longer available.” trips up windows defender lol

In this image he shared, we can see the phrase This content is no longer available in a Notepad. When this file is saved as a text file on the computer, Microsoft Defender flags it as a Trojan:Win32/Casdet!rfn and removes it without warning, irrespective of the file name. The act is claimed to protect your device from potential severe threats.

Upon further research and investigation, Yappy and other Xers found that the SHA-256 collision caused this false positive. This could be because serious threats usually have this headlining text string and, therefore, were detected as threats by the Defender detection engine.

This is not the first time Microsoft Defender has missed a step; there have been instances in the past. Overall, Microsoft Windows Defender is a decent antivirus tool. Also, this bug is not serious, and if you add another text, even a punctuation or extra space, it will no longer be detected as a threat.

In other news, you can check out the threat explorer’s latest feature, which allows it to become a hub for direct cyber protection actions.

We hope Microsoft acknowledges this bug and fixes it soon. Have you tried creating a file with the same phrase? If so, share your experience with our readers in the comments section below.

Windows 11 KB5039307: New features and clutter-free UI for the taskbar in testing

Microsoft released Windows Insider Preview Build 22635.3790 (KB5039307) to the Beta Channel on June 21, 2024.

This update introduced the Start menu companion feature for Phone Link and evolved the Copilot experience, as mentioned in the release notes. However, the company is testing new features on Windows 11 KB5039307, let’s know more

What are the new features?

The Redmond tech giant quietly added new settings related to Taskbar with KB5039307 on Windows 11. Microsoft researcher and leaker  PhantomOcean3 spotted these settings and reported on X:

Here are the list of features that could come with the newer Windows update:

Shortened date/time format

With the newer version of Windows, you will have the option to shorten the date/time format on your taskbar. The new format will be MM/DD instead of MM/DD/YYYY for date.

Also, if you have selected the 12-hour format for time, you will not see AM/PM with the time. So, if it is 9:30 AM, your taskbar will show 9:30 instead of 9:30 AM.

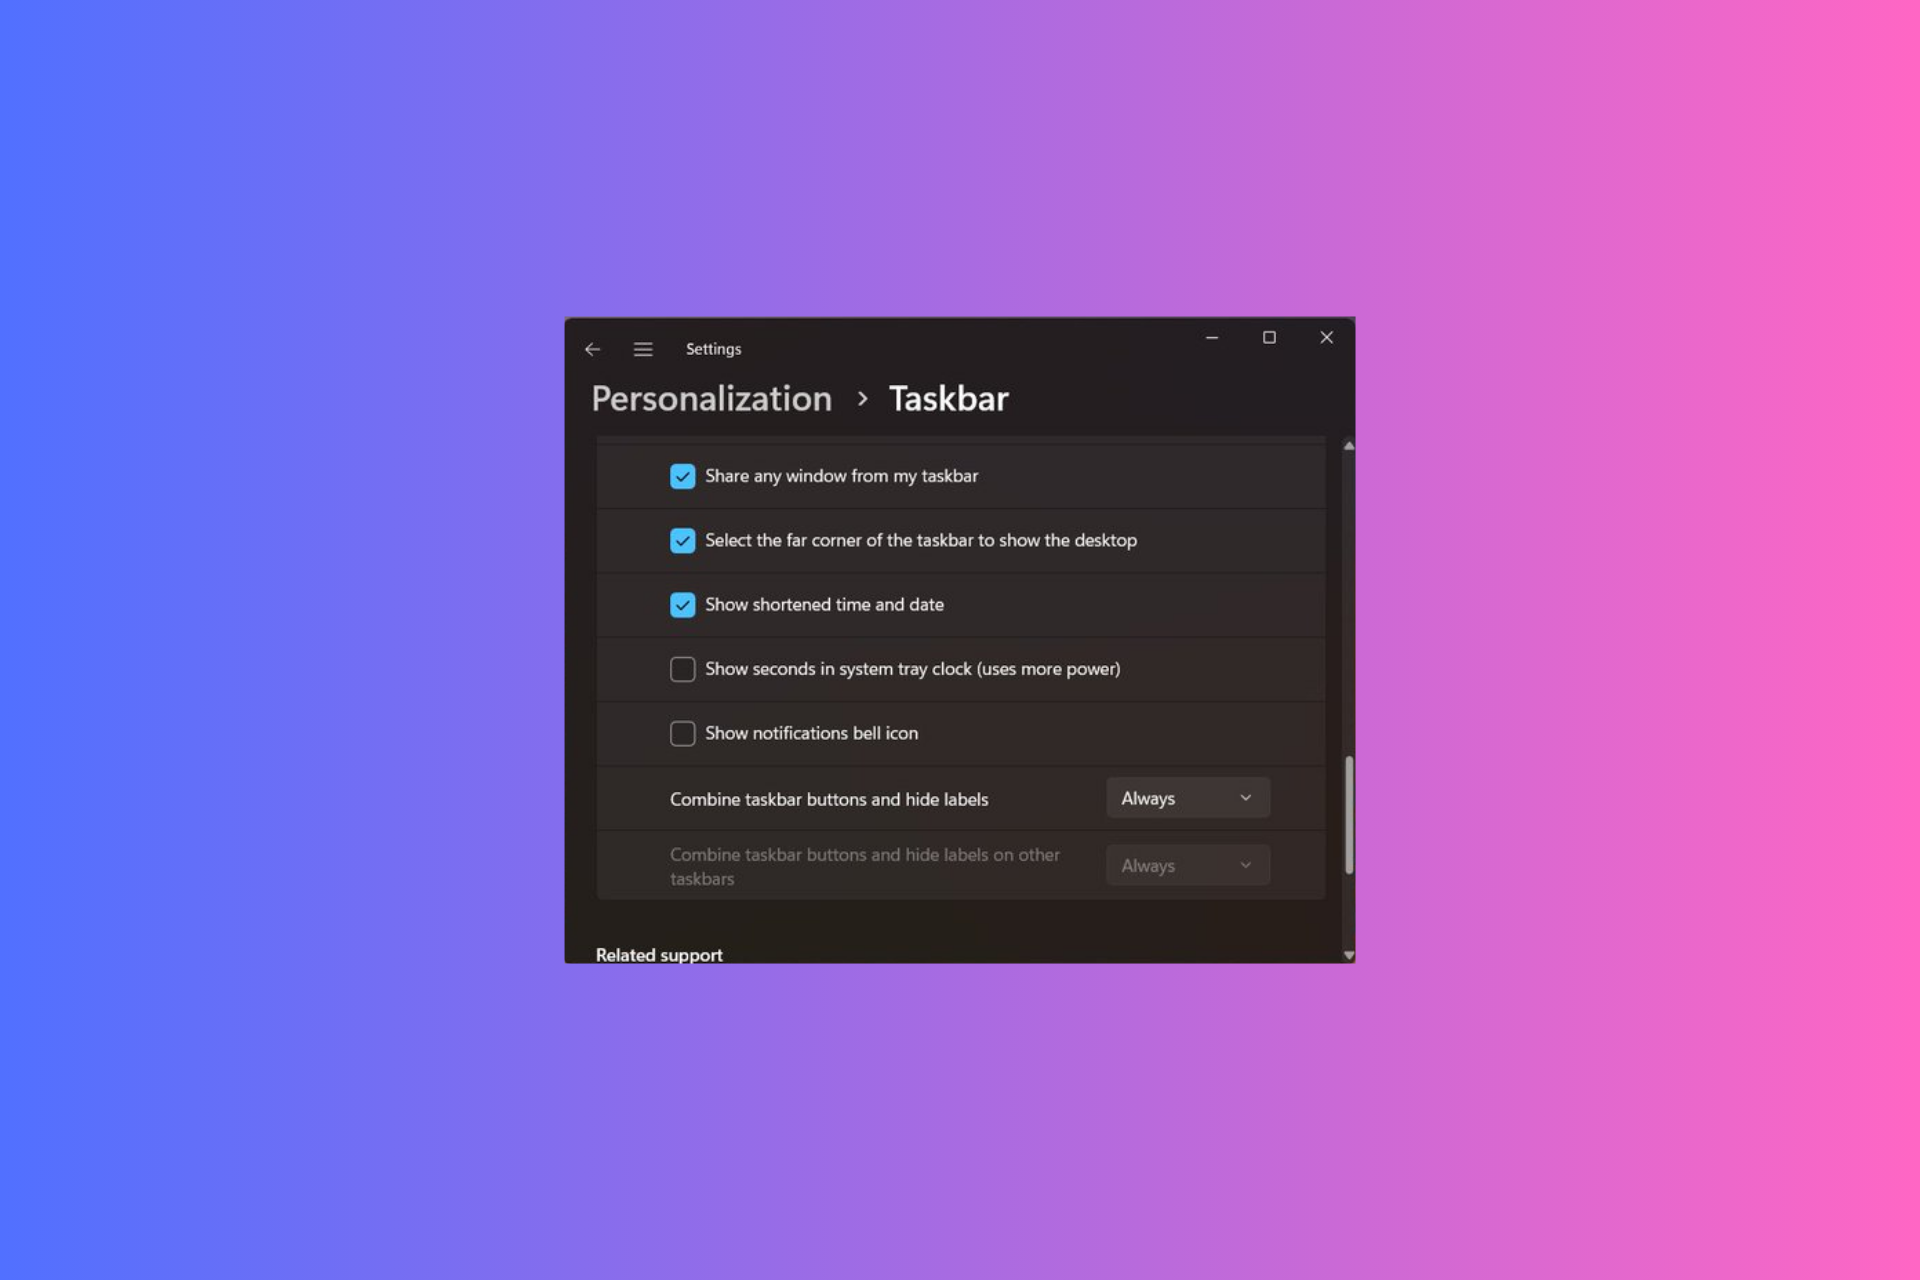
The shortened time and date format gives the taskbar a cleaner look. To set it, right-click the Taskbar and choose Taskbar settings, then choose Taskbar behaviors. Click the toggle next to Show shortened date and time to enable it.

Show notification bell icon

The notification bell icon near Copilot at the bottom right corner will no longer be mandatory for the Taskbar. You can remove it from the system tray if you like.

To do that, right-click the Taskbar, choose Taskbar settings, and then choose Taskbar behaviors. Now toggle off the Show notification bell icon.

App picker now has improved suggestions

When you right-click a document, picture, or PDF, select Open with, then Choose another app option in the File Explorer context menu, you get the list of suggested apps that can open your document.

You get a long list of suggested apps, which can confuse users. However, with the newer build, the App Picker will show you the most used or suitable apps (2-3) in the dialog box with the More apps dropdown.

If you don’t want to use the apps shown under Select an app to open, click the More Apps option to get the extended list of apps.

Hiding the suggested apps in a drop-down list is a great way to declutter the dialog box, giving the App picker a cleaner look.

With this, Taskbar thumbnails have also improved, as they now display more information about the open tabs and windows.

In conclusion, to use these features, you need to be part of the Windows Insider Program and install the latest build, KB5039307, on your device.

Have you tested these new features of Windows 11 KB5039307? If so, share your thoughts with our readers in the comments section below.

Follow this trick to bring WordPad from the dead in Windows 11 24H2

Recently, Microsoft removed WordPad from the latest Windows 11 Canary Build and announced that it will not be part of Windows 11 24H2. However, here are quick steps to bring it back.

If you don’t already know, WordPad’s core files are stored in the Accessories folder in the system drive. Here is the complete path: C:\Program Files\Windows NT\Accessories

All folders are there, but the WordPad files are missing in Windows 11 24H2. You can restore them by adding the core app files to the Accessories folder.

As we know, these files were present in the Windows 11 23H2, so you can copy them from another computer and paste them to the Accessories folder or use the backup archive created by WindowsLatest.

All you need to do is download the archive file and extract it. Upon extracting, you will see the en-US folder with the wordpad.exe.mui file, & WordpadFilter.dll, and wordpad.exe files in it.

Copy them and paste them into the Accessories folder, which comes in the Windows NT folder of the system drive.

Once done, you can launch WordPad as usual via the Start menu or search bar. You can also pin it on the Taskbar for quicker access.

If you are wondering whether it is safe for use, you need to understand the deprecated app will never get an update, new feature, or bug fix, as the Microsoft team is not working on it.

Eventually, it will stop working correctly with the newer Windows versions, and there is nothing you can do. Therefore, it is better to switch to a similar text editor app that is still supported.

Would you still use WordPad or move to another text editor on your Windows? Share your view with our readers in the comments section below.

Windows Update will include security updates for Visual Studio

Soon, Windows Updates will not be limited to drivers, security updates, and updates for Microsoft Office. Starting from the August 2024 security patch for Windows 11 and 10, Microsoft plans to bundle security updates for Visual Studio.

Microsoft announced this on Visual Studio’s developer community page. The Redmond tech giant also mentioned that to get security updates for Visual Studio from MU each month, head to Settings>Windows Update> Advanced options and enable the Receive updates for other Microsoft products option.

If you are a developer using Windows Home Edition, you can enable this option manually. However, if the option is greyed out for you and your IT admins control the updates on your machine, this feature will not work for you.

Opting into this feature will be beneficial as it will ensure you get security updates on Visual Studio without any misses. Microsoft updates run automatically in the background without disrupting the usual tasks.

This will apply to supported release and LTSC channels of Visual Studio 2022, 2019, and 2017, but it doesn’t apply to Visual Studio Preview.

If you are using an IT admin-managed system, the option is likely already enabled for you but will not be under your control.

Opting out

If you are already enrolled in receiving updates for other Microsoft products but don’t want to receive updates for Visual Studio, you can opt-out.

To do this, press Windows + R to get the Run window, type regedit, and click OK to open Registry Editor. Navigate to this path: Computer\HKEY_LOCAL_MACHINE\SOFTWARE\Policies\Microsoft\VisualStudio\Setup

From the right pane, locate VSthroughMUUpdatesOptOut, double-click it, change the Value data to 1, and click OK. If you don’t find VSthroughMUUpdatesOptOut, right-click Setup from the left pane, select New>DWORD, name it VSthroughMUUpdatesOptOut, and change the Value data.

Microsoft mentioned that the preview Visual Studio update packages via Microsoft Update will be available starting in June and July. So, if you have manually enabled the feature, you will get a preview of the Visual Studio Update experience.

The Redmond tech giant further mentioned that these Visual Studio updates delivered through the Microsoft Update channel will follow the same rules as Visual Studio updates.

Things to remember

  • Close Visual Studio: Before applying an update, ensure Visual Studio is closed, as Microsoft Update or Visual Studio will never forcefully close Visual Studio.
  • Background updates: Microsoft update will offer Visual Studio updates silently in the background. If the Visual Studio app is closed, the updates will apply on their own.
  • Manual updates: You can always initiate updates by clicking the Check for updates button from the Windows Update section.
  • Timing –

Here are the known issues mentioned by Microsoft:

There are a couple of known caveats to the experience that we’re already aware of and working on. These issues are mainly UI related, which is more noticeable when people manually try out the experience; they’re less problematic when people let and trust the update to run automatically.
First of all, the error messages in the Windows Update UI are a bit cryptic now, but they will be improved soon.
Secondly, if you decide to manually “Check for Updates” using the Windows Update UI, the progress bar will be stuck at 0 all the way until the update finishes, at which point it will immediately go to 100%. We ask for your patience here. Users will try to “Check for Updates” after they initially enable this feature, and having the progress bar look like it’s stuck at 0 leaves the impression that nothing is happening. Remember that Visual Studio updates can sometimes take a while, so just wait a bit and it’ll eventually finish. We’re working with the Windows team to improve the error messages and progress bar visuals.

Users’ reactions

A lot of users were not happy with the announcement as they wanted an option or checkbox to choose Visual Studio in MU. One of the users mentioned:

Will we eventually see this elevated to a proper checkbox/etc. within Visual Studio itself?

There’s definitely a lot of confusion on this – it’s opt-in at the machine level, but then opt-out (via registry tweak) at the application level. I would imagine a LOT of folks wanting the MU setting ON, but the VS setting OFF – and hacking the registry isn’t a solid experience to do that.

Another user expressed his concern:

I wish I could downvote this issue. I think it’s a bad idea. VS updates have broken our automated builds at least once a year for the last decade. It’s usually some subtle change in MSBuild, MSTest, .NET SDK, or some updated code analyzer that logs errors it missed before, but it’s frustrating. VS updates frequently stop our development team in its tracks. VS has such a massive surface area (e.g., .NET SDKs, Windows SDKs), that it seems very risky to think the majority of developers will want it to update without explicit interaction. VS touches too many things to be evergreen like VS Code or other Microsoft apps.

Our workflow is now, “Don’t install VS updates until I approve them and make sure they work on my machine and a build machine.” Now I’ll have to try to ensure every developer machine and build machine has this HKLM-level registry key set too, which I can’t set from a non-admin build script. I’m planning to read the registry key and throw an error if it’s not set the way I want. I wish I could override this behavior with a .vsconfig or .editorconfig setting (i.e., in a file that everyone git pulls), but I realize those are solution-scoped not machine-scoped.

I’ve only had Windows updates block me once, and I’ve never had Office updates block my workflow. But VS updates are different. They are frequent blockers.

The concerns expressed are genuine, as Microsoft updates with Office included don’t generally cause issues; however, Visual Studio updates, on the other hand, are not flawless and often create issues.

What are your views on this change? Share your thoughts with our readers in the comments section below.

Can SyncToy Automatically Run on Windows? [Quick Guide]

Can you make SyncToy automatically run on your PC? Luckily, yes you can!

SyncToy is a tool for keeping your files and folders synchronized between drives and devices. Usually, it only runs when manually prompted, which can be inconvenient for regular syncing. However, you can easily automate it.

Windows has a powerful yet often overlooked scheduling tool that can automate various applications, including SyncToy. I’ll show you how to use Task Scheduler to update your files without manual effort.

Let’s get started!

How To Schedule SyncToy To Automatically Run via Windows Task Scheduler

Follow the below steps:

  1. Type “task scheduler” in the Windows search bar and press Enter.
  2. Tap “Create basic task” under Actions.
Create basic task
  1. Add a name, and a description for the task then tap Next.
Create a basic task
  1. Select when you want the task to start and tap Next.
Trigger
  1. The next window will ask for additional settings depending on the trigger you picked. Modify then tap Next.
Additional settings
  1. Select Start a Program and tap Next.
 Start a Program
  1. Tap “browse” and select SyncToy then add quotes to the file (e.g. “C:\Users\user\Downloads\SyncToySetupPackage_v21_x64.exe.” In the Add arguments box, enter –R to run all of your syncs each time.
Browse file

Note: If you want to run one of your syncs, enter -R ”your sync name” for example, -R ”Photo Sync”

  1. Confirm the summary then tap “Finish.”
Task summary

Overall, you can set SyncToy to automatically run using Windows Task Scheduler. This method streamlines your workflow, making regular synchronization tasks more convenient and efficient. Now, your files will stay synced on their own.

Moreover, if SyncToy isn’t working properly or you’re looking for an alternative, I’ve got you covered!

New Outlook for Windows will soon be able to open all attachments in their native desktop apps

Microsoft is working on a feature with the feature ID 401123 for the new Outlook for Windows app, which is focused on streamlining user experience while handling email attachments.

Here is the description mentioned on the Microsoft 365 Roadmap site:

In the new Outlook for Windows, users can now open attachments of all types in their respective desktop app by double-clicking them. #newoutlookforwindows.

With this feature, you will be able to open attachments directly in the desktop application that is compatible with it by simply double-clicking them.

It will eliminate downloading attachments before viewing them in a compatible application. Whether it is an Excel spreadsheet, Word document, or PowerPoint presentation, all you need to do is go to the email with the attachment on Outlook and click on it. It will open in its native desktop app, ready to be reviewed or edited.

The feature was added to the Microsoft 365 roadmap on June 20, 2024, and will be ready to roll out in August 2024. Once available, you will be able to access the feature on your desktop app for Windows 11 and future releases.

This can be seen as another effort to improve productivity tools within its ecosystem and allow users to manage tasks without disrupting the workflow.

In other news, Outlook is planning to replace the basic authentication with a stronger and more secure method; read this to learn more.

What do you think about this new feature of Outlook? Share your views with our readers in the comments section below.

Microsoft 365 will soon get enhanced Collaboration features with Copilot integration

Microsoft is developing a new feature for Microsoft 365 with Feature ID 400710, allowing you to save and share custom Copilot prompts from the Copilot Lab. The saving and sharing prompts can foster teamwork and productivity across teams

Here is the description mentioned on the Microsoft 365 Roadmap site:

With this feature users of Copilot in Word, Excel, PowerPoint, and OneNote will be able to save prompts that they have created to Copilot Lab and share them with their coworkers. Also, users on the Copilot Lab website who find a Word, Excel, PowerPoint, or OneNote prompt that they like will be able to launch Copilot and run that prompt with a single click of the new “Try in Copilot button”

Moreover, suppose you are using Copilot on the web. In that case, you can use the Try in Copilot button, which will allow you to immediately launch and execute prompts with Excel, Word, PowerPoint, or OneNote in a single click. This will make adopting and utilizing new prompts by the community easier.

The feature was added to the Microsoft 365 roadmap on June 20, 2024, and will be ready to roll out in September 2024. Once available, you will be able to access these enhanced functionalities, whether you are a Windows, macOS, iOS, or Android user. You will be able to use Microsoft 365 via web browsers.

The rollout will be worldwide, so users can leverage these features to enhance collaborative tasks from anywhere.

To conclude, you will be able to create, share, and execute prompts in Copilot Lab, and the Try in Copilot button will let you effectively use the prompts in Word, Excel, PowerPoint, and OneNote.

In other news, Microsoft has retired the Windows + C keyboard shortcut for Copilot. This seems to be the new strategy for promoting the Copilot key; read this to learn more.

What do you think about this new Copilot’s feature? Share your views with our readers in the comments section below.

McAfee VPN Not Connecting – Tried and Tested Solutions

Is McAfee VPN not connecting properly? Don’t panic, I also had the problem and I fixed it.

Connectivity issues can be caused by several factors related to the network, the servers, PC settings, etc. However, they’re easily solvable. First, you should try out these basic fixes:

  • Check your internet connection or connect to a different network.
  • Update or reinstall your McAfee VPN app.
  • Restart your PC.
  • Check device limit.
  • Add the right login credentials.
  • Contact McAfee support.

If these don’t work, you can proceed to the more detailed solutions below. Let’s get into it!

How To Fix McAfee VPN Not Connecting

Follow these tips in the order in which they appear:

Add an Exception for McAfee VPN to Your Antivirus

Your PC’s antivirus might detect McAfee as a threat and block it. Since it’s an important tool, I recommend you don’t disable it. The best solution is to add exceptions to it through the settings:

  1. Press the Windows Icon, type “Windows Security,” then press Enter.
  2. Select “Virus & threat protection.”
Virus & threat protection
  1. Tap “Manage settings.”
Manage settings
  1. Scroll down and tap “Add or remove exclusions” under “Exclusions.” If your computer asks to make changes, click “Yes.”
Add or remove exclusions
  1. Tap “Add an exclusion,” then pick “McAfee” from the list.
Add an exclusion

Add an Exception for McAfee VPN to Your Firewall

Your PC’s Firewall could also block VPN usage leading to connectivity issues. Likewise, you shouldn’t disable it. You should add an exception instead. It protects your device from risks like malware and viruses. 

Follow the below steps:

  1. Tap the Windows Icon, type “Control Panel” and press Enter.
  2. Click “System and Security.”
System and Security
  1. Select “Windows Defender Firewall.”
Windows Defender Firewall
  1. Click “Advanced Settings.”
Advanced Settings
  1. Tap “Inbound Rules.”
Inbound Rules
  1. Select “New Rule.”
New Rule
  1. Pick “Program” and then press “Next.”
Select Program
  1. Click “Browse,” pick the McAfee app, then hit “Next.”
Browse
  1. Select “Allow the connection” and tap “Next.”
Allow the connection
  1. Tick “Domain,” “Private,” or “Public,” or select all to decide when to apply the rule, then tap “Next.”
Decide when to apply the rule
  1. Include a name and description for the rule, then tap “Finish.”
Name the rule

Confirm if McAfee is connecting. If it’s not working, try the next fix.

Switch Servers

Server congestion or ban will lead to connectivity issues. Changing them will help solve the problem. McAfee VPN has over 2,000 servers so you can easily pick another one. Here’s what to do:

  1. Log into your McAfee VPN account and tap the drop-down menu in the top right corner.
Access servers
  1. You’ll see a list of servers, so select one by tapping on it.
Server list
  1. Confirm you want to connect to the server by clicking “Connect.”
Connect to the server
  1. You’ll be connected automatically.
Connected

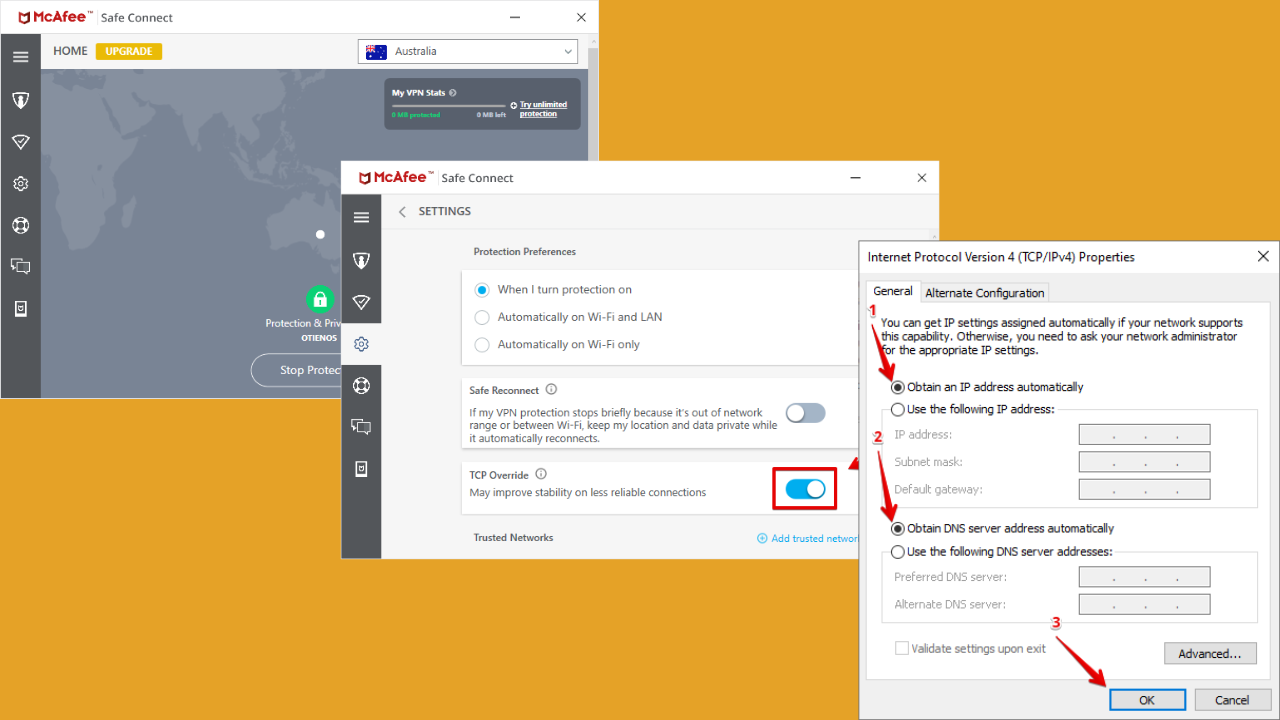
Turn on TCP Override

McAfee’s TCP Override helps to improve stability on less reliable connections. You can enable it on the app like this:

  1. Log into your McAfee account and tap on the Settings button.
McAfee VPN settings
  1. Toggle the TCP Override button.
TCP Override

That’s it! You should now have a smooth connection.

Flush the DNS

Flushing the DNS will remove outdated or corrupted DNS entries. It ensures that your system retrieves the most current website address information, leading to faster browsing experiences.  

Here’s how to do it:

  1. Open the Command Prompt by pressing Window + R, typing “cmd,” and pressing Enter.
Windows + R
  1. Write “ipconfig /flushdns” and hit the Enter button.
Write “ipconfig /flushdns.”
  1. You’ll receive a confirmation message that your DNS resolve cache is successfully flushed.
Confirmation message

Restart your PC and check if McAfee VPN connects smoothly.

Modify Adapter Settings

  1. Click the Windows Icon + X and tap “Network Connections.”
  2. Select “Change adapter options.”
Change adapter options
  1. Identify your active network adapter and right-click on it. Select “Properties.”
Select “Properties.”
  1. Click “Internet Protocol Version 4 (TCP/IPv4)” and tap “Properties.”
Internet Protocol Version 4 (TCP/IPv4)
  1. Select “Obtain an IP address automatically” and “Obtain DNS server address automatically” then tap “OK.”
Select automatic

Reboot your computer and confirm if the VPN is working.

Try an Alternative VPN Provider

If you tried all the fixes and none worked, consider using another provider. NordVPN is one of the most reliable services you can try out. It has over 6,000 servers to ensure minimal server congestion and bans. It’s also among the fastest VPNs thanks to its NordLynx Protocol. 

Here’s how to set it up on your PC:

  1. Go to the official NordVPN website and sign up for an account.
  2. Tap “Download VPN” and select an app that’s compatible with your Operating System.
Download VPN
  1. Open the file to install the NordVPN app and log in with your account details.
Log in with your account details
  1. Pick any server from the list or click “Quick Connect” to find the nearest and fastest one.
Connected on NordVPN

Apart from high connection speeds, NordVPN is known for strong security and privacy features such as a Double VPN, dedicated IPs, Obfuscated servers, CyberSec, and more.

So, now you know how to deal with McAfee VPN not connecting. The issue is easy to fix with the above solutions. Moreover, if you’re having similar trouble with VyprVPN and Proton VPN, I’ve got you covered. If nothing else works, don’t hesitate to try an alternative like NordVPN.

Helldivers 2 Crashes With DirectX 12 [Solved]

Helldivers 2 is a popular title, but it’s plagued with issues affecting the gameplay and overall experience. And most of the Helldivers 2 crashes have to do with DirectX 12, as reported by the community.

Helldivers 2 usually crashes with DirectX 12 or can’t find the version when running an outdated version of the graphics driver, critical Windows updates are missing, game files are corrupt, or there’s a bug in the game update last installed.

For those wondering whether Helldivers 2 runs better on DX11, there is no absolute answer. After talking to several players, it became apparent that the game’s performance upon switching to DirectX 11 may or may not improve. It depends on other factors, too, such as graphics card compatibility. But switching to DX11 (explained later) is worth a shot!

What can I do if Helldivers 2 crashes with DirectX 12?

1. Verify the integrity of game files

  1. Launch Steam, head to the Library tab, right-click on Helldivers 2, and select Properties.
  2. Go to the Installed Files tab, and click on Verify integrity of game files.directx 12 helldivers 2 fix steam game files
  3. Once done, reboot the PC and then launch the game.

2. Update Windows

  1. Press Windows + I to open Settings, go to Windows Update, and then click on Check for updates.windows update
  2. If new updates are available, download and install them.
  3. Finally, restart the PC, run Helldivers 2, and check for improvements with DirectX 12.

DirectX updates are now shipped via Windows Update. So, if there’s an issue with the installed version, check and install pending updates!

This also helps with Linux and Ubuntu. A few reported that when Helldivers 2 showed that Direct3D feature level 12_0 was missing, updating the OS fixed things in no time.

3. Update the graphics driver

  1. Press Windows + X to open the Power User menu, and select Device Manager from the list of options.
  2. Expand the Display adapters entry, right-click on the graphics adapter, and select Update driver.update driver
  3. Choose Search automatically for drivers and wait for Windows to install the best locally available version.automatically

Often, it’s an issue with the installed graphics driver triggering Helldiver 2 crashes with DirectX 12, and in such cases, updating the graphics driver does the trick!

Also, you could head to the manufacturer’s official website and manually install the latest driver. Here are the direct links for each:

4. Delete Shader Cache and use DirectX 11

  1. Press Windows + E to open File Explorer, paste the following path in the address bar, and hit Enter:%appdata%\Arrowhead\Helldivers2\shader_cacheshader cache folder
  2. Press Ctrl + A to select all the files and hit Delete to clear them.
  3. Now, launch Steam, go to the Library, right-click on Helldivers 2, and select Properties.helldivers 2 directx 12 crashes
  4. In the General tab, paste the following parameter in the Launch Options field: --use-d3d11--use-d3d11
  5. Finally, disable the in-game FPS limiter.

If you were wondering how to run Helldivers 2 with DirectX 11, you need to change the launch options and add the –use-d3d11 parameter. This not only helps if you are facing game crashes with DirectX 12 but also significantly boosts the performance, delivering up to a 100% increase in FPS for some.

As for the Shader Cache, the files will automatically regenerate the next time you launch the game!

5. Reinstall Heldivers 2

  1. Press Windows + R to open Run, type appwiz.cpl in the text field, and hit Enter.
  2. Select Helldivers 2 from the list, and click on Uninstall. uninstall to fix directx 12 helldivers 2 crashes
  3. Follow the on-screen instructions to complete the process and then reboot the PC.
  4. You can now reinstall Helldivers 2, and it shouldn’t throw any errors.

If you still face crashes in Helldivers 2 due to DirectX 12 or get repeated warnings, consider using an effective software uninstaller to get rid of any leftover files and Registry entries.

Before you leave, discover top-rated tips to optimize the PC for gaming and some effective ways to increase the FPS!

Which fix worked for you? Share with our readers in the comments section.

Gpedit.msc on Server Core: How to Open & Use it

Managing your policies is crucial, and Group Policy Editor is the best way to do that. Speaking of which, in today’s guide, we’ll show you how to use gpedit.msc on Server Core, so let’s get started.

How do I use gpedit.msc in Server Core?

1. Install Group Policy Management Console

  1. Open PowerShell.
  2. Run the following command: Install-WindowsFeature -Name GPMC
    Install-WindowsFeature -Name GPMC
  3. Wait for the installation to finish.

After doing that, you can use the following commands to create policies:

  • Get-GPO – to retrieve Group Policy Objects
  • Set-GPRegistryValue – to set a registry-based policy-setting
  • New-GPO – to create a new GPO.
  • Set-GPLink – to link a GPO to a site or domain

To learn more, we suggest reading the official GPMC documentation.

2. Use GPMC remotely

  1. On a different machine, make sure you install RSAT.
  2. After installing RSAT, press the Windows key + R and enter gpmc.msc.
    gpmc.msc run window
  3. Right-click on Group Policy Management and select Add Forest or Add Domain.
  4. Enter our Core Server information.
  5. Next, select the Core Server from the list and modify its policies.

For this method to work, you need to install GPMC on the Server Core as described in Solution 1. You also need to ensure that both devices are visible and that they can communicate with one another.

While this solution requires more configuration, it allows you to edit policies remotely using the graphics interface.

How to open gpedit in Server Core?

This isn’t possible since gpedit isn’t available on Server Core, and it can’t be installed.

Does Windows Server Core have a GUI?

No, Server Core doesn’t have a GUI, so it can’t run any apps that have a graphical interface, including gpedit.msc.

As you can see, while you can’t use gpedit.msc on Server Core, you can still modify group policies using the GPMC or remotely.

To learn more about Group Policy Editor, we have a great guide on Gpedit.msc vs. Secpol.msc. If you’re on the graphical version, we have a great guide on how to use gpedit.msc on Server 2019, so don’t miss it.

7-Zip on Windows 11 Portable Edition – How To Use It Effectively

Are you thinking about using the 7-Zip on Windows 11 portable version for multiple PCs? If yes, read on as I show you how to make the best use of it.

7-Zip stands out for its high compression ratio, extensive archive file support, AES-256 encryption, and easy-to-use interface. Best of all, its open-source status makes the tool available for free commercial and personal use.

It’s also available in a portable package. I’ve tested it extensively before writing this ultimate guide. Read it until the end to learn about its features, how to get the portable package, how to create a disk with it, and more.

What Is 7-Zip Portable Edition?

What Is 7-Zip Windows 11 Portable?

7-Zip portable is a special edition. Unlike the regular installer, it doesn’t need an operating system, logical partition, or internal storage. You can install the tool on an external or removable storage device, like a USB stick.

Then, you can connect it to any Windows 11, 10, etc. PC and run the app directly from the removable storage. Here’s why you might prefer the portable version of 7-Zip over the regular one:

  • It doesn’t require app package installation permission for the guest or non-admin user accounts to set up the app.
  • It runs consistently on most PCs without needing to customize PC configurations.
  • If needed, you can integrate it into the Windows File Explorer system.
  • It doesn’t utilize any additional system resources that an installed app does.
  • There’s no need to consider the system architecture, like 32-bit or 64-bit.
  • There’s virtually no chance of privacy or security breaches since the tool completely runs on removable storage.

How To Use 7-Zip on Windows 11 Portable

Follow this guide to get the hang of this software:

Create a 7-Zip Portable Disk

The PortableApps website hosts the 7-Zip portable installer package. I’ve downloaded and installed the tool on my PC. I also run a deep virus scan using AVG 2024 antivirus. I couldn’t find any malware or virus in the downloaded installer, so you can rest easy.

Follow these steps to make your own copy of portable 7-Zip:

  1. Download the portable installer package from PortableApps.
  2. Connect a removable storage to your PC.
  3. Double-click the downloaded EXE file to launch the 7-Zip installer.
portable installer
  1. This setup wizard creates a portable edition of the tool in the destination storage devices, which can be the removable storage you’ve just connected.
  2. The 7-Zip portable setup wizard will guide you through all the steps.
7-Zip wizard
  1. In the Destination Folder window, use the Browse button to select the removable storage as the installation location.
Install 7-Zip
  1. Click Install to begin.

Compress Files with 7-Zip on Windows 11 Portable Edition

Since this is a portable tool, its functions won’t show up on the right-click context menu. For example, you won’t get the Add to archive option in the right-click menu as you see in WinRAR.

Here’s how you can compress single or multiple files with it:

  1. Connect the USB drive containing the 7-Zip app to any PC.
  2. Go to the 7-ZipPortable folder of the USB stick.
  3. Double-click on its icon to run the software.
start portable
  1. To compress a file or directory, navigate to the source using the icons on the 7-Zip home screen. These are Computer, Documents, Network, etc.
Navigate to file
  1. Select the target file and click on the Add icon in the toolbar. It’s the Plus symbol in the green shade.
  2. You should see the Add to Archive dialog box.
Add file to archive
  1. Here, you can customize the following items if you want to:
    • Archive format: 7z, zip, gzip, tar, etc.
    • Compression level: Store, Normal, Maximum, Ultra, etc.
    • Number of CPU threads: If you’ve got a multi-core CPU, choose multiple cores for faster compression.
    • Memory usage for Compression: If you wish to run the file compression process in the background for a longer time, choose less memory, like 2 GB. If you wish to complete the zipping process faster, choose more memory. You can control the memory consumption by adjusting the percentage value in the drop-down menu.
Start compressing
  1. Click OK to start the file compressing process.

Securely Encrypt Files

If you wish to encrypt the compressed file, you can add a password using 7-Zip Portable. Here’s how:

  1. Select a file to compress and go to the Add to Archive dialog.
  2. You’ll see the password fields in the Encryption section.
  3. Enter your password twice.
  4. 7-Zip will automatically apply the AES-256 encryption method. It means the password is virtually unhackable.
  5. Click OK to start the file compression.
Using encryption

Make sure you write down the password somewhere and keep it a secret. You or the recipient of the file archive will need it to unzip the file. Also, if you forget the password, there’s no way you can reset it.

Create Self-Extracting Archives With 7-Zip on Windows 11 Portable Edition

What if the recipient of the compressed file doesn’t have 7-Zip or isn’t technically sound enough to install and operate such tools? In this situation, you can create a self-extracting compressed file.

The recipient only needs to double-click on the file archive and it’ll show an elaborate file decompressing wizard. There, they can choose the destination folder, file-decompressing settings, and more.

Here are the steps to create it:

  1. Choose a file from your PC in the 7-Zip portable window and open Add to Archive.
  2. Look for the Create SFX archive checkbox on the right side of the Add to Archive dialog box.
  3. Checkmark Create SFX.
  4. Click OK to start creating the self-extracting file archive.
create sfx

Integrate 7-Zip With Windows Explorer

If you wish to run the portable version from your PC along with access to 7-Zip tools in the right-click context menu, that’s also possible.

Firstly, copy the 7-ZipPortable directory from the removable storage and paste it into the local storage of the PC. Now, perform these steps:

  1. Run 7-ZipPortable from your PC. Remember, not from the USB stick.
run from pc
  1. Click on Tools in the 7-Zip toolbar.
  2. A context menu would show up. There, click on Options.
tools
  1. On the Options dialog, navigate to the 7-Zip tab.
  2. Checkmark both checkboxes for the Integrate 7-Zip to shell context menu options.
  3. Click Apply > OK to close the dialog box.
integrate
  1. Now, select the file you want to compress, press the Shift key, and right-click.
  2. You should see the 7-Zip menu in the right-click context menu.
7zip in right click

If your Windows 11 PC user account isn’t an Administrator account, you won’t be able to add 7-Zip to the shell context menu. You’ll get the following error in step 6.

access denied

Summary

If you’re here, congratulations! You’ve learned the techniques to run 7-Zip on Windows 11 portable version.

If you don’t like the default user interface style, you can customize the 7-Zip Windows 11 Theme using the Theme Manager app. Also, here’s how you can add it to the Context Menu.

You can share your suggestions and feedback in the comments below.

Now, you can use Vertical Tabs in Firefox Nightly and move them on the right side

The most requested Vertical Tabs will make an appearance in the upcoming Firefox. The feature can now be turned on in Nightly itself without the need to rely on third-party extensions or separate Nightly builds. Here’s how that can be done and our initial impressions of it.

Mozilla has recently announced and confirmed Firefox will get the most requested Tab Groups, Vertical Tabs, and also a new profile management feature. We have covered Vertical Tabs available in separate Nightly branch and the profile manager feature available from the main menu.

We noticed that Mozilla is working on Vertical Tabs in Firefox’s main Nightly branch. We have been able to enable and test Native Vertical Tabs in Firefox; here is our first look and experience.

Demand for vertical tabs keeps growing in the Firefox community. Because when you open many tabs, you may not be able to view tab names on the horizontal tab strip. Things become easier and any number of tab titles can be seen vertically. This also saves screen space and is helpful for multi-monitor users.

Regarding Vertical Tabs, the feature is already available in Brave, Microsoft Edge, and Vivaldi browsers. Vertical Tabs have been an integral part of the Edge browser. Brave and Vivaldi too offer the ability to view open tabs in a vertical layout. While Brave offers a tab context menu option, Vivaldi offers a setting to set the tab bar on any side, including the left.

Here’s how to enable Vertical Tabs in Firefox and use it

Mozilla has found a way to use the horizontal tab strip for vertical tabs. The company is building a feature on the Sidebar that shows history, bookmarks, and synced tabs.

Mozilla has to rebuild the Sidebar to accommodate Vertical Tabs. If you’re using Nightly, here is how you can early test the feature:

  1. Launch Firefox Nightly.
  2. Enter about:config in the address bar and press Enter.
  3. Click on Accept the risk and Continue.
  4. Find and toggle the following Preferences values to true
    sidebar.revamp
    sidebar.verticalTabs
  5. Restart Firefox.
  6. Right-click on the toolbar and select Customize Toolbar.
  7. Select Sidebars and drag and drop it to the toolbar.
  8. Click Done.
Vertical tabs appearing on customizable  sidebar on left in Firefox Nightly

Move Firefox’s Vertical Tabs to the right side

customize sidebar settings
  1. Click on the sidebar icon to see the redesigned Sidebar, which shows current tabs in a vertical layout, history, Tabs from other devices, and customized sidebar options at the bottom.
  2. Click on the Customize Sidebar option.
  3. Under Sidebar Settings, select Show on the right.
Vertical Tabs in Firefox can be moved to right

This option will make your vertical tabs accessible on the right side. Microsoft has promised it will allow moving Edge vertical tabs to the right, but that has yet to happen.

So, what do you think about moving your sidebar to the right in Firefox? Let’s talk about that in the comments below.

How to Enable or Disable Caps Lock On-screen Display Indicator in Windows 10

Caps Lock’s on-screen display notifications can be both useful and problematic. For laptops that don’t feature an LED Caps Lock light, it becomes critical, while for others, it may be a source of conflict and affect the device’s functioning. So, that’s why you must know both how to enable and disable Caps Lock on-screen display notifications in Windows 10.

Also, for anyone wondering whether Windows has a Caps Lock indicator, the answer is No. There is no built-in direct setting or configuration to turn on/off Caps Lock’s on-screen notifications.

Instead, the functionality is provided by the manufacturer via the installed driver. Most of us use a tool provided by the OEM. For instance, it’s the Dell Peripheral Manager on Dell devices.

How do I get the Caps Lock indicator on my screen in Windows 10?

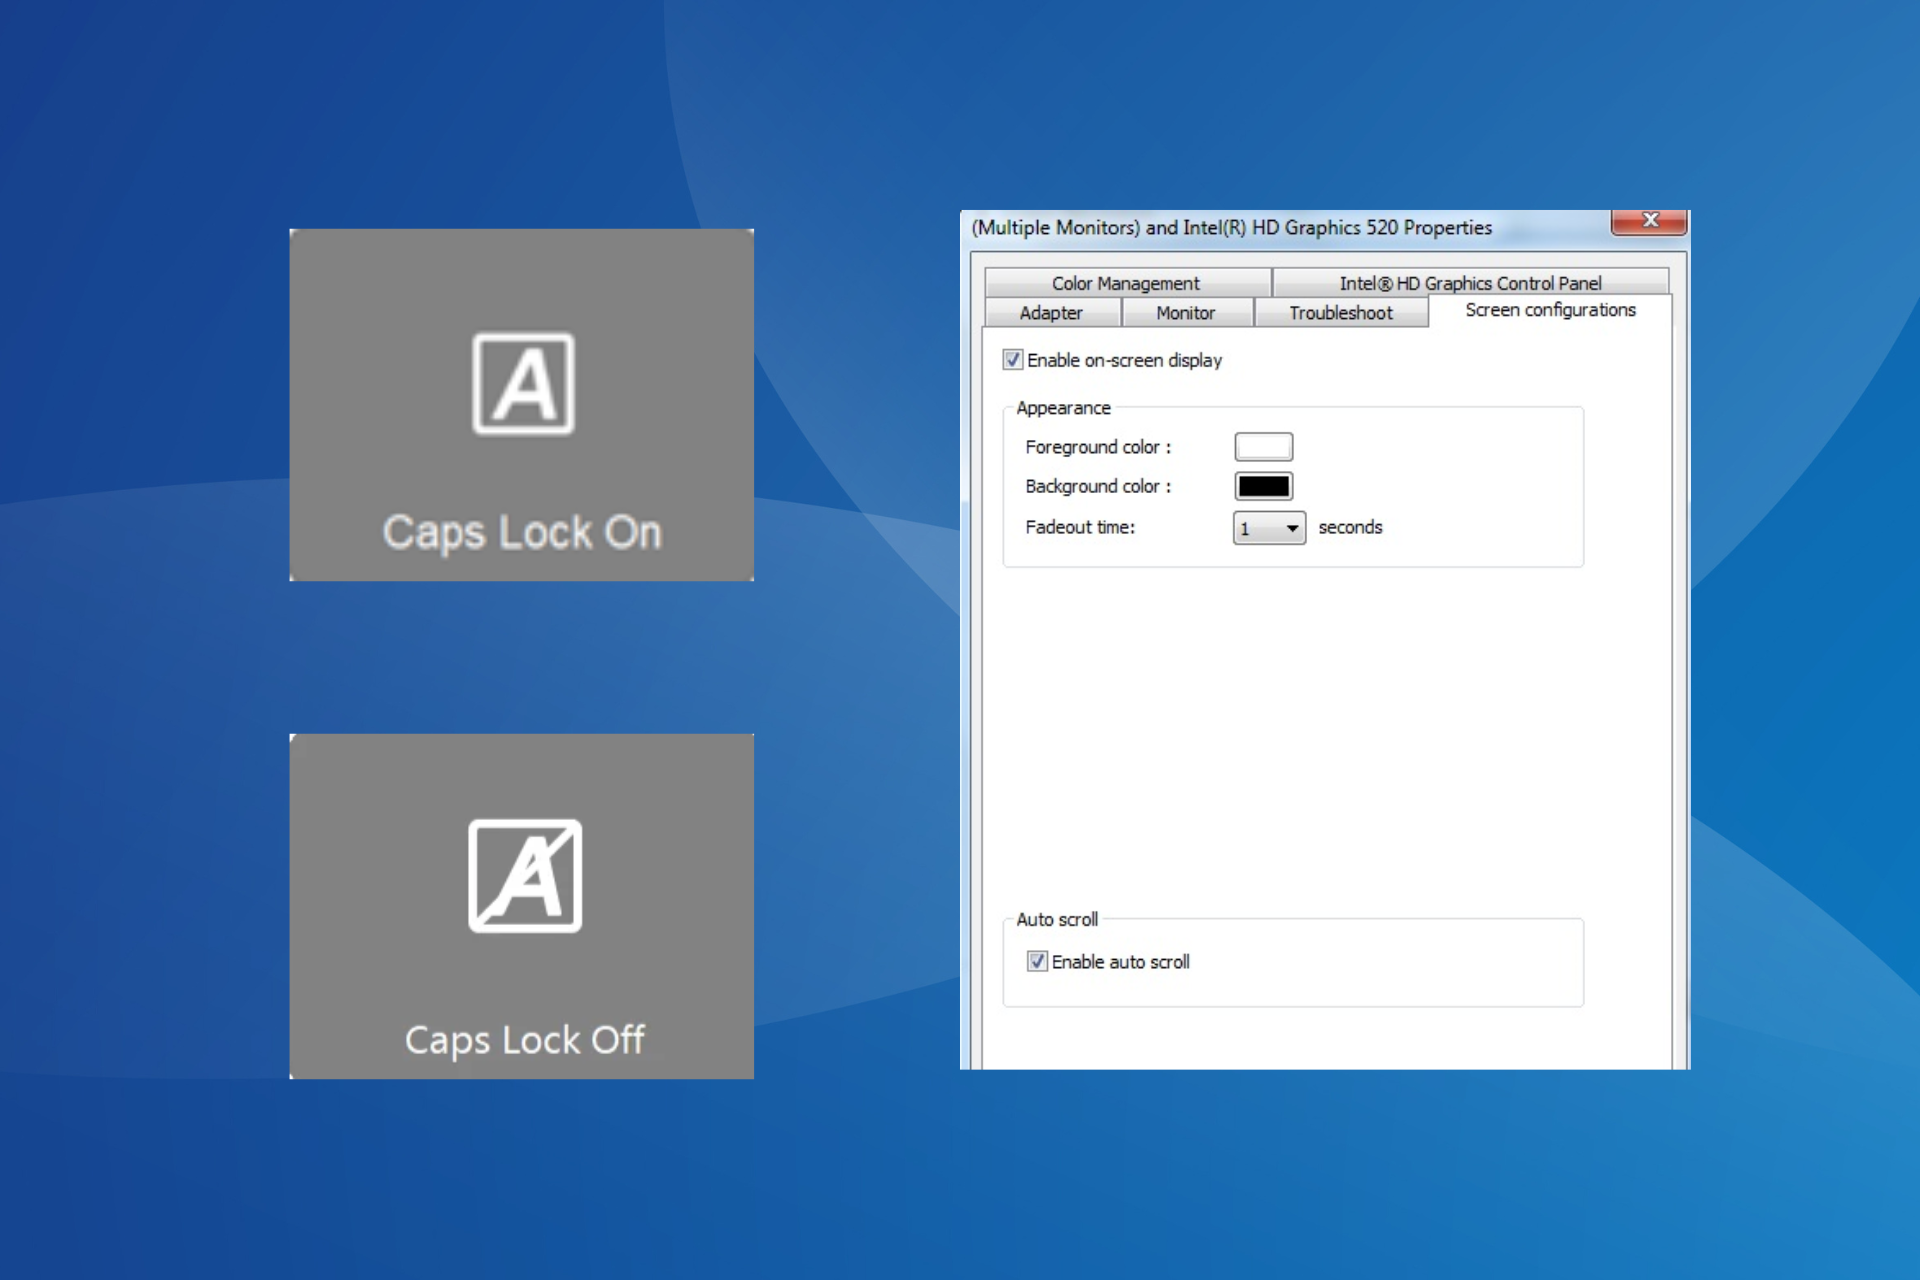
1. Turn on Caps Lock notifications via Screen configurations

Tip icon Tip
This method will only work on selected devices as it’s a functionality added by the manufacturer and doesn’t come built-in on Windows. Check for it, and if the option doesn’t exist, move to the solutions listed next.
  1. Press Windows + I to open Settings, select the System option, and then in the Display tab, click on Advanced display settings.display settings
  2. Click on Display adapter properties. The option is usually followed by the display number.
  3. Now, go to the Screen configurations tab and enable the toggle for Always show the indicator on the screen under both While the numeric lock or the caps lock is ON and While the numeric lock or the caps lock is OFF.turn on caps lock display on screen windows 10
  4. Click on Apply and OK to save the changes.

If the Screen configuration tab and the Always show the indicator on the screen option exist, you can also uncheck the options to turn off the on-screen Caps Lock indicator in Windows 10.

For a more complete understanding of Caps Lock behavior, including how the Shift key interacts with it, read this detailed Windows guide on using the Shift key to turn off Caps Lock. It can help you troubleshoot related issues or customize how your keyboard responds.

2. Enable Toggle Keys

  1. Press Windows + I to open Settings, and go to Ease of Access.
  2. Select Keyboard under Interaction from the left pane.keyboard settings
  3. Finally, enable the Use Toggle Keys setting.enable toggle keys for caps lock display on screen windows 10

Enabling Toggle Keys in Windows 10 won’t show an on-screen display notification for Caps Lock, but there will be a small beep every time you enable it. This is the only Caps Lock notification-related setting available to users on Windows 10.

3. Use the OEM’s native tool

If the built-in Caps Lock notification setting is not available and you don’t want only audio cues, perhaps consider using a tool provided by the OEM. The best is that it’s usually pre-installed on your computer.

Here are the tools you must use for different manufacturers (doesn’t cover all):

4. Download a third-party tool

When it comes to using third-party tools to enable/disable the Caps Lock on-screen display notifications in Windows 10, a good option is the CapsLock Indicator.

Note icon NOTE
Windows Report is not affiliated with CapsLock Indicator. I used the tool and found it to work well, clearly displaying the Caps Lock notifications, both while turning it on and off. I would still recommend you scan the software for malware.

To enable the Caps Lock on-screen notifications using CapsLock Indicator > install the tool > run it > enable the checkbox for Caps lock changed under Show notification when.

What I personally liked was the CapsLock Indicator’s notification colour scheme. It had a green outline when enabling Caps Lock and a red one when disabling it, facilitating quick identification of the Caps Lock status in the absence of an LED indicator.

How can I disable Caps Lock on-screen display in Windows 10?

1. Via the OEM’s utility

Note icon NOTE
The steps listed here are for the Dell Peripheral Manager, although they remain similar across all such tools.
  1. Launch the Dell Peripheral Manager and go to Settings from the top-right corner.
  2. In the General tab, untick the checkbox for Enable lock key notifications. dell peripheral manager

2. Disable relevant startup apps

  1. Press Ctrl + Shift + Esc to open the Task Manager, and go to the Startup apps tab.
  2. Select any OEM utility, say the HP System Event Utility or Dell Peripheral Manager, and click on Disable.disable startup apps for caps lock display on screen windows 10
  3. Similarly, disable all such apps from OEM and third parties.

3. Uninstall third-party software

  1. Press Windows + R to open Run, type appwiz.cpl in the text field, and hit Enter:
  2. Select any official or third-party utility used to configure the Caps Lock notifications, and click on Uninstall. uninstall to turn off caps lock display on screen windows 10
  3. Follow the on-screen instructions to complete the process.
  4. Similarly, uninstall Logi Options+ and HP System Event Utility.

Often, utilities from OEM or third parties can run at startup even after you disable them, especially after an update. In this case, it’s best to uninstall the app. If that doesn’t work, consider using an effective software uninstaller tool.

While this guide focuses on Windows 10, you can just as easily turn off Caps Lock notifications on Windows 11. Remember, these settings are critical. I have seen cases where Caps Lock notifications close active games.

Which method worked for you? Share with our readers in the comments section.

SyncToy Cannot Access Internal Metadata: How to Fix

When trying to sync files, you can sometimes get the Cannot access internal metadata error in SyncToy, which will cause the entire process to fail. Luckily, there might be a few ways you can fix this problem.

How can I fix the Cannot access internal metadata error in SyncToy?

Before we start, make sure you’re running SyncToy with administrative privileges. Also, ensure that the user running the software has full access to source and destination directories.

1. Recreate folder pair

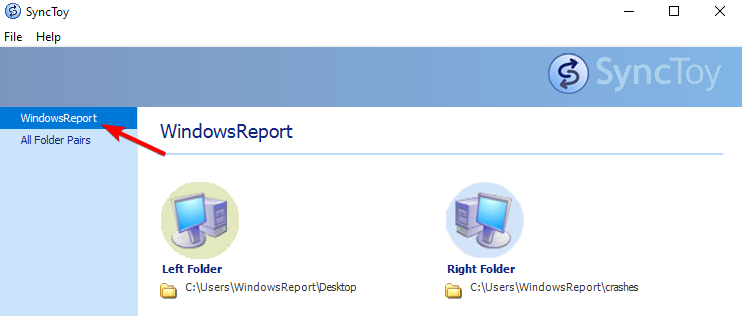
  1. Start SyncToy and select your folder pair.
    select folder pair synctoy
  2. Click on the Delete Folder Pair button.
    delete folder pair synctoy
  3. Click on Yes to confirm.
  4. After that, recreate the folder pair and check if that helps.

2. Reinstall the software

  1. Press the Windows key + I to open the Settings app.
  2. Go to Apps and then select Installed apps.
    installed apps settings app
  3. Next, locate SyncToy on the list, click the three dots next to it, and choose Uninstall.
    uninstall an app windows 11 settings app
  4. Follow the instructions on the screen to complete the process.

After removing the application, download SyncToy again and install it.

If the issue persists, maybe it’s better to try using one of many SyncToy alternatives.

In case you managed to fix the problem, we have a great guide that will help you create a SyncToy batch script and allow you to sync files in the background.

Did you find a different solution for Cannot access internal metadata error in SyncToy? If so, don’t hesitate to share it with us in the comments section.

4 Easy Ways to Fix Failed to initialize DirectX 12

Failed to initialize DirectX 12 or DirectX 12 initialization failed issue can occur due to a corrupted graphics driver or an outdated version of DirectX. To fix it, first, you must ensure your Windows is up to date.

How can I fix the Failed to initialize DirectX12?

1. Update the graphics driver

  1. Press Windows + R to open the Run window.Device Manager - directx 12 initialization failed
  2. Type devmgmt.msc and click OK to open the Device Manager.
  3. Locate and click on Display adapters to expand the category.
  4. Right-click the graphics driver and select Update driver from the context menu.Graphics Driver update - directx 12 initialization failed
  5. Click Search automatically for drivers.Search automatically
  6. If found, follow the on-screen instructions to complete the process.
  7. Once done, restart your computer.

If this doesn’t work, you need to reinstall the graphics driver.

  1. Open Device Manager again and click to expand the Display Adapters category.
  2. Right-click the graphics driver and choose Uninstall device.Uninstall device -  directx 12 initialization failed
  3. Now go to Action, and click Scan for hardware changes to reinstall the driver.Action scan for hardware changes

Alternatively, you can restart your computer after uninstallation, and your PC will reinstall the deleted driver upon reboot.

2. Install DirectX12

  1. Press Windows + R to open the Run window.DirectX - directx 12 initialization failed
  2. Type dxdiag and click OK to open DirectX Diagnostic Tool.
  3. Go to the System tab and check the DirectX Version; it should be DirectX 12.Check the version
  4. If not, you need to update it; visit the Microsoft official page for DirectX.
  5. Select your preferred language and click Download.Download - directx 12 initialization failed
  6. A file will be downloaded, double-click it, and initiate the installation of DirectX12.
  7. Follow the on-screen instructions to complete the process.

If you also encounter DirectX errors on Windows 11, consider reinstalling the latest version; for more details, check out this guide.

3. Download Visual C++ Redistributable for Visual Studio 2015

  1. Go to Visual C++ Redistributable for Visual Studio 2015 website. C++- directx 12 initialization failed
  2. Select Language from the drop-down menu and click Download.
  3. Choose the version that suits your computer and click Download.Download the C++ -  directx 12 initialization failed
  4. A file will be downloaded; double-click the file and initiate the installation.
  5. Follow the on-screen instructions to complete the process.

If you encounter a Microsoft Visual C++ Runtime Library error on your Windows, you need first to perform a clean boot; read this guide to learn more.

4. Disable Hardware acceleration

  1. Press Windows + I to open the Settings app.
  2. Go to System, then select Display.Display - directx 12 initialization failed
  3. Click the Advanced display.Advanced display
  4. Click Display adapter properties for Display 1.Display adapter properties - directx 12 initialization failed
  5. On the next window, switch to the Troubleshoot tab.
  6. Click the Change settings button to open the Display Adapter Troubleshooter.
  7. Locate Hardware acceleration, and drag next to it to None.Hardware acceleration
  8. Click OK to save the changes.

If nothing worked for you, try installing the 32-bit version of the program with which you are facing the DirectX 12 initialization failed issue.

Furthermore, if you use multiple monitors, try replugging the secondary monitor, start the app or game, go to resolution options, set it to a lower value, and save it. Now quit the app and unplug the external monitor.

If you can’t install DirectX on your Windows computer, it could be due to corrupted files; read this guide to learn more.

DirectX can also cause issues with certain games, and in our latest guide we wrote how to fix Wuthering Waves Fatal error on line 125, so don’t miss it.

Did these methods help you fix the DirectX issue? If so, share your experience with us in the comments section below.

How to Download & Install DirectX 9 on Windows 7

If you are using Windows 7 and want to install DirectX 9, it could be because some apps and programs require this version of DirectX to function. Downloading & installing it is a simple process and takes less time

What is DirectX 9?

The DirectX 9, aka Microsoft DirectX End-User Runtime Web Installer, first came out in 2002 and used to go with Windows 98 and Windows XP.

Although it is a relatively older DirectX version, you can still download it from the official DirectX website on your computer. Also, if it is missing, you will encounter an error with a message such as The program can’t start because d3dx9_41.dll is missing from your computer.

Here are the minimum system requirements to install it:

Operating SystemWindows 98, ME, XP, Server 2003, Windows 11, 10, 8, 7
ProcessorAt least Pentium 233 MHz
RAMAt least 64 MB
Hard disk spaceAt least 1.5GB
Should have CD-ROM drive

How can I download and install DirectX 9 on Windows 7?

  1. Press Windows + R to open the Run window.dxdiag - directx 9 windows 7
  2. Type dxdiag and click OK to open DirectX Diagnostic Tool.
  3. Go to the System tab and check the DirectX Version.Check the version directx 9 windows 7
  4. Next, visit the official Microsoft page for DirectX.
  5. Select your preferred language and click Download.Download - directx 9 windows 7
  6. A file will be downloaded; double-click it to open the DirectX June 2010 SDK dialog box.Yes
  7. Click Yes to proceed.
  8. On the setup window, click Next to initiate the process.
  9. Follow the on-screen instructions and click Finish to complete.

Once done, repeat steps from 1 to 3 to check the DirectX version.

Installing DirectX 9 is simple and allows you to run older games and apps requiring this version. If you are facing issues with DirectX, we have a list of fixes for common DirectX errors on Windows; read this guide to learn more.

Were you able to install DirectX 9 using these steps? If so, please let us know in the comments section below.

Microsoft closes its underwater data center ‘Project Natick’ after 11 years

Microsoft has silently discontinued its 2013-began Project Natick underwater data center (UDC) experiment. According to a recent DatacenterDynamics report, the Redmond giant has confirmed the discontinuation of Project Natick. 

Microsoft’s underwater data center Project Natick is no more

Talking with the publication about the closure of Project Natick, Noelle Walsh who is Microsoft’s Head of Cloud Operations + Innovation said:  

I’m not building subsea data centers anywhere in the world. My team worked on it, and it worked. We learned a lot about operations below sea level and vibration and impacts on the server. So, we’ll apply those learning to other cases.

Given the trend, data centers have a promising future and are expected to see a growth spike in the near future. One such example of this is NVIDIA, which recently surpassed Microsoft to become the most valued company on Earth. The chipmaker sold over 3.76 million data center GPUs in 2023.

As Tom’s Hardware notes, these GPUs would consume 14.3 TWh of electricity every year, excluding the cooling solutions. As per the DataSpan report, almost 40% of data center consumption is in cooling systems. Therefore, Microsoft might want to reduce the power requirements for building a data center. Doing so can reduce or eliminate the cost we talked about before. 

There were fewer server failures as compared to servers on land

Leaving potential energy saving aside, Microsoft has also figured out other things too. For example, out of 855 submerged servers installed off the coast in Scotland in 2018, Microsoft only lost six. It is promising considering eight out of 135 servers needed replacement on the parallel experiment Microsoft carried out on land.

Percent-wise, it is approx. 0.7% loss in the sea compared to 5.9% on land. Microsoft says that the stable temperature of seawater and the inert nitrogen gas used to protect the servers are the main reasons behind the optimistic numbers. The company hasn’t ruled out the involvement of robots in data centers, too. It said:

We’re looking at robotics more from the perspective that some of these new servers will be very heavy. How can we automate that versus having people push things around? We are learning from other industries on robotics, but we’re also very cognizant that we need people. I don’t want people worried about their jobs.

Not to forget, Microsoft hasn’t said anything about whether it will start another UDC experiment like Project Natick in the future. However, we can’t rule out that possibility, especially when Microsoft is making huge investments to build data centers in countries like Thailand and Spain.

Earlier this year, there were reports of Microsoft partnering with OpenAI to build a $100 billion data center in the US as part of the Stargate project, too. 

Chrome tests hiding the Tab bar for a cleaner look

Google is working to make Chrome’s tab bar, the strip at the top of the window that displays your open tabs, less cluttered. This update focuses on allowing the tab bar to dynamically hide or show based on the available window width.

Chrome’s Dynamic Tab Strip Implementation: Hiding based on Window Width

If you have so many tabs open that you can’t see their titles anymore. With this update (currently being tested), Chrome will automatically hide the tab bar when your window gets too small. This gives you more space to see the actual websites you’re browsing.

When the tab bar hides, a faint background appears to show you where it is. This creates a smooth transition. Even with the tab bar hidden, you can still swipe or use other gestures on the top part of the browser window (called the app header) to navigate Chrome.

In a CL titled “[TSLO] add desktop Window tab scrim transition implementation“, Google notes “Support Dynamic Top Chrome to hide/show the tab strip in a desktop window with varying widths, by updating the scrim on the strip. Allow system gestures on the app header when the strip is hidden”.

Benefits to users:

Laptops and small screens: This update is especially helpful if you use a laptop or have a limited screen size. Hiding the tab bar gives you more space to see what you’re browsing.
Cleaner Interface: Some people prefer a simpler look. Hiding the tab bar creates a cleaner interface for those who like a minimalist browsing experience.
Modern Browsing: This feature aligns with modern design trends that focus on clean and flexible user interfaces.

Google is constantly working to make Chrome better. This change is currently under development and some technical aspects like animations and peripheral device compatibility are being refined.

Previously, the tab bar was always visible, no matter how much screen space you had. This could make things cluttered, especially with a lot of tabs open.

By hiding the tab bar and making it more flexible, Chrome is aiming to provide a cleaner and better browsing experience for everyone.

Additionally, Chrome to allow changing the Tab Search position to the right and to prevent Windows built-in text input feature from tracking incognito and PiP browsing.

Microsoft brings Surface Pro Flex keyboard support on Surface Pro 8, Pro 9 & Pro 10

Do you own a Surface Pro tablet and are waiting for the new firmware update which would bring support for the Surface Pro Flex keyboard?

Worry not, a new firmware update is now available for Surface Pro 8, Surface Pro 9, Surface Pro 9 5G, and Surface Pro 10 for Business. So, you can download it to add support for Microsoft’s rather expensive keyboard on the tablets we mentioned before.

Microsoft releases the latest firmware update for the Surface Pro 8/9/10 to add support for the Surface Pro Flex keyboard

Here’s what Microsoft adds in the official changelog:

Improvements and fixes:

Enables a seamless experience of using the new Pro Flex Keyboard with Slim Pen on the latest Surface Pro devices.

If you are uninitiated, the Surface Pro Flex keyboard comes with numerous benefits when compared to previous-gen Surface Keyboards. The stand-out feature of this expensive keyboard is that it gives you the freedom to work wirelessly using Bluetooth. Plus the in-built battery offers you peace of mind.

You’ll also find a larger haptic trackpad which can be configured easily from Settings for a noise-less typing experience. If you are willing to pair the Surface Pro Flex keyboard with the Surface Pro tablets, it will cost you $349.98. And, an additional $100 for the Slim Pen.

Surface Pro 9 also gets security patches for reported vulnerabilities

On the same day, Intel-based Surface Pro 9 received security updates for three vulnerabilities that Intel reported earlier. You can check the severity and details of those vulnerabilities shared by Intel below.

  • INTEL-SA-00950 (Severity – High): A potential security vulnerability in some Intel Processors may allow escalation of privilege and/or information disclosure and/or denial of service via local access. Intel is releasing firmware updates to mitigate this potential vulnerability.
  • INTEL-SA-00929 (Severity – High): A potential security vulnerability in BIOS firmware for some Intel Processors may allow escalation of privilege. Intel is releasing BIOS updates to mitigate this potential vulnerability.
  • INTEL-SA-00923 (Severity – Medium): Potential security vulnerabilities in the Intel Converged Security Management Engine (CSME) installer, Intel Local Manageability Service software, and Intel Server Platform Services (SPS) may allow information disclosure, escalation of privilege, or denial of service.

If you own Surface Pro 9, or any of the mentioned tablets, it is best in your interest to install the latest firmware update. You can simply head to Settings > Windows Update to download the latest firmware for your Surface Pro tablets.

For the manual installation, please download the installation package for Surface Pro 10 for Business (from here), Surface Pro 9 Intel (from here), and Surface Pro 8 (from here).

Microsoft revamps the Forms website and adds two new templates

Microsoft has been actively improving its Forms service by adding new features over the last few months. And, this week the company revamped the look of the Microsoft Forms website and also included two new form templates to the portal.

Microsoft revamps the Forms website offering it a fresh look and adds two new templates as well

Microsoft, in its blog post from 21st June, says it is making changes to the Forms portal page. And, that it now has organized templates into four different categories. In addition to the earlier survey and quiz templates, you’ll now find invitation and check-in templates.

Microsoft even gave an idea of what it would look like using the new Forms templates. In the blog post, the company detailed the process of creating an invitation for a home barbecue party using the invitation template. Explaining the process of designing the invitation form, Microsoft says:

Upon entering the design page, you’ll notice that you can easily access various templates on the left side pane. In this instance, as you realize your birthday is approaching, you decide to expand your plans beyond just a barbecue and include a celebration. You locate the Birthday party invitation template and make the switch accordingly.

When it comes to customizing the style and layout, Microsoft offers different style options for you to choose from. You can even customize it based on your preferences and choose a specific cover page layout for your invitation as shown in the image below.

Microsoft Forms birthday invitation template cover page layout
Image credit: Microsoft

The Microsoft Forms site also allows you to optimize the layout so that the invitation is viewable on guests’ mobile devices. When you’re done creating the invitation form using the new template in the revamped Microsoft Forms portal, you can live present it to your audience for better engagement as seen below. 

Live presenting the Microsoft Forms created using new templates
Image credit: Microsoft

You can share the form created using a new template via an email, QR code, or more

It is worth noting that you can also send the invitation the traditional way. That means you can send the form you create using an invitation template via URL, QR code, or email. If you are active on Facebook and X (formerly Twitter), you can share it there too.  All you have to do is select the preferred method of sending out the invitation and you’re done. It’s that simple. 

What do you think about the revamped Microsoft Forms site with new templates? Please share your thoughts in the comments below.  

Microsoft retires the Win+C keyboard shortcut for Copilot, promotes the Copilot key instead

One of the main highlights of Copilot + PCs is that they all feature a dedicated Copilot key on the keyboard. It is one of the biggest changes in the three-decade-long history of Windows keyboards. If you’re wondering if triggering Copilot using the dedicated key on Windows 11 will let you explore all its horizons, sadly, it won’t. 

The dedicated Copilot key on Copilot + PCs running Windows 11 is sadly not that useful, at least for now

In fact, using the dedicated key on Copilot + PCs only launches a Progressive Web App (PWA) version of Copilot. Although you can resize, minimize, move, or close the Copilot just like any other app, the patch note dropped by Microsoft on the June 14th Windows 11 Insider Preview Build post makes the feature less useful and accessible than it is on the publicly available Windows version. 

As The Verge notes, the web app doesn’t even integrate into Windows anymore like we saw last year. It also means that you can’t use Copilot to control settings in Windows 11. Neither, the chatbot can be docked at the side of the screen.

Copilot unable to control setting in Windows 11
Image credit: The Verge

It would have been great if Microsoft had supercharged the Copilot key to use as a shortcut to launch an app or AI features, if not alone, with different key combinations at least. Doing so would have made the Copilot more useful than what Microsoft has made it now. Talking about the new Copilot experience in the patch notes, Microsoft says:

We’re also evolving the Copilot experience on Windows as an app that will be pinned to the taskbar. This enables users to get the benefits of a traditional app experience, including the ability to resize, move, and snap the window – feedback we’ve heard from users throughout the preview of Copilot in Windows.

Microsoft retires the Win+C keyboard shortcut for Copilot

Other than triggering Copilot as PWA using the dedicated key, Microsoft is also retiring the Win+C keyboard shortcut earlier used to summon Copilot in Windows 11. The keyboard shortcut will no longer be usable in Copilot + PCs. So, if you have to summon the chatbot on Copilot + PCs, you will need to use the dedicated Copilot key. 

Microsoft also adds that this model allows it to more agilely develop and optimize the experience based on user feedback. Until the company makes changes in its plan, Copilot + PCs users will have to use the Copilot key to access the not-so-useful PWA version of the chatbot.

Moreover, Microsoft has also pinned the Copilot app to the taskbar. So, if you don’t feel like using the dedicated key, simply click on the pinned Copilot icon on the taskbar. 

How to Fix DirectX 12 Not Working for Fortnite?

If DirectX 12 is not working while playing Fortnite on your Windows PC, it could be due to corrupted drivers, missing game files, outdated Windows, or the launcher’s overlay. To fix it, first check Windows Updates, then ensure CPU and GPU temperatures are within the limit.

How can I fix DirectX 12 not working on Fortnite?

1. Ensure DirectX 12 is selected

  1. Press the Windows key, type fortnite, and click Fortnite from the search results to launch it.
  2. Go to the Fortnite menu, then click Settings.How to Fix DirectX 12 Fortnite Not Working?
  3. Go to Display or Video, then locate Rendering Mode. Ensure that DirectX12 is selected.

2. Install DirectX12

  1. Press Windows + R to open the Run window.dxdiag
  2. Type dxdiag and click OK to open DirectX Diagnostic Tool.DirectX12 - How to Fix DirectX 12 Fortnite Not Working?
  3. Go to the System tab,  and check the DirectX Version; it should say DirectX 12.
  4. If it doesn’t, go to the Microsoft official page for DirectX.
  5. A file will be downloaded, double-click the file, and initiate the installation of DirectX12.
  6. Once done, try to run the game now.

3. Manage Fortnite settings

  1. Press the Windows key, then type epic and select Epic Launcher to launch it.
  2. Go to Library, right-click Fortnite, and select Manage from the context menu.Manage -  DirectX 12 Fortnite Not Working
  3. On the next dialog box, ensure Launch options is enabled and type -d3d12 in the box down.
  4. This will force the game to run on DirectX12.

4. Update the graphics driver

  1. Press Windows + R to open the Run window.Device Manager Run command - How to Fix DirectX 12 Fortnite Not Working?
  2. Type devmgmt.msc and click OK to open the Device Manager.
  3. Locate and click on Display adapters to expand the category.
  4. Right-click the graphics driver and select Update driver from the context menu.Graphics Driver update
  5. Click Search automatically for drivers.Search automatically -How to Fix DirectX 12 Fortnite Not Working?
  6. If found, follow the on-screen instructions to complete the process.
  7. Once done, restart your computer.

If this doesn’t work, you need to reinstall the graphics driver.

  1. Open Device Manager again and click to expand the Display Adapters category.
  2. Right-click the graphics driver and choose Uninstall device.Uninstall device
  3. Now go to Action, and click Scan for hardware changes to reinstall the driver.Action scan for hardware changes - How to Fix DirectX 12 Fortnite Not Working?

Alternatively, you can restart your computer after uninstallation, and your PC will reinstall the deleted driver upon reboot.

Reinstalling GPU or graphics drivers can also fix issues like the FortniteClient-Win64-Shipping.exe error; read this guide to learn more.

5. Verify the game files

  1. Press the Windows key, then type epic and select Epic Launcher to launch it.
  2. Go to Library, then click three dots next to Fortnite.
  3. Select Manage from the context menu.Manage -
  4. Next, locate the Verify File option, then click the Verify button. This will check and repair the corrupted or missing game files.Verify - - How to Fix DirectX 12 Fortnite Not Working?

You can also try disabling Overlay if applicable. If nothing has worked for you, we suggest you contact Epic Games Support for specific assistance.

Remember, to play games on your PC without any issues, you must ensure the drivers are updated on your computer. Also, ensure that your game, BIOS, and DirectX version are always up to date. If you want to play Fortnite on an unsupported OS, read this article to learn how.

Did we miss a solution that helped you? If so, share it with us in the comments section below, and we will add it to the list.

A YouTuber got Windows XP running on an old touchscreen MacBook and played Half-Life too

Have you ever thought about pairing a tablet version of Windows XP with a decade-old a touchscreen from Macbook? Fortunately, you can now have a glimpse of what the experience would look like via a YouTube video.

Before anyone attempts to do such things, Michael MJD on YouTube recently achieved this feat. He recently shared a video on YouTube detailing his experience running Windows XP on a touchscreen MacBook from 2011.  

Michael MJD, known for his computers and OS tinkering skills, recently got his hands on a touchscreen MacBook from 2011. Notably, the MacBook was modified by Lingraphica with a plug-in touchscreen for accessibility purposes.

Once he showed off the Mac on the video, he went on to test if the touchscreen MacBook could run the tablet version of Windows XP. By now you must have guessed that the process wouldn’t have been easier and involved a lot of headaches. And, you’re right.

YouTuber Michael MJD got Windows XP running on a touchscreen MacBook from 2011 after a daunting process

First and foremost the tablet version of Windows XP which he downloaded from Internet Archive took note of the kind of hardware being used during installation. As the Mac was incompatible hardware with the OS, it opted to install regular Windows XP (without the tablet features) as opposed to what Michael wanted.

However, he had to use a custom ISO to be able to install the tablet version of Windows XP on the 2011 touchscreen MacBook. While you may think that was the only problem, driver issues also plagued the hectic process. Despite having the custom ISO, the installer continually crashed and threw errors saying there had been license modification.

However, he came across corrupted license text at the end triggering the installation wizard to crash. Once he fixed the license agreement, he installed a Hampshire Touch Windows driver from the Internet Archive. It eventually helped him fix the MacBook’s touchscreen compatibility issues. 

There were hiccups during the process, but Michael eventually got the OS running

Next, he used Boot Camp so that all the drivers worked fine, and it did eventually. Fortunately, he didn’t encounter any issues to set up the touchscreen MacBook for Windows XP. Everything worked fine for him, media buttons worked well, audio came through, and it was going all well.

But, hiccups during the whole process seemed neverending as he encountered issues with the graphics driver. That said, he found the correct version of the driver from NVIDIA and got everything running smoothly.

Once Michael finished the setup process, he showed off the Windows XP tablet features in action. If you watch the video, you’ll see the Ink Ball game running on a touchscreen. He even played the Half-Life game at a decent framerate. 

If you have an interest in software and hardware tinkering, the video is a must-watch. That’s why we have embedded it below. Michael has also mentioned everything he used in the video description, so you can check it out too.  

Mastering Thrustmaster Control Panel Settings to Get the Best Performance

If you have Thrustmaster and want optimal performance and precision in your gaming experience, you need to fine-tune the Thrustmaster Control Panel settings.

What control panel settings should I use for Thrustmaster to get the best performance?

  1. Press the Windows key, type game controller in the search box, and hit Enter.
  2. On the Game Controllers window, select the Thrustmaster model and click OK.
  3. Navigate to Gain Settings, here are the settings you can apply:
FeatureValueIt simulates resistance to wheel movement, specifically when turning the wheel against inertia. Setting it to 100% makes it more realistic. However, if you feel the steering is heavier, set it to 0%
Overall Strength of all forces100%Setting this will get you a full range of force feedback effects as intended by the game
Constant100%This simulates continuous forces, like road texture and vibration. Setting it to 100 means you feel these effects strongly.
Periodic100%This generates periodic effects like road irregularities and bumps. Setting it to 100 means effects will be realistic
Spring0%Enabling or disabling it doesn’t make a huge difference; disabling it is better.
Damper100%It simulates resistance to wheel movement, specifically when turning the wheel against inertia. Setting it to 100% makes it more realistic. However, if you feel the steering is heavier, set to 0%
Auto-Centre SettingsBy the game (12%)This determines how forcefully the wheel returns to the center position after turning. Setting it to 12% indicates the strength of the auto-centering force
Boost (Constant + Spring)ONCombining these force feedback effects gives combined intensity of continuous feedback and centering resistance.

4. Then, click OK to save the changes.

Remember that all the Thrustmaster models will have the same settings, and you can apply these settings to get better results.

 If the Thrustmaster control panel is not working for you, it could be due to an incompatible device driver; read this guide to learn more about it.

What settings should I apply in ACC to maximize the output?

FeatureSettingsReason
Gain100%If you like a stiffer wheel, the number should be higher
Minimum Force7%When choosing any number higher than this, it makes your Thrustmaster bounce and straight, which could be irritating
Dynamic Damping175%When you increase the value, you get a lot of power from the wheel
Road Effects40%It gives much information related to the road, like the bounciness. These settings apply to all Thrustmaster models, but if you experience overheating, turn them down a bit.
Frequency33HzIt is a standard frequency that is good for responsiveness and efficiency. However, choosing a higher frequency means more frequent updates and smoother responses. However, it could also increase CPU usage.
Steer Lock900This means the wheel can rotate 900 degrees from center to full lock, giving you maximum steering input
Steer Linearity1.00It controls the relationship between the physical movement of the steering wheel and in-game response. Setting it to 1 means the steering input is linear.
Brake Gamma1.00It is used to adjust the brake pedal’s response curve. Setting it to 1.00 means a linear response. This will alter the pedal’s sensitivity, making it easier or harder to achieve maximum braking force.
GearShift Debouncing50msThe time between registering consecutive gearshift inputs. Setting it to 50 ms means there will be a 50-millisecond delay before the system accepts another gearshift input.

If you are using Thrustmaster with your Xbox, you can check out these settings to optimize the Thrustmaster control panel for Xbox.

These Control Panel settings work best for me and provide the desired output when playing racing games. However, you might have to adjust one or two settings according to your comfort level.

Are you using the same Thrustmaster Control Panel settings? If not, share the differences with our readers in the comments section below.
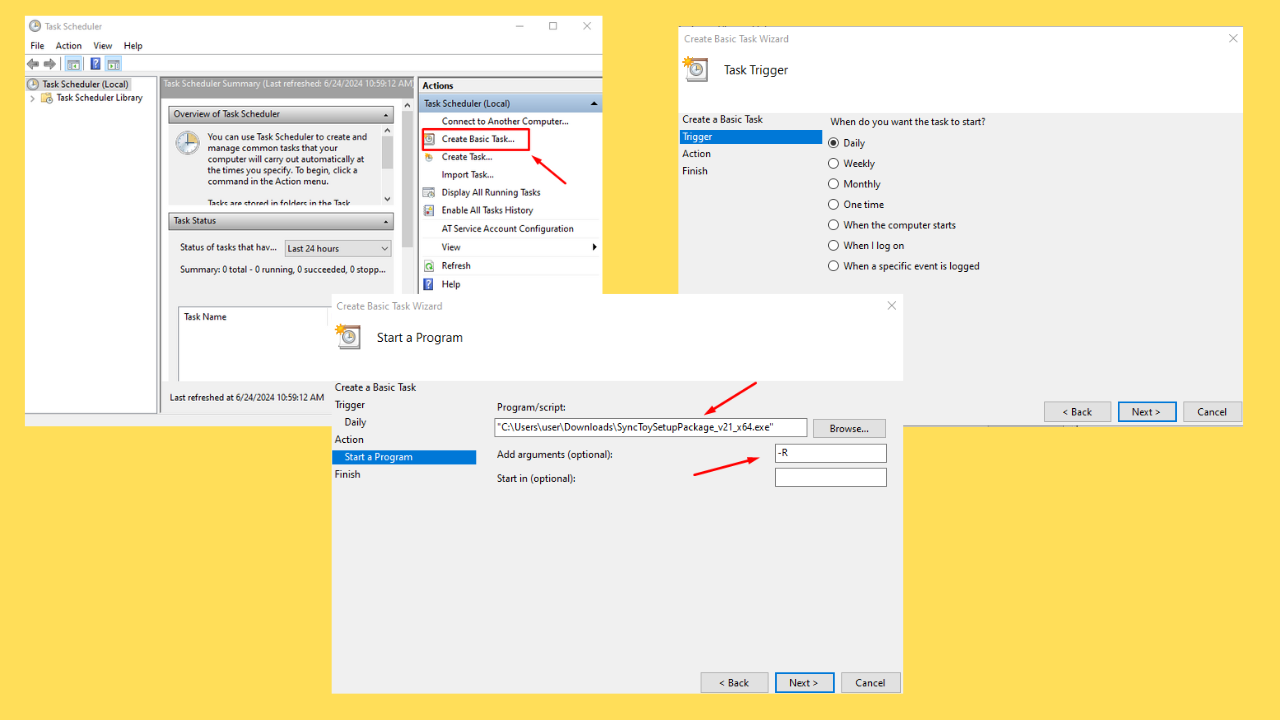
Microsoft is developing a new tool to mitigate AI hallucinations

Microsoft is working on a new AI tool to help block and rewrite underground information for better responses. And, Microsoft is doing so to mitigate AI hallucinations. As you may know, Copilot was initially called Bing Chat when Microsoft launched in early 2023.

Although the AI tool got an impressive response, there were several reports about it generating weird answers and responses to the users’ queries, often labeled as AI hallucinations.

When Microsoft became familiar with these errors, the company introduced limits on the chat sessions per day. By doing so, Microsoft wanted to reduce the amount of errors and strange responses users were getting when using the Copilot. 

Microsoft is working on a new tool to block and rewrite ungrounded info to prevent AI hallucinations

Even though the Redmond giant got rid of most of those chat turn limits, Copilot hallucinations were still a thing and bothering users as well as Microsoft at large. However, recently, Microsoft took to its Source blog to detail how such errors are made with GenAI (generative AI). In addition, the company also talked about how it is working on mitigating such issues. 

According to Microsoft, hallucinations occur when AI answers using undergrounded content. That means, for some reason, the AI models either modify or add data that were fed into its model.

However, it can be a good thing since answers can be more creative with the help of Copilot and ChatGPT. That said, businesses will still need AI models to use grounded data to get factually accurate answers. 

In a recent blog post, Microsoft added that it is developing tools that can help AI models stick with grounded data to mitigate AI hallucinations. The company says: 

Company engineers spent months grounding Copilot’s model with Bing search data through retrieval augmented generation, a technique that adds extra knowledge to a model without having to retrain it. Bing’s answers, index, and ranking data help Copilot deliver more accurate and relevant responses, along with citations that allow users to look up and verify information.

Microsoft even says that outside customers can access Azure OpenAI service and use the On Your Data feature. This would allow businesses and entities to access their in-house data using their AI applications. There’s another real-time tool for customers that can help detect how grounded the responses are from the AI chatbots.

Microsoft talks about another way to mitigate AI hallucinations in its blog post and says:

Microsoft is also developing a new mitigation feature to block and correct ungrounded instances in real-time. When a grounding error is detected, the feature will automatically rewrite the information based on the data.

There’s no release date committed for such tools as of now

All that said, we are still unsure when Microsoft will make these mitigation features available. But one thing is certain, Microsoft is aware of its AI models’ limitations. And, it is working to make them better by mitigating AI hallucinations as the day progresses. 

Earlier this year, SalesForce also promised that its Einstein Copilot AI would encounter fewer hallucinations as compared to other AI chatbots. Time will tell when Microsoft comes up with a concrete tool to prevent AI hallucinations. But, the way it approaches the whole thing makes us quite optimistic.

How to Create SyncToy Batch Script For Background File Sync

SyncToy is a legacy but useful tool that can sync files locally, and many are wondering how to make a SyncToy batch script. In this guide, we’re going to show you the best ways to do it.

How can I create a SyncToy batch script?

Use Notepad

  1. Open Notepad.
  2. Paste the following code: "C:\Program Files\SyncToy 2.1\SyncToyCmd.exe" -R
     notepad batch file
  3. Click on File and choose Save as.
    save as notepad
  4. Set Save as type to All files. Enter sync.bat as the name of the file and click on Save.
    sync.bat save as type all files
  5. Now run the newly created sync.bat file to sync your files.

Do keep in mind that this script will sync all folder pairs. If you want to sync a specific folder pair, use the following code instead in step 2:

"C:\Program Files\SyncToy 2.1\SyncToyCmd.exe" -R “WindowsReport”

Replace WindowsReport with the name that matches your folder pair.

After you create a batch script, you just need to double-click to run it and SyncToy will sync your files in the background.

More advanced users can assign a keyboard shortcut to the script or use Task Scheduler to run the script at the specified time of the day.

If you’re not familiar with SyncToy, it offers limited customization options, but you can easily change folder path in SyncToy or exclude folders in SyncToy if needed.

It’s worth mentioning that this tool has its share of issues, and we already wrote about Cannot access internal metadata error in SyncToy in our other guides.

Path Too Long Error in SyncToy: 3 Ways to Fix it

Often, while creating backups or syncing files using Microsoft’s native solution, SyncToy, you will come across the path too long error. And it doesn’t go away, no matter what you do!

The message accompanying the error reads, Exception during preview: The path is too long after being fully qualified. Make sure the path is less than 260 characters.

As the message suggests, the error arises when the path length exceeds the 260-character limit in File Explorer. If that’s not the case, there must be an issue with SyncToy itself. A quick workaround is to skip all files with long paths as long as they are minimal and not critical!

What can I do if SyncToy says the path is too long?

1. Reduce the characters in the path

If you can actually see several folders and files that are to be synced with longer-than-usual names, rename them. This time, use a shorter one to reduce the file path. Once done, reboot the PC, and verify whether SyncToy still shows that the path is too long.

This isn’t the most viable solution when we are dealing with hundreds and thousands of files, but if it’s just a few, a manual approach saves both time and effort.

2. Repair SyncToy

  1. Press Windows + R to open Run, type appwiz.cpl in the text field, and hit Enter.
  2. Select the Microsoft Sync Framework 2.0 Core Components (x64) ENU entry, and click on Change.repair to fix synctoy path too long
  3. Choose Repair and then click on Finish.repair SyncToy
  4. Similarly, repair the Microsoft Sync Framework 2.0 Provider Services (x64) ENU component.
  5. Finally, reboot the PC and check for improvements.

Given that SyncToy has been discontinued and a newer version won’t be rolled out, your best bet is to repair the current installation when faced with any errors.

3. Use a SyncToy alternative

If nothing works, I recommend you use an effective SyncToy alternative to sync the files across folders or disks without being told that the path is too long. Many tools can effectively bypass the path-length limitation.

Several users have also suggested using Long Path Tool, but our experts recommend against it due to security and privacy concerns. Although safer Long Path Tool alternatives exist, and you can use one in this case!

As you know, path too long errors can also be seen when extracting, editing, or moving files, even without SyncToy. The problem, in most cases, has to do with the OS and not the software.

Which fix worked for you? Share with our readers in the comments section.

Xbox exclusives are not going anywhere, and many more are coming, says Matt Booty

In a world where gaming consoles fight for dominance, Matt Booty from Xbox has expressed a strong statement highlighting the brand’s dedication to its fans and wider gaming community.

Xbox does not waver in its pledge to provide launch exclusives, which thrills its faithful foundation and simultaneously gives Xbox an advantageous place within this intensely competitive field of video games.

This dedication was emphasized during a recent podcast from Variety’s “Strictly Business,” where Booty spoke about his plans for the future of Xbox, how they handle cross-platform play, and why it is important to grow the gaming community.

Booty’s excitement was obvious when he talked about the triumph of “Sea of Thieves” on PlayStation. This not only increased people’s involvement across Xbox and PC but also brought many new players to the series.

This tale of success that spans multiple platforms shows how Xbox puts players first, wanting to remove barriers and bring together gamers on different devices. It is a tactic that improves the game-playing experience for all while also helping build an accepting and wide-ranging gaming society.

The talk then moved to Xbox’s wider plan and its careful handling of exclusivity. Even though the focus is still on launch exclusives, choices about sharing games across platforms are decided one at a time.

This adaptable plan shows Xbox’s dedication to its main pledge while also understanding the changing environment in the gaming business. Booty’s thoughts show a careful equilibrium that Microsoft maintains between keeping its games only on Xbox and exploring opportunities for cross-platform play.

Booty also mentioned the unity in the gaming industry, emphasizing their good working connections with Sony and Nintendo. This cooperative attitude goes past corporate alliances, showing a wider trend of coming together in entertainment.

How different forms of entertainment merge shows that gaming is becoming more solidly part of popular culture, something Xbox recognizes and actively participates in.

When looking ahead, Booty was hopeful but practical. He recognized how difficult it is to anticipate the changes in industry trends. However, one aspect remains evident: Xbox’s dedication to following its fans and adjusting to their liking is steady.

No matter if it involves cloud streaming, cross-platform play, or launch exclusives, Xbox makes an effort to be where players are, and this tactic guarantees that the console continues to be a crucial part of their gaming experience.

Booty’s thoughts about the studios, such as Tango Gameworks and their games not being released yet, deepen the complexity of game development cycles.

Even though some choices may seem sudden or harsh, they are actually part of a planned strategy that focuses on long-term success and keeping Xbox’s game collection strong.

In this ever-changing gaming world, the strategies and commitments from Xbox, as explained by Matt Booty, show what is coming next for players. A future where everyone can play, no matter their device or location, will make it easier to enjoy games together across different platforms and even encourage more creators to participate in game development.

Xbox’s journey is one filled with innovation, team effort, and a strong commitment to its community. This sets up an interesting part of the story about gaming’s future.

Opera Mini Download for PC: Get the Offline Installer

If you’re looking to download Opera Mini for your PC, you’re in the right place. This guide will walk you through several methods to get the Opera Mini offline installer, ensuring you can install it without needing an active internet connection.

How do I get Opera Mini for PC?

1. Get Opera Mini for PC from the official Opera website

  1. Open your web browser, go to Opera Mini’s official page and hit the Download button.
  2. You may also use the main Opera download website and scroll down to find Opera Mini.
  3. Click on the link for your respective operating system – Windows, Mac, or Linux.

Using the official Opera website ensures you’re downloading a safe and updated version of Opera Mini for your PC. This method avoids any risks associated with downloading from unverified sources.

2. Download Opera Mini offline installer from AskVG

  1. Open your web browser and visit the Opera download page from the AskVG website.
  2. Unfortunately, you won’t find any offline installers for Opera Mini, but they do have the Opera offline installer for Windows 32-bit and 64-bit.
  3. Click the corresponding link to download the offline installer that matches your system architecture.

3. Access the Opera FTP Archive

  1. Open your web browser and visit the Opera FTP Archive.
  2. Browse through the directories to find the version folder for Opera Mini.
  3. Look for the setup file that fits your system requirements (32-bit or 64-bit).
  4. Click on the setup file link to download the offline installer to your PC.

The Opera FTP archive is a reliable source for downloading various versions of Opera, including Opera Mini, directly and securely.

These steps offer multiple ways to download the Opera Mini offline installer for PC, ensuring you can access the internet even without a continuous internet connection during the installation process. You can also learn how to install Aloha, a privacy-focused browser.

And if you’re looking to save data, enable extreme mode especially if you have a lower-end device. For future ease, always keep your offline installer in a safe place and regularly check for updates on the official Opera website.