Response time: 14ms typical (gray to gray) w/o OD, 8ms typical (gray to gray) w/OD
Viewing angle: 178° vertical / 178° horizontal
Color support: Up to 16.7 million colors supported (true 8-bit panel)
Pixel pitch: 0.232 x 0.232mm
Pixels per inch (PPI): 110
Backlight technology: LED
Brightness: 350 nits (typical)
Signal input connectors:
2 HDMI ports. One HDMI is also an MHL input
DisplayPort
HDCP
Audio via USB, DisplayPort, or HDMI
2 Integrated USB 3.0 hub with downstream ports with BC 1.2 battery charging capability
1 upstream port to the PC
Input signal: DisplayPort 1.2, HDMI 2.0/1.4, MHL/HDMI; HDCP supported on all digital inputs
USB
Dimensions (W x D x H): Unpacked with stand: 33.9 x 7.04 x 20.5 inches
Tilt: -5 to +23 degrees; Detachable
Eco Solutions: LED backlight, TCO, ENERGY STAR, EPEAT Silver and low halogen
So, there you have it, a few excellent HP monitors to go with your new Xbox One S or Windows 10 PC. If any of them strike your fancy, then get your credit card out and get buying. Let us know in the comments if you plan on picking up any of them.
Windows 10 is one of the most successful iterations released by Microsoft, but problems with it are not uncommon. Also, some reported issues with their PC after installing Windows 10. But when they try to go back to the previous version, the option is missing in Windows 10.
The problem affects the ability to roll back Windows, but things are easy to fix. Let’s find out!
Why is my Windows rollback option not available?
If you upgraded to Windows 10, there’s a feature to revert back to the previous version of Windows. We should mention that option to revert back is available only for a month or 28 days.
So, if you don’t revert back to the previous version of Windows within that time period, you’ll have to continue using Windows 10.
It’s also worth mentioning that the old version of Windows is stored on your hard drive in the $Windows.~BT and$Windows.~WS folders. if you delete these folders, you won’t be able to go back to the previous version of Windows.
You should know that these folders can be deleted by third-party applications such as various cleaners and optimizers. In fact, you can even delete these folders if you perform a Disk Cleanup.
How can I roll back Windows 10 to the previous version?
Now, click on See more recovery options near the bottom.
Click on System image recovery.
Select a system image, if one exists, and follow the on-screen instructions to complete the process.
If you’re unfamiliar with hard drive images, you probably don’t have a backup image on your hard drive. Basically, a backup image is a backup of your hard drive that allows you to revert to it and fix any potential problems that occurred after creating the image.
It should also help when you find that the Go back option is no longer available on this PC or is greyed out in Windows 10.
Although hard drive images are extremely useful, if you have already upgraded to Windows 10, but you didn’t create a hard drive image prior to it, you won’t be able to use this feature to revert to the previous version of Windows.
2. Restore to factory settings
Certain computers come with media that allows you to restore them to their original factory settings and previous operating systems. Though, you could employ the built-in factory reset option when the option to go back to the previous version of Windows 10 is missing.
This solution isn’t available for all computers, and if you decide to use this solution bear in mind that this process will delete all files from your computer, therefore, be sure to create a backup.
Sometimes the simplest solution is to reinstall the version of Windows that you were previously using.
This isn’t always the best solution because it will delete all the files from your C drive. So, if you decide to reinstall Windows, we strongly suggest that you back up your important data if you don’t want to delete them permanently.
If the option to roll back or go back to the previous version is missing in Windows 10, it’s usually because the available period has passed or because you accidentally deleted the folders with the files for the older version of Windows. And one of these solutions should help!
The Internet is a great source of information, but at the same time it can be quite harmful, and this is why many users want to install Microsoft Family Safety on their PC.
This is a great service, and in today’s guide, we’re going to show you how to properly set it up and use it.
What is Microsoft Family Safety?
This is a parental control service available in Windows.
It allows you to limit app and game time.
Using it you can set screen time limits.
It allows you to block harmful apps, games, and online content.
Ir provides location sharing for family members.
How do I enable Family Safety on Windows 10?
How do I add a device to Microsoft Family Safety?
Open the Settings app.
Go to Accounts > Family & other users. Click Add a family member.
Select Add a child option and enter that user’s email address. To use Family Safety on Windows 10, both you and your family members have to have Microsoft accounts. Once you enter the email address, click the Next button.
Click the Confirm button.
In order to enable Family Safety, the new user needs to accept your request for it. To do that, that user needs to check their email and accept your invitation by opening the invitation email and clicking Accept Invitation.
The new browser tab will now open and explain to you what Family Safety does for you. Click Sign in and join.
After doing that you’ll get a notification that a new person joined your family.
Change family member settings
Open the Settings app and go to Family & other users.
Click Manage family settings online.
New browser window will now open and you’ll be able to change various settings related to family accounts.
The first option is Recent Activity, and by using this option you can view the browsing activity for a child account.
In fact, you can even get weekly emails with detailed reports regarding your child’s internet activity.
Bear in mind that this feature only works in Microsoft Edge or Internet Explorer, since third-party web browsers aren’t supported.
The next feature is Web browsing and you can use this feature to block inappropriate content from search results.
In addition, you can also block specific websites, or you can allow only certain websites to be accessed.
Apps, games & media feature will block mature movies and games so that your child cannot download them from Windows Store.
If you want, you can even set age restrictions for content that your child can download from Windows Store.
Next option is Screen Time and using this option you can set limits for computer usage. For example, you can set specific time frames for days of the week, and you even set limits for daily computer usage.
Purchase & spending option allows you to add a certain amount of money to a child’s account thus allowing him to buy products from Windows and Xbox Store.
In fact, you can even see all purchases in the last 90 days, so you can always keep track of your child’s spending.
If you want to keep an even closer eye, there’s an option that will notify you every time your child gets an app or a game.
You can also allow your child to get only free apps and games, or block downloading applications and games completely.
The last option is Find your child, and using this option you can easily see your child’s whereabouts on a map.
To use this feature, your child needs to have a Windows 10 Mobile device and it should be signed on to it with his Microsoft account.
What devices are supported by Microsoft Family Safety?
The following devices have the Microsoft Family Safety app available:
Windows
Xbox
Android
iOS
Keep in mind that not all features are available on all platforms. For example, you can set app and game time limits on Windows, Xbox, and Android, but device screen time limits are available only for Windows and Xbox.
As for content filtering, it only works on Microsoft Edge, regardless of the platform.
Is Windows Family Safety free?
Yes, this feature is completely free since it’s a core component of Windows.
Using it, you can monitor up to 6 devices in your household, which should be more than enough for most users.
As you can see, it’s easy to install Microsoft Family Safety since it’s already available on your computer, but other platforms might need a dedicated app.
In case you don’t want to use this feature anymore, we have a great guide on how to disable Family Safety, so be sure to check it out.
Have you ever used this feature? If so, let us know in the comments below.
Computer problems can occur once in a while, and if you’re in a similar situation, it’s recommended that you use appropriate software in order to diagnose and fix them. Many users tend to install and use Sysinternals.
But it’s usually considered to be a tool for experts. That’s not the case, though. Anyone with a decent understanding of Sysinternals can install, access, and use the tool to eliminate problems quickly and effectively. Keep reading to find out!
What is Windows Sysinternals suite?
Windows Sysinternals is a part of Microsoft’s TechNet website that offers all sorts of utilities for fixing Windows problems. Sysinternals tools were created in 1996 by a company called Winternals.
In 2006 Microsoft acquired Winternals, and Sysinternals tools became a part of Microsoft’s TechNet.
Sysinternals Suite is a collection of applications that you can download and install for free right from the Sysinternals’ website. Bear in mind that you can download the entire archive, or you can get each of the applications individually.
In fact, you don’t even have to download any of these tools since you can access them from any computer remotely.
How do I get to Sysinternals?
Press Windows + R to open Run, type the following command, and hit Enter:\\live.sysinternals.com\
Go to the Tools folder, and you should see all Sysinternals applications available.
You can use all of these applications remotely, but for your convenience, we suggest that you download them and run them locally.
What are the tools in the Sysinternals suite?
AccessChk
This is a console program, and you can use this tool to see what kind of access to files, directories, registry keys, and Windows services users have.
AccessEnum
It is a tool that allows you to quickly see security permissions that users have regarding certain folders or registry keys.
Performing this process manually requires that you check each folder’s permissions, and that can be quite a long process, especially if you need to check the permissions of several different folders.
With AccessEnum, you just need to select a certain folder, and you’ll see all the permission rights. In addition, you’ll also see permission rights for all its subfolders.
AdExplorer
It is an advanced Active Directory editor and viewer. Using this Sysinterals tool, you can easily navigate through the AD database, define favorite locations, and view object properties and attributes.
In addition, you can create snapshots of an AD database to view or compare them offline.
AdInsight
It is a real-time monitoring tool designed for troubleshooting Active Directory client applications.
Using this tool, you can monitor Active Directory client-server communication and solve authentication and all sorts of other problems.
AdRestore
It is a command line tool that shows you the deleted objects in a domain, and allows you to restore each of those objects easily.
Autologon
It is a small tool that allows you to configure and use the built-in autologon system. If you don’t want to enter your username and password every time, you can just use Autologon. This tool will store and encrypt your data in the registry and use it when required.
Using this tool, you can easily enable or disable automatic logon, or temporarily prevent it by holding the Shift key before the system performs it.
Autoruns
It is a tool that shows you all the applications and services that are starting with your PC. This tool allows you to sort startup applications by different categories, but it also allows you to disable applications or services from starting up.
Autoruns shows the location of a startup application or a driver. Therefore, if a certain startup application is causing problems, you can easily delete it or disable it using Autoruns.
Autoruns is one of the most useful Sysinternals tools for managing startup items, and you can learn how to use it in detail by reading the Autoruns Sysinternals guide which helps you diagnose slow boots and unwanted background apps more efficiently.
BgInfo
This tool is designed to show important information regarding your PC on your desktop. You can customize the look of your data by changing its style, font, or color, and you can also add all sorts of fields to show relevant information.
In addition to adding certain fields, you can even create your custom fields as well.
After you set which fields you want to use, just click the Apply button, and relevant information will be displayed on your desktop.
Bear in mind that this tool doesn’t run in the background, instead, it creates a new background image with the necessary information and uses it instead of your desktop image.
Cacheset
It is a small tool that allows you to change the size of your cache. This tool allows you to set new minimum and maximum sizes for your cache and reset them to default values with just a single click.
Contig
It is a command-line utility that allows you to defragment specified files. Once you install sysinternals in Windows, this tool will be the perfect choice to speed up the execution time of the frequently used files.
Coreinfo
It is another command-line utility that shows you information regarding the processor. For example, this tool will show you the mapping between logical processors and physical processors as well as the model of the socket that your processor uses.
Debugview
It allows you to monitor debug output on your local computer or any computer you can access via TCP/IP.
Desktops
It is a simple and lightweight application that adds up to four virtual desktops on your PC. You can easily switch between desktops using the shortcut key or by clicking the Taskbar icon.
Disk2vhd
It is a tool designed to create virtual hard drives from your physical hard drive. Unlike other similar tools, this one allows you to create virtual drives on a system that’s online.
You can even save virtual hard drives on your local PC, even on the drives that you’re currently converting.
Disk Monitor
It is an application showing all hard disk activity on a Windows system. This tool will show you what hard drive is currently active as well as which sector is being used.
DiskView
It is a tool designed to show clusters on your hard drive. You’ll get a visual representation of the clusters, but you can also double-click a certain cluster in order to see which files occupy it.
ListDLLs
It is a command line utility that shows all DDLs that are loaded into processes. After installing sysinternals, you can use this utility to show all DLLs for every process or configure it to show DLLs only for specific processes.
LoadOrder
This small application will show you when the driver is loaded, the name of the service or the device that uses this driver, and the location of this driver.
Portmon
It is a utility that monitors and displays all the activity related to a serial and parallel port on your system. If you don’t use these two ports, you probably won’t have much use for this application.
ProcDump
It is a command line utility that is designed for monitoring certain applications for CPU spikes. Every time a CPU spike occurs, this application will generate a crash dump, and users should be able to use the information from the crash dump to fix the problem.
Process Explorer
It is one of the most beneficial tools users get access to after installing sysinternals This application allows you to see which program has a specific file or directory open.
In fact, this application can show you all sorts of information regarding the currently running applications. Process Explorer also works as Task Manager, so you can use it to change the priority of certain applications or close them.
Process Monitor
This little tool allows you to see real-time file system, registry, and process activity. This application provides extensive information, and it’s great for finding and removing malware.
RAMMap
This little application will show you all the necessary information regarding your RAM. Just like in Task Manager, you can see which processes use the most RAM, but you can also see RAM consumption based on process priority.
In addition, you can see how much RAM certain files use, and verify what physical address a certain process occupies.
ShareEnum
It is a simple tool that allows you to see all shared folders easily. If you’re sharing files over your local network with other members, we highly suggest you use this tool to easily see all the shared folders.
TCPView
It is an application that shows you detailed information regarding all TCP and UDP endpoints on your computer. After you install sysinternals, use the tool to see local and remote addresses and the state of TCP connections.
VMMap
It is a process and memory analysis tool. The application allows you to see committed virtual memory as well as the amount of physical memory that is used by a single process.
ZoomIt
It is a screen zooming application that allows you to zoom in with a single hotkey quickly. In addition, this application allows you to draw on zoomed images, which makes it perfect for presentations.
These are just a few of the applications you get access to after installing the Sysinternals Suite. To deepen your Windows monitoring toolkit, check our Sysinternals Sysmon guide and learn how to log detailed system events for faster threat detection.
While some of these applications are simple to use, we advise that you visit the Sysinternals website and read the instruction manual if you wish to better understand how certain applications work.
Sysinternals Suite offers some amazing applications for free, and we’re happy to inform you that most of its applications work without any problems on Windows 10. And with a proper understanding of each, you can employ the tools to fix a wide array of complex issues.
Before you leave, find out the best PC repair tools and use these to automatically eliminate critical errors.
For any queries or to share how you use the Sysinternals suite, drop a comment below.
The slow motion capture feature for the Windows camera app has been available for Windows Insiders since November of last year but has never been a fully functional stand-alone app since users had to set their video to slow motion before filming. The disadvantage of this was that any videos filmed with that setting enabled also meant that sound was unavailable for the duration of the clip.
Fortunately, the latest Windows 10 build introduces an improvement to the slow motion capture feature. Insiders can now use this mode using whatever setting is convenient, with the ability to add slow motion effects later in the editing stage using the Photos app. The update is available for both PC and Mobile and should become available for all Windows users next month when the Anniversary Update is rolled out.
The Windows 10 Photos app recently received another useful update as the app can now handle mouse actions better. However, despite Microsoft’s efforts to upgrade its photo editing app, users don’t seem to be too happy with Microsoft’s ideas. Many users criticized Microsoft for not adding useful features for viewing, editing and organizing photos, accusing the tech giant of ignoring the main purpose of the app. Other users suggested that Microsoft should give them the option to browse the photos by folders or by tags. They also added that Microsoft should upgrade the Photos app so as to allow them to view the next image in the directory.
Their comments reflected disappointment as many features were long been requested by users, but it appears their suggestions have fallen on deaf ears. However, users shouldn’t lose hope as Microsoft still has enough time to upgrade the app before the Anniversary Update.
You might notice OneDrive hiding in your update queue today with a sneaky bugfix update. The recent update is rolling out across all Windows devices with some minor performance improvements. Some of our users have noticed the application loading just a little quicker through Windows 10 Mobile. Unfortunately, the version notes haven’t been updated on the Windows Store yet to let us know what else Microsoft is sneaking in today.
It’s not a surprise though. Microsoft continues to foster their “cloud first, mobile first” creed as they continue to pump out more and more updates for the storage service. The company prides OneDrive as one of the major cloud storage providers available, excelling in a secure and effective service. It wasn’t that long ago that they slipped in the Data Loss Prevention Tips into the mobile app.
Have you found anything else new in the update? Let us know in the comments below.
Huawei’s MateBook is the company’s newest 2-in-1 tablet that bears striking similarities to the Microsoft Surface Pro 4. The device runs Windows 10 and can be purchased right now from the Microsoft Store, Amazon, and Newegg.
Back in June, Huawei began taking pre-orders for the tablet via the Microsoft Store, but there’s no need to do that anymore seeing as it is fully available now. For those unaware, the MateBook comes packed with a full HD 12-inch touchscreen display.
Consumers can choose between four versions of the MateBook, ranging from 4GB of RAM to 8GB. Internal storage goes up to 512GB SSD, which is not too bad seeing as there are USB ports to add regular hard drives. The MateBook can run up to nine hours on a single charge.
The MateBook begins at $699 and ends at $1199. The following is a rundown of its four versions and their prices:
Core m3, 4GB of RAM, 128GB SSD – $699
Core m5, 4GB of RAM, 128GB SSD – $849
Core m5, 8GB of RAM, 256GB SSD – $999
Core m5, 8GB of RAM, 512GB SSD – $1199
The MateBook Portfolio Keyboard, seen in the picture above, can be purchased via retailers for $129.
We like what Huawei has done with the MateBook, but we’d prefer to have a device with a much better processor than the Core M. If Microsoft can do it with the Surface Pro 4, then we see no reason why Huawei is unable to do the same.
Huawei first unveiled the MateBook 2-in-1 tablet at MWC 2016 to a warm reception. Time will tell if the Core M decision will turn out to be a good one.
Microsoft is in a bit of a pickle right now after Angry Birds game developer, Rovio, decided to discontinue development of the game on the Windows platform. This is no doubt a huge blow to Microsoft as the company has been moving to inject interest into its Windows 10 platform going forward.
One of the reasons Rovio decided to place Windows Phone and Windows PCs on the backburner has to do with the company losing money. Rovio appears to be in a terrible situation since it was forced to let go of nearly 50% of its workforce. Despite riding high in the past, it has proven unable to keep that momentum going.
Outside of a game known as Bad Piggies, an Angry Birds spinoff, Rovio has failed to come up with another hit mobile game on the same level. Angry Birds was so popular at one point that the company decided to create a movie that ultimately fared poorly at the box office, only making a little over $300 million at the box office.
Here’s what Rovio had to say in a statement:
Rovio’s games are available on a wide variety of mobile platforms, including iOS, Android, and Amazon. Many of our games are also available on Windows devices, although for commercial reasons this platform is no longer a focus for us, and no further game updates for this platform are planned. However, we continue to provide help to all customers, regardless of their mobile device.
We can only hope Microsoft is able to convince other developers to not jump ship because it’s clear that Android and iOS are where the money is at and that’s not going to change anytime soon.
The whole debacle is bit ironic because earlier this year, Microsoft released a slew of Angry Birds emoji in Skype. So much for that.
Microsoft has just launched Microsoft Stream, a new business-oriented video sharing service. The new service aims to give businesses the ability to share internal videos in the same flexibility of which YouTube already offers, with the security benefits of Azure Active Directory, a recognized leader in identity management systems.
The service is currently available as a free preview, and all you need to sign up is a business email address. The user interface of Stream, meanwhile, is similar to that of preexisting streaming services and involves social features such as compatibility with various devices, uploads, a trending section, comments, and tags. There could also be many uses for this service, with video training and employee communications highlighting the possible uses. Regardless, the aim of the service is to enable business users to harness the power of video to achieve more at work.
Stream Preview Dashboard
Microsoft’s corporate VP of Business Intelligence Products Group compares the service to Office 365 Video and concludes:
Microsoft Stream builds upon the learnings success of Office 365 Video and over time the two experiences will converge with a seamless migration to ensure a consistent experience both within and outside of Office 365.”
Since the service is similar to Office 365 Video (which launched two years ago), it is worth noting that during the preview of Microsoft Stream there will be no changes to the Office 365 Video experience. Over time, however, the two experiences will converge, making Stream the de facto video experience in Office 365. Additionally, Microsoft is noting that more details on future enhancements and user updates closer to general availability of the Microsoft Stream service will be shared over time.
We would love to know how your business might use this service. Will it be used for employee training? Sharing important videos? Let us know your thoughts, comments, or suggestions on this latest Microsoft service by dropping us a comment below!
Summer is officially underway, and that means job hunting season has started for fresh out of college graduates. Luckily, for these folks, Microsoft has created a package of resources, inspiration, and advice to help college graduates stand out with recruiters and hiring managers in today’s job market. All the materials are available at office.com/dreamjob, and come after Microsoft commissioned a survey of 1,000 18 to 25-year-olds and asked for their thoughts on the job search process.
More than one fifth (22%) of those who interviewed over Skype dress professionally on the top and
casual on the bottom during their interviews – with 3% admitting they go pant-less altogether.
1 in 4 people surveyed think having a “plain resume” could hinder their job search.
43% of respondents are currently looking for a job or internship, but 45% of them aren’t confident.
Additionally, the survey also found that many new job seekers have high hopes of landing a job in hot markets like New York, San Francisco and Seattle. Of course, those surveyed also expressed the fact that they wanted meaningful work where they could express themselves creatively.
Templates for Word 2013 and higher
However, as art of the package of resources, Microsoft worked with career expert and inspiration power-house Maxie McCoy to put together tips for how to design a show-stopping resume and how to have an unforgettable Skype interview. The Redmond giant also worked with print on demand company MOO to create new cover letter and resume templates for Word 2013 and higher (seen above.) Lastly, and because online presence is becoming more and more important, Microsoft also created free eye-catching blog post, portfolio and resume templates online templates in the app, Sway.
Will you be using any of these resources? What are your thoughts on these resources? Let us know your thoughts by dropping us a comment below!
Microsoft has announced that the company has chosen Michel van der Bel as the new Corporate Vice-President of Europe, Middle-East and Africa. In his new position, he will be leading Microsoft’s business across EMEA which includes 32 subsidiaries incorporating 134 markets and close to 20,000 Microsoft employees.
Michel van der Bel (Photo from Microsoft)
Additional responsibilities for van der Bel include overseeing the marketing, sales and operations across the company’s product and services portfolio in these markets. He also will lead the accelerated transformation of Microsoft into a leading productivity and platform provider for the cloud-first, mobile-first era in EMEA. Lastly, Microsoft is noting that van der Bel will help customers and partners be successful in accelerating their own digital transformation by harnessing the full potential of the Microsoft cloud.
In a statement seen in the official announcement, van der Bel expressed excitement for his new position. He is quoted as saying,
“I am very proud and excited to lead the areas in Europe Middle-East Africa at such a pivotal time in our company’s history. Ever since 1982, EMEA has a very strong Microsoft heritage in both developed and emerging markets and together, we have a great opportunity to accelerate digital transformation with our customers and partners and maximize growth across all aspects of our business”
With over 13 years of experience at Microsoft, Michel van der Bel has had prior leadership at the company. Since 2012 he was the the Area Vice President for Microsoft UK, and prior to that he served as the chief operating officer for Microsoft in Greater China. The company had previously announced that former Vodafone exec Cindy Rose will be taking over Microsoft UK, effective November 1st.
Dream Machine, an optical illusion puzzle game developed by GameDigits, has now been released on the Windows Store (via WindowsPhoneApps.es). The game was previously released on iOS and Android just a few months ago, and it’s always great when developers don’t leave the Windows platform behind. If you enjoyed playing critically-acclaimed puzzler Monument Valley, then you should probably give Dream Machine a try. Here is the official description below along with the launch trailer:
Escape a cold, inhumane factory and free yourself into a mind-blowing fantasy world. Manipulate fantastical machinery and solve the many mysterious optical illusions that lie in wait. Use all your ability to survive hazardous levels and fight epic boss battles. Guide your mechanical friend from an oppressive workplace and lead them to freedom.
Is it real or simply an illusion? Drift into the dream of the machine and find the truth.
– Visually Stunning & Pleasant to Play
Amazingly beautiful hand-crafted levels, containing 3D puzzles, impossible geometry and optical illusions. Dream Machine is easy to pick up and play but hard to put down.
– Boss Battles
Fight against your oppressors in daring boss battles. Use all your skill and brainpower to defeat the monsters from this mechanical dream.
– Replayability & Upgrades
Beat your best level completion times to earn Cogs. These allow you to upgrade your mechanical friend, achieve better times and climb Dream Machine’s competitive worldwide leaderboard.
– Hazardous Levels
Exercise your intellect to solve illusional puzzles and use your expertise to stay alive.
You can get the game from the download link below, it’s a $1.29 universal purchase and both Windows 8.1 and Windows Phone 8.1 are also supported. If you like puzzle games, let us know in the comments if you plan to get it.
Pokemon GO is the hottest mobile game around right now, but it is only available for Android and iOS. That’s a bummer because many Windows 10 Mobile users would love to play the game. However, while Pokemon GO won’t be available for Windows 10 Mobile anytime soon, it can be played on Windows 10 right now.
To get it up and running, you’re required to download Bluestacks and an Android emulator. Furthermore, seeing as Pokemon GO was not designed for Windows 10 in mind, we suggest anticipating problems here and there because they will arise.
How can I play Pokemon Go on Windows 10?
Use Bluestacks and Kingroot
Before getting started, download the following files:
The following is how interested folks can get Pokemon GO running on their Windows 10 computer systems:
Install Bluestacks (If you already have Bluestacks, uninstall it, restart your PC and install the latest downloaded version)
(as soon as you’re done installing Bluestacks please disable camera by going into REGEDIT on your computer and going to HKEY_LOCAL_MACHINESOFTWAREBlueStacksGuestsAndroidConfig — hit the camera and change the ‘1’ to a ‘0’ exit out of that.
Add/Install Kingroot to Bluestacks
Run Kingroot and scroll to bottom and tap Try it. Wait until it gets to 100% and tap optimize.
Install Fake GPS as SYSTEM App using Lucky Patcher (above steps)
Hit yes when it asks you to install as a system app, then hit no when it asks you to reboot.
Close out of everything except the welcome/Android tab above.
Restart Android (using cog wheel)
Add Pokemon GO to Bluestacks (using the APK button on left side)
Launch Lucky Patcher
Hit Search on Bottom
Hit Filter top right and sort as SYSTEM Apps
You should see Fake GPS, click that and launch.
In Fake GPS on the top right, go into settings and make sure EXPERT mode is checked.
Find a place on map you want to start spoofing from. (ex. Central Park)
Hit the Play button or whatever on bottom right when you find a place
The maps should close — that’s fine. Open Pokemon GO (you’ll have to log into your Google account), sign in, and be sure to hit no when it says it wants to use your location.
Ever wondered what is happening over at Microsoft’s Surface Lab? Well, now you might have the chance to explore it. ExpertZone released a new video showcasing the Surface Lab featuring Microsoft’s Panos Panay and Ben Rudolph.
The video is roughly an hour long, very detailed and very interesting. It shows some prototype designing techniques and the backstory of many Surface-branded products we’ve come to love.
Panos Panay also mentioned some “confidential stuff,” that they didn’t want to talk about. Those were probably some unreleased prototypes of upcoming Microsoft products and it isn’t surprising that the Surface team didn’t want to ruin the surprise for us. He also mentioned a “hinge that is being prototyped right now,” which means that the Surface Book could come with an improved hinge, which could fix some issues with the previous one or we may see this new hinge embedded in future devices.
Welcome back to our weekly “Windows 10 news recap” series where we go over the top stories of the past week in the world of Microsoft’s latest operating system. Let’s get started.
Microsoft releases a firmware update for its Surface Book and Surface Pro 4 devices
In preparation of the Windows 10 Anniversary Update, Microsoft has released a firmware update for both its Surface Book and Surface Pro 4 devices. It brings new drivers and fixes that resolve many issues that customers were experiencing, from the touchpad to the audio. With these updates, the devices should be much more stable.
Windows 10 won’t hit its 1 billion devices target by 2018
NVIDIA releases new drivers for Windows 10, bringing Ansel support and VR improvements
For people running an NVIDIA GeForce GPU, the company has released new Game Ready drivers for its GPUs on Windows 10, which adds Ansel support and brings improvements for Virtual Reality, as well as bringing further performance enhancements for newly-released games and upcoming games.
Intel also releases new GPU driver updates for Windows 10
The Chuwi Vi10 Plus adds to the growing Windows 10 2-in-1s
With the Windows 10 2-in-1 market seeing exponential growth, from both enterprises and consumers, the Chuwi Vi10 Plus will be adding another option to the mix, with it competing in the same arena as the Microsoft Surface Pro 3.
Roku arrives in the UK, Canada and Mexico on Windows 10
Forrester Consulting believes Windows 10 cuts costs across various areas
A study ran by Forrester Consulting has found that Windows 10 cuts costs in a few areas of business, including IT, security and productivity, which shows how Windows 10 can help businesses and push them to upgrade to Microsoft’s latest operating system.
Huawei MateBook Windows 2-in-1 now available in the US
In the past one of the most popular mapping software was Microsoft MapPoint. The software isn’t officially available, but many are wondering if is it possible to download Microsoft MapPoint.
Of course, this isn’t the only map software available, and you’re free to explore alternatives, but if you want to continue using it, keep on reading.
Can I still download MapPoint?
The software was discontinued in 2014, and it’s no longer available from Microsoft.
You can download it from third-party sources.
Keep in mind that third-party sources might not be 100% secure.
Select if you want to register or not. Registration isn’t mandatory, so you don’t have to register. After you select the desired option, click Next.
The download should now automatically start. Wait for the download to finish.
Locate the MP2013 file that you just downloaded and double click it to start the setup.
Select the folder where you want to extract the setup and click the Install button.
After the extraction is completed, the setup should start automatically. If you see a warning message saying that certain components will be installed, click the OK button to proceed.
After that you should see a welcome message. Click Next.
Enter your Name and your Company’s name. Company’s name isn’t mandatory, so you can leave it blank. After entering all the necessary information click Next.
Select the directory where you want to install MapPoint and click Next.
You should see a brief installation summary. If everything is in order click the Install button to start the installation.
Once the setup is completed, click the Finish button.
After you install Microsoft MapPoint, you can start it by doing the following:
Double-click the Microsoft MapPoint shortcut.
You should see software license terms. Read them and click I agree button.
Now you’ll see an option to activate MapPoint. If you have a serial number be sure to select Activate now and enter your product key. If you don’t have the key, you can use the 14-day trial version. Click the Next button.
The application will now start, and you should be able to use all of its features.
What did Microsoft replace MapPoint with?
MapPoint was discontinued in 2014, and Microsoft replaced it with Bing Maps and Windows Maps, so feel free to use them instead of this software.
As you can see, it’s not as easy to download Microsoft MapPoint since it’s no longer supported, and we advise you to consider using one of many alternatives.
Windows 10 has many useful features that many of us don’t use at all. One simple, but underused feature is Public folder, and if you never used this feature before, today we’re going to explain you how it works.
What is Public folder and what does it do?
You probably noticed a Public folder on your PC at least once, but you never used it before. The Public folder was originally a Windows Vista feature, but Microsoft kept this feature in all future versions of Windows.
So what is a Public folder? Simply put, it’s just a folder that is available to all users on your PC. For example, if you have an Administrator account and several user accounts, both users and Administrators can access this folder. This feature can be useful if regular users have limited access to certain folders, therefore if two users want to share files, or work together on a certain file, all that they have to do is to move that file into the Public folder.
Public folder is located in C:Users folderand any user on a PC can access it without any special privileges. When you open the Public folder you’ll notice several folders available. These folders are empty, and you can store any files that you want in them. We have to mention that there are several hidden folders available. To show hidden folders do the following:
Click the View tab.
Once the Menu appears locate the Hidden items option and check it.
After turning on hidden folders you’ll notice that three new folders have appeared. Libraries and Public Account Pictures are usually empty, but Public Desktop folder contain shortcuts to applications that will appear for users, therefore, you might want to change it and add certain applications that you want all new users to have on their Desktop.
In addition to sharing files with other users on your computer, Public folder can be used for sharing files with other users on your local network. This feature is great especially if you have non-Windows computers on your network that cannot join a Homegroup.
Bear in mind that you can change the availability of Public folder in your local network. For example, if you want to share certain files with users that you share your PC with, but you don’t want to share them with other members of your local network, you can disable the sharing of the Public folder by following these steps:
Press Windows Key + S and enter advanced sharing. Select Manage advanced sharing settings from the list of results.
You should see three groups available: Private, Guest or Public and All Networks. Click All Networks group to expand it.
Under Public folder sharing section you can enable or disable Public folder sharing over the local network. Bear in mind that Public folder will always be available to users that you share your PC with.
Public folder is a simple and sometimes useful feature, especially if you share your computer with several other users. If you have an Administrator account and you share your computer with other users that have limited access to files and folders, using the Public folder might be the simplest and fastest way for you to share files with them.
Microsoft has been criticized for the consistency in its latest operating system, Windows 10. A way to feedback and make sure that Microsoft receives it is the Feedback Hub, and ironically the exact same app used to criticize, got criticized.
A Windows Insider submitted the request to make the Feedback Hub follow the system theme, that is either light or dark. Right now, only the former option is available and changing your theme won’t have any impact on the app. The request got answered by a Microsoft engineer, and they confirmed that it is “on the radar”. This doesn’t necessarily mean that it will happen, but it is a strong indication that it will arrive in a future update.
The addition of a dark theme would be very welcome, especially for AMOLED screen users. Windows phone fans have been in love with the dark theme since its release in Windows Phone 7 and not following the tradition in Windows 10 Mobile upset quite a lot of users, however, this looks set to change in the future.
Terraria is a very popular game that has now come to Windows 10. In Terraria, every world is unique and your main tasks are to explore the environment and battle those villainous bosses along the way.
The game takes you to various environments, from the floating islands in the sky to the deepest level of The Underworld. Dare to adventure to the ends of the earth, and engage in fierce battle against evil bosses.
Other features include:
Multiplayer support – Local WiFi games support up to 4 players cross-platform on any mobile device.
More than 1360 crafting recipes – weapons, armor, potions, and more.
More than 450 enemies to beat. Just when you thought the fight was over, a new enemy appears.
Over 100 block types allowing you to build anything you can imagine.
More than 30 pets to accompany you.
Over 20 evil bosses ready to get you.
Over a dozen environments to explore so that you don’t get bored.
Dynamic water & lava, day/night cycles.
You can create worlds as large as 4200 x 1200 tiles (“Small” worlds on PC).
Do check your phone’s memory before installing the game because the option to create Expanded Worlds is not available on devices with 512MB RAM or less. Also, if your device has less than 1GB of memory, you will experience performance issues.
Terraria is a fun game to play, but it’s far from perfect as crashes have been reported:
Sometimes the gameThis game is sick! Terraria is a massive success on the windows phone mainly because it supports Xbox meaning that you can earn achievements Xbox related. I’ve loved this game since I saw it on the Xbox, and I was so exited to get this game on the PC and this! I was upset when the game didn’t launch last update, but it looks like they fixed it. Aside from a couple of crashes that really affect gameplay.
The long-awaited Windows 10 Anniversary Update will come with a number of changes and new features. Let’s take a look at some of them.
Settings User Interface
Once you open the Settings app, you will notice the user interface is changed. First, the search box is now front and center, which means that users will be able to find and configure Windows settings with ease. Before this update, the search function was located in the top-right corner.
Settings: What’s New Inside
If you head to Settings->System->App & Features, you will now find a new Advanced Options link which informs you about the storage each application is using. In addition, if an application is not functioning properly, you can always reset it with a single click. Keep in mind that the reset button will permanently delete data from the application, which includes sign-in details or preferences.
If you access Settings->System->Notifications & Actions, you will notice that you have a little bit more control over the “Quick Actions” buttons. You will be able to rearrange all the Quick Actions Buttons by just pressing and holding an icon (button) and dragging it to the desired location. You can also disable all quick action buttons or disable/enable a particular one.
On Settings->System->Battery, you will notice that the Battery Saver is now “Battery”. The Battery saver options have also been moved to the main page, allowing you to configure battery parameters without having to jump between pages.
On Settings->System->Storage, while accessing the storage usage for the main hard drive, you will be able to select the files that you want to delete from Temporarily Files.
While in Settings->System->Tablet Mode, you will notice a new option called “Automatically hide the taskbar in tablet mode”, which means that you will be able to take full advantage of the screen while in tablet mode (as the taskbar will be hidden).
The hustle is real over at Redmond on Microsoft’s campus, with team members staying late and working extra days to get fixes out before the Anniversary Update next week. Today is no exception – and yes, it is a Saturday.
Jonathan Sampson, the Program Manager for Microsoft Edge, has sent out a tweet asking people to personally let him know of any issues they’re noticing with website rendering in Microsoft Edge – no matter how big or small the issue is. A simple tweet to let him know and he’ll look into it, as well as reply.
I'm in the office today, working exclusively on community issues. Slow/broken sites? Help with HTML, CSS, and/or JS? Ping me. Happy to help!
So, go take a look at your favourite sites, and if you notice any problems with how the site looks in Edge vs. other browsers, let Sampson know. We’ll hopefully see many fixes for Microsoft Edge just before the Anniversary Update drops next week.
Over the years our cellphones changed a lot. Cellphones became smarter, and many of them use Dual SIM technology. Since number of Dual SIM cellphones is rising, today we’re going to explain you what is Dual SIM and how to use it.
What is Dual SIM and how does it work?
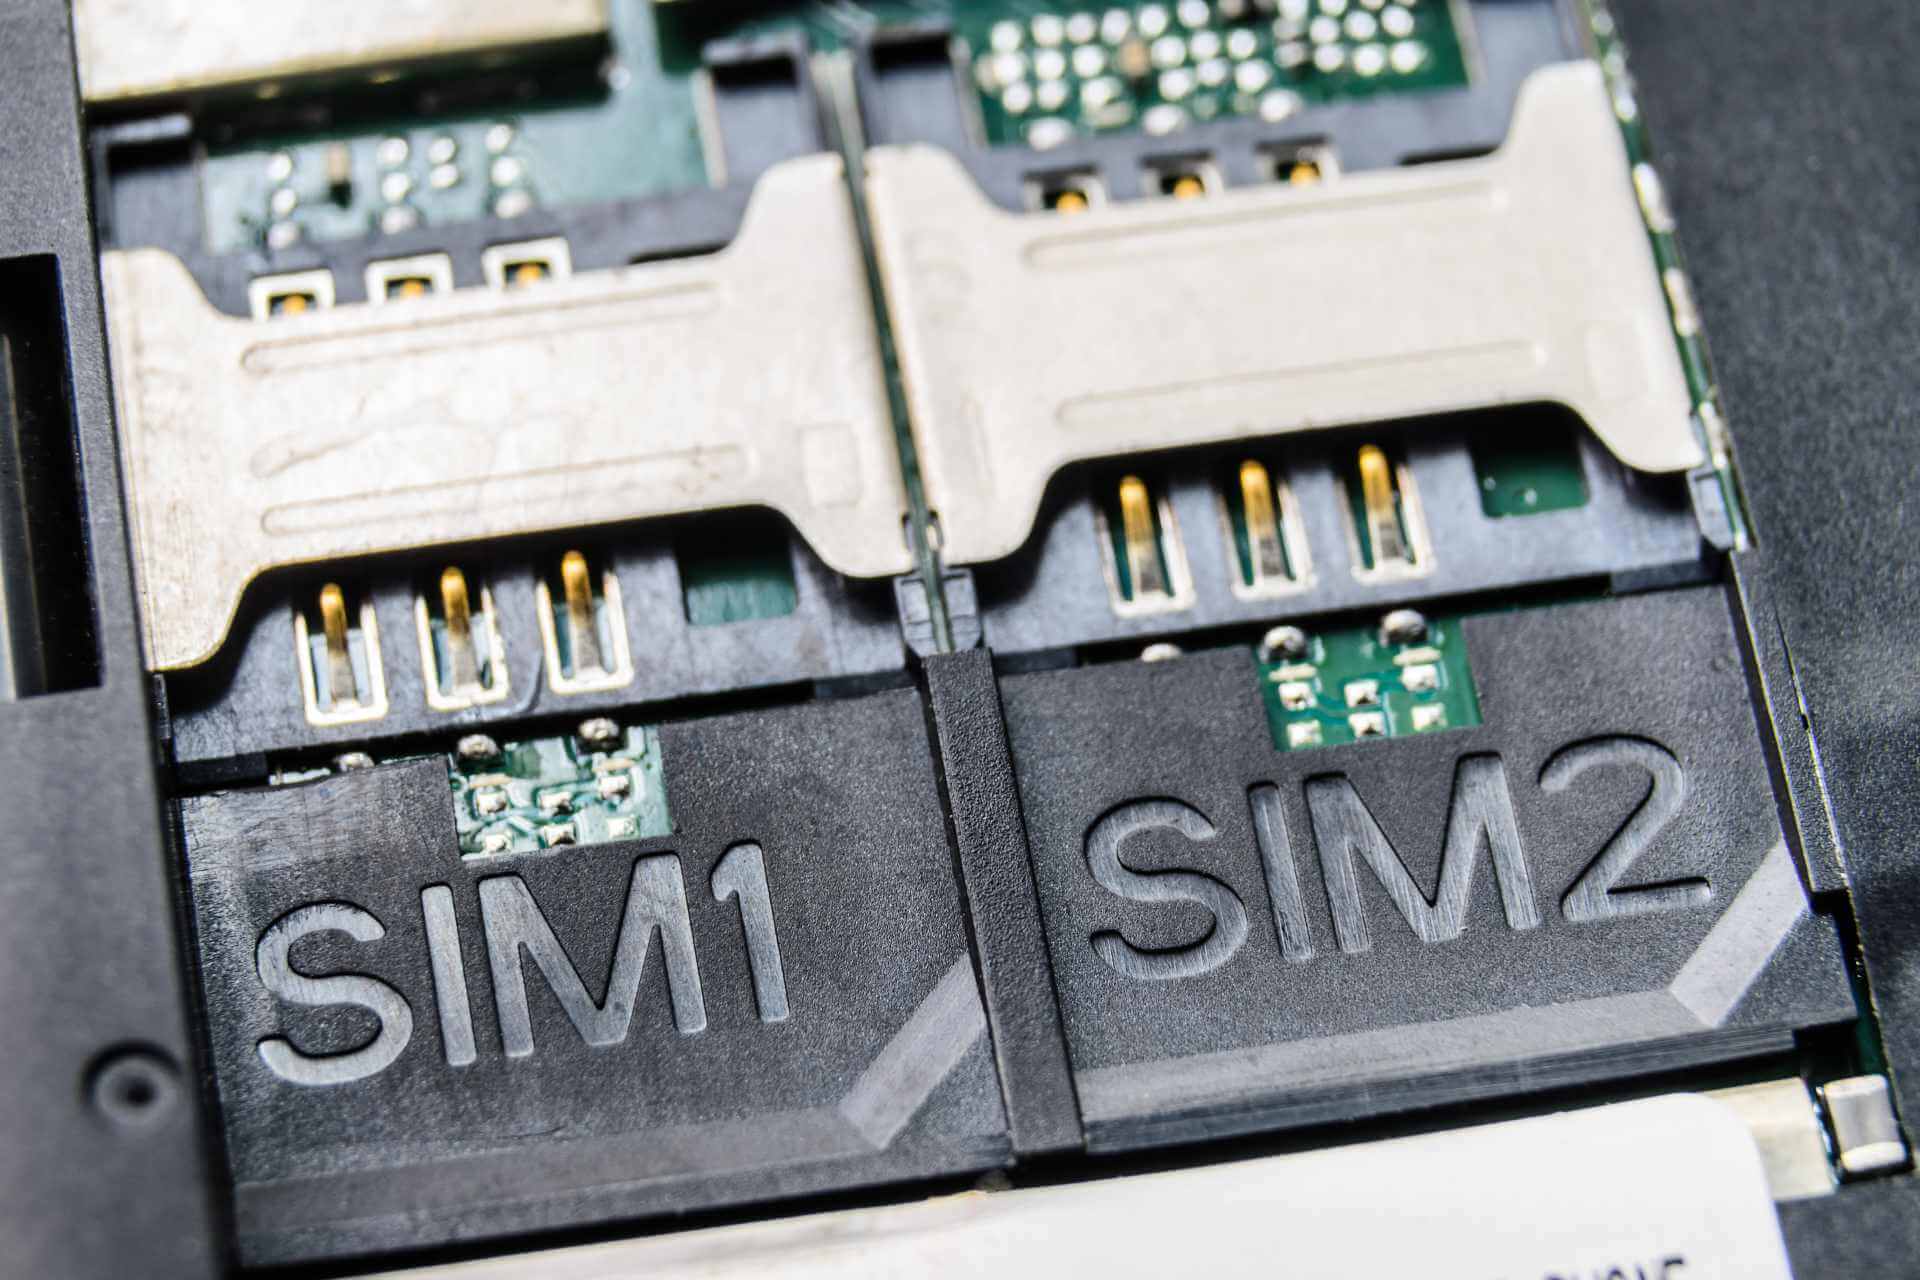
Dual SIM means that a cellphone can have two SIM cards and use any of them to make calls or send text messages. Dual SIM technology was invented in 2000, but it gained its popularity in late 2000s. Dual SIM is available on both Android and Windows 10 Mobile devices, and the number of Dual SIM devices is on the rise.
We have to mention that there are several versions of Dual SIM, and some of them, such as Passive Dual SIM, don’t allow you to use two SIM cards simultaneously. This type of Dual SIM is usually found on affordable phones, and even though your phone can hold two SIM cards at the time, you’ll have to switch between them manually. This means that only one SIM card will be active, and you can only use that card to receive calls or text messages. In order to use the second card, you’ll need to go to the options menu and activate it manually. As you can see, this is a major limitation since you have to switch between two SIM cards quite often.
Dual SIM Standby allows you to use both SIM cards thanks to the time multiplexing technology. By using this technology both of your cards are active, and you can use both to receive calls and text messages. When you receive a call, one card will become active and the other will become temporarily disabled during the duration of the call. This technology has its benefits because you don’t have to switch manually between the two cards in the options menu, however, some users might find it limiting that you cannot use both cards simultaneously.
Lastly, there’s Dual SIM Active technology that allows you to use both SIM cards simultaneously. This means that you’ll receive calls or text messages on your second SIM card, even if you’re making a call using your first SIM card. Thanks to this technology both of your SIM cards are permanently active. We have to mention that phones with Dual SIM Active technology come with two radio transceivers, and each of these transceivers is in charge for one SIM card. In practice, it means that phones with Dual SIM Active technology consume more power and drain your battery faster. Due to two transceivers, the price of these phones is usually a bit higher.
As you can see, Dual SIM can be extremely useful, especially if you need to use two different SIM cards but you don’t want to purchase an additional smartphone. Many people use Dual SIM phones for business, thus allowing them to use one phone for both business and personal use.
Dual SIM phones are also great if you want to use two different mobile providers. For example, if your mobile provider doesn’t have a suitable data plan but you don’t want to switch to a different mobile provider, you can easily use a SIM card from a different provider that offers a better data plan for you.
Lastly, Dual SIM phones are great for people that travel a lot. If the roaming rates are too expensive, you can just get a local SIM card and use it alongside your main SIM card.
We have to mention that you can use both SIM cards for data connections, but bear in mind that most smartphones come with support for 4G + 2G connection in Dual Standby mode. Models that support 4G + 3G or 4G + 4G are rare since they require a powerful processor in order to achieve that.
Dual SIM technology is great, and we hope that you understand a bit better how Dual SIM works after reading this article.
Online safety is quite important. Therefore, Microsoft created several features designed to protect Windows 10 users. Network locations are one of these features, and today we’re going to explain to you what network locations are in Windows 10.
Besides, users have been wondering where network locations are stored in Windows 10 or how these actually work. If you are one of them, keep reading to find out the answer to all these questions!
Network locations were introduced in Windows Vista, and over the years, Microsoft improved and streamlined that feature. This feature made its way to Windows 10, and it works almost the same as in previous iterations of Windows.
How do network locations work in Windows 10?
Network location is basically a profile with certain settings related to network discovery and file sharing.
When you access a certain network for the first time, Windows 10 will ask you to choose one of the three profiles: Home network, Work network, and Public network. Each of these profiles comes with different settings optimized for certain conditions.
Let’s find out about the network profiles in Windows 10:
Home network: Designed for networks that you fully trust. This option has most settings enabled, so you can easily see other computers on the network. You can also create or join Homegroup and share files easily with other devices on your network.
Work network: Similar to Home network, and allows you to see other devices on your network. But, you won’t be able to create or join Homegroups.
Public network: Doesn’t allow you to see other computers connected to the same network. Since file sharing is disabled, users won’t be able to share any potentially harmful files. Ideal for networks set up in public places.
Where are network locations stored in Windows 10?
Tip
Network locations pretty much work the same way in Windows 11. But on the latest iteration, the options are to be configured via Settings instead of the Control Panel.
Press Windows + S, enter network, and select Network and Sharing Center from the list of results.
Click on Change advanced sharing settings.
Now you should see network settings for all available profiles. You’ll notice that there are two groups of profiles, Private which includes Work and Home network profiles, and Guest or Public group.
Here’s a brief description of options that appear under the Private profile.
Network discovery: Allows your computer to be seen by other devices on the network. If you’re on a home network and you recognize all the devices on your network, you can freely turn this feature on.
File and printer sharing: This feature allows you to turn on file and printer sharing with other network devices. Again, if you recognize all the devices on your local network, you can turn on this feature.
HomeGroup connections: This feature allows you to manage the Homegroup connections. By default, Windows manages the Homegroup connections, but you can use user accounts and passwords to connect to other computers.
Guest or Public group has only two options, Network discovery and File and printer sharing.
Last on our list is the All Networks group, and here are brief descriptions of the options under it:
Public folder sharing: Allows other people on this network to access files stored in the Public folder. By default, this option is turned on.
Media streaming: Allows other people and devices to access pictures, music, and videos on your PC. In addition, by using this option, you allow your computer to find media on the network.
File sharing connections: Allow you to choose the method of encryption for file sharing. By default 128-bit encryption is used, but you can switch to 40 or 56-bit encryption if your devices don’t support 128-bit encryption.
Password protected sharing: This is one of the most important options because it allows only users that know your computer password to access the files or printer. If someone doesn’t have the password, they won’t be able to see your public files or any of your shared files.
Network locations are an important feature of Windows 10, and we hope you understand a bit better how network locations work, where are these stored, and how you can make the most out of them for enhanced security.
Wireless technology is constantly developing, and as technology develops we’re getting new standards. One wireless standard that was introduced few years ago is Miracast, so today we’re going to explain you what is Miracast and how to use it on Windows 10.
What is Miracast and how to use it on Windows 10?
Miracast is a wireless standard that allows you to stream content from your all sorts of devices to your TV, monitor, or any other device that supports Miracast. This standard was introduced in 2012, and it allows you to stream 1080p HD video and 5.1 surround sound. Miracast uses peer-to-peer Wi-Fi Direct standard, and it’s secured with WPA2 encryption.
In order to use this technology, you need two devices that have Miracast support. Even if your monitor or TV doesn’t have native support for Miracast, there are all sorts of Miracast adapters available that connect via HDMI. Regarding the support, Android 4.2 and later devices fully support Miracast and Microsoft supported Miracast since Windows Phone 8.1 and Windows 8.1. Unfortunately, Apple doesn’t support Miracast and instead it relies on its own AirPlay protocol.
You should know that Miracast doesn’t rely on your current Wi-Fi connection, instead Miracast creates direct wireless connection between the two Miracast devices. It’s worth mentioning that Miracast allows you to stream any type of content from your device, regardless of its format or protection. As long as you can play the content on your device, you should be able to stream in on any other device that has support for Miracast.
To steam using Miracast you need to have a TV or monitor with Miracast support, but if you don’t have it, you can use an HDMI dongle. All you need to do is to connect the HDMI dongle to your monitor or TV, and plug its USB connector to a USB power port. If you don’t have a USB port on your TV, you can use the power adapter and connect it straight to the power outlet.
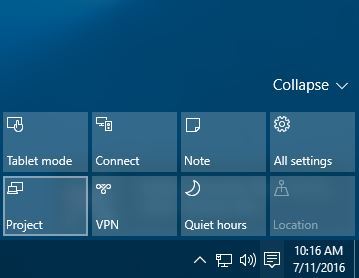
After the Miracast adapter is properly connected, you need to connect to wireless display. To do that, click the Action Center in the bottom right corner and click the Project icon. Click the Connect to wireless display and select the wireless display you want to stream to.
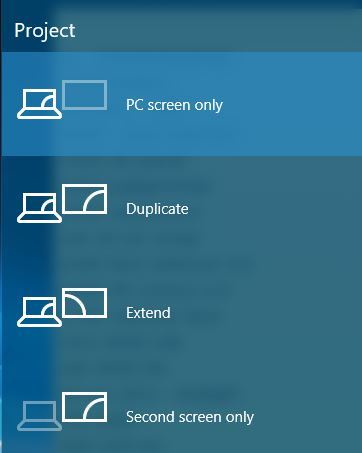
Bear in mind that you can switch between several projection modes while using Miracast. You can switch between these modes by using the Windows Key + P shortcut or by choosing the Project option from Action Center.
After you’re done with streaming, you can disconnect from wireless display by going to Action Center > Project and choosing the Disconnect option.
As you can see, Miracast is pretty simple to use as long as you have the appropriate equipment. In addition to simplicity, Miracast doesn’t require any cables, which means that you can stream content from your tablet or smartphone even if you don’t have an HDMI port on it. Since Miracast can work as long as you have the necessary adapter, you can easily connect it to any device that has an HDMI port available. This is great for business presentations, or if you travel a lot, but you want to enjoy in your favorite content on a TV screen.
Although Miracast sounds great, it has its limitations and flaws. One of the first issues is latency, and if you want to stream video games from your PC to your TV screen you should know that some latency issues can occur. Bear in mind that latency may vary depending on the quality of your Miracast devices. There might be also certain connection stability issues while using Miracast, but again, this all depends on the quality of the Miracast devices that you’re using.
Miracast is an amazing technology despite some of its limitations, and we’re certain that we’ll see more Miracast devices in the future. So far, there are more than 5000 certified Miracast devices, and that number is increasing by each day. If you haven’t used Miracast before, now is the perfect time to give it a try.
In recent years, we have seen an increasing number of QR codes. You probably saw these at least once, since QR codes are now one of the simplest ways to share information. So today, we’re going to explain to you what is a QR code and how it works.
Be it the history of QR codes, their generation, or their working mechanism, it’s all vital from a technical standpoint. So, let’s get right to it!
What is a QR code?
QR code stands for Quick Response Code, and it’s a matrix barcode similar to Universal Product Code. Unlike Universal Product Codes that you see on almost any product, these are used for different purposes. QR codes can store more information, and this is one of the main reasons for their popularity.
QR code was invented in 1994 in Japan, and it was used to track vehicles during the manufacturing process. These are simple to use, and since they can store large amounts of data, it’s no surprise to see that QR codes have become a part of everyday life.
How does a QR code contain information?
Regular barcodes are one-dimensional. Thus, they cannot store as much information as a two-dimensional barcode such as a QR code. Speaking of information, QR codes can store about 4,000 alphanumeric characters, which is quite impressive.
Unlike old barcodes that were scanned by a narrow beam of light, QR codes are scanned by the image sensor, and they are decrypted by a programmed processor.
After detecting the QR code, the processor scans the image and the position of the dots and converts them to binary numbers.
To scan one, you don’t need any expensive sensor since any smartphone with a camera can be used to scan and see the information stored inside.
What are QR codes used for?
Since almost any smartphone can scan a QR code, it’s no wonder that these are often used in advertising. These codes can store any text, such as a phone number, email address, or website.
Most commonly, QR codes are used to provide quick access to certain websites or apps. So, for example, by scanning a certain product that has the code on it, you can visit the manufacturer’s website and find more information regarding this product.
In the present day, QR codes can be used for quick online payments. They store the details for the user, and when another person scans the code, it automatically redirects them to the transfer page.
In addition, QR codes can be used to authenticate certain devices or website logins, and in fact, Microsoft included QR codes on Blue Screen of Death errors in Windows 10 in order to show you more information regarding certain errors quickly.
Some restaurants and cafes have, of late, replaced the physical menu with a digital one, accessible via a QR code. So, you sit at the table, take the phone out, scan the code, and order your favorite food. It’s simpler and more convenient!
Possibilities are endless, and this is why QR codes have become so popular!
As we previously mentioned, to scan a certain code, you just need a smartphone with a rear camera and a dedicated application that can decrypt it.
A wide range of applications are available for all mobile platforms that allow you to scan codes, so be sure to download one of these applications.
If you want to create your own QR code, you can do that easily for free. There are many QR code generators, and you can use any of them to generate your QR code quickly. Some of these are downloadable software, while others are web apps.
After you generate your code, you can share it with others or print it on a sheet of paper. Stick it somewhere, and others can scan it. Some users also create QR codes to share Wi-Fi passwords.
Say, someone asks you for the password. Instead of telling it to them verbally, you can present the code that stores the Wi-Fi password. It’s now a built-in functionality on many mobile phones.
QR codes are one of the simplest ways to store data on a small surface, and the possibilities are endless. It’s certain that we’ll see more of these in the future, and we hope that you understand QR codes a bit better after having spent a few minutes with us.
Before you leave, find out more about the Chrome QR code generator, and use it to quickly create one from the comfort of your browser.
For any queries or to share your feedback on the article, drop a comment below.
If you’re an avid Windows 10 Mobile user who is young, hip, and managed to experience the likes of Android and iOS, then there’s a good chance you might be looking forward for an official Snapchat app to make it over to the Microsoft platform.
Back in late June of this year, Microsoft support claim Snapchat for Windows 10 Mobile was on its way. This got several users of Snapchat interested in Windows on mobile again, and even overjoyed by the news. The website, DeskModder, originally reveals the information, claiming it had held conversation with Microsoft support and the following was said in regards to Snapchat:
“There are plans to make it available in the future, we’ll give updates when that’s close. But as of now, it is not actually yet at the store app,” Microsoft Support said in the conversation. “I can just say that it will be available soon. We are communicating still with the app developer to verify when we can add it in the store. But for now, there’s still no exact date.”
Rudy Huyn, one of the most well-known Windows Phone developers out there, said one should never trust Microsoft support because they do not have information about which app is coming to the company’s mobile platform. He also said Snapchat is not working on an app in a conversation on Twitter, but that’s just his opinion.
“In my opinion, Snapchat is not coming (contrary to Winter), never trust supports, they don’t have access to this kind of information.”
In my opinion, Snapchat is not coming (contrary to Winter), never trust supports, they don't have access to this kind of information
He’s right about one thing, and that is, Microsoft support does not have information about the apps coming to either Windows 10 or Windows 10 Mobile. However, that doesn’t mean the Snapchat guys are not working on an app, but we may never know for sure until the horses sing.
With most major smartphone apps not coming to Windows 10 Mobile, and with phone revenues shrinking, Microsoft should put the platform out of its misery. We’re not sure if a Surface Phone in 2017 will save the platform, but anything is possible.
The anniversary update for Windows 10 is a major update that will introduce many many new features and changes to the popular operating system, some of them having to do with the Taskbar.
Taskbar: Customization Options
It seems that Microsoft has decided to remove the “Taskbar and Start Menu Properties” page. These customization options can now be found on the Settings app. When you right-click the Taskbar, you will not see Properties anymore. Instead, you will need to click on Settings to open the new Taskbar settings page.
You can also access the “Taskbar Settings” page by heading to Settings->Personalization->Taskbar. As expected, you will find all the options that were previously found in the old Taskbar properties page. If you want to change which icons you want to appear in the notification area, you will have to click the “Select which icons appear on the Taskbar” option. You have also the ability to turn on and off the system icons by selecting “Turn System icons on or off”.
If you are a gamer who prefers to use multiple desktops, you should know that you can change the way the taskbar works with the “Show taskbar buttons on” and “Combine buttons on other taskbars” options.
For multiple displays, you can also change the behavior of the taskbar using the “Show taskbar buttons on” and “Combine buttons on other taskbars” options.
Windows Ink
The Windows 10 Anniversary Updates also introduces Windows Ink, a new, pen-supported system for devices which touch functionality. As expected, Windows Ink also comes with its own Workspace in which you will be able to use your pen with new features such as Screen Sketch, Sticky Notes and Sketchpad.
Keep in mind that Windows Ink Workspace will be automatically enabled on touch-enabled devices. You will also notice a new Windows Ink Workspace button to be found in the notification area. However, if you don’t own a device supporting touch, Windows Ink will be disabled — but you can always enable it and use the new feature with your keyboard and mouse.
Taskbar Calendar Integration
If you are an organized person, you will surely enjoy the new Taskbar Calendar Integration that the Anniversary Update will bring. The calendar is now integrated into the date and time flyout so that when you will click on the clock button that’s located in the notification area, your daily events will be shown under the calendar.
Microsoft Research has brought forth great ideas, innovations, and interesting research projects from a wide variety of participants. Over the past couple of years, we’ve reported on several researchers who have brought artificial intelligence, computational thinking and smart road projects to the public.
Among the highlighted researchers, we’ve noticed a growing trend of women who have led advanced exploration in computing and technology, and it seems Microsoft has also made the same observation.
Women are woefully under-represented in computing-related fields.
At Microsoft Research, we’re committed to helping address this imbalance through the Microsoft Research Women’s Fellowship Program. The fellowships directly support female computer scientists as they pursue graduate studies, providing US$20,000 for tuition and conference travel. Also, the program connects recipients with a Microsoft mentor and researchers in their area of study and facilitates recipients to interact with each other in a collaborative peer community.”
In addition to supporting women in computing fields, Microsoft Research will also be supporting other diversity-related initiatives such as the NCWIT Academic Alliance Seed Fund. The NCWIT is a US-based academic institution designed to develop processes for recruiting and training women by enticing them with a financial investment of up to $10,000 per project. Another diversity program Microsoft Research is supporting is its DigiGirlz, a YouthSpark program intended to capture the interest of middle to high school aged girls exploring early computer science programs.
Girls who code
As for the fellowship program, Microsoft has already named ten winners of the $20,000 fellowship award for 2016. The ten ladies are all studying various emphasis of computer science that includes human-computer interaction, natural language processing, and computational biology among others.
The list of 2016 winners include:
Alane Suhr, Cornell University
Avanti Shrikumar, Stanford University
Ellen Vitercik, Carnegie Mellon University
Erin Grant, University of California Berkeley
Helga Gudmundsdottir, University of Washington
Jeevana Priya Inala, Massachusetts Institute of Technology
KatieAnna Wolf, Princeton University
Lucia Marisol Villacres Falconi, Georgia Institute of Technology
Natacha Crooks, University of Texas at Austin
Rui Yang, University of Illinois Urbana-Champaign
For many, being associated with Microsoft Research in any way is an honor in and of itself, adding a financial incentive can be the cherry on top for women who may have been hesitant or inhibited in exploring computer science as a realistic outlet or career goal.
Microsoft’s executive vice president of technology and research Harry Shum is announcing the MSR Alumni Network today. The announcement comes during Shum and former Microsoft CEO Bill Gates sit down to talk about Future Visions during a fireside chat at the company’s Research Faculty Summit this month.
The launch of the Microsoft Research Alumni Network happens to involve the company’s recently purchased property of LinkedIn as part of its 25th Anniversary of Microsoft Research (MSR) announcement.
The LinkedIn group is dedicated to connecting the thousands of past MSR employees, postdoctoral researchers and interns with us. Together, our alumni and current Microsoft researchers have published more than 20,000 papers — much of it in open collaboration with leading universities around the world. The expertise and ground-breaking work from these researchers represent a rich legacy across many areas such as machine learning, computer vision, systems, theory, quantum computing, formal methods, robotics, networking, human-computer interaction, data visualization, security, privacy, cryptography, and multimedia.”
The best part about being a part of the Alumni Network is the free membership. Members have access to Microsoft Researches who have become leaders and influencers in their fields, as well as an opportunity to connect via virtual or in-person communications. Connecting with a Microsoft Researcher, alone offers the potential for insights into developing trends and technological evolutions that have yet to be explored by the public.
For more information about the new Microsoft Research Alumni Network, visit Microsoft’s Research Blog or keep it here at WinBeta for developing news about the launch.
Microsoft silently changed its roadmap. Now, it appears the tech giant has cancelled Edge extension support for Windows 10 Mobile. In other words, Edge extensions remain on PCs and tablets only.
Users became aware of Microsoft’s decision after the company removed the Mobile icon from the Extension section of its Windows 10 Roadmap. Actually, Edge extensions on Windows 10 Mobile have always been tricky due to limited phone resources and user interface limitations.
This decision is surprising when you take into account the fact that Microsoft has repeatedly stated it wants to offer the same Windows 10 experience to all users, irrespective of the device they’re using. So much for Windows 10 being universal.
It wouldn’t be the first time Microsoft breaks its promise. When the Play Anywhere program was first launched, the company promised to let you digitally buy your favorite games once and play it across Xbox One and Windows 10 platforms. After a while, Microsoft changed its mind and decided that not all new Xbox games would come to Windows 10. “Every new title published from Microsoft Studios will support Xbox Play Anywhere” turned into “Every new title published from Microsoft Studios that we showed onstage at E3″.
Microsoft’s decision disappointed many Windows phone users as the extensions currently available for PC users would have come in very handy on phones. For example, Microsoft Translator is much more useful as an Edge Extension on a phone than on PC. After all, when you’re travelling abroad you don’t carry your laptop in your pocket.
Of course, you can live without Edge extensions on your mobile, but what’s most frustrating is that Microsoft offered you a glimpse at what could have been — and snatched it away.
Microsoft released a new update for the Xbox One to Preview members that introduces some new features and improvements.
This new update allows you to disable Cortana and use the old Xbox commands, while the American multinational technology company headquartered in Redmond, Washington is disabling Cortana for the Xbox One users from Spain, Germany, France and Italy.
Everyone at Microsoft is thanking all users who have helped them to test out Cortana on Xbox One because as a result of the data usage and feedback, the company is now able to improve this feature before it gets released to the public.
If you want to disable Cortana on your Xbox One, the following options will be disabled:
– Headset voice control
– Voice dictation
– Universal Windows App voice features
Only the Xbox One old voice commands will be recognized if Cortana is off. To disable Cortana on your Xbox One, head to All Settings->System->Cortana Settings. This update for the Xbox One should be already available to download, but you will be able to install it on your console if you are a Preview member.
It is just a matter of time until Cortana gets more improvements for the Xbox One console. Hopefully, these features will be available for all Xbox One owners sometime in the near future. As for now, if you live in Spain, Germany, France or Italy, you will not be able to use Cortana anymore, as the company has automatically disabled completely this feature on your Xbox One console.
Are you an Xbox One Preview member? What are your thoughts about the return of the old Xbox commands?
Microsoft announced the Project Islandwood last year, and a steady development has followed the iOS to Windows bridge. Today, the bridge gets new APIs for the UIKit implementation.
iOS user interfaces have always been tricky to bridge over to Windows. Microsoft want’s to let developers reuse as much code as possible and make sure that bridging Objective-C based application is easy and simple. The bridge also includes UIKit that is a framework with hundreds of classes and as the official blog post puts it “re-implementing the entire thing is simply not feasible – not to mention the fact that Windows already offers much of the same functionality in the form of XAML”. XAML has been a part of Windows, and all of its bridges from the beginning, but up until now, there hasn’t been a simple way of bringing UIKit and XAML together.
Microsoft want’s to change that, and will share a series of technical design documents on GitHub outlining the solution to this problem, starting today.
As a result of these changes, the iOS bridge will be able to offer:
Faster bring up of iOS controls, so more of UIKit is available to you
An improved touch-input model for more performant event handling
Much improved support for accessibility and localization
Better test automation, resulting in more stable and high-quality controls
Much improved integration with and leveraging of Windows’ UI framework, XAML
In short, UIKit will work on top of XAML from now on, and you can follow Project Islandwood’s development on the official GitHub page.
These days, Microsoft is enabling a public preview, beta, or technical preview for most of its services. Windows 10 and Xbox One users have the Insider program, Visual Studio and Azure offer technical previews, and now Office 365 Network users will be joining the early access train.
According to a post on the Office Blogs, changes to the current Office 365 Network include hosting of unauthenticated platforms resulting in internet searchable community post.
Currently, the Office 365 Network is hosted as an authenticated Yammer network, which requires registration and sign-in to participate in the community, and makes discussion content searchable and discoverable only by users who are registered and signed into the network. In an effort to make the community content accessible to anyone, the new Office 365 Network will be hosted on an unauthenticated platform, meaning community posts will appear in internet search results, and visitors won’t have to sign in to view content in the network.
Office 365 Network community members can look forward to these specific additions and benefits of the public preview as well:
Personalize your home page so it displays community discussions and other content related to topics you select.
Earn badges based on your activity in the community, which will be displayed on your profile page along with a summary of your activity—including latest posts, likes given and received, people you follow and community notifications.
Search community content to uncover discussions, ideas and other information from across the Office 365 Network.
View conversations as threaded conversations and hold private conversations with others using your community inbox.
Above all else, opening up a public preview to Office 365 Network means that new and current members have more access to Office-related material. Eventually, Microsoft would like to move everyone over to the new experience and has set a date to which the current members of Office 365 Network will be redirected to the public preview starting September 1, 2016.
For now, the more technical of the communities will remain hosted on Yammer due to NDA’s and the services ability to enforce authenticated experiences. Microsoft lists Office 365 MVP Network, invitation-only network for Office Server & Services MVPs, Microsoft product teams and Yammer Community Managers as still being hosted on Yammer.
As mentioned earlier, the public preview is rolling out currently, and Microsoft is encouraging those interested testing it out also to offer feedback and suggestions through the Community Ideas Exchange or to visit the Community Discussion Board for more information.
The Microsoft Lumia 650 XL was never released, but numerous leaks have been revealed to the public with some claiming it’s the Lumia 650 XL and some it’s the Lumia 850. The cancelled release of the phone didn’t stop hacker Calyx Hikari from successfully running Windows RT 8.1 PE on the device.
The video below (via WBitalia) clearly shows the device and the software (we recommend that you mute the video):
Aside from the software, this video shows one of the models of the Lumia 650 XL, in this case the RM-1157, that only has one SIM-slot and a non-removable battery. Otherwise, it seems like a bigger version of the Lumia 650, and that is exactly what it should be.
Reddit user CDragon00 was about to add a new card to their account yesterday when they realized that there was a new payment option on his Xbox One. The option to add a mobile phone and carrier listed Sprint as the only source. CDragon00 took a couple of screenshots of it to share, sharing that they were in fact in the latest preview update for Xbox One.
Mobile payment options are useful for consumers that do not wish to use or share their credit card information. The costs are instead added onto your monthly phone bill instead of being charged immediately.
It’s worth noting that the mobile payment option only appears to be in the United States for now. If it’s like other mobile payment options for other services, it will likely build partnerships with other carriers and countries. We should likely see more information soon about this feature now that the cat is out of the bag, so to speak.
Updates to the now decoupled core Windows apps have been rolling out abundantly over the past few months, many of which appear to be performance tweaks and bug squashes. However, as the Windows team prepares for the Windows 10 Anniversary Update release, some of the core apps are receiving functionality-boosting releases as well.
Take the Movies & TV for Windows 10; the app was updated for Fast Ring Insider participants with added Xbox One controls and tighter Windows Store integration.
The changelog for version update 3.6.2350.0 is as follows:
You can now control the Movies & TV app on your console (Xbox Preview Only) using the Xbox app on your PC or phone.
We changed the experience when you choose a movie or TV episode that you’ve already partially watched. The app now asks if you want to restart from the beginning or continue from where you stopped last time. This means you don’t have to use the transport controls to get back to the beginning if you’d like to start over again.
When searching for content from the Movies & TV app, you can now see Store search results too. This gives easier access of Store content from the consumption app and is especially important for console users who are only using the Movies & TV app to Store playback content. You might notice that they search results aren’t as high quality as they have been in the past within the Store app…that issue is known and is being addressed.
We added more telemetry to tell us which codecs you’re using so that we can better understand the types of files you have.
While the update is only rolling out for Insider devices right now, presumably the Windows team is working on getting this new functionality out to all Windows 10 users within the next month.
Fast Ring Insiders are encouraged to head over to the Windows Store or follow the link below to test out the new update.