Argo Tunnel Error: 3 Ways to Get Cloudflare Working Again

If you’re using Cloudflare you might sometimes encounter an Argo tunnel error. This will prevent you from accessing your website, so let’s see how we can fix this error.

Why is my Cloudflare tunnel not working?

This can appear if Cloudflare ports aren’t forwarded or if you’re not using a reverse proxy.

How do I fix Argo tunnel error 1033?

1. Forward the traffic to the reverse proxy

  1. Set up a reverse proxy.
  2. Forward all your traffic to it.
  3. Check if that solves the problem.

2. Add Cloudflare port to router’s port forwarding ruleset

  1. Open your browser and enter your router’s address.
  2. Log in with your credentials.
     linksys router login
  3. Next, locate the port forwarding section.
    port forwarding router
  4. Configure it to forward Cloudflare ports.
  5. Save changes.

Keep in mind that each router model is different, so check your router’s manual to see how to access the port forwarding section.

3. Adjust your command

  1. Open your Docker configuration.
  2. Locate the command provided by Cloudflare.
  3. Add the following at the end of the command:  —network host

Keep in mind that this method applies when working with localhost.

As you can see, Cloudflare Argo tunnel error 1033 can cause problems, but you can fix it by setting up a reverse proxy or by forwarding the Cloudflare ports.

This is just one of many errors you can encounter, and we wrote about Cloudflare error 521 and Cloudflare error 1001.

We also have a guide on, Cloudflare error 524, so feel free to check it out for more solutions.

Signal Desktop is Not Working: 4 Ways to Fix it

Signal is available on multiple platforms, but many reported that Signal Desktop is not working for them. This can be a problem since it’s more convenient for some users to use their PC for messaging, so let’s see how we can fix this.

What can I do if the Signal desktop is not working?

1. Update the app

  1. Ensure that Signal is up to date. If an update is available, you should see a blue banner at the top asking you to download the update.
  2. If you can’t update the software from the app, download the latest version of Signal desktop from the official Signal download page.
     signal desktop download
  3. Once installed, check if the problem is gone.
  4. A few users suggested that Signal Beta fixed the problem, so you can try it as well.
    signal beta download

2. Adjust the date and time

  1. Restart your PC and keep pressing F2 or Del on your keyboard to enter BIOS.
  2. Next, check the date and time in BIOS.
  3. If it’s not correct, adjust it and save changes.

After doing that, the Signal should start working. Keep in mind that it’s not uncommon for computer clock to fall behind, and we wrote about this issue in our previous guides, so don’t miss it.

3. Enable or disable Compatibility mode

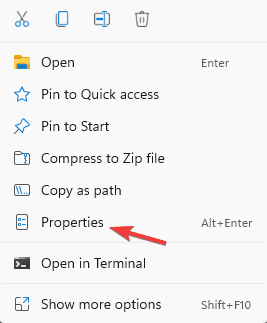
  1. Right-click the Signal desktop shortcut and choose Properties.
    properties context menu
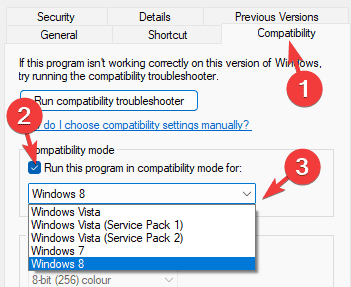
  2. Next, navigate to the Compatibility tab.
  3. Check Run this program in compatibility mode for and select an older Windows version.
    run program in compatibility mode
  4. Save changes and check if the problem is resolved.
  5. If the Compatibility mode was previously enabled, or if it doesn’t fix the problem, disable it.

4. Reinstall the software

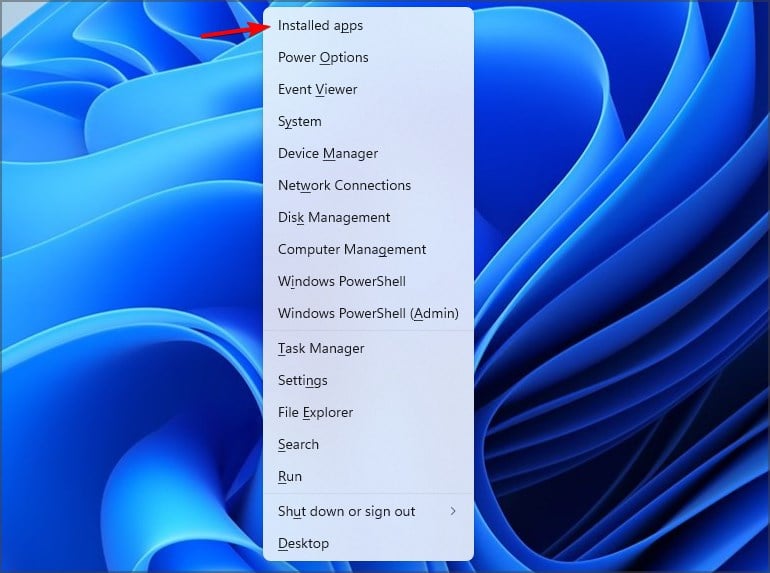
  1. Press the Windows key + X and choose Installed apps.
    installed apps windows 11
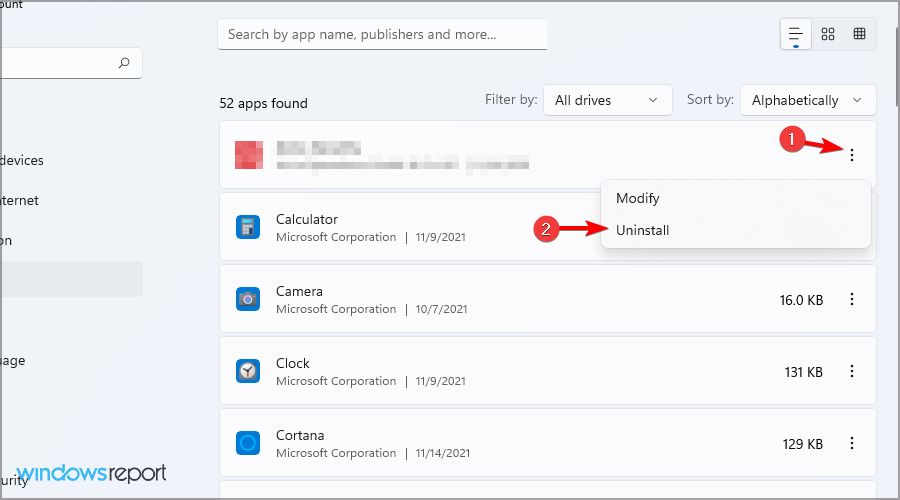
  2. Locate Signal on the list and click the three dots next to it. Choose Uninstall.
    uninstall app w11
  3. Follow the instructions on the screen.
  4. Once the software is removed, download it again from the developer’s website.

For more information, we have a great guide on how to access Signal on PC, so don’t miss it and learn how to set it up.

Keep in mind that this isn’t the only issue you can get, and we wrote on how to fix This version of Signal desktop has expired in one of our older guides, so don’t miss it. We also wrote about Database error in Signal desktop, so you might want to check it out if you’re on Linux.

A few users reported that Signal Desktop cannot connect to the server, and we have a whole guide dedicated to this issue, so don’t miss it. Our latest guide covers the problem with no QR code on Signal Desktop, so you might want to check it out.

Blizzard released Warcraft I and II Reforged and you can get them now

Blizzard Entertainment has announced remastered versions of the original Warcraft: Orcs & Humans, and Warcraft II: Tides of Darkness.

The remasters were revealed during the Warcraft 30th Anniversary Direct presentation and are available now on Battle.net, which is unexpected given that some of the information that leaked last week pointed to a 2025 release.

Warcraft: Orcs & Humans—Remastered enhances the 1994 game for modern audiences with a new UI. The gameplay keeps the classic experience, but it adds health bars, a higher unit selection count, hotkeys, and a gallery of never-before-seen artwork.

Players can also switch between the classic and the reforged edition.

The remastered edition of 1995’s Warcraft II: Tides of Darkness includes the campaign and the storyline of the Dark Portal expansion.

It features hand-painted artwork, modernized UI, and more. Blizzard says it has also uncompressed and rebalanced the game’s music. The remaster supports multiplayer, with up to eight players.

Warcraft: Orcs & Humans – Remastered is available solo for $9.99, while Warcraft II: Tides of Darkness – Remastered is available for $14.99.

Additionally, there’s a $39.99 Battle Chest bundle that includes both remasters, the original two games, and the Warcraft III: Reforged edition, but if you own the Reforged edition of Warcraft III, you’ll only pay $20 for it.

How to fix the Nvoglv64.dll Not Found Error?

Many of our readers have encountered errors related to the Nvoglv64.dll issue, like Nvoglv64.dll not found, Nvoglv64.dll access violation, Nvoglv64.dll is missing and Nvoglv64.dll crash. The Nvoglv64.dll file handles the OpenGL (graphics API) functionality for NVIDIA graphics cards.

 You might see any of these errors related to the DLL file if the graphics drivers on your PC are corrupted or incompatible or if your computer has malware infections, outdated drivers, or issues with other software.

How can I fix the Nvoglv64.dll not found error?

1. Update/reinstall the graphics driver

  1. Press Windows + R to open the Run window.Device Manager Run command - nvoglv64.dll 
  2. Type devmgmt.msc and click OK to open the Device Manager app.
  3. Locate and click the Display adapters category, then right-click the graphics driver and select Update driver from the context menu.Graphics Driver update - nvoglv64.dll
  4. Click Search automatically for drivers, and Windows will try to find the best version of the driver.Search automatically

If Windows fails to find a driver version, go to the manufacturer’s website and look for a suitable version. Alternatively, you can download and install a reliable driver updater tool and run a scan to update all the drivers on your device in one go.

If updating the driver doesn’t help, try reinstalling it using these steps:

  1. Launch the Device Manager app, locate and click the Display adapters category, right-click the graphics driver, and select Uninstall device from the context menu.Uninstall device - nvoglv64.dll 
  2. Click Uninstall again to confirm.
  3. Once uninstalled, go to Action and select Scan for hardware changes from the drop-down menu.Action scan for hardware changes

2. Scan your computer for malware

  1. Press the Windows key, type windows security in the search box, and click Open.Windows Security open Windows key - nvoglv64.dll  
  2. Go to Virus & threat protection, then click Scan options.V&T Scan options
  3. Select Full scan and Scan now.Full scan -

3. Reregister the DLL file

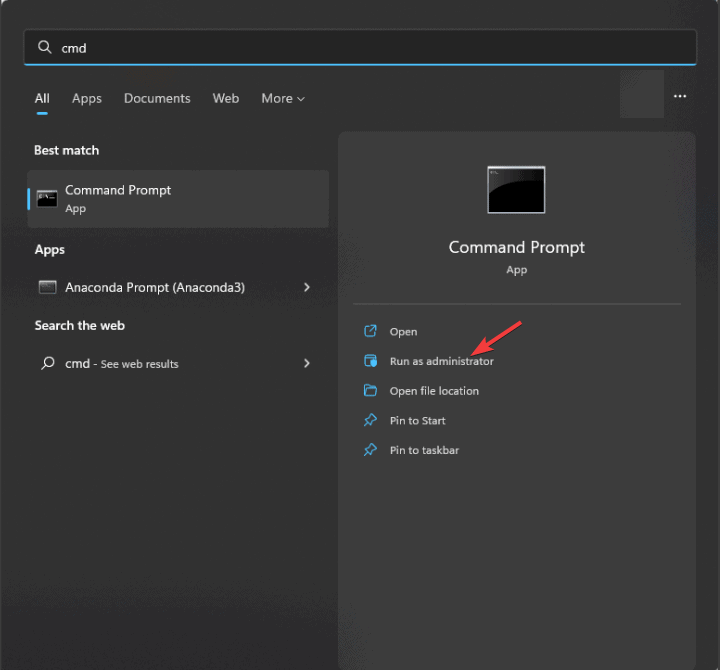
  1. Press the Windows key, type cmd in the search box, and click Run as administrator from the list of options to launch Command Prompt with elevated rights.CMD elevated nvoglv64.dll
  2. To reregister the Nvoglv64.dll, type the following command and hit Enter: regsvr32 Nvoglv64.dll
  3. Click OK when prompted and reboot your computer to save the changes.

If the DLL file is already on your PC and you still get the error, you can re-register the file to fix this problem.

4. Run the SFC scan

  1. Press the Windows key, type cmd in the search box, and click Run as administrator from the list of options.CMD elevated nvoglv64.dll 
  2. To repair or restore the corrupted system files, copy & paste the following command and hit Enter: sfc /scannowSFCSCANNOW CMD
  3. Wait for the scan to complete, then restart your computer to let the changes take effect.

5. Use a third-party DLL fixer tool

The Nvoglv64.dll file handles the OpenGL (graphics API) functionality for NVIDIA graphics cards. The OpenGL allows developers to develop 2D and 3D graphics across different platforms.

One way to fix the issue is to get it from another computer with the same version of Windows by copying the file from C:\Windows\System32\DriverStore\FileRepository\nvmdi.inf_amd64_faac8d1bca70beae\Nvoglv64.dll and pasting it into the affected PC at the exact location.

However, we advise using a third-party DLL fixer tool if you can’t navigate to the location. To restore the missing DLL files, you can download & install the app and then run it to fix all DLL-related issues quickly.

6. Restore your computer to a previous point

  1. Press the Windows + R to open the Run console.    sysdm.cpl - nvoglv64.dll 
  2. Type sysdm.cpl and click OK to open the System Properties window.
  3. On the System Properties window, go to the System Protection tab and click the System Restore button.System Restore
  4. Select Choose a different restore point on the System Restore window, then click Next to proceed.Next Choose a different restore point - nvoglv64.dll
  5. From the list of restore points, choose the one created before encountering the Nvoglv64.dll missing error and click Next.Choose a point
  6. Click Finish.Finish nvoglv64.dll

Windows will restart, and try to restore your system settings to the chosen version. If you see the System Restore didn’t complete successfully error message, the reason could be interference from third-party apps or an outdated driver; we recommend you check out this detailed guide for solutions.

7. Download the DLL file manually

Note icon NOTE
The last resort is to fetch the DLL file from a reliable third-party website like DLL-FILES, which has been verified and tested by our experts at WR.
  1. Click the DLL-FILES website link to access the Nvoglv64.dll page, then click Download.
  2. Double-click the downloaded folder to open, locate the .dll file, then copy it.
  3. Navigate to this path after replacing C with the system drive letter if it is not C for you, then paste the DLL file here: C:\Windows\System32\DriverStore\FileRepository\nvmdi.inf_amd64_faac8d1bca70beae\Nvoglv64.dll
  4. Restart your computer to save the changes.

This is how you can fix the  Nvoglv64.dll not found error. However, if you are facing the same issue due to any other DLL file on your PC, check out the common ways to quickly recover the DLL file.

If you often see errors related to missing DLL files, you must learn the reasons for them. Check out this guide to learn more.

Before you go, don’t forget to check out our latest guide on what to do if ygpsvc.dll is missing from your computer.

Did we miss a step that helped you fix this DLL could not be found error? If so, share the method with our readers in the comments section below, and we will add it to the list.

How to Fix Errors Related to the Api-ms-win-crt-heap-11-1-0.dll File

Many users have complained about getting the Api-ms-win-crt-heap-11-1-0.dll missing error while launching a program. The error usually happens when the DLL file is corrupted, system files are missing, or the Visual C++ Redistributable package for Visual Studio installation files is either damaged or missing.

How can I fix the Api-ms-win-crt-heap-11-1-0.dll not found error?

1. Reinstall the Microsoft Visual C++ Redistributable package

  1. Press Windows + I to open the Settings app.
  2. Go to Apps, then click Installed apps.  Apps - Installed apps
  3. From the list of apps, locate Microsoft Visual C++ Redistributable package, then click the three-dot icon and click Uninstall.Uninstall (2) - api-ms-win-crt-heap-11-1-0.dll
  4. Click Uninstall on the following pop-up to confirm.Uninstall
  5. Once uninstalled, go to the Microsoft Visual C++ Redistributable download website and download the suitable version for your device.
  6. Double-click the downloaded file, then agree to the license terms and click Install.Install
  7. Follow the on-screen instructions to complete the process.

2. Download a DLL fixer tool

The Api-ms-win-crt-heap-11-1-0.dll file is a part of the Windows API and is an essential system file that facilitates heap memory management calls for various apps on your Windows computer.

If you have more than one computer running on the same Windows version, you can copy the DLL file from this location: C:\Windows\System32\downlevel\api-ms-win-crt-heap-l1-1-0.dll; then paste it into the affected PC at the exact location.

However, if you don’t want to navigate to the location and manually add the file, we recommend you use a third-party DLL fixer tool. All you need to do is download & install the tool, then run it to fix all DLL-related issues quickly.

3. Re-register the DLL file

  1. Press the Windows key, type cmd in the search box, and click Run as administrator to launch Command Prompt with administrator rights.CMD elevated api-ms-win-crt-heap-11-1-0.dll
  2. To reregister the Api-ms-win-crt-heap-11-1-0.dll, type the following command and hit Enter: regsvr32 Api-ms-win-crt-heap-11-1-0.dll
  3. Click OK when prompted and restart your PC to let the changes take effect.

This method will help you fix the api-ms-win-crt-heap-l1-1-0.dll missing error if the DLL file is present on your PC.

4. Run SFC & DISM scans

  1. Press the Windows key, type cmd in the search box, and click Run as administrator to launch Command Prompt with administrator rights.CMD elevated api-ms-win-crt-heap-11-1-0.dll 
  2. Type the following command to repair or restore the corrupted system files on your Windows and hit Enter: sfc /scannowSFCSCANNOW CMD
  3. Wait for the command to complete, then copy & paste the following command to scan the Windows image for corruption and repair it using Windows Update, and press Enter: Dism /Online /Cleanup-Image /RestoreHealthRestore health api-ms-win-crt-heap-11-1-0.dll
  4. Once the scan is complete, reboot your computer to save the changes.

5. Restore your system to an older version

  1. Press Windows + R to open the Run window. rstui - api-ms-win-crt-heap-11-1-0.dll  
  2. Type rstui and click OK to launch the System Restore window.
  3. Select Choose a different restore point on the System Restore window, then click Next.Next Choose a different restore point
  4. Choose the oldest or newest restore point from the list of available restore points, and click Next to proceed.Choose a point - api-ms-win-crt-heap-11-1-0.dll
  5. Click Finish to initiate the process.Finish

Windows will restart and restore the system settings to the chosen version. If you see the System Restore is not working message after restart, then we have a detailed guide for you to fix this issue.

6. Download the file manually

Note icon NOTE
The last resort is to download and add the DLL file from a reliable third-party website like DLL-FILES, which has been verified and tested by our experts at WR.
  1. Click the DLL-FILES website link to open the api-ms-win-crt-heap-l1-1-0.dll page, then click Download.
  2. Double-click the downloaded folder to open, locate the .dll file, then copy it.
  3. Navigate to this path and paste the DLL file after replacing C with the system drive letter: C:\Windows\System32\downlevel
  4. Restart your PC to let the changes take effect.

To conclude, you can fix the api-ms-win-crt-heap-l1-1-0.dll not found error by repairing the system files, reinstall the Microsoft Visual C++ Redistributable package, re-register the DLL file if already present, or use a DLL fixer tool.

Do you often see errors related to missing DLL files? Then, you must read this guide to learn the reasons for preventing them.

If you are facing the same issue due to any other DLL file on your PC, check out the common ways to quickly recover the DLL file.

Before you go, don’t forget to check out our latest guide on what to do if Nvoglv64.dll not found on your computer.

Did we miss a step that helped you fix this DLL missing error? If so, share the method in the comments section below, and we will add it to the list.

Discord Error 1006: 5 Simple Ways to Fix it

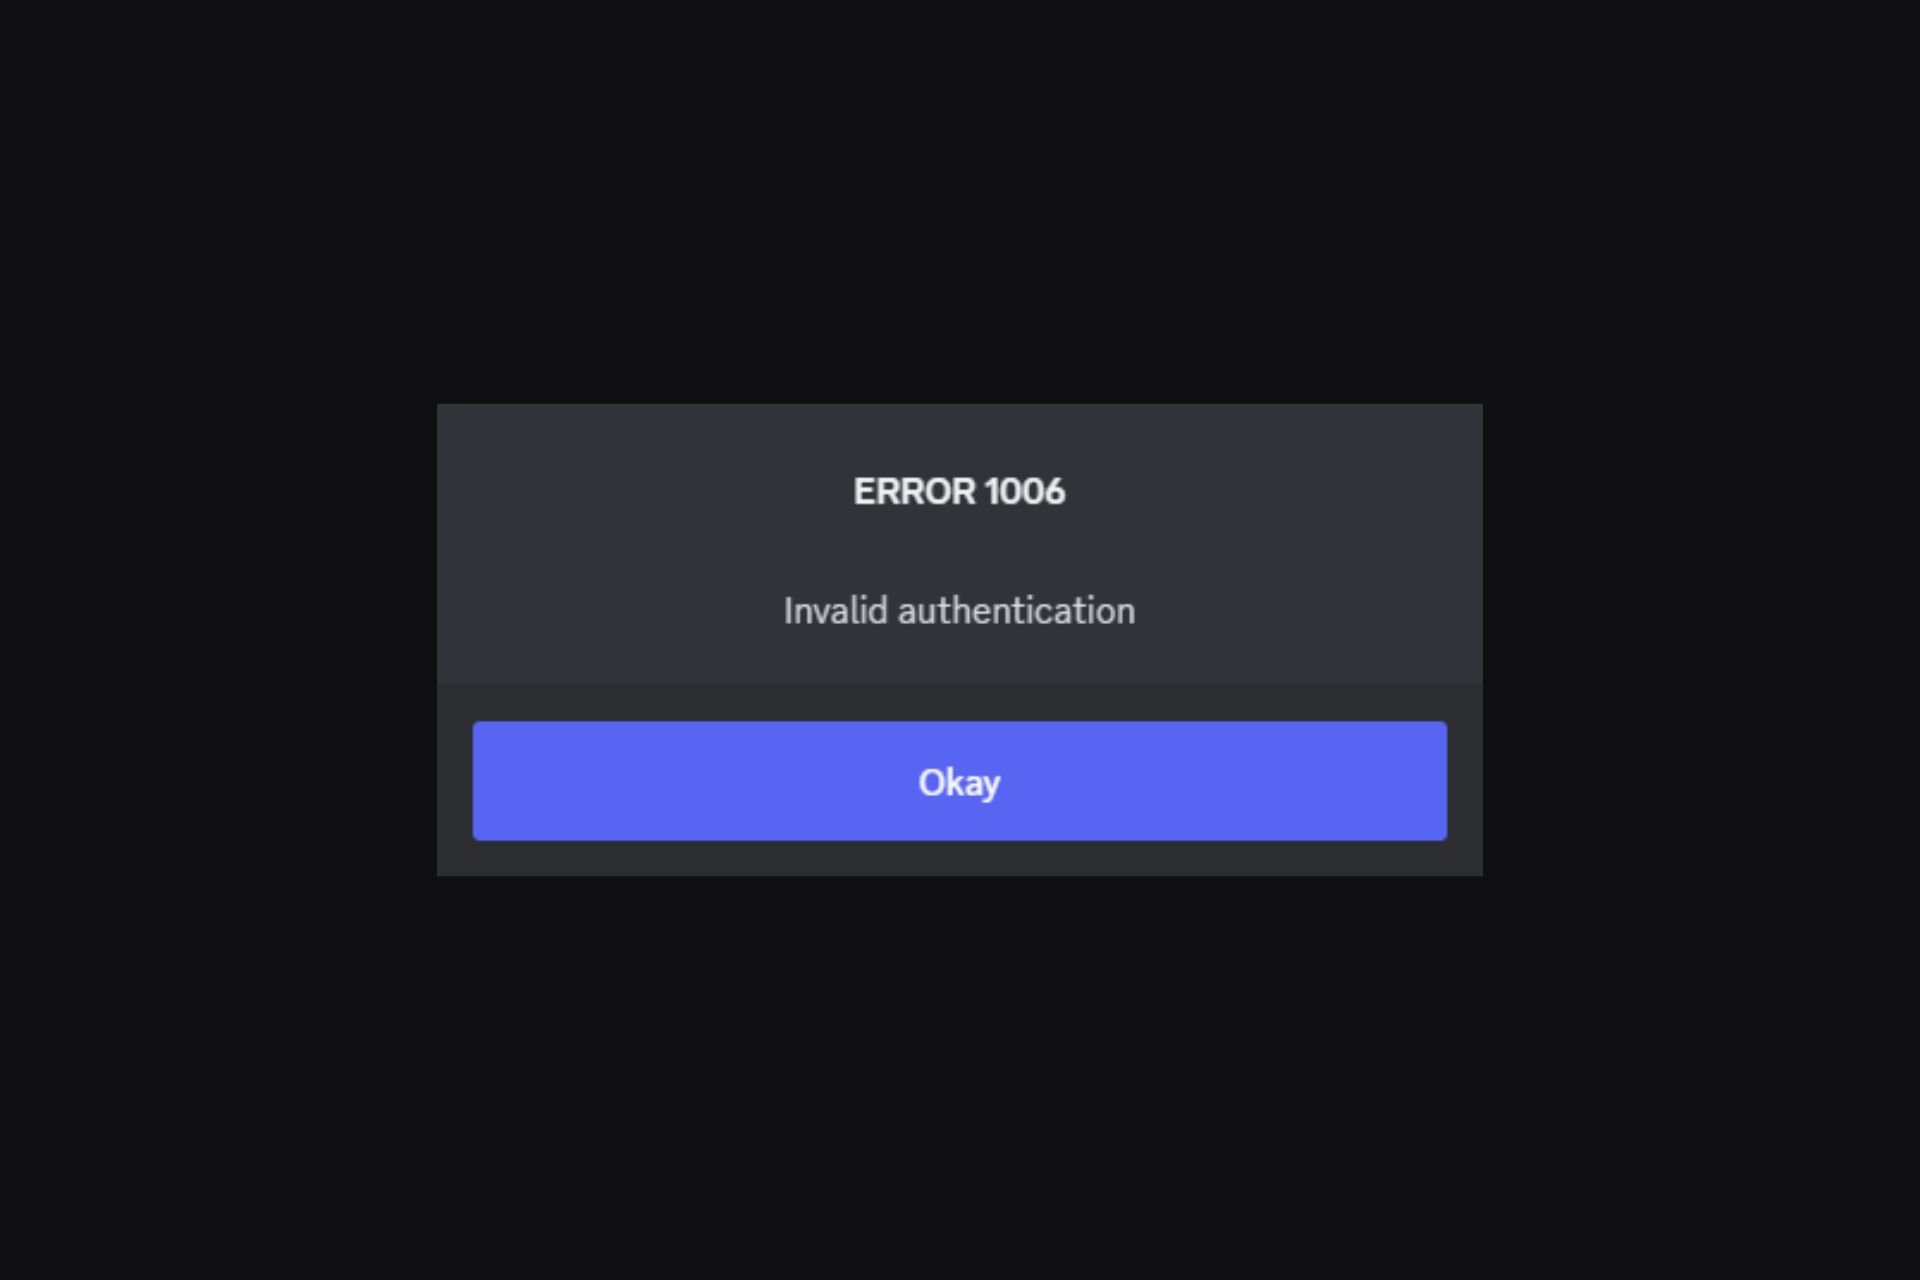
Discord error 1006 is basically code for you’ve been banned and can no longer access the platform or play any games.

It may happen to a specific game so this means you’ve not lost access in its entirety. However, Discord does have its Terms of Service so if you have violated any, you may find yourself in the error 1006 predicament.

How do I fix the error 1006 on Discord?

1. Clear the app cache

  1. Press Windows +R to open the Run dialog box.explorer_cache folder - discord elevated latency
  2. Type the following path and click OK: %APPDATA%/Discord/Cache
  3. Press Crtl + A to select all the files in the folder, then click the Delete icon.Delete cache

2. Disable your VPN

  1. Hit the Windows key and click on Settings.settings windows 11
  2. Click on Network & internet.network settings
  3. Locate your VPN client under VPN connections and click on Disconnect.

If you must use a VPN, make sure your VPN is untraceable since Discord has stringent rules.

3. Disable Proxy 

  1. Press the Start Menu icon and select Settings.settings windows 11
  2. Click on Network & Internet on the left pane, then scroll down and click Proxy on the right pane.Network proxy settings
  3. Select Edit next to Use a proxy server option in the Manual proxy setup section, toggle off Use a proxy server and click on Save.Disable proxy server

4. Reinstall Discord

  1. Press the Windows key, type Control Panel, and hit Enter.
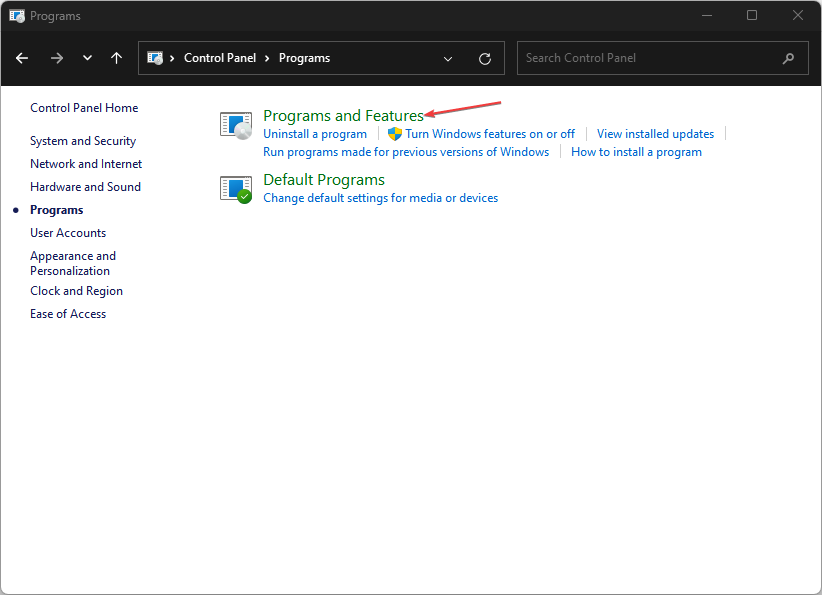
  2. Click on Programs and Features in the Control Panel window.
  3. Scroll down to locate Discord, click on it, and click Uninstall.
  4. If there is a confirmation prompt, click Yes to confirm the uninstallation and close the Control Panel once the process is completed.
  5. Next, remove any software leftovers to make sure your new installation is not interfered with by corrupt remnant files.
  6. Press the Windows key, type Microsoft Store, and hit Enter.
  7. Type Discord, and click on the displayed result.
  8. Click the Get or Install button to download the app.
  9. Once it’s installed, launch the app to see if the update will go through.

5. Perform a Network reset

  1. Hit the Windows key and click on Settings.settings windows 11
  2. Navigate to Network & internet.
  3. Select Advanced network settings.going advanced network settings win11
  4. Click on Network reset.Network Reset 1
  5. Next, hit the Reset now button.Network Reset now

Some users were also lucky to get rid of the error 1006 by updating the app on their phones and other by changing their network connections.

If your IP address is still banned and you’re sure you’re innocent, reach out to Discord’s official Twitter account or any other official channel. For all we know, it could be an update bug that’s locking you out or a connection issue that’s causing a time-out.

Elsewhere, your Discord account may have been disabled so check out the steps on how to get it back. However, beware that it’s pretty easy to get hacked on Discord so tread carefully.

Have you lost access to Discord before? Was it a response to something you did when you retrace your steps or were you an innocent victim? Let us know in the comment section below.

How to Fix the Chrome Remote Desktop Black Screen Issue

Loading your screen when launching Chrome Remote desktop may display a black screen for a prolonged period which could indicate a connection or display issue.

Getting Chrome Remote Desktop means you’re adding another extension to your browser. Too many extensions can cause conflicts so this may also trigger the black screen or green screen issue. Your browser settings also play a part so check which features need to be toned down.

How can I fix Chrome Remote Desktop’s black screen?

1. Restart Remote Desktop Services

1.1 Restart Remote services

  1. Press the Windows + R to open the Run dialog box.
    Services Remote Desktop Can't Find the Computer
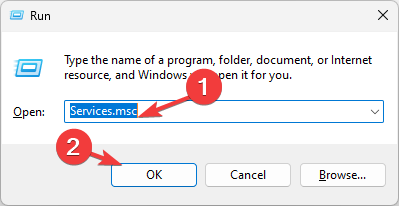
  2. Type services.msc and click OK to open the Services app.
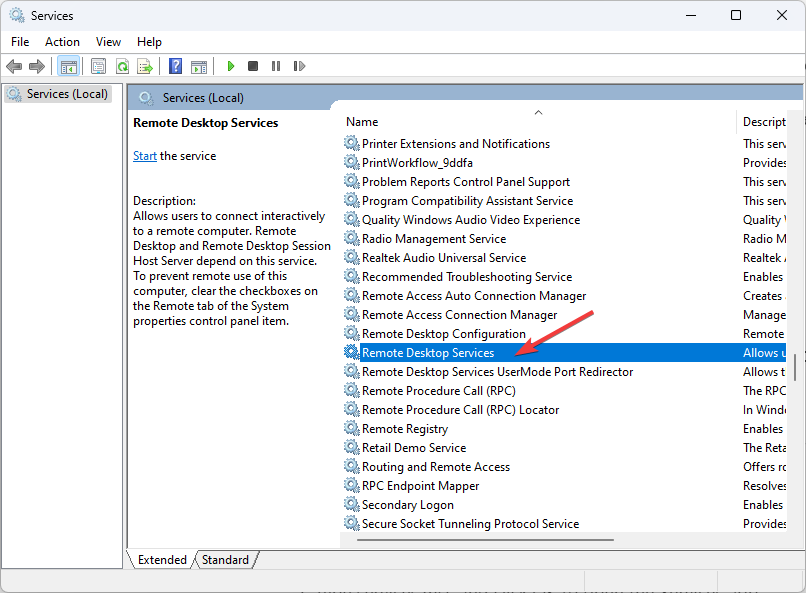
  3. Locate and double-click Remote Desktop Services to open Properties.
    Remote desktop services
  4. Restart your PC to confirm the changes.

1.2 Allow remote connections to the computer

  1. Press Windows + R to open the Run dialog box.
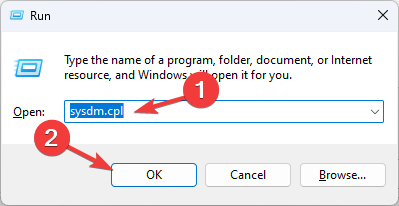
    sysdm.cpl Remote Desktop Can't Find the Computer
  2. Type sysdm.cpl and click OK to open System Properties.
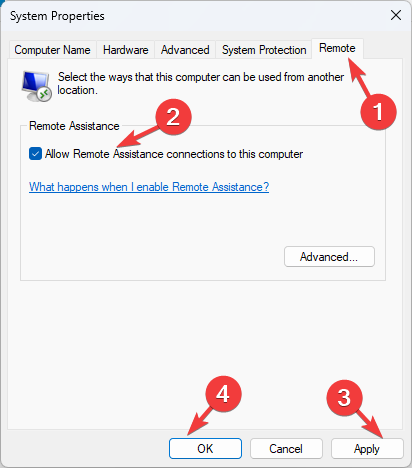
  3. Go to the Remote tab, under Remote Assistance, and select Allow Remote Assistance connections to this computer.
    SystemPropertiesComputerName_Remote Desktop Can't Find the Computer
  4. Click Apply and OK.

2. Run the connection troubleshooters

2.1 Run the Network adapter troubleshooter

  1. Hit the Windows key and click on Settings.settings windows 11
  2. Click on System, then select Troubleshoot.Open system troubleshooter
  3. Select Other troubleshooters.other troubleshooters
  4. Locate the Network Adapter troubleshooter and click on the Run button next to it.Network Adapter Run IPv6 No Internet Access

2.2 Run the Internet Connections troubleshooter

  1. Hit the Windows key and click on Settings.settings windows 11
  2. Go to System, and click Troubleshoot.System - Troubleshoot wifi keeps disconnecting windows 11
  3. Now click Other troubleshooters. Other troubleshooters
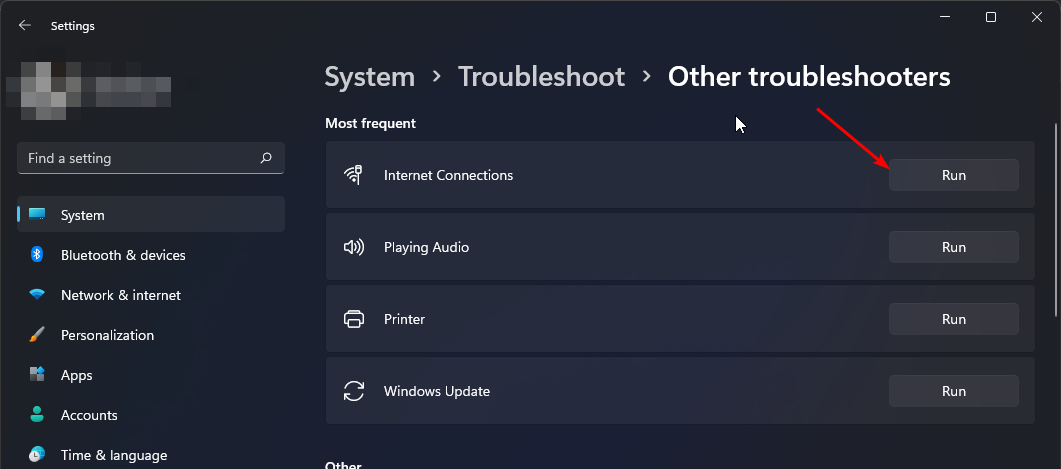
  4. Locate Internet connections, and click Run. 
  5. Follow the onscreen prompts to complete the process.  

If possible, try with another connection and see whether the black screen issue on Chrome Remote Desktop persists.

3. Update display card drivers

  1. Press the Windows key + X and select Device Manager.
    device manager
  2. Double-click the Display adapters option to expand it and right-click the device there.
  3. Now, select Update driver.
    update driver
  4. Finally, click Search automatically for drivers and install any available updates.
    search auto

4. Remove malicious extensions

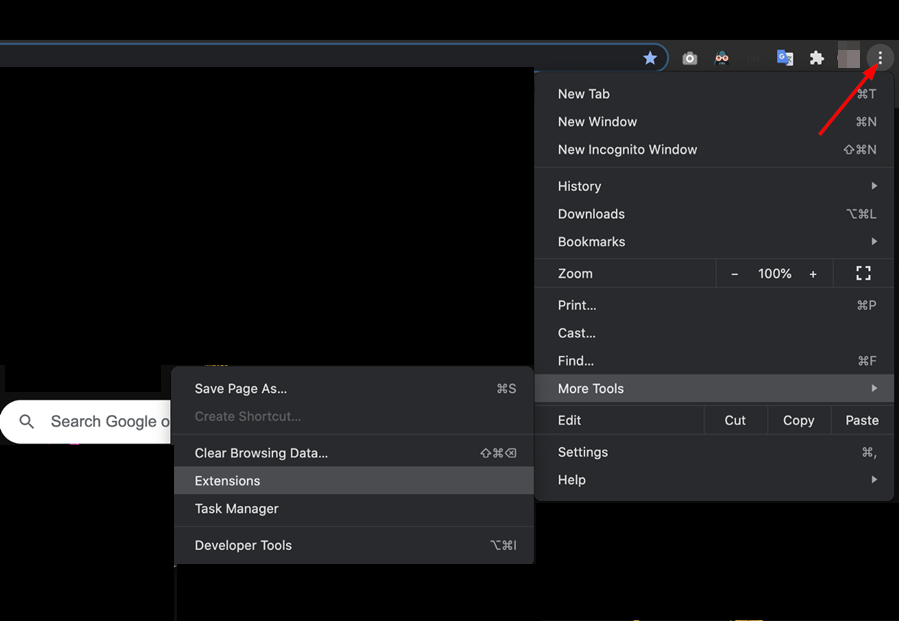
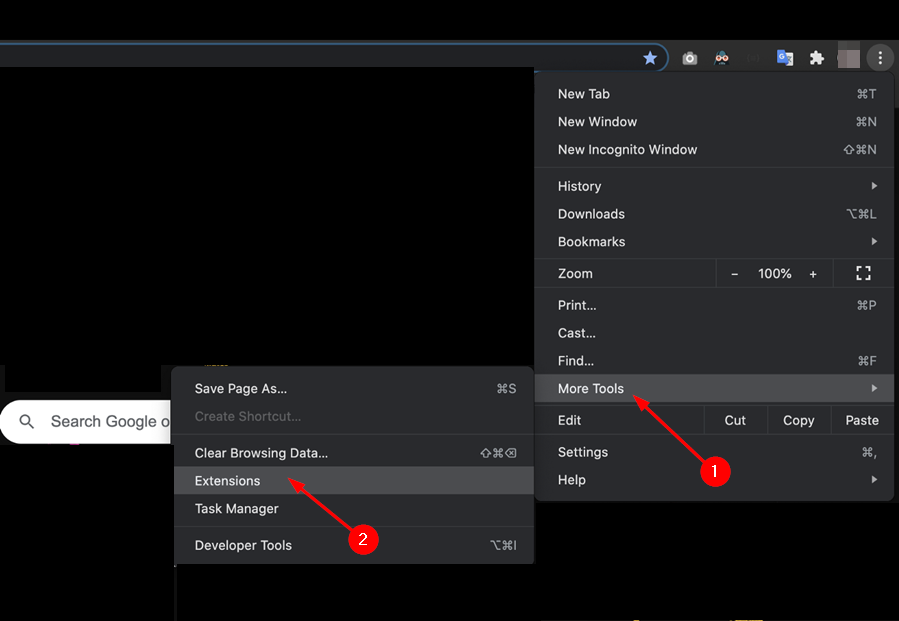
  1. Navigate to your Chrome browser and click on the three ellipses at the top right corner.
  2. Select More tools, then click on Extensions.
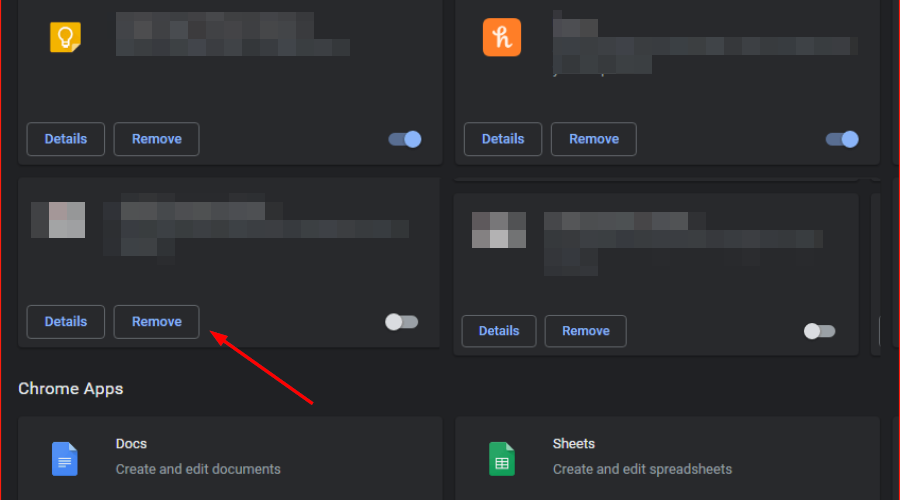
  3. Navigate to the extension you wish to remove, then click on Remove.
  4. Confirm in the new pop-up dialog box that you wish to remove the extension. Repeat this step until you figure out the culprit.

5. Disable hardware acceleration 

  1. Open your Chrome browser and click on the three vertical ellipses at the top right corner.
  2. Select Settings.
    Chrome browser settings
  3. Navigate to System and on the right pane, toggle off Use hardware acceleration when available.

If you’ve enabled hardware acceleration on your Chrome browser, the Chrome RDP may be unable to render the screen because it does not support certain features causing compatibility issues.

6. Repair the Chrome Remote Desktop tool

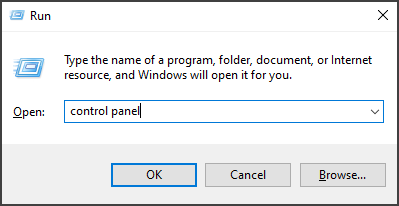
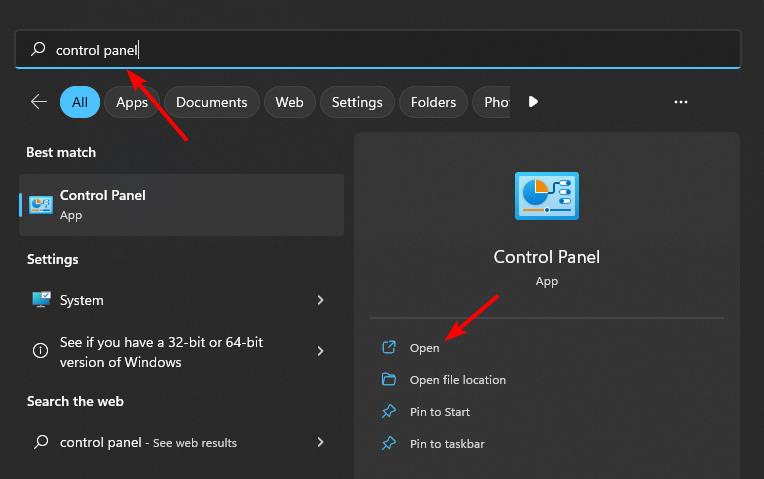
  1. Press Windows key + R. Type control panel and click OK.
  2. Go to Programs and Features.
  3. Select Chrome Remote Desktop Host from the list of installed apps. Click the Repair button.
  4. Click Yes when prompted by UAC.
  5. Wait for the repair tool to fix any issues with the app.
  6. Try connecting using the app and check if the issue is resolved.

7. Reset/Reinstall Chrome Remote Desktop

7.1. Reset Google Chrome

  1. Open your Chrome browser and click on the three vertical ellipses at the top right corner.
  2. Select Settings.
    Chrome browser settings
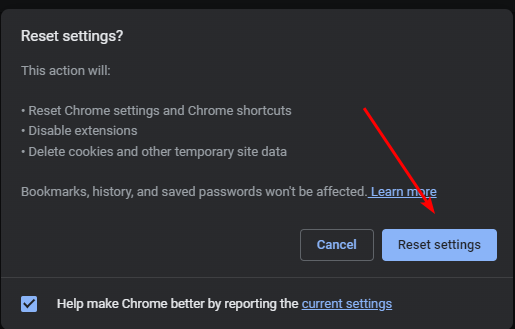
  3. Next, click on Reset and cleanup then select Restore settings to their original defaults.
  4. Confirm Reset settings in the next dialog box.

7.2 Uninstall the Remote Desktop tool

  1. Press the Start menu, type control, and click on Control Panel.
  2. Click on Uninstall Program.
  3. Select Google Chrome and click on Uninstall and click Yes to confirm the action.

If the issue persists after uninstalling Remote Desktop Host, reinstall Google Chrome.

7.2 Reinstall Chrome Remote Desktop

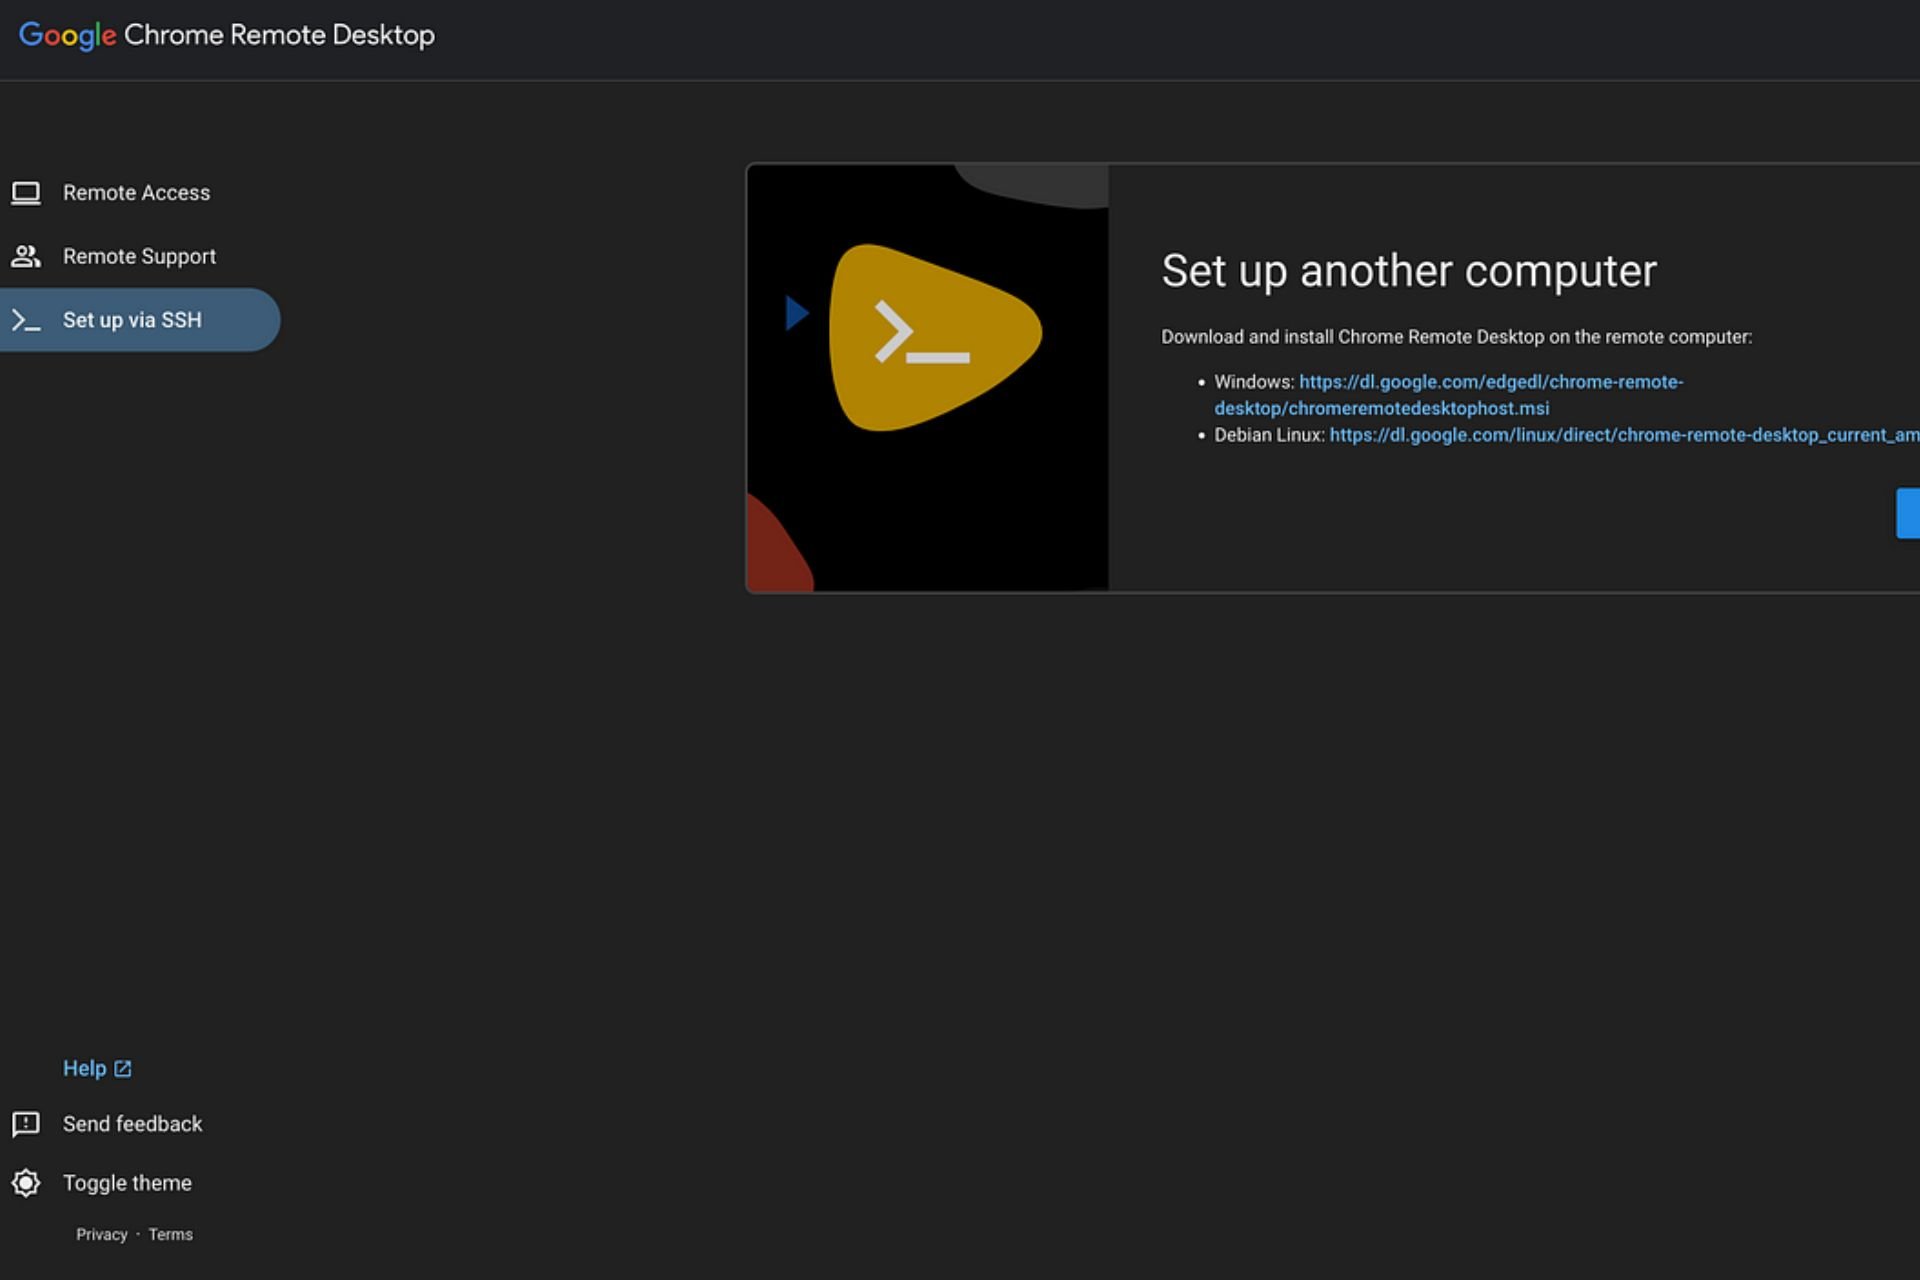
  1. Navigate to the Chrome Remote Desktop page and click the download icon.
  2. Once the download is complete, click on Accept & Install.
  3. Click on the installer file and hit Run.
  4. Wait for Windows to finish the configuration.
  5. Create a name for your PC, or use the default one.
  6. Enter a PIN that will allow you to access the PC remotely.
  7. Launch your Chrome browser, and in a new tab, go to the following location: chrome.google.com/webstore/category/extensions
  8. In the search bar at the top left, type Chrome Remote Desktop and hit Enter.
  9. Click on Add to Chrome.
  10. Confirm by clicking Add extension.

If you’ve tried all the above but still get a black screen, there may be a bug and Chrome Remote Desktop is not working at the moment. You can report the issue to Google or wait it out and try later.

As you wait, consider other remote control software so that your work is not paralyzed when Chrome Remote Desktop has issues. We also have a new guide on how to enable Curtain Mode in Chrome Remote Desktop, so don’t miss it.

Have you managed to fix this issue? Let us know which solution did it for you in the comment section below.

5 Best Microsoft Teams Whiteboard Apps to Visualize Ideas

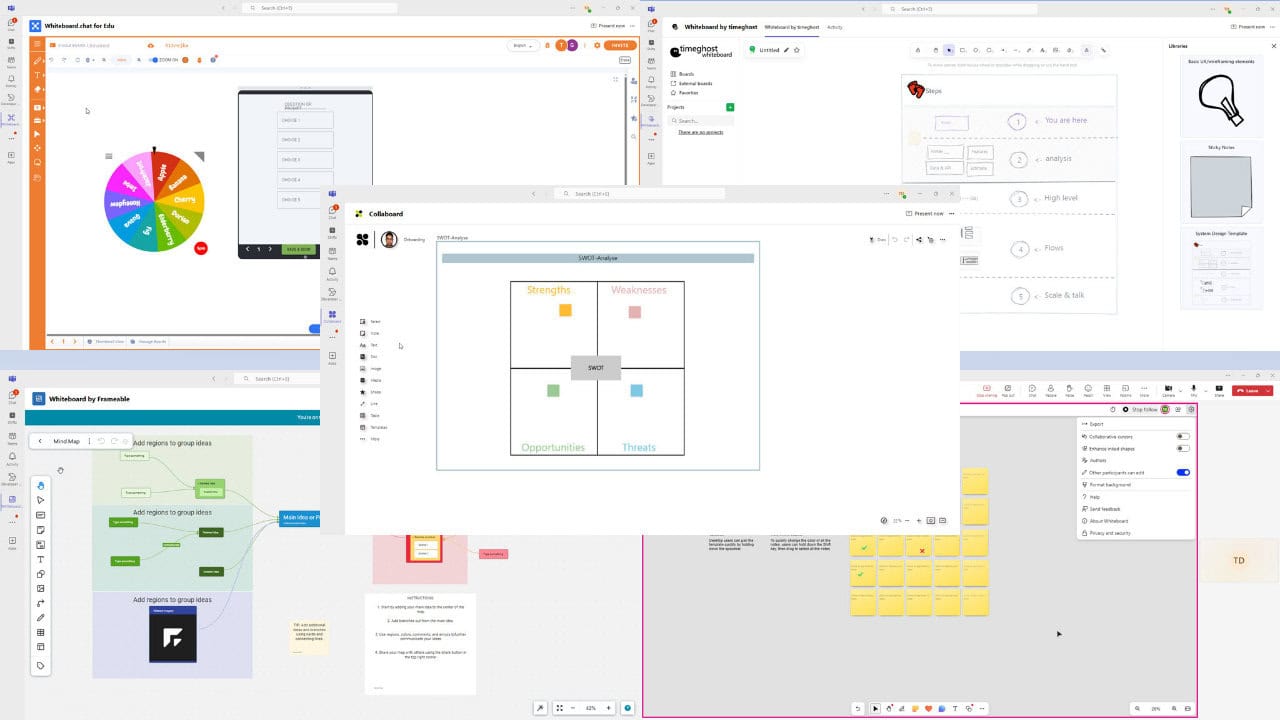
These are the best Microsoft Teams whiteboard apps for idea brainstorming, diagramming, flowcharting, wireframing, prototyping, presenting, and online tutoring.

Think of Microsoft Teams as your online meeting room, and a whiteboard app as the whiteboard on the wall. It’s where you jot ideas, map out plans, and brainstorm with teammates. Choosing the right whiteboard app can transform your sessions from chaotic to crystal clear.

What is the best Microsoft Teams whiteboard to use?

1. Microsoft Whiteboard – Best overall

Microsoft Whiteboard

Microsoft Whiteboard is the native whiteboard app for Microsoft Teams. Also, you don’t need to buy or install it separately. Furthermore, MS Teams accesses all the whiteboard projects you’ve created in the standalone Microsoft Whiteboard portal when you use it.

Therefore, you don’t need to create a new workspace for collaborative designing or brainstorming. You can simply pick one from an ongoing project.

Moreover, the user interface contains all the standard features for convenient diagramming and flowcharting. Find below an itemized list of all of the major functionalities:

  • Content annotation toolbar – With it, you can easily add notes, reactions ,text, comments, lines or other elements
  • Support for other content – The service fully supports templates, images, documents, loop components, videos, and links.
  • Easy sharing and collaboration

⇒ Get Microsoft Whiteboard

2. Get Whiteboard by timeghost – Offers advanced features

Whiteboard by timeghost

If you find the Microsoft Whiteboard app a bit uninteresting, you should try out Whiteboard by timeghost, one of the best Microsoft Teams whiteboards available for free on the MS Teams app store.

This is a minimalistic, clutter-free, and lightweight whiteboarding app suited specifically for UX and wireframe designers. Also, if you’re an avid coder and looking to use your Mermaid coding expertise for flowcharting, you must try out timeghost. It offers a simple coding interface, named Mermaid to Excalidraw for code-based diagramming.

Here are the best features that should draw your attention to it:

  • Quick navigation panel – With it you can access all the features you need in a matter of moments
  • Canvas annotation toolbar – Supports various shapes, text, and other elements
  • Laser pointer – Use it to quickly highlight important objects

⇒ Get Whiteboard by timeghost

3. Whiteboard.chat for Edu – Perfect for students

Whiteboard.chat for Edu

Whiteboard.chat for Edu has been designed specifically for online teaching. You can use MS Teams to install the whiteboard app and create a free educator account. Now, you can send invites to your students you can your whiteboard for free.

Therefore, if your school or educational institute is looking for a Google Classroom alternative or an affordable online tutoring software, you could definitely check it out.

Explore below some of its iconic features that make your online classes convenient:

  • Content annotation toolbar – Offers extensive annotation features, including pens, lines, arrows, and more
  • Whiteboard management toolbar – Allows users to quickly switch between whiteboards or classrooms
  • Quick board actions – Gives you access to whiteboard administration actions with just a few clicks

⇒ Get Whiteboard.chat for Edu

4. Whiteboard by Frameable – Offers flowchart support

Whiteboard by Frameable

If you’re specifically looking for a virtual whiteboard for MS Teams that would be suitable for various commercial use cases, check out the Whiteboard by Frameable right away. It comes with 20 different groups of diagramming and flowcharting templates that specifically cater to sales, marketing, product development, business operations, and so on.

The best thing is, if you’re just starting to figure out various business processes and visualize those on a whiteboard, you can get started with any of the professional templates it provides. Also, if you’re an experienced executive, you can create custom templates for your teammates to use.

Find below the notable features of Frameable whiteboard integration in MS Teams:

  • Dashboard – Allows you to see all your boards at a glance
  • Annotation toolbar – With it, you can easily highlight or draw attention to the important elements
  • Board controls – Allows for easy sharing and exporting of your boards
  • Navigation customizations – Offers both mouse or trackpad navigation

⇒ Get Whiteboard by Frameable

5. Collaboard – Comes with various templates

Collaboard

Collaboard integration for MS Teams is suitable for project managers who often need to visualize processes and workflows on a whiteboard. It offers a vast library of whiteboard templates organized into 14 groups.

You’ll find professional drawing boards on topics, like Strategy and Planning, Agile Work, Brainstorming and Ideation, Meetings & Workshops, Diagramming, and so on.

Its user interface is minimalistic, clutter-free, and filled with white space. It means you get more space for actual drawing rather than getting entangled in user interface elements. Here are the major features of Collaboard:

  • A projects dashboard – Allows you to easily store your ongoing projects along with whiteboards.
  • Whiteboard annotation toolbar – Offers the ability to insert elements such as notes, images, documents, etc.
  • Minimap – The Minimap view helps you to see a bird’s eye view of all the processes and wireframes that have been drawn so far on the whiteboard.

⇒ Get Collaboard

All the best Microsoft Teams whiteboard apps mentioned above are unique in their own ways. Some are good for personal use while others are for an office or business webinar setup.

Contrarily, some are specifically suitable for teaching a class full of students sitting at their homes or in a hybrid classroom environment.

To learn more about Microsoft Teams, we have a guide on how to customize Microsoft Teams, and if you ever want to relax, you might be interested in Microsoft Teams games.

To enhance it further, we also have a guide on Microsoft Teams Kanban boards so feel free to check it out for more information.

Did you find the MS Teams whiteboard app you like from the ones outlined here? Type your reply in the comment box. If you know of some better apps, don’t forget to share those as well.

Installing KB5046633 will tell you Windows 11 23H2 is reaching the end of service, but don’t worry, there is a fix

The latest KB5046633 to Windows 11 23H2 comes with a bug that causes the operating system to be labeled as reaching the end of service, but fortunately, there is a fix.

Many users found out that their Windows 11 was displaying the Your version of Windows has reached the end of service message along with the recommendation to Get the newer version of Windows to stay up to date, after updating the operating system with the latest Patch Tuesday updates.

Windows 11 23H2 22631.4460 showing end of service message. Just updated windows 11 to 22631.4460 and I am seeing a “End of Service” message in settings under windows update. It was my understanding that 23H2 was receiving updates till 2025? Is this a bug?

It affected thousands of users who are still on the Windows 11 23H2 version of the operating system, confusing many who were baffled to find out they need to upgrade to the 24H2 (which has been having many issues since its release, back in October).

However, Microsoft confirmed it is a bug, and there is a simple way to fix it, if you have encountered since installing the Windows 11 KB5046633 patch.

Simply restart your PC and the messages should go away. If it still hasn’t, don’t worry. It will go away in the next few hours. You won’t need to update to 24H2. Since KB5046633 is part of the Patch Tuesday updates, thus mandatory, you won’t be able to simply uninstall them.

But restarting your Windows 11 might effectively get rid of the KB5046633 bug that apparently labels the operating system as nearing its end.

In other news, despite this bug, make sure you download the latest Patch Tuesday updates as they’re essential to combat the active threats out there. Microsoft addressed 91 vulnerabilities with this month’s patch, and a few of them were actively exploited.

Error Eas Didnt Fit 275 (0x113): How to Fix it

If you’re a developer, you might encounter ERROR_EAS_DIDNT_FIT 275 (0x113) The extended attributes did not fit in the buffer error. To see how to fix this issue, keep on reading.

How can I fix Error_Eas_Didnt_Fit?

Before we try more advanced solutions, update management tools, split large directories and try to process them separately.

1. Check the file path and size

  1. Locate the file that is giving you this error.
  2. Ensure that the path length or the size doesn’t exceed the maximum limits.
  3. Make the adjustments if necessary.

2. Remove extended attributes

  1. Inspect the attributes of the file.
  2. You might have to remove attributes to fix the issue.
  3. Press Windows key + S and type cmd, choose Run as administrator.
    CMD elevated
  4. Run the following command: attrib -R -S "C:\path\to\file"
    attrib cmd

3. Scan your disk for errors

  1. Open Command Prompt as administrator.
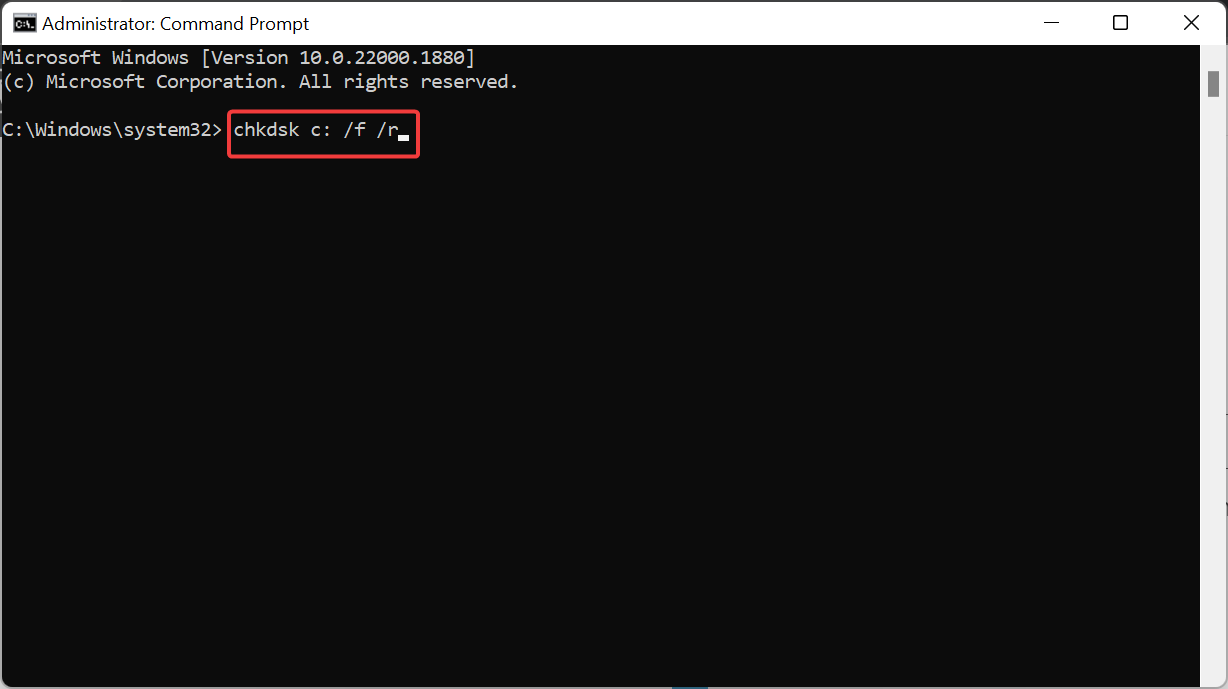
  2. Run the following command chkdsk C: /r
    chkdsk
  3. Schedule the scan and restart your PC.
  4. Wait for the scan to finish.

4. Use robocopy

  1. Start Command Prompt.
  2. Run the following command: robocopy "C:\Users\WindowsReport\Documents\SourceFolder" "D:\Backup\DestinationFolder" /COPY:DAT
    robocopy
  3. Close Command Prompt.

By using this command, you’ll only copy the data and exclude metadata and extended attributes. To learn more about this command, we have a great guide on copy vs xcopy vs robocopy commands.

This is an obscure error, and you probably won’t encounter ERROR_EAS_DIDNT_FIT unless you’re a developer. However, if you do, then use these solutions to fix it.

We covered similar issues in the past, so don’t miss our articles on Error_Pipe_Busy and Error_EA_Table_Full.

Our latest guide covers ERROR_INVALID_LOCK_RANGE so don’t miss it for more information.

Microsoft Clipchamp’s new editing capabilities will allow uses to import recorded videos in the platform immediately

Microsoft Clipchamp will be enhanced with advanced editing capabilities that will go hand in hand with the camera, allowing the platform to seamlessly switch between the editor and the camera to work on videos.

The new enhancement was announced in a recent entry to the Microsoft 365 Roadmap, and it will impact Clipchamp on the Web.

Here’s what the entry says:

This aligns the capture experience in camera and editor by enabling a seamless switch to the Clipchamp editor to make videos more appealing and impactful using advanced edit capabilities.

At the same time, Clipchamp will also allow users to create their own templates and monetize them through their organizations. But they can also be used for personal reasons.

This was too added in a recent entry to the Microsoft 365 Roadmap. Here’s the entry:

Users can create their own Clipchamp templates for personal use or distribution across an organization via brand kits.

The two new capabilities are coming to the platform in January 2025.

Speaking of the Clipchamp editor, it has recently been enhanced to support automatic image removal and noise suppression, meaning you can easily edit your video files professionally, even if you lack experience with editing.

Chrome is ditching Microsoft’s Scrolling Improvements due to battery Performance issues

Google is disabling the “Windows Scrolling Personality (WSP)” features, such as “percent-based scrolling” and “impulse scroll animation,” in Chrome due to battery issues. These features were initially introduced by Microsoft for all Chromium browsers, including Edge and Chrome, after switching to the Blink engine.

Windows Scrolling Personality

After switching to Chromium, Microsoft introduced new scrolling improvements to the Edge browser that match the personality of Windows. These improvements brought smoother and more responsive scrolling across various input methods and included new animation curves for smoother scrolling and overscroll bounce effects. Microsoft calls these enhancements “Windows Scrolling Personality.”

Here is a brief overview of these features:
Percent-based scrolling: Allows for more precise control over scrolling.
Impulse scroll animation: Provides a more natural and intuitive scrolling experience.

The company shared its code with all Chromium-based browsers, including Chrome, Brave, and others.

Google is disabling the Windows Scrolling Personality features in Chrome

Recently, Microsoft suggested to Google to disable percent-based scrolling and impulse scroll animation features in Chrome code to avoid issues. Specifically, Microsoft confirmed they already disabled the Windows Scrolling Personality code in Microsoft Edge to fix battery performance issues.

“WSP (Windows Scrolling Personality) was identified as a source of battery regressions, and we are planning to remove the code. We already disabled the feature in Edge,” Microsoft informed Google in a bug report.

Meanwhile, a Brave developer shared in the bug report that their users love the WSP feature.

Google is now following Microsoft’s advice to “unship Windows Scrolling Personality” and is removing the respective flag, as well as disabling impulse scroll animation and percent-based scrolling in Chrome code.

“Disable Windows Scrolling Personality features in code. This is the first CL in the series to remove Windows Scrolling Personality (WSP) features, particularly percent-based scrolling and impulse scroll animation,” Google confirmed its actions in a commit message.

Apart from this, Chrome will allow users to run legacy extensions using Manifest V2 with a temporary flag. Additionally, Microsoft is trying to reduce its reliance on the Chrome Web Store for Edge extensions and themes, as it has its own add-ons store.

The US-based Microsoft Rewards program has started to follow the European version and it doesn’t look good for users

Microsoft Rewards users based in the US are gradually introduced to the new version of the program, which rewards fewer points daily.

The current maximum number of points you can earn daily in Microsoft Rewards if you’re based in the US is 150 for PC-related tasks and 100 for Mobile-related tasks. European members of the program earn less: 90 points for PC-related tasks and 60 points for Mobile-related tasks.

Understandably, some users are shocked. On Reddit, however, some are not surprised at all.

Microsoft Rewards lowering points gained per search and total points able to be earned from searching (I’m in the US)

Welcome to the rest of the world

However, it’s worth noting that not all members are currently affected by the change. In the US, Europe, and Australia, some are still earning 150/100 points for PC and Mobile tasks.

This means the Redmond-based tech giant is probably testing it in some regions or with some users, and it might fully roll out the change in the following months.

We reported earlier this year that compared to 2023, in 2024, Microsoft Rewards will reward up to 40% fewer points even when completing all the tasks, so this is not entirely unexpected.

Microsoft Rewards has also been flagging suspecting search activity, and if that happens to you, you might also be flagged for testing the new 90/60 Rewards system.

Has this change impacted you yet or not?

Windows 11 Build 27749 introduces a new shortcut for Narrator

Microsoft has released Windows 11 Insider Preview Build 27749 to the Insider program’s Canary Channel. The latest build brings several improvements, fixes, and several known issues that Insiders should be aware of.

In the new build, Microsoft has added a new shortcut for Narrator in Windows 11, allowing users to copy the last spoken phrase to the clipboard using a keyboard shortcut. This can be done by pressing the Narrator key with Control and X.

In addition, the Narrator will now auto-read the contents of a message in the new Outlook app, similar to the behavior in Outlook Classic.

Elsewhere, Microsoft has fixed an issue in File Explorer that was causing the items in the navigation pane to become very spread out for some people. The company has also addressed an underlying issue causing RAW images taken in portrait mode to display in landscape mode thumbnails unexpectedly.

The build changes the taskbar and system tray so that if the taskbar auto-hides, users will now see a search box rather than an icon if the search setting on the taskbar is set to “Search box.” Microsoft has also addressed an issue where the mouse pointer circles displayed by the OS were very small on high-DPI displays.

Microsoft has resolved a performance issue in Narrator, the company says. The screen reader would slow down after 15 minutes of continuous use with a single application. The company is asking Insiders to report performance issues using the Feedback Hub.

In addition, Microsoft has fixed an issue where Narrator would add an announcement “contains style” whenever it focused on text with styling attributes across applications such as Microsoft Edge, Teams, Outlook, etc., and an issue where few dialogs in Narrator were not adopting the 200% text scaling setting.

The new build fixes an issue causing Task Manager to show a 0 count for apps and processes, an underlying problem that could lead to the audio on specific audio devices unexpectedly going to 100% on boot or after sleep, and a blank entry in Settings > Privacy that was crashing Settings if you clicked it.

Microsoft also mitigated an issue resulting in Git not working for Insiders with Arm PCs in the previous flight, fixed an issue causing some Insiders to see a bug check with KERNEL_MODE_HEAP_CORRUPTION in the previous flight, addressed an underlying issue that could potentially prevent them from joining a domain, and fixed an issue where DirectAccess wasn’t working and might stay stuck in a connecting state.

The new build has a number of known issues, including one that could cause the audio on certain audio devices to unexpectedly go to 100% on boot or after sleep.

For the Windows 11 Build 27749’s full changelog, refer to Microsoft’s blog post.

In other news, Windows’ Snipping Tool recently got a new shortcut, as well.

Synaptics Touchpad Driver Error Code 10 [Fixed]

Did you just see the Synaptics Touchpad driver error code 10? If you encounter it, your touchpad won’t work properly, so it’s crucial to fix it, and this guide will show you how to do it.

How can I fix Synaptics touchpad driver error code 10?

Before we start, ensure that touchpad is enabled. You can enable it by pressing F8 or F6 key. Restarting the device can also help. Ensure that your device isn’t damaged.

1. Disable and re-enable Synaptics touchpad hardware

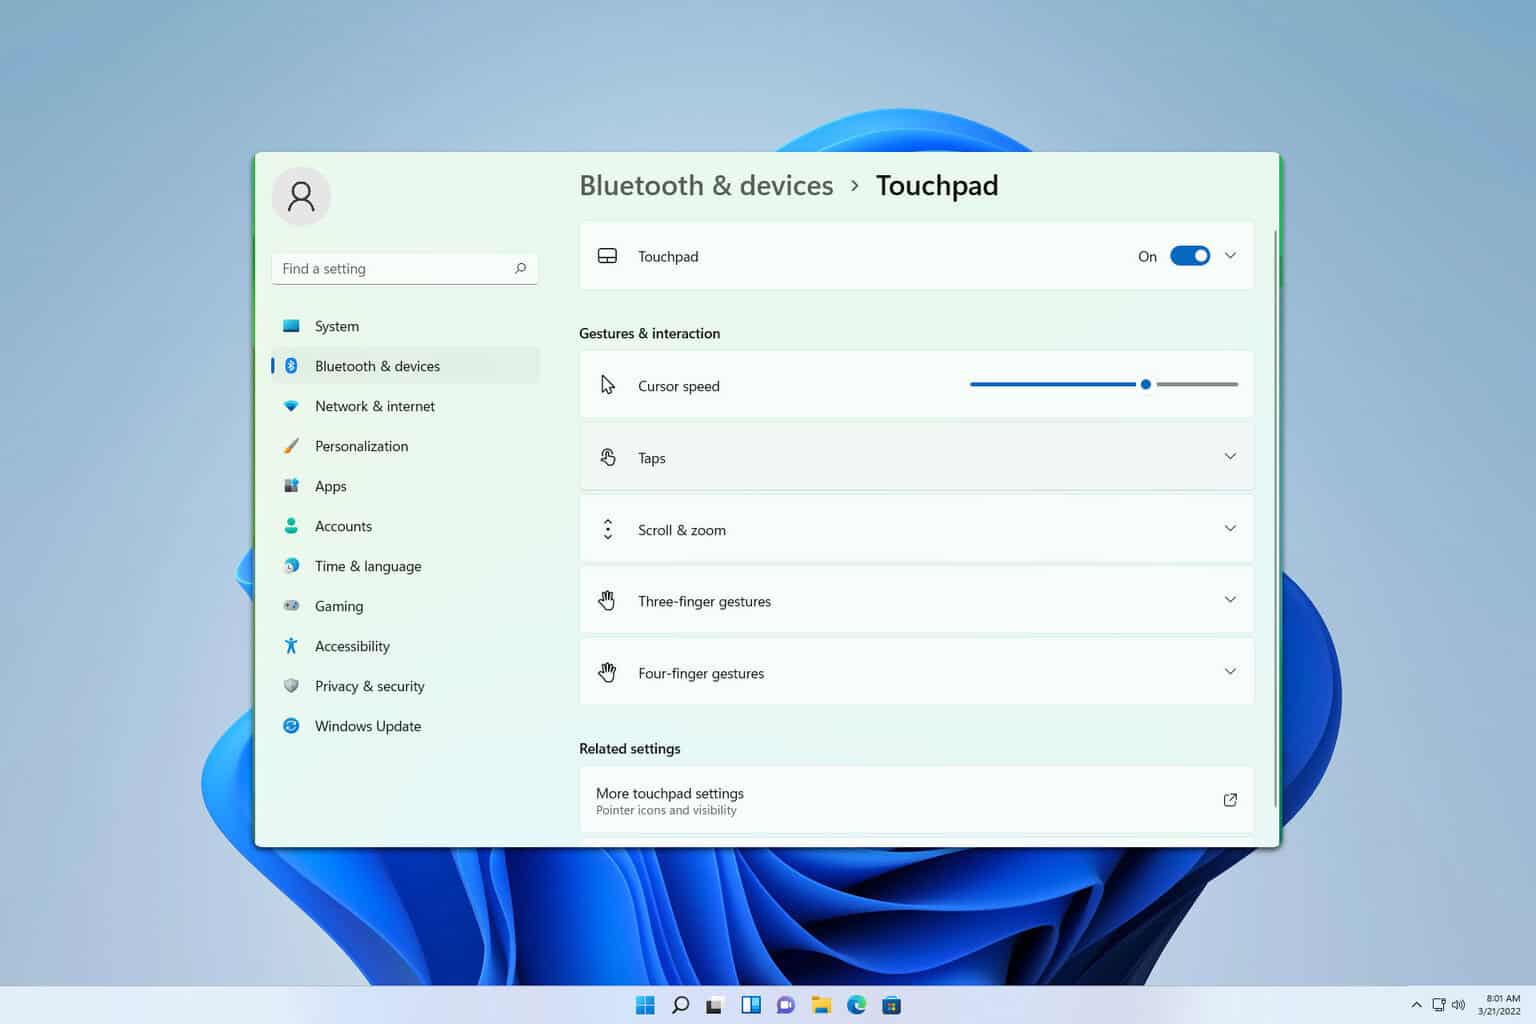
  1. Bring up the Settings app by pressing the Windows + I keys.
  2. Click on the Bluetooth & devices option and on the right-side menu, scroll down to find the Touchpad option and click on that.
  3. Toggle off and on the Touchpad button in the top right corner.
    touchpad toggle

Alternatively, you can do this from BIOS, but for correct instructions, check your laptop manual.

2. Roll back, or uninstall the Touchpad driver

  1. Press the Windows + X keys together to bring up and click Device Manager.
  2. In Device Manager, expand the Human Interface Devices section.
  3. Right-click on Synaptics Touchpad (or your touchpad’s driver name) and select Properties.
    Device properties
  4. Go to the Driver tab in the Properties window. And click Roll Back Driver and follow the prompts to complete the rollback.
    Roll back driver
  5. Click OK to close the Properties window once the rollback is finished.

After rolling back, check if the issue is still there. If the roll back option isn’t available, choose the option to uninstall the device and restart your device.

This is a simple solution, but it can help with I2C HID Device (This device cannot start. (Code 10) A request for the HID descriptor failed.).

3. Update the Synaptics Touchpad Driver

  1. Open Devie Manager.
  2. In Device Manager, expand the Human Interface Devices section. Right-click Synaptics Touchpad (or your touchpad’s hardware and driver name) and choose Update driver.
    update driver
  3. In the Update Driver window, select Search automatically for drivers.
    search automatically
  4. Windows will search online and install any available driver updates for your touchpad.
  5. Once the update completes, restart your computer if prompted.

For best results, it might be best that you download the drivers manually from the manufacturer’s website. We also have a guide on how to download Synaptics touchpad driver, so don’t miss it.

AFter updating the driver the This device cannot start. Try upgrading the device drivers for this device. (Code 10) message should be gone.

4. Perform a Clean Boot

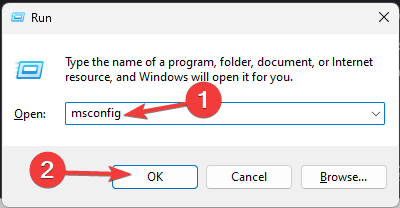
  1. Click the Start menu, type System, and select System Configuration from the results.
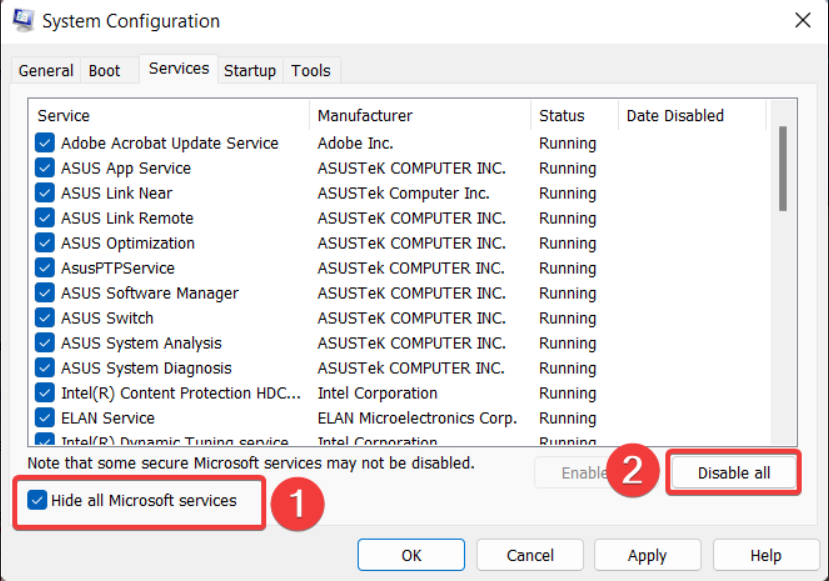
  2. In the System Configuration window, go to the Services tab.
  3. Check Hide all Microsoft services at the bottom, then click Disable all to turn off non-Microsoft services.
    disable all
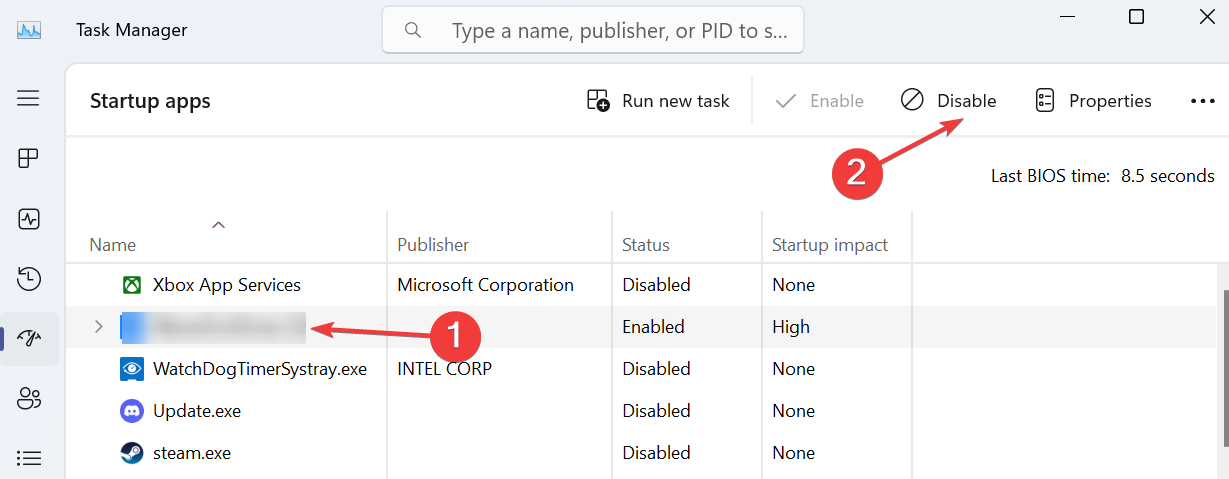
  4. Next, go to the Startup tab and click Open Task Manager. There, disable each startup item by right-clicking on each one and selecting Disable.
    Disable startups
  5. Close Task Manager and return to the System Configuration window. Click Apply and then OK.
  6. Restart your computer to enter a Clean Boot environment.
    apply system config

If the issue is fixed, repeat the same steps but this time enable services one by one or in groups until you find the culrpit.

5. Reboot Into Safe Mode

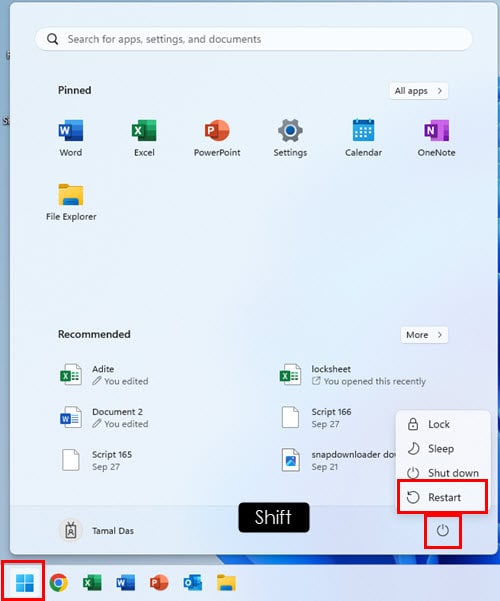
  1. Click on the Start menu and press the Shift key.
  2. Keep the Shift key pressed and restart the PC from the Power menu in the Start menu.
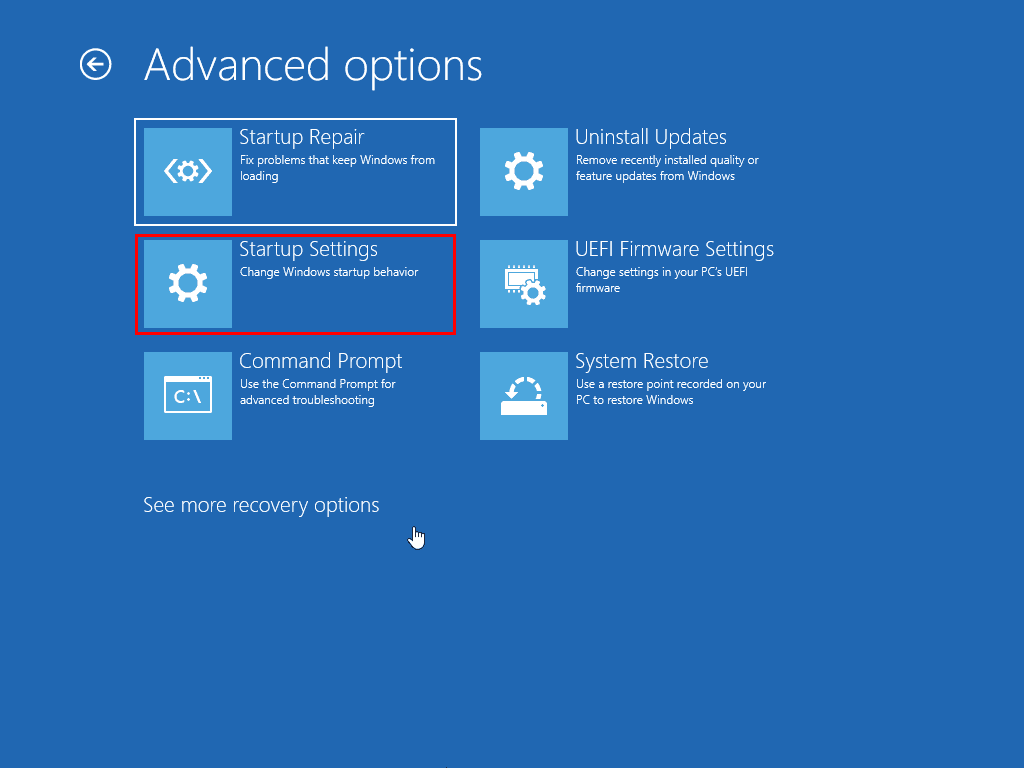
  3. Go to the Troubleshoot screen, and select Advanced options.
    advanced options 3
  4. Now, click on Startup Settings.
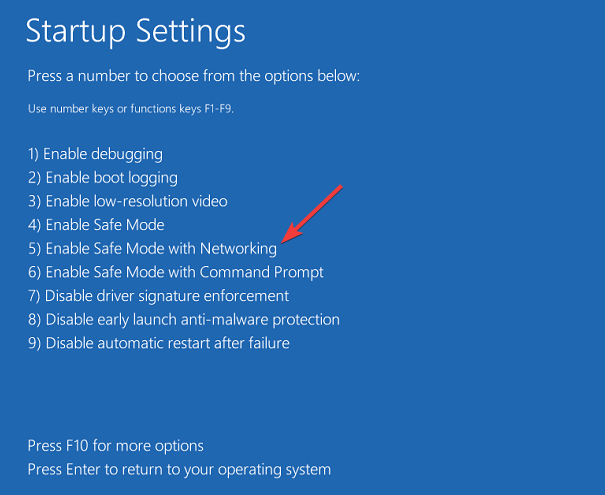
  5. Hit Restart on the next screen.
  6. Once the system restarts, press F4 or 4 to boot into Safe Mode.
    press 4 for safe mode
  7. Test if the touchpad is working or not.
  8. If it works, reboot the PC.

When you’re in normal mode, uninstall the app you installed recently just before the emergence of the This device cannot start. (Code 10) error.

6. Reseat the Synaptics Touchpad Cable

  1. Wear an antistatic wristband before opening any internal parts of the device.
  2. Refer to the user manual of the laptop to open its back panel.
  3. Find the Synaptics Touchpad cable, which is usually a flat ribbon cable connected to the motherboard.
  4. Gently disconnect the cable from its connector by lifting the clip or pulling it out.
  5. Inspect both the cable and connector for any dirt or signs of damage.
  6. Reconnect the cable securely into the connector, making sure it’s properly seated.
  7. Put the back panel back on and reattach the screws.

Did this Synaptics Touchpad troubleshooting guide help you fix your notebook? Comment below. If you know of a better way to fix this pressing issue, do share that in your reply.

This isn’t the only issue you can encounter, and many reported that Synaptics touchpad driver is not installing or Synaptics touchpad driver code 24.

We also have a new guide on Synaptics Touchpad driver scroll not working, so you might want to visit it for more solutions.

Error EA Table Full 277 (0x115): How to Fix it

Error_Ea_Table_Full is a developer error and it comes with the following message: 277 (0x115) The extended attribute table file is full. If you ever encounter this issue, the solutions from this guide should help you fix it.

How can I fix Error_Ea_Table_Full?

1. Adjust your code

  1. Open your code.
  2. Look for the files that have extended attributes.
  3. Delete files with attributes that you no longer need.

It seems that this issue appears if the number of files with extended attributes has reached the system limit, so be sure to remove them.

2.  Update your PC and the software

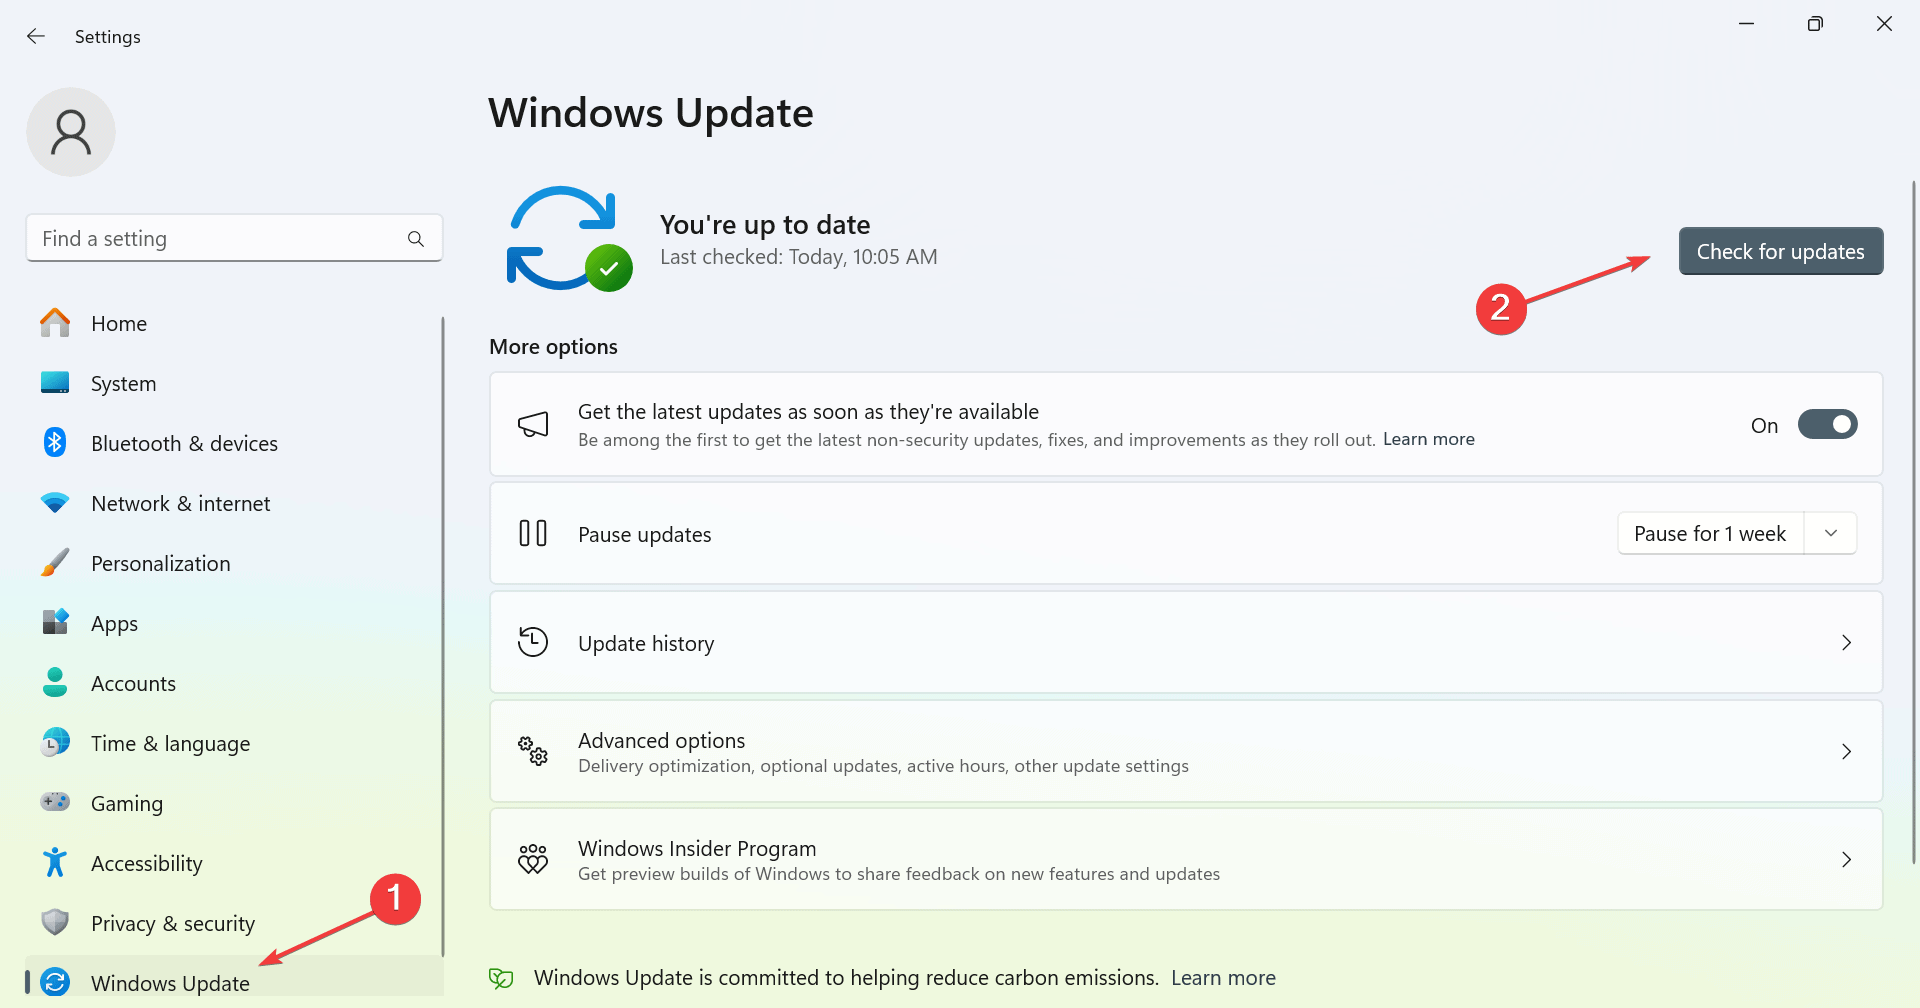
  1. Press the Windows key + I to open Settings.
  2. Navigate to Windows Update and click on Check for updates.
    check for updates
  3. If any updates are available, Windows will download them in the background.

In addition to updating Windows, update the software on your PC to ensure that it’s not causing any issues.

3. Check your disk for errors

  1. Press the Windows key + S and type cmd. Choose Run as administrator.
    CMD elevated
  2. Run the following command: chkdsk C: /r
    CHKDSK (2)
  3. Confirm that you want to schedule a scan and restart your PC.
  4. Wait for the scan to finish.

4. Other tips to try

  1. If possible, reduce the number of extended attributes.
  2. Ensure that the metadata overload doesn’t occur.
  3. Split files into smaller parts so that they can have fewer attributes.
  4. If needed, move the data to a different file system that supports more attributes.

These are just some of the solutions that you can use if you ever encounter Error_Ea_Table_Full. This isn’t the only error you can encounter, and we wrote about ERROR_NESTING_NOT_ALLOWED and KERNEL_STORAGE_SLOT_IN_USE in our previous guides.

Our latest guide covers ERROR_EAS_DIDNT_FIT message, so feel free to check it out for more information. Also, don’t miss our guide on ERROR_INVALID_LOCK_RANGE error for more information.

Windows 11’s System Tray displays language packs that weren’t installed. Here’s what you need to do

Windows 11’s System Tray capability keeps showing language packs that weren’t installed on the operating system, which has left some users confused about how to fix it.

On Reddit, those impacted by the issue call on Microsoft to fix it or at least let them disable the System Tray icon entirely.

The issue is not new; it seems it affects many users globally. In some cases, as someone noted, even though you can manually remove the language pack you haven’t chosen to install, it always comes back one way or another.

This bug has been plaguing me for years. It shows the keyboard layout switcher even though ENG US isn’t shown as installed in Settings. Yeah there are ways to manually remove it, but it just keeps coming back. In old versions of Windows you can disable the icon in the system tray, but for some reason they removed that option in Windows 11.

So what should you do then? Well, for starters, as the user mentioned, you can try disabling the System Tray icon if you are using an older Windows 11 version.

However, another Reddit user has come up with a solution that apparently works. The other users impacted by the same issue validated it, as well.

You’ll need to:

  1. Open Powershell
  2. Type in the following commandWindows 11 System Tray
  3. Press Enter
  4. (Optional) Restart your PC

Let us know if it worked for you!

Copilot Error Getaddrinfo: Fix it With Just 4 Steps

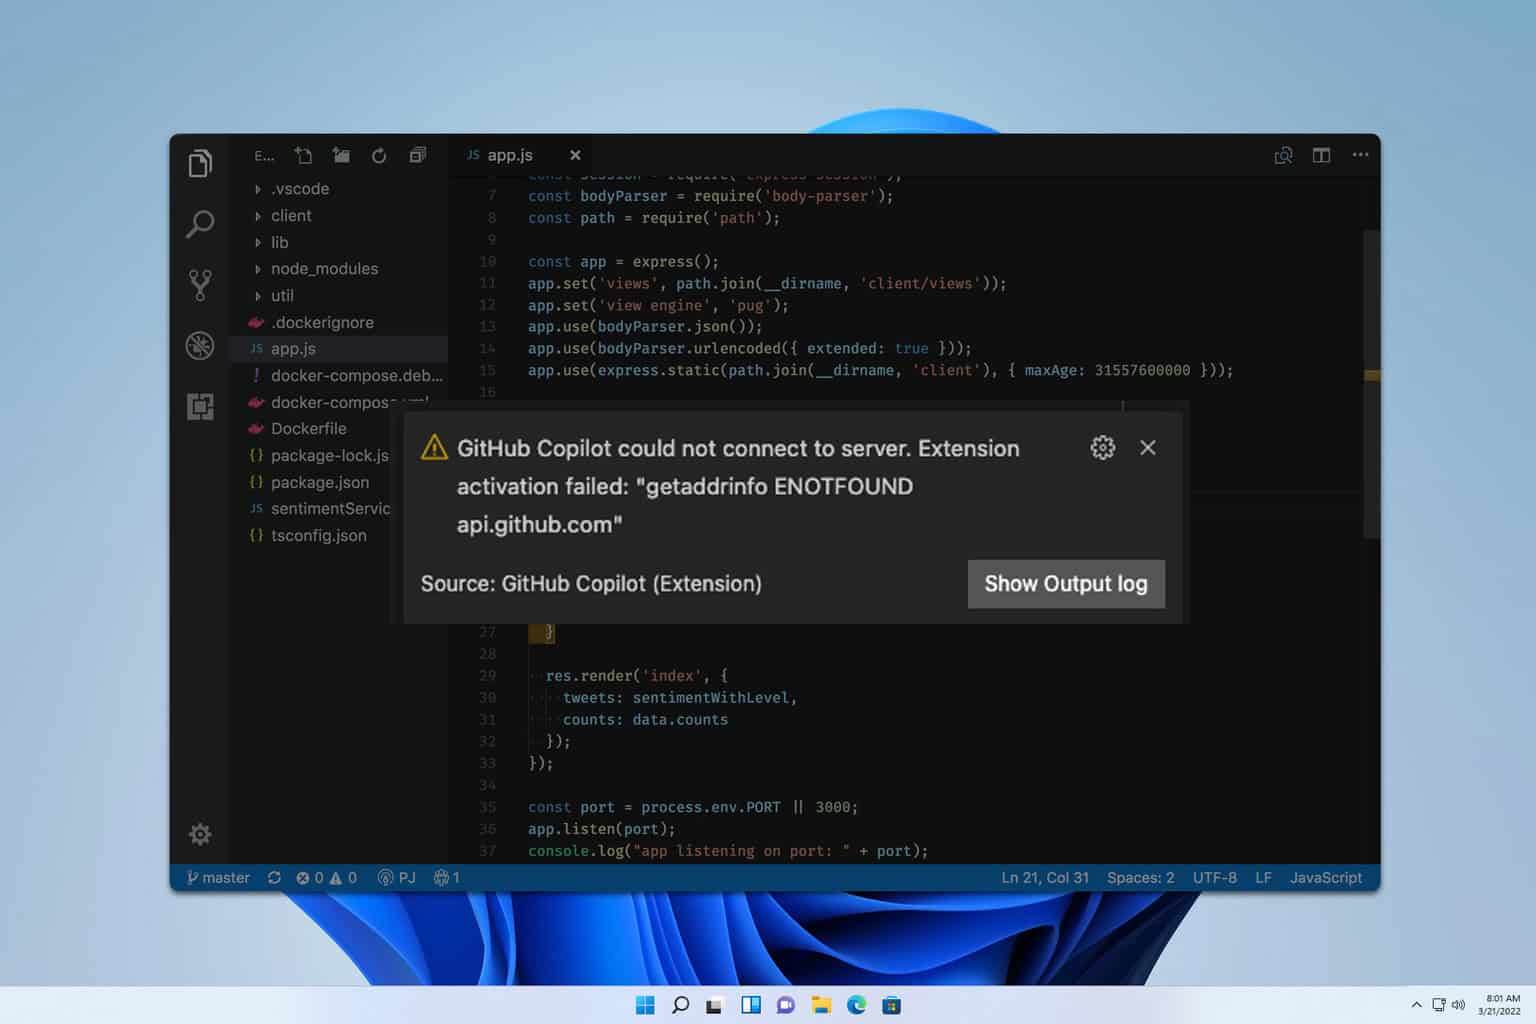
When using Copilot, you might sometimes encounter the Copilot error getaddrinfo. If this happens, you won’t be able to use the AI assistant at all, so it’s important to fix this issue, and this guide will show you how to do it.

How can I fix the Copilot error getaddrinfo?

Before we start with more complex solutions, try restarting Visual Studio Code. Do this if you’re having network issues or if you lose your Internet connection.

1. Use Command Prompt

  1. Press the Windows key + S and type cmd. Choose Run as administrator.
    CMD elevated
  2. Run the following commands:
    netsh winsock reset
    ipconfig /release
    netsh int ip reset
    ipconfig /flushdns
    ipconfig /renew
  3. Close Command Prompt.

After doing that, check if Copilot getaddrinfo enotfound api.github.com error is gone.

2. Upgrade the GitHub Copilot extension

  1. Open Visual Studio Code.
  2. Locate the GitHub Copilot extension.
  3. Update it to the latest version.
  4. Restart Visual Studio Code.

3. Disable or reinstall Copilot extension

  1. Open Copilot Extension in VS Code.
  2. Click the Disable button.
     disable extension vs code
  3. Wait for a few moments and click the Enable button.
  4. Check if the problem is resolved.
  5. If not, click the Uninstall button.
    uninstall extension visual studio code
  6. After a few moments, install the extension again.

4. Change proxy settings

  1. Click on File, choose Preferences, and then Settings.
     settings vs code
  2. Choose Application and then Proxy.
    proxy visual studio code
  3. Disable Proxy Strict SSL.
    proxy strict ssl

A few users reported that adding or updating the proxy fixed the problem for them, so try that as well.

In most cases, you can fix Copilot error getaddrinfo by resetting your network, or simply by installing the Copilot extension again.

Before you leave, don’t miss our guides on Copilot error Auth Read ECONNRESET and Something went wrong Copilot error for more solutions.

For many Microsoft Copilot is not working at all, but we have an article that tackles this issue, so don’t miss it. Our latest guide covers Copilot Error attempting to reconnect so you might want to check it out.

Something Went Wrong Copilot Error: 4 Different Ways to Fix

Many encountered Something went wrong Copilot error, and if this happens, you won’t be able to use the service at all. Despite being vague, this issue is pretty simple to fix, and today we’re going to show you how to do it.

How can I fix Something went wrong Copilot error?

1. Clear the Bing cookies

  1. Click the Menu icon and go to Settings.
    google chrome settings menu
  2. In the left pane, select Privacy and security and choose Third-party cookies.
     third-party cookies
  3. Select See all site data and permissions.
    see all site data and permissions
  4. Locate Bing on the list and click on the Delete icon.
    bing delete

If that doesn’t work, you can go ahead and clear the browser cache and delete all cookies.

2. Delete local and session storage for Copilot

  1. Open the Copilot page in a browser.
  2. Press F12 to open the Developer Tools.
  3. Navigate to the Application tab.
     application dev tools
  4. Next, expand Local Storage, right-click each element, and choose Clear.
    clear local storage
  5. Do the same for Session Storage.
    session storage clear

3. Disable VPN and flush DNS

  1. If you have VPN enabled, disable it.
  2. For third-party firewalls, ensure that it’s set to a value lower than Strict.
  3. Press the Windows key + S and type cmd. Choose Run as administrator.
    CMD elevated KERNEL_STORAGE_SLOT_IN_USE
  4. Enter ipconfig /flushdns
    cmd_ipconfig/flushdns - a critical error has occurred and the process must be terminated

A few users reported that you can fix Sorry something went wrong error code: systemerror in Copilot Studio simply by changing the VPN location instead of disabling it, so try that as well.

4. Other tips to try

  1. Ensure that your OpenAI quota isn’t exceeded. If needed, add more credits.
  2. Use the correct Copilot website.
  3. If using Copilot in Word, try selecting just a couple of sentences instead of the whole page.
  4. Open the Copilot icon on the Home ribbon. After that, launch the rewrite function from the text.

These are just some of the methods that you can use if you get Something went wrong Copilot error. In most cases, clearing the cache should be able to fix the problem.

We also wrote about Copilot error auth read ECONNRESET in our other guides, so don’t miss it. We also have an article on what to do if GitHub Copilot X is not working, so feel free to check it out.

Before you leave, you might be interested in our Copilot error getaddrinfo or Microsoft Copilot is not working guide for more information.

Our latest article covers Copilot Error attempting to reconnect, so don’t miss it for more information.

4 Easy Ways to Fix the Canva 500 Server Error

The Canva 500 server error prevents the page from loading or fulfilling any request like saving or editing your designs.

If it’s a server error, you can check from the official page for the status or Canva community pages for any updates. However, your browser may also have accumulated cache and cookies or your internet connection is not strong enough to handle such requests.

How do I fix the Canva 500 server error?

1. Re-login into your account

  1. Click on the profile picture icon on the top right corner of Canva.
  2. Hit the Sign Out button.
  3. Wait for a few moments and then sign back in again.

2. Check your Internet connection

2.1 Check internet speed

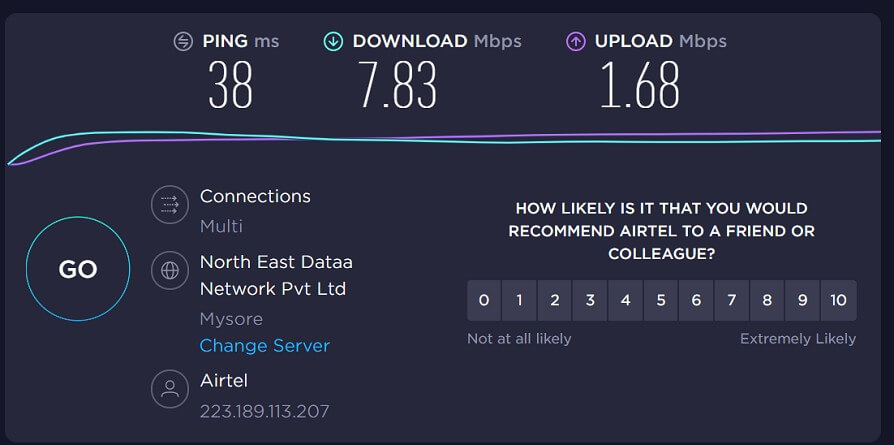
  1. Launch your browser and visit the Speedtest website.
  2. Click on Go.
  3. Wait while your connection is being tested.
    canva background remover not working

If your speeds are fine, run the troubleshooter to find out if there’s something else affecting your connection.

2.2 Run the Internet Connections troubleshooter

  1. Hit the Windows key and click on Settings.settings windows 11
  2. Go to System, and click Troubleshoot.System - Troubleshoot wifi keeps disconnecting windows 11
  3. Now click Other troubleshooters. Other troubleshooters
  4. Locate Internet connections, and click Run. 
  5. Follow the onscreen prompts to complete the process.  

3. Clear cache and cookies

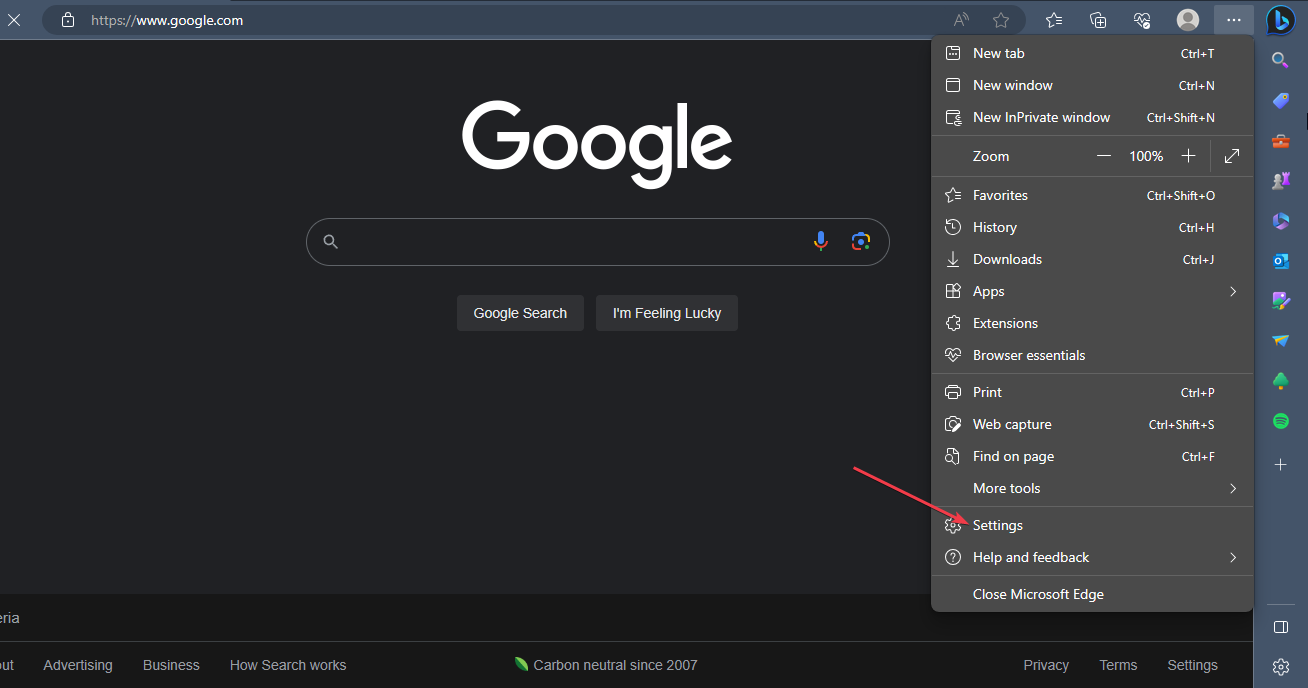
  1. Launch the Microsoft Edge browser (or the browser you’re using). Further, click on the three dots on the top right side and select Settings.
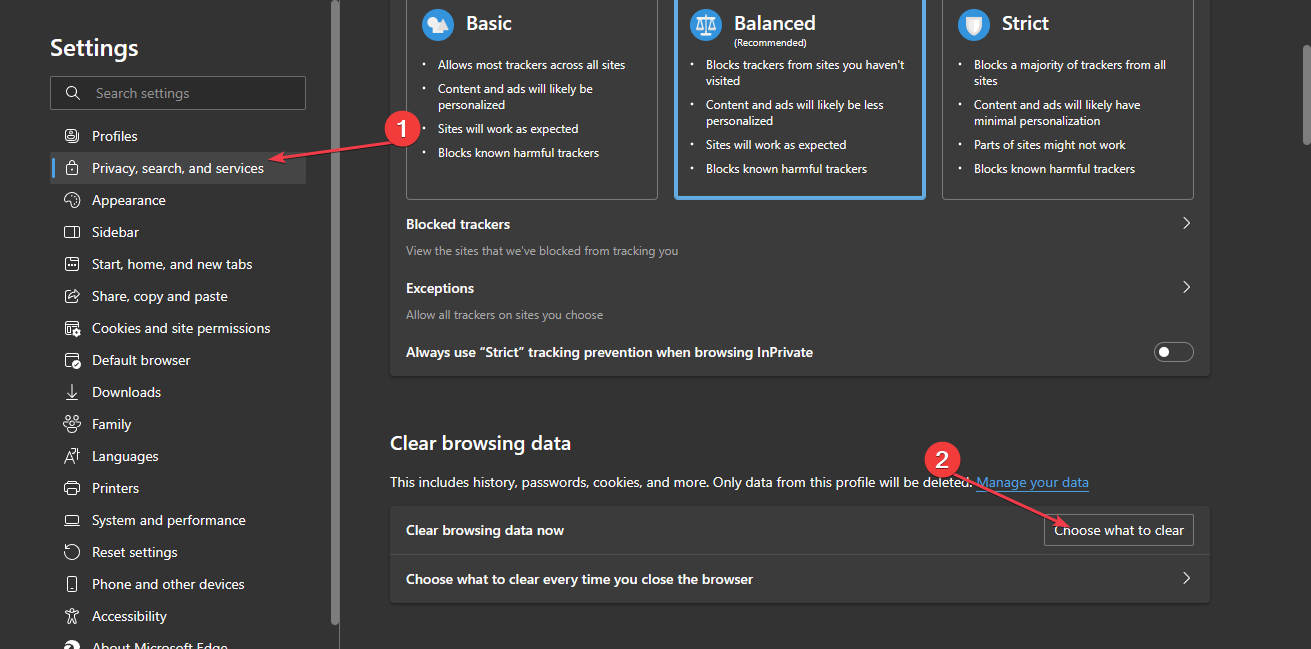
  2. Now, select the Privacy, search, and services option on the left side panel menu.
  3. Further, navigate to the Clear browsing data section, and select the Choose what to clear option.
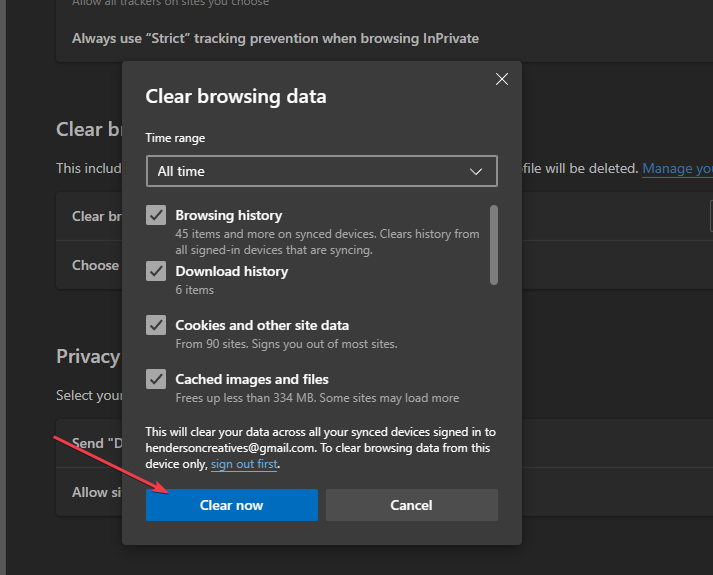
  4. Then, select All Time from the time range at the top, check the boxes next to Cookies and other site data, and the Cached images and files option. Then click on Clear now.
  5. Alternatively, you can paste the following path on the address bar and clear your cache and cookies: edge://settings/clearBrowserData

4. Remove extensions

  1. Launch the Microsoft Edge browser, click the three dots in the top right corner, and click on Extensions.
  2. Select from the list of extensions and click on Manage Extensions.
  3. Toggle off the extension to disable it and check if the error persists.
  4. Repeat this process for all extensions to find the Extensions causing the error.
  5. Select Remove to remove the extensions causing the error.

Finally, you can try the Canva app on Windows or on your phone if the web version keeps throwing the 500 server error. It could also be a browser-related error so don’t be afraid to switch to other browsers and see if the error persists.

For further troubleshooting, contact Canva support. Some errors are server-side related and being in contact with the support staff can help get it fixed faster.

Elsewhere, users also complained of the background remover in Canva not working so head on over to our article to get it back. And if Canva won’t let you edit, we have a way around it.

This error affects other web services, and we have a guide on fixing the Wplace 500 error for additional insights.

Do let us know if anything else not mentioned here worked for you by sharing it with us in the comment section below.

How to Download & Install Microsoft CoPilot Extension for Chrome

Microsoft CoPilot, an extension once reserved for Edge users is now available for other browsers including Chrome so here’s how to download and install it.

The integration with other apps enhances productivity because you can now automate your tasks without switching browsers. Further, a lot of users were sceptical about using CoPilot due to its limitation to Microsoft apps and products but now that this has been resolved, its usage is likely to surge.

How do I download the Microsoft CoPilot extension for Chrome?

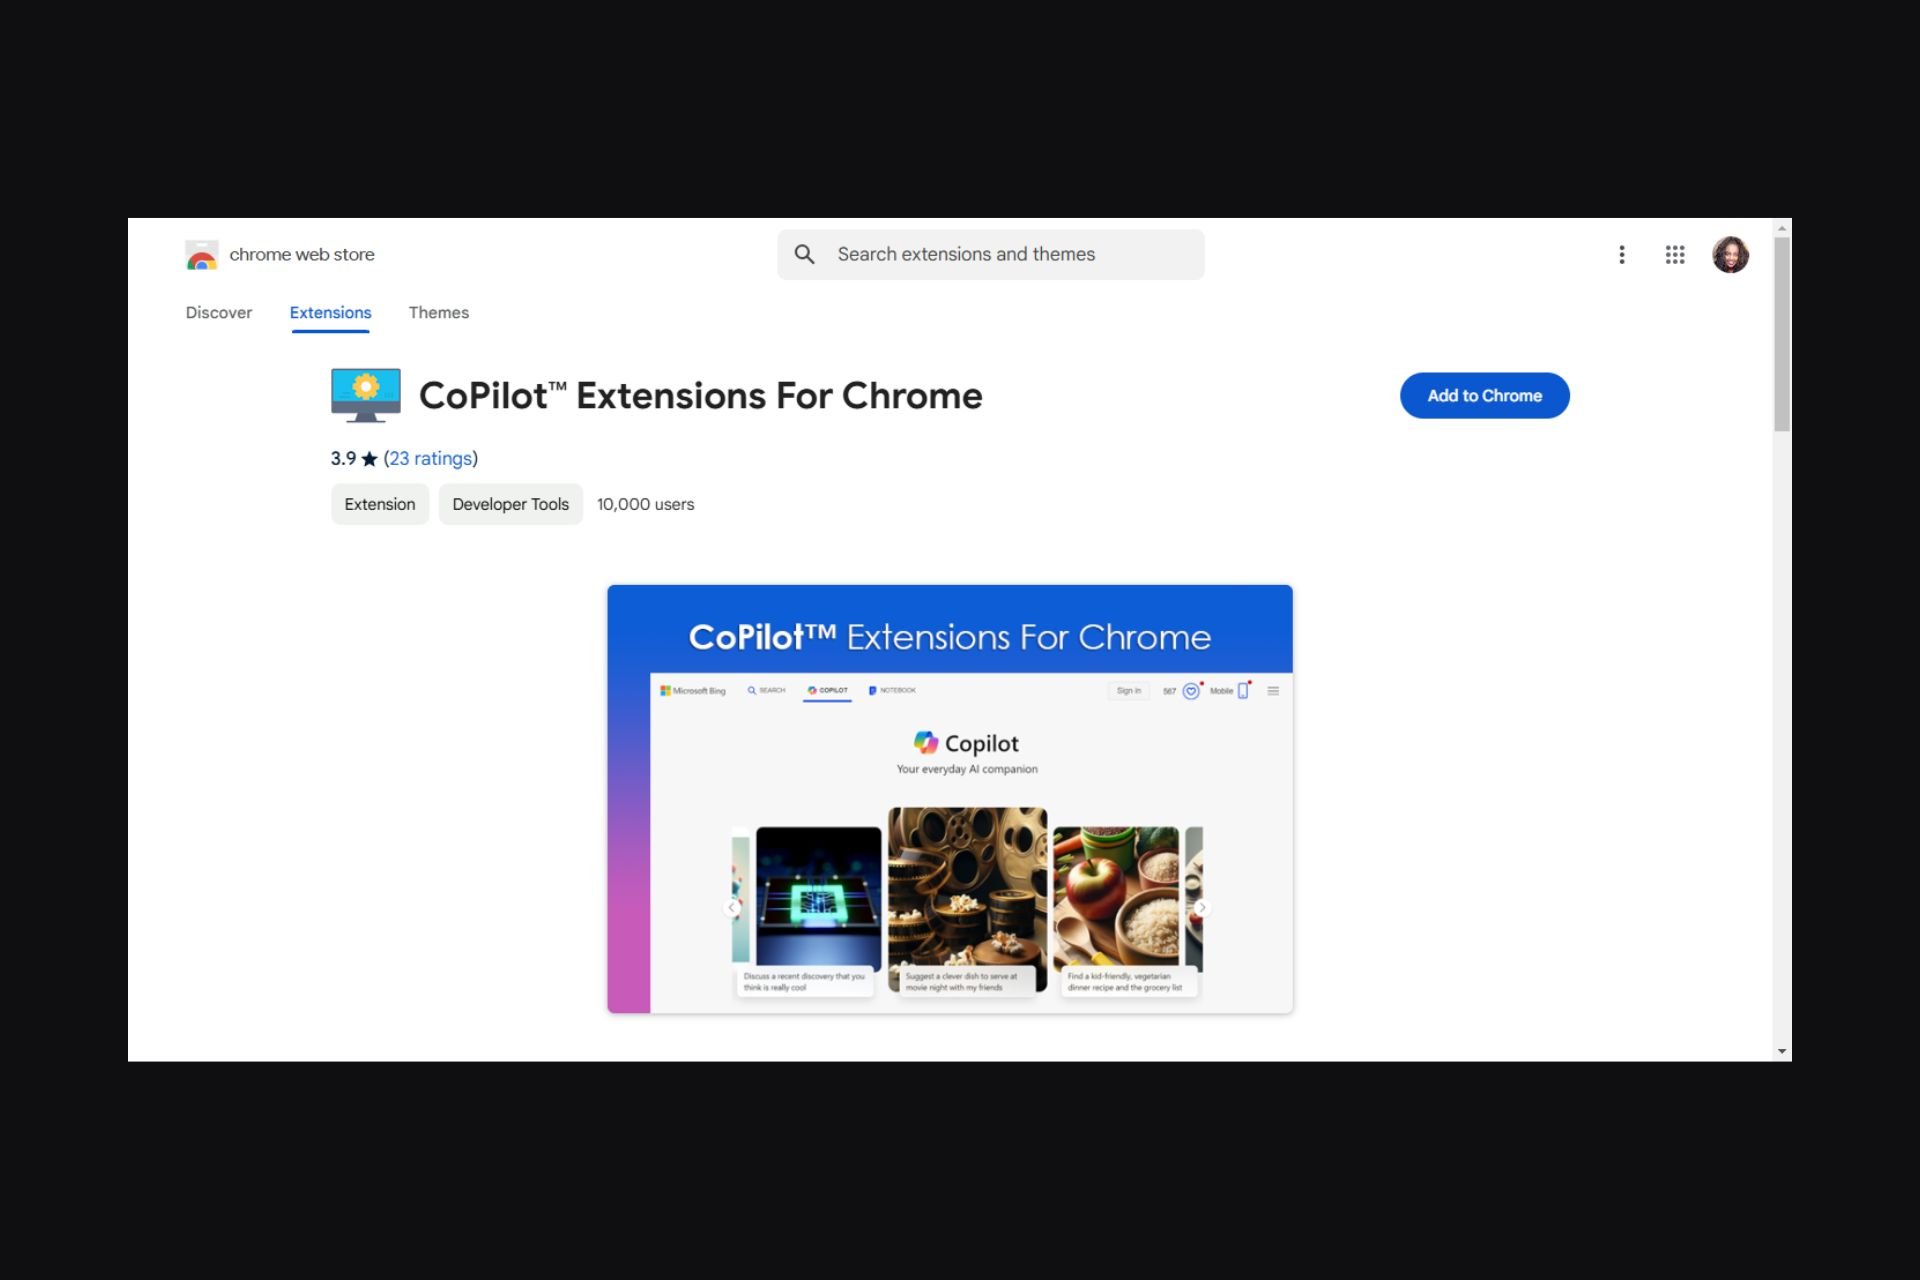
  1. Launch your browser, type chrome.google.com/webstore in the address bar and hit Enter.
  2. Next, type Microsoft CoPilot in the search bar and from the results, hit the Add to Chrome button.
  3. Confirm installation in the next dialog box then restart your browser.

What does CoPilot do on your Chrome browser?

  • Enhanced search – Browsing involves a lot of research and the CoPilot extension on Chrome can help scan through information and save you time by pinpointing you in the right direction.
  • Smart suggestions – As you search through the web, CoPilot will also come up with suggestions with additional information on your search query such as where to purchase an item you just searched for.
  • Automation – A lot of sites require you to fill out information and the CoPilot extension can help you fill these blanks. It can also help you summarize long-form content and save you some time.
  • Translation – SOme sites display in different languages and CoPilot can autodetect this and translate to your preferred language for easier comprehension.

The good thing about this extension is that it’s better than its predecessors. You’d install the extension but when you click it, you’d be directed to Edge.

Aside from installing CoPilot on your Chrome browser, you can also install it on your Microsoft Word. If you’re still new to Microsoft’s AI, we list all the cool things you can do with CoPilot so that you’re not missing out on its features.

CoPilot on Chrome is a welcome guest so if you haven’t jumped on this bandwagon yet, let us know why you’re still on the fence or share any reservations you might have. And before you say privacy issues, the extension does not collect your data so we’re eager to know what else is stopping you.

Telegram Not Working on PC: 7 Ways to Fix it

Telegram, like many apps on your Windows 11 PC may stop working because of an interruption in the network connection or a faulty update.

Being that it is one of the most secure messaging apps, getting it to run smoothly once again is at the top of our list so we crafted out some dos that worked for us.

What can I do if Telegram is not working on my PC?

1. Run the Windows Store Apps troubleshooter 

  1. Hit the Windows key and click on Settings.settings windows 11
  2. Click on System and select Troubleshoot.Open system troubleshooter
  3. Navigate to Other troubleshooters.other troubleshooters
  4. Click the Run option for the Windows Update troubleshooter.windows-update-run-troubleshooter runtimebroker.exe error

2. Run the necessary troubleshooters

2.1 Run the Network adapter troubleshooter

  1. Hit the Windows key and click on Settings.settings windows 11
  2. Click on System, then select Troubleshoot.Open system troubleshooter
  3. Select Other troubleshooters.other troubleshooters
  4. Locate the Network Adapter troubleshooter and click on the Run button next to it.Network Adapter Run IPv6 No Internet Access

2.2 Run the Internet Connections troubleshooter

  1. Hit the Windows key and click on Settings.settings windows 11
  2. Go to System, and click Troubleshoot.System - Troubleshoot wifi keeps disconnecting windows 11
  3. Now click Other troubleshooters. Other troubleshooters
  4. Locate Internet connections, and click Run. 
  5. Follow the onscreen prompts to complete the process.  

If your internet connection is fine, try with another connection if available preferably from a different ISP. Some ISPs block certain apps so try to establish if this is the issue.

3. Repair/reset Telegram

  1. Hit the Windows key and click on Settings.settings windows 11
  2. Click on Apps on the left pane then Apps & features on the right pane.
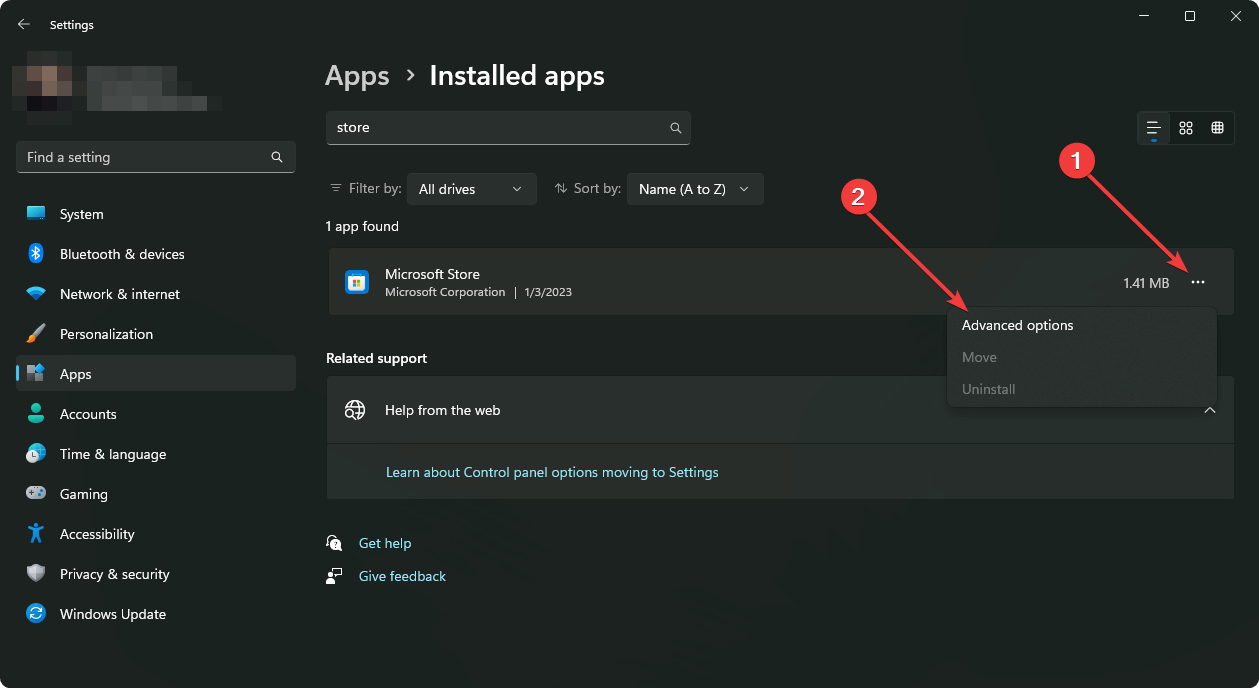
  3. Locate Telegram, click on the three vertical ellipses, and select Advanced options.going advanced options microsoft store
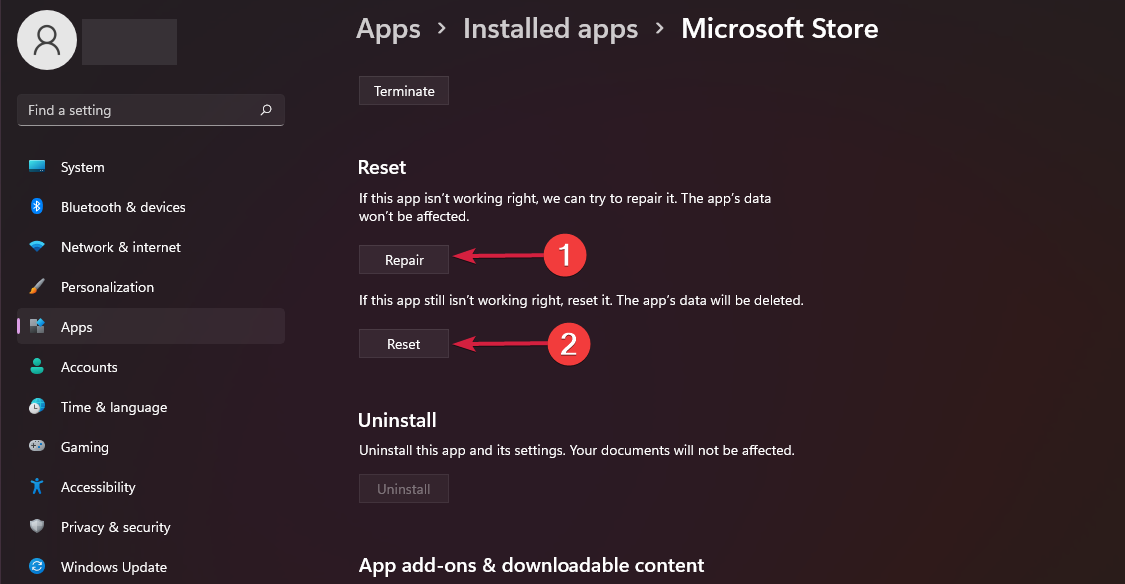
  4. Click on Repair.
  5. Go back and click on Reset if the repair option fails.

4. Disable antivirus temporarily 

  1. Hit the Start menu icon, type Windows Security in the search bar, and click Open.
  2. Click on Firewall & network protection, then select Public network.league of legends black screen after champion select
  3. Locate Microsoft Defender Firewall and toggle the off button.turning off Microsoft Defender Firewall Windows

You may have an overworking security software that quarantines certain apps and blocks any connections. If disabling it makes the Telegram not working on your PC issue disappear, it is best to whitelist it.

5. Use a VPN

  1. Press the Windows key and select Settings.settings windows 11
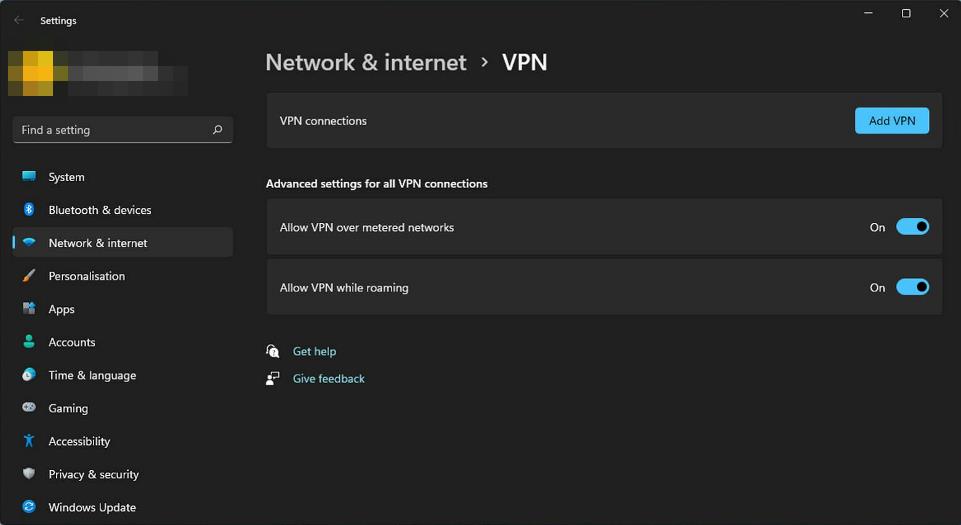
  2. Next, select Network & internet and click on VPN in the right-side menu.
  3. Click on Add VPN and follow the prompts to enable it.
  4. Try logging in again and see if the issue persists.

Whereas a VPN may resolve this issue, especially in areas where Telegram is geo-blocked, some VPNs are easily traceable and within no time, you’ll be back to square one. You can switch VPN servers or better yet, make your VPN untraceable.

Alternatively, you can employ the help of a more powerful VPN solution such as ExpressVPN. This dedicated tool offer a large number servers you can connect too and comes with very good connection speed.

⇒ Get ExpressVPN

6. Reinstall Telegram

  1. Click on the Start Menu icon, type Control Panel on the search bar, and click Open.control-panel-search fallout new vegas runtime error
  2. Select Uninstall a Program under Programs.going uninstall program control panel
  3. Find Telegram, click on it, and select Uninstall.
  4. Confirm uninstallation in the next pop-up.
  5. Launch your browser and go to the official Telegram website.
  6. You’ll be redirected to the Windows version download page. Click Get Telegram for Windows x64.
  7. Once the download is complete, tap the Downloads icon on the top right corner to access the file. Click it to run the setup.

7. Switch to an older version

  1. Launch your web browser and navigate to the GitHub site.
  2. Scroll down and click on Older versions.
  3. Select a version number older than the latest one, click on it.
  4. From the Assets, select the Windows 11 64bit version and wait for the download to complete then follow the on-screen prompts to install Telegram.

It’s possible that your current Telegram version is not working on your PC because it is not compatible. Updated versions sometimes require some time because they come with some bugs and until it is a stable version, you can continue using an older version.

If you’ve downloaded Telegram on your Windows 11, you know the download can get stuck at times. You can try the web version but even Telegram for web stops working at times.

The other option if these solutions don’t seem to revive the app point to Telegram X or other secure messaging software so explore our list and see if there’s something that entices you.

Has any of the above solutions gotten your Telegram PC app back to working again? If so, we’d love to know which one. Drop us a comment down below.

Microsoft Edge’s newest Feature Usage will let users see details of their activity on the browser on any device they use it

Microsoft Edge is set to be enhanced with a new feature: usage data sync capability, which allows users to keep their Edge browser data the same across multiple devices.

The Feature Usage is a new type of data that can be synchronized. This means users will be able to sync information about how they use various Edge browser features across all their devices.

In a recent entry to the Microsoft 365 Roadmap, the Redmond-based tech giant says it’s bringing it to the web version of the Edge browser and will also encompass data from the mobile version.

Edge Sync, which enables users to synchronize their Edge user data across multiple devices, is now launching a new sync data category called Feature Usage. This new category will allow users to synchronize data regarding their utilization of Edge features across all their devices.

In essence, this new update will let you see and use data about how you interact with Edge features on any device.

While this might not be of much utility to regular users, other than offering information about time spent browsing on Edge, the feature could be useful to organizations seeking to understand how their employees work and browse in Microsoft Edge.

The new Feature Usage will be released in Microsoft Edge January 2025.

In other news, Microsoft is once again trying to move Edge users away from Chrome by removing the link to the Chrome Web Store in Edge Appearance Settings. We discovered this in the Canary channel.

Microsoft Teams will soon let you schedule messages in channels

Microsoft is set to enhance its Teams platform to allow users to schedule messages in channels, even days ahead. With the new enhancement, users can optimize the timing of their messages based on the recipient’s work hours, remote availability, and so on to ensure they receive the message at a suitable time.

This enhancement will impact the desktop version of Teams, and the recent entry to the Microsoft 365 Roadmap doesn’t mention the mobile version at all, meaning you won’t be able to schedule messages in Teams from your phone.

Here’s what the entry says:

Like in chat, you can now schedule send messages in channels. You can optimize the timing of your messages based on the recipient’s work hours, out-of-office time, etc, and ensuring your messages are delivered at the most suitable time.

The ability to schedule messages in Teams chats is already live, but this new enhancement will allow users to tightly control the way they communicate in Teams chats and channels.

The new ability is set to be released in January 2025, and as we mentioned earlier, only the platform’s Desktop version is impacted for now. These features might be added to the mobile version at a later date.

In other news, Microsoft Teams was recently updated to support a unified chat and channel experience that will help users catch up with all of their organizations more easily and quickly.

How to Blur Background in Canva: 3 Ways to do it

Wondering how to blur the background in Canva? It’s easier than you think, and this guide will show you the best ways to do that, so keep on reading!

How can I blur the background in Canva?

1. Use the Adjustment Tool

  1. Open Canva.
  2. Drag and drop your source image in the project folder.
    Drag and drop image
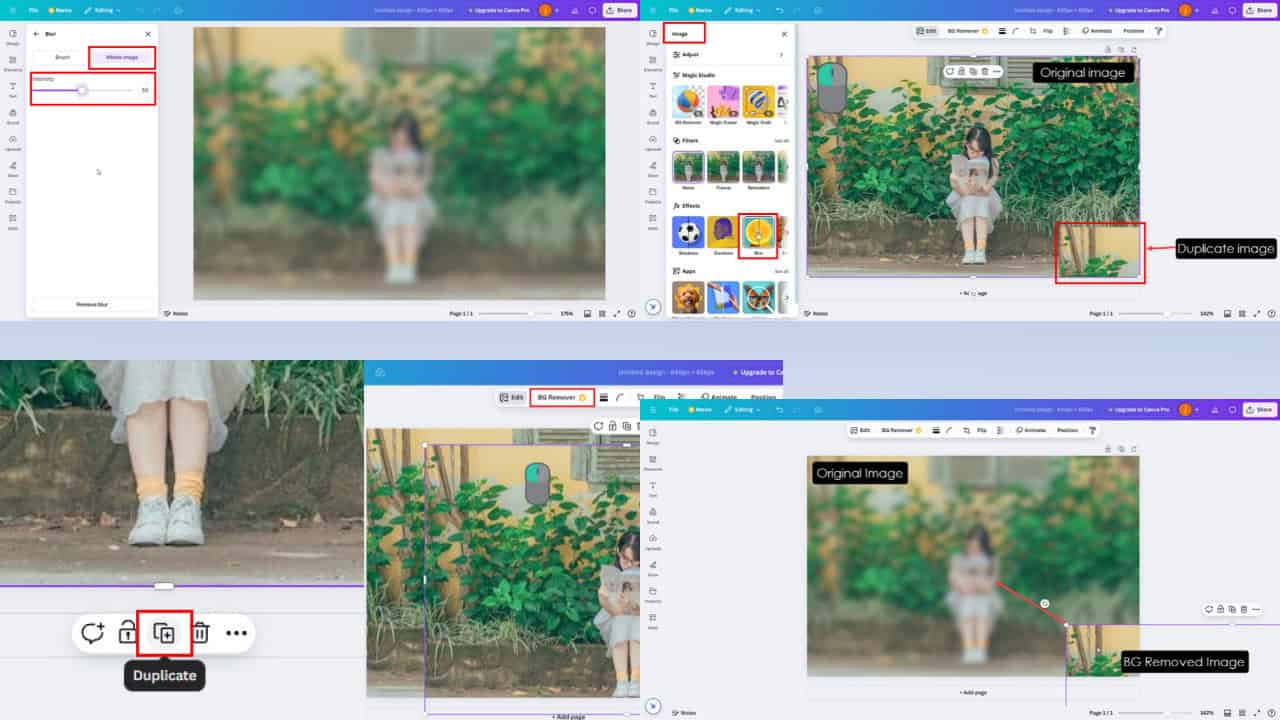
  3. Hover the cursor over the picture and click on the kebab menu. Select Edit image from the context menu.
  4. When the picture preview opens, click on the Use in a design button in the top right corner.

    Use in a design

  5. Click on the Duplicate button just below the image.
    Duplicate
  6. A copy of the picture will show as a floating overlay.
  7. Click on that and hit the Background Remover button on the top toolbar to isolate the person and convert the picture into a transparent file.
  8. Click on the image and drag it to the edge for now.

    BG Remover

  9. Now, select the other image and click on the Blur tool in the Effects menu of the Image navigation panel.

    Image navigation

  10. On the Blur navigation pane, click on the Whole image option. Use the Intensity tool slider to adjust the opacity of the bokeh effect.

    Whole image blur

  11. Close the Blur tool.
  12. Now, click on the image you kept at the edge of the editor, and place it appropriately on the blurred background image.

    Place BG removed image over the original blurred image

In a nutshell, you’re duplicating the source image in the editing project. Then, apply the blur effect on one copy and remove the background from the other copy.

When you superimpose the transparent character on the blurred background, you get a perfect design without manually applying a bokeh effect on the background.

A few users reported that Canva Background Remover is not working, and if that happens, be sure to visit our dedicated guide to fix it.

2. Use the Free Blur Tool

  1. Visit the Blur backgrounds for free tool in Canva.
  2. Click on the Upload your image button.
    upload image

  3. Use the Windows File Explorer dialog box to search and select the image file you want to edit.Blur features
  4. Select Brush to blur the background. Use the Brush size slider to adjust the diameter of the paint tool. Adjust the slider of the Intensity tool to change the opacity level of the blur.
  5. Now, carefully highlight the background area in the image using the brush.Highlight area to be blurred
  6. Once done selecting the background, release the brush tool to see the blur effect.
    bluured background in canva

This is the most basic technique and is suitable for you if you’re just starting out or looking for a free solution to add bokeh in the picture background.

3. Use a template

  1. Open Canva and click on the Templates button in the left-side navigation panel.
  2. On the top of the Templates library, type in Blur, and hit Enter.
    Search blur

  3. Click on the All Filters button on the top of the library to find various options to narrow down the search.
  4. You can choose from various categories, like Business, Social Media, Education, Marketing, Modern, Simple, Bold, Illustration, Subject, Topic, and more.
    Choose filters

  5. Once the template is open in the Canva editing interface, replace the stock or brand images with your personal or marketing materials to customize the design.
  6. Click on the Share button in the top-right corner, click Download, and choose the file type you need.

Some pre-configured designs might be behind a subscription or paywall. You’ll have to buy those designs by paying a one-time licensing fee. Alternatively, you can get a Canva Pro or better subscription to access the premium bokeh design templates.

So now you know how to blur the background in Canva. You’ve learned and practiced different methods to adjust to your comfort level in this graphics design tool.

We also have a great guide on how to blur the background in CapCut, so don’t miss it.

You might also want to read Canva won’t let you edit text error and something went wrong while trying to load Canva to fix these relevant issues.

Copilot Error Auth Read ECONNRESET: 5 Ways to Fix it

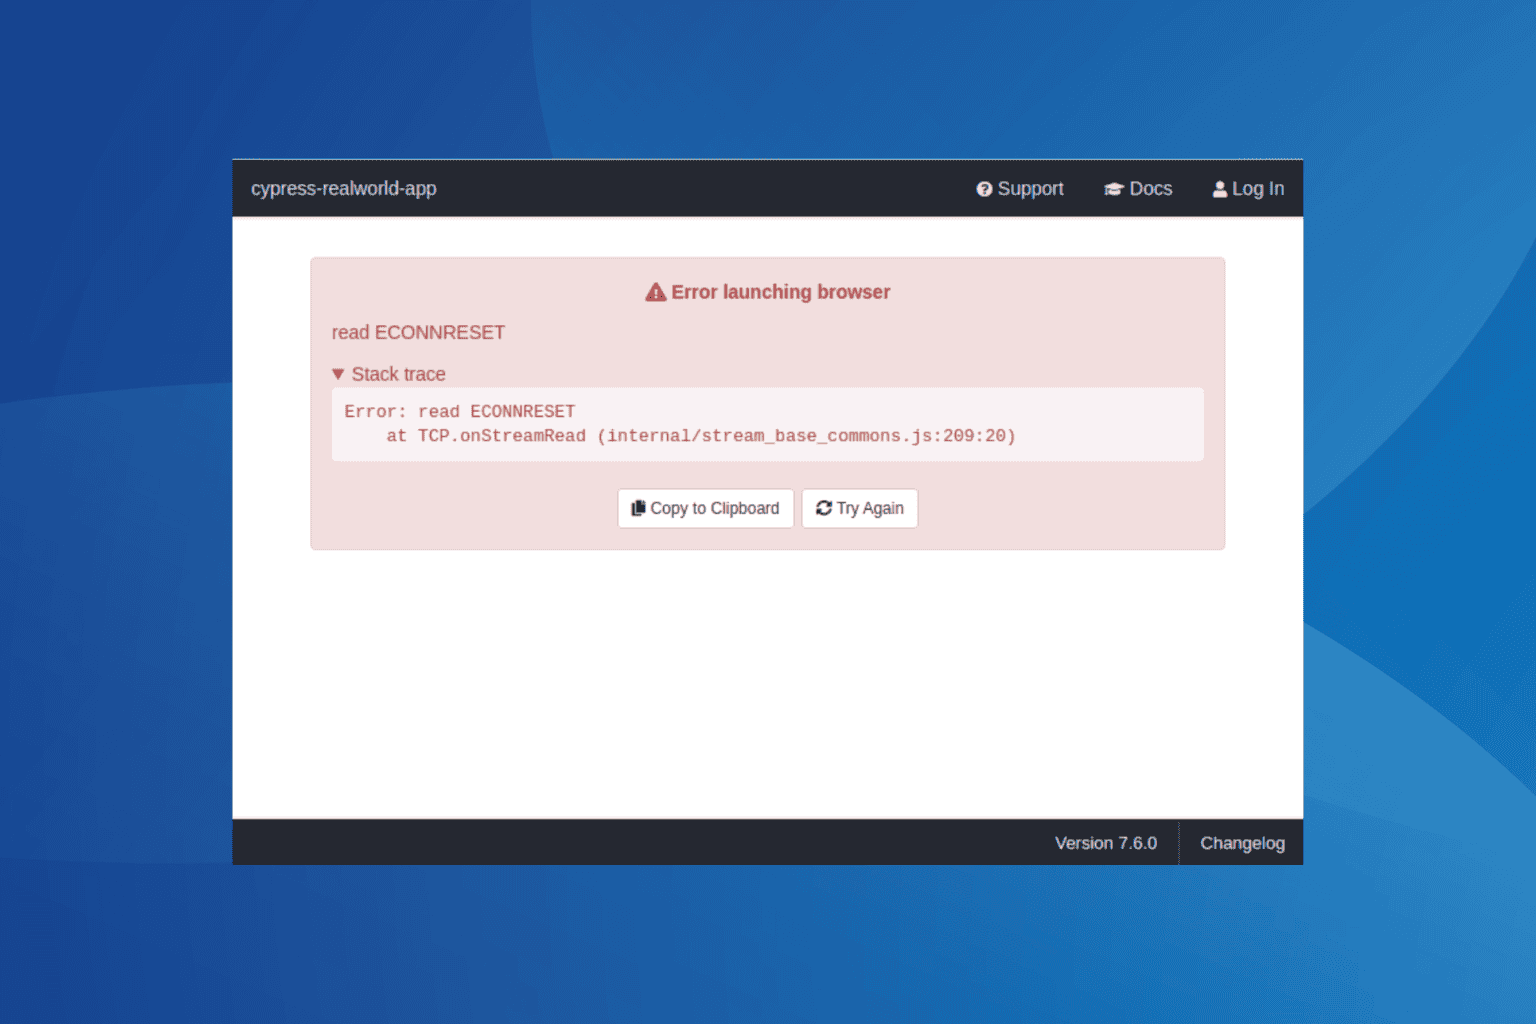
The GitHub Copilot error Auth Read ECONNRESET appears when the TCP connection is terminated abruptly, primarily due to network-related problems.

Common underlying causes for Read ECONNRESET include a proxy setup, blocking of processes by Windows Firewall or the antivirus, or the presence of conflicting applications.

Before you proceed to the solutions, restart the PC, reboot the modem/router, or switch to another network, preferably a wired connection. For most of you, this should do the trick!

How can I fix the Copilot error Auth Read ECONNRESET?

1. Turn off proxy

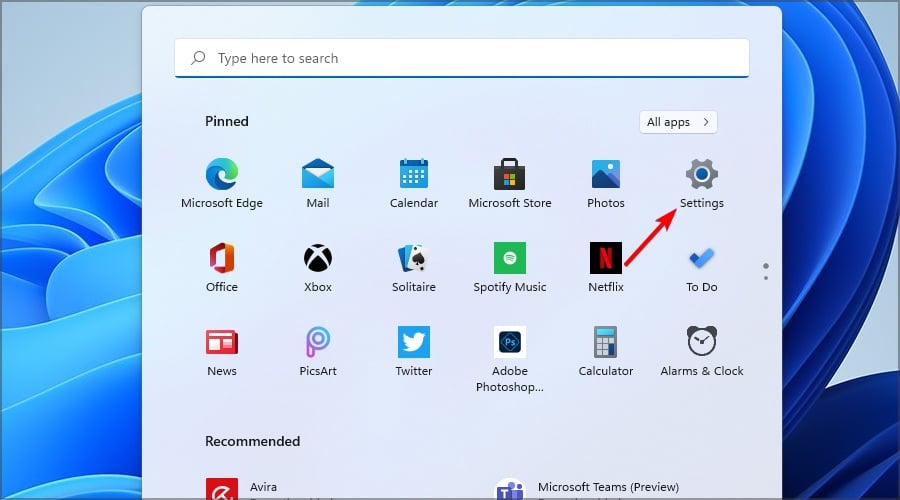
  1. Press Windows + I to open Settings, go to Network & Internet from the navigation pane, and click on Proxy.network settings
  2. Disable the toggle next to Automatically detect settings.disable proxy to fix Copilot error Auth Read ECONNRESET
  3. Restart the PC to apply the changes.

If administrators have deployed a network-wide proxy, you will have to check with them and get the ones responsible for the Copilot error Auth Read ECONNRESET disabled.

2. Add an exception for GitHub Copilot APIs in Windows Firewall

  1. Press Windows + S to open Search, type Windows Defender Firewall in the text field, and click on the relevant result.
  2. Select Allow an app or feature through Windows Defender Firewall from the left pane.firewall
  3. Click the Change Settings button.
  4. Click on Allow another app.allow another app
  5. Click the Browse button.
  6. Go to the location where the Copilot API files (or the one for the program) are stored, select them, and click on Open.
  7. Click on Add.add to firewall to fix Copilot error Auth Read ECONNRESET
  8. Next, make sure both the Private and Public checkboxes are ticked next to the GitHub Copilot entry, and then click Apply to save the changes.whitelist in firewall
  9. Finally, reboot the PC and check for improvements.

When Windows Defender Firewall blocks the program, it’s likely to trigger the Copilot error Auth Read ECONNRESET. So, you will have to whitelist it within the firewall settings!

3. Allow Copilot through the antivirus

  1. Press Windows + S to open Search, type Windows Security in the text field, and click on the relevant result.
  2. Click on Virus & threat protection.windows security
  3. Click on Manage settings under Virus & threat protection settings.
  4. Scroll down and click on Add or remove exclusions.exclusions
  5. Click Yes in the UAC prompt.
  6. Click the Add an exclusion button, and select Folder from the dropdown menu.add exclusion to fix Copilot error Auth Read ECONNRESET
  7. Go to the affected program’s directory, choose it, and click on Select Folder.
  8. Restart the computer to apply the changes.

In 2 out of 5 cases, the installed antivirus was blocking connection attempts by Copilot, thus triggering the Extension Activation Failed: Read ECONNRESET error. If you are not using Windows Security, check the antivirus developer’s official website for the exact steps to add an exclusion.

4. Uninstall conflicting applications

  1. Press Windows + R to open Run, type appwiz.cpl in the text field, and hit Enter.
  2. Select any conflicting application from the list, and click on Uninstall.uninstall conflicting apps
  3. Follow the on-screen instructions to complete the process, and then reboot the computer.

As I said earlier, antivirus solutions like Kaspersky were found to be the underlying cause behind the Copilot error Auth Read ECONNRESET. Even adding an exclusion for Visual Studio in Kaspersky crashes the latter, necessitating the need to uninstall the antivirus.

Besides, if a quick removal doesn’t work, the app most likely left behind files, cache, or Registry entries that are still conflicting with Windows. In this case, I recommend using a top-rated software uninstaller to wipe all traces of the program!

5. Reinstall Visual Studio Code

If your Visual Studio’s GitHub Copilot Extension is throwing the Auth Read ECONNRESET error, reinstalling Visual Studio Code will do the trick, as confirmed by many facing the same issue. It also helps when GitHub Copilot is not working in Visual Studio.

Just make sure to completely clear all leftover files before you proceed with the reinstallation. And always download Visual Studio Code from the official website!

One of these solutions should have helped with the GitHub Copilot Auth Read ECONNRESET API error, and things should not be up and running.

Before you leave, you might be interested in our Copilot error getaddrinfo article. Our latest article covers Something went wrong Copilot error, so you might want to check it out for more solutions.

For any queries or to share more fixes with our readers, drop a comment below.

Microsoft will reduce Windows 10, 11 updates in December for the holidays

Microsoft has announced that the upcoming holiday season might slow down Windows updates.

The company’s December 2024 non-security preview update for Windows 10 and 11, which normally would have arrived on Dec. 17, has been nixed. That means users will only get the standard Patch Tuesday security updates on Dec. 10, and that’s your lot for December in terms of Windows 10 and 11 patches, aside from any emergency updates that might be required.

Here’s Microsoft’s statement:

Because of minimal operations during the Western holidays, there will be no December 2024 non-security preview update. There will be a monthly security update for December 2024. Normal monthly servicing for non-security and security updates will resume in January 2025.

The pause is because Microsoft is expected not to have staff to deal with any potential problems caused by the updates over the holiday season.

The problem, of course, is that these non-security updates – which often bring new features and bug fixes–tend to cause issues, as we’ve seen on quite a few occasions in the past. So, the thinking is that it’s better to pause them entirely over the holidays rather than risk something breaking and not being fixed promptly.

For those who like to live on the bleeding edge, there won’t be any new optional patches to install in December. But for many, that will be a relief, particularly if you’ve had problems with Windows updates.

Of course, there are still a couple of weeks before we get to December, so there are still the November Patch Tuesday updates to deal with and potentially more minor out-of-band patches in the weeks ahead.

Nvidia App, a unified GeForce Experience and Control Panel, is now available and you don’t need an account to use it

Nvidia has officially launched the Nvidia App, a unified application combining the old GeForce Experience and Nvidia Control Panel.

The app has been in beta for a while, and Nvidia announced the software in September. It’s available as a standalone download from Nvidia’s website, and it works on Windows 10 and Windows 11 PCs with a compatible Nvidia GPU.

So, what does the app do? Quite a bit, it turns out. It updates drivers, manages game settings, configures display settings, and accesses Nvidia’s performance and image quality optimization algorithms.

In a blog post, Nvidia notes that the Nvidia App doesn’t require an account to use. That’s unlike the GeForce Experience app, which had a login requirement that could annoy users just looking to update their drivers.

At launch, the app lacks features in the now-retired Nvidia Control Panel, such as configuring Surround and multiple display mode settings. But Nvidia says those features are coming in “future updates.”

The company says it will continue to ship Game Ready and Studio Driver updates with standalone installers for now, noting that the app will become an “optional” component.

The Nvidia App is supported on systems with GeForce GTX 800/800M/900/900M/10/16, RTX 20/30/40 GPUs, and MX 100/200/300 mobile cards. To use the software, you’ll need to run Nvidia driver version 551.52 or later.

You get the app here.

Error Pipe Local 229 (0xE5): Fix it With These 4 Steps

Error_Pipe_Local usually comes followed by 229 (0xE5) The pipe is local message. This is a developer error, but regular users can encounter it too. If this happens, this guide will show you how to fix this issue.

How can I fix Error_Pipe_Local?

1. Ensure that your system is up to date

  1. Open the Start Menu and choose Settings.
    start menu settings windows 11
  2. Navigate to Windows Update and click the Check for updates button.
    check for updates
  3. If any updates are available, Windows will download them automatically in the background.

Once your system is up to date, check if the problem is gone.

2. Use Safe Mode

  1. Open the Start menu.
  2. Click the Power icon. Press and hold the Shift key and choose Restart.
  3. Once the PC restarts, select Troubleshoot.
  4. Next, select Advanced options. Navigate to Startup Settings and choose Restart.
  5. Select Safe Mode with Networking by pressing F5 on the keyboard.
    Enable safe mode with networking

Once you enter Safe Mode, check if the problem still appears. If the issue doesn’t appear in Safe Mode, it means that one of your applications or drivers is causing this issue, so you’ll need to manually find and remove it from your PC.

3. Disable startup applications and services

  1. Press Windows key + R and type msconfig.
    msconfig command
  2. Next, navigate to the Services tab and check Hide all Microsoft services. Next, click on Disable all. Lastly, choose Apply and OK.
    Hide all Microsoft services msconfig
  3. Do not restart your PC.
  4. Press Ctrl + Shift + Esc to open Task Manager.
  5. Go to the Startup tab. Select every item on the list and click on Disable.
    disable startallback task manager startup
  6. Once the all items are disabled, restart your PC.

If the issue doesn’t appear anymore, try enabling services or applications until you manage to find a culprit.

4. Use System Restore

  1. Press the Windows key + R and type rstrui.
  2. Select the desired restore point and click on Next.
    restore point
  3. Follow the instructions on the screen to complete the process.

If the Error_Pipe_Local error is still there, you might have to factory reset Windows 11, or inspect your hardware and ensure that it’s working properly.

This is an obscure error, and it’s unlikely that you’ll encounter it unless you’re a developer. Speaking of errors, we already wrote about Error_Pipe_Busy and ERROR_BROKEN_PIPE, so don’t hesitate to check out their guides.

You might also be interested in our Error_Pipe_Not_Connected article for more information.

.NET 9 is now generally available and the framework focuses heavier on AI now

After teasing it earlier this year, Microsoft announced the general availability of .NET 9, the latest version of the company’s cross-platform framework for building modern applications and cloud services.

The company said the .NET 9 release is the result of over a year of work from thousands of community members and Microsoft engineers. The release includes thousands of performance, security, and functional improvements.

The new release is available now as a part of Visual Studio 2022 v17.12, which also brings several improvements to the .NET developer experience in the Visual Studio IDE, the company said. For example, .NET 9 can write Azure Functions, Microsoft’s serverless computing platform.

To celebrate the launch of .NET 9 and learn more about what’s new, tune in to .NET Conf 2024, a free, three-day virtual developer event on November 12-14.

Here’s the lowdown on the most significant new features and updates in .NET 9:

.NET 9

The .NET team focuses on Performance, AI, .NET Aspire, and developer productivity.

.NET 9 has improved performance by optimizing the .NET runtime, the C# and F# languages, and the .NET libraries. In .NET 9, .NET workloads like ASP.NET Core and EntityFramework Core start up faster, use less memory, and deliver more throughput. Additionally, the release introduces a new adaptive server garbage collector (GC) for cloud scenarios. Microsoft says the GC will help developers better control memory use in cloud environments.

Microsoft says the platform brings new capabilities for developers building AI-powered apps. For example, the release adds support for new AI services from OpenAI, Semantic Kernel, Milvus, and others, introduces a new AI middleware layer, and updates the .NET ecosystem to enable more efficient AI development.

.NET Aspire, Microsoft’s set of tools, templates, and packages for developing observability dashboards, health checks, and other features, gets an update in .NET 9. The release adds new features to the .NET Aspire telemetry and metrics dashboard, improves observability for Microsoft Azure apps, and enables ASP.NET Core apps to be deployed to Windows virtual machines and AKS with less manual configuration.

Finally, Microsoft says .NET 9 includes new productivity-boosting features in Visual Studio 2022. For example, developers can now use AI-powered Git experiences in Visual Studio, create and manage observability dashboards and health checks in the server explorer tool window, and see detailed telemetry for . NET-based apps are directly available in Visual Studio and Azure Monitor.

In addition to these main features, the platform introduces a new way for developers to create and work with “source generators”—code that writes code—in the .NET ecosystem. Microsoft has also added new capabilities to the .NET CLI, the command-line interface for .NET, to help developers find and fix issues with their code.

For developers working with data in .NET applications, .NET 9 includes a new set of libraries for working with structured data like vectors and tensors. The release also adds a range of new libraries and abstractions to the .NET ecosystem, making it easier to work with data science-focused AI services.

For more information on what’s new in .NET 9, check out the release notes and the high-level post on the official blog.

Microsoft says .NET 9 will be supported for 18 months as a standard-term support (STS) release.

Fix: ERROR_NESTING_NOT_ALLOWED 215 (0xD7)

The ERROR_NESTING_NOT_ALLOWED Windows system error, with code 215 (0xD7), appears when an attempt is made to nest calls to LoadModule. It primarily affects older programs and self-generated codes!

Causes for Error Nesting Not Allowed include misconfigured code, program compatibility issues, and missing updates.

Before you proceed to the solutions, reboot the PC and make sure all of the required DLLs (and their dependencies) are available to the program/code. For most of you, this should do the trick!

How can I fix ERROR_NESTING_NOT_ALLOWED Windows system error?

1. Check the code

If you are getting the the ERROR_NESTING_NOT_ALLOWED Error Code: 215 (0xD7) message while running a code, try to avoid employing LoadModule.

Also, ensure that all the DLLs and their dependencies are present in the required folder, with the correct path set in the code. An incorrect path can lead to Windows loading different DLLs, which subsequently triggers the system error.

2. Run the affected program in compatibility mode

  1. Right-click on the affected program’s launcher (.exe file), and select Properties.
  2. Go to the Compatibility tab, tick the Run this program in compatibility mode for checkbox, and select an older iteration of Windows from the dropdown menu, preferably the one the program was originally designed for.compatibility mode to fix ERROR_NESTING_NOT_ALLOWED
  3. Click on Apply and OK to save the changes, and then reboot the PC.

3. Install the latest Windows updates

  1. Press Windows + I to open Settings, go to Windows Update from the navigation pane, and click on Check for updates.install updates
  2. If any Windows updates are listed, click on Download & install.
  3. Finally, restart the computer and verify whether ERROR_NESTING_NOT_ALLOWED is fixed.

4. Reinstall the affected application

  1. Press Windows + R to open Run, type appwiz.cpl in the text field, and hit Enter.
  2. Select the affected app from the list, and click on Uninstall.reinstall app
  3. Follow the on-screen instructions to complete the process, and then restart the PC.
  4. Now, reinstall the application from an official source, say the developer’s website or Microsoft Store.

If a quick removal doesn’t work, it’s likely that the app left behind files, cache, or Registry entries that are still triggering ERROR_NESTING_NOT_ALLOWED (Cannot nest calls to LoadModule). In this case, I recommend using a top-rated software uninstaller to wipe all traces of the program.

5. Perform a system restore

  1. Press Windows + S to open Search, type Create a restore point in the text field, and click on the relevant result.
  2. Click the System Restore button.restore to fix ERROR_NESTING_NOT_ALLOWED
  3. Select the Choose a different restore point option, if available, and click Next.different restore
  4. Pick a restore point created before the issue first appeared or the oldest one, and click Next.restore point
  5. Verify the details, click Finish, and then confirm the change.
  6. Wait for the restore to complete. It will take 15-30 minutes.

When nothing else works, the last option is to perform a system restore. This will allow you to revert any conflicting changes made to the PC in the recent past that are triggering the ERROR_NESTING_NOT_ALLOWED system error in Windows.

Before you leave, discover expert tips to improve the performance of Windows and enjoy a streamlined, error-free experience! We also have a guide on ERROR_EA_TABLE_FULL, so don’t hesitate to check it out for more solutions.

For any queries or to share which fix worked for you, drop a comment below.

The November 2026 Patch Tuesday adresses 91 vulnerabilities, including 4 zero-day ones

The November 2024 Patch Tuesday security updates have fixed 91 flaws, which include 4 zero-day vulnerabilities. As with most Patch Tuesday releases, November’s updates include fixes for Windows, Office, .NET, Visual Studio, SQL Server, and more vulnerabilities.

This month’s fixes list includes:

  • 26 elevations of privilege vulnerabilities
  • 2 security feature bypass vulnerabilities
  • 52 remote code execution vulnerabilities
  • 1 information disclosure vulnerability
  • 4 denial of service vulnerabilities
  • 3 spoofing vulnerabilities

Two of the zero-days fixed today are actively exploited in attacks, and the third was publicly disclosed but not exploited.

CVE-2024-43451 – NTLM Hash Disclosure Spoofing Vulnerability

This vulnerability discloses a user’s NTLMv2 hash to the attacker who could use this to authenticate as the user. Minimal interaction with a malicious file by a user such as selecting (single-click), inspecting (right-click), or performing an action other than opening or executing could trigger this vulnerability.

CVE-2024-49039 – Windows Task Scheduler Elevation of Privilege Vulnerability

In this case, a successful attack could be performed from a low privilege AppContainer. The attacker could elevate their privileges and execute code or access resources at a higher integrity level than that of the AppContainer execution environment.

CVE-2024-49040 – Microsoft Exchange Server Spoofing Vulnerability

Microsoft is aware of a vulnerability (CVE-2024-49040) that allows attackers to run spoofing attacks against Microsoft Exchange Server. The vulnerability is caused by the current implementation of the P2 FROM header verification, which happens in transport.

CVE-2024-49019 – Active Directory Certificate Services Elevation of Privilege Vulnerability

Check if you have published any certificates created using a version 1 certificate template where the Source of subject name is set to “Supplied in the request” and the Enroll permissions are granted to a broader set of accounts, such as domain users or domain computers. An example is the built-in Web Server template, but it is not vulnerable by default due to its restricted Enroll permissions.

Here’s the complete list of all the vulnerabilities Microsoft addresses with the November 2024 Patch Tuesday update.

TagCVE IDCVE TitleSeverity
.NET and Visual StudioCVE-2024-43499.NET and Visual Studio Denial of Service VulnerabilityImportant
.NET and Visual StudioCVE-2024-43498.NET and Visual Studio Remote Code Execution VulnerabilityCritical
Airlift.microsoft.comCVE-2024-49056Airlift.microsoft.com Elevation of Privilege VulnerabilityCritical
Azure CycleCloudCVE-2024-43602Azure CycleCloud Remote Code Execution VulnerabilityImportant
LightGBMCVE-2024-43598LightGBM Remote Code Execution VulnerabilityImportant
Microsoft Defender for EndpointCVE-2024-5535OpenSSL: CVE-2024-5535 SSL_select_next_proto buffer overreadImportant
Microsoft Edge (Chromium-based)CVE-2024-10826Chromium: CVE-2024-10826 Use after free in Family ExperiencesUnknown
Microsoft Edge (Chromium-based)CVE-2024-10827Chromium: CVE-2024-10827 Use after free in SerialUnknown
Microsoft Exchange ServerCVE-2024-49040Microsoft Exchange Server Spoofing VulnerabilityImportant
Microsoft Graphics ComponentCVE-2024-49031Microsoft Office Graphics Remote Code Execution VulnerabilityImportant
Microsoft Graphics ComponentCVE-2024-49032Microsoft Office Graphics Remote Code Execution VulnerabilityImportant
Microsoft Office ExcelCVE-2024-49029Microsoft Excel Remote Code Execution VulnerabilityImportant
Microsoft Office ExcelCVE-2024-49026Microsoft Excel Remote Code Execution VulnerabilityImportant
Microsoft Office ExcelCVE-2024-49027Microsoft Excel Remote Code Execution VulnerabilityImportant
Microsoft Office ExcelCVE-2024-49028Microsoft Excel Remote Code Execution VulnerabilityImportant
Microsoft Office ExcelCVE-2024-49030Microsoft Excel Remote Code Execution VulnerabilityImportant
Microsoft Office SharePointADV240001Microsoft SharePoint Server Defense in Depth UpdateNone
Microsoft Office WordCVE-2024-49033Microsoft Word Security Feature Bypass VulnerabilityImportant
Microsoft PC ManagerCVE-2024-49051Microsoft PC Manager Elevation of Privilege VulnerabilityImportant
Microsoft Virtual Hard DriveCVE-2024-38264Microsoft Virtual Hard Disk (VHDX) Denial of Service VulnerabilityImportant
Microsoft Windows DNSCVE-2024-43450Windows DNS Spoofing VulnerabilityImportant
Role: Windows Active Directory Certificate ServicesCVE-2024-49019Active Directory Certificate Services Elevation of Privilege VulnerabilityImportant
Role: Windows Hyper-VCVE-2024-43633Windows Hyper-V Denial of Service VulnerabilityImportant
Role: Windows Hyper-VCVE-2024-43624Windows Hyper-V Shared Virtual Disk Elevation of Privilege VulnerabilityImportant
SQL ServerCVE-2024-48998SQL Server Native Client Remote Code Execution VulnerabilityImportant
SQL ServerCVE-2024-48997SQL Server Native Client Remote Code Execution VulnerabilityImportant
SQL ServerCVE-2024-48993SQL Server Native Client Remote Code Execution VulnerabilityImportant
SQL ServerCVE-2024-49001SQL Server Native Client Remote Code Execution VulnerabilityImportant
SQL ServerCVE-2024-49000SQL Server Native Client Remote Code Execution VulnerabilityImportant
SQL ServerCVE-2024-48999SQL Server Native Client Remote Code Execution VulnerabilityImportant
SQL ServerCVE-2024-49043Microsoft.SqlServer.XEvent.Configuration.dll Remote Code Execution VulnerabilityImportant
SQL ServerCVE-2024-43462SQL Server Native Client Remote Code Execution VulnerabilityImportant
SQL ServerCVE-2024-48995SQL Server Native Client Remote Code Execution VulnerabilityImportant
SQL ServerCVE-2024-48994SQL Server Native Client Remote Code Execution VulnerabilityImportant
SQL ServerCVE-2024-38255SQL Server Native Client Remote Code Execution VulnerabilityImportant
SQL ServerCVE-2024-48996SQL Server Native Client Remote Code Execution VulnerabilityImportant
SQL ServerCVE-2024-43459SQL Server Native Client Remote Code Execution VulnerabilityImportant
SQL ServerCVE-2024-49002SQL Server Native Client Remote Code Execution VulnerabilityImportant
SQL ServerCVE-2024-49013SQL Server Native Client Remote Code Execution VulnerabilityImportant
SQL ServerCVE-2024-49014SQL Server Native Client Remote Code Execution VulnerabilityImportant
SQL ServerCVE-2024-49011SQL Server Native Client Remote Code Execution VulnerabilityImportant
SQL ServerCVE-2024-49012SQL Server Native Client Remote Code Execution VulnerabilityImportant
SQL ServerCVE-2024-49015SQL Server Native Client Remote Code Execution VulnerabilityImportant
SQL ServerCVE-2024-49018SQL Server Native Client Remote Code Execution VulnerabilityImportant
SQL ServerCVE-2024-49021Microsoft SQL Server Remote Code Execution VulnerabilityImportant
SQL ServerCVE-2024-49016SQL Server Native Client Remote Code Execution VulnerabilityImportant
SQL ServerCVE-2024-49017SQL Server Native Client Remote Code Execution VulnerabilityImportant
SQL ServerCVE-2024-49010SQL Server Native Client Remote Code Execution VulnerabilityImportant
SQL ServerCVE-2024-49005SQL Server Native Client Remote Code Execution VulnerabilityImportant
SQL ServerCVE-2024-49007SQL Server Native Client Remote Code Execution VulnerabilityImportant
SQL ServerCVE-2024-49003SQL Server Native Client Remote Code Execution VulnerabilityImportant
SQL ServerCVE-2024-49004SQL Server Native Client Remote Code Execution VulnerabilityImportant
SQL ServerCVE-2024-49006SQL Server Native Client Remote Code Execution VulnerabilityImportant
SQL ServerCVE-2024-49009SQL Server Native Client Remote Code Execution VulnerabilityImportant
SQL ServerCVE-2024-49008SQL Server Native Client Remote Code Execution VulnerabilityImportant
TorchGeoCVE-2024-49048TorchGeo Remote Code Execution VulnerabilityImportant
Visual StudioCVE-2024-49044Visual Studio Elevation of Privilege VulnerabilityImportant
Visual Studio CodeCVE-2024-49050Visual Studio Code Python Extension Remote Code Execution VulnerabilityImportant
Visual Studio CodeCVE-2024-49049Visual Studio Code Remote Extension Elevation of Privilege VulnerabilityModerate
Windows CSC ServiceCVE-2024-43644Windows Client-Side Caching Elevation of Privilege VulnerabilityImportant
Windows Defender Application Control (WDAC)CVE-2024-43645Windows Defender Application Control (WDAC) Security Feature Bypass VulnerabilityImportant
Windows DWM Core LibraryCVE-2024-43636Win32k Elevation of Privilege VulnerabilityImportant
Windows DWM Core LibraryCVE-2024-43629Windows DWM Core Library Elevation of Privilege VulnerabilityImportant
Windows KerberosCVE-2024-43639Windows Kerberos Remote Code Execution VulnerabilityCritical
Windows KernelCVE-2024-43630Windows Kernel Elevation of Privilege VulnerabilityImportant
Windows NT OS KernelCVE-2024-43623Windows NT OS Kernel Elevation of Privilege VulnerabilityImportant
Windows NTLMCVE-2024-43451NTLM Hash Disclosure Spoofing VulnerabilityImportant
Windows Package Library ManagerCVE-2024-38203Windows Package Library Manager Information Disclosure VulnerabilityImportant
Windows RegistryCVE-2024-43641Windows Registry Elevation of Privilege VulnerabilityImportant
Windows RegistryCVE-2024-43452Windows Registry Elevation of Privilege VulnerabilityImportant
Windows Secure Kernel ModeCVE-2024-43631Windows Secure Kernel Mode Elevation of Privilege VulnerabilityImportant
Windows Secure Kernel ModeCVE-2024-43646Windows Secure Kernel Mode Elevation of Privilege VulnerabilityImportant
Windows Secure Kernel ModeCVE-2024-43640Windows Kernel-Mode Driver Elevation of Privilege VulnerabilityImportant
Windows SMBCVE-2024-43642Windows SMB Denial of Service VulnerabilityImportant
Windows SMBv3 Client/ServerCVE-2024-43447Windows SMBv3 Server Remote Code Execution VulnerabilityImportant
Windows Task SchedulerCVE-2024-49039Windows Task Scheduler Elevation of Privilege VulnerabilityImportant
Windows Telephony ServiceCVE-2024-43628Windows Telephony Service Remote Code Execution VulnerabilityImportant
Windows Telephony ServiceCVE-2024-43621Windows Telephony Service Remote Code Execution VulnerabilityImportant
Windows Telephony ServiceCVE-2024-43620Windows Telephony Service Remote Code Execution VulnerabilityImportant
Windows Telephony ServiceCVE-2024-43627Windows Telephony Service Remote Code Execution VulnerabilityImportant
Windows Telephony ServiceCVE-2024-43635Windows Telephony Service Remote Code Execution VulnerabilityImportant
Windows Telephony ServiceCVE-2024-43622Windows Telephony Service Remote Code Execution VulnerabilityImportant
Windows Telephony ServiceCVE-2024-43626Windows Telephony Service Elevation of Privilege VulnerabilityImportant
Windows Update StackCVE-2024-43530Windows Update Stack Elevation of Privilege VulnerabilityImportant
Windows USB Video DriverCVE-2024-43643Windows USB Video Class System Driver Elevation of Privilege VulnerabilityImportant
Windows USB Video DriverCVE-2024-43449Windows USB Video Class System Driver Elevation of Privilege VulnerabilityImportant
Windows USB Video DriverCVE-2024-43637Windows USB Video Class System Driver Elevation of Privilege VulnerabilityImportant
Windows USB Video DriverCVE-2024-43634Windows USB Video Class System Driver Elevation of Privilege VulnerabilityImportant
Windows USB Video DriverCVE-2024-43638Windows USB Video Class System Driver Elevation of Privilege VulnerabilityImportant
Windows VMSwitchCVE-2024-43625Microsoft Windows VMSwitch Elevation of Privilege VulnerabilityCritical
Windows Win32 Kernel SubsystemCVE-2024-49046Windows Win32 Kernel Subsystem Elevation of Privilege VulnerabilityImportant

In addition to the above vulnerabilities, Microsoft has also fixed a bug in Windows that caused blue screens on Windows Server 2025 devices. The problem would occur during backups or deduplication jobs.

Furthermore, a new update for Microsoft Exchange Server 2025 adds a warning to emails that could be abusing the CVE-2024-49040 vulnerability.

Microsoft released the November 2024 Patch Tuesday updates for Windows 10 and Windows 11, managing to fix some frustrating issues on these operating systems.

Windows users can get the November 2024 Patch Tuesday updates via Windows Update, Microsoft Update, or downloading them from the Microsoft Update Catalog website.

How to Open .XLSX Files: 4 Ways to do it

If you’re working with tables, you probably encountered XLSX files before. Speaking of which, in today’s guide we’re going to show you how to open .XLSX files and view their contents.

How can I open .XLSX files?

1. Use Excel

  1. Open Excel.
  2. Click on File and choose Open.
    excel open
  3. Select the directory where the XLSX file is stored.
  4. Select the file.

2. Use Excel online

  1. Navigate to the Excel Online page. If asked, log in with your Microsoft account.
  2. Click on Upload.
    upload file excel online
  3. Select the file from your PC.
  4. Once it’s uploaded, click it to open.

3. Use Google Sheets

  1. Visit the Google Sheets page and log in with your Google Account.
  2. Click on the Create new spreadsheet icon.
     new sheet icon
  3. Next, go to File and choose Import.
    file import google sheets
  4. Go to Upload, click Browse and select your XLSX file. Alternatively, just drag and drop it.
    upload browse
  5. Set Import location to Replace spreadsheet and click on Import data.
    import data
  6. After that, your XLSX file will open.

4. Use XLSX Viewer

  1. Navigate to the XLSX Viewer page.
  2. Drag and drop your file.
    xlsx viewer
  3. Once the upload is done, click on View your spreadsheet button.
    view your spreadsheet

While many services can open an XLSX file online, remember to only use the ones you trust. If you don’t trust the service, then don’t upload any sensitive data to it.

What program opens .XLSX files?

Most office suites have tools that can open XLSX files. If you’re not using Excel, you can use LibreOffice Calc, WPS Office Spreadsheets, or Apache OpenOffice Calc to open these files.

How can I open a .XLSX file without Excel?

There are various software alternatives you can use, but if you don’t want to install additional software, you can use third-party viewers or Google Sheets to open an XLSX file online.

As you can see, it’s pretty simple to open XLSX files, and you don’t even have to use Microsoft Office. To learn more, we have a guide on XLS vs XLSX files, as well as an article on how to convert Excel files to CSV, so don’t miss them.

Patch Tuesday’s KB5046617 patch for Windows 11 fixed this annoying WSL bug

Microsoft has just rolled out Patch Tuesday updates for Windows 11 24H2, 23H2, and 22H2. The 24H2 update is delivered via KB5046617, while the 23H2 and 22H2 update comes in via KB5046633.

This month’s updates are mostly focused on security and quality improvements, but there are a few notable changes to be aware of.

KB5046617 is the most substantial update, fixing an issue where the number of groups in Task Manager is displayed incorrectly when arranged by type. It also resolves an issue where devices may lose internet access due to duplicate DHCP options issued by a server.

Windows Subsystem for Linux (WSL) users will be pleased to learn that KB5046617 addresses a bug that prevented access to the development drive. Microsoft says it’s aware of a single known issue in this update: players on Arm devices cannot download and play Roblox via the Microsoft Store.

KB5047621 is a servicing stack update that improves the quality of the component responsible for installing Windows updates.

It also fixes an issue that prevents the OpenSSH service from starting after the installation of the October 2024 security update, causing SSH connections to fail.

While KB5047621 is necessary for a smooth Windows update experience, installing immediately is not essential. The same is true of KB5046617.

Most users will download and install both updates automatically, but those who prefer to install patches manually can grab KB5046633 and KB5046617 from the Microsoft Update Catalog. You can read more about these updates in the official changelog here.

If you’re still using Windows 10, remember to download the Patch Tuesday updates for it, as well.

Windows 10’s latest KB5046613 fixes the bug that caused apps to not work unless you accessed them with admin rights

Microsoft has released its latest security updates for Windows 10 and Windows Server 20H2. The latest updates are available for the latest supported Windows 10 versions, 20H2, 21H2, and 22H2, and come with KB5046613, KB5046615, KB5046612, and KB5046665.

The November 2024 Patch Tuesday update for Windows 10 focuses on security patches and some fixes, including the frustrating bug that caused Quick Assist, Microsoft Teams, Windows Narrator, and many other apps to not work unless you accessed them with admin rights.

[Some games fail to start] Fixed: Some games do not start or stop responding after you install KB5044384. This occurs because some games use a third-party DRM component that is not compatible with that update. This update makes changes to support those games while the game developers address the DRM issue.

[Some apps don’t start (known issue)] Fixed: Quick Assist, Microsoft Teams, Windows Narrator, and others might not start if you do not run them as an admin. ​​​​​​​

Microsoft stated that there are no known issues in the release.

The older supported versions of Windows 10 are also getting updates today. Here’s the list of updates that are available today, along with their respective release notes (KB) and links to download from the Microsoft Update Catalog:

You can read the full changelog for Windows 10’s KB5046613 and the other patches here.

In other news, Windows 10 is slowly but gradually losing dominance. With less than a year on the market, it’ll be interesting to see if the operating system will still be the dominant Windows version next year.

Microsoft Surface Thunderbolt 4 Dock is Not Working [Solved]

Many users have in the past complained about the Microsoft Surface Thunderbolt 4 Dock not working with Surface or another laptop. Often, the lights glow but the twin monitor setup doesn’t work, or there are issues with charging. Even the Surface App, sometimes, doesn’t detect the dock.

The problem arises due to compatibility issues between the Thunderbolt 4 Dock, laptop, and the connected setup, the use of unsupported cables and adapters, and missing updates.

Before you proceed to the solutions, reboot the affected device and Surface Thunderbolt 4 Dock, check the official website for compatibility issues, and reconnect all the cables. For most of you, this should do the trick!

What can I do if Microsoft Surface Thunderbolt 4 Dock is not working?

1. Reset the Surface Thunderbolt dock

Your primary approach when the Microsoft Surface Thunderbolt 4 Dock is not detecting the monitor or working at all should be to reset it.

To do that, unplug the dock and PSU from the power supply > wait for 5-10 seconds > then, replug it.

In 2 out of 5 cases, a quick reset got things up and running in no time!

2. Clear the display cache using a Registry file

Note icon NOTE
Since the following steps will modify the Registry Editor, I recommend you create a restore point beforehand so that you can revert any untoward changes.
  1. Go to Microsoft’s support page, scroll down to Solution 8, and click the Download the Surface Dock registry file option.download
  2. Right-click on the download ZIP file, and select Extract All.
  3. Set a path for the extracted files or go with the default selection, and click on Extract.
  4. Run the surface dock registry.reg file.registry file to fix Microsoft Surface Thunderbolt 4 Dock not working
  5. Click on Run in the confirmation prompt.
  6. Once done, reboot the PC and check for improvements.

Microsoft’s recommended fix to clear the display cache proves highly effective when the Microsoft Surface Thunderbolt 4 Dock is not working on a Surface laptop. So, you must try it!

3. Download firmware and drivers for Surface Thunderbolt 4

  1. Go to Microsoft’s official website and click the Download button under Surface Thunderbolt 4 Dock Firmware and Drivers.
  2. Select the file for the installed iteration and architecture of Windows and click on Download at the bottom.firmware and drivers to fix Microsoft Surface Thunderbolt 4 Dock not working
  3. Run the downloaded setup (.msi file) and follow the on-screen instructions to complete the installation.setup
  4. After installing the drivers and firmware, reboot the computer to apply the changes.

4. Install the latest Windows updates on your laptop

  1. Press Windows + I to open Settings, go to Windows Update from the navigation pane, and click on Check for updates on the right.check for updates
  2. If any updates are listed after the scan, click on Download & install.
  3. After installing the Windows updates, reboot the PC and verify whether the Microsoft Surface Thunderbolt 4 Dock now starts working.

5. Install the latest firmware and drivers for your laptops

If you are facing issues detecting monitors with the Microsoft Surface Thunderbolt 4 Dock, say, they keep flickering or only one monitor works at a time, it’s likely that your PC is missing key firmware or driver updates.

For one user, installing the Dell, Inc. – Firmware – 0.1.20.0 update did the trick!

So, you must visit the manufacturer’s official website, locate the new releases for your laptop, and then manually install the latest driver and any available firmware updates.

6. Check the adapter and cable setup

As I said earlier, using the wrong cable or adapter can also lead to the Microsoft Surface Thunderbolt 4 Dock not working on a Windows laptop.

Users were able to fix this by switching from the existing set to Thunderbolt to HDMI or USB-C to DisplayPort adapters, depending on the setup, device compatibility, and availability of ports. So, try that!

7. Contact Microsoft support

If nothing else works, the last option is to contact Microsoft Support. Provide them with all the information about your setup, including the in-use cables and adapters, and they should be able to tell you whether it’s compatibility or missing drivers and firmware to blame.

You can then take the suggested measures. And, in all likelihood, these will do the trick and get the Microsoft Surface Thunderbolt 4 Dock working again!

In my experience, the problem often resolves on its own, after a reset, or through an update. Rarely did it have to do with major compatibility issues, and for those who had that, purchasing a compatible dock or adapter got things up and running.

Before you leave, read our detailed review of the Microsoft Surface Thunderbolt 4 Dock and find out its key strengths and weaknesses!

Which fix worked for you? Share with our readers in the comments section below.