Back when Microsoft changed File Explorer in Windows 11, everyone was reluctant but we welcomed the change as it made the context menu more clear and somehow less cluttered. Although, to be honest, I still use the keyboard for basic commands because it simply doesn’t make sense to access the top menu’s cut, copy and delete options.
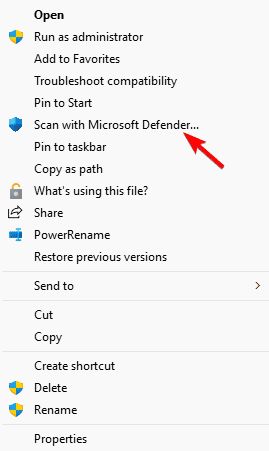
Well, since then, Microsoft kept adding more and more options, and that menu has become a lot cluttered than the old Windows 10 one. Now, a user spotted another nonsensical change in the File Manager’s context menu that adds to the already growing list.
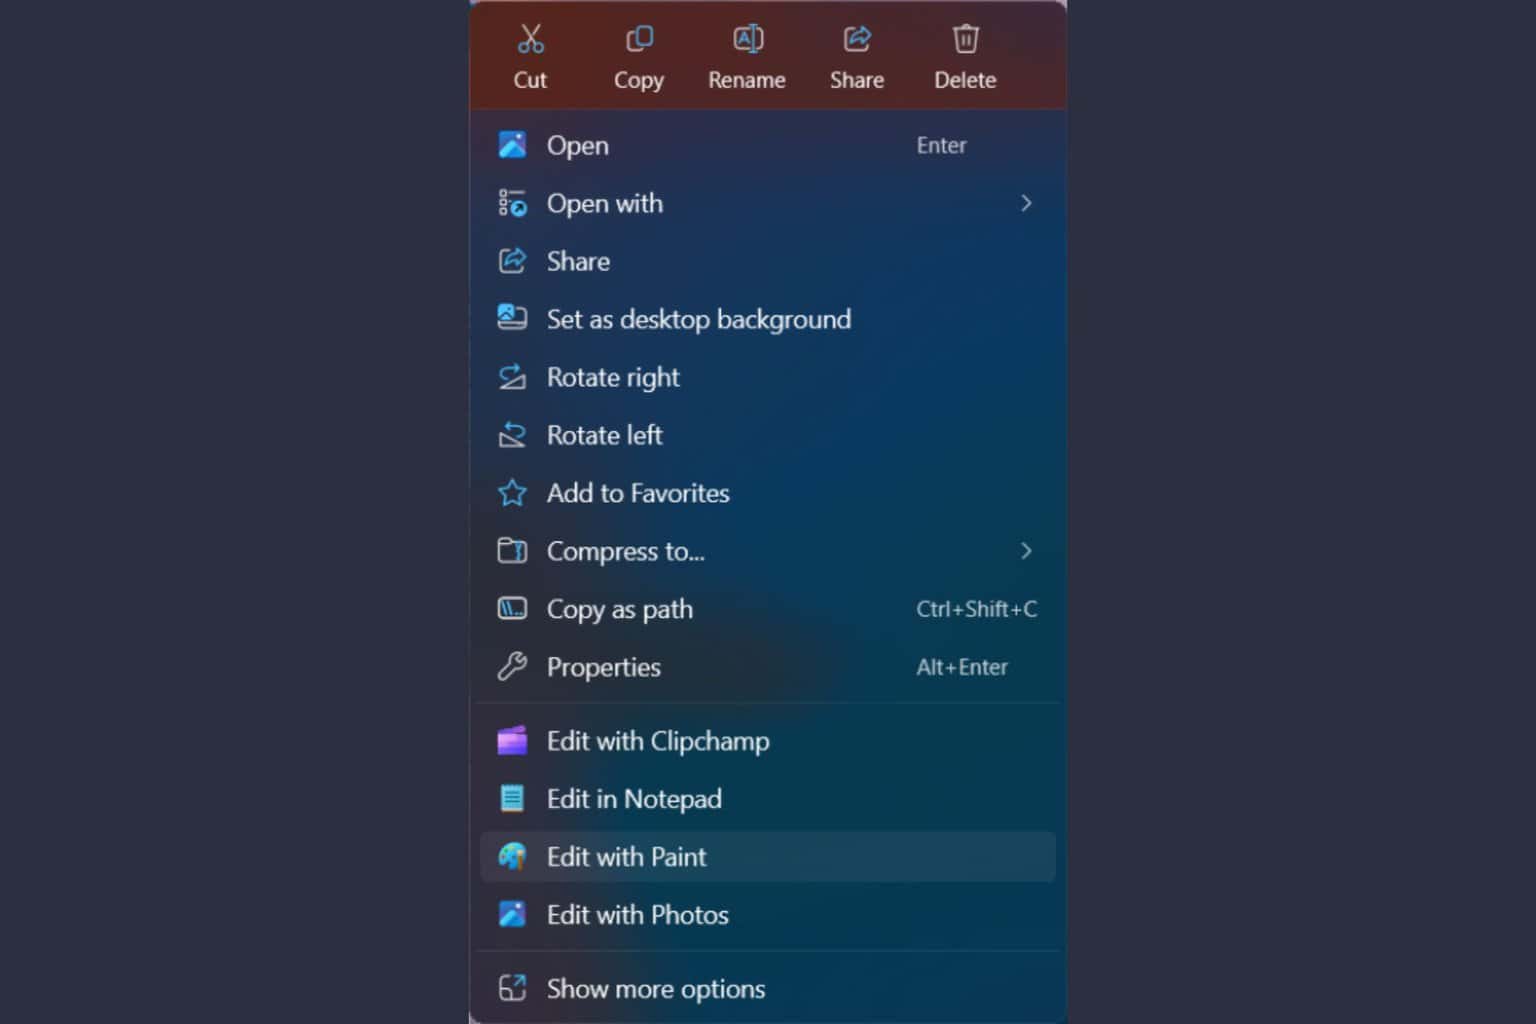
You know how Notepad + Photos got dedicated "Edit with (app)" context menu options in updates earlier this year? Yeah, Paint's getting one too. Shows up for images with version 11.2410.28.0.
(Not mentioned in any blog post, but then again it's not AI!!!11 so I'm not surprised.) pic.twitter.com/zkovNVDZEl
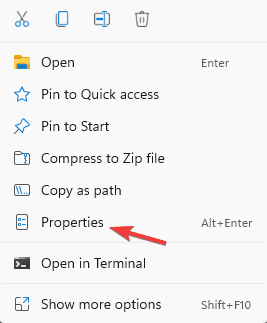
The user pointed out that in Windows 11 version 11.2410.28.0, Microsoft added the Edit with Paint and Edit in Notepad options when you right-click an image.
The change doesn’t make sense for a number of reasons. First, you already have those options in the Open with submenu. Then, there’s the problem of adding one more default option that you might not need or want.
Finally, how do you edit the image in Notepad? And this is happening for a JPG file, not some obscure format that Windows doesn’t recognize. By now, File Explorer should recognize file types and recommend the right options for opening and editing.
Then, there are 2 Share buttons, one at the top and one inside the context menu and they do exactly the same thing.
To conclude, the File Explorer’s context menu is a highly used functionality that is supposed to work fast and be intuitive for everyone. Constant changes, obviously, influence that ease of usage. Finally, users would embrace the changes too, but only if they add improvements and make sense in simplifying, not complicating things. We can only hope that Microsoft will look into these issues and fix them.
What do you think about File Explorer’s context menu? Let us know in the comments below.
Hibernation is a useful feature, but it does have a few drawbacks, and many want to know how to disable hibernation on Windows 10. This is pretty simple to do, and in this guide, we’ll show you how to do it.
How do I turn off hibernation in Windows 10?
1. Disable hibernation on Windows 10 with CMD
Press the Windows key + S and type cmd. Choose Run as administrator.
Run the following command: powercfg -h off
Close the Command Prompt.
If you ever want to enable it, just run powercfg -h on
To disable hibernation on Windows 10 with PowerShell, you can do it with the same commands.
2. Change power settings
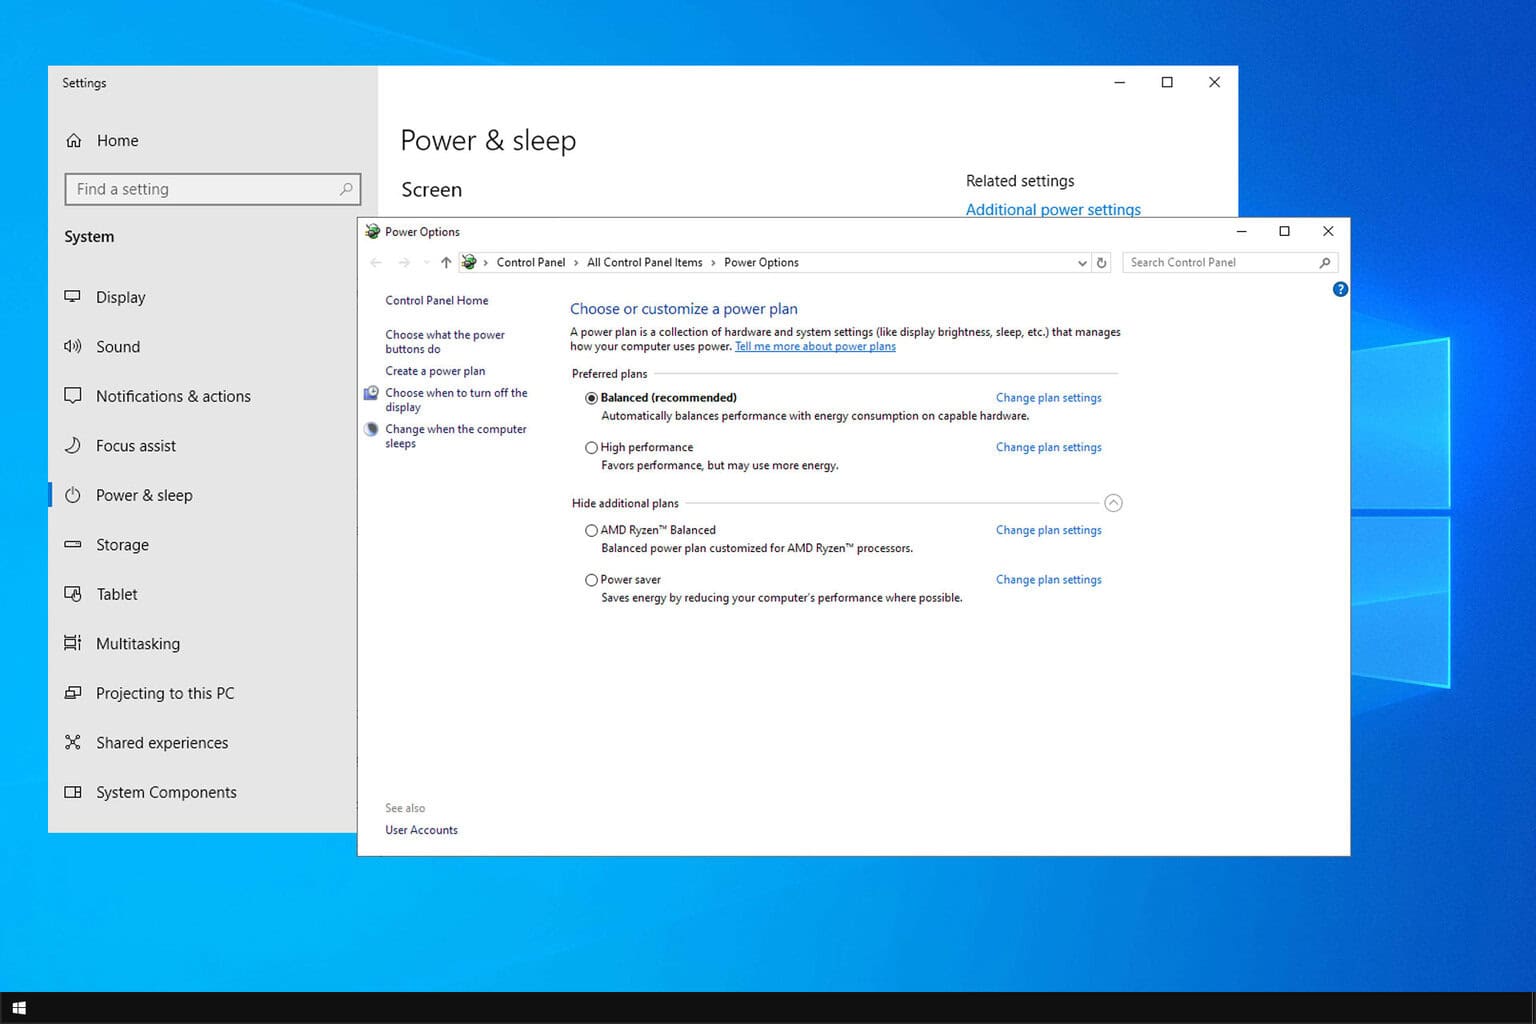
Press the Windows key + S and type power plan. Select Choose a power plan.
Next, select Choose what the power buttons do.
Select Change settings that are currently unavailable.
Uncheck the Hibernate option and click on Save changes.
3. Disable hibernation on Windows 10 from the registry
Press the Windows key + R and type regedit. Press Enter.
Navigate to the following key: Computer\HKEY_LOCAL_MACHINE\SYSTEM\CurrentControlSet\Control\Power
In the right pane, double-click HibernateEnabledDefault. Set its Value data to 0 and save changes.
How do I stop my computer from hibernating automatically?
Press the Windows key + S and type power plan. Select Choose a power plan.
Select Change plan settings next to your power plan and then Change advanced power settings.
Expand the Sleep section and set Hibernate after to Never.
Save changes.
Is disabling hibernation good?
It depends on your PC use. If you use a laptop hibernation isn’t necessary. However, it can be useful on desktop PCs that you often unplug from the outlet.
While sleep mode consumes some power, hibernation doesn’t consume any electricity, but it does use storage space, so if you’re low on storage or you simply never unplug your PC, or own a laptop, you might want to disable this feature.
Our article on hibernate vs sleep will help you understand the pros and cons of hibernation, so don’t miss it if you want to learn more.
As you can see, you can easily disable this feature and save space on your PC, so feel free to use any method that works for you. The best method in our opinion is to disable hibernation on Windows 10 from the command line since it will also delete hiberfil.sys file and save you space.
Microsoft has expanded the capabilities of its Copilot tool in Outlook, finally allowing users to create unique AI-powered themes and customize the look and feel of their Outlook experience.
The new tool, Themes by Copilot, was teased earlier this year, and it features a range of standard color themes and more than 100 AI-generated themes. The themes are available in animated and static formats, and users can also set how often they change.
For example, users can create a theme inspired by one of Outlook’s 100+ locations or use a theme that changes based on the local weather. Themes are also designed to be beautiful and accessible to all.
In the official announcement, these AI-generated themes will be available to all Microsoft 365 Copilot users starting November 7 and are accessible on Outlook for iOS and Android, Windows, the web, and Mac.
Microsoft said that it has released themes for all users of its Outlook app over the past year, but it’s clear that the company is positioning Themes by Copilot as a more premium feature. Themes by Copilot is the first instance of AI-generated theming in productivity applications and can give Outlook a more personal touch.
As a result, it’s reasonable to think that Themes by Copilot could provide a new revenue stream for Microsoft in the form of extra subscription fees or as part of a more expensive Microsoft 365 tier.
Microsoft also announced a new feature called Prioritize My Inbox by Copilot today, which will be available in private preview for Microsoft 365 Copilot users later this year and for all users in early 2025.
Prioritize My Inbox—which sounds somewhat similar to Google’s Priority Inbox—uses AI to prioritize the most important messages for each user.
What’s your take on this? Will you use these AI-generated themes in Outlook?
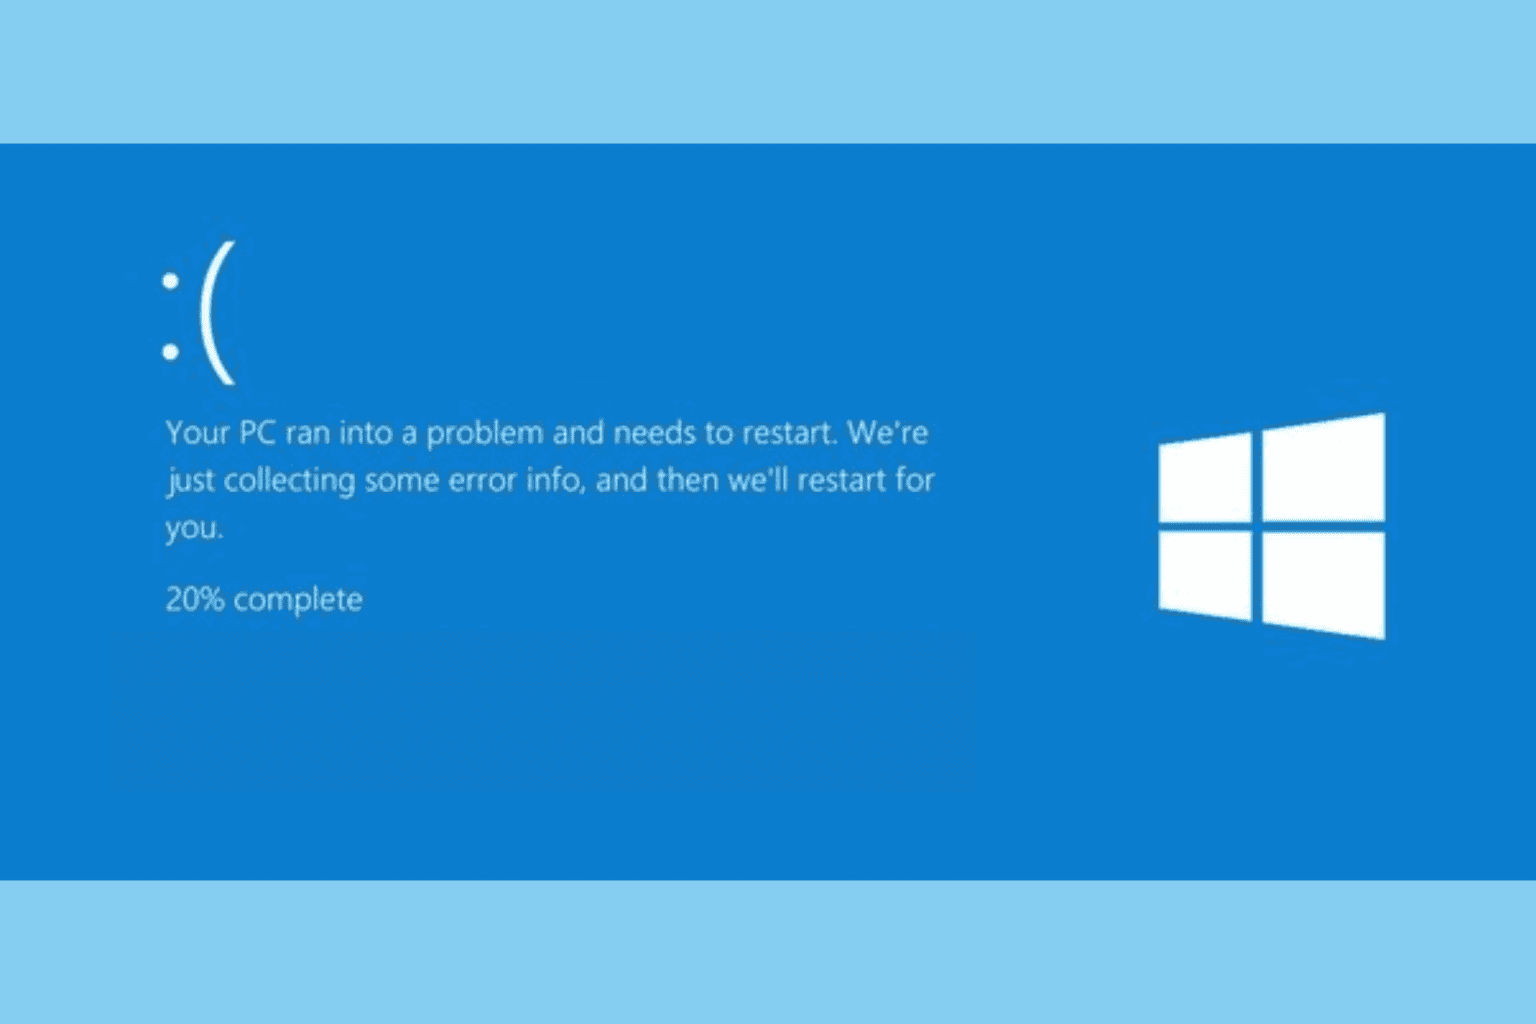
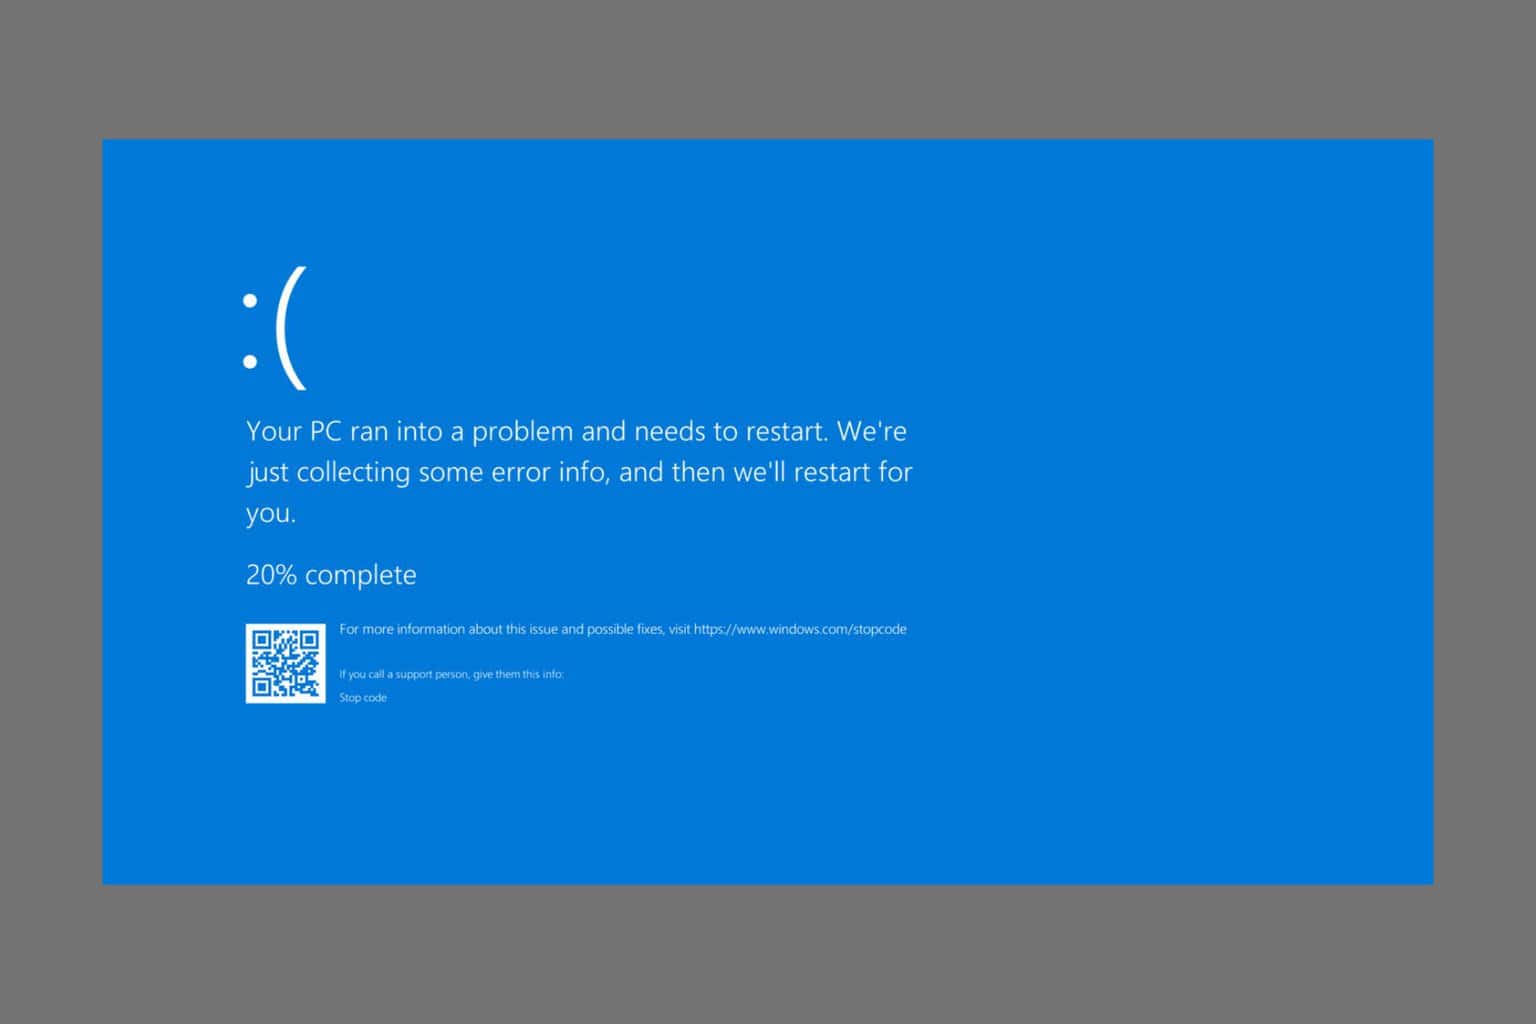
The error WORKER_THREAD_TEST_CONDITION with bug check and value of 0x00000163 is a stop or BSoD value, which usually indicates an issue with kernel-mode worker threads that are not functioning as expected. The 0x00000163 value points out that the worker thread failed a test condition.
The BSoD error usually appears due to system-level issues like hardware failure, missing or corrupted system files, or outdated drivers. First, ensure your Windows is up to date and run a malware scan using a reliable antivirus tool.
How can I get rid of the WORKER_THREAD_TEST_CONDITION error?
1. Check the specific error details
Press Windows + R to open the Run window.
Type eventvwr.msc and click OK to open the Event Viewer window.
Go to Windows Logs, then System.
Check for errors or warnings around the error WORKER_THREAD_TEST_CONDITION 0x00000163 on the right pane to understand what caused the issue.
2. Restart your PC in a clean boot
Press Windows + R to open the Run window.
Type msconfig and click OK to open the System Configuration window.
Go to the Services tab, place a checkmark next to Hide all Microsoft services, then click the Disable all button.
Switch to the Startup tab, and click the Open Task Manager link.
Locate all the Enabled startup items, select them one by one, click Disable, and then close the window.
Return to the System Configuration window, click Apply, then OK to save the changes.
Click Restart to reboot your PC, then check if the error reappears.
If you don’t see the issue again, try enabling services and startup items individually to find the culprit. If nothing is causing the problem, reverse engineer the steps to reboot your computer in normal mode.
3. Scan the disk for hardware issues
Press the Windows key, type cmd in the search box, and click Run as administrator from the list of options.
To find & fix errors and locate bad scores on your disk, type the following command and hit Enter: chkdsk /f /r
If your disk is in use, you will be prompted to schedule the scan after a restart. Type Y and hit Enter to proceed.
Now, restart your computer to initiate the scan.
4. Run a memory diagnostic scan
Press Windows + R to open the Run window.
Type mdsched.exe and click OK to open the Windows Memory Diagnosticwindow.
Select Restart now and check for problems (recommended).
Your computer will reboot and check for memory issues. If the problems are located, you may have to reseat or replace the faulty RAM.
Type devmgmt.msc and click OK to open the Device Manager window.
Go to each category, expand it, and look for the problematic driver( one with a yellow triangle with an exclamation mark inside it).
Right-click it and select Update driver from the context menu.
Click Search automatically for drivers. Windows will try to find the best available version.
Repeat these steps if there is more than one problematic driver.
If Windows fails to find the correct driver version, you can go to the manufacturer’s website to download the latest version. Alternatively, you can easily download and install a reliable driver updatertool to ensure the drivers are always updated.
6. Run SFC & DISM scans
Press the Windows key, type cmd in the search box, and click Run as administrator from the list of options.
To repair corrupted system files, type the following command and hit Enter: sfc /scannow
Wait for the scan to finish, and if it doesn’t fix your issues, copy & paste these commands one by one and hit Enter after each command:
These commands will scan and repair the system image via Windows update. Once the command is executed, restart your computer.
7. Reset your PC
NOTE
If you plan to reset your PC and remove everything, creating a backup of your important files is advised. Also, remember that after resetting your PC, you need to reinstall all the third-party apps you use, so keep their installation files handy.
Press Windows + I to open the Settings app.
Go to System and click Recovery.
Under Recovery options, locate Reset this PC and select Reset PC.
On the Choose an option screen, select Keep my files or Remove everything.
Next, select Cloud Download to install a fresh copy, or click Local reinstall if you want your device to use local storage to reinstall Windows.
If you select Remove everything, you will get two options: Just remove all files or Remove files and clean the drive. Choose accordingly.
However, if you choose Keep my files, you will be taken to the Advanced settings page. Click Next to proceed.
Click Reset to start the process.
In conclusion, the WORKER_THREAD_TEST_CONDITION (0x00000163) error appears if your computer has hardware issues or corrupted drivers or system files. You can first identify the problem using Event Viewer and follow these steps accordingly.
If you want to learn the reasons for BSoD errors so that you can take the necessary steps to prevent them in the future, we have a guide for you.
If you have any questions or suggestions about this BSoD error, feel free to mention them in the comments section below. Before you leave, you might want to check our latest Worker Thread Returned With Non Default Workload Class guide for more solutions.
We also have an article on ERROR_NO_ACE_CONDITION, so don’t miss it for more information.
The out of memory error when you’re using Whatsapp web indicates your browser is a memory hogger and cannot sustain resource-intensive tasks.
Normal operations like sending and receiving messages should proceed just fine but if you’re sharing large documents, images and videos, your browser may not be capable of handling such resource-intensive tasks.
If closing unnecessary tabs and other superfluous processes on your device doesn’t solve it, troubleshoot the issue with the following solutions.
How can I fix the Whatsapp web out of memory error?
1. Relogin to WhatsApp Web
Press the ellipsis at the top-right and select Log out from the menu.
Again, click Log out in the confirmation prompt.
Once done, follow the instructions in the image below to log back in.
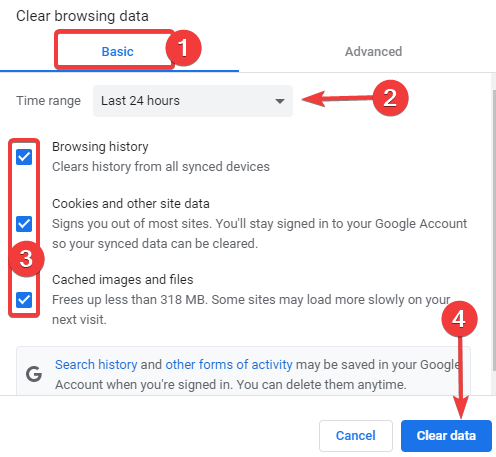
2. Clear your browser cache and cookies
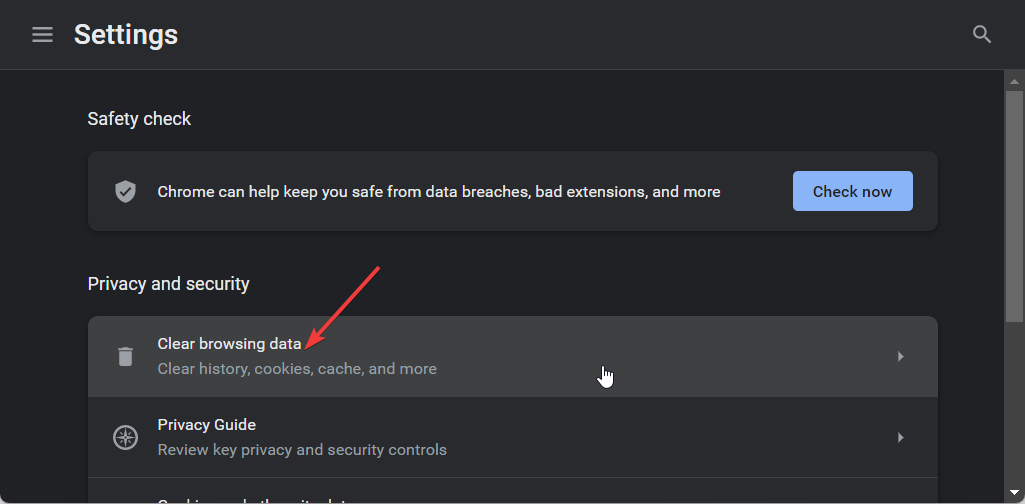
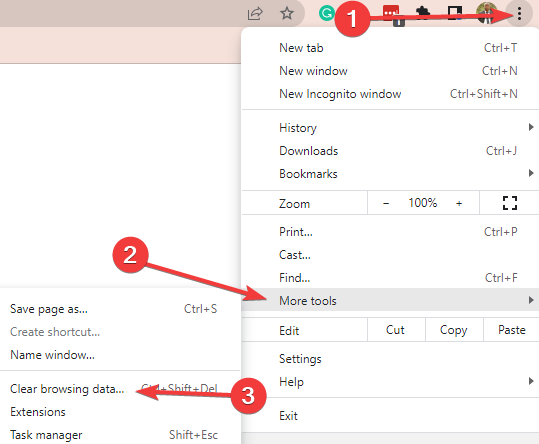
Click on the ellipses, the three dots on your browser’s top right corner, select More tools, then Clear browsing data.
Select the Basic tab, choose your desired time range, tick the checkboxes for Browsing history, Cookies and other site data, and Cached images, and finally, hit the Clear data button.
Reconnect to WhatsApp web and see if the out of memory error persists. If it does, click the Menu icon in the top right corner.
Choose New Incognito window.
A new browser window will now appear.
3. Increase Virtual memory
Press Windows + I to open the Settings app.
Go to System, then click About.
Next, click the Advanced system settings link to open System Properties.
Go to Performance, and click the Settings button.
Next, switch to the Advanced tab, locate Virtual memory, and click Change.
Remove the checkmark next to Automatically manage paging file size for all drives.
Select the system drive, then the radio button next to the Custom size option, and input values for Initial size and Maximum size in MB.
Click Set, then OK.
Click OK, then again OK to close the System Properties window.
4. Enable Chrome’s memory saver
Press the Windows key, type in Chrome, and hit Enter.
In the search bar, type in chrome://flags and hit Enter.
In the Search Flags search box, type in efficiency, and select Enabled from the dropdown next to the Enable the high-efficiency mode feature in the Settings option.
Click the Relaunch button at the bottom right corner to refresh the window.
In the Chrome window, click on the three vertical ellipses at the window’s top right corner, and select Settings.
In the next window, click on Performance on the left pane. Click and enable the Memory Saver toggle.
Close the Settings tab.
With this setting, Chrome will now free up memory from inactive tabs which will help free up space for active tabs like WhatsApp web to run efficiently without the out of memory error.
5. Disable browser extensions
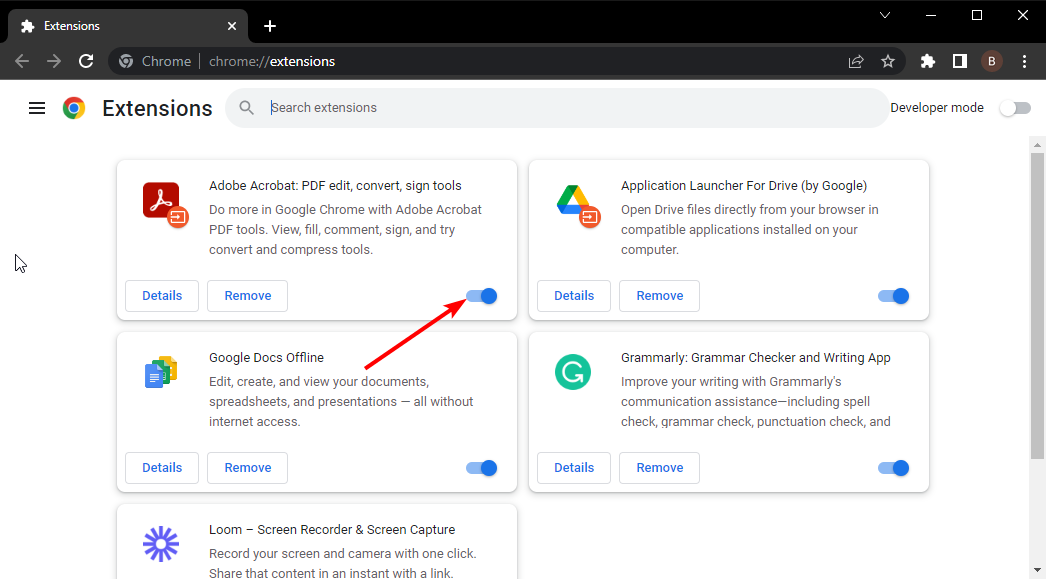
Launch your Chrome browser, and in a new tab, enter the following address:chrome://extensions/
Peruse through your extensions and toggle the Disable button for any suspicious-looking ones.
Start with VPN, security, online service, or adblockers extensions then restart the browser.
Some extensions run in the background leaving little to no memory for active tabs. When disabled, they free up memory that can resolve the out of memory error on your WhatsApp web session.
Click on Download for Windows. Alternatively, you can click on Get it from Microsoft to download it from the Microsoft Store.
Double-click the downloaded file to start the installation, and follow the installation wizard.
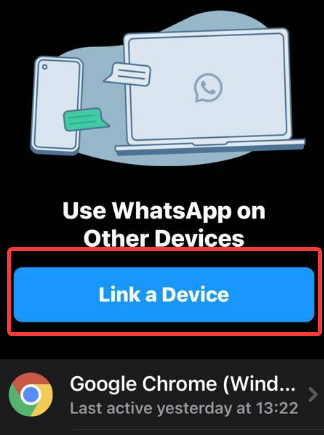
Open WhatsApp on your mobile device, and navigate to your Menu and Linked devices.
Click on the Link a Device button.
Aim your camera at the displayed bar code on your computer, and WhatsApp should open on the app.
8. Reset your browser/Create a new user profile
Open your Chrome browser and click on the three vertical ellipses at the top right corner.
Select Settings.
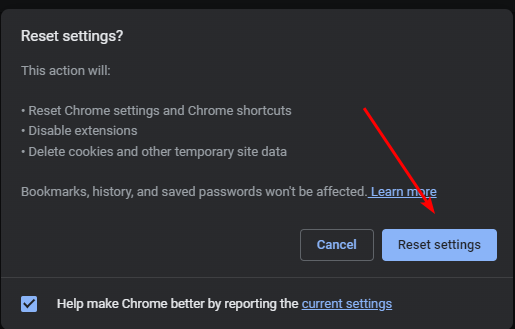
Next, click on Reset and cleanup, then select Restore settings to their original defaults.
Confirm Reset settings in the next dialog box.
Open Google Chrome.
Click on the profile icon (top right corner).
Click on Add another account to create a new profile. Assign it a name and choose an icon.
Switch to the new profile and see if the issue persists.
If you’re still unsuccessful, try to give it some time. Sometimes, WhatsApp web is just not working because of a temporary glitch so try waiting out and attempt connecting later.
Hopefully one of these solutions has fixed the out of memory issue. In case you have any other solutions that worked for you, feel free to drop them down in the comment section below.
Microsoft is raising its Microsoft 365 subscription price. The company is testing a new Microsoft 365 consumer plan in Australia, New Zealand, Malaysia, Singapore, Taiwan, and Thailand that includes AI features at a higher subscription cost.
Previously, Microsoft introduced premium AI features for consumers through the Copilot Pro plan and enterprise and business users through the Microsoft 365 Copilot plan. Now, Microsoft is testing a new Microsoft 365 consumer plan that includes AI features at a higher price.
According to the latest reports, this plan is being tested in Australia, New Zealand, Malaysia, Singapore, Taiwan, and Thailand. In Australia, the new Microsoft 365 Family with AI subscription will cost $AU179/year, and the plan without AI features will cost $AU139/year.
Microsoft plans to migrate all current Microsoft 365 subscriptions to this more expensive one. Although the change will occur at the next renewal, some users might be annoyed.
The plan also provides Microsoft 365 Personal and Family users with 60 monthly AI credits, which can be used in Word, Excel, PowerPoint, Outlook, Forms, OneNote, Designer, Notepad, Photos, and Paint. Like Image Creator works in Microsoft Paint, each task will cost one credit. Credits cannot be shared among users and will reset monthly, regardless of usage.
Getting a Copilot Pro subscription erases the AI credits, allowing you to generate images and complete other tasks with AI without a limit.
It’s worth noting that even though this plan is currently being tested in certain regions, it might be extended to other areas, such as Europe or the US.
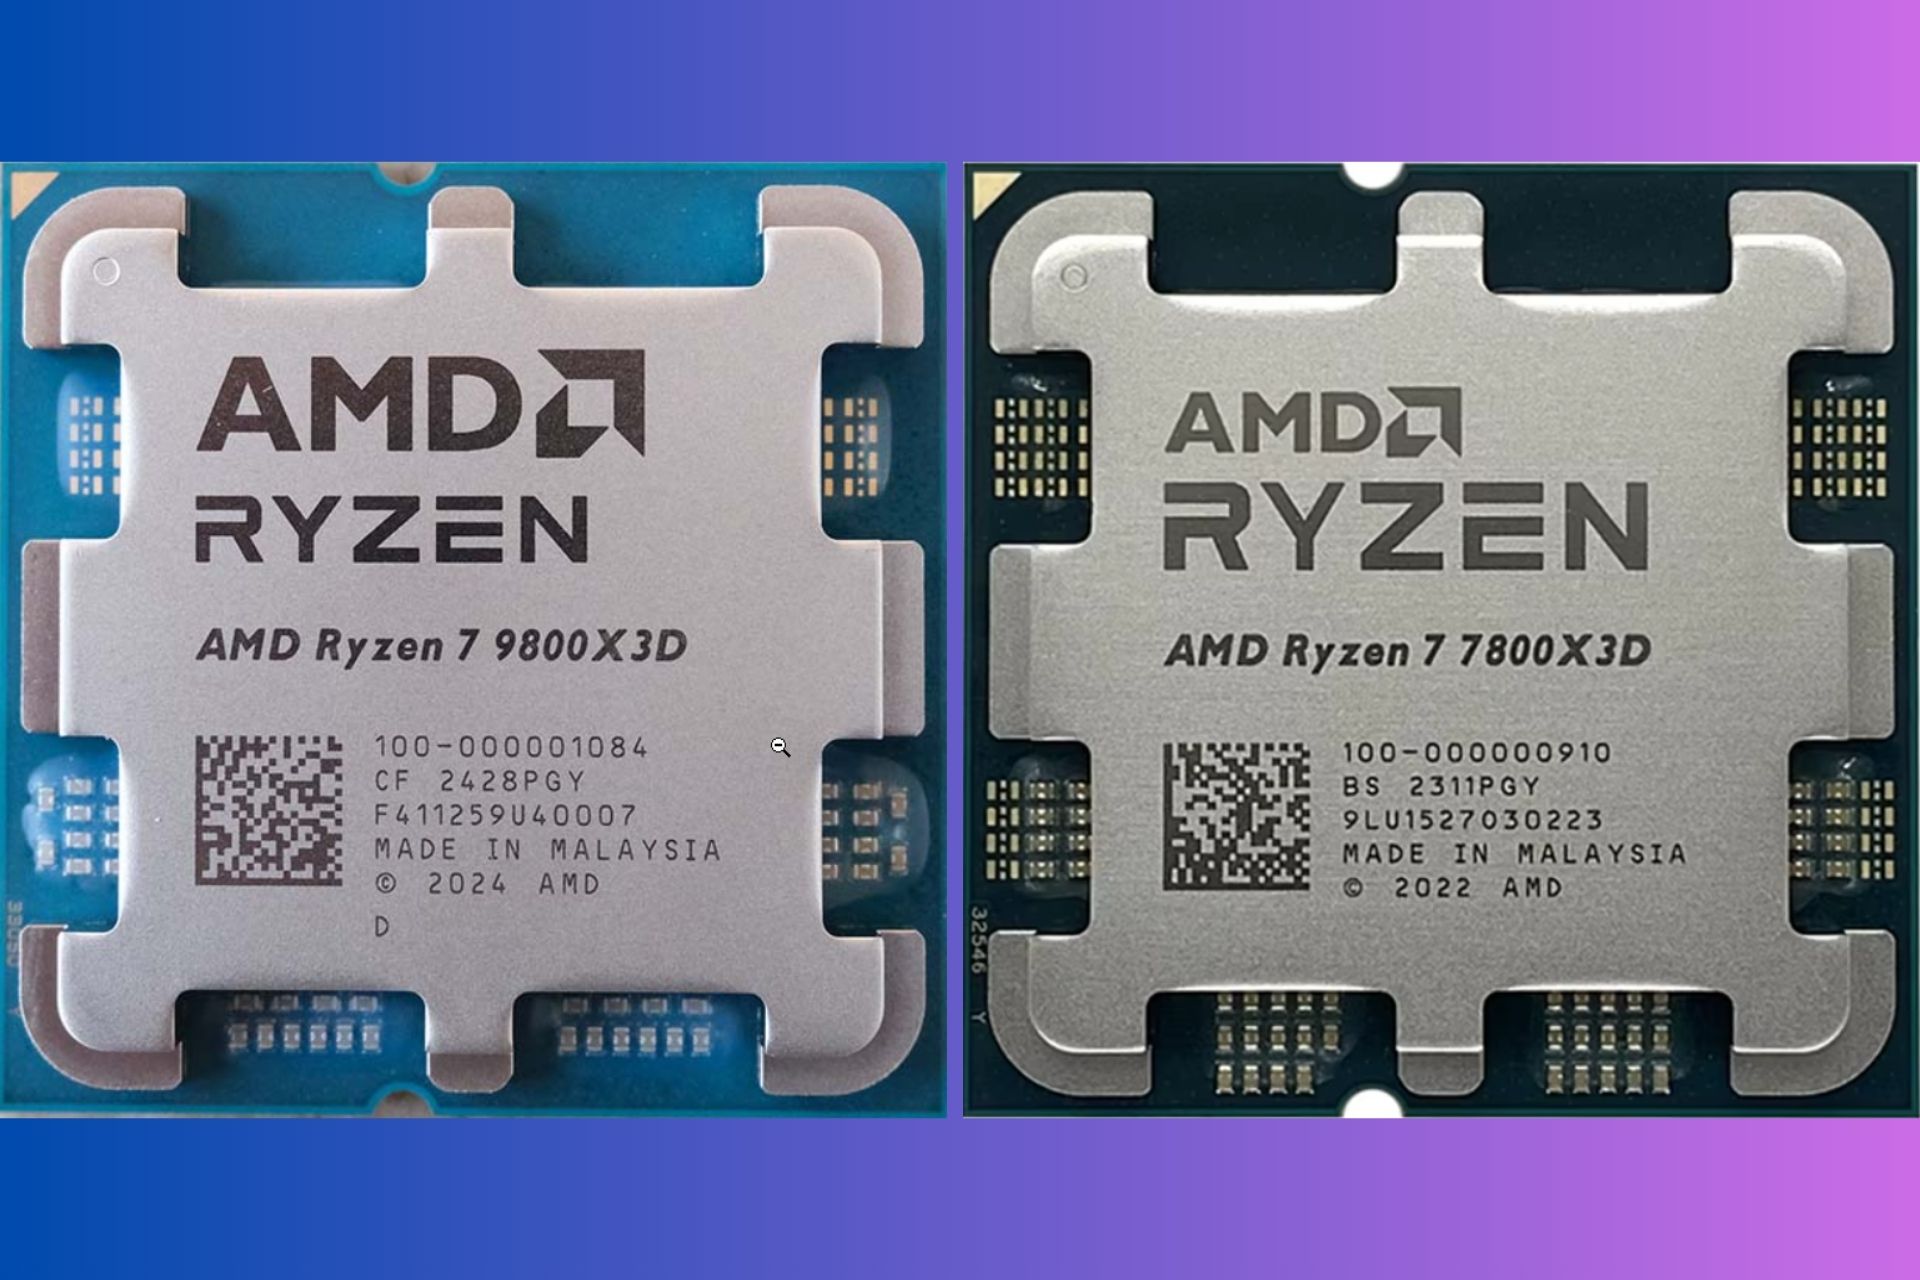
Recently, AMD launched the flagship CPU Ryzen 7 9800X3D, so if you want to know how it compares to the previous Ryzen 7 7800X3D, we’re going to highlight all the specs and differences between them.
AMD claims that the new Ryzen 7 9800X3D has 8% higher gaming performance, is 15% more profficient in multi-threading apps compared to the older Ryzen 7 7800X3D CPU. However, it’s only $30 more expensive, available at $480 on Amazon. We also have full reviews on Ryzen 7 7800X3D and Ryzen 7 9800X3D if you want to learn more about the CPUs.
Ryzen 7 9800x3D vs Ryzen 7 7800x3D comparison
1. Technical specifications
As usual, we will start by showing the technical specifications of both CPUs side by side, just to have a quick view at the differences between the two:
Specification
Ryzen 7 9800X3D
Ryzen 7 7800X3D
Architecture
Zen 5
Zen 4
Cores
8
8
Threads
16
16
Base Clock
4.7 GHz
4.2 GHz
Boost Clock
Up to 5.2 GHz
Up to 5.0 GHz
L1 Cache
640 KB
512 KB
L2 Cache
8 MB
8 MB
L3 Cache
96 MB
96 MB
TDP
120 W
120 W
Max Temp
95°C
89°C
Socket
AM5
AM5
Memory Support
Up to DDR5-5600
Up to DDR5-5200
Price
$479
$449
Release Date
November 7, 2024
April 2023
2. Key differences between Ryzen 7 9800x3D and Ryzen 7 7800x3D
Zen 5 vs Zen 4 architecture
Obviously, the most important difference between Ryzen 7 9800x3D and Ryzen 7 7800x3D is that the latest CPU is designed with Zen 5 architecture on 4 nm while the older CPU is built on the Zen 4 architecture (5nm and 4nm)
According to AMD, Improvements include Improved branch prediction accuracy and latency; higher throughput with wider pipelines and vectors; and deeper window size across design for more parallelism. As a result, single-threaded IPC is increased by about ~16% gen-over-gen.
Base and boost clock speeds
Also, the Ryzen 7 9800X3D CPU offers higher base and boost clock speeds, which translates to better overall performance, especially in gaming. However, both chips comes with the 3D V-Cache technology with a whooping 96 MB of L3 cache that really mages a huge difference when compared to the latest Intel CPUs.
Memory speed
Another notable difference, while not decisive, is that Ryzen 7 9800X3D can work with faster DDR5 memory (DDR5-5600 vs DDR5-5200), which, obviously, translates into higher performance in memory-intensive applications.
Power consumption
When comparing the power consumption, during intensive tasks like the Cinebench multi-core tests, AMD Ryzen 7 9800X3D consumes around 128W higher than the Ryzen 7 7800X3D. In contrast, the 7800X3D has a TDP of 120W but typically operates closer to 88W during normal use. So, Ryzen 7 7800X3D is more power efficient, while Ryzen 7 9800X3D delivers higher performance.
3. Gaming performance comparison
When comparing the gaming performance of the AMD Ryzen 7 9800X3D and the Ryzen 7 7800X3D, the 9800X3D clearly offers better FPS due to its higher clock speeds and improved architecture.
AMD Ryzen 7 9800X3D typically provides around 4-6 FPS more on average compared to the 7800X3D. It also improves minimum FPS by about 6 FPS, which helps in maintaining smoother gameplay, especially in demanding titles.
However, both CPUs proved to be a lot better for gaming than the latest Intel Core CPUs.
Conclusion
Obviously, Ryzen 7 9800x3D tops Ryzen 7 7800x3D in gaming performance and it is only $30 more expensive than the older model. On the other hand, Ryzen 7 7800x3D’s price has risen together with its growing popularity and that might also happen with the new Ryzen 7 9800x3D. So, if you if you want to build a gaming rig now, you should definitely grab Ryzen 7 9800x3D while you can still find it on the shelves.
On the other hand, AMD is expected to launch the new dual-CCD X3D chips soon which the company advertises with higher specs and performance. Decisions, decisions…
Let us know about your thoughts on the two AMD chips and if you plan on getting any of them in the comments below.
The Microsoft 365 admin center will be updated to support a new section focusing on usage reports for the New Outlook for Windows.
Similar to the other reports added recently—such as the one for Copilot usage—the usage reports for the New Outlook for Windows will include a variety of usage metrics for the platform, including those focused on the number of active users who made the transition from the classic Outlook for Windows to the new Outlook for Windows.
The Microsoft 365 apps usage report will include usage metrics for the new Outlook for Windows. This feature allows organizations to monitor the adoption and usage of the new Outlook for Windows client within their organization. The report provides detailed metrics on the number of active users who have transitioned from Outlook for Windows (classic) to the new Outlook for Windows.
The Redmond-based tech giant has been keen on providing organizations with all the tools they need to investigate, analyze, and build plans of action regarding certain tools. When Copilot was first announced within the Microsoft 365 Suite, the company provided its customers with a usage reports section for the AI tool to better understand what’s going on and which departments use Copilot the most.
This report would be no different. Even though the new Outlook for Windows has been released and is available to customers, many organizations are still using the classic version of the app. Microsoft had to act accordingly: it added Copilot and many more features that greatly modernized the platform.
However, the new report would also be a nightmare for admins, many of whom are already fed up with Microsoft’s constant updating of the 365 Admin Center. Back in September, we reported how dozens of admins gathered on Reddit to rant (and justifiably so) about not being able to properly keep up with the updates.
Fortunately, it will still be some time before it arrives, as Microsoft plans to add this new section to the admin center in March 2025.
Kernel_Thread_Priority_Floor_Violation 0x00000157 is a BSOD error, but it’s not a common one. However, you can still fix it by following the instructions from this guide.
How can I fix Kernel_Thread_Priority_Floor_Violation?
1. Remove ASUS software and Kaspersky
Press the Windows key + I to open Settings.
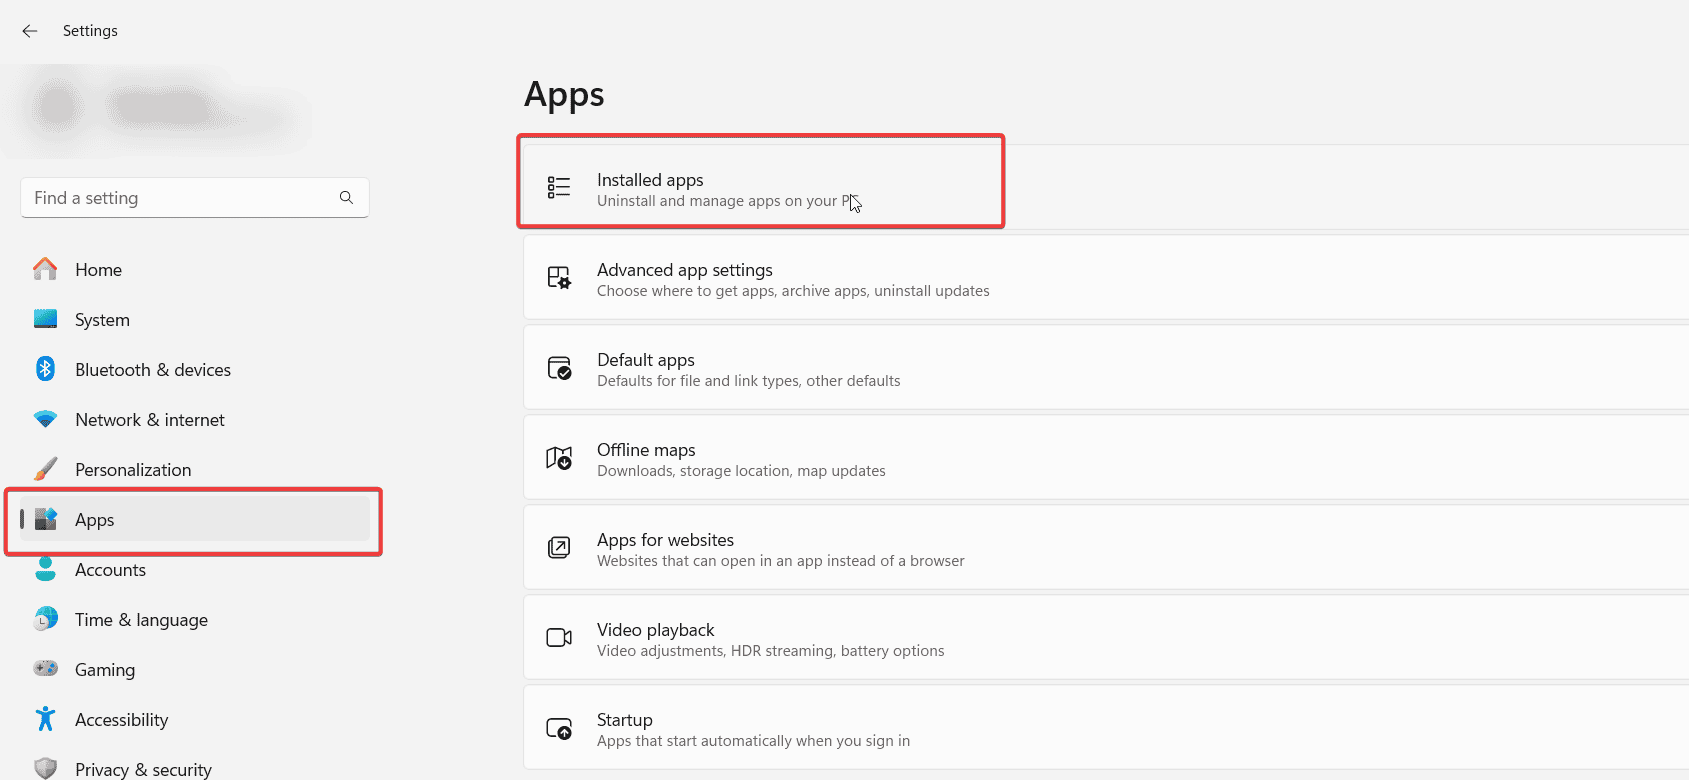
Navigate to Apps and select Installed apps.
Locate any ASUS software on the list.
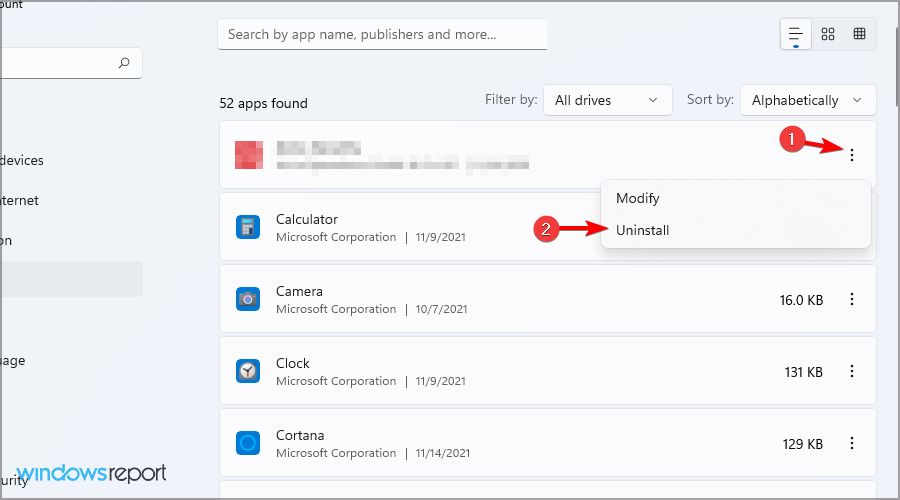
Click the three dots next to it and choose Uninstall.
Repeat the steps for all ASUS software.
The issue seems to be related to ASiO.sys and ASio64.sys, so removing ASUS software can help. A few users suggested removing the Kaspersky antivirus, so you can try that as well.
2. Update your drivers
Visit your motherboard manufacturer’s website.
Locate your model and go to the drivers section.
Download the latest drivers for your motherboard.
Optionally, download the latest drivers for other hardware as well.
Once the latest drivers are installed, check if the problem is gone.
It seems that Intel driver iaStorAV.sys is responsible for this issue, and after updating it, the problem should be gone.
Boot your PC and let it run for a few hours. If there are no errors, it means that your RAM is working properly.
Check your SSD since it can also cause this issue.
Lastly, inspect your motherboard and ensure it’s working properly.
Kernel_Thread_Priority_Floor_Violation error is often caused by incompatible or outdated drivers, but in some cases, you might have to replace your hardware to fix it.
The ERESOURCE_INVALID_RELEASE Windows Blue Screen of Death (BSoD), with error code 0x0000016E, appears when an invalid thread pointer is provided to ExReleaseResourceForThreadLite.
This usually happens due to outdated drivers, corrupted system files, conflicting third-party apps, or malfunctioning hardware.
Before you proceed, reboot the PC, install pending Windows updates, disconnect non-critical hardware, and disable overclocking, if any is configured. For most, this will fix the ERESOURCE_INVALID_RELEASE bug check.
How can I fix ERESOURCE_INVALID_RELEASE Windows blue screen?
1. Update the drivers
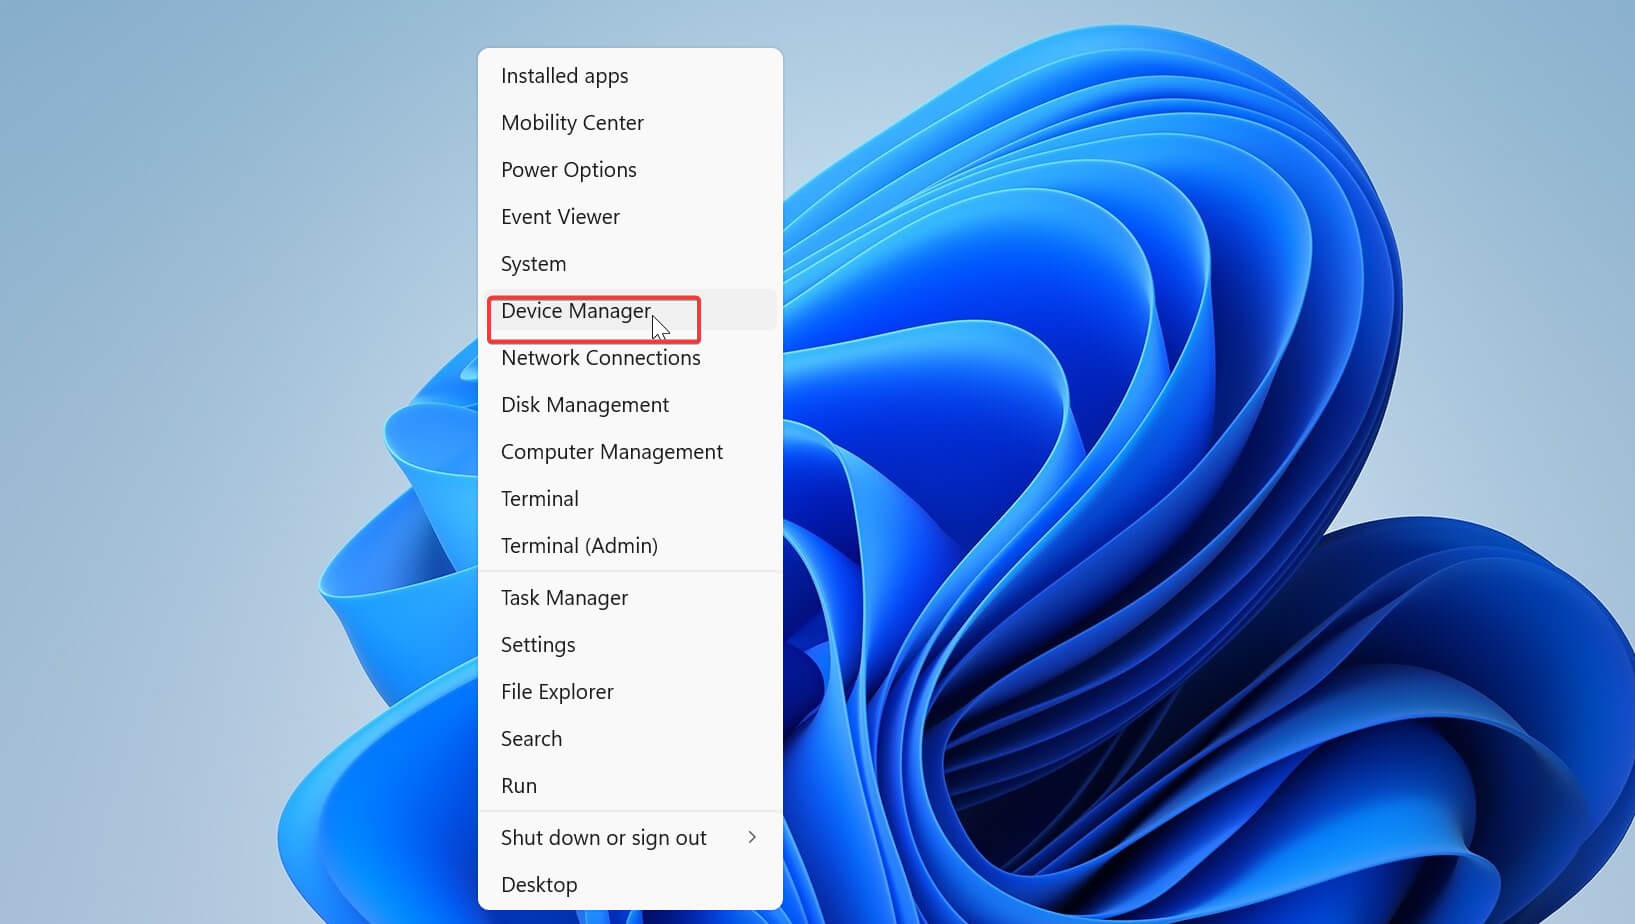
Press Windows + X to open the Power User menu, and select Device Manager.
Expand all the entries, right-click on the devices listed underneath individually, and select Update driver.
Click on Search automatically for drivers to let Windows install the best locally available version.
Similarly, update the other drivers and then reboot the PC.
Since outdated drivers were found to be the underlying cause in almost half the cases of ERESOURCE_INVALID_RELEASE, your primary approach should be to update the drivers!
If Windows can’t find a newer version, head to the manufacturer’s website, locate the new releases, and manually install the latest drivers.
2. Repair the system files
Press Windows + S to open Search, type Command Prompt, and click on Run as administrator.
Click Yes in the UAC prompt.
Paste the following commands individually and hit Enter after each: DISM /Online /Cleanup-Image /CheckHealthDISM /Online /Cleanup-Image /ScanHealthDISM /Online /Cleanup-Image /RestoreHealth
Now, execute this SFC scan command: sfc /scannow
Finally, reboot the PC and check for improvements.
3. Uninstall conflicting apps
Press Windows + R to open Run, type appwiz.cpl in the text field, and hit Enter.
Select any app that was recently downloaded or updated, and click on Uninstall.
Follow the on-screen instructions to complete the process, then restart the PC and check for improvements.
If a quick removal doesn’t work, it’s likely that the leftover files, app cache, or Registry entries are still triggering conflicts. In this case, using a top-rated software uninstaller will help you delete all these in one go!
4. Check for issues with disk and RAM
4.1 Repair the disk
Press Windows + R to open Run, type cmd, and hit Ctrl + Shift + Enter.
Click Yes in the UAC prompt.
Execute the following Check Disk command: chkdsk /r
If asked to schedule the scan, press Y, hit Enter, and then reboot the PC.
The Check Disk utility, when run, will fix issues with the hard drive, including bad sectors, which is often the reason for ERESOURCE_INVALID_RELEASE in Windows.
4.2 Identify issues with RAM
Press Windows + S to open Search, type Windows Memory Diagnostic, and click on the relevant result.
When Windows Memory Diagnostics is unable to detect any issues, you can go with an advanced RAM-testing tool like Memtest86+, which will run a series of scans on individual memory modules and identify all problems.
If a RAM stick is malfunctioning, replace it with a new, compatible one to fix the ERESOURCE_INVALID_RELEASE Windows blue screen.
5. Reinstall Windows
When nothing else works, the last option is to reinstall Windows. If you are worried about data loss, move any critical files to external storage.
Reinstalling Windows via a bootable USB
To reinstall Windows, connect a USB flash drive to another PC > go to Microsoft’s official website > download the Media Creation Tool > use it to create a bootable Windows USB > plug the USB drive into the affected PC > change the boot order to the flash drive > load the Windows setup > follow the on-screen instructions.
If this, too, fails, it’s hardware malfunction to blame for ERESOURCE_INVALID_RELEASE, and you must visit a PC repair shop.
Before you leave, learn all the causes of BSoD and take steps to prevent these from reappearing.
Which fix worked for you? Share with our readers in the comments section below.
Disable Bluetooth on your device. You might need to disable it from Device Manager as well.
Connect a Bluetooth dongle and check if the problem still exists.
Alternatively, try using wired devices instead or Bluetooth ones.
Win32k_Atomic_Check_Failure 0x00000160 is a rare error, and it usually affects Windows Insiders or developers, so if you’re a regular user you most likely won’t ever encounter it.
Viva Engage will allow users to edit and schedule polls for the first time in the platform’s history. According to a recent entry to the Microsoft 365 Roadmap, the Redmond-based tech giant will update the Viva platform to allow poll editing and scheduling for publishing.
However, there is a limit to it: editing cannot happen once the poll is published. So even if your poll is saved but not out there, you can still edit it with further information and data.
The polls are the last ones to get the editing feature. Microsoft already brought it to all of the other Viva Engage posts. Users can now edit the platform’s discussions, questions, praise, and articles.
Users can schedule a poll for publication in Engage. Users can also edit a poll prior to publication, though once published, a poll is not editable. This change brings the edit and schedule capability to polls, like all other post types in Engage (discussion, question, praise, and article).
You’ll be able to edit polls in Viva Engage starting January 2025.
AMD released Ryzen 7 9800X3D on November 7 and it already looks like the shelves will soon empty by the gamers with reasonable budgets for that. It goes for $480 on Amazon, and after you’ve read this review, you’ll probably want it too.
All about AMD Ryzen 7 9800x3D
1. Technical specifications
AMD describes it as an advanced desktop processor designed for gamers and creators seeking high performance and efficient multitasking. As this description might seem boring, let’s allow the technical specifications provided by AMD speak for themselves first.
Specification
Details
Cores
8
Threads
16
Base Clock
4.7 GHz
Boost Clock
Up to 5.2 GHz
L3 Cache
96 MB (including 64 MB 3D V-Cache)
L2 Cache
8 x 1 MB
TDP
120 W
Max Boost Power
162 W
Lithography
TSMC N4 (CCD) / N6 (IOD)
Socket
AM5
Memory Support
Up to DDR5-5600
Price
$479
Release Date
November 7, 2024
The chip is based on AMD’s Zen 5 architecture and it comes with 8 cores and 16 threads, offering a 4.7 GHz base clock that can turbo boost up to 5.2 GHz. AMD says that their new CPU is 20% better than Intel’s latest flagship (we assume they’re talking about Intel Core 9 285K). If that’s the comparison we’re looking for, the equivalent Intel Core 9 285K with 24 cores is $600 on Amazon, which makes Ryzen 7 9800X3D look like a bargain for $480.
The bomb here is that according to Tom Hardware’s review on the chip, it utterly smashes Core 9 285K with an average 35% boost in performance. That alone might be the clear sign that we’re dealing with a superstar gaming CPU.
What makes Ryzen 7 9800X3D so good? AMD says that it’s 3D V-Cache technology with a whooping 96 MB of L3 cache that make everything go faster in CPU-intensive applications and games. We’ve talked about this when we reviewed the AMD Ryzen 7 7800x3D. However, AMD states that Ryzen 7 9800X3D is 8% faster.
However, as with any new tech, the 3D V-Cache is still pretty new and not all the games are optimized to use the X3D chip’s feature. Even so, AMD argues that even on those titles you will see at least a 1% framerate increase than with Ryzen 7 7800x3D.
2. Memory and configuration
The Ryzen 7 9800X3D supports DDR5 memory with speeds up to 5600 MT/s in a dual-channel configuration, although you can do even better with overclocking. The CPU is compatible with PCIe 5.0 for fast data transfer and high-performance graphics card compatibility. Overclocking capabilities are unlocked, marking a significant shift, as AMD had previously restricted overclocking on chips with 3D V-Cache. This makes the 9800X3D more versatile for enthusiasts aiming to push its limits in custom cooling setups.
Integrated Radeon Graphics offers basic display functionality, a convenient feature for users who may not immediately add a dedicated GPU. The processor is optimized for high-end gaming and heavy multitasking, supporting the AVX-512 instruction set, which can significantly enhance performance for AI, rendering, and other complex workloads. Hardware virtualization is another highlight, allowing smooth handling of virtual machines.
The Ryzen 7 9800X3D is built on TSMC’s 4nm process for the CPU cores and a 6nm process for the I/O die, resulting in efficient energy usage while delivering a robust 120W TDP, which actually means that you will need an efficient cooling solution.
As we’ve mentioned about Ryzen 7 7800x3D, the new CPU works on the AM5 socket also used by X870 and X670, so you won’t need to change much here. However, make sure you’ve got a DDR5 compatible motherboard since Ryzen 7 9800X3D won’t work with DDR4 memory modules.
3. Benchmarks and performance
According to Techspot’s benchmarks, AMD Ryzen 7 9800X3D is simply flying on most of the gaming titles of the moment. For instance you will get an average framerate of 668 against only 514 with Intel Core 9 285K in Counter-Strike 2. The CPU gets a top FPS place in games like Hitman 3, Warhammer 40,000, Watch Dogs: Legion, and many others.
If you’re a graphics designer, you will also want this as your next CPU. To be fair, it falls behind Intel Core 9 285K when it comes to Adobe Premiere Pro 2024, but it still shows great results.
In fact, although it’s a top performance CPU for gaming, it slightly falls behind the modern Intel CPUs for productivity apps in general.
It also draws more power in idle state: approximately 35W compared to around 12W for the Intel counterparts.
The specialists who tested AMD Ryzen 7 9800X3D paired the CPU with an NVIDIA RTX 4090 graphics card, but you might as well wait for the RTX 5090 (early next year launch) and the numbers will improve even further.
Should I get the new AMD Ryzen 7 9800X3D?
Ryzen 7 9800X3D is only $30 higher than the launching price of its predecessors and it clearly leaves Intel’s Core 9 285K in the dust when it comes to gaming. Actually, for it’s value, it could stand pretty close to Core i7-14700K.
So, if you’re building a gaming rig, you’ve got the budget and you find it now in stores, go for it. Then again, AMD is expected to launch the new dual-CCD X3D chips soon, and they might have a lot more horsepower. There are always lots of ifs and whens, but if you’re living in the moment, there is no better gaming chip right now.
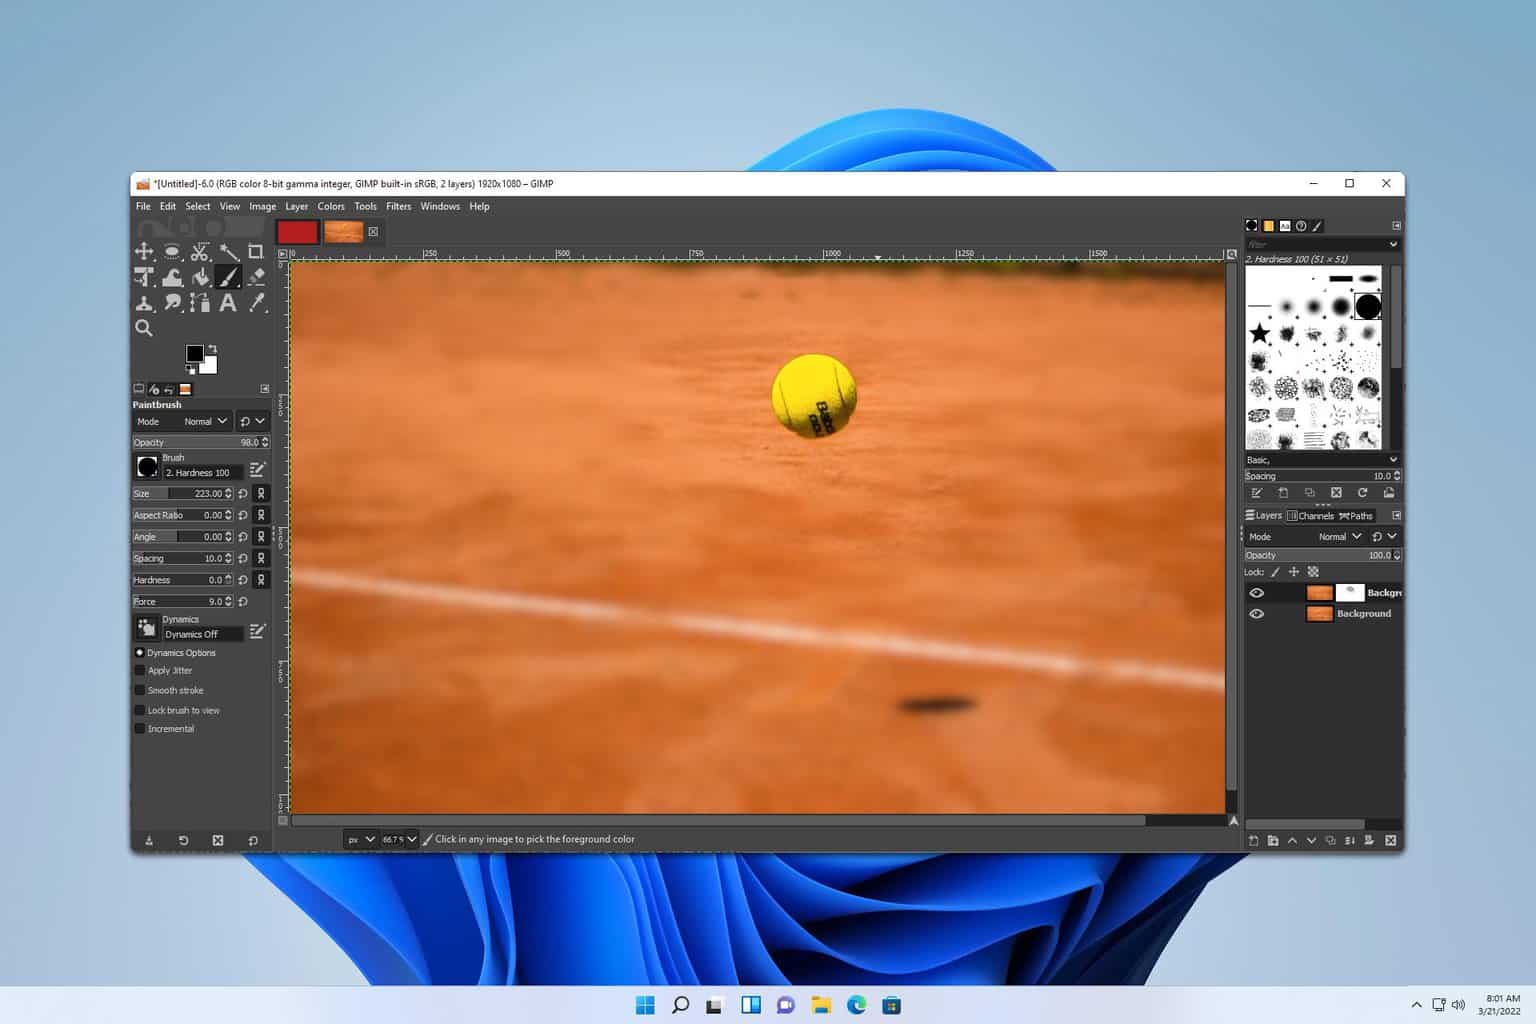
If you’re new to GIMP, you might be wondering how to blur the background in GIMP. The good news is that this process is simpler than you think, and in this guide, we’ll show you how to do it.
How do I blur a background in GIMP?
Duplicate the layer and apply the blur
Open the image you want to edit in GIMP.
Locate your layer, right-click it, and choose Duplicate Layer.
Next, select the top layer.
Choose the right selection tool. We used Ellipse Select, but you might need to use the Scissors Tool instead.
Select your object. Then, press Ctrl + I to invert the selection.
Go to Filters and select Blur. Choose Gaussian Blur.
Select the blur value and then click on OK.
Now your background is blurred, but the effect doesn’t look smooth. We can fix that by doing the following:
Right-click the top layer. It should be the blurred layer on your PC. Choose Add layer mask. Click Add.
Next, choose the Paintbrush tool.
Set its color to black. Adjust Force and Hardness to lower values.
Ensure that the layer mask is selected. It should be represented by a white square.
With the brush tool, gently paint around the subject to remove the blur and make it look more natural.
If you want to undo the effect, just switch to white color and paint over the area you want to fix.
As you can see, it’s pretty simple to blur the background in GIMP, and this is the most basic way to do it, so you can try it and experiment with different values or methods until you get the desired results.
If you want to learn more, we have a great article on GIMP 2.10 tips that you shouldn’t miss. Now that you know how to blur the background, why not take a look at our guide on how to make a transparent background in GIMP?
If you want to take your designs to a new level, you might want to learn how to install GIMP plug-ins for additional functionality. If you don’t use GIMP, we also have a guide on how to blur the background in Photoshop, so don’t miss it.
Outlook will allow users to connect to other Office apps directly from the app. The Redmond-based tech giant announced the new enhancement, called the Optional Connected Experiences privacy setting, in a recent entry to the Microsoft 365 Roadmap. It basically makes it easier for users to have wide access to an array of apps without having to repeat the login process.
The new setting is optional and can be easily enabled by going to Settings > General > Privacy and data > Privacy settings.
This rollout introduces the privacy setting for “Allow the use of additional optional connected experiences in Office” in Outlook on the web which is available in other Office apps today. The setting is found under Settings > General > Privacy and data > Privacy settings.
It’s set to be released in December 2024.
In other news, Microsoft has acknowledged the frustrating out-of-memory error that is still happening on the platform and released a fix for it. If you’re impacted by this, know that you can now temporarily fix it.
Speaking of Outlook activity, you’ll soon be able to work on the platform even when you’re not connected to the Internet. Microsoft decided to enhance it with an offline mode; we’re not sure how you’re able to use the other Office apps on Outlook while in this mode, though.
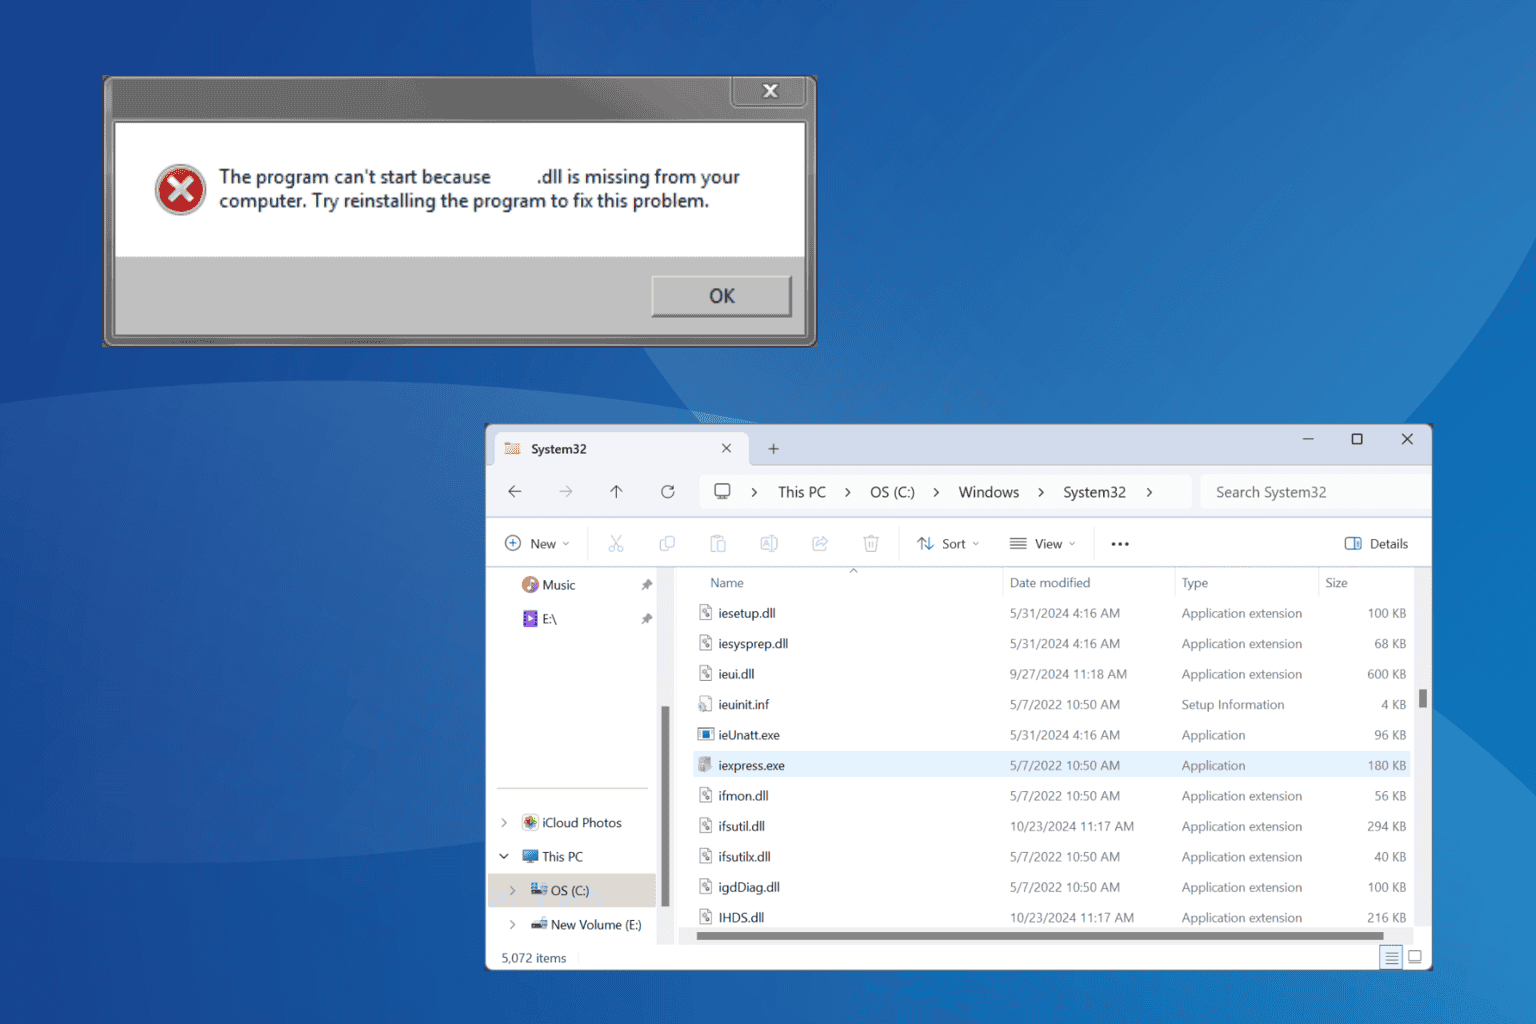
The igdumd64.dll file, developed by Intel and a component of the Intel Graphics Technology driver, is a key part of Windows. If the file is not available or incompatible, the error message reads, C:\ Windows\System32\igdumd64.dll is either not designed to run on Windows or it contains an error.
If you are getting any errors related to igdumd64.dll, restart the PC and install all pending Windows updates. For most, these basic checks should do the trick!
What can I do when igdumd64.dll is missing?
NOTE
Although several websites claim to host igdumd64.dll for download, I recommend against it since these files are often bundled with malware, which will harm your PC.
1. Manually transfer igdumd64.dll
The easiest way to restore the missing igdumd64.dll is to get a copy of the DLL from another PC running the same iteration and architecture (32-bit or 64-bit) of Windows. As for the igdumd64.dll location, it’s stored in: C:\Windows\System32
igdumd64.dll in the System32 folder
So, connect a USB flash drive to another PC > go to the System32 folder > copy the DLL to the flash drive > connect it to the affected computer > move igdumd64.dll to the same location > restart the computer.
2. Reinstall the graphics driver
Press Windows + X to open the Power User menu, and select Device Manager.
Expand the Display adapters entry, right-click on the Intel card, and select Uninstall device.
Tick the checkbox for Attempt to remove the driver for this device, and click Uninstall.
Reboot the PC, and Windows will automatically install a fresh copy of the driver.
Finally, verify whether Windows now restores igdumd64.dll.
3. Update the graphics driver
Press Windows + R to open Run, type devmgmt.msc in the text field, and hit Enter.
Double-click on Display adapters, right-click on the Intel graphics adapter, and select Update driver.
Click on Search automatically for drivers and wait for Windows to install the best locally available version.
Restart the PC to apply the changes and check for improvements.
Press Windows + S to open Search, type Device Manager in the text field, and click on the relevant result.
Expand the Display adapters entry, right-click on the Intel graphics card, and select Properties.
Go to the Drivers tab, and click on Roll Back Driver.
Select a reason for the roll back or specify one in the available field, and click Yes to confirm.
After rolling back the driver update, verify whether igdumd64.dll errors are fixed.
If a reinstall didn’t help and a newer version isn’t available, you can always roll back the driver update and revert back to the stable version, one where the igdumd64.dll file was present.
5. Reinstall the affected app
Press Windows + R to open Run, type appwiz.cpl in the text field, and hit Enter.
Select the affected app that’s throwing the missing DLL error, and click on Uninstall.
Follow the on-screen instructions to complete the process, and then reboot the PC.
Finally, reinstall the application from an official source, say the manufacturer’s website or Microsoft Store.
Sometimes, apps that require specific non-Microsoft DLLs, like igdumd64.dll, include it in the installation package. And if it doesn’t get added the first time, uninstalling the app and then reinstalling it will get things running in no time!
6. Perform a system restore
Press Windows + S to open Search, type Create a restore point, and click on the relevant result.
Click the System Restore button.
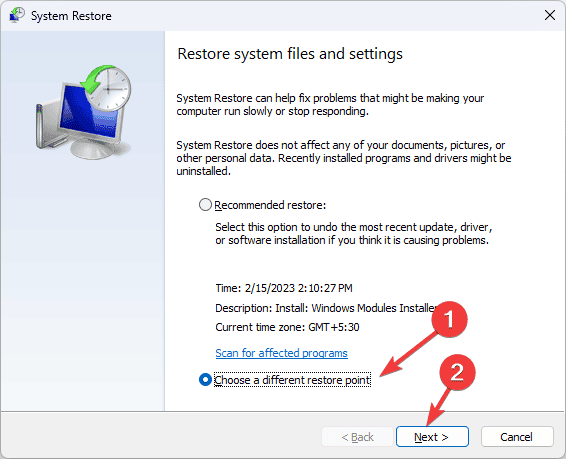
Select the Choose a different restore point option, if available, and click on Next.
Pick a restore point created before the issue first appeared or the oldest one, and click on Next.
Verify the restore details, click Finish, and then confirm the change.
Wait for the process to complete. It may take 15-30 minutes.
A system restore will come to aid when you can’t identify what led to igdumd64.dll going missing in Windows by reverting all recent changes on the PC.
The new version of Notepad, Microsoft’s text editor app for Windows, now has an AI feature called Rewrite. With Rewrite, you can rephrase sentences, adjust the tone, and modify the length of your content based on your preferences.
Microsoft says that if you don’t like the variations of rewritten text Notepad generates, you can customize Rewrite’s settings to change the output. You can do that if you want to revert to the original text.
In a blog post, Microsoft says Notepad will also remember the previous versions of rewritten text, allowing you to compare different rewrites easily. If you prefer, you can disable Rewrite in Notepad’s settings.
Rewrite is available in preview to all Windows 11 users in the US, France, the UK, Canada, Italy, and Germany. Microsoft 365 Personal and Family and Copilot Pro subscribers in Australia, New Zealand, Malaysia, Singapore, Taiwan, and Thailand can use AI credits to spin new text versions.
In addition to Rewrite, Microsoft says that it’s continued to improve Notepad’s launch performance. The company claims that with this update, most users will see Notepad launch 35% faster, and some will see the app launch more than 55% faster.
In other news, Microsoft Paint has also received additional AI capabilities, including the ability to add AI-powered elements to images with the new Generative Fill.
Sometimes you might get a Cluster_Csv_Clussvc_Disconnect_Watchdog BSOD error, and it can cause a lot of issues, so in today’s guide, we’re going to show you how to fix it.
How can I fix the Cluster_Csv_Clussvc_Disconnect_Watchdog error?
1. Restart CSVs
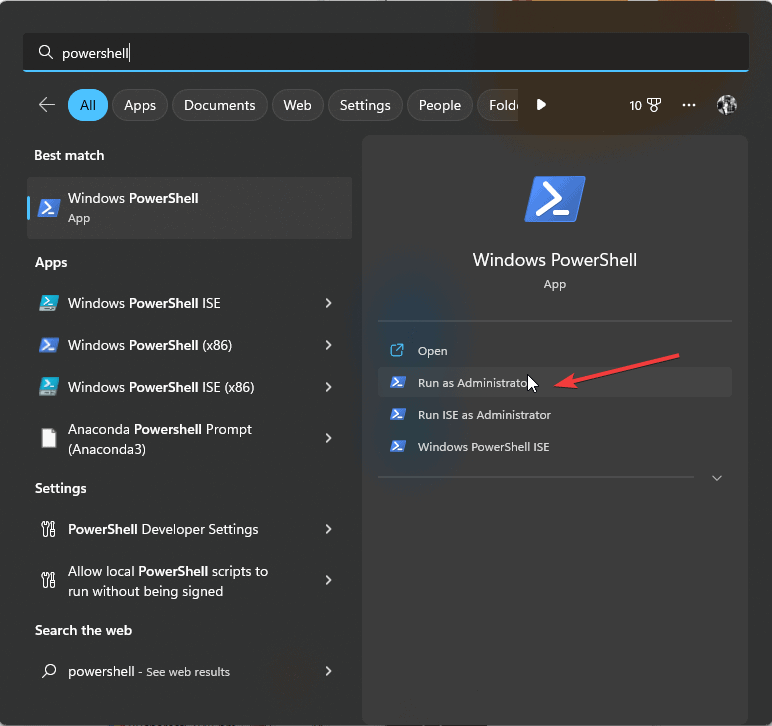
Press Windows key + S and type powershell. Choose Run as administrator.
Next, run Get-ClusterSharedVolumeState
If any CSVs are in a failed state, restart them with the following commands: Stop-Service -Name ClusSvc -Force Start-Service -Name ClusSvc
After that, check if the problem is gone.
2. Update network drivers
Press the Windows key + X and choose Device Manager.
Locate your network adapter on the list and choose Update driver.
Next, choose Search automatically for drivers.
Wait for the process to finish.
For best results, it’s advised to visit your network adapter’s website and download the latest drivers.
Click Next and follow the instructions on the screen.
If the problem still persists, you might want to consider performing a Windows 11 factory reset, just be sure to back up your files beforehand.
Cluster_Csv_Clussvc_Disconnect_Watchdog can occur due to issues with various services, and if you encounter it, try restarting them and check if that helps.
You can also inspect your hardware, and ensure that everything is working properly. It’s worth mentioning that this is a developer error, so it’s not likely that you’ll encounter it as an end user.
The ERROR_THREAD_1_INACTIVE, which comes with the error code 210 usually comes with the message The signal handler cannot be set. The bug check occurs when the system encounters an issue setting a signal handler like Ctrl + C or Ctrl + Break. When the process fails, this leads to software crashes or freezing. The culprit in this case is a corrupted or mismatch driver and here’s what to do to fix it.
How do I fix ERROR_THREAD_1_INACTIVE?
1. Change the UseSignalHandler value in the Registry
Press Win + R, type regedit and press Enter to start Registry Editor.
Navigate to the following key: HKEY_LOCAL_MACHINE\SYSTEM\CurrentControlSet\Control\CrashControl
Look for UseSignalHandler, double-click it and set its value to 0 (disabled).
Changing the UseSignalHandler value is just a workaround in this case because it’s treating the effect, not the cause. In other words, the problem is still a malfunctioning or corrupt driver, but the problem will not manifest.
2. Update or reinstall the problematic driver
Right-click the Start button and select Device Manager.
You will get a list of system components. Click on them one by one to expand the category, and look for a driver with a yellow exclamation mark next to it.
Once located, right-click the driver and choose Update driver from the context menu.
Click Search automatically for drivers.
Follow the on-screen prompts to complete the process.
Of course, you should start by looking for a driver you installed recently, because that might be causing this issue. Also, if Windows cannot find a driver for your device, you can download it manually from the manufacturer’s website. You can also download a reliable driver updater tool to install the latest version of the driver easily.
3. Set the Signal Handler for Explorer using a batch file (for advanced users)
Click the Start button, type notepad and open the app from the results.
Copy and paste the following code in Notepad, then click the File button and select Save as, then change the extension from TXT to BAT and save the file in an accessible location:
setlocal enableDelayedExpansion
for /f "skip=1" %%a in ('wmic process where name="explorer.exe" get processid') do set PID=%%a
tasklist /pid %PID% /FI "IMAGENAME eq explorer.exe" /FO CSV /NH | findstr "02" /B /E /I > nul
if %errorlevel% equ 0 (
echo The signal handler for Explorer.exe is already set.
) else (
echo The signal handler for Explorer.exe is not set. Setting it now…
for /f "skip=1" %%a in ('wmic process where name="explorer.exe" get processid') do set PID=%%a
for %b in (1 2 6 9 15 18) do (
echo Setting signal handler for signal %b…
handle 0x%b set /p "foo=" ) echo Signal handlers have been set for Explorer.exe. )
Find the file on your PC and double-click it to run. The batch script will set the correct signal handlers for Explorer and you shouldn’t have the ERROR_THREAD_1_INACTIVE problem anymore.
That’s it! By following the solutions below, you should be able to fix the ERROR_THREAD_1_INACTIVE bug check. However, if nothing works, you can also run System Restore, and turn back the time to your system before this issue started occurring. However, this will also uninstall any software you’ve installed from that point on.
If you have any questions or know about other solutions we didn’t cover, let us know in the comments below.
Many of our readers have encountered the Mpengine.DLL could not be found error while running a malware scan using Windows Defender. This error usually occurs when Microsoft Security or Windows Defender components are damaged, corrupted, or missing.
Mpengine.DLL is a dynamic link library file that is an integral part of Microsoft Defender Antivirus and is responsible for its malware detection capabilities. First, restart your computer to fix the temporary system glitches and update your Windows to the latest version.
How can I fix the Mpengine.dll could not be found error?
1. Run the System File Checker scan
Press the Windows key, type cmd in the search box, and click Run as administrator from the list of options to launch Command Prompt with elevated rights.
To repair missing or corrupted system files, type the following command and hit Enter: sfc /scannow
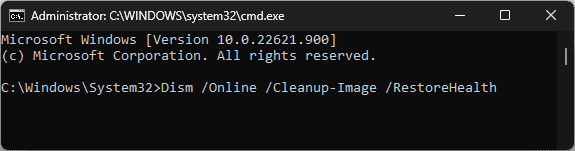
Wait for the scan to complete, as it may take some time, and the tool will fix any issues it detects. Copy & paste the following command to resolve issues related to the Windows system image and press Enter: Dism /Online /Cleanup-Image /RestoreHealth
The scan will take some time. Once complete, restart your computer to let the changes take effect.
2. Use a reliable third-party DLL fixer
The easiest way to recover or restore a DLL file and resolve this error is to copy the DLL file from another computer with the same Windows version, then paste it to the affected computer at the same location C:\ProgramData\Microsoft\Windows Defender\Definition Updates{A74D6E50-5675-43AE-9E52-77D1BF36FBAE}
If you can’t find the file, we recommend using a third-party DLL fixer tool to recover the missing DLL file without any hassle. To use it, download and install the tool, then run it to restore files and fix the problem.
3. Check the Microsoft Defender settings
Press Windows + I to open the Settings app.
Go to Privacy & security, then click Windows Security.
Click Virus & Threat protection.
Select Manage settings.
Check if real-time protection is turned on and other security settings are in place.
4. Repair/Reset Windows Security
Press Windows + I to open the Settings app.
Go to Apps, then click Installed apps.
Scroll down to the list, then locate and click System components.
Locate Windows Security, then click the three dots icon and select Advanced options.
Now look for the Reset section, and click the Repair button. This will repair the system component without affecting its data.
If this doesn’t work, go to the Reset section again and click the Reset button. This will delete the system component’s data.
5. Reregister the DLL file
Press the Windows key, type cmd in the search box, and click Run as administrator to open Command Prompt with elevated rights.
Type the following command to reregister the Mpengine.DLL and hit Enter:regsvr32 Mpengine.DLL
Click OK when prompted and restart your computer.
6. Reinstall Windows Security
Press the Windows key, type powershell in the search box, and click Run as administrator.
Type the following command to uninstall Windows Security and hit Enter: Get-AppxPackage Microsoft.Windows.SecHealthUI | Remove-AppxPackage
Copy & paste the following command to reinstall the app and press Enter: Get-AppxPackage Microsoft.SecHealthUI -AllUsers | Reset-AppxPackage
Restart your computer to complete the process.
5. Restore your PC to the previous version
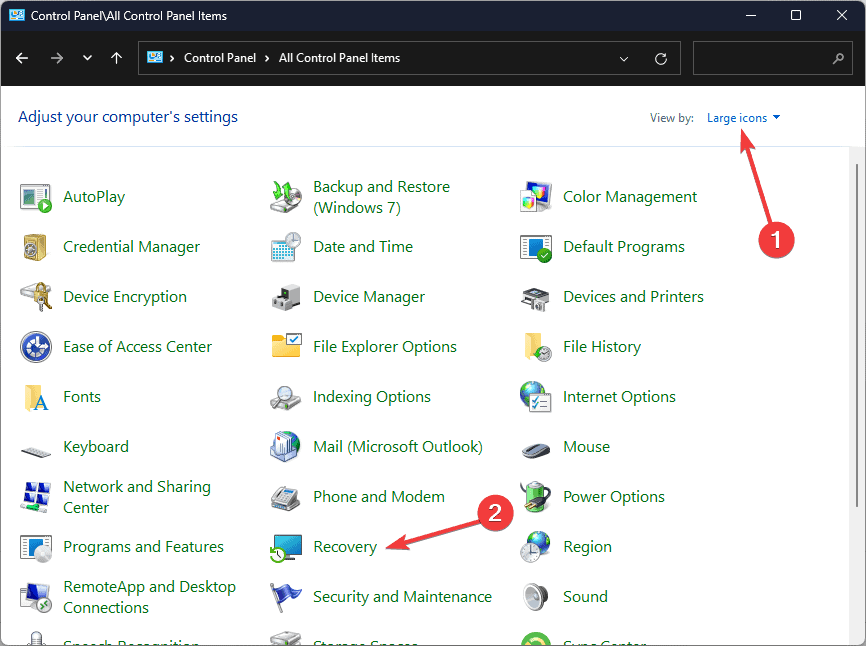
Press the Windows key, type control panel in the search box, and click Open from the list of options.
Select Large icons for View by and click Recovery.
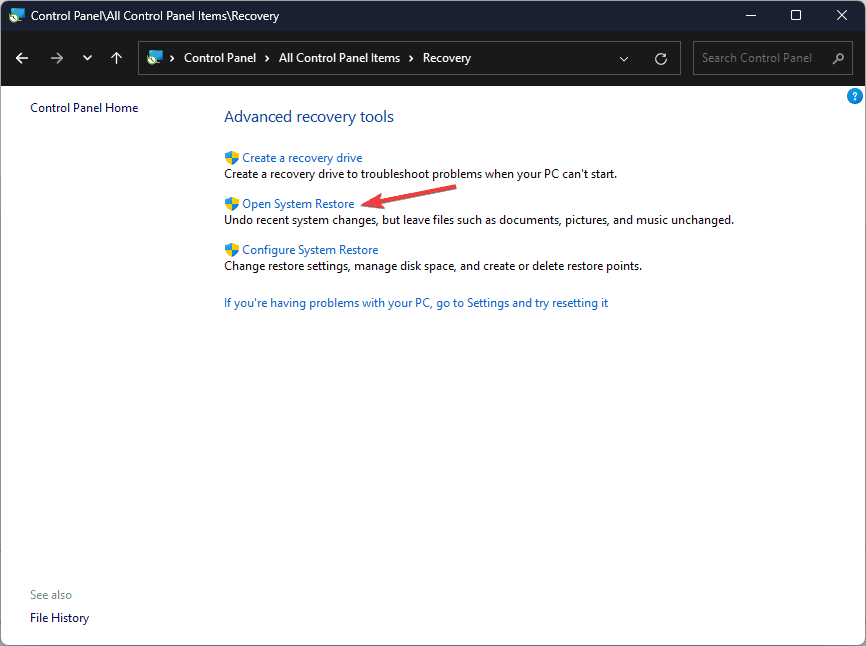
Click the Open System Restore link.
Select Choose a different restore point on the System Restore window, and click Next.
Select a restore point created from the available restore points before encountering the Mpengine.DLL error and click Next.
Click Finish.
Your device will reboot, and Windows will restore the system settings to the chosen version. If you see the System Restore didn’t complete the error successfully message, it could be conflicting programs or a driver error. We recommend you check out this detailed guide for solutions.
6. Download the DLL file from a third-party website
NOTE
If nothing has worked for you, you can get the DLL file from a reliable third-party website, like DLLme, which is verified and tested by WR experts.
Click the DLLme website to access the Mpengine.DLL page, then click the Download button.
Double-click the downloaded folder, then locate and copy the .dll file.
Go to this path and paste the copied file. Don’t forget to replace C with the system drive letter of your device if it is not C for you: C:\ProgramData\Microsoft\Windows Defender\Definition Updates\{A74D6E50-5675-43AE-9E52-77D1BF36FBAE}
Restart your PC to confirm the changes.
This is how you can fix the Mpengine.DLL could not be located error. However, if you face the same issue due to any other DLL file, you can check out this guide to quickly recover it.
Before you go, don’t forget to check out our latest guide on what to do if Invagent.DLL is missing from your computer. We also have a new guide on Amdihk64.DLL not signed, so don’t miss it to learn more about DLL files.
If you have any suggestions or questions about this DLL issue, feel free to mention them in the comments section below. We are happy to help.
Invalid_Slot_Allocator_Flags is a BSOD error that usually affects developers, but you can also get it as an end user. If this happens, this guide should be able to help you fix them.
How can I fix the Invalid_Slot_Allocator_Flags error?
1. Update Windows
Press the Windows key + I to open the Settings app.
Go to the Windows Update section and click on Check for Updates.
If any updates are available, they will be automatically downloaded.
Once your system is up to date, check if the problem is gone.
2. Update your drivers
Visit your motherboard manufacturer.
Locate your model on the list and locate the Drivers section.
Find the latest drivers for your motherboard, and install them.
Do the same for your dedicated GPU or any other device you have connected.
3. Perform a system scan
Press the Windows key + S and enter cmd. Choose Run as administrator.
Run the following command: sfc /scannow
Wait for the scan to finish.
Run these two commands: DISM /Online /Cleanup-Image /CheckHealth DISM /Online /Cleanup-Image /ScanHealth
If the commands have found any errors, run: DISM /Online /Cleanup-Image /RestoreHealth
In the Services tab, check Hide all Microsoft services and click on Disable all.
Save changes, but don’t restart your PC.
Press Ctrl + Shift + Esc to open Task Manager.
In the Startup tab, disable all startup applications. To do that, select an application and click on Disable.
Restart your PC.
If the problem doesn’t appear anymore, try enabling disabled services or startup applications until you manage to replicate the problem. Once you find the cause, you’ll need to remove that application or service from the PC.
5. Use System Restore
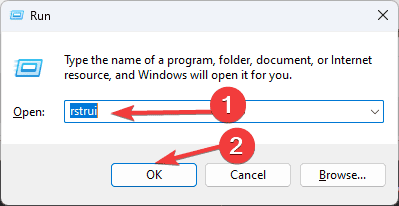
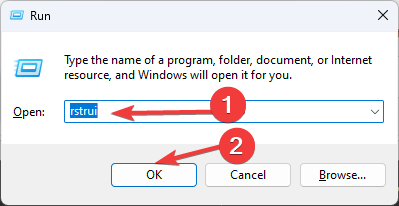
Press the Windows key + R and enter rstrui.
Select the desired restore point and click on Next.
Follow the instructions on the screen to complete the process.
Once your system is restored, check if the problem is gone.
If the Invalid_Slot_Allocator_Flags is still there, we suggest inspecting your hardware, especially if you made any changes recently. If that doesn’t help, you might have to perform a Windows 11 factory reset.
The ILLEGAL_IOMMU_PAGE_FAULT Blue Screen of Death (BSoD), with error code 0x00000158, appears due to issues with IOMMU (Input-Output Memory Management Unit). It highlights that IOMMU sent a page fault packet for an incorrect ASID (Address Space ID), and the OS crashed to preserve system integrity.
The Illegal IOMMU Page Fault error appears due to outdated drivers, corrupted system files, disk issues, incorrectly seated or malfunctioning RAM modules, conflicting third-party apps, or a misconfigured BIOS.
Before you proceed to the solutions, restart the PC, disconnect any non-critical hardware, and install pending Windows updates. For most of you, these basic checks should resolve the BSoD!
How can I fix the ILLEGAL_IOMMU_PAGE_FAULT blue screen?
1. Update all the drivers
Press Windows + X to open the Power User menu, and select Device Manager.
Expand all the entries here, right-click on the devices listed underneath individually, and select Update driver.
Click on Search automatically for drivers to let Windows install the best locally available version.
Similarly, update all the drivers and then restart the PC.
Outdated drivers, primarily those for the display adapter, network adapter, hard disk, and connected hardware, are known to cause ILLEGAL_IOMMU_PAGE_FAULT 0x158 in Windows. To fix things, update all the drivers!
If Windows can’t find a better version, go to the manufacturer’s official website, locate the new releases, and manually install the latest driver.
2. Repair the corrupted system files
Press Windows + R to open Run, type cmd, and hit Ctrl + Shift + Enter.
Click Yes in the UAC prompt.
Execute the following DISM commands: DISM /Online /Cleanup-Image /CheckHealthDISM /Online /Cleanup-Image /ScanHealthDISM /Online /Cleanup-Image /RestoreHealth
Press Windows + S to open Search, type Command Prompt, and click on Run as administrator.
Click Yes in the UAC prompt.
Paste the following command and hit Enter: chkdsk /r
If asked to schedule the scan for the next reboot, press Y, hit Enter, and then restart the PC.
The built-in Check Disk utility will fix almost all issues with the hard drive, including bad sectors, which might be the reason behind the ILLEGAL_IOMMU_PAGE_FAULT blue screen in Windows.
4. Uninstall conflicting third-party apps
Press Windows + R to open Run, type appwiz.cpl in the text field, and hit Enter.
Select any app that was recently installed or updated, and click on Uninstall.
Follow the on-screen instructions to complete the process.
Restart the PC and check for improvements. If the BSoD error persists, uninstall other apps you believe may be conflicting with the OS.
In some cases, a quick app removal won’t do the trick due to leftover files, app cache, and Registry entries. So, I recommend using a top-rated software uninstaller to get rid of all these!
5. Reset the BIOS to defaults
NOTE
Each BIOS has a different interface, and it won’t necessarily be the same as the one shown below. So, for other manufacturers, I recommend checking the official website for the exact steps.
Turn off the PC, then press the Power button to turn it on, and as soon as the display lights up, press F1, F2, F10, F12, Esc, or Del to access the BIOS.
Now, look for an option that reads Default, Reset, or Reset BIOS, and select it.
Choose the appropriate response in the confirmation prompt.
Save the changes, exit the BIOS, boot Windows, and check for improvements.
If a reset doesn’t work, update the BIOS to fix the ILLEGAL_IOMMU_PAGE_FAULT Windows blue screen.
6. Check the RAM for issues
Press Windows + S to open Search, type Windows Memory Diagnostic in the text field, and click on the relevant result.
If Windows Memory Diagnostic can’t detect any issues, experts recommend using Memtest86+, an open-source RAM testing tool that will run a wide array of scans on individual memory modules and detect all issues.
In case any of the RAM sticks are malfunctioning, it’s best to replace them with a fresh, compatible one to get rid of ILLEGAL_IOMMU_PAGE_FAULT.
7. Reinstall Windows
When nothing else works, the last option is to reinstall Windows. Since there’s a chance of data loss here, I suggest moving any critical files to external storage.
By now, you should have fixed the ILLEGAL_IOMMU_PAGE_FAULT Windows BSoD. Before you leave, discover the causes of BSoD, and take necessary measures to prevent them from reappearing!
We covered a similar issue in our latest guide on ERROR_PAGE_FAULT_DEMAND_ZERO, so don’t miss it. For any queries or to share more fixes with our readers, drop a comment below.
Well, it seems that Microsoft has listened to you and soon, you will have this feature. Here’s how Microsoft describes this new Planner capability on the Microsoft 365 roadmap page:
Board view in My Tasks offers a visual representation of your tasks similar to a kanban board, making it easier to track progress and manage your workload. See all your tasks at a glance and move them between columns to update their progress. You can group tasks by Plan, Progress, Due Date, and Priority, allowing you to tailor the board to your specific needs. Board view is available in addition to the existing grid view in My Tasks.
So, soon, not only you’ll be able to view your tasks in a kanban style view, but you will also be able to move them between columns.
Another important update is that you will also able to group tasks by different criteria and customize your board a lot better.
Microsoft also suggests that the Board view from My Tasks feature will coexist with the existing grid view and you will probably enable or disable your desired view mode.
We also need to mention that Planner actually had a Board view in My Tasks in Microsoft Teams’ Planner, but for some reason it was replaced in 2020 with the Grid view.
We don’t have any images on how the new Board view will look like, but from Microsoft’s description, it will be a more sophisticated version of the old one.
The new Board view in My Tasks from Microsoft Planner will start rolling out in January 2024.
How do you feel about the introduction of the Board view in My Tasks? Let us know in the comments below.
Microsoft and Google are working together to make Google Chrome better at recognizing whether your device is being used as a tablet or a desktop on Windows 11. In other words, Chrome will know you’re using your device with a keyboard and mouse or as a touch-screen tablet.
Touch Mode in Windows 11
Windows 11 uses an improved touch interface that automatically adjusts when you detach a keyboard from a convertible device or when using a touchscreen device. This is often referred to as “Touch Mode.” Touch Mode optimizes the user interface, making the Start menu larger, increasing the size of app icons, and allowing for easier navigation using touch gestures.
Once you enable touch mode, your Windows 11 device will automatically adjust to touch mode, making it easier to interact with your device using touch gestures.
Google to improve Chromium’s Tablet mode detection on Windows
Recently, Google has been working to update Chromium detection of tablet/desktop mode to match Windows UI. The company is introducing a code in Chromium that queries whether a Windows device is convertible and can be switched between tablet and desktop modes.
[Win] Introduce code that queries whether a device is convertible
This non-functional change introduces a QueryConvertibility method in win_util.cc which will check whether a Windows device is convertible – if it can be switched between tablet and desktop modes. It is part of a series of changes that will collectively update the tablet mode decision logic in Chromium for Windows devices.
Because of this, in the future, Chrome will be better at figuring out if your device is in tablet mode (like when you’re using a touch screen) or desktop mode (when you’re using a keyboard and mouse).
If you have an extra monitor connected, Chrome will know you’re using desktop mode. Furthermore, Chrome will now check if your device is convertible, meaning it can switch between tablet and desktop modes.
As a result of this, Chrome will quickly adapt between tablet and laptop modes. It will display the appropriate layout whether you’re using a touchscreen or a mouse, improving overall usability.
So, the next time you switch between tablet and desktop mode, you can expect Chrome to adjust smoothly, to improve your browsing experience on Windows 11.
This change will likely apply to Chromium-based Edge and other browsers that use the Chromium engine, such as Opera and Brave.
Microsoft is also rolling out updates to Cocreator, another AI tool in Paint, and Image Creator, an AI creation tool it launched in Paint last year.
The company says it’s updated the underlying diffusion-based model for Cocreator to deliver better results faster and added built-in moderation controls to the tool.
Meanwhile, the preview of Image Creator is expanding to more markets. In a blog post, Microsoft says it is now available to all Windows 11 users in the US, France, the UK, Canada, Italy, and Germany.
Microsoft 365 Personal and Family and Copilot Pro subscribers in Australia, New Zealand, Malaysia, Singapore, Taiwan, and Thailand can also use AI credits to create images in Paint.
If you don’t know what to do with it, just know Microsoft Cocreator in Paint (now Image Creator) can generate images based on your input in just a few seconds. It has many filters, including a photorealistic one, and the results are stunning. Look at our comprehensive guide to learn how to use it.
In the updated version of Paint, Microsoft introduces Generative Fill, a feature that uses AI to add new details to your artwork. As you select an area of your canvas, you can describe what you want to add to your selection, and generative fill will offer a suggestion. The feature was teased earlier this year, and it’s one of many AI features coming to Paint – together with Cocreator.
If you don’t like what’s proposed, you can ask the tool to try again, cycle through new options, or refine your selection. Generative Fill will first be available on Snapdragon-powered Copilot+ PCs and require a Microsoft account.
On the flip side, Paint now has a Generative Erase tool that automatically removes objects from a canvas. Using Generative Erase, you can manually brush over one or multiple areas of a canvas to select the content you want to remove.
You can also use the tool with a rectangle or free-form selection to specify an area you wish to erase.
In a blog post, Microsoft says the features are rolling out to Windows Insiders in the latest Canary and Dev Channels beginning today and will soon be available to all Insiders.
What do you think of all the AI-powered Generative Fill features in Microsoft Paint? Does it seem genuinely helpful, or is it more of a novelty?
Microsoft Flight Simulator 2024 will be officially released on November 19 and if you want to learn about all the new goodness, read our extensive article about it. If you already pre-ordered it or you’re planning to do so before the release day, Microsoft is throwing in an advantage to stay ahead.
If you want to avoid the huge server line, Microsoft announced on Reddit that you can pre-install the game from Microsoft Store.
However, keep in mind that you won’t actually install the full game which requires at least 50 GB of hard drive space. The gamers who performed this step reported that you only download a preloader of 12 MB.
The only idea behind the preloader is that when the full game is launched, you will be first in line to make the update and install the game.
Some gamers also asked if they will be able to download the full game on another PC if they install the preloader on their current PC, and the short answer is yes. Whether you bought the game on Microsoft Store or Steam, you will be able to install the game on any machine if you login with the account you used to purchase the game.
Of course, you can perform this step even with a few hours before the full release, but it’s a sure way to go to avoid the situation where you forget about the event.
Did you install the preloader? Tell us about your experience in the comments below.
Tech enthusiasts and Windows Insiders are in for a treat. Microsoft has announced a new Windows 11 Insider Preview Build, numbered 27744, available now for those in the Windows Insider Program’s Canary Channel.
The most significant addition to Windows 11 in Build 27744 is a new set of features for Prism, Microsoft’s Arm app-emulation solution. These features allow users to run 64-bit x86 apps on Arm-based devices like the Surface Pro X and Lenovo Flex 5G.
Specifically, the update supports more CPU features under emulation, which Microsoft says will allow previously failed apps to start running on Windows 11 for Arm. The company notes that the new features are already in use in the retail version of Windows 11 (version 24H2), allowing Adobe Premiere Pro 25 to run on Arm. However, with Windows 11 Build 27744, Microsoft enables the features for any x64 app under emulation.
Microsoft says the virtual CPU used by x64 emulated apps through Prism now supports additional extensions to the x86 instruction set architecture, including AVX and AVX2, as well as BMI, FMA, F16C, and others. This should allow apps that require these features to run in Windows on Arm.
At the same time, Microsoft is implementing a restriction. In Windows 11 Build 27744 and later, only x64 apps can use the new CPU features. If you have a 32-bit or 64-bit app that uses a 32-bit helper to detect CPU feature support, the app won’t detect the new features in Prism.
Other changes in Windows 11 Build 27744 include:
The Start menu now has a renamed “All” app list, just labeled “All.”
A new gamepad keyboard layout for the on-screen keyboard in Windows 11 that supports the ability to use your Xbox controller to navigate and type.
We have updated the designs for the disconnect and logoff dialogs in Task Manager to support dark mode and text scaling. In the Performance section, the listed disks are labeled with their type.
The detach virtual hard disk (VHD/VHDx) button under Settings > System > Storage > Disks & Volumes, which Microsoft temporarily disabled in an earlier build, is back.
As usual, alongside the new enhancements to Prism, Windows 11 Build 27744 also includes a long list of bug fixes, which you can check out in Microsoft’s full release notes.
The ERROR_AUTODATASEG_EXCEEDS_64k Windows system error, with code 199 (0xC7), appears when the Automatic Data Segment (AutoDataSeg) size for a program is higher than the system’s limit of 64 KB, and as a result, Windows can’t run the program.
This system error usually appears when running programs designed for older iterations of the OS on, say, Windows 10 or Windows 11. Reasons behind Error AutoDataSeg Exceeds 64k include problems with the code, corrupted system files, insufficient available memory, and app installation issues.
Before you proceed to the solutions, restart the PC, install all pending Windows and app updates, and make sure the RAM modules are properly seated. For most of you, this should do the trick!
How can I fix ERROR_AUTODATASEG_EXCEEDS_64k?
1. Modify the code
If you are facing the ERROR_AUTODATASEG_EXCEEDS_64k 199 (0xC7) error while running a code, make sure it conforms to the memory and resource limits imposed by the OS.
This is critical, given the error always appears due to conflicts between Windows and the code/program. Also, if possible, try switching to the 64-bit Windows architecture.
2. Run the app in compatibility mode
Right-click on the affected app’s launcher (.exe) file, and select Properties.
Go to the Compatibility tab, tick the Run this program in compatibility mode for checkbox, and select an older iteration of the OS from the dropdown menu, one that the code/app was designed to run in.
Click on Apply and OK to save the changes, and then check for improvements.
3. Repair the corrupted system files
Press Windows + R to open Run, type cmd, and hit Ctrl + Shift + Enter.
Click Yes in the UAC prompt.
Paste the following DISM commands individually and hit Enter after each: DISM /Online /Cleanup-Image /CheckHealthDISM /Online /Cleanup-Image /ScanHealthDISM /Online /Cleanup-Image /RestoreHealth
Now, run this SFC scan command: sfc /scannow
Reboot the PC and check for improvements.
If your PC has corrupted system files, it’s likely to trigger the ERROR_AUTODATASEG_EXCEEDS_64k The operating system cannot run this application program error. To fix this, run the DISM (Deployment Image Servicing and Management) and SFC (System File Checker) scans which will replace the problematic system files with a fresh copy.
4. Increase the virtual memory
Press Windows + S to open Search, type View advanced system settings, and click on the relevant result.
Click on Settings under Performance.
Go to the Advanced tab, and click on Change under Virtual memory.
Untick the Automatically manage paging file size for all drives checkbox, select the No paging file option, and click on Set.
Select the Custom size option, enter the following in the fields underneath based on the available physical RAM, and click on Set:
Initial size: 1.5 x Available physical RAM x 1024
Maximum size: 3 x Available physical RAM x 1024
For instance, if your PC has 4GB of RAM, the virtual memory sizes become:
Initial size: 6144 (1.5 x 4 x 1024)
Maximum size: 12288 (3 x 4 x 1024)
Click OK to save the changes and verify whether ERROR_AUTODATASEG_EXCEEDS_64k is fixed.
If you are getting 199 (0xC7) The operating system cannot run this application program due to low available RAM, increasing the virtual memory will fix things.
5. Reinstall the affected application
Press Windows + R to open Run, type appwiz.cpl in the text field, and hit Enter.
Select the affected app from the list, and click on Uninstall.
Follow the on-screen instructions to complete the uninstallation, and then reboot the PC.
Finally, reinstall the application from an official source and check for improvements.
6. Perform a system restore
Press Windows + S to open Search, type Create a restore point, and click on the relevant result.
Click the System Restore button.
Select the Choose a different restore point option, if available, and click on Next.
Pick a restore point created before the issue first appeared or the oldest one, and click Next.
Verify the details, click Finish, and then confirm the change. The restore may take 15-30 minutes.
If you can’t identify the change triggering system error ERROR_AUTODATASEG_EXCEEDS_64k, performing a system restore will certainly get things running in no time. All you have to do is pick a restore point created before the problem appeared initially.
Telegram, the cloud-based instant messaging and voice-over IP service, has released its official desktop app for Windows on ARM PCs. This app version has been long-awaited by users of laptops and tablets running Windows for ARM.
The ARM version of the Telegram app comes approximately a month after the launch of the Windows 11 24H2 feature update, which brings support for ARM64 apps to Windows 11 PCs. The ARM version was previously available to Windows Insider testers in the Dev Channel, and now it’s rolling out to all Windows 11 and Windows 10 users.
The availability of the ARM version of the Telegram app means that users can benefit from the app’s native performance on Windows on ARM PCs from OEMs like Microsoft, Samsung, and Lenovo. It also bodes well for other messaging apps like WhatsApp and Slack, which are expected to launch on Windows on ARM.
In recent months, Microsoft has been working to fix compatibility issues in Windows for ARM that have prevented many apps from running on ARM PCs.
The Redmond-based tech giant also released dozens of apps for Windows on Arm-based Copilot+ PCs, including several DAWs, allowing musicians and composers to craft music on these devices. More and more apps are expected to be released for this architecture in 2025.
You can download Telegram for Windows on Arm from GitHub now.
If you encounter hvsigpext.dll on your PC, you might be wondering what it is and what does it do. Today we’re going to answer this and other questions that you might have regarding this file.
What is hvsigpext.dll?
This is a system DLL file, and it’s associated with Hyper-V, Microsoft’s virtualization technology.
What does hvsigpext.dll do?
The file is used by Hyper-V’s Secure Instruction Guard (SIG) extension, and it’s used to manage the execution of virtualized workloads.
It also ensures that the handling of specific processes or instructions is properly set within a virtual environment. By its design, users or developers barely interact with this file.
Is hvsigpext.dll malware?
The file is usually located at the following location: C:\Windows\System32
If you ever notice this file in a suspicious location, you can check it for malware by doing the following:
Locate the dll file and right-click it.
Choose Scan with the Microsoft Defender option.
Wait for the scan to finish.
You can also check the certificates by doing the following:
Right-click the file and choose Properties.
Next, go to the Digital Signatures tab.
Double-click the available signatures.
The file should be signed by Microsoft if it’s legitimate.
As you can see, this is a core Windows file, and it usually runs in the background with Hyper-V, so you likely won’t interact with it too often. However, if you ever notice this file, you should know that it’s most likely safe to use
This isn’t the only DLL you can encounter, and we wrote about SppExtComObjHook.dll in our previous guide, so check it to learn what it does.
The ERROR_INVALID_SIGNAL_NUMBER 209 (0xD1) with the error message, The signal being posted is not correct appears when a signal is incorrectly handled, or there is an issue with the driver or hardware communication.
To fix it, you must look for signs of hardware failure and ensure your Windows is updated to the latest version. Next, unplug external devices like USB peripherals, hard drives, and printers, and restart your computer.
How can I fix the ERROR_INVALID_SIGNAL_NUMBER 209 (0xD1)?
1. Update the device drivers
Press Windows + R to open the Run window.
Type devmgmt.msc and click OK to open the Device Manager app.
You will get a list of system components. Click each one to expand the category, and look for the driver with a yellow triangle and an exclamation mark.
Right-click the driver and select Update driver from the context menu.
Click Search automatically for drivers.
Follow the on-screen instructions to complete the process. Repeat the same process if there are multiple problematic drivers.
Windows will try to find the latest version of the driver; however, if it fails, you can head to the manufacturer’s website to download it. Alternatively, you can download & install a reliable driver updatertool to get the driver.
2. Run the CHKDSK scan
Press the Windows key, type cmd in the search box, and click Run as administrator from the list of options.
To find errors and bad sectors on your hard drive, type the following command after replacing C with your system drive letter and press Enter: chkdsk /f /r
If the drive is in use, you will be asked to schedule the scan next time your computer restarts. Type Y and hit Enter.
Restart your computer to initiate the scan.
3. Run the SFC & DISM scans
Press the Windows key, type cmd in the search box, and click Run as administrator from the list of options to launch Command Prompt with administrator rights.
To repair missing or corrupted system files, copy & paste the following command and press Enter: sfc /scannow
Wait for the scan to complete, as it may take some time, and the tool will fix any issues it detects. Type the following command to resolve problems related to the Windows system image and hit Enter: DISM /Online /Cleanup-Image /RestoreHealth
The scan will take some time. Once complete, reboot your PC to let the changes take effect.
Under Recovery options, for Advanced startup, select Restart now.
Your computer will restart and take you to the Advanced options.
On the Choose an option screen, select Troubleshoot.
In the Troubleshoot menu, click Advanced options.
From the Advanced options menu, click Startup settings.
Click Restart.
Once the computer boots up, you will get the list of startup options. Locate an option to disable Driver Signature Enforcement; usually, it is option 7 or F7.
Once done, Windows will boot normally, but the system will not allow the installation of unsigned drivers. You can now install unsigned drivers if required. Remember that this method is temporary, and the change will only last for the current session.
5. Restart your computer in a clean boot environment
Press Windows + R to open the Run window.
Type msconfig and click OK to open the System Configuration window.
Go to the Services tab, place a checkmark next to Hide all Microsoft services, then click the Disable all button.
Switch to the Startup tab and click the Open Task Manager link.
On the Task Manager window, select the Enabled items one by one and click Disable, then close the window.
Click Apply and OK to save the changes.
Select Restart to reboot your computer in clean boot.
Now you can identify if a third-party background program or service is causing the issue and fix the ERROR_INVALID_SIGNAL_NUMBER issue.
6. Rollback the recent device driver
Press Windows + I to open the Settings app.
Go to Windows Update and select Update History from the right pane.
On the next screen, scroll down to locate the Related settings section.
Click Uninstall updates.
Locate any recent driver update and click Uninstall.
7. Restore your device to the previous version
Press Windows + R to open the Run window.
Type sysdm.cpl and click OK to open the System Properties window.
Go to the System Protection tab, and click the System Restore button.
Select Choose a different restore point on the System Restore window and click Next to proceed.
Choose the most recent restore point before the ERROR_INVALID_SIGNAL_NUMBER error appears and click Next.
Click Finish.
Windows will now restart, and try to restore your computer settings to the selected version. If System Restore is not working on your computer, it could be corrupted system files or antivirus blocking the system restore; read this guide to learn more.
In conclusion, to fix the ERROR_INVALID_SIGNAL_NUMBER, you need to update the device driver, rollback the recent driver update, restore the PC to the previous version, restart your PC in clean boot, run CHKDSK, SFC, and DISM scans.
If you have any questions or suggestions about this BSoD error, feel free to mention them in the comments section below.
The cards.dll file, developed by Microsoft and storing images of playing cards, was used by classic card games, including Solitaire, FreeCell, and Hearts, in the earlier iterations of Windows, primarily Windows XP.
In newer iterations like Windows 11, cards.dll is not present since the classic games have all been deprecated and replaced by modern-looking versions. When you try to play these classic games on later iterations, it throws the missing DLL error.
For some of you, even manually moving a copy of cards.dll along with the game’s executable (.exe file) doesn’t fix things. And that’s due to incompatibility and corrupted system files!
What can I do if cards.dll is missing?
Tip
If you are aiming for a cards.dll file download, do not go with third-party websites claiming to host the file. These are unsafe, and any files downloaded from these sources may be bundled with malware, which will harm your PC.
1. Get cards.dll from another PC
The easiest way to run or download cards.dll on Windows 11 is to get a copy from another PC that already has it. You could use the same one used for the game files. As for those wondering where to install cards.dll, it’s stored in: C:\Windows\System32
cards.dll in System32
So, go to another PC, fetch a copy of the DLL from the System32 folder > move it to an external USB flash drive > connect the flash drive to the affected PC > transfer cards.dll to the same location > restart the PC.
2. Move the app launcher and cards.dll to the same folder
For 3 out of 5 users who already had the DLL but were still getting the cards.dll not found error, moving both the DLL and the affected app’s launcher to the same folder did the trick.
Do not move them both to the System32 folder. Create a new folder, preferably in a non-system drive, and transfer the DLL and EXE files there.
3. Run the affected app in compatibility mode
Right-click on the affected app’s launcher (.exe) file, and select Properties.
Go to the Compatibility tab, tick the Run this program in compatibility mode for checkbox, and select the Windows iteration the game was developed for from the dropdown menu.
Click on Apply and OK to save the changes, and then verify whether the error is fixed.
If not, select an even older Windows iteration and try again.
4. Repair the corrupt system files
Press Windows + S to open Search, type Command Prompt in the text field, and click on Run as administrator.
Click Yes in the UAC prompt.
Paste the following commands individually and hit Enter after each: DISM /Online /Cleanup-Image /CheckHealthDISM /Online /Cleanup-Image /ScanHealthDISM /Online /Cleanup-Image /RestoreHealth
Execute this command for the SFC scan: sfc /scannow
Finally, reboot the PC to apply the changes.
Since cards.dll is linked to system files, any instances of corruption here will trigger errors. In this case, running the DISM (Deployment Image Servicing and Management) and SFC (System File Checker) scans will replace affected system files with a fresh copy!
5. Reinstall the affected game
Press Windows + R to open Run, type appwiz.cpl in the text field, and hit Enter.
Select the affected game from the list, and click on Uninstall.
Follow the on-screen instructions to complete the process and then restart the computer.
Download the game from the web or get a fresh copy from another PC and proceed with the installation.
Since cards.dll is no longer natively a part of Windows, apps and games that need it include the DLL as a part of the installation package. And if the file is not on your PC, reinstalling the game should, in all likelihood, get things running!
Everyone who loves to play those classic titles must learn how to run older games on Windows and prevent such errors from reappearing.
For any queries or to share which fix worked for you, drop a comment below.
The HAL_ILLEGAL_IOMMU_PAGE_FAULT bug check comes with the value of 0x00000159. Microsoft’s explanation is pretty technical, but we will still include it unchanged:
This indicates that the IOMMU has delivered a page fault against an ASID that was in the process of being freed. The driver was responsible for completing any inflight requests before this point in time and this bugcheck indicates a driver in the system did not do so.
Long story short, this bug check is produced by a malfunctioning or corrupted driver. Some users found that a mouse Wi-Fi or Bluetooth mouse driver is to blame, so we will start there.
How can I fix the HAL_ILLEGAL_IOMMU_PAGE_FAULT?
1. Update the device driver
Right-click the Start button and select Device Manager.
You will get a list of system components. Click on them one by one to expand the category, and look for a driver with a yellow exclamation mark next to it.
Since the culprit might be the mouse driver, check that one first.
Once located, right-click the driver and choose Update driver from the context menu.
Click on Search automatically for drivers.
Follow the on-screen prompts to complete the process.
If the system doesn’t find a driver for your device, you can download it from the manufacturer’s website. We also recommend using a reliable driver updater tool to install the latest version of the driver automatically.
2. Run the SFC scan
Click the Start button, type cmd in the search box, and click Run as administrator to launch Command Prompt with administrative rights.
Type the following command to scan and repair the corrupted system files and press Enter: sfc /scannow
Wait for the process to finish, then copy & paste the following command to repair the Windows OS files, and hit Enter: DISM /Online /Cleanup-Image /RestoreHealth
Once the scan is complete, restart your computer to confirm the changes.
3. Run the Windows Memory Diagnostic tool
First, close all the tabs and save all the work on your computer, press the Windows key, type windows memory diagnostic in the search box, and click Open.
Select Restart now and check for problems.
Your computer will restart, and the tool will check the RAM for the issues.
Once the test is complete, your PC will reboot, and you will see the results after logging in.
If you want to see the detailed results, launch Event Viewer, then go to Windows Logs > System. Look for events with the source named MemoryDiagnostics-Results.
4. Use System Restore
Press the Windows key, type control panel in the search box, and click Open.
Select Large icons for View by, then click the Recovery option.
Click the Open System Restore option.
Now, select Choose a different restore point and click Next.
Choose the restore point created before the error started to occur, then click Next.
Click on Finish to initiate the process.
Windows will reboot and restore your system settings to the chosen point. If you see the System Restore didn’t complete the successfully, we suggest you check out this detailed guide for solutions.
We hope that our solutions helped you fix the HAL_ILLEGAL_IOMMU_PAGE_FAULT BSoD, and now your PC is working fine.
If you have any questions or better suggestions to fix this issue, let us know in the comments below.
Sometimes you might encounter a message saying that dplayx.dll is missing, and this will prevent you from running certain, usually older, games. However, this can be fixed, and today we’re going to show you how to do it.
What can I do if dplayx.dll is not found?
1. Enable Direct Play
Press the Windows key + S and type optional features. Select Turn Windows features on or off.
Paste the file into the game directory and try to run it.
Keep in mind that downloading DLL files from third-party websites isn’t recommended since sometimes files can be altered, so only use sources that you completely trust.
By default, the file should be located in the System32 directory: C:\Windows\System32
In some instances, you might find it in the game’s installation directory.
As you can see, if dplayx.dll is not found on your system, you won’t be able to start older games, but luckily this can be fixed by installing Legacy Components.
We also wrote about dplay.dll not found recently, and since it’s a similar error, you might want to check it out.
The WORKER_THREAD_RETURNED_WITH_SYSTEM_PAGE_PRIORITY_ACTIVE with error code 0x0000015B points out issues in threading and system page in a Windows environment.
This indicates that a worker thread’s system page priority was leaked by the called worker routine. This error might cause performance-related issues, such as a slow PC and high CPU usage.
How can I fix the WORKER_THREAD_RETURNED_WITH_SYSTEM_PAGE_PRIORITY_ACTIVE error?
1. Update the device drivers
Right-click the Start button and select Device Manager.
You will get a list of system components. Click on them one by one to expand the category, and look for a driver with a yellow exclamation mark next to it.
Once located, right-click the driver and choose Update driver from the context menu.
Click Search automatically for drivers.
Follow the on-screen prompts to complete the process.
If there are multiple problematic drivers, you can follow the steps mentioned above to update the others. If Windows cannot find a driver for your device, you can download it manually from the manufacturer’s website. You can also download a reliable driver updater tool to install the latest version of the driver easily.
2. Run the SFC scan
Press the Windows key, type cmd in the search box, and click Run as administrator to launch Command Prompt with administrative rights.
Type the following command to scan and repair the corrupted system files and press Enter: sfc /scannow
After the scan ends, copy & paste the following command to repair the Windows OS files, and hit Enter: DISM /Online /Cleanup-Image /RestoreHealth
Once the scan is complete, restart your computer to confirm the changes.
3. Run the Windows Memory Diagnostic tool
First, close all the tabs and save all the work on your computer, press the Windows key, type the windows memory diagnostic in the search box, and click Open.
Select Restart now and check for problems.
Your computer will restart, and the tool will check the RAM for the issues. A progress bar will appear on the screen to inform you of the scan status.
Once the test is complete, your PC will reboot, and you will see the results after logging in.
If you want to see the detailed results, launch Event Viewer, then go to Windows Logs > System. Look for events with the source named MemoryDiagnostics-Results.
4. Adjust the paging file settings
Press Windows + E to open File Explorer.
Locate and right This PC, and select Properties from the context menu.
Select the Advanced system settings link.
Under Performance, click Settings.
Go to the Advanced tab and select Change.
Make sure the paging file is set to System managed size. If not, select it and click OK to save the changes.
5. Restore your system to a previous point
Press the Windows key, type control panel in the search box, and click Open.
Select Large icons for View by, then click Recovery.
Click the Open System Restore link.
On the System Restore window, select Choose a different restore point and click Next.
Choose the restore point created before the BSoD appeared, then click Next.
Click Finish to initiate the process.
Windows will reboot and restore your system settings to the chosen point. If the System Restore didn’t complete successfully, we suggest you check out this detailed guide for solutions.
In conclusion, to fix the WORKER_THREAD_RETURNED_WITH_BAD_PAGING_IO_PRIORITY BSoD error, you can update device drivers, restore your computer to the previous version, run the SFC scan, and more.
If you have any suggestions or questions about the error, feel free to mention them in the comments section below.