Windows Terminal on Windows 11 now features ChatGPT for all the shells

Recently, OpenAI released a ChatGPT app for Windows and now, Microsoft issued an update for Windows Terminal Canary that includes the AI bot. Windows Latest has took a run with it, but the first useful information is that this ChatGPT is not free. You need to prepare an API key that may include Github Copilot API, Azure’s OpenAI API or OpenAI’s own API.

How can ChatGPT help you in Windows Terminal?

First, apparently, the Terminal Chat will also work with Command Prompt, PowerShell, Azure Cloud Shell and WSL Ubuntu and will not be limited to those.

Of course, the Terminal Chat offers useful and direct information about the commands inside the shell and how to perform different operations inside it.

Also, the AI detects the contest and the shell you’re using to offer the right answers. It can be very useful when encountering an error in the terminal. Just paste the error message in the chat and the AI will provide a detail explanation on what the error is all about and how to fix it.

However, it seems that the AI has information limited to knowledge about the shell you’re using and the possible commands, it’s not a general chat bot.

You can export the conversation to a TXT file, but Microsoft says that it doesn’t store it anywhere.

How do I get Windows Terminal Canary?

We remind you that Terminal Chat is only available in the Canary version, but you can still download it from the GitHub page.

After you install the app, run it, click the arrow down menu button and select Terminal Chat.

Now comes the hard part, you will need to configurate one of the clients, either through GitHub Copilot, Azure OpenAI or OpenAI.

Lastly, you will need to add the API key and start using the Terminal Chat.

If the line command tools are pretty hard to use for some, now the AI can help you make sense of everything that happens in the shells.

What do you think about the new Terminal Chat? Let us know about your thoughts in the comments below.

Warcraft II: Reforged might be in the works at Blizzard

Blizzard is getting ready to celebrate the 30th anniversary of the Warcraft franchise, and it seems like the company has something special in store for fans. According to recent leaks, the developer is working on a remaster of Warcraft II: Tides of Darkness, the second game in the long-running real-time strategy series.

The news comes from two independent sources. First up is Blizztracker, a service that monitors changes to Blizzard’s games and servers. The site received an entry dubbed “Warcraft II: Remastered Internal Alpha” earlier today.

Around the same time, prominent Blizzard data miner Stiven managed to dig up a key art image for the remaster from the company’s servers. The art depicts a pair of ships, suggesting that Blizzard is revisiting the game’s naval combat.

“Warcraft II Remastered !!! :D,” Stiven tweeted, sharing the image.

The original Warcraft II, launched in December 1995, is set in the high-fantasy world of Azeroth. Players command one of two factions in the game’s single-player campaign — the human Alliance or the orcish Horde — to defend their base and ultimately destroy the enemy.

While Warcraft II is a beloved part of the series’ history, it also has some fairly dated systems. If Warcraft III: Reforged is anything to go by, the remaster will ideally bring modern quality-of-life improvements to the title’s campaign and multiplayer modes.

That said, we might be waiting a while before we get our hands on Warcraft II: Remastered. Blizztracker notes that the “Internal Alpha” entry is marked as “leak,” suggesting that the game is still in the early stages of development and might not see a 2024 release.

Blizzard might officially announce Warcraft II: Remastered as part of its upcoming Warcraft 30th Anniversary Direct event, scheduled for next Wednesday, November 13th. The company has teased “multiple surprises” for the show, so don’t be surprised if we get other Warcraft-related news.

Ijl15.dll is Missing or Not Found: 7 Ways to Download the DLL

The ijl15.dll file, developed by Intel and a part of the Intel JPEG Library (IJL), is required by several apps and games to run, primarily the older ones. When it’s not available, you get an error that reads, The program can’t start because ijl15.dll is missing from your computer. Try reinstalling the program to fix this problem.

Programs affected by the missing ijl15.dll error include ZooTycoon, MapleLegends, MapleRoyals, Warcraft 3, and D.ChaosMS, amongst others. Reasons for the DLL not found error are malware infection, inadvertent deletion by the active antivirus, and incompatibility between the OS and the DLL file.

Before you proceed to the solutions, restart the PC, install all pending Windows and app updates, and uninstall any conflicting third-party antivirus!

What can I do when ijl15.dll is missing?

Tip icon Tip
While several websites claim to host ijl15.dll, you should never download DLLs from third-party sources. This is risky, given that such files are often bundled with malware and viruses that can harm your PC.

1. Get a copy of the DLL

When ijl15.dll is missing or not found, you can always get it from another user. Just make sure that both PCs are running the same iteration and architecture of Windows. Regarding the location of ijl15.dll, it’s advised to place the DLL in the same folder as the affected app’s launcher (.exe) file.

So, go to another computer > copy the DLL to a USB flash drive > connect the USB drive to the affected PC > move the DLL to the folder storing the affected app’s launcher > reboot the PC.

ijl15.dll in File Explorer

The app/game throwing the missing ijl15.dll error should now run fine.

2. Run a malware scan

  1. Press Windows + S to open Search, type Windows Security in the text field, and click on the relevant result.
  2. Click on Virus & threat protection.windows security
  3. Click on Scan options.
  4. Select the Full scan entry and click the Scan now button.malware scan to fix missing ijl15.dll
  5. Wait for the scan to complete (may take 15-30 minutes) and check for improvements.

3. Restore ijl15.dll and whitelist the app in Windows Security

Note icon NOTE
The steps listed here are for Windows Security. If you are using a third-party antivirus, check the manufacturer’s website for the exact process, although the idea remains the same.
  1. Press Windows + S to open Search, type Windows Security, and click on the relevant result.
  2. Click on Virus & threat protection.windows security
  3. Click on Protection history.protection history
  4. Select Quarantined items from the Filters dropdown menu.quarantined items
  5. If you find the ijl15.dll file listed here, restore it.
  6. Now, go back to Virus & threat protection and click on Manage settings under Virus & threat protection settings.manage settings
  7. Click on Add or remove exclusions.add or remove exclusions
  8. Click Yes in the UAC prompt.
  9. Next, click the Add an exclusion button and select Folder from the list of options.add exclusion to fix missing ijl15.dll
  10. Navigate to the affected app/game’s folder, choose it, and click on Select Folder.
  11. Finally, reboot the PC to apply the changes and check for improvements.

In 3 out of 5 cases of missing ijl15.dll in MapleStory or MapleRoyals, the antivirus solution quarantined the DLL, mistaking it for a threat. So, you will have to restore the quarantined file and add the game to the list of exclusions to prevent further issues.

4. Reinstall the affected app/game

  1. Press Windows + R to open Run, type appwiz.cpl in the text field, and hit Enter.
  2. Select the affected app/game from the list, and click on Uninstall.reinstall app
  3. Follow the on-screen instructions to complete the uninstallation process, and then reboot the PC.
  4. Finally, reinstall the app from an official source, say the developer’s website or Microsoft Store.

Remember, the ijl15.dll file comes bundled with apps and games and is not natively a part of Windows. So, if you are getting the DLL not found error, it’s likely that the installation didn’t go through properly, and reinstalling the app should fix things!

In case a quick removal doesn’t work, I recommend using a top-rated software uninstaller to delete any leftover files, app cache, and Registry entries, which might trigger conflicts during the reinstallation.

5. Perform a system restore

  1. Press Windows + S to open Search, type Create a restore point, and click on the relevant result.
  2. Click the System Restore button.restore to fix missing ijl15.dll
  3. Select the Choose a different restore point option, if available, and click Next.
  4. Pick a restore point created before the issue first appeared or the oldest one from the list, and click Next.restore point
  5. Verify the details, click on Finish, and then confirm the change.
  6. Wait for the restore to complete. It may take 15-30 minutes.

A system restore allows you to revert all changes made in the recent past, including the one behind the ijl15.dll not found error in Windows. This is helpful when you can’t pinpoint the exact underlying cause.

6. Install the app/game on a virtual machine

For much older games, say those developed over two decades ago, you will have to set up a virtual machine, install an older, compatible iteration of Windows, and then play the game on it.

This is a slightly tricky and time-consuming solution but works perfectly with older games developed for, say, Windows Vista. Besides, you don’t have to pay a dime for it. Several free virtual machines are available and can be set up in no time.

7. Contact the app’s support team

If virtual machine is not an option, you should contact the app’s developers or the dedicated support team. Perhaps, they could provide you with a compatible DLL for the game or share dedicated fixes to resolve the issue!

By now, you must have fixed the ijl15.dll was not found error, and the affected app/game should be up and running!

Before you leave, discover expert tips to optimize your PC for gaming and enjoy a seamless, error-free experience! Before you leave, don’t miss our guide on what to do if lua5.1.dll is missing on your PC.

For any queries or to share which fix worked for you, drop a comment below.

You’ll be able to improve your math skills on Microsoft Teams with the new Math Progress capability

Microsoft Teams will integrate the new Math Progress into the platform to accelerate math skills.

In a recent entry to the Microsoft 365 Roadmap, the Redmond-based tech giant unveiled that the platform will introduce the so-called Math Progress in December. It’s coming to all platforms, including Web, Desktop, iOS, and Android.

Accelerate student math skills with Microsoft Teams: Math Progress.

We’re not talking about Microsoft Math Solver, another tool the company created to help users find solutions to various math problems, but a different tool integrated with Teams.

Although the description doesn’t specify Microsoft Teams for Education, it’s safe to say that this Teams version will also include the Math Progress capability.

Error No Signal Sent 205 (0xCD): How to Fix it

Error_No_Signal_Sent is a developer error, and it comes with the following message: 205 (0xCD) No process in the command subtree has a signal handler. Even though this error is obscure, you still might get it, and if that happens, these solutions should be able to help you.

How can I fix Error_No_Signal_Sent?

1. Check the table for more information

  1. Look for the table in the More Information section.
  2. In there, you should be able to find the actual error message.
    error log
  3. Research the issue and try to fix it on your own.

According to users, this issue occurs with SQL Server OLAP Services and it appears when the cube or dimension is processed using the DTS Addin and the process fails.

2. Other tips to try

  1. If you’re running a startup script, test if running the script manually works.
  2. Try deploying the script as a separate custom script deployment process with enabled logging.
  3. Use the enabled logging to troubleshoot the issue further.

As you can see Error_No_Signal_Sent is an obscure error, and not much information is currently available. The best course of action in this case would be to analyze the logs to find the cause of the issue.

We covered similar issues not that long ago in our ERROR_SIGNAL_REFUSED and Error_Invalid_Flag_Number guides, so feel free to check them out.

Our latest guide covers Invalid_Slot_Allocator_Flags, so you might want to visit it for more information.

Microsoft Edge’s new feature to give Control Over Price Tracking and Improve Shopping Experience

Microsoft continues to improve the Edge browser’s shopping experience, and its latest addition gives users more control over automatic price tracking and notifications. This newly introduced setting aims to simplify online shopping and ensure users never miss a deal. It highlights opportunities where products can be tracked, allowing users to stay informed about potential savings without manually checking each product.

Microsoft Edge supports price tracking on shopping sites and offers price drop notifications. This feature helps users stay informed about price changes and ensures they can take advantage of the best deals.

By enabling the “save time and money with shopping in Microsoft Edge” setting in Edge, users can automatically track prices for products and receive notifications when prices drop.

This setting enables Edge to help users ” find coupons, cashback, and other savings while shopping. It also identifies alternative product offers and uses browsing history and page content to improve the shopping experience.”

Microsoft Edge’s Show opportunities to track product prices setting

The new setting, “Show opportunities to track product prices,” further improves the shopping experience by automatically identifying when a product can be tracked and notifying users when the price drops. This feature is currently available in the Canary version of Microsoft Edge.

The newly introduced price tracking setting provides users with more control over price tracking, making it easier to manage notifications for price drops. It simplifies the process of tracking product prices, saving users time and effort.

How to enable the automatic Price Tracking Setting in Microsoft Edge

  1. Open Microsoft Edge
  2. Go to the settings.
  3. Navigate to the “Privacy, search, and services” section.
  4. Look for the new setting “Show opportunities to track product prices” under the services and toggle it on.
Edge’s Show opportunities to track product prices setting. Image Credit: WindowsReport.

Apart from this, after introducing the new Copilot, Microsoft has removed shopping notifications for it. If you don’t like the new Copilot UI, you can revert to the old Copilot UI with this trick.

Valve’s new Game Recording capability is now available to all Steam gamers

Valve’s new Steam Game Recording, announced earlier this year, is now available for all Steam games and “runs in the background so you never miss a moment.” The feature can be accessed via a new button on the Steam Overlay.

Steam Game Recording offers several customization options, including choosing the duration and quality of recordings or opting for background recording that captures a set duration of gameplay and then deletes it unless the user saves it. Users can also manually start and stop recordings using hotkeys.

The recordings, stored in the cloud, can be viewed from any device the user is logged into. Users can also export recordings as MP4s, send them to another device, or share them via a QR code or temporary link that can be viewed on Steam.

In a blog post, Valve says Steam Game Recording is only available on Windows, with a macOS and Linux version in development. The feature also requires an NVIDIA or AMD GPU to record gameplay without taking a hit on performance. If a user’s PC doesn’t meet those requirements, their system’s CPU will be used instead, which could cause a noticeable impact on performance.

In addition to the standalone Steam Game Recording feature, Valve has introduced new tools for editing captured footage in the Steam client. Users can crop and trim the clips, add text or a timestamp, and more when taking screenshots or recording gameplay. Tools for painting and drawing on images and footage are also included.

The tools are available in the Steam library’s new “Recordings and Screenshots” section, where users can manage their screenshots and videos.

In games that support it, users can jump between events, like kills, and view a timeline that shows how long they spent in lobbies and menus. Valve says that “a variety of games” will support the feature.

Developers can implement support for the tools using a new Steamworks SDK and API. Valve says that the SDK will be released “soon,” but in the meantime, interested developers can apply to join a beta program.

Valve has been testing Steam Game Recording in beta since June. The new features are now live in the Steam client.

Fix: ERROR_INVALID_EXE_SIGNATURE 191 (0xBF)

The ERROR_INVALID_EXE_SIGNATURE Windows system error, with code 191 (0xBF), arises when running an app incompatible with the Windows architecture, say a 64-bit app blocked on a 32-bit OS, due to problems with the signature.

The error message reads, 191 (0xBF) Cannot run %1 in Win32 mode.

Before you proceed, check for app compatibility with the OS, scan the PC for malware, and install any pending Windows updates. For most, this should do the trick!

How can I fix ERROR_INVALID_EXE_SIGNATURE?

1. Check the path

When faced with ERROR_INVALID_EXE_SIGNATURE 191 (0xBF), your primary approach should be to verify whether the path in the code is correct. In many cases, during code execution, it tried to fetch an incorrect path or folder that was inadvertently created.

Also, the presence of multiple executable (.exe) files can trigger the Windows system error. So, make sure you only have one!

2. Run the app in compatibility mode

  1. Right-click on the app launcher (.exe) file, and select Properties.
  2. Navigate to the Compatibility tab, tick the checkbox for Run this program in compatibility mode for, and select an older iteration of Windows from the dropdown menu.compatibility mode to fix ERROR_INVALID_EXE_SIGNATURE
  3. Click on Apply and OK to save the changes, then run the app and check for improvements.
  4. If the error message persists, try other Windows iterations.

3. Repair the corrupted system files

  1. Press Windows + S to open Run, type Command Prompt, and click on Run as administrator.
  2. Click Yes in the UAC prompt.
  3. Run the following DISM commands: DISM /Online /Cleanup-Image /CheckHealth DISM /Online /Cleanup-Image /ScanHealth DISM /Online /Cleanup-Image /RestoreHealth
  4. Execute this command for the SFC scan: sfc /scannowsfc scan
  5. Finally, reboot the PC and check for improvements.

If your PC has corrupted system files, it’s likely to trigger ERROR_INVALID_EXE_SIGNATURE Cannot run %1 in Win32 mode and other system errors. To fix this, run the DISM (Deployment Image Servicing and Management) and SFC (System File Checker) scans, which will replace all such problematic files with their cached copy!

4. Update all the drivers

  1. Press Windows + X to open the Power User menu, and select Device Manager.
  2. Expand the different entries here, right-click on the devices listed underneath individually, and select Update driver.update driver to fix ERROR_INVALID_EXE_SIGNATURE
  3. Click on Search automatically for drivers to let Windows install the best locally available version.automatic search
  4. After updating all the drivers, restart the PC to apply the changes.

If you get 191 (0xBF) Cannot run %1 in Win32 mode for a driver file, updating the drivers will do the trick. And in case Windows can’t find a better version, head to the manufacturer’s website, find the new releases, and manually install the latest driver!

5. Reinstall the affected app

  1. Press Windows + R to open Run, type appwiz.cpl in the text field, and hit Enter.
  2. Select the affected application from the list, and click on Uninstall.reinstall app to fix ERROR_INVALID_EXE_SIGNATURE
  3. Follow the on-screen instructions to complete the uninstallation, and then restart the PC.
  4. Finally, reinstall the app from an official source and check for improvements.

If a quick removal doesn’t help fix ERROR_INVALID_EXE_SIGNATURE, I recommend using a top-rated uninstaller software to delete all leftover files, app cache, and Registry entries that might trigger conflicts even post-uninstallation.

6. Perform a system restore

  1. Press Windows + S to open Search, type Create a restore point, and click on the relevant result.
  2. Click on System Restore.restore to fix ERROR_INVALID_EXE_SIGNATURE
  3. Select the Choose a different restore point option, if available, and click on Next.restore setting
  4. Pick a restore point created before the issue first appeared or the oldest one, and click on Next.restore point
  5. Verify the restore details, click Finish, and confirm the change.
  6. Wait for the restore to complete. It may take 15-30 minutes.

If you can’t identify the underlying cause behind ERROR_INVALID_EXE_SIGNATURE, performing a system restore will allow you to revert all conflicting changes made in the recent past, including the one triggering the error.

In case nothing else works, you can always reinstall Windows, but this should only be used as a last resort. Remember, a reinstall will also fix other similar issues, preventing reappearances of the error!

For any queries or to share which fix worked for you, drop a comment below.

A new Microsoft PC Manager toolbar shows you the internet speed directly on your desktop

We wrote a review on Microsoft PC Manager recently and as it turns out, the app is beginning to gain traction as a efficient and free cleanup and optimizing tool for Windows. However, with its latest version, PC Manager got a significant new improvement that helps you monitor your internet transfer rates live, on your screen.

What is all about with the new PC Manager toolbar?

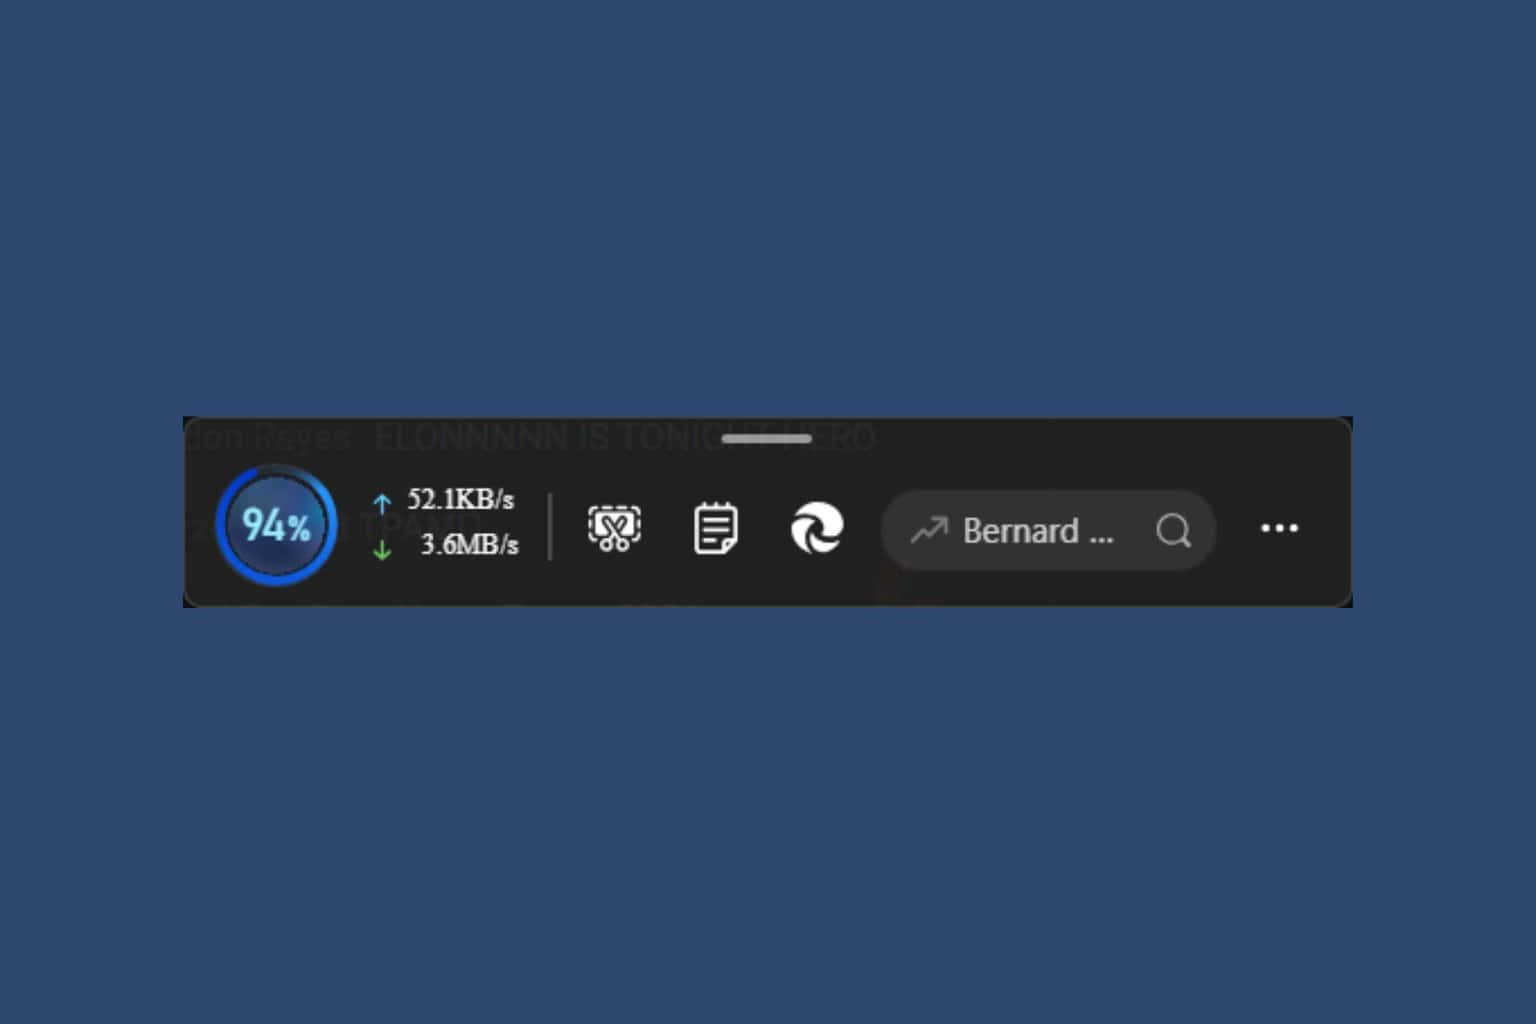
If you updated Microsoft PC Manager to version 3.14 and go to the Toolbox menu, you will see that you can activate the Show toolbar on desktop option.

The PS Manager toolbar will appear instantly on your desktop and you can move it anywhere with your mouse. By default, the toolbar will show you the Boost button and right next to it, you will see the upload and download transfer rates.

We have opened a YouTube stream and downloaded a couple of files to see the numbers rise and fall live on our desktop. Next to this live counter, by default, you will see the screenshot tool, a shortcut to Notepad, the Edge quick links (you can even start Office from this menu) and a search bar.

How do I customize the PC Manager toolbar?

As you would expect, you can customize what you get on this toolbar. You just need to click the three dots button and select Add tools.

In the next windows, you will be able to remove the screenshot tool or the Notepad icon and add a lot of other Windows tools or even web tools such as a currency convertor or image search.

However, you can’t have more than 6 tools on the toolbar and you can’t remove the Boost button or the network transfer.

This looks like a great internet monitoring tool and it can be certainly useful to learn if you have any processes out there that are consuming bandwidth without your knowledge. Of course, you may also see if you have any network issues, but you don’t get any advanced info for those numbers.

It’s very interesting because you will not see the internet transfer rates nowhere in the app menu elsewhere than this toolbar. Therefore, the only way to get this data is by enabling the PC Manager toolbar.

If you’re wondering how you can get the app, it’s as easy as searching for Microsoft PC Manager in Microsoft Store, or you can access the highlighted link that will bring you right there.

Do you already use Microsoft PC Manager? Let us know about your experience in the comments below.

Microsoft introduces a new Copilot UI for Word, which makes its features easier to access

After recently introducing a new UI for Copilot, which many users don’t like, it seems Microsoft is considering updating the AI model’s UI for the other platforms, specifically Microsoft Word and the Office suite.

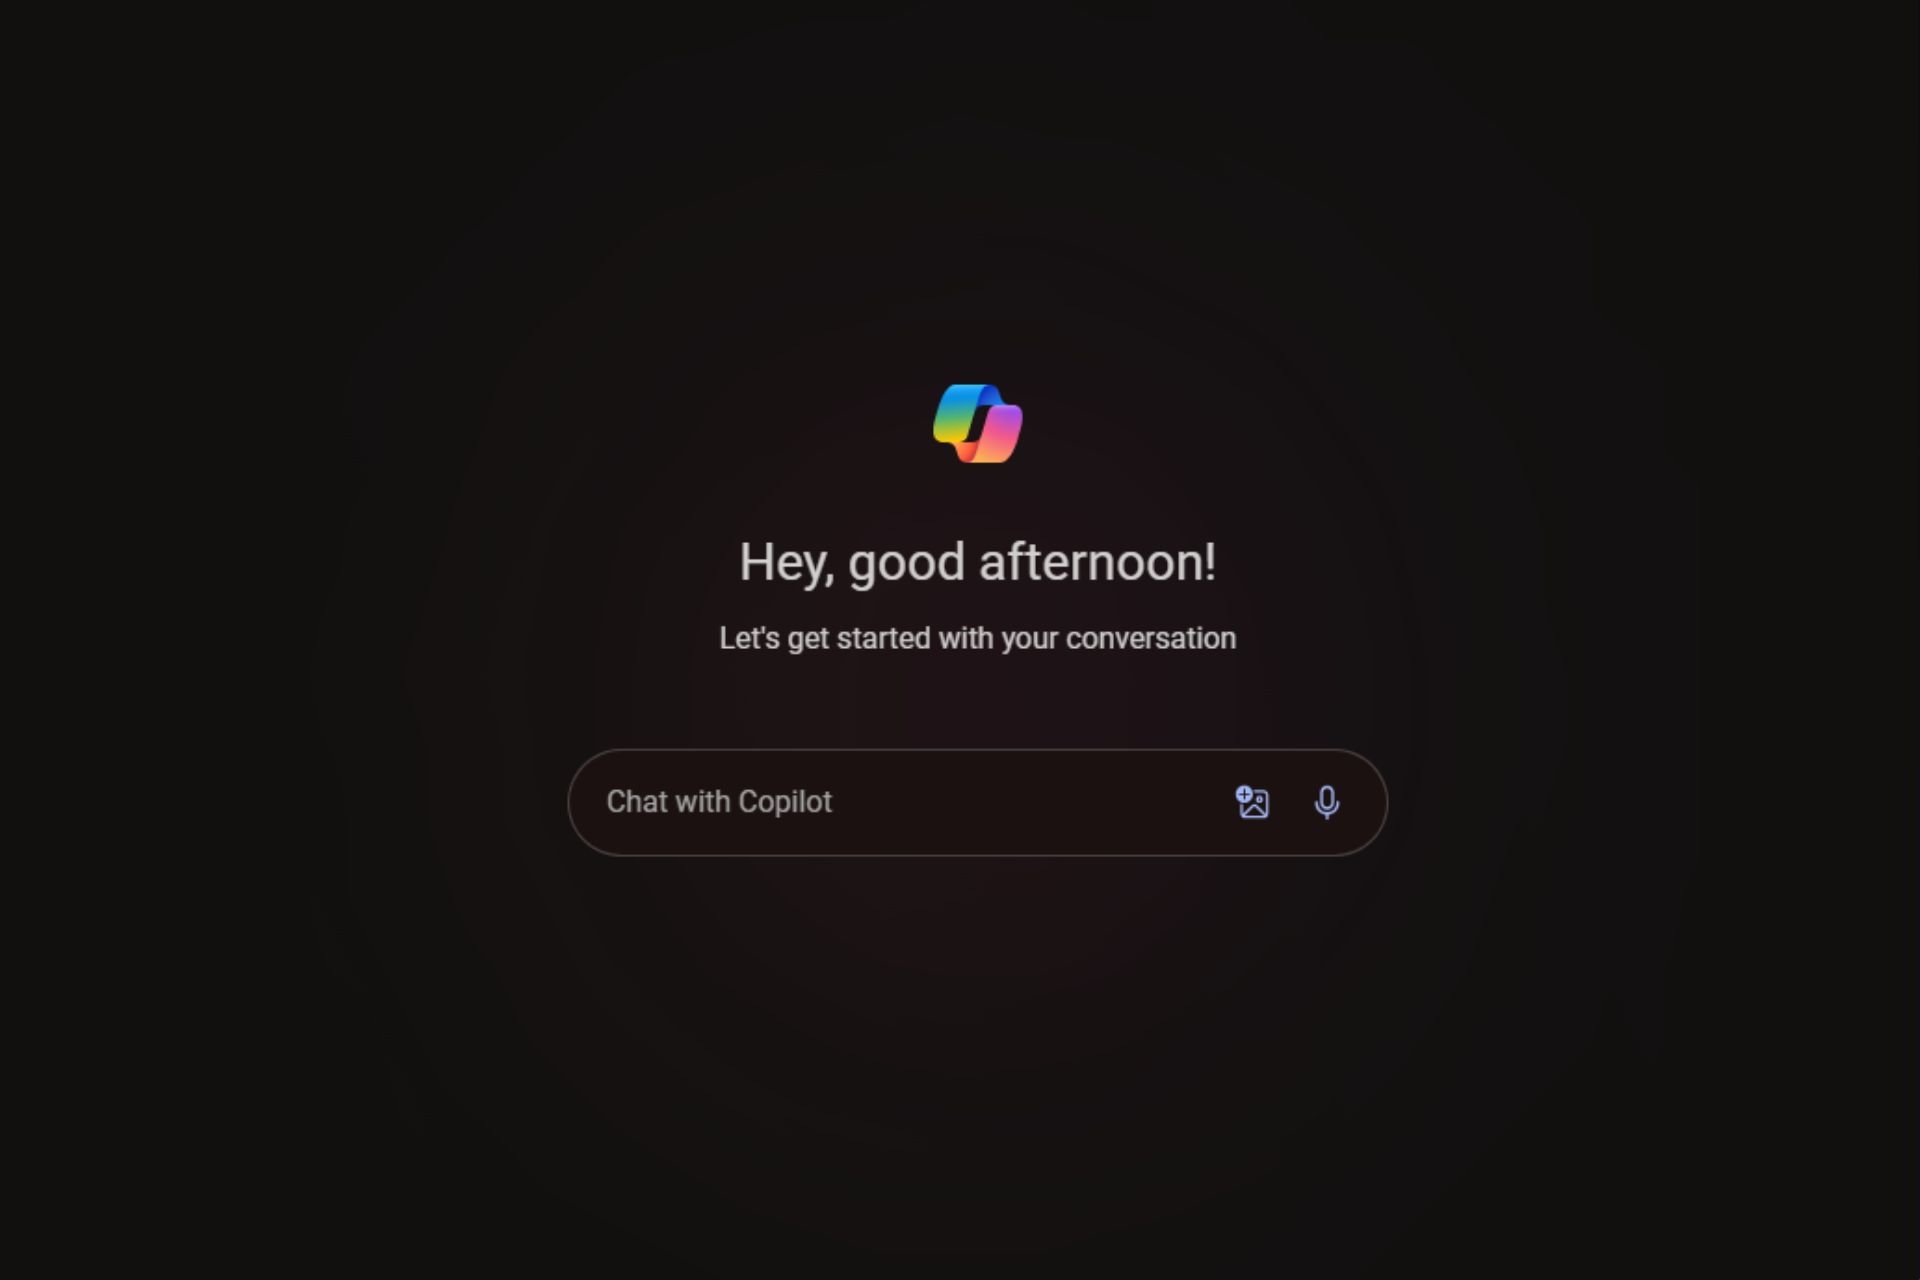
As spotted by user Michael Reinders, a new Copilot UI has made its way into Word. Once you open a new document, a rather large Copilot UI will be displayed, providing AI-powered features immediately without opening additional ribbon tabs or submenus.

The new UI includes options to write an article, draft an email, summarize a file, and describe what you want to write.

These are already available in Copilot, but the new UI will make them more accessible.

Microsoft has not yet announced this new UI, which may indicate that it’s only being tested with a small group of users before a wider rollout.

What do you think about the new Copilot UI in Microsoft Word?

Photo credits: Michael Reinders

Error Invalid Flag Number 186 (0xBA): How to Fix it

Error_Invalid_Flag_Number usually comes with the following code 186 (0xBA) and The flag passed is not correct message.

This is a developer error, but sometimes regular users can encounter it when updating Windows, and if this happens, this guide will show you a couple of solutions that you can use.

How can I fix Error_Invalid_Flag_Number?

1. Reset Windows Update Components

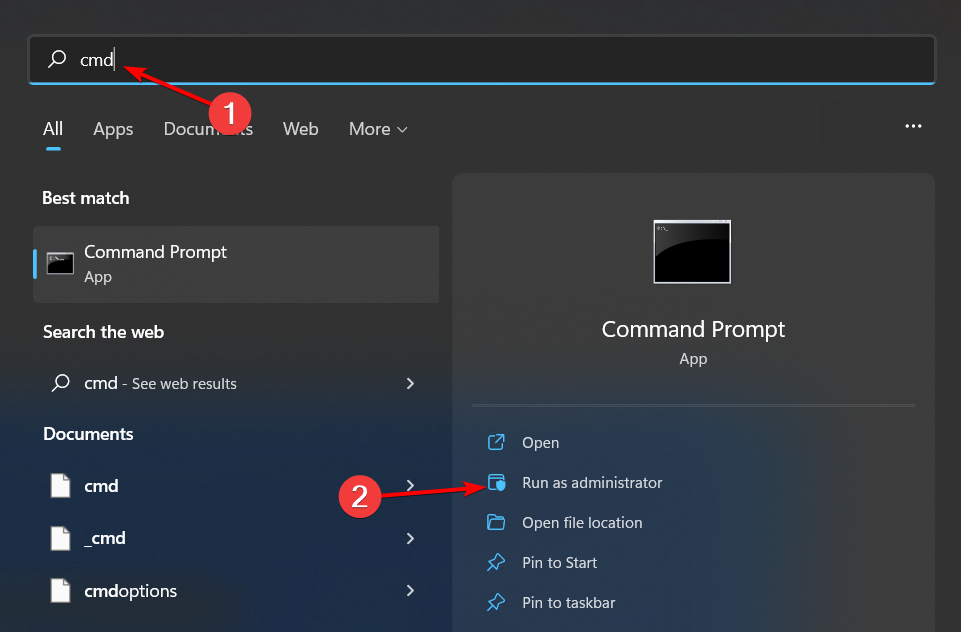
  1. Press the Windows key + S and type cmd. Choose Run as administrator.
    CMD elevated
  2. Next, run the following commands:
    net stop wuauserv
    net stop cryptSvc
    net stop bits
    net stop msiserver
    Ren C:\Windows\SoftwareDistribution SoftwareDistribution.old
    Ren C:\Windows\System32\catroot2 Catroot2.old
    net start wuauserv
    net start cryptSvc
    net start bits
    net start msiserver
  3. Check if the issue is gone.

To make this process faster, you can always use the Windows Update Components reset script.

2. Perform an in-place upgrade

  1. Visit the Windows 11 download page.
  2. Select the edition you want to download.
    download ISO
  3. Next, choose the language.
  4. Lastly, click on 64-bit Download.
  5. Once the ISO file is downloaded, double-click it to mount it.
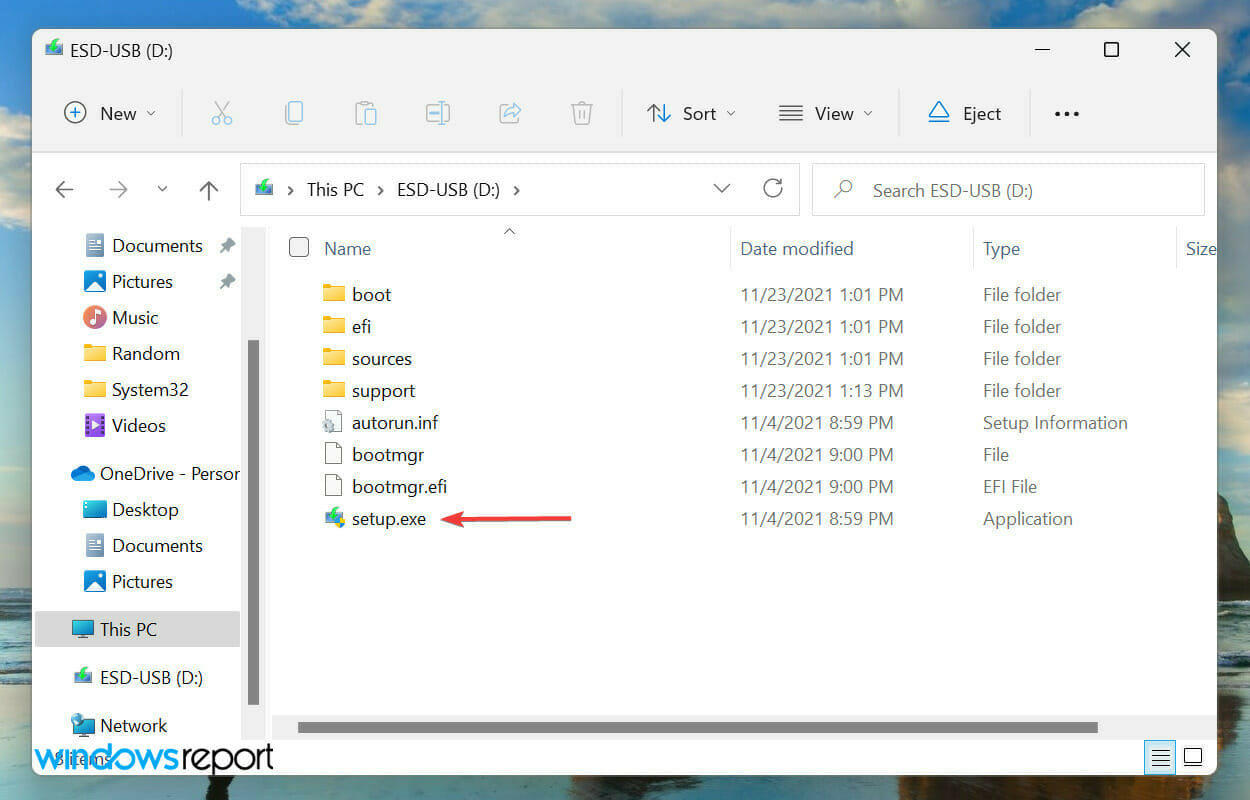
  6. Select the setup.exe file.
    Run Setup to fix 0x80071AB1
  7. Follow the instructions on the screen.
  8. Be sure to select the Keep personal files and apps option to preserve all your files.
    keep personal files and apps w11
  9. Follow the instructions on the screen to complete the process.

3. Other tips to try

  1. If you’re upgrading Windows remove third-party antivirus software and disconnect all peripherals.
  2. If a specific application is giving you this error, try reinstalling it.
  3. Adjust the flags. For this, it might be necessary to contact the application developer.

The Error_Invalid_Flag_Number is an obscure error, but if you ever encounter it, try our solutions. If you have found a different solution that worked for you, don’t hesitate to share it with us in the comments section.

Before you leave, don’t miss our guides on ERROR_INVALID_SEGMENT_NUMBER and ERROR_INVALID_EVENT_COUNT for more information.

Our latest guide covers Error_No_Signal_Sent, so don’t miss it for more useful tips. We also have an article dedicated to the Invalid_Slot_Allocator_Flags error that might interest you.

ERROR_DYNLINK_FROM_INVALID_RING 196 (0xC4) [Solved]

The ERROR_DYNLINK_FROM_INVALID_RING Windows system error, with code 196 (0xC4), appears due to conflicts between the privileges required by a program and that granted by the OS. In simple terms, the program requires a higher security level (ring level) than that allowed by Windows.

The message in the Event Viewer log reads, Error Code 196: The operating system cannot run this application program.

Before you proceed, reboot the PC, install all pending Windows updates, and reinstall the affected application. For most of you, this should fix things!

1. Run the program with administrative privileges

  1. Right-click on the affected application, and select Properties.
  2. Go to the Compatibility tab, and tick the Run this program as an administrator checkbox.run as administrator to fix ERROR_DYNLINK_FROM_INVALID_RING
  3. Click Apply and OK to save the changes, then restart the PC and verify whether ERROR_DYNLINK_FROM_INVALID_RING is fixed.

2. Repair the corrupted system files

  1. Press Windows + R to open Run, type cmd, and hit Ctrl + Shift + Enter.command prompt
  2. Click Yes in the UAC prompt.
  3. Paste the following DISM commands individually and hit Enter after each: DISM /Online /Cleanup-Image /CheckHealth DISM /Online /Cleanup-Image /ScanHealth DISM /Online /Cleanup-Image /RestoreHealth
  4. Next, run the SFC scan using this command: sfc /scannowsfc scan to fix ERROR_DYNLINK_FROM_INVALID_RING
  5. Restart the PC and check for improvements.

If corrupted system files are triggering the 196 (0xC4) The operating system cannot run this application program error, running the DISM (Deployment Image Servicing and Management) and SFC (System File Checker) scan will replace all problematic files with their cached copies.

3. Disable UAC

  1. Press Windows + S to open Search, type Change User Account Control settings, and click on the relevant result.
  2. Drag the slider to the bottom and click OK to save the changes.disable UAC to fix ERROR_DYNLINK_FROM_INVALID_RING
  3. Click Yes in the UAC prompt to confirm.

Since it’s not recommended to ideally turn off UAC, if this helps fix ERROR_DYNLINK_FROM_INVALID_RING 196 (0xC4), you can disable UAC for the specific app.

4. Repair the application using built-in functionality (if available)

  1. Press Windows + R to open Run, type appwiz.cpl in the text field, and hit Enter.
  2. Select the affected app from the list, and click on the Repair or Change option, if available.repair
  3. Follow the on-screen instructions to complete the process, then restart the PC and check for improvements.

5. Scan the PC for malware

  1. Press Windows + S to open Search, type Windows Security in the text field, and click on the relevant result.
  2. Click on Virus & threat protection.windows security
  3. Click on Scan options.
  4. Select the Full scan option and click on Scan now. malware scan to fix ERROR_DYNLINK_FROM_INVALID_RING
  5. If any threats are detected and eliminated, restart the PC and verify whether system error ERROR_DYNLINK_FROM_INVALID_RING is resolved.

6. Perform a system restore

  1. Press Windows + S to open Search, type Create a restore point, and click on the relevant result.
  2. Click on the System Restore button.restore to fix ERROR_DYNLINK_FROM_INVALID_RING
  3. Select the Choose a different restore point option, and click Next.
  4. Pick a restore point created before the issue first appeared or the oldest one from the list, and click Next.restore point
  5. Verify the restore details, click on Finish, and confirm the change.
  6. After the restore is complete, reboot the PC and check for improvements.

7. Create a new user profile

  1. Press Windows + R to open Run, type netplwiz in the text field, and hit Enter.
  2. Click on Add.add
  3. Click on Sign in without a Microsoft account.
  4. Select the Local account option.local account to fix ERROR_DYNLINK_FROM_INVALID_RING
  5. Enter the user name and password (not mandatory) for the new profile, click on Next, and then Finish.new profile creation
  6. After creating a new profile, select it from the list, and click on Properties.
  7. Go to the Group Membership tab, select Administrator, and click OK to save the changes.administrator privileges to fix ERROR_DYNLINK_FROM_INVALID_RING
  8. Finally, restart your PC, sign in into the new profile, and you should no longer be getting the system error.

Sometimes, the ERROR_DYNLINK_FROM_INVALID_RING system error in Windows is limited to a specific user profile, and to get rid of it, you will need to create a new account with administrative privileges. As for the data, you can transfer it to the new profile using an external hard disk or a USB flash drive.

Before you leave, discover the best performance-oriented settings in Windows to enjoy a streamlined, error-free experience! ERROR_REPARSE is a similar issue to this one, and we covered it in detail in its guide, so feel free to check it out.

For any queries or to share which fix worked for you, drop a comment below.

Microsoft finally fixes the Printer issues on Windows 11 24H2 on Arm

Since its launch in October, Windows 11 24H2 has been full of issues, and it seems Printers on Arm devices are also affected. One notable issue that has been bothering users is printer compatibility, which has specifically been reported on Arm-based devices. Users of HP, Canon, Brother, and other printer brands have all reported issues since upgrading to Windows 11 24H2.

The issues include the inability to install the printer driver and use the printer and some features not working. Users have taken to Microsoft’s forums to express their frustration.

Microsoft has acknowledged the issue with printer compatibility and offered a workaround. The Redmond-based tech giant says that on Windows 11 Arm-based PCs, some ARM PCs (for example, Copilot+ PCs) may be unable to add or install a printer using the included installer or the installer from the manufacturer’s website. Microsoft suggests the following:

  • Open Settings
  • Go to Bluetooth & devices > Printers & scanners > Add deviceWindows 11 24H2 Printer Arm
  • Connecting your printer via USB.

Microsoft has also provided a detailed step-by-step guide for manually adding the printer to Windows 11 settings. The company notes that the issue is currently only present on Arm devices.

Notes: We are aware of some ARM PC’s (for example Copilot+ PC’s) not being able to add/install a printer using the included installer or by downloading the installer from the manufacturer’s website. 

  • To fix this, go to Settings > Bluetooth & devices > Printers & scanners and click on “Add device” instead to add the printer manually, unless the manufacturer has specific guidance for Windows on ARM PCs.
  • To find out if you have an ARM device, go to Settings > System > About, and look for “System type” property under “Device specifications“. ARM devices have “ARM based processor” under system type.

However, there are reports that AMD64 (Intel and AMD) systems also have printer-related issues on Windows 11 24H2, although these may not be as widespread as Arm.

Microsoft hasn’t officially acknowledged the printer issues on AMD64 systems yet, but it’s good to see that the company has at least acknowledged the issue on Arm devices. It’s unclear when a fix will be available for both Arm and AMD64 systems.

Users are not pleased with Copilot’s new UI, but there is a fix, for now

We exclusively reported that Copilot was going to be updated with a new UI that not only looks good but also acts better, per Microsoft’s words, and lets users access 4 new Voice Modes.

However, as the new UI gradually rolls out to users, many don’t particularly like it. There is a Windows forum dedicated to restoring the old UI, with hundreds of replies, a sign that Microsoft might have missed this one big time.

I’m genuinely not sure that made Microsoft sit design this and say “ah yes this is what we are going for and this is what out customers will love” it’s complete and utter garbage! How do I switch back to that old white UI with my previous chats on the side not this black minimalist BS

Others agree that the new UI, even though it’s slicker and good-looking, has made Copilot more generic in its answers, and if before users could ask for help with online research, now the AI model is not properly able to do that.

I personally love the new design and how swift it is. But I feel it’s waaaaay more generic in its responses. I used to use Copilot for online research and for adding more specific researched context to texts I’m working on. That is completely gone now! No way to make it do that so far. I hope there’s a way of going back to the previous version.

Some users agree that the new design is outdated and unprofessional-looking. Whatever the reason, though, the new Copilot is not everyone’s cup of tea. However, some users have found ingenious ways to restore the AI model to its previous version.

A first solution was simply accessing Copilot through Microsoft Edge (sneaky) and extending it to use it similarly to how you used the Copilot app. This solution used to work for a couple of weeks, but now, if you try to access Copilot on Edge, unfortunately, the new UI kicks in.

However, there is one more solution to try, although we reckon Microsoft will take care of it in no time. All you have to do is access this link on Microsoft Edge, and it seems to work:

edgeservices.bing.com/edgesvc/chat

And if you prefer the Dark Mode-themed Copilot, access this link:

edgeservices.bing.com/edgesvc/chat?darkschemeovr=1

The new Copilot is not fully rolled out, so some users can still access the old version. However, it’s interesting that those already experiencing the latest version have found it inferior. Could this be a plan for Microsoft to encourage people to get Copilot Pro? If so, the Redmond-based tech giant might get a fair share of backlash.

What’s your take on this? Can you access the new Copilot version? What’s your experience with it? And let us know if the two links worked for you.

Termsrv.dll: What is it & How Does it Work?

Almost all Windows PCs have termsrv.dll available, but if you’re not familiar with it, in today’s guide we’re going to explain what this file does.

What is the Termsrv DLL service?

Termsrv.dll is a part of Terminal Services, more commonly known as Remote Desktop Services. It allows users to have multiple remote sessions using the Remote Desktop Protocol.

Where is the Termsrv DLL located in Windows 10?

You can usually find this DLL file at the following location: C:\Windows\System32

How do I allow multiple RDP sessions in Windows 10?

  1. Visit the TermsrvPatcher page.
  2. Click on Code and then Download ZIP.
    download zip termsrv patcher
  3. Once the file is downloaded, extract the TermsrvPatcher.ps1 in the same directory where it was downloaded. We’ll assume that’s the Downloads folder.
  4. Next, locate TermsrvPacther.ps1, right-click it and choose Run with PowerShell.

There are other methods you can use and we wrote about them in our guide on how to enable multiple Remote Desktop Sessions in Windows 11.

How to replace termsrv.dll on Windows 10?

This isn’t advised, since it might impact the stability of your device.  If you decide to do so, it would be best to use one of several available projects that can do that for you.

This is everything you need to know about termsrv.dll, and you shouldn’t modify this file unless you know what you’re doing and you’re ready to deal with potential risks.

To learn more about DLL files, we have great guides on bcryptprimitives.dll and imageres.dll, so don’t miss them for more information.

We also have a guide on ygpsvc.dll, so don’t miss it for more information.

Chrome’s new feature to Simplify Tab Navigation and eliminate Tab Bar Clutter

After providing the ability to close unused tabs to declutter the tab bar, Google is testing a new feature that combines the “New Tab” and “Tab Search” buttons into a single combo button in the Chrome browser’s tab strip.

Chrome’s New Tab Strip combo button

Chrome’s new “Tabstrip combo button” is available behind a flag in the Canary. This combo button merges the functions of opening a new tab and searching through existing tabs into one convenient button. This prototype is designed to simplify tab strips and improve user navigation

How to Enable the Combo Button in the tab bar

To try out the combo button, follow these steps:

  1. Open Chrome and type chrome://flags in the address bar.
  2. Search for the flag named Tabstrip combo button.
  3. Enable the flag by setting it to “Enabled”.
  4. Restart your browser to apply the changes.
Tabstrip combo button flag. Image Credit:WindowsReport

Once enabled, the new tab and tab search buttons will appear as a single combined button in the tab strip, regardless of the tab search position setting.

Chrome already offers the ability to move the tab search button from the left to the right in the appearance settings. Generally, the new tab button appears to the right of the active tab.

With the introduction of the combo button, changing the tab search position no longer affects the combined button ensuring a consistent user experience. This may change later.

The tab bar combo button feature is currently available on Mac, Windows, Linux, ChromeOS, and Lacros in Chrome Canary. As it is still in the testing phase, feedback from users will be important for Google to determine its final implementation.

Apart from this tab navigation improvement, Chrome is bringing all its AI features into one place for users to manage via a redesign. Additionally, Chrome AI-powered History search can now provide answers.

8 Best Microsoft Teams Games to Boost Productivity

Microsoft Teams is a great collaboration tool but holding meetings day-in and day-out can become monotonous and if you’re looking to boost engagement, you may want to try some games.

Organizations have moved from in-person meetings to virtual meetings in the past five years and with remote work, it lacks the socialization aspect. Luckily Microsoft Teams has games that you can play before the start of the meeting or during breaks to ease up the temperatures.

How do I play games on Microsoft Teams?

1. Create a team in Microsoft Teams

  1. Open up the Microsoft Teams app.
  2. On the right-hand side of the page you can see different areas such as Teams, Devices, Locations, Users, and more. Click Teams.
  3. You will be directed to all different teams that you are part of.
  4. At the bottom left-hand corner of the teams’ list, click New team.Teams in Microsoft Teams
  5. Then, click Create a new team.
  6. In the popup dialog box, name your team and give it a description.
  7. You will then be asked to add the members of the team, so type in their name.
  8. Any matches will pop up for you to select from.
  9. Once selected, click the Add button.
  10. When you’re done adding members, click Close to finish the process.
  11. Once created, your team will appear in the Admin Center, and in Teams too.

2. Add new Teams members

  1. Go to the main Teams overview grid.
  2. Navigate to the team’s profile page.
  3. Here you can see the members, owners, and guests that belong to the team, along with all the team’s channels and settings.
  4. From the team profile page, feel free to:
  • set whether members can edit and delete sent messages – in Conversation settings.
  • set whether the team is public or private – in Privacy settings.
  • add new members:
Add a new member
  1. Click More options > Add member.
  2. Start typing a name, distribution list, security group, or Office 365 group to add to your team.
  3. Type the email addresses for adding people outside your organization as guests.
  4. Once all team members are added, just select Add.
  5. Then, select Close.
  6. People you’ve added will receive an email letting them know they are now your team members.

Note: A team can hold up to no more than 5000 members.

3. Create channels for your team

Manage channels
  1. Find the team that you created.
  2. Click More options > Add channel.
  3. Give the channel a descriptive name.
  4. As a team owner, you can automatically favorite channels for the whole team, making them more visible to all members.

4. Add games

  1. Select the Team, and then the channel where you want to add games.
  2. Click the + icon along the top bar of Teams to add a tab and click on Get more apps.
  3. You can search for games or type in the specific game you wish to add and hit Add to a team and select the one you created in 3 above.

What are some fun games for Microsoft Teams meetings?

Ricotta Games & Trivia – Breaking the ice

If there are new hires or people who haven’t met yet, it may be a little difficult to keep conversations going because everyone is uptight. With the help of Ricotta Games & Trivia, you can break the ice by asking some fun questions to get t know your colleagues a bit better.

The quizzes will help fill in for people who have a hard time maintaining small talk and the trivia will help you get to know each other a little deeper outside the workplace.

You’ll also get a feel of everyone’s strengths which can be instrumental especially if you want to assign work to the right team. Unfortunately, the free trial period only lasts a fortnight so you can test it out and if it’s worth it, you can subscribe to a package.

⟹ Get Ricotta Games & Trivia

Who Scavenger hunts – Interactive game

This is yet another game that not only breaks the ice but aims to foster communication among colleagues. It’s basically a get-to-know-your-colleague as the team leader sets up some questions and others have to answer.

It could be about a colleague, department or the organization in general. You can create a time limit for these questions and pair up colleagues to get the adrenalin running.

Each team will have to work hard to come up with the right answers and at the same time, learning valuable information about each other and the company.

⟹ Get Scavenger hunts

Pictionary – Mind-boggling game

Consider Virtual Pictionary For Your Next Team Fun Event!

Pictionary is a game that puts Microsoft Teams features to use. You’ll be using the Whiteboard as you try to get your team members to guess the picture using words. This game is meant to test critical thinking and how fast you’re on your feet.

Again, you can divide the team into pairs, set a time limit and award points to the best performers. It’s a great energy booster especially if you’ve been holding the meeting for a while and need to recharge.

As a team leader, you can also use this as a benchmark when selecting colleagues to assign different roles for optimum performance.

⟹ Get Pictionary

Wordament – Guess the word game

Microsoft Wordament

This is yet another game to break the monotony of all work and no play. Team members are supposed to come up with a complete word by connecting letters to complete the puzzle. This is one of those games you play when you can’t meet for a face-to-face team-building exercise.

It has all the elements of competition, and fun and promotes communication through bonding.

⟹ Get Wordament

Kahoot – Earn-your-stay game

In a virtual setting, people tend to stay quiet and this can go on for consecutive meetings without hearing from select people. However, when you introduce Kahoot to the team, the team members will be engaged and with the quizzes, they’ll be prompted to speak up.

The good thing about Kahoot is you can customize it to fit the current setting. Whether you want to discuss work but on a more fun and lighter note, you can tweak the questions to reflect this.

Since it is also a competitive game, members can be encouraged to get their A-game up which can easily boost morale and encourage them to participate more in future meetings.

⟹ Get Kahoot

GIF story challenge – Fun communication game

Get to test your employees’ creativity by having them guess a GIF. This can be a fun and interactive way to explain a process that’s been fairly difficult for them to understand or breaking the monotony of a session with fun GIFs.

GIFs are already available on Microsoft Teams so the team’s familiarity could make it more fun. Try to relate the GIFs to the workplace, company terms, new hires or anything related to work to help colleagues break the ice.

It could be an imitation of the boss, description of how you feel about certain work processes or communicating your feelings about an issue without the seriousness. Your boss can then catch the hints and adjust accordingly.

⟹ Get GIF story challenge

Skribblio – Get-to-know each other

Skribblio is all about bringing the creativity out of your team members in a fun and interactive way. You can all pair up and each group takes a turn to draw something and the rest should guess accurately.

If you’re on the same team, you can share hints on the Teams chat to help you score points. You can add more fun to the game by referencing some company terms, heads of department or even a slang word you use to keep it fun and interactive.

The best thing about this game is everyone is involved and it encourages you to step out of your comfort zone as you move from the known to the unknown.

⟹ Get Skribblio

Spin the wheel – Reward game

The good thing about spinning the wheel games is how customizable they are. You can curate it to reflect the mood of the day or whatever activity you wish your team members to participate in. One of the most common wheels employed is the wheel of fortune.

You basically set up the wheel with different prizes or tokens and other slots with a loss or anything else to keep the game going. Each team member will be eager to participate to win something so it’s a great way to interact as you also reward employees.

This can boost their morale and encourage them to work harder if they know their efforts are appreciated.

⟹ Get Spin the wheel

Another tip we’d recommend is to use Teams as a walkie-talkie and use Teams avatars to identify members of the same group while playing these games especially when you’re split into groups. You can communicate with members of your team to help you with clues and win for your group.

You can also incorporate the Teams note taker to help you refer to the game in your spare time if you want to play the game again and master it.

And it’s not just games. If you’re looking to get into the festive mood, we have outlined some of the best Christmas party ideas to get you started.

If you’d like to find out more about Microsoft Teams, we also have an all-in-one Teams essentials list to help you discover the ins and outs of this collaboration tool.

We also have a guide on the best whiteboard apps for Microsoft Teams so don’t miss it.

Have you played any other Microsoft Teams games that you think we should know about? If so, let us know in the comment section below.

Solved: ERROR_DEVICE_SUPPORT_IN_PROGRESS

The ERROR_DEVICE_SUPPORT_IN_PROGRESS 171 (0xAB) with the error message Device’s command support detection is in progress, occurs when a device is in the process of verifying which commands it supports, and the operation is not complete. You can see this error when a device is initialized or a hardware interaction is processed.

As the error is temporary, the first thing to do is wait for the process to complete before retrying. Then restart your computer printer, power cycle your router, unplug it, and plug in the USB or other external devices.

How can I fix the ERROR_DEVICE_SUPPORT_IN_PROGRESS error?

1. Update/reinstall the device drivers

  1. Press Windows + R to open the Run window. Device Manager Run command - ERROR_DEVICE_SUPPORT_IN_PROGRESS
  2. Type devmgmt.msc and click OK to open the Device Manager app.
  3. From the list of system components, expand each category one by one and look for the driver with a yellow triangle and an exclamation mark. Then, right-click the driver and choose Update driver from the context menu.Update driver - ERROR_DEVICE_SUPPORT_IN_PROGRESS
  4. Select the Search automatically for drivers option.Search automatically
  5. Follow the on-screen instructions to complete the process. If more than one problematic driver is present, repeat the steps.

If Windows cannot find the latest version of device drivers, you can head to the manufacturer’s website and install them. Alternatively, you can get a reliable driver updater tool to run and install the latest drivers without hassle. Next, check for BIOS firmware update and if available, install it.

If the issue exists, follow these steps to reinstall the driver:

  1. Launch Device Manager again and locate the problematic driver.
  2. Right-click it and choose Uninstall device from the context menu.Uninstall device 
  3. Navigate to Action and select Scan for hardware changes from the drop-down menu to reinstall the driver.Action scan for hardware changes ERROR_DEVICE_SUPPORT_IN_PROGRESS

2. Reboot into safe mode

  1. Press Windows + R to open the Run window.safe boot - ERROR_DEVICE_SUPPORT_IN_PROGRESS  
  2. Type msconfig and click OK to open the System Configuration window.
  3. Under Boot options, select Safe Boot and Network.Safe mode with networking
  4. Click Apply, then OK.
  5. Select Restart.Restart

Once restarted, check if the error persists. If your device works properly, it may indicate conflicts with third-party software or driver, so reverse engineer these steps to boot your computer into normal mode. Next, check or remove the recently installed apps.

3. Check device connection and health

If you have an external device, check that the cables and connections are properly seated and that the connectors are not damaged.

You can try using a different port or cable to ensure there is no issue with the physical connection. Also, check your device for conflicts, such as IRQ or I/O, to ensure proper communication between the system and the device. Open the print queue and clear any of the pending print jobs.

4. Run the Chkdsk scan

  1. Press the Windows key, type cmd in the search box, and click Run as administrator from the list of options.CMD elevated 
  2. Type the following command to fix file system issues, recover lost data, and mark bad sectors after replacing C with system drive letter, then hit Enter: chkdsk C: /fCHKDSK 1 - ERROR_DEVICE_SUPPORT_IN_PROGRESS
  3. If the drive is in use, you will be asked to schedule the check for the system restart, type Y, and press Enter.
  4. Restart your computer to initiate the scan.

5. Restore your system to the previous version

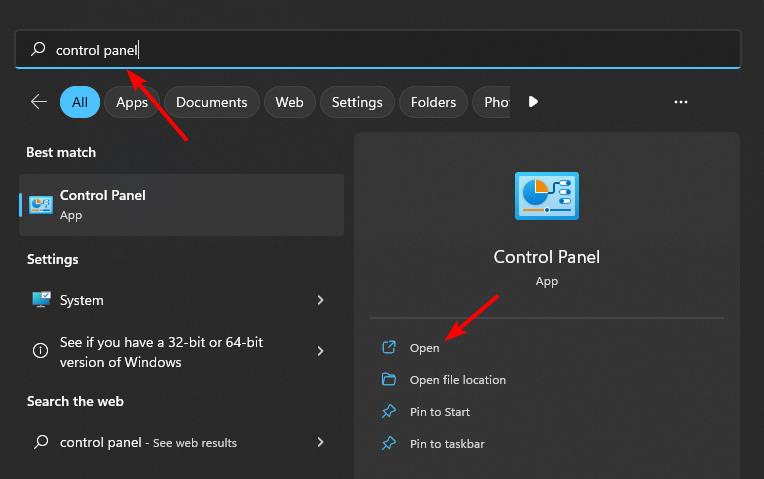
  1. Press the Windows key, type control panel in the search box, and click Open.Control Panel start menu - ERROR_DEVICE_SUPPORT_IN_PROGRESS
  2. Select Category for View By and click Recovery from the list of options.Recovery Control PaneL  - ERROR_DEVICE_SUPPORT_IN_PROGRESS
  3. Now, click Open System Restore to launch the System Restore wizard.Open system restore
  4. Select Choose a different restore point and click Next.Next Choose a different restore point
  5. From the list of available restore points, select the one created before the ERROR_DEVICE_SUPPORT_IN_PROGRESS error occurrence, then click Next.Choose a point
  6. Click Finish to start the process.

    Windows will restart and restore your system settings to the selected point. If you see the System Restore taking a long time message on your Windows 11, the system files or background processes might interfere with System Restore; check out this guide to fix it.

    If you see the ERROR_DEVICE_SUPPORT_IN_PROGRESS message on your device, you should wait a while before taking action. Then, check the device connections, run the disk scan, and try updating or reinstalling problematic drivers.

    If you have any questions or suggestions about this BSoD error, feel free to mention them in the comments section below. We’re happy to help!


5 Ways to Fix the OGG.DLL File is Missing or Not Found

The ogg.dll file is critical when playing certain games and if it’s missing, you may be unable to launch your game.

Users who got the ogg.dll file is missing message were all trying to launch a game most notably GTA and Commandos 3. The trigger behind this error was that the game was downloaded from an unofficial site.

To play GTA, you need to purchase it but if you’re looking to enjoy the perks without some bucks, you’ll likely encounter such barriers. Unfortunately, you can’t do without the ogg.dll file because it is largely responsible for the audio in your game.

What can I do if ogg.dll is missing or not found?

1. Install the latest GTA patch

Note icon NOTE
If the ogg.dll is missing error occurred on another game, check for the latest updates and install them.
  1. Navigate to the GTA 3 installation folder on your system and open it.
  2. Find your gta3.exe file 9or your GTA version), right-click on it, then select Properties.
  3. Then click on Compatibility.

  4. Check the box saying Run this program in compatibility mode for,
    then select Windows XP (Service Pack 2).

  5. Check Run in 640 x 480 screen resolution.
  6. Click Apply, then hit Okay.
  7. Start your game, then go to Options, then Display Settings.
  8. Hover over Screen Resolution, and change it to your display resolution.
  9. Afterwards, go back to the gta3 executable, Properties, then Compatibility.
  10. Uncheck Run in 640 x 480 screen resolution, hit apply, then okay, and start your game.

2. Verify game files

  1. Press the Windows key, type steam or in the search box, and click Open.Steam - open - dev error 12744 mw3
  2. Go to Library, right-click the game, then select Properties from the context menu.Properties of game -dev error 12744 mw3
  3. From the left pane, click Installed files, then click Verify Integrity of Game Files.Verify integrity of files
  4. The scan will start, and all the missing or damaged game files will be replaced with healthy files.

3. Re-register the DLL file

  1. Hit the Windows key, type Command Prompt right-click on it, and select Run as administrator.
  2. Type the following command and press Enter:
    regsvr32 ogg.dll
  3. This command registers the missing DLL file. However, if more than one DLL file is not registered, you can use the following command:
    for %1 in (*.dll) do regsvr32 /s %1

4. Download the DLL file manually

  1. Visit the DLL-Files website, search ogg.DLL, choose an appropriate option, and click Download.
  2. Double-click the downloaded folder to open, locate, and copy the .dll file.
  3. Press the Windows + E keys to open the File Explorer.
  4. Navigate through the following path and paste the file: C:\Users\%USERNAME%\Documents\Rockstar Games\GTA V\Profiles
  5. Close your File Explorer and try to launch the game and see if the error persists.

5. Reinstall the game

  1. Go to the Windows Search Bar and type in Control Panel.
  2. Under Programs, select Uninstall a Program.
  3. Find GTA3, right-click on it, and select Uninstall.
  4. After the game has successfully uninstalled, install it via CD, Steam, or Rockstar Games Launcher.

Generally, to get the most out of the game and avoid such issues, make sure you download from official sources only. Pirated copies may come with additional features that give you an advantage over the game but they may also be bundled up with malware.

Sound issues in games may manifest in different ways so if you run into another DLL issue like xaudio2_7.dll not found, feel free to check out our article for a quick fix.

You’re also likely to encounter a lot of performance issues that are not worth it in the long run. Elsewhere, if you have normal game problems like GTA not working, we have a fix guide for that. And if the issue is about missing DLL files, we have a comprehensive article that explores multiple options.

Consequently, if you often spot DLL errors, installing a DLL repair tool should be right up your alley to help fix the problem automatically. Before you leave, you might be interested in our latest guide on xgcore.dll for more information.

That’s it from us but do let us know if you have any other solutions not mentioned here but worked for you in the comment section below.

6 Ways to Fix The ERROR_DISCARDED 157 (0x9D) Error

The Error_Discarded 157 (0x9D) with the error message The segment is already discarded and cannot be locked appears when an operation or process tries to interact with a memory segment or a buffer/file that has been discarded or is no longer accessible. This error can occur when using device drivers, memory buffers, or kernel-level operations.

To begin with, check if your system has sufficient RAM and ensure there are no memory leaks. Then, check for memory usage and close unwanted apps to reduce the load. Restart the affected app or the computer to refresh the hardware or memory segment state.

How can I fix the ERROR_DISCARDED 157 (0x9D) error?

1. Update or reinstall the problematic driver

  1. Press Windows + R to open the Run window. Device Manager Run command - ERROR_DISCARDED
  2. Type devmgmt.msc and click OK to open the Device Manager app.
  3. From the list of system components, expand each category and look for a driver with a yellow triangle with an exclamation mark inside.
  4. Right-click the problematic driver and click the Update driver from the context menu.Update driver
  5. Select the Search automatically for drivers option, then follow the on-screen instructions to complete the process. Repeat these steps if there is more than one outdated or corrupted driver.Search automatically - ERROR_DISCARDED

If Windows cannot find the latest version of the driver, you can visit the manufacturer’s website to download it. Alternatively, you can use a reliable driver updater tool to scan and update the driver in no time. However, if you already have the latest version of the driver and are still getting the error, try reinstalling the driver. For that, follow these steps:

  1. Open Device Manager again and locate the problematic driver.
  2. Right-click it and select Uninstall device.Uninstall graphics driver
  3. Go to Action and select Scan for hardware changes from the drop-down menu to reinstall the driver.Action scan for hardware changes

2. Run the CHKDSK scan

  1. Press the Windows key, type cmd in the search box, and select Run as administrator from the options.CMD elevated - ERROR_DISCARDED
  2. Type the following command after replacing C with the system drive on your computer to run the disk scan and hit Enter: chkdsk C: /fCHKDSK 1 - ERROR_DISCARDED
  3. You will be informed that the scan will run after the restart. To schedule it, type Y and press Enter.
  4. Now reboot your computer and wait for the scan to complete.

3. Disable the Windows Firewall temporarily

  1. Press the Windows key, type control panel in the search box, and click Open from the options.Control Panel start menu
  2. Select Category for View by and click System and Security.  Category - Error_Discarded
  3. Click the Windows Defender Firewall option.Windows Defender Firewall
  4. Select the Turn Windows Defender Firewall on or off link.Turn on or off defender
  5. Remove the checkmark next to Turn on Windows Defender Firewall under Private network settings, and Public network settings.Turn on or off, click OK
  6. Click OK to save the changes.

4. Check the Event Viewer for errors

  1. Press Windows + R to open the Run window.Event Viewer
  2. Type eventvwr.msc and click OK to launch the Event Viewer.
  3. From the left pane, go to Windows Logs > System or Application.Windows logs- Error_Discarded
  4. Now, look for any errors or warnings related to memory management, hardware, or any specific app causing Error_Discarded.

5. Run an SFC scan

  1. Press the Windows key, type cmd in the search box, and click Run as administrator from the list of options.CMD elevated
  2. Copy & paste the following command to repair/restore the corrupted system files and hit Enter: sfc /scannowSFCSCANNOW CMD - Error_Discarded
  3. Wait for the scan to complete. If issues are found, it will try to repair the corrupted files. Restart the computer to let the changes take effect.

6. Perform a system restore

  1. Press the Windows key, type control panel in the search box, and click Open from the list of options.Control Panel start menu
  2. Select Large icons for View by and click Recovery.Recovery Control Panel - Error_Discarded
  3. Click the Open System Restore link.Open system restore
  4. Select Choose a different restore point and click Next.Next Choose a different restore point - Error_Discarded  
  5. From the list of available restore points, select the most recent one created before the error occurred, then click Next.Choose a point
  6. Click Finish to initiate the process.Finish

Windows will restart and restore the system settings to the selected point. If you see System Restore was not successfully completed error message after the system boots up, it could be due to conflicting drivers or corrupted system files; try the methods mentioned in this detailed guide.

If you still see the Error_Discarded message, consider reinstalling Windows or replacing the hardware causing the issue.

If you have any questions or suggestions about the issue, feel free to mention them in the comments section below. We’re happy to help!

How to Fix Dx8vb.dll is Missing or Not Found in Windows

If you’re looking at an error saying that Dx8vb.dll is missing or Dx8vb.dll not found, that means an old app or game is trying to access DirectX 8. The DLL file is a part of Microsoft DirectX for Visual Basic and it’s not really necessary. From our research, this file is usually required by the Easy CD & DVD Creator Basic Edition software.

What do I do if Dx8vb.dll is missing?

1. Uninstall or reinstall the affected software

As we’ve mentioned in the intro, it appears that an app needs the old DirectX file. Usually, the software that needs this file also comes with the necessary DLL files. So, a quick fix to this problem is to reinstall the software that is trying to access it.

Therefore, see which software you installed lately and uninstall them from Settings > Apps > Installed apps. Then, if you really need that app, look for a fresh, updated installer and run it again.

As we mentioned above, the app you’re looking for may be Easy CD & DVD Creator Basic Edition.

2. Install DirectX 8

You can also fix this issue by installing DirectX 8. Luckily, the Internet Archive website still offers a download link for it.

Although it’s improbable to still have an app that uses DirectX 8, this will definitely help your run it.

There is another less likely scenario that somehow you downloaded a PUP or a malware that is causing this error. Therefore, the reasonable thing to do is to run a full antivirus scan. Go to Settings > Virus & threat protection and launch a full scan or do that by using a third-party antivirus if you have one installed on your PC.

When we have missing DLL errors, we always use Fortect, a tool with an extensive DLL database and can fix such issues with just a few clicks.

We also have a complete guide on how to fix missing DLL files errors if you need more information. Before you go, head to our latest what is hvsigpext.dll article if you want to learn more about DLL files.

We hope that by using the solutions above, you managed to fix the Dx8vb.dll not found or missing issue on your computer. If you know about any possible solutions, talk about them in the comments section below.

Microsoft’s latest patent reveals technology capable of stopping AI from hallucinating

One of AI’s biggest challenges today is its hallucinating capabilities, aka fabricating false information just to complete a task. While most AI models on the market will use the Internet to respond as accurately as possible, if the conversation is long enough, the AI will sometimes use unfounded information to provide answers.

While Microsoft started working on a tool to mitigate AI hallucinations earlier this year, the Redmond tech giant has also published a paper describing a patented technology that could effectively prevent hallucinations from happening in the first place.

The paper “Interacting with a language model using external Knowledge and Feedback“ describes how this would happen.

A system would receive a query—a question or request (query) sent to it. Based on that query, it would retrieve knowledge by finding relevant information from external sources. Then, it would generate the original model input information by combining the query and the retrieved data into a single package that the language model can use.

The combined package is presented to the language model, which is trained to generate responses based on input. The AI language model generates an initial response based on the input package.

The system uses a predefined test or criteria to evaluate the usefulness or relevance of the original response and determine if the initial response meets the usefulness criteria. If the initial response isn’t valuable enough (AI hallucinations), the system generates revised input information, including feedback on missing or incorrect information.

This revised package is again presented to the language model, and the language model generates a new response based on the revised input.

This technology would not only help combat AI hallucinations, but it has many practical applications. For example, as shown by the paper, this system can be applied to an AI assistant in a restaurant, where it can provide factual and verified info to customers and even come up with solutions after the input (in this case, the customers’ requests) is changed mid-conversation.AI hallucinations

This process ensures that the language model’s responses are as accurate and helpful as possible by iteratively refining the input and feedback.

Even if it’s still just a patent, the technology described here clearly indicates that Microsoft intends to make its AI models (Copilot) fully functional and correct.

While the Redmond-based tech giant already announced that it wants to remediate and eliminate hallucinations in the AI model, this technology also proposes a case where AI could provide accurate and verified information in roles such as a restaurant assistant.

An AI model could be trained to provide answers without rooting them in false information by erasing hallucinations. Coupled with the voice capabilities of the new Copilot, AI could be used to replace the most basic jobs, such as automatic customer support.

What’s your take on this?

You can read the whole paper here.

Fix: ERROR_INVALID_SEGMENT_NUMBER 180 (0xB4)

The ERROR_INVALID_SEGMENT_NUMBER Windows system error, with code 180 (0xB4), is usually encountered while running codes or apps requiring access to a file that is not available or the key permissions are missing.

The error message reads, The system detected a segment number that was not correct.

Before you proceed, reboot the PC, check the affected file for corruption, move it to a different directory, and install pending Windows updates. For most, these basic checks should do the trick!

How can I fix ERROR_INVALID_SEGMENT_NUMBER?

1. Run the affected app as an administrator

  1. Right-click on the affected app’s launcher (.exe) file, and select Properties.
  2. Go to the Compatibility tab, and tick the Run this program as an administrator checkbox.run as admin
  3. Click on Apply and OK to save the changes.

2. Disable UAC

Tip icon Tip
Disabling UAC is not recommended and should only be used as a temporary workaround against ERROR_INVALID_SEGMENT_NUMBER 180 (0xB4).
  1. Press Windows + S to open Search, type Change User Account Control settings, and click on the relevant result.
  2. Move the slider to the bottom and click OK to save the changes.disable UAC to fix ERROR_INVALID_SEGMENT_NUMBER
  3. Click Yes to confirm.
  4. Relaunch the affected application and check for improvements.

Instead of turning off UAC altogether, you can also disable UAC for specific programs, primarily the affected app.

3. Repair the corrupted system files

  1. Press Windows + R to open Run, type cmd, and hit Ctrl + Shift + Enter.command prompt
  2. Click Yes in the UAC prompt.
  3. Run the following DISM commands individually: DISM /Online /Cleanup-Image /CheckHealth DISM /Online /Cleanup-Image /ScanHealth DISM /Online /Cleanup-Image /RestoreHealth
  4. Execute this command for the SFC scan: sfc /scannowsfc scan to fix ERROR_INVALID_SEGMENT_NUMBER
  5. Reboot the PC and check for improvements.

If corrupted system files are the reason behind the ERROR_INVALID_SEGMENT_NUMBER The system detected a segment number that was not correct Windows error, running the DISM (Deployment Image Servicing and Management) and SFC (System File Checker) scan will get things up and running!

4. Repair the disk

  1. Press Windows + S to open Search, type Command Prompt, and click on Run as administrator.
  2. Click Yes in the UAC prompt.
  3. Paste the following command and hit Enter: chkdsk /r
  4. If asked to schedule the scan for the next restart, press Y, hit Enter, and then reboot the PC.check disk to fix ERROR_INVALID_SEGMENT_NUMBER

If a file is triggering 180 (0xB4) The system detected a segment number that was not correct, it could be a disk-related issue to blame. And in this case, the Check Disk utility will repair all problems, including bad sectors.

5. Perform a system restore

  1. Press Windows + R to open Run, type rstrui.exe in the text field, and hit Enter.
  2. Select the Choose a different restore point option and click Next.restore to fix ERROR_INVALID_SEGMENT_NUMBER
  3. Pick the oldest restore point from the list, and click Next.restore point
  4. Verify the restore details, click Finish, and confirm the change.

If the previous solutions didn’t work, a system restore would help you revert any recent changes behind ERROR_INVALID_SEGMENT_NUMBER 180 (0xB4). Just make sure to choose a restore point created before the issue first appeared or the oldest one to be on the safe side.

Before you leave, discover the best Windows performance settings and enjoy a seamless, error-free experience!

We also have a guide on the ERROR_INVALID_FLAG_NUMBER message, so feel free to visit it for more solutions.

Which fix worked for you? Share with our readers in the comments section.

D3dx9_25.dll Not Found or Missing: 4 Ways to Get it Back

Sometimes you might encounter issues with d3dx9_25.dll in Age of Empires 3, Heroes 5, GTA SAMP, or other games. If this happens, you won’t be able to start the game, but there are a few solutions that you can use to fix this problem.

How can I fix the d3dx9_25.dll error?

1. Install DirectX

  1. Visit the DirectX download page.
  2. Click the Download button.
    download directx
  3. Once downloaded, run the setup file.
  4. Follow the instructions on the screen.
  5. After DirectX is installed, check if the problem is gone.

2. Copy the file manually

  1. Mount the game ISO file.
  2. Look for the Apr2005_d3dx9_25_x86.cab file and open it.
  3. Locate d3dx9_25.dll inside it and copy it.
  4. Next, paste the file into the game’s installation directory.

You might be able to find this file on the Windows ISO file as well.

3. Download MSXML 4.0 Service Pack 3

  1. Visit the MSXML 4.0 Service Pack 3 download page.
  2. Click on Download.
    download msxml core services
  3. Once the file is downloaded, run the setup file.
  4. After installing it, check if the problem is resolved.

4. Reinstall the application

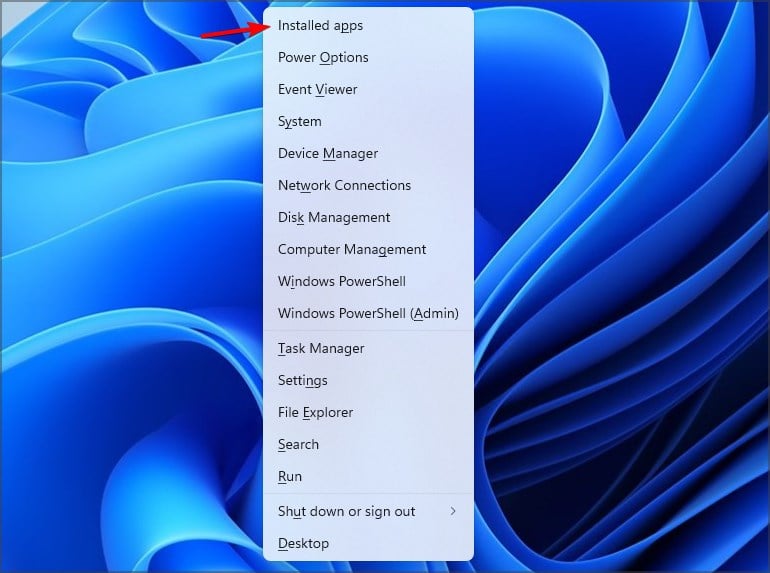
  1. Press the Windows key + X and choose Installed apps.
    installed apps windows 11
  2. Locate the application that is giving you this problem.
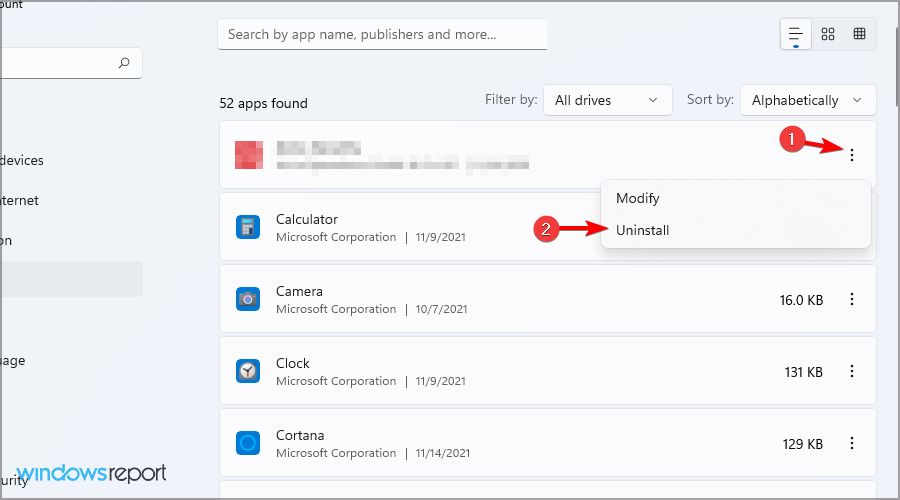
  3. Click the three dots next to it and choose Uninstall.
    uninstall app w11
  4. Once removed, install it again, but be sure to install all the components.

If the d3dx9_25.dll is not found, the best option would be to download it again, by downloading DirectX, but if that doesn’t work, try our other solutions.

This isn’t the only DirectX error you can encounter and we wrote guides on what to do if D3dx9_43.dll is not found and d3dx9_30.dll as well, so don’t miss them for more information.

We also have a guide that shows you what to do if dplayx.dll is not found so go ahead and check it out.

Fix: Dcomp.dll is Missing, Not Authorized to Run, or Faulting Mode

The dcomp.dll file, developed by Microsoft and a part of the DirectComposition API, has been included in the OS since Windows 8 and can be found on Windows 11. But when the DLL is corrupt or missing, programs that rely on it start to crash, including Office apps like Microsoft Excel and several games.

Also, in some cases, the error message reads, C:\Windows\System32\dcomp.dll is either not designed to run on Windows or it contains an error. Try installing the program again using the original installation media or contact your system administrator or the software vendor for support.

Before you proceed, reboot the PC and install any pending Windows. For most of you, this should fix the dcomp.dll missing error!

How can I fix the dcomp.dll error?

Tip icon Tip
Although several websites claim to host dcomp.dll, I recommend against downloading the DLL from any third-party sources. It’s because such files often come bundled with malware that can harm your PC.

1. Manually move dcomp.dll

When dcomp.dll is not designed to run on Windows or is missing, your primary approach should be to manually move a fresh copy of the DLL. The dcomp.dll file is stored in: C:\Windows\System32

dcomp.dll in System32

So, all you have to do is go to another PC running the same Windows iteration and architecture (32-bit or 64-bit) > locate the DLL > transfer a copy of it to a USB flash drive > connect the flash drive to the affected PC > move dcomp.dll to the System32 folder > reboot the PC.

Once done, programs should no longer throw the missing DLL error!

2. Run the program as an administrator

  1. Right-click on the affected program’s launcher (.exe) file, and select Properties.
  2. Navigate to the Compatibility tab, and tick the checkbox for Run this program as an administrator.run as administrator to fix missing dcomp.dll
  3. Click on Apply and OK to save the changes.
  4. Relaunch the app and check for improvements.

Running as an administrator especially helps when Microsoft Office apps like Excel, Word, or Outlook keep crashing or restarting due to dcomp.dll.

run as administrator
Running Microsoft Office apps with administrative privileges

In that case, search for the affected application > right-click on the result > select Open File Location > right-click on the shortcut > select Properties > go to the Shortcut tab > click on Advanced > tick the checkbox for Run as administrator > save the changes.

3. Repair the corrupted system files

  1. Press Windows + R to open Run, type cmd, and hit Ctrl + Shift + Enter.command prompt
  2. Click Yes in the UAC prompt.
  3. Paste the following commands individually and hit Enter after each: DISM /Online /Cleanup-Image /CheckHealth DISM /Online /Cleanup-Image /ScanHealth DISM /Online /Cleanup-Image /RestoreHealth
  4. Next, run this SFC scan using this command: sfc /scannowsfc scan to fix dcomp.dll
  5. Finally, restart the PC to apply the changes.

Corrupted system files are just as likely to cause missing DLL errors. And since dcomp.dll is a protected system file, running the DISM (Deployment Image Servicing and Management) and SFC (System File Checker) scans will replace it with a cached copy stored on the PC.

4. Perform a malware scan

  1. Press Windows + S to open Search, type Windows Security in the text field, and click on the relevant result.
  2. Click on Virus & threat protection.Windows Security
  3. Click on Scan options.
  4. Select the Full scan entry and click on Scan now.malware scan to fix dcomp.dll
  5. Wait for the malware scan to complete. It typically takes 15-30 minutes.

5. Reinstall the affected app

  1. Press Windows + R to open Run, type appwiz.cpl in the text field, and hit Enter.
  2. Select the affected application from the list, and click on Uninstall.reinstall app
  3. Follow the on-screen instructions to complete the process and then restart the PC.
  4. Now, reinstall the app from an official source and verify whether this restores the missing dcomp.dll.

6. Perform an in-place upgrade

Note icon NOTE
The steps listed here are for Windows 11. In case you are running the previous iteration of the OS, learn how to perform an in-place upgrade on Windows 10.
  1. Go to Microsoft’s official website, select the OS edition and language, and download the Windows 11 ISO. download ISO
  2. Run the ISO file and click Open in the confirmation prompt.
  3. Run the setup.exe file.setup.exe
  4. Click Yes in the UAC prompt.
  5. Click Next to proceed.
  6. Review Microsoft’s license terms and click on Accept.license terms
  7. Make sure the setup reads, Keep personal files and apps, click Install, and confirm the change.in-place upgrade to fix missing dcomp.dll
  8. Wait for the in-place upgrade to complete. It may take 30-90 minutes.

An in-place upgrade will, in all likelihood, fix the missing dcomp.dll error in Windows 11 without affecting the files and apps. If this, too, fails, you can always reinstall Windows to get things running.

Before you leave, discover expert tips to fix all missing DLLs and resolve such issues with ease! Also, don’t miss our newest guide to learn what is hvsigpext.dll.

For any queries or to share more fixes with our readers, drop a comment below.

Best Windows XP Gaming Laptop: Under $200

Retro gaming is a thing right now, and if you’re looking for the best Windows XP gaming laptop, we’ve got some insights for you. First of all, you’ve got 2 options here. You can either hunt for a Windows XP gaming laptop from the era, or get the best laptop that still supports Windows XP and has the drivers for it.

Well, the first tip is that Intel’s Core i3/i5/i7 CPUs Gen 5 and AMD’s FX series and APU series still support Windows XP. Yes, you can get an overkill configuration for the XP era, but it will run Windows XP seamlessly even with onboard graphics.

What is the best Windows XP gaming laptop?

1. Lenovo T430

  • Intel i5-3320M up tp 3.3GHz
  • 8GB DDR3, 128GB SSD
  • 14-inch HD LED
  • DVD, HD Webcam, 802.11b/g/n
  • You have to bring your own Windows XP installation kit

Lenovo T430 is more of a Windows 10 era laptop, not a Windows XP timeline laptop. However, as we’ve mentioned in the intro, it features an Intel i5-3320M CPU that still supports Windows XP.

It doesn’t have a discrete GPU but the onboard Intel HD Graphics 4000 still supports Windows XP graphics drivers.

The 14 inch display might be a little small for gaming purposes, but the laptop comes with a D-Sub (VGA) port for an external, bigger display if needed.

Anyway, the 8GB of RAM and the 3.3 GHz CPU will be overkill for any Windows XP era game, but that was the point, right? Obviously, it’s a refurbished laptop that comes with Windows 10 Pro, so you’ll have to bring your own Windows XP kit.

2. DELL Latitude D520

  • Intel Dual Core T2300 1.66Ghz Processor with 2MB Cache
  • 1 GB DDR2 RAM 667Mhz
  • 60GB 5400 RPM Hard Drive
  • CDRW/DVD Combo Drive
  • Low battery life

DELL Latitude D520 is a proud member of the Windows XP era and it actually comes with the OS installed. Obviously, the laptop on sale is refurbished, but even if the battery was replaced, that doesn’t mean you can get too far from the outlet.

At its time, this machine was running the XP games smoothly even with the onboard Intel GMA 950 GPU. As for the memory, it wouldn’t be bad to replace the RAM with 2GB or even 4GB if you find the SoDIMM modules to go with it.

Also, replacing the 60GB HDD with a SSD would definitely speed up this laptop a lot.

3. HP Elitebook 8470p

  • Intel Core i5 3210M 2.50GHz
  • 8GB RAM, 500GB HDD, DVD
  • 14.1-inch display
  • VGA, Ethernet, Secure Digital Card, USB 2.0
  • It’s refurbished

HP Elitebook 8470p is another laptop from the Windows 10 era, but all the components still support Windows XP and the drivers for it. However, you will need an XP installation kit to turn it back in time.

Otherwise, you’ve got yourself an overqualified Windows XP gaming machine with a capable Intel Core i5 3210M and 8GB of RAM that will make any game fly.

The 14-inch display is not the best if you want to fully enjoy a 3D game, but the VGA port will allow you to hook it up to a much bigger screen.

You will also have Wi-Fi and an Ethernet port if you want some online gaming as well.

What configuration do I need for a good Windows XP gaming laptop?

Except for the CPUs we mentioned in the beginning of this article, if you’re choosing a laptop with discrete graphics, here are the latest GPUs supported:

  • AMD: R9 270x
  • NVIDIA: 780TI, Titan, Titan Black, GTX 950 and GTX 960

Of course, any older GPUs will be supported on Windows XP. Some gamers also succeeded to trick the laptop by installing Windows 7 first, install the drivers and install Windows XP on the same machine. This method works for some modern GPUs, but not all of them.

Can I transform my modern laptop into a Windows XP gaming PC?

Yes, you can transform your your modern PC into a Windows XP system with the help of an emulator like PCem or by creating a virtual machine by using VMWare for free.

However, with PCem, you will need a Windows XP ROM online and it is a pretty complicated process to install. With VMWare, you will be stuck with some drivers for XP as well. Anyway, emulators will use the existing resources on the machine you’re running them on. That means you will use at least 4GB of RAM and the emulators are never as fast as an actual laptop running Windows XP.

All the laptops listed above are less than $200. You should also note that many gamers recommend the Alienware Area-51 M17X as the best Windows XP gaming laptop, but we didn’t manage to find it for sale. If you do find it for less than $800, that could be a real bargain.

Hopefully, you’ve got yourself a good Windows XP gaming laptop and now you’re enjoying the best XP games of the era. If you’re building a desktop instead, here’s our list of the best Windows XP graphics cards for gaming.

If you know about any actual XP gaming laptops, list them in the comments below for other readers to enjoy.

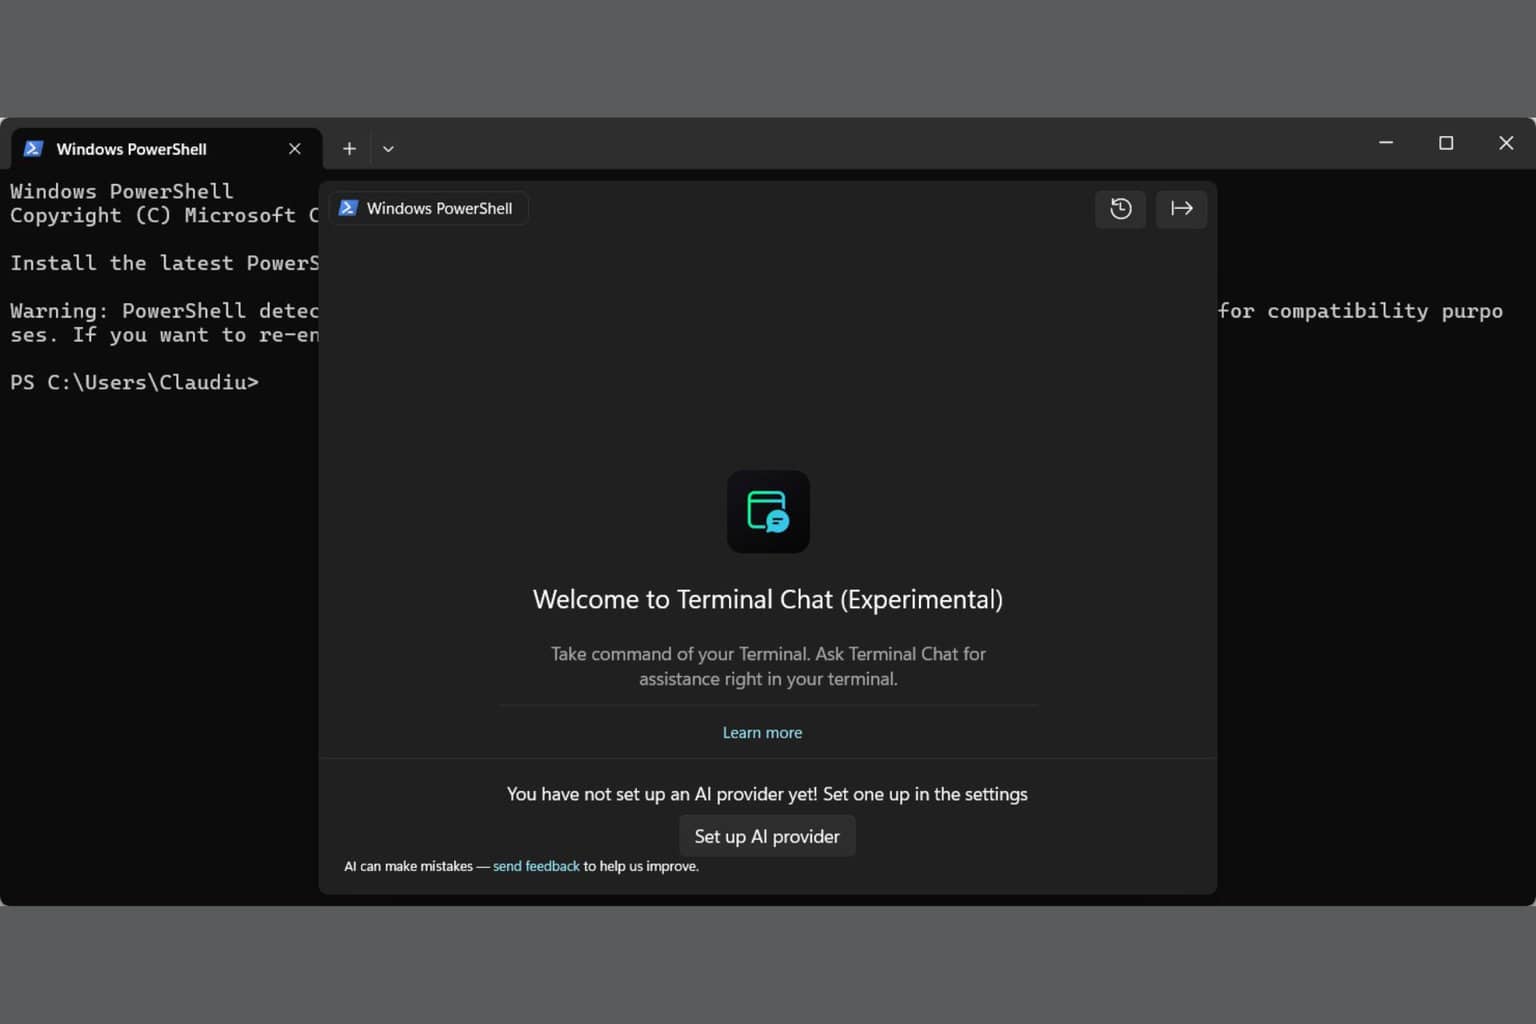
Imageres.dll: Everything You Need to Know About it

Your system has many DLL files, and one of them is imageres.dll. If you’re not familiar with it, in this guide we’ll explain what this file does, so let’s get started.

What is imageres.dll and how does it work?

Imageres.dll is a Microsoft file, and it contains Windows icons. In recent years, Microsoft started moving icons to the imageres.dll.mun file.

Where is the imageres DLL file?

You can find this file in the following directories:

C:\Windows\System32\imageres.dll
C:\Windows\SysWOW64\imageres.dll

How can I see the imageres.dll icon list?

  1. Locate any shortcut on your desktop.
  2. Right-click it and choose Properties.
    properties context menu
  3. Next, click on the Change Icon.
  4. In the Look for icons in this file paste the following: C:\Windows\System32\imageres.dll
    look for icons in this file
  5. You should now see the list of all available icons.

Can I add an icon to imageres.dll?

This is a core Windows file, and as such, you shouldn’t modify it or try to add new icons. While it’s possible to add new icons, this might lead to issues with your system, therefore it’s not advised.

Can I replace imageres.dll.mun?

While it’s possible to replace this file, the process is complicated and involves taking ownership of the file, which can result in stability issues. Therefore, we don’t advise you to try and do that.

As you can see, this is a core Windows file, and you shouldn’t modify it or delete it. We wrote about it briefly in our guide on how to get old icons back on Windows 11, so don’t miss it.

To learn more about DLL files, we have a great guide that explains what is rnd.dll file, so don’t miss it for more information. Our latest article covers termsrv.dll, so you might want to check it out as well.

Should Guitar Hero make a return on Xbox Series X/S?

Guitar Hero is probably one of those games that will stay in our minds forever. The Xbox 360 classic started a whole genre: the music rhythm video game. It proved to be fun and addictive, especially if you were a music lover.

There are many similar games, and some of them you can even play online on your PC. But somehow, they do not compare to this classic, or at least, the feeling is just not there.

So, it’s only natural to wonder if Guitar Hero should make a return on Xbox Series X/S. And it seems a lot of people are wondering about it, too.

One could wonder, of course. But has Microsoft ever thought about bringing Guitar Hero to Xbox Series X/S?

Guitar Hero on Xbox Series X/S

Well, it could happen. But would it have an audience? A reboot of the series occurred back in 2015. 9 years ago, Guitar Hero Live was released to all consoles and Windows devices. But, and this is a big but, the game underperformed. It didn’t sell well. Plus, it caused the company of that time, FreeStyleGames, to go bankrupt.

Activision laid off many employees of FreeStyleGames and sold the company to Ubisoft in 2017 for this very reason.guitar hero xbox series x

Now that Microsoft has acquired Blizzard, the Redmond-based tech giant Guitar Hero might come back one way or the other, as the Xbox execs have mentioned the game several times, but is there an audience for it?

Well, on Reddit, many Xbox gamers would love to play this game. Some even suggested Xbox should release a remake and put it on Game Pass.

Guitar Hero Ultimate. Put it on Game Pass. Make all songs, including DLC, available to everyone. Make sure to include drums so I can kick yo asses.

While physical interactions might be different now, the Internet and the way many people, including young people, use it have also changed the way we play video games.

Guitar Hero requires a lot of social interaction, but who knows? It’s still worth a try. This game should return to Xbox X/S. Maybe this time, it will be successful.

What do you think? Let us know in the comments section below.

MSVCP50.dll is Missing: 7 Ways to Download or Restore the DLL

The MSVCP50.dll file, developed by Microsoft and a part of the Visual C++ Runtime Library, is used by games and apps developed for earlier iterations of Windows.

When it’s not found, the error message reads, The program can’t start because MSVCP50.dll is missing from your computer. Try reinstalling the program to fix this problem.

Remember, the MSVCP50.dll is not natively part of newer iterations of Windows and won’t be added to the PC during OS installation. So, programs that rely on the DLL must have it as a part of the package. If that’s not the case, you will have to manually add or download MSVCP50.dll when it’s missing!

What can I do when MSVCP50.dll is missing?

Tip icon Tip
I don’t recommend downloading any DLLs from third-party websites because there’s a risk of malware infection. Files downloaded from unreliable sources often come bundled with viruses that can harm the PC. So, you should always take a manual approach.

1. Manually move the DLL

The location of MSVCP50.dll can either be the app’s dedicated folder under Program Files or the System32 folder. Here’s the path for both: C:\Program Files C:\Windows\System32

Now that you know this, go to another computer running the same iteration and architecture of Windows (32-bit or 62-bit) > find the DLL file > move it to a USB flash drive > connect the flash drive to the affected PC > transfer MSVCP50.dll to System32 and the folder with the app’s launcher (.exe) file > then restart the computer to apply the changes.

MSVCP50.dll in System32

Remember, for the 32-bit version of Windows, you will have to move the DLL file to this path instead of System32: C:\Windows\SysWOW64

Also, MSVCP50.dll may have dependencies on other DLL files, which, too, in this case, must be added for the affected program to run.

2. Install Microsoft Visual C++ Redistributable packages

  1. Go to Microsoft’s official website, and download the latest Visual C++ Redistributable compatible with your PC. For instance, if you are running 32-bit Windows, only the x86 version is needed, while for 64-bit Windows, both x64 and x86 packages are required.download
  2. Run the downloaded setup and follow the on-screen instructions to complete the installation.install to fix missing MSVCP50.dll
  3. Restart the computer and verify whether the missing MSVCP50.dll error is fixed.

3. Run the program in compatibility mode

  1. Right-click on the affected program’s launcher (.exe) file, and select Properties.
  2. Go to the Compatibility tab, tick the Run this program in compatibility mode for checkbox, and select an older iteration of Windows from the dropdown menu.compatibility mode to fix MSVCP50.dll
  3. Click Apply and OK to save the changes.
  4. Finally, relaunch the program throwing and missing DLL error and check for improvements.

4. Reinstall the affected application

  1. Press Windows + R to open Run, type appwiz.cpl in the text field, and hit Enter.
  2. Select the app throwing the error from the list, and click on Uninstall.reinstall app to fix missing MSVCP50.dll
  3. Follow the on-screen instructions to complete the uninstall process, and then reboot the PC.
  4. Finally, reinstall the application from an official source.

As I said earlier, apps that require MSVCP50.dll usually add it during the installation. If that didn’t happen the first time, you should uninstall the app and then reinstall it either from the developer’s website or Microsoft Store.

5. Perform a system restore

  1. Press Windows + S to open Search, type Create a restore point in the text field, and click on the relevant result.
  2. Click the System Restore button.system restore to fix missing MSVCP50.dll
  3. Select the Choose a different restore point option, if available, and click on Next.
  4. Pick a restore point created before the issue first appeared or the oldest one, and click Next.restore point
  5. Verify the restore details, click Finish, and then confirm the change.

Once the system restore is complete, you should have successfully restored MSVCP50.dll, and any apps that use it must run fine without throwing the MSVCP50.dll not found error in Windows.

Before you leave, find expert solutions to fix all missing DLL files and prevent such errors from reappearing!

For any queries or to share more fixes with our readers, drop a comment below.

Could Recall be one of the main reasons users won’t migrate to Windows 11?

Windows Recall was one of the main announcements at this year’s Microsoft Build event. Since its presentation in May, the capability has been the subject of much controversy regarding security and privacy issues.

Seen as a way to archive all of the activity done on Windows through recorded videos, many tech enthusiasts took it upon themselves to find holes and flaws in this capability, ultimately discovering so many of them that they prompted Microsoft to backtrack Recall and improve its security.

After several delays, Windows Recall is finally coming to the Windows Insider Program next month, in December. However, despite the security and privacy improvements Microsoft has made to it and the assurance that Recall is a local capability—only available to Copilot+ PCs—and can be entirely removed from your system, many Windows users think it is the main reason they won’t upgrade to Windows 11. This is not good news for Microsoft.

After officially being introduced to the world three years ago, Windows 11 still struggles in the Windows market share. It currently sits at a decent 35%, while Windows 10 is still the dominant Windows version—over 60% of users still have an almost 10-year-old operating system.

Microsoft first introduced the ESU, which will be available for 3 years. The Redmond-based tech giant recently announced that users can pay $30$ for the first year to help them transition to Windows 11, but it might not be enough of an incentive to do so.

On Reddit, where Windows users are usually honest about their opinions, most agree that Recall is a big reason why they won’t upgrade to Windows 11, at least for now. However, some users are eager to learn more about it. Others point out that many Windows users don’t understand how Recall works in the first place.

Windows Recall is entirely optional, and for now, only Copilot+ PCs can support it because the capability uses the AI-based NPU to work properly without creating any conflicts with the device. Microsoft has also said that the feature can be entirely removed from those PCs and won’t automatically turn itself on.

Ultimately, while Recall might be one of the reasons people won’t upgrade to Windows 11, it is not the main one. Currently, Windows 11 has dozens of other issues, such as frustrating ads and instability around major patches (just look at the number of issues coming with the latest 24H2 patch, for example). It generally requires stronger and better systems (although it can be installed on decade-old PCs).

Microsoft must address them immediately if the company wants Windows 11 to be viable.

Difxapi.dll Was Not Found or is Missing: How to Fix it

Sometimes you might encounter a message that difxapi.dll was not found or that it’s missing, and this can affect other applications. Luckily, this issue can be fixed by following these steps.

What is difxapi.dll file?

This file is a part of Driver Install Frameworks, and it’s developed by Microsoft. It’s used for driver installation and removal.

How do I fix the difxapi.dll error?

1. Copy the file to the application directory

  1. Navigate to C:\Windows\System32
    System32 folder
  2. Locate difxapi.dll.
  3. Now copy the file to the installation directory of the application that is giving you an error.

This problem occurs when trying to install or use HP printer software, but other applications can also cause it, so be sure to try this method if difxapi.dll is not installed.

2. Run the SFC and DISM scan

  1. Press the Windows key + S and type cmd. Choose Run as administrator.
    CMD elevated
  2. Run the following command and wait for the scan to finish: sfc /scannow
    SFCSCANNOW CMD - libxml2.dll
  3. Next, run DISM.exe /Online /Cleanup-Image /Restorehealth
    dism restorehealth
  4. A few users suggest that you should run an SFC scan after DISM, so you can try that as well.

These scans will repair your system and help you if the difxapi.dll is corrupted. Keep in mind that these scans can take a while, so don’t interrupt them.

Is difxapi.dll a malware?

No, this file is legitimate, but if you’re concerned you can always scan it simply by right-clicking it and choosing the option to scan it with Microsoft Security.

As you can see, problems with difxapi.dll can easily be fixed, and in most cases, you’ll just need to run a simple system scan to fix them.

This isn’t the only unusual file you can find, we wrote about setupapi.dll not found issue and missing libxml2.dll file in our previous guides, so don’t hesitate to check them out.

How to Fix ERROR_ATOMIC_LOCKS_NOT_SUPPORTED

The ERROR_ATOMIC_LOCKS_NOT_SUPPORTED BSoD error comes with the 174 (0xAE) code and the message The file system does not support atomic changes to the lock type. Don’t worry, there is not an atomic disaster on your PC. It’s a pretty rare BSoD that can occur due to outdated drivers, corrupted system files, or hardware issues.

To fix this issue, you may start by checking for any recently installed software or remember if you made any hardware changes that might have triggered the issue. Another initial troubleshooting step is to start your system in Safe Mode, especially if you can’t start the system normally.

How do I fix ERROR_ATOMIC_LOCKS_NOT_SUPPORTED?

1. Update the device drivers

  1. Right click the Start button and select Device Manager from the list of options.
  2. Expand the categories one by one and check if any of them has a yellow exclamation mark next to it.
  3. Right-click on it and select Update driver, then select Search automatically for drivers.
  4. If that doesn’t work, you may go to the component manufacturer’s website or your device’s manufacturer website and look for the correct driver for your system. You will usually find the drivers in the Support page of the website.
  5. Follow the prompts to update all your device drivers, even if they don’t show a yellow exclamation mark.

As you can imagine, manually updating drivers is really time consuming. That it’s a lot easier to use a dedicated driver updater tool that will do all that automatically. As with any other BSoD, we also recommend using Fortect, a specialized tool in dealing with such errors with only a few clicks.

2. Run SFC and DISM scans

  1. Click the Start button, type cmd and select Run as administrator from the results.
  2. Type sfc /scannow and press Enter. Wait for the scan to complete.
  3. Then, type DISM.exe /Online /Cleanup-image /Restorehealth and press Enter. Wait for the process to finish.

Running SFC and DISM scans is a pretty helpful method to fix the system and dealing with BSoD errors. Although the scans take a bit of time, they usually fix such issues.

3. Perform a clean boot

  1. Press Win + R, type msconfig, and press Enter.
  2. Go to the Services tab, check Hide all Microsoft services, and click Disable all.
  3. Go to the Startup tab and click Open Task Manager.
  4. Disable all startup items and restart your computer.

This solution will help you boot your PC with a minimum number of services so you can troubleshoot the ERROR_ATOMIC_LOCKS_NOT_SUPPORTED BSoD and look at its causes.

You might also learn more about this problem by checking the BSoD error log. If the BSoD occurs when you’re playing games, the highlighted link will take you to our guide with tested solutions to fix it.

These steps should help you resolve the ERROR_ATOMIC_LOCKS_NOT_SUPPORTED bug check. If nothing works, inspect the hardware components for any signs of damage and reseat the RAM modules on the motherboard.

These steps should help you resolve the ERROR_ATOMIC_LOCKS_NOT_SUPPORTED BSoD if it’s caused by software issues. If the problem is hardware related, you will either need to replace the affected component or look for specialized help.

For any other questions or suggestions, feel free to access the comments section below and let us know.

ERROR_BAD_PATHNAME 161 (0xA1) [Solved]

The ERROR_BAD_PATHNAME Windows system error, with code 161 (0xA1), commonly appears when running a code or application using an incorrect path or without administrator permissions. The error message reads, 161 (0xA1) The specified path is invalid.

Before you proceed to the solutions, restart the PC, check the code (if running one), and install all pending Windows updates. For most of you, this should fix the system error!

How can I fix ERROR_BAD_PATHNAME?

1. Check the path in the code

When faced with ERROR_BAD_PATHNAME Error Code 161, your primary approach should be to check the listed path. Misplaced slashes are a common issue here.

For instance, users go with \\SOFTWARE\Company while it should ideally be SOFTWARE\Company in the path. Upon making this change, the code should no longer throw The specified path is invalid message.

2. Restart File Explorer

  1. Press Ctrl + Shift + Esc to open the Task Manager.
  2. Select the Windows Explorer entry, and click on Restart task near the top right.restart file explorer to fix ERROR_BAD_PATHNAME
  3. Reboot the PC and check for improvements.

3. Run the affected program as an administrator

  1. Right-click on the affected program’s launcher, and select Properties.
  2. Navigate to the Compatibility tab, and tick the checkbox for Run this program as an administrator.run as administrator
  3. Finally, click on Apply and OK to save the changes, and verify whether ERROR_BAD_PATHNAME is fixed.

4. Grant administrative privileges to the affected user

  1. Sign out of the current account and then log into an administrator account on the PC.
  2. Press Windows + I to open Settings, go to Accounts from the navigation pane, and click on Other users on the right.
  3. Expand the account affected by the error, and click the Change account type button.change account type
  4. Select Administrator from the Account type dropdown menu, and click OK to save the changes.administrator to fix ERROR_BAD_PATHNAME

If the current user profile does not have the required privileges to perform an action, you will face the ERROR_BAD_PATHNAME 161 (0xA1) issue. A quick solution here is to make the user profile an administrator, granting it all the critical permissions.

5. Modify the Registry

Tip icon Tip
Since this method entails editing to the Registry Editor, I recommend creating a restore point beforehand, which will allow you to revert any untoward changes made inadvertently during the process.
  1. Press Windows + S to open Search, type Registry Editor, and click on the relevant result.
  2. Click Yes in the UAC prompt.
  3. Paste the following path in the address bar at the top and hit Enter: HKEY_LOCAL_MACHINE\System\CurrentControlSet\Control\Session Managersession manager registry
  4. Now, right-click on the empty space towards the right, hover the cursor over New, select DWORD (32-bit) Value, and name it ObjectSecurityMode.
  5. Double-click on the newly created DWORD.
  6. Enter 0 under the Value data field, and click OK to save the changes.ObjectSecurityMode DWORD to fix ERROR_BAD_PATHNAME
  7. Finally, reboot the PC and check for improvements.

6. Create a new user profile

  1. Press Windows + R to open Run, type netplwiz in the text field, and hit Enter.
  2. Click on Add.add account to fix ERROR_BAD_PATHNAME
  3. Click on Sign in without a Microsoft account.
  4. Now, click the Local account button.local account
  5. Enter the new profile’s username and password (not mandatory), click Next to create the account, and then click on Finish.user profile details
  6. Next, select the user profile from the list, and click on Properties.
  7. Go to the Group Membership tab, select Administrator, and click on Apply and OK to save the changes.administrator account to fix ERROR_BAD_PATHNAME
  8. Finally, sign out of the current account, log in to the new user profile, and verify whether ERROR_BAD_PATHNAME is fixed for the affected app or code.

7. Perform a system restore

  1. Press Windows + S to open Search, type Create a restore point, and click on the relevant result.
  2. Click the System Restore button.restore to fix ERROR_BAD_PATHNAME
  3. Select the Choose a different restore point option, and click on Next.
  4. Pick a restore point created before the issue first appeared or the oldest one from the list, and click Next.restore point
  5. Verify the restore details, click on Finish, and confirm the change.
  6. Wait for the restore to complete. It typically takes 15-30 minutes.

If you can’t identify the factors triggering the ERROR_BAD_PATHNAME The specified path is invalid error, a system restore will let you quickly revert any conflicting changes and get things up and running in no time.

Before you leave, discover expert-recommended tips to make Windows 11 faster than ever and enjoy an unparalleled experience!

Which fix worked for you? Share with our readers in the comments section.

Error Busy 170 (0xAA): 3 Ways to Fix it

Error_Busy often comes with the following message 170 (0xAA) The requested resource is in use. This is a developer error, but if you encounter it, there are a few ways to fix it.

How can I fix Error_Busy?

1. Adjust your code

  1. Open your code.
  2. Locate DXGetErrorString() method.
  3. Replace it with DXGetErrorDescription() and save changes.
    dxgeterrordescription

2. Use await

  1. Open your code.
  2. Next, use await speechToText.stop()
    speechtotext stop
  3. Use it before you call the listen function.

This can happen when using speech_to_text if the recognition session is already active, so by stopping it, you should prevent this issue from occurring.

If you’re using speech_to_text, you can also disable all other applications that might be interfering with this feature and check if that helps.

3. Other fixes to try

  1. If you’re using staticPortMappings->Add, try setting a different port number.
  2. When GetStream() isn’t finished, you’ll get this error. Ensure that the function is finished or reorder your code and move it down.
  3. Ensure that context isn’t active in another thread. This happens with wglMakeCurrent() if it doesn’t set the context back to NULL before returning.
  4. If you’re using MTP, remember that it supports one read and one write operation at a time per device.

Error_Busy is a developer error, and as you can see, it occurs if a specific resource is currently used and your code tries to access it again.

This isn’t the only issue you can encounter, and we wrote about Error_Path_Busy and Error_Busy_Drive in our older articles.

We also have a guide on Error_Network_Busy, so feel free to check it out for more solutions.

Outlook shows Out of memory error, but there is a fix

Microsoft acknowledged a new issue with Outlook Classic. Apparently, after you open 60 emails and have all of them open, you will get an error with the following messages:

Sorry, we’re having trouble opening this item. This could be temporary, but if you see it again you might want to restart Outlook. Out of memory or system resources. Close some windows or programs and try again.

or

Out of memory or system resources. Close some windows or programs and try again

How do I fix Outlook’s Out of memory error?

Microsoft is working for a permanent fix for this error, but in the meantime, they also issued a few workaround.

The first is, obviously, to avoid opening 60 or more emails at the same time in Outlook.

If you really need to open 60 emails or more, you may still do that by changing the value of the USERProcessHandleQuota in the Registry. Here’s how to do that.

  1. Press Win + R, type regedit and press Enter to start the Registry Editor.
  2. Navigate to the following key: HKEY_LOCAL_MACHINE\SOFTWARE\Microsoft\Windows NT\CurrentVersion\Windows
  3. Double-click the USERProcessHandleQuota, check Decimal and enter the value 10000.
  4. Save and exit the Registry editor.

See if you can now open 60 or more emails in Outlook. If it still doesn’t work, repeat the process and increase the number. The maximum is 18000.

Hopefully, Microsoft will find a permanent fix for this problem although, as you know, Outlook Classic has its days numbered. Until then, if you can’t access Outlook Classic, click the highlighted link to fix this problem.

We hope that you don’t come across this Outlook issue, but if you do, now you know how to fix it. Let us know about your experience in the comments below.


​​​​​​​ 

    The Black Basta ransomware group attacks organizations using Microsoft Teams support accounts

    The Black Basta ransomware group now employs a new social engineering tactic to compromise Microsoft Teams accounts with email spam and Teams messages containing malicious QR codes. Security expert ReliaQuest discovered the new cyberattack strategies, which the company detailed in its new blog post.

    This is a departure from Black Basta’s previous tactics, which primarily involved gaining initial access to a victim’s network via exposed remote management tools and then deploying Cobalt Strike beacons used for lateral movement and data exfiltration.

    In October 2024, ReliaQuest responded to an alert for Impacket activity, a set of tools for manipulating Windows Active Directory authentication protocols. During the investigation, the company discovered a broader trend: a campaign of escalated social engineering tactics associated initially with Black Basta. As part of a wide-ranging email spam campaign, the attackers are also sending Microsoft Teams messages to targeted users.

    The underlying motivation is likely to lay the groundwork for follow-up social engineering techniques, convince users to download remote monitoring and management (RMM) tools, and gain initial access to the targeted environment. Ultimately, the attackers’ end goal in these incidents is almost certainly the deployment of ransomware.

    ReliaQuest says Black Basta’s ransomware campaign poses a “significant threat” to organizations using Microsoft Teams. According to the company, the attackers are targeting many of ReliaQuest’s customers across diverse sectors and geographies with “alarming intensity. ” In one incident, ReliaQuest observed approximately 1,000 emails bombarding a single user within 50 minutes.

    The company agrees that the sheer volume of activity is uniquely high, and the company attributes the incidents to Black Basta with “high confidence” due to commonalities in domain creation and Cobalt Strike configurations.

    In July, after the Kaseya attack that affected hundreds of companies, Black Basta announced that it would move away from supply chain-based attacks and instead focus on exploiting active vulnerabilities in on-premises solutions. While Black Basta has not launched significant new ransomware campaigns, the group has been active recently.