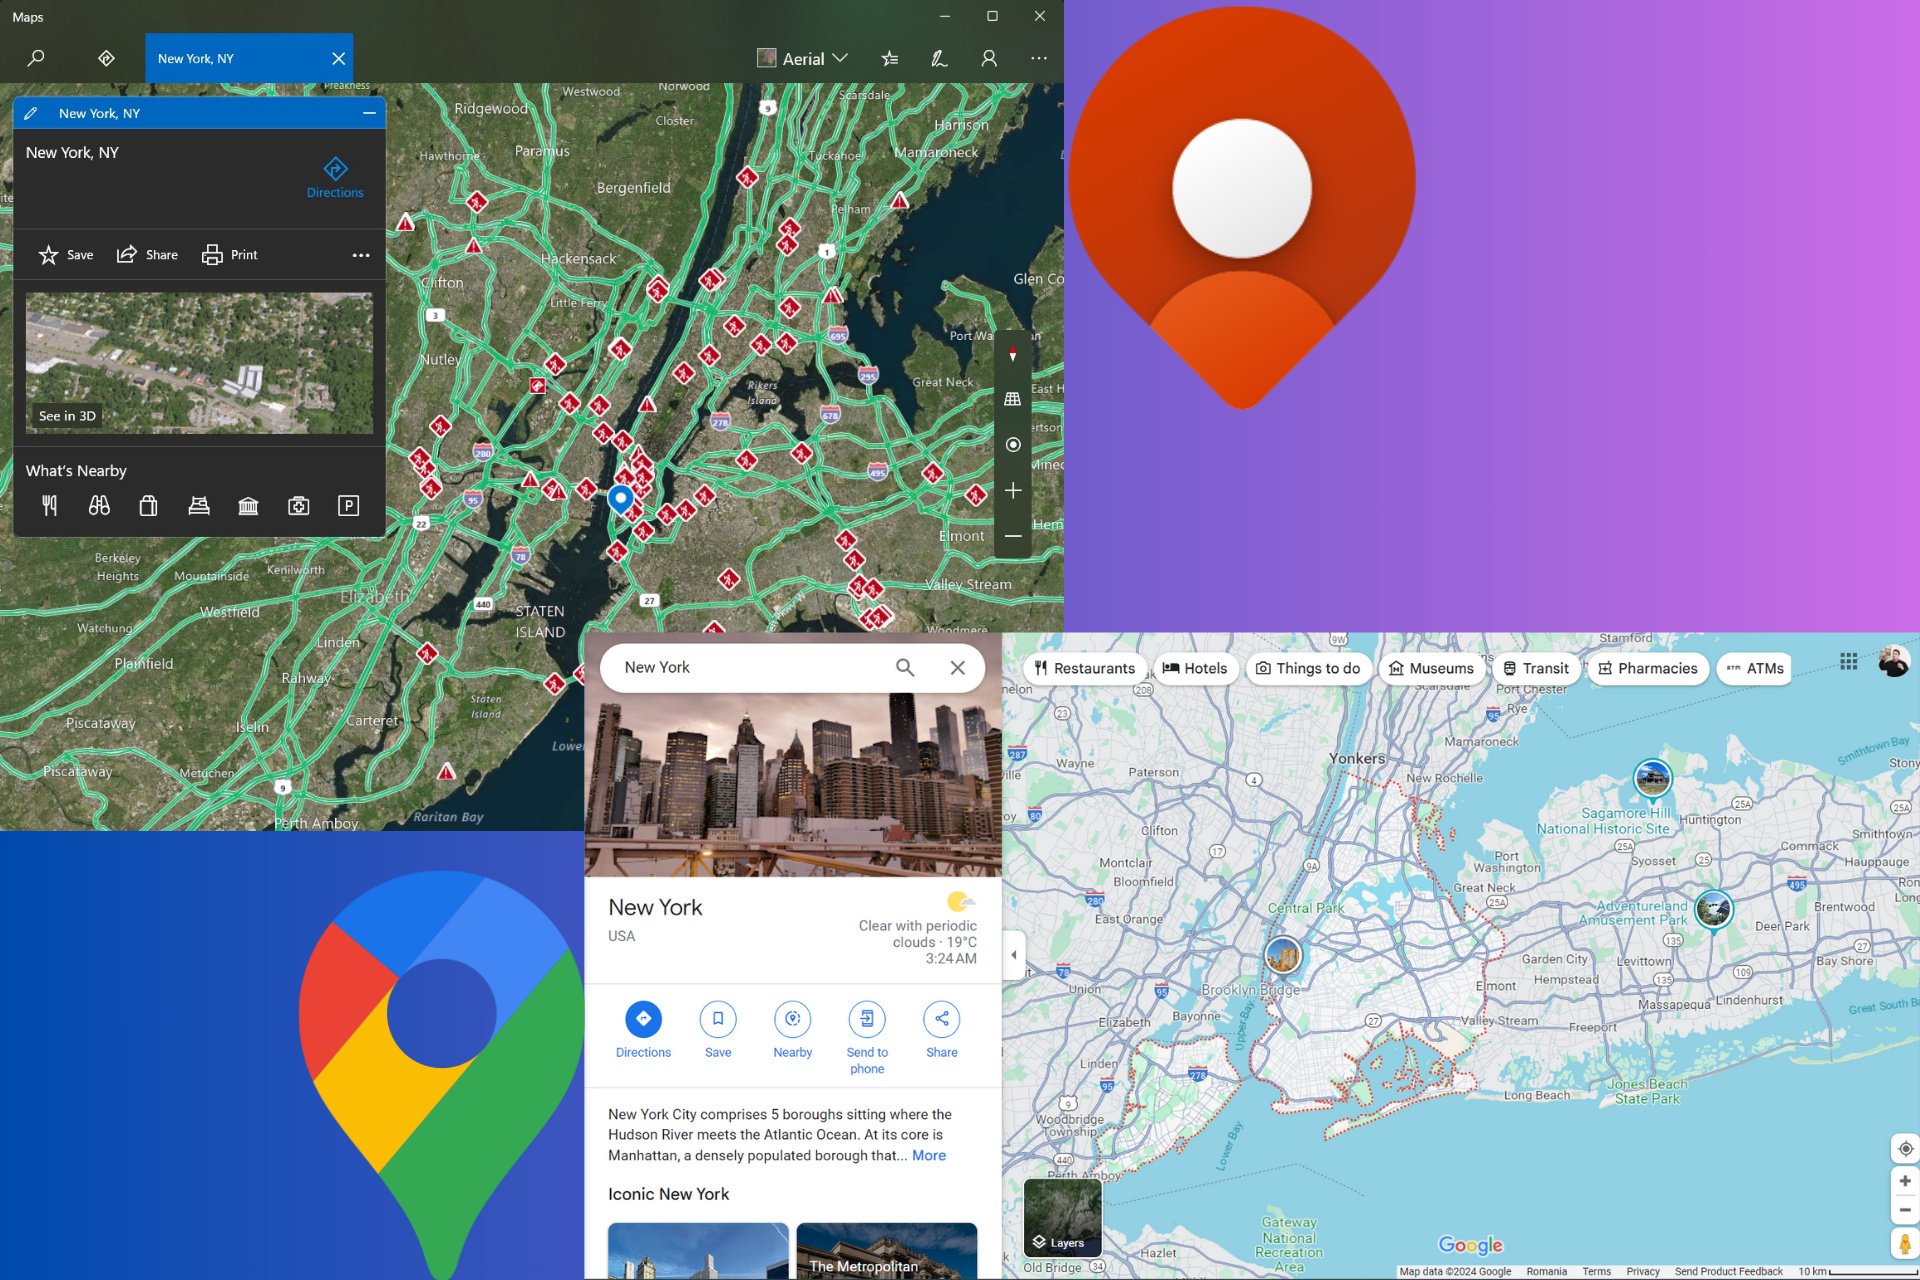
Windows Maps vs Google Maps: Which One is the Best?

Google Maps has long reigned supreme in digitally navigating the real world around us. Yet, lurking in the shadows, Microsoft’s own mapping solution, Windows Maps, together with Bing Maps have been quietly honing its features, ready to challenge the status quo. Today, we’re diving deep into the battle of the mapping titans: Windows Maps versus Google Maps. Who will emerge victorious? Let’s find out.

Windows Maps vs Google Maps rundown

Traffic Overlay and Live Cameras

Windows Maps live traffic cameras

Windows Maps comes with live traffic cameras

First off, Windows Maps offers a refreshing take on traffic overlays. With a simple click, you can view traffic conditions, represented in a familiar color-coded system. But here’s where it gets interesting: live traffic cameras. Yes, you heard that right. If you’re skeptical about the accuracy of traffic reports, Windows Maps allows you to see real-time conditions through live feeds, provided you’re in a major city. This feature is a game-changer for those of us who’ve spent one too many hours stuck in traffic jams that came out of nowhere.

Google Maps is very accurate with traffic info

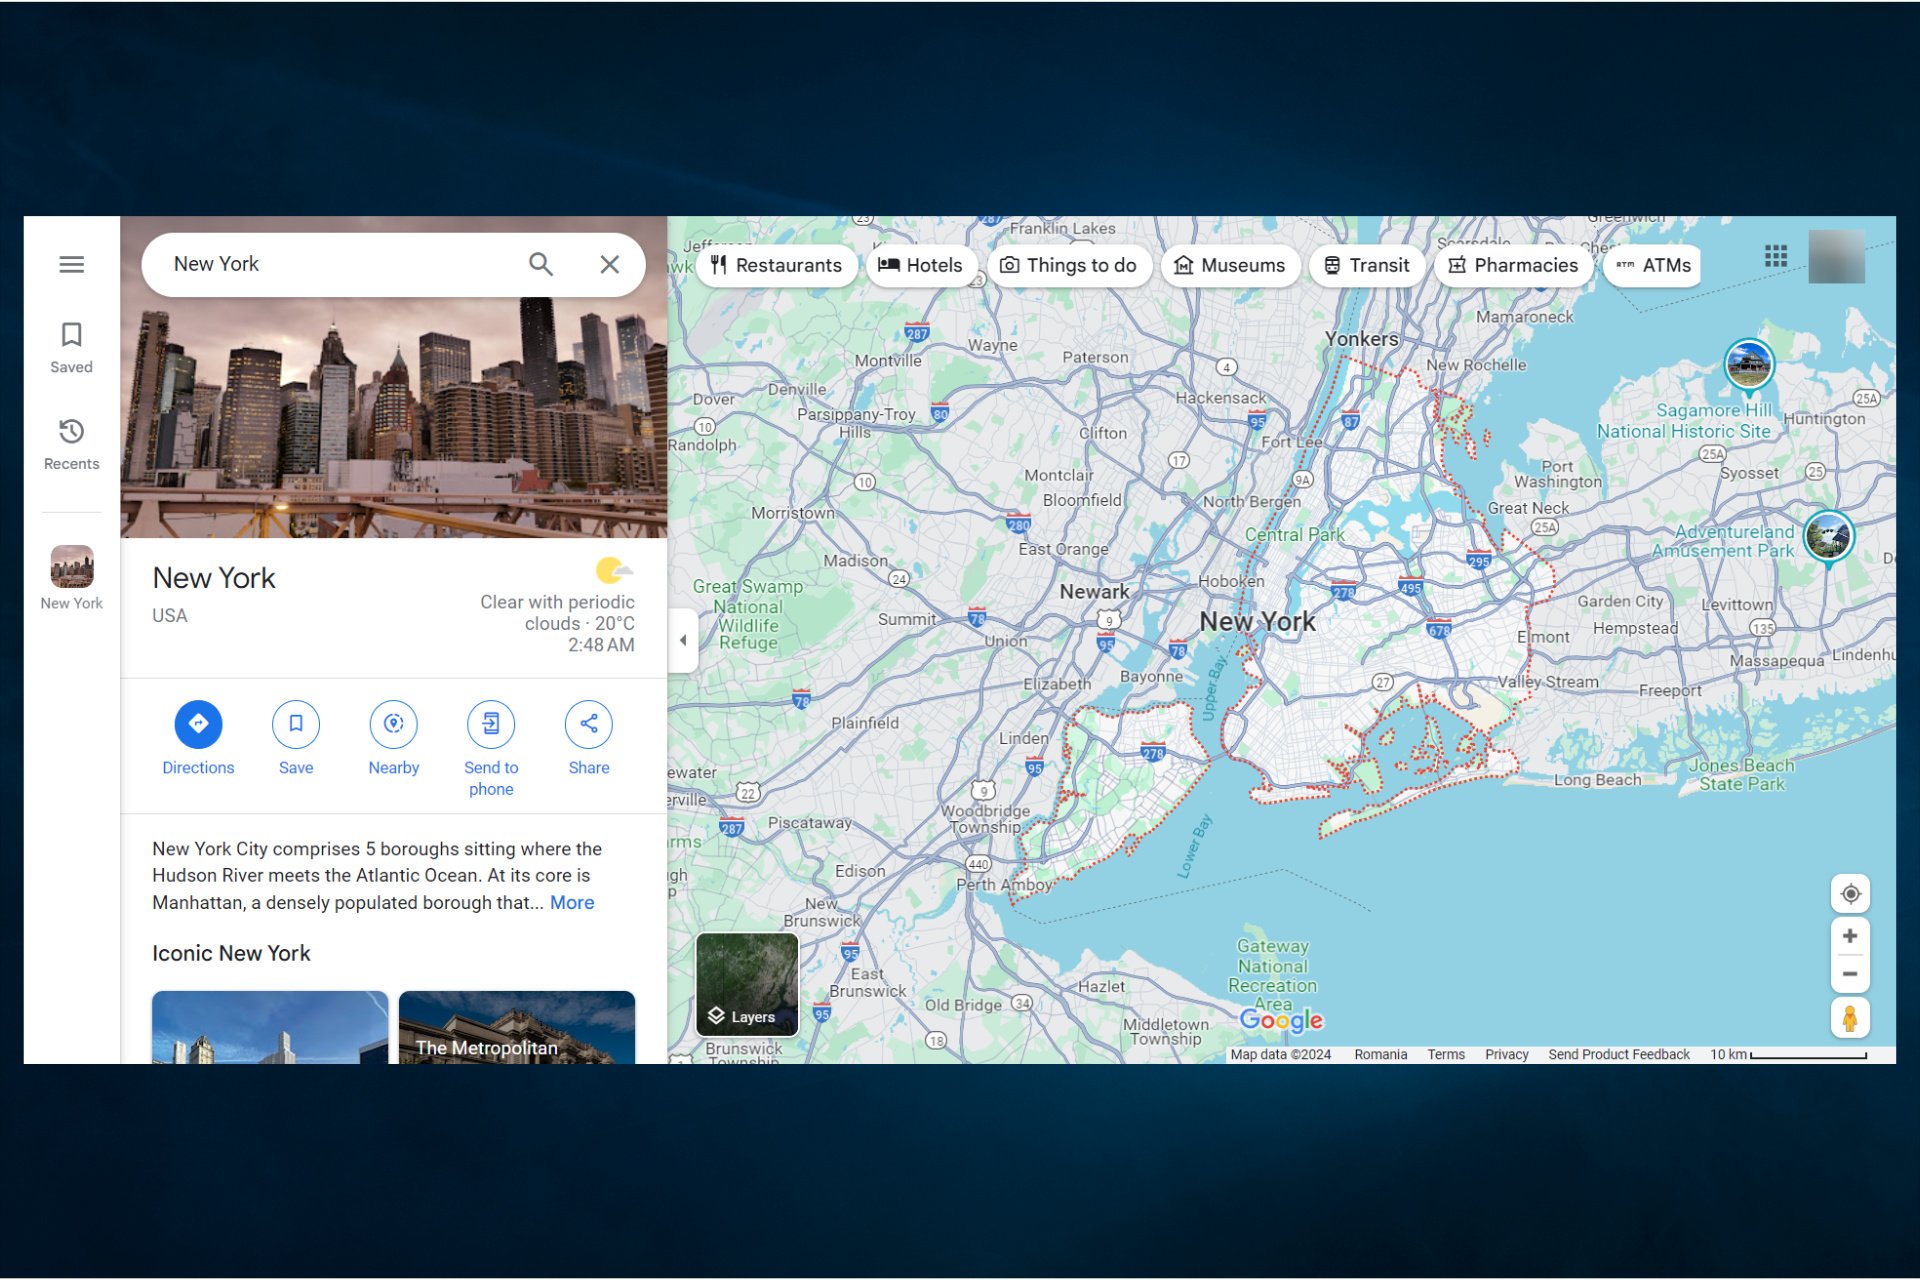
Google maps has a dedicated filter for traffic, so, if you’re using it on Windows, you need to take an extra step to get it. However, the traffic details are very well depicted in green, yellow and red to show you the level of congestion. The huge advantage of Google Maps is that it’s using the data provided from all the smartphones from our pockets. That way, it knows exactly whether or not you’re stuck in traffic.

So, while Google is using the live data from our phones, Microsoft uses a Traffic api, an AI prediction model based on local traffic data. Both are extremely accurate, but you can’t use Windows Maps on your phone.

3D Cities and Windows Ink

Google Maps offers a satellite view, but you can only see a 3D imagery if you’re using the Street View mode. Windows Maps takes it a step further by rendering buildings in full 3D. This not only helps with getting your bearings but also makes virtual exploration a whole lot more immersive.

And for the directionally challenged, Windows Ink allows you to draw directly on the map, marking routes or points of interest. It’s like having a digital pen for your map, making navigation personal and, dare I say, fun. Also, you may also use the Windows Ink tool to measure distances between two points or get directions on how to get from point A to point B just by drawing a line between them.

Multiple searches and streetside

Windows Maps keeps all your searches in tabs

Ever tried juggling multiple searches on Google Maps? It can feel like a balancing act. Windows Maps simplifies this by keeping the results of all your searches visible on the map until you decide to close them. And for those who rely on Google’s Street View, Windows Maps offers an almost identical experience with Streetside, allowing you to explore streets in photographic detail.

Satellite showdown

In a head-to-head comparison of satellite imagery, Bing Maps surprisingly outshines Google Maps in several locations, offering more vivid colors and sharper details. We’re just offering an example with New York’s Brooklyn Bridge satellite imagery.

However, if you’re going into Google’s Street View mode, the things change dramatically. You will see the actual images shot with the Google mapping cars. The only downside is that these are images that get yearly updates. That means you may see some buildings, signs, stores etc. that might not be there anymore.

Now, you might be tempted to say that Windows Maps is clearly better. However, as we’ve mentioned above, Microsoft’s app is not available on Android or iOS, which is a significant limitation in our mobile-driven world. This exclusivity to Windows devices might be a deal-breaker for many, despite its impressive features. So, even though it might be better in a lot of aspects, you’re not going to take your laptop along to guide you on the streets.

However, there is still a way to use Windows Maps on your phone, and that’s by actually using Bing Maps on a mobile browser. Unfortunately, it doesn’t have the advanced features we described earlier for Windows Maps and there isn’t an option for showing directions if you are running Android.

In conclusion, while Google Maps remains the go-to choice for many due to its extensive coverage and mobile app availability, both Windows and Bing Maps present compelling features that could sway users looking for live traffic cams, detailed 3D city views, and superior satellite imagery. So, if you’re at home on your laptop planning a trip, Windows Maps will offer better quality information, but when you get on the streets, you’re going to need your Google Maps on your mobile.

If Microsoft will finally decide to provide a mobile app or, why not, revive Windows Phone, they will have a shot. Until then, while everyone has Google Maps in their pockets, it’s hard to think that anyone would think to open Windows Maps, although it comes with Windows. However, you can check out other viable alternatives.

What do you think about the Windows Maps vs Google Maps battle? Let us know in the comments below.
The Copilot moving desktop icons around in Windows 10 error has been finally fixed

In October 2023, a strange bug appeared after Copilot was released to Windows 10 users. This bug moved the icons on people’s desktops with multiple monitors when they used Copilot. Microsoft tried to lessen this annoyance by stopping these users from updating to Windows 11 for now or using Copilot on their systems.

With Microsoft’s KB5039299 update, a new Copilot experience has been introduced. According to the official health status blog post, it solves the icon-jumping bug and improves general Copilot usability by permitting it to be pinned onto the taskbar like any other standard application.

We are gradually rolling out a new Copilot experience for devices with Windows updates released June 25, 2024 () or later. This new experience will resolve this issue for Windows 10, version 22H2. This update () was released on June 25, 2024, and you can expect to receive the new Copilot experience between now and the coming months.

Microsoft

Nevertheless, it is important to understand that this fresh Copilot experience is being presented in phases. So, some individuals may need to wait a little longer before reveling in the advantages. Microsoft has made it clear that the deployment will persist over forthcoming months for devices possessing Windows updates published on or after June 25th, 2024.

However, just like any big software upgrade, not everything is perfect. Some peculiarities still exist in Windows 10, such as the Settings app’s refusal to let users change their local profile image and a bug that influences the Microsoft Connected Cache.

Equally important is Windows 11, which encountered its taskbar problems after June 2024 when non-security updates were released. Fortunately, the pause that happened with the downloads has been resolved now. It was done to handle big bugs found on systems using particular virtualization software.

Hope is ahead if you have experienced annoyance from jumping desktop icons or have been waiting excitedly for the new Copilot experience. But remember that patience will be required as the rollout of these features happens gradually.

Microsoft Edge asks to confirm your Home Page: A new security feature or annoyance?

Microsoft Edge, a browser known for annoying users with notifications to set it as default, is coming with another popup. Though the notification intended for checking Homepage settings with you is valid and fine as a security measure, it doesn’t go away unless you interact with it.

Microsoft Edge comes with the New Tab Page set as the default homepage. Whenever you open a new tab, you see a search bar, the most visited sites, and the ability to customize a new tab with a background and control the news feed.

In addition to the above, it’s worth noting that the Edge Homepage button by default shows the New Tab page unless you configure it for a different URL.

Microsoft Edge also has the ability to show real-time notifications from websites in Windows Action Center and it combats web spam effectively, but Microsoft itself misuses it to promote its browser and features. Like Chrome, Microsoft Edge also monitors and keeps track of its settings to ensure they are not tampered with by malware.

Edge’s confirm your home page settings notification

Microsoft Edge is now performing a routine security check regarding the default homepage in the Edge browser via a notification informing you whether to continue using a personalized home page or the default homepage.

Here is the notification we received in Edge Dev:

“Confirm your homepage settings. It looks like you have a personalized home button destination page. As a security check, please confirm, otherwise use Default settings.”

Edge confirm your home page settings notification is a security check after all
Edge’ confirm your home page settings’ popup. Image credit: Windows Report

The pop-up offers the ability to revert to “Use default” homepage settings, “snooze” the notification, “Don’t Show This Recommendation Again“, and “Don’t Show Any Recommendations for a Week”.

confirm your home page settings notification options. Image credit: Windows Report

Until you interact with the notification and choose any option, it won’t go away even when you open a new tab and switch to other open tabs.

This may puzzle you if you haven’t modified your homepage settings. You can simply visit Settings > Startup, Home, and New Tabs, and under the Home button, ensure the New Tab Page is selected and no URL is manually added in the field below.

Edge talks about Home button personalisation page you see  here in settings

There is always a chance for malicious new tab page extensions to do that, so the occasional security check makes sense.

Windows Server Build 26244 is out now with only one, but important change

Microsoft has just released the latest Windows Server Insider Program update, Build 26244. Fascinatingly, this update shares its build number with the recently launched Windows 11 Canary Channel build.

The change log for this update is almost the same as before, except for a particular change: the Redmond-based tech giant decided to focus on Delegated Managed Service Accounts (dMSA). This account kind aids in shifting from normal service accounts to machine accounts with managed and entirely random keys. It’s a step that ensures better security by stopping credential collection through vulnerable accounts, which is frequently seen in regular service accounts.

The authentication method for dMSA is tied to the device identity. This means only certain machine identities, which are mapped in Active Directory, can access the account. It’s a smart solution that could greatly reduce security dangers related to service accounts.

A new account type known as delegated Managed Service Account (dMSA) is now available that allows migration from a traditional service account to a machine account with managed and fully randomized keys, while disabling original service account passwords.

Microsoft

For Server Flighting participants, this new build should be delivered automatically. It will include the newest version of the Feedback Hub app for Server Desktop users.

However, it’s worth mentioning that the Windows Server Build 26244 has various known issues that may cause some troubles: difficulties finishing upgrades, errors stating “Access Denied” when using Diskpart on particular VMs, and an odd label mismatch saying Windows 11 instead of Windows Server.

Also, graphical rendering problems occur when setting up and PowerShell script issues in WinPE (Windows Preinstallation Environment). These small obstacles demonstrate the continuous difficulties faced in developing software and how valuable it is for the community to give feedback to find out problems and solve them.

Windows Server Build 26244 is available, but some countries do not allow downloads. However, for people who can access it, the preview comes in ISO and VHDX formats with many language choices for the ISO format.

You can read the Windows Server Build 26244’s full changelog here.

ClickOnce Support on Edge Flags page: How to Enable it

Installing software is easier with ClickOnce, and in today’s guide, we’re going to see what is ClickOnce Support in Edge flags.

Edge flags and ClickOnce Support here’s what you should know

What is the ClickOnce protocol?

ClickOnce is a special protocol that allows websites to request the browser to open files from a specific URL using the Click Once file handler.

Does Microsoft Edge support ClickOnce?

Yes, Microsoft Edge fully supports ClickOnce out of the box.

How do I enable ClickOnce security settings in Edge?

Click Once should be enabled by default, but if it’s not, do the following:

  1. Open Edge.
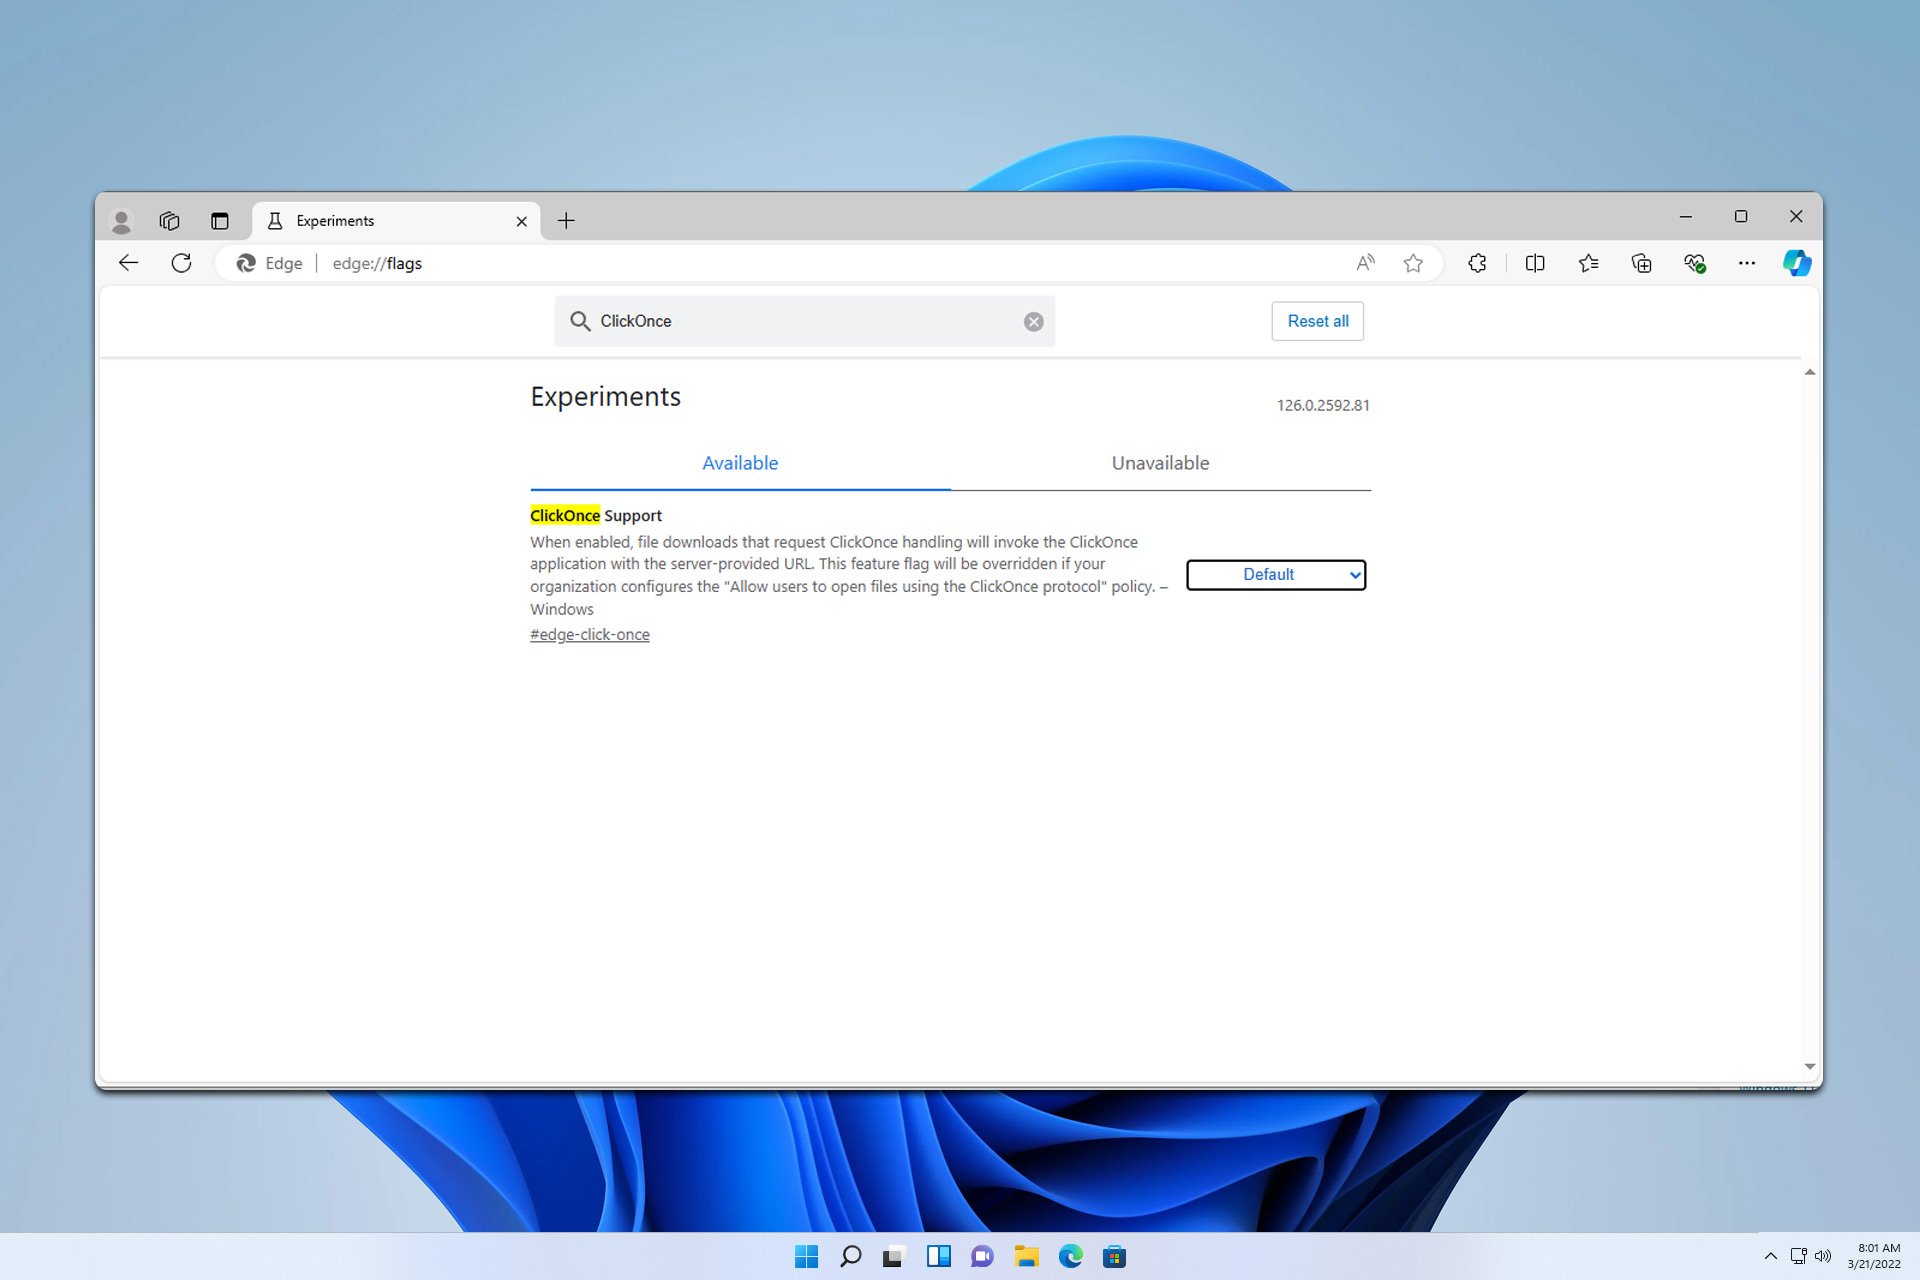
  2. Next, go to edge://flags
    edge flags page address bar
  3. Look for ClickOnce and set it to Enabled.
    clickonce enable edge flags page

For more information, we have a great guide on how to enable Edge flags as well as a guide on the best Edge flags for performance, so don’t miss them.

What browsers support ClickOnce?

ClickOnce is available in Edge, Chrome, and Firefox.

What is the difference between ClickOnce and Windows Installer?

With Windows Installer, applications rely on shared components, which can lead to potential conflicts.

On the other hand, with ClickOnce each application is self-contained and it doesn’t interfere with other applications.

How do I disable ClickOnce Security settings?

  1. In Visual Studio, select your project, click the Project menu, and choose Properties.
  2. Next, head to the Security tab.
  3. Uncheck Enable ClickOnce Security Settings.
    enable clickonce security settings

Is ClickOnce good?

ClickOnce is great since it allows you to deploy software more easily. However, ClickOnce applies only to the user that installed it, so each user on the PC will have to install it. The ClickOnce directory isn’t easy to access which can be a problem for some.

Overall, this is everything you need to know about ClickOnce Support on the Edge flags page, so don’t hesitate to give it a try.

To learn more about flags, we have a great guide on how to enable parallel downloading with Edge flags, so don’t miss it.

KB5039327 to the Windows 11 Beta Channel brings dozens of improvements to the UI scaling

Microsoft recently released a series of updates to the Windows Insider Program, including a fresh Beta Channel build for Windows 11 Insiders. This new KB5039327 fixes some bugs causing trouble, such as unwanted guests at the party. It tackles problems such as a GPU idle power bug, Storage Spaces Direct issues, a Group Policy bug, and File Explorer-related matters. Microsoft seemed to be on an all-out hunt for bugs, ensuring Windows 11 runs more smoothly than ever before.

For organized desktop lovers, the update has a new small feature for File Explorer. The preview thumbnail title in the taskbar, ALT + Tab, and Task View will show if that window has multiple tabs. It may seem like a minor alteration, but it is truly big for those who simultaneously handle many tasks.

But it is not only about the looks, there have been some small UI changes too. They made the Windows share window simpler by taking out the search box from it so that sharing files becomes easy like a breeze. Also, for all those who develop things – “End Task” in the taskbar now does not show the Not Responding dialog anymore, which means it’s faster to close down unresponsive programs.

We’re rolling out some minor UI changes to simplify the Windows share window which removes the search box.

Microsoft

Additionally, there has been an emphasis on making things more accessible. Microsoft made adjustments to File Explorer, Common File Dialog (CFD), and Browse/Shortcuts Dialogs so that they react better to changes in text size and scaling settings. From now on, you won’t need to strain your eyes on truncated file names or wrestle with screen readers anymore.

Addressed several accessibility issues where File Explorer, Common File Dialog (CFD), and Browse/Shortcuts Dialogs did not respond appropriately to your text size / scaling preferences. Including, but not limited to, fixed an issue where file name was getting clipped in the CFD and the Browse/ Shortcuts dialog.

Microsoft

The Redmond-based tech giant fixed some errors like Voice Typing in some languages, an app icon on the taskbar that flashes more noticeably, and OneDrive as a RemoteApp within Azure Virtual Desktop a few updates. Also, Microsoft solved the problem where GPUs were not going into an idle state, causing them to keep using power without need.

However, KB5039327 still has lots of known issues. For example, the All Apps list is not being read out by screen readers, and a few apps still do not get sorted correctly in this list when you use certain display languages. But looking at how Microsoft has been handling things up until now, it’s clear as day—they will surely fix these small problems, too, sooner or later.

Microsoft’s most recent Beta Channel KB5039327 build for Windows 11 Insiders combines good and bad. It has many improvements, such as simplifying multitasking, enhancing accessibility features, and fixing problems in the previous version.

You can read the full KB5039327 changelog here.

Overwatch 2 Error Disconnected [Solved]

Many Overwatch 2 players have, in the last week, reported seeing the Error Disconnected message when loading the game or trying to sign in. And with Blizzard support acting the way it does, you will have a hard time fixing things, as is evident on forums!

The Overwatch 2 error usually appears due to a server-side issue, misconfigured network settings, problems with the network adapter, or conflicting built-in and third-party apps.

Your primary approach when faced with Error Disconnected in Overwatch 2 should be to verify if server maintenance is underway, as it is the most common reason. Also, if you are on Wi-Fi, switch to Ethernet or, perhaps, connect to mobile data. Besides, download any pending Overwatch 2 and Battle.net updates or switch to another region.

How do I fix Overwatch 2 Disconnected error?

Note icon NOTE
While the steps listed here are for a Windows PC, you can encounter Error Disconnected in Overwatch 2 on PS5 and Xbox. In such cases, apply the equivalent measures on the console.

1. Update the network adapter’s driver

  1. Press Windows + X to open the Power User menu, and select Device Manager from the list.
  2. Expand the Network adapters entry, right-click on the active adapter, and select Update driver.update network driver in Windows 11
  3. Choose Search automatically for drivers and wait for Windows to install the best locally available version.network driver update
  4. Finally, restart the computer to apply the changes.

Often, your network adapter triggers Error Disconnected in Overwatch 2. If switching to Ethernet fixes the problem, you should update the Wi-Fi drivers and vice-versa. In case Windows can’t find a better version, check the manufacturer’s website and manually install the driver for the affected network adapter.

Installing the latest drivers also helps with the Unexpected Server Error in Overwatch 2!

2. Reset the network settings

  1. Press Windows + I to open Settings, go to Network & Internet from the left pane, and click on Advanced network settings.network & internet
  2. Scroll down and click on Network reset.
  3. Click the Reset now button.network reset to fix overwatch 2 error disconnected
  4. Click Reset in the confirmation prompt, and follow the on-screen instructions to complete the process.

This also helps with Error Code LC 202 in Overwatch 2.

3. Switch to Google’s DNS

  1. Press Windows + R to open Run, type ncpa.cpl in the text field, and hit Enter.
  2. Right-click the active network adapter, and select Properties.properties
  3. Choose Internet Protocol Version 4 (TCP/IPv4) from the list, and click on Properties.TCP/IPv4
  4. Select Use the following DNS server addresses, and enter the following in the fields underneath:
    • Preferred DNS server: 8.8.8.8
    • Alternate DNS server: 8.8.4.4
  5. Tick the checkbox for Validate settings upon exit, and click OK to save the changes.Google's DNS to fix overwatch 2 error disconnected

On Reddit, many users have reported fixing Error Disconnected in Overwatch 2 by switching to Google’s DNS. Or, for maximum speed, use the fastest DNS server near you, and you will no longer find Overwatch 2 disconnected from server.

4. Whitelist Overwatch 2 and Battle.net in Windows Firewall

  1. Press Windows + S to open Search, type Windows Defender Firewall, and click the relevant result.
  2. Select Allow an app or feature through Windows Defender Firewall from the left.Windows firewall
  3. Click the Change settings button.
  4. Now, click on Allow another app at the bottom.allow app
  5. Click on Browse, navigate to Overwatch 2’s installation path, select the launcher (.exe file), and click on Open.
  6. Click on Add.add Overwatch 2
  7. Now, make sure the checkboxes for both Private and Public are ticked for Overwatch 2, and click on OK to save the changes.whitelist in firewall to fix overwatch 2 error disconnected
  8. Similarly, add the Battle.net app to the list of exceptions in Windows Defender Firewall.

5. Uninstall conflicting third-party apps

  1. Press Windows + R to open Run, type appwiz.cpl in the text field, and hit Enter.
  2. Select any third-party antivirus, security program, firewall, or any app added around the same time the issue first appeared, and click on Uninstall. uninstall
  3. Follow the on-screen instructions to complete the process.
  4. Once done, restart the computer and check for improvements.

If the problem remains unresolved and Overwatch 2 keeps disconnecting from server, use a dedicated uninstaller tool to clear any leftover files and Registry entries triggering the error.

6. Reinstall Overwatch 2

  1. Press Windows + I to open Settings, go to Apps from the navigation pane, and then click Installed apps on the right.
  2. Click the ellipsis next to Overwatch 2, select Uninstall, follow the on-screen instructions to completely remove the game, and then restart the PC.uninstall game to fix overwatch 2 error disconnected
  3. You can now reinstall Overwatch 2 on the Blizzard.net app.

If nothing else works against Error Disconnected on Overwatch 2, your last approach is to uninstall the app and then reinstall it. While doing so, make sure to clear any leftover files, especially in the AppData folder!

While you are troubleshooting the network, discover some quick tips to make your Internet faster on Windows.

What helped fix network errors in Overwatch 2? Share with our readers in the comments section.

KB5038575 in Windows 11 was updated with new features for the second time in June

A while ago, Windows 11 Insider Dev Channel users received build 26120.961 (KB5038575), which contained dozens of new quality-of-life updates for the operating system.

This update itself was not ordinary, as it gave users a look into what they could expect from the future of Windows 11—version 24H2—and brought some useful upgrades and fixes to bugs that people were eagerly waiting for.

However, back then, all users in the Dev channel received the KB5038575 updates. Last Friday, though, those who turned the toggle on to receive new features were surprised to find dozens of such features being released to their Windows 11.

First, people who use the narrator can now do hands-free text dictation and give commands using voice access. Imagine being able to dictate text and control your computer without touching it. Additionally, when technology gets troublesome instead of helpful, Microsoft has added an auto-restart feature specifically for voice access that immediately fixes any issues, keeping everything running smoothly without requiring assistance from outside sources.

We are introducing auto restart for voice access in Windows 11. This feature ensures that voice access will automatically restart if it encounters any issues so that individuals with limited mobility can get back to using voice access as quickly as possible.

Microsoft

The update unveils a fresh command for Windows search. Now, you can easily find your applications or files by speaking them out loud—it’s as if you have your assistant who is always ready to assist when commanded.

Finally, for people who enjoy personalization, the Start menu includes a fresh account manager that offers a fast look at your Microsoft account benefits and a simple approach to accessing your account settings.

Copying files from the Windows share window and creating QR codes for URLs and cloud file links make sharing files more convenient than ever. Also, if you love emojis, Emoji 15.1 is now available with fresh emojis and tweaks to improve your digital emotions.

For people who worry about not being able to reach their Microsoft account, a fresh banner in the Settings menu asks you to include a recovery email address. This adds more protection to your digital life. Also, some changes can be seen in the “Rename your PC” and “Change date and time” dialogs – they now look like Windows 11 style, too.

The Task Manager also received attention, with updates for better performance, accessibility, and reliability. Whether monitoring your system’s performance or managing applications, these enhancements will make your life easier.

Certainly, every update includes repairs for different problems to make your Windows experience as smooth as possible. From solving display refresh rate issues to fixing startup app issues, Microsoft is committed to improving the overall user experience.

This change shows how Microsoft remains dedicated to inventiveness and pleasing users. As Windows 11 gains more characteristics and enhancements, it becomes clear that this operating system will fulfill expectations and go beyond them. If you are a Windows Insider in the Dev Channel, ensure your toggle is activated to receive these updates.

You can read the full KB5038575 changelog here.

Google Maps Keeps Crashing Windows 10: 6 Simple Ways to Fix

If Windows 10 crashes or freezes when using Google Maps, that is usually due to the graphics acceleration settings in Chrome. Also, Make sure that Chrome and Windows are updated to the latest version first. If that doesn’t work, the tested solutions below will fix the problem.

1. Disable graphics acceleration in Google Chrome

  1. Open Google Chrome.
  2. Click on the three dots in the top right corner to open the menu and select Settings.
  3. Scroll down and click on Advanced to open advanced settings.
  4. Scroll down to the System section.
  5. Toggle off the option Use graphics acceleration when available.
  6. Relaunch Google Chrome by clicking the Relaunch button that appears.

Disabling hardware acceleration can reduce the memory demand on your browser, which is often a culprit behind Google Maps crashes.

2. Use Google Maps in Incognito Mode

  1. Open Google Chrome.
  2. Click on the three dots in the top right corner to open the menu.
  3. Select New incognito window or press Ctrl + Shift + N on your keyboard.
  4. In the new incognito window, navigate to Google Maps and check if it works without crashing.

Using Chrome in incognito mode prevents any extensions or cookies from interfering with Google Maps, which may solve the crashing issue.

3. Delete specific cookies in Chrome

  1. Open Google Chrome.
  2. Copy and paste the following line in the address bad and press Enter: chrome://settings/cookies/detail?site=www.google.com
  3. Look for cookies that start with gsScrollPos.
  4. Click on each cookie and select Delete.

This step removes specific cookies that may be causing issues with Google Maps without removing all your other saved preferences.

4. Disable extensions on Google Chrome

  1. Open Google Chrome.
  2. Click on the three dots in the top right corner to open the menu.
  3. Select More tools, then Extensions, or you may just click on the puzzle piece icon to the right of the address bar and select Manage extensions.
  4. Find the extension called The Great Suspender or any others that might be causing issues.
  5. Click Remove next to the extension. You may also toggle to disable them and see if it works.

Disabling or removing problematic extensions can prevent them from interfering with Google Maps and causing crashes.

5. Use a different browser

  1. Download and install Opera or open Microsoft Edge.
  2. Open the browser, navigate to Google Maps and use it as you would in Google Chrome.

Switching to a different browser can be a quick workaround if Windows 10 continues to crash when using Google Maps.

6. Update the graphics drivers

  1. Right-click on the Start menu button and select Device Manager.
  2. In the Device Manager window, expand the Display adapters section.
  3. Right-click on your graphics driver and select Update driver.
  4. Choose Search automatically for drivers and let Windows search for the latest driver.
  5. Follow the on-screen instructions to install any available updates.

Updating your graphics drivers can help resolve issues related to hardware acceleration and rendering.

By following these steps, you should be able to resolve the issue of Google Maps crashing on your Windows 10 device. As a last resort, you may also reinstall Google Chrome on your Windows 10 PC.

Can you use Google Maps now on Windows 10? For any other questions, feel free to hit the comments section below.

Windows 11 Canary 26244 is now available with a new setting to keep you out of hackers’ ways

In an active series of updates, Microsoft has launched a fresh Windows 11 version for users in the Windows Insider Program who are part of the Canary Channel. The most recent edition is marked as build number 26244, and it’s not just any regular update.

It includes new features like a game pass recommendation card on the Settings homepage or an “Add Now” button to add a recovery email address to your Microsoft account. Here’s everything you need to know about Canary 26244.

First off, the Game Pass recommendation card. If you frequently play games on your PC, this fresh addition may immediately catch your attention when launching the Settings homepage. It was created to enhance the gaming experience and reveal that Microsoft focuses on gamers within its ecosystem.

The “Add Now” button for recovery email addresses is an important change in this update, focusing on enhancing account security. We have come across many dreadful tales about locked-out accounts and losing access to them. Microsoft attempts to avoid these dangers by pushing users to include crucial recovery information. It’s an easy action that could prevent much frustration later on.

To ensure you don’t lose access to your Microsoft account, we’re beginning to roll out a new banner with a “Add now” button under Settings > Account for adding a recovery email address if you haven’t added one for your Microsoft account yet. This will only show if you are signed in with a Microsoft account.

Microsoft

Furthermore, general improvements and fixes have been made overall. This enhances the experience for Insiders who are using this build. The Windows Backup enhancements now include sound settings in the backup process, along with adjustments to Font settings, showing that Microsoft is fine-tuning the system for a more personal and efficient user experience.

This update also has known problems that we Insiders have been experiencing. A few of us are still stuck on previous builds, and there are display issues with the Windows Update page in some languages. These small obstacles serve as a reminder; while the Canary Channel is exciting for trying out new things, it is equally important to exercise caution because nothing here is entirely complete yet.

Workaround for those experiencing issues or keen to try the most recent build: Microsoft gives a suggestion that includes doing a clean install from the latest ISO. It’s good to remember, being on the newest version can sometimes mean dealing with technical problems and needing patience for solving them.

Windows 11 Insider Canary build 26244 is an interesting blend of fresh elements and common beta build problems. Whether you are a gamer who wants to know what the Game Pass recommendation card can provide or a user concerned about safeguarding your account, this update has something for everyone. However, remember that an Insider’s journey may have its ups and downs.

You can read the full changelog here.

Is There a Windows 11 Government Edition? Should You Download it it?

A new Windows 11 version appeared in the wild, the Windows 11 Government Edition, but the users are asking if it’s an official build or not. The question is legitimate since there is a Windows 10 Enterprise G edition in China.

According to some comments from a Reddit post, Windows 11 Enterprise G is the equivalent Government edition of the Windows 10 version for the Chinese.

What is the Windows 11 Government Edition?

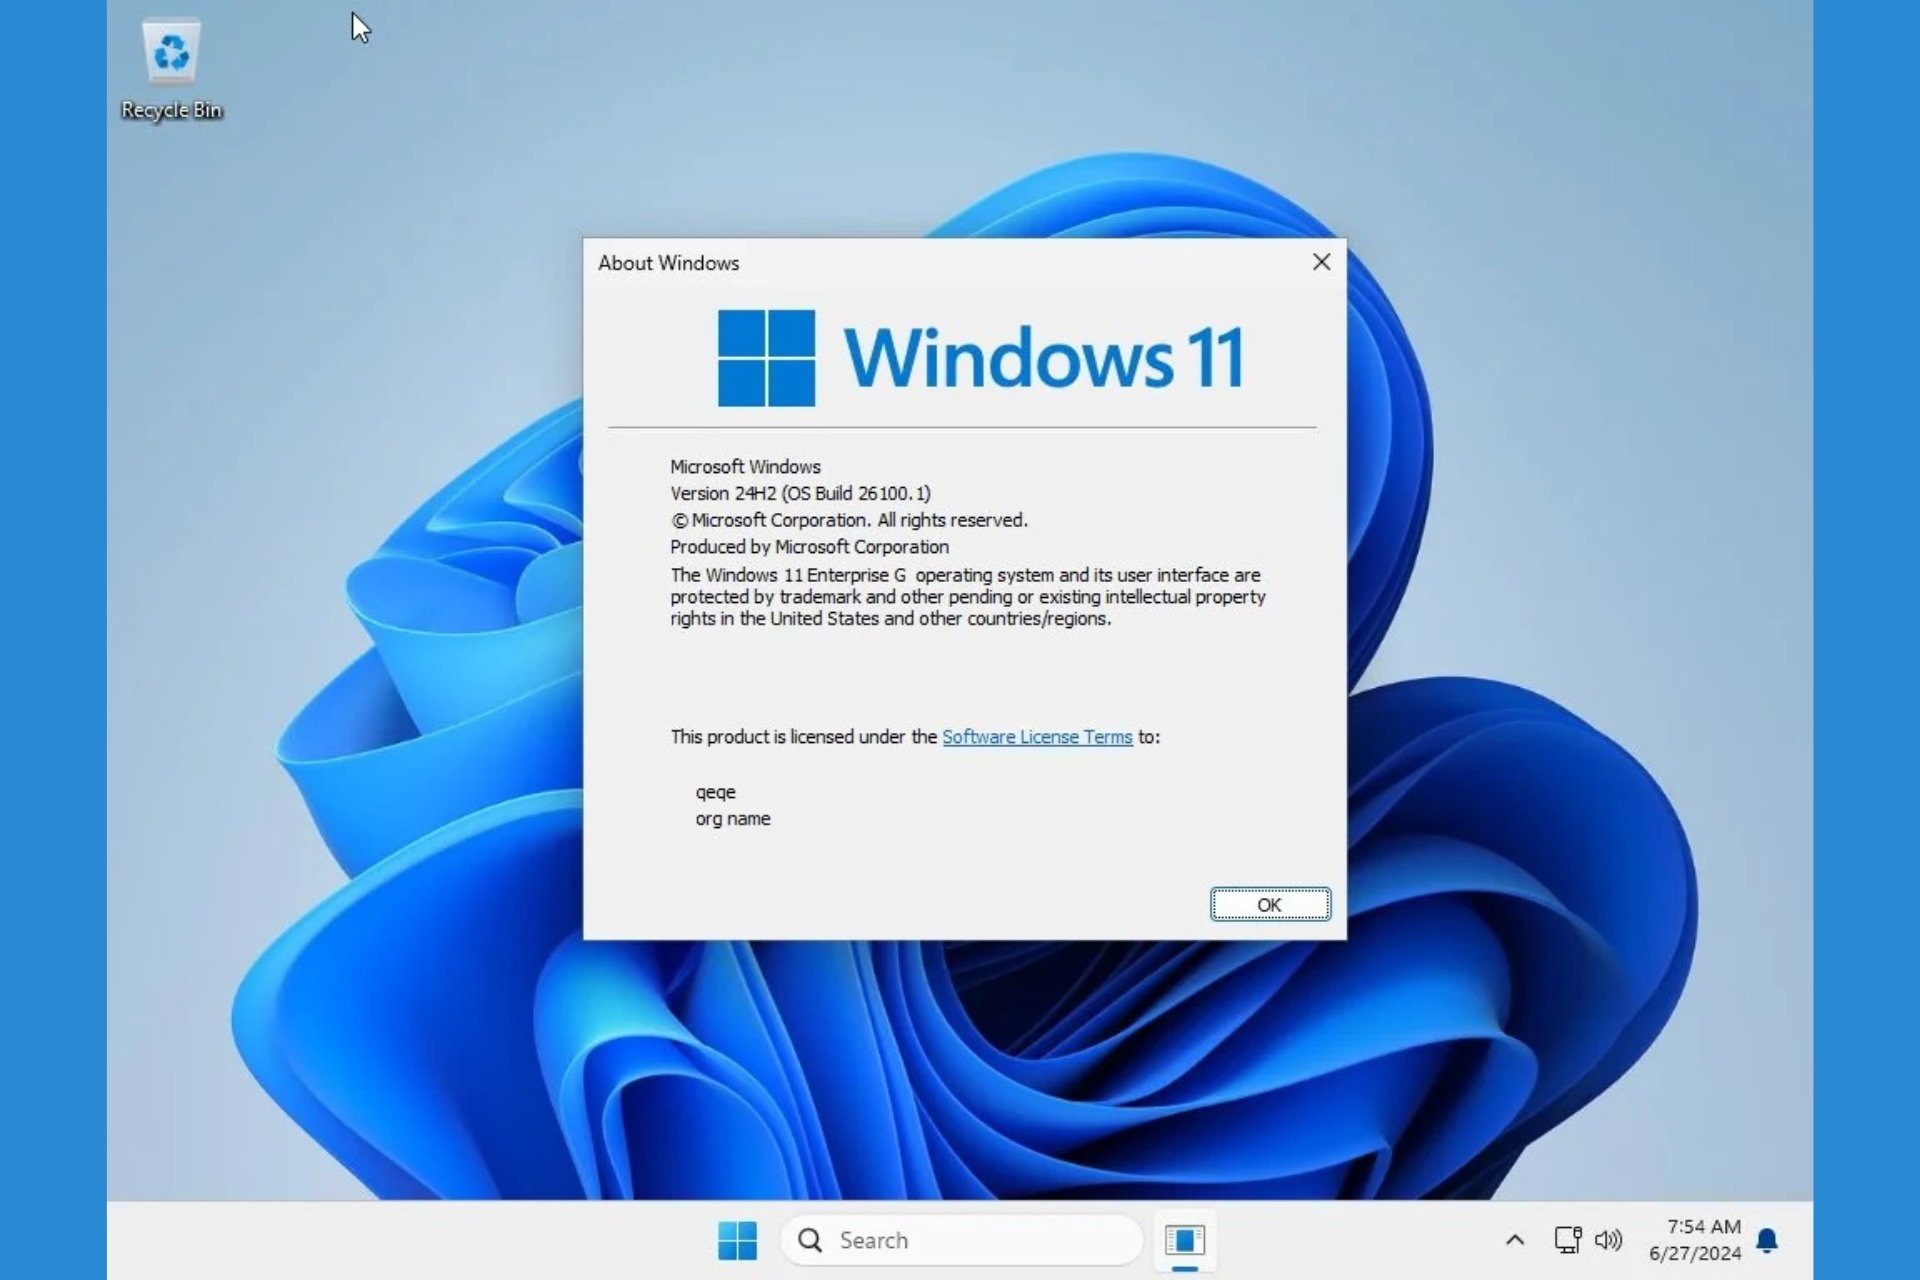
Allegedly, Windows 11 Government Edition or Windows 11 Enterprise G is a stripped-down version of Windows 11 that has no telemetry setup, no Windows Defender and it’s less bloated.

However, the users who installed this version found a lot of pinned apps, including WhatsApp and Slack which are definitely not used in China.

Is Windows 11 Government Edition legitimate?

With further research, we found that the Windows 11 Government Edition is actually a project called Enterprise G Reconstruction. It includes a guide on how to reconstruct Windows 11 with fewer features, and also lacking telemetry and Windows Defender. The installation will actually downgrade your Windows 11 Pro version to this unofficial Enterprise G version.

So, the answer is NO, Windows 11 Government Edition is not an official version of Windows 10 although the coders mimicked what Microsoft did with Windows 10 Enterprise G to comply with the Chinese requirements.

Although the users deemed this version safe to install, we wouldn’t recommend doing that. Or, if you’re a really curious advanced user, you may install it on a virtual, sandboxed environment using VMWare.

Because it’s not an official build, you will not even be able to register it and you won’t receive any updates. The lack of Windows Defender will also make it insecure in the early stages of the installation so we advise you to be extremely cautious.

So, the bottom line is that there is no official Windows 11 Government Edition OS, not even for Chinese. It’s just an experiment which you can install and use, but it’s definitely not safe to do so.

However, there is a Windows 11 Enterprise edition, so hit the highlighted link to find out more about it.

Now you know all about the Windows 11 Enterprise G OS. Let’s talk about it in the comments below.

0x000000f4 Blue Screen Error: 3 Ways to Fix it

0x000000f4 blue screen error can be serious and cause your PC to crash and lose any unsaved work, so it’s important to fix it as soon as possible, and in this guide, we’ll show you how to do that.

How can I fix the 0x000000f4 blue screen error?

Before you try anything else, make sure your SSD or hard drive is properly connected. If possible, replace the SATA and power cables or try connecting the drive to a different port.

1. Update the drivers

  1. Visit your motherboard or device manufacturer’s website.
  2. Look for your model on the website.
    motherboard search driver
  3. Head to the Drivers section and download the latest drivers for your device.
    motherboard drivers download page
  4. Install the latest drivers.

You might have to boot to Safe Mode on Windows 11 or use a different PC to download and update your drivers.

2. Remove third-party antivirus software

  1. Open the Settings app.
  2. Navigate to Apps and choose Installed apps.
    installed apps settings app
  3. Locate your antivirus software, click the three dots next to it and choose Uninstall.
    uninstall an app windows 11 settings app
  4. Follow the steps on the screen to complete the process.

Users reported this issue with Avast, but any third-party antivirus can potentially cause this issue.

3. Stop the PC from turning off the hard drive

  1. Press the Windows key + S and type power plan. Select Choose a power plan.
    choose a power plan windows 11 search results
  2. Click on Change plan settings next to your power plan.
    change plan settings windows 11
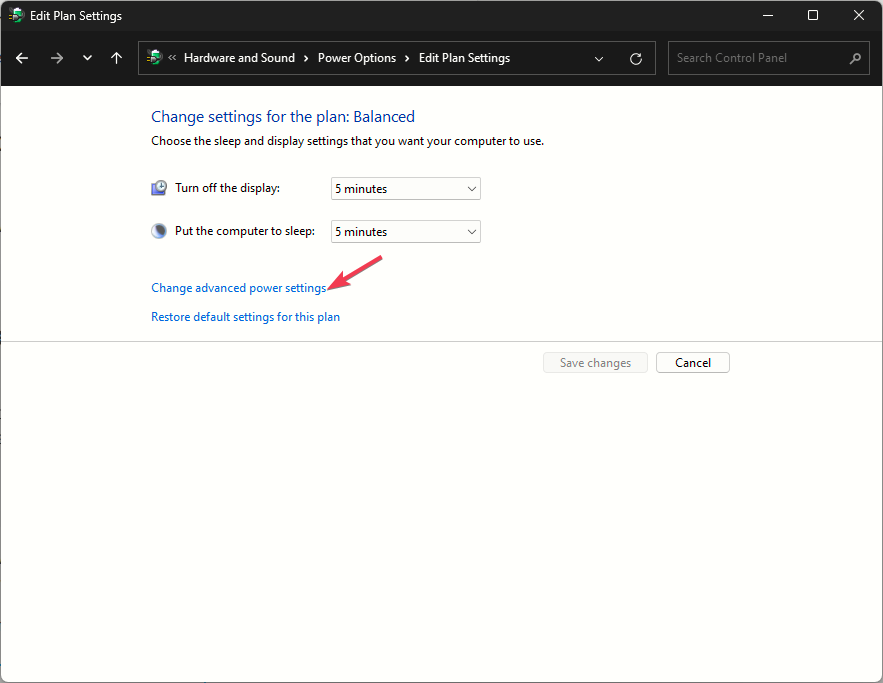
  3. Next, click on Change advanced power settings.
    Change advanced power settings
  4. Set Turn off hard disk after to 0 and save changes.
    turn off hard disk after setting

Few users suggest that a similar setting is available in BIOS, so you’ll be free to disable it as well.

If nothing else works, you might have to update your BIOS or update the SSD firmware. Lastly, the problem might be your hardware, so you’ll need to inspect your hard drive or SSD and ensure that it’s not faulty.

Is the blue screen error serious?

Yes, blue screen errors can be serious since they can be caused by hardware malfunction, so it’s important to fix them as soon as possible.

To learn more about these errors, we have a great guide on how to fix a Windows 11 BSOD. If you’re getting BSOD while playing games, we also have a special guide that can help you fix that.

Did you ever encounter this issue and how did you fix it? Let us know in the comments below!

Google Chrome tests Balanced HTTPS-First Mode for fewer Warnings

Google has enabled HTTPS-First Mode by default in Chrome for some time now. The company, which takes security seriously in Chrome and always tries to use secure connections, is testing a new “Balanced HTTPS-First Mode” to reduce the number of warnings and make browsing less annoying.

Google is also working on other HTTPS-First Mode features, including:

  • Incognito Mode: Enabling HTTPS-First Mode by default in incognito.
  • Typically Secure Users: Automatically enabling HTTPS-First Mode for users with a history of secure browsing.
  • Engaged Sites: Enabling HTTPS-First Mode for sites with high user engagement. This is why Chrome sometimes shows an interstitial message about HTTPS-First Mode for these sites.

By default, browsing the web doesn’t automatically use HTTPS encryption. This means that the information you send and receive might be vulnerable to interception.

HFM (HTTPS-First Mode) tries to upgrade all connections to HTTPS whenever possible. This ensures your data is encrypted and more secure. However, some websites might not have a working HTTPS version, leading to connection errors and frustration.

Note: You can confirm whether HTTPS-First Mode (HFM) is enabled by visiting Settings > Privacy and Security > Advanced. There, you’ll notice that the ‘Always use secure connections’ toggle is enabled by default.

Chrome’s HTTPS-First Balanced Mode

A new flag, corresponding commit, and bug spotted by Windows Report indicates Google is working on “Balanced HTTPS-First Mode.” When enabled, it “uses HTTPS-First Mode only when secure connections are likely possible.” The flag is also available on Android and Windows, Mac, Linux, and Chrome OS platforms.

Balanced HTTPS First Mode in Chrome flag
HTTPS-First Balanced Mode flag. Image credit: Windows Report

This new mode aims to strike a balance between security and user experience. Instead of forcing HTTPS everywhere, it will only warn you when a secure connection seems likely but isn’t used. This reduces the number of frustrating connection errors while still promoting secure connections.

“Add feature and flag for balanced Ask-Before-HTTP (nee HFM). Balanced mode will warn when we can reasonably expect a connection to support HTTPS, but not when we can’t. This is obviously less secure than full HFM, but will limit warning fatigue and evolve over time as HTTPS is possible in more scenarios,” Google notes.

Benefits of Balanced HTTPS-First Mode:
Enhanced Security: You’ll still get warnings for potentially insecure connections, protecting your data from snooping.
Reduced Warning Fatigue: No more annoying errors for websites that genuinely don’t support HTTPS.
Future-Proof: As more websites switch to HTTPS, the warnings will become even rarer.

Additionally, Chrome will offer performance suggestions when tabs consume more resources and Google is making Chrome on Windows to use ARM processors for video processing that improves battery life.

Chrome’s new feature will identify and alert you about tabs that impact browser performance

Google is constantly working to address bottlenecks that affect Chrome’s performance. Memory Saver mode and Energy Saver mode are examples of this. The company is adding a new “Performance intervention UI” to Chrome to allow it to alert users about slow tabs when poor performance is detected.

We recently reported on Chrome’s ability to let you choose Memory Saver mode with moderate, balanced, and maximum memory savings. Depending on the mode you select, your tabs become inactive after a certain period. For instance, selecting the “Maximum: mode discards background tabs quickly.

Google has planned something bigger regarding Chrome. Chrome already has a built-in ability to monitor and show each tab’s memory usage when you hover over it. It seems the company is expanding on this functionality to identify slow tabs that significantly affect Chrome performance.

Chrome to monitor tabs to give actionable performance suggestions

With the new “Enable Performance Intervention suggestions” flag and relevant commits [1] & [2] spotted by Windows Report, when the flag is enabled, “performance intervention UI will automatically pop up and suggest tabs to take action on during times of poor performance.”

Chrome Performance intervention UI flag
Chrome’s new Performance Intervention UI suggestions flag. Image Credit: Windows Report

This will likely appear as a UI setting in the “chrome://settings/performance” page. The flag offers four options for testing: Enabled and “Enabled string version 1”, “Enabled String version 2”, and “Enabled String version 3”. This allows Chrome developers to test alongside users in Canary.

Performance Issue alerts Setting
New Performance issue alerts setting. Image Credit: Windows Report.

The notification suggestion will likely include a “learn more” link that takes users to Chrome’s personalized performance page.

Depending on the option chosen for testing, you’ll get a different message, but all notifications will alert you that specific tabs are consuming more resources, allowing you to discard, close, or pause them. We are not yet sure about the specific options Chrome will offer when triggering alerts about tabs when Chrome’s performance isn’t ideal.

We assume the notification toolbar button that triggers a high CPU usage alert has some relation to this. We’ll know more soon. Additionally, Chrome on Windows ARM will get a video processing boost and Google is testing the ability to hide the Chrome tab bar.

July 03, 2024 Update: Added “Performance issue alerts” setting image.

Windows 10 will be supported until 2030 if you choose the 0patch updates

In an age of fast and furious technological development, it’s simple to feel outdated, particularly when your dependable old devices appear to have been abandoned by their makers.

But for those of us still attached to our cherished Windows 10 machines, here’s some good news: in a blog post, 0patch has declared its intention to prolong the existence of Windows 10 by offering an extra five years’ worth of support after it is officially recognized as having reached end-of-life status.

This way, you can continue using your current device without serious security risks. Isn’t it a relief? especially if the other option is to upgrade to Windows 11 but aren’t happy with it, struggle with the new interface, or worry about possible privacy issues.

0patch has served us before for Windows 7 and Server 2008. Additionally, their patches are small, so you can apply them without restarting your computer again. Plus, if anything goes awry, 0patch can quickly reverse the changes.

Now, for those thinking about what to do after October 2025, when Windows 10 stops giving out free updates, you might be in a similar situation. You can stay with an unsupported OS and expect good outcomes, give money to Microsoft for their Extended Security Program, or try 0patch as a cheaper and less disturbing answer.

This service is not free but gives you peace of mind because it fixes important weaknesses and even patches non-Microsoft products. A yearly subscription costs ~$27 per computer/business or $37 per device for medium or large organizations.

As you can see above, 0patch’s yearly subscription expense appears reasonable for people who are not yet prepared to switch to Windows 11.

What can you do to prepare for October 2025? If you are a normal home user or manage a small business, it might be good to familiarize yourself with 0patch and try their PRO trial.

Organizations should start assessing and testing this new technology earlier rather than later. Moreover, for those who want to keep using Windows 10 PCs, 0patch might provide a fresh opportunity for these devices.

The official support of Windows 10 might be a hint that its time is coming to an end. However, it’s not all bad news. There are options available to us, like 0patch, which could help keep our devices safe and functioning for many more years.

The Russian-based Midnight Blizzard has hacked high-ranking Microsoft managers’ emails

Microsoft has once more come to the public’s attention because of cybersecurity violations. According to reports, this time, the tech giant shared that an organization of hackers in Russia called Midnight Blizzard could see inside email accounts belonging to a few high-ranking Microsoft managers.

Additionally, this isn’t Microsoft’s first encounter with uninvited digital trespassers. At the start of this year, they dealt with a situation in which Chinese hackers targeted Outlook-based government email accounts in the United States and Europe.

This week we are continuing notifications to customers who corresponded with Microsoft corporate email accounts that were exfiltrated by the Midnight Blizzard threat actor.

Microsoft

Microsoft has reacted quickly and determinedly to the breaches inflicted by Midnight Blizzard. They’ve initiated the Secure Future Initiative program, which focuses on enhancing their cybersecurity abilities. The company is evidently treating these occurrences with great seriousness, as security has now been declared its highest concern.

They are not only making promises. Microsoft President Brad Smith traveled to Washington, D.C., and discussed these security breaches with the U.S. House Committee on Homeland Security. It appears they are doing everything possible to prevent a repeat occurrence of this situation.

It’s well known that Microsoft has been doing everything to deal with the constant cybersecurity attacks on the company: from the Redmond-based tech giant requiring employees to become knowledgeable in cybersecurity if they want raises to the company constantly releasing Patch Tuesday updates with fixes for critical vulnerabilities, Microsoft is on constant fire.

However, these incidents act as an alarm clock for everyone. Cybersecurity is not just a trendy phrase or the worry of IT sections. It is a very important part of our digital lives, requiring us to be watchful, knowledgeable, and, at times, careful.

So, when receiving a new email from Outlook, maybe inspect it before opening it immediately. Check the sender, see if it has attachments, and check out any sign of unusual identity, from the email to the name of the sender and potential bits of foreign language. It can be a lifesaver.

Microsoft will enhance the Photos app to run in the background of Windows 11

The Microsoft Photos app is about to get faster, as the Redmond-based tech giant unveils a new option that, once enabled, would allow the app to run in the background, effectively opening up immediately without experiencing lag.

The capability was discovered by the famous Windows Insider @phantomofearth, who posted a screenshot of the new feature on X (formerly known as Twitter). The new option can be found in a Windows 11 beta build.

The main change in this upgrade is permitting the Photos app to start and operate in the background, which can improve its functioning. This alteration might signify faster entry into your photo collection, making the app appear more active and less frustratingly slow.

The update is active in the most recent edition of the Photos app for individuals in the Canary experimental channel. Not everybody can use it for now, but Microsoft will release the new option for the Photos app sometime later this year, with the general release of the 24H2 Update to Windows 11.

Recently, the app has been moved to WinAppSDK, a technology language platform that aids developers in creating new features faster. This shift is already showing results with cool functions like Slideshow and Generative Erase powered by AI—it’s truly amazing, similar to what you’d anticipate from Adobe Photoshop.

Plus, the Photos app has recently been enhanced with Dynamic Zoom Slider, a capability that allows users to zoom dynamically on an image however they want.

What do you think about this new capability? Are you using the Photos app?

You can get this Dell XPS Desktop at just $1100

Have you ever been lost in the digital wilderness, searching for a PC deal that is both top-notch and economical? Your stars have aligned with Dell’s clearance sale on their XPS desktops. Picture this: Your eyes fall upon an astonishing offer where the Dell XPS Desktop, carrying Intel Core i7 power, can be yours with a $450 reduction from its initial cost. Correct, the price of this beast is now only $1,100 from its previous high amount of $1,550. Let’s explore why this offer is too good to resist.

The Dell XPS Desktop is a strong performer, equipped with an Intel Core i7-13700 processor with 16 cores and can attain maximum clock speeds of 5.10GHz.

This means it’s ready to handle whatever task you throw at it – from handling demanding software to making your workflow smooth as silk; this desktop is always there for you. If creativity is more your thing, the NVIDIA GeForce RTX 4060 GPU will ensure photo and video editing are done without any hiccups or slowdowns. Moreover, who would decline a rapid game session of Helldivers 2 amid job duties?

It has a big 16GB DDR5 memory and can save up to 512GB. This is enough for all your documents, photos, and videos. If you still need more space, you can plug in an external SSD. The Intel Killer Wi-Fi 6E 1675i interface tops everything off nicely by providing quick internet speeds from browsing to uploading or downloading files and data.

The XPS Desktop is not short on connection options either, it has many ports like USB-A, USB-C, an SD card slot and sufficient audio outputs for a complete 7.1 system arrangement.

With all this package, it is difficult to predict how long this sale will continue. So, if you have been looking for a high-quality Windows desktop at an excellent price, your search might end now. You can get it from here.

But if you’re looking for a laptop, you should check out the amazing HP Omen 16 – it’s now available at its lowest price.

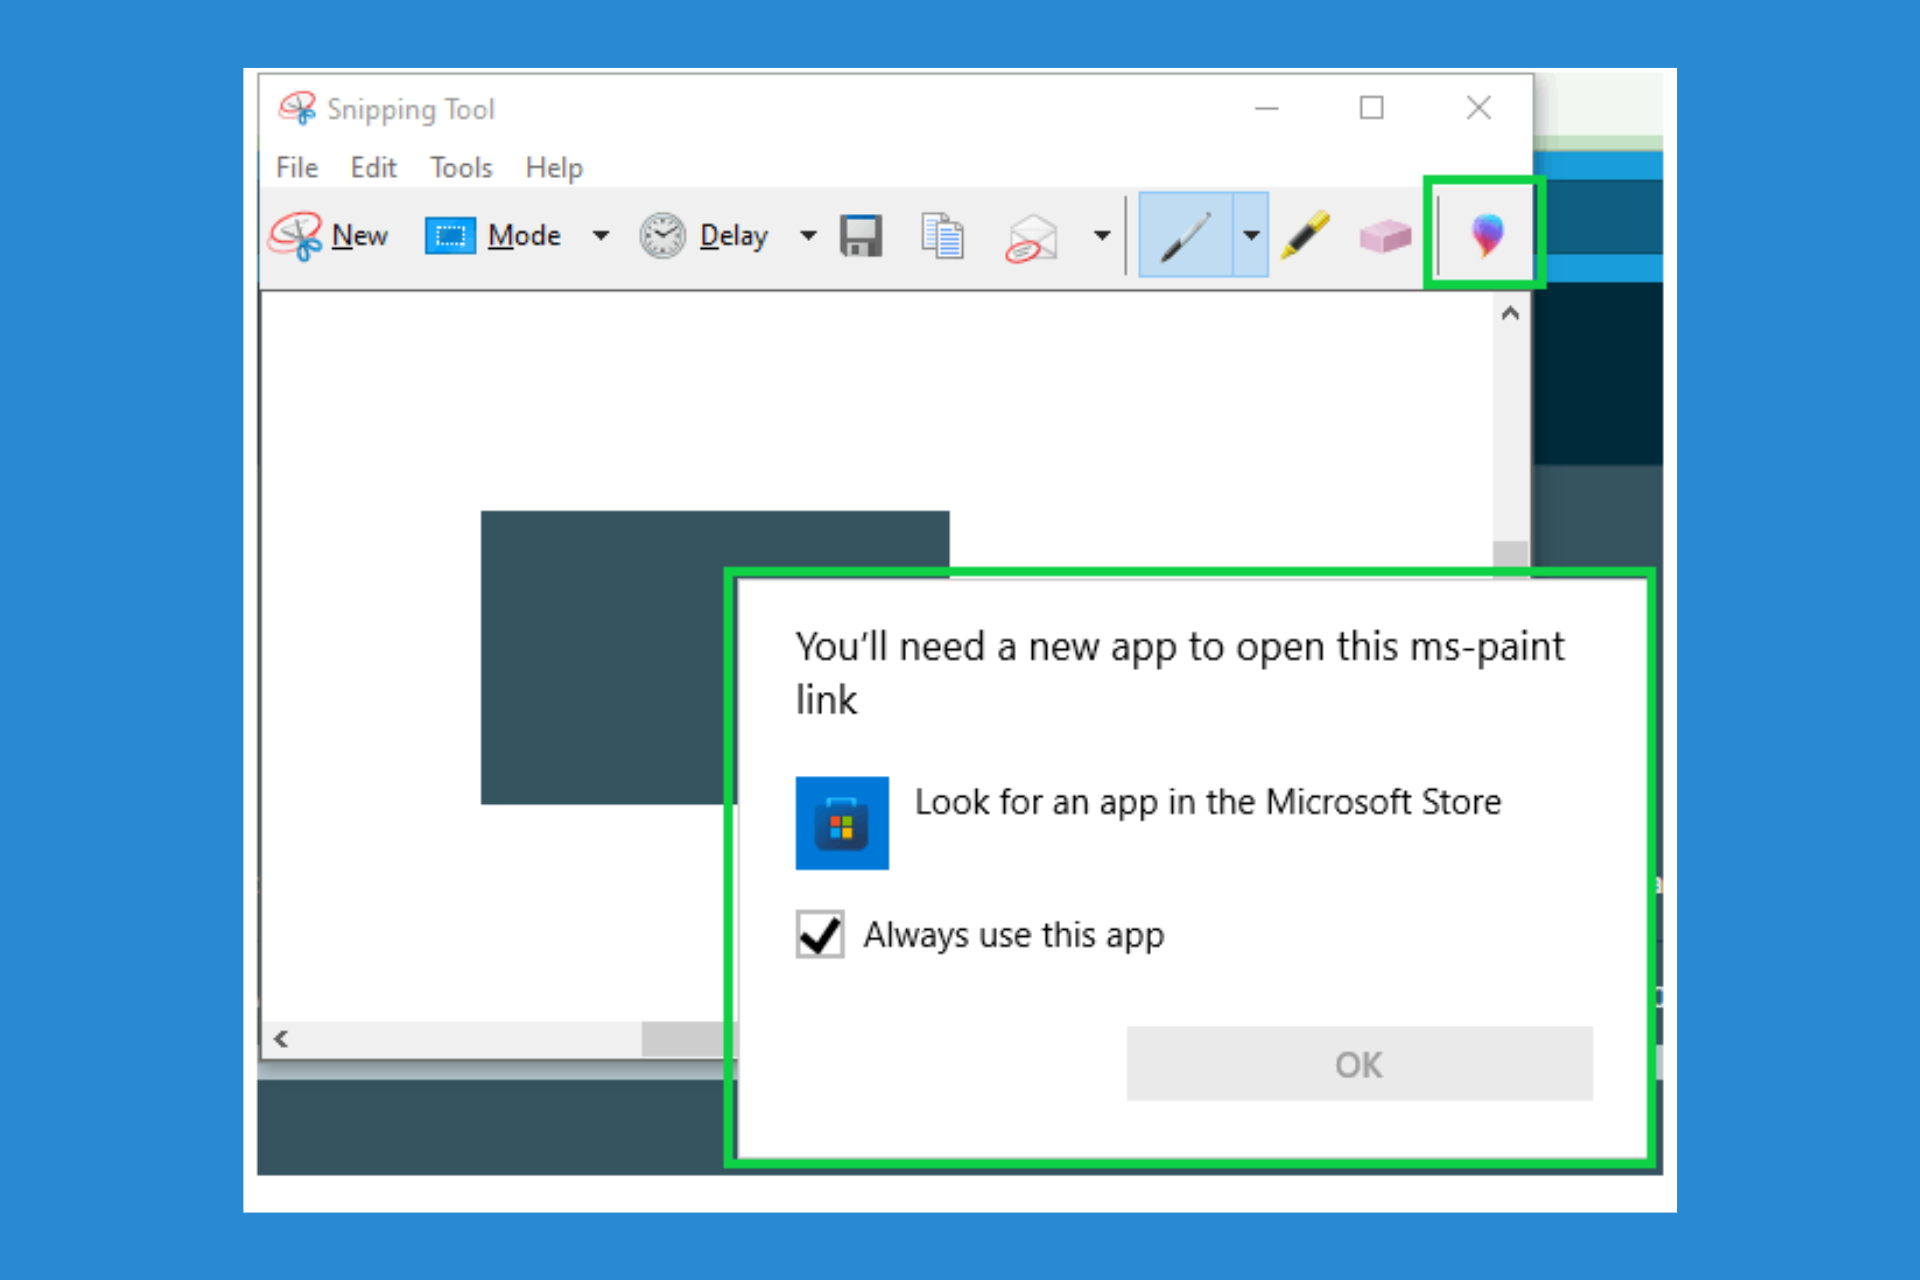
Snipping Tool’s Paint 3D Icon is not Working Automatically

If you’re experiencing issues with the Snipping Tool not automatically editing in Paint 3D, you’re not alone. Many Windows users have faced this frustrating problem. Fortunately, there are several methods to quickly resolve this issue.

How do I edit a Snipping Tool caption in Paint 3D?

1. Install an older version of Paint 3D

  1. Open the browser of your choice and go to the RG Adguard website.
  2. Here, paste the following link in the URL field and press Enter: https://apps.microsoft.com/detail/9nblggh5fv99
  3. You will get the Microsoft Store Links for all the versions of Paint 3D.
  4. Now, locate the version 2310.24037.0 in the list and download it.
  5. If you install this version, the Paint 3D button will work and the caption will open in Paint 3D like it should.

Unfortunately, this is the only way you can make the Paint 3D button work in Snipping Tool. However, you will have to stop Microsoft Store from updating the Windows apps automatically. Otherwise, the system will install the newest version again and the button will become again unusable.

You may also forget about this interaction and use the methods below to edit your caption in Paint 3D.

2. Use the Copy and Paste method

  1. Open Snipping Tool and take a snip.
  2. Press Ctrl + C to copy the snip.
  3. Now, open Paint 3D and press Ctrl + V to paste it on the canvas.

Using the copy and paste method might involve a few more steps, but it ensures that your snip gets into Paint 3D quickly.

3. Use the Save and Open method

  1. After you open Snipping tool and make your caption, click on the File menu and select Save As.
  2. Choose a location to save the snip, then open Paint 3D.
  3. In Paint 3D, click on Menu > Open > Browse Files.
  4. Navigate to the saved snip and click Open.

Saving and then opening the snip might feel cumbersome, but it’s a reliable way to ensure your snips are properly saved and can be edited in Paint 3D. Instead of going through the menus to open the snip, you may also drag and drop it on Paint 3D after saving it in Snipping Tool.

4. Manually associate image files with Paint 3D

  1. Right-click on an image file and choose Properties from the context menu.
  2. In the Properties window, click Change next to Opens with.
  3. Select Paint 3D from the list or browse to find it.

Associating image files with Paint 3D can make it easier to open snips without additional steps.

So, because Microsoft updated the Paint 3D app, the old Snipping Tool app can’t find the app to open it directly when you click on it. Thankfully, as you’ve seen, there are plenty of other options to edit the captions from Snipping Tool with Paint 3D.

Of course there are also a lot of good image editors out there that can help you with that.

We hope that you’ve managed to use our solutions to edit your Snipping Tool captions with Paint 3D and now everything is OK again. If you have more questions or suggestions, leave them in the comments below.

How to Check Whether Your Graphics Card is DirectX 9 Compatible

DirectX is a technology that has significantly improved over the years with newer versions developing and taking over the mantle from DirectX 9.

However, even as technology advances, we’re inclined to stick to older hardware and older technology for compatibility purposes. Some games are also yet to receive an update for years so they may not be compatible with newer DirectX versions.

So, yes. DirectX 9 is still supported especially for backward compatibility. It was majorly developed for Windows 10 and since the operating system market share reveals that a significant number of users are still on this OS, it explains why it is still being used.

Further, you may be unable to play some games and keep getting the DirectX 9 required error message until you install this version.

How do I check if my graphics card is compatible with DirectX 9?

  1. Hit the Windows + R keys to open the Run command.
  2. Type diaxg in the search box and hit Enter or click on OK to launch the DirectX Diagnostic Tool. 
  3. In the DirectX Diagnostic Tool window that opens, navigate to the System tab.
  4. Here, you can see what version of DirectX is supported by your PC under System Information.

You can also use the same steps to check whether your graphics card is DirectX 12 compatible. However, for a more advanced method of checking, you can install one of the GPU diagnostic tools that not only check the version but can also troubleshoot issues with your graphics card.

How do I install DirectX 9 on Windows 11?

1. Download DirectX 9

  1. Visit this official website to download DirectX 9.
  2. Click on Download.
  3. Extract the contents of the ZIP file and click on the DirectX.sdk file.
  4. Click Yes to accept the license terms and agreement.
  5. Click on Browse and select the location where you would like to install DirectX 9 and click OK.
  6. The installation will begin.
  7. Click Finish once the installation completes and restart your PC.

2. Enable Direct Play

  1. Press the Win key to open the Start menu.
  2. Open Control Panel.
  3. Select Programs and Features.
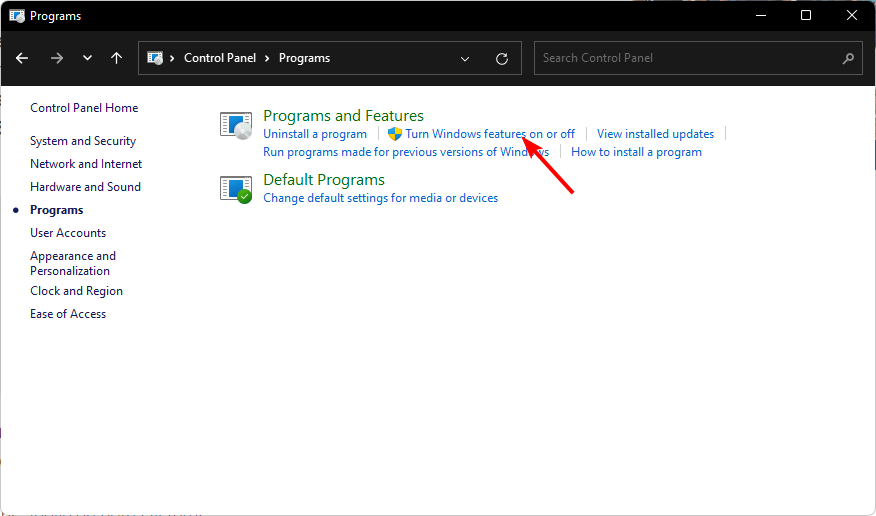
  4. Click on Turn Windows Features on or off from the left.
  5. Open Legacy Components.
  6. Tick Direct Play.
  7. Click OK and restart your PC.

DirectX is usually installed by default on most Windows versions but if you’re on a newer OS, you may need to download older versions like DirectX 9 manually. Enabling Direct Play ensures that your games play smoothly with no lags or stuttering.

What are the benefits of using DirectX 9-compatible graphics cards?

  • Compatibility – DirectX 9 compatible graphics cards are widely compatible with older Windows versions. If you were to upgrade to a newer version, you’d most likely be required to also upgrade your OS and hardware which could be costly.
  • Backward compatibility – With DirectX 9, you’re at liberty to play older games and on older OSes because it allows backward compatibility.
  • Reliability and stability – DirectX 9 is an older version which has been extensively tested and undergone various improvements. This makes it stable and its performance has been optimized making it highly reliable.

Although Windows 11 supports DirectX 12 which is the latest version, you can still use DirectX 9 for older games that do not support the newer version.

You may experience some performance bottlenecks since DirectX 9 cannot leverage fully the advancements in Windows 11 because it has a hard time matching up to modern hardware.

However, these issues are not unique to DirectX 9. DirectX 12 can be laggy sometimes but as long as you have a powerful GPU, these issues may be insignificant.

Should you face any problems with DirectX 9 not working on your PC, it’s probably a video driver issue. Reinstalling your graphic card drivers should remedy this error or reinstall DirectX. For a more detailed account on how to deal with DirectX errors head-on, check out our guide.

That’s all we had for this article but we’d like to get your thoughts on DirectX 9. Have you used it on a newer Windows version? How was its performance? Let us know in the comment section below.

Microsoft Excel now lets users translate and detect the language of their texts

Microsoft has updated Excel to translate text automatically and detect the language of the text you type into the app.

According to the Microsoft 365 Insider Blog post, the Redmond-based tech giant is making these capabilities available for Excel users on Windows or Mac platforms.

There is the DETECTLANGUAGE function. Suppose you see a phrase like “Hola mundo!” and wonder which language it is in. Now, when you type =DETECTLANGUAGE(A1) (assuming “Hola mundo!” is in cell A1), Excel will tell you it’s Spanish by returning the language code “es.” Nice and simple!

The other useful tool is the TRANSLATE function. For example, if you want to translate “Hello, World!” into Spanish. Just type in =TRANSLATE(A1, “en,” “es”), and Excel will do the magic, showing “Hola mundo!” in the cell where you entered the formula. It’s like having your translator without needing external apps or services.excel translate

However, to experience the new features, you’ll have to be enlisted in the Microsoft 365 Insiders on the Beta Channel. You’ll need to use Excel for Windows Version 2407 (Build 16.0.17808.20000) or, more recently, the Mac version 16.87 (Build 24062430) or after that time frame.

It’s worth mentioning that these functions are undergoing testing, so you should not depend on them for any crucial work yet, says Microsoft.

But the new features are useful and fun: if you love languages or simply often work with multilingual texts, these fresh Excel elements might alter the game for you.

There is no longer any need to switch apps or search for translations on Google. You can detect languages and translate text within your Excel spreadsheet by clicking only a few times. How cool is that?

In other news, Microsoft recently announced that Excel will be enhanced with another game-changer feature: directly summarizing data in rows and cells. The new capability will greatly streamline workflows for those working with a lot of data. It is due to be released in July.

What Is DevHome.Pi.EXE & How to Uninstall it

Many users reported an unknown application called DevHome.PI.exe running in the background in Task Manager. Is this application malware and what does it do? Let’s find out!

What is DevHome.PI and why is it on my computer?

What is Devhome Pi?

DevHome.PI.exe is created by Microsoft and it’s a process related to Windows Devices Developer Center.

It’s used to provide access to software development kits and documentation, and it’s usually used by software developers.

If you ever used Dev Home, this application was likely installed along with it. This isn’t the first time Dev Home installed additional software without the user’s knowledge.

Speaking of which many users reported Hotkey for Dev Home Project Ironsides on their PCs.

This app is used by developers to monitor projects more easily by using a dashboard or widgets. It can also be used to set up a development environment by downloading apps, packages or repositories.

Is DevHome.PI.exe safe?

Yes, this file is safe to use. You can check its signature and see that it’s made by Microsoft. If you want, you can scan it with your antivirus software.

It’s worth mentioning that scanning this file with Virus Total came positive for malware, but only from a single vendor meaning that this is likely a false positive.

devhome.pi virus total results

Can I remove DevHome.PI.exe?

No, this is a core component of Dev Home, so removing it can cause issues with it. If you don’t use Dev Home, you can uninstall Dev Home on Windows 11 or 10 to remove this file. To do that, follow these steps:

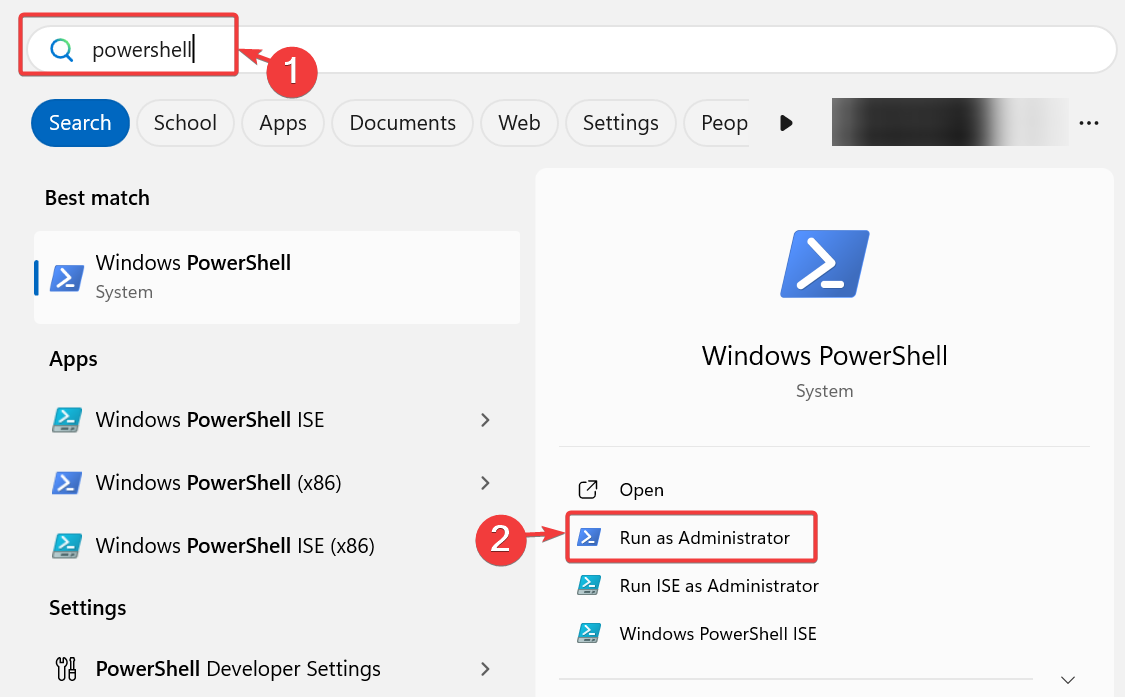
  1. Press Windows key + S and type powershell. Choose Run as administrator.
    run windows powershell as administrator
  2. When it starts run the following command: Get-AppxPackage *Windows.DevHome* | Remove-AppxPackage
    Get-AppxPackage devhome powershell command
  3. Wait for it to finish.

As you can see, DevHome.PI.exe is perfectly safe, and it won’t cause any issues on your PC, but you can remove it by uninstalling Dev Home.

If you ever need this tool again, you can get it from the Dev Home repository.

If you want to learn more, we have a great guide on how to download Dev Home, as well as a guide on how to use Dev Home for development, so don’t miss it.

10 Best Opera GX Mods to Personalize Your Browser

Opera GX is an excellent gaming browser and the best way to personalize it is by installing a Mod or a Mod kit. If you don’t know how to get and install Opera GX Mods, this guide will help you will all necessary information. Now, let’s go through with our selection of the best Mods for Opera GX.

What are the best Opera GX Mods for desktop?

1. Best Mod kits for gamers

DOOM Eternal

If you’re an old-school gamer, and want to go back to the roots of shooter games, the DOOM Eternal Mod Kit has everything you’ve been dreaming of: a dynamic wallpaper, dedicated theme, background music, and even button and keyboard sounds!

Minecraft

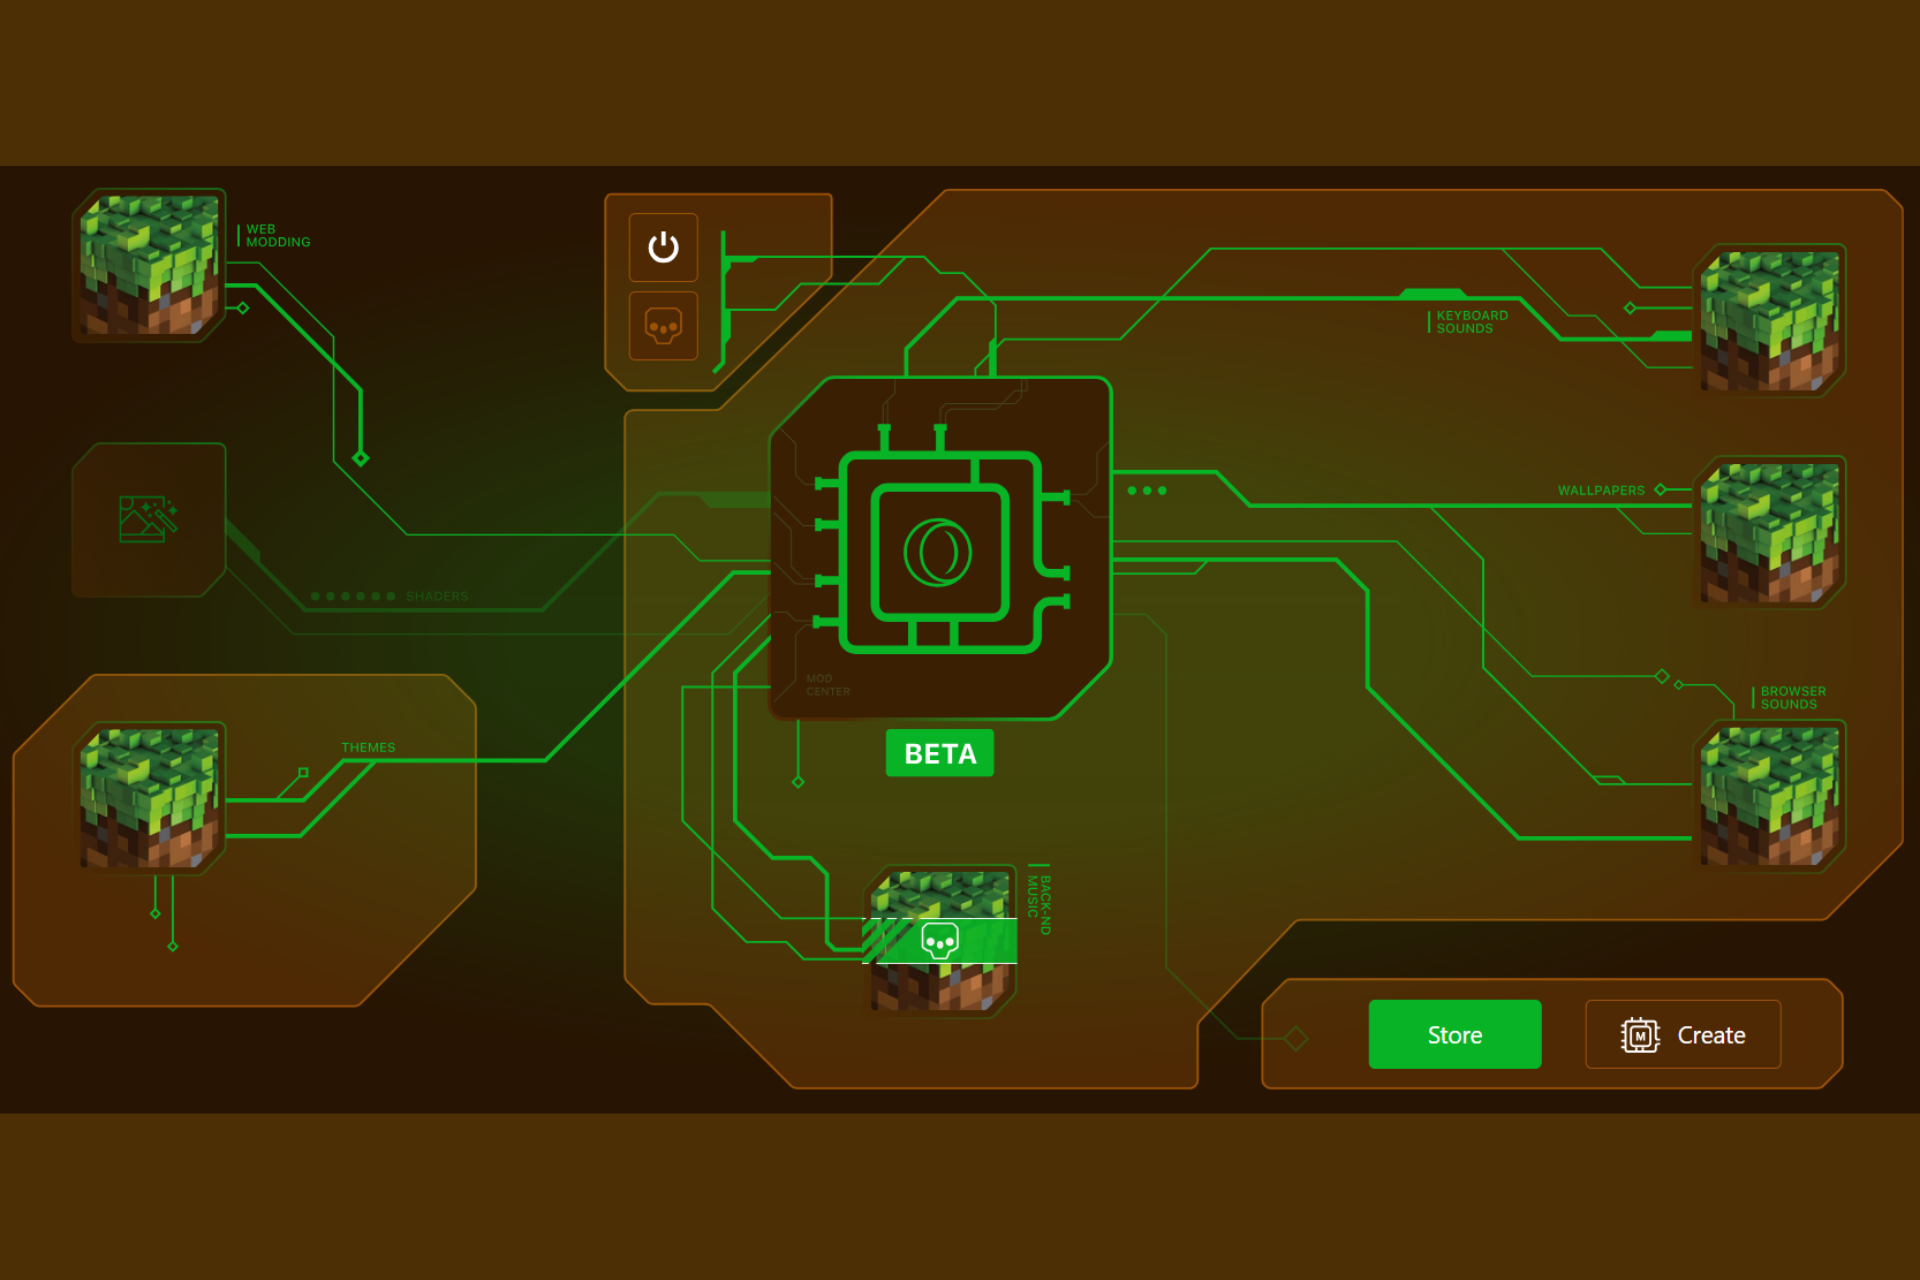
We know that you, Minecraft fans are here, so here’s the Minecraft Mod Kit for you. It has different wallpapers dor Light and Dark themes, sounds for widgets, menus, and keyboard. Of course, there’s also the background music to enjoy while you’re browsing.

God of War Theme (Kratos)

The God of War Theme is actually a Mod kit that includes wallpaper and background music to immerse you back into the game. It also comes with menu and keyboard sounds, but they are not spectacular, so you may leave them out.

Grand Theft Auto: San Andreas

If you’re nostalgic about GTA San Andreas, this Mod Kit will bring everything back, including a dedicated shader that will rain money all over your browser. It has a lot of wallpapers, a soundtrack that will play in the background, and sounds for the menus and keyboard.

2. Best Mods for movie buffs

Star Wars (Sith)

If you’re a Star Wars saga fan, this Mod Kit will bring a little bit of that Sith darkness in your Opera GX browser. It has a dedicated wallpaper, famous sound effects from the movies and a dedicated theme. The keyboard sounds are not something great but they will do. There are more Star Wars Mods in the store.

Batman Arkham Knight

The dynamic wallpaper from this Batman Arkham Knight Mod kit is pretty spectacular. The background music is nothing to sneeze at either. The keyboard and menu sounds are pretty basic though. You might want to opt those out.

The Boys

If you’re familiar with the very successful series The Boys from Amazon Prime, you will be happy that you can get this Mod Kit for Opera GX. The dynamic wallpaper has a whole panoramic sequence of movement. The background music is great but, again, the sound effects for buttons and keyboard are not so great.

3. Best Opera GX Mod Kits for Anime fans

Anime

This is a generic Anime mod that will soothe the spirit of the genre fans. It comes with a dynamic wallpaper with falling Sakura leaves, dedicated sounds and a colorful theme.

Naruto (Sasuke Anime Madara)

Yes, there is a Naruto Mod Kit for Opera GX! It has no less than 15 wallpapers, different for Light and Dark modes, a dedicated theme and lots of sound effects. Just press the Enter key after installing it and hear the voice of Naruto.

Dragon Ball (Anime Goku Gohan)

Dragon Ball Z is probably the most popular Anime title in the world, and this Mod Kit honors it the best it can. You will definitely recognize the music track from the background and the 5 papers included. There are also some sound effects, but we will let you discover if they are good or not.

That’s it! Now you have a lot of Opera GX Mod Kits to start from. All the mods above also have a Mobile version, to customize your Opera GX on the smartphone. You may also browse the Mods Store in Opera GX. Just click on the Mods icon from the sidebar and hit the Store button.

And while we’re at the customization chapter, you may also want to check our list of the best Opera GX extensions.

Which mod you like best? Tell us about it in the comments below.

Microsoft Loop now lets users sort data and expand boards

In the changing world of digital cooperation, Microsoft Loop has made an important advancement in improving user experience by adding many new functions that enhance online and remote collaboration better than ever. This comes days after the company announced that Loop workspaces can be accessed through a link.

According to the latest Insider blog post, Microsoft Loop will allow people to easily sort data and see more content by extending their boards into margins. Users can now switch board-based templates such as Kanban or team retrospective into a table view. They may also choose which Label column to pivot the data on a board. Sounds handy.

For people passionate about organization, using the new characteristics is not difficult. When you want to make your board bigger and have more things in it, or when you want to make it small and concentrate on certain details, the Operation toolbar’s new Expand and Collapse buttons are perfect for this.

To sort data in Microsoft Loop, just press the Sort button; it will let you arrange your board’s columns from smallest to largest or from largest to smallest. Altering to a table view or grouping content by distinct operations is simple and direct for a clearer summary.

Imagine this: you’re deep into a Kanban board, working with your team on an important project. The option to add more swim-lanes, sort cards by different methods, and change the board grouping according to various aspects of your project.

However, you should know that there is a small problem with sorting assignees that may not function as you expect. However, Microsoft is aware of this issue and anticipates resolving it shortly.

All Microsoft Loop users, whether they have personal, enterprise, or education accounts, now have access to the new capabilities. If you have any feedback, you should let Microsoft know. After all, these new enhancements are the result of it: they were requested by Loop users a while ago, and the Redmond-based tech giant delivered.

StartAllBack Alternative – Top 5 Tools for the Classic Windows Look

Choosing the right StartAllBack alternative can greatly improve your productivity and user experience in Windows. So, I picked out five of the best tools, highlighting their unique features, pros, and cons to help you make an informed decision.

Whether you prioritize customization, user-friendliness, compatibility, additional features, or cost, there’s an option here to suit your needs.

So, let’s check them out!

5 Best StartAllBack Alternatives

Here are my picks:

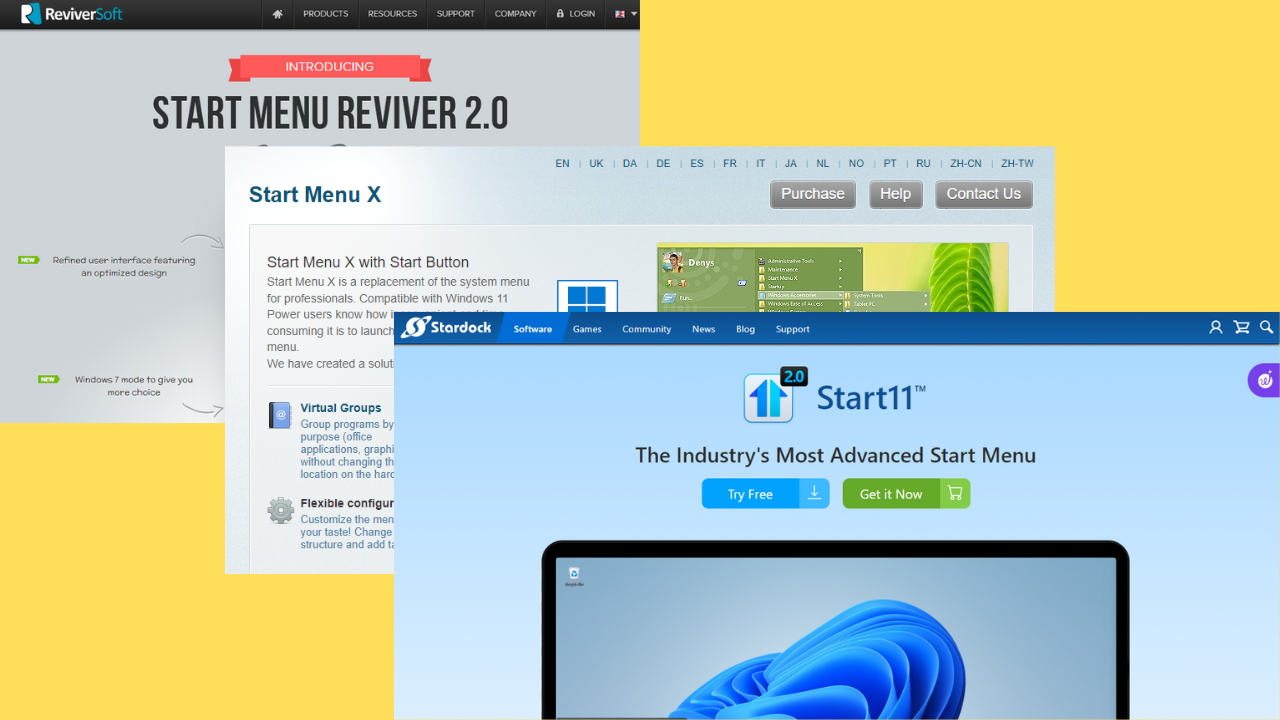
Start Menu X – Best Free Option

Start Menu X

Start Menu X offers a highly customizable and efficient start menu replacement for Windows. You can group programs by purpose to find and launch applications easier. Start Menu X also has an organized and user-friendly interface. 

User interface

Moreover, you can categorize apps without changing their location on the hard drive through its virtual group feature.  This tool also includes a timer-based power management feature so you can schedule your PC to shut down, sleep restart, and more.

Timer-based power management

The free version provides ample functionality, while the pro version adds even more customization options. 

Pros:

  • Allows grouping of programs by purpose and virtual grouping without changing file locations.
  • Has a user-friendly interface.
  • Includes a timer-based feature for scheduling PC shutdown, sleep, restart, etc.
  • The free version is pretty good, with additional features in the pro version.

Cons:

  • It may take some time to understand and fully utilize all the customization options.

Get Start Menu X

Start11 – Best for Customization

Start11

Start11 by Stardock is a powerful alternative to StartAllBack. It provides a blend of new and familiar features, so you can tailor your start menu to your liking. You have a variety of menu layouts to choose from, including Windows 7, modern, Windows 10, and Windows 11 styles. Each style offers numerous customization options and integrates perfectly with your theme. 

Styles

Start11’s intuitive interface and advanced customization options make it an excellent choice for users who want a modern yet familiar start menu.

Intuitive interface

You can also modify the transparency level to make the background more visible and customize the color of highlighted items.

Pros:

  • It has multiple Start menu layouts, including Windows 7, modern, Windows 10, and Windows 11.
  • This tool blends well with Windows themes and allows for background transparency adjustments.
  • It has several options for modifying highlighted item colors.
  • User-friendly and easy to navigate.

Cons:

  • No free version and advanced features require purchase.
  • Extensive customization options might overwhelm some users.

Get Start11

Start Menu Reviver – Highly-Compatible Alternative

Start Menu Reviver

Start Menu Reviver offers a unique take on the start menu, combining the best of classic and modern interfaces. It’s compatible with Windows 7 to 11 and supports multiple languages. This tool is an effective alternative to StartAllBack with a touch-friendly start menu ideal for both traditional PCs and touchscreen devices. 

Furthermore, you can customize the background, text color, and more.

Customize the background

It has a customizable tile-based interface, so you can pin your favorite apps, files, and websites for quick access.  

Customizable tile-based interface

This tool also allows you to modify the start menu icon, with 11 styles available. You can choose the menu size, expand it, and more.

Customizable tile-based interface

Pros:

  • The app works with Windows 7 to 11 and supports multiple languages.
  • It’s ideal for both traditional PCs and touchscreen devices.
  • Allows pinning of favorite apps, files, and websites.
  • Easy to find apps and features.

Cons:

  • The tile-based interface may not appeal to all users.
  • Limited in comparison to other tools in terms of interface modification.

Get Start Menu Reviver

Start8 – Best for Windows 8-style Menus

Start8

Start8 by Stardock is another good alternative to StartAllBack. It’s known for returning the start menu to Windows 8. It’s a paid tool, but you can try it for 30 days for free. 

Start8 pricing

It provides a familiar interface that integrates smoothly with newer versions of Windows. This app also includes customizable themes, the ability to boot directly to the desktop, and a unified search for programs, files, and settings.

It’s an ideal choice for users who miss the simplicity and reliability of the classic start menu.

App's interface

Pros:

  • It brings back the Windows 8 Start menu.
  • The app offers themes and boot-to-desktop options.
  • Integrates search for programs, files, and settings.
  • It has a simple, reliable design.

Cons:

  • No free version
  • Lacks some modern customization features found in newer tools.

Get Start8

StartW8 – The Most User-Friendly Option

StartW8

StartW8 is a StartAllBack alternative that replaces the traditional Start menu interface with Windows 8. It’s user-friendly and free to use. You can select items to include in the menu to personalize it.

Select items

Moreover, you can set the default action on the power button, including switching users, Signing out, restarting, sleeping, and shutting down. You can also choose from 27 available languages.

StartW8 button default

StartW8 provides easy access to programs, control panels, and search functions. It gives you a smooth and straightforward user experience without extra features you don’t need.

StartW8 interface

Pros:

  • The app is free to use with no ads.
  • Allows selection of items to include in the menu and power button actions.
  • It supports 27 languages.
  • Simplified access to programs, control panels, and search functions.

Cons:

  • Limited advanced features compared to other tools.

Get StartW8

How I Chose the Best StartAllBack Alternative

During my research, I considered the following factors to ensure the tool is valuable:

  • The ability to personalize the start menu layout, themes, and other elements.
  • How intuitive and user-friendly the interface is.
  • Compatibility with various Windows versions, including traditional PCs and touchscreen devices.
  • Power management tools, language support, and search capabilities.
  • Availability of free versions and the value provided by paid versions.

Overall, selecting the right StartAllBack alternative depends on your specific needs and preferences. All my picks offer distinct advantages, so consider what features matter most to you when making your choice. If you have any doubts about StartAllBack’s safety, these options are well worth checking out!

Discovery Plus Error 400: Resolve it Using These 3 Ways

If you ever get a Discovery Plus error 400, you won’t be able to use the Discovery service and watch your favorite shows. However, there’s an easy way to fix this problem, and today we’ll show you how to do it.

Why is my Discovery Plus not working?

This is usually caused by glitches on your device. Sometimes there can also be problems with the Sky service that are causing it.

How can I fix Discovery Plus error 400?

Before trying anything else, try resetting your Discovery Plus password and try to log in with a new password. If you’re using Sky STB, turn it off, disconnect it from the power outlet for 10 minutes, and connect it again.

1. Remove devices from your Discovery Plus account

  1. Log in to your Discovery Plus account on your browser.
  2. Go to Account.
     discovery plus account settings
  3. Click on Manage Devices.
    manage devices discovery plus
  4. Remove all devices.
  5. Next, open the Discovery Plus app again and log in with the QR code.

2. Perform a reset

  1. Press the Home button on your Sky remote.
  2. Select Settings.
  3. Next, choose System Management and then Resets & updates and Factory reset.
  4. Select the factory reset option.
  5. When the screen goes black, press 4 and 6 on our remote for 3 seconds to unpair the remote.
  6. Wait for the process to finish.

3. Perform a soft reset on Glass TV

  1. Disconnect your device from the outlet.
  2. Press and hold the Power button on the device.
  3. After 20 seconds plug in the TV but don’t release the Power button.
  4. Once the red light flashes on the TV, let go of the Power button.
  5. Press 1 and 3 simultaneously to pair your remote again.

As you can see, this issue usually affects Sky users, and in most cases, a quick reset will fix the problem.

This isn’t the only issue and many encountered Authentication error 403 in Discovery Go, but we have a separate guide that addresses this issue.

We also have to mention that it’s possible to watch Discovery Plus outside the US, but a few users reported that Discovery Plus is not working with VPN, but that can be easily fixed.

Microsoft wants to enhance Teams with a name mispronunciation detector, according to patent

How often have you mispronounced a participant’s name in a Microsoft Teams meeting? Sometimes, we experience being in an online meeting where we try to pronounce a workmate’s name properly only to realize we might have gotten it wrong. It’s quite an embarrassing situation, to say the least.

But what if we told you Microsoft is taking the initiative to handle this challenge with an innovative feature: real-time name mispronunciation detection in Microsoft Teams?

The technology, described in a recent patent, automatically detects when you’re not pronouncing the name of one of your colleagues correctly and notifies you. Smart, right?

The feature is built to function smoothly in online meetings. It listens carefully, finding the names of people participating in what’s being said and checking if they match a reference. If a difference is noticed, it tells the speaker about the name mispronunciation during the Microsoft Teams meeting. But how does it do this?

The system starts working before the meeting begins. It collects the names and user identifiers of every person participating in this meeting. Then, it creates a special language model for the meeting to ensure it can correctly recognize and write down names when spoken aloud.

When a name is said out loud, the system starts its action: it removes an audio part related to that name and compares this sound to reference pronunciation, which matches the user identifier linked to the participant’s name. The comparison is made by complicated algorithms that evaluate how similar the name said out loud is to the reference, producing a pronunciation score.

The speaker is informed if the score goes beneath a particular line, showing a wrong pronunciation. This is not where it ends; the system provides an experience of practice that lets speakers repeat saying the name and get feedback until they say it correctly. This element is very useful at the time of communication and also for later use in learning how to say things correctly.

This method of providing real-time feedback for name mispronunciation in Microsoft Teams is both a technical achievement and a game changer. It requires intricate steps such as making custom language models, getting and contrasting reference pronunciations, and presenting instant notifications while maintaining privacy and safety considerations.

The feature’s capacity to adjust for human speech subtleties and variations in names from different cultures demonstrates the progress made in speech recognition and machine learning technologies.

According to the patent, the images in the paper use Microsoft Teams as an example of a platform that can benefit from this capability. Teams will most likely get it in the following months or years. microsoft teams name mispronunciation

Microsoft’s real-time name mispronunciation detection feature is a modern, unique method for promoting comprehension and connection in our digital dealings. It’s good to see that technology when used correctly, can unite us more closely, making our actions appear more human rather than less.

Not only that, but this unseen assistant who guarantees that everyone’s name is pronounced correctly will spare us all from a great deal of embarrassment.

This is not the first time the Redmond-based tech giant has released patents for Microsoft Teams: in 2023, the company also revealed a patent that described a technology meant to personalize the Teams experience for each user.

Chrome on Windows ARM is getting Video Acceleration Boost and better battery life

Google recently made a native ARM64 version of Chrome available, specifically optimized for Windows PCs with ARM processors. The company is now working to use the power of these processors for faster video encoding and improved battery life in Chrome.

With the native ARM64 version, Chrome runs faster and more efficiently on your Windows ARM PC, resulting in quicker loading of web pages and smoother interactions. Chrome continues to prioritize security, and the ARM64 version benefits from Chrome’s robust security features, protecting you from online threats.

Hardware Accelerated Video Encoding on Chrome for Windows ARM

Generally, video encoding in Chrome relies on the device’s central processing unit (CPU) to handle the task. While it works, CPU encoding can take longer, especially for high-resolution videos, and can consume more battery life.

A recent Chromium commit, “Enable MediaFoundationAcceleratedEncodeOnArm64,” spotted by Windows Report, indicates Google is enabling hardware-accelerated video encoding using Media Foundation Transforms (MFTs) on ARM64 devices instead of solely relying on CPU. This results in smoother video playback by offloading video processing tasks to your device’s hardware.

“Prior CLs have fixed most of the issues observed on Qualcomm hardware. The encoding rate control tests fail on current lab TryBot devices due to the actual bitrate being further off than the allowed tolerance. These failures are not observed on newer hardware (when run locally),” Google notes.

This shift towards hardware encoding using the ARM64 processor could lead to the following:

Faster Encoding: Videos might be encoded quicker, reducing waiting times after recording or editing within Chrome.
Improved Battery Life: Hardware encoding is generally more efficient than software encoding on the CPU, potentially saving battery power while processing videos.

These video processing improvements will be initially available in the Canary version of Chrome. They can be particularly useful for video editing on Windows ARM devices. Chrome lets users move the Tab Search feature to the right side and delete Google Password Manager data.

How to Get and Install Opera GX Mods on the Desktop Version

Opera GX is a fantastic browser tailored for gamers, offering a plethora of mods to enhance your browsing experience. Whether you’re looking to customize the look or improve functionality, these mods can make your Opera GX experience truly unique.

How do I get and install Opera GX Mods?

1. Download Opera GX

  1. Open your browser, go to the official Opera GX page and hit the Download button.
  2. Once downloaded, open the installer and follow the on-screen instructions to install Opera GX.

Having the Opera GX browser installed is the first step toward accessing its mods. This provides you with the necessary software to enable and customize mods.

2. Accessing the GX Mod Store

  1. Launch the Opera GX browser on your desktop.
  2. In the sidebar, click on the Mods button, then hit the Store button.
  3. This will open the GX Mod Store where you can browse various mods.

By accessing the GX Mod Store, you can explore and choose from a wide range of customization options for your Opera GX browser.

3. Installing a Mod in Opera GX

  1. In the GX Mod Store, click on a mod that interests you.
  2. Hit the Install button next to the chosen mod.
  3. Once installed, the mod will be automatically implemented.

Installing a mod is simple and transforms your browsing experience with new themes, sounds, and visual effects.

4. Disable or enable a mod in Opera GX

  1. If you have more than one mod installed, click on the Mods button in Opera GX.
  2. Here, you will be able to enable or disable mods, but also customize which effects you want to use.
  3. For instance, you can use the sounds from one mod and the theme or background from another if you want.

Managing your installed mods ensures you can switch between them easily, keeping your browsing experience fresh and exciting.

5. Create an Opera GX Mod

Most of the mods you will encounter in the Mods Store are created by users, but it’s not that easy to do that. There’s a little bit of tweaking involved.

By hitting the Create button on the bottom of the Mods page, you will be redirected to the GitHub project page that will explain everything about how to create a mod. When you’re ready, you can start creating a mod on the GX.create page.

There are lots of mods in the GX store, from simple wallpapers and themes, to full packages that include background music and keyboard sounds. Now you know how to get and install Opera GX Mods and make your browser special.

And while we’re at it, here’s our list of the best Opera GX mods for desktop. We also have a new guide on how to manage & create profiles in Opera GX, so you might want to check it out.

For quick customization, don’t miss our guide on the GX Quick Settings button in Opera GX to learn more.

If you have any other suggestions or questions, feel free to use the comments section below and let us know.

KB5039212 is still causing a lot of issues for Windows 11 users, but fortunately, there are workarounds

If you’ve been trying to install the latest KB5039212 on Windows 11, but instead of accomplishing this task, an error message on the screen says, “Something went wrong, undoing changes,” then you should know you’re not the only one.

Many others have also faced this particular issue on Windows forums: from KB5039212 and KB5038285 failing to install to KB5039212 installing all up to 96% (or 25% in some cases), then stopping, to KB5039212 causing all sorts of issues to Windows devices once installed.

KB5039212, which arrived on June 11th, 2024, is a solution to resolve problems related to the taskbar Isass.exe and other key parts. The fixes are very important for enhancing the performance of Windows 11, specifically, if you are experiencing frequent taskbar crashes or your computer shows issues after waking up from hibernation mode. However, it also caused several issues when it was released back then.

Installing KB5039212 is important, and as we mentioned earlier, the patch makes Windows 11 more stable, but if you’re asking why this update has not been installed, there are a few common culprits for such situations.

It could be because of corrupted update parts, clashes with other software, or some system files that are too stubborn to cooperate. However, there are still some solutions you can try to install KB5039212 properly.

Here’s what you can do:

  1. Run Disk Cleanup: This process initiates a brief cleaning session for your computer to eliminate temporary files that may interfere with the update process. You can easily do it, but if you don’t know it, we have a comprehensive guide here.
  2. Use the Windows Update Troubleshooter: This tool can automatically detect issues with Windows Update and resolve them on its own. Type Troubleshoot in the search bar, choose Other troubleshooters, and start the Windows Update troubleshooter. You can also follow our steps here.
  3. Execute the sfc /scannow command. This method will get rid of any corrupted files in Windows 11 that might interrupt the installation of KB5039212. Executing this command might be a bit hard for casual Windows users, but you can follow our step-by-step guide here.
  4. Check Windows Services: Look for important services like Windows Update and BITS; they should function correctly. In the Services window, locate these services and confirm that their Startup type is set to Automatic. This is how you can do it.
  5. Reset Windows Update Components: This is similar to pressing the restart button for your update process. You must go to Command Prompt, open it as an administrator, execute a group of commands that halt the update services, and then restart them. You’ll find out how to do it here.
  6. Disable Anti-Virus Software Temporarily: If you rely on Windows Defender, the program can sometimes enter conflicts with Windows Update. Disable it, and try to install KB5039212 again.
  7. Restart Your Computer: This obvious method might untangle conflicts. If you can’t install KB5039212 on your Windows 11 system, restart it and try again.

You can also try to update the patch manually by downloading and installing it from the Microsoft Update Catalog. You might also want to ensure the drive you’re installing the patch has enough space. This is often overlooked, but it can be an issue with why the KB5039212 patch does not install.

These solutions should work, and many of them were recommended by Microsoft advisors in the official Windows forums, so it’s worth trying them. Let us know which one works for you.

Bleach: Brave Souls is now finally available on Xbox One

Bleach: Brave Souls, a free-to-play 3D action game that has captured many people’s love and support, is now available on Xbox One. This game was introduced in 2015 and has been downloaded more than 90 million times worldwide since then.

It’s not only a hit on PlayStation 4 but also liked by fans playing it on PC, iOS devices such as iPhones or iPads, and Android smartphones. Now that the game is available on Xbox One, it offers language options in English, Japanese, French, and Traditional Chinese. The purpose behind this new release was to make the game more reachable for everyone, but what sets it apart from other digital entertainment choices?

The game’s ability to work with controllers in all modes improves the playing experience. You can imagine how much fun it would be to fight against Hollows and move around the world of BLEACH using a normal game controller, particularly when you’re playing on big screens. It is all about bringing the feeling of intensity and excitement from the BLEACH universe into your living room in an immersive manner possible through a game controller.

Also, the characteristics of cross-platform play change everything. It lets players form a team or fight against others, no matter the type of platform they use to play. If you are playing on a smartphone, PC, or even your new Xbox device, with people worldwide in “Co-Op Quests” or try to win at “Epic Raid” quests.

This increases the community and boosts the game’s replay value and social element. Have you teamed up with friends who play on different devices to defeat a tough boss? If not, then “Bleach: Brave Souls” gives that chance.

The fact that it is now available on Xbox One and will soon be released for Nintendo Switch shows KLabGames’ dedication to making Bleach: Brave Souls reachable to more people. Cross-play will also be one of its features; however, multi-device play won’t be available in this game.

Why? This decision ensures that no player has an advantage over others due to using multiple devices, even though they cannot carry their accounts from one platform onto another. Some may find this choice disappointing; however, it implies that everyone begins at the same starting point, making the competition more thrilling.

Bleach: Brave Souls is a game that shows the continuing love for the BLEACH series, giving fans and new people a chance to enjoy anime’s exciting world actively. The game has high-resolution 3D pictures and many language options and can be played on different devices. These features will surely draw players into big fights or adventures.

If you have liked the series for a long time or want something new with lots of action, trying Bleach: Brave Souls on Xbox One could be a good idea. Who can say? You could get hooked into its fascinating world, fighting with or against people from all over the globe.

Talking about fascinating worlds, if you’re a Star Wars fan, you’ll be glad to hear that one of the most beloved games from the franchise, the 22-year Start Wars: Hunter Bounty, will finally be available on PCs and Xbox starting in August. It’s a good time to be a classic gamer, right?

Star Wars: Bounty Hunter is finally coming to Xbox and PC, 22 years after its original release

On August 1st, Star Wars: Bounty Hunter, a 2002 game people treasure, will return on Xbox. But this is not just an ordinary return. This action-adventure game that originally charmed gamers on the PS2 and Nintendo GameCube is ready to impress players on other current consoles like PS5, PS4, PC, and even Nintendo Switch.

And you know what? It costs $19.99. But wait, there’s even more. This is a re-release, not just an old game on another platform. It has been polished with visual enhancements and new characteristics like compatibility with DualSense and Steam Deck.

And when you finish the campaign, you can use a Boba Fett skin for your next playthroughs. How cool is that?

The story of Star Wars: Bounty Hunter centers around Jango Fett, who is well-known as a bounty hunter and the original model for the Republic’s Clone Army. He takes up the mission to hunt down Dark Jedi Komari Vosa, but naturally, it becomes complex because Fett gets caught in a plot that includes different syndicates.

You can watch the trailer below:

But, there is a turn. As the devotees patiently wait for this polished edition, a hint of anxiety can be sensed. Why, you might wonder? To begin with, Aspyr, the studio managing this remaster, has had a mix of successes and failures.

They did an excellent job with Tomb Raider 1-3 Remastered, but their performance for Star Wars: Battlefront Classic Collection was not so good. Furthermore, their participation in the KOTOR remake ended after presenting a demo that failed to impress much.

Hence, everyone asks the same question about this quality split: Which group will Star Wars: Bounty Hunter fit into?

And for all the fans, this remastered version delivers a hidden surprise from the old game. Do you recall the message “Cash in all bounties to play as Boba”? It’s possible to achieve a Boba Fett skin after finishing the campaign. It’s like a gift to the fans, a cool extra that might not exactly match the story but is very good.

So, what do you say? Are you prepared to immerse yourself once more in the realm of Jango Fett and delve into the Star Wars galaxy’s murkier sections?

August 1st is not too distant, and for just $19.99 ($17.99 on Xbox now, if you pre-order it), Star Wars: Bounty Hunter can be on your Xbox; it is a true bargain to experience a return flight into a galaxy far away with extra shine and play as Boba Fett. So, we can only hope this remaster is worthy of the original’s legacy and creates a fresh part of the Star Wars story for fans to love.

You can also pre-order the game for PC if you plan to play it there. Meanwhile, if the news sparked some memories within you, you can always become a Jedi in Starfield.

Command Prompt vs Windows Terminal: Which One Should You Use

Ever since its release, many have wondered how Terminal compares against other tools. In today’s guide we’ll take a closer look and tell you everything you need to know about Command Prompt vs Windows Terminal.

What is the difference between the Terminal and a Command Prompt?

What is a Command Prompt?

command prompt window

Command Prompt is a command line interpreter application available on Windows operating systems. This application has been an integral part of Windows since its earliest days.

What is Windows Terminal?

terminal window open

Windows Terminal is a host application for command-line shells. This allows Terminal to run various shells, including Command Prompt, PowerShell, and bash.

The application is available for download from Microsoft Store, and it’s available by default on Windows 11. You can even install Windows Terminal without the Store, right from GitHub on other versions of Windows.

What can Command Prompt do?

You can use Command Prompt to perform various actions on your PC, including the following:

  • File management
  • Displaying or terminating running processes and services
  • Modifying the registry
  • Display networking configuration
  • Performing various commands
  • Running various third-party applications that have command-line support
  • Use it for system repair

These are just some of the features of Command Prompt that we most often use, and while the tool is incredibly powerful, it offers very limited customization options.

What can Windows Terminal do?

  • It has all the features of Command Prompt, PowerShell, and bash
  • Ability to run multiple shells side by side
  • Tabbed interface
  • Ability to split a single tab into multiple shells
  • Ability to organize, rename, and change the color of tabs
  • Easy text export from any shell
  • Support for sessions
  • Themes and customization
  • Different profiles

As you can see, Windows Terminal has all the features and commands of Command Prompt, but in a modern and highly customizable user interface with a wide array of Terminal themes.

If you want to learn more about customization, we have a great guide on Windows Terminal settings, so don’t miss it.

However, Terminal is a Windows application, so it’s not available during the setup or in the recovery mode.

Is Windows getting rid of cmd?

No, Windows is not getting rid of cmd, but it’s not the default shell interface since Windows 10. However, it’s still available.

What replaced cmd?

Cmd has been replaced by Terminal on Windows 11 and by PowerShell on Windows 10.

powershell window open

Do keep in mind that by default, opening cmd will launch it inside of the Terminal on Windows 11. However, you can change the default Terminal if you want with ease.

Why does Windows still have cmd?

While PowerShell is superior, it doesn’t support all the Command Prompt commands, so removing it will force the users to learn and adapt to the new syntax.

Command Prompt has been around for decades, and many users are used to it and its syntax, so removing it doesn’t offer any benefits.

Why do we still use command prompts?

Using the command line has its benefits since it allows advanced users to make changes on their PCs just by typing in commands.

Command lines also support batch scripts that can automate various processes and run multiple commands in a sequence. Lastly, you can run commands remotely on different PCs or servers.

Should I use Terminal or Command Prompt?

Without a doubt, Terminal is a clear winner, simply because it’s an application that handles various shells, including cmd, while Command Prompt is just a shell.

Terminal offers a modern interface, customization, tabbed interface, and much more, which makes it superior compared to Command Prompt in any way.

If you want to know more about the Terminal, we have a great guide on how to open Terminal on Windows 11, so don’t miss it. To take your skills to a new level, we also have a guide on how to clear CMD, so you might want to check it out.

If you want to explore more about Windows Terminal and its advanced features, check out our detailed guide on Windows Terminal Features.

For more advanced users who want to take their skills to a new level, we have a great guide on the best Windows Terminal shortcuts and actions, so don’t miss it.

DirectX 12 is Laggy and Stuttering? Here are the Best Ways to Fix it

Experiencing lag and stuttering in your DirectX 12 games can be incredibly frustrating, especially when you’re in the middle of an intense gaming session. Here are some practical solutions to help you fix these issues and improve your gaming performance.

How do I fix lag and stuttering in DirectX 12?

1. Disable Control Flow Guard (CFG)

  1. Click on the Start menu and type Exploit protection in the search bar, then press Enter.
  2. In the window that appears, click on Program settings.
  3. Click on Add program to customize and then select Choose exact file path.
  4. Navigate to the folder where your game is installed, select the DX12 executable (.exe) file, and click Open.
  5. Scroll down to Control Flow Guard, check the box for Override system settings, and set it to Off.
  6. Click Apply, then restart your computer.

Disabling the Control Flow Guard for the game’s executable can alleviate stuttering issues by reducing the overhead caused by runtime checks, allowing the game to run smoother. This has been a common recommendation across multiple forums and has shown positive results for many users.

2. Delete Shader Cache

  1. Press the Windows key + I to open Settings.
  2. Navigate to System > Storage.
  3. Click on your main drive (usually C:) or the drive where your game is installed.
  4. Scroll down and find Temporary files.
  5. Check the box for DirectX Shader Cache and click Remove files.

Deleting the shader cache helps to remove any potentially corrupted shader files, forcing the game to rebuild them, which can reduce stuttering caused by shader compilation issues.

3. Set DPI Scaling to Application Controlled

  1. Right-click the game’s executable file and select Properties.
  2. Go to the Compatibility tab.
  3. Check the box for Override high DPI scaling behavior, and under Scaling performed by, choose Application.
  4. Click Apply and OK.

This setting ensures that the game controls its own DPI scaling, which can sometimes resolve stuttering issues related to display scaling mismatches.

4. Disable Windows Defender and Firewall for the Game

  1. Open the Start menu and type Windows Security and press Enter.
  2. Click on Virus & threat protection.
  3. Click on Manage settings under Virus & threat protection settings.
  4. Scroll down to Exclusions and click on Add or remove exclusions.
  5. Add the game folder and its executable to the exclusions list.
  6. Open Firewall & network protection, click Allow an app through firewall and ensure your game is allowed.

Adding the game to the exclusions in Windows Security can prevent security checks from interfering with game performance, which can sometimes cause stuttering issues.

5. Disable DWM for Full-Screen Games (for experienced users)

  1. Press Windows key + R, type regedit, and press Enter.
  2. Navigate to the following key: HKEY_LOCAL_MACHINE\SOFTWARE\Microsoft\Windows\DWM
  3. Right-click on the right pane, select New > DWORD (32-bit) Value, name it DisableDWM, and set its value to 1.
  4. Restart your computer.

DWM (Desktop Window Manager) can sometimes cause performance issues with full-screen games. Disabling it can reduce input latency and stuttering, but it may affect other system functionalities.

6. Downclock GPU

  1. Download and install MSI Afterburner.
  2. Open MSI Afterburner and locate the core clock speed slider.
  3. Reduce the core clock by 100 MHz and click Apply.
  4. Test the game. If the stuttering persists, reduce further in increments of 25 MHz until stable.

Some GPUs may run more stably at lower clock speeds, especially if the CPU and GPU are mismatched in performance or if the GPU is overheating. Downclocking the GPU can help stabilize performance.

7. Use RTSS to cap the FPS

  1. Download and install RivaTuner Statistics Server (RTSS).
  2. Open RTSS and add your game’s executable to the list.
  3. Set the framerate limit to match your monitor’s refresh rate (e.g., 60, 120, 144 FPS).
  4. Save and close RTSS, then start your game.

Capping your FPS with RTSS can help manage the game’s frame pacing and reduce stuttering caused by fluctuating frame rates, providing a smoother gaming experience. For settings that may cause a black screen on DirectX 12, check out our article.

By following these steps, DirectX 12 shouldn’t be laggy or causing stuttering in games. There is also a way to reinstall DirectX 12 if it got corrupted and to fix dxerror.log and directxlog errors in Windows 11. You might also check if your graphics card is DirectX 12 compatible or DirectX 9 compatible.

To keep your system running smoothly, regularly update your drivers and clear out temporary files. Did you managed to fix the DirectX 12 lag and stuttering? Let us know in the comments below.

This is how Xbox Keystone would have looked if it had been released

Have you ever considered the Xbox Keystone, the cloud streaming console that never came to our living rooms? It seems there’s a little more to its story, and with a fresh Microsoft patent discovered by Windows Central, we now have some insight into what could have been.

This device was created for your TV, providing access to Xbox Game Pass games without needing an expensive typical game console. Still, even if the idea was good, Keystone got put on hold because of difficulties with its price. Microsoft hoped to find a perfect range from $99 to $129, but they couldn’t manage the figures.

Keystone’s design was different from what we have seen in Xbox consoles. It had a square shape with a circular vent on the top, reminding us of the design of the Xbox Series S but having its unique style.

The front part had an Xbox power button and USB-A port that we are familiar with, while at the backside, you could see HDMI, Ethernet, and power ports. At the bottom, a special “Hello from Seattle” plate gave a personal touch.

Yet, as much as this patent reveal could have sparked hope for a Keystone comeback, the sad truth is that Keystone, in its current state of knowledge and speculation, will likely remain an interesting piece of Xbox history.

It’s important to understand that we don’t have any definitive information about its internals or operating system. Speculation is rife on whether it ran a full Xbox OS or something more streamlined for cloud gaming.

However, this does not mean that Microsoft is retreating from the cloud gaming field. No way. The technology titan continues to put significant resources into Xbox Cloud Gaming and is finding fresh methods for delivering games to players without requiring any physical equipment.

The difficulty is dealing with the cost of cloud servers and the competition within app stores. Microsoft’s plans involve setting up a mobile gaming store, but their strategy for gaining users isn’t unclear.

Instead of Keystone, Microsoft is having a good outcome with Xbox Cloud Gaming on places such as Samsung TVs and trying out PC cloud games to widen its service range.

The future for cloud gaming seems very positive, as technologies like NVIDIA GeForce Now pave the path ahead. This shows that getting top-notch gaming experiences through the cloud is possible and unavoidable in the future.

Hence, even if we never hold an Xbox Keystone, the concept of cloud gaming keeps developing. Microsoft’s voyage into the cloud is not finished yet—who can say? Perhaps soon, they will come up with another major innovation.

You can read the patent here.

Edge Flags Blocked by Administrator: How to Bypass it

Many users reported that the Edge flags page is blocked by the administrator, and this will prevent you from changing certain hidden settings. However, this can be fixed by using our solutions.

What can I do if Edge flags are blocked by an administrator?

1. Change Group Policy settings

  1. Press Windows key + R and type gpedit.msc. Click OK.
    GPEDIT MSC RUN window windows 11
  2. Next, navigate to the following path: Administrative Templates/Microsoft Edge/
  3. In the right pane, select the URLBlocklist policy.
  4. If flags or edge pages are on the list, remove them or disable the policy.

For this solution to work, you need to have Microsoft Edge for Business installed.

If you’re using the regular version, do this instead:

  1. Open Group Policy Editor again.
  2. Next, go to Administrative Templates\Windows Components\Microsoft Edge
     microsoft edge group policy editor
  3. Double-click on Prevent access to the about:flags page in Microsoft Edge.
    prevent access to about flags policy
  4. Set the policy to Not Configured or Disabled and save changes.

Do keep in mind that you’ll need to have administrative access to do this.

2. Modify the registry

  1. Press the Windows key + R and type regedit. Click OK.
    Regedit run window
  2. Next, navigate to SOFTWARE\Policies\Microsoft\Edge\URLBlocklist
  3. In the right pane, you should see several entries. Locate the one that mentions flags page or edge, and remove them.

This path is available only if you have Microsoft Edge for Business installed. For the regular version use the following steps:

  1. Open Registry Editor and go to HKEY_LOCAL_MACHINE\SOFTWARE\Policies\Microsoft\MicrosoftEdge\Main
  2. Double-click the PreventAccessToAboutFlagsInMicrosoftEdge in the right pane.
    preventaccesstoaboutflags dword
  3. Set the Value data to 0 and save changes.
    preventaccesstoaboutvlags value data

For these methods to work, you’ll need to have administrative access.

How do I unblock this page is blocked by Microsoft Edge?

To do this, you’ll need administrative access. You can use the same steps from above to block a specific page. Our This page is blocked by Microsoft Edge article can also help you with that.

How do I unblock a website blocked by an administrator?

This requires the administrator to change the security settings on the PC. As a user with non-administrative privileges, this isn’t possible, so you’ll need to contact the administrator.

We covered this issue in our This page has been blocked by your administrator guide, so don’t miss it for more information.

Why is Microsoft Edge blocking websites?

This can happen due to built-in tracking protection that blocks suspicious websites by default. It’s also possible that certain security policies or security software are blocking specific websites.

If the Edge flags page is blocked by the administrator, you most likely need to contact the administrator and ask them to revoke those policies, or if you’re an administrator using the steps from above should work.

This isn’t the only page that can be blocked, a few users also encountered an Err blocked by administrator message on their browsers instead.

If you managed to fix this issue, go ahead and check our guide on ClickOnce Support Edge Flag to learn more about how it works.

Did you know that you can access Edge flags in Intune? If not, we have a great guide that will show you how to do it.

Hopefully, this guide has managed to solve your issue and now you can use edge://flags page again.

How did you fix this problem? Share your solutions with us in the comments below.