The new Windows 11-based Chuwi Hi10 Max could be a worthy Copilot+ PC alternative

Do you wonder how it seems to hold the future of mobile computing in your hands? The Chuwi Hi10 Max is for you. This small device isn’t only a tablet but also an adaptable 2-in-1 gadget that claims to take your computing experience up and away.

Picture yourself with the power of a laptop and the ease of a tablet, all in one slim device. This is Hi10 Max, and it changes everything.

Inside the Hi10 Max, we find the Intel 12th-gen N100 processor. This very strong part gives good performance while being careful with power use. So you can enjoy fast work without always thinking about your device getting too hot or running out of battery life too fast.

Also, when it comes to quickness – this tablet has 12 GB LPDDR5-4800 RAM and big 512 GB SSD storage, ensuring enough room and speed for all files and apps on it.

But the Hi10 Max’s 3 K display truly makes it stand out. With a resolution of 2880 x 1920 and protected by Corning Gorilla Glass, this tablet provides visuals that are not only clear but also extremely lively.

Whether you are reading, viewing videos, or simply surfing the internet, its screen’s quality assurance promises to immerse users into an experience difficult for others to match up with, and everything becomes more captivating and enjoyable! Its illumination of 300 nits and proportion of 3:2 create an ideal balance between work and enjoyment.

Now, for typing enthusiasts who appreciate the touch of a keyboard, the Hi10 Max satisfies this desire. It can be converted into a complete laptop by attaching the magnetic keyboard folio, which provides an ergonomic touchpad. If you like to draw or take notes with your hands, then HiPen H7/H8, which has 4,096 pressure levels, will suit your needs and give precise and correct input.

Connectivity is a strong point of the Hi10 Max. It has two full-featured USB Type-C ports, one USB 3.2 Gen1 Type-A port, micro HDMI, and a 3.5 mm audio jack to connect all your gadgets and peripheral devices. Plus, Wi-Fi 6, along with Bluetooth 5.2, ensures you stay connected, whether at your house or workplace or while traveling around town for meetings or other purposes.

The Hi10 Max has an 8 MP autofocus rear camera and a 5 MP front-facing camera for capturing the world around you or for looking your best during video calls.

This device also has a smart battery of size 36.48 Wh that can run for about 5 hours without needing to be charged constantly. So, it allows you to work, play and create all day long without interruptions from low battery levels.

The most exciting part? The Chuwi Hi10 Max will be available for purchase soon, and it’s expected to be very affordable.

If you want a device that gives you the full Windows 11 experience, excellent performance, and unmatched adaptability, this is one to watch out for. This could very well be a worthy alternative to Copilot+ PCs.

See more here.

StartAllBack Keeps Crashing: 5 Ways to Fix it

Microsoft has made changes to recent versions of Windows that affect the functionality and effectiveness of third-party customization software. As a result, StartAllBack keeps crashing on Windows for many!

The problem appears when the installed version of StartAllBack is incompatible, the OS doesn’t permit the customizations, other customization apps trigger conflicts, or StartAllBack didn’t install properly in the first place.

What can I do if StartAllBack keeps crashing?

1. Update StartAllBack

  1. Launch StartAllBack and go to the About tab.
  2. Click on Check for updates and install any pending ones.update to fix startallback keeps crashing

Some time ago, Microsoft confirmed that StartAllBack and ExplorerPatcher may crash after installing the latest version of Windows 11, and for StartAllBack, users must download v3.5.6 or newer.

2. Disable customizations in StartAllBack

  1. Launch the app, go to the Advanced tab, and untick the checkbox for Disable program for current user.disable
  2. Reboot the device and verify whether StartAllBack still keeps crashing on the PC.
  3. If not, re-enable the program, head to the individual tabs and disable customizations, such as the Start Menu, Taskbar, and Explorer.disable customizations
  4. After disabling each, reboot the computer and check for improvements.

Disabling individual customizations also helps when StartAllBack causes a black screen in Windows.

3. Uninstall other similar Windows customization apps

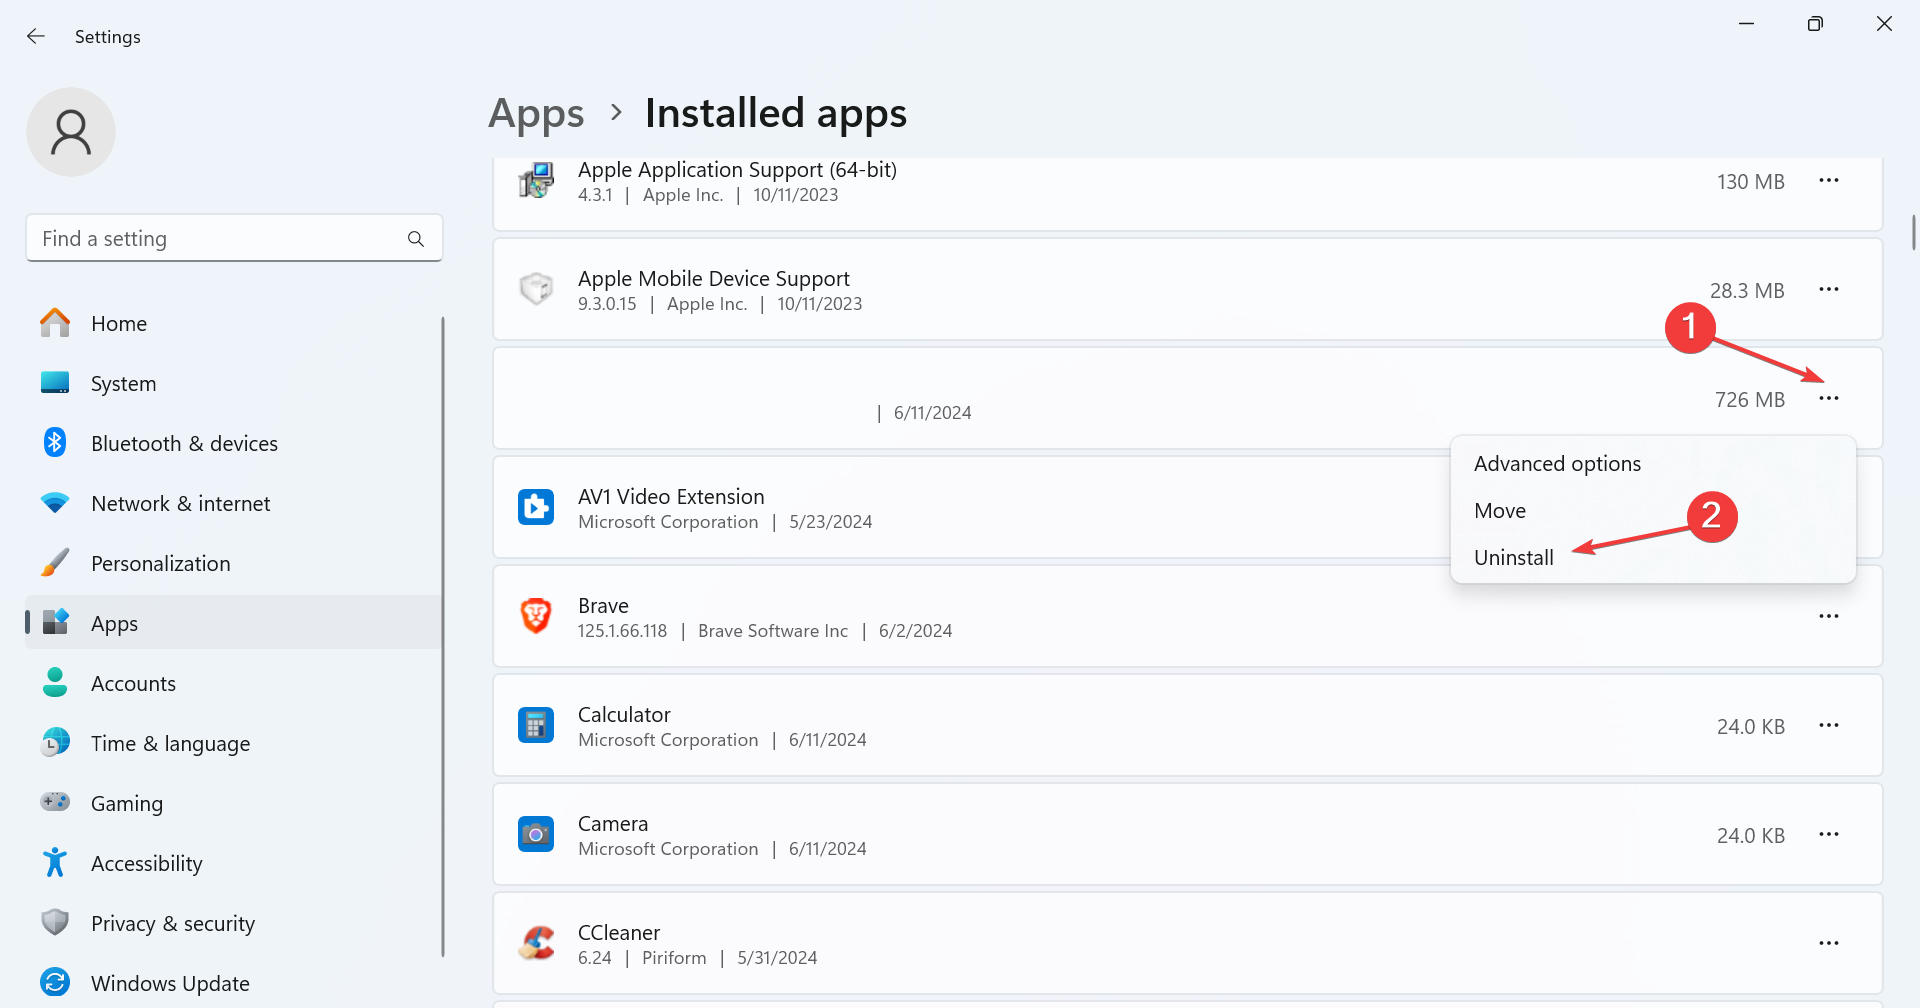
  1. Press Windows + I to open Settings, go to Apps from the navigation pane, and then click on Installed apps.apps
  2. Click the ellipsis (three dots) next to the other customization app, and choose Uninstall.uninstall to fix startallback keeps crashing
  3. Follow the on-screen instructions to complete the process, then restart the PC and check for improvements.

In forums, many have reported that having another Windows customization program like ExplorerPatcher can cause StartAllBack to crash or freeze due to the conflicts between the two. Uninstalling the app usually does the trick!

4. Reinstall StartAllBack

  1. Press Windows + R to open Run, type appwiz.cpl in the text field, and hit Enter.appwiz.cpl
  2. Click Yes in the UAC prompt.
  3. Select StartAllBack from the list of applications, and click Uninstall.uninstall to fix startallback keeps crashing
  4. Once done, reboot the PC.
  5. Now, head to StartAllBack’s official website, download the setup for the latest version, and then install it.

5. Uninstall recent Windows Update

  1. Press Windows + I to open Settings, go to Windows Update from the left pane, and click on Update history.update history
  2. Scroll down and click on Uninstall updates.
  3. Click the Uninstall option next to the update(s) you downloaded around the same time the issue first appeared.uninstall
  4. Again, click Uninstall to confirm the change.

If the previous solutions didn’t work, uninstalling Windows updates should fix things when StartAllBack keeps crashing.

What is the problem with StartAllBack?

As such, there’s no problem with the app, and our experts suggest that StartAllBack is safe. However, the OS customization program can cause privacy and performance issues on Windows, according to Microsoft.

As a result, Microsoft has disabled Windows upgrades for devices running StartAllBack. Besides, installing the program may cause the File Explorer to crash, the taskbar to disappear, or trigger a black screen in Windows 11. It’s all due to the recent changes in Windows, and app developers usually release updates to fix such issues!

If StartAllBack still keeps crashing, I recommend you take a look at our top picks for Windows customization software.

Which fix worked for you? Share with our readers in the comments section.

If you don’t want hackers to access your Windows 10 or Windows 11 PC, update it

Picture this: you are sitting in your beloved coffee shop, savoring a latte while casually using the laptop to browse the internet on public Wi-Fi. Do you realize that danger may be hiding within those shadows of public Wi-Fi?

Recently, Microsoft detected a critical vulnerability in Windows 11 and 10 that could possibly let hackers reach your PC without your knowledge. This crafty vulnerability, CVE-2024-30078, might enable cyber attackers to dispatch a harmful packet toward devices located on the identical network, allowing them to execute commands from a distance.

Now, don’t worry too much and swear off coffee shops forever. There is a good side to this news: Microsoft has released a patch.

They included one in their regular security update, which came out in May. So, if you’re like me, who often puts off PC updates (or any other device), think of this like it’s your first friendly push—get on with the updating!

Doing an update on your Windows PC is an easy but strong action you can apply to keep safe from such digital danger.

You may be thinking, “I don’t utilize public Wi-Fi frequently. Should I be concerned?” The response is yes. Even if your laptop mostly stays at home, it’s still a good idea to do this update. Remember, being cautious is always better.

Also, Microsoft has ranked it as “important,” just below their top severity level. That alone should tell you about how seriously they’re taking this issue.

Hence, might you spend a moment today checking for updates on your Windows PC? It’s just a minor action, but it can possibly save you much trouble later. And who knows, it might bring you assurance next time you sip coffee and browse the internet.

Revisiting is not only refreshing your software but also safeguarding your digital existence, which makes staying updated crucial.

Arc browser vs. Opera GX: Which is better for you?

With the arrival of the Arc browser, people have been reconsidering their browser choices. And, due to unparalleled gaming features, people are inclined to use Opera GX. Both browsers have an intuitive interface and unique features catering to different user needs, but if you are wondering which one is for you, your search ends here!

Which browser is better: Arc vs Opera GX?

FeaturesArc Opera GX
Primary FunctionMakes browsing easier and lets you customize the space according to your needs
A web browser especially for gamers and power users
Customization OptionsThemes, icons, and layout customizationThemes and wallpapers available for exclusive customization
Dynamic FoldersLive Folders No
Search without search Engine Instant LinksNo
Offline AccessYesNo
Emulator IntegrationYesNo
Performance OptimizationBasic Focuses on efficient metadata managementAdvanced comes wit GX Control for CPU, RAM, and bandwidth management
Gaming News & DealsNoYes (integrated gaming news, deals, and release updates)
Integrated MessengersNo
Yes (supports popular messaging services)
Cross-Platform SupportWindows, macOS, Linux, and iOSWindows, macOS, iPadOS, iOS and Android
SupportYes (dedicated retro gaming community)Forums and community engagement within the browser

1. User interface and customization

Arc

  • Vertical sidebar – A unique vertical tab allows you to manage and switch between tabs efficiently. You can hide it if you want.
  • Spaces – It allows you to create separate spaces for different tasks. For example, you can create a Space for personal things and another for work-related stuff.
  • Split View – It lets you view two websites side-by-side within the same window, enhancing multitasking.
  • Customization options – You can customize the bookmark bar, tab colors, and overall theme of your browser.

Opera GX

  • Workspaces – This allows you to create separate workspaces for different tasks, such as one for work-related things and another for personal stuff.
  • Customization options – You can change the theme (Dark, Custom, and Light), wallpaper (Theme and Custom), animation, GX lights, and more.
  • Sound options – You can alter the sounds on the browser, including Tab open, Tab close, Limiters, Click, Hover, Tab Slash, and Switch.
  • Widgets and inbuilt tools – You can enable widgets like Weather, Show GX Games, Show GX Mods, and Show GX.me.

With a sidebar and Spaces, the Arc browser caters to the needs of regular users who like to keep things organized. On the other hand, OperaGX has a sidebar, but for a different purpose. As for Arc’s Spaces, it has the same feature with a different name: Workspaces. Its RGB integration, cool themes, and sound options appeal more to gamers. And, with tools like adblocker and VPN, OperaGX is safer than Arc, which is the need of the hour.

2. Features

Arc

  • Live Folders – Creates dynamic folders for websites and web apps so that you get instant updates. It is currently available for GitHub but will soon be available for Google Drive and other platforms.
  • Instant Links – It eliminates the need for a search engine and efficiently finds answers to your queries without leaving the current tab.
  • Boosts – Allows you to make changes to the websites you surf.

Opera GX

  • Panic button – Triggering the panic button will hide your current session and open a new browser window. Once you are in the clear, you can press the key again to access the previous session.
  • Web modding – Allows you to customize the appearance of webpages.
  • Integrate messenger apps and chatbots—The sidebar allows you to access apps like Twitter, Facebook Messenger, Twitch, and WhatsApp directly. You can also add Chatsonic and ChatGPT to the sidebar to access the AI features.

Both browsers offer unique features that are important in one way or another. Arc lets you stay updated with the dynamic folder and Instant Links, which saves you from sifting through search results. On the other hand, Opera GX saves your browsing session from snooping eyes and lets you change the appearance of web pages.

3. Performance and speed

Arc

  • Proactive tab management – Closes all tabs except Pinned or Favorites to minimize the system resource usage.
  • Lightweight – It has been reported to run fast and provide a smooth browsing experience, especially on Mac.
  • Chromium Engine – Arc is built on a Chromium engine, which makes it compatible with Chrome extensions and ensures stable performance.

Opera GX

  • Inbuilt tools – Tools like GX Cleaner, Memory Limit, CPU Limiter, and Processor Limit ensure your browser and system stay optimized, providing a smoother browsing experience.
  • Hot Tab Killer – Closes all the resource-hogging tabs when not in use.
  • Network Limiter – It limits the bandwidth Opera GX can use, which is terrific if you are on a budget; however, you must compromise the connection speed.

Both browsers have excellent performance optimization features; in Arc, it is tab management, and in Opera GX, it is Hot Tab Killer. However, with features like Memory Limit, GX Cleaner, and others, Opera seems to

4. Privacy and security

Arc

  • Focused on privacy – Doesn’t come with an ad blocker and VPN but encourages you to use third-party extensions for better safety.
  • Data Management – Manages browsing data efficiently and also comes with an Auto archive function to keep your browser clutter-free

Opera GX

  • Inbuilt VPN – Comes with a free VPN service, which can enhance privacy and security when online.
  • Privacy protection – It blocks ads and comes with trackers to help you surf the web up to three times faster. It also includes a Crypto Wallet allowing you to make cryptocurrency transactions easily.

If you are more concerned about privacy, Opera GX is for you as it comes with a VPN, ad blocker, and Crypto Wallet. However, if being organized to maintain the workflow is essential, Arc has yet to match.

5. Cross-platform availability

Arc

  • Compatible platforms – Arc browser was introduced for macOS and iOS and is now available for Windows and Linux.
  • Sync – Arc syncs spaces and pinned tabs across compatible devices.

Opera GX

  • Multiplatform – Opera GX browser is compatible with Windows, macOS, iPadOS, iOS and Android.
  • Sync – It allows you to sync your browsing data across all compatible devices, including bookmarks, history, tabs, and settings.

With the release of the Windows version of Arc, it is now available for all popular platforms except Android. However, OperaGX is available for all platforms, including iPadOS and Android, increasing accessibility and usability across a wide range of devices.

5. User feedback and support

Arc

  • Community engagement –  Arc’s development team is highly active with its community, frequently incorporating user feedback.
  • Support – Has comprehensive tutorials and an intuitive onboarding process for new users.

Opera GX

  • Resources & support – Opera GX has FAQs, tutorials, forums, blogs, and more to help you when stuck.
  • Long-Standing Reputation – Opera has a solid user base and a long history of stable performance.

On the one hand, Arc is in the developing phase, pays attention to user feedback, and incorporates them when needed. It also has a simple onboarding process, which makes it user-friendly. On the other hand, Opera GX comes from a family of Opera, with a history of reliable performance and better user experience.

We compared all the aspects of these new browsers for you, and now you can decide which one is for you. If you like a simple interface with data management and innovative features like Live Folder and Instant Links, you should go for Arc.

However, if you want a game-like interface with tons of customization & optimization features and app integration, Opera GX is the choice.

In our opinion, when choosing between the two, the Arc browser is better to use as it focuses on what a browser should ideally be. Opera GX is a browser with many overwhelming features that are not necessarily used by every user, making it look bulky.

If you are curious how Arc browser is different from Opera and  Opera from Brave browser, we have detailed comparison guides for you.

Which browser did you choose: Arc browser vs Opera GX? Share your thoughts and views with our readers in the comments section below.

Microsoft Edge for Android tests Half Screen Page Summaries with Copilot

If you are overwhelmed by the long summary generated by Copilot for a web page in Edge on Android, Microsoft is now testing the Half-Screen Page Summary feature to give the user a shorter or condensed version.

Finding the key points of a lengthy webpage can be difficult. Copilot integrated into Edge on Android generates one-tap page and video summaries.

Things get easier if you’ve enabled the Copilot Toolbar on the flags page. This makes Edge generate summarization, video highlights, and more.

Until now, Copilot in Edge on Android could generate full-page summaries. If you found that a bit too much information, Microsoft is working to address this with shorter summaries, sort of. Microsoft calls this feature “Half-Screen Page Summary”.

Here is how to enable Copilot’s Half Screen Page summaries feature in Edge on Android

  1. Launch Edge Canary
  2. Visit edge://flags
  3. Find the “Enable HSPS feature” and enable it.
  4. Restart Edge.
Enable Half Screen Page Summary in Edge on Android

When you enable the flag and tap “Get page summary” after visiting a page, instead of Copilot producing information in its window in an untitled chat, you get a shorter version with highlights. When you compare both summaries there will be a lot of difference between the two.

It is worth noting you only get either a half Screen Page summary or a full Page summary. You can’t get both once in Edge for Andriod via Copilot.

This new feature caters to users who prefer a quick overview of a web page’s key points. This is particularly useful for quickly scanning through multiple web pages or for situations where you only need a high-level understanding of the content.

In addition to this, Microsoft has recently introduced One-Time Password feature for Edge on Android. And, Android Edge is gaining more extensions with the ability to install them in parallel.

StartAllBack: Is It Safe to Download and Use?

StartAllBack is a popular customization tool, but many are wondering if StartAllBack is safe, and in today’s guide we’re going to answer this and all other questions.

Is StartAllBack safe to use?

What is StartAllBack?

StartAllBack is a Windows customization software that lets you change your Start Menu. It was developed by Stanislav Zinukhov a lead developer of Parallels Desktop on Mac.

We tested the setup file with Virus Total and it was flagged by only one vendor, which is most likely a false positive.

startallback virus total scan results

Is StartAllBack worth it?

Yes, if you don’t like the new Start Menu and you want to customize it, StartAllBack is worth it. Do keep in mind that since this application alters your UI, you might experience certain issues.

It’s advised to disable it before any major updates unless you want to experience glitches or issues.

The software can also break because it relies on modifying certain Windows files, and if Microsoft decides to change them, the software won’t work properly, and you’ll end up with glitches.

A few users also reported getting a screen before Windows loads that asks them to disable StartAllBack.

If you want to move your Taskbar, then be sure to install StartAllBack. The software is perfectly safe, and you can always scan it with your antivirus if you’re worried.

Due to the nature of the software, glitches and issues can occur, but if that happens, you can just as easily disable StartAllBack on your computer. Moreover, if you’d like to look into viable alternatives, we’ve got you covered.

The Services.msc Extended View Tab is Blank: Here’s How to Fix

If you use the Microsoft Management Console (MMC) snap-in Services (services.msc) to manage your Windows services, you may have noticed that sometimes when you switch to the Extended view, the list of services won’t appear. The problem can be caused by some unrelated changes in the system, which might have broken the registration of some of the required system DLLs.

How do I fix the blank extended view tab?

1. Reregister the jscript.dll and vbscript.dll system files

  1. Click the Start button, type cmd and select Run as administrator from the results.
  2. Type the following commands one by one, and hit Enter after each to run it:
    • regsvr32 jscript.dll
    • regsvr32 vbscript.dll
  3. Close the command prompt window and restart the Windows services MMC snap-in.

Now the services should be visible in the Extended view.

2. Use the System File Checker tool

  1. Click the Start button, type cmd and select Run as administrator from the results.
  2. Type or paste the following command and press Enter: sfc /scannow

The System File Checker tool that might be able to find and fix any damage to the system files. After the scan is complete, restart your PC and see if the Extended tab is now populated.

3. Enable Active Scripting

  1. Press Win + R to start the Run console, type regedit and press Enter.
  2. Navigate to the following locations:
    • HKEY_CURRENT_USER\SOFTWARE\Microsoft\Windows\CurrentVersion\Internet Settings\Zones\0 HKEY_LOCAL_MACHINE\SOFTWARE\Microsoft\Windows\CurrentVersion\Internet Settings\Zones\0
  3. Double-click the value named 1400 (if exists in the above locations), and set its data to 0. The value 1400 corresponds to Active Scripting, and Zone 0 represents the local computer zone. Setting 1400 value data to 0 enables Active Scripting.
  4. Exit the Registry Editor, then close and re-open Services.msc.

4. Re-register the MMC Snap-in Components

Some Microsoft Management Console files may be unregistered. You can re-register them with:

  1. Open Command Prompt as administrator.
  2. Run these commands one by one:
    • regsvr32 msxml3.dll
    • regsvr32 msxml6.dll
    • regsvr32 mmcndmgr.dll

5. Reset the MMC Configuration

Corrupt MMC settings can cause a blank Extended tab.

  1. Press Windows + R, type %AppData%\Microsoft\MMC, and press Enter.
  2. Locate services.msc in the folder and delete it.
  3. Reopen services.msc and check if the Extended view works.

6. Install or Repair the Microsoft Management Console

On older or damaged installations, MMC components may be missing.

  1. Open Control Panel > Programs > Turn Windows features on or off.
  2. Ensure Microsoft Management Console is enabled.
  3. If already enabled, uncheck it, reboot, and re-enable it.

7. Repair Windows Image with DISM

If the blank tab is caused by damaged system files, DISM can fix it.

  1. Open Command Prompt (Admin).
  2. Run:
    • DISM /Online /Cleanup-Image /RestoreHealth
  3. Once complete, restart your PC.

This solution is a long stretch, because many users don’t have the value present in the Registry Editor. However, it worked for some, so you should try it nevertheless. Moreover, if you’re experiencing similar problems with the “Services.msc Access Denied” error, we’ve got you covered.

Hopefully, by using our solutions you fixed the services.msc Extended tab blank issue.

Phone Link might soon become a Companion app in Windows 11

Do you sometimes wish synchronizing your phone to your PC could be a little simpler? Microsoft has been paying attention to our combined signs and is about to make things more convenient for those using Windows 11.

The tech community’s talk suggests that Phone Link, the main software for connecting iOS and Android devices with PCs, will soon become an important feature within the Start menu. Imagine that: no more digging around for the app. The app recently got a major update, so it’s all possible.

According to folks at MSPowerUser, the magic works using a special panel named the “Companion.” It’s similar to widgets, but you can place them nicely on either side of your Start menu. This cool function isn’t just talk; it has been seen in nature, concealed within the code of the newest Phone Link version. We need to understand that it’s not about if but when this happens.

If you recall the Live Tiles from Windows 10, this could feel somewhat similar. It appears that Microsoft is borrowing from its own past by reintroducing a hint of Windows 10 with these Companions—now driven by Adaptive Cards.

This strategy can be seen as clever because some people did not appreciate Live Tiles much, mainly because they were disorderly and required many resources. Microsoft’s goal is clear: to simplify our digital lives while maintaining a smooth and unified design throughout its products.

To satisfy the inquisitive, this is all affirmed by going into the resources.pri file from Phone Link v. 1.24052.124.0 folders in WindowsApps. The code snippets offer a hint of what’s to come, and it’s thrilling to consider how this might alter our everyday interactions with our PCs.

It is an intriguing observation where Microsoft combines memories of the past with new creativity. They are looking backward and forward, ensuring that the function and design meet current expectations while acknowledging a sense of history. This mix of old and fresh might make using Windows more natural and easy for everyone.

So, how do you see it? Do the Companion panels in the Start menu make your life easier, or are you still unsure about this feature? No matter what, it is obvious that Microsoft is satisfied with its achievements and is working hard to enhance our digital environment. And for that, we can be thankful.

Windows 11 Screen Flickering with YouTube: 7 Ways to Fix it

Windows 11, although released quite a few years ago, still has a wide array of issues. Recently, many reported about screen flickering while watching YouTube on a browser in Windows 11!

The problem usually appears due to hardware acceleration, high refresh rate, misconfigured settings, issues with the graphics adapter/driver, or a bug in the installed update (both driver and Windows 11).

Before you move to the slightly complex solutions, restart the computer, install any pending Windows 11 or browser update, and reinstall the affected browser!

How can I fix screen flickering on YouTube in Windows 11?

1. Disable graphics/hardware acceleration

1.1 Google Chrome

  1. Launch the browser, paste the following path in the address bar and hit Enter:chrome://settings/system
  2. Now, disable the toggle for Use graphics acceleration when available.turn off hardware acceleration to fix windows 11 screen flickering youtube
  3. Relaunch the browser to apply the changes.

1.2 Microsoft Edge

  1. Launch the browser, paste the following path in the address bar and hit Enter:edge://settings/system
  2. Disable the toggle next to Use graphics acceleration when available, and then relaunch the browser.disable hardware acceleration edge

1.3 Opera

  1. Launch Opera, paste the following path in the address bar and hit Enter:opera://settings/system
  2. Disable the toggle for Use graphics acceleration when available, and then relaunch the browser.disable graphics acceleration

If the YouTube screen flickers in full-screen mode, disabling hardware/graphics acceleration on the browser should fix things in no time. Although the video quality may be affected!

2. Reconfigure the Choose ANGLE graphics backend flag

Note icon NOTE
Since all three are Chromium-based browsers, as you saw earlier, we have only listed the steps for Google Chrome below. The same process applies to Microsoft Edge and Opera. You only need to replace the browser’s name in the address bar.
  1. Launch the browser, paste the following path and hit Enter:chrome://flags/
  2. Search for the Choose ANGLE graphics backend flag and then select OpenGL from the flag’s dropdown menu.openGL to fix windows 11 screen flickering youtube
  3. Once done, relaunch Chrome for the changes to come into effect.
  4. If that doesn’t work, try again with D3D9 as the ANGLE graphics backend.

3. Turn off VSync (NVIDIA GPU)

  1. Launch the NVIDIA Control Panel, and go to Manage 3D settings from the left pane.
  2. Under Global Settings, select Off from the dropdown menu for Veritical Sync.disable vsync
  3. Click on Apply to save the changes, and then restart the computer.

VSync or Vertical Synchronization, while ideally used to balance the refresh rate, often causes YouTube videos to start stuttering or flickering in Windows 11, and disabling the functionality will do the trick!

Also, if you are using Intel or AMD GPUs, a similar setting will be available in the dedicated control center.

4. Reinstall the graphics driver

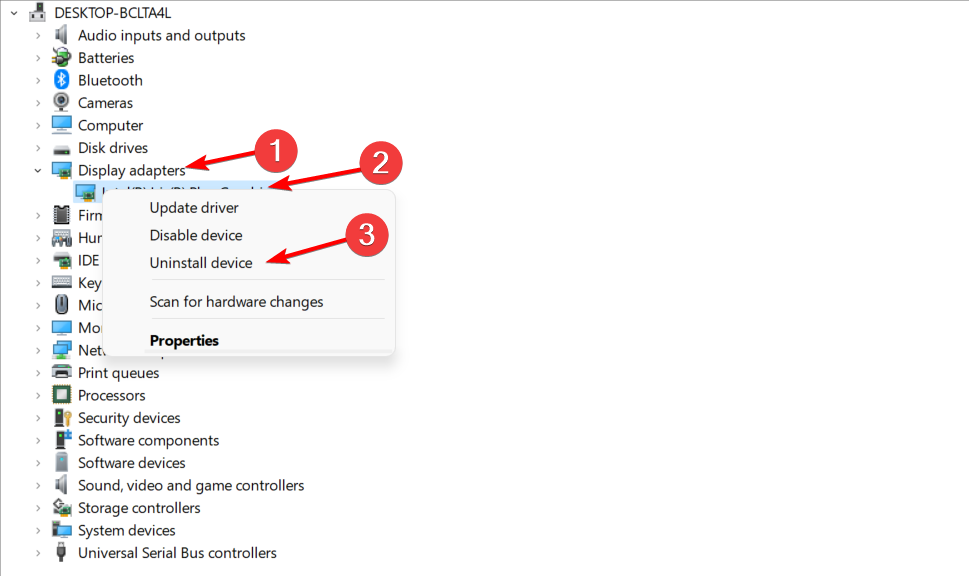
  1. Press Windows + X to open the Power User menu, and select Device Manager from the list.
  2. Expand the Display adapters entry, right-click on the GPU, and select Uninstall device.uninstall device
  3. Tick the Attempt to remove the driver for this device checkbox, and then click on Uninstall.confirm driver uninstall
  4. Once done, reboot the PC, and Windows will automatically install a fresh copy of the driver.

5. Update the graphics driver

  1. Press Windows + R to open Run, type degmgmt.msc in the text field, and hit Enter.
  2. Double-click on Display adapters, right-click on the active graphics adapter, and select Update driver.update driver
  3. Choose Search automatically for drivers and wait for Windows to automatically install the latest locally available driver.search automatically
  4. If a new driver is installed, reboot the PC.

Updating the graphics driver fixes flickering in Windows 11 across apps and websites, including Netflix and YouTube. Besides, this will work if you see a small flickering rectangle when viewing YouTube videos in full-screen mode!

If Windows is unable to find the latest version, you should manually install the graphics driver. Here are the direct links to download pages for the three manufacturers:

6. Lower the refresh rate

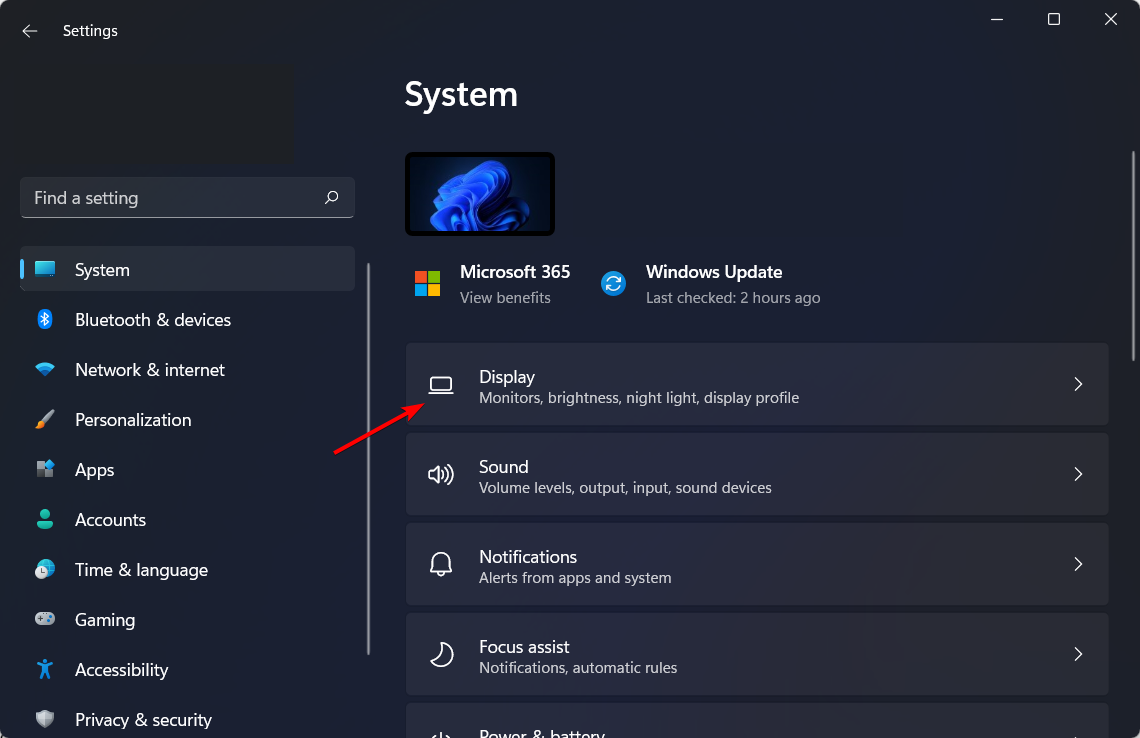
  1. Press Windows + I to open Settings, go to the System tab, and then click Display on the right.display settings
  2. Scroll down to the bottom and click on Advanced display under Related settings.
  3. Pick a lower refresh rate from the dropdown menu. If there’s just a single entry, head to the next fix.loewr the refresh rate to fix windows 11 screen flickering youtube

This also helps if Windows 11 keeps flickering, meaning all the installed apps are affected.

7. Uninstall the recent update

  1. Press Windows + I to open Settings, go to Windows Update, and select Update history.update history
  2. Scroll down to the bottom and click on Uninstall updates.
  3. Click on the Uninstall option next to the update downloaded around the same time YouTube first started flickering on Windows 11.uninstall to fix windows 11 screen flickering youtube
  4. Again, click on Uninstall to confirm the change.

If uninstalling the Windows update doesn’t work, roll back the driver update for the graphics adapter to fix screens flickering with YouTube on Windows 11.

In case all else fails, your last option is to download the YouTube app for Windows!

Which fix worked for you? Let us know in the comments section below.

Services.msc Error 1053: 6 Quick Ways to Fix it

Dealing with the services.msc error 1053 can be quite frustrating, especially when it disrupts your workflow. This error typically indicates that a service did not respond to the start or control request in a timely fashion. First, make sure that you install all pending Windows updates.

How do I fix Services.msc error 1053?

1. Change Timeout Settings in Registry Editor

  1. Press the Win + R keys to open the Run dialog box.
  2. Type regedit and press Enter to open the Registry Editor.
  3. Navigate to the following path: HKEY_LOCAL_MACHINE\SYSTEM\CurrentControlSet\Control
  4. Right-click on the Control folder in the left pane, then click on New -> DWORD (32-bit) Value.
  5. Name the new DWORD as ServicesPipeTimeout.
  6. Double-click on ServicesPipeTimeout and set its value to 180000 (this is in milliseconds, so it sets the timeout to 3 minutes).
  7. Click OK to save the changes.
  8. Close the Registry Editor and restart your computer.

Changing the timeout settings in the registry editor increases the time that Windows waits for a service to respond. This can help services that need more time to start.

2. Check System File corruption

  1. Open the Start menu and type cmd in the search bar.
  2. Right-click on Command Prompt and select Run as administrator.
  3. In the Command Prompt window, type sfc /scannow and press Enter to run the System File Checker.
  4. Wait for the process to complete. It might take a few minutes.
  5. If the System File Checker finds and fixes any issues, restart your computer.
  6. If the issue persists, run the following commands one by one in Command Prompt:
    • DISM /Online /Cleanup-Image /CheckHealth
    • DISM /Online /Cleanup-Image /ScanHealth
    • DISM /Online /Cleanup-Image /RestoreHealth

Running these commands checks for and repairs corrupted system files that might be preventing the service from starting correctly.

3. Reset the Winsock Data

  1. Open the Start menu and type cmd in the search bar.
  2. Right-click on Command Prompt and select Run as administrator.
  3. In the Command Prompt window, type the following commands and press Enter after each one:
    • netsh winsock reset
    • ipconfig /renew
  4. Restart your computer.

Resetting the Winsock catalog and renewing the IP configuration can resolve network-related issues that might be affecting the service.

4. Take ownership of the application

  1. Navigate to the folder where the application that is triggering the error has the executable file.
  2. Right-click on the executable file and select Properties.
  3. Go to the Security tab and click on Advanced.
  4. In the Advanced Security Settings window, click on Change next to the Owner field.
  5. Type your username in the text box and click Check Names. Click OK.
  6. Check the box labeled Replace owner on subcontainers and objects.
  7. Click Apply and then OK to save the changes.
  8. Restart your computer.

Taking ownership of the application ensures that you have the necessary permissions to start the service. However, make sure that you are logged in as administrator.

5. Reinstall the application that is triggering the error

  1. Press the Win + R keys to open the Run dialog box.
  2. Type appwiz.cpl and press Enter to open the Programs and Features window.
  3. Find the application in the list, right-click on it, and select Uninstall.
  4. Follow the prompts to uninstall the application.
  5. After restarting your computer, download the latest version of the application from its official website and perform a fresh installation.

Reinstalling the application can fix issues related to corrupt or missing files that are necessary for the service to start.

6. Ensure .NET Framework compatibility

  1. Press the Win + R keys to open the Run dialog box.
  2. Type control and press Enter to open Control Panel.
  3. Navigate to Programs -> Programs and Features.
  4. Click on Turn Windows features on or off in the left pane.
  5. Ensure that the appropriate versions of the .NET Framework are installed and enabled.
  6. If any required versions are missing, check the boxes to enable them and click OK.
  7. Restart your computer.

Ensuring that the correct .NET Framework versions are installed can resolve compatibility issues that prevent services from starting.

By following these steps, you can effectively resolve the services.msc error 1053 and get your system back on track. You may also need our guide on what to do if the Windows Update services are missing from Services.msc. Moreover, if you’re experiencing similar problems with the “Services.msc Access Denied” error, we’ve got you covered.

If you have more suggestions or questions, feel free to address them in the comments below.

You can get the powerful ThinkPad Yoga Gen 3 at a staggering 67% discount

Did you ever find a deal that seemed too good, like it must be an error? Today is your fortunate day because I have discovered something about a Lenovo 2-in-1 laptop. Normally, this item costs around $2,000, yet it is now for only $658—and this is not a mistake—a staggering 67% discount—or $1350 OFF. If you ask me, it is one of the best Lenovo deals of the year, and the company has been offering them for quite a while now.

This laptop is not just a regular one. It’s the Lenovo ThinkPad L13 Yoga Gen 3, and it’s now available for much less than normal cost. Certainly, this deal is too good to pass up.

This is because the ThinkPad Yoga Gen 3 epitomizes adaptability and capability in a single polished form. Imagine possessing a laptop that easily transforms into a tablet with a simple flip.

This is the power of the 13.3-inch WUXGA IPS touchscreen. It gives you amazing images whether you are doing work or relaxing with your best show. And now, a 1080p FHD RGB hybrid webcam will definitely make video chatting much sharper!

But hold on a moment; we have more to share. This laptop includes an AMD Ryzen PRO 5875U CPU and integrated AMD Radeon Graphics for gamers among us. It is swift, intense, and steadfast in maintaining its performance standards.

You can also choose up to 256GB of internal storage, along with numerous ports for external devices, so it’s prepared for all types of situations.

Deals like this are as rare as a unicorn you find in the wild. If you were waiting for the perfect moment to upgrade your technology, now is that time. You can own the Lenovo ThinkPad Yoga Gen 3 for $658. But keep in mind that these kinds of deals are not always available.

You can get it now.

Firefox 127 is here and it fixes its long-lasting installation issues

Have you ever tried to update or install a Firefox browser only to be frustrated and confused? If so, take comfort in knowing that your struggle is not unique. Mozilla has been on a wild journey with its latest release, Firefox version 127.0.1.

This update was like a light in the dark for people who had been dealing with many annoying problems. From missing tabs because of password-protected profiles to installation troubles on Windows and sluggish audio on Linux, Firefox 127.0.1 wanted to fix everything that was wrong before it was too late.

However, what did this update change?

Mozilla took a direct approach to addressing the problem. They introduced a series of fixes, which would have surely relieved users who upgraded and discovered that their previous session of tabs disappeared because they skipped the primary password prompt.

The release of Firefox 127.0.1 resolved this issue. Additionally, Linux users were delighted to find that slow audio speeds had been resolved, making their browsing experience more pleasant. Moreover, Windows users were not neglected either; the installation problems appeared to be a never-ending cycle of annoyance.

They have been corrected. Also, we should remember the problem of specific websites not rejecting cookies correctly – a small but important irritation that was also resolved.

But there is one more interesting fact: even with these great improvements, the way for Firefox was not completely clear. Statcounter shows that in May 2024, Firefox had a small fall in its number of users and kept around 6.64% of the desktop browser market share.

This reminds us how crucial it is to be alert and adaptable to maintain a leading position in technology matters.

If you are using Firefox, the updating process is not too complicated. The browser will eventually update itself without your interference. However, if you lack patience (like me at times), you can manually trigger the update via the menu.

Firefox 127.0.1 shows that Mozilla is serious about providing a top-notch user experience. By tackling these problems directly, Mozilla not only enhances the user’s enjoyment but also boosts their confidence in this browser.

So, if you’ve been with Firefox for a long time or are thinking of trying it out, it’s obvious that Mozilla is devoted to keeping its browser always at the forefront.

Microsoft has stopped rolling out the Windows Canary 26263 Build for now

Last week, Microsoft made a big move by releasing the most recent Canary Channel 26263 build of Windows 11. This was intended for those bold ones in the Windows Insider Program.

But Microsoft has done something that got the tech industry’s attention—they have stopped this update. You may wonder why. That’s the million-dollar question because Microsoft’s keeping mum on the details.

This happened: Initially, this update appeared to be a small advancement. It introduced an interesting new account manager experience within the Windows 11 Start menu. Its main things were a fast glance at your account benefits and an easier method for adjusting account settings.

UPDATE 6/18: We have temporarily paused the rollout of Windows 11 Insider Preview Build 26236 in the Canary Channel. We will resume flights to the Canary Channel shortly.

Microsoft

There were also a few bug repairs and “a small set of general improvements and fixes,” without much detail about what these might include. But later, Microsoft quietly changed their blog post to mention they had paused the process of rolling out this build. They didn’t provide any reasons for it.

And it’s not always smooth. There were a few known problems with this Canary Channel update. Some insiders got stuck on previous builds and couldn’t progress forward. Some people say that the colors of the performance section in Task Manager were slightly wrong when using dark mode.

So, what now? Microsoft assures us that the Canary Channel flights will be back soon. But for now, we all must ponder why this sudden pause happened.

Was it because of a crucial bug or maybe something more fascinating? We must wait and see. Keep watching because it will be important for you to find out when Microsoft starts giving Windows 11 build 26236 to Canary Channel Insiders again. Until then, you can download Canary 26241.

Here’s what you need to know about running Windows apps on Arm-based Copilot+ PCs

In the busy technology world, Microsoft has just shared some interesting news about Windows 11 version 24H2 that is coming up. This information is mainly for Arm-based Copilot+ PCs, so if you have one, this is for you.

Many people are excitedly waiting for the update, which promises improvements in printer support and app performance. This advancement will be a big step forward for those who use Arm-based systems. So now, let’s explore what this could mean to us.

Initially, Microsoft ensured that Windows apps would work well with Arm-based PCs. It’s like how they work on x86 computers—you can use more than just the apps from the Microsoft Store because many different applications should function immediately.

Still, if you want top performance, it’s best to go for apps made specifically for Windows on Arm. Knowing that the most popular Windows apps have been rebuilt for this platform, and more are coming, is comforting. Those that haven’t been optimized yet will still function because of emulation. The Prism emulator in Windows 11 24H2 will be used for this purpose.

But you might be thinking about printers. What about them? Microsoft has a solution for this, too. Printers must cooperate with Arm-based PCs in the same manner as they do on x86 systems. This covers all the Mopria printers, which is good if you are worried about compatibility.

In the official support blog, Microsoft has even run a new Windows Protected Print Mode for Windows 11 24H2 focusing on Mopria-exclusive printers. And what about peripherals? Everything is ready if the drivers are included in Windows 11 or the hardware producer has made Arm64 drivers available.

Now, you may be thinking, “What does all of this mean for me?” These updates are significant if you are considering a new Arm-based PC or already have one.

They pledge to provide an improved, more even, and continuous experience, whether during work time, playing games, or doing anything else with the device. The dedication to ensuring apps and peripherals function properly strongly indicates Microsoft’s support for the Arm platform.

As a tech lover, an expert searching for the newest trend, or someone who wonders about future developments in the computing world, these changes in Windows 11 24H2 are very interesting.

Microsoft is taking big steps forward by exploring new limits with Arm-based PCs which makes it a thrilling time to participate in the tech community. We should keep observing what more is to come!

StartAllBack vs. Start11: Which is the Best Start Menu Customization Tool?

When it comes to customizing the Start menu on Windows, two popular options stand out: StartAllBack and Start11. Both offer unique features and customization options that cater to different user preferences. We’ve tested them and they can even work together so let’s get on to figure out which is best.

StartAllBack vs Start11: Choosing the Best Start Menu Replacement

StartAllBack

  1. Download and install StartAllBack from their official website.
  2. Open StartAllBack by searching for it in the Start menu or double-clicking the desktop shortcut.
  3. Navigate to the “Start Menu” tab and choose from various Windows 7-style menu options.
  4. Adjust the color and transparency settings, including the type of blur effect.
  5. Apply dynamic transparency to the taskbar, which changes its transparency based on whether a full-height app is open.
  6. Go to the “Explorer” tab to enable a Windows 10-style ribbon menu and consistent dark mode in File Explorer.

StartAllBack enhances the Start menu and taskbar with a classic Windows look and provides additional consistency in File Explorer, making it an excellent choice for those nostalgic for older Windows versions.

Start11

  1. Download and install Start11 from the Stardock website.
  2. Open Start11 by searching for it in the Start menu or the desktop shortcut.
  3. Navigate to the Start Menu Style tab.
  4. Choose from seven different Start menu styles, including Windows 7, Windows 8, and Windows 10 styles.
  5. Customize the color, transparency, and even add custom textures or images for the background.
  6. Go to the “Taskbar” tab to apply changes to the taskbar separately from the Start menu.
  7. Integrate with Stardock’s WindowBlinds to apply custom themes if you have WindowBlinds installed.

Start11 offers extensive customization options for both the Start menu and the taskbar, making your Windows experience richer and more personalized.

Which has better in customization features?

After working with both for a while, Start11 is the winner when it comes to quantity of choices. The app has seven Start menu styles, some with multiple sub-styles. These include Windows 7, one inspired from Windows 8 and another in Windows 10 shape along with many others that represent variations on the new design for Windows 11’s start menu. You can change the color and see-through effect of the menus, or put in a personal texture from those given (or your own image for background).

All of this is also true for the taskbar, and you can customize them separately to have a completely custom appearance. Besides this, Start11 works together with Stardock’s WindowBlinds. If you have that app as well, then there are many custom themes available for the Start menu and taskbar too. However, while StartAllBack is 2$ for a PC license, Start11 costs $20 so you should ponder your choice a bit.

StartAllBack also provides settings for color and transparency. You can select the kind of blur effect you desire on the Start menu and taskbar (including none), so there is variety in appearance choices. The taskbar has some unique options like dynamic transparency or showing taskbar components as segments with transparent empty space.

StartAllBack, on the other hand, falls behind in terms of variety compared to Start11. The menu options of StartAllBack are essentially the Windows 7 style at their core but with diverse appearances. However, you cannot select a custom texture as background for taskbar or Start menu.

Start11 enhanced features

  • Create Groups: Form groups of apps based on their purpose, like image editing or social apps, directly on the Start menu.
  • Add Tabs and Pages: Incorporate tabs within groups and create multiple pages for better organization.
  • Include Folders: Add folders from your PC to appear as groups for quick access to files.
  • Sub-Folders and Filters: Make sub-folders open as menus and apply custom filters to view specific content.

StartAllBack enhanced features

  • Implement Ribbon Menu: Change the Windows 11 command bar to a Windows 10-style ribbon menu with updated icons.
  • Enable Consistent Dark Mode: Apply a consistent dark mode across File Explorer, ensuring file transfer dialogs and Properties windows follow the dark mode setting.
  • Dynamic Transparency: Enable dynamic transparency, making the taskbar fully transparent when nothing is open and visible when a full-height app is on the screen.
  • Segmented Taskbar Elements: Adjust taskbar elements to appear as segments with empty spaces being transparent.
  • Add Toolbars: Reintroduce toolbars to the taskbar, allowing for additional functionality like monitoring network activity without third-party apps.

Can I use Start11 and StartAllBack together?

Yes, but if you’re using both, be aware of potential conflicts like flashing menus. Recent updates may have addressed some compatibility issues. Test each application’s settings to ensure they work without causing issues. If conflicts arise, adjust settings or use features from one app while disabling overlapping features in the other.

    Combining Start11’s extensive Start menu customization with StartAllBack’s taskbar enhancements can offer a powerful combination for a personalized Windows experience.

    Conclusion

    Choosing between Start11 and StartAllBack depends on your specific needs for customization, and additional enhancements. Start11 offers extensive Start menu customization and grouping options, while StartAllBack provides superior taskbar and File Explorer modifications.

    In the end, you can still try both and see what suits your requirements better. If you’re using these tools, let us know about your experience in the comments below.

    Gaming on Arm devices is the future, Microsoft says

    In a technology world that is always changing, Microsoft has made a big move forward, especially for gamers. They recently launched the Windows 11 version 24H2 feature update made specifically for Arm-based Copilot+ PCs.

    This change can be seen as a game-changer in the gaming community, as the current Copilot+ PCs are not really geared to handle demanding gaming. It presents an array of improvements and fine-tuning that pledge to boost the gaming encounter on Arm gadgets. Now, we will explore how this affects game players and makers.

    Microsoft initially introduced the Prism emulator. This smart technology covertly converts the app code of x86 or x64 into the Arm64 instruction set. So what does it signify for you and me?

    Additionally, games that couldn’t function on Arm devices earlier now work with no extra work expected from game makers. Think about how great it would be if you could play many more games on your Arm device!

    But there is more. The update also includes Automatic Super Resolution (AutoSR). This feature is unique because it combines AI super-resolution directly into the OS.

    It improves the graphics of specific games, making them appear beautiful and operate more easily. The future of gaming graphics seems bright, right?

    Gaming security and fairness are also enjoying stronger anti-cheat support. Microsoft has worked with key providers of anti-cheat solutions, such as BattlEye, Denuvo Anti-Cheat, and Wellbia XIGNCODE3 / UNCHEATER, to guarantee that their software functions smoothly on Arm.

    This implies gamers can relish their preferred games without concerns about cheaters spoiling the fun. Fair play is key, and Microsoft is ensuring that.

    In a blog post, Microsoft says BattlEye, especially supporting Arm, is a big achievement for safe gaming on these devices. Famous games that use BattlEye as an anti-cheat can be played smoothly on Arm-based devices. This brings exciting possibilities for both players and creators.

    Microsoft and Qualcomm have also participated in an open-source site from Linaro that records game compatibility on Arm-based Windows 11 devices. This step has already verified and distributed around 1,400 compatible games.

    Among them, more than 1,200 titles can provide a good experience at a resolution of 1080p with a frame rate of 30 FPS or higher. To explore compatible games, you might want to look at Linaro’s fresh website, WorksOnWoA.com.

    Microsoft’s newest update is a big leap forward for gaming on Arm devices. Features like Prism emulation, AutoSR, and better anti-cheat assistance will elevate the gaming experience on Copilot+ PCs that run on Arm.

    If you are a gamer or someone who builds games, this is the best moment to explore more about the Arm gaming world. What game are you most excited to play on your Arm device?

    Gpedit.msc on Server 2019: How to Access & Use it

    Group Policy Editor is a must-have tool for many, and in today’s guide we’re going to show you how to open and use gpedit.msc on Server 2019, so let’s get started.

    How to use gpedit.msc on Server 2019?

    What is the Group Policy Editor in Windows Server?

    Group Policy Editor is a tool for Windows administrators that allows them to set various policies and settings for all computers that are using Windows Server.

    How to open Group Policy Editor Windows Server 2019?

    1. Use the Run dialog

    1. Press the Windows key + R.
    2. Type gpedit.msc.
      gpedit.msc run window
    3. Click OK or press Enter.
    1. Press the Windows key + S.
    2. Type gpedit.
    3. Select Edit group policy.
      edit group policy search results

    Where is Group Policy Management in Windows Server 2019?

    Group Policy Management if it’s installed should be located in the Administrative Tools in Control Panel. If it’s not installed, you can install it by doing the following:

    1. Open Server Manager.
    2. Go to Add Roles and Features and choose Features.
    3. Select Group Policy Management.
      group policy management install

    Alternatively, you can use PowerShell:

    1. Press the Windows key + X and choose PowerShell (Admin).
      powershell admin win+x menu
    2. Run the following command:  Install-WindowsFeature GPMC
      Install-WindowsFeature GPMC

    What is GPO in Windows Server?

    GPO stands for Group Policy Object and it’s a collection of Group Policy settings. GPO contains policy settings, and security permissions and applies them to users and computers in Active Directory.

    How do I create a GPO in Windows Server 2019?

    1. Open Group Policy Editor.
    2. Next, navigate to the domain you want to manage, and locate Group Policy Objects.
      group policy objects selected
    3. Right-click Group Policy Objects and choose New.
    4. Set the name for the new GPO.

    How to view GPO on a server?

    To view GPO on the server, you just need to open Group Policy Editor, expand the domain you’re managing, and expand Group Policy Objects.

    How to disable Group Policy in Windows Server 2019?

    1. Open the Group Policy Management.
    2. Next, locate the GPO that you want to disable.
    3. Right-click it and uncheck Link Enabled.
      link enabled gpo checked

    2. Use the Disable option

    1. In Group Policy Management locate the GPO you want to disable.
    2. Right-click it.
    3. Choose User Configuration Settings Disabled or Computer Configuration Settings Disabled.
      disable gpo context menu

    How to check if GPO is applied to all computers?

    1. Open PowerShell or Command Prompt as administrator.
    2. Run the following command gpresult /r /scope computer
      gpresult scope computer command in powershell
    3. You’ll now see a list of all GPOs that are applied to this computer.
    4. To check GPOs on remote computers use: gpresult /r /scope computer /S computer_name

    If you’re using Server Core, we have a great guide on how to use gpedit.msc on Server Core, so don’t miss it.

    This is how you can use gpedit.msc on Server 2019. To learn more, head to our GPO security filtering guide for more information.

    Keep in mind that issues can sometimes occur, and many reported that gpedit.msc is not found in Windows 11. Users also reported that GPO edit is grayed out, but we have a guide that tackles that issue.

    Canary 26241 brings some of the most valuable features to Windows 11

    Do you know the recent news about Windows 11 Insider Canary Preview Build 26241? It is a hot topic, particularly for tech lovers in the Windows Insider Program Canary Channel.

    To begin with, Microsoft has included a few general enhancements and repairs in Canary 26241. These are aimed at improving the experience for users like you and me.

    It is always good to observe that the big technical company is paying attention to suggestions and making small changes for better performance or ease of use.

    The most notable characteristic of Canary 26241 is the fresh drag-and-drop feature for the File Explorer Address Bar.

    It changes things for people like me who prefer arranging their files and folders systematically, and it’s an outcome of user opinions—proving that our inputs can make a difference in upcoming revisions.

    But it’s not only new features that must be highlighted; some fixes must also be noted. For example, the flashing taskbar app icon has been updated to make it more noticeable, and File Explorer has received a small improvement.

    When you choose files or folders now, they are outlined with a thin border, which helps you see what you have selected better. Also, the problem of crashing when accessing Home in File Explorer has been fixed for people facing it.

    Despite this, a few issues have been identified. For instance, some Insiders are stuck on older builds. Microsoft is aware and looking into the matter; however, they have a temporary solution that involves performing a clean installation from the most recent ISO.

    Additionally, there’s a peculiar problem where the colors in Task Manager’s performance section do not appear correctly when using dark mode. This is not a big issue but has caught Microsoft’s attention.

    If you are very much into the Windows Insider Program, do not forget that builds in the Canary Channel are just tests. They’re not linked with any particular release of Windows, and features may alter or vanish completely – some might never even become available. This is how we test and collect feedback.

    Does this make you excited about the changes and improvements, or do you still wait for other features to come in future builds? Let’s continue talking and see how Windows 11 keeps changing.

    You can read the Canary 26241’s full changelog here.

    Many users are having problems installing Windows 10’s KB5039211

    KB5039211 was released not a long time ago, and aside from its obvious security updates, the patch also brought many quality-of-life updates to Windows 10, including new features such as the new Snipping Tool, which is a bit odd but welcoming, considering the OS will reach its end of support in 2025.

    However, despite its importance (you should update your Windows 10 to KB5039211 as soon as possible), many users have stated they cannot install the patch.

    Dozens of users on Windows forums are reporting the same issue, and many are also getting the 0x800f0922 error.

    2024-06 Cumulative Update for Windows 10 Version 22H2 for x64-based Systems (KB5039211)

    This update will not successfully apply, goes through the usual dialogs only to fail on restart and undo the changes.

    I’ve tried SFC and DISM with no results.

    Any help is appreciated.

    Thanks in advance.

    Windows user

    Microsoft hasn’t said anything about it yet, so it’s unclear whether this is a known issue. But for now, if you’re encountering the 0x800f0922 error when you try to install the KB5039211 patch, you can follow our guide here on how to solve it.

    How to Uninstall StartAllBack Properly: 6 Simple Methods

    Uninstalling StartAllBack can sometimes be a bit tricky, but don’t worry, we’ve got you covered with several methods to make the process as smooth as possible. The key is to disable StartAllBack from Startup on Windows 11 first. We have a guide on how to disable startup apps. After you do that, continue with the solutions below.

    How do I uninstall StartAllBack?

    1. Disable StartAllBack from your profile

    1. Go to the Advanced tab on StartAllBack.
    2. At the bottom of the window click on the Disable program for current user box.
    3. Now, sign off from your Windows profile and sign back in.

      After disabling StartAllBack from startup and from the current user profile, you should be able to uninstall it quickly and properly. We also have a complete guide on how to disable StartAllBack for more information.

      2. Uninstall StartAllBack via Settings

      1. Open the Start menu, type apps and features and click on Installed apps from the results.
      2. Scroll through the list to find and click on StartAllBack.
      3. Click on the three dots to its right and select Uninstall to initiate the uninstallation process.

      Using the Apps and Features method is a straightforward way to uninstall StartAllBack if it appears in your list of installed apps.

      3. Uninstall StartAllBack with its Uninstaller.exe

      1. Navigate to the installation folder of StartAllBack (usually in C:\Program Files or C:\Program Files (x86)).
      2. Locate uninstall.exe or uninst000.exe.
      3. Double-click the file to start the uninstallation process.

      Running the uninstaller directly from the installation folder ensures that the program’s own uninstaller removes all components.

      4. Uninstall StartAllBack using the Run command

      1. Press Windows + R keys to open the Run command dialog.
      2. Copy and paste this uninstallation string and click OK or hit Enter: C:\Program Files\StartAllBack\StartAllBackCfg.exe /uninstall
      3. Follow the instructions to complete the uninstallation.

      This method involves using the Run command to run the uninstaller directly, which is useful if you can’t find StartAllBack in your app list.

      5. Uninstall StartAllBack in Safe Mode

      1. Press the Power button at the Windows login screen or in the Settings window, then press and hold the Shift key and click Restart.
      2. Select Troubleshoot > Advanced options > Startup Settings > Restart.
      3. Press F4 to enable Safe Mode.
      4. Follow any of the uninstallation methods listed above.

      Booting into Safe Mode ensures that minimal system processes are running, making it easier to uninstall problematic software.

      6. Manual removal via File Explorer and Registry Editor

      1. Navigate to the installation folder and delete all StartAllBack files.
      2. Press Windows + R, type regedit, and press Enter to open the Registry Editor.
      3. Navigate to HKEY_LOCAL_MACHINE\Software\ and HKEY_CURRENT_USER\Software\ to find and delete any entries related to StartAllBack.

      Manually deleting files and registry entries should be your last resort, as it involves more steps, but it ensures a thorough removal.

      You may also use professional uninstaller software that will solve this issues a lot quicker for free or for a small fee.

      By following these steps, you should be able to uninstall StartAllBack without any hassle. StartAllBack is known to cause black screen issues on Windows 11, but you can fix that with the highlighted guide.

      For more questions and suggestions, don’t hesitate to let us know in the comments below.

      Coaching by Copilot is coming to the new Outlook for Windows

      Remember not long ago when we told you Copilot would teach you how to write in Microsoft Word? Well, guess what? The Redmond-based tech giant says coaching by Copilot is coming to the new Outlook for Windows, as well.

      According to the latest entry in the Microsoft 365 Roadmap, the new Outlook will update Copilot to train you how to write the perfect email, starting this August.

      So, how will it train you? Coach Copilot will suggest how to improve your email writing in Outlook. You can also request that Copilot rewrite your email according to the coaching feedback it has given you.

      You can accept Copilot’s suggestions and have your email automatically rewritten by clicking on it. With a simple click, you’ll have the perfect Outlook email. Smart, right?

      The new coaching by Copilot experience allows you to apply the coaching suggestions given by Copilot by requesting to rewrite the email message based on the feedback received when using coaching by Copilot. With this update, you can accept and make Copilot rewrite the email in one click based on those coaching suggestions. This feature will be available in the new Outlook for Windows and web. #newoutlookforwindows

      Microsoft

      The entry says this capability will be available in Outlook on all platforms, including Web, Desktop, Android, Mac, iOS, to all users.

      Are you excited for it?

      Chrome to Stop Windows Autocorrect from tracking Incognito & PiP Browsing

      While Incognito mode prevents your browsing history from being saved, there was a privacy issue with Windows’ built-in text input features like autocorrect and text prediction. Chrome is now setting the “IS_PRIVATE” Input Scope for both Incognito and Picture-in-Picture windows also to address this.

      In Incognito mode, your browsing history, cookies, and site data aren’t saved on your device. Similarly, PiP allows you to pop out a video window and have it float on top of other applications, without saving your browsing history.

      Windows text input features are designed to be helpful by learning from your typing behavior across applications. However, this could have compromised your privacy in Incognito or PiP mode. Autocorrect and text prediction could potentially learn from the data you enter, even during private browsing sessions.

      Here, we are specifically referring to the Windows Operating System’s built-in text input intelligence features.

      These features include:

      Autocorrect: This feature automatically corrects typos as you type.
      Text prediction: The system suggests words or phrases based on your previous typing patterns.

      Chrome Incognito & PiP Get a Privacy Boost: No More Autocorrect Tracking on Windows!

      Google has addressed this concern with recent code commits within Chromium, the open-source project behind Chrome. These commits [1] &[2] enable Chrome to set the “IS_PRIVATE” Input Scope for both Incognito windows and PiP windows.

      Chrome sets private input scope for PiP windows
      Chrome sets IS_PRIVATE scope top leve incongito window commit

      What Does “IS_PRIVATE” Input Scope Do?

      This setting essentially tells Windows that the data you’re entering during Incognito and PiP browsing is private. Windows should not use this data for its text input intelligence features, like autocorrect or text prediction.

      Chrome is taking your privacy seriously. Chrome’s “IS_PRIVATE” Input Scope ensures your Incognito and PiP browsing experiences are more secure by preventing Windows text input features from potentially learning from your private browsing activity.

      Microsoft has contributed a lot to Chromium and in this privacy issue also Microsoft has helped Google.

      Additionally, Chrome saves resources when media is playing in background tab groups and Google may still use human reviewers for Chrome AI history search feature.

      How to Effectively Group Tabs on Arc Browser

      If you have recently switched to the Arc browser due to its user-oriented interface, seamless navigation, and streamlined management, grouping tabs is another area you should know about!

      The Arc browser for both macOS and Windows is highly effective at tab management, although the capabilities are limited on the latter, especially the AI integration. While Arc for macOS offers features like Tidy Tabs, which use AI to automatically group tabs based on the content, it is yet to be released for Windows.

      Nevertheless, if you have downloaded Arc on Windows, tab groups are still a possibility!

      How do I group tabs in the Arc browser on Windows?

      1. Launch the Arc browser, click the Add icon, select New folder, and enter a name for it. The folder you just created will be listed above the New Tab section.create new folder arc
      2. Now, hold and drag any active tab under the folder you just created and place it there.arc browser tab group
      3. You can similarly group more tabs under the same folder.

      On the Arc browser for Windows, you can only group tabs under a folder, given the absence of Arc Max, i.e., the AI functionalities. For effective management, I recommend you create different folders for individual categories and organize tabs under them.

      Also, if you are concerned about group tabs taking up space in Arc, simply click on any folder to collapse all tabs within it. Clicking on it again will expand the tabs. Besides, you can create or export spaces in Arc and then add folders and group tabs within them!

      Remember, this manual approach only applies until The Browser Company, the team behind the Arc browser, deploys Arc Max on the Windows ecosystem.

      How do I group tabs using Tidy Tabs in Arc?

      • Enabling Tidy Tabs: Launch Arc > open the Settings > go to the Max tab > enable the toggle next to Tidy Tabs.
      • Using Tidy Tabs: Once enabled, simply move the cursor to the sidebar > click on the Broom icon over the active tabs > all tabs will be organized under sections based on the content.
      Tidy Tabs in Arc (Image source: The Browser Company)

      Although the Tidy Tabs feature groups all tabs automatically, you can rearrange them, move them between sections, or convert a group into a folder. Also, if you open any new tabs, clicking on the Tidy Tabs option again will automatically move them to a relevant group or create a new one.

      As I said, grouping tabs is much simpler in the Arc browser for macOS than they are in Windows. But it’s this way only for a limited time. Soon, Arc Max should make its way to the Windows ecosystem, and you won’t have to manually group tabs in Arc under folders!

      If you are new to the browser and find it automatically archiving tabs, consider creating bookmarks or pinned tabs in Arc.

      Do you have any tips for grouping tabs in the Arc browser? Share with our readers in the comments section.

      What are Instant Links and How to Enable Them in Arc Browser

      What if you could browse the web without using a search engine and get the appropriate results for your search? Sounds like a dream, not anymore. With Arc browser‘s new feature, Instant Links, it is possible.

      Instant Links is a feature that uses AI to find answers to your queries without going to a search engine and annoying ads on them, accompanying search results. For example, if you want to learn about the latest iOS 18 and WWDC conference 2024, you can ask Arc’s AI bot, and it will add suitable links as an open tab in your sidebar.

      This feature eliminates the need for a search engine and is the fastest way to find answers to your queries. It uses AI technologies from OpenAI and the search results are replaced with links in the sidebar in new tab. Currently, the feature is only available for macOS with version 1.28.0 or later.

      1. Launch the Arc browser on your Macbook.
      2. Click Arc from the menu bar and select Settings from the context menu. You can also press Cmd + , to open the Settings page.
      3. Go to the Max tab on the Settings page, then toggle on the switch for Instant Links.arc browser instant links
      1. Click the New tab option from the sidebar or press Cmd + T to open it.
      2. Type in the query, and instead of Enter, press Shift + Enter.Instant links 1
      3. The Arc browser will browse the internet to answer your query and open the top result in a new tab.Instant links  2 arc browser
      • Multiple queries at once – You can enter multiple queries at once. For example, you can type videos of Selena Gomez’s People You Know, Lose You To Love Me, and Who Says, then press Shift + Enter
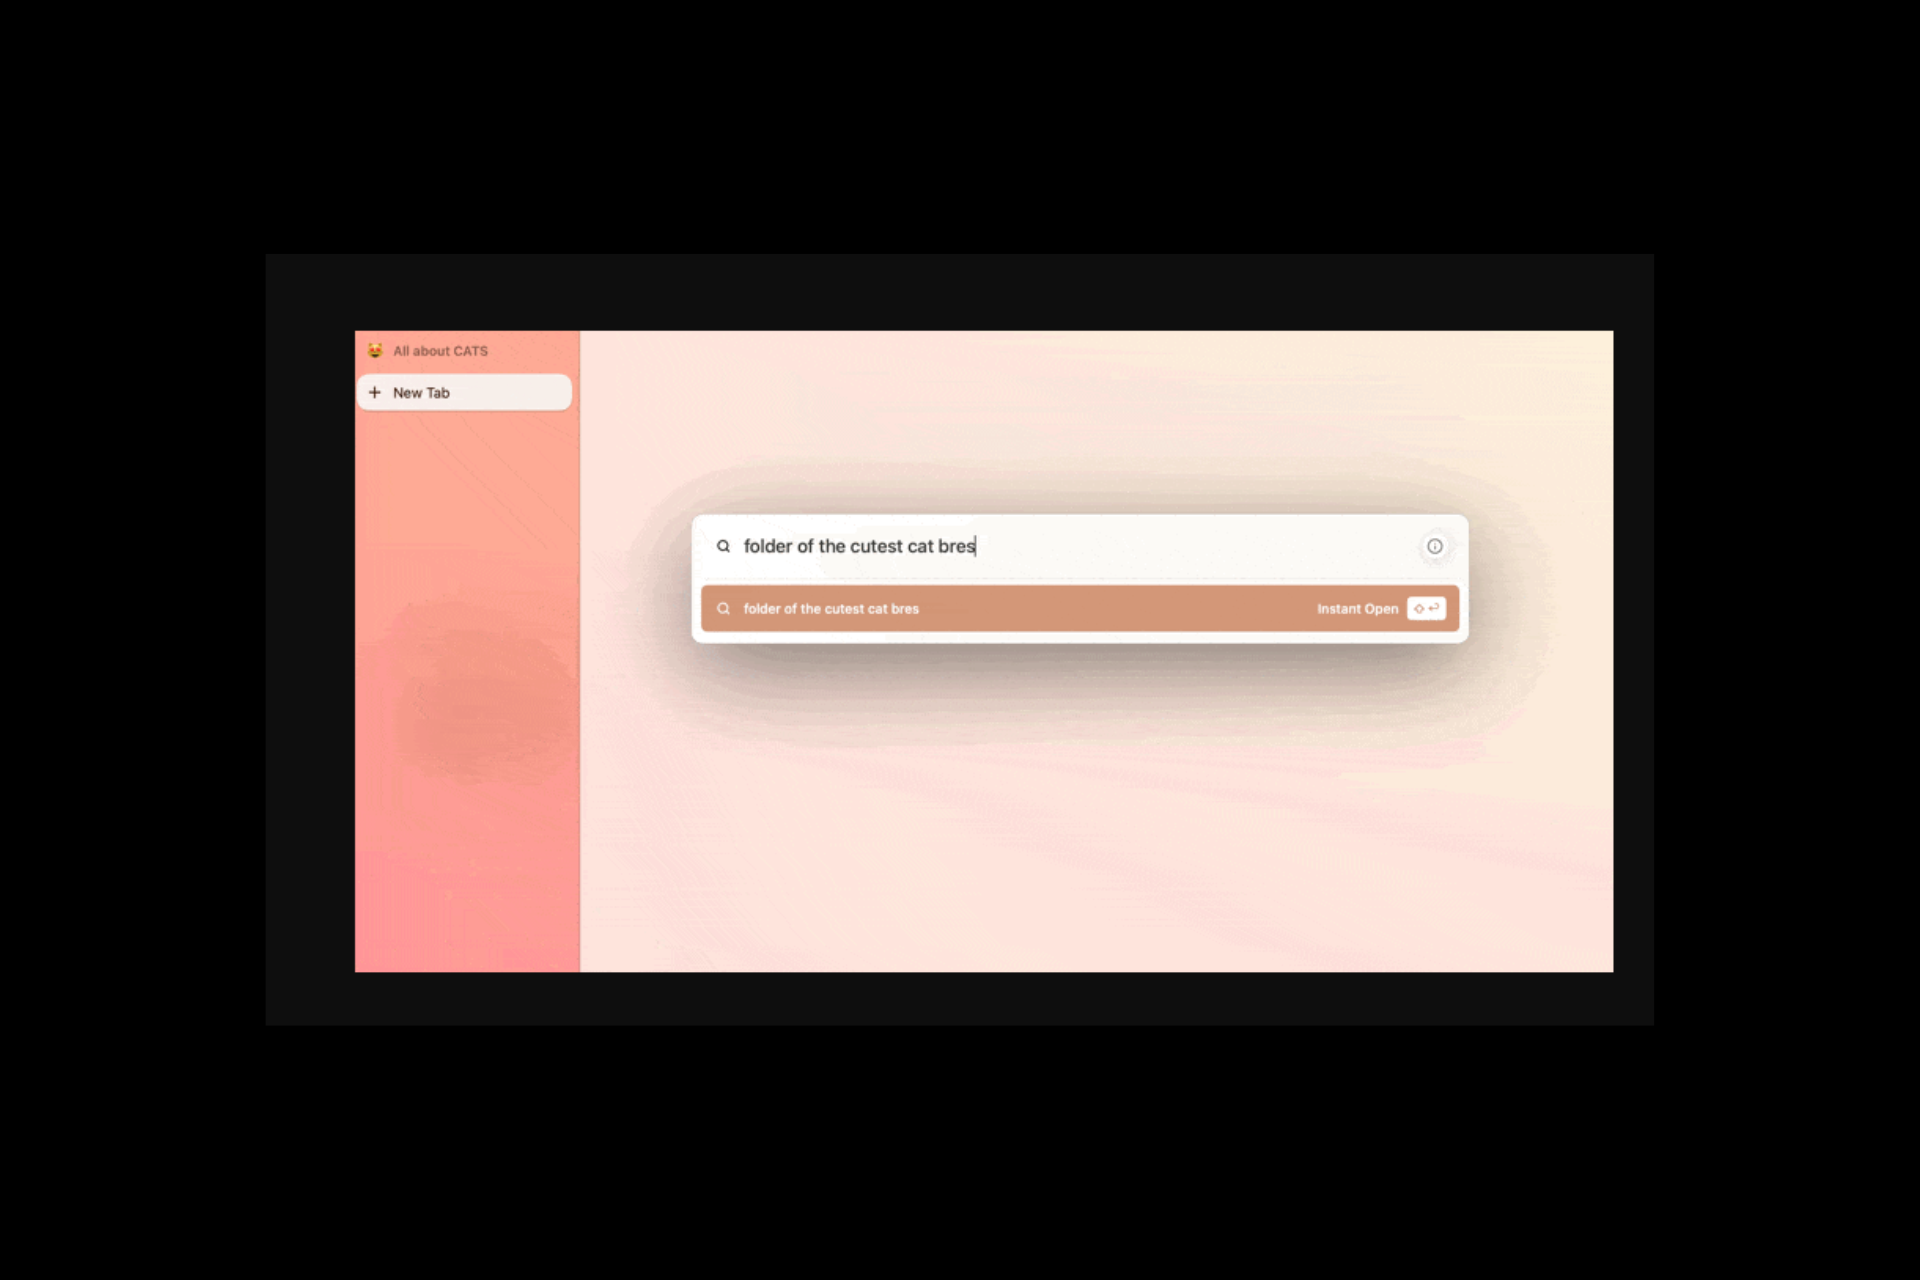
      • Create a folder – If you wish to create a folder for a query, type folder of latest movie recommendations from Pickamovieforme and press Shift + Enter. Arc will create a folder with pinned tabs with different links.

      To conclude, Instant Links is a innovative way to get answers to your queries without going to search engines. This feature eliminates the hassle of going through the search results and brings the best results for you.

      Along with Instant Links, Arc browser comes with a lot of new features including Live Folders, Export Spaces; to learn more about them, read these guides.

      If you want to learn more about Arc browser and the things it offers, we have a detailed review article for you.

      What do you think about Instant Links on Arc browser? Share your experiences and views with our readers in the comments section below.

      What are Live folders, and How Do They Work on Arc Browser

      If you never want to miss out on the latest updates from your favorite websites, like GitHub pull requests, the Browser Company has a solution for you in the form of Live Folders in Arc browser.

      The company announced Live Folders in beta earlier this year, and it is now available on macOS and Windows. It is perfect for streamlining your digital life. Let’s learn more!

      What is a Live folder in the Arc browser?

      Live Folder is a feature that lets you create a dynamic folder where the content is automatically updated based on the content of a specific website, like GitHub pull requests. It is handy when organizing and accessing apps and games based on tags or other attributes.

      How can I create a Live Folder in Arc?

      Live Folder

      In GitHub, whenever you create a new PR or Pull request, Arc will automatically create a Live Folder with the title Pull Requests, which will appear in the sidebar of your browser, and no manual setup for activation is required. Once created, it adds the latest PRs you create going forward.

      Currently, it only works with GitHub, and it can be very helpful as it compiles pull requests from you and your team members in a single place.

      After creating the Live Folder, the Arc browser updates its contents based on tags and metadata related to the app or game

      How can I create a Live Folder manually?

      You can also create the Live Folder manually. To do that, right-click the side pane of the browser, select Live Folder, and then GitHub from the sub-context menu.

      Features of Live Folder

      • Activates automatically – Creates a Live Folder when you create a Pull Request using Arc browser. You can also create a Live Folder manually using the context menu on the sidebar.
      • Filtering options – You can use filter options like Drafts, Created by Me, or Review Requests to ensure you view selected repositories in the folder.
      • Easy to deactivate – To remove the Live Folder, right-click it and select Delete Live Folder from the context menu.
      • Retrieve Live Folder – If you have disabled Live Folder and want to add it again, right-click the Sidebar and choose Live Folder, then GitHub.

      You also get options like Archive Pull Request, Copy PR, and Copy Link for every pull request added. You can move the entire Pull Requests folder to another Space or rename it.

      The Browser Company is working to make the Live Folders feature available for other essential tools, like Figma and Google Drive, to enhance the workflow further.

      Along with Live Folders, the Arc browser comes with many new features, including Instant Links and Export Spaces; read these guides to learn more about them.

      If you want to learn more about Arc browser and the things it offers, we have a detailed review article for you.

      Have you used the Live Folders on the Arc browser yet? If yes, then share your experience with our readers in the comments section below.

      5 Simple Ways to Fix Windows 11 Not Playing YouTube HDR videos

      We all enjoy high-quality videos hence why anyone would go for HDR videos but sometimes, they don’t play nice on your Windows 11.

      HDR problems can vary from showing oversaturated images or washed-out HDR images. The situation can even escalate and HDR videos don’t play at all.

      When this happens, it is probably caused by an incompatible display cable or unsupported HDR-compatible hardware, outdated software or incorrectly configured settings. If HDR videos cannot play on your Windows 11 YouTube, your video will automatically scale down to SDR playback.

      What can I do if YouTube HDR videos are not playing on Windows 11?

      1. Check system requirements

      • An HDR display supporting HDR10
      • DisplayPort 1.4 or HDMI 2.0 or higher
      • Integrated or dedicated GPU with PlayReady 3.0 support such as:
        • Intel UHD Graphics 600 series or higher
        • Nvidia GeForce 1000 series or higher
        • AMD Radeon RX 400 series or higher
      • Media players must support HDR playback
      • The latest version of Windows 11

      2. Re-enable Auto HDR

      1. Open the Settings app by pressing Windows + I. Click Display on the right side.display-select auto hdr not working windows 11
      2. Then, click HDR.hdr auto hdr not working windows 11
      3. Ensure Auto HDR is enabled. The Windows HDR won’t turn on issue will be fixed.hdr-on auto hdr not working windows 11

      If Auto HDR is not working, we have more steps on how to counter this issue.

      3. Calibrate HDR

      1. Launch the Microsoft Store from the taskbar.
      2. Search for Windows HDR Calibration and click on Get.
      3. Press Windows + I to open the Windows Settings app.
      4. Select Display, then toggle on the switch for Use HDR.
      5. Allow the Auto HDR option.
      6. Launch the HDR app you just downloaded and click on Get started.
      7. You will then be prompted to adjust several settings with a grey + sign as your base. The goal is to adjust the slider until the sign is no longer visible.
      8. Once you’re done with all settings, enter a profile name and click Finish. Creating a profile allows you to try with different colour schemes and use them in different settings.
      9. You should notice a visible change when you watch YouTube videos but if not, you can restart your PC.

      4. Update your graphic drivers 

      1. Hit the Start Menu icon, type Device Manager in the search bar, and click Open.device manager w11
      2. Navigate to Display drivers, and click to expand.
      3. Locate the NVIDIA driver, right-click on it, and select Update driver.update-nvidia-driver hp envy microphone not working
      4. Select Search automatically for drivers.Search automatically for drivers
      5. Wait for Windows to find the best match for your NVIDIA card.

      NVIDIA cards were mass reported for having this issue but it’s still worth updating all graphic drivers. And because the manual route can be overwhelming at times, we recommend using an automatic driver updater utility.

      For conciseness, it will scan and detect any missing, damaged or outdated drivers and then replace them with the correct ones from its extensive database.

      ⇒ Get Fortect Driver Updater

      5. Reinstall your NVIDIA drivers

      1. Hit the Start Menu icon, type Device Manager in the search bar, and click Open.device manager w11
      2. Navigate to Display drivers, and click to expand.
      3. Locate the NVIDIA driver, right-click on it, and select Uninstall device.uninstall-device-nvidia nvidia drivers not installing windows 11
      4. Restart your PC, and new drivers will automatically be installed.

      Since most people on Windows 11 stream YouTube on their browsers, you can also try clearing your browser cache and cookies or switching to another browser.

      Some browsers don’t allow HDR streaming but there are some browsers for streaming YouTube videos because they come with built-in features that support HDR. Just make sure they’re up-to-date.

      If the issue is the browser, you can download the YouTube app for PC and see whether the same issues are present. But keep in mind, not all videos are in HDR especially those uploaded in low quality formats.

      Additional tips and troubleshooting

      • Keep your OS and browsers up-to-date to continue enjoying a great viewing experience.
      • Ensure you have enough bandwidth since HDR videos consume a lot of data. You can remove any bandwidth limits and limit your background apps to only the necessary ones.
      • Tweak your HDR settings to suit your display and utilize HDR software where possible for an optimized viewing experience.

      When you finally get YouTube to play HDR videos on your Windows 11 device, you may encounter issues such as audio not syncing with the video or poor performance with lagging in videos. The above tips should help address such issues.

      And to enjoy YouTube even further, we suggest you switch to YouTube dark mode. Not only is it aesthetically pleasing but also easy on the eyes.

      We hope one of these solutions has resolved the YouTube HDR issue on your Windows 11. If you have any additional tip you’d like to add, drop us a comment down below.

      Teams Rooms on Windows will support cross-platform meetings via SIP

      Microsoft announced a while ago that managers will soon be able to deploy and oversee hundreds of Teams Rooms simultaneously by enabling Autologin and Autopilot, two new enhancements coming to the platform’s Windows version.

      Well, you would be surprised to find out that the Redmond-based tech giant still has many things for Teams Rooms on Windows, and many of them will be released this summer.

      According to the latest entries to the Microsoft 365 Roadmap, three new enhancements for Teams Rooms on Windows will be released this summer: roster grouping, cross-platform meetings via SIP, and room video tile resizing.

      Roster Grouping will be useful as Teams will gather all the people using a companion device under the same room node. Managers won’t have to go through each room manually, select participants, and move them to the right room, as the capability will take care of that for them.

      When joining a meeting in a Microsoft Teams Room on Windows with a companion device, in-room participants will be grouped under the room node. Participants must join through Proximity Join with Microsoft Teams Rooms.

      Microsoft

      The cross-platform meetings via SIP are also quite useful, as it will allow participants using Google Meet, Zoom, or other platforms to join Teams meetings while having a Teams experience. Microsoft says this capabilty will see the other platforms mirroring the native Teams interface.

      Joining SIP-based conferencing services like Google Meet, Zoom, Cisco Webex, and others via Teams Rooms offers a seamless collaboration experience, mirroring the native Teams interface. This integration supports features such as 1080p video, dual screen, various layout options, HDMI input, and others contingent on the third-party platform’s in-meeting controls. A SIP calling plan from a CVI partner, currently Pexip, is necessary. This is available for Teams Rooms customers with a Pro license.

      Microsoft

      Ultimately, Teams Rooms will also get the ability to re-size depending on the number of participants in the meeting. For example, if there is more than one user in the room, the room video tile will be four times larger than the size of the remote participant tile.

      Using people count information, the room video tile is dynamically re-sized in Gallery view. If there is only one user in the room, the video tile will be the same size as the remote participant tile. If there is more than one user in the room, the room video tile will be 4x the size of the remote participant tile. Admins will be available to turn on/off the people count capability.

      Microsoft

      What do you think about these changes?

      Opera GX for Smart TV – Here’s How To Safely Install It

      Can you get Opera GX for smart TV or is it available on the Android TV app store? Unfortunately, it’s not natively available for smart TVs but you can still sideload it and install it if you follow my guide.

      This popular gaming browser stands out for its resource utilization monitoring, quick streaming extensions, picture-in-picture streaming mode, and more.

      Opera GX for Smart TV

      You can get it easily for your Windows PC, Mac, iOS, and Android smartphones. But what if you also want it on your smart TV?

      I’ve tested the browser on my Android smart TV for a few days to create this first-hand guide. So, let’s jump right in!

      Is Opera GX Available for Smart TVs?

      Opera GX isn’t natively available for smart TVs just yet. It’s designed for phones and computers, not for your living room screen. It has cool features like managing how much computer power it uses (not super helpful on a TV) and a special bar for Twitch and Discord (which you’d normally use on a computer).

      Is Opera GX Available for Smart TVs

      Opera GX for Smart TV – UI, UX, and Performance

      If you’re expecting the same user interface, experience, and features for the smart TV edition, the browser will slightly disappoint you.

      The Android TV version lacks many features, like the Opera GX Sidebar, GX Control, GX Cleaner, Aria, Player, etc. Its design is also simpler and lacks the modern and stylish look.

      It offers the following features:

      • A bottom menu bar for the site overview, new tabs, and settings.
      • It uses Google Search by default and it doesn’t show any option to customize it.
      • You can use voice-based and QR code-based searches of content and URLs.
      • The Opera GX start screen shows a unique Top sites section which you can’t find on the PC version.
      top sites
      • The Top sites section is automatically managed by Opera GX. You can’t edit it to include websites of your own preference.
      • The right arrow on the start screen takes you to the usage metrics screen. However, it doesn’t show any hardware resource utilization data.
      metrics
      • You can install four default Mods from the Opera icon on the bottom menubar. If you need more, you can also visit the Opera GX Mods store.
      mods
      • You can use the My Flow feature to share content securely from your PC to your smart TV.
      my flow
      • Private mode from the Opera GX menubar allows you to browse incognito.
      private mode

      Speaking of the app performance, it’ll depend directly on your TV’s embedded hardware configuration.

      I’ve tested the app on a smart TV running the latest Android TV 14 OS. The device is capable of streaming up to 4K resolution videos without any lag.

      I didn’t experience any lag or slow response in the app. I accessed the Opera Twitch TV extension and streamed HD videos seamlessly.

      streaming twitch

      Also, I played one of the instant games available on GX.Games, named Gary, and it ran smoothly.

      instant game

      How To Get and Run Opera GX for Smart TV

      Since Opera GX isn’t natively available on any smart TV and Android TV app stores, you must side-load it using the official APK file.

      apk

      The process is a bit risky, though. You must download virus and malware-free APK files for the app from a trusted server. Otherwise, you might infect your device with malware which can steal your personal data.

      Luckily, I’ve installed and tested the Opera GX APK file that I’m going to suggest below. It doesn’t contain any harmful code that might put your device at risk. Follow these steps without any worries:

      1. Visit APKMirror to download the APK for Opera GX: Gaming Browser.
      2. You can use any of these browsers for smart TVs to access it.
      3. For example, I’m using the Downloader web browser on my Google TV.
      Acces apkmirror
      1. Download the latest edition of Opera GX.
      download latest apk
      1. Other web browsers might simply download the APK file in the internal storage of the smart TV.
      2. Contrarily, the Downloader browser will automatically show the Opera GX installation prompt as soon as the APK file is saved.
      3. So, if you don’t see the auto-install prompt on a different smart TV browser, access the APK file in the internal storage. Then, select it using the remote control’s navigation keys, and press the OK key to execute the app.
      4. For the auto-installation prompt on the Downloader app, select Install on the pop-up and press the OK button on the remote.
      Install opera
      1. If this is your first time side-loading an APK file on the smart TV, you’ll see the Allow Unknown Sources for App Installation dialog box. Click Allow, Yes, or OK, whichever is available in the pop-up.
      2. Once the app is installed, you should see the following screen. Select and press OK on the Open button.
      Open app
      1. Click on the Continue button.
      Continue on opera gx
      1. You should now see the initial configuration of Opera GX for your smart TV. Do as outlined below:
        • Ad blocking: Enable it if you don’t want distractions.
        • Cryptocurrency mining protection: Enable this feature to prevent third-party websites from using your smart TV’s hardware to mine crypto tokens.
        • Theme: Choose from three options: Light, Auto, and Dark. You can also pick from many user interface styles shown in the carousel.
        • Navigation: Choose between the Standard and the Fast Action Button options.
      initial config
      1. Click Continue once the user interface customization is complete.
      click continue on config
      1. The installer will now take you to the Opera GX smart TV browser’s start page.
      opera gx start page

      Browsing in Opera GX on a Smart TV

      1. Click on the Search… field to open the on-screen keyboard with the microphone and the QR code scanning option.
      search url
      1. If you’re using a voice-enabled remote, select and press OK on the microphone icon.
      choose microphone
      1. Now, you can speak out the website, URL, or IP address you want to visit.
      2. It’ll show up in the search field.
      3. Press OK on the remote to visit the target website.
      access a site
      1. To open another website, select and press OK on the plus icon (+) at the bottom menubar of Opera GX smart TV edition.
      1. Opera GX will switch back to the start screen where you can again access the address bar and on-screen keyboard.
      2. Let’s say you want to go back to one of the websites you’ve already opened.
      3. To access all the open pages, select and press OK on the site switcher or site overview button. It looks like two squares overlapped and it’s located on the left side of the bottom menubar.
      site overview
      1. It’ll open a vertical carousel of open websites.
      2. Use the navigation keys on the remote to browse through this carousel.
      3. If you find the website you want to re-open, select that and press OK.
      site carousel
      1. To access power user options, click on the Opera icon on the bottom menubar.
      opera icon
      1. A context menu will pop up from the bottom with the following options:
        • Private Mode
        • My Flow
        • Downloads
        • History
        • Mods
        • Settings.
      advanced options

      Viewing Resource Usage in Opera GX for Smart TV

      You can’t view the figures for CPU Limiter, RAM Limiter, Network Limiter, Hot Tabs Killer, etc., in its smart TV edition. The feature is there but it doesn’t function.

      You can however view your daily usage of the web browser.

      Click on the right arrow in the middle of the right-side edge of the Opera GX display.

      opera gx control center

      It’ll open the Opera GX Control interface which shows the following details:

      • Opened pages
      • Time in browser
      • The hardware resources panel isn’t functional.
      opera control center

      Summary

      Opera is yet to launch Opera GX for smart TV officially. However, you can use the methods explained above to get it from a third-party source for your Android-based smart TVs.

      If the article helped you or if you want to share suggestions, feel free to comment below.

      Copilot in Excel will summarize text columns and create custom and PivotTable charts

      Great news for those using Copilot in Excel. Microsoft will update the AI model to support column text summarization and the ability to create custom charts and PivotTable. According to the latest entries in the Microsoft 365 Roadmap, these updates will be rolling out gradually to users starting next month, in July.

      You can now ask for more specific charts and PivotTables, including specifying the x and y axis of charts.

      Microsoft

      Copilot can analyze columns of text to give you summaries of the information. For example, Copilot will find the main themes in survey responses from open-ended questions.

      Microsoft

      Copilot in Excel is already capable of summarizing, but not at this level; the AI model can also extract data from different sheets so that you can create reports or plans more easily and quickly, but the Redmond-based tech giant is taking it to the next level.

      PivotTables in Excel are used to calculate, summarize, and analyze data, letting you see comparisons, patterns, and trends in your data. Copilot’s ability to analyze your sheets and create such tables could greatly streamline workflows and allow you to have the information at hand when needed in a short amount of time.

      Microsoft says in the description that Copilot will consider details about these charts, including the x and y axes, so users won’t have to worry about incomplete information.

      Error Subprocess-exited-with-error: 3 Easy Ways to Fix it

      Python developers have probably encountered an error subprocess-exited-with-error message before. If you encounter it, you won’t be able to run your script at all, but luckily there are ways to fix that.

      How can I fix the error subprocess-exited-with-error?

      Before trying anything else, try running your script with PyPi instead of Test PyPi. If this issue occurs when installing modules, ensure that the module name is correct.

      1. Install an older version of pip

      1. Open the command line.
      2. Use this command to downgrade pip: pip install pip==21.3.1
        pip install pip 21.3.1 command
      3. Wait for the process to finish.

      Keep in mind that you can use the different versions of pip, we used 21.3.1 as an example. A few users suggested downgrading to an earlier version of Python, such as 3.10 or older, so try that as well.

      2. Upgrade the necessary tools

      1. Start the command line:
      2. Run the following command: pip install wheel setuptools pip –upgrade
        pip install wheel setuptools pip –upgrade command
      3. After the command is executed, check if the problem is still there.

      3. Use the –pre parameter

      1. Open your command line:
      2. Run this command: pip install pygame –pre
        pip install pygame –pre
      3. Wait for it to install.

      This issue can appear when installing various packages, so be sure to replace pygame with the name of your package and use the –pre parameter.

      Lastly, try installing older versions of certain packages. In some instances, packages can have broken dependencies, so try using the older versions instead.

      To fix the error subprocess-exited-with-error in most cases you need to use the older version of pip, Python, or one of your packages, and like all programming issues, it does require a bit of trial and error.

      This isn’t the only problem and we already covered Pip not recognized and Error loading Python DLL messages.

      We also have a great guide on Python Runtime error, as well as an article on ERROR_CONTROL_C_EXIT, so don’t miss them. Did you find a different solution for this issue? If so, share it with us in the comments section!

      Microsoft Viva will add a Hybrid Workplace Report to keep track of those working remotely

      Microsoft Viva, a virtual place where organizations can build a space for their employees to communicate and engage in various virtual activities, will introduce a new report called the Hybrid Workplace Report aimed at tracking hybrid meetings and remote workers.

      According to the latest entry in the Microsoft 365 Roadmap, the report will give managers, admins, and CEOs valuable insight into remote workers. From how they plan their work to how they carry out activities and tasks, the Hybrid Workplace Report will lay out all the details so executives can devise the best action plan for their remote employees.

      Microsoft says the Hybrid Workplace Report will be available in the Insights Teams app, and all executives or those with admin privileges can access it.

      The new Viva Insights Hybrid workplace report helps leaders understand the experience of hybrid, remote, and onsite employees at their companies. The report identifies when and how employees are working in a hybrid work environment, and how the employee experience might differ depending on whether an employee works onsite, remote, or hybrid. The report is available in the Insights Teams app or Insights web app for leaders in organizations that have hybrid workplace data available.

      Microsoft

      Similar to other reports, such as the one concerning Copilot usage in organizations, this one will have a preview this month, with the Redmond-based tech giant rolling it out to everyone next month, in July.

      You can read more about it here.

      Microsoft releases firmware updates for Surface Pro 11 and Surface 7

      In a time when technological advancements are happening faster than we can keep up with, Microsoft’s recent firmware updates to the Surface Pro 11 and Surface Laptop 7 have caught attention again.

      These devices received their day-one firmware updates, which focused on improving the display experience and making them more compatible with new Windows features.

      This is similar to adjusting your fresh car straight from the shop so that it functions as smoothly as possible. So, now we will look at the details of these updates and why they are important to people using this application.

      Firstly, if you own a Surface Pro 11, this firmware update is designed specifically for your device, but it does require Windows 11, Version 24H2 or later. What can you expect? A better display experience to enhance how you interact with the new Windows features visually and intuitively. The main focus is on ensuring what appears on your display is sharp, distinct, and reacts swiftly.

      In the same way, the Surface Laptop 7 has not been forgotten. It gets a similar update created to lift the display experience. Think about switching on your laptop and observing that every element appears enhanced. This is the aim here. And seeing that just one fresh driver is mentioned in the update, Microsoft is sticking to a straightforward but powerful method.

      You might be wondering, “How can I obtain these updates?” Well, it’s quite simple. Updates for these ARM processor-powered Surfaces are only accessible via Windows Update. So, you don’t have to look for recovery images or find your way through a complex of download links. Go to Settings and click on Windows Update. next, select Check for Updates. It is easy, correct?

      But be careful: These firmware updates are not uninstallable. After you update, there is no way to go back. It may be wise to back up any crucial data before your next step, just in case.

      The first update is available for Surface Laptop (7th Edition) running Windows 11, Version 24H2 or greater.

      Improvements and fixes:

      • Improves display experience with new Windows features.
      Microsoft

      For other devices, Windows 11 version 24H2 is still not available. It has started to roll out on Copilot+ PCs with ARM processors, and a wider release for all devices is anticipated later this year. Many unique features might make the choice more appealing if you are thinking of buying a Copilot+ PC.

      Microsoft wants people to have a good first experience with the newest Surface devices. These updates are designed for those who use their device to draft an email or make art – they want these actions on their screens to look nice and clear. If you do these things, too, maybe it’s time to update!

      Framework Laptop 13 will be enhanced with RISC-V architecture, a viable ARM alternative

      Think about a future where the heart of your laptop is not dependent on Intel or AMD, the usual power players. Now, we have RISC-V, an open-source architecture that is changing things significantly.

      The Framework Laptop 13 may soon be one of the first laptops to adopt this innovation. This action is not only for diversification; it’s a courageous move towards the forthcoming period when technology becomes available and adaptable.

      Framework, a company recognized for its modular laptops, has joined forces with DeepComputing to construct a RISC-V mainboard that can fit into the Framework Laptop 13. This partnership is an achievement in technology and conveys something significant.

      The fresh mainboard, named “DC-ROMA RISC-V Modular Mini Mainboard,” shows the Framework’s dedication to exploring new limits. However, in consumer laptops, this is still the beginning of RISC-V. The performance may not be comparable to that of Intel and AMD’s veterans, but its potential is not denied.

      It serves as a testing ground for developers, experimenters, and enthusiasts who are eager to explore RISC-V’s capabilities.

      Now, you may be saying, “But it works?” Well, we must reduce our hopes. A Raspberry Pi 4 could possibly be faster than this project’s main component, a quad-core 1.5GHz RISC-V chip.

      Nonetheless, it’s not merely about brute force. It’s also about testing, the fun of messing around with an open-source framework that might potentially compete against the heavyweights in the future.

      The Framework Laptop 13 is a device and represents what it can be. Its fingerprint reader now has a RISC-V chip, which suggests that there are more possibilities. As for when you could acquire this revolutionary mainboard, the answer is you have to wait. It’s still in the early stages of development, but the buzz is building.

      In the software field, Framework and DeepComputing do not work alone. They team up with Canonical and Red Hat to ensure strong Linux support on this RISC-V mainboard, using Ubuntu and Fedora.

      This partnership highlights the dedication of tech community in backing different architectures. It adds more attractiveness for people who want to explore into RISC-V world with Framework Laptop 13.

      So, what does this mean for you? If you are a tech lover, a developer, or simply someone very interested in the future of computing, then the Framework Laptop 13’s adventure with RISC-V can be an interesting development to follow.

      It shows us a preview of what might come ahead: devices with as open and changeable chips as the software running inside them. RISC-V’s journey into the consumer space is just starting, and it’s thrilling to be part of this.

      Even when Outlook faces serious security threats, Microsoft ignores them, according to concerned user

      You sit at your computer, drinking your favorite beverage, and you come across an alarming news item: a security bug has been found that permits anyone to imitate Microsoft corporate email accounts.

      This is not a small problem; it is a grave vulnerability that may make phishing endeavors appear highly convincing even to careful people. As per the final update, the bug still hasn’t been patched and could affect millions who use Outlook.

      This finding was discovered by a researcher who tried to tell Microsoft about the bug. However, according to reports, the big tech company initially rejected this report, saying they couldn’t repeat what he found.

      Feeling angry and worried, the researcher went on social media to announce their discovery so that Microsoft could notice it. And it looks like they did because Microsoft re-opened one of their reports later. This poses the query: Why wasn’t this grave problem dealt with earlier?

      This bug’s scope is particularly alarming. It has been designed to attack Outlook accounts, and, as per Microsoft’s latest earnings report, these accounts have at least 400 million users worldwide. This number signifies a large group of people who could potentially suffer from this threat.

      Slonser, the researcher’s online identity, shared their sadness about what happened. They underlined that they had no financial motivation behind this action; their main goal was to push companies into recognizing security researchers more sincerely.

      This event brings attention to a bigger problem in the tech market: the continuous fight against cybersecurity.

      Microsoft, a major player in this industry, has dealt with many security issues over the past years – from email breaches for the federal government (and the Redmond-based tech giant might actually lose them as customers) to serious flaws that were warned but not corrected. The incidents make us wonder how seriously Microsoft takes cybersecurity and why we must pay attention when outside researchers want to assist.

      In the present time, when ensuring digital security is highly important, this circumstance strongly reminds us of our weaknesses and how we must always remain watchful.

      It’s an urgent message to tech firms – security should be your top concern, not just in talk but also in practice by cooperating actively with security researchers. Because, during these ages of digital advancements, our personal and work-related data safety is at risk – a duty that should never be taken for granted.

      The Parameter is Incorrect Error in Services.msc: 6 Ways to Fix it

      Often, when troubleshooting issues with the PC, we have to restart a specific service or reconfigure the startup type. But while doing so, you may get The parameter is incorrect error in the Services.msc console.

      The error appears due to corrupt system files, a bug in the installed version of Windows, or issues with the related configurations and settings.

      How can I fix The parameter is incorrect error in Services.msc?

      1. Change the service’s startup type via the Registry

      Tip icon Tip
      Before making any changes to the Registry, create a restore point. This way, you can always revert the PC to the previous stable configuration in case you don’t achieve the desired results.
      1. Press Windows + R to open Run, type regedit in the text field, and hit Enter.registry
      2. Click Yes in the UAC prompt.
      3. Paste the following path in the address bar and hit Enter:Computer\HKEY_LOCAL_MACHINE\SYSTEM\CurrentControlSet\Servicesservices list
      4. Locate the service that’s throwing The parameter is incorrect error from left pane, and select it.
      5. Now, double-click on the Start DWORD on the right.start dword
      6. Enter one of the following under Value data depending on the Startup type you want to configure:
        • Automatic: 2
        • Manual: 3
        • Disabled: 4value data to fix services.msc the parameter is incorrect
      7. Restart the computer for the changes to come into effect and verify the same in the Services utility.

      Using the Registry, you can quickly change the Startup type for any service on the PC, be it BITS (Background Intelligent Transfer Service), Bluetooth Support Service, or the Windows Update service.

      Remember, this is not a solution for the Service.msc The parameter is incorrect error but just a workaround. As for the actual solutions, head to the ones listed next.

      2. Repair the corrupt system files

      1. Press Windows + R to open Run, type cmd, and hit Ctrl + Shift + Enter.command prompt
      2. Click Yes in the UAC prompt.
      3. Paste the following commands individually and hit Enter after each: DISM /Online /Cleanup-Image /CheckHealth DISM /Online /Cleanup-Image /ScanHealth DISM /Online /Cleanup-Image /RestoreHealth
      4. Once done, run the SFC scan using this command: sfc /scannowsfc scan to fix services.msc the parameter is incorrect
      5. Finally, reboot the PC to apply the changes.

      Corrupt system files often affect the critical OS functionalities, triggering Services.msc The parameter is incorrect error with the Bluetooth or Windows Update services. In such cases, running the DISM command and SFC (System File Checker) scan should do the trick, as confirmed by many users in Microsoft forums!

      3. Reset the Windows Update components (for issues with wuauserv)

      1. Press Windows + S to open Search, type Command Prompt in the text field, and click on Run as administrator.command prompt
      2. Click Yes in the UAC prompt.
      3. Paste the following commands individually and hit Enter after each: net stop wuauserv net stop cryptSvc sc config wuauserv start= auto binpath= "%SystemRoot%\system32\svchost.exe -k netsvcs -p" obj= ".\LocalSystem" password= "" sc config cryptSvc start= auto binpath= "%SystemRoot%\system32\svchost.exe -k NetworkService -p" obj= "NT Authority\NetworkService" ren %SystemRoot%\SoftwareDistribution SoftwareDistribution.old ren %SystemRoot%\system32\catroot2 catroot2.old net start cryptSvc net start wuauserv

      These commands will reset the Windows Update components. Once done executing these, reboot the PC, and it should fix the Windows Services The parameter is incorrect error!

      4. Update Windows

      1. Press Windows + I to open Settings, go to Windows Update from the navigation pane, and click Check for updates on the right.update windows to fix services.msc the parameter is incorrect
      2. If an update is available, wait for the download to complete, then restart the PC, and check for improvements.

      5. Perform a system restore

      1. Press Windows + S to open Search, type Create a restore point in the text field, and click on the relevant result.
      2. Click on System Restore.restore
      3. Select Choose a different restore point, and click Next.
      4. Pick another restore point from the list that was created before the issue first appeared, and click Next.restore to fix services.msc the parameter is incorrect
      5. Finally, verify the restore details, click Finish, and confirm the change.

      6. Format the PC

      1. Press Windows + I to open Settings, go to System from the navigation pane, and click Recovery on the right.recovery Windows 11
      2. Click the Reset PC button next to Reset this PC.
      3. Choose Keep my files.retain files
      4. Click on Local reinstall to boot Windows from the device instead of downloading it from the cloud.local reinstall
      5. Verify the current reset settings, and click Next to proceed.
      6. Finally, click on Reset to start the process. It may take a few hours to complete, so save any pending work.reset to fix services.msc the parameter is incorrect

      Often, the Services.msc The parameter is incorrect error arises due to issues with the file system, data corruption, or conflicting third-party apps. In such cases, resetting the PC while keeping the personal files fixes things in no time!

      If everything else fails to work, the last option is to reinstall Windows. It will wipe out all the data, so I recommend you move the critical files to an external storage. Moreover, if you’re experiencing similar problems with the “Services.msc Access Denied” error, we’ve got you covered.

      Which fix worked for you? Share with our readers in the comments section.

      How to Fix Gpedit.msc Access Denied on Windows 11

      Usually, accessing the Group Policy Editor is as easy as running the gpedit.msc command but if you get an access denied message, you’ll be unable to adjust any policies that may be critical to the running of your system.

      When gpedit.msc access is denied, it can be because you lack sufficient administrative permissions or your UAC security settings are too high.

      It is also possible that your antivirus software is blocking access or your Windows edition does not include the feature. You can get away with it as you can install gpedit.msc on some Windows editions.

      However, if you’re on the right edition and gpedit.msc is missing from your Windows 11, we have a way to get it back.

      How do I fix group policy access denied?

      1. Delete rename the machine file

      1. Hit the Windows + E keys to open File Explorer.
      2. Paste the path below in the address bar: C:\Windows\System32\GroupPolicy\
      3. If you can’t find the folder, you’ll need to unhide hidden items.
      4. Click on View>Show>Hidden, and ensure the tick is not there.
      5. Now, locate Machine file and rename or delete it. A safer option would be to move it to your desktop because you might want to restore this file if any new issues occur.

      2. Restart the Group Policy client

      1. Press the Windows key + R, type services.msc, and click OK.
        services
      2. Double-click the Group Policy Client to open its properties.
        option how to fix group policy error in windows 10
      3. Now, set its Startup type to Automatic and click on the Start button.
      4. Click the Apply button and OK to save changes.
        automatic
      5. Finally, launch Command Prompt as admin, type the command below, and hit Enter: netsh winsock resetwinsock

      3. Re-enable Group Policy and run as admin

      1. Press Windows + S to open the Search menu, enter Notepad in the text field, and click on the relevant result.
      2. Copy this batch file code by selecting the text and pressing the Ctrl + C hotkey: @echo off pushd "%~dp0" dir /b %SystemRoot%\servicing\Packages\Microsoft-Windows-GroupPolicy-ClientExtensions-Package~3*.mum >List.txt dir /b %SystemRoot%\servicing\Packages\Microsoft-Windows-GroupPolicy-ClientTools-Package~3*.mum >>List.txt for /f %%i in ('findstr /i . List.txt 2^>nul') do dism /online /norestart /add-package:"%SystemRoot%\servicing\Packages\%%i" pause
      3. Press the Ctrl + V keyboard shortcut to paste the copied batch file code into Notepad.group-policy-batch-file
      4. Click on the File menu in the Notepad, and select the Save As option.Save-As-option
      5. Head to the desired location, enter Group Policy Editor.bat as the File name, choose All files from the Save as type dropdown menu, and click on Save.
      6. Thereafter, right-click the Group Policy Editor batch file and then select Run as administrator.

      4. Force update Group Policy

      1. Left-click the Start button, type Command Prompt, then click Run as administrator.
      2. Click Yes on the User Account Control (UAC) prompt.
      3. Type in the following commands and press Enter after each one: RD /S /Q "%WinDir%\System32\GroupPolicyUsers" && RD /S /Q "%WinDir%\System32\GroupPolicy" gpupdate /forcerd user how to fix group policy error in windows 10
      4. Restart your PC.

      You can also try resetting Group policy settings. However, keep in mind that this will affect any customized settings as they will revert to default settings.

      4. Create a new user profile

      1. Press Windows + R to launch the Run console, enter netplwiz in the text field, and click OK.
      2. Click Add in the User Accounts window.
      3. Select Sign in without a Microsoft account (not recommended).
      4. Click on Local account button.
      5. Enter a username and password (optional) for the new user account, and a hint, in case you set a password. Once done, click on Next.
      6. Click on Finish to create the Local account.

      If access is regained with a new profile, you can conclude that the previous one was corrupt and proceed to repair your profile.

      5. Perform a System Restore

      1. Press the Windows key, type Control Panel, and click Open.control-panel-search fallout new vegas runtime error
      2. Select Large icons as View by and click Recovery.Recovery Control Panel Advrcntr6.dll
      3. Click Open System Restore.Open system restore
      4. Select Choose a different restore point and click Next.Next Choose a different restore point
      5. Now select the restore point and click Next. Choose a point
      6. Click Finish to restore the previous settings, and Windows will restart.Finish Restore point

      Other worthy solutions you can try include disabling the UAC and running the system file checker scan to ensure there are no corrupt critical system files.

      Also take note that in some organizations, some functions have been restricted to select users so you might want to get in touch with your IT administrator and check whether your account has the requisite permissions.

      That’s a wrap from us but if we’d like to get some feedback from you. Have you experienced a gpedit.msc access denied lockout message before? What would you say is your go-to solution in this case? Let us know in the comment section below.