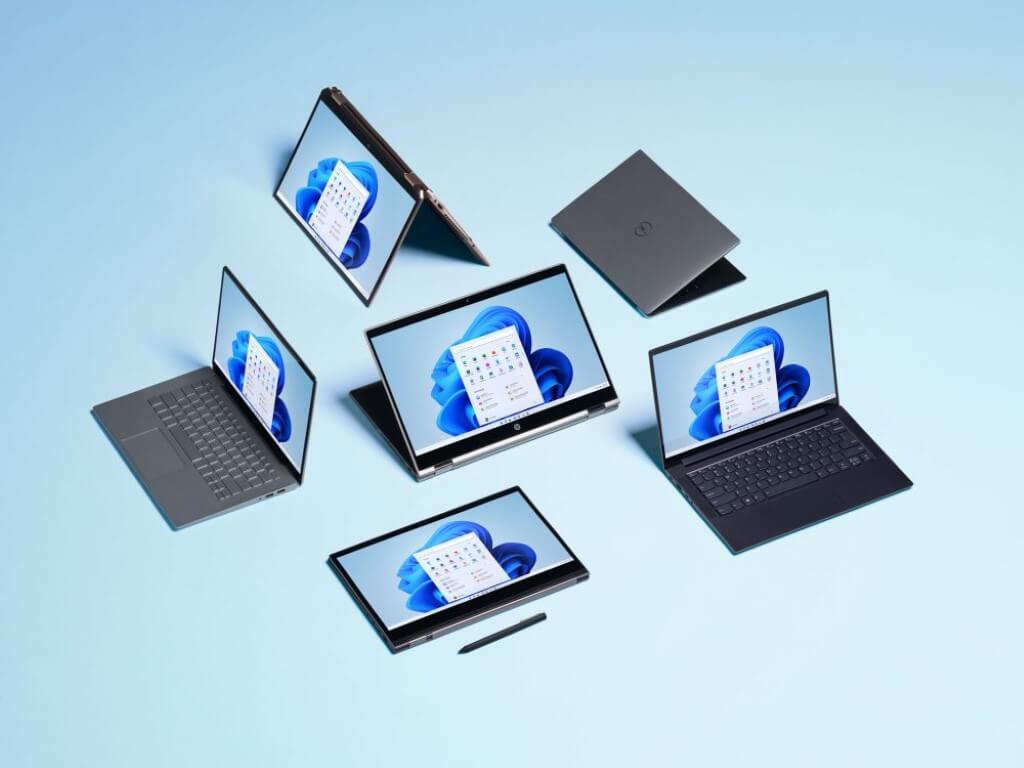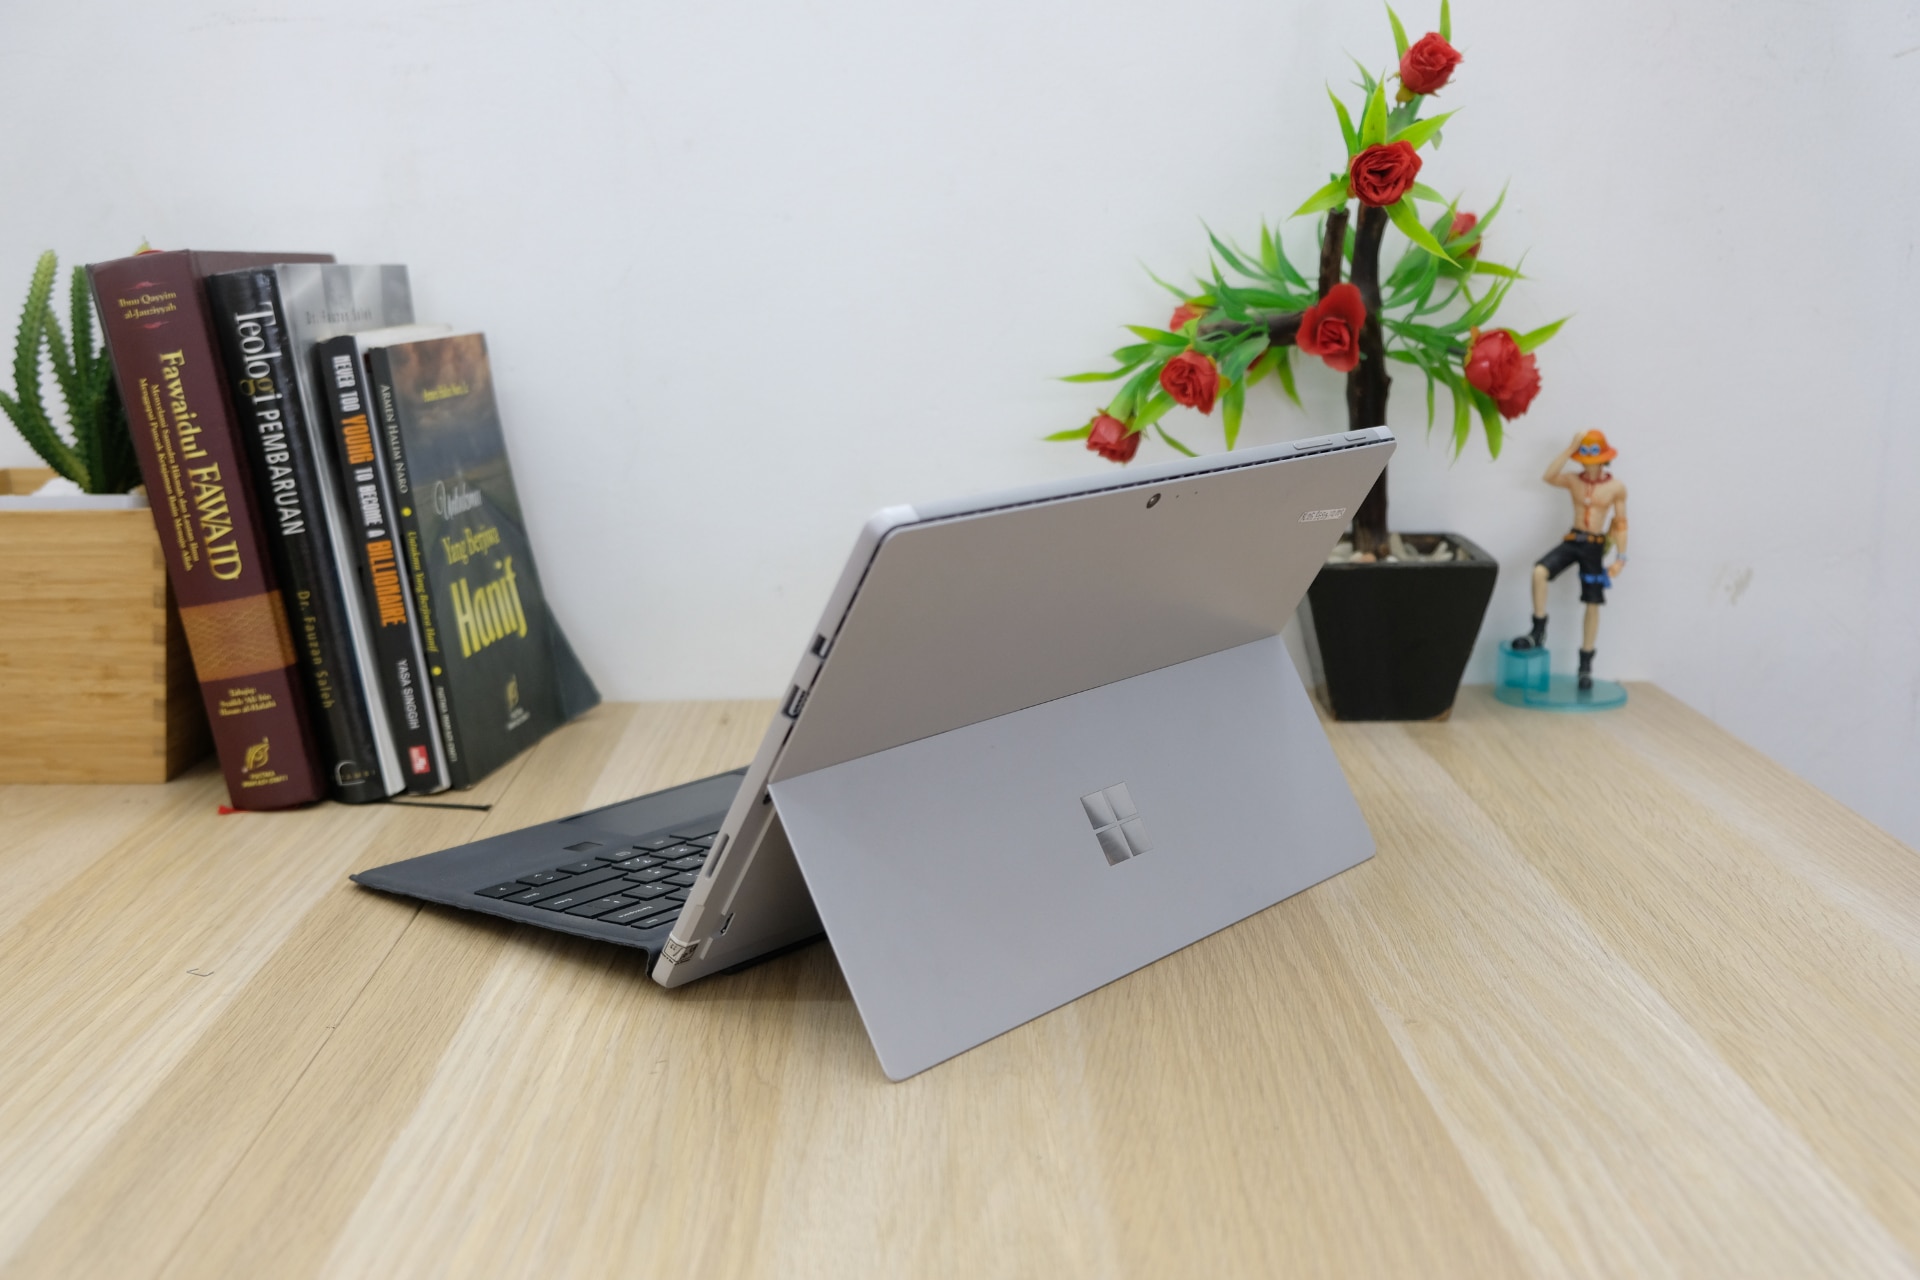
Which Surface Devices are Compatible with Windows 11?

We previously discussed which of the Microsoft Surface devices will be compatible with the new operating system, but now it’s time to take a look at how these devices perform with Windows 11 installed.

If you are a proud owner of such a device, know that Microsoft has considerably improved users’ experience, and has announced important plans for the future.

Windows 11 is said to be game-changing on Surface Pro X

Users who have already upgraded their OS on owned Surface devices are more than pleased with the way this software is currently performing.

Social media has been flooded with positive reviews for the operating system, running on these Microsoft devices.

There isn’t a single negative review for Windows 11 running on Surface Pro X, performance-wise, except for some of the UI choices that the Redmond tech company made, with the new OS.

The vast majority are content with this new era of the Windows operating system, and say that it performs good, and looks really well done, as this Reddit user exemplified with this picture.
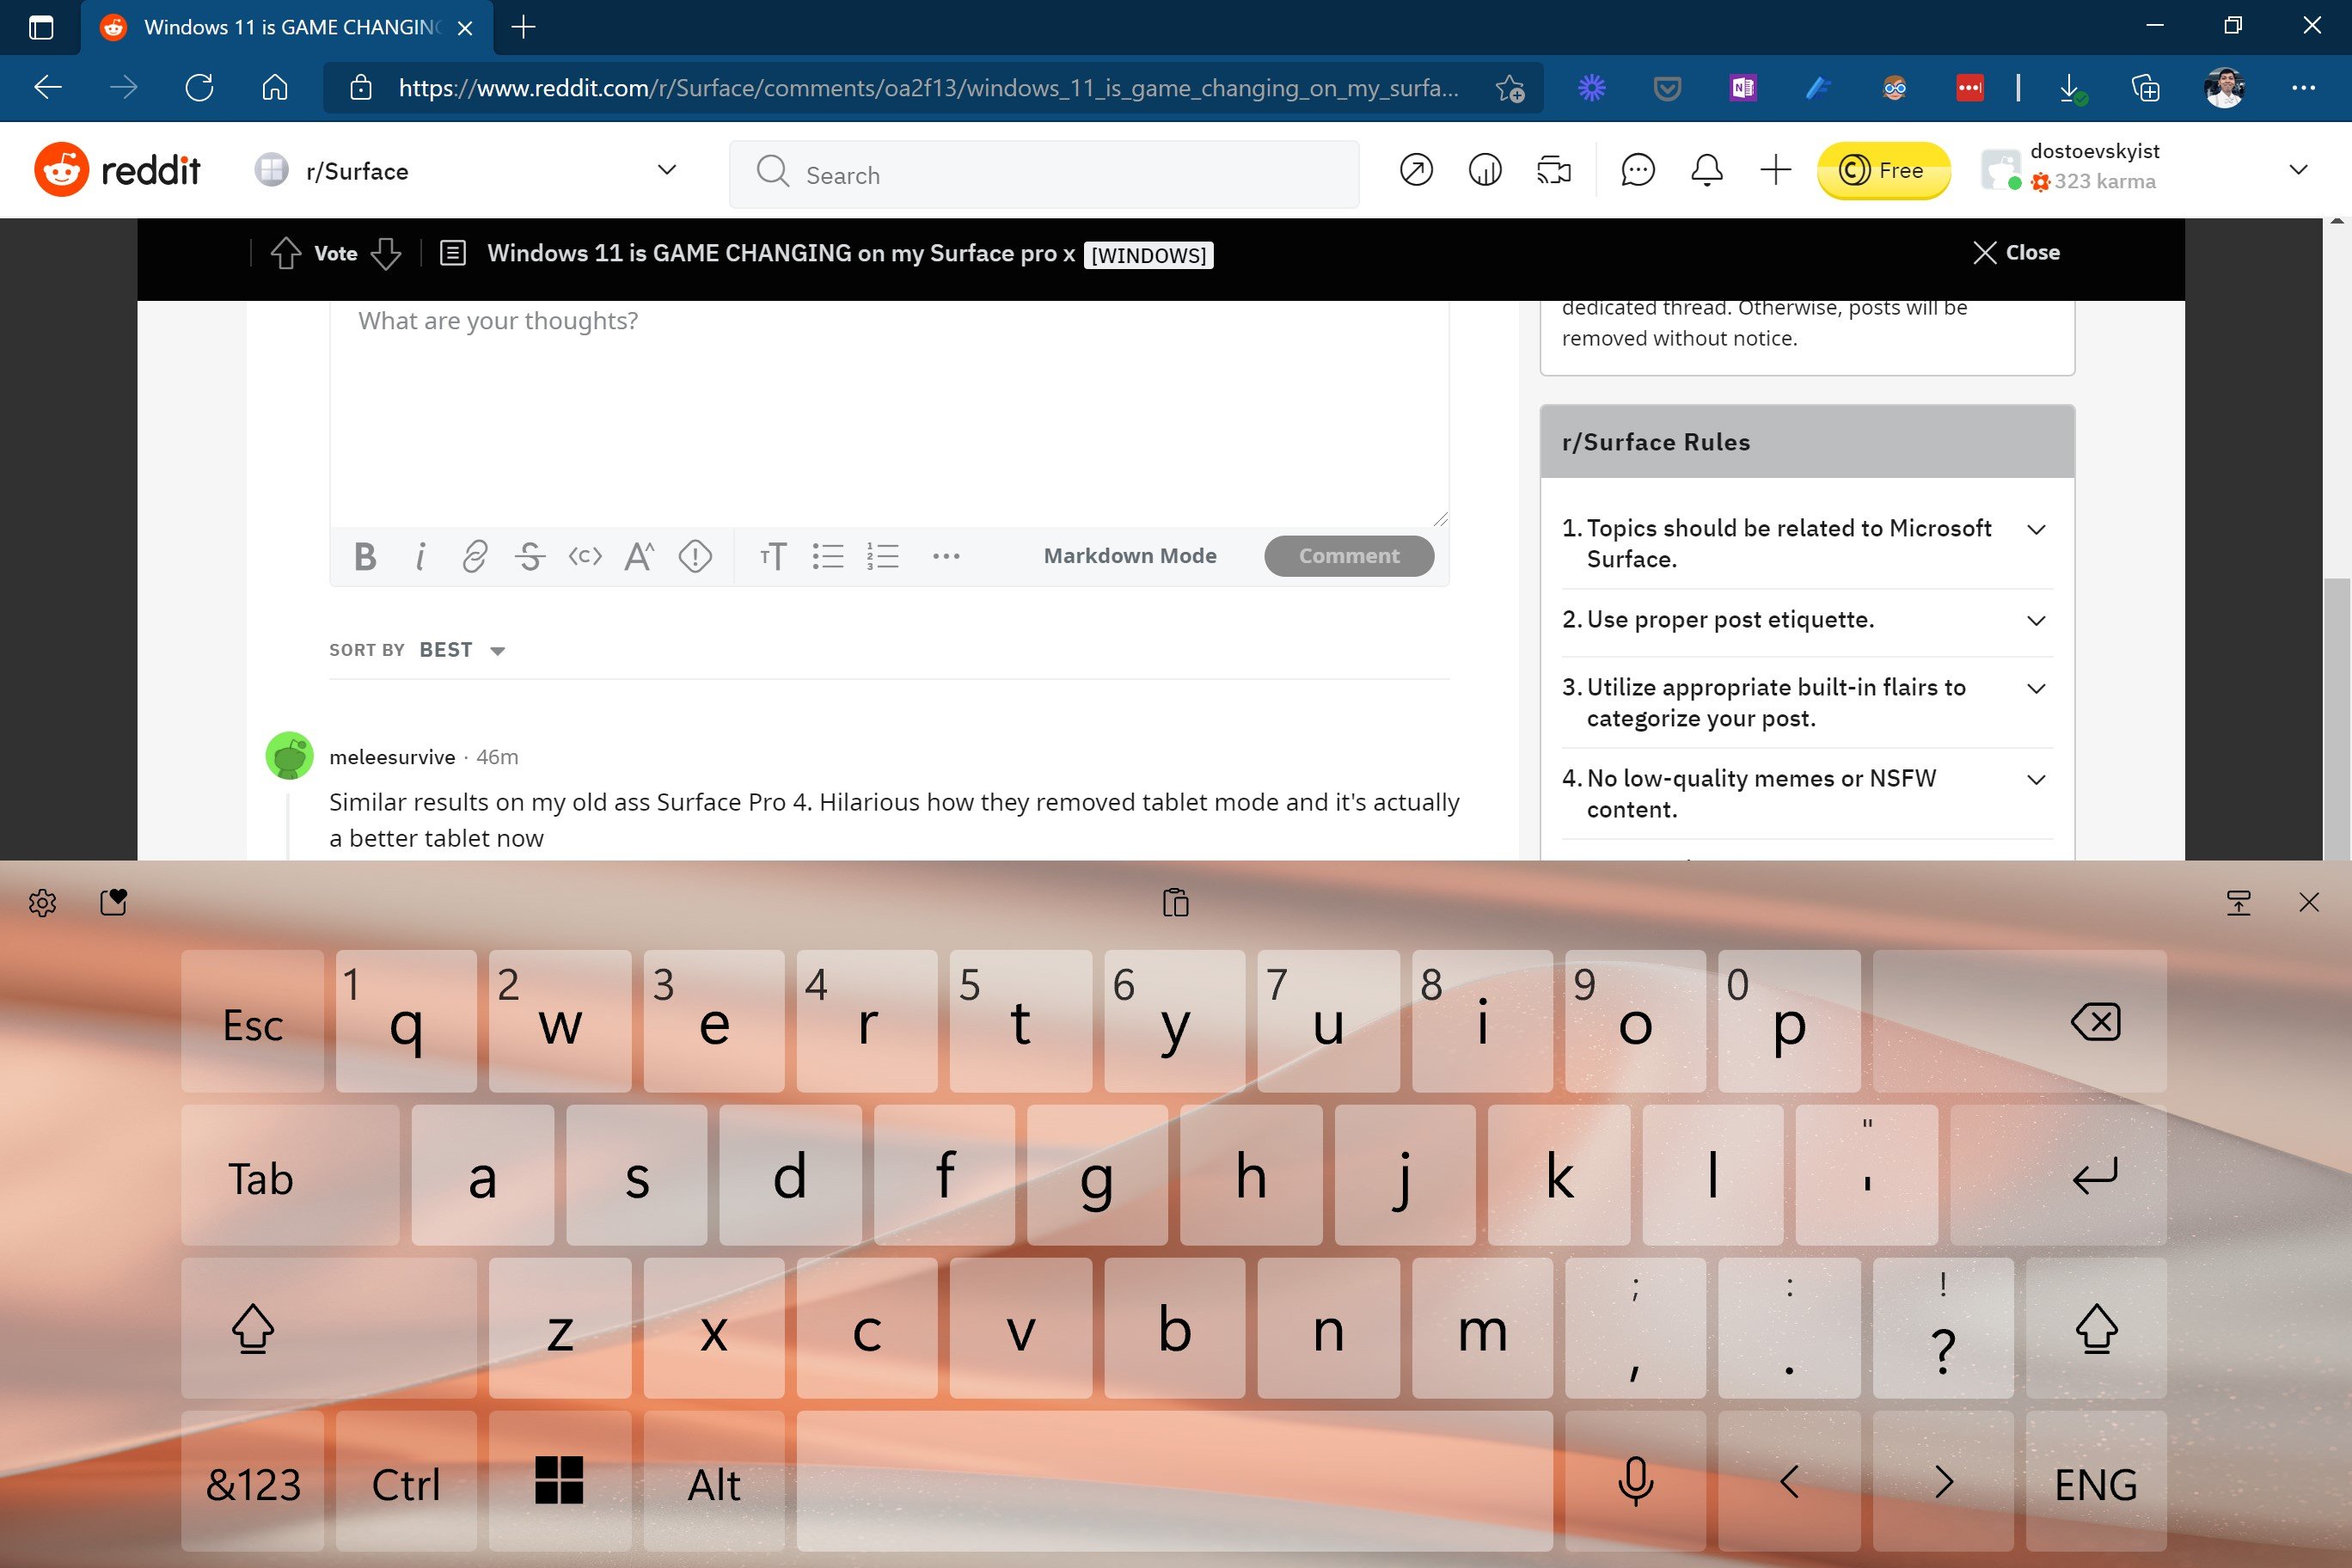
Users also mention substantial improvements to all the touch features and have even started calling these devices the iPad killers they have been dreaming of for years.

It seems that Microsoft wasn’t just all talk when it came to reshaping the future for their Surface devices, delivering a pretty immersive and complete experience for its users.

The touch keyboard is now much more usable. The keys are bigger and the feedback more intuitive.

Context menus are touch-friendly and easier to use.

Touch screen gestures are fluid and make navigating windows far more simple.

Larger hit areas make windows easier to use.

Even widgets in the dashboard are smooth. The new smart menu is cleaner, icons nicer, user interface, in general, is more refined.

64-bit amd64 emulation works flawlessly for me on this build. Wslg is working great in Debian. Zero overhead or setup required, it just works. I bet nested virt works fine too.

There are, however, some issues with Windows 11 on the Surface Pro X

From what users had to say on Reddit, there are some issues with Windows 11 on Microsoft’s Surface Pro X laptop.

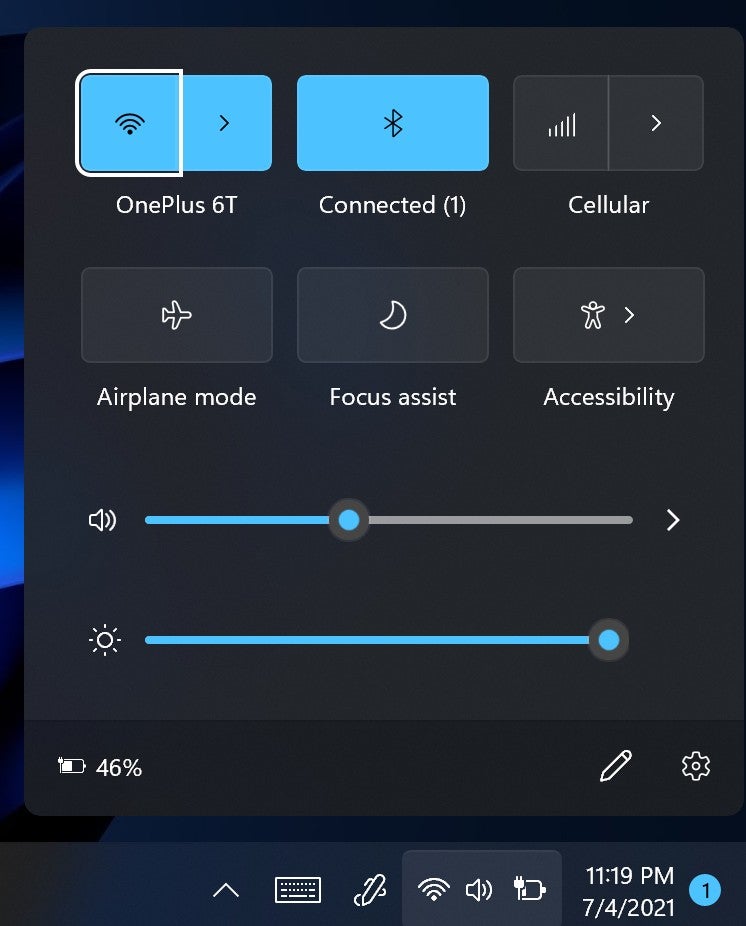
Apparently, the battery, volume, and Wifi icons are grouped together, and the action of clicking on any of them will open everything into one window.

Also, currently, there is no slider bar to adjust the power levels, from power saver to performance mode.
Source: Reddit

Insider builds also installed on the Surface Pro 4

Another Reddit thread talks about a Windows 11 insider build being installed on a Microsoft Surface Pro 4 device, which performs just as well as the above-mentioned one.

Users point out that the OS upgrade for the Surface gadgets improves everything there is, system-wise, appearance-wise, as well as performance-wise.

As flagged in the thread we mentioned, the user that upgraded his OS on his Surface Pro 4 device, says that it feels like a different, brand new computer.

He reports faster response times for the Windows UI, a much more responsive touch screen, more fluent transitions, and an overall upgrade, with some occasional animation tears, which are normal for such an early build.

All-in-all, it seems that the tech company really outdid themselves this time, if everyone is, apparently, so pleased with all these changes.

Users even upgraded to Windows 11 on Surface Go 2 devices

Again, nothing but positive reviews, from the users that went ahead and upgraded their operating systems on the Microsoft Surface Go 2 devices.

Although there are a few users that haven’t quite gotten around to applying Windows 11 to their Go 2 gadgets, as specified in this Reddit thread, most of them managed just fine.

And those who did get the new OS to run on the above-mentioned Surface devices, say that it runs extremely smooth, smoother than Windows 10 ever ran on their Surface gadgets.

Microsoft stated that it’s planning to significantly improve users’ experience for all its touchscreen-based devices, and they seem to be doing a pretty good job, so far.

And this is just the beginning as the tech giant has a lot more plans for its Surface devices in the future, plans that will revolutionize how everyone will perceive their operating system.

It will be interesting to see what new changes or features Microsoft will be adding to the Surface family, once Windows 11 officially starts rolling out to the public, later this year.

Windows 11 won’t run on the Surface Pro 5

Lately, users have been installing the new preview build of the operating system on all the compatible Microsoft Surface devices and claimed that it works flawlessly.

However, there seems to be a tiny problem when it comes to the Surface Pro 5 device, which was released back in 2017. Even though the gadget meets the mandatory system requirements, the OS won’t run on it.

This caused sever backlash from all the Surface users that adopted this model as their own, as they are all simply wondering why this is happening.

Why is the Surface Pro 5 not compatible with Windows 11? , it meets the minimum requirements and is Secure Boot and TPM 2.0 enable. It’s a Microsoft product, if Windows 11 is so efficient as they claim, it should run no problem with the notebook that Microsoft itself sells. What is the reasoning behind not running Windows 11, the processor? The processor in the i5 model runs at 2.60ghz and it’s dual-core. Are they lying about the minimum requirements then? Do they try to seem more efficient than they actually are? Can someone explain

The system requirements have been the main focal point of user complaints, ever since Microsoft announced Windows 11 in the first place.

And even though the community is constantly ranting about this critical aspect, the tech giant doesn’t seem to back down.

Windows 11 runs with a battery saver bug on the Surface 3 laptop

Another one of the Microsoft Surface devices, which supports Windows 11, has been updated with the new OS. However, the user that installed it is also reporting a bug that others have experienced as well.

Just installed the insider dev build on my surface laptop 3. Version 10.0.22000 Build 22000. Surface is an i5, 8gb ram, 256gb black model. It’s really great, enjoying the changes, but definitely doing some weird stuff.

According to this Windows user, whenever he starts up the laptop with the battery-saver feature turned on, the Windows 11 taskbar turns completely transparent.

Icons that are located on the taskbar seem to be just floating on the screen.

However, this bug is not isolated to these Surface devices, as more users have flagged it on other machines as well.

The important thing here is that Microsoft’s new operating system does work well on the Surface 3 laptop.

In case you want to check the Warranty of the Microsoft Surface device, we have a detailed guide with instructions for you.

Have you managed to use the Windows 11 dev build on any of your Surface devices? Let us know in the comments section below.
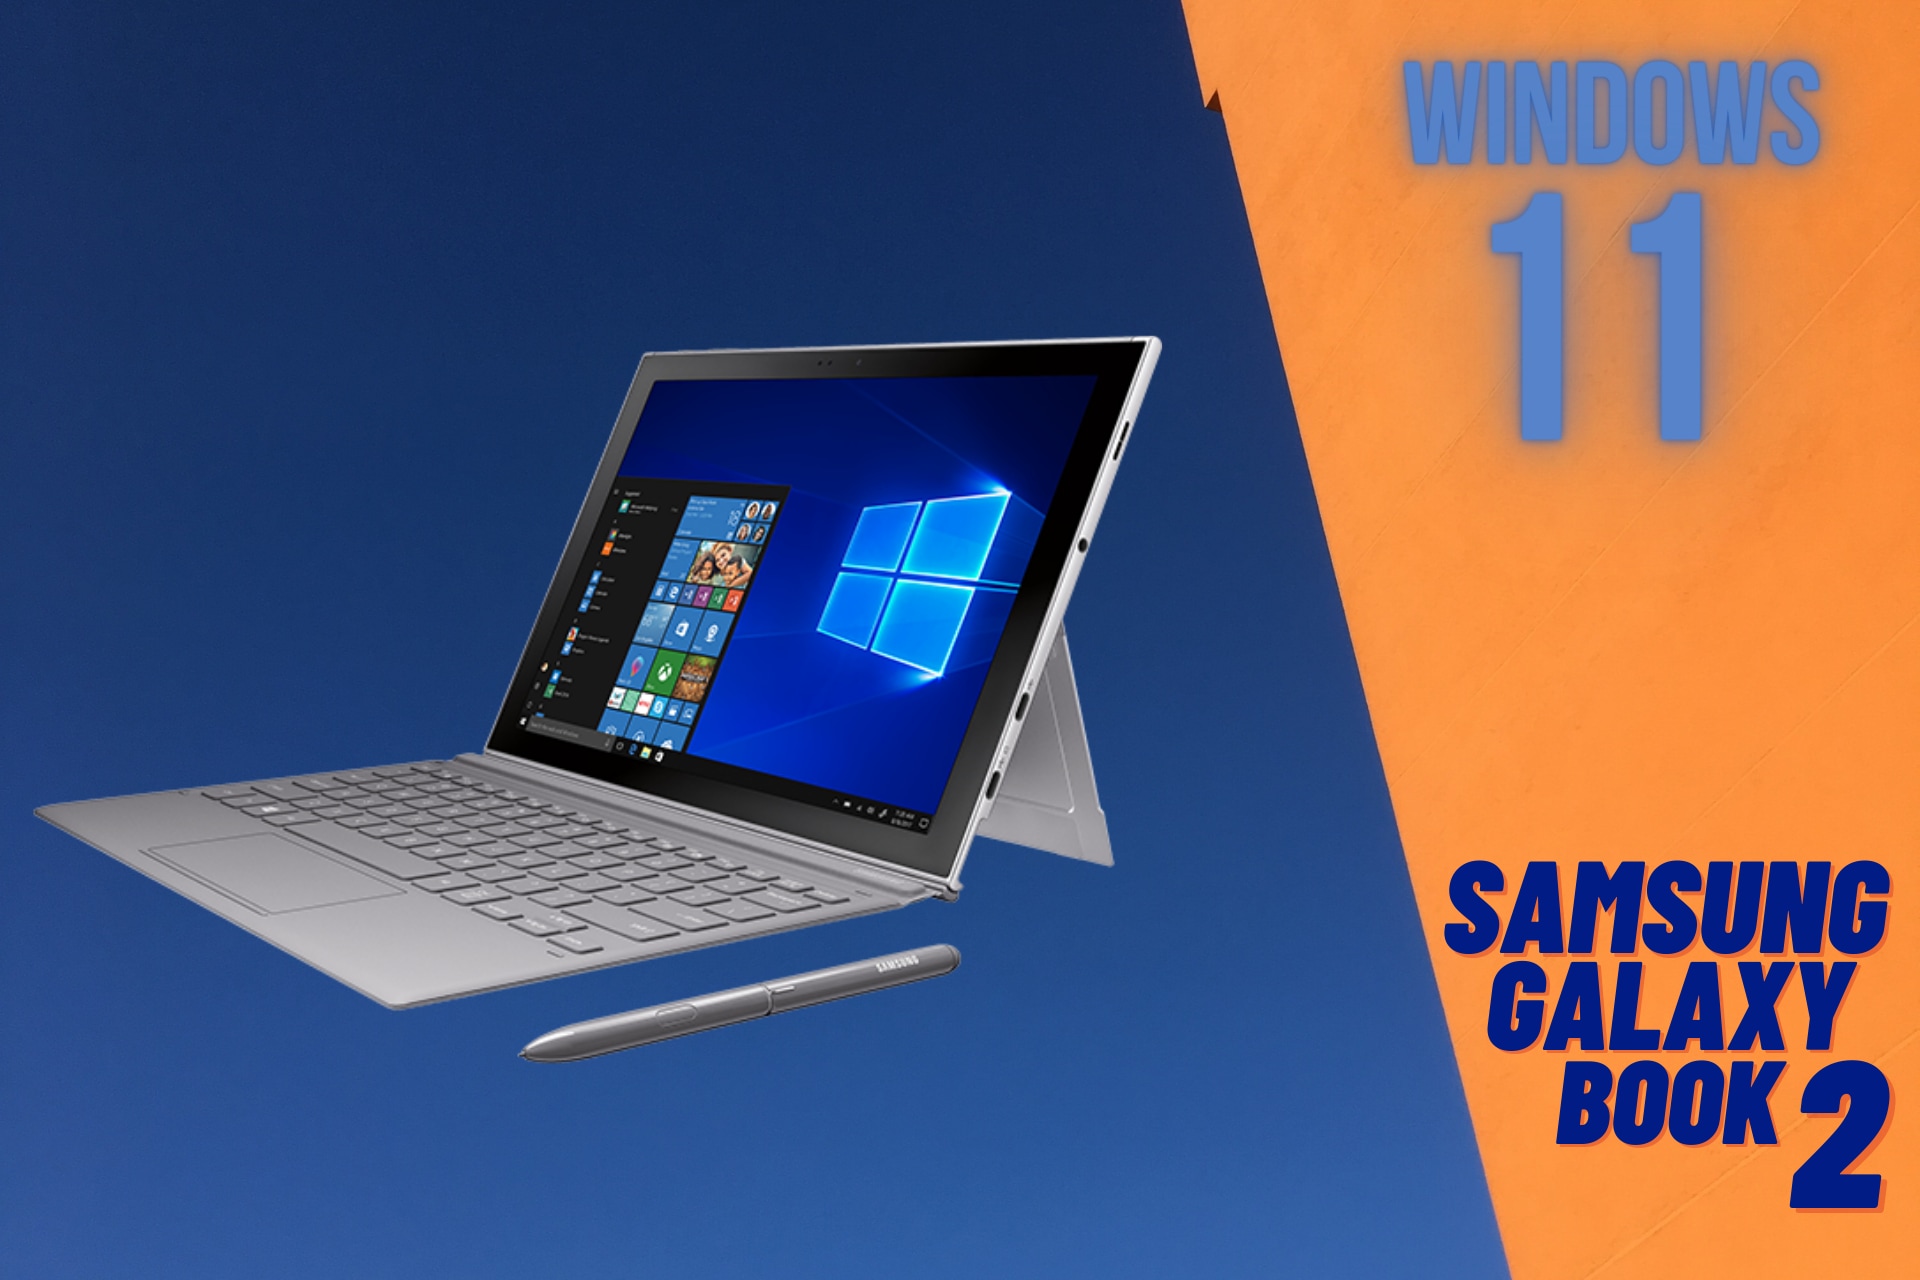
Samsung’s Galaxy Book 2 Runs Windows 11 Like a Charm

It is well known that Microsoft’s new operating system isn’t only designed for PCs and laptops, but for a wider range of devices.

There are, of course, all sorts of gadgets that will be compatible with Windows 11, such as tablets, Microsoft’s Surface devices, and maybe even mobile devices, in the future.

Galaxy Book 2 runs Windows 11 smoothly

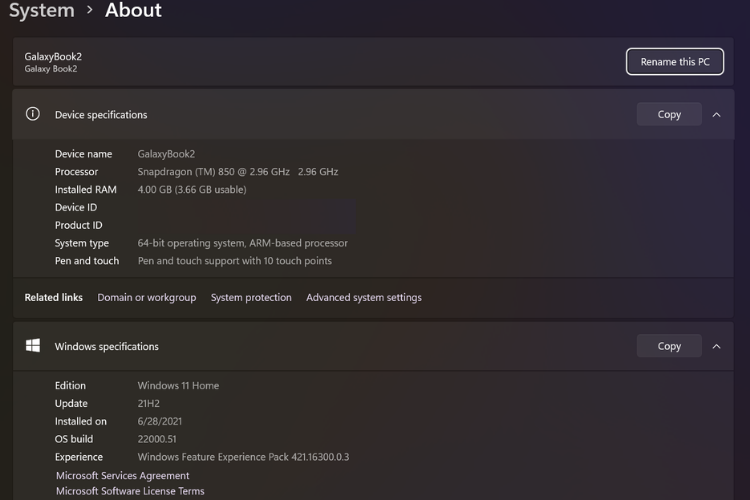
Recently, some Windows 11 users actually installed the operating system, that everyone has been talking so much about, on a Galaxy Book 2 device from Samsung.

The news here isn’t that the user actually installed the OS on this device, but how smoothly it runs on this Samsung gadget. Also, the thread author seems to be more than satisfied with his new software choice

Apparently, the new operating system is much more flexible than we first thought it would be. This is excellent news, considering that this is only the beginning of this new journey.

With time, Windows 11 might be coming to more and more devices, spreading its availability to a vast network of supported gadgets and doodads.

Remember that, before installing Windows 11 to your device, there are some system requirements that you should take into consideration.

You can determine if your device is Windows 11 ready by using Microsoft’s Pc Health Check app, which will tell you exactly if your device can, or why your device can’t support the new OS.

Also, if you are a Microsoft Surface user, you can check here which Surface models are compatible with the new operating system.

What devices have you installed Windows 11 on so far? Let us know in the comments section below.
The first Windows 11 Insider build might be slow on older devices

One of the most anticipated moments in the fresh history of Microsoft’s new operating system is finally upon us.

The first preview build for Windows 11 has become available for all insiders, in the dev channel. However, it appears that this early version did not really live up the user expectations.

After trying it for the first time, users flocked to social media platforms to share their experience with other curious Windows 11 enthusiasts.

Windows 11 preview build is laggy and unreliable for some

While some users are completely satisfied and eager to further explore all the possibilities that Windows 11 has to offer, others are not quite as convinced, or pleased with the new product.

Social media platforms have been flooded with complaints aimed at the new dev build for Microsoft’s new operating system.

The most complaints are related to the fact that Windows 11 is extremely laggy, even more than expected for a preview version.

To be a bit more exact, users accuse intense animation shutter while using the new OS preview build, paired with visual glitches and a slowly reacting Task Manager.

Although this information something we would want to hear, its not at all shocking or unexpected. This is, after all, a pre-release developers build which focuses on the flagging and fixing of current issues.

So, it’s pretty normal for some users to experience quite a few hiccups while navigating the intricate new system that is Windows 11.

The new build works fine on faster devices, apparently

Some of the other participants to the above-mentioned Reddit thread are actually trying to show the opposite of what the thread is all about.

While some struggle with the new Windows 11 build, users that have more recent or simply stronger PC/laptop builds, state that the OS is running smoothly for them.

Running buttery smooth on my Ryzen 7 1700. / It’s extremely fast on my dell! Way faster than any win10 dev build ever

This leads us to believe that some users are probably not taking into consideration some of the system requirements that Microsoft announced for Windows 11.

We can all agree that, yes, this is a preview build, but it’s still Windows 11, not Windows 10, which means that, even though it’s still a preview build, it still needs some important resources to run smoothly.

And, as we mentioned before, it is still way to early to put a permanent stamp on Windows 11’s performance just yet. Many things can and most probably will change until Microsoft releases it to the public as a finished product.

All we can do now is try to contribute to the bettering of the new OS, by flagging existing issues.

Over the coming months, Microsoft will surely release more and more builds to Windows Insiders, each version being significantly tweaked and improved.

Have you already tried the new Windows 11 dev build? If so, share your experience with us in the comments section below.

Game Pass for Windows 11: How to Play Xbox Games on PC

With Windows 11 in the spotlight, Microsoft is making some major changes in terms of gaming performance. Features such as Auto HDR and DirectStorage should make games look better and load faster than before.

However, the biggest addition is the new Xbox app that will support Xbox Game Pass for PC. What exactly is Xbox Game Pass for PC, and how does it work?

Do not hesitate to join us while we closely review this service and see what it offers.

What is Xbox Game Pass for PC, and how can I use it?

Xbox Game Pass has been on Microsoft consoles for years, and this feature gives you access to various gaming titles with a monthly subscription.

This is a great way to save money, especially if you play multiple games on a monthly basis, so you’ll most likely find something interesting to play.

Source: Microsoft

With Windows 11, Microsoft is finally bringing Xbox Game Pass to the PC with a new Xbox app, allowing you to access popular gaming titles with a monthly subscription.

Xbox Game Pass for PC isn’t only available for Windows 11, and you can use this service even if you’re on Windows 10 right now.

How does Xbox Game Pass for PC work?

To use the Xbox Game Pass for PC, you first need to purchase the Game Pass. You can do that from Microsoft’s website or the Microsoft Store app.

Once you purchase the subscription, you’ll get access to more than a hundred titles, including some amazing older games as well as the latest titles.

All available games can be downloaded and played without any extra costs as long as you keep paying the monthly subscription.

For a clear Windows walkthrough on installing titles, see How to Download Xbox Game Pass Games on PC.

To actually play the games above, you need to use the new Xbox app that will come built-in with Windows 11, or you can download the Beta version of the app from Microsoft’s website.

Once you launch the Xbox app, select the title that you want to play, download it, and you can start playing right away. The whole service is incredibly convenient since it will provide you with access to a large library of games, for a small fee.

What titles are available in Xbox Game Pass for PC?

According to Microsoft, the Xbox Game Pass for PC will give you access to over 100 high-quality PC games. There are games from all genres, ranging from FPS to strategy games, and there are even some older titles.

Source: Microsoft

Here are some notable mentions:

  • Battlefield, Titanfall, Wolfenstein, and Doom, Halo, Gears of War series
  • Age of Empires series, Crusader Kinds III
  • No Man’s Sky
  • Need for Speed series, DiRT 5, Forza Horizon games
  • The Elder Scrolls III, IV, and V, Final Fantasy VII, X-X2, XV, Dragon Age, and Mass Effect series
  • Ori series
  • FIFA and Madden series
  • The Sims 3 and 4
  • Minecraft
  • Psychonauts
  • Cities: Skylines

These are some of the available titles that you can get with the Xbox Game Pass for PC, and for the list of all available games, be sure to check this Xbox Game Pass for PC page.

Keep in mind that the list of available games will change, so some games might be available only for a limited time.

Exclusive deals

Source: Microsoft

Xbox Game Pass for PC comes with some exclusive deals from Xbox Game Studios and Bethesda Softworks allowing you to play brand new games on the launch day.

That’s right, with the Game Pass, you’ll get access to the latest games from these two developers soon as they are released and save some money along the way.

Game Pass for PC also comes with EA Play, allowing you to play selected EA games. In addition, get ready for in-game rewards and early trials for the new games.

Overall, this is a great deal, especially because you can enjoy the most recent games from two major game developers for a small monthly fee.

Xbox Game Pass for PC requirements:

  • Operating system: Windows 11, Windows 10
  • CPU: Intel Core i5, AMD Ryzen 5 or newer
  • GPU: Nvidia GTV 1050, AMD Radeon RX 560
  • DirectX: DirectX 12 API
  • Memory: 8GB RAM, 3GB VRAM
  • Storage: 150GB

Keep in mind that these requirements can change depending on the title that you’re trying to run, and some high-end gaming titles will require more hardware power to work properly.

What type of Game Pass subscriptions are available?

Source: Xbox

There are two types of subscriptions available: a regular Xbox Game Pass for PC subscription and an Xbox Game Pass Ultimate.

What’s the difference between the two? Well, the Game Pass for PC allows you to access only PC games, which is great if you don’t own an Xbox.

However, if you are both Xbox and PC gamer, then Xbox Game Pass Ultimate might be perfect for you because it offers various benefits to Xbox gamers.

With Xbox Game Pass Ultimate, you gain access to over 100 titles for both PC and Xbox and all other benefits from the Xbox Game Pass for PC.

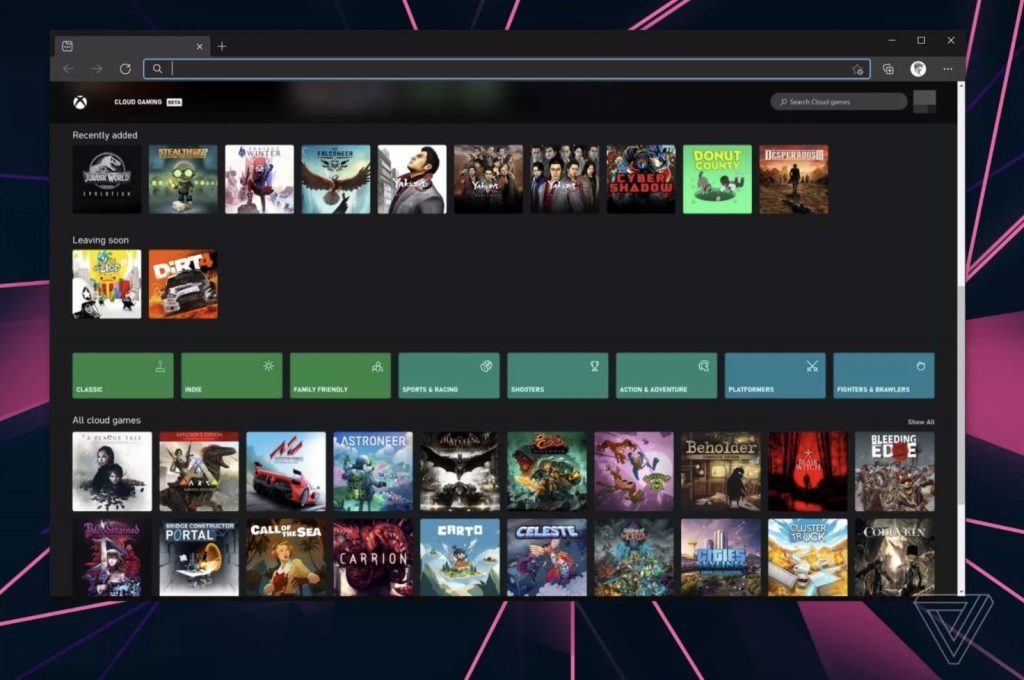
This type of subscription brings you access to cloud gaming, as well as access to Xbox Live Gold membership and Xbox Live deals.

Here’s a quick comparison of the Xbox Game Pass for PC and Xbox Game Pass Ultimate:

Xbox Game Pass for PCXbox Game Pass Ultimate
Available titles:Over 100 PC gamesOver 100 PC, console and mobile games
Day one availability for Xbox Game Studio gamesYesYes
Exclusive discounts and deals for members:YesYes
EA Play library of games:YesYes
Cloud gaming:NoYes
Free Perks, in-game content, and offers:NoYes
Xbox Live Gold and deals:NoYes
Starting price:$9.99/month$14.99/month

What is Xbox Cloud Gaming?

Source: Xbox

Xbox Cloud Gaming is a new feature that allows you to play Xbox games on different devices, including your PC, web browser, mobile device, or tablet.

With this feature, you can play with your friends on Xbox regardless of the platform that you’re using.

Since you’re streaming the games from the cloud, you can start playing a game on your Xbox, and continue playing it on your PC or tablet, right where you left off.

When playing, you can use an Xbox controller, Sony DualShock 4, Razer Kishi, or other Xbox cloud gaming compatible controllers.

As for the compatible devices, here’s the list of tested devices that support Xbox Cloud Gaming:

iPhones

  • iPhone XR, iPhone XS
  • iPhone 11, iPhone 11 Pro
  • iPhone 12 Mini, iPhone 12, iPhone 12 Pro, iPhone 12 Pro Max

iPads

  • iPad Air (3rd Gen), iPad Air (4th Gen)
  • iPad Pro 11 2nd Gen
  • iPad Mini 5th Gen
  • iPad 8th Gen

Windows devices

  • Surface Go 2
  • Surface Pro 6, Surface Pro X, Surface Pro 7+
  • Surface Laptop, Surface Laptop 3, Surface Book 2

Keep in mind that this isn’t the final list, these are just devices that have been tested by the Microsoft team, so even if you have a device that isn’t on this list, it might still work with Xbox Cloud Gaming.

Is Xbox Game Pass for PC available?

Yes, you can activate the Xbox Game Pass for PC right now and use it on Windows 10 and Windows 11. To do that, follow these steps:

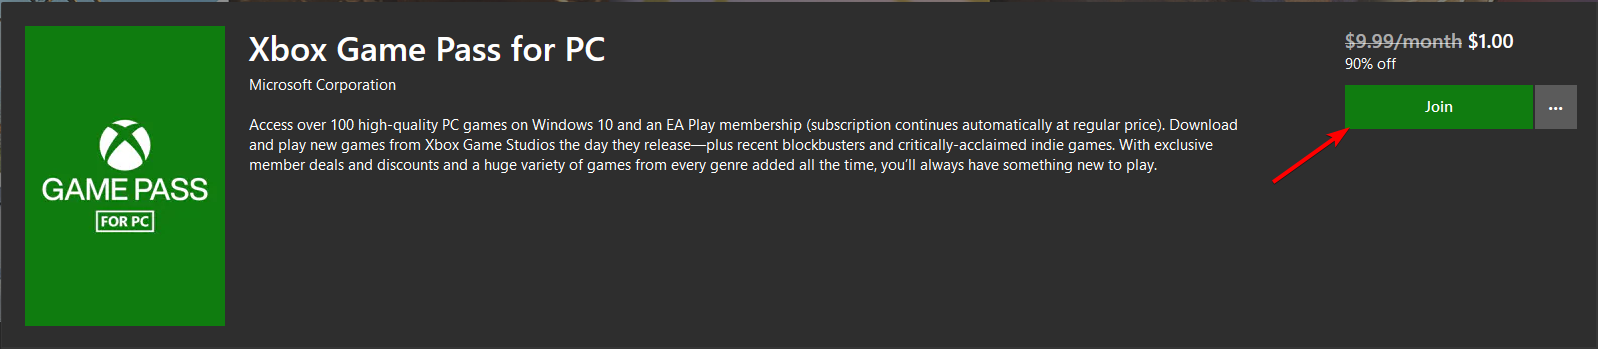
  1. Go to Xbox Game Pass for PC page or search for Xbox Game Pass for PC in the Microsoft Store.
  2. Click the Join button.
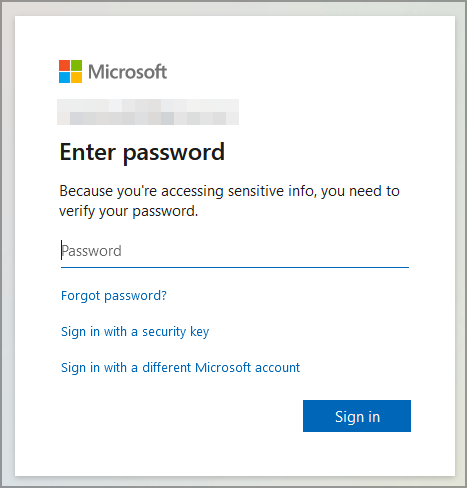
  3. Enter your account and payment information.
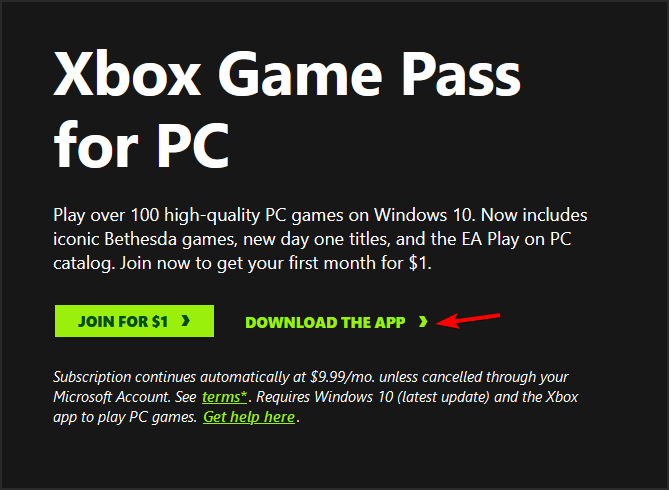
  4. Go to the Xbox Game Pass for PC page and click Download the app.
  5. Once the app is installed, start it and log in with your Microsoft account.
  6. Now select one of the available games and wait for it to download.
  7. Once the game is downloaded, run it and that’s it.

Keep in mind that this new Xbox app will be available out of the box for Windows 11 once it’s released.

In which regions is Xbox Game Pass for PC available?

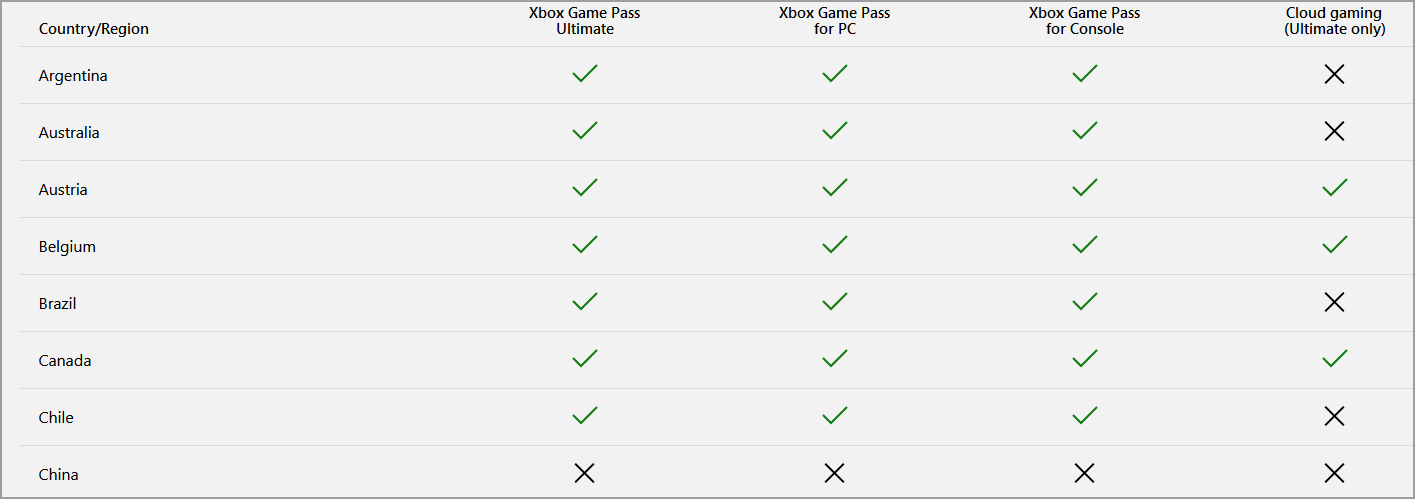
Xbox Game Pass for PC and Xbox Game Pass Ultimate are available in all regions where Xbox Game Pass is available. However, cloud gaming is available only in certain regions.

Source: Xbox

For more information, be sure to check the Xbox website and verify if Xbox Game Pass and cloud gaming are available in your region.

What happens when the game is no longer available in Xbox Games for PC library?

If a specific game is no longer available in the Game Pass library, you won’t be able to play it anymore with your subscription, and the only way to do so is to purchase it.

As a subscriber, you get a 10% discount for all games released in the past 90 days and a 20% discount on all games released for more than 90 days.

Xbox Game Pass for PC is an amazing feature that should allow you to get access to an amazing library of games with a monthly subscription.

To top it off, you’ll get day-one access to the tiles from Xbox Game Studios and Bethesda on the launch day, meaning you can enjoy those games cheaper than on other distribution platforms.

However, we hope to see titles from other developers on the launch day, along with Xbox Game Pass, in the near future. Tried Game Pass and want to stop your subscription? Use our step by step guide to cancel Xbox Game Pass in minutes.

Xbox Game Pass for PC is one of the best additions to Windows 11, making this operating system one of the best gaming platforms.

Microsoft releases out-of-band Windows 10 update to fix PDF issues

Microsoft has released an out-of-band update today to fix PDF issues on Windows 10 versions 2004, 20H2, and 21H1. The same KB5004760 patch is now available for all three versions of the OS, and you may want to install it asap if you’ve been encountering issues when trying to open PDF files on your PC.

According to the release notes, this KB5004760 patch addresses “an issue that might prevent you from opening PDFs using Internet Explorer 11 or apps that use the 64-bit version of the WebBrowser control. Additionally, a PDF might render as just a gray background when using the Adobe Acrobat plug-in.”

There are no other fixes in this out-of-band update, which follows the release of a previous optional KB5003690 patch for Windows 10 versions 2004, 20H2, and 21H1. This previous update released on June 21 addressed some performance issues that some gamers have encountered after installing a previous update, and it also included some fixes for Windows Mixed Reality, the news and interests taskbar widget, and more.

What will happen to Android emulators on Windows 11?

One of the features that users got most excited about when Microsoft announced all the possibilities for Windows 11, is the native integration of Android apps into the OS.

But the story isn’t quite what Microsoft first showed it to be during the unveiling event. In fact, its not even close to what most of us were imagining.

Running Android apps on Microsoft’s new operating system will prove to be a bit more trickier than one would expect.

Emulator developers are not convinced by Microsoft’s plan

While talking to Windows Report, Xia Yuanwei, from LD Player, shared his opinion on the developing situation, involving the integration of native Android apps into Windows 11.

In fact, using the native word is a bit farfetched, considering the way this whole system was put in place, in the first place.

So, in order to use Android apps on Windows 11 you have to actually sideload them. What this means is that when you try to download an app from the Microsoft Store, you actually download it from the Amazon Store instead.

Which also means that you will have to be signed in to an Amazon account, in order to actually do so.

As you can imagine, not many users are to content with the choice that Microsoft made, as the number of apps you can get on Amazon doesn’t even come close to what we could get from Google Play store, for example.

This whole app in an app, in an app scenario, is why some Android emulator companies are pushing the bar even higher and trying to create a better user experience when it comes to Android apps on your PC.

According to the current news from Microsoft so far, they only support apps from Amazon store. They don’t offer some features like multi-instance, keymapping, macro, etc. Also, the system may not be able to sideload apks therefore users can’t download the apps only on Google Play or another store. But we haven’t experienced this new feature on W11. So it’s hard to tell for now what exactly does it look like.

Will emulators be the future of Android PC apps?

Many were surprised to find out that you actually need an Amazon account and app to actually be able to download and use Android apps on their Windows 11 PCs, as these details weren’t part of the initial presentation.

According to Xia Yuanwei, Another concern that users have, regarding Microsoft’s initiative, is the fact that Android apps might not even run that well on a PC, and that the experience will totally change.

We are, of course, talking about features that might not work or just won’t be the same as on mobile devices, distorting the customer experience that many have grown accustomed to.

Experts think that what Microsoft is trying to do know will actually inspire other independent developers to create better ways to emulate these apps on the new OS.

Perhaps this new feature on W11 is good for letting more people know that Android apps can run on Windows and they might soon find other well-developed software called android emulator that runs better than it.

Other companies will probably perfect Microsoft’s idea

After the Redmond based tech company shared their new plan with the world, smaller companies, which deal with emulating Android software, have most likely even started to perfect the initiative.

It’ll be great to be able to use such apps on our PCs, without having to actually sideload them from a different platform, like Microsoft and Amazon are doing.

As we mentioned above, many were wishing that Microsoft would implement this idea by using Google’s Play Store, due to the vastness of opportunities it offers, in comparison to Amazon’s app store.

Emulator developing companies, such as LD Player, strongly feel that they can deliver a better product than Microsoft, if we are talking about the ability to load and run Android apps on a Windows OS.

However, their goal is to focus on gaming Android emulators, as these are the most sought after software bundles.

LDPlayer is more focusing on the gaming features for emulator development and emulator gaming is the essence of using an emulator on PC. Based on this, LDPlayer would be much better than using the new W11 feature as it gets frequent updates to improve the compatibility and stableness of games. The company has all energy to put into building the emulator but this might not be the case for W11.

However, if it comes to it, these companies will most likely not shy away from this challenge, and will rise to the occasion, delivering important software possibilities.

Intel’s new idea could help app developers not go through Amazon

After all the discussions that revolve around this subject, which clearly confused many, app developers are now wondering what their way out of this is.

Many of them don’t feel like going through Amazon just to have their creation featured on the Windows 11 Store and are now looking for more answers.

https://twitter.com/stroughtonsmith/status/1408125250961907718

The solution might be a bit unexpected for some. Intel has posted some information regarding this matter, and it seems to have sparked everyone’s interest.

Intel and Microsoft’s long-standing approach to OS, system architecture, and hardware integration enables the best PC experience for customers. The combination of Windows 11 and Intel® technologies and platforms offers unmatched performance, compatibility, and experiences on Windows, and we’re bringing people’s favorite experiences from the phone to the PC with Intel® Bridge Technology.

Apparently, the new PCs enabled by Intel Core processors. along with Intel’s vast portfolio of intellectual property, as well as platform technologies are said to deliver the full potential of new Windows 11 experiences.

This will allow users and developers to collaborate, create and also connect in ways that are meaningful to them.

How will all this work?

Based on what developers at Intel are saying, with the Intel Bridge Technology, PCs will continue to offer a plethora of choices, coupled with the best experiences for the broadest ecosystem of applications.

If you weren’t aware, know that Intel Bridge Technology is a runtime post-compiler that enables applications to run natively on x86-based devices.

This, of course, includes running those applications on the Windows OS.

More exactly, this will provide the right engines for the correct workloads, by integrating leading CPU cores, graphics technology, artificial intelligence accelerators, and image processors in a single, verified solution.

Nobody is saying that this will 100% be the solution to this situation, but more and more developers are taking notice of this initiative and become automatically interested.

Needless to say that, if Intel pulls this off, Microsoft might have to totally rethink its Amazon Store strategy for the Android apps that are supposed to come to Windows 11.

Other Android emulator companies are already taking matters into their own hands and might even develop software to bypass all this cyber bureaucracy.

What is your opinion on Microsoft’s plan for bringing Android apps to Windows 11? Let us know in the comments section below.
4 best TPM 2.0 motherboards available on the market

As the newly-released Microsoft OS, Windows 11, requires your PC to have a TPM-enabled motherboard, it is very important to understand what options you have before making a choice.

As a PC user, you have the option to invest in an already prepared device, invest in a TPM chip in case you already have the right motherboard, or change your device’s motherboard entirely.

This list is for users in the latter situation, so we will discuss some of the best motherboards available online that enable 2.0 TPM chips to be used, and thus Windows 11 to run optimally.

How we choose the best motherboards with TPM 2.0 capabilities

In order to present you with an easy-to-understand and comprehensive list of the best motherboards with TPM slots, our testers have taken the market by storm and researched every detail they could find about this idea.

The devices we present to you were chosen after a rigorous test that not only confirms the fact that TPM chips can be attached but also other important factors that make a motherboard useful and stable.

These elements are essential when choosing a good motherboard for your PC. As the motherboard is the mainframe to which all the devices of your PC connect, all these elements can make or break a good device.

Besides these elements, another important factor for running Windows 11 without issues on your device is for the motherboard to have a TPM header included.

A TPM header is a special slot that allows a TPM chip to be installed on the motherboard.

How to install a TPM 2.0 chip?

To successfully install a TPM chip to your motherboard, you will need to follow these steps:

Hardware installation

  1. Turn off your system and remove any power cords and USB devices.
  2. Remove the cover of your PC.
  3. Insert the standoff into the workstation board and insert the TPM module connector into the header on the motherboard.
  4. Press the connector gently but firmly to ensure that the slot is fully connected, and then tighten the tamper-resistant screw.

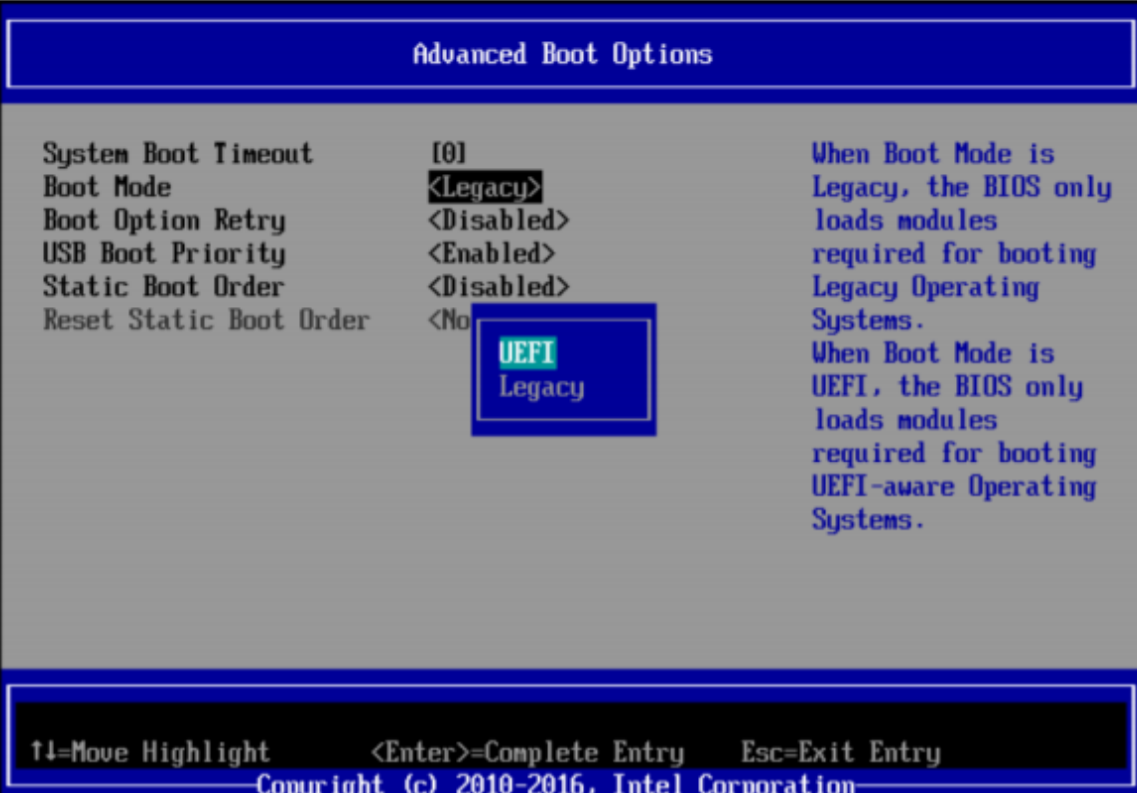
Activate UEFI mode

  1. Restart your PC and go into BIOS.
  2. Enable the UEFI mode (found under the Boot Maintenance Manager/ Advance Boot option or Boot mode.
  3. Press F10 to save the setting.
  4. Press Y to confirm and wait for the system to be rebooted.
  5. Enter BIOS again.

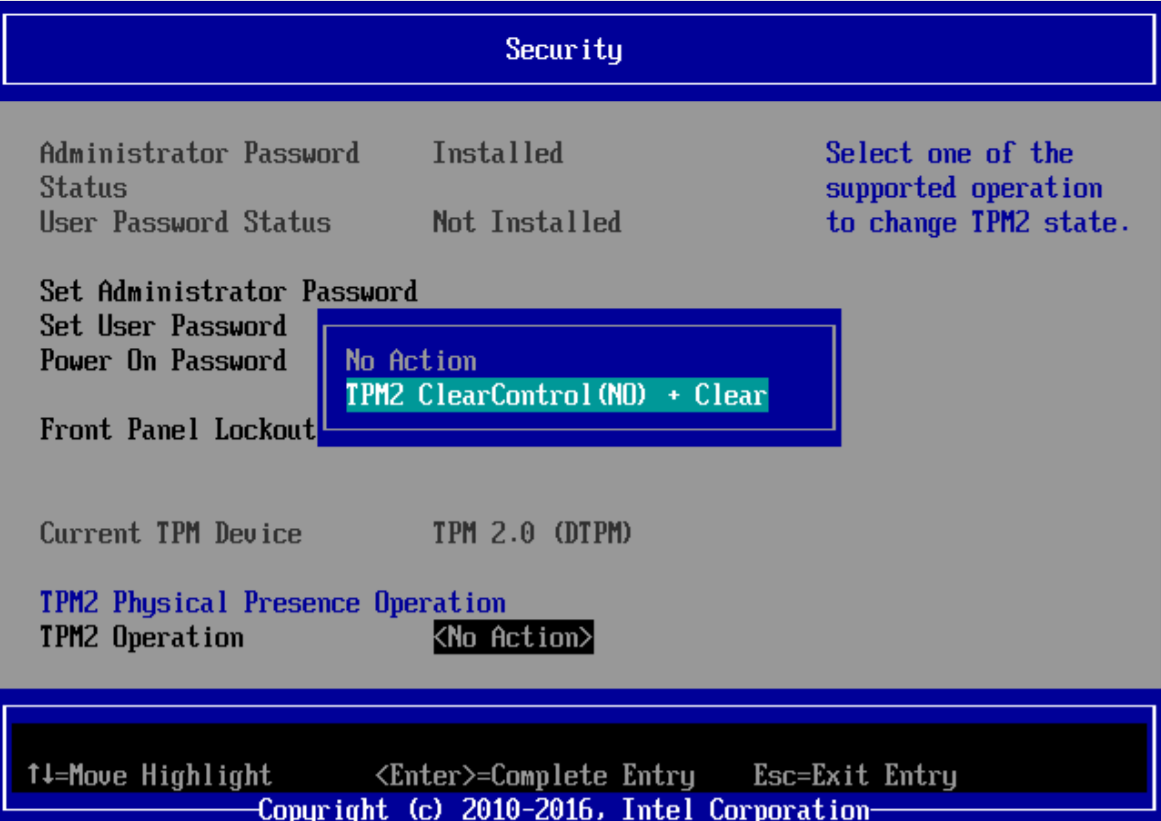
Activate TPM

  1. Navigate to the Security tab and open TPM2 Operation.
  2. Press Enter on the TMP2 ClearControl (NO) + Clear option.
  3. Press F10 to save, then press Y to confirm and wait for the system to reboot.

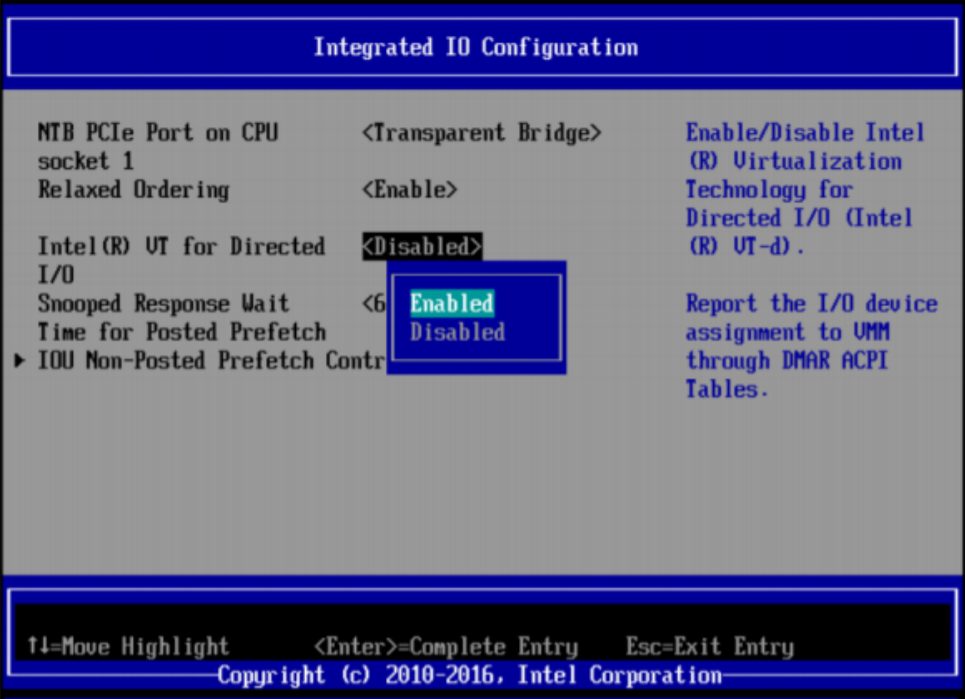
Modify Integrated IO configuration

  1. Navigate to the Advance/Integrated IO menu.
  2. Activate the Inter (R) VT for the Directed I/O option.
  3. Go to the Advanced/Processor Configuration menu.
  4. Enable both Intel (R) Virtualization Technology, and the Intel (R) TXT options.
Note icon NOTE
If the Intel (R) TXT option is greyed out, you will need to press F10 to save the settings, and perform another BIOS boot. The option should be available after.

Enable TPM 2.0 in Device Manager

To finalise this process entirely, simply boot into your Windows OS, and navigate to the Device Manager.

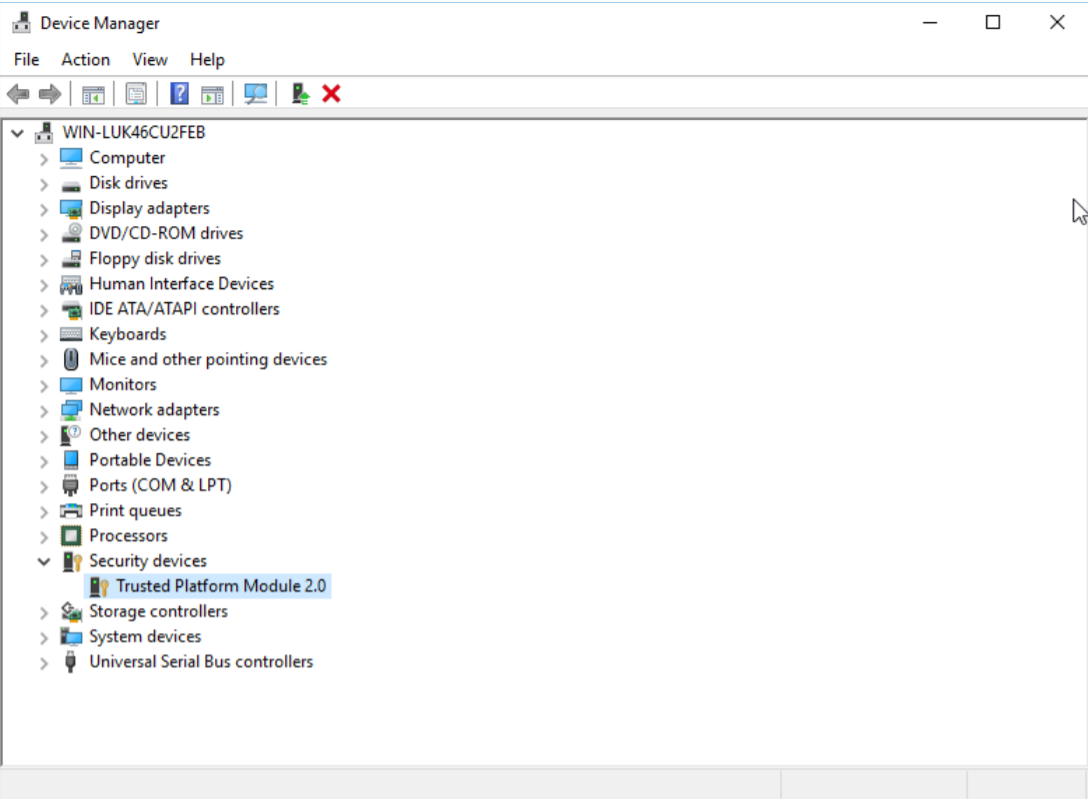
There, under the Security Devices entry, you should have the Trusted Platform Module 2.0 available.

Right-clicking it will allow you to enable the device.

As you can see, the process for activating the chip on a system that didn’t have it naturally can be a bit tricky, but these steps will surely help you with this process.

Where to buy a TPM 2.0 chip?

At this point in time, it seems that there is a shortage of TPM 2.0 chips on the market, with no seller having any available.

Some users speculate that this is because Microsoft has covered the entire market and made purchases in order to implement devices with the chip for Windows 11, while others think that this is simply caused by users being so excited about the newly-released OS.

Whatever the actual reason is, the fact remains: No TMP 2.0 chips can be bought at this point in time. We will keep an eye out on how things develop and will update this guide accordingly.

Best TPM 2.0 motherboards to buy at this point in time

Prime Z590M

  • 9 DrMOS power stages
  • PCIe 4.0
  • Compatible with both 11th and 10th generation Intelt Core CPUs
  • Six-layer PCB
  • 8-pin ProCool connector
  • Large VRM heatsinks controlled by Fan Xpert 4 software
  • The price can be too big for some users

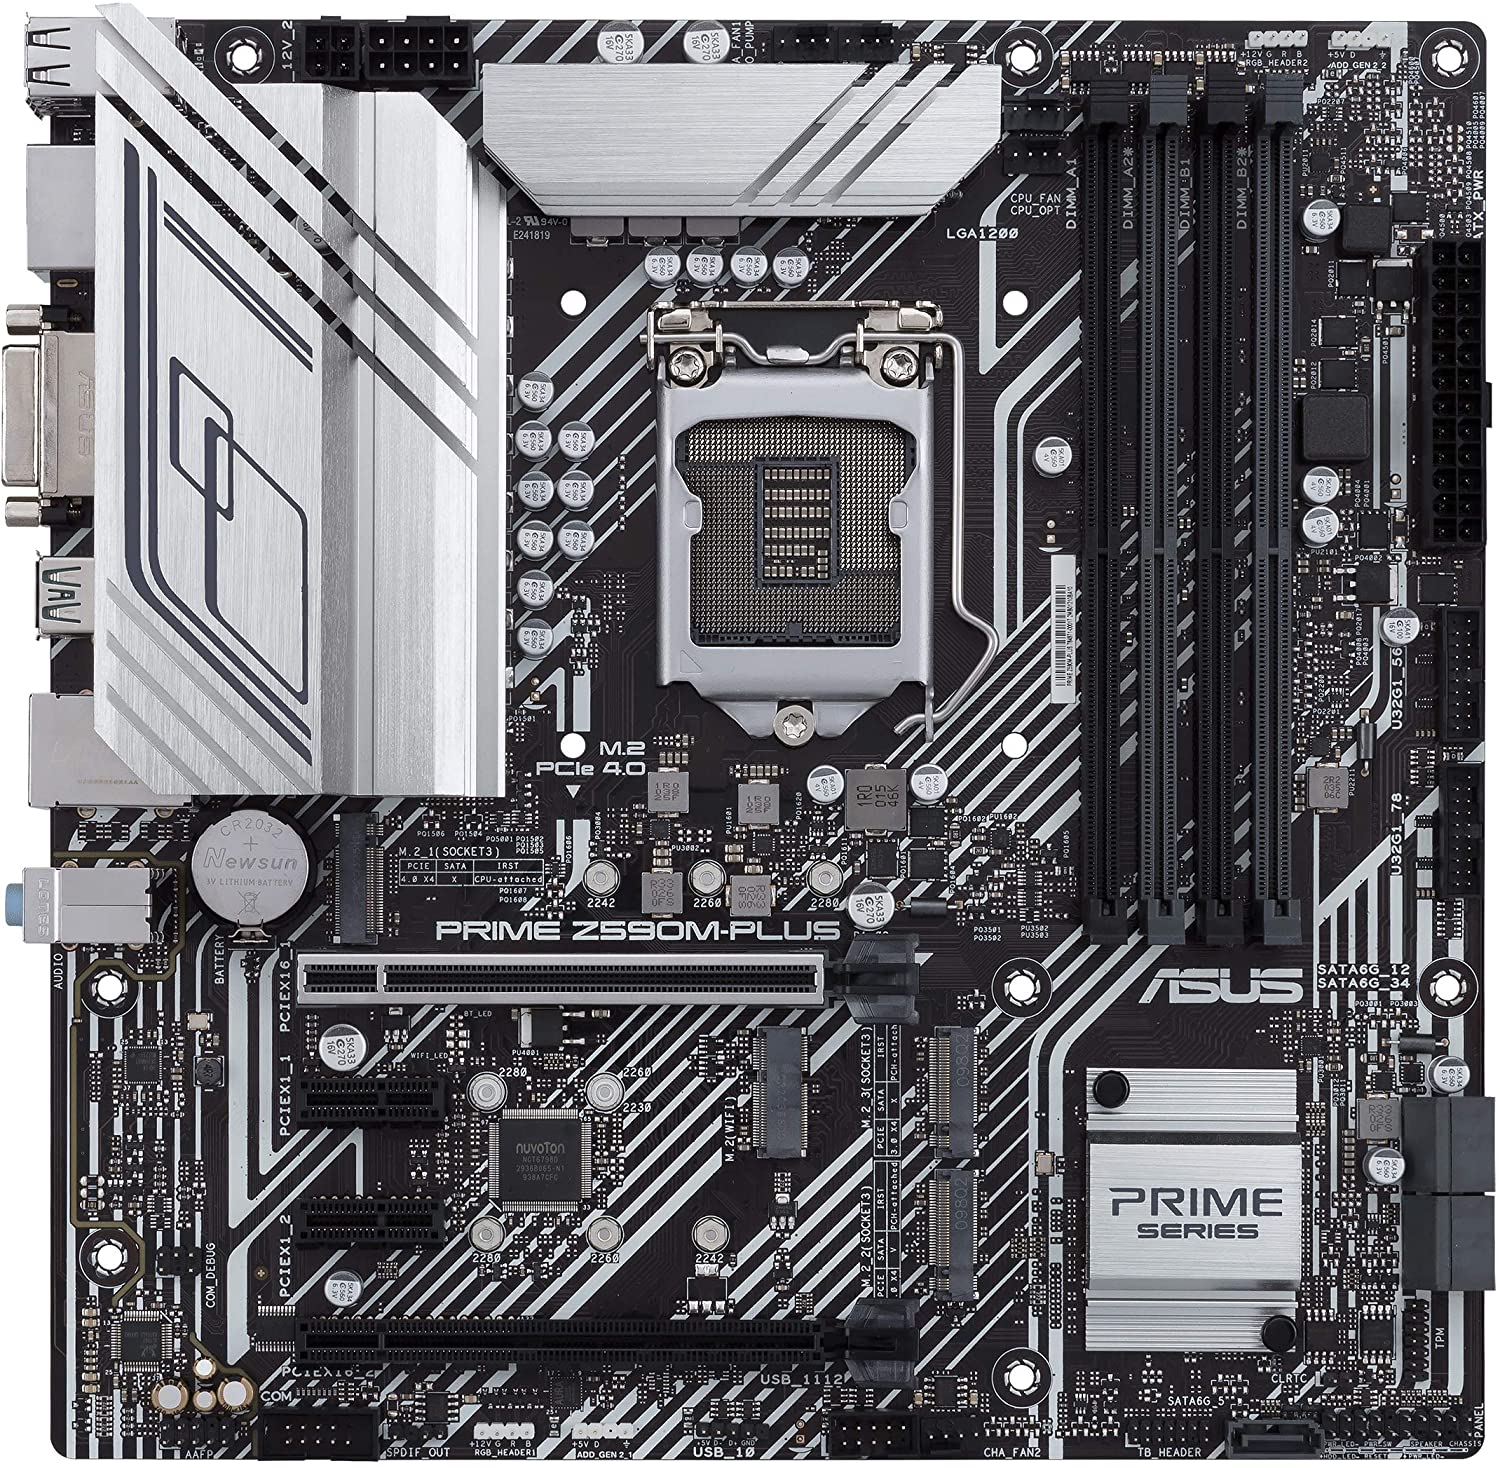
The Prime Z590M-PLUS LGA from Asus is an Intel motherboard that offers some very good features, and besides that, it looks very good.

This element of course applies only to those of you who have a see-through computer case, but it is an added bonus nonetheless.

The Intel Z590 is a micro ATX motherboard that has PCIe 4.0 and has 9 DrMOS power stages enabling you to power the entirety of your setup without any issues.

The LGA 1200 socket featured on it is perfectly compatible with either an 11th or 10th generation Intel Core processor, it has a six-layer PCB, 8-pin ProCool connector, and is built using alloy chokes and capacitors that ensure great power.

With all that power, the motherboard also needs propper cooling, and for this reason, the Z590 is using Large VRM heatsinks, a PCH heatsink, and also equipped with hybrid fan headers and Fan Xpert 4 for optimization.

The ASUS OptiMem II ensures that the traces and signals are routed optimally, while also ensuring amazing signal integrity and memory overclocking.

It also comes equipped with a 1 GB Ethernet port, 4 USB 3.2 Gen Type-C ports, and a Thunderbolt 4 header support, while also ensuring you can use TPM to keep your system secure at all times.

To ensure that your system will be ready to tackle the hardest of tasks in an instant, this motherboard uses three M.2 slots allowing a processing speed of up to 64 GBs by using PCI Express 4.0.


TUF Gaming B550

  • Sturdy design - TUF components
  • Supports AMD 3rd Gen Ryzen CPUs
  • Two M.2 slots with PCIe 4.0
  • 2.5 G Ethernet connectivity
  • VRM heatsink, thermal pad, and M.2 heatsink
  • DrMOS Stack Cool 3+
  • AI noise cancelling microphone
  • Only supports 3rd Gen Ryzen CPUs

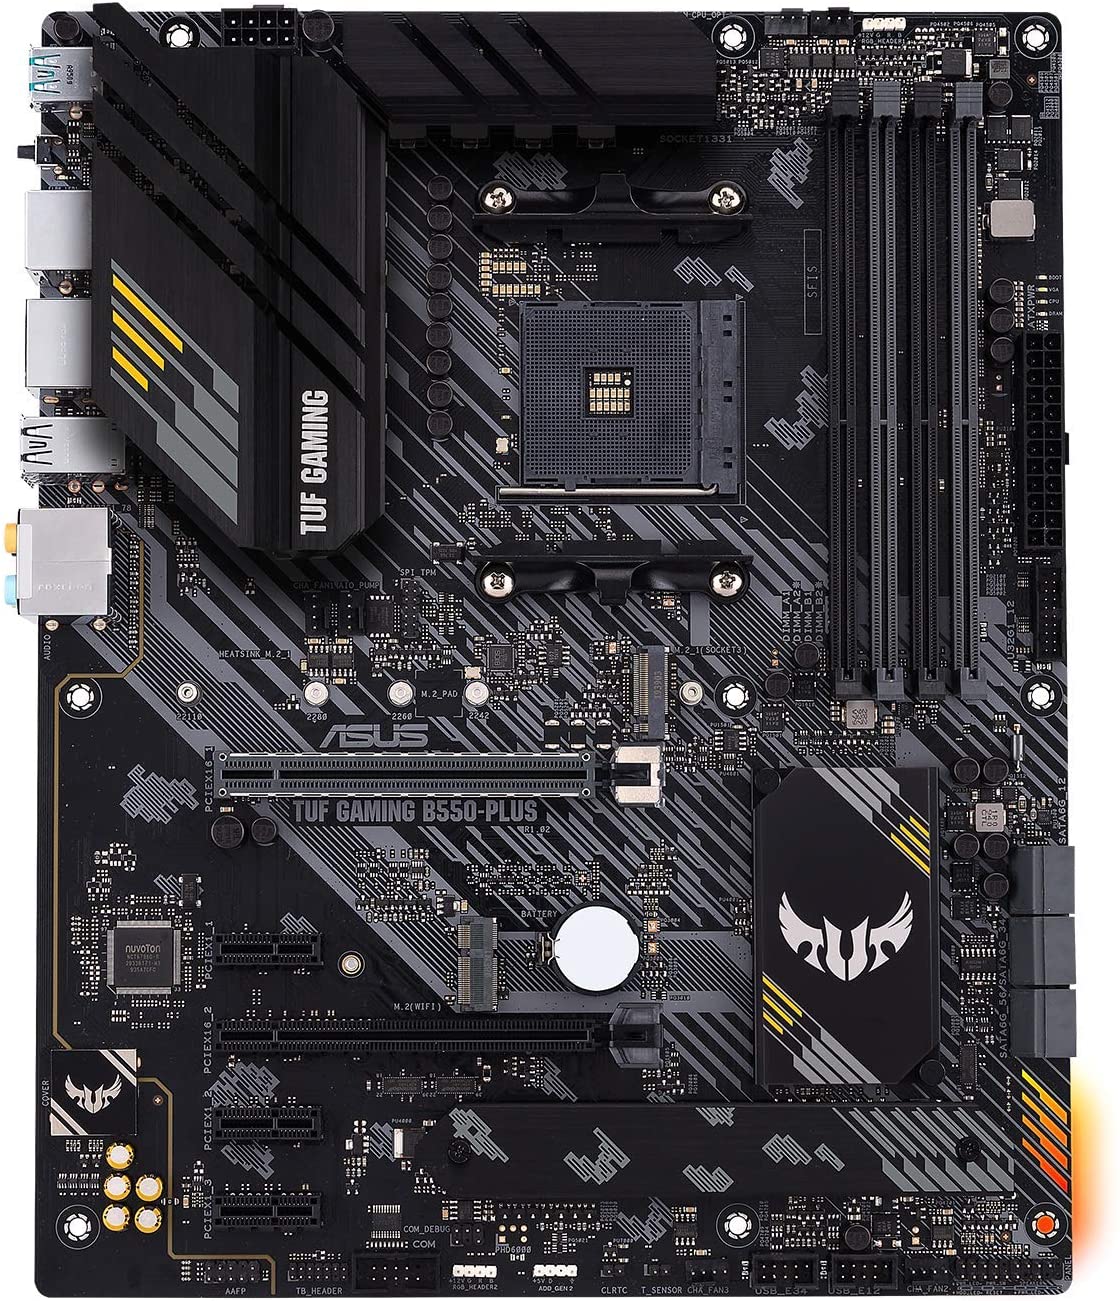
The TUF Gaming B550 motherboard is another choice from Asus that provides everything you need to build your state-of-the-art gaming system from scratch.

As it is part of the TUF array of components, which are known to be some of the toughest components on the market, this motherboard is no different.

Fully compatible with the AMD 3rd Gen Ryzen CPU, this device was built to last and at the same time offer very good performance and stability no matter what you’re testing it with.

It provides you with two M.2 slots, which also includes the latest PCIe 4.0, thus ensuring amazing data speed transfers, and great flexibility when it comes to maximum storage capacity. Both of the slots have support for up to the type 22110 socket, and also NVM Express RAID to ensure a possible performance improvement.

Because it was built with gaming in mind, the powerful TUF Gaming B550 motherboard offers a 2.5G Ethernet connectivity, claiming that it can offer a 2.5x improvement to regular connections.

Built by using quality and strong materials, this motherboard uses a VRM heatsink, a thermal pad, and an M.2 heatsink to ensure that the temperature is kept under control.

When it comes to powering your system, the B550 from Asus uses DrMOS, Stack Cool 3+, ProCool Connector, and a Digi + VRM feature, to ensure that no matter what tasks you throw at it, it will be capable of handling it.

Another feature that is worth mentioning is the AI-based noise-canceling microphone which works perfectly with a 3.5 mm jack, USB, or Bluetooth headsets alike.

To make it easier than ever to perform BIOS updates, the TUF series has a specific USB BIOS FlashBack port that allows you to perform this task without the need to have a CPU or memory installed.


Prime H410M-E

  • Compatible with 10th Gen Intel Core CPUs
  • Intel H410 chipset type
  • LGA 1200 socket
  • SafeSlot Core
  • LANguard
  • DIGI + VRM
  • DDR 4 RAM
  • Low maximum RAM value
  • Lacks in connectivity

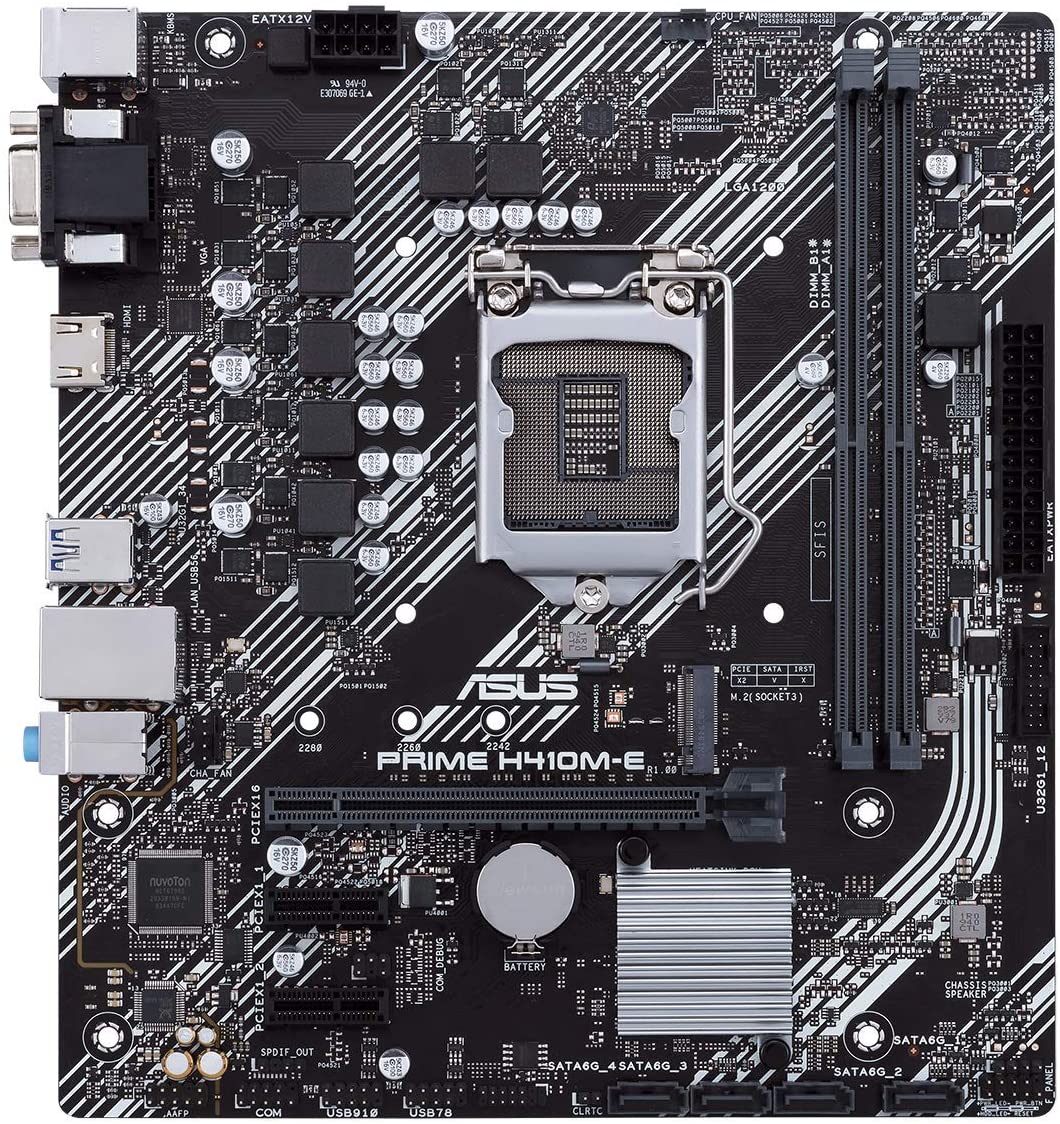
The Asus Prime H410M-E motherboard is another great option if you’re looking for a stable and useful base for your system, offering great processing speeds and optimization features.

Fully compatible with 10th Gen Intel Core processors, this motherboard offers you an Intel LGA 1200 socket with an Intel H410 chipset type, making sure that you can run your preferred software without encountering issues.

As the age that we live in requires us to always be mindful of our security and privacy both online and in the real world, this motherboard offers you 5X Protection III. This feature includes multiple hardware safeguards for all-around protection,  including network and structure enhancements.

To be more specific, the 5X Protection system is composed out of the SafeSlot Core (fortified PCIe with solid soldering), a stainless-steel back I/O ensuring longer usage life, LANguard – which offers hardware-level network protection, DIGI + VRM ensuring digital power control, and an Overvoltage Protection ensuring the regulators protect your system.

As with any respectable 21st-century motherboard, your system will also benefit from the usage of the Asus OptiMem, which enables the motherboard to optimize the traces and vias in order to preserve the signal quality and offer improved memory stability

When it comes to RAM capacity, you will be able to use DDR 4 with 2933MHz and a maximum capacity of 64 GB split by two memory slots.

It is very easy to use this motherboard to connect it to your other devices by using a variety of modalities, including  M.2, 1Gb Ethernet, and a USB 3.2 Gen 1 TYpe-A port.


Prime B450M-A/CSM

  • Lower price
  • Compatible with 3rd, 2nd, and 1st Gen Ryzen CPUs
  • AMD B540 chipset type
  • 1 GB LAN
  • HDMI 2.0b
  • DVI display output
  • 5X Protection III system
  • Extremely low RAM capacity
  • Processing speed is not great

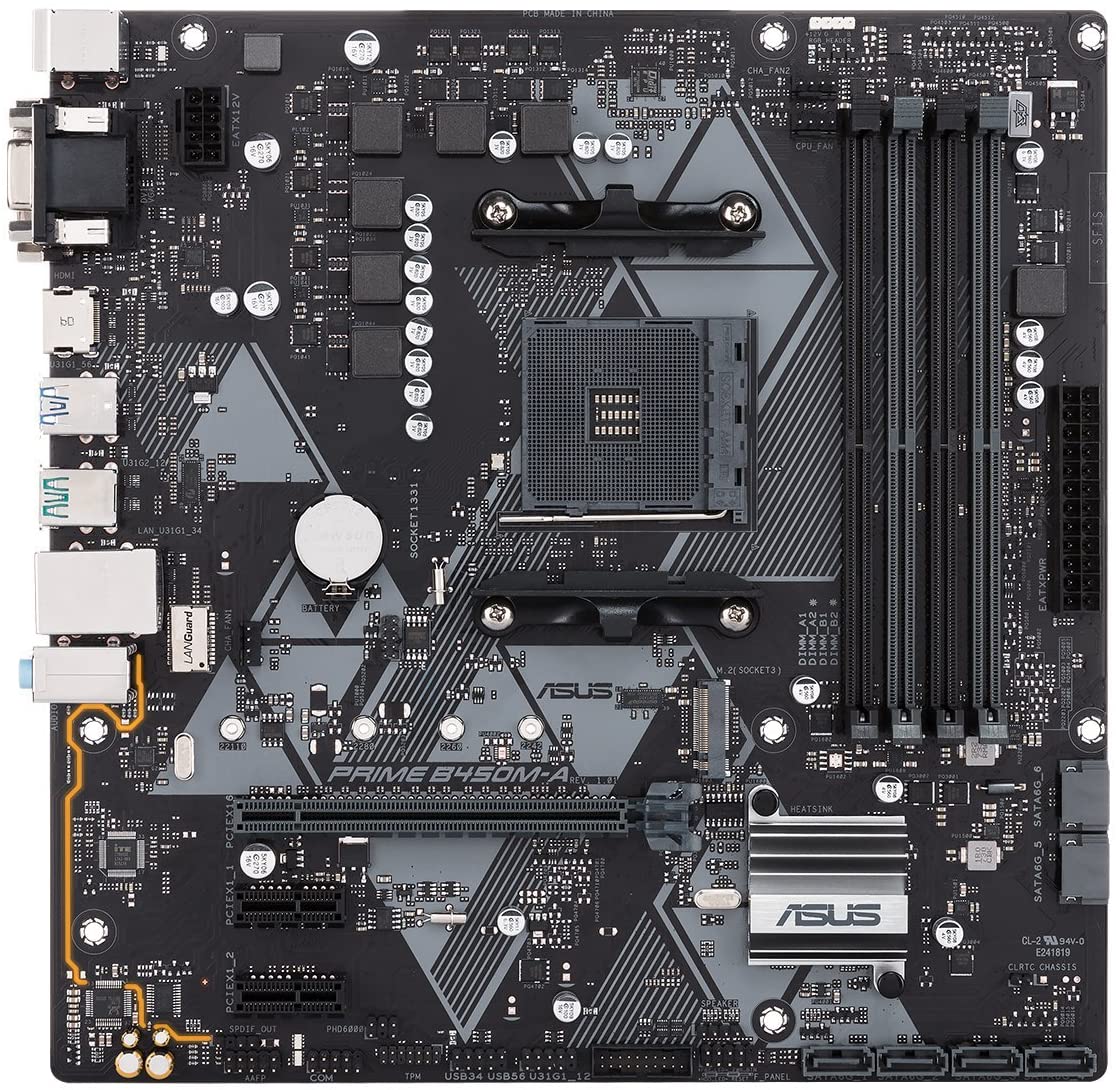
The ASUS Prime B450M-A makes the list as our last choice when it comes to good TPM motherboards.

Don’t let its position fool you in regards to what it is capable of, as this device still offers good features and capabilities, and does so at a lower price than any of the models presented before.

Using an AMD AM4 socket, this motherboard can provide power and stability to 3rd, 2nd, and 1st GEn AMD Ryzen CPUs.

The fast 1GB LAN, HDMI 2.0b, and the DVI display outputs ensure that you will always have a fast connection no matter if you’re more interested in streaming high-quality videos or using it for image-processing.

This hardware is built with an AMD B540 chipset type and has a memory speed of 2400MHz

To add to this, as in the case of the previous model we discussed, this motherboard also comes with the 5X Protection III system which includes LANguard, DRAM overcurrent protection, overvoltage protection, and SafeSlot Core safeguards with steel back I/O.

You have 4 memory slots available for customization, and DDR4 technology ensuring good processing speeds.

Unfortunately, the maximum size of RAM is 1 GB, making it not suitable for people running CPU-intensive software on their system.

That being said, it is recommended that if you want to install a compatible Ryzen 5000 CPU, you will need to make sure that you have the motherboard’s BIOS and firmware updated to the latest version available.


As you can see, our selection of the best TPM 2.0 motherboards includes a variety of options for both Intel and AMD CPU’s, with a plethora of useful features.

Make sure to read through the details and compare the products yourself before making an informed and secure decision.

Feel free to share your thoughts with us by using the comment section below.

How to update Turtle Beach N270 sound card drivers

In order to optimally run your PC, you need to always keep your drivers up to date. Thus, the Turtle Beach N270 sound card drivers are no exception to the rule.

Performing this action is simple and if you do it, you’ll surely feel a huge difference on your computer.

This article will show you some of the highest-rated solutions that will help you keep your sound drivers up to date.

How can I update Turtle Beach N270 sound card drivers?

1. Use Windows Update

  1. Open Settings.
  2. Go to Update & Security.
  3. From the left side, select Windows Update and then click on Check for updates, from the right side.

2. Use Device Manager

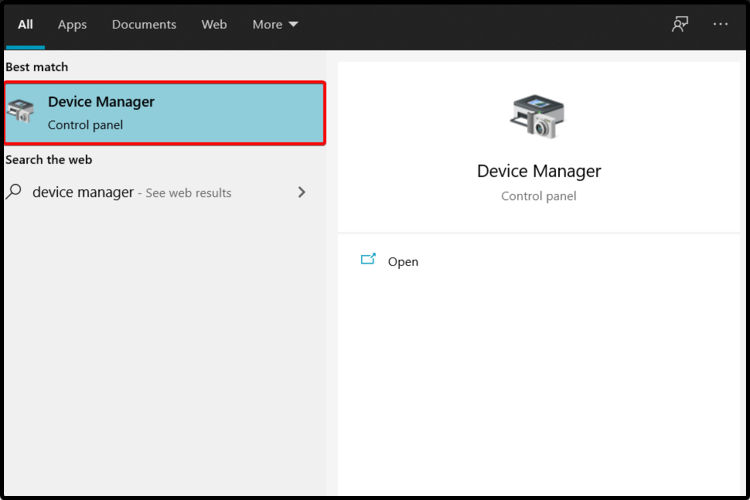
  1. Open Device Manager.
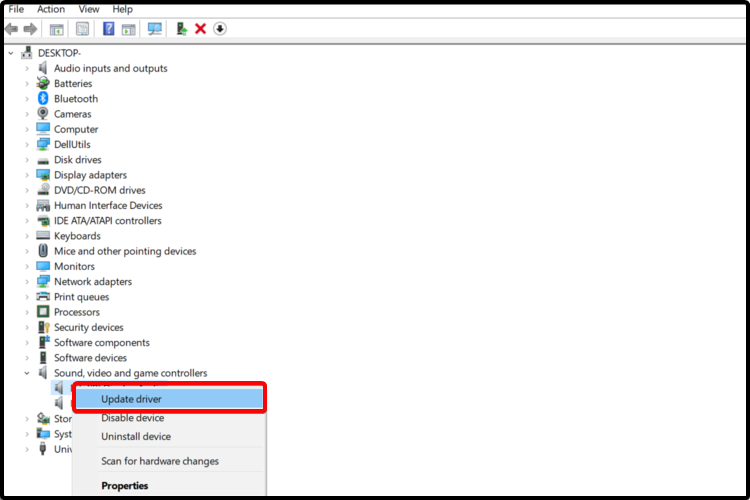
  2. Expand Sound, video, and game controllers.
  3. Locate the needed sound device on the list, right-click on it, then choose the Update driver option.
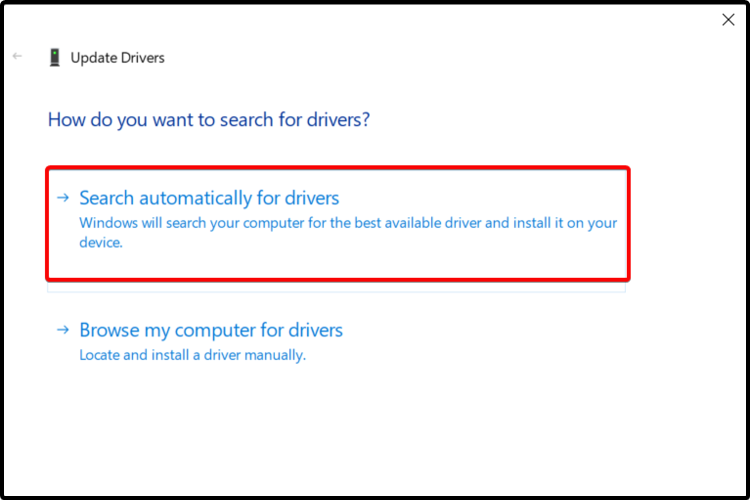
  4. Click on Search automatically for updated driver software.
  5. Windows will automatically find a suitable driver and will try to update it.

3. Give a try to a dedicated updater tool

To easily update your Santa Cruz sound card driver on Windows 10, you should consider the support of a specialized tool. Unlike the methods above, this one can automatically perform all the processes, with a small effort from your side.

Using it, all your PC drivers will be constantly and efficiently installed, updated, and fixed if necessary. Thus, we can strongly admit that this might be one of the best options you should try.

4. Use the manufacturer’s support website

  1. Access the Turtle Beach website.
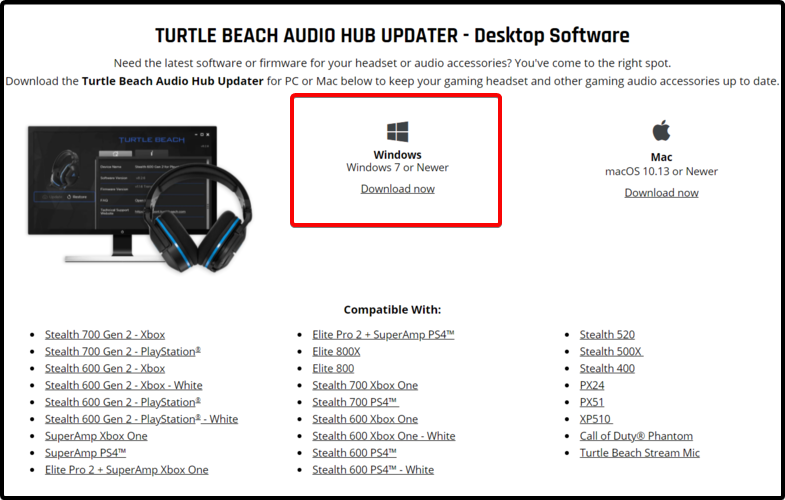
  2. Download the Turtle Beach Audio Hub Updater.
  3. Follow the on-screen instructions to install it.
Note icon NOTE
Note that you can download the Turtle Beach Audio Hub Updater for both Windows and Mac operating systems.

These are some quick and efficient solutions that will surely help you update the Turtle Beach N270 sound card drivers.

In order to keep all your software components safe, don’t hesitate to check out a full guide on how to update drivers in Windows 10 as well. You won’t regret doing so.

Feel free to share your opinion and leave a comment. As always, the section below is waiting for you.

FIX: Cowin E7 headphones not charging

The E7 headphones can be charged by plugging the micro USB into the bottom of the left ear-cup, then plugging the other end into any USB port.

However, users reported that sometimes their Cowin E7 headphones are not charging. This is how they describe the problem on the Bluetooth Detector forum:

My headphones won’t charge while off, but if I try to turn them on while plugged in, the Bluetooth will turn on, and the charging light will light up fully.

In this article we will show you some easy options you should try to make your peripherals work. Just take a closer look below.

What can I do if my Cowin E7 headphones are not charging?

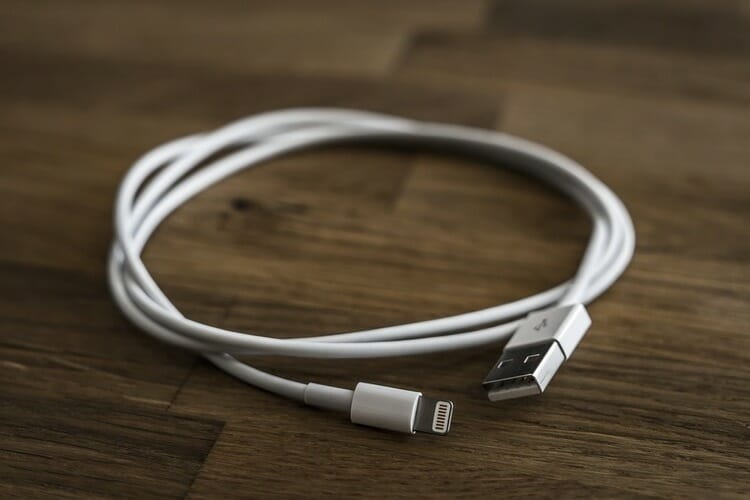
1. Check if the USB cable is working properly

Make sure the USB cable is connected

Some users usually neglect to check the connectivity between the headset and the computer. However, our presented issue might occur due to a poor connection between these two components.

You’ll firstly need to check if your USB cable is connected in optimal conditions. Thus, you’ll have to verify both headphones and power source ports.

Before the verification, you should power off, then power back on your headset and PC. You can also try to connect your USB cable to other devices, such as tablet or phone.

In case your adapter seems to be wobbly, it might be damaged, so you need to try another solution.

Change the cable to ensure it’s not faulty

If you made sure the cable is optimally connected, but your headphones are still not charging, you should ensure that the USB is not faulty.

Find another USB and check if it is suitable to connect to your Bluetooth headphones. This should clarify whether the issue is from your current charging cable.

In case your second cable is working properly, then the issue isn’t related to a connection problem. If your E7 headset is still not charging, you’ll have to follow the steps below.

2. Verify your computer status

Standby mode

  1. Open Settings.
  2. Go to System.
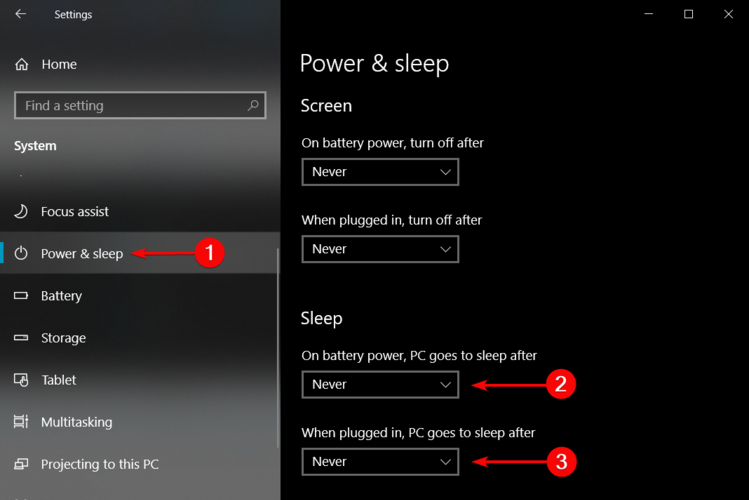
  3. From the left side, select Power & sleep, then make sure the Sleep options are set on Never.

Hibernation mode

  1. Search for Command Prompt.
  2. Right-click on the shown result, select Run as administrator, then open it.
  3. On the pop-up window, type the following: powercfg.exe /hibernate off
  4. Press the Enter key.
Note icon NOTE
You should know that charging won’t be completed if your PC is set to these two modes.

3. Reset your headphones

  1. Remove the battery cover on the left earcup by using the finger slot on top of the battery cover.
  2. Easily remove the battery by using the finger slot provided.
  3. Reinsert the battery.
  4. Reverse the process, ensuring the battery cover is put back in the same orientation as when it was removed.

These are some of the confirmed fixes that you can apply those times when your Cowin E7 headphones are not charging.

Also, if you ever notice that your Cowin Bluetooth headphones can not work on Windows, feel free to check a full guide in order to solve this problem.

For any other additional questions, don’t hesitate to leave a comment in the section below.

Microsoft introduces new Designed for Xbox mobile gaming accessories for iOS devices

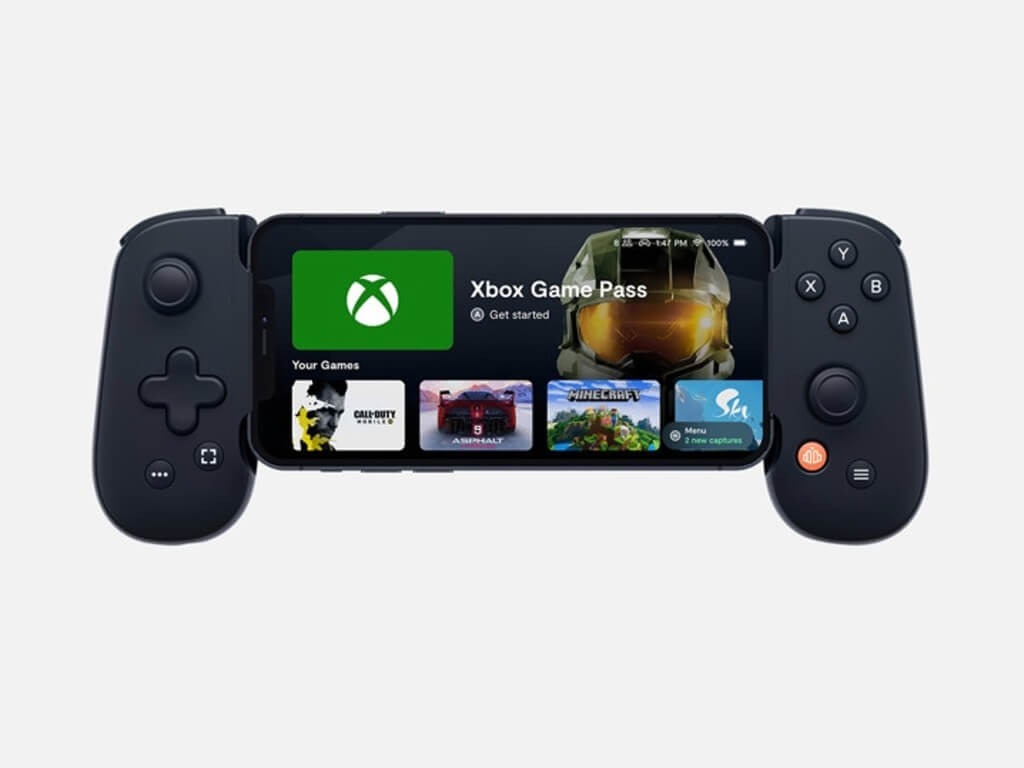
In addition to the news that Xbox Cloud Gaming was now available on PC and iOS devices in 22 markets, Microsoft unveiled yesterday new Designed for Xbox mobile gaming accessories for iOS devices. Android users already had access to several officially licensed Xbox mobile controllers such as the Razer Kishi or the 8BitDo SN30 Pro, and it’s good to see Microsoft expand its lineup of Designed for Xbox mobile gaming accessories to iOS devices.

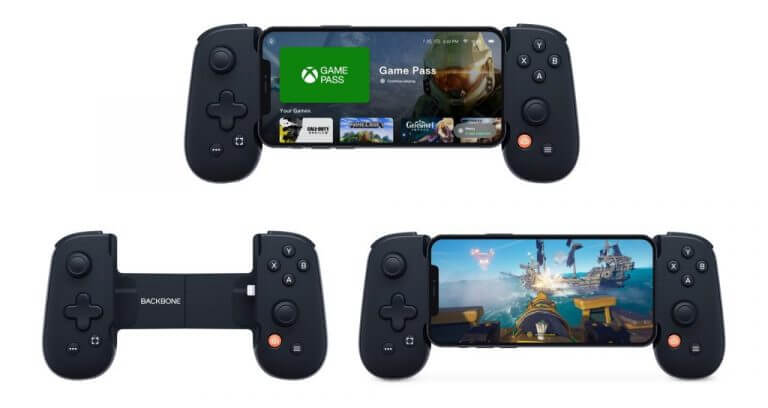
The first new Designed for Xbox mobile accessory is the Backbone One for Xbox, which compatible with all iPhone models with iOS 13 or later. This mobile controller connects to iPhones via the Lightning port and it has a dedicated button for capturing gameplay.

“With internals that reflect a breakthrough in connectivity and performance, Backbone One was designed to preserve battery life and reduce input latency by harnessing iPhone-exclusive technology, requiring no charging while enabling incredibly responsive gaming,” the Xbox team explained. The Backbone One Mobile iOS gaming controller is priced at $99.99 on the Microsoft Store, and it comes with 3 months of Xbox Game Pass Ultimate.

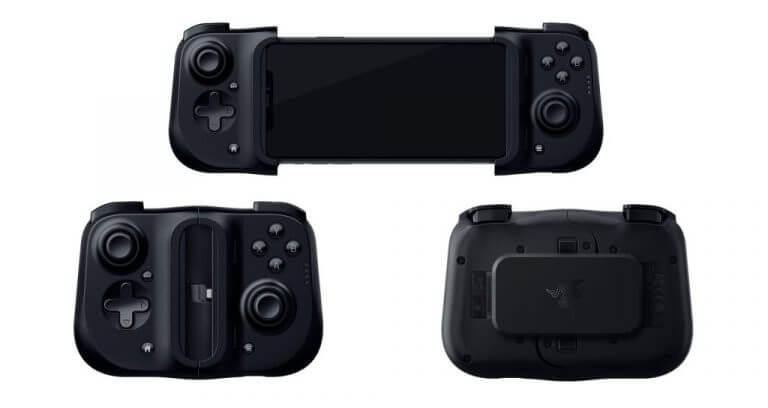
Razer has also created a new version of its Kishi Universal Gaming Controller for iOS, which looks very similar to the Android version but comes with a Lightning port to charge your iPhone when you play. The Razer Kishi Universal Gaming Controller for iOS is available for pre-order today for $99, and it will also come with 3 months of Xbox Game Pass Ultimate.

Keep in mind that can you still connect a regular Xbox Wireless controller to your iPhone or iPad to play cloud-enabled Xbox games via the web, and a growing number of games such as Minecraft Dungeons also support touch controls on iOS devices and Windows PCs. Xbox Cloud Gaming currently requires an Xbox Game Pass Ultimate subscription, and Microsoft is still offering 3 months of Ultimate for just $1 to new subscribers.

Xbox Game Pass Ultimate

Microsoft Surface network adapter not working [Full Fix]

Microsoft Surface is a great device, but many have reported that the Microsoft Surface network adapter is not working on their device.

This can be a big problem since you won’t be able to access the Internet at all using Wi-Fi. However, there are ways to fix this problem.

As expected, we’re going to show you how to do it. Just take a closer look at the troubleshooting tips below and apply them one by one.

How can I solve Microsoft Surface network adapter issues?

1. Use a dedicated driver update software

One way to fix this issue is to keep your drivers up to date. Finding the right driver manually can be a tedious task, but some tools can do this automatically for you.

Professional driver updating tools, such as Fortect Driver Updater are able to scan your system and identify the right up-to-date driver for your component. This software also works great as a maintenance tool since it will continuously scan and notify you when your drivers are outdated.

⇒ Get Fortect Driver Updater

2. Rollback to an older driver

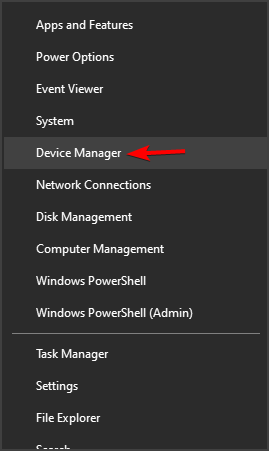
  1. Press Windows Key + X and choose Device Manager from the list.
    device manager
  2. In Device Manager, locate your Wi-Fi adapter and double-click it.
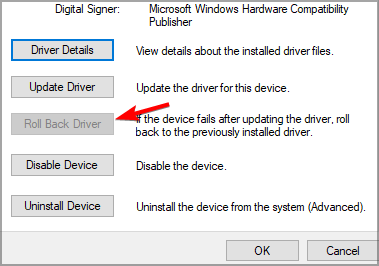
  3. Now click the Roll Back Driver button.

Once you’ve rolled back to the older driver, check if the problem is still there. Keep in mind that Windows will update the driver automatically, so be sure to block Windows from updating specific drivers.

3. Install the older driver manually

  1. Download an older version of the Wi-Fi driver from Microsoft’s website.
  2. Once the driver is downloaded, press Windows Key + X shortcut and choose Windows PowerShell (Admin).
  3. Run the following command (but be sure to change the file paths to match the ones on your system):
    msiexec /a "d:\downloads\driver_file_name.msi" /qb TARGETDIR="d:\downloads\driver"

For more information, be sure to check our guide on how to extract Exe file content. Now you need to uninstall the driver and update it manually by doing the following:

  1. Open Device Manager.
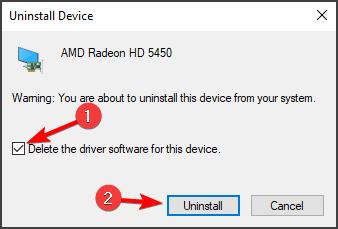
  2. Right-click your Wi-Fi adapter and choose Uninstall device.
     
  3. If available, check Delete the driver software for this device, and click on Uninstall.
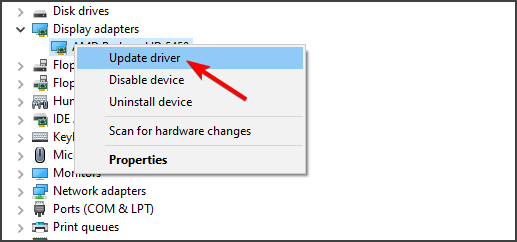
  4. Locate the Wi-Fi adapter again, right-click and choose Update driver.
  5. Select Browse my computer for drivers.
  6. Click the Browse button and locate the folder in which you extracted the MSI file.
  7. Once you select the folder, click Next and follow the instructions on the screen.

This is an advanced solution, but many reported that this method worked for them, so you might want to try it out.

4. Check for the latest updates

  1. Connect your Surface to the Ethernet using a LAN port or a USB wireless adapter.
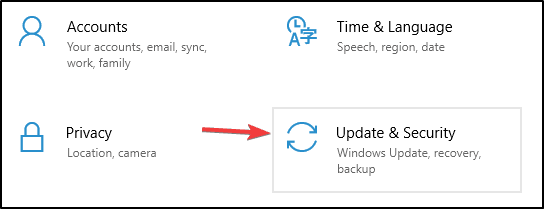
  2. Open the Settings app and go to the Update & Security section.
  3. If any updates are available, be sure to download and install them.

Once your system is updated, check if the Microsoft Surface network adapter is still missing. In addition to updating Windows 10, you can also update your Surface firmware.

5. Use the Network reset feature

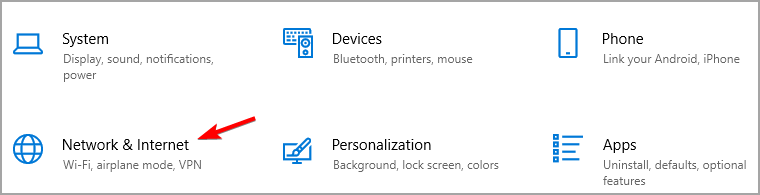
  1. Open the Settings app and go to Network & Internet section.
  2. Scroll all the way down and click on Network reset option.
  3. Click on the Reset now button and follow the instructions on the screen.

After doing that, all your network adapters will be removed and reinstalled and the issue should be resolved.

If the Microsoft Surface network adapter is not working, the most likely cause is related to drivers. If updating them with the best driver updater software doesn’t help, you can always try one of our other solutions.

Did you find a solution to this problem on your own? Feel free to share it with us in the comments below.

Dell unveils a intelligent 4K webcam with “unrivaled” image quality

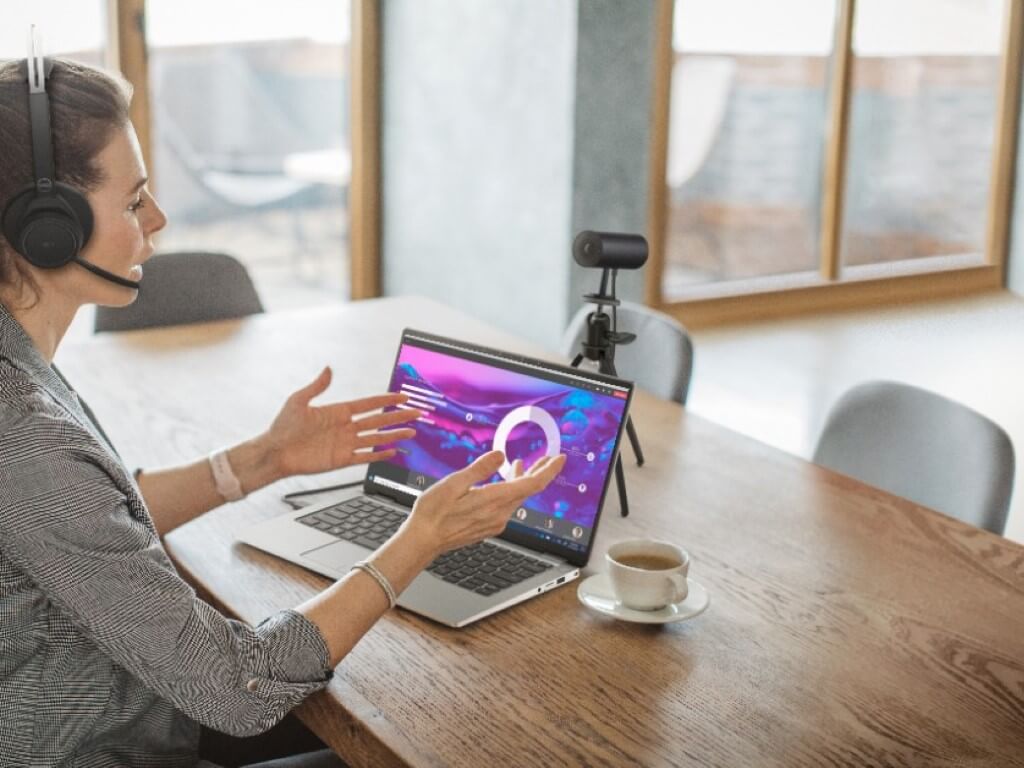
Dell has revealed what it is calling “the world’s most intelligent 4K webcam.” Taking inspiration from DSLR cameras, the company’s new Ultrasharp Webcam sports a Sony STARVIS 4K CMOS sensor, features like Digital Overlap HDR, video noise reduction, AI Auto Framing, Windows Hello, and a lot of other cool things that you won’t find onboard other webcams.

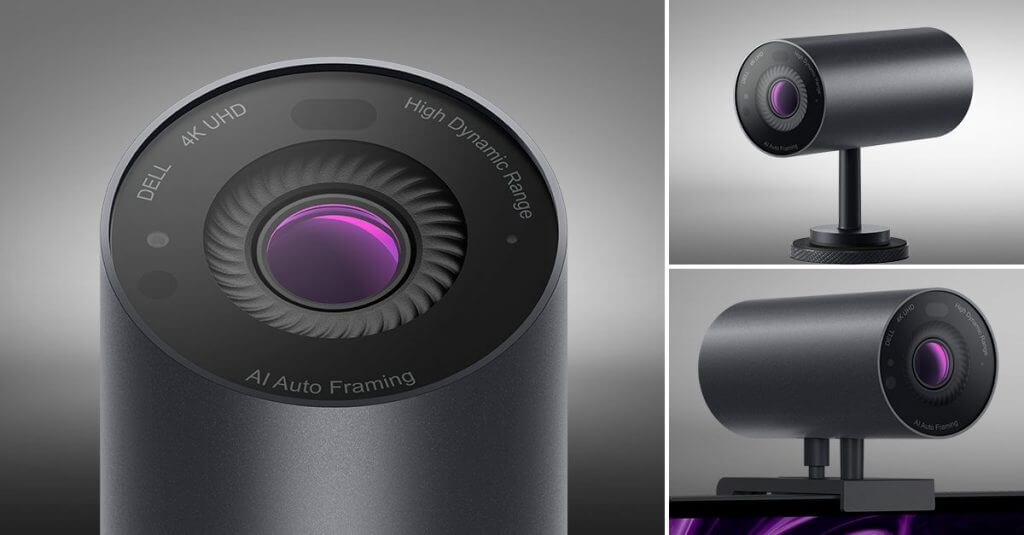
Now available for $200, this Ultrasharp Webcam is designed for professionals and others who want a superb video conferencing experience. Yet it’s also visually different from other webcams. It is cylindrical rather than rectangular and has a slim monitor mount so you can mount it with minimal front-of-screen distractions. Since it is all aluminum, it even has a magnetic mount and tripod adapter for more seamless transitions between different setups.

The Dell 4K Webcam on top of a monitor showing the lens and mount.

Other than the unique design, Dell says this webcam is all about image quality and intelligent experiences. On the image quality side, you’ll find that this webcam has a multi-element lens, that helps capture more light. Then there’s the Digital Overlap HDR feature, which can preserve true-to-life colors and balance exposure. 3D and 2D noise reduction also helps reduce grainy images, too. The lens quality itself is something you’d usually find in a DSLR, too. Some of the other technical specs of the webcam can be seen below.

  • Resolution/FPS: 4K UHD / 24, 30, Full HD / 24, 30, 60
    HD / 24, 30, 60
  • Megapixel: 8.3MP
  • Field of view: 65, 78, 90 degree
  • HD Digital Zoom: Up to 5X
  • Autofocus: Yes
  • Auto White Balance: Yes
  • AI Auto-Framing: Yes
  • Microphone: None
  • Connectivity: USB-A
  • Inbox Detchable Cable: USB-C to USB-A 2m
  • Certifications: Teams, Zoom
  • Optimized Apps: Skype for Buisness, Go To Meeting, Google Meet, Google Hangouts, Blue Jeans, Slack, Lifesize
  • Webcam Dimensions: 1.65 in x 3.54 in
  • Webcam Mount Dimensions: 1.25 in x 2.56 in x 0.37 in

As for the intelligent features, the webcam has an auto framing, that uses AI to keep you in focus and centered. In the Dell Peripheral Manager Software, you even can change brightness, sharpness, contrast, and saturation controls. Other areas in the software will let you change the field of view to 65, 78, and 90 degrees if you want.

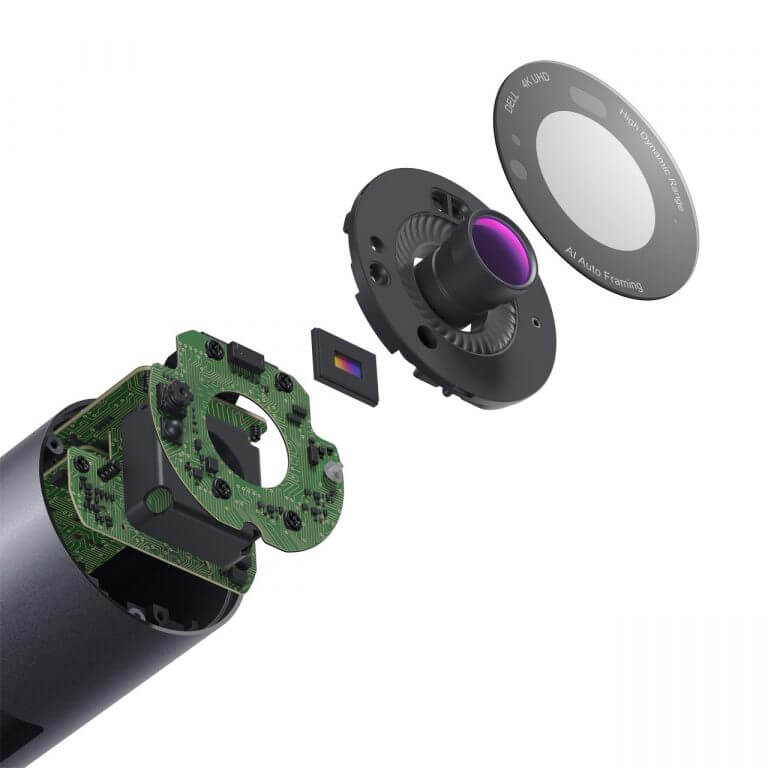
The Dell 4K webcam expanded out showing the internals.

Then there’s Windows Hello and other privacy features. You’re able to use the webcam with Windows Hello and Dell ExpressSign-in so your PC can detect your presence as you approach and automatically log you out when you step away. Finally, for privacy, you can snap off the privacy cover from the front of the lens to the back of the webcam, and keep extra peace of mind.

How to quickly fix the QuickBooks scanner driver error 281

QuickBooks is accountancy software users can utilize on PCs and mobile devices. That software includes a handy Scan Manager feature for scanning receipts and invoices.

However, QuickBooks scanner driver error 281 is one issue that can arise for some users. When error 281 occurs, users can’t scan receipts and invoices with the QuickBooks Scan Manager feature.

The resolutions below might help some QuickBooks Desktop users fix error 281.

At your convenience, be sure to also explore the latest and greatest deals on this software.

How can I fix QuickBooks scanner driver error 281?

1. Check your drivers

More often than not, this error is caused by corrupt drivers, so we will start with checking and updating your drivers before we move any further.

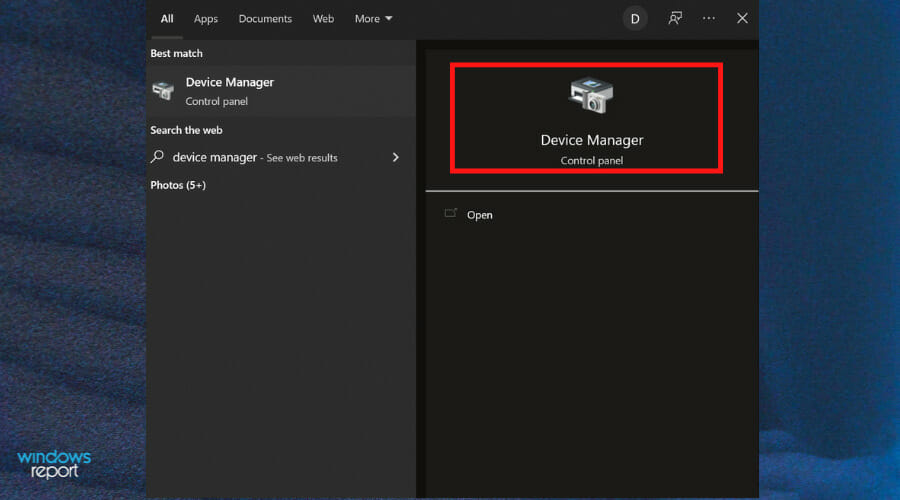
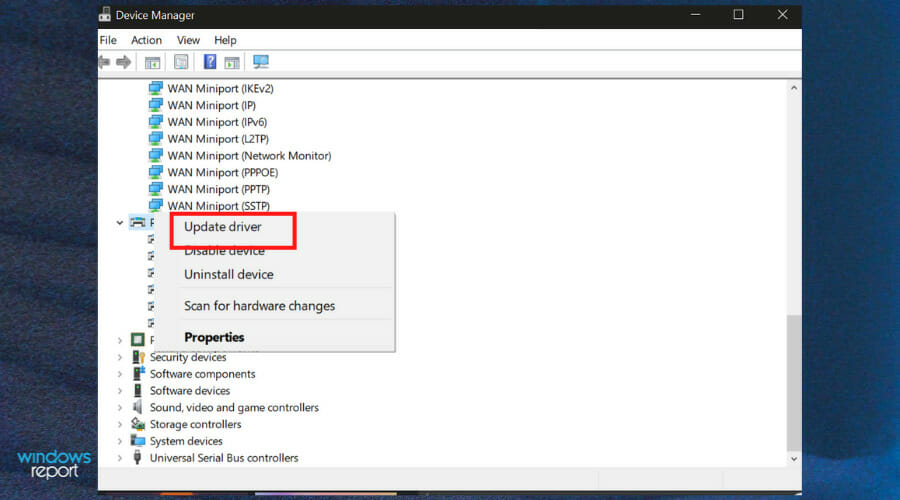
1. Type Device Manager in the taskbar and open the panel.
2. Locate your scanner driver.
3. Right-click on it and select Update.

If you want to check multiple drivers, repeat the above-mentioned steps. If you want to speed up the process and make sure you run the latest version of your driver (Windows may not always detect/install the ultimate version), make use of a third-party driver management tool.

Scanning issues can often arise due to antiquated or faulty scanner drivers. So, it might be worthwhile to scan your PC’s drivers with driver updater software when QuickBooks error 281 arises.

Such a scan will highlight if your scanner has an outdated or faulty driver and enable you to update its driver.

⇒ Get Outbyte Driver Updater

2. Install TWAIN scanner drivers

Note that you need to utilize a TWAIN-compliant scanner for QuickBooks Scan Manager. Make sure you’ve installed your scanner’s TWAIN driver, which will be available for download on the scanner manufacturer’s website.

You’ll also need to have configured your scanner for TWAIN scanning.

3. Turn off UAC

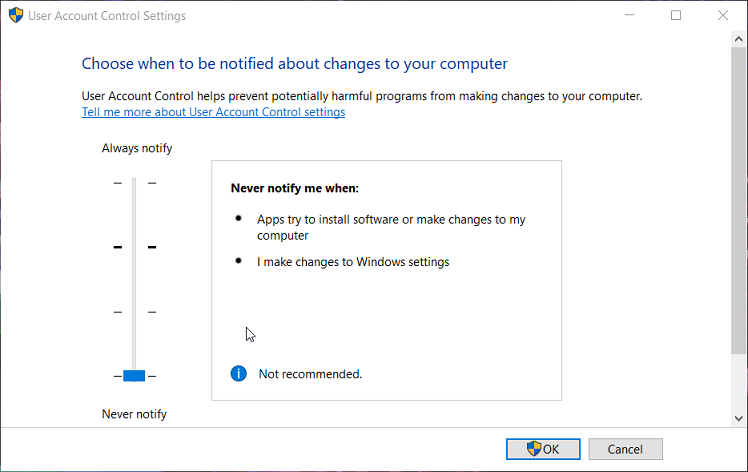
  1. Click the Type here to search button that’s on Windows 10’s taskbar (or you can press the Windows + S key combo).
  2. Next, input the keyword UAC in the search text box.
  3. Select Change User Account Control settings in the search box to open the window shown directly below.
    UAC settings quickbooks scanner driver error 281
  4. Drag the UAC slider bar down to the Never notify setting.
  5. Click the OK button.
  6. Try scanning receipts and invoices in QuickBooks with UAC disabled.

Note: It’s recommended that users turn UAC back on when they don’t need to scan anything with QuickBooks. To do that, drag the UAC slider up to the Always Notify setting and click OK.

4. Update QuickBooks

  1. Open the search box in Windows.
  2. Type QuickBooks in your search box to find that accountancy software.
  3. Click the Run as administrator option for QuickBooks to launch that software.
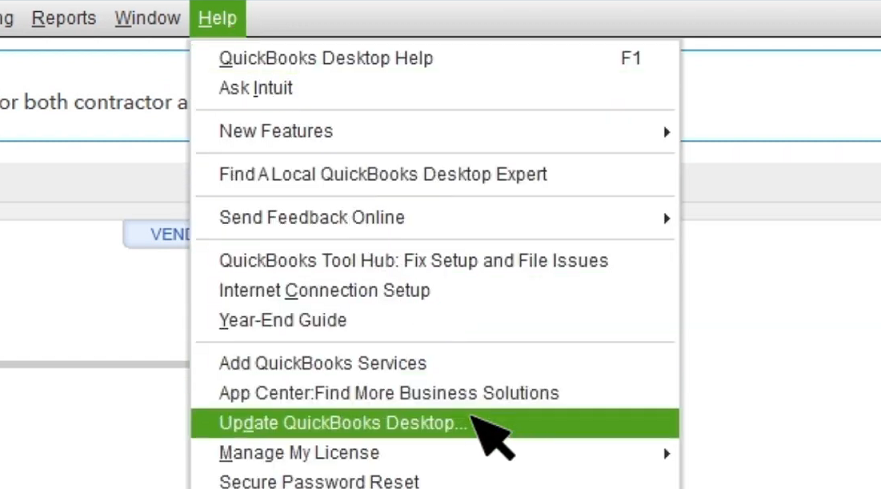
  4. Next, click the Help menu shown directly below.
    Update QuickBooks Desktop option quickbooks scanner driver error 281
  5. Select the Update QuickBooks Desktop option.

5. Repair QuickBooks

  1. Press R whilst holding down the Windows keyboard key to open Run.
  2. Input this command within Run’s text box: appwiz.cpl
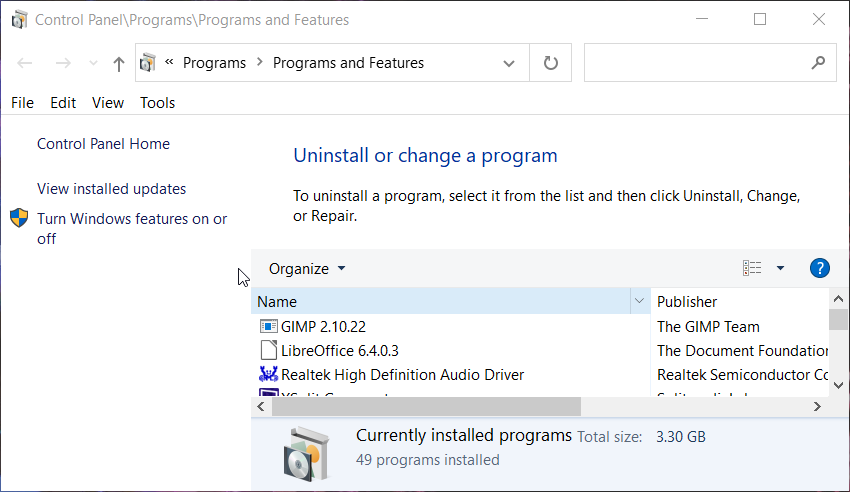
  3. Then select the OK option to open the Programs and Features applet.
    The Programs and Features applet quickbooks scanner driver error 281
  4. Next, select the QuickBooks Desktop software that’s listed in the Programs and Features window.
  5. Click the Repair (or Uninstall/Change) option for your QuickBooks software.
  6. In the window that opens, press the Next button.
  7. Then click the Repair button.
  8. Thereafter, click Finish to exit.

6. Reinstall QuickBooks Desktop

  1. Open the Windows uninstaller as covered within the first three steps of the previous resolution.
  2. Select your QuickBooks software.
  3. Click the Uninstall option for the selected software.
  4. Go through the additional prompts to uninstall QuickBooks.
  5. Restart Windows 10 after removing QuickBooks.
  6. If you have a DVD for QuickBooks, reinstall the software with that.
  7. Users who purchased QuickBooks online can download the software from the QuickBooks Desktop downloads page. Then reinstall the software with the downloaded installer.
  8. You can also uninstall QuickBooks with third-party uninstaller software. Many of those utilities will erase leftover residual files from uninstalled software the default Windows uninstaller leaves behind.

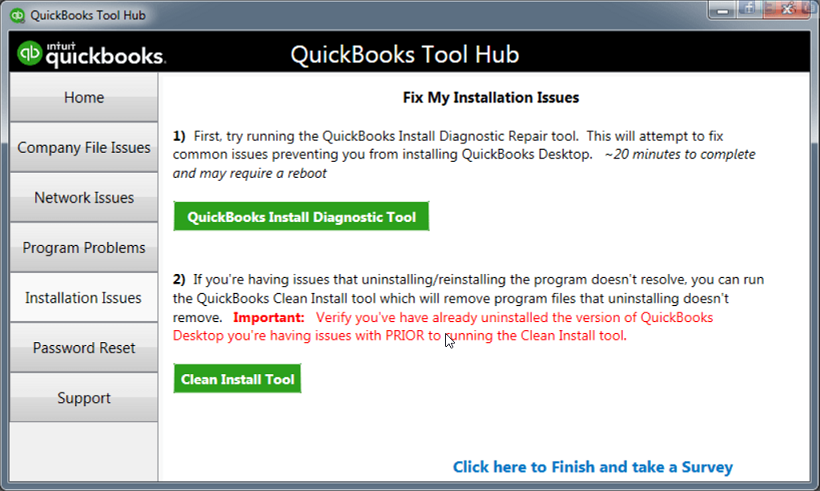
Note: There’s a QuickBooks Tool Hub utility that completely removes leftover files from a previous QuickBooks Installation. Click Download Now on the QuickBooks Tool Hub page to download it. Then install that utility with its setup wizard.

After you’ve installed QuickBooks Tool Hub, open that software; and select the Installation Issues tab. Click the Clean Install Tool button. Then select your QuickBooks Desktop version, and click the Continue button.

QuickBooks Tool Hub quickbooks scanner driver error 281

Aside from that, QuickBooks Tool Hub includes some handy program troubleshooting tools to boot. You can click a Quick Fix my Program button on its Program Problems tab. So, maybe that troubleshooting option might help fix QuickBooks scanner driver error 281 as well.

7. Run the Hardware and devices troubleshooter

  1. Open the search utility in your Windows platform.
  2. Input CMD in the search text box to find the Command Prompt.
  3. Open the Command Prompt by clicking the Run as administrator option for it.
  4. Then type in this command: msdt.exe -id DeviceDiagnostic
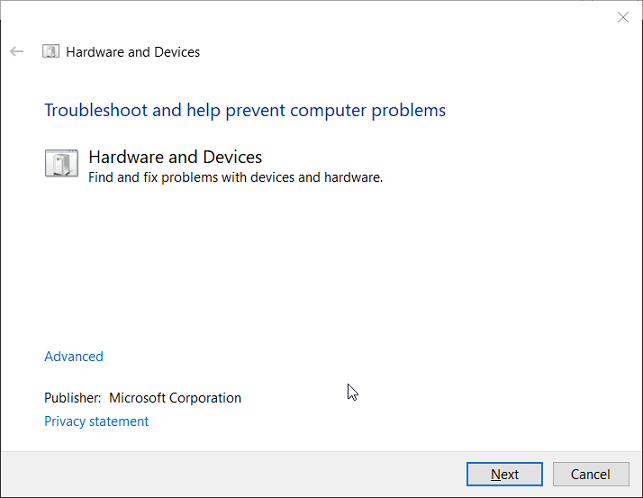
  5. Press the Enter key to open the Hardware and devices troubleshooter in the snapshot directly below.
    Hardware and Devices troubleshooter quickbooks scanner driver error 281
  6. Click Advanced on that troubleshooter’s window.
  7. Select the Apply repairs automatically checkbox.
  8. Then click Next to initiate the troubleshooting.

Those are some of the more likely fixes for the QuickBook error 281 scanning issue. QuickBooks also has a dedicated customer support service that might also help you resolve error 281.

You can click the Contact Us button on the QuickBooks Support page to get in touch with an Intuit agent.

How to update Gateway ZX4800 touch screen driver

To make sure that your device is working properly, you clearly have no other choice but to install the latest related drivers.

Fortunately, rest assured that it is not necessary to be trained to ensure that your device is working without any errors.

This guide will explore a few options you can try to install and update your Gateway ZX4800 touch screen driver.

How can I update the Gateway ZX4800 touch screen driver?

1. Download the driver from the manufacturer’s website

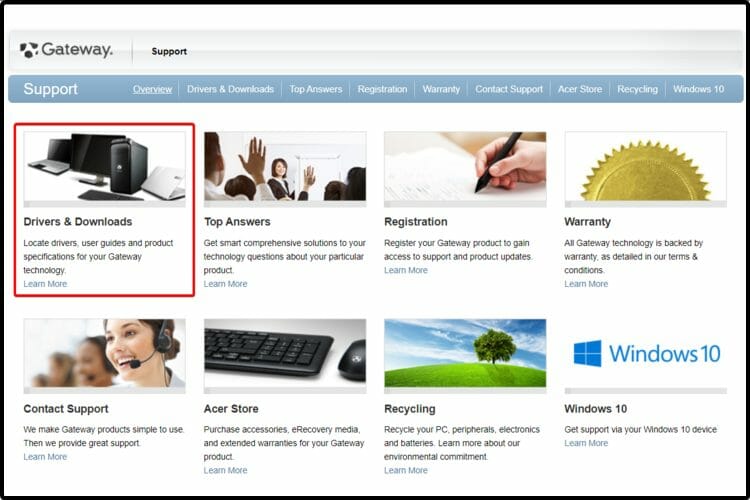
  1. Go to Gateway’s driver download page.
  2. Click on the Drivers & Download category.
  3. Search for ZX4800 and click on the shown option.
  4. Find the Chipset Driver and click on the Download blue button.
  5. Follow the given steps to complete the procedure.

2. Use third-party software

In order to automatically install and update your Gateway ZX4800 touch screen driver, you should definitely consider the support of dedicated software.

Not only that it is able to save much more of your time, but it will constantly keep your software components safe and up to date.

3. Use Device Manager

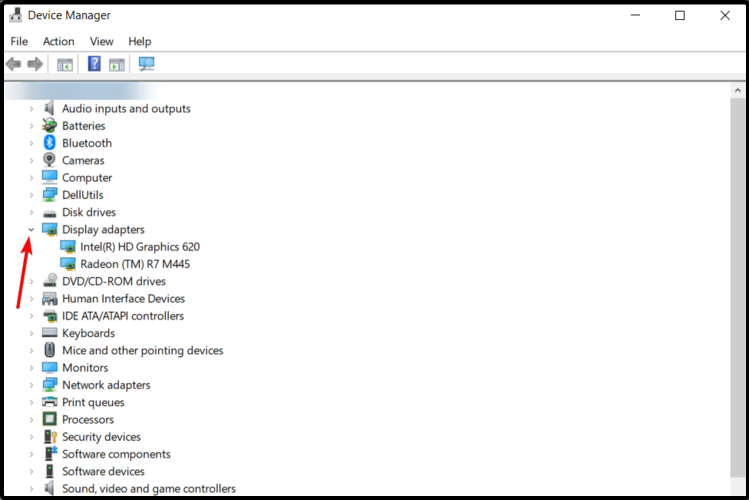
  1. Open Device Manager.
  2. Expand the Display adapters.
  3. Locate the touchscreen device on the list, right-click on it and choose the Update driver option.
  4. Click on Search automatically for updated driver software.
  5. Windows will search automatically for a suitable driver and will optimally update it.

These were the most reliable suggestions you can find to install and update your touch screen driver.

For more information, we strongly recommend you checking out a full guide about how to update drivers in Windows 10.

Which one of the presented methods above worked best for you? Don’t hesitate to leave an answer in the comment section below.

FIX: Connectify error during driver install on Windows 10/11

Even though most homes and workplaces nowadays use routers to spread the Wi-Fi signal to multiple devices, there’s always a place for an extra Hotspot.

Maybe you’re limited to a single LAN cable, or you want to limit network administrator by creating your own network inside the network (is networkception a legitimate term?).

Either way, in the abundance of hotspot solutions for PCs (including a built-in hotspot for Windows 10), we concluded that Connectify Hotspot is the sharpest tool in the shed.

However, there are users that complain about Connectify showing the Error during driver install message when they try to install the software on Windows 10.

Of course, that means that they cannot install the program at all but we have some solutions to make this work after all.

How do I fix the Connectify error during driver install?

1. Delete the partial installation

If the installation stopped partway, the first step is to clear the already installed parts that the software managed to copy.

Look for the Program Files folder and delete all files from there because when you will install it again freshly, you will need to do that on a clean slate.

You can also use a dedicated uninstaller software that will make sure that it will clean absolutely all leftover files from your drive.

2. Uninstall your third-party antivirus

According to Connectify, this issue may be caused by another application blocking the driver installation.

They suggest that Kaspersky antivirus may be the culprit in this case so if you have it installed, try to uninstall it at least temporarily.

You can also solve this by disabling the Self-Defense function in Kaspersky so make sure you try that too.

3. Run a dedicated file from the developer

  1. Download the DriverInstallPermissionsFix.bat.
  2. Save it on your drive.
  3. Double click to run the file.
  4. It may prompt you for administrator access and you should grant it.
  5. Try running the Connectify installer again.

This file was created by the developer to fix the problem with the driver error so the Connectify installer should run smoothly now.

4. Check if the Device Install Service is not disabled

  1. Type services in Windows search and click on Services app from the results.
  2. In this window, scroll down to Device Install Service. 
  3. Right-click on it and choose Properties.
  4. On the General tab, check if the Startup type is not set to Disabled. If so, change it to any other option and try running the Connectify installer again.
  5. If the Startup type was already Manual or Automatic, try the next solution.

If the Device Installer Service is disabled, that would be the reason why the Connectify app can’t install the driver and hence this issue. Follow the steps above to check it.

5. Run the installer in Safe Mode

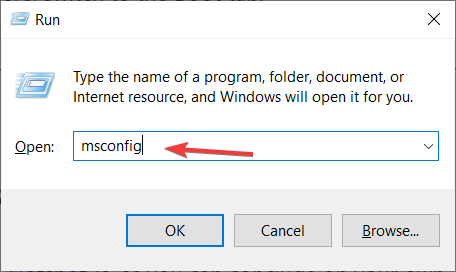
  1. Press the Windows key + R to open the Run box.
  2. Enter msconfig and press Enter.
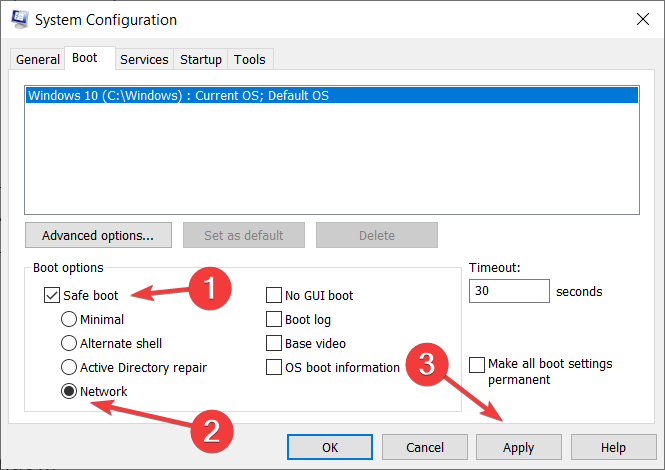
  3. Switch to the Boot tab from the System configuration window.
  4. Under the Boot options, check Safe Boot.
  5. And beneath that option also check the Networking checkbox.
  6. Save your changes and restart your computer.

After the restart, the system will run in Safe Mode. Try to install Connectify now and exit the Safe Mode.

You may probably need to install the app again in the normal mode, but it won’t need the driver installation anymore so it will run just fine.

What’s Connectify Hotspot exactly?

Connectify Hotspot is, as you can conclude on your own, an application used mainly for creating a Hotspot.

It uses LAN or Wireless connection you already established on your PC and spreads it, enabling other devices to connect as well.

It’s basically a virtual router that offers standard WPA2-PSK encryption. These are the most prominent features you can expect from Connectify Hotspot:

  • Ease of use. The user interface is as simple as they come
  • WPA2-PSK encryption
  • Sharing LAN or Wireless connection
  • Monitoring network usage for every connected device individually
  • Multi-language, emoji, and Unicode support for SSID name
  • Ad-blocker for all the devices connected to a hotspot

There’s more, but the extra features are reserved for PRO and MAX versions of the app. In addition, we must inform you that this tool doesn’t support Windows XP or Vista.

We hope that our guide helped you fix the driver error issue and now Connectify is running smoothly.

If that’s water under the bridge, you can also look at our guide on how to configure and use Connectify on your PC.

And if you know about any other good solutions to fix this problem, make sure you tell us all about it in a comment below.

Windows 11 for business is safer and encourages hybrid work

The new Windows 11 is said to be more about the average user and his improved experience, but the business-related new features are no less impressive.

There is not a dedicated version of Windows 11 for business, but the OS will change the hybrid work paradigm with a lot of boost in the productivity department.

There will be also new commerce opportunities created by a new Microsoft Store and easier deployment for IT managers to handle.

Microsoft also touts security improvements for devices and in the cloud and promises new tools for developers who will also have less hustle with the application process for their apps.

What is Windows 11 for business bringing new to the table?

1. Hybrid work with multiple desktops

It’s not the first time when Microsoft is mentioning hybrid work. It’s a concept in development since the pandemic forced us to adapt to multiple working environments.

Many of us don’t have physical offices anymore or combine them with other environments for a totally different experience.

And from Microsoft’s perspective, it’s also about facilitating the link between Microsoft Azure, Microsoft 365, and Microsoft Teams.

However, there are also a few neat tricks that will also boost the productivity while facilitating the environment change.

Multiple desktops for multiple environments

Windows 11 is remembering your desktop layouts – yes, that’s right, multiple desktop layouts – when you disconnect your device from the work display and go home.

That seems like a minor change but it’s really huge for those who perform this maneuver every day and find their icons all over the place.

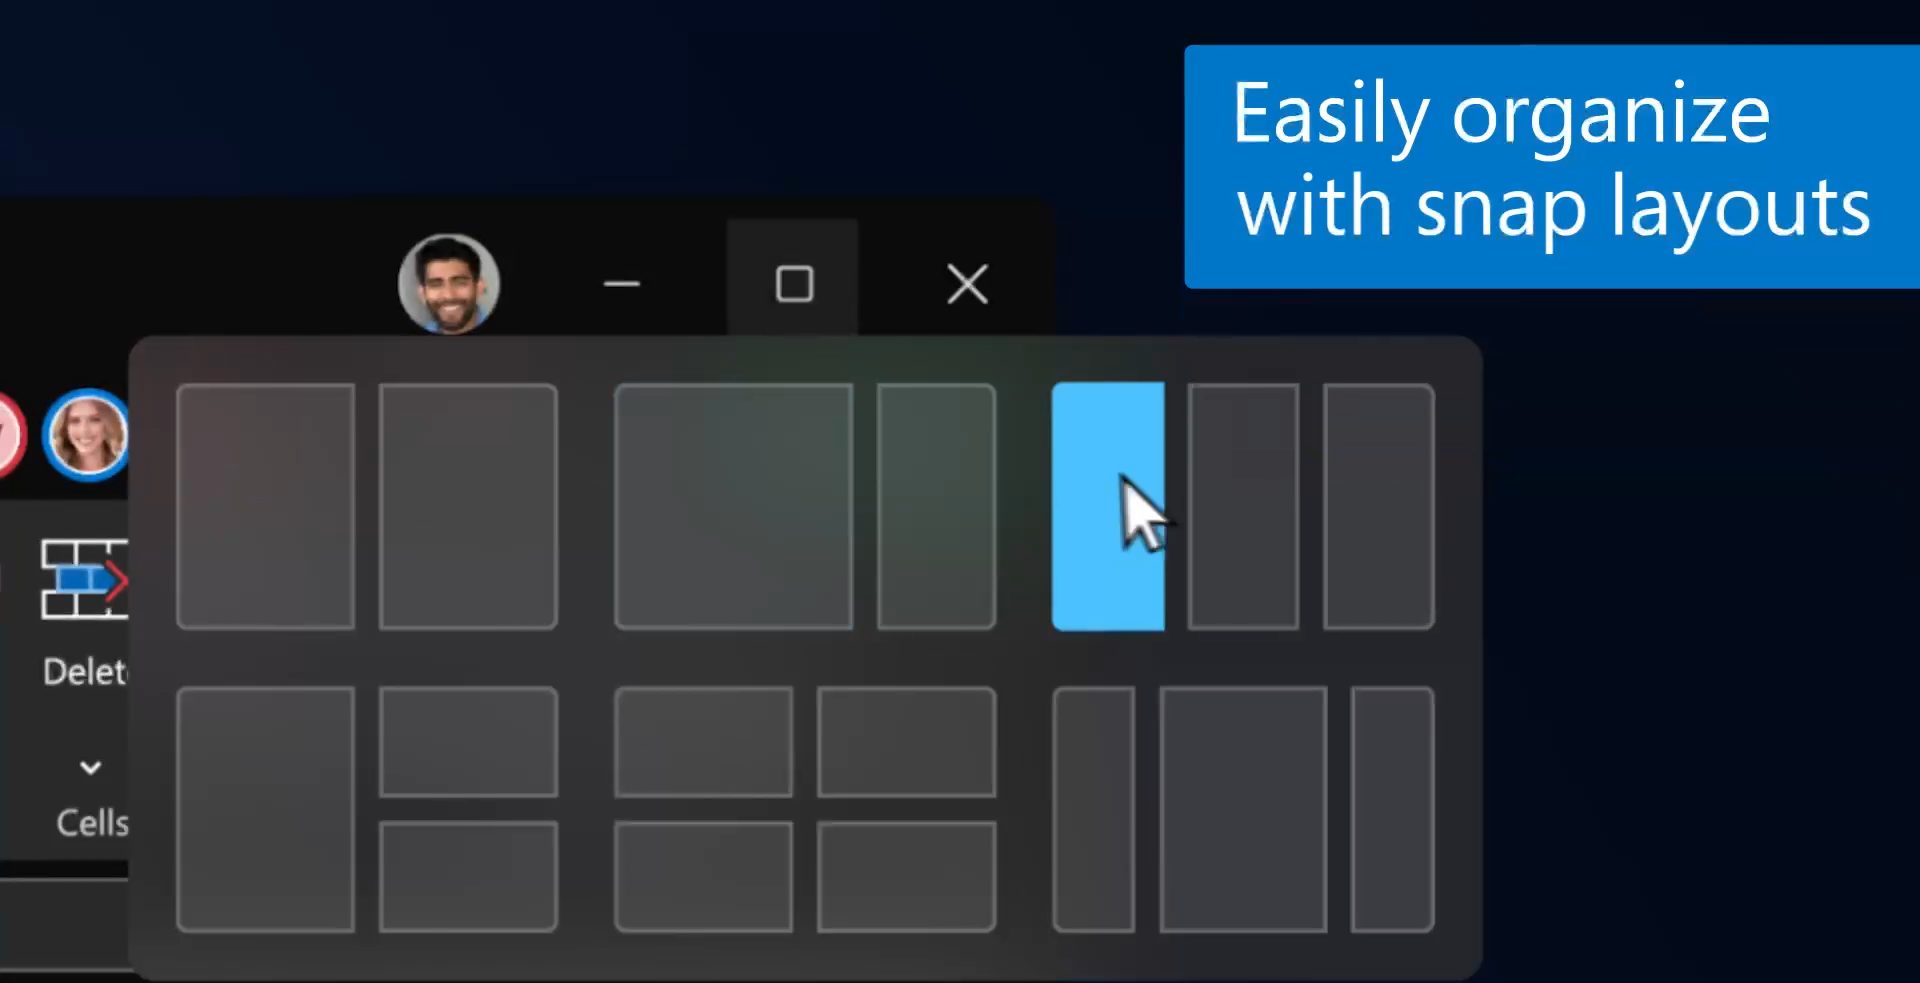
There is also a new feature to create snap layouts to arrange windows on the screen. And they are also remembered if you unplug your device from an external monitor and plug it back in.

Customizable widgets for extra information

There is also the widgets feature that can help you either get more information for your work or, on the contrary, disconnect you from it while you get home and try to find some information for yourself.

Microsoft especially touts the News widget that can pe personalized perfectly to get the best out of your preferred sources.

Universal Mute button

Whether you’re using more communication platform or just one, sometimes it’s pretty hard to find the mute button in an application.

And if your microphone doesn’t have a mute button, you can have issues if you must do that fast. Now, in Windows 11, you have a universal button that will mute your microphone in all apps.

2. New Microsoft Store, new opportunities

App stores are mainly dominated by games and Microsoft promises to change that to attract the general audience.

They promise to create a better search experience and get more content from the business area, all optimized for Windows 11.

That is good news for the developers who will now be more motivated also because Microsoft promised to change the revenue-sharing policy.

Now, developers will get to keep all the revenue instead of the 85% – 15% policy like it is right now and will also be able to use their own commerce engines.

3. Improved security

Microsoft is basically boosting up security in all instances, including at the hardware level. And that where the already infamous TPM 2.0 steps in.

It’s not all random that this TPM 2.0 is a requirement and not an optional request although right now it can be bypassed pretty easily.

Microsoft touts Windows 11 as a zero-trust platform based on hardware isolation, encryption, and malware prevention that are all in effect from the first instance.

Another great news for IT managers is the fact that the new Microsoft Defender for Endpoint (the ex Defender ATP) will allow them to see also any foreign devices connected to their network.

4. Less work for IT managers

First of all, Microsoft ensured IT managers that Windows 10 will continue to work just fine under Windows 11.

Even so, they have set up an App Assure service to help developers fix any compatibility issues.

That means that even if they don’t work readily, they will be fixed in no time so the IT managers won’t have any compatibility issues on their hands.

Moreover, Microsoft has prepared a Microsoft 365 Test Base that will show the IT staff how certain apps perform in Windows 11 or in the cloud before deploying it.

Even more, all the deployment and management tools used right now for Windows 10 will continue to work perfectly fine on Windows 11.

Overall, judging by the number of business-oriented features in the new Windows 11, we would say that it’s a pretty balanced update. It has something new for everyone to enjoy and motivates us to upgrade as soon as possible.

This brings us to the issue at hand. If you get an error saying This PC can’t run Windows 10, check out our guide to help you fix the problem.

What do you think about the business-related improvements in Windows 11? Let us know your thoughts in the comments section below.

Disable DWM on Windows 11: Can You Still do it?

Among the many other apps or features that we will inevitably have to part ways with, once we start using Windows 11, is the popular Desktop Window Manager (DWM).

If you, by any chance, are wondering what DWM (dwm.exe) is, know its a compositing window manager that renders all those pretty effects in Windows.

We are, of course, talking about transparent windows, live taskbar thumbnails, Flip3D, and even high resolution monitor support.

No more DWM killing in Windows 11

This subject sparked quite a conversation across social media platforms, as many users that currently have an early version of Windows 11 installed on their devices, are already missing it.

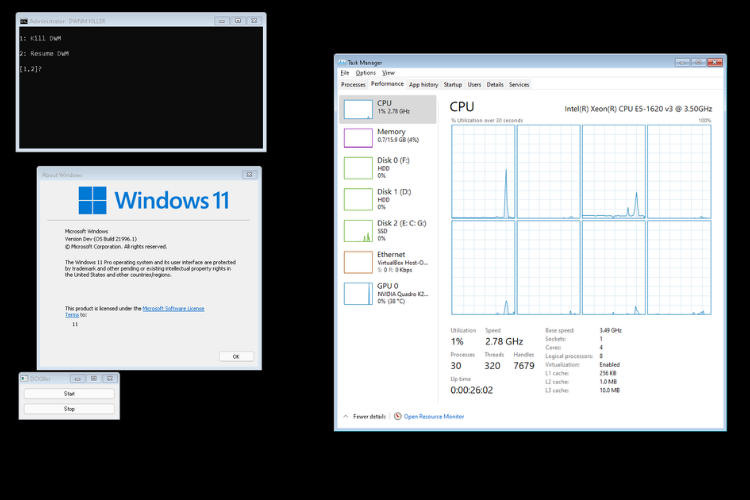
According to a Windows 11 user, that started a thread on Reddit, this is what happens when you disable the DWM on Windows 11.

Many of the respondents to this heated conversation were star-struck that people even use such software, in the first place.

The ones that do utilize DWM state that their only reason for messing with the DWM is to improve gaming performance.

More exactly, on the new operating system, the Device Windows Manager doesn’t function anymore. Even if for some, the software looks like it’s completing its tasks, the results are inexistent.

It reduces input latency in some games that don’t have native exclusive fullscreen, and other things but that’s what I use it for

So you can add this to the long list of pro’s and con’s for the upcoming operating system switch. More and more users are starting to become a bit disappointed with all of Microsoft choices, lately.

We have to understand that Windows 11 still has a long way to go before it can really present itself to the public as an OS.

And we also have to believe that every hard choice that the Redmond tech giant makes is for the bettering of it’s software.

And, most likely, at a certain moment in time, someone will surely come up with another piece of software that will fulfill the same purpose. Few users reported that DWM has crashed on Windows 11, and we have a dedicated guide that addresses this, so don’t miss it.

Have you tried Windows 11 yet? Tell us about your experience so far, in the comments section below.

Some Windows 11 systems will run without the TPM 2.0 chips

Following the backlash that one of the Windows 11 system requirements faced from Microsoft’s current OS users, you would think that the company would do something about it.

And it did, but not for everyone. Microsoft now says that some systems will be able to run this controversial operating system without the dreaded TPM security chip requirement.

Update: Windows 11 only requires TPM 1.2

Only a few systems will be able to bypass this requirement

The bad news for your everyday Windows users is that, unfortunately, normal users won’t have access to the installation ISOs or workaround used for those builds.

We could indeed see them leak to the public, at some point following the big release, after the dust settles a bit.

These special builds are most likely designed for use in countries that don’t use Western encryption technologies, such as China and Russia.

The tech giant has clarified that some systems will work without any TPM cryptoprocessor enabled, which will make the requirement seem unnecessary.

The full system requirements for Windows 11 have been republished by Microsoft, in a PDF that contains sixteen pages of tech insight, regarding the new OS.

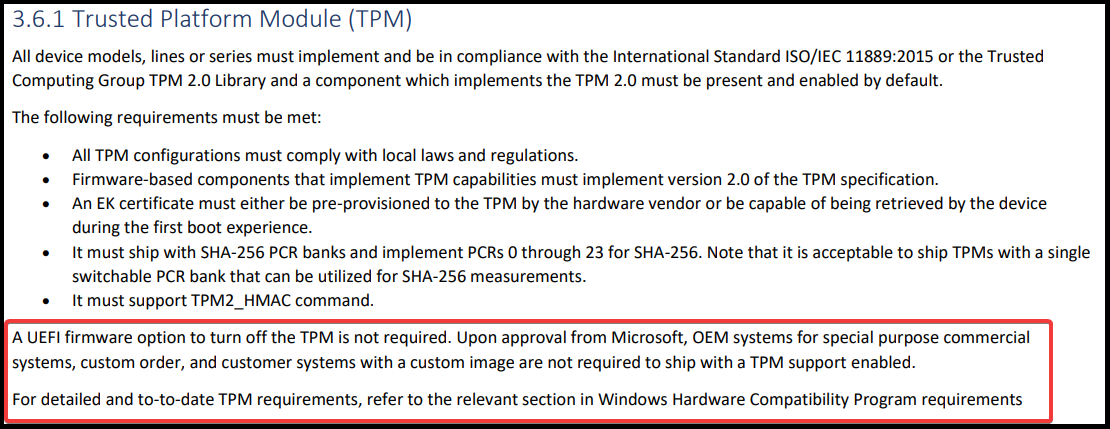
Thus, installing Windows 11 on a system without TPM enabled will require special approval from Microsoft.

The tech company will allow OEMs for special purpose commercial systems, custom order, and customer systems with a custom image to ship systems without TPM support enabled.

So, it seems that for the rest of us these TPM chips are a mandatory hardware asset, which means everyone needs to get their hands on one as fast as possible.

Now that there is such a high demand for them, the TPM 2.0 chips are highly expensive and hard to find, going for 4-5 times their initial price.

Example of a TPM free system that runs Windows 11

According to information recently made public, there is already a system build that has the capability to run Windows 11 without fulfilling the mandatory TPM chip requirement.

The devices specs are:

  1. CPU: Intel Pentium Dual-Core E6600 3.06 GHz
  2. RAM: 3GB DDR2
  3. HDD: 256GB for Windows and 512GB for files
  4. DirectX 12
  5. WDDM 2.0
  6. No TPM and Secure Boot
  7. Display: 1280×1024
  8. System firmware: Legacy BIOS

To learn more about TPM, head to our Windows 11 TPM guide for detailed information.

Have you managed to get your TPM security chip? If so, share your experience with us in the comments section below.

Xbox Cloud Gaming shifts to Xbox Series X hardware and officially launches on Windows 10 and iOS

Following a private beta that kicked off in April, Xbox Game Pass Ultimate members in 22 markets can now access Xbox Cloud Gaming on Windows 10 PCs and iOS devices via the web, Microsoft announced today. The cloud gaming service is now generally available on xbox.com/play on Microsoft Edge, Chrome, or Safari on your PC or mobile device, and it’s a big milestone in Microsoft’s journey to bring the Xbox experience to billions of new devices.

The company also confirmed today that it’s done upgrading its Xbox Cloud Gaming servers with custom Xbox Series X hardware, which should significantly improve the gaming experience with faster load times, better graphics, and improved frame rates. These server upgrades were done at no additional cost for Xbox Game Pass Ultimate subscribers, which is really great.

“To ensure the lowest latency, highest quality experience across the broadest set of devices, we will be streaming at 1080p and up to 60fps. Going forward we’ll continue to innovate and add more features to enhance your cloud gaming experience,” Microsoft said today.

Earlier this month, Xbox head Phil Spencer revealed that Microsoft was working to bring Xbox Cloud Gaming to new devices including TVs. Microsoft will partner with Smart TV manufacturers to launch an Xbox Cloud Gaming app for these big screens, and the company is also planning to launch dedicated streaming devices for older TVs that can’t connect to the Internet. Last but not least, Xbox Cloud Gaming is also coming to Xbox consoles, which will allow Xbox gamers to easily try games in the catalog before downloading them.

Microsoft confirms signing Netfilter rootkit malware

Were you wondering what Microsoft has been up to these days, except preparing Windows 11 for the big release, later this year?

Well, this time the Redmond company really got careless, as they signed a malicious driver, that has been distributed within gaming environments.

These are not rumors anymore, as Microsoft already admitted to this monumental fiasco.

The Netfilter driver is Microsoft’s rootkit

The driver we are talking about, called Netfilter, is actually a rootkit that was monitored while communicating with Chinese command-and-control (C2) IPs.

Analysts from the security firm G Data first noticed this event last week and already started tracing and analyzing the malicious drivers that had Microsoft’s seal on them.

Needless to say that the incident in cause has once again exposed the threats to software supply-chain security, only this time it started from a weakness in Microsoft’s code-signing process.

G Data researchers spent quite some time thoroughly analyzing the driver and have concluded it to be malware. As specified in the blog post, the discoveries they made shook them to their very core.

Worth knowing is that the C2 IP 110.42.4.180 that the malicious Netfilter driver connects to, belonged to Ningbo Zhuo Zhi Innovation Network Technology Co., Ltd.

Microsoft admitted to being guilty in this sensitive matter

According to the tech giant, the threat has been mainly targeting the gaming sector in China with these malicious drivers, but there are no signs of enterprise environments having been affected so far.

Microsoft has also refrained from attributing this incident to a specific nation just yet.

We have suspended the account and reviewed their submissions for additional signs of malware.

If you didn’t already know, falsely signed binaries can be continuously abused by sophisticated third parties in order to facilitate large scale software supply chain attacks.

The worst thing for Microsoft is that this incident has exposed weaknesses in a legitimate code-signing process, exploited by malicious third parties in order to acquire Microsoft-signed code without compromising any certificates.

We will keep an eye out for any developments in this story and keep you updated.

Microsoft releases new Office Insider build with ARM support and Windows 11 visual refresh

As Microsoft has just released the first Windows 11 Insider build today, the Office team has followed up with a new Office Insider Preview Build which introduces a refreshed UI, rounded corners, and an improved experience for dark and light modes. This update is now live for all Beta Channel users running v2107 Build 14228.20000 or newer on Windows 10 and Windows 11 PCs.

“This Office visual refresh is based on feedback from customers who asked for a more natural and consistent experience within and between your applications, specifically on Windows. With this update, we deliver an intuitive, coherent, and familiar user interface, using the Fluent Design principles, across all your applications: Word, Excel, PowerPoint, OneNote, Outlook, Access, Project, Publisher, and Visio. We aligned this visual refresh with the design of Windows 11 to provide seamless experiences on your PC,” the Office Insider team explained.

Zoomed view of new theme in Word, Excel, and PowerPoint

The latest update delivers a natural and consistent experience across all Office apps on Windows. It makes it easier for users to collaborate with their colleagues while working on Excel and PowerPoint on Windows 11. In addition, the Microsoft Office app will now match the default Windows theme on Windows PCs, making it easier for users to see these visual changes in their favorite Office theme.

Microsoft noted that Office Insiders will be able to turn off this update by disabling the Coming Soon toggle button available at the top right corner of the menu. This feature is currently only available in Outlook, and it is not yet supported in Access, Project, Publisher, or Visio.

Task Manager with Details tab active

Finally, Microsoft noted that Windows Insiders will now be able to download the 64-bit version of Office for Windows on ARM. “This new version of Office is designed specifically for the next version of Windows on ARM. It has been recompiled for the ARM architecture to run fast, bring greater memory availability, offer better support large documents, and maintain compatibility with existing 64-bit add-ins using the new x64 emulation capability provided by Windows,” the Office Insider team said today. If you’re interested, we invite you to check out this blog post for more details.

Microsoft announces ARM64EC – a new way to build apps on Windows 11 on ARM

If you’re a fan of Windows 11, it’s a big day. Microsoft has released the first build of Windows 11, clarified while (mostly) sticking to its stance on blocking pre 8th gen CPUs, and has also announced a new “Emulation Compatible” binary interface for Windows 11 on ARM, called ARM64EC. The new interface allows developers to transition their apps to run with native speed on ARM, even if they “dependencies or plugins that don’t support ARM yet.”

The ARM64EC can “freely mix and match” between ARM64EC emulation layer and native ARM 64 by runnining ARM64EC in (parts of) an app, while any ARM 64 native code will run using Windows 11 on ARM’s built in emulation.

Microsoft describes the benefits to developers in a blog post:

Traditionally, rebuilding an app for ARM has meant recompiling the entire app. The result is a great native experience for the customer that unlocks the full power of the ARM device. However, from a developer perspective, porting an app can be all-or-nothing, since all the binaries within a process need to be rebuilt before a customer can see the benefit.

With ARM64EC, you can choose to start small and build incrementally. You can identify a part of your codebase that would benefit most from native performance and rebuild it as ARM64EC. The rest of the app will remain fully functional as emulated x64, but the recompiled ARM64EC parts will now have native speed.  Over time, you can recompile more of the app as ARM64EC to further improve performance and conserve battery life for your app’s customers.

Developers can get started by downloading the latest Windows Insider SDK and the Visual Studio Preview. You can learn more on the blog post.

What edition of Windows 11 will you be upgraded to?

A question that was bound to come up at some point, rather sooner than later, has now been on the minds of every Windows user in the world.

Seeing how Windows 11 is supposed to be a free upgrade, for the users that run the licensed Windows 10 product versions from Microsoft, when the transition happens, will we all be upgraded to versions we have now, such as Pro, Education, or Home?

Will Windows 11 upgrades be version based?

Social media has been absolutely buzzing with lots of users asking the same question. And although the answers aren’t all the same, or very convincing, common sense triumphs in such a discussion.

For example, its not very probable that Microsoft will upgrade a user’s Windows 10 Home to a Windows 11 Pro version. Most likely the company will stick to the version that each user has installed.

Or it could be that Microsoft would want to test the waters with a more general version of Windows 11, which will represent the upgrade for everyone, regardless of current installed versions.

We’ll just have to wait and see what the future has in store for us but, for the moment, the most plausible outcome is that the Redmond company will upgrade the OS’s depending on their versions.

When will Windows 11 be officially released?

There isn’t an official release date yet, but everyone is expecting the upgrades to Windows 11 to begin rolling out to the public late in 2021 and continue into 2022.

In the meantime, we can all make sure our devices are ready for the new OS, as Microsoft already made some pretty specific system requirements public.

Also make sure to think ahead and get your hands on one of the highly coveted TPM 2.0 security chips, if your devices doesn’t already have one.

As you can remember, the price for these chips is already skyrocketing to ridiculous sums, so make sure you have your own when Windows 11 comes out.

We still have almost half a year to prepare for the new Windows experience, and also enough time to become Windows Insiders and give Windows 11 a thorough check up, before the time comes.

The first preview versions for Insiders are coming really soon, according to Microsoft.

What version of Windows 10 are you currently running? Let us know in the comments section below.

Microsoft further confirms Windows 11 block for pre 8th gen/AMD Zen 2/Qualcomm 7 CPUs (Updated)

Microsoft just released the first build of Windows 11 for Insiders, but a Windows 11 block on pre 8th gen Intel chips has been getting a lot of attention over the weekend. Microsoft today has confirmed and clarified a somewhat controversial stance that CPUs less than 8th generation (Intel) will not meet the requirements for a Windows 11 installation once it’s released this fall. During the Windows Insider testing period, Microsoft had already announced that Insiders will be exempt from the block, but only for the life of the beta. Some changes to the stance may be forthcoming, as the blog post details:

Using the principles above, we are confident that devices running on Intel 8th generation processors and AMD Zen 2 as well as Qualcomm 7 and 8 Series will meet our principles around security and reliability and minimum system requirements for Windows 11. We also know that devices running on Intel 6th generation and AMD pre-Zen will not. As we release to Windows Insiders and partner with our OEMs, we will test to identify devices running on Intel 7th generation and AMD Zen 1 that may meet our principles. We’re committed to sharing updates with you on the results of our testing over time, as well as sharing additional technical blogs.

UPDATE: Although the blog post has only been up for less than an hour, Microsoft has already backtracked. In the initial post, as you can see above, Microsoft said “We also know that devices running on Intel 6th generation and AMD pre-Zen will not.” However, as noted by Brad Sams, that line has now been removed. What this means for the future of 6th generation chips, remains, as always, unclear.

In addition, Microsoft released a PC Health Check app to check on whether your PC would meet requirements to install Windows 11, but because “it was not fully prepared to share the level of detail or accuracy you expected from us on why a Windows 10 PC doesn’t meet upgrade requirements,” the app is being temporarily pulled.

While there was lots of consternation on Twitter this weekend over the exclusion of pre 8th gen CPUs, at least they’ve outlined the principles for make what has seemed to be an arbitrary line in the sand:

  1. Windows 11 raises the bar for security by requiring hardware that can enable protections like Windows Hello, Device Encryption, virtualization-based security (VBS), hypervisor-protected code integrity (HVCI) and Secure Boot. The combination of these features has been shown to reduce malware by 60% on tested devices. Windows 11 does this all supported CPUs having an embedded TPM, supporting secure boot, and supporting VBS and specific VBS capabilities.
  2. Devices upgraded to Windows 11 will be in a supported and reliable state. By choosing CPUs that have adopted the new Windows Driver model and are supported by our OEM and silicon partners who are achieving a 99.8% crash free experience.
  3. Compatibility. Windows 11 is designed to be compatible with the apps you use. It has the fundamentals of >1GHz, 2-core processors, 4GB memory, and 64GB of storage, aligning with our minimum system requirements for Office and Microsoft Teams.

So bottom line is, for PCs running 6th gen/ pre Zen CPUs, you’re going to be out of luck (maybe, see update above). For 7th gen devices (like the Surface Studio 2), there’s hope, at least.


Microsoft details big performance improvements coming first to Teams for Consumers in the move away from Electron

Last week, Microsoft announced that it’s making some major under the hood performance improvements to the existing architecture of Teams to improve its performance on all platforms. The company today detailed the performance enhancements coming with its new Teams for Consumers architecture.

As noted by Maor David-Pur, Customer Success Leader at Microsoft on LinkedIn, the Redmond giant is currently working on Microsoft Teams 2.0, and it will soon update the current desktop application from Electron to Edge Webview2. This change will help to reduce the memory consumption of the app significantly, and it will utilize half the memory when compared to v1.0 of Teams.

Currently, the desktop version of Microsoft Teams for both Windows and Mac is built on the Electron platform. As you probably know, users have been complaining about the high memory usage of Teams since its launch, and these issues primarily affect the low-end devices, especially when multiple apps are running simultaneously. While Microsoft Teams 2.0 is still going to be a “Hybrid app,” however, going forward it will be powered by Microsoft Edge that should help to optimize the resource usage of the desktop app.

“Whether you’re running the Teams desktop app or the Teams web app, Chromium detects how much system memory is available and utilizes enough of that memory to optimize the rendering experience. When other apps or services require system memory, Chromium gives up memory to those processes,” David-Pur explained on LinkedIn. “Chromium tunes Teams memory usage on an ongoing basis in order to optimize Teams performance without impacting anything else currently running. In this way, similar Chromium workloads can utilize varying amounts of memory, depending on the amount of system memory that is available.”

This means that Teams 2.0 will now run better on thousands of low-end devices, and it will support much-awaited features like multiple accounts and more. However, this change will only benefit the existing consumer experience in Teams and the new integrated chat app in Windows 11. The firm plans to bring these performance improvements for Office 365 accounts in the future. “The journey is starting with Windows 11 + consumer accounts, and will continue from there,” Rish Tandon wrote on Twitter.

League of Legends: There was a problem setting your skin

League of Legends is probably one of the most popular video games. However, some users reported encountering the There was a problem setting your skin error message.

Apparently, this issue occurs on both rewarded and gifted skins. We understand how irritating this can be, so we are here to remind you that it’s time to take action.

This article will put in the light some of the best options you should consider when it comes to fixing this annoying inconvenience for good

How can I get rid of the League of Legends skin setting error?

1. Check if you own the champion

  1. Go to Collection, then select Champions.
  2. Look on the left side and select the Ownership category.
  3. Search for the champion related to your skin, or type its name in the Search box.

In order to be able to set your skin, you must own the related champion. To check it, you just have to follow the procedure described above.

2. Log out and log back in

  1. Log out from your account.
  2. Now log back into your account.
  3. Ask your friend to repeat the same steps.
  4. It usually takes a while for the game to recognize that you own the skin, so you might also wait a bit.

This option would be useful if there is an in-game bug that messes up the process. Thus, refreshing both of your accounts might help with your stuck skin.

3. Uninstall and reinstall the game

Uninstall League of Legends

  1. Open Settings.
  2. Go to Apps.
  3. Select Apps & Features from the left side.
  4. On the right side, scroll down to the Search this list bar, then type the game’s name.
  5. Locate and select your game, then click on Uninstall.

Reinstall the game

  1. Open the RIOT support website.
  2. Click on the Download for Windows button.
  3. Follow the on-screen instructions to install the game.

4. Submit a ticket to the support team

  1. Go to the League of Legends support website.
  2. Log in with your LoL credentials.
  3. Scroll down, then click on the Submit a ticket red button.
  4. In the search box, select Events, Promotions, Eternals & Your Shop, complete the indicated bars, then click on the Submit button.
Note icon NOTE
Do not hesitate to attach screenshots of your issue.

If you encounter the League of Legends There was a problem setting your skin error, rest assured that the above options will help.

For the times when LoL is acting weird, feel free to check a full guide about how to fix League of Legends crashes on Windows 10.

Also, for any other additional questions, keep in mind that you can simply leave a comment in the section below. We’d be glad to hear from you.

Fix: Cannot Remove Keyboard Language in Windows 10/11

Some users can’t remove keyboard language layouts via Windows 10 Settings in the usual way. Keyboard languages might reappear in Settings for some users after they’ve seemingly removed them.

Other users see languages in the system tray bar not listed within Settings. In one case or another, things shouldn’t remain like that for too long.

Let us show you how to get rid of this issue in no time. Our below keyboard troubleshooting tips are waiting for you.

What to do if you can’t remove keyboard layout languages?

1. Rearrange the listed languages

  1. Click the magnifying glass search button on Windows 10’s taskbar.
  2. Type the keyword keyboard language within the search text box.
  3. Select Edit language and keyboard options to open the window shown directly below.
    The Language tab Cannot remove keyboard language Windows 10
  4. Then select the listed keyboard language layout you want to remove.
  5. Click the down arrow button to move the selected keyboard language to the bottom of the list.
  6. Now the Remove option for the keyboard language you need to delete might no longer be grayed out. Press the Remove button for keyboard language if you can now do so.

The keyboard language at the top of the list always has a grayed-out Remove button. So, sometimes users need to rearrange the keyboard language list to remove a specific pack. This also helps when removing a display language in Windows 11.

If only one keyboard language is listed, you’ll need to install an alternative one before you can remove it.

2. Change the current system locale setting

  1. Open run right-clicking the Start taskbar button and selecting that accessory on the menu.
  2. Type this text into Run: Control Panel.
  3. Click OK to open the Control Panel’s window.
  4. Select the Category option on the Control Panel’s View by drop-down menu.
  5. Then click Clock and Region within the Control Panel.
    Clock and Region Cannot remove keyboard language Windows 10
  6. Click Region to open the window in the snapshot directly below.
    Region window Cannot remove keyboard language Windows 10
  7. Select the Administrative tab.
  8. Press the Change system locale button to open a Region Settings window.
    Region Settings window Cannot remove keyboard language Windows 10
  9. If the keyboard language you want to remove is selected on the Current system locale drop-down menu, choose a different one there.
  10. Select the Beta: Use Unicode UTF-8 for Worldwide Language Support checkbox.
  11. Press the OK button on the Region Settings window.
  12. Click Apply on the Region window to save the newly selected options.
  13. Thereafter, restart your PC.

3. Remove the keyboard language with PowerShell

  1. Open Windows 10’s Type here to search tool.
  2. Input Windows PowerShell as the search keyword.
  3. Click PowerShell to open its window.
  4. First, input this command and hit Enter: Get-WinUserLanguageList
    The Get-WinUser command Cannot remove keyboard language Windows 10
  5. Note down the language tag for the keyboard language layout you wish to remove.
  6. Next, input the following four separate commands into PowerShell (press Enter after each):
    $LangList = Get-WinUserLanguageList
    $MarkedLang = $LangList | where LanguageTag -eq <languagecode>
    $LangList.Remove($MarkedLang)
    Set-WinUserLanguageList $LangList -Force
  7. Restart your PC after entering the above commands.

You’ll need to replace <languagecode> in the second command with the actual language tag you noted down in the fifth step. If your language tag was en-GB, the command would like this:
$MarkedLang = $LangList | where LanguageTag -eq en-GB

4. Delete the keyboard language layout’s registry key

  1. Click the magnifying glass button for the search tool on the taskbar.
  2. Type Registry Editor within the search box.
  3. Select the Run as administrator option for Registry Editor within the search utility.
  4. Next, open this key within the Registry Editor window: HKEY_LOCAL_MACHINE\SYSTEM\CurrentControlSet\Control\Keyboard Layouts\
    Keyboard layouts key Cannot remove keyboard language Windows 10
  5. Open the Microsoft keyboard identifiers webpage in a browser.
  6. Find the keyboard identifier hexadecimal code for the keyboard language you want to remove on the identifier page.
  7. Then select a keyboard language layout key with a matching hexadecimal code within the Registry Editor. The Layout Text string for the selected key also tells you the language it’s for.
    Layout text string Cannot remove keyboard language Windows 10
  8. Right-click the keyboard language key and select Delete.
  9. Close the Registry Editor, and then restart your laptop or desktop.
Note icon NOTE
We recommend users back up their PCs’ registries, or create System Restore points, before deleting any registry keys or strings.

5. Edit the Preload registry key

  1. Open the Registry Editor as outlined within the first three steps of the previous resolution.
  2. Then open the Preload key at this registry path: HKEY_USERS\.DEFAULT\Keyboard Layout\Preload
    The Preload key Cannot remove keyboard language Windows 10
  3. Next, you’ll need to open Microsoft’s keyboard identifier webpage; and find the hexadecimal code for the keyboard language you want to remove there.
  4. Right-click the Preload string with a hexadecimal code that matches the one for the keyboard language you want to remove to open its context menu.
  5. Select the Delete option to erase the string.
  6. Right-click the Keyboard Layout key and select Permissions to open the window shown directly below.
  7. Click the Advanced button.
  8. Press the Disable inheritance button on the window shown directly below.
    The Advanced Security window Cannot remove keyboard language Windows 10
  9. Select the Remove all inherited permissions option to confirm.
  10. Click the Apply and OK options to return to the Permissions for Keyboard Layout window.
  11. Then select System within the window.
  12. Uncheck the Allow checkbox for Full Control to deselect it.
  13. Click Apply to save the new setting.
  14. Restart Windows 10 after editing the Preload key.

You’ll need admin user rights to edit the Preload key as outlined above. Also, note that you might be unable to add new keyboard layouts until you restore complete control of the System account.

Those are some of the resolutions users have confirmed to work. So, try them whenever you can’t remove a keyboard language layout.

Moreover, you can easily add keyboard layouts on Windows 10. Just follow the fantastic tips and tricks included in our guide in that regard.

Let us know in the comments area below which one worked for you. Moreover, if you know other solutions, don’t keep them all to yourself.

League of Legends Cheat Engine crash [Best Fixes]

Cheat Engine is a popular tool among PC gamers. It is designed to help you with modifying single-player games without an Internet connection to make the games easier or difficult according to your preferences.

However, several LOL user have reported the game crashes when using Cheat Engine. Your presence here is a sign that you might be facing the same issue as well.

When using Cheat Engine with League of Legends, your game may crash if the game developer has blocked the engine to deter potential hackers. However, this can affect even genuine users.

In this article, we show you the best ways to fix the League of Legends Cheat Engine crash problem on Windows computer.

What to do if the game crashes when using Cheat Engine?

1. Use a dedicated driver updater tool

An outdated and missing device driver may be causing the game to crash. While you can update the device drivers manually, automatic driver updater software can do this task instantly.

It scans for missing and outdated drivers and downloads them from its repository. You can choose to install individual or multiple drivers from the app settings.

2. Disable your antivirus software 

Antivirus software keeps a tab on suspicious files that are trying to modify the system or protected files.

If an external source is trying to fiddle with your League of Legends game files, your antivirus software may block the tool as a precautionary measure.

League of Legends Cheat Engine crash

To resolve the issue, disable your antivirus software temporarily. To do this, expand the system tray on your taskbar, right-click on your antivirus icon and choose Disable.

Next, choose the time you want the security solution to be disabled. Once disabled, relaunch League of Legends and check if the game issue is resolved. 

That said, you may also want to check if you have any other anti-cheat software installed on your computer that is blocking the actions from Cheat Engine. Remove or disable the software temporarily to see if that resolves the error.

Additionally, you could add the game to the exception list or prevent the antivirus from blocking your game or the cheat engine. Also, check other reasons that may prevent League of Legends from launching.

3. Find an undetected Cheat Engine Driver

You may encounter a League of Legends crash when used with Cheat Engine mod if the game developer has detected and blocked the game from using the software. 

Game developers do this to discourage game modifications that could be unfair to other players. However, there is a workaround to bypass the detection.

You can compile the software with an undetected Cheat Engine driver. You can find an undetected CE driver with a little search on the Internet.

In most, cases you may have to sign a real certificate yourself and make sure it passes the integrity check as well.

4. Run League of Legends without Cheat Engine 

  1. Press the Windows key + R shortcut to open Run.
  2. Type appwiz.cpl and click OK to open Control Panel.
  3. Locate League of Legends from the list of installed apps.
    League of Legends Cheat Engine crash
  4. Click Uninstall. Click Yes when prompted by the UAC.
  5. Reboot the computer after the game and the Cheat Engine is uninstalled.
  6. Download and reinstall the game from the official website and check for any improvements.

This may not be the ideal solution, but if you are unable to compile your own Cheat Engine, look for a CE alternative. First, uninstall Cheat Engine and then run the game to see if the crashing problem is resolved.

If the issue persists, reinstall League of Legends by applying the steps described in the above procedure.

The game crashes when using Cheat Engine in League of Legends can happen due to a driver glitch. You may also experience this issue if the game is blocking Cheat Engine modifications.

Also, check your antivirus solution for false alarm problems. As for League of Legends black screen issues, our dedicated guide is just what you need to check out.

We also have a guide on League of Legends crashing on the loading screen that might be helpful to you.

We hope that the recommendations from our list were helpful. For more suggestions or any questions, simply access the comments section below.

Windows news recap: Windows 11 officially unveiled, WordPress arrives in the Microsoft Store, and more

Welcome back to our Windows news recap, where we go over the top stories of the past week in the world of Microsoft’s flagship operating system.

Microsoft officially announces Windows 11, coming this fall as a free upgrade

After weeks of rumours and leaks, Microsoft finally took to the stage this week to unveil its next operating system – Windows 11. Like with Windows 10, Windows 11 will be a free upgrade for users. Take a look at everything that is new and different in Windows 11.

An official Windows WordPress app just launched in the Microsoft Store app store

WordPress has launched its official app in the Microsoft Store on Windows 10. The new app makes it possible to manage or create a WordPress blog from within Windows 10.

Windows WordPress app

Microsoft’s Skype will not come pre-installed on new Windows 11 devices

In what appears to be a push for people to use Microsoft Teams on both a personal and business level, Microsoft will no longer preinstall Skype from Windows 11 onwards, instead, Microsoft Teams will have direct integration with the OS.

Official Windows 10 Instagram app finally updates with the ability to create posts on PC

The Instagram app on Windows 10 has received a new update that adds the ability to create posts. This new update makes the app more worthwhile to install, as it can now do more than just allow you to consume the content – but to actually publish content too.

Windows 10 instagram app

That’s it for this week. We will be back next week with more Windows news!

Microsoft news recap: $2 trillion market value crossed, Designed for Xbox HDMI 2.1 monitors announced, and more

Microsoft news recap is a weekly feature highlighting the top Microsoft news stories of the past week. Sit back, grab some coffee, and enjoy the read!

New Outlook extension for Microsoft Edge lets users access their inbox without switching tabs

Microsoft Edge now has a new Outlook extension that makes it possible to manage your Outlook emails without having to switch tabs. The new extension, currently in Preview, adds a new icon to the address bar which will let you read and send emails. It brings Outlook into a pop-up window within the browser.

New outlook extension for microsoft edge lets users access their inbox without switching tabs - onmsft. Com - june 23, 2021

Microsoft eclipses $2 trillion market value mark; joins exclusive club with Apple

This week saw Microsoft cross the $2 trillion market value mark, placing it in an exclusive group with Apple of US companies that have reached this milestone. It took Microsoft 33 years to reach a $1 trillion market value, and only a further 2 years to hit $2 trillion.

Microsoft market value

Microsoft reveals new Designed for Xbox HDMI 2.1 monitors from Philips, ASUS, and Acer

In an effort to increase awareness and adoption of HDMI 2.1 monitors that provide the best visual experience on Xbox Series consoles, Microsoft has revealed partnerships with several monitor manufacturers to create “Designed for Xbox” HDMI 2.1 monitors. Partnerships include Philips, Asus, and Acer.

Microsoft reveals new designed for xbox hdmi 2. 1 monitors from philips, asus, and acer - onmsft. Com - june 22, 2021

OneDrive is getting new photo editing capabilities on the web and Android

New photo editing capabilities are coming to OneDrive on the web and Android. The main new feature is the ability to crop photos directly within OneDrive for social media, which some preset sizes being available, as well as the ability to custom crop. Light and colour adjustment capabilities are now also available, in addition to being able to rotate images to remove any unintentional tilt.

Thumbnail image 1 of blog post titled onedrive’s new photo editing features and more

This week in Microsoft Teams

Microsoft Teams to be directly integrated into Windows 11

Following the official unveiling of Windows 11, Microsoft has announced that Microsoft Teams will be integrated directly into its new operating system. The integration will bring new taskbar functionality, making it easier to mute and unmute, among other things.

Microsoft Teams to offer more granular controls for Breakout Rooms

The manual participant assignment of Breakout Rooms is to be overhauled with a new UI. From being able to select multiple participants, through to sorting participants, the changes are aimed at speeding up the participant assignment process.

Microsoft delays plan to let Teams users join Meetings with digital ID

The ability to join a meeting by entering an ID has been delayed indefinitely, as Microsoft states that it is “evaluating changes” based on feedback.

Microsoft Teams will let users automatically record all meetings, starting in July

As of July, it will be possible to record all meetings automatically, removing the need to remember each time that a meeting should be recorded.

Microsoft to address issues with flipped webcam images in Teams Meetings

An issue with webcam images showing in a flipped manner is set to be resolved, as Microsoft has commented that it is close to finalising a fix for the bug.

That’s it for this week. We will be back next week with more Microsoft news.

DirectStorage will be a Windows 11 exclusive feature

We can all agree that one of the most awesome gaming features being added to Windows 11 is DirectStorage. Users are thrilled to hear that this is finally becoming reality.

However, Microsoft has confirmed that DirectStorage will be an exclusive feature. What this means is, basically, the feature isn’t going to be added as an update to Windows 10.

No DirectStorage for Windows 10 users

To be more precise, the DirectStorage is a feature that was designed to take advantage of the latent power of NVMe SSDs, especially in games.

DirectStorage hasn’t only been created to make compatible games load faster, but to also support the vastness of open worlds that some modern titles going to have.

As you can understand, the ability to load assets to the graphics card faster, without bogging down the CPU, means that open-world games will render extremely fast, without long load times.

Everyone has been super hyped about DirectStorage, ever since it was first announced for the Xbox Series X/S consoles, as part of the Velocity architecture.

Also remember that DirectStorage supports PCIe 3.0 drives, as well as the faster PCIe 4.0 SSDs.

DirectStorage requires an NVMe SSD to store and run games that use the Standard NVM Express Controller driver and a DirectX12 GPU with Shader Model 6.0 support

How do I use DirectStorage and what requirements does it have?

Obviously, the first step would be upgrading to Windows 11, if you want to make the most of your NVMe SSD, in games. 

As far as system requirements go, DirectStorage will need an NVMe SSD, to store and run games that use the Standard NVM Express Controller driver, as well as a DirectX12 GPU with Shader Model 6.0 support.

Months ago, some rumors circulating on the internet led users to believe that it specifically required a 1TB or greater NVMe SSD.

But now what we know what exactly we require for this feature, as well as the fact that it’s going to be a Windows 11 exclusive, we can start making plans for the immediate future.

Also, make sure to also check the system requirements that Microsoft released for the new operating system that launched yesterday, the extremely popular Windows 11.

Is Steam on Microsoft Store in Windows 11?

In the middle of yesterday’s Windows 11 event, Microsoft talked about the democracy and sovereignty that will be implemented for creators, underlining the clear intent to allow anyone to curate app stores on Windows.

A lot of new and exciting changes are about to happen within your favorite new operating system, so make sure you stay informed by following our Windows 11 article thread.

Microsoft wants Steam in the Windows 11 Store

To add to the mountain of news that users were bombarded with during these last few, during an interview with The Verge, Microsoft’s Panos Panay made another long-awaited announcement.

Windows already in many ways hosts those stores, and if we can host it through the Microsoft Store then of course. For sure, it means as others want to come to the Store, they’re very welcome. As a matter of fact, encouraged, and that’s kind of why we’re building out some of these policies.

As most of you already know, Steam is the go-to store of choice for PC gaming right now, based on its superior content delivery scheme, paired with its long and trusted history with the industry.

Apart from this, Steam has also been an important driver of independent game development, offering innovations and millions of opportunities to a previously bleak environment.

Microsoft, as well as other companies, have emulated some of Steam’s open policies towards game development over the years, but we can all agree that Microsoft has begun to leap a bit further.

Microsoft says that it will reduce its general revenue share for PC games

Microsoft also stated that it’s planning to reduce its general revenue share to 12% for PC games, in the near future, bringing them on the same level as the Epic Game Store.

This initiative will surely make it a better deal for most developers to build games for the Microsoft Store, even though it has nowhere near the same user traffic as Steam.

Its nice to see that some of the greatest innovations of our generation are slowly rubbing off on other industry titans, which will lead to a much more open and accessible environment.

Are you excited about Steam being available in the Microsoft Store, for Windows 11? Share your opinion with us in the comments section below.
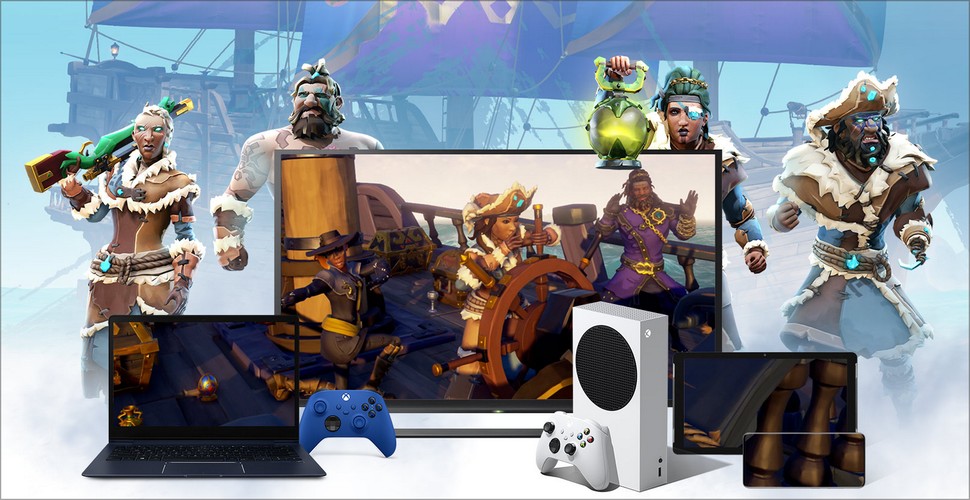
How to create an Instagram post on PC [Windows 10, Mac]

Have you thought that this day would still be coming or have you just lost hope? If you continued to believe that it could one day be possible, well, you were absolutely right.

As you know, if you are an Instagram user, you could only create and upload posts using your mobile device, not your PC. Well, all that is about to change now, with the new update designed for Windows 10.

Start creating your Instagram posts from your PC

So, to summarize a bit, the famous Windows 10 Instagram app received an update earlier today, that finally gave users the ability to create photo and video posts from their PCs.

As sad as it was, until now, the Instagram app could only be used for watching posts and going through Instagram Stories.

This new feature, that got everyone so excited, features most of the popular filters and a variety of basic aspect ratio and color options available.

Also, it goes without saying that, same as with phones or tablets, users can also add multiple files to a post if they so desire.

There is a bit of a downside in all this. For the time being, support for creating Instagram Stories, as well as livestreams isn’t available, though it wouldn’t amazing to one day find out that both of these features are on the way.

In order to actually create an Instagram post from your PC, all you have to do is:

  1. Download the Instagram app from the Microsoft Store.
  2. Install the Instagram app.

3. Open the app and register or login, if you already have an account.

4. On the top right corner of your screen, tap the plus button, which adds new content such as stories or posts.

5. Customize your post with filters and other elements.

6. Hit Post.

Instagram came a long way since it’s birth

If you remember, Instagram debuted as an app for Windows 10 PCs and tablets back in 2016, through an update for the already existing Windows phone app.

This beloved app was eventually replaced with a PWA version, which fully transitioned into the new app format back in April of this year.

Now, after all the tweaks and new additions, Instagram users can finally kick back and simply share their favorite content with other Instagrammers from around the world, via phone, tablet, or PC.

Even though some of the biggest and most popular social media platforms are owned by the same companies, the competition is still tight.

Remember that Instagram still competes with Tik Tok and Facebook, even though the latter has consistently lost important percentages of its fanbase over the years.

So, a lot more reasons to be excited about, apart from the huge Windows 11 release event that Microsoft hosted yesterday.

Windows 11 only lets you pin the taskbar at the bottom of your screen

Even though everyone is more than excited to start using the new operating system from Microsoft, there are some that are absolutely enraged by one of the UI choices that the company has made.

It is not even that big of a deal for most of the users that first pointed out this restriction, but most have grown accustomed to certain UI styles and are finding it extremely difficult to change anything.

The Windows 11 taskbar has position restrictions

Although most of us are rejoicing and making serious plans to expand or renew our gadget family, to keep up the pace with the future of our operating software, some UI elements aren’t as flexible as they were in Windows 10.

Social media has been buzzing with the positive reviews, as well as complaints, that users have for the new OS. One complaint, in particular, has caught the attention of many.

Following a recent Reddit thread, you can instantly tell that the users that got together to comment on this Windows 11 feature, are more than displeased with Microsoft’s choice.

I know it’s not a huge deal, but for me, it’s kind of important. I use two displays on my desktop, and I have the taskbar pinned to the right side of the screen on my left display, and pinned to the left side of the screen on my right display. I’ve kinda grown accustomed to that. On my surface, I also pin the taskbar to the right side of the display as I’m right-handed, and it makes touching the start menu easy.

Forcing us to pin it to the bottom is unintuitive for touch displays, as I can’t touch that part of the screen easily since it’s right at the seam between the keyboard and the display.

Does no one else find that kind of.. stupid? Like, what good reason is there to not allow pinning the taskbar to other parts of the display like it was before?

And even though this is not a factor that affects performance in any way, we can all understand that certain accommodations that we made for ourselves in our favorite OS, will be kind of hard to bypass.

There is literally not one positive comment on this UI choice made by Microsoft, which automatically means that users are enraged that the company took away their ability to personalize their own UI.

Its still early, a lot can and will change

Keeping all these changes and new features in mind, remember that Microsoft only just released Windows 11 so its far from being a final version of the product.

A lot can still change, and as we know, Microsoft really prides itself on taking users’ opinions into considerations when changing OS stuff. This means that, if nobody is happy with this, the company will change it eventually.

So don’t worry if Windows 11 still isn’t what you imagined, yet. The operating system has just launched yesterday so we can all agree that we can still give it some time to grow into what we want and expect.

Remember that early Windows Insider builds are coming next week, for Windows 11, so be ready to become an Insider, if aren’t already one, and enjoy the new Windows experience.

Microsoft says PC Health Check app fix is coming soon

As you most likely already know, yesterday, Microsoft finally unveiled the long-awaited Windows 11 update. This new content comes with an updated UI, as well as performance, and productivity improvements.

The Redmond company also informed users in regards to the minimum system requirements for Windows 11, which include Secure Boot and TPM 2.0 among other things.

Update: Microsoft temporarily removed the PC Health Check app and plans to get it back online before Windows 11 becomes generally available. Because of multiple complaints from users and some problems related to Windows 11 minimum requirements, the Redmond giant decided to rebuild and adjust the app for improved reliability and guaranteed compatibility. Find out more details from Microsoft’s official statement.

Microsoft is trying to fix the PC Health Check app

If you were just trying to install Windows 11 and give it a try but were prompted by the Your PC can’t run Windows 11 error, rest assured that you are not alone.

Users have started reporting issues with the PC Health Check app since early last night, after the big event. This app gives users the ability to check if their system meets the minimum requirements to upgrade to Windows 11.

Some, more tech savvy users have even come up with a workaround for this situation, until the dust settles.

Microsoft has now acknowledged this problem and is working on a fix. Steve Dispensa confirmed on Twitter that the tech company is currently searching for some solutions for this nuissance.

Insider builds for Windows 11 are coming next week

Considering that Microsoft is all set to release the first Windows 11 Insider build next week, users are hoping that these issues with the Health Check app will be solved.

Needless to say how important this is, as everyone will most likely enroll into Windows Insider Program and try out Windows 11.

Microsoft’s very own Steve Dispensa also stated that all the PCs shipped in the last few years come with TPM so they should meet the minimum requirements on paper.

Even though Windows 11 came with a few hiccups, Its not the end of the world, as it was totally expected to have a few glitches or bugs, as with every new product.

While you wait for Microsoft to fix these primordial Windows 11 issues, you can check our extensive Windows 11 articles, and find out everything you need to know about the new OS.

Bluetooth and Precision Touchpad are mandatory for Windows 11

As you already know, the big wait is finally over and the new OS that everyone has been continuously talking about has finally become reality.

Microsoft has also released the minimum system requirements for Windows 11, list which includes Secure Boot and TPM 2.0, among other things, but the latter can be bypassed for now.

Laptops that run Windows 11 need to have certain specs

Besides the minimum hardware requirements, Windows 11 laptops will also require support for certain features in the near future.

Judging from the available Microsoft documentation, the laptops used to run this OS will need to come with Bluetooth 4.0 or above and support Precision Touchpad.

These requirements actually apply to laptops, tablets and other handheld devices. Microsoft is also making it mandatory for Windows 11 devices to include either WiFi or Ethernet for internet connectivity.

Also, the company recommends users to install Windows 11 on non-rotational storage, such SSDs, for optimal performance.

Microsoft clearly notes that Windows 11 devices need to have at least one USB port.

If device manufacturers plan to go with USB-C PD, then they need to implement 1.1 of the USB Type-C spec or higher and revision 2.0 v1.1 and optionally support revision 3.0 v1.0 or higher of the PD spec and must be certified according to the USB-IF’s USB-C product testing matrix.

Another aspect worth taking into consideration is the fact that Windows 11 devices external PCIe capable ports must support Memory Access Protection, or Kernel DMA Protection and have it enabled by default.

So you better keep this in mind when purchasing a device that you want to run Windows 11 on.