4 Ways to Fix PCL XL Error Subsystem Kernel on Windows

Your computer may encounter errors while communicating with the printer, and one of the errors can be PCL XL error subsystem KERNEL.

It also comes with the message, Suggest to a network administrator to change the printer settings to use the STANDARD printer driver for that make of printer so it’s pretty explanatory.

PCL XL, or PCL 6, is a powerful driver used to print documents on printers, but let’s find out why this happens.

Why do I get a PCL XL error on my printer?

After seeing the error message, the problem is clear and has one main reason. The PCL XL error subsystem KERNEL is caused either because the printer driver is corrupted or it’s incompatible.

However, it may also be caused by a fonts mismatch between the PC and the printer (which is also a driver issue), or connection malfunctions (which include the port that the printer is connected to).

Do what the message says if you’re working in a controlled office environment. Communicate the problem to the system administrator, which will remedy this issue.

When working on your own printer and Windows device, you can resolve the problem by following the steps below, one by one.

How do I fix the PCL XL error subsystem KERNEL?

Before starting the actual troubleshooting, make sure you perform the following simple tasks:

  • Ensure your cables are secure and connect the printer to the computer to avoid PCL XL errors on your HP Laserjet 1536nf MFP and HP Laserjet 3015.
  • If the printer is connected to the network, try plugging it straight into your device in an appropriate port.
  • If your printer has any memory chips, try removing them and see whether it rectifies the error.

Also note that when printing specific documents on an HP printer, you may see an error message that says PCL Xl error kernel illegaloperatorssequence. This could happen if the printer cannot process specific parts of the document. It could be fonts or images that are embedded.

1. Rename the files associated with your printer

  1. On your keyboard, press Windows Key + E to open the File Explorer.
  2. Navigate to the location C:/Windows/System32/spool/drivers/x64/3Fix PCL XL error
  3. Click the down arrow beside Type. Check the .gdp extension and filter the files only to show the ones with the .gpd extension.
  4. Select the GPD File. Press Ctrl + A to select all files and copy them by pressing Ctrl + C.PCL XL error
  5. Change the file names to your preference. Right-click on the file with the .gdp extension and click Rename. However, create a backup before you rename the files. 
  1. Save the changes, then restart your PC. 

2. Update your printer driver

  1. Right-click the Start button and select Device Manager from the list.
  2. Expand the Printers section, right-click on your printer, and select Update driver.
  3. Click on Search automatically for drivers.
  4. If any suitable drivers will be found, they will be installed on your system.
  5. Restart your PC and see if the problem has been fixed.

Ensure your printer driver is updated to the latest version with recommendations from the manufacturer. If your printer came with a disc, install the available software. It will help you install the drivers or check for drivers update.

Another approach is to download the driver from the manufacturer’s website and obtain the correct version.

Ensure you get the standard driver for your printer that is also compatible with your system and processor to avoid system instability issues in the future. 

Of course, the manual approach can be tedious and time-consuming. A better alternative is to use a tool that does that automatically. That being said, we recommend Outbyte Driver Updater, a quick, easy-to-use tool that will scan your PC for missing and old drives and let you decide which one to update.

3. Change the printing settings on your computer 

  1. Press Windows key + R on your keyboard to launch the Run dialog box.Fix PCL XL error
  1. Type Control Panel inside the Run dialog box, then click OK.
  2. Choose Large Icons or Small Icons from the drop-down list beside the View By.Fix PCL XL error
  1. Click Devices and Printers.
  2. Identify the printer affected by the PCL XL error and right-click on it.Fix PCL XL error
  3. From the options, select Printing preferences.PCL XL error
  4. Move to the Advanced tab.Fix PCL XL error
  5. Set TrueType Font to Download as Soft Font and change Send True Type as Bitmap to Enabled. 
  6. Click Apply and OK to save the changes.
  7. Restart your computer and printer.  

4. Use the printer troubleshooter

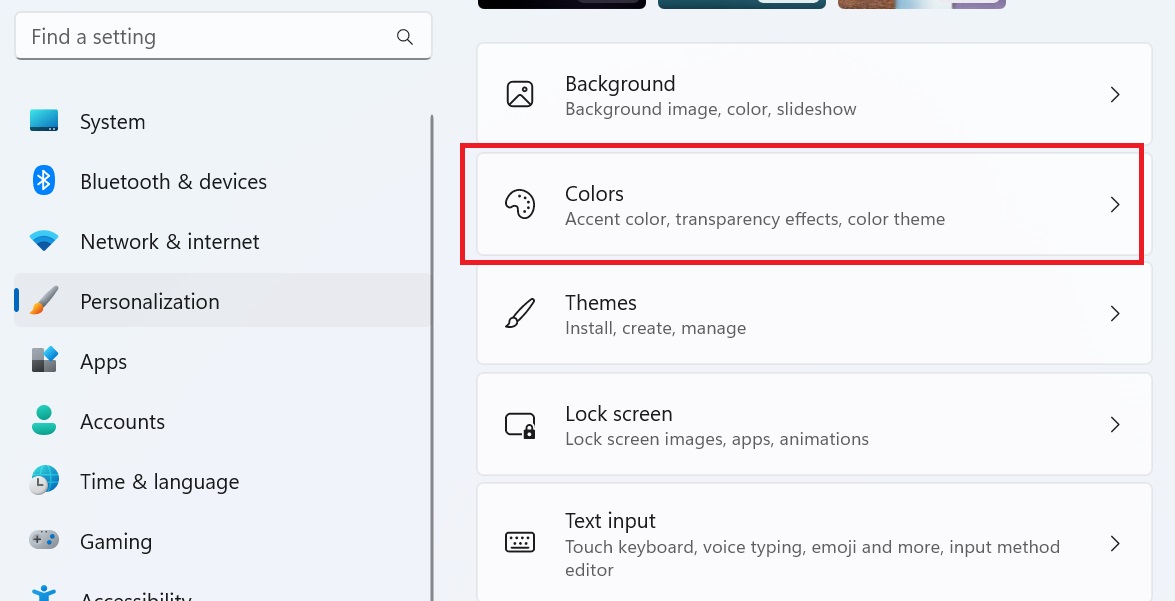
  1. Press the Windows key + I to open the Windows Settings.PCL XL error
  2. In the Settings Window, click on Update and Security.
  3. On the left side of the Settings window, click on Troubleshoot.
  4. Scroll down on the right-hand side, find and click on Printer, then click on Run the troubleshooter.PCL XL error
  5. The troubleshooter will run on your computer and detect any problem with your printer. 

How do I reinstall a printer driver on Windows 11?

1. Remove the printer

  1. Click the Start menu button and select Settings.Uninstall printer drivers
  2. On the Settings window, choose Bluetooth & devices, then from the right side, select Printers & scanners.Uninstall printer drivers
  3. Finally, select your printer and click Remove.Uninstall printer drivers

These steps will uninstall the printer drivers. It’s now time to reinstall them to your PC. 

2. Download the latest driver from your device manufacturer

  1. From the manufacturer’s official website. Let’s use HP as an example to demonstrate the actual process.Download HP drivers
  2. You will be required to enter the product model and number, and then get a download link after submission. Click Download.Download HP printer drivers
  3. Run the file easily using self-installing prompts. 

3. Reinstall the printer driver.

  1. To open the Run dialog, press the Windows key + R.Uninstall printer drivers
  2. Write devmgmt.msc in the box and hit the Enter key.Uninstall printer drivers
  3. Click on the arrow-like sign against Print queues and locate the printer you want to uninstall.Uninstall printer drivers
  4. Right-click on the printer and choose Uninstall device.how to Uninstall printer drivers
  5. Click on the Uninstall button.Uninstall printer drivers
  6. Hit Search automatically for updated driver and then click OK.

If the procedure fails, we have a comprehensive guide on what to do if you can’t install the printer on Windows 11.

The above fixes can help solve your printer and driver issues and the errors that might cause their malfunction, including PCL XL error subsystem KERNEL error missing attribute reported in many printing systems.

If nothing works, you can seek the assistance of a computer or printer technician to help you handle the issues since they got adequate skills.

Feel free to tell us which fix worked for you in resolving the PCL XL error subsystem KERNEL. Leave a message in the comment section. We would be glad to hear your feedback.

Can PlayStation and Xbox Play Together?

The gaming community is considered one of the largest and the most active on the Internet. Their concerns are usually prioritized, given that the market is worth billions of dollars. And many have long been wondering if PlayStation and Xbox can play together.

The feature wasn’t available until recently since Sony hesitated to support crossplay between platforms. The reason was the lack of parental control or content moderation, which would affect the younger PlayStation player base. But recent years witnessed a shift in their approach.

So, can you crossplay on PlayStation or play together with Xbox users now? Keep reading to find out!

Do Playstation and Xbox support crossplay?

Crossplay is the ability to play games across different platforms. And while both Xbox and PlayStation do support crossplay, it all comes down to individual games.

The answer is yes for those wondering if PlayStation and Xbox can play together on Minecraft. Cross-platform support in Minecraft was introduced in the Bedrock Edition.

Crossplay in Minecraft

Though GTA V still doesn’t support crossplay between Xbox and PlayStation. Problems also arise on the same platform, but you can run an older GTA V version on PS5 through backward compatibility to play with another user on PS4.

Remember, cross-platform and crossplay don’t mean the same thing. Cross-platform games are available on different platforms, such as Xbox, PlayStation, mobile, or PC. In contrast, crossplay allows users to play games between platforms.

What games can Xbox and PlayStation play together?

The following 20 top games support crossplay across different platforms, but our primary focus remains on Xbox and PlayStation:

  • Apex Legends: Supports PC, Xbox One, Xbox Series X/S, PS4, PS5
  • Minecraft: Supports PC, Xbox One, Xbox Series X/S, PS4, PS5
  • Fortnite: Supports Xbox One, Xbox Series X/S, PS4, PS5
  • Star Wars Squadrons: Supports PC, Xbox One, Xbox Series X/S, PS4, PS5
  • Call of Duty: Modern Warfare: Supports Xbox One, Xbox Series X/S, PS4, PS5
  • Call of Duty: Black Ops Cold War: Supports Xbox One, Xbox Series X/S, PS4, PS5
  • Rocket League: Supports PC, Xbox One, Xbox Series X/S, PS4, PS5
  • Battlefield 2042: Supports Xbox One, Xbox Series S/X, PS4, PS5
  • Borderlands 3: Supports PC, Xbox One, Xbox Series S/X, PS4, PS5
  • Operation Tango: Supports PC, Xbox One, Xbox Series X, Xbox Series S, PS4, PS5
  • Watch Dogs Legion: Supports PC, Xbox One, Xbox Series X, Xbox Series S, PS5, PS4
  • Need for Speed: Heat: Supports PC, Xbox One, PS4
  • Aliens: Fireteam Elite: Supports PC, Xbox One, Xbox Series X/S, PS5, PS4
  • Brawlhalla: Supports PC, Xbox One, PS4
  • Chivalry 2: Supports PC, Xbox One, Xbox Series X/S, PS5, PS4
  • Dead By Daylight: Supports PC, Xbox One, Xbox Series X/S, PS5, PS4
  • Destiny 2: Supports PC, Xbox One, Xbox Series X/S PS5, PS4
  • Diablo 4: Supports PC, Xbox One, Xbox Series X/S PS5, PS4
  • Elden Ring: Supports Xbox One and Xbox Series X/S, or PS5 and PS4 (not truly crossplay)
  • GWENT: The Witcher Card Game: Supports PC, Xbox One, PS4

How do I enable crossplay?

Most games that support crossplay have built-in dedicated settings to enable the feature. Look through the Network or Online settings.

If you can’t do that, head to the developer’s official website and check the support section for the exact steps.

Why is my crossplay not working?

  • Poor Internet connection: It could be the slow Internet speed. Switch to Ethernet instead of Wi-Fi or terminate the network-hogging process.
  • Geo-blocking: Geographical restrictions prevent you from playing with users. Install a reliable VPN, such as Private Internet Access (PIA), and use a different IP address to circumvent geo-blocking.
  • Crossplay not enabled: Check the dedicated game settings and turn on crossplay. In case it’s active, re-enable the feature to clear out any inconsistencies.
  • Crossplay not supported: Ensure the affected game supports crossplay for the platforms you are running it on.
  • Third-party conflicts: Firewall or third-party security software sometimes block the connection. Simply disable it or uninstall the app.
  • Bug in the installed game version: If crossplay worked fine until recently, it could be a bug in the latest game version. Check for any available game and OS updates.
  • Limit on the number of players: Check if the game restricts the number of players that can play together from different platforms.

Can you play PS4 games on Xbox One?

No, you can’t play PS4 games on Xbox One. A game is developed keeping the gaming system in mind, and one doesn’t work on the other.

Though, if the game is available across platforms, you can get the installation media for that particular console or download it and get things up and running.

That’s all for now! You now know whether a PlayStation and Xbox can play together and the games that support crossplay between the two platforms. But since all titles don’t, verify the crossplay ability when purchasing a game.

Before you leave, do not forget to check the most played triple-A games on Xbox and get one today!

For any queries or to share your experience with crossplay on Xbox and PlayStation, drop a comment below.

Exclusive: AR Glasses for Lenovo Legion Go, Release Date & NEW Images

Update: Thanks to our source, we have the official Lenovo press release that confirms Legion Go’s specs, release date, price, and more! Check all of that out in this article! We’ve also covered Lenovo’s official announcement of the gaming handheld in this article!

Legion Go gaming handheld is Lenovo’s answer to on-the-go gaming, but it has to go against the likes of Steam Deck, Rog Ally, AYANEO, or even Nintendo Switch. Can it keep up (or even surpass) with the latest and greatest from Valve and ASUS?

You’re about to find out, as we’ve got our hands on some incredible images and new info about how powerful the new console might be! We already unveiled the general look and features of the Legion Go. Thanks to our exclusive and reliable sources, we’ve got more in-detail photos, including a port breakdown and a close inside look, and some AR glasses that might be bundled with it.

Before we dive in, here are a couple of things to know:

  • Legion Go is Lenovo’s new gaming handheld that will sport Windows 11
  • It will likely be officially unveiled at IFA 2023 (we’ll also be there), alongside a plethora of other gaming gear
  • It’s set to go against the likes of Steam Deck, Rog Ally, and AYANEO
  • The console combines some of the best hardware features of its competitors
  • The console might also come bundled with AR glasses
  • There’s no price or availability info yet, but we’ll keep you updated

This is not Lenovo’s first attempt at a gaming handheld. Remember the Legion Play, a promising Android cloud gaming console that was never launched? Well, it seems like the company is finally ready to compete in the handheld space.

Lenovo AR Glasses: What we know so far

First, let’s start with the most intriguing piece of information: Lenovo’s AR Glasses. According to our reliable sources, it seems that Lenovo is preparing to launch an entire gaming ecosystem alongside the Legion Go. Among the accessories is a new pair of Legion AR glasses specifically tweaked for gaming.

Lenovo isn’t new in the AR space, but the company focused on business and productivity in the past and less so on the consumer side. ThinkReality A3 Smart Glasses is an excellent example of that, as the device is better for workspace scenarios than anything else. Last year the company attempted to bring to market a pair of AR glasses for the masses, but now that might become a reality.

The augmented reality market has some offerings but none that offer enough features and usability to become mainstream. Until Apple makes the Vision Pro widely available (and much cheaper), there’s no real competition for a mainstream device for everyday users. Maybe Lenovo will change that.

We don’t have any confirmed specs or release date for the Legion AR Glasses, but we might see them at IFA 2023 alongside the Legion Go. Based on the images we have, the glasses should be small enough to wear through long gaming sessions, with only one USB cable connecting them to any device (most likely for power, which means no standalone battery).

The Legion AR Glasess could also feature a high refresh rate and other gaming-specific features, as the Legion branding implies they’re made specifically for that. That’s a good thing, as it will mean they’ll be great for everyday tasks, too (finally, a pair of AR glasses that we can actually use?).

We don’t know if the Legion AR Glasses will come as a standalone device (most probably) or with the Legion Go. Still, our pictures indicate that both devices will work together seamlessly, especially with Legion Go’s USB-C port at the bottom, which means the cable won’t interfere with your controls. This might also point to a possible launch bundle with the two products.

Imagine pairing the two and having access to your Game Pass or Steam games anywhere on a giant screen right in front of you! Isn’t that a great promise?

Lenovo Legion Go: Exclusive new images & specs breakdown

Lenovo Legion Go Front View

Let’s start with the obvious: Legion Go couldn’t be more different but the same as most of its competitors! It’s not just another handled, but it’s a device that takes the best features (we think) from the Steam Deck, Rog Ally, and Nintendo Switch and combines them under one roof.

Design & ergonomics

Lenovo Legion Go Joystick Closeup

Legion Go might be similarly sized to the Steam Deck and Rog Ally but boasts a bigger 8-inch 16:9 or 16:10 screen. According to our images, the bezels could be much smaller than on the other devices, adding to a better gaming experience.

Lenovo Legion Go Top/Bottom View

The joy-cons use a pretty classic button placement, and from what we can see, the device might have Hall Effect joysticks (hopefully!). Besides the D-Pad and the ABXY, the front includes a Menu and View buttons, Legion L and Legion R buttons, and a trackpad similar to what Valve’s Steam Deck has.

Lenovo Legion Go Controls

Each joy-con has a release button on the back, alongside two back triggers and the classic LT/LB and RT/RB. We can also see some intake thermal holes on the back of the device, with the exhaust on the top side. This means your hands should stay nice and cool during long gaming sessions. And if you ever get tired, there’s also a Switch-like stand to prop it up anywhere you want.

Lenovo Legion Go Back View

The last exciting thing on the back of the right joy-con is a strategically placed mouse wheel. We can’t say for sure what it’s for, but if it’s programmable or has a dynamic behavior, we can see a use for it in many games, with zoom being just one possible use case.

Games & user interface

Lenovo Legion Go AMD Z1

According to our sources, the Legion Go will sport Windows 11, which is excellent news for all those PC gamers. We don’t have any other info regarding a proprietary side-os or maybe a Lenovo dedicated user interface, but the fact that it will run Windows 11 out of the box is a considerable advantage.

Imagine playing any of your PC triple-A titles on the go on a big enough screen that also seems to be a touchscreen! Again, this is unconfirmed, but based on the size of the screen, the size of the bezels, and the number of inputs the console offers, it’s a somewhat safe assumption.

Regarding games, you’ll be able to access any of your current PC titles and more. Your FPS count may vary, but based on the fact that the console will sport AMD’s Phoenix processors, performance shouldn’t be an issue unless you’re going for 4K gaming or higher.

Performance

Lenovo Legion Go Inside View

While there aren’t any official performance figures, our images show enough to go on. Most importantly, the Legion Go will sport an AMD Ryzen Z1 processor specifically designed for handheld Windows-based devices. That also confirms that the console will come with Windows 11 out of the box.

Pair that with the performant cooling system and possibly Thunderbolt ports, and we could have a great package from Lenovo. The presence of a MicroSD card reader and a 3.5mm combo audio jack are also some excellent additions to improve the usability and versatility of the console.

Here’s a quick comparison of the Legion Go and its main competitors based on what we know right now:

Lenovo Legion GoASUS ROG AllyValve Steam Deck
ArchitectureAMD Ryzen Z1 & RDNAAMD Zen4 & RDNA3AMD Zen2 & RDNA2
APUUp to AMD Ryzen Z1 ExtremeRyzen Z1 Extreme
8C/16T up to 5.1 GHz
Ryzen Z1
6C/12T up to 4.9 GHz
AMD Van Gogh
4C/8T up to 3.5 GHz
SoC GPUAMD iGPU
12CU @ 2.7 GHz
AMD iGPU
12CU @ 2.7 GHz
4CU @ 2.5 GHz
AMD iGPU
8CU @ 1.6 GHz
SoC TDPTBC9-30W4-15W
External GPUTBCROG XG Mobile (up to RTX 4090)No
Memory Capacity16GB 7500Mhz LPDDR5X16GB LPDDR5-640016GB LPDDR5-5500
Storage Capacity256GB / 512GB / 1TB256GB/512GB256GB/512GB SSD
Storage TypePCIe 4.0 NVMe M.2 2242M.2 NVMe 2230 SSD PCIe 4×4M.2 NVMe 2230 SSD PCIe 3×4
eMMC PCIe Gen2x1
Display8.8” QHD+ (2560 x 1600) IPS; 16:10 10-point Touch 500nits7″ 1920×1080, 120Hz (VRR), 500 nits, 7ms7″ 1280×800, 60Hz
Connectivity2xUSB Type-C, 1xmicroSD slot, Wi-Fi 6E (802.11 ax), BT 5.2Wi-Fi AX, BT 5.2Wi-Fi AC, BT 5
Battery49.2WHr / 900 mAh40 Whr40 Whr
Weight 640g / 854g with controllers608 g669 g
OSWindows 11 HomeWindows 11Steam OS/Win 11
Release DateSeptember 2023June 2023February 2022
Price€799$699/€799 (Z1E+16G+512GB)
$599/€699 (Z1+16G+256GB
$649/€679 (16G+512GB)
$529/€549 (16G+256GB)
$399/€419 (16G+64GB)
Handheld Gaming Consoles – with the help of VideoCardz

Battery & cooling

Lenovo Legion Go Thermals

Based on our sources and the images we have, the battery life might be better than expected. There’s no exact number yet, but the thickness of the devices hints at a decent enough capacity. While the top back half seems dedicated to cooling and air management, the bottom half is almost exclusively battery.

Remember that the mileage may vary depending on the use scenario, as with all other handhelds.

We see a large back intake and a top-mounted exhaust for cooling, with a single fan on the console’s upper side. The only concern here might be the noise levels and how Lenovo dealt with fan profiles based on the performance output, but we’ll find out more about this when we test it.

Availability & price

Currently, there’s no info regarding the availability or price of the Legion Go. Our best guess is that we’ll see the new gaming handheld at IFA 2023 (we’ll also be present there to confirm all of the specs and details) and maybe a Q4 official launch this year, right in time for the holidays.

Regarding the price, Lenovo will probably not target Valve’s starting price for the Steam Deck and position a lot closer to the Rog Ally so that it might be out for anywhere between 600$ to 900$. We’ll update you with the official price and release date once they become official.

Until then, we’d love to find out your take on the Lenovo Legion Go and its most polarizing feature (maybe), the removable joy-cons. Has Lenovo done enough to take on the Steam Deck, Rog Ally, and the Nintendo Switch? Tell us in the comments below, and we’ll continue the talk!

5 Different Ways to Tweak Windows 11 Terminal Settings

Windows Terminal is an application with Windows 11 as the default command-line tool. It replaces Windows Console Host (conhost.exe), initially saving the same purpose.

It works well with other apps like Command Prompt, Bash, PowerShell, Azure Connector, etc. making users run all of them using the Terminal.

What is Windows Terminal and what does it do?

Windows Terminal is a cross-platform command-line interface that you may use to access multiple shells, such as PowerShell, Command Prompt, and Bash. It is an essential tool for developers and system administrators to streamline productivity.

Some of its features include the ability to run several tabs, and it supports Unicode and UTF-8 characters, shortcuts, the use of panes, ability to change backgrounds and colors, among others. It’s one of the best tools Microsoft introduced; one had to download it from the Microsoft App Store for the previous versions. 

In Windows 11, there is no installation, and you can run it together with the other command-line tools. This article will cover several ways a user can change the Terminal settings using several steps to achieve the final result.

How can I change the Windows 11 Terminal settings?

1. Change the Terminals color scheme

  1. Go to the Start Search box, type Terminal, and select the Open option.Windows terminal settings
  2. Click on the downward arrow and select the Settings option to open the settings page.
  3. On the left side, choose the Color schemes option.Windows terminal settings
  4. Head over to the dropdown option and choose the color you like.
  5. Click on the plus sign to add other color options like Background, Cursor color, Selection background, and Forecolor.Windows terminal settings
  6. Give it a name by clicking the Rename button.
  7. Save your color scheme by clicking the Save button.Windows terminal settings
  8. Repeat the same procedures for the other system colors, but now we will use the color picker.
  9. After the procedures are over, save the changes by clicking the Save button.

2. Change the Terminal appearance

  1. Go to the Start Search box, type Terminal, and select the Open option.Windows terminal settings
  2. Hit on the downward arrow and select the Settings option to open the settings page.Windows terminal settings
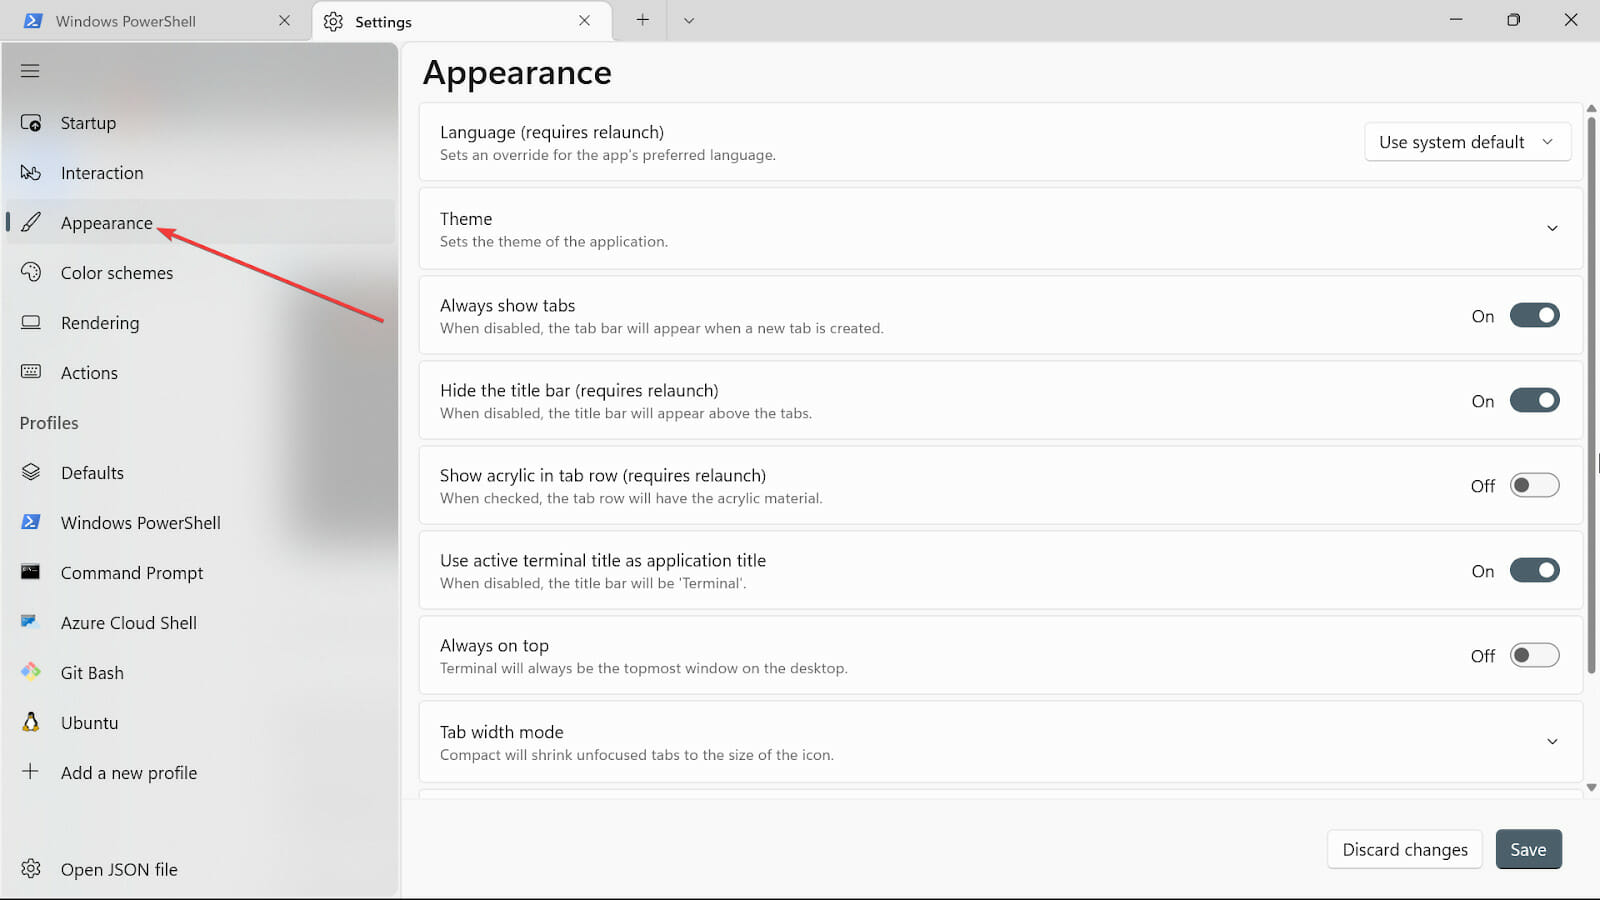
  3. Click on the Appearance tab.Windows terminal settings
  4. Under the themes, you have three options: Use Windows themes, Light, and Dark. Choose the one you like.Windows terminal settings
  5. Toggle the Always show tabs, Hide the title bar (requires relaunch), Use active terminal title as appreciation title buttons on. If you don’t want them on, you can turn them off.
  6. Toggle the Always on top button to On.Windows terminal settings
  7. On the Tab width mode, choose Equal.Windows terminal settings
  8. On the Pane animations option, toggle the button to turn it on.Windows terminal settings
  9. Save the changes by clicking the Save button.Windows terminal settings

3. Change the Terminal background

  1. Go to the Start Search box, type Windows Terminal, and select the Open option.Windows terminal settings
  2. Select the downward arrow and select the Settings option to open the settings page.Windows terminal settings
  3. Select the type of profile you use and click on the Appearance tab.Windows terminal settings
  4. Click on the Background image option and browse the path of the image to upload it.Windows terminal settings
  5. Select the type of the Background image stretch node.Windows terminal settings
  6. Go ahead and select the Background image alignment.
  7. Choose the Background image opacity.Windows terminal settings
  8. Click on the Save button to keep the changes. Visit your Terminal and view the changes.Windows terminal settings

4. Change the startup settings

  1. Go to the Start Search box, type Windows Terminal, and select the Open option.Windows terminal settings
  2. Hit on the downward arrow and select the Settings option to open the settings page.Windows terminal settings
  3. Select the Startup on the left side of the settings.Windows terminal settings
  4. On the Default profile dropdown, there are three options: Windows PowerShell, Command prompt, and Azure Cloud Shell. Select one of them.Windows terminal settings
  5. Toggle the Launch on machine startup button to On if you want the selected option to start immediately after the machine starts.
  6. On the Launch mode, choose the Default mode. The Maximized mode displays the Terminal on the whole screen with visible tabs; there are no visible tabs in full-screen mode. The Focus mode involves using keyboard shortcuts to access tabs, while the Terminal is full screen in Maximized focus.Windows terminal settings
  7. On the New instance behavior option, select Attach to the most recently used window.
  8. On the Launch size option, choose the size of Columns and Rows.Windows terminal settings
  9. Save the changes by clicking the Save button.Windows terminal settings

5. Change the Interaction settings

  1. Go to the Start Search box, type Windows Terminal, and select the Open option.Windows terminal settings
  2. Click on the downward arrow and select the Settings option to open the settings page.Windows terminal settings
  3. Select the Interaction tab on the left side.Windows terminal settings
  4. Choose the Text format when copying and choose the Plain text only option.Windows terminal settings
  5. On Remove trailing white-space in rectangular option, you can turn it on or just let it be if you want to get rid of white space.Windows terminal settings
  6. In the Word delimiters option, put the characters that you want.Windows terminal settings
  7. Toggle the Snap window resizing to character grid button to resize the Window Terminal.Windows terminal settings
  8. On the Tab switching style category, choose the type that will fit you.Windows terminal settings
  9. On the Automatically focus pane on mouse hover option, you can turn it On or let it be Off according to your needs.Windows terminal settings
  10. Navigate to Automatically detect URLs and make them clickable tab and toggle it to turn it to On.
  11. Apply the changes by clicking the Save button.Windows terminal settings

How can I open Windows 11 Terminal?

1. Using the keyboard shortcuts

  1. Press the Windows key + X to open the options.
  2. Select the Windows Terminal (Admin) option.Windows terminal settings

2. Using the Run console

  1. Press the Windows key + R on the keyboard to the empty Run console.Windows terminal settings
  1. Type wt.exe and hit Enter to open the Windows Terminal.Windows terminal settings

Are Terminal and Command Prompt the same?

No, they are not the same. Unlike Command Prompt offers base command execution, Windows Terminal is a cross-platform tool that also works on Linux and macOS.

Another big plus for Termina is that it supports shells like Bash, ZSH, and more, making it a great tool for developers that can use it on different environments.

The main difference between them in a nutshell is that Terminal is a UNIX-based environment using bash language, while Command Prompt is limited to MS-DOS commands without any scripting capabilities. 

Several users got worried when they heard that Windows Terminal is the default command line but there is nothing to worry about because it offers a lot more than Command Prompt.

And, after all, there are several ways to change the default and use the one you prefer.

If you face problems, you can fix the issue through a new installation of the Windows Terminal. We also have a guide on the differences between Command Prompt and Windows Terminal, so don’t miss it.

Let us know which Windows 11 Terminal setting impressed you. Drop a comment in the section below.

2 Ways to Quickly Reset File History in Windows 10 & 11

Need to empty the File History on your Windows PC quickly? You may want to keep your recently visited locations private, especially if you share the computer with others, so resetting it is an option.

If so, this tutorial will take you through the steps to reset your File History and start off with a clean slate.

Can file history be deleted?

File History is a built-in backup tool that you can use to protect your personal files and folders on your computer.

It creates a copy of the files in your Libraries, Desktop, and Favorites folders and any other files you choose to include. Since this information is kept in a folder on your PC, you can easily locate and delete it.

What happens if I turn off file history?

When file history is turned off, the automatic backup of your personal files stops because the file history service has been disabled. If you have alternative backup solutions, this should not be a problem. 

However, if you decide to turn off File History, we recommend that you first create a manual backup of your important files. This will ensure that your files will be safe if something happens to your computer.

Now, let’s look into how you can reset your file history.

How can I reset my file history in Windows 11?

1. Use the Control Panel 

  1. Hit the Windows key, type in Control Panel in the search bar, and click Open.control-panel-search fallout new vegas runtime error
  2. Select System and Security.Category and System & Security -file history doesn't recognize this drive
  3. Search for File History and click on the corresponding result.File history 1 file history doesn't recognize this drive
  4. Click Turn off to disable the feature.
  5. Hit the Windows + E keys to open File Explorer.
  6. Click View and select Hidden items.Hidden items
  7. Navigate to the following location. Note that File History targets external storage, so ensure you insert your flash drive prior: %UserProfile%\AppData\Local\Microsoft\Windows\File History
  8. Select all items in the folder and hit the Del key.
  9. Alternatively, you can rename the Configuration file to Configuration.old, and your File History will be reset.

2. Use the Command Prompt

  1. Click on the Start Menu icon, type cmd in the search bar, and click Run as administrator.cmd-run-admin-w11 unexpected kernel mode trap windows 11
  2. Type the following command and hit Enter: if exist "%UserProfile%\AppData\Local\Microsoft\Windows\FileHistory" RD /S /Q "%UserProfile%\AppData\Local\Microsoft\Windows\FileHistory"

How can I reset file history in Windows 10?

  1. Click on the Start Menu icon and select Control Panel.
  2. Navigate to System and Security and click to open.
  3. Click on File History and ensure it is turned off.
  4. Insert your external flash drive containing the backed up data and go to the following location: %UserProfile%\AppData\Local\Microsoft\Windows\File History
  5. Select all files in the folder, right-click, and select Delete.

When you reset file history in Windows, all of your previous versions of a file will be deleted. If you have any files backed up in the cloud, such as OneDrive or Dropbox, this process will not affect those files.

You can now reconfigure your settings or change the backup location. The File History feature works with both local drives and network shares, so you can switch to a different drive or use a network location in cases where File History does not recognize your drive or no usable drives were found.

So that’s how to reset your File History in Windows 10 and 11. We also have an interesting side-by-side comparison of File History vs Windows Backup so check that out to spot the differences.

We’d love your feedback on this issue, so leave us a comment below.

Windows 11’s August update ends SSD slowdown woes, but not for all

Slow NVMe SSD performance issues have plagued Windows 11 since March 2023; something similar happened a couple of years ago. The problem was traced back to the March 2023 Patch Tuesday update, but Microsoft remained quiet.

There are reports that some users have noticed enhancements after installing the optional update in July 2023. It has also been stated that the August 2023 Patch Tuesday update (KB5029263) has resolved the SSD issue for most users. However, certainly, this doesn’t apply to all. Thus, some users have experienced over a 50% decrease in speed, as they had previously reported.

The affected updates include:

  • KB5028185 – July 2023 Patch Tuesday update (mandatory).
  • KB5027303 – June 2023 optional update.
  • KB5027231 – June 2023 Patch Tuesday (mandatory).
  • KB5026372 – May 2023 Patch Tuesday (mandatory).
  • KB5025239 – April 2023 Patch Tuesday (mandatory).
  • KB5023778 – March 2023 Patch Tuesday (issue originated here).
  • KB5023706 is also affected.

The other possible concern seems to be that despite the various issues and changes, Microsoft hasn’t received public acknowledgment regarding these matters. This might be a concern for users seeking transparency and communication from the company about updates, fixes, and issues.

via Windows Latest

Microsoft plans to partners with Databricks to expand AI offerings, potentially competing with OpenAI

Microsoft is expanding its AI offerings by partnering with Databricks. Why is it a big news? Because it was noted that Databricks had positioned itself somewhat as an alternative to OpenAI. In June, Databricks announced the acquisition of MosaicML, a generative AI platform seen as a competitor to OpenAI, for around $1.3 billion. Things could go from bad to worse for OpenAI as they face a lawsuit from the New York Times over AI content copyrights.

According to reports, Microsoft’s Azure cloud-server unit will soon sell the Databricks software. This software allows:

  • Creation of AI models from scratch
  • It allows the reuse of open-source models, potentially serving as a substitute for OpenAI’s licensed proprietary models.

During the Databricks Data + AI Summit, Microsoft CEO Satya Nadella and Databricks co-founder and CEO Ali Ghodsi discussed the future of generative AI. Ghodsi noted that all Databricks engineers use Microsoft’s Copilot.

Nadella highlighted the strong partnership between Microsoft and Databricks and suggested integrating Azure, OpenAI, and Databricks for a joint project.

Microsoft’s collaboration with Databricks for AI expansion seems to have a multi-pronged intent. It could indicate a desire to diversify AI offerings, respond to rising demand, explore alternatives to OpenAI, enhance competitiveness, strategically acquire assets like MosaicML, or maybe to stay agile in a fast-evolving AI landscape.

via The Information (paywalled)

Minecraft’s Xbox Series X/S version tease sparks native release and ray tracing speculations

There is speculation about the possibility of a native version of Minecraft for Xbox Series X and S consoles following the game’s recent classification in Germany. This information was observed on Twitter.

Based on the screenshot shared in the tweet, the game appears to include comic book-style violence, tension, and potentially scary moments. However, it has been deemed safe for children aged six and up.

Currently, players have to play the Xbox One version of Minecraft on the newer Xbox Series X/S consoles through the backward compatibility feature. Backward compatibility lets you play classic games on new hardware with the latest features and performance improvements—no need to worry about old games becoming obsolete when upgrading your console.

However, the possibility of an optimized version of Minecraft tailored explicitly for the Xbox Series X/S hardware might have one of the exciting features that could be included in this optimized version: ray tracing.

What’s ray tracing?

Ray tracing is a cutting-edge graphics technology that enables highly realistic lighting, reflections, and shadows in video games.

There was a notable occurrence last year when developer Mojang accidentally included prototype code for ray tracing support in a preview build of Minecraft available to Xbox Insiders.

It’s safe to say that all those speculations could finally be coming true.

How to stream games using Microsoft Teams Play Together: 8 easy steps

The new Microsoft Teams Play Together feature on the Xbox Game bar is here, and today we will let you know how to stream games using it. Microsoft Teams Play Together is a way for gamers to share their gameplay experiences and communicate with friends simultaneously, similar to Discord. In this guide, we will show you how to stream games using Microsoft Teams Play Together.

While Microsoft’s acquisition of Discord in 2021 didn’t materialize, it’s not uncommon for companies to continue developing their features and services to compete in the market. Microsoft Teams Play Together might indeed be aimed at providing a gaming-centric communication and sharing platform as an alternative to Discord.

How to stream your game using Microsoft Teams Play Together:

1. Visit the widget’s page on the Microsoft Store and click Get to install it.

Microsoft Teams Play Together

2. After installation, use the shortcut Windows + G to open the Xbox Game Bar.

3. Click Get Started and follow the sign-in process.

Get Started 3

4. If you don’t see the Play Together window, access it by clicking on the Widget Menu and then selecting Play Together.

Widget Menu 4

5. Press Start Playing.

Start Playing 5

6. Choose whether to stream your entire screen or a specific app. Click on the chosen display, then select Go Live.

Microsoft Teams Play Together

7. Tap the Copy Link button and share it with friends or online contacts you want to invite to the stream.

Microsoft Teams Play Together

8. To conclude the stream, click the hang-up button.

Hang Up 8

What’s the difference between Microsoft Teams Play Together and Discord?

Simply put, Teams Play Together alone matches only a fraction of Dicord’s functionality. But it all changes completely when the functionality of Microsoft Teams Play Together, and Microsoft Teams are combined, and then it fulfills most of the functionalities of Discord.

Whether this move is a direct response to the failed acquisition or simply a part of Microsoft’s ongoing efforts to enhance its gaming offerings is speculative. Discord and Microsoft are active players in the tech and gaming industries.

They will likely develop and innovate in response to market trends and user demands. Competition in the tech industry often leads to improved products and features for consumers, so this development could benefit gamers using Windows.

How to Manage Random Hardware Addresses on Windows 11

If you’re in the habit of connecting your devices to public Wi-Fi in shopping malls and other unknown Wi-Fi networks, you definitely need a random hardware address. Otherwise, your private data is at risk from all kinds of cyber threats.

Still, this is not the only reason you might need it for. Below, we delve into all the nitty-gritty of what they are, why you need them, and how to manage them.

What are Random Hardware Addresses?

A random hardware address is a MAC address that is not associated with any specific hardware. It is assigned to each device when making a network connection.

Each device has its unique MAC address that a manufacturer assigns to every device with internet connectivity. If discovered, hackers can track your location, among other private details.

The main difference between the two is that the random hardware address is a random number that your OS assigns to the device. It is not unique and will change from one boot to another. The MAC address is the physical address of your network adapter and is unique for all devices.

Now that you know the differences between the two MAC addresses, find out how to best manage it.

How can I manage Random Hardware Addresses in Windows 11?

The process of MAC address randomization in Windows 11 allows you to easily edit your privacy settings. You can turn the feature on for all your connections or for a specific Wi-Fi connection.

You can also decide whether to change your random address daily or maintain one whenever you connect to untrusted connections.

This is particularly important because even though you may have turned it on, you may still be a target for cybercriminals if you frequent a specific public Wi-Fi network.

And if your random MAC address is the same each time your device scans for networks, you could easily be a victim. This is why you may need to edit the settings for the address to change at least once daily.

While you can make these changes within your Windows PC, it’s important to note that not all network cards support this feature. Ultimately, you may have to access public Wi-Fi with your real MAC address.

If you fear it has been compromised, you can follow the steps to change your MAC address in Windows 10 or change your MAC address in Windows 11.

Most manufacturers are highly against it, so we’d advise you to find alternate ways to mask your identity online, such as using VPNs or setting up a proxy.

Should I have Random Hardware Addresses turned on?

Random hardware addresses are a double-edged sword. On one side, you enjoy the benefits of anonymity on public networks. But on the downside, you may be blacklisted from accessing certain networks.

However, as you understand how they work, you’ll realize they serve you much better in certain situations. And in others, you’d rather have this feature turned off.

Let’s start off with the scenarios where you’d reap the benefits of having it turned on:

  • Randomizing your address makes it harder for hackers to find you. That’s why gamers use alternate mac addresses in Xbox because it’s a highly targeted platform.
  • You are able to mask your browsing activity and prevent marketing sites from tracking your behavior and later sending you ads.
  • You’ll have wider access to pre-blocked or censored sites by your government, work, or school because they can’t track the incoming content.

Onto the issues that may arise from turning on random hardware addresses:

  • Some applications may not work as intended because they rely on a specific MAC address for their functionality.
  • You may experience inconsistent performance between different Wi-Fi access points and routers.
  • Some networks only allow connections from whitelisted devices. So, chances are that unknown devices with random hardware addresses will not connect to their network.

And that’s how you can manage your Wi-Fi settings to ensure your private information is not at risk. You can also learn more about software that helps you rotate or mask your network identity by checking our guide on MAC address changer tools.

Have you set up random hardware addresses on your PC? We’d like to get your opinion on their performance thus far, so leave us a comment down below.

How You Can Access & View Email Message Source in Outlook

Emails contain a lot of information, most of which is embedded into the source code. While you can check the message body or open any attachments with the conventional approach, users often need to view the message source in Outlook emails.

The option is available on pretty much every email client, but Outlook has simplified the process, another reason why many are switching to the email service. So, let’s find out how you can view email headers in Outlook.

How can I find the source of an email?

You can find the source of an email by opening Outlook’s settings and checking the email’s properties. Every piece of information pertaining to the email is listed under Internet Headers.

Here are a few entries you commonly encounter when checking the Internet headers or the message details:

  • Delivered-To: Lists the email address that receives the email.
  • From: Displays who sent the email. This usually includes both the sender’s name and email address.
  • Received: Lists the servers that processed the email.
  • Return-Path: This shows the address where any replies to the email will be sent. The same information can be found next to Reply to.
  • Authentication-Results: Lists whether the sender’s credentials were verified and to what extent. You will find the results here.
  • Subject: You will find the email’s subject here, though this information is easily accessible in the email body. 
  • Date: This lists the date and time when the email was initially sent. In Outlook, you will also find the day of the week here.
  • Message-Id: This lists the tracking number unique to the email.
  • List-Unsubscribe: You will find the email address that can be used to unsubscribe from the mailing list used by the sender, if one is available. 
  • MIME-Version: Lists the MIME (Multipurpose Internet Mail Extensions) version used by the email. It’s usually 1.0. MIME headers come into play when sending data, including pictures, audio files, or infographics, over emails.

How do I view message source in Outlook?

1. View the Internet Headers

  1. Open Outlook and then double-click on the relevant email.
  2. Now, click on the File menu from the top left.
  3. Click on Properties.properties
  4. You will now find the source code and the headers under Internet headers.internet properties to View Message Source in Outlook
  5. Since it’s not very clear in the Properties window, we recommend pasting the Internet headers into the default text editor, preferably Notepad, and then inspecting the complete message source. 

When you want to view email header in Outlook 365, an easy option would be to check the email properties. You can check the entire headers, both for incoming messages as well as those sent to others.

Besides, you can also verify the email sender and block them if they appear to be an unstrusted source.

2. View message source without opening the email

  1. Open Outlook, and then click on the File tab.
  2. Click Options from the left.options
  3. Go to Quick Access Toolbar from the navigation pane, and select All Commands in the Choose commands from dropdown menu.all commands
  4. Select Message Options from the list and then click the Add button.message options
  5. Now, click OK to save the changes. 
  6. Head back to the email list, select one, and then click on Message Options in QAT.View Message Source in Outlook without opening email
  7. It will directly open the Properties window, and you can view the message headers.

If you regularly inspect the message source code of an Outlook email, it’s wise to add the functionality to the Quick Access Toolbar. This way, you can view the message source without opening the email.

How do I configure Outlook to store complete source and message headers?

Tip icon Tip
Since the steps require editing the Registry, we recommend you create a restore point. This will allow you to revert the changes in case anything goes wrong.
  1. Press Windows + R to open Run, type regedit in the text field, and hit Enter.regedit
  2. Click Yes in the UAC prompt.
  3. Paste one of the following paths depending on the installed version of Outlook and hit Enter:
    • Outlook 2016 and 2019:HKEY_CURRENT_USER\­­Software\­­Microsoft\­­Office\­­16.0\­­Outlook\­­Options\­­Mail
    • Outlook 2013: HKEY_CURRENT_USER\­­Software\­­Microsoft\­­Office\­­15.0\­­Outlook\­­Options\­­Mail
    • Outlook 2010: HKEY_CURRENT_USER\­­Software\­­Microsoft\­­Office\­­14.0\­­Outlook\­­Options\­­Mail
  4. For 64-bit versions of Outlook, right-click on the empty portion, hover the cursor over New, select DWORD (32-bit) Value, and then name it SaveAllMIMENotJustHeaders. For 32-bit versions, create a QWORD (64-bit) Value with the same name.dword (32-bit) value
  5. Double-click the DWORD you just created, enter 1 under Value data, and then click OK to save the changes.change value data

Outlook, by default, doesn’t store all the message headers. Even the headers are not stored along with the message body. This leads to incomplete information being presented when you view the source code.

To fix things, simply reconfigure the Registry and add a new key, which will force Outlook to store the entire email message along with entire message headers.

That’s all! You now know how to view the message source in Outlook. This information will help regular users as well as those in the field of cybersecurity or IT services.

Before you leave, find out what to do when your Outlook inbox is not updating or you find that Outlook is not launching, a problem that arises due to incompatibility or third-party conflicts. 

Also, some users were unable to add an email account in Outlook, but that, too, is easily fixable.

For any queries or to share why you wanted to view the message source, drop a comment below.

AI has produced 15 billion images so far, statistics say

We all know that AI has become a very popular choice when it comes to content creation. Bing Chat, for example, can generate images for you, if you ask it to do so. Other AI tools, such as Runway Gen-2 will generate entire videos for you with a simple script. You still have to edit them, of course.

Just earlier this year, GPT-4 promised that it can create video content just from texts, and in the following months, a lot of other tools were able to do the same thing.

Generative AI models, such as DALL-E 2 and Midjourney are able to easily generate images at your own whim. And images created by these models ended up winning photography competitions, stirring up a debate on just how ethical it is to use AI to generate art.

However, in just 18 months, AI has produced over 15 billion images so far, according to statistical research done by Everypixel Journal. The statistic also states one important fact: AI has already generated as many images as photographers have taken in 150 years.

Here’s what the statistics are saying when it comes to AI image creation

According to the research:

  • Text-to-image algorithms have created more than 15 billion images, since 2022. In comparison, it took photographers 150 years, from 1826 to 1975, to reach the 15 billion mark.ai image statistics
  • People are creating an average of 34 million images per day, mainly using DALL-E 2.
  • Adobe Firefly is the fastest generative AI: it produced 1 billion images in just three months from launch.
  • Approximately 80% of the images (i.e. 12.590 billion) were created using open-source generative AI models, services, and platforms.

Even though many of the AI images are coming from open-source models, the paid generative AI tools are also incredibly popular. For example, Midjourney has the largest community of users, with over 15 million.

In comparison, Adobe Creative Cloud, which includes the AI image generator, Adobe Firefly, has a community of 30 million. So it’s safe to say the AI tools might actually have a chance against the manual tools of creation.

If it’s ethical or not to use AI images in your work, then that’s up for debate. But AI surely does democratizes content creation. However, in many cases, human input is still required.

But what do you think about these AI image statistics? Let us know in the comments section below.

DeleteMe Review: Can it Remove Digital Footprint?

You may grow worried if you realize just how much information about you may be out there on the web.

It’s really hard to tell on your own who has your data, and even harder to get rid of it, but there are specialized services to help you with that.

Today we’ll review Deleteme, an anti-tracking tool that promises to erase your digital footprint.

We’ll explain everything from how DeleteMe works to whether is it safe or not, and much more.

Let’s get started.

What is DeleteMe

DeleteMe is a service that helps individuals remove their photos, names, ages, locations, emails, occupations, marital statuses, and so much more from apps and websites.

Here’s how DeleteMe achieves this:

The company’s team of experts works by contacting data brokers on your behalf and requesting that they remove your personal information. 

Once this is done, DeleteMe will send you a report that shows which data brokers have removed your information and which ones have not. 

It doesn’t stop there! These experts will also continue to monitor the data brokers and request that they remove your information if it is ever re-posted.

What are data brokers?

Are you wondering who the data brokers are?

A data broker is a company that collects and sells personal information about individuals. They get their data from a variety of sources, including:

  • Public records: Information like your name, address, and date of birth. Data brokers get this information from government websites and so on.
  • Commercial data: This includes data about your spending habits, interests, and online behavior. They get these from retailers, credit card companies, and websites.
  • Surveys: Data brokers sometimes conduct surveys to collect information about people’s opinions and habits.
  • Web tracking: These brokers use web tracking technologies to collect information about the websites you visit, the pages you view, and the links you click.

Let’s paint a picture of how data brokers operate:

→ When you create an account on a website the site has access to various information such as your name, email address, phone number, home address, and so on.

Also, like any person who’s used the internet, you probably agree to a privacy policy within seconds, without really knowing what kind of data you give access to. 

Or if you don’t you may have done it at some point.

Do that a few times, and tons of info about you is on the web. Then, the data brokers get hold of your data or purchase it from some websites and sell it to companies. 

Then, these companies can use your data for various purposes, including targeted advertising and risk assessment.

If you don’t want something of such to happen, that is where DeleteMe comes in.

How does DeleteMe work?

DeleteMe uses a simple yet detailed process to erase your digital footprint off the web. 

Below is a breakdown of how DeleteMe works:

  • Sign up: In this phase, you will provide your name, email address, phone, and some basic information about yourself.
  • Submission of details: Then you will submit the data you want DeleteMe to remove from search engines.
  • Removal process: DeleteMe has a team of experts who will contact data brokers and websites to request that your information be removed from the internet.

Once DeleteMe has finished removing your data, you will receive a detailed report within seven days. It will show you which websites and the type of information that was removed.

It doesn’t stop there:

Unless you unsubscribe from the service, DeleteMe will continue to monitor and scan the internet for your info every three months. 

If the team finds that your data has been re-posted, they will work to remove it again.

DeleteMe reports review

The company sends a standardized type of report to its users.

Let’s discuss each part of the DeleteMe report in detail:

1. The introduction

Here, the company submits an overview of the action it took after your submission, how long the process lasted, and what you should expect in the report.

It goes ahead to inform you about the listings that are pending and the duration of time your information on these sources will clear out. 

Moreover, DeleteMe assures you at the end of the introduction that it will continue to do everything to protect your data and privacy.

This is what the introduction would look like:

introduction of the deleteme report

2. Listing statistics

This part is a summary of the report in numbers. It displays the year you joined DeleteMe, your plan type, your privacy advisor, and for how long the company has protected your data.

Furthermore, it shows whenDeleteMe carried out the last scan, the total number of your listing and the brokers that have your information, and the broker with the most information about you.

It also informs you about both the time saved searching and removing your data from online sources. Finally, it contains the sum of all your Personal Identifiable Information (PII) it discovered.

deleteme listing statistics

3. Changes from the previous report

This section only shows you the changes since the last time DeleteMe scanned and deleted your information. It also informs you of the new brokers that were added to your list.

deleteme changes from the previous report

4. Report findings

The report findings section carries the results of the scanning and deleting of your data from public record sites like Truthfinder, Vericora, and so on.

It shows you detailed reports of all the websites, brokers, and online sources it extracted your information from and the type of information – whether it was your address, name, or email.

DeleteMe also goes ahead to tell you about the pending deletion and when you should expect total removal for some of the brokers and websites.

deleteme report progress

5. What’s next

At the end of the report, you will see the day your next report will be sent to you and a link to a relevant blog post or news on data privacy.

DeleteMe privacy and security review

Due to the nature of their service, DeleteMe has to collect information like your number, contact, address, email, online activity, and so much more.

This is why many people are skeptical and wonder if DelteMe is legitimate and can be trusted with your data.

DeleteMe assures users that it does not sell their details as it is not a data broker but describes in its privacy policy how it uses customers’ information.

For example, DeleteMe mainly uses your information to offer its services, for research, and also to send you marketing and promotional communications.

However, it doesn’t end there:

To comply with the law, prevent fraud, and safety, DeleteMe may, without your consent, share your data with the government, and authorities on request if you are suspected of a crime.

DeleteMe recommends that users manage access to the computer and devices where they logged in to the DeleteMe app. 

Although DeleteMe implements technologies meant to protect users’ information, it cannot guarantee that the data will not be hacked or intercepted by others.

Under California law, California residents are entitled to ask DeleteMe for a notice identifying the categories of personal customer information that they share with certain third parties. 

There’s also a part of this policy document that is dedicated to European users. This part of the policy respects the GDPR law and users have the right to their information.

DeleteMe pricing review

There’s something you should know:

DeleteMe does not offer free trials and its price is relatively high compared to similar services like Incogni and Kanary.

However, it allows users to carry out a free scan to see if any of their information will come up in the 40 most popular data brokers. But, it will not conduct any removal for you afterward.

In addition to these, the company awards its customers a $50 Amazon gift card for every successful referral.

Additionally, DeleteMe can refund you if you end your subscription before getting your first report. 

DeleteMe subscriptions

Now, let’s review the pricing of this service. DeleteMe operates using three basic plans that it bills both monthly and annually.

Here is the list of all the basic plans:

  • Standard Protection (1 year, 1 person) – $10.75 per month, $129 per year.
  • Most Popular (1 year, 2 persons) – $19.08 per month, $229 per year.
  • Best Value (2 years, 2 persons) – $14.54 per month, $349 per two years.

In addition to these plans, DeleteMe has premium offers users can only get by requesting them from customer support. They are the Gold, Diamond, Platinum, and VIP.

Below is the breakdown for each of them:

  • Gold – $180 yearly (addition of 60 extra sites and sends report six times a year)
  • Diamond – $425 yearly (extra 65 websites, data masking controls, and reports six times a year).
  • Platinum – $1000 yearly ( includes 75 more brokers, a Google search scrub by a professional in the DeleteMe team, and reports once a month).

The VIP membership comes with all the offerings of the Platinum plan with an additional 100 data brokers.

Whichever subscription you choose would depend on how far you want DeleteMe to go in sniffing out your information. 

DeleteMe

Don’t let your personal information linger online! Use DeleteMe to erase all of your data for increased privacy!
Check price Visit website

How to opt out of data brokers?

If you are stuck on how to withdraw yourself or information from data brokers on your own or through DeleteMe, this section covers that thoroughly.

Let’s dive right into it:

How to opt out of data brokers using DeleteMe 

It’s super easy to opt out of websites that sell your information through DeleteMe. All you have to do is submit the details you wish to remove to DeleteMe and the company will take it from there.

It will reach out to different data brokers and ask them to delete whatever personal data of you they have in their possession and boom! You don’t exist on the internet anymore.

How to opt out of data brokers manually 

Maybe you don’t have extra money to spare for DeleteMe services and you want to take on the task by yourself. It is still possible. 

Firstly, you have to find all the data brokerage websites that have your information. Then, you opt out of each of them by clicking on the control information or opt-out button.

The downside of this option is that it will waste your time and you may end up not knowing how many data brokers have your information. Also, you won’t have a detailed report like the one from DeleteMe.

DeleteMe customer service review

Without proper support, any business is sure to have confused customers and a truckload of bad reviews. DeleteMe understands this concept and does its best to respond to its users fast.

The company’s support team is always available between Monday-Friday from 9 am to 8 pm Eastern Time and typically responds within 24 hours.

Anyone can reach them through these media:

Although DeleteMe has a social media presence on LinkedIn and Twitter, it responds to issues faster through phone calls or email. Its support team can also set up a live chat when there are so many customers in the queue.

Also, it is worthy of note that the company will take time to respond if you reach out to them outside the specified work hours.

In conclusion, DeleteMe customer support is reliable when you are in dire need of guidance while using this service.

Conclusion – Is DeleteMe worth it?

Despite DeleteMe’s high subscription cost and the company requiring your personal information to effectively carry out its services, it is worth it. That’s because, at the end of it all, your data would be off the internet.

Apart from that, it would not keep you in the dark about its activities as you’ll receive reports monthly or quarterly depending on your plan. Now, with this DeleteMe review, you’ll get to know the pros and cons of the service.

Launched in 2011 by Albine Inc., DeleteMe has been on a mission to help its customers reduce the risk of identity theft, credit card fraud, robocalls, spam, stalking, and cybersecurity threats.

Aside from that, the company has hit major milestones since its inception. For example, in 2012 it contributed to the development of the Consumer Privacy Bill of Rights Act.

How to Turn on Spell Check in Outlook

If you are worried about grammatical and spelling errors while sending professional emails, you must turn on spell check in Outlook.

Once enabled, Outlook checks spelling automatically and spots the mistakes in the entire email when you click Send.

In this guide, we will explore step-by-step instructions to enable the feature to ensure your emails are free from grammatical errors.

How do I turn on auto spell check in Outlook?

  1. On the Outlook window, go to the File tab.OUTLOOK_File how to turn on spell check in outlook
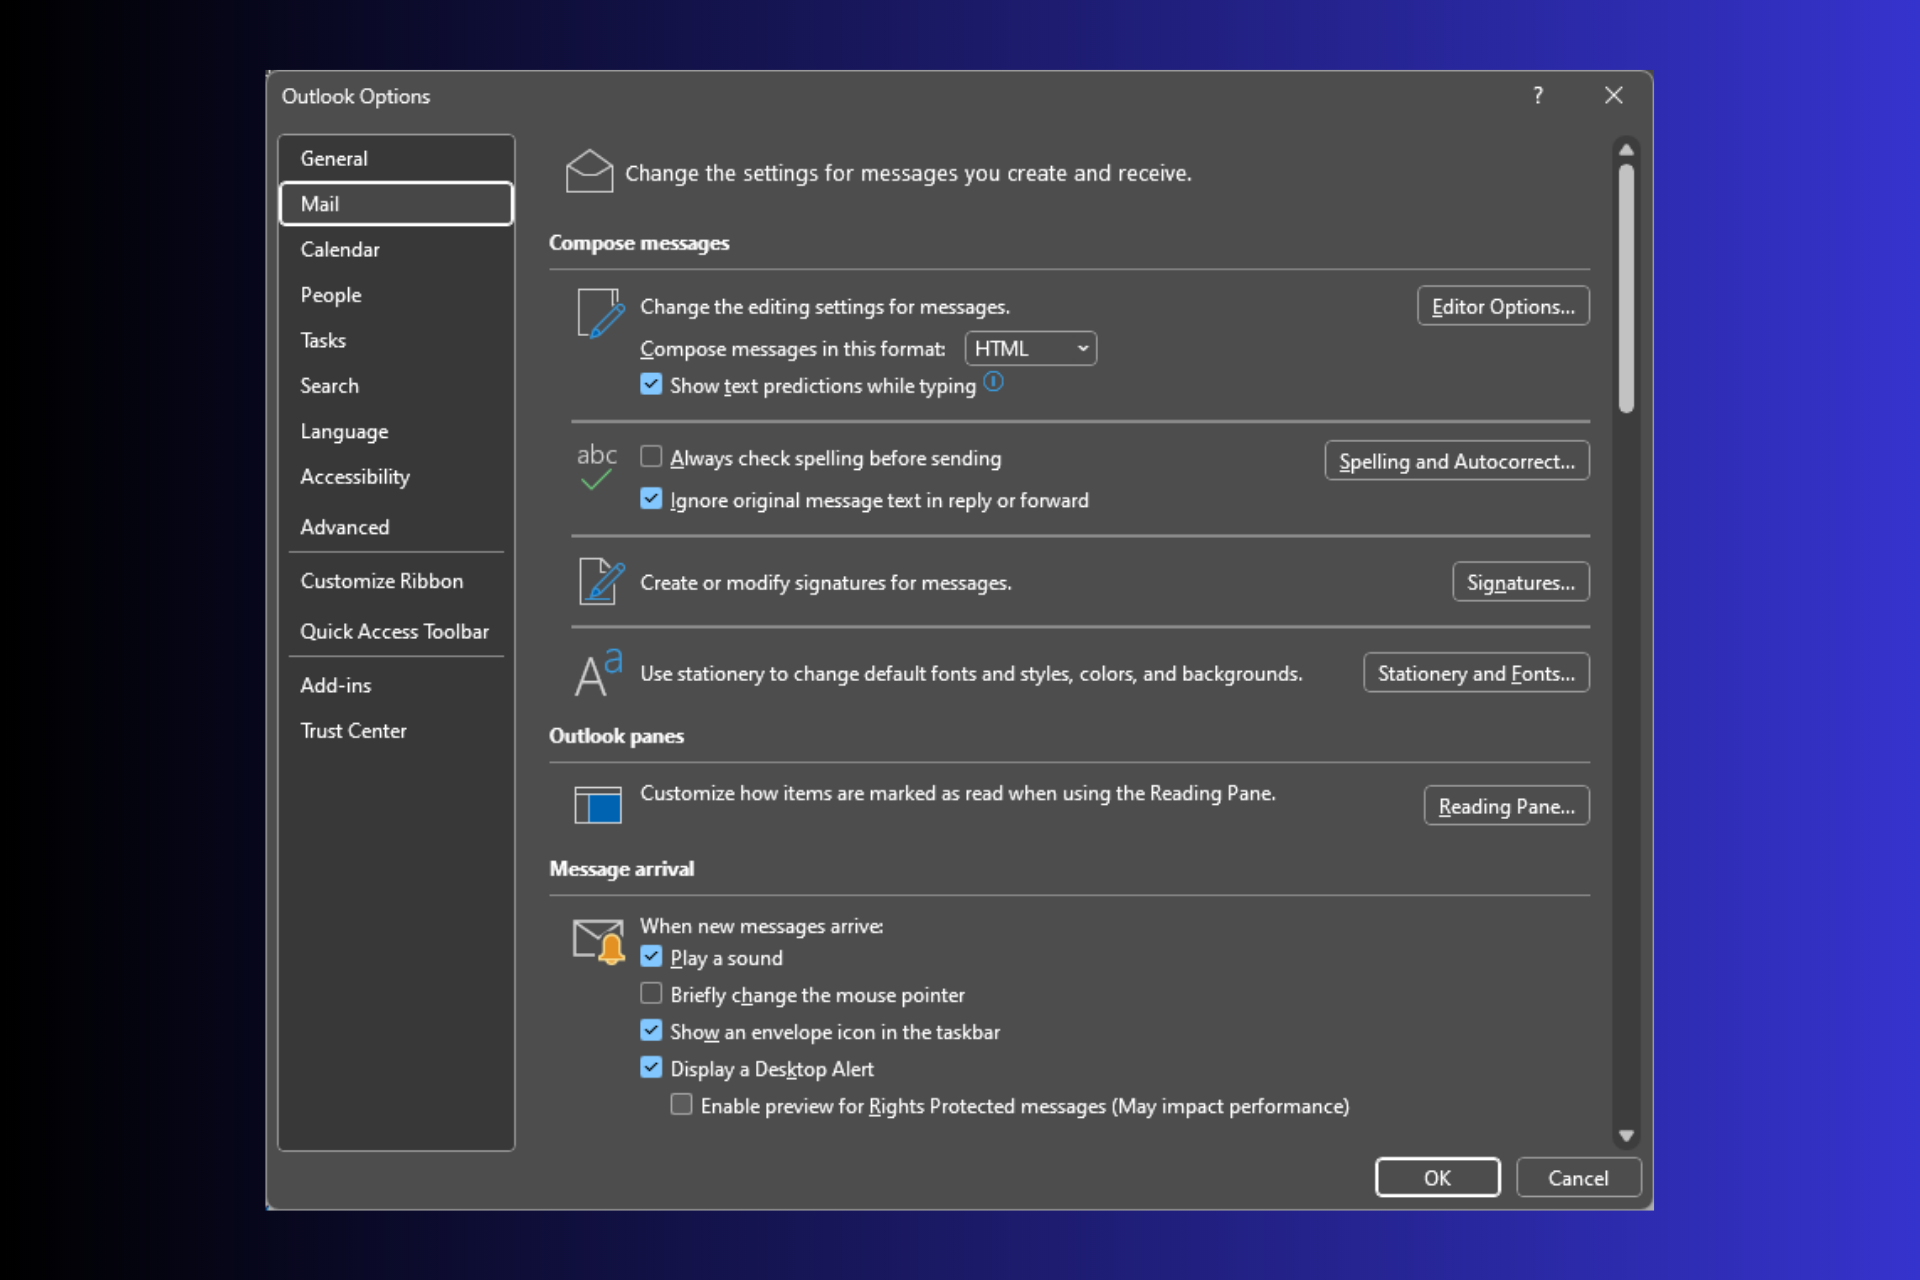
  2. Select Options to open Outlook Options.Select Options
  3. Select Mail from the left pane, locate Compose Messages, and place a checkmark next to Always check spelling before sending.Autocorrect options
  4. Next, click the Spelling and Autocorrect button.
  5. On the Editor Options window, select Proofing from the left pane.
  6. Under When correcting spelling in Outlook, place a checkmark next to Check Spelling as you type, and Mark grammar errors as you type in the Spelling tab.Check Spelling as you type,
  7. Click OK to save the changes.

This is how you can quickly enable spell check on the Outlook desktop app. However, if you are using the Outlook web app, you must ensure the spell check for your browser and OS is enabled.

If Chrome spell check is not working for you, we advise you to read this guide to find easy solutions.

Why is my spell check not working on Outlook?

There could be various reasons why the feature may not be working on Outlook; some of the common ones are:

  • Incorrect language – If the grammar checker on Outlook does not support the language of the email, the spell check will not work. Check the proofing language.
  • Feature is disabled – Spell check might not work or respond if the feature is disabled. Check the Outlook options to confirm if it is working.
  • Outlook app corrupted – If the Outlook app files are damaged, you might face many issues, including this one.
  • Outdated app – An outdated version of the app could be the reason for many problems, such as this. Check for app updates to ensure that’s not the case.

Now that you know the causes of the issue, let us check the common solutions to the problem.

How can I fix spell check not working on Outlook?

Before engaging in advanced troubleshooting steps, you should consider performing the following checks:

  • Restart the Outlook app.
  • Check if Outlook Spelling and Grammar tool is enabled.

If you still can’t see the spell check, move to the solutions mentioned below.

1. Verify proofing language selected is correct

  1. On Outlook, go to the email message you are trying to send.
  2. Click the Review tab, then the Language button, and choose Set Proofing Language.Set Proofing Language how to turn on spell check in outlook
  3. From the Language dialog box, select the preferred language and remove the checkmark next to Do not check spelling and grammar.
  4. Also, remove the checkmark next to Detect language automatically.OUTLOOK_remove checkmark Do not check spelling and grammar.
  5. Click OK.

Check if the automatic spell check works; move to the next method.

2. Run the Spell check manually

  1. Go to the email that you are trying to review on Outlook.
  2. Select the Review tab from the menu bar, then select Spelling and Grammar; choose Spelling or Spelling and Grammar from the drop-down list.Select Spelling how to turn on spell check in outlook
  3. It will spot spelling mistakes and suggest corrections. If found, apply the suggestions to remove the errors.

If you face similar issues like Outlook spell check not working with signature, we recommend you check out this guide for easy solutions.

3. Disable Ignore original messages text in reply or forward option

  1. On the Outlook main window, go to the File tab.OUTLOOK_File tab _ how to turn on spell check in outlook
  2. Select Options to open the Outlook Options window.Select Options
  3. Click Mail from the left pane, locate Compose Messages, and remove the checkmark next to Ignore original messages text in reply or forward option.OUTLOOK_Ignore original messages text in reply or forward
  4. Click OK to confirm the action.

Check if you can use the automatic spelling checks feature now.

4. Repair the Outlook .PST file

  1. Close Outlook completely and navigate to the following file paths according to the Outlook version you have:
    • 2007: C:\Program Files (x86)\Microsoft Office\Office12
    • 2010: C:\Program Files (x86)\Microsoft Office\Office14
    • 2013: C:\Program Files (x86)\Microsoft Office\Office15
    • 2016 & 2019: C:\Program Files (x86)\Microsoft Office\root\Office16
    • Microsoft 365: C:\Program Files\Microsoft Office\root\Office16
  2. Locate SCANPST.EXE and double-click it to open the Microsoft Inbox Repair tool.Location of SCANPST - how to turn on spell check in outlook
  3. Click Browse to select the .PST file from your computer.SCANPST_Browse the file
  4. Now click Start.SCANPST_Start scan
  5. Once scanned, click Repair if the scan shows errors.SCANPST_Repair the file
  6. You will get the Repair complete window, click OK, and relaunch Outlook.Repair complete window

So, this is how you can turn on spell check on Outlook and deal with the issues if the feature is not working. You can also make this change system-wide by enabling the autocorrect feature in your Windows 11.

If the spell check is not working on Word, we suggest you check out this guide to find the expert-recommended solutions.

Please feel free to give us any information, tips, and your experience with the subject in the comments section below.

2 Ways to Compare Two Files in Notepad++

Notepad++ is an editor that serves as an effective replacement for the classic Notepad, a built-in utility in Windows. The former offers advanced options and a wide array of customizations. And many use Notepad++ to compare two files.

While Notepad++ has gained popularity across the spectrum, be it amongst regular users or programmers, the ability to compare 2 files in Notepad++ and save the differences makes it stand out.

When should I use file comparison in Notepad++?

File comparison is beneficial in several situations where you must highlight the differences. For instance, if you plan to merge two files, it’s imperative to identify what’s different between them before proceeding.

Also, when transferring files from one location to another, certain parts may be left out; to verify this, a simple side-by-side comparison should do. Besides, programmers may need to compare two versions of the same file. All this is possible using Notepad++.

How do I compare text files in Notepad++?

Tip icon Tip
When comparing two text files in Notepad++, you have the option to use a plugin or do the job manually. We recommend the former since it’s more accurate and minimizes manual effort.

1. With plugin

1.1 Install the Compare plugin

  1. Launch Notepad++, click on the Plugin menu, and then select Plugins Admin.plug ins admin
  2. Locate the Compare entry, tick the checkbox next to it, and click on Install.install plugin
  3. Click Yes in the confirmation prompt.
  4. After the plugin is installed, Notepad++ will relaunch automatically.

You have now completed the first step to compare two files in Notepad++ with a plugin on 64-bit. With the plugin installed, all that’s left is to select the files and compare them.

1.2 Comparing two files in Notepad++

  1. In Notepad++, click on the File menu, and select Open.open to Compare Two Files in Notepad++
  2. Now, navigate to the location where the previous file is stored, select it, and click Open.
  3. Do the same thing, and this time, open the new (other) file you want to compare in Notepad++.
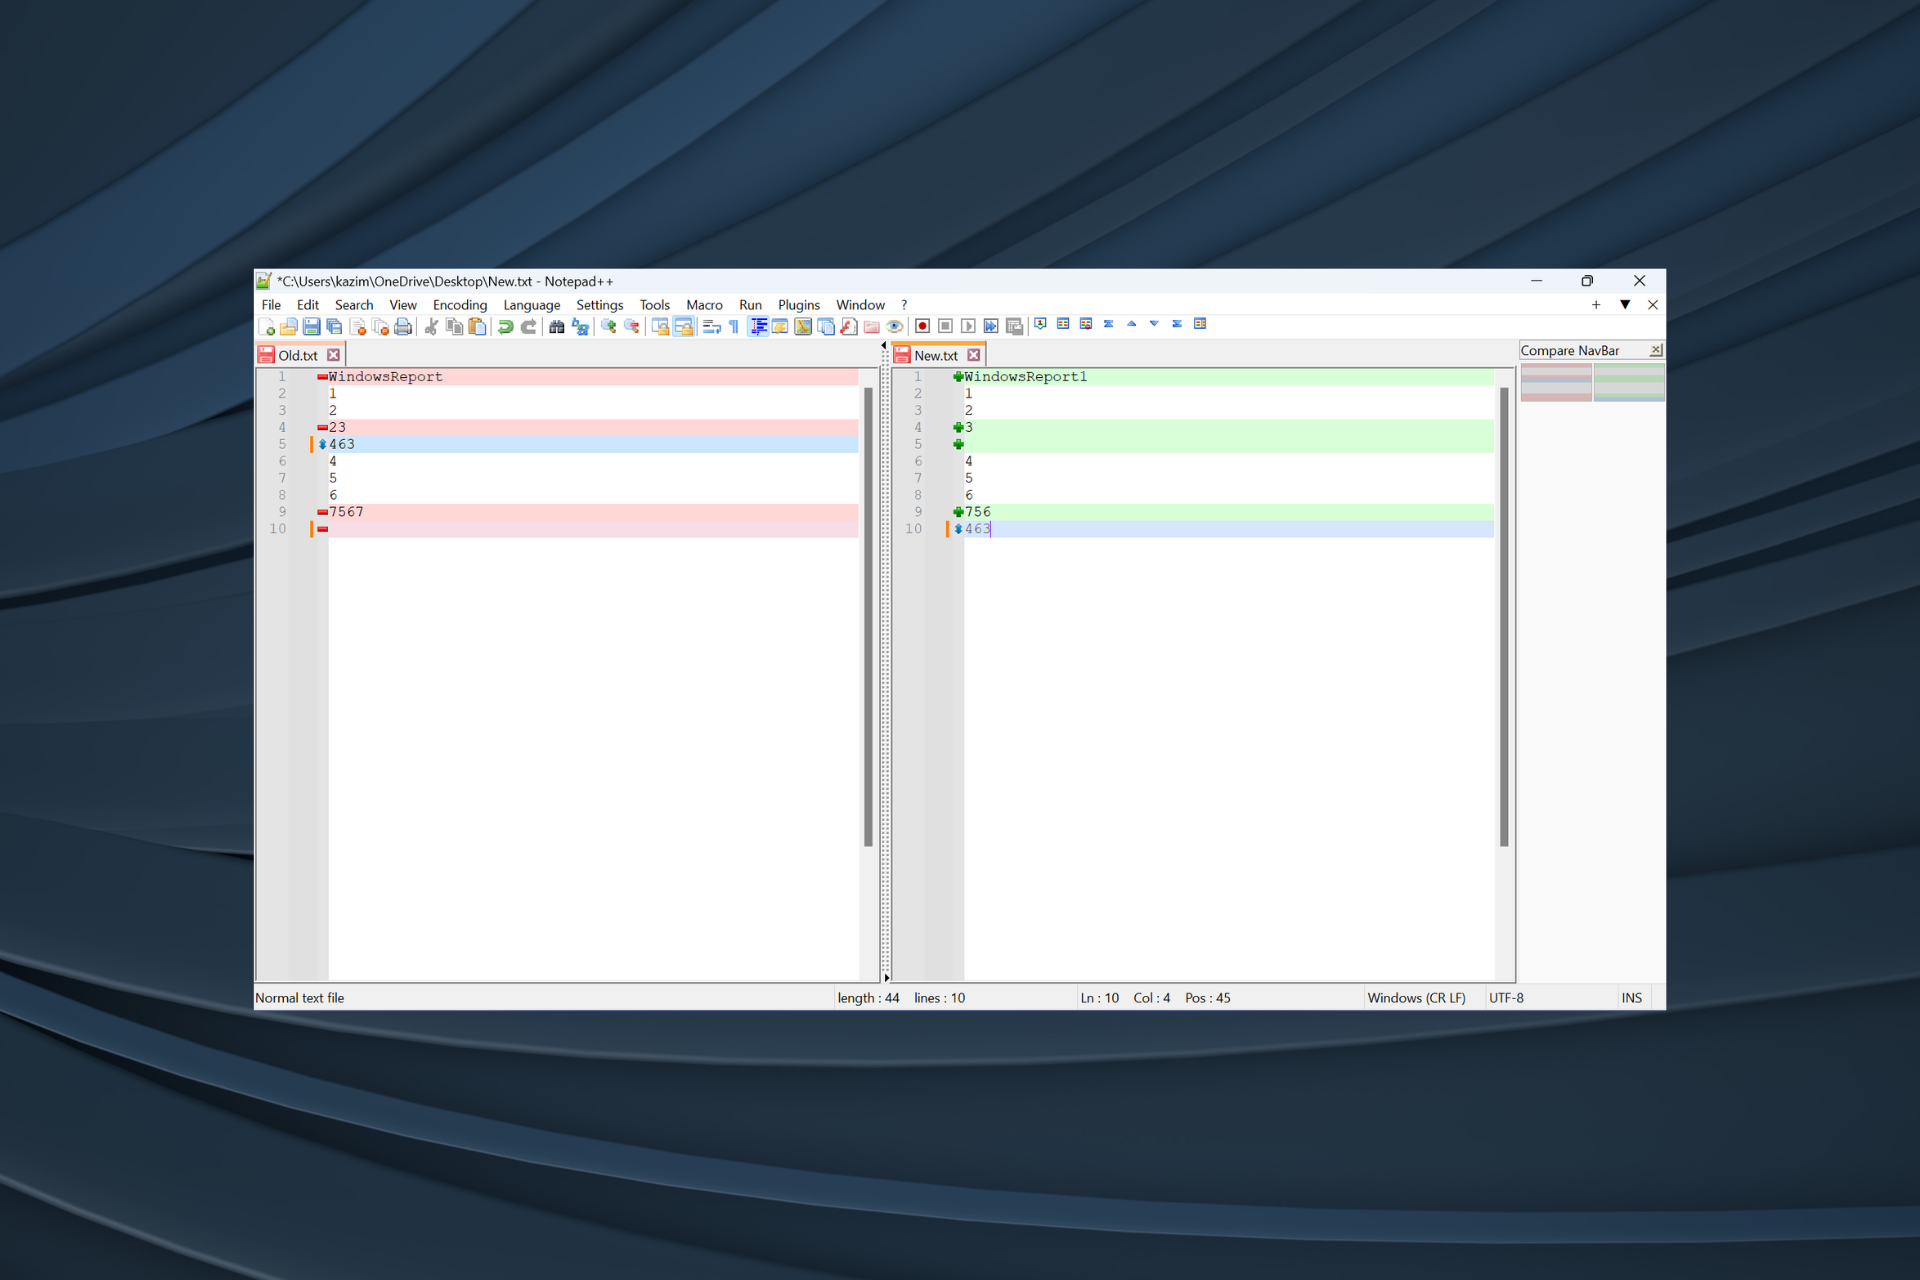
  4. Once the two files are open, click on the Plugins menu, hover the cursor over Compare, and again select Compare. Alternatively, you can press Ctrl + Alt + C to trigger the plugin.compare
  5. Notepad++ will now compare the two files and highlight the differences. You will find several symbols and colors for easy representation. These are:
    • Added: Denoted by a + sign or a green line, this shows parts that are included in the second file but not in the first. Only used in the second file.
    • Removed: Denoted by a – sign or a red line, this shows parts that are included in the first file but not in the second. Only used in the first file.
    • Moved: Denoted by a double-sided vertical arrow, this highlights parts that are present in both files but at different locations.
    • Changed: Any changes you make are denoted by ≠, and it could be both red or green in color depending on whether the part was removed or added, respectively.compare files

2. Without plugin

  1. Open both the files you want to compare in Notepad++.
  2. Now, right-click on the tab for one, hover the cursor over Move Document, and select Move to Other View.move to other view
  3. The two files will now be visible side-by-side, and you can start comparing them.Compare Two Files in Notepad++ without plugin

When you compare two files in Notepad++ without a plugin, the results aren’t as clear, requiring more manual effort and time. Besides, the lack of color coding and symbols might result in missing important differences. So, it’s recommended that you install the Compare plugin.

And once you know how to compare two or more text files in Notepad++, do not forget to check the best PDF compare software for Windows.

For any queries or to share your feedback on the process, drop a comment below.

Optimize Your Digital Environment With Lakeside Software

With the massive shift in working models from offline to online and increased reliance on digital platforms, most of us depend on our computers & other electronic devices to stay productive.

Therefore, the need for an efficient and productive digital workplace is necessary; that’s where Lakeside Software can help!

Lakeside Software’s SysTrack is a cloud-based platform that helps you get insights into the digital environment of your organization. Let’s check out what more it can offer.

Why do I need a Digital Employee Experience (DEX) tool?

Digital Employee Experience

Productivity, consistency, and satisfaction of employees can bring success to a business. As digital transformation is reshaping the workplace model, Digital Employee Experience (DEX) tools have become necessary. Here are some of the advantages of using it:

  • Data-driven insights – Provides invaluable data & analytics, including application performance, device health, and more, which helps IT admins to handle issues proactively.
  • Enhanced employee productivity – Detects the issues affecting employee systems, reduces downtime, and ensures seamless access to tech resources.
  • Proactive resolution – Enables IT teams to automatically identify & remediate potential issues before they escalate, reducing disruption in employee workflow and resulting in user satisfaction.
  • Optimized app performance – Monitors app performance, identifies bottlenecks and optimizes resources to ensure smooth operations.
  • Enhanced employee engagement -Promotes a positive work environment with qualitative feedback collection of employee wellbeing and satisfaction.

That’s why you need an intelligent and powerful cloud-based solution like Lakeside Software to get complete visibility into your IT infrastructure & digital workplace performance.

What are the best features of Lakeside Software?

1. Continuous, real-time system visibility 

Enhances end-user productivity  - Lakeside software

Lakeside Software is pivotal in improving end-user productivity, providing detailed insights to optimize digital experience.

The DEX tool continuously monitors the performance of applications and endpoints in real-time. This allows IT admins to detect & proactively manage issues that could hamper user productivity, thereby minimizing downtime, reducing disruptions, and ensuring employees can work without interruptions.

Its unique functionalities include real-time visibility into the endpoint, automated diagnosis for more than 1,200 common problems, and automated, one-click fix remediation.

2. Comprehensive incident response workflows 

Comprehensive incident response workflows  Lakeside Software

Real-time visibility enables organizations to gain continuous insights into their digital environment, providing IT teams with comprehensive health, performance, and usage of endpoints, apps, & networks.

The platform collects data, like app usage, user interactions, device performance metrics, network connectivity, etc., from various endpoints, devices, and apps within the organization network.

It uses interactive and user-friendly dashboards & reports to represent the digital environment’s health and performance.

Lakeside Software can trigger real-time alerts for specific events or thresholds, which lets IT teams respond promptly to crucial situations to prevent any negative impact on end users.

3. Insights into Microsoft Office applications

 Insights into Microsoft Office applications - Lakeside Software

Lakeside Software provides valuable insights into Microsoft Office apps, offering a detailed analysis of how employees interact with these productivity tools.

It monitors the performance of these apps in real time, including tracking load times, response times, and resource consumption, which provides IT teams understanding of how apps function.

This enables analyzing usage patterns, identifying which Office applications are most frequently used & by whom, which, in turn, helps organizations optimize licensing based on usage.

This is additionally useful in resource allocation decisions and specifying if any app requires additional resources.

4. Migration and optimization insights for Windows Endpoints

Lakeside Software has analytics capabilities that permit IT teams to monitor Windows endpoints’ performance metrics, including memory usage, CPU usage, disk activity, and network usage.

It helps identify potential performance bottlenecks and take measures to ensure optimal endpoint performance.

The User Experience Scoring measures the quality of user experience, which lets IT admins prioritize optimization efforts, measure the impact of improvements, and identify new opportunities for refinements.

The platform also provides a detailed list of hardware and software installed to help track device configuration, ensuring adherence to compliance policies.

The solution can even help IT teams plan, execute, and report on migration or optimization projects for Windows 11 and virtual desktops.

Lakeside Software

Empowers productivity, elevates the end-user experience, and unlocks digital potential!
Check price Visit Website

Evaluating apps’ performance, & device usage, pinpointing potential bottlenecks, and resolving issues proactively to avoid any workflow disruptions, Lakeside Software empowers you to optimize all aspects of your digital ecosystem.

Still unsure whether Lakeside Software is right for your business? Then, try it out, then decide. Get the Demo today and see how it can help enhance the digital experience, improve productivity & employee satisfaction.

What do you think about a DEX tool? Was the information helpful for you? Leave your thoughts in the comments section.

How much storage will Starfield take up? [System requirements]

At the Xbox Games Showcase 2023 and Starfield Direct event, there were a lot of exciting announcements. The Game Pass is coming to NVIDIA GeForce Now, meaning you can easily play games available on GeForce Now pretty much on every supported device.

Over 5000 new games are in development for the Xbox, and games such as Forza Horizon and Senua II are coming soon to Xbox as well. But the star of the event was, obviously, Starfield.

Developed by Bethesda, Starfield is an upcoming role-playing game that will take you to space, across a vast distance with hundreds of locations to visit.

Microsoft and Besheda both expect Starfield to become a commercial sensation and a cultural phenomenon. As a result, the video game will be available in the Game Pass catalog right at launch.

However, it seems that Starfield is taking quite the storage on your system. According to a Reddit user, Microsoft Store has listed the amount of space needed for the game. And it’s a lot.

How much storage will Starfield take up? [System requirements]

Microsoft Store says you’ll need at least 125 GB of free storage to be able to install Starfield. To play it, however, you’ll likely need much more. So brace yourselves, and upgrade your systems/storage, if you want to play this exciting video game.how much storage will starfield take up

Starfield will be available to Windows systems, and Xbox consoles this fall, in September 2023, so if you don’t have that enough space, there is more than enough time to upgrade your system.

Either way, you’ll be needing additional SSD space for patches, possible expansions, and so on. As the game looks and feels beautiful, it will ask for a lot of resources from your system, especially if you plan to play it on a PC.

Below are the System Requirements for Starfield.

Minimum Requirements:

  • OS: Windows 10 version 22H2 (10.0.19045)
  • Processor: AMD Ryzen 5 2600X, Intel Core i7-6800K
  • Memory: 16 GB RAM
  • Graphics: AMD Radeon RX 5700, NVIDIA GeForce 1070 Ti
  • DirectX: Version 12
  • Network: Broadband Internet connection
  • Storage: 140 GB available spacehow much storage will starfield take up
  • Additional Notes: SSD Required

Recommended Requirements:

  • OS: Windows 10/11 with updates
  • Processor: AMD Ryzen 5 3600X, Intel i5-10600K
  • Memory: 16 GB RAM
  • Graphics: AMD Radeon RX 6800 XT, NVIDIA GeForce RTX 2080
  • DirectX: Version 12
  • Network: Broadband Internet connection
  • Storage: 140 GB available space
  • Additional Notes: SSD Required
  • Additional Notes: SSD Required

Note that while you won’t need much RAM, as 16 GB is the standard now, you will need to be up to date with your Windows. So head over, and update it too while we’re at it.

Starfield might not have a physical disk copy

According to a now-deleted tweet from Bethesda Support, it seems that Starfield might not have a physical disk copy at all.how much storage will starfield take up

It will most probably have a box with a code in it, which you can use to download Startfield onto your device. However, the tweet was deleted, so take this update with a pinch of salt. There is still some time until Starfield hits the digital stores, in September, so Bethesda might change their mind.

Update: Starfield has gone gold and you can now preload the game on your Xbox X/S

According to Bethesda, Starfield has gone gold, meaning that now the game is ready to release. Even more, starting today, you’ll be able to preload Starfield on your Xbox S/X, and Windows, and on August 30th, it will be available to preload on Steam.

What are your opinions on this video game’s requirements? Are they ok, or is it too much? Let’s hear your thoughts and opinions in the comments section below.

How to Open & Install .Cab File on Windows 11

A Windows Cabinet (CAB) file, earlier known as Diamond files, is a single file that stores various compressed files in a file library and usually comes with a .cab extension.

The file is similar to ZIP files as they both use DEFLATE, Quantum, and LZX compression algorithms to compress the files in them. If you want to open and install a .cab file on Windows 11, this guide can help!

What should you do before starting the .cab installation?

  • Back up your important data.
  • Create a restore point to roll back to the last known good configuration if there is any mishap.
  • Ensure you download a compatible file from a reliable source.
  • Learn about the components of the file so that you are aware of the changes it will make.
  • Check if you have Command Prompt or Windows PowerShell installed.
  • Ensure you invoke these CLI tools with admin privileges.

After making these checks, you can continue with the installation process.

How can I install .cab files on Windows 11?

  1. Press Windows + E to open File Explorer. Locate the .cab file setup you want to install, right-click it, and choose Copy as path.File Explorer -Copy as path -  Install .Cab File on Windows 11
  2. Press the Windows key, type cmd, and click Run as administrator to launch Command Prompt.CMD elevated
  3. Type the following command to install the .cab file using the DISM tool after replacing PATH with the file location you copied and press Enter: DISM /Online /Add-Package /PackagePath:" <PATH>"command to install the cab file
  4. Once completed, restart your PC to see the changes.

You can use the same command to install the .cab file on an earlier version of Windows and to extract a .cab file on Windows 10/11.

Remember that installing the .cab files manually has its risks. Even if you are sure you are using the correct file format with the right version, keep the recovery options ready so you can either roll back to the previous version or perform a clean installation in case of emergencies.

What are .cab files used for?

  • Updating Windows – Distributes updates and patches required to add updated components & fixes to the existing installation efficiently, even to a large number of users.
  • Installing component or software – As it may contain files like DLLs, images, configuration files, fonts, and other essential resources, Windows use it to install software or component.
  • Storing components or updates – Stores and deploys components and updates, which allows better control over the modular structure of the operating system.
  • Installing device driver updates – Driver updates are also packaged and distributed in the .cab format for installation for better efficiency.

What can I do if the .cab file doesn’t install?

  • Try restarting your computer; it can be a neat trick to make the problem disappear.
  • Ensure you have downloaded the .cab file correctly, or try downloading it again.
  • Verify the file integrity.
  • Ensure you have free space on your system drive.
  • Run your computer in safe mode and try to install the file.

If these didn’t help, move to the steps mentioned below.

1. Run SFC & DISM scans

  1. Press the Windows key, type cmd, and click Run as administrator to launch Command Prompt.CMD elevated nstall .Cab File on Windows 11
  2. Copy & paste the following command to fix system file corruption from the Windows Component Store and hit Enter: sfc /scannowSFCSCANNOW CMD
  3. Wait for the command to run, then type the following command to repair Windows system image corruption using Windows Update and press Enter: Dism /Online /Cleanup-Image /RestoreHealthRestore health
  4. Upon completion, reboot your computer.

2. Disable Windows Firewall temporarily

  1. Press the Windows key, type windows security, and click Open.Windows Security open Windows key Install .Cab File on Windows 11
  2. On the Windows Security page, select Firewall & network protection from the left pane.
  3. You will get three profiles, Domain network, Private network, and Public network.Firewall and network protection
  4. Go to each profile, locate Microsoft Defender Firewall, and toggle off the switch to disable the Firewall.Turn off Microsoft Defender Firewall
  5. Once you install the file, don’t forget to turn the Firewall back on using the same steps.

If you are still unable to install the .cab file and facing errors like 42127 cab archive is corrupted, it could be because the file is corrupt or not downloaded properly.

How can I check if a .cab file is installed correctly?

1. Use Command Prompt

  1. Press the Windows key, type cmd, and click Run as administrator to launch Command Prompt.CMD elevated nstall .Cab File on Windows 11
  2. Copy & paste the following commands to get the list of installed components & packages on your device and press Enter: dism /online /get-packagesget the list of packages
  3. Go through the list and check if you see the one you installed.

You should choose this method if you have used the DISM command to install the file.

2. Check the packages list from Registry Editor

  1. Press Windows + R to open the Run dialog box.Regedit Install .Cab File on Windows 11
  2. Type regedit and click OK to open Registry Editor.
  3. Navigate to this path: Computer\HKEY_LOCAL_MACHINE\SOFTWARE\Microsoft\Windows\CurrentVersion\Component Based Servicing\PackagesCheck the list of packages in Registry Editor
  4. You will get the list of packages on your computer; go through it and check if the package related to the .cab file is there to ensure it is installed correctly.

You can also check the Event Viewer logs to locate the file installation event or run an SFC scan to verify the system files’ integrity.

If you have installed the Windows 11 Update manually using the .cab file, the quickest way to verify the successful installation would be to check the Windows Update history.

To conclude, remember always to restart your PC after the installation and test the file (if it’s meant to fix an issue) to ensure everything is as intended. If you bump into any issues or need more info about .Cab files, don’t hesitate to comment in the section below.

How to Download & Install Classic Paint for Windows

The Paint app has received a bunch of upgrades in the recent iterations of Windows, and its UI has been drastically changed altogether. While some find it friendlier, given the 3D capabilities, others want to download Classic Paint for Windows.

The Classic Paint app has been a part of Windows for as long as we can remember. It was simple to use, and over the course of time, we got hooked on it for basic editing needs. So, if you are planning to install Classic Paint in Windows 10, keep reading for the exact steps!

How do I get classic MS Paint?

1. Modify the Registry Editor

Tip icon Tip
This method works on the previous versions of Windows. Make sure to create a restore point before you start editing the registry. Also, if you have upgraded to the latest iteration, head to the next method.
  1. Press Windows + R to open Run, type regedit in the text field, and hit Enter.registry
  2. Click Yes in the UAC prompt.
  3. Paste the following path in the address bar and hit Enter:HKLM\Software\Microsoft\Windows\CurrentVersion\Applets\Paint
  4. Right-click on the Paint key in the navigation pane, select New, choose Key, and name it Settings.settings
  5. Now, select Settings, right-click on the empty portion, hover the cursor over New, select DWORD (32-bit) Value, and then name it DisableModernPaintBootstrap.DWORD
  6. Double-click the DWORD you just created.
  7. Enter 0 under Value data, and click OK to save the changes.change value data to download Classic Paint for Windows
  8. Finally, restart the computer for the changes to come into effect.
  9. Launch the Paint app now, and the classic version should open up.

2. Download MS Paint from a third-party website

Note icon NOTE
Windows7Games is a third-party website and not an official source. You can download the file at your own risk, as WindowsReport is not affiliated with it in any way. Be sure to scan the file for malware using an effective antivirus solution before running the installer.
  1. Go to Win7Games’s official website, scroll down to the Classic Paint (mspaint) section, and click the Download Paint button here.download Classic Paint for Windows
  2. Once done, head to the location where the downloaded file is stored, right-click on it, and select Extract all.extract all
  3. Make sure the extraction path is as per your choice, and click the Extract button.
  4. When the extracted files open, run the ClassicPaint setup.setup to download Classic Paint for Windows
  5. Click Yes in the prompt that appears, and then on Next in the subsequent windows.
  6. Click the Open Settings button.open settings
  7. Now, click on App execution aliases.
  8. Disable the toggle for mspaint.exe and pbrush.exe.disable
  9. Once done, follow the on-screen instructions to complete the installation process.
  10. Finally, to open the Paint app, search for it, and click on Paint (classic) from the results.paint classic

While the solution requires you to download Classic Paint for Windows from a third-party website, it’s safe, as confirmed by many. This works best if you want to get the Classic Paint app for a PC running Windows 11.

Also, the downloaded app doesn’t have the Edit with Paint 3D option, and most users are happy about it. Besides, it won’t affect the present Paint installation or any of the system files. Classic Paint will be installed as a separate app.

Is the new Paint app good?

The MS Paint app has been the go-to solution for a long time, be it to edit, crop, or resize images. Also, the classic Paint app loaded faster and worked much better with the keyboard and mouse. Besides, who hasn’t used it to create paintings?

And while the new Paint app in Windows is as good, it’s the interface that bothers users. The features are all there, but it’s their positioning that seems to trouble most. Perhaps we weren’t ready for the changes.

It’s best that Microsoft left a few classic apps untouched or at least shouldn’t remove them from the OS altogether!

If you’re unsure of the Classic Paint download & install process, or maybe you want to try something different alongside it, we’ve gathered the best painting apps you can use on your Windows PC.

Check them out, and be sure to tell us in the comments below which one best fits your needs.

Microsoft Paint gets a centered canvas (woohoo!) in latest Insider update

Microsoft announced today that the Paint app is getting a small update for Windows 11 Insiders in the Dev and Canary channels. With this update comes support for a centered canvas, and “some small UI optimizations in the toolbar.”

This follows the introduction of dark mode and other improvements to the Paint app, first showing up in the Dev and Canary channels back in early June, and then rolling out to all users this week.

Are you a Paint user? Are you excited for these changes? Let us know in the comments below.

Microsoft dominates, Oracle excels: Cloud Wars Top 10 eyes $359.4B revenue

In a testament to the cloud market’s unparalleled growth potential, Acceleration Economy’s Cloud Wars Top 10 companies are poised to generate a staggering $359.4 billion in cloud revenue during 2023, marking a remarkable 19.1% increase despite a challenging global economic climate. This growth defies economic headwinds and underscores the cloud’s pivotal role in modern business dynamics. A report last month revealed that the top 5 public cloud services providers capture over 41% market share with 27.3% YoY growth.

Despite economic uncertainties, customer expectations continue to escalate. The cloud’s ability to provide enhanced experiences and diverse choices positions it as the conduit for meeting these demands. New cloud-based tools, especially ones with Gen AI, are becoming essential for getting the best employees and making them happy.

Many businesses worldwide are just starting to use cloud technology. This shows that there’s a lot of room for growth in the cloud market, and the expected increase in revenue might be even bigger than what’s predicted.

The rise of Gen AI has become a transformative force, capturing the attention of CEOs. They have a choice: they can either take the lead in using this technology or be cautious and wait. This choice is crucial for the future of their companies.

Within the Top 10, a spectrum of performances emerges. Microsoft is predicted to make the most of it, accounting for almost 30% of the total revenue. However, some companies at the forefront of cloud services, like AWS and Salesforce, are growing slower, around 13.7% and 12%, respectively. And a comparatively more minor player, Oracle, is growing much faster, with almost 40% growth. This shows that the competition in the cloud industry is changing, and adapting quickly is essential, as the growth rates of the big players, who were leading at first, have slowed down.

Here are other estimates:

Screenshot 2023 08 17 At 10.00.09 Pm

The discoveries emphasize that the cloud market is strong, showing its ability to handle economic difficulties and drive growth. All this makes it clear that the cloud market is still changing a lot, and this is something that business leaders need to pay attention to as they navigate through these changes.

All the predictions are made by AccelerationEconomy

Xbox Free Play Days: Forza Horizon 5, Blasphemous and more

Xbox Free Play Days returns for another round of free games for Xbox Live Gold and Xbox Game Pass Ultimate subscribers to try out. This week’s Xbox Free Play Days event runs from today (Thursday) through Sunday, August 20.

There are four games on this week’s slate, including a very high-profile open-world racing title from Xbox Game Studios. It’s already available on Game Pass, which admittedly does dampen some of the excitement for its inclusion in the lineup, but its a great addition nonetheless.

The Knight Witch

Cast devastating spells in this fast-paced, shoot ‘em up metroidvania adventure. Explore a beautifully hand-drawn world and forge close bonds while on the quest to save your home from the Golem invasion. Out now on Xbox with 33% off.

Forza Horizon 5

Your Ultimate Horizon Adventure awaits! Explore the vibrant and ever-evolving open world landscapes of Mexico with limitless, fun driving action in hundreds of the world’s greatest cars. Jump in, have fun, and make this the best road trip that never ends by upgrading to the full game. All your gameplay progress will seamlessly carry over and you can play new content every week in the Festival Playlist

Let’s Build a Zoo

Let out your wild side, and create your own animal empire with this cute, expansive management sim. Import and breed rare creatures, hire the right staff, keep your visitors happy, and deal with plenty of weird and wonderful events. Let’s Build a Zoo lets you import a variety of animals from other Zoos around the world! Breed your animals and start families to expand your wildlife and fill your enclosures. Grab the full game for 50% OFF!

Blasphemous

Explore the nightmare world of Cvstodia in this brutal hack’n slash action-platformer. Perform savage executions on hordes of enemies that stand between the Penitent One and their quest to break eternal damnation. Out now on Xbox with 75% off.

Learn more about Xbox Free Play Days

Nearly every week, Xbox Free Play Days delivers a lineup of Xbox games for members to try out. It’s a great way to discover something new and maybe even find a new favorite. Learn more about the program by heading over to the Xbox Free Play Days FAQ page.

LaLiga partners with Microsoft to infuse sports with AI innovation

Globant, LaLiga, and Microsoft are partnering to create AI services for the sports industry. LaLiga and Microsoft have collaborated, who have teamed up in the past, with Globant to work on LaLiga Tech, which is LaLiga’s tech division that uses AI and data analytics to improve the sports industry.

LaLiga is Spain’s top professional football (soccer) league. It’s the same league where Inter Miami’s Messi used to play for FC Barcelona. The other notable teams competing in LaLiga are Real Madrid. Atletico Madrid, Villareal, etc.

The partnership aims to develop AI tools for coaching, fan engagement, and broadcasting. Starting with soccer, the focus will later expand to sports like basketball, rugby, and tennis. Microsoft’s Azure platform, including OpenAI GPT-4, will support LaLiga Tech.

The collaboration combines sports industry knowledge and IT expertise. Globant also collaborates with FIFA and the NBA’s Los Angeles Clippers in utilizing technologies like AI and blockchain in sports.

The projects involve:

  1. Develop AI tools for coaching, fan engagement, and broadcasting to enhance the sports industry.
  2. Increase fan engagement through AI-generated content and real-time statistics.
  3. Improve accessibility with multilanguage subtitles for live events, benefiting fans with hearing impairments.
  4. Break language barriers via automatic sports content translation, expanding audience reach.
  5. Generate revenue by licensing LaLiga’s innovations to other sports entities.
  6. Combine IT expertise and sports insights for tailored solutions.
  7. Use AI to reshape sports coaching, experience, and sharing, potentially influencing other sectors.

LaLiga Tech, launched in 2021, aims to license its innovations to other sports entities like Liga Portugal and MotoGP.

via SportsProMedia

Leaked images show Lenovo’s Windows based Steam Deck competitor called the Legion Go

Gaming on the go has always been a topic of debate and innovation. As technology advances, the gap between gaming PCs/consoles and mobile devices continues to narrow. Enter Lenovo’s latest creation, the Legion Go, a gaming handheld device that aims to redefine portable gaming.

Here are the rumored specs and features of the Lenovo Legion Go:

  • Display:
    • 8-inch display.
    • Touchscreen interface for Windows 11 compatibility.
  • Operating System:
    • Expected to run Windows 11.
    • Provides a complete operating system experience.
  • Design:
    • Inspired by Nintendo Switch design.
    • Detachable controllers like the Switch’s Joy-Cons.
    • The handheld form factor for on-the-go gaming.
  • Controls:
    • Detachable controllers offer flexible configurations.
    • Right-side touchpad, similar to Valve’s Steam Deck.
  • Connectivity:
    • Two USB-C ports for peripherals and charging.
    • Standard headphone jack for audio output.
    • MicroSD storage expansion slot.
  • Display Design:
    • Lower screen-to-body ratio than competitors.
    • Potentially larger screen with minimal bezels.

Handheld gaming consoles are unique for on-the-go play. Still, their compact sizes require a lot of compromises, resulting in drawbacks. Here are potential disadvantages that handheld gaming devices, in general, might have and how the Legion Go could potentially address them:

  1. Game Library and Compatibility: Running Windows 11 could enhance compatibility by allowing Legion Go to run various PC games.
  2. Performance and Cooling: The large air vents suggest improved cooling, potentially minimizing performance throttling during intensive gaming.
  3. Input Options: Removable joy-cons and additional back triggers could offer diverse control options suitable for different game genres.
  4. Ergonomics and Comfort: Lenovo’s design choices, including button placement and potential ergonomic considerations, could lead to a more comfortable gaming experience.
  5. Touch Interaction: Support for touch input, driven by Windows 11, might enhance interaction with specific game genres and user interfaces.
  6. Gaming Performance and Flexibility: With AMD’s new Phoenix processors, the Legion Go might deliver competitive gaming performance and handle demanding games effectively.

With Windows 11 and AMD’s new processors, Lenovo Legion Go could offer a solid gaming experience. As more information surfaces and its release approaches, the Legion Go’s impact on portable gaming will become more apparent.

via Windows Report

Microsoft Store now offers AI-powered review summaries, no more scrolling through reviews

Microsoft introduced a range of AI-centric enhancements for the Microsoft Store during the Build 2023 developer conference. As it was first introduced in Insider, it’s now starting to roll out for the general public, as viewed on Twitter (X).

The AI Hub section and AI-generated review summaries seem valuable additions to enhance the user experience. The AI-generated review summaries are handy for users who want to gauge the overall sentiment and opinions about an app or game without sifting through numerous reviews. This feature could save users time and help them make more informed decisions about which apps or games to download and use.

Screenshot 2023 08 17 At 7.20.37 Pm

The idea seems to streamline the user experience by condensing numerous reviews into informative snippets. This aids users in making well-informed decisions about app downloads. Ultimately, this innovation appears to address user needs and underscores the growing role of AI in optimizing digital platforms.

However, at the moment, this feature seems to be limited to Windows 11 users in the United States. Users outside the United States might not have access to this feature yet. It’s hoped that Microsoft will eventually expand this feature to users in other countries.

via MSPowerUser

IBM and Microsoft strengthen collaboration to accelerate ddoption of generative AI

IBM has announced a collaboration with software giant Microsoft. The partnership will focus on integrating and scaling the powerful capabilities of Azure OpenAI Service, Microsoft’s robust and fully managed AI platform.

The move will equip businesses to innovate and optimize processes via carefully curated AI applications.

IBM will intensify its collaboration with Microsoft and dedicate resources to help clients implement Azure OpenAI Service on a wider scale. Furthermore, a newly introduced offering available on the Azure Marketplace will extend the reach and power of generative AI in business applications and processes.

The addition is aimed at helping businesses identify potential benefits, formulate an adoption strategy, and target generative AI use cases that can add substantial value to their core operations.

IBM and Microsoft have unified their expertise and experience around AI to devise potential solutions that specifically address business pain points:

  • Procurement and sourcing automation: The combination of Microsoft Power Platform and Azure OpenAI Service provides a solution to automate complex sourcing and procurement processes, providing actionable supply chain insights.
  • Content generation and summarization: Financial institutions can leverage generative AI to automate the creation of personalized content for customers.
  • Streamlining Healthcare procedures: IBM Consulting uses Azure OpenAI Service to reengineer the process of ingesting and analyzing complex medical records and policy documents.
  • Enterprise search and knowledge base: IBM Consulting and Microsoft collaborated to develop a knowledge extraction tool to simplify search and data retrieval across dispersed organizational data banks.

“The collaboration between IBM and Microsoft is a testament to our commitment to an open ecosystem model that amplifies the value to our clients,” said Francesco Brenna, Global VP & Senior Partner, Microsoft Practice at IBM Consulting. “This collaboration makes it possible for clients to responsibly scale generative AI across their businesses.”

Expressing enthusiasm about this venture, Dinis Couto, GM Global Partner Solutions, Microsoft, noted, “Together, Microsoft and IBM are collaborating to deliver innovative solutions, that will help customers responsibly accelerate deployment of generative AI. As a leader in the delivery of generative AI and data solutions, we believe that partners like IBM are critical to enabling customers’ successful use of generative AI to advance business transformation.”

Notably, the partnership builds on both companies’ intent to revolutionize businesses, leveraging AI and data solutions to fuel progress and productivity. Let us know your view on this in the comments section below.

Via PR News Wire

Fifine H8 Headphones Review: Studio reference recording on a budget

Starting at $36.99

Once again, FiFine is cornering the market for beginner and mid-level audio recording hardware with a pair of budget-friendly reference cans that offer quality sound and comfort for less than $40 with the H8 Studio Monitor headphones.

 Tech Specs

  • Connectivity Technology: Wired
  • Unit Driver Size: 50mm Dia.
  • Impedance: 32Ω±15%
  • Padding Materials: Leatherette
  • Compatibility: Mixer, Sound Card, Keyboard, Computer, Xbox, Phones
  • Suitable for: Podcast/Recording/Monitoring

What’s in the Box?

  • FiFine H8 Headphones
  • 1 x 3.5mm Cable
  • 1 x 6.35mm Cable

Look and Feel

The Fifine H8 looks remarkably like standard bearer Audio-Technica headsets but it has more elongated ear pads with a signature smiley-face marker on both earpieces. Unlike Audio-Technica, the Fifine H8 lacks the same level of heft associated with the well branded competitor.

The H8 is lighter and more flexible than Audio-Technica’s and the cushions on the earpads are a bit shallower than most alternatives. The headband, which is reminiscent of the HyperX headsets, is thicker than seen in images and offers a nicely weighted counterbalance to the light feeling earpieces and rests on the top of the head well for longer recording and editing sessions.

Fifine H8 Boxing

Due to the thinner cushioning on the earpads, noise isolation takes a bit of a hit for users who have slightly larger heads which shifts the cups around the ear. Fortunately, the earpads look replaceable those seeking a specific comforted fit.

The H8 comes with both 3.5mm and 6.35mm connectors attached to long bungy curled rubber cables and can be swapped out at the base of the right ear cup. Rather than opting for a single piece adapter or dongle, Fifine includes a fully dedicated cable to switch out depending on your recording and editing setup.

As is standard for the industry, the H8 comes in matte black with only the white smiley-face with dimpled dots in white as the only accented color on the headphones.

Performance

With a 50-millimeter dynamic driver passing over a 20Hz to 20kHz frequency range supporting 32ohms, the sound is very crisp but neutral and devoid of the typically punchy stage of other competing headphones in price ranges just above the H8’s.

As a pair of studios monitoring/refencing headphones, the flat sound with an emphasis on upper and mid sound beds is appreciated for audio podcasters, streamers, and audio engineers who focus on vocals over all other sounds elements in a recording.

Fifine H8 Band

Regarding the bass, without pumping up the sub and mid bass sectors, the Fifine H8 doesn’t fall into muddy sounding references that would need later editing to lift. On the flipside, recorders to speak close to microphones may still sound a bit tiny overall when listening through the H8.

In the mid-section, voices are highlighted overall and helps to separate ambient noise during recordings but can be exhausting when listening to soundscapes with lots of integrated sounds like a Fall Out Boy composition at elevated levels.

The overall treble is level but can help audio engineers isolate pops and peaks for editing. The pairing of the onboard drivers and the equalized treble are great out the box and offer one of the best-balanced soundstages for a pair of headphones for under $40.

When using the H8 for gaming, the experience is a bit more muddled without noise cancellation most 3D audio support software fall flat but still offer great clarity over voice integrated scenes during games. Editing gaming audio can also be a bit taxing on the ear as many lean heavy on the low and mids.

Fifine H8 3.5 6.3Mm

Without any additional firmware updates, attached software or driver updates, the plug-n-play nature of the H8 is a refreshing change of pace. While some users may appreciate or even crave the customization offered by competing headsets, for $36.99 the H8 offers a streamlined listening and editing experience right out of the box.

Summary

The H8 isn’t designed to be used like regular headsets that punch up the bass and offer fuller sound reproduction. Instead, the H8’s are meant for beginning podcasters, streamers and audio engineers who are looking to dabble in professionally editing their sounds.

For less than $40, Fifine offers a great pair of cups that can be worn for hours on end for long editing sessions while also providing a neutral soundscape that provides a more accurate sound representation.

If you’re looking to get into podcasting or elevate your production level, the Fifine H8 should be next on your list of items to pick up, they compete with both the MAONAO and Samson headsets which are roughly around the same price and the more expensive Senneiser HD600’s all for $36.99.

How to Enable Archive Support on Windows 11

To the delight of many—and perhaps to the dismay of a few—Windows has recently announced it will now offer native support for RAR, GZ, 7-Zip and other file compression formats.

For you, this means that you won’t need to install additional third-party apps like WinRAR to extract or run these compressed files; you’ll be able to do that through your Windows itself. Interesting, right? So, how exactly do you do that?

Let’s look at how you can enable and use archive support on Windows 11.

How to Enable and Use Archive Support on Windows 11

To enable and use archive support on Windows you’ll first have to install the Windows Insider build 23493 of the Dev channel. So, to access the archive support system, you’ll first have to get enrolled in the Windows Insider Dev build Dev build 23493 channel.

We have separate guide that helps you figure out everything about the different Windows Insider programs that you can check out. Microsoft has a blogs that covers everything about enrolling in the Dev Insider Program on Windows—check it out if you aren’t already enrolled in the program.

After you’ve enrolled yourself in and are using the 23493 build, you can now easily extract your compressed files without any third-party apps (you can also remove any third-party apps from here on).

Now head to the file, right-click on it, and click on the Extract all option from the context menu. 

 file extraction on windows

Finally, select a place where you’d like your extracted files to go and click on the Extract button. 

extract compressed files on windows

Enabling and Using Archive Support on Windows PC

At least in the Windows environment, you don’t have to rely on third-party apps to extract your compressed files anymore. With the advent of Windows Insider build 23493, you can take care of compressed files from your Windows operating system itself.

Hopefully, you successfully enabled and are now using the archive support system on your Windows.

8 Quick Ways to Open Terminal in Windows 11

Windows Terminal is a multiple-tabbed terminal emulator that was released in 2019 and comes preinstalled with Windows 11.

In this guide, we will discuss some easy ways to open Terminal on Windows 11 with or without administrator rights.

How can I open the Terminal in Windows 11?

1. Use the Power User menu

  1. Press Windows + X to open the context menu.Terminal or Terminal Admin open Windows 11
  2. You will see two options: Windows Terminal and Windows Terminal (Admin).
  3. Choose any of the two to open Terminal.

2. Use the Run window

  1. Press Windows + R to open the Run window.Run windows open Windows 11 Terminal
  2. Type wt.exe and click OK to launch Terminal on Windows 11.
  3. To run it with admin rights, type the command, press Ctrl + Shift + Enter.
  1. On your Windows desktop, locate the Search box, click it, and type windows terminal or terminal.
  2. Under Best match, you will get Terminal, and on the right pane, you will get options, including Open, Windows PowerShell, Command Prompt, & Azure Cloud Shell. Open terminal
  3. Choose any to launch Terminal on Windows 11.
  4. To open it with admin privileges, right-click the app name under Best match and choose Run as administrator.Run as admin Terminal

4. Use the Taskbar

  1. Press Ctrl + Shift + Esc to open the Task Manager.
  2. Click Run new task.Use Task Manager to open Windows Terminal
  3. Type wt.exe and click OK to launch the Terminal.
  4. To access it with admin rights, place a checkmark next to Create this task with administrative privileges, and then click OK.

5. Use the Right-click context menu

  1. On the Windows desktop, right-click in the empty space.Contect menu, open in terminal
  2. From the context menu, select Open in Terminal.

6. Use the Windows button

  1. Press the Windows key and click All apps.All apps - open Terminal on Windows 11
  2. Scroll down to find Terminal and click it to access the app.Click Terminal to open
  3. To open it with a specific command line, right-click Terminal and choose from the options.Run as other CLI
  4. To run the app with admin privileges, right-click it, select More, then click Run as administrator.Run as admin, start menu

7. Use Command Prompt or Windows PowerShell

  1. Press the Windows key, type cmd, and click Run as administrator. CMD elevated
  2. On the Command Prompt window, type wt, and press Enter. This will open Windows Terminal with admin rights as you opened Command Prompt as admin.Use cmd to open terminal windows 11

You can use Windows PowerShell the same way to access Windows 11 Terminal through it.

8. Use Windows File Explorer

  1. Press Windows + E to open File Explorer.use File Explorer to open terminal windows 11
  2. Go to the address bar, type wt, and press Enter, and it will open Windows Terminal.

What is the Windows Terminal in Windows 11?

Windows Terminal is a modern feature-rich host application capable of running any terminal in a separate tab.

It is pre-configured to run command-line tools like Command Prompt, PowerShell, SSH, bash, Azure Cloud Shell Connector, and Windows Subsystem For Linux (WSL).

Some of its essential features are multiple tabs functionality, panes, GPU-accelerated text rendering engine, Unicode and UTF-8 character support, and more.

It allows you to create themes, customize text, change backgrounds, colors, & styles, and add configurations & shortcuts. Here are some advantages of using Windows Terminal:

  • Customization options
  • Multi-tab feature
  • Support for different command lines
  • Enhanced performance
  • Unicode & emoji support

This will add the app to the Taskbar, and you can access it whenever you want with a single click.

What are the shortcuts to accessing Windows Terminal?

There is no shortcut key assigned to launching Terminal on Windows 11, but if you create a desktop shortcut for the app, you can add a hotkey or pin the app to Taskbar.

1. Create a desktop shortcut

  1. Go to Windows desktop, and right-click in the empty space to get the context menu.
  2. Select New, then Shortcut.New - Shortcut - open terminal Windows 11
  3. On the Create Shortcut window, type the following path under Type the location of the item and click Next: %LocalAppData%\Microsoft\WindowsApps\wt.exeAdd the path
  4. On the next page, type in the shortcut name and click Finish. Once created, it will appear on your desktop; double-click it to launch Terminal.Name the shortcut
  5. To assign a keyboard shortcut key, right-click the desktop shortcut and select Properties.Click Properties
  6. Go to the Shortcut tab, locate the Shortcut key option, type the letter you want to use, and click Apply. Here we have used T, and the keyboard shortcut key for the Terminal is Ctrl + Alt + T. You can use any letter of your choice.Add shortcut
  7. To run the app always with admin rights, go to the Compatibility tab, locate Settings, and select Run as administrator. Click Apply, then OK.Run as admin always

2. Pin the app to Taskbar

  1. Press the Windows key, and type terminal.Pin to taskbar - open Terminal Windows 11
  2. Under Best match, right-click Terminal and select Pin to taskbar.

Why can’t I open Windows Terminal in Windows 11?

There could be various reasons why you can’t access Windows Terminal; some of the common ones are listed here:

  • Application is not installed – If you don’t have Terminal installed on your PC, you might get a response when you try to launch the app. Go to the Microsoft Store and install Windows Terminal.
  • App is corrupted – Terminal might not open if the app is damaged or missing some files. Try reinstalling the app to fix the issue.
  • Damaged system files – If the system files related to the app are corrupted, the app won’t open. Try running an SFC scan to restore the files.
  • Pending Windows updates – Outdated operating system could cause issues like this one. Check for updates; if available, install them, then try to open the app.
  • App is disabled – If the Terminal app is not enabled on your computer, it will not work. Go to Settings, check the App execution aliases list, and click the toggle next to Terminal to enable it.

So, these are the probable causes of the Windows Terminal not opening issue, along with fixes to handle the situation.

To explore more about Windows Terminal features, including its customization options and advanced tools, check out our detailed guide on Windows Terminal Features.

Knowing the way to open Windows Terminal quickly can help you streamline workflow and productivity. The Terminal window always opens with Windows PowerShell, but you can change the default terminal window to Command Prompt or Azure if you like.

To learn more about the Terminal, we have a great guide on Command Prompt vs Windows Terminal that you shouldn’t miss, so check it out.

Have we missed some of your preferred ways to access the Terminal on Windows 11? Feel free to mention them in the comments section below, and we’ll include them in the article.

Exclusive Images: This is the Lenovo Legion Go Gaming Handheld

Update: Thanks to our source, we have the official Lenovo press release that confirms Legion Go’s specs, release date, price, and more! Check all of that out in this article! We’ve also covered Lenovo’s official announcement of the gaming handheld in this article!

Lenovo is working on a gaming handheld called Legion Go, which might be the best on-the-go gaming device yet! And if you think this is just another rumor like Lenovo’s Legion Play from a few years back (as we also did), think again. We’ve obtained some super exclusive images with the device, which looks fantastic!

Before we go into more detail, let’s circle back a bit. Handheld gaming was and still is a controversial topic for some time now because it has to fill in a very important gap: between a gaming PC/gaming console and your mobile phone (or maybe a retro handheld, if that’s your vibe). And that’s pretty tough to achieve, especially today when streaming gains more and more ground.

Lenovo had plans to release the Lenovo Legion Play, but it never got officially launched. The company had bigger plans to take on the competition, as the rumors about the Legion Go started to pop up almost a month ago. Now it seems that most of the things Windows Central uncovered back then will most likely become a reality.

To date, we have at least 3 big players in this space: Valve’s Steam Deck, ASUS’ Rog Ally, and AYANEO’s top-of-the-line consoles. They all go for the same market; they’re similar to some extent but have some not-so-easy-to-dismiss drawbacks. Lenovo’s Legion Go addresses some of those drawbacks, at least from what we can tell right now.

These are the first official photos of the Lenovo Legion Go!

Lenovo Legion Go Front View

At first glance, it doesn’t look that much different from its competitors, but the thing that sets it apart (we think) it’s the similarities with another huge player in this space, the Nintendo Switch.

Why is that important? Well, because it’s more of a cherry-picked design that combines the best features of all of its competitors: starting with the removable joy-cons (or however Lenovo will call them), then the placement of the buttons similar to Rog Ally and a supposedly bigger screen of 8 inches, finishing up with a trackpad like on the Steam Deck.

And that’s not even the best part! It will sport Windows 11, which means that it has the potential to replace your gaming PC fully, and you’ll be able to play your triple-A titles on the go. Pair that with the fact that its heart and soul will allegedly be AMD’s new Phoenix processors, and you’ll get a fully-fledged gaming experience right at your fingertips whenever you want it!

Another thing that hints at Legion Go’s power is these huge air vents on the back of the device, alongside a stand that will help when you want to pair another controller. We can’t say anything about the noise levels yet, but we’ll surely test it as soon as it will be available, so stay tuned for that!

Lenovo Legion Go Back View

Regarding the IO, the shoulder buttons and side triggers aren’t anything new for this kind of device. The back triggers are a welcomed addition, while maybe the most interesting thing hidden on the back of the right joy-con is a wheel. We also see 2 USB-C ports (one at the bottom and one at the top), a power button, a headphone jack, + and – buttons for adjusting the volume, and (thanks to the gaming Gods!) a micro-SD slot.

We can’t confirm any info yet, but because the joy-cons are removable, we can safely assume the screen will also be touch sensitive. And so it should be, as Windows 11 is more friendly than ever for touch inputs.

Lenovo Legion Go Screen & Joy-Cons

In conclusion, Lenovo’s Legion Go looks like a complete package that promises to address some of the issues with the other big players in this market. Can you imagine opening Steam or any other platform on your way home, playing your favorite game, then removing the joy-cons and browsing through YouTube on your crisp, touchscreen device? And all of that without breaking a sweat!

That’s a cool promise, and if Lenovo can deliver, it won’t just be another handheld but a way to push the competition to improve and offer a better gaming experience for everyone.

Password Spraying vs Brute Force: Differences & Prevention

Password stealing is one of the easiest ways a bad actor can get access to your personal data. Every day, we see reports of social media accounts (be it Instagram, Facebook, or Snapchat) or other websites being hacked. The attackers use different methods to gain access to your password, and today we will look at Password Spraying and Brute Force.

Though platforms have developed protocols to improve security and mitigate risks, hackers always manage to identify loopholes and vulnerabilities to exploit them. But there are some measures that will protect you against Password Spraying and Brute Force attacks.

Most of them are simple to implement, and we think that they’re absolutely necessary for good online hygiene.

For those wondering what a brute force attack is, it is a technique hackers use to bombard the authentication server with a range of passwords for a specific account. They start with the simpler ones, say 123456 or password123, and move on to the more complex passwords until the actual credential is found.

Hackers basically use all possible character combinations, and this is achieved through a set of specialized tools.

password spraying vs brute force

But there’s a downside to it. When employing brute force attacks, it often takes a long time to identify the correct password. Also, if websites have additional security measures, say, it blocks accounts after a series of incorrect passwords, hackers find it difficult to use brute force.

Though a few attempts every hour won’t trigger an account block. Remember, just like websites enforce security measures, hackers, too, devise tricks to bypass these or find a vulnerability.

About password spraying, it is a type of brute force attack wherein, instead of targeting an account with a wide array of password combinations, hackers use the same password on different accounts.

This helps eliminate a common problem faced during a typical brute force attack, account blocking. Password spraying is highly unlikely to raise suspicion and is often found to be more successful than brute force.

It’s typically used when administrators set the default password. So, when hackers acquire the default password, they will try it out on different accounts, and users who haven’t changed theirs would be the first to lose account access.

How is Password Spraying different from Brute Force?

Brute ForcePassword Spraying
DefinitionUsing different password combinations for the same accountUsing the same password combination for different accounts
ApplicationWorks on servers with minimal security protocolsEmployed when many users share the same password
ExamplesDunkin Donuts (2015), Alibaba (2016)SolarWinds (2021)
ProsEasier to performIt avoids account lockout and doesn’t raise suspicion
ConsIt takes more time and can result in the account being blocked, thus negating all the effortsOften quicker and has a higher success rate

How do I prevent password brute force attacks?

Brute force attacks work when there are minimal security measures or an identifiable loophole in place. In the absence of the two, hackers would find it difficult to employ brute force to find out the correct login credentials.

Google disabling sign-in after multiple failed attempts

Here are a few tips that would help both the server administrators and users prevent brute force attacks:

Tips for administrators

  • Block accounts after multiple failed attempts: Account lockout is the reliable method to mitigate a brute force attack. It could be temporary or permanent, but the former makes more sense. This prevents hackers from bombarding the servers and users don’t lose account access.
  • Employ additional authentication measures: Many administrators prefer relying on additional authentication measures, say presenting a security question that was configured initially after a series of failed login attempts. This will stop the brute force attack.
  • Blocking requests from specific IP addresses: When a website faces continuous attacks from a specific IP address or a group, often blocking them is the easiest solution. Though you might end up blocking a few legitimate users, it will at least keep others safe.
  • Use different login URLs: Another tip recommended by experts is to sort users in batches and create different login URLs for each. This way, even if a particular server faces a brute force attack, others largely remain safe.
  • Add CAPTCHAs: CAPTCHAs are an effective measure that helps differentiate between regular users and automated sign-ins. When presented with a CAPTCHA, a hacking tool would fail to proceed, thus stopping a brute force attack.

Tips for users

  • Create stronger passwords: We can’t emphasize how important it is to create stronger passwords. Don’t go with simpler ones, say your name or even commonly used passwords. Stronger passwords may take years to crack. A good option is to use a reliable password manager.
  • Longer passwords over complex ones: As per recent research, it’s significantly more difficult to identify a lengthier password using brute force than a shorter but more complex one. So, go with longer phrases. Don’t just add a number or character to it.
  • Set up 2-FA: When available, it’s important to set up multi-factor authentication as it eliminates the over-reliance on passwords. This way, even if someone manages to acquire the password, they won’t be able to sign in without the additional authentication.
  • Change the password regularly: Another tip is to regularly change the account password, preferably every few months. And do not use the same password for more than one account. Also, if any of your passwords feature in a leak, change it immediately.

How do I protect against password spray attack?

When talking of Brute Force vs Password Spraying, preventive measures remain pretty much the same. Though since the latter works differently, a few additional tips might help.

  • Force users to change the password after initial login: To mitigate the problem of password spraying, it’s imperative that administrators get users to change their initial passwords. As long as all users have different passwords, the attack won’t succeed.
  • Allow users to paste passwords: Manually entering a complex password is a hassle for many. As per reports, users tend to create more complex passwords when allowed to paste or auto-input them. So make sure that the password field offers the functionality.
  • Don’t force users to periodically change passwords: Users follow a pattern when asked to change their password periodically. And hackers can identify this easily. So, it’s important to let go of the practice and let users set a complex password in the first go.
  • Configure the Show password feature: Another feature that prompts users to create complex passwords and prevents genuine failed sign-ins is when they can view the password before proceeding. So, make sure you have that set up.
Show password on Facebook

Now that you know more about Password Spraying and Brute Force attacks, keep in mind that the best practice is to create stronger passwords, no matter the method.

This alone can prevent and block most of the vulnerabilities of your accounts. Pair that with an effective password manager, and that will solidify your security and ease of access even more.

You should be aware that an incredible number of passwords are hacked every day, and the only way to protect your data is through proper online hygiene and good preventive measures.

If you have any other tips that you want to share with the community, leave them in the comments section below.

How to avoid 1-year bans by Xbox Enforcement Strike System

While Xbox has become a very popular console, especially in the US region, its popularity also comes with a lot of cyber abuse and virtual attacks. Microsoft products, per se, are known to be prone to attacks, phishing, and other unlawful intentions.

But as always, Microsoft is taking the means to reduce them as much as possible. For example, recently, the Redmond-based tech giant stated an Xbox banning tool rumored to be true, is, in fact, false, and promised people that nobody, aside from Xbox, can ban them.

And, to make it even more clear, Xbox has released its own banning system, called Xbox Enforcement Strike System. This comes some weeks after Xbox also implemented a feature that allows you to record and report inappropriate voice chats while playing on Xbox.

The new Xbox Enforcement Strike System works similarly to a driver’s license suspension. The more you violate Xbox policies, the more strikes you get, up to a total of 8. When you reach 8 strikes, you’ll get a one-year suspension from Xbox.

Players have a total of eight strikes and, once reached, will be suspended from Xbox’s social features like messaging, parties and party chat, multiplayer and others for one year from the enforcement date.

Xbox

Avoiding the Xbox Enforcement Strike System 1-year bans

It’s good to know that you won’t be instantly banned from Xbox if you break the rules. However, Xbox will ban you gradually. As we mentioned earlier, the more strikes you have, the more time you’ll get. Xbox Enforcement Strike System

So this is what you need to know:

  1. Starting now, you’ll begin your Xbox journey with 0 strikes.
  2. You can receive a total of 8 strikes, and, important to remember, each strike remains on record for six months. This means that if you broke the law 5 months ago, that strike will still follow you today, until next month.

The number of strikes also increases the number of suspended days, as follows:

  • 1 strike – 1 day
  • 2 strikes – 1 day
  • 3 strikes – 3 days
  • 4 strikes – 7 days
  • 5 strikes – 14 days
  • 6 strikes – 21 days
  • 7 strikes – 60 days
  • 8 strikes – 365 days

Important! However, you can also get multiple strikes at once, so you’ll have to take this into account:

  • Profanity – 1 strike
  • Cheating – 1 strike
  • Sexually inappropriate – 2 strikes
  • Harassment or bullying – 2 strikes
  • Hate Speech – 3 strikes

Microsoft says this system will greatly reduce abuse of any kind on Xbox. In fact, in 2022, fewer than 1% of all players received a temporary suspension, and only 1/3 of those received a second suspension. And according to their data, players typically stop inappropriate behavior after one enforcement.

But if you get a strike, and you think it’s not justified, then you can appeal it. If you’re right, then the enforcement will be reversed and the strike will be removed.

However, to surely avoid the 1-year ban by Xbox Enforcement Strike System, we recommend you should read the Xbox Community Standards, and make sure not to overstep with your reactions. After all, kindness goes a long way, indeed.

But what do you think about it? Let us know.

How to Decrease Ping With Satellite Internet [Top 8 Methods]

Accessing the internet from virtually anywhere with satellite is fascinating, right? But it suffers from one major problem – high ping time.

That’s due to the distance the signal travels between you and the orbit. Moreover, other factors like the weather, terrain, and equipment quality impact transmission.

Accordingly, you won’t be able to get the best out of your service. You’ll encounter lagging when engaging in online gaming, streaming, video/VOIP calls, etc. 

But it doesn’t have to be like this.

Today, we’ll show you how to improve your satellite internet ping using our proven and easy-to-follow solutions. That way, you’ll be able to enjoy a lag-free browsing experience.

Let’s dive in!

How to optimize your satellite Internet connection

Here are quick fixes for resolving high ping issues with your satellite internet:

1. Inspect your setup

Cross-checking your whole setup should be the first step. Begin by inspecting the satellite dish for fine dust, debris, and bird droppings.

Use a microfibre material to gently clean the surface if any are present. Likewise, you should repeat the same steps with the feedhorn receiver. 

Cleaning the satellite removes any material that might be interfering with your connection. It also improves transmission quality resulting in lower ping.   

Additionally, check the wiring of your setup for visible cracks and entanglements. Both can cause poor signal transfer from the dish to the router.

Consider reaching out to a qualified technician to repair such issues. You can also do it yourself if you have some technical know-how.

2. Reduce interference

Satellites must be in a clear line of sight with receivers for better performance. Obstacles like buildings, trees, and hills can affect signal quality.

As such, you need to check your surroundings and remove any blockades. Or move your dish to an open area for a better outcome.

3. Use a wired connection

One more thing you can try to decrease ping with satellite internet is using a wired connection to reduce the sluggishness associated with WiFi networks. You’ll benefit from a faster and more stable connection than a wireless hotspot.

You can opt for a fiber optic Ethernet cable that offers ultra-low ping times. Still, even a copper version will give you a slight performance boost.

4. Adjust router settings

Routers come with basic configurations that work pretty okayish. But there’s room to adjust them to your liking.   

The process requires you to have some technical knowledge. Check if you can adjust traffic shaping, signal compression, data usage, etc. 

Furthermore, never shy away from referring to the owner’s manual for guidance. Should you get stuck, contact your service provider for advice.

5. Update your firmware

Always keep the firmware of your router up to date. Regular updates offer fixes for bugs, misconfigurations, and security issues.

Doing it over time will bring improvements to your satellite internet service, like enhanced signal reception for fast speeds.

How to choose the right gaming server for best performance?

Sometimes, the high-ping problem might arise from choosing an overloaded gaming server. As such, picking the right one can have significant improvement in performance.

The first thing to consider is going for servers that are geographically closest to you. This reduces the distance data travels, minimizing packet loss and connectivity time.

Tools for testing ping, like Host-Tracker, can be helpful as well. You’ll need to obtain a server’s IP address or hostname to perform the checks.

test gaming server ping and packet loss

Go for those with response times of around 100ms for exceptional performance. Moreover, ensure the packet losses are less than 5% to benefit from improved reliability.

But there’s more: 

Check the server’s status before joining. As a rule of thumb, avoid those with a high player count.

Servers filled to the brim tend to process enormous traffic, which results in slower ping times. Moreover, they occasionally experience glitching due to the exhaustion of available resources.

You can also ask around for recommendations from other players. Reach out to gaming forums on the web, social media, and local communities for insights. 

However, get dedicated gaming servers if you have some extra cash to spare. These offer resources that are entirely yours for top-notch ping performance.

And we’re not done yet!

Use network optimization tools and a VPN

If you’re still wondering how to decrease ping with satellite internet, worry not. Below are additional suggestions using different software solutions on the market:

TCP Optimizer

Transmission Control Protocol (TCP) is a standard that enables devices to communicate over the web. Most systems, including yours, provide default settings that are complex to modify. 

The good news? 

You can use Speed Guide TCP Optimizer software to optimize your internet. It’s easy to tweak the default values, thanks to its simple interface.

Once you install it: 

  1. check the General Settings and increase the connection speed to 100Mbps. Choose Optimal at the bottom, Apply changes, and restart the application.
https://windowsreport.com/wp-content/uploads/2023/08/tcp-optimizer-general-settings.png
  1. Next, go to the Advanced Settings tab and switch to the Custom options. This activates the edit option to modify the default values.
tcp optimizer custom settings
  1. Now, Disable the Network Throttling Index and set System Responsiveness to zero. Doing so prioritizes your computer’s internet and resources for gaming. 
  1. Skip to optimizing Nagle’s Algorithm to reduce data packet delays over the network. Disable TcpAckFrequency, set TcpNoDelay to one, and switch TcpDelAckTicks to zero.
  1. Apply the changes and reboot your device for the customizations to take effect. 

From here, you’ll appreciate faster connectivity and ping times during gaming.

Easy, right? 

Let’s move on!

Quality of Service (QoS)

Quality of service (QoS) is a technique that some routers and PCs use to optimize traffic. It offers settings that you can tweak to prioritize apps on your network.

For example, you can set tasks like gaming, streaming, and video conferencing to use more data. That way, your system/modem won’t prioritize other activities outside the specified categories.

This nifty tool throttles the apps that would otherwise hog your traffic. For this reason, you’re bound to experience faster connectivity and ping time. 

Sadly, QoS comes in-built into select high-end routers and Windows operating systems (OSs). And even if your device has it, the configuration is not straightforward.   

But do you know what is?

Using a VPN

You can avoid all the hassle of tweaking system settings by getting a virtual private network (VPN). This tool comes fully featured with network optimization tools out of the box.   

Top of that list includes a wide range of protocols for security and stable connectivity like OpenVPN, IKEv2, Lightway, WireGuard, SSTP, and more. 

VPNs also have a vast network of strategically positioned servers around the world. This ensures you get incredible ping speeds and less packet loss during gaming.

Speaking of which:

Why not arm yourself with ExpressVPN? It consistently stands out in our benchmarks, delivering superior performance even in slow networks.

The service also shines when it comes to speeding ping times during gaming. That’s because it has over 500 VPN data centers across 90+ countries.

This broad coverage brings gaming services closer regardless of your location. Moreover, it guarantees ultra-low ping during gaming on the ExpressVPN network.

Not to forget, the service offers a clean and easy-to-use application. You also get a dedicated toggle to optimize the network on your computer.

ExpressVPN

Supercharge your internet speeds with this high-performing VPN.

Oh! We haven’t finished yet!

Bonus tips for decreasing ping with satellite internet

Here are additional tips for boosting your satellite internet’s ping. 

We assure you, they’re super-easy to follow:

  • Limit background activities: Disabling non-essential tasks can free up your internet connection resulting in lower ping times. Schedule OS updates, limit app background data, download files when necessary, etc.
  • Get a firewall: Use a firewall to limit apps from accessing the internet on a case-by-case basis. This should prevent non-essential tasks from hogging your internet.  
  • Adjust your DNS settings: Configure your satellite to use faster DNS services. Free ones include Cloudflare, Google, and Control D.
  • Debloat your device: Uninstall unnecessary software you don’t use. This will eliminate non-priority apps that jam your network all the time.
  • Upgrade your hardware: Service providers issue customers with pretty basic equipment. As such, you may need to upgrade your hardware to benefit from better connectivity. 

Summary

Satellite internet and high ping times go hand in hand. That can result in a poor web browsing experience.  

Your gaming will lag, streaming buffer, video calls hang, and so on. But as you’ve seen, solutions exist – tons of them!

Overall, we’re glad you now know how to decrease ping with satellite internet. All that remains is for you to jump into action and speed up your connectivity. 

Is Netflix Games going to compete with Xbox Game Pass?

Xbox has been enjoying a lot of success lately, from its popular Xbox Game Pass to bringing old games back to the console. With titles such as the old Call of Duty games, and the original Gears of War trilogy, Xbox has managed to become the top-selling console in some regions, while its popularity has grown.

But now, it seems that Xbox will have some new competition in the industry. We’re talking about Netflix Games. Yes, the streaming giant is coming to dominate the gaming industry, as well. In a recent announcement, Netflix said it’s testing games on more devices with two games.

Today, we’re taking the first step in making games playable on every device where our members enjoy Netflix — TVs, computers, and mobile.

Netflix

The two games, Oxenfree and Molehew’s Mining Adventure will make their way to Windows 11 PCs and Macs, TVs, and mobile phones, to play on Netflix. They are part of a Beta phase which is live to a limited number of users in the US and the UK regions.

The Beta phase is testing Netflix’s streaming-based gaming technology is meant to improve the experience on multiple devices. The streaming giant already has the support of many brands, including Amazon Fire TV Streaming Media Players, Chromecast with Google TV, LG TVs, Nvidia Shield TV, Roku devices and TVs, Samsung Smart TVs, and Walmart ONN. And new devices will be added ongoingly.

So, the question is somehow natural. Is Xbox Game Pass in danger now that Netflix Games will be an active player on the market? Well, let’s take a closer look.

Will Netflix Games and Xbox Game Pass really be in a competition?

Well, Netflix is already known for one thing: its streaming content. From movies to series, and reality shows, the streaming giant is all about relaxing. But not just any kind of relaxing, but the one that doesn’t involve a lot of mental action.

Users usually watch Netflix when they want to relax, that’s why the streaming platform is so popular. And the Netflix audience is also well-defined. There are people who love passive entertainment, and visual stories that are told with as little interaction as possible. The popular Netflix and Chill is a testament to that.

On the other hand, people who are subscribed to an Xbox Game Pass are gamers most of the time. Gaming is their hobby, and they tend to do it in their free time. They also love interactive stories, and they spend quite the time figuring out easter eggs, collecting items, or gearing up.netflix games

Whether we talk about hardcore gamers or casual gamers, these people are individuals who love video games and not just the relaxing part of it, but as a whole. Microsoft even released consoles for each of these types of gamers, Xbox Series S, and Xbox Series X, and most people purchased both versions.

Plus, with an already huge library of games and thousands of other games coming up specifically for Xbox, it might seem hard for any other gaming platform to compete with it.

Not necessarily a platform for gamers

For Netflix Games to really compete with Xbox Game Pass, the streaming giant would have to somehow convince a majority of its audience that video games are also as potent as movies and series are. This is true, sure, but they’re a different medium altogether.

Netflix actually tried this sort of thing with Black Mirror: Bandersnatch, which is an interactive Black Mirror episode that requires the viewers to make their own choices. The episode was well received, but its interactivity was criticized as being too wearisome, and it can easily ruin the viewing experience.

By the way it looks, Netflix Games can end up being the platform where people play games while they wait for the food to arrive for a TV binge. Or playing something very fun with friends on a hangout. But for a gamer that loves playing video games? Much less likely.

And its streaming-based gaming technology, while very similar to Stadia, will allow you to play games on every device. However, Stadia is gone, and similar platforms are already here, such as GeForce Now. So there’s little chance Netflix Games will actually be an important player on the market. For now, it seems aimless, without a specific target in mind.

However, time will prove if these words are true or not, but until then, if Netflix really wants to take a bite from the gaming industry, then it has to deliver.

But what are your thoughts about it? Let us know.

Fix: Microsoft Edge Dark Mode Not Working issue

So, you were enjoying dark mode on Microsoft Edge but somehow it’s not working and you need a quick fix so that you could go back to your personalized settings. Well, fret not as it’s pretty easy to bring back the Microsoft Edge dark mode.

Microsoft Edge browser lets you enable dark mode easily using settings, just the way it allows other customization things like ADMX templates to personalize your browser experience.

Dark Mode is nothing but a mere cosmetic change that alters the appearance of your browser. It changes the background color of your homepage, toolbar, settings, and even web pages you visit to black or dark grey.

Dark Mode saves the battery, and reduces eye strain and fatigue, especially when using devices for extended periods.

Alternatively, you can bypass all the fixes and choose a different browser altogether. Opera is one such browser that also offers customizations.

Opera Browser

Opera Browser

Try the new Opera instead and explore new features and customizations!

Why is my Microsoft Edge Dark Mode not working?

Before we dive into the solutions to Microsoft Edge Dark Mode not working issue, let’s know first why the setting has stopped working for you.

Well, there can be several reasons why the Dark Mode is malfunctioning on the Microsoft Edge browser. We are enlisting a few of them here.

  1. Bug in the browser.
  2. Outdated browser version.
  3. Incorrect Settings – browser is set to switch to light mode automatically based on the time of the day.
  4. Bad user experience due to stored caches with outdated or corrupted data.

While the dark mode is available on all versions of the browser, it’s still possible to experience certain malfunctioning. Take, for instance, you have turned on dark mode on Edge browser but some websites aren’t turning dark.

Microsoft is also experimenting with a darker mode on Edge, which should arrive soon.

How do I fix dark mode not working properly on Microsoft Edge?

We are enlisting the top 5 fixes for the Microsoft Edge Dark Mode issue on Windows 11. You can implement them and check if it starts working again.

Update/Reset

One of the main methods you can implement to bring the dark mode back to working is updating Edge to the latest version. Most of the problems are tied to an older version of browsers. So, it’s better to stay on the updated version and keep bugs at a distance.

To update – Go to Settings and look for About Microsoft Edge. A new page will open that will tell if your browser is up to date. If the About page shows An update is available. Select Download and Install to proceed.
Microsoft Edge browser update
To Repair – Alternatively, you can also try to repair or reset the Edge to get things back to work. Follow this path – Settings > Apps > Installed Apps > Microsoft Edge > three-dot menu > Modify.

It’s worth mentioning that resetting Microsoft Edge clears all data and browsing history. It also disables any installed extensions. So, take a backup if you don’t want your data to vanish.

Force Dark Mode

Another common method to fix the dark theme setting not working issue is to simply force the setting on Microsoft Edge. Again, you have to be on one of the latest versions of Microsoft Edge to bring the feature back.

Microsoft lets you enable some of the features via its edge://flags settings page. You just have to look for the right setting. For instance, here in this case, you can find the dark mode setting by entering edge://flags/#enable-force-dark into the address bar of Microsoft Edge.

So, follow the steps –

  1. Enter edge://flags/#enable-force-dark into the address bar.
  2. The flag will pull up the “Auto Dark Mode for Web Contents” setting by highlighting it.  
  3. Click on the drop-down menu next to the setting and select “Enabled.”
    Microsoft Edge Dark mode not working flag
  4. Click Restart in the lower right corner to apply all the changes.

Note that this feature made its way with Microsoft Edge v84. So, make sure you’re using this version or above.

Windows Color Settings

If Microsoft Edge settings didn’t work out for you, try enabling the dark mode by going into the Windows color settings. However, the change will also affect all Universal Windows Platform (UWP) apps into dark mode instead of just Edge.

  1. Go to Windows Settings or press Windows+I key combinations
  2. Select Personalization
  3. Tap on the Colors tab
    Microsoft Edge Dark Mode not working fix
  4. Under Choose your mode, select Dark.
    Microsoft Edge Dark Mode not functioning fix

Restart your PC if the applied settings don’t seem to work.

Time Zone Setting

You will need to check whether the Time Zone is correct if you’re using the Custom Color Mode feature on your Windows 11 PC,

  1. Go to Settings
  2. Click on Time and Language
  3. Select the Date and Time
    Microsoft Edge Dark Mode not working issue
  4. Click on the toggle next to Set Time Automatically turned on.
  5. Under Additional Settings, click on Sync Now button.
    Microsoft Edge not working issue
  6. Close the window and open Edge to check if the problem is solved.

Use Extensions

Interestingly, you can install a third-party extension if nothing seems to work, and switching to a completely new browser looks too much.

You can install extensions like Dark Reader to enable dark themes on all the websites you visit on Microsoft Edge. However, you may not see the changes on the toolbar.

You can also adjust the brightness and contrast of the web pages using the Dark Reader extension.

To enter into the extension –

  1. First off, add the extension to the toolbar for quick access.
  2. Click on the Extensions icon provided on the toolbar.
  3. A list of installed extensions will open. Click on the eye icon next to the Dark Reader extension to view it on the toolbar.
  4. Now, click on the Dark Reader extension to open the menu.
    Dark Reader extension
  5. Toggle On or Off. Choose between Dark and Light.

You can tweak more settings and play around.

There are many other extensions available on Microsoft Edge that can help you enjoy dark themes on the browser. Just write dark mode in the search box on the Microsoft Edge Add-ons page and select the ones based on the latest updates and reviews.

It’s worth mentioning an extension might affect page loading speed on the Edge browser.

So, these were the methods using which you can make dark mode work again on Microsoft Edge. Let us know which method worked for you.

How to Create a PST File in Outlook

If you use Microsoft Outlook on a daily basis and you’ve run out of space, want a backup, or just to create a portable archive of your information, then creating and saving a PST file is the quickest solution.

The process of doing that isn’t too complicated, and it involves some basic steps you can follow directly in Outlook.

What’s a PST file in Outlook?

PST stands for Personal Storage Table. It is a file format used to store data in Microsoft Outlook. It can be used to store emails, address book contacts, and calendar entries.

This file is created automatically when you add an email account and makes it easier to back up your data. If you have multiple accounts set up in Outlook, each one will have its own personal folder on your computer, provided it’s an IMAP or POP3 account.

Data files are stored on the server for server-based accounts like Microsoft 365, Exchange, and Outlook.com. Their offline files are stored on your PC in the OST format.

The default location for this file varies depending on your Windows version so for newer versions on Windows 11, you’ll probably find it in the following path unless you manually changed it: C:\Users\UserName\AppData\Local\Microsoft\Outlook

The main reason why people use these types of files is to keep their emails safe from any loss or corruption. Unexpected events like data theft or hardware failure can cause issues with Outlook hence why they become a safety net.

However, the bad outweighs the good. Since this file type is uncommon, you can’t simply access its content in another email client without first converting it. You may also encounter compatibility issues when you cannot open a PST file created in older versions of Outlook.

Another disadvantage is that they aren’t searchable unless you index or convert them into another format. You’ll keep getting the PST cannot be found error message even though you had created it.

The best way to ensure that your Outlook data files are stored in a format that can be read by future versions of Microsoft Office Outlook is to save them in a more convenient file format, such as an EML file instead of a PST.

How do I create a PST File in Outlook?

1. Use Outlook’s built-in settings

  1. Launch your Outlook app.
  2. Click on the New Items option, select More Items from the drop-down menu, and Outlook Data File from the pop-out menu.
  3. Type a name in the file name box. Check the Add Optional Password box if you want to password-protect the file, then hit OK.
  4. Follow the prompts to create the security credentials in the next prompt and hit Enter.

2. Use the Import and Export feature

  1. Launch your Outlook app.
  2. Click on the File menu at the top left pane, select Open & Export, and click on Import/Export.
  3. Hit Export to a file and click Next.
  4. Click on Outlook Data File (.pst) and hit Next.
  5. Select all folders you wish to create PST files from and click Next.
  6. Next, click on Browse to select a folder location to save, then hit Finish.

It is important to note that newer Outlook accounts such as IMAP, Microsoft Exchange Server, and Outlook.com use the OST format. However, this does not mean you cannot create PST files. You’ll have to use the export method to achieve this.

3. Use the Cleanup tool

  1. Launch your Outlook app.
  2. Click on the File tab, then select Info.
  3. Navigate to Cleanup tools, and in the drop-down menu, select Archive.
  4. Check all folders you wish to export from the folder list, then hit Browse to set up the Outlook PST file location and hit OK.

4. Use Account settings

  1. Launch your Outlook app.
  2. Navigate to the File menu at the top left pane, and click on Info.
  3. Click on Account settings and select Account settings.
  4. In the Account settings dialog box, navigate to the Data Files tab and click on the Add button.
  5. Choose a name for this file, and under the file type, select .pst, then hit OK.

When you encrypt PST files, they can only be opened with a password. This helps keep sensitive information safe from prying eyes, especially when using shared computers.

How do I save an Outlook email as a PST file?

  1. Launch your Outlook app.
  2. Right-click on your Inbox folder or any other and select New Folder.
  3. Enter a name for the newly created folder.
  4. Go back to your Inbox, open the email message, and drag it to the folder you created in 3 above.
  5. Click on the File tab at the top left pane, select Open & Export, and in the drop-down menu, select Import/Export.
  6. Hit Export to a file and click Next.
  7. Click on Outlook Data File and hit Next.
  8. Select the folder created in 3 above and click Next.
  9. Click on Browse to select a folder location to save the PST file, then hit Finish.

With time, as you accumulate lots of emails, calendar events, and other data, your PST file can become too large and lead to performance degradation. The risks of ending up with a corrupt PST file are also higher with such a voluminous file.

This necessitates you to reduce the PST file size to take charge of your storage and minimize any app crashes.

Users with old versions of Microsoft Office may find that the app doesn’t support PST files. In this case, you won’t see any options to import PST files into Outlook. If this is the case, we recommend upgrading to a version that does.

With the options discussed above, you should have no problems with PST file creation in Outlook mail. Just remember to back up your Outlook data before creating a PST file.

Do let us know which method you found easy to follow in the comment section below.