How to Turn off VPN on iPhone [3 Ways]

Having a VPN on your personal computer is awesome, as it can prevent unwanted snooping on your connection. A VPN pulls an encryption cloak over your connection so that your ISP (or other third-parties) can’t see what you’re up to.

Privacy is quite a fragile thing nowadays, as even something as small as a seemingly innocent ad can expose your personal data online and use it to target you with ads.

But has it ever occurred to you that your PC isn’t the only Internet-enabled device you’re using? Your phone, for instance, probably houses a lot more sensitive data on you than your computer does.

And there’s no good reason not to take care of your phone‘s privacy at least as effective as you do for your PC. Our point is, you should use a VPN regardless of the device you’re using to access the Internet.

However, in the grand scheme of things, phone VPNs are still kinda new and experimental. So, you might experience a few issues that PC users don’t. Take the iPhone, for instance.

Some iPhone VPN users report that they can’t remove VPN configuration profiles from their devices. As it turns out, most of them don’t actually know-how, but that’s okay since we’ve sorted it all out.

Turning off the VPN on your iPhone is apparently another frequent issue, so we’re going to demystify that right away.

How can I turn off VPN on my iPhone?

1. Try using the VPN feature

  1. Unlock your iPhone
  2. Access the Settings app on your device
  3. Locate the VPN option
  4. Tap it to switch the VPN off

This is the most simple way to turn off the VPN on your iPhone and requires minimum interaction. Many users deploy a VPN but don’t know exactly where it went and how to turn it off.

If the service isn’t faulty, simply flipping the VPN switch off should take care of things. Long story short, you should be disconnected from your VPN in no time if everything is alright.

2. Disable Connect On Demand VPN setting

  1. Unlock your iPhone
  2. Open the Settings app on your device
  3. Scroll all the way down to General settings
  4. Open the General section
  5. Locate the VPN option and select it
  6. Identify the active VPN connection (has a blue checkmark)
  7. Click the active VPN connection’s circled i button
  8. If Connect On Demand is activated, turn it off
  9. Head back to the VPN menu by tapping the back button
  10. Flip the Status switch to Off to disconnect from the VPN

Now everything should be good. Instead of your iPhone reconnecting to your VPN automatically, you’ll have to connect manually every time. However, that should fix your device’s inability to disconnect from a VPN for good.

Tip: before disabling the Connect On Demand option, you can see whether your connection has this option enabled. It will be visible just below the Status button as an informative note.

3. Remove your VPN app

  1. Unlock your iPhone
  2. Locate the VPN app icon (if it exists)
  3. Press and hold your finger on it until it jiggles
  4. Tap the x button on the upper-left side of the icon
  5. Confirm that you want to remove the VPN app from your iPhone
  6. Type in your device password if prompted

Sometimes, being rational about it and trying to outsmart the VPN will not end well. In this case, there might be something wrong with the app, so you can try removing it and see if it works.

Furthermore, note that some apps will leave residual VPN configuration profiles on your device. You might want to remove them, as well. Check out our guide on how to remove VPN profiles from your iPhone.

Usually, VPN can be turned off easily on iPhones

If you’ve been using a VPN on your iPhone and are trying to find a way to turn it off, just try the steps above. Chances are that one of our suggested fixes will sort things out nicely for you.

It’s worth mentioning that using a trusted, renowned VPN such as Private Internet Access on your iPhone might decrease the odds of such issues ever occurring.

How to recover deleted files from OneDrive [Quick Guide]

Microsoft’s OneDrive is one of the most popular cloud storage services out there.

A lot of Windows users are storing their most valuable files, like family photos, important business documentation, etc. on the cloud.

But what if you accidentally delete some essential files from OneDrive? Don’t worry, your file is not lost forever, and there’s a way to restore it to your OneDrive again.

Just like all operating systems, and all other cloud storage services, OneDrive also has its Recycle Bin, where all deleted files go.

So, to bring your deleted files back to OneDrive, you just have to restore them from the Recycle Bin.

How to restore files from OneDrive to PC?

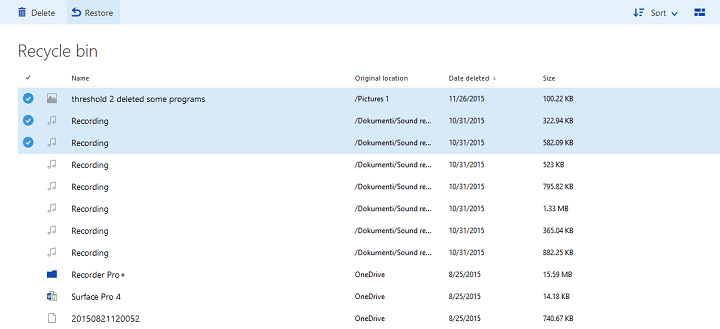
1. Restore Recycle Bin data

  1. Go to the OneDrive website and login with your info.
  2. Go to Recycle Bin.
  3. Select all the files you want to restore.
  4. Just click on Restore, and all your selected files will be restored to the location from where they were deleted.
onedrive restore

There’s also a way to restore your files if you deleted them from the OneDrive folder in Windows 10.

Just go to the Recycle Bin in Windows 10, select the file you want to restore, right-click on it, and choose Restore.

Of course, you have to make sure that you didn’t empty your Recycle Bin in OneDrive because once you empty the Recycle Bin, there’s no way to return your files ever again.

So, our advice to you is to empty your Recycle Bin only if you’re sure that you won’t need files in it ever again.

2. Use third-party data recovery tools

There’s a chance to recover deleted files from OneDrive without using a professional data recovery tool, yet that’s also an option to consider when the previous solution made no difference.

Data loss can happen to anyone now and then, but you can protect the most significant data by recovering lost files with the best data recovery tools.

In case you accidentally erased important data, this tool will restore all kinds of virtual files from the cloud or even your PC hard drive.

With deep scan capabilities over your system, all the deleted information will be restored in minutes to its initial state. Hence, you can rescue OneDrive files and benefit from all your intel.

As you can see, restoring your deleted files in OneDrive is simple and easy, so don’t lose your head if you accidentally delete one, because you can restore it right away.

If you have any comments or questions, just reach out to the comment section below.

[Solved] Samsung Data Migration Cloning failed 00001

Some users utilize the Samsung Data Migration utility to clone their hard drives to Samsung SSD storage. However, numerous users have posted on support forums about a Samsung Data Migration Cloning failed 00001 error, or similar issues with alternative codes.

Consequently, users can’t clone their hard drives to SDD storage when those Samsung Data Migration errors arise.

How can I fix the Samsung Data Migration Cloning failed error?

1. Decrypt BitLocker

  1. Log into a Windows admin account.
  2. Next, open Run by pressing the Windows key + R hotkey.
  3. Type Control Panel in the Open box, and click the OK button.
    Control Panel samsung data migration cloning failed 00001
  4. Click System and Security in the Control Panel.
  5. Select the BitLocker Drive Encryption to open further options.
  6. Click the Turn off BitLocker option.
  7. Press the Turn off BitLocker button.

2. Defrag the hard drive

  1. Open the search utility with the Windows key + S keyboard shortcut.
  2. Input disk defrag in the search box.
  3. Click Defragment and Optimize Drives to open the window in the screenshot directly below.
    Optimize Drives window samsung data migration cloning failed 00001
  4. Select a drive, and click the Optimize button. Then wait for the drive defragging to finish.

3. Run CHKDSK to fix the Samsung Data Migration Cloning Failed error for bad sectors

  1. Click Windows 10’s Type here to search button on the taskbar.
  2. Next, enter the Command Prompt in the search box.
  3. Right-click Command Prompt and select Run as administrator on the context menu.
  4. Input this command: chkdsk /f C:
    CHKDSK command samsung data migration cloning failed 00001
  5. Thereafter, press Enter to initiate the scan.

4. Turn off automatic page filing

  1. Press the Windows key + E keyboard shortcut.
  2. Next, right-click This PC on the left of File Explorer to select Properties.
    System window samsung data migration cloning failed 00001
  3. Click Advanced system settings to open the window in the snapshot directly below.
    Advanced tab samsung data migration cloning failed 00001
  4. Click the Settings button in the Performance box.
  5. Next, select the Advanced tab on the Performance Options window.
    Performance Options window samsung data migration cloning failed 00001
  6. Press the Change button.
    Virtual Memory window samsung data migration cloning failed 00001
  7. Deselect the Automatically manage paging file size for all drives option.
  8. Finally, select the No paging filing option.
  9. Click OK on the window.
  10. Select the Apply option, and click OK to exit.

5. Disable Hibernation mode

  1. Press Win+R keys to start the Run dialog.
  2. Type cmd in Run’s text box, and click the OK option.
    powercfg command samsung data migration cloning failed 00001
  3. Next, input powercfg /hibernate off in the Command Prompt; and press the Enter key.

6. Use backup software

First, remember that there is numerous alternative software to Samsung Data Migration you can clone hard drives to SDD storage with. Ashampoo Backup Pro 14 is among the more comprehensive backup/disk-cloning software utilities for Windows with which you can set up an HDD image.

The latest version of Ashampoo Backup has an overhauled backup engine, new automatic backup verification, and enhanced cloud support. So, maybe you don’t need to fix the cloning error for Samsung Data Migration!

The above resolutions might fix the Samsung Data Migration Cloning Failed 00001 error for some users.

If you still need to fix the issue, however, you might as well check out some of the alternative cloning software.

Don’t hesitate to let us know if this guide was helpful by using the comment section found below this guide.

Windows 10’s Fluent Design is a complete overhaul

Today, a Microsoft Edge insider posted a comment on Reddit that created more than a stir for Edge and Windows 10 users alike.

He complained about the design of Microsoft Edge and posted a mockup of what it would look like with an acrylic Title bar and round corners.

The discussion fired up as more users contributed with other arguments about the same issue.

What is the Microsoft Fluent Design hurdles?

We all hold our breath when we see new design additions or design promises that sometimes never come to fruition, but things are not that simple as they seem.

An allegedly Microsoft employee that describes himself as a person with insight at Microsoft replied with a very long post describing the inherited problems with Windows design:

Technically, Windows 8 and 10 are using WDDM that was used for Vista and 7. Xp didn’t have such a thing. In 8, they modified the aesthetic to fit the sharp corners of tiles and all, but ultimately it was just Aero lite underneath sans glassy effects.

Then came 10. And oh boy are we still dealing with this issue. 10 had some further changes done with WDDM under the hood and some more stuff removed and replaced.

But came the dev bridges for apps and figuring out how to hodge podge Win8 apps that were full screen intended to be multi-windowed but still accommodate the Charms calls in a new UI form.

The technical issues, unfortunately, don’t stop there but continued with Accommodating Island wood iOS app ports and Centennial legacy Win32 apps:

This is something we’re fixating the most on at the moment (really quite sad tbr but here we are). There are issues getting the display rendering of UI controls of those apps to be homogeneous with Win32 styled programs. Even the damn window UI is inconsistent.

What’s the situation with Fluent design right now?

CokeRobot user, who is potentially a Microsoft graphics team member, continues in his Reddit post to describe the Fluent Design which seems to be a complete overhaul:

Fluent design has been a challenge because of the restraints of the modern UI that was made in Windows 8 that restricted how far down apps could go down into the operating system.

WDDM is a very low level process and tapping into that to stay within bounds of modern UI programming is a challenge.

This is why seemingly trivial things like the Settings app take builds to see changes because it’s a weird mix between modern programming but also taps down into low level system calls. Henceforth, it requires an OS feature upgrade to change.

Fluent is also a fully different design language no one has done so it’s also challenging in of itself. We’re trying to design a UI across touch, mouse, and holograms, AND mobile devices from Google and Apple.

Getting things to look right and be understood by the average end user takes soooooooo much God damn time. Seeing some mock up concepts that get posted here, they’re nice to see but put that in front of an office worker and see how well it works. Sometimes it will sometimes it won’t.

The user ends his post by saying that they are working on this constantly on our glacial pace.

Of course, we are very eager to get all new and shiny things tomorrow, but all these are done by humans, office workers, people like us.

What are your thoughts about this? Let us know in the Comments section below.

The article Windows 10’s Fluent design is a complete overhaul appeared first on WindowsReport.com.

[wl_navigator]

Side-by-side configuration is incorrect error [Fixed]

A lot of users have posted on support forums about a side-by-side configuration is incorrect error that arises when they try to open (or install) software.

Users have reported that issues arising for Steam games, Avast Antivirus, MSI Afterburner, NVIDIA Control Panel, Google Chrome, and other Windows software. The full error message states:

This application has failed to start because its side-by-side configuration is incorrect. Please see the application event log or use the command-line sxstrace.exe tool for more detail.

As a consequence, users can’t open the software that the issue arises for. Nevertheless, users have fixed that issue with various resolutions. This is how users have fixed that error for specific software.

How can I fix the error Failed to start because its side-by-side configuration is incorrect?

1. Steam application has failed to start because its side-by-side configuration is incorrect

  1. Click the Update now button on the Windows 10 download page to save the WUA.
  2. Open the downloaded Windows Update Assistant.
  3. Click the Update Now button.
    The Windows 10 Update Assistant The Application Has Failed to Start Because Its Side-By-Side Configuration Is Incorrect Error
  4. Press the Next button.
  5. When the update is ready, press the Restart Now button.

2. Avast application has failed to start because its side-by-side configuration is incorrect

  1. Launch Run with the Windows key + R hotkey.
  2. Next, enter appwiz.cpl in Run and click OK to open the uninstaller window.
  3. Select Avast Antivirus (or other software the issue arises for) in Programs and Features.
    Repair option The Application Has Failed to Start Because Its Side-By-Side Configuration Is Incorrect Erro
  4. Click the Repair option for the selected software if it has one.

3. MSI Afterburner application has failed to start side-by-side configuration is incorrect

Some MSI Afterburner users have been able to fix the issue by installing missing C++ redistributable packages.

You can download C++ redistributable packages from the website pages listed below. When you’ve downloaded the required C++ redistributables, open their executable files and follow the on-screen instructions to install them.


4. NVIDIA Control Panel failed to start because its side-by-side configuration is incorrect

  1. If the failure to start error arises for software that usually comes with Windows, such as the NVIDIA Control Panel, try restoring the platform to an earlier date. To do that, open Run.
  2. Next, input rstrui in the Run box, and click the OK option.
  3. Click Next to go to the restore point list.
  4. The System Restore window may, or may not, include a Show more restore points option. If it does, select that option to expand the restore point list.
    System Restore window The Application Has Failed to Start Because Its Side-By-Side Configuration Is Incorrect Erro
  5. Choose a restore point that will roll Windows back to a time that predates the error message.
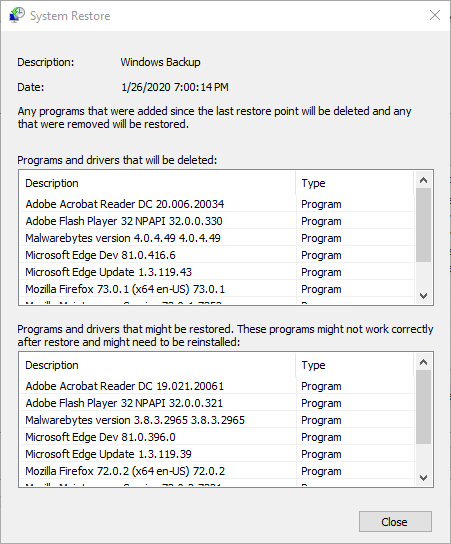
  6. Click Scan for affected programs to check what software gets deleted for a specific restore point.
    System Restore program list The Application Has Failed to Start Because Its Side-By-Side Configuration Is Incorrect Erro
  7. Click the Next and Finish buttons.

5. Google Chrome application failed to start because its side by side configuration is incorrect

  1. Launch the Run accessory.
  2. Type appwiz.cpl into Run and click OK to open the uninstaller utility.
    Programs and Features window The Application Has Failed to Start Because Its Side-By-Side Configuration Is Incorrect Erro
  3. Select the listed Google Chrome browser.
  4. Click Uninstall and Yes to remove the software.
  5. Restart Windows before reinstalling any software.
  6. Then click Download Chrome on that browser’s website.
  7. Install the browser with its setup wizard.

The above resolutions are confirmed fixes for the failure to start error. Although they’re listed for specific programs, those resolutions can fix the failed to start error for a variety of software.


[wl_navigator]

Fix: PS4 error CE-37813-2, WS-37431-8

The PS4 errors CE-37813-2 and WS-37431-8 are two network connectivity issues. These errors arise when users try to connect to the PlayStation Network.

The PlayStation 4 displays An error occurred a message that includes those error codes. Consequently, players can’t play PlayStation games online, which can cause a lot of anger to appear.

But have no worries; the methods described in this guide will surely help you resolve these issues and get back to your online gaming sessions.

How can I fix the CE-37813-2 and WS-37431-8 errors?

1. Reboot or reset your router/modem

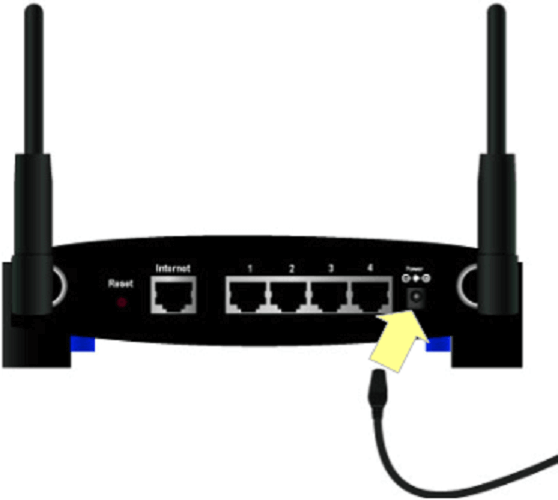
A router ps4 error ce-37813-2, ws-37431-8
  1. Power off the router, and then unplug it.
  2. Wait for about five minutes before plugging the router back in.
  3. Then power on the router back on again.

Routers also include small Reset buttons you can press with paper clips. You can reset routers with those buttons. However, bear in mind that it will completely erase all their current settings.

2. Rebuild the database

  1. Hold the PS4’s power button for 5-10 seconds until the console beeps twice.
  2. Next, connect a DualShock 4 control pad to the PS4 with USB cable so you can navigate Safe Mode.
  3. Press the PS button that’s on your DualShock 4 gamepad.
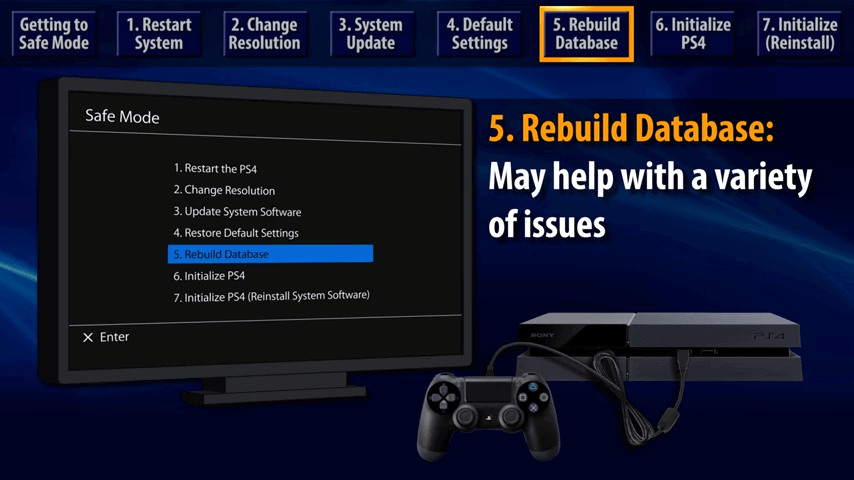
    The Rebuild Database option ps4 error ce-37813-2, ws-37431-8
  4. Select Rebuild Database on the PS4’s Safe Mode menu.

3. Change your MTU setting

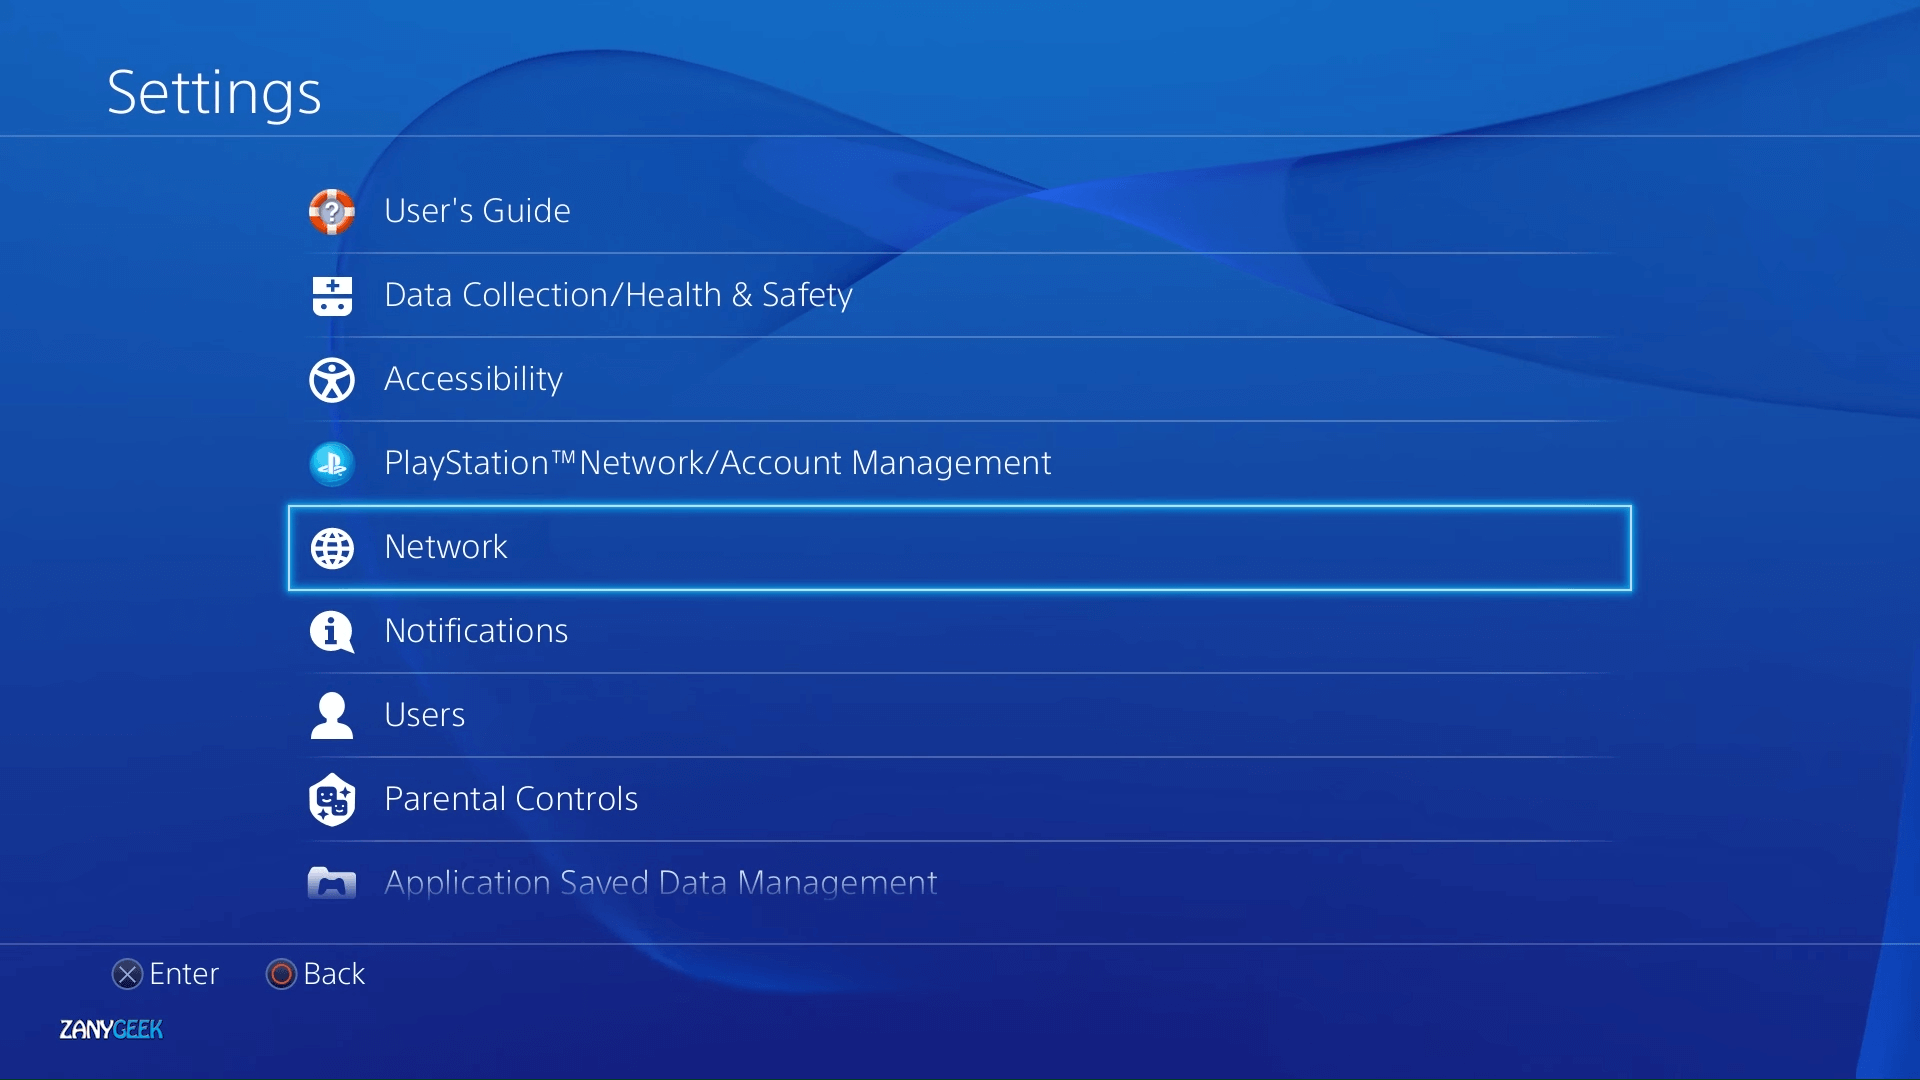
  1. Open the PlayStation 4’s Settings menu.
    The Settings menu ps4 error ce-37813-2, ws-37431-8
  2. Select the Network option.
  3. Select Set up Internet Connection and the Use Wi-Fi option.
  4. Select to configure your network connection with the Custom option.
  5. Next, select the required Wi-Fi connection to utilize.
  6. Select the Automatic IP address option.
  7. Choose Do Not Specify for the DHCP.
  8. Select Automatic for DNS settings.
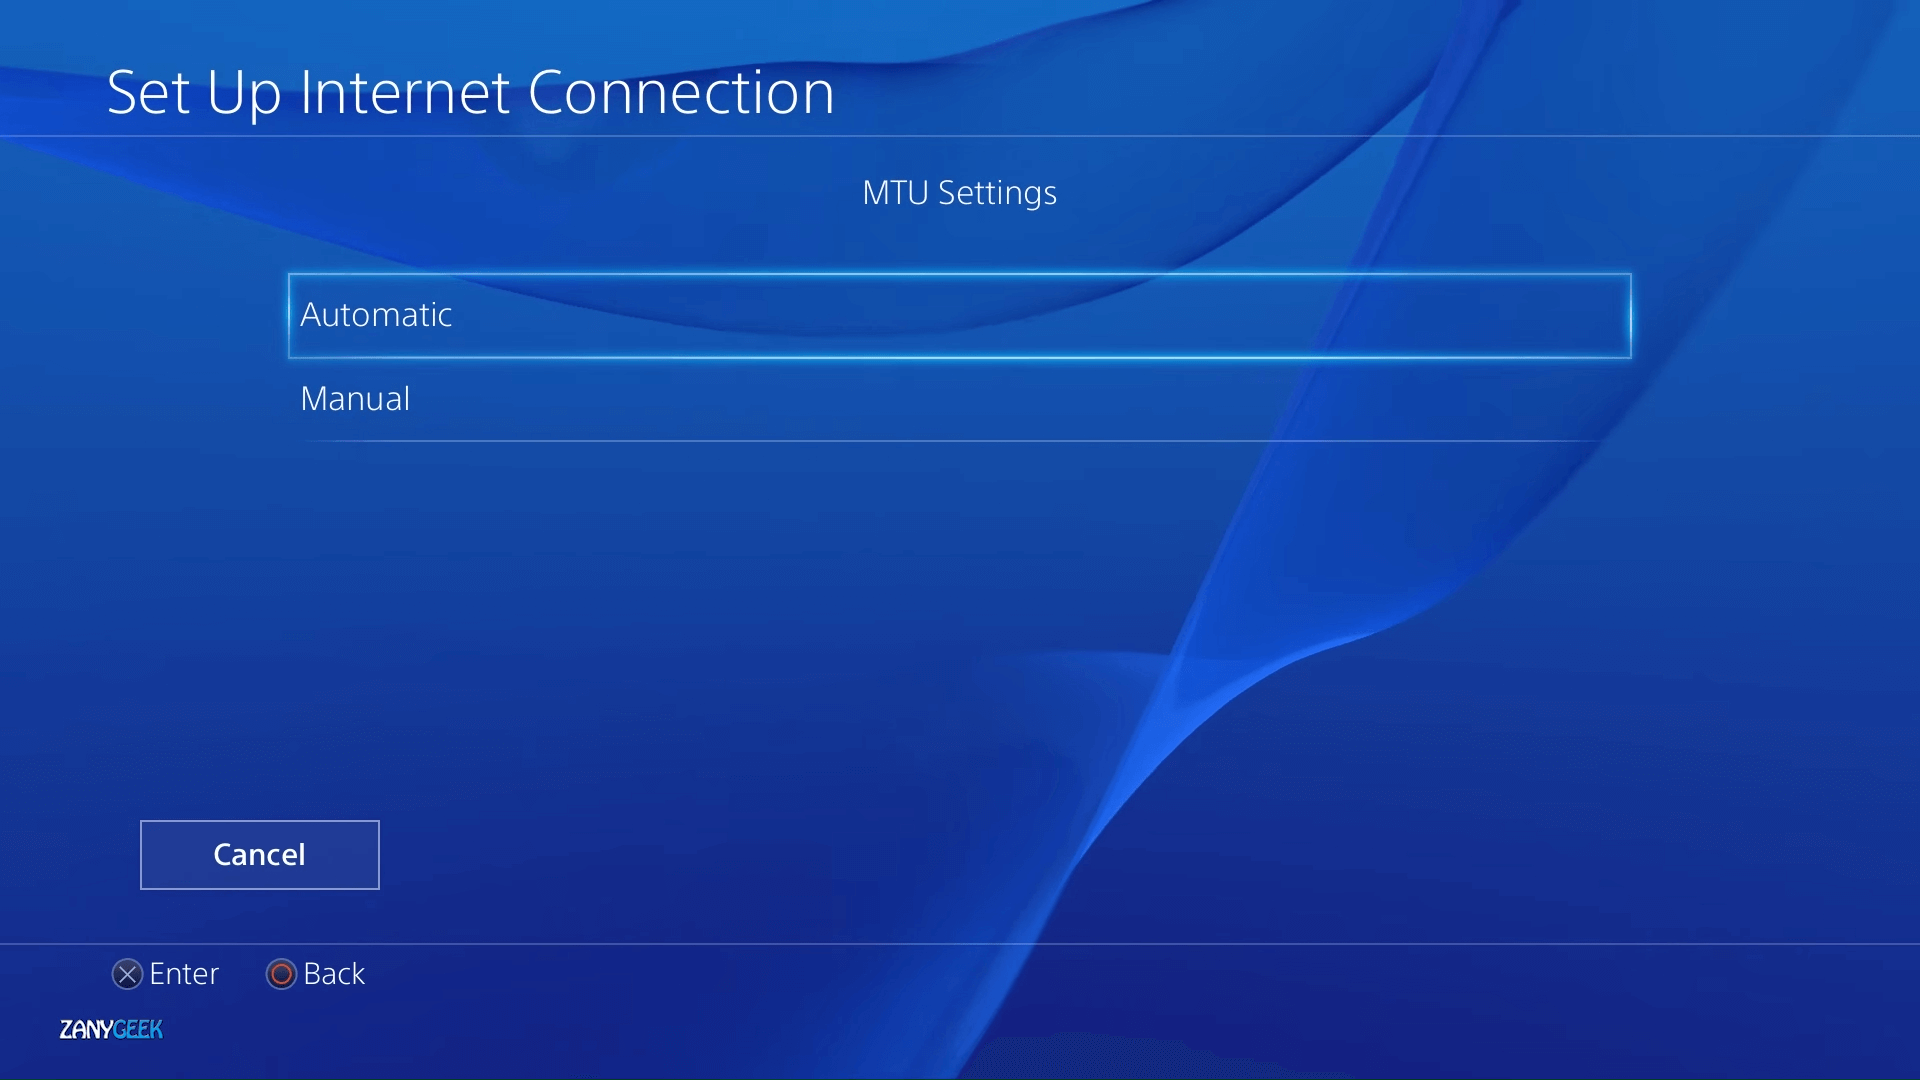
  9. Next, select the Manual MTU option.
    MTU Settings ps4 error ce-37813-2, ws-37431-8
  10. Input 1473 as the MTU number, and select Next to continue.
  11. Finally, select the Do not use proxy server option.

4. Change DNS settings

  1. Open the Settings menu on the PS4.
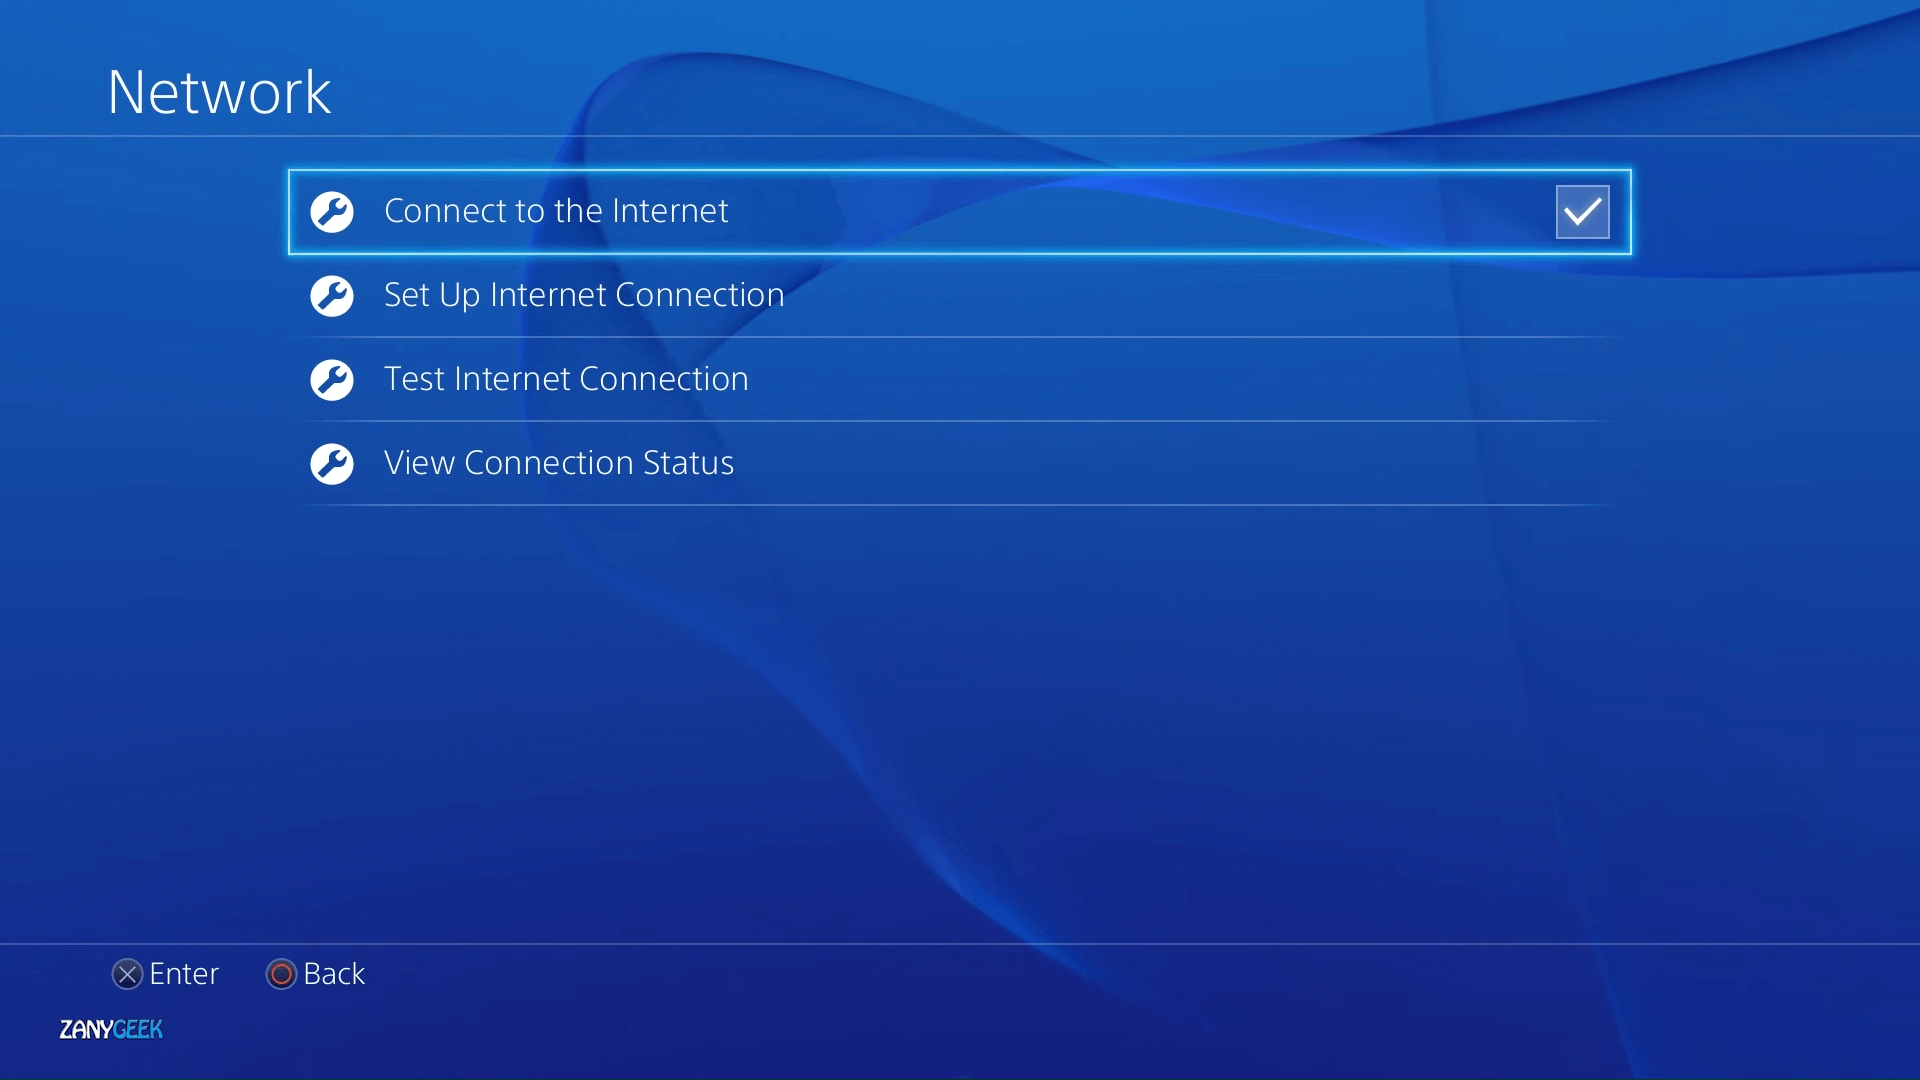
  2. Select Network to open further networking options.
    The Network menu ps4 error ce-37813-2, ws-37431-8
  3. Go to Set Up Internet Connection, and select the Wi-Fi or LAN Cable option depending on how you connect.
  4. Select the Custom option.
  5. Select a Wi-Fi network to utilize if required, and enter the password for it.
  6. Choose the Automatic option for IP address settings.
  7. Select the Do Not Specify DHCP setting.
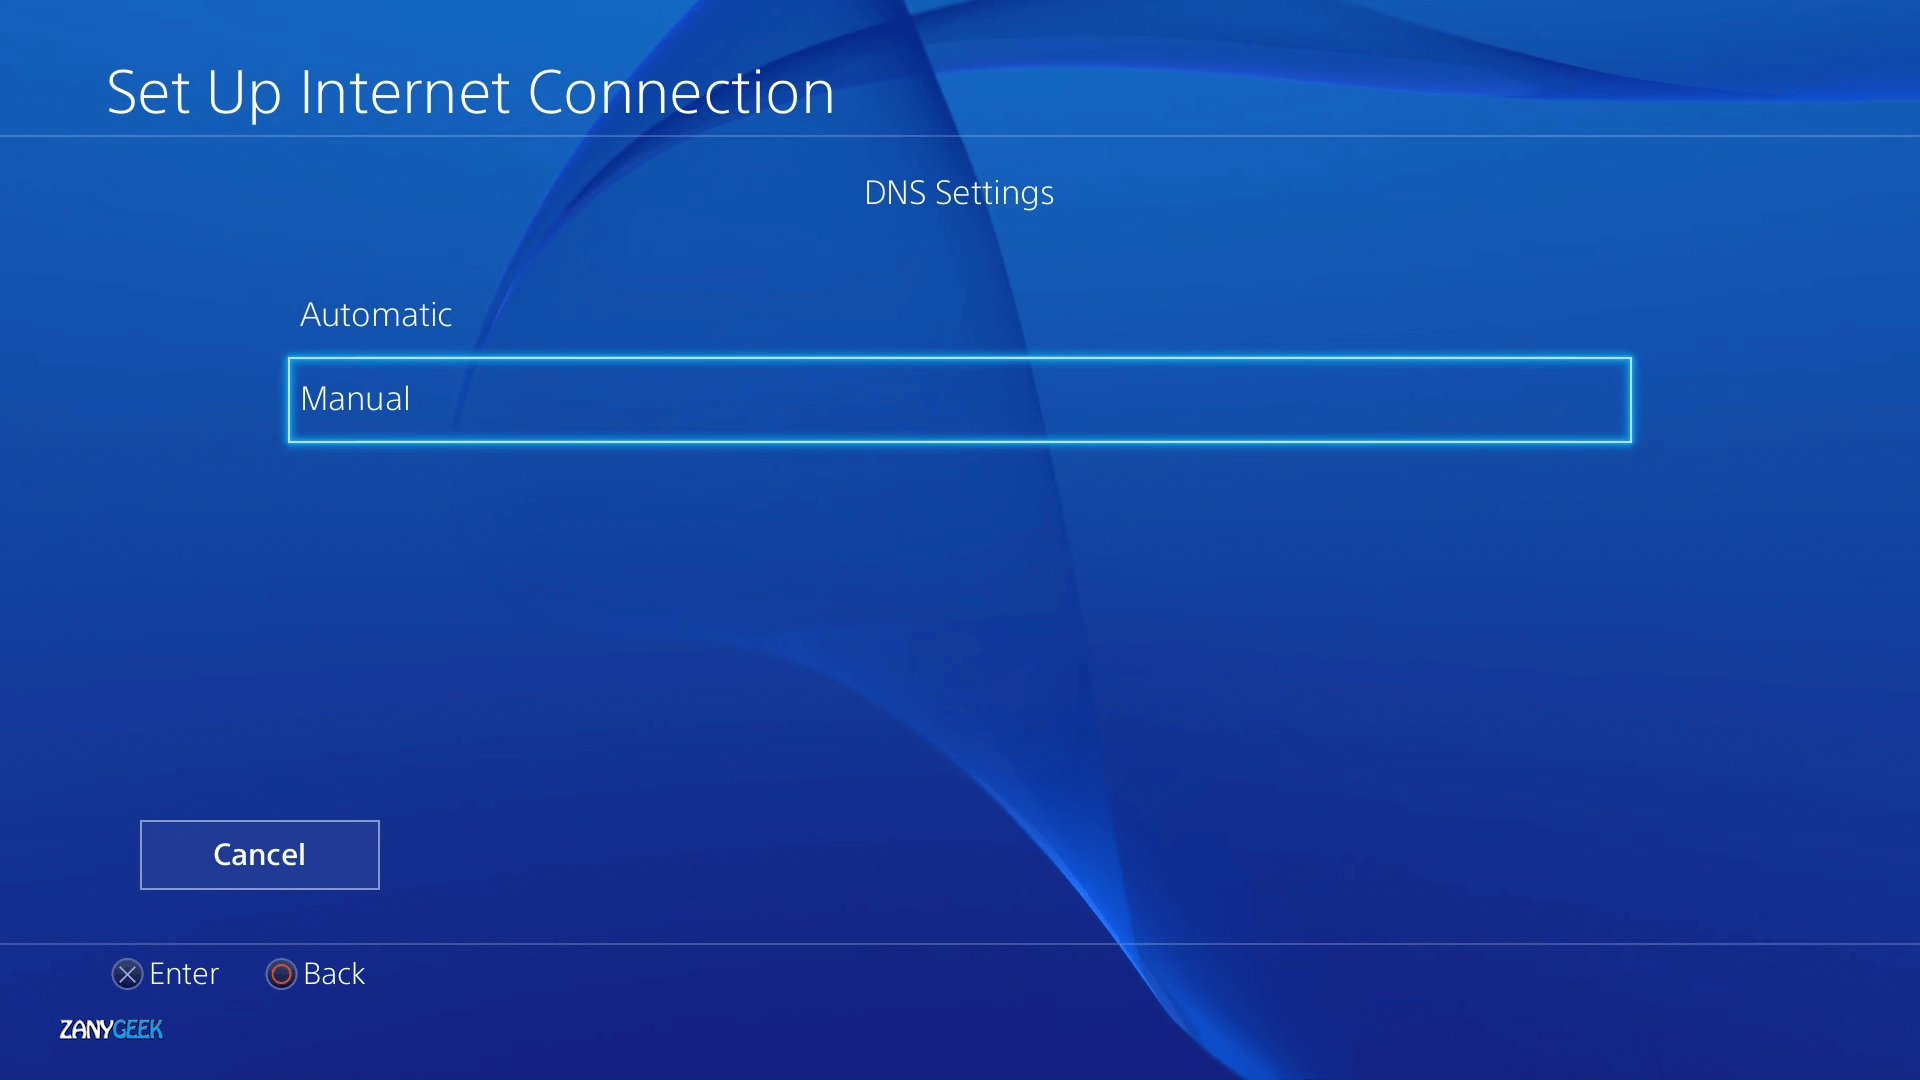
  8. Choose the Manual DNS setting.
    DNS Settings ps4 error ce-37813-2, ws-37431-8
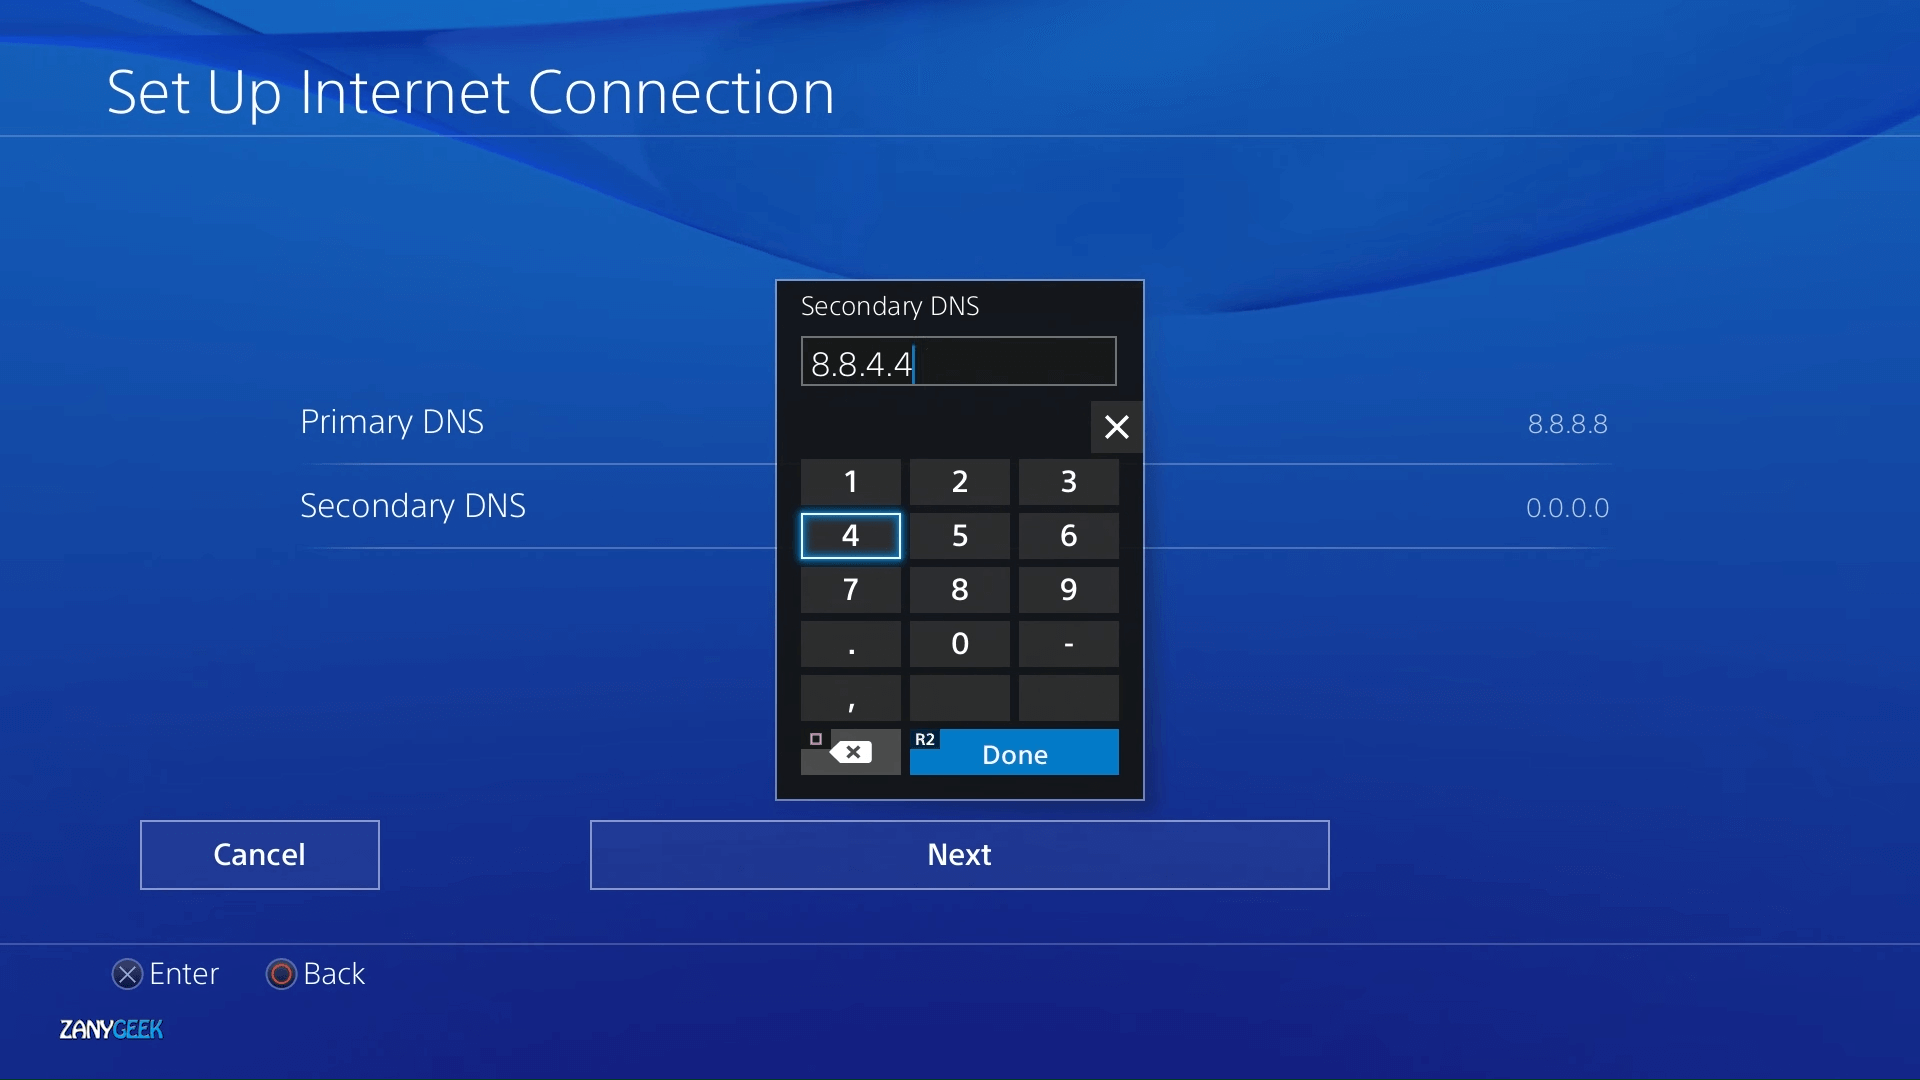
  9. Type 8.8.8.8 as the primary DNS.
  10. Input 8.8.4.4 for the secondary DNS.
    Primary and Secondary DNS settings ps4 error ce-37813-2, ws-37431-8
  11. Select the Next > Automatic > Do Not Use options to finish.

Changing the DNS will also help when Spotify is not working on PS4. Should you come across other network-related errors like nw-31291-6, feel free to check out our fix articles.

The above resolutions could fix the CE-37813-2 and WS-37431-8 errors for some users. There might be other fixes, however, and users who have fixed the same issues with alternative resolutions are welcome to share them below.

FIX: OneDrive The file is locked for shared use by… error

The file is locked for shared use by... is an error message that some OneDrive users have seen pop up on their OneDrive pages.

Consequently, they can’t open or delete a locked file. The error message occurs for users sharing files on networks.

These are a few resolutions that might fix the file locking OneDrive error.

How can I solve The file is locked for shared use by… error?

  1. Turn Off the Require Check Out option
  2. Adjust the Permissions Level Settings
  3. Wait a few hours
  4. Check that the file isn’t alreay open
  5. Try out a different storage provider

1. Turn Off the Require Check Out option

  1. Check that the Check Out setting isn’t enabled in OneDrive. To do that, open OneDrive for Business in a browser.
  2. Click the gear (Settings) button to select Site Settings.
  3. Then click Site administration > Site libraries and lists > Customize documents and Versioning settings.
  4. Select the No radio button for the Require documents to be checked out before they can be edited option.
  5. Then press the OK button.

2. Adjust the Permissions Level Settings

  1. Some users have confirmed that they’ve fixed the error The file is locked for shared use by adjusting the permission level settings. First, log in to Office 365 and open OneDrive for Business from there.
  2. Click the Settings (gear) button to select Site Settings.
  3. Select Site Permissions to open the Permissions tab.
  4. Then click Permissions Levels on the Permissions tab, and select the Edit option.
  5. Click the Select All checkbox to select all permissions.
  6. Scroll down to and press the Submit button.

3. Wait a few hours

It might just be the case that another user is indeed editing the document. Thus, wait a few hours, or till the next day, before returning to open the required file.

However, check out some of the other fixes below if you’re sure that another user is not editing the file.

4. Check That the File isn’t Already Open

  1. Right-click the Windows 10 Start button to open a menu that includes Task Manager.
  2. Click Task Manager to open the window shown directly below.
  3. Select all Office apps listed on the Task Manager’s Processes tab, such as Winword.exe, and press the End Task button to close them.
  4. Thereafter, open your browser again, log in to OneDrive for Business (via Office 365 portal), and check if the file is still locked.

You might have already opened the locked file within your browser or other Office software.

To make sure that isn’t the case, close all your browser tabs and then the browser. Then check there are no Office apps or processes listed in Task Manager as described above.

5. Try out a different cloud storage provider

If bypassing this OneDrive error seems like too much trouble for you, then it’s a sign that it’s time to take a look at a different cloud storage provider.

When a cloud solution connectivity fails, it opens the door to finding much higher-rated cloud services. Of course, OneDrive is a reliable and dependable service, but it isn’t the only one.

In a nutshell, if you want to take a shortcut, at least for the time being, go directly to another cloud provider. Furthermore, you may need extra capacity in the near future, so pre-checking for another backup cloud storage solution is a smart move to get the best deals.

A premium cloud storage solution that is designed for both regular and business users, is always a good idea to try, even if just as a workaround. User rights and permissions can still be easily set to manage access and benefit end-to-end encryption.

If you are not exactly sure which option works best for you, some cloud service providers offer free trials and demo versions.

One of those resolutions that might fix The file is locked error message so that you can open or delete the required file in OneDrive for Business.

If you have another resolution for fixing locked files in OneDrive, feel free to share it below.

PS4 error CE-36329-3, CE-30002-5 [Full Fix]

The PS4 CE-36329-3 and CE-30002-5 errors are two similar issues. Those are messages that can arise when users try to start PS4 games or when playing them.

The console displays An error has occurred error messages that include the CE-36329-3 or CE-30002-5 codes. To fix these errors, check out the potential resolutions below.

How can I fix the PS4 update errors CE-36329-3, CE-30002-5?

1. Update System Software

  1. Start the PS4 in Safe Mode by pressing and holding the console’s power button for about seven seconds until you hear two bleeps.
  2. Thereafter, connect the DualShock 4 gamepad to the PS4 with the USB cable.
  3. Press the DualShock 4’s PS button.
  4. On the Safe Mode menu, select the Update System Software option.
    Update System Software option PS4 error CE-36329-3, CE-30002-5
  5. Select the Update using Internet setting.

  6. Follow the console’s guidelines to install the update.

Note: Some users might need to save the latest PS4 firmware to a USB stick to update the console in Safe Mode. You can download the firmware from the PS4 System Software Update page.

2. Select the Rebuild Database option

Rebuild Database option ps4 error ce-36329-3, ce-30002-5
  1. Start the PlayStation 4 in Safe Mode exactly as covered for the first fix.
  2. Select the Rebuild Database option on the Safe Mode menu.
  3. Follow the on-screen instructions to complete the process.

3. Reinstall the game the error arises for

  1. Select Settings in your PS4 to open the menu in the shot directly below
    The Settings menu ps4 error ce-36329-3, ce-30002-5
  2. Select the Applications Save Data Management and the Saved Data in System Storage option to back up your data.
  3. Select Storage on the Settings menu to uninstall the game.
  4. Select Applications to open a list of apps and games.
    The Applications menu ps4 error ce-36329-3, ce-30002-5
  5. Select the game to uninstall, and press the Options button on your gamepad.
  6. Thereafter, select the Delete option.

4. Initialize the PlayStation 4

  1. Back up your datafirst.
  2. Then turn on the PS4, and select Settings.
  3. Select the Back Up and Restore and Back Up PS4 options.
  4. Select the data to back up.
  5. Select Next to continue.
  6. Select the Back Up option, and press X on your control pad.
  7. Turn off your PlayStation 4, and remove the USB drive.
  8. Next, restart the PS4 in Safe Mode.
  9. Select the sixth Initialize PS4 option.
    Initialize PS4 option ps4 error ce-36329-3, ce-30002-5
  10. After initializing the console, you’ll need to sign in to your PlayStation Network account again.

5. Format your external hard drive for PlayStation 4

  1. Select Settings on the PS4’s Dashboard (specifically for error CE-30002-5 and users with external PS4 hard drives).
  2. Select Devices on the Settings menu.
  3. Select USB Storage Devices and then the external drive to format.
  4. Next, select the Format as Extended Storage option and Next to continue.
    The Format as Extended Storage option ps4 error ce-36329-3, ce-30002-5
  5. Select Format and Yes to confirm.
  6. Select OK when the drive has been formatted.
  7. Move the games from the system storage onto the extended storage.
  8. Note that formatting an external hard drive will also delete its data. So, some users might want to back up their external hard drives first.

These are some of the more probable fixes for the CE-36329-3 and CE-30002-5 PS4 errors. If you have more problems, don’t forget to check our guide on fixing the CE-34335-8 PS4 startup error.

If you need to, you can ask a support agent for further resolutions via live chat on the PlayStation 4 support site.

SOLVED: Files already exist in this folder on OneDrive

OneDrive is certainly quite a useful piece of Windows 10. It comes pre-installed so users can start backing up data to the cloud immediately after the system installation is done.

However, even though it’s implemented from the get-go, OneDrive for Windows 10 has lots of small but annoying issues going against it.

One of the common error messages is concerning the already-existent files or folders in OneDrive when users try to upload a completely new folder or file.

Luckily, this inconvenience is solvable, and we have just the right steps to help you out.

What can I do if files already exist in this folder on OneDrive?

  1. Sign out and sign in again
  2. Rename files
  3. Upload files via the app or in the web-based client
  4. Change the local folder location
  5. Try out a full-featured cloud storage alternative

1. Sign out and sign in again

Let’s start with the basic step. OneDrive sync halts are not uncommon. This might be a temporary issue or a bug brought in with the latest update.

Or the problem might be on your side, in case the syncing procedure is interrupted. One way or another, we always suggest login out and then signing in again.

Just make sure to sign out of all clients and use the desktop OneDrive exclusively. This seemingly helped some users, but don’t hold your hopes high. If the problem is persistent, continue to the next step.

2. Rename the files

Now, even if the files have a different name, the bug might prevent merging and you’ll be welcomed by the error.

Also, due to the sync problem, even the deleted files might still be cached. Thus, the client will inform you that they’re still there even if you’ve deleted them from your local folder.

For that reason, we suggest renaming the blocked files you’re trying to upload. Even the minimal change should resolve the problem and you should be able to move on.

3. Upload the files via the app or in the web-based client

  1. Navigate to Microsoft OneDrive for Web.
  2. Sign in with your credentials.files already exist in this folder onedrive
  3. Drag the files you want to upload from the desktop and place them in OneDrive in a browser.

Another way to fix this error is to simply avoid the standard local folder and stick with either the UWP app or the web client.

This is a good method to circumvent possible issues with the desktop client.  Also, what are the chances that every OneDrive option is broken at the moment?

Either way, use the above steps to upload your files to OneDrive over the web client.

And here are the instructions on how to do it over the Store app:

  1. Navigate to this OneDrive Store app and click Get. It should open the Microsoft Store where you can install OneDrive.
  2. After installation ends, sign in with your credentials and do the same drag-and-drop procedure.files already exist in this folder onedrive
  3. Wait until all updates are finished.

4. Change the local folder location

  1. Navigate to Control Panel > Uninstall a program, and uninstall OneDrive.
  2. Go to OneDrove official site and download the desktop client installation.
  3. Install OneDrive and log in with your credentials.
  4. Choose another location for the folder where the local files are stored.
  5. Choose whether you want to download all files from the cloud or not. We don’t suggest downloading files.
  6. Move wanted files to the folder and wait until they upload.files already exist in this folder onedrive

Finally, if none of the previous steps worked out for you, we suggest changing the location of the OneDrive’s local folder.

With that little trick, you should be able to update your files without any problems whatsoever. Of course, you can skip downloading all your files locally from the cloud storage.

In addition, while we’re there, you can reinstall the OneDrive desktop client and start with the clean slate.

5. Try out a full-featured cloud storage alternative

You can enjoy a cloud storage provider for both personal and professional use. Most of them offer military-grade encryption and automated backup service.

So, if OneDrive persists to give this issue, you can always rely on other efficient cloud storage apps on Windows 10.

With that said, we can wrap this up. In case you have any alternative solutions or questions regarding the OneDrive error we covered today, feel free to tell us in the comments section below.

Posted in Fix

What to do if Fire Stick TV keeps restarting? [Full Guide]

AmazonForum is full of Fire Tick TV users complaining about the Fire Stick keeps restarting issue. The restarting issue seems to be caused due to power supply problems.

In other cases, the restarting problem can occur due to faulty USB cable, a software glitch , or in rare cases a faulty Fire Stick TV.

If you are also troubled by this issue, here is a detailed guide to troubleshooting Fire Stick TV keeps restarting issue.

What can I do if Amazon Fire Stick TV keeps rebooting?

1. Use the official Fire TV Stick accessories

Fire Stick TV keeps restarting

Your Fire Stick comes with essentials accessories such as the USB cable in the box. While using the device, make sure you are using the official accessories provided in the box.

This also applies to the power brick that comes in the box. If you use your smartphone or another spare USB cable to connect the device with a random USB adapter, it may fail to supply adequate power resulting in frequent restarts.

So, make sure you are using the official accessories to connect and power your Fire TV Stick.


Amazon Fire TV Stick remote not working? Try this!


2.  Check and replace the USB cable

Fire Stick TV keeps restarting

The micro USB cable that connects your device to the power adapter can get damaged due to wear and tear. Unplug the USB cable and check both the ends of the cable for any tear.

Try to use the USB cable to charge your smartphone or any other device that uses a micro USB port.

If the cable is faulty, consider replacing it. You can find a replacement USB cable on Amazon. In the meantime, use a spare USB cable that you may have at your place. to power the device.

Connect your USB cable directly to the power outlet

Many users connect the USB cable directly to their TV to supply power. However, this may result in an inconsistent stream of electricity to your Fire Stick TV.

Make sure the USB cable is connected to the power brick which is connected to the wall socket.

If you are using a USB hub, make sure to directly plug the USB adapter. USB hubs may not be able to provide adequate power to the device.

Check the adapter

Note: This can damage your device. Proceed at your own risk.

Several users have reported that using a higher-powered USB adapter has fixed the restart issues. While Amazon Fire Stick TV comes with a 1 Amp power adapter, using a 2 Amp adapter, seem to have resolved the restarting issue for many users.


3.  Disable HDMI CEC Device Control

Fire Stick TV keeps restarting

  1. From the Fire Stick TV home screen, open Settings.
  2. Open Display and Sound.
  3. Tap on HDMI CEC Device Control.
  4. Disable HDMI CEC Device Control by turning it off.
  5. Once disabled, restart Fire Stick TV and check for any improvements.

The HDMI CEC feature helps you to control your TV with your Fire TV Stick remote. While it is a useful feature, due to the limited implementation of the technology, it may cause issues with your Fire Stick TV.

Several users have reported that disabling the feature has helped them resolve the Fire TV restarting problem.


4. Remove all the HDMI devices connected to your device

Fire Stick TV keeps restarting

If your TV has more than one HDMI port, you may have connected multiple HDMI devices to the TV. Try removing all the connected HDMI devices. Once removed, connected your Fire TV Stick, but not the other device. Check if the problem occurs when only one device is connected to the TV.

At times, having multiple HDMI devices connected to your TV can create issues with other devices.

Check the HDMI cable.

A faulty HDMI cable can also cause the streaming device to restart. Try replacing the HDMI cable to see if that resolves the issue.


5. Check for software update

Fire Stick TV keeps restarting

  1. From the home screen, open Settings.
  2. Select My Fire TV.
  3. Press Check for a System update.
  4. Download and install the pending update.
  5. Reboot your Fire Stick TV and check for any improvements.

6. Reset your Fire Stick TV

Fire Stick TV keeps restarting

  1. Open Settings.
  2. Select My Fire TV.
  3. Select Reset to Factory Defaults.
  4. Confirm the action.
  5. Wait for the Fire TV Stick to reset.

The device will reboot automatically once the reset is complete.

If the issue persists, check the Fire Stick TV for hardware issues. Electronic devices can fail due to many reasons. Try connecting your Fire Stick TV to a different device to see if it is working.
If not, contact support to get your device replaced if under warranty.

The Fire Stick TV restarting issue is mainly caused because of a faulty USB or HDMI cable. Make sure to follow the steps in the article one by one to fix the problem. Do let us know which method helped you resolved the issue in the comments.

[wl_navigator]

Posted in Fix

Tell Me Why, the latest video game by the creators of Life is Strange, is now up for pre-order on Xbox One

One of the games that made the biggest impression last night during Microsoft’s Xbox Games Showcase was Tell Me Why, a narrative adventure title by the makers of the hit Life is Strange franchise.

Much like Life is Strange, Tell Me Why features a strong emphasis on story, characters, and mysterious powers that double as a plot device and a game mechanic to help unlock secrets.

Here’s the full game description and trailer:

Tell Me Why is the latest narrative adventure game from DONTNOD Entertainment, the studio behind the beloved franchise, Life is Strange. In this intimate mystery, reunited twins Tyler and Alyson Ronan use their supernatural bond to unravel the mysteries of their loving but troubled childhood. Set in beautiful small-town Alaska, Tell Me Why features true-to-life characters, mature themes and gripping choices.

As you conjure up memories of the past, your choices will affect the twins’ relationship, determine the strength of their bond, and shape the course of their lives.

Tell Me Why will be released in three parts with the first launching on Xbox One and Windows on August 27th. The second and third parts are set to launch on September 3rd and 10th respectively. All three chapters will be available to play for free for Xbox Game Pass subscribers.

Are you interested in Tell Me Why? Can you read the title without singing that Backstreet Boys song? Let us know in the comments below and then follow us on Pinterest and Twitter for more Xbox gaming news.

Tell Me Why: Chapters 1-3


Xbox Game Pass Ultimate

How to get OneDrive to stop popping up on Windows 10 [Fixed]

OneDrive is Microsoft’s cloud storage service that’s integrated with Windows. Thus, there’s already a OneDrive folder in the File Explorer and the cloud storage is enabled by default for some users.

Consequently, a Setup OneDrive dialog window might keep popping up for some Windows users even if they don’t require cloud storage.

How do I get OneDrive to stop popping up?

1. Try a different storage platform

If OneDrive keeps acting erratically, consider switching to a different cloud-based storage platform that allows you to store, sync, share, and access your files from just about anywhere.

There are many cloud-based services available that are just as reliable and secure as Onedrive.

Some of the best cloud storage apps for Windows offer free plans or at least free trials, so you can try out a few if you are not sure which one will be the best replacement.

The good news is that these apps are generally pretty easy to use and you won’t need much time to adjust to a new system, they are similar to each other when it comes to user interface and controls.

Just make sure that the service you decide to use offers enough storage space for you and that it has good security and encryption features.

If you plan to use your cloud-based platform for work, look for a service that has built-in collaboration features.

2. Remove OneDrive from Windows startup

First, check if the Windows startup includes OneDrive. If so, you can disable it from there, which will probably ensure the Setup OneDrive window doesn’t pop up again.

You can remove Microsoft OneDrive from the Windows startup software as follows.

  • First, you should right-click the taskbar and select Task Manager to open the window in the snapshot below.
  • Select the Start-up tab on that window to open a list of startup entries. That might include Microsoft OneDrive, which will have an Enabled status.
  • Select Microsoft OneDrive and press the Disable button to remove it from the startup programs.
  • If you can’t find OneDrive listed in Task Manager, it might be listed on MSConfig’s Services tab. Open Run by pressing the Win key + R hotkeys, and then you can type msconfig in the text box to open the window in the snapshot directly below.
  • Click the Services tab, which includes a list of services. Browse through the services to find Microsoft OneDrive.
  • If it’s listed there, deselect OneDrive’s checkbox and press the Apply button.
  • Next, click OK and press the Restart button to reboot Windows.

3. Uninstall OneDrive in Windows 8 and earlier (but not 10)

If OneDrive isn’t listed on the Start-up or Services tabs, you can remove it from Windows directly. However, you can’t uninstall OneDrive via the Programs and Features window.

Instead, you can switch off OneDrive via the registry as follows. Note that this registry edit doesn’t work in Windows 10.

  • First, open the Registry Editor by opening Run with the Win key + R hotkey and entering regedit. Then press the OK button to open the Registry Editor window below.
  • Now open this key in the Registry Editor: HKEY_LOCAL_MACHINESOFTWAREPoliciesMicrosoftWindows.
  • Next, you should right-click Windows and select New > Key from the context menu shown in the snapshot below. You can skip this step if there’s already an OneDrive key there.
  • Enter OneDrive as the title of the new key.
  • Next, you should right-click the new OneDrive registry key and select New > DWORD (32-bit) Value.
  • Enter DisableFileSyncNGSC as the title for the new DWORD.
  • Now double-click DisableFileSyncNGSC to open the Edit DWORD (32-bit) Value window and enter 1 in the Value data box.
  • Close the Registry Editor window and restart Windows.

4. Uninstall OneDrive in Windows 10

  • Windows 10 users can uninstall OneDrive with the Command Prompt. Press the Win + X hotkey and select Command Prompt (Admin) from the menu to open it.
  • First, input taskkill /f /im OneDrive.exe and press Enter to ensure that OneDrive isn’t running.
  • Next, enter %SystemRoot%SysWOW64OneDriveSetup.exe/ uninstall and press Return if you have a 64-bit Windows system.

  • For 32-bit Windows, input %SystemRoot%System32OneDriveSetup.exe /uninstall in the Command Prompt instead.

Now that you’ve effectively removed OneDrive from the startup programs or Windows, the cloud storage’s dialog window will not pop up again.

Remember that it might not be that easy to restore OneDrive in Windows, so only remove it with Command Prompt if you’re sure you’ll never need it.

There you go, these are a few tested fixes to help prevent the OneDrive dialog window from popping up. Do you know of any other workarounds?

Feel free to share your experience with us by reaching for the comments section below.

Can’t disconnect from your VPN? Here’s what you can do

VPNs are without a doubt lifesavers when it comes to preserving your online privacy. You can use them in a wide variety of environments and they can tackle a lot of issues without any special configuration. They’re awesome like that.

Besides keeping your online activities on the hush, VPNs are also good at letting you access restricted content. How many times has it happened for you to try to access a service, only to find it’s not available in your region?

Having a VPN in that situation might’ve saved you the headaches, just so you know.

But even that’s not all. If you’re unfortunate enough to sign with an abusive ISP, your bandwidth might be throttled just for the sake of cutting costs. A VPN can easily improve packet loss and decrease in-game ping caused by this throttling.

Your ISP might even snoop around your traffic if they’re motivated enough. So why not make it infinitely harder for them to pick up on your traffic? And why not circumvent geoblocking and ISP throttling, when it’s so easy to do so?

Well, enough with the praising, as we’re sure you’ve heard it before. VPNs are great, but for some users, the way they work remains a mystery. Thus, a wide range of issues might occur whenever one’s using this type of service.

For instance, has it happened to you not to be able to disconnect from your VPN? If you find yourself in this situation, here’s how you can tackle the issue.

How to disconnect from VPN?

1. Use the VPN client

  1. Download Private Internet Access
  2. Install it on your computer
  3. Launch it and log into your account
  4. Connect to a server (to protect your privacy)
  5. Once you’re done, click the big power button to disconnect
  6. Right-click the app’s icon in your System Tray
  7. Select Quit from the context menu

Private Internet Access

Private Internet Access

Looking for a safe, stable VPN? PIA might be just the one.
$2.85/mo. Buy it now

That’s it, you’ve managed to connect to your favorite VPN server and improve your privacy and disconnect from the VPN server once you didn’t need the protection any longer. Quite easy, right?

2. Use the Windows built-in features

  1. Locate your connection icon in the bottom-right corner of your screen
  2. Left-click the connection icon
  3. See if there’s any VPN connection aside from your default one
  4. If it is, select it and click the Disconnect button

You can also go ahead and remove it altogether if you no longer need it. Some VPNs leave their connections on your PC, even after you uninstall them.

This can help them reestablish a connection and restore configuration settings easier if you decide to reinstall the VPN.

3. Make sure the kill switch is not active

Some VPNs have this kill switch feature that cuts your Internet connection if you’re not connected to a secure VPN server. This in turn would make disconnecting from your VPN impossible if it means that your default connection no longer works.

For that reason, it would be a great idea to look after this kill switch and make sure to disable it before you attempt to kill the VPN connection. Otherwise, you won’t be able to access the Internet without a VPN until you do.

4. Make sure your DHCP is enabled

  1. Click the Start button
  2. Select the Settings app
  3. Go to the Network & Internet sectionChoose Network & Internet
  4. (Ethernet) Select Ethernet and click the network you’re connected toSelect Wi-Fi or Ethernet
  5. (WiFi) Click on Wi-Fi, select Manage known networksManage known networks on WiFi
    1. Choose the network you’re connected to
    2. Click the Properties buttonConnection properties WiFi
  6. Click the Edit button under IP assignmentClick the IP assignment Edit button
  7. Choose Automatic (DHCP) under Edit IP settings

Some VPNs will turn off DHCP to avoid leaks. If you normally use manual IP assignment, do not modify any of the settings, just leave them as they are.

However, if you know for a fact that your router normally handles IP assignment, it means that your VPN probably disabled DHCP and it’s safe to re-enable it.

Another thing worth mentioning is that you’ll want to disable the VPN kill switch while you modify DHCP settings.

VPNs connections can be closed with ease

All things considered, it’s safe to say that there’s also a way to fix issues, even when the problem is not being able to disconnect from your VPN. Although some of the steps we’ve described above are somewhat technical, they’re still quite easy to follow.

If, at any step, you become unsure of what you have to do, take a step back and check our instructions/screenshots once more. Also, make sure you have another Internet-enabled device you could use as a backup if your configuration fails.

How to monitor a Windows 10 VPN connection in 5 ways

A VPN is a must-have tool for anyone concerned about online security and privacy. It can change your IP address and geo-location, encrypt all data, access blocked sites, and bypass censorship.

Virtual private network solutions also help employees remotely access the workplace and use the company’s internal resources by connecting two networks.

However, if the VPN connection is faulty, those security features won’t matter anymore. That’s why it’s a good idea to track the VPN connection on your PC.

We listed 5 very different ways to monitor a Windows 10 VPN connection, depending on the type of information that interests you.

Make sure you’re connected to the VPN before proceeding.

How do I monitor my Windows 10 VPN connection?

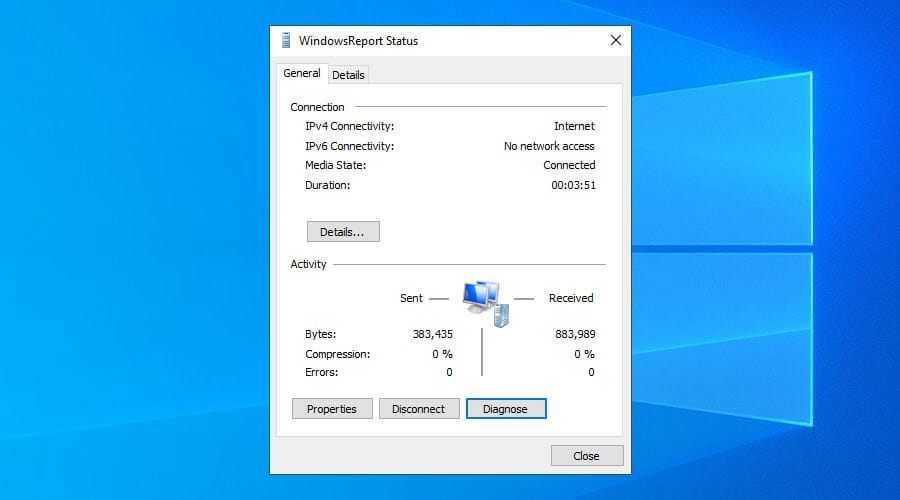
View the VPN connection properties

view Windows 10 connection status
  • Right-click the Windows 10 Start button.
  • Go to Network Connections.
  • Click Change adapter options.
  • Double-click the VPN connection.

It might seem like a rudimentary method to monitor your Windows 10 VPN connection, but you can view the total sent and received bytes this way.

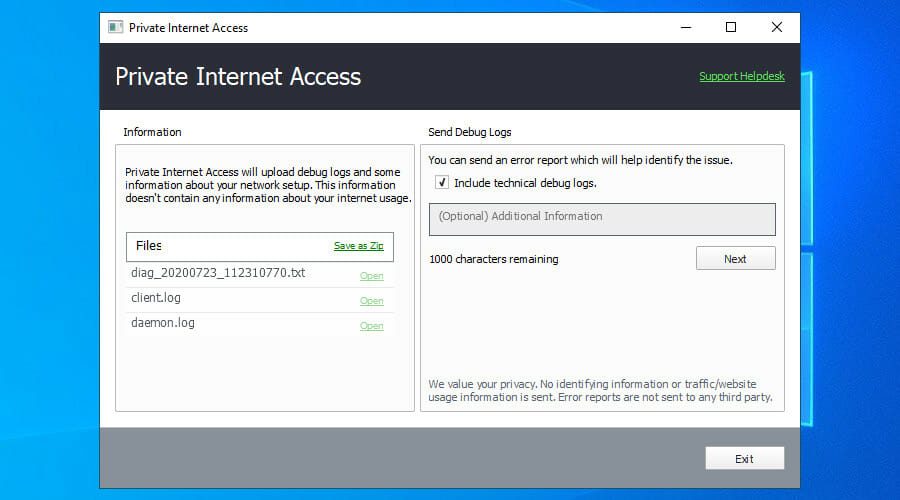
Enable debugging and inspect logs

view Private Internet Access debug logs
  • Sign up for a PIA subscription plan.
  • Download and install PIA.
  • Connect to a VPN server.
  • Right-lick PIA’s icon in the systray.
  • Go to Settings > Help.
  • Check Enable Debug Logging.
  • Click Submit Debug Logs.
  • Click Open next to a log file to open its location in Windows Explorer.

This method gives you complete, raw data about the VPN connection. We chose Private Internet Access in this example because it’s the best VPN for Windows 10. It’s a fast and secure VPN service operated by Kape Technologies.

Private Internet Access

Private Internet Access

Enable debug logging in PIA to find out exactly what happens with your VPN connection.
$2.85/mo. Buy it now

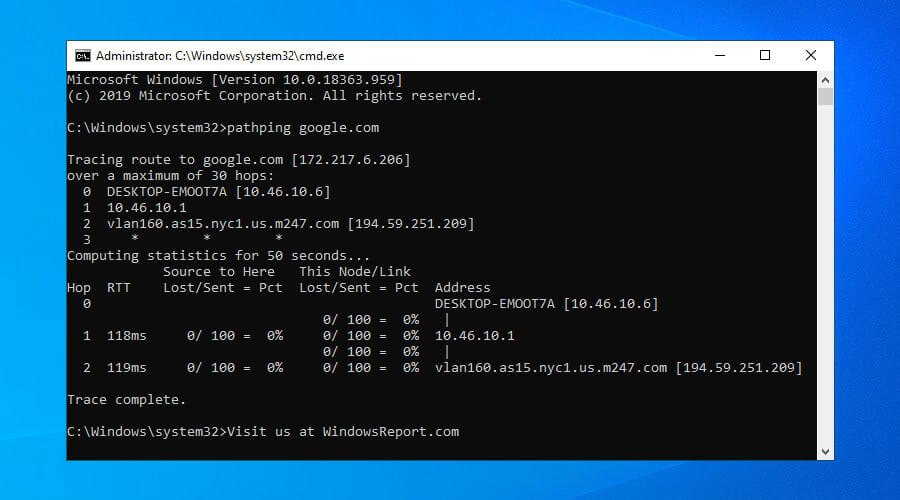
Use pathping

use Windows 10 pathping
  • Launch Command Prompt as admin.
  • Type pathping and the IP address or hostname of the remote PC.
  • You can also use arguments, as detailed in our pathping guide.

Pathping is a combination of ping and traceroute, which checks the route between your PC and a remote server. It sends the ping command every hop of the way, making it an excellent tool to monitor your Windows 10 VPN connection and check for packet loss.

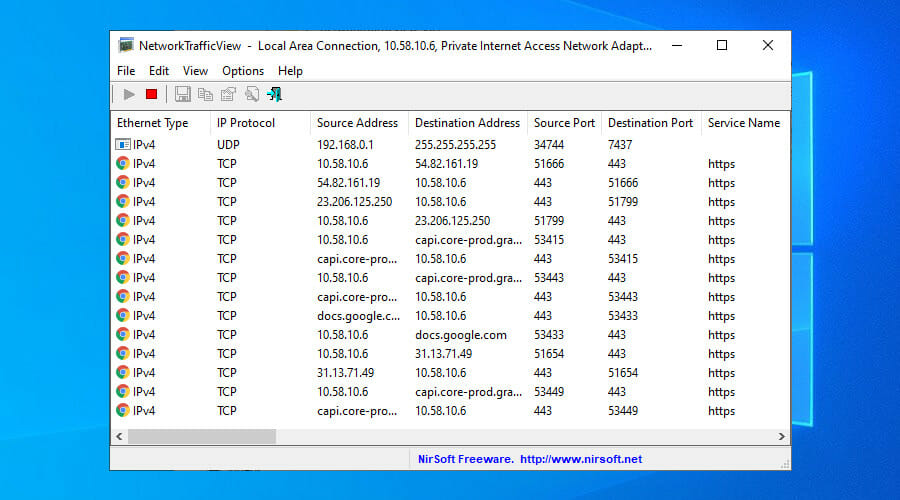
Use NetworkTrafficView

use NetworkTrafficView
  • Download NetworkTrafficView and unpack the ZIP file.
  • Run the tool as admin.
  • Set the VPN connection as your network adapter.
  • Click the start button.

NetworkTrafficView is a free-to-use packet sniffer that lets you choose the network adapter to keep track of all Internet-enabled processes. You can use it to monitor your VPN connection in Windows 10 and view detailed information, such as data speed, last packet time, and latency.

Check out other free tools like Performance Monitor (built into Windows 10) or Microsoft Network Monitor.

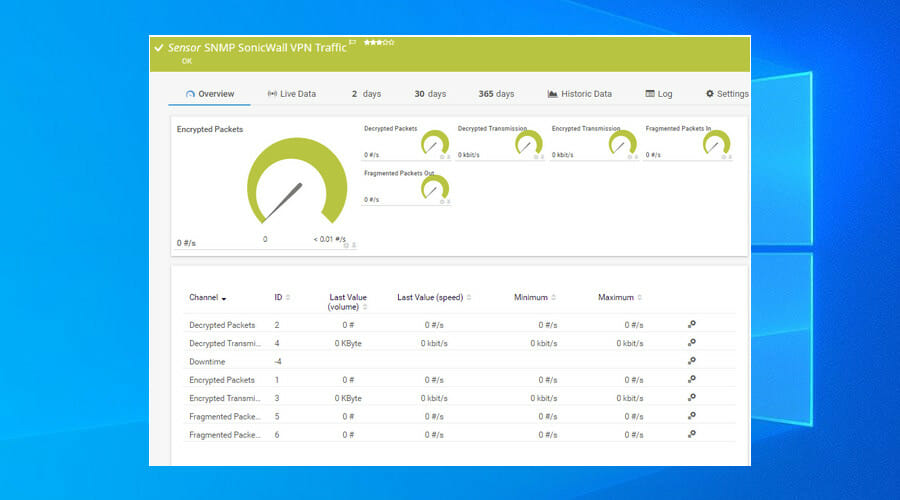
Use PRTG Network Monitor

use PRTG Network Monitor for VPN
  • Download PRTG Network Monitor.
  • Install and launch the application.
  • Log in to the web interface with the default credentials.
  • Open the Sensors menu and click Add Sensor.
  • Select Add sensor to a device and click Probe Device.
  • Click Continue.
  • In the search box, type VPN.
  • Click on the preferred sensor type.
  • Set a Sensor Name and click Create.
  • Click the sensor to view VPN-related data.

PRTG Network Monitor is a network traffic inspection tool for corporations that want to monitor VPN connections on Windows 10 and Windows Server. It can be used to keep track of the activity of remote connections.

You can detect VPN connection issues and suspicious traffic, get notified on critical events, generate reports, and more. Currently, PRTG Network Monitor supports SNMP Cisco ASA VPN connections, traffic and users, together with SNMP SonicWall VPN traffic.

In conclusion, these 5 solutions can help you monitor your VPN connections on Windows 10 computers. As you can see, they show various information, from simple data like total sent and received data packets to more elaborate details like currently connected employees.

If you’re dealing with a specific VPN error, make sure to visit our VPN Troubleshooting Hub.

Can’t delete VPN profile on iPhone? Here’s how to do it

If you’ve been around, you probably know and appreciate that VPNs are superheroes when it comes to online privacy protection. Throughout the years, technology has evolved to the point where tiny, handheld devices have more power than desktop computers. Almost.

Our point is that you can perform a lot of operations on your phone, including browsing the Internet. And truth be told, there’s probably more personal data on your phone than on your desktop PC.

For this reason, specialists have thought of developing VPNs that work on your phone seamlessly. You just install them as you would any other app, log into your account, and connect to a server.

Your phone might ask you if it’s okay to create a configuration profile for the VPN, and you’re all set.

However, as with many other mobile services, VPNs might trigger some inconveniences. For instance, you might be (apparently) stuck with unwanted VPN configuration profiles on your iPhone.

And that kinda takes away the fun from your pristine operating system and puts a dent in the flawlessness of your device. Although it won’t impair your iPhone‘s functionality too much, that unwanted configuration profile can be quite annoying.

So let’s take a closer look and see how we can fix it.

How to remove unwanted VPN from your iPhone?

  1. Unlock your iPhone
  2. Locate the VPN app you want to remove
  3. Touch and hold the app’s icon until it starts jiggling
  4. Tap the x button in the upper-left corner of the icon
  5. If prompted, confirm your action by hitting the Delete button

Note that most of the time, removing an app will also remove any data that’s associated with it. So, basically, removing a VPN should also delete the configuration profiles that it might’ve created.

How to delete VPN configuration profiles on your iPhone?

  1. Unlock your iPhone
  2. Go to the Settings app
  3. Access the General category
  4. Select the Profiles* option (also called Profiles & Device Management)
  5. Tap the VPN configuration profile
  6. Select the Delete Profile option
  7. Type your device’s password if your iPhone asks for it
  8. Select Delete once more
  9. Restart your device

* – the Profiles option is visible only if your VPN uses configuration profiles and you have them set on your iPhone

This fix is intended to be used whenever residual data remains after deleting the VPN apps. Sometimes, removing the app isn’t enough to make the configuration profile disappear as well.

Although there’there’s little it can do to affect your iPhone‘s functionality, attempting to create a configuration profile with the same name might not work.

For instance, if you’re trying to reinstall the app and the old configuration profile is there, you might have a difficult time making it work.

What’s the best VPN for iPhone?

We’ve agreed that PIA is among the best all-round VPN services you could install on either one of your devices, including the iPhone. It’s brought to you by Kape Technologies and provides you with 24/7 customer support.

Private Internet Access

Private Internet Access

Looking for an iPhone-compatible VPN? PIA might be what you need.
$2.85/mo. Buy it now

However, if you’re not convinced or just need to browse some more options, check out our best VPNs for iPhone recommendations.

VPN configuration profiles on your iPhone are easy to remove

All in all, we hope that you encountered absolutely zero issues during the removal of VPN profiles on your iPhone. Usually removing the VPN app does the trick.

However, certain VPN apps are either poorly designed, intentionally programmed to be hard to remove or even set to preserve some settings in case you decide to install them again later.

How to Watch 4K Netflix on Mac/Linux [Non-Windows OS]

If you are currently using Microsoft Edge, then you’re lucky to get 1080p and 4K playback for Netflix videos on your Windows 10 machine. For users with another operating system or web browser, however, 720p is the maximum playback resolution.

To stream media on Netflix in 1080p and 4K on non-Windows 10 devices, you can use a virtual machine image of Microsoft’s latest operating system, which lets you use Edge or the Netflix app for Windows 10 to run the service.

Alternatively, you can use a dedicated app that lets your run Windows apps on your other device.

How do I watch 4K Netflix on my Mac/Linux?

1. Use Parallels Desktop for Mac

watch netflix on mac

Parallels Desktop for Mac is probably your best option if you want to watch Netflix in 1080p and 4K on non-Windows devices.

The app runs a virtual machine powered by Windows 10 on your device so that you can enjoy the full features of a Windows system.

Parallels works with OS X, Windows 10, 8.1, and 7, Linux and Unix, and macOS Server, helping you to run Windows programs that don’t have Mac version. Besides, the subscription also allows you to remotely access your Mac from any iOS, or Android device, or browser with Parallels Access.

Installation is extremely easy, and once Parallels is installed, you can directly launch and access Windows apps right from the Mac Dock. Further on, you can use Windows side-by-side with macOS without rebooting or switching between devices. 

Parallels Desktop

Parallels Desktop

Enjoy the ultimate Netflix 4K experience on your Mac with this powerful app.
Check price Visit website

2. Use VMware Fusion workstation

use wmvare to watch netflix on mac

Yet another classic approach is to install a virtual machine on your Mac, as mentioned in the introduction.

In this respect, our recommendation would be to get VMware Fusion, a very easy-to-use tool that gives you the possibility to set up and use a virtual machine of the Windows OS on your Intel-based Mac.

The process is pretty simple, you only have to download the software on your Mac and configure it to your needs. Using VMware for the first time might not come as easy as expected, however, you’ll surely get the hang of it.

Besides, you can find a lot of documentation on using this virtual machine on VMware’s official website.

This being said, you can give VMware a try for 30 days, before settling for a full year subscription.

VMware Fusion

VMware Fusion

Install the VMware virtual machine on your Mac quick and easy, and stream Netflix 4K content right away.
Buy now Visit website

3. Use Boot Camp

If you decide to go for Parallels, as suggested above, you should know that you can reuse your existing Boot Camp installation. You can convert a virtual machine from Boot Camp using the installation assistant at startup and set Parallels Desktop to run Windows from that partition.

By using Parallels Desktop, you can run Mac OS X and your Boot Camp Windows installation simultaneously.

If you want to go for the classic approach, you’ll have to install windows on Mac using the Boot Camp Assistant that comes with your macOS.

Just make sure that you have at least 30GB of free space on your hard drive and a Windows 10 ISO prepared. Then, see our recommendations on how to complete the Windows installation on your Mac and you’ll be good to go.

So, once you’ve decided on how you want to watch Netflix on Mac, just open the app in the web browser, sign in to your account, and configure Netflix to play HD content.

To view bitrates, press Ctrl-Shift-Alt-S. You may notice stutters or some artifacts on the screen: these are hardware-related and you can’t do anything about them.

Alternatively, use the Netflix app for Windows 10. Go to the Windows Store if you don’t have it yet and search for Netflix. You must first sign in to your Microsoft account to be able to download the app, however.

Open the Netflix app, sign in, and begin playback. You can also override the default bitrate using the Ctrl-Shift-Alt-S shortcut. This helps increase or decrease the quality of the stream.

The Netflix app also allows you to download Netflix shows and movies to the local system, too, with the advantage of improved playback without the need for a strong Internet connection.

We hope this recommendation was helpful to allow you to watch today’s most popular video content on your device. Your feedback is important to us, and for this, you can use the comments section below.

OneDrive upload speed: What is the limit & how to speed up?

OneDrive is the redesigned and rebranded SkyDrive, available for all Windows users who want to upload and sync their folders and files to the cloud.

But, as it turns out, it comes with problems for some.

OneDrive is very slow on uploading/Sync. Please try to find whether something is wrong on your servers in China rather than telling us check the PC, reading tips on Maximizing uploading speed, etc. Any changes Microsoft made on the servers in China can give you the hint.

So, by looking at the above-pasted excerpt, we can see that the affected OneDrive user is from China, where multiple users have been saying that their uploading speeds are incredibly slow.

This comes just a few days after we have reported that OneDrive uploading wasn’t working at all for Windows 10 users.

How can I improve OneDrive upload speeds?

1. Maximize OneDrive transfer speed

If you too are experiencing similar problems, here are some things you could do in order to maximize the transfer speed.

You should avoid running other apps on your device when you’re uploading or downloading a large amount of data and don’t use your Internet connection for other activities while you’re transferring a large amount of data.

Also, of course, if your Internet speed isn’t quite fast and you’re also uploading big files, these might be the biggest reasons.

And here’s another user weighing in with his input and confirming the issue:

Same here. I can’t say whether I like OneDrive or not, now. I recommended outlook and onedrive to all my relatives. Suggest winphones and surface. And now I have to explain why they can’t send mail to others with only several photos or can’t sync photos from PC to pad. Maybe we know the reason, maybe not. It’s your responsibility to turn things around.

The affected users claimed that the problem occurs to both upload and download speed.

The thread has been joined by more and more affected users, and it seems that China indeed is the most affected by slow OneDrive uploading speeds.

And, as of now, an official fix hasn’t been issued, here’s the latest reply of a Microsoft representative:

We apologize for the delayed response. As per our Support Escalation engineers, we haven’t gotten any other reports with this slow upload issue in China. For further investigation, please provide us the log files of your OneDrive application that came from the computer(s) where the issue is originated. Kindly refer to the private message that I provided for more information. Make sure that you are signed in to the Microsoft Community (this site) to be able to view it. The conversation in the private message area is secure. Only you and our moderators can view it.

However, the problem doesn’t seem to be impacting only those who’re using OneDrive in China only.

There have been multiple threads appearing on various forums in Europe, the United States, and various other parts of the world.

2. Try another cloud storage solution

There are various cloud storage solutions to pick from these days and most of them will offer you the right amount of online storage.

In spite of that, upload speeds aren’t always as high as expected. Since you’re no stranger to this issue, maybe it’s time to forget all about OneDrive and try out a different cloud storage platform.

Our top recommendation is Sync. No matter the files you’re trying to back up, they are all safeguarded from intrusive access.

On top of that, you can effortlessly send files of any size to all friends and family members even if they don’t use Sync just yet.

UPDATE: Since the writing of this report, we compiled a list of the best solutions that you can use to fix slow OneDrive upload problems. More specifically, they include:

  • Using a wired Internet connection
  • Closing background apps and programs
  • Avoiding uploading files in batches
  • Checking for updates, and more.

Do check out our troubleshooting guide and let us know which solution worked for you by leaving your comment below.

Finally, let us share a few more tips for those interested in finding more about:

  • OneDrive upload speed limit – OneDrive, by default, never limits the speed that your content is downloaded or uploaded. If the slow speed in an issue, use the above tips.
  • OneDrive throttling upload speed – Verify that your OneDrive speeds are not throttled by entering into Settings > Network tab. While here, make sure Don’t Limit isn’t ticked.
  • Speed up OneDrive uploads – If closing background apps/programs and other basic troubleshooting tips made no difference, think of some great cloud storage alternatives.

Microsoft details upcoming free Xbox Series X upgrades for Forza Horizon 4, Sea of Thieves, and Gears Tactics

Microsoft shared new details today about upcoming free Xbox Series X upgrades for some of its existing Xbox Game Studio titles that shipped in the past two years. All these updates will be delivered through Microsoft’s Smart Delivery system, which some third-party developers such as Ubisoft (Assassin’s Creed Unity) and CD Proket Red (Cyberpunk 2077) have also embraced.

Sea of Thieves, Forza Horizon 4, Ori and the Will of the Wisps, and Gears 5 will all be optimized for the new console this holiday season, which also see the release of the PC game Gears Tactics on Xbox One and Xbox Series X. “The critically-acclaimed, fast-paced, turn-based strategy game is coming to Xbox consoles later this year, running in 4K Ultra HD at 60 frames per second on Xbox Series X,” Microsoft said today. Gears Tactics was the first Gears of War game to launch first on PC this year, and it’s great to see it coming to Xbox consoles this holiday season.

As you may recall, Gears 5 was the first current-game that Microsoft said would be enhanced for the Xbox Series X, and the company previously mentioned in the spring that it was exploring 120FPS support for multiplayer. The software didn’t confirm that today, and today’s blog post only mentioned that the solo and multiplayer modes would benefit from “reduced load times, instant resume and 4K HDR visuals using Ultra settings.”

We’ve also heard about Xbox Series X enhancements for Forza Horizon 4 earlier this year, and Microsoft finally shared more details today. The open world racing game will be able to run at 4K/60FPS on Xbox Series X, with “dramatically improved load times” and support for Quick Resume. As a reminder, the game on Xbox One X can be currently played at either 4K/30FPS or 1080p/60FPS, so the new 4K/60FPS mode will be very welcome.

The Xbox Series X upgrade for Ori and the Will of the Wisps was detailed during the Xbox Games Showcase earlier today, and we learned that the platform game will be able to run at 4K/120FPS on the next-gen Xbox. “The silky-smooth feel, low input latency and crisp imagery come together to create an unprecedented precision platforming experience,” the Xbox team emphasized today.

Last but not least, Rare’s popular pirate game Sea of Thieves will also get an Xbox Series X upgrade later this year, though Microsoft didn’t go into specifics today. “Sea of Thieves will launch alongside Xbox Series X, taking advantage of its advanced hardware, supports Smart Delivery, and is available day-and-date with Xbox Game Pass,” the announcement reads. Sea of Thieves currently runs at 4K/30FPS on Xbox One X, and we hope that a 60FPS mode will be available on Xbox Series X.

If you haven’t done it yet, we invite you to check out our recap of today’s Xbox Game Showcase, which includes all video trailers seen today including a first look at the Halo: Infinite single player campaign. All games Microsoft showed today will be enhanced for the Xbox Series X, and Halo: Infinite was definitely one of the most impressive titles.

Some insiders can’t install the new Build 20175

Microsoft just released the new Windows 10 Build 20175.

It’s not a very rich update although it fixed a very important problem that excluded AMD processors owners from updating to the previous Build 20161.

So although Microsoft announced that they fixed the issue, some insiders already started to complain about not seeing the new update.

What can I do if I can’t see the new update to Build 20175?

Luckily, Microsoft reacted extremely fast and came with a short announcement on Twitter with a workaround for this problem.

Here is the solution as Microsoft presented it on their answers blog post:

  1. Open the Start Menu.
  2. In the search box, type CMD.exe.
  3. On the right menu under Command Prompt, select Run as administrator. Command prompt workaround
  4. If prompted by UAC, choose Yes.
  5. From the elevated prompt, enter this command, then hit enter: net stop wuauserv
  6. Enter this command, then hit enter: rmdir /s /q C:\Windows\SoftwareDistribution\SLS
  7. Finally, enter this command, then hit enter: net start wuauserv
  8. Close the Command Prompt window.
  9. Open Settings > Update & Security > Windows Update and check for updates.

This should solve the problem and you should see the Build 20175 in Windows Update.

Another solution to the Build 20175 problem

Unfortunately, the solution didn’t work for absolutely everybody and another insider commenting on Microsoft Answer blog is suggesting another approach:

Manually delete all folders in the download section in SoftwareDistribution, restart and its working again.

I had 12 folders there.

Did you have this problem? Did the solution work for you? Leave us a line in the comments section below.

[wl_navigator]

The driver required for this iPhone is not installed [Fixed]

iTunes is a popular software suite by the smartphone giant Apple for its iPhone and iPad series of devices. It allows the users to move files between their laptop and their Apple devices. That said, when connecting the device, some users have reported the driver required for this iPhone is not installed error.

The full error reads:

The driver requires for this iPhone is not installed. Please check your Windows Update settings.

The error, as the message that accompanies it, indicates that the possible reasons for occurring is due to some pending Windows updates. However, at times it can also be due to the corrupted iPhone drivers installed on your computer.

If you are also troubled by this error, here are a couple of troubleshooting tips to help you resolve the issue in the comments.

How do I fix the driver required for this iPhone is not installed iTunes error?

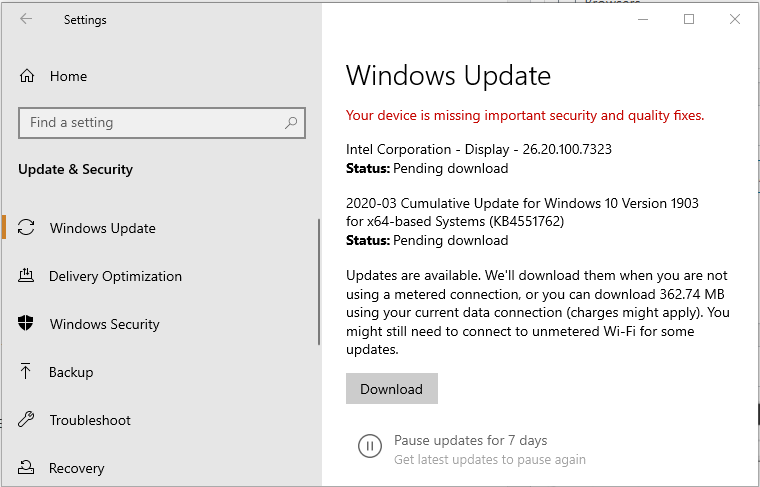
1.  Install pending Windows updates

driver required for this iPhone is not installed
  1. Press Windows key + I.
  2. Open Windows Updates and Security.
  3. Click on Install or Download.
  4. If not pending updates are shown, click on Check for updates.
  5. Windows will download and install pending updates.
  6. Once installed, you need to restart the system to apply the updates.
  7. Click on Start > Power > Restart.

Once the updates are applied, connect your iPhone again and check if the error is resolved. Make sure iTunes is open. If not, manually launch it from the desktop.

Reconnect your device

If the issue persists, try reconnecting your iPhone. Windows will install the drivers automatically when you reconnect your iPhone.  If this doesn’t work, try installing the driver manually.

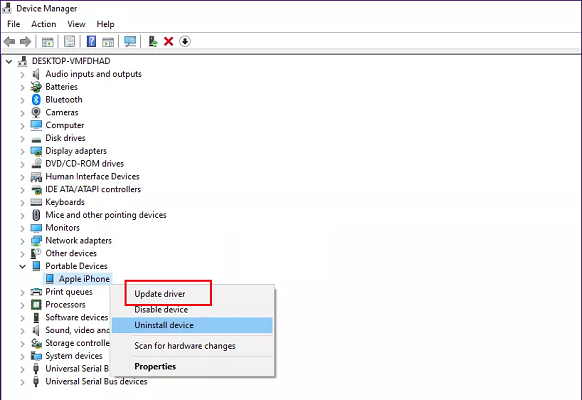
2.  Update iPhone drivers manually

driver required for this iPhone is not installed
  1. Make sure your iPhone is connected to the computer.
  2. Press the Windows key.
  3. Type device.
  4. Click to open Device Manager.
  5. In Device Manager, expand the Portable Device category.
  6. Right-click on Apple iPhone.
  7. Select Update Driver.
  8. Click on ‘Search automatically for updated driver software’ option.
  9. Windows will scan the internet and install it if a newer version of the driver is available.

Once the driver is installed, close Device Manager. Reconnect your iPhone and check if the error driver is not installed. iTunes is waiting for a Windows update to install the driver for this iPhone is resolved.

Alternatively, you can make the best use of Fortect Driver Updater, a professional driver tool that can manage all your drivers correctly, updating your device drivers automatically within minutes.

3. Update iTunes

driver required for this iPhone is not installed
  1. Press the Windows key.
  2. Type Apple Software Update and click OK.
  3. You will see a Checking for a new update screen.
  4. You can see the number of pending updates and size.
  5. Click the Install button.
  6. If there are additional updates available for iTunes, install it as well.

Once all the updates are installed, launch iTunes and connect your iPhone. Check if the error iPhone the drivers for this device are not installed (code 28) is resolved.

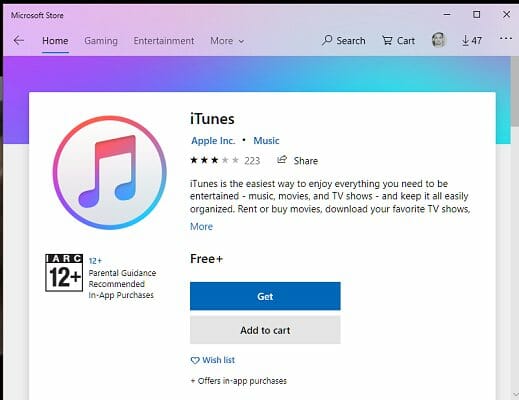
Update Microsoft Store iTunes version

Note: Do this only if you have installed iTunes from Microsoft Store.

driver required for this iPhone is not installed
  1. Launch Microsoft Store.
  2. Search for iTunes.
  3. Click on the Update button to download and install the updates.
  4. Once installed, relaunch iTunes and check if the error is resolved.

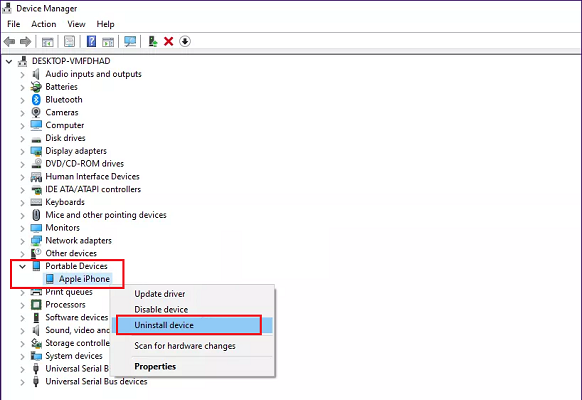
4. Reinstall iTunes driver

driver required for this iPhone is not installed
  1. Press Windows key + R.
  2. Type devmgmt.msc and click OK.
  3. Open Device Manager.
  4. In Device Manager, expand the Portable Device category.
  5. Select Uninstall Device.
  6. Click Yes to confirm the action.
  7. Once uninstalled, restart the computer.

When you restart the computer, Windows will automatically install the required iPhone drivers. Connect your iPhone and launch iTunes. Hopefully, the error should be resolved now.

The driver required for this iPhone is not installed error can occur due to corrupted iPhone drivers or pending Windows updates. Follow the steps in the article one by one to resolve the issue.

PS4 error code NW-31449-1 [Full Fix]

Even with incredibly fast Internet speeds, games these days can take an excruciatingly long time to download and install on your PlayStation 4.

There aren’t a lot of things more frustrating than running into a PS4 download error NW-31449-1.

Users on different online messaging boards have also experienced this exact error message while trying to play the Destiny 2, and the Incredibles games.

The Destiny 2 error NW-31449-1 is a PS4 network error that may occur while you trying to download the game.

In the case of the NW-31449-1 Incredibles error, the reasons for it appearing are either a result of network issues, lack of storage space, or corrupted data files on your PS4. The error also appears while the user is trying to download the game.

Check out the steps required to resolve this issue in all the cases mentioned above.

How do I fix the NW-31449-1 error on my PS4?

1. Perform a full reboot on your PS4ps4-front-panel-image

  1. Press the power button.
  2. Select Turn off the PS4 System.
  3. Ensure that the console is off and then unplug all peripherals including the power cable.
  4. Press the power button and hold it for 30 seconds while your PS4 is still completely unplugged. This will drain any residual or stored power.
  5. Let your PS4 sit for around 5 minutes.
  6. Reconnect the power cable to the outlet.

In the same way, rebooting a computer can fix most software and hardware related issues, rebooting your console can do the same thing.

After all, your console uses PC architecture and runs on a branch of the FreeBSD operating system.

Rebooting and power cycling your console will delete any leftover data in its cache and disconnect it completely from your network.

In laymen’s terms, congestion of cached data could be the root cause of not only an NW-31449-1 error but various PS4 update errors too.


2. Ensure that your PS4 has enough space

  1. Boot your PS4 up.
  2. Select your user profile.
  3. Select Settings.
    error-code-nw314491-ps4-main-screen-settings
  4. Scroll down to the System Storage Management item under settings and select it.
  5. The amount of free space you have should be under the fourth option (named Free Space).
    error-code-nw314491-ps4-free-space
  6. Match it against the game or patch you’re trying to install and decide if you have enough space.

If you’ve recently updated your PS4’s software, then you may have far less space than you originally bargained for.

Alternatively, the patch or game you’re trying download may be bigger than you originally thought it would be. This can cause a plethora of issues.

Much like the CE-35694-7 PS4 error, the NW-31449-1 code could be caused by a scarcity of space on your PS4’s hard drive.

Free up some space on your PS4

  1. In the main menu, scroll through the items until you reach the Library option. Select it.
    error-code-nw314491-main-menu-library
  2. Select the Games option.
  3. Choose a game you’re willing to delete, then press the Options button on your controller.
  4. Select Delete. It should be located above Information and just below Intellectual Property Notice.
    error-code-nw314491-ps4-delete-game-menu
  5. The system will then ask you to confirm. Select the OK option and then hit the X button on your controller.
  6. It will take a few seconds to delete the game and then it will take you back to the main menu.
  7. Once again, check if you have enough space. If not, follow steps 1 – 5.

You can always re-download a game after you delete it. So once you delete it, it’s not lost forever and you haven’t flushed your money down the toilet.


3. Rebuild your database

  1. Turn your PS4 off.
  2. Hold the power button on the PS4’s front panel for seven seconds. You should hear one beep when you initially turn off the system and then a second after the 6 or 7 seconds mark of holding the power button. This will put your PS4 into its Safe Mode.
  3. Once you boot into Safe Mode, scroll down to option 5 (Rebuild Database).
  4.  Follow any prompts the system displays and wait until it rebuilds your database.

Rebuilding your PS4’s database can take up to an hour. During this time, the system will parse through all its files and delete any corrupted data.  You’ll need to exercise a bit of patience during the process.

In addition to possibly solving your PS4’s NW-31449-1 error code, rebuilding your database will also help you if:

  • The PS4 contains any corrupt data that can’t be accessed.
  • The PS4 stopped working during an update.
  • The PS4 froze up in one of the system menus displays
  • The PS4 displays an error that reads Hard Disk Drive is Corrupt.

Hopefully, one of the tips or solutions in this guide works for you. If you have any questions or would like to share your experience with this error, leave a comment down below.

[wl_navigator]

Here’s a quick recap of the Xbox Games Showcase pre show announcements

Microsoft’s Xbox games showcase is today, and it’s widely expected that Microsoft will talk about some of the newest games coming to the Xbox lineup this season. Ahead of the event, The Games Awards host Geoff Keighley held a pre-show, and there was plenty of action and world premieres. Here’s a recap of what was shown off.

(Editor’s note: The Xbox Games Showcase has ended, and our own Laurent Giret put together a nice recap of all the games showcased today)

To begin, we learned that Dragon Quest XI S: Echos of an Elusive Age will launch on Xbox consoles with Game Pass on December 4, 2020. The Definitive Edition of the game will also include all the content from the original release of the acclaimed DRAGON QUEST XI and add extra character-specific scenarios.

We also saw the World Premiere of EXOMECHA, a brand-new free to play online competitive first shooter. It takes place in OMECHA, a new and untouched planet with exotic environments. It will be coming in 2021.

A third world premiere was Echo Generation. Also coming in 2021, this is a turn-based adventure game developed by Cococucumber. Then, Following that was Hello Neighbor 2, which will be coming to Xbox in 2021.


To end, Yuji Naka, from Square Enix introduced a new brand, BALAN Company, and a new action-adventure game called Balan Underworld that is themed towards a musical theater. He confirmed the game will support 24 languages as well as Smart Delivery.


Microsoft also put out an interesting video, showing that there are a total of 15 new Independent games coming first to Xbox, and then will be optimized for the Xbox Series X. These titles include The Artful Escape, Shredders, 12 Minutes, Tunic, The Ascent, and much more. You can see these in the video below, and check them out over on the Xbox Wire.

As a reminder, the Xbox Games Showcase is now ongoing. It’s available in 24 languages, and you can watch it from our post here. We’ll be watching live, right with you, and will be doing a recap. So keep it tuned to OnMSFT.

These top 5 Microsoft Teams Bots will boost your Teams experience

You might be familiar with apps in Microsoft Teams, but are you aware of Bots? Bots are a feature in Microsoft Teams that will allow you to get information from websites or other pieces of software and other services in a more conversational way, right from chat or a tab in a channel. Here’s a look at our top 5 Bots for Microsoft Teams and how they can boost your Teams experience.

Bot #1, Mio

A problem for most small or large businesses is communication with people across different services. You might be using Teams, but a client or customer might be on board with Slack or Cisco Webex. Well, there is a bot to help for that, and its name is Mio. With Mio, you’ll be able to join universal Teams channels to chat with people outside your organization. The Bot can be installed in two minutes. And the first three universal channels you create are free.  You can learn more about Mio over on their website.

Bot #2, Zoom.ai

Another common problem with it comes to using Teams is scheduling and setting up meetings. There usually needs to be someone behind creating the meeting and a lot of planning and thought, too. Zoom.ai is a bot which can help with meetings, and put those pains to worry. This Bot can automate scheduling for video meetings, give meeting briefings, schedule notifications, set up group meetings, and a lot more. It also syncs up with calendars and other customer relations tools, as well. A free tier is available, but paid plans will extend the experience for you as well.

Bot #3, Whobot

Other than problems with meetings and chatting, if your business is quite large, you might have trouble understanding who you’re chatting with. The person might be from a different department, or they could be new to the company. In this situation, the built-in Whobot from Microsoft will have your back.

Unlike the other picks in our list so far, WhoBot is designed by Microsoft. This means that it plugs in with the rest of Microsoft 365 with ease and can pull all kinds of information from Delve, Yammer, and more. It’s able to help you search for anyone in your organization based on what they’re working on, and a lot more.

You can install Whobot by clicking the ellipses on the left-hand menu bar of Teams, and then typing “Who” into the search bar. You’ll then want to click “add” to add the bot to Teams. Once added, you can see the bot in the sidebar of Teams, allowing you to ask questions like “Who is… Who knows… Who works with…” and so on. There is also a list of commands available with the /who command, or you can summon it with /who in the search box.

Bot #4, Polly

The fourth Bot on our list is Polly. This bot allows you to gather real-time insights with simple polls. It can be added as a tab at the top of a channel and is simple and easy to use. Once installed, you’ll be able to create polls and surveys natively in Microsoft Teams. You can get instant responses to questions, and manage polls, or keep polls anonymous. In the education space, Polly can also be used to create a quick assessment, too. You can add Polly today from the tab bar in Teams, or learn more from their website, here.

Bot #5, Flow

How to use Microsoft Flow instead of IFTTT

If you’re familiar with Microsoft Flow, then the Flow bot for Teams is for you. This Flow bot allows you to use all the same features of Microsoft Flow but within Teams. You can build certain connectors, trigger, actions, conditions, and loops, and help schedule flows to block times in your calendar, start meetings, and a lot more. We invite you to check out our guide on Flow for how you can get started.

There are a lot more Bots!

We’ve just given a look at some of our favorite Bots for Teams, but there’s a lot more which we didn’t cover. These include Statsbot for statistics, Soapbox for planning 1:1 meetings, as well as Workbot, which is a productivity-boosting bot. As a reminder, you can find all these Bots and more directly from Teams, simply click the . . . in the sidebar of Teams, then click More apps to open the catalog and choose Bots.

How to check Kindle report content error status

The advantage of ebooks is that they have the potential to be edited and updated almost immediately after an error in the content is detected. Furthermore, services like Amazon allow you to monitor the status of content errors that were reported from Kindle e-readers.

Not many users know how to access these reports. Some users may not even know how to report content errors at all.

Whether some content is not showing or syncing incorrectly across devices, in this guide, we’ll show you how to report Kindle content errors and monitor them.

How do I fix issues and check the status of my Kindle content error report?

Kindle table of contents not working

For self-publishing authors, Amazon provides a Kindle (.azw) ebook creation tool known as Kindle Create.

If you’re an author, editor, or publisher, we recommend that you consult the Kindle Create manual to help you build the interactive portions of your eBooks correctly.

Despite there being a wealth of resources to guide you through the process, creating a table of contents and making it accessible from the Kindle’s Go-To menu can still be very tricky.

Many publishers don’t get it right on the first try. As a reader, you can report table of content issues with the following steps:

  1. Using a web-browser on your computer navigate to the book’s Kindle page.
  2. Scroll down until you reach the Report an issue box. It should be above the Inspired by your browsing history section and just below the What other items do customers buy after viewing this item section.
  3. Click on the Report link under Does this book contain quality or formatting issues?
    report-quality-formatting-issues-kindle
  4. You’ll be asked to sign in if you’re not already signed in. After signing in, make sure to scroll down again and click on the Report link.
  5. From the Choose issue drop-down menu, select Others (please specify below).
  6. In the description box, describe the issue (Kindle table of contents not working).
  7. Click on the submit button.
    quality-formatting-submission-page-kindle-error-report

If there is a table of contents but it’s formatted poorly or it does not appear in the Go-To menu, you can either leave the Choose issue menu on the default (Poor formatting) or select Low-quality images or tables.

While leaving a description is not mandatory, it’s good practice. It will also make things a lot easier for Amazon and the author/publisher.


Reporting Kindle formatting and proofreading errors from Kindle e-reader

  1. On the page with the error, tap and hold onto the misspelled word.
    If an entire sentence has formatting issues, hold your finger on to the first word of the sentence and slide it across until you highlight the entire sentence.
  2. Select more from the pop-up menu.
  3. Tap on Report Content Error.
  4. Select what type of content error it is.
  5. Describe the issue in the text box (optional).
  6. Tap on Submit.

These steps won’t work for Kindle Fire tablets and non-touchscreen Kindles. If you own one of these Kindle types and you want to report an error, we suggest using the Kindle books’ webpage as illustrated above.


Getting a parsing error on your Kindle Fire? Resolve it with this easy fix


How to monitor Kindle report content error status

Amazon no longer allows users to check reported Kindle content errors from their website. Initially, you were able to see your Kindle content error report status from this page.

Amazon moved the option to the manage digital content section under devices and content.

From there, you could monitor the content error report status for each book by clicking on the action button next to the book and choosing the View your submitted correction option from the context menu.

When an error is rectified or a book has been modified, Amazon will update it. In most cases, it does this automatically when you connect your Kindle to the Internet.

If you find that the Kindle book won’t download or update, you can update it manually from the digital content management screen.

If a book in the list has an available update, a label that reads Update Available will appear underneath it.

digital-management-screen-kindle-content-error-report

  1. Ensure that you make a note of where the erroneous content in the book originally was
  2. Click the label to update your book.
  3. Input the modifications you want.
  4. Update the book.

Note: If it’s not fixed in this update, don’t fret, it’s likely that the publisher will fix it in the next iteration.


Kindle Content not showing

If you can’t find Kindle content in your library, make sure that your Kindle is synchronizing correctly, and that you have the latest firmware update installed on your device.

You can also manually download the book from the content management screen. In the case of some users, this option has resolved the issue.


In this guide, we explored how you can report content errors and track them. While the tracking method suggested in this guide may not be efficient, it’s currently the best one.

Nevertheless, we hope you’ve enjoyed reading through this guide. Leave a comment down below and let us know how you like to keep track of your Kindle content errors.

[wl_navigator]

Accounting Software for Self-Employed: Best Picks in 2026

Filing tax is a crucial task that takes a pretty good time to be done correctly. It takes a lot of patience and an eye for detail to fill up all the required details.

Since not everyone has a personal accountant to take care of tax matters, a tax program comes to their rescue.

These tax programs are especially useful for self-employed individuals who earn income by contracting with a trade or business directly.

So, what’s the best tax software for self-employed? While there is a wide range of tax programs available, finding the suitable one is the key.

Moreover, the best accounting software programs for independent contractors should also be affordable. There’s one for everyone, and so is the case with the self-employed individuals.

These tax programs increase their annual savings, track their income, and file their expenses efficiently.

For those who are wondering what’s the best tax software for self-employed, here’s a list we have created.

What is the best tax software for the self-employed?

Freshbooks – Smart time-tracking tools

Track every dollar that goes in and out of your accounts and pay all the taxes on time using Freshbooks. It features a smart database of all expenses that can be updated in real-time with data from your payments.

Freshbooks keeps track of receipts, payments made through your bank account and does all the necessary calculus for accurate tax payments.

Since the platform was created to be intuitive, when tax time is closing in, just give access to your accountant and he will quickly find what he needs to do. Is that easy you can even do it yourself.

Thinking that some of the data is off? Easily create a customized report and find the issue with ease. Reports can be created for every type of data you provided Freshbooks.

Create professional invoices in seconds with clear details of the work done and the expenses. Also, remind clients that any payment is due with a smart reminder option.

Create faster payments by giving your clients options about the method used to pay. Simplifying the process and making it faster only boost your image.

Also, here are some key features of Freshbooks:

  • Smart time tracking tools for tasks, projects and individuals
  • Easy project management with real-time data for your clients
  • Professional invoicing with smart payment options
  • Reports for profitability, cash flow and finance health
  • Smartphone integration
Freshbooks

Freshbooks

Easy to use double-entry accounting for organic growth of your business.
Free Trial Visit Website

ZoHo Books – Client portal

As a tool for taxes, ZoHo books excels in keeping all your expenses, upcoming payments and cash flow in order.

When tax time is close, don’t worry, ZoHo has everything under control. Get a smart overview of every amount of money you have using sophisticated reports with customizable data. If it’s kept in ZoHo, you can create a report about it.

When talking about expenses, ZoHo has a smart database that centralizes all payables. You can easily upload receipts, create and send purchase orders so you keep track with ease of every dollar in and out of your pocket.

To know when and where all your money is, ZoHo brings a bank integration, where you can import bank statements from your account, set categories for banking transactions and even do transaction reconciliation to stay tax season ready

Create invoices in seconds, send price estimates and follow up any late payment with reminders. On top of all this, get paid faster while giving your clients more payment options.

Apart from these, ZoHo’s key features also include:

  • Time tracking tools for tasks, projects and yourself
  • Unbilled hours and expenses tracking
  • Client portal for easy communication
  • Custom dashboard for business overview
  • Inventory level tracking and low stock notifications

ZoHo Books

Manage your finances, taxes and automate workflow with this online accounting software.
Free Trial Visit Website

QuickBooks – Intuitive navigation

Currently known as the best accounting application for small businesses, QuickBooks Online is a top pick for self-employed as well.

With Automatic mileage tracking and the possibility to send invoices on the go, using it is intuitive and flexible.

You can also connect to your bank accounts, easily transfer info to TurboTax, and talk to real CPAs, among other features.

No note that there are three versions of QuickBooks to pick from, all of which work impeccable and offer a 30-day free trial for those who aren’t decided.

Key features that QuickBooks brings to the table:

  • Intuitive navigation
  • multilingual invoicing
  • Useful add-ons and integrations
  • Quarterly estimated taxes that are calculated automatically
  • Helpful payroll support

Turbo Tax – Industry-specific deductions

opera

Turbo Tax is one of the best tax software programs for self-employed that makes it faster and easier to file taxes, correctly.

It’s easy to use and convenient software that’s suitable even for beginners. Moreover, it offers added security to your tax details.

This program is especially recommended to those who use QuickBooks to maintain their books. It basically speeds up the entire process of tax preparation.

The best part is that it can import data from QuickBooks and checks for any errors meticulously. On top of that, there’s the ng customer support that helps clients with their queries at any time.

Key features you are about to enjoy:

  • Ideal for both personal and business income and expenses
  • Looks for industry-specific deductions
  • Covers a variety of industries
  • Easy 1099-MISC import with just a snap from your smartphone
  • One-on-one help for answers from a TurboTax specialist

H&R Block – Unlimited live customer support

H&R Block is another great tax program for the self-employed that offers real pricing. It offers professional guidance from the experts in person or online.

This easy to use program comes with three chief guarantees. It helps users to achieve a maximum refund for their employment requirements considering the deductions based on the industry and expenses.

The software allows users to file payroll taxes returns 940 and 941, and also process yearly forms such as the 1099 MISC and W-2 for those having employees or 1099 contractors.

It also allows users to import data from QuickBooks and TurboTax into it.

From unlimited access to live customer support to personal tax consultation, the program offers unparalleled guidance at no extra cost.

Best of all, users can also avail of its audit facility in-person for no extra fees for its desktop edition.

⇒ Get H&R Block

TaxAct – Suitable for self-employed people

TaxAct is suitable for the self-employed, especially for freelancers. It costs less than its competitors and allows users to file a single federal tax return.

The best part is, it comes with a price-lock guarantee and so, unlike its competitors, it offers its users the same price despite how long it takes to finish filing returns.

Whether it’s income through self-employment or investments, it offers support for all.

Life Events is a feature that applies to any possible changes in the filers’ tax situation from the previous year to the current one.

To help serve the filers better it offers 19 options related to different tax situations that might be relevant to the filer currently.

All the users need to do is to click on the respective link for added guidance, information, and tips.

Live customer support is another great advantage along with hyperlinked words and phrases offering detailed information.

⇒ Get TaxAct

TaxSlayer – 100% accurate calculcations

taxslayer tax filling software

TaxSlayer is especially suitable for those business owners who want to file Schedule C. It allows the tax filers to make their own 1040 and Schedule C forms. It’s known for its ease of use and maximizes refunds.

The program offers assured maximized refunds that the users are entitled to or they promise to refund the suitable price paid.

Users also have the facility to get their TaxSlayer filing charges to be deducted straight from the federal tax refund.

Best of all, it also guarantees 100% accurate calculations or they refund the customer any of the federal or state fees along with interest charges.

⇒ Get TaxSlayer

Credit Karma – Searchable guide

get Credit Karma

Yes, Credit Karma is also known for its services in the tax category. This premium software is available for free for all users, for both state and federal taxes.

The program provides 100% assurance for accurate calculations. Additionally, it covers individuals with free Audit Defense for those who get audited.

They also provide 100% assurance to users that they will receive the refund they are entitled to. Best of all, there are no hidden charges and no sudden fees.

It helps users manage all chief IRS schedules and forms that include related complex tax situations. Users can also import last year’s returns completed by any other software previously.

As a bonus, the interface offers a searchable guide.

⇒ Get Credit Karma

If you’re self-employed, then you must be extra careful when choosing a tax software tool because that’s what should help you manage taxes efficiently.

Overall, the software can help import your data, optimize your tax deductions, checks for any mistakes, and offer unparalleled customer support.

So, for those who are wondering what’s the best tax software for self-employed, this should be your ultimate list.

Yakuza Kiwami, Sid Meier’s Civilization VI, and For Honor are free to play with Xbox Live Gold this week-end

Microsoft has just announced another Free Play Days event for Xbox Live Gold subscribers. Starting today through Sunday, July 26, Yakuza Kiwami, Sid Meier’s Civilization VI, and For Honor are free to play on Xbox One with an active Xbox Live Gold or Xbox Game Pass Ultimate subscription.

Yakuza Kiwami recently joined the Xbox Game Pass catalog, along with Yakuza 0. It’s a remake of the first Yaluza game released on PlayStation 2 back in 2005, and it’s a fun game to play is you like action-adventure games with RPG elements.

Civilization VI was released on Xbox One back in November, and it’s the latest entry in the popular turn-based strategy game series. As for For Honor, it’s a medieval fighting game with different factions and classes to explore. All three games are also discounted during this Free Play Days event, and you’ll be able to pick up where you left off if you decide to buy them. In the meantime, make sure to watch the upcoming Xbox Games Showcase on OnMSFT starting at 8AM PT.

A Synaptics Driver is Required for Reflashing [Full Fix]

While trying to update your laptop’s touchpad driver or firmware, you may have encountered a message that reads:

A Synaptics driver is required for reflashing.
Please install a Synaptics driver or contact your computer manufacturer.

Touchpad issues can be exasperating, especially when you can’t afford to use a separate mouse with your laptop. And, of course, you will want everything to work smoothly on your mobile PC, even if you have an alternative input device.

The following guide will show you how to solve a missing Synaptics driver error.

How do I fix the Snypatics driver is required for reflashing error?

1. Update your Synaptics touch-pad driver

  1. Open the Windows Power User Menu (right-click on the start menu icon).
  2. Select Device Manager.
  3. Scroll down to the Mouse and other pointing devices category and expand it.
  4. Look for your touchpad in the list of devices. If you can’t find it, check under the Human Interface Devices category.
    device-manager-synaptics-driver-required
  5. Right-click on your touchpad item and select Update driver from the context menu.
  6. Select the Search automatically for updated driver software option.
    driver-installation-confirmation-screen-synaptics-driver-install
  7. Wait for the system to search for the drivers online and install them if prompted.
  8. If Windows does not find any drivers from the Internet, click on Search for updated drivers on Windows Update and then use Windows Update to download the driver.

Since 1986, Synaptics has been one of the largest producers of human-interfacing devices and software. Like Microsoft, it has a spotty record regarding updates.

You may be running a buggy driver for your touchpad. The easiest way to fix this is by updating it using the above steps.

Alternatively, you can use a reliable third-party tool for this procedure. With a few clicks, you can set it to scan, download, and install the latest and most suitable drivers for your Windows OS.

⇒ Get Fortect Driver Updater

2. Download and Install the latest Synaptics touchpad firmware

Your freshly installed or updated drivers may be causing a conflict with Synaptics touchpad firmware. If that’s the case, you’ll need to download the firmware or update the utility from your manufacturer’s website.

For instance, if you’re using Lenovo’s L540 ThinkPad, you can find the firmware on its download page. Since this seems to be a fairly prominent issue with Acer laptops, the updates can be found on their Drivers and Manuals page.

However, we do acknowledge that you may be encountering the message A Synaptics driver is required for reflashing after you recently attempted to update your firmware.

If that’s the case, we recommend trying an automatic third-party software that downloads and installs the latest drivers for your PC. With a simple click, the program will perform these actions and optimize your Windows OS, preventing conflicts with Synaptics touchpad firmware.

3. Set BIOS to default settings

  1. Shut your laptop down completely.
  2. Remove the battery if you can and wait for five seconds. If you don’t have a battery, follow the instructions below for this step.
  3. Turn your laptop on and boot into the BIOS setup menu. On most HP laptops, you can do this by pressing the F10 key.
    Consult your laptop’s manual for more information.
  4. Load the BIOS Setup Default settings for your computer. Once again, on most HP laptops, this can be done by pressing the F9 key.
  5. Save and Exit.
  6. Select Yes if you’re presented with a confirmation dialog.
  7. Restart your computer and log into Windows.

4.  Uninstall the Touchpad device

  1. Open Device Manager.
  2. Find your touchpad device under Mice and other pointing devices or  Human Interface Devices.
  3. Right-click on it and select Uninstall device from the context menu.
  4. Confirm and follow the prompts.
  5. Restart your PC.

After restarting your PC, Windows will install the drivers for your touchpad device again. Do not manually install the drivers.

This solution works best when supplemented with the third solution (set BIOS to default settings) in this guide.

5. Install Synaptic precision touchpad drivers

  1. Download the Synaptics driver package from Lenovo.
  2. Extract the contents of the package in a folder of your choice.
  3. Open Device Manager.
  4. Locate your touchpad device.
  5. Right-click on it and select Update driver.
  6. Click on Browse my computer for driver software.
  7. Select Let me pick from a list of available drivers on my computer.
  8. Click on the Have Disk… button.
  9. Click on the Browse button.
  10. Navigate to where you unpacked the Synaptic driver package.
  11. Select the Autorun.inf file and click on Open.
  12. Click on the Synaptics Pointing Device option on the next screen and then click on Next.
  13. If Windows displays a warning dialog, read through the text, and then click on Yes if you want to proceed.
  14. Restart your computer.

Not only will this solution solve your problem, but it will also allow you to make more gestures on your touchpad device. It will also fix any other cursor-related issues.

6. Install generic Microsoft touchpad drivers

  1. Run Device Manager and locate your touchpad device.
  2. Right-click on your touchpad device and select Update Driver.
  3. Select the Browse my computer for driver software option.
  4. Click on Let me pick from a list of available drivers on my computer.
  5. Make sure that the Show compatible hardware option is ticked.
  6. Scroll through the list and select HID-compliant mice.
  7. Click on Next.
  8. Follow the prompts and restart your computer.

If you’re still encountering a Synaptics driver is required for reflashing error after exercising all the solutions in this guide, we suggest you bite the bullet and purchase an external mouse and completely turn off your laptop’s touchpad.

Alternatively, you can contact your laptop’s vendor or manufacturer and escalate the issue further. Either way, we hope you’ve found this guide helpful.

Before you go, you might want to check our guide on SynReflash not working for more information.

Which solution worked for you? Leave a comment down below.

Pure Server: Client file does not match server [Fixed]

The client file does not match server error often occurs when third-party files are added to your CS: GO install directory that are not included with the game’s default install. As a result, the user is unable to play the CS: Go game on Steam.

According to Steam, these additional files may be added by your third-party or community server that are unique to the server.

Apart from the usual suspect, these errors can also occur due to hard drive corruption or faulty memory modules.

If you are also troubled by this error, here are a couple of troubleshooting tips to help you resolve the client file does not match server error in Steam.

The following article should help if you are experiencing any of the errors listed below:

  • pure server file game pak01_104.vpk does not match the server’s file (76)
  • pure server: file [game]pak01_001.vpk does not match the server’s file
  • pure server: file [game]pak01_050.vpk does not match the server’s file (76)
  • pure server file game pak01_042.vpk does not match the server’s file
  • pure server file game pak01_082.vpk does not match the server’s file
  • pure server file game pak01_096.vpk does not match the server’s file
  • (pure server: file [game]pak01_022.vpk does not match the server’s file.

What to do if Pure Server game file does not match the server’s file?

1. Remove third-party files from the install directory

game file does not match the server

  1. Launch the Steam client on your PC.
  2. Open the Library
  3. Right-click on CS:GO.
  4. Select Manage.
  5. Select Browse Local Files.
  6. Navigate to the following location:
    \Steam\steamapps\common\Counter-Strike Global Offensive\csgo\materials
  7. Delete all the files in the materials
  8. Next, navigate to the following location:
    \Steam\steamapps\common\Counter-Strike Global Offensive\csgo\models
  9. Delete all the files in the models

Once all the files are deleted from these folders, verify your game files.

Verify Integrity of Game Files

game file does not match the server

  1. Launch Steam.
  2. Right-click on CS: GO from the game library.
  3. Select Properties.
  4. Open the Local Files tab.
  5. Click on Verify Integrity of Game Files.
  6. Steam will validate the game files and show a success message.
  7. Click on Close.

Relaunch Steam and run CS: Go to see if the error is resolved. If not, follow the next set of steps.


Experiencing a CS: GO packet loss? Find out what is it, and how to fix it


2. Delete VPK and PAK files manually

game file does not match the server

  1. Open File Explorer.
  2. Navigate to the following location:
    \Steam\steamapps\common\Counter-Strike Global Offensive
  3. Delete all the files that start with PAK and ends with VPK.
  4. Once all the files are deleted, verify game files on Steam.

Add CS: GO folder to the antivirus exclusion list

game file does not match the server

Note: These steps are for Malwarebytes antivirus. Check your antivirus documentation to access the exception list.

  1. Launch Malwarebytes.
  2. Click on Settings from the left pane.
  3. Open the Exclusion/Allow List
  4. Click the Add
  5. Select Allow a File or Folder.
  6. Select the CS: Go Global Offensive folder by navigating to the following location:
    C:\Program Files (x86)\Steam\steamapps\common\Counter-Strike Global Offensive
  7. Click OK to save the changes.

Relaunch Steam and try connecting to CS: GO server and check if the error is resolved.


3. Check for third-party apps issues

Perform a Clean Boot

Pure Server PVK error

  1. Press the Windows Key + R.
  2. Type msconfig and click OK.
  3. In the System Properties window, open Services.
  4. Check the ‘Hide all Microsoft services’ box.
  5. Once all the Microsoft services are hidden, click the Disable All.
  6. Open the Task Manager – Right-click on the Taskbar and select Task Manager.
  7. Open the Startup
  8. Disable all the startup
  9. Go back to the System Properties
  10. Click Apply and OK to save the changes.

Restart the system when prompted by the computer. After the restart, launch Steam and try connecting CS: GO to the server.

You should successfully connect without the error if a third-party software was causing the issue.

If the issue is resolved, you need to find a third-party app that is causing the trouble. Third-party apps like antivirus, system cleaning apps are known to the Client file does not match server error.

Make sure that you enable all the services from the Services tab that you disabled to perform a clean boot.


4. Check your internet connection

Pure Server PVK error

According to some reports, high ping/packet loss can also cause the Client file does not match server error. So, if you are using a WiFi or LAN connection, check the internet connection for issues.

Make sure you have a stable internet connection by using a speed testing tool. You can also use online speed testing tools to check your internet speed.

Directly connect the Ethernet cable

  1. If you are using a WiFi connection, try connecting your Ethernet cable directly to your PC or Laptop.
  2. Disconnect the Ethernet cable from your router or modem.
  3. Connect it to your PC.
  4. Try to play CS: Go and check if the error is resolved.

Perform a network restart

  1. Make sure your WiFi router is turned on.
  2. Use a paper clip or a safety pin (anything with a pointy head).
  3. Use it to press and hold the reset button of your router.
  4. You can locate the reset button at the back of your router.
  5. Release the button after 15 seconds.
  6. Leave the device idle for a few minutes.
  7. Power on the router and connect it to your PC.

5. Reinstall CS:GO

Pure Server PVK error

  1. Launch Steam.
  2. Open the Game Library.
  3. Go to Manage.
  4. Select Uninstall.
  5. When the Uninstall dialogue box appears, click on Uninstall.
  6. Once uninstalled, relaunch Steam.
  7. Search and install CS:GO.

The Client file does not match server error on Steam can occur due to several reasons. However, the most common reasons have been third-party files in the install directory.

Follow the steps in the article to fix the error for good.

[wl_navigator]

Effective ways to import passwords to Chrome [Windows & Mac]

Google Chrome is the most popular web browser for desktops and mobiles. If you switch from another browser to Google Chrome, you need to import passwords to Chrome to get going.

In the past, you could only import passwords while setting up the browser. You had to use experimental features if you wanted to perform the import after setup.

Thankfully, you now have several options for importing passwords in Chrome. Before you proceed with the methods below, ensure that you didn’t disable password saving in Chrome.

How can I import passwords in Google Chrome?

1. Open the Import bookmarks and settings menu

  1. Close all open browsers on your machine.
  2. Launch Google Chrome.
  3. Load chrome://settings/importData in the address bar of Chrome and press Enter.
  4. Click on the From dropdown menu.
  5. Choose the browser from which you wish to import passwords to Chrome.
  6. Select the Favorites/Bookmarks option from Select items to import.
  7. Hit Import.

2. Enable CSV password importing from CMD or Terminal

import-passwords-to-chrome-from-cmd-terminal

  1. Press the Windows key + R combination to open the Run dialog box.
  2. Type in cmd and hit Enter.
  3. Copy this command and press Enter: cd ''\Program Files (x86)\Google\Chrome\Application''
  4. Copy and paste the following command and hit the Enter  chrome.exe -enable-features=PasswordImport
  5. Go to Settings > Passwords
  6. Click on the hamburger icon next to Saved Passwords.
  7. Select the import option.
  8. Choose the CSV file for importing passwords in Chrome.

Note: This example uses the Command Prompt, but the commands here will also run on Terminal. You can follow the exact steps above even if you prefer to carry out the operation on Terminal.


3. Enable the Password Import browser flag

import-passwords-to-chrome-flag

  1. Launch the Chrome browser.
  2. Type chrome://flags/#password-import-export into the address bar and hit Enter.
  3. Find Password Import and select Enable from the dropdown next to it.
  4. Click the Relaunch Now option and your browser will restart.
  5. Click on the Settings menu and choose Manage Passwords in Advanced Settings.

You can also reach here by typing chrome://settings/passwords into the address bar.


4. Unhide the Import option in Chrome using built-in DevTools functionality

import-passwords-to-chrome-using-devtools

  1. Open Chrome and go to Settings.
  2. Select Passwords.
  3. Click on the hamburger icon (three dots) next to Saved Passwords.
  4. Select the Export Passwords option.
  5. Hit Inspect.
  6. Find the word hidden on the DevTools function.
  7. Double-click on the word hidden to highlight it.
  8. Hit the Delete key with the word highlighted.
  9. On the Passwords screen, click on the hamburger icon next to Saved Passwords.

This time, the import option will be available on this screen. You can use this option to import passwords in Chrome. To hide the import option, go back to the steps above and re-insert the word hidden.

You can import passwords to Chrome using any of the four techniques listed here. From then on, the browser will begin to auto-fill your imported passwords in sign-in and registration forms.

[wl_navigator]

Java Platform SE Binary not responding/stopped working [Fix]

There are lots of Java-based software for Windows. The Java(TM) Platform SE binary error is one that arises for some users when they try to open Java-based programs. When that error arises, users can’t open Java-based programs. The full error message states:

Java(TM) Platform SE binary has stopped working. A problem caused the program to stop working correctly. Windows will close the program and notify you if a solution is available.

Scroll down to explore the most efficient solutions to this annoying issue.

How can I fix the Java(TM) Platform SE binary error?

1. Update your graphics card driver

The Java(TM) Platform SE binary error can often appear due to the Java Environment conflicting with outmoded graphics card drivers.

We recommend that you use a specialized driver updater to solve this problem easily. It is a very powerful but easy-to-use software that ensures that your drivers will always be updated to the latest version available.

The best part about using dedicated software to update all your drivers is the fact that the process only requires you to click the mouse a couple of times.

The software will start scanning your system as soon as you open it. If its scan lists your graphics adapter, select the checkbox for it, and update it without hassle.

2. Reinstall Java

  1. Press the Windows key + R keyboard shortcut to open the Run dialog.
  2. Type appwiz.cpl in Run’s text box. Then click OK to open the uninstaller for Windows.
    Programs and Features window java platform se binary not responding
  3. Next, type Java in the search box.
  4. Select it and click Uninstall.
  5. Restart Windows after you’ve uninstalled all listed Java entries in Programs and Features.
  6. Click the Java Download button on the Java website to save the installer for the latest version.
  7. Open the Java setup window to install Java Environment.
  8. Restart Windows after installing Java.

3. Configure environment variables

  1. Open the Windows search utility with the Windows key + S keyboard shortcut.
  2. Input system info in your search box.
  3. Click System to open the window in the shot directly below.
    System window java platform se binary not responding
  4. Click Advanced system settings to open a System Properties window.
  5. Click Environment Variables on the System Properties window’s Advanced tab.
    Environment Variables window java platform se binary not responding
  6. Next, click the New button under System variables to open the window shown directly below.
    New System Variable window java platform se binary not responding
  7. Enter _JAVA_OPTIONS in the Variable name text box.
  8. Type -Xmx256M in the Variable value box.
  9. Click OK to close the New System Variable window.
  10. Press the OK button on the Environment Variables window.

4. Clean boot Windows

  1. Open the Run window.
  2. Enter msconfig in Run’s Open box and click OK to open MSConfig.
    General tab java platform se binary not responding
  3. First, click the Selective startup radio button.
  4. Uncheck the selected Load startup items option.
  5. Select both Load system services and Use original boot configuration checkboxes.
  6. Select the Hide all Microsoft services option on the Services tab.
    Services tab java platform se binary not responding
  7. Click Disable all to stop the third-party services listed.
  8. Press the Apply button.
  9. Click OK to close the window.
  10. Click Restart on the dialog box that opens.
  11. Then try running Java software the error arises for after the restart.

Those are some of the most widely confirmed fixes for the Java(TM) Platform SE binary error. That doesn’t mean they’re entirely guaranteed resolutions for everyone, but they’ll probably fix the issue for most users.

Product page for Seagate’s Storage Expansion Card for the Xbox Series X console goes live

The product page for the Seagate Storage Expansion Card for the Xbox Series X is now live (via TA) on the official Seagate website, possibly suggesting that it could be getting some kind of promotion during tonight’s Xbox Games Showcase livestream.

The product listing confirms that each expansion card uses custom PCIe Gen4x2 NVMe flash memory and will support up to one TB of storage.

“Xbox Series X is Xbox’s most powerful console ever — and we created the Seagate Storage Expansion Card right alongside them,” text on the listing reads. “This partnership means that when you plug this storage card into any Xbox Series X console, you’re getting all the speed and power Xbox has dreamed up, with no compromise.”

Seagate Storage Expansion Card for the Xbox Series X is designed specifically for Microsoft’s next gen console and can be connected via a dedicated external storage port, not via USB as is the case on the Xbox One family of consoles. Video games optimized for the Xbox Series X will need to be installed on such cards (if not on the console itself) though Xbox, Xbox 360, and Xbox One titles can still be run off of a USB storage device if needed.

Pre-orders aren’t open yet and the release date is currently set to Holiday 2020 though this will likely change once pre-orders for the Xbox Series X console go live.

Are you planning to buy an expansion card for your Xbox Series X console or will you simply uninstall games and apps to free up room? Let us know in the comments below and then follow us on Twitter and Facebook for more Xbox Series X news.

Foobar Unrecoverable playback error: Timeout [Fixed]

Foobar 2000 is a freeware music player for Windows that offers some great features.

Some Foobar 2000 users have posted on support forums about an Unrecoverable playback error.

When they try to play MP3s in Foobar, an Unrecoverable playback error message pops up. As a consequence, Foobar doesn’t play the music.

How can I fix the Foobar Unrecoverable playback error

1. Run the Windows Media Player Settings troubleshooter

  1. Press the Windows key + R hotkey to open Run.
  2. Type Control Panel in the search box and open it.
  3. Click Troubleshooting, and then choose the View all option.
    The troubleshooter list foobar unrecoverable playback error: timeout
  4. Click Windows Media Player Settings to open the window directly below.
  5. Click Advanced and then the Apply repairs automatically option.
    Windows Media Player Settings foobar unrecoverable playback error: timeout
  6. Click Next to initiate the troubleshooter.

2. Disable the GX mode


If you’re utilizing Foobar with Xonar DX Control Center, try disabling the GX mode.

To do this, you can simply Open the Xonar DX Control Center and deactivate the GX mode by disabling the option.


3. Restart the Windows Audio Endpoint Builder

  1. Open the Run accessory.
  2. Type services.msc in the search box and click OK to open the window shown directly below.
    Services window foobar unrecoverable playback error: timeout
  3. Right-click Windows Audio Endpoint Builder and select the Restart option from its context menu.

4. Adjust the default audio format to 16-bit

  1. Right-click the speaker icon on your system tray and select Open Sound settings.
    The Sound tab foobar unrecoverable playback error: timeout
  2. Click Sound Control Panel.
    Playback tab foobar unrecoverable playback error: timeout
  3. Right-click your default audio device and select Properties.
  4. Select the Advanced tab.
    Speakers Properties window foobar unrecoverable playback error: timeout
  5. Then select 16-bit (CD quality) on the drop-down menu.
  6. Select the Apply option.
  7. Click the OK buttons to close the windows.

5. Reinstall Windows Media Player

  1. Open the Run window.
  2. Type in optionalfeatures.exe and press Enter.
    Windows Features window foobar unrecoverable playback error: timeout
  3. Double-click Media Features to expand that category.
  4. Deselect the Windows Media Player checkbox.
  5. Click OK to reinstall WMP.
  6. Restart Windows after reinstalling WMP.
  7. Next, open the Windows Feature window again.
  8. Select the Windows Media Player check box, and click the OK button.

6. Reinstall Foobar

  1. Press the Win + R keys.
  2. Input appwiz.cpl in Run and click OK to open Windows’ uninstaller.
  3. Select the Foobar software, and click the Uninstall option for it.
    The Programs and Features window foobar unrecoverable playback error: timeout
  4. Click Yes to confirm.
  5. Restart Windows.
  6. Download Foobar 2000.
  7. Reinstall the software by following the on-screen instructions.

We hope this guide has proven useful in your case. If you want to share your experience with us, or have any suggestions, feel free to leave a comment in the section found under this guide.


Watch the Xbox Games Showcase on Twitch today to get an exclusive “ItsHappening” Halo emote

Microsoft’s Xbox Games Showcase is just a few hours away and the company is planning to reward gamers for watching the broadcast on Twitch by giving every viewer an exclusive Halo emote for use in chats on the streaming platform.

The emote is called “ItsHappening” and it’s inspired by a popular Halo GIF that’s used frequently on social media networks such as Twitter. You can check out an example of it being used below.

Microsoft frequently created special emotes promoting certain titles on its Mixer streaming service but, with it shutting down yesterday, Microsoft seems to be, understandably, focusing its attention on Twitch which is by far the largest streaming platform for gamers and tech enthusiasts. This Halo emote is the first Microsoft-owned emote created for Twitch since the closure of Mixer and it stands to reason that more may be on their way in the future.

The Xbox Games Showcase stream will also be shown on Facebook and YouTube though no special promotions for those platforms have been announced yet.

Tonight’s stream will be a pretty big one for Microsoft as the company has confirmed that it will be officially revealing several major first-party Xbox video games and also providing more details on the latest entry in the Halo franchise, Halo Infinite. It’s also possible that an all-digital version of the Xbox Series X console could be revealed and pre-orders for the next gen consoles and games may go live during the stream or after it has ended.

Are you excited for the Xbox Games Showcase and will you watch it on Twitch? Let us know in the comments below and then follow us on Pinterest and Twitter for more Xbox gaming news.

What is Windows Setup Remediations? [We Answer]

Have you spotted a Windows Setup Remediation (x64) (KB4023057) program on your desktop or laptop? If so, you’re probably wondering how exactly it got there as something you didn’t install.

Furthermore, you might also wonder what exactly Windows Setup Remediations is. Some users have even posted on Microsoft’s support forum asking what is Windows Setup Remediations?

Windows 10 gets regular patch updates from Microsoft along with a couple of annual build updates. To ensure a smoother update process, Microsoft releases Servicing Stack Updates.

Those Servicing Stacks update Windows 10’s Component Base Servicing modules. They provide files and resources that enhance the overall reliability of Windows 10 updates.

Windows Setup Remediations is a Servicing Stack Update. So, WSR is a legitimate update for Windows 10 with a KB4023057 KB number. Microsoft rolled out the KB4023057 Windows Setup Remediations update from the summer of 2019.

WSR might reset network settings, compress files, free up disk space, and reset the Windows Update database to ensure smoother updates.


How to remove Windows Setup Remediations

Use the Windows built-in uninstaller

  1. Click the Search button on the taskbar.
  2. Type the keyword apps in the text box.
  3. Click Apps & features.
    Apps & features Windows Setup Remediations
  4. Select the listed Windows Setup Remediations app.
  5. Press the Uninstall button.

Use Command Prompt

  1. Click the search box.
  2. Type cmd.
  3. Right-click Command Prompt and select Run as Administrator.
  4. For 64-bit Windows platforms should enter this command: msiexec.exe /x {32DC821E-4A7D-4878-BEE8-337FA153D7F2}
    msiexec.exe command Windows Setup Remediations
  5. For 32-bit platform, enter: msiexec.exe /x {5F01BF33-E873-4B83-B2CC-E4DEF494073E}
  6. Press the Enter key to run the command.

So, Windows Setup Remediations is a required update for some Windows 10 build versions. Note, however, that it’s not needed for Windows 10 versions more recent than 1809.


Windows 10 build 20175 improves pinned site access in Edge

You can now upgrade to Windows 10 preview build 20175 if you’re a Dev Channel insider.

As you might remember, build 20161 introduced several interesting features, including a Windows 10 Start menu with semi-transparent themes as well as Alt + Tab improvements for Microsoft Edge.

Now, with the latest build in the Dev Channel, you get to explore pinned sites accessibility improvements in the Chromium-powered browser. Besides updating multiple flaws, this package includes UWP, Surface Pro X, and Fluent Design icon updates for insiders.

What’s new in Windows 10 build 20175?

Pinned sites accessibility

Certain browser improvements go hand in hand with OS improvements, which is understandably the case with the latest pinned sites update in Edge.

So, from now on, by clicking on a pinned site on the Taskbar, you can view all the open tabs for the specific site. The change should enable you to access web content a little faster.

However, you need to be using Edge insider build 85.0.561.0 or newer to sample the feature.

Reset-AppxPackage

Windows 10 build 20175 introduces a new way to reset your UWP apps—the Reset-AppxPackage command. You might find this option helpful when you need to clear data associated with a system component that you can’t reset in Settings.

AI-powered Eye Contact on Surface Pro

They say looking a person in the eye inspires confidence and belief in what you’re saying. If it’s true, the new AI-powered Eye Contact tech for the Surface Pro X camera might help with that when you’re making video calls.

Microsoft explains:

Powered by artificial intelligence capabilities of the Microsoft SQ1(TM) processor, Eye Contact helps to adjust your gaze on video calls so you appear to be looking directly in the camera on your Surface Pro X.

Fluent Design icons for Windows 10

If you like the redesigned Windows 10 Start menu, then you’ll love the new Fluent Design icons for Sticky Notes and the Snip and Sketch app.

Write us a note in the comments section below and let us know what you think about the new Windows 10 features.

Can VPN hide download? What’s the safest VPN I can use?

We’re quite sure that you know this already, but a VPN can help you pull a privacy sheet over your entire Internet connection. What you do online stays with you and nobody else.

You can dodge ISP snooping gracefully that way, without taking any complicated steps. Just purchase a subscription plan, install a small client on your computer, log in, select a secure server and that’s it.

Nothing you do online can be leered at by your nosey ISP or anyone who would be interested in finding out about your Internet whereabouts. As long as you don’t go ahead and post private information all by yourself, that is.

So a VPN can help you hide websites that you visit online from your ISP. But what about downloads? Can it hide that information, or is it still crystal clear to whoever it may concern? Let’s find out.

How does a VPN work?

Essentially, your VPN helps you protect your privacy by redirecting your traffic through a secure tunnel. You install a client on your PC, which encrypts your traffic and routes it through the encrypted tunnel.

Once it gets out of the tunnel, it reaches the VPN server, where it gets decrypted. Finally, it reaches the destination (website, server) in its unencrypted form.

The host generates a response, which gets sent back to you the same way, only in reverse. Meaning that it gets encrypted by the VPN server, runs through the secure tunnel, gets decrypted by the VPN client, and is then shown to you.

Quite simple, come to think about it, right?

Normally, your ISP can see certain things about your online activity, such as the website you visit, how much time you spend on them, and what files you download.

However, what your ISP can’t see is encrypted traffic. For instance, an email you sent to your co-worker. Or a username-password combination that you used on an HTTPS-encrypted website.

Well, what your VPN does is encrypt all the traffic between you and the VPN exit point, so your ISP can no longer access it. But what does that include?

Can VPN hide download information?

Everything that happens in terms of online activity on your PC is masked and that’s the end of it. Visiting a website? Encrypted. Watching an online movie? Encrypted. Downloading a file via torrent or direct download? Definitely encrypted.

So, to answer your question, yes, a VPN can and does hide download-related info. However, this doesn’t mean that you get a free pass at downloading pirated content.

In no way do VPN providers (nor we) endorse piracy, so you should reconsider your actions if it did cross your mind to do it.

Although trustworthy VPNs have a zero-logging policy, some of them have other means to detect unlawful usage of their service.

However, as a rule of thumb, make sure that your VPN enforces a zero-logging policy. That way, you can rest assured that your private VPN data won’t fall into the wrong hands.

What’s the best zero-logging VPN?

There’s no absolute best service that doesn’t log your private information. However, we’ve prepared a list of our best suggestions, so that you can choose from a variety of options.

Product NameKeeps logs?Company Name
Private Internet AccessNo traffic logsKape Technologies
CyberGhost VPNNo identifying dataKape Technologies
Express VPNNo identifying dataExpress VPN
NordVPNNo logsTefincom & Co., S.A.
Surfshark VPNNo logsSurfshark LTD

Note that there are subtle differences between these services in terms of speed, price, and security options. However, regardless of the choice you make, your data will definitely be in good hands.

VPN encrypts everything, including download data

To wrap it up, you can certainly use a VPN if you want to keep your download habits a secret. VPN doesn’t filter out certain types of traffic to encrypt, so everything that happens between your device and the VPN exit point will get encrypted.

More so, if you want your data to remain private, make sure you pick a zero-logging VPN. We can’t stress the importance of this enough, but consider this: if the VPN gets hacked, or seized, there won’t be anything to find, to begin with. Stay safe.