You’ll no longer be able to access your Outlook email unless you do this

Microsoft recently announced Outlook users that the platform’s current authentication method will be changed, and so will the way users access their Outlook emails. A while ago, the Redmond-based tech giant said it would let go of its basic authentication method to create a stronger, more secure one.

In a blog post, Microsoft says this step aims to increase safety and ensure that users’ emails and private information stay away from “bad actors.”

However, this modification doesn’t just affect Outlook; it also affects those who are still utilizing Hotmail.com and Live.com for their email accounts; it seems that Microsoft is pushing people to update their Outlook to the newer version by sending them almost threatful-sounding emails.

A user on official Outlook forums was so concerned that they thought it was a scam email and wanted to know if that was the case.

I received this email. It looks like a scam. Do I need to do anything?

Update your sign-in technology before September 16th, 2024 to maintain email access.
The safety and security of your information is top priority for Microsoft. To help keep your account secure, Microsoft will no longer support the use of third-party email and calendar apps which ask you to sign in with only your Microsoft Account username and password. To keep you safe you will need to use a mail or calendar app which supports Microsoft’s modern authentication methods. If you do not act, your third-party email apps will no longer be able to access your Outlook.com, Hotmail or Live.com email address on September 16th.
What do you need to do?If you are receiving this email, you are currently using an email or calendar app that uses a less secure authentication method to connect to your Outlook.com email account. You will need to upgrade your third-party mail and calendar app to a version which supports modern authentication methods.
Microsoft provides free versions of Outlook for your PC, Mac, iOS, and Android devices which can be easily downloaded and connect to your email account. Using an updated version of an Outlook application will ensure you are connecting in the most secure way.
How can you set up your Gmail, Apple Mail, or other third-party mail application?Various non-Microsoft applications will have their own steps for connecting to your Outlook.com email account using modern authentication methods. See our help article – Modern Authentication Methods now needed to continue syncing Outlook Email in non-Microsoft email apps. However, you may need to contact the creators of those applications to provide you with instructions. In many cases, simply removing and re-adding your account with the latest version of that application will configure it to use modern authentication methods.

If you’re receiving such emails, you should know they’re legitimate. They’re a heads-up for the change that’s about to come in September when Outlook’s authentication methods will be updated to fit the newer security concerns.

To keep access to your Outlook emails, you must update your third-party mail and calendar app to a version that supports the newer authentication methods. You can even update the new Outlook since the new version supports the new authentication methods.

In case you’re wondering, here is how to access your old Hotmail sign in.

KB5039299 to Windows 10 now lets users move Copilot around the desktop

Microsoft has launched another update for Windows 10, KB5039299, unrelated to security. This update focuses on resolving problems related to the taskbar, jump lists, and more. You can get it now from the Settings app or Microsoft Update Catalogue.

This update tackles an issue that could prevent an app’s jump list on the taskbar from functioning correctly. A second problem, linked to the default Japanese Input Method Editor (IME), makes the candidate window unresponsive when not anticipated.

KB5039299 finally makes Copilot behave like an app in Windows 10. This means you’ll be able to undock it, resize and move it, and even snap it out of a window. The update comes months after the Redmond-based tech giant introduced it in Windows 11.

* New! We are advancing the Copilot experience on Windows. It is now pinned to the taskbar and will behave like an app. This gives you the benefits of a typical app experience. For example, you can do things like resize, move, and snap the window. PLEASE NOTE: Managed commercial devices will not receive this new experience. This includes devices not running Windows 10 Home and are managed by an IT administrator.

Microsoft

There is a solution to the problem that could happen when you right-click on certain apps. Instead of performing the task selected from their context menu, a dialog box for “Open with” appears, requiring you to specify how you would like the file opened.

This problem might impact any app that has tasks within its context menu. KB5039299 also relates to a recognized problem in Windows 10, where, among other indications, the icons on the taskbar and Start menu may cease functioning.

Here’s KB5039299’s full changelog:

Highlights:

  • This update addresses an issue that affects an app’s jump list on the taskbar. Completing actions from that list might fail.A jump list is a menu that appears when you right-click an app on the taskbar or Start menu. It gives you quick access to recently or frequently used app items.
  • This update addresses an issue that affects the default Japanese Input Method Editor (IME). The candidate window stops responding when you do not expect it. Then, it goes back to a former composition state at random.
  • This update addresses a known issue that might occur when you right-click some apps. Instead of running the task you choose from the context menu, an “Open with” dialog appears. It asks you, “How do you want to open this file?” This issue might affect any app that has tasks on a context menu. This issue also affects the icons on the taskbar and Start menu.

Improvements:

  • This update addresses an issue that affects MSIX applications. When you install them from an HTTPS URI, they fail to open. This issue occurs when the download of the application is not complete. This damages the package.
  • This update affects mobile device management (MDM). When you enroll a device, the MDM client sends more details about the device. The MDM service uses those details to identify the device model and the company that made it.
  • This update addresses an issue that affects Direct Composition batched presentations. A brief flash of triangles or boxes show on the screen. This issue affects browsers, like Microsoft Edge, and other apps.
  • This update brings Country and Operator Settings Asset (COSA) profiles up to date for certain mobile operators.
  • This update addresses an issue that might stop your system from resuming from hibernate. This occurs after you turn on BitLocker.
  • This update addresses an issue that affects Windows Defender Application Control (WDAC). The issue copies unsigned WDAC policies to the Extensible Firmware Interface (EFI) disk partition. It is reserved for signed policies.
  • This update addresses an issue that affects a folder context menu. When you choose the command that removes items, the command adds items instead. This occurs when a third-party service implements a sync feature.

If someone wants to set up the newest non-security update for Windows 10, they can do so by visiting Settings > Windows Update, clicking on “Check for updates,” and choosing the “Download and install” option under the KB5039299 listing. Another way is to get this update from the Microsoft Update Catalog.

5 Best MSConfig Alternatives to Improve PC Startup and Performance

Managing startup programs is crucial for optimizing your Windows system’s performance. While MSConfig is a handy tool, there are several alternatives that offer more features and control. Here are the top 10 best MSConfig alternatives to help you manage your startup programs effectively.

What is the best MSConfig alternative for PC?

1. Autoruns

  1. Download Autoruns from the official Microsoft Sysinternals website.
  2. Extract the downloaded ZIP file.
  3. Open the folder and double-click Autoruns64.exe for the graphical interface.
  4. Review and manage startup items from various sections, including logon, scheduled tasks, and services.

Autoruns provides detailed information about auto-starting locations, making it easier to manage startup programs comprehensively compared to MSConfig.

2. WhatInStartup

  1. Download WhatInStartup from the NirSoft website.
  2. Extract the downloaded ZIP file.
  3. Run the WhatInStartup.exe file.
  4. Manage startup programs by enabling or disabling items directly in the interface.

WhatInStartup is user-friendly and allows you to control startup programs effectively with a simple interface.

3. Process Explorer

  1. Download Process Explorer from the Sysinternals website.
  2. Extract the ZIP file and run the procexp64.exe application.
  3. Use the search bar to find specific processes or DLLs.
  4. Manage processes by right-clicking and selecting actions like Kill Process or Suspend.

Process Explorer offers advanced features to identify and manage processes with more depth compared to MSConfig.

4. Task Manager Deluxe (TMX)

  1. Download Task Manager Deluxe from the MiTeC website.
  2. Unzip and run the portable application.
  3. Use the Startup tab to manage auto-start programs.
  4. Explore the various process and network monitoring features available.

TMX provides a clutter-free interface and real-time monitoring, making it a powerful alternative to MSCONFIG.

5. Daphne

  1. Download Daphne from the official website.
  2. Install and run the application.
  3. Use the options to kill processes immediately, politely, or on a schedule.
  4. Set process priority, affinity, and manage process windows from the interface.

Daphne offers unique features like scheduled process termination and alpha transparency settings, providing versatile process management.

Additional Windows tools that can replace MSConfig

Windows Task Manager

  1. Press Ctrl + Shift + Esc to open the Task Manager.
  2. Click More details at the bottom left if it’s not expanded already.
  3. Navigate to the Startup tab.
  4. Right-click on startup items and choose to enable or disable them.

The built-in Windows Task Manager’s Startup tab provides a quick and simple way to manage startup programs, though it lacks the depth of other alternatives listed here.

Services.msc

  1. Press Win + R, type services.msc, and press Enter.
  2. Review and manage services by right-clicking and selecting Properties.
  3. Change the startup type to Automatic, Manual, or Disabled as needed.

The Services management console provides detailed control over Windows services, which can be crucial for system performance and startup management.

These alternatives to MSConfig provide various levels of control and detail, ensuring you can choose the one that best fits your needs for managing startup programs and system processes.

If you still want to use MSConfig, here’s how you open it on Windows 10. Also, did you know that you can change the number of processors in MSConfig?

For any other questions or suggestions, hit the comments section below and let us know.

Apply Button Greyed Out in MSconfig: How to Restore it

Many users reported that the Apply button is greyed out msconfig, and this can prevent users from switching to different startup modes. Luckily, this can be easily fixed.

What can I do if the Apply button is greyed out msconfig?

1. Enable the services manually

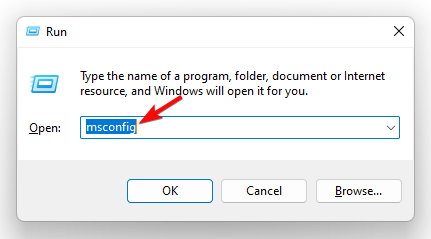
  1. Press Windows key + R and type msconfig.
    msconfig run window windows 11
  2. Navigate to the Service tab and click on Enable all. Click on Apply and OK.
    services tab enable all button
  3. If that doesn’t work, click on Disable all and then Enable all.

2. Disable advanced options

  1. Open msconfig again.
  2. Go to the Boot tab and click on Advanced options.
     boot advanced options msconfig
  3. Make sure that all options are disabled.
    boot advanced options all disabled

What are the 3 startup types on msconfig?

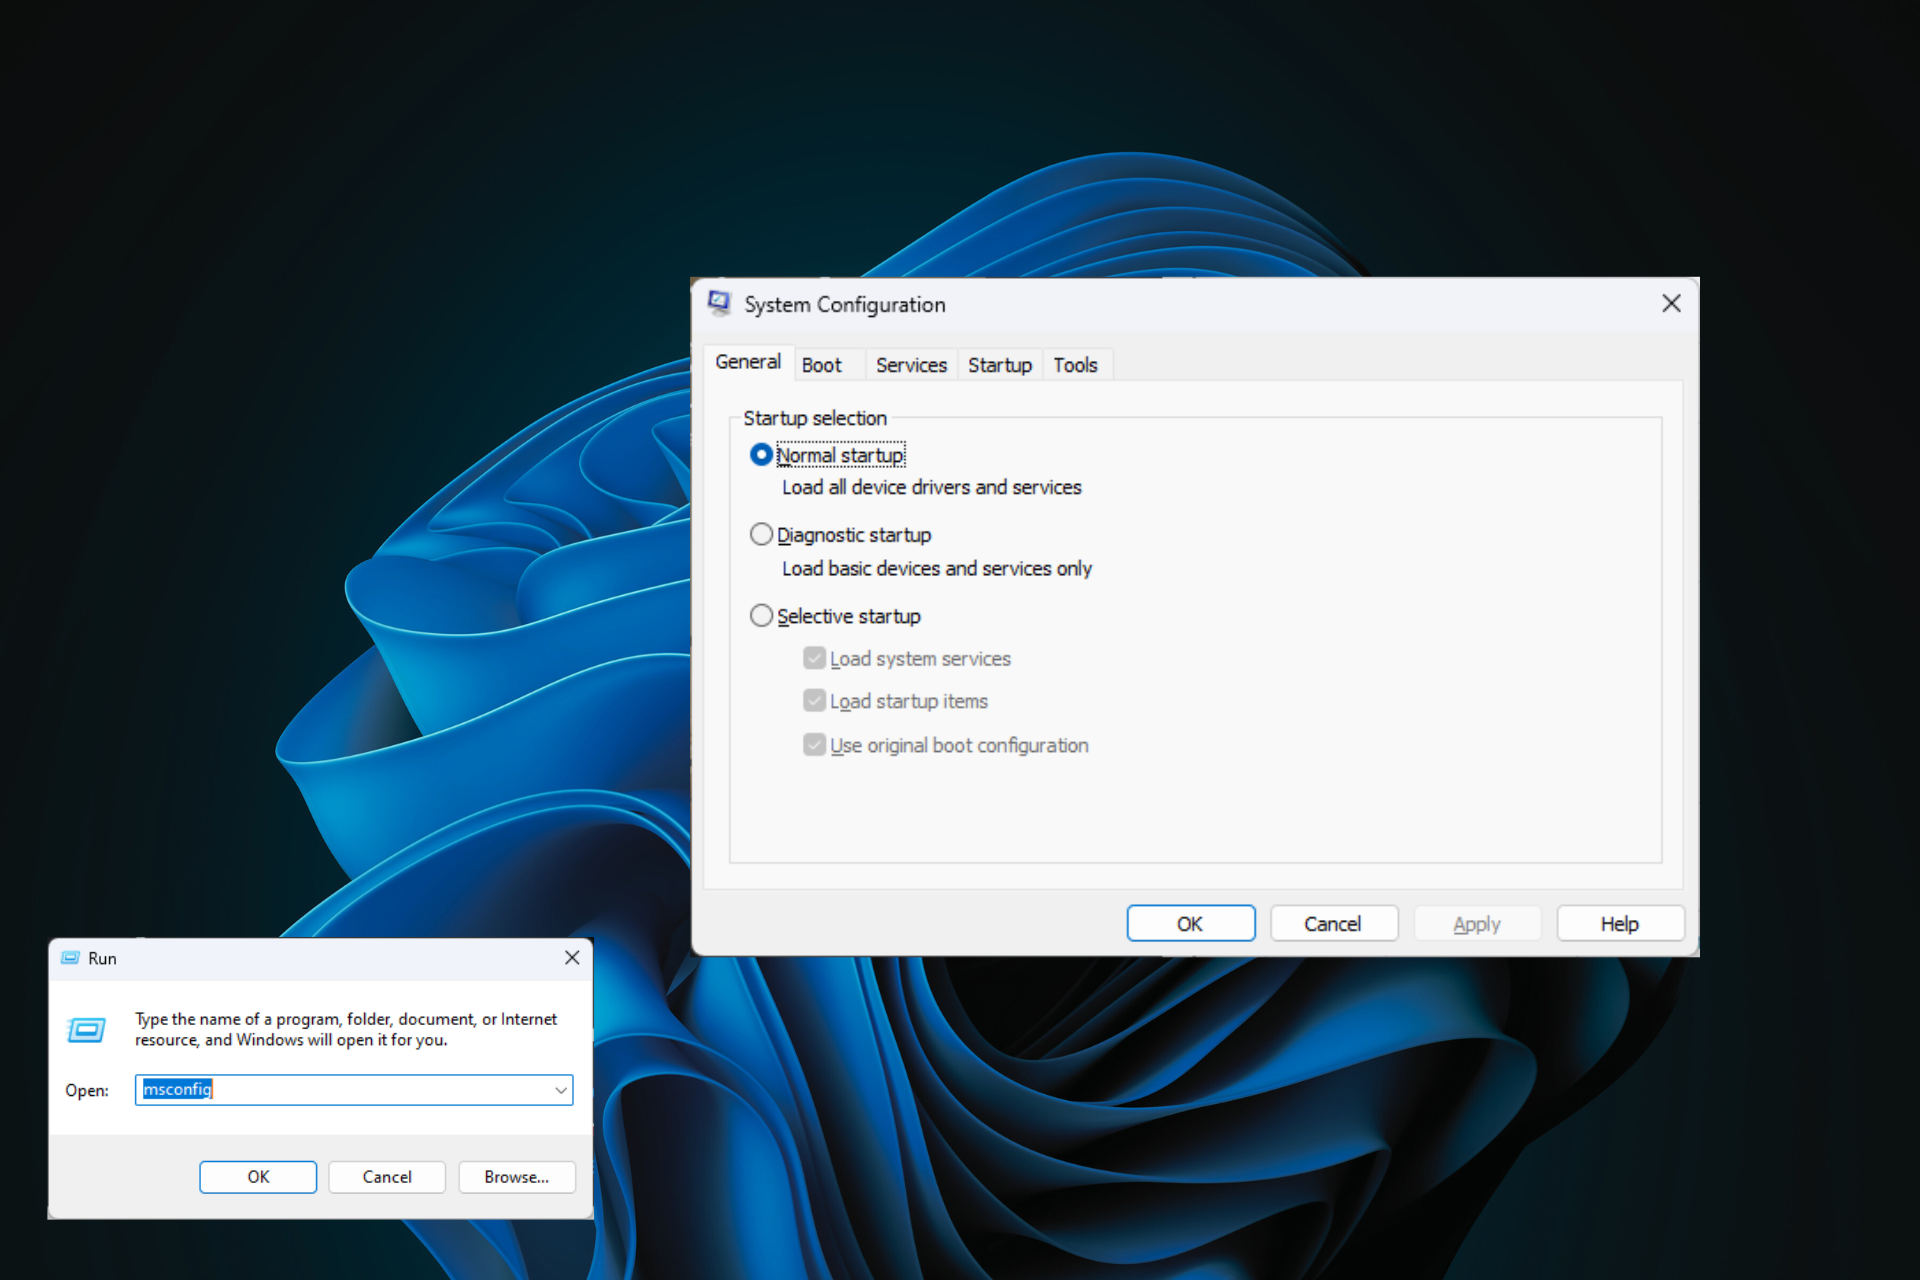
  • Normal startup – Loads all startup services
  • Selective startup – Lets you choose if you want to load startup items, system services, and boot configuration. Windows might revert to this startup type if you make any changes to startup settings
  • Diagnostic startup – Loads only the most basic drivers and services

If the Apply button is greyed out msconfig this is a minor problem that usually doesn’t cause any trouble and you can fix it by disabling or enabling certain settings.

To learn more about this tool, we have a great guide on how to open msconfig on Windows 11 and what to do if you disable all services in msconfig.

Many also reported that MSConfig keeps reverting to selective startup, but this can be easily fixed as well.

Lastly, did you know that you can change the number of processors in msconfig? If not, maybe should learn more about this feature.

Xbox Live suffered an outage for approximately 6 hours

Xbox Live suffered an outage earlier today, leaving many gamers unable to access their Xbox profiles. The problem started around early afternoon, and news about it rapidly spread on websites such as Downdetector. Microsoft quickly recognized the issue, informing people they were looking into its origin.
The outage was more than just a little problem; it went on for many hours, making gamers very frustrated and interested in knowing what happened. The Xbox Support team was working hard; they kept giving updates on social media and their status page. However, understanding the exact reason behind this situation took some time. It’s a situation that underlines the susceptibility of even the strongest online services and how they can affect a community that used to be connected.

When afternoon turned to evening, the Xbox team ended the quiet with good news: they solved the outage. Gamers were again allowed to join Xbox Live and continue playing from where they stopped.

However, what led to this digital problem? Little information was available, so one could only guess and remember the difficulties in managing worldwide online services.

According to this Reddit thread, the incident took about 6 hours to fix, a time when Xbox users could not play their games.

Xbox Live hasn’t suffered any outages recently, so this is relatively new for the community. Other Microsoft services, such as Microsoft 365, often experience outages, but considering that the productivity platform is frequently heavily hacked, users there are accustomed to it.

The service should be up and running again. Have you been impacted by this outage? What was your experience with it?

Devices and Printers Freezing in Windows 10 [Solved]

Often, when trying to add a printer or reconfiguring the connected ones, you find that Devices and Printers is freezing or crashing in Windows 10. This happens when the required services are not running, conflicting third-party apps are installed, the Registry has problematic entries, or the user profile is corrupt.

But more often than not, I have found that if the Control Panel freezes when I click on Devices and Printers, it has to do with missing services. So, let’s get straight to the fixes!

What can I do if Devices and Printers is freezing or crashing in Windows 10?

  1. Press Windows + R to open Run, type services.msc in the text field, and hit Enter.
  2. Scroll down to the Bluetooth Support Service, right-click on it, and select Properties.service properties
  3. Choose Automatic from the Startup type dropdown menu, click on Start under Service status, and then on Apply and OK to save the changes.run Bluetooth Support Service to fix devices and printers freezing windows 10
  4. Similarly, enable the following services and any other with Bluetooth or Printer in their names:
    • Bluetooth User Support Service
    • Device Association Service
    • Print Spooler
    • Printer Extensions and Notifications

Although some services don’t appear directly related to the Bluetooth functionality or printers, enabling them fixes things if the computer freezes when trying to print in Windows 10. One such is the Bluetooth Headphone Support service, as confirmed by a user in Microsoft forums.

2. Uninstall conflicting third-party applications

  1. Press Windows + R to open Run, type appwiz.cpl in the text field, and hit Enter.
  2. Select any third-party app/driver related to Bluetooth and printers or downloaded around the same time the issue first appeared, and click on Uninstall.uninstall
  3. Follow the on-screen instructions to complete the process.
  4. Finally, reboot the computer and check for improvements.

The most common one I found triggering issues with Devices and Printers in Windows 10 was ToolKitInstaller/DriverToolkit by Megaify Software, and uninstalling the app fixed things!

3. Update the printer drivers

  1. Press Windows + X to open the Power User menu, and select Device Manager.
  2. Expand the Printers entry, right-click on the connected printer, and select Update driver.update printer driver to fix devices and printers freezing windows 10
  3. Choose Search automatically for drivers and let Windows find and install the best locally available version.update driver
  4. Once done, restart the computer to fully apply the changes.

Updating the printer drivers can help if the Devices and Printers window keeps freezing on Windows 10. If Windows can’t find a better driver, I suggest you check the manufacturer’s website, locate the latest version, and manually install the driver!

4. Delete corrupt registry entries

Note icon NOTE
This solution requires you to make changes to the Registry Editor. It’s a complex process, and any mistakes on your part can affect the PC’s stability. So, I recommend you create a restore point beforehand so that you can always revert the PC to the previous stable configuration.
  1. Press Windows + R to open Run, type regedit in the text field, and hit Enter.registry
  2. Paste the following path in the address bar and hit Enter:HKEY_LOCAL_MACHINE\SOFTWARE\Microsoft\Windows NT\CurrentVersion\Print\Providers\Client Side Rendering Print Providerpath
  3. Now, right-click on the Client Side Rendering Print Provider key from the navigation pane and choose Delete.
  4. Click Yes in the confirmation prompt.

If this doesn’t work, check the error logs and verify it lists any related to Registry keys.

For instance, a user found this error log, Windows detected your registry file is still in use by other applications or services. The file will be unloaded now. The applications or services that hold your registry file may not function properly afterwards, followed by several Registry keys related to the installed printer. And deleting them did the trick!

5. Repair the corrupt system files

  1. Press Windows + S to open Search, type Command Prompt, then right-click on the relevant result and select Run as administrator.
  2. Click Yes in the UAC prompt.
  3. Paste the following DISM commands individually and hit Enter after each: DISM /Online /Cleanup-Image /CheckHealth DISM /Online /Cleanup-Image /ScanHealth DISM /Online /Cleanup-Image /RestoreHealthdism command
  4. Once done, execute the following command to run the SFC scan: sfc /scannowsfc scan to fix devices and printers freezing windows 10
  5. Finally, restart the computer and verify whether you can access Devices and Printers without it crashing or freezing.

If it’s the corrupt system files to blame for the computer freezing when trying to print, running the DISM commands and SFC scan will help, replacing all corrupted files with their cached copy!

6. Perform an in-place upgrade

  1. Go to Microsoft’s official website, and download the Media Creation Tool for Windows 10.
  2. Run the downloaded file (MediaCreationTool.exe) and click Yes in the UAC prompt.
  3. Click Accept to agree to Microsoft’s license terms.license terms
  4. Choose Upgrade this PC now and click on Next.in-place upgrade to fix devices and printers freezing windows 10
  5. Wait for Windows 10 to download and then proceed with the in-place upgrade.download

An in-place upgrade takes a few hours to complete but is highly effective against issues with built-in Windows components and features. The best part is that you don’t lose any stored files, applications, or configured settings!

7. Create a new user profile

  1. Press Windows + R to open Run, type netplwiz in the text field, and hit Enter.
  2. Click on Add.add user profile to fix devices and printers freezing windows 10
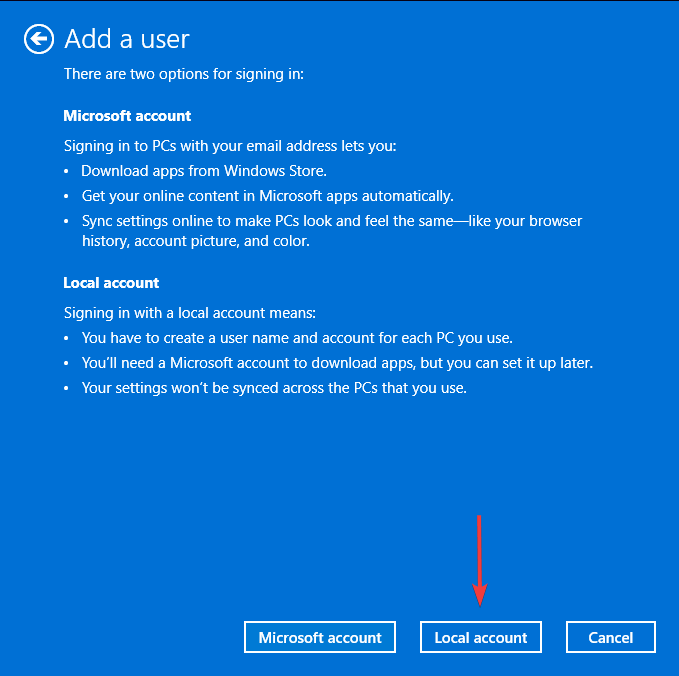
  3. Click on Sign in without a Microsoft account and then on Local account.
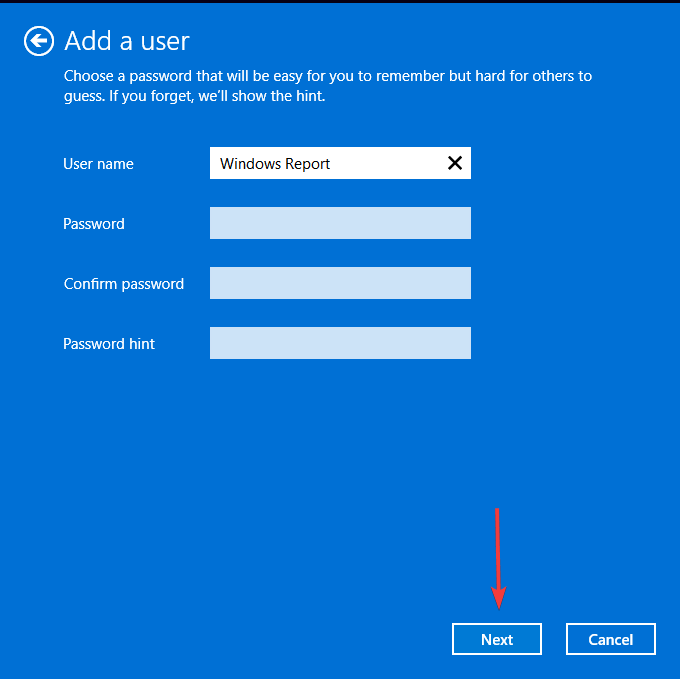
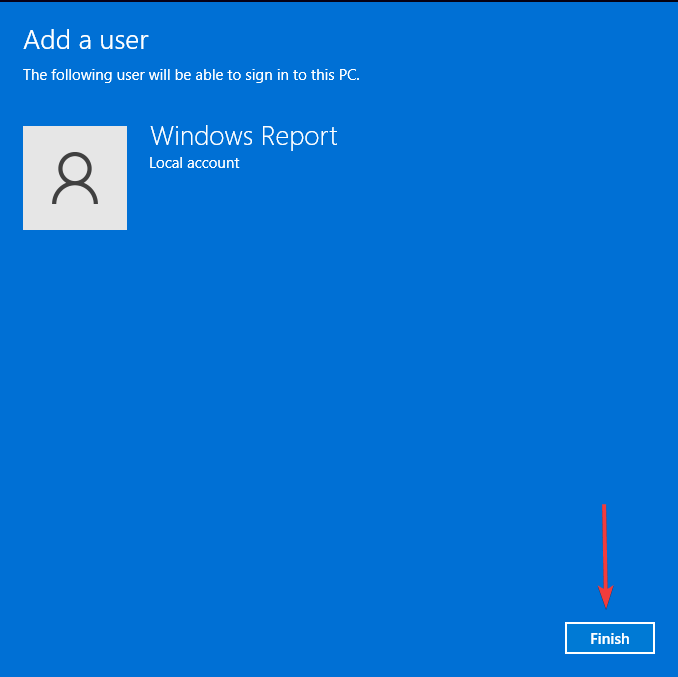
  4. Enter a username for the new profile and a password (not mandatory), then click on Next and Finish to complete account creation.new account
  5. Once done, select the new user profile and click on Properties.properties
  6. Go to the Group membership tab, choose Administrator, then click Apply and OK to save the changes.set as administrator
  7. Finally, sign in to the new user profile on Windows 10, install the printer and relevant drivers, and the Devices and Printers window shouldn’t freeze anymore. If so, you can move the data between the profiles using an external storage solution.

As a last resort, you can create a new local user account on Windows 10, as it had helped quite a few users when the Control Panel or Devices and Printers froze while printing. You can also add a shortcut to your printer for ease of access.

And while you are here, discover some quick tips to make Windows print faster than ever!

Which fix worked for you? Share with our readers in the comments section.

You can finally change the sound of your Microsoft Teams notifications

Do you remember when we told you you’ll soon be able to change the sound of your Microsoft Teams notifications? Maybe, for Microsoft Teams users on Windows and the web, your wish could now come true. Microsoft has finally launched a feature that allows users to adjust the sound of their notifications. This makes it possible to differentiate an urgent message from a normal ping even without looking. Just imagine—knowing what’s essential and what’s not only by the sound!

In a blog post, Microsoft says people using Teams Public Preview, trying out this feature is easy. You just need to click on three dots in Teams to find settings and go to the Notifications and Activity menu. Then, personalize your notification sounds with eight options for regular notifications and four more for urgent messages that require immediate attention.Microsoft Teams notification sound

But what if you are right there, deeply focused or in a meeting, and an important thing shows up? A checkbox for that permits sounds even when you’re set as busy or in a meeting. It’s similar to having your helper who understands precisely when to break your concentration and when to keep quiet.

This feature’s release is currently limited, though. To use it, you must either be part of the Teams Public Preview or a Microsoft 365 Targeted release user. And if you’re thinking about when it will be accessible for everyone or on other platforms, then you’ll have to wait until Microsoft announces the release of the feature there, as well.

To use this feature, you must be a member of the Teams Public Preview or Microsoft 365 Targeted release and use the new Teams client for Windows of web.   

Microsoft

Have you considered that a sound could arrive one day to make your work life somewhat easier? It feels like with the fresh custom sound notifications on Microsoft Teams, we are nearing towards creating our digital workplace environment slightly more customized and significantly better at productivity.

What are your thoughts on this?

How to Open MSConfig in Windows 7 [Run, CMD Command]

If you’re looking to tweak your startup programs or troubleshoot your system, knowing how to open MSConfig on Windows 7 is essential. Here are some quick and easy methods to access this powerful tool.

How do I open MSConfig in Windows 7?

  1. Click the Start button on the taskbar.
  2. Type msconfig or system configuration in the search box.
  3. Press Enter or click on the System Configuration in the search result.

This method is quick and easy, especially if you’re already used to using the Start Menu’s search function.

2. Using the Run dialog box

  1. Press the Windows + R keys simultaneously to open the Run dialog box.
  2. Type msconfig and press Enter or click OK.

Using the Run dialog is one of the most straightforward ways to open msconfig, suitable for users who prefer keyboard shortcuts.

3. Using the Command Prompt

  1. Click the Start button type cmd in the search box.
  2. Right-click on Command Prompt and select Run as administrator.
  3. In the Command Prompt, type msconfig and press Enter.

This method is great if you’re already working in the Command Prompt and want to switch quickly to msconfig. Of course, you may also use PowerShell in exactly the same way.

4. Using Control Panel

  1. Click the Start button and select Control Panel.
  2. In the Control Panel, select View by: Small icons or Large icons to see more options.
  3. Click on Administrative Tools.
  4. Double-click on System Configuration.

Opening msconfig via the Control Panel is beneficial for users who may not be as familiar with shortcuts or command lines.

5. Using File Explorer

  1. Open File Explorer by clicking its icon on the taskbar.
  2. Navigate to This PC and then go to Local Disk (C:) (or the drive you have Windows installed).
  3. Open the Windows folder and then the System32 folder.
  4. Locate and double-click on msconfig.exe.

This method might be more involved, but it’s helpful if you want to know exactly where the executable file is located.

Each of these solutions provides a different way to open msconfig based on what you might find easiest or most convenient. You might also be interested in finding out how to open MSConfig in Windows 10.

Did you disabled some services in MSConfig accidentally? Click the highlighted guide to learn how to get them back.

If our guide helped you open MSConfig on Windows 7, let us know in the comments below.

How to Import Mbox to Outlook & Transfer Your Emails

If you’re switching from one email client to another, you might experience some compatibility issues. This is exactly what happened to users who tried to import mbox file to Outlook, and in today’s guide, we’ll show you how to fix that.

Can Outlook import MBOX format?

No, Outlook doesn’t have native mbox support and to import it you need to convert it into a PST file or convert each email into an EML file and then import it.

How can I import mbox to Outlook?

1. Use an online converter

  1. Visit the Aspose page.
  2. Drag and drop your mbox file.
    mbox to pst online convertor
  3. Wait for it to convert and download it.
  4. Drag and drop the downloaded file to Outlook to import it.

Do keep in mind that some of these services might not be 100% safe, so do the necessary research before using them.

2. Use Thunderbird

  1. Visit the Thunderbird download page and install it.
  2. Open Thunderbird, go to Tools and choose Add-ons and Themes.
     add-ons and themes thunderbird
  3. In the search bar type import and press Enter.
    importexporttools search thunderbird
  4. A new tab will appear. Start typing import and choose ImportExportTools NG from the list.
    impotexporttools ng dropdown thunderbrid extensions
  5. Click on Add to Thunderbird.
  6. After the extension is added, go to Tools. Choose ImportExportTools NG and then Import mbox file.
    import mbox file thunderbird
  7. Next, choose Import One or More MBOX Files and select your mbox file.
  8. After that, mbox file will be added as a separate folder.
  9. Restart Thunderbird, choose Tools and then ImportExportTools NG. Select Export all messages in the folder and choose EML format.
    eml format export thunderbird
  10. Lastly, select all messages from the destination directory and drag and drop them to Outlook.

This is a more complex solution, but it works, and it doesn’t require you to rely on third-party services. In case the problem is still there, you can consider using a third-party mbox to PST file converter.

Which email client opens MBOX files?

Mbox format is used by Thunderbird, Apple Mail, IncrediMail, SeaMonkey, Sylpheed, and several other email clients.

To learn more, we have a great guide on the most common email file formats. Since PST is being used by Outlook, you might be interested more in finding the location of Outlook PST file in Windows 11.

Before you go, don’t miss our guide on how to convert PST to OST file for more useful information.

5 Ways to Open MSConfig in Windows 11

MsConfig is a command used to open the System Configuration window. It allows you to change Windows boot settings and the startup app actions. Opening it is very simple, and we will discuss three ways to launch System Configuration using the msconfig command on Windows 11.

How can I access Msconfig in Windows 11?

1. Using the Run command

  1. Press Windows + R to open the Run window.Run window Msconfig in Windows 11
  2. Type msconfig, click OK, or press Enter to open the System Configuration window.
  1. Press the Windows key + S to open Windows Search.
  2. Type msconfig and click System Configuration from the list of options.Windows Search - msconfig windows 11
  3. This will open the System Configuration window.

3. Using the Command Prompt

  1. Press Windows, type command prompt or cmd.
  2. From the list of options, select Command Prompt and click Run as administrator.Command Prompt - Run as admin - Msconfig in Windows 11
  3. Type the following command and click Enter: msconfigmsconfig
  4. You will get the System Configuration dialog box.

If you are well-versed in Terminal or like PowerShell better than Command Prompt, you can use it to open the System Configuration window.

4. Using the File Explorer window

  1. Press Windows + E to open the File Explorer window.
  2. In the address bar, type msconfig and press Enter.msconfig file explorer
  3. This will launch the System Configuration window.

5. Using the Task Manager

  1. Press Ctrl + Shift + Esc to open the Task Manager.
  2. Go to the Run new task option from the top of the window.Run a new task
  3. Type msconfig and click OK or press Enter.

To conclude, you can open the System Configuration window using the Run command, Command Prompt, File Explorer, and Windows Search.

Once you have opened the System Configuration, you can change the Startup mode and boot options, enable or disable Services, and manage Startup items.

In case you want to learn more about removing startup programs on Windows, we have a separate guide for that.

If you cannot open msconfig, you can check out our You don’t have sufficient privileges to run the System Configuration guide for more information.

Do keep in mind that sometimes the Apply button might be grayed out in msconfig, but that can be easily fixed. Many users also reported that MSConfig keeps reverting to selective startup, but we have a guide that tackles that issue.

If you have any suggestions or questions, please leave them in the comments section below, and we will be happy to answer.

Microsoft releases KB5041137, the first recovery update for Windows 11 24H2

Microsoft surprised many when it released the Windows 11 24H2 (2024 update) on the Preview Channel within the Windows Insider Program in May. Because the patch was so new, the Redmond-based tech giant didn’t have a recovery update for it until now: KB5041137 is the initial recovery update for this fresh version of Windows.

This is not an ordinary patch; it serves as a lifesaver if you encounter unexpected problems with the new update and need help getting out of a tight spot.

KB5041137 is a type of Safe OS Dynamic Update, which mainly focuses on increasing the strength of WinRE (Windows recovery environment). Why is this important? It’s simple: even if an operating system seems perfect and advanced in every way possible, there’s always some possibility that things may not work as planned or expected.

And when such situations arise – because they will at one point or another – having a strong recovery environment like WinRE can make all the difference between small issues turning into big problems.

But what exactly does this update do? It is an enhancement for WinRE in Windows 11, version 24H2. So, if your device has a problem and requires recovery, the process should be better now due to KB5041137’s improvements. It’s a bit like having a safety measure, making sure you can get back your system efficiently when required.

Dynamic Updates, including this one, are a little different. They are not pushed through Windows Update, but you can download them manually from the Windows Update Catalog website. This may appear to be an additional process, but it is advantageous. Users can use these updates when they want, ensuring they are prepared for them and do not interfere with their work process.

Compatibility is not an issue. The update is available in versions for both Arm64 and AMD64 devices, ensuring that most Windows 11 users can enjoy its enhancements regardless of their device’s architecture.

Although the surprise launch of Windows 11 24H2 was unexpected for some people, Microsoft had prepared earlier by releasing KB5041137. If you ever encounter trouble while experimenting with the new patch, use the recovery update to fix it.

How to Sync Outlook Notes With iPhone

When you sync notes between Outlook and iPhone, you can quickly access them on both the PC and iOS device!

When I looked up the process, there wasn’t any reliable information available on the web, with most suggesting using a third-party tool. However, you don’t need one, as the functionality is native to iOS and can be set up in less than a minute.

Let’s find out how you can sync and access Outlook notes on your iPhone!

How can I sync Outlook notes with my iPhone without iTunes?

  1. On your iPhone, open the Settings app, scroll down and go to Notes.settings
  2. Tap on Accounts.notes
  3. Now, tap on Add Account, if the Outlook account has not already been added.
  4. Choose Outlook.com from the list of options.outlook.com
  5. Enter the email address and the code you received to add the Outlook account.
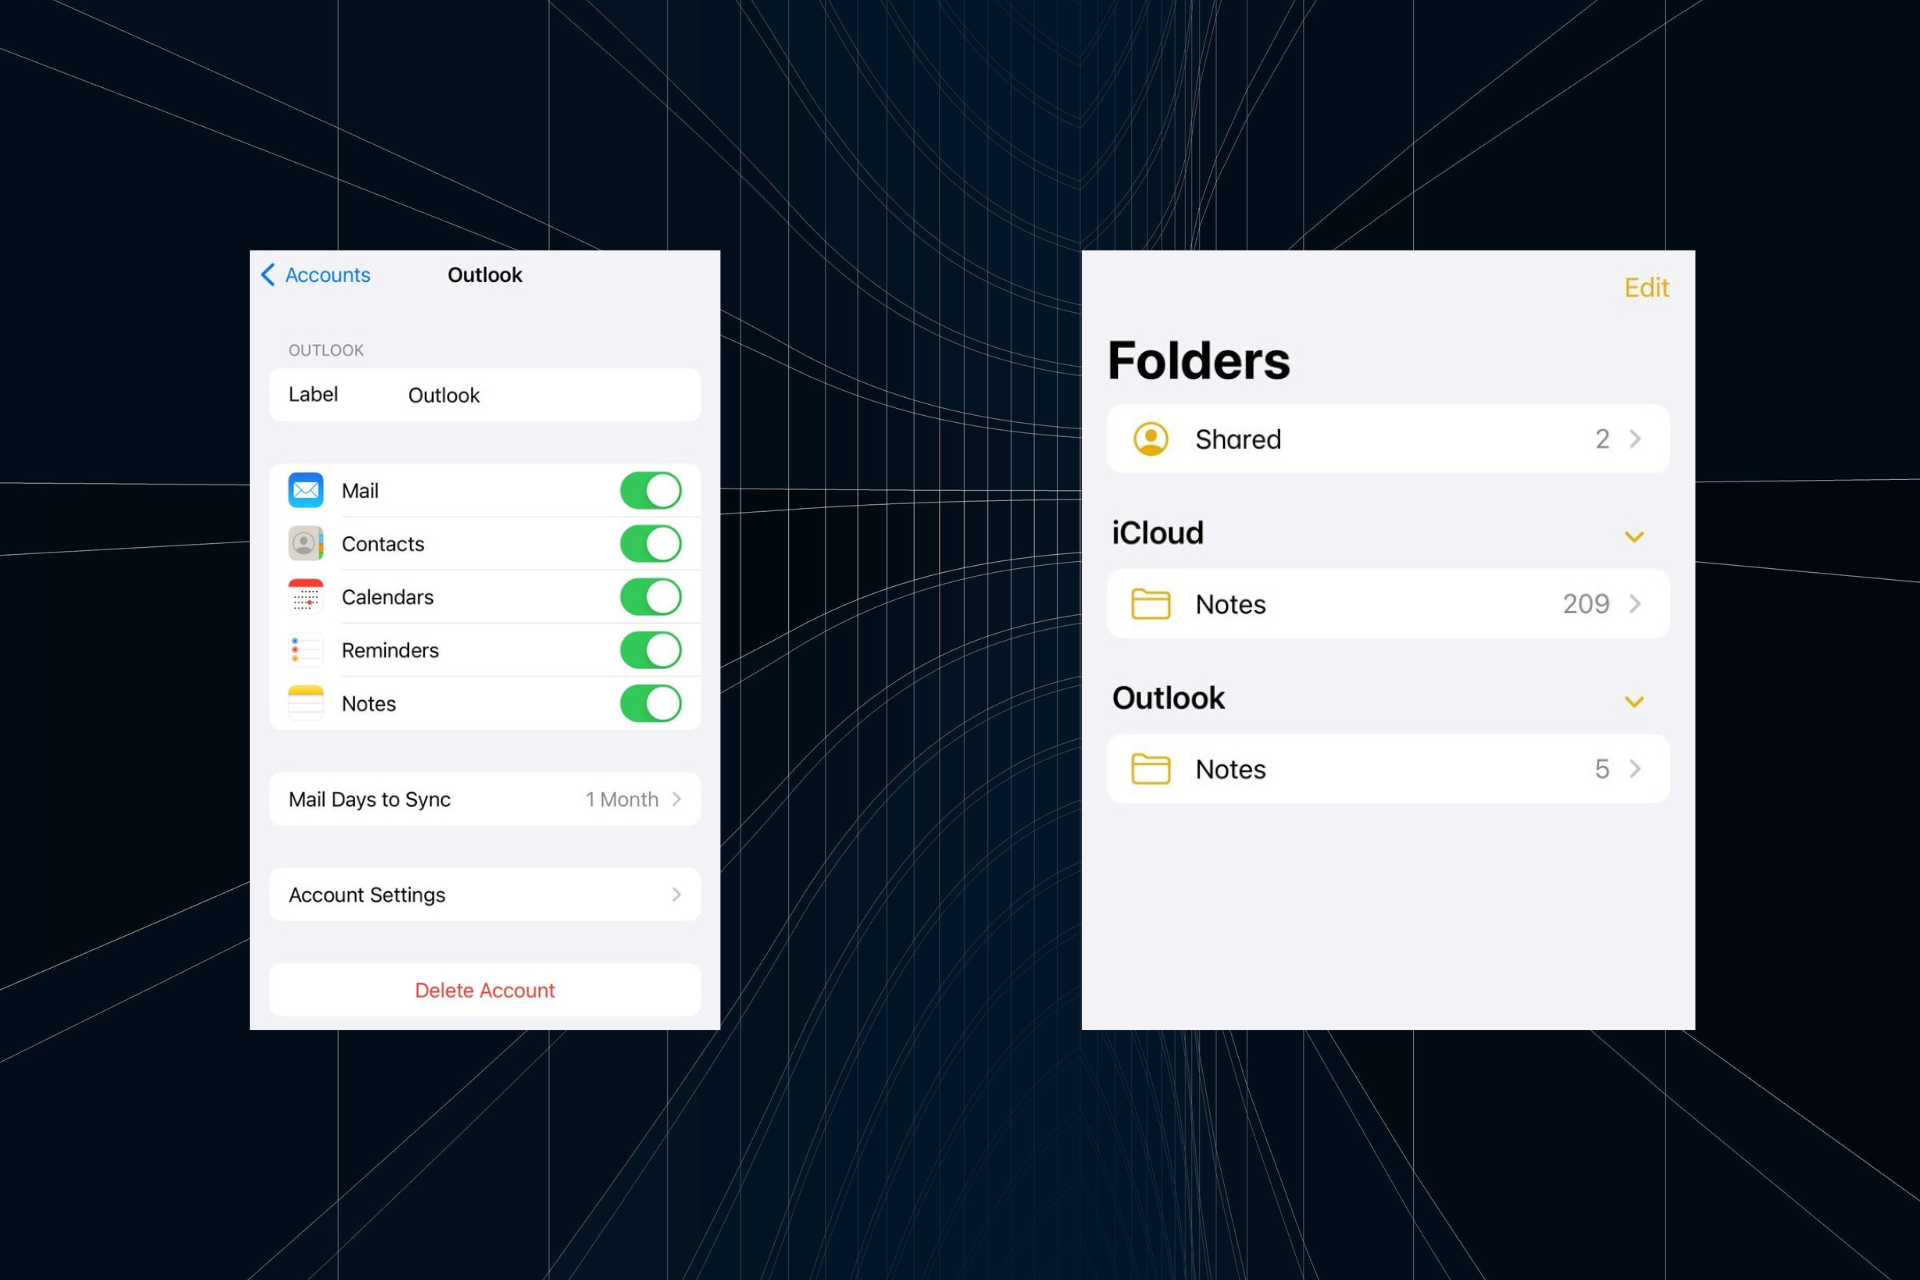
  6. Now, enable the toggle for Notes and then tap on Save.enable to sync outlook notes with iphone
  7. Wait for a few seconds, then open the Notes app on your iPhone, tap on Folders at the top left, and select Outlook. All your Outlook notes will now appear in the iPhone’s Notes app.outlook notes on iPhone

This way, you can add an Outlook account on iOS and sync notes without using iTunes. When I synced Outlook notes with iPhone, any changes made on one reflected in real-time on the other.

There’s no reason it shouldn’t be the same at your end as long as Outlook has been set up correctly, you have an exchange account, and both devices have access to a fast Internet connection.

What can I do if my iPhone doesn’t show synced Outlook notes?

  • Check the Outlook account settings: Open Settings > go to Notes > choose Accounts > select Outlook > enable the toggle for Notes (re-enable if already enabled) > check for improvements.
  • Re-add the Outlook account: Open Settings > go to Notes > select Accounts > choose Outlook > tap on Delete Account > tap on Delete from My iPhone to confirm > re-add the Outlook account > check for improvements.
  • Update iOS: If there are any pending iOS updates, install them.
Outlook

You should now have all the Outlook notes synced and accessible on your iPhone. Similarly, you can import Outlook contacts to iPhone!

A few users reported that Outlook notes are missing, but we have an entire guide dedicated to this issue, so don’t hesitate to visit it for more solutions.

Were you able to sync Outlook notes with the iPhone? Let us know in the comments section.

Windows 11 is three percent away from being the most popular Windows version on Steam

Windows 11 is becoming more popular in the changing world of operating systems. This is especially true among gamers who use Steam services. It’s interesting to observe how this new OS is moving closer to surpassing Windows 10 as the top pick for the gaming community. The most recent data from Valve’s Steam Hardware & Software Survey shows that Windows 11’s popularity continues to increase rapidly. But let’s dive a bit deeper, shall we?

In June 2024, the market share of Windows 11 increased by 0.55 points to reach a total of 46.63%. It is now less than 3% behind Windows 10, which went down slightly, losing a total of -0.93 points. This movement shows an increasing favor for Windows 11 among Steam users even though there remains a small advantage towards Windows 10, with its user base at around 49.42%. It is quite fascinating that even the earlier versions, such as Windows 7 and 8.1, are still somewhat in use, although on a very limited scale.

96.61% of survey participants use Windows to play games on Steam. This shows how Microsoft’s OS holds a powerful grip over the gaming market. Linux and macOS stand far below, with 2.08% and 1.31%, respectively. This information is not only numbers but also a treasure trove for developers who wish to improve their games on recognized platforms.

Regarding hardware, the survey shows what gamers like and choose. For those using Steam, Intel is at the top in the processors market, with a percentage share of 66.80%, followed by AMD, which has 33.15%. Regarding CPU cores, six are the most frequent – they can be found in about 32.63% of systems surveyed. The survey gives an overview of different components used by PC gamers. Among those who use Steam as their gaming platform, Intel dominates the processor market with a percentage share of 66.80%.

In second place, we have AMD at around 33.15%. Regarding CPU cores specifically for gaming purposes, six seem to be most common among these users, accounting for approximately one-third or more than thirty-two point sixty-three percent (32+63%). Almost half of gamers think 16GB is the most liked option for memory. As for the GPU model, Nvidia’s RTX 3060 stands first.

What about the display resolutions? The survey shows that 1920 x 1080 is still the most common, with 57.47% of gamers using it. However, higher resolutions such as 2560 x 1440 are becoming more popular, too – this shows how much people in our community want better graphics and to be more immersed when they play games.

This rise in Windows 11 usage among Steam users signifies a change in the operating systems they prefer. It also shows how much the gaming community’s needs and desires have transformed. However, with Windows 10’s impeding EOS, Windows 11 is starting to be a choice for all users: its market share has grown 30% in June alone.

So, people might be finally ready to migrate to Windows 11.

Windows 10 Disk Management Recovery – How To Recover Files

Does Windows 10 Disk Management recovery actually work? Let’s find out below!

The Windows 10 Disk Management tool allows you to manage your internal storage drives. It also controls how you can use removable USB and HDD/ SSD storage.

Find below the tried and tested methods to recover lost partitions or system files. Also, learn if the tool works efficiently as a recovery tool or if you need specialty third-party software for partition and file recovery.

What Is Windows 10 Disk Management Recovery?

Windows 10 Disk Management tool

Windows 10 Disk Management is a built-in tool for advanced storage operations, but it doesn’t offer any partition or system file recovery services.

You’ll find a Recovery Partition linked to the Windows OS installation drive. You’ll notice it doesn’t have a drive letter. Also, the Windows File Explorer tool won’t show this partition in the This Computer or Computer window.

Windows 10 Disk Management Recovery

Windows 10 uses the Recovery Partition to recognize the current operating system, configurations, and customizations for OS recovery purposes. It automatically accesses the Windows 10 Disk Management Recovery Partition files in the event of major failures, like BSOD, HDD issues after a power outage, and more.

Microsoft has continued the same functionalities and features of Windows 10 Disk Management in Windows 11. Therefore, you won’t find the recovery feature for this tool in Windows 11 as well.

Recreate a Lost Partition Using Windows 10 Disk Management

This tool will allow you to recreate the lost partition. However, when you create a new partition from an unallocated disk space, Windows 10 must format it using NTFS or FAT file systems. In this stage, you’ll lose the content of the lost partition.

Here’s how to use it:

  1. Right-click on the Windows Start Menu or Flag to access the Power User context menu.
  2. Click on the Disk Management tool.
Power User
  1. The Disk Management app will open.
  2. You should see separate ribbons for each disk. For example, Disk 0, Disk 1, etc.
  3. Inside the disk ribbon, you should see navy blue and dark-colored boxes. These are the partitions in the selected disk.
  4. You should see a box in the ribbon with a dark strip and a text saying Unallocated. That’s the lost partition.
Disk ribbon
  1. However, if there was an existing Unallocated disk space, the recently lost partition would be merged with that one.
  2. Let’s assume there was no Unallocated disk space in your SSD or HDD.
  3. Then, click on the Unallocated box, right-click, and choose the New Simple Volume option.
New Simple Volume
  1. The New Simple Volume Wizard will pop open. Click Next.
Simple volume wizard
  1. Click Next again on the Specify Volume Size window.
  2. The Unallocated space will automatically show the drive letter of the previously lost partition in the Assign Drive Letter or Path dialog.
  3. Click Next to choose the auto-selected drive letter.
Assign Drive Letter
  1. You’ll now see the Format Partition dialog. Enter the relevant information in fields, like Volume label, File system, etc.
Format Partition
  1. Click Finish on the next screen.
Finish creating partition
  1. The previously lost partition will now show up in the File Explorer tool.

Although you’ve recreated the lost partition, it’ll be empty since the partition wizard has formatted the drive.

At this stage, don’t create any new files or paste different files in this newly-created partition. You’ll need to use a third-party file recovery tool to get back recoverable files of the lost partition. If you start copying files in the new partition, old files will get overwritten and might get lost forever.

Recover a System File

There are no commands or functionalities to force system file recovery using Windows Disk Management. However, you can run the following commands if you suspect a system file has been deleted accidentally. Still, keep in mind that Windows 10 won’t allow you to delete any critical system files.

Run SFC Scan

  1. Open the Windows 10 terminal by searching for Command Prompt in the Start Menu, then right-click on it and select the Run as administrator option.
open cli
  1. Type the sfc /scannow command in the terminal window and press Enter.
  2. The SFC scan command will start and can take some time to complete. It should take anything between 10 minutes to up to an hour depending on the size of the Windows 10 installation partition.
run sfc
  1. Don’t interrupt the scanning session while it’s running.

Once the scan is over, the Command Prompt tool will display the outcomes. Here are some possible results:

  1. Windows Resource Protection found no integrity violations: System files are okay, and no action is needed further.
  2. Windows Resource Protection found corrupt files and successfully repaired them: You’ve recovered lost system files.
  3. Windows Resource Protection found corrupt files but was unable to fix some of them: Run DISM.

If you see the third message, move on to the next method.

Run DISM Scan

  1. Open the Windows 10 CLI with elevated rights just like in the previous method.
  2. Enter the following command in the terminal and hit Enter:
DISM /Online /Cleanup-Image /ScanHealth
DISM 1
  1. It might take a while to finish the initial scan.
  2. When CLI shows any issues with the system files after the scan, run the following command:
DISM /Online /Cleanup-Image /RestoreHealth
DISM 2
  1. Windows 10 will attempt to restore corrupted system files online.
fixing files
  1. If everything works well, the restoration should be successful as shown below.
fixed successfully

Use a Third-Party App To Recover a Lost Partition

The most convenient way to recover a lost partition is by using a specialty data recovery app, like EaseUS. You can download and install the tool for free.

However, you’ll only get a free evaluation. If you like what you see, you can buy a license key and then it’ll let you recover lost partition data.

Here’s how to use it:

  1. Launch the app using the Desktop or Start Menu shortcut.
  2. It should open the Hardware Disk window.
  3. If there are any accidentally deleted partitions on the SSD or HDD, you’ll see the Lost Partition notification for the respective drive.
  4. Select that drive, like Lost Partition 1, and hit the Search for Lost Data button in the bottom right corner.
Search for Lost Data
  1. The app will start automatically scanning for the lost files.
start scanning
  1. Click Go to Recover once scanning is over.
Go to Recover
  1. If you’re on an activated EaseUS version, you’ll see the option to choose a drive where you want to save the recovered files from the lost partition.
  2. Follow the on-screen instructions.

Summary

Unfortunately, there’s no Windows 10 Disk Management recovery option for your old partitions or system files. However, you can create a new one with the tool and then use third-party software, like EaseUS to recover the deleted files. For system files, you must use SFC and DISM commands.

If the article helped you or you wish to submit feedback, feel free to comment below!

The third time’s a charm: KB5038575 in the Dev Channel is once again stopped from rolling out

Microsoft had to stop distributing new updates to the KB5038575 patch (which received a second string of updates in June) in the Dev Channel because of unknown problems, according to the latest edit in the official changelog.

UPDATE 6/30: We have temporarily paused the enablement of these features to investigate a few issues reported by Windows Insiders. We plan to begin the enablement again shortly.

Microsoft

Microsoft had a few interesting developments, such as better narrator improvements, voice access support, a new account manager within the Start menu, and even some fresh emojis. But just when we were about to test these features for ourselves, Microsoft decided to halt progress. They didn’t spill the beans on what exactly went wrong, leaving us all wondering.

Microsoft pulling back an update is not uncommon. One week ago, they needed to retract a non-security update because it created problems for computers running virtualization software. It’s unpleasant to imagine switching on your computer only to be trapped in a never-ending cycle of restarts.

Keep in mind that there is a risk each time these updates happen. But there is no need to fret. Microsoft is dealing with it, and we expect to see those fresh characteristics in KB5038575 shortly. Let’s hope for a successful introduction during the next attempt.

Outlook AutoArchive Settings Explained & How to Use

Managing your Outlook mailbox can be a daunting task, especially when it starts to get cluttered. AutoArchive is a handy feature that helps keep your mailbox organized by automatically moving old items to an archive folder. Keep in mind that the New Outlook doesn’t have AutoArchive settings. This guide is useful if you’re using the Classic Outlook app.

How do I enable and set up Outlook AutoArchive?

1. Enable and customize AutoArchive in Outlook

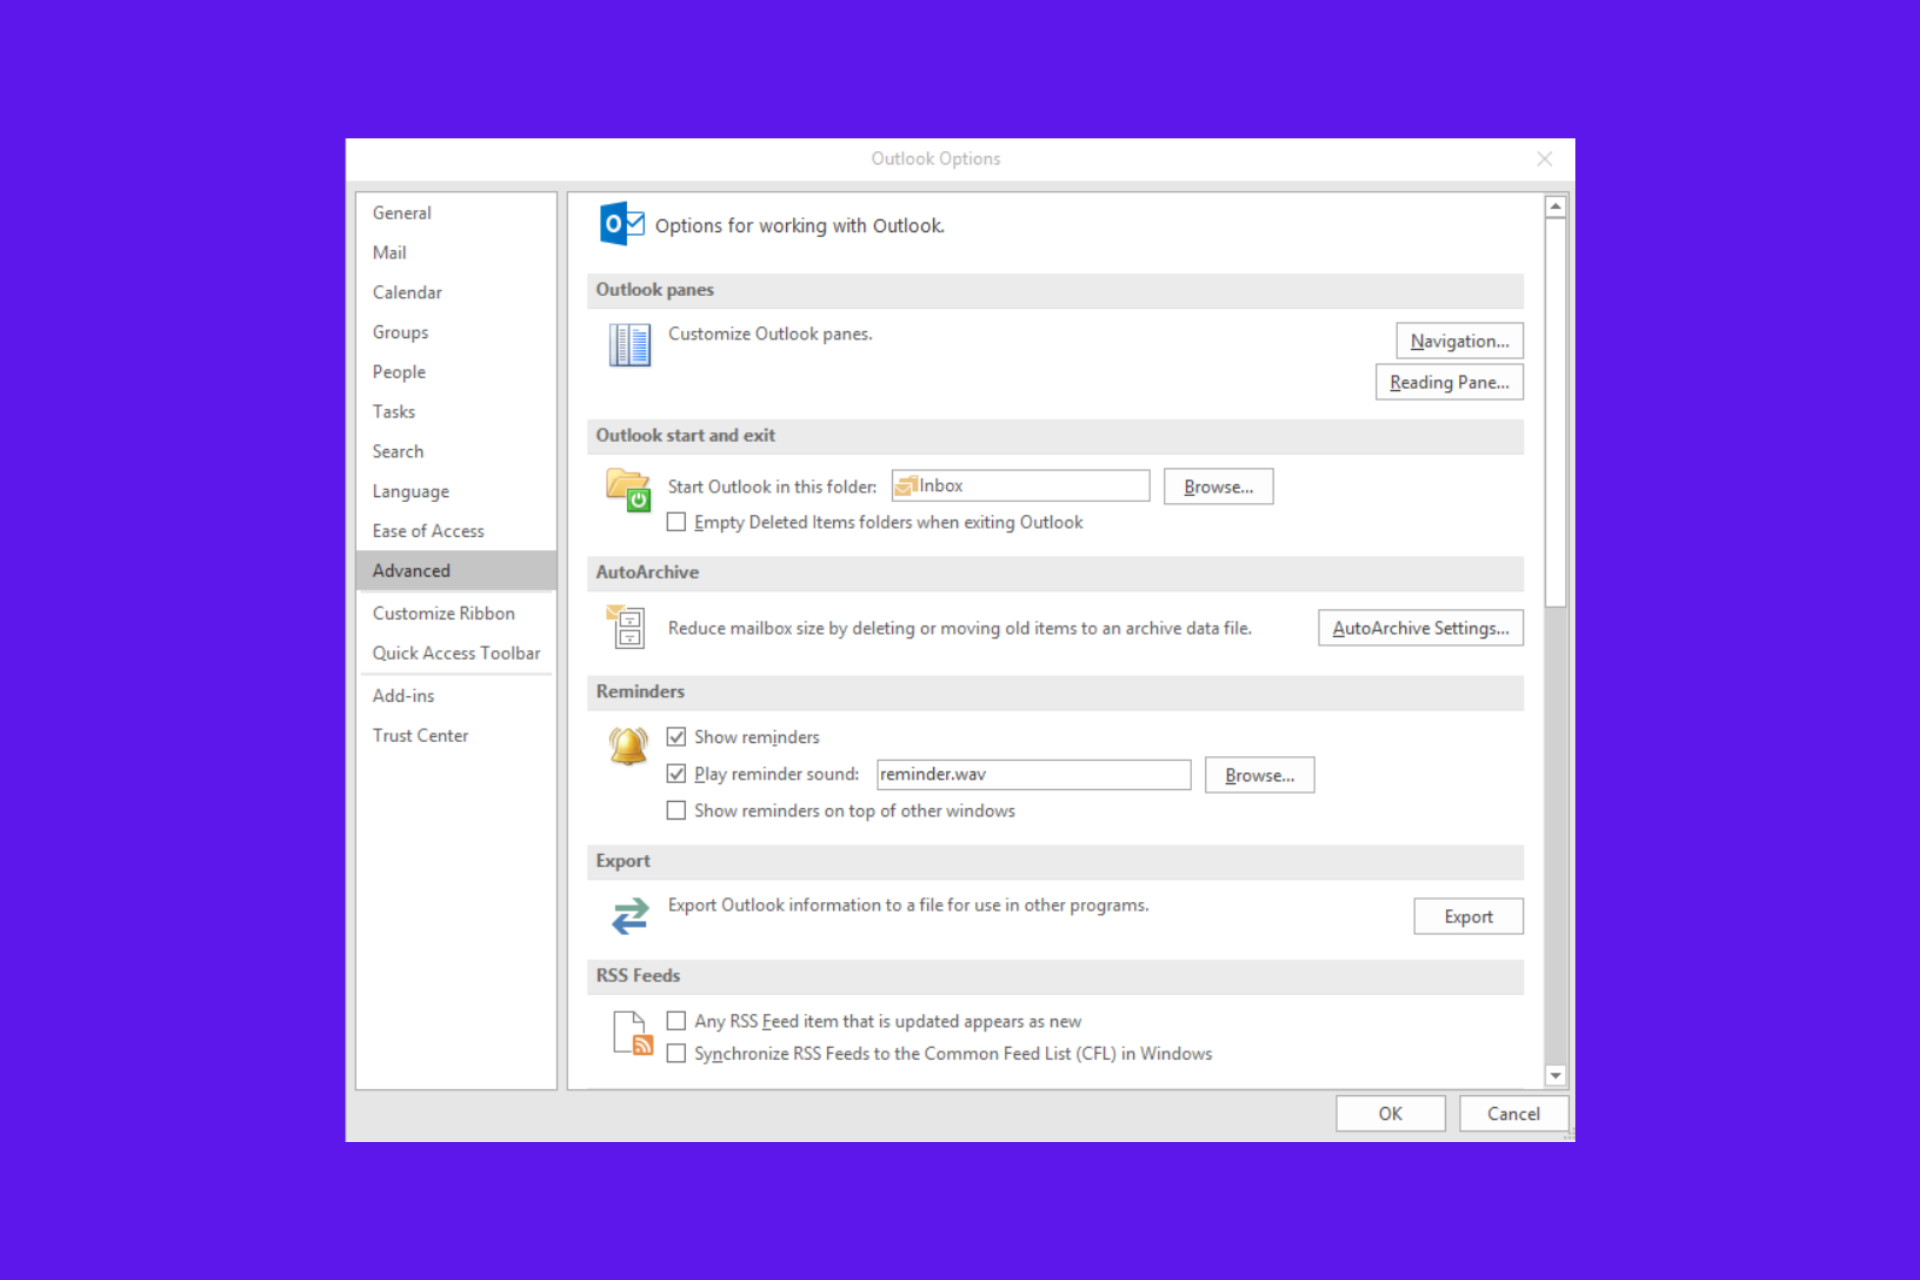
  1. Open Outlook and click on the File tab.
  2. Select Options from the menu.
  3. In the Options window, go to Advanced.
  4. Under the AutoArchive section, click on AutoArchive Settings.
  5. Check the box that says Run AutoArchive every [n] days.
  6. Enter the number of days (e.g., 14) to specify how often AutoArchive should run.
  7. Configure other settings such as:
    • Prompt before AutoArchive runs (recommended if you want a reminder before AutoArchive runs)
    • Delete expired items (to delete expired emails instead of archiving them)
    • Archive or delete old items (to set specific behaviors for archiving or deleting)
    • Show archive folder in folder list (to make the archive folder visible in the Navigation Pane)
    • Clean out items older than (to specify the age of items that should be archived)
    • Move old items to (to select the folder where archived items should be stored)
    • Permanently delete old items (to delete old items permanently without archiving)
  8. Click OK to save the settings.

This solution helps you prevent your Outlook mailbox from getting cluttered by automatically moving old items to an archive folder based on your chosen settings.

2. Adjust AutoArchive Settings for individual folders

  1. Open Outlook and right-click on the folder you want to customize.
  2. Select Properties from the context menu.
  3. Go to the AutoArchive tab in the Properties window.
  4. Choose one of the following options:
    • Do not archive items in this folder (to exclude the folder from AutoArchive)
    • Archive items in this folder using the default settings (to use the default AutoArchive settings)
    • Archive this folder using these settings (to customize the settings for this specific folder)
  5. If you choose to customize, configure the settings such as Clean out items older than and Move old items to or Permanently delete old items.
  6. Click OK to save the changes.

This solution allows you to have different AutoArchive rules for specific folders, giving you more control over what gets archived and when.

3. Manually archive items in Outlook

  1. Open Outlook and go to the File tab.
  2. Click on Tools and then select Clean up old items.
  3. In the Archive dialog box, select Archive this folder and all subfolders.
  4. Choose the folder you want to archive.
  5. Specify a date under Archive items older than.
  6. Click Browse to select a different location if you don’t want to use the default location for the archive file.
  7. Optionally, check the Include items with “Do not AutoArchive” checked box to include those items.
  8. Click OK to start the archiving process.

This method is useful if you need to manually archive certain items at a specific time rather than waiting for AutoArchive to run. In New Outlook, you just need to click the Archive button on the top menu. The emails will go right into the Archive folder on the left pane.

4. Change the location of the archive file

  1. Open Outlook and click on the File tab.
  2. Go to Open & Export and select Open Outlook Data File.
  3. Browse to the location where your archive file is stored, select it, and click OK.
  4. To move the archive file to a different location:
    1. Close Outlook.
    2. Move the archive file (archive.pst) to the new location.
    3. Open Outlook, click on File > Open & Export > Open Outlook Data File.
    4. Navigate to the new location and select the archive file.
  5. To update the AutoArchive settings:
    1. Click on the File tab, go to Options and then Advanced.
    2. Under AutoArchive, click AutoArchive Settings.
    3. Update the Move old items to path to the new location.
    4. Click OK to save the changes.

Moving the archive file to a different location helps in organizing your archived data better and managing storage effectively.

5. Understand the Aging Periods of Outlook items

  1. The aging period for Outlook items is determined as follows:
    • Inbox and Drafts: 6 months (default)
    • Sent Items and Deleted Items: 2 months
    • Outbox: 3 months
    • Calendar, Tasks, Notes, Journal: 6 months
  2. To adjust these periods, go to File > Options > Advanced > AutoArchive Settings.
  3. Customize the Clean out items older than setting for the specific folder.

Knowing the default aging periods helps you understand when items will be moved to the archive, allowing you to plan your archiving strategy accordingly.

6. Troubleshoot AutoArchive issues

  1. If AutoArchive is not running:
    • Ensure the Run AutoArchive every [n] days box is checked in the AutoArchive Settings.
    • Verify that AutoArchive is not overridden by an Exchange Server policy.
  2. If specific items are not being archived:
    • Check if the Do not AutoArchive this item property is set on the item.
    • Ensure the item’s modified date is older than the archive date.
  3. If the archive file is corrupted:
    • Use the Inbox Repair Tool (scanpst.exe) to repair the archive file.
    • If repair fails, create a new archive file.

Troubleshooting these common issues ensures that your AutoArchive process runs smoothly and efficiently.

7. Set AutoArchive for specific conditions

  1. Open Outlook and go to the File tab.
  2. Select Options and then Advanced > AutoArchive Settings.
  3. In the AutoArchive Settings window, configure specific conditions such as:
    • Delete expired items (only for email folders)
    • Move old items to (specify the folder for archived items)
  4. Apply these settings to all folders by clicking on Apply these settings to all folders now.

By setting specific conditions, you can tailor the AutoArchive process to meet your exact needs, ensuring that only relevant items are archived or deleted.

Regularly reviewing your AutoArchive settings can help maintain an organized mailbox and prevent storage issues. Keep these tips in mind to make the most out of Outlook’s AutoArchive feature.

And while you’re still on the job of organizing, here’s our guide on how to get a unified Inbox view in Outlook. You might also be interested in how to get Copilot in Outlook.

Before you go, don’t miss our guide to learn how to apply AutoArchive settings to subfolders in Outlook.

For any questions you might have, hit the comments below and tell us about it.

How to Run as a Different User Without a Password

Many users want to know how to run as different user without a password, and in today’s guide we’re going to show you a few simple ways to do that, so let’s get started.

How do I run as a different user without a password?

1. Allow accounts to have blank passwords

  1. Press Windows key + R and type secpol.msc. Click OK.
    secpol msc run window 
  2. Next, go to Local Policies and select Security Options.
    security options local security policy window
  3. Locate Accounts: Limit local account use of blank passwords to console logon only and double-click it.
    accounts local limit account use of blank passwords
  4. Set it to Disabled.
    limit local account use of blank passwords disabled
  5. Lastly, change the password to blank for the user account you want to use.

While this is a simple solution, it’s a security risk and it should only be used on home computers.

2. Use savecrd parameter

  1. Open Command Prompt.
  2. Type the following command, but be sure to replace WindowsReport and the path of the application: runas /savecred /user:WindowsReport “C:\Example\test.exe”
    runas savecred command in Terminal
  3. When asked, enter the credentials.

The credentials will now be saved and you won’t have to enter them again.

How do I always show run as a different user?

  1. Press the Windows key + R and type regedit. Click OK.
    Regedit run window
  2. Navigate to the following key: HKEY_CLASSES_ROOT\exefile\shell\runasuser
    runasuser path in registry editor
  3. Next, locate the Extended value, right-click it and choose Delete.
    extended delete registry
  4. Delete the Extended value in the following keys as well: HKEY_CLASSES_ROOT\cmdfile\shell\runasuser
    HKEY_CLASSES_ROOT\batfile\shell\runasuser
    HKEY_CLASSES_ROOT\mscfile\shell\runasuser
    HKEY_CLASSES_ROOT\Msi.Package\shell\runasuser

As you can see, it’s easy to run as a different user without a password, and you just have to change the security policy or save the credentials of the other account.

To learn more about this feature, check how to use Run as a different user on Windows 11. If you ever encounter Access denied with Run as user command, we have a special guide that addresses that.

Copilot will be able to summarize inked notes in OneNote, and it’s a game-changer

Picture yourself writing fast in a meeting or lecture with your notebook full of handwritten notes. How wonderful would it be if those scribbles could turn into neat digital text by magic? This is now possible for users of OneNote who are part of the Microsoft 365 Insiders program.

A fresh attribute in OneNote for Windows is the ability of the Copilot AI assistant to scrutinize handwritten notes. This could be a turning point for those who appreciate the sensation of pen on paper but desire digital convenience.

Before, Copilot could only show its skills on typed text in OneNote. But admit it, there’s a special charm and adaptability to writing notes by hand. Whether it’s a fast sketch for better understanding or points noted down that comes quicker than your typing pace, this fresh characteristic is here for all.

According to the official blog post, Microsoft has provided two easy methods for activating Copilot in your inked notes in OneNote. Firstly, you may click the Copilot icon in the OneNote app’s ribbon or select and tap on your handwritten notes directly to view what Copilot suggests for summary, rewriting, or a To-Do list from your scribbles.

People who want to experiment with this characteristic can find it on OneNote for Windows Version 2404 (Build 17628.20006) or later. However, there is a condition – currently, only Microsoft 365 Insiders can access Copilot for inked notes in OneNote.

The timing for when all users will get the feature has not been revealed yet; however, given how quickly Microsoft has been including fresh functions in OneNote recently, we can assume this might happen soon enough.

Insiders have witnessed numerous new features in the last few weeks, such as Loop components and an interactive ink tutorial. They also introduced a fresh Eyedropper tool, which allows you to personalize pen colors straight from images or notes.

What are your thoughts? Are you eager to witness your handwritten notes being transformed into OneNote?

Solved: Run as Different User Option Missing in Windows 11

We can appreciate how the run as a different user option in Windows comes in handy especially when you don’t want to interfere with profiles but what happens when it’s missing?

Potential reasons behind this anomaly have to do with permissions. It’s either your UAC settings have been reconfigured, or the system administrator has placed certain restrictions. On the other hand, a Windows update could also be behind it or some corrupt system files.

However, before you jump to troubleshooting, ensure the run as a different user feature is on your Windows edition as not all support this functionality.

What can I do if the run as a different user option is missing?

1. Restart the Secondary Logon service

  1. Press Windows + R to open the Run dialog box.Services RUn command - destiny 2 stuck on initializing
  2. Type services.msc and click OK to open the Services app.
  3. Locate and double-click Secondary Logon to open its properties.Secondary logon
  4. For Startup type, select Automatic from the drop-down menu.Automatic
  5. Click Apply and OK to save the changes, then reboot your PC.

2. Uninstall recent Windows update

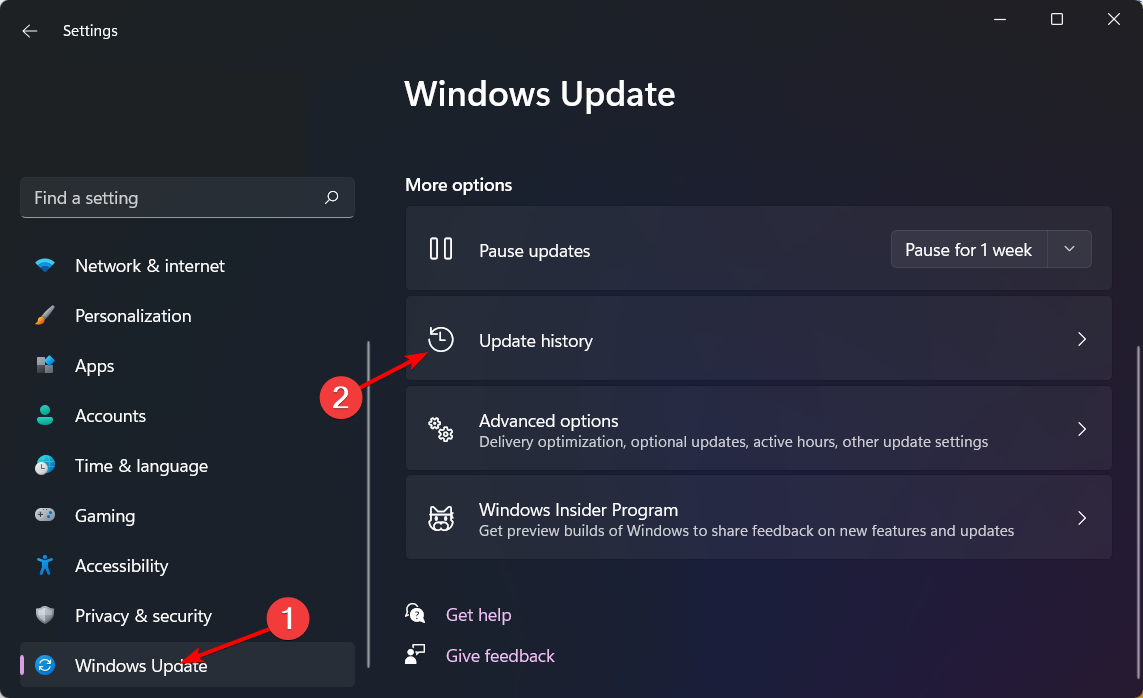
  1. Press the Windows + I keys simultaneously to open Settings.settings windows 11
  2. Navigate to Windows Update, then go to Update history.windows-update-history logitehc unifying not working
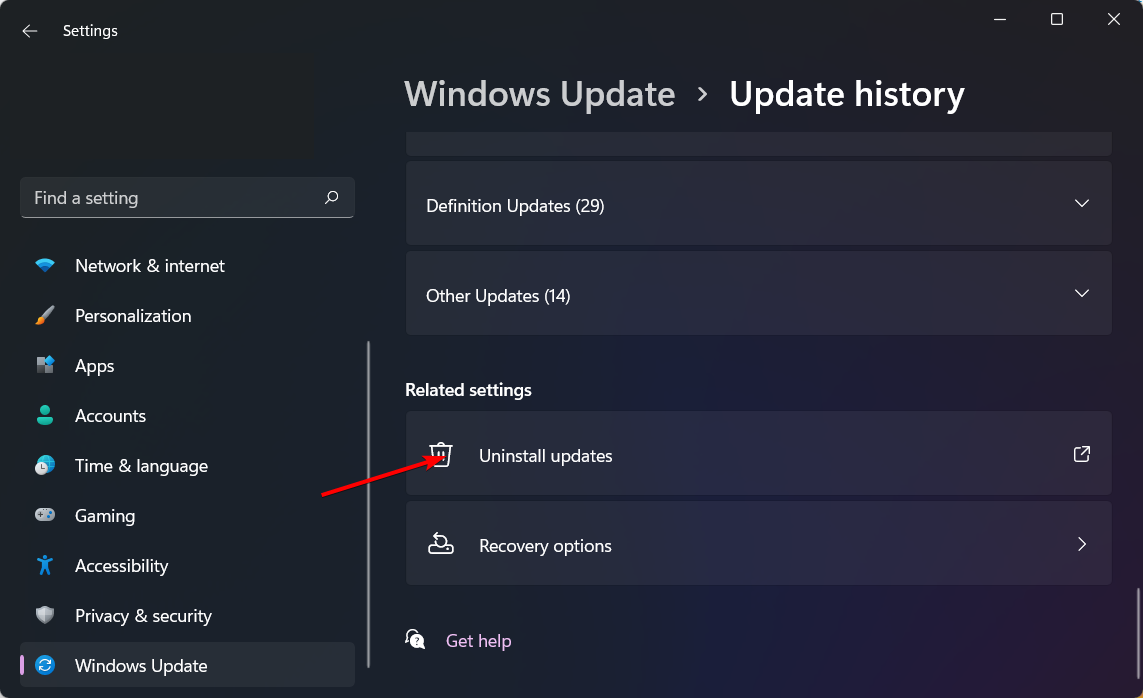
  3. Click on Uninstall updates.uninstall-updates-w11 computer-recognize-logitech-unifying-receiver
  4. Select the most recent update, then click Uninstall.

Some Windows updates can alter system settings and interfere with previously working features. If this is the case, rolling back an update should restore the run as a different user option if it was missing.

3. Run DISM and SFC scans

  1. Hit the Start Menu icon, type cmd in the search bar, and click Run as administrator.cmd-run-admin-w11 unexpected kernel mode trap windows 11
  2. Type the following commands and press Enter after each one:DISM.exe /Online /Cleanup-Image /Restorehealth sfc /scannow

In case a Windows update or even a virus has corrupted some system files, it is possible that some features were caught up in the mix. Running a system file checker scan can repair these files and restore the run as a different user functionality that was missing.

4. Adjust UAC settings

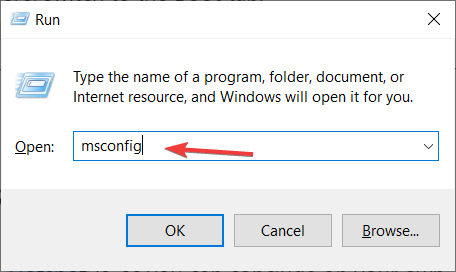
  1. Press the Win + R keys to launch the Run console. Then type msconfig in the search bar and hit Enter to open the System Configuration window.
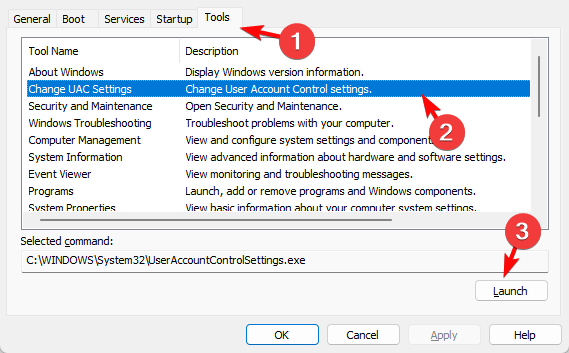
  2. Next, go to the Tools tab in the System Configuration window, select Change UAC Settings, and press Launch.Change UAC Settings
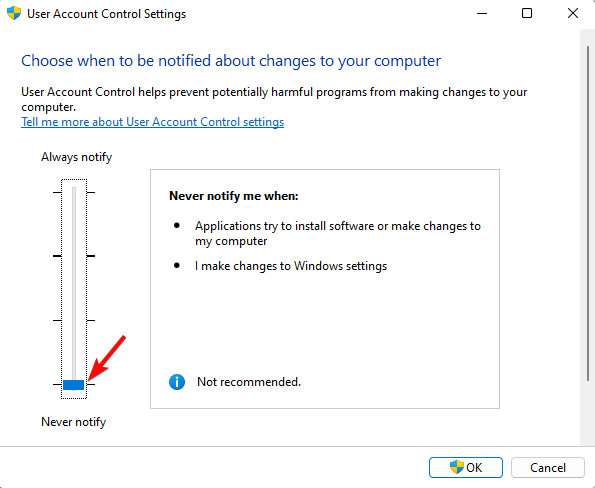
  3. This will open the User Account Control Settings window. Here, move the slider on the left to Never notify, and press OK to save the changes.set UAC to never notify

If your UAC settings are too high, you may be restricted from accessing some system functionalities especially if you’re not using an administrator account. Lowering these settings can allow you to access the run as a different user option.

Remember to adjust your UAC settings back to a secure level as disabling it exposes your system to security risks.

5. Use the Group Policy Editor

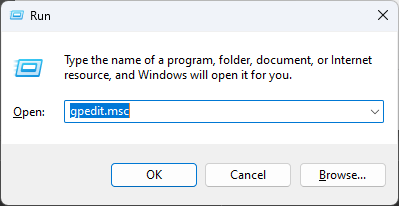
  1. Hit the Windows + R keys to open the Run command.
  2. Type gpedit.msc in the dialog box and hit Enter to open the Group Policy Editor.GPEDiT.msc -Windows Remediation Service Failed to Start?
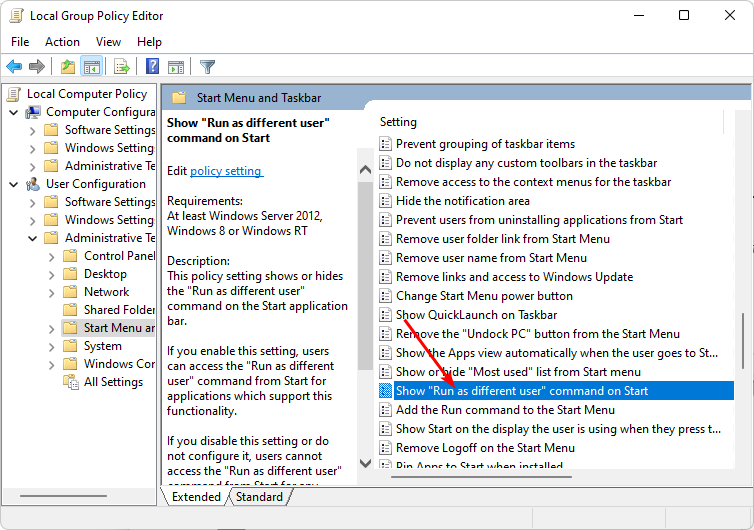
  3. Navigate to the following location: User Configuration/Administrative Templates/Start Menu and Taskbar
  4. Double-click on Start Menu and Taskbar and select Show “Run as different user” command on Start.
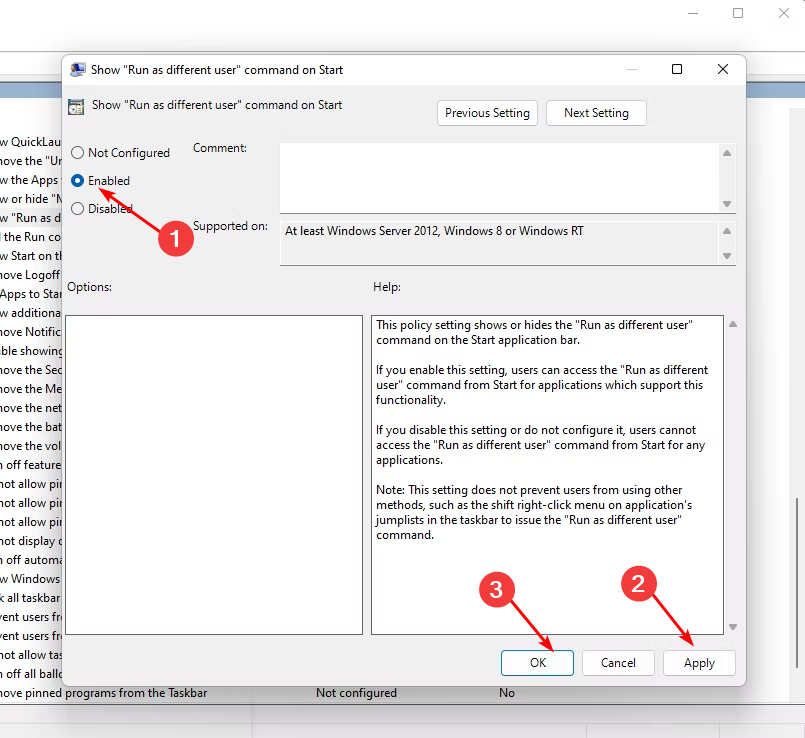
  5. In the new window, check the Enabled box then click Apply and OK to save changes.

6. Use the Registry Editor

  1. Remember to create a restore point or backup the registry before making any edits.
  2. Hit the Windows + R keys to open the Run command.
  3. Type regedit in the dialog box and hit Enter to open the Registry Editor.
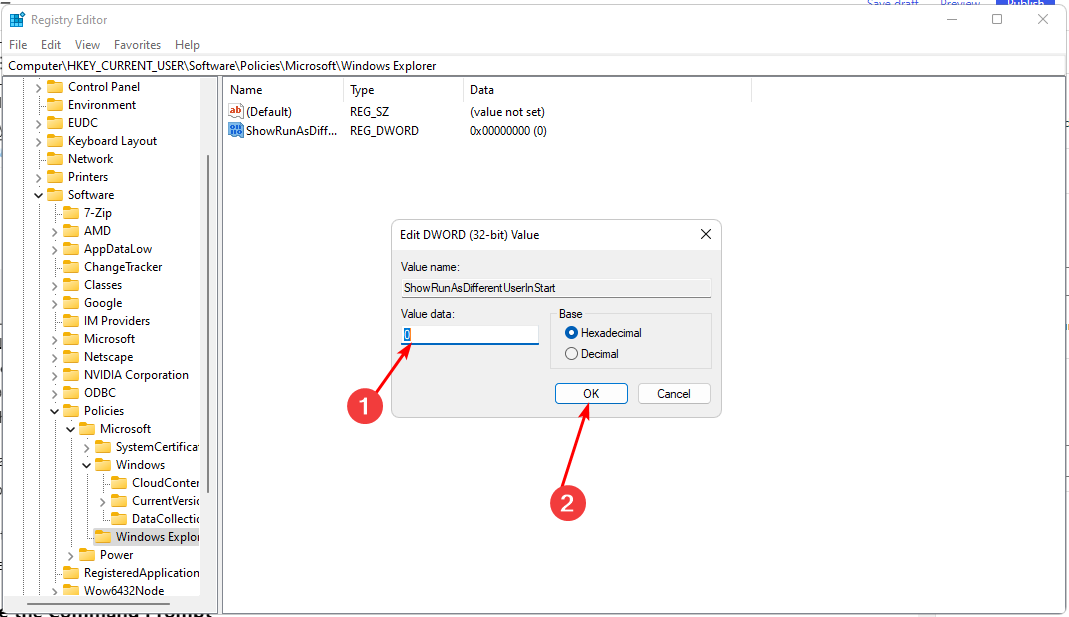
  4. Navigate to the following location: Computer\HKEY_CURRENT_USER\Software\Policies\Microsoft\Windows\Explorer
  5. Double-click on ShowRunAsDifferentUserInStart, set the Value data as 1 then click OK to save the changes.

7. Create a new user profile

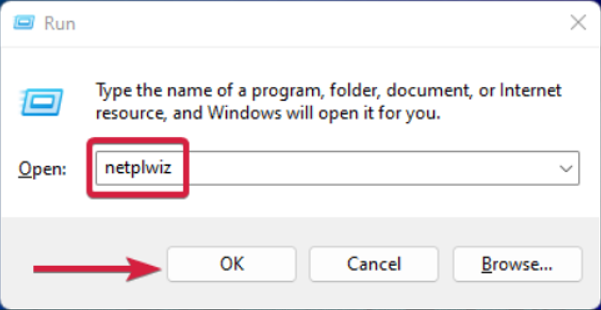
  1. Press Windows + R to launch the Run console, enter netplwiz in the text field, and click OK.
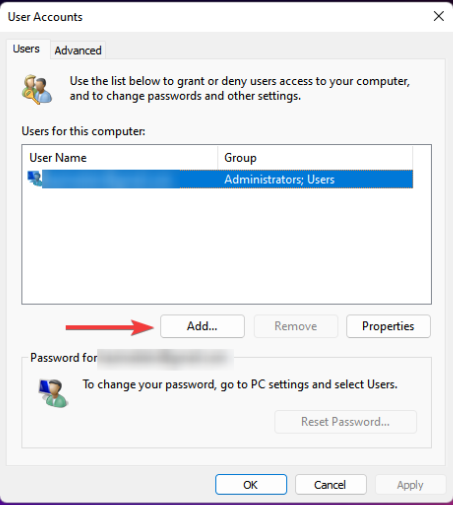
  2. Click Add in the User Accounts window.
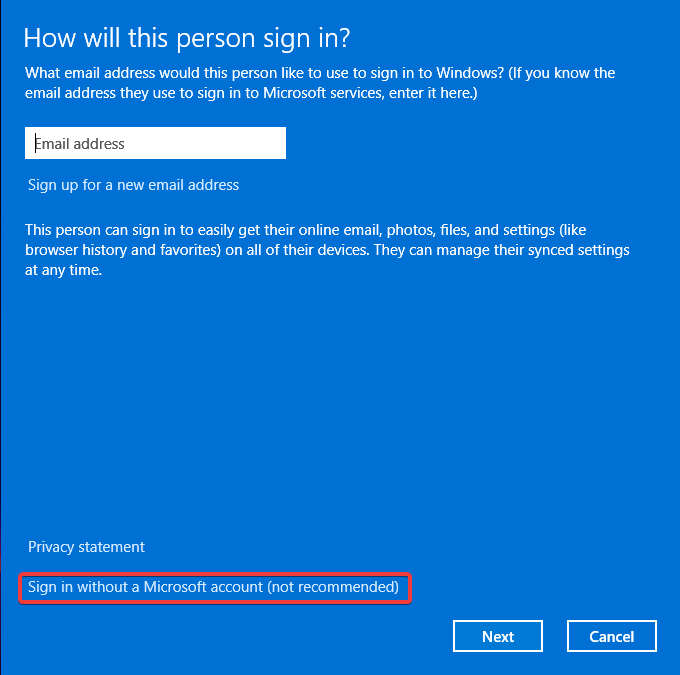
  3. Select Sign in without a Microsoft account (not recommended).
  4. Click on Local account button.
  5. Enter a username and password (optional) for the new user account, and a hint, in case you set a password. Once done, click on Next.
  6. Click on Finish to create the Local account.

A corrupt user profile may prevent you from accessing some features. While checking for corrupt profiles, also ensure your user profile is not disabled. Creating a new profile helps you isolate the issue whether it is profile-based or system-based.

8. Perform a System Restore

  1. Press the Windows key, type Control Panel, and click Open.control-panel-search fallout new vegas runtime error
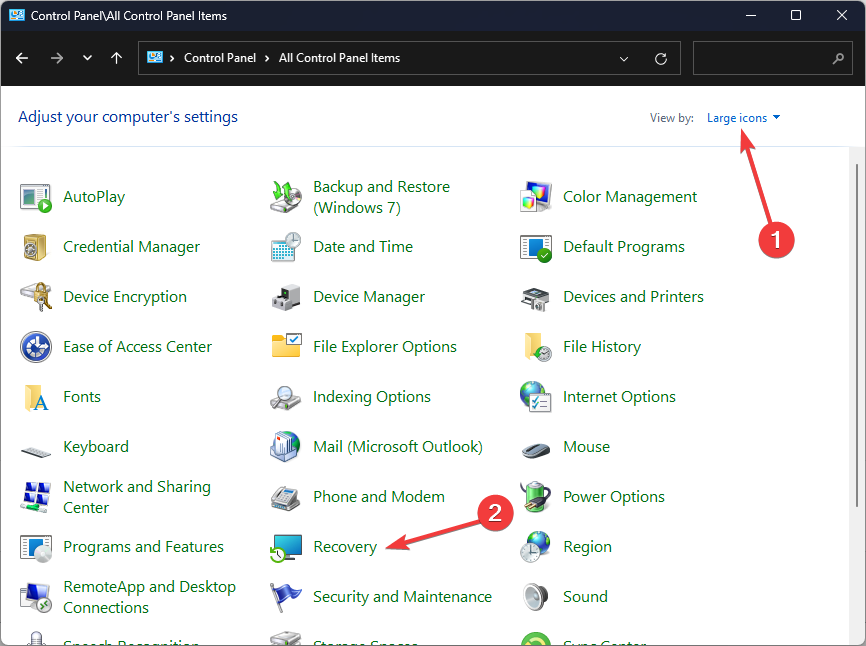
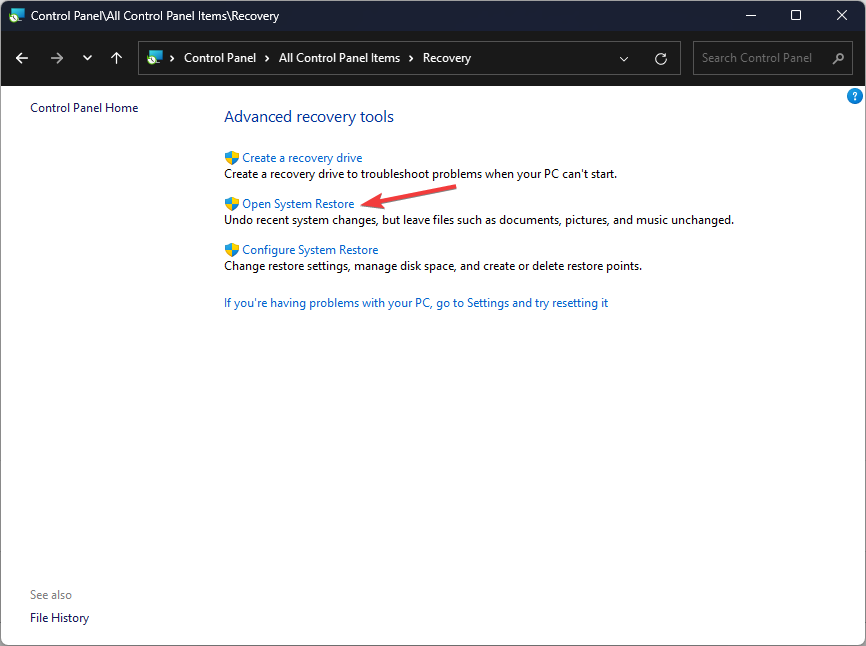
  2. Select Large icons as View by and click Recovery.Recovery Control Panel Advrcntr6.dll
  3. Click Open System Restore.Open system restore
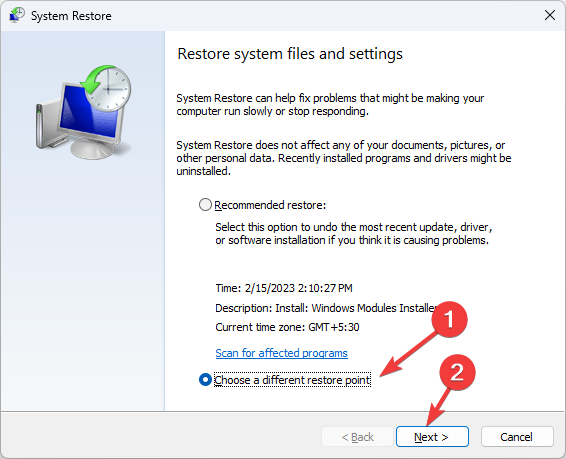
  4. Select Choose a different restore point and click Next.Next Choose a different restore point
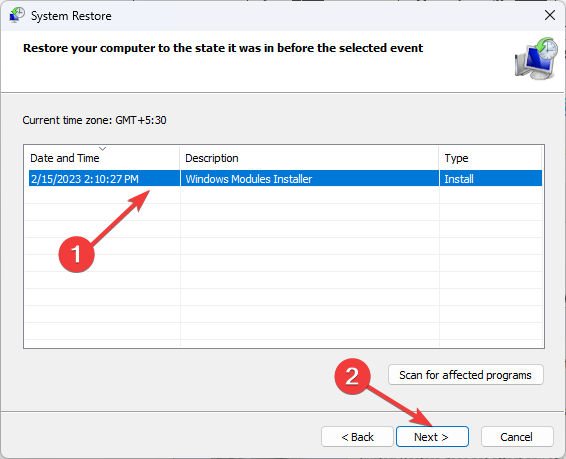
  5. Now select the restore point and click Next. Choose a point
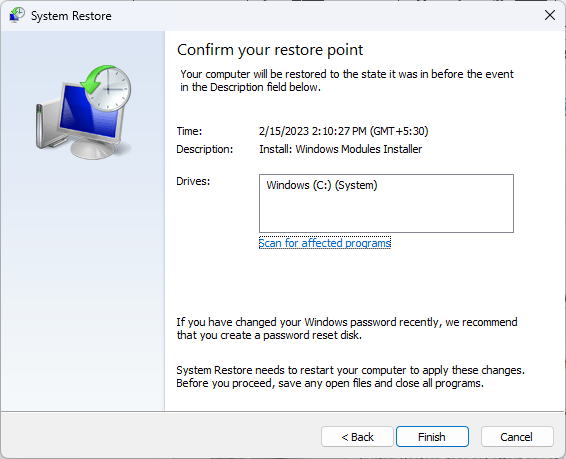
  6. Click Finish to restore the previous settings, and Windows will restart.Finish Restore point

Note that even run as administrator may fail to work or greyed out at times but we’ve already covered how to fix it in our detailed guide. Moreover, if the Run as Different User option isn’t working properly, we’ve got you covered.

In future, as an administrator, consider making all programs available for all users. This can help address permission issues.

That’s a wrap but do let us know if you’ve been able to fix this issue. And if you have any other solutions not mentioned here but worked for you, drop us a comment down below.

How to Transfer IncrediMail Emails to Outlook

Transferring your emails from IncrediMail to Outlook can seem daunting, but with the right tools and steps, it becomes a straightforward process. Whether you prefer using specialized software or manual methods, this guide will walk you through the best solutions to make the transition as smooth as possible.

How do I export my emails from IncrediMail to Outlook?

1. Manually export emails from IncrediMail to Outlook

1. Exporting Emails from IncrediMail

  1. Launch the IncrediMail application on your computer.
  2. Choose the email messages you want to export to Outlook.
  3. Click on File in the menu and select Save As… from the dropdown.
  4. Select Mail (.eml) as the file type and save the emails.

Repeat these steps for each email you wish to transfer. This process is feasible for a small number of emails.

2. Importing EML Files into Outlook

  1. Navigate to the folder where the EML files are saved.
  2. Right-click on an EML file and select Open with > Outlook.
  3. Click on the Move button in the Ribbon. Choose the folder in Outlook where you want to store the email.

Repeat the process for each EML file. This method is manual and time-consuming but works well if you have a limited number of emails to transfer.

Manually exporting and importing emails can be tedious but is viable for small-scale transfers without needing third-party tools. However, even if the tools below will cost you a few bucks, they do the job a lot faster.

2. Using SysTools IncrediMail Converter

  1. Download and install SysTools IncrediMail Converter.
  2. Follow the on-screen instructions to install the software on your computer.
  3. Open the SysTools IncrediMail Converter.
  4. Click on Add File and select the IncrediMail data files (IMM, IML, IM, DB) from your storage.
  5. Click Open to load the files into the tool.
  6. The tool will display a preview of your IncrediMail emails and contacts.
  7. Verify the data to ensure all required items are loaded.
  8. Click on the Export button and select PST as the export format to be compatible with Microsoft Outlook.
  9. Click on the Browse button to select a destination folder where the converted PST file will be saved.
  10. Click on the Export button to initiate the conversion process.
  11. Wait for the process to complete. The duration depends on the volume of data being converted.

This software provides a seamless and quick migration from IncrediMail to Outlook, even supporting bulk conversions. It maintains data integrity and is compatible with the latest Windows versions.

3. Using RecoveryTools IncrediMail Mail Migrator

  1. Download and install RecoveryTools IncrediMail Mail Migrator.
  2. Open the Mail Migrator tool.
  3. Click on Add Files and select the IncrediMail data files.
  4. Choose Outlook PST as the export format for compatibility with Microsoft Outlook.
  5. Click on Browse to select where the PST file should be saved.
  6. Use advanced filters if you want to convert specific emails or folders.
  7. Click on the “Convert” button and wait for the migration process to complete.

This method simplifies the transfer process and supports bulk conversions, making it efficient for large volumes of data. The tool also offers advanced filters for selective data migration.

4. Using BitRecover IncrediMail Converter Wizard

  1. Download and install BitRecover IncrediMail Converter Wizard.
  2. Open the BitRecover IncrediMail Converter Wizard.
  3. Click on Open and import your IncrediMail data files (IMM, IML, CAB, DB).
  4. Choose PST from the list of saving options.
  5. Click on Browse to select the folder where the PST file will be saved.
  6. Click the Convert button and monitor the live status conversion report until the process is complete.
  7. Open Microsoft Outlook.
  8. Go to File > Open > Import and select the PST file you saved.

BitRecover IncrediMail Converter Wizard is a reliable tool that ensures the preservation of folder structure and email components, making the transition to Outlook smooth and efficient.

5. Using Kernel IncrediMail Recovery Software

  1. Download Kernel IncrediMail Recovery.
  2. Install and launch the software.
  3. Click on Select File and choose the IncrediMail data files (IMH, IMB, IMM).
  4. The software will display a preview of your data. Select the data you wish to convert.
  5. Select PST as the output format for Outlook compatibility.
  6. Click on Browse to choose the folder where the PST file will be saved.
  7. Click on the Export button. The software will begin converting your IncrediMail data to PST format.
  8. Open Microsoft Outlook and use the Import feature to add the PST file to Outlook.

Kernel IncrediMail Recovery simplifies the exporting process and supports converting corrupted IncrediMail files as well, ensuring a comprehensive recovery and transfer to Outlook. You can also check out some other alternatives.

By following these solutions, you can ensure a smooth transition from IncrediMail to Outlook. As you’ve noticed, the manual process can be very time consuming but by using the tools above, the process goes automatically and smoothly.

Microsoft announces VBS Enclaves, a new and better way to protect apps from being hacked

Microsoft has introduced a new security capability in Windows 11 called VBS Enclave. Based on virtualization-based security (VBS), this characteristic intends to provide more safeguarding, particularly for third-party applications.

VBS Enclaves can be seen as a kind of Dynamic Link Library (DLL) file that protects important operations and secrets in an application’s memory space. Here’s how it works.

According to the official announcement, the VBS Enclave creates a Trusted Execution Environment (TEE) inside the host application. This environment isolates crucial parts of the program to protect them from outside dangers.

A VBS enclave is a software-based trusted execution environment (TEE) inside a host application. This is a revolutionary change in our security model for the application, allowing an app to protect its secrets using the power of VBS, from admin-level attacks.

Microsoft

The isolation occurs by utilizing Virtual Trust Levels (VTLs), and the enclave operates at an elevated privilege level that cannot be reached in a normal operating environment. It’s similar to having a secure room built into your application where you can keep your important data safe from being seen by others who might want to look at it without permission.

The Windows Hyper-V hypervisor, which creates this separate and special space called VTL1, makes all of this possible. It’s different from the normal Windows environment we use daily – VTL0. Anything inside VTL1 stays safe because it’s not affected by lower privilege levels. It’s a fancy method to hide the good parts, making the application work normally.

As for the prerequisites, there are some things you need to do before you can use VBS Enclaves. First, your device should have VBS/HVCI enabled (the default setting in Windows 11 and later). Second, make sure that the operating system on it is running Windows 11 or later versions; alternatively, if using a server computer, then choose Windows Server 2019 onwards as well.

Last but not least important – Microsoft has shared details about creating their own VBS enclave via a webpage, providing information that will help developers better protect their apps by utilizing this technology.

In this age of digital systems, the need for security is very high. Threats from cyberspace are becoming more advanced and clever, so having an extra layer can help stop them. Developers can make applications that provide users peace of mind, knowing their data is protected. For others, it means confidence that their daily applications are working hard to keep their information secure.

Microsoft’s start of VBS Enclaves is a big move forward in cybersecurity. It gives an application its safe area where important data and functions can be kept away from dangers outside. This offers more security to those who create and use the application.

Darkest Dungeon II is finally coming to Xbox Series S/X

Darkest Dungeon II, which has enthralled PC players with its tough turn-based RPG mechanics, is ready for big entrance on Xbox One and Xbox Series X|S platforms for those who love all things related to Xbox on July 15.

This coincides with its launch on PlayStation 4, PlayStation 5, and Nintendo Switch, simultaneously making it available across all major consoles. The excitement can be felt by many gamers looking forward to exploring this game’s dark and captivating world through their beloved Xbox devices.

Darkest Dungeon II is not an ordinary game; it is a continuation that pledges to raise the rogue-like involvement with its polished and bettered turn-based combat system. The creators from Red Hook Studios have carefully improved all aspects of this game, from stats up to rules, to bring forth an entirely fresh Token System that aims to make every choice more important than ever.

However, what makes this game truly distinct are its heroes, who will remain in your memory for a long time —each with their sad beginnings waiting to be discovered. When players discover new skills, paths, and items, the game becomes more engaging with its story and rules.

The Altar of Hope is a unique feature of the game. It is a large system that provides upgrades and boons for each expedition. Players can decide what matters to them while preparing for their assaults on the mountain.

Another interesting aspect is the Affinity System, which tracks relationships between heroes as they bond or irritate each other during their journey. This method complicates the gameplay because handling heroes’ stress and relationships becomes crucial for keeping the team intact until the final stages.

People excited to start this dark adventure can pre-order Darkest Dungeon II and get a 15% discount from the Xbox store. With this, you will also be buying Oblivion Edition, which includes the main game and The Binding Blade DLC pack.

This additional content introduces two extra heroes, and a fresh, moving boss creature called The Warlord, making the game’s world more exciting.

Darkest Dungeon II promises to be a tough but fulfilling experience, with its tactical intricacies, engaging narrative, and elegantly eerie game setting. If you’re not convinced, read our comprehensive review. Whether you have played the first game many times or are new and want to know what it’s like walking through these gloomy passages, we eagerly await July 15th.

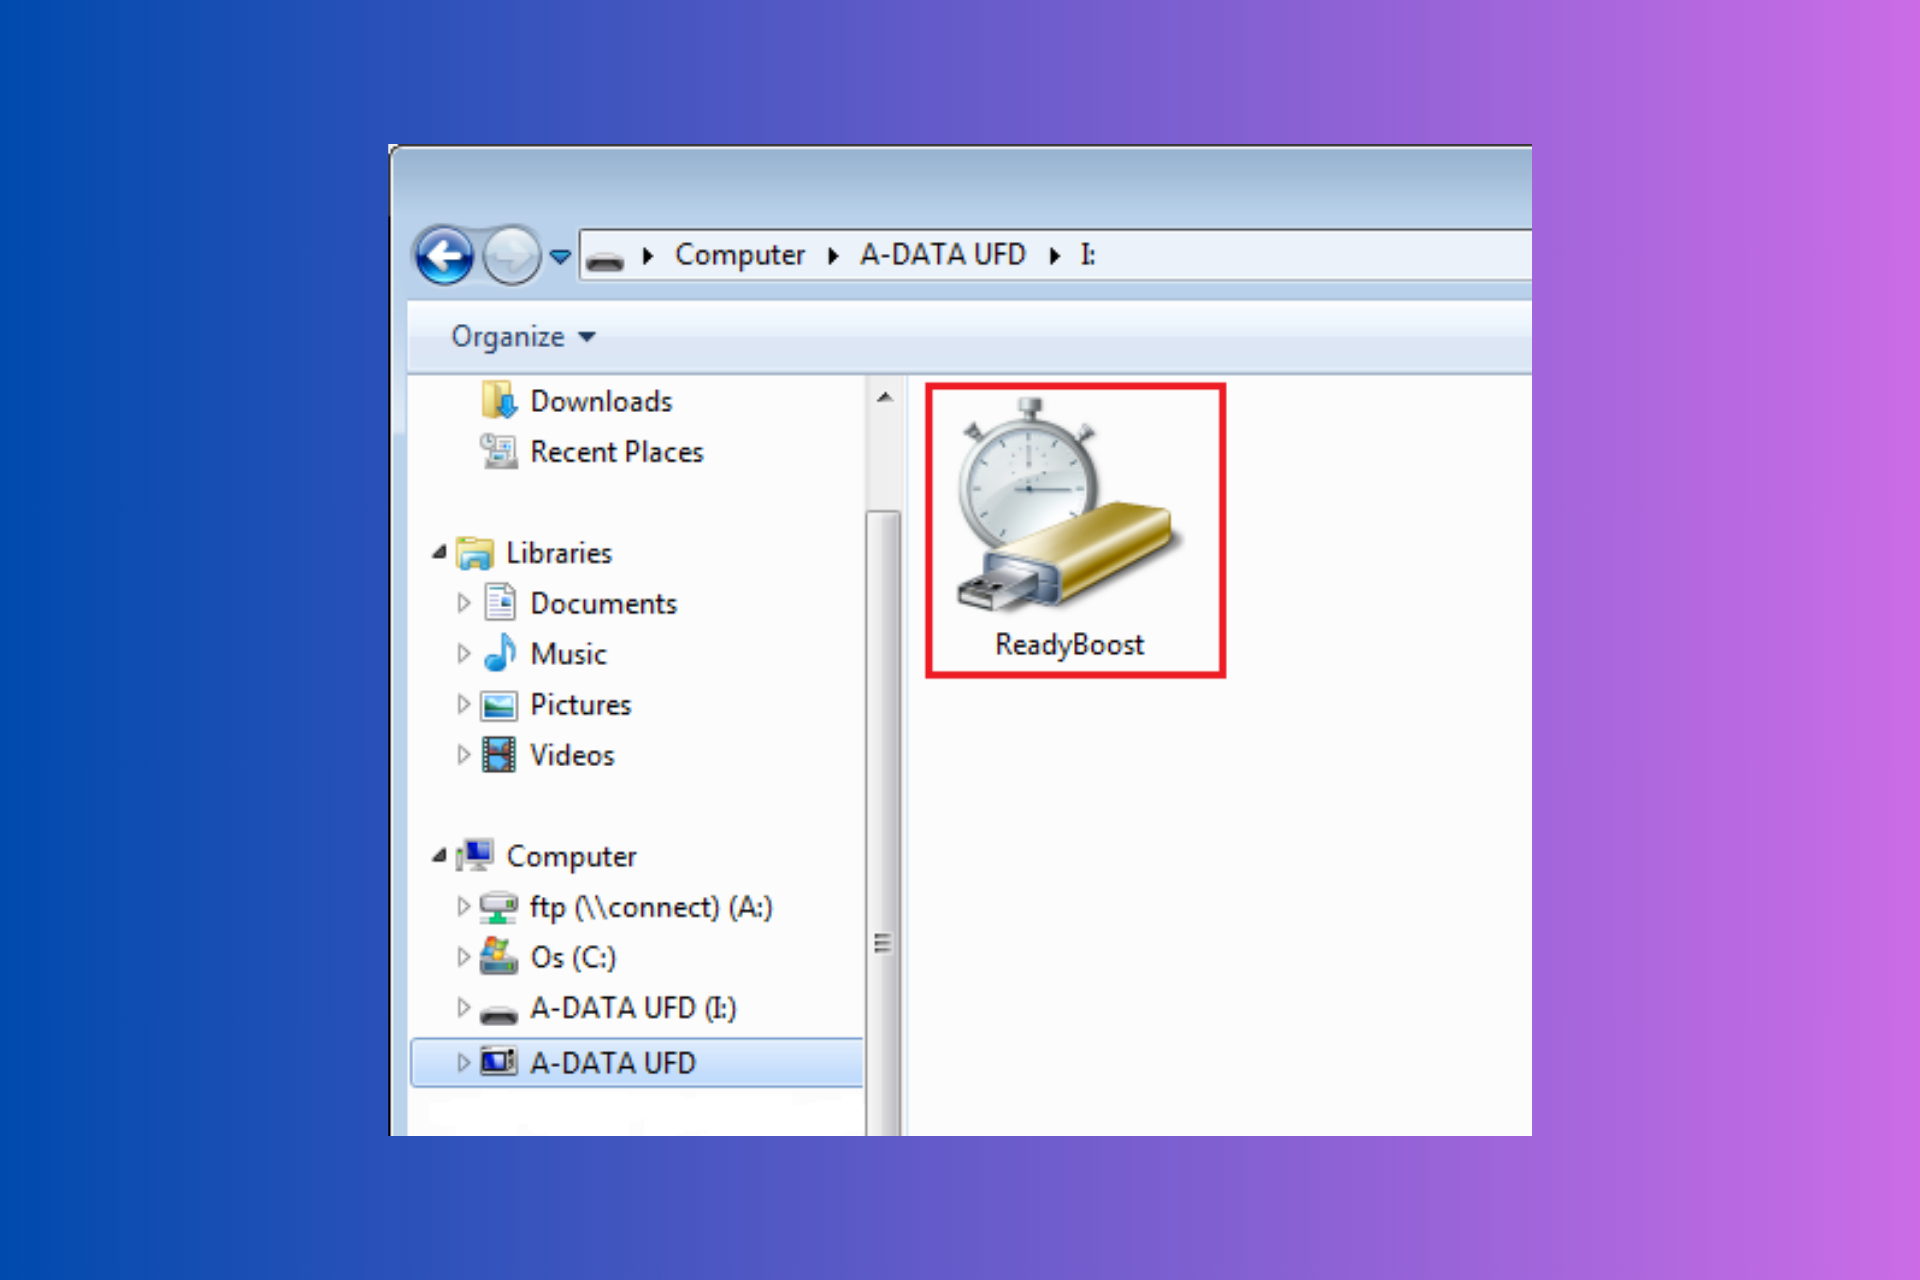
ReadyBoost is Not Working: 5 Tested Solutions to Fix

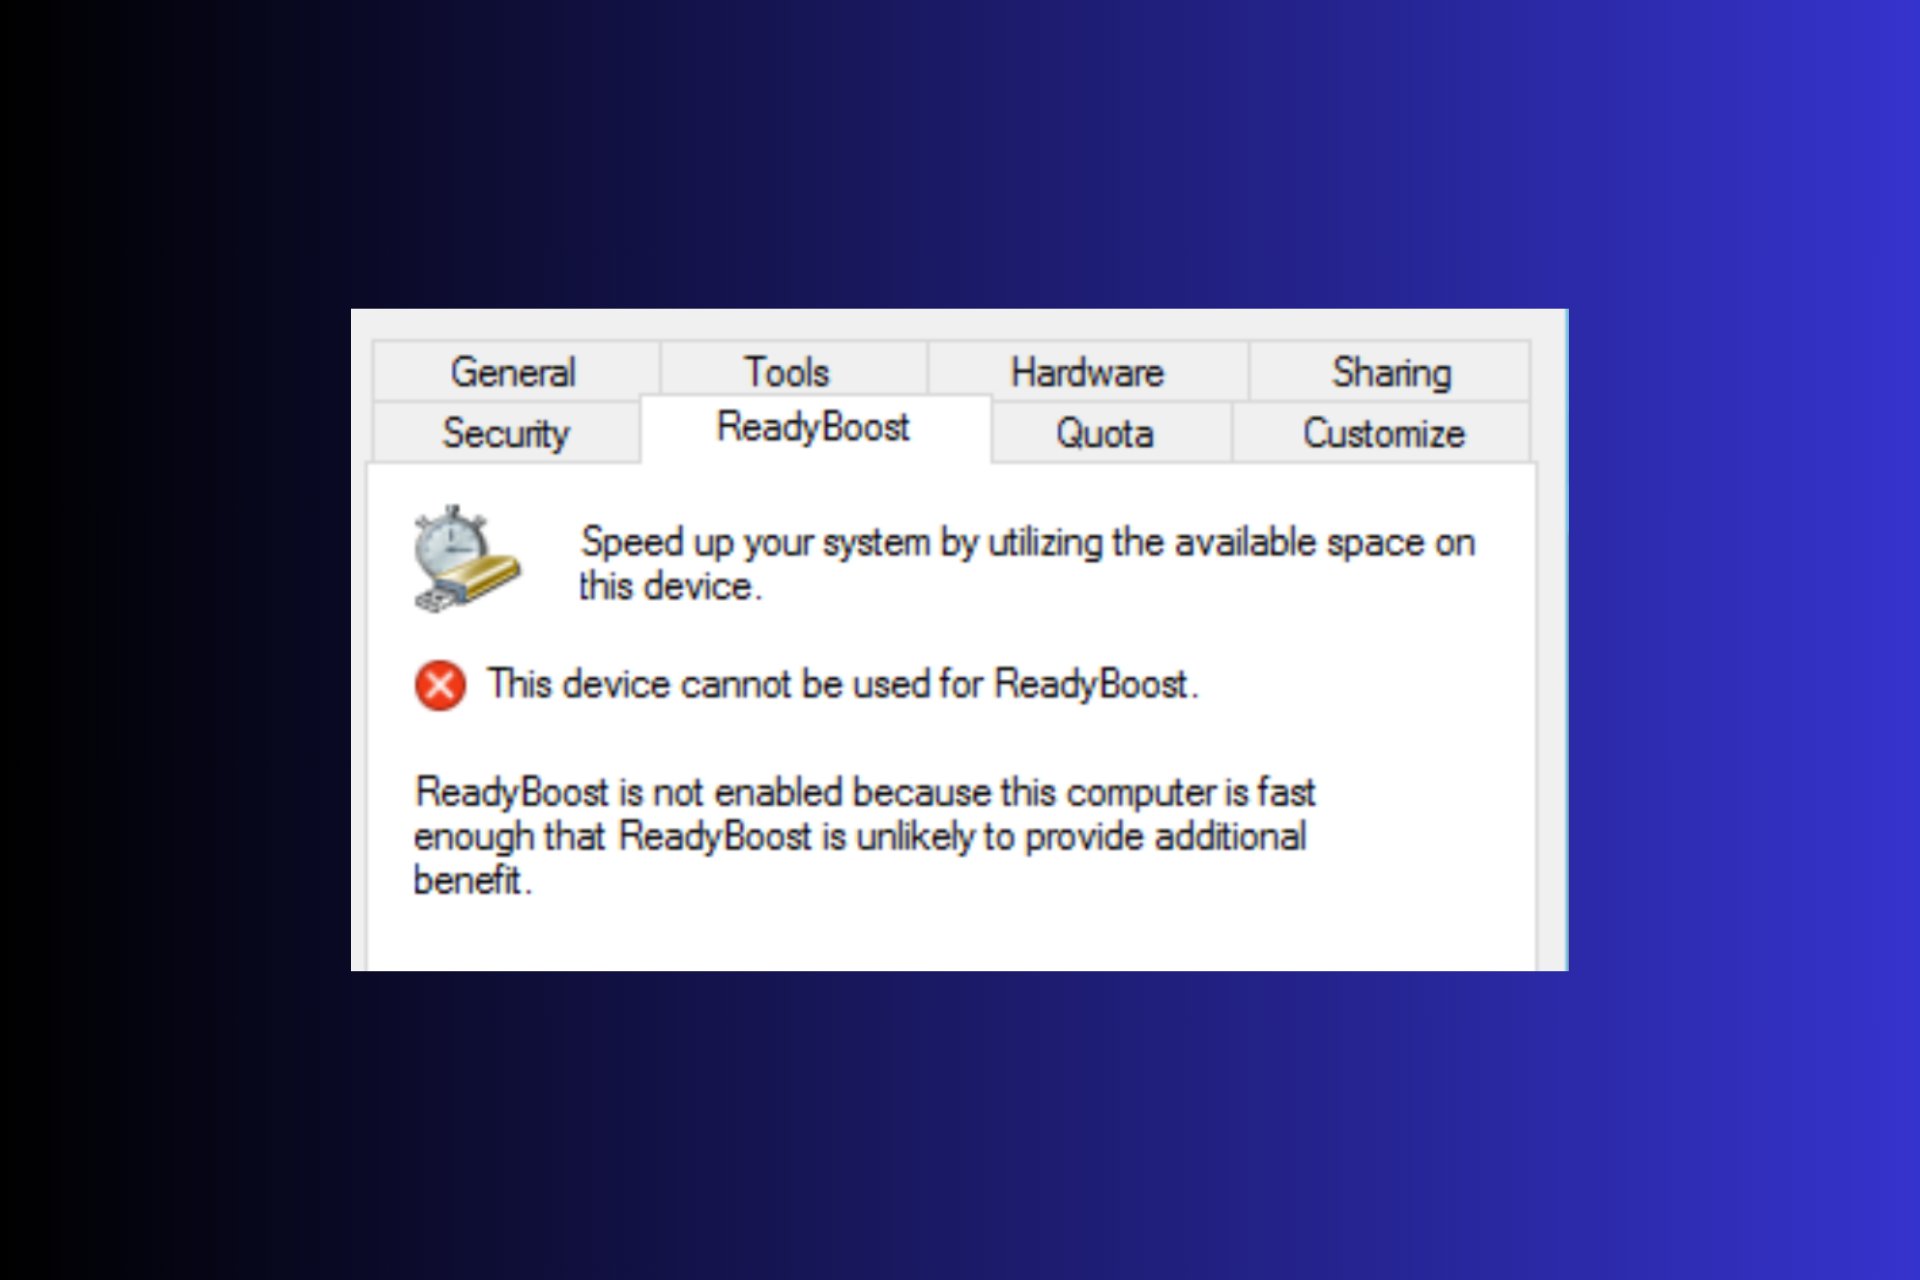
ReadyBoost can be a lifesaver for those with older systems, but it can be frustrating when it doesn’t work as expected. First, make sure you have a compatible flash drive or SD card and check if you have over 4 GB of RAM. Also, if your system is installed on an SSD, ReadyBoost won’t work because your flash storage is faster than a USB drive.

1. Verify the system requirements

  1. Open the Start Menu by clicking the Start button on your Taskbar.
  2. In the search bar, type System Information and press Enter.
  3. Check the total amount of RAM installed on your computer. If your computer has more than 4GB of RAM, ReadyBoost may not be necessary as your system already has adequate memory.

ReadyBoost is designed to enhance systems with low memory. If your system already has sufficient RAM, enabling ReadyBoost might not provide any noticeable performance improvements, which is why Windows may disable it by default.

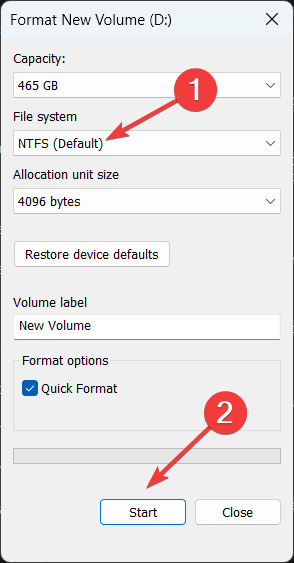
2. Format the USB drive or SD card

  1. Plug your USB drive into your computer, or the SD card into its dedicated slot.
  2. Open File Explorer by clicking on the folder icon in the Taskbar or by pressing Windows + E.
  3. Locate your USB drive or SD card under This PC, right-click on it and select Format.
  4. Choose the NTFS file system from the dropdown menu.
  5. Click Start to format the drive.

Formatting the USB drive to NTFS can resolve compatibility issues with ReadyBoost. This ensures the drive meets the performance requirements necessary for ReadyBoost to function properly.

3. Enable the ReadyBoost service

  1. Press Windows + R to open the Run dialog, type services.msc and press Enter.
  2. Scroll down and locate ReadyBoost, right-click on it and select Properties.
  3. Change the Startup type to Automatic.
  4. Click Start to initiate the ReadyBoost service.
  5. Click Apply and then OK.

If the ReadyBoost service isn’t running, your USB drive won’t be tested or used for ReadyBoost. Setting the service to start automatically ensures it will be ready to use when you plug in compatible hardware.

4. Check Disk Speed

  1. Download and install HD Tune from the official website.
  2. Open HD Tune and select your USB drive from the dropdown menu.
  3. Run the speed test to check the read/write speeds of your drive.
  4. Ensure the speeds meet the minimum requirements for ReadyBoost (2.5 MB/s read speed).

ReadyBoost requires a minimum read speed to function properly. If your USB drive does not meet these requirements, it will not work with ReadyBoost. Speed testing your drive ensures it meets the performance criteria.

5. Delete the ReadyBoost cache file

  1. Plug your USB drive into your computer.
  2. Open File Explorer and locate your flash drive under This PC.
  3. Enable hidden files by clicking on View in the top menu and checking Hidden items.
  4. Locate the ReadyBoost.sfcache file on your drive.
  5. Right-click on the file and select Delete.
  6. Eject and reinsert your USB drive and try setting up ReadyBoost again.

Sometimes, the ReadyBoost cache file can become corrupted, preventing ReadyBoost from functioning correctly. Deleting the old cache file forces Windows to create a new one, potentially resolving any issues.

By following these steps, you should be able to troubleshoot and fix any issues with ReadyBoost if it’s not working.

You may also check our guide on how to enable and use ReadyBoost on Windows 10, or learn what to do if the ReadyBoost tab is missing from Windows 11.

Use the comments section below if you have questions or additional suggestions.

WS-116386-5 PlayStation Error [Solved]

Recently, thousands of PlayStation players from across the globe reported getting the WS-116386-5 error, with the message reading, We’re doing some maintenance on PlayStation Network right now. Please try again later.

The reports of error WS-116386-5 on PS4 and PS5 first emerged on July 1, 2024, from countries like the United States, United Kindom, Canada, Australia, Sweden, Portugal, and Italy, amongst others.

While the error message made it clear that server maintenance was underway, it only affected a section of users while others were able to access the PlayStation Network and play games, even in Online Mode. This led to many confusing the error with an account ban, given that they were kicked out of the game and there’s no mention of it on Sony’s official website.

How do I fix the WS-116386-5 PlayStation error?

1. Check the PlayStation Network’s status

Your primary approach when faced with WS-116386-5 on PS4 or PS5 should be to check the PSN Service Status. If there is an issue at PlayStation’s end, the server status would indicate it, as was the case on July 1, 2024, when most services were marked as down. It took a few hours for the systems to be back up and running.

PSN Service Status
PlayStation Network’s Service Status

Also, to verify if others are facing the same problem, use a service like Downdetector. If there’s a sudden spike, it means that other users, too, are reporting issues, indicating a widespread outage!

2. Reconnect to the wireless network

If the problem is limited to an individual wireless network, I recommend you connect to another Wi-Fi point. Also, switch to Wi-Fi or connect to mobile data, then reboot the console and check for improvements.

Switching the network helps when the PlayStation network services are up and running for others while your console still throws the WS-116386-5 or nw-31291-6 error.

3. Contact PlayStation support

If nothing else works, the last option is to contact PlayStation support. While they may not be able to share a fix since the error has to do with ongoing maintenance, the support team could share a timeline as to when things will be up and running!

For a few users, simply pressing X on the WS-116386-5 error screen did the trick. But it could just as well have been a coincidence, and the PlayStation Network’s services resumed at that very instant. So, unless Sony shares an official statement, there’s very little I can tell you about the error.

Before you leave, discover some quick tips to lower the ping on PS5 and enjoy a seamless gaming experience!

This isn’t the only error you can encounter, and we recently wrote about PlayStation WC-36547-5 error, so don’t miss its dedicated guide.

What helped you fix the WS-116386-5 error? Share with our readers in the comments section.

How to make MSN the Default Homepage on Google Chrome

Google Chrome is a great browser but its homepage may be a little too bland for some users hence why one would make MSN the default homepage.

MSN is an excellent choice of homepage because of its quick access menu to social sites like Facebook and your Outlook email. You also get to explore trending topics at a glance, weather updates and search on the Internet thanks to the Bing search bar.

What’s more, you can customize your MSN homepage to display your preferred content if you don’t like the preset menus and content.

How do I make MSN the homepage on Google Chrome?

  1. Launch your Chrome browser, click on the three ellipses at the top right corner and select Settings.
  2. Navigate to Appearance and on the right side, under the Show home button option, select custom webpage and enter MSN’s official site.
  3. Close the Settings page and when you click the home button or new page, you should be directed to MSN as your homepage. If it doesn’t, restart your browser for the changes to take effect.

Additional tips and troubleshooting

While setting MSN as your homepage on Google Chrome is pretty straightforward, you may encounter some issues. The MSN homepage may fail to display or freeze whenever you open a new tab.

If this is the case, ensure your Chrome browser is up-to-date, clear any cache and cookies and disable any problematic extensions. You can also reset or reinstall your browser if the problem persists but also try with another browser like Opera to check whether it is a Chrome issue.

You can also explore other ways to personalize your browsing experience by following this complete guide on changing your browser homepage for step-by-step instructions across different browsers.

Aside from MSN as your Google Chrome homepage, there are other interesting start pages you can explore to see what works for you. And if you’d like to kickstart things even before you open your browser, you can always pin your frequently used websites to the Start Menu.

For Chrome users who prefer a Google start page instead of MSN, this guide on how to make Google your homepage in Chrome explains the full process step by step.

Have you tried the MSN site as your homepage? Would you say it’s better than Chrome’s default start page? Share your thoughts with us in the comment section below.

Google is considering dropping Chrome’s Password leak warnings

Google Chrome has a built-in security feature to check and warn users if saved passwords to the browser are involved in a data breach. This feature has been part of Safe browsing’s Standard Protection for a while now. However, Google is now considering deprecating the Password leak toggle altogether.

When Chrome detects a compromised password, it alerts you with a warning to change your password, like this:

“Change your password.
A data breach on a site or app exposed your password. Chrome recommends changing your password on [website name] now.”

Upon seeing this, users will typically head to the affected website and reset their password. This is a very useful feature, and Microsoft Edge has a similar security feature integrated as well.

Chrome to deprecate data breach Password leak warnings

As spotted by Windows Report, Google is now planning to deprecate this feature. The company is tracking a metric that shows how many users disable this toggle. If a high number of users are opting out, we might see Google removing the feature.

“Add a metric that checks if the password leak toggle is off. This metric is needed so we can get a better understanding of how many users opt out of the password leak toggle on the chrome://settings/Security page under standard protection since we are planning on deprecating it.” Google notes.

Since the feature is automatic and cannot be disabled in Enhanced Protection (which is not the default setting), user behavior data might be primarily coming from Standard Protection users. This could lead Google to believe the feature is less valuable than initially thought.

The decision or change hasn’t been finalized yet. If you have found this feature useful, you can enable it by visiting Settings > Password and Security, and under Standard Protection, enable “Warn you if a password was compromised in a data breach.”

Safe browsing Setting responsible for compromised password warning in Chrome
Password leak toggle to be deprecated. image Credit: Windows Report

Here are some possible reasons for users to opt-out of Password leak warnings for data breaches:

  • The warnings might be overwhelming, especially for users who frequently encounter compromised password alerts.
  • Some users might have their methods for checking compromised passwords, rendering the Chrome toggle redundant.
  • There could be concerns about the accuracy of the warnings, leading users to disable them out of skepticism.

There are still several ways to check if your passwords stored in Chrome are compromised including even weak or reused. The Password Checkup built into Google Password Manager in Chrome offers this functionality, and Safety Check recently gained the ability to run in the background. So, regardless of the decision about the toggle, you’re still covered.

Recently, we reported that Chrome on ARM will gain video acceleration encoding. Additionally, Google is testing HTTPS First Balanced Mode and performance suggestions on tabs that consume high resources.

Patreon Error 500: 5 Tested Solutions to Fix Your Website

Encountering a Patreon Error 500 can be frustrating, especially when it disrupts your workflow on your website. This guide will help you troubleshoot and resolve this issue with some straightforward solutions.

How do I fix Error 500 on Patreon?

1. Deactivate all plugins to check for conflicts

  1. Go to your WordPress dashboard by logging in to your admin panel.
  2. On the left-hand menu, click on Plugins.
  3. In the plugins list, click on Deactivate for each plugin except for the Patreon WordPress plugin.
  4. After deactivating all other plugins, check if the error still occurs by visiting the problematic page.
  5. If the page loads without the error, reactivate each plugin one by one and refresh the page each time until you find the plugin causing the conflict.

Disabling and enabling plugins helps identify if a conflict between plugins is causing the error. Once the problematic plugin is found, you can seek an alternative or update it.

2. Check and Update .htaccess File

  1. Connect to your website using an FTP client or your hosting control panel’s file manager.
  2. Locate the .htaccess file in the root directory of your WordPress installation.
  3. Download a copy of the .htaccess file to your computer as a backup.
  4. Open the file in a text editor and check for any irregularities or incorrect configurations.
  5. If unsure, you can replace its content with the default WordPress .htaccess content: # BEGIN WordPress <IfModule mod_rewrite.c> RewriteEngine On RewriteBase / RewriteRule ^index\.php$ - [L] RewriteCond %{REQUEST_FILENAME} !-f RewriteCond %{REQUEST_FILENAME} !-d RewriteRule . /index.php [L] </IfModule> # END WordPress
  6. Save the changes and re-upload the .htaccess file to the server.
  7. Check your website to see if the issue is resolved.

Editing the .htaccess file can fix issues caused by improper configurations that result in a 500 error.

3. Increase the PHP memory limit

  1. Access your website’s root directory using an FTP client or your hosting control panel’s file manager.
  2. Locate the wp-config.php file.
  3. Download a copy of wp-config.php to your computer as a backup.
  4. Open the file in a text editor.
  5. Add the following line before the That’s all, stop editing! comment: define('WP_MEMORY_LIMIT', '256M');
  6. Save the changes and upload the modified wp-config.php file back to your server.
  7. Refresh your website to see if the error is resolved.

Increasing the PHP memory limit helps your WordPress site handle more resources, which can prevent errors like the 500 Internal Server Error.

4. Review the PHP error logs

  1. Access your web hosting control panel or use an FTP client to connect to your website.
  2. Navigate to your website’s root directory and locate the error_log file, usually found in the public_html directory or a similar folder.
  3. Download the error_log file to your computer and open it in a text editor.
  4. Identify any plugin or theme mentioned in the error logs and note the specific error messages.
  5. Disable or update the problematic plugin/theme, or seek support from the plugin/theme developers.

Reviewing PHP error logs can give you detailed information about what is causing the 500 error, enabling you to address the specific issues.

5. Check for theme conflicts

  1. Access your WordPress dashboard and go to Appearance on the left-hand menu.
  2. Click on Themes and activate a default WordPress theme like Twenty Twenty-One.
  3. Check if the error still occurs by visiting the problematic page.
  4. If the error is resolved, your original theme may be causing the issue. Contact the theme developer for support or consider using a different theme.

Switching to a default WordPress theme helps determine if your current theme is causing the 500 error, allowing for easier troubleshooting.

To prevent future errors, regularly update your plugins and themes, and always keep backups of your critical files.

Microsoft Designer introduces the new Greeting Cards feature, allowing users to create their greeting cards professionally and affordable

Microsoft Designer, already known for helping users create AI-generated artwork and graphics by simply giving some text instructions, has now added personalized greeting cards to its list of abilities after recently being updated with landscape mode and Restyle Image.

According to the blog post, the process is straightforward. When logged into your Microsoft account and on the Microsoft Designer site, you will see a section for Greeting Cards. In this place, you can get inspired by existing designs or, if you feel creative, type in a description and let AI create it.

Greeting Cards is a fast and intuitive tool that turns your text description into a personalized greeting card tailored to your unique style and message. The front of the card features an AI-generated design inspired by your description. The inside includes an editable message for that extra personal touch.

Microsoft

The outcome? Four distinct designs designed specifically for your prompt, ready for you to choose your preference.

But what if none of the designs you see enthuse you? It’s simple—change your prompt and attempt again. When you finish choosing a design, you can modify the message inside the card to make it yours. Just after that, with one touch on the download button, you have a personalized greeting card ready for utilization. This has been saved in PNG format, and it’s also simple to share on mobile devices.

The charm of this feature is not limited to personal usage. Think about sending a unique card to celebrate your work anniversary or finish a project with one of your colleagues. The variety can go on and on, from birthdays and anniversaries to holidays or simply for no reason. The secret is customization, and through Microsoft Designer’s Greeting Cards, you can expand your possibilities as much as you desire.

It’s worth mentioning that this feature is currently only available in English, but more languages will be added soon.

Will you try the new Microsoft Designer’s Greeting Cards?

Can You Rotate Google Maps on Desktop? [Quick Guide]

Can you rotate Google Maps on the desktop? Yes, you can rotate Google Maps on your desktop using the satellite view, but the default mode has no such option. It’s useful for getting a different view of a location or aligning the map with a specific direction of travel. 

While Google Maps on mobile devices easily supports rotation, many desktop users wonder if they can achieve the same flexibility. 

I’ll show you how to do it below!

How To Rotate Google Maps on Desktop

Here are two methods you can try:

Using Satellite View

  1. Go to Google Maps and tap the layers button on the bottom left of your screen.
Layers
  1. Tap More, then select Satellite.
Satellite
  1. Tick the Globe view box, and a compass will appear on the right side of your screen.
Globe view
  1. Tap on the arrows on the compass to rotate the map.
Rotate

That’s it! You can better view your map by rotating it to any angle.

Sometimes, you can select the satellite view and tick the globe view box, but you won’t see the compass on the right side of the screen. In that case, you’ll need to enable hardware acceleration.

Here’s what to do:

  1. Tap on the three dots in the top right corner of your screen.
Tap on the 3 dots
  1. Scroll down and tap Settings.
settings
  1. Click System.
System
  1. Enable “Use graphics acceleration when available.”
Use graphics acceleration when available.

The compass icon should appear now and Google Maps should work as expected.

Using an Android Emulator

Download from Bluestacks

You can install an Android emulator like Bluestacks on your desktop and then download the mobile version. This allows you to access features that might not be available on the desktop version, such as rotating the map on the default view. However, you must sign in with your Google Account to access the Play Store through Bluestacks.

Rotate

Still, you might be unable to replicate the touchscreen commands perfectly with a mouse. This can make navigation and other touch-based interactions a bit trickier.

So, can you rotate Google Maps on your desktop? Luckily, yes. You can use the satellite view and turn on hardware acceleration if you don’t see the compass. Another option is to get an Android emulator, but it might be tricky to navigate with a mouse.

Keep in mind that this service has its share of issues, and we already wrote what to do if Google Maps location is wrong on your PC, so you might want to check it out.

Alternatively, you can check out other, similar services or Windows Maps for more rotation options. You can also change the language and enable dark mode.

Run as Different User Access Denied: 4 Ways to Force it

While it’s possible to run applications as other users, many reported an Access denied message when trying to run something as a different user, so today we’re going to show you how to fix that.

What can I do if run as a different user gives an Access denied error?

Before we try anything else, you can try uninstalling applications that can potentially interfere with your permissions.

1. Start the command line as administrator

  1. Press the Windows key + X and choose Terminal (Admin).
    terminal admin option windows 11
  2. Next, run the desired runas command.
  3. Press Enter.

2. Use PowerShell

  1. Open the command line.
  2. Use the following command, but be sure to replace [user] and [command] with the appropriate user and command:
    powershell.exe -ExecutionPolicy Bypass -command "& {Start-Process powershell.exe -Credential '[user]' -ArgumentList 'Start-Process ""[command]"" -Verb runAs'}"
    powershell run as command

3. Check the services

  1. Press Windows key + R and enter services.msc.
    services.msc run window windows 11
  2. Locate the Secondary Logon service and double-click it.
     secondary logon in services window
  3. Set the Startup Type to Automatic and click Start to start the service.
    secondary logon startup type
  4. Save changes and try to run the service again.

4. Check task settings

  1. Press the Windows key + S and type scheduler. Open Task Scheduler.
    open task scheduler search results
  2. Now locate the task that tries to run the application as a different user and double-click it.
  3. In the Security options, check Run with the highest privileges and save changes.
    run with highest privileges task settings

To learn more about this feature, we have a great guide on how to run apps as different user on Windows 11, so you might want to check it out. And if the run as a different user option is missing from your WIndows 11, we know how to get it back. Moreover, if the Run as Different User option isn’t working properly, we’ve got you covered.

Do keep in mind that this isn’t the only issue that can occur, and for some users Run as administrator isn’t working, but we have a different guide that addresses this issue.

To learn more, we have a great guide on how to Run as different user without a password, so don’t miss it.

Microsoft 365 now supports ODF 1.4 support in Word, Excel, and PowerPoint

Microsoft 365 Insiders have a special opportunity to try the ODF 1.4 support in Word, Excel, and PowerPoint. The Redmond-based tech giant announced the new feature in its latest blog post.

With this change, ODF files in Microsoft 365 apps will now save only to the ODF 1.4 format. ODF 1.4 adds support for a number of features—which we’ll explore below—that are already supported by the Open Office XML format (.docx, .xlsx, and. pptx).

Microsoft

Firstly, ODF means OpenDocument Format. This is important because it’s a way to make documents, spreadsheets, and presentations better in how they are saved and shared. With support for ODF 1.4, Microsoft shows that they are doing more – files from Word, Excel, or PowerPoint will be saved as the newest version of this format.

But why is it so important? This update is filled with improvements that assure you that you will make your documents easier to access and the work process more efficient.

One of the most exciting parts about this update is the variety. Imagine being able to put tables in shapes in Word or start lists from nothing. For people who care a lot about looks, the update ensures images and shapes do not overlap, keeping your documents clean and organized.

For those using Excel, there are improvements like better adjustments for error values and the capacity to save color filter configurations. PowerPoint also has a rise in performance, with support for slide numbering starting from zero and improved text direction inside table cells.

You may be thinking, “How can I access these features?” It’s not complicated at all. If you are a Microsoft 365 Insider in the Beta Channel, then everything is already prepared for your discovery of these updates on Windows or Mac.

This feature is available in Word, Excel, and PowerPoint to Beta Channel users running:

  • Windows: Version 2404 (Build 17531.20078) or later
  • Mac: Version 16.84 (Build 24041420) or later 
Microosoft

This update is an excellent addition for Microsoft 365 users. It improves functionality in Word, Excel, and PowerPoint while meeting the requirement of easier and quicker document management.

If you are a tech lover or like to try out new software updates, the new Microsoft 365 ODF support is worth checking into. Let us know your opinion on this.

In other news, Microsoft extended its AI model, Copilot, to various subscription plans. Regardless of their license, almost every Microsoft 365 user should be able to use AI capabilities in platforms such as PowerPoint, Excel, or Word.

How to Flip the Camera in Microsoft Teams

Microsoft Teams is configured to show you a mirrored view of your video feed, although other participants in the meeting see the unmirrored feed. To have the same feed as others, you will have to flip the camera in Microsoft Teams!

For anyone wondering why Microsoft Teams flips the camera video in your feed, it’s to provide you with a more familiar experience, as if you are looking in a mirror. This also causes issues, especially when you are presenting something, because all the characters on your feed appear inverted, making them illegible and necessitating the need to flip the webcam feed.

How can I flip the camera on Microsoft Teams?

1. Via Teams’ meeting settings

1.1 At the start

  1. On the Choose your video and audio settings screen, click the Settings icon (gear) under the webcam feed.
  2. Scroll down to Video settings and disable the toggle for Mirror my video.microsoft teams flip camera

1.2 While in the meeting

  1. While in the meeting, click on the ellipsis at the top, select Settings, and then choose Device settings from the flyout menu.settings in meeting
  2. Scroll down and disable the toggle for Mirror my video.mirror my video

As soon as you disable the Mirror my video setting, the camera’s video feed appearing at your end will be the same as that shown to the other participants. However, the Mirror my video setting is only available for accounts linked to organizations and not on personal Microsoft Teams accounts.

2. Using a third-party app

If the Mirror my video setting is not available in Microsoft Teams, or you want to flip the camera feed visible to other participants, using a third-party webcam software will do the trick!

Many third-party software offer the ability to flip the camera on a software level, thus showing a mirror image of your feed even to others. Similarly, if Microsoft Teams, for some reason, shows a mirrored video feed to others, you can un-mirror it using a dedicated software.

All you have to do is select the feed from the downloaded app in Microsoft Teams and then make the changes at the app level. To do that, open the Device settings for a meeting > choose the app from the Camera dropdown menu.

choose software

What can I do if Microsoft Teams automatically flips the camera?

  • Update Microsoft Teams: If there are any pending updates for Microsoft Teams, install them.
  • Clear the app data: Press Windows + E to open File Explorer > paste %appdata%\Microsoft\Teams in the address bar > hit Enter > press Ctrl + A to select all the files > hit Delete to clear them > confirm the change > relaunch Microsoft Teams > check for improvements.
  • Disable/remove any third-party webcam software: If you have any webcam-feed customization software available on the PC, uninstall the app and check for improvements.
Microsoft teams cache
Microsoft Teams cache under AppData

You now know how to flip the camera in Microsoft Teams as well as fix things when it does so automatically. In case issues persist, you can always switch to another reliable video conferencing software!

Were you able to flip the camera using our methods? Share with us in the comments section.

Devices and Printers is Stuck With Device Setup in Progress Message

You have installed a new device and it’s working, but when you look in Devices and Printers, you see the Device Setup In Progress message that never goes away whatever you do. It can happen with printers, audio devices and even Xbox, and it’s caused by an issue with the metadata retrieval in Windows. Don’t worry, this is not a serious issue, but the solutions below will fix the problem quickly.

How do I fix the Device setup in progress in Devices and Printers?

1. Disable the device metadata retrieval

  1. Press Win + R to open the Run dialog, type gpedit.msc and press Enter.
  2. Go to Computer Configuration > Administrative Templates > System > Device Installation.
  3. Find and double-click Prevent device metadata retrieval from the Internet and set it to Enabled.
  4. Click Apply, then OK.
  5. Restart your computer to apply the changes and go to Devices and Printers to see if the Device setup in progress message is still there.

Disabling device metadata retrieval will stop Windows from hanging while trying to download icons and metadata, speeding up the device setup process.

2. Disable metadata retrieval using Registry

  1. Press Windows key + R to open the Run dialog, type regedit and press Enter.
  2. Navigate to the following key: HKEY_LOCAL_MACHINE > SOFTWARE > Microsoft > Windows > CurrentVersion > Device Metadata
  3. Find PreventDeviceMetadataFromNetwork, double click it and set its value to 1.
  4. If it doesn’t exist, create a new DWORD (32-bit) value named PreventDeviceMetadataFromNetwork and set its value to 1.
  5. Restart your computer to apply the changes.

Modifying this registry key stops Windows from trying to retrieve metadata over the internet, which can cause long delays or failures during device setup.

3. Clear the Printer Spooler files (for printer issues)

  1. Press Windows key + R to open the Run dialog, type services.msc and press Enter.
  2. Scroll down and find Print Spooler.
  3. Right-click it and select Stop.
  4. Open File Explorer (Win + E) and navigate to C:\Windows\System32\spool\PRINTERS.
  5. Delete all files in this folder.
  6. Go back to the Services window, right-click Print Spooler and select Start.

Clearing out the print spooler’s files can resolve issues where printer installations get stuck due to corrupted spooler data.

4. Reset Device Internet settings using CMD

  1. Click the Start button, type cmd and select Run as administrator from the results.
  2. Type or paste the following command and press Enter: Rundll32.exe %SystemRoot%\System32\newdev.dll,DeviceInternetSettingUi
  3. Restart your computer to apply the changes.

Running this command resets the device internet settings, which can resolve issues where the device setup process is stuck.

5. Reinstall Printer Drivers and Software

  1. Go to Control Panel and select Devices and Printers.
  2. Right-click the problematic printer and select Remove device.
  3. Press Windows key + R to open the Run dialog, type services.msc and press Enter.
  4. Scroll down and find Print Spooler, right-click it and select Stop.
  5. Open Control Panel and go to Programs and Features.
  6. Uninstall all software related to the printer.
  7. Open Run (Win + R) and type printui.exe /s /t2 to open the Print Server Properties.
  8. Remove any entries related to the printer under the Drivers tab.
  9. Open File Explorer (Win + E) and navigate to C:\Windows\System32\spool\PRINTERS.
  10. Delete all files in this folder.
  11. Go back to the Services window, right-click Print Spooler and select Start.
  12. Now, download the latest drivers from the printer manufacturer’s website.
  13. Install the drivers and add the printer again.

By completely removing the printer software and drivers, then reinstalling them, you ensure a clean setup that can resolve issues related to corrupted installations.

Remember, keeping your drivers updated and regularly clearing out old printer spooler files can prevent many of these issues from cropping up again. For more information, read our guide on how to manage Devices and Printers on Windows 11.

Also, check our guide on what to do if Windows can’t connect to the printer if you find yourself in that situation.

If you have any question regarding this guide or issue, use the comments below to let us know.

Outlook might be enhanced to find email attachments without opening those emails, according to Microsoft patent

Do you know the feeling of searching through countless emails, looking for an important attachment but hiding somewhere in your inbox? It seems Microsoft has also been thinking about this common problem.

The Redmond-based tech giant’s latest patent describes a technology capable of doing that: allowing you to search through email attachments without opening those emails. This approach simplifies finding attachments, as going through every email is unnecessary.

The main part of this invention is showing search suggestions in a messaging application, including attachments. It’s like when you write a question in your email app and get suggestions that show related emails and attachments linked to those messages. So, it could let you avoid email and direct access to documents, images, or files necessary for you.find email attachment

The proposed search results might also bring up attachments from other sources besides the messaging application. So, for example, if you are using a Microsoft email client on Outlook and have gotten some attachments through another channel, but it’s still related to what you’re searching for, that could show up in your results, too. This widens your search area and guarantees that no possibly helpful files are overlooked.

But how does it work? When messages come in from a messaging app, they’re managed in a way that allows the application to do queries without needing to look at each message. If you type a query for an attachment specifically, the application will suggest something with at least one attachment received via message. find email attachment

Another interesting part of this patent is the user interface it suggests. It’s made to show suggested search results and find email attachments while allowing users to interact with these attachments directly. For instance, choosing an attachment from the proposed search results can open it in an associated application, such as a word processor or spreadsheet viewer, right next to the email message that came with it. This might be a big change for getting work done, making it possible to find and open important documents faster, which could lead to more efficient work.

Microsoft’s patent discusses making it easier for us to handle our emails and their attachments. The potential of finding email attachments quickly and straightforwardly could greatly decrease both the time and annoyance associated with locating certain files within our inboxes.

This technology might be helpful for professionals dealing with many documents or individuals wanting to organize their email better, providing an answer to a common issue.

You can read the full paper here.

In other news, another patent revealed that Microsoft is working to enhance Teams with a name mispronunciation detector, meaning you won’t have to spell your colleagues’ names wrong anymore.

Microsoft acknowledges the OneDrive Internet shortcut error, and an update is coming

Have you experienced the puzzling situation where your Microsoft OneDrive shared folders are now only internet shortcuts on Windows 11? If so, then know that this strange bug has confused numerous people, causing them to ponder if it was due to an update or some unknown error.

Microsoft is aware of the problem and is working to solve it, so patience is required on official Microsoft Office forums; a Microsoft agent detailed that the Redmond-based tech giant knows about the problem and is actively looking to fix it.

Welcome to Microsoft Community.

This appears to be a known issue currently affecting OneDrive shared folders. Users from different regions have reported the same issue beginning approximately June 2024. We’ve summarized the main points of our current situation in this issue, you can review them at your convenience:

1-> Impact Summary:

Many customers worldwide have reported that their OneDrive shared folders have become inaccessible as regular file folders in File Explorer and instead appear as internet shortcuts. The reported issues include:

  • Shared Folder Visibility – Users can see shared folders in a web browser, but these folders appear as link files (.URL) in File Explorer, which open the OneDrive website rather than displaying the folder contents.
  • Synchronization Issues – Shared folders are not syncing properly with OneDrive on the desktop. Attempts to add these folders to “My Files” result in creating internet shortcuts instead of actual folders.
  • Access and Sync Problems – Users are unable to sync shared folders with their local devices, resulting in workflow disruptions and inability to access files offline.

2-> Latest Update:

This issue may be due to an internal error affecting data synchronization and handling within the OneDrive service. Microsoft has acknowledged the problem and is actively working on a resolution.

  • Efforts are underway to restore proper access to affected shared folders. Initial steps include investigating the issue’s root cause and implementing fixes to ensure shared folders appear correctly as file folders in File Explorer.
  • A comprehensive analysis is being conducted to determine the exact cause of the issue. Preliminary findings suggest a possible misconfiguration or recent update affecting shared folder handling and synchronization processes.

3- > Current Status:

  • Some users have reported temporary workarounds, such as accessing shared folders directly via  OneDrive web interface -<onedrive.live.com>
  • Microsoft internal engineers are closely monitoring the service and implementing fixes to ensure stability and proper synchronization of shared folders.

We fully understand the inconvenience and disruption caused by this issue. Our team is actively addressing it and working hard to fix it as soon as possible. We are still gathering and monitoring many cases and thread behaviors, so we can always follow up with any new updates or fixes that come up.

Microsoft

If you don’t know what to do for now, you can try a couple of solutions: firstly, there is a discovered solution where the user can directly download files from the shared folder if they have permission to do so. It might not be very sophisticated, but at least it works.

Secondly, one could try different cloud storage services as an interim remedy. Remember, these aren’t official fixes, so proceed with caution.

As annoying as it is, Microsoft is working on a fix for the OneDrive internet shortcut bug, so an update will be released soon.

This Device Cannot be Used Error in ReadyBoost: 3 Quick Fixes

Running into the ReadyBoost This device cannot be used error can appear if your flash drive is not compatible with this feature or it’s corrupted. The error will also show up if your system is installed on an SSD. In this case, ReadyBoost will not make any difference. Also, your flash drive needs to have more than 2GB of storage space.

What do I do if This device cannot be used for ReadyBoost?

1. Format the flash drive to NTFS

  1. Plug the flash drive into one of your computer’s USB ports, or insert the SD card into the corresponding slot.
  2. Click the folder icon in the taskbar or press Win + E to start File Explorer.
  3. Right-click your flash drive under This PC and select Format.
  4. In the File System dropdown menu, select NTFS.
  5. Ensure the Quick Format box is checked, then click Start.
  6. Click OK to confirm and proceed.

Formatting your flash drive to NTFS may resolve compatibility issues with ReadyBoost. This file system supports larger cache sizes, which can improve performance.

2. Delete external drive folders from Registry

  1. Press the Start button, type cmd and select Run as administrator from the results.
  2. Type or paste the following command and press Enter: reg delete "HKLM\SOFTWARE\Microsoft\Windows NT\CurrentVersion\EMDMgmt" /v "GroupPolicyDisallowCaches" /f
  3. Type the next command and press Enter: reg delete "HKLM\SOFTWARE\Microsoft\Windows NT\CurrentVersion\EMDMgmt" /v "AllowNewCachesByDefault" /f
  4. Restart your PC and see if your flash drive can now be used for ReadyBoost.

Removing these registry keys can allow ReadyBoost to reappear and function properly, bypassing any group policy restrictions that may be in place.

3. Ensure USB ports and BIOS settings are correct

  1. Try plugging the flash drive into different USB ports on your computer, especially the USB 2.0 ports.
  2. Restart your computer and press the appropriate key (F2, DEL, or ESC) to enter the BIOS settings.
  3. Use the arrow keys to find the USB configuration settings.
  4. Ensure USB2.0 is enabled. Save your changes and exit the BIOS.

Ensuring your USB ports are enabled and functioning properly can help overcome ReadyBoost issues related to port performance.

If you still get the This device cannot be used for ReadyBoost message, you either have an SSD, or the USB drive is corrupted or malfunctioning. If the drive is not working even after formatting it to NTFS, try another drive. If your OS is using a FAT32 file system, you will need to format the flash drive to FAT32 instead, but you will be limited to 4GB of storage space.

Also, if you have more than 8GB of RAM, even if you have the system installed on a HDD, using ReadyBoost will not make any difference.

That’s it! We hope that you can now boost your booting speed by using ReadyBoost using your flash drive or SD card. For more information, here’s our guide on how to use ReadyBoost on Windows 10.

Also, if the ReadyBoost tab is missing on Windows 11, click the highlighted guide to learn how to fix it.

If you have any questions or suggestions, feel free to use the comments section below and let us know.