Windows 11 annoyingly sends time and zone notifications to users

People using Windows 11 and 10 are now experiencing a bug that keeps sending notifications to allow a change in the time zone. This happens even though no alteration has taken place. The problem was highlighted by Windows Latest, which also got these alerts.

These notifications seem to be in a loop. This implies that the user will be asked to accept or ignore this request many times within one day. When you click accept, the Date & Time settings page opens, but no actual change is made to any setting.

Microsoft has recognized the issue, stating that they are aware of a problem in which time zone changes are wrongly detected in a few rare cases, and it is being fixed. The company is also investigating the main cause of this issue and might be able to resolve it on the server end.

The time zone bugs in Windows 11 are pretty common, but this one is quite weird and annoying. However, if you generally have issues adjusting time and zone in Windows 11, you might want to check out our guide.

Did you meet the time zone change bug in Windows 11? What other problems did you see in the system?

Palworld Save Error: 5 Ways to Fix it on Xbox Series X|S

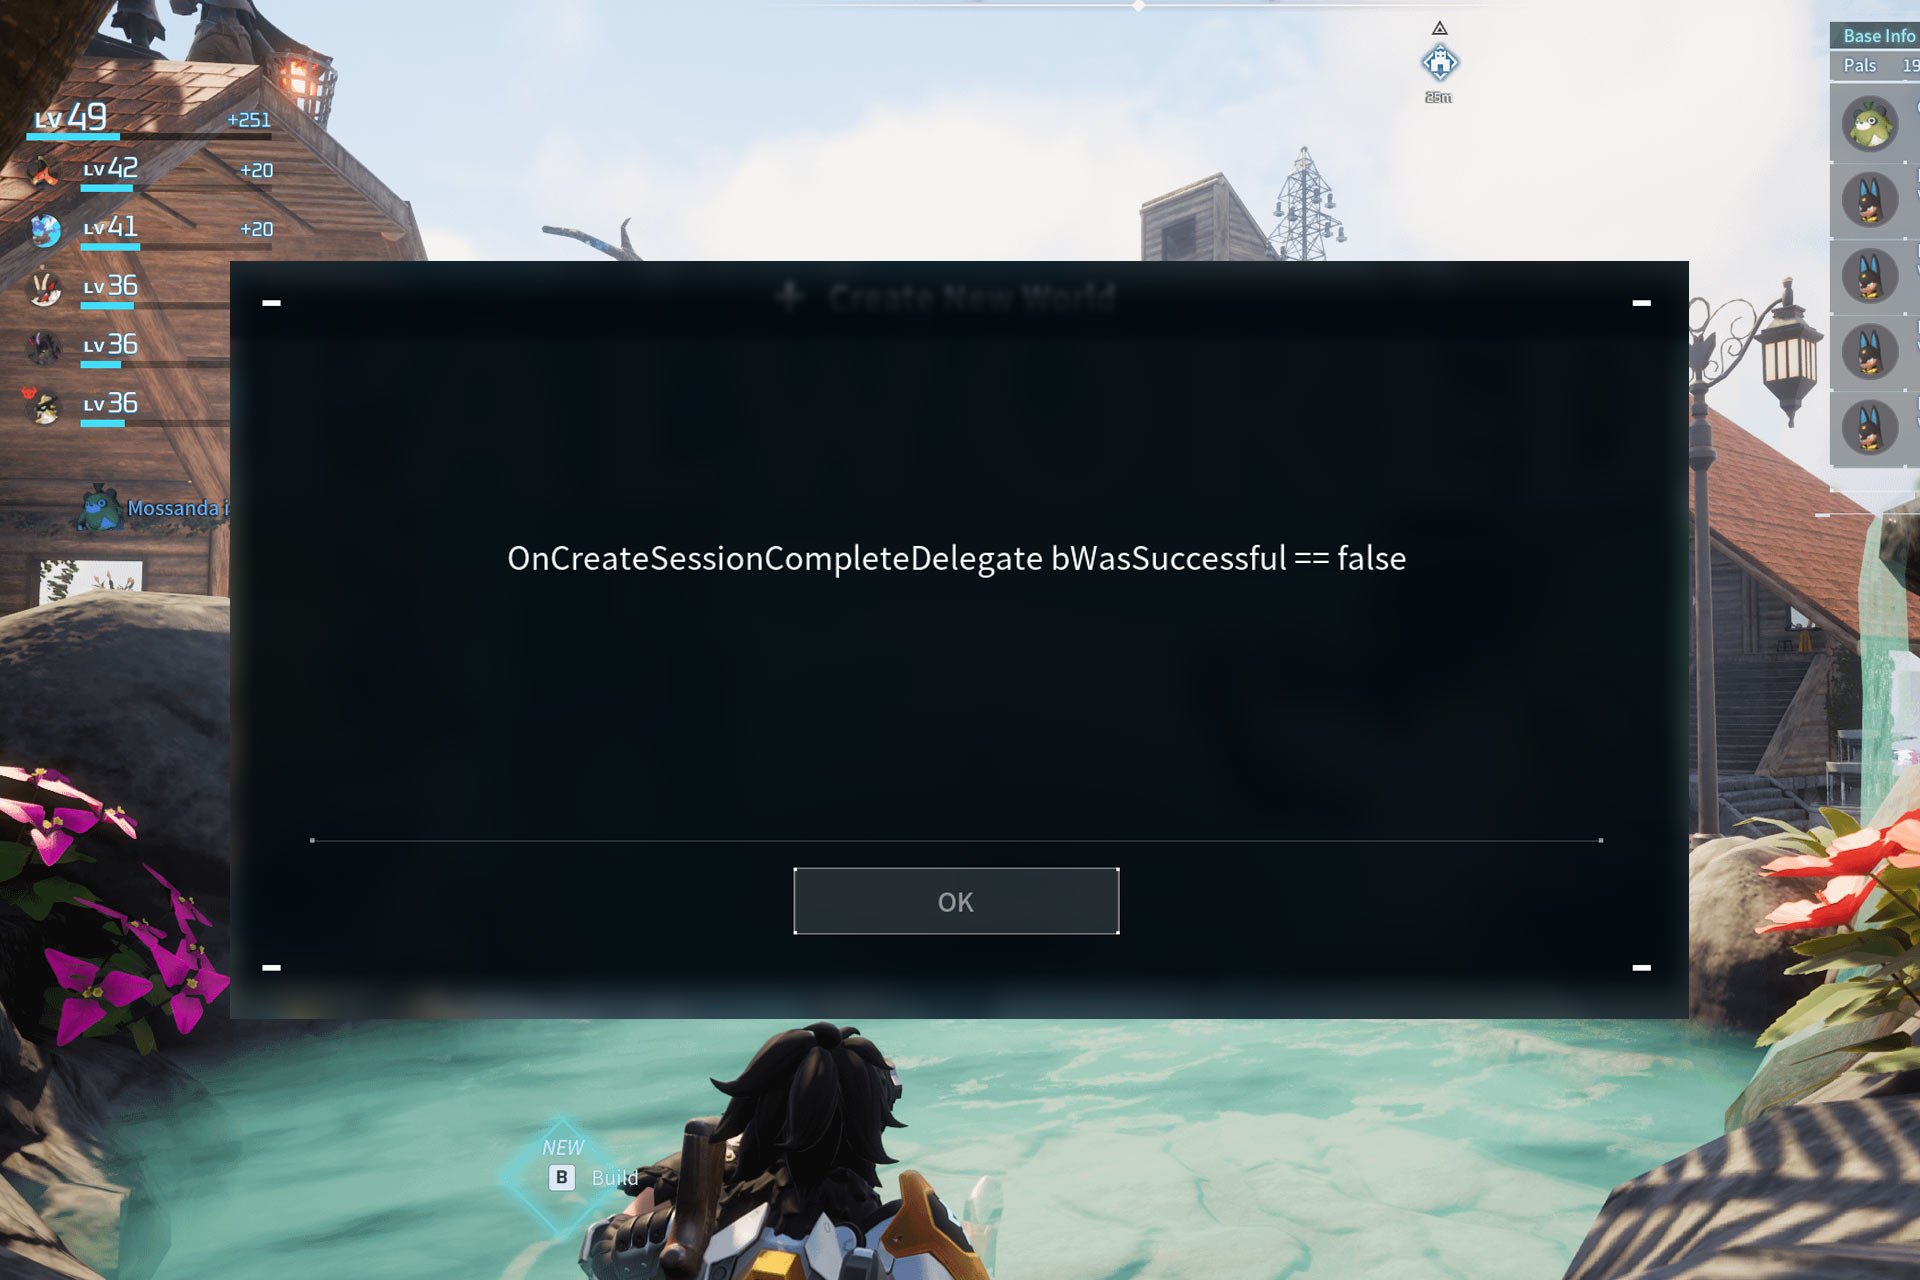
Many Xbox users reported a Palworld save error that prevented them from saving their progress. Luckily, this issue can be fixed, and today we’re going to show you a couple of ways to do that.

Why can’t I save world data in Palworld?

This issue appears mostly due to game glitches. Sometimes your cache or other stored data can cause this problem if it gets corrupted.

How do I fix the save error in Palworld on Xbox?

Before trying anything else, try reporting a bug from settings, and as soon as you leave the browser, the issue should be gone. If the error appears, you’re advised to restart the game, since it will keep appearing.

1. Use the record option

  1. When the error appears, hold the screenshot button on the controller.
  2. Alternatively, open the Xbox menu and choose Record what happened.
    record what happened xbox series x
  3. After doing that, the connection to the server should be established and the game will start working again.

Few users reported that just opening and closing the Guide works for them. Others also suggested going back to the home screen and going back to the game instead.

2. Clear local Xbox 360 storage

  1. On your Xbox Series X|S go to Settings.
  2. Next, choose System and then Storage devices.
    system storage devices xbox series x
  3. Select Clear local Xbox 360 storage.
    clear local xbox 360 storage xbox series x
  4. Select Yes to confirm.

Some users are recommending using the Clear local saved games option instead, so don’t hesitate to try it.

3. Refresh the home screen

  1. When the error appears, press the Xbox button.
  2. Next, go to My Games & apps.
  3. Press the Menu button and choose Refresh.
    refresh xbox homescreen series x
  4. Go back to the game.

4. Clear persistent storage

  1. Open Settings.
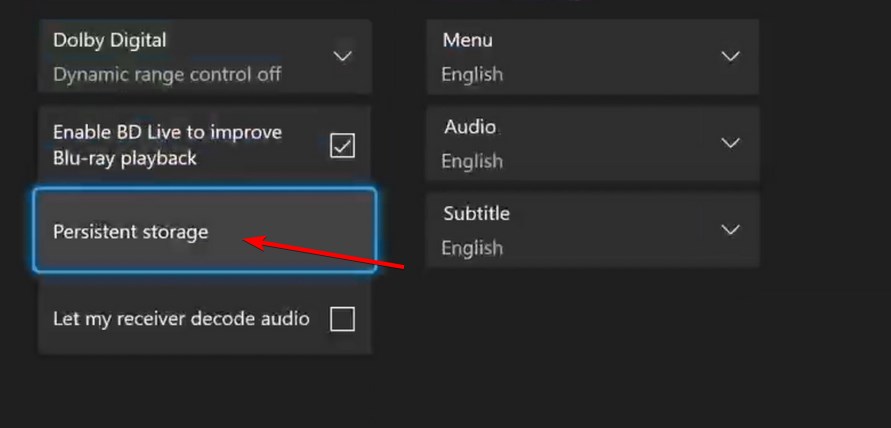
  2. Navigate to Devices & Connections and choose Blu-ray.
     devices & connections blu-ray xbox series x settings
  3. Choose Persistent storage.
    persistent storage selected xbox series x
  4. Lastly, select Clear persistent storage.

5. Clear reserve space

  1. Open the Home menu and choose My games & apps.
  2. Select Palworld and choose Manage Game.
     manage game and add-ons palworld
  3. Next, choose Saved Data.
    saved data xbox series x
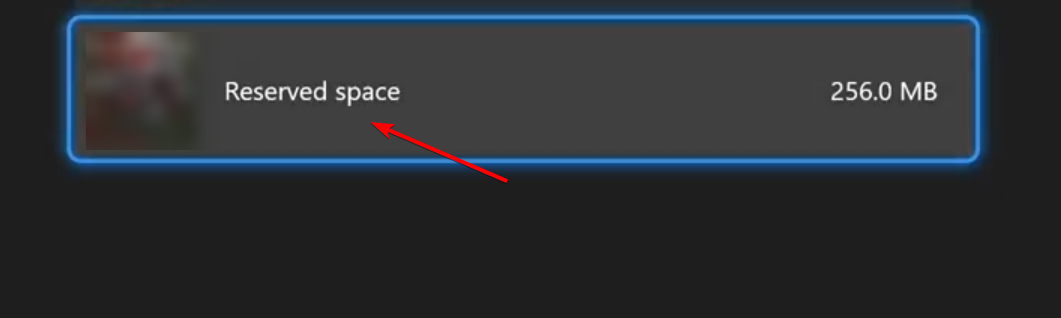
  4. Select Reserved Space.
    reserved space palworld
  5. Lastly, go to Clear Reserved Space.
    clear reserved space confirm palworld

While this solution works for some, it can also cause problems while starting the game.

Palworld save error can be tricky to fix, but in most cases opening the Guide or using the game record feature will let you bypass it.

While this is an Xbox issue, many reported that Palworld keeps crashing on PC as well as Palworld session search error.

Many users reported that a black screen prevents Palword from launching on both PC and Xbox, but we have a guide that addresses it.

With KB5039302, Windows 11 now has the best native archive app in the world

The latest update for Windows 11, KB5039302, can now be downloaded by systems using Windows 11 version 23H2 and the 22H2 updates days after it was released in the Preview Insider Channel. This time, Microsoft has included many fresh characteristics and enhancements to File Explorer, Windows Share window, Start menu, and many more.

The main change in KB5039302 is the addition of native support for more archive formats. Now, you can create 7-Zip and Tape Archive (TAR) files using File Explorer’s right-click context menu. After that, a new compression wizard allows you to adjust the archive settings, such as the level of compression or the type of data stored within it. You may even create ZIP, 7-Zip, or TAR archives by utilizing gzip and bzip2 tools, among others.

Windows 11 now supports Unicode emoji 15.1, and this update introduces new characters such as a phoenix, lime, brown mushroom, and broken chain emoji. The family grouping symbols are also increased (for example, the symbol of a single adult with a child), and you can select the direction in which some people’s emojis face.

Microsoft has included a fresh Copy button within the Windows Share window. This button is designed to copy the file you have chosen in Windows Share and place it on your device’s clipboard. In addition, within the Windows Store app, some users who have signed into their Microsoft account and often enjoy playing games on their PC will see a promotional card for Game Pass in the store’s Home section.

Microsoft, too, is commencing the phased introduction of the account manager feature that they initially revealed one month ago. This feature exhibits account benefits and information in the Start menu and allows you to handle account settings. Also, a bug in the Windows 11 touch keyboard that led to problems when trying to input special characters with the Japanese 106 keyboard has been repaired.

Beyond those changes, KB5039302 brings the following fixes:

  • Addresses an issue that causes audio distortion in Snipping Tool videos on some PCs.
  • Corrects a glitch where the touch keyboard fails to type special characters when the Japanese 106 keyboard is employed.
  • This fixes a problem with ejecting USB devices from the Safely Remove Hardware option being difficult when the Task Manager remains open.
  • Corrects a Windows Share window bug that stops you from copying files to the clipboard.
  • This resolves a problem with the Windows 11 touch keyboard not displaying the text candidates after some use.
  • Resolves a bug that causes the Windows Share app to stop responding.
  • A bug in Windows 11 that displays a grey box on the Start menu instead of the screen reader focus hint is resolved.
  • Fixes a bug where the text in the Windows 11 touch keyboard candidate bar overlaps with the keyboard.
  • Addresses a problem where the Windows 11 touch keyboard candidates disappear after being utilized briefly.
  • Fixes a bug where the touch keyboard of Windows 11 appears in an incorrect position after rotating the screen.
  • Corrects an issue where the Windows 11 touch keyboard would not display after being used briefly.
  • This fixes a problem with the touch keyboard in Windows 11 not appearing or appearing at an incorrect location when the PC is linked to a dock.

KB5039302 for Windows 11 is being released gradually, so it could take some time before you observe it on your device. You can look for this update manually by going to Settings > Update & Security > Windows Update.

If you’re still using Windows 10, don’t forget to download and install KB5039299.

Error 54 in Valorant: 3 Ways to Fix The Connection Error

For time to time, gamers are getting Error 54 in Valorant which is under the Content service failure moniker from Riot Games. This will prevent you from logging in so let’s see how to fix it.

How do I fix the Error 54 in Valorant?

1. End Valorant and Vanguard processes and set the vgn service to Automatic

  1. Right-click the Start button and select Task Manager.
  2. Look for all the Valorant and Vanguard processes and click on End Task.
  3. Press Win + R to start the Run console, type services.msc and press Enter.
  4. Look for the vgc service (click on one item and press v to find it faster), right click on it and select properties.
  5. Make sure that the Startup type of the service is set to Automatic, and start the service by hitting the Start button below.
  6. Click on Apply and OK to change its startup mode.
  7. Once the service has started try to launch Valorant again and see if you still get the Error 54.

Error 54 in Valorant may be triggered if Vanguard is not starting before Valorant and the solution above is taking care of that.

2. Flush DNS and reset the network settings

  1. Open the Start menu, type cmd and run it as an administrator.
  2. Type or paste the following command and press Enter: ipconfig /flushdns
  3. Execute the following command next: netsh winsock reset
  4. Restart your PC to complete the winsock reset process.

After flushing a DNS, it’s a good idea to check Valorant ping and ensure that servers are reachable and that you don’t have any latency issues.

3. Use a VPN

Whether the Valorant servers are down or under maintenance, in most cases, they won’t all have that status. For example, if the servers in the U.S. are down, you may still access the ones in Europe and the other way around. However, when your client starts, it will reach the closest server to you.

Of course, you can circumvent that by using a VPN for gaming. You just set a new location in the VPN and the game will pick it up. For instance, if you’re in the U.S., you can choose a server from Europe.

That’s all about fixing Error 54 in Valorant! You may also reinstall the Riot Games client and the Valorant game, but only as a last resort.

We hope that our solutions helped you fix the Valorant Error 54 and now you’re back to your gaming session. If Valorant is not opening in Windows 11, check out the highlighted guide for helpful solutions.

Let us know in the comments if you have any other questions or suggestions.

Solved: PC Crashes After Closing Game

Many users reported random PC crashes after closing games. Sometimes, it occurs within minutes of closing the game; other times, it takes an hour or so. This issue could occur due to an incompatible video driver, corrupted system file, outdated Windows, or a third-party antivirus.

To fix it, first, check your PC cabinet for dust and debris, replace the CMOS battery, ensure all the connections are in place, and then restart your computer and check for a Windows update.

How can I fix the PC crashes after closing game issue?

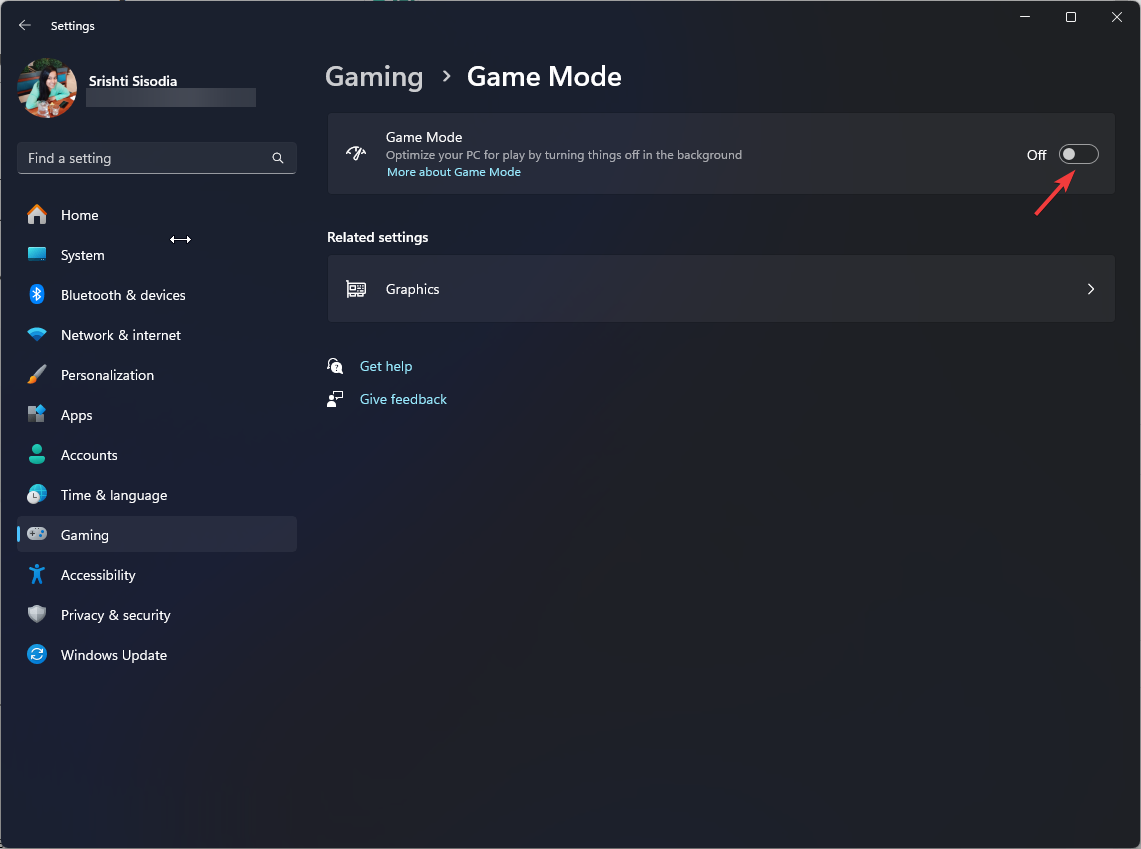
1. Turn off game mode

  1. Press Windows + I to open the Settings app.
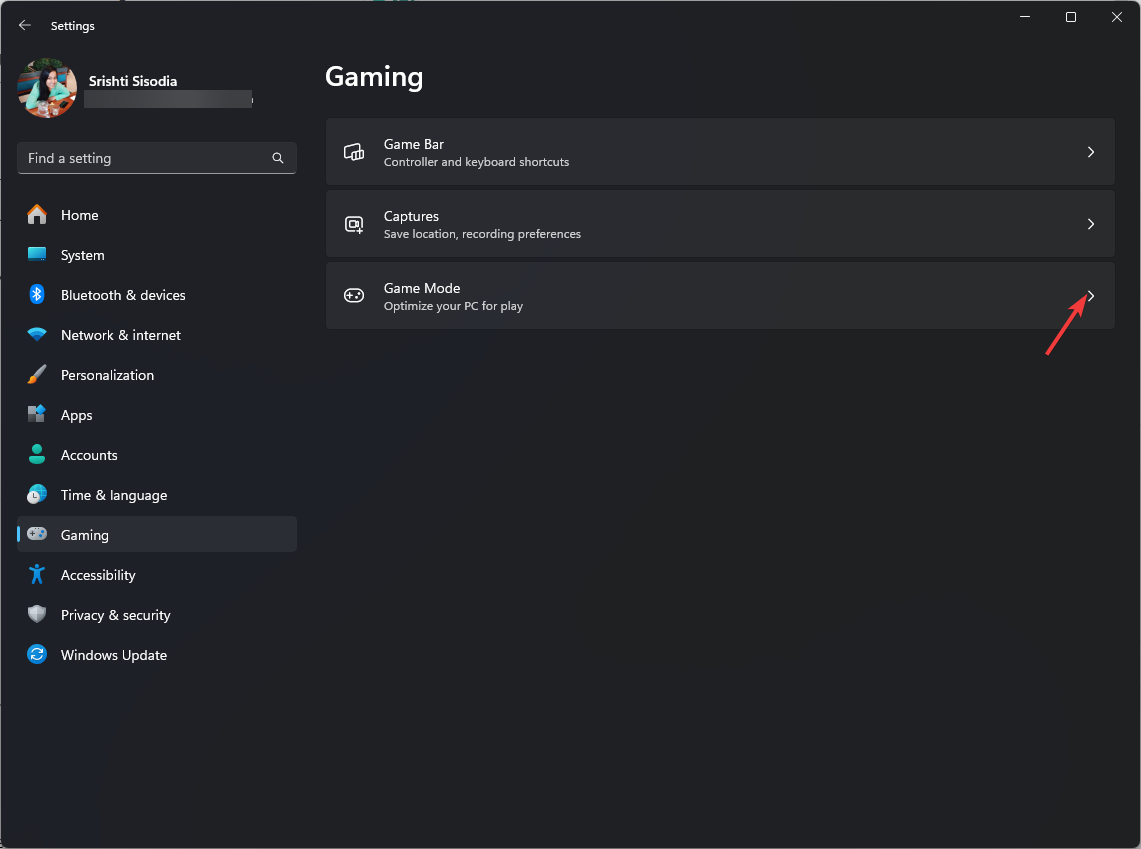
  2. From the left pane, click Gaming. PC game - PC crashes after closing game
  3. Click Game Mode.Turn off Game Mode
  4. On the next page, toggle off the switch next to Game Mode.

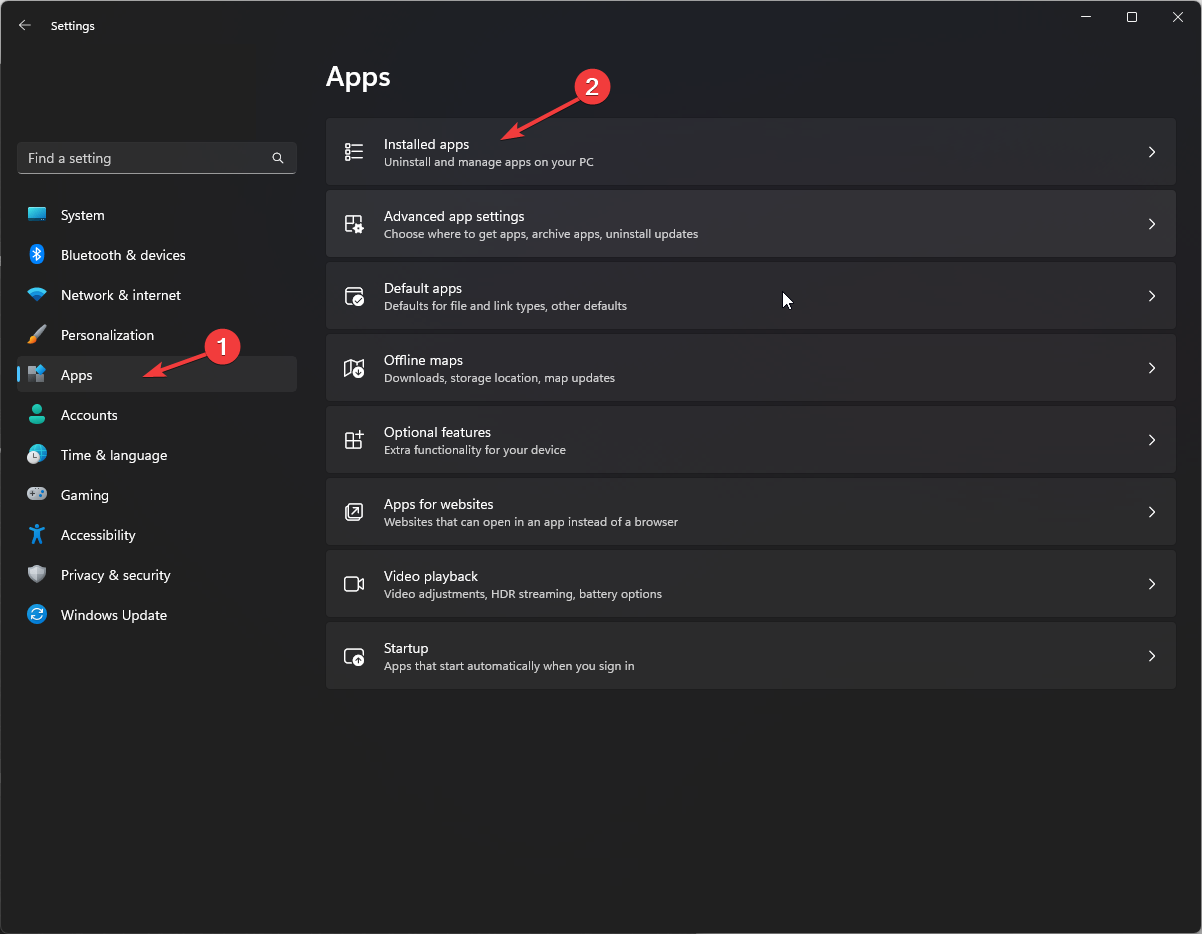
2. Disable Background Programs

  1. Press Windows + I to open the Settings app.
  2. Go to Apps, then click Installed apps.Apps, installed apps - PC crashes after closing game
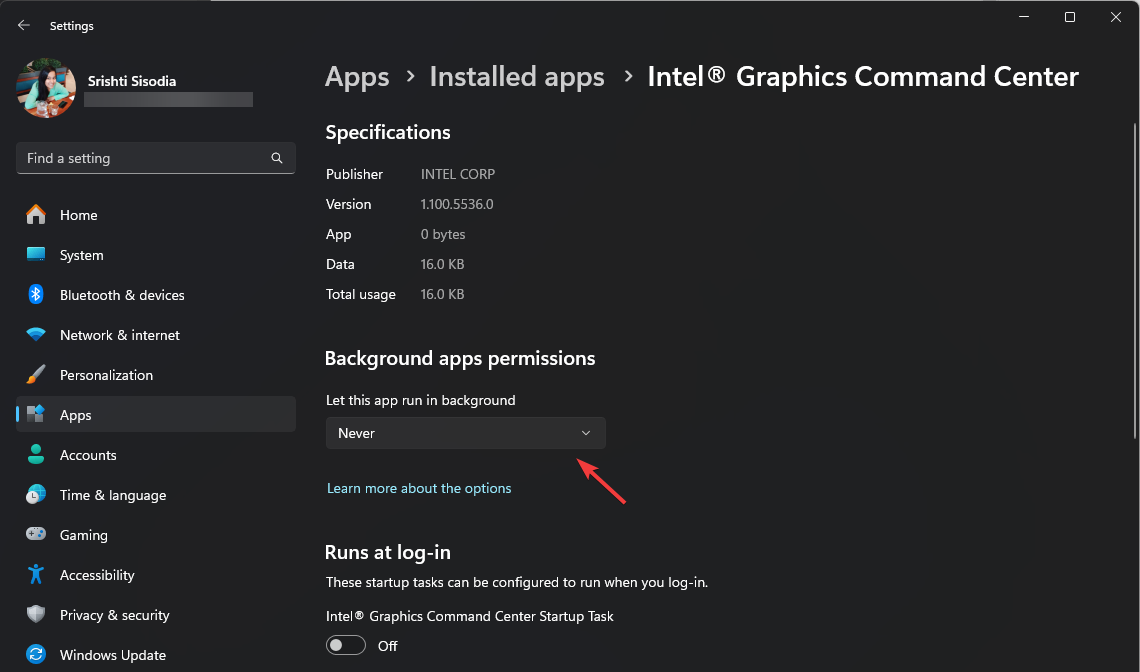
  3. Click the app from the list of apps, then look for the Background apps permissions option. For the Let this app run in background option, select Never.Background apps permissions
  4. Do the same for all the resource-hungry apps.

3. Turn off fast startup

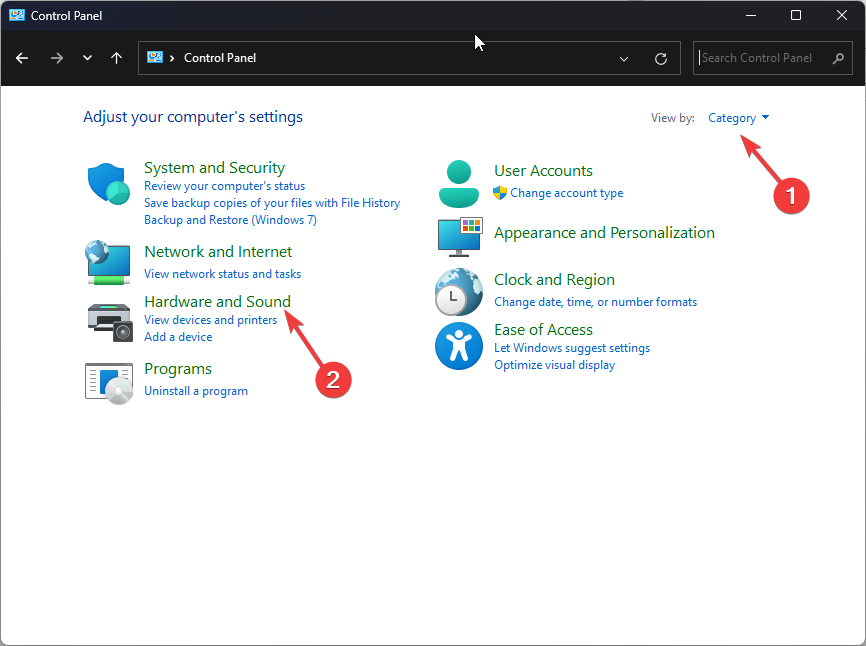
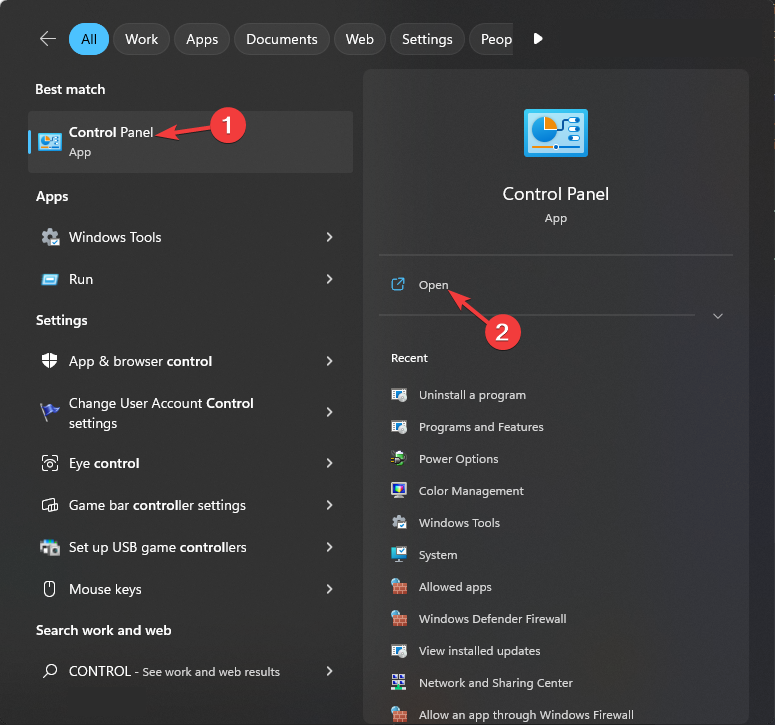
  1. Press the Windows key, type control panel, and select Control Panel to launch it.Control Panel start menu - PC crashes after closing game
  2. Select View by as Category, then click Hardware and Sound.Hardware and Sound
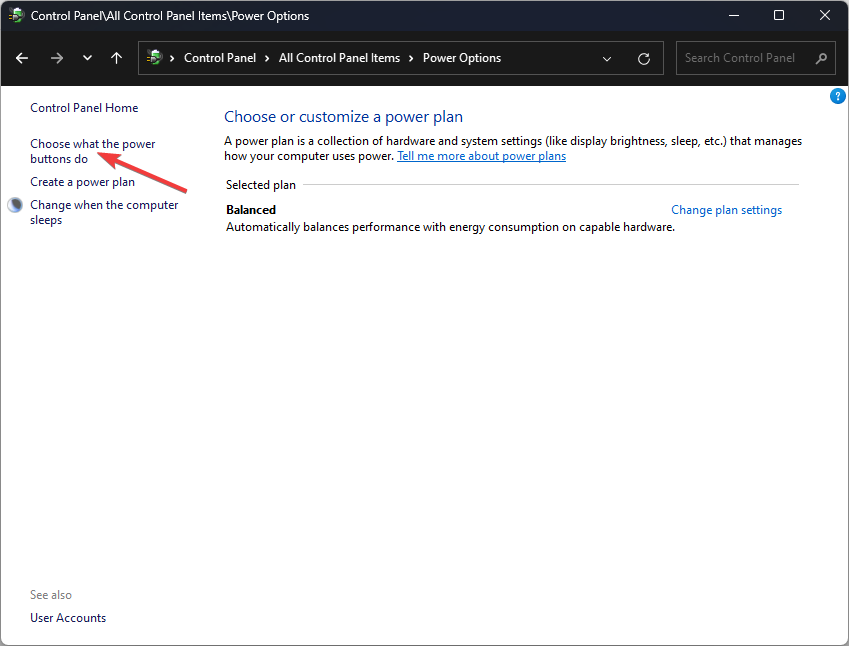
  3. Under Power Options, then select Choose what the power buttons do.Choose what the power buttons do - - PC crashes after closing game
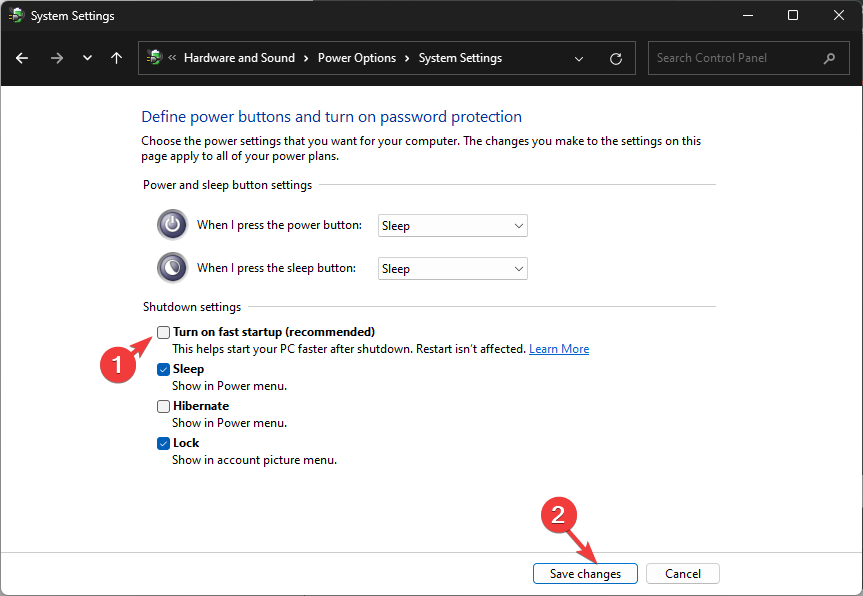
  4. Locate the Shutdown settings and remove the checkmark next to Turn on fast startup. Disable Fast Startup
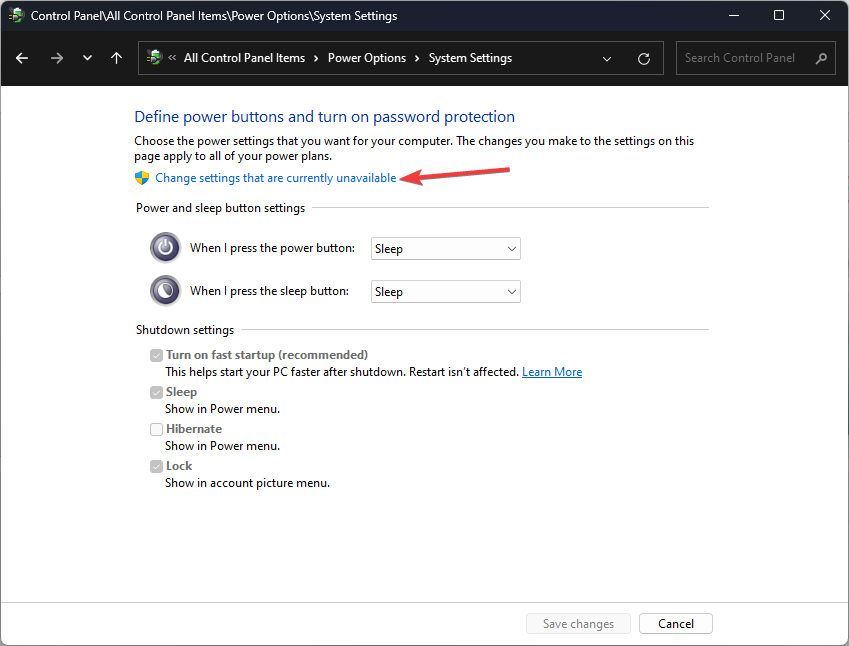
  5. If the option is greyed out for you, click Change settings that are currently unavailable.Change settings that are currently unavailable -  PC crashes after closing game
  6. Now remove the checkmark and click Save changes.

3. Reinstall the graphics driver

  1. Press Windows + R to open the Run window.Device Manager Run command
  2. Type devmgmt.msc and click OK to open the Device Manager app.
  3. Locate Display adapters and click it to expand the category.
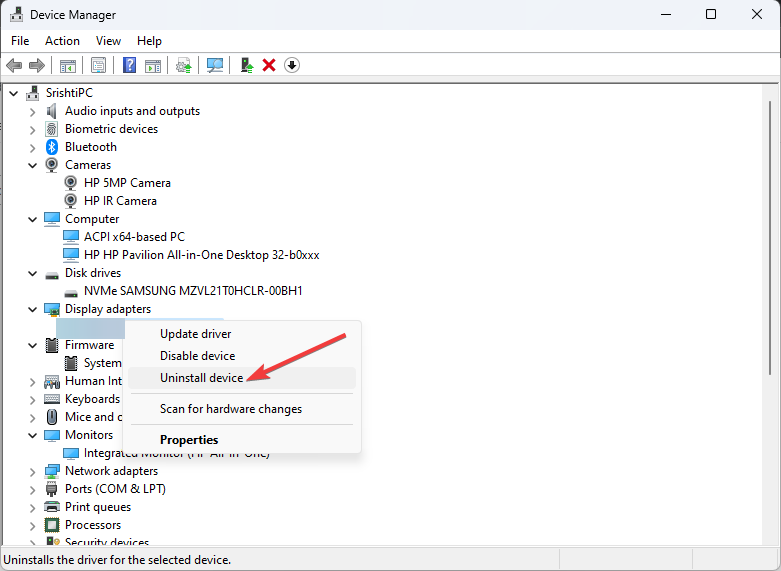
  4. Next, right-click the graphics driver and select Uninstall device from the context menu.Uninstall game -PC crashes after closing game
  5. Now, restart your computer to reinstall the driver.

However, if you want to install the driver from the manufacturer, you need to head to their official website, whether NVIDIA, AMD, or Intel, to download the driver and install it like any other software on your computer.

If this doesn’t help, you need to roll back the driver to the previous working version; follow these steps to do that.

  1. First, open Device Manager using the steps above.
  2. Now locate Display adapters, then click it to expand the category.
  3. Right-click the graphics driver and select Properties from the context menu.
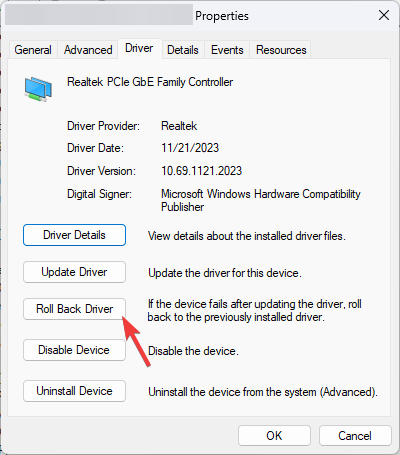
  4. Go to the Driver tab, then select Roll Back Driver.Roll back driver - PC crashes after closing game
  5. Select a reason on the Driver Package rollback page and click Yes to continue.
  6. Follow the onscreen instructions, if any, and save your work before proceeding, as your PC may shut down when you apply changes.

4. Run the SFC scan

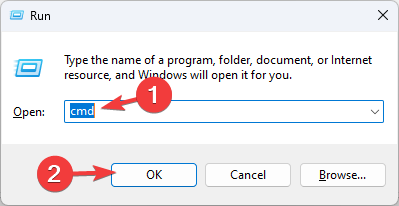
  1. Press Windows + R to open the Run window.cmd - PC crashes after closing game
  2. Type cmd and press Shift + Enter to open Command Prompt with admin privileges.
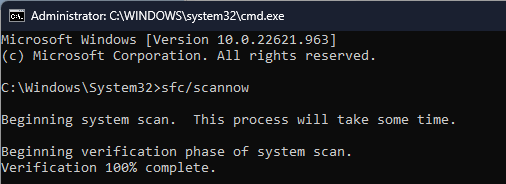
  3. Type the following command and hit Enter to initiate the SFC scan to repair or download the missing files: sfc/scannowSFCSCANNOW CMD
  4. The process may take some time, and you may have to restart the computer to let the changes take effect.

5. Perform a clean boot

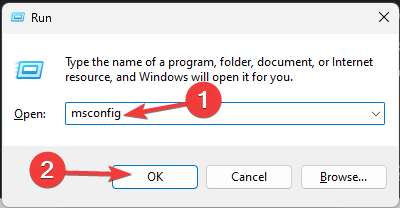
  1. Press Windows + R to open the Run dialog box.cleanboot1
  2. Type msconfig and click OK to open the System Configuration window.
  3. On the System Configuration page, go to the Services tab, place a checkmark next to Hide all Microsoft services, and click the Disable all button.  This will ensure only non-Microsoft services are disabled.Clean boot Disable all
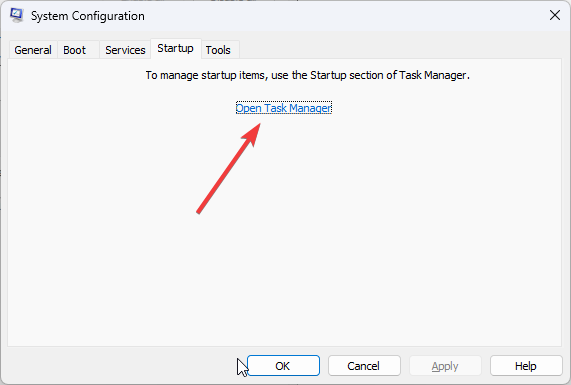
  4. Switch to the Startup tab and click the Open Task Manager link.Open task Manager Clean boot
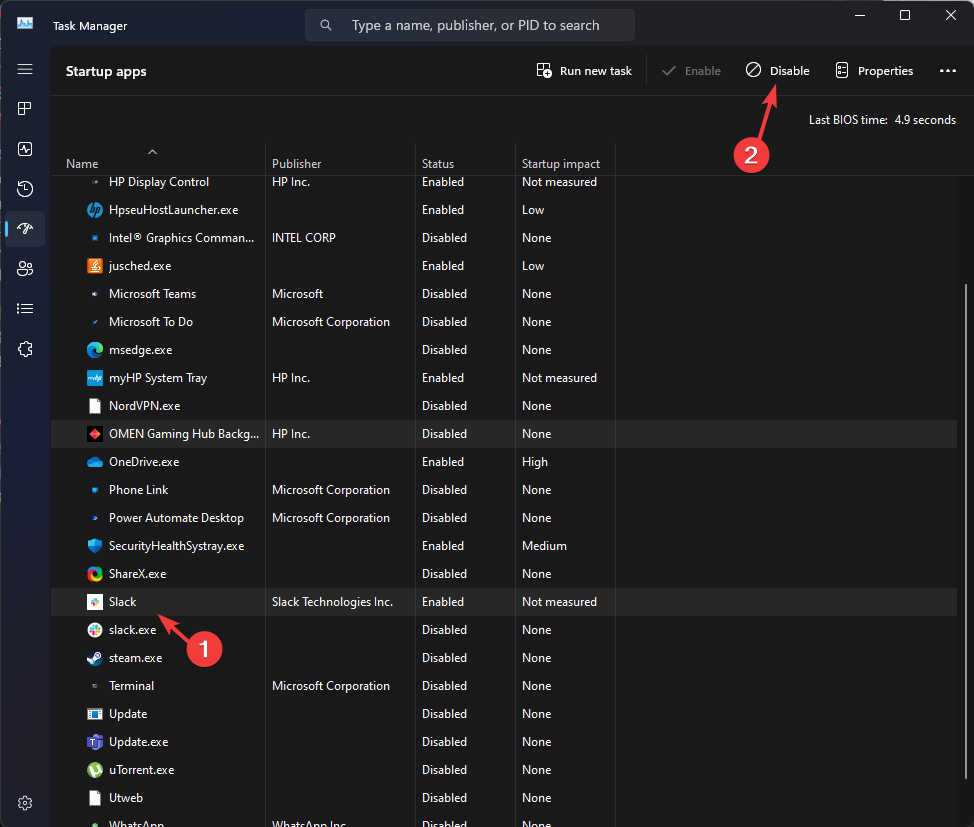
  5. On the Task Manager window, for each Enabled item, select them and click Disable, then close Task Manager.Disable Third party startup apps
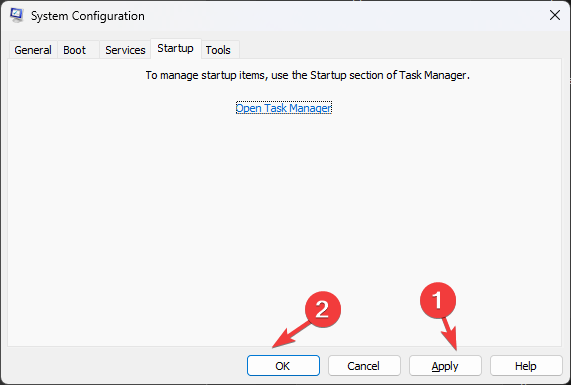
  6. On the System Configuration window, click Apply, then OK.CLEAN BOOT 5
  7. Click Restart to reboot your PC.Restart clean boot - PC crashes after closing game

    6. Run a memory diagnostic tool

    1. Press Windows, type Windows memory diagnostic, and click the first result.Memory diagnostic tool  - PC crashes after closing game
    2. Select Restart now and check for problems.memory-diag-tool 3
    3. Wait for the process to finish. When it is done, your PC will reboot automatically.
    4. The scan will now start, so wait for it to finish.

    During the scan, you can press F1 and configure the type of scan you wish to run. You can switch between sections with the Tab key and use F10 to apply changes. The recommended settings are Standard or Extended scan with at least 5 passes.

    Once the scan is complete, your computer will restart, and you will get the scan results on the screen.

    7. Run a malware scan

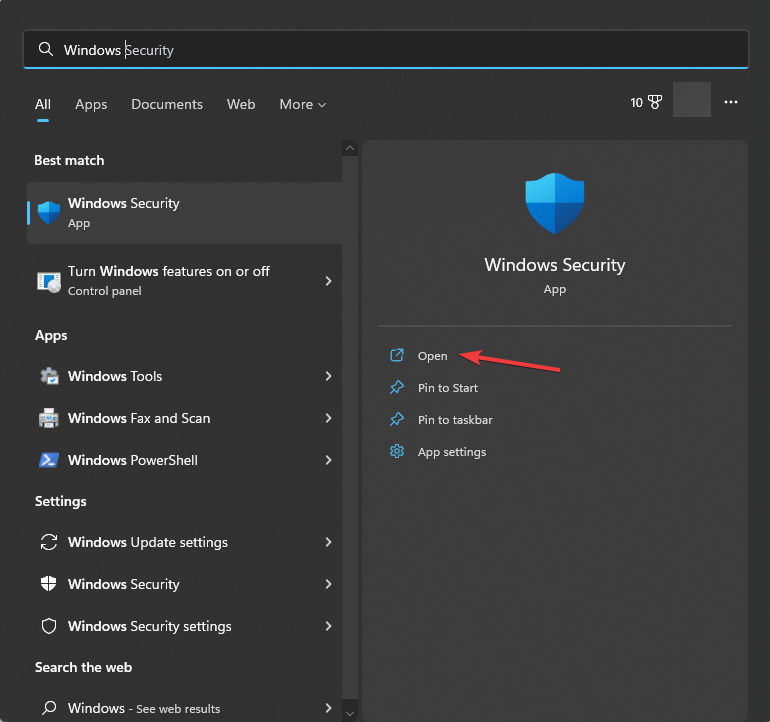
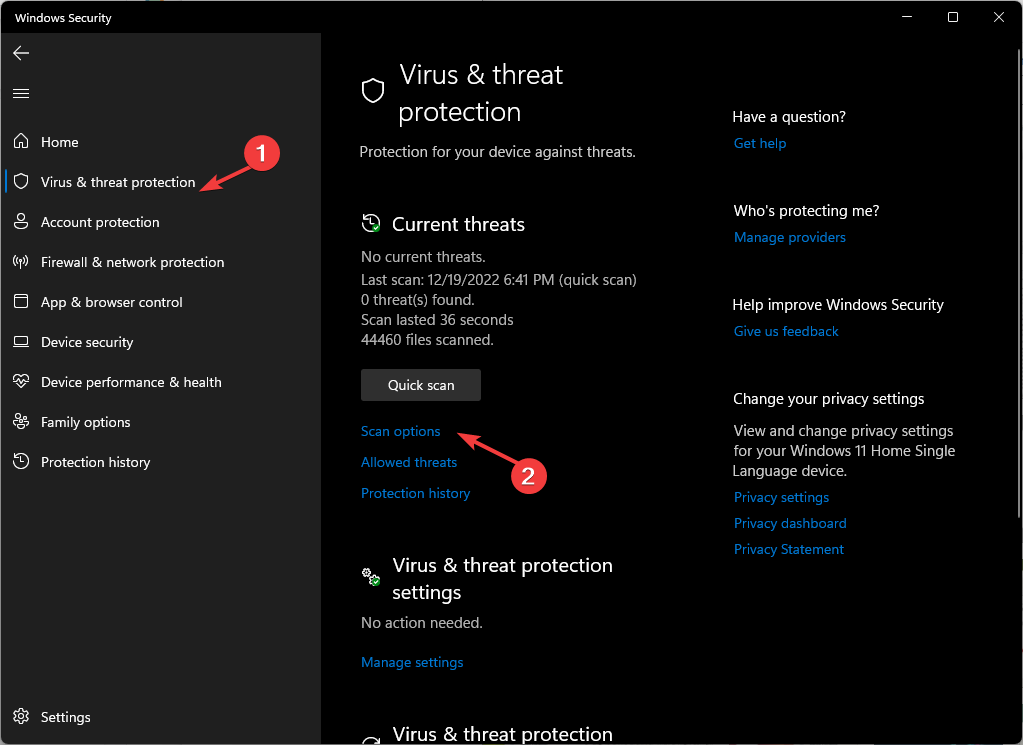
    1. Press the Windows key, type windows security, and click Open for the first result.Windows Security open Windows key - - PC crashes after closing game
    2. Select Virus & threat protection.
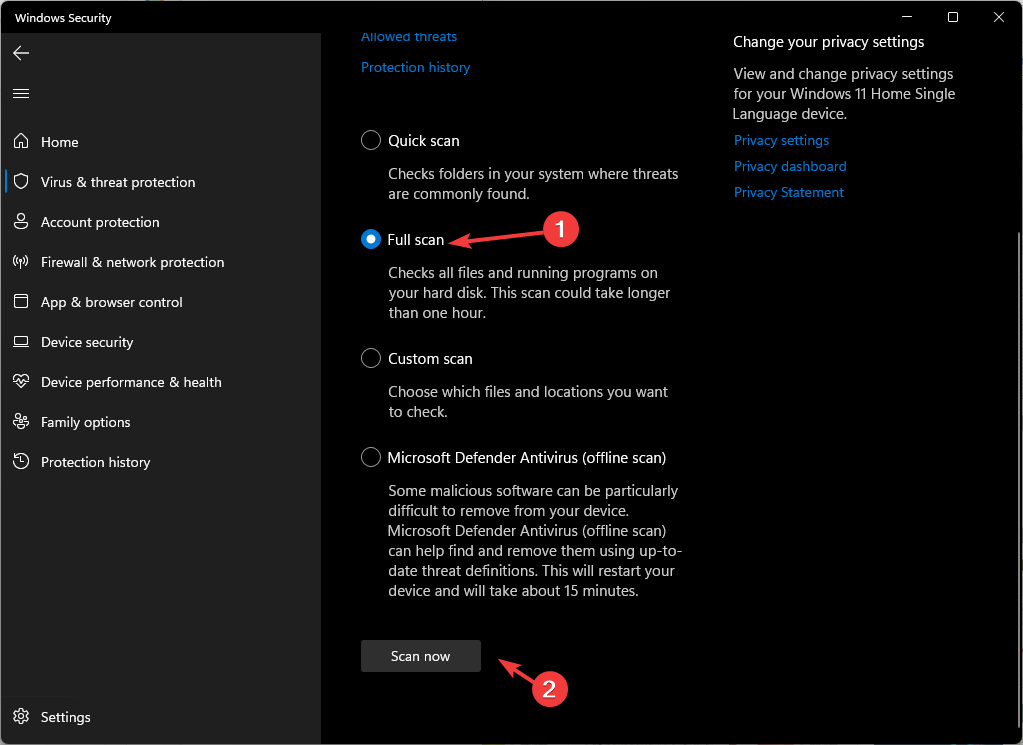
    3. Click the Scan options link.V& T Scan options PC crashes after closing game
    4. Choose Full scan and click Scan now.Full scan -

    The process will take some time to finish, and if it flags any file, make sure you delete it from your computer.

    You can also try uninstalling game optimizers like Razer Cortex, as sometimes they may not work well with your processor, and ensure your BIOS is up to date. If the issue happens only with a specific game, you can reinstall it and check if it persists.

    In case nothing works, you need to perform a clean install of Windows to fix the problem once and for all.

    Were you able to solve the PC crashes after closing game issue with these fixes? If not, mention your problem in the comments below, and we will try to help you.

    Microsoft Designer introduces the Frame Image and Collage Creator capabilities to the tool

    Microsoft Designer has introduced two new features. They are expected to assist you in enhancing your photographs and make them more appealing.

    The company announced in a blog post that it is now launching Frame Image and Collage Creator for Designers, which enables you to generate AI-made frames for your photos and make collages of images.

    Using Frame Image, you can create a picture and write about the theme or parts you desire in this frame. Eventually, you may incorporate styles like watercolor, doodle art, neon art, and pencil sketch. You could then link your image with Microsoft Designer to add the frame.

    On the other hand, Collage Creator permits you to gather as many as ten photos together. You can put that collection in a custom AI image frame. You may explore various collage layouts like landscape and portrait orientations.

    Frame Image and Collage Creator can be used to create anything from wedding and birthday invitations to vision and mood boards. They’re also perfect for celebrating kids’ milestones and capturing memories from vacations, events, and family gatherings. They make it easy to share your creations on social media or turn them into one-of-a-kind posters, calendars, or gifts.

    Microsoft

    In Microsoft Designer, the Frame Image and Collage Creator features are available in English. Soon, they will be accessible in other languages, too. In other news, the platform has been getting a lot of attention lately, as the Redmond-based tech giant recently added the amazing Restyle Image capability that turns every image you upload in the tool into a piece of art.

    Nvidia’s market cap has shrunk by a considerable $550 billion

    Just days after becoming the world’s most valuable company, Nvidia Corporation experienced a significant loss in the stock market. According to the latest reports, its shares dipped nearly 70% in just a few days, diminishing its market value by over $550 billion.

    The business is famous for producing powerful graphics processing units (GPUs), which are utilized in many applications and are particularly popular within the gaming and professional industries.

    The stock drop came after the company shared its quarterly outcomes and predicted a lower revenue expectation, indicating a possible decrease in demand for GPUs and data center products.

    The decline in the value of Nvidia’s stock is part of a chain reaction that affects both the business and its co-founder, Jensen Huang, who serves as CEO.

    This crisis has erased over $30 billion from his wealth, ranked among America’s biggest billionaire fortunes. Huang leads Nvidia with visionary guidance, and a noteworthy part of his total net worth is linked to how well this company does financially when it comes to stock value changes.

    The primary reason for the stock market disaster was a mixture of elements that made investors worried. In particular, Nvidia’s results from the 2nd fiscal quarter and its revenue prediction for the 3rd quarter did not meet what people expected, which created concerns about how well this company will do in the last part of the year.

    The cryptocurrency mining sector is decreasing in demand, and it was earlier a prime money earner for Nvidia; this could cause the company’s declining luck. The slowdown of cryptocurrency mining, mainly seen in China, has resulted in excessive graphics cards made especially for this purpose.

    In the datacenter area, Nvidia’s segment that has been a growth driver for many quarters also saw demand slow down. The datacenter market decreased due to few factors such as not much use of products using Nvidia’s fresh Hopper architecture, problems in supply chain, inflation and increased liking towards different computing structures like CPUs and field-programmable gate arrays (FPGAs).

    The company has issues with lacking components such as chips, which affects its capacity to fulfill customer requirements. The growing problem of the semiconductor supply chain is for many technology companies, including Nvidia, which struggle to supply products on time due to this issue.

    Even though the crisis continues, some analysts think that Nvidia has a good chance of returning from the stock market drop.

    The company is making a strong bet on the Metaverse, which refers to a virtual reality space where people can interact with computer-generated environment and other users. Nvidia’s RTX 40 series GPUs, if they are released in 2022 as planned, might provide growth because these have been made for use within this world of Metaverse.

    Nvidia is also growing its datacenter products, aiming to gain more market space. They just released their H100 Tensor Core GPU, saying it’s the strongest AI server globally. Nvidia is putting money into creating AI software for different fields like health and finance too.

    Nevertheless, the obstacles Nvidia encounters are quite significant. In the upcoming quarters, they must demonstrate their worth again to win back investors’ confidence.

    How to Install Intel Network Drivers in Windows

    If you have an Intel network adapter on the PC, you must install and regularly update the relevant drivers for seamless and error-free performance. Although Windows does a fine job at updating drivers, manually doing so helps get rid of a wide array of network and Internet-related issues.

    Intel regularly releases updates for its drivers, both via the official website and Windows Update. So, getting the latest version of Intel network drivers won’t take more than a few minutes. Let’s see how you can do that!

    How can I install Intel network adapter drivers in Windows?

    Note icon NOTE
    Although we have listed the steps to install/update Intel’s wireless network adapter drivers, the process remains the same for the Ethernet adapter driver. You need to locate the driver that is compatible with the available adapter.

    1. Using Intel Driver & Support Assistant

    You have a dedicated Intel Driver & Support Assistant (DSA), which automatically identifies any connected devices from Intel, lists the latest drivers, and facilitates quick installation.

    Since it’s an official utility, Intel DSA is completely safe to use!

    2. Via Device Manager

    2.1 Automatically install the driver

    1. Press Windows + X to open the Power User menu, and select Device Manager from the list.
    2. Expand the Network adapters entry, right-click on the Intel adapter, and select Update driver.Install Intel Network Drivers on Windows 11
    3. Choose Search automatically for drivers and let Windows install the best locally available version.network drivers
    4. Restart the computer to apply the changes.

    Letting Windows automatically install the best Intel network adapter driver is quick and straightforward and, at the same time, reduces the likelihood of post-installation issues.

    2.2 Manually install the driver

    1. In the Device Manager, locate the Intel network adapter, right-click on it, and choose Update driver.
    2. Select Browse my computer for drivers.manually install network drivers
    3. Click on Let me pick from a list of available drivers on my computer.
    4. Tick the checkbox for Show compatible hardware, then pick a driver from the list, and click on Next to install it.
    5. Once installed, restart the computer.

    Often, when the current version throws an error, you can manually install another Intel network driver in Windows, perhaps an older or generic (says Microsoft next to it) version.

    3. Via Windows Update

    1. Press Windows + I to open Settings, go to Windows Update from the left pane, and click on Advanced options.windows update
    2. Click on Optional updates.
    3. Now, expand the Driver updates section, tick the checkbox for the Intel network adapter driver, if one is available, and click on Download & install.Install Intel Network Drivers

    4. Via the manufacturer’s official website

    1. In the Device Manager, identify the Intel network adapter available on the PC.identify network adapter
    2. Now, open any search engine and search for the network adapter’s driver update. In my case, I had the Intel Wi-Fi 6 AX201 160MHz Wi-Fi adapter. So the search query became, Update Intel Wi-Fi 6 AX201 driver.
    3. Next, go to Intel’s or your computer manufacturer’s official website from the search results.search for driver
    4. Open the driver page and download the driver setup (.exe file). If it’s a compressed file (.zip), you will first have to extract the contents.
    5. Run the setup and follow the on-screen instructions to complete the installation process.Install Intel Network Drivers
    6. Restart the computer for the changes to come into effect.

    If you want to install the latest Intel network drivers on Windows 11 and 10, the best option is to manually search and download them from the official website.

    Although, you will have to be careful, as installing the wrong drivers can affect the network adapter’s functionality, lead to performance-related issues, or slow the Internet speed.

    5. Using a driver updater utility

    The safest and most straightforward option for installing Intel network drivers is to use an effective driver updater utility. A dedicated tool will automatically identify all network adapters and install the latest driver version available for each.

    Also, there are free driver update utilities, in case you don’t want to purchase a license just yet, but these lack in terms of functionalities.

    What can I do if Intel network drivers won’t install?

    If the Intel network drivers are not installing, these solutions will help:

    With these methods and tips, you can quickly install Intel network drivers, both Wi-Fi and Ethernet, and not run into any issues. Also, if you have another adapter, the steps to install network drivers in Windows 11 remain the same.

    Many tend to use specialized tools to update their drivers, however, this can lead to issues, and we already wrote what to do if Intel Driver Support Assistant is not working, so don’t miss it.

    Which method worked best for you? Share with our readers in the comments section.

    Audacity is Not Recording Sound: 7 Tested Solutions to Fix it

    If Audacity is not recording the sound from your microphone, that’s usually because of incorrect software or Windows settings for audio. Sometimes you may also see the Error opening recording device error message, which typically shows an improper input or enabled sound device. 

    Other reasons may include incorrect MME settings, improper sample rate, an outdated app or plugins interfering with your recording. However, before anything else, make sure that the mic is correctly connected to the right port in your PC and it’s detected by Windows.

    What can I do if Audacity is not recording sound?

    1. Make sure you’ve selected the right input

    1. Open your Audacity recording project.
    2. Select the right device for recording from the second drop down menu under the microphone section.
    3. If the device is not on the list, right click the Volume icon on the taskbar and select Sound settings.
    4. Make sure that the external microphone is plugged in and select it within the Input section from the list. Also, make sure to turn the mic volume up from below.
    5. Now, see if you can find the device in the Audacity input list. If not, restart the app.
    6. Finally, hit the Record button in Audacity and see if the app is picking up any signal.

    I common problem when I start a recording session is that I don’t plug in my mic before starting Audacity. Even if I notice and plug it in, the app doesn’t add it directly so I must restart the app to see it in the recording menu. We also have a guide on how to test your microphone on Windows 11 that might come in handy.

    2. Set the correct recording settings in Audacity

    1. In Audacity, click on Edit and select Preferences.
    2. Go to the Recording tab, and make sure you check the Play other tracks while recording and Detect dropouts options.
    3. Make sure that nothing else is checked and don’t change the default values for the Punch and Roll Recording default settings.

    Audacity’s default settings include the recommended checked options above, but if you’ve changed them by mistake, you may have problems recording.

    3. Adjust the sample rate of the track and mic

    1. In Audacity, go to Edit > Preferences.
    2. This time, select the Quality tab.
    3. Here, check the Default sample rate to 44100 Hz.
    4. Now, right-click on the Volume button from the taskbar and select Sound settings.
    5. Here, go to the Input section, locate your mic and click on the arrow to its right to reach the settings.
    6. In this menu, change the input format to 1 channel 44100 Hz. The microphone is recording on one channel. If you select 2 channels, in Audacity you will still get signal on only one of them.

    You can experiment with the sampling rate according to your audio devices, but 44100 Hz is the standard recording settings for most audio devices.

    4. Monitor the input and set the mic volume

    1. In Audacity, go to Click to Start Monitoring in the upper part of the window.
    2. Now, talk or sing as you would do in the recording session and adjust the mic level accordingly.
    3. Of course, also make sure that the mic is not muted and has plenty of volume from the Windows audio settings, as noted in the first solution.

    Audacity may not record sound because the mic volume is too low, so this method will not only tune the volume before recording but also avoid this issue.

    5. Allow apps to access your microphone

    1. Under the Start menu, click Settings and then select Privacy & Security.
    2. Next click Microphone.
    3. Here, scroll down and click on Microphone.
    4. Then, make sure the boxes for Microphone Access and Let apps access your microphone are switched on.
    5. You may also scroll down and make sure that Audacity is allowed to access it. If it does, it will show a Currently in use message under it.

    In Windows 11, there is also a menu called Let desktop apps access your microphone. Audacity may be under that section so enable it as well.

    6. Update the microphone driver

    1. Right-click the Start button and select Device Manager from the list.
    2. Go to Audio inputs and outputs and expand the section, right-click on your microphone and select Update driver.
    3. Select Search automatically for drivers and if there is a new driver, Windows will install it.

    This solution is only if your microphone is not delivering any sound in any recording apps.

    7. Reinstall Audacity

    1. Press Win + I to access Settings.
    2. Go to Apps > Installed apps, find Audacity, click on the dots to its right and select Uninstall.
    3. Now, open a browser and access the official Audacity download page for Windows.
    4. Get the installer and run it to perform a fresh installation of Audacity.

    As a last resort, you may reinstall Audacity. This way, you will be sure to have the latest version with all the default settings in place, avoiding the Audacity not recording sound issue.

    That’s it! To sum our guide up, this problem might be caused by some simple settings in Audacity and/or Windows. if Audacity is not recording the sound, the solutions above should have helped you fix the problem. Our guide on how to download and use Audacity will also offer a lot of extra information.

    If Audacity refuses to work, you can look at our list of the best vocal recording software for Windows and get a better tool.

    For any other questions or suggestions, feel free to use the comments section below.

    Firefox tests HTTPS-First Mode in Nightly

    Three years after making HTTPS the default in Private Browsing mode, Mozilla is testing an upgrade to prioritize HTTPS connections in regular browsing windows. This feature, known as HTTPS-First Mode, is currently available in Firefox Nightly, version 129.

    HTTPS-First Mode in Mozilla Firefox improves web browsing security by prioritizing HTTPS connections. It encrypts communication between your browser and websites, safeguarding sensitive data (such as login credentials and financial information) from interception by hackers on insecure networks. Moreover, HTTPS ensures data integrity, preserving the accuracy of information exchanged.

    When you try to visit a website, Firefox will first attempt to upgrade the connection to HTTPS, even if the website doesn’t explicitly use it.

    If the upgrade fails, Firefox will display a warning informing you that the connection is insecure. This helps you make informed decisions about whether to proceed to the website.

    HTTPS-First Mode in Firefox Nightly

    Mozilla initially enabled HTTPS by default in Private Browsing mode with Firefox 91. They are now testing HTTPS-First Mode by default in the Nightly version (version 129), scheduled for release on August 6, 2024

    This change improves security for users browsing in the Firefox Nightly version. Once Mozilla evaluates user feedback, they may eventually make it the default setting in the stable version as well, although the exact timeframe is unknown.

    While HTTPS-First Mode might lead to minor compatibility issues with some older websites or a slight performance impact in rare cases, the security benefits far outweigh these potential drawbacks.

    “Starting with Firefox 129, Firefox Nightly will automatically try to use a secure HTTPS connection whenever possible in loading a page. This behavior is known as “HTTPS-First”, or “HTTPS Upgrades”, and has been the default in Firefox’s private browsing mode since Firefox 91. Here is a blog post from when this feature was introduced in Private browsing.” Mozilla notes in Nightly release notes.

    It is worth noting, that Google is still testing HTTPS First Mode for Chrome in Incognito Mode.

    Following Mozilla’s confirmation of upcoming features like vertical tabs, tab groups, and AI functionalities, we previously reported on how to enable vertical tabs in Firefox.

    Prince of Persia: The Last Crown is now free to play on Xbox Store

    Hands down, it is one of the best titles from the Prince of Persia franchise and one of the best Metroidvania video games to be released recently. Prince of Persia: The Last Crown is now the latest game available for free on the Xbox Store.

    Released earlier this year, the game combines action-adventure elements with exploration and open-world elements in a 2.5-D side-scrolling video game where you control Sargon, which can jump, slide, and air dash between platforms, all while battling enemies with his two swords.

    Prince of Persia: The Last Crown might fly under the radar, but it’s one of this year’s highlights. From its vibrant atmosphere to the fun gameplay and rich story, the game is definitely worth your time.

    Plus, its Metroidvania elements allow you to overcome obstacles when ready instead of leaving them behind for good. So, if you’re a completionist (sometimes that I can relate to, as well), you’ll have hidden places to discover, puzzles to solve, and a lot of secret treasures to find.

    You can get the game now. If you’re looking for something else, you should check out the huge discounts for all the Xbox 360 games out there, even if you still can. The store is going to be deprecated soon.

    Happy gaming!

    Play Xbox Games From an External Hard Drive [How to]

    Many users are wondering if is it possible to play Xbox games from an external hard drive, and in today’s guide, we’re going to answer this question.

    How can I play Xbox games from an external hard drive?

    Add a new drive and move the game to it

    1. Connect your USB HDD or SSD to the USB port on the console.
    2. Select Format storage device and enter the desired name for the drive.
      format storage device xbox series x
    3. Next, choose Keep current location.
      keep current location xbox series x
    4. Select Format storage device.
      format storage device xbox series x
    5. Next, press the Xbox button and select My games & apps.
    6. Select the game you want to move and press the View button.
    7. Choose Move or copy from the menu.
      move or copy xbox series x
    8. Ensure that the right game is selected and choose Move selected.
      move selected xbox series x
    9. Wait for the game to move.
    10. After the process is finished, you should be able to play it from the external drive.
    Note icon NOTE
    Only Xbox, Xbox 360, and Xbox One games can be played from external hard drives. This solution won’t work for Xbox Series X|S games.

    Bought a Series X|S game that will not run from an external drive? Learn how to request a refund on Xbox in a few quick steps.

    Can you play games directly from an external hard drive on an Xbox?

    On Xbox Series X|S, you can play games from previous generations from external hard drives. Newer games can only work from internal storage or expansion cards.

    How to use an Xbox external hard drive?

    To use an external hard drive with Xbox, simply connect it with a cable and format it as mentioned at the beginning of the guide.

    How many games can a 1TB Xbox hold?

    This depends on the size of the games, but 1TB Xbox should be able to hold around 25 games, maybe a bit more.

    Can I use my external hard drive on another Xbox?

    Yes, your external hard drive will work on other Xbox consoles without any additional configuration. You can even transfer Xbox games to another console if you want.

    Changing consoles often goes along with updating account details. Learn how to change email on Xbox to keep access uninterrupted.

    Do Xbox games load faster on an external hard drive?

    No, external SSDs and hard drives are slower than internal storage or expansion cards on Xbox Series X|S. The internal drive is almost 7 times faster than an external SSD.

    What external hard drives are compatible with Xbox?

    Almost all external storage drives are compatible with Xbox. For games, you need to use USB 3.0 or newer with at least 128GB of storage. As for multimedia, you can use any USB drive, regardless of its speed or size.

    As you can see, it’s not simple to play Xbox games from an external hard drive, because newer games need NVME storage to load faster, and external drives with USB connection can’t provide that.

    However, Xbox One, Xbox 360 or Original Xbox games should be able to work from an external drive without too many issues. To play Xbox Series X|S games from external storage, you’ll need to use official expansion cards.

    In case you’re having any problems with storage, we also have a great guide on how to fix game loading issues on Xbox Series X, so don’t miss it.

    YouTube teases Hype, an upcoming feature that can make any video viral

    A new characteristic that YouTube is about to introduce has grabbed the attention of many people. Imagine how exciting it would be to enhance your preferred video from a creator by giving it a huge push—this way, it would stand out more in the busy realm of internet content. This is what YouTube’s latest “Hype” attribute offers.

    It’s like a virtual high-five for creators, showing them that you enjoy their content and are ready to promote it. This feature is still in the initial stages of testing and will be available for a chosen group of creators with less than 500,000 subscribers. A big shift is happening, which can be very beneficial, especially for smaller creators trying to increase their audience and discover fresh viewership.

    Now, you could ask yourself, “How does this Hype work?” It is very simple. A video can be hyped if published within the last seven days. This is not merely another button you can press; it’s an attempt to assist creators in standing out from typical Trending content and being seen as different in the Explore section.

    According to the official blog post, YouTube currently assesses this feature in Brazil, Taiwan, and Turkey. Yet, they have not clarified if users need to pay for it, similar to Super Chat or Super Stickers.

    What is intriguing is that YouTube has announced that Hype will not influence how a video ranks in the search and discovery system.

    This feature is only for viewers to express more affection towards it, showing some additional liking or support. If YouTube continues gathering feedback and observing how people use this function, there might be chances of making it available on a broader scale later on.

    Moreover, the Hype feature is not the only new addition to YouTube. The company also adds a Note feature to YouTube videos, allowing users to add more contextual information to content in a move similar to X.

    As a YouTube fan and someone who likes finding fresh creators, the Hype feature seems thrilling. It’s all about viewers having the power to bring attention to the creators they like.

    For those making content, it is a chance for them to be seen by different people and expand their community. I’m observing how this feature develops and potentially becomes a common part of our YouTube viewing experience.

    Blender Crashes When Opening File: 3 Ways to Prevent it

    If Blender crashes when opening a file, you won’t be able to continue working on your current project, so it’s important to fix that, and this guide will help you do it.

    Why does Blender crash when I open it?

    This occurs if the Load UI setting is enabled or if the file is too large or corrupted. Your power settings can also cause this issue.

    What can I do if Blender crashes when opening a file?

    Make sure that the file you’re trying to open isn’t made in a newer version of Blender. If the file is large, and you have access to original data try exporting it in segments. Lastly, try opening the file from File Explorer and not from Blender.

    1. Disable UI in settings

    1. Open Blender,  click on File, and then Open.
    2. Click the Cog icon in the top right and disable the Load UI setting.
      load ui blender checkmark disable
    3. Select the file you want to load.

    2. Append the character to a new scene

    1. Open a new Blender instance.
    2. Next, click on File and choose Append.
      append option file menu blender
    3. Select the file that is giving you trouble.

    3. Disable power saving

    1. Press the Windows key + S and enter the power plan. Select Choose power plan.
      choose a power plan search results
    2. Next, make sure to select High Performance power plan.
      high performance power plan selected
    3. Save changes.

    If you have power saving enabled anywhere else on your PC, disable it.

    Can I recover the crashed Blender?

    Yes, it’s possible to recover crashed files by using the Recover option in the File menu. You can use the Last Session or Auto Save option.

    These are just a couple of ways to fix Blender if it crashes when opening a file. Users also suggested updating their graphics card drivers, so try that as well.

    To ensure that your file is compatible, don’t miss our guide on supported file formats in Blender.

    We also have a great guide on Your system does not use 3D hardware acceleration error, so don’t miss it if you have additional Blender issues.

    Did you find a different way to fix this problem? If so, share it with us in the comments below.

    Microsoft has most likely broken the law with its Teams bundle, says the European Commission

    A sudden twist in the tech world’s plot: the European Union is scrutinizing Microsoft for possibly crossing a border with its Teams bundles. Picture this scene: it’s July 2023, and the European Commission, like a referee in the tech industry, decides to observe Microsoft.

    They were interested in whether it was fair, according to EU antitrust laws, that Microsoft bundled its Teams online meeting and collaboration service with other productivity services, such as Microsoft 365.

    If we jump to the present, the European Commission shares its initial thoughts, and it appears that they think Microsoft possibly overstepped a boundary. Bundling Teams, with its main productivity services, could be seen as creating an obstacle to competition, making it harder for rival companies that offer similar products to stay in business.

    To tackle these worries, Microsoft stated in October 2023 that it would provide Teams as a separate service across most parts of Europe, and by April, this was introduced globally (Microsoft’s Teaming Up With Others). On the other hand, the European Commission implies that this decision has not completely resolved their worries.

    Margrethe Vestager, a prominent person in the European Commission recognized for her position in competition policy, voiced concerns about Microsoft’s method possibly providing Teams an unjust benefit compared to similar services.

    We are concerned that Microsoft may be giving its own communication product Teams an undue advantage over competitors, by tying it to its popular productivity suites for businesses. And preserving competition for remote communication and collaboration tools is essential as it also fosters innovation on these markets. If confirmed, Microsoft’s conduct would be illegal under our competition rules. Microsoft now has the opportunity to reply to our concerns.

    Margrethe Vestager

    This is important because a competitive environment encourages creativity—especially for remote communication and collaboration tools. If Microsoft’s behavior regarding its Teams bundle is found to violate competition rules in Europe, it may be subject to penalties that could potentially result in fines equal to 10% of its yearly global revenue.

    Microsoft, in response, also shows a readiness to cooperate. Brad Smith, the President of Microsoft, recognizes the feedback and tells about their commitment to finding remedies that will tackle the remaining worries of the Commission. However, the European Commission has not given a specific time when they will announce their final decision yet.

    This story raises many questions about the equilibrium between providing complete productivity solutions and maintaining a fair market. It hints at how big technology companies have to carefully manage their path of creativity while following rules set by regulators.

    It will be fascinating to observe how Microsoft adjusts as this tale progresses and what it says for the upcoming days in digital collaboration tools.

    Microsoft is one of this year’s Gartner Magic Quadrant for Data Science and Machine Learning Platforms leaders, thanks to its AI advancements

    In the fast-changing technology world, Microsoft has again shown its strength. In an official announcement, the company gained leadership in the 2024 Gartner® Magic Quadrant™ for Data Science and Machine Learning Platforms.

    Microsoft’s Azure AI was very influential. It offers a strong and flexible platform that speeds up progress in data science and machine learning while maintaining enterprise management. But what makes Microsoft stand out in such a crowded field?

    Firstly, Azure AI is not merely providing tools; it’s creating an environment for data science and machine learning to grow.

    The Azure AI model catalog includes a wide range of foundation models, including popular choices like Phi-3, JAIS, and GPT-4o. Microsoft enables your ability to adjust or create your own models on these trusted bases. This adaptability becomes very important in an area that changes fast, such as AI.

    But it’s not only about the technology. Microsoft knows that every excellent innovation comes from skilled teams. That is why Azure Machine Learning was created to aid in cross-functional teamwork, making it simple for groups to distribute and manage machine learning properties.

    The platform’s capacity to work with ONNX Runtime and DeepSpeed improves training and inference time efficiency, which benefits performance, growth potential, and energy utilization.

    When organizations must put into service and handle thousands of models over production surroundings, it’s possible through managed online endpoints. Microsoft customers can deploy their models on strong CPU and GPU machines without the burden of managing infrastructure underneath. This ease in deployment saves time and effort significantly.

    But how about the operations side? In this area, Microsoft also has a clear advantage because of its adaptable MLOps and LLMOps. Azure Machine Learning’s quick flow can make the whole cycle of developing generative AI applications more efficient.

    This arrangement of models, prompts, APIs, and tools for vector database lookup and content filtering eases development and helps developers concentrate on creating new things.

    In the world of responsible AI, Microsoft is leading the way. The responsible AI dashboard shows Microsoft’s dedication to fairness, safety, and openness in AI. By giving data scientists and developers useful tools for using responsible AI, Microsoft ensures that their creations are not only moral but also beneficial.

    Security, privacy, and following rules are very important in today’s digital world. Microsoft Azure Machine Learning handles these concerns directly with its strong security and compliance features. Whether it’s about limiting access to resources, encrypting data, or making sure data stays within certain areas, Microsoft has got it covered.

    If you are a big business or small start-up, there should be something in Azure AI by Microsoft that suits your needs. This indicates that Microsoft isn’t just playing a role in the future of AI; it’s actively helping to create it.

    Steam Error 16 on Windows: 8 Simple Fixes

    Steam Error 16 typically relates to connection and timeout issues, but it’s also due to incorrect credentials. Don’t worry, we’ve got a range of solutions to help you get back on track.

    Before anything else, double check if you entered the login information correctly and peak at the Steam’s server status page to see if everything is OK on their part. Also, check if you have a steady internet connection to rule out a possible local network problem.

    How do I fix Steam Error 16 on Windows?

    1. Reset your Steam account password

    1. Open your web browser and go to the Steam login page.
    2. Click on the Forgot Password? option located below the login fields.
    3. Enter your Steam account email address or login name when prompted.
    4. You will receive an email with a unique URL. Click on the link in this email to be taken to the password reset page.
    5. Enter your new password twice for confirmation, then press the Reset Password button.
    6. If you encounter issues, try using a different web browser or clear your browser cache and cookies.
    7. If the problem persists, contact Steam Support through support.steampowered.com.

    This solution helps you regain access to your Steam account by resetting your password, which can often resolve Error 16 caused by incorrect credentials.

    2. Clear the Steam app’s cache

    1. Open the Steam client on your computer.
    2. On the top left corner, click on the Steam menu and select Settings.
    3. Click on the Downloads tab and select the Clear Cache button under Clear Download Cache.
    4. Confirm the action by selecting OK in the prompt.
    5. Restart Steam and try logging in again.

    This solution clears unnecessary cached data that might be causing Error 16, helping to eliminate software conflicts.

    3. Disable the firewall and antivirus temporarily

    1. Open your firewall settings (if using Windows, go to Control Panel > System and Security > Windows Defender Firewall).
    2. Temporarily disable the firewall by selecting Turn off Windows Defender Firewall (not recommended) for both private and public networks.
    3. Open your antivirus software and temporarily disable the real-time protection.
    4. Try logging into Steam again.
    5. Remember to re-enable your firewall and antivirus after the test.

    This will help determine if security software is blocking Steam and causing Error 16, allowing you to adjust settings as needed.

    4. Verify Game File Integrity

    1. Open the Steam client and go to your Library.
    2. Right-click on the game causing issues and select Properties.
    3. In the Properties window, click on the LOCAL FILES tab.
    4. Click on Verify integrity of game files….
    5. Wait for Steam to check and repair any discrepancies in the game files.

    This helps fix corrupted game files that might be triggering Error 16, ensuring your game files are intact and up-to-date.

    5. Update the Steam client

    1. Open the Steam client on your computer.
    2. Click on the Steam menu in the top left corner and select Check for Steam Client Updates.
    3. If updates are available, follow the prompts to install them.
    4. Restart Steam after the update is complete.

    Updating the Steam client ensures you have the latest bug fixes and improvements, which can resolve Error 16.

    5. Reinstall Steam

    1. Press Windows + R to open the Run dialog, type appwiz.cpl, and press Enter to open Programs and Features.
    2. Find Steam in the list of installed programs, right-click it, and select Uninstall.
    3. Follow the on-screen instructions to remove Steam.
    4. Download the latest version of Steam.
    5. Install Steam and log in to your account.

    Reinstalling Steam can resolve any underlying software conflicts by providing a fresh installation, potentially fixing Error 16.

    6. Contact Steam Support

    1. Go to the Steam Support Page.
    2. Select Help, I can’t sign in and follow the prompts to contact support.
    3. Provide detailed information about the issue, including any error messages and steps you’ve already tried.
    4. Wait for further instructions from the support team.

    Steam Support can offer specialized help and additional troubleshooting steps if the common solutions do not work.

    7. Clear the browser data

    1. Open your web browser and go to Settings.
    2. Find the option for clearing browsing data (usually under Privacy and Security).
    3. Select all checkboxes to clear history, cookies, and cache.
    4. Click Clear data to complete the process.
    5. Try accessing Steam again.

    Clearing browser data helps eliminate any stored information that might be causing conflicts, thereby resolving Error 16.

    8. Use a different browser

    1. If you are trying to reset your password through a browser and encountering issues, try using a different web browser.
    2. Download and install an alternative browser, such as Opera.
    3. Navigate to the Steam login page and attempt the password reset process again.

    Switching browsers can bypass any browser-specific issues causing Error 16, providing a smooth reset process.

    By following these solutions, you should be able to resolve Steam Error 16 and get back to your gaming adventures. You might also get help from our guide on how to fix Steam if the browser is not working.

    Do you still get the Steam Error 16? Let us know if our solutions helped in the comments below.

    Zoom Crashes When Sharing Screen: 4 Simple Fixes

    Screen sharing is an important feature in any video conferencing tool such as Zoom so if the app crashes at this precise moment, a lot is at stake especially if you’re the host of the meeting.

    One of the main reasons why Zoom may crash when you’re sharing your screen is your connection. If your Internet keeps dropping randomly, it will not be able to perform this function. Further, if you’re using a work or school account, there may be some restrictions preventing you from sharing your screen.

    Other factors include overzealous antivirus software, hardware limitations that lead to incompatibility or even an outdated Zoom client or operating system.

    How do I fix screen sharing on Zoom?

    1. Change the Zoom video rendering setting

    1. Launch the Zoom app and click the Gear icon in the top right corner.
      gear icon
    2. Choose Video in the left pane and click the Advanced button.
      video windows driver foundation high cpu
    3. Check all the boxes under Use hardware acceleration for section.
      hardware
    4. Now, click the dropdown before for Video Rendering Method and set it to Direct3D9.
      gdi windows driver foundation high cpu
    5. Click the dropdown for Video Rendering Post Processing to Disable.
      disable
    6. Finally, set the option for Video Capturing Method to Direct Show and restart Zoom to effect the changes made.
      direct show windows driver foundation high cpu

    Direct3D9 is an older method for rendering videos on Zoom that offers more stability. It is mostly compatible with older hardware and may resolve the issue of Zoom crashing when screen sharing.

    Your framerate also matters. If your Zoom app is on 1080p but you have older hardware, you’ll have a difficult time trying to screen share as the program will get overloaded with data quite fast. Try scaling down and see if there are any improvements.

    2. Add Zoom to the Firewall exception list

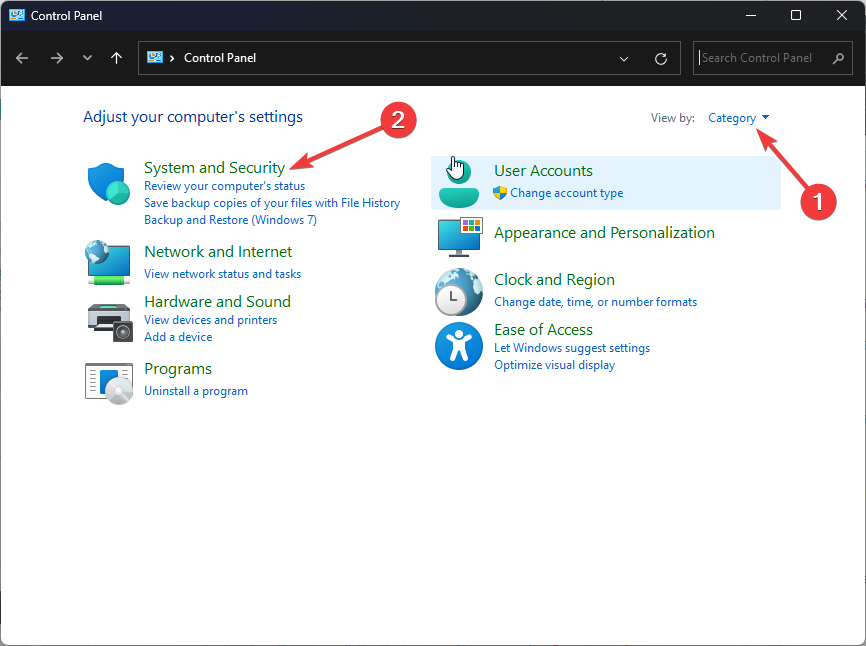
    1. Press the Windows key, type control panel, and click Open. Control Panel start menu Zoom Error Code 103033
    2. Select View by as Category and click System & Security.System and security
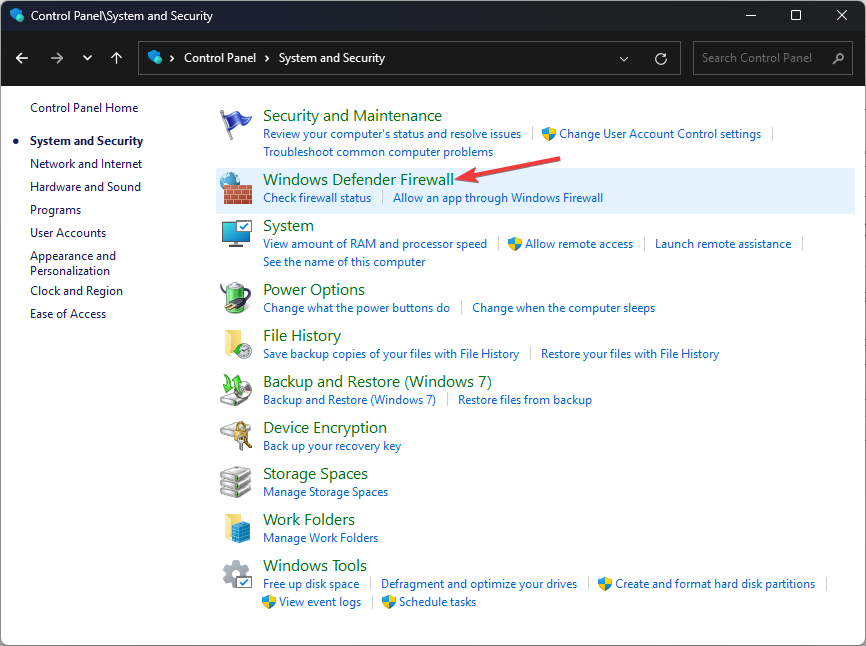
    3. Click Windows Defender Firewall.Windows Defender
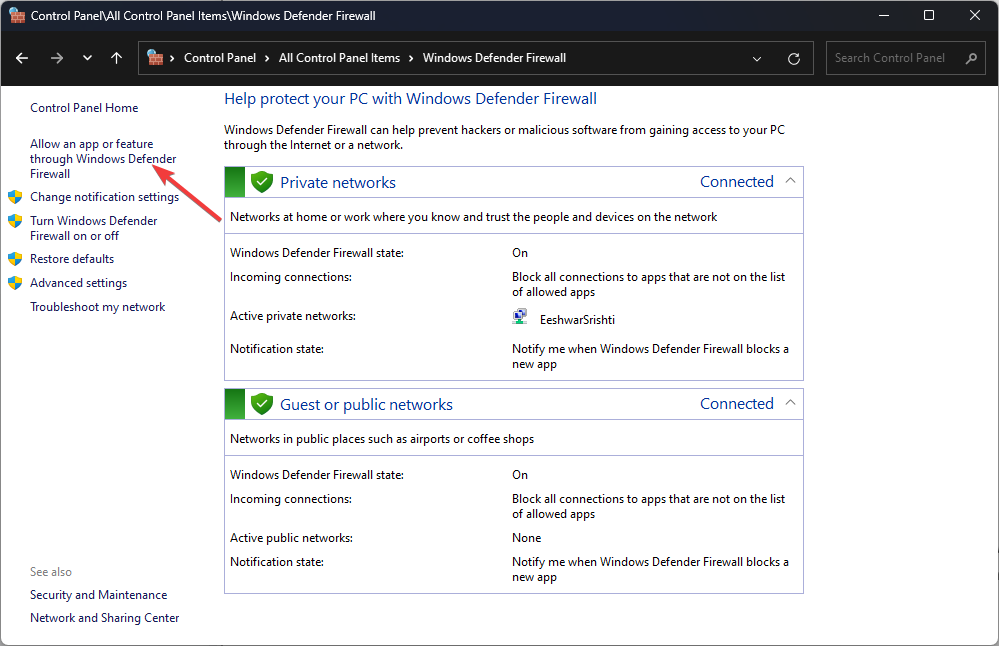
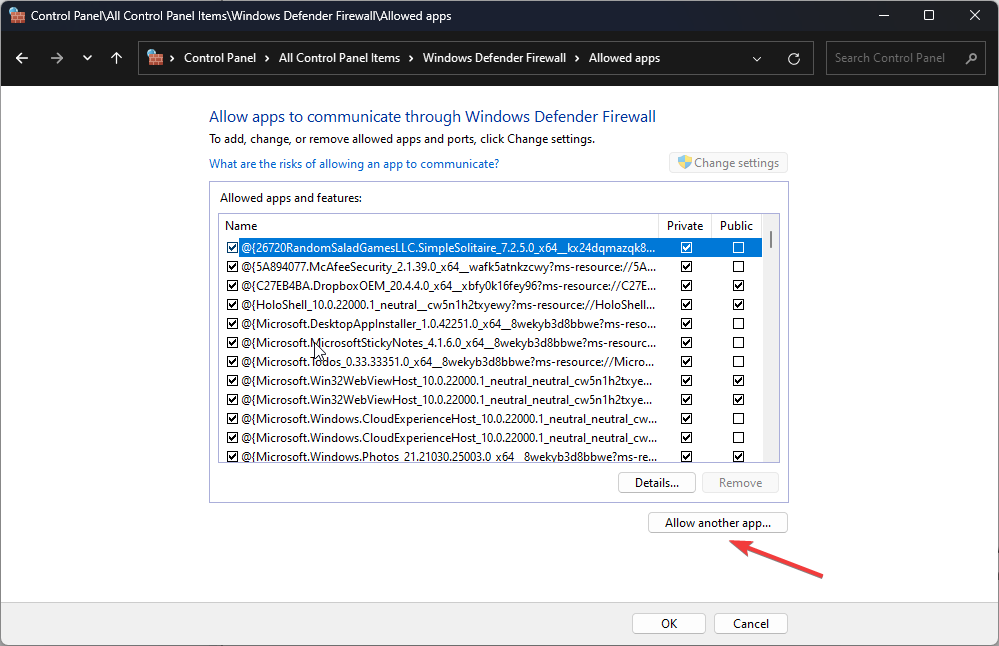
    4. Now click Allow an app or feature through Windows Defender Firewall.Allow an app
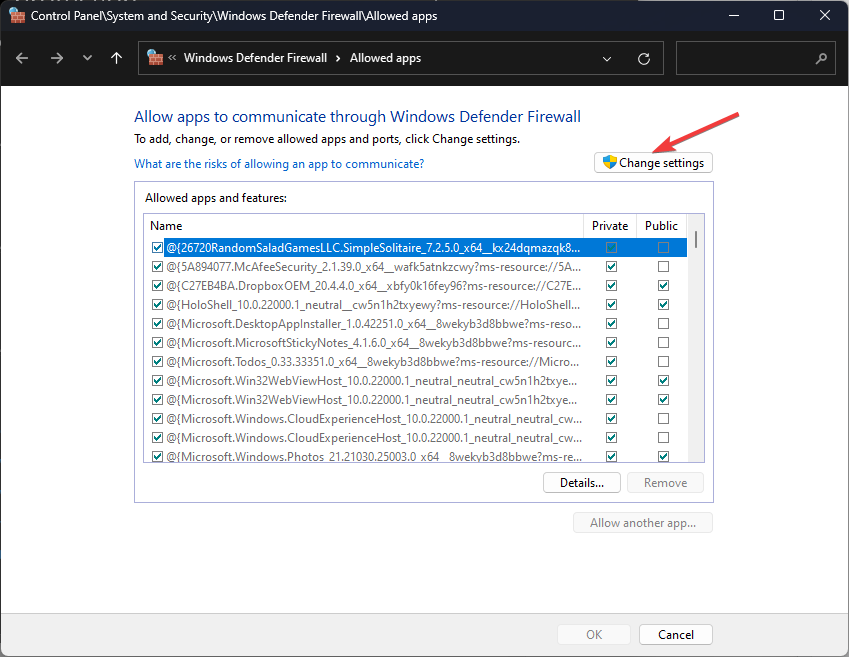
    5. Click Change settings.Change settings
    6. Select Allow another app.Allow another app
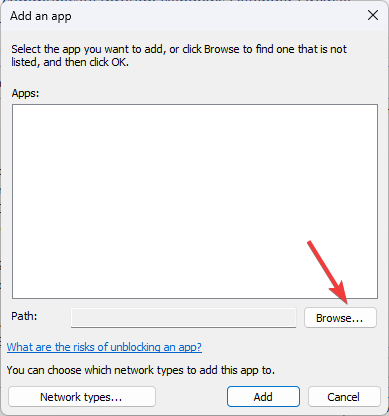
    7. Click the Browse option and select Zoom. Browse Zoom Error Code 103033
    8. Next, click the Add option. ADD
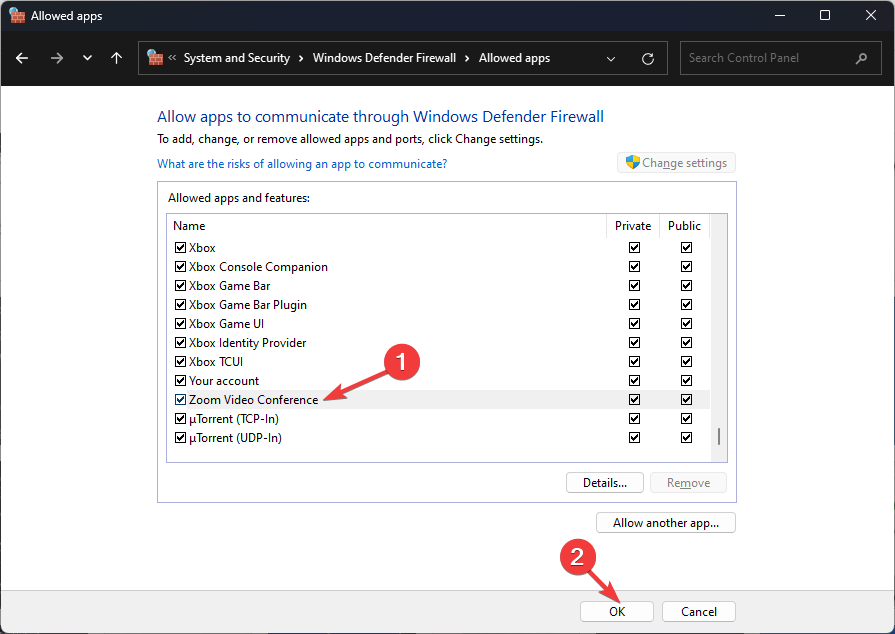
    9. Make sure for the Zoom Video Conference app, Private and Public options are select
      Click OK
    10. Click OK to close the window.

    Zoom crashing when screen sharing could be permission-related. Make sure to allow Zoom as an exception to rule out this possibility.

    3. Reinstall the Zoom client

    1. Press Windows + I to open the Settings app.
    2. Go to Apps, then click Installed apps.Apps - Installed apps -Zoom Error 4502
    3. Locate Zoom, click the three dots icon, and select Uninstall.
    4. Click Uninstall to confirm the action.
    5. Go to Zoom’s official website, locate Zoom Desktop Client, and click Download.Download Zoom to fix zoom error code 4502
    6. Once the executable file is downloaded, double-click it to install the app.

    Corrupt files could be causing the crash so a reinstallation can reset the configuration files. When reinstalling, ensure it is the 64-bit version. Screen sharing is a resource-intensive task so it will need a high-performance version for improved stability.

    4. Install an older app version

    Note icon NOTE
    WindowsReport is not affiliated with the Uptodown.com site. Do your due diligence and ensure you have an antivirus before downloading any files from this site.
    1. Uninstall your Zoom app and remove any software leftovers.
    2. Launch your web browser and navigate to the Uptodown site.
    3. Scroll down and click on Older versions.
    4. Search for a specific version number you may have noted down using the CTRL + F combination then paste it to locate it faster. If you don’t have a specific version, pick the second one from the top.
    5. Wait for the download to complete then follow the on-screen prompts to install Zoom.

    Additional tips for improved screen sharing on Zoom

    • Use an Ethernet cable where possible. A wired connection tends to offer a more stable and faster internet connection than a wireless connection. Also, limit the number of devices on the same network and the number of background apps to prevent network congestion.
    • When screen sharing on Zoom, only share your current tab instead of all your windows especially since Zoom is known for its high CPU usage. This will reduce the pressure on resources required and avoid a possible crash.
    • Keep your Zoom app, operating system and display drivers updated as they all work together to ensure a seamless experience and compatibility.
    • Always perform a test of your mic lest your Zoom mic fails to work, screen sharing and any other features needed before starting your meeting. Your Zoom may fail to launch and interfere with your meeting.
    • Configure your Zoom app settings to strike a balance between the usage of minimal resources and high performance. With optimal screen resolution, the chances of Zoom crashing when screen sharing are minimized.

    If you’re unlucky with any of the above recommended solutions, perhaps Zoom support may be able to offer additional assistance.

    At the same time, Zoom is not the only video conferencing software available. We have a list of top secure video conferencing tools so feel free to explore this list.

    That’s a wrap from us but we’re curious. Have you encountered any issues while screen sharing on Zoom? What solution would you say resolved this issue? Let us know in the comment section below.

    Copilot in Microsoft Dynamics 365 is now capable of summarization

    Microsoft Dynamics 365 is creating a new trend in the exciting enterprise technology field with its powerful AI summarization ability. Think about it: complicated data from different parts of your business—supply Chain Management, Finance, Commerce, or Human Resources—is not only available but also condensed into understandable and useful information.

    Microsoft says this is what Copilot in Dynamics 365 uses artificial intelligence for. This technology allows users to complete tasks without constantly switching their contexts, leading to quicker and better decision-making by the user.

    Vendor summaries are cleaning up the way you grasp vendor performance and financials. Picture yourself as a procurement manager who, instead of moving through maze-like forms, receives a summary of active contracts, purchase orders, etc.

    In the same manner, accounts payable teams quickly see essential financial details. This context-aware method makes connecting with vendors easy for users of any role.

    For sales and purchase orders, AI summarization is very useful as it helps to highlight key items in open orders. This can be a big advantage for teams that handle purchases and sales because they used to spend many hours tracking these kinds of orders. Copilot combines important details into one place, making it straightforward to spot things that need urgent attention.

    Customer summaries transform Copilot into a useful tool for various customer service teams by personalizing the knowledge to fit the user’s part. Whether you are an accounts receivable agent who requires easy information about open invoices or part of the sales order team looking for details on open orders and shipments, Copilot can offer assistance. This helps in making sure that interactions with customers become not just faster but also more successful.

    Warehouse Workers: These employees must begin their day clearly and understand what they will do. Copilot’s dynamic operational summary on the Warehouse Management home screen provides this, keeping them updated during their shift and aiding in quick adjustment to modifications.

    Another area where AI summarization is helpful is providing workflow history summaries. These help review and approve invoices, expense reports, etc., and provide a compact overview of recent actions and comments.

    For business workers buying items (procurement managers) and keeping track of stored goods (warehouse managers), the shortened form of product previews and detail summaries provides easy-to-understand crucial details. This makes work faster and more effective in managing inventory.

    For HR and employees, Copilot helps in handling leave. It condenses important details such as vacation and sick days balances, making it easy for workers to arrange their time away.

    For retail, Copilot assists in recognizing risky transactions across various stores by summarizing retail statement errors. This helps solve problems swiftly and improves store management’s efficiency.

    Summaries of merchandise workflow tackle the issue of dealing with intricate product setups by giving a simple summary of settings and automatically validating data to lessen the chances of mistakes.

    Apart from the mentioned use cases, the advantages of AI summarization in Dynamics 365 are wide-ranging. The impact on operational efficiency is seen in enhanced productivity, proactive problem-solving, improved accuracy, and customized user experiences.

    The smooth integration of these AI features into the existing Dynamics 365 framework adds to its value without requiring extensive setup or training.

    When we consider what comes next, the beginning of generative AI in ERP products such as Dynamics 365 is done carefully to guarantee dependability and establish customer trust.

    Microsoft’s dedication to ethically utilizing AI technology is clear because it follows strict laws related to data privacy and standards for ethically using AI.

    Whether you use Copilot in Microsoft Dynamics 365 now or plan to start using it soon, the path toward a more efficient business process that is driven by insights has already begun with AI summarization power.

    Extend a Basic Volume on Windows 11 – Step-by-Step Guide

    If you’re wondering how to extend a basic volume in Windows 11, this is the best guide you can refer to!

    Storage disks are often cluttered with many unnecessary partitions that can be challenging to track. Not to mention, some disk drives might hit the maximum storage capacity ceiling. These situations might push you to seek options to extend basic volumes by using unallocated disk spaces.

    So, I’ve tested a few built-in and third-party tool-based methods to change a drive’s capacity and listed the best ones here.

    How To Extend a Basic Volume on Windows 11

    There are two simple methods you can try out:

    Using the Disk Management Tool

    Windows Disk Management is the native tool for creating, deleting, merging, and editing partitions. In most cases, this is the only method you need to know, because it gives deep access to internal storage drives like HDDs, SSDs, and NVMe SSDs.

    1. On your PC, press the Windows + X keys together to launch the Power User context menu in the bottom left corner.
    2. There, find and click on the Disk Management tool.
    Power User menu
    1. Let the Disk Management app open and load all drives and partitions.
    2. Now, select the basic volume you want to extend from the list of partitions for individual HDDs or SSDs.
    3. Windows 11 will list the HDDs or SSDs as Disk 0 for the first storage drive, Disk 1 for the second storage drive, and so on.
    4. Here, I selected Disk 0, and inside Disk 0, I clicked on the New Volume (F:) partition I wanted to extend.
    5. After selecting the source partition, right-click and select Extend Volume from the context menu.
    Extend volume
    1. The Extend Volume Wizard will open. Click Next.
    2. If there’s just one disk in the PC, it’ll automatically select that in the Selected list on the right side of the Extend Volume tool.
    3. In the same dialog box, you’ll see the maximum available storage space you can allocate to extend the basic volume.
    4. Enter the storage space requirement in MBs within the Select the amount of space in MB field. Click Next to move forward.
    enter value
    1. Click Finish to complete the process.
    Finish process

    You can see in the above screenshot that Windows 11 has taken away 5 GB of storage space from the Unallocated partition. The same amount was added to the New Volume (F:) to increase its storage ceiling.

    extended volume using DM tool

    Using the Settings App

    If the Disk Management tool isn’t available or doesn’t work, you can try this alternate method:

    1. Press the Windows + I keys together to launch the Settings app.
    2. Click System on the left-side navigation panel and select Storage from the right-side menu.
    Choose Storage in System
    1. On the next screen, scroll down to the Storage management section and click on Advanced storage settings.
    2. More tools will become available on the menu. Click on the Disks & volume option.
    Advanced storage settings
    1. Find the partition you want to extend in the Disks & volume menu and click Properties next to it.
    New volume properties
    1. You should now see the details window for the selected basic volume. Here, click on Change size.
    New vol change size
    1. The Change size dialog will pop up. There, enter the new storage space you want. For example, 25,000 for 25 GB.
    Changze size values
    1. Click OK and Windows will instantly allocate new storage space to the basic partition.
    extended volume with system

    How To Troubleshoot Basic Volume Extension in Windows 11

    If the Extend Volume button isn’t active or not available at all, try these troubleshooting ideas:

    • Make sure unallocated space is available next to the partition you want to extend. If not, delete as many partitions as possible. Then, create a new volume from scratch.
    • Format the source partition to NTFS from the FAT file system.
    • If the volume you want to extend is on a basic disk, consider converting it to a dynamic disk.
    • Between the volume you want to extend and the unallocated space, there shouldn’t be any system-reserved partition or other protected partition.

    So, now you know how to extend a basic volume on Windows 11 to increase the storage capacity.

    If the article helped you manage disk drives and partitions effectively, you can acknowledge it in the comments below. Also, if you’ve got any feedback, feel free to share it!

    At one time, Microsoft simultaneously managed over 264000 Windows 10 devices globally

    In this world where the digital change of workplaces is not just talk but real, Microsoft Digital leads by changing how devices are managed for its workers. Picture a scene where dealing with over 250,000 Windows 10 gadgets becomes as easy as clouds moving across the sky.

    According to the Redmond-based tech giant, Microsoft Digital is making this a reality by utilizing tools like Microsoft Intune, Azure Active Directory, and many other cloud-focused instruments. It’s not only about staying updated but also about leading the way in managing devices for the future.

    Microsoft Digital is responsible for managing more than 264,000 Windows 10 devices that Microsoft employees around the world use daily. Historically, our management methods have been based primarily on the network and infrastructure on which these devices reside. The corporate network has been the functional foundation of Microsoft operations for more than 30 years. Our technical past was built on Active Directory Domain Services (AD DS) and the accompanying identity and access management principles that work well within a tightly controlled and regulated on-premises network. With this model, Microsoft Digital has been able to manage devices connected within a protected and insulated digital ecosystem.

    Microsoft

    The necessity of managing devices in a modern manner is very evident. Gone are the days when devices were attached to a company network, working within the boundaries of one specific and protected area.

    Nowadays, cloud technology rules everything, while devices stay connected to the internet all the time; this requires management solutions that are as flexible and dynamic as the setting they exist within.

    Microsoft Digital was aware of this change and started a process to adopt an internet-first, cloud-focused management style. This shows a big shift from the old ways based on local networks.

    Moving to this current type of management was not an instant change. It needed a planned and step-by-step method, beginning with co-management using Intune and Configuration Manager and gradually moving towards a complete modern management model.

    This approach ensured the shift happened smoothly without causing disruptions in device security or productivity among workers during the procedure. Crucial for this change were Intune and Azure AD, which gave us the required instruments to handle devices from anywhere and, at any moment, removed the necessity for a VPN link back to our corporate network.

    The advancement story in modern device management displays Microsoft Digital’s dedication to progress and effectiveness. With the help of cloud potential, they have bettered the device experience for their workers while also establishing a fresh measure for how groups can handle their digital properties in a more interlinked world.

    The future of managing devices has arrived, and Microsoft Digital is clearly at the forefront, showing what can be done when technology empowers individuals and changes businesses.

    ERR_NAME_RESOLUTION_FAILED Error in Chrome: 6 Simple Fixes

    The ERR_NAME_RESOLUTION_FAILED error in Chrome usually indicates a problem with your DNS settings or network configuration. Often, you will fix this issue by clearing the browser cache or the internet settings.

    How do I fix the ERR_NAME_RESOLUTION_FAILED error?

    1. Clear the browsing data

    1. Open Google Chrome and click on the three-dot menu at the top right corner.
    2. Hover over More tools and then click on Clear browsing data.
    3. In the popup window, choose the All time range from the dropdown menu.
    4. Check the boxes next to Browsing history, Cookies and other site data, and Cached images and files.
    5. Click the Clear data button.

    By clearing your browsing data, you remove outdated or corrupted cache files and cookies that might be interfering with Chrome’s ability to load websites. This simple step often resolves many browser-related issues, including the ERR_NAME_RESOLUTION_FAILED error.

    2. Reset Chrome’s settings

    1. Open Google Chrome and click on the three-dot menu at the top right corner.
    2. Go to Settings and click on Reset settings from the left pane.
    3. Now, click on Restore settings to their original defaults.
    4. A confirmation dialog will appear. Click Reset settings.

    Resetting Chrome’s settings removes any unwanted extensions or changes that might have caused the error. This helps you start fresh with a clean configuration, resolving conflicts that might have led to the issue.

    3. Change the DNS Address

    1. Open Chrome and go to Settings.
    2. Go to Privacy and security and click on Security.
    3. Scroll down and find the Use secure DNS section.
    4. Select the Custom option and enter a DNS address like Google’s (8.8.8.8 or 8.8.4.4), or OpenDNS (208.67.222.222 or 208.67.220.220).

    Changing your DNS address can resolve connectivity issues if the default DNS server is experiencing problems. Using a well-known DNS like Google’s or OpenDNS often provides faster and more reliable performance.

    4. Reset the network settings

    1. Open Command Prompt as an administrator by typing cmd in the search bar, right-clicking on Command Prompt, and selecting Run as administrator.
    2. Enter the following commands one by one and press Enter after each:
      • ipconfig /release
        ipconfig /all
        ipconfig /flushdns
        ipconfig /renew
        netsh int ip set dns
        netsh winsock reset

    Resetting network settings can help if the issue is related to incorrect or outdated network configurations, ensuring that your computer can properly connect to websites.

    5. Check for malware

    1. Open Windows Security by typing it in the search bar.
    2. Go to Virus & threat protection, then click on Quick scan or Full scan.
    3. If any threats are found, follow the on-screen instructions to handle them.

    Malware can interfere with network settings, causing the ERR_NAME_RESOLUTION_FAILED error. Scanning your computer removes any malicious software that might be disrupting your internet connection.

    6. Use a Virtual Private Network (VPN)

    1. Choose a reliable VPN service and download its software.
    2. Install the VPN and follow the setup instructions.
    3. Connect to a VPN server.

    Using a strong VPN, such as ExpressVPN, can help bypass local network issues or ISP restrictions that might be causing the error. However, be mindful that some websites may restrict access when using a VPN.

    Additional solutions

    1. Restart your router: Sometimes, a simple restart of your router can resolve connectivity issues.
    2. Check antivirus settings: Ensure that your antivirus software is not blocking your internet connection.
    3. Uninstall problematic programs: If the issue started after installing a new program, try uninstalling it to see if it resolves the problem.

    By following these steps, you should be able to resolve the ERR_NAME_RESOLUTION_FAILED error and restore your internet connectivity. To prevent future issues, regularly update your browser and keep your system free of malware.

    Did you manage to fix the ERR_NAME_RESOLUTION_FAILED error using our solutions? Let us know in the comments below.

    Netflix Crashes on Roku TV: How to Stop it [Fix]

    Many users reported that Netflix crashes on Roku TV, and this can be a major problem since you won’t be able to watch your favorite shows. Luckily, this issue can be easily fixed.

    Why does my Netflix keep crashing on my Roku TV?

    This happens due to an issue with autoplay previews. Roku cache is also responsible for this problem.

    How can I fix Netflix crashes on Roku TV?

    Before trying anything else, let the show autoplay for 10 seconds. After 10 seconds have passed, you can use your remote again without crashes.

    1. Turn off autoplay previews

    1. Open the Netflix website on your browser.
    2. Sign in to your account.
    3. Open the Menu and choose Manage Profiles.
      manage profiles netflix
    4. Select your profile.
    5. Disable the Autoplay Previews setting.
      disable autoplay previews netflix

    2. Clear the cache using your remote

    1. Press the Home button five times.
    2. Press the Up button once.
    3. Next, press the Rewind button twice.
    4. Lastly, press the Fast Forward button twice.
    5. The screen will freeze up for 30 seconds and the device will reboot.

    What does clearing the cache on Roku TV do?

    Clearing the cache will remove cached files from your device. This will clear up storage space and allow apps to run more smoothly.

    If Netflix crashes on Roku TV you won’t be able to watch your favorite shows, so adjust your preview settings or clear the cache to fix this issue.

    This isn’t the only issue you can encounter, and many reported We’re having trouble playing this title on Netflix on various platforms, including Roku.

    Issues such as Roku error 014.30 are also common but they can be fixed as well. Keep in mind that other services have issues, and we wrote about Amazon Prime video not working on Roku in our earlier guides.

    How to Download and Update the CSR Bluetooth Driver in Windows 11

    If you are using a CSR 4.0 Bluetooth dongle on Windows 11, having the latest driver is necessary!

    Upon connecting the CSR Bluetooth dongle for the first time, you will have to manually install the drivers if not downloaded automatically. Besides, regular driver updates will enhance compatibility and performance, in addition to eliminating bugs.

    So, let’s get straight to the steps to manually install the CSR Bluetooth drivers in Windows 11!

    How can I install the CSR Bluetooth driver in Windows 11?

    Tip icon Editor’s tip
    Before you start with the process, make sure the CSR Bluetooth dongle is plugged into a functional USB port on the PC.

    1. Via Device Manager

    1. Press Windows + X to open the Power User menu, and select Device Manager from the list of options.
    2. Expand the Bluetooth entry, right-click on CSR Bluetooth Radio, and select Update driver.update csr bluetooth driver windows 11
    3. Choose Search automatically for drivers and let Windows install the latest available version on the PC.search automatically
    4. Once done, restart the computer to apply the changes.

    If you are new to updating and installing drivers, I recommend you let Windows pick the best one automatically. This reduces the chances of post-installation issues, and the process is rather straightforward.

    Also, if CSR Bluetooth Radio is not listed under Bluetooth, check the Universal Serial Bus controllers category.

    2. Using Windows Updates

    1. Press Windows + I to open Settings, go to Windows Update from the navigation pane, and click Advanced options on the right.windows update
    2. Select the Optional updates entry.
    3. Expand the Driver updates section, tick the checkbox beside CSR Bluetooth Radio, and click on Download & install.install driver via Windows Update
    4. Finally, restart the computer for the changes to come into effect.

    As confirmed by many in forums, the Bluetooth adapter often doesn’t show up in the Device Manager, even under hidden devices. In such cases, the device’s driver may be listed under Optional updates.

    3. From the website

    While searching online, I came across the West Mountain Radio website hosting the CSR Bluetooth Dongle drivers. These are compatible only with the Bluetooth 4.0 Dongle Micro Wireless Adapter.

    Also, you will find other third-party websites hosting the same driver or the ones for other adapters. In any case, I recommend you scan the downloaded files for malware and run another scan post-installation using a top-rated antivirus solution.

    4. With a driver updater tool

    The safest option when updating drivers is to use an effective driver updater tool. These automatically detect all the available devices, search for the latest driver for each, and install them on the PC, delivering a seamless and error-free experience!

    We also have a curated list of the best free driver updaters for Windows 11, although generally speaking, these lack a bit in terms of functionality.

    What can I do if the CSR 4.0 Bluetooth dongle is not working in Windows?

    • Install the generic driver: Open the Device Manager > expand Bluetooth > right-click on CSR Bluetooth Radio > select Update driver > choose Browse my computer for drivers > click on Let me pick from a list of available drivers on my computer > select Generic Bluetooth Driver > install it.
    • Run the Bluetooth Support Service: Open the Services console > right-click on Bluetooth Support Service > choose Properties > select Automatic under Startup type > click on Start > click Apply and OK to save the change > restart the computer.
    run service
    Running Bluetooth Support Service

    By now, you should have installed the latest CSR Bluetooth driver on Windows 11 and got things up and running. In case you are planning to get another adapter, we found some value-for-money Bluetooth adapters for Windows 11.

    Which method worked for you? Share with our readers in the comments section.

    Windows Live Mail Error 0x800c0006: 5 Tested Fixes

    Windows Live Mail was a component found in Windows Live Essentials 2012 and it was deprecated. However, you may still use it and if you encountered the Windows Live Mail Error 0x800c0006 we know how to fix it. This error typically arises due to installation issues or conflicts with other software.

    How do I fix the Windows Live Mail Error 0x800c0006?

    1. Download and run the full offline installer

    1. Luckily, you may still download Windows Live Essentials full offline installer from the Internet Archive.
    2. Click on the Wi-Fi icon in the system tray and select Disconnect or turn off Wi-Fi. If your device is connected through an Ethernet cable, just unplug it.
    3. Right-click on the downloaded installer file and select Run as Administrator from the context menu.
    4. Proceed with the installation process. If prompted, select only necessary components of the Windows Essentials suite, such as Windows Live Mail.

    This method helps in bypassing any server-side issues related to Microsoft services, ensuring the installer runs without network dependencies.

    2. Change the Windows language settings

    1. Press Windows + I to open the Settings app.
    2. Click on the Time & Language option and select Language & region from the right.
    3. Click on Add a language next to the Preferred languages section. Type English (United Kingdom) and select it.
    4. Click Next and follow the prompts to install the language pack.
    5. Ensure English (United Kingdom) is set as the primary language.
    6. Restart your computer for the changes to take effect.
    7. Try installing Windows Live Essentials again using the Offline Installer you downloaded using the first solution.

    Changing the language settings to match the installer language helps resolve compatibility issues during the installation process.

    3. Modify the Registry entries

    1. Press Windows + R to open the Run dialog box, type regedit and press Enter.
    2. Go to the following key in the Registry Editor:  HKEY_CURRENT_USER\SOFTWARE\Microsoft\Windows Live Mail
    3. Right-click on the right pane, select New > DWORD (32-bit) Value.
    4. Name the new DWORD entries as follows if they do not exist:
      • RecreateFolderIndex
      • RecreateStreamIndex
      • RecreateUIDIndex
      • Set the value for each DWORD to 1 by double-clicking the entry and entering 1.
    5. Close the Registry Editor by clicking the X at the top-right corner of the window.
    6. Try reinstalling Windows Live Essentials again.

    Modifying these registry settings ensures that Windows Live Mail can re-index its folders and streams, potentially resolving the installation issue.

    4. Disable third-party antivirus software

    1. Open the interface of your third-party antivirus program (e.g., McAfee, Norton, Avast).
    2. Locate the real-time protection feature within the antivirus settings and temporarily disable it.
    3. Retry installing Windows Live Essentials with the antivirus disabled.
    4. Once the installation is complete, re-enable real-time protection to ensure your system remains protected.

    Disabling the antivirus prevents it from potentially interfering with the installation process.

    5. Use the Microsoft Program Install and Uninstall Troubleshooter

    1. Download Microsoft’s Program Install and Uninstall troubleshooter.
    2. Open the downloaded file and follow the on-screen prompts.
    3. Choose Installing when prompted to describe the problem.
    4. When asked which program you are trying to install, select Windows Live Essentials from the list.
    5. Complete the troubleshooting process by following the instructions provided.

    The Microsoft troubleshooter can help resolve issues that prevent programs from being installed or removed.

    By following these detailed solutions, you will increase your chances of successfully installing Windows Live Mail and resolving the error 0x800c0006.

    Did you manage to install Windows Live Mail? Let us know in the comments below.

    A gaming PC with the same specifications as an Xbox Series X is more expensive, but you get multiple benefits

    Do you think about the cost of making a PC that can match the Xbox Series X in power and performance? You are not alone. With its impressive specifications, the Xbox Series X has set high standards for gaming consoles, having more than 12 TFLOPs of graphical power and advanced SSD technology.

    But still, for those who like the versatility and potential to improve a PC, the query is: can you create a PC that equals the Xbox Series X, and if yes, what would be its expense?

    First, let us look at the CPU. Xbox Series X has an 8-core processor. However, in our construction, we are interested in an Intel i5-13400F with 10 cores that allow hyperthreading for improved functioning. This option is selected not just for compatibility with Xbox but also to prepare our setup for future requirements, all at an approximate cost of $160.

    For the GPU, which is like the heart of any gaming machine, Xbox Series X has a special chip based on RDNA2. We are thinking about comparing RTX 3060. It can do ray tracing at the hardware level and comes with 8 GB GDDR5 memory. This setup should be strong enough to handle the newest games in high resolutions, with costs of RTX 3060 ranging from $275 to $300.

    We require good RAM to make gameplay smooth. 16GB of Corsair Vengeance DDR4 memory appears to be right for our build because it costs about $40 and is not too costly. It is quick enough with a frequency of 3200MHz, dependable, and should remove any potential bottlenecks.

    Though it may not directly affect gaming performance, the motherboard is very important for linking all of our components together. The MSI H610M-G is a good choice as it provides a stable base and costs only $80.

    Don’t buy a weak power supply. A strong unit, like the Cooler Master MWE Gold 850 V2 that costs $95, can keep your system safe from power spikes and give it steady functioning.

    For storage, we are choosing a PCI e 4.0 SSD, particularly the Samsung 990 EVO 1 TB type, which costs roughly $84. This guarantees quick loading speeds and sufficient room for games and applications.

    Lastly, the cupboard is where you put your flavor. The $80 Zalman Z7 NEO ATX tower provides a good mix of looks and cost.

    Adding all the prices together, the rough cost of our suggested build is about $839, almost around the same price as this powerful gaming PC. This amount does not include peripherals or a Windows license, which would increase the expenses. But this can be seen as a starting point for people who want to have similar performance to Xbox Series X on their PC.

    Why go for a PC and not the Xbox Series X? It’s not only about the mightiness of hardware parts but also about flexibility in adjusting them, a wider variety of software choices, and perhaps more advantageous game deals. Also, building your system provides a unique sense of accomplishment. However, the Xbox Series X has some benefits, such as a lesser initial expense and the availability of the Xbox Game Pass.

    Ultimately, whether you pick a PC or an Xbox Series X is up to what you like, your money situation, and the gaming experience that suits you. There are good things about both choices. The similarity between a custom PC and a top-level gaming console such as the Xbox Series X is very interesting.

    The new Surface laptops are now among the most repairable in the world

    In a new teardown review, people at iFixit examined Microsoft’s latest products: the Surface Pro 11 and Surface Laptop 7. These gadgets are special as they use Qualcomm’s Snapdragon processors, so they are the first to be reviewed by iFixit.

    What is interesting about this situation is that it appears that Microsoft has changed the usual story on repairability. Do you recall when opening a laptop was like defusing a bomb? Those times could be ending, at least for these devices.

    The design philosophy of Microsoft for the Surface laptops seems to have changed, making their devices more open for repairs. No longer must we go through a maze of glue and special screws; the Surface Laptop 7 greets you with easily accessible screws and magnetic holders that lead you inside its insides like a friend-showing path in the dark. It’s a new, refreshing way that helps the tech-oriented DIYers and gives more life to our relied-upon devices.

    You may wonder about the Surface Pro 11. It’s a combination of good and not-so-good. The SSD is simple to access, like turning over a lid. But the battery resembles a puzzle without all the parts needed to reach it.

    You should look for something to heat the adhesive, keeping the display in place. It’s not as enjoyable as a Saturday afternoon activity, but it’s far from similar to impossible tasks set by earlier models.

    The repair scores of iFixit, which can be compared to the Oscars for those who love technology, were good. Both devices got a score of 8 out of 10.

    This shows Microsoft’s strong dedication to creating devices that excel in performance and design and have sustainability and repair ability as key factors. The Surface Pro 11 and Laptop 7 are like shining lights amid many throwaway tech items, demonstrating that it is feasible to mix advancement with usefulness.

    But we should remember that the path to repairability was not a quick race but a long run. Microsoft’s previous Surface devices were famous for being as inaccessible as Fort Knox.

    It is good news that there has been such a big change from devices that were once known to be very difficult to repair to models that are now setting an example for everyone else. This action will make Microsoft more appreciated by its users and inspire other field companies to take similar steps.

    In the current scenario, where electronic waste is becoming a big worry, Microsoft’s move to increase repair-friendliness in Surface Pro 11 and Laptop 7 is praiseworthy and important. This shows a path towards sustainability, indicating that the tech business can balance advancing technology and protecting our environment.

    Error Creating Bean With Name in Spring: 8 Tested Fixes

    Encountering the Error Creating Bean with Name issue in Spring can be quite frustrating, especially when you’re in the middle of a crucial development phase. This error typically arises due to misconfigurations or missing dependencies in your Spring setup.

    How do I fix Error creating bean with name in Spring?

    1. Add a No-Argument Constructor

    1. Locate the class definition where the error indicates a missing no-argument constructor. For example, public class CompteDAOHib.
    2. Add a no-argument constructor to the class: public class CompteDAOHib { public CompteDAOHib() { // Default constructor } // Other constructors and methods }
    3. Save and rebuild your project.

    Adding a no-argument constructor ensures that Spring can instantiate your beans correctly without requiring specific arguments.

    2. Annotate Constructor with @Autowired

    1. Find the class and constructor where dependencies are injected, such as public CompteDAOHib(SessionFactory sessionFactory).
    2. Annotate the constructor with @Autowired: public class CompteDAOHib { @Autowired public CompteDAOHib(SessionFactory sessionFactory) { this.sessionFactory = sessionFactory; } }
    3. Save and rebuild your project.

    The @Autowired annotation tells Spring to automatically inject the required dependencies, making it easier to manage bean creation.

    3. Ensure all dependencies are available

    1. Check the stack trace for clues, typically following Caused by: to identify missing classes.
    2. Add the necessary dependencies in your pom.xml or build.gradle file. For example, if missing a Hibernate library: <dependency> <groupId>org.hibernate</groupId> <artifactId>hibernate-core</artifactId> <version>5.4.30.Final</version> </dependency>
    3. Clean and rebuild your project.

    Ensuring all required dependencies are available in the classpath prevents the ClassNotFoundException or NoClassDefFoundError issues.

    4. Check the XML configuration for bean definitions

    1. Open your Spring XML configuration file, usually applicationContext.xml or similar.
    2. Verify the bean definitions to ensure they match the class names and constructors: <bean id="userDao" class="com.example.dao.UserDaoImpl"> <constructor-arg ref="sessionFactory"/> </bean>
    3. Correct any discrepancies and save the file, then rebuild your project.

    Checking and correcting bean definitions in XML configuration files ensures that Spring correctly initializes and injects beans.

    5. Check for circular dependencies

    1. Identify the beans involved in the circular dependency, typically mentioned in the stack trace.
    2. Refactor your code to break the circular dependency. One way to do this is by using setter injection or @Lazy for one of the beans: public class BeanA { private BeanB beanB; @Autowired @Lazy public void setBeanB(BeanB beanB) { this.beanB = beanB; } }
    3. Save and rebuild your project.

    Breaking circular dependencies prevents BeanCurrentlyInCreationException, ensuring smooth bean initialization.

    6. Verify Spring configuration file paths

    1. Ensure the correct placement of Spring configuration files, typically in src/main/resources.
    2. Verify the file paths in your configuration, like applicationContext.xml: <context:component-scan base-package="com.example"/>
    3. Correct any incorrect paths and save the file, then rebuild and restart your project.

    Correct file paths and package scanning settings ensure Spring can properly locate and load beans.

    7. Handle XML special characters

    1. Check for special characters in your XML configuration files, such as &, <, >.
    2. Escape special characters using XML entities: <property name="password" value="&lt;password&gt;"/>
    3. Save and restart your application.

    Escaping special characters in XML files prevents parsing errors and ensures the configuration is loaded correctly.

    8. Use the spring.cloud.stream.function.autodetect property

    1. Open your application.yml or application.properties file.
    2. Add the following property to disable auto-discovery of functions: spring: cloud: stream: function: autodetect: false
    3. Save and restart your application.

    Disabling auto-detection of functions prevents conflicts during bean creation in Spring Cloud Stream applications.

    These solutions address the most common causes of Error creating bean with name in Spring applications, ensuring proper bean initialization and dependency injection. To avoid similar issues in the future, always double-check your configurations and keep your dependencies up to date.

    Did you manage to fix the beans problem in Spring by using our solutions? Tell us in the comments below.

    Black Screen with Miracast on Windows 11 [Solved]

    Often, when you are wirelessly screen sharing using Miracast on Windows 11, the display turns black. Switching to a wired connection may fix the problem, but that brings in cables, something that Miracast, a wireless screen mirroring protocol, claims to get rid of!

    Miracast, also commonly known as HDMI over Wi-Fi, shows a black screen due to using an incorrect projection mode, misconfigured network settings, corrupt or outdated graphics driver, or conflicts created by other software.

    Before you start troubleshooting, make sure both the PC and the other display are connected to the same Wi-Fi network, and that both devices support the Miracast standard. Also, remember that the Windows 11 N edition doesn’t support wireless screen mirroring.

    How do I fix a Windows 11 Miracast black screen?

    1. Change the projection mode

    1. While connected to the other display using the Miracast wireless protocol, press Windows + P to view the projection modes.
    2. Now, if it’s set to PC screen only, switch to Duplicate. This will project the computer’s screen to the TV or another display.duplicate projection mode to fix windows 11 miracast black screen

    Also, if the computer screen is black while using a wireless display, you may have set the Second screen only projection mode. Using Duplicate or Extend will ensure that both displays remain functional with Miracast wireless screen mirroring.

    2. Update the graphics driver

    1. Press Windows + X to open the Power User menu, and select Device Manager from the list of options.
    2. Expand the Display adapters entry, right-click on the graphics adapter, and select Update driver.update
    3. Choose Search automatically for drivers and wait for Windows to install the best locally available version.automatic driver update
    4. Once done, restart the computer and check for improvements with Miracast.

    Updating the graphics driver often helps fix issues triggering black screen with Miracast on Windows 11. Also, while you are at it, update the network adapter drivers.

    If Windows can’t find a newer version, check the manufacturer’s website and manually install the driver. Here are the direct links:

    3. Reset the network settings

    1. Press Windows + I to open Settings, go to Network & Internet from the navigation pane, and click on Advanced network settings.network & internet
    2. Click on Network reset.
    3. Click the Reset now button.reset to fix windows 11 miracast black screen
    4. Finally, click Yes in the prompt and confirm the change.
    5. Reboot the PC for the changes to come into effect and again connect wirelessly to the display.

    4. Reconfigure the network settings

    4.1 Enable network discovery

    1. Press Windows + I to open Settings, go to Network & Internet and click on Advanced network settings.
    2. Click on Advanced sharing settings.sharing settings
    3. Expand the network type that says Current profile next to it, and then enable the toggles for both Network discovery and File and printer sharing.enable network discovery to fix windows 11 miracast black screen

    4.2 Whitelist Cast to Device functionality in Windows Firewall

    1. Press Windows + S to open Search, type Windows Defender Firewall in the text field, and click on the relevant result.
    2. Choose Allow an app or feature through Windows Defender Firewall from the left.whitelist through firewall
    3. Click the Change settings button.
    4. Locate the Cast to Device functionality entry, and make sure it has a checkmark under both Public and Private.allow to fix windows 11 miracast black screen
    5. Click OK to save the changes, then restart the computer and check for improvements.

    Often, the built-in Windows Defender Firewall can block connection attempts with other displays, thus causing a black screen while using the Miracast standard on Windows 11. Also, for the device’s visibility, Network Discovery must be turned on. And this section does both!

    5. Install the Wireless Display optional feature

    1. Press Windows + I to open Settings, go to System from the left pane, and click on Optional features near the bottom. settings
    2. Click the View features button next to Add an optional feature.
    3. Search for Wireless Display, tick the checkbox next to the entry with the same name, and click on Next.wireless display optional feature
    4. Now, click on Add to install the feature.
    5. Once installed, restart the computer and check if you still get a black screen while the mirroring displays.

    6. Remove any conflicting apps

    1. Press Windows + R to open Run, type appwiz.cpl in the text field, and hit Enter.
    2. Select any app you installed around the same time the issue first appeared, and click on Uninstall.remove conflicting app
    3. Follow the on-screen instructions to complete the process.
    4. Restart the PC and check for improvements.

    If you have been seeing a black screen with Miracast in Windows 11 or 10 ever since the start, it could have to do with the installed antivirus. A few found ESET Internet Security to be responsible for the issue!

    I recommend you first disable the third-party antivirus, and if that works, uninstall the program and then switch to an effective antivirus solution.

    7. Use third-party screen mirroring software

    If nothing else works, you can always use a top-rated screen mirroring software. The best ones will help get rid of the black screen and allow you to connect wirelessly to a display using Miracast on Windows 11.

    Besides, if you are having trouble with screen mirroring, we have a dedicated guide that explains the steps to set up screen mirroring between Windows 11 and a TV!

    Which fix worked for you? Share with our readers in the comments section.

    DirectX 12 on Steam Deck: Is it Available & Should You Use it

    Many want to know how DirectX 12 works on Steam Deck and whether can it improve your performance. Today we’re going to answer this and other questions that you have.

    DirectX 12 on Steam Deck, everything you need to know

    Does Steam Deck have DirectX?

    Steam Deck doesn’t have DirectX, however, it uses a compatibility layer called Proton that allows games that rely on DirectX to run.

    Does DX12 work on Linux?

    DirectX is exclusive to Windows, so it doesn’t work on Linux. While DirectX isn’t available, Proton is translating all DirectX calls to Vulkan.

    How to install DX12 on Steam Deck?

    It’s not possible to install DirectX 12 or any version of DirectX on Steam Deck. However, the Proton layer should have all the necessary DirectX DLL files.

    How do I change my DirectX on Steam Deck?

    This is achieved when launching the game, simply select the DirectX version you want to use. For other games, you’ll need to change their graphics settings and select the preferred version.

    Should I use DX12 or DX11?

    On Steam Deck both DX12 and DX11 are processed by Proton and converted to Vulkan, so you’ll get similar results.

    A few users suggested that using DX11 will give up to 5 more frames, but this can change depending on the game, so you should experiment with both for best performance.

    Is Steam Vulkan better than DX11?

    Vulkan is natively supported by Steam Deck, so it’s always a better choice since it doesn’t convert DirectX instructions to Vulkan.

    This wraps it up, and as you can see, it doesn’t matter if you’re using DirectX12 on Steam Deck, since it’s being translated to Vulkan, but you might get slightly better performance with different versions.

    To learn more about this handheld, we have a great guide on how to use Steam Deck BIOS. Also, don’t forget to update Steam Deck software regularly for the best performance.

    Before you go, we also have a great guide on how to check if your graphics card is DirectX 12 compatible, so don’t miss it.

    The SiriusXM Windows App is Not Working: 5 Quick Solutions

    We’ve all been there—ready to jam out to our favorite SiriusXM stations, only to find the app isn’t cooperating. The SiriusXM Windows app is not working because the developer pulled out their support for the software in October 2023. Unfortunately, you may only use it in the car, your mobile, some smart TVs and devices and on your browser.

    Yes, you may still see the app on Microsoft Store, but when you try to get it, there is no download button. Hopefully, they will get back to their decision but until then, let’s see how you can still enjoy SiriusXM.

    What can I do if the SiriusXM app is not working?

    1. Use the SiriusXM web player

    1. Launch any web browser (e.g., Chrome, Firefox, Edge).
    2. Go to the SiriusXM online player.
    3. Enter your SiriusXM credentials to log in and access the web player.
    4. You can now stream SiriusXM content directly from your browser without relying on the Windows app.

    Using the web player is a quick workaround if the SiriusXM Windows app is not functioning and allows you to continue listening to your stations.

    2. Clear the browser cache and cookies

    1. Click the three dots or hamburger menu icon in the top-right corner of your browser and select Settings.
    2. Find and click on the Privacy and Security section.
    3. Select Clear browsing data or Clear cache and cookies, depending on the browser you’re using.
    4. Choose All time to clear all data.
    5. Click Clear data or Clear now.

    Clearing your browser’s cache and cookies can help resolve issues related to outdated or corrupted data, which might be causing problems with the SiriusXM web player.

    4. Update Windows and your browser

    1. Press the Start button and type update, click on Check for updates and follow any prompts to install available updates.
    2. Open your browser, go to the About section (usually found under Help or Settings).
    3. Follow prompts to update to the latest version.

    Keeping your operating system and browser updated ensures compatibility with the latest versions of applications and web players.

    5. Contact SiriusXM Support

    1. Open your web browser and go to the SiriusXM support page.
    2. Submit a support ticket and provide a detailed description of the issue including any error messages.
    3. Check your email for responses from SiriusXM support. Follow any instructions they provide to resolve the issue.

    If none of the above solutions work, contacting SiriusXM support can provide you with specific assistance tailored to your issue.

    By following these solutions, you should be able to forget about the issues with the SiriusXM Windows app and continue enjoying your favorite content.

    We remind you that the Windows app for SiriusXM is not supported anymore and if you have an older version of the app, you can safely uninstall it because it won’t work anymore.

    For any other questions or suggestions, feel free to let us know about them in the comments below.

    HP Victus 15L is a good looking powerful gaming PC that will stand out everywhere you place it

    Have you ever come across a deal that seems like discovering treasure? Yes, gamers and tech enthusiasts, let’s gather around because I have news that is akin to striking gold. Picture this: you can acquire an HP Victus 15L Gaming Desktop, a beast of a gaming PC, with an amazing price reduction.

    Usually, this beast costs $1,400, but hey—for not long now, you can get it for only $800. Yes, that’s a big discount of $600 from its initial cost! If this does not make your gamer’s heart beat fast, let’s examine why this offer is too good to ignore.

    The HP Victus is not your ordinary gaming PC. It’s a masterpiece of modern technology, made to elevate your gaming experience. Inside it, you will find the 13th-generation Intel Core i7 CPU and NVIDIA GeForce RTX 3060 GPU as its heart and soul.

    These two work together to provide super-fast processing power with amazing graphics—everything from quick movements to fine details is shown in clear motion so that you can enjoy playing for longer without getting bored or tired quickly.

    Furthermore, possessing 16GB of RAM and the ability to house up to 512GB of internal storage ensures uninterrupted gaming marathons.

    However, if you are concerned about connectivity, the Victus offers all kinds of ports, such as HDMI 2.1, multiple USB-C, and USB-A. It also has a couple of audio jacks. It also comes with a keyboard and mouse combination – but you may prefer upgrading to equipment designed for gaming.

    Let’s not forget the extra benefits, such as Wi-Fi 6 and Bluetooth 5.3 matching, along with a case and parts that are good for the environment. Oh, and there is HP QuickDrop, too, which lets you easily move your photos, videos, or documents from Victus to other mobile gadgets without any wires needed.

    Now, I know that such deals are not always available. If you have plans for a new gaming tower, this could be an ideal moment to act upon. Just think about it: saving $570 and getting the amazing HP Victus by spending only $830. Deals of this kind make one understand why searching for the finest technology bargains is so important.

    You can get the HP Victus 15L now.

    However, HP and Lenovo have some interesting offers if you are looking for a student laptop or a more compact gaming laptop. There is a 50% discount on an HP Pavilion laptop, and you can get one of the best Lenovo gaming laptops at a considerable discount today.

    Lenovo Legion Pro 7, one of the best gaming laptops, has a huge discount

    Do you know the latest news in gaming? A big change is coming for all game lovers, especially those who want to own an excellent gaming PC but not at a high cost.

    Lenovo’s Legion Pro 7, a strong gaming laptop, is now up for sale, and I must say that this opportunity feels almost too good to pass by. Initially priced at $3,500, this beast can now be bought for only $2,604. This represents a huge discount of $896!

    You may wonder why this deal is worth your attention. The Lenovo Legion Pro 7 is not an ordinary gaming laptop. It carries a powerful AMD Ryzen 9 7945H CPU and NVIDIA GeForce RTX 4090 GPU, with support from 32GB of RAM.

    This mix is great because if you are playing the newest AAA games or handling multiple tasks like a pro, this laptop will not struggle. The screen has 16 inches and WGXGA IPS; it gives clear and bright visuals with 2,540 x 1,600 pixels, which is better than normal HD, which is 1080p, but has not yet reached 4K territory. **For gamers: this signifies an enjoyable gaming experience where one can see sharp images in vivid colors. **

    The laptop’s brightness is also impressive, reaching up to 500 nits. For those who love gaming, this device offers a refresh rate 240Hz—even the quickest and most dynamic games will be displayed smoothly and vividly (Gadgets360).

    Plus, we should not overlook connectivity options. Furthermore, the Legion Pro 7 has two USB-C 3.2 Gen 2 ports that can do DisplayPort 1.4, an HDMI 2.1 port for external displays, and a special USB-C port that can get as much as 140W from chargers if compatible.

    But wait, there’s more. Lenovo provides additional goodies such as the Lenovo Vantage dashboard, a SteelSeries audio system, and three months of Xbox Game Pass with EA Play. This deal is not easy to come by.

    If you have been considering upgrading your gaming setup or searching for a portable gaming machine that can handle serious power demands like a pro, look no further than the Lenovo 16-inch Legion Pro 7; it might just be what you need!

    You can get it now from here. But if you prefer something more affordable, this HP laptop can now be purchased at half its price.

    The powerful HP Pavilion Laptop 15t is now only $550

    Are you searching for a good deal on a student laptop? The newest offer from HP appears to match what you need. Consider getting your hands on the smooth and powerful HP Pavilion Laptop 15t, which has an Intel Core i7-1355U, all at an astounding 45% discount.

    Correct, it is now at $550 from the starting point of $1,000. This laptop isn’t just a regular one—it’s a portable strength ideal for school and office tasks. It was made to ensure you stay ahead in the tech world without spending too much money.

    Why is this deal worth your attention? Let’s explore further. The HP Pavilion is not a joke when it comes to power. The laptop has a CPU with 10 cores and 12 threads, offering speeds up to 5.0GHz. It also comes equipped with integrated Intel Iris Xe Graphics, 16GB of RAM, and internal storage capacities of a maximum of 256 GB.
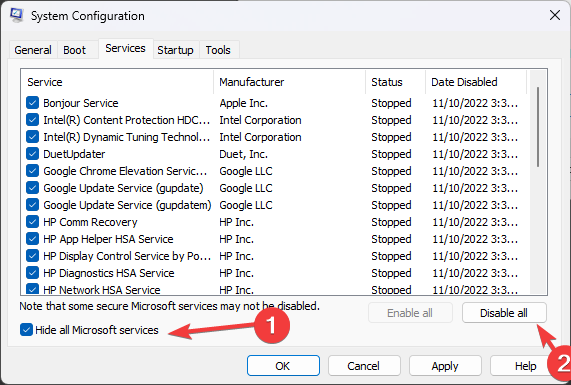
    Whether your work involves heavy number crunching or video editing duties, it is on the cards for today’s tasks – this is not an ordinary mid-level device! Also, when it comes to relaxation time, it may involve watching many episodes from one season back-to-back without interruption. This laptop can handle it all.

    The screen is also a standout feature. It has a 15.6-inch FHD display that shows clear and sharp images at 1080p resolution, which makes it good for work or entertainment. Moreover, the anti-glare layer helps prevent reflections while studying or watching shows on Netflix. And although it is not the most powerful gaming setup, Minecraft will run fine on this device as long as your internet signal is strong.

    HP didn’t forget to add some nice extra features. With temporal noise reduction, the built-in HD Wide Vision 720p webcam ensures you will appear and sound clear in your online classes or virtual meetings.

    Two B&O speakers, along with HP Audio Boost, improve the audio experience. This means you can listen to high-quality sounds without separate loudspeakers or earphones. Furthermore, it has a battery life that can last up to six hours and supports Fast Charge—this ensures you’re prepared for the day’s work without needing to locate an electrical socket frequently.

    HDMI, Ethernet, 3.5mm aux, and USB ports for easy connection, plus Wi-Fi 6 support, make connectivity simple. But keep in mind that these deals usually vanish fast. If you want a trustworthy and top-performing laptop but only pay a part of the cost, now is your chance to save $450 on the HP Pavilion Laptop 15t with Intel Core i7-1355U.

    Get it now.

    Microsoft Edge 127 is now available, and it has some bad news for those using tokens

    In the beta channel, Microsoft Edge has just issued a new version. This version is recognized as 127.0.2651.8 and has various fresh features and policies.

    In this latest version, the browser has been updated with many bug fixes and performance enhancements. It has also added several new features and policy updates. Microsoft Edge Beta is now at version 127.0.2651.8, too.

    One significant point is that Microsoft Edge will no longer support CPUs without SSE3. If your device uses an older CPU, it’s time to say goodbye to future updates.

    Another significant alteration in this release is the deprecation of Token Binding in Microsoft Edge version 130. Microsoft expresses that Token Binding in Edge 130 is marked to become outdated, with the AllowTokenBindingForUrls policy first becoming outdated and then made obsolete in a coming Edge version.

    Token Binding. Token Binding uses cryptographic certificates on both ends of the TLS connection in an attempt to close the security gap of bearer tokens, which might be lost or stolen. We’re planning to deprecate Token Binding in Microsoft Edge version 130. The AllowTokenBindingForUrls policy is deprecated and will be obsoleted in Microsoft Edge version 130.

    Microsoft

    The Hub has a Gift Card Redemption History feature, which could be interesting for people who like to keep a record of their digital buys. It’s helpful, right? Just imagine having all your gift card redemptions tracked in one spot.

    And to the administrators, Microsoft has thought about you, too. The release notes include some policy updates, such as deprecating SignInCtaOnNtpEnabled and making ImmersiveReaderPictureDictionaryEnabled obsolete. It feels like Microsoft is always evolving, keeping Edge safe and easy for users.

    But there is more. Think about the AI theme generator and the better user experience for Purview copy/paste controls. These are just a few instances where Microsoft uses technology to improve our browsing experience. Do not overlook the fresh Workspaces color display; it fills our browser windows with lively colors.

    According to the official changelog, in Microsoft Edge’s Wallet hub, people who have a Microsoft account or a Microsoft 365 for Enterprise account can now check details about gift card redemptions. This includes the time when they redeemed their gift card and whether it has been used yet.

    Admins can manage the EdgeWalletCheckoutEnabled policy to control feature availability. Microsoft has stated that the feature is now available to everyone as part of a controlled feature rollout.

    Gift Card Redemption History in the Hub. Users with an MSA or Microsoft Entra ID Linked Account can view and utilize information from gift card redemptions through Pay with Rewards or the Rewards Dashboard. Once a user successfully redeems a gift card with Pay with Rewards, information relating to their gift card (date, card number/pin, redemption status) redemption is added to a Redemption History. This information is located in the Wallet hub. Admins can control availability of this feature using the EdgeWalletCheckoutEnabled policy. Note: This feature is a controlled feature rollout. If you don’t see this feature, check back as we continue our rollout.

    Microsoft

    Microsoft Edge has been on the rise recently, and with these upcoming capabilities coming with 127.0.2651.8, the browser might rise even more in popularity.

    OneDrive automatically backups folders in Windows 11 without users’ permissions

    Picture this: You’ve prepared your fresh Windows 11 computer, ready to experience its elegant style and discover what it has to offer.
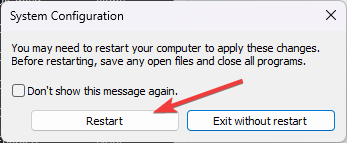
    But hold on—there is something not right. According to the latest reports, Windows 11 has made an independent choice by automatically turning on OneDrive folder backup for Desktop, Pictures, Documents, Music, and Video folders without your permission. This signifies that, whether you approve or not, everything is becoming coordinated with the cloud.

    We knew Microsoft was preparing something big for OneDrive, but we didn’t think it would be this. Maybe you are thinking, “What is the reason behind Microsoft doing this? ” It appears to be a smart yet cunning strategy from Microsoft to steer users towards their Microsoft 365 plan.

    When your folders begin consuming that humble 5GB complimentary storage limit of OneDrive, you will probably encounter a barrier. And for those who are not very familiar with technology, the next reasonable action could be purchasing additional storage.
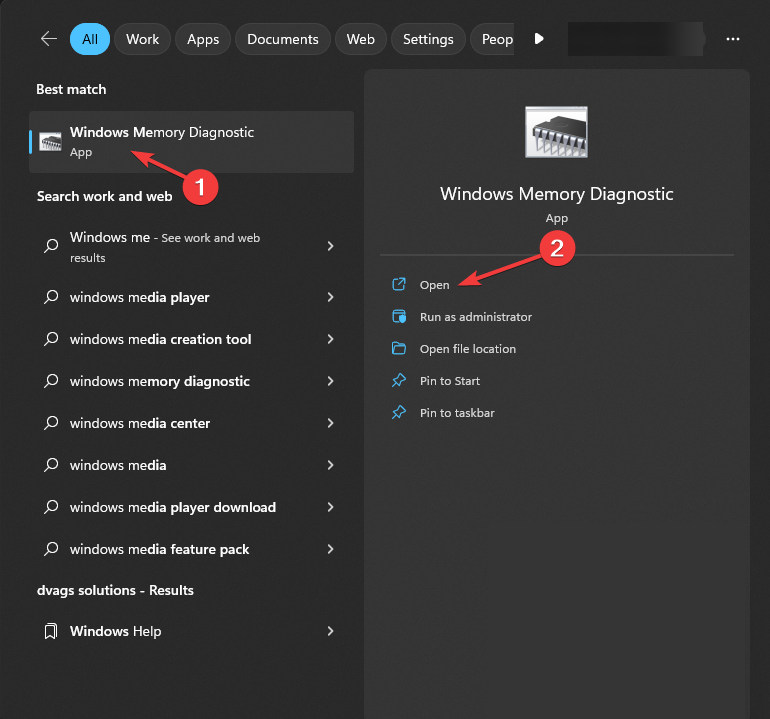
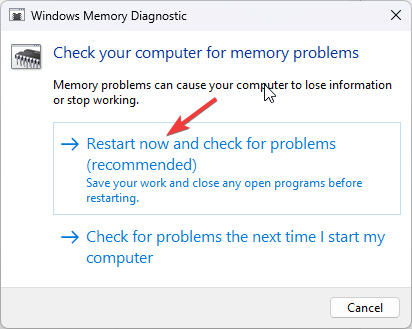
    Here’s the surprising part: Microsoft made this switch without telling anyone. There was no warning, no “Hey, we’re going to begin backing up your things onto OneDrive,” nothing at all. Instead, there are a lot of green checkmarks beside your files and folders, which causes many people to feel puzzled. Do you sometimes get puzzled by the green checkmarks? Now you understand their purpose.

    Don’t you like the sound of this automatic backup? You can escape from it, too. Go into OneDrive’s settings and switch off the automatic backup for those folders you wish to keep away from the cloud. It may be somewhat bothersome, but at least there is a choice not to participate.

    This action from Microsoft fits into a larger pattern where big tech companies cleverly (or not so cleverly) promote their services and subscriptions to users. It isn’t only about Microsoft; there have been instances of Google doing something similar with Google Photos and its storage plans.

    The thought behind all this is to create such strong connections between their services and your regular digital activities that deciding against them appears more bothersome than beneficial.

    Keep an eye on your settings, particularly when you have just finished setting up a new device or updating your operating system. Companies such as Microsoft constantly seek methods to link users with their environments—sometimes without permission.

    Certainly, OneDrive is a valuable service—especially if you are well into the Microsoft world. But it’s important to keep in mind that it might not be suitable for everyone, and people have specific needs for managing their files. Users must control what they want to be backed up and what should remain strictly local.

    Ultimately, you decide whether to use OneDrive’s automatic backup feature on Windows 11. Ensure that this choice is yours and not done for you.