Hands-on with Project Moca preview: A clean way to keep your work organized

These days, working from home often involves juggling a lot of different types of information. You have to keep track of To-Do lists, documents, your notes for meetings, links to websites, and a lot more. That often means sifting through many different Microsoft services, like To Do, Outlook, OneDrive, or Edge.

In such a treasure chest of information, it’s really easy to get lost or feel disorganized. So, why not have a single, central hub where you can organize and bring all this information under one place?

That’s where Project Moca preview comes into the picture. It’s a new experience from Microsoft, currently in a preview, which simplifies your workflow so you can focus on what matters. Here’s a hands-on look with the experience.

Launching Project Moca

Project Moca Microsoft Featured Image 2

Currently, project Moca is in preview for Microsoft 365 consumer subscribers, EDU customers, and select commercial customers. To open the experience, you need to click to it from the module switcher on Outlook for the web. That’s the area at the bottom where you have access to your Outlook Calendar.

If you don’t see it there, you need to look for it in the overflow menu at the bottom (the . . . ) If it’s still not available there, you can access Project Moca by going to Outlook.com/Spaces. That’s because Project Moca had another name, known as Outlook Spaces, as we detailed back in February. It’s not clear if Outlook Spaces will be the final name.

Different Templates
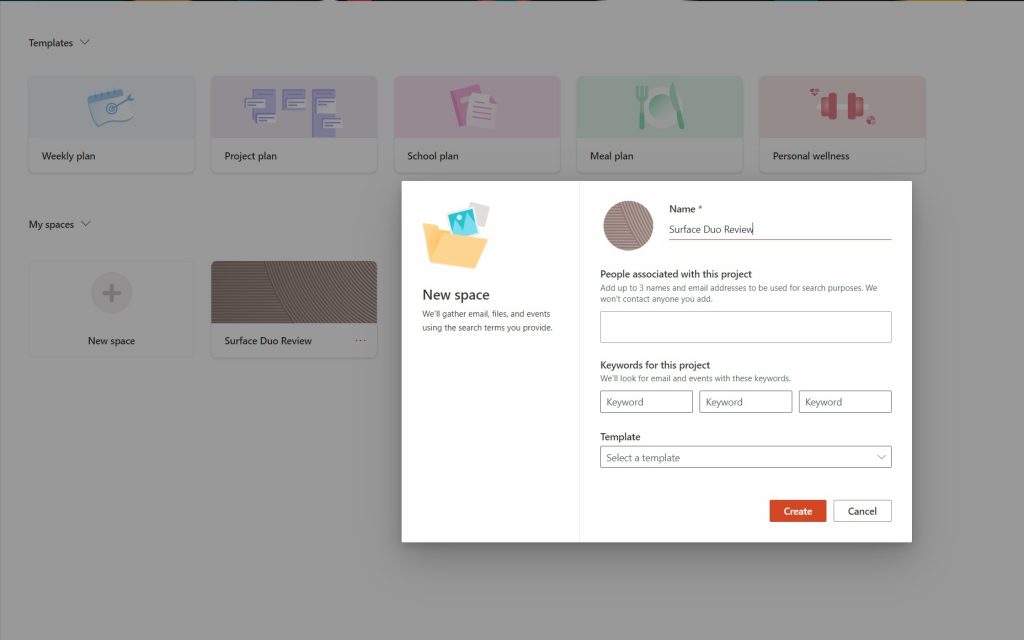
Project Moca Creating Space

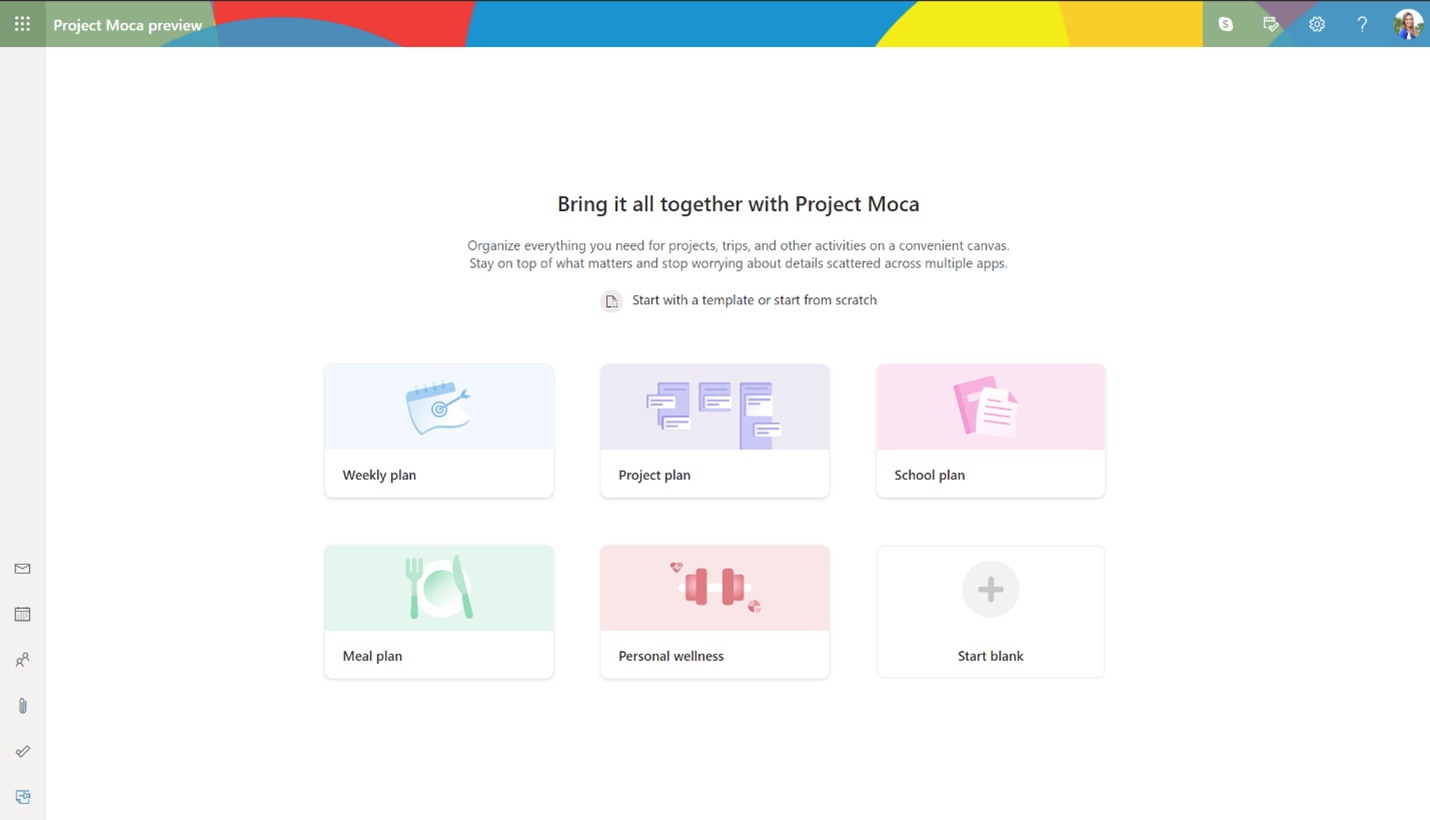
As soon as you go into Project Moca, you’ll be greeted with the option to choose different types of templates. Some of these include a weekly plan, a project plan, a school plan, a meal plan, or a personal wellness plan. No matter which template you choose, they’ll all be placed on a simple canvas known as a “space,” allowing you to stay on top of information for that specific plan. You also can start from blank, and create your own one, too, if needed. We suggest you start here, so you can play around with Moca and learn the ropes.

For the purposes of this hands-on, we’ll be creating a blank template. Regardless if you choose one of the templates, or start from scratch, the process of adding information types and other materials will be the same. In our hands-on, we’ll be starting from blank and creating a custom template (and space) for our upcoming Surface Duo review. Once a plan is created, you’ll be able to get to it by selecting the “Space” from the main Project Moca page.

Getting Started
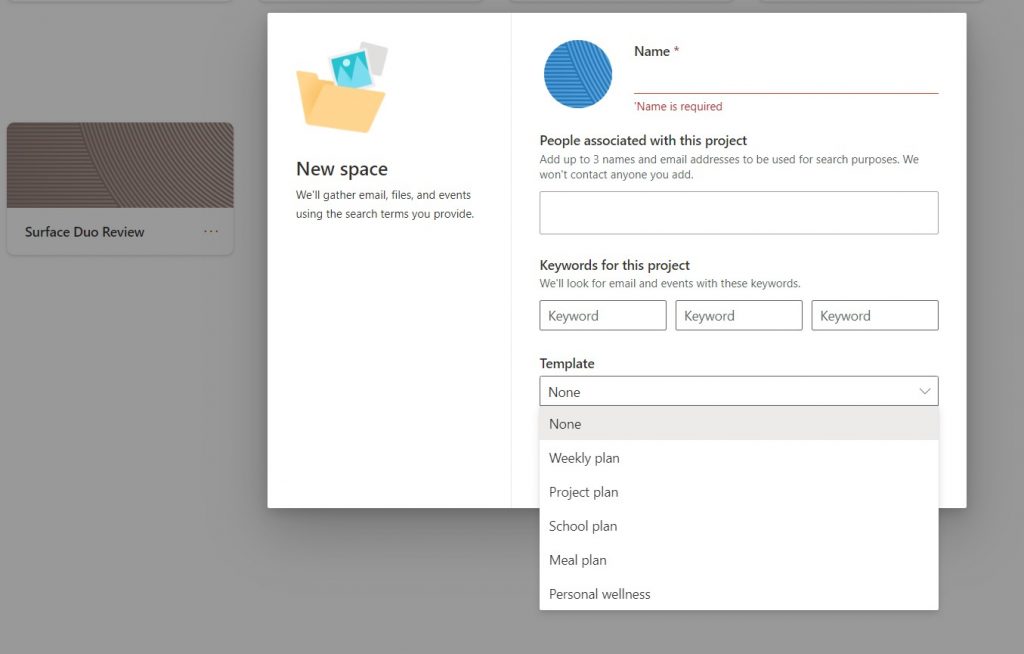
Project Moca Getting Started

Once you create a space (or choose a Template) in Project Moca, you’ll have to give it a name. You also can add up to three names and email addresses to be used in the template for search purposes. Finally, you can add keywords, which helps Project Moca pull out information from Microsoft’s services to help you create that template. There’s also a drop-down menu to choose a template type, as well.

The Canvas
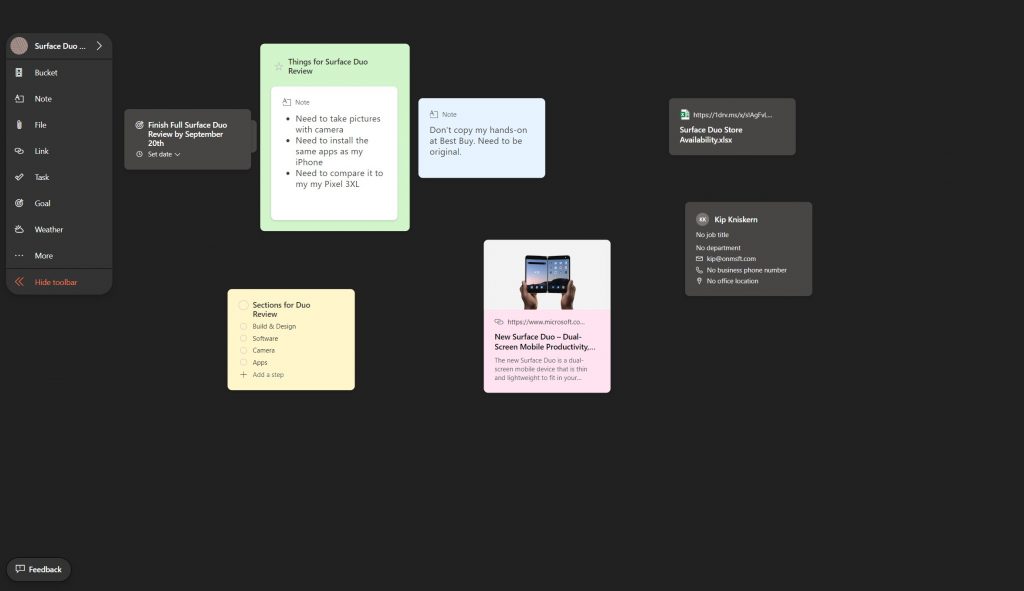
Project Moca Canvas


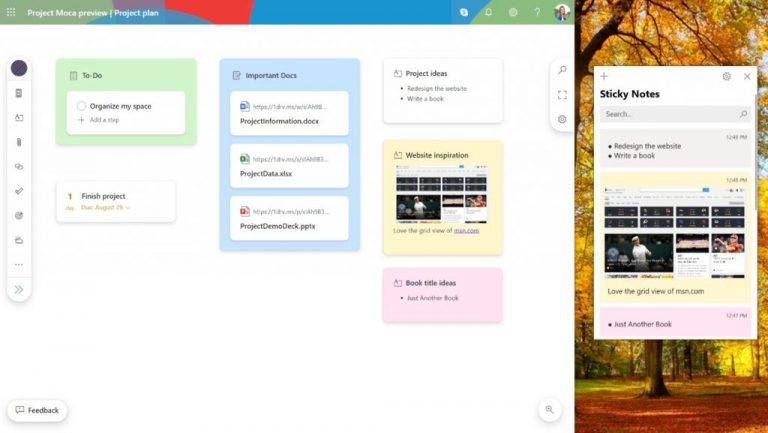
Now that you created a space in Project Moca, you’re free to start editing it and adding more information. A bit like Microsoft Whiteboard, the canvas in Project Moca has a few different tools, and all of them are used to add things to your canvas.

You’ll see these tools all in the toolbar at the side of the screen. It can be collapsed at any time by clicking Hide Toolbar. From here, you can add a bucket, a note, a file, link, task, goal, or weather. There’s also the ability to add a location or a person too. You can even zoom out to add more content, by clicking the magnifying glass in the bottom right corner of the screen. Finally, anything you add to the canvas can be dragged around, as you see fit.

We’ll start first by creating a bucket. In Project Moca, a bucket allows you to drag certain items into a central hub of sorts, to organize your space a bit more. We created a main bucket for “things for Surface Duo Review” and will be dragging some notes into it, created fusing the Note tool. If you want, you can change the color of the bucket, or set the due date as well. Anything you create in Moca can be dragged into a bucket. You also can change the color for anything you add in Moca, as well.

Next up, we’ll talk about some of the other things you can add to the canvas in a space on Project Moca. You can create Notes, just as you would a sticky note in Windows 10. These notes will sync up to your Windows 10 PC, too. You also can add files, as well. Any added file will come from your OneDrive account. Additionally, you can add a link to a relevant webpage, or create a task. Tasks will be saved to To Do. Finally, any goal added to Space will be saved to Outlook.

Adding additional content, and email messages
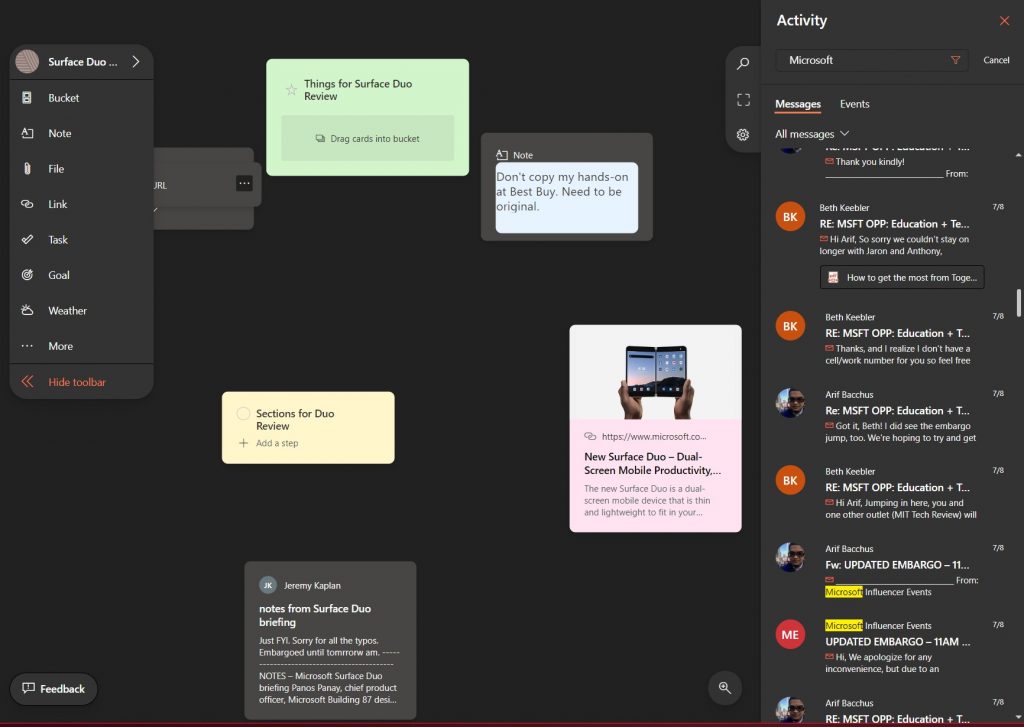
Project Moca Emails

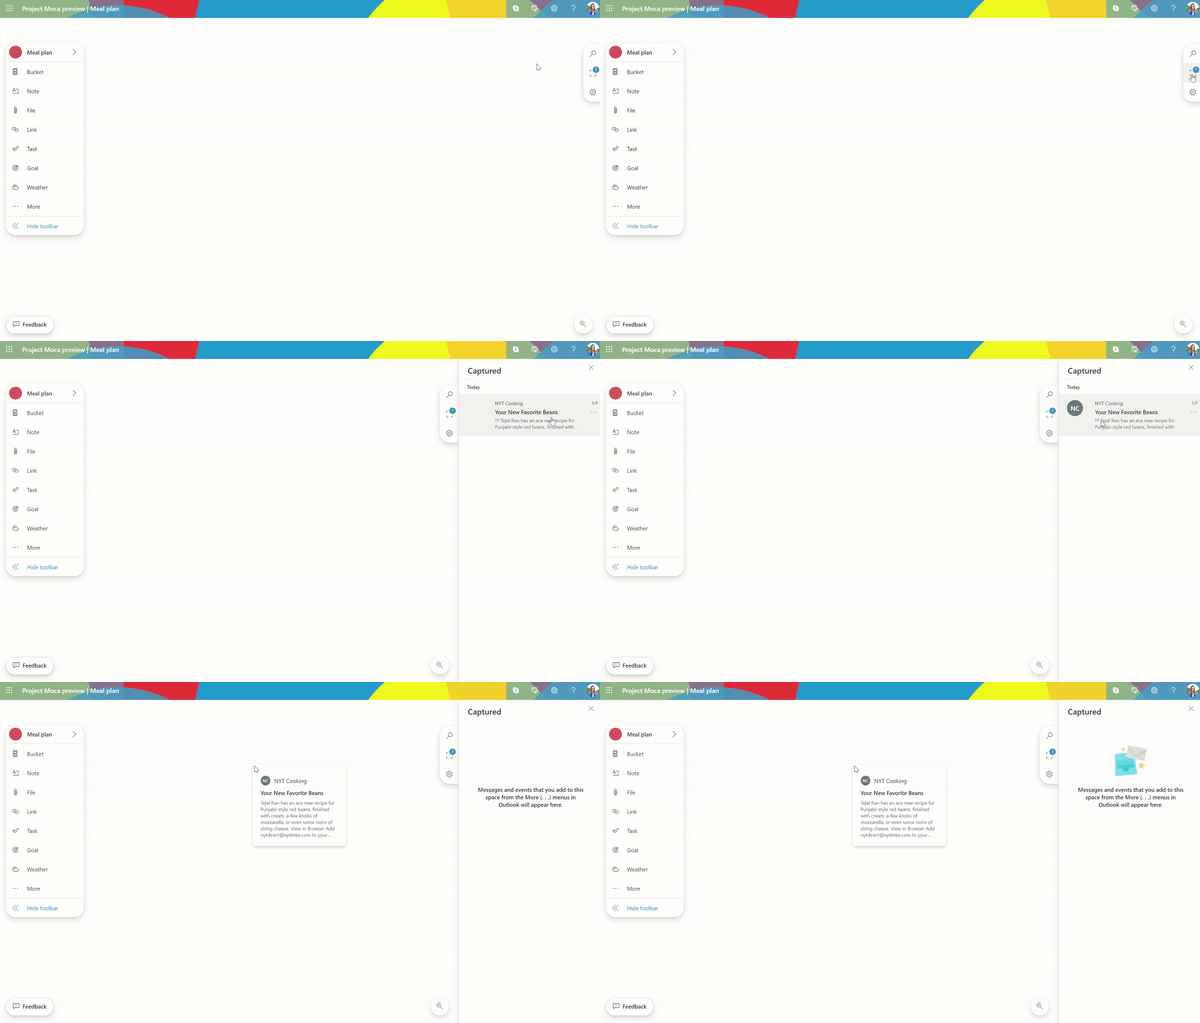
Another interesting point about Project Moca is the ability to drag in emails to your canvas and space. You can do this by clicking the search icon at the top right corner of the screen. When done, You’ll see a list of your messages from Outlook. To put it on the canvas, just click it and choose to add to canvas. You can also drag items, too, if need be.

This is a super useful feature for when you want to keep an email handy in relation to your ongoing space. If you want, you also can do the same thing with events, too. And, you can “capture” an email by clicking Add to Project Moca from the . . . menu from your email in your Outlook inbox.

Check it out now and let us know your thoughts!

Project Moca is a super cool experience, and it definitely is a nice take on Trello and other task management tools. It allows you to bring all things Microsoft related to work or play, right under one central place to help you stay organized. Check it out now, and let us know if you like the experience by dropping us a comment.

Software to Read Mac Drive on Windows PC: 3 Best to Use

It’s obvious that Windows PCs and Mac computers are quite different. But besides their many significant differences, there are also smaller distinctions that separate Microsoft’s and Apple’s operating systems.

For example, Windows and Mac computers use different file systems for reading hard disks and removable drives. As you may have heard, Windows uses the NTFS file system, while Mac uses HFS+.

Alternatively, most hard drives and USB flash drives are formatted with the FAT32 file system, recognized by both PCs and Macs.

That way, wider compatibility means more customers. However, some people might need to load an HFS+ drive but don’t have a Mac nearby.

How to read a Mac-formatted drive on a Windows PC?

Paragon HFS+ – Full integration with File Explorer

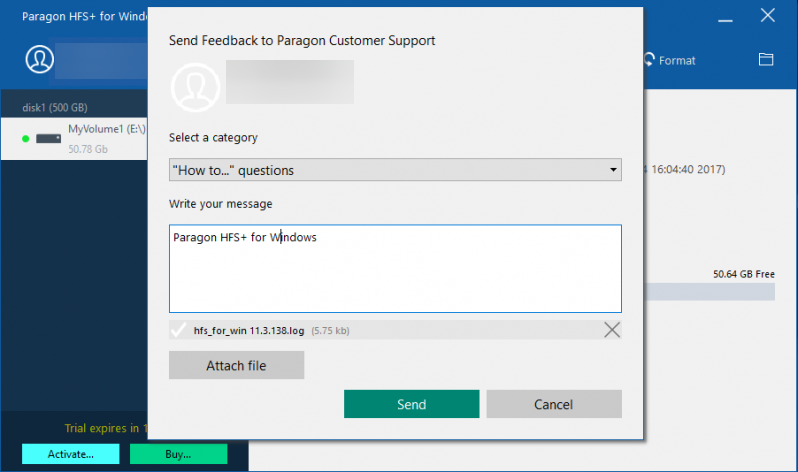
Paragon HFS+ is a feature-rich tool that supports multiple Mac file system formats, such as HFS+ (Mac OS Extended), JHFS+ (Journaled Mac OS Extended), HFSX (Case-sensitive Mac OS Extended), and JHFSX (Case-sensitive, Journaled Mac OS Extended).

When mounting a volume in write mode you can do anything with the files, read, edit, delete, rename, or create new.

Paragon HFS+ also has built-in systems for data safety, you don’t have to worry about data integrity because it can prevent accidental data corruption and loss.

Paragon HFS+ also offers full integration with the File Explorer so that you can open the HFS+ drive from basically anywhere.

The developer promises a satisfying performance, which is another plus for this program.

So, if you need to perform this action only once, you can take advantage of the free trial, and get the job done free of charge.

On the other hand, if you frequently need to manage HFS+ drives on your computer, paying this fee is still a pretty good deal.

Paragon HFS+

Effortlessly read and write files from macOS formatted HDD, SSD, or flash drives with HFS+ for Windows by Paragon Software.
Free Trial Visit Website

HFS Explorer – Very easy to use

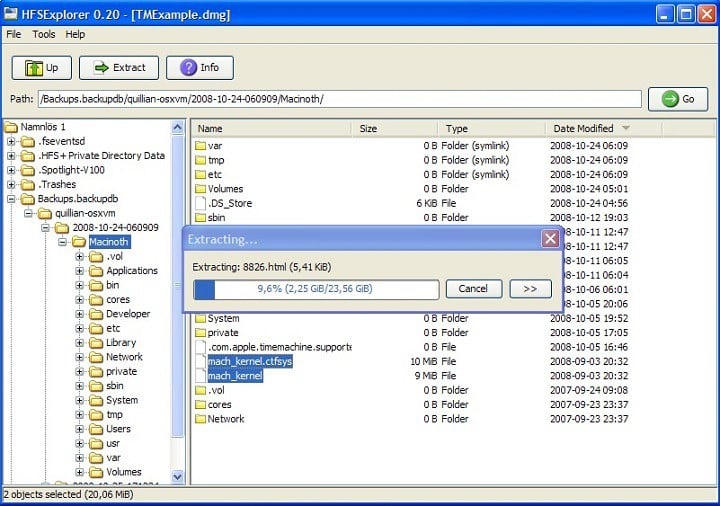
HFS Explorer is probably the program you’re going to use for this action, especially if you need to read a Mac-formatted drive for free on your Windows.

The reason for using HFS Explorer is because, first and foremost, it’s free, unlike other programs from this list. Additionally, it’s quite simple to use and doesn’t require much effort.

To access data from an HFS+ drive with HFS Explorer, connect the drive, open the program, and go to File > Load File System From Device.

HFS Explorer will automatically recognize the drive and show its content. From here, you can manage and export files and folders from the drive to your computer.

Keep in mind that HFS Explorer is a read-only program, so you can’t copy files from your computer to the hard drive.

If you want to have full control over your HFS+ hard drive in Windows, you’ll have to try some of the paid solutions listed in this guide.

Additionally, to be able to use HFS Explorer, you need the Java runtime environment installed on your computer.

⇒ Get HFS Explorer here

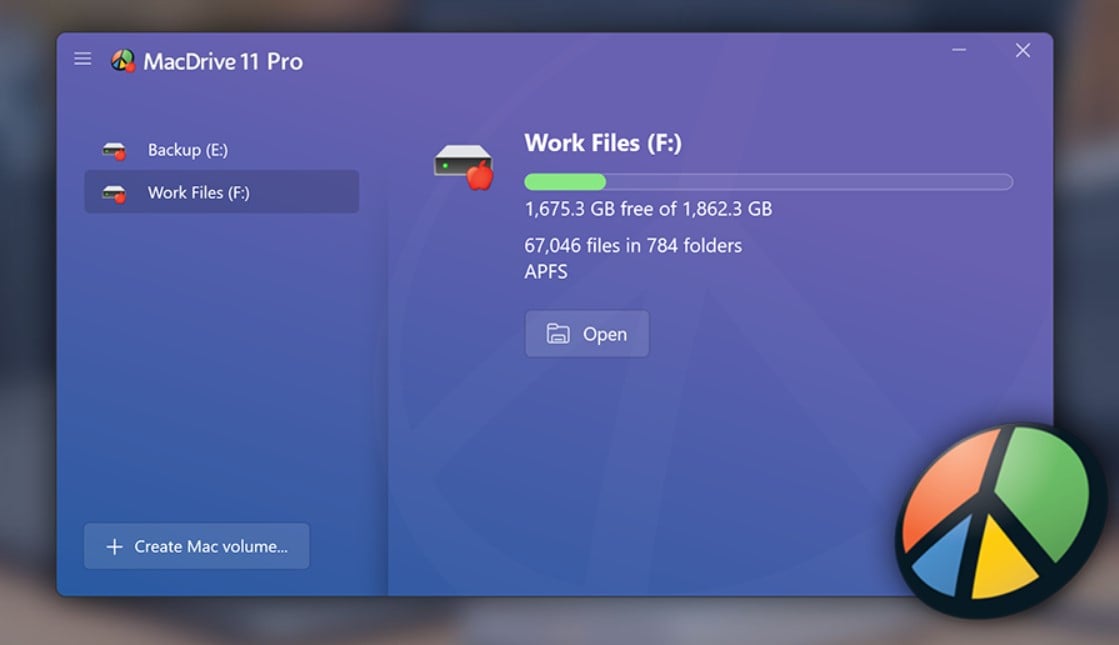
MacDrive 11 – Can repair disks

MacDrive is a solution for more advanced users who really need to get the most out of their HFS+ drives.

It offers complete integration with File Explorer, which makes HFS+ drives extremely easy to use on Windows computers.

MacDrive’s newest version also provides full support for Apple’s new file system APFS to Windows. You get full read-and-write support, APFS crash protection, multi-volume APFS disks, and APFS formatting.

Perhaps the biggest standout of this program is the ability to repair disks and manage partitions. With all these options, Mediafour’s MacDrive allows users complete control over HFS+ drives on Windows.

All these features come with a price of $50 ($49.99 to be more exact). However, just as in the case of Paragon‘s program, you can also take advantage of the free trial. With MacDrive, it only lasts for five days.

⇒ Get Mediafour MacDrive here

Alternative solution: Use iCloud

Additionally, you can open .page files on Windows 10 by using iCloud. In order to do this, all you need is your Apple ID and a browser.

Here’s how:

  1. Launch your browser and go to iCloud.com.
  2. Use your Apple ID to sign in. Now, go to Pages > Settings > Upload Document.
  3. Select the pages that you want to upload and edit.
  4. You can then click on Tools and select Download a Copy to get a copy of the respective files on your Windows 10 PC.
  5. Select Word to export the documents in Word format on your PC.

And this is how you can read Mac-formatted documents on your computer without downloading any software solution.

Don’t format the drive by yourself

As soon as you connect a Mac-formatted drive to a PC, you’ll be asked to format a drive. The following message will appear: You need to format the disk in drive X: before you can use it.

If you choose to format, it will erase everything from the drive, leaving an empty space.

This is fine if you just want a free drive to use, but if you have some data to access, click Cancel and use one of the following programs to make the hard drive readable.

In that case, we should seek help from a third-party solution. A few useful programs allow us to read HFS+ drives on our Windows PCs without formatting them.

Even more, our detailed guide on how to open SKV files on Windows and Mac will show you how to deal with not being able to view SKV files natively (using the built-in applications).

In the end, we hope you’ll find these solutions satisfactory in order to solve your issue. If you have any comments, questions, or suggestions, just let us know in the comments section below.

PowerToys for Windows 10 gets new Video Conferencing Mute tool with latest update

Microsoft has released two new versions for PowerToys, its collection of utilities for power users designed to streamline their Windows experience. PowerToys version 0.21.1 is a maintenance update to the stable v0.20, and it’s mainly focused on localization, stability as well as quality enhancements for both users and developers.

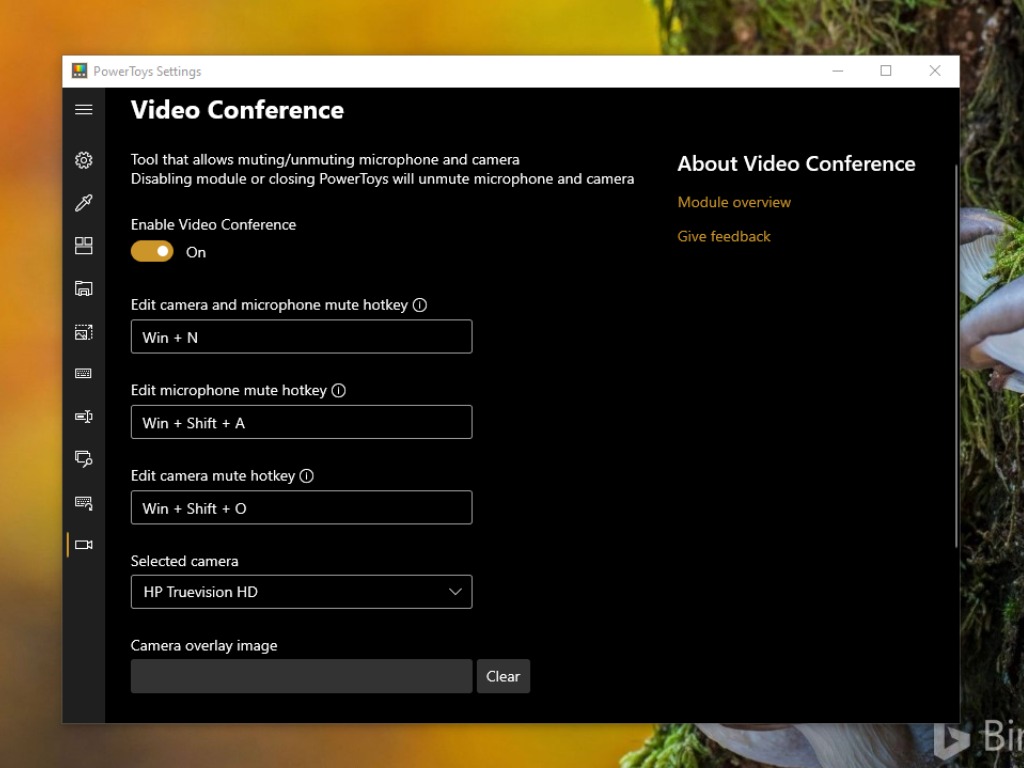
The company has also released a new preview release, version 0.22. This release includes a nifty Video Conference Mute tool that lets users to easily mute their audio/video streams of a video conference with a single button.

“The utility will mute not just your audio but your video as well with a single keystroke. You can do audio, video both. We knew this would impact our roadmap and goals but felt extremely strong that this is the right decision. We’re all multi-tasking and trying to make the best of everything and being able to quickly mute while on a conference call is critical regardless of where you are on your computer,” said Clint Rutkas, Program manager lead on PowerToys.

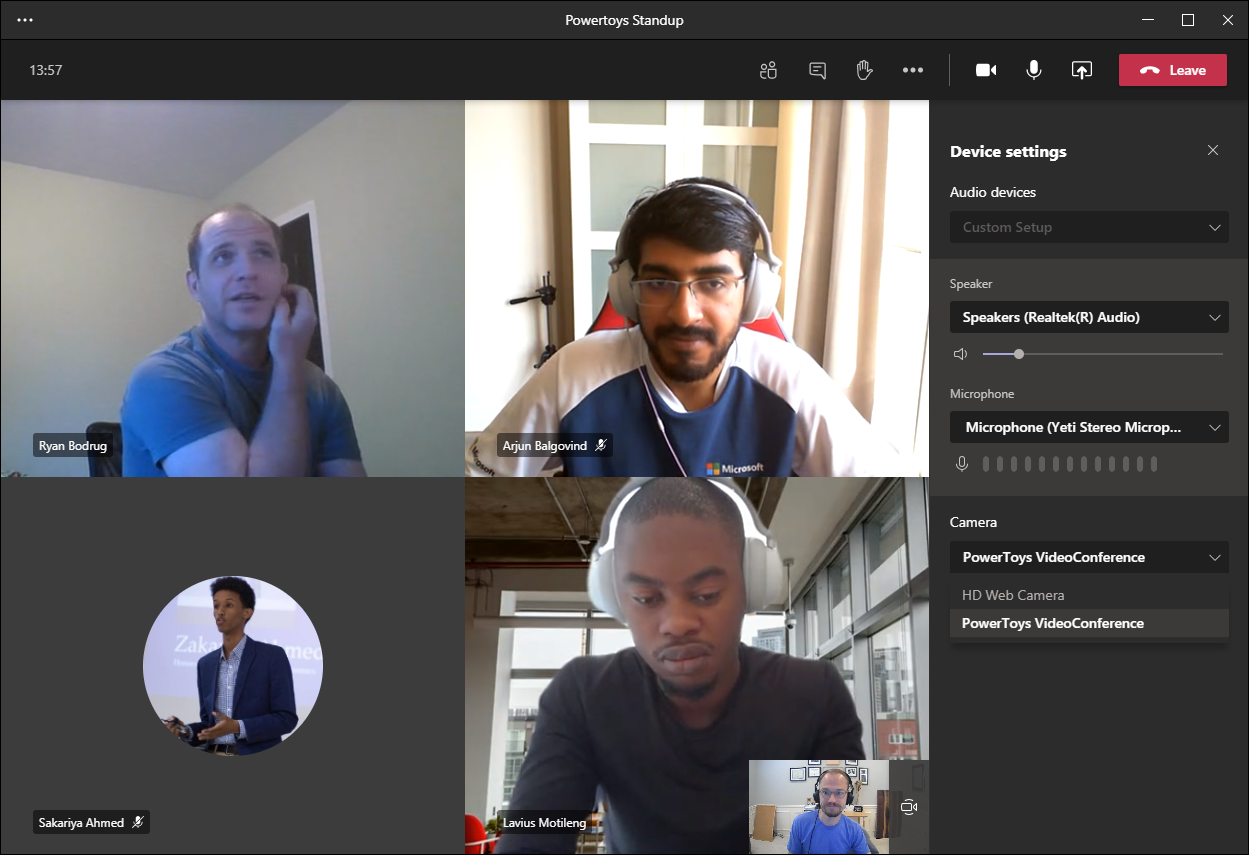
Image of the Teams changing default camera

To use the Video Conference Mute tool during a meeting, simply select the PowerToys camera (as shown above). Once the camera is set up, a quick toggle UI will appear on your screen that can be used to mute video and audio streaming. Users will also be able to use some shortcut keys to tweak their audio/video settings.

  • Win+N to toggle both Audio and Video at the same time
  • Win+Shift+O to toggle video
  • Win+Shift+A to toggle microphone

For those anxious to download the update, head over to the official GitHub page to download the latest version. Just be aware, it’s still an experimental mute feature for video conferences, and there are still some problems with the preview build. “We know a certain laptops currently the video forwarding does not work and are proactively working on fixing this,” Rutkas explained.

Identify Font in PDF [2026 Guide for Windows & MAC]

A good font can improve the reader experience, and some fonts are just too eye-catching. If you ever come across a PDF file with an excellent font and wonder how to identify a font in PDF, this is the article you need.

There are a few ways to find fonts in PDF formats. You can either use offline PDF programs like Adobe Acrobat Reader or use web apps to identify fonts in a PDF file.

In this article, we explore how to recognize fonts from PDF files. These tools are compatible with both Mac and Windows computers.

How to identify fonts from scanned PDF?

Soda PDF – Best tool to identify fonts

Soda PDF is one of the best PDF tools in the industry you can use it to create, edit, and customize PDFs.

Besides these features, you can use this software to identify fonts, and here’s how you can easily do it:

  1. Launch the Soda PDF tool.
  2. Click on the File option and choose the Properties section.
  1. You can now spot the Fonts tab and view all the fonts used in the selected document.

Other than identifying the document’s fonts, you can customize the content and layout of any PDF, insert images, links, page marks, and many more.

Soda PDF

Quickly find out the PDF document’s fonts and use Soda PDF to discover other interesting tools.
Check price Visit Website

Adobe Acrobat Reader – Versatile software

Adobe Acrobat Reader is a popular PDF reader that is available on multiple platforms. Apart from allowing you to read and edit PDF documents, it has some nifty not-so-known features.

One such feature is the ability to detect PDF file fonts. Here is how to do it.

  1. Launch Adobe Acrobat Reader.
  2. Click on File and select Open.
  3. Once you have opened the PDF file, right-click on the document.
  4. Select Properties.
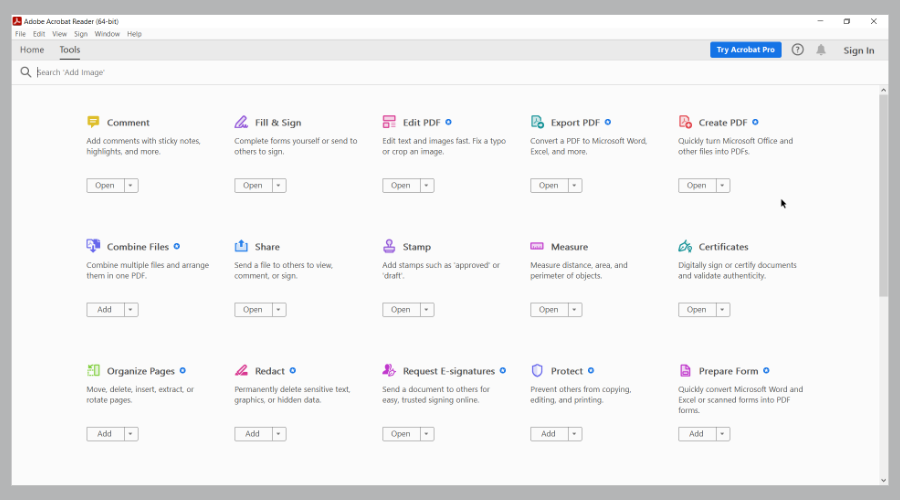
    Identify font PDF
  5. In the Properties window, open the Fonts.

The Fonts will display all the details about the font used in the PDF document. If there is more than one font, it should display all the fonts in a list with font type and encoding.

Adobe Acrobat Reader

Easily identify fonts from your PDF files by using the versatile Adobe Acrobat Reader.
Free Trial Visit Website

MyFonts – Easy to use

Don’t want to download a PDF reader app just to identify a font? MyFonts is an online font for instant font identification powered by the world’s largest font collection website MonoType.

  1. Open the MyFonts page.
  2. Drag and drop the PNG or JPG file.
  3. If you have a PDF file, take a screenshot, save it as PNG, and then upload the file.
  4. Next, you need to select the text to identify using the crop tool.
  5. Click the Arrow icon to identify the selected font.
  6. WhatTheFont will display a list of matching fonts after scanning its collection.

Depending on the font type, you may have to purchase it before you can use it in your document.

⇒ Get MyFonts

Artwork Font Finder – Intuitive interface

Artwork Font Finder is similar to WhatTheFont; however, it allows you to upload PDF documents instead of an image to identify the font.

  1. Visit the Artwork Font Finder page.
  2. Click on Upload PDF.
  3. Select and upload your PDF.
  4. Artwork Font Finder will show the font-related information on the right pane.

Apart from identifying fonts, it can also help you find color information as well as measurement for the page.

⇒ Get Artwork Font Finder

PDF-XChange Editor – Premium tool

PDF-Xchange Editor is a feature-rich PDF reader available for the Windows platform. It is a premium tool in two versions: PDF-Xchange Editor and PDF-Xchange Editor Plus.

If you have the PDF-Xchange Editor installed, here is how to identify fonts using the same.

  1. Open the PDF file in the editor.
  2. Right-click on the document and select Select Tool.
  3. Select the text and right-click again to select Text Properties.
  4. Open the Formatting tab to view the font type and other details.

⇒ Get PDF-Xchange Editor

Now that you no longer wonder whether a font can be extracted from a PDF, knowing what fonts are used in a document can help you improve your documents. You can identify the font in PDF using the tools listed in this article.

Also, you can check out our best PDF editors list if you have needs that surpass the identifying of the font used. And if you ever get the HoeflerText font wasn’t found Chrome message prompting you to download a file, don’t do it since it’s a scam.

Formatting Software for Windows 10: Best to Use in 2026

Most computer users have one physical hard disk drive on their PCs and one partition that is labeled C. But you can create more than one partition on your computer, and this brings some advantages.

If you have two partitions, one for the operating system and the other for all your personal data, your data is less likely to get lost forever in case of a cyber apocalypse, aka computer crash.

For a quick definition, a partition is simply a way to tell your computer that you want to split your hard disk into many logical drives. Each and every partition will be treated as a separate drive. To list all the partitions on your computer, go to My Computer/This PC, and you will find all the drives on your computer.

There are many reasons why you should use more than one partition on your PC: you can enhance data protection and PC performance, use multiple operating systems on the same PC, you can speed up defragmentation, and more.

Another important issue after creating a partition on your hard drive is the format process. We’ll briefly explain why this process is necessary and beneficial for your computer.

Formatting a hard drive

Over time your computer’s hard drive may experience some malfunctions due to wear and tear, viruses or software which can cause system conflicts and slow down your PC. Formatting the hard drive on a yearly basis should be a vital thing to do for your system’s health. Another good idea is to take a few precautions to wipe a hard drive so that your personal data will not be recovered especially if you have an older computer that you may want to sell.

Reformatting an operating system such as Windows will wipe out all of your data, clean the overloaded registries, and get rid of viruses that have been causing lots of damage to the system.

Before you format a hard drive you should run a virus utility program to clean the operating system. The process will prevent any corrupt files from reattaching themselves to your reinstalled or new operating system. After this, you should back up any data that you plan to keep on an external drive and then start the formatting process.

After you format a hard drive and reinstall the operating system, all the glitches and issues should disappear, and the overall performance of your computer should improve significantly.

There are several options when it comes to disk formatting. We recommend using dedicated software because it automates a big part of the process and is built to ensure error-free results. 

What are the best partition formatting tools for PCs?

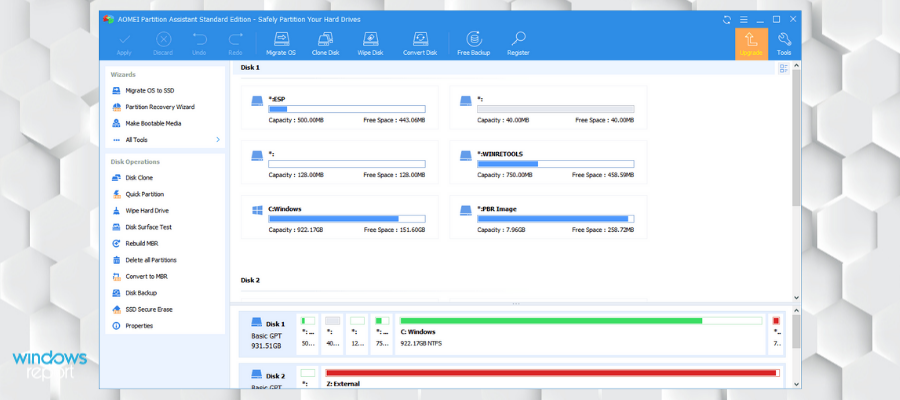
AOMEI Partition Assistant Professional (recommended)

AOMEI Partition Assistant is a free disk partition management tool that managed to earn an excellent reputation among worldwide users.

You can download the tool directly from the AOMEI Partition Assistant Standard page to start managing your partitions with a user friendly interface.

The software comes with so many powerful features that you can completely control your hard disk and your partitions.

For instance, you have the Extend Partition Wizard feature that will enable you to increase the partition size in order to solve low disk space issues completely, or you can also flexibly manage the disk space with the features called Resize Partition, Split Partition, Merge Partition and Copy Partition.

AOMEI Partition Assistant Standard offers sector-level protection for all your data. The developer team has strictly tested its technology, and it enables users to realize safer partitioning operations as you expected.

No matter whether your disk style is GPT or MBR and regardless is your disk is a small one or larger than 2TB; the product is able to help users solve various problems that usually occur with disk partitions.

This partition management software for Windows 10 helps you manage the partitions completely, and it supports Windows 8.1, Windows 7, Windows Vista, and Windows XP.

Other key features of AOMEI Partition Assistant include:

  • Allocate free space from a partition to another
  • Dynamic volume management
  • Compatible with Windows Recovery Environment

It also allows the user to make a bootable drive/ CD and to convert a disk between GPT and MBR.

AOMEI Partition Assistant Professional

If you need a reliable tool to format partitions, go ahead and give AOMEI Partition Assistant Professional a try!
Check price Visit website

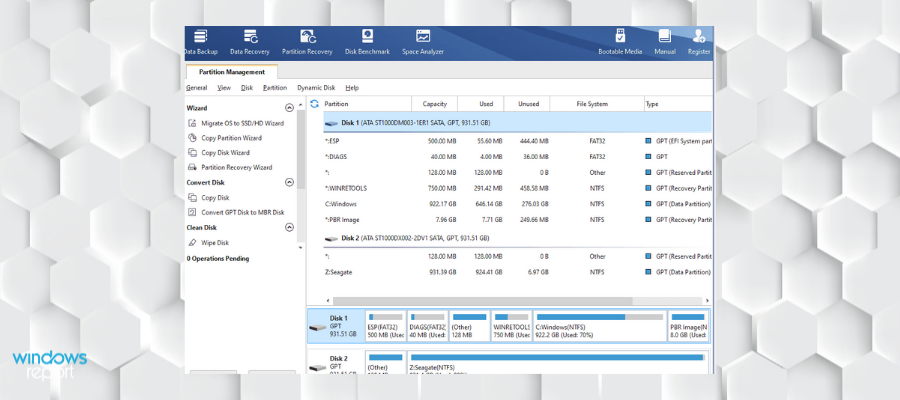
Paragon Partition Manager Advanced

The Paragon Partition Manager will allow you to quickly divide your hard disk into easily manageable partitions without any loss of data and this will ensure an ideal hard disk structure.

The tool will offer you an extensive range of functions for flexible partitioning while optimizing and managing your computer.

No matter whether you are restructuring your hard drive and dividing it into partitions if you are redistributing free memory storage space or just using several operating systems on the PC all at once, the tool will offer you high-performance partitioning features.

These will help you make optimum use of the available memory space on the hard disk.

This high-performance partitioning engine will help you divide your hard disk into well-arranged partitions as quickly as possible, and it will make sure the memory storage space available on the hard disk is used ideally.

Your operating system will be able to process data more efficiently if the physical hard disk is divided into more logical hard drives each of which has its own letter and volume name.

Other key features of Paragon Partition Manager Advanced Include:

  • Command line
  • Support to migrate OS
  • Wipe data
  • Virtual disk support

The Integrated Paragon backup functions allow you to create a backup before working on a hard drive. So, in case an operation doesn’t go as planned, it’s no big deal. The recovery wizard will get your system back up and run in no time.

Paragon Partition Manager Advanced

Take control of your disk partitions with the help of this fantastic memory management tool!
Check price Visit website

Mini Tool Partition Wizard

MiniTool Partition Wizard is straightforward partition manager software with comprehensive functions. It features partition management for Windows server 2000/2003/2008/2008 R2/2012/2016 and Windows 2000/XP/Vista/7/8/10.

MiniTool Partition Wizard fully supports the mainstream file systems, like exFAT, FAT12/16/32, NTFS, Ext2/3/4, and it also gives perfect support on GPT partitions.

This tool allows the standard tasks such as creating, resizing, deleting, moving, and formatting but it also provides the ability to perform extended tasks including the extension of system partitions.

The Data Protection Mode can be selected while modifying the partitions on the disks; you will see that this mode is considered as insurance against data corruption that occurs due to sudden power failure or to electrical disturbances that occur while the software is in the process.

The merge feature is a great way to boost the response rate of your system. If you have a partition that is low in resources, you can combine it with another one to get some extra space and help your system work faster.

This feature does not remove any data on any of the partitions you decide to merge. 

Additionally, you can also split a partition with this software. This can be a good solution if you are extra cautious about your data because it allows you to split your operating system files from your personal files, thus if anything happens with your system, your files will be probably safe if they are in another partition.

Lots of hard disks including SATA< IDE< SCSI, and all USB external drives are compatible.

The program offers lots of additional benefits including the following:

  • Enhanced functionality because it allows you to access the previously created partitions
  • Complete data recovery from the disk partitions that have been previously created
  • Migrate OS to SSD

MiniTool Partition Wizard has well established free version that can help you with basic partition management tasks. For additional help, you can subscribe to the Premium version.

MiniTool Partition Wizard

If you find manually managing your partitions too difficult, then let MiniTool Partition Wizard Pro take over for you!
Free trial Visit website

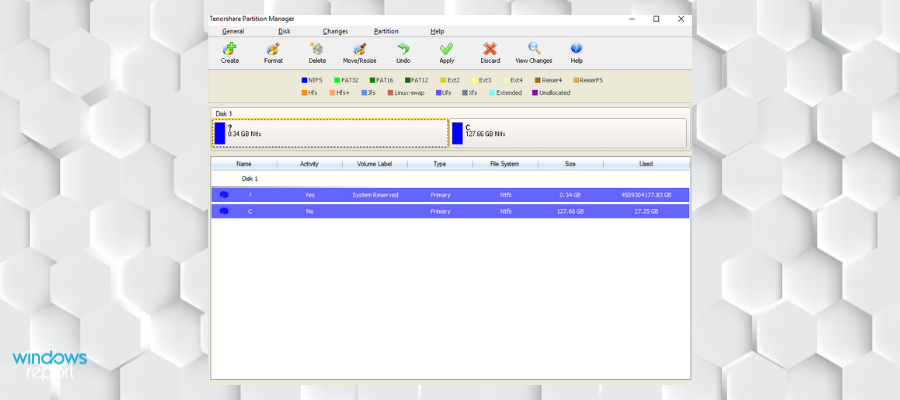
Tenorshare Partition Manager

The tool supports almost every version of the Windows operating system, including Windows 10 and this makes it one of the most versatile disk management tools.

It features various functions that will allow you to optimize the existing partitions by just deleting all the additional portions of the data. You will also be able to format your data just in case you want to free up some space for a new operating system.

You can format partitions when you intend to install OS, re-organize your hard disk, or need to delete all the data on that partition. You also have the ability to resize a partition by flexibly extending it to a larger size or reducing a partition without losing data.

You can copy your partition as well as data onto another partition or even a separate hard drive.

Other key features include:

  • Change driver letter and paths
  • Change volume label
  • Active/inactive partion settings
  • Compatible with removable media

With this tool, you will also be able to convert the file system easier to get an advanced file system that will offer you advanced features in terms of security, performance, and reliability.

Tenorshare Partition Manager

Format your hard disk, manage your partitions and keep your data safe with this full-feature tool.
Free trial Visit website

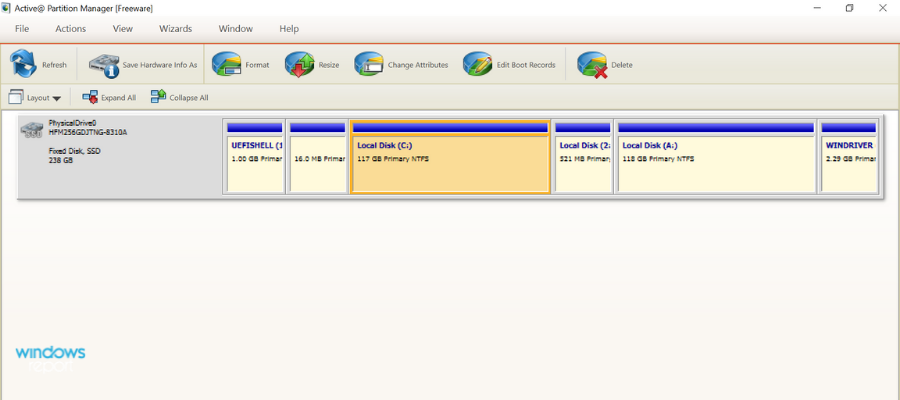
Active Partition Manager

Active Partition Manager is a free disk formatting software that allows you to create, delete, format, name your partitions or change their name. You can do all that without restarting your computer as most of the changes are implemented immediately.

You can use this tool to format a logical drive or partition. The following formats are supported: FAT, exFAT, NTFS. You can rely on it if you need to format a USB flash memory as NTFS as well.

Active Partition Manager has the ability to give you full access to a non-bootable PC so you can use the local disks and system.

You can add it to a removable media such as CD, DVD, or USB flash drive and it will load with no problem.

Active Partition Manager has additional data recovery tools that will scan and restore any lost files and folders on your system. It also can fix broken files within your partitions.

Active Partition Manager key features include:

  • Create a partition and resize the logical drive.
  • Edit or  synchronize boot sectors of FAT, exFAT, NTFS, UFS, HFS+, Ext2/Ext3/Ext4.
  • If your disk has been damaged, you can initialize a new disk as MBR or GPT or fix MBR (GPT).
  • The tool can convert MBR to GPT or GPT to MBR.
  • Rollback support for cancelling certain partition changes (delete or format partition and disk initialization).

Active Partition Manager is a full-feature free software that comes with many premium-level features. It is definitely worth a shot. 

⇒ Get Active Partition Manager

The software solutions mentioned above are some of the best partition management tools for Windows 10 that allow you to organize and format your drive.

Handling your disks can be an intimidating job, especially if you have only slight knowledge or practice with hard drives in general. Install one of these tools, and let the software do the job for you.

For more software on disk partitioning, go to our Utilities Hub.

Need more software lists that were handpicked by experts? Check out our Software section.

How to Properly Dual-Boot Windows 10 With Another OS

You probably already heard that it is not recommended to install Windows 10 as your primary operating system, but if you really want to use it there are a couple of methods which will allow you to use it, along with your current system. And one of these methods is dual-boot.

Performing a dual-boot is not a complicated task. Here’s what you need to do to complete it successfully:

  1. Shrink your System Partition to make enough space
  2. Download the Windows 10 ISO file
  3. Install Windows 10 alongside your current system
  4. Choose which Operating System you want to boot

How do I dual boot Windows 10 and another OS?

The present article will guide you through the dual-boot process. For more information on specific operating systems you choose to team up on your computer, also check these articles:

  • Dual Boot Windows 10 and Ubuntu – follow along with the instructions below. Since Windows 10 has settings that are not optimal for dual boot setups, you might encounter some issues. Here is a specific guide to fix Ubuntu Windows 10 dual boot.
  • dual boot Windows 10 and Linux – many of them had issues with this one. If you’re stuck installing Linux on Windows 10 PC in a dual-boot mode, make sure to check this tutorial.
  • dual boot Windows 7 and Windows 10 – you can easily dual boot Windows 7, or any other version of Windows, and Windows 10 Preview build by following this guide.
  • dual boot Windows 10 and Windows server – in our dedicated article, you can see a good example of how to install Windows Server 2012 R2 as the second OS on a machine. The same steps also apply to the Windows Server 2016 or the older 2008 R2 which was based on the same kernel as Windows 7.
  • dual boot Windows 10 and Endless OS – find the guide in this article.

Shrink your System Partition to make enough space

First, you’ll need to make space for Windows 10 on your hard drive. If you have two different hard drives in your computer and one of them is empty, you can skip this part. But you’ll probably want to install Windows 10 alongside Windows 7 or 8 on the same hard drive.

Before you install another operating system on your computer, you’ll need to free up some space for it. If you have two different disk drivers in your machine, and one of them is empty, you don’t need to do anything. But, you probably want to install Windows 10 on the same partition as your current system.

To free up some space for your new operating system, you’re going to use the Disk Management Utility, which is built-in feature in Windows 7 or 8.

To run Disk Management Utility follow these steps:

  • Hit the Windows Key and R, then type diskmgmt.msc into the Run dialog box
  • press Enter to launch it
  • Locate your system partition, which is probably C:
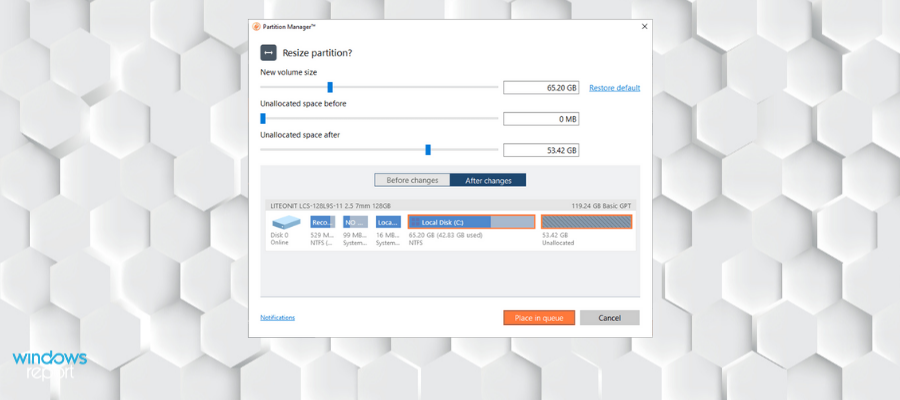
  • Right click on it and choose Shrink Volume.
disk management tool


This feature will free up some necessary space, and you’re good to install the new operating system on the same partition as your current OS. System requirements of Windows 10 Technical Preview say that you’ll need at least 20 GB of free space, same as for Windows 8 or Windows 8.1, but you’ll probably want to have more free space than that.

After the shrinking is done, you can download Windows 10 from Microsoft’s website, and continue the process.


This can also be one via third-party partition managers which can do the job faster, in a much safer manner, and you don’t need so many steps either.

One great example is Aomei Partition Assistant Professional, a tool that can allow anyone with basic knowledge of English to do whatever they want to their partitions, including shrinking them.

Simply launch the program, select the partition in question, and then select from the toolbar what is it that you want to do with it.

AOMEI Partition Assistant Professional

Shrink your system partition down to size without compromising your OS with the help of this fantastic partition manager!”
Check price Visit website

Also, don’t forget to backup your data before you install a new operating system. Although it shouldn’t delete any of your existing files, you should perform a backup, just in case.

Download the Windows 10 ISO File


After you prepared your hard disk drive for installation of the new operating system, you should download it from Microsoft’s site. Download a Windows 10 ISO file and either burn it onto a DVD or make a bootable USB flash drive.

After you do that, leave your DVD or USB Flash in your computer, and restart it. It should automatically start the installation, but if it doesn’t, change the boot priority in BIOS.

Install Windows 10 alongside your current system

Now, install Windows 10 Technical Preview normally.

Select your language and keyboard layout and proceed to Install now.

After agreeing on the license agreement, choose Custom: Install Windows only (advanced), because it will install the fresh copy of windows on your desired partition.

If you choose Upgrade option, it will upgrade your current operating system to Windows 10.

install windows 10


The Where do you want to install Windows? will window appear. You’ll notice an Unallocated Space option, this is the space you shrank earlier. Choose Unallocated Space and New, to create a new partition in the empty space.

A Size box will appear asking you how big you want your new partition to be. You should use all the free space (which is also a default option), and just click Apply to create a new partition.

dual-boot Windows 10 choose partition


After that, just follow further on-screen instructions, and finish the installation.

Choose which Operating System you want to boot

From now on, you’ll be able to choose which system you want to use on your computer. To switch between Windows 7/8/8.1 and Windows 10, just restart your computer and choose again.

dual boot Windows 10 and another OS


Go to Change a default operating system or Choose other options in order to choose which operating system you want to boot by default, and how much time will pass before the computer automatically boots the default one.

choose between the systems win8apps


Both versions of the system use the NTFS file system, so you’ll be able to easily access your files from both operating systems.

Let us know if this guide was helpful by leaving us your feedback in the comments section below.

League of Legends won’t update on PC [FULL FIX]

League of Legends is a popular online game played by millions worldwide. As it’s the case with any software, there are several errors that affect the gameplay experience.

Failing to update to the latest version is one of the causes; it also affects several patches of the game.

Error messages that are commonly displayed include Unspecified error occurred, Check logs for more information, or similar.

Most importantly, many beginners could find this hard to resolve as the error messages tend to be vague and not informative. And, as a result, they might give up playing the game, altogether.

Even expert gamers are challenged when such messages pop up.

The updating issues can be resolved with some solutions, however, after testing them, users got mixed results.

So if a particular solution that we’ve listed below doesn’t work for you, try the next one until you get your game updated.

How can I get League of Legends to install updates?

  1. Reinstall League of Legends
  2. Temporarily disable your antivirus
  3. Use an Executable patch to run the game
  4. Change the Update client

1. Reinstall League of Legends

resinstall league of legends

Reinstalling a game is one of the best options when having update problems.

However, since League of Legends is an online game, you would need to have a good Internet speed to reinstall the game. Again, using the VPN recommended in the previous solution will be of great help.

With the fresh installation, you automatically get the latest patch version of the game, eliminating the updates issue.


2. Temporarily disable your antivirus

fix league of legends update

It is common knowledge that some antivirus tools tend to interfere with online gaming activities. As a result, the antivirus could be blocking the connection to the game servers, compromising the updating process.

If the previous solutions didn’t help, disable your antivirus before launching League of Legends, and then run the updates.

However, in some situations, you may need to uninstall the antivirus before running the update.

Note: The antivirus is an essential program for your system. Instead of completely disabling it, we recommend you use one that won’t interfere with LoL, such as Bitdefender.

Choose an antivirus for gaming because you can set them up to temporarily pause intrusive notifications while you are in the game. They run in the background, but don’t interrupt.


3. Use an Executable patch to run the game

Use an Executable patch to run the game

Using an executable patch to update your game is actually better than running automatic updates. And there are several websites offering these patches.

Besides saving time,  a patch can easily be removed if errors occur.

For this purpose, the game developers have inserted a patcher in the game folder. It can serve as an alternative if the game updates are not working properly.

To access this patcher follow this steps:

  1. Open your League of Legends folder.
  2. Click on the Rad folder.
  3. In the drop-down list, click on Projects.
  4. Select lolpatcher and click on releases.
  5. Select the file folder with numbers in its name.
  6. Select Deploy.
  7. This leads to the deploy folder where you would see an executable file named LoLPatcher.exe.
  8. Run the executable file.

This will update your game to the latest League of Legends version.


4. Change the Update client

fix league of legends update bugs
  1. Go to the League of Legends folder.
  2. Click on C:Riot GamesLeague of Legends.
  3. Search for the file User.cfg and open using Notepad.
  4. Change the input of the following character LeagueClientOptIn = yes to LeagueClientOptIn = no (Note: It is important you make sure you input the right characters.)
  5. Save and exit.
  6. Launch your game.

There you go, we hope that these quick suggestions helped you fix your LoL update error.

If you come across other workarounds, feel free to list the steps to follow in the comments below.

[wl_navigator]

Windows 10 Insider build 20206 is out with Voice Typing, improved Emoji picker and touch keyboard

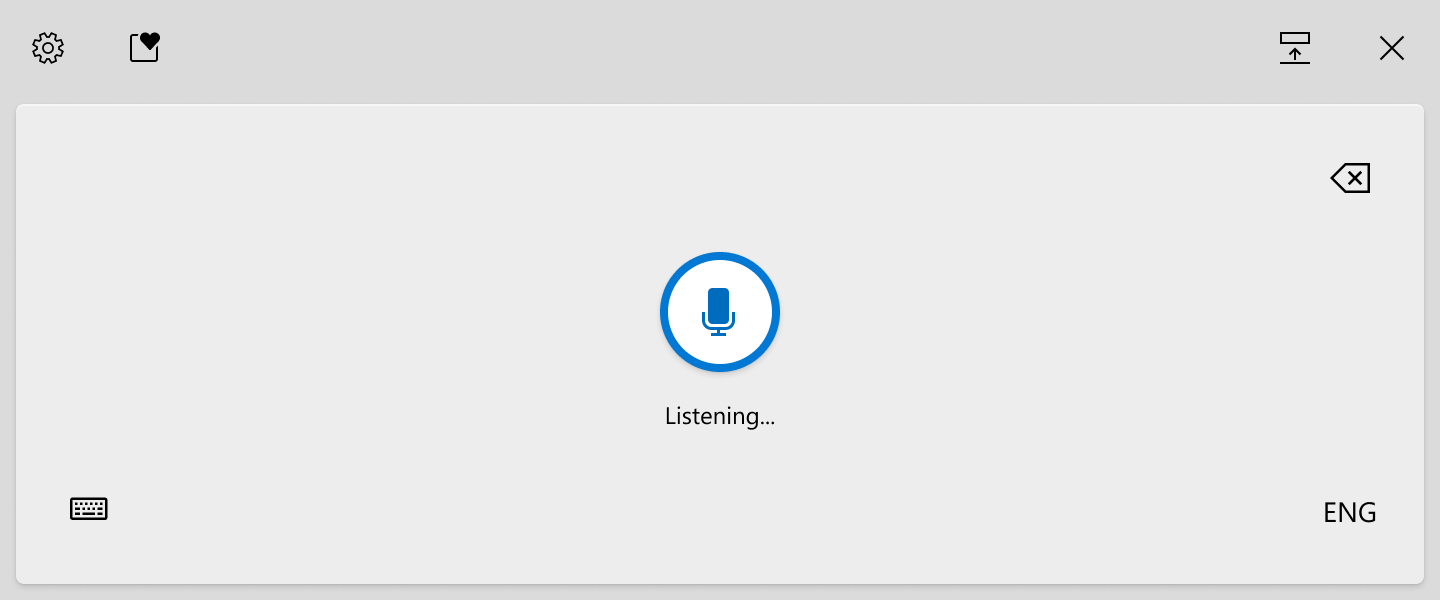
Heads up Windows Insiders, the Windows 10 Insider build 20206 is now available in the Dev Channel with some exciting new features. The first interesting addition is Windows Voice Typing, which is an evolution of Windows dictation that’s now optimized for use with touch keyboards. 14 languages are currently supported including English, French, Spanish, German, and Portuguese, and Voice typing will support auto-punctuation and intuitive voice commands.

Voice typing will roll out to just a subset of Dev Channel Insiders at first, so don’t worry if you don’t see it immediately. The Windows Insider team also noted that Insiders may experience random pauses while using the feature in some Office apps, but clicking the microphone icon or using the dedicated Win + H shortcut should restart the listening experience.

Windows 10 Voice keyboard

The build 20206 also brings some changes to the Emoji Picker, which gets an acrylic background, Emoji search, and animated GIF support powered by Tenor. Microsoft is also combining input and clipboard history, and the latter will now show up when switching to the “Clipboard” category after pressing the WIN + [.] or WIN + [;] shortcuts. Again, these improvements for the Emoji picker will only roll out to a subset of Insiders who install this new build today.

The revamped emoji picker is your one-stop for expressing yourself with quick access to emoji, kaomoji, symbols, animated GIFs and your clipboard.

Some Insiders will also notice a new touch keyboard after installing the new bits. “The updated design includes a fresh aesthetic and many other small tweaks, including updated key sizes / layouts to optimize for typing comfort & accuracy. We have also done some work to help improve discoverability and usability of available features,” the Windows Insider team explained today.

The redesigned touch keyboard offers quick access to emoji and animated GIFs so you and express yourself any way you like while typing in Windows.

Another important change to the touch keyboard is the ability to hold and drag on the spacebar to move the cursor. This has been a popular request from Insiders, but once again, only a subset of them will see this new feature after installing today’s build.

Press and hold on the space bar on the touch keyboard to move the cursor on your screen.

This build also brings other minor changes, bug fixes, and known issues, and you can find the full list below:

Changes and Improvements

  • When annotated content and linked control Narrator commands are invoked on context which doesn’t have any linked controls available, Narrator will now say “No linked item”.
  • When setting focus to Windows Explorer in the Processes tab of Task Manager, we’re updating the keyboard shortcut for the Restart option to now be Alt + R.

Fixes

  • We fixed an issue where the new option to enable DNS encryption wasn’t persisting update.
  • We fixed an issue leading to certain apps not launching due to nlsdl.dll being missing.
  • We fixed a race condition in the last few builds that could result in some Insiders experiencing scaling issues after waking their PC from sleep when using multiple monitors.
  • We fixed an issue that could result in the Narrator Home crashing when using the back button.
  • We fixed an issue where after adding a VPN connection, Narrator focus would move to the Settings home button rather than read that the VPN connection had been successfully added.
  • We fixed an issue from the last two flights resulting in Office documents opening blank when opened from File Explorer rather than from within the app.
  • We’ve fixed an issue in the Mail app preventing syncing with certain mail services.
  • We’ve fixed and issue causing some devices to receive bugchecks with error code KERNEL_MODE_HEAP_CORRUPTION.
  • We fixed an issue that could result in Task Manager erroneously indicating that a non-UWP app had been suspended. We’ve mitigated an issue with the previous build causing some devices to download larger than normal amounts of data during the update process. This may have resulted in slower downloads and disk space warnings. If you continue to experience the issue with this build, please file a new feedback.
  • We’ve made improvements to address issues where the new taskbar experience for pinned websites wasn’t working for some websites. If you continue encountering issues, please ensure you’re running the latest version of Microsoft Edge Dev or Canary, and report the issue using the Feedback button in Microsoft Edge if you are.

Known issues

  • We’re looking into reports of the update process hanging for extended periods of time when attempting to install a new build.
  • We’re working on a fix to enable live preview for pinned site tabs.
  • We’re working on enabling the new taskbar experience for existing pinned sites. In the meantime, you can unpin the site from the taskbar, remove it from the edge://apps page, and then re-pin the site.
  • We’re investigating reports of some Office applications crashing or missing after updating to a new build.
  • We’re investigating reports of the Settings app crashing when opening Manage Disks and Volumes.
  • We’re working on a fix for the Linux kernel not being installed when using the `wsl –install` command in the Windows Subsystem for Linux. For an immediate workaround run `wsl –update` to get the latest kernel version.

Microsoft has been consistently releasing new builds on Wednesdays this past couple of weeks, though today’s flight comes a bit later than usual. It will certainly be a bit frustrating for Insiders to not have access to all new features immediately, though the Windows Insider team promised that Voice Dictation, the new Emoji picker, and the redesigned touch keyboard would soon be generally available in the Dev Channel.

For Honor connection issues on Windows 10/11 [FULL FIX]

People love the idea behind Ubisoft’s For Honor. It’s been a while since we’ve seen a game that simulates medieval combat so well while adding up much-needed complexity. And that’s exactly what convinced players to buy this game.

The game’s single-player mode seems rather like an extended tutorial that lasts for about 6 hours. On the other hand, the multiplayer mode is the real gem, although still a hidden gem for some players.

Numerous users reported disastrous Internet connectivity when launching For Honor. The game’s official Steam page is flooded with negative reviews from players who constantly fail to connect to duels, and other multiplayer modes.

Here’s what some of them say:

  • The game in a nutshell: A connection error has occured. Returning to main menu.Don’t waste money and time until this gets fixed.
  • It’s a great game. I really like it. and it’s the friendliest community I’ve met in a LOOOONG while. There’s only one problem, you will have connection problems more often than not because someone thought than not having dedicated servers was a good idea.
  • Fifteenth attempt at completing a game, finally about to kill the last guy. A connection error has occured. Returning to main menu.

As one player stated on the forums, it’s unacceptable for Ubisoft to allow so many connection issues in a game that boasts with the multiplayer mode.

Ubisoft needs to do something immediately if they don’t want to end up with another solid game ruined by technical issues.

Still, while we wait for Ubisoft to fix the ongoing problem, perhaps by releasing a patch or two, we can try to solve connection problems on our own.

So, see below a few solutions we’ve gathered. They might help you with dealing with connection issues in For Honor.

How do I fix For Honor connection issues?

Here are some common issues reported by users.

  • For Honor servers unreachable – Sometimes you might encounter a problem with For Honor due to your antivirus. To fix the issue, be sure to check if your antivirus or firewall interfere with the game.
  • For Honor matchmaking failed, connection failed – These messages can appear if the necessary ports aren’t forwarded. To fix that, it’s advised to open your router’s configuration and forward the necessary ports.
  • For Honor 7-00000005 – Reset your hosts file to default and check if that solves the issue.
  • For Honor connection error 0006000037 – If you encounter this error message, you might be able to fix the problem simply by enabling UPnP feature on your router.
  • For Honor connection error has occurred/ session has been lost – Try one of our solutions detailed below.

1. Check your antivirus

According to users, the most common cause for For Honor connection issues might be your antivirus. To fix the problem, first, you need to add For Honor in your list of exceptions in both your antivirus and firewall.

This process varies for each antivirus application, so you might need to look for a guide on how to add exceptions in your antivirus/firewall. If the game isn’t blocked by your antivirus/firewall, your next step would be to disable certain antivirus features and check if that helps.

We don’t advise for disabling the antivirus altogether, though, but rather for using a program that does not interfere with other processes.

You can find many antivirus options nowadays and many of them provide top-level protection without compromizing on PC speed or affecting other apps.

The best antivirus software to boost your gaming should include a game mode. This is a functionality that pauses all intrusive notifications while you are in the game. The antivirus is still actively protecting your system but does not interrupt you.

2. Stabilize your Internet connection

fix internet connection for honor

While advertised as a streamer’s best friend, we’d say that Sppedify is a gamer’s best friend.

Speedify is a VPN that detects, protects, and prioritizes video and audio streams, thus adjusting to network conditions.

The result is an enhanced gaming experience, due to faster and smoother Internet connectivity that is dynamically distributed across all your connections, depending on what you are doing on your PC.

Speedify also monitors incoming traffic to report on connection usage, latency, and packet loss. This way you can see how to better manage your network settings.

⇒ Get Speedify

3. Uninstall and reinstall the game

Some players suggest that the most effective solution for this problem is to simply uninstall and reinstall the game.

So, the first thing you’re going to do is to uninstall For Honor completely. It’s very important to delete the For Honor folder, as well. It usually takes up to 1GB of space.

Better still, use a third-party uninstaller tool to make sure that you get rid of any traces of the game.

Uninstaller software can successfully remove all lingering files that a normal uninstallation would not be able to. They scan your whole PC for leftover files and permanently delete them.

This is very helpful because it optimizes your PC by removing unnecessary data while allowing you to reinstall problematic apps and also remove stubborn ones.

4. Check your ports

If you still experience connection issues, you can try with forwarding ports in your modem. The following ports need to be forwarded for the best possible experience:

  • Uplay PC
    • TCP: 80, 443, 13000, 13005, 13200, 14000, 14001, 14008, 14020, 14021, 14022, 14023 and 14024
  • Game Ports
    • Inbound UDP: 3075

5. Restart your modem/router

For Honor matchmaking failed

Sometimes issues with your modem or router can interfere with For Honor and cause connection issues to occur. To fix the problem, it’s advised that you turn off your router and modem. Wait for a few moments and then turn the modem/router back on again.

Wait for a few moments while your router boots. After the Internet connection is established, try to run For Honor again and check if the issue is resolved.


6. Enable UPnP

enable UPnP

According to users, sometimes your ports aren’t properly forwarded and that can lead to connectivity issues in For Honor. To fix that, you can manually forward the ports or you can turn on UPnP feature.

If you’re not familiar, UPnP stands for Universal Plug and Play, and thanks to this feature, applications can automatically forward the required ports. To enable this feature, you need to open your router’s configuration page, locate UPnP feature, and enable it.

To see how to properly do that, we advise you to check your router manual for detailed instructions. Once you enable this feature, check if the problem is still there.


7. Reset the hosts file

Reset hosts file

Connectivity issues with For Honor might also be related to your hosts file. Sometimes this file can be altered by a third-party application, and that will prevent you from connecting to For Honor’s servers.

However, you can fix the problem simply by resetting the hosts files. We already wrote a detailed guide on how to reset hosts file on Windows 10, so be sure to check it out for more instructions.

Keep in mind that sometimes you might encounter certain issues while modifying this file. If you get an Access denied message while editing the hosts file, so be sure to check it out.

Once you reset your hosts file to default, check if the problem is still there.


8. Flash your DNS

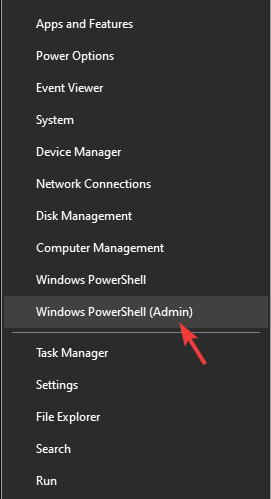
  1. Open Win + X menu. You can do that by pressing Windows Key + X shortcut. Now choose Command Prompt (Admin) or PowerShell (Admin) from the list.
    For Honor connection with session has been lost
  2. When Command Prompt starts, enter ipconfig /flushdns and press Enter to run it.
    For Honor servers unreachable

After running this command, your DNS cache will reset and the problem should be resolved.


9. Check for problematic third-party applications

  1. Press Windows Key + R and enter msconfig. Then click OK.
    For Honor connection error has occurred
  2. Go to the Services tab and check Hide all Microsoft services. Now click Disable all button.
    For Honor servers unreachable
  3. Go to the Startup tab and click Open Task Manager.
    For Honor connection failed
  4. A list of startup applications will appear. Select the first item on the list, right-click it, and choose Disable from the menu. Repeat this step for all applications.
    For Honor 7-00000005
  5. Close Task Manager and go to the System Configuration window. Click Apply and OK and restart your PC.
    For Honor connection error 0006000037

Once your PC restarts, check if the problem is still there. If not, you can enable services and applications one by one until you find the problematic application.

Once you find it, use the uninstaller software recommended above to remove it completely from your PC. Afterward, the issue should be completely resolved.

Unless the problem lies with the game, not your computer, these solutions will surely be helpful.

So what’s your experience with For Honor so far? Let us know in the comments below.

[wl_navigator]

Microsoft’s next-gen smart glasses could be sleeker than ever

There’s no shortage of interesting ideas from Microsoft these days, just like the patent for the multilingual keyboard.

Now, looking a bit deeper, we found another gem, a Micro LED Display System patent published just a few days ago.

It’s obvious to say that the company will rely on their precious information from their HoloLens but the new ones promise to be a lot more thin and easy to wear.

What are the smart glasses that Microsoft is working on?

First of all, the biggest problem for HMDs today is the bulkiness that makes them harder to wear.

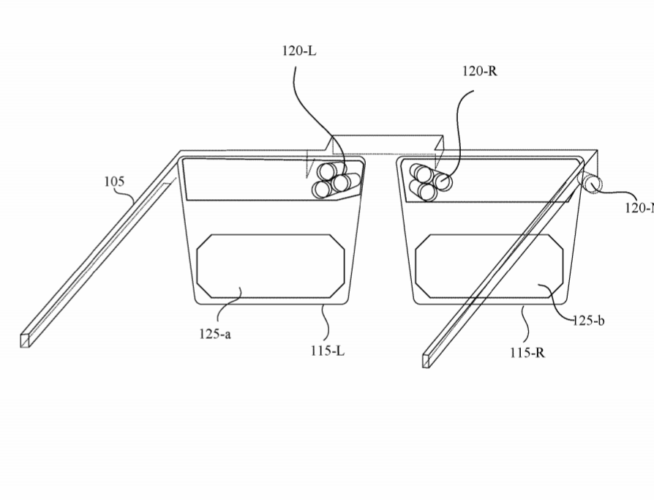
According to the patent, Microsoft tackles that by incorporating microLED projectors, three to be precise, that will form an image by combining the RGB images from each.

Microsoft details the description in the specifications section of the patent presentation:

Features of the present disclosure implement a MicroLED display system that incorporates a plurality of monochrome projectors (e.g., three MicroLED projectors) to generate three monochrome images (e.g., red, blue, and green images) that are separately input into a single waveguide of the HMD and combined to form an image that is displayed to the user.

By incorporating fewer elements, Microsoft is aiming for a much sleeker design than the classic HMDs.

Interestingly enough, the pair doesn’t include a camera, one of the features that led to privacy concerns in the case of the abandoned Google Glasses for instance.

The patent doesn’t describe any controls for the glasses although we can assume that it will be done through a wireless interface with your smartphone and computer.

Probably we won’t see Microsoft’s glasses any time soon but in the meantime, check our list with the best VR headsets for gaming.

What do you think about Microsoft’s project? What do you think about smart glasses? Let us know in the Comments section below

[wl_navigator]

Intel’s rebranding may start with a new Microsoft product

It’s not a secret for anyone who knows a little bit about the market that Intel is not walking on rose petals right now. After they delayed the production of their 7nm chips, they need any nudge in the right direction.

And that is coming from the obvious place, their old friends from Microsoft.

Panos Panay could hint Intel’s rebranding

The famous leaker WalkingCat posted a clip on Twitter featuring Microsoft‘s CPO Panos Panay who is reinforcing his belief in the partnership with Intel.

Mostly it’s about things that we already know about the two companies collaborating better than ever but in the end, Panay is hinting something interesting:

I think that energy that energy between our two companies comes together tenfold when we’re working together and thinking about what that might be. And we see that today, we see it in the future products that we’re making.

Of course, that means that we should expect new products from the two companies working together. But the CPO’s short speech is not ending with Microsoft’s logo but with Intel’s logo.

A new Intel logo.

What device could be next for Microsoft and Intel?

That’s where another tweet from WalkingCat could help. He is asking if Larkin is a Microsoft Surface code name.

Microsoft Surface devices are, of course, landmark products born from the collaboration between Microsoft and Intel so we’re just trying to connect the dots here.

Another user reinforced the hypothesis of Larkin being a Microsoft Surface code name by saying that writer Mary Jo Foley could have said that in a Windows Weekly episode.

Is Intel rebranding? Will we see another secret device marking that rebranding? These are just guesses but they stick together pretty well right now.

Feel free to write your thoughts in the Comments section below.

[wl_navigator]

Winamp is not working in Windows 10/11

Winamp is, arguably, the most famous third-party music player since the Windows era started.

It was a reliable choice for so many years and now it’s in a decline, as the music streaming services are taking over.

Even its optimization for Windows 10 is not without issues and some users report not being able to open Winamp or play any audio files.

We have some suggestions on how to solve this problem, so make sure to give them a go.

  1. Scan for malware and PuPs
  2. Run the app as an administrator and remove Plugins
  3. Check the format of multimedia files
  4. Install the redistributables and NET. Framework
  5. Reinstall the application

What can I do if Winamp won’t play audio files?

1. Scan for malware and PuPs

The corruption of Winamp might occur due to a malware infection. Albeit, this is hardly the case. However, just for the sake of troubleshooting this problem, run the deep scan on your antimalware tool.

In addition, if you’re suspecting the presence of some PuPs which might interfere with Winamp, the antimalware solution suited for your PC should remove them in no time.

A malware removal tool offers real-time protection against all types of device viruses, such as spyware, malware, ransomware, etc.

These utilities are very easy to use, once you run it choose Scan, and simply wait for the procedure to finish. Afterward, your device will restart and the scanning process will be complete.

2. Run the app as an administrator and remove Plugins

  1. Right-click on the Winamp shortcut and open Properties.
  2. Select the Compatibility tab.
  3. Check the Run this program as an administrator box and confirm changes.winamp won't open

Remove plugins

  1. Navigate to the Winamp installation folder in Program Files (Program Files x86).
  2. Open the Plugins folder.
  3. Backup all plugins and delete them from the folder afterward.

3. Check the format and state of multimedia files

This suggestion is a long shot, but you should check the state of files before we move to additional steps. If you have any alternative player (even the built-in Windows Media Player will do), make sure to try opening the files.

If you’re able to play audio files on an alternative player and Winamp is still crashing, move to the next step on the list.

Here’s the list of file formats Winamp supports by default:

  • MP3
  • WMA
  • RealAudio
  • Vorbis
  • Musepack
  • AAC
  • AC-3
  • APE
  • FLAC
  • ALAC

4. Install the redistributables and NET. Framework

Some users suggestions confirmed that Winamp started working as intended after they installed the associated software.

Chances are you already have C++ Redistributables and NET. Framework installed, but we still encourage you to check whether the latest versions are available.

In addition, you should update Winamp to meet the latest iterations of Visual Studio and NET. Framework. You can download the latest C++ Redistributables and also the NET. Framework.

After you install them, Winamp should start working in a seamless manner.


5. Reinstall the application

  1. In the Windows Search bar, type Control and open Control Panel.winamp won't open
  2. Choose Uninstall a program.winamp won't open
  3. Remove Winamp and all associated user preferences.
  4. Navigate to the official site and download Winamp.
  5. Install the client again and look for changes.

With that, we can conclude this article. In case you have some alternative solutions and are willing to share, the comments section is just below.

Microsoft Video Authenticator aims to detect deepfakes by using AI and Azure

Microsoft has launched a new video authenticator tool to combat “deepfakes” to prevent misinformation on social media ahead of the upcoming U.S. election. Microsoft Video Authenticator has been designed to analyze photos and videos to automatically determine a “confidence score” to indicate that they’re artificially manipulated.

“This technology has two components. The first is a tool built into Microsoft Azure that enables a content producer to add digital hashes and certificates to a piece of content. The hashes and certificates then live with the content as metadata wherever it travels online. The second is a reader – which can exist as a browser extension or in other forms – that checks the certificates and matches the hashes, letting people know with a high degree of accuracy that the content is authentic and that it hasn’t been changed, as well as providing details about who produced it”, the company explained.
Example of a deepfake identification

Deepfakes basically use artificial intelligence to manipulate audio, video, or image files to make people appear to say something or do they didn’t. Deepfakes are now extensively used worldwide (including politicians, meme-makers, and news agencies), so it’s important for organizations to step up and build technology to address this issue. With Microsoft Video Authenticator, Microsoft aims to help news outlets and political campaigns that are involved in the democratic process.

Microsoft noted that the implementation of this tool is a part Defending Democracy Program, the company’s recent initiative to fighting disinformation, protect voting, secure campaigns, and more. “It’s also part of a broader focus on protecting and promoting journalism as Brad Smith and Carol Ann Browne discussed in their Top Ten Tech Policy Issues for the 2020s“, Microsoft said yesterday.

New vertical layout comes to Office app for Windows 10

Microsoft recently delivered a new design for the Microsoft 365 Office dashboard, but part of that is now expanding to the Office app on Windows 10, too. Spotted by Windows Blog Italia, a new vertical layout is coming to the Office app on Windows 10.

Currently, the feature is rolling out on a slow basis, and we’re only seeing it on one computer on our end. However, once it is made available, the experience of the Office app changes quite a bit, as seen in the featured image above.

The links to the core Microsoft 365 apps move from the middle of the app to a sidebar, making it easier to reach. There’s also a new clearer “all apps” button, too which makes it easier to see all the Microsoft 365 apps. You’ll also find a nice, clean looking “new document” button, as well.

It appears as though this is coming by way of a server-side update, which means you don’t need to go to the Microsoft Store to update the app to see this new layout. It should be coming to you automatically. We’re still hoping that this feature rolls out to more users soon, as it fits great with Windows 10’s overall design.

Microsoft 365 (Office)

How to fix the AppHangB1 error on Steam

The AppHangB1 error usually causes the computer to become unresponsive or extremely slow. This error usually appears if you try to open a game through Steam.

It is also possible for users to receive this error when they try to open applications like Adobe Acrobat, Microsoft Edge, etc.

If you are seeing this error on your computer as well, then you will want to look at the possible fixes below. 

How can I fix the AppHangB1 error on Windows 10?

1. Search and destroy malware

try out Malwarebytes

Computer spyware and viruses are commonly known to negatively interfere with other applications. They can seep into your system settings and alter them without your consent.

This can cause Steam, or other programs, to execute some commands improperly, eventually generating errors like the AppHangB1 one.

Thus, it is not unlikely that the AppHangB1 error on your computer is caused by malware of some sort. That’s why it’s highly recommended to perform a virus scan using Malwarebytes.

This tool is easy to install and use, making the task to protect your devices and precious data much more intuitive.

Malwarebytes

Malwarebytes

Malwarebytes is a simple utility ready to help you fix the AppHangB1 error on Steam. Eager to give it a try?
Free trial Visit website

2. Disable antivirus programs or properly configure them

  1. Locate and double click on the Windows Firewall icon on the bottom right corner of your taskbar. Alternatively, you can open your Windows menu by pressing the Windows key on your keyboard.
  2. Type in Windows Firewall once you have your Windows menu open.
  3. Next, enter the Windows Firewall dialog and click on the Turn Windows Firewall on or off section located on the left side.
  4. Next, you will need to Turn off Windows Firewall on both your private network settings and your public network settings. You can see where to find them in the picture below.
  5. Press OK.
  6. Restart Steam or the application that you have a problem with and run it as administrator.

This advice may seem entirely contradictory to the advice of Fix 1. However, it is important to know that antivirus applications tend to restrict applications from opening, regardless of whether they are trustworthy or not.

Furthermore, Steam tends to use numerous different processes in order to offer the optimal gaming experience.

Antivirus programs that are not configured correctly can sometimes consider these processes as a potential threat to your computer. This in turn can cause errors when you open Steam games.

Therefore, you may want to try disabling your antivirus programs temporarily to see whether or not they are the reason why you are getting the AppHangB1 error.

If you are not sure how to disable Windows Firewall on Windows 10, then follow the above instructions.

3. Configure launch settings on Steam

  1. First, locate the default location of your steam client. This is typically found in  C: Drive>Program files (x86)Steam.
  2. Next, you will need to make a shortcut of steam.exe in the same folder.
  3. Right-click on the shortcut and choose Properties.
  4. Go to the Shortcut tab of properties and locate the section called Target. In this dialog box, you should see C: Program Files (x86)SteamSteam.exe written in it. Add -dx9 at the end. Your dialog should look like the picture below.
  5. Remember to press OK.
  6. After, open Task Manager and end task Steam Client Bootstrapper. 
  7. Relaunch Steam to see whether or not you will get the AppHangB1 Error.

This fix works for Steam, but it has not been tested on other applications that have problems with the AppHangB1 error. Basically this fix is a workaround type of fix for the error.

The instructions below will teach you how to make Steam and its games open with dx9, also known as DirectX 9. This sometimes fixes the AppHangB1 error.

Here is how you can change the game’s launch settings individually:

  1. Open Steam.
  2. Go to the Library section where all of your games are kept.
  3. Right-clickon the game that is giving you this error and click on Properties from the list.
  4. Go to the General tab.
  5. In the General section, you should see an option called Set Launch Options. Click on it.
  6. A dialog box will appear. Type in -dx9 into it and press OK.
  7. do not forget to press Apply and OK in the properties Windows also.
  8. You will need to completely close and exit Steam.
  9. Restart it, and see if the issue has been resolved.

4. Use Safe mode

Safe mode

  1. One method to boot Windows 10 in Safe Mode is to utilize the Run tool. Press the Windows key + R keys of your keyboard together to immediately bring up the Run dialog.
  2. Type in msconfig in the dialog box. This opens the System Configuration Windows. Alternatively, you can simply use Cortana to help you find System Configuration.
  3. Once you are inside the System Configuration Windows, you will need to click on the Boot tab.
  4. In this section, you should see a Safe boot option in the Boot options section. Select Safe boot and then select Network underneath it. Remember to apply your changes.
  5. Restart computer.
  6. Check to see whether or not the AppHangB1 Error still persists.

Computers using the Windows OS are capable of starting up in Safe mode. It is typically used to diagnose any problems your computer might have.

This mode shuts down most software and processes in order to make it easier for users to troubleshoot an issue.

Often, the AppHangB1 Error is caused by a third party program interfering with how Steam operates.

Starting Windows in safe mode can help you determine which program has a conflict with Steam. This will in turn allow you to disable any programs that are causing problems.

For Windows 7, which is the most popular OS among gamers, you can enter safe mode by holding Shift + F8 together while your computer is booting up.

However, since most modern computers these days are fast enough to boot up in a few seconds this technique became impracticable.

Therefore, Windows 10 has other options that allow users to boot their system in Safe mode.

If you are still getting the error message after you try this fix, then it is likely that a third party program, including third-party antivirus programs, is interfering with the operations of Steam.

You will need to see which program is affecting Steam and disable it.

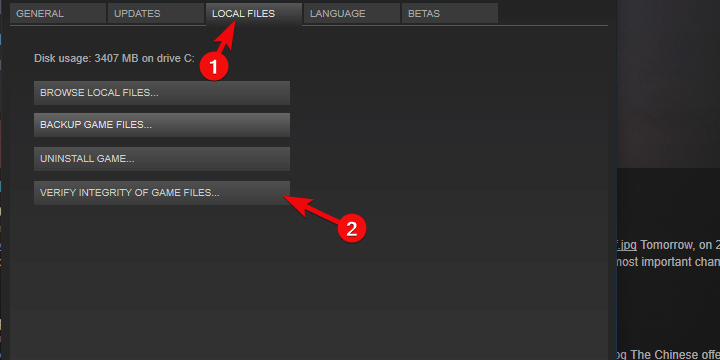
5. Verify the integrity of your game files

check integrity of your game files

  1. Open Steam.
  2. Locate the game that is giving you the error and right-click on it to open Properties. 
  3. Next, go to the Local Files tab.
  4. You should see an option that says Verify Integrity of Game Files.
  5. Click on that option and Steam will do the rest.

Perhaps your computer was incorrectly shut down or the download of your latest patch was interrupted.

If events like these happened recently, then you may have corrupted files in your game. Corrupted files can cause errors like the AppHangB1 error.

Therefore, one fix to the AppHangB1 Error is to verify the integrity of your game files, which will fix any corrupted files.

Fortunately, Steam has an option that lets you easily fix corrupted files. Use the above steps in order to find that feature.

The AppHangB1 Error is a common problem, yet there are many methods that can resolve it. It is important to note that the fixes in this article are not ordered from best to worst or in any order.

Merely, since there are numerous possible causes for this error, so there are multiple solutions. Let us know which one worked for you in the comments area below.

[wl_navigator]

Microsoft is bringing its next-gen DirectStorage Xbox API to PCs

Yesterday was a big day for PC gamers, with NVIDIA announcing its brand new GeForce RTX 30 Series GPUs that will ship ahead of the less powerful PlayStation 5 and Xbox Series X next-gen consoles. Nvidia has been pioneering features like ray-tracing and Deep learning super sampling (DLSS) on PC, but next-gen consoles may still have an edge on storage speeds thanks to new I/O system designed specifically for gaming.

That’s what Microsoft has been working on with the Xbox Velocity Architecture for the Xbox Series X, which will leverage a new DirectStorage API to unlock the full performance of the console’s NVMe SSD. Well, the good news is that Microsoft is now working to bring this next-gen DirectStorage Xbox API to PCs with NVMe drives. After Microsoft announced that DirectX 12 Ultimate would unify the graphics platform across PC and Xbox Series X, DirectStorage coming to PC should be another important milestone in simplifying game development on these two platforms.

“DirectStorage will bring best-in-class IO tech to both PC and console just as DirectX 12 Ultimate does with rendering tech. With a DirectStorage capable PC and a DirectStorage enabled game, you can look forward to vastly reduced load times and virtual worlds that are more expansive and detailed than ever,” the company explained yesterday. However, it’s important to note that PCs that won’t support DirectStorage will still be able to play the same games, though performance won’t be optimal. Having an NVMe drive that can bring data to the GPU as fast as possible should be a transformative experience, though it will be up to developers to take advantage of these new capabilities in their games.

“For every DirectX family feature, Microsoft brings together the best of the PC gaming industry players to standardize new gaming features, make them available to game developers, and eventually get them into your gaming machines. This process has already begun for DirectStorage and we’re working with our industry partners right now to finish designing/building the API and its supporting components,” Microsoft said yesterday. There’s still no precise ETA on the general availability of the DirectStorage API on PC, but Microsoft is currently planning to release it in preview for game developers next year.

Become an expert at Microsoft Teams meetings with these top five best practices

Now more than ever, you’re likely spending more time in meetings in Microsoft Teams. However, the more time you spend in Teams, the more important it becomes to try and make the most of all the features available for you, so you can have a seamless experience. Here’s a look at some of those features, and some best practices to leverage so you can become an expert at meetings in Microsoft Teams.

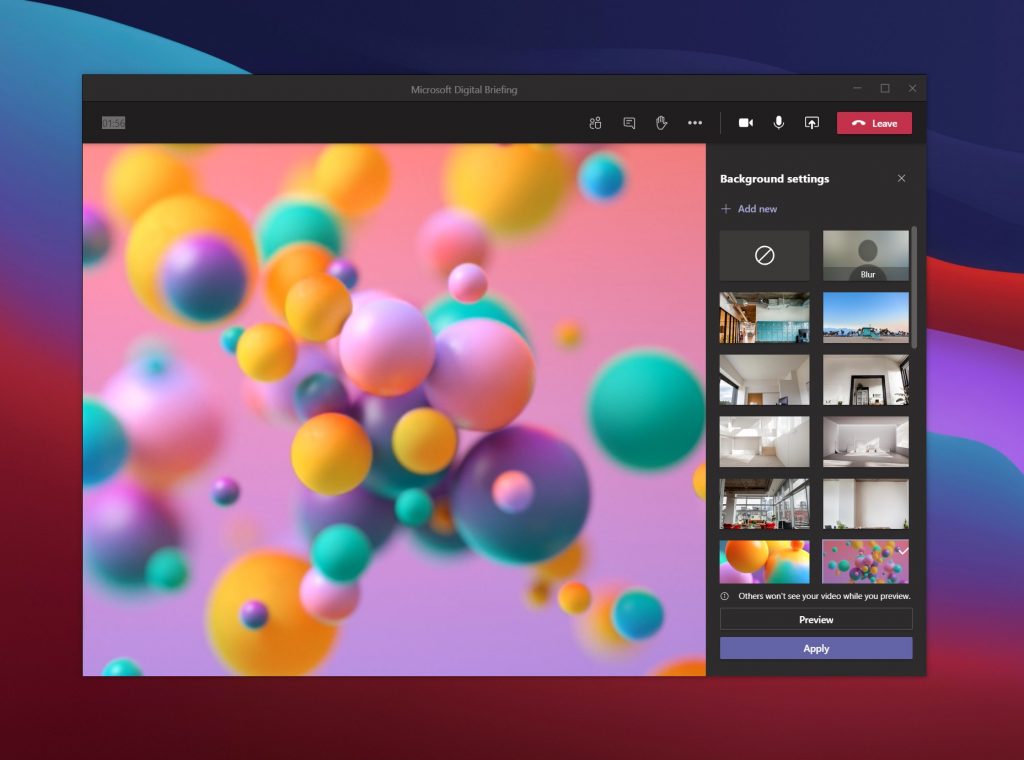
Practice 1: Blur your background or use background images

Microsoft Teams Backgrounds

The first best practice on our list is one that is the most obvious and most popular in the current situation. That is, using the ability to blur your background in Teams or use background images.

With this best practice, you can have your meeting almost anywhere, and disguise whatever happens in the background around you. Indeed, thanks to the feature, Teams will only put an emphasis on your face and hides everything else. Just be aware, it uses artificial intelligence, and only works with humans. So, you might want to be a little careful if your furry friends are in the background.

There are a few ways to blur your background or use a background image in Teams. You can do this before the meeting, or during the meeting.

Before the meeting, on the join screen, you’ll want to click the square box to the left of PC Mic and Speakers under your video feed. From there, you’ll see an option for Background Settings. You can choose the first one, which says Blur. Or, if you want a different background, you can choose one from the list. Your feed will change to the desired background, and when you’re done, you can close the Background settings window with the X.

To Blur your background during the meeting, click the three periods ( . . . ) at the top of the meeting window. Then, from there, click Apply Background Effects. You can then choose one from the list, and click Apply. 

Practice 2: Use a headset for a better experience

Next up, is a practice that your coworkers might end up appreciating: using a headset. With this practice, you’ll end up having a higher quality call in Teams. You won’t have to worry about coworkers not hearing you, or you not hearing them. Here’s how you can set one up in Teams.

To use a headset with Teams, just make sure it is plugged in or connected to your device, either via Bluetooth or headphone jack. Once connected, you’ll want to make sure Teams is configured properly for the headset. Again, there are two ways you can do this, either before the meeting on the join screen or during the meeting from the menu.

Before the meeting, you can configure the settings by clicking the PC Mic and Speakers button under your video feed. Once you do that, you’ll see Device Settings pop up. Be sure to look at the sections for Speaker and Microphone. Click the down arrow, and choose your headphone from the list for both speaker and microphone. Then, close the window with the X.

During the meeting, you can change to your headset by clicking the three periods ( . . . ) at the top of the screen and choosing Device Settings. From there, you’ll be able to choose the same settings as we describe above. When finished, close the window with the X.

It’s worth noting that you also can use the Make a test call feature here too, to ensure everything works right before you head into a meeting.

Practice 3: Schedule your meetings

Teams Scheduling Assistant

One of the worst things about meetings is being pulled into one at the very last minute or second. That’s why, as a best practice, we suggest scheduling and fine-tuning your meetings. You can do this with the Scheduling Assistant in Microsoft Teams. Here’s a look at how to use it.

First, click the Calendar icon in the sidebar of Teams. From there, click the Scheduling Assistant tab on the top. From that tab, you’ll be able to schedule a meeting based on the availability of your coworkers. You can add locations, attendees, and so much more. When adding attendees, your coworkers will show up as either available unavailable, or unknown. The assistant pulls information from your coworker’s Outlook calendar to fill this out. You’ll see a schedule view, showing their already scheduled meetings in purple. You can also scroll through days and hours to find the time that’s right for everyone.

Related to this, is the ability to share a meeting agenda. You can do this so that your coworkers and everyone in the meeting will be on the same page. When creating a net meeting, you’ll see this in the compose box. You’ll be able to put your agenda here, and it will appear in the invite email.

Practice 4: Take meeting notes

Microsoft Teams Meeting Notes

What happens if you’re in the middle of an important meeting, but need a way to take some notes? You think you’d have to use Microsoft Word or another program, but did you know that Teams has its own meeting notes feature, too?

This is one of our other best practices for meetings in Teams. The reason why? Notes get saved as part of the meeting itself, and can go anywhere with you, and will be saved for later or for sharing with your coworkers.

To use the feature, join the meeting as you normally would, and then click the (. . . ) more actions button, followed by Meeting Notes. You should then see a Meeting Notes window pop up. From there, you’ll want to click Take notes. This will then give you full access to a formatting toolbar, with bold, italic, highlighting, and some of other things you are used to in Microsoft Word. You also can create a new section with the (+) button, too.

When the meeting is finished, you can access your notes from the chat. There should be an option that says Show notes in full screen. Click it to view the notes.

Practice 5: Record your meetings (with permission of course!)

Microsoft Teams Recording Meetings

Final on our list of best practices is recording a meeting in Teams. One of the worst things in meetings is when you have to constantly ask your coworkers to repeat things over and over because you weren’t able to get it down or take some notes. Well, if you have the consent of all parties in the meetings, you can actually record a meeting live, as it happens, to ensure that you can have a copy of the meeting for reference later.

To record a meeting, you can click the three dots ( . . . ) at the top of the screen, followed by the Start Recording button. From there, you’ll see a disclaimer that the meeting is being recorded. You can ignore it, this is just for your coworker’s security. When the meeting is over, and you’re ready to stop, you can then click the same menu and choose Stop Recording.

When the recording is finished, you’ll get an email letting you know that it is available in Microsoft Stream. You can click that link in the email to access it, and even download a file, so you can view it offline.

Check out our other tips

While the focus of this article has been some of the best practices for Teams meetings, there’s a lot more to know about Microsoft Teams. Over the past few months, we’ve been diving deeper into Teams. Topics include how to run multiple instances of Teams, how to use Bots, manage notifications, and a lot more. Check out our news hub here for more, and let us know if you have any Teams tricks and tips of your own by dropping us a comment below.

Microsoft unveils new ‘Designed for Xbox’ logo for third-party accessories supporting all Xbox consoles

Microsoft revealed this morning a new ‘Designed for Xbox’ logo for new third-party accessories that will be compatible with all Xbox consoles including the upcoming Xbox Series X. We already knew that the next-gen Xbox would support all existing Xbox One accessories, but Microsoft is now expanding its Designed for Xbox program with new partners and a brand new logo to highlight officially-licensed products.

First of all, if you purchased officially-licensed Xbox One accessories that connect to your console via USB or wirelessly, the Xbox team made it clear today that they should work on the Xbox Series X, though firmware updates may be required in some cases. “Some gaming headsets that utilize an optical cable may require a firmware update to support game and chat audio over USB on Xbox Series X. Soundbars and headsets that do not receive updates may be connected directly to your televisions optical port,” the team explained.

Designed For Xbox Accessories

Going forward, consumers will see the new ‘Designed for Xbox’ logo on all partner accessories, and Microsoft said today that it has now teamed up with over 34 companies across the world and expanded the program to new categories including accessibility and cloud gaming. “The Designed for Xbox badge communicates how closely we have worked with our partners on each product to test quality, performance, safety, and security with all Xbox hardware experiences. It also communicates continuous compatibility as we move into the next generation of gaming,” the blog post reads.

So far, one of the first new accessories we’ve seen for the Xbox Series X is the 1TB expansion card from Seagate, which will provide the same speeds as the built-in NVMe drive on the console. However, Microsoft highlighted a couple of new partners including today including Cable Matters, luxury audio brand Bang & Olufsen, and flight simulator hardware company Honeycomb Aeronautical. The latter should is definitely a promising addition ahead of the release of Microsoft Flight Simulator on Xbox consoles. “We will continue to expand the Xbox ecosystem with innovative products and experiences, all while maintaining a level of quality we are proud of,” the team said today.

Microsoft now allows Surface Hub 2S owners to run Windows 10 Pro or Enterprise

Microsoft announced yesterday that it’s now allowing Surface Hub 2S owners to replace the built-in Windows 10 Team OS with the more versatile Windows 10 Pro and Enterprise. From the beginning, the family of digital whiteboards have been optimized for touch interactions, meeting spaces, and other enterprise use cases, but Microsoft acknowledges that some customers would like to have more flexibility with the 50-inch device.

By installing Windows 10 Pro or Enterprise on the Surface Hub 2S, customers will be able to install any app they want on the device, use any Windows 10 compatible accessory, and even use Windows Hello Biometrics with the Surface Hub 2 Fingerprint reader or third-party accessories. In comparison, the Windows 10 Team OS that ships on the Surface Hub 2S is restricted to Microsoft Store apps, and it supports inbox drivers only. It’s an OS optimized for multi-usage and immersive collaboration experiences, but the regular Windows 10 may really prove useful for some customers.

“The Windows 10 Pro and Enterprise on Surface Hub 2 configuration enables customers to break the monotony of sitting at one’s desk all day and allows our customers to stand, move around and meet with remote participants more naturally and invitingly, explained Yoav Barzilay, Senior Program Manager, Surface Engineering. “With the availability of the Windows 10 Pro and Enterprise on Surface Hub 2 configuration, customers can also create custom kiosk mode configurations in targeted environments – just like you would on any Windows 10 PC.”

The Surface Hub 2S comes with a massive 4K multitouch 50” screen, and using regular Windows 10 on it should be quite an experience. The device starts at $8,999, but enterprise users can also configure it with a Roam Stand and a battery to use it completely unplugged. If your company own one, you can find instructions on how to install Windows 10 Pro or Enterprise on it on this page.

Twin Breaker video game officially confirmed for release on Microsoft’s Xbox One consoles

In a bit of exciting news for fans of the popular Sacred Symbols podcast, Twin Breaker: A Sacred Symbols Adventure, the video game created by the show’s two hosts, has been confirmed for Microsoft’s Xbox One family of consoles and is set for release later this month on September 23rd.

Twin Breaker: A Sacred Symbols Adventure originally launched on Sony’s PlayStation 4 and PlayStation Vita consoles back in March. While this made perfect sense considering that Sacred Symbols is a podcast dedicated to PlayStation news, it did raise doubt on it ever coming to other platforms. Thankfully, this indie title sold well enough to justify a broader release.

In addition to the Xbox One version, Twin Breaker: A Sacred Symbols Adventure will also launch on Windows PC via Steam and the Nintendo Switch on the same day.

The title is inspired by retro brick breaking games but contains features that modern gamers would come to expect such as a solid story, collectibles, and Xbox Achievements. The Xbox One pre-order page isn’t live yet though it should be soon given how close the actual release is.

Are you excited for Twin Breaker on more platforms? Let us know why or why not in the comments below and then follow us on Pinterest and Twitter for more Xbox gaming news.

How to Fix the Network Lag Detected PUBG Error

The PUBG Network lag detected error blocks the player in place. This is, to some extent, a part of the anti-cheating server mechanism which prevents the lag switch. Nonetheless, we are certain that the majority of affected users are not cheating but rather have connection issues or the game is failing them.

How do I fix PUBG Network lag detected error in Windows 10?

1. Use a VPN

Since PUBG is an online battle royale game, it goes without saying that lag can mean death in a match. Thus, a game-oriented VPN service like Speedify will greatly help you with such ordeals.

It does this thanks to the variety of techniques that it uses to fix lost and corrupted packets before they slow you down, and their expanded network of servers will provide you with the bests speeds based on latency and availability.

More so, all of this is self-regulated, so you don’t have to be a networking wiz in order to make ait work.

All this so that you can play PUBG without lag, lag spikes, connectivity issues, and more.

2. Update the drivers

Drivers somehow always find their way in basically any given troubleshooting list. And there is good reasoning behind that. Firstly, faulty drivers will affect the game’s performance, online or offline. One problem leads to another and if your system is poorly configured, everything else will suffer. Because of that, we suggest acquiring the latest drivers, with the main focus on the GPU.

Depending on your GPU’s manufacturer, here are the places to look up for the functional drivers.

Additionally, you could always try using a third-party driver updater that will do all the work for you, a tool like Fortect Driver Updater.

Simply download Fortect Driver Updater, run it, let it scan your PC for missing, broken, or outdated drivers, and then let it fix them for you. It’s all that simple!

More so, the program is 100% portable, so you don’t need to worry about installing tools just to keep others optimized.

⇒ Get Fortect Driver Updater

3. Inspect your connection

Now, there’s a division in the PUBG community concerning this issue. On one side, we have a tide which strongly suggests that the problem is individual and not a widespread issue we can pin to Bluehole and their servers.

On the opposing side, there are users who are certain that Bluehole’s servers are the ones to blame. You can actually check the PUBG latency situation.

We can concur that the truth is in the middle. Either way, it’s important to thoroughly check your connection and seal all the holes on your end.

Here are some things you can do to avoid the network lags and improve the gaming experience concerning the connection:

  • Always use a wired connection. Avoid using wireless while gaming at all costs as it’s unstable and the latency spikes are quite common.
  • Restart your modem.
  • Flush DNS.
    • Press Windows key + R to summon the Run elevated command line.
    • In the command line, type ipconfig /flushdns, and press Enter.network lag detected pubg
  • Restart Steam.
  • Check the server status. Maybe others are suffering from the same network lag.
  • Check your PING on different servers.
  • Update router/modem firmware.
  • Enable QoS (Quality of Service mode for gaming) in your modem settings.
  • Set PUBG as the High priority app in modem settings.
  • Disable IPv4 and stick with 5 GHz wireless frequency if you really need to use Wi-Fi.

4. Tweak firewall and antivirus

Another way to fix the PUBG ping problem is by checking the Windows Firewall or a third-party firewall in case you have one active. Allowing PUBG to communicate freely through the Firewall is of utmost importance.

Furthermore, if you have a third-party antivirus suite that includes a firewall, make sure to whitelist the PUBG and Steam. You can disable it for the remainder of a gaming session.

Additionally, if you use a VoIP for in-game chatting, don’t forget to let it past the firewall, as well.

Here’s how to allow the unhindered communication of PUBG through Windows Firewall:

  1. In the Windows Search bar, type firewall and choose Allow an app through Windows Firewall.network lag detected pubg
  2. Click on the Change settings button.network lag detected pubg
  3. Besides the PUBG, check both Private and Public network boxes.
  4. Confirm changes.

5. Disable background applications

Even if you initially have an above-average bandwidth speed and low latency, some of the third-party applications working in the background can be an issue. Disabling those should help a lot if you’re, say, torrenting in the background.

Also, disabling antivirus (or enabling game mode, if available) during the gaming sessions can certainly help.

When it comes to programs you should consider disabling, we would focus on the bandwidth-hogging applications. This includes VoIP and chat apps, torrent clients, Updaters for various third-party applications, media streaming services, cloud services etc.

Furthermore, disabling Windows 10 Gaming mode helped some users.

Another thing worth pointing out is VPN. VPN can be of help to avoid the geo-restrictions and ISP throttling, but it can also lead to high latency and subpar online gaming performance.

So, if you use VPN with PUBG, make sure to use the proper one and to choose a good server. If you play on US server, avoid non-US IP addresses. The latency will get too high due to a long data package travel time.

Do we need to say to avoid generic drivers provided by Windows update? Those can be a good compromise for a non-gaming GPU’s. For the GPU which can work its way around PUBG, you need a proper driver provided by the OEM.

6. Check game’s integrity

  1. Open the Steam client.
  2. Select Library.
  3. Right-click on PUBG and open Properties.network lag detected pubg
  4. Choose the Local files tab.
  5. Click on the “Verify integrity of game files…“.network lag detected pubg
  6. This can take some time. Once it finishes, restart Steam and PUBG.

If you’ve purchased the game via Steam and you are past the connection troubleshooting, we advise you to check the game’s integrity, in order to fix the PUBG ping problem.

This might be nothing of importance, but if the Network lag detected prompt starts appearing suddenly, checking the game files for corruption can be a resolution for the issue.

The tool automatically identifies the absence of some files and downloads the replacing files accordingly.

7. Reduce the monitor refresh rate

Here’s how to reduce the monitor refresh rate:

  1. Right-click on the Desktop and open Display settings.network lag detected pubg
  2. Navigate to the bottom and open Display adapter properties.network lag detected pubg
  3. Under the Monitor tab, reduce refresh rate from 144 Hz to 60 Hz.network lag detected pubg
  4. Confirm changes and start the game again.

Some users addressed the problem at hand by simply changing the monitor’s refresh rate from 144 Hz to 60 Hz. We’re aware that this downgrades the in-game experience and aesthetics.

However, if you want to play the game without the aforementioned error, we recommend doing so. On the other hand, this isn’t a 100% guarantee that the game will work without the Network lag detected prompt. Just give it a try.

8. Update the game

Since the game is out of its testing beta phase, the developers have a rather good insight on the plaguing issues which broke the gamers’ experience. A lot of issues from the Beta got fixed with the final release.

Connection issues and server lags are substantially reduced, even though this battle royale still has issues of its own. All in all, make sure to update the game as soon as possible. A lot of problems get sorted out that way.

The game updates on its own. However, if you run into an issue, just click Steam > Settings > Downloads and clear the cache. After that, you should be able to obtain the latest client version for PUBG.

And, that’ll hopefully address the “Network lag detected” error.

9. Reinstall the game

Finally, if none of the previous solutions worked for you, there are three last things we can recommend: reinstall the game, tweak your in-game settings, or minimize in-game graphics. Enabling vSync helped some users fix their PUBG ping problem, along with disabling some mildly-redundant effects.

And the last option is to send a ticket to a developer and wait. There’s a reason why the game is getting mixed reviews, no matter how big the player base is. We can only hope they’ll make the experience better over time, as it has a large potential, just like its battle royale peers.

Street Fighter V PC unable to connect to Internet [Fix]

Street Fighter V is one of the best games in the genre. One of the oldest fighting game producers in the business, Capcom, introduced a cross-platform title that brings a lot of new features to the table while holding on to well-known principles and characters.

The game’s most decisive feature is online gaming, which enables you to test your key-bashing abilities versus the players from around world. However, even though the game online modes are well-designed, there’s always a chance that you’ll have connectivity issues.

A lot of users experienced connection-inflicted FPS drops and sudden disconnections while playing. For that purpose, we prepared a list of the most common troubleshooting steps, hoping to help you resolve your issue.

If you’ve encountered any connections issues with Street Fighter V, make sure to check the steps below.


How to resolve connection problems on Street Fighter V for PC

1. Use a solid VPN


Since Street Fighter also has an online component, you will be trying to connect to the server in order to play with others.

However, if you have connection issues, or if the server you want to connect to is not the one you base don location, then a VPN is what you need.

For all of your gaming needs, there is no better VPN than Speedify. This service will resolve the problem by detecting, protecting, and prioritizing the connection issues that the user has.

As a bonus, it also monitors the traffic, so the user will know the connection’s usage, latency, and packet loss allowing them the chance to better manages their network settings.

Speedify

Speedify

Pummel your opponents into submission in online Street Fighter matches thanks to this fast and effective VPN!
Free trial Visit website

2. Check the antivirus/firewall


When it comes to online security, you’ll most definitely need an antivirus and firewall. If not, your PC will be endangered of malware infection. However, when it comes to online gaming, security solutions may be quite a drawback.

For that reason, make sure to create the exceptions for Street Fighter V, as some of them may prevent you from playing or cause an unstable connection. These are the files and/or folders you’ll need to create exclusions for in your antivirus and firewall:

  • C:ProgramFiles(x86)SteamsteamappscommonStreetFighterVStreetFighterV.exe
  • C:ProgramFiles(x86)SteamsteamappscommonStreetFighterVStreetFighterVBinariesWin6StreetFighterV.exe
  • C:ProgramFiles(x86)SteamsteamappscommonStreetFighterV

On the other hand, if the problems are persistent and some game executables are still affected, make sure to temporarily disable the antivirus. But only the antivirus, while keeping the Microsoft Firewall enabled.

Additionally, you can disable your router firewall and stick with the Windows built-in software.


3. Prevent the programs from running in the background

Another known reason for connection fallacy is a certain background app. There are so many programs that may and will make a negative impact on your Street Fighter V online experience. However, the ones that are known for bandwidth hogging are obviously highly positioned. These are some program categories you should take into consideration:

  • VoIP programs like Skype.
  • Torrents and other P2P download clients.
  • Cloud services.
  • Live recording and streaming programs.

Additionally, it’s well known that some touch input devices are somewhat affecting your connectivity. So, make sure to disable those before you start the game. Some users even advised to troubled users to disable even the Steam client from running in the background.


4. Disable Internet Protocol version 6


Some users encountered connectivity issues because of Internet Protocol version 6, which is not preferred when it comes to peer-to-peer online gaming.

Of course, it’s useful to say that you’ll need stable ethernet connection rather than Wi-Fi since Wi-Fi isn’t exactly best suited for the online gaming. This is the procedure you should follow in order to disable IP6v and run exclusively IP4v:

  1. Right-click the Connection icon in the notification area and open Network and Sharing center.
  2. Click on the Change Adapter settings option in the left pane.
  3. Right-click the ethernet network you use and open Properties.
  4. Under Networking tab, uncheck the box beside the Internet Protocol version 6.
  5. Click OK to confirm the selection.

That should hopefully decrease FPS drops inflicted by the faulty connection.


Check the server status


On some occasions, there’s a chance that the server may be down for maintenance or due some crash. For that reason, you should check the server status changes on the official Twitter account. It can be found here.

It’s quite important to check your data package loss and PING, also. You can use widely acknowledged Speedtest to check your PING. The lowest the number, the better. This is of utmost importance for online gaming.


Forward ports and enable UPnP on your router


This workaround may not be a reliable solution for certain users, but the for most of them, port forwarding may have a great impact on the overall connectivity. There are some ports you’ll need to open in order to play the game online. Since the procedure differs on different modems/routers, you should look up for your model online.

These are the ports you should enable in order to play the game:

  • TCP ports: 80, 443, 20002, 30840, 30850, 30870
  • UDP ports: 30840-30859, 30870-30879

Additionally, if it’s not enabled by default, you should open your router settings and enable UPnP. Moreover, make sure that your router/modem is running the latest firmware.


Use exclusively P2P instead of relay server


Now, let’s move to game-related tips. Since the game functions mostly on the peer-to-peer process, your overall experience is highly dependent on the opponent’s connection.

So make sure to choose wisely opponents in regard for their connection rating. Play only against the 5-bars rated players.

In addition, don’t play over the relay server but rather choose only the P2P connection mode. Also, have in mind that the Battle connection and data package loss will differ when you play with the players that are from another country or continent.


Update/Reinstall the game


At the end, some users managed to resolve connection inflictions after the update. Street Fighter 5 packs a two update clients: one trough the Steam client and other, minor, trough the game UI itself. So, make sure that you’re running the latest version of the game, in order to resolve some of the bugs that may affect your connection.

However, if the problem is still there and everything is functioning as intended on your end, reinstallation may be your best bet to resolve connection-related issues.

  1. Backup your saved games.
  2. Open Steam client.
  3. Click Library.
  4. Right-click Street Fighter and choose Uninstall.
  5. Restart your PC and open the Steam desktop client again.
  6. Open Library and locate Street Fighter V again.
  7. Click Install.

That should do it. If you have any alternative solutions or questions regarding the ones we posted, we look forward to those in the comments section below.


[wl_navigator]

LoL Connection Issues: 5 Ways to Get Rid of Them

LoL connection issues can negatively impact your gaming experience, so it’s crucial to fix them, and speaking of which, this guide will show you the right way to do it.

How do I fix common LoL connection issues?

Before we start, try switching to a wired connection since it’s usually more reliable. Restarting your router can also help.

1. Use a reliable VPN

Most often, using a VPN will pretty much always solve lag spikes and issues in games, as well as deal with common connection errors such as packet losses.

In the case of League of Legends, one great product worth trying is Speedify, a VPN service that makes your online experiences faster, more reliable, and more secure.

Besides, even when you’re not playing LoL, you can still use SPeedify from streaming content, safe browsing, and more, all at speeds that make you forget that you are using a VPN in the first place.

Speedify

Speedify

If you want to win matches in the Summoner's Rift without any lag, then Speedify is the VPN that you need in your life!
Free trial Visit website

2. Check your server’s current status

  1. Visit the Riot service status page.
  2. Check for any active issues.
  3. If there are issues present, wait for developers to fix them.

If there’s no issue with the server, perform a League of Legends ping test and ensure that servers are properly responding.

3. Make firewall exception or disable the firewall

  1. Go to Control Panel.
  2. Choose System and Security.
  3. Click Windows Firewall.
  4. Select Allow an app or feature trough Windows Firewall.
  5. In the given list you should find 2 League of Legends executables.
  6. Make sure both of them are checked in both Private and Public columns.
  7.  If the executables are not listed, you’ll need to add them manually.
  8. To do so, choose Change Settings and click Allow another app.
  9. The default location of two executables are :
    • C:/Riot Games/League of Legends/lol.launcher.exe
    • C:/Riot Games/League of Legends/RADS/systemrads_user_kernel.exe
  10. Add both to your firewall exceptions list and click OK.

To disable your Windows Firewall, follow the path:

  1. Go to Control Panel.
  2. Choose System and Security.
  3. Click Windows Firewall.
  4. Select Turn Windows Firewall on or off.
  5. You’ll need administrator privileges to turn it off.
  6. Turn it off.

4. Change to a public DNS

  1. Open Control Panel.
  2. Select Network and Internet.
  3. Select Network and Sharing Center.
  4. Select Change Adapter Settings on the navigation bar on the left
  5. Right-click on your network adapter and select Properties
  6. Select Internet Protocol Version 4 (TCP/IPv4) and open Properties
  7. Go to the bottom of the menu and change Obtain DNS server address automatically, to Use the following DNS server addresses: 8.8.8.8 and 8.8.4.4
  8. Save your changes by selecting Ok.
  9. Close all open web browsers and applications.
  10. In the Search bar type command prompt.
  11. Right click on the result and select Run as Administrator.
  12. In the command prompt type ipconfig /flushdns and press Enter.
  13. Restart your computer.

5. IP Release/Renew and Flush DNS

  1. Press the Windows Key (the key on the left side of the spacebar, between ctrl and alt).
  2. Type cmd
  3. Right-click the Command prompt shortcut and select “Run as Administrator” from the drop-down menu. You should now see a black window with white letters.
  4. Type ipconfig /release in the command prompt.
  5. Press Enter.
  6. Type ipconfig /renew in the command prompt.
  7. Press Enter.
  8. Type ipconfig /flushdns in the command prompt.
  9. Press Enter.
  10. Close the command prompt and attempt to make a connection.


We hope these steps help you resolve your LoL connection issues. If not,  you can submit a ticket to LoL Player Support here.

If you have any other solutions, feel free to share it with us in the comments section.

What happens when you reset your iPhone [Factory Reset]

Sometimes your iPhone can run into certain issues, and the best way to fix them is to reset your device.

Resetting your iPhone is fairly simple, and today we’re going to show you how to reset your iPhone and explain what happens to your files and settings when you perform an iPhone reset.

How to factory reset your phone?

1. Use the reset option on your iPhone

  1. Back up your iPhone. You can back it to iCloud or to your Mac. If you’re using Windows, you can back it up using iTunes.
  2. On your iPhone, open the Settings app and navigate to General.
  3. Now tap on Reset.
  4. Select Erase All Content and Settings.
    erase all content what happens iphone reset
  5. You’ll be asked if you want to back up your iPhone. If you already did that select Erase Now. If not, be sure to use the Backup Then Erase option.
  6. Enter your passcode if required and tap on Erase iPhone.
  7. Wait for the reset process to finish.

Note: iPhone reset will remove all files and settings, so use it as a last resort, or if you planning to sell or give away your iPhone.

2. Reset the iPhone using your computer

  1. Backup your iPhone.
  2. Connect the iPhone to the computer.
  3. If you see a message asking you to trust your computer, be sure to allow it.
  4. Open Finder if you’re on Mac or open iTunes if you’re on Windows.
  5. Locate and select your device in the sidebar.
  6. Click the Restore iPhone button.
    restore iphone what happens iphone reset
  7. Click the Restore button to confirm.
  8. Wait for the process to finish.

iPhone reset process deletes all your settings and data, and it basically reverts your phone to its original state.

This is why it’s crucial that you back up your data to iCloud or to your computer, so you can restore your iPhone after the reset. If you choose not to back up your iPhone data, it will most likely be lost forever.

iPhone reset is a fairly simple procedure that will restore your iPhone to its original state by removing all your files and settings.

The process is simple and you can easily perform it from your phone or from a computer. Just be sure to back up all your data before hitting the Reset button.

WTFast Gaming VPN: Is It Legit? How Does It Work?

Pros
Simple user interface
Supports over 1000 different games
Can reduce latency and packet loss
Uses machine learning
Cons
Free trial requires your payment information

While gaming online, the biggest problems can be high latency or lag. These issues can drastically impact your experience and potentially ruin your game.

Many tools can help you fix this issue, and one of them is WTFast. The software will pick the shortest route to the gaming server and thus lower your latency.

The software sounds great, so today, we decided to take it on a test run and see how it works in action.

What is WTFast?

WTFast is a software that uses machine learning to choose the best traffic path for your gaming connection.

By doing so, the software will reduce your latency in-game and lower the number of lost packages.

To download WTFast, be sure to visit our in-depth WTFast download guide.

WTFast

WTFast is a gaming software that will optimize your connection and reduce the latency and lag in online games.
Check Price Visit Website

Does WTFast work?

main window wtfast review

Yes, WTFast works, and it will improve your latency in certain games. The software can help you if your connection is taking a longer route to the gaming server.

If your latency is caused by a technical issue or a limitation related to your ISP, then you might not see a drastic improvement while using WTFast.

Is WTFast legit?

Yes, WTFast is a Canadian company founded in 2009. The service has several satisfied customers, so we can certainly say that WTFast is completely legit.

What are WTFast features?

Reduce your latency

WTFast will select the best route to the gaming server, and by doing so, it will reduce the latency and lower the number of lost packages during gaming sessions.

Optimized traffic path

Thanks to machine learning, the software will take the optimal traffic path for your gaming connection. However, you can customize the path and pick the best server route anytime.

Real-time network analysis

WTFast provides you with real-time network analytics so you can keep track of your network data at all times.

Works as a GPN

Unlike a VPN, a GPN (Gamers Private Network) will optimize your connection data, and it won’t change your IP address or your network settings.

Supports the most popular games

WTFast works with more than 1000+ different games, and the developers are constantly adding new games to the list of supported titles.

All the latest multiplayer games are on the list, and it’s rather likely that your favorite multiplayer titles are supported.

Do you have to pay for WTFast?

setting wtfast review

Yes, WTFast requires a subscription, but you can also test it out for free. There are four types of subscriptions, monthly, 3-month, 6-month, and yearly.

Is WTFast worth it?

WTFast is a great tool, and with its simple user interface and more than 1000 different supported games, WTFast is one of the best gaming services you can use.

If you’re experiencing packet loss or high latency while gaming, WTFast might be the right choice, so be sure to use it for the best lag-free gaming experience.

Kill Ping Review: Get Rid of High Ping Once and For All

Pros
Can lower ping by up 60%
Friendly user interface
Supports 30+ most popular games
100+ available servers
Cons
Results might vary depending on your ISP

When playing online games, high ping can be one of the biggest problems and negatively impact your gaming sessions.

Certain applications can help you reduce your ping, and one of them is Kill Ping.

The software will route your gaming traffic to its servers, creating a shorter route and thus lowering your ping.

In today’s article, we will take a closer look at Kill Ping, see what it can do, and how it can lower your ping.

How does Kill Ping work?

Kill Ping is a special software that reduces your latency while playing online. In order to do that, Kill Ping redirects your gaming data to its game servers.

Kill Ping chooses the best routing paths to lower the ping and enhance your gaming experience.

The application is incredibly simple to use, and after you log in, you need to select the desired game and the server, and you’re good to go.

To download Kill Ping, be sure to visit our in-depth download guide.

Kill Ping

Kill Ping

Kill Ping is a gaming software that will optimize your connection and reduce both lag and ping while during multiplayer sessions.
Subscription Download it now

What are Kill Ping features?

Access to all servers regardless of your subscription plans

kill ping review


Kill Ping has multiple servers available, and you can access any of them regardless of the plan that you’re using.

By doing so, all Kill Ping users will get access to the same features, as long as they have an active subscription.

Latency reduction of up to 60%

Kill Ping developers claim that the software can reduce the latency by up to 60%.

Bear in mind that these are some extraordinary cases, and your results might vary.

Over 30 different supported games

Regarding the supported games, Kill Ping supports over 30 popular games. The list includes Fortnite, Rocket League, Overwatch, CS: byGO, LoL, Dota 2, WoW, and many others.

Over 100+ available servers

Kill Ping has over 100+ servers available, and you can access any of them with even the most basic subscription. All servers have 99% uptime, so Kill Ping will be ready whenever you need it.

Regarding the location of the servers, there are servers at 30+ different locations, so you should be able to find the best server in your region with ease.

Ease of use

Kill Ping has a simple to use interface and even the first-time users won’t have any issues using the software.

To make things even easier, the software also has the ability to automatically pick the best server for you depending on your current location.

Does Kill Ping work?

Kill Ping works, but keep in mind that it can only fix certain problems. If your ISP, for some reason, has issues reaching the game server or if it’s choosing the longer routes, Kill Ping can help with that.

On the other hand, if your ISP is having technical issues or if there are server-side issues, Kill Ping might not be able to fix those.

Is Kill Ping safe?

Yes, Kill Ping is safe to use, and it won’t interfere with other applications or with your network in any way.

The software will only send gaming packages to a specified server, similar to a VPN, so there’s no need to worry about your privacy.

Final thoughts on Kill Ping

High ping is the most common problem affecting your online gaming sessions, but with Kill Ping you should be able to rectify that.

By routing your traffic to its servers, Kill Ping will lower your latency and create a faster and more enjoyable multiplayer experience.

The application offers a simple and friendly user interface, so even the less tech-savvy gamers can enjoy the lag-free multiplayer experience with just a few clicks.

With the support for more than 30+ most popular titles, Kill Ping is a great choice for any gamer, so you might want to try it.

FIX: This folder is empty error on Windows 10/11

This folder is empty error occurs occasionally for some users when they plugin USB flash drives.

File Explorer displays this annoying error for a USB drive even though the flash drive’s storage bar highlights that there are certainly files and folders in it.

As such, users can’t open the folders and files in their USB drives.

To fix these annoying Windows 10 errors for USB devices, check out some of the resolutions below.

How can I fix This folder is empty error on Windows 10?

1. Use Copernic Desktop Search tool

Use Copernic to fix This folder is empty error on Windows 10

Copernic Desktop Search is a free tool to search for lost files of various types of extensions on your own PC, and also text, pictures, music and video files.

With this great tool you don’t need your entire hard drive to be searched. You can easily set up the specific USB flash drive which you want to be searched, and the search results you get are accurate and comprehensive.

The search findings are presented in date order, and useful search options are offered. You can install it now and get back your relevant data. This desktop finder recognizes over 150 file types.

You can use it also to locate lost emails, documents and contacts, or to get back pretty much everything that you suddenly lost.

Copernic Desktop Search

Copernic Desktop Search

Now you can easily find files on your PC with Copernic Desktop Search.
Free trial Visit website

2. Scan the USB drive with a file recovery software

StellarInfo

Stellar Data Recovery helps you to recover files that seem to be lost or cannot be opened or used.

Need more info on how this recovery tool truly works? Just take your time to check out this detailed Stellar Data Recovery review.

Long sort short, after starting the program, the appealing interface shows all drives available on the computer.

It is also possible to read and restore files from deleted partitions, USB sticks, smart cards, or scratched CDs/DVDs.

Once you have selected the media, you need to select a location and then click on the Scan button at the bottom right to start the search for lost files.

If the file you are looking for is not among the items found, you can still perform a deep scan.

Stellar Data Recovery

Stellar Data Recovery

Ready to recover deleted, damaged, or corrupted files? Do so by using the intuitive Stellar Data Recovery tool!
Free trial Visit website

3. Insert the flash drive in an alternative USB slot

Fix This folder is empty error on Windows 10

  1. Insert the flash drive in another USB slot.
  2. File Explorer might not show the USB drive’s content.
  3. If that is the case, there’s probably something wrong with one of the USB ports.

4. Use the Hardware and Devices troubleshooter

  1. Plug the USB flash storage into your desktop or laptop.
  2. Next, press the Type here to search Cortana button on the taskbar.
  3. Enter the keyword troubleshoot in the search box.
  4. Select Troubleshoot.
  5. Select Hardware and Devices.
  6. Press the Run the troubleshooter button.
  7. Follow the on-screen solutions to fix your USB stick.

5. Select the Show hidden files, folders and drives option

  1. Open the Cortana app’s search box.
  2. Enter folder in the search box.
  3. Select to open Show hidden files and folders.
  4. Select the Show hidden files, folders and drives option.
  5. Then deselect the Hide protected operating system files option. 
  6. Click the Apply and OK buttons.

The flash drive’s content might not be visible if the Show hidden files, folders and drives option is not selected. Selecting that option will ensure that there are no invisible folders and files.


6. Show invisible files with the attrib command

  1. Press Win key + X key and select Command Prompt (Admin).
  2. Type attrib -h -r -s /s /d g:*.* in the Command Prompt, and press Enter.

Having trouble accessing Command Prompt as an admin? Take a closer look at this guide!


Follow each of these steps, and let us know which one worked best for you by leaving a comment in the section below.

[wl_navigator]

Microsoft’s Trello competitor “Project Moca,” gets officially promoted by company

Microsoft has been quietly testing out a new flexible content canvas tool to help Office 365 users access the files, media, links, documents, To-Do Lists, Sticky Notes, emails, and more.

The first appearance of this new digital workspace (similar in fashion to content management tools such as Trello or Monday) came back in February of 2020 when images and videos of the service began surfacing on the internet. At the time, Microsoft’s coalescing efforts were only known as Project Moca, and when asked about the project, the company avoided direct confirmation of its existence.

Since the pandemic hit, Project Moca has flown relatively under the radar, despite a preview roll out in May of this year. However, yesterday Microsoft finally acknowledge its existence by crowing it with a promotional roll out via the company’s Outlook Blog.

As the blog name implies, Project Moca will be part of a feature set for Outlook where users can call upon it from the navigation pane in Outlook for the Web and create and organize buckets of content. Use case scenarios might include project-specific “Buckets” to keep all corresponding emails, notes, websites, project goals, and related files, in one area.

Stickynotes

Depending on the level of access, Project Moca could be just another reason small to mid-sized businesses can find value in moving from free patchwork options such as Google, Trello, and Slack to a more streamlined Office 365 experience.

Capture

As part of the Community Blog post “Project Moca is available for Microsoft 365 consumer subscribers, EDU customers, and select commercial customers as a preview and is shipped off-by-default. Admins can enable it through PowerShell with the Set-OwaMailboxPolicy OwaMailboxPolicy-Default -ProjectMocaEnabled $true parameter.”

As we reported back in May, those interested and have access to an Office 365 account can visit this link to test it out the feature set ahead of a presumed general rollout.

RealPlayer Downloader Not Working on Windows 10

Some users still encounter problems when downloading videos or playing some clips with the player.

Just like BSPlayer for prior Windows versions, the popular RealPlayer video player is also compatible with Microsoft’s latest operating system.

However, some users have been reporting problems, especially with Windows 10. Here’s what one of the many users says:

Hello, I have problems with Real Player. It will give me the option to download videos online and everything but as it gets towards the end of downloading; it gives me a message saying download unsuccessful, refresh page and try again this is getting really annoying and it does that with every video I try to download from YouTube.

I have already tried manually resetting the compatibility mode with windows 8 and have even tried updating to the newest version of real player but still no luck. If anyone can help me with this problem or has any suggestions on what I can try please reply.

What can I do if RealPlayer downloader is not working?

1. Download the most recent RealPlayer version

Most of these issues seem to be related to the fact that Windows 10 users aren’t using the latest version of RealPlayer. Fortunately, this can be fixed in no time.

All you need to do is to grab the link below and install the tool into your PC.

⇒ Get RealPlayer for Windows 10

2. Try out a RealPlayer alternative

If the version above doesn’t work on your PC, the only solution left is to switch to another player. It might sound difficult, especially if you are using RealPlayer for a while, but don’t get scared.

Luckily, there are several alternative media players on the market that support high-quality video playback and media library management that have a similar user experience to RealPlayer.

Media player alternatives come with advanced audio and video settings to ensure you get the best possible entertainment experience.

Most of these tools include their own subtitle library and some of them allow you to connect to streaming platforms and access them directly from the player’s UI.

Let us know which of these solutions worked for you. If you decide to switch to a different player, which one do you prefer?

If you’re interested in more information about media players, these great universal video players cannot disappoint you.

We do our best to help you fix several software issues, as you can see in our PC Software Hub.

FIX: Belkin Network USB Hub Issues in Windows 10/11

Apparently, for some users, there are a lot of problems with the Belkin Network USB Hub in Windows 10.

The fact that Microsoft released Windows 10 has affected a lot of users who had to update their drivers and, in many situations, they have been experiencing annoying issues.

In a previous article, we explored how you can fix the USB 3.0 issues, as well as problems with external hard drives.

This time, some users are complaining that their Network USB Hub from Belkin doesn’t work with Windows 10 or has other problems:

I have the Belkin Network USB Hub (Part # F5L009) and have used it successfully in Windows XP through Windows 8.0.  Upgrading to Win 8.1, however, has broken it and I can no longer connect to my scanner and inkjet printer attached to it.  I’ve uninstalled and reinstalled the software to no avail.  The program connects to the hub and shows me the devices attached to it, but I cannot connect to and use them. During the reinstall on Win 8.1, Windows complained about SXUPTP driver, which I’ve seen elsewhere in the forums.  Why did this work on Win 8.0, but not on Win 8.1?  This really stinks and I’m ready to try rolling back to Win 8.0 because I really need my scanner and printer.

How can I fix Belkin Network Hub issues on Windows 10?

1. Scan your system for malware

Malicious software may trigger a wide array of problems on your Windows computer. Make sure that your machine is malware and virus-free by running a full system scan.

In that matter, we recommend that you use TotalAV. It’s the perfect Internet security system that protects your PC from all sorts of online vulnerabilities.

The real-time protection of this antivirus helps keep your device safe from trojans, spyware, ransomware, worms, or viruses.

Once you download it, the interface is intuitive and very easy to use. All you need to do is to run a full scan and delete all malicious elements.

TotalAV

Try this excellent antivirus software to offer total protection for your browser and device.
Free Trial Visit Website

2. Install Sxuptp.inf drivers

  1. Close the Belkin network hub’s tray application.
  2. Download the latest version of SX Virtual Link.
  3.  Extract all of the files.
  4. In Windows Explorer, navigate to sx-virtual_link_win_3120s-33a3120FilesBinSxcsapiWinVistaX64 if you are running a 64 bit OS.
  5. If you are running a 32 bit OS navigate to sx-virtual_link_win_3120s-33a3120FilesBinSxcsapiWinVista.
  6. Right-click on Sxuptp.inf and select Install from the menu.

3. Check your firewall

Make sure that your firewall is not blocking the Belkin Network USB Hub.

You can either add Belkin to the list of exceptions or you can temporarily disable your firewall software.

That is all. We hope that one of the above solutions will help fix the Belkin Network Hub issues. If you have more suggestions or recommendations, let us know in the comments section below.


FIX: 0x8009002d error code in Windows 10

Many users tend to use PIN code to lock their PC and to protect it from unauthorized access.

PIN codes are great since they are easy to remember, but users reported a 0x8009002d error while trying to sign in. This happens to Windows 10 users when introducing a PIN code.

Here are more examples of this problem:

  • Windows 10 PIN error 0x80070032 – Error code 0x8009002d  is one of the most common PIN-related issues in Windows 10.
  • Windows 10 PIN something went wrong – If you’re unable to login with your PIN, you’ll either receive this error message, or error code 0x8009002d.
  • Windows 10 add PIN does nothing – If you’re unable to do anything on the login screen, you can apply some of the solutions listed below.
  • Windows 10 PIN login not showing – If the PIN login screen doesn’t show, just log in with your password, and apply the solutions listed below.
  • Something went wrong code 0x8009002d – In this case, restart your device to see if that fixes this common PIN login-related issue.

How can I fix Something went wrong code 0x8009002d?

  1. Restart your PC
  2. Turn off Sleep mode and reset your PIN
  3. Delete everything from the NGC folder
  4. Remove your PIN
  5. Use I forgot my PIN option
  6. Use Find my phone feature
  7. Turn off cellular data on your phone

1. Restart your PC

This isn’t a permanent solution, but it’s a working workaround according to the users.

Users reported that restarting your computer fixes this error, but you’ll have to restart your computer every time this error appears.

This might not be the most practical solution, but it should allow you to log in to Windows 10.

2. Turn off Sleep mode and reset your PIN

  1. Press Windows Key + S keyboard shortcut and enter power options. Select Power Options from the list of results.
    0x8009002d-Windows-10-power options
  2. Find your currently selected plan and click the Change plan settings.
    0x8009002d-Windows-10-change-plan-settings
  3. Set Put the computer to sleep to Never and click Save changes.
    0x8009002d-Windows-10-save-changes

Sleep mode is useful if you want to save your current work and temporarily turn off your computer.

All your opened applications will be available once you turn them on so you can easily continue where you left off.

Sleep mode is great if you want to preserve power, but it seems that Sleep mode might be responsible for the 0x8009002d error on Windows 10, and many users are suggesting that you turn it off.

After turning off Sleep mode, reset your PIN by following the below procedure.

  1. Open the Settings app and go to Accounts > Sign-in options.
  2. Locate the PIN section and click the Remove button.
    0x8009002d-Windows-10-remove-pin
  3. The PIN section will change asking you if you’re sure that you want to remove your PIN. Click the Remove button to confirm your decision.
    0x8009002d-Windows-10-remove-confirm
  4. Enter your account password to verify your account and click OK. After clicking OK the PIN should be removed.
    0x8009002d-Windows-10-verify-account
  5. Click the Add button in the PIN section to add a new PIN.
    0x8009002d-Windows-10-add
  6. Enter your new PIN twice and click the OK button to confirm it.
    0x8009002d-Windows-10-new-pin

3. Delete everything from the NGC folder

Several users reported that one quick way to fix this error is by deleting all files from the NGC folder. Before thinking of any sort of complicated procedures, let us tell you more about Stellar BitRaser.

This nifty tool can erase pretty much anything you have in mind from Windows and Mac PCs – files from the previously mentioned folder, the folder itself, your saved passwords, photos, videos, and not only.

You can even get rid of app traces to keep away your sensitive data from hackers or remove your Internet usage history across Opera, Chrome, Mozilla Firefox, Microsoft Edge, and more browsers.

Consequently, you should consider this practical software to wipe out any data you have and permanently delete it from your device.

⇒ Get Stellar BitRaser

4. Remove your PIN

Using a PIN code to sign in is great if you want to protect your PC but you don’t want to memorize a long password and enter it every time you want to sign in to Windows 10 or use a certain application.

Since users reported that PIN code can cause these types of errors, many of them suggested that you remove the PIN code and use a standard password instead.

Using a standard password isn’t the best solution, but it’s a decent workaround until you find a permanent solution. To see how to remove your PIN check steps 1 – 4 from the previous solution.

5. Use I forgot my PIN option

  1. Open the Settings app and go to Accounts > Sign-in options.
  2. Locate the PIN section and click the I forgot my PIN option.
    0x8009002d-Windows-10-forgot-pin
  3. Click the Continue button.
    0x8009002d-Windows-10-continue
  4. Enter your account password and click Sign in.
    0x8009002d-Windows-10-password
  5. Now enter your new PIN code and click the OK button to save it.

According to users, you can fix this problem by using the I forgot my PIN option. To see a forgotten PIN, do as described above.

6. Use Find my phone feature

  1. Log in to your Microsoft account.
  2. Go to Find my phone section and choose the Lock option.
  3. Enter your PIN code.
  4. After entering your PIN code your phone will turn off. Turn on your phone and enter the PIN code.

Error 0x8009002d affects both Windows 10 and Windows 10 Mobile, and if you’re getting this error on your phone you can fix it by using the Find my phone feature.

Unable to Login with my Microsoft Account in Windows 10? This quick guide will show you how to solve the issue.

7. Turn off cellular data on your phone

Users reported that 0x8009002d error appears on their Windows 10 phone while cellular data is turned on, so if you’re having this problem disabling cellular data temporarily might be a good workaround.

Error 0x8009002d affects both Windows 10 and Windows 10 Mobile, and if you’re experiencing this problem make sure that you check all of our solutions.

Let us know in the comments area which one worked for you.

Windows 10 May 2020 Update has new compatibility issues with certain LTE modems

Microsoft has discovered a new compatibility issue for some PCs with LTE modems running the Windows 10 May 2020 Update (via Bleeping Computer). On the Windows 10 Health Dashboard, the company explained yesterday that some PCs with certain WWAN LTE modems running the May 2020 Update might not be able to connect to the Internet after waking from sleep.

The company expects to fix the issue in a patch coming in late September, but in the meantime, the company has applied a compatibility hold on devices with affected WWAN LTE modems. For users who have already installed the May 2020 Update and are now encountering the issue, Microsoft recommends to enable and then disable Airplane mode to connect to the Internet after waking from sleep.

The Windows 10 May 2020 Update launched with several compatibility issues in the last week of May, and many owners of recent Surface devices have also been unable to install it until recently. However, Microsoft and its partners have now managed to resolve most problems, though there’s still a compatibility issue with Conexant audio drivers.

In the latest AdDuplex Windows Devices Statistics report for the month of August, the May 2020 Update was running on 24.1% of all surveyed PCs, still lagging behind the November 2019 Update at 35.5%. As the latest Windows 10 version is continuing its slow progression, Microsoft is now getting ready to roll out Windows 10 version 20H2, which will be a minor release just like the November 2019 Update was last year.

Hands-on with Surface Duo at Best Buy: An impressive phone unlike any other

The first Surface Duo review units are out, but Microsoft has a review embargo, and tech reviewers are under NDA and can not discuss the software or camera experiences until September 10th. Being the Surface fan that I am (and since OnMSFT was not on the initial review unit list and not under embargo) I was still eager to try one out, gather my own thoughts, and share them here.

Ahead of the arrival of my own Surface Duo pre-order next week, I headed to my local Best Buy where a display unit was available to try one out (without any limits on looking at the software or cameras.) It was tricky finding a location that had one available, but after spending two hours with the Duo in my hands, I must say, it is a phone like any other, and a phone that’ll make you a dual-screen believer.

Editor’s note: We are not under any NDAs and are using a display unit, and the final Android/software experience of the Surface Duo is subject to change. There’s also a red “tint” in our photos and videos, due to the lighting in the room at Best Buy. This is only noticeable on camera, and not in person.

The premium-feeling hardware

The minute I walked up to the Surface Duo display unit, I was amazed. As I picked it up with my hands, I was really surprised at how thin the Duo felt. Coming from the world of Windows Phone, Blackberry, iPhone, and Google Pixel, I never quite felt a phone that thin. As many tech reviewers have pointed out, one screen on the Duo is almost as thin as a single USB-C port. And, when folded together, the Duo is just as thin as a Pixel 3XL. It really is quite amazing.

But the thinness wasn’t all that amazed me. As I folded and unfolded the screen, the hinges really caught my attention. They are super solid and really can hold the phone up well. No matter which angle I opened the Duo too, the phone was able to support itself thanks and stay in place thanks to the hinges. The feel is a bit reminiscent of the watchband hinges that Lenovo has on its Yoga laptops, but the difference is that Microsoft tucked the hinges inside the screen.

Surface Duo Hinge 2

Then, there’s the overall material. The Duo is unlike your average Surface and is made of glass and not magnesium. It did feel a bit too smooth and slippery in my hands for my liking, but I think the included bumper case or a Drand skin can fix that. That’s also where I really appreciated the thick bezels, as it gave my fingers something to grab onto when handling the phone and rotating it around.

Comparing the dimensions of the Duo to my Pixel 3XL, meanwhile, offered another interesting experience. The Pixel is a lot taller than Duo, whereas the Duo is shorter, and a bit wider. I wasn’t able to move the Duo to see if it could fit in my pocket, but with those dimensions, I don’t see why it can’t fit.

The Dual-Screen Android experience

Surface Duo Dual Screen Apps

Next up in my hands-on experience was touring the dual-screen experience. This is where the Duo again feels different from other phones, and it’s all thanks to the underlying work Microsoft has done with Android. In fact, I think the Duo marks the perfect combination of Microsoft hardware and Google Android software.

In my experience of testing out the dual-screens on the Duo, I tried a couple of things. I stacked and scrolled two apps on the two screens at the same time, slid apps around from one screen to the next, spanned an app across the two screens. I also ended up rotating the Duo so both screens are in the vertical orientation, and turned it back over and shifted apps around. Then, I ended up using the Duo in its various modes, such as “tent” or “laptop.” Keep in mind, all of these gestures and experiences are powered by Microsoft Launcher and Android.

Surface Duo Side By Side Apps And Home

Again, thanks to Microsoft’s work on the hardware, leveraging those dual-screens for all my tests was an amazing experience. My fingers easily moved in between the two screens hinges as I pushed one screen to the next. It felt like the hinges and the gap in the screen were not even there. Even for pre-release, the software also felt quite polished too. As I moved things around, the Duo didn’t freeze and on-screen animations were always fluent and fast.

However, the hinge did feel a little annoying when spanning apps “full screen” in the horizontal mode. It cut out things I was scrolling or watching, especially when it comes to videos.

Surface Duo Apps Spanned Vertical Mode

But I do want to mention an interesting point. Although Microsoft hyped-up opening apps side by side, the real strength of the Duo is using it in the vertical mode, with a single app. Thanks to its aspect ratio and orientation, scrolling webpages, and other apps felt really natural and smooth. When reading the New York Times website, It felt like I was holding a piece of paper in front of me, and the content on the screen was really natural-looking. This will be a point for the Duo that I’ll keep an eye on moving forward.

I’ll end this section by pointing out another thing that makes the Duo unique. Since it has hinges, you can fold the Duo over into a tent mode. I did this to watch a video on YouTube, and it was really cool, to say the least. Although the video had a weird letterbox mode (I assume YouTube isn’t optimized for the Duo) it was a little heartwarming to be able to “fold” a phone over and use it to watch videos, in the same way that I would on a Windows 2-in-1.

The inking and using the Surface Pen

Surface Duo Inking On Phone

As I moved along in my demo, I found that the display unit I played with asked me to sign into a Microsoft Account to use core apps like OneNote, and Outlook, so my inking experience was a bit limited. However, that didn’t stop me.

I pulled up a New York Times article on one screen, and the sticky notes widget in the Microsoft Launcher on the other. I simulated jotting down notes, and I felt right at home. The movements of the pen on the screen is fluent, as is the latency. It’s really like using a Windows 10 PC or a Surface Pro.

Just be aware, there’s nowhere for the Surface Pen to attach to the Surface Duo. It’ll stick to the back screen, but it also will slide off. You’ll have to keep attaching it as it moves. From what I know, this isn’t officially supported, and you’d have to keep the pen stored in your pocket. Apparently this gets a bit better with the bumper, but still, it’s no Note 20.

The camera

Surface Duo Camera

The final point I want to mention is the camera. This has been an area of controversy with the Duo, and a reason I was quite hesitant to purchase one for my personal use. However, after trying the Duo out, I’m not as worried. Here’s why.

Microsoft has done a lot of optimization with the Surface Duo camera. To my surprise, the overall user interface is quite fluent. While it is true that there’s no rear camera, if you want to take pictures of something in your world, the Duo has your back.

Thanks to the software, just fold the screens over, and flip them around to switch from selfie mode to rear-camera mode. The switch happens almost instantly as clicking the “switch camera” button on a typical Android phone.

But, then there’s the quality. With a single 11MP sensor, can the Duo make the cuts? Have a look below for the quality, and let us know what you think in the comments.

Overall, I am not too worried about the Surface Duo camera. For situations with a lot of light, it looks like the camera can punch out some really great photos. However, in situations with low-light, the Duo might struggle a bit. It’s hard to come to a conclusion right now, but I do look forward to finding out more when I get my own Duo and take it out into the wild.

I can’t wait to get my own Duo!

As my initial hands-on occurred on a demo unit in the limited setting of Best Buy, there’s still a lot of things I am curious to see about the Duo. Once I get my own Duo, I can’t wait to set up my daily apps (Snapchat, Instagram, etc) and see how the phone tackles my everyday needs. I’ll be doing a full review of the Duo come mid-September, so be sure to keep tuned to OnMSFT. And, if you have any questions for me, drop me a comment in the section below. I’ll do my best to answer them!

Crusader Kings III, Resident Evil VII, and more are coming to Xbox Game Pass in September

The month of August was a pretty good one for Xbox Game Pass, which received no less than 4 new Microsoft games including the critically-acclaimed Flight Simulator and Wasteland 3, the Battletoads reboot, as well as the first episode of Tell Me Why. Well, Microsoft has just announced the next wave of new games coming to Xbox Game Pass in September, starting with the freshly-released strategy game Crusader Kings III on PC.

More games will follow on Thursday, September 3, with Resident Evil 7, Touhou Luna Nights, and the episode 2 of Tell Me Why on Console and PC. Console gamers will also get The Jackbox Party Pack 4 on the same day, while World War Z, which is already available on Xbox Game Pass for Console, will also join the PC catalog. It’s worth noting that the latter was previously exclusive to the Epic Games Store on PC, and the Left 4 Dead-inspired game also recently introduced support crossplay between PC and Xbox One.

Next week, two new games will join the catalog on September 10 with Disgaea 4 Complete+ on PC and Hotshot Racing on Console. Additionally, the third and final chapter of Tell Me Why will also be available on Console and PC on September 10. The Xbox team also listed Destiny 2: Shadowkeep & Forsaken as “coming soon” on Console, and we’ll let you know once we have the release date.

In case you missed it, four games will also leave Xbox Game Pass in September, starting with NBA 2K20 on console today. Red Dead Redemption 2 will follow on September 7, and then Jumpforce and Gonner: Blueberry Edition will also be removed on September 15. On that day, Microsoft will also launch Cloud Gaming (Project xCloud) on Android as part of Xbox Game Pass Ultimate, and Microsoft promised that over 100 Xbox games would be playable on mobile devices at launch.

Xbox Series S mention appears once again in official Microsoft product docs

If Microsoft recently confirmed that its next-gen Xbox Series X console will launch in November, the company has yet to announce its cheaper alternative, the Xbox Series S, also codenamed “Lockhart”. This second next-gen Xbox console previously appeared in official documentation for developers as well as on the packaging for the next-gen Xbox controller to be released alongside the Xbox Series X and presumably, the Xbox Series S.

Earlier today, Twitter user BravaryBrendan tweeted a picture of an Xbox Game Pass Ultimate trial code sheet mentioning the “Xbox Series X/S consoles.”

According to previous reports, the Xbox Series S will share many of the Xbox Series X’s components, including a custom AMD Zen 2-based CPU and custom NVMe SSD. However, the Xbox Series S GPU is expected to deliver just 4 teraflops of computing power compared to 12 on the Xbox Series X. As a result, Microsoft is expected to position the Xbox Series S as an affordable next-gen option for 1080p gaming, delivering a better experience than the now-deprecated Xbox One X thanks to a faster SSD and a more modern GPU and CPU.

With the Xbox Series X set to launch in November, Microsoft probably won’t wait too long before officially announcing the Xbox Series S, as well as pricing details for the new console. A lot of details about the Xbox Series S have leaked in the past couple of months, but it’s quite impressive that the full hardware, which is presumably already in production, hasn’t leaked yet.

According to a previous report, the Xbox Series S could look more like the Xbox One S/X than the Xbox Series X. As the Xbox One X has now been discontinued, it could make sense for the company to re-purpose its existing Xbox One X manufacturing capabilities for Xbox Series S consoles going forward.

4 Tips on How to View Your WiFi Password in Windows 10/11

We use Wi-Fi almost every day on our devices, and we have dozens of saved networks on our devices. But what if we need to see saved WiFi passwords for certain networks?

These operating systems keep track of previously saved passwords. This includes all the networks you connected your device to.

There are multiple different ways to see your WiFI password in Windows and Mac, and you can even use your browser to do so.

This is pretty easy to do, and in today’s article, we’ll show you how to do this on both Windows 10/11 and Mac computers.

How do you find your Wi-Fi password on PC?

There are multiple ways to see WiFi password on your Windows 10/11 PC. You need an account with administrative rights. The simplest method is to check your connection settings. You can also use the Command Prompt or Powershell.

You can use the Command Prompt to learn more about your network connections and check your activity, devices, and more.

How do I list Wi-Fi networks using CMD?
There are several commands that you can use to get network-related information. Most PC requires the administrator’s rights to use these commands.

  1. Make sure to select Run as administrator when you open CMD.how to see wifi password windows 10
  2. Type the following command: netsh wlan show wlanreport Press enter.how to see wifi password windows 10
  3. The Command Prompt will generate the report and display its location. To access it, open the Windows File Explorer and paste the location in the location bar. Press Enter.how to see wifi password windows 10
  4. This will open the report in a new window or tab on your default browser.how to see wifi password windows 10

The report shows info about the computer you execute the command from including name, manufacturer, BIOS version, operating system, and more.

You also get a list of all Network Adapters that are connected to your network. You can see the name, type of connection, connectivity percentage, and other useful information.

Another useful command that will give you a list of the WiFi networks in your area is netsh wlan show networks

Operating systems keep logs of the passwords of your saved networks. So if you have trouble connecting to a network you have logged into before on your Windows on Mac computer, check the following instructions.

How can I view saved WiFi passwords on Windows 10 and Mac?

1. Check your connection properties

  1. Press Windows Key + I to open the Settings app.
  2. Go to the Network & Internet section.
    network & internet view saved wifi passwords windows 10 , mac
  3. Click on Change adapter options.
    change adapter options view saved wifi passwords windows 10 , mac
  4. Double-click your Wi-Fi connection.
    wi-fi connection view saved wifi passwords windows 10 , mac
  5. Click the Wireless Properties button.
    wireless properties view saved wifi passwords windows 10 , mac
  6. Go to the Security tab and check Show characters checkbox.
    security tab view saved wifi passwords windows 10 , mac
  7. You should now see the password for this Wi-Fi connection in the Network security key field.

2. Use PowerShell or Command Prompt

  1. Press Windows Key + X and choose PowerShell (Admin).
    powershell view saved wifi passwords windows 10 , mac
  2. When the PowerShell starts, enter the following command: netsh wlan show profile WI-FI_NAME key=clear
    netsh wlan powershell view saved wifi passwords windows 10 , mac
  3. Be sure to replace WI-FI_NAME with the name of your Wi-Fi network.
  4. Scroll down to the Security settings and in the Key content field you should find the password for this Wi-Fi network.
    key content view saved wifi passwords windows 10 , mac

3. Use Keychain Access

  1. On your Mac go to Applications > Utilities section.
  2. Start Keychain Access from there.
  3. In the Keychains field select System. In the Category section select Passwords.
    keychain access view saved wifi passwords windows 10 , mac
  4. Locate the network in the right pane and double-click it.
  5. Now check the Show password checkbox.
    keychain access show password view saved wifi passwords windows 10 , mac
  6. Enter your administrative password and the Wi-Fi password will appear.

4. Use the Terminal

  1. Go to Applications > Utilities and start the Terminal.
    terminal open view saved wifi passwords windows 10 , mac
  2. Run the following command: security find-generic-password -ga WIFI_NAME | grep “password:”
  3. Replace the WIFI_NAME with the name of your network.
  4. Now enter your administrative credentials.
  5. The Wi-Fi password should now appear.

How to find WiFi password on Google Chrome?

  1. Open Google Chrome.
  2. In the address bar type 192.168.1.1 and press Enter.
    chrome address bar view saved wifi passwords windows 10 , mac
  3. Enter your router’s username and password.
  4. Go to the Wireless section.
  5. In there you should see your Wi-Fi settings.
  6. If available, check the Show password option to reveal your Wi-Fi password.
Note icon NOTE
Google Chrome doesn’t store saved Wi-Fi passwords, but you can use it to view your home network password.

Keep in mind that you need to know both your router’s IP address and login credentials to do so. Also, some routers won’t reveal your password, so this workaround might not work for you.

Viewing the saved password on Windows 10 and Mac is quite simple, and you can easily do it using the graphical interface.

If you’re more tech-savvy, you can easily reveal the saved password by using the command line. Did these methods work for you? Let us know in the comments below.

Want to learn more about network connections? For more info, go to our Network & Internet section.

We have a wide array of similar guides, and you can find them all in our How to Hub. Learn how to remove errors, optimize your settings, and more