How to Fix Media Center Error on Windows 10/11

Some users prefer using Media Center for their multimedia needs, but sometimes issues with this application can appear. Speaking of issues, today we’re going to show you how to fix the most common Media Center errors.

There are many issues that can occur with Media Center, and as for issues, here are some common problems that users reported:

  • Windows 10 Media Center not working, stopped working – This problem can occur due to third-party applications. To fix the issue, it’s advised to perform a Clean boot and remove the problematic applications that are interfering with Media Center.
  • Windows 10 Media Center decoder error – Sometimes your drivers can be the problem, so if you’re having issues with Media Center, perhaps updating your drivers will fix the problem.
  • Windows Media Center Windows 10 won’t start – This is one of the problems that can occur with Media Center, but you should be able to fix it with one of our solutions.

How can I fix Media Center errors on Windows 10?

  1. Perform a Clean boot
  2. Perform a chkdsk scan
  3. Make sure that your drivers are up to date
  4. Rename the EpgListings directory
  5. Download the latest updates
  6. Remove the problematic applications
  7. Perform a System Restore

Solution 1 – Perform a Clean boot

If you’re having issues with Media Center on your PC, perhaps you might be able to solve the problem simply by performing a Clean boot. In case you don’t know, by performing a Clean boot you’ll completely disable all startup applications and services.

This is quite simple to do, and you can do it by following these steps:

  1. Press Windows Key + R to open the Run dialog. Now enter msconfig in the input field and click OK or press Enter.
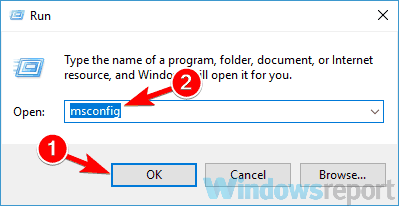
    msconfig media center not working
  2. The System Configuration window will appear. Navigate to the Services tab and check Hide all Microsoft services. Now you need to disable all non-Microsoft services. To do that, just click the Disable all
  3. After you disable all startup services, you need to do the same for applications. Head over to the Startup tab and click Open Task Manager.
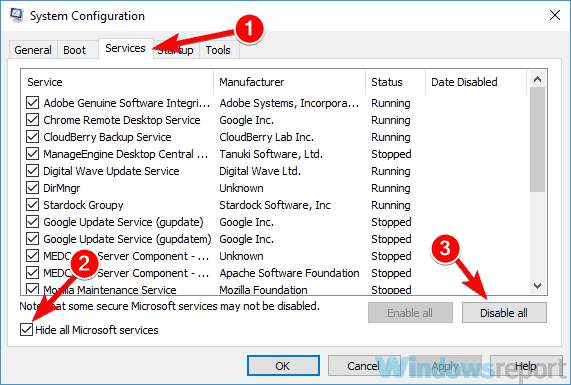
    disable services media center error
  4. List of startup applications will now appear. Right-click the first entry on the list and choose Disable from the menu. Repeat this process for all startup applications on the list.
    media center error startup applications
  5. After you disable all startup applications, close Task Manager and go back to the System Configuration Click Apply and OK to save changes and restart your PC.

Once your PC restarts, check if the problem with Media Center is still there. If not, it’s almost certain that one of the disabled applications or services was causing the issue. To pinpoint the cause, it’s advised to enable applications and services one by one until you manage to pinpoint the cause of the problem.

Bear in mind that you’ll have to restart or at least log out after enabling a set of services or applications in order to apply the changes. Once you find the problematic application or service, you can uninstall it or keep it disabled.

Solution 2 – Perform a chkdsk scan

In some cases, problems with Media Center can occur because the files on your hard drive are damaged. To fix this, it’s advised to perform a chkdsk scan and repair the files. This is actually quite simple to do, and you can do it by following these steps:

  1. Open Command Prompt as administrator. To do that, press Windows Key + X or right-click the Start button. Now choose Command Prompt (Admin) or PowerShell (Admin) from the menu.
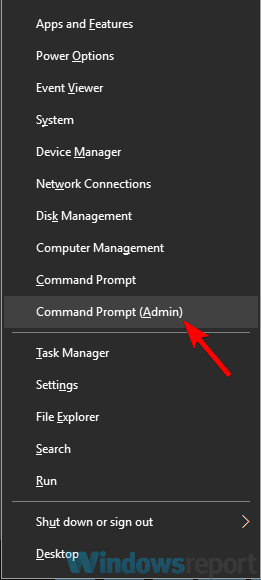
    media center not working command prompt
  2. Command Prompt should now start. Type chkdsk /f :X and press Enter. Bear in mind that you need to scan your system drive, so replace :X with your system drive letter. In most cases, that would be C.
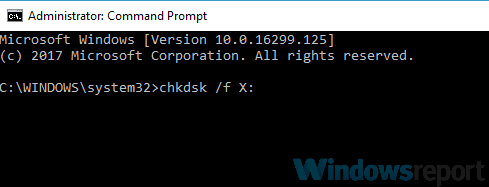
    chkdsk scan media center error
  3. You’ll be asked to schedule a restart at next reboot. Press Y to confirm.

Now restart your PC. Once the PC boots, the chkdsk scan should start automatically. Bear in mind that this scan can take about 10-20 minutes, depending on the size of your system drive.

Once the scan is finished, check if the problem is still there. If certain files are damaged, the scan can take an hour or more, so keep that in mind.

Solution 3 – Make sure that your drivers are up to date

  1. Right click on Windows Start button and select Device Manager
  2.  Right click on the Display adapters and select Update driver option
  3. Select Search automatically for drivers option to install best available drivers
  4. See if the best drivers for your PC are already installed

Sometimes problems with Media Center can be caused by your drivers. In order for your hardware to work properly with Media Center, your drivers need to be up to date. To fix this problem, you’ll need to ensure that all-important drivers are up to date.

To update your drivers, you’ll need to visit your hardware manufacturer’s website and download the appropriate drivers for your hardware. This can be a bit tedious, especially if you need to update multiple drivers.

However, you can speed this process simply by using third-party software that can download the latest drivers automatically with just a couple of clicks.

⇒ Get Outbyte Driver Updater

Solution 4 – Rename the EpgListings directory

If you’re having problems with Media Center, the issue can be caused by EpgListings directory. To fix the problem, some users are recommending renaming or removing this folder. This is quite simple to do, and you can do it by following these steps:

  1. Navigate to the C:ProgramDataMicrosofteHomePackages
  2. Locate EpgListings directory and rename it.

After doing that, the problem should be completely resolved.

Solution 5 – Download the latest updates

If you’re having problems with Media Center on your PC, it’s possible that the issue is caused by certain glitches on your system.

Glitches can sometimes appear if your system isn’t up to date, so to prevent this problem from appearing, it’s important that you keep your system up to date.

Windows 10 usually installs the missing updates automatically, but sometimes issues with Windows updates can occur and you can miss certain updates. Of course, you can always check for updates manually by doing the following:

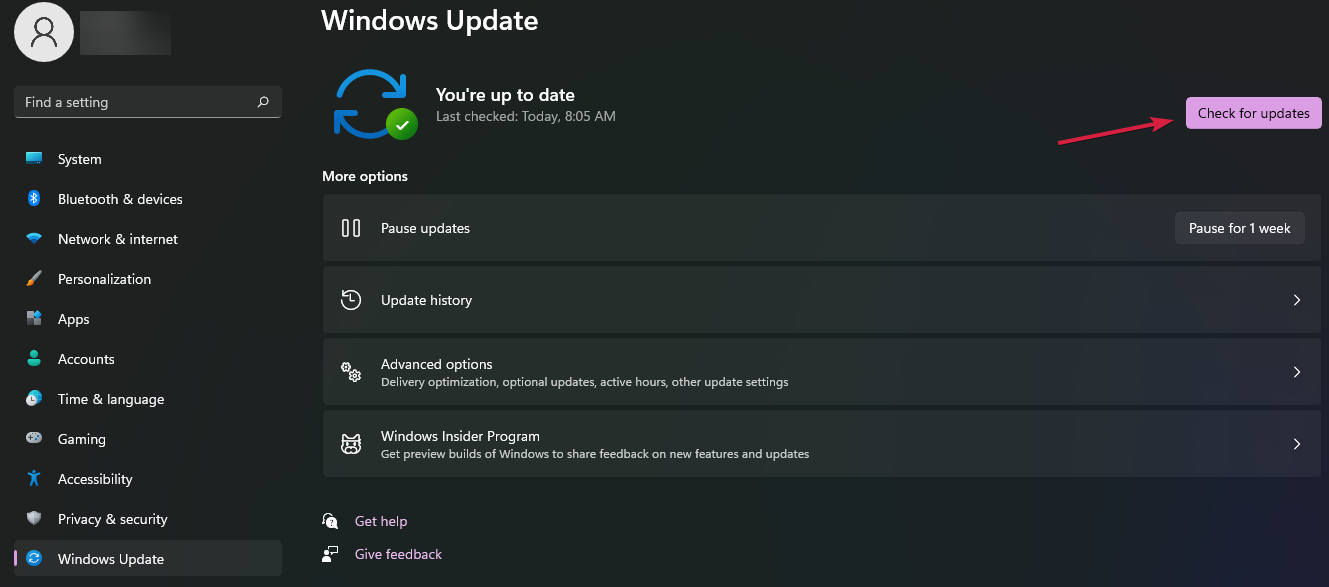
  1. Open the Settings app. You can do that quickly by using the Windows Key + I shortcut. Once the Settings app opens, navigate to the Update & Security section.
  2. Click the Check for updates button in the right pane.
    check for updates media center error
  3. Windows will now check for available updates. If updates are available, Windows 10 will download and install them automatically.

Once your system is up to date, check if the problem is still there.

Solution 6 – Remove the problematic applications

  1. Type Control Panel in the Search bar
  2. Find Programs and click on Uninstall a program 
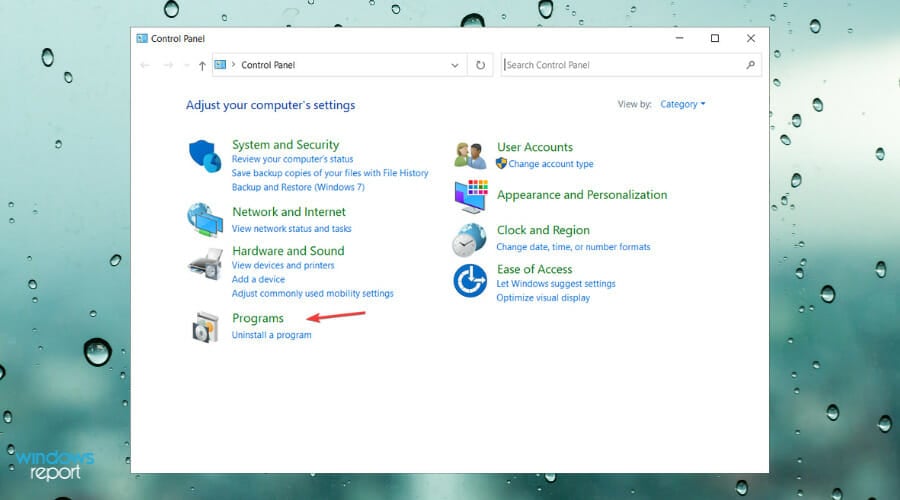
  3. Check the list to uninstall the problematic programs

If you’re having problems with Media Center on your PC, the issue might sometimes be other applications. Third-party applications can interfere with Media Center and they can lead to various issues.

Speaking of problematic applications, many users reported that LogMeIn software and TeamViewer caused these issues to appear. To fix the problem, it’s advised to find and remove these applications from your PC.

There are several ways to do that, but the most effective one is to use uninstaller software.

Uninstaller software is a special application that can remove the selected application from your PC completely. To do that, uninstaller software removes all files and registry entries associated with the application you want to remove.

Once you remove the problematic applications using this software, check if the problem is still there.

Solution 7 – Perform a System Restore

If the problem with Media Center is still there, you might have to perform a System Restore in order to fix the problem. If you’re not familiar, System Restore is a useful feature that allows you to restore your system to and fix various problems.

This feature is incredibly simple to use, and you can restore your system by doing the following:

  1. Press Windows Key + S and enter system restore. Choose Create a restore point from the list.
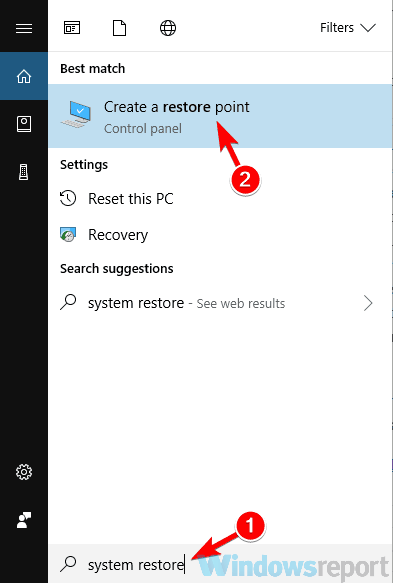
    system restore search media center error
  2. The System Properties window should now appear. Click the System Restore button.
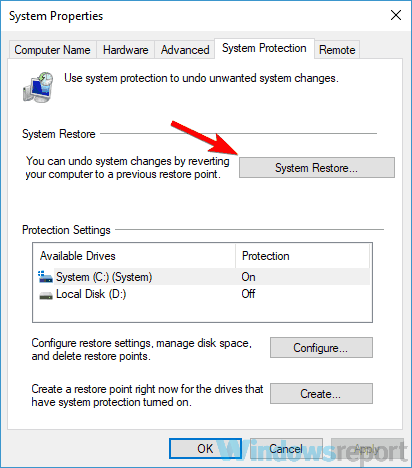
    system restore button media center not working
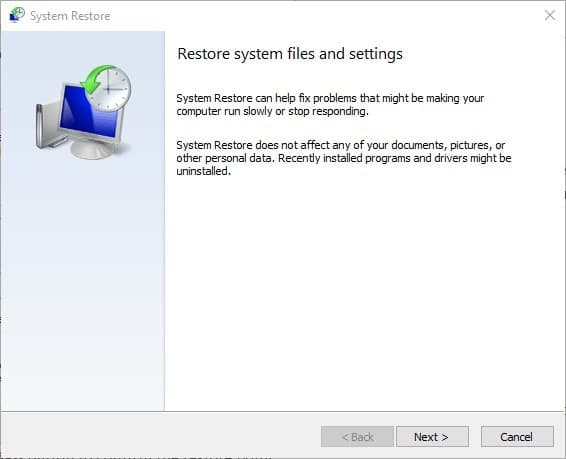
  3. System Restore window will appear. Click Next to proceed.
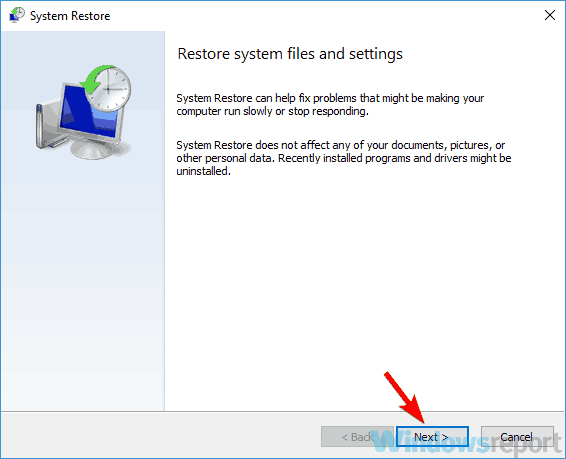
    system restore media center error
  4. Check Show more restore points option, if it’s available. Now select the desired restore point and click the Next button.
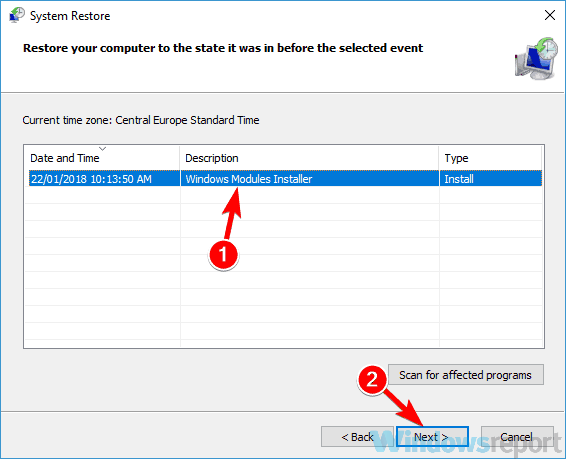
    restore point select media center
  5. Follow the instructions on the screen to complete the process.

Once your system is restored, check if the problem is still there.

Media Center is a useful tool, but sometimes problems with it can occur. However, we hope that you managed to solve your problem after reading this article.

FIX: Windows 10/11 shuts down instead of hibernating/sleep

In order to conserve the energy we often put our computers into Sleep mode or into Hibernation.

Users have reported that their computers are shutting down after they wake up Windows 10 from Hibernation so let’s try to fix that today.

Hibernation is one of the best ways to save your work and to conserve energy and since it doesn’t require any power.

This means that you can put your computer into Hibernation, unplug it completely and connect it whenever you want and continue where you left off.

Although waking up from Hibernation is a bit slower than waking up from Sleep mode it will preserve your data indefinitely while requiring no power to do so.

As you can see, Hibernation is quite useful and many Windows 10 users are using it, but it has been reported that their computers would unexpectedly shut down after waking up from Hibernation.

This can cause some inconvenience, or in some cases make you lose your data, but there’s a way to fix that in Windows 10.

Unexpected shutdown after hibernation can disrupt your work, so it’s important to fix this issue. Speaking of this issue, here are some similar problems that users reported:

  • Unexpected shutdown Windows 7, 10 – This error can appear on other versions of Windows, but even if you’re not using Windows 10, you should be able to apply almost all of our solutions.
  • Unexpected shutdown event id 41, 6008 – Sometimes this problem can come with an error message. To fix the issue, you might have to change your power settings.
  • Unexpected shutdown due to blue screen – Many users reported that an unexpected shutdown was followed by a blue screen. This is usually a driver-related issue, and to fix it, you have to find and remove the problematic driver.
  • Unexpected shutdown after sleep, reboot – Shutdowns can occur in other instances, but you should be able to fix the problem using one of our solutions.

What to do if PC keeps shutting down when on hibernate?

1. Change how hibernation works

  1. Press Windows Key + X to open Win + X menu. Now select Command Prompt (Admin) from the list. You can also use PowerShell (Admin) if you want.
    Unexpected shutdown event id 41
  2. When Command Prompt starts, just type the following into Command Prompt and press Enter to run it:
    bcdedit -enum all
  3. Now you should look for Resume from Hibernate line in the output. It should look something like this: Resume fromHibernate---------------------identifier {3d8d3081-33ac-11dc-9a41-806e6f6e6963}device partition=C:path Windowssystem32winresume.exedescriptioninherit {resumeloadersettings}filedevice partition=C:filepath hiberfil.syspae Yesdebugoptionenabled No
  4. Now, you need to copy the identifier value from the previous step. In our case it was {3d8d3081-33ac-11dc-9a41-806e6f6e6963}, but it will different for your computer.
  5. Now run the following command in Command Prompt
    • bcdedit /deletevalue {3d8d3081-33ac-11dc-9a41-806e6f6e6963} inherit

Of course, remember to use the identifier value that you got in Step 3. After running that command Hibernation should work without any problems.

2. Uninstall the network driver

  1. Open Device Manager.
  2. When Device Manager opens, locate your network adapter, right-click it and choose Uninstall device.
    Unexpected shutdown event id 41
  3. When the confirmation dialog appears, check Remove driver software for this device, if available. Now click Uninstall.
    Unexpected shutdown due to blue screen
  4. After removing the driver, click the Scan for hardware changes icon.
    Unexpected shutdown Windows 7
  5. Windows will now install the default driver.

As we briefly mentioned in one of our previous solutions, your drivers can sometimes cause unexpected shutdowns to occur after hibernation.

Several users reported that their network driver caused the issue to occur.

It’s also worth mentioning that other drivers, such as Intel(R) Management Engine Interface can cause this problem as well.

To fix the problem, it’s advised that you uninstall your network driver. This is quite simple to do, and you can do it by following the above steps.

After installing the default driver, the issue should be resolved. To keep your system running smoothly, it’s always recommended to download and install the latest driver.

You can download the latest driver right from the manufacturer’s website. Downloading the drivers manually can sometimes be a hard task, especially if you don’t know the exact model of your device.

However, you can use third-party tools to automatically update all your drivers with just a single click.

Driver updater software scan your PC for out-of-date drivers and automatically install the latest driver version that is suitable for your specific hardware.

3. Change power settings

  1. Press Windows Key + S and type power settings. Select Power & sleep settings from the list.
    Unexpected shutdown Windows 10
  2. The Settings app will now appear. Navigate to Additional power settings in the Related settings category.
    Unexpected shutdown event id 6008
  3. You should now see all the power plans on your PC. Locate your power plan and click Change plan settings next to it.
    Unexpected shutdown due to blue screen
  4. Click Change advanced power settings.
    Unexpected shutdown after reboot
  5. Expand the Hard disk category and set Turn off hard disk after to 0 minutes. Now click Apply and OK to save changes.
    Unexpected shutdown Windows 7

If you’re getting an unexpected shutdown after hibernation, the problem might be your power plan settings.

According to users, their hard drive was set to turn off automatically after being idle for some time, and it seems that this setting caused the unexpected shutdown.

However, you can fix this issue by making a couple of changes to your power plan. To do that, just follow the above steps.

After making these changes, the problem with unexpected shutdowns should be completely resolved.

Some users are suggesting to set the value to 2180 minutes, or any other high value, so you can try that as well.

4. Remove MotionJoy software and drivers

Some users are using their PlayStation controller on their PC via MotionJoy software.

This is a third-party software, and although it allows you to use a PS3 controller on your PC, it can sometimes cause the unexpected shutdown to occur after hibernation.

To fix this problem, users are suggesting to remove MotionJoy driver and software from your PC. This is relatively simple to do, and you can do it right from the Settings app.

However, we have to mention that this method although simple isn’t always the most effective.

There are times when certain applications can leave files or registry entries behind once you remove them, and those files can still cause this issue to occur.

If you want to completely remove an application along with all files and registry entries, we suggest using an uninstaller software tool.

5. Prevent your PC to turn off USB devices in order to save power

  1. Press Windows Key + X and choose Device Manager from the list.
    Unexpected shutdown due to blue screen
  2. When Device Manager opens, locate your mouse on the list of devices and double-click it.
  3. Go to the Power Management tab. Make sure that Allow the computer to turn off this device to save power option is disabled. Now click OK to save changes.
    Unexpected shutdown after sleep

Sometimes unexpected shutdown can occur after hibernation due to your USB devices. Your PC will sometimes turn off unused USB devices in order to save power.

This is the default behavior, but it can sometimes cause issues to occur. However, to fix the problem with the unexpected shutdowns, you just have to disable this feature for your USB devices.

After making these changes, check if the problem is still there. Keep in mind that other USB devicesor even devices such as keyboards and monitors can cause this issue to appear.

So, repeat these steps for as many devices as you can. Some users are suggesting to uncheck Allow this device to wake the computer.

Therefore, you might want to try disabling this option as well and check if it works.

6. Use default power plans

Windows is quite customizable, and as such it allows you to fine-tune your power plans. However, sometimes non-default power plans can cause an unexpected shutdown to occur.

To fix the problem, users are suggesting to stick to default power plans.

To change your power plan simply follow the instructions from Solution 3 and pick one of the three default power plans.

7. Update your BIOS

If other solutions didn’t fix the unexpected shutdown issue, the problem might be related to your BIOS.

Sometimes there might be slight incompatibility issues with your BIOS and hardware and that can lead to this problem.

To fix it, some users are suggesting to update your BIOS to the latest version. This is an advanced and slightly risky procedure, so keep in mind that you’re performing it at your own risk.

We already explained briefly how to flash your BIOS in this useful article. You can also check your motherboard manual for detailed and exact instructions on how to update your BIOS.

As long as you follow the instructions from the motherboard manual carefully, you won’t have any problems with the BIOS update. Once you update your BIOS, the issue should be resolved.

Unexpected shutdown after hibernation can be quite annoying, but we hope that you managed to fix this problem using one of our solutions.

Age of Empires 4: Which faction is the best?

Friends, we have all gathered here to talk about one of the most expected games of 2021, and by that, we are obviously talking about Age of Empires 4.

As you might know, the last mainline Age of Empires game was way back in 2005. Since then, we’ve seen a lot of remasters, re-releases of the original games, which were all pretty good.

But now, the time has come to embark on an entirely new voyage and relive the stories of some of the world’s greatest ancient civilizations.

We’re about to have a look at the playable factions that World’s Edge and Relic Entertainment introduced to their brand new title. Spoiler alert, there are eight of them.

Age of Empires 4 has eight playable civilizations

Yes, you’ve heard correctly, there are a total of eight playable factions within Age of Empires IV, all unique in their own ways, and from totally different parts of the world.

Creators chose these civilizations due to their rich heritage, the historical impact they’ve had, and also to add a bit of flavor and make sure there’s a little bit of everything in the game, to satisfy everyone’s taste.

We’re about to break each of them down individually and see what they look like, and also figure out their strengths and weaknesses. Are you ready to embark on a legendary voyage into the past?

The Rus

As described by the game’s developers, the Rus are ruthless, highly skilled hunters that grow more powerful as they expand to new frontiers through the ages.

In Age of Empires 4, the Rus civilization tells the story of a fledgling empire caught between powerful opponents over the years 882-1552 CE.

Hardened by devastating invasions, political instability, and bitter winters, the Rus people were definitely built for survival.

Masters of hunting, trade, and wooden construction, they would rebuild their realm as their leaders fought to birth a new empire under Moscow.

Why play the Rus?

Playing the Rus means the wilderness is yours to command. You can reap key benefits from your surroundings, particularly in gathering resources to build up a strong economy quickly.

Enemies facing the Rus will find it difficult to disrupt their growth, as they gain steady incomes of Gold from the Hunting Cabin, which acts as a standard mill, and the unique Bounty score when killing Gaia animals.

With the Bounty system, players earn Gold when killing any animal on the map. This contributes to the player’s Bounty total, as it increases, food harvest and Hunting Cabins’ gold rate also increase.

Rus unique units

  • Horse Archers are a unique ranged cavalry unit available in the Castle Age. They are highly mobile and effective against slower melee units.
  • The Streltsy is a high damage, light gunpowder infantry unit with a stronger rate of fire when stationary. They employ a huge axe that is potent against melee attackers.
  • Warrior Monks are a military-minded support unit that improves combat capabilities of nearby units after they attack. They can pick up Relics, convert enemy units, and capture Sacred Sites.

The Holy Roman Empire

The Holy Roman Empire is a civilization that is shaped by a powerful infantry army, made stronger by the support of their most valuable unit, which is the Prelate.

The Holy Roman Empire in Age of Empires 4 spans the years 936-1517 CE, centered in a region that comprises modern Germany, claimed to be the rightful successor to the ancient Roman Empire.

Its emperors controlled central Europe with a stalwart infantry of exuberant Landsknechte and aimed to capture the center of the Christian world itself: Rome.

Why play the Holy Roman Empire?

Well, one of their biggest perks is the fact that, through careful use of the Prelate, players will be able to buff Villagers, speeding up their economic growth.

This is a powerful infantry-based civilization, able to fend off opponents with several options for defensive turtling.

Facing them in battle will require careful consideration, as the Holy Roman Empire can recover quickly from attacks and their Landsknechte’s devastating area-of-effect capability is sure to make advances against them difficult.

Their structures are highly durable and difficult to destroy, further enhanced by upgrades improving their strength.

Outposts, Towers, and Keeps can garrison Relics for bonus armor and damage, making the Holy Roman Empire a truly impenetrable civilization.

Holy Roman Empire unique units

  • As you would imagine, the Prelate is a support unit that heals and inspires nearby armies, granting them benefits.
  • The Landsknecht is a light infantry unit with a two-handed sword, adept at area-of-effect damage.

The Chinese

Creators describe the Chinese civilization as one with impressive constructions, gunpowder strength, and a dynasty system that provides unique benefits and varied strategies to overcome the opponent.

In Age of Empires 4, the Chinese are a thriving, unique civilization that grows through their dynasty system over the years 907-1644 CE. They are powerful defenders behind formidable fortifications.

The engineering prowess of the Chinese dominated the world for centuries, a trait present in Age of Empires IV. 

You live through history as Chinese culture, strength, and innovations created ripples across Eurasia, growing your empire as you move through vibrant Tang, Song, Yuan, and Ming Dynasties.

Your units speak Mandarin Chinese, a Sinitic language originating in North China.

Why play the Chinese?

At the dawn of their civilization, the Chinese have a head start with additional Villagers. This lays the foundation for a robust economy, fueling the needs of a great, expansive civilization.

City planning is an important growth strategy. A special trait of the Chinese civilization is their dynasty system, which offers several advantages when triggered, like unit bonuses and access to unique buildings.

This gives several routes in strategy and ways to leverage all that the Chinese civilization has to offer.

Also, the military prowess of the Chinese lies in their mighty gunpowder units. They have access to multiple unique gunpowder units, making them a fierce civilization to go up against in battle.

Chinese unique units

  • The Imperial Official is an official produced from the Town Center that collects gold from nearby buildings.
  • Fire Lancer is a cavalry unit from the Yuan Dynasty equipped with a fire lance.
  • Nest of Bees is a powerful siege weapon that fires an immense burst of rocket arrows in an area.

The English

The English are a defensive powerhouse in Age of Empires 4. Their strength is unparalleled, reinforced by the power of their archery units, a firm control over castles and defensive buildings, and a highly dependable food economy that sustains them through the Ages.

Age of Empires 4, introduces the English civilization during the Anglo-Saxon era in Great Britain spanning from 850-1555 CE.

As you progress from the Middle Ages to the Late Renaissance in the 16th century, you bear witness to the story of a civilization that survived the fall of empires, conquerors, and plagues.

The game will have you you build up the English civilization across four eras: the Anglo-Saxon, Anglo-Norman, English Gothic, and Tudor eras.

Each Age has its distinct style from architecture to armor, with populations speaking Old English in the Dark Age and evolving to Early Modern English by the Imperial Age.

Why play the English?

Simple! Because playing as the English in Age IV opens the door to several key advantages, creating an exciting battlefield for resources and victory.

The English have access to cheaper farms compared to other civilizations, giving them a highly dependable source of food to greatly expand upgrades and armies throughout matches.

Also, this faction specializes in their network of castles: Town Centers, Outposts, Towers, and Keeps trigger an alarm when an enemy approaches, prompting nearby units and defensive structures to fire faster for a short period.

Their Keeps can produce all units, allowing for the English defense to reign supreme in a match.

  • The English Villager is the humble unit of the civilization and the key to starting a powerful economy. They have light fighting abilities with a ranged bow attack.
  • Longbowman is an unrivaled Archer unit, making it a powerful foe on the battlefield with their long range and powerful upgrades.
  • English Man-at-Arms is a sturdy infantry unit, available earlier than other civilizations and has an extra armor upgrade.

The Delhi Sultanate

The Delhi Sultanate civilization is at the forefront of technological innovation. They have a strong focus on research and defense, with an edge in technological advancement over other civilizations.

In the game, the Delhi Sultanate civilization is based on the powerful empire formed from the invasion of the Ghurid Dynasty (originating in Persia) into northern India spanning the years 879-1526 CE.

For 300 years, this empire shaped an independent Indo-Islamic region, adopting technology present in India.

Advancing through the Ages will actually allow us to experience this civilization’s rich and vast history.

With the first Age reflecting the Turkish and Iranian Ghurid Sultanate, playing the Farsi/Persian-speaking Delhi Sultanate civilization brings you through the Mamluk and Khalji Dynasty, Tughlaq Dynasty, and the Sayyid and Lodi Dynasty.

Why play as the Delhi Sultanate?

Strategic decisions in the early Ages of the match are essential for the Delhi Sultanate civilization, which emerges as a dominating force in the late game.

The Delhi Sultanate army can be terrifying to encounter: the core of their army, the War Elephant, is a melee unit of staggering raw strength capable of high damage.

This faction’s specialty lies in research. Not only do they have access to several upgrade options throughout the Ages, but their unique Scholar Research System provides an advantage in research that no other civilization has.

You can research technology with no resource cost but at a greater time investment. To offset this, the Delhi Sultanate uses Scholars, each of which speeds up research.

While biding their time growing their strength through the Ages, the Delhi Sultanate can tap into their defense through foot units’ abilities to construct defensive structures.

Once their military reaches full heights, this proud civilization’s power is a force to be reckoned with.

Delhi Sultanate unique units

  • Scholars are the civilization’s equivalent of the Monk with a unique ability to speed up research and technology upgrades.
  • The mighty War Elephant is a powerful melee unit with high health and damage against units and structures.
  • Not very different from the second one, the Tower War Elephant is a devastating unit with a ranged attack: Two archers mounted in a tower on a War Elephant.

The Mongols

The Mongols are an agile civilization, excelling in hit-and-run military strategies and capable of expanding armies rapidly.

You witness the Mongols through the Ages, spanning from 1000-1500 CE, as a disciplined civilization, recognized for changing history in connecting the East to the West.

In the game, Mongols are known for their unique structure and are at their most powerful when playing to their strengths in tight groups. They speak Mongolian, which is the most widely spoken of the Mongolic languages.

Why pay as the Mongols?

This is described as being one of the best factions for beginners. A fearsome force, one may not meet them in massive throngs, but even in small numbers, their army can outmaneuver enemies with ease.

Their aggressive military production capabilities force the opponent to be on the defensive early.

They are a nomadic civilization with the ability to move their bases. Combined with early access to cavalry units and speed granted from Outposts, the Mongols reign supreme in flanking enemies and retreating quickly before enemies have a chance to catch up.

You can build up your economy with unique buildings, like the stone-mining Ovoo. The Mongols’ need for resources for their army can trigger a dramatic battle for resources as they pursue total domination.

Mongols unique units

  • The Khan is a unique horse archer unit. His Signal Arrow ability supports and strengthens the Mongol army, making him a fearsome foe.
  • Mangudai are the star of the Mongols’ fearsome military, a supreme horse archer that excels at hit-and-run tactics.

The Abbasid Dynasty

The Abbasid Dynasty is a highly adaptive civilization due to its ability to research unique upgrades at the House of Wisdom.

These upgrades impact and alter core game elements and mechanics, providing a unique way to build your empire.

In this game, the Abbasid Dynasty civilization spans the years 750-1517 CE and is based on the Abbasid Caliphate and the Mamluk Sultanate.

The empire was born in modern-day Iraq, but after the Mongols destroyed its capital of Baghdad in 1258, the seat of power moved to Cairo.

You will experience the Golden Age of Islam playing the Abbasid Dynasty. This period saw flourishing technological innovations as the medieval world raced towards the modern era.

This faction ruled the spiritual heart of the Islamic world for nearly 800 years, surviving civil wars, the Crusades, the Mongol invasion, relentless piracy, and rebellions.

Why play as the Abbasid Dynasty?

The Abbasid Dynasty civilization is centered around their House of Wisdom, which provides unique upgrade opportunities and acts as the basis of their Golden Age mechanic.

As buildings are constructed around the House of Wisdom, the tier of their Golden Age increases, bringing with it increases to gather, research, and production rates.

Unique to their civilization, the Abbasid Dynasty receive Camel Archers and Camel Riders, which serve as unique anti-cavalry cavalry units.

This civilization’s unique ability to construct Landmarks and advance through the ages without needing to assign active villagers enables the Abbasid Dynasty to continue gathering resources, construct buildings, or perform other tasks allowing uninterrupted growth.

Abbasid Dynasty unique units

  • Camel Archers is an anti-cavalry cavalry unit that reduces damage from nearby enemy cavalry units. Their expanded attack range and higher damage than average Horse Archers allows them to pick away at enemy cavalry from a safe distance.
  • The Imam is an inspirational community leader that can be created from the Abbasid’s Mosque building.

The French

Known for their cavalry, the French are a fearsome army whose armored knights and charges can tip the tides of battle.

The French civilization in Age of Empires 4 spans the years 840-1559 CE and is based on a medieval France that fought its way from adversity to prosperity.

Overcoming invasions, plagues, and revolt, France emerged as a powerful modern nation with a lot to offer.

Playing the French will take you through the age of chivalry and honorable combat, to the time of Joanne d’Arc and France’s darkest hour, to the formation of a disciplined standing army capable of liberating the nation with the roar of cannon fire.

Why play as the French?

This faction’s strength lies in their formidable army of knights, gunpowder siege weapons, and advantages in trade. French Traders have the unique ability to bring back any resources needed, a valuable trait during a resource shortage.

French cavalry charges can break enemy lines and give bonus damage, useful for hit-and-run tactics. French units also have access to several upgrades, ranging from special health to defense bonuses available only for certain French troops.

They also have a unique Influence system, where units cost less from Archery Ranges and Stables around the Keep. Their Town Center can produce units quicker with each Age, a key advantage in hastening their economy.

French unique units

  • The Royal Knight is the French civilization’s heavily armored knight, with their fearsome charge ability.
  • Arbalétrier are a powerful range unit, who gains a special ability called Pavise, a deployable shield for ranged defense.
  • The Cannon is a mobile gunpowder siege weapon unique to the French. Unlike the Bombard, the Cannon does not need to pack and unpack.

These are the eight civilizations that are playable in Age of Empires IV, with their strengths and all the unique units at their disposal.

Whichever you choose to play is up to you, but we are more than sure that no matter which one you pick, you will have a blast.

We’re not sure yet, but creators could add a couple of new factions along the way, making this awesome game even more entertaining than it already is.

Which civilization will you pick as your first one in Age of Empires 4? Share your opinion with us in the comments section below.

Full Fix: Att.net email not working with Outlook

Many users use att.net email, but sometimes this email provider might not work properly with Outlook. This can be a problem, but in today’s article, we’ll show you how to fix this issue on Windows 10.

Att.net email has a number of users, but some of them reported various issues with att.net mail and Outlook. Speaking of issues, here are some common problems that users reported:

  • att.net email not working with Outlook 2010 – This issue can affect almost any version of Outlook, and Outlook 2010 isn’t an exception. However, you should be able to fix the problem using one of our solutions.
  • att.net email won’t send – Sometimes your att.net emails can’t be sent at all. However, you might be able to fix the issue by reconfiguring your att.net account.

Att.net email not working with Outlook, how to fix it?

  1. Make sure that your account is properly configured
  2. Check your antivirus
  3. Use IMAP instead of POP account
  4. Remove your email profile
  5. Use webmail or a different email client
  6. Start Outlook in Safe Mode
  7. Switch to Google DNS

1. Make sure that your account is properly configured

Sometimes att.net email isn’t working with Outlook because the email account isn’t configured properly. This is a common problem with almost any email provider, but you can fix it if you properly configure your email account. To add an att.net email account to Outlook, you need to do the following:

  1. Open Outlook and go to File > Add Account.
  2. Now choose Manual setup or additional server types.
  3. Select Pop or IMAP and enter the desired display name and your email address.
  4. Set the account type. You can use IMAP or POP3.
  5. Depending on the selected account type, you configure your incoming and outgoing server:If you’re using IMAP server, use the following settings:Incoming mail server:imap.mail.att.net
    • Outgoing mail server: smtp.mail.att.net
    • As for POP3 server, use the following data: Incoming mail server:inbound.att.net
    • Outgoing mail server: outbound.att.net
  6. Enter your full email address and paste your secure mail key. Make sure to check to Remember password and Require logon using Secure Password Authentication.

After setting the server, you just need to configure ports and a few more settings:

  1. Click More Settings and check My outgoing server (SMTP) requires authentication. Now select Use same settings as my incoming mail server.
  2. Now you just need to configure your ports. For incoming server use: 993 (for IMAP) or 995 ( for POP3).
    For outgoing server enter: 465 (works for both IMAP and POP3).In Use the following type of encrypted connection section, select SSL for both Outgoing and Incoming server.
  3. After doing that, click OK and then Next. Outlook will now test your connection. If everything is in order, click Finish.

As you might’ve noticed, we mention that AT&T email requires a secure mail key in order to create a new email account. This is a security feature that should provide extra security to your email client.

If you don’t have a secure mail key generated, you’ll stop the account creation process and generate the secure mail key. This process is quite simple, and you can do it in a minute or two. To generate a secure key, do the following:

  1. Go to your AT&T profile and choose Sign-in info.
  2. Select your email account and scroll to the Secure mail key section and select Manage secure mail key.
  3. Select your email address, and click Add secure mail key. You can set a nickname for that secure mail key in order to recognize it in the future.
  4. Choose Create secure mail key and click Copy secure mail key to clipboard. Click OK.
  5. Go to your email client and use the secure mail key instead of your password.

This procedure might be a bit overwhelming at first, but if you follow the instructions carefully you should be able to add and configure your att.net email without too much hassle. Just be sure to create a secure mail key and have it available when needed.

2. Check your antivirus

Before we start fixing this issue, it’s always a good idea to check your antivirus and make sure that it’s not interfering with your applications. Third-party antivirus tools can cause issues to appear, and in order to fix them, you’ll need to disable certain antivirus settings.

If that doesn’t work, your next step would be to disable your antivirus altogether. In the worst-case scenario, your only option might be to uninstall your antivirus. If removing the antivirus fixes the issue, you should seriously consider switching to a different antivirus.

3. Use IMAP instead of POP account

As you might know, there are two types of email accounts, IMAP and POP, and IMAP is newer between the two. As a newer standard, it also offers certain features, such as the ability to sync your emails across all devices.

With the introduction of IMAP, the POP standard became outdated, and many email providers are moving away from it, including AT&T. If you have any issues with att.net email and Outlook, it might be because you’re using a POP account.

To fix that, you need to change your account settings in Outlook and set your email to use the IMAP server. To see the addresses and ports related to the IMAP server, check Solution 2.

After switching to an IMAP account type, the problem should be resolved.

4. Remove your email profile

If your att.net email isn’t working with Outlook, you might be able to fix the problem simply by removing your email account and recreating it. Removing your profile will remove files stored locally on your PC, but all your email messages that are on the server will be preserved.

To remove your profile you need to follow these steps:

  1. Go to File > Account Settings > Manage Profiles.
  2. Now click on Show Profiles. Select your account and click Remove.

After doing that, add your att.net email by following the steps from Solution 2. Once your account is added again, check if the issue is still there.

5. Use webmail or a different email client

If you’re still having problems with att.net email and Outlook, you might want to try using the webmail version as a temporary workaround. Webmail version doesn’t require any configuration, and while it might not be as convenient as Outlook, it should allow you to check your emails without issues.

If you prefer using email clients and want a proper Outlook replacement, you might want to try out Mailbird.

This amazing tool brings everything you may ever need to enjoy fast, efficient, and secure email sending and receiving, including encryption, message translation, calendar and tasks, notes, and more.

With all of these tools, it can double as both an email client and a personal information manager, just like Outlook.

⇒ Get Mailbird

6. Start Outlook in Safe Mode

If att.net email is not working with Outlook, the issue might be Outlook settings or add-ons. Sometimes these add-ons can interfere with Outlook and cause issues to appear. To check if your settings or add-ons are the problems, we advise you to start Outlook in Safe Mode. This is quite simple to do, and you can do it by following these steps:

  1. Press Windows Key + R and type Outlook /safe.
  2. Press Enter or click the OK button.
    att.net email won't send
  3. When a new window appears, click OK to continue.

Outlook will now start, and you should check if the issue still appears. You can also start Outlook in Safe Mode by doing the following:

  1. Locate Outlook shortcut.
  2. Press and hold the Ctrl key and start Outlook. Once you do that, Outlook will start in Safe Mode.

If the issue doesn’t appear in Safe Mode, it means that one of your settings or add-ons was causing the problem, so you need to find it and disable it.

7. Switch to Google DNS

  1. Click the network icon on your Taskbar.
  2. Select your network.
    att.net email not working with Outlook 2010
  3. Choose Change adapter options.
    att.net email won't send
  4. List of all network connections on your PC will now appear.
  5. Right-click your network and select Properties.
    att.net email not working with outlook
  6. Select Internet Protocol Version 4 (TCP/IPv4) from the list and click the Properties button.
    att.net email not working with Outlook 2010
  7. Select Use the following DNS server addresses.
  8. Enter 8.8.8.8 as the Preferred and 8.8.4.4 as Alternate DNS server.
  9. Click OK to save changes.
    att.net email won't send

In some instances, the problem with att.net mail can be caused by your DNS. However, users reported that they managed to fix the problem simply by switching to Google’s DNS.

After saving the changes, check if the issue with att.net email and Outlook is resolved.

Many users use AT&T, and if att.net email isn’t working with Outlook, you should be able to fix this issue using one of our solutions.

The above-mentioned solutions also work if you have encountered the following issues:

Att.net email not syncing in Outlook – Some users reported that the emails they received from ATT.net don’t sync when using Outlook.

Windows 10/11 update error 0x800703ed [FIX]

Windows 10 is a massive step forward in many categories, with a lot of stability improvements and timely support.

Nonetheless, even though we can expect a lot from Windows 10, there’s still an abundance of issues that need to be addressed.

Yes, we are talking about update errors and the inability to get scheduled updates.

The error we’ll try to troubleshoot today goes by the code 0x800703ed. This error is mainly caused by faulty drivers or system files corruption.

So, in case you’ve encountered an error with this code, follow the steps below.

How can I fix Windows 10 update error 0x800703ed?

Update error 0x800703ed can be problematic and prevent you from installing the latest updates. Speaking of update errors, here some similar issues that users reported:

  • Windows 10 update failed dual boot – According to users, this issue can occur if you’re using dual boot on your PC. To fix the problem, simply make your system partition as active and check if that helps.
  • 0x800703ed Windows 10 upgrade – If you’re having this problem, the issue might be your drivers. However, you can fix the problem by updating your drivers to the latest version.

Solution 1 – Use SFC and DISM scans

If you can’t update your Windows to the latest version due to error 0x800703ed, you might want to check your system for file corruption. To do that, you just need to run an SFC scan. This is relatively simple, and you can do it by following these steps:

  1. Press Windows Key + X to open Win + X menu. Now choose Command Prompt (Admin) from the menu. If Command Prompt isn’t available, you can also use PowerShell (Admin).
    0x800703ed Windows 10 upgrade
  2. When Command Prompt starts, enter sfc /scannow and press Enter to run it.
    Windows 10 update failed dual boot
  3. SFC scan will now start. Keep in mind that the scan can take up to 15 minutes, so don’t interrupt it.

Once the scan is finished, check if the problem is still there. If you can’t run SFC scan, or if the issue is still there, your next step would be to run DISM scan. To do that, follow these steps:

  1. Open Command Prompt as administrator.
  2. Now run DISM /Online /Cleanup-Image /RestoreHealth command.
    0x800703ed Windows 10 upgrade
  3. Wait for the DISM scan to finish. This process usually takes up to 20 minutes, so be patient.

Once the DISM scan if completed, check if the issue is still there. If you weren’t able to run SFC scan before, try running it again and check if that solves your problem.


Solution 2 – Use batch file to reset Windows Update components

We are aware that the troubleshooting can occasionally be quite annoying, especially with complex issues like this. Furthermore, if you are not experienced enough, you can cause additional issues that may prove even harder to resolve.

Good thing is that tech enthusiasts created the script that can do everything instead of you. You’ll just need to download and run it. Follow these instructions to utilize this helpful tool:

  1. Download the script from here.
  2. Save the file.
  3. Right-click and Run as administrator.
  4. After the process is finished, check for the updates.

Additionally, you can use this script to troubleshoot any kind of update-related issue.


Solution 3 – Update BIOS

One thing that is of utmost importance for all-around system performance is updated BIOS. Some of the users weren’t able to even install Windows 10, while others experienced a variety of issues after the installation.

Because of that, we advise you to replace the outdated BIOS drivers with the latest ones.

On the other hand, the process is risky and involves some advanced knowledge. So, we further recommend you to ask something else before pursuing flashing procedure and updating BIOS firmware, in case you’re not sure what you’re doing.

Solution 4 – Update GPU and Network drivers

According to users, outdated drivers can cause this issue to occur on your PC. If you’re getting error 0x800703ed, we would have to recommend that you update your drivers.

In most cases this problem occurs because your GPU and network drivers are out of date, and in order to fix the problem, it’s advised to update them.

To update your drivers, simply visit your hardware manufacturer’s website and download the latest drivers for your hardware. This is a relatively simple procedure if you know the model of your hardware and how to download your drivers.

If you don’t want to manually download the drivers, you can always use an automated tool to download the necessary drivers automatically.

⇒ Get Outbyte Driver Updater


Solution 5 – Use Windows boot

According to users, you might encounter error 0x800703ed if you’re using both Linux and Windows in a dual boot mode. To fix the problem, you need to set your PC to use Windows boot instead of Linux boot.

To do that, you’ll need a third-party application such as easyBCD. Simply set your PC to use Windows boot and the issue should be completely resolved.


Solution 6 – Check your antivirus

Antivirus is the common cause for update errors, and if you’re having error 0x800703ed, be sure to disable certain antivirus features. If that doesn’t work, you might have to completely disable or remove your antivirus.

If removing the antivirus solves your problem, this might be a perfect time to consider switching to a different antivirus solution.

Why not go with an antivirus that won’t stop your Windows from working as it should? Or won’t interfere with any Windows Updates. 

There a many options for good Windows 10 compatible antiviruses that ensure great protection.

Solution 7 – Make sure that your system partition is set to Active

According to users, this issue can occur if your system partition isn’t set to Active. To fix the problem, you just need to change your partition settings. This is relatively simple, and you can do it by following these steps:

  1. Press Windows Key + X to open Win + X menu. Now choose Disk Management from the list.
    Windows 10 update failed dual boot
  2. Right-click your system partition and choose Mark Partition as Active from the menu.

After doing that, try to install the update again. If you don’t want to use Disk Management, you can use any other third-party disk management tool.


Solution 8 – Disconnect all unnecessary devices

0x800703ed Windows 10 upgrade

If you can’t update Windows 10 due to error 0x800703ed, the problem might be your USB devices. Sometimes other devices can interfere with your PC and that can lead to this and many other errors.

To fix the problem, users are suggesting to disconnect all devices from your PC, except for your keyboard and mouse.

If you have a second monitor, be sure to disconnect it as well and check if that solves your problem. Some users are also recommending to change your resolution to 1024×768 before trying to install the update, so you might want to try that as well.


Solution 9 – Change update settings

According to users, sometimes update error 0x800703ed can be caused by your update settings. Your settings can interfere with your system, and that could lead to this and many other errors.

However, you can fix the issue simply by changing a couple of settings. To do that, just follow these steps:

  1. Press Windows + I to open the Settings app.
  2. When Settings app opens, go to Update & Security section.
    Windows 10 update failed dual boot
  3. Now choose Advanced options.
    0x800703ed Windows 10 upgrade
  4. Scroll all the way down and select Delivery Optimization.
    Windows 10 update failed dual boot
  5. Disable Allow downloads from other PCs option.
    0x800703ed Windows 10 upgrade

After doing that, try to install the update again.


Solution 10 – Repair system with USB/DVD system installation media

Besides the clean installation, we’ve got one last solution for you. If the previous workarounds fell short, you can use USB/DVD drive with system installation to repair the update issues.

The process is a bit lengthy, but it is certainly worth trying. Follow these instructions closely:

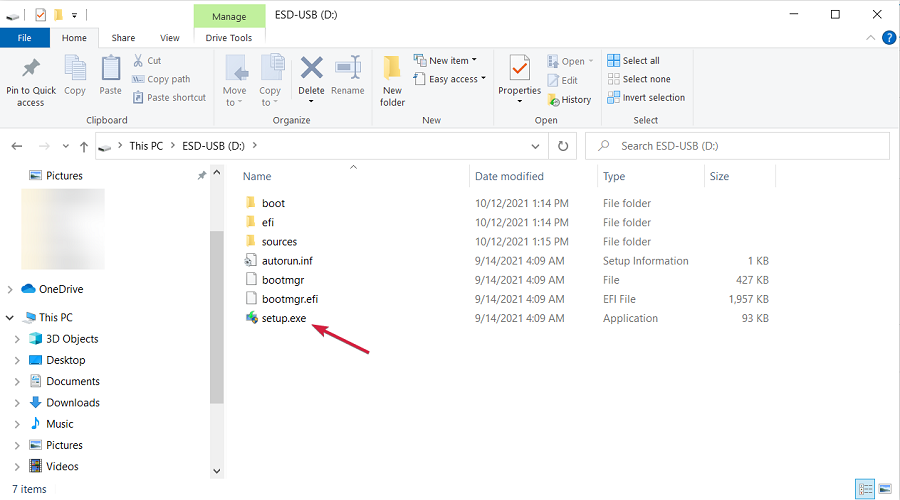
  1. Insert DVD or USB with Windows 10 installation (the same architecture and version you have running on your PC).
  2. Open the drive and double-click Setup.
  3. Wait for the Setup to prepare.
  4. Choose to Download and Install Updates.
  5. After updating, Accept the License Terms.
  6. Choose what you want to keep.
  7. And now you’ll just have to wait for the process to finish.
  8. If the update issues are still there, your only hope is the clean reinstallation.

That should be that. Additionally, we are available for your questions and suggestions. Be free to share them with us in the comments section.

[Fixed] eM Client emails keep disappearing

eM Client is a popular email client, but users report that the Email section is often disappearing out of the blue. While this can seem like a major problem, rest assured that it is not.

In fact, you can easily restore all your emails by using this guide.

What to do if the Email section has disappeared in eM Client?

1. Use the context menu

  1. In the left pane, you should see a list of sections. Right-click any list item.
  2. From the context menu, be sure to check Mail.
  3. After doing that, the Mail section will appear in the left pane.

If the Email section is missing in eM Client, you can get it back in two clicks. You just need to complete the above procedure.

2. Reinstall eM Client

Sometimes this problem can occur if there’s a glitch with your application, and to fix it, you need to reinstall it.

By using a dedicated professional uninstaller software, you can remove the eM Client safely. Using a specialized tool to do so can assist you in completely removing the clutter left behind by uninstalling the app from your computer.

Essentially, the uninstaller is used to undo modifications made to the database when you have installed the email client. Because all modifications performed during installation are reversed, the app may be removed without leaving any junk files.

Once the application is removed, download the latest version and install it.

3. Check if the issue appears in other email clients

If Email is missing in eM Client, perhaps you should try using a different email client as a temporary workaround. There are various eM Client alternatives that seek to benefit on its benefits while reducing its drawbacks.

You may want to test the free versions of different email clients to see the differences for yourself for a better understanding and experience.

Following confirmation that another app works, the next steps will assist you further with eM Client.

4. Try using the web version

The easiest workaround is to use the web version of your email service as a temporary workaround.

For this purpose, you can use any web browser, but if you want to make sure that you’re safe online, there are browsers such as UR Browser.

This browser is privacy-oriented, and it won’t send your data to Google or to third parties. In addition, it comes with tracking, malware, and phishing protection.

For an extra layer of security, there’s a VPN available as well.

If the Email section has disappeared in eM Client, you should be able to get it back using our solutions. Also, do note that they may be applied when dealing with these issues as well:

  • eM Client Exchange email disappearing – With eM Client, you are supposed to add as many accounts as you want without ever worrying about missing important Exchange emails. This clearly doesn’t happen, so you’d better reinstall the eM Client.
  • eM Client missing emails Gmail has them – Even if eM Client is a popular email client for Windows, it seems that it doesn’t always handle Gmail emails with care. Refer to the above procedures for quick solutions.

5. Try out a reliable email client

Mailbird is a top email client for the Windows operating system that differentiates itself from eM Client by focusing on usability and letting you truly manage multiple email accounts with ease.

Mailbird is an intuitive program that will show you how amazing is to have all your emails in one inbox, instead of two or even more.

It goes without saying that they will never disappear. On top of that, it works flawlessly even when it’s integrated with other applications and services.

This includes WhatsApp, Facebook, Google Calendar, and much more, since it is designed with simplicity in mind.

Mailbird

Mailbird

When most of your precious eM Client emails keep disappearing, Mailbird is a powerful alternative to enjoy.
Get it free Visit website

If you found this article helpful, feel free to leave a comment in the area below. We’re eager to hear from you.

Fix Runtime Error 429: ActiveX Component Can’t Create Object

The ActiveX error 429 is a run-time error that some end users have encountered in Windows. The error usually ensures that an open application comes to an abrupt halt and closes.

It also returns an error message stating, “Run-time error ‘429’: ActiveX component can’t create object.” Error 429 is most frequent for MS Office applications, such as Excel, Word, Access, or Outlook, with automated Visual Basic sequence scripts.

Error 429 is largely a consequence of software attempting to access corrupted files. Thus, the automation sequence can’t operate as scripted. This could be due to a corrupted registry, deleted OS files, incomplete installation of software, or corrupted system files.

So there are various potential fixes for ActiveX error 429.

How can I fix ActiveX runtime error 429 on Windows 10?

1. Reregister the Program

If a specific program is generating the ActiveX error, the software might not be correctly configured. You can fix that by reregistering the software with the /regserver switch, which resolves issues with the automation server.

This is how you can reregister software with Run:

  • First, make sure you have admin rights with a Windows admin account.
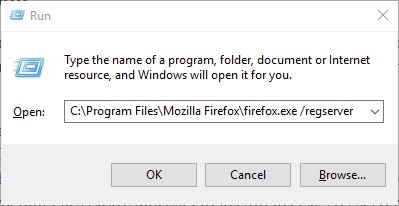
  • Press the Win key + R hotkey to open Run.
  • Enter the full path of the software followed by /regserver in the text box as shown below. Enter the exact path, including the exe, of the software you need to reregister.
  • Press the OK button.

In some cases, this error is confused with connection-related issues such as Proxy Error 429, so make sure you’re troubleshooting the right problem. This guide will walk you through the best fixes.

2. Reregister the Specified File

If the ActiveX error message specifies a particular .OCX or .DLL file title, then the specified file is probably not correctly registered in the registry.

Then you can feasibly fix the ActiveX issue by reregistering the file. This is how you can reregister specified OCX and DLL files via the Command Prompt.

  • Close all open software windows.
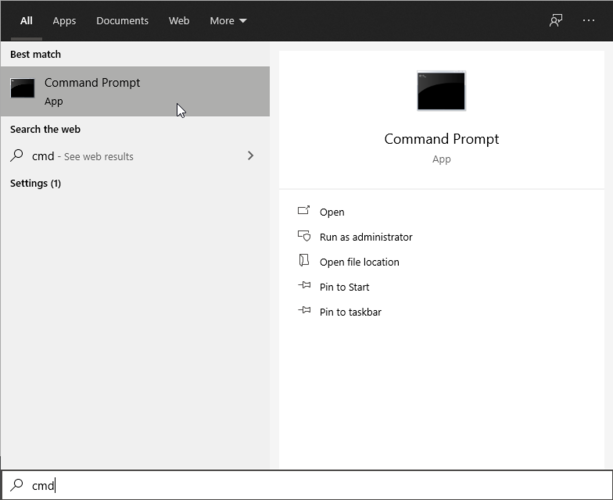
  • Open the Command Prompt in Windows 10 by pressing the Win key + X hotkey and selecting Command Prompt (Admin) from the menu. Alternatively, you can enter ‘cmd’ in the Start menu’s search box to open the Prompt.
  • Now enter ‘regsvr32 Filename.ocx’ or ‘regsvr32 Filename.dll’ in the Command Prompt window. Replace filename with the specified file title.
  • Press the Return key to reregister the file.

3. Run a Virus Scan

It might be the case that a virus has corrupted, may be deleted, and files pertinent to the runtime error. As such, running a full virus scan of Windows with third-party anti-virus software can feasibly fix the ActiveX error 429.

You can find a lot of antivirus software options that fit all types of needs and budgets. Some of the best antivirus solutions that are compatible with Windows 10 PCs come with full-feature free trials, so you can try them out before buying a license.

4. Check for Windows Updates

You should also check for and install Windows updates. Microsoft is usually updating system files that might be associated with error 429. So updating Windows with the latest service packs and patches can help resolve runtime errors.

You can update Windows as follows:

  • Enter ‘Windows update’ in the Cortana or Start menu search box.
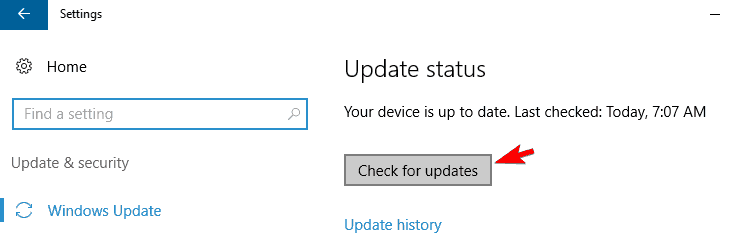
  • Then you can select Check for updates to open the update options directly below.
  • Press the Check for updates button there. If there are available updates, you can press a Download button to add them to Windows.

5. Run the System File Checker

Many system errors are due to corrupted system files, and that includes the ActiveX 429 issue. As such, fixing corrupted system files with the System File Checker tool could be an effective remedy.

You can run an SFC scan in the Command Prompt as follows:

  • First, enter ‘cmd’ in the Cortana or Start menu search box.
  • Then you can right-click Command Prompt and select Run as administrator to open the Prompt’s window.
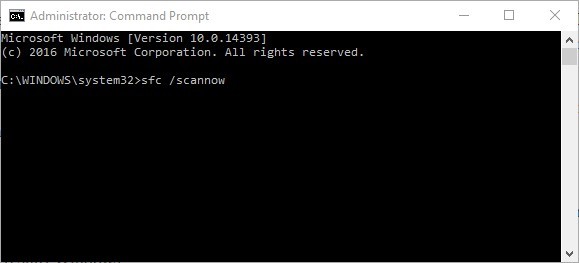
  • Enter ‘sfc /scannow’ in the Command Prompt, and press the Return key.
  • The SFC scan might take up to 20 minutes or longer. If the SFC fixes anything, the Command Prompt will state, Windows Resource Protection found corrupt files and successfully repaired them.
  • Then you can restart Windows.

6. Scan and Fix the Registry

Runtime errors are usually generated from the registry, so an effective registry scan will fix the invalid or corrupted registry keys.

Specialized registry cleaner software is able to scan your registries and identify any problems quickly. You can then instruct the tool to apply fixes, which may even include downloading new system files to replace the broken ones.

7. Undo System Changes with System Restore

The System Restore tool undoes system changes by reverting Windows back to an earlier date. System Restore is Windows’ time machine, and with that tool, you can revert the desktop or laptop back to a date when your software wasn’t returning the ActiveX error message.

However, remember that you’ll lose software and apps installed after the restore point date. You can utilize System Restore as follows:

  • To open System Restore, enter ‘System Restore’ in the Cortana or Start menu search box.
  • Select Create a restore point to open the System Properties window.
  • Press the System Restore button to open the window in the snapshot below.
  • Click the Next button, and then select the Show more recent points option to open a full list of restore dates.
  • Now select an appropriate restore point to revert back to.
  • Press the Next and Finish button to confirm the restore point.

If you’re interested in more info on how to create a restore point and how would that help you, take a look at this simple article to find out everything you need to know.

Those are some of the numerous potential fixes for the Windows ActiveX runtimeerror 429. If none of the above fixes resolve the issue, uninstall and reinstall the software generating the error

If you have further suggestions for fixing ActiveX error 429, please share them below. Also, if you have any other questions, feel free to leave them there.

Thunderbird Won’t Open: 4 Fix if it has Stopped Working

Mozilla Thunderbird is one of the most trusted email clients on the market, available on various platforms used not only as an email client but also as an RSS feed and much more. And the best part? It’s an open-source project.

However, even though this email client is frequently updated and well-coded, users are experiencing several issues with the software.

One is critical, and it’s related to sudden crashes after startup. For this purpose, we prepared a simple but helpful workaround that should help you resolve it.

Why won’t Thunderbird open?

If you have issues opening Thunderbird, there are a few elements that users have attributed to this. Some of them include the following:

  • Outdated software version – If the software is outdated, you will need a new version to respond properly.
  • Insufficient resources – In some cases, users may have run out of device storage. This will mean some applications will cease to respond.
  • Corrupted profile – If the user profile has been corrupted, you generally will have issues using certain applications, including Thunderbird.
  • Firewall or antivirus issues – Users have experienced that, at times, the firewall may block out the Thunderbird app.
  • Corrupted files – If the software installation file has been corrupted, you will likely face a few bugs, including difficulty starting the application.

Although a solid email client, many users reported that Thunderbird wouldn’t open on their PC. This can be an issue. Speaking of Thunderbird, here are some similar issues reported by users:

  • Thunderbird not responding – Many users reported that Thunderbird isn’t responding at all. This can be due to your Thunderbird profile, but you can fix that by deleting parent.lock file.
  • Thunderbird won’t start/ missing profile in Safe Mode – These Thunderbird issues can appear on any version of Windows, but even if you don’t use Windows 10, you should know that most of our solutions can be applied to both Windows 8.1 and 7.
  • Thunderbird won’t start already running – If you’re getting this error message, open Task Manager and close all Thunderbird instances. After doing that, try to start the application again.
  • Thunderbird won’t launch – Many users reported that it wouldn’t launch on their PC. This can be a problem, but you can fix it simply by running Thunderbird in Safe Mode.
  • Thunderbird won’t start after crash – Sometimes, a crash can damage your Thunderbird profile, and to fix that, try reinstalling the application.

What can I do if Thunderbird won’t open?

Before trying our fixes, you should restart and reset your modem. Several users reported that they fixed the issue with Thunderbird simply by restarting their modem. This is relatively simple, and to do it, you need to press the Power button on your modem, wait for a few seconds and then turn it back on again.

You can also consider switching to a different email client. For example, if the previous solution didn’t fix the problem with Thunderbird, this might be an excellent time to consider switching to a different email client.

Many great email clients are available, but if you want one similar to Thunderbird, we recommend you try Mailbird.

Due to its seamless integration with other email clients like Gmail and Outlook, Mailbird is one of the best software options on the market.

You can quickly transfer complicated schedules from your calendar and also add contacts from other third-party software, allowing you not to worry about your data not being compatible.

Or, as an alternative, use a portable version of the app. This version doesn’t require installation, and it won’t add any information to the registry so the previous Thunderbird installation won’t affect it in any way.

Once you download the portable version, run it and check if that solves your problem. If the issue doesn’t appear, you might have to switch to the Portable version until you fix the problem.

1. Delete parent.lock file

  1. Close Mozilla Thunderbird.
  2. Right-click on the Taskbar and open Task Manager.
    Thunderbird won't start Windows 7
  3. Under Processes, find and kill all Thunderbird-related processes.
  4. Press the Windows key + R to bring up the Run command.
  5. Type %appdata% in the command line and press Enter.
    Thunderbird won't start already running
  6. Open the Thunderbird profile folder.
  7. Find and delete the parent.lock file. You may need administrative permission to do so.
  8. Start Thunderbird again. It should now function without any problems.

These steps should also correct any issues with your Thunderbird user profile in case it is corrupted.

2. Reinstall Thunderbird

  1. Press Windows + R, type appwiz.cpl, and hit Enter.
    thunderbird won't open
  2. Search for Thunderbird from the app list, click it, and hit the Uninstall button.
    thunderbird won't open
  3. Follow the wizard to complete the uninstallation.
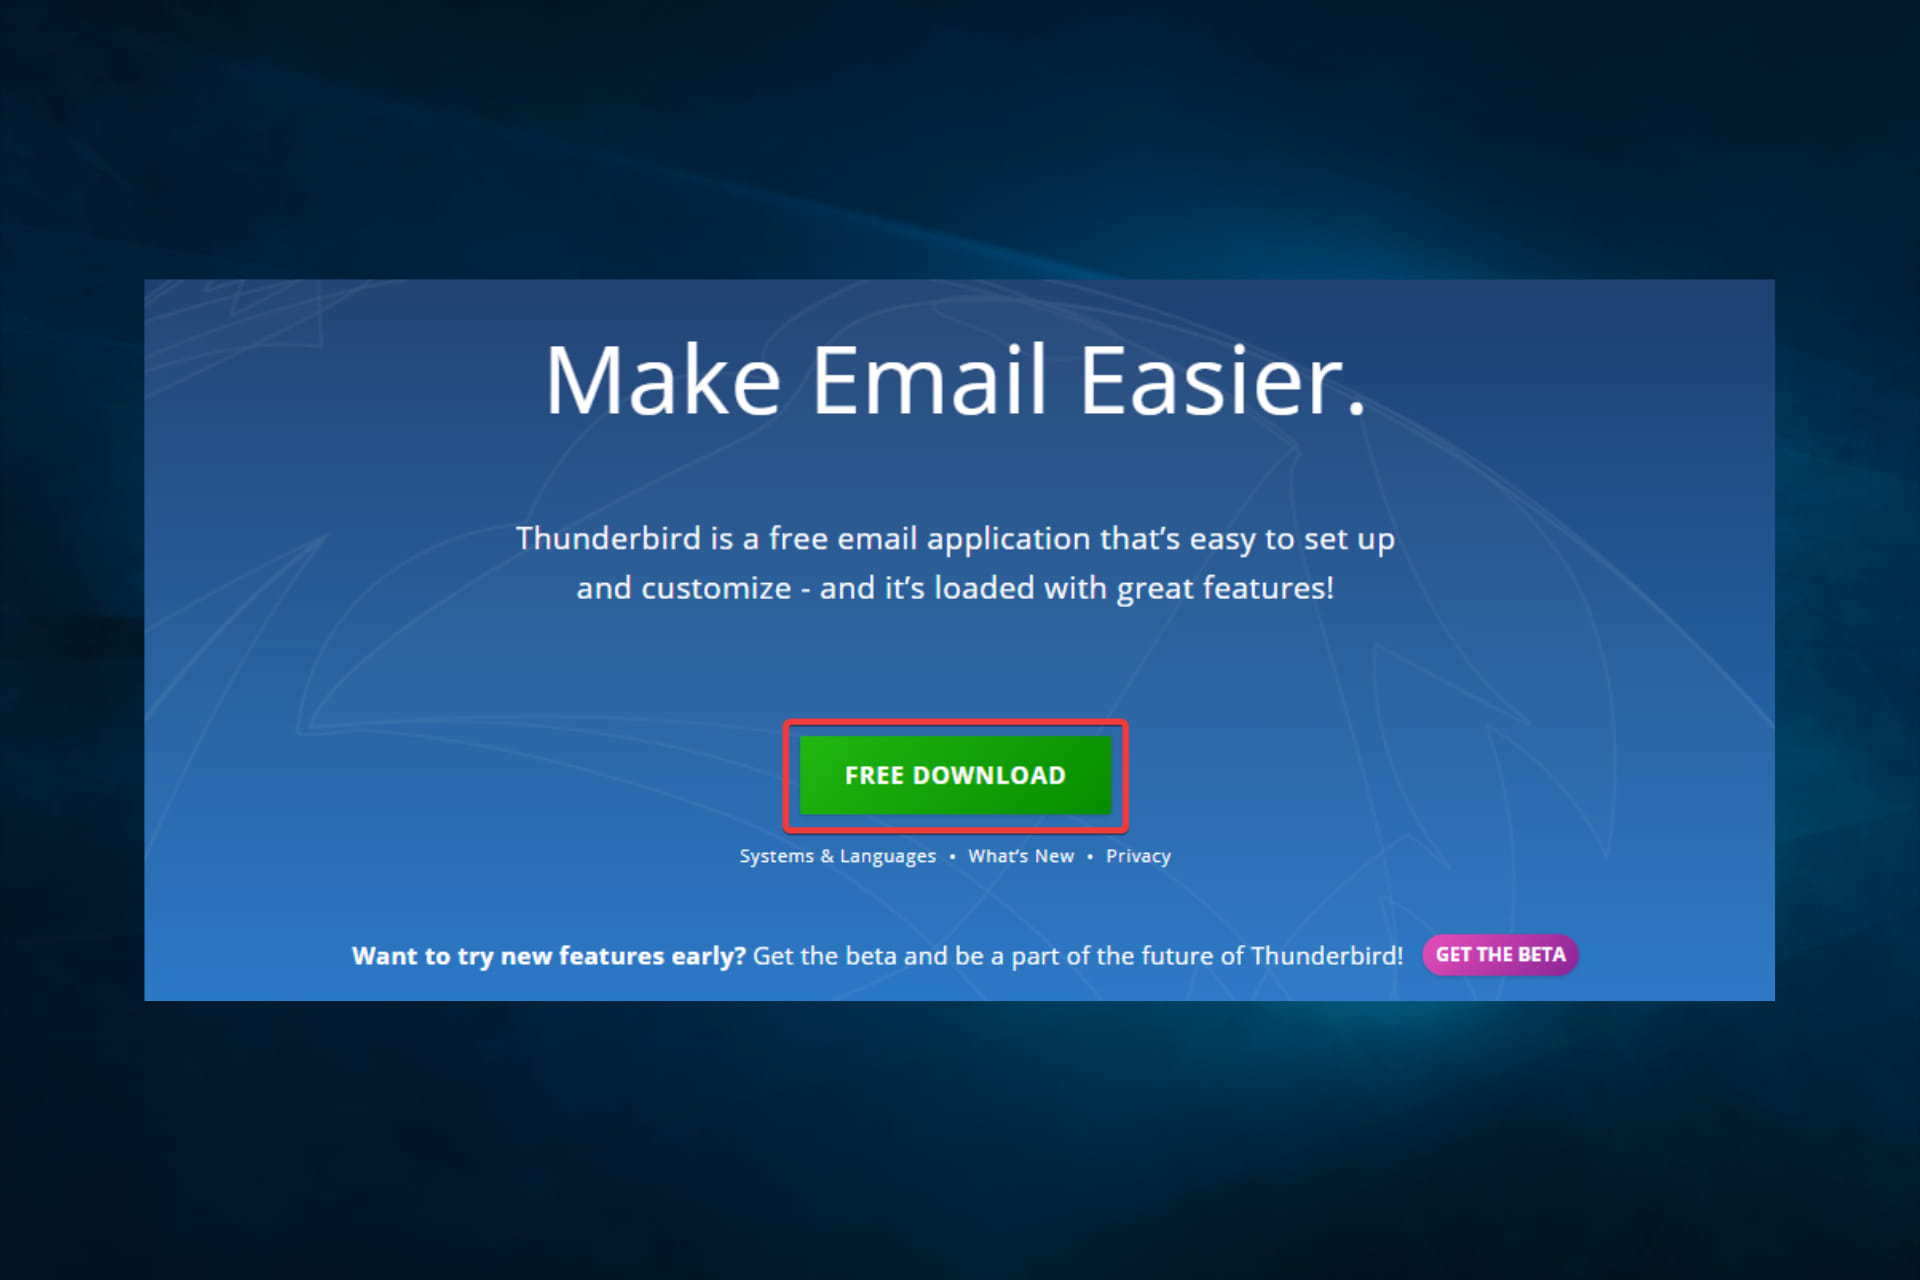
  4. Visit the Thunderbird website.
  5. Click on the Free Download button.
    thunderbird won't open
  6. Double-click on the downloaded file and follow the wizard to complete the installation.

According to users, sometimes Thunderbird won’t open if your installation is damaged. This can be a big problem, but one of the easiest ways to fix the issue is to reinstall Thunderbird. There are several ways to do that, and you can do it right from the Settings app.

We recommend you use dedicated software to uninstall Thunderbird. Sometimes, uninstalling from the UI or the settings app can leave behind unwanted files.

Not only will these files take up space on your PC for no reason, but they may also prevent you from reinstalling the app and creating all sorts of errors in your system.

We suggest you look into the best uninstaller software and pick your best bet. They are specifically created to remove stubborn programs along with lingering files.

On top of that, many of them include additional PC optimization features that keep your system clean and high-functioning.

3. Start Windows in Safe Mode

  1. Press Windows Key + I to open the Settings app.
  2. Go to Update & Security section.
    Thunderbird won't launch
  3. In the left pane, select Recovery. In the right pane, click Restart now in the Advanced startup section.
    Thunderbird won't start after crash
  4. Now select Troubleshoot, then Advanced options.
    thunderbird won't open
  5. Click on Startup Settings, then Restart.
    thunderbird won't open
  6. Once your PC restarts, you’ll have a list of options. Press F5 or 5 to select Safe Mode with Networking.

Once you start Windows in Safe Mode, try to rerun Thunderbird. If the issue still exists, start Thunderbird in Safe Mode and check if that helps.

4. Start Thunderbird in Safe Mode

  1. Press Windows + R to bring up the Run command.
  2. Type thunderbird -safe-mode and press Enter.
    Thunderbird won't start already running

If you want a more user-friendly way to start Thunderbird in Safe Mode, locate the Thunderbird shortcut, press and hold the Shift key and start the application.

After doing that, a new window will appear. Just click Continue in Safe Mode to start the Thunderbird. If the issue doesn’t appear, your add-ons or toolbars are causing it.

To permanently fix the problem, repeat the process, but this time check Disable all add-ons and Reset toolbars and controls. Now click the Make Changes and Restart button.

This is useful if your configuration or third-party add-ons cause the issue. For example, Thunderbird supports a wide array of add-ons allowing you to enhance its functionality. Still, sometimes specific add-ons can interfere with your system and prevent you from starting Thunderbird.

Hopefully, your email client now works. However, if you have any remarks or questions regarding the subject, use the comments section below!

5+ best mouse pads for FPS gaming

No matter if you want to invest in a gaming laptop, or if you would prefer getting a gaming desktop PC if you’re serious about your gaming endeavors, one of these options need to be chosen.

Of course, there are situations in which you might already have the setup you want, and the peripherals are the only element left to consider.

Even though not as important as choosing the right GPU for your system, or other elements like the type and amount of storage you have on your device, having the right peripherals for gaming can provide you with a more immersive overall experience.

Investing in a good gaming keyboard will ensure that no input lag will ever stop you from going on a long killing-spree in your favorite FPS games, while also providing you with an edge when compared to other gamers.

Another aspect of your gaming setup will also come in the form of a customizable gaming mouse that will allow fast reactions in first-person shooters. This applies especially if you’re a professional gamer.

Once you have all the devices required to play games, one other important aspect that needs to be covered when dealing with your gaming is the need for an oversized mouse pad for gaming.

As this will be the surface on which all mouse movements will take place, choosing the best oversized mouse pad for gaming will ensure that your quick reactions will be transmuted without any hiccups into your favorite first-person shooter game.

The designs of mouse pads have evolved considerably in the last decade, and many extra features have been added which can improve your gaming experience.

Here are some of the most useful add-ons:

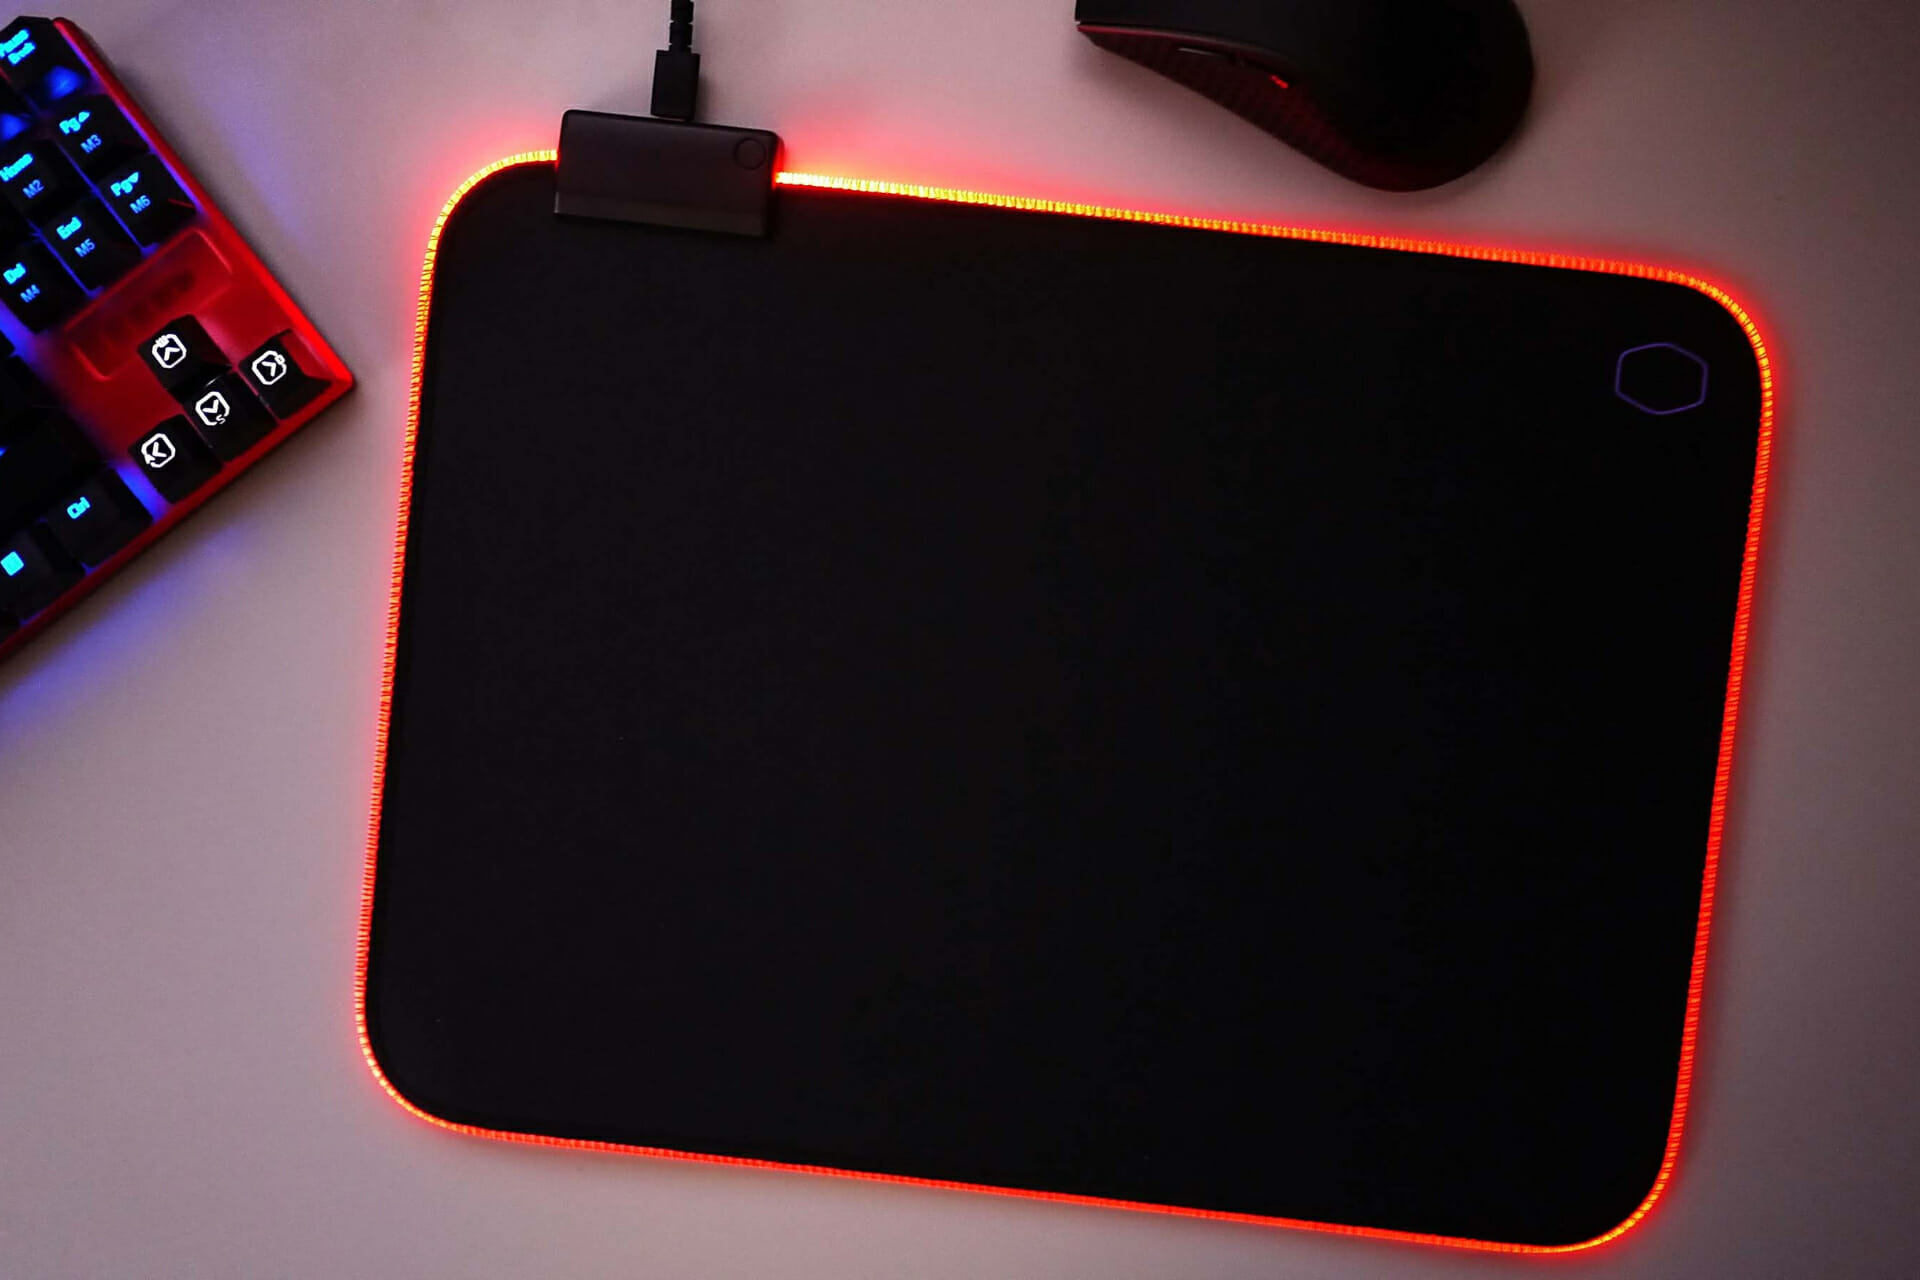
  • RGB lighting – ensures an immersive gaming experience
  • Wireless charging
  • Smooth gliding surface – improves accuracy
  • Gel pads – wrist support while playing games

Choosing the right type of mouse will most certainly come down to personal user preference, but some elements like wireless charging for compatible mice and a surface that ensures smooth gliding can be of the essence.

How we chose the best gaming mouse pads for first person shooters

Our team of expert testers, with a combined experience of 15 years, has tackled a variety of testing tasks for any device you could imagine.

Their experience comes into play as a very important element when choosing the products we described in this guide, and a large variety of factors have been taken into consideration.

The options that have been chosen offer great quality and cover the entire spectrum of price ranges, thus enabling everybody to find something that fits their needs both financially and otherwise.

SteelSeries QcK Gaming Surface XL

  • 35.43 x 11.81 inches
  • 2-zone RGB lighting
  • Reacts to gaming illumination
  • Perfect for competitive gaming
  • Non-slip durable base
  • Smooth surface that works both with optical and laser sensors
  • The RGB cable can bother some users

The QcK Gaming Surface XL from SteelSeries has been one of the top picks of the eSports professional gamers for almost 20 years, and there are good reasons for that.

This XL size gaming mouse pad offers you a dynamic 2 zone RGB feature that can provide both illumination and great visual effects.

One of the best features of this mouse pad is that the RGB lighting can match the game lighting and also reacts to Discord notifications, thus ensuring an even more immersive gaming experience.

The material used for this item is made out of the world-renowned Qck micro-woven cloth that offers amazing control and accuracy at every movement of the mouse.

The RGB version comes in two sizes, the XL we’re discussing now, and the 3XL which covers your entire gaming station. Both provide enough coverage to never be bothered by hitting the edge of the pad while playing FPS games.


KTRIO RGB Large Gaming Mouse Pad XL

  • 31.5 x 11.8 inches
  • Textured micro-weave cloth surface
  • LED lighting on the edges
  • Non-slip rubber base
  • Stiched edges for more sturdiness
  • LED lighting which is inferior to RGB models

The RGB Large Gaming Mouse Pad from KTRIO is another very good item that will take your FPS gaming experience to the next level.

Even though a lot more affordable than the previous model, this mouse pad still provides amazing gaming features and is large enough to fit your gaming needs without problems.

This item has stitched edges, making it more durable than its non-stiched variants, and has an LED lighting feature that will make it especially useful when gaming at night.

The mouse pad from KTRIO uses a micro-weave cloth as the gaming surface, ensuring smooth swipes of your gaming mouse, and at the same time provides a stable surface with the use of a non-slip base.

The RGB version comes in the X-large version which measures 31.5 x 11.8 inches, but can also be ordered in the XXX-Large option, which measures 35.4 x 15.7 inches.


Blade Hawks RGB mouse pad

  • 31.5 × 12 inches
  • RGB lighting has 7 static and 3 dynamic modes
  • Easily access the effects by the use of one button
  • Power-off memory
  • Non-slip base
  • Could be too big for some desks

The RGB gaming mouse from Blade Hawks is another great option for playing FPS games without needing to worry about not having enough space to move your mouse.

Measuring 31.5 × 12 inches, which is wider and taller than other options, this pad can accommodate your mouse and keyboard without any issues, and also allows space for your phone, tablet, etc.

The RGB lighting installed on this mat has 7 static modes and 3 dynamic ones, giving you a wide range of customization options. Added to that, it also remembers the settings you had when turning it off, and activates the same options once turned on.

This item uses an anti-slip rubber base that ensures the mat will essentially stick to your desk, and will only allow movement if you lift it.

The Blade Hawks RGB pad uses a micro-textured cloth surface for optimal mouse control and smooth movements, while also being waterproof.


GIM RGB Gaming Mouse Pad

  • 31.5 x 11.8 inches
  • Ultra thick - 5mm
  • 14 modes RGB lighting
  • 4 USB ports
  • Anti-slip base
  • Built out of rubber

The GIM RGB gaming mouse pad is another amazing option that will complete your gaming setup.

This great XXL mousepad ensures that your mouse tracking is more accurate and faster, and thus can provide you with an important edge in FPS games.

Besides the built-in RGB lighting feature which can be controlled with ease by using a button on the edge of the mat, this item also includes a USB hub with four ports.

The RGB lighting feature includes 14 lighting modes and ensures that even in the darkest of nights, you will be able to game without problems. This includes 11 monochromatic lights, 1 RGB rolling subtitles, 1 RGB rainbow, and 1 RGB breathing effect.

To round this device up completely, the matt is also slip-resistant, uses a smooth surface for effective mouse movements, and is also waterproof.


Glorious XXL Extended gaming mouse pad

  • 18 x 36 inches
  • Smooth cloth surface
  • Non-slip rubber base
  • Anti-fraying stitched frame
  • Machine Washable
  • No RGB lighting

The Glorious XXL Extended gaming mouse pad is another very useful option that has a great work surface and is built out of very qualitative materials.

This model has an 18 x 36 inches size, which will allow you to include your mechanical keyboard, mouse, and other devices without worrying about them falling off the desk.

It also comes in other shapes and colors, but this has caught our eye from the start.

The smooth cloth surface ensures that your mouse, no matter what type it is will work without lagging or interruptions, and features a non-slip base that will ensure no sliding will occur even in the most intense FPS gaming session.

The anti-fraying stitching on the side of the matt ensures a great lifespan, and also makes it look professional. Even more, this mousepad can be washed inside a washing machine without any issues.


Bottom runners

Even though these options didn’t make it to the main list of our guide, they are still worthy of being mentioned, as they offer some good capabilities, even though not comparable to the main choices.

➡ Bitpro LGM computer mouse pad

Even though it has a plastic surface, this mouse pad can still be useful for some users, as it provides an ultra-thin 11 x 9.4 inches surface for FPS gaming.

➡ TECKNET ergonomic gaming pad

This item didn’t make the main list selection as it is not extremely useful for gaming considering its reduced size, but it will work without issues for amateur gamers.

The feature which makes this mouse pad stand out is the built-in wrist rest, which ensures that no additional strain comes to your hands.


As you can see, our guide provides you with a wide array of some of the best oversized mousepads for gaming that fit both professional FPS gamers’ needs and also normal gamers, and come at a variety of price ranges as well.

The details presented in this guide will surely provide you with enough data to make an informed decision, no matter if you plan on investing in a powerful gaming setup or not.

Don’t hesitate to share your choice with us by using the comment section below.

Microsoft launches preview of Teams feedback portal, makes it easy to vote/ track new features, and more

Microsoft has announced that a preview of the feedback portal for Microsoft Teams is now available. Based on the company’s own Dynamics 365 Customer Service tool, the new portal is one of the ways Microsoft hopes to collect feedback from Teams users after it was originally announced back on October 8.

According to Microsoft, this new portal will allow users to submit their own feedback and view other submitted ideas. The new portal also makes it easy to track Microsoft responses, see top-voted ideas, and upvote the feedback from other users. You’ll even be able to easily track your favorite ideas through the ‘star’ icon and receive notifications when your own ideas are responded to by Microsoft.

You can now get to the feedback portal by going to https://aka.ms/TeamsFeedback. We checked it out, and it seems like a very clean experience, letting you filter feedback for Teams and Edge by platforms and various categories. You also sort by most votes, newest feedback, oldest feedback, most comments, or least comments. Evens sharing an existing feedback entry is easy, with a share button at the top of the screen.

This new feedback portal comes after outrage in March when Microsoft quietly shut down its various Office 365 UserVoice forums, which allowed users to suggest ideas, comment, and vote for them. Let us know what you think of this new portal by dropping us a comment below.

Phishing emails containing QR codes can steal your Microsoft 365 credentials

Hackers are at it again are they are now sending out phishing emails containing QR codes in a campaign designed to harvest login credentials for Microsoft 365 cloud applications.

Make sure you don’t fall prey to these malicious third parties because usernames and passwords for enterprise cloud services like Microsoft 365 are a prime target for cybercriminals.

These shady individuals or organizations can exploit them to launch malware or ransomware attacks or even sell stolen login credentials onto other hackers to use for their own campaigns. 

Attackers now attach QR codes to phising emails

Hackers have found yet another ingenious way to trick victims into clicking links to phishing websites designed to look like authentic Microsoft login pages, accidentally handing over their credentials.

One of the more recent phishing campaigns, which was observed and reported by cybersecurity researchers at Abnormal Security is using emails loaded with QR codes.

These codes are actually designed to bypass email protections and steal login information. All this is known as a quishing attack.

What is unique is that these messages contained QR codes offering access to a missed voicemail, handily avoiding the URL scan feature for email attachments present in secure email gateways and native security controls. All the QR code images were created the same day they were sent, making it unlikely that they have been previously reported and would be recognized by a security blocklist. In total, six unique profiles were used to send messages for the campaign, with most designed to appear related to the same industry as the target.

QR codes can be effective weapons when used by malicious third parties because standard email security protections like URL scanners won’t pick up any indication of a suspicious link or attachment in the message. 

The above-mentioned campaign is actually run from email accounts that have been previously compromised.

This ingenious scheme allows the attackers to send emails from accounts used by real people at real companies to add an aura of legitimacy, which encourages victims to trust them.

These phishing emails are said to contain a voicemail message from the owner of the email account they’re being sent from and the victim is asked to scan a QR code in order to listen to the recording.

Also important is that all of the QR codes analyzed by the security experts were created the same day that they were sent.  

While using the QR codes method can more easily bypass email protections, the victim needs to follow many more steps before they reach the point where they could mistakenly give their login credentials to cybercriminals.

For this to even work, the user needs to scan the QR code in the first place, and if they’re opening the email on a mobile, they’ll struggle to do this without a second phone.

To make sure you don’t also fall victim to these quishing emails, you should be extremely wary of scanning QR codes presented in unexpected messages, even if they look like they come from known contacts.

Also, enabling multi-factor authentication for Microsoft 365 accounts can help protect login details from being stolen.

Have you received any such suspicious emails containing QR codes? Let us know in the comments section below.  

The Windows 11 Account and Apps & Features Settings pages have been changed

As you know by now, Microsoft just released a new preview version for Windows 11, through which they are introducing the new settings page for Microsoft accounts.

However, don’t get too excited just yet, because this new feature is only available for some Insiders at this time.

Your Microsoft Account has been added to the Settings menu

The Redmond-based tech company has chosen to slowly roll out the new Your Microsoft Account settings page to their Insider community. 

This page allows quick access to information on the Microsoft account directly in the Settings menu of Windows 11.

Of course, this includes information on subscriptions for Microsoft 365, links to the order history, payment details, and also any Microsoft Rewards you might have earned.

We are beginning to roll out a new entry point for “Your Microsoft account” under Settings > Account. Clicking this new entry point brings you to a new settings page that displays information related to your Microsoft account, including your subscriptions for Microsoft 365, links to order history, payment details, and Microsoft Rewards. This allows you to access your Microsoft account directly within Settings in Windows 11. We are beginning this rollout to a very small set of Insiders at first and then will ramp it up over time.

If you were among the lucky ones to receive this new Settings page for your personal Microsoft account, you will find that it is extremely easy to access.

All you have to do is:

  1. Press Windows Key + I to access the Settings menu.
  2. Select the Accounts category, then click the Your Microsoft Account button.

Pretty easy, right? Remember that for the time being, only a limited number of Insiders received this new feature, so don’t feel bad if you didn’t, because we will all get it shortly.

Apps & Features has been split into two categories

Another one of the changes implemented by the Redmond tech giant through this new build is still related to the Settings app.

But this time, we are talking about the Apps & Features category, which got split up into two mini-categories, instead of just one.

So, from now, under the Apps category, one subpage will be dedicated exclusively to applications already installed on your P, while the other one will be for settings related to these apps.

Not a bad initiative at all, considering that this will speed up the process of finding installed software and properly managing it.

Source: Reddit

It will be interesting to see what other ideas Microsoft will come up with and how they’ll spruce the new operating system even further.

Are you among the Insiders that received these new changes? Share your experience with us in the comments section below.

iPhone AutoPlay not working on Windows 10? Here’s what to do

The Windows 10 AutoPlay feature lets you play multimedia automatically, but many Windows 10 users reported that iPhone AutoPlay is not working.

According to users, even the AutoPlay window doesn’t come up even though you may occasionally hear the sound acknowledging that you have plugged in your iPhone.

So, how do you restore your iPhone’s AutoPlay feature for Windows 10 machines?

What to do if iPhone is not listed in AutoPlay devices?

  1. Reset Windows 10 AutoPlay settings back to default
  2. Modify the registry
  3. Run the ShellHWDetection command
  4. Turn AutoPlay off then back on
  5. Update your drivers
  6. Run Windows 10 hardware/devices troubleshooter
  7. Reinstall the driver
  8. Disconnect other USB devices

1. Reset Windows 10 AutoPlay settings back to default

  1. Press Windows Key+S keys and type control panel. Choose Control Panel from displayed results.control panel iPhone AutoPlay Not Working
  2. As soon as your Control Panel opens, select AutoPlay.autoplay control panel How do I get AutoPlay to recognize my iPhone?
  3. In the AutoPlay settings, check the box next to Use AutoPlay for all media and devices.
  4. Now, tap on the Reset all defaults This resets Windows 10-iPhone AutoPlay settings back to default.reset all defaults How do I get the AutoPlay window to appear?

If iPhone AutoPlay is not working, try the above procedure. Now test if your AutoPlay starts when you connect your iPhone.

You can’t open Control Panel? Take a look at this step-by-step guide to find a solution.

You may also opt to alter your AutoPlay settings via the Settings app:

  1. Click Start, then select Settings.devices settings app How do I import photos from iPhone to pc if AutoPlay does not appear?
  2. Select the Devices section.
  3. Click AutoPlay from the left-hand side of the menu and choose the options that says Ask me every time (on the right-hand pane) for Removable drive as well as a Memory card.

2. Modify the registry

  1. Copy the following text in Notepad.
notepad How do I allow my computer to access my iPhone?

Windows Registry Editor Version 5.00[HKEY_CURRENT_USERSoftwareMicrosoftWindowsCurrentVersionPoliciesExplorer] "NoDriveTypeAutoRun"=dword:00000091
[HKEY_LOCAL_MACHINESOFTWAREMicrosoftWindowsCurrentVersionPoliciesExplorer]
"NoDriveTypeAutoRun"=-

  1. Save the Notepad your desktop then close the note pad.
  2. Now right-click this file (on the desktop) and rename it with a .reg extension.
  3. Now right-click on the saved file then choose Run as administrator to alter the registry.

In some instances, iPhone AutoPlay is not working due to your registry setting. You should hence run a text file to amend the troublesome registry entries.

Then, just reconnect your iPhone and retry the AutoPlay feature.

3. Run the ShellHWDetection command

  1. Click on the Start button and type cmd (in the search box).
  2. Right-click on the cmd option and select Run as administrator.command prompt administrator iphone autoplay not working
  3. When the Command Prompt window starts, type net start shellhwdetection then press Enter.start shellhwddecetion iphone autoplay problems
  4. Restart your computer.

The ShellHWDetection command helps manage the Shell Hardware Detection, a service that provides notifications for Windows 10 AutoPlay.

If iPhone AutoPlay is not working, perhaps this service is the problem, so complete the above procedure.

4. Turn AutoPlay off then back on

  1. Click Start, then choose Settings.settings app iphone autoplay not working
  2. Select Devices, then AutoPlay.devices autoplay import pictures not working
  3. Find the Use AutoPlay for all media and devices tab and slide it to off.autoplay off how to import photos from iphone
  4. Wait for some moments then slide it back on.

5. Update your drivers

Outdated drivers can cause problems with AutoPlay. As a reminder, you should always make sure that your PC’s drivers are properly updated.

Not only should this keep your computer in good working condition, but it also has an impact on all functions and apps, including AutoPlay.

Then, don’t forget to perform a simple restart for the changes to take effect. Besides that, keep in mind that this is your chance to solve all driver-related issues.

Moreover, you can automatically search for drivers updates on your computer to check if any of your system drivers need an update. If yes, you should proceed with simple steps in order to get the latest drivers.

Thus if you need a helping hand regarding the update process for your drivers, you can find some best driver update software to streamline the method even more.

If iPhone AutoPlay is not working, try to disable the AutoPlay feature temporarily, as described above.

6. Run Windows 10 hardware/devices troubleshooter

  1. Click on the Start button and type troubleshooting in the search box.troubleshoot iphone autoplay not working
  2. Select Troubleshooting from the list of results.troubleshooting iphone not listed in autoplay devices
  3. Choose View all and then tap on Hardware and Devices.hardware and devices troubleshooter iphone autoplay not working
  4. Click Next, then follow the on-screen instructions.

Running your computer’s hardware and devices troubleshooter may help if iPhone AutoPlay is not working. Now check if the problem is resolved.

If the Troubleshooter stops before completing the process, fix it with the help of this complete guide.

7. Reinstall the driver

  1. Open the Device Manager.
  2. Right-click on Portable devices.
  3. Look for the Apple iPhone entry and right-click on it.
  4. Select Uninstall device and follow the instructions on the screen.
  5. Plug in your iPhone to the USB. Windows will reinstall the driver software. If not, go back to Device Manager and right-click on the iPhone and choose Update driver.update driver windows 10 iphone autoplay not working

In case the driver update doesn’t help, try reinstalling your Apple iPhone driver.

8. Disconnect other USB devices

other USB devices

Can you try to disconnect all other USB devices before reconnecting your iPhone? Though rather odd, this solution sometimes works.

If iPhone AutoPlay is not working on your PC, be sure to try all of our solutions, and let us know in the comments section if we managed to solve your problem.

[wl_navigator]

FIX: Surface Pro won’t connect to the iPhone’s hotspot

No matter which device you’re on, whether it is an iPhone or Android, your Surface Pro will work with it, so you can get the most out of them.

When used together, you can access your photos, music, documents, and other favorites, but you can also connect to your mobile phone as a hotspot, via the tethering functionality.

Both the Surface Pro 4 and iPhone work just great together, but there are times when the Surface Pro 4 won’t connect to your iPhone’s hotspot, either because of network settings, or another underlying cause.

This article looks at how to fix this connection issue using the solutions below.

How do I fix Surface Pro 4 not connecting to the hotspot?

1. Check special characters on the SSID name

  1. Select General.
  2. Then select About.
  3. Afterward, select Name.
  4. Change the name of your iPhone without using spaces, then switch on Personal Hotspot on your Surface Pro and it will connect.

Sometimes your Surface Pro 4 won’t connect with the iPhone hotspot because of special characters used in the iPhone name, which makes the device not recognize the characters, therefore you need to change it.

Note: Numbers are special characters too, so delete spaces and apostrophes, but numbers as well. E.g. don’t write Bob’siPhone, write BobsiPhone instead.

2. Disable Network Device

  1. Go to Desktop. 
  2. Swipe from the right and tap Settings.
  3. Select Control Panel, then select Network and sharing center.
  4. Tap on Change Adapter Settings.
  5. Select the Wi-Fi adapter and click ‘Disable this Network Device’
  6. Wait a few seconds and enable it again. It should show up now.
  7. Go to Control Panel, then tap on Hardware and Sound.
  8. Afterward, select Devices and Printers.
  9. Set the iPhone as a Wireless Network. The password for this is in Personal Hotspot.

One other solution is to disable your network device on your Surface Pro 4. In order to do this, you need to fiddle with your adapter settings and transform your other device into a wireless network.

3. Check WiFi settings on your Surface

  1. Go to Start and select Settings.
  2. Select Network & Internet.
  3. Tap on Wi-Fi and check if it is On.
  4. Then check that the Airplane mode is Off.
  5. Lastly, check if your iPhone hotspot is in the list of available networks but you cannot connect to it.

Sometimes, simply checking if your Wi-Fi connection is actually on is all you need to do. Also, the Airplane mode needs to be off in order for your internet to work, because if it is enabled, it will block any time of data transfer from your phone.

4. Check your network on another device

If your iPhone hotspot appears in the list of available networks on your Surface Pro 4 but you can’t connect, ensure the network is working properly on another device. Also, make sure that the device has a working internet connection that could be transferred through the hotspot.

If it doesn’t work on any other devices, the problem might be with the network or hardware itself, preventing it from properly connecting to your Surface Pro.

5. Check the date and time settings

  1. Tap Start and select Settings.
  2. Select Time & language.
  3. Make sure the info is correct or make changes as necessary.
  4. Try to connect to your Wi-Fi network.

You can also check and, if needed, correct your date and time settings on your Surface Pro 4. This information can interfere with your connection if the date and time on your devices do not correspond with each other.

6. Check to see if MAC address filtering is enabled

  1. Select the search box in the taskbar, enter cmd, and select Command Prompt.

  2. At the command prompt, enter ipconfig /all.
  3. Tap Enter.
  4. Find the Physical Address. This is the MAC address for your Surface.
  5. Turn off MAC filtering temporarily to see if that is preventing your Surface Pro 4 from connecting to your iPhone hotspot.
  6. Add the MAC address of your Surface to your iPhone’s authorized list.

MAC filtering can bring up the Surface Pro 4 won’t connect to the iPhone hotspot issue. If it is turned on, change it by following the aforementioned steps.

7. Check the signal

If you have limited or no connectivity, then you may be out of range so you need to check your signal. In the taskbar, select a wireless network and check to see how many bars are lit up in the cellular icon.

If you have only one lit bar or none, you are likely on the edge of or out of your operator’s range. To reconnect, you need to move to get back in range.

Losing a wi-fi signal is easy, especially if you’re in a different room or far away from your router. The wi-fi radio waves have a hard time passing through concrete walls, so keep that in mind.

8. Allow roaming

  1. Tap Start and select Settings.
  2. Select Network & Internet.
  3. Afterward, select Cellular, and look at the right side of the interface.
  4. Select the name of your mobile operator, then select Connect automatically.
  5. Select Allow Roaming.

If you are traveling outside of your mobile operator’s network coverage area and want to use an iPhone hotspot connection, make sure that roaming is turned on.

Roaming allows you to connect to the Internet even when you are away from your mobile operator’s network.

Some operators charge extra for roaming or have a different data plan with this included. Set your Surface so roaming turns on by default when you are out of your mobile operator’s range.

This sums up all the possible fixes for your issues regarding the Surface Pro 4 connection to a mobile hotspot.

Did any of these solutions help get your connection back? Share with us in the comments section below. Also, leave any other suggestions or questions that you may have and we’ll be sure to check them out.

Sony creates new PlayStation PC label for its exclusive games launching on Windows

Sony has registered a new “PlayStation PC LLC” label for its PlayStation exclusive games that are being ported on Windows. The new label has been spotted on the Steam listings for PlayStation exclusive games, where it has replaced the existing “PlayStation Mobile, Inc.” publisher name on some titles (via VGC).

The PlayStation PC LLC label has been registered in April according to a Corporation Wiki listing, though Sony has yet to officially discuss this new brand. However, the PlayStation division has already showed that it’s serious about bringing more PlayStation exclusive games to Windows, with the best-sellers God of War and Uncharted 4 coming to PC in 2022.

If Microsoft now releases most of its new first-party games simultaneously on Xbox and PC (with the exception of the freshly-released Age of Empires IV), Sony has ignored PC gamers for a long time. This strategy has been working very well for the company, with a first-party game like God of War selling 19.5M copies since its release on PlayStation 4 back in 2018.

Most PlayStation first-party games are real system-sellers for Sony, and it probably makes sense for the company to wait a couple of years before bringing these games to Windows. We’ve already seen some high-profile PlayStation exclusives come to PC such as Horizon Zero Dawn and Days Gone, and this likely just the beginning. Earlier this year, Sony announced the acquisition of Nixxes Software, a developer known for its excellent work on PC ports.

The Dark Pictures Anthology: House Of Ashes game review

House of Ashes is the third installment of The Dark Pictures Anthology, a series of interactive drama survival horror videogames that each feature their own unique cast, location, and horrific story to tell.

It’s developed by Supermassive Games and published by Bandai Namco Entertainment and if you somehow missed knowing about this series’ existence, then you’ve surely heard about their Playstation exclusive Until Dawn or Little Nightmares II: Enhanced Edition.

I was a huge fan of Until Dawn but found the first entry in the anthology, Man of Medan, somewhat unimpressive. Even though it had some great ideas, the execution wasn’t always spot on. I can already tell you that they’ve come a long way since and that House of Ashes is a horror treat you should definitely not pass up.

Into the abyss – Story breakdown

House of Ashes starts with an interesting prologue taking back all the way in 2231BC, before the country was even called Iraq and when two ancient nations were at war while also dealing with famine and plague. We control a soldier in the Akkadian army who is tasked with sacrificing prisoners to hopefully appease the gods.

The blood dripping into the sand brings them more than what they bargained for however and it unleashes what seems like an evil curse that sweeps through the palace and leaves no one alive.

Except for a sculptor maybe who spent the rest of his life making creepy statues

Fast forward to 2003 in the midst of the Iraq war and we lead a group of marines on a mission to find hidden weapon silos by Saddam. A fight breaks out between the US marines and Iraq soldiers and their bloodshed seems to trigger the curse once more.

The lucky few that survive tumble into the abyss and find themselves in the buried ruins of the ancient temple from the prologue. It doesn’t take long before they realize that the opposing army isn’t the only danger lurking in the dark and perhaps they’ll even need to learn to co-operate to survive the monsters that prey on them.

You’ll notice that I don’t include screenshots of the creatures in this review. I’d like to leave their appearance and true nature a secret for those that still want to play the game and discover the secrets for themselves. Due to the narrative nature of the title, I do believe we’ll dip our toes into some form of spoiler territory, but I’ll aim to keep the waters as shallow as possible.

A guiding hand

NO SPOILERS!

The curator is the only returning character, but his role takes place outside the game. He’s the one telling us these stories from his library full of horror tales and he’s ever watchful of our actions and decisions, teasing us with our mistakes or tempting us to count on him to lift the veil on what’s to come.

It’s an interesting set-up and just like in previous games from The Dark Pictures, you can find spoilers in the game itself. Hidden throughout the game are stone tablets that upon inspection show you a premonition of a possible character demise.

I recall the ones from Man of Medan truly giving some insightful info and warning me of possible deadly paths, whereas I mostly managed to keep my characters away from the deadly traps here. Mostly…

When I asked for a piercing, this was not what I had in mind.

Still, it’s very much worth looking for all the secrets in the game. Especially the torn pages from a diary written by explorers who started digging at this archaeological site in 1947. They also went through similar tribulations as your current cast of characters, and you’d do well to learn from their mistakes.

Your choices matter

The way the story is told from multiple perspectives is simply brilliant, switching control from one player character to the next and with your decisions impacting what happens way down the line. Whenever a decision has to be made, you’ll get an option to follow your heart, your mind, or say nothing at all.

“This is the worst date ever”

These choices impact the game in multiple ways. First of all, you have bearings, decisions like not calling in air support at the start of the game will have both an immediate impact as well as rippling effects down the line. But also finding certain items on your path may open up different outcomes later on.

The second impact is on how other characters perceive you. Are they friendly and do they trust you, or will they only be willing to bury the hatchet in your back? You can track your status with all player characters at any time during the game.

People-pleasing personalities and horror games don’t always mix.

Quick on your feet – Quick Time Events

Other than these decisions that count on your intuition or forward-thinking, another element that makes a return are the Quick Time Events. Timed button presses that will very likely end in someone dying or getting discovered by the monsters if you fail.

A. A. A. A. Staying alive!

Interestingly, House of Ashes has multiple difficulty settings and this aspect of the game is impacted the most. I preferred to use the easy mode that gives you a warning ahead of time when a Quick Time Event is coming and ample time to press because there are no take-backsies in this game.

As soon as you fail or succeed, the game will save so don’t think you can try to cheat your way out of a bad outcome. If you’re really willing to roll back on your actions, however, there is a scene selecting available from the main menu, and it will ask you if you want to overwrite your current save or create a new one.

No more tank controls

The last aspect of the gameplay is how you control characters. While it feels like over 50% of the game is watching cutscenes with minimal player input, you do get free control every now and then. And in Man of Medan, this was the true horror of the game.

You see, Man of Medan went with tank controls combined with static cameras from classic survival games. House of Ashes, on the other hand, has clearly listened to player and critic feedback and opted for a more natural feeling control scheme that leans closer to what people are used to from modern third-person action adventures.

Don’t stair at me!

Especially when you press RB and whip out your flashlight or lighter, it gives pretty accurate control of your characters. Dying because you didn’t press a button on time is on you but dying because your character walked into a trap that you were trying to avoid but that the game didn’t let you is extra frustrating. In House of Ashes, this is a thing of the past.

Masters of the camera

Like I have mentioned earlier, The Dark Pictures games are interactive drama games full of cutscenes. It’s no surprise then that there are a lot of cinematic influences here. From a monster close-up that resembles the famous scene of an Alien opening their mouth near Ellen Ripley, through monster-goggles like in Predator: moments where you see the action from the creatures’ point of view to make them seem extra menacing and untouchable.

There are even some classic film moments here that look and sound like old documentaries, whenever you find a journal page from 1947. I love how these framed the horrors as something that has been there throughout the ages of human technological evolution.

When the game really becomes spectacular is in action scenes with four or more playable characters in the same room and passing the control between them. The camera swoops across the large setpiece locations from one person to the next and makes good use of slow-motion to warn you of the transition. Seemless and downright impressive at times.

Great but campy acting

It borrows a lot from movie classics, most of all one of my favorite movies ever: Aliens. With the evolution of one Alien stalking a group of humans in cramped spaces like in the original, to a group of well-armed marines fighting a whole swarm of them. House of Ashes, is more of the latter, with much of the tension leaning on the action and body horror.

I won’t spoil how much these universes have in common to avoid ruining some of the surprises, but another thing they share is the campy acting. It’s never so frequent as to annoy and more often than not, characters keep a straight face, but when they do dip into one-liners and cheesy quotes, I actually caught myself smiling at the moment.

It’s clear to see how the series has improved with every new release and the facial animations are another clear checked box on that list. The humans express credible emotions, but it does threaten to dip into uncanny valley territory a few times, especially during close-ups.

The creatures are the ones that truly steal the show, however, with some of the best creature motion-capture I’ve seen in games and you can truly tell how much attention went into their design. (if you beat the game, there is even a bonus video that explains their creative process)

A visual feast

Which brings us to the graphics. The Dark Pictures: House of Ashes is a stunning-looking game, especially on the Xbox Series X with 4K visuals and HDR bringing life to even the darkest scenes. I played the game on an OLED TV set and with the game being as dark as it is, that really felt like it added a lot.

Speaking of which, I recall complaining about the dark environments in Man of Medan and sometimes not even being able to tell what I was doing, even in a darkened room without any light bleed polluting the screen output. I’ve not once suffered the same issues here and there is always a light source nearby to provide enough contrast.

Not being able to see would be torch-ure

The environments are a sight to behold and even made some sense after several playthroughs. By the end of my 3rd playthrough, I already had some sort of grasp on the temple layout.

While the Xbox Series X version loads scenes super fast, I did notice some HD textures settling in at the start of some perspective changes. It’s not all the time and it’s only a fraction of a second, but still noticeable.

How long to beat and complete

A single playthrough of House of Ashes will take around 5 hours if you spent a little time exploring and looking for secrets. But only playing the game once would be doing it a disservice.

There are so many possible endings and decisions that impact your story in a meaningful way, that I couldn’t help but boot the game up again right after beating it a first time with three survivors.

In my second playthrough, I managed to keep all five playable characters alive, and I was rewarded with a bunch of new scenes that I had missed in my first run. I applaud the developers for their clear vision here and I never once spotted a sequence error, unlike many other games with branching narratives.

Need a helping hand?

To spice up your next playthroughs, I would advise playing it in Movie Night mode (pass the controller) or with other people over an online connection. It’s marvelously done and actually does add some extra weight to the experience, especially if you each have an assigned character that can die permanently.

Beating the game 100% and getting all achievements will take around five playthroughs or careful use of the scene selection feature and meticulous use of a guide. You’re looking at around 18-20 hours of playing the same game over and over again to get the full 1000G. But at least you’ll have seen every possible outcome.

If only they would have included a way to skip cutscenes you had already seen before, like what was present in Life Is Strange: True Colors, that would have been a huge help!

…now THAT’s a helping hand!

Final thoughts on House of Ashes

Pros
The many branching narrative paths are masterfully thought out
The game looks fantastic and despite its setting; never too dark
It's rare to actually feel the consequence of your actions and choices as much as in House of Ashes
Cons
Facial animation still dips into uncanny valley at times
Really hard to complete 100% without a step-by-step guide
No way to skip cutscenes

FINAL SCORE: 4.5/5

The Dark Pictures Anthology: House of Ashes managed to surprise me. Its predecessor had lowered my expectations somewhat but after multiple playthroughs, I’m honestly impressed with how great of a survival horror game this ended up being.

The action is fantastic, even though it mostly takes the control out of the player’s hands and opts to use cutscenes for maximum effect. It’s rare when games succeed in making your mistakes or successes actually feel like they impact the story in a meaningful way, but House of Ashes does just that.

It’s a horror experience I won’t soon forget and that I will possibly remember as fondly as the movie classics it borrowed inspiration from.

The Dark Pictures Anthology: House of Ashes costs around $29.99 and is available on Windows PC, Xbox One, Xbox Series X|S, Playstation 4, and Playstation 5. If you want to try before you buy: there is also a free trial that should give you a good idea.

*Disclaimer: reviewed on Xbox Series X, Review copy provided by the publisher.

Microsoft Teams public preview now supports real-time collaboration on “Live Components”

Earlier this year, Microsoft announced its plans to bring Fluid live components to Teams, allowing users to easily co-author content in chats and meetings. As spotted by Twitter user Paul Lange, Live Components are now available in public preview globally in the desktop and mobile versions of Teams.

The new Fluid components in Teams chats allow users to collaborate on task, lists, or tables in real-time and share them across other Office apps. The feature also enables meeting participants to create agendas, take notes, assign tasks to their colleagues, directly from the meeting window.

“Live components in Teams chat offer a new way to ideate, create, and make decisions together. Send a component—like a table, task list, or paragraph—where everyone in your chat can edit inline and see changes as they’re made. This means you can gather ideas and feedback from your team while holding fewer meetings and minimizing the need for long chat threads,” the company explained on a support page.

To get started, Microsoft Teams desktop users will need to click on the “Insert live components” icon and choose the component to add to their chat message. On mobile, navigate to the + menu and then tap Compose >> Components, and select the type of component. Finally, enter the content and tap the Send button.

The launch of Live components in Teams should help users get tasks done faster than ever before, but this is just the beginning. The company also plans to expand Fluid components to other platforms, including Microsoft Whiteboard, OneNote, and Outlook in the coming months.

Microsoft’s Xbox Gear Shop just added an exclusive Halo Infinite action figure bundle

A limited edition Halo Infinite action figure bundle has just gone live in Microsoft’s Xbox Gear Shop online store.

The bundle is exclusive to Xbox Gear Shop and includes action figures based on Master Chief and the pilot from the Halo Infinite campaign in addition to two accessories and two bases. Everyone who places a pre-order will also receive a code via email which can be used to unlock a Neon Skull Weapon Charm in the Halo Infinite video game.

Enter the world of Halo Infinite with Jazwares new 4″ scale action figure series! This limited edition The Pilot and Master Chief 2-Pack brings together two pivotal characters from the Halo Infinite campaign story with a limited production bundle only available for purchase through the Xbox Gear Shop.

Bonus DLC:

Receive this exclusive Halo Infinite bonus in-game content [Neon Skull Weapon Charm] with the purchase of The Pilot and Master Chief 2-Pack. This in-game content code will be sent via e-mail including redemption instructions once your order has shipped.

This item is currently available for pre-order and is expected to ship in February 2022

Features:

  • 2x 4″ World of Halo 4″ scale figures, the Pilot and Master Chief from Halo Infinite
  • 2x weapon accessories, a Battle Rifle and a SPNKr Rocket Launcher
  • 2x figure bases to stand and pose your figures on, these hexagonal bases can also connect to one another to create cool dioramas of figures together
  • World of Halo 4″ scale figures, vehicles, and weapons are all accurately scaled against one another as they appear in the Halo universe for an authentic play and display experience

In addition to the above action figure bundle, a variety of other Halo Infinite merch has also been added to the Xbox Gear Shop such as several new Halo T-shirts, two new cups, and some 20th anniversary playing cards. You can view them all here.

After something different? Check out Xbox Gear Shop’s official Halloween Halo products.

Microsoft’s Xbox 2042 concept video teases 32K video, 240 FPS, holograms, and more

Microsoft published a rather cool and, at first seemingly random, video on the official Xbox YouTube channel last night that presents a wide range of exciting possibilities for Xbox consoles and gaming two decades from now.

Named, Xbox 2042, the concept video offers a glimpse of what gaming could look like in the year 2042 with an Xbox console or cloud service powered by technologies such as quantum computing, advanced AI, proper holographic interfaces, hardware that can interface directly with the human brain and eyes, and with games that can run at 240 frames-per-second (FPS) in 32K.

Check the Xbox 2042 video out below.

“Imagine the future for gaming powered by quantum computing and featuring the world’s first holographic UX,” the video description reads. “The fastest most powerful gaming experience ever made — capable of 1 exaFLOPS of processing power, 32K video and 240 frames-per-second — yet it’s 90% smaller, a gaming supercomputer you hold in the palms of your hands. Imagine Xbox 2042.

“Xbox 2042 is built to drive native 32K resolutions in Full Spectrum Color at a base frame rate of 240 FPS (up to 480 FPS) with zero latency. All games are now “instant-on” requiring no loading times whatsoever. Even cloud-based open-world games with worlds so enormous they have their own dedicated data centers load and sync instantly. The all-new holographic user experience is intuitive, extra-sensory and will forever change how you game.”

Amusingly, the description goes on to promise that this future Xbox platform will support full backwards compatibility and will launch with 70 video games with one of them being Battlefield 2042, the latest entry in the Battlefield franchise that’s actually due for release next month in November 2021.

Some fine print at the bottom of the video description confirms what most would expect after reading that last bit, that this video is in fact part of a promotion for Battlefield 2042’s launch on Xbox Series X. this year

“Xbox 2042 is a marketing campaign inspired by the highly anticipated release of Battlefield 2042, the text reads. “This is not an actual product announcement. Xbox Series X|S consoles and games sold separately in 2021.”

While the fact that this video is part of a promotion for a specific game is a bit of a downer, some of the ideas that it presents are pretty exciting to think about and honestly not that crazy given the speed of which technology is advancing.

For example, actual holograms that don’t require any kind of headset or eyewear are a lot closer than most would think. Check out this video by CNET for a look at some of the latest developments in that field.

What do you think about the Xbox 2042 video? Do you think we’ll see this level of tech in gaming by then? Share your thoughts with us in the comments below and then follow us on Pinterest and Twitter for more Xbox news.

Without explanation, Microsoft says Launcher updates on Surface Duo will now come with system updates

Microsoft is taking a very strange new approach with the way Microsoft Launcher works on the Surface Duo and Surface Duo 2. Spotted by Windows Central, it’s been confirmed that Microsoft Launcher (which basically powers the Duos) will now be updated via system updates instead of the Google Play Store.

This issue was first spotted over on Reddit. There, users mentioned that trying to go to the listing for Microsoft Launcher, or Microsoft Launcher Beta leads to the error that the app is not compatible with the Duo anymore. Many original Surface Duo users thought this was because of the Duo 2 and other compatibility issues, but Vishnu Nath responded to Windows Central’s Daniel Rubino and confirmed/ mentioned that the Duo launcher updates now happen via system updates.

Nath’s tweet does not say much officially but there are some working assumptions as to why this is happening. It could be because Microsoft wants bigger controls of Microsoft Launcher on the Duo in ways that Google won’t allow via the Play Store updates. It also could mean that Launcher on the Duo and Duo 2 or Duo could be getting a re-write with new features. Windows Central reports that Microsoft previously talked about more customization options for the Duo, so the second option could be more likely.

Anyway, with Android 12L coming to support Surface Duo 2 and other large-screen devices, there’s a chance that this could be good news. We’ll have to wait and see what the news means and if Microsoft issues any further clarification.

Surface Laptop Studio Review: Two weeks in, and it’s the best Surface I’ve ever owned

About two and a half weeks ago I purchased a Surface Laptop Studio. Since then, I’ve been putting the system through my daily grinds, leading up to this review. Usually, I’d try to be just a tiny bit technical in my reviews and showcase benchmarks as well as other tests, but for this review, I’d like to tone things down a bit and keep it relatively standard.

That’s because my colleague Kareem Anderson is planning his own write-up on the Surface Laptop Studio. If you’re after a more technical take, you can look out for a more in-depth review in a few weeks. This piece will be a bit more simplistic, explaining why this is one of the best Surface devices I’ve ever owned.

Specs & Price

I want to get the business out of the way first. The unit I purchased is one of the higher-end models. It comes configured with an Intel Core i7 11370H processor, 16GB of RAM, a 512GB SSD, and Nvidia GeForce RTX 3050Ti graphics. This unit retails for $2,100. I also picked up a Slim Pen 2, which is an additional $130. To try and save some cash, I checked out my Microsoft Rewards, giving me a slim $210 discount on everything.

Note that if you really want a Surface Laptop Studio, the base model starts at $1,600. That includes an Intel Core i5 processor, 16GB of RAM, 256GB of storage, and Intel’s Iris X graphics. There’s no GPU in the model, however, so your computing options will be a bit limited. All Surface Laptop Studio models come with Windows 11 Home pre-installed. If you want a model with Windows 10, you can buy one through Microsoft’s commercial store.

A special design

Leading off with the design, the Surface Laptop Studio is something special. Crafted out of cool-to-the-touch magnesium, the Laptop Studio feels similar to a Surface Pro when I run my hands on the top of it. Yet, from afar, it even looks like a MacBook (if you don’t peek down to see the Microsoft logo.) That’s because the device has a lot of curves to it, from the display bezels to the wrist rests. It’s quite a treat to look at, and it’s like Microsoft blended the best of both tech worlds together in one product.

Even so, the treat gets better once you deal with the screen. There are two hinges on the Laptop Studio. The first lets you open and close the lid like a regular laptop, and the second is tucked behind the screen. This second hinge is made of fabric and is held down by magnets. Pull the screen out towards you when in the regular “Laptop Mode,” and the screen moves down at an angle to the trackpad for “Stage Mode.” Then, pull it down once more to turn the Laptop Studio into a thick tablet in “Studio Mode” so you can draw and ink in a canvas-like experience.

The hinges on the Surface Laptop Studio

Overall, the transition between those modes is very fluent. In two weeks, the hinges held up to my wear and tear. I was worried it’d be too fragile but turns out that the hinges are plenty strong. Even when inking in the “Studio Mode,” the hinges held the screen down, and it didn’t move around too much as my wrist movements jiggled the screen. Microsoft has proven it is good with hinge systems thanks to the work it’s done on the Surface Pro lineup, so I’m not surprised that this one works well on the Laptop Studio.

This design isn’t original though. As many have pointed out, Microsoft seems to have borrowed the concepts of the Studio Mode and Stage Mode from the Sony VAIO Z Flip. The differentiating factor though is that the Surface Laptop Studio has a “hump” on the bottom. The hump allows for ventilation, as well as a place for Microsoft to put the GPU. Many complained about this “hump,” but I’ve come to realize it’s not even noticeable once the Laptop Studio sits on a desk or in my lap. The only times I’ve noticed it is when the GPU is in use, and air blows out from the side.

You barely can see the bottom hump on the Surface Laptop Studio

Another thing that people have complained about is the weight of the Laptop Studio. Coming in at around 4 pounds, I think the device is manageable. The magnesium material makes the device feel lighter than it is. Compared to my old HP ENVY 15, though, the compact form factor of the Laptop Studio is great. It’s relatively small, and light, when put up against gaming laptops with this same GPU inside (The Legion 5 is 5.28 pounds, as an example.)

Even Apple’s new M1 Pro and M1 Max MacBooks are in the same weight class, coming in at around 3.5-4.8 pounds. So I don’t see a reason to complain. When you want all the power of a dedicated GPU, you’ll have to sacrifice something, and it comes at the weight. Thickness, though, is alright. This isn’t a brick in terms of design, as the system measures just around 0.7 inches thick.

Good performance but could be better

When it comes to overall performance, the Surface Laptop Studio was good enough for my needs, but I won’t lie, there is one flaw. For $2,100, seeing quad-core Intel H-series processors inside the Laptop Studio is a letdown. You can find a better laptop with an 8-core processor for the same price (the XPS 15 or XPS 17 are examples,)

For a Surface, though, there’s plenty of CPU power on the Laptop Studio. This is because, for the first time, Microsoft is using 35-watt processors in this laptop form factor. Microsoft also said that it uses a custom framework to manage the CPU and GPU power, to help in real-world tasks. That’s so that when the CPU is paired with the GPU in tasks like encoding videos or gaming, there will be enough power to go around to both.

In my daily grinds, I used the Laptop Studio for work at OnMSFT and my other publication. I handled a combination of 10+ tabs in Microsoft Edge, and two sessions of Teams (one as a PWA.) The Laptop Studio’s 16 GB of RAM kept up with no issues. Even when handling Windows Updates in the background, and using Edge, the Studio kept up fine. Plus, I did plug my Laptop Studio into a 4K monitor, with Microsoft Flight Simulator on one screen, and Edge on another, and the device didn’t lock up, but the CPU and GPU usage were very high.

As far as the GPU and the RTX 3050 Ti go, it’s manageable. Heavy gaming and CPU demanding tasks might be limited by the quad-cores in the Laptop Studio, but the performance will get you by for most tasks. As seen above, Microsoft Flight Simulator runs just fine and around 30-45 frames per second in medium settings and at 1080p on the Laptop Studio. At the native resolution, it’s a playable level, too. I did notice, however, that Flight Simulator kept warning me about the limits of the CPU when I toggled into developer mode of the game to see frames.

When it comes to video encoding, I was very impressed. The Laptop Studio punched out an hour-long 1080p and 60 FPS OnPodcast episode (a 6GB file) in about 16 minutes. And, in a shorter episode, in 10 minutes. In both cases, the original file I worked with in Filmora had a lot of B-roll and audio. Nvidia’s CUDA cores in the new RTX GPUs really come out here and show the possibilities of the Laptop Studio.

An amazing keyboard and trackpad for “Laptop Mode”

Performance and design done, it’s time to talk about the keyboard and trackpad. In these areas, I’d like to compare the experience to a MacBook Pro, as well as a Surface Pro 8.

The typing experience on the Surface Laptop Studio is akin to the Surface Type Cover, mixed with a regular Surface Laptop. In terms of key spacing, it’s exactly like the Laptop 4 or Laptop 3. And with keypresses, my fingers easily hit the gray keycaps, and there’s a lot of comfortable action and feedback when the keys go into the chassis. The backlighting is also pretty even, and it looks pretty amazing when typing at night.

As for the new haptic trackpad, it’s one of the best on a Windows laptop. It feels exactly like the one on the MacBook Pro (smooth and fluent,) yet it’s better in a few ways. First of all, the palm rejection is on point. Secondly, you can customize your feedback levels to make clicks feel harder, or softer. It’s pretty amazing to be able to click anywhere on the trackpad to accomplish tasks in Windows 11.

A bright and vibrant display for “Stage Mode”

In talking about the display, I want to mention the “Stage Mode.” This mode pulls the Laptop Studio’s display near to your face and hides your keyboard. It’s one enjoyable way to watch movies as well as TV shows. I’ll admit I spent most of my time in “Laptop Mode,” but this mode is where I went for multimedia, and I’m glad I did. The Laptop Studio’s display is one of the brightest and most vibrant on a Surface.

I did run some tests with my Spyder5 colorimeter, and the Studio put up some good numbers. It measured close to 450 nits and recorded 100% of the sRGB spectrum, 81% AdobeRGB, and 88% DCI-P3. If those numbers don’t mean much to you, then let me put them in words. I watched the September Surface event on the Laptop Studio, and it felt as though Panos Panay was in the room with me. I noticed all the fine details from the shine on his watch, to the dust on his black jacket.

In other specs, the 14.4-inch display on the Laptop Studio hits 2400×1600 resolution. Of course, it’s in the 3:2 aspect ratio, for more vertical room for multitasking. I wish the resolution was higher, but the color accuracy makes up for the lack of pixels. Plus, tweaking the display scaling always adds more room on the display, too. I hope one day Microsoft introduces a 16 or 15-inch model, especially considering the bezels on the Laptop Studio are relatively big.

There are some special features on the display. For the first time, you get a 120Hz refresh rate on a Surface product. This brings Windows 11 to life and makes animations feel crisp and smooth. In gaming, it also helps with making the action feel smoother, too. 120 Hz is still the default, and Microsoft has yet to enable Dynamic Refresh Rates, where the laptop can pick the rate it needs.  Also enabled by default is support for Dolby Vision HDR. When you download the optional Dolby Access App, the Laptop Studio can enhance your movies and content to give you almost OLED quality blacks, contrasts, and colors.

Microsoft even throws in a neat software feature called “wake on touch.” If the Laptop Studio is in Stage Mode, you can double-tap the screen to wake it up. Just like an iPhone or iPad. The option is hidden under Touch settings.

The inking with Slim Pen 2 in “Studio Mode”

I’m not much of an artist, but the Laptop Studio makes me wish I was. Like the Surface Pro 8, the Laptop Studio has support for haptics, or what Microsoft calls “tactile signals,” in the screen. With this, as you tap the Surface Slim Pen 2 to the display, you get a little haptic feedback for that true pen-to-paper feel. It’s a subtle feel, but it’s mind-blowing the first time you try it. Several apps including OneNote, Word, Whiteboard, Adobe Fresco, Sketchable, all support the technology at the moment. The Fresh Paint app I used for the photo above, though, doesn’t. Seems like it’s up to developers to support the technology.

Along with the 120 Hz screen, this makes inking feel so smooth and natural. Plus, the convenience of having the pen stored under the Studio makes you want to pick up the pen and draw. I just wish that the display was a little less reflective, though. As you can tell from my photos, there’s no anti-glare technology in play here on the Laptop Studio.

Needs more ports

Apple recently went back in time and added more ports to its new MacBook Pros, and I wish the Laptop Studio had done the same based on the Surface Book 3. It only has two Thunderbolt 4 ports, a headphone jack, and a Surface Connect Port. Thunderbolt 4 allows for dual monitor support without dongles or docks, as well as external GPUs and faster transfers between external drives — a first for a Surface.

That’s cool and all. I enjoyed moving podcast stuff from my Samsung T5 SSD over to my system with speed (it took less than 15 seconds for about 15GB of files,) but I find myself always keeping a dongle on my desk when using the Laptop Studio for my keyboard and mouse. An extra USB-A port, or a MicroSD card reader would have been appreciated.

The speakers and webcam, though, do somewhat make up for the lack of ports. Microsoft opts for a Front-facing 2.1 megapixel 1080p Windows Hello webcam, a boost from the 720p on the Surface Book 3. I used the in-built webcam on the Surface Laptop Studio to podcast, and could barely tell a difference over my dedicated external Dell webcam.

And for the speakers, there are four Omnisonic speakers on the Laptop Studio. These are some of the loudest I’ve heard on a Surface. There are two bass speakers on the side, and two under the keyboard deck. Despite what MKBHD says in his review, these speakers impress. The Laptop Studio can even have sound profiles that adapt to the postures you use the device in. In moving to “Stage Mode,” sound comes out the sides, but in “Laptop Mode,” sound comes out the top.

Decent battery life

My actual Battery report on a dGPU Surface Laptop Studio. Averaging 7-9 hours of battery… from Surface

As always, I’ll end with battery life. The Laptop Studio in my tests comes home with around 9-10 hours of battery, maximum. I uploaded my battery report to Reddit, and you can see it above if you’re curious. In keeping the display to 34% brightness, and at 60Hz, I get around 9 hours of web browsing and multimedia consumption. At 120Hz, the difference isn’t that noticeable, and the numbers come in the same. That’s still far off the 19 hours Microsoft mentions in the product listing.

In terms of using the Laptop Studio’s dedicated GPU on battery, don’t expect it to last 19 hours either. In my tests, I only got 2 hours of battery when working on encoding a podcast, with an external SSD attached to the system. In all games, you’ll only get 30fps max, too. The Laptop Studio is more of a desktop machine, and to get the most out of it, I suggest plugging it into the wall most times.

A laptop for Surface fans

If you’re hoping to buy the Surface Laptop Studio, then do it. From the display to the overall performance of the dGPU, it’s one excellent machine. Sure, you can find a laptop that’s better-performing for the same price, but not many laptops with a dGPU offer up the different modes of use and inking support that the Laptop Studio has. For fans of Microsoft, the Laptop Studio is excellent. It takes everything learned from Surface Pro, Surface Laptop, and Surface Book, and puts it all together in one fantastic product.

iCloud for Windows 11: How to Download & Install

iPhone is one world’s foremost smartphone series that has revolutionized mobile computing in more ways than one. Aside from communication, users utilize Apple mobiles to capture photos and videos. Those files are saved on their iCloud storage.

There are two ways you can transfer photos, videos, music, and other files between your mobile and the PC. One way is to connect the iPhone to a PC with a USB cable. Then you can transfer files with iTunes or alternative software.

Alternatively, you can transfer files between your iPhone and the computer with iCloud cloud storage. That method eliminates the need for USB cables as you don’t need to connect devices. Instead, files are saved in your cloud storage, which you can then access on PC with the iCloud Windows app.

The second method is a much more convenient one. You can sync the files on your iPhone with a Windows 11 PC thanks to the iCloud app. Then you’ll be able to access iCloud folders in File Explorer as outlined below.

What is cloud storage used for?

Cloud storage is quite simply a service that enables users to save (upload) files within an online account. You can download files from your cloud storage accounts onto devices. Apple iCloud is the default cloud storage service for iPhones and iPads.

Many cloud storage services offer a few gigabytes of free storage space. You can pay subscriptions to expand the amount of storage space you have.

You can utilize cloud storage in both browsers and with downloadable apps. The iCloud for Windows app is one you can install on desktops and laptops. That app is freely available and enables file synchronization between Windows PCs and iOS mobile devices.

What do I need to sync my iPhone files with Windows 11?

To utilize the iCloud app in Windows 11, you’ll need an Apple ID. The vast majority of iPhone users will no doubt have an Apple ID account for downloading apps. The iCloud cloud storage is a part of your Apple account.

You’ll also need a Microsoft account for Windows 11. That account is required for downloading and installing the iCloud for Windows app. You can set one up on the Microsoft account website.

Aside from that, you’ll need devices that meet the minimum system requirements for iCloud. Apple’s System requirements for iCloud page provides full details for the recommended and minimum system requirements.

How can I sync iPhone files with Windows 11 PC?

1. Download and install iCloud for Windows 11

  1. First, sign in to your Microsoft account via the MS account site if you’re not already.
  2. Press the Start menu’s taskbar button in Windows 11.
  3. Click the Microsoft Store app on the Start menu.
    Start menu windows 11 icloud
  4. Type iCloud for Windows in the MS Store app’s search box.
  5. Select the iCloud app in the search results.
    MS Store app windows 11 icloud
  6. Click the Get button for the iCloud for Windows app to download and install it.

If you’ve tried to apply the above steps and you received an Upgrade to iCloud error, check out this guide on what to do if iCloud won’t install on Windows 10. Although the guide is for Windows 10, it would assist you when applying the steps in Windows 11 too.

2. Set up iCloud File Explorer syncing in Windows 11

Note icon NOTE
You must be signed in to the same Apple ID account on the iPhone you want to sync with Windows 11.
  1. Click the magnifying glass for Windows 11’s search tool to bring up that utility.
    The magnifying glass button windows 11 icloud
  2. Enter iCloud in the search box to find your newly installed app.
  3. Click iCloud to the launch that app.
  4. When you first open iCloud, you’ll see a login window. Type your Apple ID login details within the two text boxes.
    iCloud login windows 11 icloud
  5. Press the Sign in button.
  6. Select either the Don’t send or Automatically send option according to preference on the Send diagnostic prompt that opens.
  7. Thereafter, select the iCloud Drive and Photos checkboxes if they’re not already checked.
    iCloud for Windows windows 11 icloud
  8. Click the Options button for Photos.
  9. For file syncing purposes, it’s best to select the iCloud Photos and Shared Albums options.
    Photos Options window windows 11 icloud
  10. Click the Done button on the Photos Options window.
  11. Then click the Apply option on the iCloud window.

For a full walkthrough, use this step-by-step guide on how to login to iCloud before proceeding with setup.

3. Move your PC’s files to iCloud Drive and Photos

  1. Open File Explorer by clicking the folder button on the taskbar.
    The File Explorer button windows 11 icloud
  2. Next, open a document, video, or photos folder in File Explorer.
  3. Left-click a file to move into your iCloud Drive and hold the left mouse button.
  4. Then drag that file onto iCloud Drive on the left side of File Explorer.
    The iCloud Drive folder windows 11 icloud
  5. Release the left mouse button when the Move to iCloud Drive cursor tooltip is visible. Then the file will be included in iCloud Drive.
  6. If you want to transfer images and videos saved on your PC to your mobile, it’s better to drag-and-drop pictures into iCloud Photos on File Explorer’s sidebar. You’ll be able to see the images moved into iCloud Photos on your iPhone’s Photos app.
Note icon NOTE
You’ll need to have iCloud Photos enabled on your iPhone to sync photographs and video. To do so, tap iCloud, then Photos in Settings. Finally, turn on the iCloud Photos setting.

Can’t I just utilize the iCloud web app instead?

Sure, you can sign in to the iCloud web app on both Windows and mobile browsers. However, you won’t get the neat iCloud File Explorer file syncing by utilizing the web app.

You’ll have to manually download and upload files on your PC and iPhone to transfer files with your cloud storage.

What are the alternative cloud storage apps for Apple iOS devices?

Google Drive, DropBox, DropBox, and OneDrive are three of the most notable cloud storage alternatives to Apple’s iCloud.

All of those services have downloadable apps for both Windows and iOS mobiles. You can also sync files between iPhones and Windows PCs with those cloud storage apps.

However, it’s best to utilize the free cloud storage space available for your iPhone’s iCloud storage first, which amounts to 5 GB. When you run out of iCloud space, consider adding Google Drive to your iPhone. The Google Drive cloud storage offers 15 GB of free space.

The iCloud for Windows app is invaluable for linking Apple mobile devices with Windows 11 PCs. With that app installed, iCloud will become more like an extension of your PC’s hard drive with which you can seamlessly transfer files between Windows 11 PCs and iOS phones.

Installing iCloud for Windows will also make it much easier to access photos captured with your iPhone’s camera on a PC. Snapshots taken with an iPhone will become automatically available within the iCloud Photos folder in File Explorer.

So, the advantages of utilizing the iCloud for Windows app are obvious enough. It’s a great app for syncing iPhones with Windows 11 computers.

If you experience problems, check out this guide when iCloud drive is not syncing on Windows 10. The tips listed there may be easily applied on this OS as well. The same recommendation extends to this article on how to fix iCloud in Windows 10 if it’s not working.

Having iCloud installed is crucial if you want to use iCloud Passwords for Firefox, so be sure to have the client installed at all times.

Don’t forget to tell us about your experience with the iCloud client on Windows 11 in the comments section below.

They Always Run game review: Bounty killer

At first glance, you’d be forgiven for mistaking They Always Run for a Metroidvania. It certainly looks like one, and at times it almost pretends to be one. But despite slowly drip-feeding you new abilities and powers throughout the runtime, it’s a much more linear experience than a Metroidvania.

I hasten to add that this is not a bad thing. I’m certainly not criticizing a game for setting out to tell a cohesive story and actually telling it. And in actual fact not having to constantly backtrack through areas is oddly refreshing. It also makes more sense in They Always Run, since your prey is always going one way and you’re always chasing their tails.

Eat, sleep, prey

Well, tails and claws and mechanical arms, since few of your marks are ordinary humans. They Always Run takes place in an almost Star Wars-esque universe, where multiple sentient species live in an often hard-fought peace on the fringes of the galaxy. You’ll frequent bars and settlements with more than a hint of Space Western about them. There’s nothing quite as dense or colorful as the Mos Eisley Cantina, but you get the idea.

Our protagonist is Aiden, a three-armed bounty hunter who may or may not be one of the last remnants of an ancient civilization. Generally regarded as a mutated freak, Aiden spends his days seeking out the worst scum in the solar system, bringing them either to the police or to private investors with more nefarious intentions.

The story begins with Aiden on the hunt for The Rat, a mechanized criminal with a small private army. Ambushed and imprisoned in the opening moments, you’ll soon be using a combination of Aiden’s abilities and guidance from his ship’s AI, Jonathan, to escape.

They Always Run: Hit counter

Combat is clunky and weighty and ridiculously fun in They Always Run. Aiden has three arms with three blades or three guns, and so you can engage up to three enemies at once. A blue glow indicates that you can perform a counterattack, which will insta-kill an opponent. There’s a great variety of animations for these counters, and each one is equally cool and satisfying to execute. Being 2D, enemies can only really come at you from the front and back, or occasionally from above.

With the right timing, you can dodge bullets, leap behind your enemies, insta-kill several goons at once, or shoot up to three cyborg killing machines in one hit. Aiden will unlock more skills and abilities as you progress, such as rocket boots to allow double jumps and an environmental scanner to highlight hidden switches.

You can also find out which seemingly random enemies also have bounties on their heads, and you can then beat them senselessly and activate a teleporter to send them to the nearest cop shop. It’s an interesting system, but one that feels kind of underused. I’d have preferred something other than currency for this, and seeking out particular bounties could have rewarded things like rare cosmetics, for example.

Wanted: Dead or alive

Currency is used as XP at the black market, where you’ll unlock and upgrade Aiden’s various gadgets and gizmos. Bullets can over-penetrate foes, or you can increase the range of your scanner, etc. It’s nothing terribly unique or fresh, but it all works in context with the world you’re in. But all the time I was playing I couldn’t help but think of Dead Cells. With this gameplay and that gear system, you’d have a masterpiece. 

Another particularly cool element is the way you bring in bounties. Important marks can’t be teleported to the cops, see? Criminals pay better and often set the bounties Aiden follows. Instead, you’ll need to render your prey inert and physically carry them back to your ship. You can either kill them, which reduces the payday, or use Aiden’s third arm to knock them unconscious.

This third arm has a variety of uses, such as breaking hard-to-reach switches or smashing through a guard’s defenses. Build up enough energy and you can also use it to unleash a powerful attack. The fact that it can be launched in any direction is pretty cool, but it makes you wonder why it doesn’t feature more in the platforming. That said, you can get a grappling hook and the ability to slide upwards on ropes and pipes, but the third arm doesn’t feel super necessary for that.

Galaxy of outlaws

It really doesn’t matter though, because what’s here is more than enough bang for your buck. Add in the fact that it’s also quite well written, with some genuine humor and a few decent story twists, and you’ve got a recipe for a great little indie game here. The music is just exceptional all the time, a combination of synth and strings that feels perfectly at home among the retro-futuristic factories, sewers, and junkyard planets. 

They Always Run also looks gorgeous throughout.  Yes, the combat is a little stilted, but this feels deliberate. The traversal is sublime, chaining slides and jumps and hook shots. During the chase sequences when the music is up and the chips are down, it feels unmatched by other side-scrolling adventure games.

The animation style works well with the high-res pixel art, and little details in the environments and characters make a subtle difference that you would only notice in their absence. The worlds you’ll traverse are nothing we haven’t seen many times over, but they work within the context of the story.

Grim future

There are some bugs hidden in the code though. Mostly they relate to the animation, but there are little annoyances with the collision that can be irritating. Once or twice Aiden completely missed a ledge or pipe despite obviously reaching it, though thankfully the checkpointing is pretty lenient. 

Boss battles are the only issue here, as some can go on for quite a while. They’re usually a variation on hit-and-run tactics, without a great deal of nuance. They’re not overly common, but compared to the moments where you’ve just got to run from or chase after something, they can feel limited.

Completion and achievments

Being a PC exclusive (so far) They Always Run doesn’t feature trophies or achievements. Its linear nature also means there won’t be any replaying of chapters for secrets and collectibles. As a result, a straight playthrough will take around 10 hours and there’s not much of a reason to go back.

Final thoughts on They Always Run

Pros
Looks amazing
Soundtrack is great
Intriguing and compelling story
Cons
Some minor bugs here and there
Occasional difficulty spikes
Boss fights aren't great

Final Score: 4/5

With so many titles at the moment vying for attention, it’s easy to overlook something like They Always Run, but it’d be a shame to do so. With a compelling story, an interesting main character, and a familiar but exciting world, it’s worth checking for any fan of 2D action games.

Don’t confuse it for a Metroidvania, though. This is a more straightforward adventure with little backtracking and a fairly compact skill tree that focuses on gear rather than intrinsic abilities. Despite a handful of minor bugs, it’s a well-made romp that feels fresh and familiar at the same time.

They Always Run is available now on PC and costs $14.99. There is currently no word on a console release. You can check out the system requirements on Steam.

*Disclaimer: Reviewed on Windows 10. Review code provided by the publisher.

Microsoft Forms will soon add a countdown timer to online quizzes

Microsoft Forms will soon receive a new update that will allow users to create quizzes with time limits. The news comes from a recent update to the Microsoft 365 roadmap, which suggests that the “Timed quiz” feature is expected to arrive in January 2022.

With Timed quiz, Microsoft Forms will be able to set a time limit for respondents to complete a quiz, and once the time is up, it will be submitted automatically. The feature is aimed at Education customers, but the Microsoft 365 roadmap indicates that it’s also coming to business and GCC tenants. Google Forms has long offered similar functionality (via third-party add-ons), so it’s nice to see Microsoft Forms finally getting a native integration.

Overall, this new Timed quiz feature should be a welcome addition, and it can help to restrict respondents from looking up answers from other sources across the web. Microsoft Forms has recently added new organization capabilities, and you can find more details in our separate post.

Dell launches a super-powered and redesigned XPS desktop with Windows 11

Dell has launched a new performance-first desktop carrying the XPS badging. The new XPS desktop will be coming later this fall, starts at $919, and includes options for 12th generation Intel Core i9 processors, Nvidia RTX 30 Series GPUs, or AMD Radeon RX GPUs. It also comes shipped with Windows 11 Home or Pro pre-installed.

Compared to the previous generation, the new XPS desktop is designed to help you expand your creative possibilities and even gaming options. It has a physically bigger chassis, which enables bigger and better graphics cards. Dell notes that the tower itself is now 42% larger than before, which allows for improved airflow, and liquid cooling for better performance.

Under the hood, the XPS desktop comes with options for up to the 12th generation Intel Core i9-12900K processor, up to Nvidia’s GeForce RTX 3090, or AMD Radeon RX 6900 XT Graphics. The RAM is also DDR5, which has a faster clock speed than DDR4. Dell is including options for up to a 750w power supply, which can support up to 350W graphics, PCIe5 graphics, four storage bays, and three PCIe expansion slots.

There’s an optional “Creators edition” available which includes optional NVIDIA Studio drivers. The new XPS desktop ships in two color options. There is one model with a Night Sky resin front bezel with aluminum sides and rubber feet. The other model is Platinum Silver and comes with an aluminum bezel and sides plus a mineral white resin base with aluminum feet.

Alongside the XPS desktop, Alienware also revealed the new Aurora R13 and Ryzen Edition R14, powered by Intel and AMD processors. These gaming desktops offer tool-less entry, and Dell says it’s one of Alienware’s most accessible and upgradable desktops to date. These Alienware desktops have the new curvaceous Legend 2.0 chassis, which has an open-air design to increase performance. Unlike the XPS desktop, these are now available, with pricing starting at $1,480 on the R13, and $1,250 on the R14.

How to Install Windows 11 Without the Assistant

Windows 11 was released to the general public, but the rollout will stretch until the middle of the next year.

So, even if you have received the message that your PC is ready for Windows 11, you don’t know yet when you will have the go message to make it happen.

Your PC is ready for Windows 11

However, you can install Windows 11 even if your turn hasn’t arrived yet, and there are plenty of ways to do that, as you will see below.

But first of all, if you didn’t receive the message above in the Update & Security section, you need to check if your PC meets the Windows 11 minimum requirements.

You need to know that you can bypass the TPM 2.0 and Secure Boot requirements, but we don’t recommend going through, with the procedures below if your other specifications prevent you from installing it.

How do I check if my PC is ready for Windows 11?

  1. Download the PC Heath Check application.
  2. Once the file finished downloading, run it to install PC Health Check.
  3. Click the Finish button and this will open the app.
  4. The last thing to do is to hit the Check now button.
  5. We hope that you will see a message that will say that This PC meets Windows 11 requirements. You can click on See all results or on Device specifications to get more information but that’s all up to you.

If your PC passed the test, we can finally go through with the methods of installing Windows 11 without the assistant.

However, at this point, we urge you to create a backup for any important files on your drive. Although some of the options don’t affect your files, it’s an extra precaution.

How can I install Windows 11 without the assistant?

1. Use the Windows 11 Media Creation Tool

Note icon NOTE
For this procedure, you will need a USB flash drive of at least 8 GB in capacity.
  1. Download the Windows 11 Media Creation Tool.
  2. Once it’s downloaded, run the file and click on Accept after reading the terms.
  3. Now you can either go with the recommended options, or uncheck the box and select your desired language, then click the Next button.
  4. Select the USB flash drive, then hit Next.
  5. At this point, you need to connect the USB media, to select it from the list, then click the Next button.
  6. Make sure you have a steady Internet connection at this point because the tool will download Windows 11 and will create the bootable copy on your USB media. Click Finish at the end of the process.
  7. Now, press the Windows key + E to start File Explorer, browse your USB flash drive, and select the Windows 11 setup file to start the installation process.
  8. You can also restart your PC, enter BIOS, and change the boot sequence so that the removable device or the USB has the boot priority.

This method will take a few extra minutes than the one that implies using the Installation Assistant. Still, in the end, you will also have a recovery USB media that you will be able to use anytime your system is in trouble.

We also have a guide on how to boot from USB in Windows 10, and you can use the newly created Windows 11 USB media to do so. You can also install Windows 11 without a Microsoft account, and we have an entire guide dedicated to it.

Make sure you have a steady Internet connection at this point because the tool will download Windows 11 and create the bootable copy on your USB media. Click Finish at the end of the process. If you would rather complete setup offline, check this guide on installing Windows 11 without internet.

2. Download the Windows 11 ISO

  1. Go to the Microsoft dedicated webpage, select Windows 11 from the menu, and click the Download button.
  2. Next, you will be prompted to select the product language and click the Confirm button.
  3. Now, click the 64 bit Download button. The link is valid for 24 hours.
  4. Wait for the ISO file to completely download, then press the Windows key + E to start File Explorer, navigate to the location of the file, right click on it, and select Mount from the list of options.
  5. The only thing left to do is to access the virtual DVD Drive that was created and click on the setup file to start the Windows 11 installation.

Of course, you can also burn the Windows 11 ISO on a DVD to create a bootable USB drive and have a hard copy that will help you restore your system if something wrong happens.

Using an ISO file to download the feature update like Windows 11 23H2 is the safest way to get early access to the latest features of Windows. To learn more, check out this guide.

How to use the Windows 11 Installation Assistant?

Even though you might avoid using the Windows 11 Installation Assistant because it checks for the minimum requirements, this is the easiest way of upgrading.

So, if your PC meets the minimum requirements, here’s how to use the Installation Assistant.

  1. Go to the Microsoft dedicated download page and click on the Download now button under Windows 11 Installation Assistant.
  2. Run the downloaded file and click on Accept and install.
  3. The tool will begin the 3 step process to download and install Windows 11.
  4. When it finishes, you will only need to restart your PC, and your Windows 11 will boot up.

How to check for new updates in Windows 11?

Before letting you enjoy the change, we will also help you find out if there are any updates for the OS.

You must do this from time to time, and it’s imperative to check them right after installing Windows 11 because there might be new drivers and security patches to install.

  1. Click the Start button and select Settings.
  2. Now choose Windows Update from the left and hit the Check for updates button from the right.
  3. If there are any new updates, the system will download and install them right away.

That’s it! You have a new copy of Windows 11 installed on your PC, and we hope that our solutions helped you perform the upgrade seamlessly.

You have to keep in mind that Windows 11 is still a new OS, and there may be a lot of bugs and errors bothering you, but you will also find solutions for them here on our website.

If you change your mind and don’t want to upgrade, there is also the option to install Windows 11 on a virtual machine and test it without implications for your PC.

You will need more physical memory to load it, but once you run it on the VM, you can test its features in a controlled environment.

For any questions or suggestions, you can use the dedicated comments section below, and we will get back to you as soon as possible.

How to Change Cursor Color on Windows 11 [2 Ways]

The cursor (otherwise pointer) is that little arrow you move with the mouse in Windows 11. Some users like to customize mouse cursors by changing their colors. You can do the same with the methods below.

Why stick with the same old plain white mouse pointer all the time? You may modify your cursor’s color to one that matches a selected accent color in Windows 11 to enhance your theme’s consistency.

Changing a mouse pointer’s color is also one way to enhance its visibility. Moreover, modifying both the cursor’s color and expanding its size will make the mouse pointer clearer.

Are there any new Windows 11 settings for the cursor’s color?

Windows 11’s mouse pointer settings haven’t changed much from its predecessor. Therefore, the color options for cursors in Settings are much the same as before. You can change the cursor color via Settings as outlined below.

Aside from that, feel free to customize your mouse cursor by downloading new cursor theme packs for Windows 11. They aren’t anything new either, but you can also change your mouse cursor’s color with them.

How do I change the cursor’s color in Windows 11?

1. Use Settings

  1. First, click Start on Windows 11’s taskbar.
  2. Select Settings on the Start menu to open that app’s window.
  3. Enter the keyword mouse pointer style in the search box within Settings.
  4. Then click Mouse pointer style in the search findings to open the options in the screenshot directly below:
    Mouse pointer style options change mouse cursor color
  5. Next, click the Custom button with the green mouse cursor icon on it.
    Custom button change mouse cursor color
  6. Then you can select one of the recommended cursor colors.
  7. Alternatively, click Choose another color to open the color picker tool.
    The color picker tool change mouse cursor color
  8. Choose a color by holding the left mouse button and dragging the circle with your cursor.
  9. To configure your chosen color more, drag the Value bar there to the left and right.
  10. Press the Done button when you’ve finished.

2. Download new cursor schemes that have different colors

Download and extract a cursor scheme

  1. First, open this cursor library page.
  2. Select a cursor set there that has your alternative color of preference. If you want a red cursor, for example, select a cursor set based on that color.
    Download button change mouse cursor color
  3. Click the Download button for your cursor set.
  4. Next, select a folder to download the cursor set’s ZIP archive to on the Save As window.
  5. Press the Save button on the window.
  6. Open File Explorer by clicking the folder icon on Windows 11’s taskbar.
  7. Now open the folder you downloaded the cursor set to.
  8. Select the cursor set’s ZIP archive, and click the Extract all button in File Explorer.
    Extract all button change mouse cursor color
  9. Click Browse in the extraction window that opens to choose a path for the extracted folder.
    Extract Compressed Folders window change mouse cursor color
  10. Then press the Extract button.

Apply your new cursor scheme in Windows 11

  1. Press the Windows + I keyboard keys at the same time to bring up Settings.
  2. Type the keyword Mouse settings within the search box in Settings.
  3. Click Mouse settings to bring up the window that you can see below:
    Mouse Properties window change mouse cursor color
  4. Then click Additional mouse settings to open a Mouse Properties window.
  5. Select that window’s Pointers tab.
  6. Click the Scheme drop-down menu to select a scheme to change the cursors for.
    Scheme drop-down menu change mouse cursor color
  7. Next, select one of the scheme’s cursors to change. It’s best to change the normal select cursor.
  8. Press the Browse button.
  9. Then select a cursor from your downloaded cursor pack, and click the Open button.
  10. When you’ve finished customizing your selected cursor set, click the Save As option.
  11. Enter a name for the cursor set, and click the OK button.
  12. Then press the Apply button.
    A custom cursor change mouse cursor color
  13. Click OK to close the Mouse Properties window.

How do I change my cursor in Windows 11?

The Windows 11 Control Panel includes additional customization options you can further change the cursor with. By using those options, you can select alternative black or white cursor size options. You can modify the Control Panel’s cursor options as follows:

  1. First, open the search box by clicking the magnifying glass on the taskbar.
  2. Next, type Control Panel in the search box.
  3. Click Control Panel to bring up its window.
  4. Now select the Ease of Access Center applet.
    Control Panel change mouse cursor color
  5. Click the Change how your mouse works to bring up the options that you can see below:
    Mouse pointer settings change mouse cursor color
  6. Then select a different mouse pointer radio button there. For example, choose the Large Inverting option if you prefer to have a larger black mouse pointer.
  7. Click Apply to save the new cursor options.

So, that’s how you can change the cursor’s color in Windows 11. Modifying the mouse cursor’s color is just one way you can customize the pointer. The OS includes many more customization settings for the mouse.

To further customize your mouse cursor, check out our guide on how to change Mouse Settings in Windows 10 and learn to adjust the pointer’s speed, motion, visibility, and more besides!

For any other information or questions, feel free to confidently use the comments section below. We’d love to hear from you.

A low-cost Surface Laptop is currently in the works to compete with Chromebooks

As we are nearing the end of the year, Microsoft may have yet another announcement in store for its users. According to the rumors, the device is more education-focused and affordable.

Chromebooks are widely used in schools, and now Microsoft wants a stake in the market. Upon releasing the laptop, Microsoft may also release a new Windows 11 variant.

If you may recall, during the Surface event held a few weeks ago, an array of its flagship devices and now, an affordable version is coming soon.

Specifications

The new laptop is expected to have an 11.6-inch display, 8GB memory, and a low-end quad-core Intel Celeron N4120 processor.

It will also have USB-A and a USB-C port and charge either through the USB-C or AC ports, just like the Surface devices.

Reduced price

The device will not follow the usual Surface screen 3:2 aspect ratio as these will be 16:9. In addition, they may not be available for retail as the major clientele is educational institutions. They will probably be offering them in bulk which will significantly reduce the prices.

From the reports on Twitter, It would seem that this is a very well-received piece of news as users are hopeful with the expected release.

Windows 11 SE

The details on the Windows 11 SE are very scattered, so the assumption from the report is that it could be a Windows 10 but in S mode. The OS is expected to run Microsoft Store apps and can be upgraded to Windows 10.

Others suggest that it could be an enterprise version without the Microsoft Store and limited apps and settings.

We can only wait and see what the OS will have and what it won’t.

Competition with Chromebooks

It has been a tradition for Microsoft to offer low-cost Windows versions with limited abilities, but it seems this new version may be somewhat different. This new device should be able to give educators a way to reuse the blackboard, just like Chromebooks.

This would be the company’s first and using its hardware which in the past, it enabled other hardware makers to offer the OS for a cheaper price.

Microsoft is yet to make a statement on the new Windows 11 SE version when the release of either the device or OS will be available. We will be on the lookout in case there are any new developments.

What features would you like to see included in the Surface device dedicated to educators? Let us know in the comment section below.

PC Health Check App is coming to Windows 10 via a cumulative update

Since all people can talk about nowadays is if they can run Windows 11 or not, know that if you have a PC running the Windows 10 OS, then Microsoft is bringing its PC Health Check app to your device via a new software update.

This application became popular after it offered users a way to check Windows 11 eligibility. So this means that you don’t even have to be a Windows Insider in order to get it, you’ll have it handy in case you need it.

Microsoft is delivering the diagnosis app via update

The Redmond-based tech company actually said that PC Health Check will be delivered to existing Windows 10 PCs running version 2004 or later, via KB50005463.

For the moment, you need to be an Insider in order to get your hands on the app, but that is all going to change with the new Windows Update.

Anf since we were talking about utility, the PC Health Check app is meant to do a lot more than just checking for Windows 11 compatibility.

The popular software also lets you set up OneDrive’s backup and sync, check battery and storage capacity, manage startup time, and throws tips to improve overall performance.

With all this being said, know that the app isn’t of much use now as the Windows Update page already fulfills its primary purpose and shows whether your PC can run Windows 11 or not.

What if I don’t wnt the PC Health Check app on my PC?

Well, nobody said it was mandatory for you to keep it or use it. Indeed, Microsoft will do us the courtesy of providing us with the application, but if you simply don’t want it, you can easily remove it.

Yes, of course, we will tell you how you can do this, but we bet that you already know seeing how this is no different than any other application on your PC.

  1. Access the Settings app.
  2. Select the Apps category.
  3. Navigate to Apps & Features.
  4. Locate the PC Health Check app in the list and click on it.
  5. Press the Uninstall button.

That’s all you have to do if you have no use for this software whatsoever. However, if you are planning an upgrade to the latest OS, it might be useful.

What’s your opinion on Microsoft’s latest decision? Let us know in the comments section below.

Microsoft Store’s early 2021 gift guide is out

As we round the corner on the holiday and shipping dates have already begun to slip, Microsoft is looking to get its gift guide out early to help sell its wares and give buyers enough time to purchase.

The Microsoft Store is hosting discounts on everything from game subscriptions to eco-conscious mice peripherals with promised free 2 – 3-day shipping windows, extended warranties, an “extended low price promise”, and scheduled personal set-ups and training sessions with experts for the best gift buying experience.

Xbox Game Pass Ultimate ($14.99/mo)

Perfect for the one who can never have enough games to discover, explore and master: 

  • A library of over 100 high-quality games
  • Benefits of Xbox Live Gold and EA Play
  • Allows users to play across devices from the cloud
Surface Headphones 2 ($229.99)

Save up to $25.00

Microsoft Surface Headphones


Perfect for the busy body who’s always listening to music, podcasts, TV shows or phone calls:

  • Spectacular Omnisonic sound
  • Adjustable noise cancellation
  • Up to 18.5 hours of music listening time
Surface Pro 8 (From $989.99)

Save up to $260.00

Perfect for the friend who seems to always be doing it all: 

  • An entirely modernized redesign in the most powerful Pro yet
  • Offers more screen on a high-resolution 13-inch display
Surface Duo 2 (Starting at $1,499.99)

Perfect for the one who is always on the go: 

  • New and improved design with increased durability, optimized audio in every mode, a dynamic triple-lens camera, and lightning-fast 5G
  • Two foldable screens for apps, email, meetings, and calls that never leaves your side
Surface Laptop Studio (Starting at $1,599.99) 

Perfect for your loved one with the running imagination and endless creativity: 

  • The best of Surface heritage in one powerhouse device with three different postures, allowing users to work the way they want
  • Provides built-in Slim Pen storage and charging
Ocean Plastic Mouse ($24.99) 

Perfect for eco-conscious shoppers looking to improve their office space: 

  • Made with 20% recycled ocean plastic, a breakthrough in materials technology that begins with the removal of plastic waste from oceans and waterways
  • Includes an exclusive ocean-inspired theme pack to customize your Windows desktop background


These are just a handful of the latest items in the Microsoft Store that are being highlighted but there are more savings on items such as $500.00 off on a Razer Blade 15 RZ09 gaming PC, Harry Potter Kano Coding Kits, Minecraft for Windows Starter Collection Xbox Stereo Headsets, and more.

Microsoft Edge and Bing Shopping tabs now integrate Shopify listings

Microsoft has unveiled a new partnership with the e-commerce platform Shopify to improve the shopping experience for consumers living in the Microsoft ecosystem. The company has announced that shopping tabs in Microsoft Edge and its Bing Search engine now display listings from 1.7 million Shopify sellers, and this Shopify integration is also coming soon to its new personalized news service, Microsoft Start.

“Using the Shopping tab on Microsoft Bing, and Microsoft Edge, you will now see more diverse products, better prices, and improved discovery of deals. You will also be able to simply check out via the Shopping tab on Microsoft Bing quickly and securely,” the Microsoft Bing team explained.

shopping-tab-on-Bing-with-Shopify-stores.png

Microsoft Edge and Bing may not be as popular as Google and its Chrome browser, but this partnership should still benefit Shopify merchants by bringing more eyeballs to their brands and products. Microsoft has created a dedicated Channel app where merchants can connect with shoppers, and their products will automatically show on the Shopping tab on Microsoft Bing and the Microsoft Start Shopping tab for free.

The Redmond giant noted that the new partnership is just the beginning of enhancements it has planned for those looking to save some money this holiday season, and it plans to bring more shopping features to its products soon. “We are excited to create new and meaningful connections between shops and shoppers for this season and beyond,” the Microsoft Bing team said yesterday.

Microsoft Teams public preview adds option to pin chat messages

Microsoft Teams is set to receive a new update that will allow users to pin chat messages. The company has started testing the pinned messages feature in the Teams desktop client, and it’s available for all public preview users.

The new capability allows any chat participant to pin or unpin any specific message to the top of the chat window, making it visible to everyone. Once pinned, users can easily navigate to the original message in the chat thread by clicking on the pinned message. The feature is also supported in channel conversations in Teams. However, the app does not display the pinned posts at the top of the channel, and they show up in the information pane instead.

To get started, simply hover over the specific chat message you’d like to pin, click the (. . .) menu, and select the “Pin” option. Once that is done, the pinned message will instantly appear at the top of the conversation. Users will also be able to remove the pinned chat message or replace the currently pinned message with another one at any time.

Overall, the pinned messages experience is a nifty addition to Teams to help users keep track of important announcements within a chat. The feature works in Microsoft Teams chats with external participants and guest users, but only one message can be pinned at a time. This capability is already supported on competing platforms, such as Slack, and it’s great to see Microsoft Teams finally catching up.

Hyperkin’s Xbox 20th anniversary Duke controller pre-orders are selling out

Pre-orders for Hyperkin’s 20th Anniversary Xbox controllers went live a few hours ago and all three models sold out almost immediately.

“Thx for supporting the #Duke!” a tweet on the official Hyperkin Twitter account read. “Because pre-orders were met w/ enthusiasm, the 1st batch of Anniversary Dukes are SOLD OUT! A 2nd batch will be released 12/15 on Amazon!”

The above-mentioned Amazon pre-orders are now live and, as of the time of this writing, all three are still in stock.

Hyperkin announced their special 20th Anniversary Xbox controllers last month. Each controller is modelled after the original Xbox console’s massive Duke controller with designs inspired by the Halo franchise’s Cortana character and the newer Xbox Series X and S black and white designs.

Each Hyperkin 20th Anniversary Xbox controller features a built-in screen which plays an Xbox logo startup animation on the white and black controllers and a special Cortana clip edit on the purple Cortana controller.

Hyperkin Xbox 20th Anniversary Cortana Controller

The first batch of controllers are currently slated to launch on November 15th though the second batch of pre-orders being sold on Amazon will come out a month later on December 15th. If you’re in Australia, pre-orders via EB Games are slated to ship on December 21st so it’s likely that release and ship dates will vary by region and product availability.

Are you planning on picking up any of these controllers? Let us know which one’s your favorite in the comments below and then follow us on Pinterest and Twitter for more Xbox gaming news.

Xbox releases official Age of Empires IV Wolol-o’s cereal with bonus free CD

To help promote the release of Age of Empires IV this week, the Australian and New Zealand branch of Xbox has made an actual breakfast cereal inspired by the video game.

Name, Age of Empires IV Wolol-o’s, this extremely limited edition cereal is packed in a proper cereal box that comes with the 100% edible cereal and a bonus CD, just like back in the 90s and early-2000s.

The bonus CD includes the Age of Empires IV soundtrack and 12 months of Xbox Game Pass for PC access.

Right now the only way to get a box of Age of Empires IV Wolol-o’s is to enter the competition on Xbox ANZ’s Facebook page which can be entered simply by liking and sharing this post. Note that the competition is only open to residents of Australia and New Zealand.

Age of Empires IV is due for release on Windows PC later this week on October 28th. The game will also be made available to play for free for subscribers of Xbox Game Pass for PC on the same day.

Want more Xbox gaming news? Follow us on Twitter, Pinterest, and Facebook.

Microsoft identifies a second SolarWinds-like attack from Russian based hackers

Companies are still reeling from the sophisticated large scale 2020 attack on SolarWinds who worked with 320,000 customers in over 190 countries, and it appears there is a second attempt under away.

While the actual number of customers who downloaded the “impacted version of SolarWinds’ software” was much smaller at 18,000 and even fewer than 100 who were hacked, this new threat isn’t being taken lightly.

Microsoft has managed to identify a second nascent attack on the horizon that is deploying a similar Trojan-horse technique to gain direct access to cloud services used by global IT supply chains.

In a blog post authored by Microsoft’s corporate vice president of Customer Security & Trust, Tom Burt names Russian nation-state actor Nobelium as the same perpetrators of both the original SolarWinds attack and this new copycat attempt.

Nobelium has been attempting to replicate the approach it has used in past attacks by targeting organizations integral to the global IT supply chain. This time, it is attacking a different part of the supply chain: resellers and other technology service providers that customize, deploy and manage cloud services and other technologies on behalf of their customers. We believe Nobelium ultimately hopes to piggyback on any direct access that resellers may have to their customers’ IT systems and more easily impersonate an organization’s trusted technology partner to gain access to their downstream customers.

Microsoft has been keeping an eye on Nobelium since May of this year and alerting its vulnerable partners and customers which has been more than 140 resellers and service technology providers.

Sadly, Microsoft believes of the 140, at least 14 have been seriously compromised by the new attack. On the plus side, Microsoft also believes it’s caught Nobelium in the preliminary stages despite an increase in activity during the summer.

Similar to SolarWinds, Nobelium is looking to weaponize a long-term strategy of surveillance on potential Russian targets in the future, according to Microsoft.

The attacks we’ve observed in the recent campaign against resellers and service providers have not attempted to exploit any flaw or vulnerability in software but rather used well-known techniques, like password spray and phishing, to steal legitimate credentials and gain privileged access. We have learned enough about these new attacks, which began as early as May this year, that we can now provide actionable information which can be used to defend against this new approach.

Microsoft notes Nobelium isn’t the only nation-state attempting to gain illegal access to resellers IT supply chains, but it is among the most aggressive at the moment.

Microsoft is collaborating with authorities and the security community in US and European government agencies to coordinate and execute counter measures.