How to Use Apple Keyboard and Mouse on Windows 10

Currently, Apple is one company that offers one of the best ranges of peripherals on the market with a lifetime above average and an excellent user experience.

Many of you are likely users of Windows systems but you would like to be able to use the keyboard and mouse from Apple or you were Mac users and you want to use as many components on a computer with Windows.

How can I use Apple keyboard and mouse on Windows 10?

Fortunately, this is possible without a workaround. Here is what you have to do to connect an Apple keyboard and mouse to a Windows 10 system.

These two hardware devices from Apple are wireless and can be connected to your Windows PC via Bluetooth. Apple Magic Mouse also has seamless wired USB support.

How to configure the Magic Mouse on Windows 10

The Magic Mouse from Apple is a bit different product compared to other devices of this kind.

It has no physical buttons and scroll wheel but all actions that you can do with a normal mouse can be made with this mouse and this experience is a little strange at first, but nothing that you cannot get used to.

If you were a Mac user, this should not any create problems.

All you have to do to make this mouse work is to download a free driver and execute a basic installation.

Normally, the whole process should not take more than 10 minutes. Here is how you do this.

Make sure that before you install this driver you have uninstalled any other software of this kind:

  1. You can download the driver without having to sign or fulfill any other condition. On that site you have two types of drivers depending on which mouse version you own. Download the driver associated with your device.
  2. The driver will be received as a .zip and you need to extract the content. You will get an executable through which you will start installation by double-clicking on it. The installation is basic and easy to make because you just have to follow the steps indicated by the installer. You have to accept the license agreement and select the place where you want the driver to be installed.
  3. Before finalizing the configuration, the installer will download some utilities for the model of your mouse, but this will not take too much time because these have less than 4MB.
  4. You can run the installed utilities from the last page of the setup wizard. You can find them also in the taskbar.
  5. After you have opened the Magic Mouse Utilities, connect the mouse to your system and make sure throughout using that software will remain active, otherwise, the device cannot be used. You can set the service to start when you open the computer to save some time.

That is all! This method can be used also for Windows 8, 8.1, 7 depending on your mouse model.

How to configure Apple wireless keyboard on Windows 10

The Apple wireless keyboard is very different from a PC keyboard.

The tactile feel of a solid mechanical device is missing on the first, so, if you are a PC user and prefer a simple and streamlined look, the Apple keyboard might be perfect for you.

This configuration does not require any support software, because it can be done from your computer’s Bluetooth settings.

Before installation, make sure that your keyboard has a fully charged set of AA batteries because you will need to use the keyboard during this process.

  1. In the Windows search bar type Bluetooth and click on the Bluetooth settings.
  2. Your keyboard should appear on the Manage Bluetooth devices list.
  3. Select the Apple Wireless Keyboard and click on the Pair.
  4. You will receive a passcode on your screen that you have to enter on the keyboard.
  5. Hit the Enter button to finish the keyboard configuration.

Note: Often you can receive That didn’t work. Please make sure your device is discoverable or the device no longer listening errors.

There is nothing to worry about because they are due to the fact that you have not pressed enough the power button of the keyboard or a driver issue that can be solved by updating the drivers.

Here is how you do that.

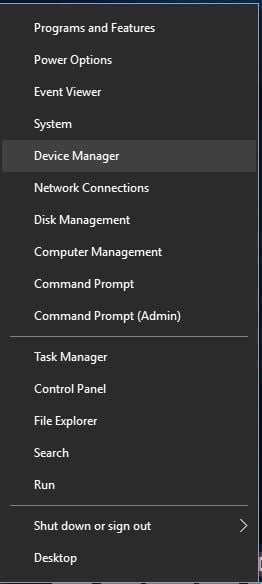
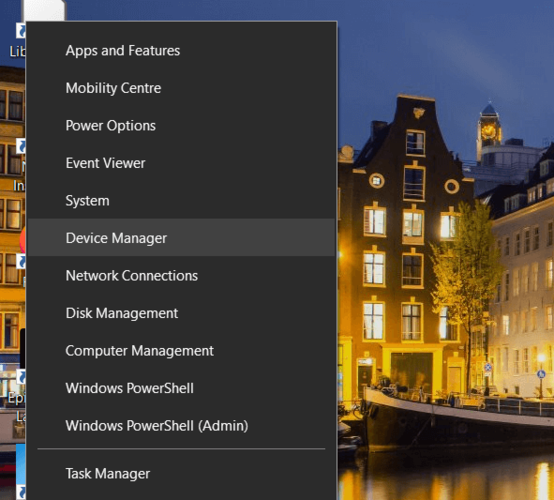
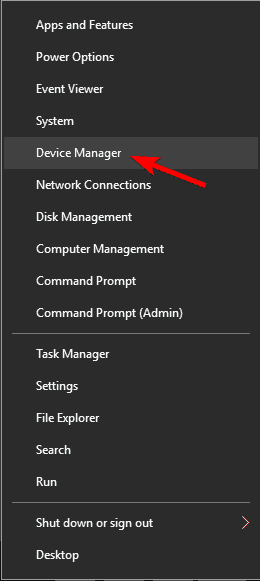
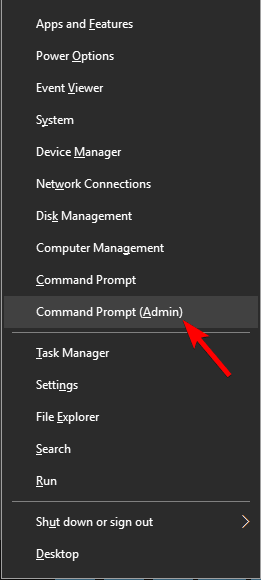
  1. Right-Click on the Windows icon from the bottom-left corner of your screen.
  2. Select Device Manager.
  3. Make sure you do not have any errors at the Bluetooth.
  4. Run a scan on the Software devices and System devices categories and update the drivers if needed.

Windows can’t automatically find and download new drivers? Don’t worry, we’ve got the right solution for you.

After have you solved the problem, try one more time to connect the keyboard. If you still cannot connect it, we recommend you present your problem to the Apple Support Service.

Also, there are two different keyboards that you can use for your Windows 10 computer: the older Wireless Keyboard and the newer Apple Magic Keyboard.

The configuration for the latter might cause some minor issues because Windows 10 reads the Magic Keyboard as a separate device.

It will present a code in a window with the text “compare the passcodes”. Click “Yes” and now you should be connected.

If you want to disconnect the keyboard, simply click on the keyboard’s name from Manage Bluetooth devices and then click on the “Remove device” button.

And in case you have more keyboards and devices, don’t hesitate to check out our Ubotie keyboard pairing guide for Windows, Mac, and iPad too.

If you have any other questions, feel free to leave them in the comments section below.
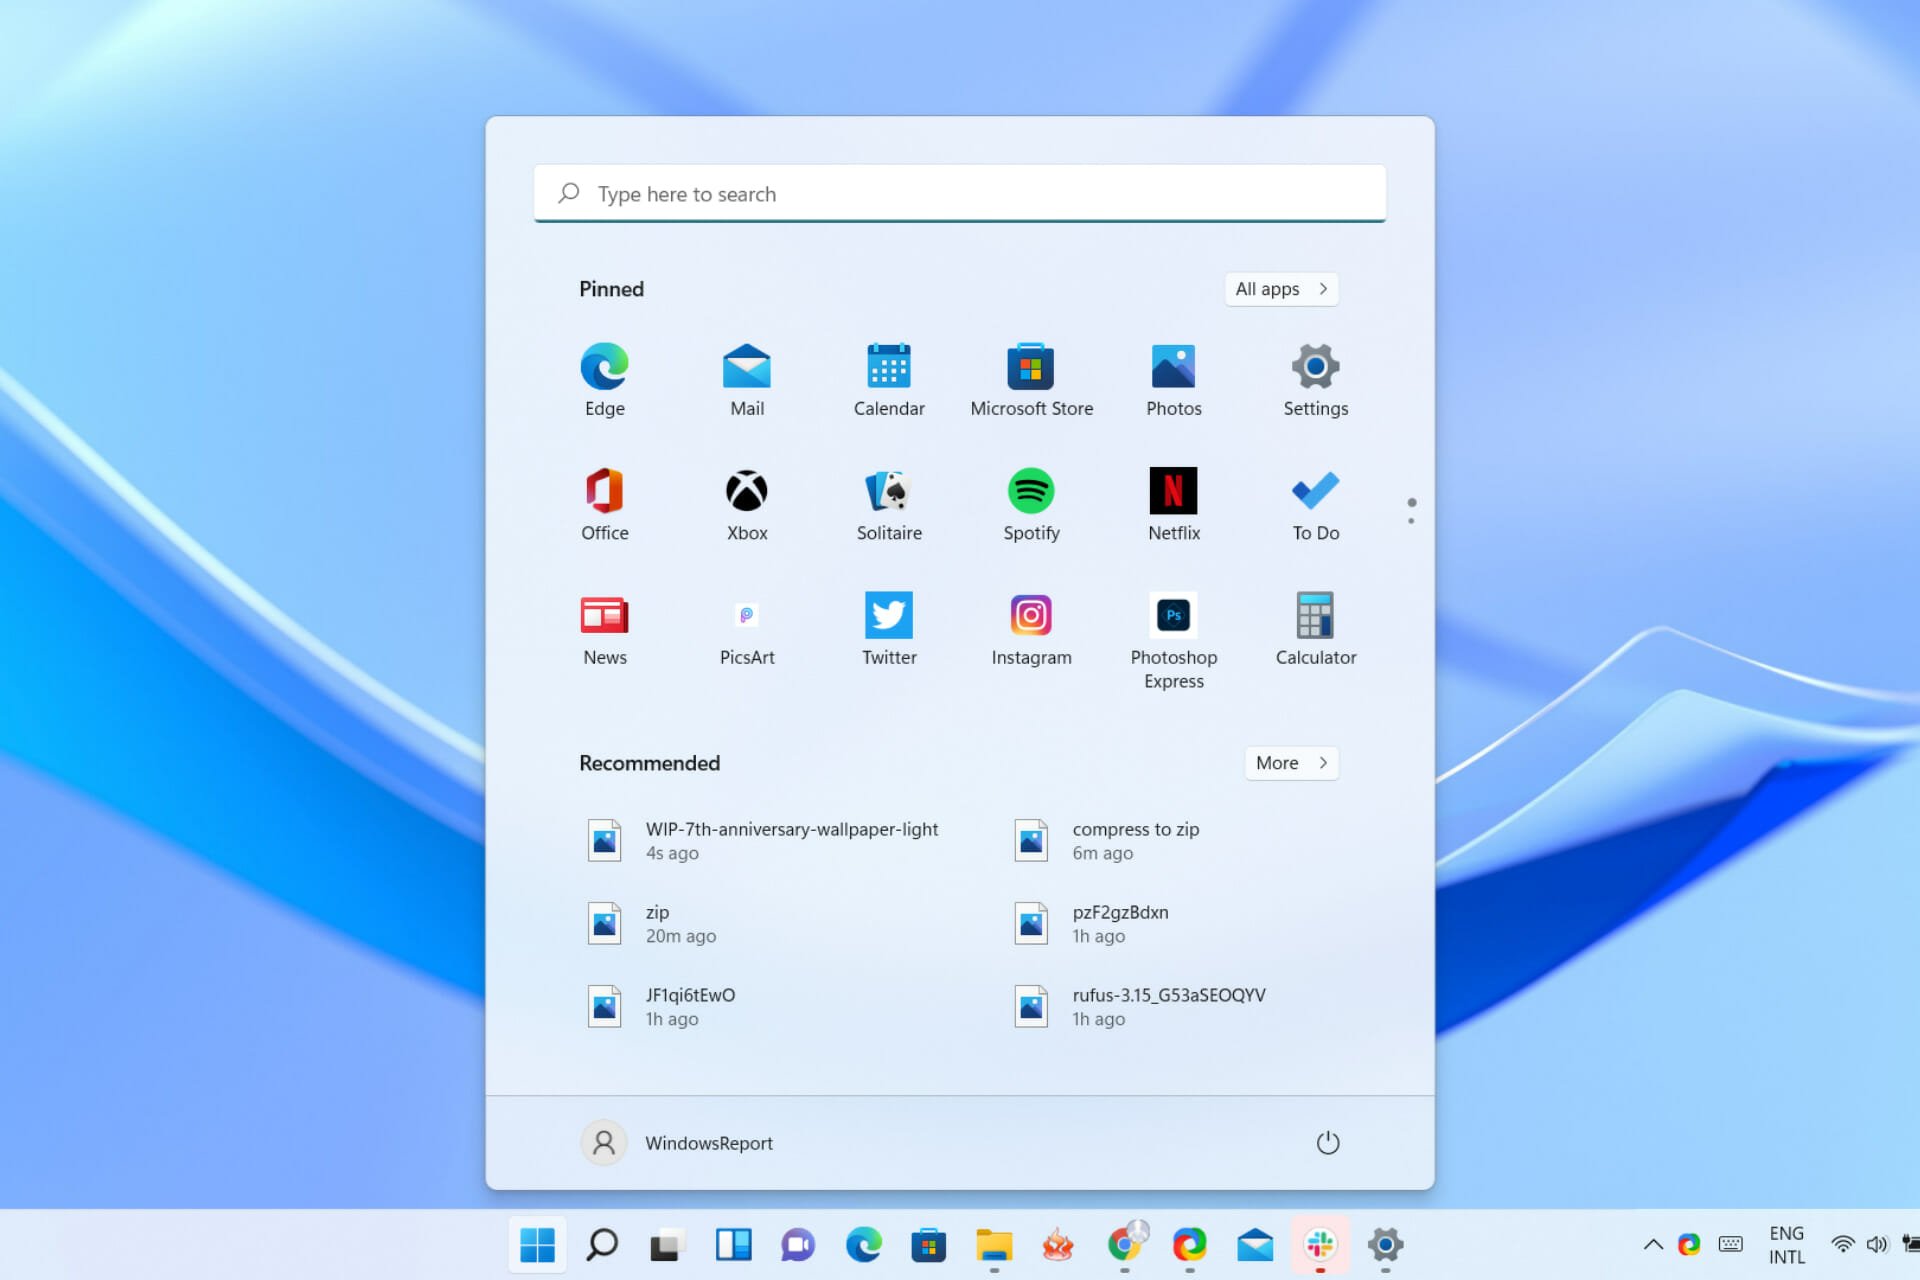
We are paying more for laptops just because they are Windows 11 compatible

Did you know that laptop manufacturers are actually charging their customers extra for choosing to purchase devices that are compatible with Microsoft’s latest operating system?

These changes are easily spotted with the naked eye and people are starting to call these controversial price spikes a Windows 11 tax.

This whole situation is perplexing, considering that the Redmond tech giant clearly stated that the upgrade from Windows 10 to Windows 11 will be entirely free.

Are manufacturers adding a Windows 11 tax to their prices?

Ever since Microsoft announced the new operating system, hardware manufacturers all over the world rushed to create and put out new laptop models that are Windows 11-ready.

Brands like Asus, HP, Acer, Dell, and Lenovo were among the first ones to come up with these new devices and most of them are already available for purchase if you were looking for an alternative for Surface models.

While you are sitting and reading this, while thinking that companies wouldn’t do this to their customers, let’s analyze this scenario together.

For example, the award-winning Dell XPS 13 laptop costs $881.99 if you buy it with a preinstalled version of Windows 11 home.

At the same time, the exact same laptop only costs $734.99 with Windows 10 Home. Those $147 represent a 20% price difference, and it’s kind of hard to not question what the reasoning behind the decision is.

In the UK, there is a more reasonable price difference of £50 or 5.9% between Windows 11 Home and Windows 10 Home for the same product.

However, this is justified by an upgrade from 256GB to 512GB SSD, which is actually believable, compared to the first scenario.

We’re not saying that there’s a whole conspiracy here, it could be that the manufacturers or the retailers mispriced these products. But what if they didn’t?

It’s clear that whenever a new and desirable product hits the market, there will be a lot of thirsty third parties that will try to profit however they can and we’re hoping that’s not the situation here.

Another theory is that retailers, as well as manufacturers, are actually discounting Windows 10 devices, while the Windows 11-ready ones maintained their price.

The only way we can be sure is to keep monitoring the situation and then draw conclusions. In the meantime, if you are looking for a new laptop or tablet, there are a lot of available options out there.

What is your opinion on these price spikes? Share your thoughts with us in the comments section below.

How to restore a missing Volume icon in Windows 10 / 7

If you want to quickly change the sound volume on your PC, the easiest way to do that is to use the Volume icon in the Taskbar. Unfortunately, users reported that the Volume icon is missing on Windows 10, so let’s see how to fix this issue.

Volume icon missing on Windows PC? Here’s how to fix it

1. Make sure that Volume icon is enabled

  1. Open the Settings app and go to System.
    Volume icon missing Windows 8
  2. Now go to the Notifications & actions tab.
    1. A list of available app notifications will appear.
    2. Make sure that the Audio is set to On.
      Volume icon missing from taskbar Windows 10

If the Volume icon is missing on Windows 10, you need to make sure that this icon is enabled.

2. Run Local Group Policy Editor

  1. Press Windows Key + R and enter gpedit.msc.
  2. Press OK or click Enter.
    Can't turn volume icon on
  3. In the left pane navigate to User Configuration > Administrative Templates > Start Menu and Taskbar.
  4. In the right pane locate Remove the volume control icon and double-click it.
    Volume icon has disappeared
  5. Once the properties window opens make sure that Not Configured or Disabled option is selected.
    Volume icon missing notification area
  6. Click Apply and OK to save changes.

Local Group Policy Editor is a powerful tool that allows you to change many system settings, and one of those settings is the appearance of the Volume icon.

3. Change the text size to 125%

  1. Right-click your Desktop and choose Display settings.
    Volume icon greyed out Windows 10
  2. When the Customize your display window opens move the slider a bit to the right and set the size of the text to 125%.
  3. After you’ve done that, move the slider back again to the left and change the size to the 100%.
    Windows 10 volume icon not working
  4. Close the window and the Volume icon should appear.

Unfortunately, you might have to repeat these steps every time the Volume icon disappears from Windows 10. If the Volume icon is missing from Windows 10, you can fix this problem by changing the size of the text to 125%.

4. Update your audio drivers

  1. Press Windows Key + X and choose Device Manager from the list.
    Volume icon missing Windows 7
  2. When Device Manager opens, expand the Sound, video and game controllers section, right-click your audio device and choose Update driver.
    Volume icon missing Windows 7
  3. Select Search automatically for updated driver software and let Windows download the best driver for your device.
    Volume icon missing from taskbar Windows 10

According to users, some of them managed to fix the problem with the missing volume icons simply by updating their audio driver. Sometimes outdated drivers can cause this and other problems to occur, and in order to fix it, it’s advised to update your drivers.

Alternatively, you can also download the necessary drivers simply by downloading them directly from your sound card manufacturer. If you don’t want to download drivers manually, there are also automated solutions that will update your drivers automatically.

5. Log out and log in to Windows 10

Windows 10 volume icon not working

According to users, one of the simplest ways to fix this issue is to log out and log back into Windows 10. To do that just click the Start button, then your user name, and choose to Sign out from the menu. After you sign out, log back into Windows 10, and the Volume icon should appear.

This is a simple workaround, and you’ll have to repeat it every time in order to fix the problem with the missing Volume icon.

6. Restart Explorer

  1. Press Ctrl + Shift + Esc to start Task Manager.
  2. When Task Manager starts, go to Details tab.
  3. Locate explorer.exe process and right click it.
  4. Choose End Task from the menu.
    Can't turn volume icon on
  5. Press Windows Key + R and enter explorer.
  6. Press Enter or click OK.
    Volume icon has disappeared

Another workaround is to restart Explorer by using the Task Manager. According to users, after restarting the Explorer process, the Volume icon appears.

7. Add values to the registry

  1. Press Windows Key + X to open Power User Menu and select Command Prompt (Admin).
    Volume icon missing notification area
  2. When Command Prompt starts enter the following lines:
    • reg add “HKCUControl PanelDesktop” /v “HungAppTimeout” /t REG_SZ /d “10000” /f
      volume-icon-missing-cmd-1
    • reg add “HKCUControl PanelDesktop” /v “WaitToKillAppTimeout” /t REG_SZ /d “20000” /f
      volume-icon-missing-cmd-2
  3. Close Command Prompt and check if the issue is resolved.

Adding values to the registry can be potentially dangerous and cause system instability, therefore, it might be a good idea that you create a backup of your registry just in case.

8. Delete a value from your registry

  1. Press Windows Key + R and enter regedit.
  2. Now click OK or press Enter.
    Volume icon greyed out Windows 10
  3. When Registry Editor opens, go to the following key:
    • ComputerHKEY_CURRENT_USERSoftwareClassesLocal SettingsSoftwareMicrosoftWindowsCurrentVersionTrayNotify key in the left pane.
      Windows 10 volume icon not working
  4. Before we proceed, it’s always a good idea to back up your registry, just in case.
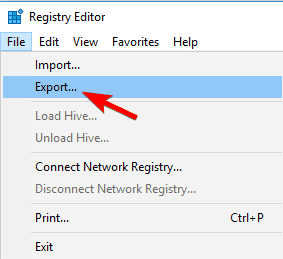
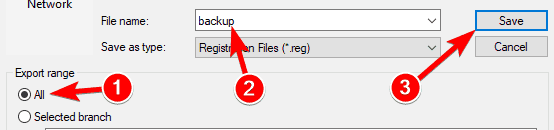
  5. To do that, right-click TrayNotify key in the right pane and choose Export from the menu.Can't turn volume icon on
  6. Make sure to choose Selected branch in the Export range section.
  7. Now enter the desired file name, choose a save location and click the Save button.
    Volume icon has disappeared
  8. Now you have created a backup of your registry. If any issues occur after making registry changes, feel free to run this file and restore your registry to the original state.
  9. In the right pane, locate IconStreams and PastIconStreams and delete them both. If you have only one of these values, just delete that one value.
  10. Now restart your PC and check if the problem is resolved. If you don’t want to restart your PC, you can restart Windows Explorer or log out of your account and log back in.

If you’re still having problems with the missing volume icon, you might be able to solve the problem by removing a couple of values from your registry.

Your registry holds all sorts of sensitive data, and by changing this data you can change various settings. It’s worth mentioning that your registry is rather sensitive, so we advise extra caution while modifying the registry.

As you can see, this solution is relatively simple, and if you have problems with the missing volume icon, be sure to try it out.

9. Make sure that the necessary services are running

  1. Press Windows Key + R and enter services.msc.
  2. Now press Enter or click OK.Volume icon missing notification area
  3. List of services will now appear. Double-click Windows Audio service.
    Volume icon missing Windows 7
  4. When the Properties window opens, set the Startup type to Automatic.
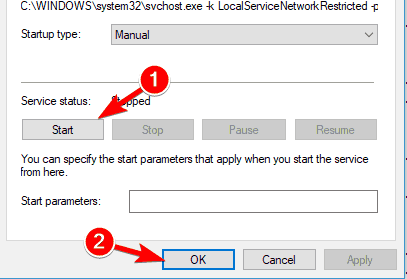
  5. If the service isn’t running, click the Start button to start it.
  6. Now click Apply and OK to save changes.
    Volume icon missing from taskbar Windows 10
  7. Now double-click Windows Audio Endpoint Builder service, and repeat everything from the previous step.
    Volume icon greyed out Windows 10

Many components of Windows rely on certain services in order to work properly, and if the Volume icon is missing on your PC, the problem might be because the necessary services aren’t running. However, you can always fix that problem by enabling the required services manually.

After doing that, the necessary services should be started and working properly, and your problem will be resolved. Missing Volume icon in Windows 10 is a small problem that can cause inconvenience, but we hope that you fixed the problem by using one of our solutions.

Missing volume icon can be annoying, but users reported many similar issues. Speaking of volume icon issues, here are some of the problems that users reported:

  • Volume icon missing Windows 7, 8
    • This error can appear on both Windows 7 and Windows 8.
    • Even if you don’t use Windows 10, you should be able to fix this problem by using some of our solutions.
  • Volume icon missing from taskbar Windows 10
    • If your volume icon is missing from the Taskbar, it’s possible that the icon is just disabled.
    • To fix the problem, make sure that your volume icon is enabled from the Settings app.
  • Volume icon greyed out Windows 10
    • This problem can occur if there’s an issue with your audio device.
    • If your volume icon is grayed out, you might want to try updating your drivers and check if that solves the problem.
  • Windows 10 volume icon not working
    • If volume control icon isn’t working, that might be due to a temporary glitch.
    • To fix the problem, simply sign out and sign back in and the issue should be resolved.
  • Can’t turn volume icon on
    • According to users, sometimes you might not be able to turn your volume icon on.
    • If that’s the case, be sure to check if the required services are running properly.
  • Volume icon has disappeared
    • This is another common problem that can occur.
    • If you’re having this issue, just change the text size and that will solve your problem.
  • Volume icon missing notification area
    • Another common problem is the missing volume icon from the notification area.
    • This can be a problem, but you should be able to fix it using one of our solutions.

By following these steps, you should be able to see the Volume icon in the taskbar back in no time.

Let us know which of the steps listed above helped you the most by leaving us a message in the comments section below.

There was a problem connecting to OneDrive [Fix]

OneDrive is Microsoft’s cloud storage service, but many users reported There was a problem connecting to OneDrive. Subsequently, it becomes impossible to save or even sync your documents and photos.

Well, here is how to restore connectivity and get rid of the frustrating error message once and for all.

How to fix OneDrive 0x8004deed & 0x8004ded0 errors?

  1. Disable your firewall
  2. Modify your PC’s Internet Properties
  3. Try out a different cloud storage provider
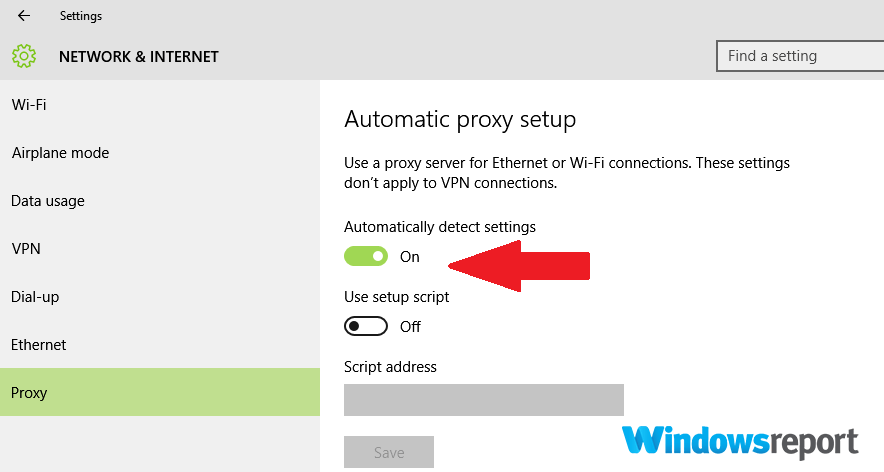
  4. Remove proxy addresses
  5. Reset the entire network connection
  6. Create a new Windows 10 user profile
  7. Reset OneDrive
  8. Uninstall and reinstall OneDrive

1. Disable your firewall

Your firewall may be blocking the OneDrive’s Internet connection and causing There was a problem connecting to OneDrive error.

Refer to the manufacturer’s website for detailed instructions on how to switch off your firewall. You may also turn off your current antivirus software but don’t forget to re-enable it as soon as you’re done.

In some instances, you might fix the problem by switching to a different antivirus. These antivitus software offers great protection, and they won’t interfere with your system in any way.

2. Modify your PC’s Internet Properties

  1. Press Windows Key + R to open the Run box.
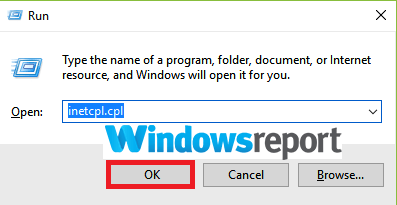
  2. Type inetcpl.cpl and press the Enter key to open the Internet Properties window.inetpcl run window there was a problem connecting to onedrive
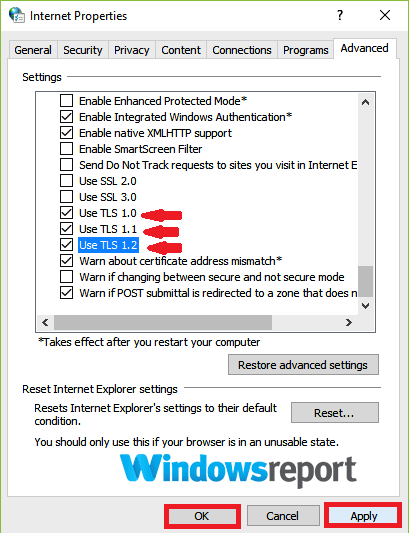
  3. Select the Advanced tab and scroll down then tick on Use TLS 1.0, Use TLS 1.1, as well as Use TLS 1.2. Click Apply.TLS enable there was a problem connecting to onedrive you dont have access to this service
  4. Restart OneDrive.

3. Try out a different cloud storage provider

If you aren’t afraid to try out something new, Sync has been around since 2011 and it’s evolved into the best alternative could storage solution for current OneDrive users.

Sync makes it easy to back up your files in real-time and even recover deleted files and previous versions of your important documents.

Moreover, it has the advantage of never accessing or scanning your data. That’s actually an end-to-end encrypted storage platform, so rest assured that your private files remain private.

⇒ Get Sync.com

4. Remove proxy addresses

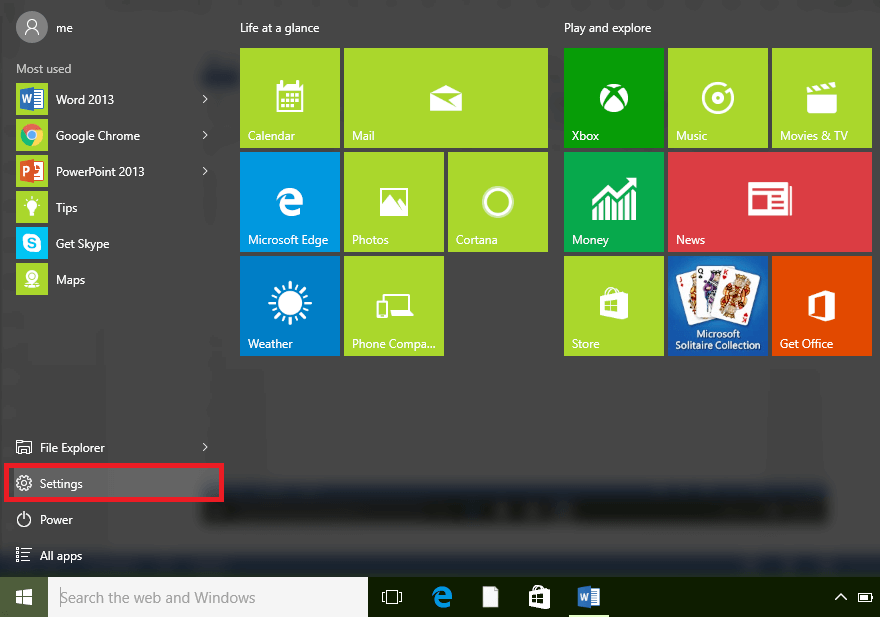
  1. Click on the Start button and choose Settings.settings OneDrive cannot connect to Windows
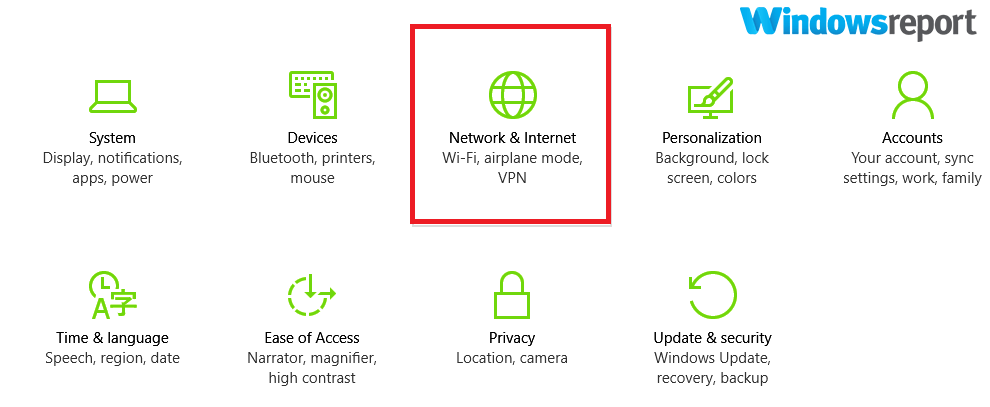
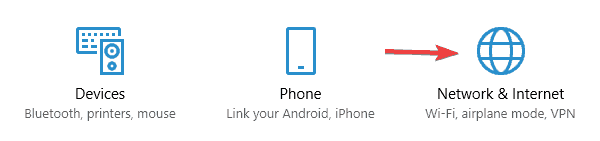
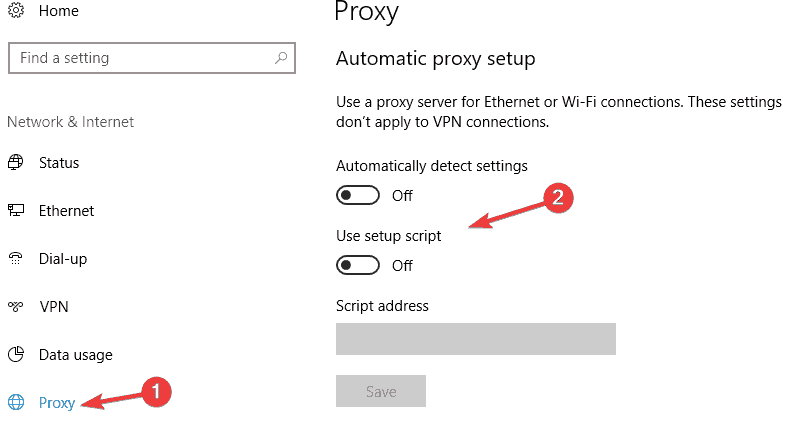
  2. Select Network & Internet and scroll to the bottom and click Proxy (left side).network and internet there was a problem connecting to onedrive 0x8004ded2
  3. Under the Automatic proxy setup section, enable Automatically detect settings option.automatically detect settings there was a problem connecting to onedrive you dont have access to this service

If you are using OneDrive with proxy, try turning it off in your browser. This can sometimes help with There was a problem connecting to OneDrive error.

5. Reset the entire network connection

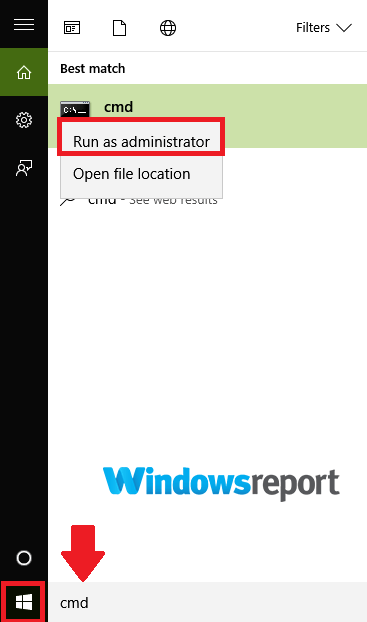
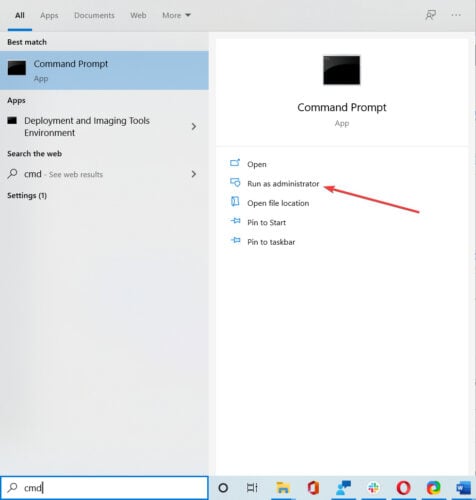
  1. Click Start and type cmd in Windows 10 search box.
  2. Right-click the cmd option then choose Run as administrator. Select Yes if and when prompted by UAC (User Account Control).run as administrator onedrive says no internet connection
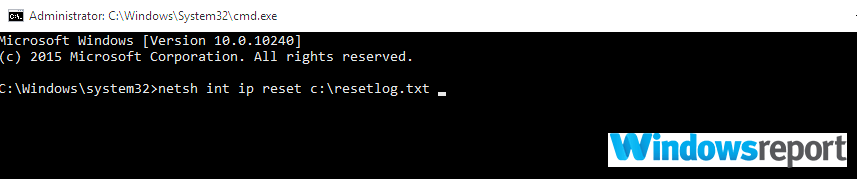
  3. Type the command: netsh int ip reset c:resetlog.txt and hit the Enter key.netsh int ip one drive says no internet connection
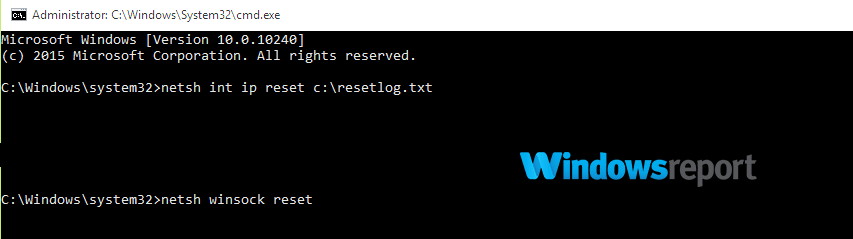
  4. Now type netsh winsock reset then press Enter.netsh winsock reset There was a problem with connecting to OneDrive

If modifying your proxy settings doesn’t help, try to alter and refresh the whole network. Restart your computer and see how OneDrive behaves.

6. Create a new Windows 10 user profile

  1. Click the Start button then select Settings (as seen earlier).
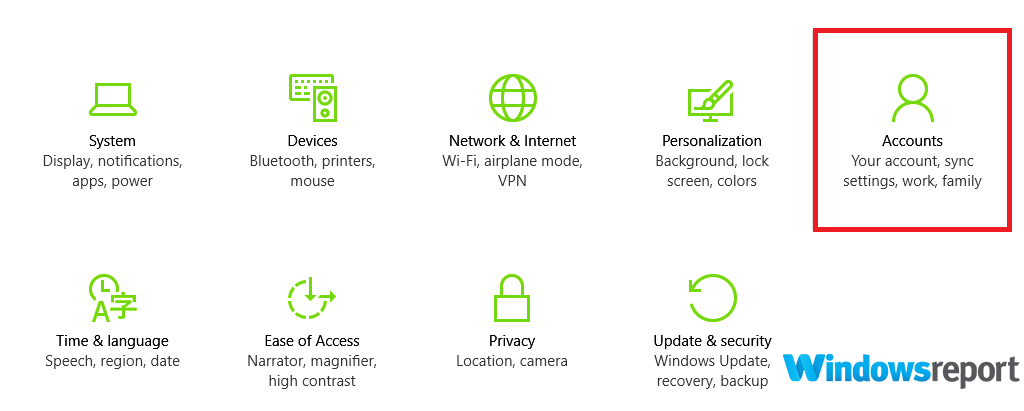
  2. Choose Accounts. accounts there was a problem connecting to onedrive
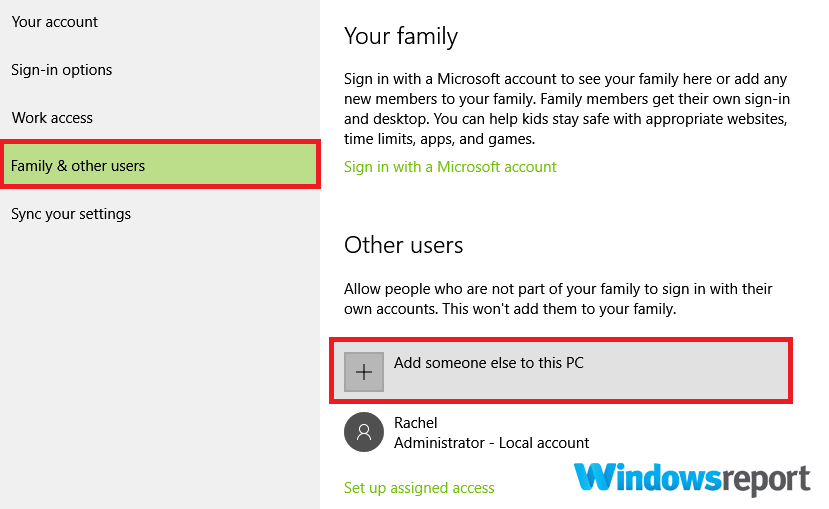
  3. Tap on Family & other users followed by Add someone else to this PC.add someone else to this PC there was a problem connecting to the server
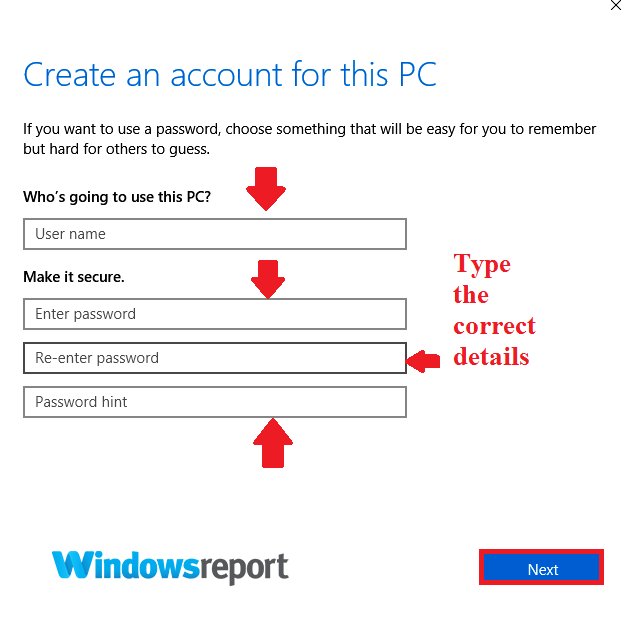
  4. Enter an appropriate user name, password, plus a password hint. Then select Next.create an account for this PC there was a problem connecting to onedrive error

Perhaps the trouble is due to your user account settings so creating a new user profile may fix There was a problem connecting to OneDrive error.

Now make this account an administrator account as follows:

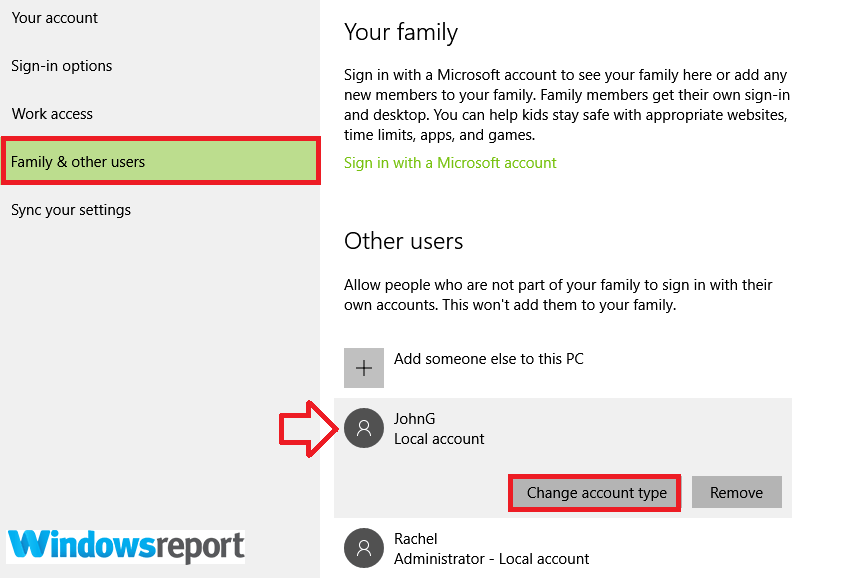
  1. Go back to Settings then Accounts and onward to Family & other users.
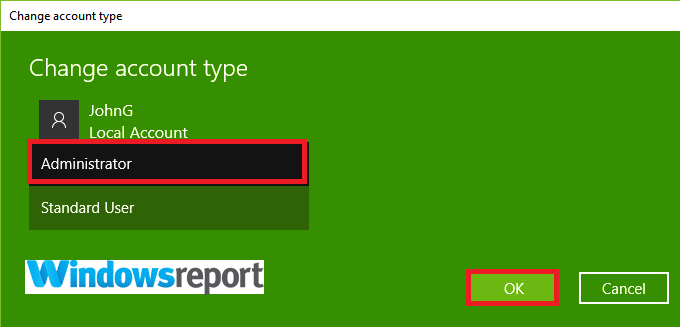
  2. Choose the account name and click Change account type.change account type there was a problem connecting to onedrive
  3. Select Administrator under Account type then click OK.account type change there was a problem connecting to onedrive 0x8004ded0
  4. Sign in with this new administrator account and see if OneDrive will work.

7. Reset OneDrive

  1. Press Windows key+R keys to open the Run dialog.
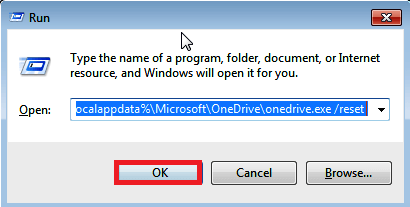
  2. Type %localappdata%MicrosoftOneDriveOneDrive.exe /reset then press OK. You may notice a Command window appear briefly.appdata run window there was a problem connecting to onedrive
  3. Now click Start the type OneDrive in Windows 10 search box.
  4. Select the OneDrive app from the results. This manually re-launches OneDrive.

Resetting your OneDrive disconnects all connections and can help fix the There was a problem connecting to OneDrive error.

No files are lost by resetting the application on your computer. Is OneDrive now functioning properly? If not, try the next fix.

8. Uninstall and reinstall OneDrive

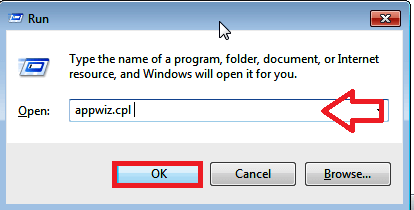
  1. Press the Windows+R keyboard shortcut to start the Run dialog.
  2. Type appiz.cpl then click OK.appwiz.cpl there was a problem connecting to onedrive
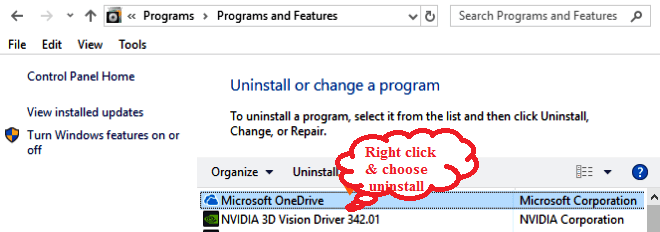
  3. Locate the Microsoft OneDrive app from the list and right-click it then choose Uninstall.onedrive uninstall there was a problem connecting to onedrive
  4. Restart your computer
  5. Visit the OneDrive Download page and select the need to reinstall/download hyperlink to commence the reinstallation process.
  6. Restart and reopen your freshly reinstalled OneDrive app and see if there was a problem connecting to OneDrive hiccup is finally gone.

There was a problem connecting to OneDrive can prevent you from accessing your files, but we hope that you managed to fix it once and for all with our solutions.

Xbox consoles are getting a built-in Twitch live streaming experience

Microsoft is finally integrating Twitch live streaming into the Xbox OS and select Xbox Insiders can test it now. This new “Console Live Streaming” feature is now live in the latest Xbox preview builds for Alpha and Alpha Skip-Ahead Insiders, and it will let Xbox gamers stream games on Twitch without having to install the Twitch app for Xbox consoles.

This new Twitch integration should feel familiar for Xbox gamers who used to stream games on Microsoft’s now-deprecated Mixer service. Twitch Live Streaming will be accessible from the “Capture and Share” tab in the Xbox Guiden where a new “Live Streaming” option will appear. To get started, users will first need to link their Twitch account to their Microsoft account, then a “Go Live now” button will appear to start streaming games on Twitch.

Following the sunsetting of Mixer last year, Xbox head Phil Spencer said Microsoft was working on integrating other live streaming services on Xbox consoles. “We absolutely want to give gamers choice of where to stream for Xbox,” the exec said back in June 2020, and we’re finally seeing the result of that with this new Twitch integration.

As you may know, Sony had a forward-thinking approach on this front right from the beginning of the previous console generation, with the PlayStation 4 making it seamless for gamers to start streaming games on Twitch on YouTube by pressing the Share button on the PS4 controller. It’s great to see Microsoft finally catching up, as the current Twitch app for Xbox that remains mandatory for streaming games on Twitch can be pretty clunky.

In addition to this new Console Live Streaming feature, today’s update for Xbox Insiders also brings more Xbox Cloud Gaming improvements. Xbox One owners can now Xbox Series X|S games like The Medium on their console, and this is thanks to Microsoft upgrading its xCloud server blades with custom Xbox Series X hardware earlier this year. If Xbox Cloud Gaming on Xbox consoles should become generally available later this year, the new Twitch live streaming features is “totally early days” according to the Xbox team.

OneDrive status icons missing [Sync, Overlay, Cloud]

Icon overlays are distinctive signs put over the normal folder icons and used to add complementary information about the respective folders.

Examples of icon overlays include the lock icon which indicates that a file needs special access permissions, the small arrow which is used to indicate that the icon is actually a shortcut, and so on.

Unfortunately, sometimes the icon overlays are unavailable. OneDrive is one of the apps frequently affected by this issue, which can be quite annoying because users don’t have any information about the status of the files they’re syncing.

Moreover, Windows 10 limits the number of icon overlays that can be loaded and displayed per session to 15.

OneDrive icon overlay missing: How can I to restore it?

Missing overlay icons can be an inconvenience, but and speaking of missing icons, these are some of the common problems that users reported:

  • OneDrive sync overlays missing – If sync overlays are missing for OneDrive, the issue might be missing updates. Microsoft is aware of this issue, and in order to permanently fix it, it’s advised to update your Windows to the latest version.
  • Sync icon overlays are missing from OneDrive personal – Many users reported that sync icon overlays are missing from the Personal version of OneDrive. This can be because you reached the maximum number of overlay icons. Simply remove other applications that use overlay icons, and the problem should be resolved.
  • OneDrive icon overlays not showing – According to users, it seems that OneDrive icon overlays are missing from their PC. This can be a problem, but you should be able to fix it by modifying your registry.

1. Uninstall unused applications

Since Windows supports a finite number of icon overlays, other applications that heavily use icon overlays on files and folders (for example Dropbox) take priority in displaying theirs and suppress those for OneDrive.

After you uninstall the applications, restart your computer for the OneDrive icon overlays to appear.

There are several methods that you can use to remove an application, but the most effective one is to use dedicated uninstaller software. Sometimes applications can leave leftover files and registry entries even if you remove them, and these files can still interfere with your system.

Removing leftover files and registry entries manually is a tedious task even for advanced users, so it’s usually better to use a software that will do that automatically for you.

2. Delete temporary files and run SFC scan

  1. Create a recycle bin folder for OneDrive
  2. Transfer all the temporary files from the temp and the %temp% folders to the recycle bin folder. You can also delete them if you want.

After removing temporary files, it’s recommended that you perform an SFC scan and check your system for file corruption. This is quite simple and you can do it by following these steps:

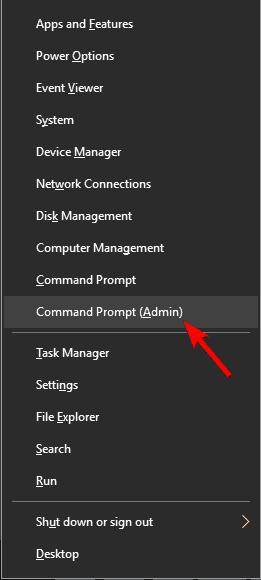
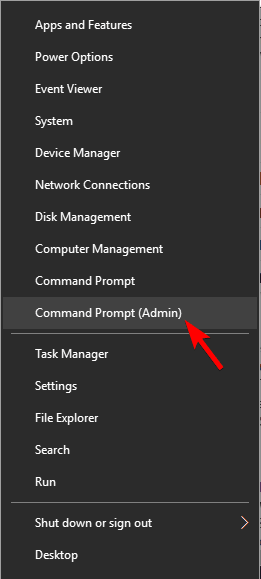
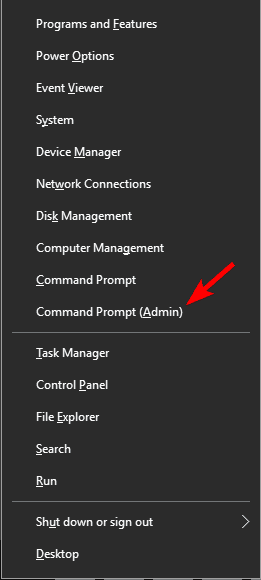
  1. Press Windows Key + X to open Win + X menu. Now select Command Prompt (Admin) from the list. If Command Prompt isn’t available, you can use PowerShell (Admin) instead.
    OneDrive sync overlays missing
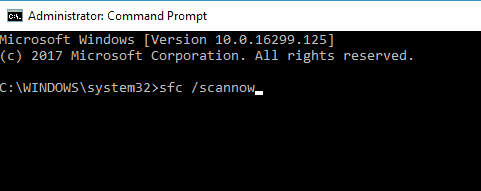
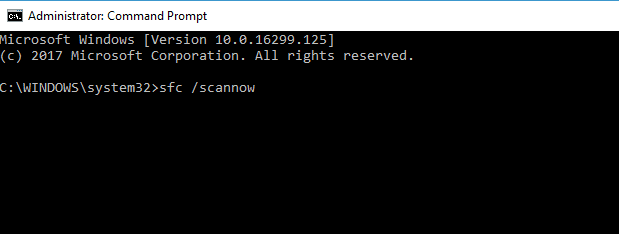
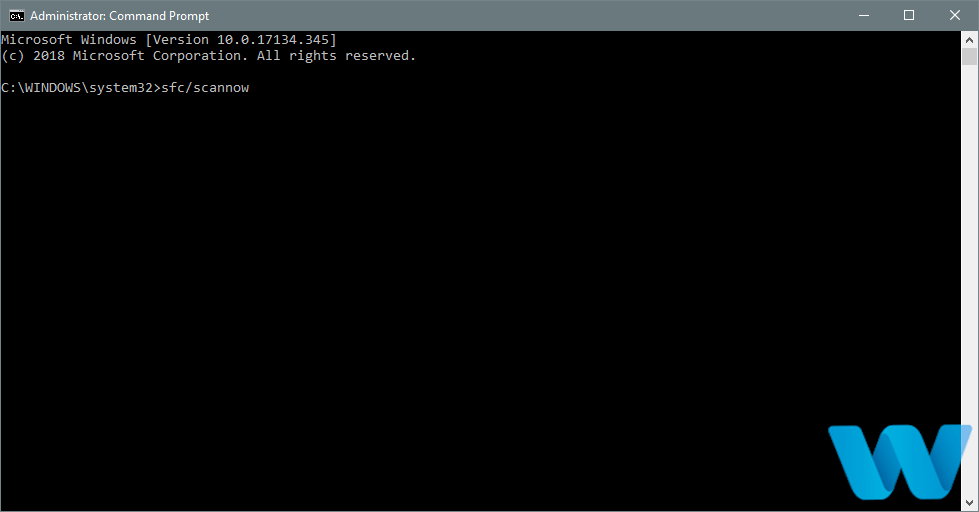
  2. Once the Command Prompt starts, run the sfc /scannow command. This will start an SFC scan on your PC. Keep in mind that the SFC scan can take up to 15 minutes, so don’t interfere with it.
    OneDrive icon overlays not showing

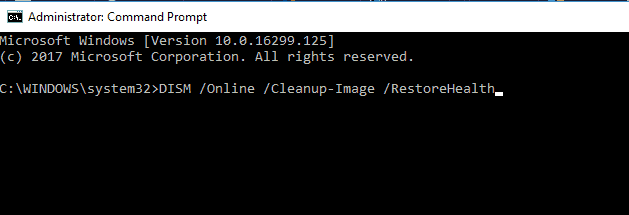
In addition to SFC scan, you might want to run DISM scan as well. Sometimes SFC scan can’t run or fix your problem, and if that happens, it’s advised to run a DISM scan instead. To do that, follow these steps:

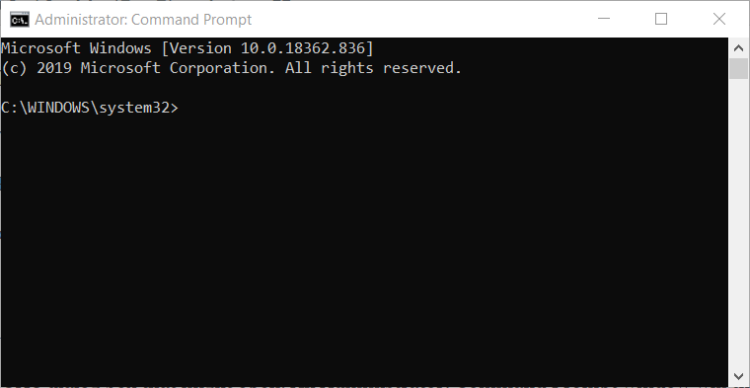
  1. Start Command Prompt as administrator.
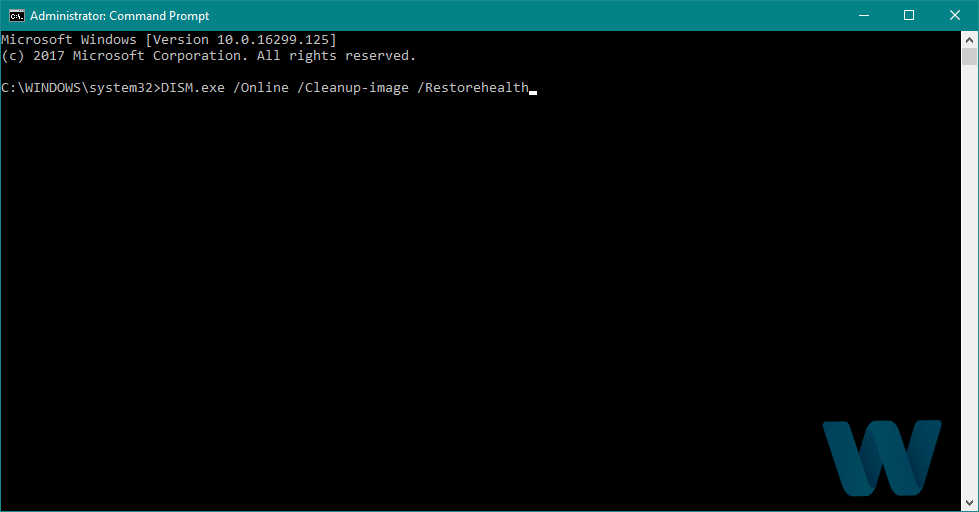
  2. Now enter DISM /Online /Cleanup-Image /RestoreHealth in Command Prompt and press Enter to run it.
    Sync icon overlays are missing from OneDrive personal
  3. DISM scan will now start. We have to warn you that this process can take about 20 minutes or more, so it’s crucial not to interrupt it.

Once the scan is finished, check if the problem still persists. If you couldn’t run an SFC scan before, you might want to repeat it again and check if that solves the problem.

3. Edit your registry

  1. Type regedit in the search box and press Enter.
  2. Back up the Windows Registry -> right-click on Computer > Export.
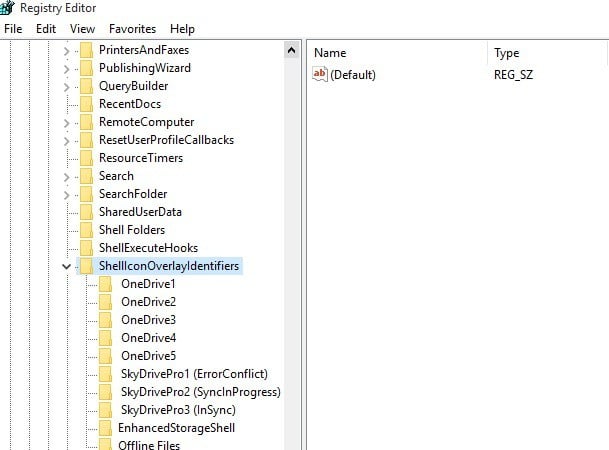
  3. Go to HKEY_LOCAL_MACHINESOFTWAREMicrosoftWindowsCurrentVersionExplorerShellIcon‌OverlayIdentifiers
  4. Delete the folders with no name, as well as the spaces at the beginning of the names of the folders that are higher than the ones relative to OneDrive. You can insert a space in front of the OneDrive file names to send those files to the top of the list.
    regedit onedrive icon overlay
  5. Restart your computer.

4. Use ShellExView

If the OneDrive icon overlay is missing, the problem might be the limited number of icon overlays. Windows has a certain limit of icon overlays that it can use, and if your OneDrive icon overlays are missing, it’s possible that you reached the maximum number of icon overlays.

If that happens, other applications will get a priority over OneDrive which will cause your OneDrive icon overlays to stop working.

This doesn’t mean that OneDrive isn’t working, but you won’t get a visual notification in terms of icon overlays which can be a problem for some users.

However, there’s a way to see the applications that use icon overlays. To do that, you’ll need a third-party application called ShellExView. This is a freeware and portable application, so you can use it on your PC without any limitations.

Once you download the application, follow these steps:

  1. Start ShellExView.
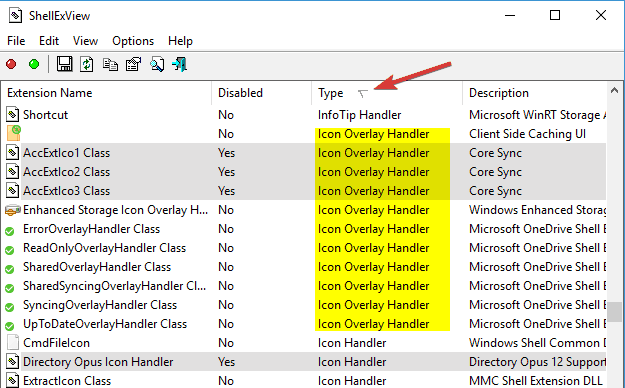
  2. When ShellExView opens, go to, click the sort the entries by Type and scroll down until you locate Icon Overlay Handlers.
    OneDrive sync overlays missing
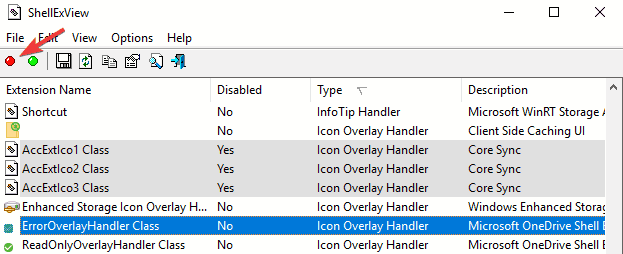
  3. Now you’ll see all Icon Overlay Handlers on your PC. Simply select the Icon Overlay Handler that you want to disable and click the red circle in the toolbar. Keep a close eye on the description section so you can identify which application is using the handler.
    Sync icon overlays are missing from OneDrive personal

After disabling unused handlers, the problem should be resolved. If needed, you can always enable handlers by going back to the ShellExView application. This is an advanced solution, so use extra caution while performing it.

5. Use Microsoft’s troubleshooter

If OneDrive icon overlays are missing on your PC, you might be able to fix the issue by using Microsoft’s troubleshooter.

Microsoft has provided an automated workaround that can fix the problem for you in just a couple of clicks. To use this tool, you need to do the following:

  1. Download Microsoft’s troubleshooter.
  2. Once the troubleshooter is downloaded, run it and follow the instructions on the screen to complete it.

This is a simple solution, and it should work for you, so feel free to try it out.

6. Make sure that you have the latest updates

If you’re having problems with icon overlays, you might be able to fix the problem simply by installing the latest updates. Microsoft is aware of this issue, and it’s rather likely that the problem is fixed in one of the recent updates.

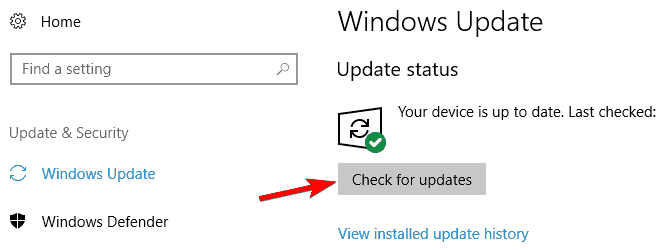
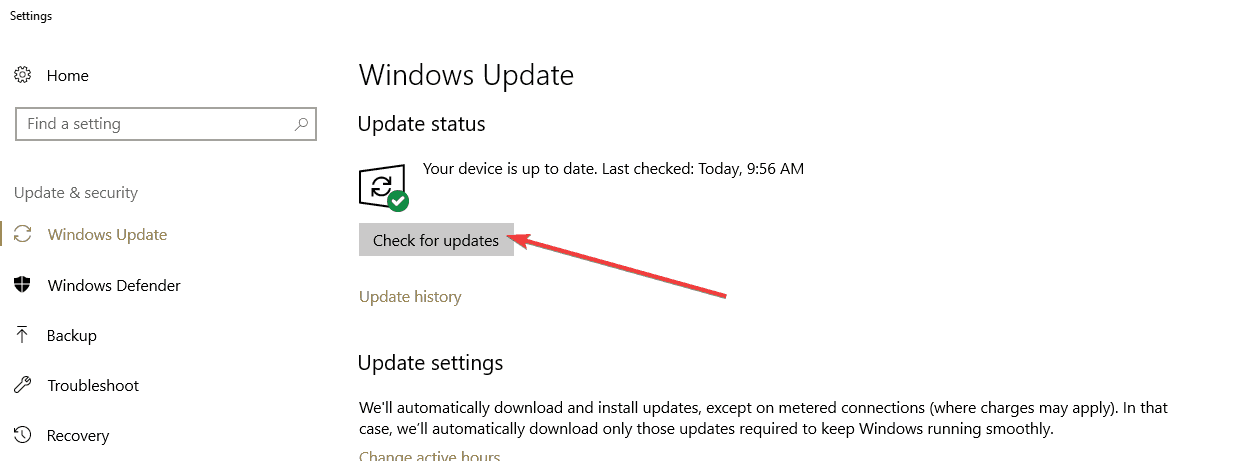
By default, Windows 10 will automatically download and install the missing updates, but sometimes you might miss an update or two due to certain bugs. However, you can always check for updates by doing the following:

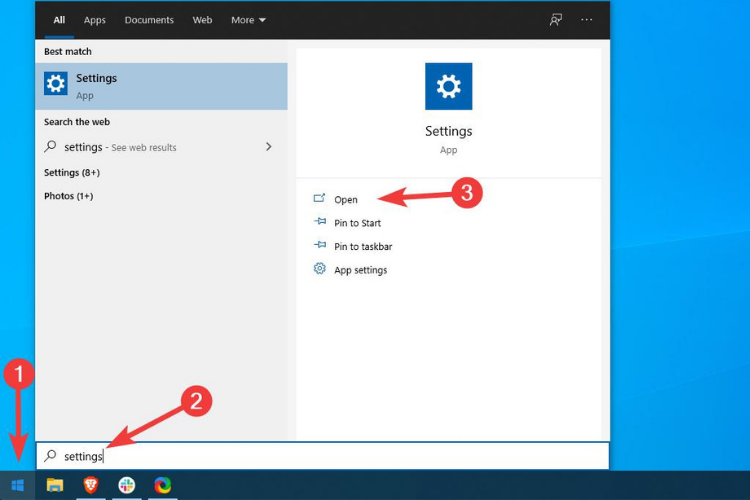
  1. Press Windows Key + I to open the Settings app.
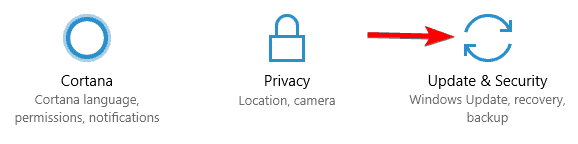
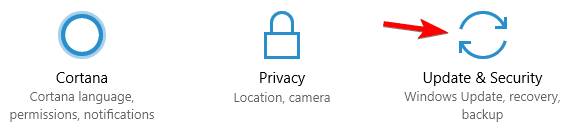
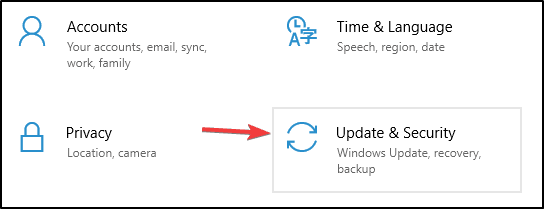
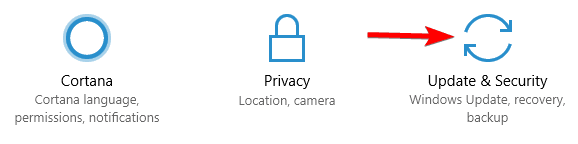
  2. Now go to the Update & Security section.
    OneDrive icon overlays not showing
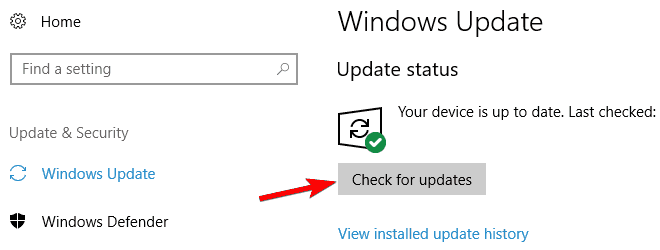
  3. Click the Check for updates button.
    OneDrive sync overlays missing

Windows will now check for available updates. If any updates are available, they will be downloaded automatically in the background. Once the updates are downloaded, Windows will install them as soon as you restart your PC.

After you install the missing updates, the issue with icon overlays should be permanently resolved.

7. Perform a Clean boot

Sometimes third-party applications might be interfering with Windows and that can cause OneDrive icon overlays to become missing. However, you might be able to fix this problem by performing a Clean boot.

To do that, just follow these steps:

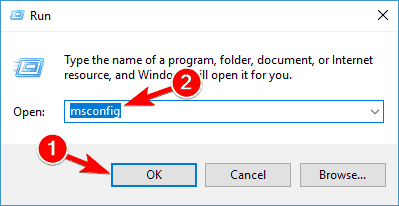
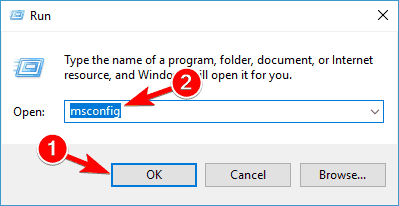
  1. Press Windows Key + R and enter msconfig. Press Enter or click OK.
    Sync icon overlays are missing from OneDrive personal
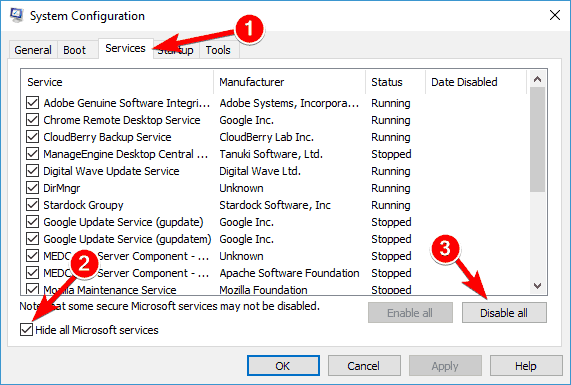
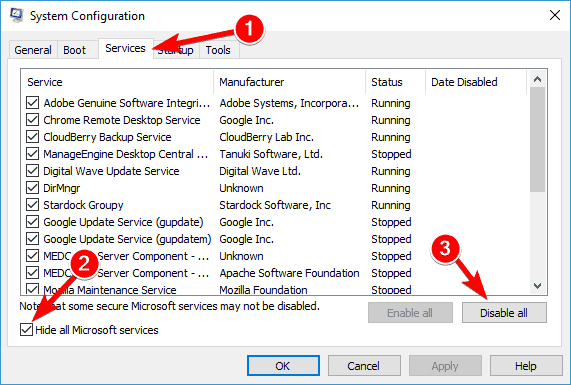
  2. The System Configuration window will now appear. Go to the Services tab and check Hide all Microsoft services. Now click Disable all button.
    OneDrive icon overlays not showing
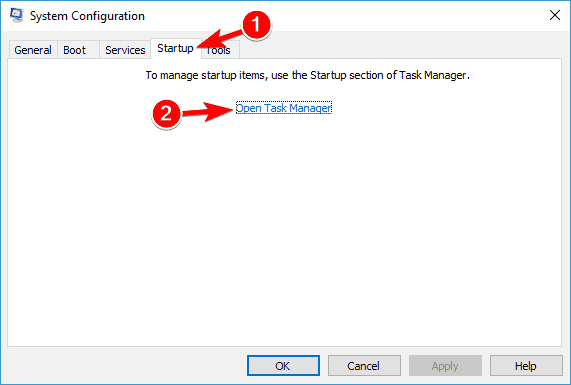
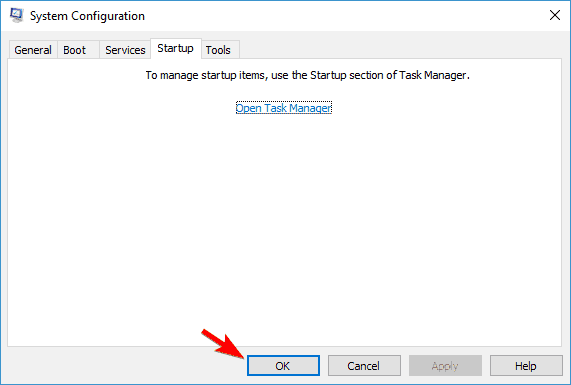
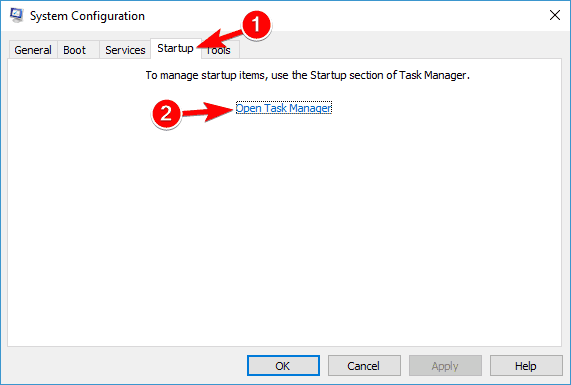
  3. Now go to the Startup tab and click on Open Task Manager.
    OneDrive sync overlays missing
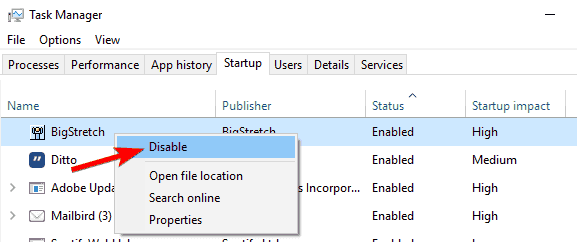
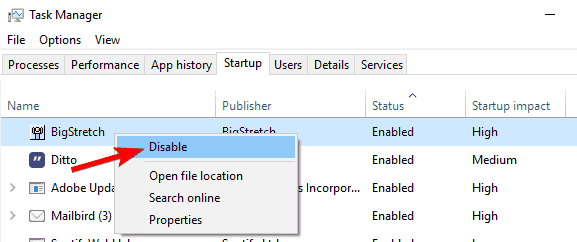
  4. Task Manager will now appear and you’ll see the list of startup applications. Right-click the first entry on the list and choose Disable from the menu. Repeat this step for all entries on the list.
    Sync icon overlays are missing from OneDrive personal
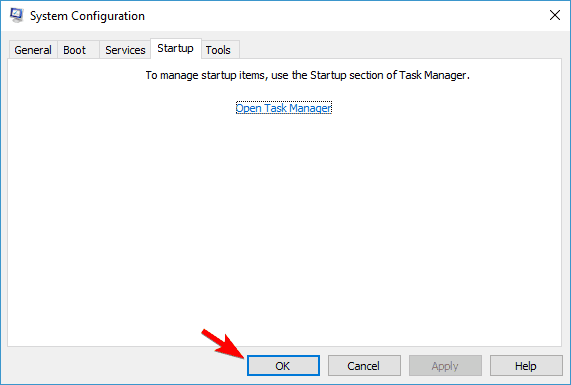
  5. Once you disable all startup applications, close Task Manager, and go back to System Configuration window. Click Apply and OK to save changes and restart your PC.
    OneDrive icon overlays not showing

Upon restart, check if the problem still persists. If not, you need to enable applications and services one by one until you find the problematic application.

Once you find the problematic application, remove it, and check if that solves the problem.

There you go, these solutions should help you fix the missing OneDrive status icons issue.

Do you know of any other workarounds? Feel free to share your experience with us by reaching for the comments section below.

The file or directory is corrupted and unreadable [Easy Fix]

The file or directory is corrupted and unreadable error message can cause a lot of problems on your PC can prevent you from accessing certain files. However, there’s a way to fix this problem, and in this article, we’re going to show you what causes this error and how you can fix it on your PC.

Quite a few people have lost important data from their PCs due to hard drive errors. A common error on the Windows OS is the one that many will identify with The file or directory is corrupted and unreadable popup message.

The error prevents you from accessing, copying, renaming, or doing other things you may want to do with the files stored on a hard drive partition on your PC. You can encounter this error with other file storage devices like external hard drives, USB thumb drives, removable hard disks, and flash memory cards.

What causes this error? How do you recover your data? And, most importantly, how do you fix the error and prevent it from happening again?

  1. Format the flash drive
  2. Use Chkdsk Windows Utility to repair file system errors
  3. Use a third-party software
  4. Reinstall Windows

What causes the file or directory is corrupted and unreadable error?

This error is usually a result of some form of file corruption or damage to the external data storage devices on which the affected files are stored. Because of this you can’t access the files or do what you want with them. This is bad news if you have important data stored on the affected files.

But how do hard drives files get corrupted in the first place?

Corrupted MFT (Master File Table)

In most cases, this is a consequence of how you use and care for your hard drives. For one, pulling the external hard drive cable from the PC’s USB port before the computer is done copying a file, or while it executes some other command related to the external hard drive is known to corrupt your files.

Usually, it’s the MFT that’s corrupted. The MFT is part of the NFTS file system that handles file storage. It is where all file access permissions are granted and where information about file sizes and names, as well as where the creation and last edit times are recorded. Once this MFT is corrupted access to your files is blocked.

Make sure you have released the external storage devices from all the programs Windows may be running on them before you pull them from the PC. The safest way to eject external hard drives is by clicking on the drive icon on the Windows Explorer window.

Physical damage to the external hard drive

Sometimes the cause of hard drive failure and the subsequent ‘the file or directory is corrupted and unreadable’ error is physical damage to the external hard drive itself.

As you would any digital and mechanical devices that store important information, you should protect your external storage devices from moisture, dust, heat, and other forms of damage.

In the case of USB drives and removable disks, physical damage could take the form of bad sectors, which are sections of the drive that are damaged to the extent they are no longer readable or writable. If file information was located on these now inaccessible bad sectors, retrieving the data becomes difficult, hence the error message.

Virus infection

This is the scariest of all the possible causes of the “The file or directory is corrupted and unreadable” error. Virus infection may, in fact, lead to consequences far more serious than the loss of your data. Today, there are many sources of virus infection that every computer user needs to be extra vigilant.

You could open your computer to virus infection through the websites you browse, files you download from the internet and portable storage drives that you connect to your PC. These viruses will often corrupt your file partitions, delete your data, and make unauthorized changes to your PC’s registry settings. All these could cause “the file or directory is corrupted and unreadable” error.

If you suspect the file corruption could be due to virus infection, get good anti-virus software and scan your PC without delay. In some cases, the anti-virus PC clean-up could be all it takes to recover your inaccessible files.

Still, in some cases, only select partitions of an external hard drive could be generating the error message. The other partitions could be working just fine. This reduces the likelihood the error could be a result of virus infection or any physical damage to the hard drive.

How can I fix the file or directory is corrupted and unreadable?

1. Format the flash drive

This is possibly the easiest solution to ‘the file or directory is corrupted and unreadable’ error. But it isn’t the most ideal. Formatting the hard drive simply means you are erasing all the files stored on the hard drives.

By formatting the hard drive, you are also getting rid of whatever had corrupted your files in the first place. You can now start from a clean slate. But, clearly, this is not always a practical solution as the purpose of a hard drive is to store data that is useful to you. The last thing you may want is to get it all deleted.

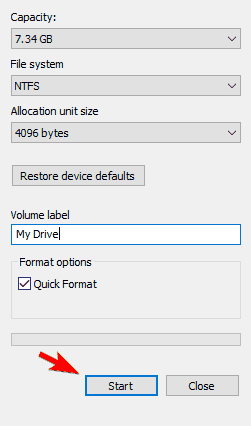
To format the disk, follow these steps;

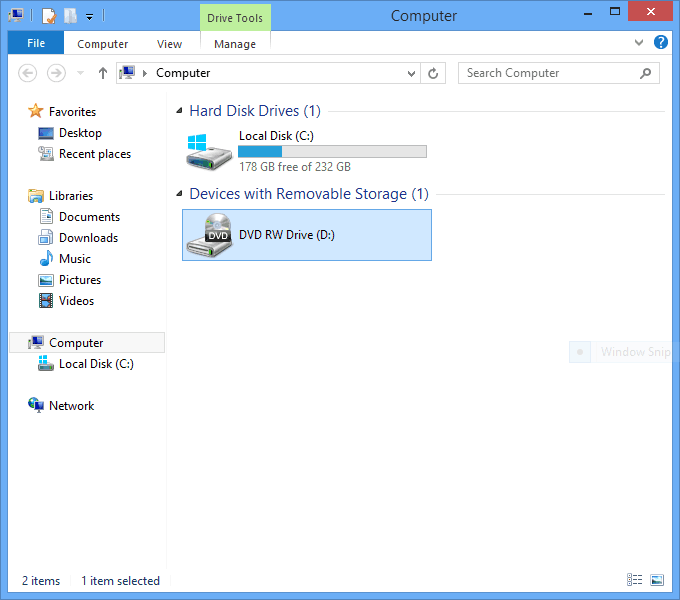
  1. Locate the affected disk partition. You can easily single out which drive is generating the error by checking the error message itself. A typical error message will read, H: is not accessible, followed by ‘the file or directory is not corrupted and unreadable’. In this case, drive partition H is the one you will need to format.computer hard drive file directory corrupted
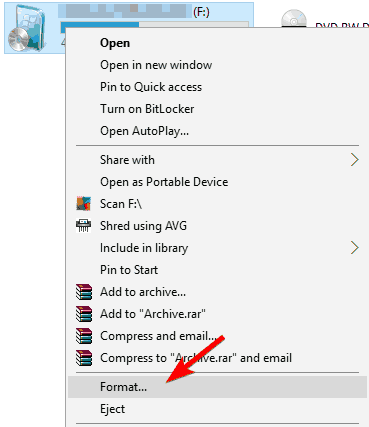
  2. Right-click the affected drive and choose the Format option on the drop-down menu.
  3. On the new window that will pop up, click the Start button. This will start the formatting process.

Formatting might be the quickest solution, but it will also remove all files from your drive, so you might want to think twice about using it. If you choose to format your drive, be sure to back up important files beforehand.

2. Use the Chkdsk Windows utility to repair file system errors

  1. For Windows 10 users, type in the WinKey+X keyboard shortcut.
  2. Select Command Prompt (Admin).
  3. If you use Windows  XP, and Vista, click the Windows Start button
  4. Type cmd into the search box and hit enter. This also applies to windows 8 and 8.1
  5. A User Account Control pop-up will ask for permission to make changes to your PC. Click Yes.
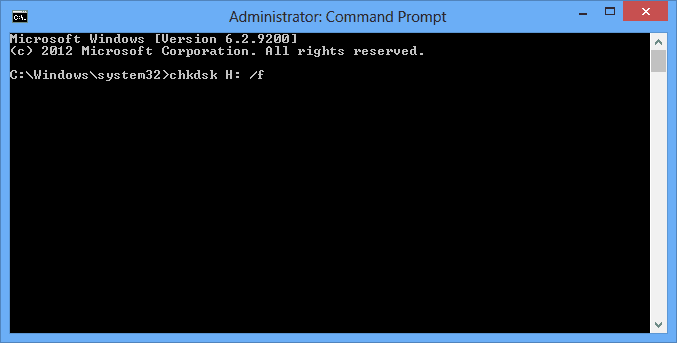
  6. Type in chkdsk H: /f and hit enter. H represents the affected drive partition.
  7. The chkdsk disk repair process may take some time. So, you will need to be patient. file directory corrupted chkdsk
  8. Do this with every hard drive partition generating ‘The file or directory is corrupted and unreadable’ error message.

Using the Chkdsk command-line option to clean your hard drive disk usually solves the problem and helps you recover your data. Issues the Chkdsk utility can help resolve include directory errors, lost clusters, and cross-linked files.

3. Use a third-party software

The prospect of losing data will drive most people into a panic. But before you do that, try using the Stellar Data Recovery Software.

Stellar Data Recovery is a very powerful tool, and it can help you recover any type of lost document: email, photos, or videos.

You can basically recover your lost data regardless of the storage type: hard drive, SSD, memory card, USB drive, and even RAW storage drive.

If you want to know more about this tool, just check out our detailed Stellar Data Recovery review. You’ll see whether it is worth the money or not.

Moreover, let’s have a look at some of the included key features:

  • Data recovery from corrupted files
  • Entire drive and folder scan
  • Restores lost or deleted files and pictures
  • Sorting files
  • Recovery from all types of storage media devices
  • Save the current scan & recovery
  • Two scan modules: quick and deep scan

⇒ Get Stellar Data Recovery

4. Reinstall Windows

There are exceptional cases where the local drive C is the one generating the error message. Ordinarily, if Drive C, which is the system drive, gets corrupted, your PC should stop working. It shouldn’t boot using the normal Windows startup.

But if a file on drive C gives ‘The file or directory is corrupted and unreadable’ error and the PC does not stop working, the Chkdsk utility rarely resolves the issue. The one option you have is to reinstall your Windows OS. This should, of course, be the last resort after all other options have been explored.

The prospect of losing access to your precious data is terrifying. But in most cases, there is no need to panic as the fix is usually an easy one. The few we have discussed here should get you working with your machine in perfect harmony again in no time.

Install & Run Google Play Store on Windows 11 [Quick Guide]

We already know that the Redmond tech giant has started testing the Android subsystem for Windows 11, and a limited number of insiders can now download it from the Amazon AppStore.

The availability of Android apps on Windows 11 would strongly depend on the items published in the Amazon AppStore, but you can still sideload APKs.

However, it’s been proven that you can also run the Google Play Store on Microsoft’s latest operating system.

Is it possible to run the Google Play Store on Windows 11?

A developer known as ADeltaX unlocked Google Play Store support by making changes to Windows Subsystem for Android.

This Play Store hack, which is not beginner-friendly, enables support for both Google Play services and the Google Play Store with sign-in support.

This method could actually pave the way for installing any Android app on Windows 11 and Google Play services, and based apps will also work.

The script mentioned above is hosted on Github, however, it’s currently not beginner-friendly and it’s better to stay away from the hack unless you know exactly what you are doing.

How do I run the Google Play Store on Windows 11?

Before you get started, please make sure you read the percent paragraph once more. To get started, you first need to download Windows Subsystem for Android.

After that, you need to install Windows Subsystem for Linux and download Ubuntu from the Microsoft Store.

Now run the following commands in the Ubuntu terminal:

sudo apt-get update
sudo apt install unzip lzip

The next step involves heading over to OpenGApps and creating a package that features the following configuration settings:

  • Platform: x86_64.
  • OS: Android: 11.
  • Variant: Pico on OpenGApps

Now download 7Zip and extract the .msixbundle of Windows Subsystem for Android and locate the msixbundle compatible with your architecture/device language.

Proceed with extracting the second msixbundle to another folder and delete the appxblockmap, appxsignature, content_types, and appxmetadata files.

Moving on to the Ubuntu terminal, you have to run these commands:

git clone https://github.com/ADeltaX/WSAGAScript
cd WSAGAScript/\#IMAGES
mv /mnt/path-to-extracted-msix/*.img .
cd ../\#GAPPS
cp /mnt/path-to-downloaded-gapps/*.zip .

The command we’ve listed above will automatically download the necessary files to run the WSAGA script.

With this command, WSL would follow the same path as Windows after /mnt/, but make sure the drive letter is correct.

Now you need to run executable permission for the scripts.

cd..
sudo chmod +x extract_gapps_pico.sh
sudo chmod +x extend_and_mount_images.sh
sudo chmod +x apply.sh
sudo chmod +x unmount_images.sh

Proceed to change the root directory in VARIABLES.sh using the command pwd and note down the output. Run the following command where VARIABLES would be the output of the previous command:

nano VARIABLES.sh

We’re almost done, so bear with us for just a few more seconds. Now, all you have to do is run these commands:

sudo ./extract_gapps_pico.sh
sudo ./extend_and_mount_images.sh
sudo ./apply.sh
sudo ./unmount_images.sh

You will want to copy the modified WSA image, and for that, you will need to run another command, which is:

cd \#IMAGES
cp *.img /mnt/path-to-extracted-msix/

Provided you followed the above steps correctly, you should be able to successfully register the modified image.

In order to do register, enable developer mode in WSA and run Add-AppxPackage -Register path-to-extracted-msix\AppxManifest.xml

Now, Windows Subsystem for Android will install the required apps and files for Play Store. As we said at the beginning of this article, this is no easy task.

To sign in with your Google account, copy the kernel file from GitHub and replace the kernel file inside the tools folder of the extracted mix.

Note icon NOTE
WSA should not be running in the background at this point.

Once all the above is done, enter the ADB shell and run the following command:

su
setenforce 0

Although the instructions are available, they’re not for beginners, and it’s better to wait for a third-party tool to automate the entire process.

Some readers complained about the OR-RWE-O3 payment error on Google Play. If you’re also experiencing it, read the highlighted guide for fixes.

Also, if you are interested in learning how to fix the OR-CCSEH-26 error, we have a dedicated guide to help you with that.

Have you also managed to get the Google Play Store on your Windows 11 device? Share your process and experience with us in the comments section below.

Element Not Found error in Windows 10/11 [Quick Fix]

Windows 10 has been released for some time, and although it’s the latest version of Windows, it doesn’t mean it doesn’t have its flaws.

Speaking of flaws and Windows 10, some users have reported getting Element Not Found error on Windows 10.

Element Not Found is a relatively common error on Windows, and in this article, we’re going to cover the following issues:

  • Element Not Found Windows 10 pictures – This error message usually occurs when you try to view pictures on your Windows 10 PC. The issue is most likely caused by your default photo viewer app, and to fix the problem, you just need to replace the default photo viewer application.
  • Element Not Found Microsoft Edge – This error can appear in Microsoft Edge as well, and it’s most likely caused by file corruption. However, you should be able to fix it using one of our solutions.
  • Element Not Found Explorer.exe – Sometimes this error message can appear while using File Explorer. However, you can fix the problem simply by restarting the explorer.exe process.
  • Element Not Found Windows 10 update – Many users reported this problem after a Windows update. However, you can fix the issue simply by finding and uninstalling the problematic update.
  • Element Not Found jpg – Element Not Found error is relatively common with jpg images, but it can also appear with other files. If you have this problem on your PC, be sure to try some of our solutions.

This error can affect the functionality of your Windows 10, and it can prevent you from accessing Settings, Universal apps, it can even occur when you’re trying to open .jpeg images.

As you can see, this can be a big problem for Windows 10 users, but fortunately for you, we have a few solutions that might be helpful.

How can I fix Element Not Found error in Windows 10?

1. Uninstall recent updates

  1. Open the Settings app.
  2. Now navigate to the Update & Security section.
    Element Not Found Explorer.exe
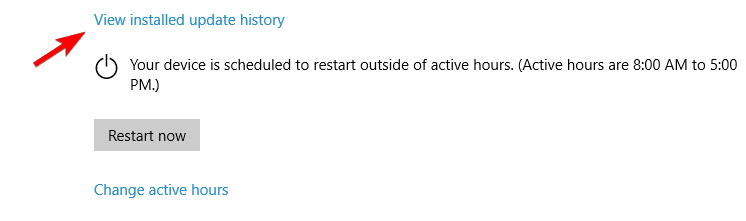
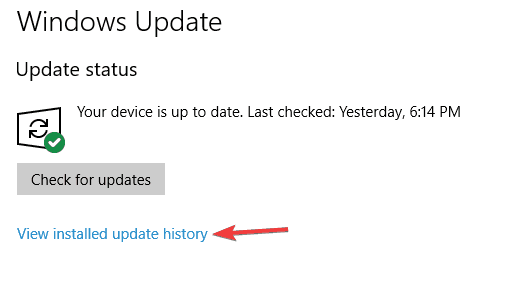
  3. Click on View installed update history.
    Element Not Found Windows 10 update
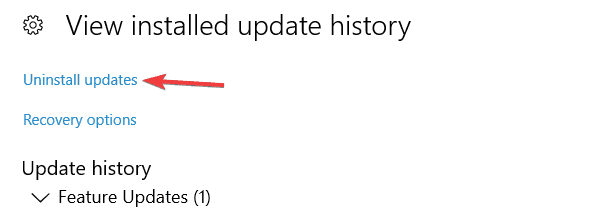
  4. Now click on Uninstall updates.
    Element Not Found jpg
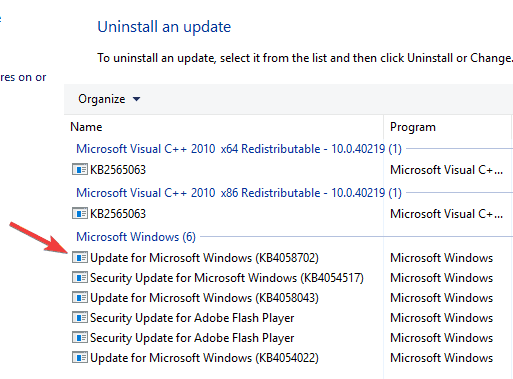
  5. List of installed updates will appear. Now you need to remove recently installed updates and check if that solves your issue. Several users reported that they removed all updates and that resolved the issue for them.

According to users, sometimes recent Windows updates can cause Element Not Found error to appear. In order to fix the issue, you need to find and remove the problematic updates.

This is rather simple and you can do it by following the above steps.

If uninstalling the problematic update fixes the problem, you need to prevent that update from installing in the future.

Windows 10 automatically installs the missing updates, but we wrote a simple guide on how to prevent certain Windows updates from installing, and we strongly recommend you to check it out.

Many users reported that removing the problematic updates fixed the issue for them, so be sure to try that.

If you’re having trouble opening the Setting app, we can quickly help you solve the issue.

2. Temporarily disable your antivirus

Sometimes your antivirus can interfere with your system casing Element Not Found error to appear. To check if your antivirus is the problem, disable it and try running the application again.

If that doesn’t work, you might have to uninstall and switch to a different antivirus solution.

For the Norton users, we’ve got a dedicated guide on how to completely remove it from your PC. There’s a similar guide for McAffe users, as well.

There are many great antivirus applications on the market, but be sure you try one that provides the best protection for all your devices against the latest malware.

3. Uninstall Lenovo software from your computer

If you’re using a Lenovo laptop, you should know that certain Lenovo software can cause this issue, so the best solution is to remove this software from your laptop.

The software piece that is causing the Element not found error is most likely Lenovo CAPSOD and OneKey Theater. Just remove this software from your laptop and this issue should be resolved.

Also, keep in mind that you need to remove all files associated with the problematic software.

Doing this task manually is an advanced process, but there are tools that can help you easily get rid of all associated files and registry entries.

Don’t refuse the advantage of a free download and use an efficient tool to remove Lenovo CAPSOD and OneKey Theater. The problem should be completely solved in no time.

4. Restart explorer.exe

  1. When Windows 10 starts press Ctrl + Shift + Esc to open Task Manager.
    Element Not Found Microsoft Edge
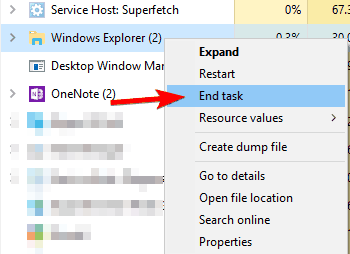
  2. Locate explorer.exe (Windows Explorer) in the list of processes. Right-click it and choose End task.
    Element Not Found jpg
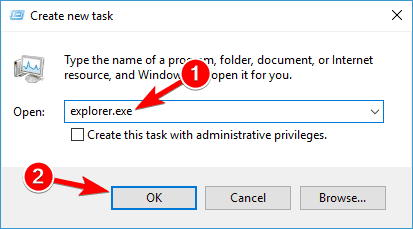
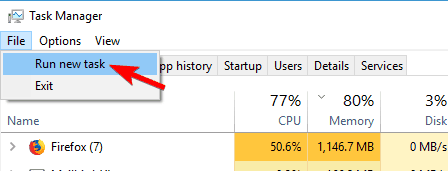
  3. Next, go to File > Run new task.
    Element Not Found Windows 10 pictures
  4. The Run window will open. Now just type explorer.exe into it and press Enter to run it.

This is a simple workaround, but it actually might work for you. Use the above procedure in order to restart the explorer.exe process.

Windows Explorer should now start, and the problem will be resolved. Keep in mind that this is just a workaround, so you might have to repeat it if the issue reappears.

Windows won’t end a task in Task Manager? Count on us to solve the problem.

5. Set a different picture viewer

  1. Press Windows Key + I to open the Settings app.
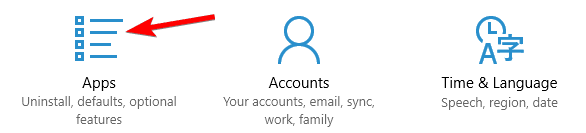
  2. When the Settings app opens, navigate to the Apps section.
    Element Not Found Windows 10 pictures
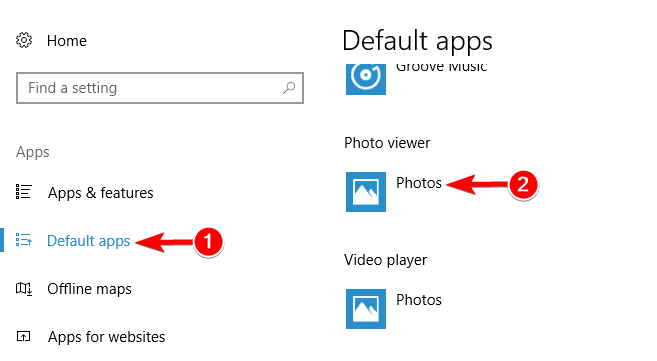
  3. In the left pane, click on Default apps. In the right pane, locate Photo viewer and click it.
    Element Not Found Explorer.exe
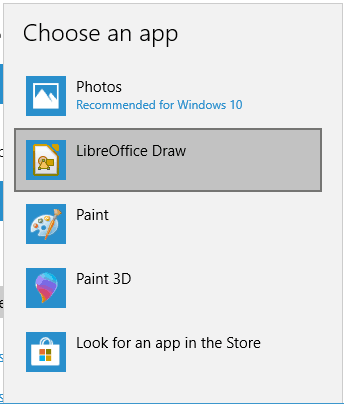
  4. Select an application that you want to use as a default Photo viewer. Many users recommend using Windows Picture Viewer, but you can also use any other application instead.
    Element Not Found Windows 10 pictures

Many users reported that Element Not Found error appeared on their PC while trying to view photos.

According to users, you might be able to fix this issue simply by going to the Settings app and choosing a different image viewer.

After changing your default photo viewer, the issue should be completely resolved. This error message occurs due to problems with the Photos app.

To fix the problem, you just need to change your default photo viewer.

If you don’t have a third-party photo viewer, we covered some of the best photo viewers for Windows 10, so be sure to check that article for some great software.

6. Perform an SFC scan

  1. Press Windows Key + X to open Win + X menu. Now choose Command Prompt (Admin) from the list.
    Element Not Found Microsoft Edge
  2. When Command Prompt opens, enter sfc /scannow and press Enter.
    Element Not Found Explorer.exe

Element Not Found error message can appear due to file corruption. However, you can easily fix corrupted files by using an SFC scan. To run an SFC scan, do as described above.

SFC scan will now start. Keep in mind that this scan can take about 10-15 minutes, so don’t interrupt it. Once the scan is finished, check if the problem still appears.

If the issue still persists, or if you were unable to run an SFC scan, you might want to try running a DISM scan instead. To do that, follow these steps:

  1. Start Command Prompt as administrator.
  2. Enter DISM /Online /Cleanup-Image /RestoreHealth
    Element Not Found Windows 10 update
  3. DISM scan will now start. This process can take about 20 minutes or more, so don’t interrupt it.

Once the scan is finished, check if the error still persists. If you were unable to run an SFC scan before, try running it now. After both SFC and DISM scans are completed, check if the issue still persists.

If you’re having trouble accessing Command Prompt as an admin, then you better take a closer look at this handy guide.

 Does it seem that everything is lost when DISM fails on Windows? Check out this quick guide and get rid of the worries.

7. Disable your integrated graphics

Many PCs come with both dedicated and integrated graphics cards, however, sometimes issues can occur if both graphics cards are enabled.

Many users reported that Element Not Found error was caused by their graphics card, and in order to fix the issue, you need to disable integrated graphics.

There are several ways to do that, and you can do it from Nvidia Control Panel or Catalyst Control Center.

If you can’t open the Nvidia Control Panel on Windows 10, we’ve covered this pesky problem in this dedicated guide. Also, we’ve got a similar article about Catalyst Control Center.

If that doesn’t work, or if you can’t find the way to disable integrated graphics from these applications, you might want to try disabling it from BIOS.

To see how to access BIOS and how to disable your integrated graphics card, we strongly recommend that you check your motherboard manual for detailed instructions.

Once you disable your integrated graphics, the problem should be completely resolved.

Accessing BIOS seems too big of a task? Let us make things easier for you with the help of this amazing guide.

8. Reset your PC

  1. Press Start and click the Power Options button.
  2. Then hold the Shift key and press the Restart button.
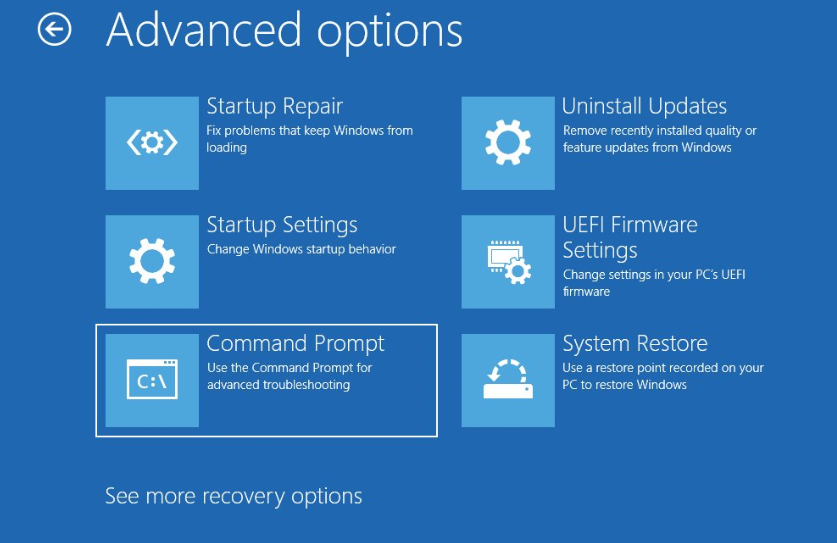
  3. Now you will boot to advanced startup options screen. Make sure that your Windows 10 installation disc or USB flash drive is connected.
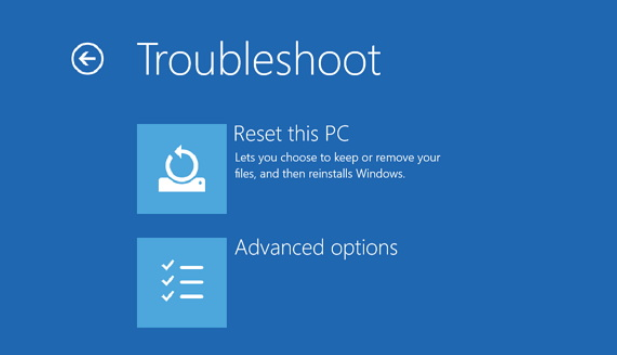
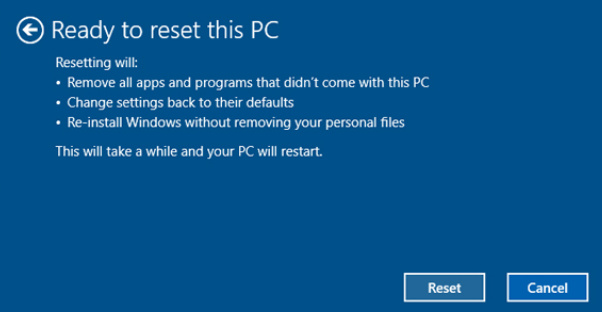
  4. Click on Troubleshoot. After that choose Reset this PC.
  5. Now you have the option to keep your files or not. Choose Keep my files.
  6. Next, you’ll be asked what version of Windows you wish to reset. There should be just one option available, so click it.
  7. Next, you just need to follow the instructions and wait until the setup process is completed.

To do this, you’ll need Windows 10 installation disc or USB flash drive with Windows 10 setup files on it.

This process will reinstall Windows 10, but it will allow you to keep your personal files, although it will delete your installed applications.

Use this solution as a last resort if nothing else seems to work. To do so, you need to do as described above.

That would be all. We hope at least one of these solutions helped you to solve the problem with this error.

If you have any questions, comments, or maybe some other solution for this problem, reach to the comments section below.

We’re sure our readers would like to know even more about this issue.

Password Protect a Zip File in Windows 10 & 11 [How To]

Keeping your personal files protected all the time is extremely important.

Setting up passwords for certain files, folders, or zip packages is recommended, especially if there are other persons who have access to your Windows 10 device.

Also, if you share files between different computers, or use a network that’s not properly secured, the best is to set individual passwords for your most important files.

That’s why we want to show you the best security solutions that can be used to password protect zip files in Windows 10.

For regular files and folders, you can use built-in Windows 10 features and set individual encrypted passwords.

Unfortunately, when discussing ZIP files, it’s more complicated to find the right security alternatives – no, you cannot set passwords for protecting zip files in Windows 10 by default.

Thus, third-party solutions must be applied instead. And since there are different tools available on the web, it’s indicated to choose wisely.

How to add a password to a zip file on Windows 10?

1. Use WinZip

  1. Download now WinZip (free).
  2. Once installed, open it, and click Create/Share on the top options’ pane, so it opens the main Actions menu.encrypt password protect winzip
  3. Do not forget to activate the Encrypt option in the right Actions menu.
  4. Drag a file from the navigator menu on the right into the NewZip.zip center space.
  5. When a file is dragged, if you enabled the Encrypt function the set your password window will appear.set zip password winzip
  6. After setting your password, you also will need to set the encryption setting, and you’re done!
  7. Now you have a military-grade encrypted, password-protected ZIP file.

WinZip is a tool that has been downloaded over 1 billion times, which means that it has great features. And it has, indeed.

Here you can find a quick guide on how to password protect a file that you want to zip using WinZip.

WinZip

WinZip

The world’s best compression software is there to help you protect your ZIP files.
Free trialGet it now

2. Use WinRAR

  1. Of course, start by downloading the WinRAR client.
  2. Follow on-screen prompts and install this program – just click on the executable WinRAR file.
  3. Next, choose the file which you want to compress and secure.
  4. Right-click on this file and, from the list that will be displayed, choose Add to archive….winrar password zip file
  5. From the window that will be displayed, under the General tab, enter a name for the future zip file, choose the Archive format (click on ZIP), and, before selecting OK for confirming your changes, click on Set password.
  6. When prompted, enter your passwords and re-enter it for confirmation.
  7. Apply the changes and that’s it.

WinRAR is maybe the most popular tool used in the Windows 10 system. Of course, WinRAR can help you easily compress files and folders into one compressed file.

Additionally, WinRAR can also be used for setting up a password for the compressed file. Thus, in our situation, we can use this free-distributed app for securing our zip files.

Now, if you want to set a password for an already compressed file, follow these steps:

  1. Open WinRAR and click on Tools.
  2. Then, select Convert archives from the Tools options.
  3. From Convert archives, under Archive types, keep the zip option checked.
  4. Choose the location where you want to place the protected zip, and then click on the Compression… button.
  5. The Set default compression options window will be displayed.
  6. Under the General tab, click on Set password… and enter your password.
  7. Complete the validation process and save your work.

3. Use 7-Zip

  1. First, download 7-Zip on your Windows 10 system.
  2. Install 7-Zip on your device – run the executable file and then follow on-screen prompts.
  3. Choose the file you want to compress, and right-click on it.
  4. Pick Add to archive.
  5. Under the Add to Archive window, you need to: enter a name for the file, set an archive format, and enter an encryption solution.
  6. So, set the password for protecting the future zip file.
  7. When done, click on OK, and that’s it.

Unlike WinRAR, through 7-Zip, you won’t be able to set a password for an existing compressed zip file. This software will let you set up one password only during the zip process.

So, for already compressed packages, you will have to unzip first and re-zip afterward. Anyway, 7-Zip is also free and offers an intuitive interface, just as we noticed with the WinRAR client.

As you will notice, both platforms are quite similar so just choose the one that you prefer the most, or try them both and decide afterward which solution is best for what you wish to accomplish.

These are the easiest ways in which you can protect a zip file by setting up a dedicated password. Keep in mind that Windows 10 doesn’t offer a built-in solution for completing this encryption.

However, by using the tools listed above, you can easily protect any zip file you want.

Both WinRAR and 7-Zip are open-source platforms, so you can download and use them for free.

Also, if you want to password-protect compressed folders in Windows 10, you should check out our complete guide.

Now, if you can’t manage to set a password for your ZIP file in Windows 10, we are here to assist you.

Use the comment section below to tell us more about your issue, and we will find the perfect explanations in order to make everything crystal clear.

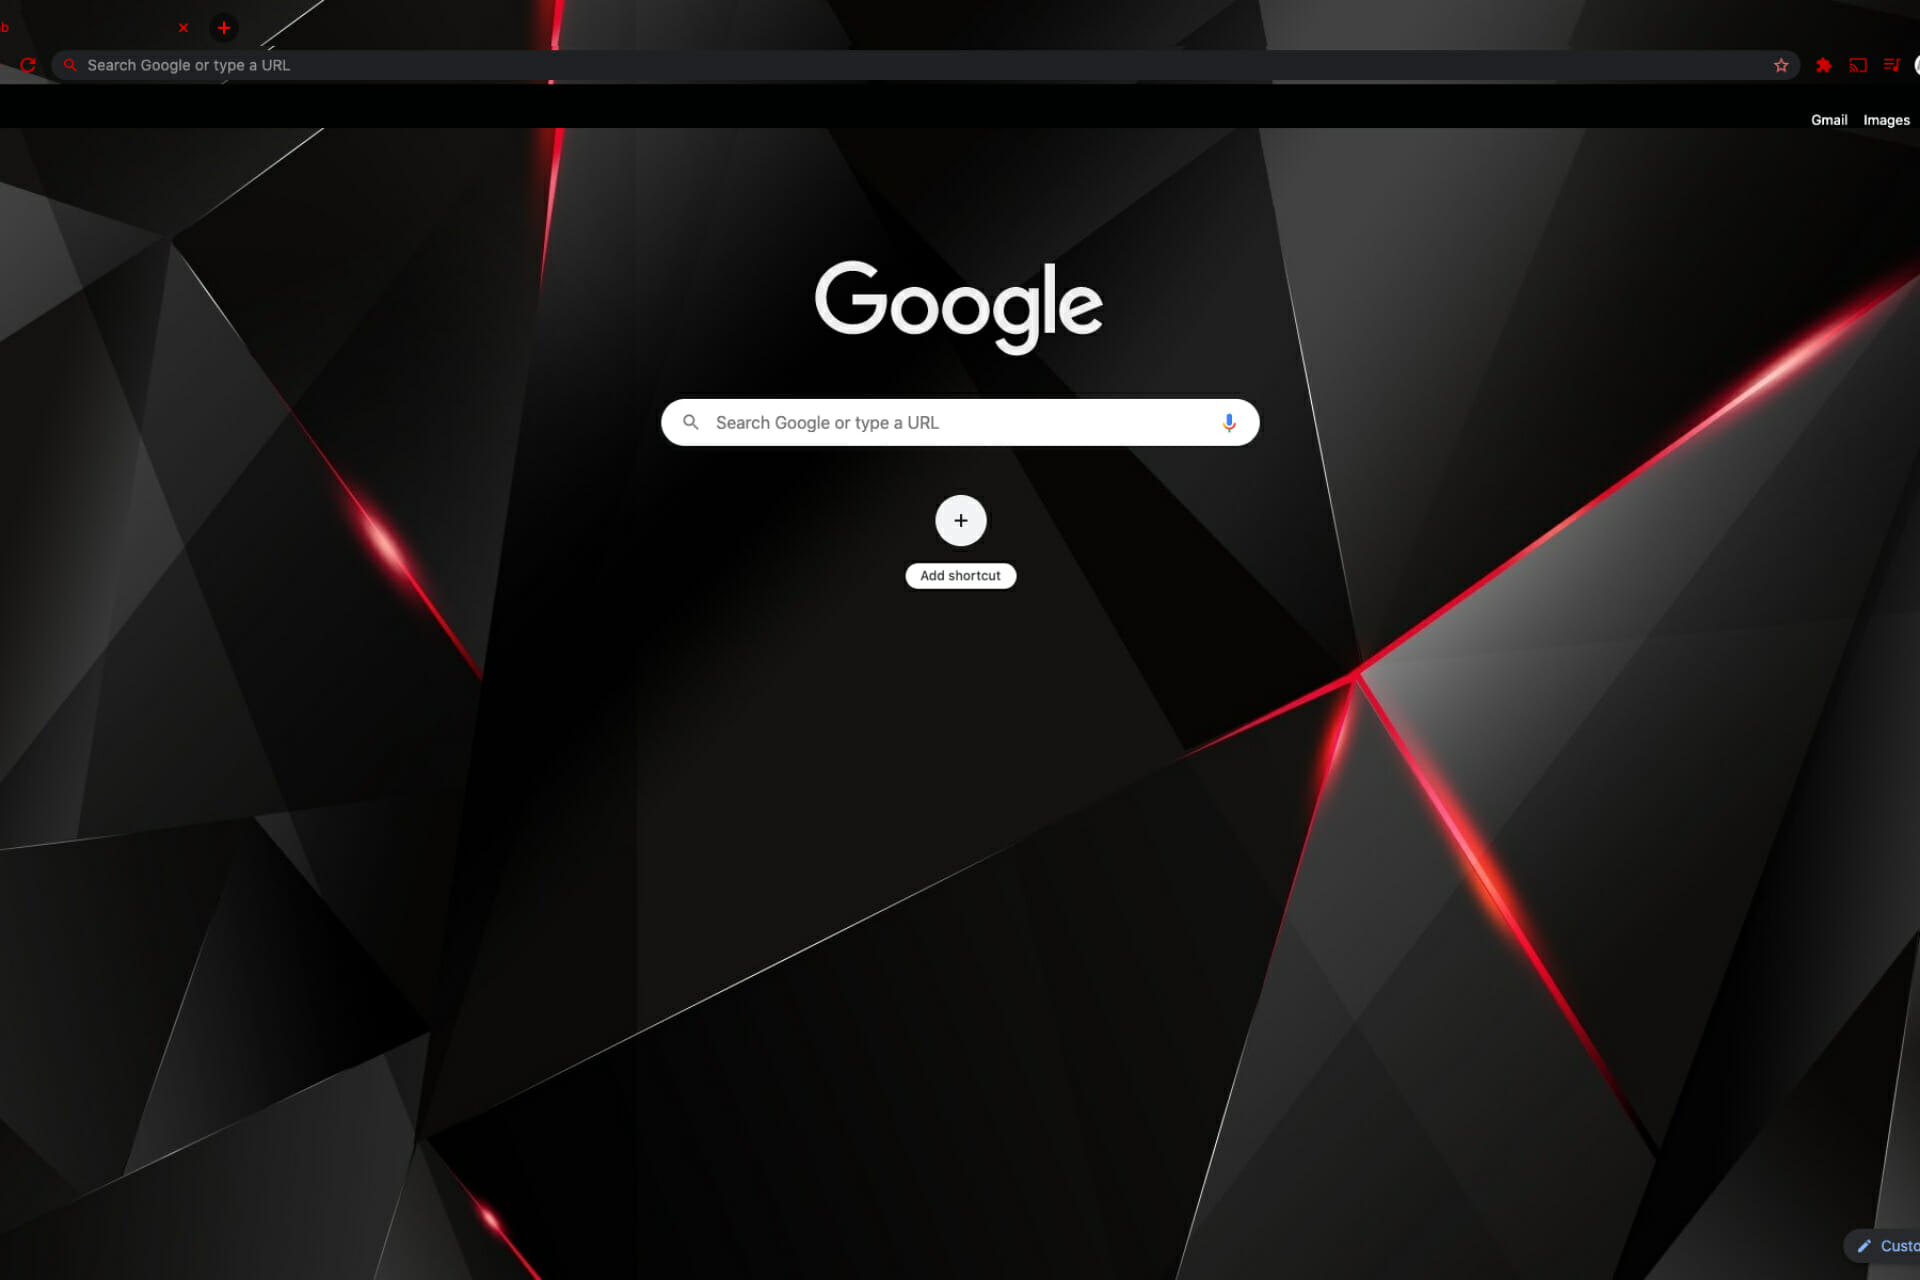
The latest Chrome update can push your SSD to its limit

It’s totally possible that some older PC owners may have noticed somewhat of a change in their device’s performance recently.

And you will be surprised to find out that the cause is not the recent Windows 11 upgrade. A recent Google Chrome update, however, wreaks havoc on the above-mentioned machines.

Intel X25-M SSD was tested while using the Chrome browser. During testing, it was discovered that Chrome was pushing the SSD at 100 percent utilization.

Chrome will significantly slow down your system after udpdate

A lot of users started noticing that their systems were beginning to get a bit sluggish, for no apparent reason.

This massive hit on the CPU and memory seemed trivial at first, and most thought that their SSDs broke, or the systems were obsolete and ready to be changed with new ones.

However, the performance issues were at their lowest during web browsing, so this raised some eyebrows, as well as some important questions.

Naturally, people started installing and testing to see if their machines run the same with Firefox and Edge, which is based on Chromium.

Much to everyone’s surprise, all these issues disappeared when Chrome wasn’t used anymore and the other browsers ran like a charm.

Meanwhile, when Chrome was active, even just navigating around Windows was unbearably slow, compared to the other browsers, which had minimal impact on the SSD.

Microsoft’s Edge browser only spiked the SSD for anywhere between 2 percent (see image below) to around 10 percent. Firefox came in around the same usage as Edge.

Anyway, Chrome users are no strangers to the browser using such a large amount of their available memory.

The internet is full of people constantly complaining about having experienced the pain of how Chrome hits their disk drives hard most of the time.

However, the popular browser had not been such a major issue before its latest update on October 19th, which brought Chrome to version 95.0.4638.54.

If you are also experiencing the same issue while using Chrome with an older SSD, it is in your best interest to check if using another browser fixes your problem.

Also, turning off Chrome’s preload features could help the situation. While these features make loading webpages quicker, they also add to the CPU usage.

Before you leave, why not check our trim SSD guide, to learn how this feature works and how it can improve your performance?

Have you also been experiencing such problems while browsing with Google’s Chrome? Let us know in the comments section below.

Surface Duo 2 first impressions: Much better hardware, still unpolished software

A little over a year ago, OnMSFT reviewed Microsoft’s first Surface Duo. As the reviews of the first Surface Duo were not very favorable, Microsoft got more right than it got wrong with the Surface Duo 2.

I picked up the first Surface Duo in the Woot fire sale in July. Surely, I was not going to fork over $1,400 for the first Surface Duo, but $410 is a good deal for that device.

Since that time, I have been using the first Surface Duo as a secondary device. I tried to use it as my primary device, but there were too many things missing for me.

I love the form factor and found that using dual screens is the best when it comes to doing two things at once. However, the downsides were too hard to ignore, especially the lack of a decent point-and-shoot external camera.

The hardware is better than ever

surface duo 2 hinge
Surface Duo and Surface Duo 2 hinges

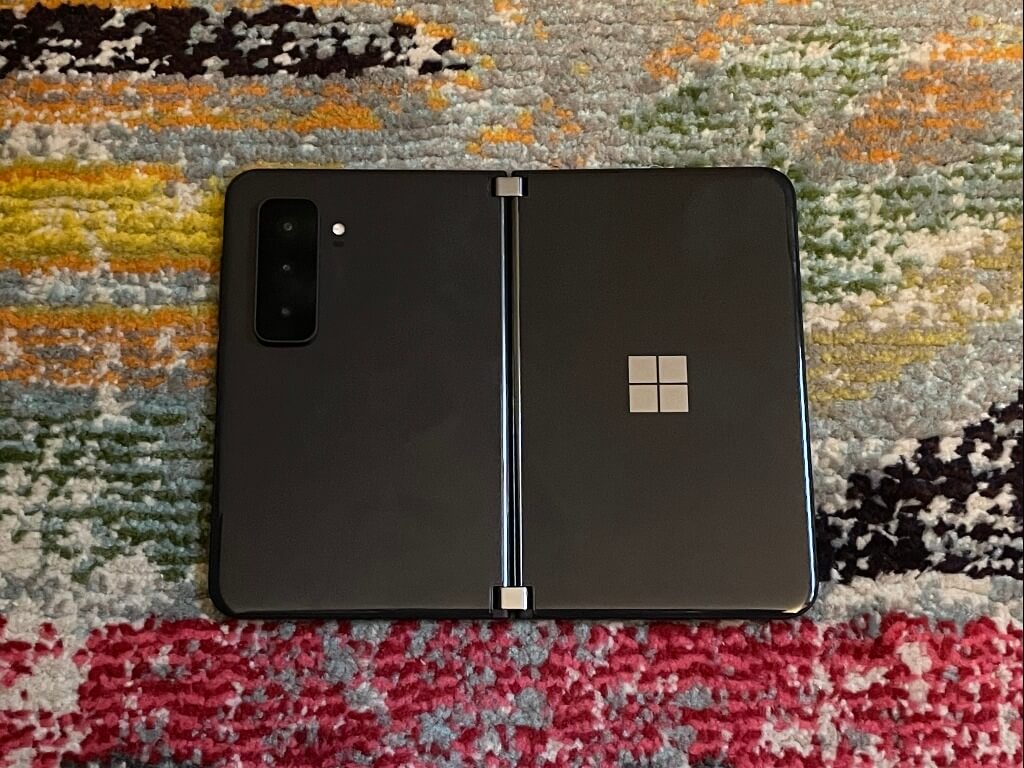
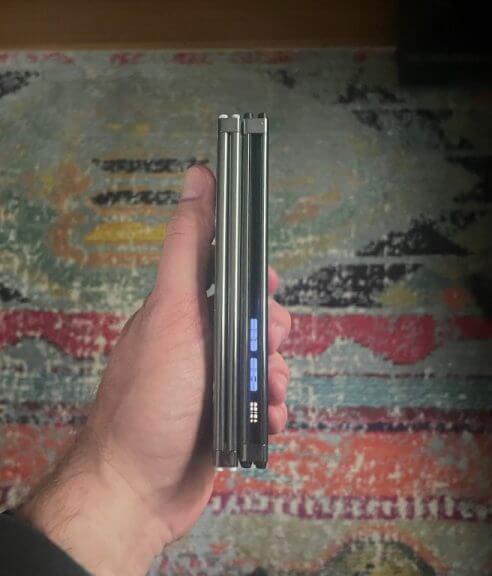
Based on our hands-on with the first Surface Duo, some things have changed for the better. The first thing you notice is the hinge on the Surface Duo 2. The hinge is slightly bigger this time around, made of better materials, and it has new Glance Bar on one of the curved displays where you can see the time of day, the battery level, as well as notifications for phone calls and text messages without opening the Surface Duo 2.

Holding the first Surface Duo, you feel as though with a little force you can snap it in half. The Surface Duo 2 is heavier and feels more premium, similar to the Samsung Galaxy Fold 3. And like the Fold 3, I am sure it would easily smash to pieces if I drop it.

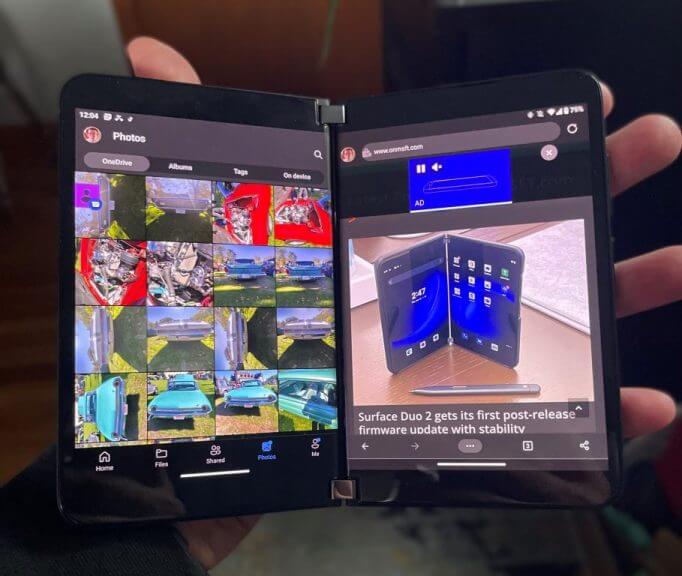
If you loved the Surface Duo 1, you are going to love the improvements on the Surface Duo 2. The 90Hz display, Glance Bar, NFC, and the triple camera setup are all great upgrades. The screen bezels are a little smaller, offering a tad more screen real estate for your viewing pleasure, and the fingerprint sensor built in the power button is also very convenient.

In my short time with the Surface Duo 2, I am impressed with the build quality, design, and upgrades. If the hardware feels worth the money, the software experience is a different story, though.

The software still feels unfinished

While the Surface Duo 2 is well-made and feels premium, the software is still quite buggy at launch. As I was taking pictures for this hands-on, the Duo 2 decided it did not want to cooperate. Moreover, trying to get the Glance bar to work when I press the power button is inconsistent, sometimes it won’t turn on, or there can be a two-second delay.

As an owner of the first Surface Duo, the bugs that were present in the first are no longer present in the Duo 2. However, accidental touches and the camera app getting unknown errors when I try to open up the app are persistent and annoying. The software experience is the major downside to this device, even after I installed the latest stability update. After shelling out close to $1,700 for the Duo 2 (device + Microsoft Complete), I am extremely frustrated by the Duo 2’s software experience.

You only get one chance to make a good first impression, and the original Surface Duo didn’t really do that. There’s much more to like about the Surface Duo 2’s hardware, but I’m afraid that Microsoft still has to really optimize Android for dual-screen devices. The Surface Duo 2 is just Microsoft’s second Android device, and it could be years before the company could rival Samsung and other Android OEMs on the software front.

What do you think about the Surface Duo 2? Let us know in the comments! If you have any specific questions, you can hit me up on Twitter.

Rise of Humanity game preview: Turn-based tactics terminator

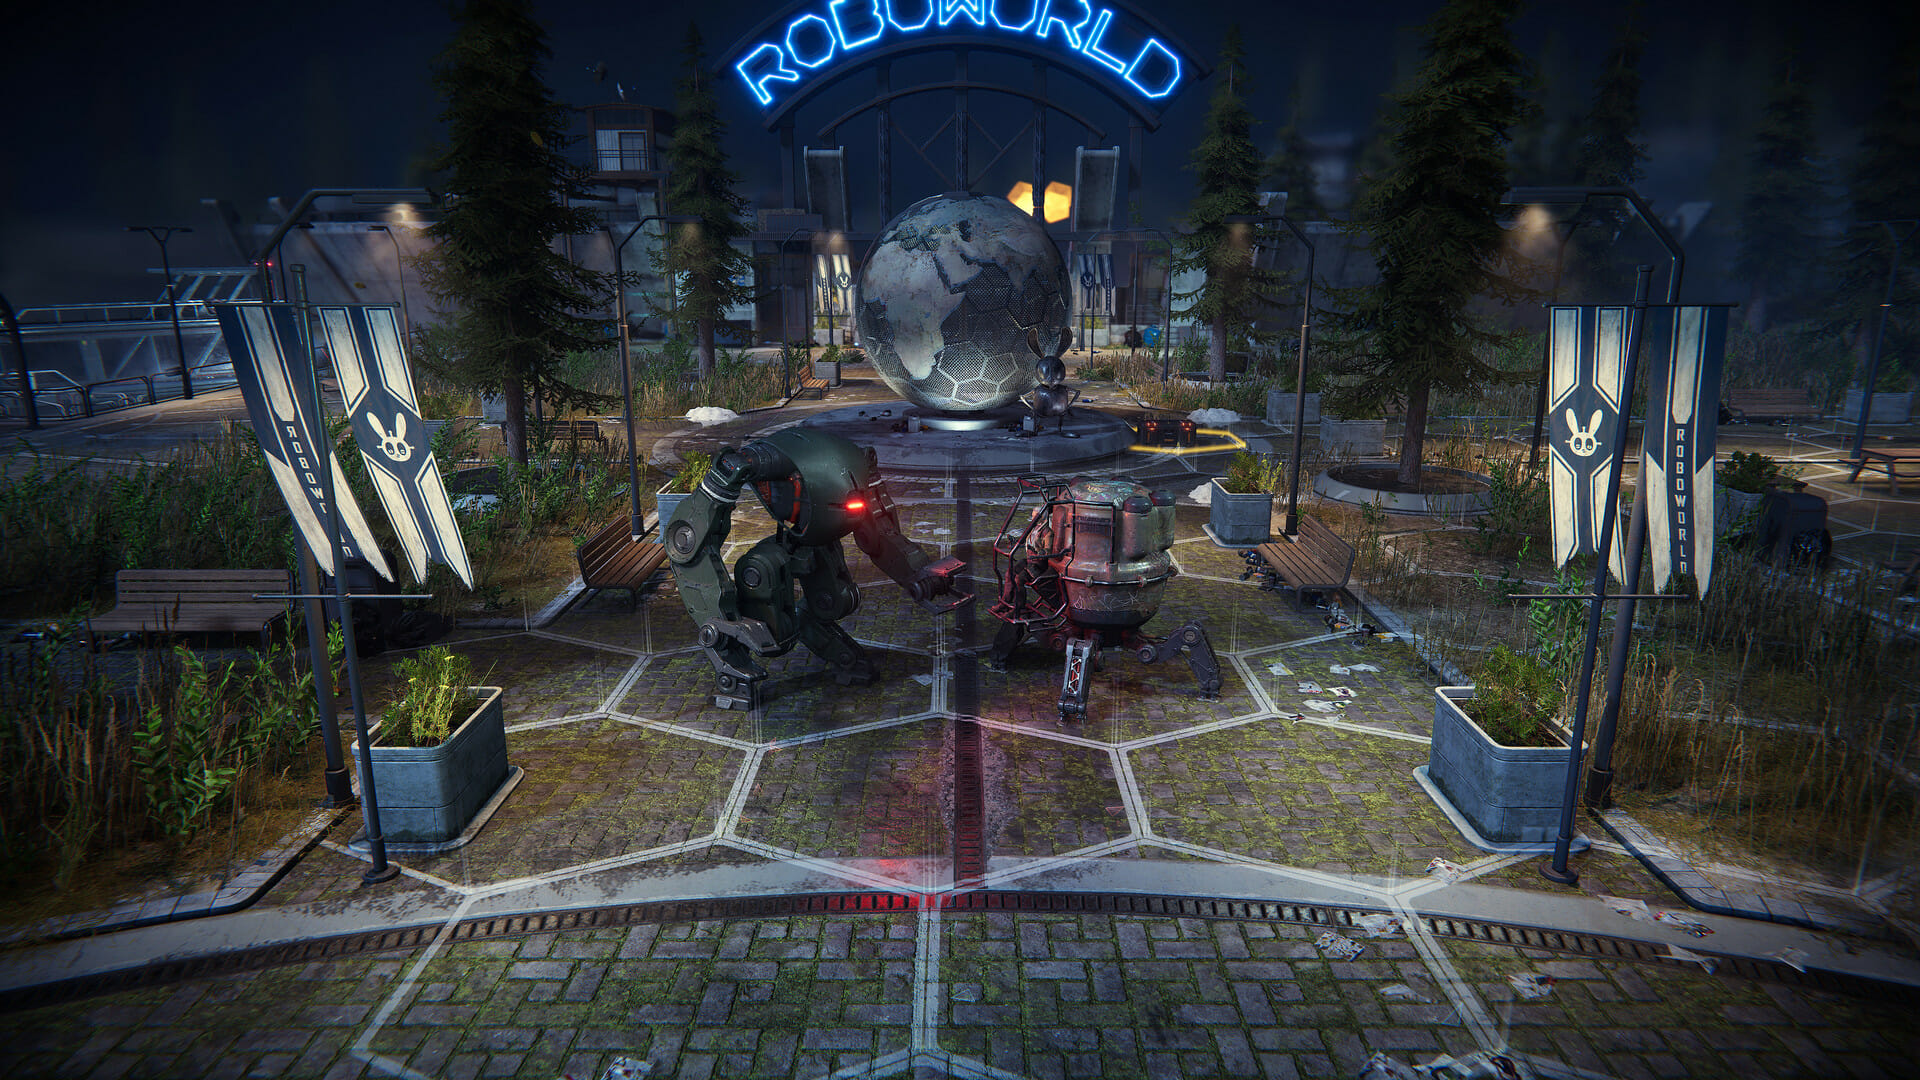
Rise of Humanity is a post-apocalyptic turn-based deck builder set in a world that somewhat resembles the setting of Terminator: humanity is on the run for the robots that have taken over the world and it’s time for them to strike back.

The game was released in Early Access on Steam so this is not a scored review yet, but the 6 story missions present in the current build already offer a good insight into what’s to come.

Next to the single-player campaign, the game also focuses on competitive ranked daily challenges, where community members can face off against each other while trying to get the highest score on the leaderboard.

Come with me if you want to live – Story

Rise of Humanity is set in the aftermath of a robot apocalypse and when a group of humans gets together, they realize they may have a shot at setting things right.

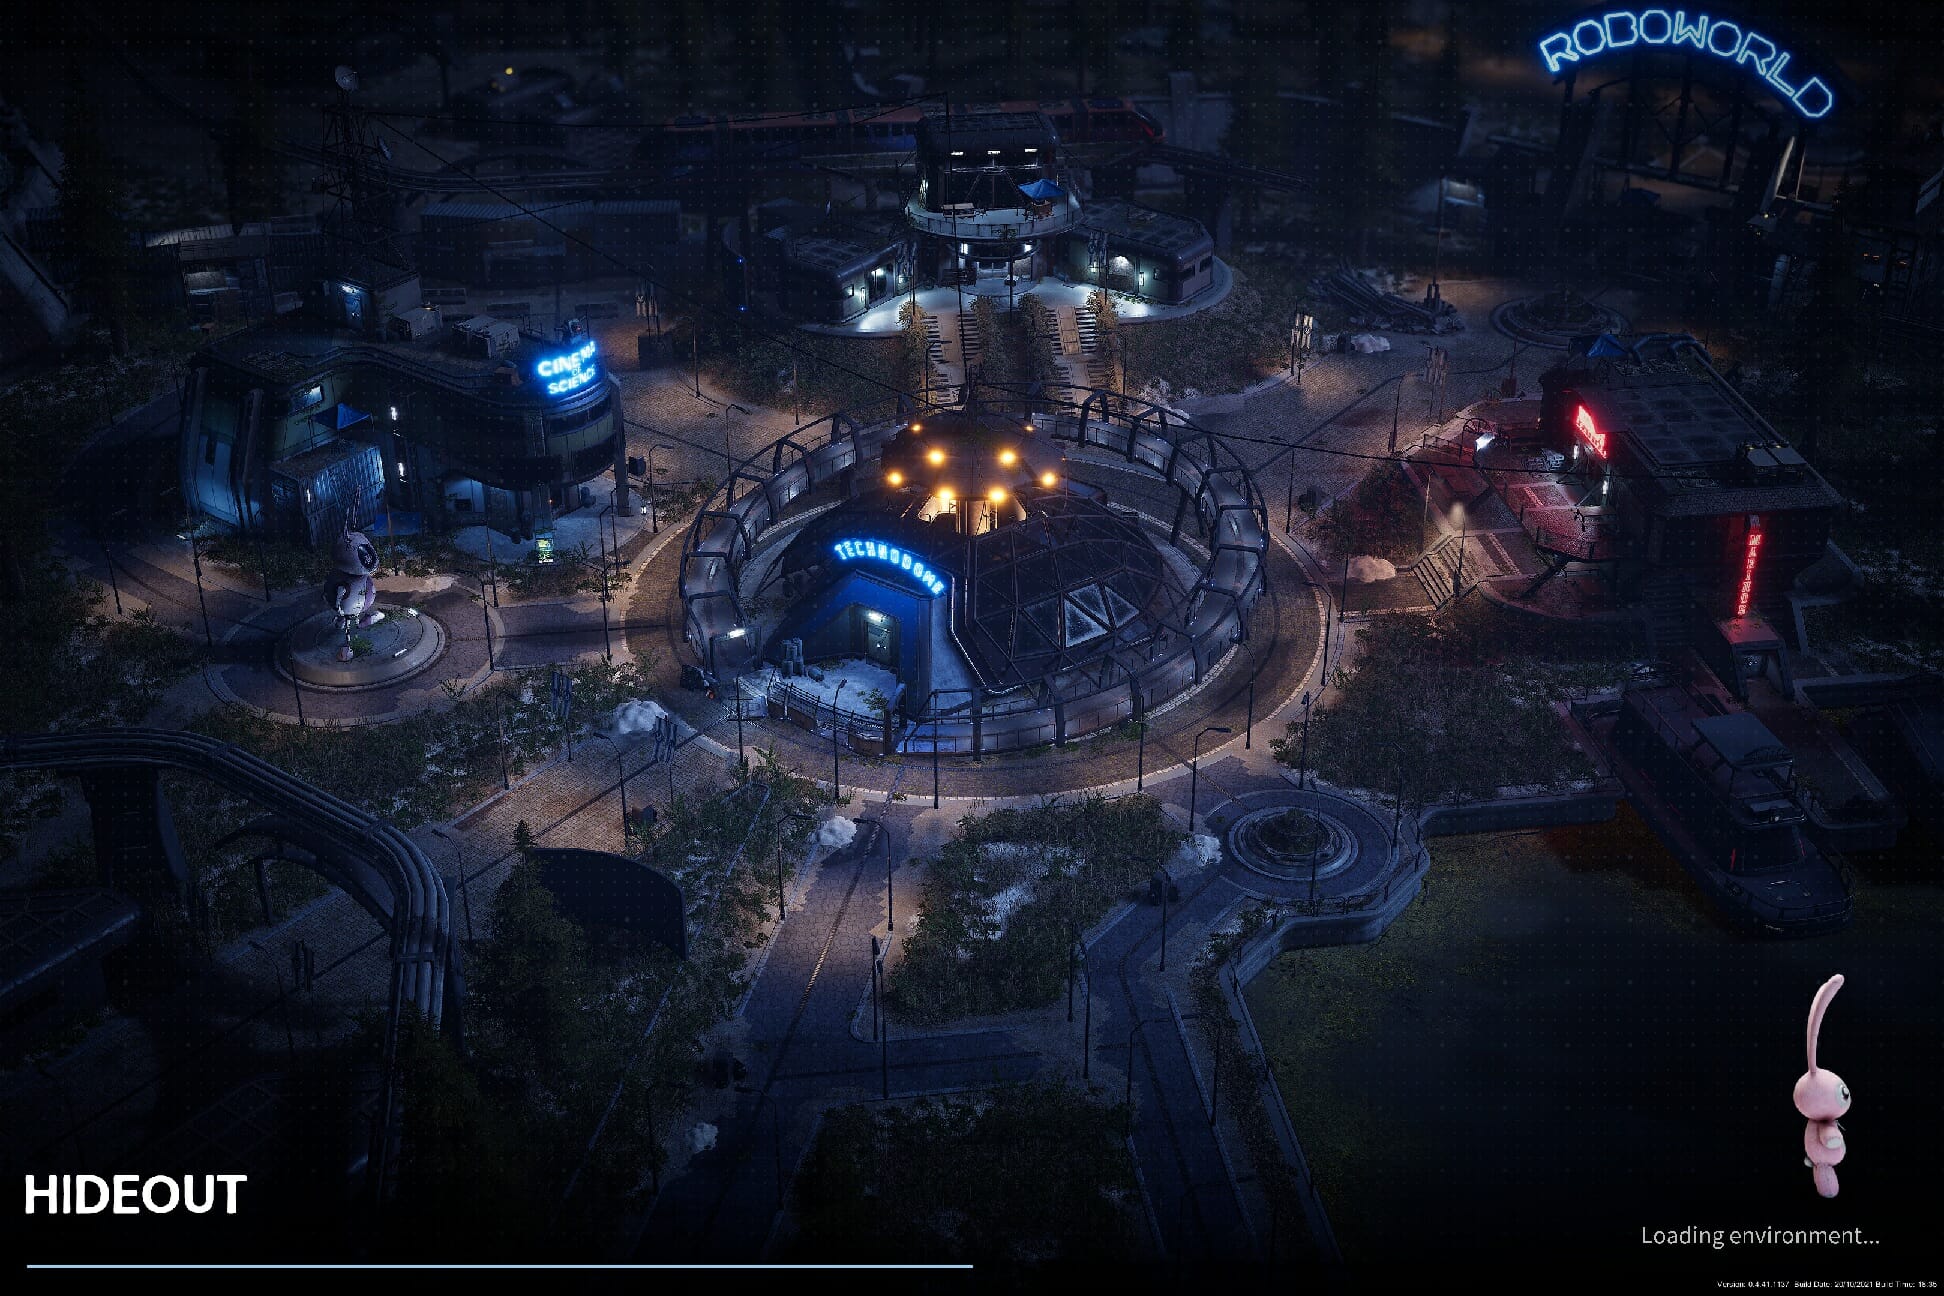
Through character dialogues that happen in the game’s hub, which is interestingly an amusement park, and some during the story missions, you learn more about their motivations and what their goals are.

The Roboworld Hideout

The writing itself is fine but could use some improvement, as their emotions don’t always come across the way that I believe it was intended. There is no spoken dialogue and only static avatars, so most of that emotion needs to happen through text, something that is very possible, as recently shown by Midnight Protocol, but that will still need some work here.

That being said, simply taking place in this setting is already a step up for me and I’m very curious what kind of world-building and character developments we’ll see in the 14 added story missions that will be in the full game.

Hasta la vista, baby! – Gameplay

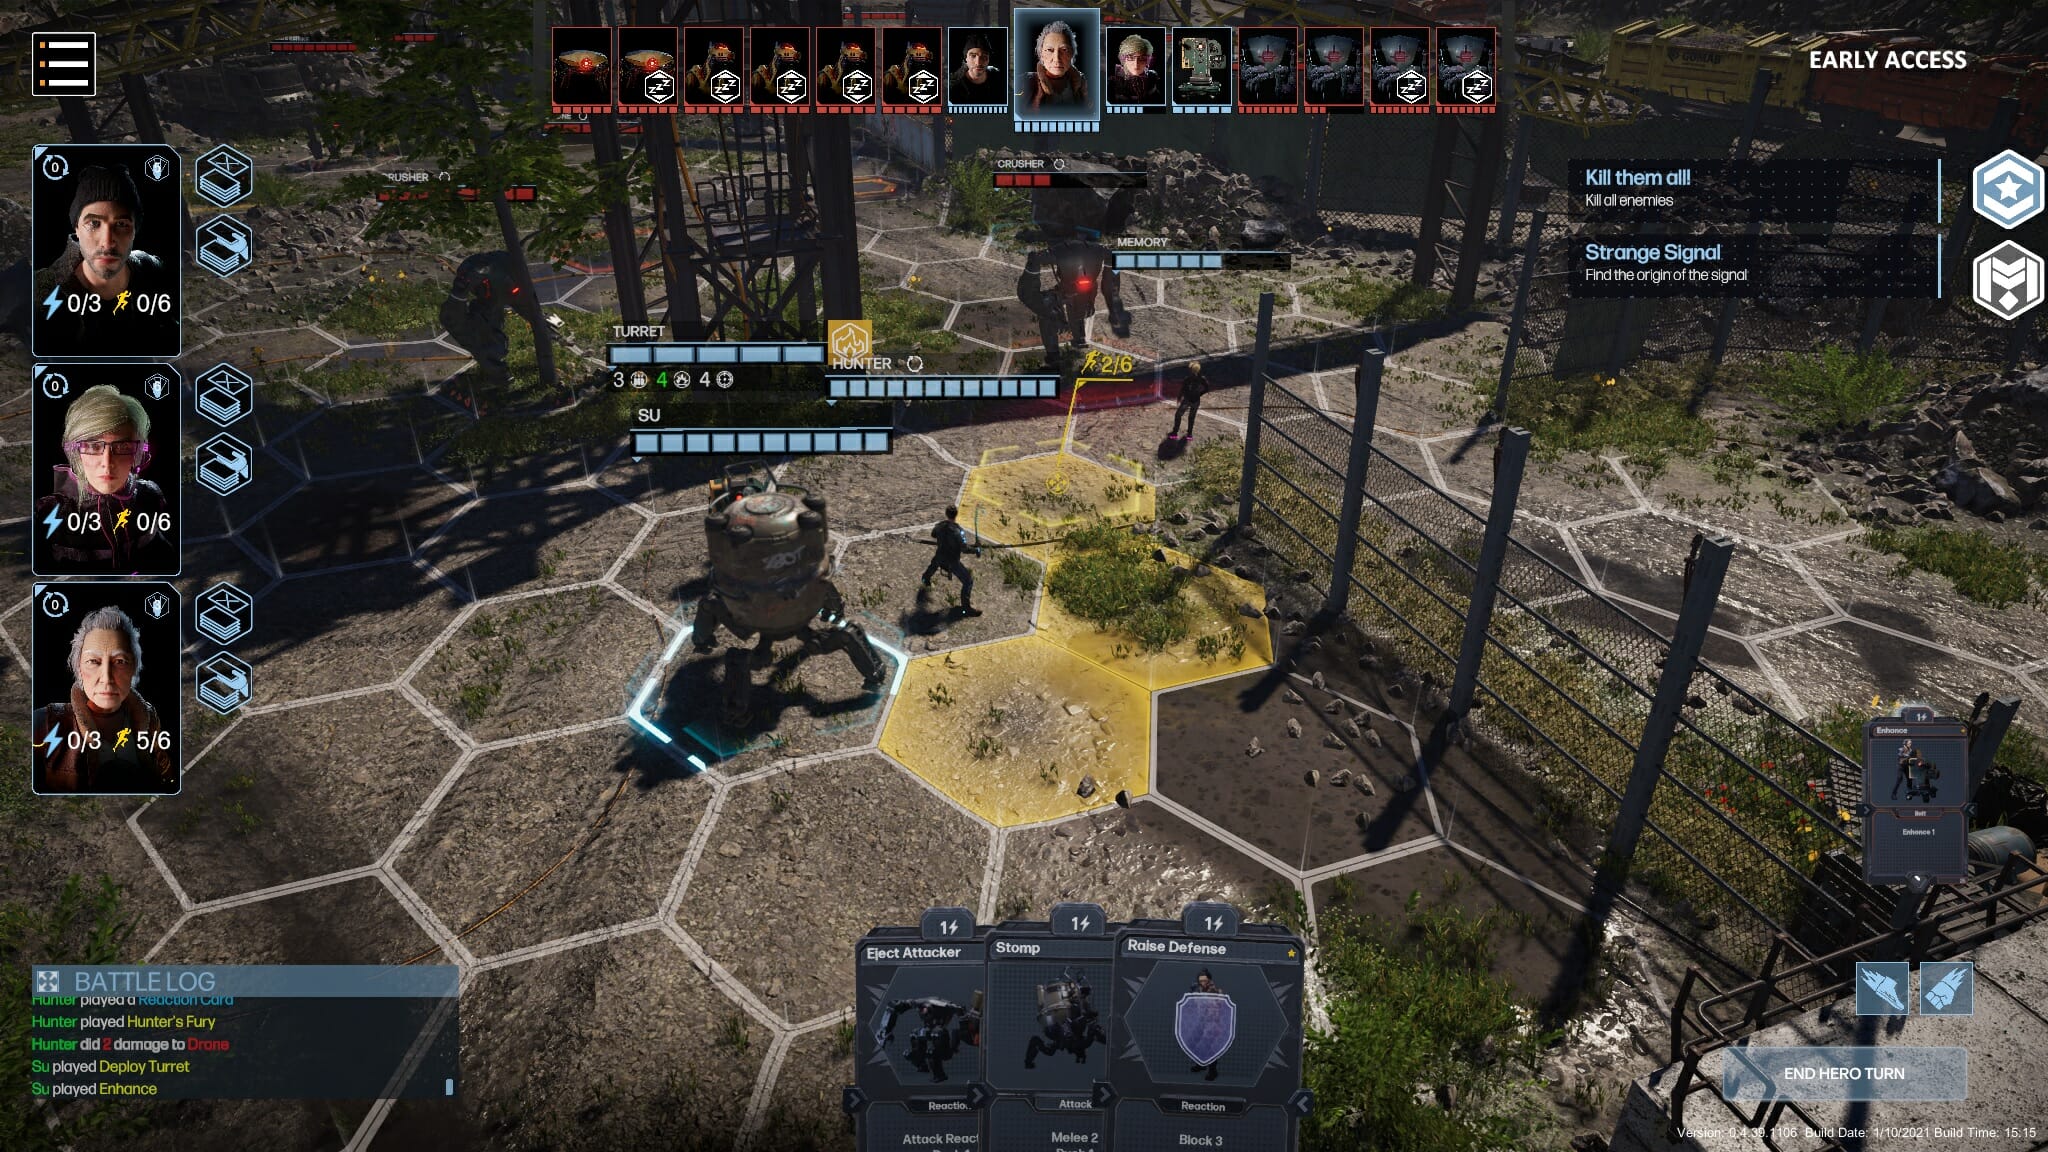
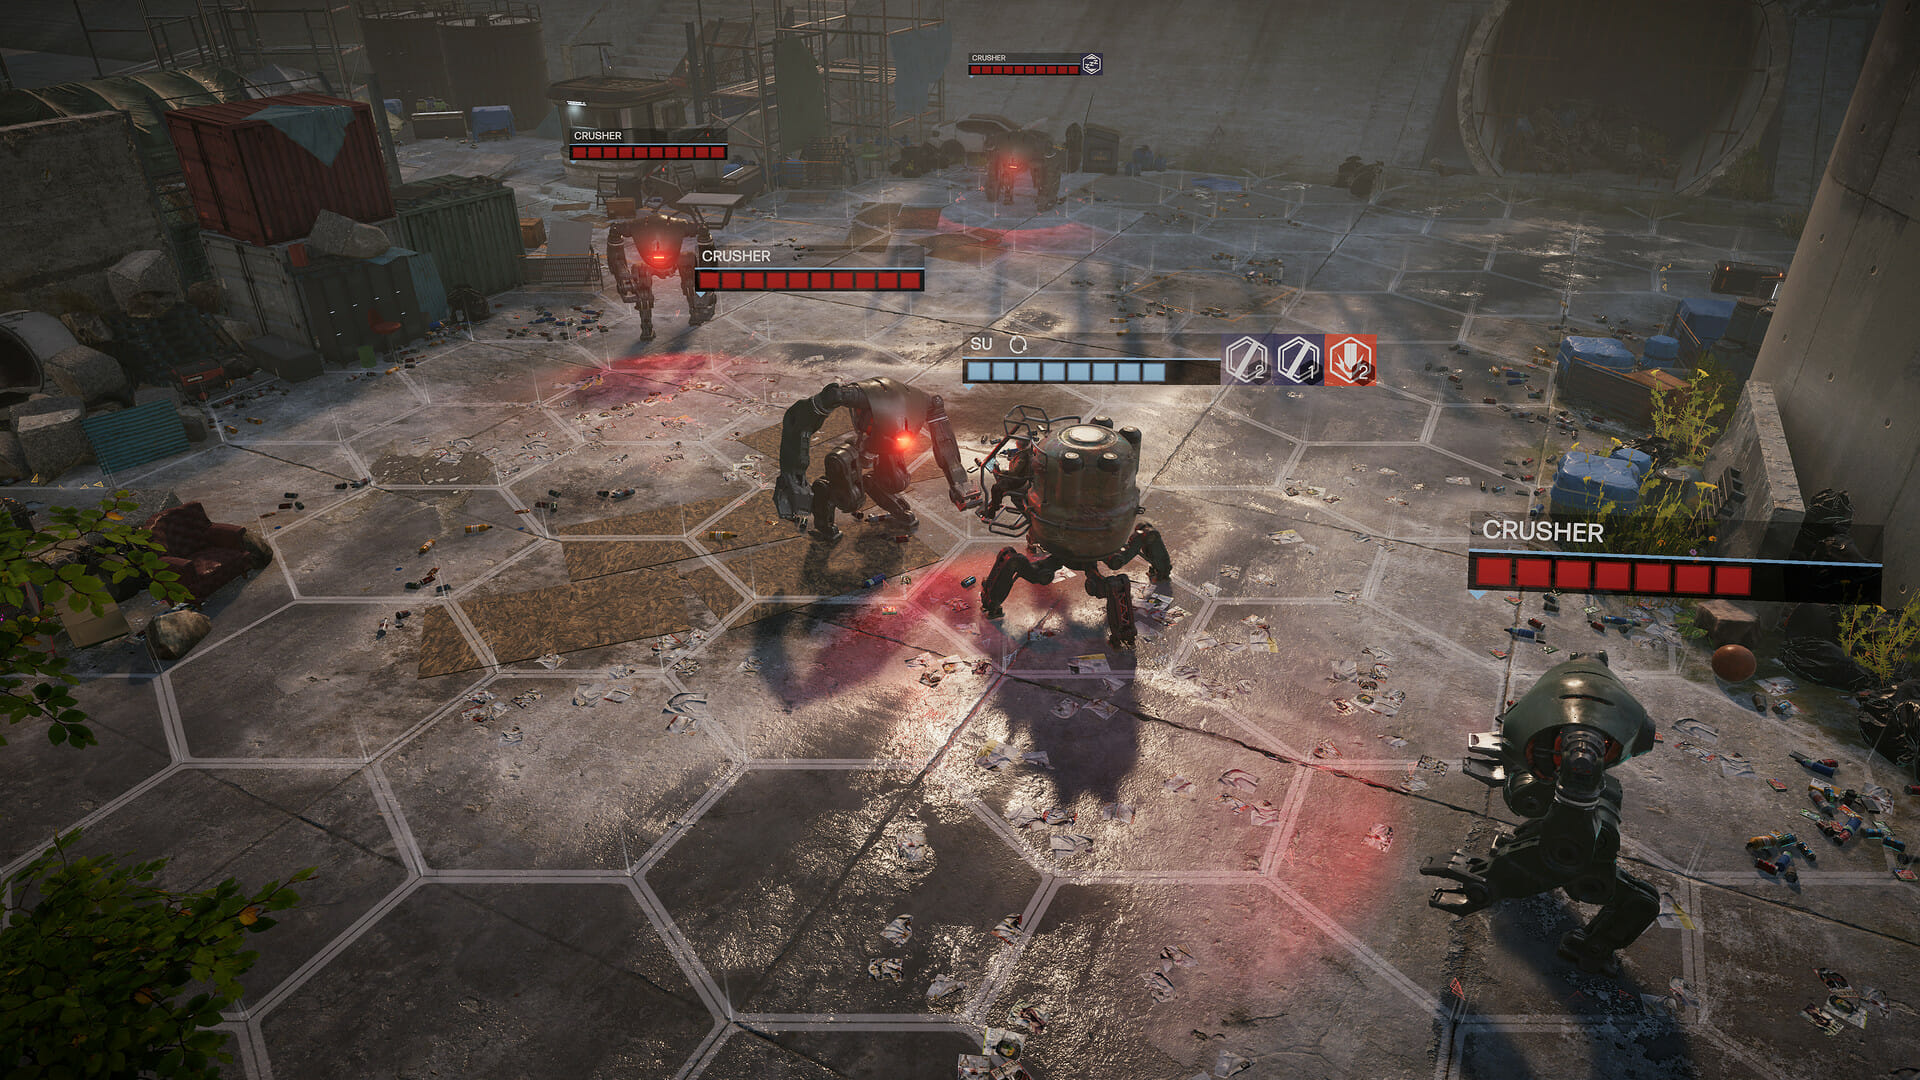
Rise of Humanity combines two well-known game mechanics: On one end it has the tile-based movement we’ve seen in a lot of tactics games, letting you move X amount of tiles and then executing an attack. Careful placement of your characters is key to survival, especially on harder difficulties.

Hex-based movement

To actually deal out damage, you’ll need to use cards. Whereas most other games in the genre would use one action per turn or use MP/stamina for bigger moves, each action you can choose is represented by a card in a characters’ deck. Each card does use a set amount of energy though, but most of the starting ones cost one energy and you get 3 to spend each turn.

There are offensive moves like a melee swing with a crowbar, but you also have a ton of ranged attacks coming from guns, grenades, and everyone’s personal favorite (I guarantee it): a pink exploding bunny. It packs a real punch!

Clever players will also learn to rely on cards that activate during their opponent’s turn like blocking, evading, or drawing extra cards when you get damaged.

Block 4 incoming damage next turn

You only get to draw a single card every turn, so it’s very important that each card in your deck is useful and optimized, but luckily you can customize your deck and characters in the game’s hub.

I need your clothes, your booths and your motorcycle – Upgrades

During the game, you’ll discover chests that contain new cards and earn money that can be used to upgrade your cards. As soon as you have two of the same card, you can increase its level which will have an impact on the damage output or the range, for example.

What I’ve not seen before, is a required sum to eliminate a card from your deck, but it does make sense: you really want to make sure that every single card you draw has a practical use.

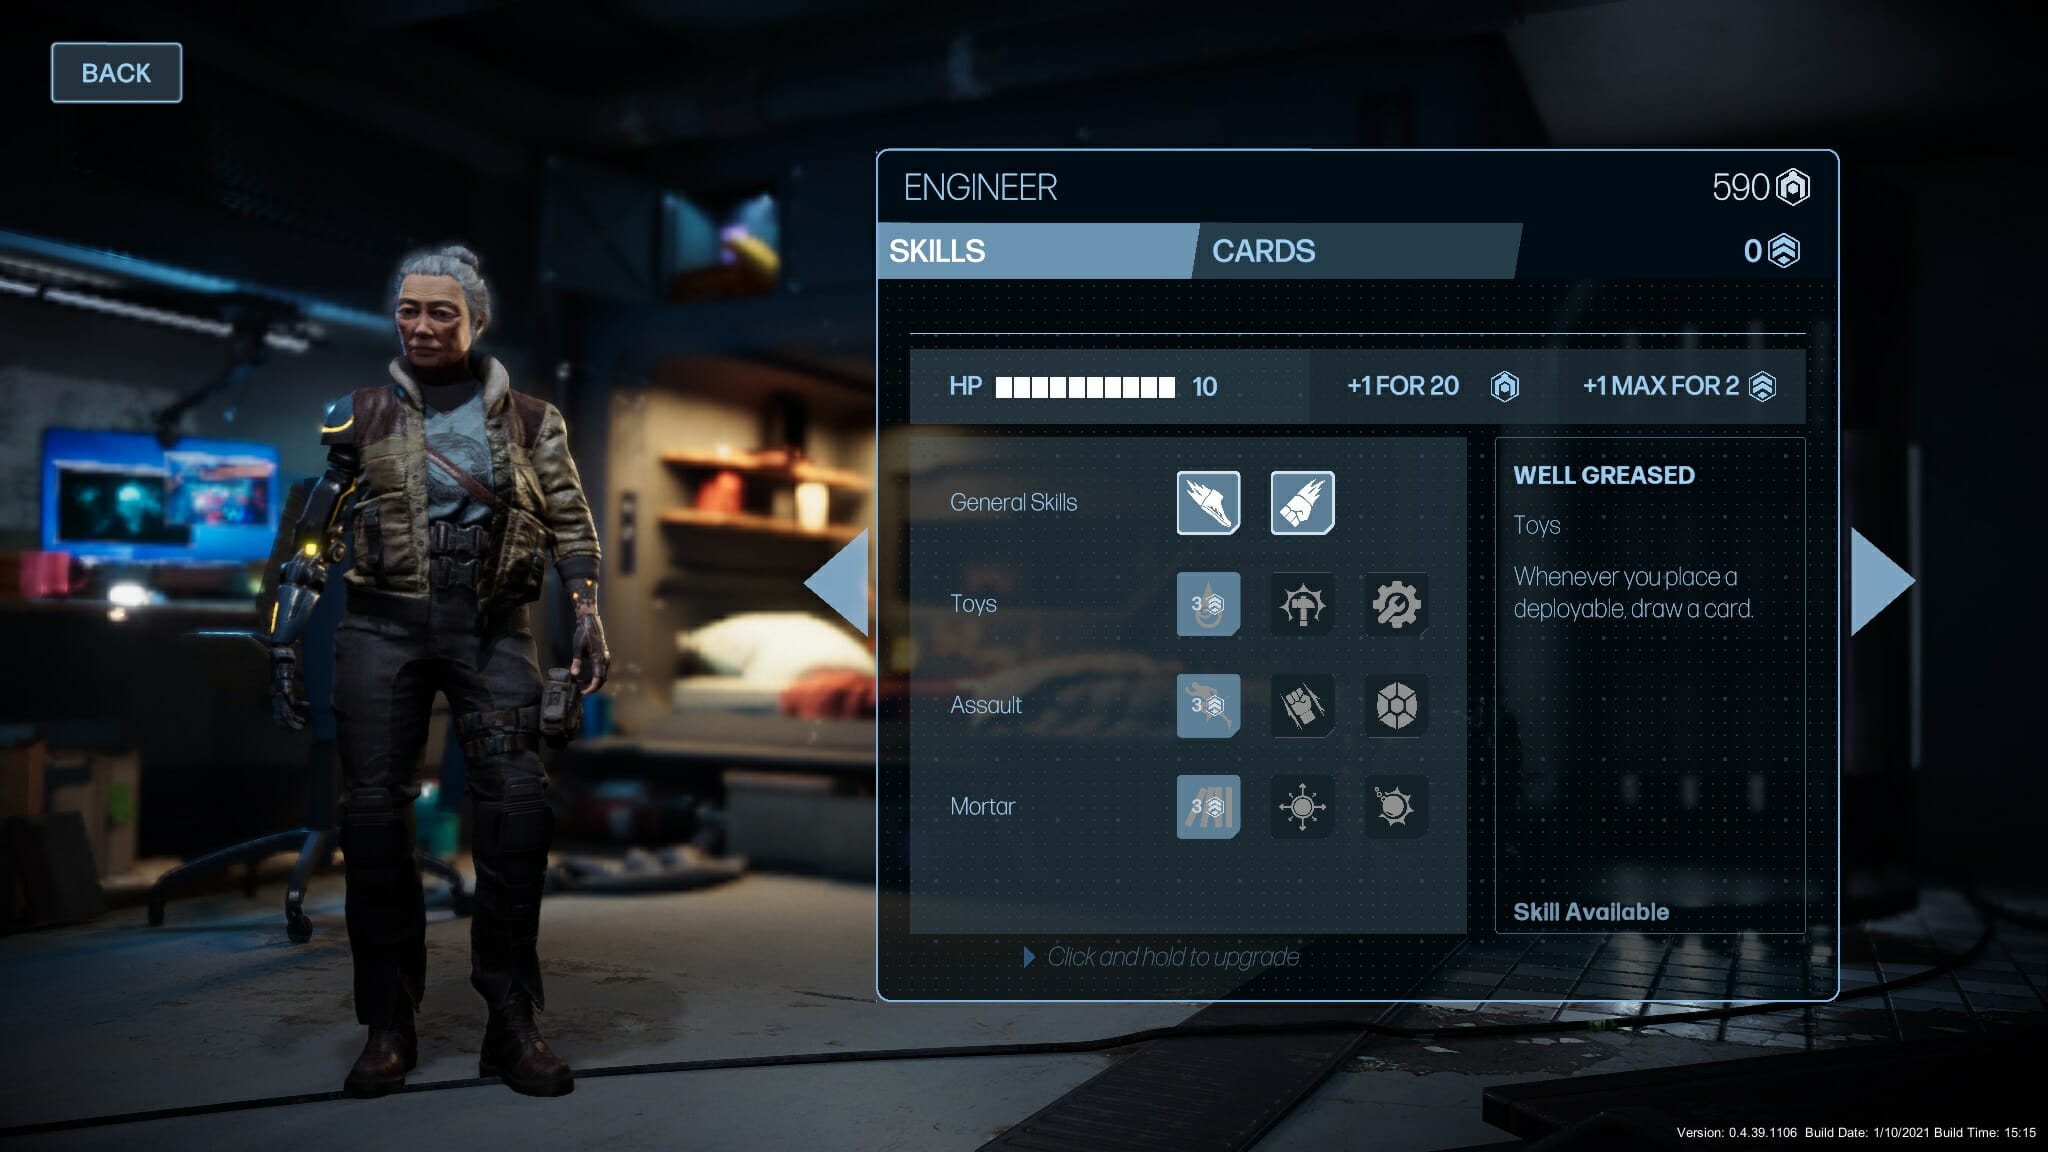
Each character has their own deck and specific job-related cards. Your healer will have the option to restore health, the Engineer can deploy turrets or mobile explosives and how well you do in combat will largely depend on the choices you make.

Battle Goals – a nice touch!

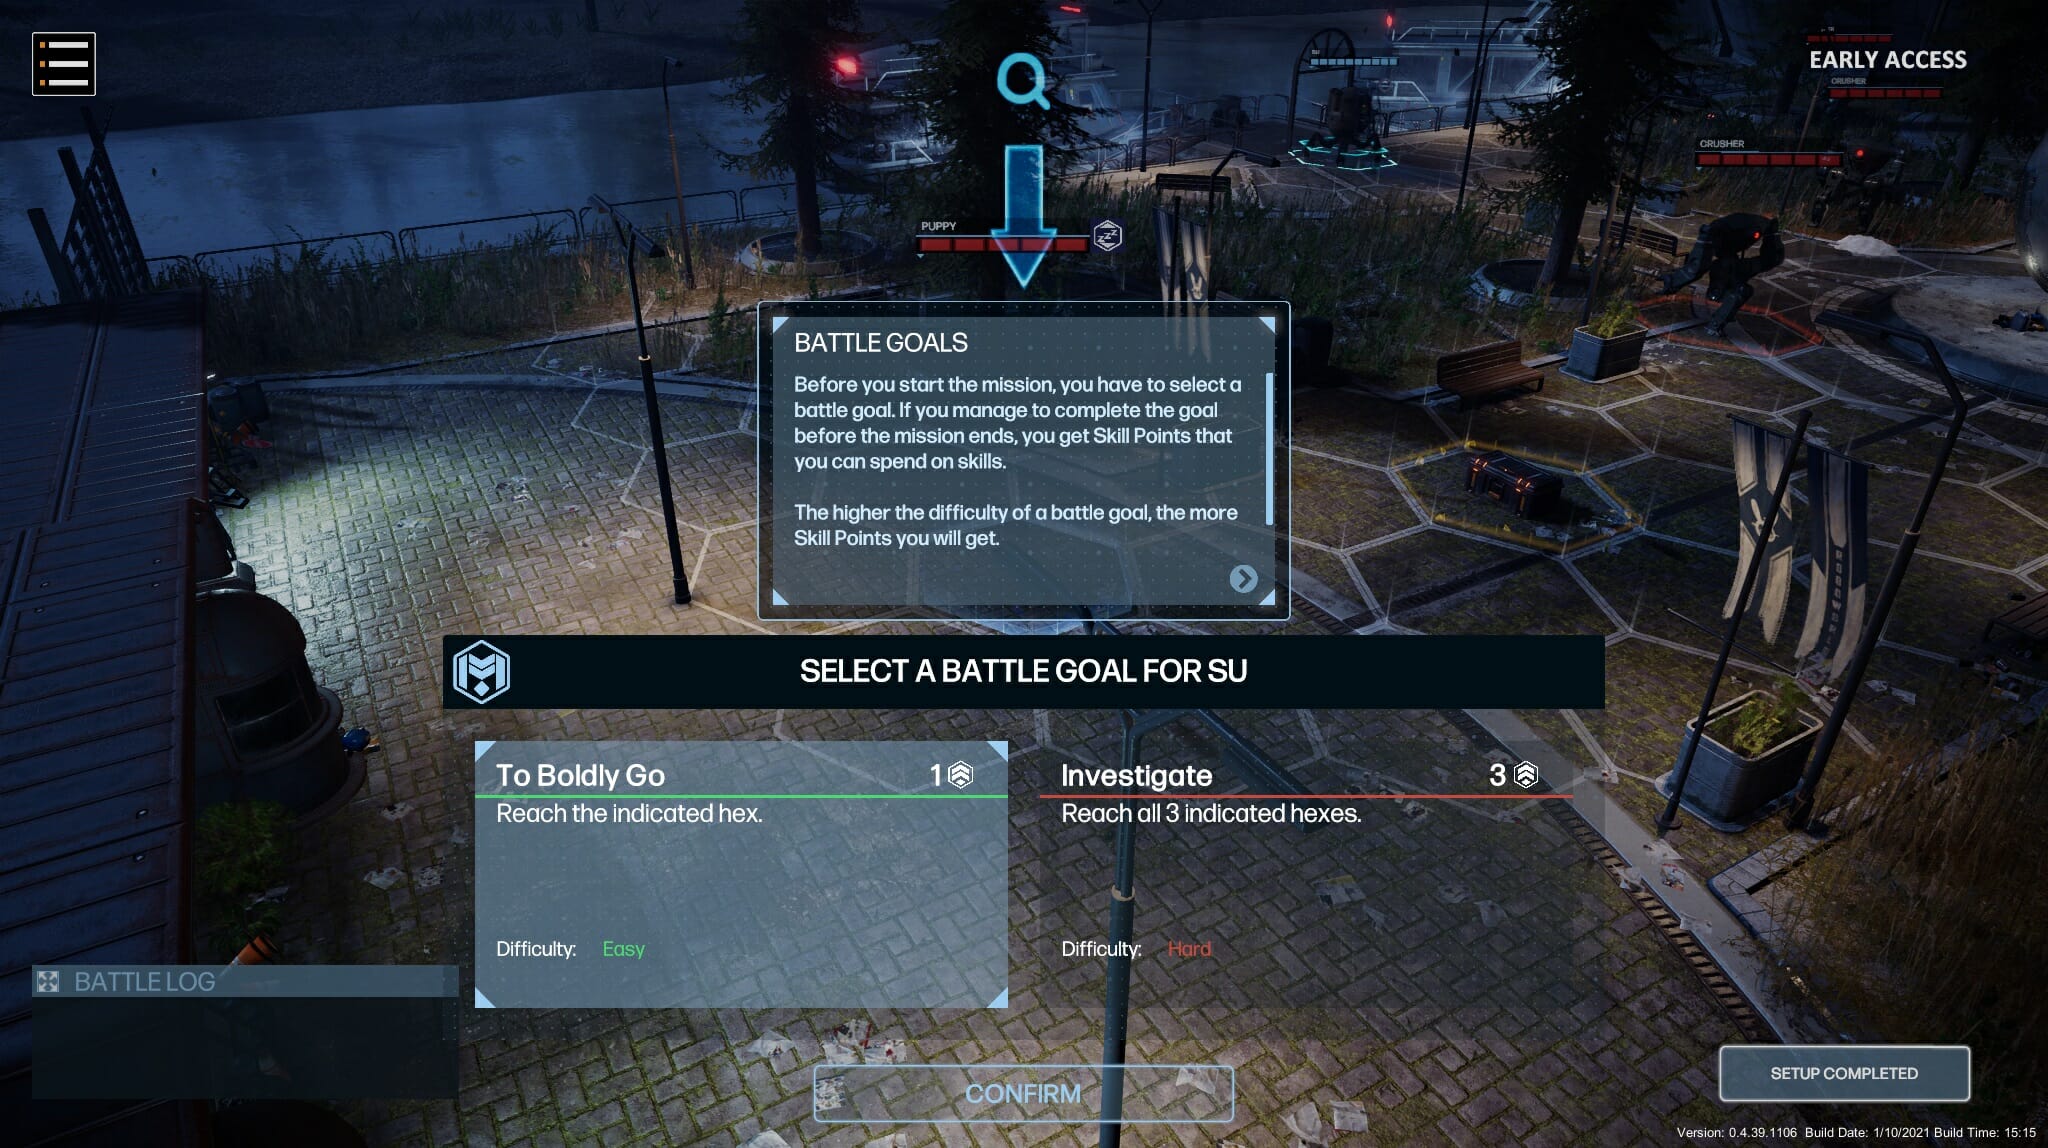
One interesting aspect is that at the start of each level you get to pick character-specific battle goals. This adds a bit of additional challenge, like moving to certain tiles or using your restorative health spray three times. If you reach the goal, you get tokens that can be used to upgrade your character.

In the hub, you can spend those tokens on new passive skills that will have a huge impact on the gameplay. If your Engineer is already good at placing deployable, you can imagine that drawing a card each time you do vastly increases your options during your next turn.

Upgrade your character

It’s wise to save those tokens for the abilities that really matter and it also helps that picking those battle goals adds a bit of longevity to the campaign missions, requiring you to act in a certain way.

Also of note: you don’t automatically restore health after combat and it costs money to heal up. Making the Medic my preferred character in the game as she gets around that limitation.

I’ll be back! – Daily challenges

The Early Access build only has 6 story missions, with 14 more being added in the full release. It only took me around 2.5 hours to beat those but there are a bunch of replayable levels and even daily challenges that will give the game some extra value.

The team behind Rise of Humanity is aiming to make this a community-based game where players try to get higher on the leaderboards, even offering physical prizes like a free T-shirt as incentives. I don’t know about you, but for me, this works really well as motivation, especially because it features the pink exploding bunny.

You can just check the game every day to stay tuned on the challenges, but I recommend hopping into their Discord server so you can discuss tactics with other players.

Shake hands?

I’m looking for Sarah Connor – Possible improvements

The game is fun and looks great, but I can still see a lot of room for improvement. Luckily this is an Early Access version and they are still accepting feedback, so be sure to send your opinions their way via the Discord link I mentioned earlier.

As for my personal feedback, I’d love to play more story missions and see the world and characters fleshed out more with improved writing so we actually care for them.

The game also looks great, but because of the forced perspective during combat, we don’t get to see the graphics up-close and I’d love to see more combat animations like the one where the hunter runs up to the enemies and slashes at them: this brings the player closer into the action.

I’m not sure if there will be human opponents in the final game or other builds of robots, but I only saw 3-4 different enemy types in the Early Acces build and a bit of added variety could go a long way.

Crusher. Crusher. Crusher.

Final thoughts on Rise of Humanity

Pros
Great turn-based combat
Lots of ways to improve your characters and deck
Fantastic soundtrack and superb voice acting
Interesting post-robot-apocalypse setting
Cons
Not a lot of story content yet and the writing can be improved
Looks great but doesn't showcase this enough
Could use a few speed-up options

Rise of Humanity does a lot of things right: the turn-based tactical aspect of the game gives you plenty of time to plan out your next moves whereas you can gradually make your crew stronger through character upgrades or better deckbuilding.

It’s also got an interesting setting but doesn’t give away that much yet so people invested in the story may be left hungry at this point in time. Graphically it looks great, but due to the nature of the top-down perspective, you hardly ever see the visuals up close, something I hope they remedy by adding more combat animations and cutscenes.

Rise of Humanity is currently only available on PC, it costs $19.99 in Early Access on Steam, and buying it at this price will give you access to the full game at launch, which will be sometime next year. There is a launch discount until 28 October that you can still use if you’re quick!

*Disclaimer: Reviewed on Windows 10. Steam review copy provided by the developer.

Windows news recap: PC-first experience promised for Halo Infinite, Firefox coming to the Microsoft Store, and more

Welcome back to our Windows news recap, where we go over the top stories of the past week in the world of Microsoft’s flagship operating system.

Microsoft promises a “PC-first experience” for Halo Infinite

A PC-first experience has been promised for Halo Infinite, and whilst testers have only seen a glimpse of the game, Microsoft has provided some additional info on what to expect. Some key details include that AMD has been selected as the exclusive partner, meaning that AMD Ryzen and Radeon RX6000 GPUs will be optimised for the game, and that AMD FreeSync Premium Pro will be supported. Additionally, a post-launch update will bring raytracing support. There are a wide range of other PC-specific announcements, even non-AMD related, that Microsoft discussed. You can read the full details here.

Mozilla’s Firefox internet browser to come to the Windows Microsoft Store app store

Mozilla Firefox is set to arrive in the Microsoft Store. Whilst there is no specific release date, it is expected to arrive in the Microsoft Store later this year.

Mozilla Firefox browser on Windows 10

Parallels Desktop for Mac improves Windows 11 VM support and gaming performance

An update to Parallels Desktop for Mac has brought some improvements for Windows 11 virtual machines. Version 17.1 brings some key improvements, including the fact that virtual Trusted Platform Modules will be enabled by default, and improved performance for gaming.

Microsoft shares more details about how Android apps will work on Windows 11

Ahead of Microsoft having launched Android apps on Windows 11 to some Insiders, the company shared some more details on how Android apps will work on Windows 11. When an Android app is installed, the Subsystem for Android will be automatically installed in the background. In addition, the Windows Subsystem for Android will come with its own Settings app. To see everything Microsoft announced, take a read here.

Microsoft shares more details about how android apps will work on windows 11 - onmsft. Com - october 20, 2021

That’s it for this week. We’ll be back next week with more Windows news.

Microsoft news recap: 512GB and 2TB expansion cards coming for Xbox Series X|S, Visual Studio Code comes to the browser, and more

Microsoft news recap is a weekly feature highlighting the top Microsoft news stories of the past week. Sit back, grab some coffee, and enjoy the read!

Xbox Series X|S owners can pre-order new 2TB and 512GB Seagate Storage Expansion Cards

If storage space is becoming an issue on your Xbox Series X or S, not to worry, as two new Seagate Storage Expansion Cards are on the way, offering either 512GB or 2TB of additional space, allowing you to store more next-gen games.

How to use the seagate storage expansion card

Microsoft Teams app to end support for some Android devices soon

Some Android devices will lose support for the Microsoft Teams app shortly. Android 5, 6, and 7 devices will begin to lose support in a phased manner. Android 5 devices will begin in March 2022, Android 6 in July 2022, and Android 7 in September 2022.

Microsoft finally brings Visual Studio Code to the browser

A web-based version of Visual Studio Code has been made available. Accessible via vscode.dev, it allows you to edit code within your browser, including opening a folder from your local machine and editing the files within.

Vs code on the web

Microsoft Edge 95 reaches Stable channel new Efficiency mode and PDF improvements

Whilst a relatively small update overall, Microsoft Edge 95 has reached the Stable channel, and it brings with it a new Efficiency mode which aims to reduce battery usage of the browser. By default, the new mode is active when in battery saver mode, or can be manually set to be always on or when unplugged. There are also several PDF improvements.

Microsoft Edge On Windows 10

That’s it for this week. We will be back next week with more Microsoft news.

You can now set Windows Terminal as the default terminal application in Windows 11

Apart from releasing a new Terminal Preview 1.12, It comes packed with an array of features, including bug fixes, windows restoration, and full transparency in Windows 11.

This is huge as it allows users to go back to the same Tabs they had opened when they shut down their devices in their last session. This is, however, only exclusive to Windows 11 users.

Default terminal

Whereas you can set the tool as the default terminal emulator, you need to either operate from the Windows Insider Program Dev Channel or be running Windows 11 to enjoy this feature.

Users can also enjoy full transparency instead of the usual acrylic.

Other additions

Profile matching has also been added. You will now have all your customizations under one profile whenever you launch. The feature is currently only available on Windows Terminal Preview but will soon be availed to Windows Terminal in future.

Bug fixes

Bug fixes are essential in any release, and some that have been addressed include;

  • Text printed in your buffer with the keyboard is now selectable.
  • Visual Studio Developer Command Prompt (VS2017+) and Visual Studio Developer PowerShell (VS2019.2+) profiles will now be automatically generated.
  • The elevated terminal windows will now show a shield icon to the left of the tabs.
  • The “adjustIndistinguishableColors” profile setting can be adjusted to the foreground color to make it more visible, based on the background color.
  • Users now have the option to select and interact with subtrees of panes.
  • SplitState now accepts directional modifiers 
  • Alt+Space command now opens the system menu.
  • The touch keyboard should now invokes properly when tapping inside the console window.
  • When the viewport is scrolled the mouse coordinates are now functioning properly.
  • Selecting new tabs focuses on the tab immediately when running multiple actions. 
  • You don’t have to zoom out to navigate pane focus.

Both Windows Terminal and Windows Terminal Preview are available from the Microsoft Store or from the GitHub releases page.

What do you think of the default terminal application settings in Windows 11? Share your thoughts in the comment section below.

Fix Symelam.sys Boot Error with these solutions

We will give you an easy route to take when fixing the problem of Symelam.sys boot error, but first, let us explain what Symelam.sys is.

The Symelam.sys is a system folder that saves driver file data that is required for a significant process in Windows. All SYS files store data that is required to carry out important tasks like initialization of specific Windows programs and so on.

Regarding the location, the SYS files are usually saved in the Windows installation directory. However, it is important to note that SYS files can be opened directly with the usual way of double-clicking on the icon.

How can I fix Symelam.sys boot error?

  1. Run a malware scan
  2. Update your drivers

1. Run a malware scan

One reason why symelam.sys boot error may occur is a malware infection. Damaged hardware, incompatible hardware, corrupt OS, damaged hard disk, and hardware failure is also reasons for this error.

However, malware infection is the most common cause of this problem, and in order to fix it, you are advised to scan your system for any malware.

There are various antivirus tools that can help you with that, but if you’re looking for a reliable antivirus, we recommend you some of the best antivirus software with comprehensive protection for your everyday use.

Finally, you may like to know if a Symelam.sys file is secure. SYS files form parts of the OS and are required in order for Windows 10 to work properly, meaning that these files don’t pose any risk to your PC.

2. Update your drivers

Let us remind you that SYS files usually save configuration information related to the operating system. For this reason, outdated drivers can be the reason for the symelam.sys boot error. To solve it, open the Device Manager and manually update the drivers.

Alternatively, you can update your drivers automatically by using third-party tools that will scan your system and update any outdated drivers automatically.

There you go, these are some solutions that can help you fix symelam.sys boot error on your PC. Be sure to try all of our solutions and let us know if they worked for you.

Something went wrong Skype error? We got fixes for it

Did you ever encounter Something went wrong Skype error? If you are encountering this, then this article will guide you in solving it. This is a long guide, so you would need to carefully read through each step to fix the problem.

How can I fix Something went wrong error on Skype?

  1. Check if you are connected to the Internet
  2. Check if Skype is experiencing any service issues
  3. Reinstall Skype
  4. Confirm that your username and password are correct
  5. Diagnose what is stopping the software from working

1. Check if you are connected to the Internet

One of the first things to check when you encounter Something went wrong Skype error is your Internet connection. Check if it is working by opening your browser and try visiting a few websites.

If this works, then jump straight to the next solution.

If the websites are loading very slowly, it means you might not be on a good network. Try shutting down any software or downloads that might be making use of your bandwidth. Then, try to start Skype again.

Furthermore, if the websites are not loading at all, it means that your Internet connection isn’t functioning. So, you need to check your device if it is properly connected to your network. Also, you might want to contact your ISP.

2. Check if Skype is experiencing any service issues

If your Internet connection is working fine and you are still experiencing Something went wrong Skype error, it means that Skype might be having some service issues.

Confirm that Skype services are running smoothly. If the service is okay then move on to the next step.

3. Reinstall Skype

Something went wrong error on Skype might stop you from entering your Skype login details. To fix this, you need to do the following:

  • Uninstall Skype from your device
  • Restart your device
  • Reinstall Skype

In order to completely remove Skype, it’s advised to use uninstaller software. By doing so, all files and registry entries will be removed from Skype completely.

If this does not fix it, then you can make your complaint to the Skype community. This issue can be caused by so many things so it might be difficult trying to do it with this guide.

4. Confirm that your username and password are correct

skype sign-in Something went wrong Skype

Sometimes your login information might not be correct, and that can cause Something went wrong error on Skype.

To check if your login information is in order, try signing in to your account on Skype’s website. This can also be a test to confirm if your credentials are valid. Is signing in not possible? Then, reset your password.

Have you reset your password and still can’t sign in to your account on the Skype website? If so, try to contact Skype support.

If you have successfully signed into the Skype website then move to the next solution.

5. Diagnose what is stopping the software from working

If you’re still getting Something went wrong Skype error, follow these steps:

  • Erase the shared.xml file.
  • Confirm that the ports needed by Skype are running.
  • Confirm if Skype is working in the background.
  • Check that Skype can connect to your proxy server.

Have you carried out all these instructions and still find it difficult to sign in to Skype, then report on the Skype community for help.

Something went wrong error on Skype can be problematic, but we hope that you managed to fix it using one of our solutions.

Are you having other problems with Skype? We covered a wide array of Skype issues in our Skype hub, so be sure to check it out.

Display Driver Failed to Recover From Timeout [Windows 10/11]

Your graphics card is one of the most important components, and problems with it can be quite serious.

The Display driver amdwddmg stopped responding and has successfully recovered error in Event Viewer highlights that the AMD graphics driver stopped working, usually for a few seconds. You will see a black screen with no sound during this period, and all active applications will crash.

However, several Windows 10 users reported that the display driver failed to recover from the timeout, therefore let’s see how to fix that error.

Display driver failed to recover from timeout, how to fix it?

1. Uninstall your graphic card driver

This error is mostly related to your graphic card and its driver. Therefore, users are suggesting that you remove your graphic card driver as a temporary workaround. To do that, follow these steps:

  1. Press Windows Key + X on your keyboard to open Power User Menu. Select Device Manager from the list.
    Display driver quit working
  2. Once the Device Manager opens locate your graphics card driver, right-click it and choose Uninstall from the menu.
    Display driver stopped responding and has recovered Intel
  3. If available check Delete the driver software for this device and click OK.
    Attempt to reset the display driver and recover from timeout failed AMD
  4. After the driver is uninstalled, restart your computer.

After you remove your display driver, Windows 10 will install the default driver instead. Users reported that the default driver fixed the problem, but bear in mind that using the default driver will influence your performance, especially in games.

2. Download the latest drivers

Your graphic card requires the latest drivers to work correctly, and if your drivers are outdated, you might get a display driver failed to recover the message. To fix this problem, we highly recommend downloading the latest drivers for your graphic card.

Updating your graphic card driver is quite simple. If you removed your driver now, you just need to visit your graphic card manufacturer’s website and download the latest drivers for your graphic card.

In case you are not sure about which driver versions you need to download for AMD, don’t risk your system’s health and try a solution that will keep your PC away from malfunctioning.

Update drivers automatically

You could also opt for an easier alternative and use a professional driver updater tool that performs this action automatically.

For example, you can try Fortect Driver Updater, as this tool will save you time by searching for the most suitable drivers for your device, and with just a few clicks, you can set it to optimize your system.

⇒ Get Fortect Driver Updater

3. Underclock your graphic card

Sometimes, to fix these types of problems, you need to underclock your graphic card. By underclocking your card, you reduce its performance while minimizing heat emission. Bear in mind that underclocking your graphic card can be dangerous; therefore, underclock your graphic card at your own risk.

According to users, they changed the following values:

  • Core from 570MHz to 400MHz
  • Shader from 900MHz to 700MHz
  • Memory from 3000MHz to 2800MHz

Remember that you might need to use different values for your graphic card. Once again, underclocking your hardware can be dangerous and lead to system instability, so use extra caution.

4. Overclock your graphic card

By using the overclocking software you can change the hardware settings of your graphic card and increase its performance. A few users reported that their graphics card wasn’t getting enough power, and after overclocking their graphics card and increasing the voltage of their GPU, the problem was fixed.

We have to mention that overclocking can be dangerous and cause system instability or even permanent damage to your PC if you’re not careful. Therefore, if you decide to overclock your graphics card, bear in mind that you’re doing it at your own risk.

5. Check if your graphics card is working properly

Sometimes this problem can occur if your graphics card is faulty, so you might want to try it on a different PC and check if the problem occurs again. Alternatively, you can try replacing the graphics card and check if that fixes the problem.

6. Close background applications

Sometimes background applications can lead to this issue. Background applications can stress your graphics card and cause the Display driver failed to recover from timeout error to appear.

To fix this problem, you are advised to close all unnecessary background applications. Keep only the essential applications running, and check if the problem still appears. If it doesn’t, perhaps you should remove any recently installed applications.

There are several ways to remove an application, but the best one is to use uninstaller software. In case you’re not familiar, uninstaller software is a special application that will remove the selected application along with all of its files and registry entries.

Using an uninstaller application’ll ensure that the application is completely removed and prevent any leftover files from interfering with your PC.

7. Perform a Clean boot

Sometimes Display driver failed to recover from timeout message can appear due to third-party applications on your PC, and in order to fix the problem, it’s advised that you perform a clean boot. To do that, just follow these steps:

  1. Press Windows Key + R and enter msconfig. Now press Enter or click OK.
    Display driver failed to recovered Excel
  2. System Configuration window will now appear. Go to the Services tab and check Hide all Microsoft services. Click Disable all button.
    Display driver failed to recovered Excel
  3. Go to the Startup tab and click Open Task Manager.
    Display driver keeps failing Windows 10
  4. List of startup applications will now appear. Right-click the first item on the list, and choose Disable from the menu. Repeat this step for all startup items on the list.
    Video driver failed to initialize
  5. After disabling all startup items, go back to the System Configuration window. Click Apply and OK to save changes and restart your PC.
    Display driver stopped responding and has recovered Intel

Once your PC restarts, check if the problem is still there. If not, one service or application is causing the problem. To find out which application is the issue, disabled applications should be enabled one by one or in groups.

Keep in mind that you need to restart your PC every time after enabling a group of applications or services to apply changes.

8. Try using a different connector

Several users reported that this was caused by the connector on your graphics card. According to them, Display driver failed to recover from timeout only appeared when using a certain connector. After using a different connector on their graphics card, the issue was completely resolved.

Keep in mind that this is just a workaround. If one connector isn’t working properly, your graphics card may be faulty, so you should consider replacing it in the future.

9. Switch to the integrated graphics

According to users, sometimes Display driver failed to recover from timeout message can appear due to issues with your graphics card. Many users have both dedicated and integrated graphics, and sometimes your dedicated graphics can have certain issues.

As a temporary workaround, users suggest switching to integrated graphics. You can do this using the graphics card software on your PC or by making the change in the BIOS. After switching to integrated graphics, the issue should be resolved, and you’ll be able to use your PC without any crashes.

10. Check your GPU temperature

Sometimes Display driver failed to recover from timeout error can appear due to high GPU temperature. Your heatsink or fan might be filled with dust, which can cause your temperature to rise.

Display driver failed to recover from timeout error message can cause many problems on your PC, and speaking of issues, here are some of the most common problems that users reported:

  • Display driver stopped responding and has recovered Intel – This can be a big problem and affect any graphics card. To see how to fix this problem, be sure to check out Display driver stopped responding and has recovered article for detailed solutions.
  • Attempt to reset the display driver and recover from timeout failed AMD – Sometimes you might encounter this problem with AMD graphics card. To fix the issue, try using the default driver and check if that helps.
  • Display driver failed to recovered Excel, Explorer, every few seconds – Sometimes this problem appears only in specific applications. To fix the problem, it’s advised that you update your graphics card drivers.
  • Display driver failed to start black screen, blue screen – This problem can appear if you’re due to issues with your graphics card. To fix the issue, switch to the integrated graphics and check if that helps.
  • Display driver keeps failing Windows 10 – If this problem keeps occurring, you might be able to solve the problem simply by underclocking your graphics card.
  • Video driver failed to initialize – If your graphics card is faulty, you might encounter this error. To fix the problem, inspect it and make sure that it’s working properly.
  • Display driver quit working – This is another common problem that you can encounter. However, you should be able to fix this issue by using one of our solutions.

To check if your temperature is the problem, we advise you to use efficient CPU monitoring software to see if your CPU and GPU temperature are stable. If your temperature is outside of the recommended limits, you need to clean your fan and heatsink on your graphics card. To do that, open your computer case and use the pressurized air to clean it.

After cleaning your fan and heatsink, the issue should be resolved entirely. We also covered Error Driver Cancel Timeout in our latest guide, so don’t miss it.

If the display driver fails to recover from the timeout, remove and update your graphics card driver. If that doesn’t work, you might want to try another solution from this article.

FIX: Skype auto sign in problems on Windows 10/11

Millions of Windows 10 users rely on Skype every day for communication, but it seems that they are having some issues with it. According to them, there are various problems available with Skype and the auto sign-in option on Windows 10.

How can I fix Skype auto sign in problems on Windows 10?

Skype is one of the most popular instant messenger services, however, issues with Skype can occur and prevent you from logging in. Speaking of issues, these are some of the most common problems that users reported:

  • Skype auto login not working – According to users, sometimes this issue can occur due to your antivirus or firewall. To fix the issue, make sure that Skype is allowed through your firewall.
  • Skype for Business not automatically signing in – This issue can occur in Business version of Skype, but most of our solutions can be applied to Business version as well, so feel free to try them.
  • Skype auto sign in just keeps loading – According to users, sometimes Skype keeps loading while trying to sign in. If you have this problem, simply reinstall Skype and check if that solves the issue.
  • Skype sign in error – There are various errors that can occur while trying to sign in to Skype. However, you should be able to fix these errors with one of our solutions.

1. Check the Skype options menu

  1. Start Skype.
  2. Go to Tools > Options.
    Skype for Business not automatically signing in
  3. Locate Sign me in when Skype starts option and uncheck it if you want to disable this option or check it if you want to turn it on.
    Skype auto sign in just keeps loading
  4. After you’re done, click the Save button to save changes.

3. Use Sign in with Facebook option

According to users, the auto sign-in button will appear on the main screen if you use Sign in with Facebook option.

Although this is a simple workaround, it won’t work if you don’t have a Facebook account or if your Skype isn’t connected to Facebook.

3. Reset all Skype settings

  1. Close Skype completely. If needed, close Skype from Task Manager.
  2. Press Windows Key + R and enter %appdata%. Click OK or press Enter.
    Skype auto login not working
  3. When Roaming folder opens, locate Skype folder and rename it to Skype.old.
  4. Press Windows Key + R and enter %temp%skype.
    Skype for Business not automatically signing in
  5. Delete the DbTemp folder.

Try starting Skype again and check if the issue is resolved. Bear in mind that your chat logs will be deleted by using this solution, but you should be able to restore them from Skype.old folder if you need them.

Windows won’t end a task in Task Manager? If you’d like to fix the problem when Windows 10 won’t end task, there are ways to resolve it.

4. Check your antivirus

Sometimes your antivirus can interfere with Skype and that can cause problems while signing in. To fix the issue, you need to disable certain antivirus features such as your firewall and check if that solves the problem.

If the issue still persists, you might have to temporarily disable your antivirus.

Sometimes disabling the antivirus won’t help, so you’ll need to uninstall your antivirus. If uninstalling the antivirus solves the problem, you should consider switching to a different antivirus solution. There are many great antivirus tools available that offer great protection if you have any problems without interfering with other programs.

For the Norton users, we’ve got a dedicated guide on how to completely remove it from your PC. There’s a similar guide for McAffe users, as well.

If you’re using any antivirus solution and you want to completely remove it from your PC, you can safely uninstall it using the best uninstaller software for your Windows PC.

5. Disable Skype notifications

  1. Open Skype and go to Tools > Options.
  2. Go to Notification settings and make sure that comes online option is not checked.
    Skype auto login not working
  3. Click Save to save changes.

This looks like a strange solution, but few users claim that it works, so it won’t hurt you to try it.

6. Use ListFix

  1. Completely close Skype.
  2. Download ListFix.
  3. After the tool is downloaded, extract it.
  4. Run the tool.
    skype-auto-sign-in-listfix-1
  5. Select and shared.xml and click Clear Skype names.
    skype-auto-sign-in-listfix-2
  6. After the process is completed, click on Clear Skype cookies.
  7. Close ListFix application and try to run Skype again.

7. Unlink your Microsoft and Facebook account

  1. Go to https://login.skype.com and log in with your Skype account.
  2. Now go to Settings and unlink both your Microsoft and Facebook account.

After doing that, both your Microsoft and Facebook accounts will be unlinked and you’ll be able to sign in automatically to Skype.

Keep in mind that this method might not work if you signed up for Skype with your Microsoft or Facebook account.

8. Reinstall Skype

According to users, if Skype keeps auto signing in, you can fix that simply by reinstalling it. Users reported that after uninstalling and reinstalling the Skype application this problem was resolved, so be sure to give it a try.

There are several ways to uninstall an application, but usually, the best is to use uninstaller software. If you’re not familiar, uninstaller software is a special application that can easily remove any software from your PC.

In addition to removing the program, these tools will also remove all files and registry entries associated with it. This is perfect if you want to completely remove an application from your PC.

If you’re looking for uninstaller programs, it’s very likely to resolve the issue using the best uninstaller software for your Windows 10 PC.

If you need more info you can learn easily from a short guide on how to uninstall Skype on Windows 10.

9. Check if your username and password are correct

According to users, if have auto sign-in problems with Skype, your username or password might not be correct.

Before trying to sign in, be sure to check if everything is in order with your username and password.

If you suspect that your Skype account might be hacked, be sure to reset your password and try to sign in with a new password.

10. Check if your Internet connection is working

If you have problems signing in to Skype, the issue might be your Internet connection. To fix this problem, it’s important that you check if your Internet connection is working properly.

If other websites work without any problems, it means that everything is in order with your network connection, so the problem is most likely with Skype.

To check if Skype and its services are working properly, be sure to go to https://support.skype.com/en/status.

From there you can see which Skype services are working properly. If there’s an issue with any of these services, Microsoft will try to fix them as soon as possible.

Skype sign in error

11. Try Skype for Web

According to users, sometimes this problem can occur due to issues with your Skype application.

To check if your application is the problem, you might want to try using Skype for Web. Simply go to Skype for Web page and sign in with your Skype credentials.

If Skype for web works, it means that the issue is related to your Skype application. To fix the issue, you should try some of our other solutions.

12. Check if your account is restricted or suspended

If you have problems signing in to Skype, the issue might be caused by your account. Sometimes your account can be temporarily restricted and suspended.

This can occur if there’s any unusual activity on your account associated with a security breach.

If you suspect that your account is blocked due to a security breach, you should contact Skype support to resolve this issue.

Skype auto sign-in option can be useful, but it can also cause all sorts of problems for the users. If you’re having any issues with the Skype auto sign-in option on Windows 10, be sure to check some of our solutions.

If you’re having additional problems with Skype, be sure to check our Skype hub where we post all sorts of useful guides.

If you have any other suggestions or questions, feel free to leave them in the comments section below.
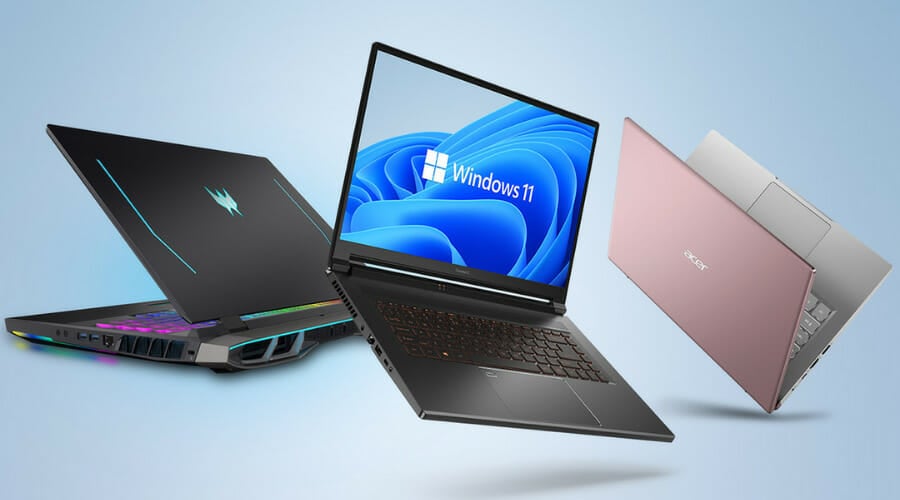
FIX: The specified module could not be found USB error

One of the most annoying errors that you can experience with your USB flash drive is The specified module could not be found error. This error can prevent you from accessing your files, so today we’re going to show you how to fix it on Windows 10.

What to do if the specified module is missing

1. Scan your USB drive for viruses

The specified module could not be found error can sometimes be related to virus infection.

To ensure that you don’t infect your PC, we advise you to scan your drive with antivirus software. In addition to your regular antivirus, we advise you to use malware removal tools such as Malwarebytes or similar.

For some additional options, check out this guide with the best anti-malware software available right now.

If you find any viruses on your drive, be sure to remove them. After removing the viruses, try to access your flash drive again.

If you already have an antivirus for flash drives, you’ve automatically verified that the infected USB does not spread a virus to your computer. Following that, you may run a scan on the USB to ensure it’s clean.

To make the process more interesting, consider installing a portable antivirus on your flash drive, which is frequently used by experts to do an emergency scan of a virus-infected PC system. This ensures that no virus gets onto the USB in the first place.

2. Use Command Prompt

The specified module could not be found also appears if the attributes of your flash drive are modified. This usually occurs after a virus infection, so if you haven’t scanned your flash drive already, we urge you to do so.

To change the attributes of your flash drive, do the following:

  1. Check the drive letter of your flash drive. You can do that by opening This PC. Be sure to memorize the correct letter of your USB flash drive. In our case, the assigned letter is F, but it might be different on your computer.
  2. Now open Command Prompt as administrator. To do that, press Windows Key + X to open Win + X menu and choose Command Prompt (Admin).
  3. When Command Prompt opens, you need to enter attrib -h -r -s F:*.* /s /d. Be sure to replace F: with the letter that you got in Step 1. In our example we got F, but you might get a different letter on your PC. It’s important to use the correct letter, but if you accidentally enter the wrong letter you can cause issues with your PC, so be cautious.
  4. Press Enter to run the command.
  5. After the command is executed, close Command Prompt.

After doing that, you should be able to access your flash drive without any issues.

Some users are also suggesting copying the contents of your flash drive to your hard drive and then use the Command Prompt to fix the problem. To do that, follow these steps:

  1. Open This PC and locate your USB flash drive. Right click it and select Copy from the menu.
  2. Paste the content of your flash drive to a desired folder on your hard drive. We created a new folder just for this purpose.
  3. Hold the Shift key on your keyboard and right click the folder that has files from your USB flash drive in it. Choose Open command window here from the menu.
  4. Command Prompt will now appear. Enter attrib -r -s -h /s /d command and press Enter to run it.
  5. After running the command, close Command Prompt.

If your Shift key isn’t working, fix it quickly with the help of this useful guide.

Now you should be able to access backed up files without issues. Last thing that you need to do is to format your USB flash drive. To do that, follow these steps:

  1. Go to This PC, locate your USB flash drive, right click it and select Format from the menu.
  2. Select formatting options and click the Start button.
  3. Wait while Windows 10 formats your drive.

After your drive is formatted, you should be able to access it without any problems.

The specified module could not be found USB error will prevent you from accessing files on your USB flash drive. Users reported that changing the attributes of your flash drive can easily fix the problem, so be sure to try that.

In addition, it’s always a good idea to scan your flash drive and be sure that it’s clean from viruses.

If you have any other suggestions or questions, feel free to leave them in the comments section below.
FIX: Microsoft Store doesn’t work in Windows 10/11

Universal apps are a very important part of the Windows 10 operating system, and the only way to get them is through Microsoft Store.

But if Microsoft Store doesn’t work, Universal apps won’t too, so we prepared you a few solutions in case you have any problems with Microsoft Store after upgrading to Windows 10.

How do I fix the Microsoft Store if it doesn’t work?

Microsoft Store is a crucial component of Windows 10, but many users reported issues with it. Speaking of issues, here are some common problems that users reported:

  • Microsoft Store doesn’t open, load
    • According to users, sometimes Microsoft Store won’t open at all on their PC.
    • We already covered this issue in detail in its own article, so be sure to check it for more information.
  • Microsoft Store cache may be damaged
  • Can’t access Microsoft Store
    • This problem can occur due to various reasons, but the common cause is usually your antivirus.
    • Try disabling your antivirus and check if that solves the issue.
  • Microsoft Store won’t install apps
    • Many users reported that Microsoft Store won’t install apps at all.
    • This might be just a temporary glitch, but you should be able to fix it by clearing your cache.

1. Reset Microsoft Store

  1. Go Search, type run and open Run.
  2. In the Run box type wsreset.exe and hit Enter.
    Windows Store doesn't open

This command will reset your Microsoft Store and hopefully, you’ll be able to download and use your apps again.

Resetting Microsoft Store is probably the most common solution for this problem and I hope it will help you as well. Resetting the Store is very simple and all you need to do is this:

2. Check if your region and time are right

  1. Open the Settings app. You can do that quickly by pressing Windows Key + I shortcut.
  2. Once the Setting app opens, go to Time & Language section.
    Can't access Windows Store
  3. Check if your date and time are correct.
    • If not, disable Set time automatically option and turn it back on again.
    • In addition, be sure to check if your Time zone is correct.
      Windows Store won't install apps
  4. Navigate to Region & language in the left pane.
  5. Set your country or region to the United States.
    Windows Store doesn't open

After making these changes, check if the problem with Microsoft Store is still there. Many Microsoft Store problems can occur if there’s an issue with your date and time or your regional settings.

Microsoft Store is closely connected to your region, and if your regional settings aren’t correct, you might not be able to use Microsoft Store at all.

3. Check your antivirus

Sometimes Microsoft Store won’t work on your PC due to your antivirus software. However, you can fix this problem simply by disabling certain antivirus features. If that doesn’t work, you might have to completely disable your antivirus.

Many users reported issues with McAfee, and according to them, the only solution was to completely remove the application. Keep in mind that other antivirus tools can cause this issue, so be sure to try removing your antivirus software.

If removing your antivirus solves the problem, you should consider switching to a different antivirus solution. If you want to ensure that your PC is completely protected, we suggest you try an antivirus with encryption features that ensures protection against the most dangerous threats.

4. Install the missing updates

  1. Open the Settings app and go to Update & Security section.
    Can't access Windows Store
  2. Now click Check for updates button.
    Windows Store cache may be damaged

If any updates are available, they will be downloaded in the background and installed as soon as you restart your PC. Once everything is up to date, try to start Microsoft Store again and check if it works.

According to users, sometimes you can fix Microsoft Store problems simply by installing the latest Windows updates. Windows 10 usually installs the missing updates automatically, but sometimes you might miss an update or two due to certain issues.

5. Disable your proxy

  1. Open the Settings app and go to Network & Internet section.
    Windows Store doesn't load
  2. Select Proxy from the menu on the left. In the right pane, disable all options.
    Windows Store cache may be damaged

Many users are using a proxy to protect their privacy online, however, sometimes proxy can interfere with Microsoft Store and prevent you from using it.

After doing that, your proxy should be disabled and Microsoft Store will start working again.

If you’re still concerned about your privacy, perhaps it’s time to consider using VPN software. The best VPNs for Windows 10 provide up-to-date encryption and privacy solutions to protect your browsing data and keep your identity 100% private. 

6. Reinstall Microsoft Store

  1. Press Windows Key + S and enter powershell.
  2. Right-click Windows PowerShell from the list of results and choose Run as administrator.
    Can't access Windows Store
  3. Paste the following command, and press Enter to run it.:
    • Get-AppXPackage -AllUsers -Name Microsoft.WindowsStore | Foreach {Add-AppxPackage -DisableDevelopmentMode -Register “$($_.InstallLocation)AppXManifest.xml” -Verbose}
      Windows Store won't install apps

If Microsoft Store won’t work on your PC, you might be able to fix the problem simply by reinstalling it. This is a slightly advanced procedure, but you can perform it using PowerShell.

Once the command is executed, the Microsoft Store will be reinstalled and the issue should be permanently resolved.

7. Delete the files from LocalCache folder

  1. Press Windows Key + R and enter %localappdata%.
  2. Press Enter or click OK.
    Windows Store doesn't open
  3. Navigate to PackagesMicrosoft.WindowsStore_8wekyb3d8bbweLocalCache directory.
    Windows Store cache may be damaged
  4. Now delete all files and directories from LocalCache folder.

After doing that, try to start Microsoft Store again and check if the issue is still there. According to users, sometimes problems with Microsoft Store can occur due to various issues with the local cache.

Your cache can get corrupted, and that will cause this and other errors to occur. However, you can fix problems with your cache simply by removing the contents of the LocalCache folder.

8. Enable User Account Control

  1. Press Windows Key + S and enter user account control.
  2. Select Change User Account Control settings.
    Can't access Windows Store
  3. Move the slider to the second position and click OK to save changes.
    Windows Store won't install apps

According to users, sometimes the main cause of this problem can be User Account Control. This is a security feature that notifies you whenever an application tries to perform an action that requires administrative privileges.

Although this might be a useful feature, due to its frequent notification dialogs, many users choose to disable it. However, several users reported that disabling the User Account Control feature caused issues with Microsoft Store to appear.

If Microsoft Store won’t work on your PC, you can try enabling User Account Control and check if that solves the problem. After turning on User Account Control, the problem with Microsoft Store should be resolved.

9. Create a new user account

  1. Open the Settings app and go to Accounts section.
    Windows Store cache may be damaged
  2. Go to Family & other people section in the left pane.
  3. Now click Add someone else to this PC.
    Can't access Windows Store
  4. Select I don’t have this person’s sign-in information.
    Windows Store won't install apps
  5. You’ll be asked to enter Microsoft account login information.
  6. Select Add a user without a Microsoft account.
    Windows Store doesn't load
  7. Enter the desired username and click Next to proceed.
    Windows Store cache may be damaged

Sometimes issues with Microsoft Store can occur due to your user account. Your account can get corrupted, and that can lead to various issues. To fix the problem, it’s advised to create a new user account and check if that helps.

Once you create a new user account, switch to it and check if the Microsoft Store is working properly. If it works, you’ll have to move your personal files to the new account and start using it instead of your old one.

If you have any comments or suggestions, or maybe some other solution for the Microsoft Store problem, tell us in the comments because our readers would love to know more about this issue.

FIX: We didn’t recognize your sign in details Skype error

Skype is one of the most popular messaging services, but unfortunately, users reported certain issues with it on Windows 10. According to them, they are unable to sign in to Skype and every login attempt is followed by Sorry we didn’t recognize your sign-in details error message.

How do I fix Sorry we didn’t recognize your sign in details error on Skype?

Skype is one of the most popular messaging applications on Windows, but sometimes issues with Skype can occur. Speaking of Skype issues, here are some of the common problems that users reported:

  • Skype doesn’t recognize sign in details – This message can appear if your username or password isn’t correct. If you get this error, check your sign-in details. If everything is in order, you might have to reset your password.
  • Skype name and password were not recognized – This can be a problem with your Skype client, so if you’re having this issue, reinstall Skype and check if the error message still appears.
  • Skype can’t connect – This is another problem with Skype that you can encounter. If you get this error, be sure to check if Skype servers are working properly. If there’s an issue with Skype servers, you’ll have to wait until Microsoft resolves the issue.
  • Skype oops please check your details – Sometimes you might get this message instead. This is a similar problem, and in order to fix it, be sure to try all solutions from our article.

1. Use Skype for Web or try signing in on a different device

If you’re getting Sorry we didn’t recognize your sign-in details error message, the problem might be with your desktop Skype client.

To check if this problem only affects the desktop client, we advise you to try signing in to Skype for Web and check if the problem appears.

In addition, you can also try signing in to Skype on your phone or on a different PC.

If Skype for Web and Skype on your phone work without any issues, it means that the problem is caused by the desktop client, so you should reinstall it.

2. Reinstall Skype

Not being able to log in to Skype can be a big problem, and one of the potential solutions is to reinstall the application. Simply uninstall the application, restart your computer and try to install it again.

Users reported that they are unable to install Skype by using the same setup file, therefore it’s recommended to download the latest full version of Skype.

The full version of Skype is actually an offline installation that doesn’t download any files.

The offline installation contains all the necessary files, and it’s perfect if you don’t have a constant Internet connection available in order to install Skype.

In order to completely remove Skype, along with all of its files and registry entries, it’s advised to use uninstaller software. This is a special kind of application created to completely remove any program from your PC.

Using these tools you can uninstall Skype completely and remove all files and registry entries associated with Skype.

If you’re looking for uninstaller software, we strongly advise you to browse through our list of great uninstallers, since there are many great programs to choose from.

3. Change your hard drive serial number

Sometimes you’ll get a Sorry we didn’t recognize your sign-in details error message if Skype blocks your hard drive serial number.

To fix this problem, you need to change your hard drive serial number. You can do this in several different ways, but the easiest solution is to download Hard Disk Serial Number Changer.

After downloading this tool you just need to run it, select your main partition, usually, that would be C, and you should see a hard drive serial number that consists of eight characters separated by a dash.

Change the serial number a bit, for example, you can just change a single character, and click the Change button. After doing that, your hard drive number should be changed.

Hard drive serial number changes every time you format your drive, therefore this procedure should be harmless, and users didn’t report any problems after changing their hard drive serial number.

If you’re concerned that something might go wrong, create a System Restore point or hard drive disk image.

4. Check your antivirus settings

Antivirus and firewall software can sometimes interfere with Skype, therefore be sure to check its settings.

Users reported issues with their antivirus, and after turning off the option to scan SSL protocol the issue with Skype was resolved.

Bear in mind that almost any antivirus program can cause this error to appear, therefore check if your antivirus software has an option for scanning SSL protocol and disabling it.

If you can’t find this option, you might want to temporarily remove your antivirus and check if that fixes the issue.

If removing your antivirus solves the problem, you might want to consider switching to different antivirus software.

All these tools offer great protection, and they won’t interfere with your system or applications in any way, so feel free to try them.

5. Use Facebook login to sign-in to Skype

If you can’t sign in to Skype due to the Sorry we didn’t recognize your sign-in details error, you might want to try logging in with your Facebook account instead.

According to users, they weren’t able to sign in to Skype before, but after trying to log in with their Facebook account the issue was resolved completely.

This is just a workaround, but it might work for you, so feel free to try it out.

6. Check the status of Skype’s services

Sometimes you might encounter Sorry we didn’t recognize your sign-in details Skype error because Skype services aren’t available.

If you can’t sign in on your desktop client, Skype for Web, and on the mobile version of Skype, it’s rather likely that Skype is having some server issues.

You can always check if there are any issues with Skype’s servers by doing to the https://support.skype.com/en/status.

There you can see all Skype services and their status. If Signing into Skype or any other service is having issues, that might prevent you from signing in to Skype.

Skype doesn't recognize sign in details

Since this is a server issue, Microsoft is most likely aware of it, and it should be fixed in a matter of hours. If all Skype’s services are working normally, but you still can’t sign-in, the problem might be something else.

7. Check your username and password

If you can’t sign in to Skype due to Sorry we didn’t recognize your sign-in details error, the problem might be your login information.

Sometimes you might not enter the sign-in information correctly, and that can cause this error to appear. If you’re completely certain that your sign-in information is correct, it’s possible that your account is hacked.

To fix this, be sure to reset your Skype password and try signing in with a new password.

If the new password doesn’t work, the issue is related to Skype’s services or your Skype client.

8. Disable third-party applications and proxy

Sorry, we didn’t recognize your sign-in details error can appear due to third-party applications on your PC.

If you’re using a VPN, temporarily disable it and check if that solves the problem.

Some users use a proxy in order to protect their privacy, and if you’re one of those users, you might want to consider disabling it in order to solve this issue. To do that, you need to do the following:

  1. Press Windows Key + I to open the Settings app.
  2. When Settings app opens, navigate to Network & Internet section.
    Skype oops please check your details
  3. From the menu on the left select Proxy. Now turn off all options in the right pane.
    Skype doesn't recognize sign in details

After doing that, your proxy should be disabled and the issues with Skype will be resolved. If disabling proxy or VPN solves the issue, you might want to consider switching to a different VPN client.

Skype is one of the most popular messaging services in the world, and Sorry we didn’t recognize your sign-in details error message can be problematic, especially if you use Skype frequently.

As you can see, this problem can be easily fixed, and we hope that you solved this issue by using one of our solutions.

FIX: Skype audio won’t work on Windows 10/11

Skype is the most popular messaging application in the world, but besides instant messaging support, this application also supports video and audio calls.

Users reported that Skype audio isn’t working on Windows 10, so let’s see how to fix this problem.

Frequent Skype audio issues

Skype is a great application, but many users reported audio issues while using Skype. Speaking of issues, these are some of the common problems that users reported:

  • Skype no sound in call – According to users, sometimes they aren’t getting any sound during their Skype call. This can appear if your microphone or speakers aren’t properly configured in Skype.
  • Skype audio very quiet – This is another common problem with Skype. By default, Skype automatically adjusts the audio levels, and if your audio is quiet, be sure to disable this feature and check if that solves the problem.
  • Skype audio won’t go through headphones – This is another problem that can appear on Skype. If this happens, make sure that your headphones are selected as a default audio device in Skype.
  • Skype audio breaking up – Sometimes your Skype audio can break up during the call. To fix this problem, be sure that you don’t have any downloads running in the background. In addition, you might want to try switching to a wired network and check if that helps.
  • Skype audio output not working – If this problem occurs, you need to check your playback settings and make sure that your speakers or headphones are set as the default audio device.
  • Skype audio distorted – This problem can appear due to your network connection, and in order to fix it, be sure to check if your connection is fast and stable.

How can I fix audio issues on Skype?

1. Make sure that your speakers and microphone are properly configured

  1. Open Skype.
  2. Go to Tools > Options.
    Skype audio breaking up
  3. Navigate to the Audio settings tab.
    Skype audio output not working
  4. Be sure that Microphone and Speakers are properly set. If you want, you can test both microphone and speakers from Skype. If your speakers and microphone passed the test, it means that they are properly configured and working in Skype.
  5. Click Save to save changes.

According to users, sometimes an update can change your default speakers or microphone, so be sure to check if your audio device is properly configured in Skype.

2. Use Microsoft’s default audio driver

  1. Press Windows Key + X to open Power User Menu and choose Device Manager from the list.
    Skype audio very quiet
  2. Once Device Manager opens, locate your audio device, right-click it and choose Uninstall device.
    Skype audio won't go through headphones
  3. If available, check Delete the driver software for this device and click Uninstall.
    Skype audio breaking up
  4. After you delete the driver, restart your PC.

When your PC restarts, the default driver will be installed and problems with Skype audio should be fixed.

3. Update your audio drivers

Users reported that you can fix Skype audio issues simply by downloading and installing the latest drivers for your audio device.

You can download the latest drivers from your motherboard or sound card manufacturer’s website.

Users reported issues with Realtek drivers, but even if you don’t use a Realtek sound card you might want to try updating your audio drivers.

There are many types of drivers for audio cards, so select the exact version for your hardware and then download and install it. There are several alternative ways to update drivers for your Windows 10 system.

When you are sure your drivers are all up-to-date, you can check again and see if the problem persists.

4. Change your microphone settings

  1. Right-click the audio icon on your Taskbar and choose Recording Devices from the menu.
    Skype audio very quiet
  2. Locate your microphone and double-click it to open its properties.
    Skype audio won't go through headphones
  3. Go to Advanced tab and make sure that Allow applications to take exclusive control of this device is not enabled.
    Skype audio breaking up
  4. Click Apply and OK.

5. Restart Windows Audio service

  1. Press Windows Key + R and enter services.msc. Press Enter or click OK.
    Skype audio output not working
  2. When Services window opens, locate Windows Audio service, right-click it and choose Restart from the menu. If the Restart option isn’t available, just try stopping and starting the service manually.
    Skype audio distorted

6. Update / reinstall Skype

  1. Sign-in to Skype.
  2. Now go to Help menu and choose Check for Updates.
    Skype no sound in call
  3. Now click Update Classic Skype.
    Skype audio very quiet
  4. The update process will now start, so don’t interrupt it.
    Skype no sound in call

If you already have the latest version installed, you might want to switch back to the older version of Skype and check if that fixes the issue for you.

In addition to updating, users also suggest that you reinstall Skype and delete all Skype-related registry entries.

To do that, you can uninstall Skype and manually remove all Skype entries from your registry.

Manually deleting entries from the registry isn’t the best or the most practical solution, so you might want to use a tool to completely remove Skype from your PC.

After you remove Skype, try reinstalling it and check if that fixes the problem. If Skype won’t reinstall, we got your back with a guide to fix the issue.

7. Select the proper audio device

  1. Right-click the audio button in the bottom right corner and choose Playback devices from the menu.
    Skype audio distorted
  2. Now you should see several devices available. Make sure that you have the correct playback device set as default. To set a device as a default audio device, simply right-click it and choose Set as default.
    Skype no sound in call
  3. After changing your default playback device, click Apply and OK to save changes.

Once you change your default audio device, check if the problem is resolved.

To fix this problem, in most cases you just have to set your speakers or headphones as the default playback device, and the issue should be resolved.

8. Check if your speakers and microphone are properly connected

If you’re having any audio issues during Skype calls, that might be due to your microphone or speakers.

Several users reported that the other side can’t hear them during the Skype call, and that is most likely caused by your microphone.

Just like your headphones speakers, your microphone uses a 3.5mm jack, so it’s possible that you connected your microphone to the wrong port by accident.

This is just a minor problem, and to fix it, simply disconnect it from the wrong port and connect it to the right one.

As you can see, this is a quick and easy solution, so be sure to try it out.

9. Try changing your DNS server

  1. Click the network icon in the bottom right corner and select your network from the list.
    Skype audio output not working
  2. Now click the Change adapter options.
    Skype audio distorted
  3. Locate your current network, right click it and choose Properties from the menu.
    Skype audio very quiet
  4. Select Internet Protocol Version 4 (TCP/IPv4) and click the Properties button.
    Skype no sound in call
  5. Now select Use the following DNS server addresses and enter the following:
    • Preferred DNS server: 8.8.8.8
    • Alternate DNS server: 8.8.4.4
      Skype audio won't go through headphones
  6. Now click OK to save changes.

In addition to Google’s DNS, you can also try using OpenDNS. After you change your DNS, check if the problem with Skype is resolved.

10. Check your network connection

If you’re having Skype audio problems, the issue might be your network connection.

If you have any problems with your Internet connection, Skype will automatically change the quality of your audio in order to keep your call active.

However, you might get better results simply by using a wired connection. Wi-Fi connection can suffer from interference, therefore it’s always better to use a wired connection.

If you can, switch to a wired connection and check if that solves your problem.

11. Close other applications

Sometimes other applications can interfere with Skype and cause problems with audio. To minimize the interference, be sure to disable all streaming applications and downloads.

After doing that, Skype will be able to use your bandwidth without any issues or interference from other applications.

Speaking of bandwidth, here are the best monitor tools that you can choose to keep track of your internet activity.

If Skype audio isn’t working that can be a big problem because you won’t be able to perform Skype calls with your friends, but we hope that one of our solutions helped you fix this issue.

This isn’t the only issue that can occur on Skype, and if you have any other problems, be sure to visit our Skype hub for more in-depth fixes.

FIX: Registry_Error Blue Screen in Windows 10/11 [0x00000051]

There is a wide range of Blue Screen of Death errors that can affect your Windows 10 PC. These types of errors are somehow hard to diagnose and troubleshoot.

These errors always restart your PC in order to prevent damage, and since these errors are rather serious, it’s your priority to fix them.

When a Blue Screen of Death appears there is a blue screen with a message, telling you that the PC has run into a problem. Usually, the stop code registry error appears at the bottom of the screen.

Fixing these registry errors in Windows 10 isn’t as hard as you think. In this article, we’re going to show you how to fix the REGISTRY_ERROR BSoD.

How can I fix the BSoD Registry Error Stop Code on Windows 10?

1. Use a dedicated tool

A third-party repair app is one of the best solutions to have when you’re dealing with various computer errors. You can run the repair process and fix numerous Windows 10 issues regarding BSoD stop codes, PC crashes, and registry problems.

In this way, your PC will become more optimized and error-free due to smart tools that remove any registry malfunctions causing the REGISTRY_ERROR BSoD case.

2. Update Windows 10

Keeping up with the latest updates is crucial if you want your Windows 10 to be stable and error-free.

Many BSoD errors are caused by hardware and software incompatibility issues, therefore it’s crucial to perform Windows Update regularly.

By downloading the newest updates, you’ll be sure that your system is safe and stable. Also, you’ll prevent the registry error in Windows 10 and other BSoD errors from appearing.

3. Run the BSoD Troubleshooter

  1. Open the Settings app by pressing the Windows + I key combination.
  2. Go to Update & Security section.
  3. Select Troubleshoot from the menu on the left.
  4. Select Blue Screen from the right pane and click Run the troubleshooter.
  5. Follow the instructions on the screen to complete the troubleshooter.

If updating Windows and drivers didn’t get the job done, you can try the built-in troubleshooter. This tool can be helpful when dealing with all sorts of issues, including the registry error in Windows 10.

However, depending on your OS version, you might not see the blue Screen option. If this is the case, go to the next step.

If the Windows Troubleshooter has stopped working on your computer, we recommend you to use our dedicated guide to fix this problem.

4. Run the SFC scan

  1. Press Windows +S key combination top open the Search bar .
  2. Type Command Prompt and choose Open as Administrator.
  3. Enter the following line and press Enter: sfc/scannowREGISTRY ERROR Windows 10 error sfc scan
  4. Wait until the process is done (it may take a while).
  5. If the solution is found, it will automatically be applied.
  6. Now, close the Command Prompt and restart your computer.

This command-line tool, SFC,  scans your system in search of various problems and automatically resolves them. So, it might be helpful when dealing with BSOD issues and registry errors in Windows 10.

If you encounter any errors while running SFC, it stops or does not work at all on Windows 10, you can use our comprehensive guide in order to fix the problem.

5. Run DISM

DISM is yet another command-line troubleshooter that we can use if the previous ones failed to resolve the issue. In fact, DISM might be the most powerful troubleshooter, because it freshly deploys the system image.

We’ll walk you through both standard and the procedure that utilizes the installation media below:

Standard way

  1. Type Command Prompt in the Windows search bar.
  2. Click Run as administrator.
  3. Paste the following command and press Enter: DISM /Online /Cleanup-Image /RestoreHealthREGISTRY ERROR Windows 10 error dism scan
  4. Wait until the scan is finished.
  5. Restart your computer and try updating again.

With the Windows installation media

  1. Insert your Windows installation media.
  2. Open command prompt as administrator like in the above solution.
  3. In the command line, type the following commands and press Enter after each: dism /online /cleanup-image /scanhealth
    dism /online /cleanup-image /restorehealth
  4. Now, type the following command and press Enter: DISM /Online /Cleanup-Image /RestoreHealth /source:WIM:X:SourcesInstall.wim:1 /LimitAccess
  5. Make sure to change an X value with the letter of the mounted drive with Windows 10 installation.
  6. After the procedure is finished, restart your computer.

6. Update your drivers

Every operating system relies heavily on drivers, and since outdated or corrupted drivers can often cause BSoD errors, it’s crucial to update them regularly.

In order to fix the REGISTRY_ERROR BSoD error, you’ll have to update as many drivers as you can, and that can sometimes become a long and tiresome process.

Searching for drivers on your own can be time-consuming. So, we advise you to use a tool that will do this for you automatically and prevent PC damage caused by installing the wrong driver versions. 

⇒ Get Outbyte Driver Updater

7. Check the hard drive

  1. Enter the Advanced Startup (restart your computer while holding the Shift key).
  2. Choose Troubleshoot > Advanced Options.
  3. Select Command Prompt from the list of options.registry error advanced options
  4. When Command Prompt appears, enter the following lines and press Enter after each line in order to run it:
    bootrec.exe /rebuildbcd
    bootrec.exe /fixmbr
    bootrec.exe /fixboot
  5. Additionally, you can run chkdsk command for every hard drive partition you have, for instance chkdsk /r c:REGISTRY ERROR Windows 10 error chkdsk command prompt
  6. Restart your computer and check if the issue is resolved.

If Automatic Repair couldn’t repair your Windows 10 PC, you can try to perform the steps from our dedicated guide and easily fix the problem.

8. Uninstall problematic applications

Users reported that certain applications, such as Deamon Tools can cause the registry error to appear in Windows 10. In order to fix this error, you’ll have to completely remove the aforementioned software.

Bear in mind that almost any software can cause this issue, so be sure to remove any software that you installed recently. It’s also worth mentioning that your antivirus software can also cause these types of errors.

Almost any antivirus software can cause the REGISTRY_ERROR, so be sure to remove all antivirus except Windows Defender.

To completely remove a certain antivirus software, you’ll need to use a dedicated removal tool.

In order to do that, you can further use efficient uninstaller software for your Windows 10 PC. That will help you get rid of problematic applications.

Many security companies host these tools on their website, so be sure to download and use that tool to remove your antivirus software.

If the problem is fixed by removing your antivirus, you can now download the latest version of the software you were using.  Also, you can switch to a different antivirus.

9. Check System Maintenance

  1. Press Windows Key + S and enter maintenance.
  2. Select Security and Maintenance from the list of results.
  3. Expand Maintenance section and click on Start maintenance.Security and Maintenance
  4. If you get the BSoD error it means that System Maintenance doesn’t work, therefore you’ll have to disable it.
  5. Press Windows Key + R.
  6. Enter regedit and press Enter.regedit run window Registry Error
  7. Registry Editor will open. Navigate to the following key in the left pane: HKEY_LOCAL_MACHINESOFTWAREMicrosoftWindowsNTCurrentVersionScheduleMaintenance
  8. If MaintenanceDisabled DWORD isn’t available in the right pane, create it.
  9. Right-click the empty space, choose New > DWORD (32-bit) Value and enter MaintenanceDisabled as the name.maintenance new dword Registry Error
  10. Double click the MaintenanceDisabled and set Value data to 1.
  11. Click OK to save changes.
    maintenance disabled Registry Error

If the REGISTRY_ERROR BSoD appears after leaving your computer idle for a couple of minutes, the issue is probably caused by System Maintenance.

Bear in mind that this is just a workaround, but your PC should now be stable and without the BSoD error.

10. Install an older graphics card driver

  1. Press Windows Key + X to open Power User Menu.
  2. Select Device Manager from the list.
  3. When Device Manager opens, locate your graphic card, right-click it, and choose Uninstall.
    uninstall driver Registry Error
  4. If available check Delete the driver software for this device and click OK.
    confirm uninstall driver Registry Error BSOD
  5. After the driver is uninstalled, restart your computer.
  6. Now you just need to download the older version of the driver for your graphic card.

Few users reported problems with the latest Nvidia graphic card driver. According to them, the latest drivers were the cause of the blue screen with the stop cod registry error in Windows 10.

However, this solution might be helpful for AMD owners as well, so if you have an AMD graphic card, be sure to try this solution.

11. Perform System Restore/Windows 10 reset

Restore

  1. Restart your computer a few times while it boots. This will start Automatic Repair process.
  2. Choose Troubleshoot > Advanced options > System Restore.system restore
  3. Enter your username and password and select the restore point.
  4. Follow the instructions in order to complete System Restore.

If the issue is caused by a software problem, you should be able to fix it by performing a System Restore.  If System Restore didn’t fix the problem, you might have to reset Windows 10. 

Reset

  1. Start Automatic Repair process by restarting your PC a couple of times while it boots.
  2. Select Troubleshoot > Reset this PC.reset this pc
  3. Select Remove Everything.
  4. Click the Reset button and wait for the process to finish.Reset button

By resetting Windows 10 you’ll delete all files and folders from your C drive, so be sure to create a backup. If the error still occurs, it’s most likely a hardware issue.

12. Check your hardware

RAM is the often cause of many BSoD errors, and if you’re having the REGISTRY_ERROR BSoD be sure to check if your RAM is working properly with a tool such as MemTest86.

If your RAM is working correctly, check other components such as your motherboard, hard drive, graphic card, etc. Sometimes new hardware might not be fully compatible with your PC, so be sure to remove it and check if your PC works without it.

The BSoD registry error in Windows 10 can be problematic. Finding the cause can be also problematic because both software and hardware issues can lead to a blue screen.

Thus, when troubleshooting this error, you have to take it to step by step. In most cases, you can fix this error by finding the software that is causing it, or by performing a Windows 10 reset.

Hamachi does not work in Windows 10/11 [BEST SOLUTIONS]

Hamachi is a well-known virtual private network application, and it’s used for a variety of things.

For example, gamers often use Hamachi in order to create a virtual LAN network to play with their friends.

With Windows 10 release some users are complaining that Hamachi isn’t working, so let’s try to fix that.

Hamachi is a popular service, but sometimes issues with it can occur. Speaking of issues, in this article we’re going to cover the following topics:

  • Hamachi network adapter error Windows 10 – This is a relatively common error with Hamachi, and it’s most likely caused by your driver. To fix it, you need to update or reinstall your Hamachi driver.
  • Hamachi tunnel problem yellow triangle – Another common problem with Hamachi. To fix this issue, you might have to restart Hamachi or your PC and check if that fixes the problem.
  • Hamachi service stopped – If you’re having this problem, you can easily fix it by manually starting the Hamachi service.
  • Hamachi won’t connect, open – Many users reported that Hamachi won’t open or connect on their PC. This can be a problem, but you might be able to fix it simply by reinstalling Hamachi.
  • Hamachi gateway not working – This is one of more serious Hamachi errors that you can encounter. However, you should be able to fix it by using one of our solutions.

Before we start trying to fix this issue make sure that you’ve downloaded the latest version of Hamachi.

If you’ve installed the latest version of Hamachi and the problem persists, uninstall it and try one of these solutions.

What can I do if Hamachi does not work in Windows 10?

Solution 1 – Disable Microsoft Network Adapter Multiplexor Protocol

According to users, Microsoft Network Adapter Multiplexor Protocol can often interfere with Hamachi.

In fact, this protocol can prevent Hamachi from working properly, but you can fix that by doing the following:

  1. In Control Panel go to Network Connections.
  2. Delete the Network Bridge.
  3. Find Local Area Connection and right-click it.
  4. Make sure that all items are checked except Microsoft Network Adapter Multiplexor Protocol.
  5. Restart your computer and install the latest version of Hamachi.

After doing that, check if the issue still appears.

If you have any Local Area Connection adapter driver errors, be sure to check out this detailed guide.

Solution 2 – Turn on LogMeIn Hamachi Tunneling Engine service

Hamachi requires certain services to be running in order to work properly. Sometimes these services can become disabled on your PC, but you can enable them with ease.

Make sure that you have the latest version of Hamachi installed before trying the following steps:

  1. Press Windows Key + R and type services.msc and press Enter to run it.
    Hamachi service stopped
  2. In the Services window locate LogMeIn Hamachi Tunneling Engine. Double click the service to open its properties.
  3. Now in the Service Status click Start to start the service.
    Hamachi tunnel problem yellow triangle
  4. Click Apply then OK to save changes.

If the service is already running, stop it, wait for a couple of seconds and start it again. After restarting the service, the issue should be resolved completely.

Most users don’t know what to do when the Windows key stops working. Check out this guide and be a step ahead.

Solution 3 – Run Hamachi as administrator

This is a pretty simple solution, but according to some users, it works. To run Hamachi as an administrator just do the following:

  1. Find Hamachi shortcut. Make sure that Hamachi isn’t running in the background.
  2. Right click it and choose Run as administrator.
    Hamachi won't connect

If this method works, you might want to set Hamachi to always run with administrative privileges. To do that, follow these steps:

  1. Right click the Hamachi icon and choose Properties from the menu.
    Hamachi gateway not working
  2. Navigate to Compatibility tab. Check Run this program as an administrator and click on Apply and OK to save changes.
    Hamachi network adapter error Windows 10

After doing that, Hamachi will always start with administrative privileges and your problem should be resolved.

Solution 4 – Delete Hamachi registry entries and reinstall the application

First, you need to uninstall Hamachi from your computer. After doing that, you need to remove all Hamachi-related entries from your registry. To do that, follow these steps:

  1. Now you need to press Windows Key + R and type regedit to run Registry Editor.
    Hamachi gateway not working
  2. Once the Registry Editor starts, it’s wise to create a backup of your registry just in case something goes wrong.
  3. Click File > Export and set the location where you wish to export your registry.
    Hamachi network adapter error Windows 10
  4. In the Export range make sure you select All. Now click Save to export your registry. If something goes wrong you can just click this file and restore the registry to its current state.
    C:UsersmetalPicturesWork pictureshamachi doesn't work
  5. Press Ctrl + F and type hamachi into the search field.
    Hamachi tunnel problem yellow triangle
  6. Delete any keys that you find.
  7. Press F3 to search for the next Hamachi key.
  8. Repeat this until you’ve deleted all the Hamachi keys.
  9. After all the keys have been deleted, install the latest version of Hamachi.

If you can’t edit your Windows 10’s registry, read this handy guide and find the quickest solutions to the issue.

Solution 5 – Restart your PC

If you’re having problems with Hamachi, you might be able to solve them simply by restarting your PC. According to users, sometimes a simple restart can fix the problem, so be sure to try that.

We have to mention that restarting your PC might provide just a temporary solution, but if you’re looking for a quick fix, be sure to try it out.

If your PC gets stuck on restart, take a look at this step-by-step guide to get past the problem.

Solution 6 – Update Hamachi drivers

Hamachi comes with its own drivers, and if you’re having any problems with it, that might be because its drivers are out of date. However, you might be able to fix this problem simply by updating the necessary drivers. To do that, just follow these simple steps:

  1. Press Windows Key + X to open Win + X menu. Now select Device Manager from the list.
    Hamachi service stopped
  2. Go to Network adapters section and right click your Hamachi adapter. Choose Update driver from the menu.
    Hamachi won't open
  3. Click on Browse my computer for driver software.
    Hamachi gateway not working
  4. Click on Browse button and choose your Hamachi installation directory. Once you select the desired directory, click on Next to continue.
    Hamachi network adapter error Windows 10

Now Windows will try to install the driver. Once the driver is installed, check if the problem still persists.

Solution 7 – Install Hamachi as legacy hardware

If you have problems with Hamachi and its drivers, you might be able to fix the problem by installing Hamachi as legacy hardware.

Before we can install Hamachi as legacy hardware, we need to remove its driver by doing the following:

  1. Open Device Manager.
  2. Once Device Manager opens, locate your Hamachi Network Adapter, right-click it and choose Uninstall device from the menu.
  3. When the confirmation dialog appears, just click on Uninstall.
    Hamachi network adapter error Windows 10

Once the driver is removed, we can add Hamachi as legacy hardware by doing the following:

  1. Go to Action menu and choose Add legacy hardware.
    Hamachi service stopped
  2. When the Add Hardware wizard opens, click on Next.Hamachi gateway not working
  3. Select Install the hardware that I manually select from a list (Advanced) and click on Next.
    Hamachi network adapter error Windows 10
  4. Select Show All Devices and click Next.
    Hamachi tunnel problem yellow triangle
  5. Now click on Have Disk.
    Hamachi service stopped
  6. Click the Browse button, locate Hamachi installation directory and select the Hamachi driver.
    Hamachi won't open
  7. Now just follow the instructions on the screen to install the driver.

Once the driver is installed, the problems with Hamachi should be fixed.

Solution 8 – Uninstall conflicting software

Several users reported that they were unable to run Hamachi on their PC due to their VPN client.

Hamachi is a network tool, so it’s not uncommon for other network applications, such as VPN, to have issues with it.

Users reported that uninstalling their VPN fixed the problem, so you might want to try that.

According to users, the issue was caused by the Dell VPN client, but after removing it, the problem was completely resolved.

After removing your VPN, the problem should be resolved and Hamachi will start working again. However, if you need a new VPN, you might want to switch to a different VPN software that will enhance security without sacrificing performance.

If you need more alternatives to completely remove Hamachi from your PC, be sure to check out this amazing list with the best uninstaller software you can use right now.

I hope at least one of these solutions helped you to solve the problem with Hamachi in Windows 10. If you have any questions or comments, just reach to the comments section below.

How to disable CDpusersvc error code 15100 in Windows 10/11

After upgrading to Windows 10 Anniversary Update, many users noticed a strange module in the Windows Service, that wasn’t previously there:  CDpusersvc <Failed to Read Description. Error Code: 15100.

There is very little information available about this elusive module. Many Windows 10 users actually make fun of this situation, suggesting that Microsoft hasn’t filled in any description on this module simply because it doesn’t actually know what this service does.

Many Windows 10 users also report that CDpusersvc is really buggy. They keep on getting error logs for services that use it, as well as security violations. The most intriguing thing for users is that they can’t find what the app is in order to adjust the privileges.

The good news is that this error can safely be ignored as it doesn’t affect Windows in any manner. If it becomes too annoying, you can remove it using Regedit.

CDpusersvc error code 15100 can appear on your PC and lead to various issues. Speaking of CDpusersvc and issues, these are some of the common problems that users reported:

  • CDpusersvc has stopped working, crash – According to users, this process can frequently crash or give you Has stopped working message. If that happens, it’s advised to disable the process by modifying your registry.
  • CDpusersvc virus – This process might look like malware, but it should be perfectly safe. If you’re concerned that your PC is infected, feel free to perform a full system scan and check if that solves the problem.
  • CDpusersvc failed to read – This is another common error that can appear with Cdpusersvc. To fix the problem, you might want to try removing and blocking the problematic updates.
  • CDpusersvc high CPU – Sometimes this process can use too much of your resources. Microsoft is aware of this issue, so the fix should be available in form of Windows update.

How to disable CDpusersvc in Windows 10

1. Change your registry

  1. Press Windows Key + R and enter regedit. Now press Enter or click OK.
    CDpusersvc failed to read
  2. When Registry Editor opens, go to HKEY_LOCAL_MACHINESYSTEMCurrentControlSetServicesCDPUserSvc.
    registry editor
  3. Change the Start value data from 2 to 4 (Disabled).
  4. Restart your computer and CDpusersvc should be disabled now. You may notice that the number is different now (CDPUserSvc_35375), but rest assured, the module is disabled.

According to users, one way to fix CDpusersvc error code 15100 is to modify your registry. Your registry holds all sorts of sensitive information and it allows you to disable various services such as this one.

We have to warn you that modifying the registry can be potentially dangerous, so use extra caution.

2. Remove the problematic update

  1. Press Windows Key + I to open the Settings app.
  2. Now navigate to the Update & Security section.
    cortana update and security
    uninstall an update
  3. Click View installed update history.
    checking for Windows updates
  4. You should now see the list of installed updates. Look for any recent updates and memorize their names. Click Uninstall updates.
    view installed update history
  5. A list of updates will appear. Double-click the update you want to remove and follow the instructions on the screen to remove it.

Once you remove the update, check if the problem with Cdpusersvc is resolved. If so, you should probably block this update from installing again.

Windows 10 automatically installs the missing updates, and if you don’t block this update from installing, the issue will soon reemerge. In one of our previous, we explained how to block Windows updates on Windows 10 in order to remove potential issues with automatic updates.

According to users, sometimes CDpusersvc error code 15100 can appear after an update. If this happens, it’s advised that you find and remove the problematic update from your PC.

If you recently installed a system update, and you’re encountering this issue, it’s advised to find and remove that update in order to fix the problem.

3. Install the latest updates

  1. Open the Settings app and go to Update & Security section.
  2. Now click Check for updates button.
    check for updates

Windows will now check for available updates and download any pending updates in the background. Once the updates are downloaded, simply restart your PC in order to install them. After your system is updated to the latest version, check if the problem still persists.

4. Isolate the process

  1. Press Windows Key + X to open Win + X menu and choose Command Prompt (Admin). If Command Prompt isn’t available, you can instead use PowerShell (Admin).
    running Command Prompt as admin
  2. When Command Prompt opens, type sc config cdpusersvc type=own and run this command.
    sc config cdpuserv

After running this command, the Cdpusersvc process will be isolated forcibly and that might be able to fix any problems related to it.

5. Create a .bat file to stop the service

  1. Open Notepad.
  2. When Notepad opens, paste the following lines:
  • @ECHO OFF
  • SC QUERY state= all>servicesdump.txt
  • FINDSTR /L /C:”SERVICE_NAME: CDPUserSvc_” servicesdump.txt >CDPservice.txt
  • FOR /F “usebackq tokens=2” %%i IN (CDPservice.txt) DO SET CDPUserSvc=%%i
  • NET Stop “%CDPUserSvc%”
  • SC  Delete “%CDPUserSvc%”
  • DEL CDPservice.txt
  • DEL servicesdump.txt
  1. Now click on File > Save as.
    notepad save as
  2. Set Save as type to All Files and enter fix.bat in File name field. Now click Save to save changes.
    renaming as fix.bat

After doing that, you just need to locate the fix.bat file and run it, and the Cdpusersvc service should be stopped. Keep in mind that this is just a workaround, so you’ll need to repeat it if the issue reappears.

6. Scan your PC for malware

The cdpusersvc process usually comes followed by a random array of numbers, which makes it look suspicious. Many users mistakenly confuse this process with malware since it has such an unusual name.

If you fear that your PC might be infected by malware, we advise you to perform a full system scan with antivirus software. For this purpose, you should consider removing malware issues using the best anti-malware software on the market.

7. Perform a System Restore

  1. Press Windows Key + S and enter system restore. Choose Create a restore point from the menu.
    creating a restore point
  2. System Properties window will now appear. Click the System Restore button.
    system restore
  3. When System Restore window opens, click Next.
    restore system files and settings
  4. If available, check Show more restore points options. Select the desired restore point and click Next.
    system restore point
  5. Now follow the instructions on the screen to restore your PC.

Once your PC is restored, check if the problem still persists. Keep in mind that this issue might be caused by a Windows Update, and if that’s the case, find the problematic update and block it from installing.

  • Is there a problem with Windows 10?
Windows 10is the most stable release yet so the problem occurrences are less and less prominent. However, the system is still vulnerable to malware and virus attacks, the most important cause of Windows 10 problems. Other problems can be caused by third-party software that can create errors in Windows 10 or with other software. 
  • Why is my computer stuck updating?
First, make sure that it’s stuck of it’s just working slower. Restart your computer and see what happens. It the computer is stuck also, restart your computer using the reset button or the power button. Most likely, Windows will start like the usual and finish installing the updates. 

Among Us is coming to Xbox Game Pass in December

We know that it can never be enough when it comes to games and this insatiable hunger can only be quenched with, you guessed it, more games.

And since gamers are forever on the lookout for future prey, and by that we mean video games, they’ve surely spotter this lonely injured gazelle.

Leaving the National Geographic metaphors references aside, we have some news about another game joining the Xbox Game Pass family.

Amog us will be available with Xbox Game Pass

Even though the title count has surpassed 420, Microsoft decided that more is better, therefore proceeded to add the ultra-popular Among Us to the Game Pass.

What more could you wish for in the month when technically all wishes come true? We all know the answer but let’s just try and leave the decision making up to Santa Claus.

So, pretty soon, starting with December 14th, players that pay their monthly subscription and benefit from the Game pass will be able to play Amon US.

Pretty sweet for a Christmas treat, right?

If we’re talking about this holiday, you will surely be looking for a present. And since we’re on the Xbox topic, remember that the new wired Xbox headset is about to hit the market.

Also, if you were waiting on the Series X/S versions of Studio Project-Red’s Witcher 3 and Cyberpunk 2077, they might not be ready in 2021 after all.

Don’t forget that if you encounter any problems while trying to install the Xbox Game pass on your PC, we can help you with that too.

All we can do now is wait and make u a bunch of clever lies that we can feed to our unsuspecting Among Us victims.

Oh, before we go, keep in mind that Xbox Game Pass also had some new features added recently, among which is Play Later, and enhanced Alexa support.

Certain Windows 11 UI were never even modernized

Yes, we know that opinions on the matter are very diverse, but we know that users are split into 3 major categories when it comes to Windows 11.

The ones that love everything about the new OS are the first and biggest category of them all. The second one is full of people that, even though enjoy Windows 11, constantly critique certain aspects of it.

So, the third and final category contains everyone that totally dislikes the latest operating system and would want nothing to do with it whatsoever.

People from the secon

People from the second and third categories are always poking at the OS, trying to uncover new glitches, performance problems, or UI inconsistencies.

And when you are so busy trying to find the wrong in everything, watch out, because you might actually succeed.

The latest UI-related topic on various forums and social media platforms is now the compression animation for Windows 11.

Yes, we are talking about the tiny window that pops up when you are trying to compress files on your device.

A lot of Windows 11 users are harshly criticizing this small OS detail, and claim that the UI for this process hasn’t been updated since back in the day when Windows 7 was king.

Although not a system-threatening issue or some glitch bound to erase all data on your PC, these visual inconsistencies are a real turn-off for a lot of people.

This really acts like gasoline thrown on top of the Windows 11 is just Windows 10 with a new skin and it’s worse than Windows 8 fire.

As we said, this does not represent a major issue or something to be deeply concerned about, but some really don’t appreciate the lack of design consistency.

However, we’re sure that things will begin to settle and more beneficial changes will be applied to Windows 11 so that everyone will be happy.

After all, Microsoft’s new operating system is only officially a bit over two weeks old, so there were bound to be some things wrong with it.

Microsoft Lists app in Teams now lets users add comments on list items

Microsoft has released a new update for the Lists app in Teams which brings the same commenting experience that was first introduced in Lists on the web last year. This feature is currently rolling out in Microsoft Teams across all platforms, including the web, desktop, and mobile.

The firm says that Microsoft Teams users should now be able to view, delete, and add comments on list items to collaborate with their colleagues. All the users mentioned in a comment will automatically receive an email notification and a link that will take them directly to the list item on the web.

To try out this feature, open the Lists app in Microsoft Teams, select the specific list item, and then click the “Comments” option. Now type the message in the comments pane and then press Enter to post it.

It is worth noting that the ability to add or delete comments will be available for people with edit permissions, and those with read-only permissions will only be able to view comments. However, list owners can choose to turn off the commenting capability for individual lists by heading to the List Settings page on the web.

Microsoft’s Power Platform to better integrate with SAP and Oracle with Clear Software acquisition

To be more customer accommodating, Microsoft has acquired the company Clear Software to help its Power Platform leverage 3rd connectivity while also chasing a growing process automation trend.

In a pretty straightforward post to the Microsoft Power Platform blog, partner general manager of Power Automate Stephen Siciliano explains the need for the company to bolster its efforts to meet customers on their own turf when providing SAP extensions and iPaaS services.

We want to make it easier for customers to integrate a variety of systems when they build business applications with Microsoft Power Platform. The Clear Software integrations will make it a more seamless experience to use Power Apps and Power Automate to build business applications and automations over complex systems like SAP and Oracle.

It comes with more than 100 pre-built abstractions over these systems and can be customized in UI to support each organization’s unique needs. We will share more with customers about how to access the new capabilities in the future.

Details of purchase price or timelines have not been made available, but it seems plausible that Microsoft gets Clear Software integrated quickly to help it leverage a growth sector of process automation that occurred in some form for 40% of companies in 2019 and could account for 60% of occupations according to Forrester estimates and a McKinsey survey.

Microsoft currently has a toe in the process automation market with its investments in Process Advisor which allow its customers to leverage Power Automate in broader “hyper automation” scenarios.

FIX: 3G USB dongle doesn’t install properly in Windows 10/11

Those of you who have tried installing a 3G USB dongle on a Windows 10 computer might have encountered some issues after you restarted or shut down the operating system.

The installation seems to work fine at first, but after rebooting your Windows 10 OS and plugging the 3G USB dongle back in, the installation restarts. However, this time the computer won’t recognize the device.

So check out the tutorial below for detailed explanations on how to get the 3G USB dongle work on Windows 10.

How can I fix 3G USB dongle issues on Windows 10?

  1. Temporarily disable your antivirus/firewall
  2. Reinstall the USB Dongle driver
  3. Keep your 3G USB Dongle permanently connected
  4. Run Windows Update
  5. Run the Hardware and Devices Troubleshooter
  6. Contact your 3G USB Dongle manufacturer

1. Temporarily disable your antivirus/firewall

3G USB dongle doesn’t install

Your antivirus and firewall may somehow identify the USB dongle or its drivers as a threat and block installation.

So first, try turning off your antivirus and firewall during the installation process. You can then enable antivirus protection as soon as you’ve installed the 3G UBS Dongle.

2. Reinstall the USB Dongle driver

  1. Go to Start and launch Run.
  2. In the Run dialog box, enter devmgmt.msc and press Enter.Reinstall the USB Dongle driver
  3. In the Device Manager window, locate your 3G USB Dongle driver (it should be located under Modems).
  4. Right-click on it and select Uninstall.
  5. Reboot your Windows 10 device.
  6. Right-click on the 3G USB dongle executable file when the device starts copying it.
  7. In the menu, select the Properties.
  8. Go to the Compatibility tab.
  9. Select Run this program in compatibility mode for.
  10. From the drop-down menu, select the operating system on which this driver for the USB Dongle worked.
  11. Hit Apply.
  12. Now, right-click on the driver executable file and select Run as Administrator.
  13. Follow the on-screen instructions to finish the installation process.
  14. Reboot the device and check to see if your 3G USB Dongle is working properly.

If the method above did not update your PC’s drivers successfully, we recommend using an automatic driver repair.

Outbyte Driver Updater takes updates to the next level of importance, which is essential for the health and performance of your PC. A missing driver may disrupt communication between the device and the OS.

For prevention, we advise you to have software that will maintain your drivers up to date, ensuring that you are protected against typical computer issues and device malfunctions.

3. Keep your 3G USB dongle permanently connected

eep your 3G USB Dongle permanently connected

Keep the 3G Dongle USB always plugged in your Windows 10 system when you reboot the device:

Apparently, if you install the driver with the 3G USB dongle plugged in and you keep it there, you should not have any issues if you reboot the operating system.

If you unplug the USB dongle from the device and reboot the operating system, you will be asked again to install it and you might encounter further errors.

4. Run Windows Update

Make sure that you’re running the latest OS version on your computer.

It is worth mentioning that Windows Update automatically installs the latest drivers on your machine, so you can also use this solution to update your 3G USB dongle drivers.

What you have to do is to manually hit the Check for updates button in the Update & Security section of your system settings.

check for updates

If you can’t launch the Setting app, take a look at this article to solve the issue.

5. Run the Hardware and Devices Troubleshooter

  1. In your device Settings, go to Update & Security.
  2. Select Troubleshoot in the left-side menu.
  3. Scroll down to Hardware and Devices and click on Run the troubleshooter.

In the less likely situation that the Troubleshooter stops before completing the process, use this guide to give it a push.

6. Contact your 3G USB dongle manufacturer

If nothing worked, try contacting your dongle’s manufacturer for support. They will offer you more information on how you can quickly fix this problem and enable an Internet connection on your PC.

If you are looking to buy a new 3G dongle for your Windows 10 device, here are some of the best options currently available. Or if you’re looking for extra speeds, then you definitely need to go for a 4G dongle.

So these are a few solutions to fix the 3G USB dongle issues. We hope at least one worked for you.

Also, if you need further help regarding this subject, please write us in the comments section below and we will help you as soon as possible.

Visit the Utilities & Tools section for some inspiration on the devices you need in your digital life, and refer to the Troubleshooting Hub to become an expert in fixing common software errors.

Fix: Your Channel Options Will be Limited Windows 11 Error

With Windows 11 in the spotlight and a fresh build worth installing, people all over the world are excited. However, errors are not out of the question.

Microsoft’s confusing set of system requirements includes TPM 2.0 support, due to which machines with Intel’s 6th Gen or older processors cannot run Windows 11.

During the rollout, most were getting the same Your PC does not meet the minimum hardware requirements for Windows 11. Your channel options will be limited error.

Why am I getting the error message Your channel options will be limited?

  • You may be getting the error because your PC does not comply with the Windows 11 system requirements.
  • Windows 11 will only run on machines with Intel’s 7th Gen or above and AMD’s Ryzen 1000 series or above processors. Additionally, you also need to have TPM and Secure Boot options enabled.
  • If you don’t know what channel options mean, let us help you with that. When you opt into the Insiders program, you get to choose from three channel – Dev, Beta, and In Release Preview channel.

How do I fix the Your channel options will be limited error?

1. Enable TPM and Secure Boot in BIOS

  1. In Windows 10, head over to the Settings app.open settings app in windows
  2. Head over to Update and Security.Windows update and security
  3. Then, in the menu on the left, find and click on Recovery.Windows update recovery
  4. In the advanced startup section, click on the Restart now button.Windows recovery restart now
  5. Doing this will restart your computer into recovery mode, where you will see many options. All you need to do is navigate to the option UEFI Firmware Settings and hit enter.advanced restart
  6. You should now boot into BIOS. Not all the BIOS’es look alike. Hence, don’t panic if yours looks different than the one in the image below.
  7. Find the TPM option in the security menu and use the arrow keys on your keyboard to navigate and the F5/F6 keys to set it to enabled.TPM state BIOS
  8. Similarly, head over to the boot options and enable Secure Boot.secure boot and exit BIOS
  9. Go to the Exit section, save your changes, and exit. Boot into Windows 10, head over to the Insiders settings, and you should no longer see the Your Channel Options will be Limited Windows 11 error.

BIOS (Basic Input/Output System) is an important component in your computer that helps your computer start.

If your PC meets Windows 11’s hardware requirements, then enabling the TPM option and secure boot should fix the issue

2. Enabling Dev channel with Windows Registry hacks

  1. Hold the Windows + R key combination to open the Run application.Regedit Windows 10
  2. Type Regedit and click on OK.
  3. In the registry editor, navigate to the following path.
    HKEY_LOCAL_MACHINE\SOFTWARE\Microsoft\WindowsSelfHost\UI\Selection
  4. Double-click on the UIBranch and change its value from ReleasePreview to Dev.UIBranch to dev
  5. Now, in the UIContentType, change the value to Mainline and change the UIRing value to External as shown in the image above.
  6. Now navigate to the following path
    HKEY_LOCAL_MACHINE\SOFTWARE\Microsoft\WindowsSelfHost\Applicability
  7. Change the BranchName value to Dev, ContentType value to Mainline, and Ring to External.branchname to dev
  8. Finally, close the registry editor and restart your PC.
  9. You should now start receiving Windows 11 preview builds which solves the Your channel options will be limited Windows 11 error.

Before proceeding, here’s a piece of warning. Registry hacks can sometimes break the OS. Hence, we recommend you follow the instructions carefully.

Considering that you’ve already enrolled yourself into the Windows Insider program, you should now be enrolled in the Windows 11 Dev channel.

How do I leave the Insiders program?

  • Microsoft allows you to unregister yourself from the Insiders program if you no longer want to receive the builds.
  • The process of unregistering is same as what you did to register. Go to the Insider program in Settings and click on Leave the Insiders program option. You can enroll again if you want.
  • However, getting out of Insiders program won’t roll you back from Windows 11 to Windows 10. You’ll either need to clean install Windows 10 or roll back using the settings if you have the previous OS’s backup.

We wouldn’t recommend installing preview builds on your work machines as they’re not very stable for regular usage. Also, do make sure to take a backup of Windows 10 before proceeding.

If you’re new to Windows 11 and don’t know what has happened since its launch, check out our latest Windows 11 build review to learn more about the OS.

Were you able to get rid of the Your Channel Options will be Limited issue by following these methods? Let us know in the comments section below.

Razer’s Zephyr smart mask finally launched and sold out within minutes

One of the more highly-anticipated tech products of the past year, the Razer Zephyr, finally launched today but sold out within minutes. The overwhelming demand also caused the Razer’s online storefront to crash, leaving many unable to add the smart mask to their cart and finish their purchase.

“The demand for the Razer Zephyr has been overwhelming and our first wave is sold out within minutes,” a tweet from the official Razer Twitter account explained. “Stay tuned and appreciate your patience as we work hard to restock them as fast as we can. Sign up to be notified when the next batch arrives.”

Razer always planned to give Zephyr a limited debut launch before releasing more stock in the following months but it seems as if they were still caught by surprise.

The Razer Zephyr was first announced as a concept during CES 2021 where it was referred to as Project Hazel. The mask was rebranded as Razer Zephyr in August of this year while limited public testing began around the same time.

“Breathe in the future with the Razer Zephyr—an award-winning concept made reality,” reads the current product description for Razer Zephyr. “Stay safe with its replaceable N95 Grade filters for daily protection. Stay social with its transparent design for clear face visibility. Stay sustainable with its reusable nature for long-term use.”

Update: Razer has since removed any mention of N95 grade protection from both Zephyr and Zephyr Pro mask product descriptions.

Did you manage to order a Razer Zephyr or are you planning to buy one when they get more stock? Let us know in the comments below and then follow us on Twitter and Facebook for more tech news.

Xbox’s Fallout 76 video game and more are free to play on consoles this weekend

The Fallout 76, F1 2021, and Dead by Daylight video games are currently free to download and play in full on Xbox One and Xbox Series X consoles for all console owners with an active Xbox Live Gold subscription.

Dead by Daylight and F1 2021 are free to play until the end of Sunday at 11:59 p.m. PDT while Fallout 76 can be enjoyed until Monday at 10 a.m. PDT.

As is typical with Free Play Day promotions, all three titles can be installed and played as if they were owned outright, Xbox Achievements can be unlocked, and all game progress will be saved to the cloud for continuing at a later date should the games ever be played again in the future.

All three games have also had their prices reduced.

The Standard Edition of Fallout 76 has been given a 75% discount, F1 2021 a 35% discount, and Dead by Daylight a 50% discount. The other versions have also had their prices temporarily reduced as well.

Are you going to play any of these games this weekend? Let us know which ones in the comments below and then follow us on Twitter, Pinterest, and Facebook for more Xbox content.

Fallout 76
Fallout 76
Developer:
Bethesda Softworks
Price:
Free


F1® 2021
F1® 2021
Developer:
Electronic Arts
Price:
Free


Dead by Daylight
Dead by Daylight

October Xbox Update brings 4K dashboard on Series X consoles and new Night Mode settings

The October Update is now available for Xbox One and Xbox Series X|S consoles, and the main new feature is a nice-looking 4K dashboard on Xbox Series X. If you have your Series X console connected to a 4K TV, the Xbox dashboard, Guide, and other menus should now look sharper than ever.

“Prior to today’s update, the Xbox Series X dashboard, Guide, and other menus were upscaled from 1080p to 4K. We know players with an eye for detail and an appreciation for 4K wanted a crisp experience even when navigating the dashboard,” the Xbox team explained today. You can see the difference with the previous 1080p dashboard in the comparison image below.

Another cool addition in the October update is the new Xbox Night mode, which lets Xbox Series X|S owners dim their screen at night to make it easier to sleep after long gaming sessions. The different settings include a customizable blue light filter, and Xbox night mode works across apps and games without affecting performance, screenshots, or game clips.

Night mode also offers scheduling settings, and there are even options for adjusting the brightness of the power button on Xbox controllers as well as the power light on Xbox consoles. “If you’re a movie fan, you can now enjoy theater-like total darkness while watching your favorite films,” the Xbox team emphasized.

The October Xbox update also makes it easier to toggle accessibility features by adding a new Quick Settings menu to the Xbox Guide. This should make a big difference for families sharing a console, as quick settings will let family members quickly turn features on or off depending on their accessibility needs.

That’s it for the October Xbox update, which won’t be the last system update coming to Xbox consoles this year. Microsoft is planning to bring Xbox Cloud Gaming to Xbox gamers before the end of the year, and the Xbox team has also started testing a new feature that will automatically mute speakers when using connecting headphones to an Xbox console.