How to recover and fix corrupted ODT files

ODT is the file format for OpenOffice and LibreOffice Writer documents. When an ODT document is corrupted, an error message might pop up stating The file .odt is corrupt and therefore cannot be opened.

Consequently, users can’t usually open corrupted ODT files by clicking on File > Open. Is one of your Writer’s documents corrupted?

If so, check out the resolutions below and fix those corrupted ODT files in no time.

How can I solve ODT file corruption issues?

  1. Look for a Backup Copy
  2. Repair ODT documents with third-party software
  3. Update LibreOffice or OpenOffice
  4. Insert the corrupted file into a blank document
  5. Fix ODT files with the Repair OpenOffice Writer document utility
  6. Convert the ODT to a ZIP file

1. Look for a Backup Copy

First, note that LibreOffice Writer includes an Always create backup copy option. So you might find a backup copy of the corrupted document if the Always create backup copy option is selected.

This is how you can open the ODT document backups in Windows.

  • First, open the File Explorer window by clicking its shortcut on the Windows 10 taskbar.
  • LibreOffice users can open their backup folder at this path: C:UsersxxxxxxAppDataRoamingLibreOffice 4userbackup.
  • OpenOffice users can open this path in File Explorer:C:UsersxxxxxxAppDataRoamingOpenOffice4userbackup.
  • That folder might include a .bak file for your corrupted document. Select to open a matching file title from there.
  • If there’s nothing in the backup folder, you can still ensure it includes ODT file backups next time you need them. To do that, open Writer and select Tools > Options.
  • Double-click Load/Save to expand that category of options.
  • Then click General to open the settings shown directly below.
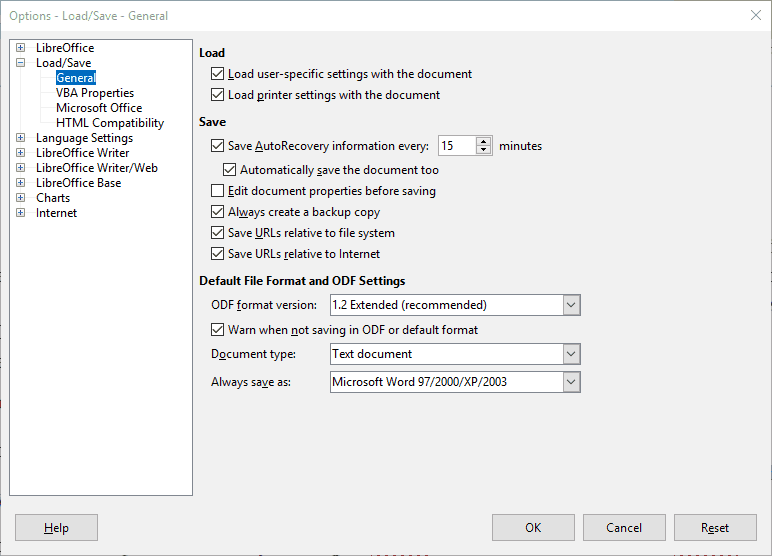
  • Select the Always create a backup copy option.
  • In addition, click the Automatically save the document too checkbox.
  • Click the OK button on the Options window. Now you’ll have other copies of Writer documents when you can’t open the original ODT files.

2. Repair ODT documents with third-party software

While there is no shortage of tools that can repair Microsoft Office files, the OpenOffice formats are not so popular. Hence there are only a few third-party utilities for fixing corrupted ODT files.

Hetman Office Recovery is one such tool that compensates for the entire market with its powerful and comprehensive repair and recovery functions.

This software provides native file support for Microsoft’s popular formats such as DOCX, DOC, XLS, XLSX, but also for ODT, ODS, PDF files, and more.

In fact, versatility is a quintessential characteristic of  Hetman Office Recovery and it does justice to its reputation by seamlessly working with all types of platforms, devices, storage media including all SSD, HDD, USB pen drives, NAS and all versions of FAT and NTFS.

Moreover, not even damaged devices can stand a chance against this powerful ODT recovery tool.

Through sophisticated disk analysis algorithms, Hetman Office Recovery will help you retrieve and access ODT files (and others) from formatted, repartitioned, corrupted, inaccessible, worn, and physically unstable disks and partitions.

Let’s quickly look at its key features:

  • Recovers documents from formatted and repartitioned drives, corrupted partitions, removable media and storage devices
  • Fully compatible with Microsoft Office, OpenOffice, and other file formats
  • Supports all types of storage media (HDD, SSD, memory cards, USB pen drives, NAS and even VM)
  • Advanced File Recovery Engine to retrieve data from damaged, corrupted, and inaccessible devices
  • Sophisticated signature search algorithms for successful recovery
  • Intuitive and user-friendly interface with an integrated step-by-step wizard to assist throughout the recovery process and integrity validation check-up
  • Burn files onto a CD/DVD, create ISO images, or upload the files onto an FTP server
  • Pre-Recovery Preview feature to view thumbnails of the recoverable files without saving them on the damaged disk
  • Searching and Filtering functions to easily locate any file

⇒ Get Hetman Office Recovery

3. Update LibreOffice or OpenOffice

The latest LibreOffice or OpenOffice applications might still open only slightly corrupted ODT documents. So check that you’re utilizing the most updated LibreOffice or OpenOffice suites.

To update the office suite, click Help > Check for updates. The window shown directly below will tell you if there’s a more updated suite. If so, press the Download option to get the setup wizard for it.

4. Insert the corrupted file into a blank document

This is another trick that might open corrupted ODT documents in Writer. The Writer includes an Insert menu from which you can select to insert a file in a blank document.

Thus, selecting to insert a corrupted file might open it within a blank document. To do that, open a blank document, click Insert > File and select the corrupted ODT file.

5. Fix ODT files with the Repair OpenOffice Writer Document utility

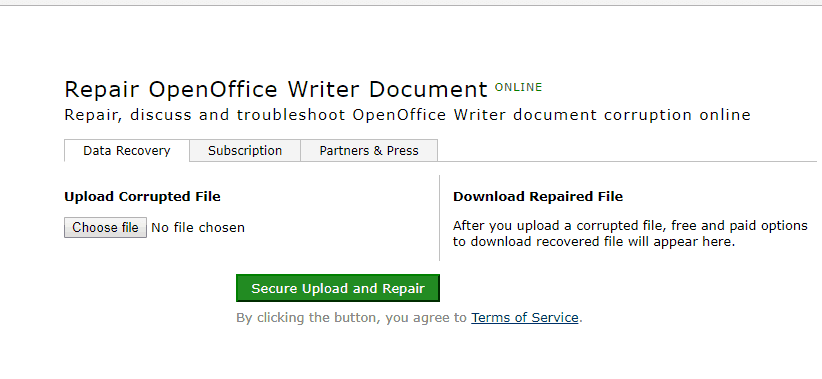
To fix a corrupted ODT file, check out the Repair OpenOffice Writer Document utility. That’s a web tool you can open on this page.

Press the Choose button to select an ODT file. Then you can press Secure Upload and Repair to fix the ODT.
6. Convert the ODT to a ZIP File

This isn’t exactly a fix for a corrupted ODT. However, you might still retrieve the document by converting it to a ZIP. The ZIP archive can include a content.xml file, which retains the document text alongside XML formatting statements.

This is how you can open the context.xml file for an ODT file:

  • First, click the File Explorer button on the Windows 10 taskbar.
  • Open the folder that includes your corrupted ODT document.
  • Right-click your corrupted ODT document and select Rename.
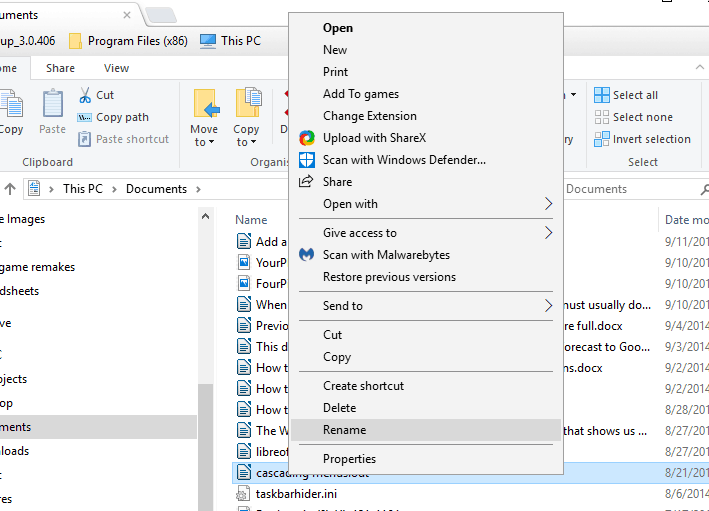
  • Replace the ODT file extension at the end of the document title with ZIP, and press the Enter key.
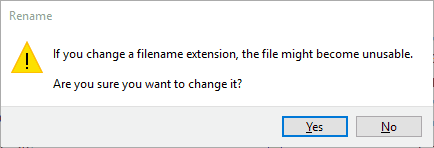
  • Click Yes on the Rename dialog box that opens.
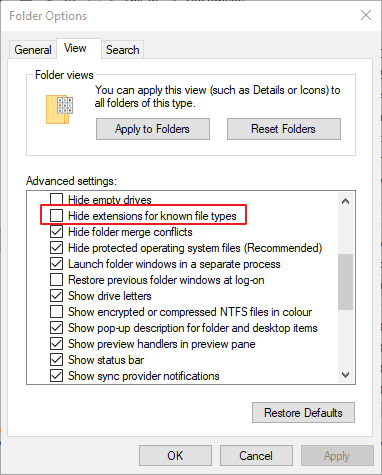
  • If Explorer doesn’t include the file extensions for documents, you’ll need to select the View tab and click Options > Change folder and search options. Click the View tab on the Folder Options window, and uncheck the Hide extensions for known file types option.
  • Double-click the newly converted ZIP file for the former ODT document.
  • Press the Extract all button, which opens the window shown directly below.
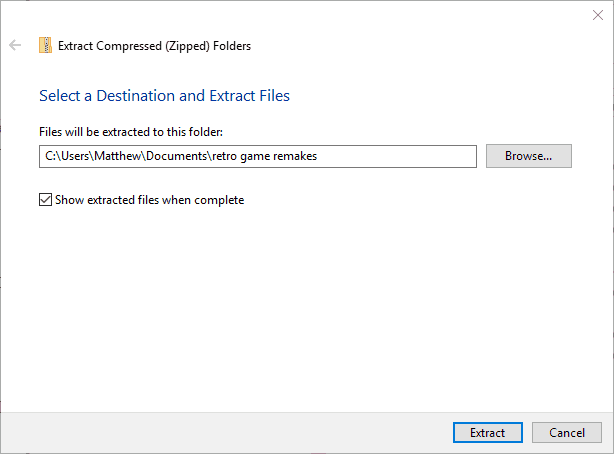
  • Click Browse to choose a folder path to extract the ZIP.
  • Press the Extract button.
  • Then open the extracted ZIP folder, which contains a content.xml file.
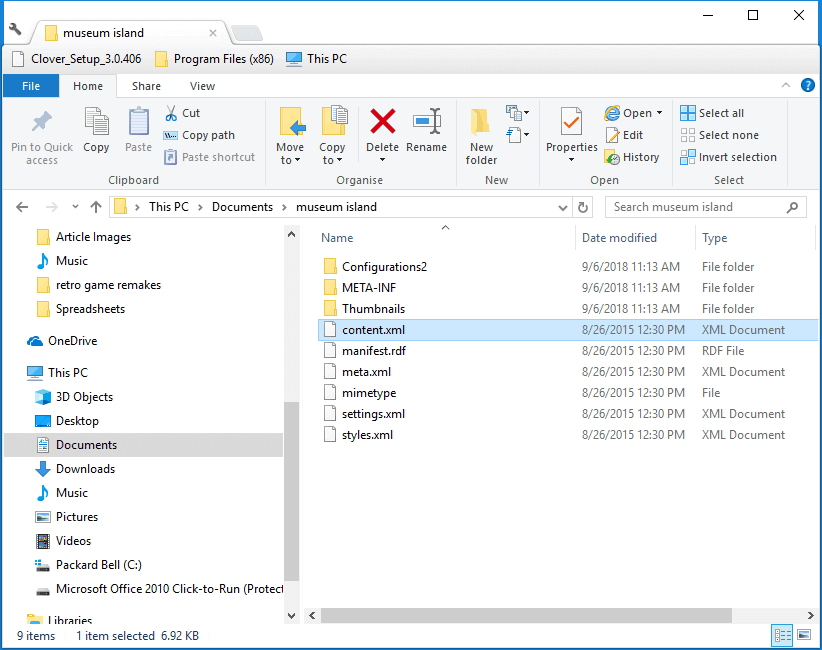
  • Right-click content.xml and select Open with > Notepad. That will open it in Notepad as shown directly below.
  • The XML includes all the text from the original document along with formatting statements. You can copy and paste the XML into a blank OpenOffice or LibreOffice document by selecting the text and pressing the Ctrl + C and Ctrl + V hotkeys.
  • After pasting the XML file into a blank document, you can delete all the XML statements from it.
  • Click File > Save as to save it as a ODT document.

So that’s how you can open and fix corrupted ODT documents. Some of the above tips might also come in handy for recovering corrupted OpenOffice ODB, ODS, ODP, and ODG files.

Do you know any other workarounds? Feel free to share your experience by reaching for the comments section below.
FIX: Couldn’t repair Office 2007/2010/2013/2016

Microsoft Office offers a powerful suite of programs that let you do so much like creating documents and spreadsheets, sharing files and folders, and so much more using programs such as Word, Excel, Access, PowerPoint and many others.

Sometimes Office, like other programs, can act up, become unstable or stop working in the normal way. Most people would restart their computers to fix the problem, but if that doesn’t work, you can try repairing it.

But what happens when you couldn’t repair Office? One of the reasons why this happens is because installation files in your system are corrupted. Here are some solutions to help you resolve the issue when you don’t know what else to do.

FIX: Couldn’t repair Office 2007/2010/2013/2016

  1. Install Office updates
  2. Run an easy fix tool
  3. Check if Excel.exe is running and end the process
  4. Uninstall Silverlight and perform a system restore
  5. Get the latest drivers
  6. Check if Office shows in installed programs
  7. Stop and restart Microsoft Office Service
  8. Check if the previous Office client was removed totally then reinstall Office

1. Install Office updates

Before using any other solution listed here, it is important to ensure that Office is fully updated on your computer. If you still cannot repair Office, and get ‘stopped working’ errors after this installation, try the next solutions.

2. Run an easy fix tool

When you cannot repair Office, it could be as a result of corrupt system files and/or slow internet connection. As initial troubleshooting, use an easy fix tool and uninstall Office completely, then try reinstalling Office.

Additionally, you could always employ a third-party repair tool that specializes in the Microsoft Office Suite.

For example, Stellar Toolkit for File Repair is a software solution that will immediately and efficiently fix all of your MS Office issues.

It doesn’t matter if you have problems with Excel, Word, SharePoint, or PowerPoint, Stellar Toolkit for File Repair will get the job done.

Stellar Tookit for File Repair

Stellar Tookit for File Repair

Fix your Microsoft Office issues in just a few minutes with the help of this all-inclusive repair tool.
Check priceVisit website

3. Check if Excel.exe is running and end the process

  • Right click Start
Couldn’t repair Office
  • Select Task Manager
Couldn’t repair Office
  • Click Processes tab
Couldn’t repair Office
  • Look for Excel.exe
  • Right-click on it and click End Process
  • End the process and try the repair again then check if it helps

4. Uninstall Silverlight and perform a system restore

  • Right-click Start
Couldn’t repair Office
  • Select Programs and Features
Couldn’t repair Office
  • Find Microsoft Silverlight, right click and select Uninstall
  • Restart your computer

Once you do the above steps, perform a system restore by doing the following:

  • Click Start
  • Go to the search field box and type System Restore
  • Click Create a restore point in the list of search results
Couldn’t repair Office
  • Enter your administrator account password or grant permissions if prompted to
  • In the System Restore dialog box, click System Restore then Choose a different restore point
Couldn’t repair Office
  • Click Next
  • Click a restore point created before you experienced the problem
  • Click Next
  • Click Finish

To go back to a restore point, do the following:

  • Right click Start
Couldn’t repair Office
  • Select Control Panel
Couldn’t repair Office
  • In the control panel search box, type Recovery
Couldn’t repair Office
  • Select Recovery
Couldn’t repair Office
  • Click Open System Restore
Couldn’t repair Office
  • Click Next
  • Choose the restore point related to the problematic program/app, driver or update
  • Click Next
  • Click Finish

5. Get the latest drivers

  • Click Start
  • Select Settings
  • Select Update & Security
  • Select Windows Update
Couldn’t repair Office
  • Click Check for Updates. Windows will automatically install any pending updates on your computer
Couldn’t repair Office

Update drivers automatically

While updating drivers manually, you can damage your system by choosing and installing the wrong versions. In order to prevent that from the start, we strongly suggest to do it automatically by using a specialized software.

Using an automatic driver updater will certainly save time and it will constantly keep your system up to date with the latest drivers.

⇒ Get Outbyte Driver Updater

6. Check if Office shows in installed programs

  • Right-click Start
Couldn’t repair Office
  • Select Programs and Features
Couldn’t repair Office
  • Find Office on the list and try repairing the installation

7. Stop and restart Microsoft Office Service

  • Right-click Start
Couldn’t repair Office
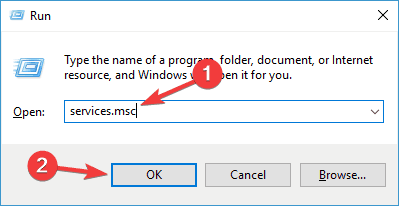
  • Select Run
Couldn’t repair Office
  • Type services.msc
Couldn’t repair Office
  • In the Services list, double-click Windows Installer
Couldn’t repair Office
  • In Windows Installer Properties dialog box go to Startup type and click Automatic
Couldn’t repair Office
  • Click Start > Apply > OK to start the software installation
Couldn’t repair Office

8. Check if the previous Office client was removed totally then reinstall Office

  • Right click Start
Couldn’t repair Office
  • Select Programs and Features
Couldn’t repair Office
  • Click Uninstall a program
  • Ensure there is no Microsoft Office shown in the list.
  • Use the easy fix tool to completely uninstall Office
  • Reinstall Office and see if it helps

Note: If the problem persists after Windows updates, check specific drivers such as the graphics or video card, printer, keyboard, and mouse. You can download the drivers or install them directly from the device manufacturer’s website.

If you have a laptop, check with the manufacturer’s website for any updates related to your particular model. Did any of these solutions help fix the Office repair problem? Let us know in the comments section below.

Monese money not received / payment pending [Solved]

Monese is a UK-based company that offers current accounts and money transfer services as an alternative to traditional banks. As far as functionality goes, anyone that has a Revolut card will find that Monese is pretty much identical in both function and form.

As such, having a Monese card means that you can send and receive money, as well as make currency exchanges on the spot, etc. However, some people have been asking about Monese’s way of sending and receiving cash.

More precisely, some have been complaining that the money they were expecting weren’t received.


Why haven’t I received my money on Monese?

First of all, make sure when sending or receiving money via Monese that both parties have the other one’s correct contact info to avoid misplaced funds.

Monese is not responsible for faulty transactions if the client is to blame.

More so, depending on the circumstances in which you made or should be receiving payment, there is a certain processing time.

For example in the case of Monese, different types of payments will take a different amount of time to process.

  • Monese to Monese payments:
    • These types of transfers will be done almost instantly
  • Local payments from a UK account to your UK account:
    • Once the money is received, it will be allocated to your account immediately, including weekends.
    • Please be aware that UK Faster Payments are processed every 30 minutes
  • BACS payments it will take 3 business days
  • CHAPS payments clear on the same day if made before 2 pm UK time
    • Actual clearing times also depend on the sending party
  • Payments received to the shared IBAN account:
    • Once the money is received, it will be allocated to your account at 8 AM, 11 AM and 5 PM Monday through Friday
    • Euro currency payment received from SEPA region will normally arrive on the next business day
    • Payments from other countries or in other currencies may take longer to process
  • SEPA payments to your Eurozone account:
    • Payments made to you before 14 PM Central European Time (GMT +1) will be funded to your account on the same day by 17 PM CET time
    • Payments made after 14p PM will arrive on the next business day.

Why is a card payment I made still pending?

However, if you are concerned that a card payment is still pending for quite some time, you should keep note that: The retailer has 7 days to either claim or cancel the payment.

In case of a cancelation, a declined card payment or withdrawal may also appear as a pending payment. Afterward, the pending payment will expire automatically and funds will be returned to your account within 7 days.

As such, it is not a matter of why hasn’t a payment come through, but rather WHEN it will come through.

Do you have a Monese card? Do you think it is better than other similar services, such as Revolut or Payoneer? Let us know in the comments section below.

Consider using an alternative payment method

Monese isn’t the only service of its kind out there, as the market is filled with money transfer services and virtual card apps.

However, given their abundance, it is hard to choose which are good and which are not. One app that has been verified to be extremely good and reliable is Revolut.

This tool has the same payment options as Monese, only things are made to be far easier. Enjoy free instant money transfer, currency exchange, crypto, and stock trading, all without any hidden costs.

Revolut

Revolut

No service is better suited act as a Monese alternative better than Revolut. Get it now for free.

[wl_navigator]

Payoneer payment not received yet? Here’s why

Payoneer is a popular financial service for freelances and professionals around the world to send and receive payments directly to their bank account. However, at times you may not receive Payoneer payment as expected.

To resolve the Payoneer payment not received issue, you can check the Payoneer FAQ page. But, if you did not find a satisfactory answer, this article is for you.

In this article, we take a look at some tips to help you resolve Payoneer payment not received an issue with your account.


What can I do if the Payoneer payment not reached my bank account?

1. Delayed due to holidays

Payoneer payment not received

  1. Your bank usually takes 24 hours to process the payment once it has been withdrawn from the Payoneer account.
  2. However, the payment can get delayed due to bank holidays and other govt holidays.
  3. Depending on your country, check if there are long holidays or even bank holidays.
  4. The payment request made on Friday is usually processed by the banks on Monday.
  5. Officially Payoneer says it can take up to 5 days to process the payment. Make sure 5 days are passed before you take any steps.

If you’re tired of waiting for your payments to go through (sometimes up to 24h), then it may be time to switch to a different payment service.

Revolut is one such service, and waiting lists will be a thing of the past once you start using it. Not only will you be able to pay services, subscriptions, and other users instantly, but you can do it all for free.

Simply register for an account and besides access to this amazing service, you will also get a physical credit card at no additional costs.

As for money transfers, the app will simply look at your phone contacts, and then make a list of everyone inside that also have Revolut. Sending money will then be a simple matter of tapping their name, entering the desired sum and currency, and pressing Send.

Revolut

Revolut

Send and receive money instantly to anyone in the world with just a few taps of the screen with this amazing online payment service.

Transfer money using Payoneer in just a couple of easy steps


2. Contact Payoneer Support

Payoneer payment not received

  1. If the payment is not received after 5 business days, you can contact Payoneer support.
  2. Log in to your Payoneer account and visit the Contact us page.
  3. Payoneer offers multiple options to contact them including Live Chat and Call option.
  4. Select Live Chat and discuss the issue.
    • Keep your transaction ID handy.
  5. Payoneer support may also ask you to provide the bank statement for verification.
  6. The customer support will give you details about the transaction and if the payment is rejected by your bank.

3. Contact your bank

  1. Payoneer support will most likely ask the users to contact their respective bank branches to get more information about the delayed payment.
  2. Contact your bank and provide the transaction details.
  3. If you plan to visit the bank, download the transaction confirmation document from your Payoneer account.
  4. Login to Payoneer and go to Transactions.
    Payoneer payment not received
  5. Click on the recently made transaction and then click on Get Confirmation button.

By following the steps in this article, you can resolve Payoneer payment not received an issue with your Payoneer account. Do let us know what you did to fix the problem in the comments below.


[wl_navigator]

PayPal not Accepting Card? Fix It with These 4 Steps

To take the full potential of PayPal, you’ll need to link your bank or debit card. This allows you to transfer funds from PayPal to your bank account and vice versa.

Linking a debit card works great most of the time, and you should be set in a matter of minutes. However, PayPal is not accepting a card for some users. If you cannot link a debit card to your PayPal account, follow the steps below.

Why is PayPal not accepting my debit card?

1. Ensure that the card information is on point

First, you must ensure that all the debit card information is on point. Ensure that the debit card is supported and that you set the right billing address, expiration date, and security code before moving on.

PayPal not accepting card

All the information must match the information from your bank. Remember to use only Visa, MasterCard, and American Express debit cards. Some Visa or MasterCard debit card iterations won’t work with PayPal if they only support the local currency.

2. Use a PayPal alternative

PayPal isn’t the only service of its kind on the market, so if using it is out of the question, at least you know all is not lost. However, if you choose to use a different service, you might as well use something that is as good or better than PayPal.

Other payment channels like Google Pay are often plagued by issues like error code U13 that bar transactions. Luckily, Payoneer fits the bill due to its flexible methods to get paid or fast transfer services between you and other clients.

With this payment manager option, you can benefit from fast online payments worldwide, local currency account bills, or low fees for your income. You’re able to make purchases online and in-store as well.

At the same time, your money can be managed efficiently with local currency transfers or withdrawals at any ATM worldwide.

3. Make sure that the debit card balance is at least 2 USD or EUR

This is really important. For PayPal to confirm that the debit card at hand is active, it’ll take 1 USD during the registration process. The sum will be returned to your bank balance once PayPal successfully links the debit card.

PayPal not accepting card

Therefore, ensure that you have at least 1 USD available, although due to exchange rates (if you have a different currency), we suggest having at least $2.

4. Remove the debit card from other accounts

If you have it linked, it is important to unlink the debit card from other PayPal accounts. PayPal allows for one card to be used on a single account solely.

PayPal not accepting card

Finally, you can contact the PayPal support team to discuss the issue. In our own experience, they tend to be quite helpful. You can reach them on the official support website.

Tell us the alternative solutions you used in the comments section below.

Why PayPal is not working? Best solutions to fix it quickly

PayPal is the world’s leading service when it comes to online payments that have redefined the way we make online transactions. While not the first of its kind, it has become the default payment method for many eCommerce websites.

However, like any online service, things don’t always go smoothly. The same thing can be said about PayPal’s services, but since it is a service that handles your money, it becomes a bit of a problem.

If none of the solutions mentioned below work, you should consider using an alternative to PayPal. While the market is indeed filled with similar services, you will most likely be looking for something that is just as good as PayPal, if not better.

Most common reasons why PayPal may not be working:

1. You don’t have the funds when pre-ordering something

PayPal doesn’t need you to put money on it, as adding a debit or credit card would suffice.

  1. Click Money and check if the bank account there is For transfer only.
  2. Click on that and follows the on-screen instructions to input your Direct Debit Instruction, and link your account to your cards.

2. You’re not logged in, or your guest pass has reached its limit

Keep in mind that non-account holders that use PayPal can only use a particular credit card 15 times, and only up to a maximum of approximately $4,000 in a lifetime.

If you don’t have a PayPal account, all you have to do is make an account, and the limitations will be lifted. If you already have a PayPal account, simply log in using your credentials.

3. You are using a faulty Ad-blocker

Depending on the website you are trying to pay on, if you have clicked Continue with PayPal and all you see is a blank window, then you most likely have a pop-up blocker installed.

This pop-up blocker will block PayPal from opening an additional payment window. All you need to do is temporarily disable it and then the window can open or load properly.

4. PayPal may be down

Like any other Internet service, PayPal is not safe from the occasional downtime. As such, all you can do is check their server status, and simply wait it out.

5. Your antivirus may be blocking PayPal

You may experience situations where your antivirus is blocking PayPal and you cannot access or even log in to do any transactions. If your antivirus is blocking your ability to make PayPal payments, check this guide for further information.

6. You receive the Something went wrong on our end PayPal error

This issue can arise when you’re trying to reset your password or when attempting to log in to your PayPal account.

The listed solutions also apply when you have the following issues:

  • Paypal not loading – This happens mostly when there are server issues or problems with your browser of Internet connectivity
  • Paypal credit not working – This issue is triggered when users are unable to make payments via PayPal
  • Paypal app not working – This happens when there are software issues with the PayPal app that you have installed.

For further information regarding this issue, please check out this detailed guide. And that’s about it. If you have any other questions, feel free to reach in the comments section below.

For more troubleshooting guides about this service, check out our PayPal Issues Hub.

To learn more about online services and tools, visit our Web Apps page.

Microsoft Store won’t accept PayPal payment [Solved]

The Microsoft Store offers many services, products, and apps that are ideal for Windows 10 PCs. However, some users report Microsoft Store PayPal, not working issues.

The reason for this problem revolves between Microsoft Store and PayPal itself. Therefore, the WindowsReport team has provided applicable workarounds to solve this Microsoft Store PayPal not working problem.

Microsoft Store won’t accept payment

  1. Check your PayPal account
  2. Use an alternative to Paypal
  3. Change Region
  4. Use VPN and generated US address
  5. Reset Microsoft Store
  6. Delete Microsoft Store database files
  7. Re-register the Store App
  8. Update payment options
  9. Run Windows Update

1. Check your PayPal account

Firstly, you need to check whether your PayPal account has been limited or not. Most of the time, PayPal users get limited and ‘enforced’ by PayPal to provide certain documents before they can remove the PayPal limits.

In addition, if your PayPal account has some flags or imposed limits, then you might have to contact PayPal to solve the problem. This method can potentially fix the ‘Microsoft store PayPal not working’ issue without any stress.

2. Use an alternative to Paypal

If none of the solutions above or below manage to help you fix PayPal payments to the Microsoft Store, then maybe you should choose an alternative payment option altogether.

One perfect example of this case is Revolut, an independent and extremely reliable virtual banking and credit card tool that oversimplifies the way you can manage your finances.

Simply go to their website or download the mobile app, register, and you are free to go. As an added bonus, you will receive a physical credit card within just a few days, at no additional costs.

The card can be used for any type of payment, including online ones like with the Microsoft Store.

Revolut

Revolut

Make online payments faster than ever before with the help of this amazing virtual card service, all without any hidden costs.

3. Change Region

Microsoft Store works only in certain regions, most especially the US. Therefore, another way to clear off Microsoft store PayPal not working problem ultimately is by changing your PC region to US region. Alternatively, you can change your date and time as well to reflect the current US time.

Follow these steps in order to do that:

  • Go to Settings
  • Select Time & Languagemicrosoft store paypal not working
  • In the left pane select Region & language. In the right pane select United States as your Country or region.microsoft store paypal not working

However, if Microsoft store PayPal, not working problem persists, you can proceed to the next workaround.

4. Use VPN and generated US address

Another way of bypassing Microsoft store PayPal not working problem is by using a VPN along with a US-based address for your payment info.

Firstly, it is ideal to use a VPN for Paypal with a dedicated IP address. VPN goes a long way in protecting your identity and keeping your online activity anonymous.

Some of the best VPNs you can use with PayPal include CyberGhost, NordVPN, Hotspot Shield Elite, etc.

In addition, after activating your VPN service, we do recommend that you use an address generator such as namefake or fakenamegenerator.com to generate your US-based address.

Here’s how to do this:

  • Go to fakenamegenerator.com
  • In the Gender tab, select your gender
  • In the name set tab, select your nationality.
  • Now, in the Country tab, select American.
  • Click on Generate
  • Save the address somewhere safe. For instance:
  • Enter your ‘generated’ US address in the payment info tab as required by Microsoft store.

Meanwhile, if you encounter Microsoft store PayPal not working problem after these workarounds-which is unlikely, then you should reset Windows Store.

5. Reset Microsoft Store

Another quick and easy solution to try out is to reset Microsoft Store to default settings. This method is effective in fixing the issue.

Here’s how to do this:

  • Open the Settings app. Alternatively, press Windows Key + I.
  • Afterwards, go to the Apps section.microsoft store paypal not working
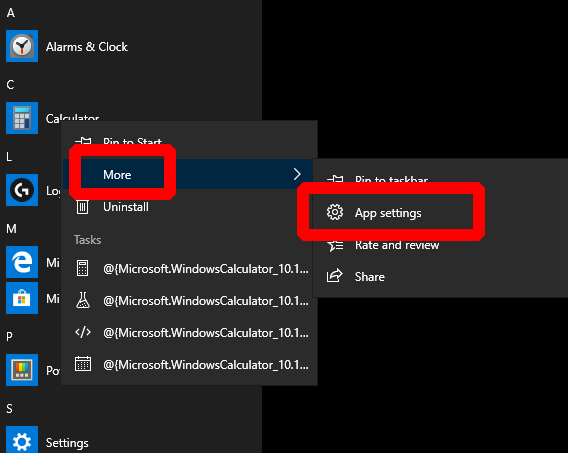
  • Select Microsoft Store from the list and click on Advanced options.microsoft store paypal not working
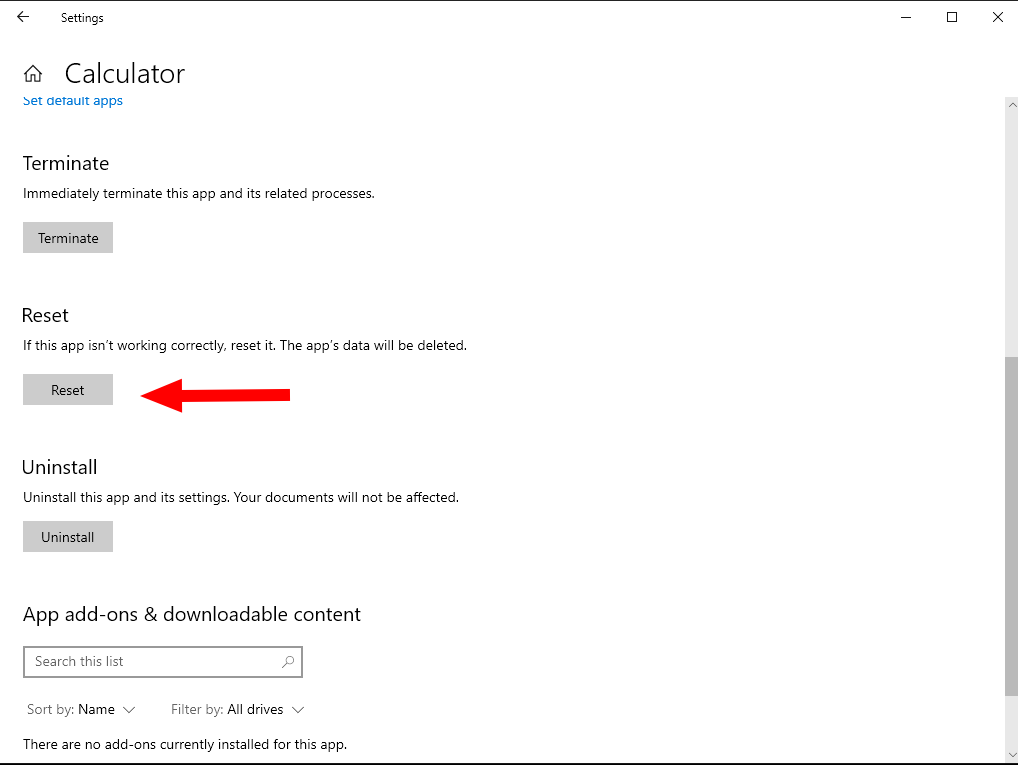
  • Click the Reset button. Now click Reset button in the confirmation dialog to proceed.microsoft store paypal not working
  • Wait until the process is finished.
  • Restart your computer.
  • Now, open the Store, sign-in to your Microsoft Account again, and then add your payment info when prompted to do so.

6. Delete Microsoft Store database files

If you still experience Microsoft store PayPal not working issue even after trying all the solutions mentioned above, the subsequent step is removing Microsoft Store database files.

Here’s how to do this:

  • Locate C:WindowsSoftwareDistributionDataStoreDataStore.edb and delete DataStore.edb.
  • After deleting the .edb file, restart your PC.
  • Launch Microsoft Store

7. Re-register the Store App

Follow these steps to re-register the store apps:

  • Open Start screen and press Windows + R keys on the keyboard.
  • Run the following in a Command Window (CMD) to re-register the Store App:

powershell -ExecutionPolicy Unrestricted Add-AppxPackage -DisableDevelopmentMode -Register $Env:SystemRootWinStoreAppxManifest.XML

8. Update payment options

If you still have issues adding your PayPal account, then you might consider adding alternative payment methods such as debit cards or credit cards.

However, in order to add a new payment method and/or update your payment method, you need to log in with your Microsoft account to the Microsoft payments site.

Follow these steps to add a payment method:

  • Sign in to Payment options with your Microsoft account.
  • Select Add payment option.
  • Fill in the required fields, then select Next, and you’re done.

Follow these steps to add a payment method If using Xbox One console

  • Sign in to the Microsoft account associated with the payment option you want to add.
  • Press the Xboxbutton to open the guide
  • Select Settings.
  • Under Account, select Payment & billing.
  • Under Payment options, select Add a payment option.
  • Choose a payment option and follow the instructions

To update the payment method, do the following:

  • Sign in to your Payment options with your Microsoft account.
  • Pick a payment method, and then select Edit info.
  • Type your updated info. Payment options used to pay for a subscription can be edited, but can’t be removed until you change how you pay for the subscription. Go to Card info for subscriptions or other services associated with the payment option
  • When you’ve made your changes, select Next.

To update from your Xbox One console, do the following:

  • Sign in to the Microsoft account associated with the payment option to update.
  • Press the Xbox button on your controller to open the guide
  • Select Settings.
  • Under Account, select Payment & billing.
  • Under Payment options, scroll right to the payment option you want to update
  • Select Edit info.
  • Update payment option details, then select Save.

Note: Ensure that the country linked to the payment mode is the same as the country linked to your Microsoft account.

9. Run Windows Update

Microsoft consistently releases patches that fix bugs and a plethora of issues —  this relates to Microsoft products and services most especially the Microsoft Store. Therefore, Windows Update might also be applicable in solving Microsoft store PayPal not working problem.

Here’s how to update your Windows 10 OS:

  • Open the Settings app.
  • Now go to Update & Security section.
  • In the right pane, click Check for updates button

In conclusion, you can also get in touch with Microsoft Store support team if you still experience Microsoft store PayPal not working problem.

Speaking of purchases, you can also check your Microsoft Store order history, and we have a great guide that shows you how to do that.

However, keep us informed if you have any other Microsoft Store issues or if you were able to get it resolved by using any of these solutions by leaving a comment in the section below.

Set up a credit card terminal on Windows 10/11

Your Windows 10 tablet or device can become a mobile credit card terminal with the right app, read below to find how you can do it

When credit cards first came along they were regarded as the best thing that ever happened: our money was safe, we never had any issues with carrying lots of bills or coins along with us and they were very convenient.

Nowadays, the credit card is slowly but surely integrated into mobile device. This way, we move closer to a smartphone or tablet that can help us do anything.

Although the concept isn’t new and its features are already known from the other mobile apps that we can use to pay anything with, this Windows 10 app offers its users lots of features and a high level of security, so they can transform their Windows 10 devices into credit card terminals.


How do I turn my device into a credit card terminal?

1. Use a dedicated virtual credit card app

Technology has evolved a lot, and virtual banks have begun appearing everywhere. However, with all of this freedom of choice, it becomes harder and harder to weed out which are the most reliable of them all.

That being said, we recommend Revolut, a Virtual banking service that provides you with all of the utility of an actual bank, but without any of the associated headaches.

Simply install the app, register for a free account, and you are set. As an added bonus, you will receive an actual physical card within several working days.

The fact that you can make payments and transfers to and from contacts with just a few finger taps are just some of the reasons why this service is regarded as one of the best virtual credit card apps in the world.

Of course, just because the app is simple to install and use doesn’t mean that it isn’t secure. Accessing the app is done via a PIN code at all times, and transfers and payments can be set to only be done via confirmation.

As for turning your device into a terminal, if your have a smartphone that supports NFC, then you won’t even need the physical credit card to make your payments.

Revolut

Revolut

Turn your Windows 10 tablet into an efficient credit card terminal with the help of this amazing virtual credit card service.

2. Credit card terminal alternatives

You can also think about other apps that may serve you as a credit card terminal: Credit Card Reader (mobile only). Even if it doesn’t support your PC, it works like a charm on Windows mobile devices.

It has some interesting features as:

  • Calculates tax rate
  • Allow customers to include tip
  • Export data to Excel
  • Next day funding

⇒ Download Credit Card Reader 


[wl_navigator]

Windows 10 news recap: PowerToys gets bug fix update, May 2020 Update still blocked on some Surface devices, and more

Welcome back to our Windows 10 news recap, where we go over the top stories of the past week in the world of Microsoft’s flagship operating system.

Windows 10 Your Phone app will soon let you sync multiple Android phones

The Your Phone app is set to support syncing multiple Android phones in the near future, perfect for those who carry multiple phones.

Windows 10 Your Phone

PowerToys for Windows 10 gets memory leak fix and more with latest update

Improving the stability of PowerToys for Windows 10, Microsoft has released a new update this week that aims to fix a few critical bugs, including a memory leak issue.

Windows 10 May 2020 Update is apparently still blocked on several Surface devices

Users of some of Microsoft’s Surface devices are still unable to update to the Windows 10 May 2020 Update, as apparently the update is still being blocked on some of the devices – something most users wouldn’t expect from Microsoft’s own line of devices.

That’s it for this week. We’ll be back next week with more Windows 10 news.

iTunes error 42110, 14? Here are our fixes

iTunes is a great multimedia application, but some users reported that they are experiencing iTunes error 42110 and 14.

These errors can prevent you from downloading music and other multimedia content, so in today’s article, we’re going to show you how to fix them properly.

How do I fix iTunes error 42110 and 14?

1. Update iTunes

  1. Open the App Store.
  2. Navigate to the Updates section.
    appstore update itunes error 42110, 14
  3. If there are iTunes updates available, click the Install button next to them.

2. Run iTunes as administrator

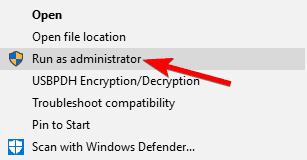
  1. Right-click iTunes shortcut.
  2. Choose Run as administrator.
    run as administrator itunes error 42110, 14

If this method works, you’ll need to repeat this process every time, or you can set iTunes to always start with administrative privileges by doing the following:

  1. Right-click the iTunes shortcut and choose Properties from the menu.
  2. Navigate to the Compatibility tab.
  3. Check Run this program as an administrator option and click on Apply and OK.

Keep in mind that this solution applies only to Windows platform.


3. Remove SC Info directory

  1. Close iTunes completely.
  2. Press Windows Key + R and enter %ProgramData%Apple ComputeriTunes and press Enter.
    run itunes error 42110, 14
  3. Locate the SC Info directory and remove its contents.
  4. Restart your computer and start iTunes again.

For Mac:

  1. Close iTunes.
  2. Open Finder and select Go > Go to Folder.
  3. Type /Users/Shared/SC Info  and press Enter.
  4. Now delete everything inside of the SC Info directory.

After doing that, error 42110 and 14 will be gone.


4. Check your USB cable

  1. Make sure that your USB cable isn’t damaged.
  2. Try using a different USB port.
  3. Connect your iOS device using a different Apple-certified cable.
  4. If everything else fails, try connecting your device to a different computer.

iTunes errors 42110 and 14 can be problematic and prevent you from downloading multimedia content, but hopefully, you managed to fix them using our solutions.

[wl_navigator]

How to set up a VPN on jailbroken Firestick? 5 best VPNs

If you have a jailbroken Firestick, you can use a VPN to watch unlimited streaming on Netflix, Hulu, BBC iPlayer, Prime Video, or other online services.

A VPN can help unblock movies and TV shows that are exclusive to other regions and not normally available to you. Besides, you can also use a VPN to protect your online identity when browsing the web on the Firestick.

Follow the 11 simple instructions below to quickly set up a VPN on your jailbroken Firestick. We’re also showing you the 5 best VPNs for Amazon’s device.

What do I need to install a VPN on a Firestick?

  • A second- or third-generation Firestick.
  • Subscription to a premium VPN (we used PIA in our example below).
  • File manager for Firestick (we used ES File Explorer).
  • A computer.
  • USB cable.

How do I set up a VPN on a jailbroken Firestick?

download PIA APK
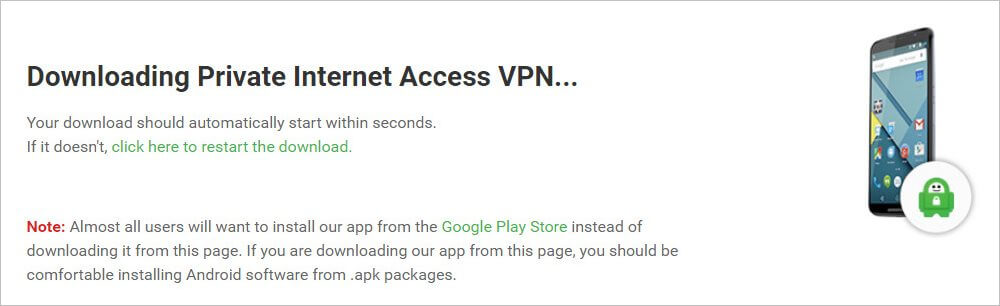
  1. Download PIA APK to a computer.
  2. Connect the PC and Firestick with the USB cable.
  3. Transfer the APK to the Firestick.
  4. Unplug the Firestick from the PC, plug it to the TV and switch it on.
  5. On the TV, download ES File Explorer from Amazon Appstore.
  6. Install ES File Explorer on the Firestick.
  7. Open ES File Explorer and select Internal Storage.
  8. Select the PIA APK file and install it.
  9. When it asks for permissions, click Install again.
  10. Open PIA and log in with your credentials.
  11. Select a VPN server and connect.

Since PIA doesn’t have a native app in the Amazon Appstore, you have to use this workaround to get it up and running on your jailbroken Firestick. But if the Firestick isn’t jailbroken, it won’t work.

On the other hand, if you choose a VPN with a native app for Firestick, then you won’t have to go through all this trouble since you can directly install it from the Amazon Appstore. Plus, a native VPN client works whether your Firestick is jailbroken or not.

What are the best VPNs for jailbroken Firestick?

Private Internet Access

use PIA for Netflix on Mac

Developed by Kape Technologies, Private Internet Access is the best VPN for jailbroken Firestick, and that’s why we used it in our how-to guide above. It’s also the best VPN for watching Prime Video.

PIA has high-speed VPN servers optimized for streaming, allowing you to watch Prime Video, Netflix, Hulu, HBO Go, and other media services. It protects your DNS queries with PIA DNS servers and supports port forwarding.

Although PIA doesn’t have a native app for Amazon Appstore, you can use the workaround above to quickly set it up on your Firestick. And, if you stumble upon technical difficulties, you can turn to its 24/7 live chat support.

More about PIA:

  • +3,300 VPN servers in 48 countries
  • 10 simultaneous connections
  • Watch Netflix US
  • No traffic logs
  • 30-day money-back guarantee (no free trial)

Private Internet Access

Install this VPN on your jailbroken Firestick to unblock Netflix US and secure your Internet connection.
Check price Visit website

NordVPN

use NordVPN for Netflix on Mac

Created by Tefincom & Co., NordVPN is one of the best VPNs to watch Netflix on Mac. You can also install its native app on your Firestick from the Amazon Appstore without having to use a file manager and computer.

NordVPN is designed for all critical Internet activities, including streaming, torrenting, gaming, and secure browsing. You can use it to circumvent geoblocks, lift geo-restrictions, and defeat censorship on any device.

On your Firestick, you can boost your security with CyberSec, use the best server with Quick connect, explore specialty servers such as Obfuscated, Double VPN, or Onion over VPN, as well as configure custom DNS servers.

More about NordVPN:

  • +5,100 VPN servers in 59 countries
  • Protects 6 devices at once
  • Unblocks Netflix US, UK, France, Italy, Germany, Australia, Spain, and more
  • No identifying logs
  • 30-day money-back guarantee (no free trial)

NordVPN

Unblock streaming services on your jailbroken Firestick and protect your Wi-Fi connection with this reliable VPN.
Check price Visit website

Surfshark

use Surfshark for Netflix on Mac

Surfshark surpasses the other VPNs on this list in several aspects, such as low prices and unlimited device connections. It is owned by Surfshark LTD and has a native app available in the Amazon Appstore.

As such, you can quickly install Surfshark on your Firestick, even if it’s not jailbroken. It gives you the possibility to watch numerous Netflix libraries from all over the world.

Surfshark has private DNS one each VPN server, obfuscated servers, an emergency kill switch, and split tunneling. You can install it on all important operating systems.

More about Surfshark:

  • +1,700 VPN servers in +63 countries
  • Unlimited connections
  • Watch Netflix US, UK, India, South Korea, Poland, Sweden, Turkey, and more
  • A strict no-logging policy
  • 30-day money-back guarantee (no free trial)

Surfshark

Quickly set up this VPN on your jailbroken Firestick and start watching the best Netflix titles.
Check price Visit website

CyberGhost VPN

An alternative virtual private network solution is CyberGhost VPN, which is also operated by Kape Technologies. In fact, it’s the best free VPN for jailbroken Firestick on this list.

CyberGhost VPN gives you the possibility to quickly connect to the nearest VPN server to get the best possible speed. You can use it to access blocked websites, enable split-tunneling mode, and optimize your DNS servers.

Furthermore, you can download CyberGhost VPN straight from the Amazon Appstore, which means that you can seamlessly install it on your Firestick, whether it’s jailbroken or not.

More about CyberGhost VPN:

  • +6,500 VPN servers in 89 countries
  • 7 connections at the same time
  • Unblocks Netflix US, UK, Canada, Japan, Germany, France, and more
  • No traffic logs
  • Up to 45-day money-back guarantee (1-day free trial)

CyberGhost VPN

Easily set up this dependable VPN on your jailbroken Firestick to access unlimited streaming media.
Check price Visit website

ExpressVPN

use ExpressVPN to unblock Netflix UK

ExpressVPN is another excellent VPN for your jailbroken Firestick, especially since it comes with a native VPN client available for download in the Amazon Appstore. It belongs to Express VPN International.

You don’t have to worry about your online security and privacy since ExpressVPN goes to great lengths to protect them. It encrypts your network data with 256-bit AES military-grade encryption.

Moreover, ExpressVPN uses a zero-knowledge DNS and TrustedServer exclusive technology to erase any details about your VPN traffic. You can unblock various streaming services on your Firestick, including Netflix catalogs.

More about ExpressVPN:

  • +3,000 VPN servers in +94 countries
  • 6 simultaneous connections
  • Watch Netflix US, UK, Canada, Australia, Japan, and others
  • No logs
  • 30-day money-back guarantee (no free trial)

ExpressVPN

Protect your online privacy and security on jailbroken Firestick using this trustworthy VPN.
Check price Visit website

To sum up, you can set up a VPN on your jailbroken Firestick not just to unblock streaming services like Netflix but also to secure your browsing sessions and protect your device from hackers.

Even if your preferred VPN doesn’t have a native client that you can download from the Amazon Appstore, you can still get it up and running on your jailbroken Firestick by taking some extra steps.

Firefox 78.0.2 brings security and screen reader fixes

User privacy and security features were among the key highlights of Firefox 78.0, which Mozilla released on June 30, 2020.  But the browser seems to have had a security vulnerability that’s now patched with update Firefox 78.0.2.

Firefox 78.0.2 security patch

Firefox 78.0.2 fixes a website framing bug.

If a website frames yours, it gets the ability to display your site’s content. But you can use the X-Frame-Options header to prevent other websites from doing that in Firefox.

However, it appears that someone could have used object or embed tags to override X-Frame Options in Firefox.

Mozilla explains:

Using object or embed tags, it was possible to frame other websites, even if they disallowed framing using the X-Frame-Options header.

Other fixes

Firefox version 78.0.2 offers non-security solutions too, including for a screen-reader bug. As Mozilla explains, the issue made it difficult for readers using the assistive tech to get to the content they want to read.

The reader-mode-processed content appears after the reader mode toolbar in the accessibility tree, which is a problem for screen-reader users because they have to wade through the toolbar (which unfortunately isn’t using the most semantic markup as it is) to get to the content every time.

In addition, the update resolves a problem causing an address bar malfunction on macOS. With this issue, the address bar failed to work if you typed something in it and pushed enter to get search results.

Mozilla had linked the problem to a corrupt or locked database, which caused the user’s favorite search engine not to work in the browser. The company then issued update ESR 78.0.1 to fix the bug on macOS, but that didn’t work.

Hopefully, Firefox 78.0.2 settles the address bar issue once and for all.

Also available is a patch for a problem whereby, if you received a Microsoft Teams link by email, you couldn’t open it in Firefox. The bug originated with the Firefox ESR 78.0.1 update.

How’s your experience with Firefox 78.0 so far? You may let us know via the comments section below.

[wl_navigator]

iTunes errors 13014, 9? Here’s how to fix them

If you own an iOS device, you’re most likely familiar with iTunes. Although iTunes is great, many users reported iTunes errors 13014 and 9.

These errors can be problematic, and they can prevent you from starting iTunes. However, there’s a way to fix these problems once and for all.

How can I fix iTunes error 13014 and 9?

1. Delete iTunes Library Genius.itdb-journal file

  1. Go to C:\Users\your_username\Music\iTunes directory.
  2. Now locate and delete iTunes Library Genius.itdb-journal file.

On Mac:

  1. Navigate to Home\Music\iTunes.
  2. Locate iTunes Library Genius.itdb-journal and delete it.

If that doesn’t work, you can try removing iTunes Library Genius.itdb or iTunes Library Genius.itdb.lock file as well.

2. Turn off the Genius feature

  1. Open iTunes.
  2. Select File > Library.
  3. Now click on Turn Off Genius.
    turn off genius itunes error 13014, 9

You can also turn off the Genius feature by doing the following:

  1. Make sure you’re disconnected from the Internet.
  2. Open iTunes and go to Preferences > General.
  3. Uncheck iCloud Music Library and click OK.
  4. Now go to File > Library and turn off the Genius feature.

3. Move your iTunes library

  1. Move your iTunes library to the Desktop.
  2. Start iTunes again and choose the option to create a new library.
  3. Now add the songs from your library and check if the problem is still there.

Few users reported errors 13014 and 9 in iTunes while storing their iTunes library on NAS. To fix it, move the library from NAS to the local disk.

4. Free up space and restart your Mac

  1. Make sure that you have enough space on your local disk. If needed, free up some space.
    hard disk itunes error 13014, 9
  2. If freeing up space doesn’t help, restart your Mac and check if that helps.
  3. If you have antivirus software installed, be sure to disable it or remove it and check if that solves the problem.

If you need to automatically unclutter your Mac device and free up storage space, you can successfully get it done using the CleanmyMac X tool.

5. Make sure that your devices are up to date

  1. Make sure that both your Mac, iOS device, and iTunes are up to date.
  2. Restart your iOS device, connect it, and choose the Update option.

Alternatively, you can try these steps:

  1. Check the USB cable for damage.
  2. Try using a different USB cable or a different USB port.
  3. If everything else fails, try using a different computer.

iTunes errors 13014 and 9 can be problematic, but we hope that you managed to fix them using our solutions.

Dark/light mode missing in Microsoft Edge Canary build

Dark mode made it to a couple of Windows 10 and Office 365 apps, including Outlook and Microsoft Edge, sometime back.

Regardless of the ongoing debate about its potential visual ergonomics, turning dark mode on can give your app’s interface a unique, cool appearance.

But if you’re a dark mode fan currently using the latest Canary build of Microsoft Edge, you won’t like what has happened to the feature. It’s just not an option on the browser’s Settings page.

Dark and light mode options not available in Microsoft Edge Canary

To choose a dark or light theme in the stable version of Edge, you normally go to the edge://settings/appearance page. Then, under Customize browser, you select Dark or Light from the dropdown to the right of Default theme.

However, according to a screenshot that a user recently posted on Reddit, the Customize browser section is missing on the Settings page of the Edge Canary build.

 Newest build of Canary removes ability to choose light/dark theme. Defaults to system setting

It’s not yet clear whether the missing theme options are as a result of a deliberate move or an oversight on the part of the Microsoft Edge team. In the meantime, you can only work with the theme you set for all Windows 10 apps.

The Edge browser usually lets you apply dark or light mode regardless of your system theme.

If the bug makes its way through the beta testing channels to the stable version of Microsoft Edge, a lot of users will be unhappy.

The good news though is that a member of the Microsoft Edge team acknowledged the issue on Reddit and promised a fix.

Great news: this is a known issue in the Settings page, and our team is already working on it!

Have you tried dark mode in Microsoft Edge yet? Feel free to share your experience with the theme or ask any question via the comments section below.

[wl_navigator]

iTunes Error Code 5105, 4005? Here’s How to Fix It

There are various problems that you can encounter in iTunes, and a few common ones that users reported are 5105 and 4005.

These errors can appear while trying to download app updates, so today we’re going to show you how to fix them properly.

How do I fix iTunes error code 5105 and 4005?

1. Run iTunes as an administrator

  1. Close iTunes completely.
  2. Locate iTunes shortcut, right-click, and choose Run as administrator.
    run as administrator iTunes error code 5105, 4005

Note: This solution only works on Windows.

Keep in mind that you’ll have to repeat this solution every time you want to start iTunes. You can also set the iTunes to always run with administrative privileges from the Compatibility tab.

2. Disable Bonjour service

  1. Press Windows Key + R and enter msc. Press Enter or click OK.
    run window services iTunes error code 5105, 4005
  2. Locate the Bonjour Service and double-click it.
  3. If the service is running, click the Stop Set the Startup type to Disabled, click on Apply and OK to save changes.

Keep in mind that this solution applies only to Windows computers. Also, you can uninstall Bonjour.

3. Check your credit card info

  1. Login to your account.
  2. Now locate the Payment section.
  3. Check if your credit card info is up to date.

Several users reported iTunes errors because their credit card info was outdated, so be sure to check that.

4. Reinstall iTunes

  1. Completely remove iTunes from your computer.
  2. Now download and install the latest version.
  3. After doing that, check if the problem is still there.

5. Restart your iOS device and try to update it

  1. Restart your iOS device.
  2. Connect it to your computer.
  3. Start iTunes and choose the Update option.

6. Install the latest updates, try a different USB port or a computer

  1. Update both your operating system and iTunes to the latest version.
  2. Try using a different USB port on your computer.
  3. Use a different Apple-certified USB cable.
    USB cable iTunes error code 5105, 4005
  4. If that doesn’t work, try using a different computer.

iTunes errors 5105 and 4005 can cause problems while restoring or updating your iOS device, but after using our solutions you won’t have this problem anymore.

Fake Office 365 login page created to steal user credentials

Cyber gangs, yet again, created a fake Office 365 login page with a view to stealing their victims’ Microsoft credentials, according to an Abnormal Security report.

Threat actors have done this before, such as, when they set up a fake Microsoft Outlook login page to capture their targets’ Microsoft account usernames and passwords. They’ve also targeted remote workers that access their Office 365 accounts via VPNs.

Fake Office 365 login page, spoofed Zoom email

In the phishing attack that Abnormal Security reports, hackers targeted remote workers that that have Zoom and Office 365 accounts.

First, they spoof the official Zoom email address, from which they send phishing emails to their targets. But they’re targeting the employees’ Office 365 login credentials in the end.

Each phishing email notifies the recipient to click a provided link or lose access to their Zoom account.

As you’d expect with any such attack, clicking the link doesn’t lead to a legitimate Zoom site. Instead, it eventually takes the target to a fake Microsoft login page.

The phishing page is hosted on a different domain though. By attempting to log in to their Office 365 account via the fake portal, the victim hands their security credentials to the hackers.

The email contains a link concealed within the text that redirects to a page hosted on an unrelated domain (likely hijacked by the attackers). This link redirects to a fake Microsoft login page hosted on another domain. Though the email impersonates the Zoom brand, the attacker is targeting the recipient’s Microsoft credentials, which can be used to access a larger trove of sensitive information.

However, it’s not just the Office 365 platform that’s at risk. A recent survey by NetMotion found that 300 remote workers clicked malicious web links in just 30 days.

Against the backdrop of all these hacking and phishing events, it may be time to rethink best practices for cloud security.

What are your thoughts on possible Office 365 security gaps? Feel free to ask any question or leave a suggestion in the comments section below.

[wl_navigator]

Excel lets you use food, movies, space, and more data types

What type of data do you mostly handle or process in Excel day to day? Names of places, movies, food?

Well, from now on, you don’t have to assign generic types, such as, text or integers, to that kind of data.

Where relevant or applicable, you have the option to use any of the more than 100 new Excel data types that Microsoft launched to Office insiders on Windows 10 and Mac.

New Microsoft Excel data types

If you’re an Office insider with a Microsoft 365 subscription, you can start working with the new data types in Excel, including:

Food: calories, carbohydrates, fats, vitamins, nutrients, etc.

Exercise: exercise types and calories burned.

Locations: zip codes, economic data, airports, schools, forests,etc.

Universities: graduation rates, tuition, student body, etc.

Chemistry: elements, compounds, and minerals.

Space: planets, moons, satellites, supernovas, space missions, etc.

Movies: actors, characters, directors, release dates, poster art,etc.

And More: music, plants, animal breeds, famous people, languages, etc.

Moreover, you can assign properties to your data types. For example, the food data type has properties like calories and nutrients.

You can reference data types with formulas besides creating your data types in Excel. Also, you can manipulate the data as you’d typically do in a table.

For example, you may filter or sort your data based on the new properties.

In addition, the feature comes with a couple of automations to let you quickly get started on crunching the numbers.

Creating a table for the Food data type is a perfect example. When you add a column to the right of the Food table, you’ll get auto-suggestions for a single field or multiple fields. Also, Excel will auto-fill the columns with their respective values.

The new Excel data types are yet another consumer-focused feature that Microsoft is bringing to the spreadsheet application. A few weeks ago, the company announced Money in Excel, a personal finance management tool aimed at individual consumers.

If you’re an Office insider, have you received the new Microsoft Excel data types yet? Kindly let us know in the comments section below.

New Microsoft KDP blocks malware by protecting the Kernel

According to a Microsoft security blog post, right now, attackers that were rejected by security technologies that prevent memory corruption, are switching their focal point towards data corruption.

Attackers use data corruption techniques to target system security policy, escalate privileges, tamper with security attestation, modify initialize once data structures, among others.

To counter the attacks, Microsoft is launching a new technology, Kernel Data Protection (KDP).

How does Kernel Data Protection protect your OS?

KPD uses virtualization-based security (VBS) to protect a part of the Windows Kernel and drivers against data corruption attacks, taking advantage of hardware virtualization features.

Basically, VBS is creating and isolating a secure region of memory from Windows 10.

This way, protecting the kernel memory as read-only will also protect the inbox components, security products, and third-party DRM drivers.

According to Microsoft, the protection is implemented in two parts:

  • Static KDP enables software running in kernel mode to statically protect a section of its own image from being tampered with from any other entity in VTL0.
  • Dynamic KDP helps kernel-mode software to allocate and release read-only memory from a secure pool. The memory returned from the pool can be initialized only once.

What do I need to get Kernel Data Protection?

You don’t have to do anything special to benefit from the new Kernel Data Protection. If you have VBS support, you will also be able to use KDP with an application on Windows 10.

According to Microsoft, right now, VBS is supported on any computer that supports:

  • Intel, AMD or ARM virtualization extensions
  • Second-level address translation: NPT for AMD, EPT for Intel, Stage 2 address translation for ARM
  • Optionally, hardware MBEC, which reduces the performance cost associated with HVCI

KDP is already included in the latest Windows 10 Insider Build. We don’t know yet when it will be included in the Windows 10 stable release.

[wl_navigator]

Microsoft starts testing modern commenting experience in Word

Microsoft Word on Windows is getting a modern commenting experience that should help you focus on your content without missing active comments from teammates related to the specific part of the document you’re working on. The modern commenting experience is now available through a dedicated Comments pane for Windows Insiders running the Beta Channel Version 2006 (Build 13006.20002) or later.

The new commenting experience will allow Microsoft Word users to choose between multiple views. By default, it will provide a “focused view” of comments next to the page you would be working on. You should be able to click the “Comments” button (also called Collab corner) in the upper right corner of your Word window in order to switch between different views. Once you have taken care of these comments, they will be instantly moved to the Comments pane, where you will be able to find them later as per your requirements.

GIF of modern commenting experience

It is worth noting that your comments will only be visible to people once you have finished editing them and have clicked the Post button at your end. The new feature will allow you to bring other team members into the conversation by using @mentions, and it will send automatic updates made in the comment thread to the mentioned users.

GIF of modern commenting experience

The new experience is part of Microsoft’s efforts to align the existing commenting capability across all Word platforms and other Office apps, including Word, Excel, and PowerPoint. It should provide a much-needed foundation for a richer Word collaboration experience for remote teams by introducing modern features such as @mention notifications, and more.

If you are interested to learn more about how the new commenting experience works, feel free to check out the Office Insider post.

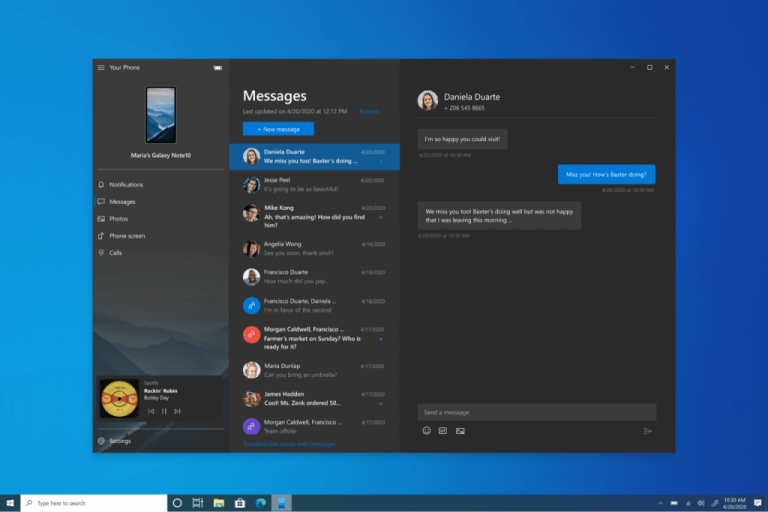
Windows 10 Your Phone app lets you pair more smartphones

Microsoft announced in a tweet that they released a new feature, available only for Insiders first. The new feature enables you to pair another smartphone with Your Phone app.

How can I pair my smartphone in Your Phone app?

It’s pretty easy to do that. Just click on the Settings button from the bottom left corner of the app and then click on the Add a device button to start adding your new smartphone.

Add another device in Your Phone app

For now, even though you have the graphic option to pair an iPhone, the feature only works with Android devices.

add Android iPhone in Your Phone app

Windows 10 Your Phone app has seen a lot of improvements lately, like controlling music, accessing your photos, and displaying notifications from your smartphone.

The new features of Your Phone app culminated with the syncing feature from Surface Duo.

You can download Your Phone app from Microsoft Store or you can just open Microsoft Store from your Windows 10 device and search for Your Phone app.

We remind you that this new feature is available now only for Windows Insiders.

[wl_navigator]

Fix the PS4 error code CE-35694-7 in just 3 easy steps

The most annoying this about the PS4 error code CE-35694-7 is not that it doesn’t allow you to play games on your console, but that the error message is vague , and leaves no clue about the cause of the issue.

All it says is that an error has occurred.

However, it’s a good thing that you’re reading this guide because you are about to find out what causes the PS4 error code CE-35694-7 and how to fix it.

This problem arises when the hard disk of your PS4 console runs out of storage space to download new games.

In the past, you wouldn’t get this error if the space available is sufficient to run the game.

However, recent firmware will hit you with the CE-35694-7 error when the storage space is less than double of what you require to play the game.

Keep reading this guide to get working fixes for this issue.

How can I fix the PS4 error code CE-35694-7?

1. Delete irrelevant games and data

  1. Turn on the PS4 console.
  2. Navigate to Settings and tap the X button to select it.
  3. Go to System Storage Management and click on it using the X button.
  4. From the screen that follows, use the X button to click on Applications.
  5. Press the Options button on your controller, and select Delete.
  6. Click on the game titles and installed apps that you want to delete to mark their checkboxes.
  7. Navigate to the Delete button and select it with the X button.

Note: To clear out more space, you can also delete data from other locations. 

The number one cause of the PS4 error code CE-35694-7 is an insufficient storage space of your HDD. Therefore, clearing out old games and media will likely fix the issue.

Also, you don’t have to worry about your deleted data if you back it up somewhere else first before wiping them off your PS4.


2. Force check the system storage status

fix-PS4-error-code-CE-35694-7-force-storage-status-check

  1. Power on your console and connect a game controller to it via a USB cable.
  2. Press the Power button on the console and hold it down for a few seconds (the system will beep soon after, but only release the Power button when the LED light flashes).
  3. When the PS4 is completely turned off, press the Power + Eject buttons and hold them till the screen light up.
  4. On booting up, the system enters the System Storage Status check procedure. Give it some time, and the system will restart.

After deleting your games and freeing up your storage, the PS4 error code CE-35694-7 should go. However, due to a known PS4 bug, the system can show you inaccurate storage stats.

To resolve this issue, you need to force a System Storage check.


3. Rebuild the system’s database

fix-PS4-error-code-CE-35694-7-initialize-database

  1. A database rebuild is a PS4 alternative to a factory reset. Therefore, you must first back up your game saves either on a USB storage drive or on the cloud.
  2. Go to the Settings menu on your home screen ribbon.
  3. Scroll down to the Initialization option and hit the X button to select it.
  4. Select Initialize PS4.
  5. Select Full with the X button for a complete reboot of your system.

Start troubleshooting the PS4 error code CE-35694-7 from the first solution in this guide. Deleting unused data would most likely fix the PS4 error code CE-35694-7.

If this fails, it means that your console is having problems processing the correct empty storage space on the hard disk.

In this case, you now need to force a System Storage status check. If this also doesn’t work, your last resort is to initialize the PS4 console.

Make sure you back up your game saves and data before initializing your system. Hopefully, these methods should clear the error and let you continue to enjoy your PS4.

Op-Ed: Microsoft is finally taking PC gamers seriously, and it’s already paying off

Windows may be one of the most popular gaming platforms in the world, but it took some time for Microsoft to really pay attention to what PC gamers want. The Redmond giant allowed Steam to become the biggest digital storefront for PC games at the beginning of the millennium, and initiatives like Games for Windows Live, later replaced by the Windows Store on Windows 8 and Windows 10 have been received pretty poorly by PC gamers.

The Microsoft Store on Windows 10 still has lots of issues to this day, but the launch of Xbox Game Pass for PC last year finally brought some quality games to the store. All of Microsoft’s Xbox Game Studios are now launching on the Microsoft Store and Xbox Game Pass for PC on day one, joining high-profile games from other publishers such as Bethesda (Fallout 76), Square Enix (Final Fantasy XV), or Deep Silver (Metro Exodus).

The Microsoft Store catalog still has a long way to go before catching up to Steam or the Epic Games Store, but it’s finally something to be taken seriously in 2020. In parallel, Microsoft has also started releasing more of its games on Steam, and some of them such as Halo: The Master Chief Collection and Sea of Thieves have been consistently staying in the top sellers section. Microsoft said last month, that PC gamers spent more than 3.5 million hours in Sea of Thieves by the end of its first week on Steam, and the pirate game is currently the 4th best-selling game on Valve’s platform as of this writing, ahead of PUBG, Halo: MCC, and GTA V.

Sea of Thieves quickly became a best-seller on Steam.

Microsoft isn’t the only big game publisher to embrace Steam and other digital stores in a pretty big way. Two PlayStation 4 exclusive games, Death Stranding and Horizon Zero Dawn are currently among the top ten best Steam sellers ahead of their PC release this summer. EA also recently brought many of its recent games on Steam including Mass Effect: Andromeda and Star Wars Jedi: Fallen Order, and the company’s EA Access game subscription service that debuted on Xbox One consoles years ago will also be available on Steam later this year.

Microsoft and other publishers have certainly a lot to win by putting their games on Steam and the Epic Games Store, with the latter only taking a reasonable 12% revenue cut compared to Steam’s 30%. However, Microsoft is still keeping many of its cash cows off Steam: Minecraft is a pretty good example, along with the popular Forza series of racing games. However, things may well change after Microsoft saw the huge popularity of Sea of Thieves and Halo on Steam this year.

Speaking with Gamesindustry.biz this week, Xbox head Phil Spencer shared that “Last year was our biggest year ever on PC in terms of revenue as Xbox Game Studios.” Keep in mind that Halo: MCC on PC was only released in December of last year, while Sea of Thieves came to Steam on June 3, 2020. We can suppose that revenue will probably be up significantly this year, especially with Halo: Infinite and the new Flight Simulator launching on PC in the holiday season.

Xbox Game Pass for PC, which is still in beta, is also great value with an introductory price of $4.99/month. The subscription service is also expected to integrate with Project xCloud, with Microsoft reportedly experimenting with PC server blades for streaming PC games on other devices. The Project xCloud public beta has remained focused on Android and iOS devices so far, but we know that a Windows 10 app is also in the works. With Windows 10 now running on more than 1 billion devices, the game streaming service could become an attractive option for casual gamers with low-end PCs.

Overall, there’s really a demand for more Microsoft games on PC. Brian Jarrard, Community Director at 343 Industries is certainly aware of it after seeing a huge number of messages from Halo fans asking for a PC port of Halo 5: Guardians.

The upcoming Halo: Infinite will certainly be a critical title for Microsoft’s PC gaming ambitions. The game will be available on Xbox Game Pass for PC and console on day one, but we don’t yet if it will also come to Steam or other PC stores. Anyway, the game has the potential to become Xbox Game Pass for PC’s killer app, but at the same time, it could reveal the flaws of Microsoft’s Windows 10 Store to everyone. Five years after the launch of Windows 10, it’s still not clear if Microsoft can really fix the Microsoft Store.

Earlier this year, we learned that Microsoft would shut down its Ad Monetization platform for UWP apps on June 1, 2020. A previous report from ZDNet’s Mary Jo Foley also revealed that the future of the Microsoft Store was “uncertain,” with Microsoft planning to sunset its Microsoft Store for Business and Education. The Redmond giant could well follow EA’s footsteps and put all of its games on Steam, as well as Xbox Game Pass for PC. That would certainly make PC gamers really happy, though maybe Microsoft cares too much about services revenue to give up on the Microsoft Store.

How to open a window on a monitor from which it was launched

You may be running multiple monitors from a single computer. To optimize your workflow, you’ll want to customize how applications launch and display their Windows.

By default, programs usually launch onto the main display. But how do you open programs on a monitor from which it was launched in Windows 10?

You’ll find your answers in the following guide.

Make application open on the monitor it was launched from Windows 10

How to make a Windows 10 program remember which monitor it was on?

The easiest way to make an application open on the monitor it was launched on from windows 10 is to use a dedicated software solution. If you find it impossible to download or use the software recommended in this guide, there is a workaround.

In this section, we’ll cover both methods.

Use a dedicated software solution to open a program on a specific monitor

  1. Download and install DisplayFusion.
  2. Right-click on the DisplayFusion System Tray icon and select Settings.
  3. Click on Triggers from the left panel.
  4. Click on the Add button.
    open-window-launch-screen-displayfusion-triggers
  5. Make sure the checkbox marked Trigger is enabled is ticked.
  6. Select Window Created from the Event selection box.
  7. Under Frequency, select Always.
  8. Under Match Conditions, select your Process Filename. This is the application whose window you want to launch on a specific window.
  9. Leave everything else as is and click on the Add button.
  10. From the Add menu, select Move Window to Selected Monitor.
  11. In the appearing prompt, pick which monitor you want your application’s windows to launch from.
  12.  Click on OK.
    open-window-launch-screen-displayfusion-triggers
  13. On the settings screen, click on Apply then OK.
  14. Run your application to see if your windows launch on the right monitor.

Each window that’s created from this application will now launch on the selected window. This includes save and open file dialogs. You can configure this by including more trigger match conditions and changing the Frequency.

Applications like DisplayFusion are a must-have for users with multiple displays. This includes gamers, designers, hobbyists, and office professionals.

Not only can you manage which monitor an application launches its window on, but you can also set screen savers, have access to easier windows snapping, customize your taskbar(s), and set Windows position profiles.

For a complete setup walkthrough and feature overview, read our DisplayFusion guide.

Drag, drop, close and open to change which monitor a program opens on

  1. Run the desired application.
  2. Use your mouse to manually drag it to the monitor you want it to launch on by default.
  3. Close the window/application completely.
  4. Launch it again.

If it doesn’t work on your first attempt, you’ll need to try it again. Sometimes maximizing and then minimizing the window after you’ve dragged it can help. As you can tell, this may not be the most efficient way of changing the default monitor where a program opens itself on in Windows 10.

How do I open a program on a specific monitor Windows 10?

The best way to change which monitor a program opens on is by using one of DisplayFusion‘s many features.

It allows you to toggle which screen an application opens on, almost at will.

While we recommend DisplayFusion, there are other dual-monitor programs that can help you achieve the same effect.

It’s temporary. Once you restart your computer, the application will go back to launching the window on the main display.

Dedicated solutions like DisplayFusion provide you with an easier and less iffy way of picking which monitors a program launches its windows on.

Nevertheless, tell us if any of these solutions worked for you down in the comment section. How do you like to manage your displays?

How to reset a misbehaving app in Windows 10

Sometimes you might get into a situation where an app’s not working properly or you just want to return it to a freshly installed state. Fortunately, Windows 10 has a built-in reset option that means you don’t need to actually reinstall the app.

Screenshot of app's Start menu context menu in Windows 10 with More > App Settings highlighted

The quickest way to do this is to right-click the troublesome app in the Start menu. Click “More” and then “App settings” in the context menu which appears.

The app’s page within the Settings app lets you review its details, terminate any running processes and change basic configuration details. Scroll down the page to the Reset heading.

Screenshot of resetting an app in Windows 10

Click the “Reset” button to clear all data stored by the app, as if it was being reinstalled. Acknowledge the confirmation prompt to complete the action. A word of warning – this will delete all data associated with the app, such as your settings and any saved progress (in the case of games). Although some apps save to the cloud, you should make sure you have a backup of anything important before using this option.

With the app reset, launch it from the Start menu. With a little luck, your app should now be working normally again. You’ll need to reconfigure it as if it had just been installed for the first time.

Demand for Microsoft 365 skills is jumping in IT jobs marketplace

If there is no doubt that some countries have eased their lockdown restrictions, it seems unlikely that we will return to the pre-coronavirus world anytime soon. The crisis has been changing our working conditions across the world, and hundreds of companies and small businesses are now fast-tracking digital transformations in order to become more resilient to future disruptions.

The pandemic has also been providing new opportunities for companies developing collaborative solutions, such as Microsoft with its Microsoft 365 suite of tools. According to an analysis of ITJobsWatch data conducted by the TeleWare Group (via TheHR Director), professionals with Microsoft 365 skills are even more appealing to prospective employers than ever before.

The study showed that Microsoft’s productivity suite has gained six places in a list of the most in-demand IT job titles. The analysis also found around 5,174 permanent job advertisements in the UK that cited Microsoft 365 during the past 6 months, representing 6.25% of all permanent IT jobs, compared to 4.1% for the same period in 2018. Moreover, the median annual salary for IT professionals with Microsoft 365 skills in the UK has now reached £44,500, up 11% compared to 2018.

According to Steve Haworth, CEO of the TeleWare Group, most companies today are not a position to hire more people, but mastering Microsoft 365 has become a very valuable skill for the remote workforce. “Technology solutions should incorporate Microsoft 365, better connectivity through network provision, hardware, and AI solutions to set workers up for success,” said Haworth. “Tapping into the Microsoft talent on the market right now – or working with a trusted partner – will deliver better connectivity, collaboration and productivity to drive a strong bounce back.”

The good news is that it’s now a bit easier than before to build your skillset and get prepared for future job trends. Microsoft has recently launched an initiative to teach 25 million people across the world digital skills for free by the end of 2020. We invite you to check out our separate post to learn more.

Fix iTunes error 3600, 4000, 4013 with these solutions

If you own an iOS device, you most likely are using iTunes. Even though iTunes is a great application, you can encounter certain errors while using it.

In today’s article we’re going to show you how to fix iTunes error 3600, 4000, and 4013, so let’s get started.

How do I fix iTunes error 3600, 4000, and 4013?

1. Update both iTunes and your macOS

  1. Open the Apple menu and go to System Preferences > Software Update.
  2. If updates are available, click on the Update Now button to install them.
    software update itunes error 3600, 4000, 4013

To update iTunes, do the following:

  1. Open the App Store and navigate to the Updates section.
    app store updates itunes error 3600, 4000, 4013
  2. Now click Install next to iTunes update to install the update.

By updating your operating system and iTunes, you should be able to fix iTunes 4013 error.


2. Restart your iOS device

  1. Restart your iOS device.
  2. Once the device restarts, connect it to your PC.
  3. If asked to update or restore your device, choose Update.

3. Try using a different cable, USB port or computer

  1. If you’re having iTunes errors, try using a different USB port.
  2. Try using a different Apple-certified cable.
    USB cable itunes error 3600, 4000, 4013
  3. Try connecting the iOS device to a different computer.

4. Put your device in Recovery Mode and update

  1. Make sure iTunes is up to date.
  2. Connect your iPhone to your computer.
  3. Now press Volume Up then Volume Down button.
  4. Press and hold the Side Button while the iPhone reboots.
  5. Open iTunes and choose the Update option.

After doing that, iTunes error 4000 will be gone.


5. Hardware issues

In some instances, iTunes error 4013 can appear if there’s a hardware issue with your device.

The problem can be caused by loose cables or problems with the NAND chip or your camera.

To fix these problems, it would be best to take your device to Apple’s repair center.

iTunes error 3600, 4000, and 4013 can prevent you from connecting your iOS device with your computer, but we hope that this article helped you fix this problem.

[wl_navigator]

How to fix iTunes error -50, -54 for good

If you own an iOS device, iTunes is a must-have software. However, some users reported error -50 and -54 while using iTunes.

These errors will prevent you from syncing your files, and in today’s article, we’re going to show you how to fix these problems once and for all.

How can I fix iTunes error -50, -54?

1. Restart iTunes

  1. Make sure that the iOS device is connected to the computer.
  2. Close iTunes.
  3. Connect the device again and try to sync your files.

Several users reported that restarting iTunes has fixed error -54 in iTunes, so be sure to try that.


2. Change your permission settings

  1. Go to Applications > Utilities and start the Script Editor.
  2. Now run the following commands:
    • tell application “Finder”
    • set locked of every item of entire contents of folder “Music:iTunes” of home to false
    • end tell

You can also use Terminal to fix iTunes error -54:

  1. Open Terminal.
    terminal itunes error -50, -54
  2. Use one of the following commands:
    • sudo chown your-username your-filename – if you don’t own the file or folder
    • sudo chgrp staff your-filename – if it isn’t set to the same group like other iTunes items
    • chmod 666 your-filename and/or chmod 777 your-folder-name – to give everyone editing permissions

Users are also suggesting to disable FileVault if you’re using it, so be sure to try that as well.


3. Update iTunes

  1. Open App Store on your Mac.
  2. Navigate to the Updates section.
    updates app store itunes error -50, -54
  3. Download the available iTunes updates.

Several users reported that they fixed iTunes error -50 by updating iTunes, so be sure to try that.


4. Authorize your computer

  1. Open iTunes and make sure that you’re signed in with your Apple ID.
  2. Select Account > Authorizations > Authorize This Computer.
    authorize this computer itunes error -50, -54

After doing that, iTunes error -50 should be resolved.


5. Consolidate your iTunes library

  1. Open iTunes.
  2. Navigate to File > Library > Organize Library.
  3. Select Consolidate files.
    consolidate files itunes error -50, -54
  4. Now click on OK.

6. Check your files

  1. Make sure that third-party antivirus isn’t interfering with iTunes.
  2. Try syncing a couple of files at a time.
  3. Delete and re-download content or delete and re-import the content.
  4. Do not try to sync PDF files.

These are Apple’s official guidelines for fixing error -54 in iTunes, so be sure to try them.

iTunes error -50 and -54 can cause a lot of problems when syncing content, but we hope that you managed to fix this issue using our solutions.

[wl_navigator]

Headless browser: What is it and how to use it

When talking about web browsers, most of us are familiar with browsers such as Google Chrome, Opera One, Firefox, etc.

However, there’s a special kind of browser called the headless browser. In case you’re not familiar with these browsers, let us help you out.

In this article, we’re going to explain to you everything you need to know about these browsers with no graphical user interface.

Quick Tip:

Opera One is available on all desktop and mobile platforms, and thanks to the synchronization feature, you can always have your browsing data with you. It’s easy to manage and toggle the graphics features.

Opera One is light on resources, so it should be able to handle any website with ease. In addition, the browser has the ability to organize tabs into workflows and a comes with a native AI.

Opera One

Could a headless browser be too much to handle? Install the user-friendly Opera One!
Free Download Visit website

What is a headless browser?

1. Discover all about headless browsers

find all about headless browsers

A headless browser is a web browser without a graphical user interface. Such a web browser can perform certain commands using a command-line interface.

These types of browsers are usually used for testing web pages, or scrapping data for websites.

Developers also use them to run automated tests for JavaScript libraries or for taking screenshots.

2. How to use a headless browser?

Firefox:

  1. Open Firefox and go to about:profiles.
  2. Click on Create a New Profile.

    new profile firefox Headless browser
  3. Create a new profile and name it test.
  4. Now press Windows Key + R.
  5. Enter C:Program FilesMozilla Firefoxfirefox.exe -p test -headles

    run dialog firefox Headless browser

This is a basic way of starting Firefox in headless mode. To execute commands, you’ll need to enter them manually.

Chrome:

  1. Open the Run dialog like in the previous step:
  2. Enter C:Program Files (x86)GoogleChromeApplicationchrome.exe --headless --disable-gpu --remote-debugging-port=9222 https://www.website_name.com

    run dialog chrome Headless browser

To run commands, be sure to check online guidelines for the headless version of Chrome.

If you’re planning to actively use a headless version of Chrome or Firefox, it would be best to run commands from Command Prompt or PowerShell.

What are the best headless browsers?

There are several headless browsers that you can use, but here are the most popular ones:

  • Chrome
  • PhantomJS
  • HtmlUnit
  • TrifleJS
  • Splash
  • SimpleBrowser

While headless browsers are useful for automation and web development, regular users won’t have too much use for them.

Headless browsers can be useful to web developers and advanced users, and we hope that our article was helpful to you.

As for regular users, they should stick with standard GUI browsers such as Opera One. Let us know your choice in the comments area below.

Regular users who prefer standard GUI browsing can boost accessibility and speed by enabling Caret Browsing, which lets you move and select text using only the keyboard; learn how in our Caret Browsing guide.

“At least one signature has problems” Error in Adobe Reader

‘At least one signature has problems’ – You may have encountered this error while opening a signed document on Adobe Acrobat Reader.

It’s even more common if you’re trying to open and read documents digitally signed through electronic signature software and services like DocuSign.

But what does this error actually mean and what can you do to fix it? In the following guide, we’ll explore what causes error messages in Adobe Acrobat Reader and how you can quickly fix them.

How do I get rid of “At least one signature is invalid”?

Adobe at least one signature has problems

adobe-reader-signature-error


Since Adobe Acrobat Reader does not come with trusted identity data out of the box, it has to download it.

This error arises because the authentication data to validate the signature on the document isn’t available on your system.

In layman terms, Adobe cannot automatically verify signatures that were made using a self-generated certificate through third-party applications such as DocuSign.

These types of certificates are known as self-signed certificates.

However, this warning or error message (“At least one signature has problems”) does not indicate that the signatures on the document are corrupt or invalid. It simply informs the user that the certificates connected to the signatures may not be trusted by Adobe.

The latest version of Adobe Acrobat Reader tries to download the certificate data automatically upon opening a document with digital signatures. The “At least one signature has problems” in Adobe may occur and disrupt the process.

The easiest way to fix this is by manually validating the certificates and signatures.

Remove at least one signature that has problems

  1. Near the end of the ‘At least one signature has problems’ error bar, click on the button labeled ‘Signature Panel‘.
  2. On the panel that displays itself on the left side of your screen, right-click on the signature you want to validate.
  3. Click on Validate Signature.
    adobe-acrobat-example
  4. On the Signature Validation Status dialog click on the button labeled Signature Properties…
  5. On the Signature Properties screen, click on the Show Signer’s Certificate button.
  6. In the Certificate Viewer, click on the Trust tab in the main panel. It should be adjacent to the Revocation tab.
  7. Click on the button marked Add to Trusted Certificates.
  8. Acrobat will display a warning message. Click on OK. 
  9. You can leave the next screen as is and click on OK. 

Alternatively, you can click on the Validate All button. This may be an issue for larger documents with multiple signatures.

If you’re just viewing a document, verifying the certificates attached to a signature is unnecessary.

It’s also important to only manually verify certificates that you trust. Verifying the wrong certificates can pose a security threat.

Nevertheless, this issue isn’t unique to Adobe Acrobat Reader. A lot of other PDF readers suffer from the same issues but they can be handled almost as easily.

You can actually use this as a test to see how secure a PDF reader is.

If it doesn’t scan for untrusted certificates, then it’s not very secure. So it’s less an issue and more a security feature.

This isn’t the only problem you can encounter, and we wrote about Windows Cryptographic Service Provider reported an error in our other guide, so feel free to check it out.

Did the solutions in this guide work for you? Do not hesitate to leave a comment down below.

Can VPN apps hack you? How to choose a safe VPN provider?

One of the most pressing matters when installing a VPN app is that you trust the provider 100% with your personal details and private Internet traffic.

From that point onward (i.e. installing the VPN), your ISP is no longer the middleman in your connection. Instead, your VPN grabs this role.

We’ve seen that VPNs can access your data, but most of them choose not to. Or if they do, they shrug it off without grinning devilishly, grabbing it and handing it over to whoever demands it.

There are various scenarios where VPNs turn evil and start doing wrong for no apparent reason. And that’s exactly what we’re going to discuss today: can VPN apps hack you?

That sounds downright ridiculous, so here’s a more proper way to put this: can you get hacked through VPN apps?

Can you get hacked using VPN apps?

Technically speaking, everything is possible. So, to put it shortly, yes, you can get hacked through VPN apps, no doubt about it. However, it’s highly unlikely.

The odds of that ever happening are once in a blue moon. Most VPN providers check their apps regularly and the security measures they apply for their data centers are so out of this world you won’t even believe them.

Even if, say, one of the employees would go rogue and try to sabotage you, it won’t go undiscovered.

It’s more likely that you’ll be hacked through mobile apps. However, both Google and Apple make great efforts to scan and filter any suspicious apps from their stores.

How to choose a safe VPN?

Go for premium VPN services

Private Internet Access is a popular premium VPN service from Kape Technologies.Private Internet Access

Among its top features are:

  • More than 3000 servers to connect to
  • Zero-logging policy
  • Fast servers
  • Kill switch
  • Several encryption protocols
  • Proprietary DNS and DNSCrypt support
  • Lets you connect up to 10 devices on the same account

VPNs such as PIA take your privacy and security very seriously. As a rule of thumb, try to avoid at all costs free VPN services.

Private Internet Access

Private Internet Access

Need a safe, secure VPN service? Try using Private Internet Access.
$2.85/mo. Buy it now

The reason why you’d want to keep away from them is that even though you don’t pay with money, they still get paid one way or another.

Most of them run ads (which can be riddled with malware), but others go so far as to collect your data and sell it to the highest bidder.

Check the VPN’s privacy policy and terms of service

If you’re about to start using a VPN, it would be a wise thing to give a thorough read to their privacy policy and terms of service documentation.

VPN providers are legally obligated to specify the way they treat your personal data and the way they interact with the end-users’ devices.

If proved otherwise (that they violated their terms), it’s an offense that they can be sued for.

Another good advice is to try and avoid anything that seems sketchy. Any VPN that even slightly attempts to normalize heavy data logging is out of the question.

The same goes for those who fell under government regulations and agreed to deploy backdoors on their servers.

VPNs can hack you through their apps, but most of them won’t

So the answer to your question is yes, absolutely, VPNs can compromise your system through their apps. But the truth is that most of them won’t risk doing that.

Trust is a very important resource for all VPN providers and such an event (i.e. spying on someone through their apps or compromising their device) surfacing might deal a tremendous blow to their reputation.

[wl_navigator]

Cortana to let you make voice queries in Teams mobile app

The new Cortana app is one of the key highlights of the Windows 10 May 2020 Update. As you may already know, Microsoft repurposed the digital voice assistant to suit the features and functions of Office 365 productivity tools.

For example, the AI-powered application can read aloud your Focused Inbox emails (via the Outlook mobile app), thanks to its Play My Emails feature.

If you’re excited about Cortana’s productivity-focused capabilities, then you’ll be happy with the upcoming ability to use its voice assistance in the Microsoft Teams mobile app.

Teams mobile app to support Cortana voice assistance

Microsoft recently announced the upcoming integration of Cortana with the Teams mobile app. The feature is only rolling out to Microsoft 365 Enterprise users though.

The tool lets you collaborate, communicate, and carry out other meeting-related tasks in Teams by issuing verbal commands. Using spoken natural language, for example, you’ll be able to instruct Cortana to call anybody in your contact list.

Similarly, when your hands are working on something else, Cortana lets you join a Teams meeting by speaking a directive into your phone’s microphone.

The app’s voice assistance will also come to the rescue when you need to send an instant chat message, access your calendar, share a document, and a lot more.

Coming soon to the Teams mobile app, Cortana uses AI and the Microsoft Graph to provide voice assistance in Teams. To stay connected to your team even when you have your hands full, you can ask Cortana to make a call, join a meeting, send chat messages, share files, and more.

Android and iOS versions of the Teams app will support the feature, which arrives in the U.S. in the next few weeks.

The Teams mobile app is currently getting other productivity improvements, including inline message translation.

What’s your take on Cortana voice assistance coming to the Teams mobile app? Feel free to express your opinion via the comments section below.

[wl_navigator]

Can VPN access your data? Is your VPN safe?

VPNs are seen by many as superheroes, as they help maintain a private, secure, and free Internet. What a VPN does is create a tunnel and redirects all of your Internet traffic through it.

More so, they encrypt the data they pass through that tunnel. That way, your ISP has no chance of getting grab of your traffic, let alone decrypt and analyze it.

However, like your ISP, a VPN is but a middleman. An intermediary, if you want. As long as there’s someone or something between you and the destination server, there will also be a means of observing and collecting your data.

Basically what a VPN does is ask you not to trust your default intermediary (which is your ISP), but to willingly hand them access to your private data, hoping that they will only act as passive observers.

For that reason, users have started to ponder on questions such as whether or not VPNs are truly safe, and if they can access your Internet traffic and/or private data.

But before we jump to hasty conclusions, let’s take a step back and run a quick recap.

VPNs act as middlemen

From a security standpoint, there’s little you can hide from your VPN provider. By default (without a VPN), your ISP can see everything you do online, ranging from websites you visit to connection times and what files you’ve downloaded.

They can even go as far as seeing every bit of unencrypted data that belongs to you. For instance, if you’re posting something on an HTTP website, they can see it. Passwords, messages, pictures, you name it.

Now, if you use a VPN, you simply replace the middleman. So everything you’ve trusted your ISP not to do will be expected of your VPN.

Just to be clear, your VPN can see the same information that your ISP usually sees. However, how they choose to treat that information is what sets VPNs apart from each other and from ISPs.

The importance of zero-log VPNs

As we’ve mentioned just above, the VPN provider’s policy is quite important, as it rules on how your data gets treated by the service. There are several VPN services that swear by their zero-logging policy, which is a good thing.

Not keeping any logs means that if the provider’s servers get seized, there will be no data worth analyzing.

This includes connection timestamps, IP addresses, and basically anything that can help someone link you with your VPN account or with specific actions that have been performed in a certain fashion or timeframe.

To put it shortly, if the VPN doesn’t log anything, there’s nothing to analyze.

Most VPNs do run some logs, but these are only meant to help optimize the service since the data they monitor and/or collect is anonymous and can’t be traced back to you.

For instance, VPNs can log successful or failed connection attempts, the date (and not exact time) you connected to a specific server, and how many users are connected to each of their servers.

Even though these bits of information seem specific, they’re not enough to pun a pin in you.

Is your VPN safe?

The quickest way to learn that is by giving a quick rundown to the provider’s privacy policy and terms of service. We know it’s a lengthy, tedious process, but it will help you learn more about your VPN‘s trustworthiness.

Another way to determine whether you can trust your VPN or not is by looking it up online. VPNs who previously sold or handed customer data never live it down. You can find tens, if not hundreds of articles and even court cases where they gladly handed incriminating info.

Only use trustworthy VPNs

  1. Download Private Internet Access
  2. Install it on your PC
  3. Launch it
  4. Log into your PIA account
  5. Enjoy private, secure Internet browsing

Private Internet Access is a VPN you can trust. It’s brought to you by Kape Technologies and not only does it encrypt your traffic to keep it away from prying eyes, but it also keeps no logs regarding your online activities.

Private Internet Access

Private Internet Access

Want a VPN that won't log your data? Try using Private Internet Access.
$2.85/mo. Buy it now

Thus, whatever website you decide to browse or file you might want to download, PIA will keep it on the hush for you. Just don’t make the mistake of taking PIA as your unlawful sidekick.

Neither PIA nor we condone unlawful activities using a VPN. You should only use VPN to keep your online whereabouts to yourself, but be careful about which side of the law you land on.

Can VPN servers see my data?

With all that in mind, we can safely conclude that yes, your VPN provider can absolutely see your online data. All of them, no exception. However, some of them decide not to act on it. Others might harvest it and sell it to the highest bidder.

If you want to avoid nasty situations like your private data falling in the wrong hands, make sure to do your research thoroughly before deciding to stick with a VPN provider.

There’s plenty of helpful guides online and even discussion forums can make a great starting point for your research.

[wl_navigator]

Microsoft Teams gets video filters, Dynamic view, and more

With support for up to 300 attendees per meeting and a host of other feature updates, Microsoft Teams is expanding at the speed of lightning.

The Office 365 tool, which lets you create digital workspaces for your employees, recently received multiple updates that empower collaboration in the workplace and the education sector.

New Microsoft Teams meetings features

Microsoft Teams received new features that make workforce collaborationa breeze. Microsoft said that the improvements make meetings more lively and inclusive.

They help you feel more connected with your team and reduce meeting fatigue. Second, they make meetings more inclusive and engaging. And third, they help streamline your work and save time.

Here are some of the features either coming or currently rolling out to Microsoft Teams users:

Together mode

Microsoft says it researched and learnt that virtual meetings make people feel less connected. So, it’s rolling out Together mode in Teams, which uses AI to place virtual meeting participants in a shared background.

Dynamic view

This AI-powered feature lets users customize how they view shared content and fellow Teams meeting attendees on the screen. For example, you can configure the feature to see select participants side-by-side.

In addition, Microsoft will be rolling out large gallery view in August. This update enables up to 49 people to appear on the video screen at the same time.

So, finally, Microsoft Teams is going to match Zoom’s maximum number of participants visible on each screen.

Video filters

Use this feature to customize the appearance of participants on the video screen. You may tweak the lighting or adjust the camera focus to achieve video effects typical of photography and social media applications.

Live reactions in Microsoft Teams

A few months after Microsoft Teams got the raise hand feature, it now supports live reactions. This capability lets the audience give feedback to the speaker in real time using emojis.

Other announced Microsoft Teams features include chat bubbles, suggested replies, and more.

Kindly leave us a message in the comments section below to let us know what you think about the new Teams enhancements.

[wl_navigator]

This is how you can fix HTTP 403 error on Google Drive

Due to its omnipresence on Android devices, many users choose Google Drive over numerous cloud alternatives. And it’s a valid choice, considering that it looks great with the material design and does exactly what a casual user needs.

However, from time to time, users experience issues with completely undermine the reliability of Google’s cloud service. One of them is the HTTP 403 error where an affected user can’t access or download certain files from Google Drive.

We made sure to shed some light on this and, hopefully, provide you with the solution.


How to fix Google Drive access denied (error 403)

  1. Clear browser’s cache
  2. Change your cloud storage
  3. Sign out and sign in with your Google Account
  4. Disable browser extensions temporarily
  5. Try an alternative browser or use the Incognito mode
  6. Create a shareable link and use it to access your file

1.  Clear browser’s cache

Let’s start with the elementary step when in-browser issues emerge. This applies even when the first-party websites like Google Drive in Google Chrome won’t work. And that’s, of course, clearing the browsing data.

You can immediately go for the Incognito mode and skip 2 or 3 steps from this list, but that’s a temporary solution. Most likely you have a variety of saved credentials in browser cached data so using the Incognito mode every time an issue appears is just a mere workaround.

Follow these steps to clear the browser’s cache from Google Chrome, Mozilla Firefox, and Microsoft Edge:

Google Chrome and Mozilla Firefox

  1. Press Shift + Ctrl + Delete to open the Clear browsing data menu.
  2. Select All time as the time range.
  3. Focus on deleting Cookies, Cached Images and Files, and other site data.
  4. Click on the Clear Data button.http 403 error google drive

Microsoft Edge

  1. Open Edge.
  2. Press Ctrl + Shift + Delete.
  3. Check all the boxes and click Clear.http 403 error google drive

2. Change your cloud storage

As mentioned in the beginning, there are a lot of cloud storage options available out there, so why not go for something new?

Our recommendation is Sync.com, a very user-friendly cloud storage, and file-sharing tool.

What recommends Sync is the end-to-end encrypted technology they use. Most cloud storage providers can access, scan, and read your files. But not Sync (or anyone else). This is why there’s a minor chance that your database gets corrupted and that you get blocked from accessing it.

What’s more, Sync backs up your files in realtime and makes it easy to recover deleted files and previous versions of any file, any time.

Sync.com

Sync.com

With Sync you keep all your important files safely stored in the cloud and accessible just to you, anytime, anywhere.
$8/mo. Visit website

3. Sign out and sign in with your Google Account

Another viable step to take if Google Drive is blocking your downloads is to sign out and sign in again with your Google Account.

There’s a fair number of mishaps concerning the access permission. Especially if you’ve copied the file from Google Drive assigned to a different Google Account. Or, maybe, uploaded the file from a different platform, like Android or iOS.

For that and similar reasons, this simple sequence might help you resolve the problem. Here’s how to do it in any browser:

  1. Open your browser and navigate to Google.com.
  2. Click on your profile pic and sign out.http 403 error google drive
  3. Restart your browser and sign in again.

4. Disable browser extensions temporarilydisable browser extensions

While we’re at browser-based troubleshooting, we can’t avoid mentioning possible issues a rogue extension can cause. It can even be one of your regulars, like an adblocker or even a third-party theme.

Since we can’t say with certainty what exact extension is causing the problem, we suggest disabling all of them temporarily.

If the problem is resolved, make sure to re-enable extensions one by one until you, by a system of elimination, find out which one was causing the error 403 with Google Drive.


 These are the best Chrome extensions to protect your privacy today


5. Try an alternative browser or use the Incognito mode

If one browser won’t cooperate, there’s an abundance of alternatives.

Chances are you already have a few installed on your PC, including Microsoft Edge and Internet Explorer, which are built-in browsers. So try logging into your Google Drive via some other web browser and hope for the resolution.fix google drive 403 error

On the other hand, as we duly noted, the Incognito mode is the best way to avoid all browser-related concerns. Just click on the 3-dot menu in the top right corner and choose New incognito window or anything along those lines. Then sign in and try downloading the troublesome file from your Google Drive.


6. Create a shareable link and use it to access your file

Finally, some users who were stuck with the HTTP 403 error even after all these steps found a workaround.

If you can’t download a file directly from Google Drive, try with the shareable link. The shareable link allows everyone to download a private file. It automatically copies to the clipboard so the only thing you need to do is pasting it into the Address bar.

You should see a download page from where you can get your file without any issues. If you’re not sure how to do it, follow the steps we provided below:

  1. Open Google Drive from your browser.
  2. Right-click on the file you want to download and choose “Get shareable link” from the contextual menu.http 403 error google drive
  3. Click on the browser’s Address bar line and press Ctrl + V to paste the link. Hit Enter.
  4. Download the file.http 403 error google drive

With that said, we can conclude this article. If you have any other concerns, questions, or possibly suggestions, feel free to use the comments section below.

Hackers created fake Outlook login page in phishing drive

The cloud enables enterprises (big and small) to deploy computing resources cost-effectively, at scale. But as users of Microsoft Outlook, Teams, Excel, and other Office 365 apps have come to realize, the platform has its own perils.

Hacking, which is one of the negative aspects of the cloud, reared its ugly head recently. This time around, hackers targeted Outlook accounts of employees in various organizations, according to an Abnormal Security report.

Phishing attackers used a fake Outlook login page

In this phishing attempt, the attacker sends an email designed to look like it comes from the genuine Microsoft Outlook team.

The email notifies the recipient that their organization expects all employees to migrate to a new MS Outlook web portal.

In addition, it injects a sense of urgency into the communication to compel the target to act faster.

The attacker impersonates an automated notification from the Outlook team on behalf of the recipient’s company. Recipients are urged to “upgrade” their Outlook services within 24 hours, or email deliveries to them will be delayed.

To migrate or upgrade to the new MS Outlook site, the victim has to unwittingly click on a login link that leads to a fake Outlook login page.

Since the attacker controls the fake sign-in portal, they have access to the Microsoft account user credentials that the victim types.

Once the hacker receives the victim’s login details, they can access troves of information stored on the Microsoft account. Similarly, you can’t rule out the possibility of the attacker compromising other accounts associated with the breached Outlook account.

The cloud though isn’t going anywhere despite the persistent hacking threats. But Office 365 users can protect their data and apps with the various security features available on the platform.

In addition, stronger password policies and password security awareness programs can help a great deal.

As always, you can share your opinion or ask any question about Microsoft account security in the comments section below.

[wl_navigator]

StrongVPN for Netflix: Does it work? How to unblock Netflix

StrongVPN is a virtual private network service that focuses on making your online activities more secure. However, a lot of users are wondering if StrongVPN works with Netflix.

Because Netflix has a strict policy against customers using VPN and proxy servers, it bans most free solutions because they use public IP addresses to spoof your location, resulting in a Netflix VPN error.

But it’s not so easy when it comes to premium VPN services that go to great lengths to maintain VPN servers that unblock Netflix. In this article, we’re testing StrongVPN to see if it’s worth your money.

Does StrongVPN really work with Netflix?

Yes, it does.

You can use StrongVPN to unblock Netflix US and watch TV series and movies that are only available to the United States. But the tool can’t unlock other regional Netflix catalogs.

That means that StrongVPN is worth the trouble only if you’re living or traveling outside of the US (if you’re only interested in using a VPN to watch Netflix).

How to unblock Netflix US with StrongVPNuse StrongVPN

  1. Download StrongVPN.
  2. Install the VPN on your device.
  3. Connect to a US VPN server.
  4. Start watching Netflix US.

Made by Strong Technology, StrongVPN is compatible with all major platforms, including Windows, Mac, Android, and iOS. It supports more than 59,000 VPN IP addresses, and you can use it to circumvent geoblocks.

Furthermore, you can connect to the best available location to get the best possible Internet connection speed. There are no speed limits, and StrongVPN doesn’t capture any traffic logs.

The tool can secure your entire Internet traffic using the OpenVPN, WireGuard, L2TP, SSTP, IPSec, or IKEv2 protocols, depending on your preferences.

More about StrongVPN:

  • +950 VPN servers in 35 countries
  • Unblocks Netflix US
  • Up to 12 connections at the same time
  • 30-day money-back guarantee (no free trial)

StrongVPN

StrongVPN

Unblock Netflix US and start watching your favorite shows with this VPN app.
$7/mo. Buy it now

What’s the best VPN for Netflix?

use CyberGhost VPN to unblock Netflix

When it comes to unblocking Netflix, we recommend using CyberGhost VPN because it works with all major Netflix catalogs. A product of Kape Technologies, this VPN service can redirect your entire network traffic via VPN.

Besides, unlike StrongVPN, CyberGhost VPN offers a free trial. It has a special category dedicated to streaming services, so you can quickly connect to a VPN IP address that really works with Netflix. It’s also one of the best VPNs for Netflix UK.

CyberGhost VPN can be installed on all major platforms. It even has a VPN extension for Chrome. No logs are stored about your VPN activity. Plus, it comes with an ad and malware blocker, together with exclusive DNS servers.

More about CyberGhost VPN:

  • +6,500 VPN servers in 89 countries
  • Unblocks Netflix US, UK, Canada, India, France, Germany, and others
  • 7 simultaneous connections
  • Up to 45-day money-back guarantee (1-day free trial)

CyberGhost VPN

CyberGhost VPN

Unlock the best Netflix catalogs with this VPN, including Netflix US and UK.
$2.75/mo. Buy it now

To summarize, StrongVPN works with Netflix, giving you the possibility to watch Netflix US. However, it’s not the best choice for this streaming service. In fact, StrongVPN stops working sometimes.

If you’re looking for the best VPN to watch Netflix, we suggest using CyberGhost VPN because it can unlock most Netflix catalogs, not just Netflix US. And it offers superior connection speeds so that you won’t have to worry about buffering.

[wl_navigator]