Microsoft offers 6 month free trial of paid Teams tier in light of Coronavirus

Microsoft is offering a six-month free trial to the premium version of its Microsoft Teams business chat/collaboration application, a part of the Office 365 suite. The move comes as fears of the coronavirus outbreak cause many businesses to have their employees work from home.

Companies and businesses that take advantage of the six-month free trial of Teams premium will gain access to many of the application’s features which aren’t available of the free plan—including better access to scheduling and meeting features. Additionally, Microsoft says it will begin to allow users on the free Teams plan to schedule meetings starting March 10. The move promotes public health safety by making it easier to work from home.

Microsoft has recently begin promoting Teams as the place for employees to access from anywhere, likely as the result of the increased demand from working from home. A Microsoft employee from Shanghai also shared some tips for those who will be taking their work to their homes.

While coronavirus concerns have resulted in the cancellation of numerous tech events including Microsoft’s summit, the company says it will continue to monitor the situation before it decides on whether or not to cancel this year’s Build event.

Will you be working from home? What do you think about Microsoft’s promotion? Feel free to share your thoughts in the comments area below.

Microsoft is collaborating with Accenture to help deepen the reach of startups focused on social impact

Microsoft and Accenture have teamed up to help deepen the reach of entrepreneurs and startups that are focused on social impact and sustainability. The collaboration is part of the companies’ shared vision to amplify the societal impact of emerging technology and benefit a million people by democratizing access.

As part of the initiative, Microsoft Research India and Accenture Labs will help social enterprise startups test and validate proofs-of-concept, conduct design thinking sessions to help them re-envision the impact of their solutions, and provide support in exploring and using Microsoft technologies. The partnership will help these startups build scalable solutions and business models with more tangible and lasting benefits.

“Our experience shows that by applying emerging technologies to critical challenges facing society, we can accelerate social transformation. This collaboration is a great illustration of delivering on ‘value’ and ‘values’ – creating tangible business and social value while aligning with people’s values. By providing social impact entrepreneurs with direct access to the combined power of Accenture and Microsoft’s technology expertise, we can help significantly improve access, equality, education, inclusion, health, sustainability, and the environment.”

– Paul Daugherty, Group Chief Executive, Accenture Technology & Chief Technology Officer, Accenture

The program will initially engage with startups in Africa, the Middle East, and South Asia, leveraging the MSR India Center for Societal impact through Cloud and Artificial Intelligence (SCAI). Initially, the program will focus on the areas of agriculture, education, and healthcare.

Microsoft’s involvement in this initiative is part of Microsoft’s Global Social Entrepreneurship program. The Global Social Entrepreneurship program is designed to empower an ecosystem of tech-enabled startups, focused on addressing important social or environmental challenges. The involvement of Accenture Labs is part of its ongoing Tech4Good program, which is focused on applying emerging technologies to help solve complex social challenges.

Windows update KB4535996 causes micro stutters in games

There are many ways to introduce a bug to your PC, but a Windows 10 update should not be one of them. Yet, unhappy users are still reporting various system complications after installing the cumulative update (CU) KB4535996 that Microsoft released last week.

Update causes micro stutters in games

According to a Windows 10 Subreddit post, the CU KB4535996 may cause micro stuttering in video games—a quality defect that can ruin your gaming experience.

It’s not extreme, but I say my frame rate in games has gone down 10 frames or so, and stuttering occurs once in a while. After uninstalling the cumulative update, everything was fine. Weird.

Outdated graphics and video card drivers may cause irregular GPU frame rates. In that case, you can fix the problem by updating the drivers.

But if you had an excellent gaming experience before the CU, hardware drivers may not be the problem. Uninstalling the update appears to fix the issue, though.

Microsoft account access

Microsoft’s answers forum is also flooded with user complaints about update KB4535996 post-installation issues. After updating their Notebook, one user claims that they could no longer log in to their Microsoft account.

They tried logging out and back in as recommended, but that did not work.

Missing files

Another user posted that the update resulted in the loss of all their desktop files.

All I know is that my computer installed updates last night. Then I restarted this AM and everything was missing that was on my PC.

Some perennially frustrated users are resorting to ignoring all optional updates, which may not always be a great idea if their PCs have a problem that a Windows update could fix. So, folks are still craving for a Windows 10 world in which updates, including security fixes, can install without adverse effects.

Microsoft has not officially acknowledged any problem with the optional update it released last week. Users can only hope that the next Windows 10 fix will satisfactorily address all the issues raised so far.

Microsoft shows cleaner-looking Windows 10 Start Menu, confirms Live Tiles are here to stay

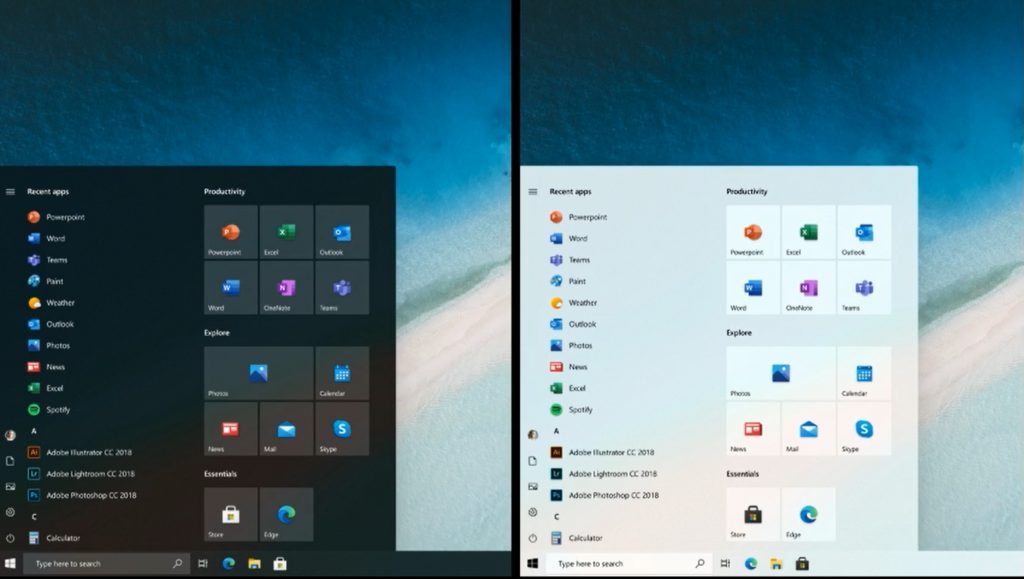
It’s no secret that Microsoft has been on a mission to give Windows 10 a new look. We’ve seen new icons roll out across the operating system, as well as the Light Mode introduced in the Windows 10 May 2019 Update. But, there could be bigger things ahead. Indeed, Microsoft recently teased a cleaner looking Windows 10 Start Menu, which appears to be heavily designed by Fluent Design and the new modern Windows icons (via PCWorld.)

As seen in the featured image above, this new Start Menu isn’t much different from the current version of Windows 10 when it comes to layout and overall format. It does, however, look to be more uniform, with less randomly colored backgrounds on the app tiles. Overall, it is cleaner with more uniform colors throughout, allowing the icons to blend in nicely with the acrylic effects delivered by Fluent Design.

This Start Menu was originally discussed by Microsoft during today’s Windows Insider webcast. You can see a still of it in action by watching the webcast on-demand here, at around the 46-minute mark. “The idea is to visually unify the Start menu, [from] a somewhat chaotic color, to something a bit more uniform,” said Mike LaJoie, the person in charge of icon design at Microsoft.

Rumors have previously said that Windows 10’s Live Tiles might be dead in the future, but judging from what Microsoft PM Brandon LeBlanc said during the webcast, the Live Tiles are here to stay. As the image of the Start Menu is still, we can’t tell if they’re present in this new Start Menu. However, LeBlanc mentioned that “Those with Live Tiles will still be able to use them.” It could be that users will continue to have full control over Live Tiles and be able to turn them off and on as needed.

Do you think that this new Start Menu is more clean and efficient? Let us know in the comments below.

Disney Plus is not available in your country? Try this

If Disney Plus is not available in your country, it looks like you are not able to access it. The service is currently available in the US, Australia, Canada, Netherlands, and New Zealand. Later on, in March 2020, a number of European countries will see the launch of their local versions of Disney Plus too.

Until that happens, if you live outside these countries, Marvel, The Simpsons, or Star Wars are out of your league, at least in theory. We’re saying that since there’s a chance to access Disney Plus in other regions too.

The advantages of using a VPN – or Virtual Private Network – in this case, are unquestionable. For the uninitiated, a VPN is a piece of software you can download off the web that lets you hide the IP address of your laptop, phone, or your router.

Then, it makes it appear in an entirely different location where Disney Plus is available. Long story short, today we will show you what to do if Disney Plus doesn’t work in your country.

What can I do when Disney Plus is not available in my area?

1. Choose the perfect VPN option

Before having the very best Disney Plus shows and films at your disposal, you’ll first need to get a VPN application.

Aside from giving you Disney Plus access from anywhere in the world, these applications can be used to safeguard your online privacy and stop any deliberate slowing of your speeds.

If the choice you face is highly emotive and you literally dream of all those Disney goodies, your instincts and the rush coming along with them may not serve you well. Don’t know what to choose?

We made a list of the fastest VPN options for Windows 10 you can use to stream video content with ease.

The encryption tunnel is supposed to remain super private, so your true location is always unseen. To make sure of that, it’s recommended to check for your IP address on specific IP address lookup sites. Let’s hope that it won’t fail to hide your real one.

We recommend you get a VPN with a large server coverage. For Disney+ users, make sure that the US specifically is thoroughly covered.

Also, make sure to get a VPN with a transparent privacy policy. Even though these tools are meant to protect your data, some of them may store unnecessary details about your identity and browsing, so be careful with that.

2. Select a compatible location as your home country

At this point, you have the VPN already installed. All you have to do next is to open the VPN app, then log in using your credentials.

Just hit Choose location and feel free to connect to a US server. You may also select any other compatible location as your home country.

3. Sign-up for Disney Plus outside of its supported countries

After connecting to the VPN, you’ll clearly need to go to the Disney Plus website and sign up before you can do anything else. The big news is that you’ll no longer be blocked from signing up this time.

You can easily go through the setup procedure and get inside for the first time. Besides creating a new account for this media streaming service, you must also select a subscription plan and complete the payment process.

Disney Plus doesn’t offer a free trial, but it puts at your disposal flexible pricing options and packages.

⇒ Get Disney+

Finally, Disney Plus will present its content. Rest assured that you can use it without any limitations since you already tricked Disney’s area restrictions.

How does it feel like to have Disney Plus at your convenience? We surely hope that it’s as good as expected. Other eager users also describe taking advantage of Google Chrome on an Ethernet hardwired computer to cast Disney Plus to the TV via the inbuilt Chromecast of NVIDIA Shield TV.

However, taking a quick look at the Subscriber Agreement reveals that this method of accessing Disney Plus is a violation of the terms and conditions.

Do you know another solution for a quick connection even if Disney Plus is not available in your area? Don’t hesitate to share it with the community in the comments section below.

Moreover, if you’re completely new to VPNs, let us be clear in this regard. Even if the access you get when you sign up with a VPN service is great, keep in mind that you still have to connect to a server in another region or even country.

This means that you should be ready for a little bit of latency in your secure connection. Other issues could occur while using a VPN application, yet we’re here to help you out.

Halo: Combat Evolved Anniversary joins Halo: MCC for PC today, and you can play it with Xbox Game Pass

Great news for Halo fans, Halo: Combat Evolved Anniversary is now available on PC as part of Halo: The Master Chief Collection. This remaster of the original Halo game follows the release of the Halo: Reach remaster on PC and Xbox One in December, and it’s once again available on Xbox Game Pass for PC, the Windows 10 Microsoft Store, and Steam.

The PC version of Halo: CE Anniversary will still let PC gamers switch between remastered and classic game graphics on the fly, and both modes should look pretty good in 4K. Here are all the power user features you can expect according to 343 Industries:

Halo: Combat Evolved Anniversary looks and plays better than ever at 60 frames-per-second (or greater) with 4K UHD support, and players can fine-tune their experience with a vast array of options including variable framerate, native mouse/keyboard support and the ability to rebind controls, support for ultra-wide displays and different aspect rations, updates texture/shadow quality and more. Additionally, we’re happy to introduce community-requested features such as the option to use ‘classic’ audio in multiplayer and improvements to Spartan customization

If you have an Xbox Game Pass for PC or Xbox Game Pass Ultimate subscription, you can download Halo: CE Anniversary for free today. The game is also included in the full $39.99 Halo: MCC bundle available on Steam and the Microsoft Store, but you can also purchase it separately for $9.99.

343 Industries is still on track to bring the rest of the Halo games to Halo: MCC on PC throughout the year. You can expect Halo: 2 Anniversary to come next, followed by Halo 3, Halo 3: ODST, and Halo 4, the latter being the first Halo game developed by 343 Industries after Bungie went to work on the Destiny franchise.

Microsoft updates Build 2020 website with message about Coronavirus, continues to monitor situation

Due to the spread of Novel Coronavirus, Microsoft has already canceled both the MVP Summit and its GDC briefing in favor of virtual events. Many have now been wondering if Build 2020, which is set for May 19-21 would be canceled, too.

Although an official decision has not been made yet on that front, the company recently updated its Build 2020 webpage with a message about Coronavirus, saying it will “monitor and make any necessary changes as the situation evolves.” Here’s the statement:

In light of the global health concerns due to the novel coronavirus (COVID-19), Microsoft is monitoring public health guidance in relation to in-person events. At this time, global health authorities have not issued guidance to avoid travel to this location. We are looking carefully at our event calendar as well as our presence at industry events in the coming months. We are not taking decisions lightly, but the health and well-being of our employees, partners, customers and other guests remain our ultimate priority.

We will continue to monitor and make any necessary changes as the situation evolves.

March 2, 2020

Currently, Coronavirus is spreading across the Seattle area, and many Microsoft watchers like Paul Thurrott are doubtful about the status of Build. However, as Microsoft states on the webpage, global health authorities have not yet issued guidance to avoid travel to Seattle, Washington. The company instead insists that it is “monitoring public health guidance in relation to in-person events” and is “looking carefully at [the] event calendar as well as [the] presence at industry events in the coming months.”

While it is still two months out, canceling Build could likely be a huge logistics nightmare for Microsoft. In the statement on the page, the Redmond giant insists it does not take decisions lightly, and wants to put the health and well-being of employees, partners, customers, and other guests first.

There’s been some talk of MVPs, especially if they can’t get refunds for their travel and accommodations, to head to Seattle/Redmond anyway. In a reply to a tweet related to the MVP Summit, former Windows Insider chief Dona Sarkar said that people should not be planning to visit Microsoft’s campus, as the company will be locking down visitations with “tons of people working from home.”

Coronavirus is definitely shaking up the conference industry for sure, even outside of Microsoft. Google recently announced it would be re-imagining its Cloud Next ’20 conference as a free, global, digital-first, multi-day event. Adobe also canned its annual summit in Las Vegas in favor of an online event. And, outside of the United States, Microsoft canceled its Ignite Tour in Zurich.

Fix The Printer Error 1260 in Just a Couple of Easy Steps

After installing Windows 10 updates, many users have reported the printer error 1260. This error can have multiple error messages, including:

A policy is in effect on your computer which prevents you from connecting to this print queue. Please contact your system administrator.

That didn’t work We can’t install this printer right now.  Try again later or contact your network administrator.  ERROR #1260

This error is related to the new Driver Packaging Awareness requirements and can be resolved by configuring Point and Print policies in the Group Policy editor. If you are also troubled by this error, here is how to resolve it in Windows 10.

How can I fix printer error 1260?

1. Disable antivirus and firewall

Turn off firewall

We can't install this printer right now error 1260
  1. Click Start and select Setting.
  2. Go to Updates and Security.
  3. Click on Windows Security.
  4. Select Firewall and Network Protection.
  5. Click on your currently active network.
  6. Scroll down and toggle the switch to turn off Windows Firewall.

Disable antivirus 

We can't install this printer right now error 1260
  1. If you have a third-party antivirus installed, try disabling it temporarily.
  2. To disable it from the taskbar, right-click on your antivirus icon.
  3. Select disable temporarily.

If disabling the antivirus did not resolve the issue, you may have to uninstall the security program and then try to install the printer or the related drivers.

If the issue is resolved after disabling the firewall and antivirus, enable Windows Firewall and antivirus again.

2. Add FQDN and NETBIOS name for Point and Pinter Server

We can't install this printer right now error 1260
  1. Press Windows Key + R to open Run.
  2. Type gpedit.msc and click OK to open the Group Policy Editor.
  3. Now look for Point and Printer Restriction policy.
  4. Right-click on the policy and select Properties.
  5. Earlier, the user could only include the FQDN of their printer servers. However, now you need to include the shorter names as well.
  6. For example, if your FQDN is serv-print.mydomain.local, now you also need to include “serv-print” separated by a semicolon in the Group Policy Editor.
  7. After making the changes, running gpupdate should resolve any printer issues.

You don’t have the Group Policy Editor on your Windows PC? Get it right now in just a couple of easy steps.

The A policy is in effect on your computer printer 1260 error can occur if your security program or firewall is blocking the connection or if the issue is with the Group Policy Editor. Follow the steps in this article to fix the problem and get your printer back online.

If you have any additional questions or suggestions, please leave them in the comments section below.

Here’s how you can use the Touch Bar on a MacBook Pro with Office 365 for boosted productivity

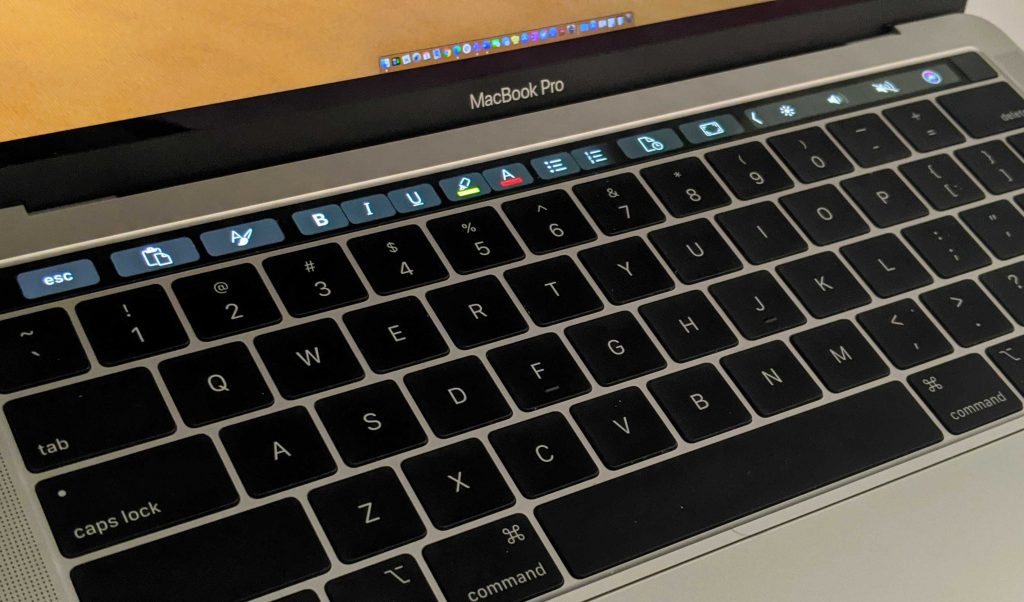
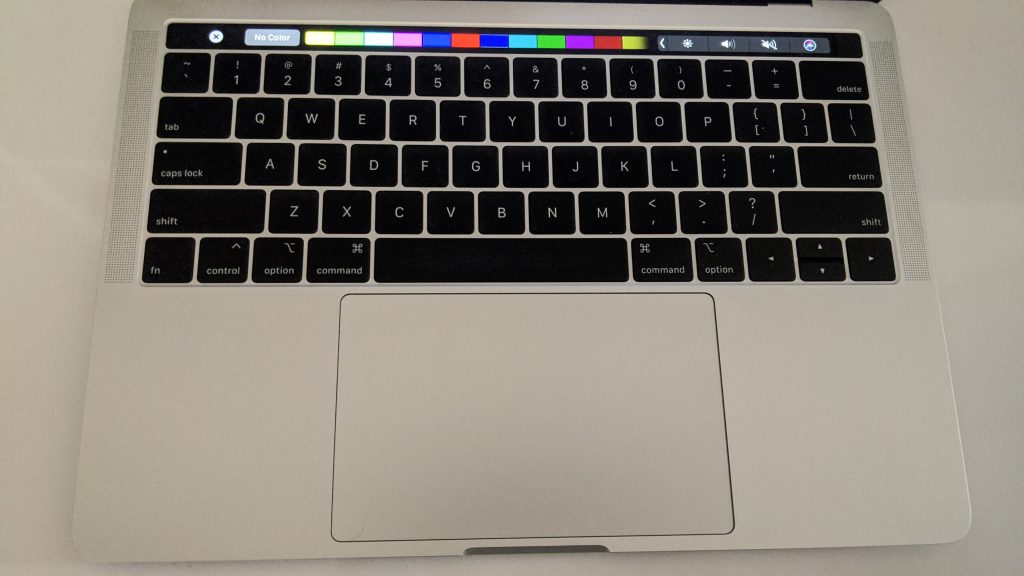
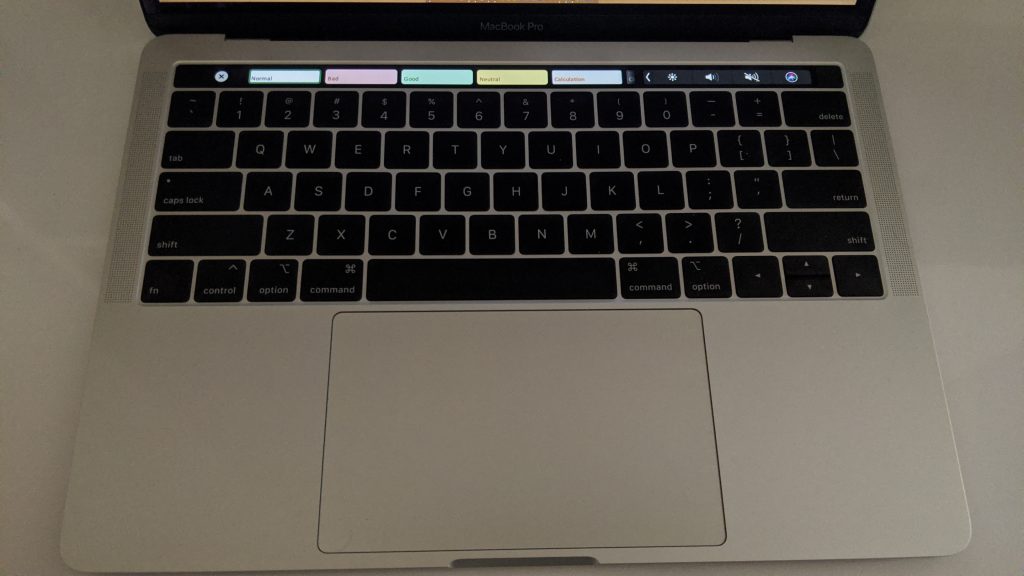
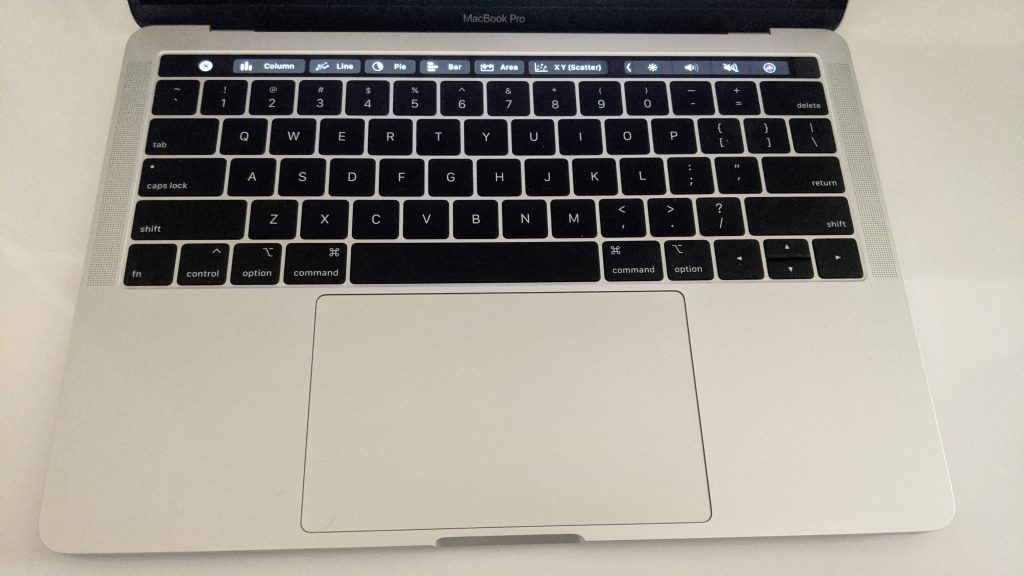
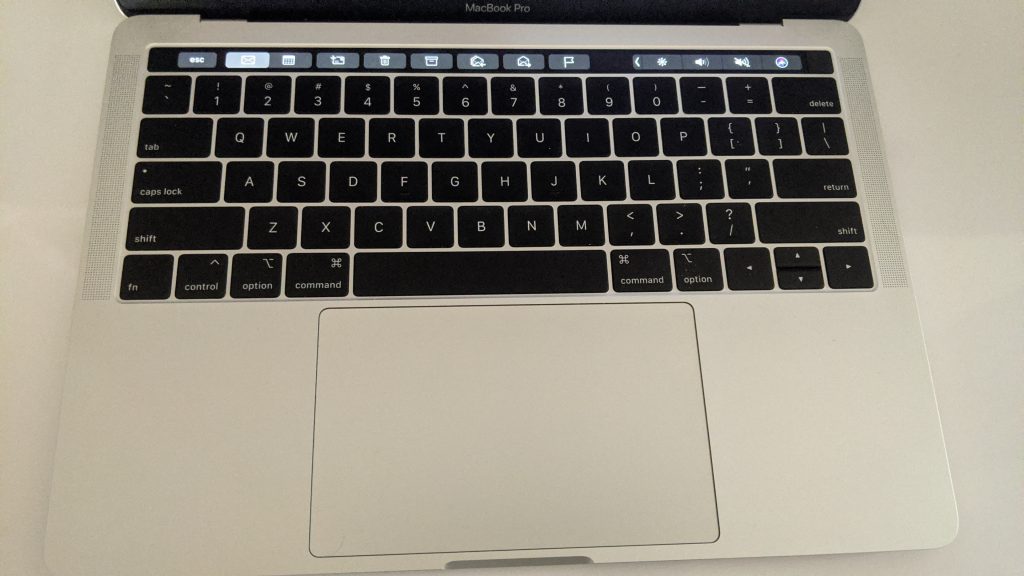
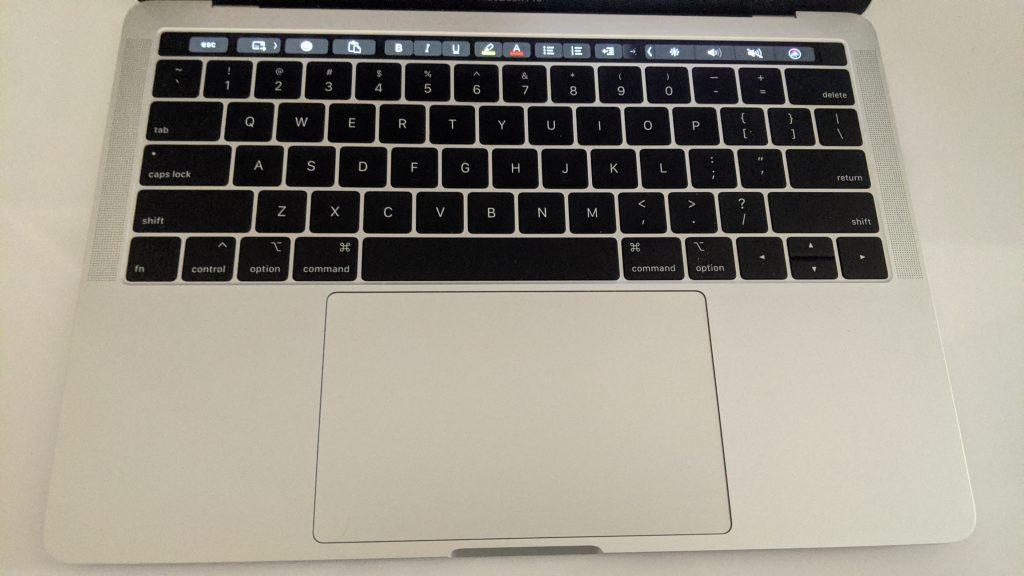
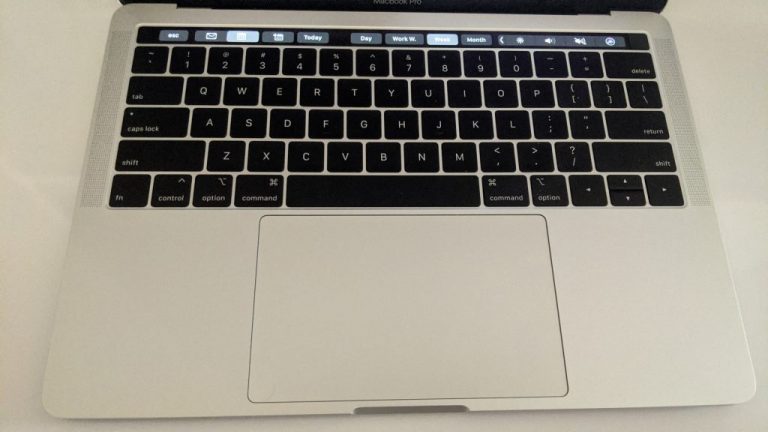
When Apple released the fourth generation MacBook Pro in 2016 it came with a new feature known as the “Touch Bar.” An OLED strip running above the keyboard, the Touch Bar replaced the traditional function keys with multi-touch keys. Depending on which app you use, the Touch Bar is able to adapt and show you various functions, as well as a digital “ESC” key. Many apps in MacOS, including Microsoft’s own Office 365 suite, have special Touch Bar functionality, and in this guide, we’ll show you how to make the most of it in the core Office apps.

Word

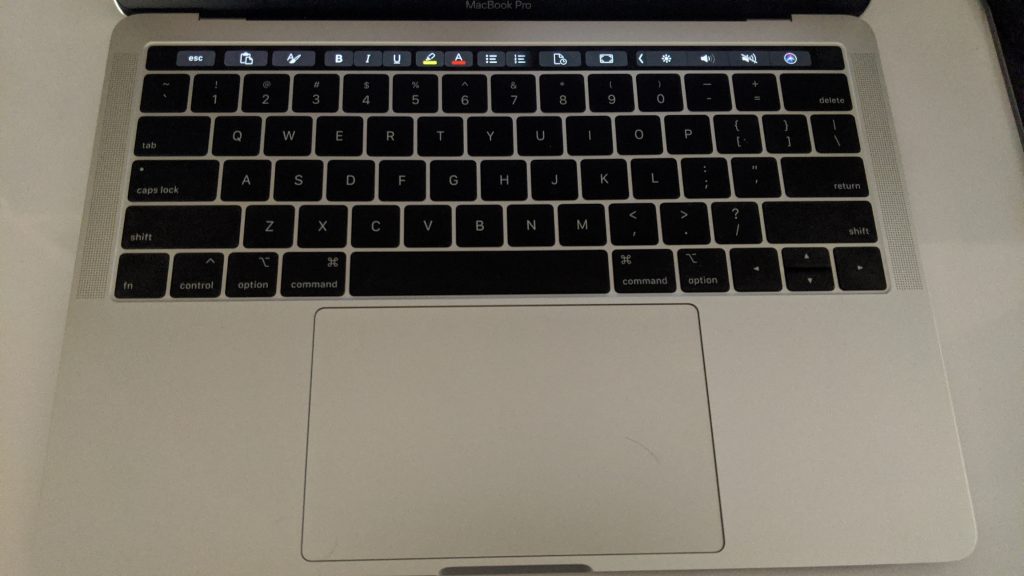
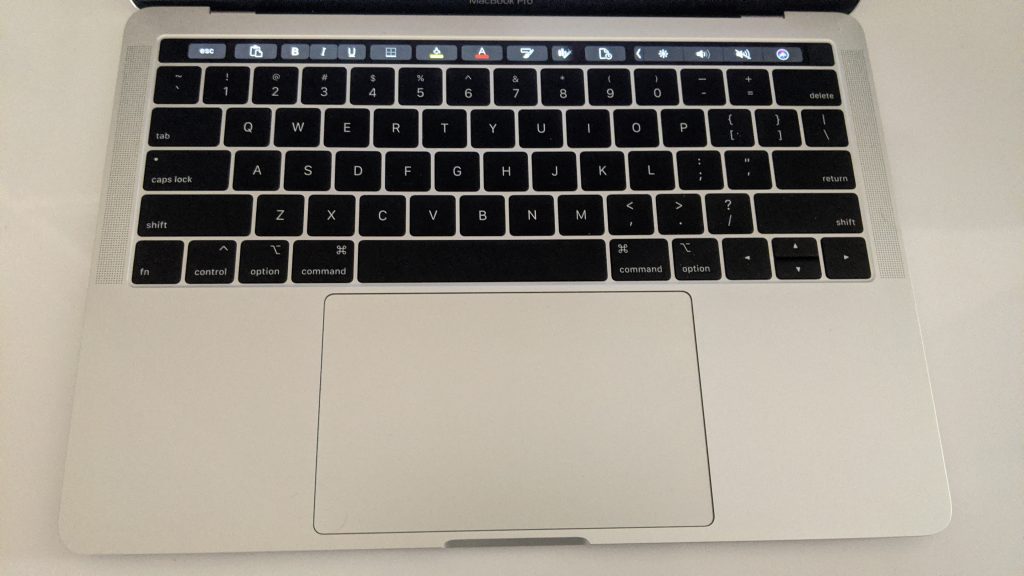
In Microsoft Word on Mac OS, there are quite a few useful Touch Bar functions to help you be more productive and skip out common keyboard shortcuts. Starting from left to right, you will find access to a clipboard paste button and a styles button for bold, italics and underline. You’ll also find options for highlighting, followed by text color, and bulleting, numbers, and justification.

Scrolling on the Touch Bar will show additional controls for inserting hyperlinks, photos, and comments. For faster access to opening documents, there’s even a button for opening recent documents. Finally, on the far left, you’ll find one to bring Word full-screen.

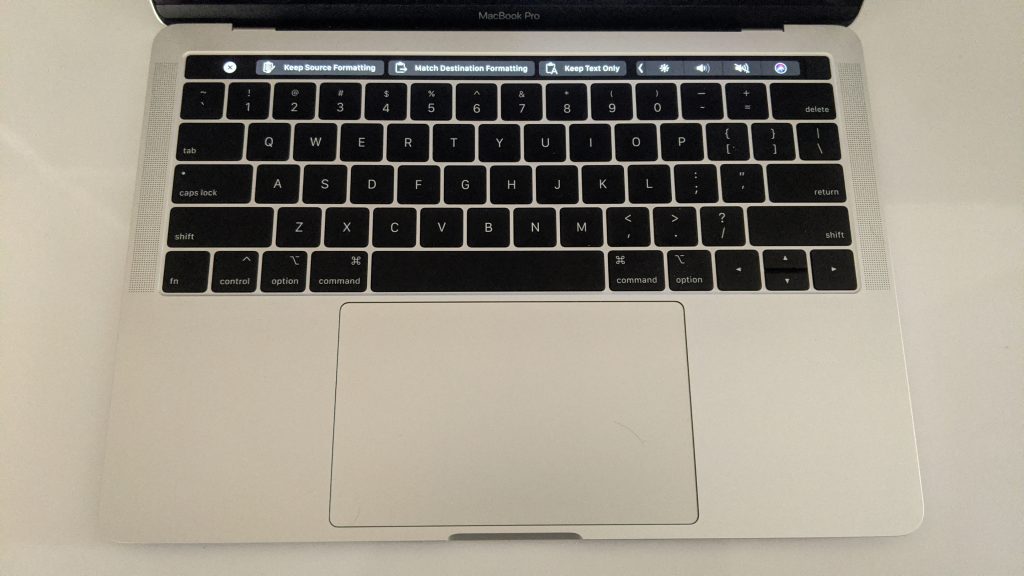
It’s worth noting that some of these buttons on the Touch Bar will have secondary functions. Clicking the clipboard gives you quick access to pasting, complete with formatting options. The highlight button will then show you a color wheel and allow you to pick the right color for highlighting. The same also applies to the font color. It’s a quick convenient way of getting to core editing functions and will save you a valuable click.

Excel

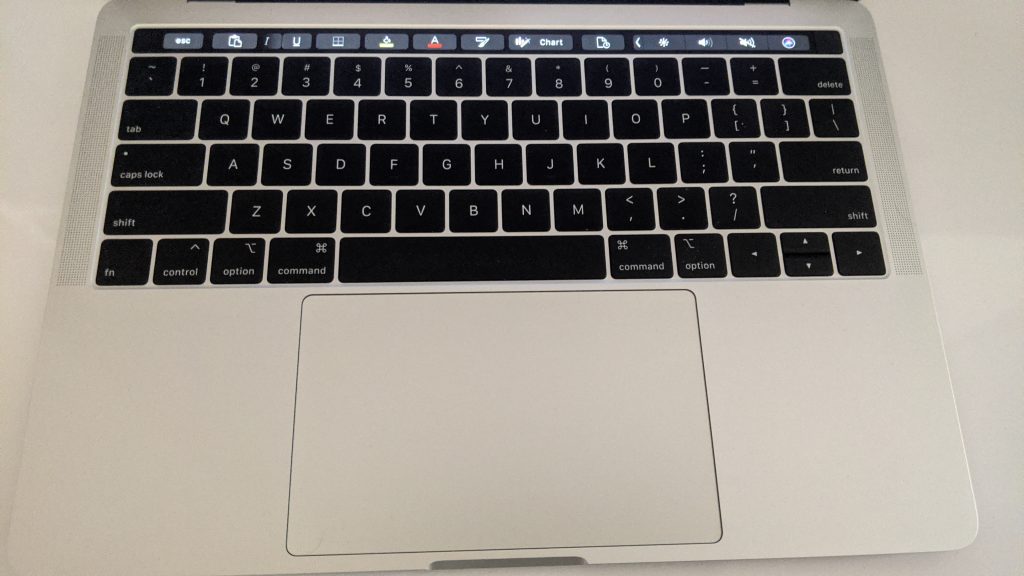
Moving on to Excel, the functions of the Touch Bar are quite similar to the ones for Word. Again, left to right, you’ll still have access to some basic editing functionality without using keyboard shortcuts. This includes a paste button, as well as options for formatting for bold, italics and underline. After that, though, the buttons change a bit. There’s a new option for boarders in cells, as well as an option for the cell fill color. That’s then capped off with options for the cell style, and then an option to create a chart.

In terms of secondary functions, the cell border button will give you access to various cell border styles. The Cell fill color, meanwhile, will give you a color picker, as does the font color option. As for the cell style button, you can choose from a variety of styles such as “Good,” “Bad,” or “Neutral.” Finally, the chart button will give you quick picks for charts such as Column, Line, or Pie. Again, this is a quick way of avoiding clicking on the ribbon in Excel for common tasks.

PowerPoint
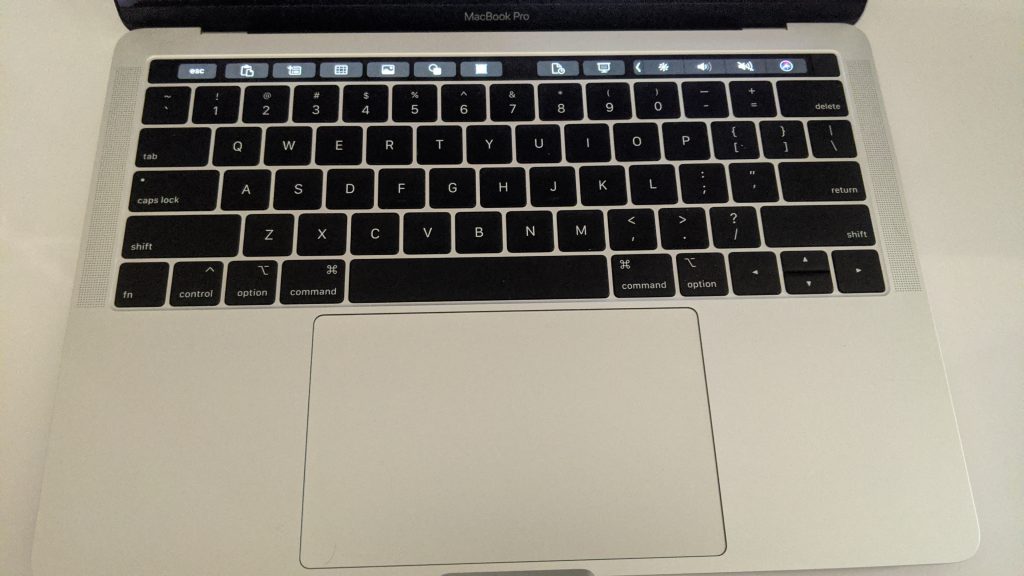
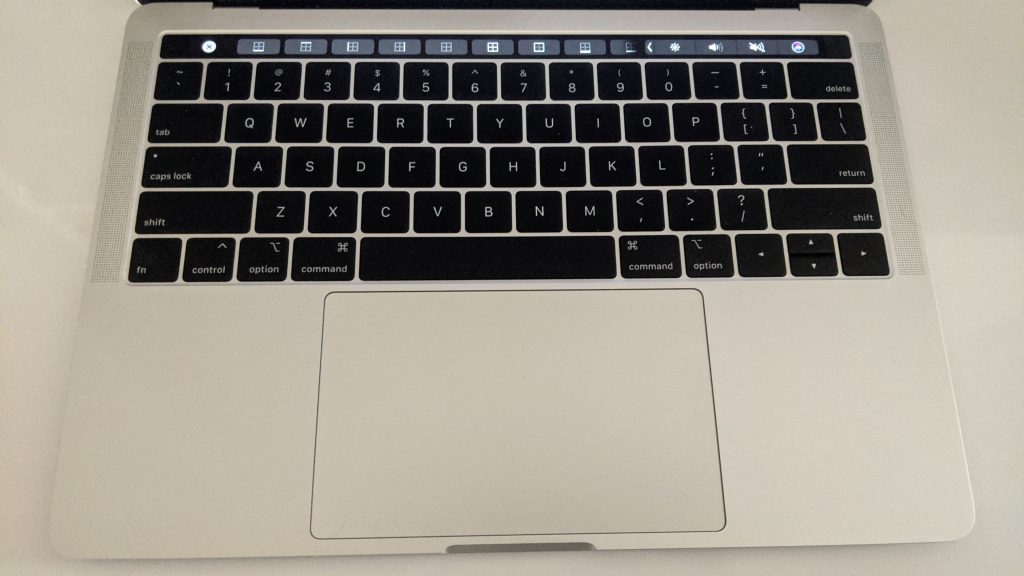
Next up, there’s PowerPoint. This Office program has perhaps what is the best function for the Touch Bar on the MacBook Pro as the functions change based on how you’re using PowerPoint. We’ll be starting first with the functions for editing mode. In this mode, from the left side, you’ll find the clipboard paste option, just as you do in the other Office apps. That’s then followed up by a button to add a new slide and a button to insert a table, photo, and shape. You’ll then find a button to summon the text edit option, followed by a button to open recent files, and another to begin the presentation. We’ll move on to the text edit options next.

With the text edit options for the Touch Bar in PowerPoint on the MacBook. there’s quite a lot similar to Word. There are buttons to bold italics, underline, insert number or bullets, edit the color of text, and change the justification. When in this mode, you can go back to the main view by tapping the ESC key. That will then give you access to additional features such as fill color, outline color, and options to rotate images and change image formats. Again, quite useful, as these are typically buried beneath the right-click menu.
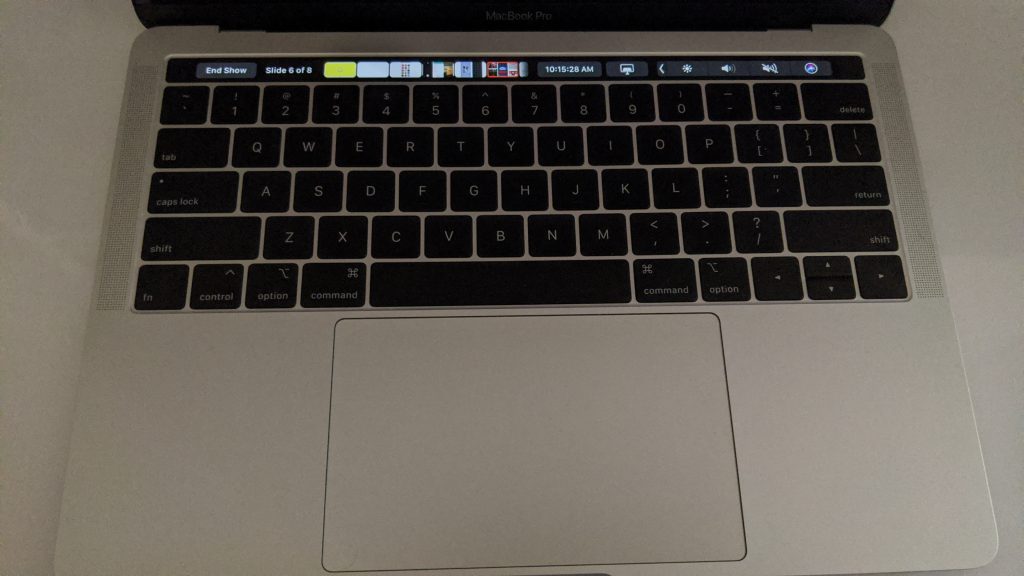

Finally, we’ll talk about how you can use the Touch Bar on the MacBook Pro in PowerPoint during a presentation. This is the coolest mode of them all, as here, you’ll be able to see a live preview of your slides. A button on the left of the Touch Bar will allow you to end the show, and the button next to it will show you the progress on the slideshow. You’ll then see a preview of each of the slides, and you’ll be able to drag your way through and touch each slide one by one while seeing it on the screen to move from one to the next. There’s even a mini clock in the Touch Bar to show you the time, and additional controls to switch your screen to the more traditional presentation mode.

Outlook

Much like PowerPoint, the Touch Bar in Outlook will show you different options based on how you use the app. We’ll be starting first with when you’re in your inbox. In this mode, you’ll find a button to switch between the mail and calendar portions of outlook. That’s then followed by options for creating a new message, deleting, arching, moving, and replying to the message. You’ll also find a flag button, too.

Next, there are functionalities for when you’re replying to an email. In this mode, The Touch Bar will have a button to send out your email, followed by an emoji key, and then the clipboard paste button. There are then the standard editing options seen from the rest of Office 365, such as style, font color, and more.

Lastly, there are some functions for the calendar. In this mode, there are options for sorting through the different views: Day, Month, Week, Work Week. There’s even a key to start a new meeting or event. It’s quite the nifty little trick, to help you avoid clicking buttons in the menu bar, or using keyboard shortcuts.

Just a little way to boost productivity

Looking at things all together, these Touch Bar tricks are just one small way to boost your productivity. Instead of having to worry about keyboard shortcuts or where to click in the Office Ribbon, you can slide your fingers up to the Touch Bar instead. It’s just one small thing, though, as we’ve previously explained tips and tricks for many of the Core Office 365 apps. Check out our coverage here for more, and let us know your thoughts in the comments below.


Deus Ex: Mankind Divided, Thimbleweed Park and more are leaving Xbox Game Pass soon

A couple of games are leaving Xbox Game Pass for Console and PC soon, as seen on the Xbox Game Pass mobile app today (via TrueAchievements). Shenmue I & II, Thimbleweed Park, Litchspeer: Double Speer Edition will be leaving the Console and PC catalogs soon, and you can add to that list Deus Ex: Mankind Divided on Console as well as Titan Quest Anniversary Edition and Apocalipsis on PC.

The Xbox Game Pass Mobile app doesn’t reveal when these games will be removed, but it will likely be later this month. Deus Ex: Mankind Divided will actually be the latest high-profile Square Enix to disappear following Shadow of the Tomb Raider, Rise of the Tomb Raider, and Just Cause 4.

It’s not all bad though as Xbox Game Pass will get two new Xbox Game Studios titles this month with the much-anticipated metroidvania game Ori and the Will of the Wisps (coming March 11), as well as the team brawler Bleeding Edge (coming March 23). Microsoft will likely announce more games very soon, as it usually does at the beginning of every month. If you have yet to try Xbox Game Pass, we remind that you can get your first month of Xbox Game Pass Ultimate for just $1.

Microsoft amps up Teams as the “Teamwork from anywhere” solution following Coronavirus outbreak

In the wake of the Coronavirus outbreak, many companies have been canceling pubic events or suggesting employees work from home via telecommuting solutions like Teams or Slack. This is of particular concern in the Seattle area, Microsoft’s home-base where the virus is still spreading.

As a result, Microsoft recently canceled its MVP summit, but that isn’t stopping the company from advertising its products in the wake of the virus. Ironically, some timely new ads for Teams are showing how it is the “Teamwork from anywhere” solution.

Recently, we noticed two of these new Teams ads online. Our managing editor came across an advertisement for Teams on Twitter, which can be seen above. The ad mentions that remote work is made easy for free with Teams and shows an image suggesting how Teamwork can be done from anywhere. In a separate instance, one of our writers also noticed a banner ad for Microsoft Teams on Microsoft’s support website for two-factor verification. The “Learn how” banner mentions how users can keep in touch and stay productive with Teams and Office 365 with working remotely.

This is a fairly engrossing way to draw more attention to Teams. Microsoft previously aired an ad for Teams during the NFL Playoffs in January, and it took jabs at Slack. As a result, it will be interesting to see how this campaign helps boosts Teams’ popularity as Cortanavirus spreads and more companies encourage folks living in impacted cities to work from home.

More of Microsoft’s new app icons begin to roll out to public Windows 10 users

Several Microsoft apps began to update on Windows 10 devices last week with their new app icons such as Calendar and Mail and now it looks like even more have started to get their icon refresh.

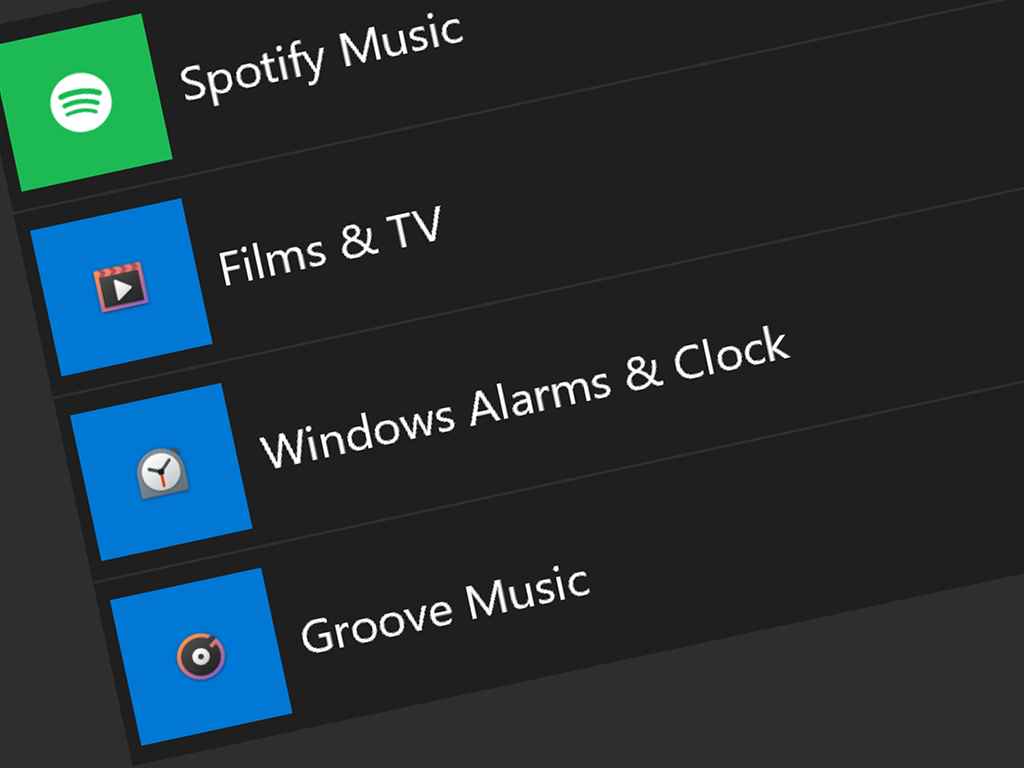
Earlier today, Films & TV (Movies & TV), Microsoft Alarms & Clock, and Groove Music (see above image) all got an update that replaces their old icon with their new one. The app icon update appears to a bit staggered with others claiming that their Calculator, Photos, and Voice Recorder apps have also been refreshed.

Microsoft revealed their intention to update their numerous app icons back in December of 2018 but the rollout has been strangely delayed and randomly implemented across Windows 10, iOS, and Android devices. The company then expanded on this idea in December last year with an even more ambitious icon plan.

Do you like these new app icons? Share your thoughts with the community in the comments below and then follow us on Pinterest and Twitter for more Microsoft app news.

Fix: You are not set up to use this calling feature

The Microsoft Office Suite is probably the world’s most well-known office suite currently available. Part of its popularity is due to the variety of tools that it brings to the table, one of which is Skype for Business.

Skype for Business is a collaborative tool that has been on the market for quite some time now, and its popularity doesn’t seem to diminish.

However, Skype for Business is not without its kinks and bugs. for example, users have reported that they are getting an error when trying to call certain numbers stating that:

You’re not setup to use this calling feature, please contact your admin

The reasons behind this error message are well-known, and we will discuss them further in the article below.

How do I get rid of the calling feature error?

Unlike other error messages, this particular one is not caused by functionality issues with Skype for Business. In fact, it only appears when you don’t meet certain conditions using the program.

Here’s a complete list of the things you need to do in order to get rid of the calling function error message:

  • Purchase calling plans for Office 365
    • If you have a service provider that provides on-premises PSTN connectivity for hybrid users, you don’t need to buy a calling plan
  • Assign the phone system for office 365 licenses and then assign a calling plan to the users in your organization
    • If you are using on-premises PSTN connectivity for hybrid users, you only need to assign a Phone System license
  • Add numbers in Skype for Business admin center
  • Add emergency addresses and locations for your organization
  • Assign phone numbers and emergency addresses to users skype pricing

I still can’t make calls via Skype for Business

If you still can’t make calls via Skype for Business, or are just unhappy with the subscription plans and offers, you could always migrate to a new collaborative tool.

We recommend using a flexible third-party program that allows you to manage your calls via any type of device and provides you with versatile settings that enhance your productivity.

⇒ Get Microsoft Teams

For a complete list of the best collaborative tools currently on the market, check out this in-depth guide.

If you know of any other way to bypass this issue with Skype for Business, tell us about it in the comments section below.

[wl_navigator]

You can now tag specific user groups in Teams

If you are an enterprise that uses Teams to collaborate in the workplace, the tool boasts a host of new features to help your employees work and communicate more efficiently.

In a recent post Microsoft announced changes that streamline collaborations on Outlook emails within Teams. The updates also touch on how supervisors or superiors can use @ mentions to address specific users in their organization.

Tagging particular user groups

Even before the latest Teams updates, you could @ mention anyone within the platform to get their attention. You could also target all members of a team by using the @team tag.

But the tag is limiting in that it does not let you address a specific user group within your team. So you end up drawing the attention of people who should be focusing on other tasks or responsibilities in the office.

Now, Teams lets team owners set up tags for specific user groups or roles, allowing them to send targeted messages. This enhancement makes sense because team members may have different responsibilities, and some critical communication may only be relevant to certain personnel.

Targeted communication allows team members to message everyone assigned to a specific tag at the same time; simply @mention the tag name in a post. Using tags, team owners can organize users based on a common attribute, like a role, project, or location.

For example, you can @ mention and only target neurosurgeons in a team that also includes cardiologists, gastroenterologists, and dermatologists.

Share to Teams in Outlook

The news of Teams-Outlook email integrations does not come as a surprise since Microsoft had hinted about it before. It just so happens that reading, responding to, or collaborating on official email conversations are still a vital part of everyday workflows or tasks in modern workspaces, including digital ones like Teams.

Say, you have a prospective customer communicating to you via Outlook. But you are managing the sales process, including working with sales reps, in Teams.

With the new Share to Teams feature in Outlook, you can move an entire email conversation with the prospect to Teams. The reverse process is also possible within Teams.

According to recent rumors, Microsoft is working on a new Outlook feature, Spaces. The tool is meant to help organizations manage project elements like emails, contacts, to-do lists, and OneDrive files. The ability to export Teams conversations to Outlook will certainly make Spaces more powerful.


Failed to Load Extension From Chrome: How to Fix it

Google Chrome is one of the world’s most popular web browsers currently in use. It is fast, powerful, and can be customized with tens of thousands of extensions that improve its functionality. But many reported that they failed to load an extension from Chrome.

They instead see a message that reads, Manifest file missing or unreadable. The error often appears when launching Chrome, and the extensions remain inaccessible. Keep reading to find out how to fix things!

What can I do if Chrome failed to load an extension?

Before we head to the slightly complex solutions, try these quick tricks first:

  • Restart the computer.
  • Switch to Incognito or Private browsing mode. You can access it by pressing Ctrl + Shift + N on Chromium-based browsers.

If none work, head to the fixes listed next.

1. Activate your extensions one-by-one

If you keep getting the same error messages, disable your extensions and then activate them one by one until the error appears again.

Then remove the extension enabled last and use an alternative one that does the same thing.

2. Reinstall Google Chrome

  1. Press Windows + R to open Run, type appwiz.cpl, and hit Enter.
  2. Select Google Chrome from the list of programs and click on Uninstall.uninstall
  3. Follow the on-screen instructions to complete the process.
  4. Once done, restart the computer to apply the changes.
  5. Now, head to Chrome’s official website, download the setup, and run it to install the browser.

Normally one could uninstall Google Chrome by simply accessing the list of installed programs, but you also need to delete all stored app data on your PC.

To do that efficiently, you should use a third-party uninstaller that will get the job done in seconds. It won’t just clear the leftover files but also remove any registry entries created by the program.

Now, you should no longer encounter extension loading errors when using Google Chrome.

Before you leave, check the best extensions to speed up Chrome, and get one today!

Which of these solutions helped you get rid of the issue? Let us know by leaving a message in the comments section below.

FIX: Google Chrome Error 138

When it comes to navigating the Internet, you need a solid web browser at your disposal. There are plenty out there to choose from, and Google Chrome is a top choice.

It is fast, powerful, customizable and probably the most popular web browser currently on the market.

However, Google chrome is still nothing but a piece of software, and it too has its own fair share of issues. One good, or in this case bad, an example is error 138 that many users have reported encountering.

While encountering this issue is indeed unfortunate, the good news is that there are a couple of fixes that you could try that will let your use Google Chrome again easily.


How do I fix Google Chrome Error 138?

1. Check to see your other browsers as well

If you encounter Error 138 in Google Chrome, then try opening other browsers to see if they encounter any similar issues connecting to the Internet.

Note: Even if Google Chrome is the only third-party web browser that you are using, remember that you can still use Internet Explorer or Microsoft Edge since they come pre-installed with Windows 10.

If you notice that all other browsers work, then your firewall might be blocking Google Chrome. As such, try turning it off or at least temporarily suspending it.

This method varies based on what firewall software tool you use. Thus, go to the developer’s website to check out how to unblock a program for your particular firewall choice.

While testing out your connectivity, you might end up keeping the new web browser as your new default one. As such, you might as well get a very reliable one. For some of our top choices, check out this detailed article.


2. Check router and connectivity settings

If you notice that all of your web browsers experience similar connectivity issues, then a good course of action would be to simply restart or reset your router settings. That being said, go to the manufacturer’s website and check out exactly how you can do this for your particular model.


3. Delete your Google Chrome profile

  1. Reboot your PC and make sure you don’t open Google Chrome during this session at all
  2. Press Windows + R
  3. Type in the following line, and press Enter:
    • %LOCALAPPDATA%GoogleChromeUser Data
  4. Rename the Default folder to Default.old
    • Make sure you make a backup of this folder somewhere just in case
  5. Launch Google Chrome and try connecting to a website

By following these steps, you should regain full functionality of your Google Chrome browser again, and no longer encounter error 138.

If you know of any fix for this browser error, leave us a message in the comments section below so that we may update the article accordingly.

[wl_navigator]

Can’t retrieve media content on Disney Plus? Try this

If you log on to Disney Plus right now with the intention to watch Home Alone or Magical Holiday Celebration, you’ll most likely be disappointed. Disney Plus has quietly removed titles from its library. That’s why plenty of subscribers like you look for a way to retrieve their favorite media content.

Around 10 years ago, Disney just bought Marvel and streaming services were pretty much unknown. Today it turned into a streaming giant that houses almost everything it produces. This includes Star Wars, Pixar, Mickey Mouse, and Goofy cartoons, along with the vault of classic Disney animated films.

Add to the list shows from 20th Century Fox or National Geographic – all supporting the wide audience. Unlike its competitors, Disney Plus made no official statement regarding swapping content out for newer titles.

Accepting that some Christmas titles are gone is one thing, but the lack of any warning is another. Moreover, titles like Dr. Dolittle, The Pirates of the Caribbean: On Stranger Tides, Garfield 2, Shaggy Dog 2006, or Flicka have vanished into thin air too.

Hopefully, they’ll come back soon. And if this doesn’t happen, is there anything that you can do to correct that?

What can I do to retrieve media content on Disney Plus?

Access Disney Plus with the use of a VPN
  1. Sign up for one of the VPNs you prefer using.
  2. Then, install the appropriate app for your device.
  3. Log in.
  4. Connect to a secure server from another supported country.
  5. Once connected, head to the Disney Plus site or app and enjoy. While your true location is hidden, Disney Plus thinks you’re streaming from the country the VPN server is in.

Note: if you’re unsure about your VPN choice, this list with super-fast VPN options for Windows 10 might help you out.

Usually, you can download movies from Disney Plus and house them on your device. This gives you the peace of mind that nothing could ever go wrong, but there’s a thing to consider.

There are no restrictions on how many times you download a title, but any downloaded content would only stay on your device as long as it is available on Disney Plus. When it’s removed from the service, it’s also gone from your device.

Since this isn’t a viable solution, note that these unexpected changes seem to affect especially North American subscribers. Many of the aforementioned titles are still available internationally.

Disney changes its content from one location to another due to complications of licensing deals and streaming rights. The selection of titles on Disney Plus could remain in flux for the next several years, just like it happens on Netflix.

However, with the use of a VPN, remember that you can access Disney Plus from anywhere around the world. Do a quick search to find the availability of your favorite TV episodes, films, and shows, then stream Disney Plus after choosing the right VPN location for it.


Despite a few titles being removed, Disney Plus still is an awesome service packed of popular content. At only $6.99 per month or even less with an annual subscription, it remains cheaper than the less attractive entry-level Netflix account.

And it’s not like some titles are missing without any compensation. Disney is marching on, keeping up the good work of adding new original movies and shows to its library each month.

Let us know whether the above trick worked for you or if you’ve already bought some physical copies of your favorite films. The comments area is waiting for you.

iDRAC Virtual Console is Not Working: 3 Ways to Launch it

If iDRAC Virtual Console is not working on your PC, you won’t be able to remotely monitor your server.

This is a major problem and it can affect your business and clients, but there are ways to fix this problem.

Why is the iDRAC Virtual Console not working?

  • Compatibility issues with the newer versions of Java.
  • Java security settings can often interfere with iDRAC.
  • Outdated iDRAC firmware is a common cause of problems.

How can I fix the iDRAC Virtual Console if it’s not working?

Before we try other solutions, we suggest you perform the following checks:

  • Ensure that iDRAC firmware and trust certificates are up to date.
  • Resetting iDRAC can also help at times.
  • If you’re using Kaspersky antivirus, consider changing its settings or disabling it.
  • You can also use iDRAC in Docker as an alternative.

1. Revert to an older Java version

  1. Prior to uninstalling your current version, turn off Auto Java updates.
  2. Open Settings, and select Apps from the Windows Settings screen.
  3. Select Java from the Apps and Features screen. Click the Uninstall button.
    find and uninstall Java
  4. If an older version of Java is shown, do not uninstall it.
  5. Next, go to the Java archive page and download an older version of Java.

2. Use the GitHub script

  1. Navigate to the IDRAC6 Virtual Console Launcher page.
  2. Read the instructions on that page and familiarize yourself with the script.
  3. Click on Download ZIP.
  4. Extract the files and run the scripts.

3. Modify the Java security file

  1. Open the Java installation directory. By default it should be: C:\Program Files\Java
  2. Next, go to lib and then the security folder. Locate java.security and open it with Notepad.
  3. Locate the jdk.jar.disabledAlgorithms and remove RC4. Some users also had to remove SSL3.
  4. Save changes.

How do I reset my iDRAC Virtual Console?

iDRAC9 Web Interface

  1. Connect to the Web interface and log in with your credentials.
  2. Navigate to Maintenance and select Diagnostics.
  3. Lastly, select Reset iDRAC.

iDRAC7 and 8 Web Interface

  1. Connect to the Web interface with your username and password.
  2. In the Quick Launch Tasks section in the bottom right select Reset iDRAC.
  3. Confirm that you want to reset it.

If iDRAC Virtual Console is not working, that’s usually a Java issue and you can fix it by installing an older version or by adjusting your settings. However, that may give you the Oudated Java message, but that can be easily fixed.

We also suggest checking our Java is not recognized guide as well as our article on how to remove Java update is available message.

Did our solutions work for you? Do let us know in the comments area below!

The first batch of new Windows 10 icons hits live builds

With the retirement of one of their most popular OSes in history, Microsoft now focuses more and more on developing their current OS, Windows 10.

However, these don’t include just functionality improvements or bug fixes, but some flavor changes as well.

Back in December, Microsoft announced that they are preparing to deliver some new icons to Windows 10 users, with some of them already available in Windows Insider builds.

The first revamped icons reach live builds

However, these new icons are no longer Insider exclusive, since Microsoft has made a few of them available for everyone. The new update was first spotted by Techdows and it seems that Mail and Calendar, Movies and TV, and the Calculator app are some of the new tools to receive an iconic facelift.

The new icons will update on Windows 10 Start Menu, Taskbar, and Splash Screen. This seems to be just a first batch of a much greater wave of icon updates to come since changes previously seen in preview builds have not been released yet to live.

Those of you that are currently running Windows 10 version 1909 can already test out the new icons. Unfortunately, no word on whether those running older versions will get the icons is out yet.

The icons also feature in Windows 10X, the OS that Microsoft is currently fine-tuning for later deployment on the Surface Neo, a dual-screen device.

Note: While updates to the Calendar and Mail apps seem to have been pushed out automatically to everyone, in order to see the new icons for the Calculator and Movies & TV apps, you’ll need to update the apps via the Microsoft Store.

What do you think about the new and improved icons for Windows 10? Give us your feedback by leaving a message in the comments section below.

[wl_navigator]

New Cortana changes will help you increase work productivity

Everyone that loves interactive apps is probably familiar with Windows 10‘s very own Cortana. This voice assistant has been with users ever since the first version of Windows 10, acting as Microsoft‘s version of Alexa or Google Assistant.

It received numerous updates throughout the years, some ore or less successful, but it seems that things are about to change.

In a recent post, Microsoft stated that they are planning to turn Cortana into a productivity assistant for Office 365:

The upcoming update to Windows 10 will include access to a new Cortana experience with an emphasis on productivity, helping you quickly find the information you want across Microsoft 365. The new Cortana experience in Windows 10 features a chat-based UI that gives you the ability to interact with Cortana using your voice or the keyboard.

Cortana will lose some key features

As part of the new revamp brought to Microsoft‘s voice assistant, some features that aren’t very work-focused will be dropped.

For example, Microsoft mentioned that some consumer skills including music, connected home and third-party skills will no longer be available in the updated Cortana feature in Windows 10.

The end-goal for these changes is to finally transform Cortana into a full-fledged work assistant that will focus more on productivity, helping you quickly find the information you want across Microsoft 365.

Cortana will gain some new skills

Of course, Cortana is also getting some new ones as well. New versions will allow you to type or speak out requests to find people or files, or quickly create or queue up emails.

You can also use it to check out yout calendar, set a reminder, or add entries to your lists in Microsoft To Do. With these changes, Microsoft hopes that work productivity will increase while making it a bit more interactive and engaging.

The main reason behind these changes is most likely Microsoft‘s plan to replace Cortana as the default voice assistant in Windows 10x.

Given how something newer would replace it, the only logical choices would have been to either give Cortana a new purpose or remove it altogether. However, the program is still quite popular among Windows users, and that is probably why Microsoft didn’t choose the latter.

What’s your take on the latest changes that are to come for Cortana? Let us know what you think by leaving a message in the comments section below.

[wl_navigator]

Microsoft’s MVP Summit is the latest event to fall victim to Coronavirus caution, will be a virtual only event

Word is filtering out through Twitter today that the Microsoft MVP Summit, a sometimes annual event bringing some 1500 Microsoft MVP award recipients to Microsoft’s Redmond campus for a week of NDA protected sessions, has been cancelled.

Quick update, here’s the notice, as posted by an MVP

MVPs have been notified via email about the cancellation. The event was to be held March 15-20, in Bellevue and Redmond, Wa. MVPs tweeting about the cancellation are saying that it will be replaced by a virtual event.

With concern about the COVID-19 Coronavirus spreading, the MVP Summit is one among a growing number to be cancelled or postponed. So far, there’s no word about Microsoft’s Build developer conference, slated for May 19-21 in Seattle, but prospects aren’t probably looking good for any large conference. The Mobile World Conference, Facebook’s F8, and the Game Developer Conference (GDC) have already been cancelled, or in the case of GDC, postponed. So far, Google I/0, set for May 12-14, is still on, as is Build, but obviously plans could change.


New Xbox Wireless Phantom Magenta Controller will be available on May 17

The Xbox team unveiled today a new Limited Edition Xbox Controller that looks even cooler than the purple Fortnite Limited Edition controller that launched last year. Indeed, the new Xbox Phantom Magenta controller will use the same translucent design seen on the well-received Phantom Black and Phantom White controllers, but this time with a dark pink design.

This new Limited Edition controller will cost $69.99 and start shipping on May 17, and you can already pre-order it from the Microsoft Store. There’s also a $49.99 officially licensed charging stand that uses the same Phantom Magenta design, and you can pre-order it today before it starts shipping on March 17.

The Phantom Magenta Controller has a matching charging stand.

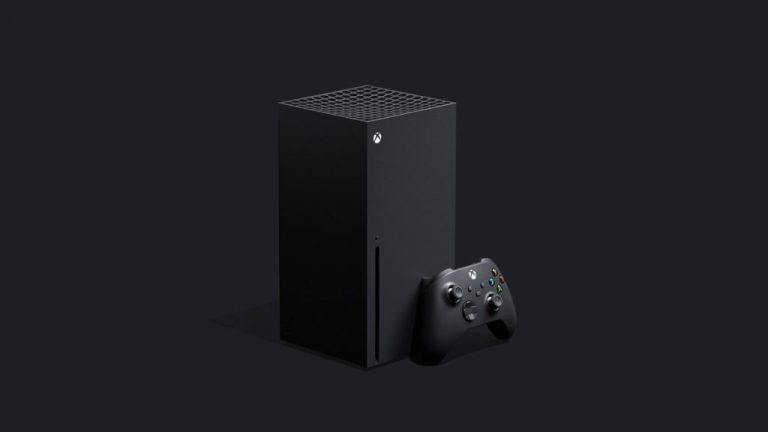
Keep in mind that all existing Xbox accessories will keep working on the upcoming Xbox Series X when it’s released in holiday 2020. We’ll likely see Microsoft launch more Limited Edition controllers throughout the year, and the company really seems to be onto something with this “Phantom” series using a translucent design.

A Fatal Error Occurred While Trying to Sysprep the Machine [Fix]

The System Preparation tool is an essential part of the Windows OS and helps in duplicating, testing, and delivering new installations. However, while running it, you may encounter A fatal error occurred while trying to sysprep the machine.

This error occurs if the Windows Software Licensing Rearm program has run more than three-time in a single Windows image. Keep reading to find out the solutions!

How do I fix Sysprep’s fatal error?

1. Edit SkipRearm Key

  1. Press Windows + R to open Run, type regedit, and click OK.
  2. In the Windows Registry Editor, navigate to the following location:HKEY_LOCAL_MACHINE\SOFTWARE\Microsoft\Windows NT\CurrentVersion\SoftwareProtectionPlatform
  3. On the right pane, locate the SkipRearm key.path
  4. Double-click on the SkipRear, and in the Value data field, enter 1, then click OK.
  5. Close the Registry Editor and check if the error is resolved.

By editing the SkipRearam key, you can fix the Sysprep fatal error issue in Windows. Make sure you create a restore point before editing any registry keys.

2. Edit GeneralizationState and CleanupState keys

  1. Open the Registry Editor, and navigate to the following location:HKEY_LOCAL_MACHINE\SYSTEM\Setup\Status\SysprepStatus
  2. In the right pane, locate and double-click on the GeneralizationState key.GeneralizationState to fix GeneraliazationState
  3. In the Value data field, enter 7, and click OK.
  4. Next, locate and double-click the CleanupState key. If you can’t find it, save the changes and restart the PC.
  5. For those who did find the DWORD, enter 2 in the Value data field and click OK.
  6. Run System Preparation Tool and check for any improvements.

Editing GenealizationState and CleanupState DWORDs can help fix things if you see A fatal error occurred while trying to sysprep the machine when running sysprep /generalize.

3. Run the DISM commands

  1. Press the Windows key, type cmd, right-click on Command Prompt, and select Run as Administrator.
  2. Click Yes in the UAC prompt.
  3. In the command prompt, paste the following commands and hit Enter after each:
    DISM /Online /Cleanup-Image /CheckHealth DISM /Online /Cleanup-Image /RestoreHealthdism commands
  4. The process may take a few minutes to complete.
  5. Upon completion, it will display a success message.
  6. Close the command prompt and run the System Preparation Tool.

The DISM commands help repair the system image and can fix things when you receive errors while running the System Preparation Tool. You can also go for a specialized tool to simplify this process.

4. Uninstall MSDTC

  1. Press Windows + R to open Run, type cmd, and hit Ctrl + Shift + Enter.
  2. Type the following command and hit Enter to uninstall the server:msdtc -uninstall
  3. To reinstall the service, run the following command:msdtc -installreinstall msdtc
  4. Run the System Preparation Tool and check for improvements.

That’s all! With these quick solutions, you should be able to fix A fatal error occurred while trying to sysprep the machine in Windows 7 and Windows 10.

Before you leave, find out how to use Sysrep in Windows, the various commands, and actions.

Don’t forget to leave any other questions or suggestions that you may have in the comments section below.

Domain Not Working: Why Is It and How to Fix the Issue

Domain issues can stymie the excitement of launching your first website. Nothing is as frustrating as finalizing the design of your website and launching it, only to see a DNS_PROBE_FINISHED_NXDOMAIN error and the domain not working.

Fret not! Because you’re not alone. Being unable to load your website because your domain name is not working is a fairly common problem. One that is remediable with the following steps in this guide.

What can I do if my domain is not working?

Before we start making changes, here are a few quick tricks to try:

  • Double-check with your registrar to ensure your domain name is not expired.
  • In case you’ve just registered your domain, it may take a while to finalize the registration. Usually, this process will take an entire day (24 hours), though you should wait for 2-3 days.

If none work, move to the fixes listed next.

1. Clear your browser’s cache

Note icon NOTE
The steps listed here are for Google Chrome and work for Microsoft Edge and other Chromium-based browsers.
  1. Open your browser, and press Ctrl + Shift + Delete.
  2. Navigate to the Advanced tab, tick all the checkboxes here, especially Cookies and other site data and Cached images and files, then click on Clear data.clear data to fix domain not working
  3. Once done, relaunch the browser.

This solution works particularly well for users who have migrated their website to a new hosting service or changed their IP address. If the website‘s IP address does not match the domain in your browser’s cache, it may cause some problems.

This is because your browser will try to consult its cache instead of the authoritative name server.

Clearing your browser’s history may take a while. You’ll need to ensure that all active tabs are closed if you want it to work effectively. If it’s taking too long, you might have to restart your browser and go through the above steps again.

2. Flush and reset the DNS cache in Windows

  1. Press Windows + R to open Run, paste the following command, and hit Enter:cmd /k ipconfig /flushdnsflush dns
  2. Wait for the reset to complete.

After running this command, a console window should appear with a success message. This solution works on the same principles as clearing your browser’s DNS cache and should help fix things when the domain is not working.

Your operating system also saves DNS information, and your browser will sometimes try to use this cached data if it can’t find DNS information in its cache.

3. Make sure your domain is registered with the right name servers

If you already have an idea of what name servers are delegated to your domain, then the best way to ensure that the nameservers are correct is by using a domain name registration data lookup like ICCAN Lookup or Whois Lookup.

When using these lookups remember to insert your domain name (windowsreport) followed by the top-level domain (.com). You don’t have to worry about the subdomain (www.). Your input should look something like windowreport.com.

That’s it! One of these solutions should have helped when the domain was not working, and things should be up and running now.

Before you leave, check the best open-source network monitoring tools for detailed information on the various parameters.

Did any of these steps work for you? Do you have any qualms or questions? If you do, don’t hesitate to reach for the comments section below.

FIX: Sysprep stuck at Just a moment screen in Windows 10/11

The System Preparation tool allows users to test and deliver new installations for the Windows operating system based on an established installation. However, some users have reported that Sysprep is stuck at Just a moment screen while applying the image to a new machine.

This issue can occur due to several reasons, which makes it difficult to pinpoint the problem as it can vary depending on the machine.

In this article, we have listed a couple of troubleshooting tips to help you resolve the Sysprep stuck at Just a moment issue in Windows 10.

What can I do if Sysprep is stuck at Just a moment screen?

1. Change the computer name

Windows 10 Sysprep stuck at just a moment

  1. Log in to your Windows computer with administrative rights.
  2. Press Windows Key + R to open Run.
  3. Type control and click OK to open the Control Panel.
  4. Click on System and Security.
  5. Under the System section, click on see the name of this computer.
  6. In the new window, scroll down to Computer name, domain and workgroup settings section.
  7. Check if the computer has a name.
  8. If blank, click on the Change Settings button.
  9. In the Computer description field, enter a name for your computer.
  10. Click on Apply and OK to save the changes.

Several users have reported that the error to have resolved after adding a name to the computer instead of leaving it blank.

You can’t open Control Panel? Take a look at this step-by-step guide to find a solution.


Can’t change the name of your PC in Windows 10? Don’t worry, we’ve got the right solutions for you.


2. Check for scripts

Windows 10 Sysprep stuck at just a moment

  1. If you have a script that is supposed to run after the first sign in, it is possible that the script is creating issues with the Sysprep tool.
  2. Create a backup and delete the script.
  3. Reboot the computer and check for any improvements.

3. Remove pre-installed apps

Windows 10 Sysprep stuck at just a moment

  1. Right-click on the Start button.
  2. Select Windows PowerShell (Admin) from the context menu.
  3. In the PowerShell window type the following command to get a list of all the installed apps.
    Get-AppxPackage | ft Name, PackageFullName -AutoSize
  4. Now find all the app that you want to uninstall using the PackageFullname.
  5. For example, if you want to uninstall the People app, the name of the app would be .People.
  6. To uninstall the app, enter the following command and hit enter:
    Get-AppxPackage *people* | Remove-AppxPackage
  7. This will uninstall the selected app.

Uninstall all the preinstalled apps simultaneously

Windows 10 Sysprep stuck at just a moment

  1. If you want to uninstall all the preinstalled apps, do the following.
  2. Run PowerShell as admin.
  3. In the PowerShell window, type the following command and hit enter:
    Get-AppxPackage -AllUsers | Remove-AppxPackage
  4. This will uninstall the pre-installed apps for all the users. Ignore the error if any displayed.
  5. Once the apps are uninstalled, rerun the Sysprep tool and check for any improvements.

Windows PowerShell has stopped working? Check out this guide and fix the issue in no time.


The Windows 10 Sysprep stuck at Just a moment can occur due to several reasons. Follow all the steps in this article one by one to resolve the issue with your machine.

If you have any other questions or suggestions, leave them in the comments section below and we’ll be sure to check them out.

READ ALSO:

Reports of Windows 10 update problems emerge again

If current user reports are anything to go by, troublesome Windows 10 updates are here to stay, or so it seems.

The latest of these to cause trouble are non-security fixes (update kb4535996) according to complaints posted on the Windows 10 Subreddit.

Audio acts up after updating

One user claims that their audio malfunctioned after installing the Cumulative Update (CU) for Windows 10. The glitch resulted in bad quality sound, which could not be fixed by updating the sound card drivers or restarting the machine multiple times.

My PC decided to install today’s big Update, and afterward, my audio has been sounding muffled and distorted. I have a Sound Blaster Audigy Fx sound card and Astro A10s. I updated the drivers and restarted a couple of times.

Responding to the above claim, another Reddit user suggested that the problem might have originated from the reactivation of the Sound Blaster surround 5.1 on a 2.1 speaker system. In that case, there would be a configuration mismatch due to the absence of a center speaker, compromising the audio quality.

Slow Update

The CU seems to be taking longer than usual to install, according to yet another Reddit post.

This Update is huge. Currently installing after the first reboot and seeing the percentage meter slowly crawling to 100%.

The update fixes dozens of issues impacting Windows 10 version 1909 and 1903 machines, so it is easy to understand why it is massive. A look at the Microsoft Update Catalog reveals that the smallest CU file is about 190 MB while the largest is approximately 350 MB in size.

Installation failure

Another user lamented that the CU failed to install for the umpteenth time. It is not clear if, before attempting to update, the user had installed the recommended Servicing stack updates (SSU) to address compatibility issues.

Preview updates are usually for testing

While Microsoft said it is not aware of any issues associated with update kb4535996, it expects them for sure. The company releases such preview updates the third and fourth weeks of the month for testing purposes.

So, if you have updated and encountered any installation or post-installation issues, Microsoft encourages you to provide feedback. The company may consider your experience with the category D fix when fine-tuning the next Update Tuesday release.


Get the February 2020 cumulative update for Windows 10

Microsoft has released the latest cumulative update (CU) for Windows 10 version 1903 and 1909. It patches many problems that some users of the operating systems have been complaining about.

The CU is optional

The latest CU is optional, so you do not have to install it unless your Windows 10 has had some of the issues it is meant to fix. None of the problems Microsoft listed has something to do with OS security, though.

The Windows Search box has not been rendering correctly for some users, and it is one of the glitches the update is addressing. Updating should also fix a keyboard layout issue that a previous Windows 10 upgrade caused in some machines.

Other fixes the CU introduces include:

  • Updates an issue that prevents the speech platform application from opening for several minutes in a high noise environment.

  • Updates an issue that reduces the image quality in the Windows Mixed Reality (WMR) home environment.

  • Updates an issue that might prevent ActiveX content from loading.

  • Improves the battery performance during Modern Standby mode.

  • There are two ways to download and install this CU on your PC:

Windows Update

Click Settings on the Windows 10 Start Menu, choose Update & Security, and then click Windows Update. You will see a link in the Optional updates available area. Click it to get the update.

Microsoft Update Catalog

This option lets you download the kb4535996 Windows 10 update as a standalone executable. You may install the CU file at your convenience by double-clicking it and confirming the installation.

How to minimize upgrade issues

As you may already know, installing any Windows 10 update does not always go according to plan. It sometimes fails as a result of errors originating from incompatible drivers.

Microsoft acknowledges the potential frustration, and it is providing a servicing stack update (SSU) to enhance the compatibility of your machine with the latest CU.

If you are updating via Windows Update or Microsoft Update, be sure to get the latest SSU for Windows 10 version 1903 and 1909. Alternatively, search for SSU KB4538674 in the Microsoft Update Catalog.

Remember to install the SSU before updating your PC with the latest CU.

You may also try these proven traditional hacks to avoid typical Windows 10 CU install bugs.


Sysprep is not shutting down? Check out these solutions

Several users have reported issues while preparing an image of Windows 10 to run Sysprep. Trying to shut down the machine, Windows 10 reboots itself instead of shutting down.

In other Microsoft Community reports, users said that they are stuck with the shutting down screen and the computer fails to do anything:

I’m trying to create a Server 2016 template on Hyper-V.  I installed the OS, patched it, etc and then ran Sysprep.  I chose Generalize and OOBE and Shutdown.  It ran for a bit and then bot to a plain blue screen that says “Shutting down”.  There’s no spinning balls or anything to make it look like it’s doing anything and it’s been sitting there for an hour.

If you are also troubled by this error, here are a couple of troubleshooting tips to help you resolve Windows 10 Sysprep shut down issues.

What can I do if Sysprep does not shut down?

1. Use an existing template file

Windows 10 Sysprep not shutting down

  1. If it is not a Blue Screen of Death error, but you are stuck at the Shutting down screen, you can try to use an existing template file from a different location to fix the issue.
  2. Copy a template file already sysprepped from a different location and use it here.
  3. Several users have reported that using the already sysprepped file has helped them resolve the error.
  4. While this may not be a permanent fix, it can help you resolve the issue until you identify the real bug.

2. Use force shutdown

Windows 10 Sysprep not shutting down

  1. Press Windows Key + R to open Run.
  2. Type cmd and click OK to open the Command Prompt.
  3. In the Command Prompt type the following command and hit enter to execute:
    shutdown -s -f 
  4. This will force Windows to shut down the system.
  5. Check if force shutdown can help you fix not shutting down the issue.

If you’re having trouble accessing Command Prompt as an admin, then you better take a closer look at this guide.


3. Update BIOS

Windows 10 Sysprep not shutting down

  1. If you have a laptop or bought a pre-built computer, then head to the computer manufacturer’s website and select your computer.
  2. Now, look at its download page.
  3. If an update is pending for your motherboard, then it should be listed on the download page.
  4. Download the newer version of BIOS.
  5. The BIOS file usually comes with readme.txt file with instructions on how to update the BIOS.
  6. The easiest method to update the BIOS is to use a bootable USB drive with the help of a flashing tool.
  7. Reboot the computer after successfully updating the BIOS and check for any improvements.

While updating the BIOS, it is recommended to use the BIOS menu rather than the flashing tools to successfully update BIOS.

Accessing BIOS seems too big of a task? Let us make things easier for you with the help of this amazing guide!

Windows 10 Sysprep shutting down issues are difficult to diagnose as they can occur due to several reasons. We have listed all the possible fixes that can help you get past this problem.

If you have any other questions or suggestions, don’t hesitate to leave them in the comments section below.

READ ALSO:

Microsoft news recap: ex-engineer faces up to 20 years in prison for defrauding $10m, coronavirus affects financial outlook, and more

Microsoft news recap is a weekly feature highlighting the top Microsoft news stories of the past week. Sit back, grab some coffee, and enjoy the read!

Microsoft’s SwiftKey Keyboard adds support for Dark Mode on Android phones and tablets

SwiftKey on Android has received a new update that has brought Dark Mode for both phones and tablets, The Settings screen has also received a new design.

Microsoft SwiftKey Keyboard for Android

Ex-Microsoft engineer faces up to 20 years in prison for defrauding company of $10 million

One of Microsoft’s ex-engineers is facing up to 20 years imprisonment for defrauding the company of $10 million. Following a 5-day trial, the ex-engineer was found guilty of 18 federal felonies.

A Microsoft logo on a glass wall witha reflection of a blue sky

Xbox Series X will support audio ray tracing and resuming games after a reboot

New information surrounding Microsoft’s next gaming console, the Xbox Series X, has been announced. Of note is the console’s ability to resume a game after rebooting the console.

Microsoft updates Q3 FY20 guidance as coronavirus outbreak to impact Windows OEM and Surface revenues

As the Coronavirus continues its course across an increasing number of countries, Microsoft has updated its Q3 FY20 guidance to make note of the impact that coronavirus could have on its financial performance. Notably, Microsoft expects it to impact Windows OEM and Surface revenue.

That’s it for this week. We’ll be back next week with more Microsoft news.

Windows 10 news recap: new Instagram PWA now available, Live Tiles may be dropped from the Start Menu, and more

Welcome back to our Windows 10 news recap, where we go over the top stories of the past week in the world of Microsoft’s flagship operating system.

Cortana to lose consumer skills in Windows 10 20H1 update, but Alexa integration is here to stay

Microsoft looks to be massively scaling back Cortana as it has started work on removing a number of consumer skills, including music, connected home and third-party skills, as well as ending support for Cortana on unsupported versions of Windows 10, including Windows 10 Mobile.

New Instagram PWA is now available in the Windows 10 Microsoft Store

Instagram is rolling out a new app for Windows 10 to the Microsoft Store. This time, it is a Progressive Web App (PWA). Along with it comes the ability to use Direct Messages via the desktop. For Windows 10 users, hopefully it ends the issue of long delays between updates compared to other platforms.

Windows 10 Start Menu may lose its Live Tiles according to new report

According to a new report, Windows 10’s Start Menu could lose its Live Tiles functionality. The report states that Microsoft could replace Live Tiles with icons.

That’s it for this week. We will be back next week with more Windows 10 news!

New report reveals Surface Duo specs, suggests it could launch this summer

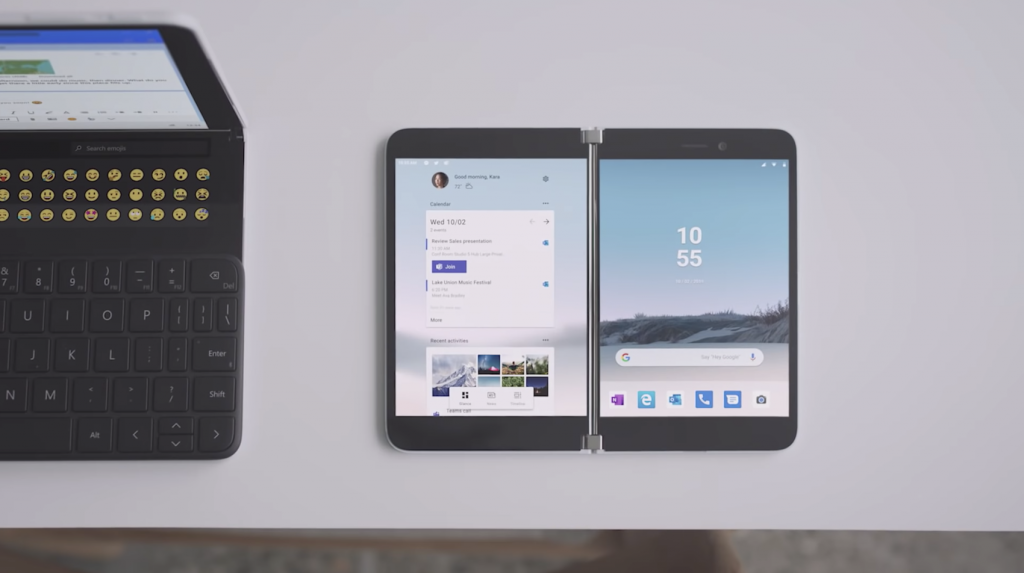
Microsoft’s may launch its first dual-screen device a bit sooner than expected according to a new report from Windows Central. The Surface Duo, the company’s first Android device may, start shipping as soon as this summer, with Microsoft possibly confirming the news during a Spring Surface event where Surface Book 3 and Surface Go 2 could also appear.

“I’m told that Microsoft is hoping to have all the software done by early April, and that Surface Duo could start shipping in limited quantities in time for the summer if everything goes according to plan,” wrote Windows Central’s Zac Bowden. “I expect that this initial launch will be aimed primarily at developers and enthusiasts, with its availability announced in the spring alongside the Surface Go 2 and Surface Book 3.”

Sources also told Windows Central that Surface Duo will come with a Snapdragon 855 SoC, 6GB of RAM, and 64GB of storage, though there will be different configurations with more RAM and storage. However, Surface Duo using Qualcomm’s flagship processor for 2019 means that it won’t support 5G.

Bowden also has a theory about some of the Surface Duo’s surprising design choices such as the pretty big bezels (for today’s standards), as well as the lack of multiple cameras. This may be because the hardware has been ready for quite some time, before Microsoft decided against using Windows Core OS on Surface Duo in favor of Android:

Surface Duo has had a long, hard journey internally. Microsoft started working on it back in 2016 under the codename Andromeda, and the plan was for Surface Duo to be one of the first products to ship with Windows Core OS. Under those plans, the product was supposed to launch in 2018, but that changed when Microsoft dumped Windows for Android instead.

Because of this, the hardware has essentially been ready to go for two years, with only iterative changes being made to the device since. This might explain why Surface Duo doesn’t have slim bezels or multiple camera sensors. These were only just starting to be a thing on smartphones launching in 2018. In 2020, thin bezels, 5G, and multiple cameras are pretty much the norm.

As of this writing, the Surface Duo page on Microsoft’s website still indicates that the device is “coming holiday 2020.” However, we were wondering earlier this week if a leaked promotional Surface Duo video where the date on the device’s display is 06/18/2020 may actually be teasing the Surface Duo’s launch date. Technically, June 18 is just 3 days ahead of summer, but a June launch doesn’t sound that crazy especially after we’ve seen a video a Surface Duo out in the wild.

Just Cause 4 and Dragon Ball Fighter Z video games are now free to play on Xbox One consoles

The games, Just Cause 4 and Dragon Ball Fighter Z, are now free to play on Microsoft’s Xbox One consoles as part of this week’s Free Play Weekend campaign.

Both games join the previously announced The Division 2 as Xbox One games that can be played in full by anyone with an active Xbox Live Gold subscription from now until the end of Sunday with all game progress being saved to their accounts.

Here’s the official trailers for each game along with their online store links at the bottom of the page.

In addition to being free to play this weekend, all three titles have also had their prices slashed with discounts ranging from 65% to 95% now being activated. The Standard Edition of The Division 2 is now just $2.99 which is kind of insane.

Let us know what games you’ll be playing this weekend and then follow us on Pinterest and Twitter for more Xbox gaming news.

Just Cause 4
Just Cause 4
Developer:
Square Enix
Price:
Free


Tom Clancy's The Division® 2
Developer:
UBISOFT
Price:
Free

Fix: Chkdsk Stuck on an External Hard Drive

If your Windows 10 device is running slow, or if you get force close errors, a good idea is to run a general chkdsk operation. This way, you will be able to fix errors and repair any corrupted files, resulting in a more stable and smoother Windows 10 system. This works just as well, even if you are running it on an external hard drive.

Many complaints have risen about a chkdsk stuck, as more and more users aren’t capable of fixing their Windows 10 problems since the disk check can’t be completed.

As you know, when a disk check is running, it is not recommended to reboot your device, as you can end up hard-bricking it. So, you should be patient until the check is over – in most cases, this can take hours or even a whole day (so there is no problem with the disk check; you just have to let the process do its work).

If you are running a chkdsk on your external hard drive and it is stuck, try to follow the steps below to fix it.

What can I do if chkdsk gets stuck on an external hard drive?

1. Use the Registry Editor

  1. Use the Windows 10 install CD or a repair CD (recovery image) of Windows 10.
  2. Enter the mentioned CD and reboot your device.
  3. Now, from the CD main window run cmd by pressing and holding Shift + F10 keyboard keys.command prompt window
  4. Next, on the cmd window type regedit in order to open Registry Editor.regedit window
  5. Navigate to HKEY_LOCAL_MACHINE folder, and from there, select Load Hive.
  6. Go to path C:WindowsSystem32Config and pick System. If a name will be prompted enter something intuitive, such as Disksys, and just press enter to confirm.
  7. Now, you will have to navigate towards DisksysControlSet001ControlSession Manager and select BootExecute.
  8. From there change the autocheck autochk * /rDosDeviceC: line into autocheck autochk *.
  9. Go to your Disksys folder, select unload Hive, and exit Registry Editor.
  10. Type in cmd, then type chkdsk c: /r, and wait for the new process to complete.

If you can’t edit your Windows 10 registry, read this handy guide and find the quickest solutions to the issue.

2. Run Disk Cleanup

  1. In the search box on the taskbar, type disk cleanup, and select Disk Cleanup from the list of results.
  2. Select the drive you want to clean up, and then select OK.
  3. Under Files to delete, select the file types to get rid of. To get a description of the file type, select it.
  4. Click OK.

So, if you can’t wait for the chkdsk process to complete or if you think that the disk check is stuck, try to follow the steps from above in order to fix this Windows 10 problem. Besides, if you find the utility stuck at CHKDSK is verifying Usn journal, run the command in Windows RE.

If you have any other questions or suggestions, don’t hesitate to leave them in the comments section below; we’ll check them out.

How to use OneNote 2016 with Outlook for your productivity advantage

If you’re using OneNote 2016, there is one advantage to the desktop app compared to the counterpart available on the Microsoft Store or MacOS App Store. As you’re writing emails or other things on Outlook, you can turn them around and put them into your OneNote notebook. In this guide, we’ll show you how you can do that, and some more so you can use the Microsoft note-tasking app to your productivity advantage.

How to make sure the OneNote 2016 add-in is active in Outlook

To begin, you’ll want to sure that the OneNote add-in is active in Outlook. If it is active, you should see a OneNote icon in the Home tab in Outlook right under Move. This is typically on by default, but if it is not, you might need to enable it in the Outlook settings. Here’s how.

  1. Click the File tab
  2. Click Options to the left
  3. Click Add-ins
  4. Click Manage Com Add-ins on the bottom of the page. Then, click Go.
  5. Make sure that the box for OneNote Notes about Outlook Items is checked and click OK.

Once enabled, you are good to go. We’ll be showing you three things in this guide. In the first part, we’ll look at how to send an Outlook email to OneNote 2016. Then, we’ll show you how you can how to send meetings to OneNote 2016, and take notes that you can send out to everyone else. Finally, we’ll give a look at how you can use OneNote to add a new task to your Outlook Tasks list. Let’s dig in!

How to send your Outlook item to OneNote 2016

Now that the OneNote add-in is active, you will be able to send the email that you’ve worked in Outlook to OneNote. Doing this is a quick and easy process. It might even help you be more productive, as you’ll have a copy of the email handy in your OneNote Notebook during a meeting where you typically might take notes and mark up certain items. You also can use this method as a way of backing and saving up a copy of your emails in your OneNote Notebook.

To get started, all you need to do is open an email that you want to send to OneNote. After that, click the Home tab and choose OneNote under the Move section. You should then see a pop-up asking you where to send it. Choose the specific Notebook, and then click OK. Once you do that, the email will automatically be inserted into the OneNote notebook you selected. OneNote 2016 will also open up, and you’ll be able to peek at the email in your Notebook.

How to send an Outlook meeting to OneNote 2016

Sending emails to OneNote is just the start. You also can add a meeting to OneNote, too. This will help you save time, and you’ll be able to connect a meeting you’ve got on your calendar, take notes, and email those notes to the other people in the meeting, all at the same time. Here’s how.

To begin, you’ll want to find the meeting that you want to add to OneNote. Open your calendar in Outlook, and double click it to open the meeting, and check the Invited Event window. You should see an option for OneNote Meeting Notes under the Meeting tab.

You’ll want to click this and then choose one of the two options:  Share notes with the meeting or Take notes on your own. To share notes with the meeting, you must have a shared OneNote notebook already set up. If you choose the take notes on your own option, these notes will only exist in your private notebook until you share them through email. This is the option we use.

Once you choose your option, you’ll be prompted to choose which Notebook you want the meeting notes to open in. Choose one, and then click OK. You should then enter your notes below where it says Notes. When done, you’ll want to click the Email Page button under the Email section of the Ribbon. This will then send you back to Outlook, where you’ll see a traditional email that has meeting information and attendees at the top and your freshly added notes at the bottom.

How to create Outlook tasks in OneNote

Creating Outlook Tasks in OneNote 2016 is the simplest task of them all (no pun intended.) To get started with this, you’ll want to start a new note in OneNote. You’ll want to make sure, though, that you choose the To Do Tag option from the Tags section of the Home tab.

Once done, you can create a list of items as usual. When the list is complete, you’ll want to highlight everything, and head back to the Home tab. Look for the option that says Outlook Tasks and then choose it. You can then pick a day for the task. As a reminder, you always can delete the task by highlighting everything, going back to this menu, and choosing Delete Outlook Task. 

Heading back into Outlook, you can see the task you just created in Outlook by heading to the navigation bar in the bottom right corner of the screen and clicking the . . . button. An option for Tasks should then appear. Click it, and you’ll see your task! Alternatively, you can also see the task by highlighting it in OneNote 2016 and clicking Open Task in Outlook. This will also let you edit it to change the date or add more details.

How do you use OneNote 2016?

These are the top three ways to use OneNote 2016 to your own productivity advantage. Although the UWP version of OneNote is the way to go these days, OneNote 2016 obviously has the most links to Outlook and the rest of Office 365. It isn’t going anywhere, and Microsoft will be merging the code bases over time, with extended support through 2025. How do you use OneNote 2016? Let us know in the comments below.
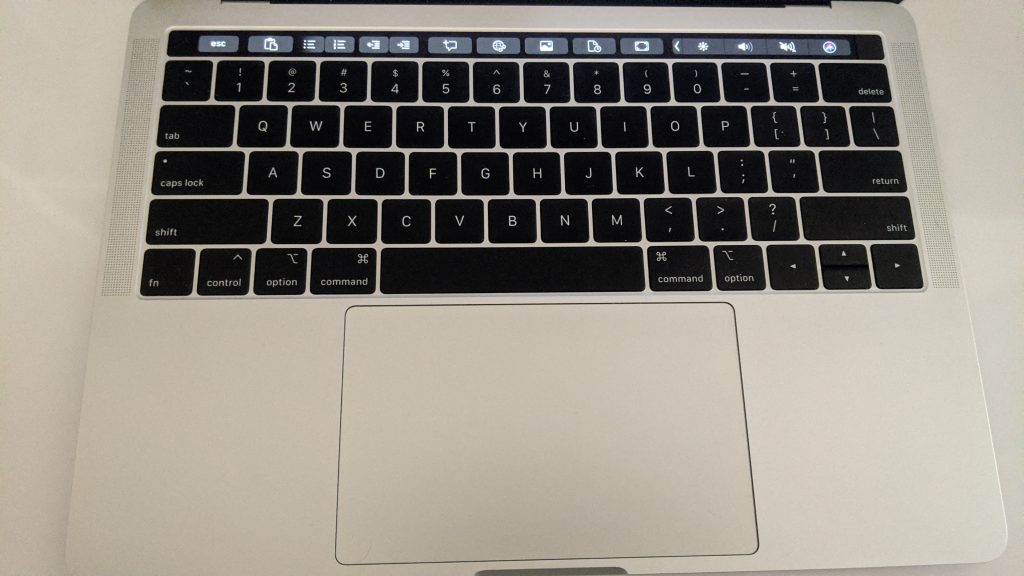
Tom Clancy’s The Division 2 is free to play on Xbox One and PC this weekend

If being able to get Tom Clancy’s The Division 2 for just $2.99 (that’s 95 percent off) wasn’t enough to get you to give it a shot, Ubisoft has something else for you. Starting today until March 2, the game is available for free to those on both Xbox One, PS4, and PC.

On the Xbox One, you’ll need an Xbox Live Gold subscription to play the game. Additionally, if you enjoyed the game when it was free to play last October for Xbox One, all of your previous saved data will carry over to this renewed trial.

Tom Clancy's The Division® 2
Developer:
UBISOFT
Price:
Free

PC owners will be able to access the free-to-play access of the game though either Uplay or the Epic Store. Playstation 4 owners also won’t require a Playstation Plus membership, unlike that of the Xbox One console.

With the sale and the free-to-play trial both going on, it could be the best time for players to get into the action. Especially as the older Tom Clancy’s The Division was recently removed from the Game Pass catalog.

Will you be participating in the free-to-play weekend of the game? Let us know what you think about it in the comments area below.

Fix printer error 1726 in just a couple of simple steps

If you are installing a new printer after a Windows update, you may encounter printer error 1726. This error can occur with HP as well as Brother printers. This error can occur due to various reasons, including Windows issues, printer driver incompatibility, etc.
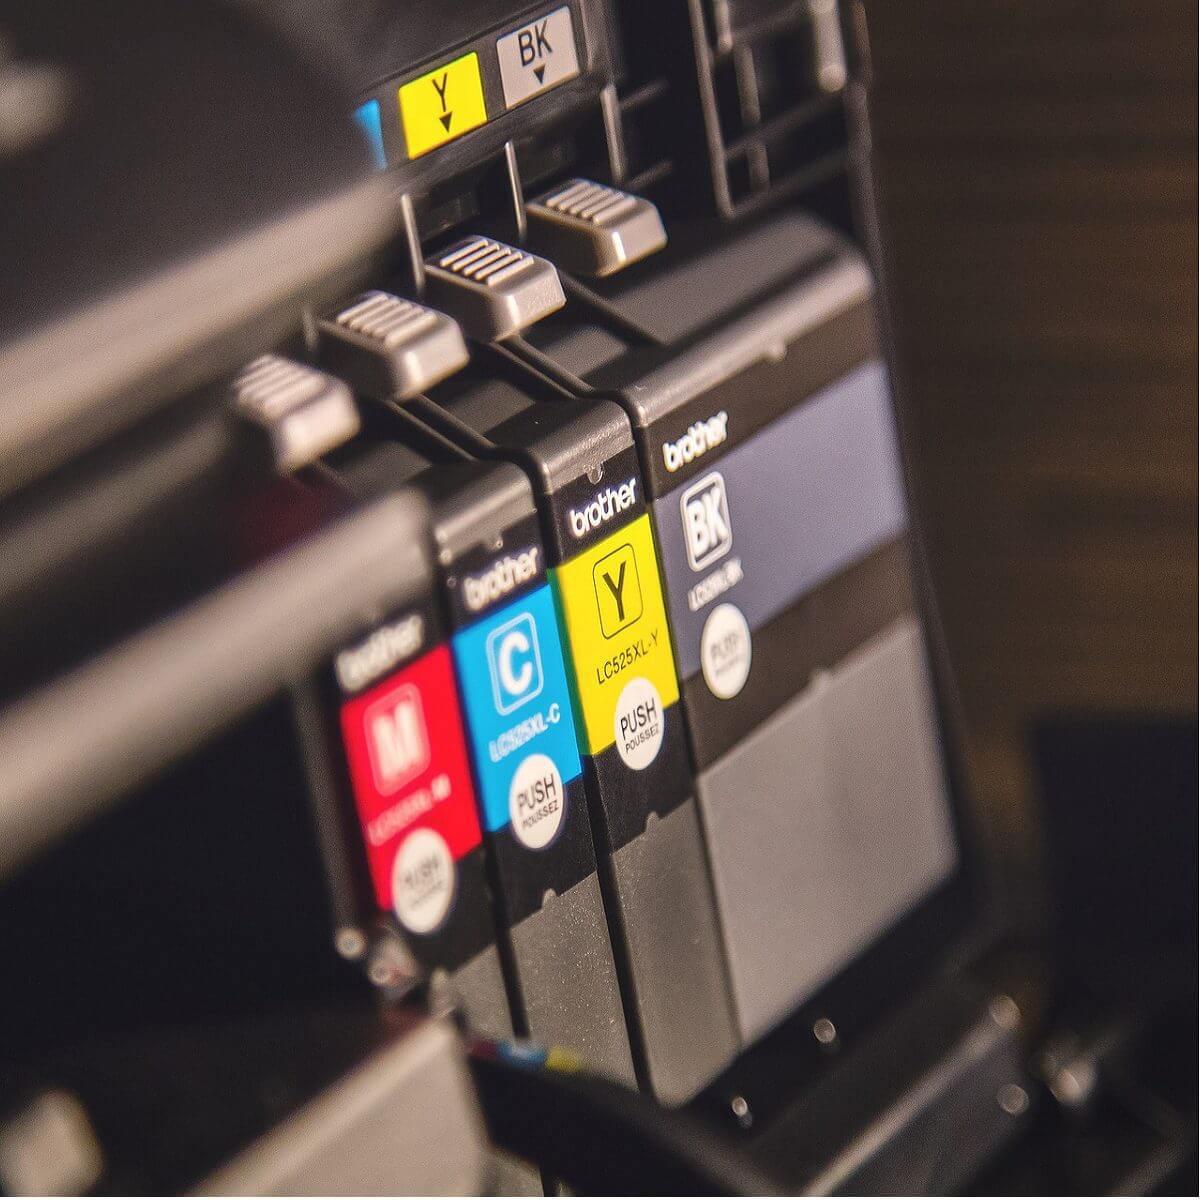
If you are also troubled by this error, here are a couple of troubleshooting tips to help you resolve printer error 1726 in Windows 10 and help you put your printer back to work.

How can I fix printer error 1726 in Windows 10?

1. Check the Print Spooler status

printer error 1726

  1. Press Windows Key + R to open Run.
  2. Type services.msc and click OK to open Services.
  3. On the Services window, locate the Printer Spooler service.
  4. Right-click on Printer Spooler and select Properties.
    printer error 1726
  5. Check the status. If it is stopped, click on the Start button.
  6. Now try to install the printer and check for any improvements.

Print Spooler service is not working in Windows 10? Follow the simple steps from this guide to fix the issue.


2. Uninstall and reinstall the printer

Uninstall the software

printer error 1726

  1. Click Start and type control. Open Control Panel from the search options.
  2. Go to Poragms > Programs and Features.
  3. Select your HP Printer name and click Uninstall. Click Yes to confirm the action.

You can’t open Control Panel? Take a look at this step-by-step guide to find a solution.

Remove the printer

printer error 1726

  1. Press Windows Key + R to open Run.
  2. Type control and click OK.
  3. Go to Hardware and Sound > Devices and Printer.
  4. Right-click on your printer Remove Device / Uninstall Device.
  5. Follow the on-screen instructions to complete the removal.

Install the printer

printer error 1726

  1. To install the printer make sure it is connected to the computer.
  2. Download and install the printer software from the manufacturer’s website.
  3. Install the software and it should recognize the connected printer.

3. Reset this PC

printer error 1726

  1. Click Start and select Settings.
  2. Select Update and Security.
  3. Select the Recovery tab from the left panel.
    printer error 1726
  4. Under Reset this PC, click the Get Started button.
  5. In the Choose an option window, you will see two options:
    Keep my files – Remove apps and settings, but keeps your personal files.
    Remove Everything – Remove all of your personal files, apps, and settings.
  6. Select Keep my files option and follow the on-screen instructions. This will remove all the installed programs on your PC but keep the files and reset the PC.
  7. Once done, try installing the printer again and check if the error is resolved.
  8. If the issue persists, use the Remove Everything option.
  9. Once done you should be able to install the printer without errors.

If you’re having trouble opening the Setting app, take a look at this article to solve the issue.


Disaster strikes and you can’t reset your PC! Fortunately, we’ve got the right solutions for you.


If the issue still persists, as a last resort, try to perform a complete reset of your Windows computer following the above steps. As noted earlier, resetting the PC will uninstall any apps that are installed on your computer.

Printer error 1726 is a generic error and can occur due to many reasons. Follow the initial troubleshooting tips first. If the issue persists, you may have to reset the PC or perform a clean install of Windows.

READ ALSO: