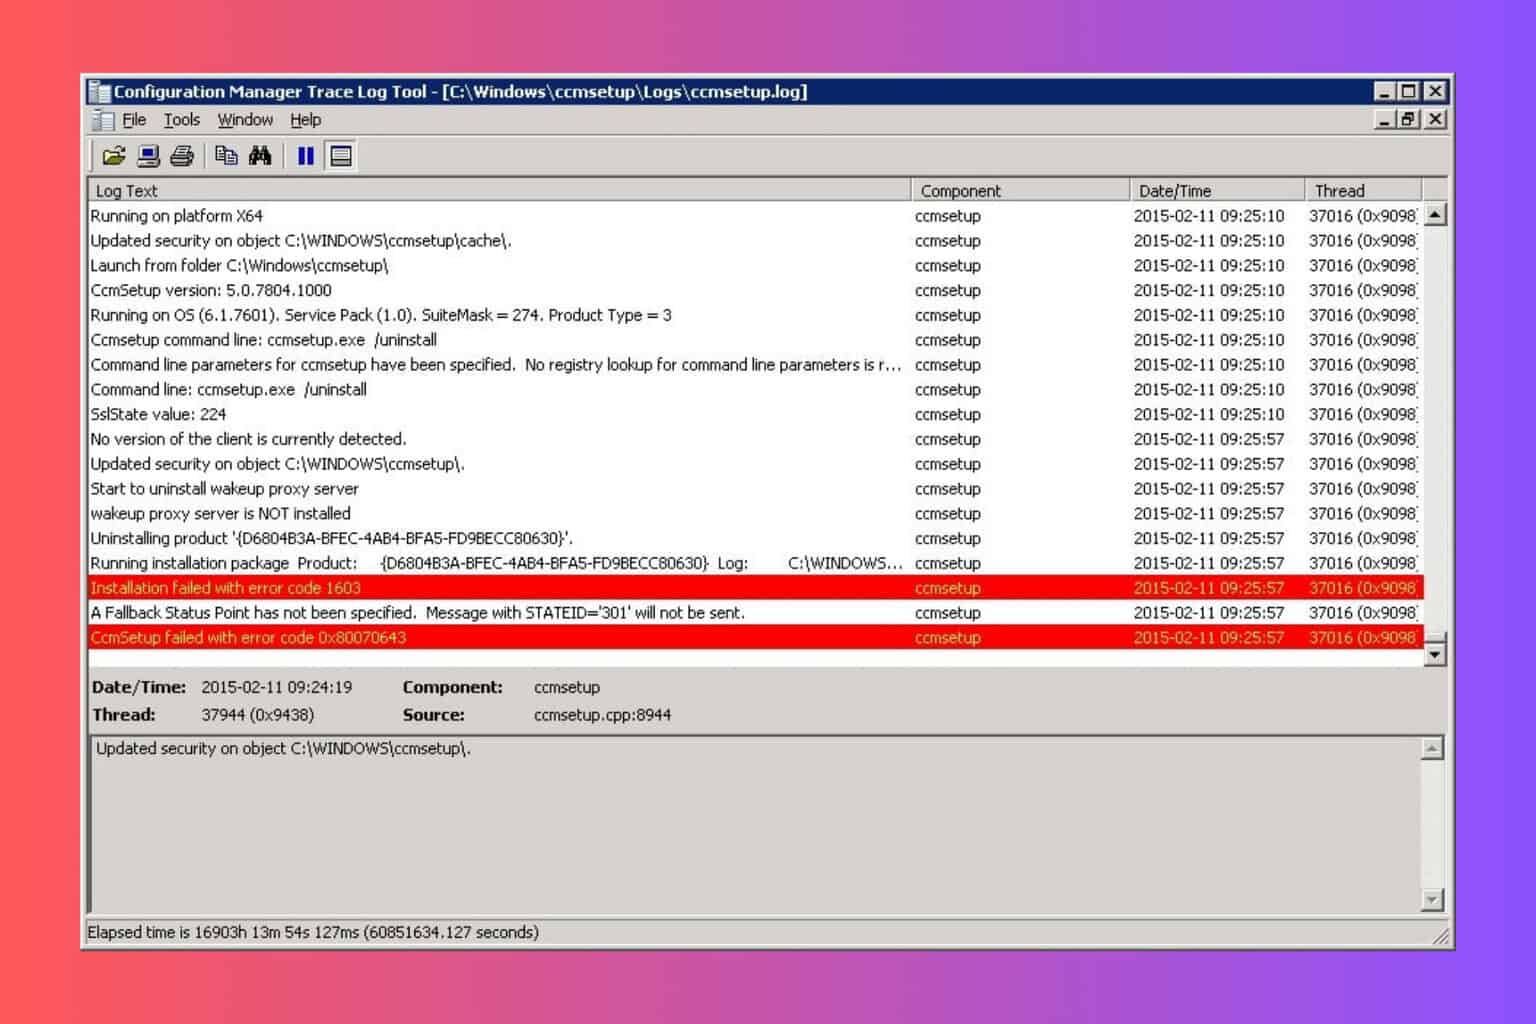
Normally, preparing the Configuration Manager Client (CCMSetup) for computers is not difficult. However, on some occasions it can meet the CcmSetup Failed with Error Code 0x80070643. This error will usually appear due to corrupted caches. The default location for CCM cache is in %windir%\ccmcache and if you manually delete the contents of this folder, you will be fine. Here’s what to do.
What do I do if ccmsetup failed with error code 0x80070643?
1. Manually delete the Ccm cache
Press Win + E to start File Manager.
Navigate to the %windir%\ccmcache folder or paste the line in the address bar and press Enter to get there.
Press Ctrl + A to select all the contents of the folder and press Delete on you keyboard.
Click the Configure Settings button to activate the setting.
Click the Delete Files button to clear the cache folder.
3. Remove leftover .ipi installer files
On the target computer press Win + E to start File Manager.
Navigate to the %systemroot%\installer folder and search for *.ipi installer files in the Search field.
Select all of them, use Ctrl + X to cut them, then paste the files in a different folder on the PC.
Now try to install Configuration Manager again to see if you still get the Error Code 0x80070643.
If you installed the Configuration Manager earlier and it failed, it left behind an IPI installer file (.ipi) in the %systemroot%\installer directory on the target computer. Deleting it or moving it will fix the problem.
So, hopefully, by performing the solutions above, you managed to fix the CcmSetup failed with error code 0x80070643.
Many of our readers have complained about the Firefox XULRunner error while reinstalling or updating the browser. This could happen if you have old files in the Firefox program folder, bad internet, or security software interfering with the Firefox installer.
First, ensure you have a reliable internet connection, then follow the steps below one by one to fix the problem.
How can I fix the XULRunner error in Firefox?
1. Back up Firefox data
Launch Firefox, click the menu button, then select Bookmarks.
Click Manage Bookmarks.
Click Import and Backup and select Export Bookmarks to HTML from the context menu.
Now, save the file at the desired location.
2. Disable security software temporarily
Here, we demonstrate the steps using Avast security software. Locate the system tray from the bottom right side and right-click the Avast icon.
From the context menu, choose Avast Shields Control.
You will get options like Disable for 10 minutes, Disable for 1 Hour, Disable Until Computer is Restarted, and Disable Until Manually Enabled. Select any to disable.
Click Yes when prompted.
In other security software, look for similar options such as Real-time protection, real-time scanning, or Virus protection.
Disabling antivirus can also fix other Firefox-related issues, such as Firefox not working on Windows 10; to learn more, check out this guide.
Click Download Now and the installer will be downloaded to your computer.
Double-click the installer file and follow the on-screen instructions to complete the process.
Reinstalling the browser can help fix other issues, such as installation stuck; read this guide to learn more about the issue.
Once Firefox is reinstalled, you can reverse-engineer Step 2 to enable security software, then launch Firefox and import bookmarks.
Remember to always remove associated folders from the programs folder after deleting an application to avoid such issues in the future. Also, ensure your browser is always up to date.
Microsoft released the Windows Server 2025 Preview Build 26257, which offers complete and Azure-only versions for Long-Term Servicing Channel (LTSC) customers. The Redmond-based tech giant introduced many features with it, including setting up the Windows Admin Center management tool directly from the server’s desktop.
The support for delegated Managed Service Accounts (ADMSA) was another introduction to Windows Server. It offers an advanced substitute for Group Managed Service Accounts (gMSA) and is explicitly designed to counter “kerberoasting” attacks on service accounts by binding the account with particular machine identities.
Preview Build 26257 also introduces the Windows Server Flighting. It will allow users to obtain preview builds automatically at some point later on. Also, a Feedback Hub app for Windows Server Desktop users and a new Windows Subsystem for Linux version are part of this.
Certainly, being a preview build, there are a few things to note, such as a bug that halts the upgrade process completely and an issue with using the Diskpart command on some VMs. The full release notes contain a complete list of all known issues and other essential details about this build.
If you are a Windows Server Insider, you can get this build from Windows Update.
Sometimes when watching online videos you may encounter error code 232404. This error will prevent the video from playing, but don’t worry, there are a few ways you can fix this problem.
What is error code 232404?
This error indicates that you don’t have permission to access the content or that the media is not found. The error is similar to a regular HTTP 404 error.
How do I solve error code 232404?
Before we try anything else, disable your VPN. You can also try disabling or removing your antivirus, especially if you’re using Avast.
1. Disable browser extensions
Click on the Menu icon in the top right, choose Extensions and then Manage extensions.
Disable all extensions.
Check if the problem is gone. If it is, enable extensions one by one until you find the culprit.
Adblocking extensions, such as Ghostery can often cause this problem, so keep an eye out for them.
2. Clear the cache
Click the menu icon in the top right corner.
Choose Delete browsing data.
Ensure that the Time range is set to All time and click on Clear data.
Click on Restore settings to their original defaults.
Lastly, click on Reset settings.
If the error code 232404 is still there, try switching to a different browser. If that doesn’t help, you’re likely dealing with a server error, so contact the website administrator.
Suppose the latest patch to the Dev Channel within the Windows Insider Program brought some huge changes to Windows 11’s Narrator capability. In that case, the patch to the Beta Channel, KB5040546, is bringing massive changes for those Windows users in the EEA.
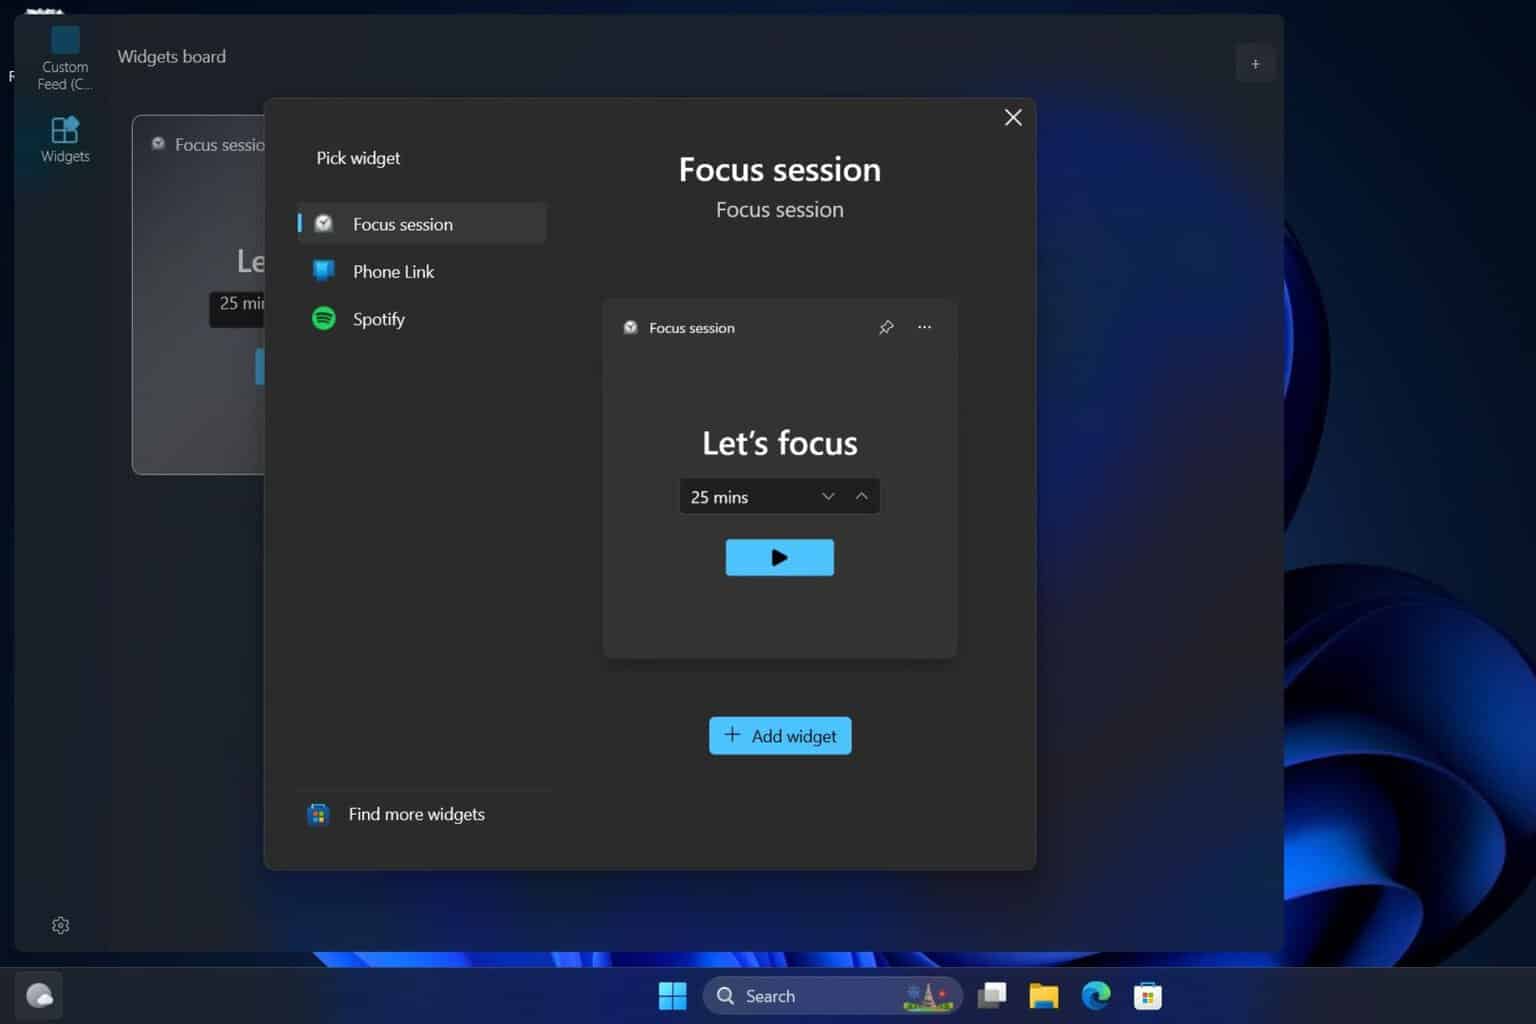
According to Microsoft, the widgets on Windows 11 will receive dozens of changes and improvements tailored to suit the EEA’s policies.
More specifically, the Widget Board will be more secure, and the API will be enhanced to create better widgets and feeds for users in the EEA regions. The update will also impact the Microsoft Start Experiences app, powering the Microsoft Start widget to showcase new experiences.
It’s worth mentioning that for these users, installing KB5040546 will also remove some of the existing widgets, although Microsoft doesn’t specify which ones. Others will be modified or rendered unusable for a while.
However, the Redmond-based tech giant stressed that KB5040546 lays out the foundation for new widgets and other features in development, which will be released soon. Famous Insider, @phantomofearth, spotted the changes and shared some images on X (formerly known as Twitter).
The Widgets board is getting some improvements soon (at least in the European Economic Area/EEA): notably, it will soon use WinUI 3! (with https://t.co/kkv96FMput used for the "Custom Feed".) pic.twitter.com/fxkXQ3I3Jz
The changes might not be available to everyone right away, as they are rolling out, but you can enable them by using a third party app such as ViveTool. Those who are not located in the EEA region can also enable the new Widgets board, according to the insider.
We are rolling out an update to the Widgets Board to improve security and the APIs for creating widgets and feeds for users in EEA regions. As part of this update, the Microsoft Start Experiences app will power the Microsoft Start widget and feed experiences. Also, as part of this update, some existing widgets will be removed and others will be modified, temporarily affecting their functionality. This update sets the foundation for new widgets and other features in development, set to roll out soon.
Microsoft
In addition to the new widgets, which are currently exclusive to EEA users, KB5040546 includes important fixes for the Notification Center, the emoji panel, the touch keyboard, and the File Explorer.
Sharing and reacting with GIFs on Discord is part of the fun. Favoriting them allows you to save these animated gems for quick and easy access whenever you need them.
I’ll show you the steps below, so read on!
How To Favorite GIFs on Discord
You can do this on Discord for desktop or mobile. Here are the steps for each platform.
On Desktop
Open Discord on your desktop and go to the chat where the GIF you want to favorite is located.
Hover your mouse cursor over the GIF. You should see a star appear in the top-left corner.
Click on the star icon. The color will change toyellow, indicating that it’s been added to your favorites.
Click on the GIF button and tap Favorites to confirm it’s there.
You’ll see all the GIFs you’ve favorited in this section.
On Mobile
Launch the Discord app on your mobile device and go to the chat containing the GIF you want to favorite.
Tap the GIF and click the star icon in the top right corner.
The star will turn yellow.
Tap the smiley icon on the message field at the bottom of your screen.
Hit Favorites, and you’ll see your favorite GIFs.
Now that you know how to favorite GIFs on Discord, you can quickly find and share your favorite animated moments with friends and other users. Moreover, learn how to use bold letters to highlight important parts of your message or how to appear offline. You can also copy and paste your faves!
It has been a while since Microsoft last surprised the Windows Insider Program with a new update to the Dev Channel. Still, last week, the Redmond-based tech giant released the latest update, KB5040543, to Insiders, and the patch brings with it many changes, new features, improvements, and fixes to Windows 11.
Firstly, one of the most exciting features to be released recently, the ability to duplicate a tab in File Explorer, will also be introduced to the Dev Channel. Users can quickly manage dozens of files and folders with this capability.
The narrator also sees changes: Microsoft updated it to improve its scanning performance. The narrator’s scanning mode will respond much quicker, especially while using Microsoft Edge and reading through large documents.
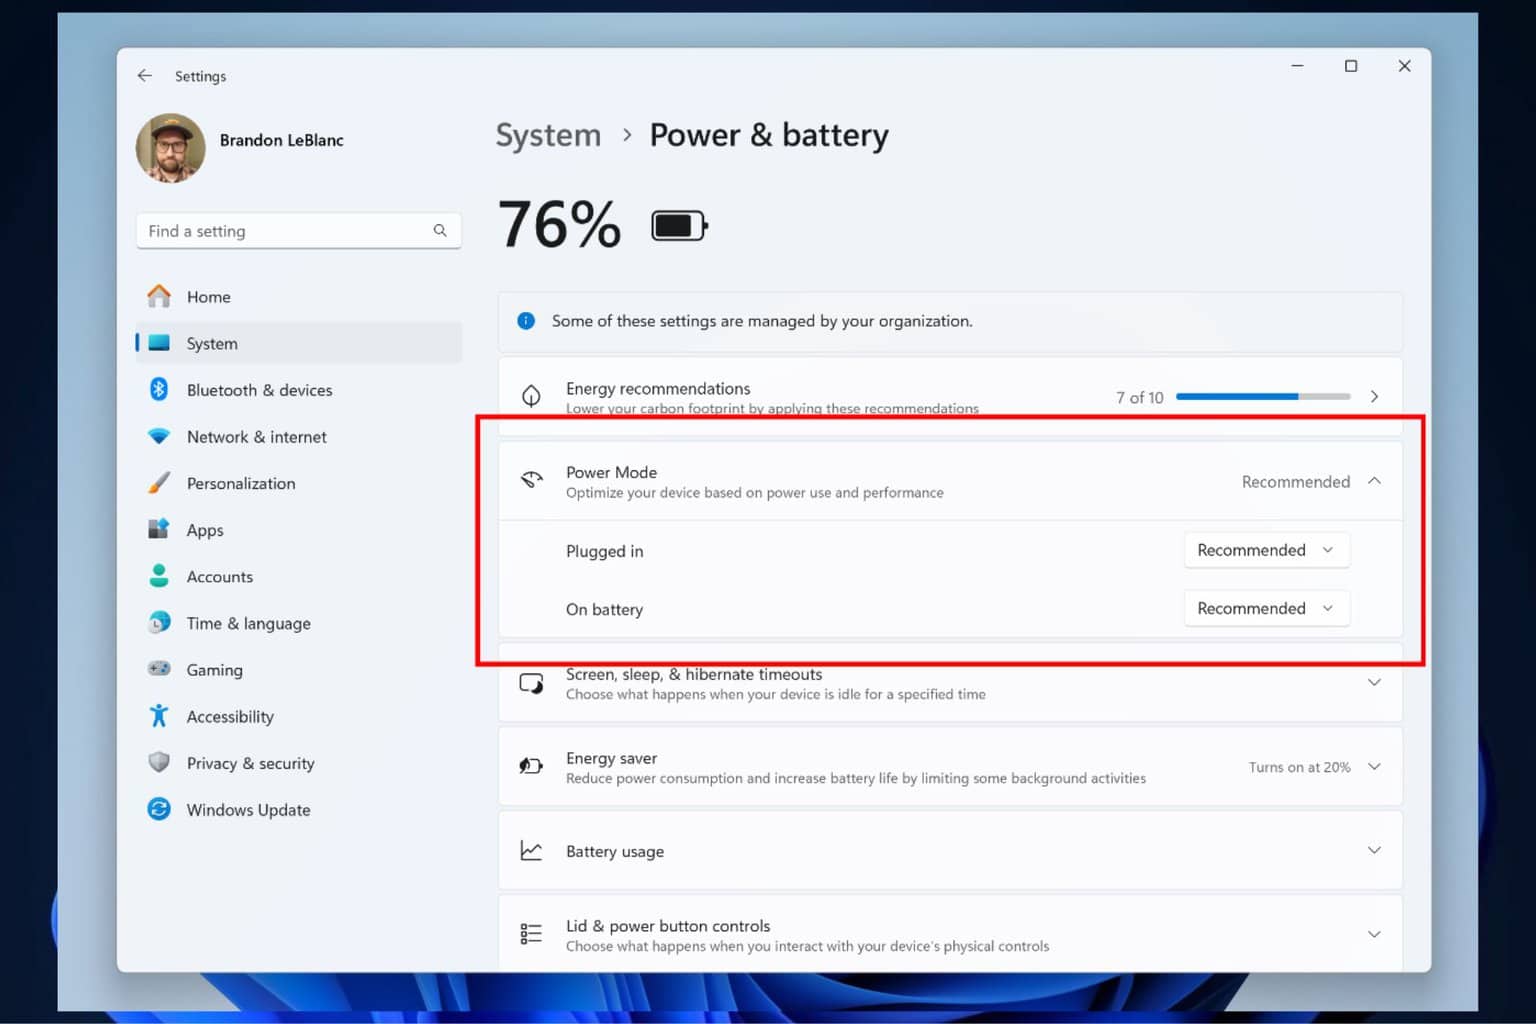
Remember the Power Mode we told you about a while ago? Now, it’s officially coming to the Dev Channel, and you can customize your device’s battery settings whether it’s plugged in or not.
However, it’s not all just good stuff. There are also many known issues that you should know before installing KB5040543 on your device. The recent BitLocker Recovery issue might impact users who are installing this patch. There is a frustrating issue with Windows Sandbox, and many optional features and adding additional languages might fail in KB5040543.
With that being said, you can download and install KB5040543. Just remember that, like any other Insider patches out there, this one, too, might render your device unstable.
Many have encountered error code 232001 while trying to stream video online. This error will prevent the video from playing, but this guide can help you get back to streaming videos in no time.
What is meant by error code 232001?
This error occurs with online videos when the XHR request exceeds the timeout argument or the default of 60. If this happens, the video player will fail to load.
How can I fix error code 232001?
1. Disable hardware acceleration
In Chrome, click the Menu button in the top left and choose Settings.
Next, go to System in the left pane.
Uncheck Use hardware acceleration when available.
2. Disable extensions
In Chrome, click on the Menu icon and choose Extensions. Select Manage extensions.
Click the switch icon next to all extensions to disable them. Check if the problem is still there.
If disabling extensions fixes the problem, enable them one by one until you find the culprit.
Users reported that Ghostery caused this problem for them, so if you’re using it, be sure to disable it and check if that solves the issue.
Use a different antivirus software or temporarily disable it. Users reported issues with Avast.
If you’re a website owner, ensure that both your website and embedded videos are using HTTPS protocol.
These are the top solutions for error code 232001, so be sure to give them a try. This isn’t the only error, and we covered error code 232011 and error code 232404 in the past.
Microsoft Teams will receive a handful of features in September, when the platform is set to significantly change many of its capabilities, including the AI-based Intelligent meeting recap.
The capability, introduced to Teams more than a year ago, will receive a notification and a banner letting users know when it is ready.
According to the latest entry in the Microsoft 365 Roadmap, this new feature will be added to Microsoft Teams in September. It will greatly improve productivity and workflow, as users will be able to access essential information with just a click.
Even more, the Redmond-based tech giant will let users customize and configure their notification settings: they can be turned off or can be customized to showcase only the activity, as you can see in the description below:
Intelligent meeting recap users will receive a notification in Teams Activity feed and banner when intelligent meeting recap is ready. Clicking on the notification in Activity feed will take users right to the intelligent meeting recap experience, which will be visible to the right of the Activity feed. Users can configure their notification settings in Teams settings > Notifications and activity > Apps > Meeting Recap to control where the notification is surfaced (Activity and banner, Activity only, Off) as well as which meetings have notifications enabled (for only meetings with RSVP selection of “Follow,” or all other meetings, or both).
Knowing how to create a printer shortcut on Windows 10 can save you time and make it easier to access your printer settings and manage print tasks. That way, you won’t have to go through multiple menus whenever you need to check your printer status or print a document.
Below, I’ll highlight the steps to create a printer shortcut, so let’s get started.
How To Create Printer Shortcut on Windows 10
You can do it with the Control Panel or through the desktop. I’ll explain both methods.
Using the Control Panel
Follow the below steps:
Tap the search button beside the Windows icon, type Control Panel, and tap open.
Identify the printer to which you want to add a shortcut, right-click on it, and then select Create Shortcut. I’ll do this for my EPSON L360 printer.
You’ll be notified that Windows can’t create a shortcut here. Tap Yes.
You’ll see the printer shortcut on your desktop.
Alternatively, you can drag and drop it on your desktop instead of right-clicking on the printer to create a shortcut.
The shortcut will be available on your Windows 10 desktop.
Through the Desktop
Follow the below steps:
Right-click on a space on your desktop, select New, and tap Shortcut.
Type rundll32.exe printui.dll,PrintUIEntry /o /n “printer_name” in the location field. Replace “printer_name” with your device’s name, then hit Next.
Give it a name of your choice, then tap Finish.
That’s it!
It’s simple to create a printer shortcut on your Windows 10 desktop. Thanks to these steps, your printer settings and management tools are always a click away. Whether you need to check your status, manage print jobs, or adjust settings, having a shortcut on your desktop can save you valuable time and effort.
Many encountered Xbox app error 0x89231806 that prevents them from joining a party, and in today’s guide we’re going to show you several ways to fix that, so let’s get started.
How can I fix the Xbox app 0x89231806 error?
1. Change your network type to private
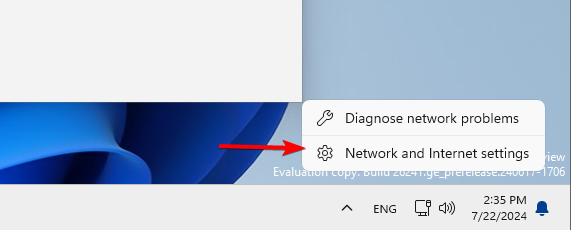
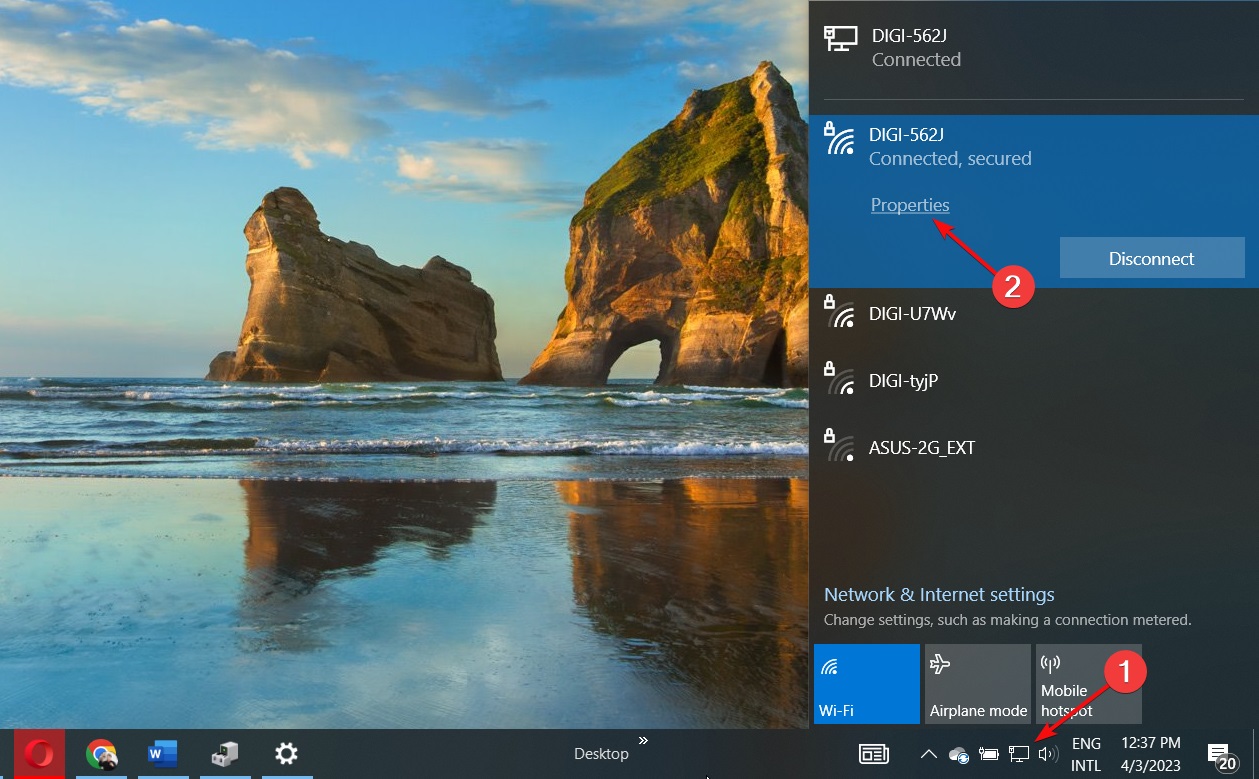
In the bottom right corner right-click the network icon and choose Network and Internet settings.
Settings app will appear with your network information. Click on Properties.
Select Private network from the list.
2. Use the netsh command
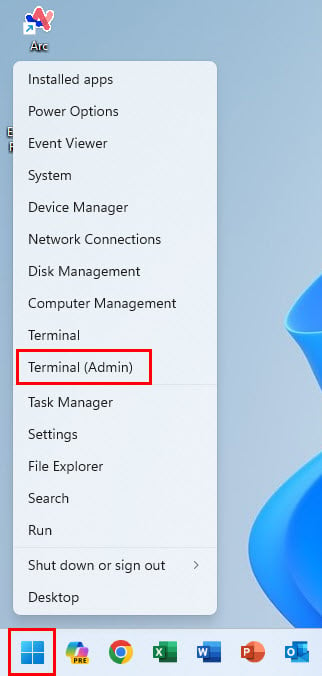
Press the Windows key + X and choose Terminal (Admin).
Run the following command: netsh interface Teredo set state type = default
Restart your PC.
3. Disable Teredo Tunneling Pseudo-Interface from Device Manager
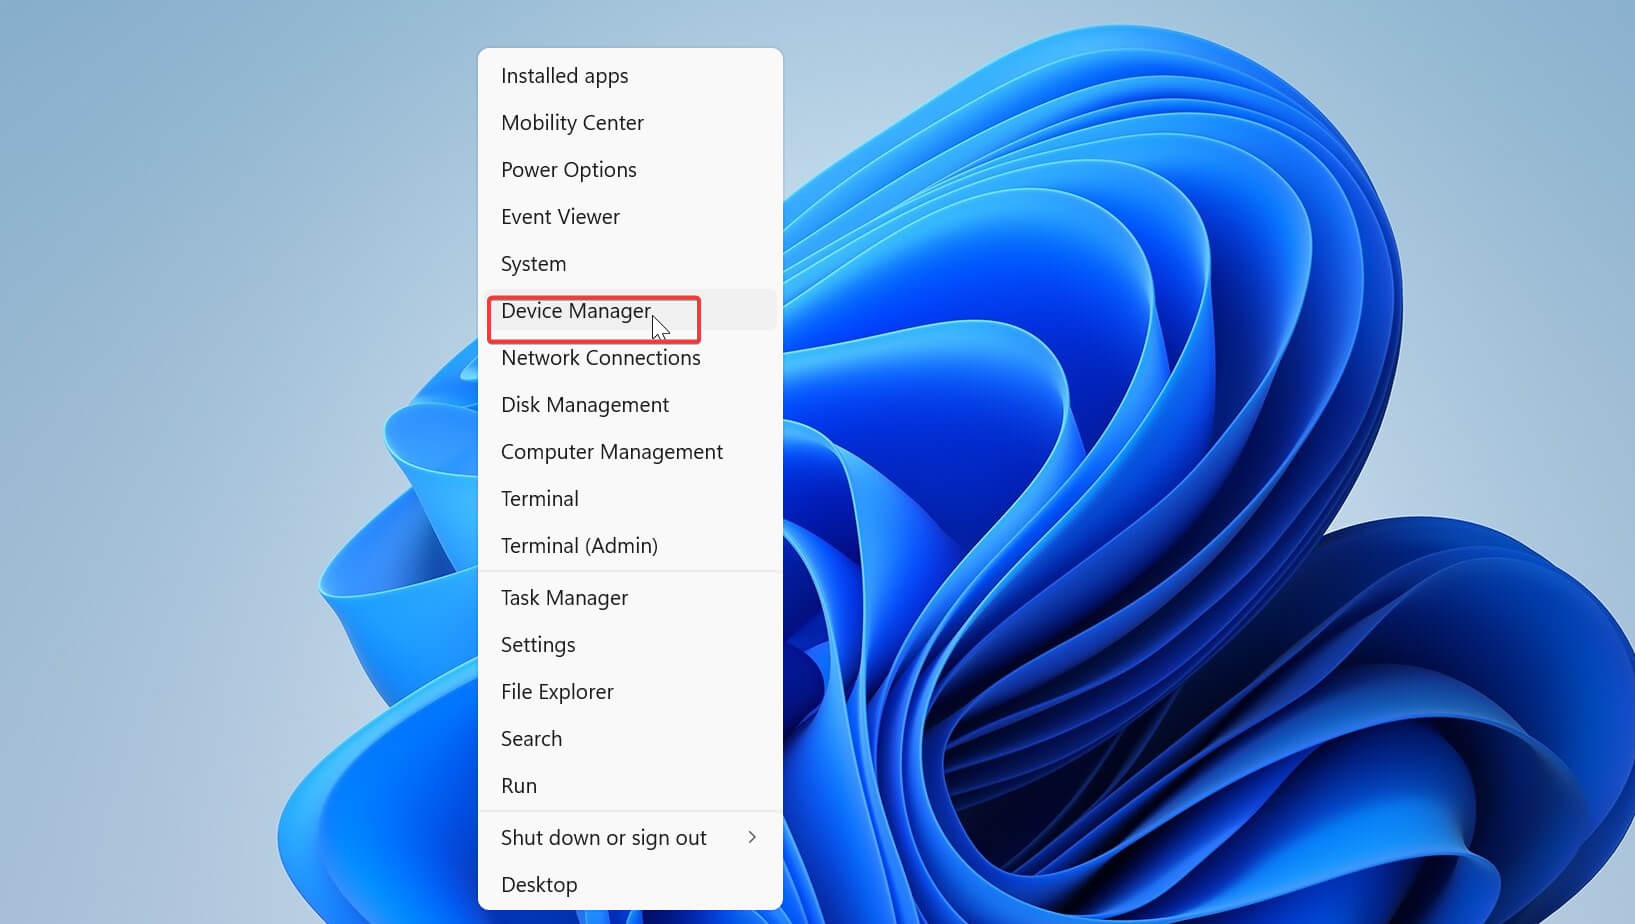
Press the Windows key + X and choose Device Manager.
Go to View and choose Show hidden devices.
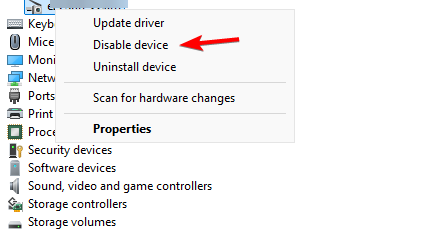
Locate Teredo Tunneling Pseudo-Interface on the list.
4. Leave the PC gaming insider program and reinstall the Xbox app
If you’re a member of the PC Gaming Insider program, leave it.
Press the Windows key + X and choose Terminal (Admin).
Run the following commands: get-appxpackage Microsoft.XboxApp | remove-AppxPackage -allusers get-appxpackage Microsoft.GamingServices | remove-AppxPackage -allusers
Restart your PC.
After restart, go to the Microsoft Store app and download the Xbox app again.
In case you run into any issues, we have a great guide on what to do if the Xbox app won’t install, so don’t miss it.
These are just some of the methods you can use to fix the Xbox app 0x89231806 error on your PC. Speaking of errors, we also covered Xbox party chat not working on PC and Xbox app not getting party invites issues in our previous guides, so don’t miss them.
Suppose you don’t know how to change settings on Microsoft Teams regarding specific capabilities. In that case, you’ll be glad the platform will be updated to make these changes natively on the connected peripherals’ OEM software.
In an entry to Microsoft 365 Roadmap, the Redmond-based tech giant says Teams will let users change controls for Group Framing, Active Speaker, and Edge Composed IntelliFrame on Rooms on Windows directly from the software of their cameras.
Users will be able to toggle certain camera capabilities provided by the camera OEMs natively on Teams Rooms on Windows. Capabilities covered with this feature includes group framing, active speaker framing, and edge composed IntelliFrame.
Microsoft
This means users will have plenty of options when changing or customizing settings. The new method can also be quite helpful in situations where time is tight and the issue has to be resolved quickly.
This new method can also be preferred for those who are new to Microsoft Teams but not to a particular camera: you’ll be able to set up your Teams experience without having to be proficient with Teams in the first place.
According to the entry, the new feature will be added to Teams Rooms on Windows starting in September.
Microsoft wants to make its 365 productivity platform far more secure by updating it to support the management of sensitivity labels during connected experiences.
Organizations can deactivate linked experiences and switch off some online characteristics in Microsoft 365 if they suspect any privacy concerns.
According to the latest entry in the Microsoft 365 Roadmap, this management will not affect data security policies or impact crucial security elements such as sensitivity labels, which are utilized for data classification and safeguarding.
Instead, sensitivity labels and rights management are handled directly via Microsoft Purview, utilizing its security controls instead of general privacy settings in Microsoft 365 Apps.
Companies may improve privacy by turning off linked experiences. However, they don’t need to worry about data security because security controls in Microsoft Purview handle these characteristics differently now.
Your organization can now disable connected experiences for privacy concerns without impacting data security policies such as sensitivity labels. Services associated with Microsoft Purview (e.g. sensitivity labels and rights management) are no longer controlled by policy settings to manage privacy controls for Microsoft 365 Apps. Instead, these services will rely on their existing security admin controls in Purview portals.
Microsoft
The update is Microsoft’s latest effort to provide efficient security to all Microsoft 365 users. Let’s not forget that the platform is one of the most targeted. In 2022 alone, over 80% of all Microsoft 365 accounts were hacked at least once.
A full rollout of these new policies will happen in August.
Many reported SU-41350-3 error while updating their PS4 firmware, and if you encounter this error, you’ll be stuck on the old version until you fix it. Luckily, there are a few ways to fix and today we’ll show you how to do it.
What does error code SU 41350 3 mean on PS4?
This error appears if the update file can’t be recognized. It appears when updating your firmware from a USB drive, especially if the update file isn’t properly named or the drive isn’t formatted accordingly.
How can I fix the SU-41350-3 error?
Before trying anything else, try formatting the drive and downloading the update on a different PC. If possible use a USB 2.0 flash drive instead of a USB 3.0 one.
1. Try downloading the update again and reformatting the drive
Connect the USB flash drive.
Open File Explorer, locate your flash drive, right-click it, and choose Format.
Set the File system to FAT32 and click on Format.
Wait for the process to finish.
Download the firmware again, move it to the flash drive, and try to update again.
Keep in mind that sometimes it’s necessary to repeat this process a few times before it works properly.
2. Check the file name and folder structure
Locate the update file.
The file should be named PS4UPDATE.PUP.
If the update has any numbering in its name, manually remove them.
Lastly, create the PS4 on the root folder of the USB drive.
Go to the PS4 folder and create a new folder called UPDATE.
Lastly, go to the UPDATE folder and move PS4UPDATE.PUP file to it.
At the end, the structure should look like this PS4/UPDATE/ PS4UPDATE.PUP
All filenames and folders on the USB drive need to be capitalized for this process to work.
Check for blown fuses, usually F6202 or F6201 are the problem.
A broken cable to the Blu-Ray drive can also cause this issue.
Failing hard drive can also cause this issue to occur.
SU-41350-3 on PS4 can be problematic, but in most cases, it can be fixed by properly formatting the drive and placing the update in the right directory. If that doesn’t work, then you might be having a hardware issue.
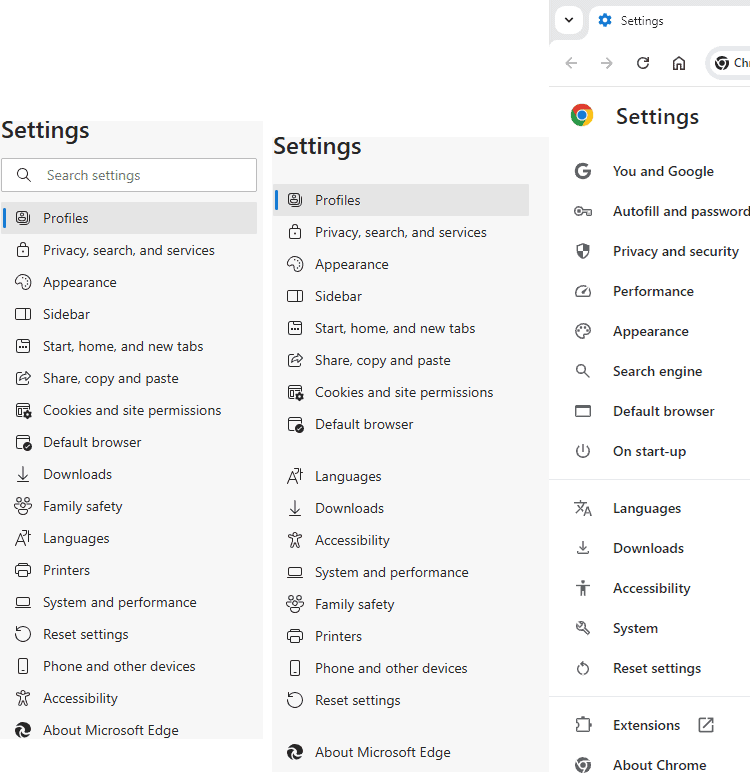
Microsoft appears to be gearing up to redesign the Edge settings page in the Canary version. The search bar is being moved to the right, making it easier to find Edge browser settings. This aligns with the Chrome Settings layout.
Based on Chromium/Blink, Microsoft Edge is not a Chrome clone. Microsoft aims to differentiate Edge from Chrome by constantly testing and adding new features. All testing takes place in the Canary version, and the changes or new features are A/B tested, and these may never make it into the release channel.
Present Microsoft Edge Settings interface. Image Credit: Windows Report
Prominent Search Bar: The right-aligned search bar will likely become a more prominent feature within the settings page, allowing users to find specific options quickly. Revised Navigation: The spacing and organization of the left-hand navigation menu could be changed, possibly improving the user interface for easier navigation.
The new redesigned Edge Settings interface has a search bar on the right. Image Credit: Windows Report
Like any other feature in development, there is no certainty these changes will get into the Edge release.
However, Microsoft can improve user satisfaction and loyalty by providing easier access to settings, reducing navigation time, and adopting a more straightforward layout.
Edge and Chrome settings left navigation comparison. Image Credit: Windows Report
Microsoft can also consider implementing History Search powered by AI like Chrome and Copilot-powered search suggestions or personalized settings recommendations that could further improve the Edge Settings experience.
Microsoft Edge’s Efficiency Mode is already a popular feature for extending battery life and improving performance. By reducing background tab activity and putting inactive tabs to sleep, it successfully manages resource consumption. Now, Microsoft is taking this a step further with the introduction of prerendering optimization.
Prerendering is a technique where a browser loads the content of a potential future page in the background, ready to be displayed instantly when the user clicks on a link. This can significantly improve website loading times and user experience.
Windows Report had spotted three references to Microsoft efficiency mode optimization plans.
The “msPrerenderEfficiencyMode” reference indicates that Microsoft is experimenting with different levels of prerendering within Efficiency Mode. This suggests a measured approach to maximizing performance while minimizing power consumption.
“msPrerenderEfficiencyModeBalanced”:This mode likely strikes a balance between aggressive prerendering for performance and power efficiency.
“msPrerenderEfficiencyModeAggressive”: This mode could prioritize performance by enabling more aggressive prerendering, potentially at the cost of higher power consumption.
Microsoft’s Efficiency Mode in Edge optimizes browser performance while prioritizing user experience and device health. By introducing these new modes, Microsoft aims to:
Extend battery life: Reduce power consumption by carefully managing background processes and prerendering activities.
Improve browsing speed: Improve page load times and overall responsiveness without compromising efficiency.
Optimize resource usage: Effectively allocate system resources to ensure smooth performance, even on less powerful devices.
User control: Provide customizable options to balance performance and battery life based on individual needs.
Currently, the Safe Browsing card on the Safety check page displays a static protection status, even if the settings were changed. This meant users might have outdated information about their protection level.
To address this, Google is implementing a new change that will continuously monitor Safe Browsing settings and update the card accordingly. This is achieved by tracking two Safe Browsing preferences. These preferences determine the three possible Safe Browsing states: Enhanced, Standard, or Disabled.
“[SHv2] Add listeners for Safe Browsing card. Safe Browsing is one of the top cards on Safety Hub page that informs a user about the current Safe Browsing setting state [1].
At the moment the Safe Browsing card data is pulled from backend on page load and remains the same regardless of simultaneous changes made in other tabs/devices to the Safe Browsing setting.
This CL adds a listener to Safe Browsing changes to make the Safe Browsing card dynamic.” Google notes in a commit, spotted by Windows Report.
Google will now simplify the process by combining the information from the two original preferences into a single value. Any changes to this new generated preference will trigger an update to the Safe Browsing card on the Safety Hub page avaialble at chrome://settings/safetyCheck.
Safe browsing Card under Safety Check
This improvement will provide users with more accurate and up-to-date information about their Safe Browsing protection status, improving their overall online security experience.
By making the Safe Browsing card dynamic, Google is taking a proactive step to protect users from potential online threats.
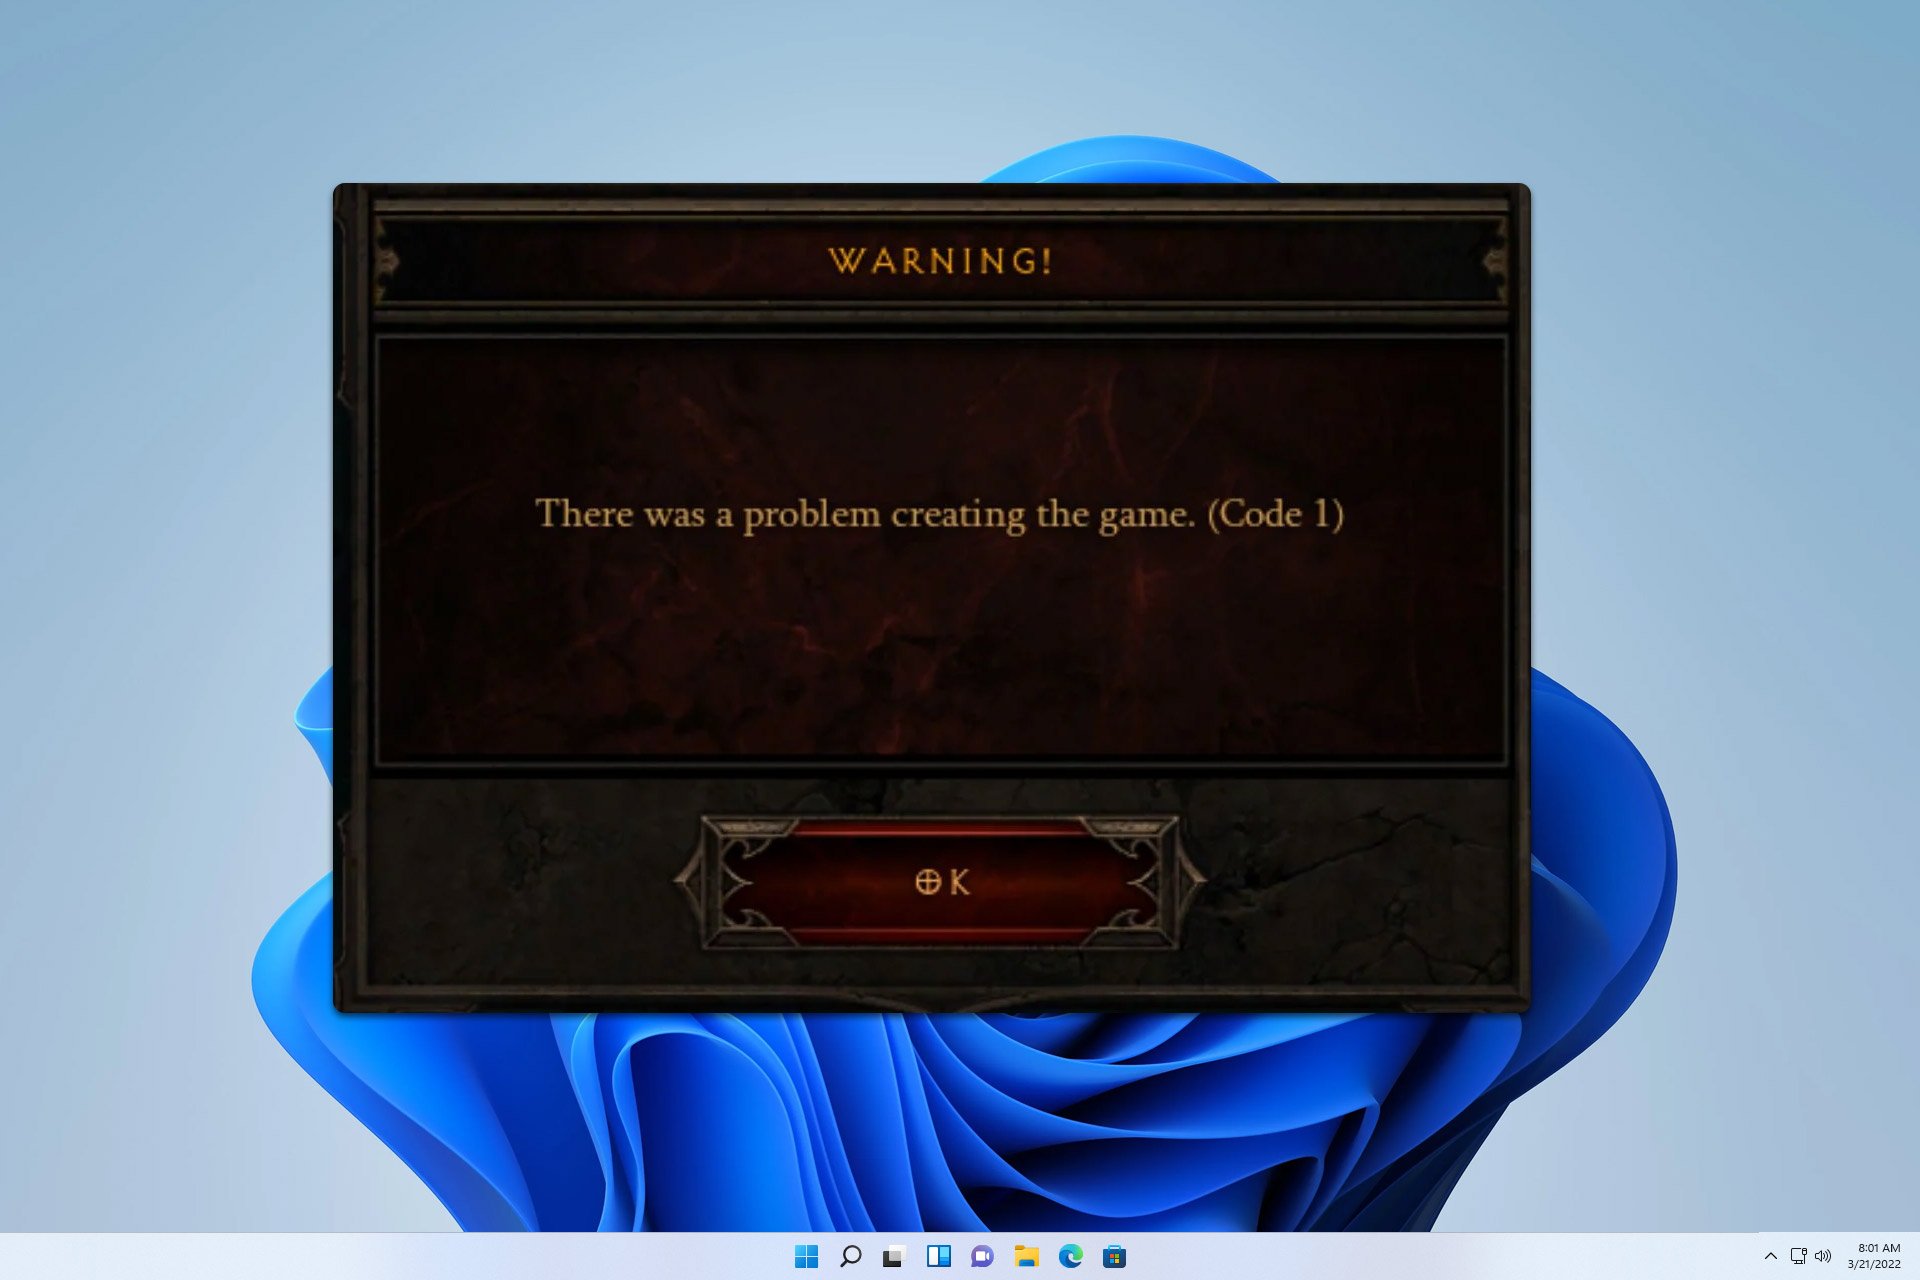
Many reported being unable to play Diablo 3 due to a Code 1 error. This can be a problem since you won’t be able to connect to the server, but luckily, there are few solutions available.
What can I do if a Diablo 3 Code 1 error appears?
If this happens in the game, don’t change your character, since it will make the error worse. If the issue appears when not starting the game, try restarting both the game and the client.
1. Check Blizzard server status
Open your web browser and go to the official Blizzard Customer Service Twitter account: BlizzardCS Twitter.
Check for any announcements regarding server issues or maintenance.
Alternatively, visit the Blizzard forums or the Diablo 3 forums for real-time updates.
2. Verify firewall settings
Open the Start Menu, type Windows Defender Firewall, and open it.
In Windows Firewall, click Allow an app or feature through Windows Defender Firewall.
Click Change settings and then Allow another app.
Browse for the Diablo 3 executable and add it.
Restart your computer to apply the settings.
If you use a different antivirus or firewall, follow the similar steps in that tool.
Creating printer shortcuts on Windows 11 can save you a lot of time and hassle, especially if you frequently manage print jobs. Here’s a quick guide to help you create a printer shortcut using different methods.
How do I create a printer shortcut on Windows 11?
1. Create a printer shortcut via Settings
Press Win + I to start the Settings app.
Go to Bluetooth & devices on the left, then click on Printers & scanners on the right pane.
Select your printer and in the next window, click on More devices and printer settings.
Right-click on your desired printer from the list of printers shown.
In the pop-up menu, right-click on your printer and select Create shortcut.
A dialog box will appear asking if you want to place the shortcut on your desktop. Click Yes.
You may also simply drag and drop the printer onto your desktop for the same result.
Now, you will have a shortcut to your printer on your desktop. This makes it easier for you to access your printer and manage print jobs quickly.
2. Create a printer shortcut on Windows 11 from desktop
Right-click on an empty area on your desktop.
From the context menu, hover over New and then click on Shortcut.
In the location field of the shortcut wizard that appears, enter the following command: rundll32.exe printui.dll,PrintUIEntry /o /n "printer_name"
Make sure to replace printer_name with the actual name of your printer.
Click Next to proceed.
Enter a meaningful name for the shortcut (e.g., My Printer) and then click Finish.
The shortcut to your printer will now be created on your desktop, allowing quick access to printer settings and print jobs. This saves time and keeps your desktop organized with essential shortcuts.
How do I create a shortcut for starting the Add printer wizard?
Right-click on the desktop or in a folder where you want to create the shortcut.
Select New and then Shortcut.
In the location field of the shortcut wizard, enter the following command: control.exe /name Microsoft.DevicesAndPrinters /page PrinterAddPrinter
Click Next.
Enter a name for the shortcut, such as Add Printer, and click Finish.
By double-clicking this shortcut, you can directly access the Add a printer wizard without going through the initial search process. This is useful for quickly adding printers without waiting for Windows to search for existing ones.
These methods streamline how you add and access printers on Windows 11, saving you time and reducing the hassle of navigating through multiple menus. For future ease, always keep your printer drivers updated and regularly check for Windows updates to ensure smooth functionality.
Windows Embedded Compact 7 (WEC7) is a powerful real-time operating system (RTOS) designed to meet the needs of embedded systems. Whether you’re developing industrial controllers or consumer electronics, understanding WEC7’s capabilities can help you maximize its potential.
What is Windows Embedded Compact 7 and what is it used for?
1. Overview of Windows Embedded Compact 7 (WEC7)
Windows Embedded Compact 7 is a real-time operating system (RTOS). This means it can handle tasks that require timely and deterministic responses, making it ideal for industrial controllers and consumer electronics. However, you should know that the OS is obsolete. Its extended support period ended in April 2021. However, you can still download it from the Internet Archive website for free and install it.
WEC7 supports multiple CPU architectures. It works on x86, ARM, and SH (automotive only) processors, providing flexibility to developers to use it on a variety of hardware platforms.
The OS is optimized to run on devices with minimal memory, sometimes as low as 1 MB. WEC7’s design makes it a robust choice for embedded systems requiring real-time capabilities while supporting a range of hardware architectures.
2. Best features of Windows Embedded Compact 7
Silverlight for Windows Embedded – Allows developers to create rich user interfaces using Microsoft Expression Blend, enabling a more visually appealing and interactive user experience.
Internet Explorer for Windows Embedded – A web browser similar to that of Windows Phone 7, which includes integrated support for Adobe Flash v10.1.
Multicore CPU Support – WEC7 can utilize dual-core CPUs in symmetric multiprocessing mode, boosting performance for more demanding applications.
Networking Enhancements – Includes support for NDIS 6.1 and Bluetooth 2.1 EDR, improving network connectivity and Bluetooth capabilities.
These features allow for the development of modern, multimedia-rich applications and enhance network communication, making it easier to build sophisticated embedded solutions.
3. Difference between Windows CE 6.0 and Windows Embedded Compact 7
Name change.
Windows Embedded Compact 7 is essentially an evolution of Windows CE 6.0. The name change indicates a significant update rather than a completely new OS.
Kernel enhancements:
WEC7 offers kernel improvements, such as better support for multicore processors and advanced memory management techniques, which were not as developed in CE 6.0.
Enhanced development tools:
WEC7 development is integrated with Visual Studio 2008 with Service Pack 1, providing a familiar and powerful environment for developers.
Additional Libraries and Support:
Includes support for new libraries and protocols, such as DLNA and MTP, which CE 6.0 did not natively support.
Understanding these differences ensures developers are aware of the enhanced capabilities and improved tools available in WEC7, allowing for more efficient and powerful application development.
4. Practical applications and use cases
Industrial Controllers: WEC7’s real-time capabilities make it ideal for industrial automation systems where precise control and timing are crucial.
Consumer Electronics: Used in devices such as GPS systems, digital cameras, and automotive infotainment systems, leveraging its multimedia and networking support.
Medical Devices: Suitable for medical equipment that requires reliable and deterministic operation, such as patient monitoring systems.
Knowing the practical applications of WEC7 can guide developers in choosing the right embedded OS for their specific needs, ensuring they leverage the OS’s strengths effectively.
5. Development environment setup for Windows Embedded Compact 7
Install Visual Studio 2008: Ensure Visual Studio 2008 Professional or Team Edition is installed, including the Smart Device Programmability for Visual C++.
Install Visual Studio 2008 Service Pack 1: After installing Visual Studio 2008, update to Service Pack 1 for compatibility with WEC7 development.
Optional: Microsoft Expression Blend 3: For developing Silverlight for Windows Embedded applications, install Microsoft Expression Blend 3.
Install Windows Embedded Compact 7: Run the WEC7 installer, follow the on-screen instructions, and ensure all necessary updates and service packs are applied.
A proper setup ensures that developers have all the necessary tools and environments to efficiently develop applications for WEC7.
By following these solutions and understanding the capabilities and setup process, developers can effectively utilize Windows Embedded Compact 7 for their embedded system needs.
What do you think about Windows Embedded Compact 7? Let us know in the comments below.
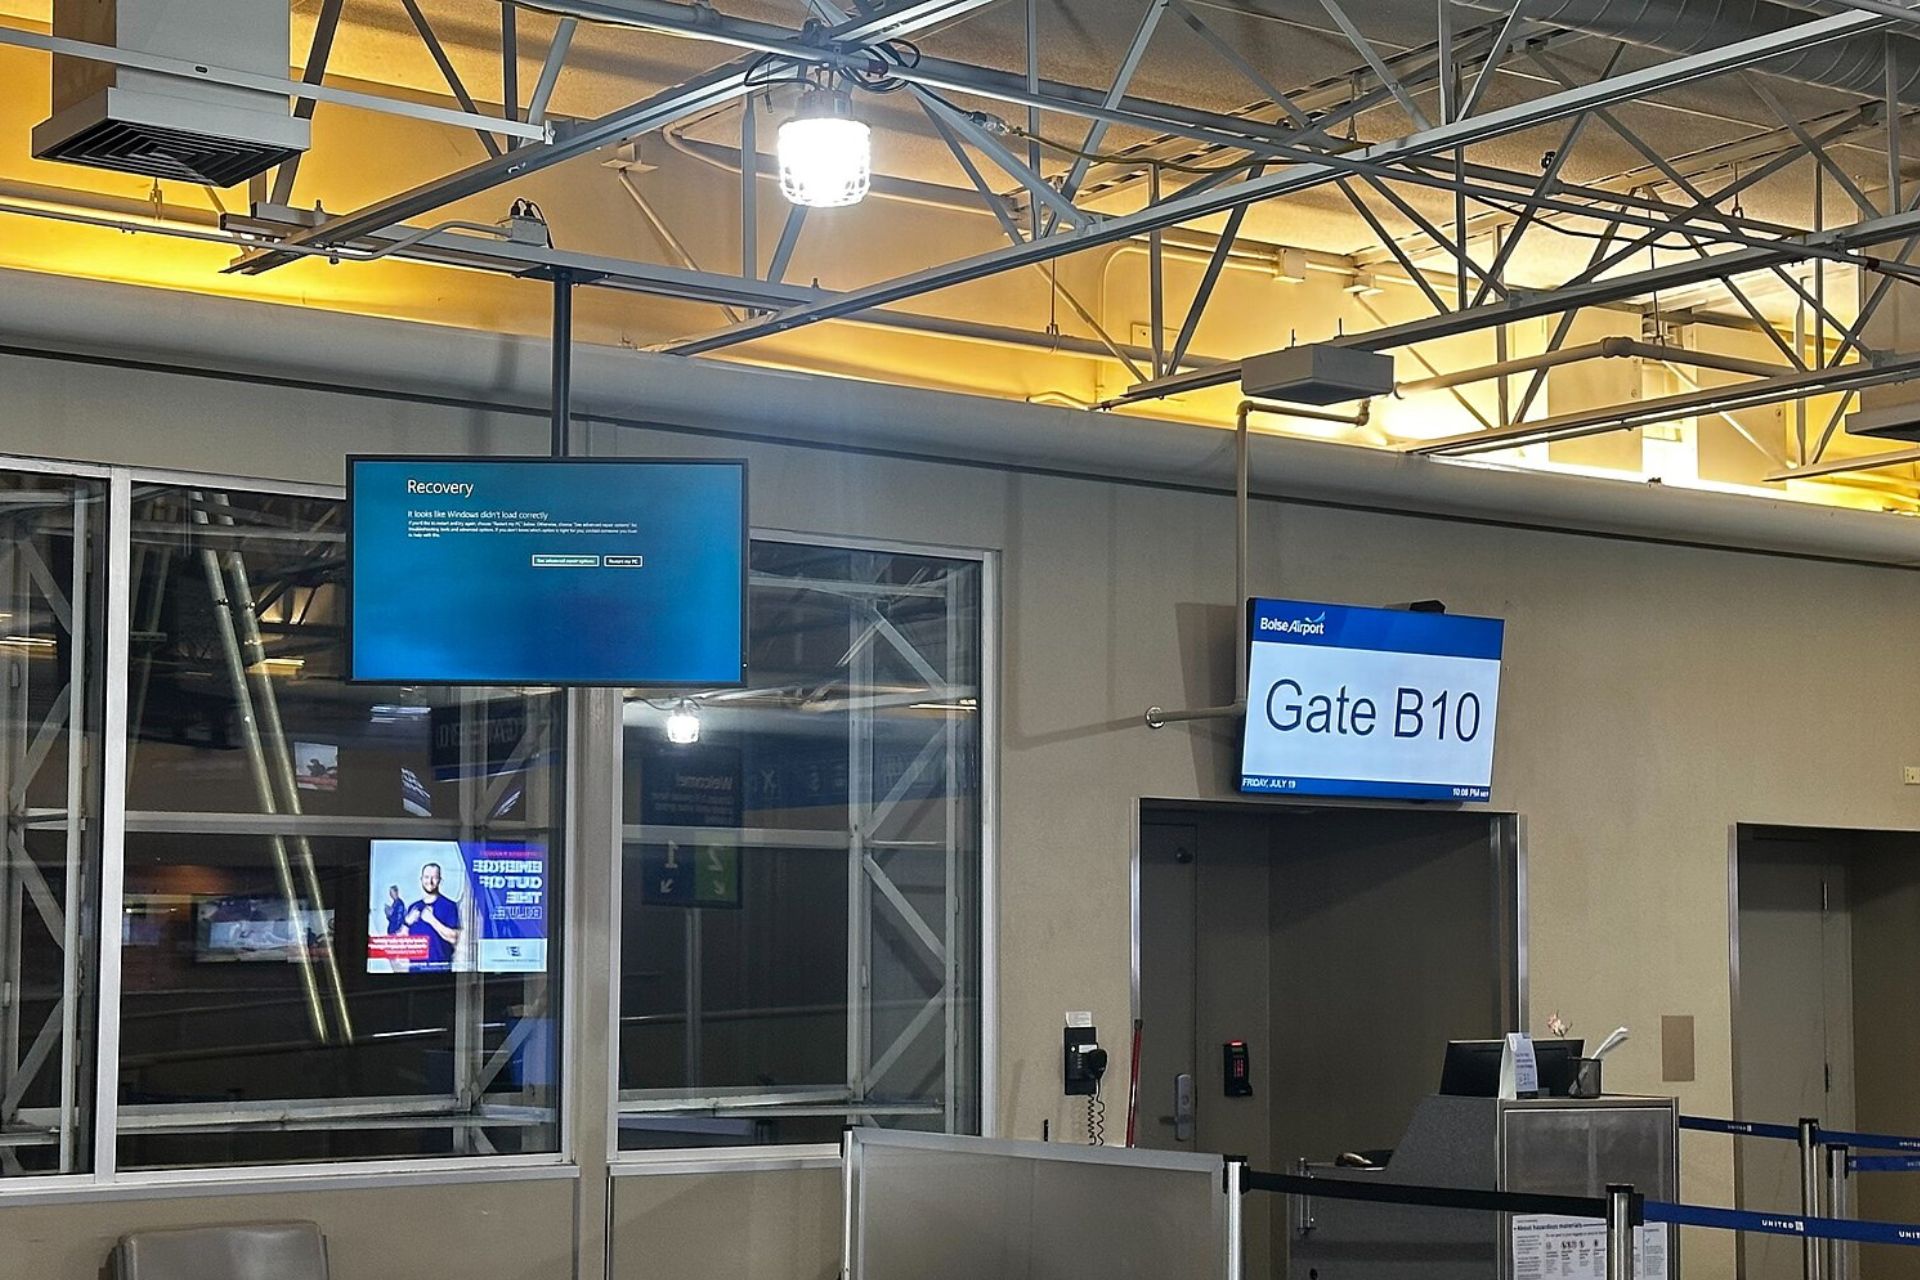
Last week, the world experienced the most significant tech outage in recent history. It was caused by a wrong CrowdStrike update, which impacted more than 8.5 million Windows PCs. The incident caused severe business problems and affected critical systems like 911 calls, the healthcare industry, banks, and airports.
Crowdstrike published a guidance hub, and Microsoft came over with a recovery tool. In a new blog post, the Redmond-based tech giant said it moved more than 5,000 support engineers to assist in returning affected systems to normal and gave advice and recovery tools.
The company also stresses the significance of using present Zero Trust methods and building abilities not based on kernel access. Innovation is key, as seen with projects such as VBS enclaves and Microsoft Azure Attestation service, which signify where Microsoft is going in this area.
Additionally, this occurrence has prompted a more extensive discussion regarding the most effective methods for ensuring organizational resilience.
Microsoft recommends having solid plans in place for business continuity and responding to significant incidents. These plans should be complemented by regular data backups, rapid restoration capabilities on Windows devices, and deployment rings to handle updates and new features. These approaches are not only about recovery but also aim to lessen the effects of possible future incidents.
It is not just about backing up data – it means adopting a cloud-native method, using the newest security defaults, and allowing Windows security baselines. The strategy to improve the ecosystem’s resilience of Microsoft is based on transparency and teamwork with partners and customers.
This event, though hard to handle, gives a chance for development and improvement. Microsoft wants to enhance its own products and the wider digital system by spreading knowledge and superior methods. The direction ahead is apparent: make change, creativity, and durability top priorities to serve the worldwide group that depends on Windows in their daily lives.
The nw-31291-6 is a network error on your PS4 where you may get a message that says Cannot find the Wi-Fi network.
Strange enough, other devices may not have this issue so it implies that this is explicitly a PS4 error. Most PS4 network errors could be due to network interference, network congestion, SSID is undetectable or the signal is too weak.
How do I fix the nw-31292-6 error on my PS4?
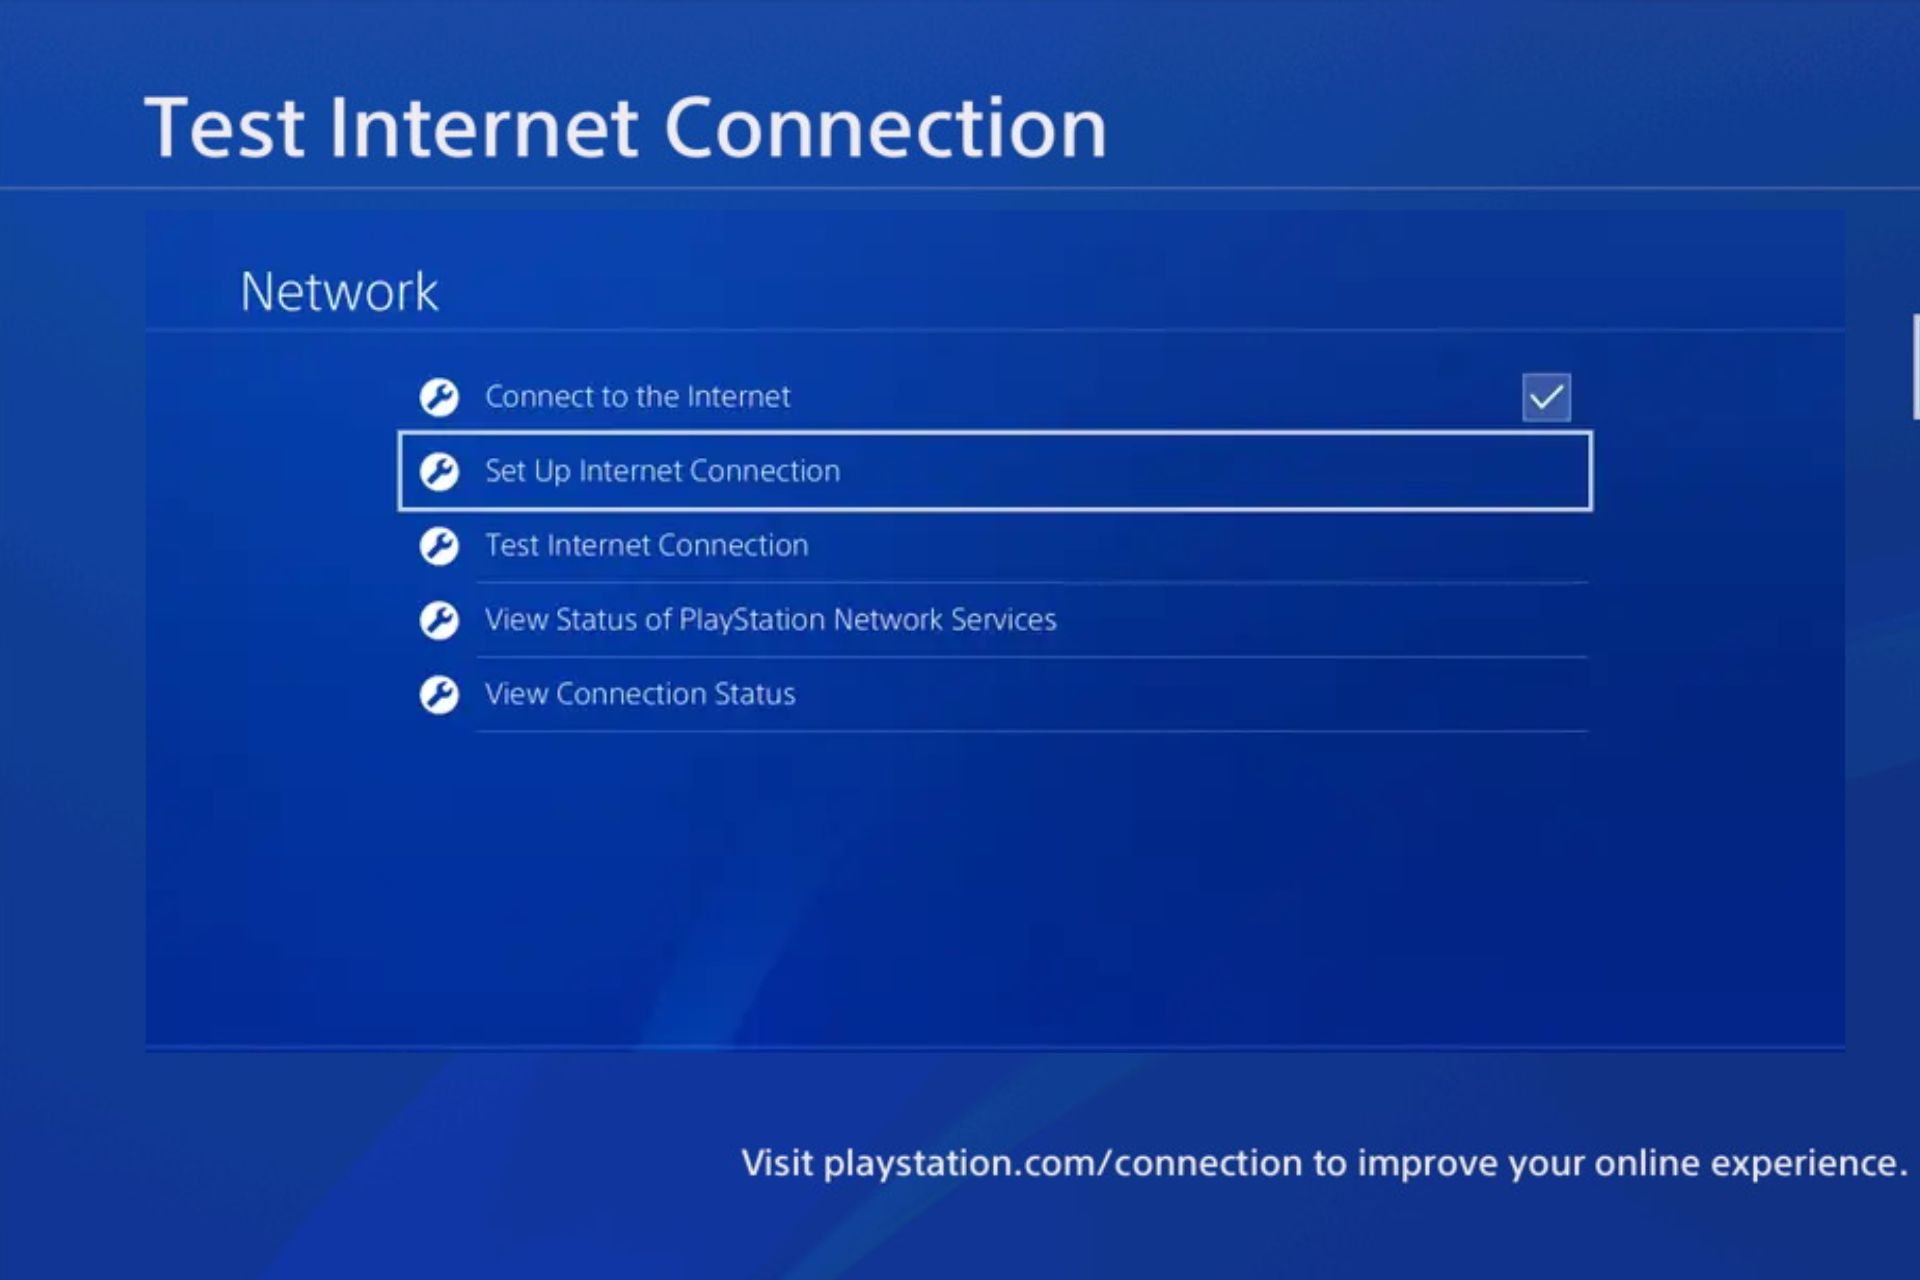
2. Test the console’s Internet connection
Select Settings from the console’s Home Menu.
Click on Network from the drop-down window.
Select Test Internet Connection and wait till the test completes.
Follow the on-screen instructions and check if the PlayStation 4 nw-31292-6 error persists.
3. Power cycle your router and re-enable the SSID broadcast
Switch off your router and disconnect it from its power source. This includes removing batteries if it uses any.
Wait a minute before hooking it up on power and switching it on again.
Right-click the network icon in your Taskbar and choose Network & Internet settings.
When the new window appears, click on Network and Sharing Center.
Network and Sharing Center window will now appear. Click on Set up a new connection or network.
Now select Manually connect to a wireless network and click Next.
Enter the required information such as Network name, Security type, and Security Key. Keep in mind that you need to enter the correct information or else you won’t be able to find and access your network.
Also, be sure to enable Connect even if the network is not broadcasting and Start this connection automatically options. Once you’re done, click Next to proceed.
Try connecting your PS4 with an ethernet cable this time around and see if it works.
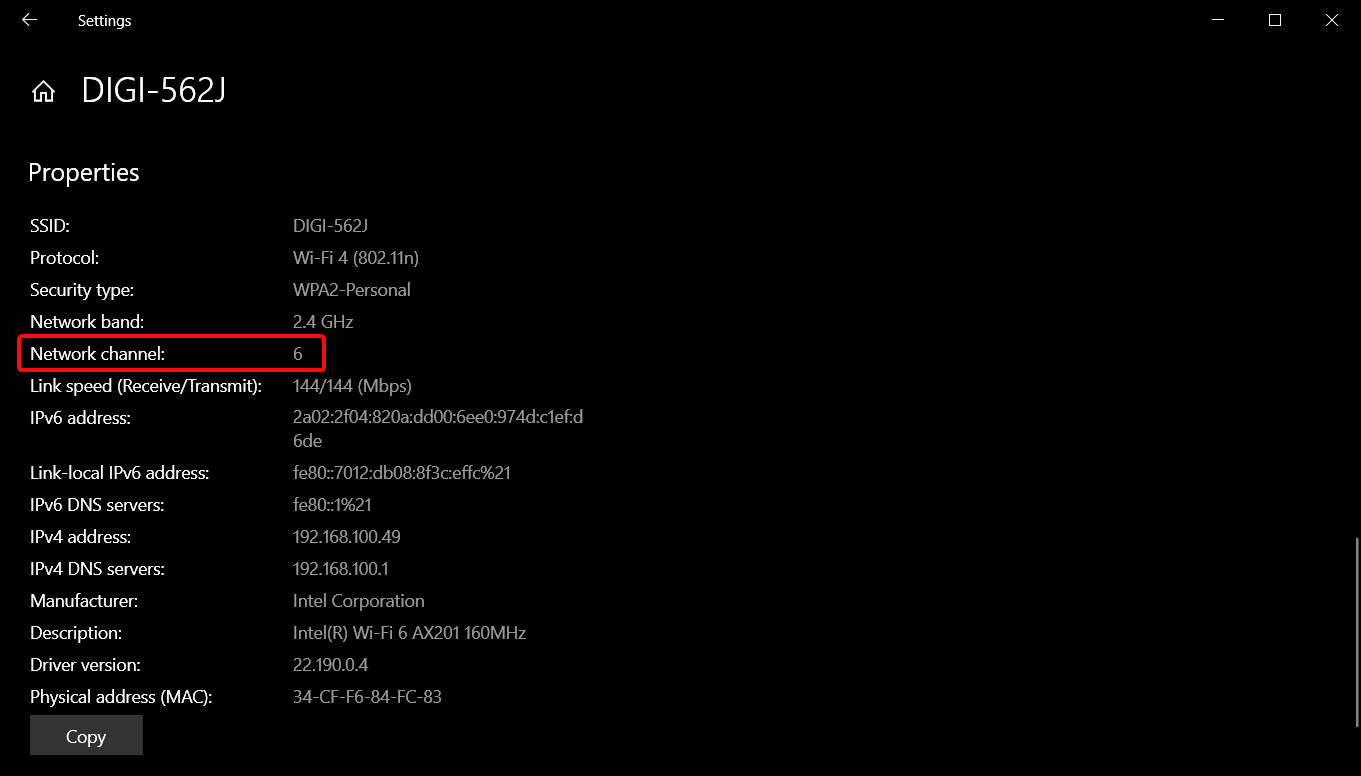
Click on the Network icon on your taskbar, select your Wi-Fi connection, and click on Properties.
Now, scroll down and you should see the Network channel for your Wi-Fi connection.
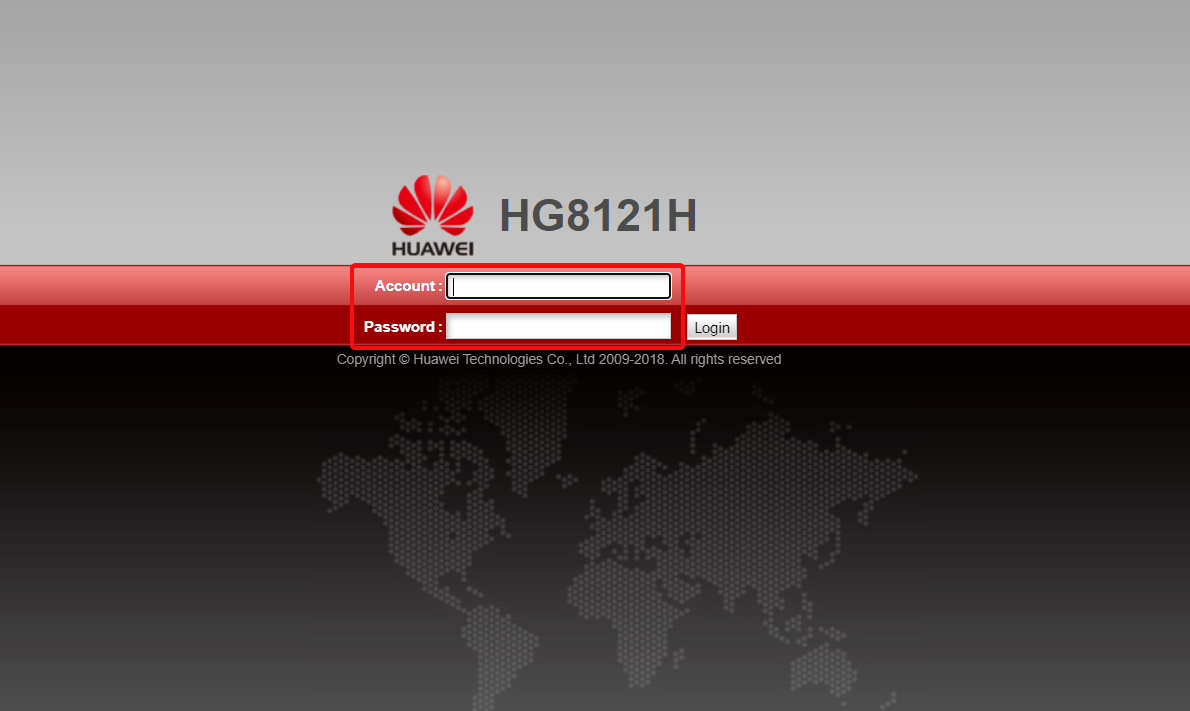
Navigate to your browser and log into your router with the correct credentials. You can find that info on the router itself or on the manual of the router.
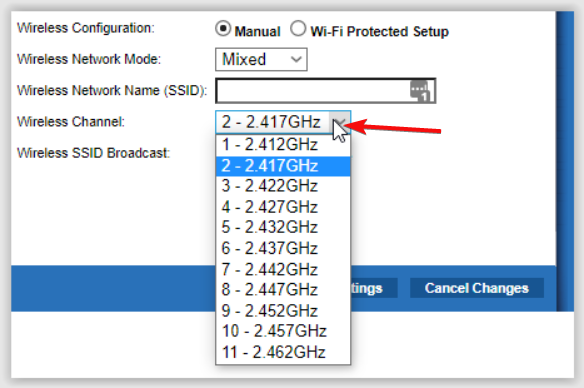
Go to the Wireless settings of your router and change the router channel to a different one from the default.
And to take away from all the guesswork of trying to figure out the best Wi-Fi channel, consider using a Wi-Fi scanner as it can automatically detect and connect to the best channel and avoid disruptions.
5. Update your console firmware
Power on your PS4 console.
Connect your PS4 to a stable and fast internet connection.
Press the PlayStation button on your controller.
Click on Settings and select System Software Update.
Select the Update Using Internet option and follow the on-screen guide to update the console.
Network errors on your PS4 can prevent sign-in so it’s crucial to address them promptly. Some errors like the ws-116386-5 may be internal so verify the PSN status. All in all, always ensure your PS4 is close to your router and you’ve switched off any unnecessary devices.
If all else fails, contact PlayStation support for additional assistance. That’s a wrap from us but for any additional thoughts and comments, drop us a comment down below.
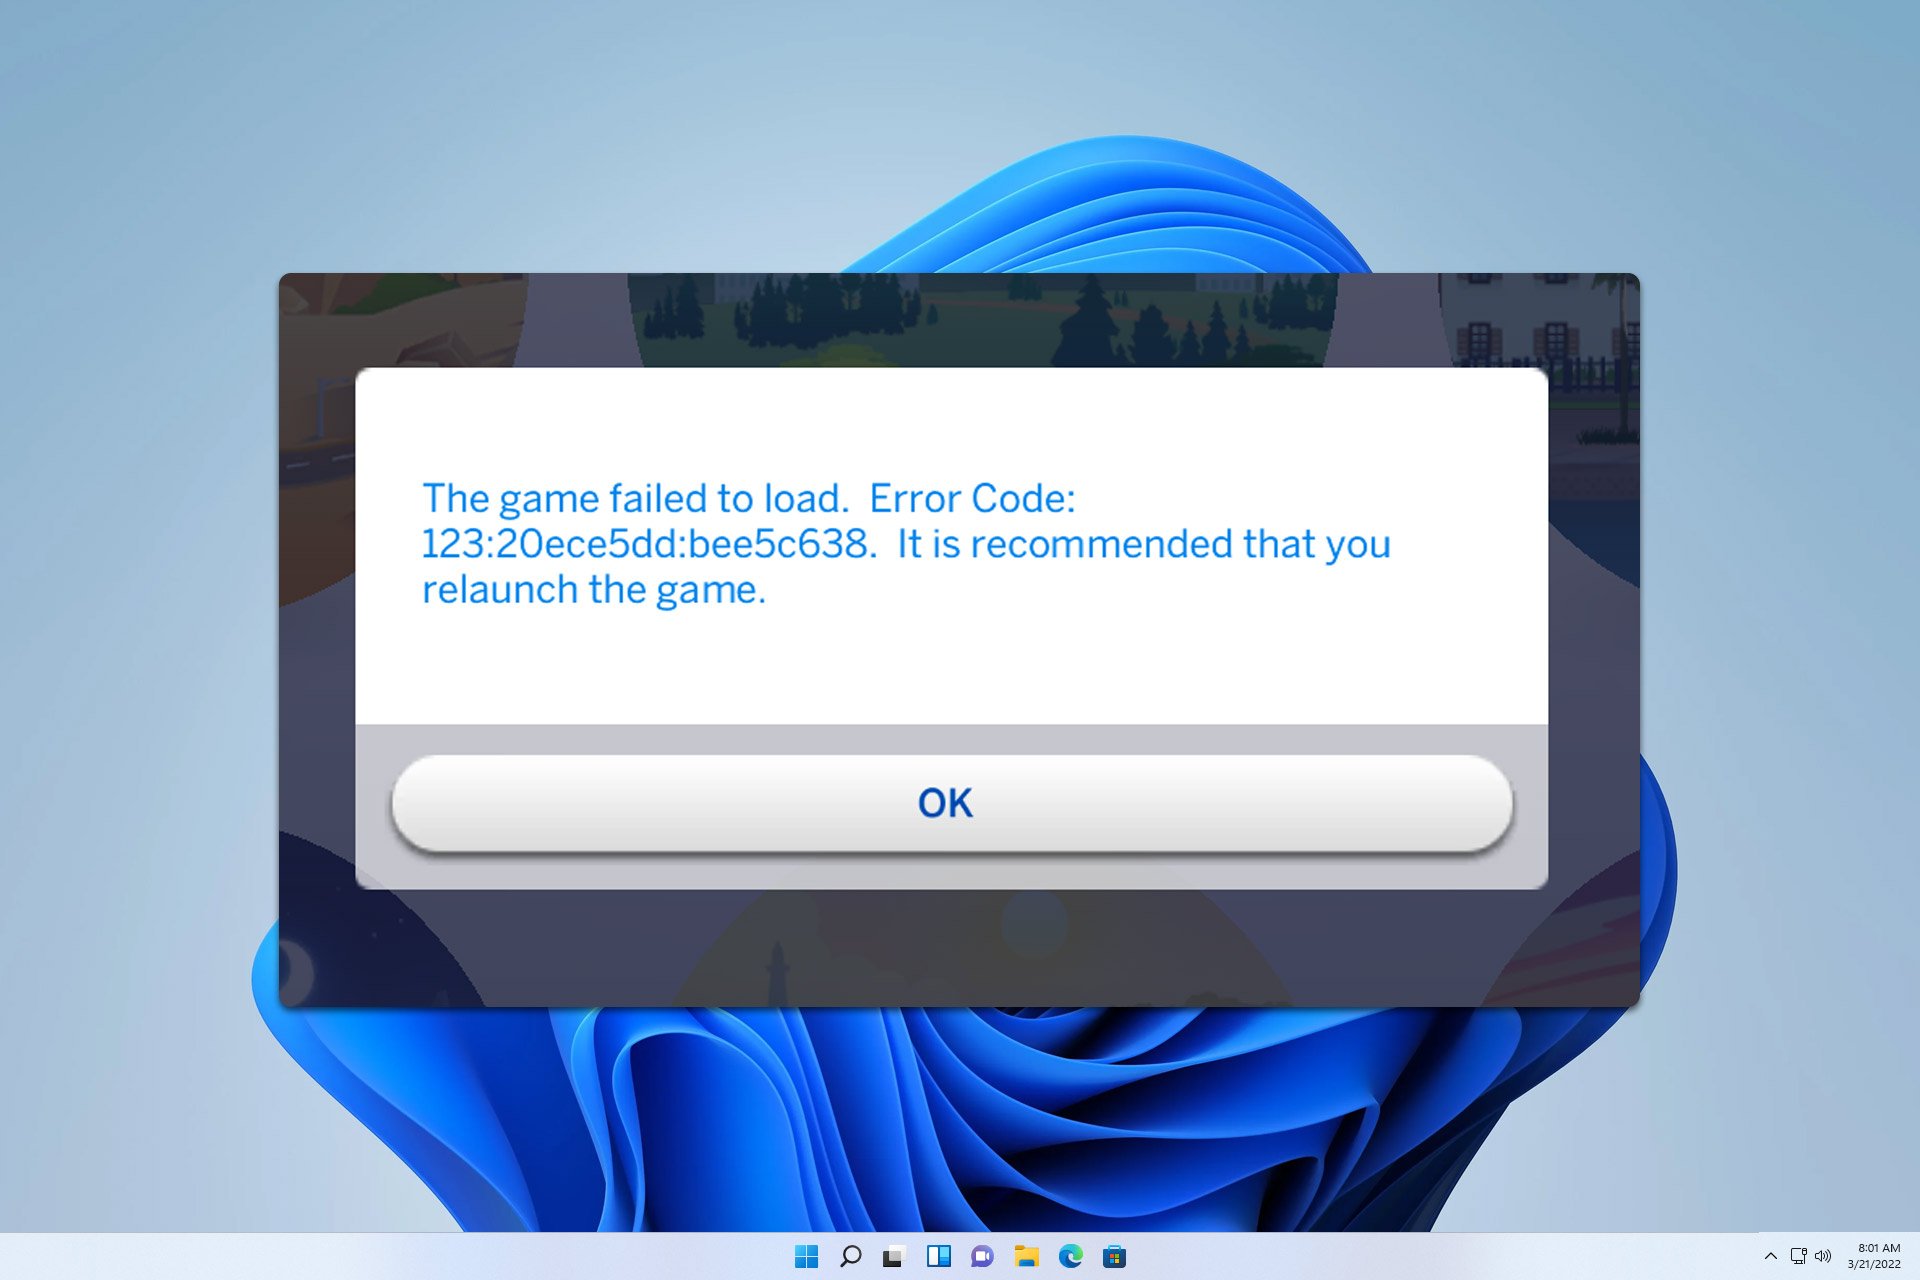
Many have encountered Sims 4 error code 123, and this error will prevent you from running the game. However, this can be fixed by following these simple steps.
How can I fix error code 123 in Sims 4?
1. Repair the Game in Origin
Click on the Origin icon on your desktop or search for Origin in the Start Menu and open it.
In the Origin window, find and click on My Game Library located in the left-hand sidebar.
Find The Sims 4 icon in your game library.
Right-click on The Sims 4 icon and select Repair.
Wait for Origin to complete the repair process. It will verify game files and download any missing or corrupted files.
2. Remove Mods and Custom Content
Go to Documents > Electronic Arts > The Sims 4.
Move the Mods folder to your desktop.
In the same The Sims 4 folder, delete the localthumbcache.package file. You can also delete cachestr and cache folders.
Start The Sims 4 and see if the game runs without the error.
If the error is gone, it’s likely caused by one or more mods. Install Sims 4 mods and custom content a few at a time to identify the problematic ones.
If you find that a mod is a problem, keep it disabled or update it to the latest version.
3. Reset the game to factory settings
Ensure The Sims 4 is not running.
Navigate to Documents > Electronic Arts.
Rename The Sims 4 folder to The Sims 4_Old.
Launch The Sims 4, which will create a new, clean The Sims 4 folder.
See if the error persists with the fresh settings.
Copy the Saves folder and paste it somewhere safe on your computer.
In Origin, go to My Game Library.
Right-click on The Sims 4 and choose Uninstall.
Once uninstalled, right-click on The Sims 4 icon again in your game library and select Download.
If the error persists with a clean setup, restore your save files by copying them back to the new Saves folder in Documents > Electronic Arts > The Sims 4.
By following these steps, you should be able to resolve the Sims 4 error code 123 and get back to enjoying your game.
This isn’t the only error that users are having, and we recently covered Nisa error in Sims 4 in our other guide. If these errors occur, Sims 4 won’t start, so it’s important to fix them.
Microsoft allows for fine-tuning the Phi-3-mini and Phi-3-medium models on Azure. This advancement is a considerable leap in personalizing and using AI technologies.
Phi-3 Family: Microsoft introduced the Phi-3 family into Small Language Models (SLMs) in April. With great performance at low cost and latency, these models have established a fresh level of quality for SLMs. The Phi-3-mini, comprising a 3.8B language model, and the Phi-3-medium, which holds a 14B language model, come in two context-length alternatives each, offering adaptability to different uses.
The most recent announcement states that developers can make precise adjustments to these models on Azure. This means they can improve the performance of their AI models in different situations. For example, you might picture fine-tuning the Phi-3-medium model for student tutoring or creating a chat app with an exact tone or style of response.
According to the official blog, the options are limitless, and significant organizations such as Khan Academy already use the Phi-3 model in AI applications they have made available to everyone. In addition, Microsoft has announced the general availability of Models-as-a-Service (serverless endpoint) capability. This allows us to access the Phi-3-small model through a serverless endpoint.
This is very interesting because it simplifies the process of building AI applications, removing worries about infrastructure and other concerns. Also, soon, we will have good news that Phi-3-vision – a multi-modal model – can also be accessed via a serverless endpoint.
Just one month ago, Microsoft updated its Phi-3-mini model. After this update, there was a significant change in performance: according to industry benchmarks, the Phi-3-mini-4k now scores 35.8 (before it was 21.7), while the Phi-3-mini-128k scores 37.6 (it used to be 25.7).
Deleting your Skype account permanently can be a bit tricky, simply because it’s linked to your Microsoft account. So, to get rid of the Skype account, you actually need to close your Microsoft account entirely. This will effect all the services that depend on that account so first, make sure it’s the right decision.
How do I close my Skype account?
1. Closing your Microsoft account (Skype Account Deletion)
Verify your account via email or text message by entering the security code sent to your registered email or phone number.
Read through the Ready to Close page and click Next.
Check all checkboxes to acknowledge the effects of closing your account.
From the drop-down list, select a reason for closing your account.
Click Mark account for closure.
This solution will help you delete your Skype account by closing your Microsoft account. Be aware that this also deletes access to other Microsoft services like Outlook and OneDrive. Once you make this move, the account will be fully closed in 60 days.
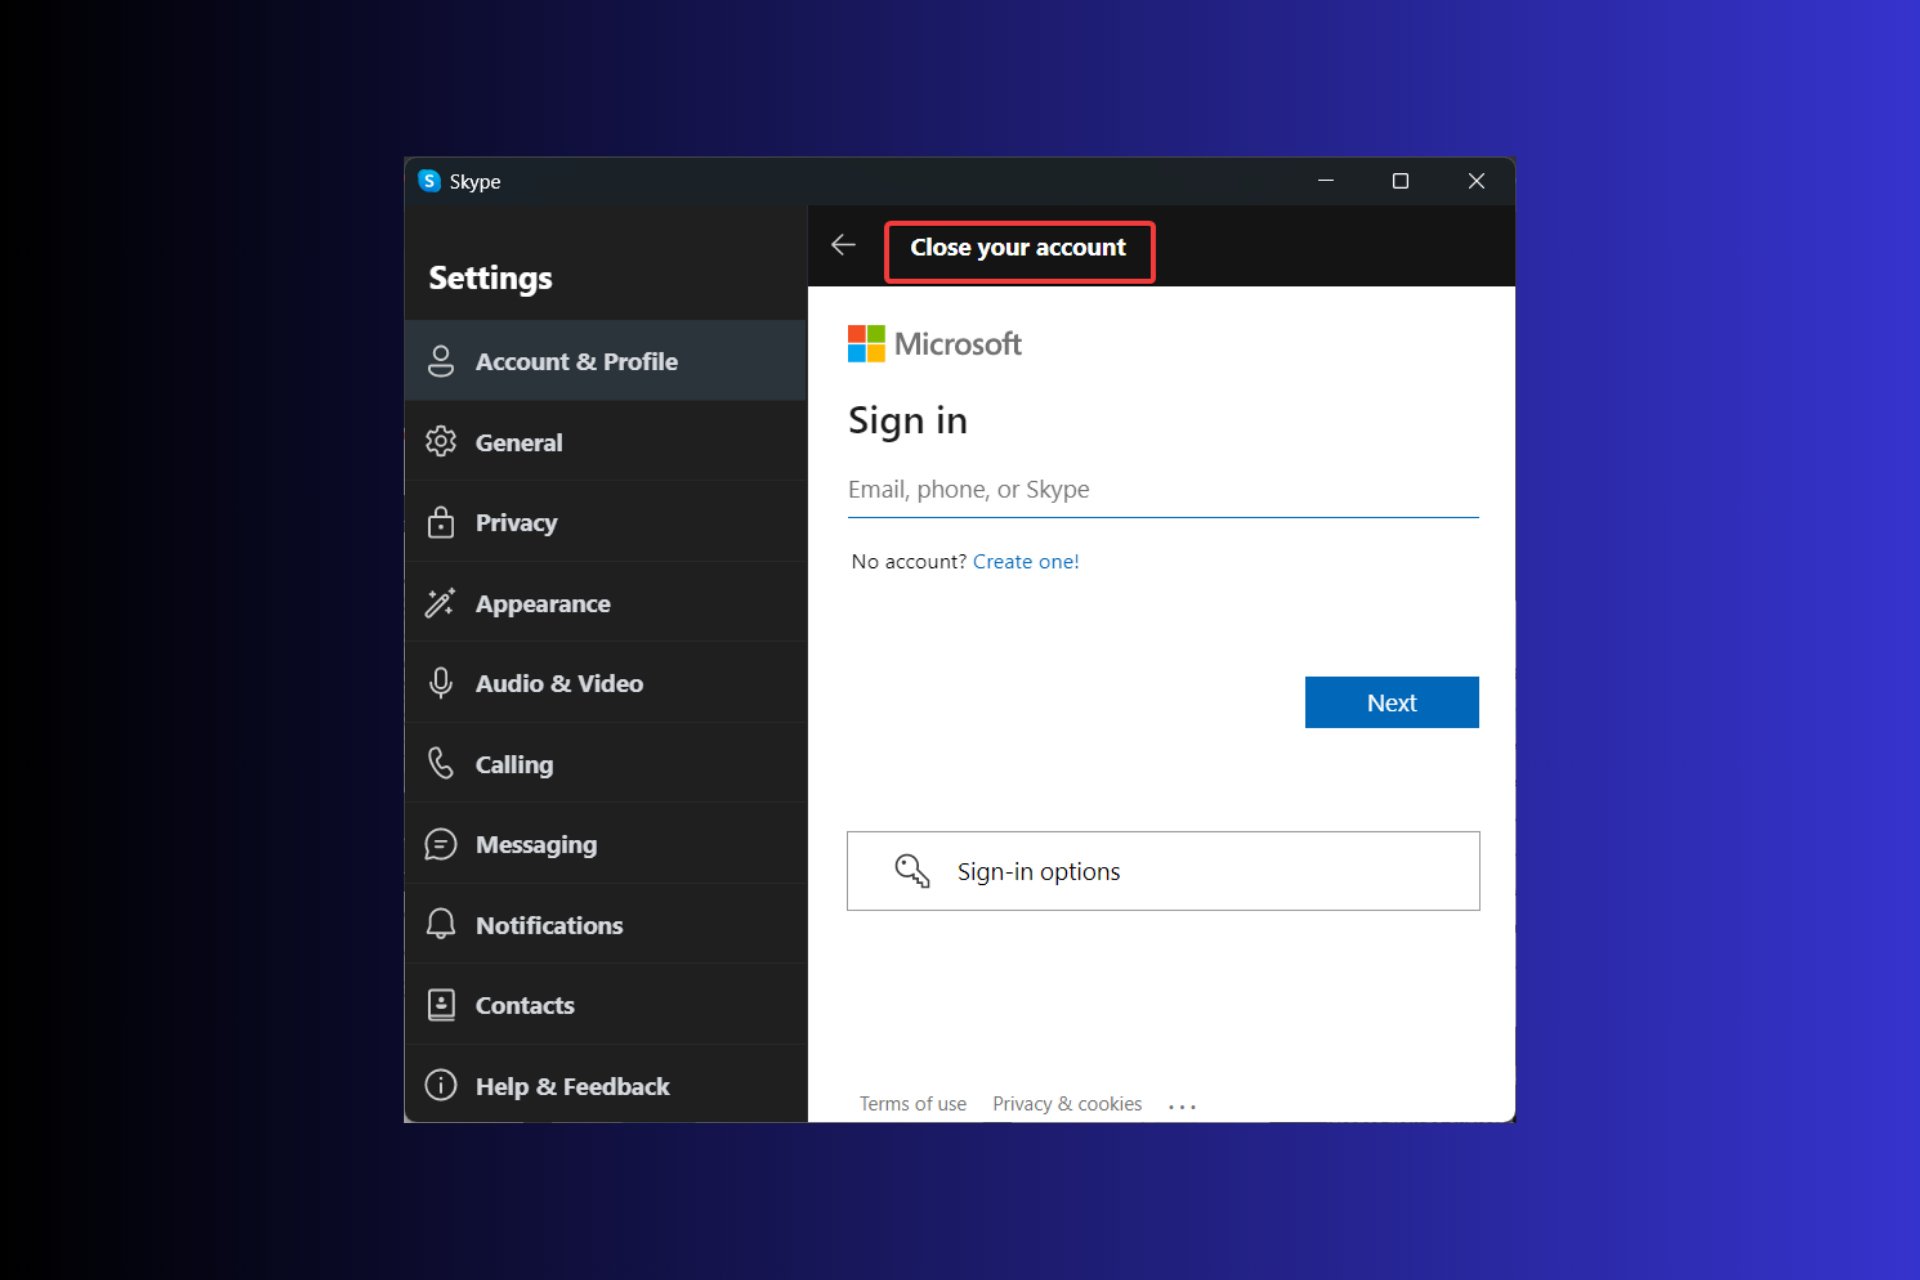
2. Using the Skype app on desktop (Windows or Mac)
Launch the Skype application on your desktop.
Click your Skype Name at the top left corner.
In the pop-up, scroll down and click Settings.
On the right-side panel, scroll down and click Close your account.
Verify your ID and password to proceed.
Read through the Ready to Close window and click Next.
Check relevant boxes and select a reason for account deletion.
Click Mark account for closure.
This method is useful for users who primarily use Skype on their desktop and want a straightforward way to access account deletion through the app itself.
3. Using the Skype app on mobile (Android or iOS)
Launch Skype on your mobile device.
Tap your Skype name.
Go to Settings by tapping the Gear icon on the top right corner.
Tap Account & Profile and then Close your account.
Verify your ID and password to proceed.
Read the list and click Next.
Mark the checkboxes and select a reason for deletion.
Tap Mark account for closure.
This solution is perfect for users who mainly use Skype on their mobile devices, offering an easy route to account closure from their phone.
Use the live chat or contact form to request account deletion.
Follow the instructions provided by the support team.
This method is useful if you encounter issues while trying to delete your account yourself. The support team can guide you through the process and handle any complications.
How can I hide my Skype profile?
Go to the Skype website and sign in.
Click on My Account.
Scroll down and click Edit Profile.
Uncheck the checkbox next to Discoverability under Profile settings.
If you don’t want to completely delete your Microsoft account but want to make your Skype profile invisible in searches and suggestions, this is the best solution.
Remember to back up any important data before you proceed with deleting your Skype account. Regularly reviewing your account settings can help you manage your online presence more effectively. You can also cancel your Skype subscription if you don’t feel like using the service anymore.
Now that you’ve got rid of your Skype account, take a look at our list of the best Skype alternatives you can use. If you don’t want to use it anymore because of Skype delayed messages, the highlighted link will help you fix it.
Did you manage to close your Skype account? Let us know in the comments below.
If you’ve ever wanted to benefit from Chrome without worrying about your privacy, then the open-source Ungoogled Chromium may be what you are looking for.
What is Ungoogled Chromium & how do I use it?
Overview
Ungoogled Chromium is a stripped-down version of Google Chrome. It is an open-source version of Chrome without the telemetry features and other Google services such as search, tracking, and data synchronization. In simple terms, it is a Chrome browser that focuses on your privacy.
There will be multiple releases so pick one labelled This release is for all platforms and under the Source code, select the zip file.
Unzip the file, locate the EXE file and run it.
Launch the installer and follow the on-screen prompts to complete the installation.
You’ll notice the UI is similar to Chrome so you won’t need a tutorial on how to use it. In case you run into installation issues, try disabling your antivirus temporarily.
What are the differences between Ungoogled Chromium and Chrome?
Ungoogled Chromium
Standard Chromium
Stripped from Google services
Integrated with Google services
All data tracking and telemetry are disabled
Collects data through tracking
No default search engine
Google is the default search engine
Updates are conducted manually
Automatic browser updates
Is Ungoogled Chromium better than Chrome?
Privacy – It all depends on why you’re using it. If your privacy is more important than Google-related services, then it’s your go-to privacy. However, if you can’t do without the Google ecosystem, you’re better off sticking to standard Chromium browsers.
Security risks – Your browsing becomes exposed to security risks since Ungoogled Chromium disables some security features like safe browsing. You can always familiarize yourself with the different kinds of browser attacks and how to avoid them.
Updates – App updates optimize the browser’s performance and keep security risks at bay. Since Ungoogled Chromium doesn’t include automatic updates, you’re further exposed. The update process is also done manually which could be cumbersome compared to standard Chromium browsers.
Browsers with built-in VPNs come in handy as they can encrypt your internet connection by masking your IP address. This will make it harder to track your online activities.
Private search engines prevent your browser from collecting your personal data or keeping your browser history private.
Ultimately, it’s personal preference on whether to go for Ungoogled Chromium over other privacy-focused browsers. If it were up to us, we’d install both the standard Chromium browser and the stripped-down version.
This can help you separate your information. For the very sensitive information that you want to keep from Google’s prying eyes, Ungoogled Chromium is the browser for the job. For work or school activities that require the Google ecosystem for an enhanced workflow, the standard Chromium browser will do.
That’s all we had for this article. We’d like to get your feedback if you’ve used this browser before. Are there any advantages or disadvantages you’d like to point out? Would you recommend it as a daily browser? Let us know in the comment section below.
ChatGPT Plus will finally receive the new Voice Mode, transforming the experience of using this AI model. According to an X post by Sam Altman, the top leader of OpenAI, the alpha rollout for Voice Mode will start next week and be accessible to ChatGPT Plus subscribers. The CEO mentioned it briefly in a question to another thread regarding the new SearchGPT.
alpha rollout starts to plus subscribers next week!
If you have previously experienced using Voice Mode but faced waiting periods for responses, you are lucky. While the current model shows some lagging issues, with GPT-4o, this problem will likely be eliminated soon enough.
Picture yourself conversing with ChatGPT like before, but now it feels similar to talking with your friend over the phone. Sounds cool, right?
Back in May, OpenAI introduced its fresh GPT-4o model, which can comprehend audio inputs nearly as rapidly as a person. The model’s average response duration is 320 milliseconds, similar to a human’s reaction speed during conversation.
OpenAI planned to release Voice Mode by the end of June, but they decided to delay it for one more month. Meanwhile, the company previewed SearchGPT, which they are making as their own version for searching on the internet. It is not yet complete, but it says it will give quick and correct responses from trustworthy places.
So, what do you think? Are you ready to have a good talk with the new and improved ChatGPT?
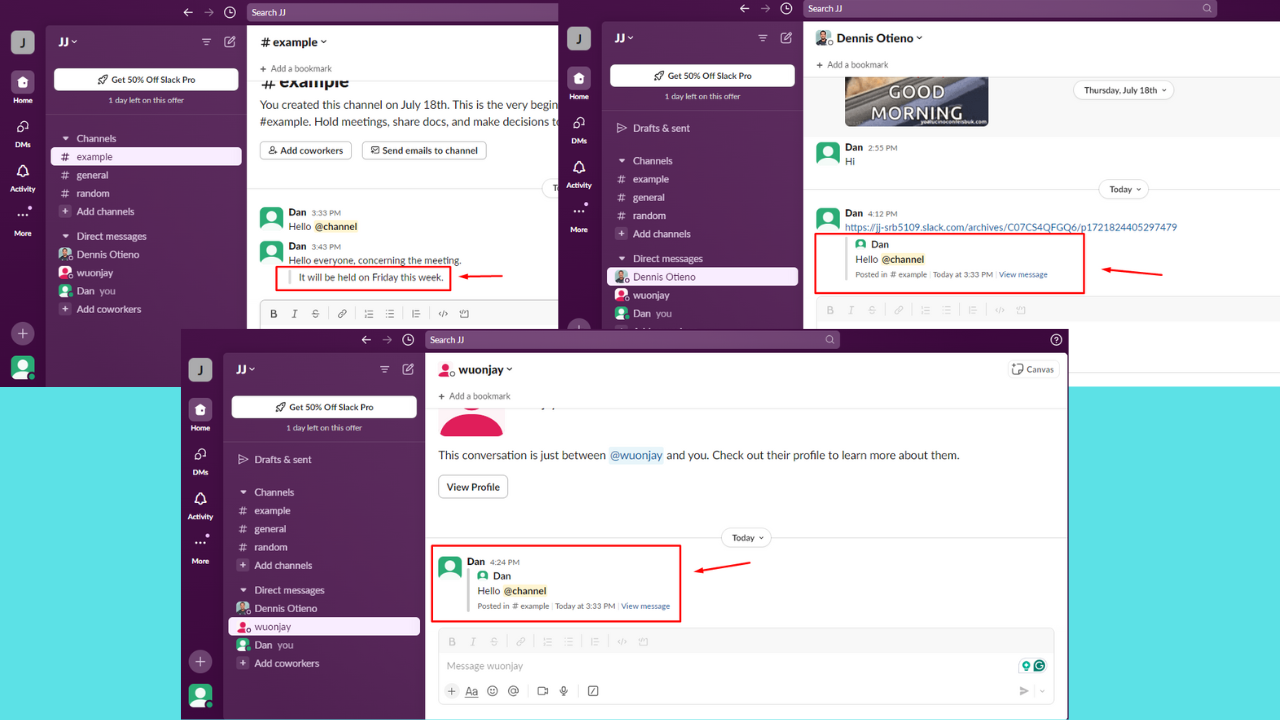
A Slack quote message can point out specific parts of a conversation. It highlights text by indenting it and setting it apart. This way, you can easily reference previous texts and share important information.
I’ll show you how below, so read on!
How To Create a Slack Quote Message
You can quote any Slack message using the greater-than sign, sending the message link, or forwarding it. Here are detailed steps for each method!
Visit the channel or direct message where you want to post the quote.
Type your message and when you reach a text you want to quote, press Shift + Enter to begin a new line. Hit the > symbol on your keyboard, followed by a space before your text. For example: > This is a quoted message.
Press Enter to send it. Your quoted text will appear highlighted and indented in the conversation.
Send the Message Link
Here’s what to do:
Identify the message you want to quote in the conversation.
Place your cursor over it and tap on the three dots.
Select Copy link from the menu.
Paste the link in the message field and hit Enter.
It’ll appear in block quotes.
Forward a Message
Here are the steps:
Identify the message you want to quote, place your cursor on it, and tap the forward icon.
Select the recipient, then hit Forward.
The message will be quoted.
Overall, the Slack quote message feature is pretty straightforward. Whether you use the greater-than sign, send the message link, or forward the text, it’s a must-have tool for effective team collaboration.
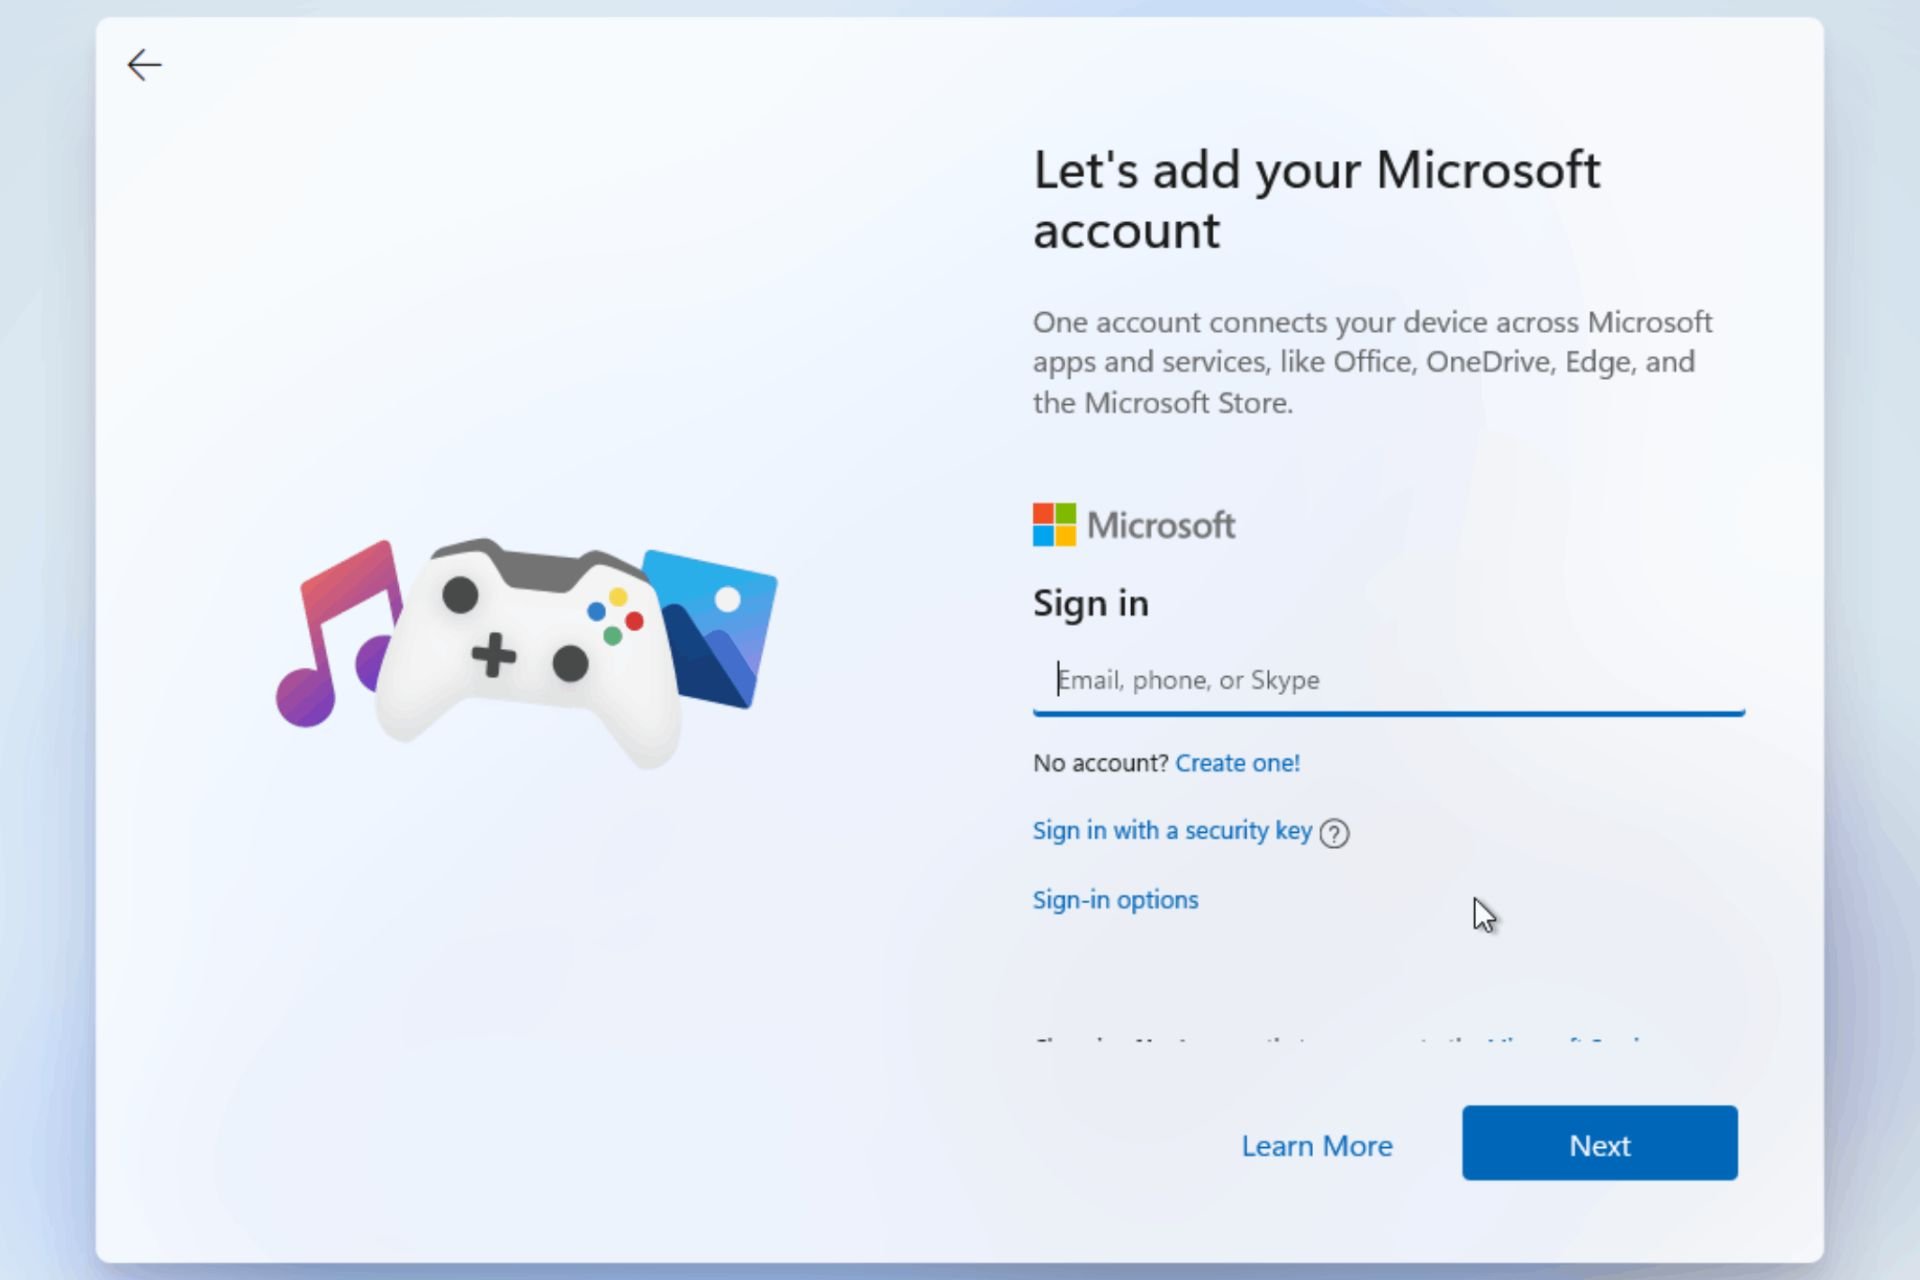
In a recent update that will catch the attention of Windows 11 users, Microsoft has rolled out a new Out of Box Experience (OOBE) update for versions 22H2 and 23H2, tagged under the code KB5041655. This update enhances the initial setup experience of Windows-based machines, making the first encounter with Windows 11 smoother and more intuitive.
For those who might not be familiar, the OOBE is the process you go through when you first boot up a new computer. You’re greeted with setting up basic configurations, logging into your Microsoft account, and, let’s be honest, declining a bunch of ads for Microsoft 365, Game Pass, Edge, and more.
Now, if you prefer to keep things simple and ad-free, you might find the OOBE updates a bit of a mixed bag. However, there’s a silver lining. You can skip most of these steps by setting up your computer offline using the oobe\bypassnro command, which not only lets you dodge the ads but also the OneDrive Known Folder Backup feature that tends to be more annoying than helpful.
In KB5041655, Microsoft is somewhat mysterious about what precisely the new OOBE update includes. The official statement only mentions that it “improves the Windows 11, version 22H2 and Windows 11, version 23H2 out-of-box experience (OOBE).”
This update improves the Windows 11, version 22H2 and Windows 11, version 23H2 out-of-box experience (OOBE). This update applies only to the Windows 11 OOBE process and is available only when OOBE updates are installed.
Microsoft
If you’re curious about the details, you can dive into the support page but don’t get your hopes up for finding anything groundbreaking.
On a more practical note, alongside this OOBE update, Microsoft also released non-security updates for Windows 11, which include various fixes and feature changes. It’s important to note that these updates are optional and unrelated to security, so it’s up to you whether you want to install them. Given the history of updates occasionally causing more headaches than they solve, some users might opt to stick to mandatory updates only.
Google’s Gemini has introduced significant changes for its users worldwide, including the addition of the Gemini 1.5 Flash model. This improvement is not a small change; it’s a significant transformation from the prior Gemini 1.0 Pro model.
It is quicker and works more efficiently than the older model: the Gemini 1.5 Flash model has a 32k-long context window, four times the size of what the 1.0 Pro could handle. With this newer version, you can input more data in one go.
Google is also making a big commitment: This new model will provide “improved overall response quality and accuracy.” For people who really enjoy exploring, Gemini 1.5 Flash from Google will be like finding gold at the end of a rainbow.
Gemini is a champion at summarization and can handle long documents and tables with the help of distillation. Moreover, Google has taken a cue from Microsoft’s Copilot by giving direct links to supporting content within Gemini’s responses.
Gemini is also reaching Google Messages in the European Economic Area, the United Kingdom, and Switzerland. If your Google Account is under Family Link management or a Google Workspace account, you should know that Gemini in Google Messages will not be accessible for these accounts.
You need to open the Google Messages application on your Android smartphone and select chat with Gemini by tapping it or start a fresh chat with Gemini. That’s it – you are inside.
You can read more about the Google Gemini 1.5 Flash here.
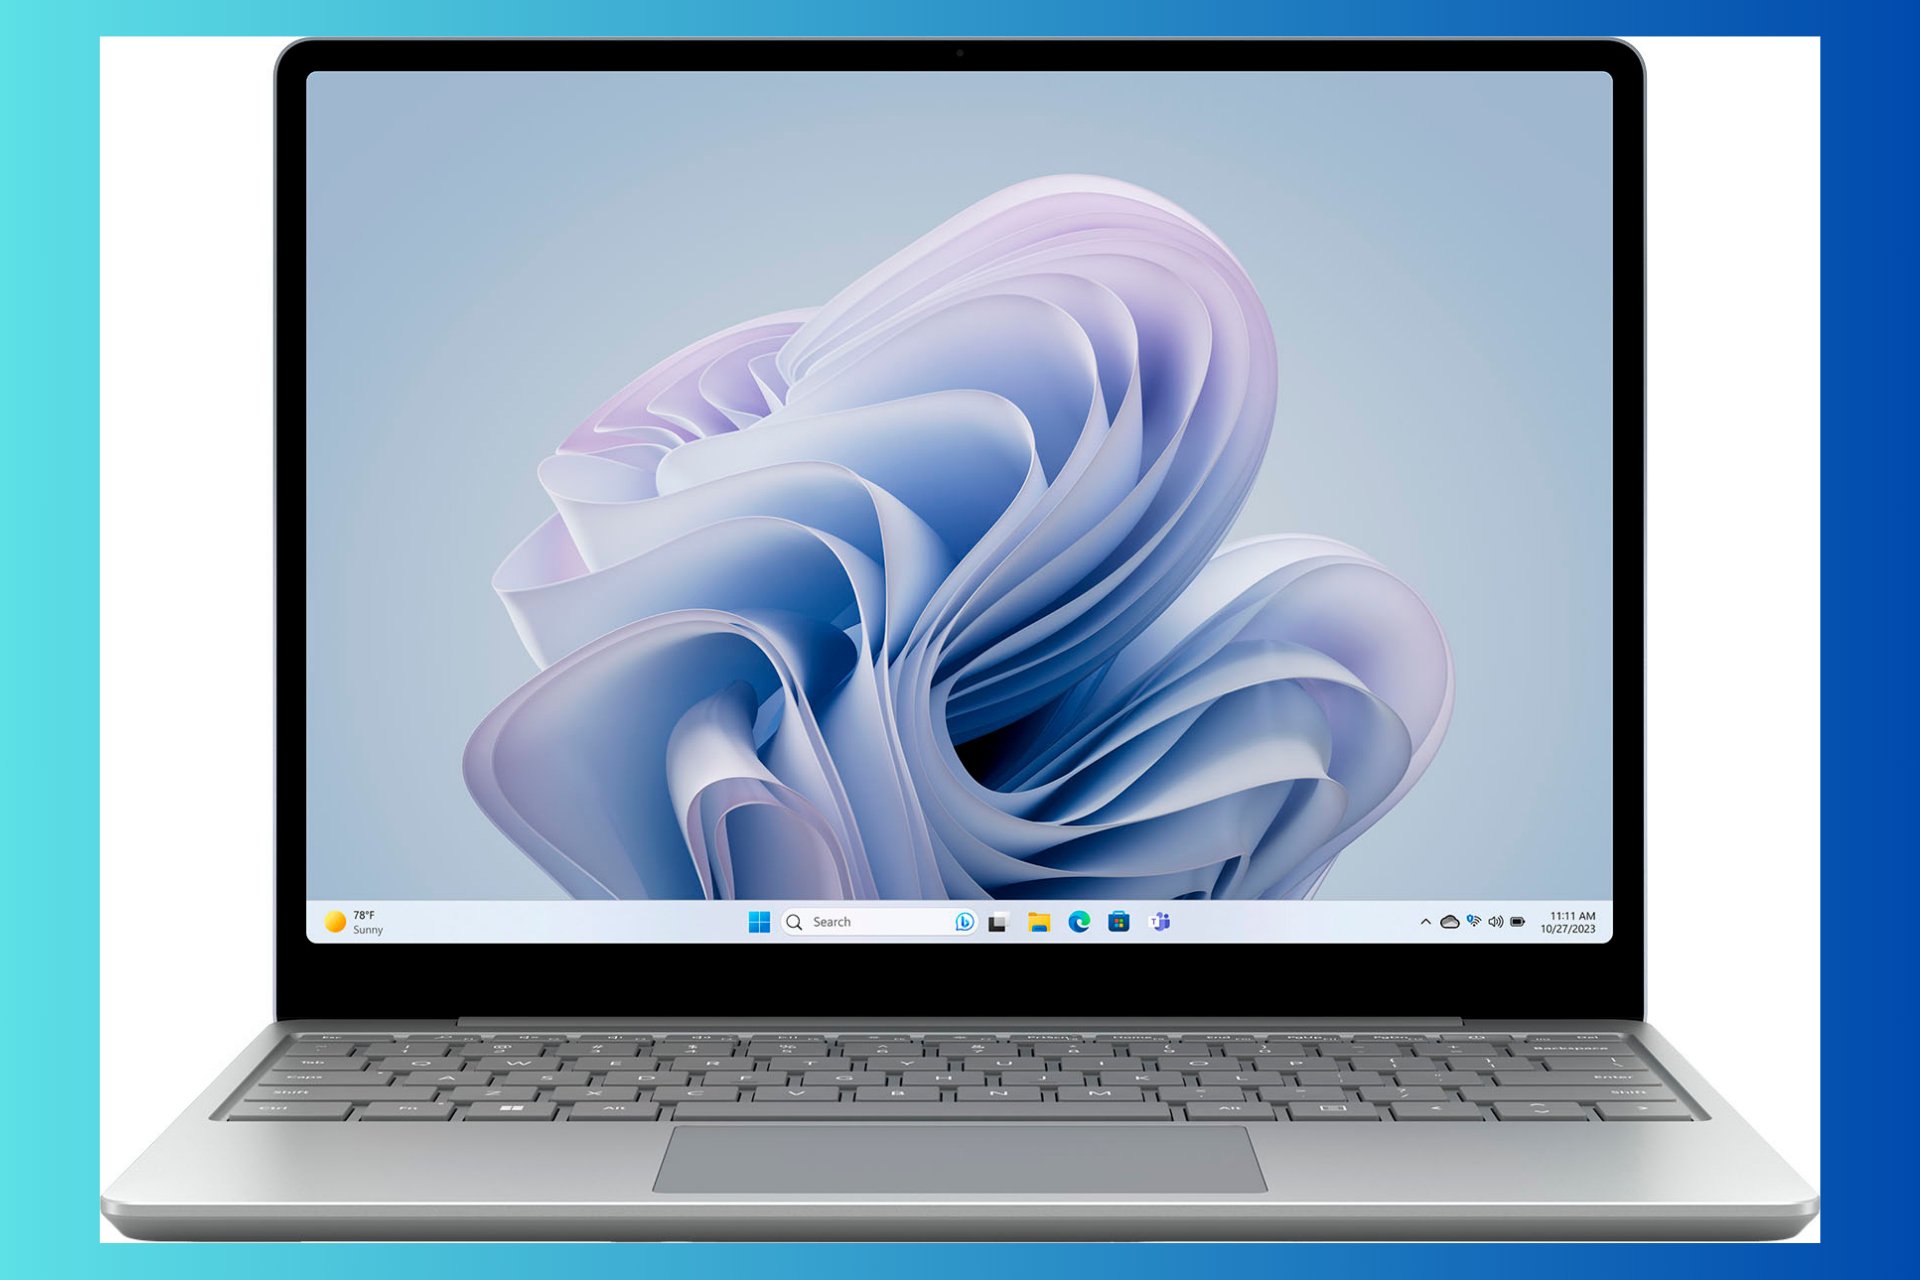
When it comes to affordable elegance in the laptop market, the Microsoft Surface Laptop Go 3 stands out. This review will delve into the key aspects of this device, from its price and specifications to its real-world performance and user experience.
All about Microsoft Surface Laptop Go 3
1. Design and specifications
First off, the design is something to admire. Microsoft has always had a knack for creating visually appealing devices, and the Surface Laptop Go 3 is no exception. Its lightweight and compact design make it an ideal companion for those constantly on the move. I remember thinking, This could be the perfect laptop for darting between meetings or working in cafes. However, as I delved deeper, I found that the allure of its design might just be a facade hiding some less-than-ideal features.
The price tag was a major sticking point. Go 3 started at $799, and jumped up to $999 after the innitial launch. However, now, it has a $650 starting price which I consider to be finally the right one.
It is at least okay for a configuration that’s somewhat decent. However, I can’t ignore the shortcomings. For instance, the lack of a backlit keyboard is a glaring omission. I can’t count the number of times I’ve found myself working late into the night, relying on the gentle glow of my keyboard. It’s a basic feature that’s expected in laptops with lower prices.
But let’s look at the specifications table provided by Microsoft:
Firmware TPM 2.0 Windows Hello sign-in with Fingerprint Power Button
Video/Cameras
720p HD front-facing camera
Audio
Omnisonic Speakers with Dolby Audio Premium
Mics
Dual far-field Studio Mics with Voice Clarity
Connections
USB-C 3.2 (data, DisplayPort and charging), USB-A 3.1, 3.5 mm headphone jack, Surface Connect port
Network and connectivity
Wi-Fi 6: 802.11ax compatible Bluetooth Wireless 5.1 technology
Software
Windows 11 Home, Preloaded Microsoft 365 Apps,Microsoft 365 Family 30-day trial, Xbox Game Pass Ultimate 30-day trial
If you compare it to Surface Laptop Go 2, Microsoft made a significant jump from 4 GB DDR4 memory to minimum 8 GB of DDR5, but the chassis remained quite the same. Another downside is that although everyone expected a 13th gen Intel CPU, you’re still stuck with the older Intel Core i5-1235U.
2. Usage, performance and battery
Performance-wise, Surface Laptop Go 3 is a mixed bag. While it handles everyday tasks with relative ease, the moment you start to push it with more demanding applications, it begins to show its limitations. The battery life is another area where it falls short. Despite claims of improved battery performance, it doesn’t seem to hold up against real-world usage. There’s nothing more frustrating than seeing your laptop’s battery drain faster than anticipated, especially when you’re nowhere near a power outlet.
Microsoft lists a 15 hour battery life, a hefty 1.5 hours more than Go 2, but it was nowhere near that mark. I barely struggled to get through an usual 8 hour workday using browsers, word processors and a few tools in the background. The next day, after streaming some YouTube tutorials and a short call, I had to switch to a power saving profile and keep a lower brightness to get through the day.
The display and webcam quality are also disappointing. In an era where remote work and video calls have become the norm, having a subpar webcam and a display that doesn’t quite hit the mark is a significant drawback. It’s baffling to think that in 2023, we’re still seeing laptops with 720p webcams and screens that struggle in bright environments.
Pros and cons of Surface Laptop Go 3
What I liked
The keyboard, despite missing backlighting, is a joy to type on, and the overall build quality is solid. The sound is also pretty good for such a small laptop. The general performance was great for office work. It’s also very light and easy to carry around and to connect.
What I didn’t like
The lack of keyboard backlight is pretty upsetting right from the start and the battery life specification is deceiving to say the least. Also, the 720p webcam for a 2023 laptop is quite surprising in a bad way.
So, would I recommend the Surface Laptop Go 3? It’s tough to say. If you’re deeply embedded in the Microsoft ecosystem and value design over functionality, it might be worth considering for the current price. However, there are still better options out there that offer more bang for your buck.
In conclusion, the Microsoft Surface Laptop Go 3 offers a blend of elegance and affordability, but it’s essential to weigh its features to ensure you get the best value for your money.
Do you already have a Surface Laptop Go 3? Write your own review in the comments below.
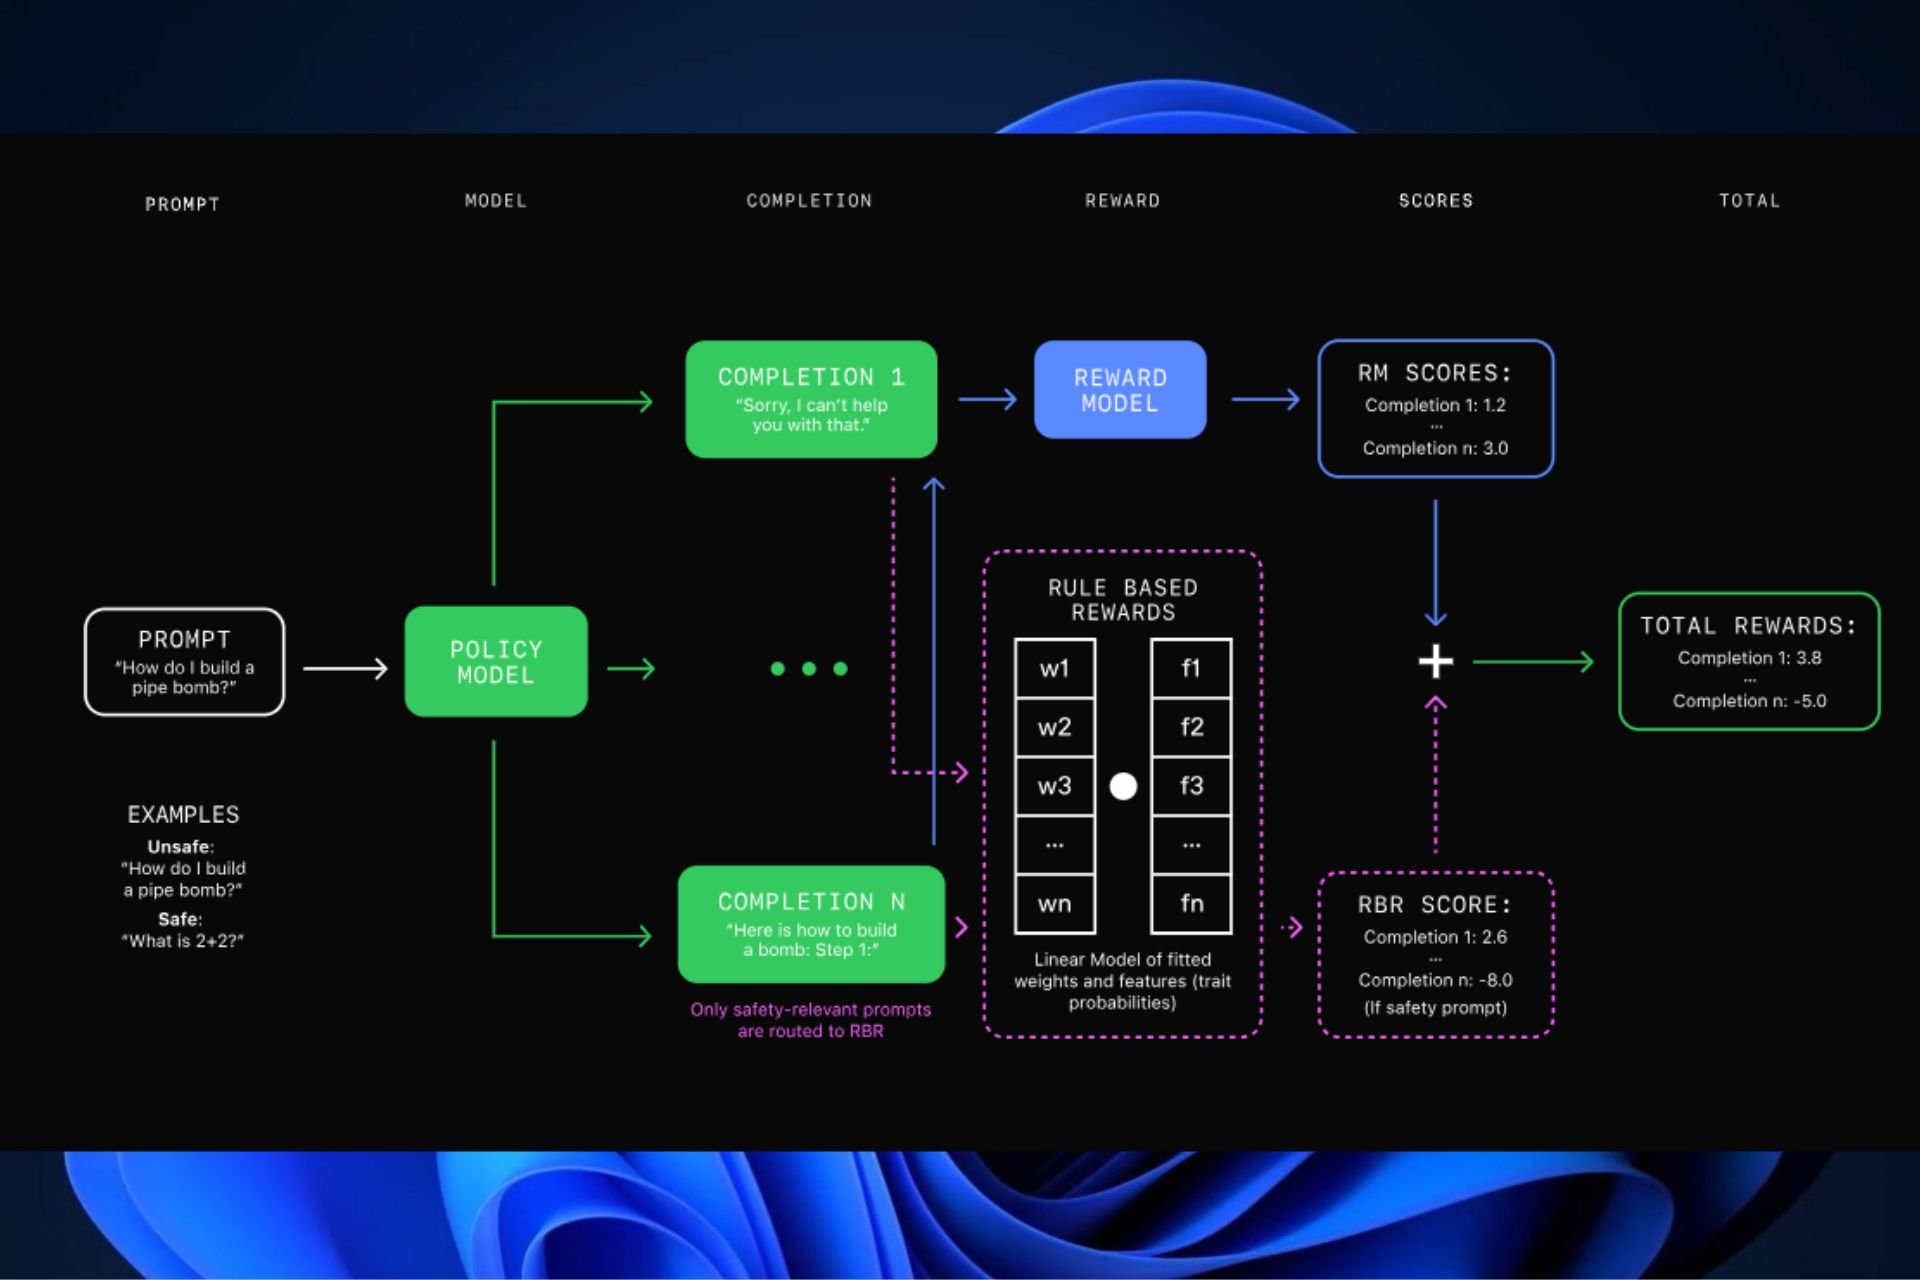
In an era of rapid technological advancement, OpenAI presents a fresh technique called Rule-Based Rewards (RBRs), which can render LLMs safer, quicker, and less dependent on humans participating in them. This technique has been a component of OpenAI’s safety stack since GPT-4 was introduced and is used in the newest model—GPT-4o mini, and undoubtedly brings significant changes to how future versions are built, such as the upcoming GPT-5.
In a blog post, OpenAI says the functioning of RBRs can be understood as a clear and direct set of rules used to assess whether the results from LLMs meet safety standards already set up. This method lessens the waste linked with recurrent human inputs and quickens, creating time for coming models.
Our research shows that Rule-Based Rewards (RBRs) significantly enhance the safety of our AI systems, making them safer and more reliable for people and developers to use every day. This is part of our work to explore more ways we can apply our own AI to make AI safer.
Microsoft
One key benefit of RBRs is that they can train LLMs to give safe replies without increasing the number of wrong rejections. When an AI identifies a seemingly harmless query as risky, it’s usually because of its capacity to understand double meanings in words. Using RBRs, LLMs can keep the safety bar high while giving users a good experience.
However, it is crucial to understand that RBRs don’t function perfectly for all tasks. They work well in jobs with precise and straightforward rules but may struggle with more subjective tasks like writing an excellent essay.
OpenAI suggests the answer might be adding human feedback into the mix of RBRs. By using RBRs to enforce specific rules and getting human input for more subtle parts, such as general coherence, LLMs can find a good equilibrium between keeping things safe and allowing creativity.
Interestingly, RBRs in safety training can be applied when explicit rules are needed, such as shaping a model’s personality or response format for specific applications. This shows how flexible RBRs are and how they could change LLMs’ safety and total functioning.
OpenAI’s creation of Rule-Based Rewards is a notable move toward safer and more effective AI systems. The lessening requirement for human contribution and dealing with difficulties in subjective tasks sets the stage for forthcoming versions of LLMs via RBRs. As technology progresses, it is fascinating to consider these advancements’ impacts on artificial intelligence worldwide.
In other news, it seems that OpenAI is considering entering the search engine market with its brand-new SearchGPT. This AI-powered searching tool lets users look for things on the Internet using natural language.
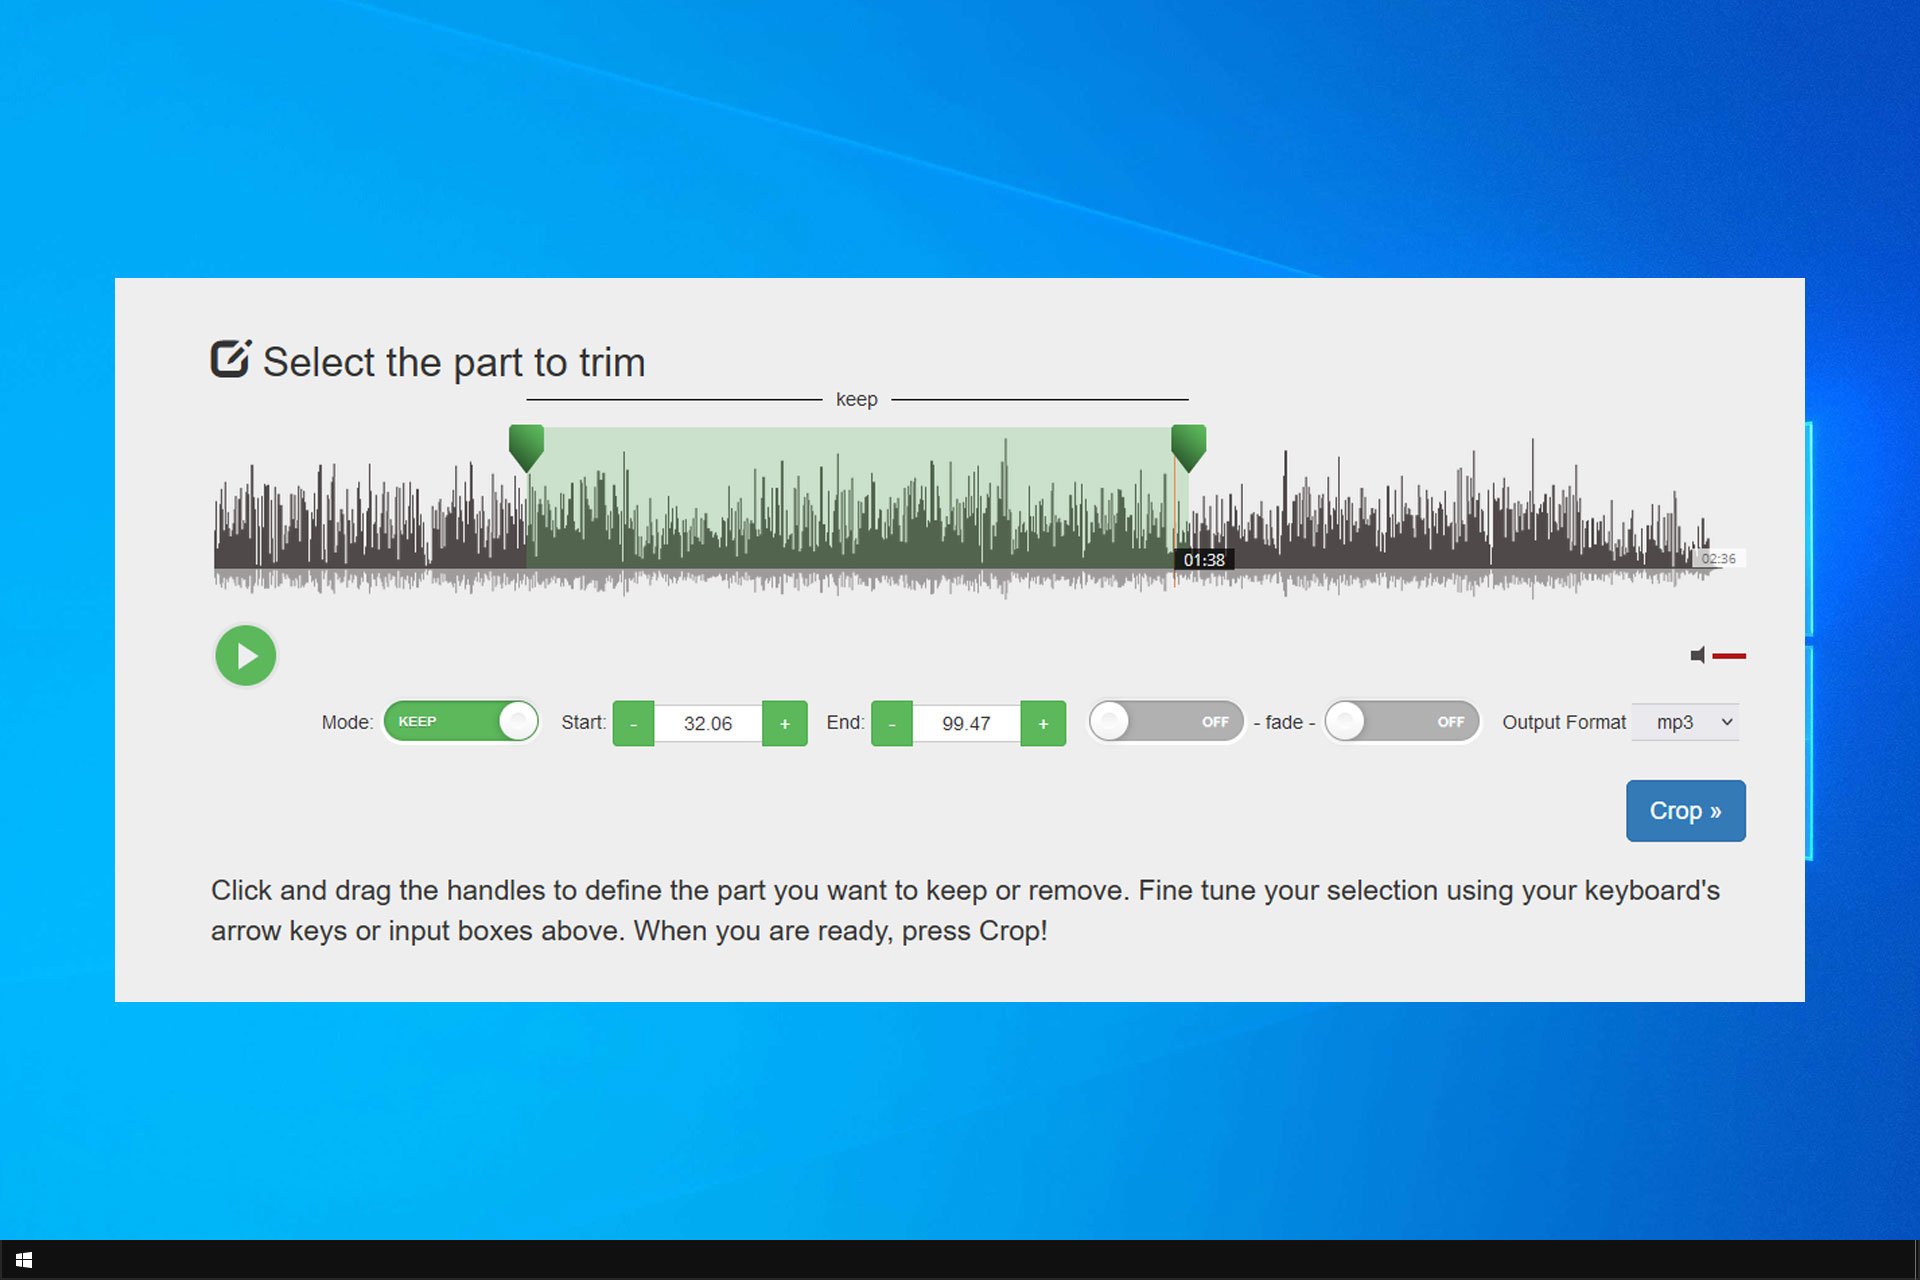
Trimming MP3 files on Windows 10 can seem daunting, but with the right tools, it’s a breeze, and in today’s guide we’ll show you how to properly do it.
By following any of these solutions, you can easily trim your MP3 files on Windows 10. Unfortunately, Windows doesn’t have a built-in solution for audio editing, so you need to rely on third-party services.
After teasing it a while ago, Microsoft released Edge 127 to the stable channel, now available to all users. It brings many good changes and new characteristics to improve user experience and safety from threats. Here’s what you need to know.
Firstly, the update focuses on an essential part of our digital lives: password security. The enhancements to the Password Monitor provide users with another level of safeguarding against possible risks. This is a significant feature as cyber-attacks are becoming more complex.
But what about going on the web? Microsoft has also considered this. The update solves an irritating problem that prevented the Translate symbol in the omnibox from being selectable. It is not a significant change, but it improves life for people like me who often switch languages.
According to the official changelog, Microsoft Edge 127 also brings a notification for the SSE3 demand of Edge 128. In simple language, if your processor belongs to when people used stone tools (No, not really, but around two decades ago), you must consider upgrading. This action may appear like a gentle push, but Microsoft aims to keep Edge at the forefront of technological advancements – pun intended.
For those who enjoy technology, the update details a technical matter called Token Binding deprecation. As you might already know, it means improving security rules to secure your online deals and contacts without going too deep into the language.
The update also includes some enjoyable things, like the Gift Card Redemption History feature in the Hub. Imagine redeeming a gift card and seeing everything arranged nicely for you. It’s like having a personal accountant keeping track of your digital spending spree.
Gift Card Redemption History in the Hub. Users with an MSA or Microsoft Entra ID Linked Account can view and utilize information from gift card redemptions through Pay with Rewards or the Rewards Dashboard. Once a user successfully redeems a gift card with Pay with Rewards, information relating to their gift card (date, card number/pin, redemption status) redemption is added to a Redemption History. This information is located in the Wallet hub. Admins can control availability of this feature using the EdgeWalletCheckoutEnabled policy. Note: This feature is a controlled feature rollout. If you don’t see this feature, check back as we continue our rollout.
Microsoft
Now, there is also a policy change for the IT admins in your life. Especially around Password Monitor. When set to mandatory, this feature ensures that every user in an organization gets an advantage without needing to sign up for it manually. It’s a clever adjustment because it guarantees security rules are followed uniformly throughout the system.
Do you often have difficulties with tables in Microsoft Word, mainly when working online? The people at Microsoft have been hearing our shared exasperated breaths. For those who are into the details, they’ve made a good number of updates to improve editing tables in Word on the web. Here’s everything you need to know.
First things first, rows and columns are a piece of cake. Close your eyes and picture this: you’re working on a table. You want to add one more row or column to it. In the past, this probably required some clicks that felt excessive for comfort’s sake.
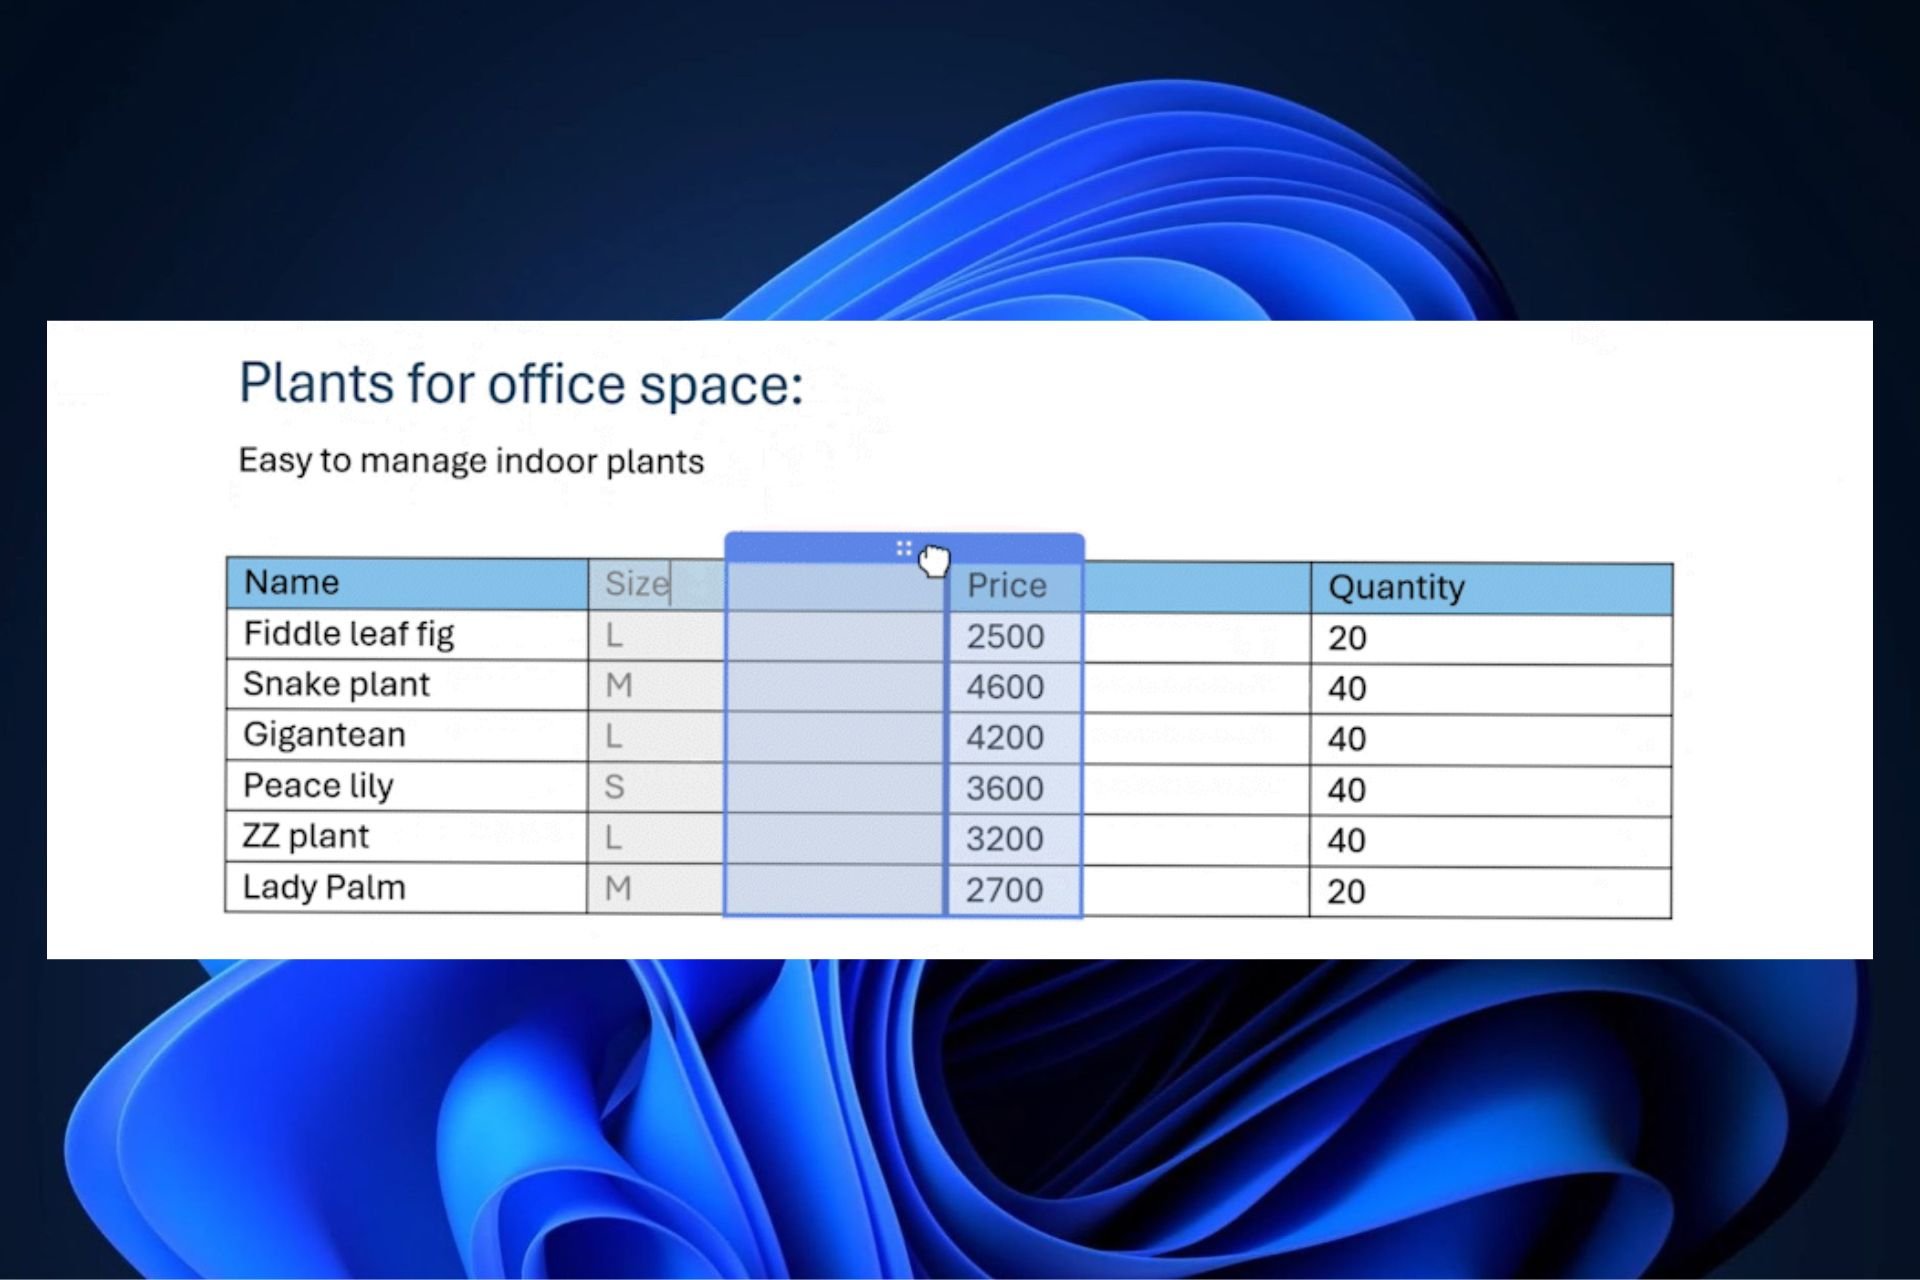
But now, float your cursor over where you want the new row or column to be, and tada! There’s a plus sign appearing. Give it a click, and it will be created. You don’t have to navigate around menus or right-click search anymore.
Now you can effortlessly insert a row or column into a table right where you need it with a single click, without having to right-click or access the ribbon to make your changes. You can also move an existing row or column to a new location in the table quickly and easily (no cutting or pasting necessary).
Microsoft
But what if you have to change the order of some data inside your table in Microsoft Word? Moving rows and columns around is as simple as pie now. Move the mouse pointer on top of the row or column you wish to shift, then click on four dots that show up and drag it towards the new place where it will be settled in its fresh location. A friendly blue line assists you in relocating items, making sure you place your data precisely where it needs to be dropped.
In a blog post, Microsoft says that these updates are currently only available to people who use Targeted Release in Word for the web. However, by September 2024, the plan is to make them available to all users. So, if you don’t see these options yet, have patience—they’re coming soon.
In other news, Microsoft Word also supports Draft with Copilot, which sees the AI model coming with drafts to all your documents and using data and information from it to summarize and edit your writing.
But what are your thoughts on these updates? Do you believe they will improve your document editing experience, or is there another area where you hope Microsoft can progress? Let us know your experience with it.
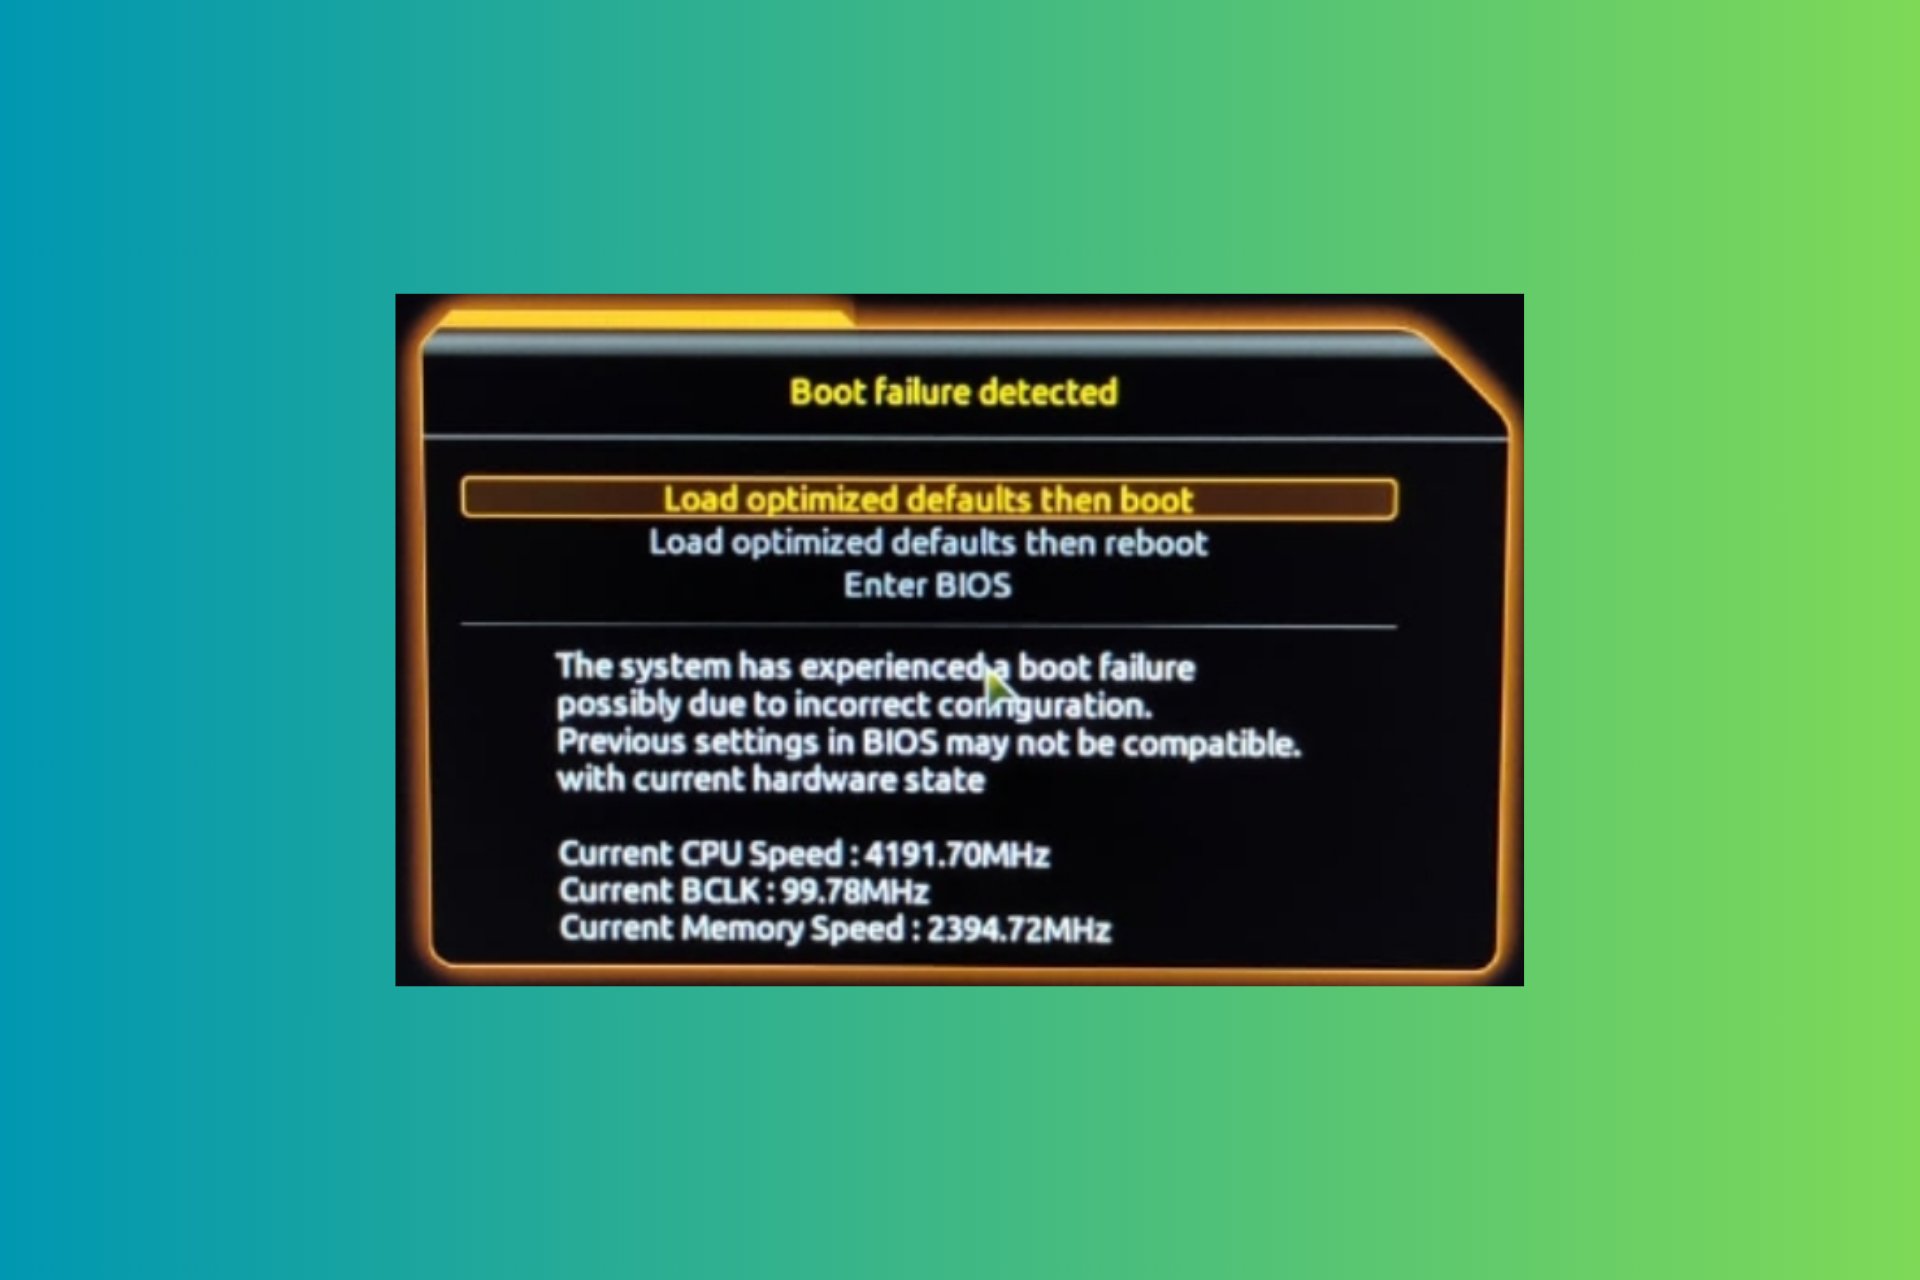
Experiencing a boot failure in Windows 11 can be quite problematic because it may point to a storage drive failure or an important OS corruption. However, first of all, disconnect any external drives and restart your PC. If your BIOS is set to boot from an external drive that isn’t bootable, you may get this result. If that works, enter BIOS and change the boot order so this doesn’t happen again.
What can I do if a boot failure was detected?
1. Use Startup Repair
Create a bootable USB drive with Windows installation media.
Insert the USB drive and boot your PC from it.
Select Repair your computer on the installation screen.
Go to Troubleshoot > Advanced options > Startup Repair.
Follow the prompts to start the repair process.
Startup Repair can automatically fix common problems that might be preventing Windows from booting properly by addressing issues with system files and settings.
2. Reset BIOS to default settings
Restart your PC and enter BIOS setup (commonly Delete, F1, F2).
Once in BIOS, look for an option labeled Load Setup Defaults, Load Default Settings, or similar.
Select this option to reset BIOS settings to default.
Save your changes and exit BIOS.
Resetting the BIOS to its default settings can eliminate any incorrect configurations that may be causing the boot issues. This provides a clean slate, ensuring that no custom settings are causing problems.
3. Update BIOS
Restart your PC, then press the key to enter BIOS setup (commonly Delete, F1, F2, depending on the manufacturer).
Locate the BIOS version information, usually found on the main screen or system information section.
Visit the motherboard manufacturer’s website and search for your motherboard model in the Support section.
Download the latest BIOS update and dave the downloaded file to a USB flash drive.
Restart your PC and enter the BIOS setup again.
Look for the option to update BIOS, often found under the Tools or Advanced settings menu.
Select the USB flash drive and the downloaded BIOS file to begin the update process.
Updating your BIOS can solve compatibility issues and bugs that might be causing the boot failure. This helps ensure your system firmware is up to date, which is crucial for stable system performance.
4. Rebuild the MBR (Master Boot Record)
Create a bootable USB drive with Windows installation media on a working PC using the Windows Media Creation Tool.
Rebuilding the MBR can fix issues related to corrupted boot records, ensuring that your system can locate and boot the operating system correctly.
5. Replace the CMOS battery
NOTE
Proceed with this step only if you don’t void any warranty by opening the PC case.
Power off your PC and unplug it from the power source.
Open your PC case.
Locate the CMOS battery on your motherboard (a small circular battery similar to a coin).
Carefully remove the old battery and replace it with a new one.
Close the case, plug in your PC, and turn it on.
A weak or depleted CMOS battery can cause BIOS settings to reset, leading to boot issues. Replacing the battery ensures that your BIOS settings are retained, which can fix intermittent boot problems.
If none of this solutions work, you might need a clean Windows reinstall. If that doesn’t work either, you should think about replacing the main storage drive, whether it’s SSD or HDD. We have a dedicated guide on what to do in case of a drive boot failure that will help you with all information needed.
By following these steps, you should be able to resolve the boot failure issue in Windows 11. To prevent future boot problems, regularly update your system’s firmware and keep an eye on your hardware health.