Fix: User profile AD import job not running in SharePoint

In an attempt to incorporate as many apps within the Microsoft Office Suite that are relevant to work environments, Microsoft decided to also incorporate SharePoint.

This versatile collaborative tool can be used as a document management and storage system, but the product is highly configurable and usage varies substantially among organizations.

However, software is software, and SharePoint has its own fair share of bugs and kinks. One good example is a bug users have been reporting where the Active Directory Import timer job does not run:

I created User Profile service application in SharePoint 2016 and created synchronization connection to import users from AD. Then started full synchronization but it is not importing any user from AD. “Profile Synchronization Status” is always in Idle mode.

Since SharePoint relies on organizational work, not being able to import new members can severely affect the program’s functionality.

That is why we’ve decided to put together this list so that you can be guided in a step-by-step manner to a viable solution.

How do I fix the SharePoint user profile import error?

All the servers in the farm that are running the User Profile Service are also not allowed to run timer jobs of the Service Job type.

In our case, importing a user profile is also a service job and it can only run on servers running the User Profile service. This means that there are no servers on the farm that are allowed to run the job.


Change your server’s properties

  1. Press Start
  2. Type in and launch PowerShell with administrative rights
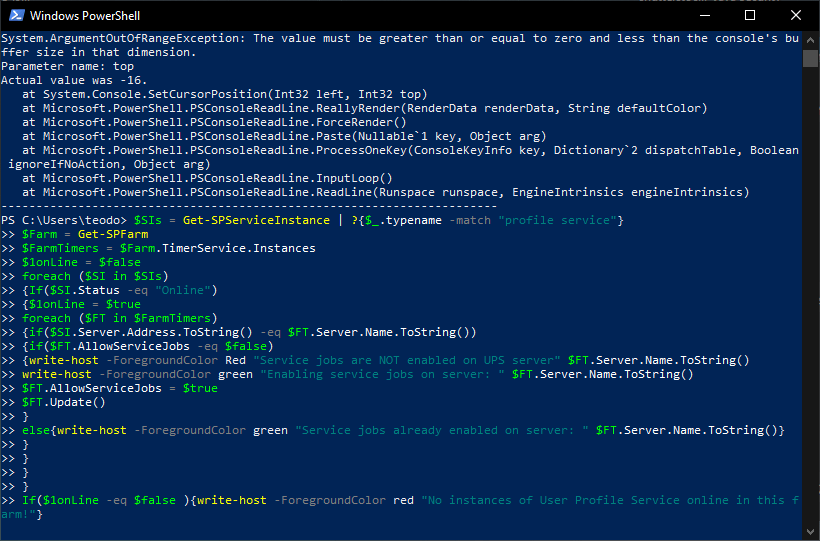
  3. Copy and paste these lines and run them :
$SIs = Get-SPServiceInstance | ?{$_.typename -match "profile service"}
$Farm = Get-SPFarm
$FarmTimers = $Farm.TimerService.Instances
$1onLine = $false
foreach ($SI in $SIs)
{If($SI.Status -eq "Online")
{$1onLine = $true
foreach ($FT in $FarmTimers)
{if($SI.Server.Address.ToString() -eq $FT.Server.Name.ToString())
{if($FT.AllowServiceJobs -eq $false)
{write-host -ForegroundColor Red "Service jobs are NOT enabled on UPS server" $FT.Server.Name.ToString()
write-host -ForegroundColor green "Enabling service jobs on server: " $FT.Server.Name.ToString()
$FT.AllowServiceJobs = $true
$FT.Update()
}
else{write-host -ForegroundColor green "Service jobs already enabled on server: " $FT.Server.Name.ToString()}
}
}
}
}
If($1onLine -eq $false ){write-host -ForegroundColor red "No instances of User Profile Service online in this farm!"}
powershell fix sharepoint

The PowerShell command written above will l check to make sure there is at least one User Profile Service instance in the farm. Additionally, this sets the AllowServiceJobs property to true for the timer instance on those servers.

If modifying server properties seems too complicated, another solution would be starting the User Profile Service on a server where service jobs are allowed.


By following these steps, you should no longer have any issues with import jobs using SharePoint‘s Active Directory feature.

If you’re aware of other ways to solve this problem, don’t hesitate to share them with us in the comments section below.

Fix: Football Manager 2020 Not Launching

Football Manager 2020 launched back in November 2019 from developer Sports Interactive to a warm welcome, boasting a Metacritic score of 84 and Very Positive reviews on the Steam platform.

However, users are reporting that Football Manager is not launching on some machines.

Have you encountered issues with Football Manager 2020 not starting? The solutions outlined below will provide some workarounds and get you playing in no time.

What can I do if Football Manager is not launching?

1. Verify the integrity of the game files

football manager not launching
  1. Right-click on Football Manager 2020 in your Steam Library.
  2. Click on Properties.
  3. Navigate to the Local Files tab.
  4. Click Verify integrity of game files.

If you’re running the game from Steam, one of the first things to do if Football Manager won’t start is to use Steam’s built-in file verification.

2. Launch Football Manager 2020 with administrative rights

football manager not starting
  1. Navigate to the installation folder of the game.
  2. Right-click the fm.exe and select Properties.
  3. Click on the Compatibility tab and tick the box next to Run this program as an administrator.
  4. When Using Steam, right-click on the game in your Steam library and select Properties, go to Local Files and select Browse local files.

When Football Manager is not launching or crashing on start, a lack of administrative rights would be a potential reason.

3. Update your graphics card driver

update nvidia graphics driver
  1. Update your nVidia driver by opening GeForce Experience .
  2. Select Drivers and click on Check for Updates and follow the update wizard.
  3. Update your AMD driver by downloading the Radeon Software Installer and Click on the recommended version, then hit Install.
  4. Update your graphics card driver manually by following our in-depth guide.

All these manual updates are great, but the process is time-consuming and not everyone can do it without some skills.

However, you have a quicker and faster solution, to use dedicated, third-party software that repairs and updates all your drivers in one go automatically.

4. Update Windows 10 to the latest build

football manager windows update

You should always make sure that your system is running the latest build of Windows 10 and that all security updates and patches are installed.

To help you manually update Windows 10, we’ve put together a short guide and a list of the latest updates.\

5. Add Football Manager to Firewall and Ransomware exceptions

  1. Press the Windows key + I to start the Settings app.
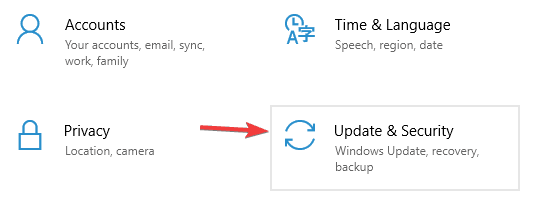
  2. Select Update & Security.
  3. Select Windows security from the left pane and click on the Open Windows Security button.
  4. Click on Firewall & network protection
  5. Click on Allow an app through the firewall.
  6. Click on the Change settings button.
  7. Scroll through the list until you find Football Manager 2020 and tick the box to its left.

Depending on which antivirus solution you’re using, you will have the option to add certain applications to the exceptions list.

6. Whitelist the game under Ransomare protection

  1. Start the Settings app as indicated in the previous step.
  2. Select Update & Security.
  3. Select Windows security from the left pane and click on the Open Windows Security button.
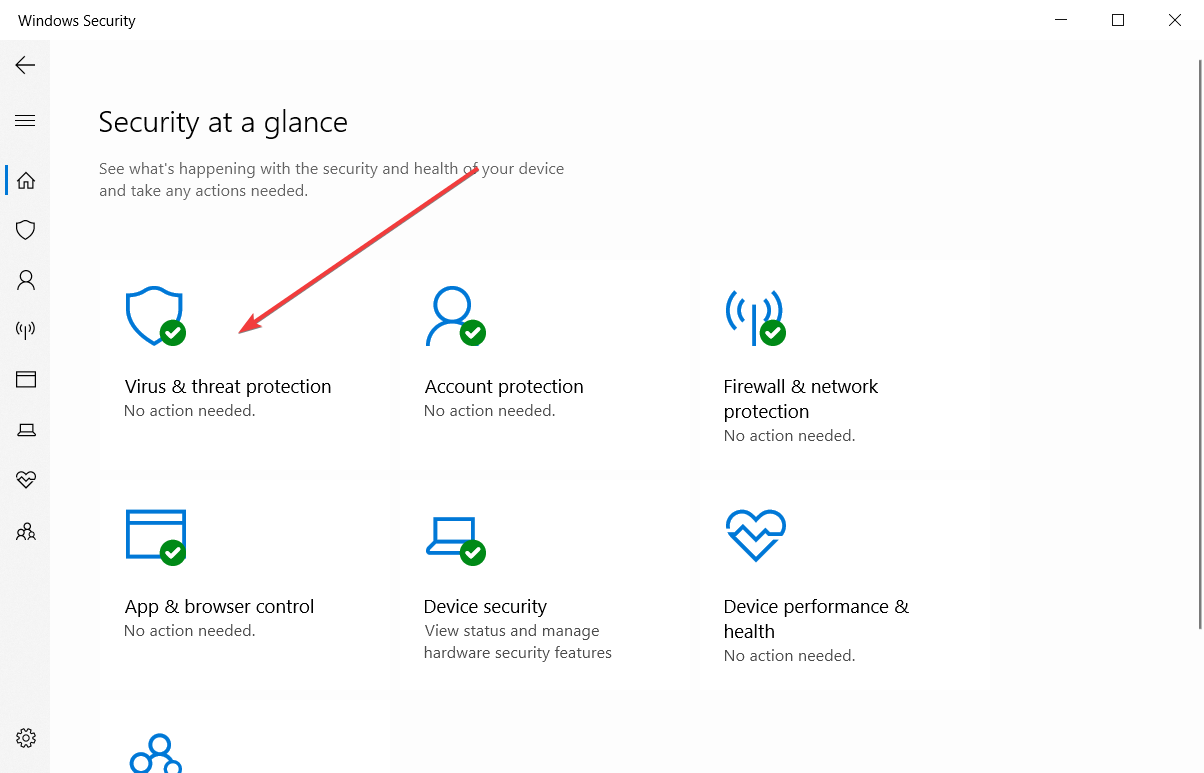
  4. Click on Virus & threat protection.
  5. Click on Manage Ransomware protection.
  6. Click on Allow and app through controlled folder access, and select Add an allowed app.
  7. Select the Browse all apps button and select Football Manager.

7. Disable software which is known to interfere with Football Manager

Developer Sports Interactive has advised that the following programs have impacted the performance of Football Manager to the degree that they might inhibit it from starting or cause crashes:

  1. MSI Afterburner
  2. Riva Statistics Tuner
  3. EVGA Precision
  4. Toshiba DisplayLink
  5. openhardwaremonitor
  6. xsplit
  7. D3DGear

8. Clear crash dumps and preferences

8.1 Clear crash dumps

  1. Create a new folder somewhere on your system.
  2. Navigate to the following folder: C:\Users\[Your Windows Username]\Documents\Sports Interactive\Football Manager 2020
  3. Cut everything (do not delete these files) contained in this folder and paste them into the new folder created in step 1.
  4. Launch Football Manager 2020.
  5. If it launches with no issues, you can close the game and move back all the files to their original location.

8.2 Clear Football Manager preferences

  1. Navigate to the following folder: C:\Users\[Your Windows Username]\AppData\Local\Sports Interactive\Football Manager 2020
  2. Select all the files in the Football Manager 2020 folder.
  3. Delete the contents of the folder.

Crash dumps can be useful diagnostic tools for troubleshooting, but if Football Manager 2020 is crashing on launch or not responding you you can reset the game by clearing these files.

9. Unable to initialize Steam API error

football manager not launching admin rights

Some users have reported that Football Manager 2020 doesn’t open because of the dreaded Unable to initialize Steam API error. Generally, there are two causes for this error:

  1. Your antivirus or Firewall is blocking Football Manager, in which case you will need to refer to the fix we provided above.
  2. Your Windows account does not have administrative privileges.
    • To check if your account has admin rights, go to Windows Settings, select Accounts, and click on Your info and you should see under your name the type of account you have.
    • If you don’t see Administrator, log in to an admin account and try re-launching Football Manager.

9. Repair .NET Framework

Football Manager 2020 publisher, SEGA, has responded to some players who have contacted customer support regarding the game not launching.

They advised that a possible solution for Football Manager not starting is to use the .NET Framework Repair Tool.

Like its predecessor, Football Manager 2020 has a strong fan base, and plenty of gamers return to the series with each iteration of the franchise, and just like the previous games in the series, it has faced a few hurdles.

We understand how frustrating not being able to play your games can be.

Luckily, if you are one of the few experiencing issues with Football Manager not launching, this guide has helped you address the crashes and you can be on your way to creating the ultimate team.


10. Ensure you have the minimum system requirements

  1. CPU: Intel Pentium 4 / Intel Core 2 / AMD Athlon 64 (2.2Ghz or more)
  2. GPU: nVidia GeForce 9600M / Intel GMA X4500 / Radeon 3650 (256MB of VRAM)
  3. Memory: At least 2GB of RAM
  4. Storage:  7GB of free space

As you can see, Football Manager 2020 has modest system requirements, but if you are planning on playing on a laptop or a low-end PC, you should make sure that your system meets these specs.

We hope that you managed to fix the Football Manager not loading issues and you are again a happy gamer right now. For any other questions or suggestions, don’t hesitate to reach in the comments section below.

Stellaris and Cities: Skylines are free to play on Xbox One and Xbox Series X this weekend

The Stellaris: Console Edition and Cities: Skylines video games are currently both completely free to play until the end of the weekend for all current or last-gen Xbox console owners with an active Xbox Live Gold subscription.

Any Xbox Live Gold member with a console in the Xbox One or Xbox Series X families can play both titles in full and unlock Xbox Achievements until end of Sunday at 11:59 PM PDT. As is usual with Free Play Weekend promotions, Stellaris and Cities: Skylines have both been discounted for those wanting to continue playing after the free play period is over.

Both versions of Stellaris: Console Edition currently have an impressive 65% discount while all versions of Cities: Skylines have been reduced by 75%.

Are you going to play either of these Xbox games this weekend? Let us know which ones in the comments below and then follow us on Twitter and Facebook for more Xbox gaming news.


5 best printers with USB port for home&office

Printers vary widely based on whether they’re for home or business use, what do you intend to print with them, and color output. Speaking about the USB ports a printer might have, there are 2 kinds.

The port located mostly on the back of the printer is used to connect the device to your PC. The other USB port is usually in the front or near the printer panel and is used to print files from a USB device.

In this article, we will be looking at some of the best printers with both USB ports available on the market, in different price ranges.


What are the best printers with USB ports?

HP Color PRO M479fdw

  • 4.3-inch color touchscreen with editable shortcuts
  • High volume printer, more than 4000 pages per month
  • 2-sided printing by default
  • A little large and heavy for home use

The HP Color LaserJet Pro M479fdw is a midrange color laser all-in-one printer, the best option for small business or home use.

It has a great printing speed of up to 28 ppm (page per minute) color or black. Furthermore, the input paper tray holds put up to 300 sheets A4 paper size, but you can add an additional tray of 550 sheets.

Printers can be an open door for cyber attacks, but this model comes with an embedded suite of security features that will help you avoid any of them.

If you’re looking for a reliable and solid printer but easy to use, HP Color M479fdw is the best multifunctional printer you can buy.


HP Color M283fdw 

  • Print speed of 22 ppm color and black
  • Wide range of paper support
  • Works with Alexa
  • Lacks near-field communication (NFC)

The HP Color M283fdw model is another great printer from HP, suitable for office or home use.

When it comes to the quality of prints and the speed, you will not be disappointed. As you would expect from a laser printer, text and other printed content are very crisp and high quality.

With the Hp Smart app installed on your phone, you will take advantage of remotely printing features. This allows you to manage the printer, see print jobs, receive notifications, and scan on the go.

HP Color M283fdw offers a great balance of functionality and quality for any household and small business.


Brother MFC-J995DW

  • Compact design
  • Reasonable printing costs
  • Print from and scan to the cloud
  • Loud and slow

The Brother MFC-J995DW is an excellent entry-level choice for a home or an office that has bulk printing needs.

It uses clean, familiar cartridges that hold more ink and work with an internal ink storage tank. The printer deliver up to 1-year of printing without the need to replace cartridges.

You can print to it from just about any device wirelessly and, for mobile, you don’t even need a network to do it, thanks to its NFC.

Brother MFC-J995DW is a feature-rich and intuitive machine, incredibly efficient, just perfect for any kind of use.


Epson WorkForce WF-7710

  • Auto-duplexing ADF and scanner
  • Decent photo quality
  • Large 4.3-inch touchscreen display
  • High running cost

The WorkForce WF-7710 model from Epson is one of the best all-in-one printer option available on the market. It is a wide-format printer, capable of borderless prints up to 13 by 19 inches.

It also scans, copies, and faxes up to the tabloid size of 11 by 17 inches. Those extra inches provide a substantially larger print area for your spreadsheets and promotional flyers.

It features just about every connectivity option available, including Ethernet 10/100bps, Wi-Fi, Wi-Fi Direct, connecting to a single PC via USB, and near-field communication (NFC).

If you need to create wide and borderless images, then this printer is one of the best you can buy.


Canon MB2720

  • Low running cost
  • High speed of up to 24 black and white ipm and 15.5 color ipm
  • Compatibility with all popular OS
  • Does not support automatic two-sided scanning

The MB2720 Wireless All-In-One Printer belongs to the Canon MAXIFY family of five printers. Being and AIO printer, is suited for office use also.

It features a 500 sheet paper capacity with two trays of 250 sheets. Furthermore, it can handle 20,000 pages as a maximum duty cycle per month, which is great if you need to print many documents.

The printer works with multiple Wi-Fi-enabled devices like iOS and Android phones. It is also compatible with Canon Print application, Google Cloud Print, and AirPrint.

Canon MB2720 is an attractive printer because it offers a winning mix of modest price, multiple connectivity options, and good output quality.


Even if important steps for digitalization were made nowadays, we still need to have documents on paper. Because of this, printers remain a necessary device to have.

All of the above printers are new models and have many connectivity options, including USB. You can also scan or print to USB whenever you need.

Microsoft issues update on the shuttering of its Business and Education app stores

As Microsoft continues to evolve its app developer vision from Metro to UWP to PWA’s, so too goes its vision of distributions. Today, March 11, 2021, Microsoft notified customers that it will no longer have apps that will “be available for acquisition” through its Microsoft Store for Business and Education.

Today’s warning follows a year-long transition away from the specific Business and Education Store form of distribution for Windows enterprise and education app developers. Taking a 30,000-foot view of Microsoft’s conceptual app development vision, funneling business and education development through these two portals makes little sense now, especially in light of the infrequent attention developers are showing towards the Windows 10 platform. Couple the fact that commercial devs have been hesitant to rewrite apps for the UWP platform as well as adopting web and cloud-based options, it’s become apparent the need to end support for these terrestrial distribution channels.

As of now, Microsoft is clarifying that users who have already downloaded their institution’s apps from their respective channels will still be able to receive updates for them for now. No new paid apps will be distributed through the stores after April 14, 2021, and after that date, users will need to have an existing Azure Active Directory account to navigate the stores.

ZDNet journalist Mary Jo Foley is also hearing from sources within Microsoft that as early as June 2020 the two stores were scheduled to be deprecated but understandably roadmaps have adjusted according to the world during the pandemic.

While Microsoft was mum on the shuttering of its commercial app stores during its recent virtual Ignite 2021 conference, BUILD is just around the corner and hopefully, Microsoft will have a clearer picture for its new vision of app development and distribution.

5 Best Monitors With Speakers And Webcam

Today more than ever we use a lot of tools like Skype, Google Meeting, and Discord for daily work or for games. All these applications require a webcam and speakers.

One of the best solutions available for you is to have a monitor with a built-in camera and speakers. In this way, you won’t have to look for other devices, that might need additional drivers.

In this article, we’ll help you choose the best deals on monitors with built-in speakers and webcam, whether you’re a gaming enthusiast or simply work from home.


What are the best monitors with speakers and webcam?

HP Elite

  • 23.8 inches screen with FHD resolution
  • 60-hertz refresh rate
  • Sleek, elegant design
  • The integrated webcam is not the best

The HP Elite display is one of the best monitors for your home office or gaming room. It is a great piece of device that comes with an incorporated microphone and camera.

This monitor is Skype for Business certified for optimal video and audio experiences with an HD webcam, expertly-tuned Audio by Bang & Olufsen, and microphone.

You will like this monitor not only for the beautiful design but also because of its adjustable tilt, and up to 150 mm height adjustment.


Dell P2418HZm 

  • Adjustable stand pivots, tilt, and height
  • Versatile connectivity options, including VGA, DisplayPort, and HDMI
  • USB 2.0 and USB 3.0 ports
  • The camera does not fold when not in use, you have to switch off an above button

Dell is another well-known brand in computing and accessories. The model Dell P2418HZm is very affordable and is perfect for gaming or work station. 

With the 2MP Full HD infrared sensor camera, you can engage in meetings and login to your device with the secure facial recognition feature with Windows Hello.

It is a 24 inches monitor with good image clarity and FHD resolution with 1920×1080 pixels. The slim borders let you enjoy a smooth, less obstructed view when working across multiple monitors.


HP HC270CR

  • Pivot Rotation
  • Anti-glare monitor
  • USB 3.0 hub
  • Built-in webcam only works with Windows PC, it is not supported for Mac or Chromebook

The HP Business Class HC270CR is another good monitor choice from HP, a little more expensive than the HP EliteDisplay model.

It is a 27 inches large monitor and has adjustable tilt and height. The resolution on this HP monitor is excellent, with 2560 x 1440 pixels. So, the display is crisp and sharp.

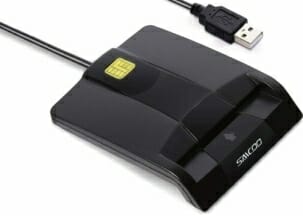
It includes many connectivity options for your laptop or desktop – like VGA, HDMI, and Display port. It also has an RFID reader, 720p webcam, and USB 3.0 hub.


ASUS VK278Q

  • Sharp and accurate display with bright colors
  • Affordable
  • 2 milliseconds response time
  • No USB port

The Asus VK278Q model is a perfect addition to your home. Produced by Asus Company, which is known for its quality and performant products, it cannot disappoint you.

It has a 27 inches display, with 16.7 million colors and a 1920 x 1080 resolution, every detail is flawless. You’ll have a clear view, no matter where you’re sitting due to its viewing angle of 170 degrees.

This monitor features an integrated webcam of 2 MP, which is also rotable for improved flexibility. To ensure the best sound quality, there are two built-in speakers. 


Philips Brilliance 329P9H 

  • LowBlue Mode technology to reduce harmful shortwave blue light
  • IPS Technology
  • Built-in USB-C Docking Station
  • Highly expensive

If you don’t have a limited budget and want the best you can buy, Philips Brilliance is definitely an ideal monitor due to its design and awesome features.

It is a large monitor of no more than 32 inches, so you need to have some space on your desk for it. The resolution is outstanding, 4K UHD with 3840 x 2160 pixels. 

It also comes with an amazing secure pop-up webcam. It pops up when you need it and securely folds back into the monitor when you are not using it. Better than having to puss a button.

The webcam is also equipped with advanced sensors for Windows Hello facial recognition. You can use this feature for Windows login instead of typing your password.


With more and more activities taking place in online environment, you need the proper device to make your communications easier. A monitor with webcam and speakers is a prefect and easy solution.

All of the above monitors are very performant and will help you stay connected with your friends, family or work.

Best 14 Inch Laptops For Every Budget

Laptops have risen to popularity as soon as they appeared on the market, mainly for the fact that they are highly portable while allowing you to take advantage of a complex variety of technological benefits.

Coming in a multitude of sizes and incorporating features that respond to the latest tech advancements, laptops are on top of the users’ preferences.

In this article we’re going to take a look at the best laptops of the moment with a 14 inch display that suits every budget and need.

What is the best budget 14 inch laptop?

ASUS Laptop L406

  • Slick and light weight design 0.7 inches thin and 2.87 lbs
  • One year free Microsoft 365 personal subscription
  • High image quality through Intel UHD Graphics 600
  • Non-responsive pad

This device comes with an Intel Celeron N4000 processor and a resolution of 1366×768 pixels with a NanoEdge Bezel for optimal viewing comfort.

It offers a 64GB of flash memory storage and 4GB RAM which allows running multiple applications whether you’re handling your office work or streaming movies.

No matter where you feel inspired to perform your tasks, you can take your laptop along with you because you benefit from fast wireless connection through WiFi 5 (802.11ac).

Another aspect that makes this device highly portable is the battery that last up to 12 hours which is 3 times more than average lithium-ion batteries.


HP 14 14.0″ WLED-Backlit

  • SVA anti-glare micro-edge WLED-backlit for an excellent visual experience
  • Windows 10 Home in S Mode for out of the box use
  • Headphone and microphone combo
  • Can't install printer drivers in Windows S

With an AMD Athlon Silver 3050U processor and AMD Radeon Vega 3 Graphics, this laptop can be the device you can rely on in almost any context.

Multitasking will become a breeze improving your volume of work because this device incorporates 4GB DDR4-2400 SDRAM and 128GB Solid State Drive.

Some other fine perks that you’ll find useful are the two SuperSpeed USBs Type-A and the SuperSpeed USB Type-C, for connecting any type of gadget you feel like to your device.


Lenovo IdeaPad 3

  • Privacy with physical webcam shutter
  • Great bandwidth for using several applications at once
  • Easy connectivity through Bluetooth 4.1 and up to 2x2 Wi-Fi 5
  • No USB-C

With this device you get a slick design, impeccable audio clarity and a Full High Definition screen with narrow side bezels, making it one recommendation that you should definitely catch your eye.

The AMD Ryzen 5 3500U Mobile Processors and the Radeon Graphics make an ideal combo in providing you with an excellent experience regarding your every day work.

You can switch between fast or a powerful performance, as well as quiet battery saving mode, considering the tasks you’re performing.


Lenovo Flex 5 14″

  • Portable and lightweight 3.64 pounds and 0.82 inches thick
  • Long lasting battery of up to 10 hours
  • Lenovo Active Pen included
  • The 360 hinge can be fragile

This 2 in 1 laptop features a full high definition touchscreen tablet with 4-side narrow bezels, 16GB RAM and 256GB SSD of flash memory.

Thanks to the 360 hinge this device can be positioned in Tent or Stand mode for those moments when you want to relax by watching your favorite TV Show.

With the AMD Ryzen 5 4500U mobile processor and Radeon graphics, you get optimal performance for any type of activity, from office work, to gaming or downloading movies.


Acer Swift 5 Intel Evo

  • Antimicrobial technology solution
  • Amazing long lasting battery of up to up to 15 hours
  • Preinstalled Windows 10 fur immediate use
  • Loud fan noise

If high-performance is what you aim for, then look no further than this laptop that incorporates an Intel core i7-1165g7 processor and a FHD touchscreen with LED-backlit IPS and antimicrobial Corning Gorilla Glass. This device can absolutely satisfy even the most demanding users out there.

The 16 GB RAM along with the  1TB SSD and the Intel Iris Xe graphics ensure optimum functionality even when you’re running multiple complex tasks.

It also features the latest connectivity technology like dual-band Intel Wi-Fi 6 (802.11ax) and Bluetooth 5.1 for an excellent internet experience.


We narrowed down the overwhelming variety of 14 inch laptops that are on the market to the ones that come with excellent features and are also accessible price wise.

So whether you’re going for a complex laptop or one that incorporates basic characteristics, we hope that our guide helped you in choosing the right device for your needs.

We want to hear your opinions and recommendations so please access our comment section bellow.

AOL Account Not Responding [Quick fix]

Like any person in the world, your AOL mail is an extension of your work. You need to send and receive emails every day, and it can be extra stressful when AOL is not responding to your actions.

In order to recover your webpage, there are steps that you can do without asking for professional help.

Note: It is always a good idea to ask for assistance from AOL customer service support. However, for an unresponsive webpage, there are simple troubleshooting steps that you can try easily. Fixing the problem on your own saves you time.

How can I recover unresponsive AOL webpages?

1. Clear caches and cookies from your browser

The best way to clear the cache and cookies from your operating system is to use specialized browser cleaner software.

A dedicated tool will scan your browser and create a report of all the unnecessary data you have stored. Upon your approval, it will permanently remove all of that, thus improving overall performance.

Moreover, these tools come with additional online security features as well as PC cleaning features that can find and remove useless files stored all over your system.

2. Restart your computer

Even though it might seem like an obvious solution, in the case of some users this method has proven useful.

Restarting your computer can solve issues about AOL webpage not responsive, and to do so, you can follow these steps:

  1. Click on the Start button from your taskbar.
  2. Hover your mouse over the Power button.
  3. Choose Restart from the options presented.

3. Reset your Wi-Fi connection

An AOL webpage not loading could simply be a case of poor or no Wi-Fi connection.

Restarting your modem/router will reset the data packages that are sent through your router, thus allowing the connection to be refreshed.

It is recommended that you use the Reset button, but if you can’t find it, or you can’t access it, then you can also pull the power cable out of the router, wait for 15-30 seconds, and then plug it back in.

4. Check your browser

Often, the problem with the AOL webpage not loading is an outdated browser. Update your browser to resolve the issue.

The process of updating your browser will vary from one software to the other, the reason for which we are unable to describe the steps.

If you feel that this process is too cumbersome, or you just want to resolve this issue fast, we recommend that you change your browser to a more capable and less prone to errors option.

⇒ Get Opera

5. Turn off hardware acceleration

Hardware acceleration is quite helpful in boosting your computer performance.

But this function can sometimes result in “Page not responding” error. So turn off this option by going to the Advanced section under Settings.

6. Turn off Sandbox Mode in Chrome

  1. Go to Properties.
  2. Select the Shortcut tab.
  3. At the Target section, add -no-sandbox at the end.
  4. Click Apply first and then OK.

7. Temporarily disable your antivirus

AOL disable antivirus

This step must be a final resort since it is quite dangerous to leave your computer without an antivirus.

Once you have disabled your antivirus, check if your webpage issue is resolved. And then enable your antivirus back on.

If for any reason all the troubleshooting steps failed to work and still AOL is not responding, it is time to contact customer support.

This option must be the last choice, especially if you do not have a lot of time to spare. However, you should not ignore the problem.

You either fix it on your own or ask for help from people who know best. The bottom line is the unresponsive AOL webpage gets resolved.

How to Fix Rocket League Packet Loss [No Latency Variation]

Rocket League is essentially football with cars. You’re on a field, you control a car, there’s a huge ball in the middle and two goals. You have to use your mad driving skills to push the ball into the opponent’s goal.

It might sound simple because it is. But the truth is that Rocket League can take months, or years to master. You can perform boosts, twists, turns, and even drive on the arena’s walls.

If you’re the lone-wolf type of player who enjoys playing solo, then this article won’t help you much.

However, if you’re a social gamer and like to share the joy of gaming with your peers, you might relate to the following sections.

Have you ever heard of rubberbanding? How about experiencing ball jitters?

Has it ever happened that you drive the ball all the way through your opponent’s goal, only for it to disappear and spawn itself in a whole different area of the arena?

If you answered yes to some or all of the questions above, you might be suffering from packet loss. Or high ping. Or both.

Why am I getting packet loss in Rocket League?

Packet loss can have a huge number of reasons. To put it shortly, even if you have poor Ethernet cables you can trigger packet loss. That’s how wide the range of culprits is.

Some of the most common issues include:

  • Rocket League: packet loss in every game
  • Constant packet loss in Rocket League
  • Rocket League packet loss on PS4, PS5, Xbox (Xbox One, Xbox series X)
  • Rubber banding Rocket League
  • Rocket League packet loss with good ping rates
  • Rocket League keeps disconnecting mid game

Packet loss can have a huge number of reasons. To put it shortly, even if you have poor Ethernet cables you can trigger packet loss. That’s how wide the range of culprits is.

We’ve explained everything you need to know about packet loss and how to fix it in a comprehensive guide.

Although most of the time packet loss seems to come and go by itself without any apparent reason or fix, sometimes you might be able to fix it.

Rocket League packet loss fix

1. Use a VPN

  1. Get a good VPN for Rocket League. We recommend ExpressVPN.
  2. Download the dedicated ExpressVPN app and install it on your device.
  3. Log in with your credentials or activation code.
  4. Connect to the server of your choice.
  5. Check if the packet loss issue still persists.

Using a VPN might not always work, especially if the issue is on either end of the connection (i.e. you or the server you connect to).

However, if you suspect that your ISP is throttling your connection or just doesn’t do a great job with routing, a VPN such as this one can be of help.

To make sure, you can run a ping test on google.com and see if there’s any packet loss. If there’s no packet loss there, it means that there’s a problem with Psyonix’s servers. Thus, using a VPN won’t fix your problem.

ExpressVPN

Fix network irregularities and get unlimited bandwidth to get rid of packet loss in Rocket League!
Free trial Visit website

2. Troubleshoot your connection

In our packet loss guide, we’ve explained how to run some simple tests using Windows’ built-in tools. Depending on the tests’ results, the packet loss issue might be present in 4 different locations within your connection:

➡️ you (your PC, router)

➡️ your ISP

➡️ the network distributor

➡️ the server you want to connect to

According to the location you’ve managed to isolate, there are different courses of action. You can either:

➡️ try to solve it on your side by checking if your PC, router, and cables are alright

➡️ call your ISP if the issue seems to be on the hops that correspond to their network

➡️ contact Psyonix if the last hop is the one that triggers the packet loss

There are a bunch of things you can do to minimize the chance of packet loss occurring because of you.

Check for bad cables, make sure your router and PC are properly configured, always use wired instead of wireless if possible, and install up-to-date software.

Rocket League packet loss: test it quickly

  1. Run a packet loss test as we’ve described in our guide.
  2. Note the hop with the largest ping.
  3. Troubleshoot the affected node as needed.

Unfortunately, there’s no guaranteed way to get rid of packet loss. Mostly because what causes it can range from a bad wire to an overloaded network.

Therefore, you might want to log off for a while and check again later if the problem’s still there. More often than not, packet loss disappears as swiftly as it appears and you won’t even notice it.

However, if you’re sure it has something to do with your ISP (and not with you, your hardware, or the Rocket League servers), you might consider using a VPN.

High ping can also lead to packet loss in Rocket League.If you experience high ping, and it’s never happened before, it’s probably a server-side issue.

In this case, you can use a VPN to improve your ping, especially if your ISP throttles your connection.

A VPN such as ExpressVPN can help you improve your gameplay by reducing ping and packet loss incidence greatly. However, remember that not even a VPN will fix all of your connection issues magically.

5 Best Firewall Routers For Medium Business

Malware and virus protection is a crucial component for any business network, that’s why firewalls are known to be an essential tool in handling various types of malicious software threats.

However, the best router combo for small or medium enterprises is a router with an incorporated firewall. This kind of device ensures that confidential data is secured against spam or unknown ISPs and is perfect for organizations with limited resources.

So, in this article, we’re going to analyze what are the best options for the best hardware firewall for medium business.

What is a business-grade router?

In short, a business-grade router is defined as a device with superior security, multi-user, and advanced network with web dashboards and business deployment.

Compared to consumer routers, small or medium businesses need higher Internet coverage, VPN or cloud support, and reliable maintenance.

What are the best firewall routers for medium businesses?

Sophos XG 106W

  • Highly efficient thanks to the Next-generation network protection
  • Security Heartbeat unique feature for synchronized security
  • Fast modular connectivity
  • Heavy

This is the best business router with firewall from Sophos due to optimal wireless connection, speed of up to 5GHz, a Firewall of 3500 Mbps, and a VPN with a capacity of 360 Mbps. No wonder this piece of equipment occupies the first spot on our list since it’s a device that is perfect even for a small home office.

One element that will surely add an important layer of security to your online work is the next-generation firewall that is designed to reach 480 Mbps.

No internet security is complete without a high-quality antivirus and this firewall router apparently doesn’t fall short and comes with an Av Proxy of 450 Mbps.

What definitely stands out about this device is a one-of-a-kind component, the Sophos Security Heartbeat, that can identify the source of infection and limit access to other network resources.

Cisco RV160W

  • 4 Ethernet ports, 1 WAN port
  • SPI firewall, port forwarding/triggering, DoS protection
  • IPsec, PPT, and L2TP pass-through support
  • Support for guest networks
  • QoS support
  • Wi-Fi performance could be better

Cisco RV160W comes with 4 Gigabit Ethernet ports and a single Ethernet/SFP WAN port. Wi-Fi support is available, and there’s 2×2 802.11ac Wave 1 Wi-Fi available.

The router has a guest Wi-Fi feature, so you can separate your Wi-Fi network in your office and protect your devices from unauthorized access. The device has IPsec VPN support, allowing you to encrypt all your traffic for maximum protection.

Cisco RV160W also has a business-grade firewall, so you can rest assured that only authorized applications and users can communicate with your business network.

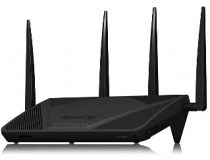
Synology RT2600ac

  • 4x Gigabit LAN, 1 WAN port, Dual WAN support
  • 4×4 MIMO Omni-directional antenna
  • Up to 800Mbps on 2.4GHz, up to 1.73Gbps on 5GHz
  • Firewall, intrusion protection, denial-of-service protection
  • Content filtering
  • Minor firmware issues

Another great firewall router for medium businesses is Synology RT2600ac. The device comes with 4x Gigabit LAN ports and a single WAN port. It’s worth mentioning that the device has dual WAN support.

The router has 4×4 MIMO Omni-directional high gain antennas, and it supports both 2.4GHz and 5GHz networks. Regarding the speed, it can achieve up to 800Mbps on 2.4GHz, and up to 1.73Gbps on 5GHz.

Synology RT2600ac also has a built-in firewall, and it can work as a VPN server and provide encryption for all devices connected to your network.

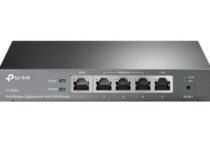
TP-Link Multi-WAN Router

  • Highly secure VPN
  • Speed testing
  • Powerful firewall with filtering
  • DoS defense
  • Omada SDN support
  • DHCP interface could be better

This is a great firewall router for medium business and it comes with five Gigabit ports in total. With this device, you can optimize bandwidth usage through one device using four available WAN ports.

Additional features include integrated Omada’s Software Defined Networking (SDN), cloud-based controller, and cloud access. As for security, there’s an advanced firewall available.

Also, there’s DoS protection, IP/MAC/URL filtering, speed tests, as well as a secure VPN that supports up to 20 LAN, 16 OpenVPN, 16 L2TP, and 16PPTP connections.

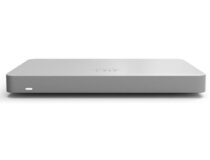
Cisco Meraki MX67

  • Intrusion prevention (Source Fire Snort based)
  • Network asset discovery and user identification
  • Real-time diagnostic and troubleshooting over the web
  • Advanced Security Licensed required

This firewall router comes with a wireless connection combined in a device that provides LAN port bandwidth of up to 1000 Mgps and supports the Cisco IOS operating system.

It allows content filtering, provides intrusion detection and prevention, and offers an Advanced Malware Protection feature.

With this device, you get a firewall throughput of 450 Mbps and a VPN performance of 200 Mbs.

One of the best characteristics is the auto VPN self-configuring site-to-site ability, an element that makes the router quite user-friendly.

What are the benefits of a business router?

The enterprise firewall router is a beneficial device because it offers complex and essential networking resources, connectivity, and security for multiple devices. Therefore, small to medium businesses can take full advantage of its features and use the same Internet connection.

Whether you have a home office or you own a space with a few employees, we gave you some of the best solutions out there regarding these devices.

Tell us more about your experience and maybe drop us some recommendations by accessing the comment section below.

VyprVPN vs NordVPN, ExpressVPN, PIA, PureVPN

VyprVPN is a popular VPN provider used by many worldwide to enjoy security and access geo-restricted websites.

The VPN provider hosts its own servers and is known for its excellent services coupled with its friendly interface.

However, over the past 2 years, there have been several complaints of VyprVPN being blocked in several countries around the world.

China was able to block the VPN for a while last year which led to Users not being able to access contents.

There have also been complaints from the Middle East in accessing government censored services such as VoIP.

We are not explicitly discouraging you from using this service but it is recommended for you to look for alternative VPNs that provide more reliability and advanced encryption options.

If you are having problems with your VyprVPN, here below are some great alternative VPN services you should consider switching over to.

Which VPN is better? Comparison guide

Private Internet Access (recommended)

get Private Internet Access

A powerful VPN such as Private Internet Access (PIA) may provide peace of mind, speed, and consistency to its users.

This Kape Technologies VPN solution has a strict zero-logs policy, which is great if you’re a private person. It will always encrypt your data, whether you’re at home or in public.

Once up and running, you also get a reliable unblocker of geo-locked streaming services including Netflix, Hulu, and HBO Go.

Besides enjoying enhanced security, keep in mind that you’ll get extensions for Chrome, Firefox, and Opera too. They work as proxies that will hide your IP address with ease.

Take a closer look at some Private Internet Access key features:

  • Supports both AES 128-bit and AES 256-bit specifications
  • Useful PIA MACE ad-blocking feature
  • Consistently faster than similar VPNs
  • P2P torrent-friendly
  • Ten simultaneous connections
  • Option to use prepaid gift cards
  • 30-day money-back guarantee
Private Internet Access

Private Internet Access

Private Internet Access is about to become your top VPN choice. Currently available at a major discount!
$2.69/mo. Buy it now

CyberGhost

get CyberGhost

Cyberghost gives full VPN features and excellent customer support. The provider has been in the business for a long time which is evident in their large customer base.

You get access to over 6400 servers in 89 countries, with this you have a wide range of options to pick from.

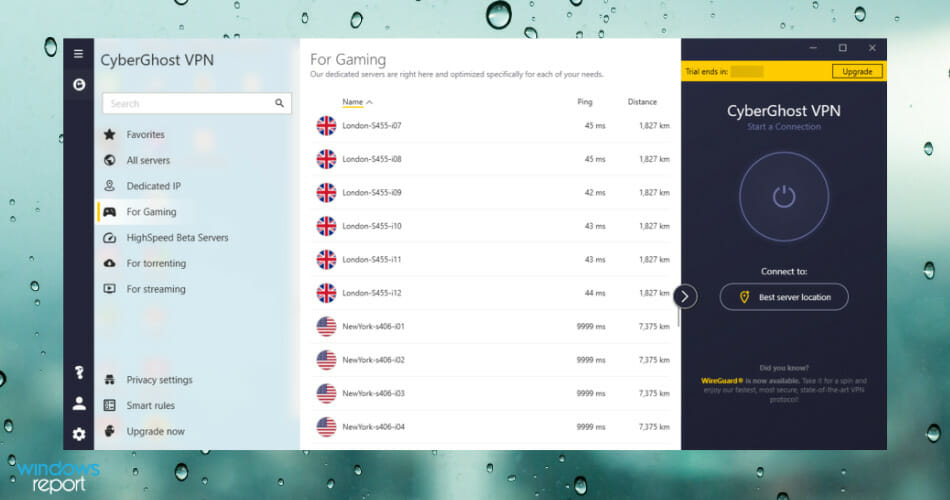
Their servers are known for their speed and performance which is important if you use it for gaming.

In addition, CyberGhost has all security features including, DNS leak protection and DDoS protection features. These features prevent accidental leaks of the IP address to your ISP.

The VPN is easy to use and automatically picks the fastest server nearest to your location.

CyberGhost comes at a discounted price at this moment and includes a 30-day money-back guarantee.

CyberGhost VPN

CyberGhost VPN

Looking for a viable alternative to VyprVPN? Check out CyberGhost VPN.
$2.75/mo. Buy it now

NordVPN

get NordVPN

NordVPN is preferred by users that want extra security. Since they provide over 5400 servers across 59 countries, this enables you to choose any server for your activities.

Also, their security features include a kill switch option and DNS leak protection-which helps to keep your identity safe when browsing.

All servers are encrypted with 256-bit encryption which ensures your data connection is not open to hacks and government trackers.

This Tefincom & Co., S.A. VPN also has excellent customer support features with an easy to use interface which guides users on how to use the software efficiently.

NordVPN

NordVPN

Choose it over VyprVPN and you won’t be dissaponted! Get the best deal right away!
$3.71/mo. Buy it now

TunnelBear

get TunnelBear

Developed by McAfee, LLC, TunnelBear is a popular service provider that gives customers excellent performance and user interface.

TunnelBear has servers in 23 countries that give you numerous options to connect to geolocation blocked websites.

You also get unlimited bandwidth for the paid versions with fast server speeds, not to mention the security suites such as kill switch and DNS leak protection system.

TunnelBear

TunnelBear

Get TunnelBear if you want a great alternative to VyprVPN.
$4.17/mo. Get it now

ExpressVPN

get ExpressVPN

ExpressVPN is one of the best all-round VPN services available with many excellent reviews from customer base around the world.

You get reliable and performance-based servers when you use their services. Also, this Express VPN International Ltd. service enables up to seven devices on a single connection.

The stealth mode enables you to access geo-blocked contents undetected. The security features hide your IP from your ISP and government trackers giving you secure browsing.

Since they own their servers, don’t think about reliability issues. They also offer excellent customer support to users and a 30-day money-back guarantee.

ExpressVPN

ExpressVPN

Need to replace VyprVPN with a better VPN solution? Check out ExpressVPN.
$8.32/mo. Buy it now

PureVPN

get PureVPN

PureVPN is renowned for its emphasis on reliability and performance. The VPN provides a wide location of servers as you get access to over 2000 servers in 140 countries.

This means you can connect to any geo-blocked content all around the world. You also get to use five devices on a single subscription with the VPN compatible with multi-devices.

Moreover, their servers have impressive speeds and are encrypted with state of the art encryption protocols.

You also have your online activity safe as the VPN maintains a no log policy. You can access this VPN with a number of packages available.

PureVPN

PureVPN

In need of a VPN that can protect your privacy 24/7? Check out PureVPN.
$3.33/mo. Buy it now

Hotspot Shield

get Hotspot Shield

Hotspot Shield is a good VPN service that has been in existence for a long time. The VPN offers users about 3200 servers in 70+ countries.

Developed by AnchorFree, this VPN is known for its simplicity and good server speeds. In addition, DNS leak protection and kill switch options are available. This ensures your online activities are well secured.

Hotspot Shield offers both free and paid versions with the premium plan starting at $6,99 a month billed annually.

Hotspot Shield

Hotspot Shield

Want to replace VyprVPN with a better service? Why not try Hotspot Shield for a change?
$2.99/mo. Buy it now

In conclusion, the VPNs we mentioned above can be used on your PC if VyprVPN is blocked or you simply want a more reliable choice.

We do appreciate it if you share your experience with us. Feel free to comment below.

FULL FIX: Avira Phantom VPN failed to connect to the service

Most of us know about Avira’s antivirus software, but did you know it also has a VPN service? It is called Avira Phantom VPN.

This VPN, like most other service providers in the same industry, offers web anonymity by changing your IP address, secure encryption to protect your private communications, unblocks geo-restricted content, is fast and runs silently in the background, plus has no logs and supports the IPv4 and v6 protocols.

You can also connect to as many devices as you like with Avira Phantom VPN, and connect from any of its servers in 36 locations, plus its so easy to use.

This VPN doesn’t track the sites you visit, virtual locations used while surfing, your real IP address, or any information that can link you to any action like file downloads or website visits.

However, it does track diagnostic data to improve the product (optional tracking), and tracks if you’re a free or paid users, plus how much data you consume so as to calculate the costs of providing their infrastructure for free.

So what happens when the Avira Phantom VPN won’t connect? This article looks at what to do when Avira Phantom VPN failed to connect to the service.

FIX: Avira Phantom VPN failed to connect to the service

Under certain circumstances, after updating to a more recent version, the Avira Phantom VPN service will hang and you cannot use it anymore even after a reboot, then it displays the message: Internal error: failed to connect to the service.

1. Uninstall and reinstall the VPN

In order to fix the Avira Phantom VPN failed to connect to the service, one of the solutions is simply to uninstall and reinstall the VPN.

Does this help? If not, try the next solution.

2. Change your VPN

If Avira Phantom VPN failed to connect to the service or it won’t connect, you can try using the recommended VPN below that is among the best VPNs for Windows.

Best VPN for privacy

This is a US-based VPN, owned by Kape Technologies, that offers OpenVPN, AES-256 encryption, and zero log policy. It lets you surf anonymously, unblock websites and protect your online privacy.

It is a pretty reliable service with enough history behind it that proved its worth. It offers a fast service and a safer web offering as it protects your data.

It even includes the possibility of blocking ads when connected to it.

Here are the main reasons we recommend this solution:

  • 30-day money-back guarantee if anything is not working for you
  • Connect up to 10 devices with a single subscription making it ideal to share with family members
  • A network of over 35,906 servers so you can rest assured about speeds
  • Compatible with a long list of devices, including routers
Private Internet Access

Private Internet Access

PIA VPN is a premium alternative to Avira Phantom VPN, it comes with good connection speeds, privacy protection and no ads options.
Check priceVisit website

Best free VPN

The VPN recommended below protects your privacy on a multi-platform privacy solution, using the highest encryption available with 256-bit encryption technology.

Plus your IP will remain hidden, and you get Wi-Fi protection if you’re in a public area. They are owned by the same company as the previous solution – Kape Technologies.

However, its best quality is the fact that you can test it with all its complete, unlimited features for free for one day on your Windows 10 device without using your credit card.

It has 6,600 servers in 88 countries, so you can access streaming sites, whether the services are blocked or not where you reside.

Its Unblock Streaming feature lets you access many popular streaming services without testing servers manually.

It also comes with a strict no-logs policy that doesn’t track your internet activity, multiplatform apps for your laptop, and other devices and security for conversations.

⇒ Get CyberGhost VPN


3. Stop the VPN service

You can also restart the Avira Phantom VPN service by doing the following:

  • Type CMD in the search box
  • Right click Command Prompt and select Run as administrator
Avira Phantom VPN failed to connect to the service or it won’t connect
  • This opens up the command prompt screen, type the following lines: net stop AviraPhantomVPN and net start AviraPhantomVPN then press enter
  • Launch Avira Phantom VPN again

Does this help? If not, try the next solution.

4. Check the license status

Some users have reported that there could have been a downgrade issue on the license they use, and Avira should be able to rectify this issue. If it persists, try and reinstall Avira Phantom VPN.

Does this help? If not, try the next solution.

5. Keep launcher installed

You also need to keep the Avira Launcher installed in order to resolve the Avira Phantom VPN failed to connect to the service problem. If you have a password that won’t reset or gives issues, reset it again through the reset link provided on the Avira Phantom VPN site.

6. Check that the service is running

If Avira Phantom VPN failed to connect to the service, the service may not be running. Here’s how to resolve it:

  • Right-click Start
  • Select Run
Avira Phantom VPN failed to connect to the service or it won’t connect
  • Type services.msc
  • Right-click Avira Phantom VPN from the list and click Start

Does the VPN work again? Are you able to connect? If all else fails, try the next solution.

Let us know if any of these solutions helped fix Avira Phantom VPN failed to connect to the service issue, by leaving a comment in the section below.

StrongVPN won’t connect / login failed [Full Fix]

Having a good and reliable VPN is important, however, many users reported that StrongVPN stopped working on their PC. This can be a problem, but today we’ll show you how to deal with this issue.

StrongVPN is a solid VPN client, but sometimes issues with it can occur. Speaking of issues, here are some common problems that users encountered:

  • Strong VPN stopped working Opera browser, Chrome – This issue is usually caused by your firewall, and in order to fix it, you might have to disable your firewall temporarily.
  • Strong VPN stopped working Norton – Sometimes antivirus tools such as Norton can cause this issue to occur. To fix the problem, try disabling or removing your antivirus software.
  • StrongVPN quit unexpectedly – This problem can occur if your installation is corrupted. To fix the issue, reinstall your VPN client and check if that helps.
  • Strong VPN won’t connect, user authentication failed – These problems are fairly common and in order to fix them, be sure to try some of our solutions.

What to do if StrongVPN won’t connect?

1. Check your antivirus

antivirus solution

If StrongVPN isn’t working on your PC, it’s possible that your antivirus is causing the problem. Sometimes your antivirus can interfere with the VPN causing this and many other problems to appear.

To fix the issue, be sure that your VPN is added to the list of exclusions. If StrongVPN is already on the exclusions list, perhaps you can fix the issue simply by disabling certain antivirus features.

If that doesn’t help, your next step would be to disable your antivirus altogether. This should fix the issue in most cases, but if the problem is still there, perhaps the best solution would be to uninstall your antivirus.

If you’re using Windows 10, you should know that Windows Defender will work as a default antivirus even if you choose to remove a third-party antivirus from your PC.

Once you remove the antivirus, check if the problem is still there. If removing the antivirus solves your problem, perhaps this would be a perfect time to consider switching to a different antivirus solution.

2. Consider using a different VPN

In case the problem is still there, perhaps this is the best time to consider switching to a different VPN.

There are many great VPN tools on the market, but if you want a reliable solution, you should try out the solution recommended below.

Developed by Kape Technologies, this is currently the best VPN that will keep you safe while browsing with DNS leak protection and an intuitive PIA MACE ad-blocking feature.

A single license lets users run it on no less than 10 devices simultaneously. And if you’re still not convinced, they offer a 30-day refund if you just tell them you weren’t satisfied.

Private Internet Access

Private Internet Access

Unlike StrongVPN, Private Internet Access will always connect. Currently available at a major discount!
Check priceVisit website

3. Temporarily disable your firewall

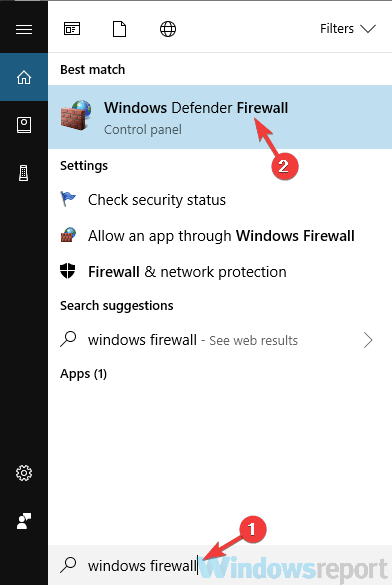
  1. Press Windows Key + S and type firewall. A list of results will now appear. Select Windows Firewall.
    strongVPN stopped working firewall search
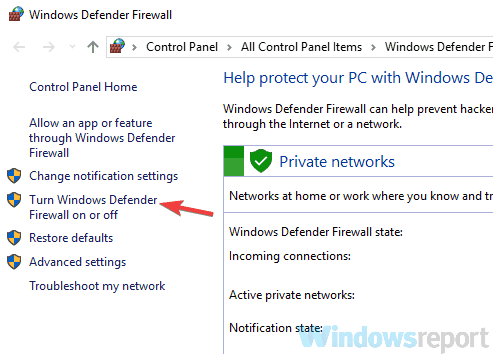
  2. Windows Firewall window will now open. In the left pane choose Turn Windows Firewall on or off.
    firewall turn off strongvpn not working
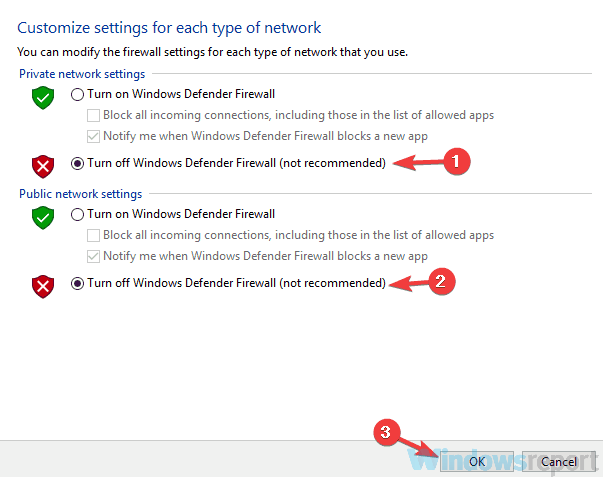
  3. Select Turn off Windows Firewall (not recommended) for both Public network and Private network profiles. After doing that, click OK to save changes.
    firewall turn off strongvpn

Another cause for problems with your VPN can be your firewall. As you probably know, your firewall can block outgoing and incoming connections from certain applications, including StrongVPN.

To fix this issue, it’s advised to temporarily disable your firewall. If you’re using a third-party firewall, be sure to disable it and check if that solves the problem.

However, Windows has its own firewall so you might have to disable it as well. To do that, follow the above steps.

Your firewall should now be disabled. Once you disable the firewall, check if the problem with StrongVPN is still there.

If StrongVPN works, the issue is related to your firewall, so be sure to check its settings and make sure that StrongVPN is allowed through it.

Bear in mind that disabling the Windows Firewall isn’t the best security practice, so be sure to turn it back on as soon as you can.

4. Use your phone as a hotspot

phone hotspot strongvpn can't connect

According to users, sometimes there might be an issue with your network connection that is preventing you from using StrongVPN. However, you might be able to fix this problem simply by using your phone as a hotspot.

Once you set your phone to work as a hotspot, connect to it and check if that solves the problem.

Bear in mind that this is just a workaround, but if this method works, it’s possible that your ISP is blocking StrongVPN, so be sure to contact it as well.

5. Be sure to try all VPN protocols

If StrongVPN isn’t working properly, it’s possible that the problem is related to VPN protocols. To fix this problem, users are suggesting to try all VPN protocols including L2TP, PPTP, and SSTP.

Bear in mind that this solution only works if you have a PPTP VPN account registered with StrongVPN.

6. Try using a different location or different server type

If StrongVPN doesn’t work on your PC, perhaps the problem is related to the server you’re connecting to. Some users are suggesting to try different server locations or different servers in the same location.

This process requires a bit of trial and error, but it should help you to troubleshoot this issue.

In addition, it’s advised to switch between Windows and Linux servers. Sometimes the issue can be related to the server type, and switching between different server types can help you fix the problem.

7. Try using StrongVPN on a different device

According to users, sometimes this issue can be related to your PC and its settings, and in order to troubleshoot the problem, it’s advised to try using StrongVPN on another device in the same network.

This can be a different PC or your phone. If StrongVPN works on another device, it means that the problem is related to your PC, so you should focus on it and try to pinpoint the issue.

8. Restart your network

In some cases, problems with StrongVPN can occur due to issues with your router. To fix the problem, it’s advised to turn off all network devices including your modem, router, and other network hardware that you might have.

Once you turn off your modem/router, wait for a few moments. After doing that, turn the router/modem back on again. Wait for a few moments while the router boots.

Once your network starts working again, check if the problem is still there. Some users are also suggesting connecting your PC directly to your modem since your router isn’t configured to support PPTP VPN Passthrough.

If connecting the PC directly to the modem solves the problem, be sure to check your router’s settings and enable the PPTP VPN Passthrough feature.

9. Check your date and time

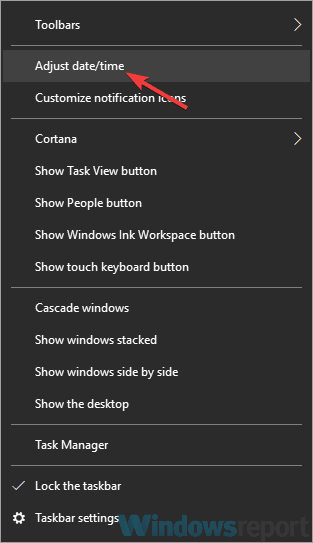
  1. Right-click the clock icon in the bottom-right corner. Now pick Adjust date/time from the menu.
    date and time menu strongvpn can't start
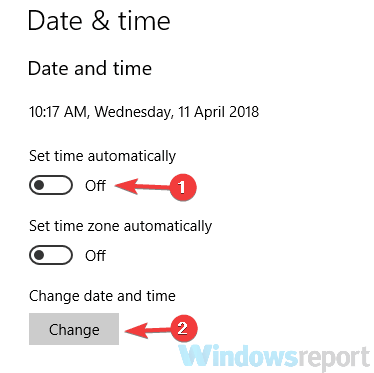
  2. In the new window locate Set time automatically option and turn it off.
    set time automatically strongvpn not working
  3. Wait for a few moments and turn this feature back on again.

In some cases, StrongVPN might not work if your date and time aren’t correct. Incorrect date or time can cause issues with various certificates, and if there are certificate problems, you might not be able to use your VPN at all.

However, you can fix this problem simply by adjusting your date and time. To do that, follow the steps above.

After doing that, your clock will readjust itself automatically and the problem will be resolved. If you want, you can also click the Change button in order to manually set the date and time.

10. Perform a Clean boot

  1. Press Windows Key + R to and type msconfig. Now click OK or press Enter.
  2. The System Configuration should appear. Head over to the Services tab and check to Hide all Microsoft services. Click the Disable all button to disable the selected services.
  3. Navigate to the Startup tab and click Open Task Manager.
  4. You should now see the list of all startup applications. Right-click the first entry on the list and choose Disable. Do this until you disable all startup applications.
  5. Once you disable all startup applications, head back to the System Configuration Click Apply and OK to save changes, and restart your PC.

If you’re having issues with StrongVPN, it’s possible that other applications on your PC are interfering with it and causing this problem.

To fix the issue, it’s advised to disable all startup applications and services. This is fairly simple, and you can do it by following the steps detailed above.

Once your PC restarts, check if the problem is still there. If not, the issue is most likely related to one of the disabled applications or services.

To fix the problem, enable disabled applications and services one by one until you manage to pinpoint the cause of the problem.

Bear in mind that you’ll have to restart your PC or at least logout and log back in after enabling a certain service or an application. Once you find the cause, remove the application, or keep it disabled.

Problems with StrongVPN can leave your system unprotected online, but we hope that you managed to fix this problem with one of our solutions.

Fix: SonicWall VPN stopped working / not connecting

Many users use various VPN tools to protect their privacy, however, some reported that SonicWall VPN stopped working on their PC. This can be a problem and leave your privacy in danger, but today we’ll show you how to fix SonicWall VPN problems.

There are various issues that can occur with SonicWall VPN, and speaking of issues, here are some common problems that users reported:

  • SonicWall site to site VPN can’t ping, connected but no traffic, dropping connection – These are some common problems with SonicWall VPN, but you should be able to fix them using one of our solutions.
  • SonicWall VPN no green light – Sometimes glitches with your router can cause this problem to appear. To fix it, you just need to restart your router.
  • SonicWall VPN won’t connect – Antivirus is a common cause for VPN problems. To fix this issue, disable your antivirus temporarily and check if that helps.
  • SonicWall VPN user authentication has failed – Sometimes your firewall can cause this problem with your VPN, so in order to fix it, you’ll have to adjust your firewall settings.
  • SonicWall VPN hangs on acquiring IP – This problem can occur due to your network drivers, so you might want to reinstall them and check if that solves the issue.

SonicWall VPN stopped working, how to fix it?


Solution 1 – Try a different VPN client

SonicWall Global Client is a good VPN client, but if you can’t fix this issue, perhaps this is the perfect time to consider switching to a different VPN.

There are many great VPN clients on the market, and if you want a reliable VPN client, you should try out the one recommended below

It is owned by Kape Technologies and is a service that has been around for many years, having a really good reputation. They have expanded their network and are continuously improving their servers.

Here are the key features we like about this VPN:

  • Support for OpenVPN as well as PP2P/L2TP protocols in case you can’t use the dedicated application
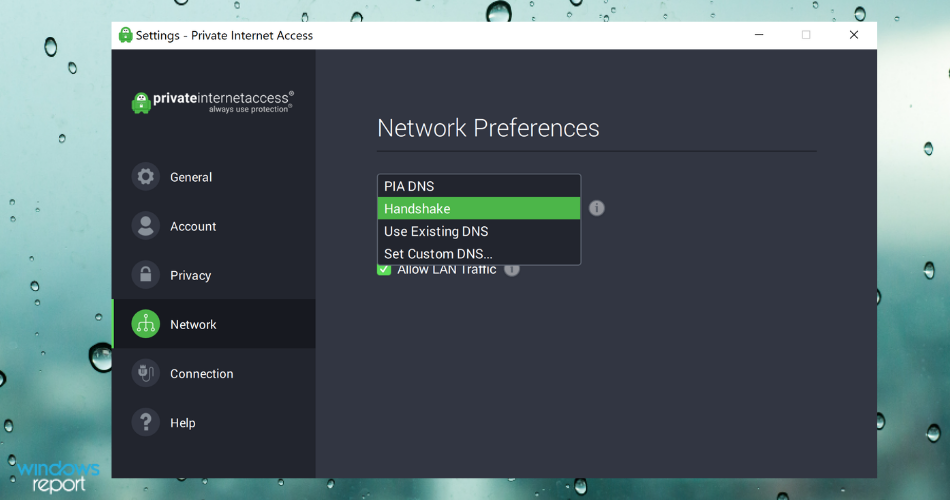
  • Dedicated DNS servers to protect from leaks
  • Can use AES-256 for encryption, SHA256 for authentication, and RSA-4096 for handshake encryption
  • Can get and use a static IP from your preferred VPN server
Private Internet Access

Private Internet Access

Offers PPTP connections that can be configured to work with SonicWall firewall and provides unlimited bandwidth.
Check priceVisit website

Solution 2 – Check your antivirus

bitdefender sonicwall VPN not working

According to users, if SonicWall VPN stopped working on your PC, the problem might be related to your antivirus. Sometimes your antivirus can interfere with certain applications and prevent them from connecting to the Internet.

To fix this problem, users are suggesting to add your VPN to the list of exclusions in your antivirus and check if that helps. Alternatively, if your antivirus has a firewall built-in, you can check it as well and make sure that it’s not blocking your VPN.

If that doesn’t solve the problem, try disabling certain antivirus features or disable your antivirus altogether. In some rare instances, you might have to remove your third-party antivirus in order to solve this problem.

If removing the antivirus fixes the problem with your VPN, we suggest that you consider switching to a different antivirus solution. There are many great antivirus tools on the market, but if you want a reliable antivirus that won’t interfere with your system in any way, we suggest that you try out Bitdefender.

  ⇒ Download Bitdefender Antivirus 2020


Solution 3 – Restart your router

According to users, if SonicWall VPN stopped working, the issue might be related to your modem/router. If you have any issues with the VPN, perhaps the problem is related to your router.

To fix the problem, users are suggesting to restart your router and check if that solves the problem. This is quite simple to do, and you can do it by following these steps:

  1. Locate the Power button on your router and press it.
  2. After your router is turned off, wait for a minute.
  3. Now press the Power button again to boot it.
  4. Wait for about 30 seconds for your router to boot.

Once your router is up and running, check if the problem is still there. Bear in mind that this might be just a temporary solution, so you might have to repeat it if the issue reappears.


Solution 4 – Enable NAT Traversal in your firewall

According to users, sometimes your firewall settings can cause issues with the VPN. If SonicWall VPN stopped working, the issue might be related to NAT Traversal feature on your router.

Several users reported that in order to use SonicWall VPN, you need to have this feature enabled. To do that, just follow these steps:

  1. Open your router’s configuration page.
  2. Go to the Firewall section and enable NAT Traversal feature.

After doing that, check if the problem is still there. If you can’t find this feature, be sure to check your router’s instruction manual for detailed instructions.


Solution 5 – Reinstall your wireless adapter drivers

According to users, if SonicWall VPN stopped working on your PC, perhaps the problem is related to the wireless adapter drivers. To fix the problem, users are suggesting to reinstall your wireless adapter drivers.

Most wireless adapter drivers come with dedicated software, so in order to perform a complete reinstall, it’s advised to remove both the software and the drivers itself. First, we’ll remove the Wi-Fi software.

There are many ways to do that, but the best method is to use uninstaller software such as Revo Uninstaller. By using the uninstaller software you’ll ensure that the driver software is completely removed, along with all of its files and registry entries.

You can also remove the drivers for the wireless adapter. To do that, follow these steps:

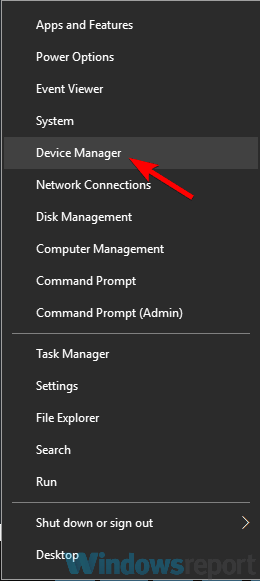
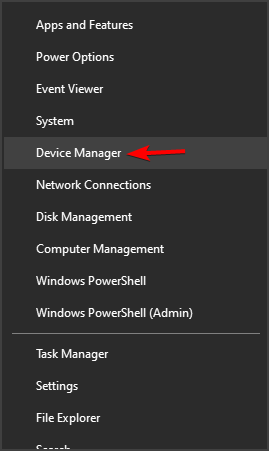
  1. Press Windows Key + X to open Win + X menu. Select Device Manager from the list.
    sonicwall VPN not working device manger
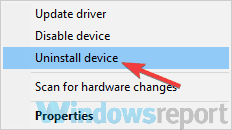
  2. Locate your wireless adapter, right-click it and choose Uninstall device.
    device manager uninstall sonicwall VPN can't connect
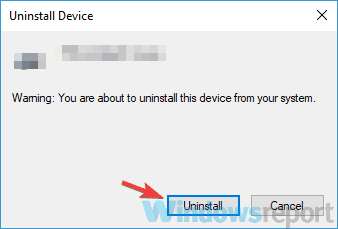
  3. When the confirmation menu appears, click Uninstall.
    uninstall confirmation dialog sonicwall VPN not starting
  4. Now you just need to restart your PC to apply changes.

After doing that, go to the SonicWall Client settings and reset NAT Traversal to Automatic. Now connect to the hotspot and check if the problem is still there.


Solution 6 – Make sure that you’re using DHCP

Sometimes problems with your VPN can occur if you’re using a static IP Address. To fix the problem, users are suggesting switching to DHCP on your router. This might a bit advanced solution, so before you proceed, we advise you to check your router’s instruction manual for step by step instructions.


Solution 7 – Disconnect from all SonicWall VPN clients

Many users have SonicWall VPN clients installed on multiple devices, and that can sometimes be a problem. If SonicWall VPN stopped working on your PC, it’s possible that other devices are interfering with it.

To fix the problem, it’s advised that you log out of all other SonicWall clients and then try to log in to your SonicWall VPN client. Several users reported that this method worked for them, so you might want to try it out.


Solution 8 – Disable Dead Peer Detection

According to users, sometimes certain network features can interfere with your VPN. Several users reported that SonicWall VPN stopped working due to the Dead Peer Detection feature.

To fix the problem, it’s advised that you disable the Dead Peer Detection feature completely. After doing that, the problem with your VPN should be resolved and everything will start working again.


Solution 9 – Change your configuration

Sometimes issues with SonicWall VPN can be caused by your configuration. If your client isn’t configured properly, you might encounter this and many other errors. However, you can fix that by adjusting your settings.

According to users, you need to enable the Keep alive option on both ends of the site-site VPN. In addition, change the assignment to Zone WAN instead of VPN. After doing that, the problem should be resolved and everything will start working again.


Solution 10 – Enable Restrict the size of the first ISAKMP packet sent option

According to users, sometimes certain VPN settings can interfere and cause problems with your VPN. If your SonicWall VPN stopped working, the issue might be related to the ISAKMP packet sent option. According to users, you can fix this problem simply by doing the following:

  1. Open the VPN properties.
  2. In the General tab, you should see Restrict the size of the first ISAKMP packet sent Enable it.
  3. Click Apply and OK to save changes.

After making these changes, check if the problem is still there.


Solution 11 – Make sure that Disable SPI Firewall option is enabled

According to users, sometimes your router settings can interfere with SonicWall VPN and lead to various issues. Users reported this problem with the Netgear router, and in order to fix the problem, you just need to change a single setting. To do that, follow these steps:

  1. Open your router’s configuration page and navigate to Netgear WAN
  2. Now enable Disable SPI Firewall

After doing that, check if the problem is still there.

There are numerous problems with VPN that can occur, and if SonicWall VPN stopped working on your PC, be sure to try all of our solutions and let us know which solution solved the problem for you.

KB5000802 and KB5000808 cause printing crashes in Windows 10

Microsoft just released the new KB5000802 and KB5000808 cumulative updates for Windows 10 but unfortunately, they already started creating problems for a lot of users.

The updates released yesterday are causing Blue Screen of Death crashes when printing to network printers.

Apparently, after the new updates, some users experienced BSoD errors while trying to use a network printer in Windows.

Here’s how one of them is complaining on Reddit:

Hey Jen, several folks over in r/sysadmin, myself included, are seeing a BSOD post-update (on at least Win10 20H2 so far) when sending print jobs to any Windows Server printer share using a type 3 Kyocera KX driver. (i.e., type 4 KX driver and other generic type 3/4 drivers don’t exhibit the issue)

Another user comments on the same Reddit post about the same issue hinting at uninstalling the update to fix the issue:

Same here using Ricoh printers over LAN. With different models and different driver versions. At the moment uninstalling this update is the solution.

How can I fix the Windows 10 network printing issue?

1. What are the errors triggered by KB5000802 and KB5000808?

Until now, from the user testimonials, the brands affected by these printing bugs are Kyocera, Dymo, and Rycoh.

The BSoD error triggered by the updates is the APC_INDEX_MISMATCH which we already covered. However, updating the printer driver recommended in that solution didn’t work this time.

In the meantime, Microsoft has been notified about the issue and they rolled back the updates from the Windows Update.

However, they are still available in the Microsoft Update Catalog so the first step to stop this problem is to avoid installing the KB5000802 and KB5000808 updates.

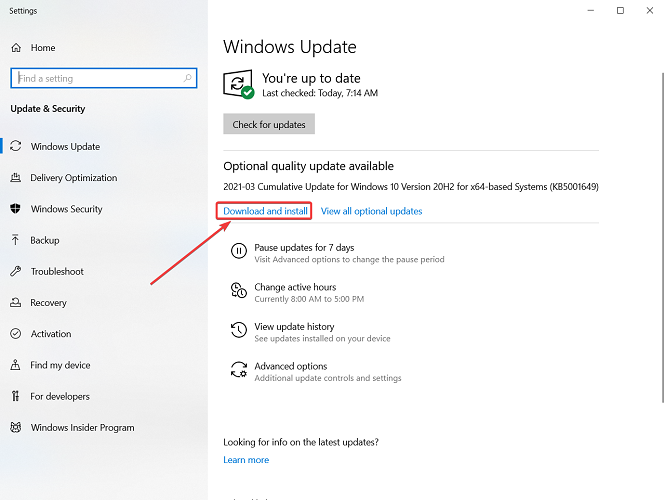
Update: Microsoft acknowledged the issue and resolved it with the out-of-band update KB5001649, so if you check for updates and install the KB5001649, the issue will be resolved.

To check for updates, type updates in Windows search and select Check for updates. You should see the Cumulative Update for Windows 10 Version 20H2 for x64-based Systems (KB5001649).

Click on Download and install button under it to proceed with the installation.

If you can’t find it and didn’t install it already, you can also find it in the Microsoft Update Catalog.


2. Force uninstall the KB updates

One of the best solutions for fixing this problem and going back to normal printer usage until now is to force uninstall the KB updates.

So, if you are one of those who already installed the new KB5000802 and KB5000808 updates, you can fix this by running the following commands in an elevated Command Prompt window and pressing enter after each one:

wusa /uninstall /kb:5000802
wusa /uninstall /kb:5000808

The first command is for uninstalling the KB5000802 update and the second is for uninstalling the KB5000808 update.


3. Manually uninstall the updates

  1. Press the Windows key + I to open Settings.
  2. Click on Update & Security and go to Windows Update.
  3. Click on View Update History.
  4. Click on the Uninstall updates option.
  5. Locate the update and hit the Uninstall button.

Another great solution would be to rollback your system to a previous restore point.

If you don’t know how to create a restore point, we have an excellent article that will guide you all the way.


4. Enable Direct Printing

  1. Identify the exact name of your printer.
  2. Type cmd in the search tab in Windows and click on Run as administrator to open Command prompt with administrator privileges.
  3. Paste the following command and press Enter to run it (make sure you replace printername with the actual name of your printer): rundll32 printui.dll,PrintUIEntry /Xg /n "printername"
    • That will tell you information about the Direct Printing status.
  4. If Direct Printing is OFF, paste the following command and press Enter: rundll32 printui.dll,PrintUIEntry /Xs /n "printername" attributes +direct

5. Use a third-party tool to get rid of BSoD errors

Because BSoD errors never have a clear cause, it’s hard to pinpoint exactly what measures should be taken to fix them, so you’re only solution is to use a software repair tool that can go through several troubleshooting procedures.

6. Uninstall and reinstall the drivers

6.1 Uninstall the printer driver

  1. Right-click the Start button and select Device Manager from the list.
  2. Extend the Printers section, right-click your printer, and select Uninstall device.
  3. Restart your PC. The system will install a default driver for your printer.

One of our readers managed to solve this problem by deleting the drivers, so make sure you try this also.

6.2 Update the drivers automatically

The manual remove of the driver will trigger the system to install a default driver that might not be the best for your printer.

Of course, you can also visit the manufacturer’s website, download the exact driver and install it but it’s a lot easier to use a dedicated, third party tool like the one recommended below.

It’s light, easy to install, and it will repair or update all your drivers in a fraction of the time needed for the manual procedure.

⇒ Get Outbyte Driver Updater

We hope that you managed to get back to your printing activities after uninstalling the updates. Do you have any other solutions? Let us know in the comments below so that others can also benefit.

Is it worth getting a VPN? What is the risk using free VPNs?

For some people, VPN is a must; for others, well, not so much. However, considering the tides of internet growth, online privacy was never as threatened as it is now.

Various leaks informed us about privacy intrusions, FCC is negating the net neutrality, large internet companies and ISPs are profiting on users data, by tracking and profiling them. The internet age of no privacy summarized.

That’s where the VPN comes in handy. Now, a lot of users that are aware of the threat, decide not to pay for VPN and settle for free solutions. And that’s fine. Anything is better than nothing.

Nonetheless, we are doubtful about free VPN solutions and today we decided to explain why is that the case. So, if you’re having any second thoughts, make sure to check the explanation below.


Is VPN something you should spend your money on?

What’s VPN exactly?

VPN is short for Virtual Private Network. It’s basically a safe tunnel that leads from your PC to ‘everything internet’ while enabling you to hide your IP address, avoid tracking, monitoring, and censorship.

The VPN providers provide you with dedicated servers that enable you to switch your current IP and location while maintaining the same levels of accessibility.

Think about it as a rent-a-car, just with the IP address instead of Toyota. The VPN client grants you the location and random IP of your choice, therefore enabling you to be a ghost on the grid.

Just an anonymous user without companies to track your online behavior.

VPN protects you from Internet Service Providers and individual sites that try to track your IP and thus violate your privacy. Furthermore, most of the premium solutions have multiple dozens or even hundreds of available servers for you to choose from.

So you can, let’s say, sit in your comfy home in Calcutta and use New York IP address in order to access the geo-restricted content and avoid tracking.

That’s the main concept for you. However, even though the tools are mostly similar, you might ask what creates a distinction between them.

Is paying for a VPN worth it?

It all boils down to how much you value your privacy, and how restrictive the Internet access laws are in your region.

For example, there are plenty of regions around the world where common websites are blocked, like YouTube or Netflix, or even programs altogether, such as how Skype is blocked in the United Arab Emirates.

More so, certain services are region-locked, the way Hulu is only available in the US. Thus, if you want the freedom of accessing any type of content, then a VPN is your only chance.


What is currently the best VPN I should use?

There are many factors that you should consider when trying to determine what VPN is best for you. Some users focus on high-security levels while others want more access points or a more stable connection.

While some VPN services are better than others and each has its own pros and cons, one VPN stands out because it has the perfect balance of all the criteria you may be looking for.

This service is owned, maintained, and developed by Kape Technologies (the same developers that brought your CyberGhost), and it has over 35,906 servers in 77 countries.

More so, your connectivity is safe and secure thanks to the WireGuard, PPTP, OpenVPN, and L2TP/IPSec technology used.

It also has the ability to easily switch between VPN Gateways means that you are very flexible when choosing your new IP.

More so, a single subscription will give you support to 10 devices simultaneously, so both you and your friends and family can enjoy a more private Internet browsing experience.

Private Internet Access

Private Internet Access

Browse the Internet in a more secure manner with this amazing VPN, now at a discount price for a limited time only!
Check priceVisit website

Is AVG VPN worth it?

AVG VPN is not exactly the best VPN on the market, but that doesn’t mean it is awful either. However, from a performance-to-price ratio point-of-view, there are certainly better alternatives.

Is Avast VPN worth it?

Just like with AVG VPN, Avast VPN isn’t exactly the best VPN on the market. This product is owned by a company that focuses primarily on antivirus software, so their VPN service isn’t all that much of a priority.

Is Nord VPN worth it?

Nord VPN is a top VPN service that features 5500 servers in 59 different countries, and it has a long history of delivering quality services. More so, if you manage to get it at a discount price, the investment is well worth it.


Is there a real need to use VPN nowadays?

It depends. If you’re concerned about your privacy, you probably should take VPN solutions seriously. People tend to say that they don’t have anything to hide.

On the other hand, that same folk won’t easily share their browsing history or credentials for various accounts, both personal and professional.

And that’s how it should be. That data is yours and only yours, and third-party sites, ISPs, or malicious individuals must be restrained from accessing it.

Therefore, the sole fact that your personal data is exposed to a higher bidder sounds incredibly Orwellian. Even though, for the most part, they tend to use it ‘only’ for advertisement purposes.

The internet is basically free and it’s, arguably, the synonym for the open society nowadays. With FCC (Federal Communications Commission) trying to break the net neutrality concept, one must assume that things are going south in regards to privacy and security for every affected user.

Another point of interest concerns geo-location restrains, where certain users from certain countries are unable to access the restricted content.

That somewhat elitist approach also goes against the concept of the Internet and makes it narrower than it’s supposed to be initially.

So, you can draw your own conclusions, and decide whether you want to protect your privacy or not.


What should you expect from a premium VPN solution?

There’s one, a tad washed-up Andrew Lewis’s phrase that’s frequently used but that doesn’t make it any less true. ”

If you are not paying for it, you’re not the customer; you’re the product being sold.

No one can guarantee you that the paid solution won’t track your data for sure, but at least, there’s the money for goods concept. And don’t forget that this isn’t a tool, but rather a service.

In addition, when it comes to performance and features, freeware solutions are mostly underperforming and quite limited in regards to the number of available servers, and also, they heavily affect the bandwidth.

That places them far behind the subscription-based premium solutions which, on the other hand, offer stable speeds and numerous servers.

What you can expect from premium VPN solutions is:

  • No data and speed limits.
  • Support for multiple devices.
  • Wireless network protection.
  • Full anonymity while using the service.
  • The formidable quantity of servers you can choose from.
  • Stability and valid customer support.
  • Support for handheld devices.

Don’t settle for less. The prices are going up to $100 per year subscription, but there’s a list of much more affordable solutions out there. Your final choice should depend on your preferences, but most of them should serve you justice.

With that, we can conclude this article. We certainly hope that you were able to learn something new about VPNs and their usability.

Do you think about VPN as a necessity? If so, what’s your VPN of choice? Do tell us in the comments section.

5 Best Mini PCs with Graphics Card Slot [Top Options]

Due to technological advancements, many computer’s hardware can be smaller in size. As a result, we can find mini-PCs on the market that have great performance.

A mini-PC works exactly like a desktop or a laptop, but they don’t take up any desk space. This is a significant advantage in situations where space is limited or you don’t really want a tower case.

If you want to take advantage of the small size, low cost, and less noise, you should definitively try out a mini-PC.

In this article, we’ll review the best mini-PCs that come with a graphic card so you can use it to watch high-resolution videos or even to play games.

What are the best mini PCs with graphic card slot?

Intel NUC 8

  • Intel Quad-Core i7-8705G up to 4.1GHz
  • AMD Radeon RX Vega
  • Many connectivity options: Wi-Fi, Bluetooth, Gigabit Ethernet
  • Windows 10 Pro
  • Expensive

NUC 8 is the most powerful mini-PC that was ever produced by Intel.

Unlike other NUC systems, this system’s dedicated AMD Radeon RX Vega graphics is powerful enough to run VR applications and play graphically demanding games. Moreover, there are six video ports that you can use to connect displays. 

You can buy this mini-PC with different storage and memory option, depending on your needs and budget. You can choose from 8GB RAM up to 32GB, and from 128GB SSD up to 2TB SSD.


Intel NUC 8 Mainstream Kit

  • You can add up to 32GB RAM
  • 8th Generation Intel Core i5 8259U processor
  • Supports Windows 10
  • Can't be used out of the box

NUC 8 Mainstream Kit is another great option if you want to buy a mini-PC with a performant graphics card.

NUC series from Intel can be a ready-to-go computer or a kit, meaning that you have to add some additional components. In this case, you have to add storage. Otherwise, it comes with Intel Iris Plus 655 graphics that supports up to 3 displays in 4K resolution.

If you like to build your own computer instead of an already configured model, this NUC 8 Kit is the best deal.


Beelink U55

  • Intel Core i3-5005u CPU
  • 5 USB ports
  • Wi-Fi, Gigabit Ethernet, and Bluetooth
  • Not the best mini-PC for gaming

Beelink U55 Mini is a very small mini-PC, easy to carry with you. Even if it’s smaller than a smartphone, this system has the proper amount of resources for Windows 10.

It is equipped with 8GB RAM and a 256GB SSD with a preinstalled Windows 10 Pro, so it can be used as soon as you unpack it. You can extend the RAM up to 32 GB and the storage up to 2TB SSD.

The video card is Intel HD Graphics 5500 with support for dual screen display via 2 HDMI ports, and a maximum resolution of 4K.


Lenovo ThinkStation P330 

  • 8th Gen Intel Core i7-8700T
  • Windows 10 Pro
  • 1 HDMI and 4 mini-Display port for video output
  • It can get hot at times, depending on the running tasks

Lenovo ThinkStation P330 is a perfect solution for both business and home use.

Likewise Nuc 8, you can choose the configuration for RAM memory and storage, right before buying. The system supports up to 64 GB RAM and 2TB SSD storage.

As per the graphics card, it comes with NVIDIA Quadro P620 with 2GB GDDR5. Great GPU for video editing software, CAD software, and as well for gaming.


ACEPC T11

  • Intel HD Graphics 500 with support for 4K resolution
  • Dual-band Wi-Fi and Gigabit Ethernet for internet connectivity
  • Very quiet
  • Not great with intensive tasks

If you are on a very limited budget, then the T11 model from ACEPC is the best solution for a mini-PC with just enough performance for daily tasks.

It features Intel Atop x5-Z8350 1.44GHz CPU with 4 cores, which can be overclocked to work at 1.92GHz. Along with that comes 4GB of RAM, with the maximum support of 64GB eMMC, which is pretty decent for a mini-PC.

The storage is not great, but it can be expanded up to 128GB by using a Micro SD card, or by simply using USB external HDD/SSD up to 2TB.


Whether you like to configure the PC with your own desired hardware or buy one that’s already configured, these mini-PCs are a perfect choice.

All of the above mini-PCs come with a good processor, and a great graphics card, making them perfect to watch movies in 4K resolution or to play video games.

Microsoft just announced a special roundtable about Bethesda joining Xbox at 10AM PT, watch it here

Microsoft has just announced that it will hold a special roundtable this morning to discuss its recent acquisition of Bethesda, which has been made official earlier this week. The event will kick off at 10AM PST, and we hope to learn more about the additional Bethesda games coming to Xbox Game Pass that Microsoft teased two days ago.

Xbox Marketing exec Aaron Greenberg made it clear that today’s event won’t be about new game reveals, but it should be “a great chance to learn more about the teams & people at Bethesda.” To be clear, it’s best to keep your expectations in check.

Microsoft acquired several new studios in recent years, but the company now owns eight new renowned developers with fantastic IPs such as Doom, Quake, Wolfenstein, Fallout, The Elder Scrolls, and more. Most Bethesda games should join Xbox Game Pass sooner or later, and future games will also be available in Game Pass on day one.

Earlier this week, Xbox head Phil Spencer reiterated that some upcoming Bethesda games will be exclusive to Xbox and PC, and it remains to be seen if we’ll get more details during the roundtable. Anyway, the event will kick off at 10AM PST on the Xbox YouTube channel, and we’re looking forward to hearing what the teams have to say.

Perfmon /Report Not Working: 5 Easy Methods to Enable It

Optimal system performance is vital for the effective functioning of the PC. And for that, you can use the built-in Resource and Performance Monitor or a reliable third-party tool. But, many reported that perfmon /report is not working.

This puts users in a tricky spot since they cannot access the critical data related to the PC and thus ensure its upkeep. Don’t worry, though! We have some great insights if Perfmon generating report got stuck. Let’s find out.

Why is perfmon /report not working?

Here are the primary reasons you will find perfmon /report stuck or not working:

  • Appears to be stuck: In most cases, Resource and Performance Monitor continues to display the diagnostics as running even after a report is generated. So you will have to verify this first.
  • Corrupt system files: If the system files are corrupt, the built-in tool will have trouble generating a performance report or even running the diagnostics test.
  • Buggy update: Many users reported the problem only with specific versions of Windows, which probably indicates a bug in these.

What can I do if perfmon /report is not working?

Before we start with the complex solutions, here are a few quick things you can try:

  • Restart the computer.
  • Update the OS to the latest available version and check whether perfmon /report is still taking too long and not working.
  • When running the perfmon /report command, make sure to open Command Prompt with administrative privileges.
  • Ensure you are generating the report on an administrator account. If not, switch to an administrator account.
  • Disable the third-party antivirus, if any are installed on the PC, and try again. In case it works, we recommend you uninstall the current one and switch to an OS-friendly antivirus.

If none work, head to the fixes listed next.

1. Use a specialized software

Most of the time, using specialized software is what will have the work done more efficiently and even quickly. Using such software when perfmon is not generating reports is our recommendation.

PRTG Network Monitor will allow you to create and analyze all the system performance reports you need on Windows 10 in practically no time.

PRTG Network Monitor

Analyze and keep track of your entire IT infrastructure, ensuring your computer systems are running smoothly.
Free trial Visit website

2. Check if the report is already generated

  1. Press Windows + R to open Run, type perfmon in the text field, and hit Enter.perfmon
  2. Expand Reports, double-click on System, and then select System Diagnostics.check reports when perfmon /report not working
  3. All the generated reports will be listed on the right. Check if any matches the time frame you ran the tool, and open it.report

As stated earlier, your primary approach when perfmon /report is not working should be to verify whether the report has already been generated because, in most cases, it was.

3. Fix corrupt system files

  1. Press Windows + S to open Search, type Command Prompt, and click on Run as administrator.command prompt
  2. Click Yes in the UAC prompt.
  3. Paste the following commands individually and hit Enter after each to run DISM:DISM /Online /Cleanup-Image /CheckHealth DISM /Online /Cleanup-Image /ScanHealth DISM /Online /Cleanup-Image /RestoreHealth
  4. Once done, execute the following command to run the SFC scan:sfc /scannowsfc scan to fix perfmon /report not working
  5. After it’s complete, restart the computer, and you should be able to generate a performance report.

As stated earlier, corrupt system files could be why perfmon /report is not working. And the simplest fix, in this case, is to run the DISM (Deployment Image Servicing and Management) tool and SFC (System File Checker) scan.

Besides the quick method mentioned above, we also recommend third-party software because it can perform this action automatically.

It’s a safe and reliable option to use, as it can help you thoroughly scan your computer for corrupt system files and then locate fresh components from its frequently-revised vault.

4. Uninstall recent Windows updates

  1. Press Windows + I to open Settings, go to Windows Update from the navigation pane, and click on Update history.update history
  2. Scroll to the bottom, and click on Uninstall updates.uninstall updates to fix perfmon /report not working
  3. Now, click on Uninstall next to the last installed update.uninstall windows update to fix perfmon /report not working
  4. Again, click Uninstall in the prompt to confirm the change.uninstall
  5. Once done, restart the computer.

5. Perform a system restore

  1. Press Windows + R to open Run, type rstrui.exe, and click OK.rstrui.exe
  2. We recommend you select the Choose a different restore point option, and then click Next.choose a different restore point
  3. Choose a restore point from the list, one created before the problem first appeared, and click Next.system restore to fix perfmon /report not working
  4. Verify the restore details, and click Finish.start restore to fix perfmon /report not working
  5. Wait for the restore to complete.

If nothing listed previously worked, you can always perform a system restore to get things up and running when perfmon /report is not working in Windows. This is the reason many recommend regularly creating restore points.

As a last resort, you can reset Windows to factory settings, though in most cases, it wouldn’t come to that. Also, find out how to boost Windows performance and check some reliable tools to fix issues in Windows.

For other queries or to share the solution that worked for you, comment below.

5+ best games for old Windows 10/11 laptops

Windows 10 gaming laptops are a match for most desktops when it comes to playing the latest games. However, a lot of the latest games (especially 3D titles) aren’t going to run on more outdated laptops.

That doesn’t necessarily mean you can’t still have lots of gaming fun on an antiquated laptop, but your choice of games will be more limited to titles with lower system requirements.

Nevertheless, there are still plenty of great low end games for Windows 10 you that you can run. These are a few of the best games for outmoded Windows 10 laptops.

Here are the best low spec Windows 10 laptop games

Team Fortress 2

After the Half-Life series, Team Fortress 2 is perhaps Valve’s best game for Windows. This multiplayer blaster first launched in 2007, and it remains one of the most widely played Steam games.

Team Fortress 2 requires just 512 MB RAM and a 1.7 Ghz CPU, so it will run on most Windows 10 laptops. Furthermore, this game is free and you can add it to Windows 10 from Steam.

Team Fortress 2’s huge fan base might be partly due its humorous gameplay and art design. With more than 10 game modes Team Fortress 2 provides great variation.

Players can select to play Capture the Flag, King of the Hill, Control Points, Payload Race and Mann vs Machine game modes among others.

Another great thing about Team Fortress 2 is that it still getting regular updates with new content added that keeps the game fresh.

⇒ Get Team Fortress 2


Half-Life 2

Half-Life 2 isn’t just one of the best Windows first-person shooters ever, it’s one of the best games ever. The sequel to the original Half-Life scooped 39 Game of the Year awards in 2004.

So this is surely one of the best games you can play on any lower specification Windows 10 laptop. The minimum system requirements for Half-Life 2 amounts to 512 MB RAM, 1.7 Ghz CPU and DirectX 8.1 graphics card.

With a Metacritic score of 96, Half-Life 2 is one of the most highly rated Windows games.

The game stars with the scientist Gordon Freeman who rallies the resistance against the alien Combine on Earth. Half-Life 2 retained all the suspense and intense gameplay of the original.

Its Source engine added whole new realism to the game. Half-Life 2 is renowned for its realistic physics with gravitational forces that send objects flying.

The Gravity Gun, with which players can toss objects at aliens, adds a whole new dimension to its gameplay.

This was a revolutionary game when it launched, and even today few first-person shooters can match Half-Life 2’s storytelling and controls.

⇒ Get Half-Life 2 on Amazon

If you’re searching for a good price deal for Half-Life 2, you should know that you can also find it available on G2A.

The game can also be bought from Kinguin, another cheap and safe alternative.


IL-2 Sturmovik: 1946

The original IL-2 Sturmovik has remained the most highly rated combat flight simulator for Windows for more than a decade.

IL-2 Sturmovik: 1946 is a compilation pack that brings together titles from the original series and includes additional content expansions of its own.

The game’s Steam page only includes Windows XP and 2000 within its OS system requirements, but IL-2 Sturmovik: 1946 does run on Windows 10.

The original IL-2 Sturmovik is a World War 2 flight simulator based in Eastern Europe’s air war.

However, you can also play the Pacific Fighters expansion in IL-2 Sturmovik: 1946, which includes U.S. and Japanese aircraft in the Pacific Theater.

As the game also packs in the Ace Expansion Pack, Forgotten Battles and additional alternative history campaigns, you can play in almost 200 missions. Overall, the compilation package includes five games in one.

Players can select to fly 229 vintage WW2 aircraft, which is a number few other flight simulators can match. IL-2 Sturmovik is renowned for its realism and physics, and each plane has its own unique feel.

Players can play in expansive multiplayer battles or single player missions that have varied objectives.

So this is little more than just a dogfighting simulator in which you blow everything out of the sky. Although the game’s graphics might be a tad dated now, it’s the gameplay that really counts.

⇒ Get IL-2 Sturmovik from Amazon

That’s not all. Thanks to its popularity, you can find the game on G2A as well.

You should also give GreenManGaming a look since they constantly have good deals.

If that doesn’t cut it for you, know that Kinguin has frequent deals for this game.


Age of Empires III: Definitive Edition

Age of Empires III is a classic RTS (Real-Time Strategy) game for Windows that Microsoft Studios has now revived in 2018 with Age of Empires III: Definitive Edition. So a great game is back with a bang with remastered visuals.

As this is still a 2D game, you don’t need a laptop with a top-notch 3D GPU for it. A Windows 10 laptop with a 1.8 Ghz i5 CPU, Four GB RAM. The game also requires DirectX 11 and one GB video card RAM win run this game.

Age of Empire’s players can select 16 civilizations to battle it out within the game’s 10 single-player campaigns and multiplayer mode. The revamped Age of Empires: Definitive Edition has 4K HD visuals and remastered sound.

There are a few gameplay refinements in the Age of Empires Definitive, such as its new Attack Move, unit queuing, and rally points.

The game also includes a Campaign editor tool with which you can make your own scenarios maps. So Age of Empires fans will love the remastered AoE Definitive.

⇒ Get AoE III: DE on Amazon

You can also buy it on G2A, another trusted CD Key site.

Note that Kinguin has AoE: DE for sale as well.

If you’re still not sure, you can check its price on GreenManGaming as well, since they also sell it.


Civilization V

Civilization titles are the best turn-based strategy games for Windows, and they don’t have hefty system requirements. However, if you really can’t run the latest Civ 6 on your Windows 10 laptop, check out Civilization V instead.

You can play this game on a Windows 10/8/7/Vista laptop with two GB RAM, 1.8 Ghz Intel Core 2 CPU and 256 MB nVidia 7900 GS GPU. The game is also compatible with Mac OS X and Linux Ubuntu platforms..

In Civilization V, as in the rest of the series, players build their civilizations up through the ages to reach an eventual victory condition.

Civilization 5 introduced new city-states and hex grid and included overhauled combat and cultural systems that give the game more strategic depth than its predecessors.

In Civ 5, where you position your army’s units is almost as important as their military tech. With a stunningly detailed game map, Civ 5’s graphical quality is also among the best in the series.

⇒ Get Civilization 5 from Amazon

You can also get Civilization 5 for cheap from G2A. The site is pretty popular, so you should give it a try.

Kinguin also has the game on its stock. You’ll definitely get some good deals there.

If those sites don’t interest you, try checking out Civilization 5 on GreenManGaming.


StarCraft: Remastered

StarCraft Remastered

Blizzard launched StarCraft: Remastered, a renewed version of the popular 2d RTS, for Windows 10 in 2017 to celebrate the anniversary. StarCraft: Remastered has breathed new life into a cult classic with slick new visuals.

The game only needs two GB RAM, an Intel Pentium D CPU and 256 MB Nvidia 6800 GPU to run on Windows laptops. The original StarCraft is available for free, and the remastered version can be found on many sites.

StarCraft: Remastered is pretty much the same game as the original title in which players battle it out with the Protoss, Terrans and Zerg factions in the Koprulu Sector.

However, it also includes the Brood War expansion that expands its content. The remastered StarCraft retains exactly the same gripping campaigns and gameplay, with much more detailed and smoother visuals.

Now you can play StarCraft in 4K on widescreen VDUs (Visual Display Units). Blizzard has also added stylized briefings and enhanced narrative to the game and rejuvenated its soundtrack.

Note: You can also play loads of classic retro games on Windows with console emulator software.

⇒ Get StarCraft: Remastered from Amazon

You’ll also find the game available on G2A, another awesome site filled with great deals for popular games.

Talking about popular, you should check Kinguin’s Starcraft: Remastered offer as well.


So who needs an Acer Predator, Alienware 17, or ROG Strix laptop for Windows 10 gaming? These are just a few of the great low graphics games for Windows 10 that you will definitely enjoy.

Did any of these games interest you? Make sure to let us know in the comment section below.

3 Best VR Controllers For PC [2026 Guide]

If you’re looking for a reliable VR controller to improve your gaming experience, you’ve come to the right place.

In this article, we’re going to list the best VR controllers for Windows PCs currently available on the market.

Therefore, we can only advise you to take your time and check our picks below. 

What are the best VR controllers for PC?

Razer Wolverine Tournament Edition

  • 4 remappable multi-function buttons
  • Optimized ergonomics
  • Razer Chroma Lighting
  • Razer Synapse for Xbox
  • Detachable braided cable
  • Not the most affordable option

First of all, we invite you to take a closer look at Razer Wolverine Tournament Edition. Thanks to its 4 remappable multi-function buttons, it can be adapted to suit your individual needs.

Razer Wolverine TE is powered by Razer Chroma lighting, so it is easier than ever to personalize your controller and enjoy a unique gaming experience.

Moreover, that’s your chance to show off your personal style with Razer Chroma’s wide selection of lighting effects and profiles, easily customizable through Razer Synapse for Xbox One.


VR remote controller Bluetooth

  • Ideal or mobiles iCade VR game
  • Support for Android and Windows
  • Extremely responsive
  • Newly designed shape
  • Great price
  • Doesn't work with Google Daydream

This VR remote controller gamepad might surprise you thanks to its video playback abilities. Users often find it especially helpful for sports highlights when things move very fast.

Linking your VR glasses is very simple, without interference, so don’t think twice. Use it with VR glasses as well and you won’t be disappointed.  

As for its unique shape, it is ideal to hold and control up to 5 high-tech devices, including mobile phones, smart TVs, and even certain TV box versions.


SteelSeries Stratus Bluetooth

  • Home and Back buttons
  • Easy-to-read LEDs
  • Up to 40 hours of wireless gaming
  • Android and PC compatibility
  • Ergonomic design
  • Bluetooth adapter sold separately

If you like the idea of simplicity, then keep in mind that SteelSeries Stratus Bluetooth was designed to pull out of the box, connect to your computer, and start gaming.

It also works on all Android devices if you’re on the go most of the time. There’s no wonder that it fits perfectly in your hands and feels great for hours of use.

Finally, rest assured that a wireless Bluetooth connection is incredibly responsive when using this controller.


With these VR controllers, you can walk around freely and explore the VR world in front of you.

Speaking of which, if you love the freedom of movement that comes with VR games, you can further enhance it with our wide selection of VR cable management systems.

You will most likely enjoy the experience!

So, with such great choices in front of you, what’s your favorite VR controller? Tell us more in the comments section below.

Posted in VR

FIX: HDMI Isn’t Showing in Playback Devices on Windows 10/11

Many users tend to connect an additional display to their PC using the HDMI connection, but sometimes HDMI is not showing up in the playback devices section.

This can lead to certain problems, but today we’ll show you how to easily fix this issue.

Sometimes your HDMI device won’t show up in the playback devices section. That can be a big multimedia issue, and speaking of HDMI issues, here are some common problems that users reported:

  • Digital output device (HDMI) missing Windows 10
    • This is a common problem, and if this happens, be sure that your HDMIdevice isn’t hidden or disabled in playback devices section.
  • Windows 10 no HDMI audio option
    • Sometimes HDMI audio won’t work due to your audio drivers.
    • To fix the issue, reinstall your audio driver. If the issue is still there, update the audio driver to the latest version and check if that helps.
  • HDMI port not working on laptop
    • Sometimes this problem can occur due to your graphics card drivers.
    • To fix the issue, update the drivers to the latest version and check if that helps.
  • HDMI not showing up as audio device Windows 10, up in Sound
    • This is a relatively common problem, and in order to fix it, be sure that you turn on your HDMI device, connect it to the PC, and then turn on your PC.
    • By doing so, you’ll force the PC to recognize the device.
  • HDMI not detected, working, recognized, playing audio
    • These are some relatively common HDMI issues, and we covered most of them in our how to fix HDMI output problems article, so be sure to check it out for more solutions.

How do I fix HDMI not showing up in my playback devices

  1. Install the default graphics driver
  2. Reinstall the graphics card drivers
  3. Double-check the playback devices list
  4. Update the High Definition Audio Device
  5. Disable the Hyper-V feature
  6. Change the projection mode
  7. Make sure that you turn on your devices in the correct order
  8. Remove the problematic applications

1. Install the default graphics driver

  1. Press Windows Key + X to open Win + X menu.
  2. Now select Device Manager from the list.
    device manager win + X menu Hdmi not working
  3. When Device Manager opens, locate your graphics card driver and right-click it.
  4. Choose Update driver from the menu.
    update driver menu HDMI not working
  5. Select Browse my computer for driver software.
    Search computer for driver software HDMI not working
  6. Now select Choose Let me pick from a list of device drivers on my computer.
    pick form a list of available drivers HDMI doesn't work
  7. Select the available driver and click Next.
  8. Follow the instructions on the screen to complete the process.

According to users, if HDMI is not showing up in playback devices, the problem might be related to the drivers. To fix this issue, users are suggesting installing the default graphics card driver.

Once the default driver is installed, check if the problem is still there. Bear in mind that the default driver might not offer the same performance as the latest driver.

So if you’re planning to play the latest games on maximum settings, perhaps this won’t be a good long-term solution for you.

2. Reinstall the graphics card drivers

  1. Open the Windows search bar.
  2. Type in Device Manager.
  3. Expand your Display Adapters section.
  4. Select your GPU, then right-click on it and select Uninstall.
  5. Now restart your computer.
  6. After your computer finished restarting, it will automatically search for a new driver.

Once you remove the drivers, try installing the latest drivers for your graphics card. You can do that by visiting your graphics card manufacturer’s website and downloading the latest driver for your model.

As already mentioned in the previous solution, sometimes your graphics card drivers can cause this problem to appear. To fix the issue, some users are suggesting removing your graphics card drivers.

Update drivers automatically

To completely remove your drivers, it’s advised to use a third-party software driver updater that can do it automatically for you, so you won’t need to worry about doing something wrong.

The software will make sure all of your drivers are up to date. With just a few clicks, the app will scan your device for compatible drivers and install them. The process is mostly automated as well.

3. Double-check the playback devices list

  1. Open the Playback devices
  2. Right-click the empty space and make sure that you check both Show Disabled Devices and Show Disconnected Devices.
    hidden devices playback settings HDMI not showing

Many users reported that HDMI is not showing in playback devices section, and if this happens on your PC, perhaps the HDMI device isn’t listed as HDMI on the list.

Many users reported that their device was listed as the model of their display followed by NVIDIA High Definition Audio.

As you can see, the device won’t be listed as HDMI, so you’ll need to pay a bit more attention and check all devices in the playback devices section in order to find your HDMI device.

Several users reported that their HDMI device was disabled and therefore hidden in the playback devices section. To fix that, you need to reveal all playback devices by doing the following:

After doing that, you should be able to see your HDMI device on the list and enable it.

4. Update the High Definition Audio Device

To do that, follow these steps:

  1. Open Device Manager and locate High Definition Audio Device.
    • It should be listed as AMD High Definition Audio Device or NVIDIA High Definition Audio Device.
  2. Right-click the device, and choose Update driver.
  3. Now select Search automatically for updated driver software and Windows will try to update the driver on its own.
    automatically search for driver software HDMI not in playback devices

According to users, if HDMI isn’t showing in playback devices, the issue can be related to your audio driver. To fix the problem, you just need to update this driver.

Once the driver is up to date, check if the problem is still there. If this method didn’t fix the problem for you, you can try updating the driver manually and check if that helps.

Some users are suggesting to uninstall your HDMI sound driver and install it again, so you might want to try that as well.

5. Disable the Hyper-V feature

  1. Press Windows Key + S and type windows features.
  2. Now choose Turn Windows features on or off.
    • Windows Features window will now appear.
  3. Look for Hyper-V on the list and disable it.
  4. Once you disable this feature, click OK to save changes.
    hyper-V disable HDMI not detected
  5. Restart your PC to apply the changes.

Hyper-V is a virtualization feature, and thanks to it, you can create a virtual environment on your PC and use it to run any operating system inside of Windows.

Although this feature can be incredibly useful to some users, it can also cause issues with HDMI devices.

In fact, many users reported that their HDMI device wasn’t showing up in the playback devices section due to the Hyper-V feature.

According to them, they managed to fix the issue simply by disabling the Hyper-V feature. This is quite simple to do, and you can do it by following these steps:

Once your PC restarts, the Hyper-V feature will be disabled and the problem with HDMI should be resolved.

6. Change the projection mode

  1. Press Windows Key + P.
  2. You should now see a list of options.
  3. Select Duplicate or Extend from the list.
    project modes HDMI not working

If HDMI isn’t showing in playback devices, the issue might be related to the projection mode.

Windows allows you to switch between several projection modes, and it seems that only duplicate and extend modes will show your HDMI device in the playback devices section.

After doing that, the HDMI device should appear in the playback devices section.

7. Make sure that you turn on your devices in the correct order

  1. Make sure that your PC and second display are turned off.
  2. Turn on your second display or TV.
  3. Now connect the HDMI device to your PC.
  4. Turn on your PC.

According to users, sometimes your HDMI device won’t show up in the playback devices section due to certain glitches.

Apparently, the HDMI device isn’t recognized if you plug it directly in your PC while it’s running. Once your PC boots, the problem should be resolved and the HDMI device should appear in the playback devices section.

Bear in mind that this is a one-time procedure, and once your HDMI device appears in the playback devices, the issue should be permanently resolved.

8. Remove the problematic applications

Several users reported that third-party applications can sometimes lead to issues with HDMI and playback devices. If your HDMI device is not showing, perhaps the problem can be related to third-party applications.

Several users reported that VLC Media Player caused this issue, but after removing the application, the issue was resolved.

Bear in mind that there are several ways to remove an application, but the most effective one is to use a dedicated utility such as CCleaner.

CCleaner is a PC cleaning and optimization software that has a powerful uninstaller feature, capable of completely removing any app along with its corresponding files and registry entries.

Once the application is removed, check if the problem is still there. Problems with HDMI devices are fairly common, and if your HDMI device isn’t showing in playback devices, be sure to try all of our solutions.

⇒ Get CCleaner

These are just a few of the solutions you can try to resolve this issue, but we also have further solutions for when there is no HDMI signal.

Let us know which one works best for you in the comments section below.

Error Writing to File on Windows 10 [Best Solutions]

Computer errors can occur from time to time, and sooner or later you’ll experience an error on your Windows 10 PC.

Users reported Error writing to file error messages while installing certain software, and since this error can prevent you from installing new applications, it’s crucial to know how to properly fix it.

In this comprehensive article, you will learn how to fix the Error writing to file for all the Windows 10 apps.

How can I fix error writing to file alerts?

Before applying any tweaking methods below, make sure you have enough disk space. Sometimes, the Error writing to file can be triggered by such a trivial problem.

1. Fix – Error writing to file

1.1 Register Windows Installer service

  1. Type cmd in the search tab and click on Run as administrator under Command Prompt to start it with full privileges.
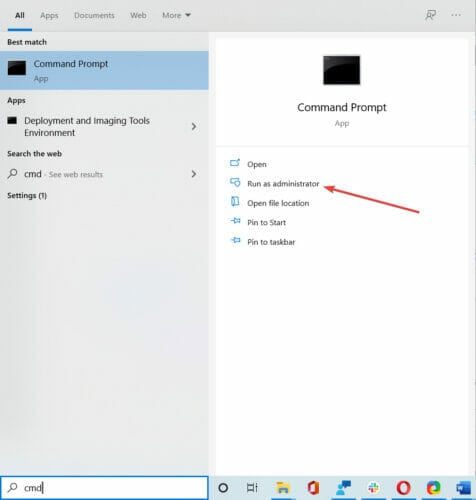
  2. When Command Prompt opens, enter the following lines:
    • msiexec /unregister
    • msiexec /regserver
  3. After both commands are successfully executed, close Command Prompt.

If you’re trying to install new software on your PC, you’ll have to use Windows Installer service.

This service is crucial for the installation process, but sometimes this service can become unregistered and prevent new applications from installing.

To fix this problem, you need to register the Windows Installer service manually.

By running these commands you’ll manually unregister and reregister the Windows Installer service, and hopefully, that will fix this error for you.

If you can’t access the Windows Installer, we have an excellent guide that will help you fix the problem.

1.2 Run the chkdsk command

  1. Open Command Prompt as administrator as shown in the previous step.
  2. When Command Prompt opens, enter chkdsk X: /r and press Enter (Be sure to replace X with the letter that matches your hard drive partition that you’re to installing the application to).
    • If you’re trying to scan your system partition you’ll have to schedule a restart and scan your partition before Windows 10 starts.
  3. After the scan is completed, try to run the installation process again.

Sometimes Error writing to file messages can appear if you have corrupt files that are interfering with the installation process.

One way to fix this problem is to perform a chkdsk scan and scan your hard drive partition for any corrupt files.

If chkdsk gets stuck follow this comprehensive guide to fix it quickly and continue with this fix.

1.3 Rename the com.Apple.Outlook.client.resources folder

Users reported this error message while trying to install iTunes on their PC, and one way to fix this problem is to rename one of your folders.

According to users, com.Apple.Outlook.client.resources folder can cause this error to appear, therefore in order to fix this problem, you need to find this folder and rename it to com.Apple.Outlook.client.resources_OLD.

After renaming the folder, try to perform the installation again and check if your problem is resolved.

1.4 Perform a Clean boot

  1. Press Windows key + R and enter msconfig. Press Enter or click OK.
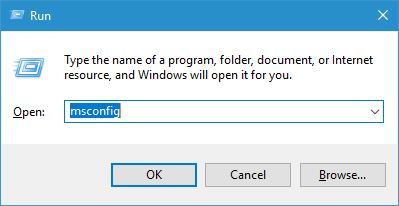
    error-writing-to-file-msconfig-1
  2. When System Configuration window opens, go to the Services tab.
  3. Check Hide all Microsoft services and then click on Disable all.
    error-writing-to-file-msconfig-2
  4. Now go to Startup tab and click Open Task Manager.
  5. In the Startup tab, disable all startup applications. You can do that by right-clicking the startup item and choosing Disable from the menu (Repeat this process for all startup applications).
    error-writing-to-file-msconfig-3
  6. After all startup items are disabled, close Task Manager.
  7. Go back to System Configuration window and click Apply and OK to save the changes.
  8. Restart your PC.

Sometimes Error writing to file messages can appear due to installing third-party applications. Certain applications and services can interfere with the setup process and cause this error to appear on your PC.

One way to fix this problem is to disable all startup applications and processes.

After your PC restarts, try to install the application again. If the application manages to install without any errors, repeat the same steps and enable all startup applications and services.

1.5 Change the security permissions for the ProgramData folder

1.5.1 Change the owner of the folder
  1. Open File Explorer and navigate to C:.
  2. Locate the ProgramData folder. If you can’t see this folder, go to View tab and check Hidden items checkbox.
  3. Right-click the ProgramData folder and choose Properties.
    error-writing-to-file-permissions-1
  4. Go to the Security tab and click on Advanced button.
    error-writing-to-file-permissions-2
  5. Click the Change link next to the Owner name.
    error-writing-to-file-permissions-3
  6. In Enter the object name to select enter Administrators and click Check names. If everything is in order, click OK to save changes.
    error-writing-to-file-permissions-4
  7. Select the Replace the owner on subcontainers and objects.
    error-writing-to-file-permissions-5
  8. Click Apply and OK to save the changes.

Some applications rely on the ProgramData folder for their installation, and if you don’t have the necessary privileges to access this folder, you might get Error writing to file message.

To fix this problem, you need to change the security permissions, but since that is an advanced process, we strongly recommend that you create a System Restore point before making any security-related changes.

1.5.2 Change the permissions from the Advanced security settings
  1. When Advanced Security Settings window opens check if SYSTEM and Administrators group have Full control access.
    • If one of the groups is missing, be sure to add it by clicking the Add button.
    • In case any of the two groups doesn’t have Full control, you can simply change that by double-clicking the group and checking the Full control option.
  2. Check Replace all child object permissions entries with inheritable permissions entries from this object and click Apply and OK.
    error-writing-to-file-permissions-6
  3. After that, try to reinstall the application again.

Another way to change the permissions of a specific folder is to use Command Prompt. This is a faster, although a bit more advanced method, therefore use it with extra caution.

To do that, open Command Prompt as administrator, enter the following command, and press Enter: icacls "C:Config.Msi" /T /C /grant administrators:F

This is just an example, therefore be sure to replace C:Config.Msi with the path of the folder that you’re trying to modify.

Although we showed you how to change the permissions of the ProgramData folder in our example, sometimes in order to fix this problem you need to change the permissions of the installation directory instead.

1.6. Rename the Config.msi folder

Sometimes, certain Adobe applications can’t be installed on your PC due to the Config.Msi folder. One of the simplest ways to fix this is to locate the Config.Msi folder and rename it.

By default, this folder should be located in the C: directory, and you can easily rename it. If you can’t rename the folder, you have to change the permission settings for the Config.Msi folder and try again.

1.7 Run the setup file as administrator

You can fix the Error writing to file error message simply by running the installation process as an administrator. To do that, right-click the setup file and choose Run as administrator from the menu.

This isn’t a permanent solution, but it should allow you to install the desired application without any errors.

1.8 Disable McAfee’s EPO agent

McAfee tools such as McAfee EPO agent can sometimes interfere with the installation process and cause this error to appear.

According to users, McAfee EPO agent has the policy to block autorun, and this policy can prevent applications from installing.

After turning the McAfee EPO agent off, you should be able to install any application without problems.

1.9 Check your firewall

Sometimes this error can occur due to your firewall settings, and you should be able to fix it simply by changing those settings.

User reported this error while installing iTunes, and according to them, the error was caused because the QTTask.exe was prevented from accessing the Internet by the firewall.

After allowing QTTask.exe to access the Internet the issue was completely resolved.

This solution applies to iTunes, but if you’re installing or updating a different application, be sure to check if your firewall isn’t blocking any installation files.

1.10 Give Full Control permissions to the Everyone group

  1. Locate the Config.msi folder, right-click it, and choose Properties from the menu.
    • By default this folder should be located in the C: directory.
    • Keep in mind that this folder might be hidden, therefore you need to enable Show hidden items option from the View tab.
  2. Go to Security tab and click the Edit button.
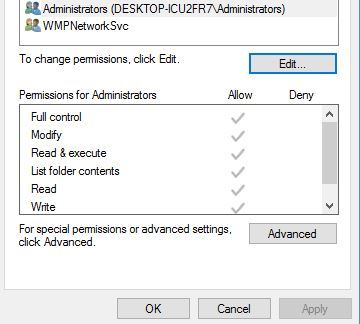
    error-writing-to-file-edit-1
  3. Click the Add button.
    error-writing-to-file-edit-2
  4. In Enter the object names to select field enter Everyone and click Check Names. If your input is correct, click the OK button.
    error-writing-to-file-edit-3
  5. Everyone group should now be added to the Group or user names section. Select Everyone and check Full control in the Allow column.
    error-writing-to-file-edit-4
  6. Click Apply and OK to save the changes.

Users are also reporting that you can fix this problem simply by giving Full control over the Config.msi folder to Everyone on your PC. This is a simple procedure, and you can do it by following the steps above.

After changing the security permissions, try to install the application again.

1.11 Delete the Config.msi folder

  1. Click the Start button, hold the Shift key on your keyboard and choose Power, then select Restart.
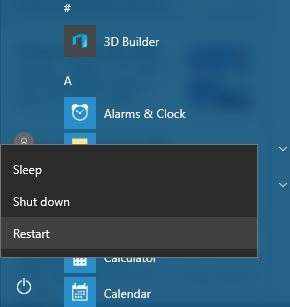
    error-writing-to-file-safe-mode-1
  2. When your PC restarts choose Troubleshoot, choose Advanced options and select Startup settings.
  3. Click the Restart button.
  4. When your PC restarts again you’ll see a list of options. Select any version of the Safe Mode by pressing the appropriate keyboard key.
  5. When Safe Mode starts, start the Command Prompt as administrator.
  6. When Command Prompt opens, type the following lines pressing Enter after each one:
    • cd c:config.msi
      erase *.*
      cd c:
      rd config.msi
  7. Restart your PC and try to install iTunes again.
  8. If the problem still persists, create the Config.msi folder in the C: directory.
  9. Create the .rdf file that the installation requires in the Config.msi folder and try to install iTunes again.
  10. If you encounter any errors, be sure to ignore them and you should be able to install iTunes.

A few readers reported that they were unable to install iTunes due to problems with Config.msi directory. One suggested a solution that worked for some users was to delete this folder from Safe Mode and recreate it.

1.12 Uninstall iDrive

According to users, sometimes, the Error writing to file message can appear if you have iDrive installed on your PC.

We don’t know how iDrive interferes with the installation process of other applications, but the only solution is to uninstall iDrive. After removing iDrive, the issue should be completely resolved.

You can, of course, do it manually from the Apps & features function in Windows 10.

But sometimes, programs don’t get uninstalled properly and you’re left with file remains that might interfere with the next installation of the same program.

The solution is to use a dedicated uninstaller tool that will do that automatically. To find the most suitable one for your needs, we advise you to pick from the best uninstaller software on Windows 10.

1.13 Disable Kaspersky antivirus and Memeo Instant Backup

Users reported this error while installing the MySQL workbench tool, and according to them, the issue was caused by Kaspersky antivirus and Memeo Instant Backup.

According to them, after disabling these tools the error was completely resolved. Keep in mind that any other antivirus or backup tool can cause this error to appear, therefore be sure to disable it temporarily.

Users also reported issues with Webroot antivirus, so if you have it installed be sure to temporarily disable it and check if that solves the problem.

1.14 Turn off User Account Control

  1. Press Windows key + S and enter user accounts. Select User Accounts from the menu.
  2. When User Accounts window opens, go to Change User Account Control settings.
    error-writing-to-file-uac-2
  3. Move the slider all the way down to Never notify and click OK to save changes.
    error-writing-to-file-uac-3
  4. After disabling User Account Control restart your PC and check if the problem is resolved.

User Account Control is a security feature that will alert you whenever you try to make a change that requires administrator privileges.

This is a useful feature that can sometimes protect you from malicious software that tries to make changes to your PC without your knowledge.

Even though this feature can be useful, it can also interfere with the installation process and cause Error writing to file message to appear.

1.15 Change the Symantec Endpoint Protection settings

  1. Open Symantec Endpoint Protection.
  2. On the left side click the Change Settings tab.
  3. Click the Configure Settings button in the Client Management section.
  4. Locate and disable Enable Application and Device Control option.

According to some of our readers, sometimes, Symantec Endpoint Protection can interfere with the installation process and cause this and other errors to appear. To fix this problem, you need to perform the quick steps above.

2. Fix – Error writing to file for android-sdk.7z

2.1 Install the Java Development Kit

Users reported this error while trying to install Android SDK on their Windows 10 PC. Apparently, this error is caused because the Java Development Kit is missing.

And the fastest way to fix this problem is to download the Java Development Kit. After downloading it, simply install it and the problem should be completely resolved.

2.2 Run the setup as administrator and disable your firewall

According to our readers, you can fix this problem simply by running the setup file as the administrator. If that doesn’t help, you might have to temporarily disable your antivirus and firewall and check if that solves the issue.

If the problem still persists, you might have to completely remove your antivirus software. Users reported that the issue was resolved after removing McAfee antivirus, therefore be sure to try that.

3. Fix – Error writing to file for 3DS Max

3.1 Turn off the Compression on Save option

According to users, this error appears when you try to save your file in 3DS Max, and one suggests that the workaround is to disable the Compress on Save option in Preferences.

After disabling this option, the error will not appear anymore, but your files will get larger in size without compression, so keep that in mind.

Users also reported that this error appears if you have more than two instances of 3DS Max open, therefore as long as you have less than 3 instances of this application running, you shouldn’t have any problems.

4. Fix – Error writing to file for Adobe Acrobat

4.1 Rename the Active X folder

Users reported Error writing to file message while trying to install Adobe Acrobat, and according to them, they managed to resolve this issue simply by renaming the Active X folder.

After renaming the folder to Active X_OLD, create a new Active X folder and copy the files from Active X_OLD folder to the new Active X folder that you created. After doing that, try to install Adobe Acrobat again.

Some users are also suggesting renaming the Acrobat folder to something else and try to install Adobe Acrobat again, so you might want to do that as well.

4.2 Delete the Apricot folder

A few of our readers reported that they managed to fix this problem simply by going to the Adobe folder: C:\ProgramData\Adobe

You should see Apricot and two other folders available. Delete them and try to install Adobe Acrobat as administrator.

4.3 Use a dedicated software to fix the Registry

Users reported that they managed to fix Error writing to file error while installing Adobe Acrobat simply by running a third-party solution.

Using the dedicated solution recommended below they removed problematic registry entries and that solved the problem for them.

⇒ Get CCleaner

The Error writing to file message can prevent you from installing certain applications, but in most cases, you can fix this problem by disabling your antivirus or by changing your security permissions.

If those solutions don’t work, feel free to try any other solution from this article. Also, if you have any other suggestions, don’t hesitate to write them in the comments section below.


Windows 10 Facebook app returns to the Microsoft Store app store as a PWA

Just over a year since the original Windows 10 Facebook app was removed from the Microsoft Store app store, a new one has now appeared.

This new app (cheers, AL) appears to be in beta and is in the Progressive Web App (PWA) format which essentially means that it’s kind of a web wrapper but with some added support for Windows 10 features such as notifications.

While using this new Windows 10 Facebook app is pretty much the same as using the Facebook website, it is noticeably faster than accessing the site in a web browser such as Edge or Chrome. It can often be hard to justify using a PWA over simply visiting a website but for those that get frustrated with how slow the Facebook website can be on their Windows 10 devices, this new app may be a good alternative.

How do you prefer to access Facebook? Let us know the comments down below and then follow us on Facebook for more Windows 10 app news.

Facebook (Beta)
Facebook (Beta)
Developer:
Meta
Price:
Free

5 Best Gaming Laptops Under 600$ [Buying Guide]

Not anyone wants to play a triple-A titles, and if you’re one of those kinds of gamers, you might be interested in a budget gaming laptop.

Some games don’t require much computing power to run, so all you need is a budget laptop and you’re set. We will show you a list of the 5 best gaming laptop under 600$ you can find on Amazon.

What are the best gaming laptops under 600$?

ASUS F512DA-EB51

  • AMD Quad-Core R5-3500U CPU
  • 15.6-Inch Full HD Display with thin bezels
  • Exclusive ErgoLift design for improved typing position
  • USB 3.2 Type-C, two USB 2.0 ports
  • Micro SD and HDMI port
  • No Thunderbolt 3 support

ASUS F512DA-EB51 is a great and cheap laptop for light gaming. It comes with a powerful CPU that runs less graphically intensive games well. The 8GB of DDR4 memory allows you to run multiple programs while you game and the SSD makes your games load fast.

It has a modern, attractive design and the case is slim, yet it has all the ports you need. The keyboard is backlit so you don’t have to worry about pressing the wrong keys when you play games late at night.


Acer Aspire 5

  • Ryzen 3 3200U AMD CPU
  • 16GB DDR4 memory, 1TB HDD and 128GB SSD
  • Radeon Vega 3 Graphics
  • 15.6-Inch 1080p Display
  • Windows 10 Home preinstalled
  • Battery doesn't last long if you're gaming

Acer Aspire 5 is a great laptop for its budget range. It combines high-quality, durable materials with customizable internals. The laptop is geared with a powerful Ryzen 3 CPU accompanied by 16GB of RAM.

Moreover, if you enjoy playing a multitude of games, you can store all of them thanks to the high storage capacity. The laptop has a compact and slim design and backlit keys.


HP 14 Touchscreen

  • 14-Inch HD Touchscreen Display
  • AMD Ryzen 3 3200U CPU
  • Radeon Vega 3 Graphics
  • 512GB SSD
  • 8GB DDR4 2400MHz RAM Memory
  • No DisplayPort via USB-Type C

The HP 14 Touchscreen is a light and slim laptop, equipped with a powerful AMD Ryzen 3 CPU and an integrated GPU. It is a smaller laptop but it is still capable of running less demanding games with no problem.

In addition, it comes with an SSD so you don’t have to worry about loading times. The Type-C HD Webcam allows you to socialize with your friends on Discord, Skype, or Twitch.


ASUS VivoBook 15

  • 15.6-Inch Full HD Display
  • 8GB DDR4 RAM memory
  • Ryzen 3 3200U Dual-Core CPU
  • AMD Radeon Vega 3 GPU
  • Underwhelming battery life

Asus VivoBook 15 is a cheaper laptop that can still run games, thanks to the AMD Ryzen 3 CPU and the Integrated GPU. This is a slim laptop with a wide display and slim bezels.

The keyboard is backlit and it includes the Numpad buttons which you can bind when playing MMOs, MOBAs, and RTS games.


Dell Inspirion

  • 15.6-inch display
  • Dual-Core i3 2.7GHz CPU
  • Intel HD 620 graphics
  • 8GB DDR4 SDRAM
  • 128GB SSD
  • Small storage space

Dell Inspirion is another great gaming laptop under 600$. The device comes with a 15.6-inch display and Truelife LED-Backlit Display and 1366×768 resolution.

As for the hardware, the laptop is powered by Intel Dual-Core i3-7130u 2.7GHz CPU and Intel HD 620 Graphics. Regarding the memory, there’s an 8GB DDR4 SDRAM and 128GB solid-state drive.

Of course, additional features such as 802. 11bgn Wi-Fi, Bluetooth 4.1, USB 3.0 port, and headphone jack are also available.


These laptops will satisfy gaming needs, so if your budget is tight make sure to check the products out.

Feel free to drop a comment in the section below if you want to leave any feedback related to gaming laptops.

5 Best Card Readers Compatible With Windows

A Smart card Reader is an external device for reading electronic smart cards. These are plastic cards with a built-in chip used for electronic processes, like authentications or financial transactions.

You will most probably need it because not all laptops include an incorporated card reader, and desktops do not have it at all.

Like many other peripherals, it can be or is not compatible with a particular operating system. In this article, we’ll present you with the best smart card readers compatible with Windows 10.

What are the best card readers for Windows 10?

SAICOO DOD

  • Sleek ergonomic design
  • Recommended by militarycac.com
  • Piv and EMS ready
  • You have to install it, is not a plug&play device

SAICOO DOD Military is one of the best smart card readers on the market you can buy.

It is not only compatible with Windows 10 OS but also with older Windows versions. So, if you haven’t upgraded your system to version 10, this reader will surely work.

You can use it for all contact smart card operations like online banking or digital signature applications. 

Zoweetek Smart Card Reader

  • Compatible with all Windows versions, Linux and Mac OS
  • Advanced Realtek Chipset
  • Sleek ergonomic flat design
  • The mini driver disk provided in the package can't be used on slot-load drive

The Zoweetek smart card reader is another great and performant choice if you need a smart card reader.

It comes with a long USB 2.0 connecting cable, so you can easily install it on the back USB ports of your desktop. Furthermore, it features multiple certification standards like  PIV, EMS, and Microsoft WHQL certifications.

You can also use it to sign PDF documents, and it can work with foreign smart cards.

HID OMNIKEY 3121

  • All major operating systems supported, including Window 10
  • Plug&play on Windows 10
  • ISO 7816 Standard and EMVCo Terminal Level 1
  • Not very portable

The HID Omnikey is a smart card reader that comes with a standing base for convenient vertical use.

This reader complies with all official regulations, and you can use this one with officially issued IDs.

It is solidly built and comes with an attachment sticker. If you don’t need to carry it, this card reader is great for static use alongside your business computer.

Identiv SCR3500

  • Windows 10 compatible
  • Has a loop for a key ring
  • EMV level 1 certification
  • For Mac OS it doesn't work as a plug&play device

The Identiv SCR3500 model is one of the most portable and lightweight smart card readers you can find.

This device folds down to nearly half its size when not in use so it’s easy to store and transport. Besides its great look, it complies with all major smart cards and relevant industry standards.

It is also very easy to use with your Windows 10 OS, it will work as soon as you plug it, without the need for any driver installation.

Identiv SCR3310v

  • Operates quickly
  • Ergonomic design
  • Compatible even with Android platforms
  • You might need to install drivers if your OS is not up to date

Identiv SCR3310 is an ideal smart card reader option for various secure applications.

It works seamlessly with virtually all contact smart cards and operating systems. In addition, it provides full compliance with all major industry standards.

If you have a smart SSO or Network login card, Identiv SCR3310 is ideally suited for these tasks.

Smart cards are widely acknowledged as one of the most secure and reliable forms of electronic identification. If you need to use a card like this, you’ll also need a smart card reader for it to function.

All of the above card readers work flawlessly with your Windows 10 systems are easy to use, so be sure to consider them.

3 best VPNs for Black Desert Online to reduce ping and lag

Black Desert Online is a fantasy MMORPG that you can play in sandbox mode. The game has incredible graphics and works with Windows PC, PlayStation 4, and Xbox One. On Windows PC, it’s available on Steam. You can choose from over 16 classes and fully customize your character.

In Black Desert Online, you engage in combat, track down monsters and bosses, join guilds to siege nodes and conquer castles, as well as train skills such as crafting, trading, fishing, or cooking.

You can play it on multiple servers in North America and Europe. However, if you have connection issues like high ping that stops you from enjoying the game, consider using a VPN to improve ping in Black Desert Online.

What you need is a VPN with a large network of servers in North America and Europe. Furthermore, it should deliver excellent speed while also protecting your privacy and shielding you from DDoS attacks.

What are the best VPN apps for Black Desert Online?

Private Internet Access

Private Internet Access (PIA) is ideal for reducing ping while playing Black Desert Online. Created by Kape Technologies, it has numerous VPN servers all over the world, along with various features optimized for gaming.

For example, PIA lets you use static or dynamic IP addresses. It can also help you bypass ISP throttling and preserve your online anonymity thanks to a strict zero-logging privacy policy.

What you need to know about PIA:

  • Over 3,200 VPN servers in 46 countries (including North America and Europe)
  • Reduce lagging in Black Desert Online using private DNS servers
  • Turn off encryption if you absolutely need maximum speed (no security)
  • 30-day money-back guarantee (no free trial)

Private Internet Access

Reduce ping and enjoy a smooth gaming experience when you play Black Desert Online.
Check price Visit website

CyberGhost VPN

Also owned by Kape Technologies, CyberGhost VPN can take your worries away when you play Black Desert Online by eliminating lags. It’s one of the fastest VPN apps with an impressive network of servers.

When it comes to security, CyberGhost VPN is designed to protect you from DDoS attacks while gaming. Similar to PIA, it has exclusive DNS servers, but it can also protect you from DNS leaks.

What you need to know about CyberGhost VPN:

  • More than 6,400 VPN servers in 89 countries
  • Decrease your ping time while playing Black Desert Online
  • Protect your Wi-Fi router from hackers
  • 45-day money-back guarantee (1-day free trial, no credit card)

CyberGhost VPN

Turn your Black Desert Online gameplay into a smooth experience by eliminating lag with this VPN app.
Check price Visit website

BullGuard VPN

Developed by BullGuard, BullGuard VPN is another strong candidate to improve your gaming experience by decreasing ping in Black Desert Online. Although it has fewer servers than the other two VPNs on this list, the app delivers excellent network speed.

As far as security goes, BullGuard VPN has a kill switch that becomes active as soon as you lose the VPN connection. Moreover, it allows up to 6 simultaneous device connections. It’s one of the best VPNs for Windows 10.

What you need to know about BullGuard VPN:

  • More than 2,000 VPN servers in 16 countries
  • Eliminate lag when you play Black Desert Online
  • No identifying data
  • 30-day money-back guarantee (no free trial)

⇒ Get Bullguard

In conclusion, Black Desert Online is a great MMORPG you can play online whenever you want to take a break and immerse yourself in a world of monsters. And, if you’re having trouble with Black Desert Online due to lag, make sure to use one of the VPN apps above to eliminate this issue.

Aventail VPN connection failed / not found [Solved]

Many Aventail VPN users have encountered the error message Aventail VPN is not connecting. This problem seems to occur no matter how the VPN service was used and on different Windows operating systems.

This issue can be extremely annoying, as the purpose of using a VPN service in the first place is to not have browsing limits.

If your Aventail VPN service is not connecting to any server, people are entitled to try and change their service.

Although changing the VPN that you use will always be an option, in this article we will explore some of the best troubleshooting methods.

The methods presented here are not a full-on fix, but they helped other users in your situation.

For this reason, please try these methods in the order that they were presented to avoid causing any further complications.


What can I do if the Aventail VPN connection is not found?

1. Make sure that your antivirus service and VPN are not interfering

  1. Open the antivirus software > open Firewall settings.
  2. Check for the list of apps allowed through the antivirus firewall.
  3. Make sure that Aventail VPN is allowed connections for both local and public servers.
  4. Save the settings.
  5. Restart your PC, and try to connect to the Aventail VPN server again.

2. Try out another VPN solution

It’s time to reconsider your options when you’re tired of getting the same connection failed errors. The VPN recommended below is a solution founded in the United States in 2010.

A leader in privacy like Kape Technologies most likely sounds like music to your years, so that’s your chance to legally hide all your activity risk-free on every website and enjoy a smooth overall experience.

Its dedicated apps for Windows, Mac OS, Linux, iOS, and Android are intuitive even for newbies. Within the app, let us tell you from the start that you’ll find various settings options.

You may enable DNS leak protection, change the level of encryption, or enjoy that Internet kill switch that will prevent traffic from leaking even when VPN gets disconnected.

Private Internet Access

Private Internet Access

Private Internet Access is a great alternative to Aventail VPN. Now available at a major discount!
Check priceVisit website

3. Set the Aventail VPN remote access settings

computer - aventail vpn not connecting
  1. Right-click on the Aventail Connect icon inside your taskbar -> select Enable Remote Network.
  2. Inside the Remote Network Access window -> click the remote network box.
  3. Type or select the appropriate remote network access you want to use.
  4. Click OK.
  5. Check to see if you can connect to the server.

4. Automatically detect the Internet proxy server settings

Note: Before trying out this method, it is very important that you disable remote network access. You can do so by following the 2nd method presented in this article.

  1. Right-click the Aventail Connect icon inside your taskbar -> select Options.
  2. Inside the options window -> select the Internet Proxy tab.
  3. Click Detect.
  4. If the automatic detection is completed, the software will automatically assign values to the Server, Port, Version, and Internet Proxy fields.
  5. Check to see if this fixes your connection problems.

In this guide, we explored some of the best troubleshooting methods to deal with connection problems in Aventail VPN.

Please feel free to let us know if this guide helped you solve your issue, by using the comments section below.

Convert AAX to MP3 [Best free & paid solutions]

Audible offers a huge range of audiobooks, originals, and TV programs to its users. As you certainly noticed, Audible uses the proprietary AAX file format to distribute the audio files from its library.

However, what if you want to convert AAX to MP3 format? While the Audible app comes with a decent media player, not everybody is fascinated by the same.

A good number of Audible users would prefer to use their favorite MP3 player to play audiobooks as it offers more control and customization options.

By default, Audible does not offer an option to convert the AAX format to MP3 or other audio formats. Fortunately, there are multiple third-party tools that can help you with this task.

In this article, we take a look at the best AAX to MP3 converts to help you turn your Audible audiobooks to MP3 format.

Note: Some of these tools are free while others may require you to purchase a license to use.

How can I convert Audible AAX files to MP3?

Epubor Audible Converter

Epubor Audible Converter is a powerful tool that can convert Audible AAX files to MP3. It can remove Audible DRM and convert the files to MP3 with 100% quality preserved.

While Epubor Audible Converter is a premium software, you can still download the free trial to try the tool before making a purchase.

The tool comes with a splitting feature that allows you to split a single Audible book into multiple chapters. You can customize the split into minutes, segments, or chapters accordingly.

Let’s quickly look at its key features:

  • Edit the metadata of your files
  • Convert Audible DRM files to unprotected formats up to 60 times faster
  • Preserve original parameters (channel, bit rate, codecs) upon converting files
  • Split Audiobook into chapters
  • Interactive guides to walk you through the conversion process
Epubor Audible Converter

Epubor Audible Converter

Convert AA/AAX books to MP3 and enjoy them on your favorite media player with 0 compromises on quality!
Free trialVisit website

imElfin Audible Converter

imElfin Audible Converter

This is an all-in-one tool that performs flawlessly when it comes to removing the DRM from AA and AAX audiobooks. What’s more, it does so without any quality loss.

With imElfin Audible Converter, you can convert your audiobooks to MP3 or M4B formats in no time, thanks to its intuitive, drag, and drop-compliant interface.

Let’s quickly look at its key features:

  • Convert audiobooks to MP3 or M4B with no quality loss whatsoever
  • Batch conversion support to accelerate workflows
  • Faster conversion speed to save you even more time
  • Clean interface with intuitive, 1-click controls and drag and drop functionality
  • Split audiobooks into chapters or by time to perfectly fit your listening habits
  • Remove DRM from Audible AA/AAX
imElfin Audible Converter

imElfin Audible Converter

Remove DRM from Audible AA/AAX and convert Audible to MP3 or M4B like a pro!
Free trialVisit website

TunesKit Audible AA/AAX Converter (WIN & MAC)

Audible to MP3 converter

TunesKit Audible Converter is a feature-packed premium converter that lets you get full control over the audiobooks you purchased from Audible.

The downloaded audiobooks can be converted into MP3 to enjoy the collection on all the MP3 format supported players.

Due to the high quality decrypting process, the tool is capable of saving all Audible AA and AAX audiobooks without any quality loss. Additionally, you can choose the output format as lossless before converting the file.

TunesKit Audible Converter can convert into multiple audio formats including MP3, AAC, M4A, AC3, and WAV. Furthermore, you can also adjust the output settings to meet your requirement.

⇒ Get TunesKit Audible Converter


TunePat Audiobook Converter

TunePat is one of the best tools to convert Audible AA/AAX books into practically any format of your choosing, plus it’s for sure the best Audiobooks downloader on the market.

This software allows you to download Audible audiobooks and save them locally on your PC, thus making the presence of an internet connection optional.

TunePat can easily convert the proprietary AA & AAX format to MP3, M4A, or M4B without impacting the quality – this means you can enjoy lossless output files that preserve the same quality as the originals.

Let’s quickly look at its key features:

  • Download audiobooks for offline listening
  • Convert AA/AAX Audiobooks to M4A/M4B/MP3
  • Faster conversion speed and no quality loss
  • Generate accurate metadata for your audiobooks automatically
  • Preserve chapters after conversion
  • Free software updates and technical support included

⇒ Get TunePat Audiobook Converter


TuneCable Audiobook Converter

TuneCable Audiobook Converter

TuneCable might be focused on Apple Music conversion, but it does an excellent job with AA/AAX audiobooks as well.

This powerful tool can easily convert Audible books into MP3, WAV, FLAC, and many more popular formats with 100% quality preservation.

Just as the previous software on our list, it’s also capable of rendering your audiobooks offline on any device and keep metadata in place to help you stay organized at all times.

Let’s quickly look at its key features:

  • Recording capacities for Apple Music
  • Convert AA/AAX audiobooks and M4P music to MP3, WAV, FLAC, or AAC and more formats losslessly
  • Play content offline
  • Get output files 10 times faster
  • Preserve metadata and artwork upon conversion for organizational purposes
  • Upload and share your files directly to Google Drive, Dropbox or OneDrive

⇒ Get TuneCable Audiobook Converter


Have you got the chance to try out one of the tools on this list? If so, feel free to share your experience with us by reaching for the comments section below.

Happen to know other products that you believe might be worth mentioning here? Don’t be shy to come forward and we’ll make sure to update our guide for the rest of the community to benefit.

How to get rid of the Edge Legacy end of life notifications

Microsoft Edge Legacy has finally reached its end of life and starting from March 10, 2021, if you’re still using it, you will receive a notification that will let you know about this change.

The browser notification looks like this: This version of Microsoft Edge is no longer supported or receiving security updates. Download the new version of Microsoft Edge today.

The key words here are receiving security updates, or actually not receiving them which nowadays can write a recipe for vulnerability against all kinds of online threats.

What can I do if Edge Legacy has reached end of life?

Basically, you are prompted to download and install the new, more advanced Edge Chromium version. By hitting the Download now button you will be redirected to the Microsoft Edge webpage.

You can also opt for the Not now button, but you will probably keep receiving the notification soon because the program created a timestamp of this action in the Registry.

How can I get rid of the Edge end-of-life notification?

  1. Type group policy in Windows search and click on Edit group policy from the results.
  2. Navigate to the following path: Computer Configuration\ Administrative Templates\ Windows Components\ Microsoft Edge
  3. Find the Suppress the display of Edge Deprecration Notification policy and double click it to open in a new window.
  4. Tick the Enable option, click on the Apply button from the bottom right, and then click the OK button.

If you’re keen on still using the old Edge and don’t want to be bothered by such notifications, you can also get rid of them, you can change that with the Group Policy Editor.

Microsoft added the Suppress the display of Edge Deprecration Notification policy just for this purpose.

Note: If you’re running a Windows 10 Home OS, you won’t find the Group Policy editor but you can follow this excellent guide to activate it.

Anyway, you will be able to use the old Legacy version of Edge only until April 13, 2021 when a Patch Tuesday update will remove it and replace it with the Chromium version.

Tell us what are your thoughts about the Edge Legacy end of life with a comment in the section below.
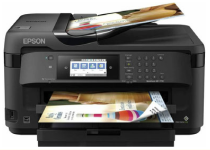
Avira Phantom VPN trial and data reset [Full Guide]

Avira Phantom is a VPN service from the popular security software provider Avira. The software like any other VPN service allows you to surf securely and anonymously.

The VPN is available on all the devices including your Windows computers and it comes in both free and paid and version.

Sometimes, the VPN may fail to work and get stuck at the connecting screen or simply fail to connect. One way to resolve this issue is by resetting the Avira VPN.

If your Avira VPN client is not working, here is how you can reset Avira Phantom VPN on your Windows 10 computer.

What can I do if Avira Phantom VPN is not working?

1. Reset Avira Phantom VPN

  1. Press Windows Key + R to open the Run box.
  2. In the run box, type regedit and press OK to open the Registry Editor.
  3. In the Registry Editor, you need to navigate to the following key:
    • ComputerHKEY_LOCAL_MACHINESOFTWAREClasses{80b8c23c-16e0-4cd8-bbc3-cecec9a78b79}
  4. Copy and paste the above key path as it is to locate the key.
  5. Right-click on the {80b8c23c-16e0-4cd8-bbc3-cecec9a78b79} key and select Delete.
    Delete registry key Avira VPN Reset
  6. Close the Registry Editor and reboot the system. Windows will automatically create the deleted key in the registry editor.  That should reset the Avira VPN.

2. Try out another reliable VPN

If you like the idea of a different VPN that does not have connection failures and errors encountered in Avira Phantom, the VPN recommended below has a tested reputation.

That’s a solution developed by Kape Technologies that has been gaining a lot of popularity in recent times. You may know that it comes from a US-based business.

This isn’t a red flag since the tool has a strict zero-logs policy. With no user-identifying logs, the government can’t ever get access to your data.

You can even pay anonymously with many brand gift cards if you don’t want to reveal your payment information.

Moreover, you may use it on 10 devices simultaneously, hide your identity, and encrypt web traffic without the constant fear that it could stop working out of the blue.

Private Internet Access

Private Internet Access

Private Internet Access is a great alternative to Avira Phantom. Currently available at a major discount!
Check priceVisit website

3. Run Diagnostic

If the issue persists, you can run the built-in Diagnostic tool provided by the Avira VPN to flush out any other issues.

  1. Open the File Explorer.
  2. Navigate to the following path where the Avira Diagnostic tool is located.
    • C:Program Files (x86)AviraVPNcommand prompt Reset Avira VPN
  3. Double-click on the Avira.VPN.Diag.exe to run the diagnostic tool. If the UAC prompt appears, click on Yes.
  4. It will open the command prompt and run the diagnostic. The command prompt window will close if the diagnostic is successful.
  5. Restart the system and check for any improvements

By following these steps, you should be able to reset Avira Phantom VPN on your Windows computer.

However, if the issue persists, check out our detailed guide including the most common VPN errors and their quick fixes.

News and Interests in the taskbar get another refresh with Windows 10 Insider build 21322

Microsoft has just announced the release of Windows 10 Insider build 21322 for Insiders in the Dev Channel. This new build introduces another redesign for News and Interests inspired by user feedback, though the bad news is that Microsoft will be restarting the gradual rollout of this new feature from scratch.

If you have access to this new feature on your Insider PC, you may lose it after installing today’s build. The Windows Insider team still plans to make the new experience available for all Dev Channel Insiders soon, but for now, only a subset of Insiders will see the redesigned News and Interests flyout in the taskbar.

“The news and interests flyout experience will now show two columns of content, making it easy to quickly glance over your feed of weather, headlines, money, and more. By default, it will open via hover or click. Based on your feedback, we will also be introducing an option to only open via click in a coming update,” the team explained today.

The build 21322 will also remove the 3D Viewer and Paint 3D apps on clean installs, though the apps will remain available in the Microsoft Store. This build also removes the Math Input Panel due to “increasingly low usage,” though the experience will also remain available as an optional feature in the OS.

You can learn more about all the changes, bug fixes, and known issues in the build 21322 below:

Changes and Improvements

  • Our new option to paste as plain text from clipboard history (WIN + V) is now rolling out to all Insiders in the Dev Channel.
  • Theme-aware splash screens have been re-enabled for everyone in the Dev Channel with this build.
  • 3D Viewer and Paint 3D will no longer be preinstalled on clean installs of the latest Insider Preview builds. Both apps will still be available in the Store and will stay on your device after an OS update. So, if you upgraded your PC like normal, you shouldn’t see these apps changed in your app list.
  • Due to increasingly low usage, Math Input Panel is being removed. However, the input control and math recognition engine that powered the app is remaining as an optional feature titled “Math Recognizer” which can be installed via Settings > Apps > Apps & features and clicking “Optional features”. So, while the app itself will no longer be there, the features it enabled for math equation input in OneNote, Excel, and elsewhere, will continue to work and developers can continue to utilize the input control.

Fixes

  • We fixed an issue where Surface Pro X devices would bugcheck when resuming from sleep.
  • We fixed an issue where devices were experiencing hangs when Xbox controller were connected while shutting down, restarting, or entering sleep in recent Dev Channel builds.
  • We fixed an issue leading to the About page of Settings not being present in the previous flight.
  • We fixed an issue where the OS Info link on the Windows Update Settings page did not work.
  • We fixed an issue resulting in some Settings search results unexpectedly being missing in recent flights.
  • We fixed an issue where if you go to Settings > System > Power & Sleep it would crash Settings for some Insiders.
  • We fixed an issue where the status information was not being displayed under Settings > Update & Security > Windows Update when you were up to date.
  • We fixed an issue where the Chinese text for the lunar calendar in the clock and calendar flyout was not displaying properly in recent flights.
  • We fixed an issue where it was unexpectedly possible to scroll the quick actions area of the Action Center when the region was collapsed.
  • We fixed a bug affecting GPU Compute support in the Windows Subsystem for Linux. See this GitHub issue for reference.
  • We fixed an issue where clipboard history might not update to display the latest entries.
  • We fixed an issue where launching an app would dismiss the touch keyboard even though you’d used the taskbar button to manually invoke it.
  • We fixed an issue resulting in gifs (via the touch keyboard or emoji panel) unexpectedly being inserted as a single image in certain apps.
  • We fixed an issue where when using search to insert the red heart emoji from the touch keyboard or emoji panel, in certain apps upon insertion it would unexpectedly appear black, despite the app supporting colored emoji.
  • We fixed an issue where when using the new dark mode for the Pinyin IME displayed tips would be unreadable due to having black text.
  • We fixed an issue when typing with certain IMEs where Narrator wouldn’t announce when you expanded or collapsed the displayed information in the candidate window.
  • We fixed an issue where certain TV tuners no longer were no longer working.
  • We fixed an issue that could result in your PC bugchecking when renaming a file or folder on an SD card.
  • We fixed an issue where devices running Trend Micro software may randomly bugcheck.
  • An issue has been fixed where devices with Bitdefender installed experienced a black screen and/or explorer.exe crashes. Resolving the issue requires an update to the Bitdefender software.

Known issues

  • We’re looking into reports of the update process hanging for extended periods of time when attempting to install a new build.
  • Live previews for pinned sites aren’t enabled for all Insiders yet, so you may see a grey window when hovering over the thumbnail in the taskbar. We’re continuing to work on polishing this experience.
  • We’re working on enabling the new taskbar experience for existing pinned sites. In the meantime, you can unpin the site from the taskbar, remove it from the edge://apps page, and then re-pin the site.
  • [News and interests] We’re addressing an issue where news and interests may not be available when signing into Windows without internet access but returns when online.
  • [News and interests] Sometimes the news and interests flyout cannot be dismissed with pen.
  • [ARM64] Insiders who installed the preview version of the Qualcomm Adreno graphics driver on the Surface Pro X may experience reduced brightness of the display. This issue is fixed with an updated version of the preview graphics driver at https://aka.ms/x64previewdriverprox. If you are experiencing this issue, please see the feedback collection for more information.
  • Windows Subsystem for Linux (WSL) users who upgrade to this build will be unable to use the GPU Compute feature. We’re working on a fix for this. Users who do a clean install will not be affected.
  • We’re working on a fix for an issue where some devices with Realtek network adapters running driver version 1.0.0.4 may experience intermittent loss of network connectivity.
  • We are investigating an issue where on some high-refresh-rate monitors, games will only run at 60Hz. Variable-refresh-rate monitor scenarios may also result in tearing.
  • The network flyout on the login screen doesn’t open on this build, which will prevent you from connecting to a new network before logging in. If your account is in a state that requires internet to log in, you can work around the issue by plugging in Ethernet, getting the device in range of a previously configured Wi-Fi network, or logging in with any other available account first.
  • We’re working on a fix to address a DWM memory leak that was introduced in the previous flight.

News and Interests in the taskbar is the main new feature we’ve seen in recent Insider builds, and we hope to see more additions soon. Last week, the build 21327 also introduced new system icons inspired by the Microsoft Fluent Design style, and this is hopefully just a teaser for the “Sun Valley” design update coming later this year.

Yubico and Microsoft team up to make international election campaigns, high-risk organizations more secure

Yubico, which has the mission to make secure login easy and available for everyone. is expanding its partnership with Microsoft. The company announced today in a blog post that it has delivered, free of cost, 25,000 YubiKeys to Microsoft AccountGuard customers in 31 countries.

The goal of the expanded partnership is quite simple. Building on what has already been done in the United States ahead of last year’s election, YubiCo hopes that it can extend protections to international election campaigns, human rights defenders, healthcare workers, journalists, and other high-risk organizations. It comes just a short week after Microsoft detailed its Zero Trust security mindset, which involves approaches to addressing security, compliance, identity, and device management as an interdependent whole.

“Yubico is a valued partner for Microsoft AccountGuard and the YubiKey is our recommended hardware-based multi-factor authentication solution,” said Tom Burt, Corporate Vice President, Customer Security & Trust, Microsoft. “We’re working with individuals whose security is at risk by sophisticated attackers. Knowing that we can give AccountGuard customers the most advanced form of phishing protection, at no cost, is a tremendous win across the board.”

YubiCo’s YubiKey will be used as part of the partnership. It allows enterprises to ditch passwords and securely access their accounts with just the tap or touch of a YubiKey. YubiKey also supports both legacy and modern systems. More information on YubiCo’s products are available here.

Xbox Store and Xbox Game Pass app now displays supported languages for games

Microsoft has started adding information about supported languages for games on the Xbox Store and the Xbox Game Pass app. This has been a longstanding missing piece compared to what other digital stores like Steam and the PlayStation Store and Steam already offers, and it should really help Xbox gamers to decide if they want to play or buy a game depending on its supported languages.

As of today, Microsoft has added language tags on the Xbox Store and the Xbox Game Pass app for “hundreds of games,” with more to come in the future. The store listings will show in language for a game’s interface, audio, and subtitles, as seen below. “To make it even easier, the language you select as the default for your console will surface to the top of the list; you won’t have to scroll,” the Xbox team explained today.

Xbox Supported Languages

Microsoft redesigned the Xbox Store last fall ahead of the release of the Xbox Series X and Series S consoles, bringing speed improvements, search filters, and a personalized experience using your Microsoft account. However, there’s still some room for improvements on this redesigned Xbox Store. As an example, it’s still too difficult to find Xbox games that support mouse and keyboard input, and Microsoft also doesn’t allow customers to gift Xbox One games to people in other markets or even gift backwards-compatible Xbox 360 and original Xbox games.

“Later this year we will unveil more updates to make it even easier for you to find and play games that are right for you, meeting your unique preferences and needs,” the team said today. We’re looking forward to learning more details about these improvements, but in the meantime, the addition of supported languages for games is very welcome.

Chrome OS is a better tablet operating system than Windows 10 — Here’s why

There’s no doubt that Windows 10 has evolved a lot over the years. Many things like Action Center, the Start Menu, Task View, and a lot of other smaller everyday UI elements across the operating system have changed a lot since Windows 10 was first introduced in 2015.

One thing that hasn’t changed much, though, is tablet mode. Despite Microsoft pushing out its own flagship tablets like the Surface Go, Surface Book, and Surface Pro, tablet mode largely remains a mess in Windows 10.

Sure, last year’s October 2020 Update introduced some small tweaks to make tablet mode, but the traditional tablet mode experience largely remains a mix of leftovers from Windows 8.1, with custom touches for Windows 10.

Enter Chrome OS. I recently purchased a Google Pixel Slate and coming from using a Surface Go 2 as my main device, I feel like Google has made a lot of advancements in tablet mode, making Chome OS the better tablet operating system when compared to Windows 10.

But could there also be lessons learned from Microsoft, and could Microsoft learn from Google? Let’s dive in to find out.

The main tablet mode user interface

Let me go first to where it all starts — entering tablet mode. In Windows 10, entering tablet mode has gone through some changes. Windows now recognizes the posture of your tablet and will automatically adjust the desktop user interface with a more touch-friendly layout. The taskbar gets more spaced out, the search bar collapses, and File Explorer adapts, too.

This change was actually introduced in the October 2020 Update, but you can still manually switch over to a more specially catered tablet mode (which I prefer) by configuring it in the Windows 10 settings. This traditional tablet mode has more of a full-screen experience and forces apps full screen rather than keep them windowed.

Lessons likely learned from Microsoft, Chrome OS handles this the same way. When a 2-in-1 Chromebook is flipped over, or a Chromebook tablet’s keyboard detached, the Chromebook will switch away from its traditional desktop-UI to a more compact experience, automatically. That is in the same way that Windows 10 used to automatically switch you to a specially catered full-screen tablet mode experience by default.

It’s here where the differences become apparent, though. It is also why I can see why Microsoft no longer forces users into that traditional tablet mode user interface. In Chrome OS, the tablet mode is clean and concise. You have a search box up top and a static list of icons for apps. This is reminiscent of what we’ve seen in Windows 10X, and I really do like the simplicity of it.

Basically, in Chrome OS tablet mode, you don’t have anything in your way. You get only what you want, and need. To me, this is important when you’re holding a tablet in your hand. It works just like a home screen on a phone — pick the app you want, and launch it.  A full-screen Start Menu with Live Tiles doesn’t make sense in 2021.

Nobody cares to see information at a glance anymore, especially if they’re already planning to jump into that app by just tapping it, anyway. Again, look at why these Live Tiles are being phased out in Windows 10X as an example.

But the Windows 10 tablet mode mixes things up a bit too much for my liking. You get both your Live Tiles, as well as an option for a list of static apps. The list of static apps is the clearest, as my colleague pointed out to me, but it’s still a scrollable list and doesn’t have easily show or has a list of folders, as it is in Chrome OS. Lessons learned for Microsoft, as Windows 10X has a similar home screen.

But tablet mode goes just beyond a home screen, there’s also multitasking, switching apps, and using apps in a tableted mode. Let’s go there next.

Multitasking

Multitasking is the heart of any tablet mode. In Windows 10, when in tablet mode, you can drag down an app from the title bar to the right side of the screen to enter a split-screen view to multitask. This then lets you open any other open app on the left side of your screen.

As you know, you can close apps by dragging them down into the taskbar or clicking the “X” when triggering the split-screen view. You also can switch between open or pinned apps by tapping the back button in the taskbar, too, to go back. To resize Windows, meanwhile, you can just drag the slider between the screen.

There’s nothing wrong with that basic way of multitasking in Windows 10 tablet mode. It, in fact, works very well and is intuitive, which is why I think Google has done something the exact same thing in Chrome OS. But looking at Chrome OS, there are some added touches for multitasking in tablet mode that Windows 10 could use.

In Chrome OS, multitasking works as it does on Android. The system shelf ends up becoming “collapsed” so you can pull it up on it quickly as needed to switch between your pinned or open apps (reminiscent of the now-dead Windows 10X for dual-screen tablets.) A long swipe up and hold on the shelf, meanwhile, will bring you back to your home screen. You can then split-screen by dragging the app to the side of the screen you need it on, seeing suggestions for other open apps on the empty side.

Looking at this Chrome OS multitasking, there’s one thing I wish Microsoft could clean up in Windows — it involves the Taskbar. Chrome OS tablet mode collapses the system tray and presents you with floating icons for apps when you multitask. I wish Windows would do the same, with more gesture-based controls beyond what we already have. Everyone is already familiar with the swiping gestures from Android and iOS, so why not bring them to Windows, too?

The Taskbar in tablet mode is great, but it does feel cluttered at times (even when configured to be hidden.) Collapsing it down a bit, spacing the icons out on top of a floating Taskbar like Chrome OS would really help in terms of discoverability and switching apps. We’re getting previews of this in Windows 10X for single-screen devices, so there is hope ahead.

Using apps in tablet mode

The final thing on my list comes in relation to using apps in tablet mode. I touched on this when I talked about the lack of a tablet mode in Microsoft Edge, but after using Chrome OS, I think that Google is outdoing Microsoft in this area.

Why? When browsing the web in Edge in tablet mode, Edge retains all of its window controls. You still see controls to minimize, close the Edge window itself unless you manually enter full-screen mode. It feels a bit intrusive, as valuable space is being taken up for those controls. It is true that UWP apps, and select apps in Windows, do remove the window controls, but Edge does not, That’s a shame, as the majority of people spend their time web browsing.

Chrome OS steps things up and will “hide” the window controls in all apps, in the same way that Android does. It’s a really clean and concise experience. Especially when browsing through YouTube, or Twitter, which puts emphasis on the space for viewing media and other items.

Changes on the way

As I touched on throughout this post, there are indeed changes on the way to Windows 10. Rumor has it that sweeping visual changes are coming in the Sun Valley update to Windows, rejuvenating the look of the operating system. Even with Windows 10X, Microsoft is making bounds. The Taskbar, Action Center, and other areas of the operating system (which I didn’t touch on here when talking about Chrome OS) are all rumored to be getting big changes. We covered these in our video above, and it offers a breath of hope for Windows in the future.

Microsoft Build – coming May 25-27?

During the Microsoft Ignite livestream, CVP Jeff Sandquist revealed that “Build is coming in May.” Not a huge revelation, as the conference has traditionally been in April or May, but so far Microsoft hasn’t said much about this year’s virtual only version of the annual developer focused event.

Now, in a sizzle video revealed by Microsoft-watcher extraordinaire WalkingCat, it looks like we may be able to further narrow down the dates for the upcoming Build 2021:

The sizzle reel, starting with an ode to Microsoft’s resilience in response to the global pandemic when it comes to pivoting to these virtual events, goes on to reveal a very quick slide showing some dates for upcoming events, captured in this screenshot:

Build Dates

WalkingCat is adamant on Twitter that these are “placeholder” dates, but even though Microsoft isn’t saying much about timings, the dates for Ignite are right, and there’s as good a chance as any that these will turn out to be the actual dates for Build (May 25-27), Ready (July 21-22), and another version of Ignite (October 13-14).

For now, we’ll have to wait and see. Until then, enjoy the video, it’s fun!