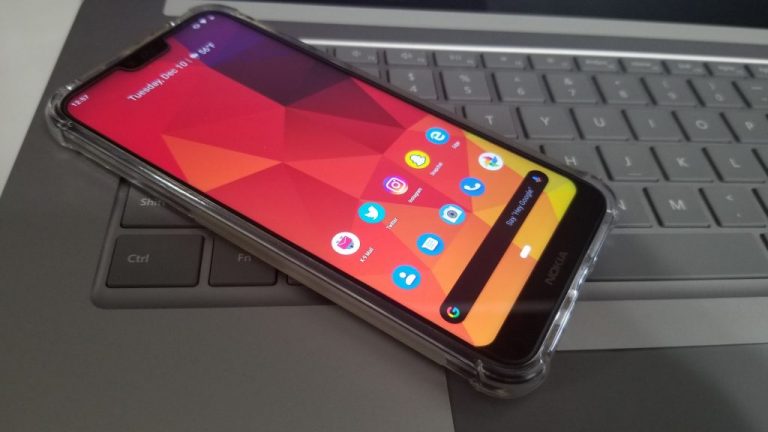
Here’s how you can praise your coworkers and bring happiness to the workplace in Teams

Microsoft Teams is the central hub for everything work and teamwork related for many people and organizations across the world. You’re able to use the service to chat with coworkers, set up meetings, voice calls, and so much more. However, nothing boosts team confidence more than sending some praise. In this guide, we’ll show how you can use Microsoft Teams’ praise features, and help your coworkers feel accomplished!

Step 1: Find the praise feature in Teams

The praise feature in Microsoft Teams is on by default as an app. To get started with using it, you’ll need to head to the message compose box at the bottom of the screen in Microsoft Teams. Typically, it’s not pinned by default, and you’ll need to tap on the “…” icon first. Once you do that, you can search for praise in the list and open it up. If you want to access it more easily, you can click the Pin button to pin it to the bottom menu of the compose box.

Step 2: Select a Badge to send

Once you’ve found the praise feature, you can select it. You’ll be greeted by a card. There are quite a few praise options you can choose from. Achiever, Awesome, Coach, Creative, Kind heart, Leadership, Problem solver, Team player, and Thank You are just a few examples. Once you’ve chosen one that fits your situation, feel free to click it.

Step 3: Edit the description, and preview and send

Now that you’ve chosen a badge, you can add the name of the people you want to praise, or even add a description to it. You’ll also be able to select the option to preview it, so you’ll see what it looks like before it heads to your recipient. Once you’re happy with it, press send. The message will show up inside Microsoft Teams, with the recipient being @’ed to bring it to their attention.

One of the many cool features in Microsoft Teams!

Although a bit hidden, the Praise feature is just one of the many cool elements in Microsoft Teams. As we’ve previously covered, some other cool features include support for apps that can boost your productivity, a Wiki tab to help you communicate effectively, and Microsoft OneNote integration. All these features, and the many others in Teams,, might even make Microsoft Teams better than Slack for your needs. Keep it tuned to OnMSFT as we continue to dive deeper into Microsoft Teams, and all the other Office 365 apps.

Fix: Document has insufficient permission for this operation

Portable Data Files (PDF) are a very common file format that you will meet in pretty much any environment. They can be used in home PCs, office groups, school and more.

Of course, one of the things that make this file format especially special is how secure they can be made.

When you create a PDF file, you can restrict the number of things that can be done to it, you can make them only viewable, or you can restrict them for good via password.

The problem is when you are the one trying to open such a PDF file, and you encounter an error message stating that:

Document has insufficient permission for this operation

How can I remove document permissions from a PDF file?

1. Download the Document

You may not be able to edit a PDF document when you are viewing it online through your browser. That is why downloading it on your PC and then trying to edit it again may be the right solution.

This process varies from browser to browser, so check out each developer’s documentation on how you can do this.

2. Get the password from the PDF’s creator

Permission restrictions are usually hidden behind passwords. Once you’ve inputted the right password, you may do with the PDF document whatever you please.

As such, contact the creator of the PDf file and ask them for the password.

3. Use a third-party PDF unlocker

If the creator of the PDF cannot be contacted, you can try using third-party PDF unlocking software. These usually come in the form of downloadable programs or even online services.

PDF password remover tools have proven themselves efficient at removing any type of restriction from PDF files, and some of them even offer PDF viewing and editing tools.

Keep in mind that these programs are either usually hidden behind a paywall, or they offer a free version that has limited functionality.

By following these steps, you should be able to get full access to a PDF and use it however you see fit.

Did you ever have to deal with a restricted PDF file? Tell us how you manage to bypass the problem in the comment section below.

A Problem Prevented the Document from being Scanned [Fixed]

Windows 10 includes a scanning tool that is helpful to scan documents and pictures, which can be download from the store. However, some users have reported a problem prevented the document from being scanned error while trying to use the tool.

If you too are getting this error message, try following this step-by-step guide that we’ve compiled for you, and you will be able to scan your documents in no time.

How do I fix a problem prevented the document from being scanned?

Before proceeding to the solutions in this section, try the following troubleshooting steps:

If this does not work, you can now proceed to the fixes below:

1. Remove and then add the scanner or printer

  1. Press Start.
  2. Click on Settings.
  3. Select Devices.
  4. Go to Printers & scanners.
    printers a problem prevented the document from being scanned
  5. Click on the device you have problems with and select Remove device.
  6. Click Yes.
  7. Stay on the same page, and then click Add a printer or scanner.
    add a
  8. When the device is detected, click  Add device.

One of the first things to do if you are getting a problem prevented the document from being scanned error is to remove and add the scanner or printer again. This will clear the glitches that might be causing the problem.

2. Reinstall the printer driver

  1. Go to the device manufacturer’s website and download the latest driver.
  2. Press Windows + X and select Device Manager
  3. Select either the Print queues, Imaging devices, or Scanners trees.
    print queues
  4. Right-click your device and choose Uninstall.
  5. Check the box next to Delete the driver software for this device.
  6. Click OK and restart your PC.
  7. Reboot
  8. Install the driver you downloaded earlier
  9. Once this is done, you need to add the printer or scanner, as described in the previous steps.

By applying the solutions above carefully, you should be able to fix the a problem prevented the document from being scanned. Please try again, or for troubleshooting information, see help error on Windows 10.

If you are dealing with a similar issue in Windows Fax and Scan fatal error, check our detailed guide to fix it.

Did you run into this error before? Tell us about your experiences in the comments section below.

Microsoft news recap: Xbox Series X revealed, new Xbox support website launches, and more

Microsoft news recap is a weekly feature highlighting the top Microsoft news stories of the past week. Sit back, grab some coffee, and enjoy the read!

Microsoft reveals Xbox Series X, the next-gen Xbox console coming in holiday 2020

In a surprise announcement, Microsoft revealed its next-gen Xbox at the Game Awards – the Xbox Series X.

3 million gamers played Halo: Reach on PC and Xbox One during launch week

During Halo: Reach’s launch week, 3 million players took to the game across PC and Xbox One, as well as becoming the #1 top-selling game on Steam during the week.

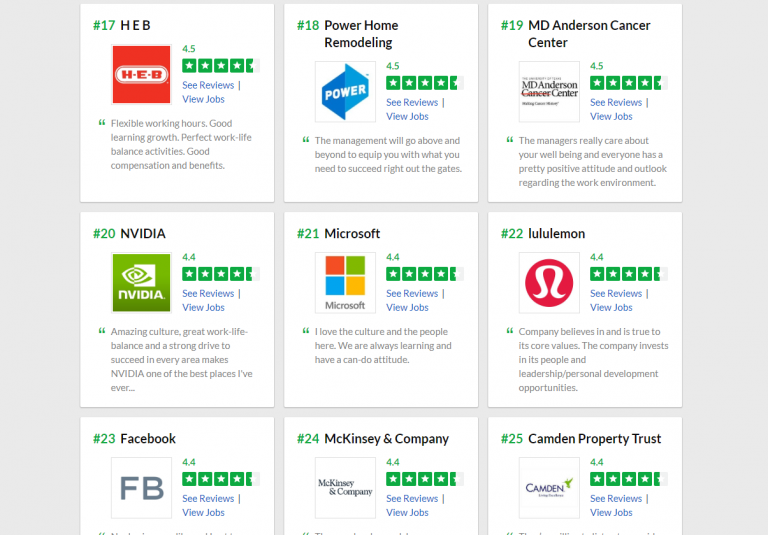
Microsoft jumps in Glassdoor’s “Best Places to Work” list as Facebook and Google drop out of top 10

Beating out Facebook and Google, Microsoft has risen up the charts on Glasdoor’s “Best Places to Work” list.

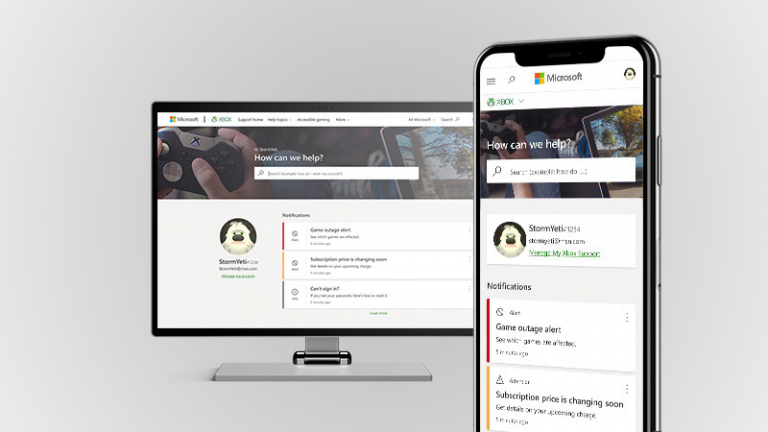
Microsoft launches new Xbox support website

A new Xbox Support website has been launched that offers a simpler and faster experience that works better on mobile, whilst also making it easier to get in touch with a support representative.

That’s it for this week. We’ll be back next week with more Microsoft news.

Sorry this Document can’t be Opened for Editing: How to Fix

Since SharePoint handles more or less complex business processes, providing a certain workflow allows more efficient handling of all onboard projects. Thankfully enough, Microsoft has released a new app as part of the Microsoft 365 Suite called Microsoft Flow.

However, things are not really straightforward, as users experience sorry this document can’t be opened for editing error. It all boils down to users not being able to open and edit documents that are already in Sharepoint.

How can I open documents for editing in SharePoint?

1. Ensure you have the right permissions

permission sorry this document cannot be opened for editing

Before all else, make sure that you have the right to edit the file in the first place.

For example, if you belong to a workgroup and it was uploaded to SharePoint by someone else, make sure you have all the access and editing privileges granted to you.

2. Make sure the file is editable even when not on SharePoint

Furthermore, make sure the file is not marked as read-only, as these types of files can only be viewed but not edited. In some extreme cases, read-only files can’t even be accessed at all.

So, change it accordingly, and sorry, this document cannot be opened for editing error should be fixed for good.

3. Make sure you use Flow appropriately

Flow is filled with commands and actions that need to be properly applied to each step in order to function correctly. Consider looking over Flow documentation to make sure you’ve taken the right steps.

Additionally, make sure that flow can support whatever it is that you are trying to do.

In the case presented above, the Convert Word Document to PDF action needs to use File Browse to specify the file, which is something the user did not do. As it stands, Dynamic content and Expression are not supported by Flow to configure file paths.

By following these steps, you should be able to avoid running into the sorry, this document can’t be opened for editing error in SharePoint.

If you can’t edit any Word document on your PC, quickly go through our detailed guide to fix it.

Did our article help you get past your issue? Let us know in the comment section below.

Fix: Nvidia Kernel Mode Driver has stopped responding

Nvidia is well-known for its ultra-powerful graphics cards, especially in the gaming community.

However, some users have been complaining that they have been having issues with some of their devices:

I am having a problem where if I use my graphics extensively, playing video, music, or any other graphics intensive activity, my computer will, more often than not, black screen for about 3-8 minutes and then come back. A system message pops up saying:

Display driver Nvidia Windows Kernel Mode driver, (whatever driver version I have) has stopped responding and has successfully recovered.

This issue is not that uncommon, so a lot of users have tried a lot of solutions until eventually, some stood out as being able to fix this issue.

We’ve compiled a list of all of these solutions, and arranged them in a step-by-step manner so you can understand them easier.

How can I fix the Nvidia Kernel Mode Driver error?

1. Reinstall your Nvidia drivers

  1. Download DDU (Display Driver Uninstaller)
    • You should create a restore point in case things go wrong
    • If you don’t know how to create a restore point, check out this detailed guide
  2. Run Display Driver Uninstaller.exe
    • It is preferable if your launch in Safe Mode
  3. Click Reboot to Safe mode and follow the instructions
  4. Reboot your PC
  5. Go to Nvidia and download the latest compatible video drivers available
  6. Install them by following the on-screen instructionsUninstall Nvidia

Alternatively, we recommend using a third-party tool that is specialized in identifying drivers that need an update and proceeds to download and install them automatically.

This is a time-saving solution that will stabilize your operating system and help it reach peak performance.

⇒ Get Fortect Driver Updater

2. Disable Windows Visual Enhancements

  1. Press Windows + R
  2. Type in sysdm.cpl and press Enter
    • This will open System Properties
  3. Go to the Advanced tab
  4. Under Performance, click Settings
  5. Check next to Adjust for best performance
  6. All sub-entries will be unchecked, go and check these 3 entries again:
    • Smooth edges of screen fonts
    • Smooth-scroll list boxes
    • Use drop shadows for icon labels on the desktop
  7. Click Apply, then OK
  8. Reboot your PC
visual enhancements

3. Set PhysX configuration

  1. Right-click an empty area of your desktop
  2. Select the Nvidia Control Panel from the menu
  3. Expand 3D settings
  4. Select Set PhysX configuration
  5. Look over the PhysX Settings dropdown
  6. Change Auto-select with your Graphics Card 
  7. Reboot your PCSet PhysX configuration

4. Turn off Vertical Sync

  1. Right-click an empty area of your desktop
  2. Select the Nvidia Control Panel from the menu
  3. Expand Manage 3D settings
  4. Look under I would like to use the following 3D settings
  5. Find the Vertical sync settings
  6. Click on it, and then select Off or Force Off
  7. Reboot your PCturn of fVS

5. Registry Fix

  1. Press Windows + R
  2. Type in regedit, and press Enter
    • This will open the Registry Editor
  3. Go to the following Registry Key
    • HKEY_LOCAL_MACHINESYSTEMCurrentControlSetControlGraphicsDrivers
  4. Right-click on GraphicsDrivers 
  5. Select New > DWORD (32-bit) value
  6. Give this DWORD the name TdrDelay
  7. Set the value to 8
  8. Click OK
  9. RebootRegistry Edit

6. Tweak Internet Explorer

You receive the error while browsing with Internet Explorer, then you need to make some tweaks.

  1. Launch Internet Explorer
  2. Click on Settings (the cog button)
  3. Select Internet Options
  4. Go to Advanced
  5. Check the Use software rendering instead of GPU checkbox
  6. Click on ApplyIE

By following these steps, you should be able to get rid of any Nvidia Kernel Mode Driver errors.

Did you find this article useful? Let us know in the comment section below.

How to debug Windows kernel

A kernel can be considered one of the building blocks of Windows as an operating system. This is mainly because it controls all the processes running on the system.

That being said, any problems and issues with the kernels can result in crippling functionality issues for your PC, which includes Blue Screen of Death errors.

Unfortunately, not even Windows 10, the latest version of the Windows OS is not safe from such issues. One piece of good news is that kernel code can be debugged, as long as you know how.

Fortunately, kernel debugging is possible and made easier through the presence of kernel debuggers.

How can I start Kernel debugging?

The answer to that question is quite complex, but suffice it to say that you need to follow a set of predefined steps before you can start:

1. Determine what PC is the host, and what PC is the target

The most basic thing that you need to know is that you cannot start debugging without a kernel debugger. The kernel debugger will run on the host system, while the code that needs debugging will run on the target system.

The two systems can be one and the same, but certain conditions need to be met beforehand.

2. Determine if you’ll do a kernel-mode or a user-mode debugging

Choosing what type of debugging isn’t that hard. All you need to do is determine what type of debugging will be more efficient.

  • Kernel-mode code has permission to access any part of the system and can gain access to any part of any other process running in either user mode or kernel mode
  • User-mode has more restrictions applied to it, but it has the benefit of not being able to tamper with actual system resources if things go wrong

3. Choose a debugging environment

The Debugging environment is basically the program you will be using to do the debugging with. WinDbg works well in most situations, but there are times when others may work better, such as console debuggers for automation or Visual Studio.

4. Figure out how you’ll connect the target and host

Usually, both target and host systems are connected by an Ethernet network. If you are doing early bring-up work, or you lack an Ethernet connection on a device, other network connectivity options can be used.

5. Choose between 32-bit or 64-bit debugging tools

This is probably the easiest step of them all since it depends on what version of Windows the host and target are running, and whether or not the code that needs debugging is 32-bit or 64-bit code.

6. Configure your symbols

If you are using an environment like WinDbg , you’ll need to configure the right symbols if you’ll want to use all of its advanced functionalities. If you don’t configure them, you won’t be able to use any of the debugger’s features that depend on those symbols.

7. Configure the source code

The path to the source code needs to be defined, even in the eventuality of it being your own source code. Thus, configuring a path to it in all cases is mandatory.

8. Become familiar with debugging

Debugger operations and techniques aren’t all that hard once you get used to them. This is thanks to the extensive documentation that comes with each operation, all of which is described in a step-by-step manner.

9. Use the debugger reference commands

You can’t know it all, and you can’t remember anything forever, but what you can do is look for the debugger reference commands that are there to help.

One good example is the .hh command, which will display help documentation about every single command available.

10. Use debugging extensions

Code can be extremely complex and it branches out in a variety of ways. Because of that, your environments may not be enough to perform the debugging.

Thus, using debugging extensions that provide parsing of domain-specific data structures can be very useful.

Closing thoughts

The steps mentioned above are all the basic procedures that you need to go through when attempting a kernel debugging.

Of course, there are many specific situations where these steps may vary, but the bottom line is all of them involve more or less these basic 10 steps.

Did our article help you better understand how you can start kernel debugging? Let us know what your opinions are in the comment section below.

FIX: This document has certain edit capabilities that are locked

This document has certain edit capabilities that have been locked error message can appear while trying to edit Word and Excel documents on Mac. The issue usually occurs when trying to edit citations, and in this article, we’ll show you how to fix that.

How do I unlock a document for editing on Mac?

1. Update Word to the latest version

If you’re getting This document has certain edit capabilities that have been locked error, try updating Word. You can do that by following these steps:

  1. Open Word.
  2. From the ribbon bar select Help > Check for updates.
  3. Microsoft AutoUpdate screen will appear. Select Automatically Download and install. Now click on the Check for updates button.
  4. If the update is available, you’ll see a new window. Just follow the instructions on the screen to update it.

2. Try copying the contents of the file

Few users reported that copying the contents of the file fixed the This document has certain edit capabilities that have been locked error.

Simply create a new document and paste the contents of the file that’s giving you the error to it. This is a simple workaround, but it might help you out.


3. Create a new administrator account

new administrator account This document has certain edit capabilities that has been locked

  1. Go to the Apple menu and select System Preferences.
  2. Now choose Users & Groups.
  3. Click the Lock icon in the bottom left corner. Now click the Plus icon.
  4. Set New Account to Administrator.
  5. Enter the required information and click the Create User button.
  6. Switch to a new account and check if the problem is resolved.

4. Reinstall Office

Sometimes, there might be a glitch with Office that is causing the This document has certain edit capabilities that have been locked error. To fix it, you need to reinstall Office by following these steps:

  1. Open Finder and go to Applications.
  2. Press and hold the Command button and select all Office applications.
  3. Ctrl + click the applications you selected and choose Move to Trash.

After doing that, you need to remove the files from the user Library folder by doing the following:

  1. In Finder press the Command button + Shift + G.
  2. A new window will appear. Enter ~//Library and click Go.
  3. Navigate to the Containers folder and Ctrl + click the following folders and move them to Trash:
    • microsoft.errorreporting
    • microsoft.Excel
    • microsoft.netlib.shipassertprocess
    • microsoft.Office365ServiceV2
    • microsoft.Outlook
    • microsoft.Powerpoint
    • microsoft.RMS-XPCService
    • microsoft.Word
    • microsoft.onenote.mac
  4. Go back to the Library folder and navigate to the Group Containers.
  5. Select the following folders and move them to Trash:
    • UBF8T346G9.ms
    • UBF8T346G9.Office
    • UBF8T346G9.OfficeOsfWebHost

Lastly, you need to remove Office applications from the Dock by doing this:

  1. Ctrl + click the application in the Dock.
  2. Choose Options > Remove from Dock.
  3. Restart your Mac.

There you go, these are the best ways to fix This document has certain edit capabilities that has been locked error, so be sure to try them all.

If you have other questions or suggestions, don’t hesitate to leave them in the comment section below.

FIX: This document could not be autosaved on Mac

Many users have reported This document could not be autosaved error on their Mac. This can be an annoying issue, but in this article, we’re going to show you how to fix it once and for all.

How can I fix This document could not be autosaved error?

1. Duplicate the keynote and save the copy

If you’re getting This document could not be autosaved error, try duplicating the keynote and save the copy. This is just a workaround, but several users reported that it works, so be sure to try it out.

2. Check for corrupted files

Sometimes, This document could not be autosaved message will appear if your file is corrupted. Few users reported that one of the tabs in Numbers was corrupted and that caused the problem.

One way to fix this is to copy all uncorrupted data from that file to a new one and save it. Bear in mind that corrupted data won’t be saved by this process.

If you’re using Pages, you can choose the Duplicate option and check if that solves the issue.

3. Clear Open Recent menu in Pages

It seems that This document could not be autosaved message appears due to certain permission issues. However, users managed to fix this problem simply by clearing the Open Recent menu in Pages. After doing that, the issue was completely resolved.

4. Paste data to a different application

You might be able to fix This document could not be autosaved error by using this little workaround. You just need to follow these steps:

  1. Open Numbers and choose Merge all
  2. Now copy the section of the spreadsheet that won’t save and paste it to Numbers.
  3. Quit the Pages document. Now open it again.
  4. Paste the data from Numbers back to Pages document and save it.

This is a workaround, but several users reported that it worked for them, so be sure to try it.

There you go, these are the several methods that you can try if you ever encounter This document could not be autosaved error on your Mac.

If you have any other questions or suggestions, leave them in the comments section below and we’ll be sure to check them out.

Microsoft’s Surface Hub 2X, expected for 2020, may run Windows 10X according to new report

Even as 2019 comes to a close with Microsoft putting out some relatively exciting hardware with a refreshed Surface Pro 7, Surface Laptop 3 in two variants, and the Surface Pro X, it now seems 2020 is shaping up to be another blockbuster year for the company’s hardware offerings.

Aside from the eventual release of the coveted Surface Neo, Duo, Earbuds and, Xbox Series X, Microsoft also has on the docket a wider release an update to its digital conference board in the Surface Hub 2X. The Surface Hub saw a refresh in late 2018 with the unveiling of the Surface Hub 2S and the announcement of the Surface Hub 2X.

While the Surface Hub 2S was eventually released in Q2 2019, Surface Hub 2X devices are road mapped for general release sometime in 2020 and as such, details of the devices are now beginning to come to light such as the Hub 2X differing from its Hub 2S cousin and possibly shipping with Windows 10X out of the box.

According to a report from Windows Central’s Zac Bowden, Surface Hub 2X could ship with a variant of the Windows Core OS that it was originally unveiled with back in late 2018 alongside the Surface Hub 2S. The Hub 2S has been on the market for much of 2019 and runs on the same OS as older Surface Hubs for compatibility reasons. Yet, the Surface Hub 2X has been arguably shelved by Microsoft from public view since it’s late 2018 showcase, and according to Bowden’s sources, it’s because the company has been working on a tweaked version of the Windows Core OS to ship on the Hub 2X that’s taking longer than expected.

The Surface Hub 2X was originally held back from general release in 2019 because Microsoft wanted to ship a slightly beefier experience with the device and fully utilize its Windows Core OS by enabling dynamic rotation, faster Windows Updates, tiling and more. But now it seems based on codenames, the Windows Core OS flavor destined for the Surface Hub 2X is dubbed Santorini and is basically a shell experience that differs slightly from the original Aruba or Windows Core OS proper that was demoed on the Hub 2X last year.

How different is Santorini from Aruba and what new features will be coming to the Surface Hub 2X, Bowden and his sources seem to have no answers regarding those details, however, if Santorini is closer in nature to the dual-screen Windows 10 X experience demonstrated on the Surface Neo and Duo, there could be a future in which the Surface Hub 2X digitally bonds screens through some advanced mira casting techniques embedded in Widows 10X.

Between now and Microsoft’s targeted June 2020 development date of Windows 10 X, the company has several developer conferences and events lined up to slow leak more details about its next flagship operating system.

Smite gets full keyboard and mouse support in latest Xbox One update

There is a new update to Smite, the free-to-play, MOBA (Multiplayer Online Battle Arena) game for Xbox One. As noted in a post on Xbox Wire, the newest Smite update, “The Vigilant,” is now available and adds full keyboard and mouse support for Xbox One, including a new character, Heimdallr, a Norse Hunter god.

Here’s a video look at Heimdallr in SMITE’s The Vigilant update.

Among the more notable changes available in SMITE’s The Vigilant update include the introduction of Heimdallr and his new Hunter abilities:

  • His basic attacks have a longer animation time and higher damage scaling
  • These attacks rotate between ranged cleaves vs higher damage single target, following an A-A-B chain.
  • His base stats are on the tankier side for hunters, or similar to the lower end of Warriors.
  • He has no ability that temporarily boosts his attack speed or power
  • Can gain vision of areas of the map in ways other than wards, as many as 3 of of his abilities can grant him vision bonuses, and some can even see stealthed enemies.
  • Has a movement ability, but one that requires planning and functions unlike any other ability in SMITE
  • An Ultimate that features new tech and visuals to create a unique experience, especially for the enemy hit by it.

Get Smite on Xbox One

SMITE
SMITE
Developer:
Hi-Rez Studios
Price:
Free

Do you play SMITE? What new features would you like to see in a future SMITE update? Let us know in the comments!

Mortal Kombat 11 is getting cross-play support between Xbox One and PlayStation 4

Mortal Kombat 11 is likely to get cross-play support soon, allowing Xbox One and PS4 players to play head-to-head. As noted in a post on the Mortal Kombat FAQ page, the game developers are working on a way to bring “Xbox One and PS4 players into the same matchmaking pool for Online Kasual game modes.”

Here’s a look at how cross-play (dubbed KrossPlay in Mortal Kombat 11) will work :

  • Whenever players are in matchmaking in Online Kasual modes, the game will now look for the best match across prospective PlayStation 4 and Xbox One players.
  • Designated Krossplay Online Rooms will provide a central location for PlayStation 4 and Xbox One players to manually meet up and fight against other players on opposite platforms in Online Kasual game modes. Please note, friends on opposite platforms will need coordinate outside of the game ecosystem, then meet up in a specific Krossplay Online Room to play against each other.

As far as Mortal Kombat 11 players playing beyond Xbox One and PS4 consoles, there are no plans to extend cross-play to Windows 10 PC, Nintendo Switch, or Google Stadia. No word yet on the exact date that cross-play will be available, so stay tuned.

Senua’s Saga: Hellblade II announced for Microsoft’s Xbox Series X video game console

Senua’s Saga: Hellblade II was officially announced during The Game Awards 2019 earlier today with a rather impressive trailer featuring entirely in-engine footage rendered on an Xbox Series X, Microsoft’s upcoming Xbox console that was also unveiled today.

Little is known about the game beyond it being a sequel to the hit Hellblade: Senua’s Sacrifice title and that it will be releasing on the Xbox Series X. It’s unclear if it will be a launch title or one that will debut several months or even a year after the Xbox Series X hits store shelves.

Here’s the trailer that’s got everyone talking:

The Xbox Series X will be the beginning of the fourth generation of Xbox consoles following the Xbox, Xbox 360, and the Xbox One. It will be four times more powerful than the Xbox One X and will support backwards compatibility for all Xbox One games and accessories. Read more about Xbox Series X here.
Are you excited for Senua’s Saga: Hellblade II? Let us know in the comments below and then follow us on Pinterest for more Xbox gaming content.

Digital pre-orders open for Ori And The Will Of The Wisps on Xbox One and Windows 10

The highly anticipated sequel to Ori and the Blind Forest, Ori and the Will of the Wisps, is finally available to pre-order digitally on Windows 10 and Xbox One consoles ahead of its March 10th release date.

Ori and the Will of the Wisps is an Xbox Play Anywhere title which means that buying it on one platform will unlock it for free on the other. The Xbox One and Windows 10 versions will also support cross-saves as well.

Here’s the official game description and trailer:

From the creators of Ori and the Blind Forest – the acclaimed adventure game with more than 50 awards and nominations – comes the highly-anticipated sequel, Ori and the Will of the Wisps. Embark on an all-new adventure in a vast and exotic world where you’ll encounter towering enemies and challenging puzzles on your quest to unravel Ori’s true destiny.

Ori and the Will of the Wisps, like its predecessor, is a 2D platformer with a visually dense art style and cinematic soundtrack. Players control the creature, Ori, who must navigate the numerous levels while unlocking new powers and defeating villains.


Like all Xbox One video games, Ori and the Will of the Wisps will also be playable on the newly-announced Xbox Series X console coming in late-2020.

Are you excited for Ori and the Will of the Wisps and are you going to pre-order it? Let us know in the comments below and then follow us on Pinterest, Twitter, and Facebook for more Xbox gaming content.

Differences between Windows kernel and Linux kernel

A system as complex as Windows cannot exist without the presence of certain elemental building blocks. In the case of Windows OS, these building blocks are called kernels.

The kernel is the link between all the hardware and software components of your computer and controls all the processes running on the system.

Of course, Windows isn’t the only OS on the market. There are many operating systems out there, and they all have their fair share of differences and similarities.

One good example of another OS is Linux, and it too is also based on coding known as kernels.

There are certain underlying differences between Windows and Linux kernels, and this article plans on detailing what those differences are.

What sets apart Windows kernels from Linux kernels?

1. Their purpose

The Windows kernel is a commercial kernel developed by Microsoft, while Linux‘s kernel is open-sourced based on Unix.

2. Accessibility to the source code

Being a commercial software, there is no access to the Windows source code, while everyone has access to Linux‘s source code. This means anyone can work on developing it, and it is free to use however you see fit.

3. Different architecture

There are differences even in the way the coding is built. Windows kernel has hybrid architecture while Linux kernel has monolithic architecture.

4. Different file access control protocols

Windows kernel uses an Access Control List for file access control protocols. On the other hand, Linux kernel uses traditional Unix Permissions and POSIX ACL  for file access control.

5. Location of the GUI stack

The Windows kernel includes a GUI stack in the kernel. However, the Linux kernel keeps the GUI stack in the user-space.

6. Multi-user support capabilities

Windows kernel can offer multi-user and multi-session support, but it depends on the version and edition of your Windows OS. Linux, on the other hand, offers 100% multi-user environments.

7. Configuration storage location

The Windows kernel keeps a registry to store its configurations. Linux chooses to keep its configurations into files.

8. The way it handles the devices it runs on

Depending on what device you are running the Windows kernel, it will behave differently due to a variable mechanism. Linux will behave the same on all devices.

A summary

As you can see, there are plenty of differences that set Windows and Linux kernels apart. Of course, most of them involve accessibility and the way they behave in certain situations.

While at first glance Windows kernel seems less permissive, it is also much easier to understand for the common user. This makes the OS it comprises far better for wide-scale commercial use, while the Linux code is better for development.

Did you find this article useful? Let us know if we skipped any major differences between the two kernels in the comment section below.

RELATED ARTICLES YOU SHOULD CHECK OUT:

Best practices to avoid Kernel Security Check Failure errors

Everyone who’s ever had Windows as their operating system has heard of the Blue Screen of Death (BSOD) error. Unfortunately, even those that have upgraded to Windows 10 haven’t gotten rid of it entirely.

The BSOD is usually caused by virus infections, and sometimes seven incompatibilities between your drivers, and the version of Windows you’ve just updated to.

Of course, while most of the time they happen randomly, there are a few things you could do to make them happen less frequently.

We’ve compiled a list of the best practices to avoid Kernel Security Check Failure errors, and they are listed in an easy-to-read manner.


We’ve written many articles about BSOD errors, so be sure to look them up if you encounter any such issues.


What can I do to avoid Kernel Security Check Failure errors?

1. Make sure everything is tightly connectedram

A lot of times the BSOD is caused by the memory slots or lack thereof. That is why checking if everything is well connected and inserted into their slots accordingly can be key.

The same basic principle can be applied to your hard drive. Faulty or damaged hard drives that have plenty of bad sectors can be a cause of BSODs. Additionally, the errors can also happen if your hard drive isn’t connected properly.

Thus, making sure that your hard drive in tip-top shape and well connected will lower the chance of BSOD errors.

Note: When checking the memory slots of hard drive connections, always remember to do it while the PC is turned off.

2. Keep your Windows updated

Microsoft always releases new updates for their OS. That is why it is a good idea to always get the latest updates as soon as possible.

Normally, updates download and apply themselves automatically, but when more critical ones become available, you need to manually confirm their download and installation.

To do this, simply follow these steps:

  1. Press Start
  2. Click on Settings
  3. Select Update & Security
  4. Go to Windows Update
    1. Click on Check for updates if none is downloaded already
    2. Click Download if an updated has already been detectedWindows update

3. Keep your drivers constantly updated

As mentioned above, a BSOD error can happen when your drivers are too old and no longer compatible with the latest Windows update you’ve just installed.

That is why keeping them updated to the latest supported version is critical. For a more in-depth guide on how to update your drivers, check out this great article.

4. Frequently scan your PC for malware

One of the most common reasons why you get a BSOD is because your PC has a virus infection.

In order to prevent such unfortunate events, frequently performing a full system scan can save you a lot of headaches in the long run. That is why performing a full system scan in order to detect any malware running on your computer.

There are several solutions that you can use, such as:

If you choose to use a third-party antivirus, then we wholeheartedly recommend Bitdefender. It is rated as the Nr. 1 best antivirus in the world, and for good reason.

Download Bitdefender Antivirus

5. Back up your PC just in case

Some BSOD errors prevent you from even properly logging into Windows entirely. If that happens, then your only solution is to either reformat your drive entirely or go back to a previous version of Windows by using a restore point.

If you don’t know how to create a system restore point, check out this in-depth guide for more info on the matter.


Can’t extract the original copy in System Restore? Learn how to solve the issue with this guide!


6. Try to avoid overclocking your PC

While overclocking your PC for the sake of gaming may seem natural, it can also increase the chance of you getting a BSOD error. As such, risking not to game at all just so you can make your PC run a game just a bit smoother defeats the purpose altogether.

That is why it is a good idea to revert your PC‘s settings to their default values (if the overclocking was done from the BIOS) and remove any overclocking software entirely.

Closing thoughts on BSOD preventive measures

By following the above-mentioned practices from time to time, you should be able to avoid running into any BSOD or Kernel Security Check Failure errors.

However, if they do happen, you should be able to know exactly what to do in those situations. For more details on how to handle a BSOD, check on this detailed guide.

Keep in mind that these errors can happen for a wide variety of reasons, so following all of the steps will greatly reduce the chance of you getting them.

Did you find the article to be useful? Let us know in the comment section below.

RELATED ARTICLES YOU SHOULD CHECK OUT:

Is your Master Boot Record on the wrong drive? Try this

Whenever you boot your PC, it will usually boot off of whatever drive has the bootloader installed on it.

This is usually an issue those with multiple drives encounter. This generally happens because the computer may not know which drive has the bootloader by default.

One common misconception is that the drive that has the Windows install files is also the drive that has the bootloader, but that couldn’t be more wrong.

Thus, you may need to change the Master Boot Record (MBR) if it is not on the intended drive. Since this process requires several steps, we’ve compiled a step-by-step guide to show you how you can do this.

How do I change the Master Boot Record?

1. Mark System Partition as Active with Windows Installation Media

  1. Enter your PC’s BIOS setup
    • This procedure varies from PC to PC, so check on your manufacturer’s website for more info
  2. Go to Boot order
  3. Set the CD-ROM (for CDs and DVDs) or Removable Device (for bootable USB drives) as the first boot devices
  4. Save the changes and exit the BIOS setup
    • The PC will now reboot from the Installation Media
  5. Boot your PC using Installation Media
    • This could be a CD, DVD or a bootable USB flash drive
  6. Once in the menu, select Repair your computer
  7. Choose Troubleshoot
  8. Select Advanced Options
  9. Enter the Command Prompt
  10. Input these commands, and hit Enter after each of them:
  • list disk
    • select disk x (In your case x is the number of the disk you will operate)
  • list partition
    • select partition y (In your case y is the number of the correct system partition)
  • active
change active drive

Your Windows PC should now booth from the appropriate drive.

2. Mark System Partition as Active with MiniTool Partition Wizard

There are plenty of third-party tools out there that can do the same job as the first method, only with fewer steps. One such tool is MiniTool Partition Wizard.

If you want to use it to change the boot drive, then follow the steps below:

  1. Create a bootable USB drive using the MiniTool Partition Wizard’s Bootable Media Builder
  2. Enter your PC’s BIOS setup
  3. Go to Boot order
  4. Set the Removable Device as the first boot devices
  5. Select the partition that you want to make bootable, and mark it as Active via the Set Active feature
  6. Select Apply to save the changes
  7. Restart the PC
  8. Go back to the BIOS
  9. Set the drive as the first Boot order choice
  10. Save your changes and press ExitMini partition wizard

Your Windows PC should now boot from the appropriate drive.

By following any of the two steps, you should be able to change the boot drive of your PC without any issues.

Did you find this guide to be useful? Let us know if you know other methods of changing the boot drive in the comment section below.

RELATED ARTICLES YOU SHOULD CHECK OUT:

Posted in Fix

This is how you can enable Master Boot Record Security

The Master Boot Record (MBR) is an important part of a disk. this is because it contains all the information needed to successfully boot from a disk and access the data on it.

Because of its importance, several safety measures are taken to maintain its well-being.

One such measure is the Master Boot Record Security that prevents changes to the MBR caused by malicious software. These threats come in the form of MBR viruses, or errors caused by faulty disk utilities.

Depending on your computer system, Master Boot Record Security may not be activated by default, so turning it on is recommended.

Because this process isn’t too straightforward, we’ve compiled a step-by-step guide on how you can perform this task successfully.

How can I turn on Master Boot Record Security on my PC?

  1. Turn on or restart your PC
  2. Enter the BIOS menu
    • This process varies from PC to PC, so go to your manufacturer’s website for more info on the matter
  3. Once in the BIOS menu, go to the Security tab
  4. Go to Master Boot Record Security
  5. Change it to Enabled
  6. Select Save Master Boot Record
  7. Save your changes
  8. Exit the BIOS menu

MBR Security

By following the steps mentioned above, you should be able to increase the security level of your MBR, which will greatly reduce the chance of any boot-related errors in the future.

Things to consider if you turn on MBR Security

If you activate Master Boot Record Security, the BIOS prevents any changes being made to the MBR of the current bootable disk.

You need to remember that every time you start your PC, the BIOS will compare the MBR of your current bootable disk with the one it has saved.

If the BIOS detects any changes, you will be prompted with an error message that will ask you to configure MBR Security.

If this happens, you have three choices:

  • Save the MBR of the current bootable disk
  • Restore the previously saved MBR
  • Disable the MBR Security feature

If the BIOS detects any changes and the bootable disk you have now is not the same as the one that was previously saved, you will be prompted with another error message.

If this happens, you will need to do one of two things:

  • Save the MBR of the current bootable disk
  • Disable the MBR Security feature

Do you think turning on MBR Security is worth the hassle? Let us know in the comment section below.

RELATED ARTICLES YOU SHOULD CHECK OUT:

Save up to 70% off Resident Evil 2, Borderlands 3, and more during the Xbox Game Awards sale

Since 2014, The Game Awards ceremony has been honouring the best video games released during the year. The annual show hosted by Canadian video games journalist will be held later today at the Microsoft Theater in Los Angeles, and the software giant is celebrating the event today with a limited-time Game Awards sale on the Xbox Store.

Until tomorrow, December 13, you can take advantage of up to to 75% discounts on games such as Tom Clancy’s The Division 2, A Plague Tale: Innocence, Borderlands 3, Call of Duty: Modern Warfare, Control, Destiny 2: Shadowkeep, Devil May Cry 5, Mortal Kombat 11, Metro Exodus, and more. Gears 5, Microsoft’s latest AAA game which received two nominations is also 50% off, while Obsidian Entertainment’s The Outer Worlds is 25% off.

The latter received a total of 4 nominations for the Game Awards 2019, including one for Game of the Year. Obsidian Entertainment is turning out to be a great acquisition for Microsoft, as The Outer Worlds has been doing very well for a brand new IP without an AAA budget. Now with Microsoft’s backing, we can only hope that this will become a very valuable franchise for Microsoft in the near future.

The Game Awards 2019 ceremony will kick off at 5:30 PM PT today, and Xbox head Phil Spencer will come back to the stage this year. The show will be live-streamed on many platforms including Microsoft’s Mixer, where you’ll be able to earn free “Mixpot” digital rewards if logged in with your Microsoft account.

Fortnite now supports split-screen multiplayer on Xbox One and PS4

In Fortnite’s newest update, v11.30 contains a number of bug fixes, performance updates, and now offers split-screen multiplayer support on Xbox One and PS4.  As noted in a post on the Fortnite v11.30 update, gamers can now play with their friends locally, split-screen in Fortnite. With split-screen support on Xbox One, Fortnite gamers can play Duos and Squads with a friend on the same console. Since this is an early release of split-screen support, the Fortnite team implores you to use the in-game feedback tool to report any issues.

In addition to bug fixes, here’s a look at the new features available in the Fortnite v11.30 update.

  • Preview what’s in the Item Shop using your mobile device.
    With Party Hub, you can now preview what’s new in the Item Shop before loading into the game.
    To do this, open Party Hub, swipe right, and tap “Preview Items.”
  • Increased the daily Item Shop gifting limit from 3 to 5.
  • Changed Ammo Indicator.
    Now a visual representation of the remaining ammo number rather than a solid bar.
  • You can now choose when to transition from the “Eliminated By” screen to the end-of-match XP screen.
    To transition to the end-of-match XP screen, press “Continue” on the “Eliminated By” screen.

In addition to the aforementioned changes, the Fortnite team also made changes for the upcoming Star Wars: The Rise of Skywalker event this Saturday, December 14, 2019, at 2:00 PM ET. The Rise of Skywalker event will feature director J.J. Abrams reveal “exclusive scene in-game ahead of the movie’s release, only in Fortnite! Remember to drop in early at 1:30 PM ET when the doors open.”

What other features would you like to see in Fortnite? Let us know in the comments!

Forza Horizon 4 new battle royale mode launches on Xbox One and Windows 10

Forza Horizon 4 has a new game mode launching later today. “The Eliminator” is a new battle royale game mode where you play a 72-player battle royale. The Eliminator is part of the Series 17 update arriving sometime today. Since the full Series 17 changelog is not yet available on the Forza Horizon 4 website, it’s hard to say what else will be included in the update. However, based on the video below, The Eliminator looks like it’s a lot of fun to play.

Going head-to-head in a 72-car battle royale mode trying to race towards the finish line while attempting to take each other out seems like the most fun and competitive Forza racing experience to come along in a while. Similar to other battle royale games, you will get eliminated if you stay outside a targeted area, or if you can’t complete a race by an opponent who challenges you to a 1V1 race.

The Eliminator is being included for free, as part of the Series 17 update arriving on Forza Horizon 4 later today. Personally, I am excited to start playing The Eliminator right now. Forza Horizon 4 is available as part of an Xbox Game Pass subscription, along with all the other games in the Forza series. You can also buy Forza Horizon 4 for $35.99 for Xbox Live Gold subscribers.

Are you looking forward to playing Forza Horizon 4 The Eliminator? Let us know in the comments.

Hands On with Surface Hub 2S: Say goodbye to your Whiteboards?

Microsoft might be best known for the Surface Pro, Surface Laptop and Surface Book lineup for consumers, but the company also has a vision for how it wants you to use its devices and services in the modern workplace. We’ve already seen this come to life in part with the original Surface Hub, but Microsoft in May 2018 revealed its successor, dubbed the Surface Hub 2.

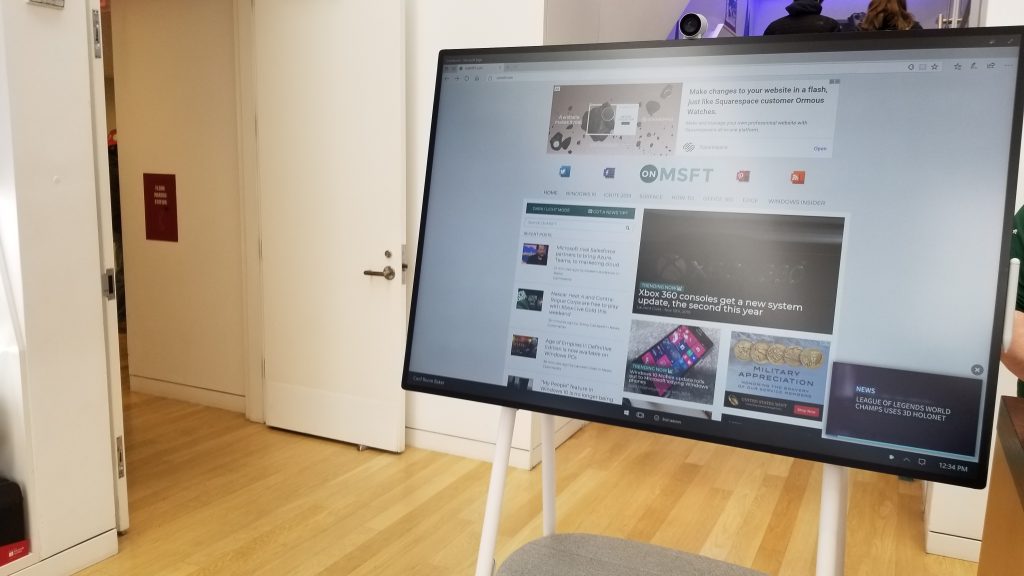
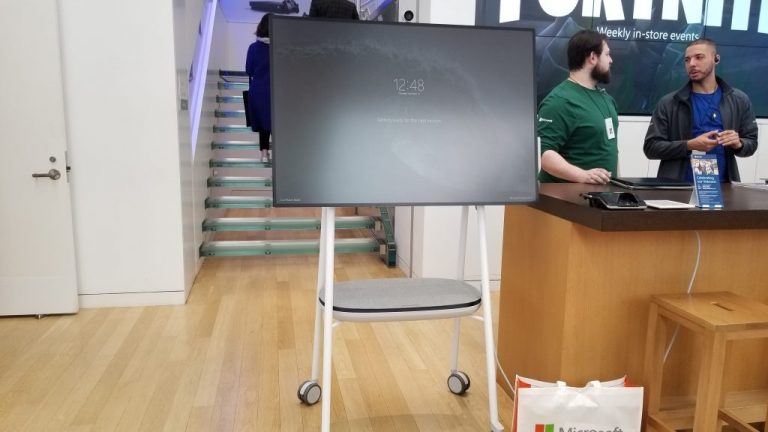
The Surface Hub 2S is a form of the Surface Hub 2 that went on sale in June of 2019, and a demo unit was recently on display at the flagship Microsoft Store in New York City. I went hands-on with it and was very impressed, finding that it’ll make you want to say goodbye to your office whiteboard.

So thin, so cool

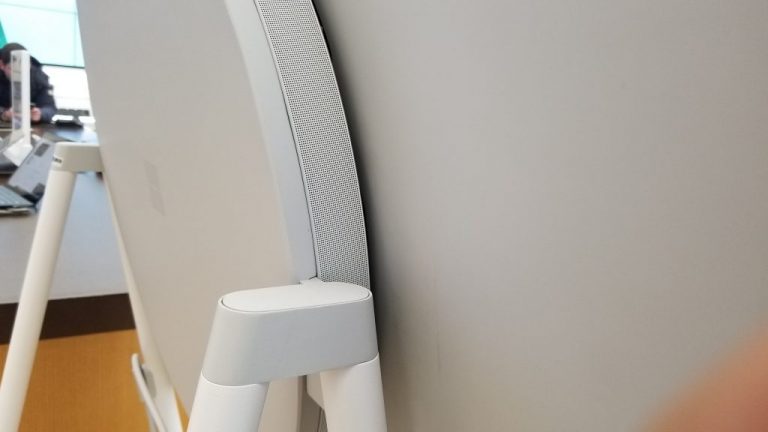
The original Surface Hub was mindblowing on its own for many reasons, but the Surface Hub 2S takes that to another level. It is now up to 40% smaller, coming in at 29.2″ x 43.2″ x 3.0″ over the original Surface Hub’s 46.12” x 86.7” x 4.15″.  It is also much lighter, and is a mere 61.6 pounds, compared to the original Surface Hub’s hefty 280-pound weight. The display, though, has shrunk and is now 50-inches instead of 55 inches like the original Surface Hub. There will be, however, a larger version with an 85-inch display coming later next year.

But those are just numbers on paper. You really do have to see the Surface Hub 2S in person to see how much it’s changed over the last generation. The side bezels are now much slimmer. The Surface Hub 2S also ditches the black color for Microsoft’s signature platinum, and the overall design and profile make it seem just like an oversized and slightly thicker Surface Book display. I’ve previously gone hands-on with a collaborative touch-screen display from Dell, and the difference is quite outstanding. The Surface Hub 2S really is thin for something of this size.


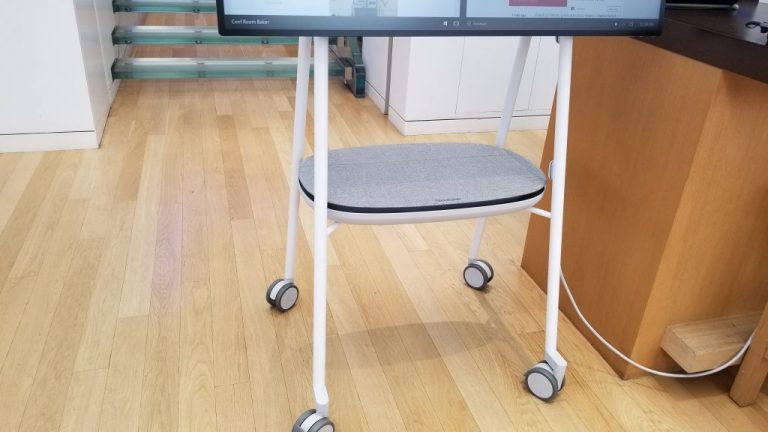
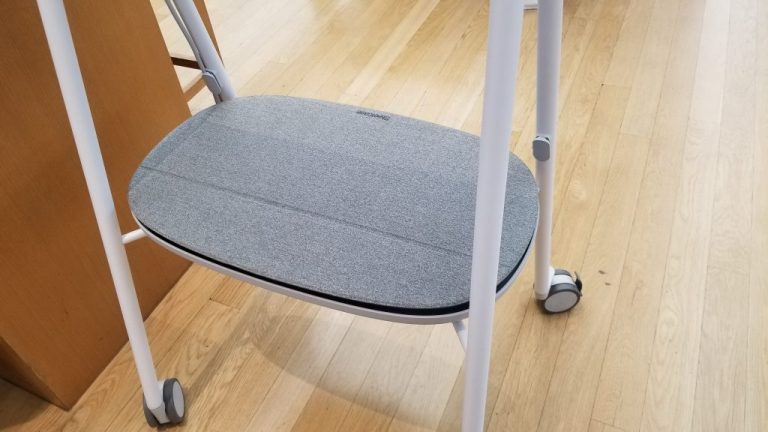
But what makes the Surface Hub 2S special is its ability to be mounted on an easel. While it indeed can still be mounted on a wall, Steelcase sells a mobile easel for the Surface Hub 2S which makes it a more mobile solution. Called the Steelcase Roam, the easel is just as slim as the Surface Hub 2S. It has a low profile and even a battery pack that lets you wheel the Surface Hub 2S around. The battery pack also doubles as somewhat of a stand, allowing for you to place a laptop or other objects on top. I really wanted to roll the Surface Hub 2S around the store, just because the stand seemed so cool.

A note on the computing power

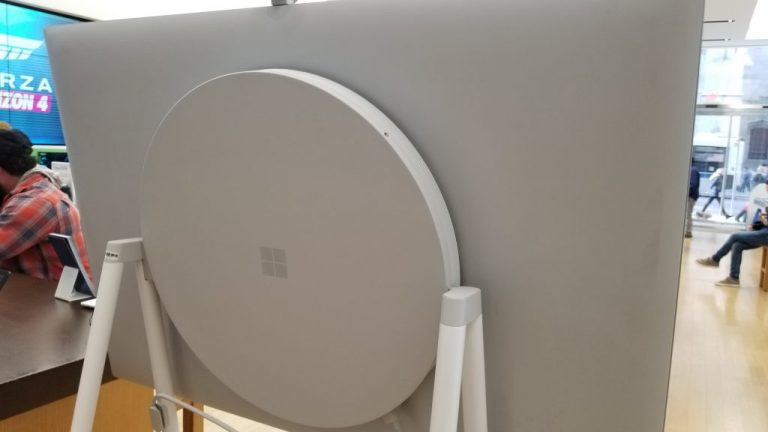
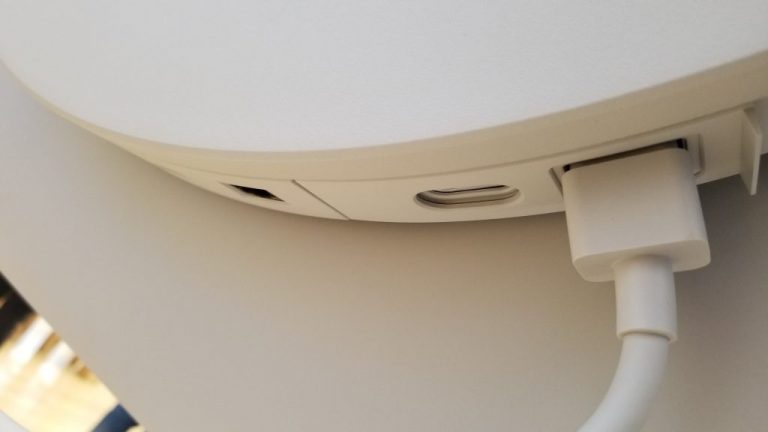
Another thing that makes the Surface Hub 2S special is the fact that it has all its computing power built right into the unit itself, and is designed sort of like a cartridge system. It’s all located in the back of the Surface Hub 2S inside a circular-shaped housing. There is where you’ll find the quad-core 8th Generation Intel Core i5 processor, 8GB RAM, and 128GB SSD. You’ll also find some ports here on the back too. Connectivity on the 2S ranges from a USB-A port, Mini-DisplayPort, RJ45 Ethernet Port, HDMI Input USB-C with DisplayPort Input, and four USB-C ports.

This is quite a modern upgrade from the original Surface Hub, which sports the 4th Generation Intel Core i7 processor, 128GB SSD, as well as 8GB of RAM. It also only had 1 USB-C port, USB-3.0 port, USB 2.0 port, Ethernet 1000 Base T, DisplayPort Video Output, and 3.5mm Stereo Out.

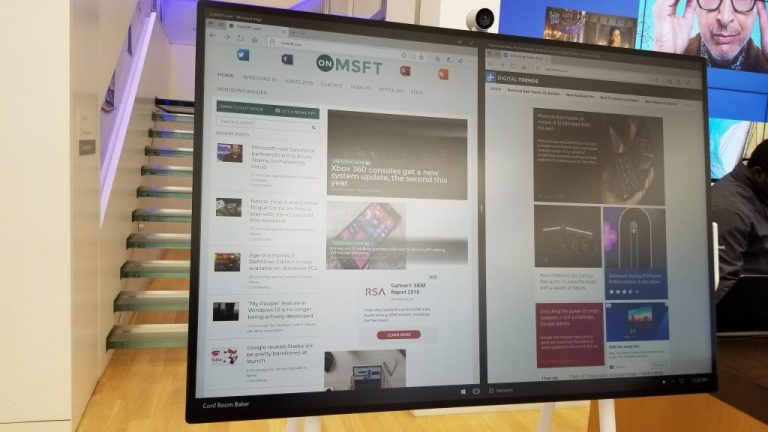
Anyway, these specs make the Surface Hub 2S quite a beast for any multi-tasking. I opened up multiple tabs in Edge, instances of YouTube, and the Hub was able to keep up with it. I’ll also want to mention that the Surface Hub 2S will be upgradable to the Surface Hub 2X next year via a cartridge. It will have beefier specs to unlock the power of Windows Core OS, and the ability to combine four different displays together as one and rotate it into the vertical orientation.

A note on the operating system & user interface

When Microsoft showed off the original Surface Hub 2, it showcased a version running an operating system that we’ve come to know as Windows Core OS. The operating system was able to adapt to the display, and seemed a bit more modular. However, the Surface Hub 2S currently is powered by the Windows 10 Teams OS that currently ships on the original Surface Hub. If you’re not familiar with the OS, then I’m about to explain.

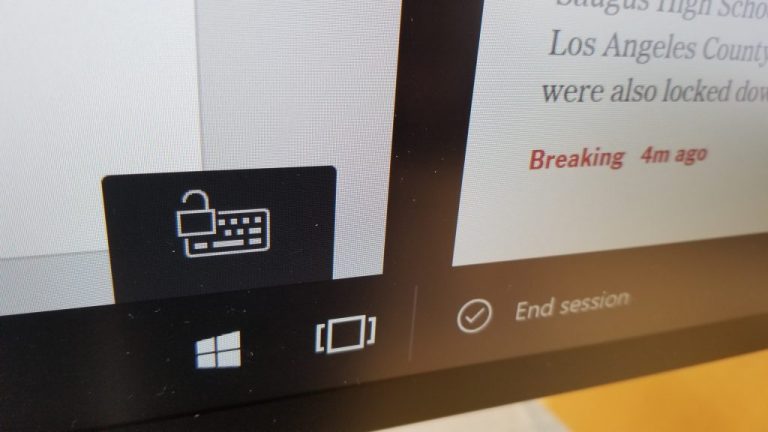
Basically, the Surface Hub 2S is a bit similar to regular Windows 10 but overlayed with Teams and a custom skin for a large screen display. If you walk up to it, you’ll be able to sign in. A pop-up message will then prompt you to tap the Start menu. When you do that, a somewhat modular-looking start menu will then show up. It seems a bit similar to the Windows Mixed Reality Start Menu. It also shows you a list of your pinned apps, and the option to join a meeting in Microsoft Teams or end the session. You also can expand it out and see a list of apps by pressing All Apps.
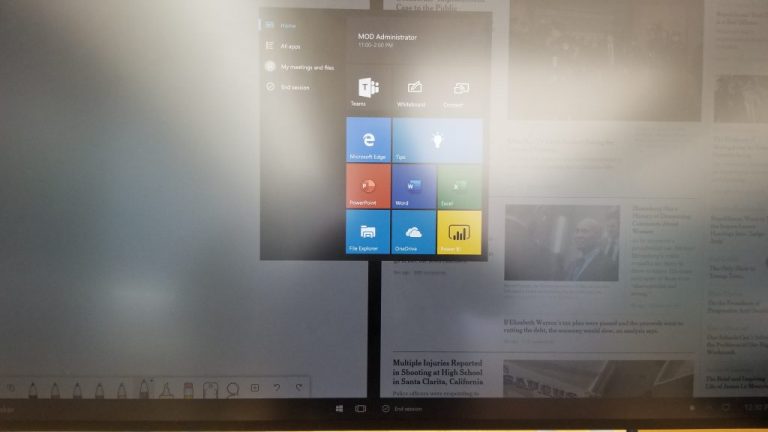
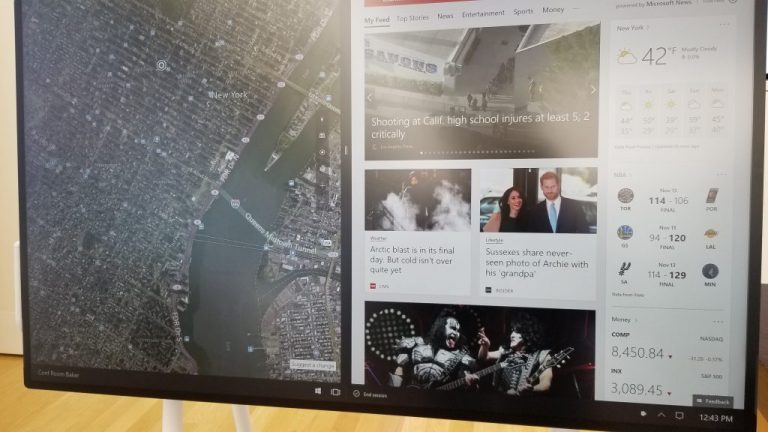
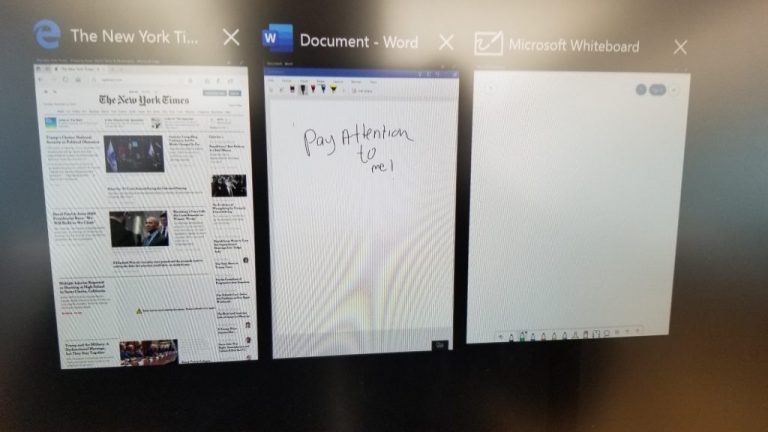
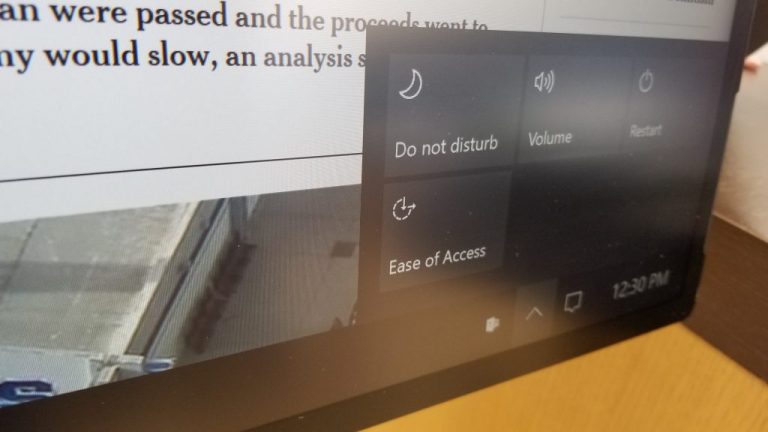
Once you open an app, you can send it full-screen, but you also can split-screen by tapping a split-screen icon on the taskbar. This will show you a list of open apps. If you choose one, it will give you a divider along with the screen, letting you size the apps as you see fit. You even can touch on the Action center icon which gives you access to some quick toggles for volume and do not disturb mode.

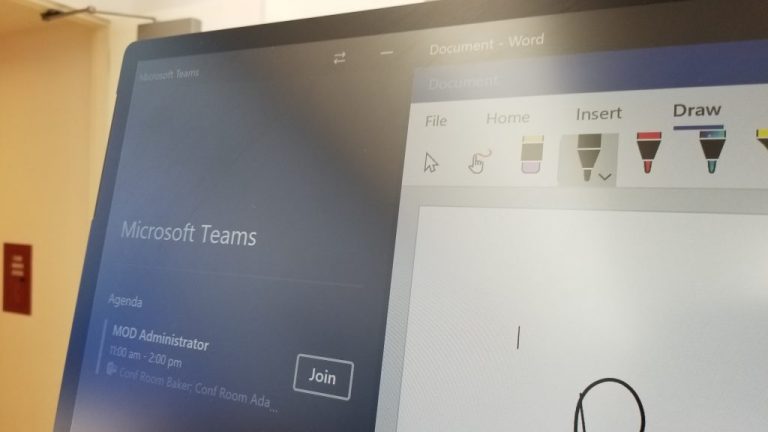
As I touched on before, Microsoft Teams is also overlayed on top of the UI on Surface Hub 2S. When open, it’ll appear on the left side, or right side of the screen. It’ll show you an agenda, as well as an option to join a meeting. As this is a collaborative display, that’s quite convenient.

Touch screen display that’ll knock you off your feet

As a collaborative display, the killer feature of the Surface Hub 2S has got to be its 50-inch IPS LCD touchscreen. It comes in at a resolution of 3840 x 2560 and sports the signature 3:2 aspect ration from the rest of Microsoft’s Surface lineup. In my time with the Surface Hub 2S, I opened up webpages and even a YouTube video.  Everything that showed on the screen was crystal sharp and clear. Even the fonts of the New York Times webpage looked sharp as I stepped back from the display.

It’s also worth noting that the display itself is flanked by some small bezels. According to Microsoft, it comes in at around 15.5mm. This is quite slim, as other collaborative displays will have thicker borders for you to grab hold of. It’s really quite inviting and begged me to go in and touch the display. Oh, the speakers are also hidden in those bezels too, but can still get quite loud and immersive. Microsoft says it’s 3-way stereo speakers. There’s also support for the Surface Hub 2 Pen, as we discuss later.

Power to the pen, touch, and other accessories

Finally, there’s the need to talk about touch and pen support. The Surface Hub 2S sports support for up to 10 points of touch, as well as the Surface Hub 2 Pen. I tried out the touch support by dragging and scrolling through a map of Manhattan, and it really was responsive. It didn’t lag, and it tracked the movements of my fingers.

To try out the pen, I inked up a map in the Microsoft Maps app, simulating directions on how to take the train to the airport from Manhattan. It too was smooth. The pen itself is also really comfortable. It’s rounded and feels nice and solid in the hands, similar to a Sharpie dry-erase marker for a whiteboard. There’s a button on the side, and an eraser on the top, just as you’ll find on the regular Surface Pen. It’s even magnetic and stick to the side of the display, so it stays out of your way when you don’t need it.

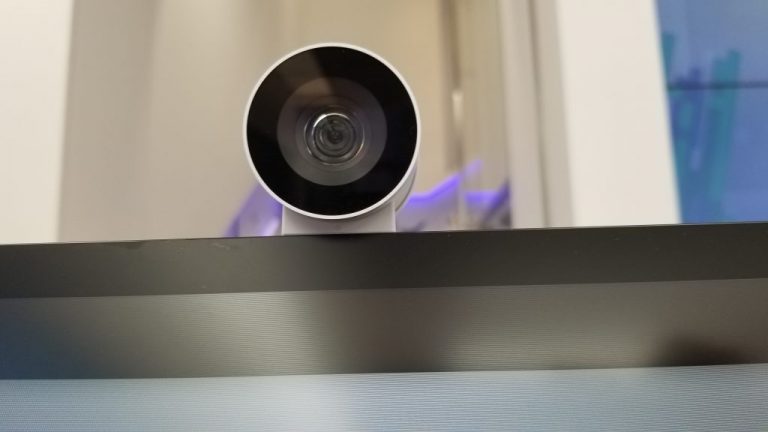
Another feature of the Surface Hub is the Surface Hub 2 camera. It is housed on the top and, according to Microsoft, allows you to “capture the room and conference participants in a full field of view.” It’s magnetically attached and has a 90-degree HFOV, with anti-dicker, and face-based auto exposure. It wasn’t something I got to try out, but I wish I did as these specs make it seem high-quality.
A high price to pay to replace whiteboards

At the end of the day, the Surface Hub 2S is quite amazing. It’s touch screen display really packs a lot of pixels, and the overall design is quite modern and thin. The computing power is also impressive, and the Windows 10 OS backs it with some cool touch gestures. Inking support and the Surface Hub 2 Pen also opens it up to replacing whiteboards, but at the high cost of $9,000.

Top 5 task managers for Mozilla Thunderbird

Mozilla Thunderbird is probably one of the world’s most well-known email clients. It comes with plenty of features that let you not only send and receive emails, but it lets you organize meetings, schedule your day, and more. Of course, there’s always room for improvement. In the case of Mozilla Thunderbird, these can come in the form of extensions or programs. They can improve an already existent feature of Thunderbird, or add a completely new one. For example, there are plenty of add-ons and tools for Thunderbird that allow you to organize tasks better. Since these can be very useful to those in working environments, we’ve decided to rank the best of the best based on several criteria.

Top Mozilla Thunderbird task managers to use

Lightning

LightningLightning is arguably one of the most well-known addons for Mozilla Thunderbird.

This is mainly because it was one of the first at giving the email client the calendar, task management, and scheduling tools that it lacks.

More so, it continues to be updated, and this allows it to stay the most popular addon of its kind even as of today.

Pros:

  • Give Mozilla Thunderbird the task management and scheduling tools it lacks
  • Can be used as a framework for other similar addons
  • Provides you with a calendar tool

Cons:

  • Pop-ups can be annoying if staked to close together

Download now

Todo.txt

Todo.txtTodo.txt is an interesting new way of handling and writing down the things you need to do throughout the day.

It works in conjunction with the Mozilla Thunderbird Lightning add-on and can be used to add task management functionality to the email client.

It will make writing down, managing and marking tasks as completed very easy to do, and you won’t need any other similar third-party program.

Pros:

  • Can be opened and modified with any text editor

Cons:

  • Requires the Lightning addon

Download now

Remember the Milk

Remember the MilkRemember the Milk is simple addon for Mozilla Thunderbird that is also available as an integrated service for Google or Gmail.

It is a simple task manager that allows you to input tasks into its interface, organize your tasks, and associate tasks with specific locations. You will then receive notifications right when or prior to when the tasks need to be completed

Pros:

  • Integrated with Google and Gmail already
  • Easy-to-use

Cons:

  • More of a list-maker than a scheduler

Download now

Tasks & Mails

Tasks & MailsTasks and Mails is a neat Thunderbird addon that links tasks directly to emails. For example, if you receive an email that requires a follow-up action. you can use the addon to link the task to that particular email.

Microsoft Outlook users may recognize this as the flag feature from their email client. The tasks are then stored with the email in the email folder, making it useful if many of your tasks are associated with emails and RSS feeds.

Pros:

  • You can use Tasks and Mails to link the task to the guiding email

Cons:

  • Useless if you frequently ignore notifications

Download now

Provider for Google Calendar

Provider for Google CalendarUsing multiple services is not uncommon nowadays, so using Mozilla Thunderbird in conjunction with Google Calendar isn’t all that odd.

However, switching between one another can be frustrating, so Provider for Google Calendar is here to make things easier.

This neat Thunderbird addon basically links the two services, so that all the tasks and schedules you have on Google calendar can be seen and used from within Mozilla Thunderbird.

Pros:

  • Links Mozilla Thunderbird to Google Calendar

Cons:

  • Some features are not cross-compatible

Download now

Closing thoughts on task managers for Mozilla Thunderbird

Unlike other email clients that also have several personal information organizing tools, like Outlook, Thunderbird is just a simple email client.

However, it can be customized with a wide variety of tools and addons that can fill in some of the gaps that it has. These allow you to continue using it without feeling as if you’re missing out on potentially beneficial tools.

RELATED ARTICLES YOU SHOULD CHECK OUT:

Top 5 ZIP archive recovery tools

Similar to their real-world counterparts, an archive file is a compilation of one or more computer files along with metadata. Their purpose is to collect multiple data files together into a single file for better portability and to occupy less space. Of course, an archive file is still a computer file, and like all files, deleting them can be rather problematic. This is especially problematic if they are no longer in the Recycle Bin anymore either. Thus, you will eventually need the help of third-party tools that deal with this type of file. The Internet is full of such tools, so compiling a list of the best ones seems to be appropriate. This is especially the case if you value a program that is efficient and easy to use.

What are the best ZIP archive recovery tools that I can use?

Kernel ZIP Recovery

Kernel for ZIPTopping off our list is a tool that can not only recover deleted archive tools, but it can also repair corrupted ones, regardless of why they were broken in the frist place.


Need to recover files fast and efficiently, not just archives? Thy out these programs!


Additionally, the simple easy-to-use interface makes it so that you don’t need a tutorial to know what you are doing.

Pros:

  • Can recover selected individual files from the corrupt ZIP archive
  • Recovers password-protected ZIP files
  • Fixes ZIP files showing CRC and checksum errors

Cons:

  • Need to pay to unlock full functionality

Get now

Recover Data for Zip

Recover Data for ZipWhat makes Recover Data for Zip so special is that it is the only entry on our list to feature two different repair modes.

You can use the Fast Mode for when archive corruption is at a minimum and you need to repair large amounts of data in the least amount of time.

Conversely, if data corruption is pretty severe, you can use Advanced Repair Mode. While it may take longer, it will repair mode data from more damaged archives.

Pros:

  • Features two different repair modes
  • Fast repair speeds

Cons:

  • More often than naught you’ll need to go for Advanced repair mode

Get now

SysInfo ZIP Recovery

zip-recovery (1)SysInfo ZIP Recovery is a neat archive recovery tool that also comes with a great gimmick: the free version is available as an online service, and you can use it to preview the content of a damaged archive.

This spares you the hassle of having to download and install a free demo only to be disappointed that it doesn’t even work properly.

Pros:

  • It extracts files from corrupted or damaged ZIP archives
  • Facilitates support for all ZIP file format such as spanned ZIP files, split ZIP files
  • Free ZIP Repair tool is available online to take Preview of recovered files

Cons:

  • The price tag

Get now

SysTools Zip Recovery

zip-recoverySysTools Zip Recovery is an archive recovery and repair tool brought by a developer specialized in making file recovery tools for pretty much every format.

That is precisely why this program works so well. Not only does it recover archive is a fast and professional manner, but it can do so with archives that are enormous in size as well.

Pros:

  • Repair & recover corrupt, damaged, erroneous zip file data
  • Allows to load & preview the files within the zipped folder
  • Supports Zip recovery of password-protected zip files

Cons:

  • The free download allows previewing data from a corrupt backup file

Get now

Stellar Phoenix Zip Recovery

Stellar Phoenix Zip RecoveryStellar Phoenix Zip Recovery is a tool that isn’t designed to recover ZIP archives files per se, it is made to recover backup files that also happen to include the ZIP format as well.

This makes it an excellent choice for those that have really important data to recover, and given the wide range of supported formats, it is also quite versatile.

Pros:

  • Supports recovery of corrupt Backup files (VHDX, BKF, ZIP, FD)
  • Restores all the instance of inaccessible data from the selected backup file
  • Saves the scanned output in a .DAT file format for later use

Cons:

  • Mainly used for recovering backup files

Get now

Closing thoughts on archive repair tools

Theoretically, if you use a universal file recovery tool it should be able to work on archived content as well.

However, if you’re looking for something more precise and with a higher chance of success, having a tool dedicated to ZIP archives is recommended.

All in all, the entries on this list should get the job done in no time.

RELATED ARTICLES YOU SHOULD CHECK OUT:

Fix: Windows Update red exclamation mark

Those of you that keep your PCs constantly updated and visit the Windows Update menu frequently have probably noticed that sometimes there’s a red exclamation mark on the Windows Update icon.

A lot of users have been asking on forums what does this mean and how they can get rid of it:

My PC hangs for an hour (and possibly longer) at “Restarting”. It never comes to “configuring updates“, restart and “working on updates“. The usual sfc and dism checks turned out that everything is ok. Free disk space is more than 20 GB. No third party antivirus or tuning sw installed. No driver change since two years. No USB device attached. 

Answers and solutions of the most diverse kind were soon to follow.

What is the red exclamation mark?

Apparently, updates marked with the red exclamation mark are critical updates, rather than simple updates, like antivirus definitions.

To that extent, they are there to signal that you must install the latest updates to benefit from the latest security features.

How do I get rid of the red exclamation mark?

1. Install the updates

Normally, Windows 10 can be set to download updates automatically, but there are some that need your permission. When a critical update appears that needs manual permission, simply download and install it and the mark will go away.

  1. Press Start
  2. Click on Settings
  3. Select Update and Security
  4. Click on Download
  5. Let the update run its coursedownload update

2. Remove any Windows update blockers

If you’ve set your PC to stop any updates, or are using a third-party tool to block them, then they will accumulate over time, and the red mark will never go away.

Thus, uninstall any program that blocks updates, and allow your PC to get them.

  1. Press Windows + R
  2. Type in control.exe
  3. Select Uninstall a program
  4. Right-click the program you use to block updates and select Uninstall
  5. Restart the PC

By following any of these steps, you should now have upgraded your Windows OS with all the critical updates, and the red exclamation mark should be gone.

Did you find this guide useful? Let us know in the comment section below.

RELATED ARTICLES YOU SHOULD CHECK OUT:

3 million gamers played Halo: Reach on PC and Xbox One during launch week

The long-awaited Halo Reach remaster had a “monumental launch” last week according to Aaron Greenberg, Xbox Games Marketing General Manager at Microsoft. The game was released on December 3 on Xbox One, Windows 10, and Steam, and it’s also available on Xbox Game Pass for PC and console.

Here are the launch numbers that Greenberg highlighted on Xbox Wire today:

  • Nearly 3 million players of MCC on PC and Xbox One during launch week
  • #1 top-selling game on Steam during launch week and the highest-ranking debut for an Xbox Game Studios title on Steam
  • #1 most-watched game on Twitch during launch day

As you may know, Microsoft doesn’t share game sales numbers for its first-party titles, preferring to highlight engagement instead. It’s true that having first-party games on Xbox Game Pass on launch day is certainly cannibalizing sales, but Halo Reach being a top seller on Steam (along with Age of Empires II: Definitive Edition) shows that Microsoft was definitely right to not make its PC games exclusive to the Windows 10 Store.

Halo: MCC’s overall reviews on Steam are currently “Very Positive,” and we hope the upcoming PC ports of Halo: Combat Evolved, Halo 2, Halo 3, Halo 3: ODST, and Halo 4 will meet the high expectations from Halo fans. 343 Industries recently said that the first Halo: CE PC build will ship to select Halo: Insiders after the holidays, with the rest of the Halo games to follow in 2020.

If you have yet to try Halo: Reach, the game is free with Xbox Game Pass for PC and Console, and you can also get it for just $9.99 on the Microsoft Store and Steam.

Halo: Reach
Halo: Reach
Developer:
Xbox game Studios
Price:
Free

How to fix the Adobe Creative Cloud download error

Adobe Creative Cloud usually enables users to select from a range of Adobe apps. However, some CC users have posted about a Download Error for Creative Cloud on Adobe’s support forum.

The Apps section of CC displays a Download Error message for those users. The error message states: Download error. Please retry to try again or contact customer support. Consequently, users can’t select any software on the Apps tab.

How can I fix Adobe Creative Cloud’s download error?

1. Reinstall Creative Cloud

!Quick tip: If you’re not using the Adobe Application Manager, make sure you reinstall the Creative Cloud Suite only from official sources.

  1. Some users have also said they’ve fixed the Download Error by reinstalling Creative Cloud. Press the Windows key + R hotkey.
  2. Input appwiz.cpl in Run and click OK, which opens the uninstaller.The uninstaller window adobe creative cloud download error
  3. Select Adobe Creative Cloud, and click the Uninstall option.
  4. Click the Uninstall button on the dialog box that opens to confirm.
  5. Restart Windows after removing Creative Cloud.
  6. Click Download Now on this page for the AdobeCreativeCloudCleanerTool.
  7. Right-click the AdobeCreativeCloudCleanerTool.exe to select Run as administrator.
  8. Then users can press 6 on the keyboard to select to remove Creative Cloud only. Users can also press 4 to remove CC apps.AdobeCreativeCloudCleaner utility adobe creative cloud download error
  9. Press the Y key to confirm.
  10. Thereafter, click Adobe Application Manager on the Adobe Application Manager page. Then you can reinstall Creative Cloud and other apps with Adobe Application Manager.
  11. Alternatively, users can download CC from the Creative Cloud website.

⇒ Download the Official Creative Cloud here


2. Delete the OOBE and AAMUpdater folders

  1. The official fix for the Download Error is to delete the OOBE and AAMUpdater folders. First, close the Creative Cloud app if it’s running.
  2. Next, open File Explorer with the Windows key + E hotkey.
  3. Select the File name extensions checkbox on the View tab.
    The Hidden items check box adobe creative cloud download error
  4. Open this folder in File Explorer: UsersApp DataLocalAdobe.
  5. Select the OOBE folder, and press the Delete button.
  6. Select the AAMUpdater folder, and then click Delete to erase it.
  7. Then launch Creative Cloud from the Start menu.

3. Update Creative Cloud

First, try updating the Creative Cloud software. To do that, sign in to a CC account via the login page for it. Then users can click Download and follow the instructions to update Creative Cloud.

Adobe sign in page adobe creative cloud download error


Creative Cloud installer failed to initialize? Follow this simple guide and solve the problem in no time.


Those are a few of the confirmed fixes for Creative Cloud’s Download Error. So, the resolutions above will probably resolve the issue for most users.

If you have any other questions or suggestions, feel free to leave them in the comments section below.

[wl_navigator]

Ready to finally give up on Windows Phone? Here are some of the best new phones you can buy

After nearly four years, Microsoft is finally ending support for Windows 10 Mobile. While it might seem like all is now lost if you have stayed true to the platform, there’s still plenty of hope left if you’re a Microsoft fan.

As we have previously explained, Microsoft is no longer just a single platform company. The company’s mission is to empower everyone to achieve more, and that now includes great mobile apps and experiences on iOS and Android.

So, if you’re giving up on Windows Phone, there’s still plenty of great phones you can choose from to get the Microsoft experience you were once accustomed to. Here are our picks for the best phones you can buy.

Samsung Galaxy S10 ($900) or Galaxy Note 10 ($849)

The number one picks on our list is the Samsung Galaxy S10 or the Galaxy Note 10. As we’ve detailed, Samsung and Microsoft now share a deep partnership when it comes to mobile phones. Newer Samsung phones — which the Galaxy S10 and Note 10 just so happen to be — share a “Link to Windows feature.” This feature essentially lets you enjoy some of the older synergies you once experience on Windows 10 Mobile, but now on Android.

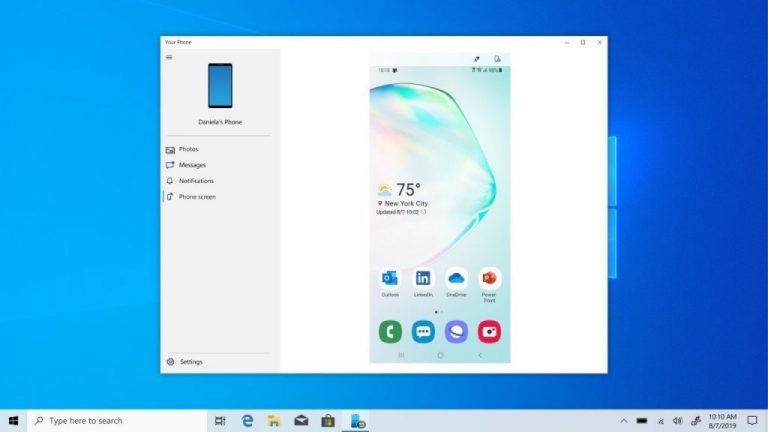
Mainly thanks to the power of the Your Phone app in Windows 10, you’re able to get access to your text messages, photos, as well as your phone notifications from a Galaxy S10 or Note 10 right on your Windows 10 PC. You don’t even need to download a companion app onto the phone as it is all built right in. If you’re a Windows Insider, you also can connect your phone to your PC and mirror its screen, allowing you to take control of your apps and more.

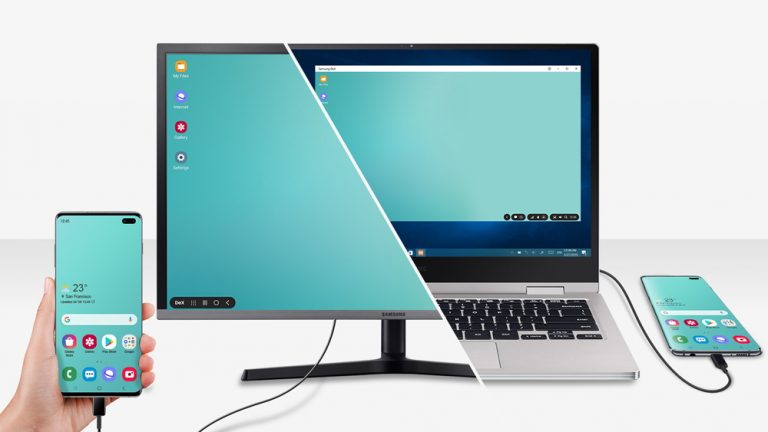
Much like Continuum in Windows 10 Mobile, the Galaxy S10 and Note 10 feature something that Samsung Calls DeX. This lets you plug your phone into a display, and get a desktop-like experience. Your apps and games go full-screen, and you’re even able to use DeX as an app on your Windows 10 PC if need be. That allows you to extend out the power of your phone, just like Continuum once did on the Lumia 950, Lumia 950 XL, and HP Elite X3.

The Samsung Galaxy S10 is available through the Microsoft Store for $900. A larger S10+ is also available for $1,000. The S10 features a 6.1-inch display and the S10+ sports a larger 6.4-inch display. Compared to older Windows Phones, these displays are bigger, more immersive, and vibrant. The cameras are also excellent and have been called by many as the best you can find in the industry. You’re also getting beefy specs under the hood, with the Note 10  and S10 having 8GB of RAM, and the S10+ having 12GB of RAM.  There’s definitely a lot you’re getting for the buck in terms of performance.

You also can step things up and get the Galaxy Note 10 if you please, which has the added benefit of an even larger 6.3-inch screen and built-in stylus, similar to a Surface Pro device. It’s slightly cheaper at $849. There’s also the Galaxy Note 10+ which has a super-large 6.8-inch screen, approaching phablet territory.

Nokia 7.1 ($209)

Next on our list is the Nokia 7.1. As someone switching from Windows 10 Mobile or Windows Phone, you might remember that Microsoft once owned Nokia’s phone business. Well, after Microsoft sold its feature phone division to FIH Mobile Ltd, Nokia announced that it signed a strategic brand and intellectual property licensing agreement with the newly founded company HMD Global. Since then, HMD has released several new Android phones under the Nokia name.

So, if you don’t have $900 to spend on a smartphone, you might want to consider staying with something from Nokia. Just like when Microsoft pushed out Nokia phones like the Lumia 650, and the Lumia 640, the new Nokia 7.1 is an Android phone from HMD that’s well worth switching to. In fact, as an ex-Windows Phone user myself, it is a device that I recently purchased myself, and have really enjoyed using compared to my Note 8.

https://twitter.com/abacjourn/status/1201624185392508928?s=20

While the Nokia 7.1 might not have the beefy specs and built-in features of the Galaxy Note 8, it is still a great budget phone. Similar to the pure OS that you get with Windows 10 Mobile, the Nokia 7.1 runs stock Android, with no skins like other Android phones such as the Note 10. Much like I described a few years ago, you can also turn the Nokia 7.1 (and any Android phone) into an All-Microsoft phone if you want to.
Thanks to the power of Your Phone, you can download a companion app on the Nokia 7.1 and have it sync your messages, photos, and notifications to your Windows 10 PC. You also can swap out your app defaults, and switch them to Microsoft-only apps, such as Microsoft Edge. Then, there’s the power of Microsoft Launcher. Once installed, you’ll be able to see the Windows Timeline activity from your PC right on your phone. You also can enjoy Cortana, Glance Screen, and so much more.

iPhone XR ($600)

There aren’t many synergies between Apple’s iPhones and Microsoft Windows 10 but that doesn’t mean you should ignore the platform entirely if you’re switching from Windows 10 Mobile. While you can’t get your text messages or photos between iPhones and Windows 10, you still can get the best of Microsoft from the Apple device. Outlook, OneDrive,  Cortana, Microsoft Edge, Office 365 apps are all available on iOS, and you can technically use these apps instead of Apple’s if you go team iPhone and not team Android.

I originally owned an iPhone at one point after switching off Windows 10 Mobile, and the experience was alright. Although you can’t switch to default apps to Microsoft-only as you can on Android, the experience is still worth it. iOS is clean, concise, and is very secure, much like Windows 10 Mobile once was.

There are many options you can choose from

Much like when Windows Phone was in its prime, there are a lot of other Android or iPhone models you can choose from if you’ve chosen to move on from Windows 10 Mobile and Windows Phone. Some other suggestions include the budget-friendly Motorola G7 ($180,) as well as the iPhone 8 ($449.) You also can step up the ladder and grab the iPhone 11 ($700)  or the One Pus 7 Pro (around $700). Of course, you might also want to buy a cheaper device, for now, and hang on to buy the Surface Duo, which is Microsoft’s Android smartphone, set for release in Holiday 2020.

KB4530734 brings full-screen Windows 7 upgrade notifications

December 2019 Patch Tuesday updates are out, but if you’re a Windows 7 user, then you should pay extra attention to this month’s cumulative updates.

KB4530734 is the bearer of bad news for Windows 7 users

Why? Because Microsoft included a somewhat expected, but nonetheless annoying, change for its old OS:

Starting on January 15, 2020, a full-screen notification will appear that describes the risk of continuing to use Windows 7 Service Pack 1 after it reaches end of support on January 14, 2020. The notification will remain on the screen until you interact with it.

This pop-up notification will appear on Windows 7 Starter, Home Basic, Home Premium, Professional (without the Extended Security Update), and Ultimate.

It’s worth mentioning that the pop-up will not be present on domain-joined machines or machines in kiosk mode.

It’s well-known already that Windows 7 is closing fast on its end of free security updates. This doesn’t mean that the OS will be rendered useless, but only more susceptible to vulnerabilities and security threats.


Want to get Windows 7 Extended Support for your business? Check out this guide to find out how you can do it.


Will I be able to get rid of the upgrade pop-up?

While some Windows 7 Home and Pro users are already getting the end-of-support pop-up from time to time, the notification on January 15 will come in the form of a full-screen warning.

There will be 3 options: Remind me later, Learn more, and Don’t remind me again. The annoying part is that none of the options won’t permanently stop the warning.

This “feature” is already present in KB4530734 which is included with the December 2019 Patch Tuesday updates, so there’s no doubt about its implementation.

As a reminder, customers that purchased Extended Security Update (ESU) will still get security updates after January 14, 2020, if they follow certain procedures. For more info about that, check out Microsoft’s official support page.

What’s your take on this annoying notification? Leave your thoughts in the comments section below and we’ll continue the talk.

READ ALSO:

Patch Tuesday keeps your Office suite safe from attackers

December 2019 Patch Tuesday updates are finally here, and besides the usual non-security updates, this time Microsoft is fixing some denial of service vulnerabilities found in the Microsoft Office suite.

More specifically, Microsoft Word, Excel, and PowerPoint are getting patched through security updates. This means that they will not be exploitable anymore, as long as you update, of course.

Microsoft’s Office suite is getting patched for vulnerabilities

Microsoft Word – CVE-2019-1461

CVE-2019-1461 is a denial of service vulnerability that is present in Microsoft Word when the software can’t handle objects in memory. As a result, attackers could implement a remote denial of service.

It’s worth mentioning that this action can take place only when a specific document is accessed by a vulnerable user. Microsoft is recommending the installation of the latest updates to address this issue.

Microsoft PowerPoint – CVE-2019-1462

CVE-2019-1462 is a denial of service vulnerability that is present in Microsoft PowerPoint and is very similar to the one found in Word. But unlike that one, the exploitation of CVE-2019-1462 allows an attacker to run arbitrary code in the context of the current user:

If the current user is logged on with administrative user rights, an attacker could take control of the affected system. An attacker could then install programs; view, change, or delete data; or create new accounts with full user rights.

For this attack to manifest itself, a user would have to open a specific file from an email or to click on a certain link on a website.

Microsoft Excel – CVE-2019-1464

CVE-2019-1464 is a information disclosure vulnerability that is present in Microsoft Excel. This means that the exploitation of this vulnerability could lead to loss of sensitive data.

The attack could take place only if a user would open a specific file. Microsoft is recommending the installation of the latest updates to address this issue.

Just to be clear, all these vulnerabilities are addressed by the Redmond giant in the latest updates. If you want to keep your PC safe and updated, download and install the December 2019 Patch Tuesday from this link.

READ ALSO:

Download Windows 7 KB4530692 and KB4530734 updates

The December Patch Tuesday updates are here, and they come with plenty of new security updates.

These updates are extremely important since they provide users with the latest protective features against all modern security threats.

That is precisely knowing what to do when these updates become available is extremely important.

Patch Tuesday updates come to all versions of Microsoft Windows that are still supported, and this includes Windows 7.

What do KB4530692 and KB4530734 bring new to Windows 7?

As you probably already know, Windows 7 is at the end of its life and will stop receiving any security updates as of January 14. This means that this round of updates is among the last that it will be receiving.

These updates include security updates for:

  • Windows Input and Composition
  • Windows Virtualization
  • Windows Kernel
  • Windows Peripherals
  • Windows Server

Of course, those of you that still want to continue using Windows 7 can always opt to get Windows 7 Extended support for business.

Before attempting to install KB4530692 and KB4530734, you must first install KB4490628 and KB4474419.

Additionally, Microsoft strongly recommends that you install KB4531786.

Regardless of what OS version you have installed, keeping it updated is extremely important.

This is because by having the latest security updates, you can spare yourself the headache of falling victim to hackers, such as the ones that take advantage of Exploit Wednesday.

If you too want to get the latest Patch Tuesday updates, but have no idea how, check out this detailed guide for more info.

Did you find this article to be useful? Let us know in the comment section below.

KB4530689 improves mouse, keyboard and stylus security

If you like keeping your PC updated with the latest new tools and security features, then you better be prepared because the December Patch Tuesday updates are here!

If you don’t know what Patch Tuesday is, then you better read up on how important it is.

This new string of updates comes with a host of new features, mainly security ones. These include improvements to the mouse, keyboard and stylus security.

Why are mouse, keyboard and stylus security updates important?

Patches in general work to fix any vulnerabilities or exploitable bugs that may have been found with devices and features. As such, installing these new updates on your Windows PC will make it so that your mouse, keyboard, and stylus are safer and more secure.

For example, in the case of mice and keyboards, attacks from MouseJack can allow an attacker to break into the peripherals connected to your computer.

They can then connect their devices to it and send all the keyboard input they want. By doing this, they can get access to your personal files, passwords, usernames, and can even completely wipe your PC.

If you too want to get the latest features that this round of Patch Tuesday is bringing, then you better be prepared accordingly.

This is because, besides the above-mentioned features, the updates bring security updates to plenty of other Windows services as well, protecting you from all possible dangers.

Are you happy with what the December Patch Tuesday updates bring? Let us know your opinion in the comment section below.

Editor’s Note: If you want to know everything there is to know on Patch Tuesday, check out this in-depth guide.

Patch Tuesday brings a whole new level of day-to-day security

Microsoft just released a new batch of cumulative updates with the December Patch Tuesday updates, and there are a lot of new changes and features included.

Unlike the classic releases, the company is now being a little more vague when specifying all the changes. It seems that the new KBs bring “Updates to improve security when Windows performs basic operations”, but what it really means?

December Patch Tuesday improves Windows’ security

Well, first of all you should know that the December security release includes security updates for Windows, Internet Explorer, Microsoft Office, SQL Server, Visual Studio, and Skype for Business.

While that doesn’t sound very basic, the updates aim to improve usability and security in normal tasks.

As such, everything related to virtualization and the Windows Kernel is less vulnerable to external and internal attacks. Also, external devices like game controllers, web cameras, and other peripherals, get the same treatment.

Microsoft Scripting Engine and Windows Server are not left out. In addition to non-security updates, the December Patch Tuesday updates also include fixes for all vulnerabilities that affect Windows 10.


Want to download the latest December 2019 Patch Tuesday updates? Find them right here!


What can I expect from the new cumulative updates?

You can expect a more secure update process, an errorless diagnostics process, and day-to-day tasks should be less prone to security errors and vulnerabilities.

The Windows ecosystem gets some compatibility improvements to make devices and applications work flawlessly with new updates.

So, what do you think of the new Patch Tuesday improvements? Leave your answer in the comments section below and we’ll continue the talk.

Editor’s Note: If you want to know everything there is to know on Patch Tuesday, check out this in-depth guide.

READ ALSO:

Patch Tuesday improves game controller and webcam security

If you want to have the latest features that Microsoft rolls out with every update, then you need to keep your Windows PC updated at all times. This includes the Patch Tuesday updates that become available monthly.

For example, the December Patch Tuesday updates are now live, and they come with a host of new improvements and fixes.

There is one specific update that improves security when using external devices, such as game controllers and web cameras. The update is available for Windows 10 v1809 and you can download it by following the link below:

Why are webcam and game controller updates important?

Such vulnerabilities open your devices to external control, allowing hackers to gain control of them.

One such example is how your webcam ca be hijacked and someone can access it whenever it is plugged in, without your knowledge.

Additionally, scripts can be installed so that your webcam becomes active whenever you visit certain websites.

As for the game controllers, vulnerabilities that allow hackers to view your controller commands exist and they can lead to serious issues, such as account thefts.

These come in the form of controller-specific keyloggers that can monitor all of your usernames and passwords.

It is recommended that you always install any updates that Microsoft releases since they usually include security updates that protect your PC from external attacks.

Keep in mind that the update process is fairly simple. If you installed earlier updates, only the new fixes will be downloaded and installed on your device.

If you are having difficulties figuring out how to install the Patch Tuesday updates, check out this detailed guide.

Do you think getting extra protection for your webcams and game controllers is necessary? Let us know in the comment section below.

Editor’s Note: If you want to know everything there is to know on Patch Tuesday, check out this in-depth guide.

KB4530715 fixes Microsoft Store launch issues on ARM devices

The December Patch Tuesday updates are here, and they bring an entire host of improvements. This new batch of updates target three main directions:

  • Updates to improve security when Windows performs basic operations.
  • Improvements to security when using external devices
  • Fixes for an issue in which the Microsoft Store might fail to open on Windows on ARM

Microsoft Store now works better on Windows 10 on ARM devices

Thanks to the latest update, you can now launch the Store without any issues. Errors and launch issues should now rarely occur. Of course, the Microsoft Store is not perfectly optimized for ARM devices just yet, but the company has made significant progress in this direction lately.

As a quick reminder, games and apps that are not compatible with ARM device no longer show in the Store.

So, if you want to get this update, use the direct download link below:

KB4530715 known issues

Unfortunately, KB4530715 comes with its own fair share of issues.

For example, when you try to rename something, such as files or folders that are on a Cluster Shared Volume (CSV), you may failand get an error message.

Additionally, installing KB4493509 on devices with Asian language packs may also result in several error messages.

Keeping your Windows updated at all times is critical for a variety of reasons, that is why you should download the latest patch as soon as it becomes available for you.

If you don’t know exactly how you can install Patch Tuesday updates, check out this detailed guide for more information.

Do you think this round of updates is great for the functionality of your PC? Let us know in the comment section below.

Editor’s Note: If you want to know everything there is to know on Patch Tuesday, check out this in-depth guide.

KB4530684 improves the Windows Kernel and Virtualization

It’s Patch Tuesday time again, and Microsoft has some interesting changes in the bag.

As you already know, Windows 10 v1909 was released last month. This version of Windows shares the core operating system and the system files with Windows 10 v1903.

Because of that, many of the new features of v1909 were included in the v1903, thanks to the latest quality update. But they are inactive until the installation of a enablement package meant to activate the v1909 features.

For that reason, Windows 10 v1909 and v1903 share most of the new changes and features that come with KB4530684. This will bump up the OS builds to 18362.535, and 18363.535 respectively.

KB4530684 brings some error fixes for v1909 and v1903

KB4530684 brings improved security when Windows performs basic operations for both Windows versions, but not only that.

Some of the key changes for Windows 10 v1903 include:

  • Addresses an issue that might cause error 0x3B in cldflt.sys on some devices.
  • Addresses an issue that might prevent you from creating a local user account using the Input Method Editor (IME) for Chinese, Japanese, or Korean languages. This issue occurs when setting up a new Windows device during the Out of Box Experience (OOBE).
  • Security updates to Windows Virtualization, Windows Kernel, the Microsoft Scripting Engine, and Windows Server.

It’s worth mentioning that Windows 10 v1909 includes all the changes that come with v1903. Also, there are no know issues in the release.

KB4530684 includes an update for Microsoft HoloLens released December 10, 2019, but the big M will push it directly to the Windows Update Client for improved reliability.

How can I update to KB4530684?

download patch tuesday december 10, 2019

If you want to update to the latest KB4530684, you can do so automatically through Windows Update. Just go to Settings and click on the Check for updates button.

If you want to download the update manually, head over to the Microsoft Update Catalog down below.

Download KB4530684 – DIRECT LINK

What’s your take on Microsoft’s latest Patch Tuesday updates? Share your thoughts in the comments section below.

Editor’s Note: If you want to know everything there is to know on Patch Tuesday, check out this in-depth guide.

READ ALSO: