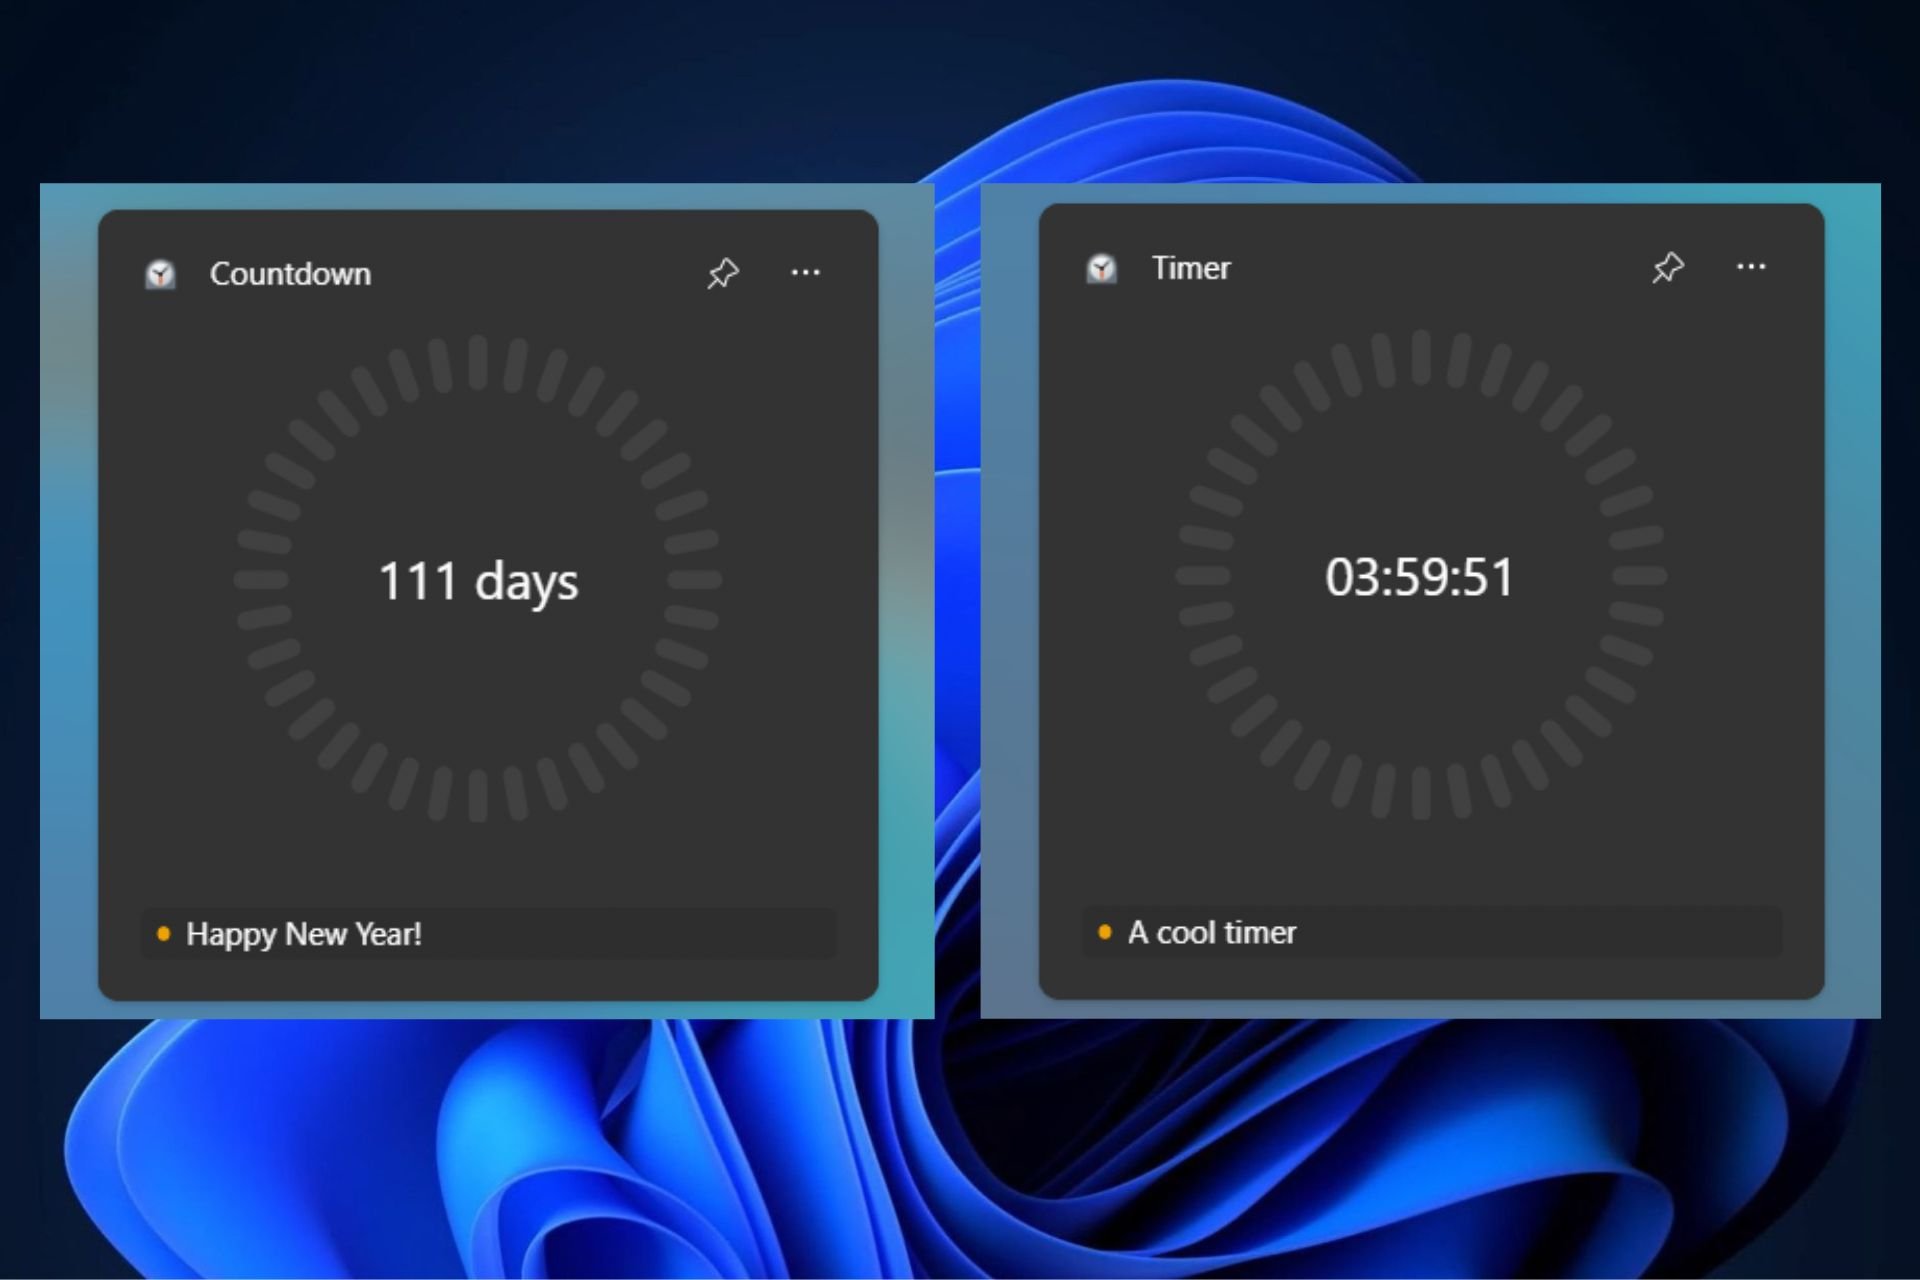
Microsoft has released a new feature for Windows 11 Clock that will allow users to pin timers to their widget board. The latest version of the Clock app adds a new Timer widget that can be pinned to the desktop widget board.
Day Countdown is another widget added to the Clock app. It allows users to add any date of their choosing and track the days until that date arrives. Users can add multiple dates to the widget and quickly switch between them.
Spotted by Windows Insider @phantomofearth, Microsoft is rolling out the new Timer and Day Countdown widgets to Windows Insiders in the Canary Channel. If you’re not a Windows Insider, you can manually install the updated Windows 11 Clock app via a bundle from the internet.
Latest Clock app update (11.2408.9.0, currently rolling out to WIP Canary and Dev) adds Countdown and Timer widgets. pic.twitter.com/pMzDYDsRHu
To do so, go to store.rg-adguard.net and use the ProductId search to find “Microsoft.WindowsAlarms.” Download the bundle and double-click on it to update the Clock app.
After that, open the Windows Widgets interface (Win + W) and click the plus button to add the Timer and Day Countdown widgets to your board.
If you encounter any problems with the updated Clock app, uninstall it from the Start menu or the Settings app and install the Stable version from the Microsoft Store.
It’s worth noting that Microsoft has yet to allow Windows 11 widgets to be pinned to the desktop rather than the board, although the company has been working on this.
Speaking of widgets, Windows 11 24H2 will welcome users with a new Widget Board when the version is released later this year.
The AnselSDK64.dll, a part of the Ansel in-game screenshot feature developed by NVIDIA, is often included in game installations. But when running an app/game, you may get an error that reads, AnselSDK64.dll is missing, or AnselSDK64.dll is either not designed to run on Windows or it contains an error!
The error is usually encountered with Hitman 3, Space Engineers, Metro Exodus, Frosty Mod Manager, and Dishonoured.
If the DLL is not found, your primary approach should be to reboot the PC, install all pending game and OS updates, launch the game from the dedicated directory instead of a shortcut, and verify the integrity of game files (through the game client).
What can I do if AnselSDK64.dll is missing or not found?
Tip
If a DLL is missing or not found, you should never download it from a third-party website. Such sources are not secure, and the download files are often bundled with malware or adware.
1. Download AnselSDK64.dll using a DLL tool
The easiest solution for a missing or broken AnselSDK64.dll is to use a top-rated DLL repair tool. These auto-scan the PC for missing DLLs and download any problematic/missing ones.
Also, if several other DLLs are missing alongside AnselSDK64.dll, a DLL repair tool will save significant time and effort!
2. Manually move the file from another PC
You can also move the DLL from another PC with a similar configuration and OS architecture to the affected PC. First, you need to check the DLL’s path in the error message.
AnselSDK64.dll error message
After you have AnselSDK64.dll’s path, go to the same path on the other PC > copy the DLL to a flash drive > plug the flash drive in the affected PC > move the DLL to the path listed in the error message (usually the game folder) > reboot the PC and check for improvements.
3. Run the affected game or app with administrative privileges
Right-click on the affected app’s launcher (.exe file) and then select Properties.
Go to the Compatibility tab, and tick the checkbox for Run this program as an administrator.
Finally, click on Apply and OK to save the changes.
4. Modify the permissions for AnselSDK64.dll
Go to the path listed in the error message, right-click on AnselSDK64.dll, and select Properties.
Go to the Security tab, and then click on Advanced.
Click on the Change permissions button.
Click on Add.
Now, click on Select a principal.
Click on Advanced in the new window.
Next, click on Find now.
Select the Administrator account from the list, and click on OK.
Tick all the permission-related checkboxes, including Full control, and click OK.
While you are at it, update any NVIDIA software installed on the PC as well.
6. Turn off Memory Integrity
Press Windows + S to open Search, type Windows Security in the text field, and click on the relevant result.
Click on Device security.
Now, click on Core isolation details under Core isolation.
Disable the toggle for Memory integrity.
Reboot the PC, then launch the app throwing the missing or broken AnselSDK64.dll error and check for improvements.
7. Reinstall the affected app/game
Press Windows + R to open Run, type appwiz.cpl in the text field, and hit Enter.
Select the affected application from the list and click on Uninstall.
Follow the on-screen instructions to complete the process.
Reboot the PC and then reinstall the app from an official source, say the manufacturer’s website, a gaming client, or Microsoft Store.
As a last resort, you can always reinstall the affected app to fix the missing AnselSDK64.dll in Windows 11. If a quick removal doesn’t work, use an effective software uninstaller to also delete all the leftover files and Registry entries before reinstallation.
Microsoft recently released KB5043355, a new Windows 11 24H2 recovery update. The update improves the Windows Recovery Environment (WinRE) in Windows 11 24H2, the second feature update for this version in 2024.
WinRE is Windows’ recovery environment. It helps users troubleshoot and recover from booting issues and other problems that might prevent the OS from booting into a state where regular use is possible.
KB5043355 is accompanied by KB5043353, which fixes Setup.exe binaries for Windows 11 24H2 and improves the overall Windows setup experience.
The update, which should be available via Windows Update, improves Windows setup binaries or any files that setup uses for feature updates in Windows 11, version 24H2.
As Microsoft explains, Dynamic Update is one of the first steps invoked as soon as a Windows feature update initiates, reaching out to an Internet-facing URL hosted by the company to fetch new content and then applying those updates to your OS installation media. That content includes fixes to set up binaries, Safe OS updates for the Windows Recovery Environment, Windows 10 servicing stack updates, the latest cumulative update, driver updates and more.
They will preserve language pack and Features on Demand content during the upgrade process, ensuring that you don’t lose any of the functionality you had before the update.
KB5043355 and KB5043353 are available for Arm64 and AMD64 Copilot+ PCs through the Windows Update Catalog.
On the other hand, the Redmond-based tech giant has also started rolling out the September 2024 Patch Tuesday updates via Windows Update as KB5043939, which improves the out-of-box experience (OOBE) in Windows 11 24H2. The OOBE update is optional and will install automatically during setup if the user has an active internet connection.
The company says the September 10, 2024 update improves the Windows 11, version 24H2 out-of-box experience (OOBE). This update applies only to the Windows 11 OOBE process and is available only when OOBE updates are installed.
In a separate document about OOBE, Microsoft explained what these OOBE updates deliver. It also notes that the update’s downloading and installation time depends on the user’s hardware and internet connectivity.
Critical driver updates and critical Windows zero-day patch (ZDP) updates will begin downloading automatically during OOBE after the user has connected to a network. The user can’t opt out of these critical updates as they are required for the device to operate properly. Windows will alert the user that the device is checking for and applying the updates.
ERROR_NET_WRITE_FAULT appears as an issue for Windows devices that are connected to a server but fail to be recognized as such. According to Microsoft, it’s usually accompanied by the text message “A write fault occurred on the network.”
What causes the ERROR_NET_WRITE_FAULT?
Since ERROR_NET_WRITE_FAULT is an issue with networks and connecting to servers, it is usually caused by wrong credentials or external factors, such as the Windows firewall, that stop the device from connecting to servers.
How to fix the ERROR_NET_WRITE_FAULT?
1. Make sure the credentials to the network are correct
ERROR_NET_WRITE_FAULT occurs when even the slightest mistakes in typing out credentials happen. So when you’re asked for the server’s domain and the admin’s username, make sure to type it out correctly.
This is the structure you will be looking for to avoid this frustrating issue:
<domain>\<username>
The error commonly happens when users mistake the “\” for the “/”, and while the mistake seems harmless, it will cripple the logging-on process.
2. Turn Windows Defender Firewall off and attempt another login
The ERROR_NET_WRITE_FAULT can also occur because the Windows Defender Firewall stops the logging-on process by blocking the target traffic and displaying the error “Wmi communication failure during connect”.
While the “Wmi communication failure during connect” has its own set of solutions that can also come in handy to fix this issue, turning Windows Defender Firewall off and attempting another login can fix the ERROR_NET_WRITE_FAULT. Here’s what you need to do:
In Windows 11’s Search Box, type in Windows Defender and open Windows Defender Firewall.
Click on Turn Windows Defender Firewall on or off and open it.
Select Turn off Windows Defender Firewall (not recommended) for private and public network settings.
Click on OK.
Reboot your system and access the server again.
The second solution is not always recommended, as the Firewall is quite helpful in preventing your system from being the target of cyber threats. Still, it should give you a temporary fix for the ERROR_NET_WRITE_FAULT bug.
Before you leave, take a look at our latest guide on ERROR_RECEIVE_PARTIAL for more information.
Let us know if any of these solutions worked for you and if you have any other recommendations for dealing with it. Please post them in the comments section below.
FrankerFaceZ is a popular Twitch extension, however, a few users reported problems while trying to install FrankerFaceZ on Firefox, so today we’re going to show you how to do it properly.
Yes, FrankerFaceZ is open-source meaning that anyone can inspect its code and see how it works. You can find its source code on the FrankerFaceZ GitHub page.
Is FrankerFaceZ safe?
This extension is available on Chrome Web Store with a rating of 4.4 meaning that it’s safe. Since it’s open-source, the community can always verify the code and ensure that nothing suspicious is going on behind the scenes.
Many users suspect that this extension is malicious because it’s not available on the Firefox Add-Ons store, but according to the developers that’s due to inconsistencies with the build process and demands from Mozilla.
What extensions are like FrankerFaceZ?
There are several similar ones, but the main alternative is BetterTTV. We have a guide on BetterTTV for Firefox, so don’t miss it for more information.
As you can see, it’s easy to install the FrankerFaceZ extension on Firefox as long as you follow our instructions. A few users reported that Twitch emotes are not showing, but we have a guide that addresses that issue. Speaking of emotes, we also have a great article on what to do if Twitch emotes are not uploading.
Microsoft Edge’s Circle to Copilot feature, which lets you circle anything on your screen in Edge and ask Copilot, isn’t dead yet. A new update makes the feature more useful beyond the Edge browser.
Microsoft has been testing Circle to Copilot in Edge preview versions for some time. The feature isn’t available to everyone yet.
Recently, Microsoft has rebranded the feature to Copilot Vision in the Appearance settings. In addition to Circle to Copilot, Copilot Vision lets you select anything on your screen and ask Copilot. This should work outside the Edge browser, including the Windows 11 desktop, and in other applications such as Google Chrome.
Microsoft Edge now lets you Search anything on your Windows 11 deskop Screen
Unfortunately, the Copilot Vision expansion to the Windows 11 desktop barely worked. Until now, with Copilot Vision enabled and when using the available shortcut in its settings, it allowed you to drag to select the region on the screen and shows a UI at the bottom to annotate and copy to the clipboard. You could then paste this copied content into Copilot in the Edge sidebar and get the desired results.
Present Copilot vision UI on desktop screen. Image Credit:WindowsReport.
Recent Edge Canary updates hint at what the Circle to Copilot feature, now called Copilot Vision, can do. With the shortcut, when you drag to select anything on the Windows 11 desktop, settings, or within Windows, you might notice Visual Search-related results about the highlighted area or object powered by Bing image search, in a pop-up window.
Copy the image to clipboad and Press Esc deactivate the feature. This is the first time we’ve noticed this. Microsoft may update the feature even more in the future.
Image Credit:WindowsReport.
With Windows Copilot not yet available to everyone on Windows 11, Microsoft Edge’s Copilot Vision with the Circle to Copilot feature enabled could be another reason to use the Edge browser.
Dealing with Nvidia driver timeouts can be incredibly frustrating, especially when you’re in the middle of an important task or an intense gaming session. If you just installed a new Nvidia graphics card, check if your power supply delivers enough wattage for your GPU.
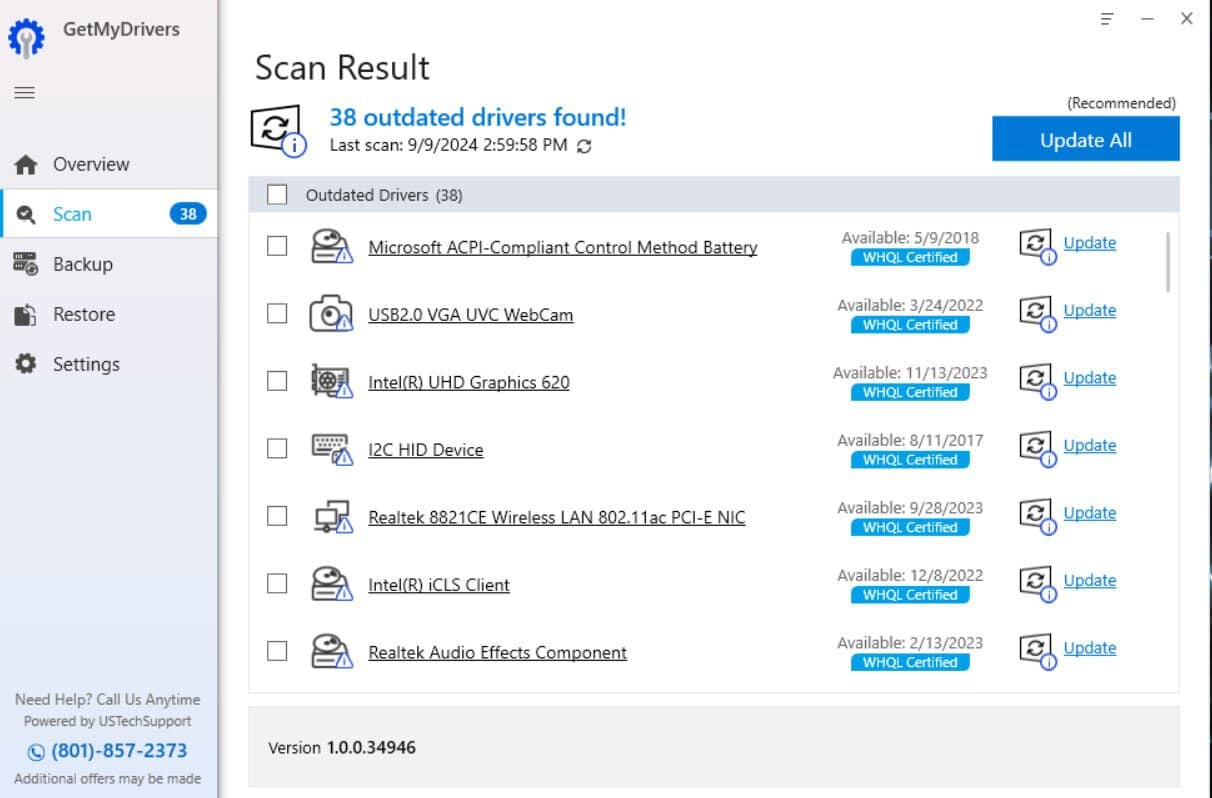
After you install it, GetMyDrivers will automatically run a complete scan of your system to identify any problematic or missing drivers, including the Nvidia graphics.
It will only take a couple of seconds but after that, you will get a full status. Just find the Nvidia driver within the list and click Update from its right.
Restart the PC after the driver is installed.
Using a driver updater tool such as GetMyDrivers is the quickest way to get around this issue, and it’s free. Nevertheless, this tool will fix a lot of other driver problems you didn’t even know about. If you pay for the full version, you will be able to update all the drivers at once with a single click.
Another important thing to mention is that GetMyDrivers is savind the configuration before performing the updates, so you will be able to restore your system if anything goes south.
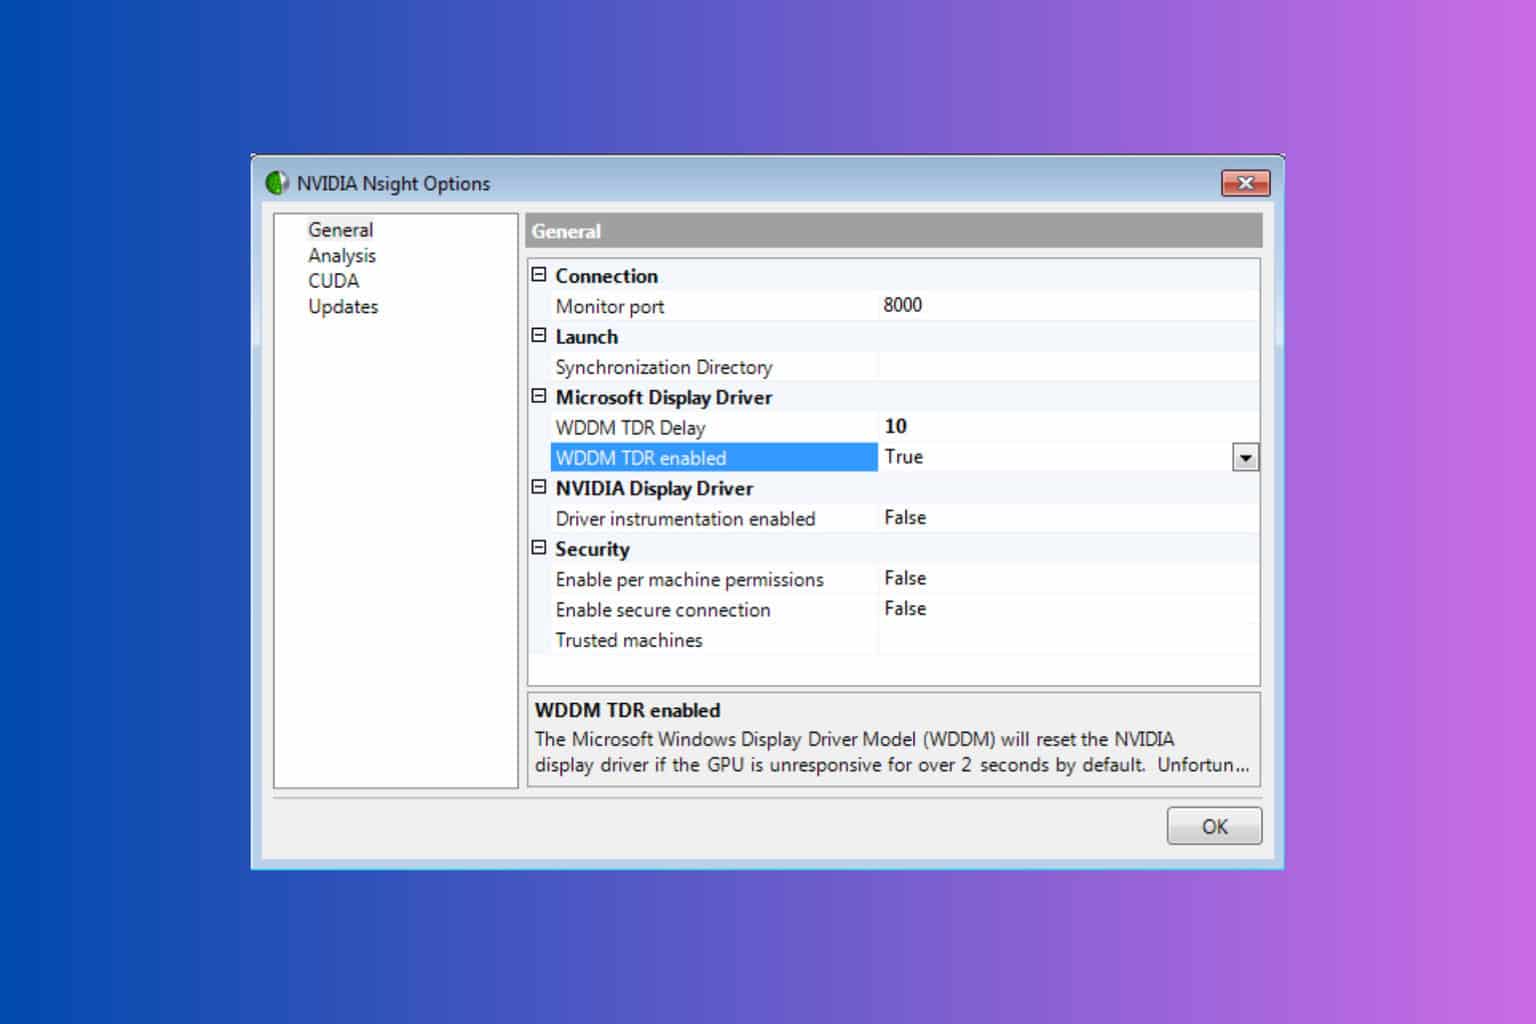
2. Increase Timeout Detection and Recovery (TDR) Delay
Press Win + R, type regedit, and hit Enter.
Go to the following key: HKEY_LOCAL_MACHINE > System > CurrentControlSet > Control > GraphicsDrivers
Right-click on the blank area in the right pane, hover over New, and select DWORD (32-bit) Value. Name it TdrDelay.
Double-click TdrDelay, set its value to 10 (or more depending on your needs), and click OK.
Increasing the TDR delay allows your graphics card more time to complete tasks, which can prevent it from being reset by the operating system.
3. Disable Multiplane Overlay (MPO)
Press Win + R, type regedit, and hit Enter.
Navigate to the following key: HKEY_LOCAL_MACHINE > SOFTWARE > Microsoft > Windows > Dwm
Right-click on the blank area in the right pane, hover over New, and select DWORD (32-bit) Value. Name it OverlayTestMode.
Double-click OverlayTestMode, set its value to 5, and click OK.
This disables Multiplane Overlay, which can cause stability issues in certain GPU driver configurations, particularly with AMD cards. Disabling it might stop driver timeouts.
4. Update and clean install Graphics Drivers
Go to the official DDU website and download the latest version of Display Driver Uninstaller.
Boot your PC into Safe Mode (Press F8/Shift + Restart during boot). Run DDU and completely uninstall your current graphics drivers.
Run the installer as Administrator by right-clicking and selecting Run as Administrator.
Updating your drivers ensures you have the latest fixes and compatibility improvements. Running the installer as an administrator can prevent any permissions issues during installation.
5. Verify the game files and reinstall the game
Open your game client (Steam/Epic Games/etc.).
Right-click on the game experiencing issues and select Properties.
In the properties window, find and click on Local Files and then Verify Integrity of Game Files.
If verification fails, uninstall the game via the game client and reinstall it.
Verifying game files ensures that all game data is correct and not corrupted, which can solve crashes due to bad data. Reinstalling the game is a broader measure to fix persistent issues.
6. Set a custom tuning profile in the GPU software
Open the NVIDIA Control Panel.
Go to Manage 3D Settings > Program Settings.
Adjust the Power Management Mode to Prefer Maximum Performance.
Reducing the maximum frequency for your GPU can stabilize it if it’s overclocking itself too aggressively. Setting the power management mode to prefer maximum performance keeps the GPU running at a stable performance level.
By following these steps, you can significantly reduce the chances of encountering Nvidia driver timeouts. Always keep your system updated and regularly check for driver updates to maintain optimal performance.
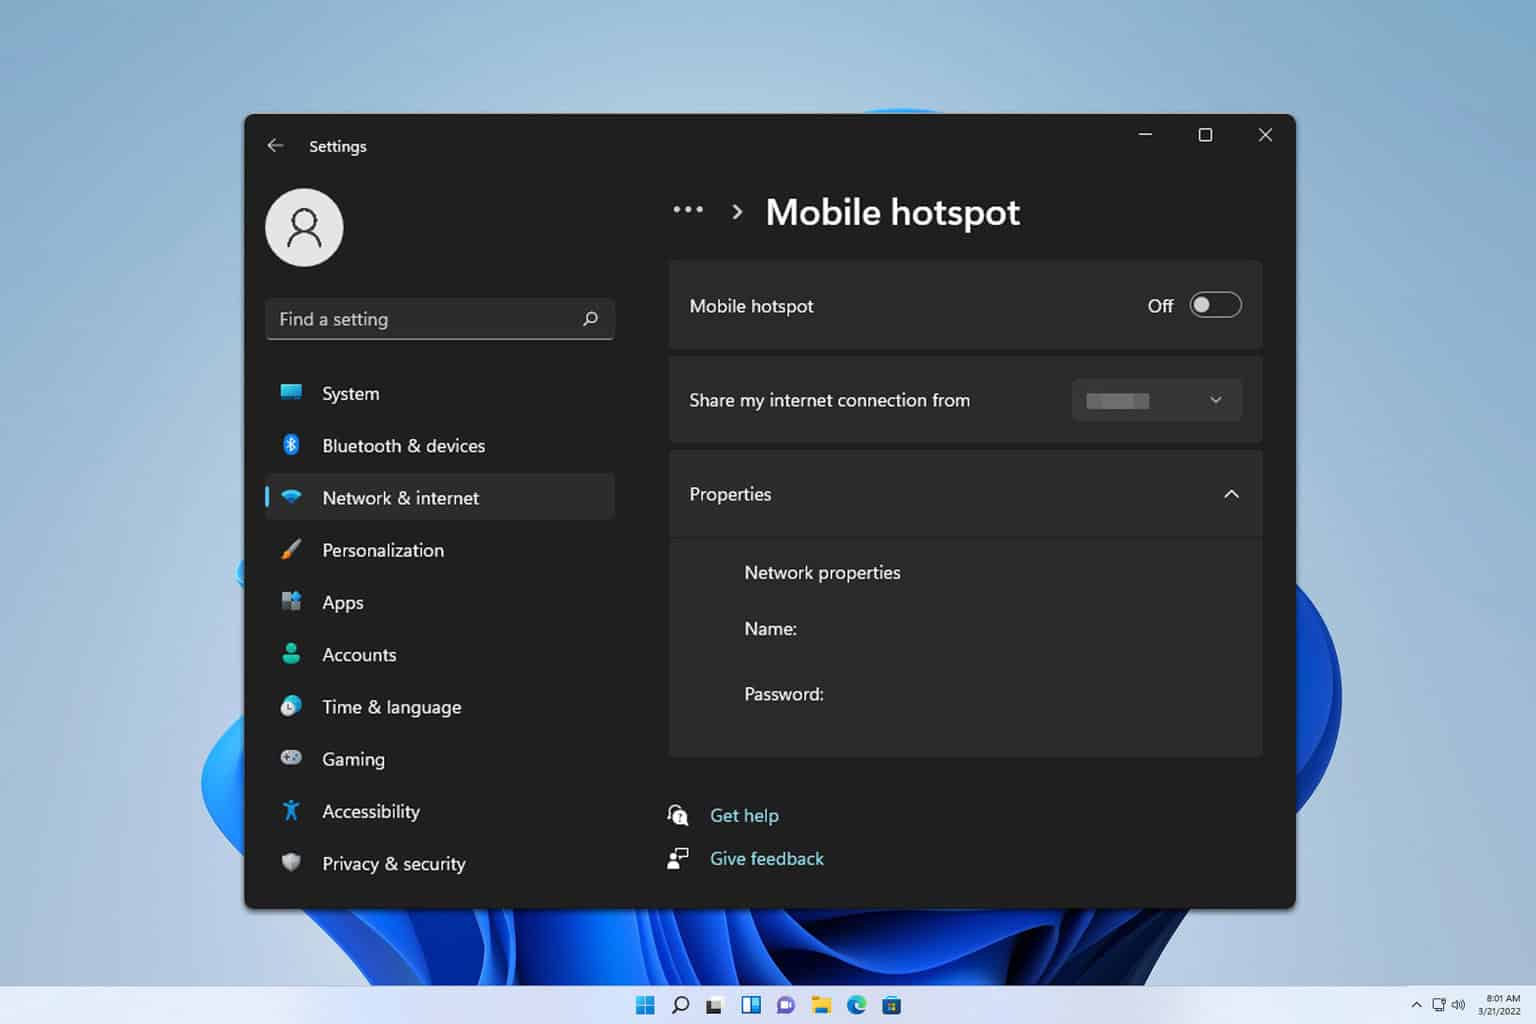
Many users tend to use their PC as a hotspot, but is there a way to make a Windows 11 hotspot with no password? Today we’re going to answer this question.
How can I make a Windows 11 hotspot with no password?
Can I have a hotspot without a password?
On Windows, it’s not possible to have a hotspot without a password. Having a hotspot without a password can put your system at risk, and this is why it’s not possible to create one.
How do I find my hotspot password on Windows 11?
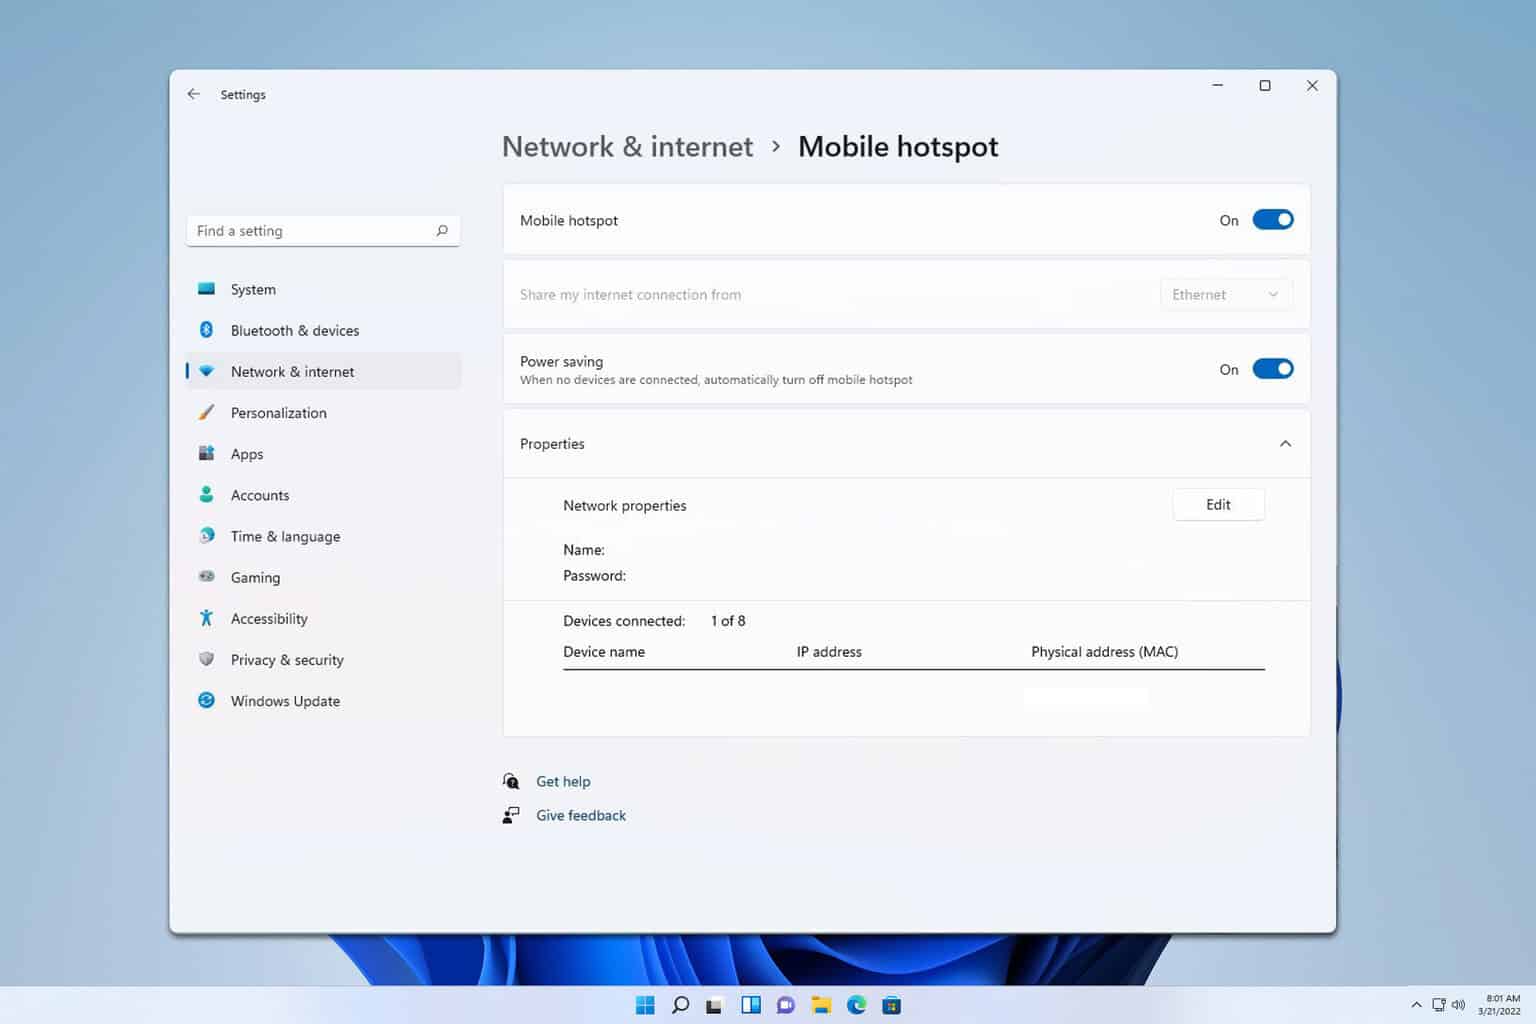
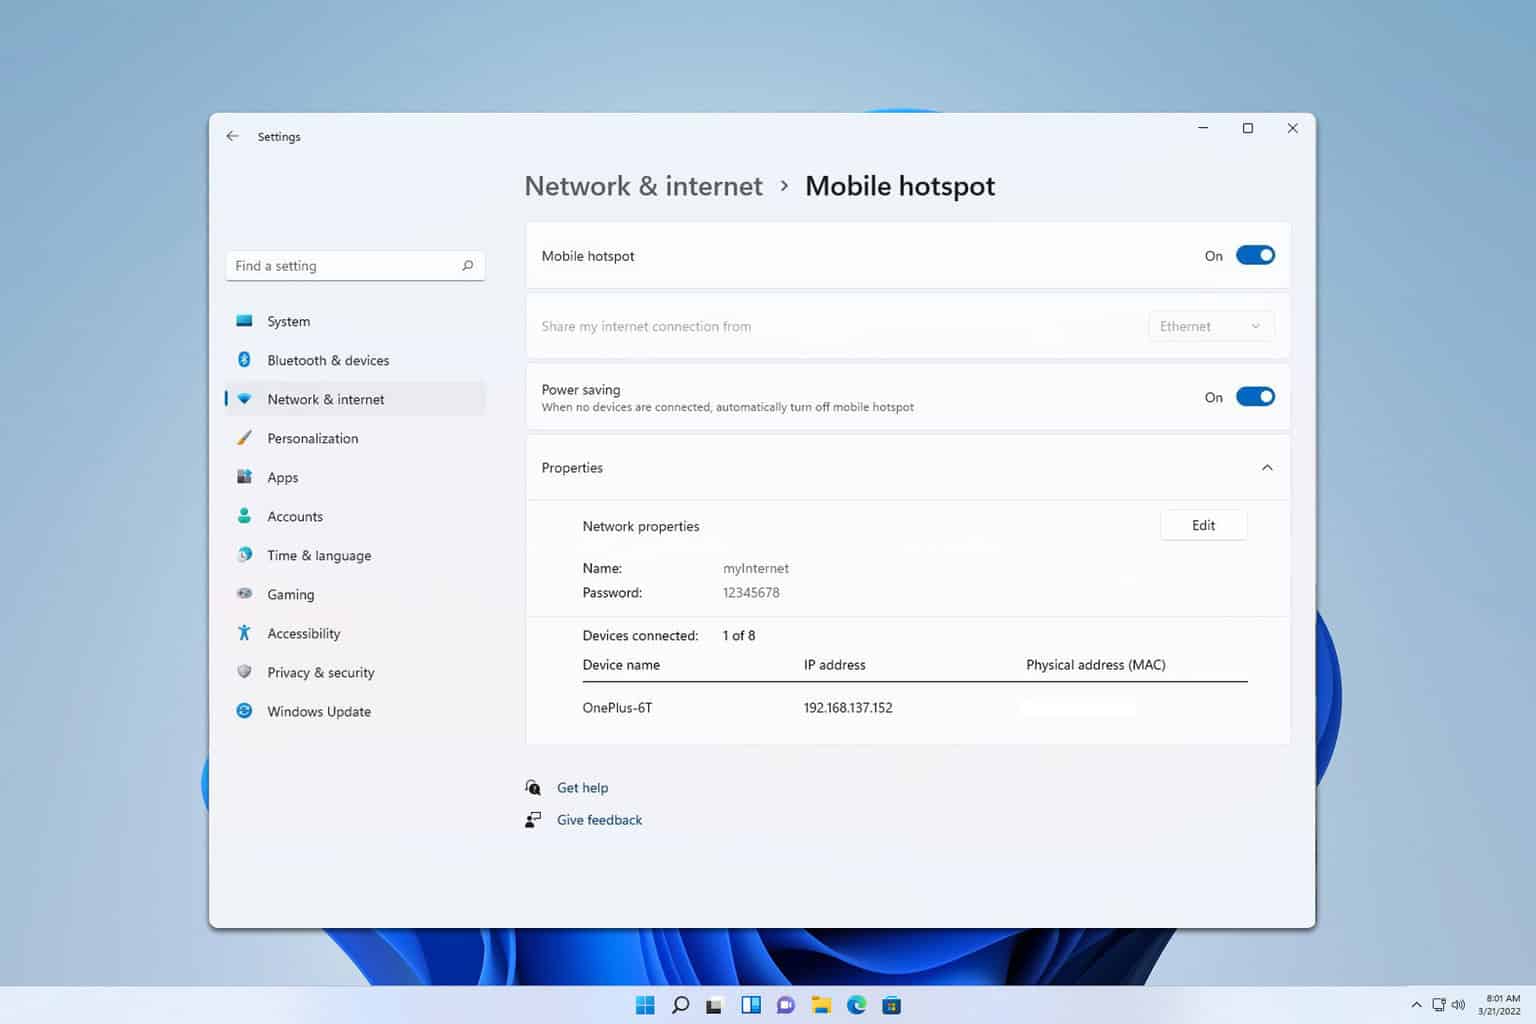
Press the Windows key + I to open the Settings app.
Next, go to Network & internet and choose Mobile hotspot.
Click the Edit button.
From there you should be able to see and edit your password.
Can you connect to a Mobile Hotspot without a password?
Yes, you can connect to a mobile hotspot that doesn’t have a password. However, you can’t create a hotspot on Windows 11 without a password.
Does hotspot require a password?
On Windows, hotspot requires you to set a password. On your phone, you can set up a hotspot without a password.
On Windows, it’s not possible to remove the hotspot password. On your phone, you can do the following:
Open Settings on your phone and navigate to Connections.
Next, head to Mobile Hotspot and Tethering.
Choose Mobile Hotspot.
Tap on the network name.
Set Security to Open.
Save changes.
Why is my hotspot not working on Windows 11?
There are several reasons for this issue ranging from outdated drivers to DNS settings. For more information, we suggest reading our mobile hotspot not working on the Windows 11 guide.
As you can see, it’s not possible to set up a Windows 11 hotspot without a password. To learn more about hotspots, we also have a guide on how to hide hotspot SSID on Windows 11.
Many reported that their Windows 11 hotspot is slow, but we have a guide that tackles this issue, so don’t miss it.
One of the perks of playing Fortnite is the ability to go head to head with other players so when joining a match and you are hit with the error code 6, it can be a bore.
For the most part, it’s a server-side issue with Epic Games and they are unable to handle the traffic overload. However, it can also be a Fortnite network error especially if you’re getting an intermittent connection or due to or corrupt game files.
How can I fix error 6 on Fortnite?
1. Restart Fortnite
1.1 Xbox
Hit the Xbox button on your controller.
Select Fortnite from the list of games that is running.
Click on the Menu button on your controller.
Choose Quit and press the A button to close it.
1.2 PS5
Highlight Fortnite and press the Options button.
Close the game.
Restart Fortnite and see if the error code 86 is resolved.
1.3 PC
Right-click on Start and select Task Manager.
Select the Processes tab and go to the Apps section.
Look for Fortnite, right-click on it, and select End task.
Launch it again and see if the error code 86 persists.
Also, check the Fortnite servers. There may be a widespread outage or too much traffic. Reliable sites to verify the server status include:
If found to be a server issue, all you can do is wait.
2. Verify the game files
Press the Windows key, then type epic and select Epic Launcher to launch it.
Go to Library, then click three dots next to Fortnite.
Select Manage from the context menu.
Next, locate the Verify File option, then click the Verify button. This will check and repair the corrupted or missing game files.
3. Address connection issues
3.1 Run the Network adapter troubleshooter
Hit the Windows key and click on Settings.
Click on System, then select Troubleshoot.
Select Other troubleshooters.
Locate the Network Adapter troubleshooter and click on the Run button next to it.
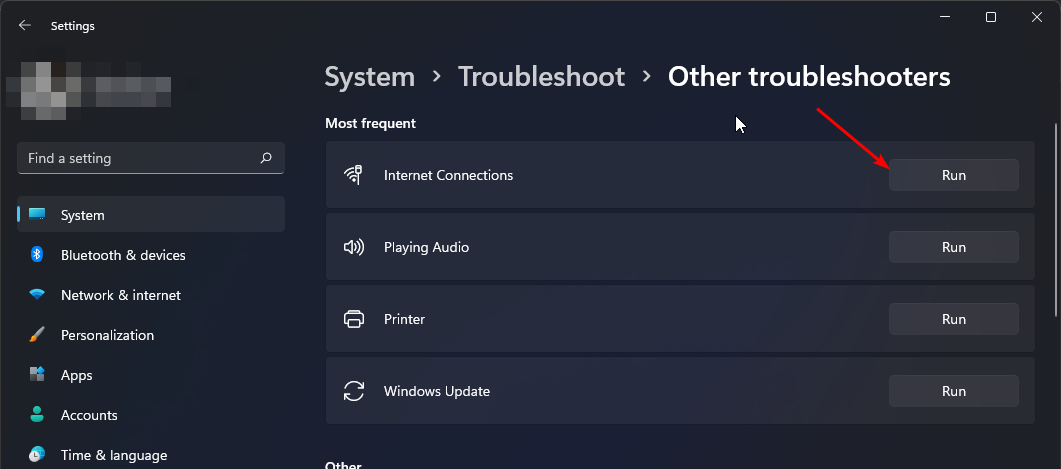
3.2 Run the Internet Connections troubleshooter
Hit the Windows key and click on Settings.
Go to System, and click Troubleshoot.
Now click Other troubleshooters.
Locate Internet connections, and click Run.
Follow the onscreen prompts to complete the process.
3.3 Update your network drivers
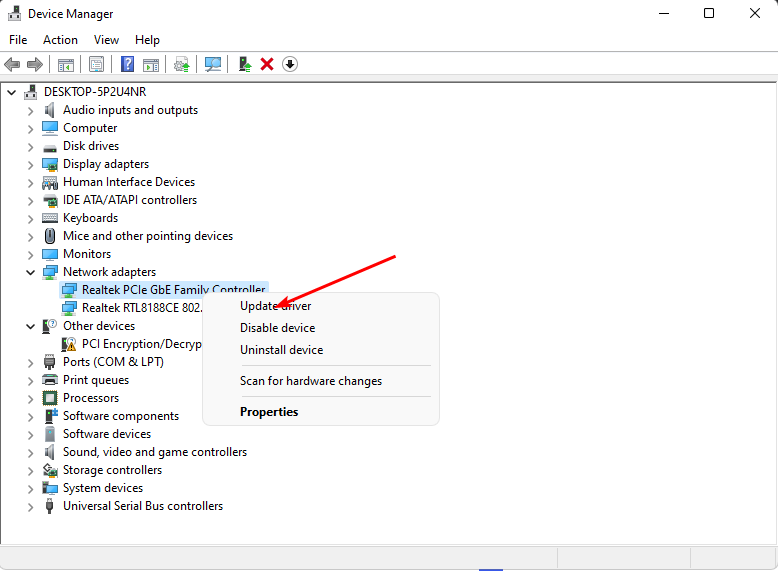
Hit the Windows key, type Device Manager in the search bar, and click Open.
Navigate to your Network adapter, right-click on it, and select Update driver.
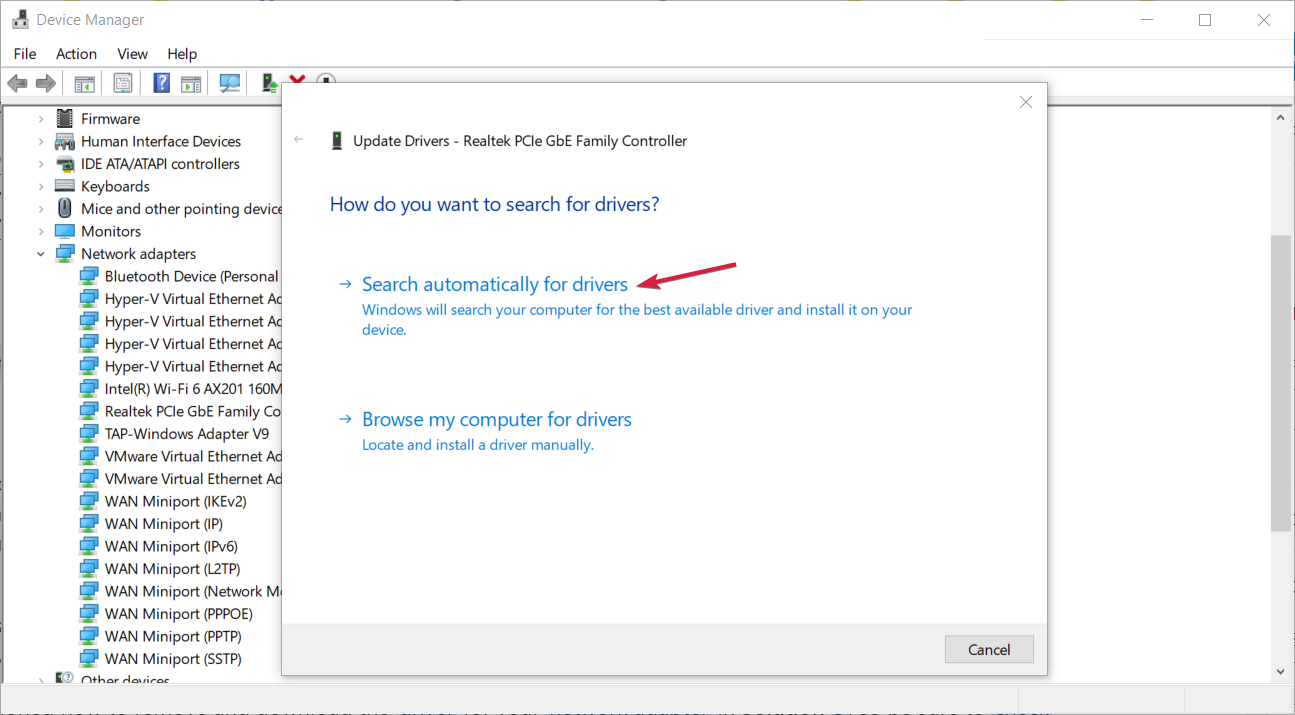
Select Search automatically for updated drivers.
3.4 Reset your network
Hit the Windows key and click on Settings.
Navigate to Network & internet.
Select Advanced network settings.
Click on Network reset.
Next, hit the Reset now button.
4. Remove custom code and change region
Start the game.
Navigate to the Custom Options in the bottom right.
Remove the custom code and click OK.
Go back to Settings.
Next, set a different Matchmaking region. Use a region closest to you for the best performance.
After switching the server, check if the issue is gone.
While custom codes are great for private games, they can interfere with specific game rules and settings. This mismatch can result in the error code 6 on Fortnite.
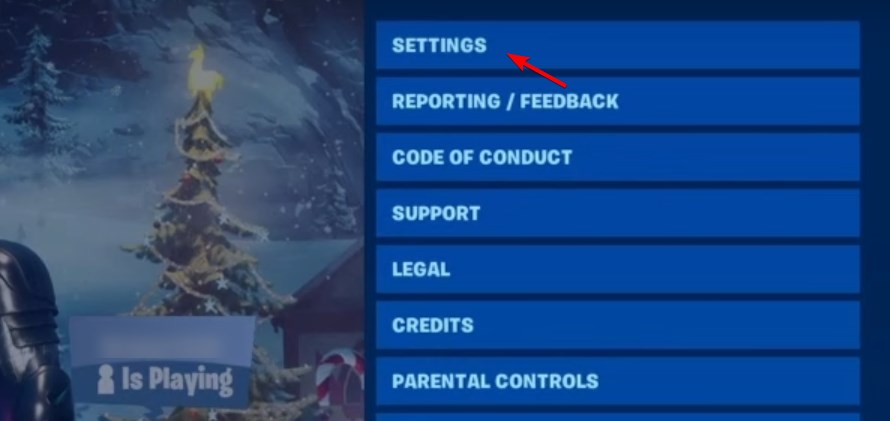
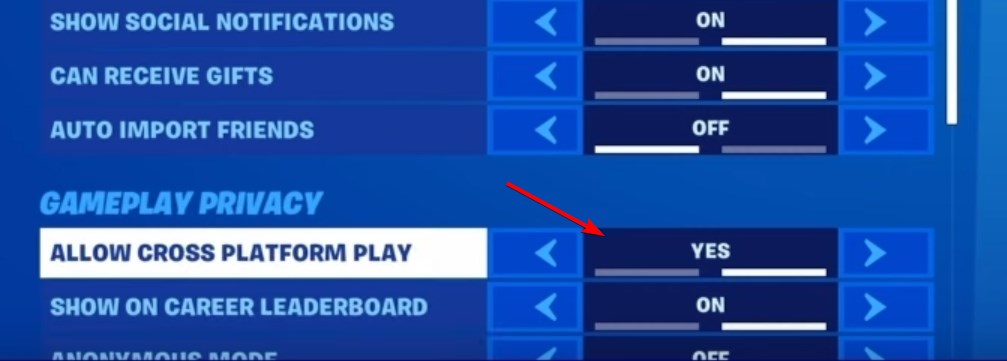
Locate Allow cross platform play and set it to Yes.
After making this change, try to matchmake again.
5.2 Xbox
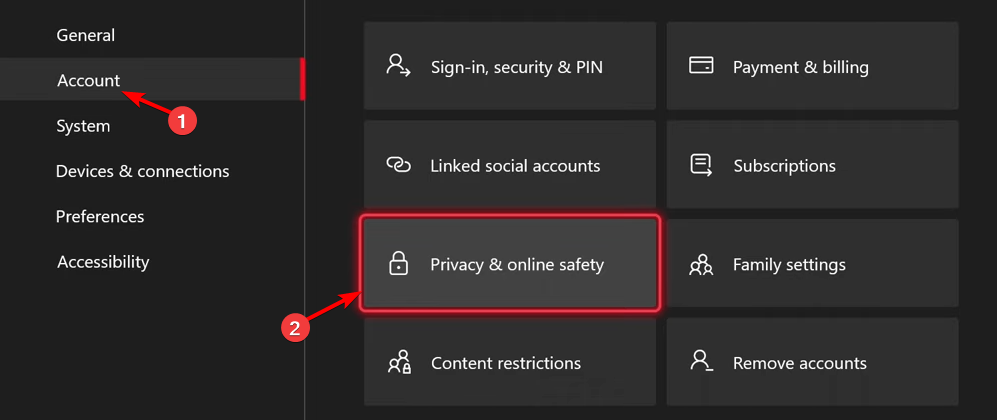
Press the Xbox button and go to Settings.
Navigate to Account and select Privacy & online safety.
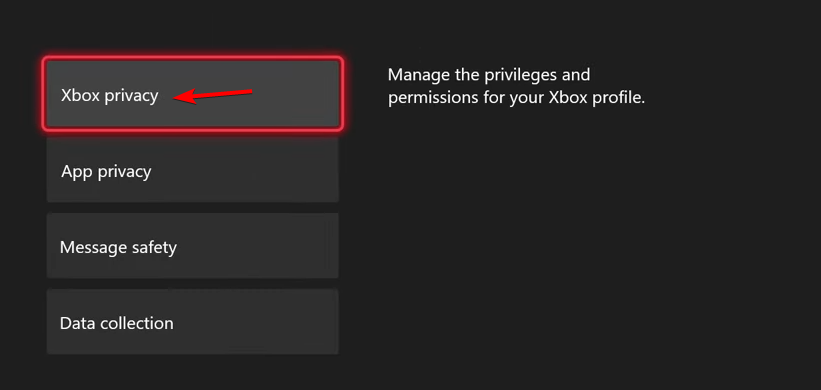
Next, go to Xbox privacy.
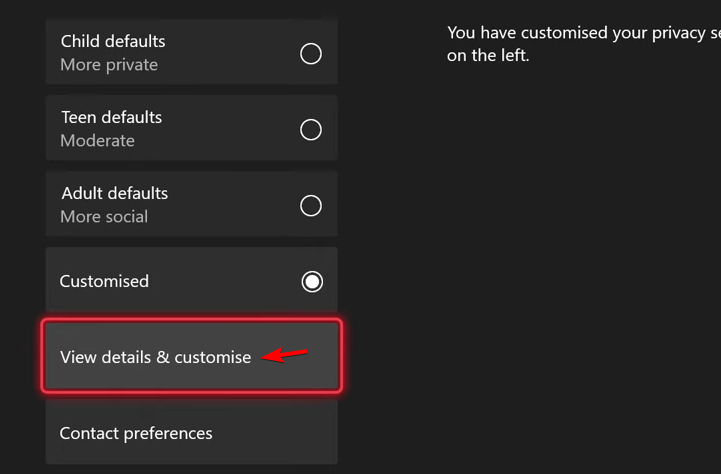
After that, select View details & customise.
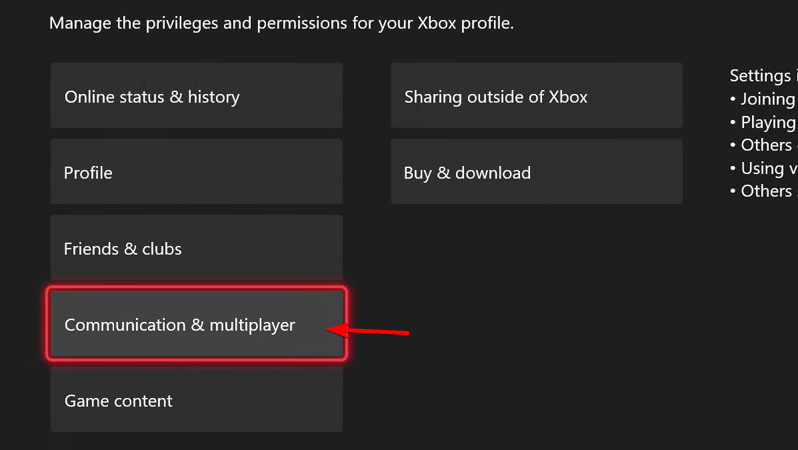
Head over to Communication & multiplayer.
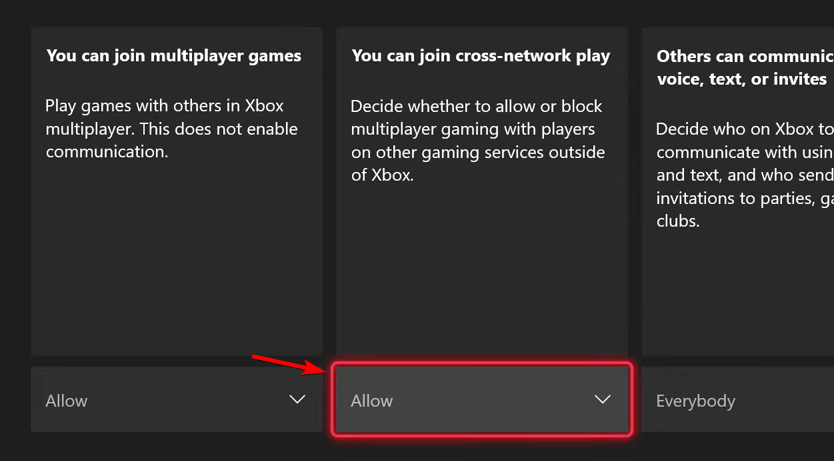
Set You can join cross-network play to Allow.
Save changes, go back to the game, and test if it works.
It is possible that you’re unable to join a match because of your crossplay settings. Enabling this feature ensures that players can join the match regardless of the platform they’re on and addresses any other matchmaking errors.
As a last resort, you can try reinstalling Fortnite and resetting your console then see if this fixes the error. Otherwise, get in touch with Epic games support for additional assistance.
In the meantime, it may be a good time time to investigate whether there are other reasons as to why you’re getting the error code 6.
We’d love to get your feedback if you’ve encountered this error before. What solution did it for you? Have you tried any other not mentioned above? Let us know in the comment section below.
Claude AI has been giving GPT a run for its money but it has not managed to absolve itself from issues like the internal server error.
Most server errors usually occur because of a server overload. This can happen especially for the free tier users who try to use Claude AI during peak hours. However, we also got this internal server error when trying to upgrade to the pro version.
Payment would not go through and kept throwing the internal server error. It is possible that payment was not accepted due to geo-restrictions so we tried the following workarounds.
What can I do to fix Claude’s internal server error?
1. Clear the cache
1.1 Browser cache
Launch your browser, and for this step, we shall be using Google Chrome.
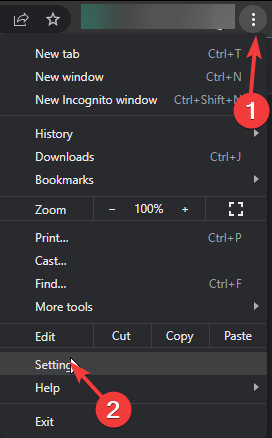
Click the three horizontal dots and select Settings.
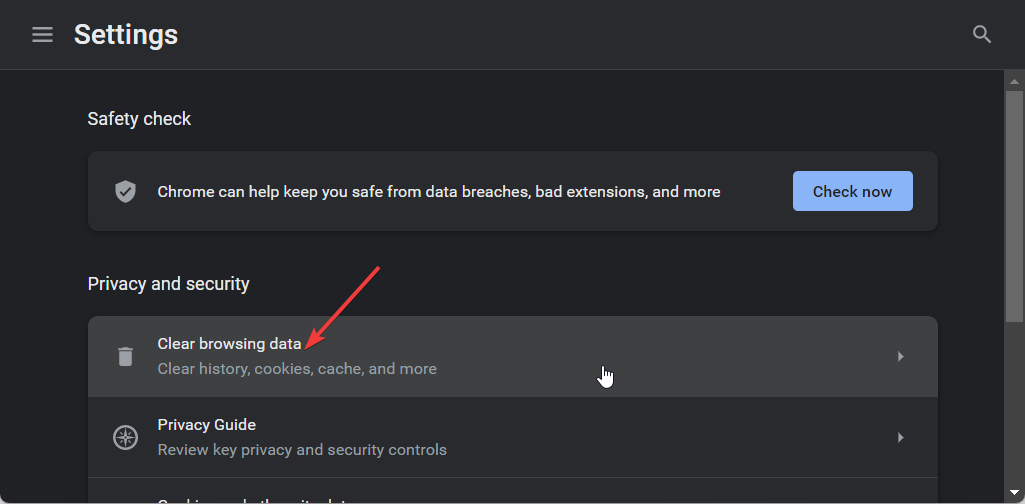
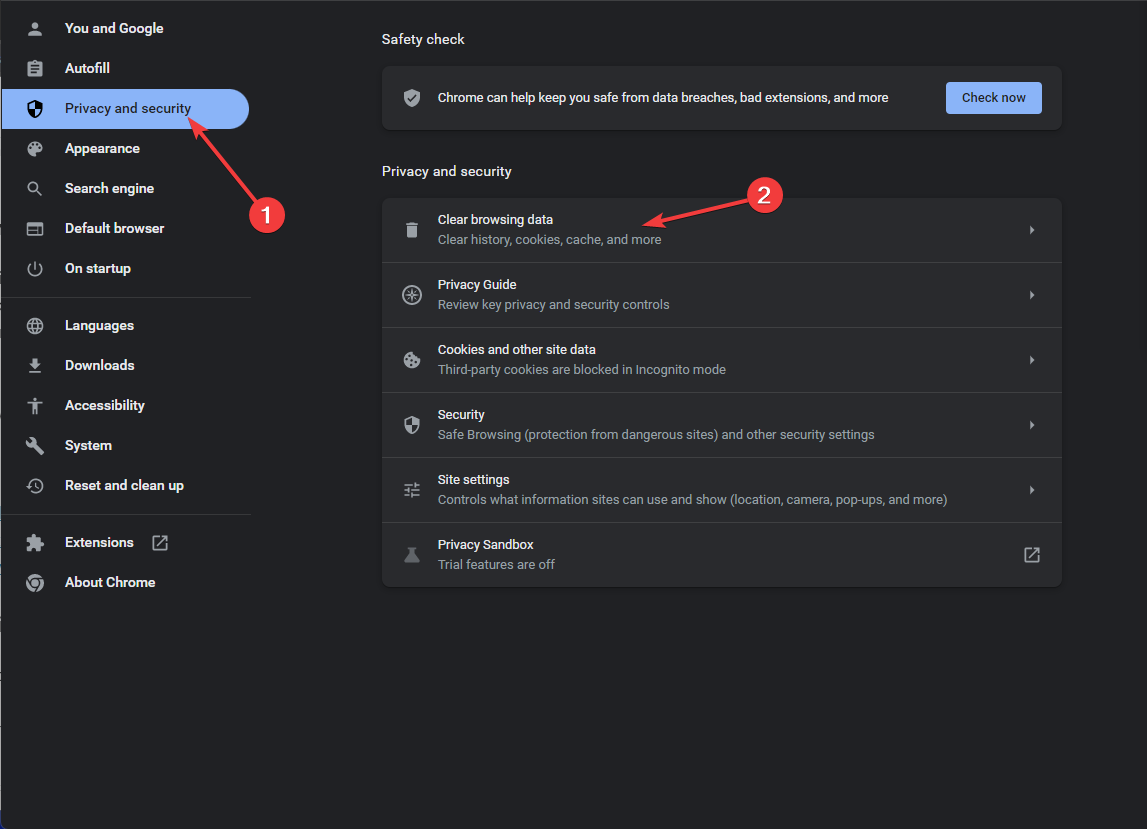
Go to Privacy and security and click Clear browsing data.
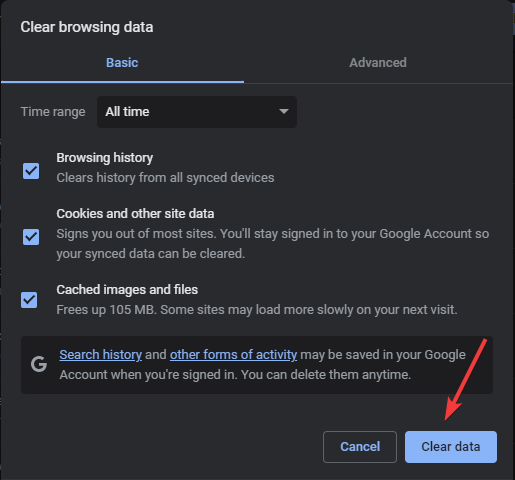
Select Browsing history, Cookies and other site data, & Cached images and files, then click Clear data.
1.2 App cache
Tap on Settings on your phone.
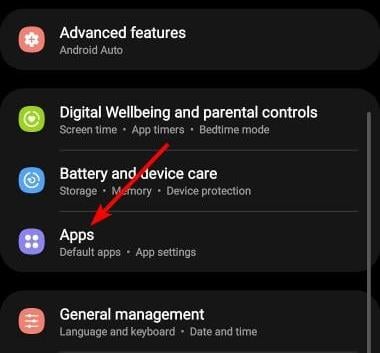
Next, tap on Apps.
Find the Google Wallet app and tap on it.
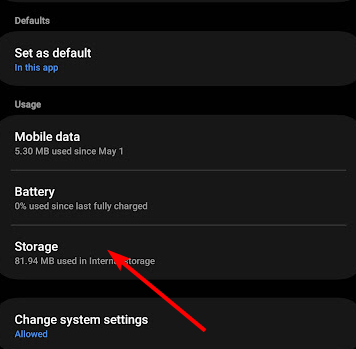
Scroll down and select Storage.
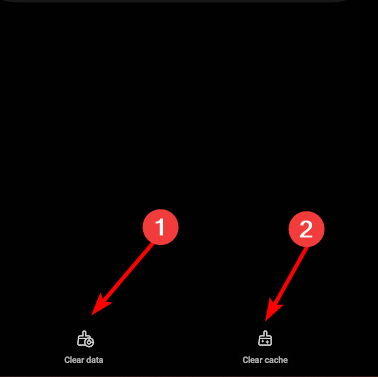
Tap on Clear data and Clear cache,then try again.
Also before you retry, check the Claude AI server status for any downtime or scheduled maintenance updates.
2. Use a VPN
Press the Windows key and select Settings.
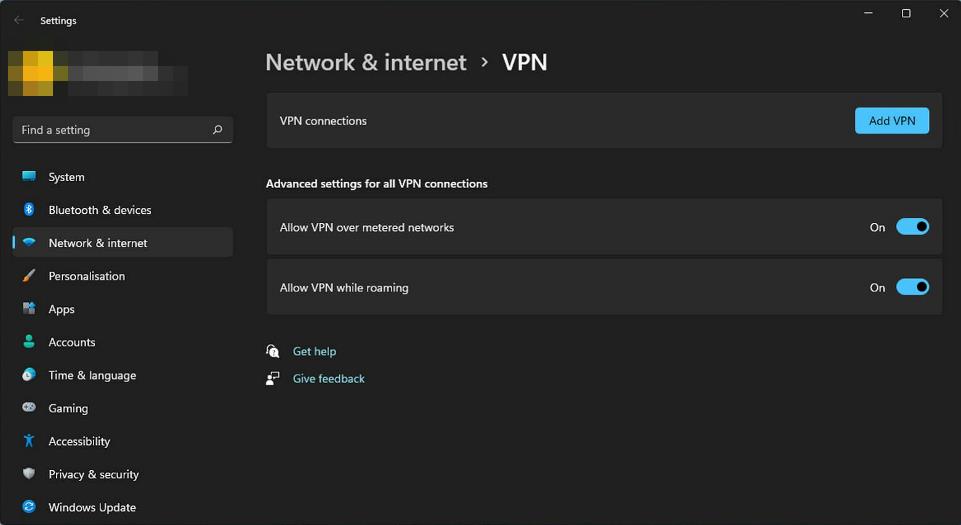
Next, select Network & internet and click on VPN in the right-side menu.
Click on Add VPN and follow the prompts to enable it.
Try making payment again and see if the internal error persists.
If you’re using Claude AI on your phone, try some of the best VPNs for Android and iPhone. When choosing a VPN, make sure you select a server in a country where Claude AI is not restricted. Better yet, make your VPN untraceable for the best performance.
Specialized VPN Software, such as ExpressVPN is always a great choice when dealing with networking issues. You can choose from a very large number of servers with amazing connection speed and hence bypass restrictions or improve certain online services such as AI, gaming platforms or streaming services.
Click on Network & Internet on the left pane, then scroll down and click Proxy on the right pane.
Select Edit next to Use a proxy server option in the Manual proxy setup section, toggle on Use a proxy server and enter the necessary details then click on Save.
4. Check for Alerts on Google Pay
Log into your Google Pay account from your phone or on any browser.
Check the allerts from the top right corner of the window.
If you click on the icon, you will see the information on any payment issues that could preventing you from upgrading to Claude AI pro version and you will be able to fix them.
Select the card you wish to remove and click on Remove.
Next, click on Add a payment method.
Proceed to fill in your debit/credit card details and hit Save.
If all these fail, your best bet is Claude AI support. The issue may be unique to your account and their customer care support may be able to pinpoint the exact problem and sort you out.
The thing about such problems, they can happen to any site. We’ve already covered the Janitor AI internal server error and Bing Chat internal server error. The good thing is that they rarely happen simultaneously so if you can’t access one site try another.
And for that, we have a detailed list of Claude AI alternatives so find what works for you and avoid interruptions.
That’s it for this article but do let us know if you have any other solutions that worked out for you but didn’t make it to our list in the comment section below.
With the increasing instances of data theft, there has been a significant rise in concerns about protecting personal data; it has become a priority for all internet users. To fulfill this need, browsers like Firefox have introduced features like Global Privacy Control (GPC). In this guide, we will learn about this feature and how it can be helpful to you.
What is Global Privacy Control in Firefox?
With version 120, Mozilla Firefox has introduced Global Privacy Control (GPC) to enhance privacy by letting you notify websites that you don’t want your information about your browsing session on that website to be sold or shared.
Global Privacy Control (GPC) operates as a Do Not Sell mechanism in some US states, such as Colorado, California, and Connecticut. The feature can also indicate an opt-out of targeted advertising or a general request to restrict the sharing or sale of your data.
When you enable the feature, the GPC sends a signal to the websites you visit about your privacy preferences. This signal is intended to give users more control over their data and how the companies can use them online.
This signal is sent via a special HTTP header called DNT: 1(Do Not Track), which is part of Firefox’s web request.
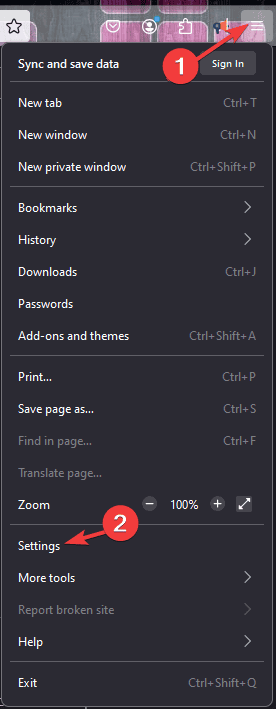
From the top right corner, locate the Menu (three-horizontal line) button, and from the drop-down, select Settings.
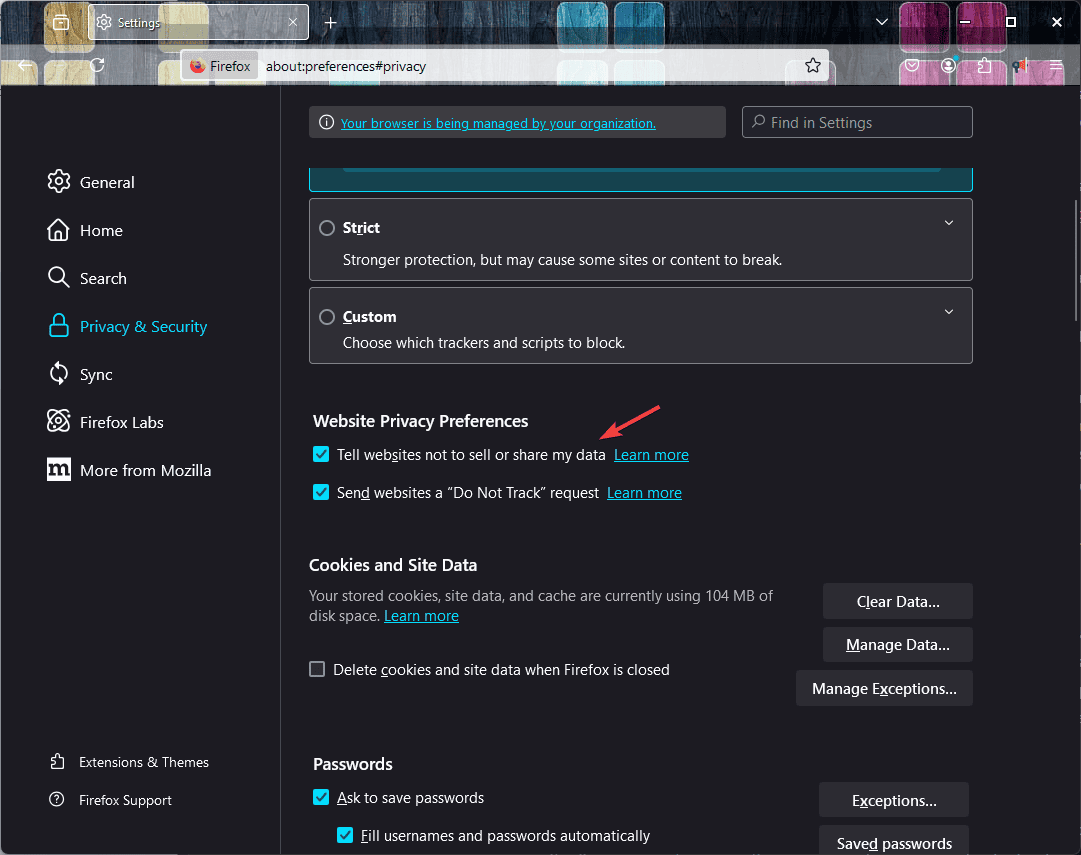
Navigate to the Privacy and Security panel, look for Website Privacy Preferences and select the Tell websites not to sell or share my data option.
Now close the Settings to save the changes.
What are benefits of using the GPC feature?
Enhanced privacy – Prevents businesses or companies to use your information for targeted advertising and data collection.
Ability to set global privacy preferences – No need to set privacy settings manually for every other website you visit; just enable GPC, and you are all set.
Increased transparency – GPC promotes transparency and better data handling practices by adhering to user consent.
Sense of control – The users can stay in control of the information that can or cannot be used by companies, thereby reducing the instances of data misuse.
Aligned with CCPA and GDPR – GPC is aligned with the California Consumer Privacy Act (CCPA) and the General Data Protection Regulation (GDPR) in Europe, helping reinforce the regulations.
Global Privacy Control, or GPC, allows you to set global privacy preferences, which are then communicated to the websites you visit and ensure that your data is managed accordingly.
Websites that comply with the GPC and respect the signal will not track your data to sell or share it. However, it is important to note that not all websites can act on or identify the GPC signals; therefore, the impact can differ depending on the privacy practices followed by a site.
In conclusion, we can say that GPC is a good initiative; but seems like a stepping stone in the long journey of need for more advanced privacy tools.
What do you think about Global Privacy Control, and will you turn it on in Firefox? Share your thoughts with our readers in the comments section below.
Getting your HP LaserJet P1108 printer up and running on your PC doesn’t have to be a hassle. Whether you’re a tech-savvy user or just someone trying to get their printer working, this guide will walk you through the steps to install the driver smoothly.
How do I install the HP LaserJet P1108 driver on PC?
Once you start it, the GetMyDrivers app will automatically perform a scan of all your drivers to find any missing or problematic ones.
In just a few seconds, you will get a complete report, and detect the HP LaserJet P1108 printer. You just need to find it in the list and click on Update or Install and the software will do the rest.
Restart the PC after the driver is installed.
Using a driver updater tool such as GetMyDrivers is the quickest way to get the HP LaserJet P1108 driver. Moreover, the app will detect other problems you didn’t even think about. If you buy the full version, you will be able to update all the drivers at the same time and even schedule checks to keep them up to date at all times.
Some new drivers may not be that great, but don’t worry because the app can restore the previous drivers if needed.
2. Download the driver from the official HP website
Hover over or click on Printers in the main menu, then select Printers again from the dropdown menu.
In the search bar, type HP LaserJet P1108 and select the matching result from the list.
The website should automatically detect your operating system. If not, you can manually select it from the available options.
Look for the Driver-Product Installation Software section. Click on Download next to the driver software package.
Once the download is complete, locate the file in your Downloads folder and double-click to run it.
The installer will guide you through the necessary steps to complete the driver installation. This usually includes accepting terms and conditions and choosing a destination folder.
This solution will help you get the latest and most compatible driver directly from HP, ensuring your printer functions smoothly with your PC.
3. Use the Windows built-in printer installation
Plug the HP LaserJet P1108 printer into your PC using a USB cable.
Click on the Start icon in the taskbar, then select the Settings gear icon.
In the Settings menu, click on Bluetooth & devices.
Now, click on Printers & scanners.
Next, click on Add device.
Windows will search for available printers. When it detects your HP LaserJet P1108, click on it and select Add device.
Windows will automatically search for the necessary drivers and install them.
If the printer is not detected, make sure its connected properly to your PC and click on Add manually.
Follow the prompts on the screen to add your printer.
This method leverages Windows’ built-in ability to find and install drivers, which is convenient if you prefer not to download drivers manually.
4. Install Using HP Smart App
Open the Microsoft Store and search for HP Smart.
Click Get or Install to download and install the app.
Launch the app once the installation is complete.
Click on Set up a new printer from the app’s home screen.
The app will guide you through connecting your HP LaserJet P1108 to your PC. This includes selecting your printer from a list of detected devices and following the steps to download and install the necessary drivers.
Using the HP Smart App simplifies the setup process and offers additional printer management features.
5. Use Device Manager
Ensure your HP LaserJet P1108 is connected to your PC via USB.
Press the Windows key + X and select Device Manager from the menu.
Expand the Printers or Unknown devices section to find your HP LaserJet P1108.
Right-click on your printer and select Update driver.
Choose Search automatically for drivers. Windows will search online for the latest driver and install it.
Device Manager allows you to update drivers directly and could be handy when other methods fail to detect the correct driver.
By following these solutions, you should be able to successfully install the HP LaserJet P1108 driver on your PC, ensuring that your printer functions correctly. To avoid future issues, regularly check for driver updates and keep your operating system up to date.
For the most part, you won’t require to run a majority of apps or files as an administrator but for some high-level operations, you’ll need it and it may be greyed out.
Your run as administrator option being greyed out could be as a result of misconfigured UAC settings, corrupt files or programs, or even a corrupt user profile. However, before you try out any troubleshooting, ensure you’re running an account with administrator privileges.
What can I do if the run as administrator option is greyed out?
1. Check availability in compatibility mode
Locate the problematic file or program, right-click on it, and select Properties.
Navigate to the Compatibility tab, check whether the Run this program as an administrator option is greyed out. If not, place a checkmark next to it then click Apply and OK.
The issue of the run as administrator option being greyed out mostly occurs with shortcuts. Shortcuts essentially link to the EXE file but sometimes, if they are configured incorrectly, this option may be unavailable.
Other times, the shortcut may not support elevated permissions and cannot be prompted by the UAC security settings. To process this request properly, you’ll have to go to its properties.
2. Disable UAC settings
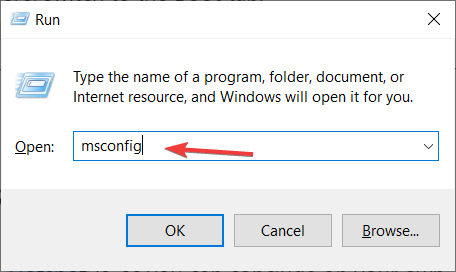
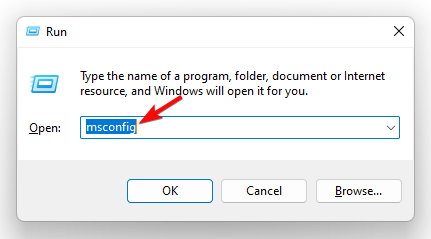
Press the Win + R keys to launch the Run console. Then type msconfig in the search bar and hit Enter to open the System Configuration window.
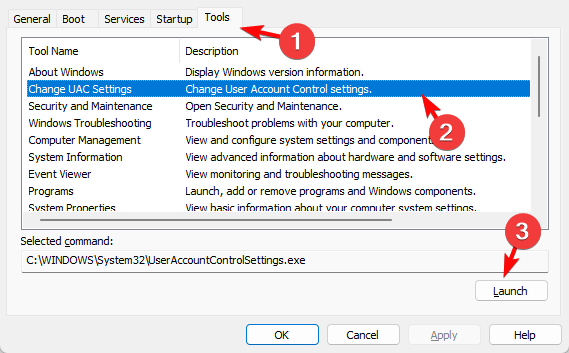
Next, go to the Tools tab in the System Configuration window, select Change UAC Settings, and press Launch.
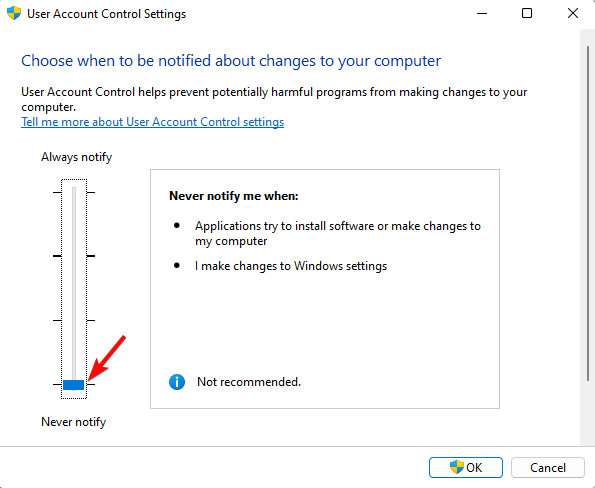
This will open the User Account Control Settings window. Here, move the slider on the left to Never notify, and press OK to save the changes.
3. Adjust folder permissions
3.1 Allow user permissions
Locate the problematic file in question, right-click on it, and select Properties.
Navigate to theSecurity tab.
Click on the Edit button.
Check all options under Allow to grant all authenticated users permissions, then click on Apply and OK to save the changes.
Try opening the file again.
3.2 Take ownership of the file/folder
Locate the word document in question, right-click on it, and select Properties.
Navigate to the Security tab and look for You must have Read permissions to view the properties of this object. This will let you know you have insufficient permissions to open the file. Go to the bottom of the screen and click on Advanced.
Hit Continue in the next window that pops up.
Click on Add in the Permissions tab.
In the Permissions Entry window, click on Select a principal, enter the information required in the listed entries, and click on Advanced at the bottom.
Click on Find New, select Authenticated Users then press OK to generate a list of all users at the bottom.
Check all the checkboxes to grant permissions then click on OK to save the changes.
Try running the file as an admin and see if the error persists. Some PCs may require a reboot to effect the changes.
4. Run the DISM and SFC scans
Hit the Start Menu icon, type cmd in the search bar, and click Run as administrator.
Type the following commands and press Enter after each one:DISM.exe /Online /Cleanup-Image /Restorehealthsfc /scannow
5. Reinstall the problematic app
Click on the Start Menu icon, type Control Panel on the search bar, and click Open.
Select Uninstall a Program under Programs.
Find the problematic app, click on it, and select Uninstall.
Now, wait for Windows to prepare the setup and click Yes when prompted.
Next, accept the Licence Agreement and wait while Windows downloads the required updates.
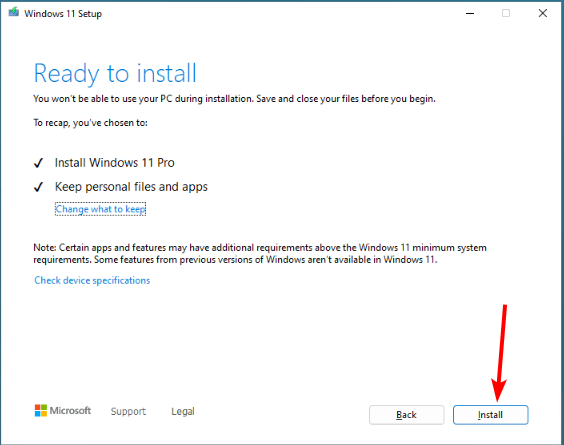
Select between keeping your files and apps and removing them. Since you want to perform an in-place upgrade, leave the recommended settings, i.e., keep your files and apps.
Now, click the Install button to start the in-place upgrade.
Finally, wait for Windows to copy the necessary files to upgrade your device and restart your PC.
Remember that an overzealous antivirus may sometimes limit your access level so if necessary, disable it temporarily and take note of any changes.
Apart from this option missing, you may find that the option to run as a different user option may also be missing. If so, feel free to check out our comprehensive article for tried and tested methods.
It’s a wrap from here but we’d love to get your feedback on which solution did it for you. Also, if you have any other solution not mentioned here but worked out for you, drop us a line below.
Every Windows user is used to the standard administrator account but when you get to exploring, you’ll discover the hidden administrator account and how you can enable it.
So why is it hidden? First, it is to prevent unauthorized access to your PC. Administrator accounts have privileged access to features that standard users don’t so making this available to all and sundry can put your data at risk.
Second, since this admin account operates high-level system operations, it’s best kept hidden to minimize errors for users who don’t understand the implications. Enabling it can increase the surface area attack. It also helps by separating it from regular admin tasks and comes in handy for advanced troubleshooting.
How do I enable the hidden administrator account in Windows 11?
1. Enable the hidden account
Hit the Windows + R keys to open the Run command.
Type lusrmgr.msc in the dialog box and hit Enter.
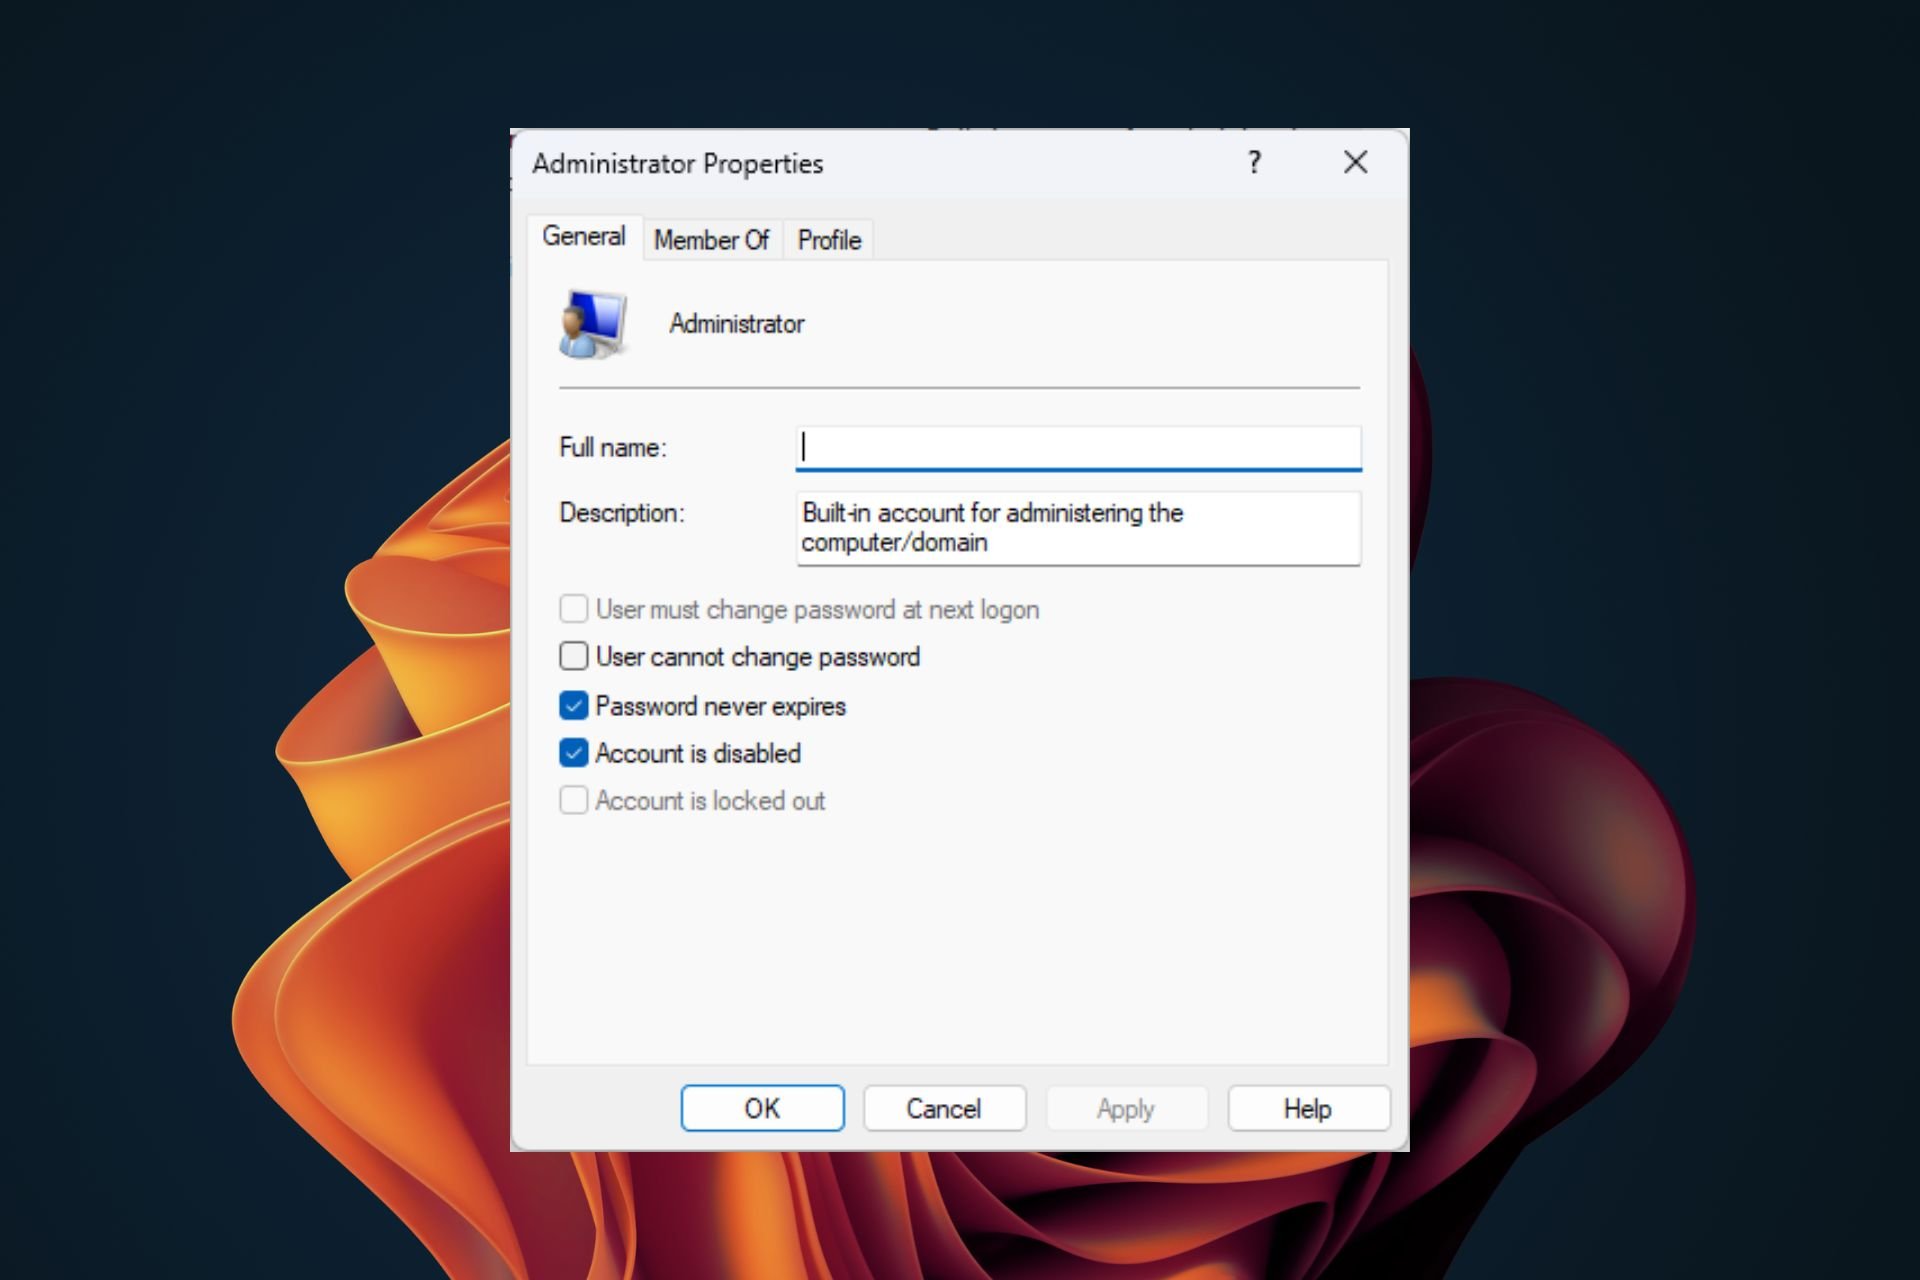
Select Users on the left pane and double-click on the second Administrator account.
Uncheck the Account is disabled option then click on Apply and OK to save changes.
Once enabled, go ahead and activate the hidden administrator account using any of the below methods.
2. By using the Command Prompt
Hit the Windows key, type cmd in the search bar, and click Run as administrator.
When Command Prompt starts, type the following command and press Enter to run it: net user administrator /active:yes
Sign out of your current account.
You should see new Administrator account available. Log in to it.
Hit the Windows key, type Powershell in the search bar, and click Open.
Type the following command and hit Enter: Enable-LocalUser -Name “Administrator”
4. By using the Local Policy
Press Windows key + R and type secpol.msc. Click OK.
Next, go to Local Policies and select Security Options.
Navigate to the right pane, right-click on Account: Administrator account status and select Properties.
Check the Enabled box then click Apply and OKto save the changes.
Because enabling the hidden administrator account on your Windows 11 can be risky, you need to know your way back to minimize this risk. To disable it, simply reverse engineer the above steps.
Best practices for managing the hidden administrator account
Only enable this admin account when necessary. If you’ve accidentally deleted your admin account, try getting it back. Only enable the hidden one for advanced troubleshooting or accessing high-level system files. Once done, disable it.
Keep an eye on the event viewer for any potential issues when the hidden admin account is enabled. This can hep you identify cropping issues and address them in a timely manner.
Ensure your system is up-to-date because the hidden admin account is prone to malicious attacks and any vulnerabilities in the system increase the surface area risk.
That’s all we had for this article but we’d love to hear your experiences with this hidden admin account. Have you enabled it before? What was the reason and any notable differences with the standard admin account? Let us know in the comment section below.
The ERROR_BAD_DEV_TYPE system error, with code 66 (0x42), is often encountered when using a DOS application to run a print command or adding/mapping a PSDrive. The error message reads, System Error 66: The network resource type is not correct.
The problem usually appears when you run an incorrect command, the connections are not in order, the firewall or security software conflicts with the operation, or you have set an incorrect path.
Before you start troubleshooting things, install all pending Windows updates, reconnect the printer, or reboot the device and try adding the PSDrive again.
How do I fix ERROR_BAD_DEV_TYPE?
1. Check the command for mistakes
If you are getting the 66 (0x42) The network resource type is not correct error while running the net use command from a DOS window with administrative privileges, it could be mistakes within the command to blame.
First, make sure that you are using this command while replacing PrinterServer and PrinterName with the ones in your case: net use lpt1 \PrinterServer\PrinterName /persistent:yes
Also, for some users, replacing 127.0.0.1 as PrinterServer with the actual printer server name did the trick!
2. Run the network troubleshooter
Press Windows + R to open Run, paste the following command, and hit Enter: msdt.exe -id NetworkDiagnosticsNetworkAdapter
Follow the on-screen instructions to complete the troubleshooting process and apply the recommended fixes.
3. Check the path (if adding a new PSDrive)
If you are adding a new PSDrive from within an elevated Windows PowerShell, make sure the path listed in the command is correct.
For one user, adding a backslash (\) to the drive’s path triggered ERROR_BAD_DEV_TYPE The network resource type is not correct error. This is because the target host was unreachable. So, check for such inaccuracies!
4. Temporarily disable the firewall
Press Windows + S to open Search, type Control Panel in the text field, and click on the relevant result.
Click on System and Security.
Click on Windows Defender Firewall.
Select Turn Windows Defender Firewall on or off from the left pane.
Now, choose the Turn off Windows Defender Firewall option under both Private network settings and Public network settings, and then click OK to save the changes.
Finally, verify whether ERROR_BAD_DEV_TYPE is fixed.
If the error message doesn’t appear again, check whether Port 445 is blocked in Windows Defender Firewall and open it. It’s not recommended to keep the firewall disabled for extended periods since this puts your PC at risk. So, this approach should only be used as a workaround!
5. Perform a system restore
Press Windows + R to open Run, type rstrui.exe in the text field, and hit Enter.
Select the Choose a different restore point option, and click Next.
Pick a restore point created before the issue first appeared and click Next.
Verify the details and click on Finish to start the restore.
Wait for the process to complete. It usually takes 15-30 minutes.
When nothing else works, a system restore will fix System Error 66: ERROR_BAD_DEV_TYPE. You just have to pick the right restore point.
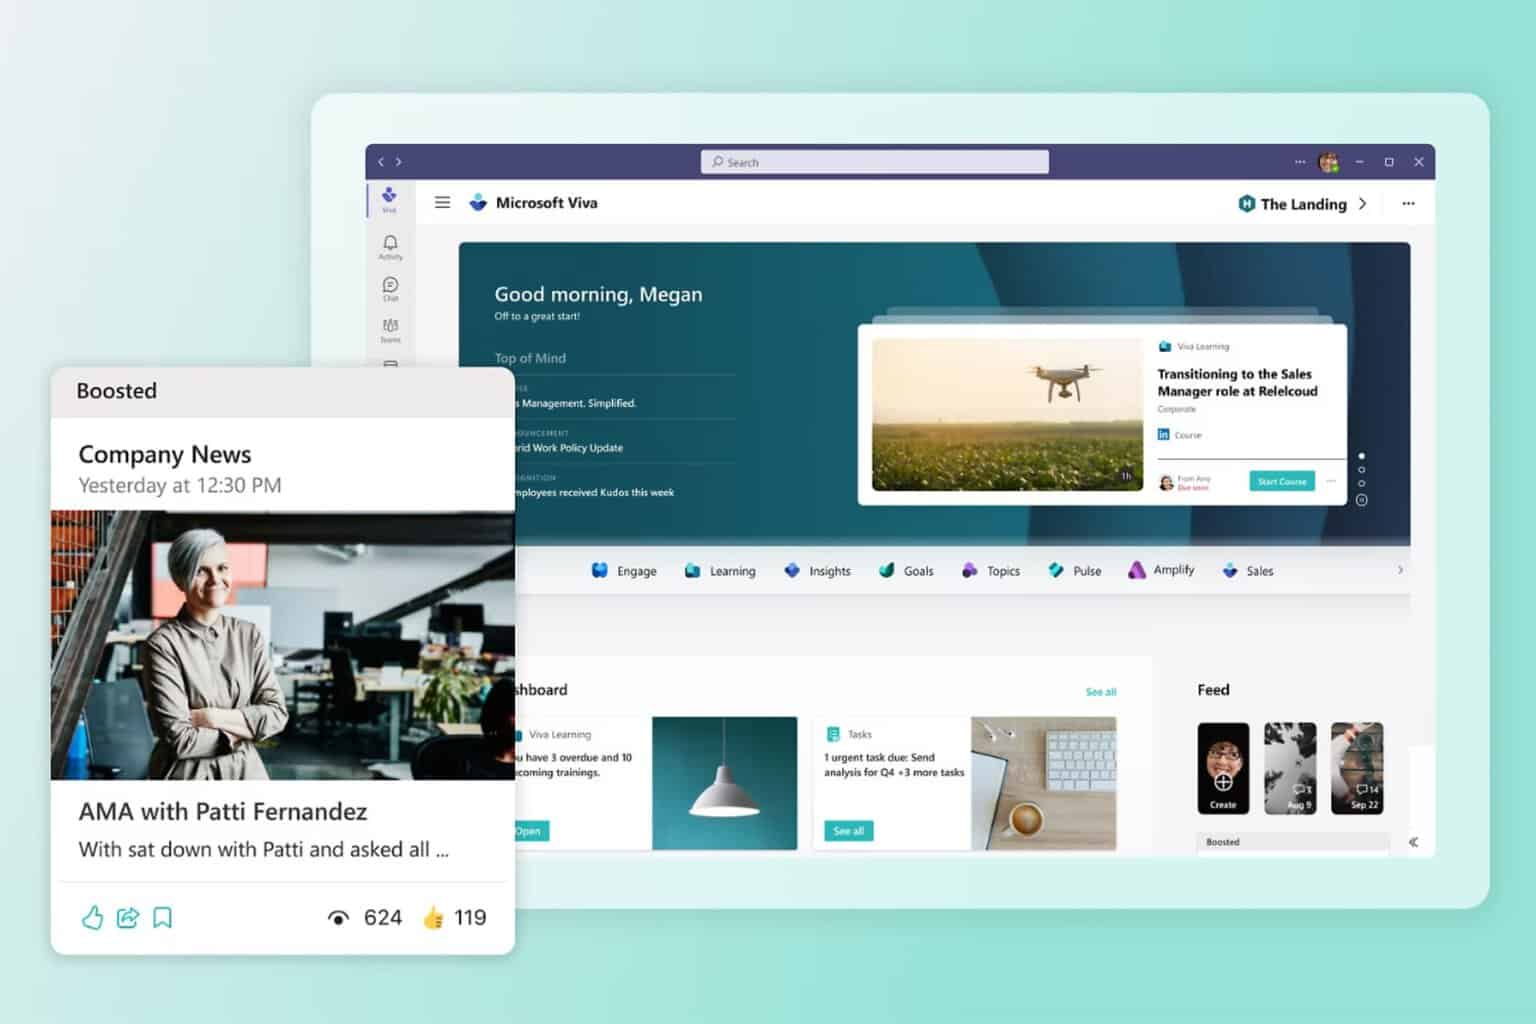
After announcing a Unified Create button for Viva Engage, Microsoft seems to be updating the platform with a new look and feel for reactions in conversations.
According to the latest entry to Microsoft 365 Roadmap, the new enhancements will add a more interactive style to the reaction section. Microsoft says these enhancements will turn others’ reactions as clickable pills across the conversation card.
While we don’t have any images of the new look, the Redmond-based tech giant says the new Viva Engage reactions will align more with other 365 apps, such as Teams. So think about that platform’s looks: the reactions should follow that design.
It’s worth mentioning that this new design will not change the number of icons available in Engage, but the design will be visible on other platforms that integrate Viva Engage, such as Teams and Outlook.
Viva Engage will feature a new look and feel for reactions in conversations. Users will see a more interactive style, showing others’ reactions as clickable pills across the conversation card. This design brings Engage reactions more in line with other Microsoft 365 products, including Teams. There are no changes to the number of icons available in Engage with this new design. Users will see this change in Engage web and Teams and Outlook apps. Mobile apps and other integrated surfaces will follow.
All these changes will be made to Viva Engage in October.
Setting up a mobile hotspot on Windows 11 and configuring port forwarding can help you manage network traffic more effectively. Here’s a step-by-step guide to achieve this.
How do I set up Windows 11 hotspot and configure port forwarding?
1. Set up a mobile hotspot
Press Win + I to open the Settings app.
Click on Network & Internet, then select Mobile hotspot to turn it on.
Under Share my Internet connection from, select the network adapter you want to use (e.g., Wi-Fi or Ethernet).
Toggle the Share my Internet connection with other devices switch to On.
Click on Edit under the Properties section.
Enter a network name (SSID) and password for your hotspot, then click Save.
2. Configure the port forwarding
Press Win + X and select Windows Terminal (Admin) or Command Prompt (Admin).
If prompted by User Account Control (UAC), click “Yes” to allow changes.
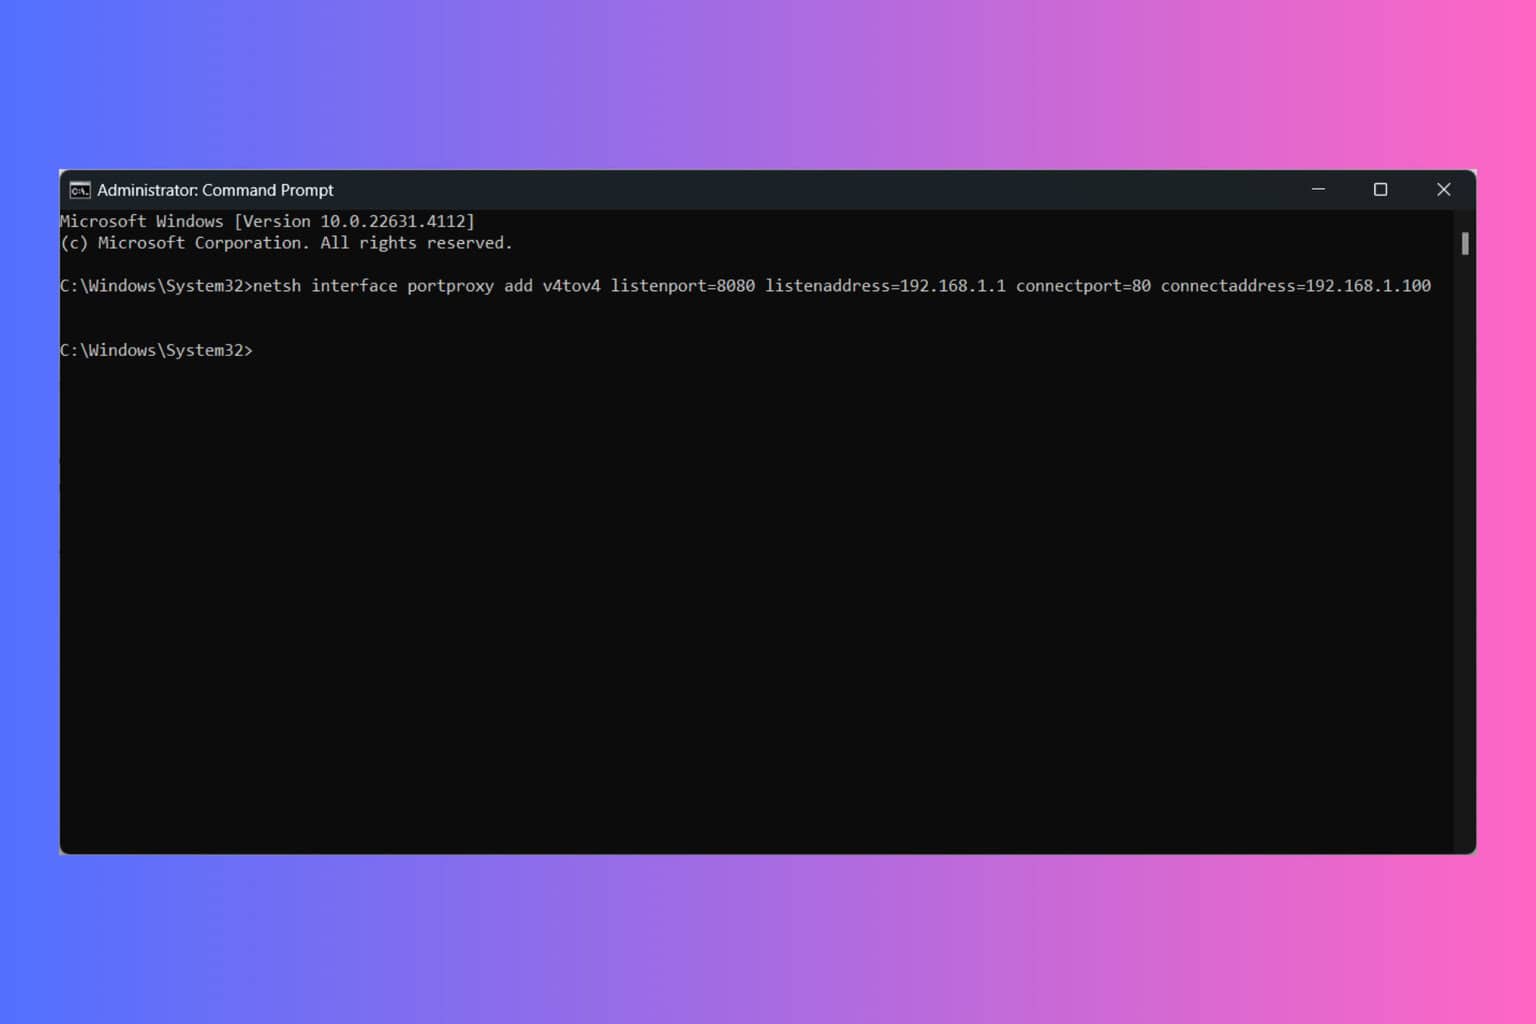
Use the netsh command to add a port forwarding rule. Replace the placeholders with your specific details: netsh interface portproxy add v4tov4 listenport=[ListenPort] listenaddress=[ListenAddress] connectport=[ConnectPort] connectaddress=[ConnectAddress]
This command forwards traffic from port 8080 on the hotspot to port 80 on the connected device with IP address 192.168.1.100.
To verify the rule, use the following command: netsh interface portproxy show all
Open Windows Defender Firewall by typing firewall in the Start menu and selecting Windows Defender Firewall with Advanced Security.
Click on Inbound Rules and then New Rule.
Select Port and click Next.
Choose TCP or UDP and specify the port number you used in the port forwarding rule.
Allow the connection and follow the prompts to complete the rule setup.
Connect a device to your Windows 11 hotspot.
Use a tool like telnet or a web browser to test the port forwarding setup by accessing the forwarded port.
By following these steps, you should be able to set up a mobile hotspot on Windows 11 and configure port forwarding to manage network traffic effectively.
Many use their PC as a hotspot, however, users reported that their Windows 11 hotspot is slow, and this can cause issues especially if you’re streaming content. Luckily, there are a few ways to fix this.
Why is my Windows hotspot slow?
Outdated drivers as well as Wi-Fi scanning features can cause this problem.
What can I do if my Windows 11 hotspot is slow?
Before we try anything else, ensure that you have the latest Windows updates installed. Also, try to minimize any online activity on your PC since it will influence the hotspot speed.
1. Update your network adapter drivers
Visit your network adapter manufacturer’s website.
Locate your model and go to the drivers section.
Now download the latest WLAN driver.
Once you install the driver, check if the issue is gone.
2. Use the netsh command
Press the Windows key + S and type cmd. Choose Run as administrator.
Next, run the following command: netsh wlan set autoconfig enabled=no interface="YOUR WIRELESS NETWORK NAME"
This will disable the Wi-Fi network search and solve the problem hopefully.
To enable Wi-Fi search, run netsh wlan set autoconfig enabled=yes interface="YOUR WIRELESS NETWORK NAME"
In addition to updating your drivers, many are suggesting using a hotspot software instead of a built-in Windows hotspot, so you might want to try that as well.
We hope that this guide helped you fix the problem with the slow hotspot on Windows 11. This isn’t the only issue, and many reported that Windows 11 mobile hotspot is not working.
Microsoft is set to change the layout of the Edge’s Settings page next month, and it will undergo major changes. The latest entry to the Microsoft 365 Roadmap unveiled the changes, and you’ll need to get ready, as they will be released in October.
First, the Redmond-based tech giant is introducing quick access to the most used actions on the Settings landing page. So, for example, if your most used action is to update Edge, that will be the one that appears on the landing page after this update.
The landing page will then also contain shortcuts to the most populated pages: Privacy, search, and services; appearance; cookies and site permissions; and, finally, System and performance.
Ultimately, the sections on the pages mentioned earlier will have a table of contents that lists all of their respective sub-settings.
To make finding browser settings more efficient, Microsoft Edge is introducing three navigation improvements to Edge Settings. We are making no changes to the functionality of any setting and all settings will remain on the same page as they are today but will be behind clickable sections. The first is introducing quick access to the most used actions on the landing page of Edge Settings. Second, each densely populated page—Privacy, search, and services; Appearance; Cookies and site permissions; System and performance—will feature quick access to its most used actions. Third, for these same pages, each section will now click-through to its respective sub-settings (similar to a table of contents).
As we mentioned earlier, all of these changes are set to take place in October, but the Redmond-based tech giant doesn’t mention how they’ll be rolled out: gradually or instantly. It’s worth mentioning that the changes won’t include modifications to the settings’ functionality.
Aside from the Settings UI changes, Microsoft is also integrating the Windows 11 Energy Saver with Microsoft Edge to extend Battery Life. We spotted this in the Dev Channel, and it seems that the Redmond-based tech giant will enable it by default.
In the last few years, thousands have faced issues joining Facebook groups, citing that the Join Group button is missing, not working, or greyed out. Even reports sent out to Facebook didn’t yield any positive response!
For those wondering why I can’t join a Facebook group I was invited to, it’s likely that your account is restricted, the browsing data is corrupt, or there’s an ongoing bug/problem in Facebook’s server.
Before you start troubleshooting things, make sure you are not signed in with a page account, log out and then sign back into Facebook, disable any active VPNs, or use a different device to join the group.
What can I do if the Join Group button is missing on Facebook?
Tip
Although not confirmed, some users were able to join Facebook groups after dissociating their profile from any owned pages. So, you may try that!
1. Check whether your account is restricted by Facebook
In many cases, users were restricted from joining Facebook groups based on recent activity that violated Facebook’s guidelines. Restrictions can also be imposed if you join many groups in a small period, say 30-50 per day.
To check for account restrictions on Facebook, open your profile > click on the ellipsis (three dots) > choose Profile status > and look for what it says under the Account status section. A green checkmark on the profile also indicates no restrictions.
Check for restrictions on the Facebook account
If it reads something like, Your account is restricted for 7 days. Your account activity didn’t follow our Community Standards, so you can’t do one or more things you usually do, wait for the said period or reach out to Facebook support.
2. Get the admin to send an invite or add you as a friend
For 4 out of 5 users, asking the admin or someone within the group, if allowed in the Facebook group invite settings, to send a group joining invite did the trick.
Also, if the private Facebook group invite link is not working, ask the admin to add you as a friend and then send an invite.
3. Sign in using a browser instead of the Facebook app
If you were using the Facebook app on Android or iPhone and an error occurred while trying to join the group, it could be an app-related problem. To fix things, simply open Facebook through any browser.
Using Facebook in a browser on a PC
Also, sometimes switching browsers helps fix things when Facebook’s Join Group button is missing. So, I suggest using Google Chrome or Opera!
4. Clear the browsing data
Open the browser you are using for Facebook, and press Crtl + Shift + Delete.
Select All time from the Time range dropdown menu, tick the checkboxes for Browsing history, Cookies and other site data, and Cached images and files, and then click on Delete data.
Finally, relaunch the browser, open Facebook, and check whether the Join Group button now starts working.
5. Create a new Facebook profile
As a last resort, you can always create a new Facebook profile to join the group. Remember, you should follow this approach only when you can’t join a group but others can.
Also, make sure not to join too many groups within a short span using the new profile, as it could lead to account restrictions.
Given that thousands of users are currently facing the issue, the missing Join Group button on Facebook is likely a server-side problem. Since it has been reported, you can expect a patch in the coming days.
The super administrator account in Windows 11, also known as the built-in Administrator account, has elevated privileges and is hidden by default. Here’s a step-by-step guide to enable and disable this account.
How do I enable Super Administrator in Windows 11?
1. Enable/disable the Super Administrator account using CMD
Click the Start button, type cmd and select Run as administrator from the results.
If prompted by User Account Control (UAC), click Yes to allow changes.
In the Command Prompt window, type the following command and press Enter: net user Administrator /active:yes
You should see a message saying The command completed successfully.
To set a password, type the following command and press Enter: net user Administrator [YourPassword]
Sign out of your current account.
On the login screen, you should now see the “Administrator” account.
Click on it and enter the password if you set one.
To disable the super administrator account, type the following command in Command Prompt: type the following command and press Enter: net user Administrator /active:no
Now, if you log out, you shouldn’t see the Administrator account in the login screen.
2. Using the Local Users and Groups
Press Win + R, type lusrmgr.msc, and press Enter.
Navigate to Users under Local Users and Groups.
Right-click on Administrator and select Properties.
To enable, uncheck Account is disabled and click OK.
To disable, check Account is disabled and click OK.
Press Win + X and select Windows PowerShell (Admin).
If prompted by UAC, click Yes to allow changes.
Type the following command and press Enter: Enable-LocalUser -Name "Administrator"
Type the following command and press Enter: Disable-LocalUser -Name "Administrator"
By following these steps, you can easily enable or disable the super administrator account in Windows 11. Please note that you still need administrative rights to enable or disable the built-in Administrator account.
Microsoft Teams will introduce the Queues app on Teams phone devices. This app allows users to handle incoming calls, view call queues, and even manage call history directly from their phone devices without using the desktop version.
According to the entry in the Microsoft 365 Roadmap, the Redmond-based tech giant plans to add the Queues app to Teams phone devices starting in December.
This means that communication will become not only faster but also efficient and effortless, allowing managers to quickly grasp conversations without wasting time.
Queues app on Teams phone devices enhances call management capabilities by allowing agents to handle incoming calls, view call queues, and manage call history directly from their Teams phone devices, improving efficiency and ensuring effortless communication for agents.
For now, the Queues app is only available on Android devices, and Microsoft hasn’t said anything about iOS, but iPhone support might also be available in the following months.
The Redmond-based tech giant has been updating the platform on Android devices: Teams will provide an immersive experience on Rooms on Android, thanks to a new 3×3 Gallery View coming to these devices.
Many users use their PC as a hotspot, but is there a way to hide the SSID of a hotspot on Windows 11? In this guide, we’re going to answer this question.
How do I hide the hotspot SSID in Windows 11?
Unfortunately, Windows doesn’t allow you to hide the SSID of your hotspot. If you choose to use your PC as a hotspot, the best way to protect it is to secure it with a strong password.
Do personal hotspots have an SSID?
Yes, every wireless connection has an SSID that allows users to identify it and connect to it.
How do I hide my SSID on my Mobile hotspot?
Open Settings on your phone and go to Connections.
Next, choose Mobile Hotspot and Tethering.
Select Mobile Hotspot.
Tap on the network name.
Expand the Advanced section.
Enable Hidden network.
Keep in mind that the steps might be different for different phone brands. Also, some phones have Broadcast SSID instead of a Hidden network feature.
Can you hide the SSID of a wireless network?
Open your router login page in a browser. Enter your credentials.
It has been flying under the radar, but currently, in the Microsoft Store, OneDrive is rated Teen on the ESRB code, which is usually reserved for video games only. Under this code, the Teen label means that OneDrive is suitable for ages 13 and over because it would include violence, suggestive themes, crude humour, minimal blood, frequent use of moderate language, and infrequent use of strong language if we are to trust Wikipedia’s definition.
However, OneDrive is not a video game and does not resemble one; it’s merely a platform where users can store their files and folders. Even then, you’d need to have an account to access it, so this rating is unusual, to say the least.
ESRB stands for Entertainment Software Rating Board and was established in 1994 to label controversial or even violent video games to suit the right audiences. Currently, there are seven ratings: Rating Pending, Rating Pending—Likely Mature 17+, Everyone, Everyone 10+, Teen, Mature 17+, and Adults Only 18+.
It’s uncommon for software products outside of video games to be rated with the ESRB label, and many users, including us, wonder why it is labelled this way.
Of course, on Reddit, the topic is prone to jokes, and rightfully so.
because it’s an fps game. you shoot your computer to death after getting angry at onedrive.
Sorry that’s my fault, I uploaded a curse word.
Some say the rating is there because you have to be 13+ to make a OneDrive account, but that still doesn’t make sense, as OneDrive doesn’t offer interactive entertainment tools other than being a regular storage app.
Is it indeed uncommon in the tech world? Who knows… maybe OneDrive has been a video game all along.
After all, the Redmond-based tech giant has been teasing huge changes coming to the storage platform. Or it might all well be a video game based on our patience to deal with the platform’s issues and bugs. Again, that question has no answer, but it’s good to know that OneDrive is labelled Teen on the ESRB code. At least it’s safe to use.
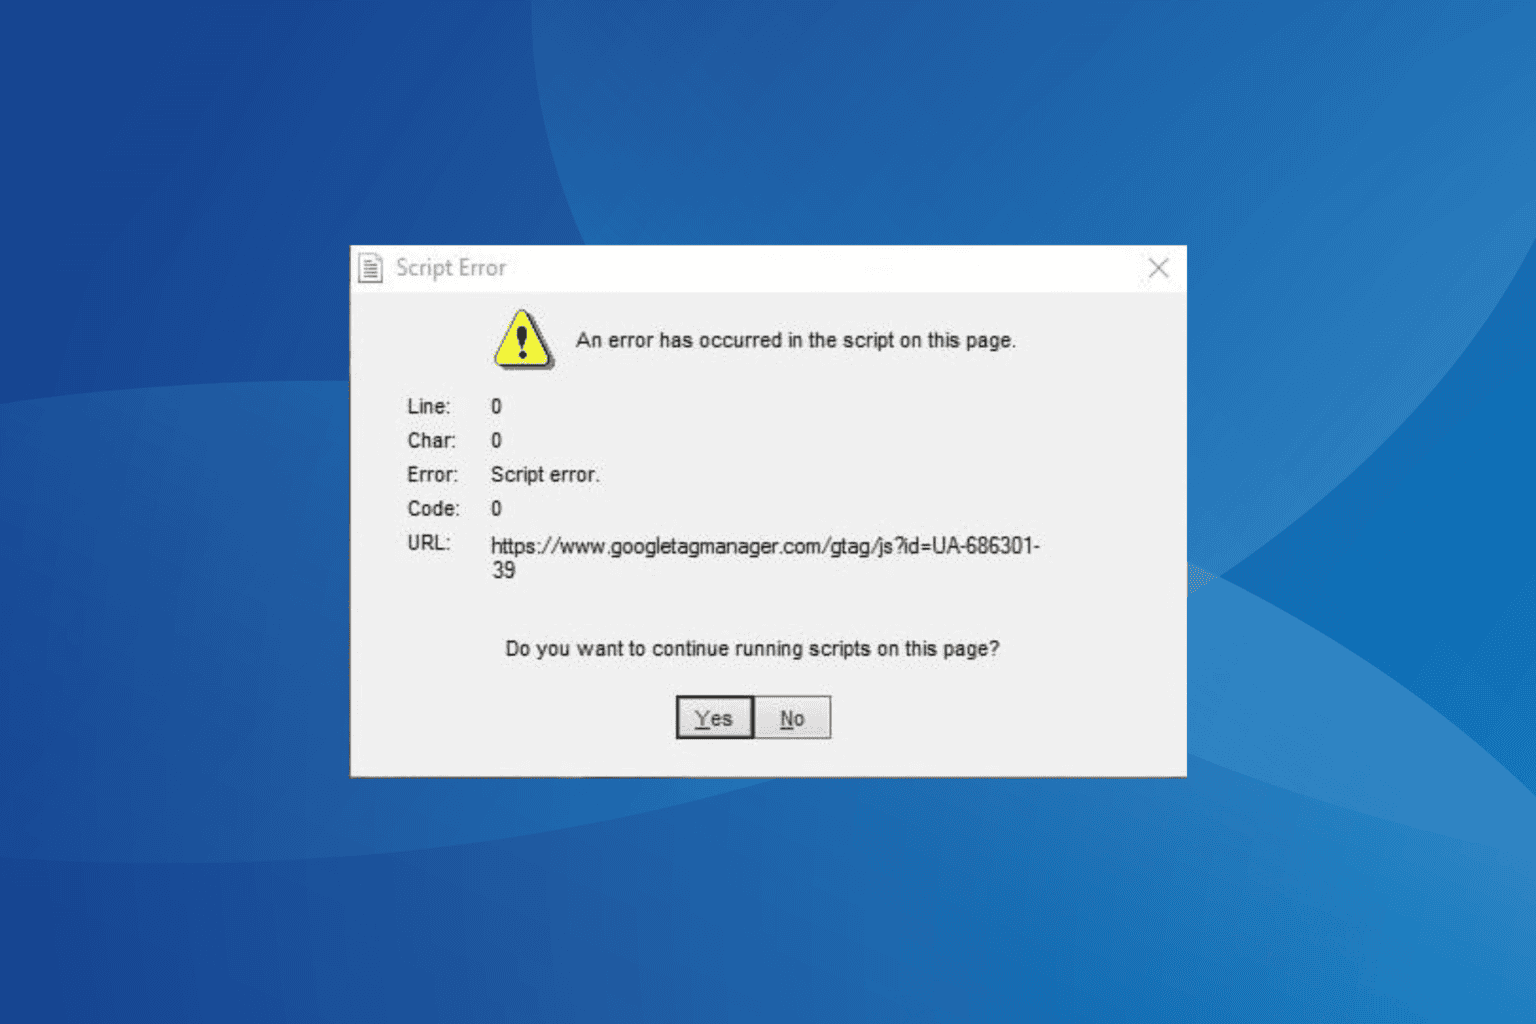
The Google Tag Manager script error pop-up in Windows appears at startup or while launching an app/game. The message often reads Script Error and lists https://www.googletagmanager.com/gtm.js id=gtm-trx5wp8 as the URL!
After looking at previously reported cases, it’s established that leftover files, conflicting programs, missing permissions, misconfigured network configuration or settings, and malware infection can cause Google Tag Manager script error popup in Windows.
Before you proceed, install all pending Windows updates, and if the script error appears when sending the print command, reinstall the printer software and drivers.
How can I fix the Google Tag Manager script error?
1. Delete the file/folder triggering the script error
Wait for the Google Tag Manager script error message to appear, and don’t close the pop-up.
Press Ctrl + Shift + Esc to open the Task Manager, click on the ellipsis near the top right, select View, and choose Expand all.
Look for the entry under which Script Error is listed, right-click on it, and select Open file location.
If the problematic file belongs to an app that’s already been uninstalled, delete the file as well as any other listed alongside.
In case the concerned app is still installed, press Windows + R to open Run, type appwiz.cpl in the text field, and hit Enter.
Select the app from the list, and click on Uninstall.
Follow the on-screen instructions to complete the process.
Head back to the file’s location and verify whether it, too, was deleted. If not, delete the file manually.
Reboot the PC and check for improvements.
In 3 out of 5 cases, it was MiniTool Partition Wizard that triggered the Google Tag Manager script error, and simply uninstalling the app and deleting its files does the trick!
If the error reappears after a quick removal, use a top-rated software uninstaller, which automatically clears any leftover files and Registry entries post-app uninstallation.
2. Run the affected program as an administrator
Right-click on the program throwing the error, and select Properties.
Go to the Compatibility tab, and tick the checkbox for Run this program as an administrator.
Click on Apply and OK to save the changes.
Relaunch the program and verify whether Google’s script error pop-up still appears.
3. Disable automatically detect proxy settings
Press Windows + I to open Settings, go to Network & Internet from the navigation pane, and then click on Proxy.
Now, disable the toggle for Automatically detect settings.
Reboot the PC, then launch the affected app and check for improvements.
4. Reconfigure Internet Options
Press Windows + S to open Search, type Internet Options in the text field, and click on the relevant result.
In the General tab, click on Delete under Browsing history.
With the default selections, again click on Delete to confirm the change.
Go to the Security tab, and move the slider under Security levels for this zone to Medium.
Go to the Privacy tab, click on Advanced, select Accept under both First-party Cookies and Third-party Cookies, and then click OK.
Head to the Advanced tab, tick the checkbox for Allow software to run or install even if signature is invalid, and untick the one for Use SSL 3.0.
Click on Apply and OK to save the changes, then restart the PC and verify whether the Google Tag Manager script error pop-up in Windows is fixed.
5. Disable non-critical startup apps
NOTE
Disabling the affected app from loading at startup doesn’t fix the underlying cause but prevents the pop-up from appearing.
Press Ctrl + Shift + Esc to open the Task Manager and go to the Startup apps tab from the left.
Individually select all non-critical third-party apps from the list, and click Disable.
Once done with all, you shouldn’t get the Google Tag Manager script error on startup.
6. Scan the PC for malware
Press Windows + S to open Search, type Windows Security in the text field, and click on the relevant result.
Click on Virus & threat protection.
Click on Scan options.
Select the Full scan entry and click on Scan now.
Wait for the built-in antivirus to detect and eliminate any active threats. The scan may take 15-45 minutes.
If Windows Security doesn’t find any threats but the Google script error popup keeps appearing, I recommend using an effective antivirus solution to run advanced malware scans on the PC.
7. Perform a system restore
Press Windows + S to open Search, type Create a restore point, and click on the relevant result.
Click on System Restore.
Select the Choose a different restore point option, and click Next.
Pick a restore point created before the issue first appeared and click Next.
Verify the restore details and click on Finish to start the process.
If you can’t identify the underlying cause behind the Google Tag Manager script error, a system restore does the trick. It reverts any recent changes to the PC, including installed Windows updates, that might be triggering the repeated pop-ups.
Remember, for most users, it was the MiniTool Partition Wizard to blame for the error. So, your primary approach should be to uninstall it and delete any leftover files. If that doesn’t resolve the problem, look for network-related misconfigurations!
On September 12, Microsoft 365 services faced a downtime, affecting thousands of users. At least over 20,000 users reported the issue through various channels. The outage mainly impacted Outlook and other services.
Users took to social media to express their frustration, with some suggesting it could be an excellent excuse to take the day off. On Reddit, for instance, some argued that Microsoft hit another low point.
As of this writing, Microsoft has resolved the incident, “We’ve monitored our systems and confirmed that impact has been remediated. Please look for MO888473 in the admin centre for more details,” the company said in an update on X via the Microsoft 365 Status handle.
We've monitored our systems and confirmed that impact has been remediated. Please look for MO888473 in the admin center for more details.
The downtime report started at around 04:30 AM PDT and continued to spike up, mainly affecting Outlook. Ookla’s Downdetector recorded a spike in down reporting from over 20,000 users, “possibly related to issues in Microsoft Azure.”
However, even if the Microsoft services are up and running, admins seem to be unable to sign into the Microsoft 365 Admin centers.
We're investigating reports of an issue in which admins are unable to access the Microsoft 365 admin center. We're reviewing details provided by affected admins, and we'll provide an update shortly.
Per Microsoft, the company has found out why, but it hasn’t provided a fix yet.
We identified and repaired an issue within the authentication flow for the Microsoft 365 admin center. We confirmed through monitoring service telemetry and via admin reports that the impact is resolved. See MO889001 in the admin center for more information.
The Redmond-based tech giant has been constantly hit with outages in 2024. Earlier this summer, the company was also the subject of one of the most significant tech blackouts in recent history. A Crowdstrike error affected millions of Windows PCs simultaneously, rendering airports, healthcare institutions, and educational organizations helpless for a few days.
If you have WhatsApp on Windows 11, you might be wondering what is WhatsApp storage location on Windows 11. In today’s guide, we’re going to show you how to find it.
How can I find WhatsApp storage location on Windows 11?
Check the Local App Data folder
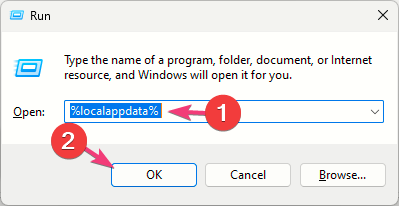
Press Windows key + R and type %localappdata%. Click OK.
Next, navigate to Packages.
Next, navigate to <somecode>.WhatsAppDesktop_<somecode> folder. Usually, it’s 5319275A.WhatsAppDesktop_cv1g1gvanyjgm but it might be different on your PC.
Lastly, go to LocalState\shared\transfers
In this folder, you should be able to find all your saved files.
This is the fastest way to find WhatsApp Desktop storage location, so be sure to try it.
Where is the WhatsApp install folder on PC?
Install folder for WhatsApp is C:\Users\WindowsReport\AppData\Local\Packages\5319275A.WhatsAppDesktop_cv1g1gvanyjgm
Remember to replace WindowsReport with your actual username.
If you’re looking for a WhatsApp media storage location, you should know that the images are stored inside the transfers folder which is located in the WhatsApp installation directory, as described at the beginning of the article.
As you can see, it’s pretty simple to access WhatsApp storage location on Windows 11. It’s important to mention that there are various WhatsApp issues on Windows.
To celebrate National Video Game Day, Clipchamp has introduced Xbox-themed content, such as custom stickers, templates, video backgrounds, images, sound effects, and music, so content creators and Xbox fans can celebrate the day in style.
In a blog post, Microsoft unveiled that Clipchamp has partnered with Minecraft and Sea of Thieves to bring this exclusive Xbox-related content to its platform. Now, users can create gameplay videos or promotional content using various tools, even if they’re new to video creation.
Clipchamp has added various Sea of Thieves-themed content to its library, including stickers, images, videos, music, sound effects, and GIFs. Users can edit this content within the Clipchamp platform to make it their own.
The platform has also added Minecraft templates, allowing users to create videos that look professional-made. Users can add their Minecraft gameplay footage to these templates and export them at up to 4K quality.
To find this Xbox-themed content, users can head to the Clipchamp home screen, click on templates or content library, search for Minecraft or Sea of Thieves or browse through the different categories.
This new Xbox-themed content is available to all Clipchamp customers using a personal account. If you’d like more gaming content added to Clipchamp, you can submit your feedback to the Clipchamp team through the platform.
Microsoft has combined Edge Efficiency Mode and Windows Energy Saver to provide users with better battery life. We noticed a setting for this feature enabled by default in Edge Dev.
Microsoft Edge uses Efficiency mode to reduce power consumption and save battery life. This feature is handy for laptop users. When enabled, Efficiency mode minimizes power usage by saving computer resources and works alongside Sleeping Tabs to put inactive tabs to sleep after 30 minutes. However, Efficiency mode may cause videos to run less smoothly due to additional steps to conserve battery.
Even if you haven’t enabled Edge Efficiency mode, Windows 11 offers its Efficiency mode with power and battery settings to improve battery life.
To access these settings, go to Start, then Settings, then System, and finally open Power. Here, you can customize options like screen brightness, screen saver, and sleep settings.
As reported in July, Microsoft explored combining Edge Efficiency mode and Windows Energy Saver mode for user benefits. This integration has now become a reality. We noticed the respective setting in Edge Dev, live, and enabled by default.
The new setting, available under Efficiency mode in the optimize performance section, states, “Use Windows Energy Saver to control efficiency mode settings.”
Image credit:WindowsReport.
When the setting is on, “Windows Energy Saver mode will automatically set your device to Efficiency mode to conserve energy. This feature is only available when Energy Saver mode is turned on in Windows Power and Battery settings”.
Clicking the “Windows Power and Battery settings” link will open Windows 11 Power Settings, where you can change power mode and energy saver settings.
Based on our experience with the developer version, it seems that Edge might not require user consent to activate the feature. We haven’t enabled Energy Saver by default, and I’m using a desktop computer.
In a new shift towards greater accessibility, Microsoft has updated its work-oriented Teams platform with bidirectional support for Teams Live Interpretation.
The feature will allow interpreters to translate in both directions of two languages. For example, they can translate from English to Spanish and Spanish to English. Additionally, the capability allows interpreters to change the direction of their translation. They can choose which language to translate into at any moment.
At the bottom of the screen, there will be buttons for each of the two languages involved in the translation. Interpreters can click the button of the language they want to translate into.
The highlighted language button will be the language the interpreter is translating into. Attendees will hear the translation in this highlighted language.
With bidirectional support in Teams Live Interpretation, interpreters can now switch the direction they want to provide translation in between the two languages by clicking on the button of the language they want to interpret into at the bottom of the screen. The highlighted language button will be the language the interpreter is translating into and attendees hear from.
Microsoft
In a blog post, the Redmond-based tech giant says users must be members of the Teams Public Preview or Microsoft 365 Targeted release and use the new Teams client for Windows or macOS.
Recently, Microsoft said it has always considered users’ feedback when developing accessibility features. It’s good to see the company keeping and acting on that promise with the new bidirectional support on Microsoft Teams.
Microsoft will release a couple of important policy changes in the new Outlook for Windows and Web in October that will greatly enhance security on the platform.
The changes were noted in Microsoft 365, and they’re set to be released in October.
The first concerns checking feedback policies across all accounts. The Redmond-based tech giant will make the feedback policy check more restrictive, which will make it more secure. Those unable to provide feedback due to policies in place will no longer be shown the Feedback button for any of their accounts.
Currently, when we determine whether a user is entitled to submit feedback, we only look at the feedback policy for their primary (global) account. Going forward, we are going to make the feedback policy check more restrictive which is more secure. We’ll be looking at feedback policies for all users’ accounts and basing their eligibility off the most restrictive policy value found. For example, if any of the users’ accounts have Feedback disabled by a policy, we won’t show the Feedback button in the Help tab of the ribbon for any of their accounts.
The second of these policies has to do with turning off sharing recommendations. Outlook will disable the ability for users to share folders with individual users. If before, this setting only stopped users from changing the default and anonymous sharing permissions for folders, and that part will stay the same, now users won’t be able to share folders with specific people. The way this policy works with calendar sharing won’t change either.
Updates to the office Cloud Policy Service setting “Turn off sharing recommendation” will disable the ability for users to share folders with individual users. Currently, the policy blocked users’ ability to update default and anonymous permission levels for shared folders. This functionality will remain and will not be changed. The current policy and how it works with calendar sharing will not be impacted by this change and will remain as implemented.
The two policies are set to make Outlook more secure and safe for commercial users. These policies will impact the new Outlook for Windows and Web, which was recently made generally available to users.
After fixing many issues with the first release of Edge 130, Microsoft has released an update to the Dev channel of its Edge browser, bringing it to version 130.0.2821.1. This update brings several small features and fixes for desktop and mobile browser versions.
The update adds a new ‘Theme Description’ and ‘Theme Type Label’ section to the browser’s settings and appearance page, allowing users to see more information about the themes they have installed.
Microsoft Edge 130.0.2821.1 also fixes an issue where the browser would crash after scanning a QR code during account transfer. The same problem was causing crashes on iOS when users tried to log out of their Microsoft account.
For macOS users, the update resolves a problem where three extra lines would appear in full-screen mode and issues with the ‘Pick a colour’ function in the theme settings.
Windows Experience Blog reports that Edge 130.0.2821.1 includes several other fixes as well. Here are some of the more noteworthy ones:
– Fixed an issue where clicking the site icon on the taskbar controller did not work after opening the site side pane from the sidebar and minimizing the browser.
– Resolved an issue where the Add Split Screen option was missing from the toolbar and only available in the ‘More’ menu.
– Fixed an issue where tabs displayed URLs in ‘Tab groups’ from the Favorites/Collections group.
– Resolved an issue where Autofill was not working for coupons in the browser.
On Android, the update fixes a problem with tooltips displaying in the wrong location under the extensions menu and an issue where the browser title would incorrectly display as “Microsoft Edge First Run Experience” when users clicked on an Outlook link to open the browser. The update also fixes issues for iOS and Mac users.
If you’re a Dev channel user and haven’t seen the update, try closing and reopening Edge to trigger the download.
Viva Engage is set to introduce a new way for users to create posts on the platform: a new button called the Unified Create button. According to an entry in the Microsoft 365 Roadmap, this new capability will be introduced to Viva users starting next month and will allow all those creating content on the platform to use a single button to do so.
As the Redmond-based tech giant states, Engage users need to go to different areas within the platform to create various types of content. A regular post needs a specific button, while a community post needs another button.
However, with the new Unified Create button, Viva Engage seeks to ease the creation process and help users quickly learn the tools they are licensed to use.
Here’s what the entry says:
This feature brings a new way for users to create posts, communities etc. through a centralized creation button in Viva Engage. Currently, Engage users need to go to different locations in the application for different creation types – a post, community, etc. Starting in October 2024, a Viva Engage user will be able to create the different types of content already enabled for them, using a centralized creation button. This new feature eases the process of creation and helps users quickly discover the various creation options they are licensed to use.
With this update, Viva Engage will have a similar posting UI to other social media platforms, such as FaceBook, where users can create different kinds of posts in one single place. This should streamline and increase productivity in the coming months while making it easier for users to interact with the platform.
The Redmond-based tech giant has been updating Viva Engage with several functional capabilities lately. For instance, earlier this year, Viva Engage allowed admins to mute users and limit their engagement for a safer working environment.
Microsoft Teams will provide an immersive meeting experience, and before you think about Microsoft Mesh, let me stop you right now. It’s not about Mesh but rather a more traditional way of offering immersive experiences on the platform.
According to the latest entry in the Microsoft 365 Roadmap, Teams will allow for a 3×3 video gallery on dual displays for Room on Android. What does this mean? Dual display rooms will be capable of presenting up to 18 videos (3×3 on each screen) when no content is being shared during meetings.
Microsoft says this will ensure a uniform experience across Windows and Android Teams Rooms devices.
Dual display rooms are now capable of presenting up to 18 videos (3×3 on each screen) when no content is being shared during meetings. This enhancement ensures a uniform experience across both Windows and Android Teams Rooms devices.
The capability is set to be released in November 2024.
Microsoft has officially announced that it is killing support for legacy Windows Media DRM (WMDRM) in Windows Media Player, Windows 7, Windows 8, and Silverlight, which was introduced in 1999 with Windows 98. This means that these services will no longer be able to play back-protected content.
The announcement isn’t really a surprise, as Microsoft debuted its PlayReady DRM in 2007 as a replacement for WMDRM. PlayReady is widely used today, and Microsoft began deprecating PlayReady 2.1 and below last fall.
The playback of protected content in the legacy Windows Media Player on Windows 7.
The playback of protected content in a Silverlight client and Windows 8 clients.
In-home streaming playback from a Silverlight client or Windows 8 client to an Xbox 360.
The playback of protected content ripped from a personal CD on Windows 7 clients using Windows Media Player.
Silverlight, a browser plug-in for multimedia content that Microsoft debuted in 2007, is also getting the axe. Microsoft announced in 2012 that it would phase out support for Silverlight and last year said it would end Silverlight updates in October 2021.
Microsoft promises to retire the WMDRM services and Silverlight support “in the coming months.” In the meantime, Microsoft doesn’t plan to offer any more PlayReady 2.1 or older licenses.
The Redmond-based tech giant recently caused controversy when it updated one of its support pages to hint that Control Panel would also be deprecated. However, Microsoft quickly backtracked on its statement, instead offering a more ambiguous note on it. Regarding Legacy DRM, however, it seems that its fate is sealed.
What do you think? Do you still use devices that rely on WMDRM or Silverlight? Let us know in the comments.
Microsoft has announced the new Xbox Friends and Followers Experience, which will be available to Xbox Insiders starting this week.
The Xbox Insider program allows Xbox users to test new features and provide feedback before they are released to a broader audience.
The new Friends and Followers Experience will allow users to send, accept, or delete friend requests, making it more straightforward to connect with others.
We’re re-introducing friend requests!
You will be able to send, accept, or delete friend requests, in addition to following or being followed by others.
We are testing with Xbox Insiders now and look forward to sharing more later this year on a full rollout. pic.twitter.com/dQCNEtGBtk
Friends will now be a two-way, invite-approved relationship, giving users more control and flexibility. Meanwhile, following someone will remain a one-way connection, allowing users to stay updated with shared content from another player, club, or game.
The update will be available to Xbox Insiders across all devices, including Xbox consoles, Windows PCs, and handheld devices. The company says it will roll out the update to all users “soon.”
Xbox deprecated the Friends and Followers experience over a decade ago due to criticism surrounding this capability: it often allowed strangers or bots to connect with users without warning, and its notification system wasn’t the best.
However, nowadays, Xbox has the chance to transform the Friends and Followers experience into something similar to Twitch, where Xbox users can create public profiles and let other gamers follow them.
Until then, however, Xbox assures players that they can manage their experience, security, and privacy.
With these updates, we are also adding new privacy and notification settings, letting you decide who can send you friend requests or follow your account and which notifications you receive.
So the Xbox Friends and Followers experience should be more stable, and less disturbing today. Either way, it lays the foundation for Xbox to experiment with different social settings, maybe even coming up with their own version of Twitch.
Xbox users are less enthusiastic, and while some of them are excited about the capability returning, most of them saw it as a nuissance to begin with. On Reddit, tens are sharing a common issue: the frustrating notification system.