Wasteland 2: Director’s Cut is now an Xbox Play Anywhere game

Wasteland 2: Director’s Cut, the post-apocalyptic RPG from inXile Entertainment has received support for Xbox Play Anywhere this week. This means that you can purchase the game once and play it on both Xbox One and PC, and your saves and achievements will also be shared across both platforms.

Previously, the PC version of Wasteland 2: Director’s Cut on the Microsoft Store didn’t support Xbox Live achievements and Xbox Live cloud saves. If you’ve been playing this version of the game on your PC, you’ll need to install the new Xbox Play Anywhere version which will prompt you to import your saves at launch. You can get more details about transitioning to this new Xbox Play Anywhere version of the game on this FAQ.

Wasteland 2: Director’s Cut is currently priced at $29.99 on the Microsoft Store, but you can play it for free with Xbox Game Pass. If you haven’t played it yet, now is a good time to check it out ahead of the release of Wasteland 3 on August 28, 2020. This upcoming sequel won’t support Xbox Play Anywhere, but it will be available on Xbox Game Pass for Console and PC on day one.

Getting the printer error 123? Here’s how to fix it fast

Windows error codes give out clues about the origin of the problem, and the printer error 123 indicates the presence of misconfigured, corrupt, or damaged Windows files. The cause of the corrupt files can be a broken printer installation or an incomplete uninstall of a printer or its software.

To fix the printer error 123 code, you must bear in mind that the files can corrupt the Windows registry and file system. Hence, the solutions on this page will be centered on finding and eliminating corruption in the Windows system.

How do I fix the printer error code 123?

1. Restore the computer manually

  1. Restart your computer and log into Windows as an Administrator.
  2. When Windows loads, press the Start button and enter system restore.
  3. Click on Create a restore point to open the System Properties window.
  4. Next, navigate to the System Protection
  5. From the list under Protection Settings, select your system drive, and hit Configure.
  6. Select Turn on system protection next and save the settings by clicking Apply.

The above steps configure system restore and automatically creates a restore point. Next, we will proceed to how to perform the actual system restore.

  1. Still, on the System Protection tab, click System Restore and hit Next.
  2. Select the restore point you just created.
  3. Click Scan for affected programs to be sure of the programs that you might lose to the system restore.
  4. Close the window, and lastly, click Next and Finish to save.

2. Disable startup processes

  1. Press Start and search for MSConfig.
  2. Next, choose the Selective Startup under the General tab.
  3. Next, check the Clear the Load Startup
  4. On the Services tab, check the Hide all Microsoft services box at the bottom.
  5.  To the left, click Disable all and hit OK to save and close the window.
  6. Restart your computer.

3. Clean up your disk

  1. Search for disk cleanup on the Start menu and select the Disk Cleanup utility when suggested.
  2. Mark the checkboxes of the items you can spare to delete and hit OK.
  3. On clicking OK, a window will pop up on your screen asking if you are sure you want to delete the items you selected. Click Yes to confirm the operation.
  4. Next, close the window.

4. Scan the computer with Microsoft Security Essentialsscan with microsoft essentials to fix printer error 123

  1. Search for Microsoft security essentials on the Start menu and open it.
  2. In Microsoft Security Essentials, check the Full box.
  3. Hit Scan Now to begin the scanning.
  4. On completion of the scan, close Microsoft Security Essentials.

After completing these steps, try to print again and see if you still get the printer error 123.


5. Check for system disk corruption with the CHKDSK utilitychkdsk utility to clear printer error 123

  1. Search for cmd in the Start menu and select Command Prompt.
  2. In the command prompt, input chkdsk /f and hit Enter to trigger the CHKDSK utility.

This check scans for hard drive corruption. If it detects issues, then it would be easier to troubleshoot the printer error 123.


To recap, we have seen that corrupt files are the culprits of the printer error 123. These corrupt files are usually residues of deleted/uninstalled hardware and software, as well as damaged installations.

Solving printer error 123 could be a little complicated for non-technical users. However, if you follow the step-by-step solutions on this page, you will clear this error in no time.

Update your drivers, scan your hard drive for corrupt sectors, disable autorun processes, or perform a system restore. If anything here is unclear, do not hesitate to leave a comment and let us know. We love hearing from you.

[wl_navigator]

Seeing the Canon Printer error 1003? Follow These 3 Steps

If you keep getting an error saying printer error 1003: No paper, even when you have paper loaded in the printer, then read this guide. The error you get most likely means that you are attempting to carry out a print job on a printer with dirty pinch rollers.

Basic troubleshooting steps for this error involve cleaning the dirty components with cotton and isopropyl alcohol; this usually solves the problem but not always.

After cleaning the components thoroughly, restart the printer and retry the printing. If you still get the printer error 1003: No Paper error, then this two-part guide will help you fix it.

How do I fix the Canon printer error 1003?

1. Update your printer drivers

The error might be caused by outdated printer drivers and a proper update can fix this issue. We recommend using a third-party program that performs this action automatically and safely.

An automated tool such as Fortect Driver Updater will securely install the best printer driver version available. It can detect your hardware, thus removing the risks that may come with installing a mismatched driver.

The software is very easy to use. Just let it scan your PC or pick the specific driver you want to scan, then allow it to download and install the best corresponding driver version.

⇒ Get Fortect Driver Updater

2. Run the printer troubleshooter

  1. Press the Start button and search for troubleshooting.
  2. Click on Troubleshoot Settings to open a new window.
  3. Here, under Get up and running, click Printer and hit Run the troubleshooter.
  4. From here, follow the instructions presented on the wizard to troubleshoot the printer.

3. Re-install driver in compatibility modeinstall driver in compatibility mode to repair printer error 1003

  1. Find the installation file for the printer. It will be an executable file (.exe).
  2. Next thing to do after you find it is to right-click on this EXE file and select Properties.
  3. When the Properties bar opens, switch to the Compatibility
  4. Mark the checkbox labeled Run this program in compatibility mode for and then select a different Windows version, preferably Windows 7.
  5. Click OK to save the settings.
  6. Launch the installer now by double-clicking on the executable file.

4. Drain the power

Finally, if all of these solutions fail to clear the printer error 1003, then disconnect the power cable. Next, press and hold the Power On button for around 20 seconds while the printer is off to drain out the power completely.

This solution may not work on the first try, but a lot of people have succeeded after carrying out these steps three times.

The printer error 1003 is most likely caused by a mechanical problem, but you cannot rule out software issues also. To clear this error, begin by cleaning the pinch rollers and blowing out particles from the internals.

If those fail, then head over to your computer and run the printer troubleshooter. Another method that fixes the printer error 1003 is to completely re-install the printer on your PC in compatibility mode.

Is Cricut not cutting your materials? Fix it in 6 easy steps

If your Cirut machine is not cutting through your material or the Circuit is not cutting at all, you can repair it with some simple troubleshooting. So many times, you attempt to use Cricut for a design, but the machine completely messes it up.

A lot of users have had the challenge of Cricut not cutting through the material, so we will explore the solutions for this problem here. Let us go through troubleshooting tips for when Cricut is not cutting or when it does not cut all the way through.

How do I fix my Cricut not cutting correctly?

1. General troubleshooting tips

  1. Ensure that the blade depth is deep enough to cut cardstock. In most cases, five is perfect.
  2. Increase the pressure to the highest setting.
  3. Make use of a Circut brand blade.
  4. Remove the blade and reinsert it the correct way – the cone point end should not be the side sticking out.
  5. The material you intend to cut must match the one you selected in the material setting.
  6. Try using a different web browser.
  7. Clean the mat to remove debris and create some clearance in the front and back of the machine.

The tips above are the general troubleshooting steps to take when you notice that Circut is not cutting correctly.

If you attempt 1 to 7, and the machine is still malfunctioning, then proceed to the specific solutions that follow.

2. Install the green/gold assembly into the cutting arms correctly

install the green/gold assembly into the cutting arms if cricut is not cutting

Always insert the green/gold assembly in the middle groove area. Users mistakenly put it in the lower groove area, and this can be why the Cricut is not cutting.

If you install the assembly correctly, there will be no space between the bottom of the machine and the blade.

3. Determine why Cricut is not cutting using an assembly test

assembly test to fix cricut not cutting all the way through
  1. Remove the blade and reinsert it slowly.
  2. While reinserting the blade, check how it enters. Make sure that the blade goes in naturally.
  3. If the blade is not inserted correctly, it would look like it does not fit or stick while going in.

4. Check blade height setting

check blade height settings when cricut is not cutting

Without additional external testing, you can confirm if the blade extends out of the green/gold blade assembly. If it does, then you need to adjust the blade height settings.

It is tough to estimate the correct height. So, change the blade height to around 6 (1 mm) and adjust it from there.

5. Determine why Cricut is not cutting using an arm buoyancy test

  1. Turn on the machine and flick the assembly arm gently.
  2. When flicking the assembly arm, see if it is bouncy or only goes up and down.
  3. Also, confirm that there were no obstructions when the arm is pushed down.

6. Adjust the sizes

  1. Increase the image size and retry.
  2. If there are texts, increase the font size and try again.adjusting font size can solve cricut not cutting
  3. Bolden the font.
  4. If you can afford to, delete the section of the design.

Images and texts may be too small to cut. Changing the size of the fonts and images can fix this issue of Cricut not cutting.

Several factors can be the reason for Cricut not cutting all the way through, and we have explored the solutions. Begin the troubleshooting with the tips in the first section, as these are sufficient for most cases.

What is HDCP and how to fix the HDCP error on HBO Go?

Before troubleshooting HDCP error on HBO Go, it is essential to understand what HDCP is. HDCP (High-brandwidth Digital Content Protection) protects digital HBO’s HD content from unauthorized duplication.

For HDCP to work, your TV, drivers, cable, and adapters must be HDCP compliant. If not, you will get the HDCP error on HBO Go. Here, we will explore this and other solutions to tackle this error.


How do I fix HDCP error on HBO Go?

1. Confirm that your setup is HDCP compliant


Before troubleshooting the HDCP error on HBO Go, you must know that the error can arise if your HBO Go setup is not HDCP compliant. Non-HDCP compliant gear will not only show the HDCP error on HBO Go, but the following will happen also:

  • You will be limited to viewing only content in standard definition.
  • You may get only audio or video if a standard definition video is unavailable.

How do I tell if my setup is HDCP compliant?

Generally, newer HDMI and DVI cables are HDCP compliant. The same goes for new models of HDTVs. However, older televisions, HDMI, DVI, VGA, and similar cables would probably not be HDCP compliant.

If your setup is alright, but you still get the HDCP error on HBO Go, then proceed with the troubleshooting steps that follow.


2. Update your internet browser

An out-of-date browser can cause the HDCP error on HBO Go. Different browsers have their unique updating steps, but they are all similar. For this solution, we will be updating the Google Chrome browser.

  1. Launch the Google Chrome browser on your computer.
  2. Next, click on the More icon, which is an ellipse at the top right-hand corner of the Chrome window.
  3. From the options, go to Help >  About Google Chrome.
  4. The first section of this page is where the updating happens. If your browser is up to date, you will see a blue tick and some text saying Google Chrome is up to date.update-chrome-HDCP-error-hbo-go
  5. Otherwise, if your browser needs updating, the text there becomes Update Google Chrome. Also, you will see an arrow beside this text. A green arrow indicates that the update has been available for more than a day.
  6. Finally, click on Update Google Chrome, and the process commences.

On successful completion of the Google Chrome updating, the browser will restart. Now, try HBO Go once again and see if you still get the HDCP error.

3. Disable/remove internet browser addons and plugins

Here also, we’ll only go through the steps of disabling or removing addons and plugins on Google Chrome. The procedure is similar in most browsers.

  1. Open the Google Chrome browser.
  2. Click on the More options icon (three dots) at the top right-hand corner of the screen.
  3. Next, select More tools, and from the options, choose Extensions.
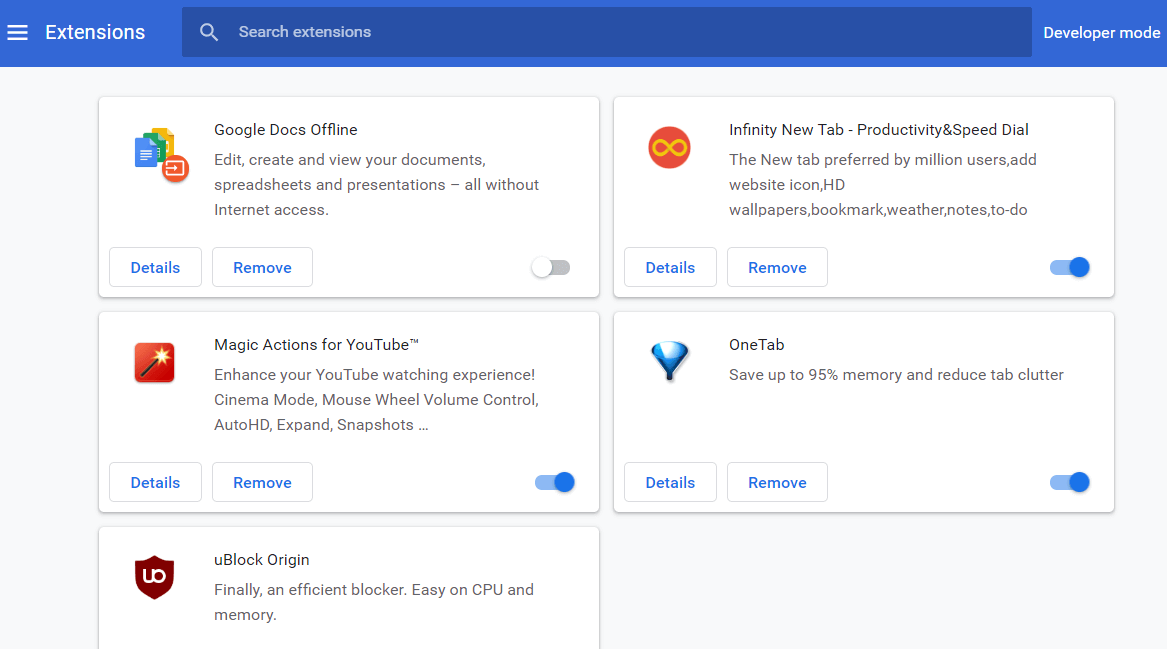
  4. On the Extensions page, toggle the switch beside the extensions to disable them.disable-chrome-extensions-HDCP-error-hbo-go
  5. If you wish to uninstall an extension entirely, hit the Remove button.
  6. After uninstalling an extension, go back and see if the HDCP error on HBO Go persists. If it does, disable another and retry.
  7. Next, we head over to the plugins. Search for chrome://plugins in the address bar of Google Chrome.
  8. Under a plugin, hit the Disable link to disable it.
  9. Like you did with the extensions, retry HBO Go after disabling a plugin until you find the problematic one.
  10. If you discovered that the HDCP error on HBO Go was from a bad plugin or extension, disable it and restart your browser.

If these solutions fail, another tip is to stream from your primary monitor for HBO Go. Further, you can try a different browser and see if the HDCP error on HBOGois peculiar to one browser.

Moreover, you can try a different streaming service, such as Disney+. It has a generous library that includes Disney’s movies and shows for all ages.

⇒ Get Disney+

We hope those solutions help you with your issue. Let us know in the comments.

How to Fix Netflix Error Code M7353-5101 in a Few Easy Steps

Netflix might be the world’s foremost movie-streaming service, but it’s not perfect. There are a few Netflix-streaming error codes.

Error M7353-5101 is one of those streaming issues. The M7353 error code has an Oops, something went wrong message that halts movie playback.

How do I fix the Netflix error code M7353-5101?

1. Turn off browser extensions

Google Chrome

  1. Netflix error code M7353-5101 can often be due to browser extensions. To turn off Google Chrome’s extensions, type chrome://extensions/ in that browser’s URL bar and press Enter.
  2. Then click all the blue toggle buttons on the extensions to disable them.
    Chrome's Extensions tab netflix error code m7353-5101
  3. Or you can click the Remove buttons to delete extensions.

Firefox

  1. To disable Mozilla Firefox add-ons, press the Ctrl + Shift + A hotkey.
  2. Click Extensions on the left off the Add-ons Manager tab.
    Add-ons Manager tab netflix error code m7353-5101
  3. Click the blue toggle buttons to turn off their add-ons.

2. Clear your browser’s cookies

Google Chrome

  1. Try clearing your browser’s cookies and cache data. In Google Chrome, press the Ctrl + Shift + Del hotkey.
    Clear browsing data options netflix error code m7353-5101
  2. Select the All Time option for the time range.
  3. Select the Cookies and Cached data options.
  4. Click the Clear data button.

Firefox

  1. Enter about:preferences#privacy in Firefox’s URL bar, and press the Enter key.
  2. Click the Clear Data button.
  3. Select the Cookies and Cached Web Content check boxes.
    Clear Data window netflix error code m7353-5101
  4. Click the Clear button.

3. Turn off third-party antivirus software

The Avast Antivirus utility's context menu netflix error code m7353-5101

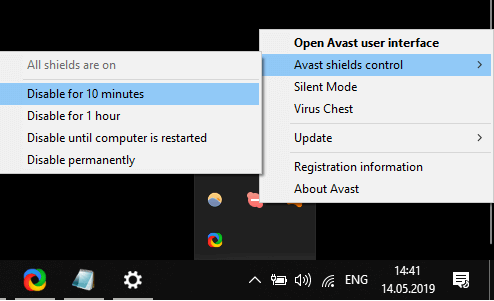
Some users might need to disable third-party antivirus software to fix the M7353 Netflix error. To do so, right-click the system tray icon for your third-party antivirus utility to open its context menu.

The antivirus utility’s context menu will probably include a disable option of some kind you can select to turn it off temporarily. Select to disable the antivirus utility until restart if you can. Then, try watching a Netflix movie with the antivirus software disabled.

4. Disable proxy server

If you have the Use a proxy server setting enabled, try disabling it. Press the Windows key + R hotkey for the Run accessory.

  1. Input inetcpl.cpl in Run, and press the Enter key.
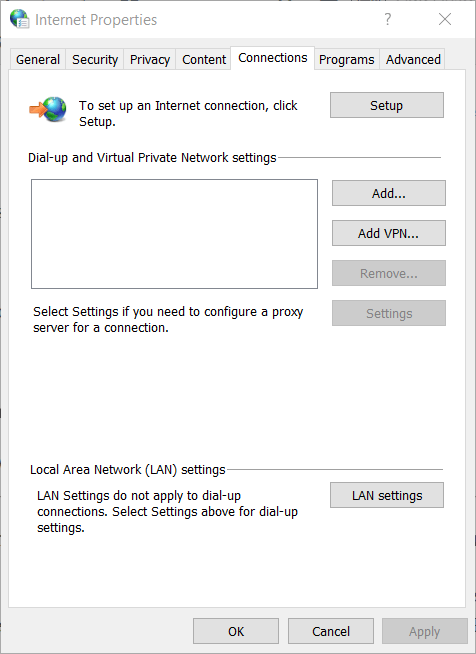
  2. Click the Connections tab on the Internet Properties window that opens.
    Internet Properties window netflix error code m7353-5101
  3. Click LAN settings to open the window in the shot directly below.
    Local Area Network (LAN) Settings window netflix error code m7353-5101
  4. Deselect the Use a proxy server option there.
  5. Click OK to exit the window, and press the Apply button.

5. Update Chrome’s Widevine Content Decryption Module

  1. Google Chrome has a Widevine Content Decryption Module that some users might need to update to fix Netflix error code M7353-5101. To do that, enter chrome://components/ in Chrome’s URL bar; and press the Return key.
  2. Then click the Check for update button for Widevine Content Decryption Module.
  3. Restart Google Chrome if that module gets updated.
  4. Alternatively, you can update Chrome to get that module updated. Input chrome://settings/help in the browser’s URL bar, and press the Enter key.
    The Widevine module netflix error code m7353-5101
  5. Then you can click Relaunch if the browser updates.

6. Update Windows 10

  1. Check that your Windows 10 is fully updated. Press the Windows key + S hotkey to open the platform’s search utility.
  2. Type updates in the search box so that you can click Check for updates.
    Check for updates button netflix error code m7353-5101
  3. Press the Check for updates button for patch updates.
  4. If there’s a build update available, click Download and install to upgrade to the latest Windows 10 version.

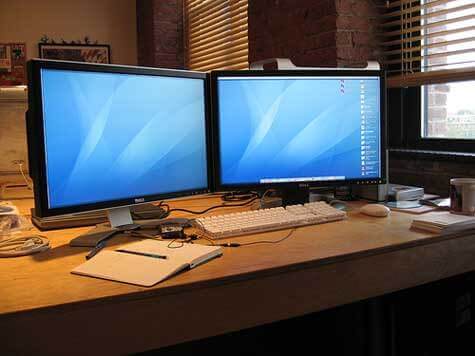
7. Don’t utilize secondary displays

Dual monitors netflix error code m7353-5101

If you’re utilizing dual monitors, disconnect the secondary display. Then try playing the Netflix stream again without any secondary VDU.

The above fixes might resolve Netflix error code M7353-5101 for most users. However, users who still need more potential fixes can contact Netflix support.

In case you have more problems like this one, we have a guide on how to address Netflix M7362 1269 issue, so don’t miss it.

Click the Start Live Chat button on Netflix’s Help Center page to discuss the M7353 error with a support agent. Before you go, don’t miss our latest guide and learn what to do if Netflix is not working on Firefox.

Registry Editor Could Not Set Security Key or Some Subkeys

Registry Editor could not set security key currently selected or some of its subkeys the error message you get when you work with protected registry keys or subkeys. The protection of the Windows Registry is not a fault; it is protected by default and only editable by the Windows system itself.

To resolve this issue, we will change the security permissions for the Windows registry keys and subkeys. This guide deals with the Windows Registry Editor. Follow the steps carefully to avoid complications.

How do I fix the Registry Editor could not set security key currently selected error?

Note: An error in the Registry Editor can break important system functions. Therefore, before taking any steps in troubleshooting the registry editor could not set security in the key selected error message, it is advisable to first create a system restore point.

1. Start your computer in Safe Mode

  1. Go to Settings on your computer by pressing the Windows logo key and then I on your keyboard.
  2. Click on Update & Security and choose Recovery.
  3. Next, hit Restart now under Advanced startup.Registry Editor could not set security key currently selected or some of its subkeys safe mode
  4. On clicking Restart now, the computer goes off and comes on to greet you with the Choose an option
  5. Here, go to Troubleshoot.
  6. On the next window, select Advanced options.
  7. Next, click Startup Settings.
  8. Finally, hit Restart.
  9. This restarts the computer. When it comes back on, this time, press the F4 key or choose 4.

This puts the computer in Safe Mode and troubleshoots the registry editor could not set security in the key selected error. To exit Safe Mode after fixing this error, restart your machine or follow the steps below:

  1. Press the Windows logo key and then R on your keyboard. This opens the Run box.
  2. In Run, enter msconfig and hit
  3. Click on Boot tab.
  4. Finally, uncheck Safe boot. This you can find in the Boot options.

2. Enable the built-in Admin user account

enable built in admin Registry Editor could not set security key currently selected or some of its subkeys

  1. Press the Windows logo key to open the Start menu.
  2. Search for cmd. Right-click on Command Prompt and choose Run as Administrator.
  3. In the Command Prompt window, enter the command below and hit Enter:
net user administrator /active:yes
  1. Next, type exit in command prompt and press Enter to close the window.
  2. Now, log out of the Administrator user account.

3. Set registry key permissions

  1. Open the Run dialog box by pressing the Windows logo key and R on your keyboard.
  2. Enter regedit in the box and hit OK to open Registry Editor.
  3. In Registry Editor, navigate or enter the path to the relevant key.
  4. Next, right-click on the key and choose Permissions.
  5. On the ensuing dialog box, click Advanced.
  6. Now, you will be in the Advanced Security Settings dialog box. Beside the Owner label, click Change. change key owner Registry Editor could not set security key currently selected or some of its subkeys
  7. To claim ownership of the key and its subkeys, type in your user account name and hit Check Names.
  8. The name you entered now changes to the official username. Mark the Replace owner on subcontainers and objects checkbox.
  9. Finally, click Apply but leave the dialog box open.click apply to save registry owner settings Registry Editor could not set security key currently selected or some of its subkeys

You have successfully claimed ownership of the registry key. However, you have to also change the permission of the keys to remove the registry editor could not set security in the key selected error.

3.1 Change registry key permissions

  1. On the dialog box, you will see a button labeled Disable inheritance, click it.
  2. Next, hit the Add button to include yourself.
  3. Click on the Set a principal.
  4. Next, enter your name in the field provides and hit Check Names. When the official username displays, click OK.
  5. In Basic permissions, Mark the Full Control checkbox and hit OK.
  6. You are then returned to the Advanced Security Settings dialog box. At the bottom of the screen, check to Replace all child object permission entries with inheritable permission entries from this object.
  7. Finally, click OK and OK again to close the out dialog box.

The Windows registry is a sensitive space because it contains files that control the working of everything on the computer. Because of this, strict restrictions are in place to prevent modification, deleting, or even accessing the keys and subkeys.

To fix the Registry Editor could not set security key currently selected or some of its subkeys error you get on the system, you have to assign yourself rights to it using the guides here. Lastly, remember to either back up the keys or create a system restore point before attempting this fix.

[wl_navigator]

How to use the WiFi printer driver for Chromebooks

Even with all the online access across multiple devices and platforms out there, sometimes having a hard-copy of certain documents or information is all you need.

Printing from a Chromebook is easy once you connect your printer to the device correctly. Chromebook supports most printer brands, but depending on the method you choose, some printers need extra capabilities.

How do I connect my Chromebook to a wireless printer?

Connect your printer to WiFi

  1. Turn your printer on.
  2. Connect the printer to an internet network. Settings are different, depending on the model.
  3. Turn your Chromebook on and connect to the same network (if this is not done by default).

Next, we’ll be looking at some ways in which you can set up the connection between your Chromebook and your printer.

1. Use the WiFi printer driver extension

You can find a WiFi printer driver extension for Chromebooks in the Chrome Web Store. This is an extension that, once installed, automatically recognizes your printer which is already connected to WiFi.

There’s no need for you to install other programs. The only setback of the extension is that it doesn’t support any printer and you have to contact the developer to tell them to add a certain printer model.

2. Use the Google Cloud Print systemadd printer chromebook

  1. Open a Chrome browser.
  2. Type chrome://devices in the address bar and press Enter.
  3. Under New devices, find your printer > Manage.
  4. In the Confirm registration box that appears, click Register.
  5. Follow the steps to finish registering.

Google Cloud Print is a service available mostly for cloud-ready printers, that connects your printer to the web. Similarly to the previous method, while you’re logged in to the same network as the printer, you should be able to see it and print any document.

Unlike the Chrome printer extension, Google Cloud Print includes a wider selection of compatible printers. Your printer must have the Google Cloud Print feature for you to be able to use this service.

If your printer is not cloud-ready and you want to use this method, you will have to contact your manufacturer for help.

3. Directly connect your wireless printer to Chromebookadd wireless printer chromebook

  1. Open the Settings menu from the Quick Quick Settings Panel at the right lower side of your screen.
  2. Type print into the search box.
  3. Select Printers > Add Printer.
  4. Click on your printer’s name in the list that appears > Add.

If your printer is older and does not appear in the mentioned list, do the following additional steps:

  1. Click the Add Manually button.
  2. Give the printer any name you want.
  3. Type its IP address into the Address box. (It’s shown somewhere in the printer’s display menu, or in its network or wireless configuration settings) > click Add.
  4. Then type in your printer’s manufacturer and model > click Add again.

That’s it! Now you can just hit Ctrl-P from any browser tab or document to get the hard copies you wanted.

Your suggestions on this topic are always welcome and you can use the comments section below to get in touch with us.

How to fix CBS All Access not working on Amazon Firestick

Encountering the message An error has occurred. Please try again later. (Error UVP-1011), can cause you a lot of stress. But rest assured that this guide will help you.

This is a common error with the CBS All Access on-demand video service, that subscribers have reported time and time again.

It occurs mostly with Amazon Fire TV and Amazon Firestick users. The app works fine on other devices – iOS, Android, Roku. Also, the users mentioned that the error occurs mainly when pausing or exiting the app in the middle of the program.


How do I fix CBS All Access not working on Amazon Firestick?

1. Perform a power cycle

A complete power cycle should put your media devices, internet connection, and CBS All Access app back on track.

So, switch off your devices (including modem and router), unplug them, wait for a few minutes, then plug them back in.

Hopefully, this solves the problem. If otherwise, continue with the next solutions.


2. Clear cookies & cache

  1. In the Fire TV menu, select Settings.
  2. Go to Applications >Manage Installed Applications > CBS All Access.
  3. Select Clear Cache, and then Clear Data.

If you continue to experience this issue, try to uninstall and reinstall the app.


3. Reset Firestickcbs all access error on firestick

  1. In the Fire TV home screen > Settings.
  2. look for My Fire TV > Reset to Factory Defaults.
  3. Click Reset.

Note that this process will delete all personal data made to your device.


Error code 1011 is known by the team at CBS All Access, yet they did not provide other solutions. If you used another trick to get the service going, please share it in the comments section below.


[wl_navigator]

Is Raspberry Pi causing fsck errors? Fix it in 3 easy steps

If you are using a USB drive or SD card to boot your Raspberry Pi, you may encounter the fsck error. Several users have reported the Raspberri Pi causing fsck error resulting in a corrupted SD card.

I have experienced several instances of data corruption on the SD card on my Pi. I am still investigating the root cause of this. At the moment to correct filesystem errors I shut down the pi and put the card into my laptop to fsck the root filesystem.

To avoid USB or SD card corruption make sure you use a USB power hub to connect your USB flash drives. If your boot SD or USB drive is corrupted, try fixing the drives by following the steps in the article below.

How do I fix Raspberry Pi causing fsck errors?

1. Use trusted third-party PC software

Fsck errors and other similar issues can lead to system malfunctioning and affect your files. Installing the latest drivers will prevent these problems and help your hardware to function properly.

For an in-depth diagnosis and an effective solution, we recommend installing a PC repair tool that keeps all of your PC driver software healthy and recovers important files that have been damaged during the process.

With a simple click, this type of tool can scan external memory devices such as SD cards and USB ports and enables you to protect specific files and folders by retaining metadata in case of unintended deletions.

⇒ Get Disk Drill

2. Fix the SD card using a Windows computer

Raspberry Pi causing fsck errors
  1. Remove the SD card from the Raspberry Pi slot.
  2. Connect it to a Windows computer. Since the process won’t take more than a couple of minutes, borrow a Windows system if you don’t have one yourself.
  3. Once connected to your Windows computer, the PC will automatically detect that there is a problem with the card.
  4. When the Do you want to scan and fix Removable Disk dialog appears, click on Scan and fix.
  5. Wait for Windows to scan the drive for errors and fix them.
  6. Once fixed, eject the SD card and insert it into your Raspberry Pi device.
  7. Reboot the device and check if the error is resolved.

Using a Windows computer to fix the SD card issue is a much simpler solution than using the Ubunto terminal commands. However, if the issue persists and Windows fails to fix the drives, proceed with the next set of steps.

3. Use Linux terminal to repair the drive

Raspberry Pi causing fsck errors
  1. Eject the SD card or USB drive from your Raspberry Pi.
  2. Connect it to a Linux system using a card reader or USB port.
  3. Press Ctrl + Alt + T in Ubuntu to open the terminal.
  4. Type mount and hit enter to find your pen drive or SD card letter.
  5. Type the following command and hit enter. Make sure to replace the sdc1 in the below command with the pen drive or SD card letter applicable to your drive.
    sudo dosfsck -w -r -l -a -v -t /dev/sdc1
  6. The dosfsck will scan the drive for errors and fix them.
  7. Once finished, eject the SD card and insert it into Raspberry Pi to see if the error is resolved.

In the above command:

  • -w means write to disk immediately.
  • -r run the performs disk check interactively.
  • -l means to list the filename processed.
  • -a asks the tool to fix any errors if found.
  • -v means verbose mode.
  • -t means mark unreadable cluster. You can skip the -t switch if the scanning and repairing process is taking too much time.

The Raspberry Pi can cause fsck error if the boot drive that is your SD card is corrupted. The error can be fixed using the Windows USB drive troubleshooter or using the dosfsck tool in Linux.

Follow the steps in the article and let us know which method helped you resolve the issue in the comments.

Bothered by the Netflix error H403? Fix the problem fast

Not being able to access your Netflix account when you need it can cause issues, and it can get annoying. Especially if the error persists for a long time.

Here is what one user had to say about this issue:

My Netflix app on Windows 10 does not open and shows me an error: Sorry, there was a problem in communication with Netflix. Please try again. (H403).

Thus, the Netflix app for Windows 10 doesn’t start when that error occurs.


How can I resolve the Netflix error H403?

1. Run the Windows Store Apps troubleshooter

  1. The Windows Store Apps troubleshooter can provide fixes for UWP apps that don’t start. To open that troubleshooter, click the Type here to search button on the taskbar.
  2. Input troubleshoot in the Type here to search box.
  3. Click Troubleshoot Settings to open that tab.
    The Troubleshoot tab netflix error h403
  4. Next, select the Windows Store Apps troubleshooter listed there.
  5. Click Run the troubleshooter to open the Windows Store Apps troubleshooter.
    Windows Store Apps troubleshooter
  6. Try any resolutions suggested by the troubleshooter.

2. Sign in to Netflix on an alternative device

  1. Try signing in to Netflix on a mobile device with the same internet connection. First, open Netflix in a browser on the Windows PC error H403 arises on.
  2. Click the Sign out option on the profile menu at the top right of the Netflix page.
  3. Next, turn on a mobile device you can sign in to Netflix on.
  4. Add the Android or Apple Netflix app to the mobile if it’s not already on it.
  5. Make sure the mobile device is connected to the same network as the Windows PC. So, disconnect it from a VPN if required.
  6. Open the Netflix mobile app to sign in to it.
  7. Stream a Netflix movie within the mobile app.
    A movie in mobile netflix error h403
  8. Thereafter, sign out of the Netflix mobile app.
  9. Open Netflix within a browser on the Windows 10 PC.
  10. Sign back into Netflix on the Windows 10 PC.

3. Reset the UWP Netflix app

  1. Users have confirmed resetting the Netflix app for Windows can fix error H403. Open the search utility in Windows 10.
  2. Type apps in the search box.
  3. Click Apps & features to open the Settings window as in the shot directly below.
    Apps & features tab netflix error h403
  4. Select the Netflix app, and click Advanced options to open further settings.
    Reset button netflix error h403
  5. Press the Reset button to open a confirmation box.
  6. Click Reset on the confirmation box.

4. Undo recent Windows updates with System Restore

  1. Restoring Windows to an earlier date will undo recent updates and remove recently installed software that might be conflicting with Netflix. First, right-click the Start button and select Run on the Win + X menu that opens.
  2. To open System Restore, enter rstrui in the Open box and click OK.
    System Restore window netflix error h403
  3. Select the Choose a different restore point option (which isn’t always there), and click the Next button.
  4. Select the Show more restore points option, which will display all restore points.
    Show more restore points option netflix error h403
  5. Choose a restore point that predates Netflix error H403 on your desktop or laptop. If in doubt, select the restore point that goes the furthest back.
  6. Click the Next and Finish options to confirm and restart Windows.

5. Reinstall Netflix in Windows 10

  1. Reinstalling Netflix will ensure you have the latest app version. To do that, open the Apps & features tab in Settings as covered within the third fix.
  2. Next, click the Uninstall button for the Netflix app.
    The Uninstall button netflix error h403
  3. Restart Windows before reinstalling Netflix.
  4. Open the MS Store page for the Windows Netflix app, and click the Get button there.

The fixes above will probably kick-start the Netflix app for most users. Remember, however, that you can always watch Netflix content in a supported web browser instead. So, the Netflix UWP app isn’t entirely essential.


[wl_navigator]

CBS All Access not working on Roku? Here’s how to fix it

Roku media players and smart TVs are compatible with most of the popular on-demand streaming services available on the market today.

Generally, one should be careful that either the equipment provider or the service supplies mention what version of devices is compatible with a specific streaming platform.

This and updated device are essential aspects to make sure that you fully enjoy the streaming experience.


How do I get CBS to work on my Roku?

1. Fully restart you Roku devicefix cbs all access

For Roku player:
Go to Settings > System > System restart. 

For Roku TV: 
Go to Settings > System> Power > System restart. 

Also, unplug your Roku device, wait for a few minutes, then plug it back in and switch it on to see if the problem was solved.


2. Check for Roku updatesroku player update to access cbs

  1. Press the Home button on the Roku remote.
  2. Scroll to Settings > System.
  3. Select System update.
  4. Click the right button > Check Now.

3. Check Roku device requirements

Although the service provider might mention compatibility with Roku devices (generally speaking), it is very possible that older versions of Roku TVs or media players are not supported.

To clear out this aspect, you should drop a question to either CBS or Roku support services.


If you managed to get your  CBS All Access subscription to work using other solutions, please share it with us in the comments section below.

[wl_navigator]

YouTube TV Family Sharing not Working? Fix it in 2 steps

Similar to other video streaming services like Netflix, Hulu, or Amazon Prime, YouTube TV subscribers can share their accounts with family members and/or friends.

One YouTube TV membership covers up to 6 accounts, the main account (Family Manager) included. Each member can have their own login account, DVR space, and simultaneous streaming on up to 3 devices.

Issues can nevertheless occur when family members try to join the group and we’re going to discuss here how to fix this.

How do I share YouTube TV with my family?

Family members account for prerequisites

  • Age 13 or older and have a Google Account
  • Live in the same household as the family manager
  • Live in the same house/country/region as the family manager
  • Not be part of another family group

When inventing family members or friends to join your YouTube TV account, make sure they meet these requirements.

Having said these, users have reported two situations when they could not join the family account, as the YouTube TV app kept directing to payment details or suddenly signed them out.

1. Check location details


Being part of a family account implies that members live in the same household so that they can share the same location details.

When this is not the case, to continue streaming YouTube TV you have to bring the device to the home network where the Family Manager lives and connect to that network at least once, so that the app inherits the location details.

Even so, the app will work for some time, after which it is possible that it signs you out again.

2. Sign out of any other Google family group

When you are trying to join the family group, make sure that you are not already part of another family group; perhaps an older group or a group related to a brand account, with the same Google account.

To sum up, if you’re having some trouble with the YouTube TV family sharing option, make sure you meet the account sharing requirements.

If you’ve encountered another situation, please let us know in the comments section below.

Edge receives fix for escalation of privilege vulnerability

Microsoft takes Edge security and privacy seriously, which is necessary to stand a chance of catching on to the levels of Chrome and Firefox. Toward that end, the tech giant shipped a fix for an escalation of privilege vulnerability in its Chromium-based browser.

The security patch is part of the Edge update 83.0.478.37 that is currently rolling out in the Stable channel. The non-security updates include features like automatic profile switching.

Escalation of privilege vulnerability

Microsoft calls the security risk in question CVE-2020-1195. The exposure stems from the tendency of the Feedback extension in Edge to incorrectly validate input.

Therefore, if an attacker managed to take advantage of the loophole, they could move files to arbitrary memory locations. Doing that could also give the hacker higher system privileges.

An elevation of privilege vulnerability exists in Microsoft Edge (Chromium-based) when the Feedback extension improperly validates input. An attacker who successfully exploited this vulnerability could write files to arbitrary locations and gain elevated privileges. This vulnerability could be used in conjunction with one or more vulnerabilities (for example a remote code execution vulnerability and another elevation of privilege vulnerability) to take advantage of the elevated privileges when running.

Microsoft assigned the vulnerability an exploitation assessment index of 2. It means that users of the latest version of Edge are less likely to be a target for this kind of attack.

The escalation of privileges vulnerability, in itself, does not amount to an attacker executing illegal code. But a hacker can use it to pave the way for a more serious breach.

For example, after illegally attaining elevated privileges, they could exploit a remote code execution (RCE) loophole. An RCE attack could in turn allow them to steal data, spy, or even stage a denial of service attack.

However, the escalation of privilege vulnerability in Edge should be no cause for alarm. Microsoft has not received any evidence of its exploitation in the wild.

If you have any questions or suggestions regarding Microsoft Edge security, you can always leave them in the comments section below.

[wl_navigator]

Sling TV Authorization Error? Try These Simple Solutions

The Sling TV authorization error can occur due to many reasons and can be content or device-specific. While most of the authorization errors typically resolve themselves after 24 hours, some may require some troubleshooting.

The authorization error if content specific can occur when watching a channel or show that was available for a free preview. The error means the user has no longer access to the channel.

If you are also troubled by this error, here are a couple of troubleshooting tips to help you resolve the Sling TV authorization error.

How do I fix the Sling TV authorization error 8-393227?

1. Check for content-specific issues

Sling TV authorization error 8-12
  1. If you are receiving an 8-2 authorization error when watching a channel or show, check if the program was available as a free preview.
  2. The error indicates that the user does not have access to the program or channel anymore.
  3. You can check the Sling TV Free Preview page to see if the preview for the selected content has ended.

2. Check for device-specific issues

Log out of Sling TV

Sling TV authorization error 8-12
  1. Launch the Sling TV app on your streaming device. If you are using a browser, open the Sling TV web page.
  2. Click on your profile and select log out.
  3. Sign in again with your Sling TV account and check for any improvements.

3. Update your Sling TV app or browser

Amazon Fire TV

Sling TV authorization error 8-12
  1. From the home screen, scroll down to Apps.
  2. Locate and open the Sling TV app.
  3. If an update is available for the app, you will see an Update button.
  4. Click the Update App Now option to download and install the updates.
  5. Once installed, relaunch the app and check if the error is resolved.

Android TV/AirTV Minir /AirTV Player

Sling TV error
  1. Close the Sling TV app.
  2. Launch Google Play Store.
  3. Go to My Apps and open Sling TV app.
  4. Click update to bring the update process.

LG TV

Sling TV error
  1. Press the Home button on your TV remote.
  2. Select Settings > All Settings.
  3. Choose the General tab.
  4. Scroll down and select About this TV.
  5. Make sure the Allow automatic update is checked.
  6. Click on Check for updates.

If you are watching Sling TV using a web browser, make sure the browser is up to date and has the latest version installed. You can update the browser by going to Menu > About.

4. Perform a power cycle

Sling TV error
  1. Power off your streaming device. Skip these steps if you are using a smartphone.
  2. Turn off your WiFi router and modem.
  3. Disconnect the cords from the power outlet.
  4. Leave the devices idle for a few minutes.
  5. Reconnect the cables and power on the devices.
  6. Launch the Sling TV app and check if the error is resolved.

Additionally, check for the service outage. Most of the time, authorization errors are resolved automatically after 24 hours. If you are unable to resolve the issue even after trying all the steps listed in this article, contact Sling TV support.

Another viable solution would be to try another streaming service to watch the TV show or movie you want. A program with a responsive design and modern capabilities that allow you to access the content from multiple devices might prevent this type of error.

⇒ Get Disney+

The Sling TV authorization error can occur due to temporary issues and typically resolves in 24 hours. Sadly, this isn’t the only service with issues, and many reported F1 TV BM1300 error on their devices, but we have a fix for that.

However, if the issue persists, follow the steps provided above to see if that helps you resolve the error.

FIX: Netflix HDCP unauthorized content disabled

While playing Netflix content on streaming services devices like Amazon Fire TV/Stick, Roku and Roku Streaming Stick, you may encounter ‘HDCP unauthorized. Content Disabled’ error.

This error typically points to a hardware problem where your device cannot play protected content.

If you are also troubled by this issue, here are a couple of troubleshooting tips to help you resolve HDCP Unautorized, contend disabled error. We have covered troubleshooting tips for both Amazon and Roku streaming devices below.


How do I fix Netflix HDCP unauthorized, Content Disabled’ message?

1. Perform a power cycle 

HDCP unauthorized, Content Disabled

  1. Unplug your Amazon Fire Stick from your TV along with the power source. Leave the device idle for a minute.
  2. Additionally, you may also want to turn off and turn on your TV.
  3. Plug the Fire TV back in.
  4. Turn on the devices using the device’s remote.
  5. Open Netflix and check for any improvements.

Sometimes, performing a quick power cycle can help you resolve connection related issues with your streaming devices. If the issue persists, try other steps below.


Best Free (trial) VPNs that work with Netflix [2020 Guide]


2. Check for HDCP issues

HDCP unauthorized, Content Disabled

  1. Make sure you are using an HDMI cable and check for any loose connection.
  2. Make sure the device directly connected to the TV. Bypass any receivers or stereo equipment.
  3. Try reversing the HDMI cable and plugin again.
  4. If your TV has multiple HDMI ports, try connecting to a different HDMI port.
  5. If you have multiple TVs, try connecting the device to another TV via HDMI. If the device works, the issue can be with your TV’s HDMI port.
  6. In case the device does not work on both the TVs, try changing the HDMI cable.

The Nextflix HDCP Unauthorized. Content Disabled error mostly occurs due to hardware issues. In more than one case, replacing the HDMI cable has resolved the issue for the users. However, at times it can also happen if the TV’s HDMI port is faulty.


3. Disable Auto-adjust display refresh rate

HDCP unauthorized, Content Disabled

  1. Press the Home button on your Roku remote.
  2. Select the Settings option.
  3. Next, go to the System and select Advanced System Settings.
  4. Select the Auto-Adjust Display Refresh Rate.
  5. If the option is set to Enable, select it again, and choose Disable.
  6. Close the Setting page and check for any improvements.

The Auto-adjust display refresh rate feature optimizes the content to provide the highest picture quality. However, enabling the feature can lead to the aforementioned error.

Note that this feature is only available on Roku players with 4K option. If you have a standard streaming device, you can skip this step.


4. Configure your TV for HDR

Samsung HDR TVs

Netflix Ruku error

  1. Press the Menu button on the remote.
  2. Go to Picture and select Picture Options.
  3. Select HDMI UHD Color.
  4. Set it to On and then restart the TV.

LG HDR TVs

Netflix Ruku error

  1. Press the Hom button and select HDMI.
  2. Go to Settings > Advanced.
  3. Select the Picture option.
  4. Set HDMI Ultra DEEP COLOR to On.
  5. Restart the TV.

Sony HDR TVs

Netflix Ruku error

  1. Press the Home button on your remote.
  2. Go to Settings > External Inputs > HDMI Signal Format.
  3. Select HDMI and choose Enhance Mode.
  4. The TV will automatically reboot.

The Netflix HDCP unauthorized, Content Disabled error can occur due to multiple reasons. Try following all the steps in this article one by one to resolve the HDCP problem with your streaming device.

If it’s still not working, we suggest switching to Disney+, one of the biggest streaming services nowadays that provides unlimited streaming of exclusive movies, TV shows and original content for one monthly subscription fee.

⇒ Get Disney+

Do let us know which method helped you resolve the issue in the comments.

[wl_navigator]

Netflix error code U7361-1253-C00D6D79? Fix it fast

The U7361-1253-C00D6D79 error is a streaming issue that can arise for the Windows 10 Netflix app.

The U7361-1253-C00D6D79 error message states: Whoops, something went wrong… We’re having trouble playing this title right now. Consequently, users can’t play selected Netflix movie titles when that error arises.

In today’s guide, we will explore some of the best methods to try out in this situation. Read on for more details.


How can I fix the Netflix error code U7361-1253-C00D6D79?

1. Open the Windows App Troubleshooter

  1. The Windows App Troubleshooter might come in handy for fixing Netflix error code U7361-1253-C00D6D79. First, click the Type here to search taskbar button.
  2. Then type troubleshoot in the search box.
  3. Click Troubleshoot settings to open that Settings tab.
    The Troubleshoot tab netflix error code u7361-1253-c00d6d79
  4. Select Windows Store Apps within Settings.
  5. Click the Run the troubleshooter button to open the Windows Store Apps window.
    Windows Store Apps window netflix error code u7361-1253-c00d6d79
  6. Go through the potential fixes the troubleshooter might provide.

2. Check for pending Windows 10 updates

  1. Some users might need to install pending Windows 10 updates to fix Netflix error code U7361-1253-C00D6D79. To do that, open the search box.
  2. Then enter update to search for Check for updates.
  3. Click Check for updates to open that Settings tab.
    The Check for updates option netflix error code u7361-1253-c00d6d79
  4. Click the Check for updates button to download and install pending updates.
  5. Restart Windows 10 after updating it.

3. Update the Netflix app

  1. Make sure your Netflix app is the most update version. To check for Netflix updates, click Microsoft Store on the Start menu.
  2. Click the See more button to open the menu shown directly below.
    The See more menu netflix error code u7361-1253-c00d6d79
  3. Next, select Downloads and updates on the menu.
    Downloads and updates netflix error code u7361-1253-c00d6d79
  4. Click the Get updates button to check for and download available app updates.

4. Reset Netflix

  1. The app Reset option might resolve Netflix error code U7361-1253-C00D6D79. Enter apps in Windows 10’s Type here to search box.
  2. Click Apps & features to open Settings as shown directly below.
    The Apps & features tab netflix error code u7361-1253-c00d6d79
  3. Select the Netflix app, and click its Advanced options link.
  4. Press the Reset button.
    The Reset option netflix error code u7361-1253-c00d6d79
  5. Click Reset again to clear the app’s data.

5. Reinstall Netflix

  1. You can also try reinstalling Netflix instead of resetting it. To do so, open the Apps & features tab as outlined for resolution four.
  2. Select the Netflix app, and click its Uninstall button.
  3. Next, restart Windows.
  4. Open the Netflix app’s MS Store page.
    The Netflix app page netflix error code u7361-1253-c00d6d79
  5. Click Get to reinstall Netflix.

6. Delete the downloaded move title

  1. It might be the case that the movie title error U7361-1253-C00D6D79 arises for has not downloaded correctly. To delete the downloaded movie title, open the Netflix app.
  2. Click the app’s Menu button.
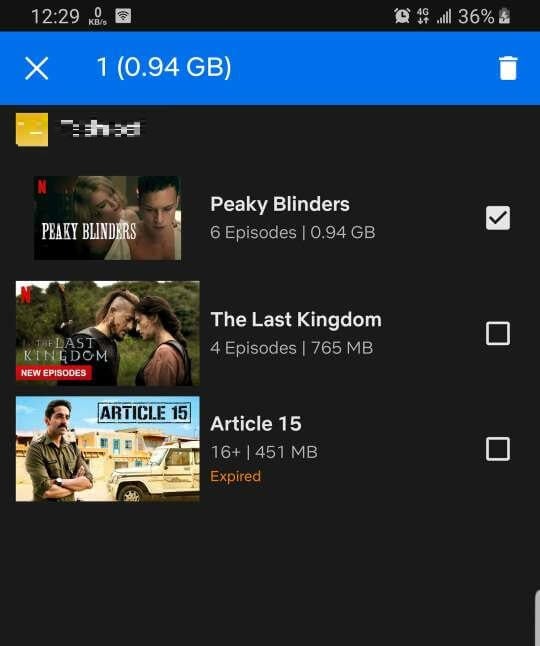
  3. Select My Downloads to open a list of downloaded Netflix movie titles.
    The My Downloads option netflix error code u7361-1253-c00d6d79
  4. Select the edit button at the top right corner of the app.
  5. Select the movie title error U7361-1253-C00D6D79 arises for.
    My Downloads netflix error code u7361-1253-c00d6d79
  6. Click the Delete (bin) button to erase the downloaded movie title.
  7. Thereafter, try streaming the movie title again.

The resolutions above will probably fix Netflix error code U7361-1253-C00D6D79 for the majority of users.

However, you can also get further fixes from a Netflix support agent. To do so, click the Start Live Chat button on the Netflix Help Center page.


[wl_navigator]

How to fix Netflix error code U7121-3202 in a few easy steps

Some users have posted on Microsoft’s support forum about Netflix error code U7121-3202. That error arises when users try to play downloaded Netflix movies.

The U7121-3202 error message states, Whoops, something went wrong… We’re having trouble playing this title at the moment. This error typically arises on Windows 10 for users utilizing Netflix with its UWP app or within a browser.


How can I fix the Netflix error code U7121-3202?

1. Run the Windows Store Apps troubleshooter

  1. If error U7121-3202 arises when utilizing the Netflix UWP app, try running the Windows Store App troubleshooter. Click the Type here to search button on your Windows 10 taskbar to open its search utility.
  2. Next, enter the keyword troubleshoot in the Type here to search box.
  3. Select Troubleshoot settings to open Settings as in the snapshot directly below.
    Windows Store App troubleshooter netflix error code u7121-3202
  4. Select Windows Store Apps and click its Run the troubleshooter button.
  5. Go through the troubleshooter’s suggested resolutions.

2. Delete and download the move file again

  1. Netflix error code U7121-3202 is usually due to movie titles now downloading right. To fix that, click the Menu button at the top left of the Netflix app.
  2. Click My Downloads to open a list of downloaded movie titles.
    My Downloads netflix error code u7121-3202
  3. Click the edit (pencil) button at the top right of Netflix.
  4. Then select to delete all the movie titles.
  5. Click the Delete (bin) button to erase selected movies.
  6. Thereafter, click the Menu button and Available for Download.
    Available for Download option netflix error code u7121-3202
  7. Then you can select the movies you deleted to download them again.

3. Undo a recent Windows 10 build update

  1. Some users have confirmed they’ve fixed error U7121-3202 by rolling back their Windows 10 build updates. To do that, press the Windows key + S hotkey.
  2. Type the keyword recovery in the search box.
  3. Click Recovery options to open the Settings tab as in the snapshot directly below.
    The Get started option netflix error code u7121-3202
  4. Users can roll back to a previous build version within 10 days of updating to it. Click the Get started button under the Go back to the previous version of Windows 10 subheading.

4. Reinstall the Netflix UWP app

  1. Some users might need to reinstall their Netflix apps to fix the U7121-3202 error. Open the search box in Windows 10.
  2. Type app in the search utility.
  3. Click Apps & features to open the Settings tab shown directly below.
    The Apps & features tab netflix error code u7121-3202
  4. Select your Netflix app listed there.
  5. Click the Uninstall button.
  6. Restart Windows before reinstalling Netflix.
  7. Click Get on the Netflix app page.

5. Update Silverlight for Internet Explorer 11

Silverlight installer netflix error code u7121-3202

If Netflix error code U7121-3202 arises when utilizing Internet Explorer 11, try updating Silverlight. Click Install for Windows on the Silverlight webpage. Then open the Silverlight installer to install the latest version.


The above resolutions are the most likely fixes for Netflix error code U7121-3202. If you still need more potential fixes, check out the Netflix Help Center. There you can click Start Live Chat for live assistance.

[wl_navigator]

FIX: Netflix download error [Full Guide]

Netflix allows viewers to download movies and TV shows for offline viewing. However, at times Netflix may show a download error when you try to download any content to your device.

Following are some of the Netflix download errors that you may encounter:

You’ll need to remove downloads from this device, or from another device on your plan. For more info, go to help.netflix.com. (10016-22005)

You have downloaded on too many devices. Please remove downloads from another device, or go to netflix.com/changeplan for plan options. (NQL.23000)

Downloads on Too Many Devices
Try removing downloads from this device. (NQL.23000)

These errors are usually trigged if you have exceeded the maximum number of the device that can store downloaded titles at the same time.

In this article, we explore some of the best solutions to fix all the Netflix download error on your device.


How do I fix the Netflix download error?

1. Delete a downloaded title

iPhone/iPad

Netflix download error

  1. Open the Netflix app.
  2. Tap the Downloads icon (down arrow).
  3. Tap Edit in the upper right corner.
  4. Choose the X icon to remove the title from your device.
  5. Try to download the show that was showing the error.

Android phone and tablet

You'll need to remove downloads from this device

  1. Open your Netflix app and then tap on the profile.
  2. Tap on the Downloads icon at the bottom.
  3. Tap the Edit (pencil) in the top right corner.
  4. Select the shows that you want to delete.
  5. Tap the Delete icon (trash can) to delete.
  6. Try to download the Netflix content again to see if the error is resolved.

Upgrade your Netflix plan 

Netflix download error

  1. If you don’t want to delete the Netflix shows and keep them stored on more devices, you can upgrade your streaming plan.
  2. Netflix offers a multi-device plan that allows the users to store downloaded titles on 1 or 4 devices simultaneously.
  3. Check out Netflix Plans to upgrade your current plan.

8 best free VPNs for Netflix [Windows 10 & Mac users]


2. Unable to download any TV show or movies

Run Netflix app diagnostics

Netflix download error

  1. Open the Netflix app.
  2. Tap on More.
  3. Select App Settings.
  4. Scroll down to Diagnostics and select Download.
  5. The app may display one of the following error code:
    NA.2
    OF.NA.4
    OF.NA.6
    OF.NA.7
  6. Contact Netflix‘s support with the error code to fix the issue. You can also search the code to find a solution online.

Clear the Netflix app data

Netflix download error

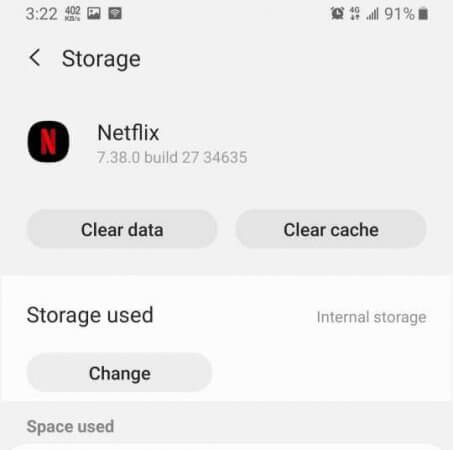
  1. On your Android phone, open Settings.
  2. Go to Apps > All Apps.
  3. Open Netflix from the list of installed apps.
  4. Select Storage.
  5. Tap on Clear Data and then tap OK to confirm.
  6. Relaunch the Netflix app and check if the error is resolved.

Enable download storage

Netflix download error

  1. On your Android device, open Settings.
  2. Select Apps.
  3. Open Netflix form the list.
  4. Select Permissions.
  5. Toggle the switch for the Storage option to On.
  6. Relaunch Netflix and check for any improvements.

3. Update/reinstall Netflix

Android phone/tablet

Netflix download error

  1. First, open the Play Store and check if any update is available for Netflix.
  2. Install the update to see if the error is resolved.
  3. If the issue persists, try reinstalling the app.
  4. From the home screen, open the apps menu.
  5. Tap and hold the Netflix icon.
  6. Tap on Uninstall.
  7. Once uninstalled, open Play Store and reinstall Netflix.

For iPad/iPhone

You'll need to remove downloads from this device

  1. From the home screen, tap and hold the Netflix icon.
  2. Tap the X in the top left corner of the Netflix icon.
  3. Tap Delete to uninstall the app.
  4. Open the App Store and search for Netflix.
  5. Install the app and check for any improvements.

The Netflix download error can occur if the user has exceeded the maximum downloads the device can store at the same time. This can be resolved by deleting the titles, or you can upgrade the plan.

In other cases, the issue can be with your device or the Netflix app. Follow the steps to troubleshoot the issues with your device and the app.

If you still see issues, you can follow this detailed guide on how to fix Netflix we’re having trouble accessing these titles for more solutions.


[wl_navigator]

Want to fix the Sling TV dish network error? Try this guide

Video streaming service Sling TV is owned and distributed by Dish Network. From a functional point of view, the two entities are interdependent, meaning that Sling TV subscribers don’t need a Dish Network account to use the streaming service.

However, whenever the network operator experiences transmission issues, these also replicate with the streaming service.

This is why if there’s a network error, Sling TV users will specifically see a message that says that there’s a Dish Network Error.


What can I do to solve the Sling TV dish network error?

1. Perform a power cyclenetwork error sling tv

Switch off all your devices (including modem and router) and fully unplug them. Wait a few minutes, then plug them back in and switch them back on and see if the error still appears. This should re-establish the connection with servers and fix any power supply issues (if any).

Usually, a power cycle helps and there’s no need for further troubleshooting.

However,  if the problem persists try the next solution.


2. Check Internet connectioncheck internet to fix network error on sling

  1. Turn off all devices connected to your home network.
  2. Close all background apps or other programs.
  3. Then, place the modem or router near your device.
  4. Or connect your device using an Ethernet cable.

3. Contact support

First, you might want to check on social media if Sling TV reported some streaming issues.

Then, you can contact Sling TV support, but since this is a Dish Network error, they might redirect you to the provider’s support page.


If you have received the same error when trying to stream on Sling TV and found a more specific fix, please share it with us in the comments section below.


[wl_navigator]

Error code: m7111-5059 Netflix proxy error

The Netflix error m7111-5059 shows up when Netflix detects that you are trying to access its service using a network unblocker, proxy, or VPN (virtual private network) server. It comes with the following message:

You seem to be using an unblocker or proxy. Please turn off any of these services and try again.

Because Netflix shows are only available in specific countries, people use VPNs to access Netflix from a fake location, and this is what the platform is preventing by throwing the Netflix error n7111-5059.


How do I fix the Netflix error code m7111-5059?

1. Disable your VPN or internet routing software

disable-VPN-Netflix-error-m7111-5059

Unlike other errors, the Netflix error m7111 1331 5059 states precisely what’s wrong, and in this case, you are using a VPN. Disabling your VPN is, therefore, a no-brainer. Well, this is if you want to play Netflix content that is available in your country.

You can fix the Netflix error m7111 5059 by simply changing your network settings to its default values. For the IP settings, simply choose the Automatic settings.

Further, Netflix does not support IPv6 proxy tunneling over an IPv4 network. This would surely cause the Netflix error m7111 1331 5059.


2. Use a more secure VPN

Netflix-error-m7111-5059-reliable-vpn

Are you actually Netflix from outside of your home country and want to keep up with shows you love? This may be why you used a VPN, and that’s understandable. However, not all VPNs are born equal.

Some VPNs cannot unblock Netflix, or Netflix has blacklisted the IP address you used. As a matter of fact, IP addresses from many VPNs are blacklisted by Netflix. When you access the streaming service using a blacklisted IP address, you will get the Netflix error m7111-5059.

Now, a solution could be trial-and-error; meaning that you keep trying IP addresses until one works. Alternatively, you can change to a better VPN service to fix the Netflix error m7111-5059 once and for all.

We published a detailed guide on the best VPNs for Netflix. You can read it up and choose from one. Having downloaded the VPN, the next thing you should do is connect via your preferred location and with the VPN connected, launch Netflix.


3. Contact your internet service provider

Netflix-error-m7111-5059-contact-isp

Software, despite how complex they seem, as far from perfect. Though the Netflix error m7111-5059 says that you are connecting from a VPN or via a proxy, it may be some confusion.

Some users have reported encountered the Netflix error m7111-5059 while using no VPN, unblocked, or proxy tunnel. In this case, the issue is that Netflix is seeing your traffic like it’s coming from one of these prohibited services.

What you can do now is to get in touch with your internet service provider (ISP). When you are talking to them, let them know the issue. Also, demand that they rectify any problem that makes your traffic is associated with VPN or proxy usage.

Unless you intend to watch global shows, your Netflix content would be tailored to your region. Using a VPN to tweak your geolocation brings up the Netflix error m7111-5059.


We have explored the ways to get rid of this error. The most recommended is to use a more reliable VPN service or disabling all forms of unblockers while using Netflix.

[wl_navigator]

Got the Netflix error UI3012? Follow this simple guide

Error UI3012 is another one from the pretty long list of Netflix error codes. That error can arise for some uses when streaming Netflix movies in browsers.

Its error message states: There was an unexpected error. Please reload the page and try again. If you need to fix that issue, check out the resolutions for it below.


How can I fix the Netflix UI3012 error?

1. Restart your router

  1. First, restart your PC and internet router. Turn off the PC.
  2. Power off your router.
  3. Unplug the router for about five minutes.
  4. Then plug in and turn on the router again.
    Router power cable netflix error ui3012
  5. Thereafter, try streaming Netflix videos your browser again.

2. Reset network

  1. Try resetting your network back to ifs default settings. To do that, click Type here to search on the Windows 10 taskbar.
  2. Enter the keyword network reset in the search box.
  3. Click Network reset to open the window shown directly below.
    Reset now option netflix error ui3012
  4. Press the Reset now button.

3. Disable your browser’s extensions

Google Chrome

  1. Error UI3012 can be due to certain browser extensions. To turn off extensions in Google Chrome, type chrome://extensions/ in the browser’s URL bar and press Enter.
  2. Then click the blue toggle buttons on the extensions to turn them off.
     Chrome's extensions tab netflix error ui3012
  3. Or click Remove to delete extensions.

Firefox

  1. Click Firefox’s Open menu button.
  2. Click Add-ons > Extensions to open a list of add-ons.
    Add-ons Manager tab netflix error ui3012
  3. Click the add-ons’ blue toggle buttons to disable them.

Edge

  1. Click Edge’s Settings and more button.
  2. Click Extensions to open the sidebar shown directly below.
    Extensions sidebar netflix error ui3012
  3. Then toggle listed Edge extensions off.

Opera

  1. To disable Opera browser extensions, click the O button at the top left of the browser’s window.
  2. Click Extensions on the menu.
  3. Click the Disable buttons for listed extensions.
    The Extensions tab netflix error ui3012

4. Connect PC into a router with an Ethernet cable

Router plug netflix error ui3012

  1. If you have an Ethernet cable, try connecting your PC directly to router with it. First, turn off your PC if it’s on.
  2. Plug the Ethernet cable into the PC and router.
  3. Unplug your router power cable for about half a minute.
  4. Plug the router back in.
  5. Then try watching Netflix content again.

5. Boost your Wi-Fi signal

A laptop and router netflix error ui3012

  1. Try boosting your Wi-Fi signal in three ways. First, move the router closer to your laptop or desktop if you can.
  2. Move other Wi-Fi devices, such as mobiles, tablets, and TVs, away from the router. At the very least, make sure such devices are turned off when utilizing Netflix.
  3. Thirdly, place the router in an elevated position such as the top of a bookshelf or high table to get better reception.

Those are some of the more likely fixes for Netflix error UI3012. If those fixes aren’t enough, however, open the Netflix Help Center in a browser.

There you can discuss error UI3012 with a Netflix support agent by clicking the Start Live Chat button.


[wl_navigator]

Seeing the YouTube 500 Internal Server Error? Fix it fast

The YouTube 500 Internal Server Error is one that some users can encounter when they try to open YouTube pages.

When users try to open a YouTube page, a 500 Internal Server Error tab opens. A humorous error message on that tab states: Sorry, something went wrong. A team of highly trained monkeys has been dispatched to deal with this situation.

All joking aside, users can’t open YouTube when that issue arises. Note that the YouTube 500 error is often a server issue. You can’t do anything to fix that error when it’s a server-side issue. However, sometimes YT’s 500 error can be a browser issue.

Below are a few troubleshooting steps to follow that might resolve the YouTube 500 error.


Troubleshooting tips for the YouTube 500 error

1. Refresh the YouTube page

The Reload this page button youtube 500 internal server error

When the YouTube 500 error arises, try refreshing the page. The hotkey for refreshing pages in Google Chrome and Firefox is F5. So, press that hotkey to reload the YouTube page in Fox and Chrome.


2. Is YouTube down?

Downdetector page youtube 500 internal server error

If refreshing YouTube pages doesn’t do the trick, check if YT is down. As mentioned, the YouTube 500 Internal Server Error usually means there’s something up with YT’s servers.

Open the DownDetector page for YouTube to check YT’s server status. If that highlights there might be an outage, then wait a day or so before opening YouTube pages again.


3. Clear your browser’s data

  1. Some users have confirmed that clearing browser data can help fix the YouTube 500 error. In Google Chrome, you can clear browser data by pressing the Ctrl + Shift + Del hotkey.
    Clear browsing data options youtube 500 internal server error
  2. Select the Browsing history, Cookies and other site data, and Cached images options.
  3. Click the Time range drop-down menu to select All time.
  4. To clear Firefox data, click the Open menu button in that browser.
  5. Click Options to open that tab.
    The Options tab youtube 500 internal server error
  6. Click Privacy on the left of the Options tab.
  7. Click the Clear Data button to open the window in the snapshot directly below.
    Clear Data option youtube 500 internal server error
  8. Select the Cookies and Cached Web Content options, and click the Clear button.
  9. Press the Clear data button.

4. Open your browser in its incognito mode

Incognito mode youtube 500 internal server error

Some users might find they can still open YouTube pages in incognito mode. To open Chrome’s incognito mode, press the Ctrl + Shift + N keyboard shortcut in that browser.

You can open incognito mode in Mozilla Firefox by pressing that browser’s Ctrl + Shift + P hotkey. Then try opening YouTube pages in incognito mode.


5. Try opening YouTube in another browser

A YouTube video in Edge youtube 500 internal server error

If YouTube 500 error is a browser issue, then switching to another browser should resolve the issue.

Try switching to Edge, Firefox, Google Chrome, Safari, or Opera as an alternative to whatever browser the error arises in for you.

Note that Internet Explorer is no longer among YouTube’s supported browsers.


The above troubleshooting tips might fix the YouTube 500 Internal Server Error for a few users. However, a lot of users might still have to wait for those monkeys at Google to fix the matter.

[wl_navigator]

Is Crackle not working? Fit it with these 3 simple steps

If Crackle is not working on your Steaming device or when accessing the service from the web browser, it can be an issue with your internet connection.

That said, many users have reported similar issues with the Crackle service even when they have a stable internet connection with decent bandwidth.

In this article, we explore some of the common troubleshooting tips to help you resolve any issues with the Crackle service so that you can continue watching your favorite shows without any interruption.


What to do if Crackle is not working?

1. Check your internet connection

Crackle is not working

  1. Crackle requires users to have a stable internet connection to stream content without buffering/freezing issues.
  2. Crackle recommends having a minimum download speed of 9.0 Mbps for HD content streaming.
  3. Launch any internet speed testing utility on your computer or smartphone and check if your internet service provider is offering the promised speed.
  4. You may also open other streaming services like YouTube or Netflix and try streaming content from the platform to make sure the internet connection is working fine.
  5. Make sure your device is within range of your wireless base station and clear of obstructions that may cause internet interference.

2. Perform a power cycle

Crackle is not working

  1. Power off your streaming device such as your computer or TV that you are using to watch Crackle.
  2. Unplug the cord from the power outlet.
  3. Turn off your wired modem and routers.
  4. Leave the devices idle for a few minutes.
  5. Reconnect all the devices to the power source and turn them on.
  6. Connect your device to your WiFi network and check if Crackle is working without any issues.

Disable ad-blockers

Crackle is not working

  1. Crackle is an add supported platform, so make sure you don’t have an ad blocker enabled when using the Crackle app.
  2. If you have any ad blocker enabled, disable it temporarily to see if that resolves the issue.
  3. If the issue persists, try uninstalling the ad blocker completely and check for any improvements.

3.  Update your web browser, streaming device, and Crackle app

Update web browsers on PC

Crackle connection issues

  • Chrome – Go to Menu and click Help > About Google Chrome. Download and install all the pending updates. Relaunch the browser and check for any improvements.
  • Mozilla Firefox – Click the Menu icon, select Help > About Firefox. Click on the Update button to download and install the updates.

For Android

Crackle connection issues

  1. Open the Play Store app.
  2. Search for the Crackle app.
  3. Tap the update button to install the newer version of the app.
  4. Restart your Android device, and the Crackle app should work without any issues.

For streaming devices

Crackle connection issues

  • If you are using streaming devices like Roku, Fire TV, or Apple TV, check if any update is available for the Crackle app.
  • You may also want to check if any firmware update is pending for your streaming device.
  • If the issue persists, try uninstalling and reinstalling the app from your respective platform.

The Crackle not working is a common issue and can occur due to many reasons. Begin by checking your internet connection and then move on to check your streaming device and the Crackle app for issues. If you found a working solution that is not listed in the article, make sure to leave a comment with your tip.

Fix the Netflix error NW-3-6, NW-4-7, NW-4-8 in just 5 steps

Netflix has encountered an error followed by the NW-3-6, NW-4-7, or NW-4-8 message usually indicate issues with your device’s cache or internet connection.

According to Netflix, the error points to information stored on your device that needs to be refreshed or to a network connectivity issue. The error can be fixed by restoring your network settings to default.

If you are also troubled by this error, here are a couple of troubleshooting steps for your device to resolve the issue by yourself.


How do I fix the Netflix error NW-3-6, NW-4-7, NW-4-8?

1. Sign out of Netflix

  1. From the Netflix home screen, open the menu.
  2. Select Settings.
  3. Select the Sign out option.
  4. Once signed out, log in again with your Netflix credentials and check for any improvements.

2. Update the Netflix app

Netflix error NW-3-6

  1. Open Google Play Store.
  2. Search for the Netflix app and open it.
  3. Tap on Update to download and install the updates.
  4. Once installed, relaunch the app and check for any improvements.

Smart TVs and streaming devices install app updates automatically. To check and install the updates manually, open the app store available on your device, and check for any pending Netflix app updates.


3.  Perform a power cycle

Netflix error NW-4-7

  1. Turn off your smart TV, gaming console, or streaming devices like Roku TV.
  2. Unplug your TV from power for at least 1 minute.
  3. Disconnect the HDMI cable if the TV is connected to any streaming device.
  4. Leave the devices idle for a few minutes.
  5. Plug your TV back in and connect the HDMI devices, if any.
  6. Turn your TV on and try Netflix again.

Unable to watch a Netflix show due to region restriction? Check out the 8 best free VPNs


4. Restart your home network

Netflix error NW-4-8

  1. Turn off and unplug your TV.
  2. Turn off and unplug your modem and WiFi router.
  3. Leave the devices idle for a minute or two.
  4. Plugin your modem and wait till the indicator lights stop blinking.
  5. Turn on your Smart TV and connect it to your network.
  6. Login to Netflix and check for any improvements.

Try a mobile hotspot

Netflix error NW-3-6

  1. Create a mobile hotspot on your smartphone.
  2. Connect your TV or streaming device to the mobile hotspot.
  3. Launch Netflix and check if you can stream content without the error.
  4. If the error does not occur, the issue could be with your internet connection.
  5. Make sure you have disabled all the proxy settings and VPN services.
  6. Run an internet speed test to see if you have sufficient download speed.
  7. Also, try to improve your WiFi signal. You can move your router to a new location to improve signal strength.
  8. Try disconnecting other devices that are connected to the same network when you are streaming Netflix to see if that helps.

5. Reinstall Netflix

For Roku TV

Netflix error NW-4-7

  1. Press the Home button on your Roku remote.
  2. Move to the right and highlight the Netflix app.
  3. Press the Star * button and then select Remove Channel.
  4. Once uninstalled, search for the Netflix app in the Roku Channel Store and then select Add Channel.

For Android TV

Netflix error NW-4-8

  1. From the home screen, launch Google Play Store.
  2. Click the menu icon and choose My Apps and Games.
  3. Select the Netflix app, select Uninstall, and then select OK to confirm.
  4. Once uninstalled, you can reinstall the app from the Play Store again/

The Netflix error NW-3-6, NW-4-7, NW-4-8 and NW-3-16 are usually triggered due to connectivity issues or temporary glitch with your streaming device.

Follow the steps listed in the article and let us know which method helped you resolve the issue in the comments. For browser-related errors like nses-uhx, check out our article on how to fix it.

[wl_navigator]

Microsoft Lists helps you organize yourself and others

Microsoft Lists is a Microsoft 365 app that helps you track information, organize your work, and organize others.

Although it’s a stand-alone app, Microsoft Lists can be also used within Microsoft Teams and in SharePoint.

Lists is not just a to-do list, it’s a web app that can be used on a desktop or on a mobile device, working with the same tools and data.

How can I use Microsoft Lists?

To start using Microsoft Lists, you will have to click on the Lists icon from the Microsoft 365 app launcher. Next, you have to choose how to start.

You can either start from scratch or choose a template already made. You can also create new lists from existing lists or even importing an Excel table if that’s where you collected the data with.

In the Lists app, you will see all your lists or the lists that someone shared with you. Of course, you can also share your lists with others.

how to start using lists

Microsoft provided a short preview on how to use Microsoft Lists.

How can I use Microsoft Lists in Teams?

In Microsoft Teams you can collaborate on lists, using flexible views like grids, cards, and calendar. You can add a list to a Teams channel or you can create a new one directly in Teams. Talking about the contents of the list will help you reach a better and faster result.

How to use Lists in Teams 

Try to use an existing template in Lists

Microsoft thought of possible uses of Lists and designed templates that can fast track your job like tracking issues, onboarding new hires, handling an event’s itinerary, managing assets, and many more that you will able to explore.

The templates come with everything you will need to get a quick start but if they are not 100% what you need, you can always change them to tailor your needs exactly.

try to use Lists templates

Drop us a line in the comments section to tell us how you feel about Lists.

[wl_navigator]

How to use Windows 10 Packet Monitor tool Pktmon

Windows 10 Packet Monitor or Pktmon is a real-time monitoring tool that was included in the Windows 10 October 2018 Update. Its description from Command Prompt calls it an Advanced packet capture and event collection but its more common description would be a package sniffer.

How can I use Packet Monitor in Windows 10?

To run the Packet Monitor, first, you need to open a Command Prompt Window.

1. Press Ctrl + R to open Run and type cmd, then hit Enter or click the OK button.

How to run command Prompt

2. While in Command prompt, type pktmon.exe and hit Enter.

How to use the Packet Monitor in Windows 10

3. You will see a list of possible commands. If you’re not familiar with them, you can use the help command. Type pktmon name of the command help. For example, the pktmon start help will show you the whole description of the command like in the picture below.

pktmon start help command window

Some useful Pktmon command lines

1. To filter a port for packages, you can use the pktmon filter add -p [port] command for each port you want to monitor. For instance, pktmon filter add -p 80 will filter the 80 port.

2. To start monitoring packages type pktmon start –etw -m real-time.

3. to stop the monitoring type pktmon stop.

After you stopped monitoring, the report has been stored in the PktMon.etl file. To read that, you either download and install the Microsoft Network Monitor, or you can transform that into a text file.

To do that, type pktmon format PktMon.etl -o reportlog.txt.

Please leave us your comments in the section below.

[wl_navigator]

Windows 10 accessibility improves for the vision impaired

The May 2020 update comes with Windows 10 accessibility updates for people with low or no vision. 

In the latest stable iteration of Windows 10, Microsoft improves the text cursor visibility, provides a better Magnifier function, makes welcomed changes in Narrator, and improves the Narrator’s Outlook experience.

What are the Windows 10 accessibility improvements?

We recently made text and pointers easier to personalize in Windows 10. Millions of people prefer larger text, and larger and brighter pointers to make Windows 10 easier to see and use.

Perhaps not surprisingly, many low vision users asked us to continue to make it easier to work with text cursors. More specifically, they told us that text cursors are difficult to find when they are too thin and don’t contrast enough with text.

, writes Jeff Petty, Windows Accessibility Program Manager Lead in the Windows Blog. 

Text cursor is a lot more visible

For starters, you can and add a text cursor indicator by clicking on the Turn on text cursor indicator, then drag the slider below to make it as big as you want it like in the picture below.

You can also choose a bright color for the indicator so you make sure you don’t miss it.

how to change the accessibility options

If the indicator is too much for you, there is another option (outlined at step 3), to make the regular cursor wider.

Magnifier follows your cursor

The Magnifier option now follows your mouse pointer, so that you don’t have look hard for the pointer. The mouse pointer will now always be in the center of the display.

how to use Magnifier with narration

Another very useful new feature is the narration. Magnifier now includes Play, Pause, Next sentence. Moreover, arguably the most useful button is the read from here,

If you click on it and select a reaction of text, you will only hear that part read out loud, not the whole text or page.

Magnifier works everywhere, in browsers, and with other applications like Word, Outlook, and PowerPoint. Magnifier will highlight each word that is spoken and will scroll content into view if it is not currently displayed.

Narrator is easier to use

Microsoft made the reading more natural, and redesigned Narrator sounds for efficiency.

For example, rather than having to hear scan on or scan off when switching between scan mode and other modes, now you can choose to hear tones instead of the words. By default, both the words and sounds are turned on, to learn the new sounds.

Other Narrator improvements include automatically starting reading web pages from the top of the page,  a page summary on-demand, and disambiguating links with titles like Click here without having to press the link to see where it goes.

Narrator now supports Firefox, and they added support for rich text in Chrome and Firefox so that it’s easier now to read content on sites like Wikipedia.

Narrator in Outlook is beter

Microsoft also improved the Narrator’s experience with Outlook. Now it’s faster and easier to sort out mail. They improved the message reading experience by automatically starting to read the message when you open it.

Tell us what you think about the accessibility improvements in Windows 10 with a line in the comments section below.

[wl_navigator]

Microsoft kicks off 5th annual ID@Xbox Indie Game Fest running May 21-25

Starting from May 21 through May 25, 2020, ID@Xbox will be highlighting creators, stories, and characters it finds truly unique during its fifth annual online Gamefest 2020.

Xbox’s ID@Xbox Gamefest is a way for the platform to shine a light on indie games that often don’t get the AAA marketing budgets to become household names, normally. In 2020, as a more captivated “shelter-in-place” audience looks for more stories, characters, and creative content to pass the hours, the new Gamefest list couldn’t have come at a better time.

  • Fractured Minds – A game created by a young woman as a means to cope with her own struggles with mental illness, an immersive artistic experience that explores anxiety and mental health issues. Fractured Minds is available with Xbox Game Pass on console.
  • HyperDot – A minimalist action arcade masterpiece with one rule: dodge everything. In the development process, the game’s creator partnered with disabled content creators to stream the game and use their feedback to make the game playable and uniquely accessible for everyone. HyperDot is available with Xbox Game Pass on console and PC.
  • Celeste – A game hailed by many as a modern classic, uses its platforming gameplay to provide a window into how those who deal with depression, anxiety or dread can learn to visualize their out-of-control moments and bring them back under control. Celeste is currently on sale for 50% off.
  • Night in the Woods – An award-winning adventure game about a college dropout, her friends, and the small town they live in. While it’s ostensibly a mystery about strange things happening in the town, it’s also an insightful allegory about class, small-town America, and young people discovering a place in the new world. Night in the Woods is currently on sale for 40% off.
  • Hellblade: Senua’s Sacrifice – The game follows a broken Celtic warrior on a vision quest, but it’s so much more than that. Created in collaboration with neuroscientists and people who experience psychosis, Hellblade: Senua’s Sacrifice is a deep exploration of mental illness. It’s currently on sale for 50% off.
  • In Between – In Between follows the story of an African American man facing his impending death, brought on by a diagnosis of lung cancer. Each level explores an aspect of him coping with grief via mind-bending puzzles that are solved by manipulating your surroundings and gravity itself. In Between is currently on sale for 60% off.
  • Stone – Stone is an interactive story that features a Koala detective who wakes up with a hangover and must save his kidnapped boyfriend. Stone is currently on sale for 50% off.
  • What Remains of Edith Finch – What Remains of Edith Finch is a truly incredible story of a young woman exploring a remote and fantastical family house to uncover the secrets behind the untimely deaths of her entire family tree. Each family member’s story is told in a different style with distinct gameplay elements. What Remains of Edith Finch is currently on sale for 50% off.

These are just a few showcased titles from this year’s list of 50 indie games that are currently discounted as low as $1.19 or free with Microsoft’s Xbox Game Pass. Check out the full list here, or drop into the ID@Xbox portion of the store on your console.

Run Windows 10/11 as a guest OS in Hyper-V with ARM64 VHDX

In February, Microsoft added the ability to install Hyper-V on ARM64 devices like the Surface Pro X that run Enterprise or Pro editions of Windows 10.

Now, they offer the ARM64 VHDX for Windows 10 Insider Preview Build 19624, so that you can run Windows 10 as a guest OS in Hyper-V.

How can I create an ARM64 VM?

First, you need a Windows 10 ARM-based PC with a Microsoft SQ1, Qualcomm Snapdragon 8cx, or Qualcomm Snapdragon 850 processor

Then you need to install a Windows 10 Pro or Enterprise versions, build 19559 or newer.

After that, you have to enable Hyper-V.

Download and install VHDX

  1. Download the VHDX file from here.
  2. Create a virtual machine in Hyper-V, using the downloaded VHDX as an existing virtual hard disk

How can I create a virtual machine using Hyper-V Manager?

  1. Open the Hyper-V Manager.
  2. Click on the New option from the Action pane, then click on Virtual Machine. Hit Next in the New Virtual Machine Wizard.
  3. Make your selections for your virtual machine and click Finish.
  4. Now right-click the virtual machine and select connect.
  5. In the new window, select Action and Start.

Note: Hyper-V on Windows 10 ARM64 devices only works on Windows 10 Insider Preview Builds 19559 and above. Nested virtualization is not supported.

[wl_navigator]

FIX: Hulu error codes PLAUNK65 and PLRUNK15 in 5 steps

Hulu error codes PLAUNK65 and PLRUNK15 fall into the category of playback errors, which the service seems to get a lot lately.

Before contacting Hulu’s support department and get a general answer that they’re looking into the situation, your only option is to try and fix the problem yourself.

Luckily, there’s a list of common troubleshooting steps that you can try and hope to get your service up and running in no time.


How do I fix PLRUNK15 error code (for Roku users mainly)

1. Force stop the Hulu app

This is just an immediate solution to make sure that all features of the app are turned off and the app can restart anew. So just exit the Hulu app. Additionally, you can turn off your device and power on again, then restart the app.


2. Uninstall/reinstall the Hulu appuninstall hulu app to fix PLRUNK15

  1. Press the asterisk or star button on your Roku remote.
  2. Select Remove Channel.
  3. Then, go to the Roku Channel Store.
  4. Find the Hulu app > Add Channel.

This will force a fresh and updated app to be installed, at the same time, removing streaming history and cached files.


3. Allow ads/uninstall the ad blockerfix plrunk error roku

When you’ve checked the Limit Ad Tracking option in the Settings menu or if you’ve installed a specific ad blocker to enjoy an uninterrupted streaming experience, this might have also messed with the actual functioning of the app.

Try to allow ads or to uninstall the ad blocker to see if video streaming is resumed.


4. Update your Roku device

  1. Turn on Roku in the Home menu.
  2. Go to Settings > System > System Update.
  3. Select Check Now.

This is to make sure that you have the latest firmware installed.


5. Fully restart your Roku devicerestart roku

This helps to refresh your connection and improve streaming conditions. You only have to turn off your Roku device, unplug it from the power source, wait for a few minutes then plug it back in and power back on. Restart the Hulu app to see if the issue has been solved.

6. Use a better app for your TV

After you fully restart your Roku device and it still does not work properly, we recommend you to add Disney+ from the Chanel Store on Roku’s official website.

If you want a different experience on Roku TV, like unlimited streaming and downloading your favorite originals from Pixar, Marvel, Star Wars, Disney, National Geographic, ad-free entertainment, the capacity to watch on 4 different screens at once, and much more, this is the best choice by far. Disney+ is compatible with hundreds of Roku TV models and accessible anytime, anywhere.

⇒ Get Disney+ now


An additional solution  for error PLAUNK65

hulu error plaunk65

Error PLAUNK65 is not as common as PLRUNK15. It can also occur not only on Roku, but also on mobile devices, Play Station or smart TVs.

The above-mentioned solutions should work to recover streaming functionality altogether. Nevertheless, we recommend an additional one, namely clearing cached data.

On devices running on Windows, Android, or iOS, cached data is usually found in the storage/privacy section of the Settings menu.

You can also use professional software to get rid of unnecessary files, such as CCleaner. After downloading and installing the tool, run a scan, and allow the program to remove all unwanted files.

For Play Station, you have to completely turn off the device, unplug the power cord from the back of the device, wait for a few minutes, then plug the cord back in and restart the device.

On Apple TV you need to uninstall and reinstall the app to clear cache and data.

For Xbox One see the following steps:

  1. Go to Menu.
  2. Choose My Games and Apps > Apps.
  3. Highlight the Hulu.
  4. Hit menu on your controller.
  5. Tap on the Manage Apps > Clear saved data.

Got the 0xC00DB3B2 error on Windows 10? Fix it in 4 steps

Despite the fact that Windows 10 is one of the popular platforms, many users often encounter various issues. One of them is error code 0xc00db3b2. This error specifically appears when you try to use the Film & TV app to play videos.

A user complained about a similar issue on the official Microsoft Answers forum:

I’m unable to play 4K HEVC video. when I open the 4K video, showed me some error like – Please try again. If the problem continues, visit https://support.microsoft.com to check for guidance. 0xc00db3b2

If you are on the same boat, a buggy Windows 10 update might be the potential reason behind this issue. Today we will discuss some quick solutions that can help you to fix the error 0xc00db3b2.


How do I fix error 0xC00DB3B2 on Windows 10?

1. Repair HEVC Video Extensions

  1. Simultaneously press Windows + R keys to open the Run dialog box if HEVC Video Extension app is already installed on your system.
  2. Type ms-settings:appsfeatures and hit the Enter button. It will open the Apps & Features tab available in your Windows 10 Settings application.open apps and features error 0xC00DB3B2
  3. Look for the HEVC Video Extension app from the list of applications. Click on the app and select Uninstall from the context menu.
  4. Check if the problem is resolved.
  5. Head towards the second solution if the HEVC Video Extension app is not installed on your system.

2. Install Repair HEVC Video Extensions

  1. Visit Microsoft Store to download HEVC Video Extensions. download HEVC Video extension error 0xC00DB3B2
  2. Click Get to install the application to start the download process. Wait until the installation process is complete.
  3. Finally, reboot your system and check if the problem still persists.

3. Reset the HEVC Video Extension

  1. Open the Settings app and click Applications.
  2. Select the Apps & Features tab and scroll down to find the HEVC Video Extension.open apps & features error 0xC00DB3B2
  3. Click on it, select Advanced options and click the Reset button.
  4. A confirmation prompt will appear on your screen. Click the Reset button again.
  5. Finally, reboot your system.

If you are still experiencing the 0xc00db3b2 error, the Movies & TV app might contain some corrupted elements. You need to reset this app as well.


4. Reset the Movies & TV app

  1. Open the Settings app and click Applications.
  2. Select the Apps & Features tab and scroll down to find the Movies & TV app.
  3. Click on it, select Advanced options and click the Reset button.reset Movie & TV app error 0xC00DB3B2
  4. A confirmation prompt will appear on your screen. Click the Reset button again.
  5. Wait for the Reset process to complete and reboot your system.

Did any of these solutions fix the error code 0xC00DB3B2? Share with us your experience in the comments down below.

[wl_navigator]

FIX: Past duration too large error in FFmpeg

FFmpeg is an open-source tool that is used by billions of people around the world for processing audio, video, and other multimedia content.

This command-line program often generates Past Duration Too Large error during the downscaling or encoding video content. One of the users who experienced a similar problem reported the issue on StackOverflow.

When encoding H.264 using ffmpeg I get the following type of warnings:  Past duration 0.603386 too large

What do they mean? I have not found anything clear online or in the ffmpeg documentation.

It seems like it is a warning message rather than an error that appears when you try to encode a high frame rate file to a low frame rate output.

The framerates are dropped in that case. Today, we will show how you can get rid of this warning message.


How do I fix the Past duration too large error in FFmpeg?

1. Set the input frame rate

set input frame rate FFmpeg Past Duration Too Large error
  1. The problem might appear if the input frames are missing from the video and it can cause some frames to drop.
    • You need to add the input frames to fix the issue.
  2. Look at the call that you are using for video conversion.
    • It should be similar to this one:
      • ffmpeg -framerate 24 -i %05d.png -c:v libx264 -crf 5 out.mkv
  3. You need to separately mention the input and output framerate in the following manner:
    • ffmpeg -framerate 25 -i %05d.png -r 10 -c:v libx264 -crf 5 out.mkv

The issue should disappear because the encoding is now done for 161/400 images. The system will delete the rest of the images.

However, if the problem still persists head towards the second solution.


2. Add Sync Flags

add sync flags FFmpeg Past Duration Too Large error
  1. Right now, you might be using the call mentioned below: ffmpeg -framerate 24 -i %05d.png -c:v libx264 -crf 5 out.mkv
  2. If yes, you might be missing sync commands and it might trigger the error.
  3. Add the -async 1 -vsync1 synchronization commands in order to synchronize the video input and video output:
    • ffmpeg -framerate 24 -i %05d.png -c:v libx264 -crf 5 out.mkv -async 1 -vsync 1

The situation can be frustrating if you are unable to encoding or downscaling a video. It is important to find a quick solution in that case.

Speaking of errors, another common error is Invalid data found when processing input, but we covered it in another guide, so don’t miss it.

Make sure that you are correctly following each and every step to fix this problem. Let us know in the comments section below if our solutions helped you to fix this issue.

Added Money to Revolut But it’s Not Showing: 4 Ways to Fix

Revolut is a popular digital banking solution that offers instant banking facility with its Revolut app. However, many reported that they have added money to Revolut but it’s not showing.

In case you’re not familiar with this service, we have a great guide on how to use Revolut web app, so be sure to give it a try.

This can be a serious issue, so in today’s guide we’ll show you the best ways to fix it.

Why is Revolut taking so long to transfer money?

  • The transfer usually takes 3-5 business days, so you might have to wait for a bit.
  • Issues with the cache can cause this problem to appear.
  • In some rare instances, corrupted installation can lead to this problem.

What can I do if I added money to revolut but it’s not showing?

1. Clear the cache

  1. From your Android device home screen, tap on the Settings icon.
  2. Scroll down to Apps and tap on Manage apps.
  3. Wait for the apps list to load. Locate and tap on Revolut.
  4. At the bottom, tap on Clear data option.
  5. Select Clear Cache and tap on Yes to confirm the action.
  6. Now tap on Force Close option (bottom left corner).
  7. Choose Yes to confirm the action.
  8. Relaunch the Revolut app and check if the money not appearing issue is resolved.

2. Log out and log in

  1. If the issue persists, try to logout and login.
  2. Launch Revolut and tap on your Profile.
  3. Tap on sign out.

  4. Close the app.
  5. Open Revolut and log in without your credentials.
  6. Check if the app displays the balance correctly.

This is a simple workaround, so don’t hesitate to give it a try.

3. Wait and contact support

  1. Money sent from one bank account to your Revolut account may not appear instantly.
  2. At times, international transactions may take a few days.
  3. Normally, international transactions take 2-3 days depending on where you live.
  4. If you haven’t received the money even after 3 days, make sure you contact the Revolut support.
  5. Also, check Revolut social media accounts to check if any of the services are down for maintenance.

4. Uninstall and reinstall Revolut

  1. If the issue persists, try uninstalling the app.
  2. From the home screen, tap and hold on the Revolut app icon.
  3. Select Uninstall from the options.
  4. Restart the phone.
  5. Open PlayStore and search for Revolut.
  6. Download and install the app.
  7. Log in without your Revolut credentials and check if the money not received issue is resolved.

This isn’t the only issue that users reported, and many experienced Revolut is not compatible with your device message, however that can be easily fixed.

By following the steps in the article, you can fix Revolut money not received issue. Transaction related issues are rare and the support staff can resolve the issue when a ticket is submitted.

FIX: Waze send ETA doesn’t work

Waze is a popular app that offers directions, a live traffic map, and road alerts. It can save time by delivering alerts to your phone gathered by other Waze users. Sometimes, you may get Waze eta not working issue on your smartphone.

Several users have reported similar issues with the Waze eta feature in the Reddit Community.

My wife and I use Waze to communicate to each other about when we’re going to be home (or somewhere else that we’re meeting). Used to be when she would share a drive with me and I would open it, I would get a screen that showed her ETA. But for weeks now, that has not been working for either of us, it just shows “Driving“.

If you are also troubled by this issue, here are a couple of troubleshooting tips to fix Waze eta not working problem.


How do I fix Waze eta not working?

1. Check social media settings

  1. The Waze app integrates with your social media accounts for better sharing. If you have connected your Facebook account to the Waze app, check if the ETA feature is turned off.
  2. Open the Waze app on your phone and log in.
  3. Go to Social Settings.
  4. Under Facebook, make sure the Show Facebook friends and friends on the way option is turned on.
  5. Relaunch the Waze app and check for any improvements.

Share drive guide

  1. As a workaround, you can share your guide through a message using the options button.
  2. Your friend receives a message with a link. Taping on the link shows the ETA and follow your itinerary.

Fix Waze not announcing directions with these steps


2. Check services outage

  1. Before taking any other steps to make sure the Waze service is up and running.
  2. At times the Waze eta not working issue may occur if the service is temporarily down.
  3. You can check the Waze social media account to get an update. Or contact Waze support via a ticket.

3. Clear Waze cache data

  1. The old cache can create issues with the app. Try clearing the cache and check if the issue gets resolved.
  2. Tap on Settings from the home screen or App Drawer.
  3. Scroll down to Apps section. Tap on Manage apps.
  4. From the list of apps, locate and tap on Waze.
  5. Tap on Clear Data button at the bottom of the page.
  6. Choose Clear Cache and then tap on Yes to confirm the action.
  7. Next, tap on Force Close option.
  8. Tap on Yes to confirm the action.
  9. Relaunch the Waze app and check if the ETA is working.

4. Update and reinstall Waze

  1. If the issue still persists, check if an update is available for the Waze app.
  2. Open the Play Store on your phone and search for Waze.
  3. Download and install any pending updates.

Reinstall Waze

  1. As a last resort, uninstall and reinstall the Waze app. This will clear any glitches and unfixable issues with the app.
  2. Reinstall the app from the Play Store and check for any improvements.

By following these steps, you should be able to avoid anymore Waze eta issues, both now and in the future.

Let us know which solution you used to get rid of this problem by leaving us a message in the comments section below.


[wl_navigator]

Running Scripts is Disabled on This System on Windows 11

PowerShell is an automation engine that helps users in task automation. However, many reported Running scripts is disabled on this system on their Windows 11 PC.

This can be fixed by enabling scripts to run, but sometimes that’s not enough to fix the core issue that you’re having.

In today’s guide, we’re going to take a closer look at this issue and show you the best ways you can fix it.

Why is running scripts disabled on my PC?

  • This is a security policy enacted by PowerShell in order to protect your PC.
  • By default, all scripts are restricted from running in PowerShell.

How do I fix Running scripts is disabled on this system on Windows 11?

1. Bypass the Execution Policy

  1. You can update the command to get access to the script access via policy.
  2. Open the run dialogue by pressing Windows + R keys.
  3. Type Powershell in the textbox and simultaneously press Ctrl + Shift + Enter keys. This process will run PowerShell as an administrator.
    open powershell running scripts is disabled on this system powershell error
  4. Now you can type the following command to execute a specific PowerShell script:  powershell -ExecutionPolicy ByPass -File testscript.ps1ByPass Execution Policy running scripts is disabled on this system powershell error
  5. Finally, hit the Enter key and check if your system successfully runs the script.

This solution will bypass the Execution Policy to run the script on your system. After running this command, check if Running scripts is disabled on this system on Windows 11 message is still there.

2. Change the Execution Policy

  1. Simultaneously press the Windows + R combo to open the run dialogue box.
  2. Once the dialogue box opens on your screen, type Powershell and press Ctrl + Shift + Enter keys to open PowerShell with administrative access.open powershell running scripts is disabled on this system powershell error
  3. Based on your particular situation, Windows allows you to set the policy to four different modes. To get the List of Execution Policy, you can type the command: Get-ExecutionPolicy -List
  4. Press the Enter key and you will now see a list showing the Execution Policy status for all the User Groups.
  5. Check the status of LocalMachine under the scope column.
  6. If the execution policy is set to Restricted or Undefined, you need to set the Execution Policy to Unrestricted.
  7. Type the following command to change the status in the PowerShell window: Set-ExecutionPolicy RemoteSignedchange execution policy running scripts is disabled on this system powershell error
  8. Press the Enter key to execute the command and then Y to confirm the change.
  9. If the problem still persists, replace RemoteSigned with Unrestricted. 

This is a permanent solution, and it should help you fix Running scripts is disabled on this system on Windows 11 for good.

Note icon NOTE
The RemoteSigned Execution Policy restricts your system from running those scripts that are not signed by a trusted publisher. However, the restriction is removed if you choose Unrestricted.

As you can see this error can be easily fixed with our simple solutions.

In case the problem is still there our Execution of scripts is disabled on this system should be able to provide you with more solutions.

If you found our solutions helpful, do let us know in the comments section below which one of them worked for you.