How to Fix Common For Honor Bugs and Glitches

We’re sure that For Honor players are very determined to annihilate any bugs that may dare to appear in their way.

Indeed, judging by player feedback, there are a lot of bugs affecting the game, but the good news is that Ubisoft has already published a list of quick workarounds that you can use to fix them.

How can I fix common For Honor bugs?

1. Easy AntiCheat – Impossible to launch the game error

  1. Use the Verify File Integrity option in Uplay PC client.
  2. Open your For Honor game page and click Properties.
  3. In the Local files section, select Verify files.
    verify files

Easy AntiCheat sometimes displays an error message, preventing the game from launching or simply closing it after the intro videos.

2. Easy AntiCheat error 10018

  1. Close For Honor and use Task Manager to end all game processes, then restart the game.
    end task
  2. Close the game and restart Uplay PC client.

The AntiCheat error 10018 is resolved by fully restarting the game and the Uplay desktop client. Once you’ve ‘killed’ their respective processes, start them again, and the error prompt shouldn’t appear.

If it keeps reappearing, consider disabling background programs like VoIP or chat apps.

3. For Honor won’t return to the desktop

Sometimes, after getting a Connection has been lost error message while being idle on matchmaking, you may be unable to quit the desktop. To return to the desktop, restart the game.

You can force-quit the game by pressing Alt + F4 and killing the process from the Task Manager.

4. Gamepads not working

Unplug all other non-necessary peripherals, especially Steering Wheels and Flight Joysticks. If this doesn’t work, follow the troubleshooting steps listed in this Gamepad not recognized article.

5. Controller switches Right & Left Trigger

Usually, this issue is prevalent for Bluetooth controllers. Try connecting your controller through USB. Ubisoft also recommends installing the Windows 10 Anniversary update OS as a workaround.

6. Game stutters when you are hit

Use the exact solutions suggested for fixing controller switch issues. You can also try reducing the graphics and checking your network connection. Since there are no dedicated servers for For Honor, many things fall on the player’s side.

Restarting the game and starting again might help as well.

7. NAT Type Group issues

Groups with more than 1 Strict NAT are not recommended, as they will not be able to reach matchmaking. Preferably invite friends with open or moderate NAT types instead.

8. Mixed Region Group Connectivity issues

Users might encounter connectivity issues when grouping with players from other regions. For this reason, Ubisoft doesn’t recommend creating mixed region groups.

9. Error 0004000008

If error 0004000008 appears on the screen, restart the game. This error was, at a certain point in time, a complete plague for For Honor players, but it seems that’s somewhat resolved or at least significantly reduced these days.

10. For Honor won’t launch

  1. Run Uplay in Admin mode.
  2. Disable your antivirus software or add the game and Uplay as an exception.
  3. If you’re using an Intel-integrated chipset, try forcing the dedicated GPU instead: under the Manage 3D settings tab in the NVIDIA control panel, navigate to your game’s .exe and specify which GPU to use.
    manage 3d
  4. Make sure that the game is installed on your C: drive
  5. Launch the game from an entirely new Windows system profile
  6. Unplug your controller/non-essential peripherals, then launch the game again. Then reconnect your controller. Also, temporarily disable any software linked to the controllers.

We hope these workarounds helped you fix some of the For Honor issues bugging you. If you are experiencing a more serious issue like high ping, latency, and stuttering on For Honor, we have a comprehensive guide to help you fix that.

As always, if you’ve come across other workarounds, you can help the community by listing the troubleshooting steps in the comment section below.

Posted in PC

Windows 10 19H1 build 18358 goes live for Fast Ring Insiders, along with new Windows Defender Application Guard extensions for Chrome and Firefox

Microsoft has just released another 19H1 build for Windows Insiders on the Fast Ring today. The 19H1 build 18358 follows the build 18356 released three days ago for these same Insiders, and the new bits bring additional bug fixes, though some known issues are still there.  

Microsoft says that it has resolved some issues with Game Mode in this build, and Windows Insiders streaming games or recording games should enjoy more consistent performance. The company is also still looking to get feedback about its State of Decay game available via the Xbox Insider Hub, and if you haven’t tested it yet the company has just added more slots. You can read more about the other bug fixes and known issues in the build 18358 below:

General changes, improvements, and fixes for PC

  • FOR GAMERS: We have addressed an issue with Game Mode that may degrade game streaming and recording quality.
  • Here’s the latest on trying out our new Windows gaming technology:
    • Still haven’t had a chance to get the game State of Decay for free (for a limited time)? We’ve added even more slots! Whether you’ve tried it in earlier builds or haven’t had the chance yet, these instructions have everything you need.
    • Installed the Insider version of State of Decay already? We’ll be trying out another update later today. To get it, launch the Store app, click […] and then “Downloads and Updates”. Once installed, you shouldn’t see any difference in the game – it’s just a test update – but please let us know if anything doesn’t work!
  • We fixed an issue that could result in the thumbnails in Alt + Tab sometimes becoming offset.
  • We fixed an issue where certain upgrade paths could result in the contents of the Recycle Bin being left under Windows.old.
  • We fixed an issue resulting in upgrades failing at 18% or 25% and rolling back for some Insiders.
  • We fixed an issue resulting in some Insider experiencing green screens with error KERNEL_SECURITY_VIOLATION.
  • We fixed an issue resulting in some apps using the Windows Installer failing to install recently.

Known issues

  • Microsoft Store app updates do not automatically install on 18356+. As a workaround, you can manually check for, and install updates via the Microsoft Store app. Open Select “…” > “Downloads and updates” > “Get updates”.
  • Launching games that use anti-cheat software may trigger a bugcheck (GSOD).
  • Creative X-Fi sound cards are not functioning properly. We are partnering with Creative to resolve this issue.
  • Some Realtek SD card readers are not functioning properly. We are investigating the issue.
  • We’re investigating an issue preventing VMware from being able to install or update Windows Insider Preview builds. Hyper-V is a viable alternative if available to you.

Known issues for Developers
* If you install any of the recent builds from the Fast ring and switch to the Slow ring, optional content such as enabling developer mode will fail. You will have to remain in the Fast ring to add/install/enable optional content. This is because optional content will only install on builds approved for specific rings.

The blog post also mentioned the release of new Windows Defender Application Guard extensions for Google Chrome and Mozilla Firefox. Once the extension is installed, Chrome and Firefox users visiting an untrusted website will be redirected to an isolated Microsoft Edge session where they’ll be able to browse the website securely.

Microsoft says that the Windows Defender Application Guard extensions for Chrome and Firefox are rolling out to Windows Insiders today and will be generally available soon, and they will require Windows 10 Pro or Enterprise version 1803 or newer. This has been a pretty busy couple of days for Windows Insiders overall, and we hope the flow of new builds will continue next week.

This is how you can fix HDR games issues on Windows 10/11

The fact is that HDR has been available on TVs a few years before it was introduced on computer monitors. This was because Windows didn’t support the HDR display technology until May 2018.

So now Windows users can now enjoy the advantages that HDR has to offer which include the color depth and accuracy.

Now many individuals are faced with the HDR games bug on their computers. So, to get this fixed, first check out this.

Steps to fix HDR game issues on PCs

1. Confirm that your computer supports HDR

Windows is very selective when it comes to devices that it permits to show HDR contents on. HDR options won’t display for individuals using 20ft HDMI 1.4 cables, it can only work through DisplayPort 1.4 or HDMI 2.0a cables.

For your benefit, here is a list of requirements that an external display will need to meet up to before displaying HDR contents on Windows 10:

  • The PC must permit HDR10 and DisplayPort 1.4 or HDMI 2.0 or even higher ones. Better still, display devices that are DisplayHDR certified are recommended.
  • Windows 10 computer needs to have a good graphics card that permits PlayReady 3.0 hardware digital rights management. Note that this is for protected HDR content. The graphics card should be AMD Radeon RX 400 series or higher versions, Intel UHD Graphics 600 series or higher models or NVIDIA GeForce 1000 series or anyone higher than that. Graphics card that supports hardware-accelerated 10-bit video decoding for HDR video codecs is highly recommended.
  • The needed codecs installed for 10-bit video must be available on the Windows 10 computer such as VP9 codecs or HEVC.
  • Have the recent WDDM 2.4 drivers installed on the PC. For the latest drivers, you can get to Windows Update on your settings or you can get it on from your computer manufacturer’s website.

2. Activate HDR on Windows 10

Before you can do this, make sure that your PC meets up all the listed requirements and you must have updated to the latest Fall Creator Update.

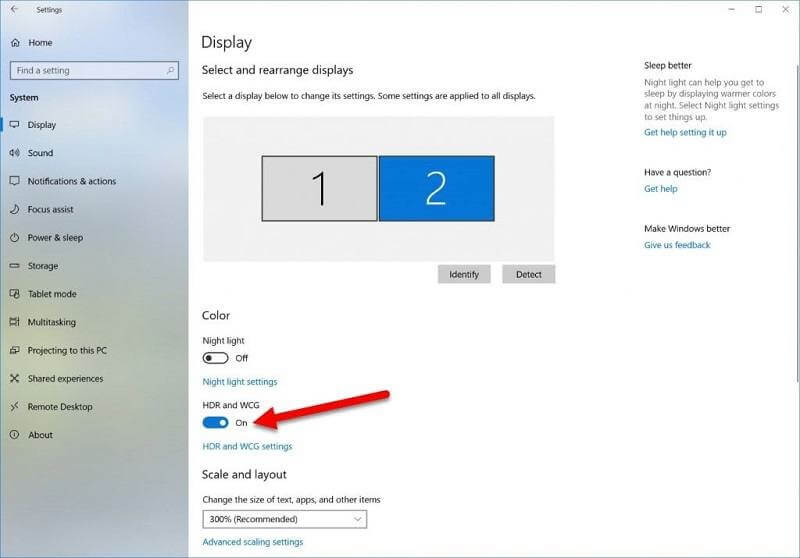
If these are settled then you are good to continue the process. Now, to activate HDR on your Windows 10, open up your start menu and ho to the Setting app:

Now click on ‘Display’ and you would find a toggle just below the Night Light option which reads ‘HDR and WGC’

Now you can turn on the HDR on your screen display. Note that any non-HDR content will be displayed as faded or washed out on the color spectrum because of this action.

This is because Windows will automatically reset the whole color profile of your computer to recognize HDR content and this implies that any other content not configured for HDR such a web browser, emails and the rest will display grayish or darker than normal.

To get this back to normal you can go back and click on the link for HDR and WCG settings option under the toggle, just as displayed above.

You can make use of the SDR Content slider to set the color palette and brightness for non-HDR content.

This could help a bit, but the fact is, it might be difficult to get a non-HDR content to display fine on your Windows screen after you must have enabled HDR.

However, to resolve this permanently, only turn on the HDR toggle if you want to do anything pertaining to HDR content or play a game that has HDR color gamut and when you are done and wants to browse, turn off the toggle for a better experience.

We hope this would help you a great deal.

RELATED GUIDES TO CHECK OUT:

Microsoft Store gains a new Windows 10 drawing app with CorelDRAW

A special Microsoft Store Edition of CoreIDRAW launched earlier this week in Windows 10’s Microsoft Store app store.

The app is designed for artists and graphic designers for creating and editing images. It supports touch, stylus with Microsoft Surface and Wacom tablets, the Surface Dial, and all of the major image file types.

Here’s the official list of features in CoreIDRAW Microsoft Store Edition.

  • VECTOR ILLUSTRATION – Use powerful vector illustration tools turn basic lines and shapes into complex works of art.
  • PAGE LAYOUT – Find all the tools you need to create layouts for brochures, newsletters, multi-page documents and more.
  • TYPOGRAPHY – Arrange type beautifully with a complete set of typography tools. Adjust font, size, leading and kerning, and add effects to text like block shadows and contours.
  • COLOR & TRANSPARENCY – Easily apply color to both fills and outlines. Change the transparency of an object, and fill objects with patterns, gradients, and mesh fills, and more.
  • STYLES – Manage styles and style sets to apply consistent formatting across multiple objects, produce iterative versions, and format whole documents quickly and consistently.
  • TRACING – Save precious time while converting bitmap images into vectors. The built-in Corel® PowerTRACE™ engine turns the most demanding bitmap images into high-quality vector objects.
  • NON-DESTRUCTIVE EDITING Edit bitmaps and vectors knowing you won’t harm original image or object. Enjoy many non-destructive features such as Block Shadow tool, Symmetry Drawing mode, and more.
  • WEB GRAPHICS TOOLS – Develop captivating web content and graphics with a collection of web graphics tools and presets.
  • PROFESSIONAL PRINT OUTPUT – With a powerful color management engine, you can control color consistency across different media and know your colors are accurate before you print.
  • FILE COMPATIBILITY – Publish to a wide variety of file formats, including AI, PSD, PDF, JPG, PNG, SVG, DWG, DXF, EPS, TIFF and more.
  • PEN – Work quickly and efficiently with Windows Real-Time Stylus pen-compatible tablets, such as the Microsoft Surface, in addition to the Wacom tablet and devices.
  • TOUCH – Create quick adjustments using touch or a stylus. The Touch workspace maximizes the size of your drawing window by displaying only the tools and commands used most often.
  • DIAL – Enjoy support for Microsoft Surface Dial. Experience an alternative and more intuitive way of working in CorelDRAW by using touch and dial alone.

CoreIDRAW Microsoft Store Edition does require a monthly subscription but all first-time users gain full access for free for the first week of usage.

Are you a fan of CoreIDRAW or do you prefer another app for creating artwork on your tablet? Share your recommendations with the community in the comments below and then follow us on Pinterest for more app content.

Xbox 360’s Castlevania: Harmony of Despair comes to Xbox One consoles today

Castlevania: Harmony of Despair is the latest Xbox 360 video game to make the jump to the Xbox One with backwards compatibility.

Castlevania: Harmony of Despair originally launched on the Xbox 360 back in 2010. Like many of the other titles in the Castlevania video game franchise, Harmony of Despair is also an adventure-platformer with a strong focus on fantasy action. The game supports online multiplayer for up to six players who can play either cooperatively or against each other.

Here’s the official game description:

Step into the shadows of the hell house: Castlevania is back in all its pixel-powered 2D glory, this time in full 1080p! Call upon the series’ most hallowed heroes and vanquish your nemesis, Dracula! All-new multiplayer modes like 6-player Co-op and Survival have been whipped up for you, too… but enough talk. Have at it!

Are you a Castlevania fan and are you hyped to play Castlevania: Harmony of Despair on your Xbox One? Share your thoughts with the community in the comments below and then follow us on Pinterest for more Xbox gaming content.

Castlevania: Harmony of Despair
Developer:
Konami
Price:
$4.94

Windows 10 lets you mirror your Android phone on your PC

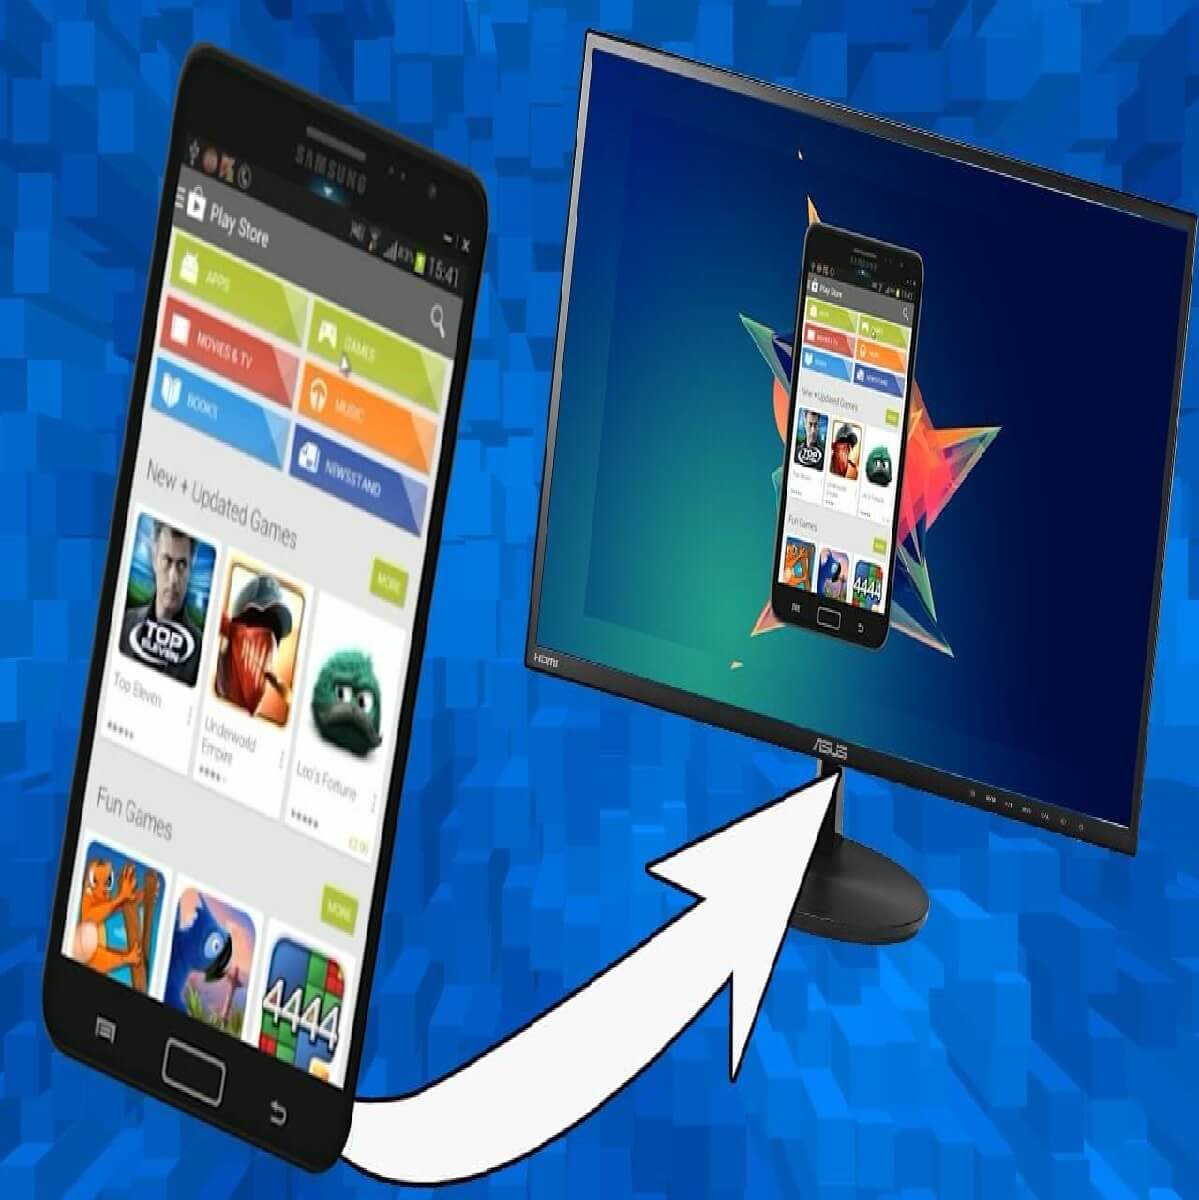
Microsoft promised to bring Android apps to Windows 10 with screen mirroring in 2018. Screen mirroring enables users to project their Android mobile phone displays on desktop or laptop monitors.

It basically streams Android mobiles to Windows. Now Microsoft is testing screen mirroring on Windows 10’s Your Phone app.

Microsoft has rolled out the first previews of screen mirroring within Your Phone. However, that screen-mirroring preview is restricted to Windows Insiders.

Microsoft’s Mr. Sarkar announced phone screen on the recent Windows 10 Insider Preview build 18335 blog post for the 19H1 update.

Thus, the updated Your Phone can only be tried out on Windows 10 build 18335 at the moment.

Furthermore, Your Phone’s screen mirroring currently only works for a few Android mobiles.

The app will mirror Samsung Galaxy S8, S8+, S9, and S9+ models. Those phones must be based on the Android 7.0 platform. In addition, the Surface Go tablet is compatible with Your Phone’s screen mirroring.

On top of those requirements, users also need laptops or desktops with built-in Bluetooth. That laptop or desktop also needs to support Bluetooth with Low Energy Peripheral mode.

Users can check if their PCs meet the Bluetooth requirements for Your Phone screen mirroring as follows.

  • Press the Windows key + X hotkey, and select to open Device Manager.

skype error cant access your sound card

  • Double-click the Bluetooth category in Device Manager to expand it. The laptop or desktop doesn’t support Bluetooth if that category is not there.
  • Double-click either Adapter for Bluetooth or Radio Driver to open its properties window.
  • Select the Details tab.
  • Then select Bluetooth radio supports Low Energy Peripheral Role on the Property drop-down menu.
  • The desktop or laptop supports Bluetooth radio supports Low Energy Peripheral Role if that property’s value is True.

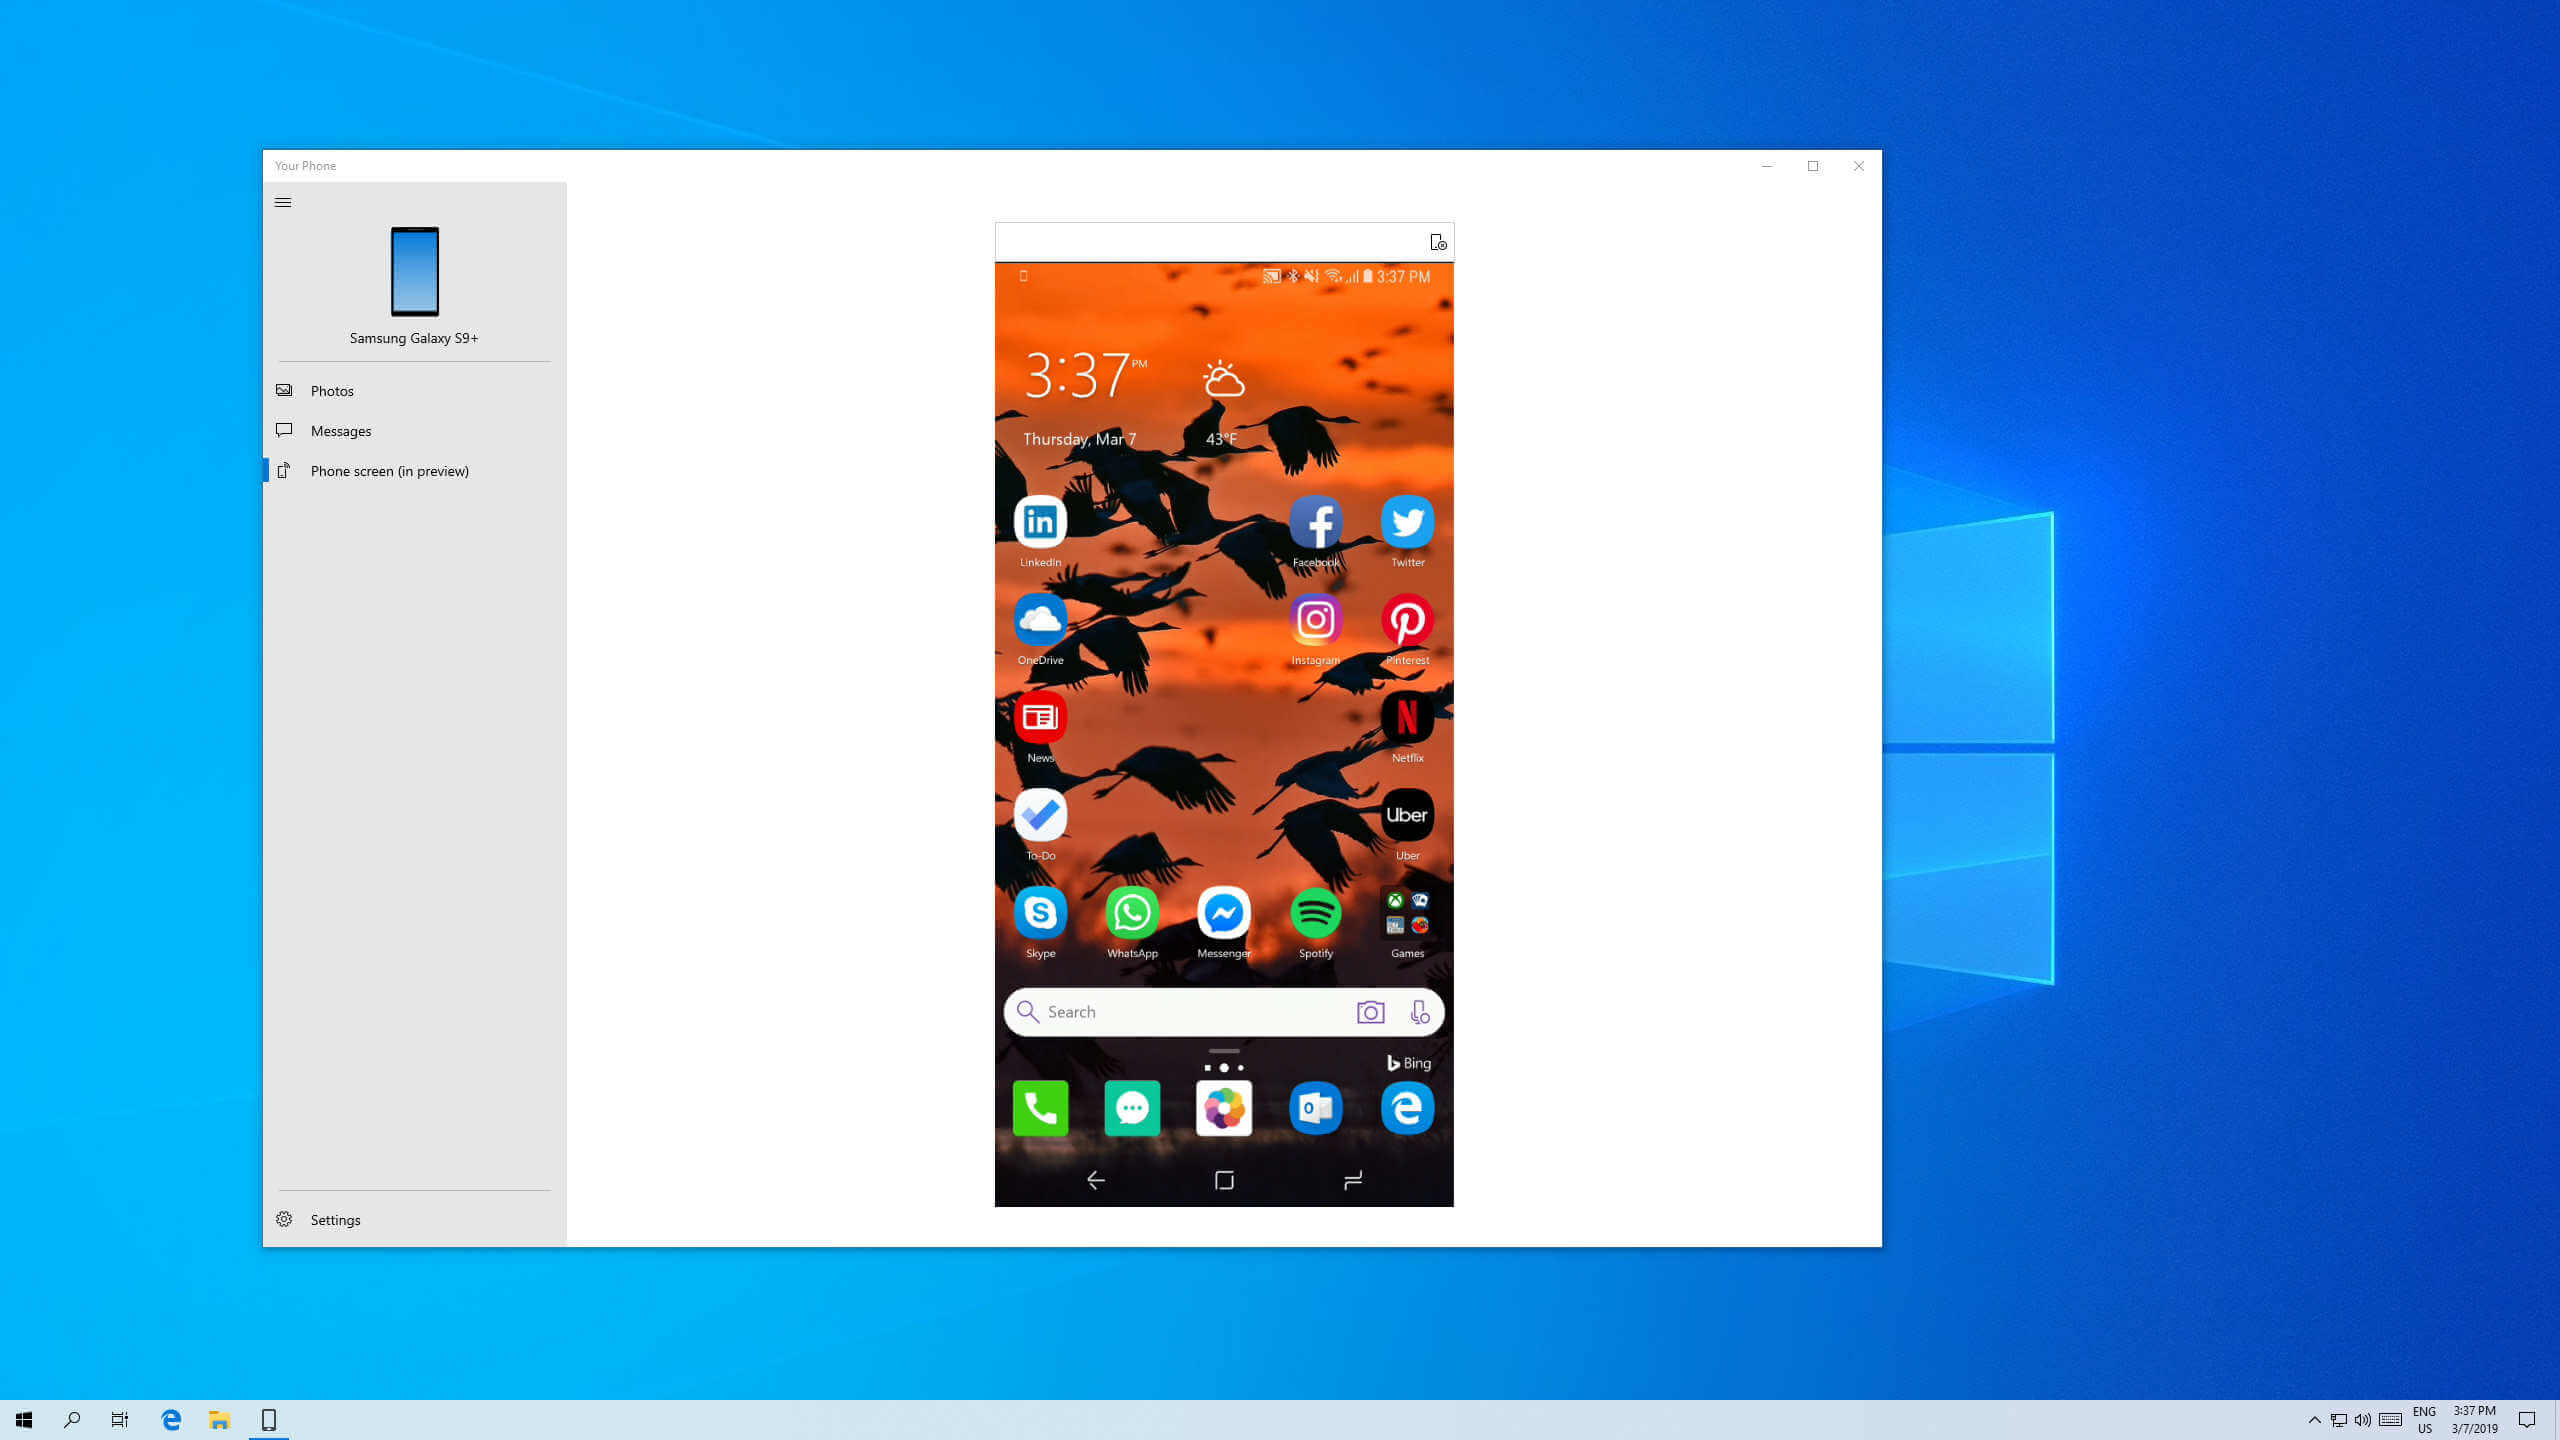
Users who can tick off all those requirements for Your Phone’s screen mirroring can try out phone screen. Users should see Phone screen on the left of the app’s window after pairing an Android device with PC.

Clicking Phone screen displays the paired Android device’s OS within Your Phone.

Most users will need to wait until Microsoft rolls out the 19H1 Windows 10 update. The updated Your Phone app with screen mirroring will be a part of that update.

Microsoft will probably roll out the 19H1 update from April or March 2019 at the latest.

RELATED ARTICLES TO CHECK OUT:

Windows 7 users will get end of support alerts starting next month

Microsoft is planning to push Windows 7 users to upgrade to Windows 10 by sending desktop notifications. The notifications will inform users about the end of support deadline i.e January 14, 2020.

The push notifications will appear on your screens starting next month.

Windows 7 End Of Support

Microsoft has already warned Windows 7 users that it is not going to support Office 2020 on Windows 7 devices.

Users will no longer receive security updates on their devices. Microsoft has already advised its users to upgrade to Office 365 and Windows 7.

Those who are not planning to upgrade will have to keep their devices vulnerable to threats and cyber-attacks.

That is the only reason Microsoft released a payment plan for the extended add-on support.

The only drawback is that it doubles every year and Microsoft will charge you on a per device basis.

In short you, will end up paying quite a nice sum over the course of 3 years for extended security updates.

Upgrade Notifications

The upgrade notifications are going to inform users about the end of support deadline. A link to the Microsoft site will also be there. Users can then click the link to find out more details regarding the end of support.

The notifications are not going to specifically mention the Windows 10 version you should install. In fact, the website is going to encourage users to either buy a new machine that comes with the latest version or upgrade the existing OS to the latest version.

Matt Barlow, the corporate vice president of Windows wrote in a blog post,

 These notifications are designed to help provide information only and if you would prefer not to receive them again, you’ll be able to select an option for ‘do not notify me again,’ and we will not send you any further reminders.

Most of the users find the desktop notifications are nothing but a big mess.

What do you think about Microsoft’s upgrade strategy? Let us know in the comments below.

RELATED STORIES TO CHECK OUT:

Xbox One 1904 system update will be available today for Xbox Insiders on the Delta Ring

The upcoming Xbox One 1904 system update will be available to test for Preview Delta Xbox Insiders later today. Microsoft will release the first 1904 build for these Insiders at 2PM PST, with the following new features:

  • A new virtual mini keyboard
  • The ability to reprogramming the OneGuide button on the Xbox Media Remote
  • A new Restart console button in the Power Center
  • Xbox Game Pass Quests are now accessible right from the dash
  • With Message Requests, Xbox Live messages from your contacts will be separated from messages sent by strangers
  • A new Suggested Uninstall feature will help you choose which games and apps to remove when you need to make space to install new content.

That’s quite a lot of new features coming to Xbox One owners in April, though it’s worth noting that the latest 1904 Insider builds still have some known issues that will hopefully be fixed ahead of the public release such as audio, Game Pass and profile color issues, to name a few.

As an Xbox Insider, don’t hesitate to report any encountered bugs to the Xbox team.

Microsoft open sources Project Zipline, its data compression technology for the cloud

Similar to the HBO hit show Silicon Valley matriarch company Pied Piper, Microsoft also possess a sought after compression algorithm called Project Zipline that it has announced it is essentially making public.

As more companies make the jump to the cloud to store their tera and petabytes of historical data, access to a successful in-house compression algorithm is typically something that is kept close to the vest by cloud service providers. However, Microsoft seems confident enough in its Azure service packages that it voluntarily made its compression algorithm, hardware specification and Verilog source code available to the Open Compute Project (OCP), according to a report from TechCrunch.

Microsoft annonced at a OCP Summit 2019 keynote in Denali that as of today, developers and contributors to OCP will now have the secret sauce ingredients to Microsoft’s compression algorithm clocked at 2x higher compression ratios when compared to the industry standard Zlib-L4 64KB model.  

Leveraging data gathered about how companies utilize the cloud, Microsoft optimized its Project Zipline for use on the system level to reduce overhead, produce higher throughput rates and minimize latency greater than other compression algorithm solutions on the market.

For anyone a bit weary of Microsoft’s proclamations, the company is dogfooding its own algorithm in its Azure cloud as well as partnering with other OCP participants such as AMD, Ampere, Marvell, Broadcom, NGD Systems, Arm, and Synopsys, to name a few.

Skype will soon double the maximum number of people in group calls to 50

Skype is still an app many use for group audio and video calls, and Microsoft announced this week that it will soon double the maximum number of people in group calls from 25 to 50 (via Neowin). The new limit is already live in the version 8.41.76.62 of the app, which was released for Skype Insiders on all platforms yesterday.

“When you start a call in these large groups, it will send a notification instead of ringing all the members, to not interrupt those who can’t join,” the company explained, adding that these notifications will also be sent for all group video calls. Being able to bring up to 50 people together in an audio or video call is great, but keep in mind that Skype can currently show 10 people onscreen at a time as of today.

With the maximum number of callers bumped to 50, Skype is catching up with Facebook Messenger which had this feature on iOS, Android and web since 2016. Again, this is restricted to Skype Insiders for now, but this new Skype update to roll out soon on all platforms.

How to revise Windows 10 Startup Delay to possibly speed up starting your computer

Windows 10 has a feature that waits approximately ten seconds to open your startup apps when your computer turns on. The “startup delay” is meant to allow your desktop and Windows app services to finish loading, which can make the apps and services run more smoothly. However, if you have apps or services you want to start up immediately when Windows 10 starts, there is a Registry edit you can use.

This Registry edit can reduce or disable the ten second startup delay completely. Unfortunately, it  applies to all startup apps; you won’t be able to apply this edit to specific startup apps. It should be noted that this Registry edit works best on a Windows 10 PC that has an SSD (solid state drive). An SSD loads programs much quicker than a traditional HDD (hard disk drives). HDDs are better suited for mass storage and you can apply this Registry edit to a Windows 10 PC with an HDD, but you might not see much of a difference in how fast your startup apps load.

Here are the steps you need to take to edit your Windows Registry to make your PC load faster:

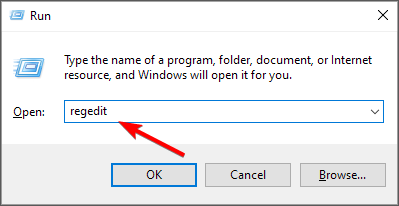
1. Open the Windows Registry Editor by going to the Start menu or search bar and typing “regedit” and choose Run as administrator. Regedit
2. Choose Yes when prompted by the UAC (User Account Control) prompt to make administrative changes to your Windows 10 PC.Regedit
3. Browse to the following Registry Key: HKEY_CURRENT_USERSoftwareMicrosoftWindowsCurrentVersionExplorerSerialize
4. If Serialize, does not exist, create a new Key in Explorer by right clicking on Explorer: New > Key (Name the Key: Serialize).Regedit
5. Within Serialize, create a new DWORD (32-bit) value and name it StartupDelayInMSec. Be sure to set the hexadecimal value to 0. It should be set to 0 by default.Regedit
This is how StartupDelayInMSec should look in Serialize in the Registry Editor.
Regedit
6. Restart your computer for the changes to take effect.

You’re all done! Windows 10 Startup Delay is removed. Again, if your Windows 10 PC has an SSD, you should see a significant boost in your startup time. With HDDs, you might still not see much, if any, speed increase in your startup times. The boot time into Windows 10 also depends on how many apps and Windows services you have enabled for startup. If you have a lot of services enabled at startup, you may still see a slight speed increase in how long it takes for Windows 10 to start.

New Microsoft Edge Insider Addons web page briefly goes online

Microsoft is getting closer each day to releasing the public preview of the new Chromium-based Edge web browser, and today a webpage for downloading add-ons for the preview browser has been made briefly available for users to browse. When the public preview goes live, users will be able to test preview updates of the browser by signing up to be an Edge Insider, in a similar way that that Insiders test preview builds of Windows 10.

WalkingCat was discovered the new web page, which has since gone offline, showing a preview of an extension available under the “Microsoft Edge Insider Addons.” While there’s not much else to be seen now that the page is unavailable, Neowin points out that it listed as many as 82 addons during its brief availability, although the Get button did not work at the time they checked.

Microsoft’s Edge is certainly a nice and speedy web browser, but the lack of developer support has resulted in the app’s low market share especially as Google Chrome overwhelmingly dominates this area. Microsoft’s decision to move Edge to Chromium for better web interoperability is supposed to fix these issues. Since their decision, we’ve seen screenshots of the new browser leak and have also learned that it might only support 64-bit devices at launch—which thankfully is the majority of devices today, but if you’re running a small tablet with only 1 GB of RAM you might be out of luck.

Even then, it’s hard to tell the shortcomings the browser might face as it competes fiercely with Google’s offering. Extensions support is certainly one challenge for Microsoft, especially given that it is a major feature users enjoy in Chrome. However, because the new Edge will be Chromium-based, most Chrome extensions should be able to work if allowed.

Microsoft Edge is expected to see the availability of preview testing sometime this year, and is expected to eventually make its way to older versions of Windows (7 or 8) and even macOS. Hopefully if all goes well, it might exit the preview before the year’s end, but that’s a major if.

Feature Image credit: Richard Hay

What to do if iPad isn’t charging on a Windows 10/11 PC?

If your iPad won’t charge when you connect it to a Windows 10 PC, that can be a big problem, but in today’s article, we’ll try to help you fix this annoying issue.

It seems that Windows laptops and Apple products don’t go along really well. There have been many complaints about how the Windows machine doesn’t charge iPad or iPhones.

In rare cases the hardware (lightning connector) is faulty but in most cases, it is the software that needs a little bit of fiddling around.

We have listed some troubleshooting steps, follow them and stay assured your Windows PC will charge your iPad.

iPad says Not Charging when plugged into computer? Fix it now

  1. Restart
  2. Check the cable and Ports
  3. Problem with battery indicator
  4. Restore your device on iTunes
  5. Connect your Apple device to the Windows PC via the lightning connector
  6. Use the wall charger

Solution 1 – Restart

This is one step that I always perform irrespective of the problem. Force restart will soften the ill-gotten things and will ensure that your hardware runs better. In order to do this press and hold the sleep/wake button on the iPad.

In the case of iPhones press and hold the home button along with the Sleep/Wake button. Ideally, this should turn off the screen and force the device into restart mode. In the meanwhile, I would also recommend restarting your Windows laptop as well.

Solution 2 – Check the cable and Ports

Yes, faulty cables can turn things upside down. Before you move on to further troubleshooting steps check the cable by plugging it into another device or best a wall charger. More than often the cables wear out in the course of usage.

Apple Lightning cables are notorious for tearing off at the edge of each connector. Also, ensure that you buy third party cables with due diligence, it is always advisable to buy an Apple Certified accessory.

The next best thing to do is borrow a cable from your family or friends, this way you can also rule out a fault in both the device and the cable. Also, try plugging into a different USB port, and last but not least check for loose connections.

Solution 3 – Problem with battery indicator

This is one of the weirdest things I have ever heard. Folks at the Apple forum have been saying that the entire fault lies with the iPad battery indicator. According to them the iPad charges as expected but the charging indicator doesn’t glow up.

Install a battery health app and see whether or not the Windows machine is charging your iPad, if yes make sure that the charge voltage is within the prescribed range.

Solution 4 – Restore your device on iTunes

I have sorted out a couple of problems on my iPhone after restoring it using iTunes. Even Apple care will ask you to reset and restore the device as a last resort.

Even if this step fails then you need to contact Apple Care. Before getting started with the restore process ensure that you take the backup. Follow the steps below to backup your iPad or iPhone and restore the same.

Solution 5 – Connect your Apple device to the Windows PC via the lightning connector

  1. Select Device tab from the top left corner.
  2. In this step click on Backup and wait for the process to end.
  3. Click Restore and once again wait for the process to end.
  4. Don’t worry, it is natural for the device to restart several times during the process.

If everything else fails and the iPad is not charging it’s time to call up Apple Service care. They would be able to pinpoint between an electric failure or any other issues with the hardware.

Solution 6 – Use the wall charger

If your iPad won’t charge while connected to the PC, perhaps the problem is related to insufficient power. Your PC can’t produce the same amount of power as a wall charger, and that might be the cause for this problem.

To fix the problem, connect the iPad to the wall charger and check if it works. If the device chargers while using the wall charger, it’s possible that your PC isn’t properly configured or it simply doesn’t deliver enough power to the USB ports.

In case you have an AppleCare+ plan it’s well and good if not compare the cost of repairing vs the cost of buying a new device. Also, request the Apple Care executive to clear the dust from the ports.

How to use multiple monitors like a single monitor on Windows 10

On previous versions of Windows, users who use more than one monitor were able to have their lock screen on each of the monitors that were connected to their PC. However, users who have Windows 10 on their PC, do not have access to this same feature.

The dual monitor’s lock screen feature does not work on Windows 10, as only one (the main monitor) will display the lock screen and the other monitor(s) will display a black screen.

According to Microsoft’s customer support, the dual monitor’s lock screen feature is not available on Windows 10 due to the OS being on an entirely new architecture. Reportedly, the team in Microsoft is still working on a solution to fix the issue.

How to fix black screen issues on Windows 10 dual monitors

  1. Install Nvidia Surround
  2. Install multi-monitor tweaking apps

Solution 1 – Install Nvidia Surround

For now, there are some workarounds that can resolve the problem to a degree. For instance, some users use the program called Nvidia Surround, which allows them to treat their multiple monitors as a single monitor. While this Nvidia feature is designed for gaming on multiple monitors, it can also be utilized to make your dual monitors lock screen more attractive.

Solution 2 -Install multi-monitor tweaking apps

Another method users have used to fix the black screen issue is by using third-party multi-monitor tweaking programs. Apparently, programs like these can allow you to configure your settings to create dual monitors lock screens. It is important to note, that third-party programs are not provided or supported by Microsoft. Therefore, it is never safe to completely trust a third-party program that tweaks your Windows settings.

Download them at your own risk as some of these programs may inject malicious code into your PC.

Nevertheless, using third-party programs seems to be the only way to solve the issue at the moment. It is rumored that the pro version of Display Fusion allows users to work around the issue. The program also offers many other features that allow you to tweak other parts of your Windows 10 OS, like Windows management, monitor controls, remote controls, power functions, and more. It is probably the closest thing you will find to a dual monitors lock screen solution on Windows 10.

Recommended Articles:

Fix: No Power Options in Start Menu [Windows 10]

A Windows 10 update can come with great improvements but also with bugs, including the missing power options in the Start Menu.

They are not just greyed out. The Shutdown, Restart, Sleep, and Hibernate options in the Power Options menu are missing completely. Instead, the Start Menu offered only the sign-out option.

What can I do if the power options are missing from Windows 10?

1. Run a series of scans in Command Prompt

  1. Go to Start, type cmd, and launch Command Prompt as an administrator.
  2. Type the following commands and hit Enter after each one:
  • sfc /scannow
  • powercfg –restoredefaultschemes
  • DISM /Online /Cleanup-Image /RestoreHealth

After running all the above scans, restart your PC and see if the power options have been restored.

2. Tweak the Registry

  1. Open the Group Policy Editor by typing gpedit.msc in Search and clicking Enter.
  2. Go to the following settings and double-click on it to open the configuration box: User Configuration/Administrative Templates/Start Menu and Taskbar
  3. Now, double-click on Remove and prevent access to the ShutDown, Restart…
  4. Select Not Configured or Disabled and click Apply.
  5. Exit after completing the steps above.

However, if you are using Windows 10 Home, the Group Policy Editor is not available, but you can still install gpedit separately.

But you can run regedit to open the Registry Editor and go to the following registry key: HKEY_CURRENT_USER/Software/Microsoft/Windows/CurrentVersion/Policies/Explorer

Ensure that a value named NoClose exists with a value of 0. Then, reboot your PC and check whether the Power Options are back.

3. Reset the PC to factory settings

Finally, if none of the previous steps worked for you, we can only suggest resetting your PC to factory settings.

We know this will cost you some time, as you’ll need to reconfigure settings and reinstall applications from scratch. However, this might be your only option, as the error is rather critical.

Let us know in the comments section below if you have any further questions or suggestions.

Devil May Cry 5 Black Screen and Other Issues [Fix]

Devil May Cry 5 has been out for a while, and many users are wondering how to fix Devil May Cry 5 black screen issues on their PC.

This is a somewhat common issue; many reported black screen while gaming. However, this issue will make your gaming sessions unplayable.

Luckily, there is a way to fix this problem, and in today’s guide, we’re going to show you the best ways to do it.

Why is my Devil May Cry 5 not responding?

  • Interference from the TableInputService can cause this problem.
  • Improperly configured dmc5config.ini file causes various issues.
  • Your graphics card settings can cause all sorts of problems.

How can I fix Devil May Cry 5 black screen issues?

1. Cap your FPS

  1. Download RivaTuner Statistics Server, install it in your preferred location
  2. Run it and input your FPS cap.
  3. That should fix the problem.

2. Disable TableInputService

  1. Open your Windows Task Manager.
  2. Click on the Services section;
  3. Locate the Process TabletInputService and disable it.

If you’re running the game on regular computers, you can clean boot your machine, which should help with Devil May Cry 5 grey screen issue.

3. How to fix Devil May Cry 5 Stuttering

  1. Locate your game folder in Steam/steamapps/common/DMC5
  2. Scroll until you’ve found dmc5config.ini and open it with any text editing program you have, keeping in mind to create a backup of this file.
  3. You’ll need to edit the following sections Capability=DirectX12 to Capability=DirectX11 and TargetPlatform=DirectX12 to TargetPlatform=DirectX11;
  4. Save changes.

4. Use the keyboard shortcut

  1. Start your game;
  2. Press Alt + Enter to make the game go into windowed mode;
  3. Access video settings in the game and adjust its resolution to your screen’s resolution;
  4. Save changes, you can now play the game in fullscreen mode.

This is a simple solution, and it can help with Devil May Cry 5 full screen issue on your PC.

5. Fix Audio Sync issues on Nvidia

  1. Open Nvidia Control Panel and select Manage 3D Settings;
  2. Click on Program Settings and select the game from the list;
  3. Set Vertical Sync to Fast and save your settings.

6. Cutscene black screen fix

  1. Access your DMC5 game directory in Steam/ steamapps/ common/ Devil May Cry 5
  2. Open the file dmc5config.ini and search for this line UseVendorExtension=Enableand change it to UseVendorExtension=Disable;
  3. Save your changes.

We hope these fixes were of help to you. In the meantime, we compiled a list of common glitches and bugs reported by players so far.

In case you have more problems, we suggest reading our PC crashes while gaming guide for more in-depth solutions.

How has your DMC5 experience been so far? Do let us know in the comments below.

iCloud For Windows Not Working or Won’t Open [Fix]

Many are using iCloud, but some users reported that iCloud for Windows is not working. This can be a problem and leave your files out of sync.

In the past, we wrote about how to download iCloud for Windows, but today we’re going to focus on how to fix its issues.

Why is my iCloud not opening on my computer?

  • Missing media components can sometimes prevent iCloud from running on your PC.
  • Sometimes Apple’s processes can interfere and prevent iCloud from working.
  • Using an outdated version of iCloud will cause this and many other problems.

What can I do if iCloud for Windows is not working?

1. Fix missing media features

  1. Click the Cortana button and input the program in the search box to open the Programs and Features window.

  2. Click Turn Windows features on or off.
  3. Now click the + to expand Media Features, which includes a Windows Media Player check box.
  4. Is the Windows Media Player checkbox selected? If not, select it and press OK to close the window.
  5. Restart the OS and add iCloud to Windows.
  6. If Windows Media Player is selected, you can reinstall it by deselecting its checkbox and restarting Windows. Then select the Windows Media Player check box again to switch it back on.

2. Enable iCloud Photos on Windows 10

  1. First, open the iCloud for Windows software.
  2. Click the Open iCloud text and then select the Photos checkbox.
  3. Press the Options button for Photos to open further settings.
  4. Select the My Photo Stream option.
  5. You can also press the Change button to choose an alternative default photos location in Windows.
  6. Click OK > Apply to confirm selected settings.

After doing that, check if the problem is resolved

3. Fix iCloud Photo Stream not syncing

  1. Open the Task Manager by right-clicking the taskbar and selecting Task Manager.
  2. Select the Processes tab and then search for Apple Photostreams Uploader and Apple Photostreams Downloader processes listed there.
  3. Right-click each of these processes and choose End task to close them.
  4. Open Run by pressing the Win key + R hotkey, input %appdata% and click OK.

  5. Click Apple Computer and open the Media Center directory in File Explorer, and delete everything in the Media Center folder.
  6. Reboot or Log out and back into Windows 10.
  7. Now open the iCloud control panel again, and double-check the Photos options to ensure they’re configured correctly.

4. Update iCloud for Windows

  1. Enter Apple in the Cortana search box and select Apple Software Update to open the window below.

  2. Then click the iCloud for Windows checkbox.
  3. Press the Install 1 item button to update iCloud.
  4. Or you could add the latest iCloud to Windows 10 by pressing the Download button on this page. Remove the antiquated iCloud software and replace it with the new version.

If iCloud for Windows is not working, that can be an issue, but we hope that these solutions managed to help you fix it.

Sadly, this isn’t the only issue you can encounter, and many reported that they can’t sign into iCloud on their PC. Fortunately, we have a special guide that addresses that.

Did you find a different solution? If so, share it with us in the comments section below.

KB4489899 brings some browsing issues on Chrome and Edge

Microsoft recently rolled out the Patch Tuesday updates for March 2019 and fixes some graphics and mouse performance issues caused by KB4482887.

Although these issues have been resolved, the update brings a bundle of other issues for Windows 10 users. 

Most of the users took it to Reddit and Microsoft’s forum to report the bugs they have experienced so far.

KB4489899 reported issues

1. Sub-folders disappear

A user has reported an issue that he has lost the sub-folders that he had under Favourites.

After I installed KB4489907 and KB4489899, I lost many of the sub-folders under Favorites main folder of MS Edge browser.

The bug is expected to be addressed in the next update.

2. Failed automatic update

While another user was trying to automatically install KB4489899 and KB4486553, he encountered and reported the following error.

2019-03 Cumulative Update for Windows 10 Version 1809 for x64-based Systems (KB4489899) -Error 0x8007371c

Although Microsoft has not released any fix for the bug you can still try the following workarounds to fix the issue.

Solution 1 – Change Windows Update settings

  1. Open the Settings app > Update & Security > Advanced options
  2. Disable the option ‘Give me updates for other Microsoft products when I update Windows
  3. Go to Delivery Optimization >Allow downloads from other PCs
  4. Disable the option

Solution 2 – Free up some space

  1. Type disk cleanup in the search bar.
  2. Choose Disk Cleanup > select your system drive >OK.
  3. Disk Cleanup will now scan your drive.
  4. Select the files you want to remove and click OK.

Solution 3 – Run Windows Update troubleshooter

  1. Open the Settings app and go to Update & Security section.
  2. Select Troubleshoot from the left pane.
  3. Select Windows Update from the list and click Run the troubleshooter button.

3. Blur delay issue

Another user took it to Reddit and stated that this Patch Tuesday update failed to resolve the blur decay issue that existed in the Action Center. The issue is preventing users from clicking on anything.

You did not fix the blur delay issue on Action Center. Yes, it may be just a UI issue but I just found out that you can’t click anything until the blur shows.

4. Chrome Text Rendering Bug

Furthermore, another user reported experiencing text-rendering issues in Chrome browser. Currently, the issue is no reported to exist on any other browser.

He further stated that he had to face a black screen for around 5 mins on the first restart after installing the update. The system was also slowed down that caused performance issues.

Anybody else suddenly having text-rendering issues in Chrome? Text on various websites is screwed up for me now, on and off (so right now, I can see it fine, but if I refresh, it’ll glitch out again for a bit).

Microsoft has not yet suggested any workaround for the issues.

5. Performance issues in games

Although Microsoft claimed that it has resolved the performance degradation issues in KB4489899. Still, a user had experienced that some of the games including BF V and PUBG were using more frames in full-screen mode.

Games are getting more frames. Both PUBG and BF V were tested. Something very odd: I’m getting crazy more FPS when I run PUBG in fullscreen windowed. like 20-30 more.

One of the possible solution to fix the issue is:

  1. Open the game properties.
  2. Navigate to the compatibility tab and disable Fullscreen optimizations. 
  3. Close the dialogue box and save the new settings.

Your game will now run better in Fullscreen mode. 

KB4489899 Known Issues

Microsoft has acknowledged a couple of known issues in KB4489899. The tech giant confirms that you might experience authentication issues in  Internet Explorer 11, application not responding, and audio issues. 

You can have a look at the complete list of known issues on Microsoft update page.

RELATED ARTICLES YOU NEED TO CHECK OUT:

Far Cry New Dawn needs new expeditions and a full sized map

Since its release, the newest title in the Far Cry franchise has garnered mixed reviews. Just like the post nuclear landscape, some like it, some don’t.

Radiation Can Shrink Maps?

The open world aspect of the game revolves around a re-imagined Far Cry 5 map, with some new areas becoming accessible, while others are now inaccessible.

It does offer a fresh feel to a familiar setting with fans of the previous installment. But is the post-nuclear torn landscape so rich in exploration as the previous title?

New Feature: Expeditions

A new feature in New Dawn is the expedition maps, that add more challenges and upgrades to your outposts. Expeditions are a series of closed-world adventures that take place outside of Hope County.

Take on the challenge for up to three difficulty levels, each level giving the player rare loot and upgrades for Prosperity itself.

Gamers need new expeditions

Users from both Steam and Ubisoft forums have shared their opinions and wishes regarding the exploration aspect of the game, and the prospect of new content.

While new content was featured in New Dawn, old and familiar elements have seemingly disappeared in a nuclear cloud. Steam users were quick to express their feelings towards the changes.

And airplanes. Those are gone from New Dawn and I miss them dearly. Helicopters just aren’t the same.

While the expedition map aspect adds more length and variety to the game, there’s not enough content to keep players in the saddle.

Dear devs, please add further Expeditions. Love this title, but sadly it is far too short. Would have loved a full sized map of this.

Others have stated that the game lack the weekly challenge feature that Far Cry 5 brough to the table, while support seems to be lacking.

Such a shame that there isn’t even a weekly challenge like in FC5. I would love to see further support for this title.

On Ubisoft’s forums, a community  manager has stated that there is no additional content planned for this title.

It’s been discussed already in this thread, but as things stand right now, there is no additional content planned for New Dawn.
While that is the case, rest assured that we are keeping our eyes on your ideas, concerns and other feedback and are making sure that they are seen.
It is not possible to realise each and every request in a game (past, present or future) – there are so many other factors that affect such decisions, it’s not as easy as that.
But you can be certain that your posts on these forums don’t go unnoticed.
As far as we are concerned, that is what these forums and other channels exist for. So by all means, keep the ideas coming!

In the meantime, you can share your thoughts on this topic. Did you enjoy the game? What’s your favorite aspect?

 RELATED STORIES TO CHECK OUT:

How to fix EasyAntiCheat error messages in Ubisoft games

Many For Honor players have complained about various EasyAntiCheat error messages lately. It seems that the anti-cheating tool erroneously blocks players from entering the game. After a thorough search on the web, it appears that this is actually a common issue on Ubisoft’s games.

Here’s how one player describes this issue:

easyanticheat banned 0006000043
Spent hours of playing, practicing to get better, with less than 50% of win rate, and get banned for just adjusting my controls. Basicly i just give away my $70 for this. help?

Fortunately, Ubisoft published a list of workarounds to fix the annoying EasyAntiCheat error messages on all its games.

How to fix EasyAntiCheat errors

1. Make sure that Uplay is up to date > verify the install status of the game.

2. If the error message occurs when you install the game, follow the troubleshooting steps listed on EasyAntiCheat’s help website.

3. If the error message occurs when you launch Uplay, follow the instructions listed on this support page.

4. If you get an error message while running the game (the most frequently encountered situation), this may be triggered by game integrity violations or multiplayer issues.

Fix EasyAntiCheat game integrity violation errors

1. Corrupted memory: This error can occur if the physically installed RAMs are defective and cause runtime memory corruption. Check that your game installation is up-to-date.

2.Corrupted packet flow: This error may occur if there is heavy packet loss in multiplayer. Try joining another multiplayer session with low latency.

3. Forbidden system configuration: This error is triggered if the Windows Kernel Patch Protection was been disabled or modified. This error is a strong indicator of a rootkit virus infection. Run a full system anti-virus scan or re-install Windows.

4. Forbidden tool: This error occurs when there’s a hacking tool running in the background. Make sure there are no unknown programs running with the Windows Task Manager. Restart Windows to fully unload the hacking tools from the system.

5. Internal anti-cheat error: A hack attempt to the anti-cheat core was detected. Check that your game installation is up-to-date.

6. Missing required file: You’re running an outdated game version or manually deleted game files on disk. Check that your game installation is up-to-date.

7. Unknown file version: You’re running an outdated game version or manually deleted game files on disk. Check that your game installation is up-to-date.

8. Unknown game file: An unknown file that is not part of the game installation was loaded from the game directory. Close the running game and then delete the file inside the game directory.

9. Untrusted system file: The game loaded a system dll that failed an integrity check. Use Microsoft’s System File Checker tool: launch Command Prompt as admin > type sfc /scannow and wait for the scanning process to complete. Then run a full anti-virus system scan. Additionally, make sure that all available updates have been installed through Windows Update.

Fix EasyAntiCheat multiplayer issues:

1. Host or peer validation failed

2. Kicked: EAC Disconnected: This message indicates a client-side connectivity issue with your PC and the EasyAntiCheat network. Make sure that your anti-virus and/or firewall is not blocking the connection to EasyAntiCheat’s DNS address: client.easyanticheat.net:80.

Always launch the game through Steam and not directly from the game directory. Otherwise, the game may start without anti-cheat protection, thus failing to authenticate with game servers.

Ultimately, we recommend using a third-party antivirus program that addresses your privacy concerns and protects you while you play online. It’s important to protect your device at all times and block any unexpected access to it.

⇒ Get TotalAV

Download Devil May Cry 5 on Windows 10/11 [Download link]

The long awaited sequel with our favorite demon hunter, Dante, is back, with old acquaintances and new characters jumping into the action.

The story takes place five years after the events of Devil May Cry 4, the rest of the story is left to the player to experience.

Interested in getting DM5? Use the download link below.

Gameplay-wise, the newest DMC brings a lot to keep you busy for hours. You’re sent right into the thick of the fighting, with hordes of demons and multiple types of attack.

Weapons get a nice boost, they’re flashy, brutal and so fun to wield. Dante now has the ability to combine his weapons into a motorcycle called Cavaliere. Nero will bring a new helping hand into the fight.

A new playable character, simply named V, will bring some interesting summoning abilities, that will be left to the player to use to his heart’s content.

We’re back to the style-rating combat mechanic we all love to improve, from previous instalments, this time with an added feature of the music changing in accordance to your perfomance, so if you wanna hit the high notes, do it with more style.

With the game‘s soundtrack being composed by talented individuals such as Kota Suzuki, Jeff Rona, Casey Edwards and Cody Matthew Johnson, we can expect some epic moments amongst the carnage.

DMC 5 options on Steam

The game is currently priced around at $67 USD, with the Devil May Cry 5 Deluxe Edition having a bit higher price but offering 13 items: Devil May Cry 5, Devil May Cry 5 – Alt Style Rank Announcers, Devil May Cry 5 – Alt Title Calls, Devil May Cry 5 – Live Action Cutscenes, Devil May Cry 5 – DMC1 Battle Track 3-Pack, Devil May Cry 5 – DMC2 Battle Track 3-Pack, Devil May Cry 5 – DMC3 Battle Track 3-Pack, Devil May Cry 5 – DMC4 Battle Track 3-Pack, Devil May Cry 5 – Gerbera GP01, Devil May Cry 5 – Pasta Breaker, Devil May Cry 5 – Sweet Surrender, Devil May Cry 5 – Mega Buster, Devil May Cry 5 – Cavaliere R.

Begin your road to bad-assery today and download Devil May Cry 5 on your PC!

Enjoy the game!

Windows 10 20H1 build 18855 is now available for Skip Ahead with more bug fixes

After Microsoft released the 19H1 build 18356 for Fast Ring Insiders yesterday, the company is now shipping the 20H1 build 18855 to Insiders on the Skip Ahead ring today. This new build from the 20H1 development branch is another minor update with no new features, though it brings several bug fixes that Fast Ring Insiders received in the 19H1 build 18353 last week.

Indeed, the build 18855 includes the same Windows Sandbox improvements that previously came with the 19H1 build 18353, including microphone support and various usability improvements. As for known issues, Microsoft still hasn’t fixed the GSODs caused by anti-cheat software, as well as the compatibility issue with Creative X-FI sound cards. You can check the full list of fixes and known issues below:

General changes, improvements, and fixes for PC

  • Notepad now automatically restores unsaved content when Windows restarts for updates.
  • We’ve enabled microphone in Windows Sandbox, which among other things will improve several accessibility scenarios.
  • We’ve enabled microphone in Windows Sandbox, which among other things will improve several accessibility scenarios.
  • We’ve added functionality to configure the audio input device via the Windows Sandbox config file.
  • We’ve fixed an issue in which the Windows Sandbox time zone was not synchronized with the host.
  • We’ve enabled the Shift + Alt + PrintScreen key sequence in Windows Sandbox which activates the ease of access dialog for enabling high contrast mode.
  • We’ve enabled the ctrl + alt + break key sequence in Windows Sandbox which allows entering/exiting fullscreen mode.
  • We fixed a recent issue resulting in some Insiders experiencing bug checks upon lid close, monitor plug, or monitor unplug.
  • We fixed an issue resulting in preferred region settings getting reset on upgrade in the last few flights.
  • We fixed an issue resulting in the Chinese version of multiple games not working.
  • We fixed an issue in memcpy that caused some drivers to hard-hang the system on load; this could manifest as a hang on upgrade, depending on the system.
  • We fixed an issue from recent builds that could result in monitors being missing from the built-in Color Management application.
  • We fixed an issue causing Explorer.exe to crash for some Insiders when Jump list content was updated.
  • We fixed an issue where text scaling values did not persist across upgrades for Win32 applications.
  • Due to a Narrator reading reliability issue for the “Change how capitalized text is read” feature, the feature has been disabled starting in build 18855.
  • We fixed an issue that could cause the touch keyboard to crash when switching from IME-based languages to another language.

Known issues

  • Launching games that use anti-cheat software may trigger a bugcheck (GSOD).
  • While this flight contains some night light improvements, we’re continuing to investigate reported issues in this space.
  • When performing Reset this PC and selecting Keep my files on a device that has Reserved Storage enabled, the user will need to initiate an extra reboot to ensure Reserved Storage is working again properly.
  • Some Realtek SD card readers are not functioning properly. We are investigating the issue.
  • Creative X-Fi sound cards are not functioning properly. We are partnering with Creative to resolve this issue.
  • We’re investigating an issue preventing VMware from being able to install or update Windows Insider Preview builds. Hyper-V is a viable alternative if available to you.
    Known issues for Developers
  • If you install any of the recent builds from the Skip Ahead and switch to either the Fast ring or the Slow ring, optional content such as enabling developer mode will fail. You will have to remain in the Fast ring to add/install/enable optional content. This is because optional content will only install on builds approved for specific rings.

There are not a lot of differences between 19H1 and 20H1 builds for now, and we hope things will get more interesting pretty soon. We’re still wondering what will happen when Microsoft will start releasing 19H2 builds later this Spring, as there will be two separate development branches to follow with probably different new features being tested with Fast Ring and Skip Ahead Insiders. In the meantime, let us know in the comments if you encounter any issues after installing the build 18855 on your PC.

Latest Windows 10 Insider build 18356 may have opted you out of the Insider program, here’s how to get back in

The Windows Insider program is far from an exact science when it comes to reliability for both the Windows engineers and the testers who often experience unforseen setbacks, delayed releases, buggy previews and in rare occasions a device crippling preview.

Yesterday’s Windows 10 Insider build 18356 is further evidence that being an Insider requires a certain level of patience and understanding, as users are now seeing evidence that when updating to the preview, their devices are being opted out of the Insider program, unable to receive new builds.

According to the head of the Windows Insider program Dona Sarkar, there is a work around for anyone experiencing the new issue and she has just addressed the complication via her Twitter handle.

As a refresher, to opt in, just go to Settings > Update & Security > Windows Insider Program > Get Started, and choose “Active Windows Development” (the Fast Ring). Remember if you have been on the Fast Ring but take this opportunity to join the Skip Ahead ring (now on 20H1 builds), you won’t be able to go back, so choose carefully.

The new auto selection problem doesn’t seem to be a widespread issue and is not noted in the Known Issues log in the release notes, but it seems like something that will and should be addressed by the time the next preview hits Insiders.

Microsoft 365 Government gets expanded Teams support, more

Following the launch of Microsoft 365 Government last year, Microsoft is announcing today that Microsoft Teams is now available in all Microsoft 365 Government cloud environments. This should push more US federal, state, local, tribal, or other territorial government entities to make the move to Office 365.

“While Teams has been available in the Government Community Cloud (GCC), today we are announcing the availability of Teams in GCC High and Department of Defense (DoD) environments,” wrote Catherine Boeger, General Manager of Microsoft 365 Commercial GTM. “Teams is built to meet the enhanced security and compliance requirements of government agencies, which can now better deliver against their mission and provide services to citizens and constituents.”

In addition to the expanded Microsoft Teams availability, the Redmond giant also reiterated today that its Outlook app on iOS and Android can now be used by Office 365 U.S. GCC High and DoD customers. That’s because the mobile client adopted a new architecture earlier this year that meets all the security requirements for these organizations.

Lastly, Microsoft is planning to improve its Microsoft 365 Government threat protection and intelligence tools later this year to help security teams address the rising volume of cybersecurity threats. “Soon we will launch new capabilities in Office 365 Advanced Threat Protection (ATP) P2 for GCC that automate investigation and remediation of threats in email—helping you further reduce the burden on your team and time to response,” Boeger explained.

Windows 10 Camera app is getting Office Lens integration

The Windows Camera app is getting support for Office Lens integration, as Italian blog Aggiornamenti Lumia reports that the update is rolling out to Windows Insiders. For those who might not be familiar, Office Lens is a tool that allows user to scan images from printed documents for a multitude of reasons, such as for the conversion of the physical document to to be editable in Word or to save the information in OneNote.

This update brings two core features of Office Lens straight to the Camera app—Document and Whiteboard scanning. This means that users can users can not only scan documents straight from the Camera app, but also handwritings and drawings on whiteboards onto an easy to read image.

We’re not exactly sure how this all works just yet, but it’s available to a handful of Windows Insiders right now, and we were able to download the update on a PC in the Skip Ahead ring. After a little bit of testing from Insiders, the update will eventually make its way to all Windows 10 users, making for a much quicker and more effective way to scan a document on the go.

Microsoft also recently added Office Lens support to the OneDrive application for iOS, bringing support for scanning documents and business cards for saving within the cloud storage service. With Office Lens integration being added each of Microsoft’s other apps, there seems to be less incentive for users to download the dedicated Office Lens app.

Windows Camera
Windows Camera
Price:
Free

World of Warcraft becomes first game to use DirectX12 on Windows 7, with more to come

Despite Windows 10 edging out Windows 7 as the prefered operating system choice for gamers recently, developers at Blizzard wanted to bring its Windows 10 gaming gains to Windows 7 users.

Recently, Blizzard began supporting DirectX 12 on Windows 10 and World of Warcraft gamers began benefiting from multi threaded compute processes that resulted in better frame rates across a myriad of configurations.

However, DirectX 12 isn’t offered on Windows 7 and in order bring a similar experience to its substantial gamer base on Windows 7, Blizzard developers and Windows engineers had to hash out an alternate set of work arounds.

Fortunately, the Microsoft and Blizzard were able to come up with a runtime solution that is now being released within the WoW: Battle for Azeroth game patch 8.1.3.

At Microsoft, we make every effort to respond to customer feedback, so when we received this feedback from Blizzard and other developers, we decided to act on it. Microsoft is pleased to announce that we have ported the user mode D3D12 runtime to Windows 7. This unblocks developers who want to take full advantage of the latest improvements in D3D12 while still supporting customers on older operating systems.

Yesterday’s patch becomes the first of its kind where a game developer port DirectX 12 to Windows 7. WoW gamers on Windows 7 will now gain similar Windows 10 improvements that include boosted frame rate performance, and other GPU related features.

To be clear, DirectX 12 cannot be manually installed on to Windows 7 machines but is coming via a game update. Microsoft is said to be working with a handful of studios to replicate Blizzards update patch process, so more DirectX 12 benefits are on their way to Windows 7 gamers.

Microsoft’s new Wireless Display app lets you cast your Windows or Android screen to an Xbox One, and it works with PC games

Microsoft has released a new app for the Xbox One console, which allows PC and Android screens to be projected to the system. The app allows the Xbox to act as a Miracast receiver, where an enabled device can connect to it to be used as a second display.

While screen projection is certainly a nice touch, the real feature here is being able to play PC games directly on the Xbox from within the new app. This is because the app sports controller support, allowing input from the Xbox gamepad to be sent straight to the PC. This allows for a multitude of PC-exclusive games to be played on the system, in a similar manner to how Xbox games can be streamed directly on the Windows 10 PC via the Xbox app.

You have to go though a hoop of steps to get this to work, with the first being to install the app directly on the Xbox. After it’s installed, you can open it on your Xbox, which will immediately become visible for other devices to connect to. One the blue cast screen is loaded, you can connect to it just like you would any other Miracast display, by going into the display menu (via the Win + P command) and select XBOXONE. If you intend to control the PC from the Xbox such as for playing games, make sure to tick the box to enable keyboard and mouse input from the Xbox.

When the app is loaded, the connect screen will look something like this.

If all goes well, you should be able to easily switch between mouse and gamepad inputs by simultaneously hitting the view and menu icons on the gamepad. From our end, we were able to get mouse input to work just fine on the Surface Go, but had trouble getting the gamepad to work in a game of Minecraft. On the other hand, Asphalt 9 worked just fine, so it’s hard to understand what the limitations are for the controller support. However, it doesn’t seem to work on Android devices at all as of the time of this writing.

From the PC side, you can also switch between various screen latency modes, Gaming, Working, and Watching videos from the connection bar at the top of the screen. Despite the latency option, though, watching protected content such as that on Netflix is a no go.

Wireless display connection through Miracast has worked on the Surface Hub 2 for some time, allowing for the projection of documents and presentations on the larger screen. Microsoft has brought the same technology to the Xbox One, but improving it even further by adding gamepad support.

While the gamepad can act as a keyboard and mouse combo, the same can’t be said true if you connect an actual keyboard and mouse to the Xbox One. On the other hand, as keyboard and mouse gaming is slowly becoming a thing for the system, perhaps it won’t be long until the feature does make its way to the app.

Wireless Display
Wireless Display
Price:
Free

iCloud Calendar Not Syncing With Outlook: How to Force it

Is your iCloud calendar not syncing with Outlook? This can be a big problem on any PC and make you miss important events.

The calendar also allows you to show and manage tasks in Outlook, but we covered that in a separate guide. Today we’re going to focus solely on the syncing issues, so let’s get started.

Why is iCloud calendar not syncing with Outlook?

  • Issues with Apple’s servers can sometimes cause sync issues with Outlook.
  • Temporary glitches in iCloud can sometimes cause this problem.
  • Missing updates can lead to this and other issues, so keep the iCloud client updated.
  • Your iCloud account might not be properly configured in Windows.

What can I do if iCloud calendar not syncing with Outlook?

1. Check iCloud’s system status

  1.  Visit System Status page in your browser.
  2. Check if there’s an issue with any of Apple’s services.
    icloud status icloud calendar not working
  3. If there are, wait until Apple resolves them.

2. Sign out and in

  1. Open the iCloud for Windows software.
  2. Next, press the Sign out button to log out.
  3. Select Delete from computer when prompted to keep a copy of your iCloud calendar and contacts.
  4. Wait a few minutes and then sign in to iCloud again.
  5. Select the Mail, Contacts, Calendars and Tasks option on the iCloud window to synchronize the Calendar.

After doing that, check if the problem with the iCloud calendar is still there.

3. Update your iCloud software

  1. Press Windows key + S and enter store. Select Microsoft Store from the list.
  2. Go to Library.
  3. Check if iCloud is on the list of updates.
  4. If so, install the update and check if that helps.

After doing that, check if the problem is still there.

4. Open Outlook with the/resetnavpane switch

  1. Close Outlook if it’s currently open.
  2. Press the Win key + R to open Run.
  3. Run the following command:Outlook.exe /resetnavpane outlook.exe resetnavpane icloud calendar

5. Edit the registry

  1. First, open the Mail applet in the Control Panel.
  2. Select to open the Mail Setup applet.
  3. Press the Show Profiles button and click Add.
  4. Then you can type a title in the Profile Name text box, and press the OK button.
  5. Now open the Registry Editor by pressing the Win key + R. Enter regedit and run it.
  6. Next, navigate to HKEY_CURRENT_USER\SOFTWARE\Microsoft\Office\Outlook\Addins\Apple.DAV.Addin
  7. Double-click LoadBehaviour on the right of the window. Enter 3 in the Data value text box if it’s currently at 0.

6. Check if iCloud is your default account

  1. In Outlook go to File and select Info.

  2. Head to Account Settings and then select Data Files.
  3. Now you can see if iCloud is the default Comments column account. If that’s the case, select an alternative account as the default one.
  4. Select Set as Default to adjust the default account settings.
  5. Then restart the Windows 10 OS.

These are a couple of fixes you can use if the iCloud Calendar is not syncing with Outlook.

Unfortunately, this isn’t the only problem you can encounter, and many reported that iCloud for Windows is not working.

What solution did you use to solve this issue? Let us know in the comments below.

DVD Not Working in Windows 10/11? Here’s how to fix it

If your DVD is not working, you might experience certain issues, especially if you have multimedia or other applications on DVD discs. This can be a problem for some users, and today we’re going to show you how to tackle this issue.

Many users, including myself, have been reporting problems with their DVDs in Windows 8 or Windows 8.1. If your DVD too is also not working, then follow the below steps needed to fix the problem.

Problems with the DVD drive not working in Windows 8 or Windows 8.1 are one of the most common and experienced by many users. We’re going to talk about this issue and try to offer some working solutions, as there are enough guides to help you get rid of it. The CD and DVD problems have occurred with Windows 8 more often than with Windows 8.1, so it seems that Microsoft has put an update in place.

My DVD drive installed Windows 8 and can also boot from DVD, but Windows 8 does not recognize the drive after the operating system is loaded. How can I get drivers loaded for this version of Windows? If I boot with the Windows 8 DVD in the drive, ignore the option to boot from the CD or DVD, when the OS loads, the drive is recognized and I can use it for that session. If I reboot without the DVD in the drive, it is gone again.

DVD drive not detected in Windows 10? Try these solutions

  1. Use Command Prompt
  2. Delete UpperFilters and LowerFilters DWORDs
  3. Run the troubleshooter
  4. Check your optical reader
  5. Change your group policy
  6. Reinstall your DVD drivers
  7. Install the necessary drivers manually
  8. Check for updates

There are many problems that can occur with your DVD drive, and in this article we’ll address the following issues:

  • Windows 10 DVD drive not reading discs – Several users reported that their DVD drive isn’t reading discs. This is usually caused by a bad driver or a dirty optical sensor.
  • DVD not playing Windows 10 – Several users reported that DVD isn’t playing on their Windows 10. This can be an annoying problem, but you should be able to fix it using one of our solutions.
  • DVD drive not showing – Sometimes your DVD drive might not even show up on Windows 10. If that’s the case, be sure to check your drivers. In one of our previous article we showed you how to fix missing DVD drive, so be sure to check that article for detailed explanation.
  • DVD writer not working properly – Several users reported that DVD writer isn’t working on their PC. If you have this problem, be sure to check your DVD configuration.
  • DVD not, found playing, reading, recognized, detected, ejecting, responding, spinning, displaying files, loading – There are many problems that can occur with your DVD. However, you should be able to fix most of these problems by using one of our solutions.
  • DVD not autoplaying Windows 10 – Many users reported that DVD AutoPlay isn’t working for them. In one of our previous articles we explained how to fix AutoPlay problems for DVDs, so be sure to check it out.
  • DVD not appearing in my computer – Another problem that many users reported is that DVD isn’t appearing on their PC. This can occur if your DVD drive isn’t connected properly or if your drivers aren’t compatible with Windows 10.

1. Use Command Prompt

This is what one user is saying and many others are having similar problems like this one. Users affected by this problem said that they saw the following message: “Windows cannot start this hardware device because its configuration information (in the registry) is incomplete or damaged. (Code 19).” Now, let’s see what we can do to fix it. First of all, try the following:

  1. Run Command Prompt as an administrator. To do that, right click the Start Button and choose Command Prompt (Admin) from the menu. If you don’t have Command Prompt on the list, you can also use PowerShell (Admin).
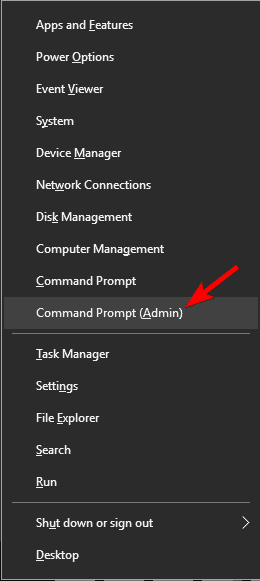
    command prompt DVD not reading
  2. Type reg.exe add HKLMSystemCurrentControlSetServicesatapiController0″ /f /v EnumDevice1 /t REG_DWORD /d 0x00000001 and press Enter.
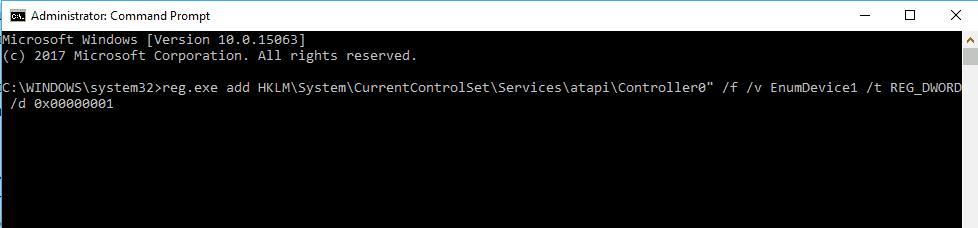
    reg.exe command prompt DVD not autoplaying Windows 10

After doing that, restart your PC and check if the problem is fixed.

2. Delete UpperFilters and LowerFilters DWORDs

If the previous solution didn’t fix your problem, then try checking if all the cables are properly put in place, just in case this might be caused by a rather stupid problem that you overlooked.

Also, you can check for the DVD drive in BIOS. After restarting the Windows 8/Windows 8.1 computer, enter the BIOS screen (usually by pressing F10 multiple times). If it is absent, then it is a hardware problem, and not a software one, and you’ll need to contact your vendor. Now, here’s another potential fix:

  1.  Type regedit in the Search bar and press Enter.
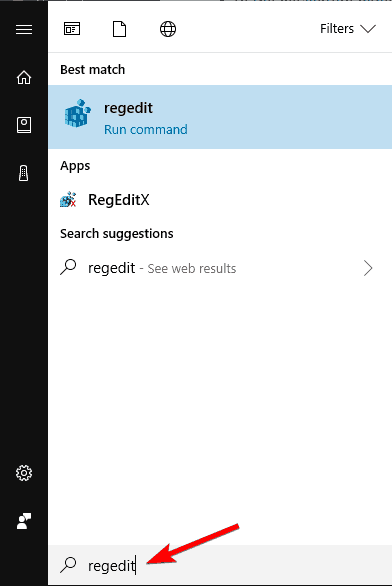
    regedit search DVD writer not working properly
  2. In the navigation panel, locate and then click the following registry subkey: HKEY_LOCAL_MACHINESYSTEMCurrentControlSetControlClass{4D36E965-E325-11CE-BFC1-08002BE10318}.
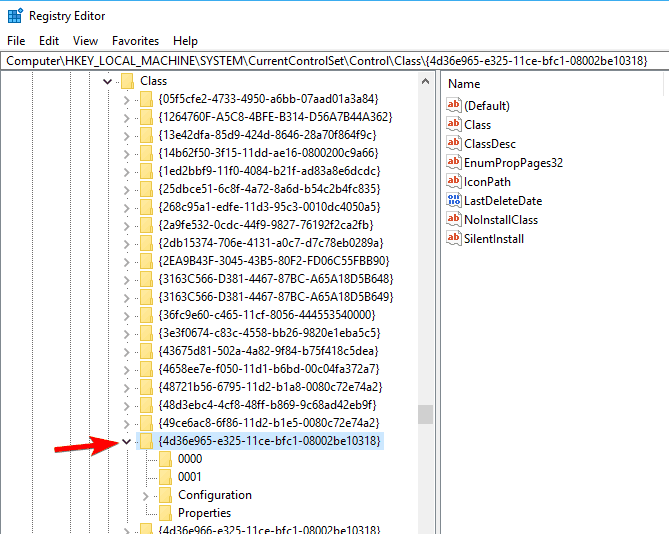
    registry key DVD not playing
  3. In the right panel, locate one or both of the keys UpperFilters and LowerFilters. You can have only one, or you can have both. Select these keys, right-click them and choose Delete.
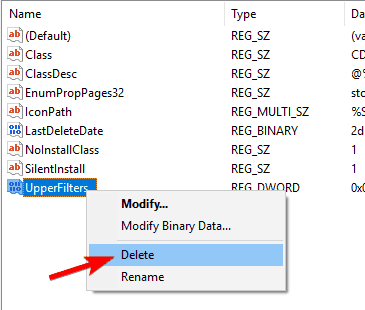
    delete DWROD DVD not autoplaying Windows 10
  4. When you are prompted to confirm the deletion, click Yes.
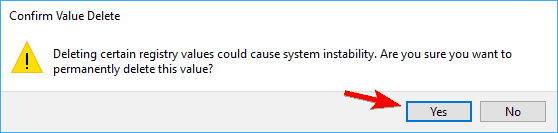
    delete confirm DVD not appearing in my computer
  5. Exit Registry Editor.
  6. Restart the computer.

3. Run the troubleshooter

Sometimes you might be able to fix the problem with the DVD drive simply by running the hardware troubleshooter. To do that, follow these steps:

  1. Press the Windows Key + R to open the Run dialog box. Type control in the Run dialog box, then press Enter or click OK button.
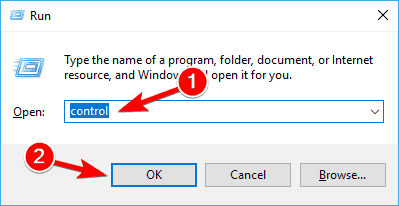
    control run Windows 10 DVD drive not reading discs
  2. In the Search box in Control Panel, type troubleshooter, and then click Troubleshooting.
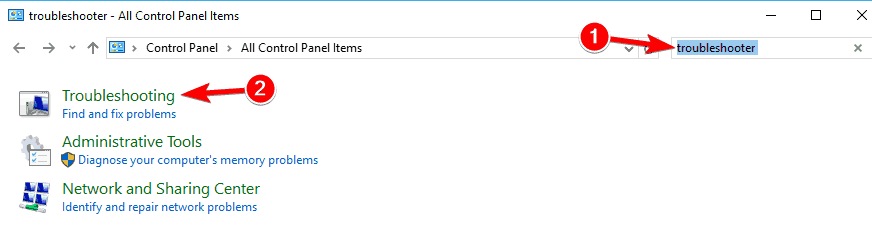
    troubleshoot DVD not playing Windows 10
  3. Under the Hardware and Sound section, click on Configure a device. If you are prompted to enter an administrator password or provide confirmation, type the password or provide confirmation.

After the troubleshooter is finished, check if the problem still remains.

4. Check your optical reader

If your DVD is not working, the problem might be your optical reader. Sometimes the reader can move and remain in a new position causing this problem to appear.

To fix the issue, you need to use a small object and move it to the original position. Keep in mind that this is rather dangerous, and if you don’t know what you’re doing you can easily permanently damage your DVD drive and your PC.

Several users reported that cleaning their optical reader fixed the problem. There are many ways to do that, and the best one might be to open your DVD drive and clean it with a cue tip.

If you’re not comfortable with removing your DVD drive, you can always use a disc that comes with a small brush that automatically cleans your DVD.

If cleaning the DVD drive doesn’t work, your DVD might be faulty, and the only choice is to replace the entire DVD drive.

5. Change your group policy

According to users, if DVD is not working the problem might be related to built-in burning features. However, you can resolve this problem by making few changes in Group Policy Editor. To do that, follow these steps:

  1. Press Windows Key + R and enter gpedit.msc. Press Enter or click OK.
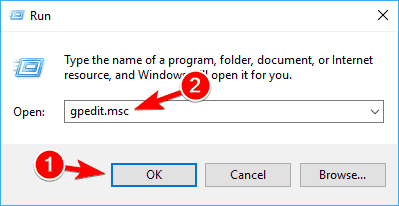
    gpedit.msc DVD not autoplaying Windows 10
  2. In the left pane navigate to User ConfigurationAdministrative TemplatesWindows ComponentsFile Explorer. In the right pane, double click on Remove CD Burning features.
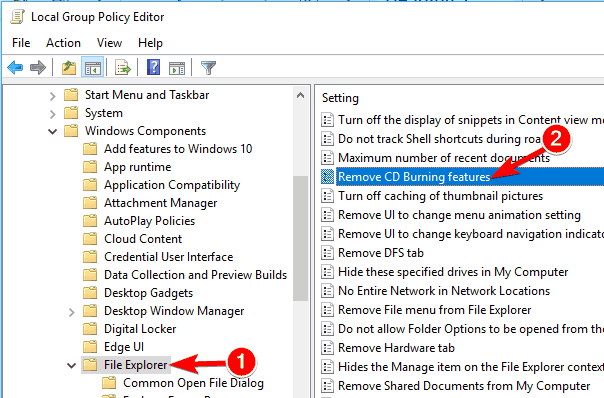
    remove CD burning features DVD not appearing in my computer
  3. When the Properties window opens, select Enabled and then click on Apply and OK.
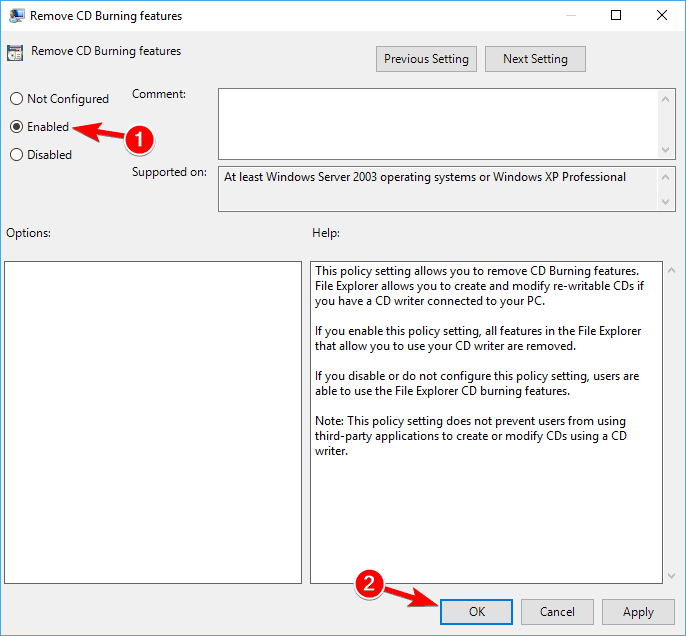
    enable policy Windows 10 DVD drive not reading discs

If you can’t access Group Policy Editor, you can disable this feature using Registry Editor. To do that, follow these steps:

  1. Open Registry Editor.
  2. In the left pane, navigate to HKEY_CURRENT_USERSoftwareMicrosoftWindowsCurrentVersionPoliciesExplorer key. In the right pane, look for NoCDBurning DWORD and double click it. If this DWORD isn’t available, you’ll need to create it manually.
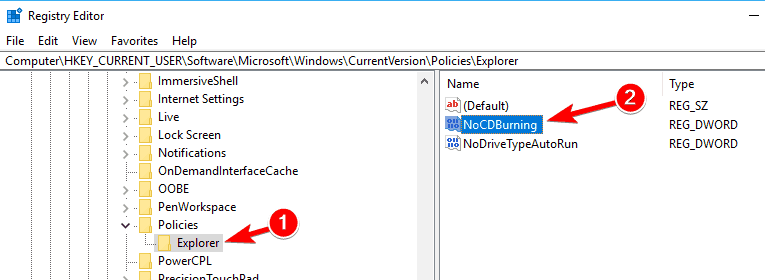
    registry NoCDBurnining DVD not playing Windows 10
  3. Set the Value data to 1 and click on OK to save changes.
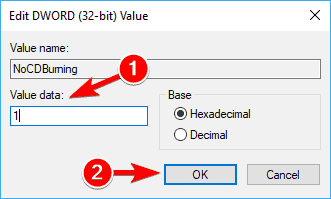
    value data DVD drive not showing

After making the changes, restart your PC and check if the problem is resolved.

6. Reinstall your DVD drivers

Few users reported that they fixed the problem simply by reinstalling their DVD driver. If DVD is not working, you can fix the problem by doing the following:

  1. Open Device Manager. You can do that by pressing Windows Key + X and choosing Device Manager from Win + X menu.
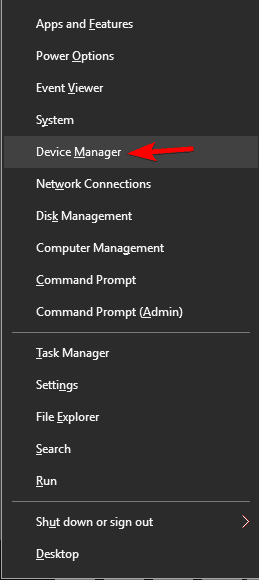
    device manager DVD drive not showing
  2. When Device Manager opens, locate your DVD drive and right-click it. Choose the Uninstall device.
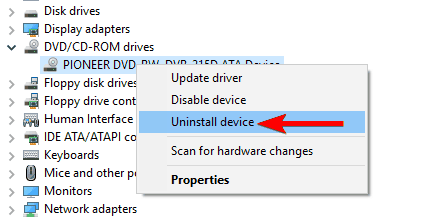
    uninstall device DVD writer not working properly
  3. When the confirmation menu appears click on the Uninstall button.
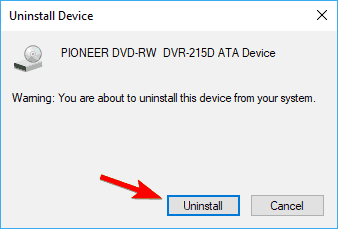
    confirm uninstall DVD not found

Once the driver is removed, restart your PC. When the PC restarts, Windows will automatically install the default driver and your DVD drive should start working again.

7. Install the necessary drivers manually

If your DVD isn’t working on Windows 10, the problem is most likely related to your drivers. This is a minor problem that can be fixed by manually installing the missing drivers. To do that, follow these steps:

  1. Open Device Manager. Locate your DVD drive on the list. If there’s a small question mark or an exclamation mark next to it, it means that there’s a problem with your DVD drive.
  2. Right-click your DVD drive and choose Update driver.
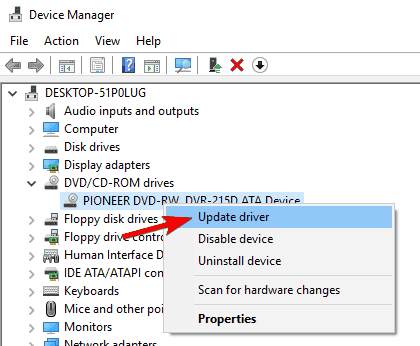
    Windows 10 DVD drive not reading discs
  3. Click on Browse my computer for driver software.
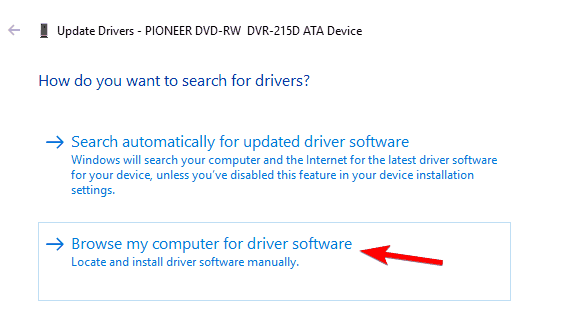
    browse my computer for driver software DVD not playing Windows 10
  4. Now click on Let me pick from a list of available drivers on my computer.
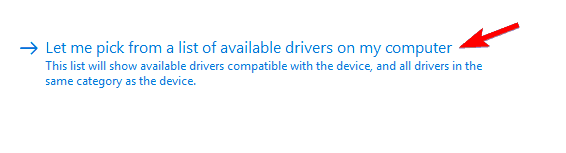
    let me pick from a list of available drivers DVD drive not showing
  5. Select the desired model from the list and click on Next.
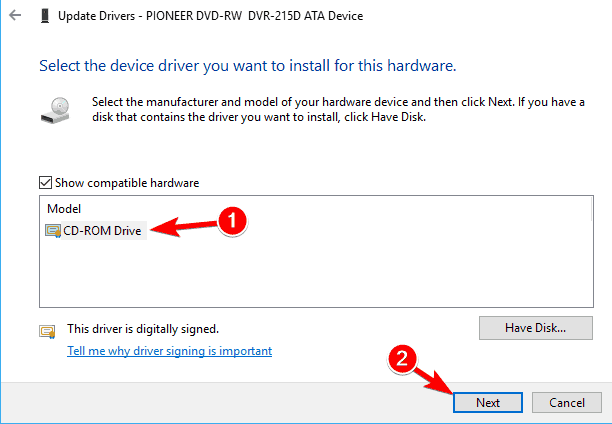
    CD-ROM Drive DVD writer not working properly

After installing the driver manually, the problem with your DVD drive should be resolved.

8. Check for updates

If the DVD is not working, perhaps you can fix the issue simply by updating Windows 10. Windows 10 already updates itself automatically, but you can manually check for updates by doing the following:

  1. Open the Settings app.
  2. Head over to the Update & Security
  3. Now click Check for updates

If any updates are available, they will be downloaded automatically in the background. Once the updates are downloaded, restart your PC and check if the problem is still there.

If all of the above still didn’t solve your problem, then have a look at this guide from HP that is meant for HP and Compaq computers with Windows 8, but there’s a high chance it could work for you, as well.

Microsoft To-Do updates on Windows 10 & web with new flagged email feature

The Microsoft To-Do app updated today for the web and Windows 10 devices with the new flagged email smart list feature.

This new feature activates automatically when a user logs in with the same account information used for Office 365 and can be enabled from within the app’s settings.

After it’s enabled, a new Flagged Email smart list will appear within the left column that will pull the 10 most-recently flagged emails from the last two weeks. Each email will appear in To-Do as a task that can be managed, deleted, or checked off.

The Flagged Email smart list will not function for those that aren’t using a connected Office 365 account.

Have you had a chance to use this new feature yet? Share your thoughts on it with the community in the comments below and then follow us on Pinterest for more Microsoft tech content.

Download Windows 7 KB4489885, KB4489878 on Patch Tuesday

Well, the March 2019 Patch Tuesday edition didn’t bring any major updates to Windows 7 users.

While there are two new updates available for download (KB4489885 and KB4489878), they only focus on adding general security updates to various Windows components.

The changelog is rather “thin” and reads as follows:

Addresses an issue that may prevent the Event Viewer from showing some event descriptions for network interface cards (NIC). 
Security updates
to Windows App Platform and Frameworks, Windows Cryptography, Windows Hyper-V, Windows Storage and Filesystems, Windows Fundamentals, Windows Server, Windows Kernel, Windows MSXML, and the Microsoft JET Database Engine

It is worth mentioning that security update KB4489885 brings one additional bug fix that fixes the issue causing the abbreviated Japanese Era names to be incorrect.

Windows 7 KB4489885, KB4489878 bugs

These updates also come with a known issues. Microsoft acknowledged that after installing one of these patches, Internet Explorer 10 may have authentication issues.

As the Redmond giant explains, this problem occurs when two or more people use the same user account for multiple, concurrent login sessions on the same machine.

When this happens, you may experience one of the following issues: cache size and location show zero or empty, keyboard shortcuts may not work properly, webpages may intermittently fail to load or render correctly, credential prompts will keep on popping and you won’t be able to download files from the internet.

In order to avoid this problem in the first place, the best solution is to simply use different user accounts for each user.

If you already downloaded KB4489885, KB4489878 and you encountered additional bugs, do let us know in the comments below.

KB4489868, KB4489886, KB4489871 and KB4489882 [Download links]

If you’re running older Windows 10 versions, there are four new cumulative updates that you can install on your computer.

Each OS version has its own cumulative update.

If you’re interested in downloading the stand-along update package, follow the direct download links listed below.

March 2019 Patch Tuesday update download links

The March 2019 Patch Tuesday edition brought only “thin” updates, so to speak. In other words, the new patches feature less than 5 bug fixes and improvements on the official changelog.

More specifically, there are two common fixes and improvements that these four cumulative updates share.

Microsoft has fixed the software issues causing error 1309. At the same time, the tech giant added a series of security updates to many Windows 10 components and programs.

Addresses an issue that may cause users to receive “Error 1309” while installing or uninstalling certain types of MSI and MSP files.

Security updates to Internet Explorer, Microsoft Edge, Microsoft Scripting Engine, Windows Shell, Windows App Platform and Frameworks, Windows Input and Composition, Windows Storage and Filesystems, Windows Wireless Networking, Windows Fundamentals, Windows Hyper-V, Windows Server, Windows Linux, Window Kernel, Windows MSXML, and the Microsoft JET Database Engine.

It is worth mentioning that KB4489871 and KB4489882 also fixed the issues that causes users to receive an erroneous return value of “0” when calling _isleadbyte_l().

Have you already installed the latest Patch Tuesday updates on your Windows 10 machine? Tell us more about your experience in the comments below.

Download KB4489899 to fix graphics and mouse issues in games

If you’re running Windows 10 v1908 on your computer, you can now check for updates and download KB4489899.

If you’re also a gamer, you’ll definitely want to download this patch as soon as possible as it fixes a series of annoying bugs limiting your gaming experience.

Download KB4489899 [Direct download links from Microsoft]

As stated above, you can also download the updates automatically via Windows Update.

Hit the ‘Check for updates‘ button and the updates will download automatically.

KB4489899 changelog

This cumulative update brings only 3 bug fixes, as well as some security improvements.

Here’s the official changelog:

  • Addresses an issue in Microsoft HoloLens with tracking and device calibration that has affected some users. You may notice improvement 10-15 minutes after installing this update, but we recommend resetting the holograms for best results. 
  •  Addresses an issue that may cause users to receive “Error 1309” while installing or uninstalling certain types of MSI and MSP files.
  • Addresses an issue that may degrade graphics and mouse performance with desktop gaming when playing certain games, such as Destiny 2, after installing KB4482887.
  • Security updates to Microsoft Edge, Internet Explorer, Microsoft Scripting Engine, Windows Shell, Windows App Platform and Frameworks, Windows Kernel-Mode Drivers, Windows Server, Windows Linux, Windows Hyper-V, Windows Datacenter Networking, Windows Storage and Filesystems, Windows Wireless Networking, the Microsoft JET Database Engine, Windows Kernel, Windows, and Windows Fundamentals.

Keep in mind that some users may experience audio issues and browsing slowdowns after installing this patch.

Chrome’s new smooth scrolling feature lands later this year

Google’s Canary Build has revealed Microsoft’s plans to add the smooth scrolling functionality to the newly designed version of Edge. Users will be able to scroll using scrollbars when the main thread is busy.

The decision will impact Mac, Windows, Linux,  Android and Chrome OS as the platforms that support Chromium based browsers. 

We have reported earlier that the upcoming Edge browser will be based on Chromium. The news was later confirmed as Microsoft officially started contributing to the open-source project.

We can expect significant improvement in the native Chrome browser itself as a result.

Recent reports suggest that Microsoft is planning to fix the scrolling issues in Chrome and other Chromium based browsers by adding a new feature. The news came into the spotlight as a result of recent commit by Microsoft to the Gerrit source code management of Chromium.

Instead of a bug, users have reported the smooth scrolling to be a feature request accepted by the company.

Microsoft will enhance the feature on Windows devices because we known the smooth scrolling feature is already available in Google Chrome. The company said that Windows 10-based accessibility client apps will be compatible with the latest version of Edge.

How to enable smooth scrolling in Google

Google is working on the feature and it is now available in the Chrome‘s Canary build. Users can enable the smooth scrolling feature if they have the new Canary build. Move towards the Chrome flags and look for Smooth scrolling. Your scrolling on the browser will be improved as you have enabled the feature.

The news surfaced online as Microsoft is ready to release the latest Chromium-based version of Edge. A few days ago, a leaked screenshot unveiled the UI of the Chromium based Edge browser.

Reports confirm that the new browser will be equipped with a lot of latest capabilities, features, and improvements. Some of these features include Chromium for Arm, touch optimization, and browser-accessibility features.

Up until now, Microsoft has not allowed Chrome users to have access to test or enable the smooth scrolling feature.  The feature is currently under development and we can expect it to be released in the second half of the year.


Minecraft will join the Xbox Game Pass catalog on April 4

Minecraft, the popular sandbox game that Microsoft acquired back in 2014 is finally coming to Xbox Game Pass. The Xbox One version of the game will join the Game Pass catalog on April 4, but Microsoft is leaving Minecraft for Windows 10 out of the party for now.

“Since its launch in 2009, the Minecraft community has remained one of the most active and passionate in gaming, attracting over 91 million players of all ages from virtually every country in the world. Those joining through Xbox Game Pass will enter a vibrant, global community that plays across 20 unique platforms like Windows 10, Nintendo Switch, Xbox One, and mobile. Xbox Game Pass players will also gain access to an ever-expanding array of content for purchase via the in-game Minecraft Marketplace, which contains over 1,000 pieces of content from 60 distinct creators,” explained Parimal Deshpande, Director of Product Marketing for Xbox Game Pass.

Minecraft was one of the few first-party games that Microsoft had yet to add to its Xbox Game Pass subscription service, and there are still a couple left such as Forza Motorsport 7, an Xbox Play Anywhere title released last year. We hope this will change soon so Xbox Game Pass finally becomes the only service you need to play all Xbox Game Studios games from the past, present and future.

Halo: The Master Chief Collection is coming to the Windows 10 Microsoft Store and Steam, with Halo: Reach to be added soon

The rumor was true, Halo developer 343 Industries has been secretly working on a PC version of Halo: The Master Chief Collection, and the anthology will be released on the Windows 10 Microsoft Store and Steam later this year. That’s pretty great news for PC gamers, as the last Halo game to be released on PC was Halo 2 back in 2007.

Halo: MCC on PC will include the same content as the Xbox One game, but 343 Industries’ Brian Jarrard said today that the games will actually roll out one by one. Another great news that Jarrard announced today is that Halo: Reach, Bungie’s latest Halo game released back in 2010 on the Xbox 360 will soon be added to Halo: MCC on Xbox One and PC. On Xbox One, the multiplayer content will be free for everyone who owns Halo: MCC, but the campaign and Firefight modes will be available as a paid DLCs (all content will be available for free for Xbox Game Pass subscribers).  This will be different on PC as Halo Reach will actually be the first game to be released on this platform, and the PC version will include all game content.

The Master Chief’s arrival on PC will happen in stages with each title releasing one by one over time -– giving the development teams the ability to ensure each one is right, while giving players a chance to jump in right away, rather than having to wait for the entire suite of games to be completed. Our current plan is for this journey to begin with the launch of Halo: Reach – the fictional beginnings of Master Chief’s saga – with the rest of the titles following in chronological order thereafter. Halo: Reach, Halo: Combat Evolved, Halo 2, Halo 3, Halo 3: ODST (Campaign), and Halo 4 will each be available for individual purchase within MCC as they become available. And each game will evolve and grow over time with community input.

Jarrard said today that Halo: MCC will be released on PC later this year, but didn’t share an ETA. We also don’t know if the Microsoft Store version will support Xbox Play Anywhere and cross-platform multiplayer between Windows 10 and Xbox One, but 343 Industries will likely share more details in the coming months.