Call of Duty: Black Ops 6 was released on October 25, 2024, for PC and console and it was first received by New Zeeland gamers due to the time zone. Although the date has passed, you should learn this trick because it applies for many of the game releases, including to play BO6 Early on Xbox.
Click on the Xbox logo in your Activision account to connect it to your Xbox account if you didn’t do that already.
Click on the blue Profile button, then click on the Basic Info from the left.
Select Edit next to your address and add a New Zealand address, then change your location to New Zealand using the dropdown menu.
Click Save.
Open your Xbox console and go to the Settings menu.
Go to System and click on Language & location.
Select Location and click on New Zealand.
Select Restart Now on the right to restart your Xbox console and save your changes.
This Xbox New Zealand trick will help you play BO6 Early on Xbox and it will apply to many other releases.
How to play BO6 Early on PC?
The New Zealand trick doesn’t work on PC, at least not on the Steam or Battle.net distributions. However, you can do it on the Microsoft Store version. First, perform the steps 1 to 5 in the first solution to change the country and region to New Zeeland in your Activision account. Next, perform the following steps:
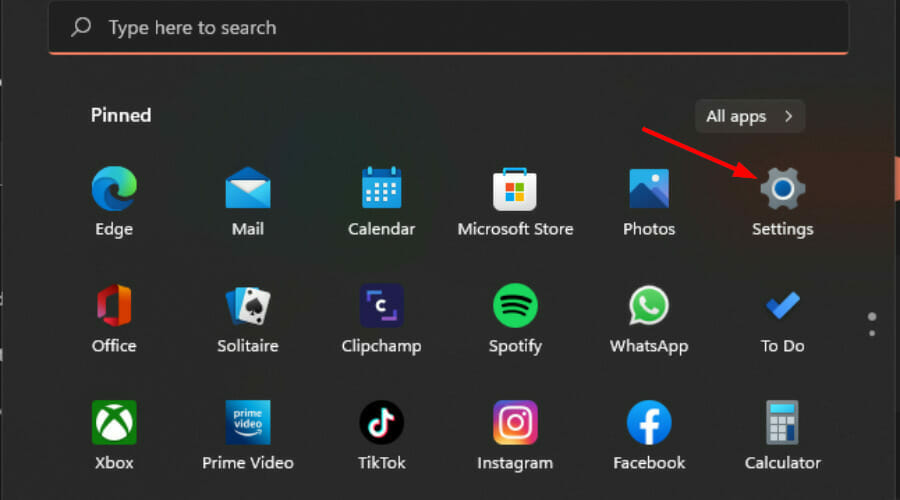
Click the Start menu and select Settings.
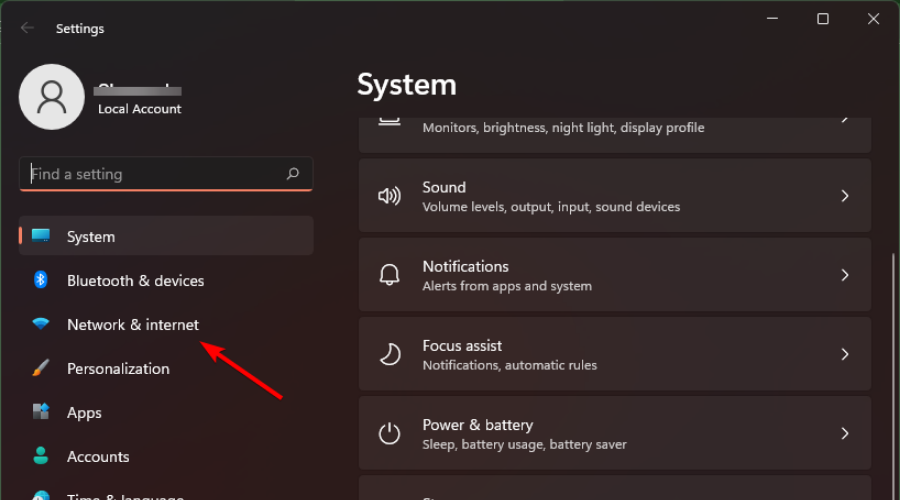
Click Time & language from the left pane, then select Language & region.
Look for Region and select New Zeeland in the drop-down menu.
Restart your PC and start your game on your PC.
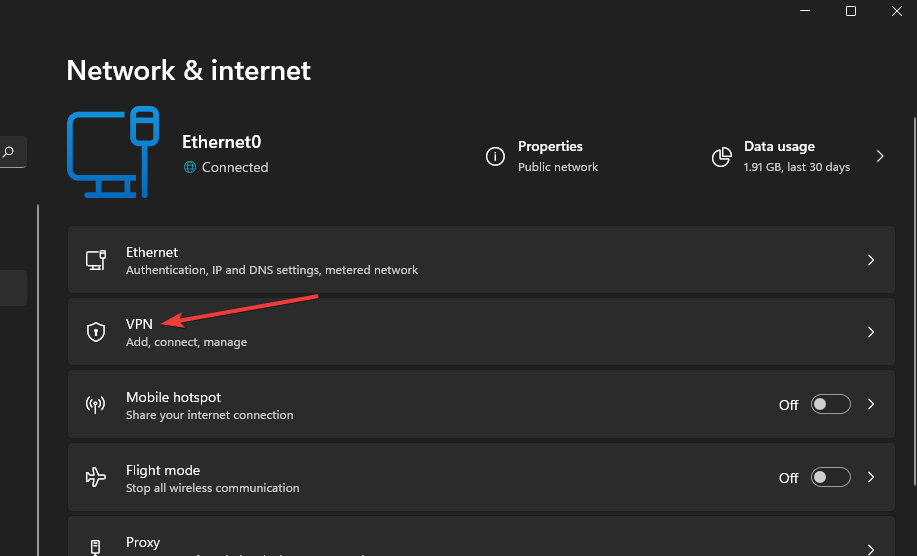
If this doesn’t work, try using a VPN and select a server from New Zeeland. Here’s our list of the best VPN tools for PC and select the right one for your needs.
So, even if you missed playing BO6 early on Xbox, you can use the above trick for many other impending gaming releases and have a taste of your favorite titles hours ahead of other gamers in the world. This will also work if BO6 is not available yet in your region.
We must also warn you that this trick won’t work for any game. Some developers may have detecting systems to check for region changes and may ban such accounts. Therefore, we recommend using a different account, not your main one to test this trick. Also, if a lot of players will do the same, the servers will be very crowded and may even crash, so use it responsibly.
Did the New Zeeland trick helped you play Call of Duty: Black Ops 6 early on Xbox? Let us know in the comments below.
For some users, Chrome Incognito mode keeps popping up, and this can be frustrating and disrupt your workflow. However, there are ways to fix this, and today we’re going to show you how to do it.
What can I do if Chrome Incognito keeps popping up?
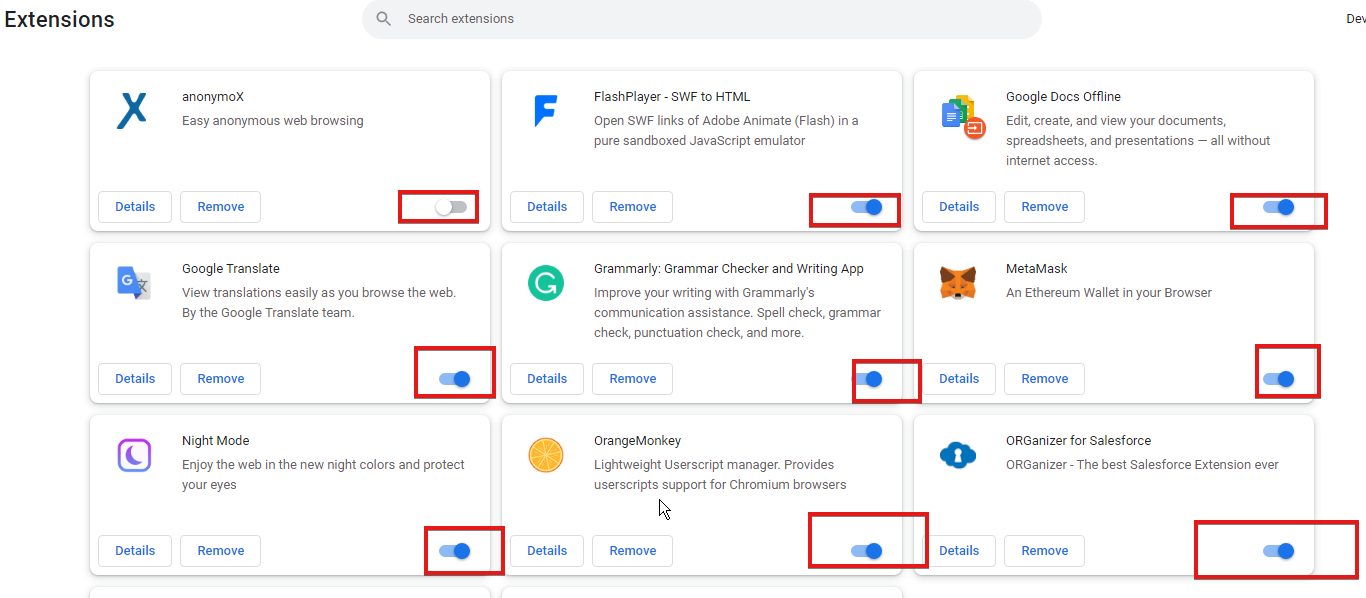
1. Disable all extensions
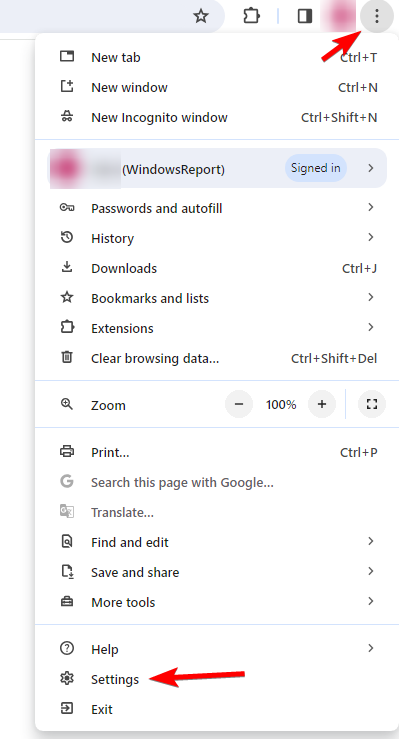
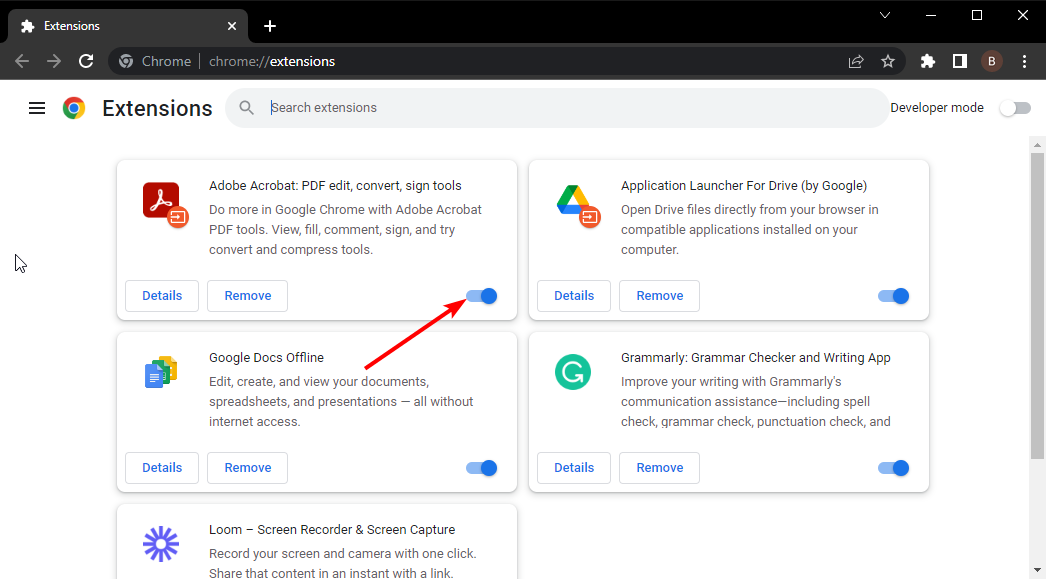
Click the Menu button in the top left corner. Choose Extensions and then select Manage Extensions.
Next, click the switch button next to all installed extensions to disable them.
Check if the problem appears.
If not, enable extensions one by one until you find the one that caused the issue.
2. Reset Chrome
Click the Menu button and then choose Settings.
Next, select Reset settings in the left pane.
Click Restore settings to their original defaults.
Keep in mind that this process will delete all your browsing history, saved logins, and extensions, so it might be best to sync them beforehand.
The BO6 error code 2901 usually occurs when you are playing from a Game Pass shared account. Activision basically doesn’t allow sharing the game and you get the Black Ops 6 error code 2901. The same error appears in MW3 with the same reason. If you’re not in this situation, the error may also be caused by problematic cache and cookies or account issues.
How do I fix the BO6 error code 2901?
1. Clear the browser’s cache and cookies
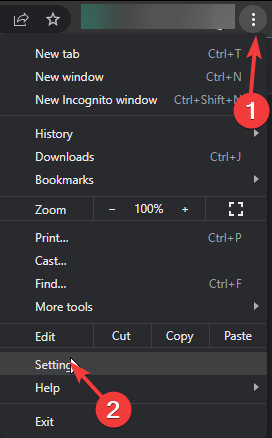
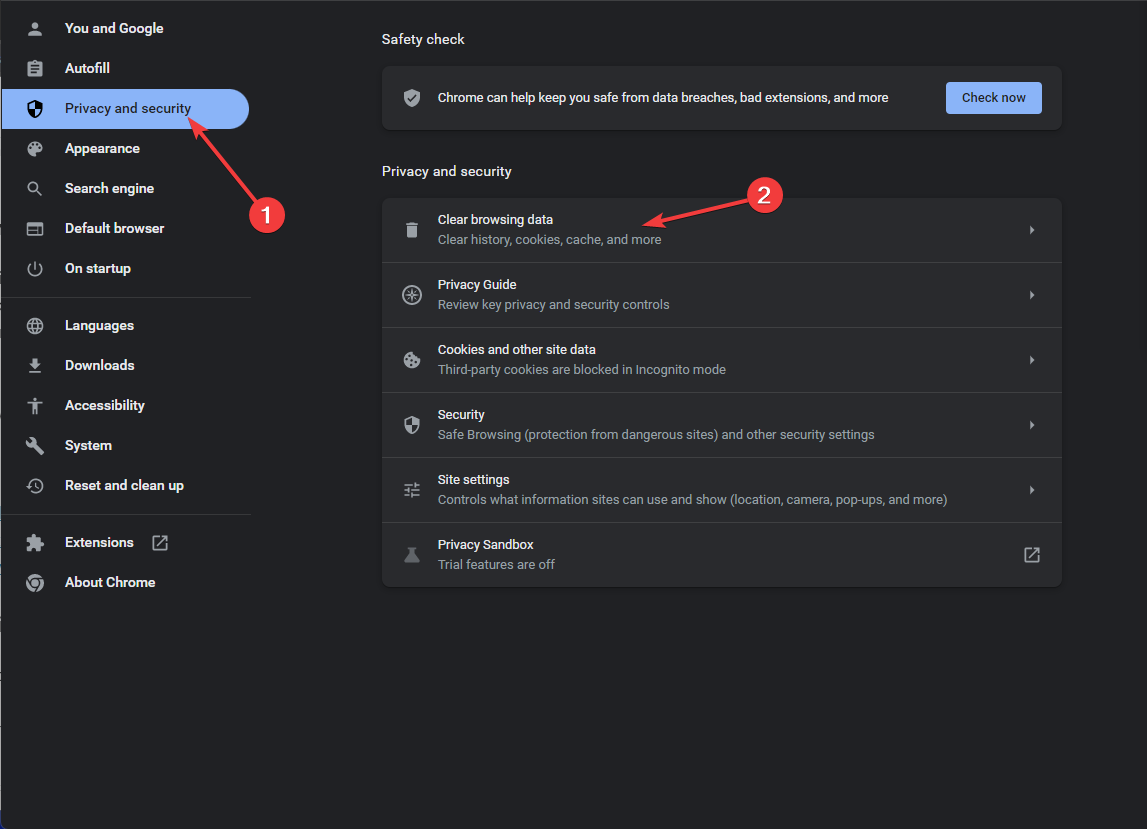
In Google Chrome, click the menu button and select Delete browsing data.
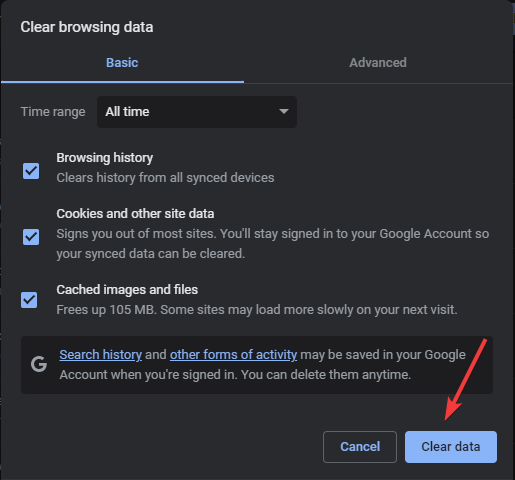
Now, select the Time range to All time, check the Cookies and other site data and Cached images and files and click on Delete data.
This is a troubleshooting suggestion from the Activision support department. They also recommend clearing the cache of the profile.callofduty.comand page. We have shown above how to clear the cache and cookies from Chrome, but the process is similar on other popular browsers.
You may also try a different browser or opening the login page on an incognito page.
2. Make sure that you have a stable internet connection
The BO6 error code 2901 may also be caused by problems with the servers or your local connection. To eliminate the first potential problem, open a browser and go to the Activision’s BO6 status page, or check the Downdetector CoD page to see if there is anything wrong with their online services.
If the services are online and working, check your connection speed on a dedicated website and see if it’s on par with the specifications of your internet contracted services.
In case you’re using a Wi-Fi network, try switching to cable or disconnect some of the devices in your local network.
If the BO6 error code 2901 still persists after these fixes, check out our complete guide on Black Ops 6 not working for more step-by-step solutions.
3. Contact Activision support for BO6
If none of the above solutions worked for you, feel free to visit the Activision support page and contact them to fix the BO6 error code 2901. Keep in mind that BO6 is now in Open Beta phase and it is prone to a lot of bugs and problems.
To conclude our guide, you can’t play Black Ops 6 on a Game Pass shared account. Try creating a new account to fix the BO6 error code 2901. If that’s not the case, and you didn’t manage to fix the problem with the solutions above, try reinstalling the game on your PC.
If you have any questions or other suggestions on how to fix this error, let us know in the comments below.
Users can often encounter the error code VAL 5, and this error will prevent you from playing Valorant entirely. Luckily, there are a few methods that you can use that can help you fix this error.
Why do I keep getting error code VAL 5?
This issue appears if you’re logged in to your account from multiple devices. If the Vanguard service isn’t running or if it’s not installed, you’ll also get this message.
How can I fix the Valorant error code VAL 5?
Before we try more complex solutions, try switching to an Ethernet connection. If you’re already using it, try using Wi-Fi instead. Restarting the router can also help.
1. Enable VGC service
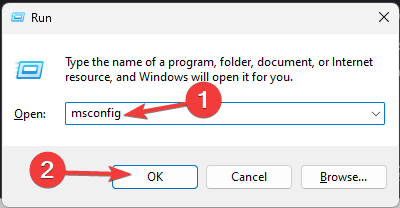
Press Windows key + R and type msconfig. Click OK.
Navigate to the Services tab.
Check Hide all Microsoft services.
Locate vgc service and click the checkbox next to it to enable it.
Click on Apply and OK and restart your PC.
2. Reinstall Vanguard
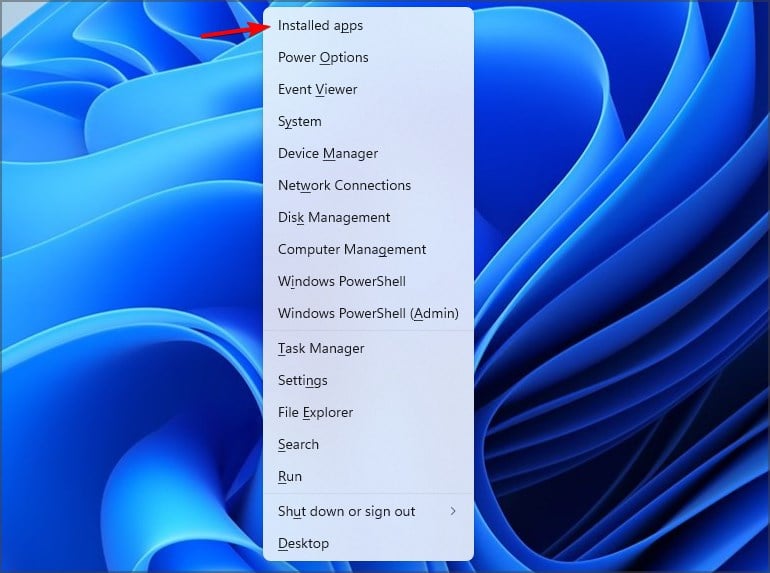
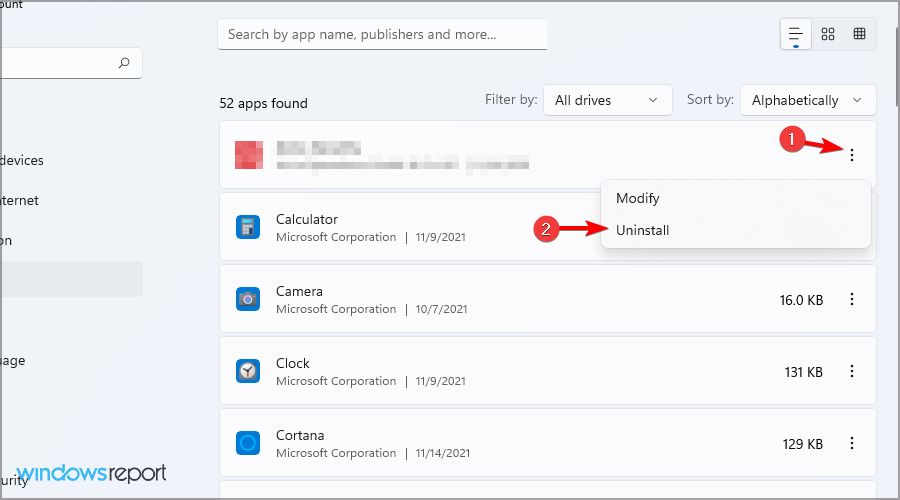
Open Settings go to Apps and then select Installed apps.
Locate Vanguard on the list.
Click the three dots next to it and choose Uninstall.
Next, start Riot Client. You’ll be prompted to update.
Install the update and check if the problem is gone.
3. Log out of all Riot accounts
Log out of all Riot accounts on your PC.
If you have multiple devices signed to your Riot account, log out as well.
After doing that log back in and check if the problem is gone.
This isn’t the only error you can encounter, and we already wrote about Vanguard Error 84 and Valorant error code VAL 62 in our previous guides, so feel free to check them out.
Sometimes Firefox Incognito mode is not working, and this can be a problem. However, there are a few solutions you can use to fix this problem, and today we’re going to show you how to use them.
Why is Incognito mode not working in Firefox?
If you have Always use private browsing mode setting enabled, you won’t be able to start Incognito mode manually on Firefox.
What can I do if Firefox Incognito mode is not working?
Before we start, ensure that you have the latest updates for Firefox installed.
Change history settings
Click the Menu icon in the top right and choose Settings.
Select Privacy & Security in the left pane.
Locate the History section in the right pane.
Uncheck Always use private browsing mode.
Restart your browser.
If Firefox Private Browsing is not working, it’s because your browser is configured to run in this mode, so it’s impossible to start it separately. After disabling it, the issue should be gone.
What is Firefox’s New private window shortcut?
Firefox uses Ctrl + Shift + P. To learn more, we have a whole guide dedicated to the Firefox Incognito shortcut, so don’t miss it.
One way to force Incognito mode is to change history settings and enable Always use private browsing mode. Alternatively, you can adjust the Firefox shortcut like this:
Locate Firefox shortcut.
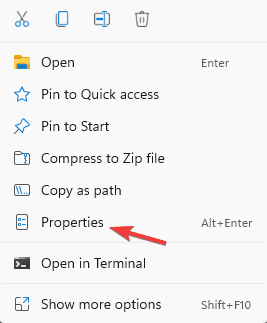
Right-click it and choose Properties.
Locate the Target field.
After the quotes, add -private-window. Remember to add space between the end quote and -private-window.
Save changes.
Now whenever you use this shortcut it will start Firefox in Private browsing mode.
As you can see, if Firefox Incognito mode is not working, it is most likely that you have private browsing enabled in your settings, but you can disable it with just a few clicks.
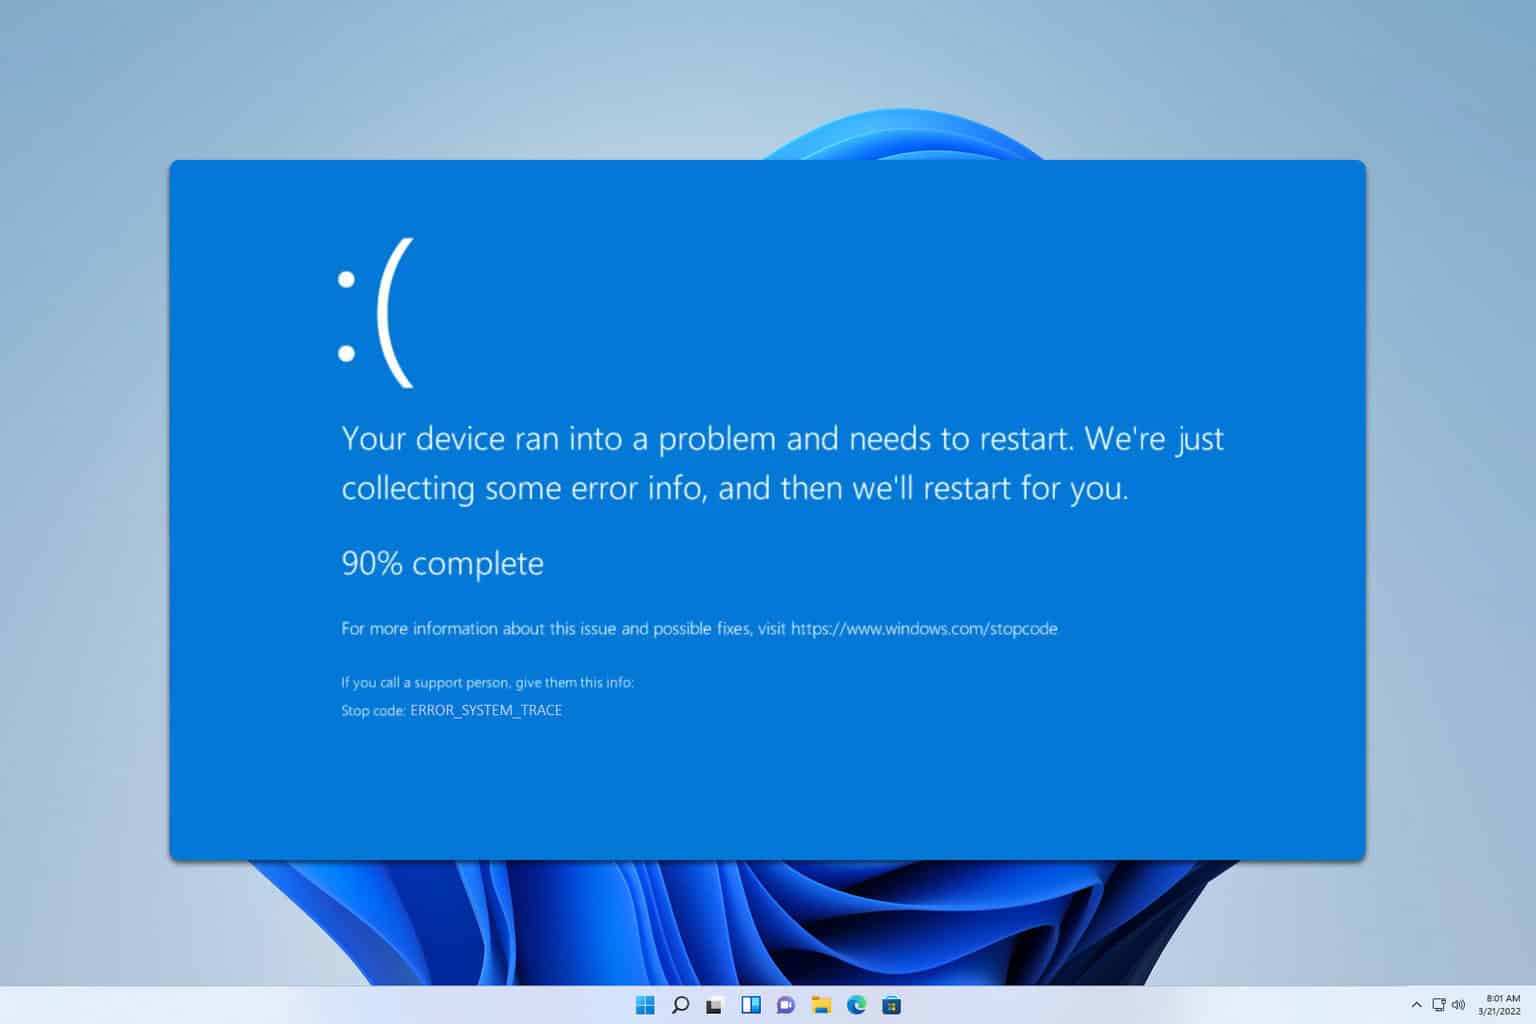
Error_System_Trace comes with the following message 150 (0x96) System trace information was not specified in your CONFIG.SYS file, or tracing is disallowed, and this is a developer error. However, if you encounter it as a user, we have a few solutions that can help you fix it.
How can I fix Error_System_Trace?
1. Use hibernation in VM
In the VirtualBox Manager, right-click your virtual machine.
Select Close and then choose Save the Machine State.
After doing that, check if the problem is gone.
This message appears when the guest system is put to sleep, but using the hibernate option as an alternative usually works.
2. Change resource allocation
Turn off your virtual machine.
Next, right-click the VM and choose Settings.
Go to the System tab and adjust the Base Memory. Assign about half of your actual RAM to it.
Next, go to the Processor section and decrease the number of CPU cores allocated to your VM.
Remember that you need to leave CPU cores and RAM available to the host PC to prevent issues such as these from occurring.
Error_System_Trace is a vague error, and it rarely appears, but if you ever encounter it in your VirtualBox logs, you might be able to fix it with these steps.
This isn’t the only issue you can encounter, we recently wrote about Refs_File_System error as well as Mailslot_File_System, so don’t miss them for more information.
In our Error_Is_Subst_Target article we covered a similar issue, so don’t miss it for more information.
Have you run into the PUBG Error “Could not connect” warning message on your PC, Xbox, or PlayStation? Try these proven fixes to get back to your gameplay.
Since PUBG is an online game, it relies heavily on server connectivity. This is one of the most common errors that stop you from logging in and as a result, PUBG won’t launch.
I’ve tested many fixes for this pressing issue to discover these sure-shot methods. So, let’s get down to business!
Potential Causes
If you’re seeing this error, you’re most likely from a country where this game app is banned or not yet available. However, if you believe you’re from one of the allowed countries and still facing the issue, these are the root causes you need to look into:
PUBG servers aren’t working or facing extraordinary user loads.
The PC antivirus or firewall is blocking the game app.
Your ISP might be blocking PUBG.
There’s a problem in the internet configuration, like DNS and IP addresses.
The game setup files are corrupted.
Too many bandwidth-hogging background processes might be blocking PUBG from accessing its own servers.
How To Fix PUBG Error “Could Not Connect”
Find below the tried and tested approaches to fix this annoying PUBG server connectivity issue:
Perform These Basic Checks and Fixes First
Check PUBG Server Status: Visit this PUBG X handle to skim for posts that indicate server maintenance, unexpected downtimes, or updates. If servers are down, take a coffee break and check back later.
Restart the internet modem or router.
Relaunch the game.
Restart Steam.
Close apps that consume high bandwidth.
Launch Game With the EXE File: On the Steam app, go to the Steam Library, right-click on the PUBG game title, hover your cursor over Manage, and select Browse local files. Windows File Explorer will open the locally installed files and folders. Enter the Binaries directory to find the game EXE. Double-click on it to launch it. You can also use this local storage address to find the EXE file:
Use a system-wide VPN software, like Windscribe to access the PUBG game server if you’re playing it on a PC. Don’t forget to switch to a premium server that offers a low latency ping and highspeed browsing experience.
Also, you can switch to an address closer to a PUBG game server location. For example, if you’re in New York, use high-speed VPN software to switch to IP addresses for states like Iowa, Virginia, Texas, Ohio, and California.
Here are more servers for you if you’re located in any other continent than the Americas:
São Paulo, Brasil
Ireland
London, UK
Sydney, Australia
Mumbai, India
Frankfurt, Germany
Seoul, Korea
Singapore.
These are the states where the game developer has placed the game servers. The closer you’re situated to the server, the better speed and ping you’ll get.
Its user interface will open in the System Tray area.
It should be in the Disconnected state.
Click on the toggle button to activate the app’s services.
It should now show the Connected status.
Click on the Cogwheel icon in the bottom right corner.
A context menu will open. There, select the 1.1.1.1 with WARP option.
Add PUBG EXE to Local Antivirus and Firewall
Though the local antivirus and firewall shouldn’t tag the PUBG game EXE as malware and block it from accessing the web, you shouldn’t take any chance. Here’s what you need to do:
Whitelist an App in Antivirus
Bring up the Windows Settings app by pressing the hotkey Windows + I.
Click on the Update & Security settings menu.
Select Windows Security on the left side navigation panel.
Now, click on the Virus & threat protection option on the right.
Scroll down to the Manage settings link and click on that.
You should now see the Virus & threat protection window.
Scroll down to the bottom and click on the Add or remove exclusions option.
On the Exclusions screen, click on the Add an exclusion button.
Choose File in the context menu.
Use the Windows File Explorer dialog box to navigate to the PUBG game EXE file.
Select that and click Open.
From now on, the built-in Windows Security app won’t block the PUBG EXE from running or accessing the web.
If you’re using an additional antivirus on top of Windows Security, go to the Settings or Options menu of the software to look up the Exclude apps or Allow app through the antivirus option.
Whitelist an App in Firewall
Open the Windows Security menu in Windows Settings.
Click on the Firewall & network protection option on the right side below the Protection areas.
Select Allow an app through firewall on the next dialog box.
You should enter the Allowed Apps window.
Click on the Change settings button in the top right corner.
Now, find the PUBG game app in the Allowed apps and features table and checkmark it.
Click OK to save the settings you just changed.
Change Network DNS Address
You’re probably using the default DNS settings set by the ISP. Here’s how you can modify them to set up a custom address that’s better:
Right-click on the Internet access or Wi-Fi icon in the System Tray.
Choose the Open Internet & Network Settings option.
The Network status dialog will open.
Scroll down to the Advanced network settings section and click Change adapter options.
Select the active network on the Network Connections dialog box, right-click, and select Properties.
Double-click on the Internet Protocol Version 4 option. If you’re using IPv6, click on the appropriate protocol below IPv4.
On the IPv4 Properties dialog, select Use the following DNS server addresses option and enter the following into the respective fields:
Primary: 8.8.8.8 (Google DNS)
Secondary: 8.8.4.4 (Google DNS)
Primary: 208.67.222.222 (OpenDNS)
Secondary: 208.67.220.220 (OpenDNS)
Use any of the above pairs.
Click OK to save.
Switch to IPv4 from IPv6 or Vice Versa
Since the IPv6 adoption rate is very low, devices using this protocol often get faster access to game servers than the conventional IPv4 protocol. Also, networks built for IPv6 adoption come with modern networking technologies, helping the users enjoy low latency and efficient bandwidth.
If you’re facing the PUBG Error: Could not connect issue on an IPv4 network, do the following:
Login to the router administrator console by entering 192.168.1.1 in your browser’s address bar.
If this doesn’t work for you, look at the back of the router for the admin console’s IP address.
Enter your user ID and password to access the router control portal.
Click on the Advanced tab at the top of the page and select IPv6 from the left-side navigation panel.
Use the toggle button to enable IPv6.
Choose the type of connectivity, like Static IP, PPPoE, Dynamic IP, etc., from the Internet Connection Type drop-down menu. If you don’t know which one to use, contact your ISP.
Hit the Connect button.
Click Save.
Now, go to the Network Properties dialog box on the PC. You’ll find the steps in the previous troubleshooting method above in this guide.
Uncheck the checkbox for the IPv4 protocol.
Click OK to save the new configuration.
Restart the Wi-Fi router.
Update PUBG From Steam
Open Steam on the PC and go to the Library tab at the top.
Now, select the PUBG game title in the left-side navigation panel.
Right-click and select Properties from the context menu.
You should see the General dialog box.
Navigate to the Updates dialog.
Click the Automatic Updates drop-down menu and select the High Priority option.
Select the Background Downloads drop-down menu and choose the Allways allow background downloads option.
Steam will update PUBG in no time if any updates are pending.
Verify Game Files on Steam
Navigate to the General dialog for the PUBG game title on Steam.
You’ll find the steps in the earlier section.
Now, select the Installed Files option from the left-side navigational panel.
Hit the Verify integrity of game files button on the right.
Clear PUBG Steam Cache
Click on the Steam icon in the top-left corner.
Select Settings.
Go to the Downloads menu on the left.
Click on the Clear Cache button in the right-side menu.
Now, visit this directory on your Windows PC:
C:\Program Files(x86)\Steam\appcache
Delete everything within the folder.
Now, attempt the Verify Game Files on Steam method as shown earlier.
Restart Steam and launch PUBG.
Here are the directories for the Steam cache for other supported devices:
If you’re facing the PUBG Error: Could not connect warning message on a gaming console, you can try the following instructions:
Resetting an Xbox
Press the Xbox button on your controller to open the guide.
Navigate to Profile & system.
Select Settings.
Scroll down and choose System.
Select Console info.
Choose Reset console.
Select Reset and keep my games & apps.
You can now test the game’s performance.
Resetting a PlayStation 4
Go to the Function screen or area and select Settings.
Scroll down and select Initialization.
Choose Restore Default Settings from the options.
Go through the list of items that will be affected by this action. Then, click Restore.
Confirm your choice by selecting Yes when prompted.
Wait for the PS4 to reset, which may take a few minutes.
After the reset is complete, your PS4 will restart with default settings.
Before attempting this method, ensure you’ve got the following handy:
Your PS4 login details.
Wi-Fi network SSID and password.
Uninstall and Reinstall PUBG
Finally, you can delete the game app from your PC or console and re-install it again through the cloud download method.
Uninstall Using Steam
Go to the PUBG game title in the Library tab of Steam.
Right-click and hover the cursor over Manage.
Click on the Uninstall option.
Once uninstalled, look up PUBG in the Steam Library and hit the Install button.
Remove From Xbox
Use the navigation buttons on your Xbox controller to select My games and apps on the Home Screen or Dashboard.
If you can’t find My games and apps there, tap the Xbox button on the game controller.
The left-side navigation panel will open.
Scroll down once to select My games & apps.
Press A on the controller to access this menu.
Select See all and press A again.
You should now see all the installed games.
Select the PUBG game title and press the three-line menu button on the controller.
Scroll down to the Uninstall option in the context menu that shows and press A.
Select Uninstall all on the warning dialog box.
Once removed, open the Microsoft Store app on the device and look up PUBG.
Select the game from the search results page.
Choose Install on the right side and press A to start the installation process.
Uninstall From PlayStation 4
Open the PS4 Library app.
Select Games in the left-side navigation panel.
On the right, select the PUBG game title and press X.
A right-side navigation panel will show up.
Select Delete and press X to confirm.
To install PUBG again, go to the Purchased menu in the PS4 Library app.
Find the PUBG game title, select it, and press X.
Select the Download button in the context menu and press X again to start the installation process.
Summary
You can fix the PUBG Error “Could not connect” on your PC, Xbox, or PS4 with these troubleshooting ideas. However, you should try them in the order they appear to avoid missing out on the simplest solutions and save time.
Comment below to let me know the method that worked for you.
The KERNEL_WMI_INTERNAL BSoD comes with the 0x0000014A error code and it’s caused by an internal kernel WMI subsystem encountering a fatal error. The Windows Management Instrumentation (WMI) service is providing information about the system and its components to other applications and services. It’s failure is mostly caused by system files corruption.
How do I fix the KERNEL_WMI_INTERNAL BSoD?
1. Restart the WMI service
Press the Windows key + R to open the Run dialog box.
Type services.msc and press Enter to open the Services window.
Scroll down and locate the Windows Management Instrumentation service.
Right-click on it and select Start from the context menu.
Also, make sure that the service is set to Automatic, then click on Apply and OK to save this change.
Wait for the service to restart and check if the error persists.
This solution might look too obvious, but the KERNEL_WMI_INTERNAL BSoD can be triggered by the WMI service not set as Automatic.
2. Rebuild the WMI repository
Click the Start button, type cmd and select Run as administrator from the results.
Type or paste the following command and press Enter to rebuild the WMI repository: winmgmt /resetrepository
Wait for this process to end and restart your PC.
Rebuilding the WMI repository is another tested fix for the KERNEL_WMI_INTERNAL BSoD so try it out.
3. Run a SFC scan
Click the Start button, type cmd and select Run as administrator from the results.
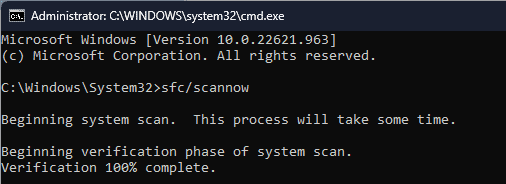
Type or paste the following command and press Enter to run it: sfc /scannow
Wait for the scan to finish and restart your PC.
If the KERNEL_WMI_INTERNAL BSoD is caused by system file corruption, running a System File Checker scan is the best way to fix the problem.
4. Use System Restore
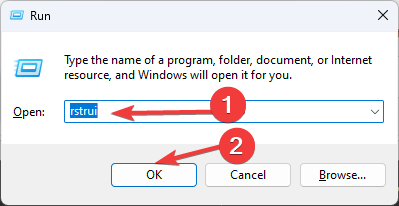
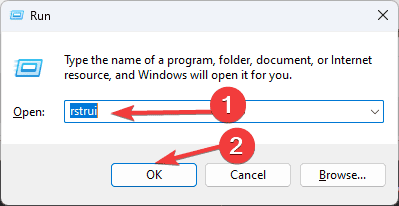
Press Win + R to launch the Run command dialog box, enter rstrui.exe in the text field, and hit Enter to launch System Restore.
Click Next at the bottom to proceed.
Now, select a restore point before the KERNEL_WMI_INTERNAL BSoD started occurring, and click on Next.
Click on Finish to start the restore process.
If the KERNEL_WMI_INTERNAL bug check is not caused by hardware issue, restoring your system before it started showing up, will fix the problem. However, keep in mind that this action will undo any installations you’ve performed since the restore point.
We hope that our solutions helped you fix the KERNEL_WMI_INTERNAL BSoD. If the WMI files are missing, the highlighted link will lead you to our guide on how to fix this problem.
You might also be interested in our guide on the WMIADAP file and usage, because it is a WMI component..
To learn how to train Copilot agents better, Microsoft will allow admins to have transparency on granular metadata.
Admins can see detailed information (metadata) about things like where data came from and what custom actions agents took. This gives them a clear view of these details, which helps them understand and manage everything better.
A recent entry to the Microsoft 365 Roadmap describes the new transparency, which is due to be released in December for Microsoft Copilot on web and desktop devices.
Admins have transparency on granular metadata (data source, custom actions) for agents.
With this transparency, admins will also be able to verify exactly how these Copilot agents work. In case of a security breach—which can happen, given that Microsoft 365 is still a top-targeted platform—they will be able to trace back the steps and stop the agents from doing more harm.
It’s still interesting to see if the tech and business industry will adopt these Copilot agents.
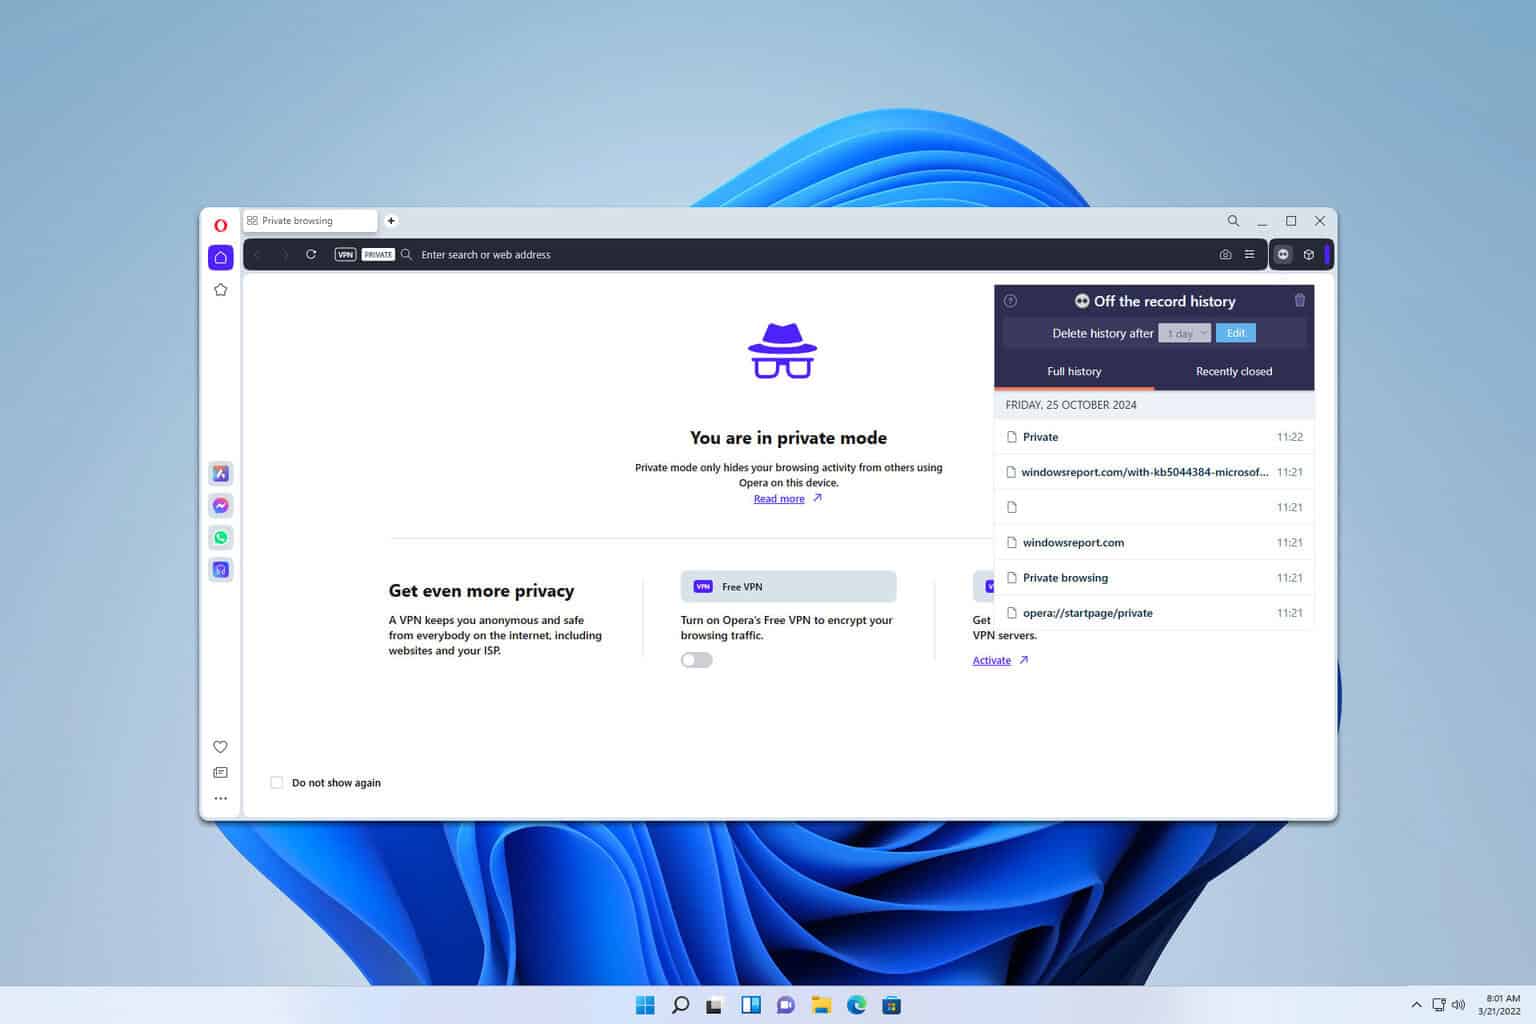
Many are wondering if is there a way to view Opera incognito history, and in today’s guide we’re going to tell you everything you need to know about it.
How do I check Opera’s Incognito history?
1. Use the ipconfig command
Press the Windows key + S and type cmd. Open Command Prompt.
Next, run ipconfig /displaydns
A list of all visited domains will now appear on your screen.
While this isn’t the exact browsing history, you can see which domains, not pages, were visited recently, even if you’re using Incognito in Opera.
Click on Add to Opera and then click on Add to confirm.
Next, click on the Extensions icon in the top right and choose Manage extensions.
Locate Off The Record History and check Allow in Incognito.
Open Incognito mode in Opera and start browsing.
Click the Off The Record History icon to reveal your browsing history.
This is a useful extension since it will temporarily preserve your browsing history even in a Private browsing window. However, you won’t be able to view any browsing history before you install this extension.
Does Opera save private history?
No, Opera doesn’t save any private history on your PC, so you can’t access it once you close the Private browsing window.
How do I retrieve Incognito browsing history?
This isn’t possible since nothing is stored on your PC while you use Private browsing. If you want to save the websites you visit, your only option is to add them to your bookmarks while browsing or use specialized extensions.
No, Incognito history can’t be seen by other users who share the web browser with you. However, the browsing history can be seen by your Internet Service Provider, employer, or school administrator.
As you can see, it’s impossible to view Opera Private browsing history, and the closest information that you can find is DNS records but they can be cumbersome to read and won’t give you the exact pages that you visited. Instead, you’ll just get the list of domains that you visited from your PC.
Browser extensions are a simpler way to do that, but they will only hold your browsing history for a few days once you install them.
Microsoft released Version 131.0.2903.9 to the Edge browser’s Beta Channel. Get ready because the patch is quite big and full of changes that will impact site compatibility.
First things first, though: this version brings an important new feature to Edge, and that’s the ability to instantly update the browser. The Redmond-based tech giant says Edge will instantly and automatically update itself when you step away from your computer. The feature is gradually rolling out to users.
Another important update is a new policy for the Edge browser that will allow specific apps to be opened in the Microsoft Edge sidebar. The Redmond-based tech giant doesn’t mention which ones. This new policy is quite intriguing, considering Microsoft is considering bringing the detachable sidebar back.
With Version 131.0.2903.9, Edge introduces dozens of changes that impact site compatibility, as we mentioned earlier. From CSS positioning and highlighting to WebHID on dedicated workers, Edge should provide a better user experience.
The Delta Force server error is showing up on all screens, no matter what platform you’re playing it on, and that is because the Alpha test servers were closed. Delta Force: Hawk Ops will relaunch for free open beta access on December 5th. However, we will address here several issues to fix the problem when the servers reopen.
How do I fix the Delta Force server error?
1. Check the server status and connection
First, check the server status. Delta Force doesn’t have a dedicated updated page for that, but you can check their X account where they make such announcements, or look on the game’s Discussions page on Steam to learn about any such disruptions.
At this point, you may also check your connection speed to see if you’re up to par and you don’t have too much lag.
2. Verify it you haven’t been blocked
The developer is banning any account that is connected to illegal plugins or software, or if you’re using any bugs or exploits in a malicious way. Besides that, it is possible that someone reported you for inappropriate behavior and upon inspection, your account has been banned.
During the Steam Next Fest one week test period, the developer banned 430 accounts, and for some reason, it might have happened the same to you. Check your account on Steam and reach Customer Support to see if there is any resolution for your status.
3. Check the quarantine from your antivirus
Several users have reported that Avast quarantined a Delta Force: Hawk Ops file and right after they recovered that file, they got rid of the Delta Force server error problem.
It is known that some antiviruses can have false positive results, so whether you’re using Avast or any other third-party antivirus, check its quarantine section and unflag the file(s) related to Delta Force.
To conclude our guide, the Delta Force server error on PC is due to the servers being shut down for the demo, and the next open beta of Delta Force will start on December 5th. We will keep you updated with new developments.
If you have any other questions or suggestions, feel free to use the comments section below.
Google is gearing up to roll out a series of “AI Innovations” in Chrome, now being tested in the Canary build before going public.
Recently, we reported Google is redesigning the Chrome AI Settings. The changes are live and the design is being tested under the codename “Synapse”.
Google is revamping AI features in Chrome, making them more accessible to users. This update, codenamed “Synapse,” brings a dedicated “AI Innovations” section to Chrome settings, replacing the old confusing structure.
Google Chrome now refers to AI settings as “AI Innovations,” aiming to improve user experience with features like History Search, Compare Products, Help Me Write, and Tab Organizer. The settings page now includes a new section titled “Things to Consider,” which provides users with brief descriptions and considerations regarding these AI features.
“The revamped settings interface, titled ‘Reimagine Chrome, supercharged with AI,’ showcases several innovative AI features.
History Search: AI helps you find what you’re looking for in your browsing history with answers.
Compare Products: Get AI-powered insights when comparing products online.
Help me Write: This AI feature offers suggestions to improve your online writing.
According to a Chromium Gerrit commit, spotted by us, the previous “main toggle” and individual feature toggles for graduated features like “Compose,” “Auto Tab Groups,” and “AI Themes” are being removed due to redundancy. However, these features themselves are not going away.
If you’re using GIMP, you might get a message saying libgimp-2.0-0.dll not found when you try to run it. Without this file, the software won’t run, so let’s see how can fix it.
How can I fix libgimp-2.0-0.dll error on my PC?
Before we start, ensure you’re not running plugins directly from the installation directory, instead run them from GIMP.
1. Create a GMIC subfolder
Go to your user plugins folder.
Now create a GMIC folder.
Install G’MIC and all its DLLs into it.
No go to Edit and choose Preferences.
Choose Folders and then Plug-ins.
Add the GMIC folder from Step 2 and save changes.
2. Reinstall G’MIC
Remove all G’MIC files from your plugin directory.
Next, download the installer version of G’MIC and install it.
Once the plug-in is installed, add it to the list of plug-in folders in GIMP.
Press the Windows key + I to open the Settings app.
Navigate to Apps and then select Installed apps.
Locate GIMP on the list and click the three dots next to it. Choose Uninstall.
Follow the instructions to remove it.
Be sure to remove all its files, including the Extension Pack and GMIC. You can use uninstaller software to do that, or you can use the manual method. Once removed, install GIMP again.
Where do I put the Libgimp 2.0 0 dll?
The file should be located in the GIMP installation directory:
If the libgimp-2.0-0.dll is not found on your PC, GIMP won’t be able to start, and in most cases, this issue is caused by problems with the GMIC plugin on the GIMP installation, and a quick reinstall usually fixes all the issues.
To avoid this issue in the future, make sure you check our guides on how to install GIMP plugins properly. If you’re having other issues with GIMP, we have a great guide on what to do if GIMP won’t let you draw, so don’t miss it for more information.
Microsoft has introduced two new settings for its Edge web browser, enabling users to customize their online experience further: Page colors, and Turning off custom scrollbars aim to provide greater control over the appearance and accessibility of web pages.
The Page colors setting is particularly useful for users with vision impairments, color blindness, or light sensitivity. It allows them to adjust web page color schemes to enhance readability.
Once enabled, users can choose from a range of color schemes such as Dusk, Desert, Black, and White directly from the Settings menu or even exclude specific websites from being affected by Page colors.
By default, Page colors are applied to web pages only when a Windows Contrast theme is used, but this behavior can be adjusted to apply Page colors on all web pages, regardless of the theme used.
The second setting, Turning off custom scrollbars, improves the scrolling experience on the web. Users can revert to the default scroll style by turning off custom scrollbars, overriding any customizations that website authors have applied.
Microsoft says this can improve consistency and accessibility for users who prefer the default scrollbar appearance and better accommodate user preferences.
The new features are rolling out now as part of Microsoft Edge 130 and will be available in Edge 132 for Linux users.
In a blog post, the company says introducing these features reflects its ongoing commitment to accessibility and customization in Edge.
We hope the new Page colors and Turn off custom scrollbars settings will significantly improve your browsing experience by providing greater accessibility and personalization options. We look forward to hearing your feedback about these new settings and about other ways that we can continue enhancing the time you spend online with Microsoft Edge.
To enable the new settings, head to Settings & More > Settings > Accessibility.
To enable Page colors in Edge:
Go to Settings and more (…) > Settings >Accessibility.
Under the Page colors section, select the color scheme you want to apply. You can choose between the Dusk, Desert, Black, and White theme color values.
To turn off custom scrollbars in Edge:
Go to Settings and more (…) > Settings >Accessibility.
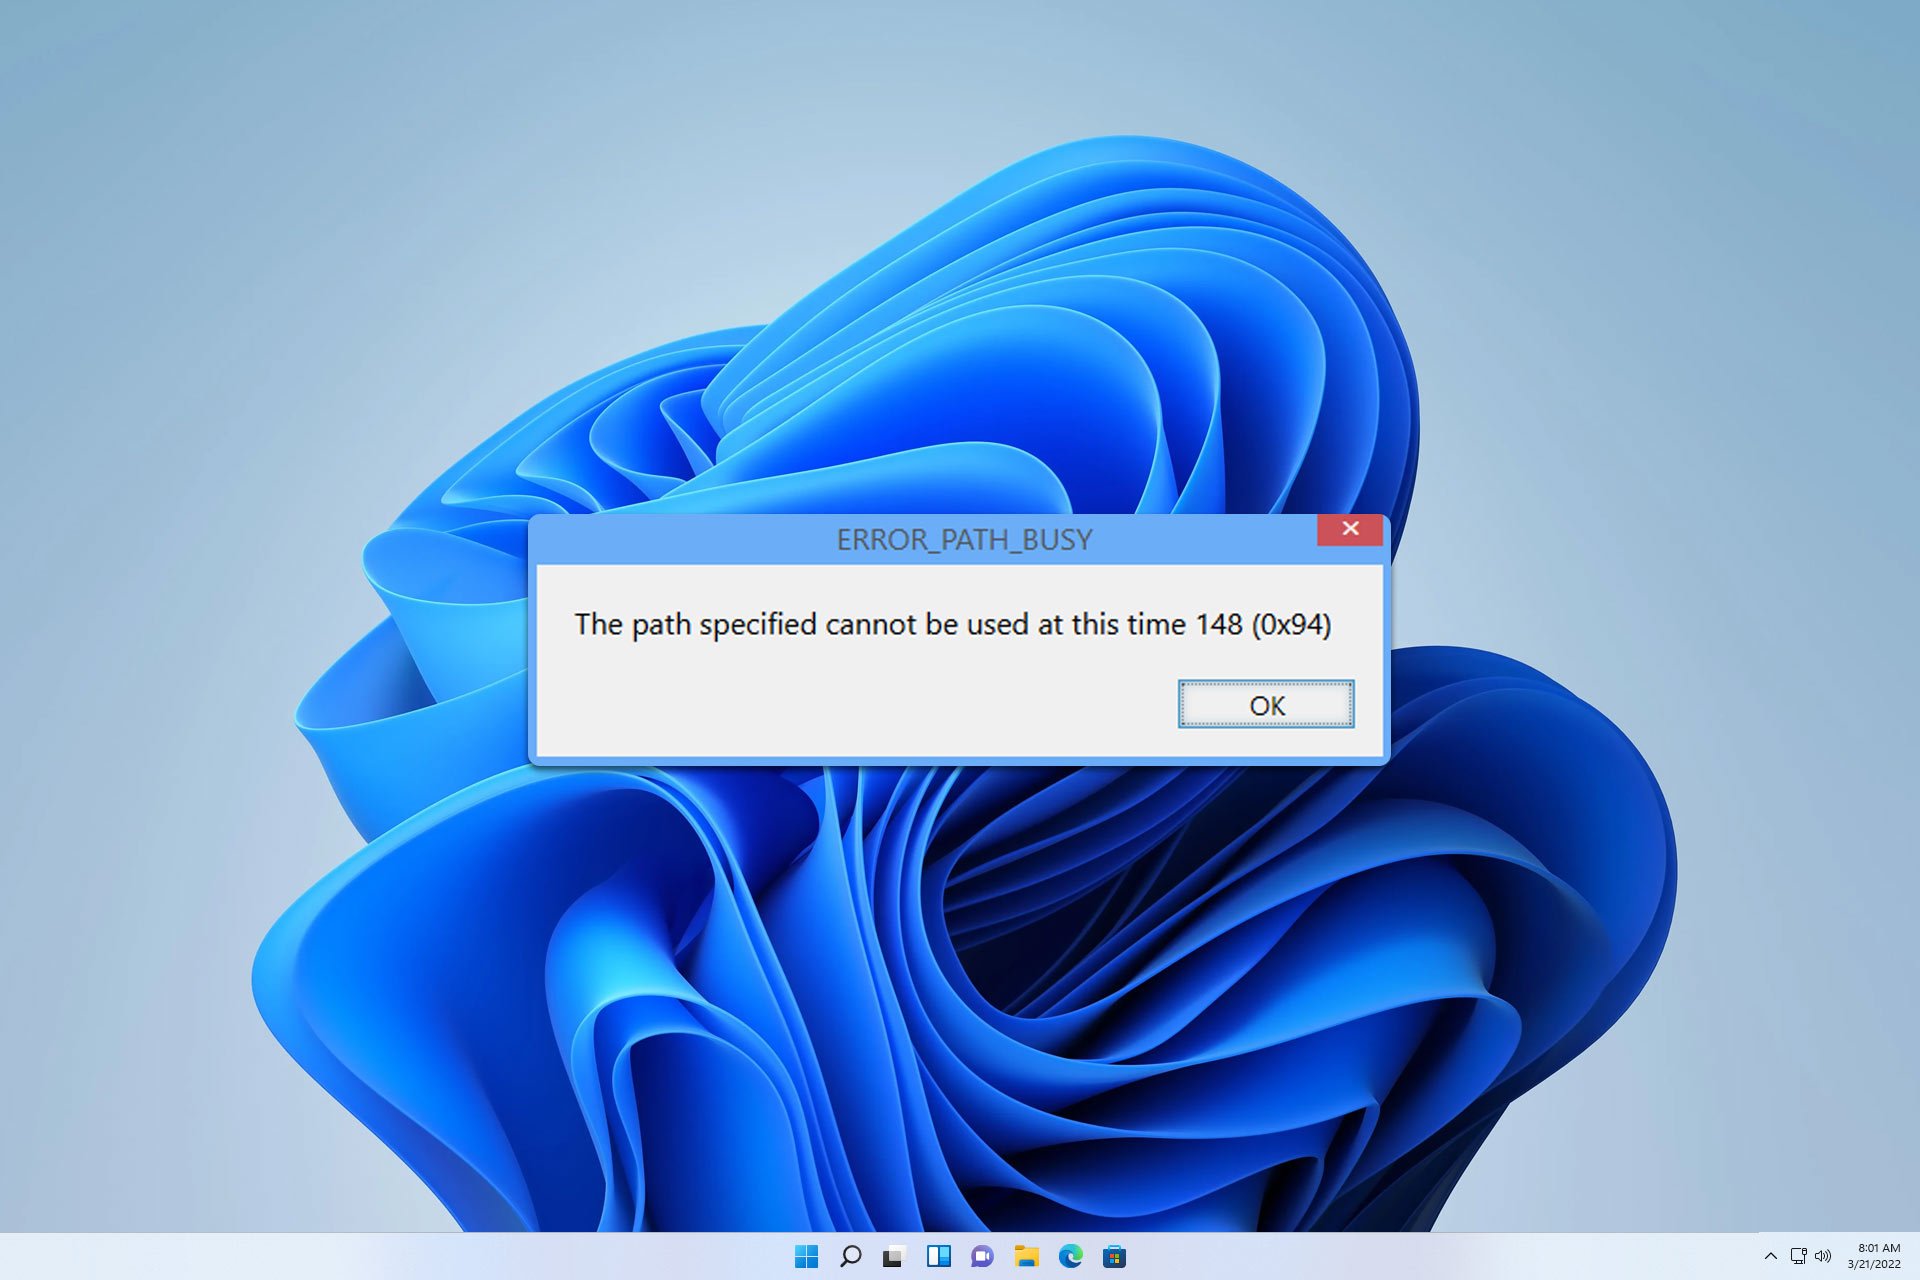
Error_Path_Busy often comes with 148 (0x94) The path specified cannot be used at this time, and it usually affects developers. However, if you encounter it, there are a few ways to fix it.
How can I fix Error_Path_Busy?
Before trying anything else, ensure that your device is up to date with the latest patches and hotfixes.
1. Perform IISReset
Press the Windows key + S and type cmd. Select Run as administrator.
Next, run the iisreset command.
Wait for the process to finish.
2. Restart Windows SharePoint Services Timer
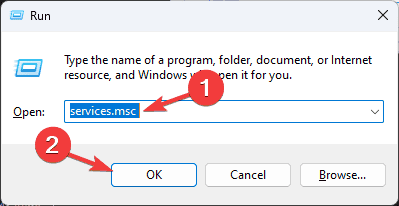
Press Windows key + R and type services.msc. Press Enter.
Next, locate the Windows SharePoint Services Timer.
Right-click it and choose Restart.
Alternatively, you can do this with Command Prompt:
Open Command Prompt as administrator.
Next, run the following commands: net stop SPTimerV4 net start SPTimerV4
Microsoft has released update KB5044384 for Windows 11 version 24H2, bringing several bug fixes and quality improvements. The update is available to anyone on Windows 11 version 24H2 and is labeled a “C” (non-security) release, meaning it’s separate from the monthly Patch Tuesday updates.
The update also fixes an issue where you can’t sign in to your account from the web because the screen stops responding, allows you to configure the Copilot key on your keyboard to open the Copilot or Microsoft 365 app, and resolves an issue where the WindowsDisk Cleanup app might show the wrong amount of disk space that you can free up in the ‘Windows Update Cleanup’ category.
In terms of new features, KB5044384 adds a detach virtual hard disk button in Settings for VHDs, so that Wi-Fi SSIDs with Unicode characters (like emoji) will display properly in the netsh wlan show networks command. It introduces the Windows Sandbox Client Preview with runtime clipboard redirection, audio and video input control, and more. This preview is available from the Microsoft Store.
Several other changes and a long list of bug fixes are included, including an issue where you cannot view some parts of the UI when you run certain apps, an issue where HTA optional components (OC) are now in ARM64 Windows PE, and more. Check out the full release notes here.
The changelog for this release includes the following:
Notifications: You can now stop the suggestions to turn off notifications from certain apps. Select the ellipses (…) in the notification and turn it off. You can also go to Settings > System > Notifications and turn it off. Look for “Notification Suggestions” in the senders list. An entry will only appear in the list after you receive a notification.
Wi-Fi password dialog: The dialog now has the Windows 11 visual design. Go to Settings > Network & internet.
Narrator: This update adds a new Narrator shortcut. Press the Narrator key + Ctrl + X to copy what the Narrator last spoke to the clipboard. This shortcut is useful when you want to copy some content, like codes or numbers, quickly. It will now auto-read the contents of an email message in the new Outlook. This is like the behavior in Outlook Classic.
Gamepad keyboard: This update starts the rollout of a new Gamepad keyboard layout for the on-screen keyboard. With it, you can use your Xbox controller to move around the screen and type. Button accelerators are also available; these include the X button for backspace and the Y button for the spacebar. For better movement patterns, the keyboard keys are aligned vertically.
Start menu: “All apps” has the new name, “All.”
ALT + Tab: On some PCs, the screen goes black for a few seconds when you switch between certain windows.
Scanning apps: They don’t detect specific scanners, although they are connected.
The patch should provide a smooth transition to Windows 11 24H2. The major patch has been quite buggy since its release earlier this month, and the 8.63GB bug wasn’t the only confusion it caused. It also caused major Internet connection issues, and some devices appeared with a deactivated Windows right after installing the patch.
Microsoft is temporarily stopping access to all of the free Windows 11 virtual machines, especially Parallels (macOS) and VMware (multi-platform). This was announced in a short note in the latest blog post on the Developer’s site.
In a statement posted to the Windows Development Environment website, Microsoft says that it’s “temporarily” pulling the Windows 11 virtual machines due to “ongoing technical issues.”
Due to ongoing technical issues, as of October 23, 2024, downloads are temporarily unavailable.
Microsoft
This could be a bit troublesome for managers and developers. Here’s why. Currently, the Windows Development Environment virtual machines are available in four types: VMware, Hyper-V Gen 2, Parallels Desktop, and VirtualBox. Microsoft usually updates these virtual machines every month after the Patch Tuesday updates.
It’s not clear what caused the technical problems, but customers can no longer download or activate any of Microsoft’s four Windows 11 virtual machines in Hyper-V, VMware, VirtualBox, and Parallels formats. If you already have one of the Windows 11 virtual machines up and running, it will now display a persistent “Activate Windows” watermark and automatically shut down every hour.
The official Windows 11 virtual machines still have value. They are equipped with Windows 11 Enterprise and provide a complete set of development tools, such as Visual Studio, Windows Subsystem for Linux, Terminal, developer mode, and more.
Microsoft has introduced a new feature to Outlook for Windows: adding personal Microsoft accounts with non-Microsoft email addresses to the Outlook app.
This will allow users to access Microsoft services tied to a Microsoft account with a non-Microsoft email address, such as Microsoft 365 and Microsoft Copilot Pro.
Before this change, Outlook for Windows only supported adding Microsoft accounts with emails ending in outlook.com, hotmail.com, live.com, msn.com, and passport.com. In the future, users can use a Microsoft account like [email protected] to purchase a Microsoft 365 Personal subscription and then add that account to Outlook to access their emails.
The change doesn’t affect how Microsoft 365 is licensed, and users who didn’t have access to Microsoft 365 services before won’t gain access if their admin doesn’t change any licensing settings for their account.
Outlook for Mac users have been able to add personal Microsoft accounts with non-Microsoft email addresses for some time now.
OneNote will be enhanced with major AI features that will allow Copilot to not only summarize your notes but also listen to your verbal notes or conversations and turn them into efficient plans of action.
The platform will also enhance Copilot’s ability to review the videos and images you provide and summarize them into notes. If your OneNote notes contain questions, Copilot will answer them right there, using contextual information.
All these enhancements will be coming to Copilot in OneNote next year, and the rollout is scheduled between March and June 2025.
The first will work exclusively on OneNote Mobile for Android, enhancing the platform’s versatility. Copilot will examine your OneNote notes and come up with suggestions, recommendations, and summaries. These include your voice notes, all sorts of voice recordings made with OneNote, and other forms of notes.
Copilot in OneNote transforms fragmented voice thoughts and conversation recordings into clear, actionable insights. It enhances productivity by accurately capturing and organizing verbal notes, filling in gaps, and providing structured summaries, making it easier to review and utilize information effectively. Exciting News! Copilot in OneNote can now access and understand verbal notes, synthesize conversations, and transform fragmented thoughts into clear, actionable insights, boosting productivity.
Later next year, in June, the Redmond-based tech giant will enhance Copilot so that it can analyze images and videos you upload to OneNote and provide key insights, summaries, and recommendations. This enhancement will also be available to OneNote on Android, according to the entry.
With this new feature in OneNote mobile, you can share videos and images into OneNote and watch the magic unfold. All the key insights from the video and images are captured effortlessly into notes so that you do not have to manually create them.
Copilot in OneNote for Android will also answer all of your questions as you go through your notes; the AI model will then create a summary for you to quickly access information.
With this new Summary feature in OneNote mobile, you can create a short and fluent summary of your longer pages which will help to consume relevant information faster. With the Question and Answer at your fingertips, you can get real-time answers to your queries directly within your notes, enhancing your ability to access and utilize information quickly and effectively.
It is unclear if the other mobile operating systems (we mean iOS) will get these new features, as the roadmap doesn’t mention it.
In other news, Microsoft finally made Copilot Agents available after teasing them for a while, and the tech giant hopes these new AI tools will change the way of doing work.
If you’re looking for a hands-on SetMe review, I’ve got you covered.
I tested its key features, ease of use, and everything else you need to know about this powerful remote support software.
Let’s get started:
What is SetMe?
SetMe is a user-friendly and reliable remote access and support suite that provides seamless access to attended and unattended computers. Whether your business needs to perform administrative tasks, transfer files, or solve technical issues, it uses the cloud to stay connected.
In just three steps, SetMe can connect to any Windows or Mac computer and offers a portable client app and a more robust solution for long term use.
SetMe comes from the long established global Techinline team, with decades of experience with tools like FixMe.IT.
Who is SetMe for?
Although SetMe is useful for individuals who need remote access to their personal computers, it really shines for businesses.
It enables businesses to improve productivity and collaboration by facilitating remote access to office computers, enabling employees to work from anywhere, while providing remote assistance to clients.
IT professionals get an efficient and secure way to remotely manage, monitor, and support client computers.
SetMe Review – Main Features
After getting to grips with SetMe, here’s what stands out the most and how it compares to other remote access software:
Remote Connections
At its core, SetMe facilitates remote desktop connections. It’s as simple as the remote user running its lightweight client and the technician entering the provided 6-digit ID in the SetMe expert console. Then the connection is made.
You can also use:
Portable App – A more lightweight client app when working on the fly for one time use cases.
MSI Package – This allows you to set up and manage the application on numerous computers without having to install it one by one, making the process quick and efficient.
I experienced minimal lag and no issues with response time across all SetMe’s apps.
I like the fact that you can keep your mouse pointer size when controlling the remote computer too. There’s nothing worse than losing your cursor.
Unlike older remote software, the use of stable cloud servers helps maintain the connection. When I tried LogMeIn Pro, it only offered a client-server model.
SetMe’s servers act as a bridge, allowing your local computer to communicate with the remote computer without the dreaded drops or input lag.
What’s more, it works even when network configurations change. I.e, when IP addresses are dynamic or when the remote computer is behind a firewall or NAT.
Typically, remote connections can be disrupted when the computer enters sleep mode, shuts down, or the network connection is lost.
SetMe retains remote sessions after an extended idle time (sleep/shutdown) for up to 3 days!
In the rare chance that you are disconnected, it will automatically reconnect.
Remote desktop settings are also saved for 6 months after your last connection to a specific computer.
Overall, by routing traffic through the cloud, SetMe ensures that remote access remains uninterrupted and smooth, regardless of network conditions.
Other key features include the ability to:
Displays detailed connection and system statuses when working with the remote desktop as well as within the unattended device.
Easily shutdown or restart a remote computer, including in safe mode while maintaining the remote connection on reboot.
Easily switch between all connected computers with multi-window control:
With each remote session opened in a separate window, you can conveniently switch between remote desktops by simply clicking on the respective window or using keyboard shortcuts.
This simplifies tasks like comparing data across computers or monitoring real-time progress on different systems.
Unattended and Attended Access
You might initially consider cheaper software like AnyViewer. However, SetMe stands out due to its ease of use and connection stability for both unattended and attended remote access.
Some basic software offers attended access, but this requires the user of the target system to be present and grant permission for the connection. This is still suitable for technical support, conducting online meetings, or collaborating with colleagues. SetMe does this well. Nonetheless, this is generally suited for home-based or scaled-back scenarios.
However, SetMe’s unattended access lets you remotely connect to a computer when there’s no remote user to grant permission. Moreover, it offers unlimited unattended connections.
This is useful for remote system administration, maintenance, and monitoring.
With SetMe, you can configure unattended access by installing the SetMe client application on the remote computer and setting up a secure connection. Once configured, you can access the remote computer at any time, without needing the remote user’s intervention.
Moreover, admin rights are not required. As a support technician you can Run As Admin even when the remote computer has standard user rights.
You can elevate permissions to perform the tasks that require admin privileges with just a few clicks.
File Transfer and Clipboard Sync
SetMe’s remote file transfer feature allows users to easily transfer files between local and remote computers using an intuitive drag-and-drop interface.
Because it stores the latest copy of a transferred file in the target computer’s cache, transfer speed is lightning quick.
This feature enables quick and hassle-free file sharing, eliminating the need for email attachments or external file-sharing platforms, which can be time-consuming and less secure.
Drag-and-drop couldn’t be easier. Simply select the desired files on your local computer, drag them to the remote desktop window, and drop them into the destination folder.
It also supports cross-operating system transfer, such as Windows to Mac, and there are no filetype or file size limits.
Along with file sharing, SetMe lets you automatically share the contents of the local clipboard with the remote computer’s clipboard, and vice versa. If you copy a text snippet or image on your local computer, the same content will instantly become available on the remote computer’s clipboard.
I found it most useful when editing documents, sharing screenshots, or transferring small files between computers.
Remote System Information
SetMe is good for troubleshooting by providing a snapshot of the remote system. Like TeamViewer and LogMeIn Pro, the support tech can see what type of system they’re dealing with right in the expert console without having to manually open Windows/Mac settings on the remote computer.
Its roadmap aims to extend this further in 2025.
Remote Desktop Toolbar
Technicians control a lot of features via a straightforward remote desktop toolbar which acts as the hub for communicating with the remote system and its user. You can:
Manage Multi-Monitor Computers – Switch between viewing all remote displays in a single window or select an individual display to work with. It also supports scaling and zooming to fit your local screen, so there’s never an issue with viewing what you need comfortably.
Image Quality – Customize the visual quality of the remote desktop to suit your preferences and optimize performance.
Ctrl-Alt-Del – Send the keyboard shortcut Ctrl-Alt-Del to the remote computer, allowing you to access the Windows Security screen or Task Manager on the remote system. It also supports the Force Quit menu on a Mac.
Capture – Easily record video footage or take screenshots of the remote computer’s screen. This Is useful for creating tutorials, documenting issues, or preserving visual information for future reference.
Screenshots and Record – Capture still images of the remote desktop and create video recordings of activity, which can be used for training, auditing, or troubleshooting purposes.
Chat – A built-in chat window where you can message and hit send to communicate with the remote user in real-time. It supports both one-way and two-way communication, and the chat history is saved for the duration of the support session.
Security
SetMe prioritizes security and uses end-to-end encryption for secure remote connections.
Additionally, it offers various security features, such as two-factor authentication via an authenticator app like Google, Duo Mobile, Authy, etc. As well as granular permissions, to further protect user accounts and restrict unauthorized access.
Other key security features include:
Lock On Session End – When this feature is enabled, you can automatically lock a remote computer’s screen as soon as you end the session, requiring a password or other authentication method to unlock it.
Blank Screen – Temporarily hide the remote computer’s screen while maintaining full control over the remote device. When activated, the remote screen goes black, preventing anyone present at the location from seeing the screen’s contents and interfering with your tasks. This is particularly useful if the work is security sensitive.
Disable Remote Input – Block keyboard and mouse input on the remote computer during a remote session. When enabled, the remote user will not be able to control the mouse or use the keyboard on their computer and disrupt your tasks.
Admin Web Dashboard
You don’t need software to manage your account and team thanks to the web-based dashboard.
Here, I was easily able to control user accounts, security settings, view analytics, and more.
You can organize users into groups and assign specific permissions or access levels to control who can access certain remote computers.
The portal also allows you to configure security options, such as two-factor authentication, and password policies.
I especially like the reporting section. This lets you view and track active and historical remote sessions and generate visual reports to make quick sense of your team’s performance.
The ability to monitor user activity is key to ensure compliance and troubleshoot any issues. You can also export or print the data for deeper analysis.
The admin space is also where you’ll find all the necessary licenses, billing information, and payment details.
Interface
The software interface for both technicians and target users is surprisingly easy to use and can be set up in minutes with limited technical know-how.
Depending on your organization, you might include a link on your website or intranet, email the client link, or get the tech team to install it on all applicable computers, ready for remote access when needed.
However, when you invite the remote user, all they need to do is run the client app, get the randomly generated ID, and the technician simply starts a new connection and enters the ID.
On the technician side, you use the Expert Console. It offers different interaction modes, such as “View Only” and “Full Control,” to accommodate various remote support scenarios.
On the left side, the connection list displays all your saved remote connections. You can easily search, filter, and organize your connections using custom groups and tags.
When you select a remote connection, the console displays essential information about the remote computer.
The top toolbar provides quick access to session controls, including options to connect, disconnect, send keyboard shortcuts, and switch between monitors on the remote computer.
The console’s settings menu lets you customize its appearance, enable advanced features, and manage security settings to suit your requirements.
SetMe’s Expert Console combines an intuitive layout with powerful features and customization options. Even as a non-expert I had no trouble navigating the software.
Customer Support
SetMe is easy to use out of the box, but if you do require technical support, it offers an extensive help center with tutorials and guides for all aspects of the platform.
To contact support directly, you can email [email protected] and qualified staff will typically respond within the day. In my test email, it was only a couple of hours before an issue was addressed.
Pricing
SetMe offers an affordable and straightforward premium plan. Unlike LogMeIn Pro, SetMe is free to test for 15 days before committing. You can pay monthly or get a discount by purchasing an annual subscription upfront.
Note: A concurrent user per seat is the number of users within your team who can simultaneously connect to remote computers. Licensed users are the number of individual users with access to the software.
$49/mo or $492/yr – 3 licensed users and 1 concurrent user per seat, unlimited attended devices, unlimited unattended devices, unlimited concurrent support sessions.
To conclude this SetMe review, the solution is one of the most reliable and versatile on the market. With multiple ways to connect, such as the portable client, and the straightforward interface, there isn’t much not to like.
When looking for remote desktop software, stability is key, and SetMe’s cloud servers keep everything running like clockwork.
Its unattended access, reporting, and a feature rich Expert Console enable technicians to efficiently manage, monitor, and troubleshoot remote computers.
The platform’s commitment to security and customer support further enhances its appeal as a top-tier remote access solution.
Microsoft Teams will enhance the work location setting—which you can use to let others know where you are—to include buildings, even specific ones.
In the latest entry to the Microsoft 365 Roadmap, the Redmond-based tech giant says that Teams’ work location will include buildings. It will automatically update to the specific building you’re working from as soon as you connect to a peripheral or a BYOD room.
This means you won’t have to worry about manually changing the settings. It will change by itself.
With work location in Teams now including buildings, make your presence known, coordinate with others, and take advantage of AI-assisted booking in the future. Once enabled and opted-in, your work location can auto-update to a specific building when you connect to a peripheral at a bookable desk or BYOD room.
The enhancement is set to be released in December 2024. For those working remotely, this means your employer will be able to see where you are exactly. We don’t know yet if the option can be disabled/modified.
Outlook released a similar feature called Work Hours and Location earlier this year. It can be enabled quite easily, and it’s an efficient way for employers to inform their companies of their daily work activity.
However, the entry doesn’t say if Outlook’s feature gets this enhancement.
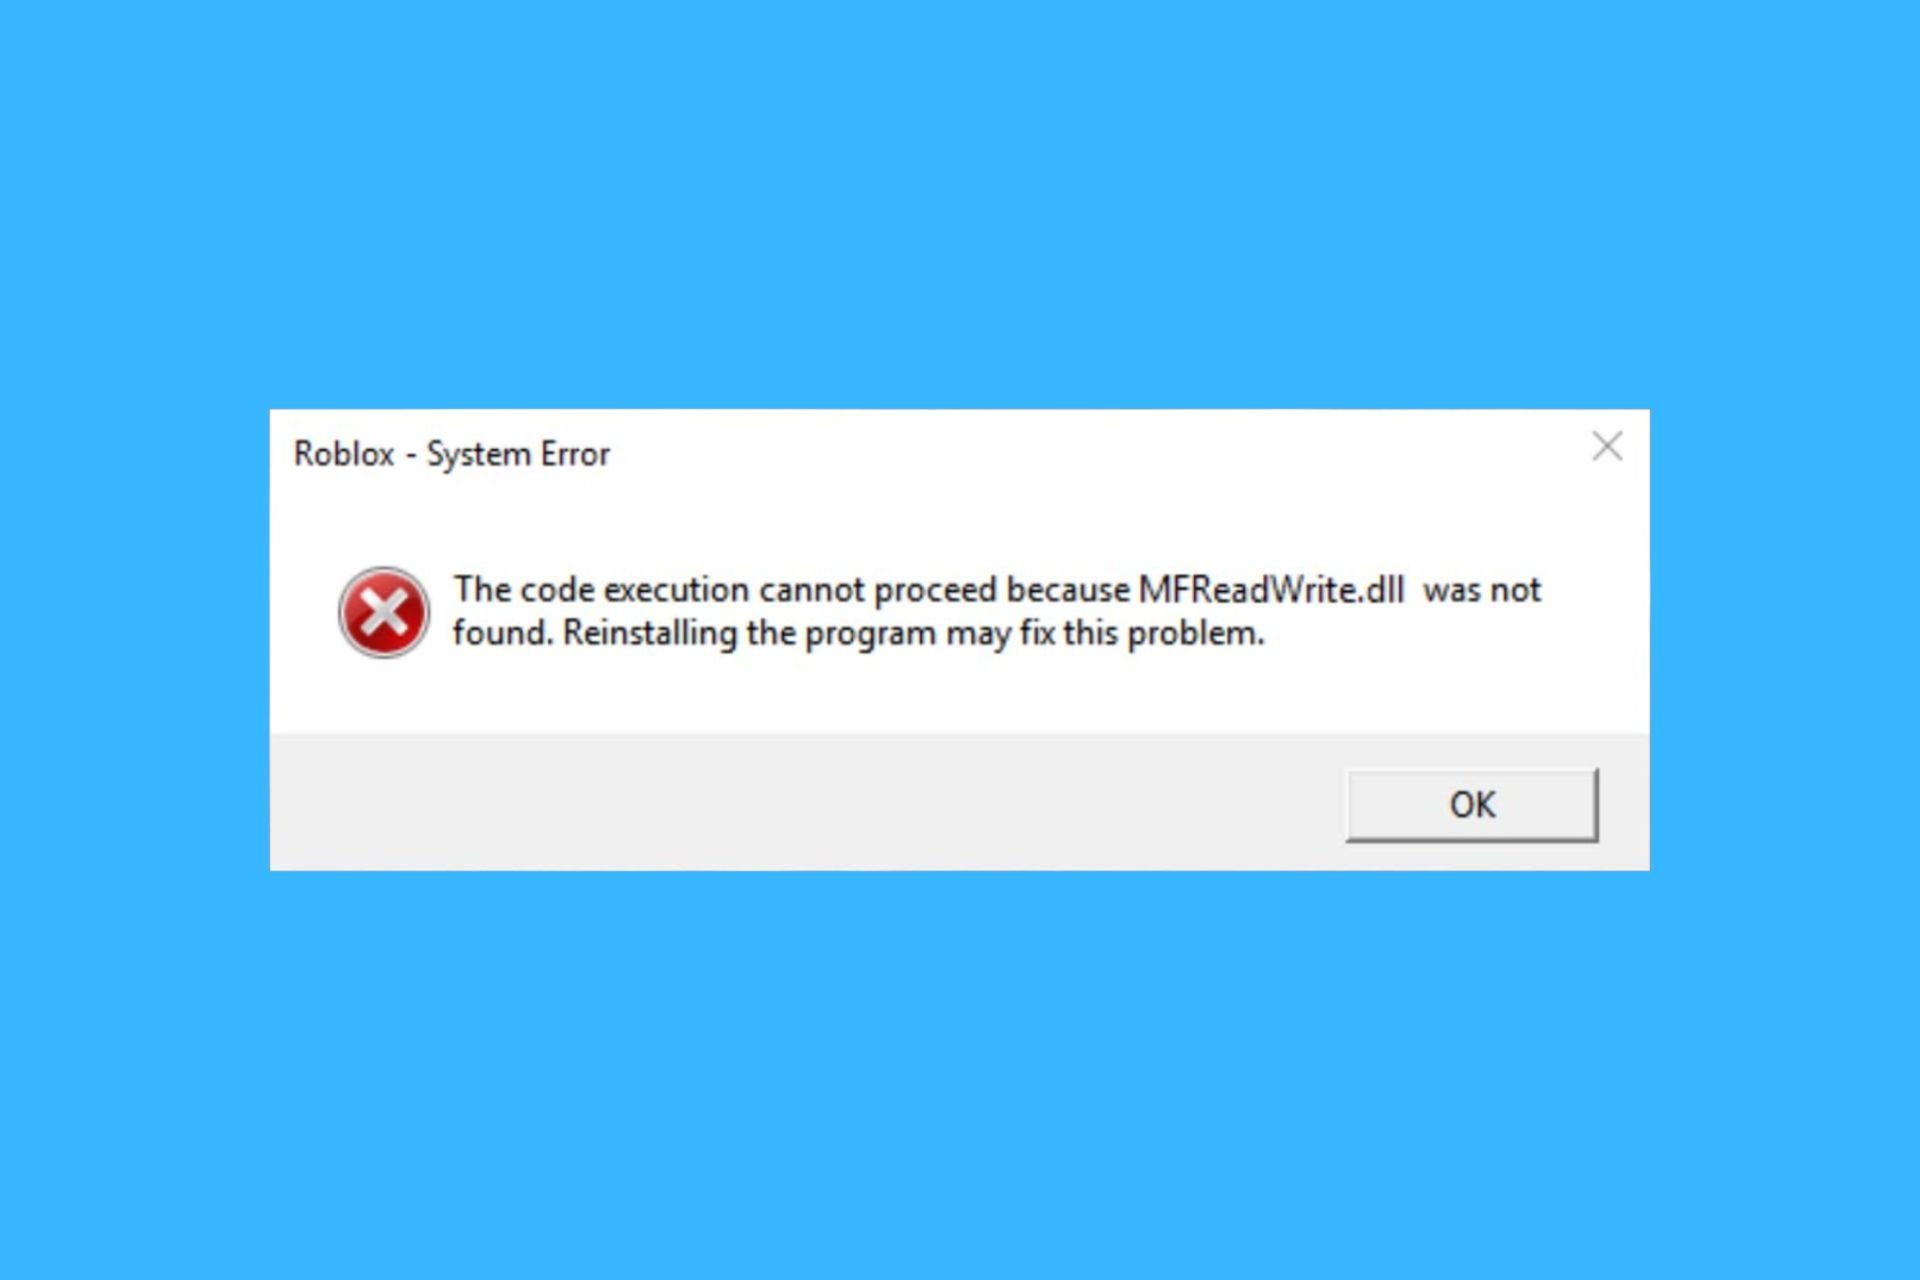
If you get the MFReadWrite.dll is missing or not found error on your PC, that is probably because you are running a Windows N or Pro N version. The error is due to the fact that the N version doesn’t come with media utilities such as Windows Media Player, Voice Recorder, Video Recorder, and more.
Don’t worry, you can fix this issue quite easy by installing the Media Feature Pack. However, if you’re running a previous OS version such as Windows 7, the Media Feature Pack is not available anymore.
What do I do if mfreadwrite.dll is missing?
1. Download the Media Feature Pack for Windows 10 N
Scroll down to the Downloads section, select the edition of your Windows 10 N and click on Confirm below.
After downloading the pack, run the installer and follow the on-screen instructions to get the desired components.
If you don’t know which Windows edition you have installed, select Start > Settings > System, then select About. In this window you will see the Edition, Version, and OS Build information.
2. Get the Media Feature Pack by activating the optional features
Press Win + I to open Settings.
Click on Apps & features on the left side, and click/tap on the Optional features link on the right side.
Now, click on Add a feature, scroll down until you find the Media Feature Pack and check the box to its left.
Finally, click on Install below and follow the instructions to get the pack.
That’s it! By installing the Media Feature Pack, you will also get the MFReadWrite.dll and you will no longer get the MFReadWrite.dll is missing error. This guide will also fix the MFPlat.dll missing error as well.
Teams Rooms on Windows will be enhanced to support Live transcription and live caption translation. Both of these capabilities will allow users to understand exactly what’s being said in a meeting, even though it happens in multiple languages.
Live transcription will allow users to control the transcription during a meeting from a Teams Room. This includes the name of the speaker, timestamps, and settings such as the language, the translated language, and the way it shows on the screen.
You can control live transcription (start, stop, restart) during a meeting from a Team Rooms on Windows device. The real-time transcript includes each speaker’s name and timestamp. You can also change settings including the spoken language, the translated language, and whether the original and translated transcript would show side by side. This feature is available in Teams Rooms Pro.
Live caption translation on the other hand, will allow users to choose the translation language they prefer without impacting what the other participants in the meeting see. This capability will ensure you can understand everything even if you’re not fluent in the language that’s spoken in the meeting.
While live captions display in the spoken language by default, on Teams Rooms on Windows, you can now choose the translation language you prefer without affecting what other meeting participants see. This feature is available on Teams Rooms Pro.
The two new capabilities are coming to Teams Rooms on Windows devices in December.
In other news, regarding enhanced settings, Microsoft Teams’ Town Halls will soon be enhanced to allow users to pause/move back and forth. This means you’ll no longer have to worry about missing important parts of a webinar; with these controls, you can jump back to the start of it.
The SOC_SUBSYSTEM_FAILURE BSoD has the value of 0x0000014B and usually comes with the message An unrecoverable error was encountered in a System on a Chip (SoC) subsystem. This issue often appears after you have installed a new system component driver, you have replaced a hardware component, or the hardware is malfunctioning.
Many users faced this BSoD on Microsoft Surface laptops after the Wi-Fi adapter went missing. If you’re in this situation the quick solution is to disconnect the power adapter and keep the Power button pressed for 60 seconds. This solution worked especially for Surface Pro 9 laptops.
How do I fix the SOC_SUBSYSTEM_FAILURE BSoD?
1. Uninstall and reinstall the affected drivers
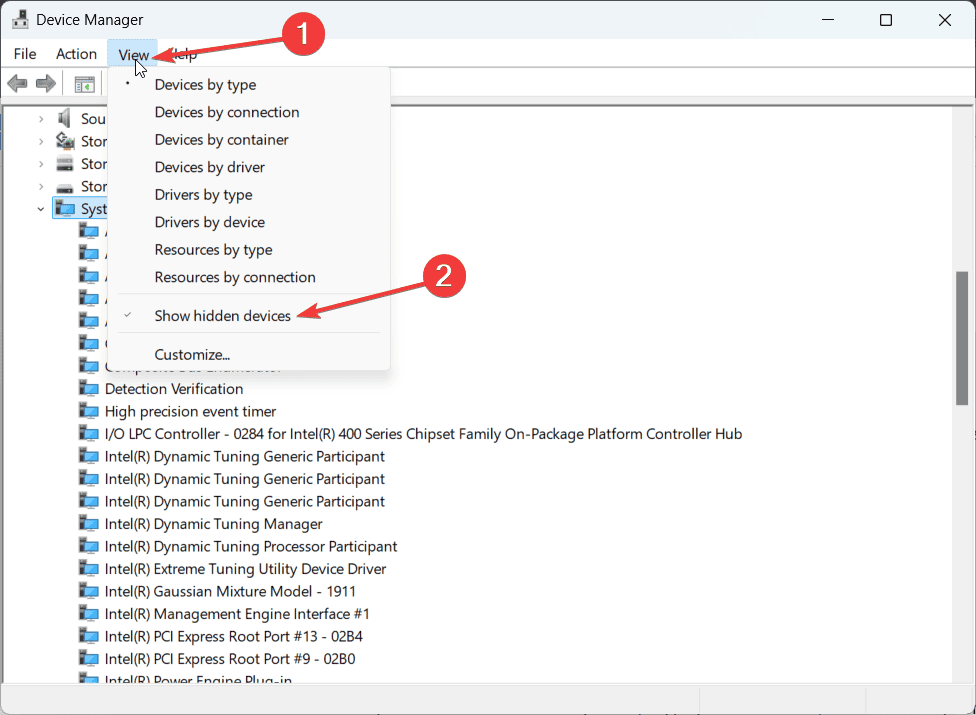
Press Windows key + X and select Device Manager.
Click on View and select Show hidden devices.
Expand the relevant categories (e.g., System devices, Network adapters) and see if there is any yellow mark next to a driver or if there are any faded drivers (the hidden devices).
Right-click each device and select Update driver, then click on Search automatically for drivers.
If this doesn’t work, right click the component and select Uninstall device, then click on Action and select Scan for hardware changes. This will force the detection process and the system will install the necessary drivers.
It would also be recommended visiting the PC manufacturer website, or the component manufacturer website and downloading the latest driver for your system.
This can be a tedious and time consuming task. Also, if you don’t install the correct driver, you will be back to square one. We recommend using a dedicated driver updater tool that will do all that automatically.
2. Update BIOS
The SOC_SUBSYSTEM_FAILURE BSoD may also come from a mismatched detection from BIOS and that is probably because its firmware is not updated.
Updating the BIOS is different depending on the manufacturer of your device or the BIOS itself. However, they all require a USB flash disk and downloading the newest firmware from the manufacturer.
We have a complete guide on how to update BIOS on PC that will provide the step-by-step instructions to get this done as quickly as possible.
3. Restore your system to a previous point in time
Click the Start button, type system restore and select Create a restore point from the results.
Click on the System Restore button and hit Next.
Now, select a restore point before the SOC_SUBSYSTEM_FAILURE BSoD occurred and click Next.
Follow the on-screen instruction to go through with the restauration process.
If the option is grayed out or you don’t have an existing restore point, this solution will not work. Also, note that by restoring your system to a previous point will erase any installations you have performed since then.
Other solutions to fix SOC_SUBSYSTEM_FAILURE BSoD
Run a hardware diagnostic tool. Some manufacturers have readily installed such apps for your convenience, but if you can’t find one, check the highlighted link to get one of the best from our list.
Stop overclocking. If the SOC_SUBSYSTEM_FAILURE occurred after an overclocking attempt, disable that feature.
Right-click the Start button and select Event Viewer. Find the BSoD event and check for more information. Sometimes, you will find the name of the file or subsystem that failed so you can troubleshoot the issue faster.
To conclude our guide, SOC_SUBSYSTEM_FAILURE BSoD is usually due to problematic drivers and fixing that problem will restore your system to normal.
If the solutions below didn’t work, unfortunately, you will have to perform a Windows clean installation.
You may also check our article about the causes of BSoD to learn more about this kind of bug checks. We also have a new guide on the Win32k_Atomic_Check_Failure error, so feel free to to check it out.
For any questions or suggestions, feel free to address the comments section below and let us know.
Refs_File_System is a BSOD error, and it often comes with the 0x00000149 code number. In this guide, we’re going to show you a couple of methods that you can use to fix this issue.
How can I fix the Refs_File_System error?
Before we start, ensure that your Windows and drivers are up to date. Additionally, ensure that there’s enough free storage space available and that there’s no malware on your PC.
1. Repair your system files
Press the Windows key + S and type cmd. Select Run as administrator.
Run the following command: sfc /scannow
Now run the following commands to check the health of your system: DISM /Online /Cleanup-Image /CheckHealth DISM /Online /Cleanup-Image /ScanHealth
If there are any problems, run DISM /Online /Cleanup-Image /RestoreHealth
2. Check your storage drive
Open the Command Prompt as administrator again.
Next, run chkdsk C: /r
Choose to restart your PC and wait for the scan to finish.
You might have to remove RAM modules to test them individually.
We also have a guide on how to perform a RAM test on Windows 11, so don’t miss it for more information. If your RAM is the problem, you’ll have to replace it.
Select the desired restore point and click on Next.
Follow the instructions on the screen to complete the process.
5. Remove updates
Open Settings.
Go to Windows Update and select Update history.
Choose Uninstall updates.
Now select the update you want to remove.
After doing that, check if the problem is gone. If the issue is still there, you might have to factory reset Windows 11 to fix it or check your hardware for additional problems.
Refs_File_System is a developer error, and you most likely won’t encounter it, but if you do, try our solutions. This isn’t the only issue you can encounter, and we wrote about File System error in another guide.
Microsoft has released the latest update, 131.0.2903.5, to its Edge Insider Dev channel. This update includes several bug fixes and new features. The new build is based on Chromium 131, and Microsoft has updated the features list for version 131 with a new “autonomous agents” feature.
The new autonomous agents feature will be available in Microsoft Edge Insider build 131.0.2903.5.
The Google Play Store listing for Microsoft Edge Dev has also been updated with the 131.0.2903.5 release notes, including many Android user bug fixes. The mobile release notes are as follows:
New Settings page for Profile Workspaces.
Resolved an issue where the browser would crash after tapping “Fewer stories like this” several times in the News feed on the New Tab Page on iOS.
Resolved an issue where the browser would crash when refreshing the wikipedia.org page on Android.
Many of these updates are also available on the desktop build of Edge Dev and the Beta and Stable builds of Microsoft Edge.
Microsoft says that this new update is now rolling out to all Dev users, so if you haven’t received it already, be sure to check for updates in the Google Play Store.
Even though the market is already filled with music streaming platforms, from Spotify to YouTube Music, Apple Music, Pandora, Deezer, and so on, it seems that Microsoft might be considering entering the market with its own music streaming platform.
The Redmond-based tech giant recently published a paper describing patented technology that analyzes a music track’s sound qualities —like rhythm, tempo, and melody— to make recommendations regardless of genre or artist.
It creates a unique description for each song, which helps compare it to other songs and determine their similarity. If a user likes a certain song, the system uses this information to decide whether to suggest another song based on their similarities.
The technology, suggestively called Song Similarity Determination, would recommend other songs strictly based on music criteria. The goal is to discover new music and artists and shine a light on a catalog of tracks and music that has had little to no coverage so far.
In the context of music, collaborative filetering recommendations will recommend music tracks that were listened to by other users with a similar musical taste. However, the catalog of available tracks is incredibly large (ypically tens to hundreds of millions), and large parts of the catalog consists of tracks that nobody listened to in the past. In addition to the songs with no listening data, songs can have too little listening data to make a statistically significant classification.
In this process, the audio descriptors are used directly to form a track-to-track similarity measure between tracks. By measuring the similarity between a track that a user is known to like and an unknown track, a decision can be made whether to recommend the unknown track to the user.
The recommendation process described by the patent is no different than the one currently on the market. The users will be notified of these recommendations via playlists or notification systems, and they will include artists, albums, producers, songwriters, multiple songs,
Besides this, Microsoft envisions this software as a regular music streaming platform, capable of generating playlists that follow the user’s music tastes; it also has a system of notifications, as we mentioned above, that will let the user know new music is waiting for them.
The distinctive factor, however, would be the focus on smaller/unknown artists, as this software’s algorithms would heavily consider songs with fewer or no listens at all. They will be recommended if they have a musical print similar to a popular song. This would make the platform a worthy competitor to the others currently on the market that are not focusing much on smaller artists.
For example, Spotify’s recent policies harm artists who don’t have more than 1000 streams yearly, as the platform decided not to pay them anymore. However, it doesn’t recommend them or place them in curated playlists to boost their popularity.
On the other hand, Microsoft is seeing an opportunity in this, which might make it real.
Speaking about music, Copilot+ PCs will finally support many DAWs (Digital Audio Workstations), such as Cubase or Nuendo, allowing musicians to compose music directly on these devices. Copilot could also be used to compose music, and the Redmond-based tech giant has actually patented the technology a while ago.
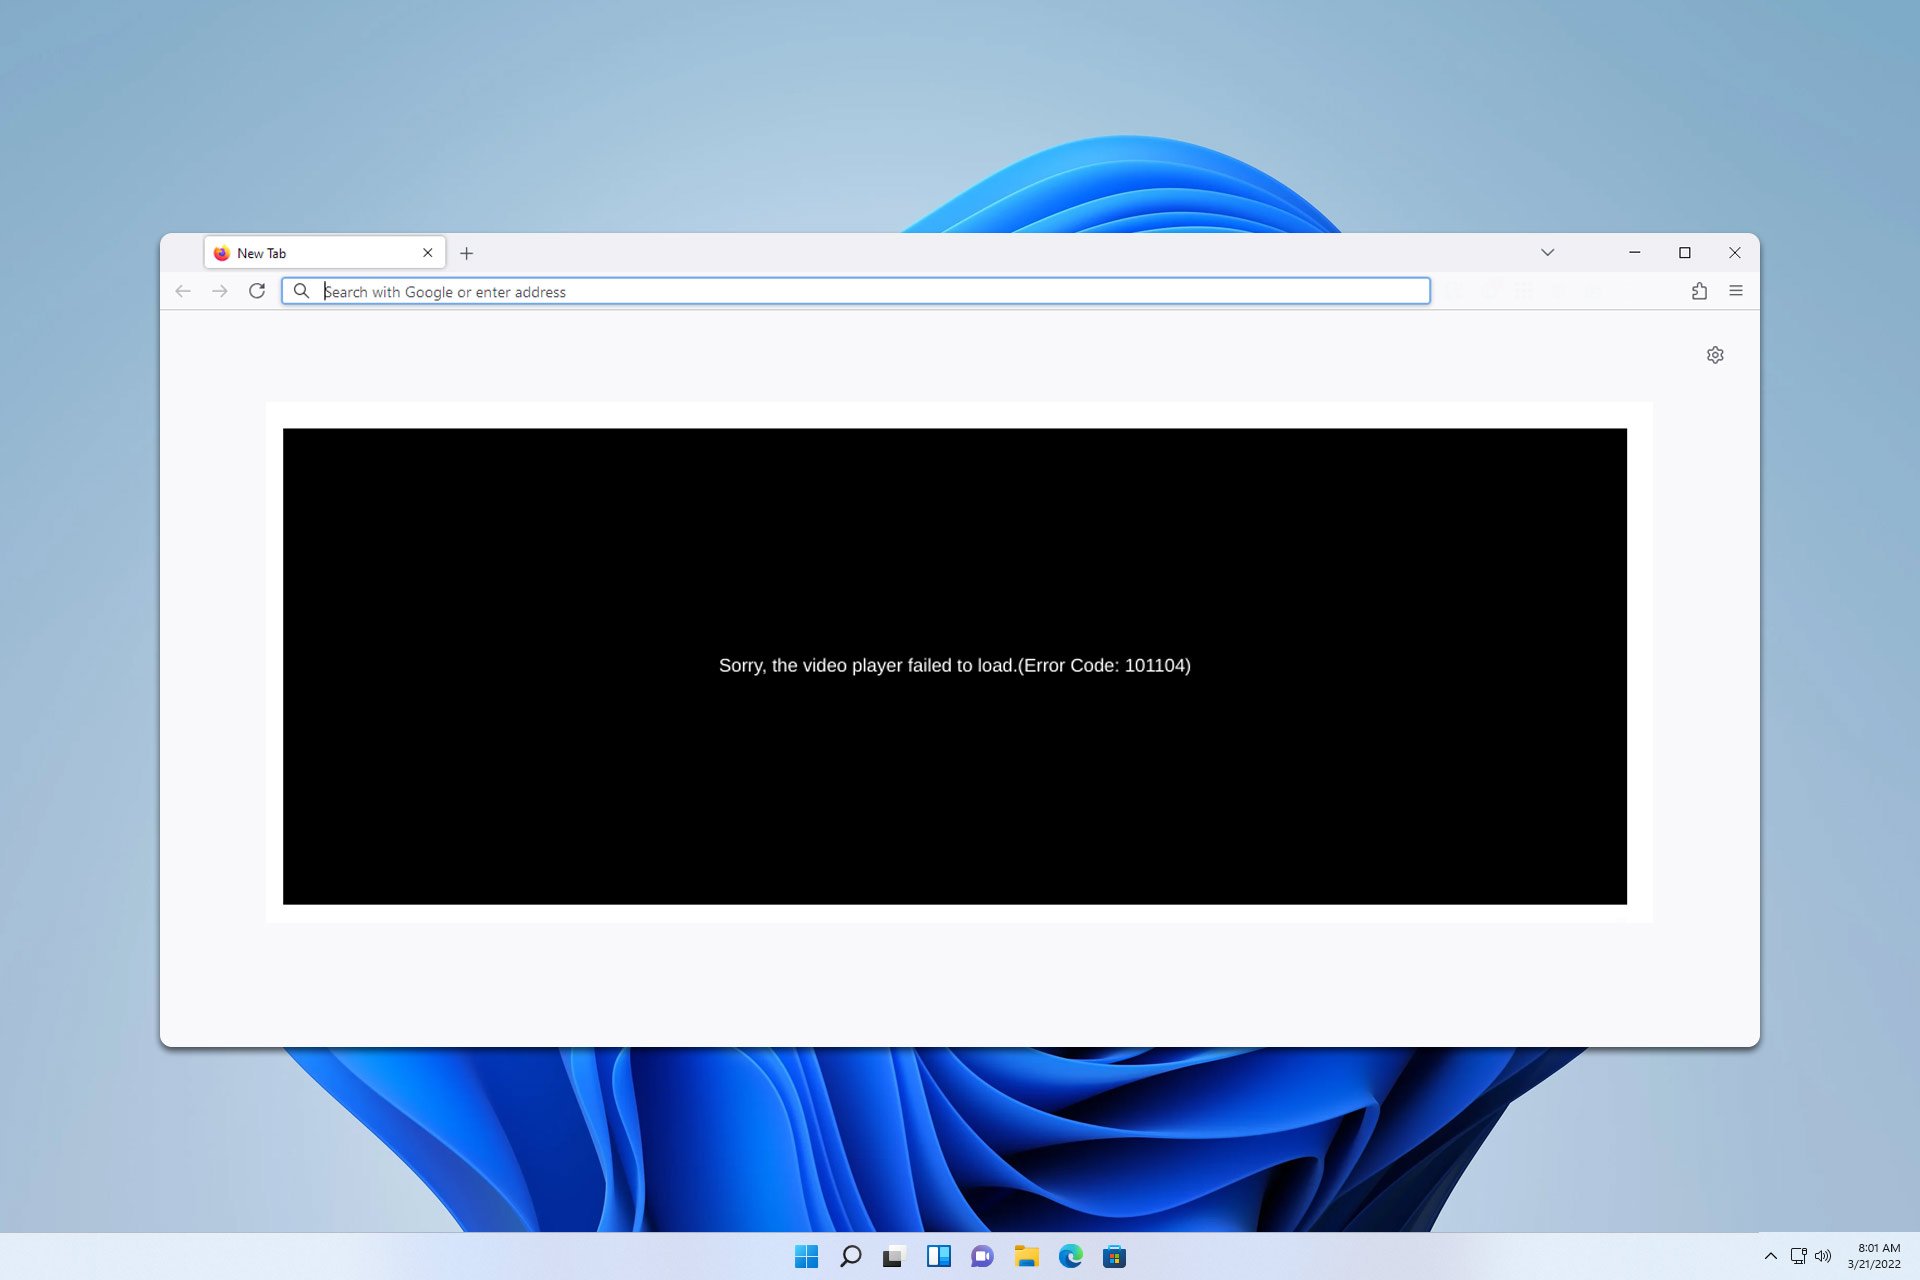
Error 101104 appears in your browser when you try to watch videos in your browser using JWPlayer. If you ever encounter this issue, our solutions should help you fix it.
What is error code 101104 on JWPlayer?
This error means that jwplayer.core.controls.html5component failed to load, probably due to a network error.
How can I fix error 101104?
Before trying anything else, try waiting for a bit or restarting your device. Check if the problem appears on other browsers or devices.
1. Disable extensions
Click the Menu button in the top right corner.
Next, choose Extensions and then Manage Extensions.
Toggle all extensions off and check if the problem is still there.
If the issue doesn’t appear, enable extensions one by one to find the culprit.
2. Clear the cache
Click the Menu icon and choose Delete browsing data.
Ensure that the Time range is set to All time and click on Clear data.
Once the process is finished, check if the error 101104 is still there.
Zoom error 3010 is pretty rare and it sometimes occurs after you make some changes to Zoom or after you update the app. It basically recommends restarting the system for the changes to take effect.
How do I fix Zoom error 3010?
1. Close all apps and restart your PC
Although it seems to easy, closing all the running apps and restarting your PC fixes the Zoom error 3010 for most users.
So, save everything you’re doing and hit the X button on the apps you’re running on Windows, then click the Start button, select the Power option and select Restart. After the system reboots, try opening Zoom and getting back to your meeting. If Zoom is not launching at all, click the highlighted link for a complete guide on how to fix this issue.
Of course, if you’re using an older version of Zoom, try
2. Reinstall Zoom
Click the Start button and select Settings (or press Win + I).
Go to Apps and select Installed apps from the right pane.
Look for Zoom, click on the three dots to its right and select Uninstall.
Usually, you won’t need to reinstall the Zoom app, but this will fix any problem you have with it. It it still throws any error, try disabling the third-party antivirus to see if it’s blocking the app. Sometimes, the firewall may block certain apps. If you want to see if that’s the case, you can click the previous link to learn how to check that.
Other solutions you may try to fix Zoom error 3010
Launch Zoom as administrator. You can do that by right clicking the executable file and selecting Run as administrator.
Make sure there are no conflicting apps. If some other apps are using the webcam, close them down or uninstall them temporarily.
Check your internet connection to ensure it’s stable.
So, this is how you fix Zoom error 3010on your PC. As we mentioned above, restarting your PC and updating the app will fix this issue. If you have any issues with the first solution, we also have a complete guide on how to download and install Zoom on Windows 11.
Many users want to open Private browsing in Opera by default, and this is simpler than you think. To learn how to do that, keep reading to find out more.
How do I start Opera in private mode by default?
Adjust Opera shortcut
Locate the Opera shortcut on your desktop.
Right-click it and choose Properties.
Go to the Shortcut tab and in the Target field add –-private after opera.exe. Don’t forget to add space before ––private.
Save changes.
Now whenever you use this shortcut you’ll open Opera in Private mode by default.
Opera Private mode will keep your browsing activity hidden from other users on your PC, so it’s useful if you’re sharing your PC with others.
However, using Private mode won’t hide your browsing history from your ISP or other third parties. For a layer of privacy, you can use Opera’s built-in VPN, but even then, Opera will have access to your browsing history.
If you can’t find a VPN in Opera, we have a short guide that will help, so feel free to check it out.
There is only one way to make Opera open Private mode by default, so if you want to use it, you’ll need to change your Opera shortcut or create a new one with a –private parameter.
This feature is also available in other versions of Opera, and we have a great guide on how to access Incognito Mode on Opera GX, so don’t miss it.
Next, click on Add to Opera and then on Add extension.
Click the Extensions icon in the top right corner and choose Manage extensions.
Locate the Incognito Blocker on the list and check Allow in Incognito.
Now whenever you try to open Incognito mode in Opera, it will automatically close it. This method will prevent you from using the Opera Incognito shortcut as well as the menu option.
We wrote in our previous guide what to do if there’s no Incognito mode in Chrome, and one of the reasons why this issue occurs is that there are special policies that administrators can enable for Chrome.
With Opera, there are no such policies available natively, so your only option is to use extensions. While this isn’t the most reliable solution, since extensions can be easily disabled, it’s the only one currently available.
Volume Master is a popular Chrome extension, and many users are wondering if is there a Volume Master for Firefox. There is a similar extension for Firefox, and in this guide, we’ll show you how to use it.
How do I download and use the Volume Master extension for Firefox?
After a few moments, the extension should be installed.
2. Use 600% Sound Volume
Open any tab that is currently playing audio in Firefox.
Next, click the 600% Sound Volume extension.
Use the volume slider to adjust the volume for the current tab.
It’s important to mention that you can adjust the volume for individual tabs, so if a certain tab’s volume is too low, you can easily increase it or vice versa.
You can also use Ctrl + Shift + 6 to quickly open the extension and then use keys 0 to 6 to quickly adjust the volume. You can also use the arrow keys to fine-tune the volume.
Overall, it’s a great extension, but some users had privacy concerns regarding it, and this is why some advise using 600% Sound Volume without ads.
If your volume is already to the max, you can use volume booster Firefox extensions, such as 600% Sound Volume.
While the original Volume Master for Firefox isn’t available to download, this extension is a perfect replacement since it brings volume control per tab to Firefox.
If you want to get the most out of your sound in the browser, don’t miss our guide on the best Firefox equalizer extensions. We also have a great article on how to use Shazam on Firefox, so don’t miss it.
Now that you have all the extensions to manage sound, why not give Video Speed Controller for Firefox a try as well to control the video playback like a pro?
The P-DEV323 error code appearing when you try to stream shows on Hulu is an indicator of connection issues.
If you’ve already checked Hulu’s Support page on Twitter for any official statements about a possible down time or scheduled maintenance, it’s time to check your connections.
How do I fix the Hulu error cod P-Dev323?
1. Disable your adblocker extension
Launch your browser, in this case, Chrome, and in a new tab, enter the following address:chrome://extensions/
Peruse through your extensions and toggle the Disable button for your adblocker plugin. UBlock was the most reported adblocker in this case.
While you’re still here, look through all your extensions and expunge any suspicious-looking ones. Repeat this step until you find the culprit.
Alternatively, you can try streaming Hulu on your incognito tab and check whether the p-dev323 error persists.
Sometimes, Hulu keeps buffering or won’t connect at all because there’s an extension interfering with its functionality. Users on a browser may get connection-related errors like RUNUNK13 error because of additional addons so try limiting or disabling them for an enhanced experience.
2. Clear cache
2.1 Android app cache
Tap on settings on your phone.
Next, tap on Apps.
Find the Hulu app and tap on it.
Scroll down and select Storage.
Tap on Clear data and Clear cache,then try again.
2.2 Android TV cache
On your TV, find your Settings.
Go to Apps and select Hulu.
Scroll down and hit Clear data and Clear cache.
2.3 Browser cache
Click the three horizontal dots and select Settings.
Launch your browser, and for this step, we shall be using Google Chrome.
Go to Privacy and security and click Clear browsing data.
Select Browsing history, Cookies and other site data, & Cached images and files, then click Clear data.
3. Perform a system update
3.1 Factory reset
Press the Home button on your remote control.
Now go to Settings.
Under Storage & Reset select Factory data reset.
Choose Erase everything and confirm by selecting Yes.
3.2 Power cycle your router
Once you’re done, perform a power cycle on your router by powering off the device you are using to watch Hulu.
Next, power off the modem and router and unplug the equipment from the power source.
Take a moment and let the devices idle for a few minutes.
Reconnect all the devices back to their power sources.
Restart your modem as well as your TV/stream devices.
3.3 Update your TV’s firmware
For this solution, we shall be using the TCL model.
On your TV, find your Settings.
Go to System.
Click on About then select Software update.
Select Network update and click on System update.
Now click on Check Update. Your system will scan for any available updates.
You’ll either start downloading updates or get a message that your TV is already up to date.
4. Reset the Hulu app
Hit the Start Menu icon on the Taskbar and click on Settings.
Click on Apps on the left pane, then select Apps & features on the right pane.
Navigate to Hulu app, click on the three ellipses and select Advanced options.
Hit the Start Menu icon on the Taskbar and click on Settings.
Click on Apps on the left pane, then select Apps & features on the right pane.
Navigate to Hulu app, click on the three ellipses and select Uninstall.
Launch the Microsoft Store, search for the Hulu app, and click Install.
Follow the on-screen prompts and try again.
6. Disable/enable your VPN
Press the Windows key and select Settings.
Next, select Network & internet.
Select VPN in the right-side menu.
Select the VPN connection you want to disable, click on the drop-down and select Remove.
Try accessing the page again.
Depending on your location, Hulu may restrict certain content. If you’re using a VPN and it is detected, your access will be blocked. You can switch to a reliable VPN service provider as free VPNs tend to be unstable and can be easily detected since they don’t give you unique IP addresses.
7. Reset your network
Hit the Windows key and click on Settings.
Navigate to Network & internet.
Select Advanced network settings.
Click on Network reset.
Next, hit the Reset now button.
Resetting your network can also help eliminate any launch problems with Hulu especially if it is internet-related.
Unfortunately, you may try all these connection tweaks but the error P-DEV323 won’t budge. In this case, Hulu’s customer support can come to the rescue. Alternatively, if you have Disney+, you can try streaming Hulu from here and see if the error persists.
We also have a comprehensive list of Hulu connection errors that you may encounter from time to time so feel free to peruse through.
For any additional thoughts or comments, drop us a line below.
For some users, the Incognito option is greyed in Chrome out, and they can’t use this feature at all. This can be a problem, so in today’s guide, we’re going to show you how to fix this issue.
Why is incognito mode greyed out in Chrome?
This can happen due to certain policies on your PC, or if you’re a member of Microsoft Family. Your administrator can also block access to this feature.
What can I do if the Incognito mode is greyed out in Chrome?
Opera has launched the new Opera One R2, touted by the company as the most powerful and best-looking Opera browser to date. And that’s for a good reason.
The new browser enhances Opera One’s AI capabilities to new heights while also introducing more traditional but much-needed features, such as Split Screen and Tab Traces. You can personalize your theme with animations, sound effects, or music through the new dynamic theme’s capability. Opera’s AI model, Aria, has been enhanced to accompany you in your browsing experiences while also generating and understating images.
First things first. The Spit Screen and Tab Traces will let you easily manage tens of tabs. The first capability will normally allow you to work in two tabs simultaneously, while Tab Traces provides visual information on the five most recently visited tabs. Tab Traces works best when you have more than 30 tabs open, so if you are that kind of Internet explorer, this is for you.
Regarding multitasking, the new Opera One R2 allows users to detach the music & video player controls and move them around the screen without interrupting the browsing experience. What’s cool is that this enhancement also works with video calls, so you can quickly move the video call windows to a corner of the screen. Plus, if you’re listening to music while waiting to join a call, Opera One R2 will automatically pause it for the duration of the call and resume after the call.
Aria, Opera’s AI model, can now summarize web pages, analyze articles, and even help you shop online. Opera One R2 has enhanced the model to leave the chat box and follow you around as you browse the Internet.
Like Copilot, Aria can now generate images and understand the ones you upload. The AI model will tell you what’s in the image and can create images based on the photo provided. Users won’t have to log in to access Aria and these features.
On the visual side, Opera One R2 introduces Dynamic Themes and a Glass UI. The Dynamic Theme allows you to customize your theme, starting from one central idea and adding various elements to make your browsing experience unique.
The browser will let users choose between the Midsommar, Classic, and Aurora themes, allowing them to build the perfect Opera One R2 for their aesthetics. Future updates will add more immersive themes.
Opera One R2 will also continue to support the native ad blocker, meaning you won’t have to install additional ad blocker extensions. However, if you want to, the browser supports Manifest V2 extensions, meaning you can also customize these preferences.
The browser is now available for free and you can download it on the official site.