How to Launch a Firefox Incognito Window Using Command Line

Not many users know that you can use a command line to launch a Firefox incognito window, but that is as simple as typing firefox -private into the Run console. Here is more about that and other possible methods.

How do I open a Firefox private window with command line?

1. Open a new Firefox incognito window

  1. Press Win + R ro start the Run console.
  2. Type firefox -private and press Enter.
  3. Firefox will open in Private mode.

This is the easiest and quickest method to open a new private Firefox window using a command line. It’s great when you don’t have an accessible shortcut or you just can’t see it.

2. Open a certain website in a private Firefox window

  1. Press Win + R ro start the Run console.
  2. Type firefox -private <website URL> and press Enter. Ex: firefox -private www.windowsreport.com
  3. Firefox will open the website in Private mode in a new tab, if Firefoxt is already open. If not, it will open the website in a new Firefox window.

This is a quick way of opening a website using a Firefox incognito window. The alternative would be to open Firefox, open a new private window and then type the website URL, so this is a lot quicker.

So, this is how you launch a Firefox incognito window using command line and how to open a certain website in private mode. You may also create a shortcut to open a Firefox incognito window and you will make things even faster.

We also have an interesting article on Chrome incognito vs. Firefox private to see which one is better. Also, don’t miss our latest Firefox Incognito is not working guide if you’re having any issues.

This isn’t the only browser that can do that, and our latest guide shows you how to start Edge Incognito from the command line. Speaking of which, many reported that the Firefox Incognito shortcut isn’t working, but we have an article that can fix that.

For any questions or suggestions regarding the Firefox incognito command line, let us know in the comments below.

How to Fix the PASSIVE_INTERRUPT_ERROR BSoD

The PASSIVE_INTERRUPT_ERROR BSoD has a value of 0x0000013B and it signals that the kernel has detected issues with the passive-level interrupt. It usually comes after another, more common BSoD, IRQL_NOT_LESS_OR_EQUAL. Interrupt errors are usually due to RAM issues, but the causes include corrupted system files and faulty drivers.

First, shut down your PC and reseat the memory modules on the motherboard. Make sure that they are compatible with your system and check for any signs of damage.

How do I fix PASSIVE_INTERRUPT_ERROR BSoD?

1. Check for memory problems

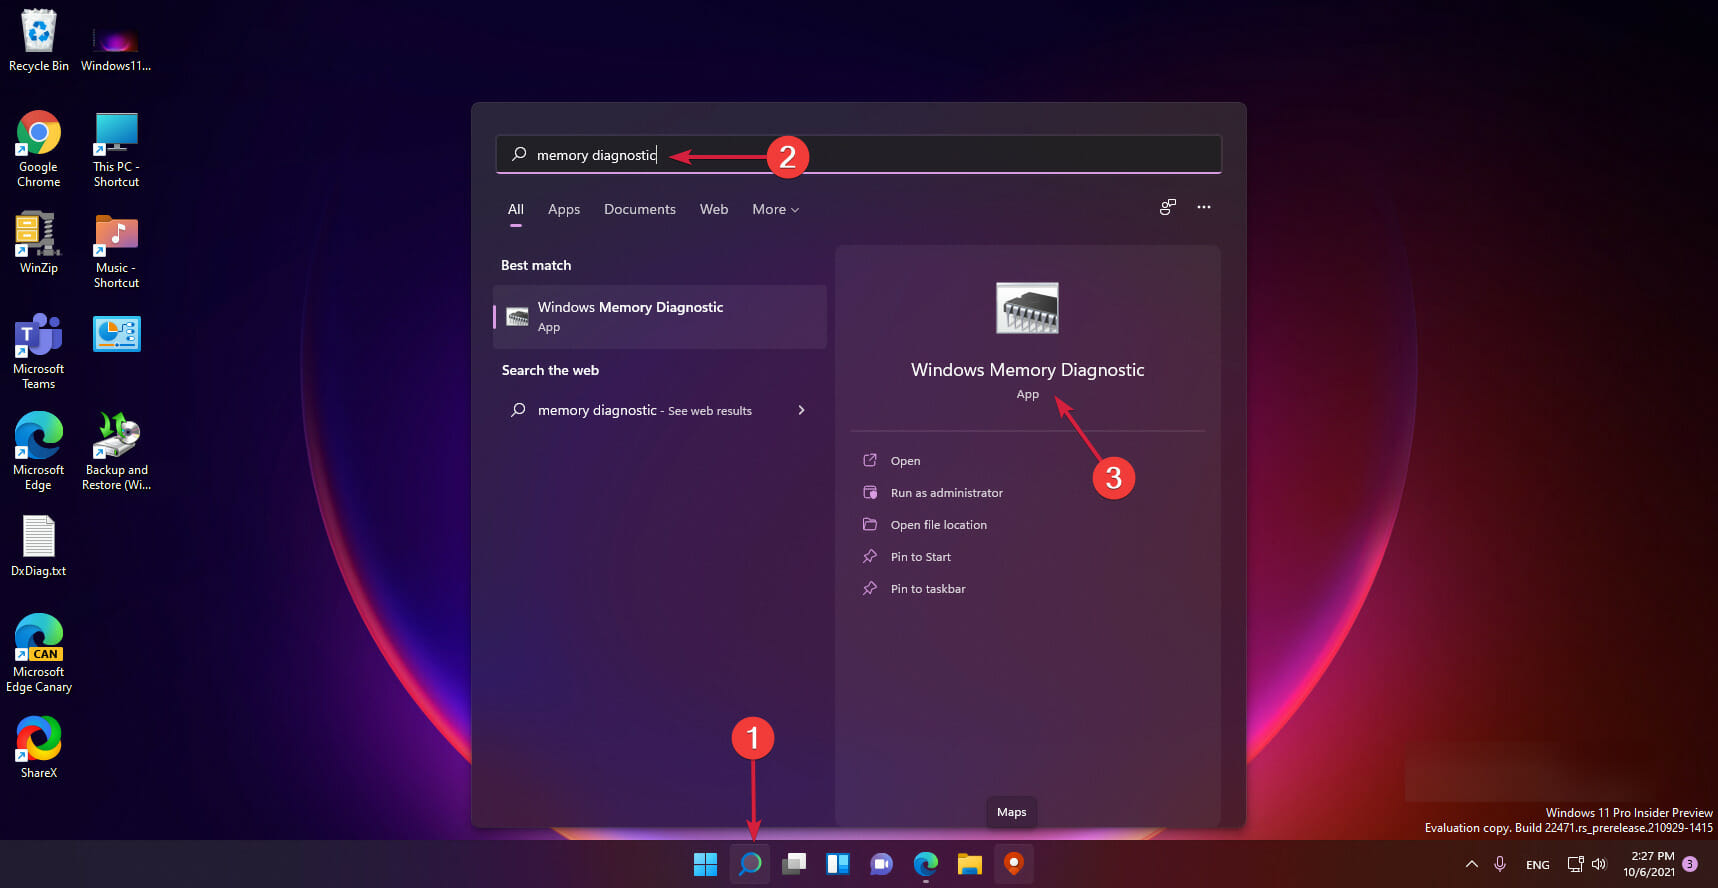
  1. Click the Start button, type memory diagnostic, and select the app from the results.
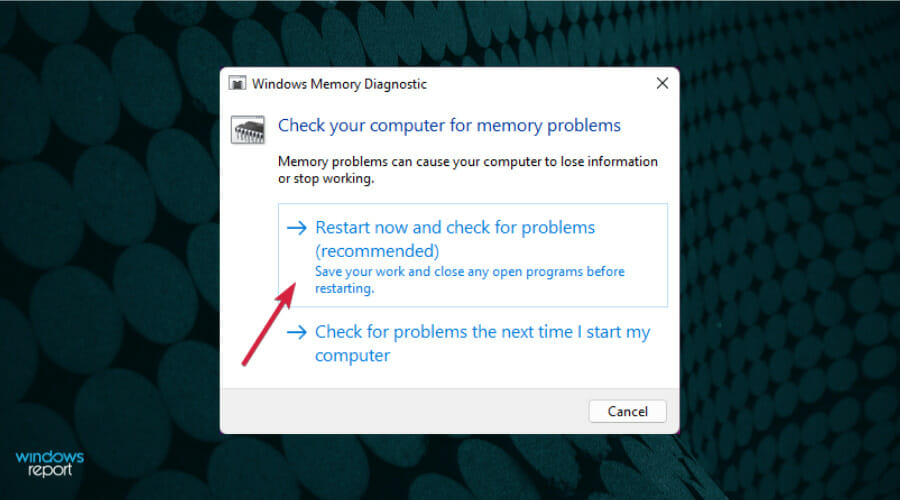
  2. Choose the first option, Restart now and check for problems.
  3. The PC will restart and make the necessary check for your RAM and if it finds any problems, you will receive a report so you can deal with the issue.

Luckily, the PASSIVE_INTERRUPT_ERROR doesn’t cause a restart loop, so you will be able to boot normally and apply the solution above. If the scan finds any issues with the RAM, reseat the affected module and repeat the test. If the results are the same, try with another set of RAM or replace the damaged one.

2. Update, uninstall or rollback your drivers

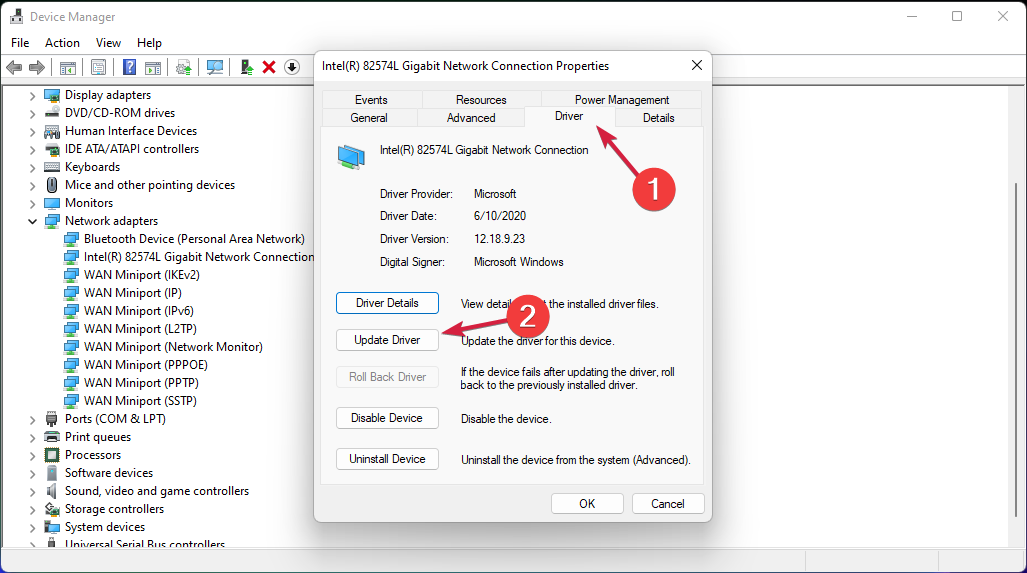
  1. Right-click the Start button and select Device Manager.
  2. Expand the categories one by one and look for any yellow mark next to one of the drivers.
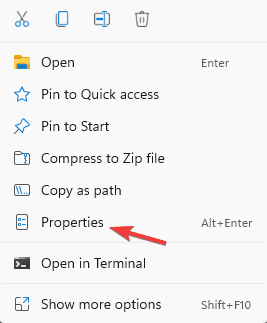
  3. Right-click the driver, and select Properties.
  4. Now click on the Driver tab and then start by selecting Update driver. If the system will find a better driver, it will install it. If not, you can also try the Roll Back Driver or the Uninstall Device options, one by one, and see if that changes the situation.

If you can’t find any yellow marks, the situation will be a bit more complicated because you will need to perform the solution above for the majority of component drivers. That can be tedious and time consuming so we recommend using a dedicated driver updater instead. The best of them will perform the check and updating in just a couple of seconds automatically.

3. Run the SFC scan

  1. Click the Search button from the Taskbar, type cmd, and select Run as administrator to start Command Prompt with full privileges.
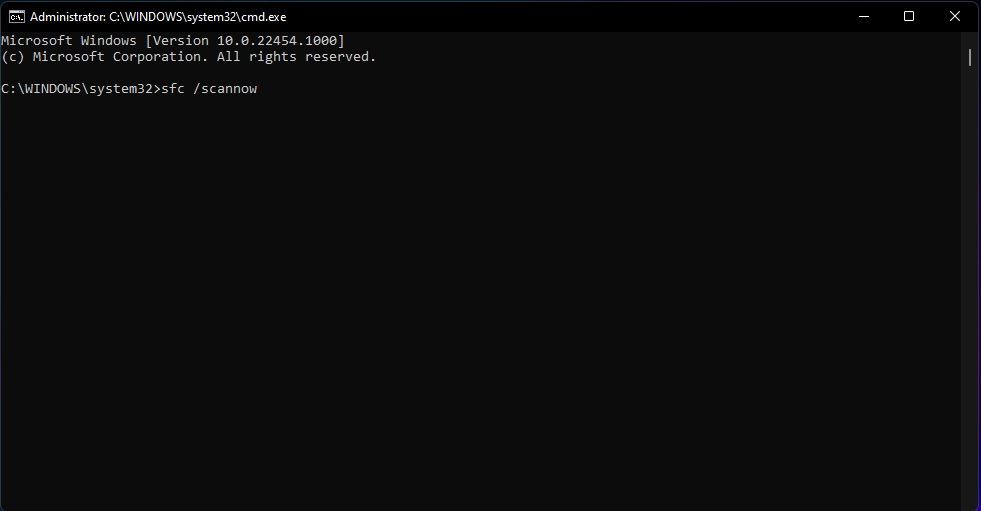
  2. Type or paste the following command and press Enter to run it: sfc /scannow
  3. Wait for the scan to finish as it will take a few minutes. If there are any corrupted system files, the tool will detect and repair them.

4. Restore your system to a previous point

  1. Press Windows + R to launch the Run command dialog box, enter rstrui.exe in the text field, and either click OK or hit Enter to launch System Restore.
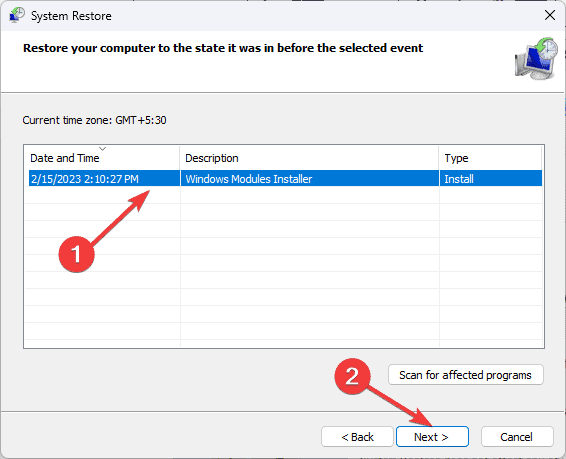
  2. Click Next at the bottom to proceed.
  3. Now, select a restore point before the PASSIVE_INTERRUPT_ERROR started to show up, and then click on Next.
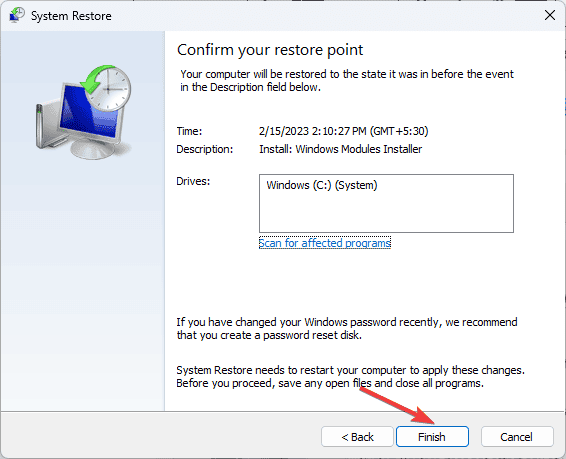
  4. Verify the details, and then click on Finish to start the restore process.

If the PASSIVE_INTERRUPT_ERROR is not caused by hardware issue, restoring your system before it happened will fix the problem. However, remember that this action will undo any installations you’ve performed since then.

Also, keep in mind that this solution only works if you created a restore points in Windows 11 before, to help bypass such issues at ease.

We hope that by applying the solutions above, you managed to fix the PASSIVE_INTERRUPT_ERROR BSoD and your system works fine now. If you have any questions related to this issue, leave a comment in the dedicated section below.

Admins will soon control who’s able to leave messages in chat before and after a Microsoft Teams meeting

The Admin Center will soon be enhanced with a new capability that allows admins to enable/disable at will who can leave messages in the chat before and after a Microsoft Teams meeting.

According to the latest entry in the Microsoft 365 Roadmap, this new enhancement will be released in December 2024 and introduce two new values: In-meeting only for everyone and In-meeting only except for anonymous users.

In the Admin Center, Microsoft Teams admins will see new settings under Meetings > Meeting Policies > Meeting Engagement. There will be five new options available:

  • On for everyone
  • On for everyone but anonymous users
  • Off
  • In-meeting for everyone
  • In-meeting only, except anonymous users

Choosing the In-meeting only values can disable participants’ ability to send messages in the meeting chat before or after the meeting. The chat will still be available to read and go through, but users cannot leave messages there anymore.

Here’s what the entry says:

We are expanding the existing ‘Meeting chat’ control in Teams Admin Center with two new values, “In-meeting only for everyone” and “In-meeting only except anonymous users.” In Teams Admin Center, admins will see a setting called ‘Meeting chat’ under Meetings > Meeting Policies > Meeting Engagement. Admins can now select from five options in the ‘Meeting chat’ setting: (1) “On for everyone” (2) “On for everyone but anonymous users” (3) “Off” (4) “In-meeting only for everyone” (5) “In-meeting only except anonymous users.” Admins can select the “In-meeting only” values to disable participants’ ability to send messages in the meeting chat before or after the meeting, for meetings organized by specific users in their tenant. When one of these “In-meeting only” values are selected, participants can read past chat history but no one can send messages in the meeting chat unless the meeting is active.

The new policy will impact all devices, from mobile to desktops, including iOS and Android, and it will depend on admins to make these changes. This is not the first new policy to be announced for the platform. Microsoft is set to release many others, prompting admins to say they cannot keep up with all the latest features.

It’s understandable, but maybe it’s also part of the job!

What is Chrome Incognito Shortcut & How to Use it

Did you know that you can open Chrome Incognito mode with a keyboard shortcut? That’s right, and in this guide, we’ll tell you everything you need to know about it.

What is the Incognito shortcut for Chrome?

To open Incognito mode on Chrome, you can use Ctrl + Shift + N on Windows, or Control + Shift + N on Mac.

How do I go to Incognito mode in Chrome?

  1. Click the Menu icon in the top right corner.
     menu icon chrome
  2. Choose New Incognito window.
    new incognito window
  3. A new browser window will now appear.

Alternatively, use the keyboard shortcut for quick access.

How to open Chrome always incognito?

  1. Locate the Chrome shortcut on your PC.
  2. Right-click it and choose Properties.
    properties context menu
  3. Go to the Shortcut tab.
  4. Next, in the Target field, add -incognito after the quote symbol.
    incognito target field
  5. Click Apply and OK.

After that, you can always start Chrome in Incognito by using this shortcut.

How do I get Chrome incognito on my taskbar?

  1. Create a Chrome Incognito shortcut as shown above.
  2. Right-click the shortcut and choose Pin to Taskbar.
    pin to taskbar context menu
  3. The icon will now appear on your Taskbar.

How do I open the current tab in incognito mode in Chrome?

This isn’t possible natively. However, you can achieve this with an Open incognito tab extension. If you don’t want to use extensions, you can copy and paste the URL to the Incognito window instead.

You can choose to open a specific URL to a new tab simply by right-clicking it and choosing Open link in incognito window.

open link in incognito window

Why can’t I turn on Incognito mode?

This can happen due to extensions or if you’re a member of an organization. We covered this subject in detail in our Incognito mode not working in Chrome, so check it out.

Can anyone see my Chrome Incognito history?

Chrome Incognito history isn’t available to other users who share the same PC. However, your browsing history will be available to your ISP even if you use Incognito mode.

As you can see, it’s pretty simple to access Chrome Incognito with a keyboard shortcut. Other browsers have this feature as well and we wrote how to open Incognito in Firefox with shortcut. We also have an article on how to use Opera Incognito shortcut, so don’t miss it.

Keep in mind that there are sometimes issues with Chrome, and our Chrome Incognito mode is greyed out article does its best to show you how to fix some of them. We also have a guide on what to do if Chrome Incognito keeps popping up, so don’t miss it.

In our latest guide, we wrote about how Chrome Incognito tabs disappear and what can you do to fix that, so feel free to visit it.

Black Myth Wukong’s Xbox Release Date: This is when the game will be released on Xbox Series X|S

There’s a buzz surrounding the release date of the new action-adventure phenomenon Black Myth: Wukong for the Xbox Series X|S. This fantasy action RPG, already launched for PC and PS5, has quickly become a monster hit.

With over 2.2 million concurrent players on Steam, it’s the most-played single-player game on the platform. Yet, Xbox enthusiasts find themselves on the edge of their seats, wondering when they’ll join the adventure. And understandably so. Who wants to miss all the fun?

Black Myth: Wukong’s Xbox release date has been a tale of anticipation and patience. Initially slated for a simultaneous release with its PC and PS5 counterparts, the Xbox version faced a delay.

The developers of Game Science said they need more time for further optimizations, which is why the game has been delayed on Xbox. This news left many wondering if there was more to the story, perhaps a secret deal that kept the game from gracing the Xbox sooner. However, the truth is that technical challenges further pushed the release date of Black Myth: Wukong on Xbox.

The real reason Black Myth: Wukong’s Xbox S/X release date has been delayed

According to the latest reports, the Xbox Series S, the more affordable sibling in the Xbox family, has primarily been at the heart of the delay. Compared to the Series X and PS5, its less powerful hardware has presented a unique challenge for developers aiming to deliver a consistent and quality experience across all platforms.

The game is reportedly experiencing a very specific issue called Memory Leak, which can cause significant crashes that could compromise the performance of your Xbox console. Xbox Insiders confirmed this in an interview with Spanish-speaker content creator eXtas1s.

This isn’t the first time a game’s release has been staggered due to Xbox Series S optimization issues, and it likely won’t be the last. If you remember, the legendary Baldur’s Gate 3 had the same problem.

As for when Black Myth: Wukong finally lands on the Xbox, the crystal ball remains cloudy. The developers have promised an announcement once the game meets their quality standards, leaving fans to speculate and hope for a release sooner rather than later.

However, an ESRB rating that shows Xbox Series X|S alongside PC and PlayStation 5 versions has gone live for Black Myth: Wukong, spotted by eagle-eyed fans. This suggests that an Xbox Series X|S release is finally on the horizon.

Some guess a late 2024 or early 2025 timeframe, but only time will tell.

In the meantime, the gaming community continues to rally around Black Myth: Wukong, celebrating its success and eagerly awaiting the day when Xbox players can join the fray. The game’s blend of rich storytelling, stunning visuals, and engaging gameplay has captured the imagination of millions, and its eventual arrival on Xbox will surely be a moment to remember.

KB504498 to the Beta Channel finally fixes Windows 11 Narrator’s slowing down bug

Windows 11 Preview Build 22635, or KB504498, is now available to Windows Insiders in the Beta Channel. The latest build introduces several changes and improvements to the operating system, including new shortcuts to Narrator.

KB504498 includes improvements to the Narrator screen reader and the File Explorer search box. For example, the Narrator now automatically reads the contents of an email in the new Outlook app. Microsoft says it addressed a bug that caused the narrator to slow down after 15 minutes of continuous app use.

One notable update in the new build is an improvement to the Snipping Tool. Windows 11 Preview Build 22635 introduces a new “Copy as table” feature in Snipping Tool (version 11.2409.23.0 and newer) that allows users to capture structured table data from a screenshot, copy it to the clipboard, and paste it into an email, document, or spreadsheet. Microsoft says the feature works best when a screenshot contains only one table.

Elsewhere, Microsoft is making changes to window snapping in Windows 11. According to the company, it’s tweaking how snap layouts suggest apps when users attempt to snap windows side by side. When using the Narrator key + control + X keyboard shortcut, Windows will now copy what the Narrator last spoke to the Windows clipboard.

KB504498 started rolling out to Windows Insiders in the Beta Channel on Monday. For a list of what’s new in this release, check out Microsoft’s full blog post.

In other news, the latest build to the Dev Channel is also available now.

Opera Incognito Shortcut: What is it & How to Use it?

Many are using Incognito mode in their browser, but did you know that there’s an Opera Incognito shortcut that you can use? That’s right, and in this guide, we’re going to show you how to use it.

What is the shortcut for Incognito in Opera?

In Opera, you just need to use Ctrl + Shift + N to open the Incognito mode window. If you’re on Mac, use Control + Shift + N.

How do I turn on Incognito mode on Opera?

  1. Open Opera.
  2. Next, click the Opera icon.
     opera icon
  3. Choose a New private window from the menu.
    new private window opera

Alternatively, you can use a keyboard shortcut as shown earlier.

How do I use extensions in Incognito mode in Opera?

  1. Click the Extensions icon in the top right and select Manage extensions.
    manage extensions opera
  2. Next, locate the extension you want to run in Incognito mode.
  3. Check Allow in incognito and that’s it.
    allow in incognito opera

What is the shortcut for private browsing in Opera GX?

Opera GX Incognito shortcut is the same as the one for the regular version of Opera and it’s Ctrl + Shift + N. We also have a great on how to turn on Opera GX Incognito, so check it out for more information.

Does Opera Incognito have VPN?

Yes, Opera Incognito allows you to enable Opera VPN which allows you to protect your browsing history from your Internet Service Provider or other third parties.

opera vpn private browsing

If you can’t find a VPN in Opera, we have a guide that can help you with that.

How do I delete Incognito history in Opera?

Simply by closing the Opera window, you’ll clear all website history for this session.

 Does Opera track private browsing?

Since all data is deleted as soon as you close the Incognito window, your browsing data is removed, so Opera can’t track it.

As you can see, the best way to open Opera Incognito is with a keyboard shortcut, but you can use other methods described in this guide. We have an in-depth guide on Opera and Opera GX shortcuts, so don’t miss it if you want to learn more.

Did you know that you can disable Private browsing in Opera and if you do, the keyboard shortcut won’t work anymore? For those that frequently use this feature, you can start Opera in Private browsing by default, and we have a guide that shows you how to do that.

Do you think it’s possible to check Opera Incognito history? We have a guide that explores this subject in detail, so feel free to visit it.

Since Opera and Chrome have many similarities, you can access Chrome Incognito mode with a shortcut by following the same steps.

How to Fix ERROR_BUSY_DRIVE Bug Check 142 (0x8E)

The ERROR_BUSY_DRIVE error typically comes with the error code 142 (0x8E) and it occurs when a drive is in use and cannot be accessed for a specific operation. It may also be triggered by hard drive malfunction, whether it’s internal or external.

Before going to more complicated solutions, try removing any USB external devices from the PC, except for the mouse and keyboard and reboot your PC. If it restarts normally, connect the devices one by one to see which one is causing this issue. Also, check if any internal drives are overheating.

How do I fix ERROR_BUSY_DRIVE?

1. Check for disk activity

  1. Right-click the Start button and select Task Manager.
  2. Go to the Performance tab and check the disk activity. If the disk is heavily used, wait for the activity to decrease.
  3. You may also right-click the Start button and select Device Manager.
  4. Here, check for any processes that are using the disk.

2. Check the disk for errors

  1. Click the Start button, type cmd and select Run as administrator from the results.
  2. Run the following command to check for disk errors: chkdsk /f /r
  3. Wait for the scan to finish and restart your PC.

3. Disable drive indexing

  1. Press Win + E to open File Explorer.
  2. Right-click on the drive and select Properties. 
  3. Now, uncheck Allow files on this drive to have contents indexed from the bottom of the window.
  4. Click Apply and then OK to save the settings.
  5. Check if the issue reappears.

4. Start Windows in Safe mode

  1. Restart your computer and press F8 (or Shift + F8) before Windows starts loading.
  2. Select Safe Mode from the Advanced Boot Options menu.
  3. Try accessing the drive in Safe Mode to see if the issue persists.

5. Update the drivers

  1. Right-click the Start button and select Device Manager.
  2. Expand the Disk drives category, right click on the drive and select Update driver.
  3. Select Search automatically for drivers.
  4. If the system doesn’t detect any new ones, go to the manufacturer’s website and get the correct driver for your device and system.
  5. If you can’t remember the model of the drive, type sys info in Windows Search and open System information.
  6. In the new window, go to Components > Storage > Disks and you will find the name of the manufacturer and the model number.

By applying the solutions above, you should be able to fix the ERROR_BUSY_DRIVE bug check. If these steps do not resolve the issue, you may need to consult with a professional or refer to detailed technical documentation.

If Windows found errors on the drive, click the highlighted link for a guide to fix this problem. Just note that you may even format an external drive even if it’s not visible in Windows.

We covered a similar error in our Error_Path_Busy 148 (0x94) article, so don’t hesitate to check it out. We covered another related issue, Error_Busy, in our latest guide, so don’t miss it.

For any questions or possible solutions we didn’t cover, feel free to access the comments section below.

With KB5044400, Microsoft wants you to use the Xbox controller to navigate Windows 11

Today, Microsoft released Windows 11 Insider Preview Build 26120.2130, or KB5044400, for Dev Channel Insiders. The update brings new features and improvements to Windows 11, some of which are gradually rolling out to those who have opted to receive early builds.

KB5044400 includes a new Gamepad keyboard layout for the on-screen keyboard that supports using an Xbox controller to navigate and type. Microsoft also says the keyboard keys have been vertically aligned for better controller navigation patterns.

Another notable change is that Narrator, Windows 11’s built-in screen reader, will now automatically read the contents of a mail in the new Outlook app, similar to how it did in classic Outlook.

There are a few new keyboard shortcuts and other options for Narrator. For example, Windows 11 now has a “Narrator key + control + X” shortcut to copy what the Narrator last spoke to the clipboard. If you want to quickly copy some content or descriptions or codes/numbers for use, you can use these shortcuts to review and copy what the Narrator said.

If you use the netsh wlan show networks command, you should be able to read SSIDs that are UTF-8 encoded. Wi-Fi SSIDs with Unicode characters (like emojis) should be appropriately displayed in netsh output.

As always, Microsoft has addressed several issues with KB5044400. For example, an underlying problem that could lead to clipboard history not displaying items you’d copied has been fixed. Microsoft says that Narrator should no longer add an additional announcement “contains style” whenever its focus is on text that has styling attributes such as bullets and numbers across applications such as Microsoft Edge, Teams, Outlook, etc.

Today’s build has many known issues, including crashes with live captions and mica. Microsoft’s blog post provides the full rundown.

If you’re a Windows 11 Insider in the Dev Channel, download the latest build now by heading to Settings > Windows Update and tapping “Check for updates.”

KB5044400 is available to those who have opted to receive early builds now, and it’ll roll out to all Dev Channel Insiders over the next few days.

You can read the full blog post here.

In other news, Microsoft recently enabled a feature that lets Windows users customize their Copilot Key on Windows 11 devices.

Playback Error This Video Requires Payment in YouTube TV

Many have encountered a Playback error this video requires payment to watch message on YouTube TV on their Roku, Fire TV or other devices. This can be a major problem since it will prevent you from viewing online content, but there are a few ways to fix it.

How can I fix the YouTube TV Playback error this video requires payment to watch error?

Before we try more complex solutions, try restarting your router and check if that helps. You can also retry opening the video again and check if it loads. Remember to keep your streaming device up to date.

1. Update your location

  1. On your device, click your Account picture.
  2. Next, choose Location and select Home Area. Let it load. Make sure it shows the correct address and zip code. If it doesn’t, update it.
    area youtube
  3. Open the YouTube TV app on your phone.
  4. Go to Account. Choose Location.
  5. After that, click on Update.

2. Select your account

  1. Open the YouTube app.
  2. Select the option to switch accounts.
  3. Select your account.

3. Clear the cache

  1. Select Settings.
    settings android tv
  2. Navigate to Apps.
    apps android tv
  3. Choose See all apps.
    see all apps android tv
  4. Select YouTube.
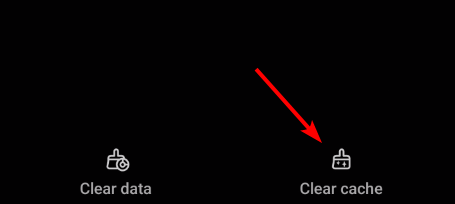
  5. Choose Clear cache and confirm.
    clear cache android tv

If possible, you can also try clearing the device cache.

4. Ensure that YouTube TV can access your location

  1. Open Settings on your phone and go to Location.
     location android
  2. Choose App permissions.
    app permissions
  3. Select YouTube TV.
  4. Set it to Allow all the time.

5. Uninstall the app

  1. Open Settings.
  2. Now select Apps.
  3. Select YouTube TV and choose Uninstall.
  4. Once removed, install the application again.

6. Factory reset your device

  1. Press and hold the Back button and the right side of the navigation circle.
  2. Hold them for 10 seconds.
  3. You’ll get a message on the screen that the device will reset.
  4. Ignore the message and let the device reset.

If you choose this method, all your data and accounts will be removed, so use it as a last resort. Keep in mind that these steps are for Fire TV, but they will differ depending on your streaming device.

YouTube TV playback error this video requires payment to watch error usually appears if there’s an issue with your location, but that can be easily fixed with these steps.

This isn’t the only issue you can encounter, we wrote about YouTube TV error code 3 and an Unhandled error has occurred in YouTube TV.

A few users reported that YouTube TV isn’t working at all, but we have a dedicated guide that addresses this, so don’t miss it.

6 Ways to Fix Wow Error 51900118

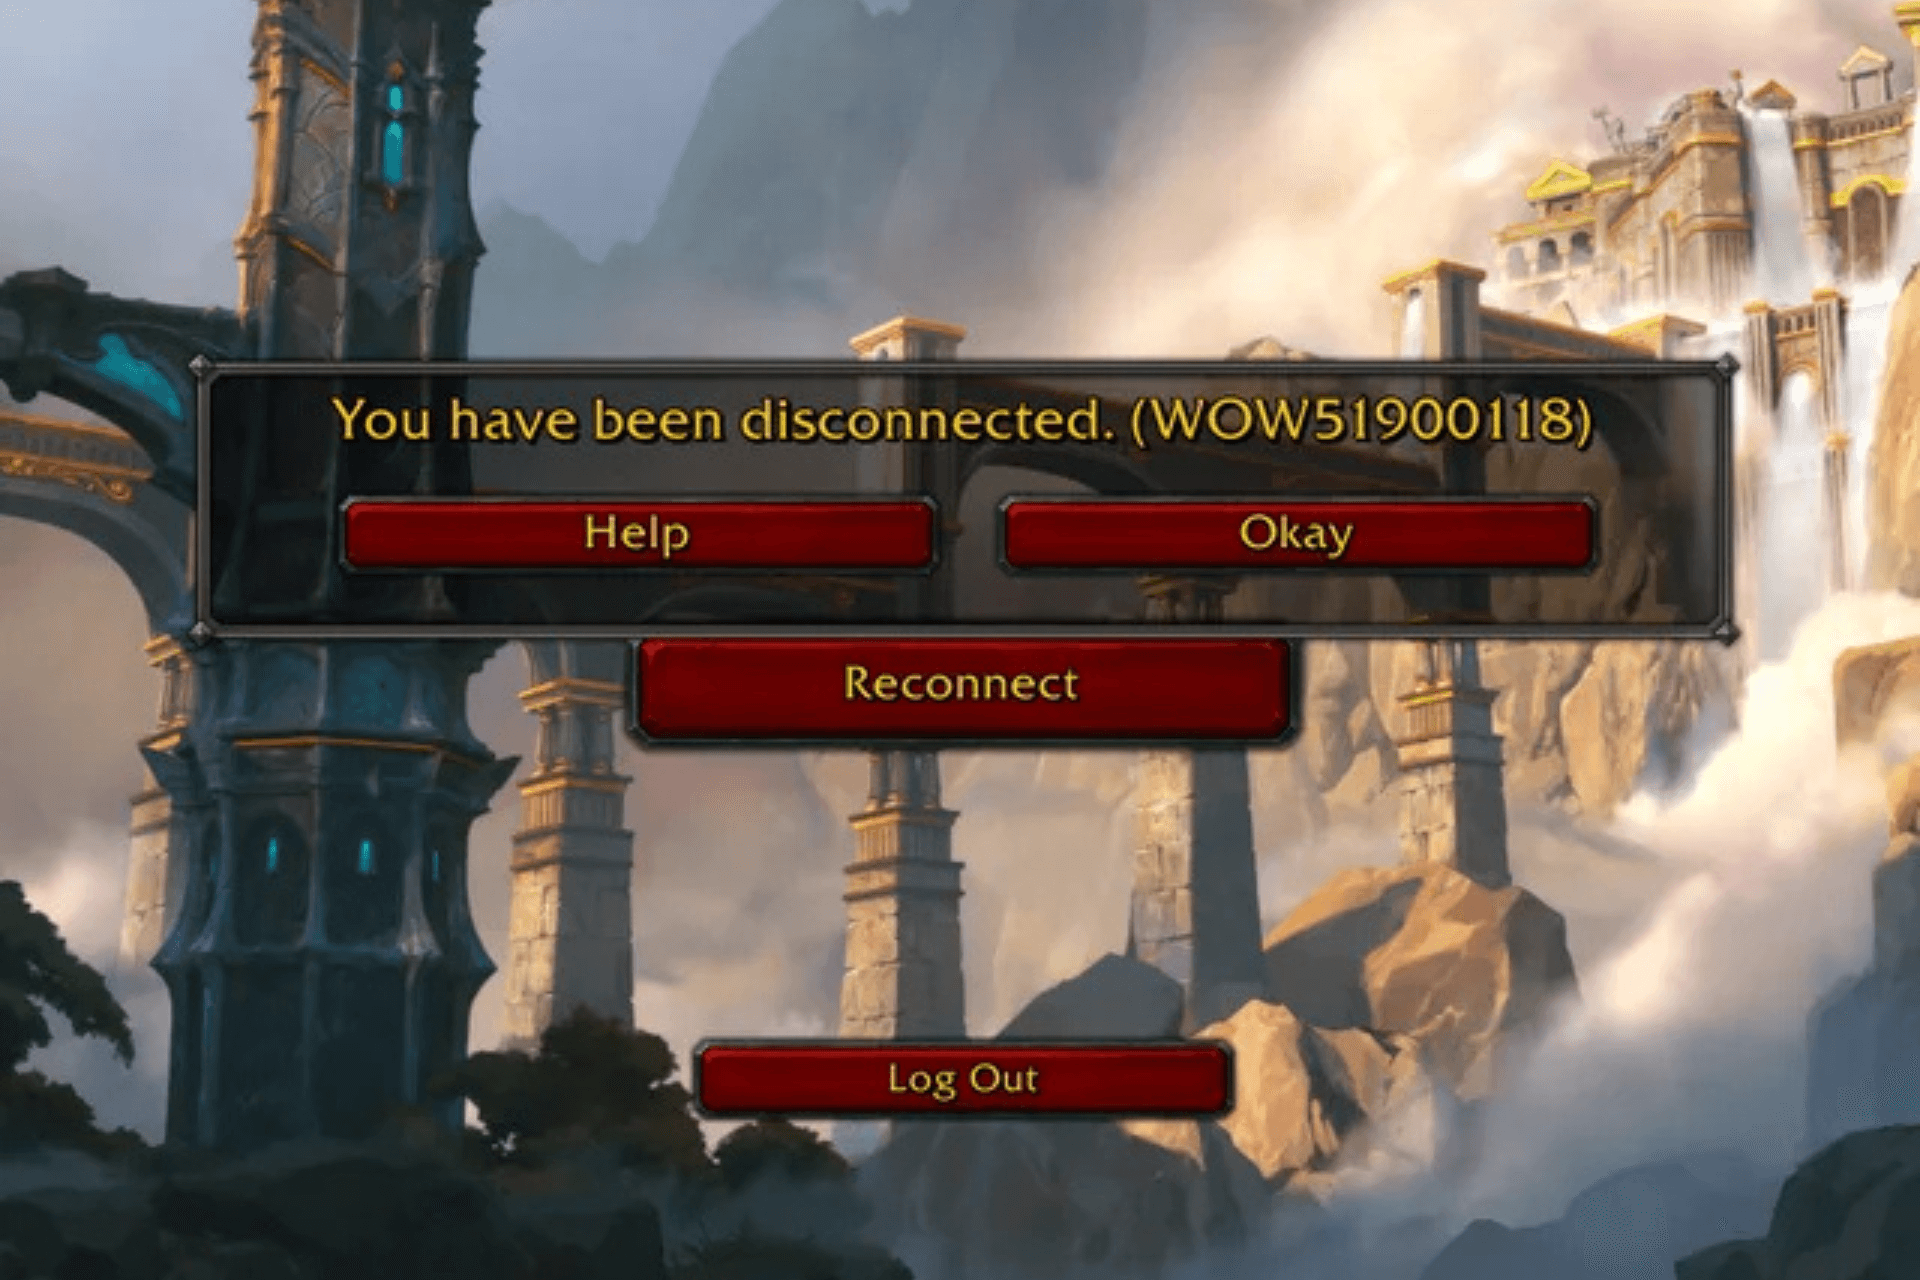
Many of our readers have complained about getting the error, You have been disconnected WOW51900118 when trying to log into World of Warcraft (WOW) on their computer.

The error usually occurs if the WOW servers are offline, the internet connection is unstable, the network configuration is incorrect, or the DNS servers are down. First, check the server status of World of Warcraft from Blizzard’s official Realm Status page, then try switching to a different network connection.

How can I fix the Wow error code 51900118?

1. Sign out of Battle.net

  1. Press the Windows key, type battle.net in the search box, and click Open to launch the Battle.net client.
  2. Locate and click the profile icon from the upper right corner of the Battle.net app.
  3. From the menu, choose the Log Out option.
  4. Now, log back into Battle.net and check if the issue persists.

2. Power cycle your router

  1. Remove your router’s power cord from the power outlet. If your modem is a different device, also unplug the modem wire.
  2. Now, let the router be unplugged for 30 seconds to 1 minute.
  3. Reconnect the power cord to the router and plug in the modem as well.
  4. Let the router and modem restart; you may have to wait 2-3 minutes for the device to reboot.
  5. Once the router is up, reconnect your PC and check if the issue persists.

3. Flush the DNS cache and reset the Winsock Catalog

  1. Press the Windows key, type cmd in the search box, and click Run as administrator to launch the Command Prompt with administrative rights.CMD elevated
  2. Type the following command to flush the DNS Resolver Cache one by one successfully and hit Enter after every command:
    • ipconfig /release
      ipconfig /renew
      ipconfig /flushdns
  3. Copy & paste the following commands to reset the Winsock catalog one by one and press Enter after every command:winsock reset - wow error 51900118
    • netsh winsock reset
      netsh int ip reset
  4. Restart your computer to let the changes take effect.

Flushing DNS cache can also help you fix the World of Warcraft wow51900328 error; read this guide to learn more about the issue.

4. Reset the network settings

  1. Press Windows + I to open the Windows Settings app.
  2. Go to Network & internet, and select Advanced network settings. Advanced network settings
  3. Under More settings, click Network reset.network reset
  4. Locate and click the Reset now button.Reset now 1 - wow error 51900118
  5. Click Yes to confirm the action.
  6. Now click Close, and your computer will restart.

5. Switch to a different DNS server

  1. Press Windows + R to open the Run window.
  2. Type ncpa.cpl and click OK to open the Network Connections window.    NCPA run command 1 - wow error 51900118
  3. Right-click the Wi-Fi or Ethernet connection, whichever is active, and select Properties.Network Connection properties
  4. On the Properties window, select Internet Protocol Version 4 (TCP/IPv4), then click the Properties button.Internet Protocol Version 4(TCPIPv4) Properties
  5. On the Internet Protocol Version 4 (TCP/IPv4) properties window, place a checkmark next to the Use the following DNS server addresses option.
  6. Now, for the Preferred DNS server option, type 8.8.8.8 and Alternative DNS server option, type 8.8.4.4.DNS server - wow error 51900118
  7. Click OK to save the changes, then check if the issue persists.

6. Allow WOW through Windows Defender Firewall

  1. Press the Windows key, type control panel in the search box, and click Open.Control Panel start menu - wow error 51900118
  2. Select Category for View by, then select System and security.Network and Internet - wow error 51900118   
  3. Click Allow an app through Windows Firewall.aLLOW AN APP THROUGH FIREWALL
  4. Click Change settings, then select the Allow another app button.Change app
  5. Click the Browse button and head to the app’s exe file location.Browse
  6. Now, click the Add button to add the app to the list.ADD
  7. Once added, place a checkmark next to Private and Public next to World of Warcraft, then click OK.

In conclusion, to avoid World of Warcraft error 51900118, you must ensure the server is always up and running, and the internet connection is working properly.

Keeping a check on server status and ensuring you have a stable internet connection can also help you avoid issues like high latency in World of Warcraft (WoW).

Next, you can refresh your internet connection using flush DNS commands or reset your PC’s network settings to fix the problem.

If World of Warcraft is not starting in Windows 10/11, you can try using the local account, closing background apps, or deleting the Battle.net cache files.

If you have any questions or suggestions about the WOW error code 51900118, feel free to mention them in the comments section below.

How to Fix the Wowarmhw.DLL Missing Error?

Wowarmhw.dll, along with WoW64cpu, wow64, xtajit, and wow64win, are legitimate system files in Windows 10 and are part of the WOW64 emulator present in Windows 10. These files allow 32-bit apps to run on a 64-bit Windows system.

If Wowarmhw.dll is missing or can’t be found on your computer, it could be due to a corrupted DLL file, malware infection, or missing essential system files.

To begin with, restart your computer, ensure your Windows is up to date, and run a malware scan using a reliable antivirus tool.

How can I get rid of the Wowarmhw.DLL missing error?

1. Use a third-party DLL fixer tool

The Wowarmhw.DLL file is an important system file. It is part of the Windows WOW64 subsystem and helps manage the translation and execution of 32-bit code into a 64-bit environment.

If you have another computer with the same version of Windows, you can head to C:\Windows\SysWOW64, copy the Wowarmhw.DLL file, and paste it into the affected computer at the exact location. However, if you are not sure about the file or device you are using, it is best to use a third-party DLL fixer tool.

These tools can help you recover DLL files quickly and without any hassle. You only need to download and install the app and run it to restore the missing DLL files. This will resolve conflicts between OS and third-party apps and optimize your device’s performance.

2. Reregister the DLL file

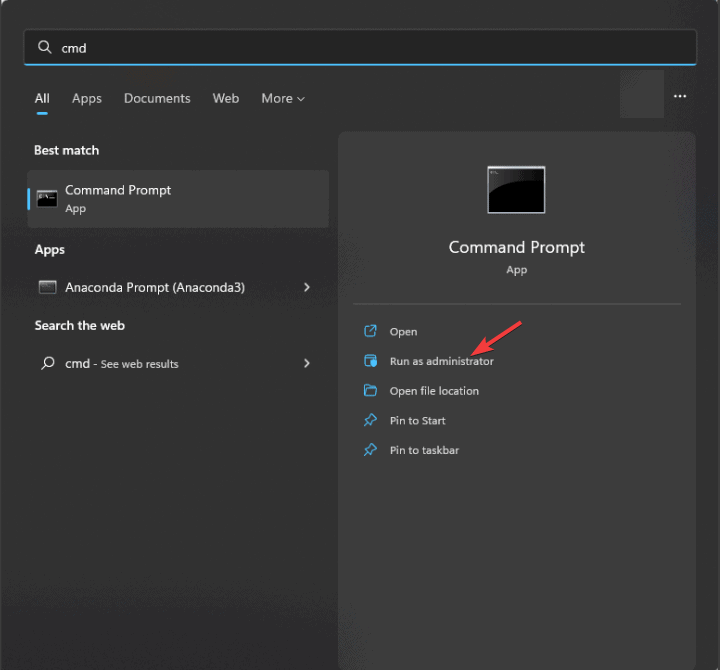
  1. Press the Windows key, type cmd in the search box, and click Run as administrator to launch Command Prompt with elevated rights.CMD elevated
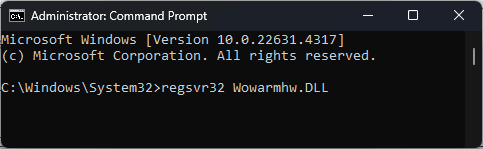
  2. Copy & paste the following command to reregister the Wowarmhw.DLL and press Enter:regsvr32 Wowarmhw.DLLRegister the DLL - wowarmhw.dll
  3. Click OK when prompted and restart your computer.

Sometimes, the file is already in the system and only needs to be re-registered. Refreshing the file registration within the Windows system can resolve the missing DLL file problem.

3. Repair/Reinstall the affected app

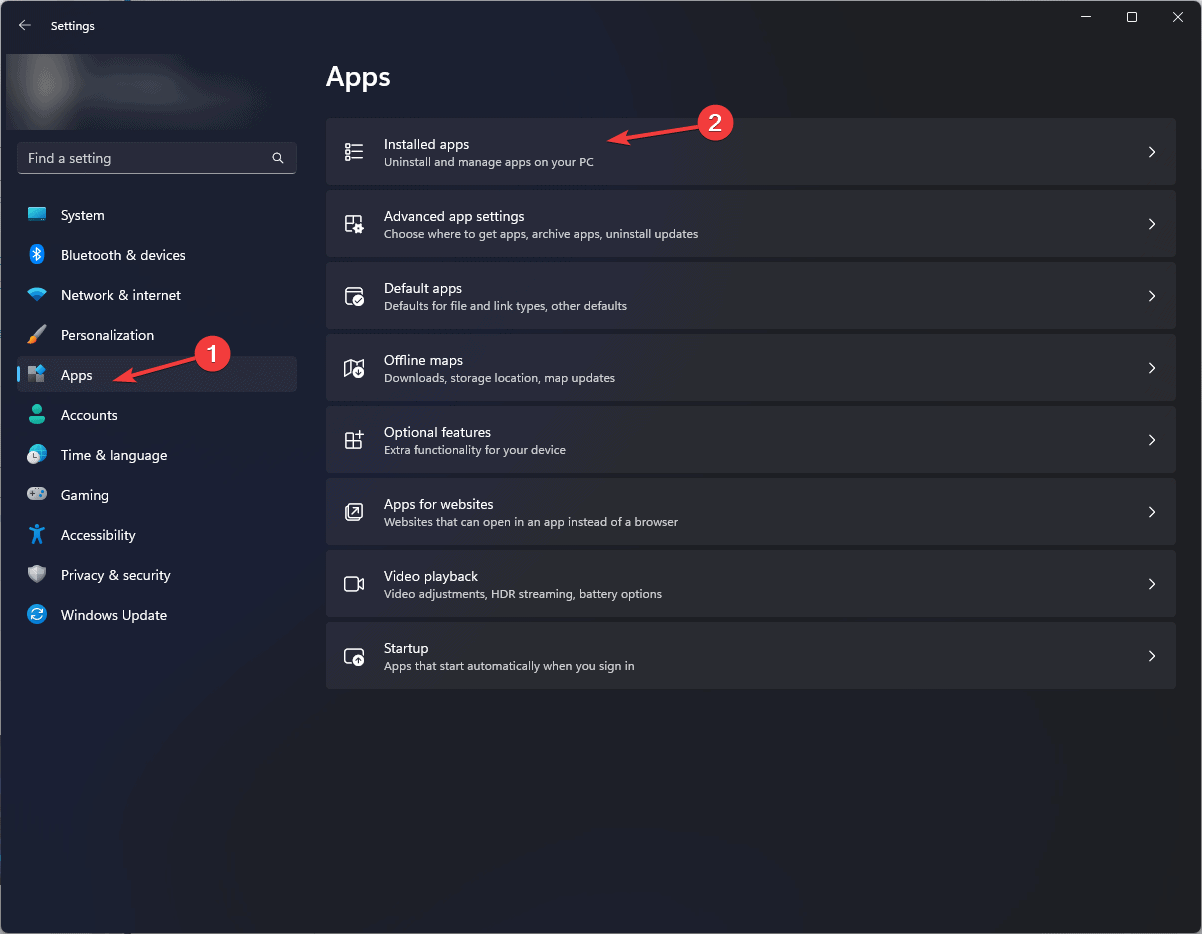
  1. Press Windows + I to open the Settings app.Apps - Installed apps wowarmhw.dll  
  2. Go to Apps, then click Installed apps to get the list of installed applications. 
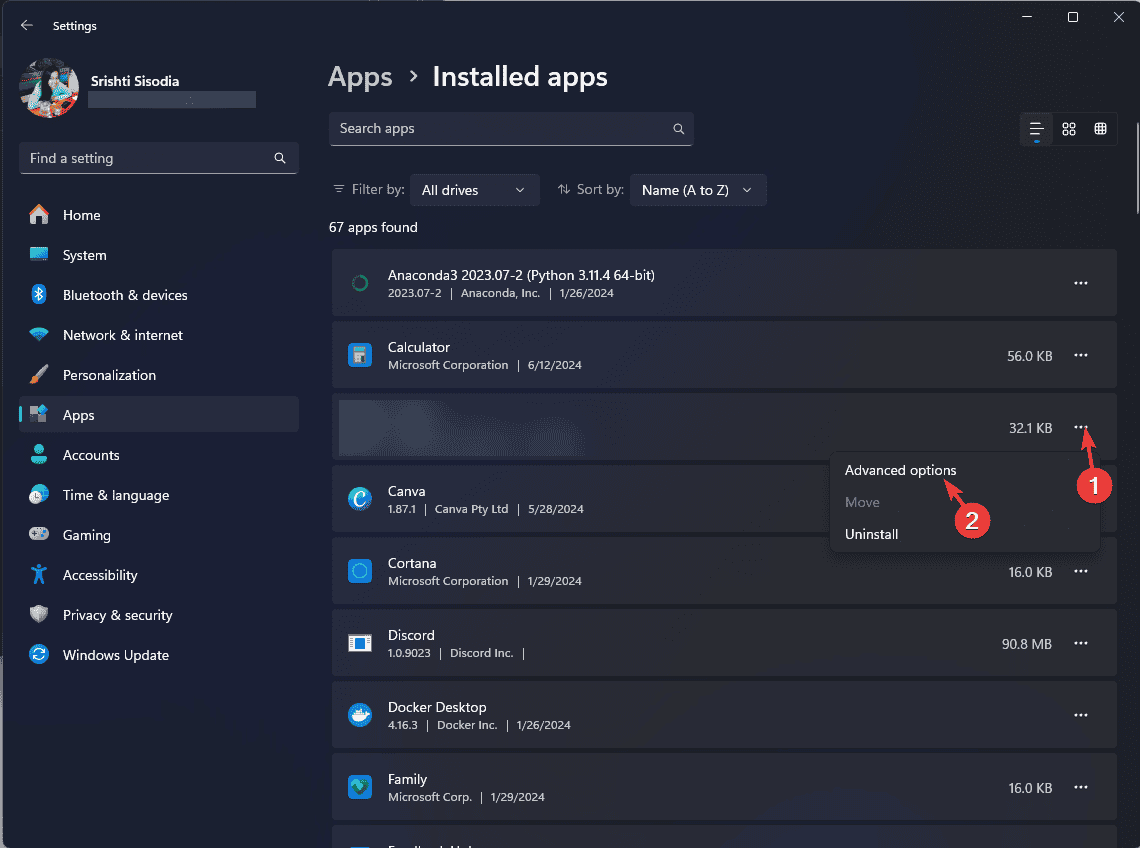
  3. Locate the affected app, click the three dots icon, and select Advanced options from the context menu.Advanced options
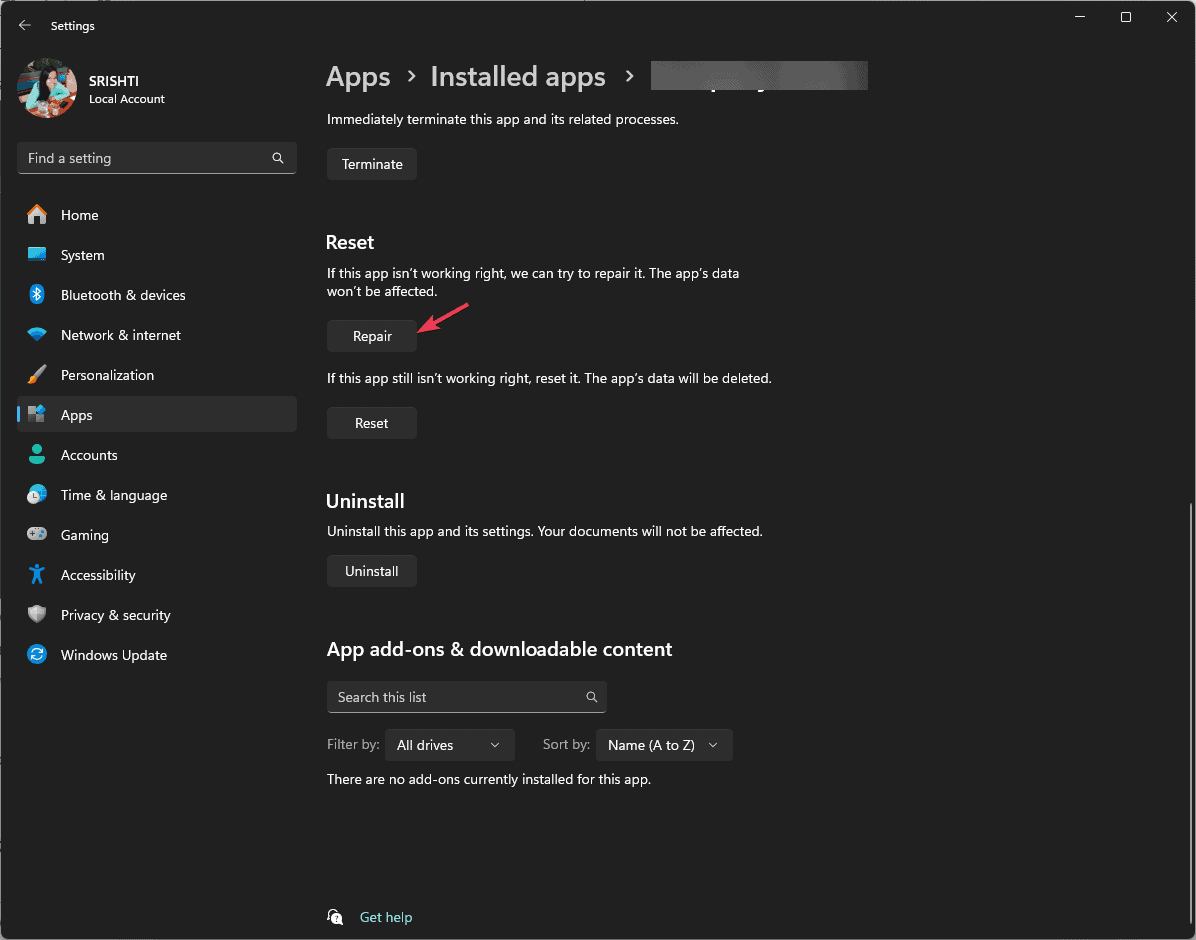
  4. Go to the Reset section and click the Repair button. This process may take some time, but rest assured your app data will not be removed.Repair the app - wowarmhw.dll

If repairing the app doesn’t fix the issue or the option is not available for the app, try reinstalling it. For that, follow these steps:

  1. Go to the Installed apps list in Settings again.
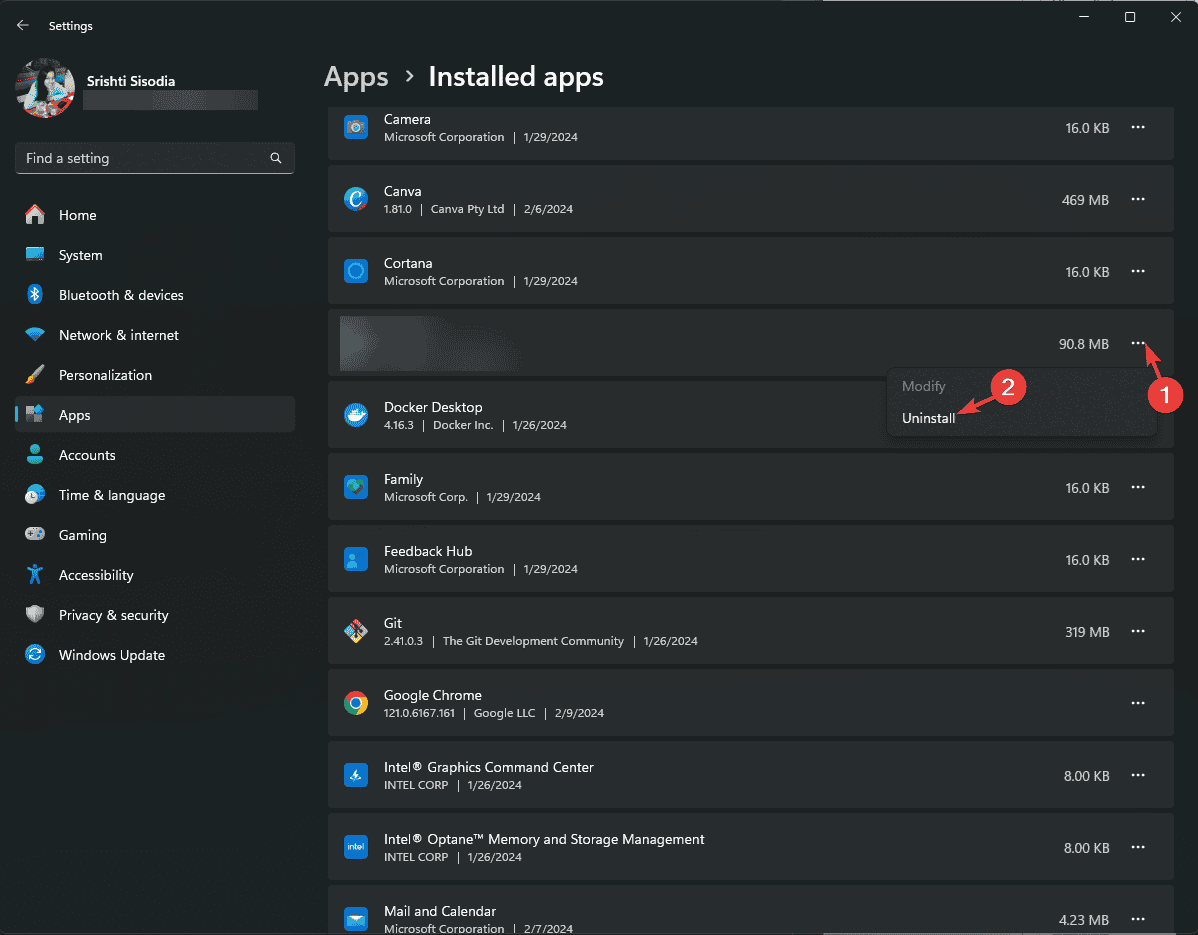
  2. Navigate to the affected app, click the three dots icon, and select Uninstall. Uninstall (2) wowarmhw.dll 
  3. Click Uninstall again and follow the on-screen instructions to complete.uninstall confirmation app
  4. Open the Microsoft Store or the app’s official website, and click Download/Get to reinstall the app.
  5. Once done, reboot your computer.

4. Run SFC & DISM scans

  1. Press the Windows key, type cmd in the search box, and click Run as administrator to launch Command Prompt with elevated rights.CMD elevated
  2. Click Yes on the UAC prompt.
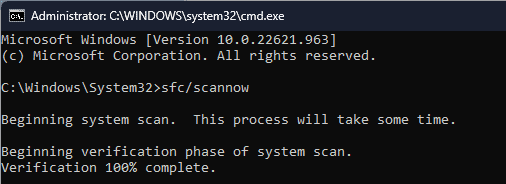
  3. Copy & paste the following command to restore/repair the Windows system files and press Enter:sfc/scannowSFCSCANNOW CMD wowarmhw.dll
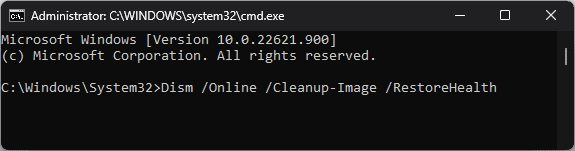
  4. Wait for the scan to execute, type the following command to scan the Windows image for corruption and repair it via Windows Update, and hit Enter:Dism /Online /Cleanup-Image /RestoreHealthRestore health
  5. Once the scan is complete, restart your PC to let the changes take effect.

Read more about this topic

5. Perform a System Restore

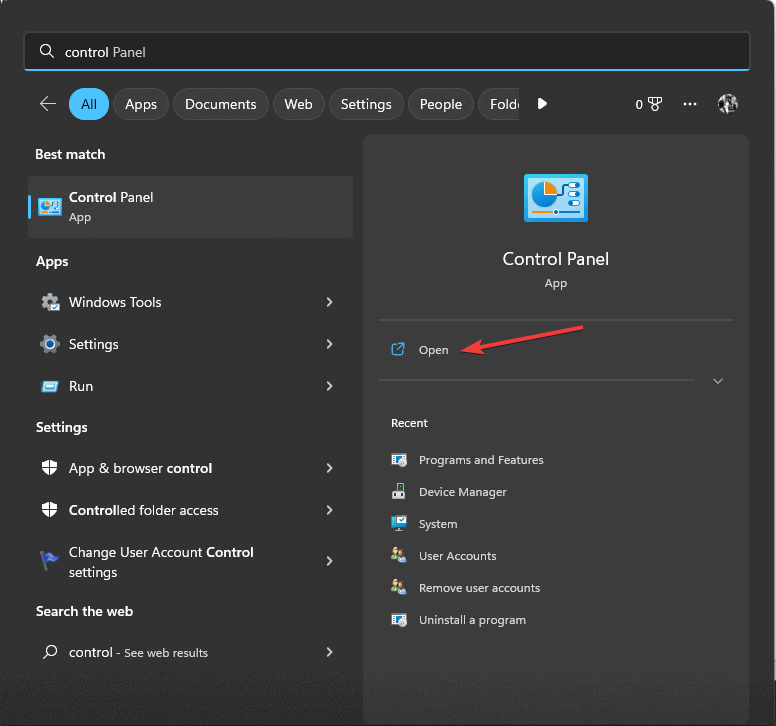
  1. Press the Windows key, type control panel in the search bar, and click Open to launch Control Panel.  

    Control panel

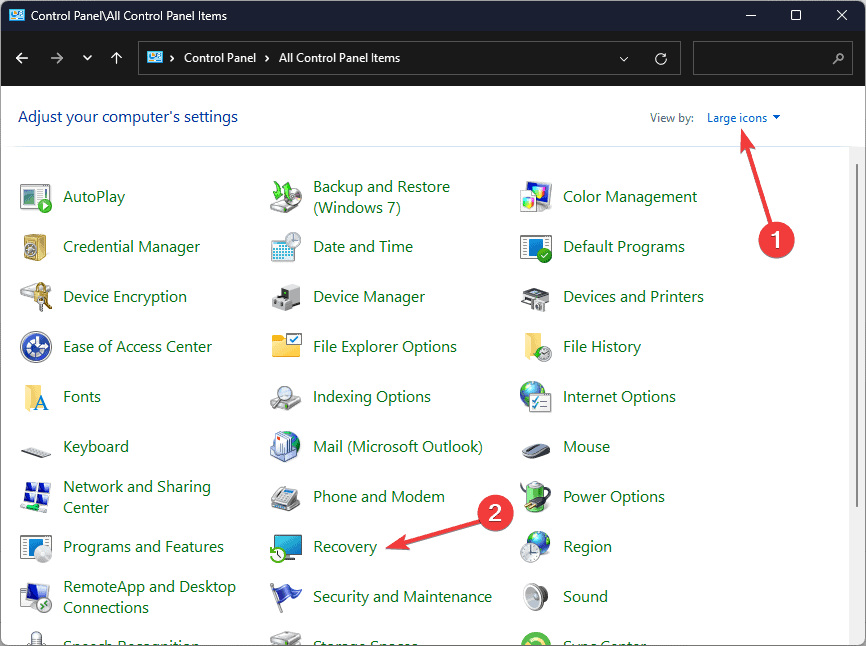
  2. Select Large icons for View by and select Recovery.Recovery Control Panel
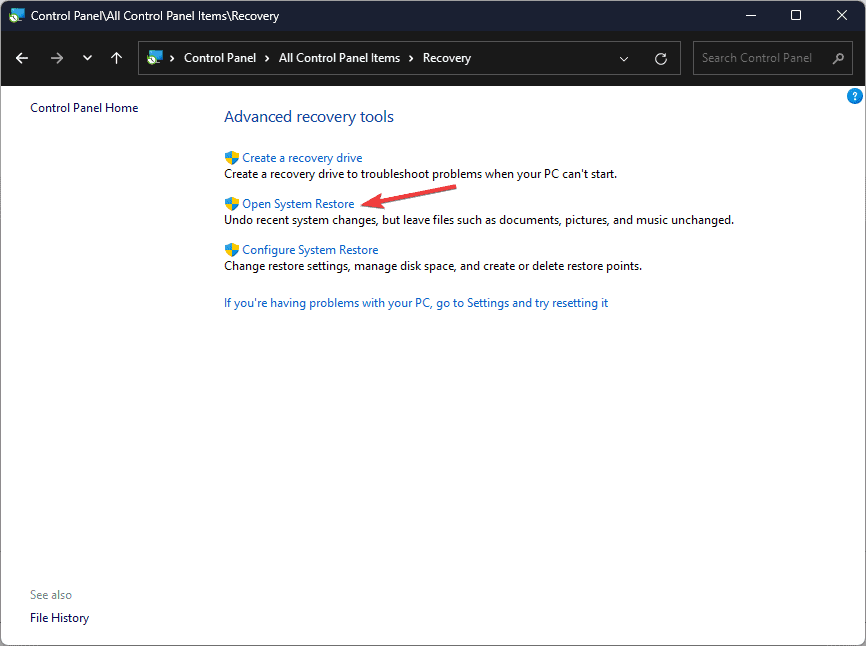
  3. Click the Open System Restore link.Open system restore
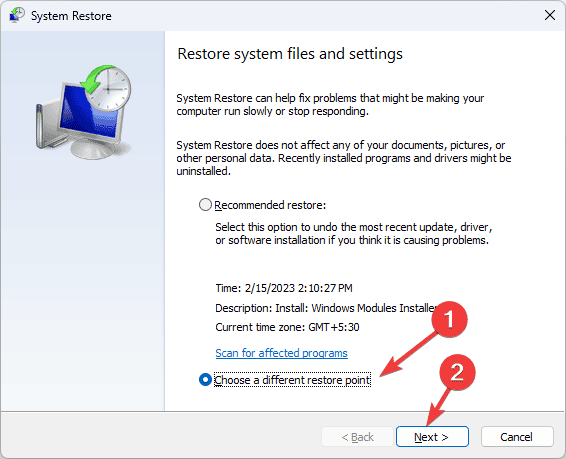
  4. Select Choose a different restore point on the System Restore window, then click Next.Next Choose a different restore point
  5. You will get a list of available restore points on your computer. Select the restore point created before encountering the missing DLL error and click Next.Choose a point wowarmhw.dll
  6. Click Finish to initiate the process.Finish wowarmhw.dll

Windows will restart and restore to the chosen version. If you see the System Restore didn’t complete the error successfully, it could be due to conflicting programs or driver error, we recommend you check out this detailed guide for solutions.

6. Download the DLL file manually

Note icon NOTE
The last resort to get the DLL file is to download it from a reliable third-party website, like DLL-FILES, which has been verified and tested by WR experts.
  1. Click the DLL-FILES website to access the wowarmhw.dll page, then click Download.
  2. Double-click the downloaded folder to open, locate, and copy the .dll file.
  3. Go to this path and paste the DLL file. Don’t forget to replace C with your system drive letter if it is not C for you: C:\Windows\SysWOW64
  4. Restart your PC to save the changes.

This is how you can fix the wowarmhw.dll missing error. However, if you are facing the same issue due to any other DLL file, this guide can help you quickly recover the DLL file.

If you want to learn more about the causes of missing DLL files on Windows, we have a separate guide for you. You can also fix a similar issue with the IEShims.dll guide.

Before you go, don’t forget to check out our latest guide on what to do if  Invagent.DLL is missing from your computer.

Did we miss a step that helped you fix this missing DLL error? If so, share the method in the comments section below, and we will add it to the list.

Fix: GPIO_CONTROLLER_DRIVER_ERROR (0x00000138)

The error code GPIO_CONTROLLER_DRIVER_ERROR (0x00000138) usually occurs when your Windows GPIO (General Purpose Input/Output) controller driver is damaged. Other causes of this error could include outdated drivers, hardware conflicts, incompatibility issues with recent Windows updates, or malware infection.

To begin with, restart your computer, ensure your Windows is up to date, and run a malware scan using a reliable antivirus tool.

Next, check all the hardware connections, especially the newly installed hardware, to ensure every component is correctly seated.

How can I fix the GPIO_CONTROLLER_DRIVER_ERROR (0x00000138)?

1. Update your GPIO drivers

  1. Press Windows + R to open the Run window.Device Manager Run command
  2. Type devmgmt.msc and click OK to open the Device Manager app.
  3. Go to System devices, or Other devices, and click it to expand.
  4. Right-click on the device, and select Update driver from the context menu.Update your driver - GPIO_CONTROLLER_DRIVER_ERROR
  5. Choose Search automatically for drivers.
  6. Follow the on-screen instructions to complete the process.

Windows will try to find the best version of the driver for your device and install it. If it fails to do so, you can head to the manufacturer’s website or use a third-party driver updater tool to install the latest version.

2. Run DISM & SFC scans

  1. Press the Windows key, type cmd in the search box, and click Run as administrator to launch Command Prompt with admin rights.CMD elevated
  2. Copy & paste the following commands one by one to scan and repair the Windows OS image files via Windows Update and hit Enter after every command:
    • DISM /Online /Cleanup-Image /CheckHealth
      DISM /Online /Cleanup-Image /ScanHealth
      DISM /Online /Cleanup-Image /RestoreHealth
  3. Wait for the scan is complete, type the following command to repair or restore the system files, and press Enter: sfc /scannowSFCSCANNOW CMD GPIO_CONTROLLER_DRIVER_ERROR
  4. Once the scan is executed successfully, restart your computer to let the changes take effect.

3. Roll back the GPIO driver

  1. Press Windows + R to open the Run window.Device Manager Run command
  2. Type devmgmt.msc and click OK to open the Device Manager app.
  3. Go to System devices, or Other devices, and click it to expand.
  4. Right-click on the device, and select Properties from the context menu.  Properties  - GPIO_CONTROLLER_DRIVER_ERROR
  5. Go to the Drivers tab, then click the Rollback Driver button.Rollback Driver
  6. On the following page, select the reason for rollback and click Yes to continue.Select a reason - GPIO_CONTROLLER_DRIVER_ERROR
  7. Once done, reboot your PC.

4. Restore your computer to the latest version

  1. Press Windows + R to open the Run console.   sysdm   
  2. Type sysdm.cpl and click OK to open the System Properties window.
  3. Go to the System Protection tab and click the System Restore button.SystemPropertiesComputerName_Z5BXqVzSCV = GPIO_CONTROLLER_DRIVER_ERROR
  4. Select Choose a different restore point on the System Restore window, then click Next.Next Choose a different restore point
  5. From the list of available restore points on your PC, select the one before encountering the GPIO_CONTROLLER_DRIVER_ERROR and click Next.Choose a point
  6. Click Finish to start the process.Finish GPIO_CONTROLLER_DRIVER_ERROR

Windows will restart and restore to the selected version. If you see the System Restore didn’t complete the error successfully, it could be driver errors or software conflicts, we suggest you check out this detailed guide for solutions.

In conclusion, to fix the GPIO_CONTROLLER_DRIVER_ERROR with code 0x00000138, you can update or roll back your GPIO driver, run SFC & DISM scans, or restore your Windows to the selected version.

Before you leave, check out all the causes of BSoD so that you can take precautions and avoid these types of errors from reappearing. We also have a new guide on ERROR_BACKUP_CONTROLLER, so you might want to check it out.

Did we miss a step that helped you fix this BSoD error? If so, share the method in the comments section below, and we will add it to the list.

How to Fix VOLSNAP_OVERLAPPED_TABLE_ACCESS (0x0000012D)

The error code VOLSNAP_OVERLAPPED_TABLE_ACCESS (0x0000012D) is related to Windows’s Volume Shadow Copy Service (VSS) and indicates a problem accessing shadow copy storage or managing volume snapshots.

It usually appears if the shadow copies are corrupted, your device has insufficient disk space, there are issues with storage drivers, or the system files are damaged.

How can I fix the VOLSNAP_OVERLAPPED_TABLE_ACCESS (0x0000012D)

1. Free up disk space

  1. Press Windows + R to open the Run console.Cleanmgr Run command VOLSNAP_OVERLAPPED_TABLE_ACCESS    
  2. Type cleanmgr and click OK to open the Disk Cleanup window.
  3. On the Disk Cleanup: Drive Selection window, select the Drive from the drop-down menu and click OK.DISK C
  4. Click the Clean up system files button.Clean up system files
  5. On the Disk Cleanup: Drive Selection window, select the Drive from the drop-down menu and click OK.
  6. Select the items under Files to delete, and click OK.Files to delete
  7. Click Delete Files.Delete Files - VOLSNAP_OVERLAPPED_TABLE_ACCESS

You can also locate & remove large files and videos from your device manually and retrieve space on your computer.

2. Repair the shadow copies

  1. Press the Windows key, type cmd in the search box, and click Run as administrator to open Command Prompt with elevated rights.CMD elevated
  2. Click Yes on the UAC prompt.
  3. Copy & paste the following command to disable and re-enable the VSS and hit Enter: vssadmin delete shadows /allDelete volume shadows
  4. The command will delete all existing shadow copies, so make sure you don’t need them.

3. Run DISM & SFC scans

  1. Press the Windows key, type cmd in the search box, and click Run as administrator to launch Command Prompt with admin rights.CMD elevated  
  2. Copy & paste the following commands one by one to scan and repair the Windows OS image files via Windows Update and press Enter after every command:
    • DISM /Online /Cleanup-Image /CheckHealth
      DISM /Online /Cleanup-Image /ScanHealth
      DISM /Online /Cleanup-Image /RestoreHealth
  3. Wait until the scan is complete, type the following command to repair or restore the system files, and hit Enter: sfc /scannowSFCSCANNOW CMD VOLSNAP_OVERLAPPED_TABLE_ACCESS
  4. Once the scan is executed successfully, restart your computer to let the changes take effect.

4. Check the Volume Shadow Copy service

  1. Press Windows + R to open the Run console.Services RUn command VOLSNAP_OVERLAPPED_TABLE_ACCESS
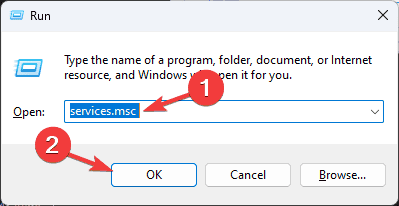
  2. Type services.msc and click OK to open the Services window.
  3. Locate the Volume Shadow Copy service, right-click it, and see if the Start option is available. If it is available, click it to start the service. However, if it is greyed out, it indicates that the service is already running.Start volume shadow service

5. Update your storage driver

  1. Press Windows + R to open the Run console.Device Manager Run command - VOLSNAP_OVERLAPPED_TABLE_ACCESS
  2. Type devmgmt.msc and click OK to open the Device Manager app.
  3. Locate the System devices or Other Devices category, and click it to expand.
  4. Right-click on the device under it and choose the Update driver option from the context menu.Update driver - VOLSNAP_OVERLAPPED_TABLE_ACCESS
  5. Click Search automatically for drivers.
  6. Follow the on-screen instructions to complete the process.

Windows will try to find the best version of the driver for your device and install it. If it fails to do so, you can head to the manufacturer’s website or use a third-party driver updater tool to install the latest version.

In conclusion, to fix this kind of BSoD error, you must always check the error message displayed to understand it better.

If you are facing other issues related to VolSnap like the VolSnap 25 error, we have covered it in our previous guide, don’t forget to check it out.

Before you leave, check out all the reasons for BSoD occurrence so that you can take precautions and avoid these errors from reappearing.

If you have any questions or suggestions about the VOLSNAP_OVERLAPPED_TABLE_ACCESS BSoD error, please mention them in the comments section below.

What is the Sky Follower Bridge Extension & How to Download it

If you’ve ever wanted to keep up with your followers on X(formerly Twitter) the Sky Follower Bridge extension on your Firefox browser can help you achieve this.

X is continuously making changes and it’s easy for your timeline to become unfamiliar. With Sky Follower Bridge, you get to curate your timeline and follow your interests by following the same users.

How do I download and install the Sky Follower Bridge extension on Firefox?

  1. Launch your Firefox browser and go to the Firefox Browser add-ons website.
  2. Search for Sky Follower Bridge, select the one you want from the search results, and then click Add to Firefox. 
  3. The extension will be downloaded and installed. Click Add to allow the extension to access browser tabs, and browser activity during navigation.
  4. You might also get a prompt to allow this extension to work in a private session. To enable it, place a checkmark and click Okay.

The extension also gives a warning that it is not actively monitored for security by Mozilla so you may want to reconsider before installing it.

Once you’re done, you’ll also need to download the BlueSky app to important your follower list.

  1. Next, launch and log into your X account and start the Sky Follower Bridge extension.
  2. You’ll be prompted to sign into your BlueSky account and once in, Sky Follower Bridge will begin searching for followers on BlueSky and you can follow them.

While this is a great to ensure mutual follows, BlueSky doesn’t guarantee that the X username will be similar. Sky Follower Bridge may not be able to identify them if these usernames are different. You’ll need to do a lot of back and forth checking to ensure it’s the right account.

Further, if someone is not on BlueSky, their username will not show up on Sky Follower Bridge as the two are interconnected. This makes it very limiting since out of your follower list, only a handful will probably sign up for BlueSky.

Speaking of follows on these social platforms, we also have an interesting article on the IG Follow extension which can help you export your Instagram follow list. Once you have the list, you can now examine closely and check real vs fake followers on your Instagram account.

That’s all we had for this article but do let us know if you’ve tried the Sky Follower Bridge extension on Firefox or any other browser. What was your experience? Let us know in the comment section below.

How to Create Microsoft Outlook Signature Template

An email signature in Microsoft Outlook can display professionalism while providing the recipient with your essential contact information. A block of text or image appears at the end of your email and can include your name, title, contact information, company name, logos, and social media links.

In this guide, we will discuss creating and customizing your signature in Outlook to suit your style and leave a lasting impression.

How can I create a Microsoft Outlook signature template?

  1. Go to the email signature gallery template page and select your preferred template.Email template
  2. Click Download, and double-click the downloaded template to open in Word. DOwnload the template - microsoft outlook signature template
  3. The signature template might open in Protected View. To edit the template, you can click Enable Editing.Enable editing in Word
  4. You can now edit it accordingly. Once you’ve done so, go to the Home tab, then select Copy.
  5. Press the Windows key, type outlook in the search box, and click Open. Outlook start menu - microsoft outlook signature template
  6. Click the New Email option (Outlook Classic) or New, then select Mail (Outlook New).
  7. Paste the signature you copied in the email body. You can also make other changes, such as changing your photo and logo or adding hyperlinks to your social profile and website.
  8. Once you have personalized the signature, save it to continue using it in all outgoing emails.
  9. Press Ctrl + A to select the signature, then press Ctrl + C to copy it.
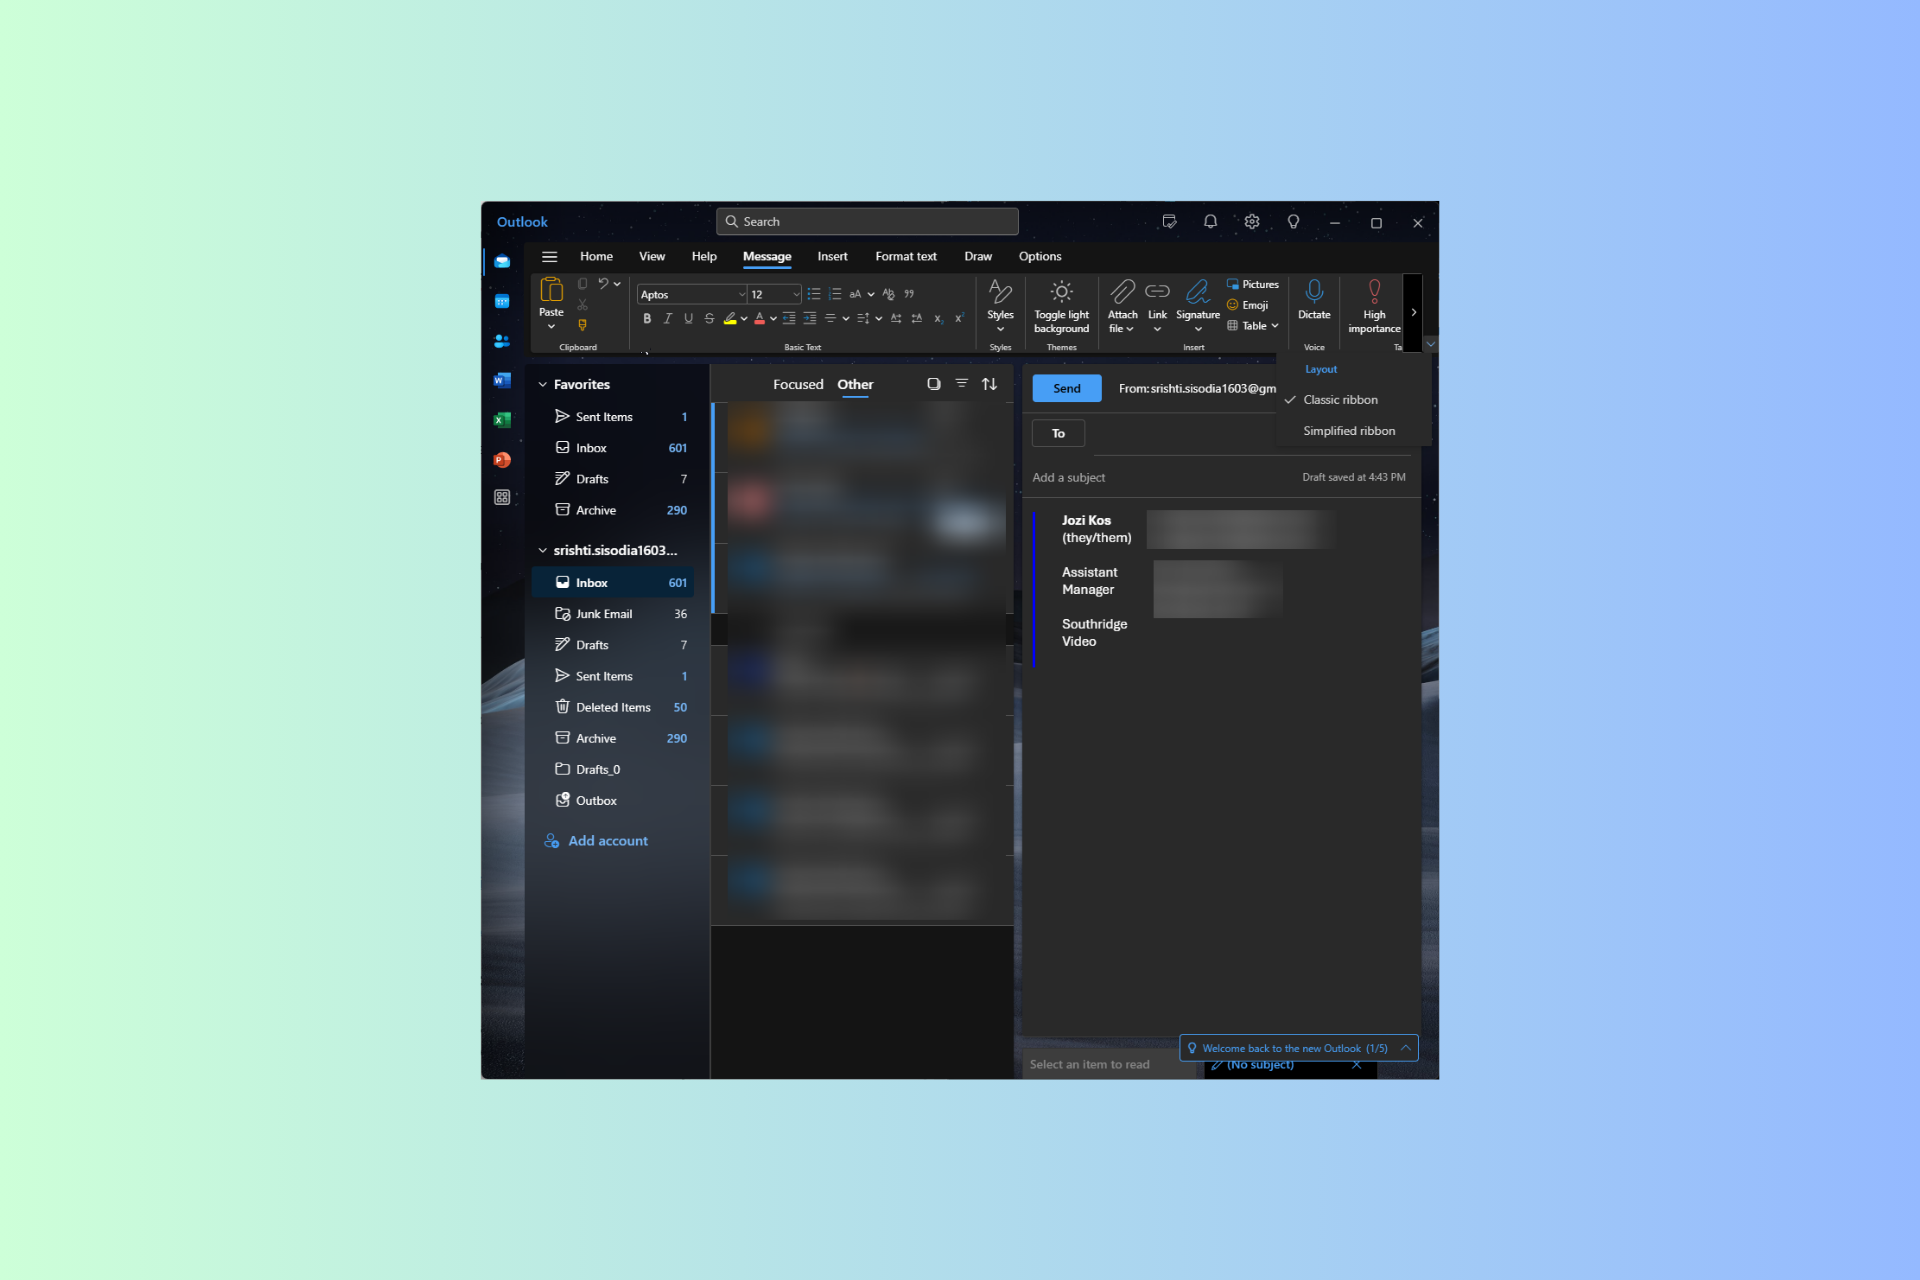
  10. Next, go to the Message tab, locate the Include group, select Signature, and then Signatures. However, if you are using the new Outlook, instead of Include, look for Insert, choose Signature, and then Signatures.Signatures
  11. If you can’t see the Include/Insert group, go to the right side of the header, click the downward arrow, and select Classic ribbon.Classic ribbon - microsoft outlook signature template
  12. Click New signature and type a name for your signature.
  13. In the Edit signature field, right-click and select Paste from the context menu. The signature is now displayed in the field.
  14. Under Select default signatures, select the signature from the drop-down menu For New Messages and For Replies/Forwards.
  15. Select Save to save the signature.
  16. Click OK.

How can I change the photo/logo in the signature?

  1. Right-click the photo in the signature, then choose Change Picture. Then, browse to select the location of the photo you want to use.
  2. Go to the picture you want and select it.
  3. Select Insert.
  4. You can also resize the image. Select the image to see drag handles appear around it. Move the drag handles to resize the image. Choose the Picture Format tab, and format the picture the way you want.

You can also right-click the hyperlink or social icon and choose Edit Link or Edit Hyperlink. Under Text to Display, you can update the address box and add the necessary information.

If you want to know more about how to set up and update your signature on Microsoft Outlook, read this guide.

How can I create an email signature template in Outlook for the Web

  1. Go to the email signature gallery template page and select your preferred template.
  2. Click the Customize in Word button, and you will be redirected to the login screen. Select your account and enter your credentials to sign in.Customize in Word
  3. Press Ctrl + A to select, then Ctrl + C to copy the signature from the Word document.Word doc - microsoft outlook signature template
  4. Now open Outlook for Web, then click New mail, and press Ctrl + V to paste the signature. Paste the sign
  5. Make the changes to the template to customize it accordingly.

This way, you can create and customize Outlook’s email signatures. Depending on your needs and the nature of the email, you can create multiple signatures.

To speed up repetitive replies and match your new signature style, you can also follow this guide on creating email templates in the new Outlook.

You can speed up repetitive replies and keep them consistent with your new signature by using this guide on creating email templates in the new Outlook, which explains how to build and reuse message templates.

If your Outlook Signatures has disappeared, it could be due to an outdated browser cache, incorrect signature settings, or conflicting software. Read this guide to learn more.

Also, in case you have multiple mailboxes added to Outlook, you might need different signatures; read this guide to learn the steps to set them up. Don’t forget to check out our guide to download Outlook calendars & signatures.

Which Outlook email signature template do you use? Feel free to share your preferences with our readers in the comments section below.

AGP_ILLEGALLY_REPROGRAMMED – Step-by-Step Fixes

You can easily fix the AGP_ILLEGALLY_REPROGRAMMED BSOD error with the tips and tricks outlined here. Keep reading!

The most common hardware and software that cause a Blue Screen error are the graphics processing chipset/external card and their drivers. Usually, it’s due to inappropriate programming or overclocked AGP cards. Other reasons also contribute to the complexity of the issue.

I’ve evaluated many techniques to address it. Here are the ones that worked!

What Is the AGP_ILLEGALLY_REPROGRAMMED Error?

AGP_ILLEGALLY_REPROGRAMMED is a Blue Screen of Death that occurs when Windows finds a discrepancy between the intended and real-time programming of the AGP card. It overrides the process to a stop to prevent damage to the entire PC. The result is a sudden Blue Screen with a Stop code.

AGP_ILLEGALLY_REPROGRAMMED BSOD

STOP Code: AGP_ILLEGALLY_REPROGRAMMED

Bug Check Value: 0x00000106

Explanation: The Accelerated Graphics Port (AGP) hardware has been reprogrammed by an unauthorized agent.

Potential Causes

Improperly tested and malicious video drivers are the primary causes behind this BSOD error. They force the AGP card to operate against its intended programming.

Additionally, it could be due to:

  • The AGP card or related hardware components aren’t compatible with each other.
  • Malware in the system poses itself as a video driver for unauthorized crypto mining purposes.
  • Third-party services interfere with the graphics card driver.
  • Someone didn’t install the AGP properly.

How To Fix AGP_ILLEGALLY_REPROGRAMMED BSOD Error

Follow these troubleshooting steps in the order they appear. This will help resolve the issue with minimal effort.

Basic Troubleshooting

  • Shutdown or restart: Shut down your PC and attempt a power cycle or restart and see if the issue occurs again.
  • Power cycle: If you’ve turned off the PC, unplug all cables from the laptop or CPU cabinet. For laptops, also remove the battery pack if you can. Now, press and hold the power button for 30 seconds. Reseat all the cables in their original ports, turn on the PC, and monitor its activities for several hours.
  • Reset the GPU: Reboot the AGP card and its driver by pressing Windows + Ctrl + Shift + B. You might see a dark screen briefly or a blink in the display unit. On some laptops, you might hear a beep sound.
  • Update Windows: Open the Windows Settings by pressing the Windows + I keys. Select Update or Update & Security from the menu and click on Windows Update on the left side navigation panel. Now, select Install updates, Resume updates, or Check for updates if any such buttons are available on the right side screen.
Resume updates
  • Update GPU driver: Open Device Manager by typing the same name in the Start menu. Now, on the tool interface, expand the Display adapters items tree, right-click on the built-in or external AGP card, and choose Update driver from the context menu. In the following wizard, select the “Search automatically for drivers” option. Hook the PC up to an internet network.
Search automatically for drivers

Download Official GPU Driver From the Manufacturer’s Website

The best way to beat the error is to install the latest official release directly from the manufacturer’s website.

Don’t uninstall the existing video driver just yet as you’ll get no video output from the AGP or face issues without it.

So, visit any of the following sites to download compatible drivers:

If they come as an archive file, like ZIP or RAR, extract the executable software in a separate directory.

Uninstall Any Newly Installed Video Driver

If your video driver came from NVIDIA or AMD Radeon, you can uninstall it from the Apps menu. Here’s how:

  1. Navigate to the Apps & features section on Windows Settings > Apps by pressing the Windows + I keys together.
  2. Now, enter NVIDIA or Radeon in the Search this list field on the right side.
apps and features
  1. Select the NVIDIA graphics Driver app and hit Uninstall.
uninstall
  1. Don’t restart the device even if it asks to do so.
  2. Remove the rest of the apps that also have the NVIDIA name on them.
  3. For AMD Radeon, the names and app fragments might differ.
  4. Now, you can reboot the PC.

Another way to uninstall video drivers and their leftover files is by using the Display Driver Uninstaller tool. It’s available for free.

Download it and run it. Click on the Select device type drop-down list and choose GPU.

Hit the Clean and restart button to remove the video driver completely, even temporary files, cache files, and registry entries.

running DDU

Once you’re back on the Desktop, go to the Downloads directory and install the recently downloaded AGP driver.

Remove Any Newly Installed Hardware

If the above methods didn’t fix the problem, the BSOD error might be linked to a newly installed AGP, RAM, or other internal component. This method only applies to desktop PCs:

  1. Turn off the PC and remove the power chord from the main outlet.
  2. Now, disconnect all the cables from the PC case.
  3. Discharge static electric charge on your body by touching a grounded metal surface.
  4. Alternatively, you can wear an anti-static wristband for better results.
  5. Now, open the left-side cover of the CPU chassis.
  6. If it’s a RAM module, unlock the RAM slot tabs by sliding them delicately up and down or left or right. It depends on their orientation.
ram locks
  1. Remove the newly added RAM.
  2. If it’s an AGP card, slide the small white bar on the slot outward or to the right to unlock it.
AGP lock
  1. Also, remove any screws that might be fastened to the AGP card from the back of the CPU chassis, known as the I/O panel.
AGP screw
  1. Remove the AGP from its slot.
  2. Put back old hardware that you might have removed previously.
  3. Connect all the cables and turn on the PC.
  4. Observe for several hours and see if the issue comes back or not.

The new hardware you installed is compatible with your PC system if the issue doesn’t reappear. In that case, look for suitable replacements to resolve AGP_ILLEGALLY_REPROGRAMMED.

You can also follow this method to remove and re-install your existing components. This often helps fix the BSOD error.

Disable Fast Startup

Turning off the fast startup mode usually resolves this error. Here are the steps to follow:

  1. Press Windows + I to open Settings.
  2. Select System.
  3. In the System dialog, choose Power & sleep.
power and sleep
  1. Click on the Additional power settings hyperlink below Related settings.
  2. You should see the Power Options dialog.
  3. Click on the Choose what the power buttons do link.
choose what buttons do
  1. The Turn on fast startup checkbox should be inactive.
  2. Activate it by clicking Change settings that… shield at the top.
disable shield
  1. Now, uncheck the Turn on fast startup option.
  2. Hit Save changes.
  3. Restart the PC and observe for a few hours.

Run the Microsoft Safety Scanner Tool

Microsoft Safety Scanner is a free malware detection and removal software from Microsoft. To use it:

  1. Visit the Microsoft Safety Scanner Download portal.
  2. Download a 32-bit or 64-bit copy depending on your system.
  3. Press Windows + R on the keyboard to learn which one you need.
  4. Type msinfo32 and hit Enter.
  5. If it says x64-based PC in the System Type section, it’s a 64-bit PC.
sytem info
  1. For any other values, it’s a 32-bit PC.
  2. Now, double-click the downloaded file.
  3. Click Run on the Security Warning dialog.
run software
  1. Accept the terms and click Next twice.
  2. Select Full scan and hit Next.
full scan
  1. Once the scanning process is over, the app will show a report of malware it detected and removed.

Clean Boot the PC

In the Clean Boot state, Windows OS only runs Microsoft services and background processes. So, this is the best technique to isolate any third-party software causing the AGP_ILLEGALLY_REPROGRAMMED error.

  1. Open the Run command by pressing Windows + R.
  2. Type in msconfig and hit Enter.
  3. The System Configuration tool will open.
  4. Go to the Services tab.
  5. Checkmark the box for Hide all Microsoft services.
  6. Hit Disable all.
disable all
  1. Click on the Startup tab.
  2. Open Task Manager using the link provided in that tab.
  3. You’ll arrive on the Startup tab of Task Manager.
  4. Disable all active startup processes by right-clicking and choosing Disable.
disable tasks
  1. Close Task Manager.
  2. Go back to System Configuration and hit Apply.
  3. Restart the PC.

Restore PC

Try restoring the PC to its last known good configuration. This method is only applicable if you’ve enabled the System Restore Point creation feature.

By default, Windows OS automatically creates a system snapshot when you make substantial changes, like installing a driver, software, etc.

  1. Press Windows + R to launch Run.
  2. Type in rstrui and hit Enter.
  3. The System Restore dialog box will open.
  4. You can select the Recommended restore option.
system restore
  1. Alternatively, select Choose a different restore point and a preferred date and time.
  2. Once you’ve done that, click Next.
  3. Hit Finish.
start restore

Your PC will restart a few times during the process. Once it’s back on the Desktop, keep doing what you were previously doing when the BSOD error showed up. Monitor the system for a few hours.

Replace AGP Card

The AGP hardware is likely broken or its chip isn’t working as it should. The embedded circuitry is trying to modify the built-in programming on its own due to electronic faults.

If someone you know is also using the same AGP, you can borrow it from them, install it, and see if the issue goes away.

If it does, buy a new AGP.

Contact Manufacturer for Warranty Services

Most AGP cards come with a 3-year warranty period. So, you should check with the manufacturer’s support team if you can get a replacement or repair service. Here are the support portals for major AGP manufacturers:

For laptops and brand-sold desktops, it’s better to contact the customer support team of device manufacturers, like Dell, HP, Acer, Lenovo, Asus, MSI, and so on.

Summary

So, now you know how to resolve the AGP_ILLEGALLY_REPROGRAMMED error.

Comment below which method worked for you. If you tried a better fix that I might have missed, mention that in your reply. Moreover, if you’re facing a similar issue such as AGP_GART_CORRUPTION, I can help you out!

How to Fix Fortnite Error Code 0: Quick Guide

The Fortnite error code 0 is pretty clear and it appears due to the anti-cheat system. Basically, the anti-cheat system doesn’t have enough privileges to run and without it, you get the Error Code 0 when run Fortnite. This might also be due to corrupt game files and we’ll address both issues below.

How do I fix Fortnite error code 0 on PC?

1. Run the anti-cheat files as administrator

  1. Press Win + E to start File Explorer and go to the Fortnite folder on PC.
  2. Go to the following location: FortniteGame\Binaries\Win64
  3. Right-click on the FortniteClient-Win64-Shipping file and select Properties.
  4. Click on the Compatibility tab and check the box Run this program as an administrator, then click Apply and OK to save the changes.
  5. Repeat the same procedure for the FortniteClient-Win-64-Shipping-BE, ForniteClient-Win64-Shipping-EAC, and FortniteLauncher files.
  6. Now, try launching the game.

After providing administrator right to launch these files, you won’t have any issues anymore. However, you need to be logged on your PC on an administrative account for this to work. In case you don’t find the FortniteClient-Win64-Shipping.exe, click the highlighted link to find out how to fix this problem.

If this doesn’t work, also try disabling the third-party antivirus temporarily.

2. Check the integrity of the game files

  1. Open the Epic Game Launcher on your PC.
  2. Click on Library and click the gear icon by the Fortnite launch button.
  3. Now click on Verify and wait for the launcher to verify the integrity of all the game files.

If Fortnite is missing any files or has been corrupted by a other problems, the Epic Launcher will restore the problematic files.

As a last resort, you may also reinstall the game, but remember to copy your saves to another location first so you don’t lose your progress.

We also have useful guides on how to fix Fortnite error 6 and Error code 83 in Fortnite if you’ve stumbled across them.

Our latest article covers ESP-INIT-001 error in Fortnite, so don’t miss it for more information.

We hope that our solutions helped you fix the Fortnite error code 0 and now you’re back in the game. If you have any questions or suggestions, feel free to use the comments below.

Haptic Touchpad vs Regular Touchpad: Which One is Better?

Haptic touchpads are not that new as you imagine. They date back to 2015, when Apple implemented a haptic feedback trackpad called Force Touch. However, you may not even know you have one because the haptic technology also includes the sensation of touch on the surface, not necessarily an actual physical response from the surface.

However, in 2021 there have been implemented piezo actuators and force-sensing resistors (FSR) that introduce real force feedback to the touchpads. These can even simulate a click, vibrate, and they a much wider sensitive area. Let’s get all this with more detail.

All about haptic touchpads and their advantages

What is a haptic touchpad?

According to manufacturers, a haptic touchpad is any touchpad that offers any response to the actions you perform on their surface. The smartphone in your pocket most likely has some kind of touch response when you interact with the interface or some applications and games.

In 2021, Sensel introduced a piezo haptic touchpad that was implemented on the Lenovo ThinkPad X1 Titanium Yoga laptop and started the revolution for Windows laptops in this area.

With these haptic touchpads, you can still press to click the surface and you’re feeling the click, but there is no actual mechanical switch there, it’s a feedback response that may fool you into thinking you’ve pressed a button.

Last year the same manufacturer brought a new haptic touchpad on Lenovo ThinkPad Z13 and Z16 Gen 2 that included touch-sensing, force-sensing, and haptics to the laptop’s trackpad.

Now, if you buy a Lenovo ThinkPad X1 Carbon & X1 2-in-1, or Dell’s XPS 14 and XPS 16 laptops, you get the same experience with a bigger surface area touchpad.

However, there are many other manufacturers who are producing haptic touchpads. And yes, since the beginning of 2024, Windows 11 has dedicated options for haptic feedback touchpads.

How do I know if I have a haptic touchpad on my laptop?

As we’ve mentioned above, Sensel is not the only manufacturer of haptic touchpads and you might have one installed on your laptop, but don’t know about it.

We’re not going to show here a list of laptops that have haptic touchpads, because it’s much more simple to check if you have one. Just go to Settings, select Bluetooth & devices and click on Touchpad.

If you see the touchpad feedback option, that means you have a haptic touchpad on your laptop. Depending on the touchpad, you will be able to select the level of intensity for the feedback or other options.

However, first, make sure that you installed the latest touchpad drivers and enabled the touchpad from Settings, as shown above.

What are the advantages of haptic touchpads vs regular touchpads?

Obviously, the most important advantage for us, consumers, is the actual experience. First, the surface of a haptic touchpad feels smoother, whether if it’s plastic or glass. The other is the actual response to touch, clicks or gestures. Some haptic touchpads also include pressure sensitivity so you may actually have different actions based on the force you apply to it.

Another advantage is that haptic touchpads usually have bigger surface area and all of it is usable. Regular touchpads don’t respond to the touch in their margins. However, that can become a disadvantage if you’re often touching the touchpad by mistake.

The haptic touchpads are also thinner than regular ones. A piezo haptic pad can be as thin as 0.6 inches (1.8 mm). That’s not really relevant for you as a consumer, but it is important as the manufacturer has more space to work with and design a slimmer case.

Their only obvious drawback is that they consume more power than a mechanical touchpad. However, we didn’t see any complaints in this department from users either. Of course, a haptic touchpad has a higher price and that is reflected in the price of the laptop. That’s why you will usually see haptic touchpads on premium laptops.

Ultimately, it’s all about user experience. A lot of users praise this technology, while others would prefer a regular touchpad instead. Personally, besides the novelty factor, I didn’t feel any real benefits for productivity. The gool ol’ mouse is still a lot faster and more versatile, so the difference will really show in situations where you can’t use the mouse.

Should I buy a haptic feedback laptop?

You obviously not buying a laptop just because it has a haptic touchpad or not. If you’re a regular touchpad user, we recommend going to a computer shop and actually test some to see how they feel and if it’s really your thing.

If you get a laptop that has a haptic touchpad, we’ve mentioned above that you can actually disable the feedback part and that will leave you with a good sensitivity touch surface that won’t hurt.

We also have a guide on how to disable the touchpad completely if you decide to switch on a mouse.

We also have an interesting guide focused on comparing the Synaptics and Windows Precision drivers for your touchpad.

We hope that our guide on haptic touchpad vs regular touchpad provided all information needed. If you have any questions, use the comments section below to get in touch.

Microsoft Edge’s latest 130.0.2849.46 update already deprecates Copilot policies

Microsoft Edge has been updated to version 130.0.2849.46, and along with the update, the browser received dozens of new capabilities, enhancements, and fixes.

In an exciting announcement, Microsoft says Live Captions will finally be gradually released to Edge users. The capability has been available on the browser for a while, but it wasn’t generally available, However, those who have the ExperimentationAndConfigurationServiceControl policy set to ‘FullMode’ might receive this new feature.

As a new feature, with version 130.0.2849.46, Edge is also set to elevate top settings and improve settings page navigability. This enhancement will greatly improve the way you set up Edge. If you want to take a deeper dive, here’s our comprehensive article about it.

With this version, the Redmond-based tech giant continues to deprecate the Token Binding, and using the AllowTokenBindingForUrls policy will no longer do anything. Microsoft will also change some Copilot policies, while other Copilot policies, such as CopilotCDPPageContext, are already becoming obsolete.

Edge has started to support non-special scheme URLs. These are special written URLs, such as git://example.com/path, which weren’t supported on Edge until version 130.0.2849.46.

You can read the Microsoft Edge 130.0.2849.46 full changelog here.

In other news, Edge Dev also has a new build that introduced a capability that makes it easier to save passwords.

Introducing OpenHCL: Microsoft’s new, open source ‘paravisor’ for confidential VMs

Microsoft has announced a new open-source paravisor called OpenHCL. It is designed to provide a rich set of virtualization services to confidential and non-confidential virtual machines (VMs) running on confidential computing hardware.

Microsoft’s James Myers explains in a blog post that OpenHCL is a host-independent solution that can run on top of various hypervisors to provide confidential and non-confidential services to VMs. OpenHCL is designed to work with Microsoft’s other OpenVMM-based confidential computing projects or other providers’ projects that are compatible with the OpenVMM API.

The OpenHCL paravisor contains several key components, including a VMM that runs in guest VMs to provide services like device emulation, device translation and diagnostics support. OpenHCL’s VMM is itself powered by a small, customized Linux kernel that’s designed to be lean and mean, with minimal Kconfig to reduce binary size and runtime RAM usage.

The OpenHCL VMM is what provides the rich set of services to a guest. The VMM runs as a collection of processes in VM user mode (VMPL0 or VMPL1) and is higher privileged than the guest OS. The VMM also provides a set of standard interfaces to the guest, allowing the guest to interact with hardware and devices as if it were running natively on the platform in question. This allows VMs to run on top of a paravisor without any guest OS changes.

Since September, OpenHCL has been generally available in Microsoft’s Azure cloud computing service, with the para visor running on over 1.5 million VMs in the past month alone. Microsoft has also started rolling out a new class of confidential VMs in Azure called Azure Boost that use OpenHCL, and the company plans to use OpenHCL in future confidential VM offerings.

To start, OpenHCL is supported on x86-64 and ARM64 platforms, and the paravisor is compatible with Intel TDX and AMD SEV-SNP confidential computing hardware. OpenHCL has a few “core” services that it provides to both confidential and non-confidential VMs. These services include:

  • Device emulation: OpenHCL presents standard device interfaces to the OS, allowing existing device drivers to work unchanged. OpenHCL ships with emulated devices (such as a virtual TPM and serial ports) that the VMM and the hardware platform support.
  • Device translation: OpenHCL translates hardware interfaces like NVMe to virtualized interfaces, like para-virtualized SCSI, so hardware devices can be assigned directly to VMs without requiring guest OS changes. This enables VMs to take advantage of the performance of modern hardware devices.
  • Diagnostics support: OpenHCL provides a set of standard interfaces to the guest that tools can use to inspect the guest environment. This enables debugging and performance analysis of the guest from the host or another VM.

OpenHCL allows VMs running older OS versions to run on confidential computing hardware without requiring the OS to be updated to understand confidential VM features.

The official announcement provides more information, and if you’d like to try it for yourself, OpenHCL is now available on GitHub.

Error is Join Target 133 (0x85): How to Fix it

ERROR_IS_JOIN_TARGET is followed by 133 (0x85) A JOIN or SUBST command cannot be used for a drive that contains previously joined drives message, and this is a developer error that rarely affects end users.

However, if you encounter it, you can fix it by following the instructions from this guide.

How can I fix ERROR_IS_JOIN_TARGET?

Check the logs

  1. Check your logs.
  2. Look for any error that might’ve caused issues with the Taraserver.
    taraserver logs
  3. You need to pinpoint the exact Windows error and resolve it.

This issue affects NetBackup 7.6 and TARA 15.110, and if the error occurs, the Taraserver will be terminated. If your backups are working all week long and fail on the weekends due to this error, this indicates that Tara software isn’t the problem.

ERROR_IS_JOIN_TARGET is a pretty vague and rare error that usually doesn’t affect regular users, but you might encounter it if you’re a developer or system administrator.

If that happens, your only option is to check the logs to determine which Windows error caused the issue with Taraserver and address that original issue.

We covered similar errors in the past, with the most recent being ERROR_JOIN_TO_SUBST.

We also wrote about ERROR_CALL_NOT_IMPLEMENTED and ERROR_NEGATIVE_SEEK in our previous guides, so don’t hesitate to check them out.

Windows 11 24H2 is gradually rolling out, but you can get it now

Microsoft released the Windows 11 24H2 update almost three weeks ago, but it’s gradually rolling out. If the company’s Windows Update isn’t offering it to you, there’s now an official way to trigger the update on your PC manually. Here’s how to do it.

While it’s a good idea to wait for Microsoft to offer the update through Windows Update (as it may not be fully compatible with your PC just yet), if you can’t wait anymore, you can now force the update to Windows 11 24H2 using a new Registry or Group Policy hack.

How to get Windows 11 24H2

Using the Registry Editor:

  1. Open the Registry Editor
  2. Go to HKEY_LOCAL_MACHINE\SOFTWARE\Policies\Microsoft\Windows\Windowsupdate
  3. Create a new string value called ProductVersion, and set the value to Windows 11
  4. Create another string value called TargetReleaseVersionInfo, and set the value to 24H2
  5. Create a DWORD value called TargetReleaseVersion and set the value to 1

Using the Group Policy Editor

  1. Open the Group Policy Editor
  2. Go to Computer Configuration > Administrative Templates > Windows Components > Windows Update > Windows Update for Business
  3. Double-click on the Select the target Feature version policy
  4. Click on the Enabled option.
  5. Type in Windows 11 in the product version section.
  6. Type in 24H2 in the Target Version section.
  7. Click on Apply and OK.Windows 11 24H2

After completing the above steps, head to Settings > Windows Update and check for new updates. You should now see Windows 11 24H2. However, you might want to wait a few more weeks before installing it. The update is causing dozens of issues, from conflicts with the WD SSDs to deactivating Windows and other similar bugs.

Error Join to Subst 140 (0x8C): How to Fix it

ERROR_JOIN_TO_SUBST comes with the following message 140 (0x8C) The system tried to join a drive to a directory on a substituted drive. This is an obscure error, but if you encounter it, there are a few ways to fix it.

How can I fix ERROR_JOIN_TO_SUBST?

1. Install PowerShell

  1. Install the Windows Management Framework Core on your server.
  2. Now check if the problem is resolved.

The issue appears when running AD Object Merge, and it affects the Migrator for Notes to Exchange. After installing PowerShell 2.0, the issue should be resolved.

2. Check your license key

This error message can appear due to having a wrong license key on the DataFlow Server. To fix this, you need to contact your Software Support and ensure that you have the correct license key.

ERROR_JOIN_TO_SUBST is an obscure error, and you most likely won’t ever experience it as an end user, since it usually affects administrators and developers.

However, if you even encounter 140 (0x8C) The system tried to join a drive to a directory on a substituted drive, this guide should be able to help you fix it.

These aren’t the only errors you can encounter, we wrote about Error_Join_To_Join and Error_Not_Joined in our previous articles, so feel free to check them out.

We also have a new guide on ERROR_IS_JOIN_TARGET error, so you might want to visit it.

Windows 11 24H2 causes the Critical Process has died error on Western Digital (WD) SSDs

Windows 11 24H2 was released on October 1st, but the major update is causing many issues on devices where it has been installed. The latest is huge crashes on devices equipped with Western Digital (WD) SSDs.

The issue was first reported almost ten days ago, on October 8th, with many users reporting issues with constant blue screens since updating to Windows 11 24H2.

The Event Viewer shows two errors: stornvme and The driver detected a controller error on \Device\RaidPort1 or 2.

These errors affect devices with WD NVME drives SN580/SN770 and constantly result in a blue screen of death on the new Windows 11 24H2. On a Windows forum that discusses the issue, one user agrees that the error might be caused by a change in the HBM policies made by Windows 11 24H2.

The changes imply that the new Windows version allocates more chache than is allowed by WD (the manufacturer behind the SN580/SN770 NVME drives).

While Microsoft is aware of the issue and working on a permanent fix, you can try to disable the HMB policies. However, turning off the HMB policies will affect all SSDs on your device.

For now, though, if you want to stay on Windows 11 24H2 with your WD drives, it’s advisable to do so. Here’s how:

  1. Open Registry Editor.
  2. Navigate to HKEY_LOCAL_MACHINE\SYSTEM\CurrentControlSet\Control\StorPort
  3. If there is no HMBAllocationPolicy, create one as DWORD.Windows 11 24H2 WD
  4. Set HMBAllocationPolicy to 0.
  5. Reboot.

We’ll update this article as soon as Microsoft releases an official statement.

Edit: While Microsoft hasn’t released any official statements yet, Western Digital has released firmware updates for the issue, that permanently fixes it.

According to the manufacturer, here’s the list of all affected SSDs.

NameModel Number Starting WithUpdated Firmware Version
WD_BLACK SN770 NVMe SSD 2TBWDBBDL0020BNC, WDS200T3X0E731130WD
WD_BLACK SN770M NVMe SSD 2TBWDBDNH0020BBK, WDS200T3X0G731130WD
WD Blue SN580 NVMe SSD 2TBWDBWMY0020BBL, WDS200T3B0E281050WD
WD Blue SN5000 NVMe SSD 2TBWDBS3F0020BNC, WDS200T4B0E291020WD
SanDisk Extreme M.2 NVMe SSD 2TBSDSSDX3N-2T00731130WD

Hop on to the official blog post to download and install the firmware updates. If you don’t know how to do it, don’t worry. Western Digital has a guide on how to install these updates.

It’s understandable that Windows 11 24H2 would cause so many errors: days after its release, many users reported issues connecting to the Internet. Others also complained about their Windows deactivating right after updating to the 24H2 version.

Plus, it seems that the version also stores an 8.63 GB file on devices, which left many users confused. However, the build has been out for less than a month, and if you’re still on Windows 11 23H2, maybe wait a bit more before updating to this version.

Pokemon HOME Error Code 10015: How to Fix it

Pokemon HOME error code 10015 can prevent you from transferring your Pokemon, and it will negatively impact your gaming experience. Luckily, there are a few ways to fix this problem.

What is the meaning of Pokemon HOME error code 10015?

This error appears if your account is flagged, and it usually happens if you use hacked Pokemon from third-party sources.

How do I fix error 10015 in Pokémon HOME?

Before we start, ensure that Pokemon HOME is up to date and that you have the latest patches installed.

1. Transfer Pokemon with valid IDs

  1. Look for the Pokemon Tracker ID.
  2. If the Tracker ID says 0 or any other value, it means that it can transferred and they will get a valid ID.
    pokemon home id
  3. However, you won’t be able to transfer Pokemon with an invalid or empty tracker ID.

Keep in mind that this applies only to legally obtained Pokemon before HOME 2.0 was released.

2. Transfer fewer Pokemon

  1. Try to transfer fewer Pokemon. Users suggest limiting your transfers to a box or less.
  2. If you find a bugged Pokemon, transfer all other Pokemon except that one.
  3. Check if the problem is gone.

As you can see Pokemon HOME error code 10015 can appear on Nintendo Switch if you’re trying to transfer Pokemon that weren’t legally obtained to prevent cheating.

This isn’t the only issue you can encounter, and we already wrote about Pokemon HOME error code 400 as well as Pokemon HOME error 504 in our previous guides, so don’t miss them.

Edge Dev 131.0.2889.0 finally makes it easier to save your passwords

Microsoft Edge Insider Builds has been updated to version 131.0.2889.0 for users in the Dev channel. This update introduces new features, improvements, and quality-of-life updates.

Key Features

  • Microsoft Rewards: A million-dollar sweepstakes is now available to Insiders.
  • Help information has been added to some rows on the Profile Preferences Page to assist users.
  • The company introduced a new custom border to save and update the password flyout.

Improvements

  • Fixed an issue where the browser would crash on startup after an upgrade installation on Android.
  • Resolved an issue when switching to any search engine would cause the browser to crash on iOS.
  • Sidebar apps are no longer pre-installed for new users in Gamer Mode.
  • The wallpaper was previously enlarged on the New Tab Page but has now been fixed.
  • The New Tab and Edit icons in the tab group showed the same tooltip as the tab group name; this has been resolved.

iOS specific fixes

  • Under experimental settings, text in the Soft-landing UI section now appears clear on iOS.
  • The PDF toolbar would previously appear upon signing in with an AAD account; this has been fixed.
  • After clicking the ‘Exit InPrivate mode’ button, the New Tab Page would sometimes switch to dark mode; this has been resolved.
  • The PDF toolbar would briefly appear on non-PDF pages; this has been fixed.
  • ‘News and more’ would be displayed in feeds when the tab center was clicked while opening a new tab page; this has been resolved.

With this update, Microsoft has also resolved several other issues that caused the Edge browser to crash, misbehave, or display UI incorrectly on different platforms. The original announcement post contains the full list of resolved issues and known problems.

It’s worth mentioning that some of the features mentioned might not be available to all users in the Dev channel just yet, as Microsoft is gradually enabling them for testing purposes.

Read Edge Dev 131.0.2889.0’s full changelog here.

OpenAI releases ChatGPT app for Windows, and it works on Windows 10, as well

OpenAI has expanded its ChatGPT (Chat Generative Pre-trained Transformer) platform to Windows. The new app, available on the Microsoft Store, is aimed at ChatGPT Plus, Team, Enterprise, and Edu users.

In a blog post, OpenAI says the ChatGPT app for Windows includes features like the ability to summarize and rephrase text and generate images from text descriptions using OpenAI’s DALL·E 3 image generator. However, it lacks some capabilities available in the ChatGPT web app or the Mac app.

For example, the Windows app doesn’t yet support voice responses. It also can’t perform commerce transactions through ChatGPT’s GPT Store, and because it’s a separate app, it doesn’t support integrations with tools like Slack and Discord at launch.

ChatGPT’s Windows app runs on most Windows 10 PCs, but requirements exist. Your PC needs to be running Windows 10 version 1809 or later and have at least 4GB of RAM and 200MB of disk space. The app is officially supported on Intel and AMD x64 processors, and OpenAI says that it “strongly” recommends a machine with at least an 8th-gen Intel Core or 2nd-gen AMD EPYC processor or a GPU with at least 4GB of VRAM.

OpenAI says Windows users can expect a more “full experience” later this year. For instance, the company plans to allow users to drag and drop files into the ChatGPT window and chat about Word, PowerPoint, and Excel files.

The ChatGPT app for Windows follows the launch of the Mac app in May, and the iOS app in 2023. In a blog post, OpenAI said it’s working on a Linux and web apps that don’t require a download.

In other news, OpenAI recently finetuned the GPT-4o and GPT-4o Mini models to be capable of even more tasks.

Xbox Partner Preview, the October 2026 teases Alan Wake 2’s second expansion, and Subnautica 2

In the latest Xbox Partner Preview for October 2024, Xbox showcased many new titles set to arrive on the Xbox Series X and S consoles, Windows PC, and Game Pass.

Among the games featured in the showcase were new expansions for Remedy’s Alan Wake 2, new indie darlings, and a new project from the creators of Control.

Here are all the most significant announcements from Xbox Partner Preview, the October 2024 Edition:

Alan Wake 2: The Lake House Expansion – Gameplay Showcase

Remedy returned to the Xbox Partner Preview stage in October 2024 to dive into the second expansion for Alan Wake 2, titled The Lake House. The new content will follow the story of a Federal Bureau of Control agent as they investigate a new area of the Oldest House. It’s set to release on Xbox Series X|S and PC on October 22.

Animal Well – Available Now

One of two surprise releases during the show, Animal Well, is now on Xbox Series X|S, Xbox One, and Windows PC. The game sees players navigating an alien world as astronauts, platforming and solving puzzles to find their lost crew.

Blindfire – Available Now in Game Preview

Blindfire is a first-person shooter set entirely in darkness, with players using echolocation and weapons to navigate and take down enemies. It’s now available in Game Preview on Xbox Series X|S and Windows PC.

Cronos: The New Dawn – Announced

Cronos: The New Dawn is the latest project from Bloober Team, the studio behind games like The Medium and Blair Witch. A third-person survival horror game, Cronos is set in two different periods — 1980s Poland and a post-apocalyptic future.

Edens Zero – Announced

Based on the manga and anime of the same name, Edens Zero is a third-person action game from Koch Media that will be released in 2025 for Xbox Series X|S and PC.

Eternal Strands – Announced for Game Pass

Eternal Strands, a third-person action RPG in which players can combine different magic spells for exciting effects, is coming to Xbox Series X|S, Xbox One, and PC in early 2025. It’ll also be available on day one on Game Pass.

FBC: Firebreak – Announced

FBC: Firebreak is a new game set in the world of Control, but with a twist — it’s a cooperative multiplayer game. In Firebreak, players will take on the roles of FBC agents with unique abilities and weapons as they work together to contain Altered World Events. The game will be available on Game Pass on day one of its 2025 release for Xbox Series X|S, Xbox One, and PC.

The Legend of Baboo – Announced

The Legend of Baboo is a new open-world action-adventure game from developers at Dead Mage and 505 Games. As the child of a traveling merchant, players will explore an archipelago overrun with pirates, ancient warriors, and dangerous creatures alongside their loyal dog, Baboo. The game is coming to Xbox Series X|S, Xbox One, and PC in 2025.

Like a Dragon: Pirate Yakuza in Hawaii – New Gameplay, Earlier Release Date

The latest game from Ryu Ga Gotoku Studio (Yakuza: Like a Dragon, Judgment), Like a Dragon: Pirate Yakuza in Hawaii, is now launching on Xbox Series X|S, Xbox One, and PC on February 21, 2025 — a few months earlier than previously announced. The game will also be available on day one on Game Pass.

Mistfall Hunter – Announced, Closed Beta Sign-Up Available

Mistfall Hunter, from Neon Giant (The Ascent), is a new Soulslike game featuring a unique world, a cast of characters, and many challenging enemies to take down. You can sign up for a closed beta now.

Mouse: P.I. For Hire – Announced

Developed by 2BIGo, Mouse: P.I. For Hire is a first-person shooter set in a world of anthropomorphic animals. You’ll play as a mouse detective, solving crimes and taking down criminals using a variety of weapons and gadgets. The game is coming to Xbox Series X|S in 2025.

Phasmophobia – Announced for Xbox

Co-op ghost-hunting game Phasmophobia is coming to Xbox Series X|S and Xbox One on October 29. If you’re unfamiliar, Phasmophobia has players investigating haunted locations, collecting evidence of paranormal activity, and attempting to escape the clutches of angry spirits.

Subnautica 2 – Announced for Early Access

Subnautica developer Unknown Worlds Entertainment has announced Subnautica 2, a sequel to the critically acclaimed underwater survival game. The game will launch in early access in 2025 and eventually come to Xbox Series X|S, Xbox One, and PC.

Wheel World – Announced, Coming to Game Pass

Wheel World — previously known as Ghost Bike — is a new game from developer 34BigThings (Redout) coming to Xbox Series X|S, Xbox One, and PC in 2025. The game, available on day one on Game Pass, is a relaxing, open-world bike racing game set across two distinct worlds.

Wuchang: Fallen Feathers – New Look, Coming to Game Pass

Wuchang: Fallen Feathers, an action RPG from Leenzee Games, takes place in a world where technology meets Chinese mythology. Players will explore small towns, ancient temples, and the wilderness while fighting supernatural threats. The game will be available on Game Pass on day one in 2025 for Xbox Series X|S, Xbox One, and PC.

Which of these games are you most looking forward to? Let us know in the comments, and check the official blog post for trailers.

In other news, the new Xbox Series S and X consoles with updated cooling systems are now available.

Windows 11 Insider Preview Build 27729 now lets Canary users customize their Copilot Key

Microsoft has released Windows 11 Insider Preview Build 27729 to the Canary Channel, adding a new feature for the Microsoft Copilot keyboard.

Insiders now have the option to configure the Copilot key to launch an app that is MSIX packaged and signed, indicating that the app meets security and privacy requirements. The setting can be found via Settings > Personalization > Text input. Further refinements are planned in a future flight.

The build also fixes an underlying issue that caused certain games, including Microsoft Solitaire & Casual Games, to crash on launch after installing Build 27718+. There’s also a fix for an issue where the screen would go black for a few seconds for some people when using ALT + Tab, and BitLocker did not work correctly for a small number of Insiders in the last two flights.

As for known issues, here’s what to be aware of:

  • On Copilot+ PCs, joining the Canary Channel from the Dev Channel, Release Preview Channel, or retail will result in losing your Windows Hello PIN and biometrics to sign in to your PC with error 0xd0000225 and the error message “Something went wrong, and your PIN isn’t available.” You should be able to re-create your PIN by clicking “Set up my PIN.”
  • Some Insiders with PCs that have older NVIDIA GPUs, like the GTX 970 or Quadro K620, are experiencing issues where their displays appear stuck on a black screen and unresponsive or where their GPUs show errors in Device Manager and do not work correctly. Microsoft is aware of the issue and is working on a fix.
  • Microsoft is working on fixing an issue causing some Insiders to see a bugcheck with the error PAGE_FAULT_IN_NONPAGED_AREA starting in Build 27723.

Microsoft is rolling out an update for Snipping Tool (version 11.2409.23.0 and newer) to Windows Insiders in the Canary, introducing a new “Copy as table” feature.

You can download Build 27729 via Windows Update if you’re on the Canary Channel. The new build comes just a few days after Microsoft released Build 27723 to the Dev Channel.

You can read Build 27729’s full changelog here.

AGP_GART_CORRUPTION: BSOD Error Fixed

Here’s a step-by-step guide to fix the AGP_GART_CORRUPTION BSOD on your Windows PC.

You can often link such Blue Screen errors to rendering graphics whether the device uses a dedicated graphics memory or shares the system memory. Fixing it is fairly easy if the external or internal GPU is working but the drivers aren’t.

I’ve reproduced the pressing 0x00000105 error in a test environment. After evaluation, I discovered that the following fixes will work and save you time.

What Is AGP_GART_CORRUPTION?

AGP_GART_CORRUPTION is a Blue Screen of Death error that usually affects systems with older graphics technology called AGP or the Accelerated Graphics Port. The graphics processing hardware, driver, and software related to the BSOD will show the following:

AGP_GART_CORRUPTION BSOD

STOP Code: AGP_GART_CORRUPTION

Bug Check Value: 0x00000105

Explanation: The Graphics Aperture Remapping Table (GART) is corrupt.

The system crashes to prevent further damage when something goes wrong with graphics memory handling.

Possible Causes

The improper direct memory access (DMA) by an AGP driver or GPU driver is often the root cause of this BSOD error. However, there are other common reasons such as:

  • The newly installed memory modules no longer support your existing AGP card.
  • Also, the AGP might be incompatible with a backward-compatible motherboard you just bought which has both the PCIe and AGP slots for external GPUs.
  • The AGP or PCIe GPU drivers have become outdated.
  • Malware in the system interfering with GPU and system memory.
  • You’re overclocking your GPU which isn’t supported or beyond its limits.
  • The AGP card doesn’t snuggly fit into its slot or is broken.
  • Shared memory modules are faulty.

How To Fix AGP_GART_CORRUPTION BSOD Error

Now, let me introduce you to the fixes you should try. I’ve organized the troubleshooting methods in the order of increasing complexity:

Basic Troubleshooting

  • Restart device: Simply reboot the PC when it freezes with a blue screen. Observe its performance by running graphics and memory-intensive tasks. If the issue doesn’t appear again, you’re all good.
  • Use VGA port: Use a VGA cable to connect the display unit with the CPU.
  • Restart the AGP card: Press Windows + Ctrl + Shift + B a to restart the graphics processing unit.
  • Shutdown and power cycle: Turn off the PC. Disconnect all cables from the CPU cabinet, like power cable, keyboard, mouse, etc. Press and hold the power button for 30 seconds. Now, connect all the cables back into the cabinet and turn on the device. If you’re on a laptop with a removable battery, take it out and press and hold the power button for 30 seconds.
  • Update Windows: Press the Windows + I keys to open Settings. Find and click on the Update or Update & Security menu. Hit the Check for updates, Resume updates, or Install updates button. Let the Windows OS update and restart.
Resume updates
  • Roll back graphics driver: Uninstall the GPU driver from Settings > Apps > Apps & features > NVIDIA Graphics Driver > Uninstall. It could be a Radeon Graphics Driver as well. Now, download and install the latest one from NVIDIA or Radeon.
  • Update graphics driver: Go to Device Manager by right-clicking the Windows flag. There, find the Display adapters item and click to expand its options. If you’re using an external GPU, it’ll show NVIDIA or AMD Radeon. Select the appropriate item, right-click, and choose Update driver from the context menu. Choose Search automatically for drivers and follow the onscreen instructions.
update driver

Remove Any Recently Installed Drivers

A few Microsoft Community support threads talk about unverified or corrupted GPU drivers leading to BSODs. You should use the Display Driver Uninstaller (DDU) tool to remove it completely. Here are the steps:

  1. Download DDU for free from its official website.
  2. Install the app.
  3. Launch DDU from the Desktop.
  4. Click on the Select device type drop-down list and choose GPU.
  5. Hit the Clean and restart button.
Clean and restart

The tool will remove the existing GPU driver including its cache, folders, temp files, and registry entries.

Now, you can install genuine NVIDIA or AMD Radeon drivers from the following portals:

Run the Driver Verifier Tool

The built-in Windows Driver Verifier app will help you identify unstable, fake, and problematic hardware drivers on your PC. Here’s how to find out which one is causing the AGP_GART_CORRUPTION BSOD error.

  1. Press Windows + X to launch the Power User menu.
  2. Click on the Terminal (Admin) option.
  3. The Windows PowerShell terminal will open.
  4. Type verifier and hit Enter.
  5. The Driver Verifier graphical user interface will open.
  6. Select Create standard settings below the Select a task section, and click Next.
create standard settings
  1. Keep the default selection, which is the Automatically select unsigned drivers option. Just click Next.
select unsigned drivers
  1. If the tool finds any problematic driver, note it down and remove it from Apps or Device Manager.

Run the Microsoft Safety Scanner App

This is to ensure that malware isn’t causing this error. Follow these steps:

  1. Download 32-bit or 64-bit Microsoft Safety Scanner from Microsoft’s website.
  2. Double-click on the EXE file to run it.
  3. Click Next twice to arrive on the Scan type screen.
full scan
  1. Select Full scan and hit Next.
  2. Once the scanning is over, the tool will have cleared any detected malware.
progress
  1. Click Finish to close it.

Run Windows Memory Diagnostic

This test will clearly tell you if the issue is linked to a faulty RAM. Here are the steps:

  1. Click on the Windows flag to open the Start menu.
  2. Type Windows Memory and the Windows Memory Diagnostic tool will show up below the Best match section.
windows memory diagnostics
  1. Click on it to access the GUI.
  2. Select Restart now and check for problems (recommended).
restart now

Once the testing is over and you see the sign-in screen, enter your account credentials and log in.

running test

Now, follow these steps to find out the result of the memory diagnostic report:

  1. Open Event Viewer from the Start menu.
  2. Click on the Windows Logs tree on the right and expand it to find System. Click on that.
system events
  1. On the right-side screen, you’ll see a list of entries, like Warning, Error, Information, and the MemoryDiagnostics-Results file.
  2. Click on MemoryDiagnostics-Results and look at the details in the General tab just below the list of entries.
  3. If the General tab says ‘Windows Memory Diagnostic didn’t detect any errors,’ you don’t need to worry about the RAM chips.
  4. However, if you see any of these error messages, you must replace the existing memory modules or use a brand-new RAM:
    • Hardware Errors Detected
    • Memory Test Failure
    • Parity Errors
    • ECC (Error-Correcting Code) Memory Errors
    • Read/Write Errors
    • Page Faults
    • Address Line Errors
    • Cache Errors
    • Bit Errors (Single-Bit or Multi-Bit)
    • Pattern Test Errors.

Disable Overclocking

If you’re overclocking the CPU, GPU, and RAM for gaming or any high-level computing, disable this and check if the issue is fixed.

If you overclock your PC using MSI Afterburner, follow these steps:

  1. Launch MSI Afterburner.
  2. Use the Core Clock slider to reduce it to 0+.
  3. Also, change the Memory Clock slider to 0+.
Save msi afterburner
  1. Hit the Save button.
  2. Restart the PC.

Run Windows in Safe Mode

Here’s how you can run the PC in safe mode to find out if any third-party services are causing the AGP_GART_CORRUPTION error.

  1. Click on the Start menu button, press the Shift key, click on the power icon, and choose Restart.
shift reboot
  1. On the Choose an option screen, select Troubleshoot.
troubleshoot
  1. Now, select Advanced options on the Troubleshoot window.
  2. Click on Startup settings.
startup settings
  1. Select Restart.
  2. You’ll see the Advanced Boot Options screen.
  3. Use the navigation arrow keys to select Safe Mode and hit Enter.
safe mode

When the PC enters safe mode, test it for stability for a while. If the issue doesn’t reappear, it proves that a third-party app is the root cause.

Restart the PC to enter the normal mode. Now, uninstall all the recently installed software from the Apps menu in Settings.

Restore Your PC

You can also try to revert the PC back to a previous state when it worked well. It reverses every single change you made that has led to the AGP_GART_CORRUPTION error. However, this doesn’t apply to installing new hardware.

For example, if you’ve installed a new AGP card and its driver, the driver will be removed but the card will still be there.

Follow these steps to restore a PC:

  1. Type Restore in the Start menu and click the Create a restore point option.
  2. You should see the System Properties dialog.
  3. Click on the System Restore button.
system restore
  1. You can either use the recommended point or manually change that.
  2. Click Next.
recommended restore
  1. Click the Finish button.

Reseat AGP Card and RAM

Often, removing and reseating the involved hardware also fixes the BSOD error. Here’s what you can do:

  1. Shut down the PC and disconnect all cables.
  2. If your PC has an external Wi-Fi and Bluetooth antenna, disconnect that as well.
  3. Open the cabinet door from the left side.
  4. Wear an anti-static wristband or touch a metal surface grounded to the earth to release all static electric charges from your body.
  5. Don’t touch any of the internal parts of the PC cabinet without discharging static electricity. Otherwise, you might damage the hardware.
  6. Now, unlock the lock keys of the RAM modules.
  7. Delicately remove the RAM chips from their slots.
  8. Now, slide the small white band of the AGP slot outwards to unlock the card.
  9. Safely remove the AGP card.
  10. Press and hold the power button for 30 seconds.
  11. Now, put the AGP card and RAM modules back in their respective slots.
  12. Close the CPU cabinet door and connect all cables.
  13. Power on the PC and observe. You can play games or run resource-heavy apps.

Replace the AGP Card

If the AGP_GART_CORRUPTION BSOD becomes an intermittent problem, it’s likely that the AGP card is faulty. If you see a similar error in a PCIe GPU, the external GPU is possibly broken.

You should use a different AGP or PCIe GPU and test the PC for several hours. If the issue doesn’t reoccur, you’ll probably have to buy a new one.

Contact Support for Warranty Inquiry

Before buying a new GPU, find out if you can get warranty assistance from the manufacturers. Usually, AGP and PCIe GPU cards come with a 3-year warranty period.

Find below customer support links for major Windows-compatible graphics card manufacturers:

If you’ve bought a bundled PC or laptop from a PC manufacturer, contact them directly for warranty inquiries.

Summary

So, these are the tried and tested methods to address the AGP_GART_CORRUPTION error.

If any of them worked for you, feel free to comment below.

Also, you can learn how to fix the Blue Screen loop and troubleshoot a BSOD after installing drivers. Moreover, if you’re having trouble with a similar issue such as AGP_ILLEGALLY_REPROGRAMMED, I’ve got just the guide for you.

Microsoft Teams might soon be capable of video streaming that reduces the quality of videos users aren’t focusing on

Microsoft has recently published a paper describing a technology capable of selective video streaming based on users’ gaze. The patent, suggestively called GAZE BASED VIDEO STREAM PROCESSING, uses an AI-based system to find out where you’re looking, reducing the quality of the videos you’re not focusing on.

The paper mentions that this technology could be used in an array of applications, including virtual meetings, such as Microsoft Teams. The gaze-based video streaming tech would reduce the quality of streams to enhance connectivity and consume less data.

Aspects of the present disclosure are directed to processing video streams based on a gaze location. For example, a user may interact with a computing system that may utilize a gaze estimation system to estimate a gaze location of the user, thereby allowing a stream processor to reduce quality of video streams that the user is not actively watching. Reducing the quality may allow for a reduced bandwidth utilized to transmit the video streams.

The tech would receive multiple video streams, each with its quality level. Then, using a neural network, the system estimates where the user looks on the screen. It would adjust the quality of the stream of at least one video stream based on where the user is looking. Ultimately, it would send the video stream back to the display device with its new quality.video streaming microsoft

The computing device provides high quality video streams where a user is gazing, but lower quality video stream where a user cannot readily discern additional detail, which saves processor cycles for other activities.

Microsoft envisions the gaze-based video streaming system as capable of lowering the stream quality differently for a plurality of videos available in the stream based on their distance to the user’s gaze. It currently supports the 1080p60, 1080p30, 1080p24, 720p60, 720p30, 720p24, and 320p24 video quality, and it can easily change between them depending on the distance of the gaze.

The plurality of quality levels may include, from higher quality to lower quality, 1080p60, 1080p30, 1080p24, 720p60, 720p30, 720p24, 320p24. The stream processor selects a lowest image quality level for the video stream that is furthest from an estimated gaze location, and selects a medium quality level that is still less than the initial image quality level for the video stream.

One of the best advantages of gaze-based video streaming technology is that it makes Microsoft Teams meetings run almost perfectly anywhere, no matter the Internet connection speed. As we mentioned earlier, the paper highlights this as one of the reasons for the invention of such a technology.

It would also be more sustainable and a much better alternative to the camera off/mute option, as you can still see the participants, but Microsoft Teams won’t eat as much Internet data to do so.

This wouldn’t be the first time Microsoft has patented sustainable technologies for its services and products. Earlier this year, the Redmond-based tech giant issued a patent describing a Windows version that is highly aware of energy consumption and will take the necessary steps to preserve/consume as little energy as possible.

Another technology Microsoft patented last year is a selective dimming system that lowers or brightens the screen based on the user’s gaze.

You can read the paper here.

An Error Has Occurred in Bitwarden: 5 Ways to Fix it

Many encountered Bitwarden an error has occurred message on their iPhone or Android device, and this can be a major issue since you can’t access your passwords. There are a few ways to fix this problem, and today we’re going to show you how to use them.

How can I fix An error has occurred message in Bitwarden?

Before we start, try accessing your Vault from a different device to see if it still works. You can also try logging in while using a VPN or mobile data instead of your wireless connection.

1. Deauthorize all sessions

  1. Log in to Bitwarden on your PC.
  2. Next, go to Settings and choose My Account.
  3. Enter your master password and click on Deauthorize Sessions.
    deauthorize sessions bitwarden settings
  4. Lastly, try to log in from your phone again.

2. Change the server

  1. On the login screen, tap Not you.
  2. Next, tap on Logging in as and choose bitwarden.com or bitwarden.eu.
    server bitwarden
  3. Try to log in again.

A few users suggested that switching to a different server and then back to the original one worked for them, so be sure to try it.

3. Reinstall the app or delete the cache

  1. Locate the app on your phone.
  2. Tap and hold it.
  3. Select the information icon.
  4. Next, choose Clear cache.
    clear cache app
  5. Check if the problem is resolved. If it persists repeat the steps from above.
  6. Select the Uninstall option.
  7. Next, go and install the app again.

4. Downgrade your Docker container

  1. Try using an older image for self-hosted Docker.
  2. Deploy the image and check if the issue is resolved.
  3. Alternatively, try upgrading your Vaultwarden instance to a newer version.

5. Disable two-step authentication

  1. Log in to Bitwarden on your PC.
  2. Next, go to Settings, select Security, and then go to the Two-step login tab.
    two step login bitwarden
  3. Disable all two-step authentication methods.
  4. Save changes.

Disabling two-step authentication will make your account less secure, so use this as a temporary solution and last resort.

These are just a couple of methods that you can use if you get An error has occurred message in Bitwarden. This isn’t the only error you can encounter, and we wrote about Bitwarden failed to fetch in another guide.

We also have a great guide on Error: Cannot decrypt in Bitwarden, so don’t miss it for more information.

How to Fix the NMR_INVALID_STATE BSoD

The NMR_INVALID_STATE bug check has a value of 0x00000125 and it means that the NMR (network module registrar) has detected an invalid state. Long story short, if you installed a new or additional network card, or installed a new driver to it, that is the most likely cause for the NMR_INVALID_STATE BSoD.

Before starting, check if the network drive or module is installed correctly on your device and it’s compatible with your Windows OS.

How do I fix NMR_INVALID_STATE?

1. Roll back any recently updated network driver

  1. Right-click the Start menu and select Device Manager.
  2. Here, expand the Network adapters section and see if there is any yellow exclamation mark next to any of the drivers.
  3. If you find any, right click on it and select Properties.
  4. Next go to the Driver tab and select Roll Back Driver.
  5. If the option is grayed out, click on Update Driver instead.
  6. Next, click on Search automatically for drivers.
  7. Also, look through the Network adapters section and remove any adapter you don’t recognize. Do do that, right click on it and select Uninstall device.
  8. Restart the PC after making the changes.

Windows updates also come with driver updates that will install automatically, so there might be a new driver that you don’t know about. If this doesn’t work, you can also visit the manufacturer’s website for that component and download the correct driver for your device and OS.

This can be a tedious task, so if you have driver issues, we recommend using a dedicated driver updater tool that will do that for you automatically.

2. Use the Network troubleshooter

  1. Press Windows + I to start Settings.
  2. Now, go to System > Troubleshoot, and click on Other troubleshooters.
  3. Here, click on Run to the right on Network and Internet troubleshooter.
  4. Follow the on-screen instructions to detect and fix networking issues.

3. Check the memory for issues

  1. Press Windows + R, type mdsched, and press Enter to start Memory Diagnostic Tool.
  2. Select Restart now and check for problems (recommended).
  3. Windows will restart and perform a memory diagnostic test.
  4. If any issues are found, follow the on-screen instructions to fix them.

Although it’s less likely, the NMR_INVALID_STATE BSoD, may also be caused by a malfunctioning or incorrectly connected memory module. After performing the memory check, try reseating the RAM modules on the motherboard and perform another test. If the results keep showing the same issue, try with another RAM module or replaced the damaged one.
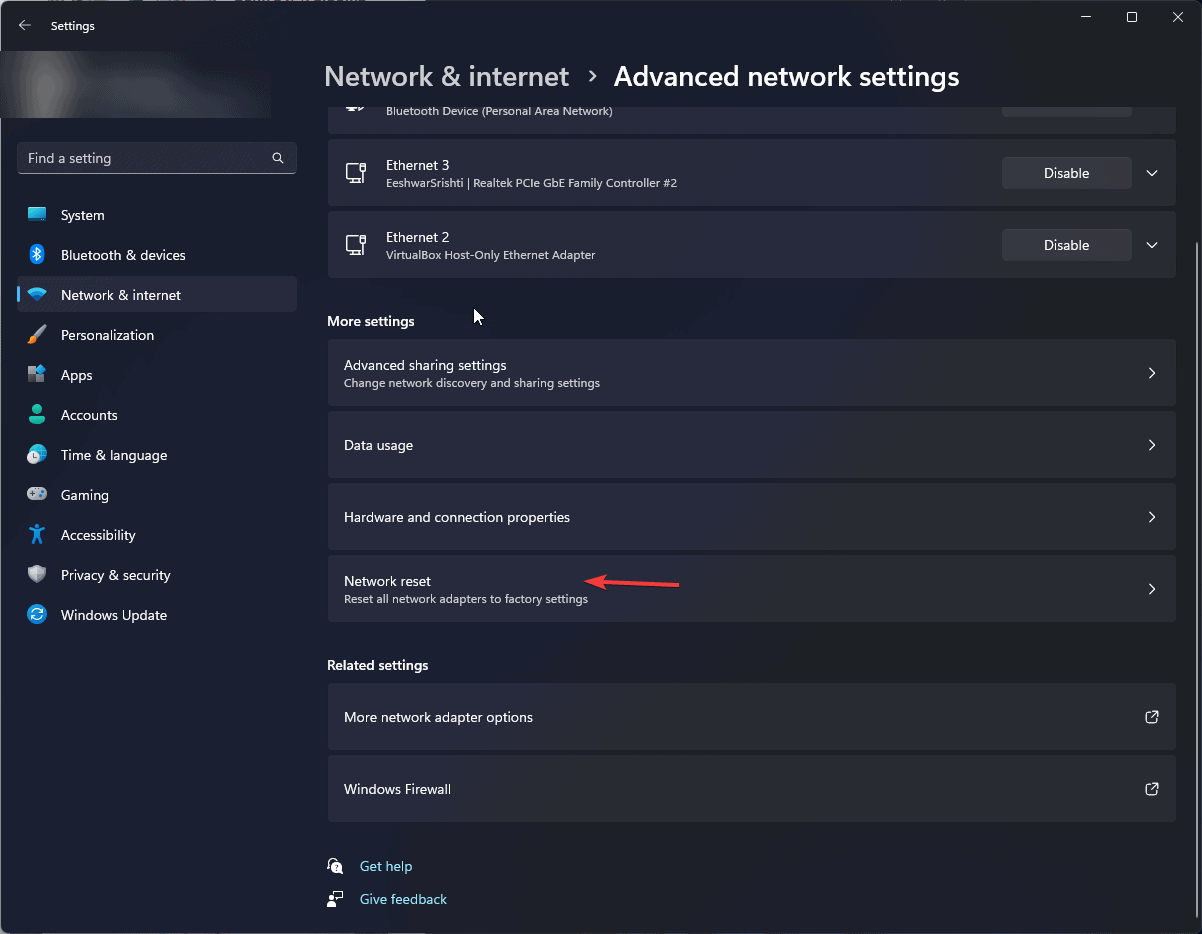
In the same way, if the network card you just installed is not supported, we recommend disconnecting and replacing it.

We hope that our guide helped you fix the NMR_INVALID_STATE BSoD. If you need more information about bug checks, refer to our article on the causes of BSoD.

If you have any questions or suggestions, scroll down and use the comments section below.

How to Fix RESOURCE_OWNER_POINTER_INVALID BSoD

The RESOURCE_OWNER_POINTER_INVALID BSoD comes with the 0x00000132 error code. The bug check points out that an invalid resource owner pointer was supplied. The message doesn’t help you very much, but it usually has to do with a corrupted or missing driver. Of course, as usually for a BSoD, this may also have hardware implications or system file corruption.

How do I fix RESOURCE_OWNER_POINTER_INVALID?

1. Disable the Automatically restart option

  1. Press Win + I to start Settings.
  2. Go to System > About and click on Advanced system settings.
  3. Now, go to the Advanced tab and click on Settings under Startup and Recovery.
  4. In the new window, uncheck the Automatically restart option and click OK.

Luckily, RESOURCE_OWNER_POINTER_INVALID BSoD occurs randomly, so you will be able to boot your PC to make this change. By disabling the Automatically restart option you will prevent restarting the PC on a system failure and it’s a first step to carefully debug this problem.

However, first, inspect the PC hardware and see if there are any signs of damage or overheating. The system is restarting to prevent further damage to your components.

2. Update or reinstall the drivers

  1. Right-click the Start button and select Device Manager.
  2. Expand all the categories and see if any of the drivers features a yellow exclamation mark next to it.
  3. Right-click on it and select Update driver, then select Search automatically for drivers.
  4. In case the system doesn’t find any new drivers, right click on it and select Uninstall device.
  5. Next, click on Action in Device Manager and select Scan for hardware changes.
  6. The system will scan the drivers and detect the component and reinstall a default driver.
  7. You may also visit the manufacturer’s website for that component or the one for your device and look for the right one for your system.

You may also install the latest drivers in Settings > Windows Update > Advanced options > Optional updates. Some drivers are listed there as optional updates and if you find any, select and install them.

This procedure may be daunting if you can’t find the culprit driver that is causing this issue. In that case, we recommend using a driver updater tool that will go through your drivers and install the correct ones with just a few clicks.

3. Run SFC and DISM scans

  1. Click the Start button, type cmd and click on Run as administrator from the results.
  2. Type the following command and press Enter to run the SFC scan: sfc /scannow
  3. After the scan is complete, type or paste the following command for the DISM scan: DISM /Online /Cleanup-Image /RestoreHealth
  4. Restart your PC and see if the RESOURCE_OWNER_POINTER_INVALID BSoD happens again.

Running SFC and DISM scans is always a good idea when dealing with a BSoD because they will help you fix corrupted system files and repair the Windows image.

4. Restore your system to a previous point

  1. Click the Start button, type system restore and click on Create a restore point from the results.
  2. Now, click on the System Restore button, select a restore point dated before the BSoD started to manifest itself and click Next.
  3. Follow the on-screen instructions to restore your system.

Running the System Restore is a great way to patch things up on your system, but for that, you will actually need to have a saved restored point of your OS. Another drawback is that everything you installed since the date of the restored image will be lost.

We hope that our solutions helped you fix the RESOURCE_OWNER_POINTER_INVALID BSoD and now your system is running smoothly. You may also perform a clean Windows installation, but if you don’t install the correct drivers, or if the problem is caused by a malfunctioning component, the bug check will reappear.

For more information, check our article on the causes of BSoD just to have a more clear picture of what you’re dealing with.

If you have any questions or suggestions, you can leave them in the comments section below.

In the latest Digital Defense Report, Microsoft says it sees 78 trillion security signals daily

In the latest Microsoft Digital Defense Report 2024, Microsoft revealed that it now sees 78 trillion security signals daily, up from 65 trillion the previous year. The company also said it tracks more than 1,500 unique threat groups, including more than 600 nation-state threat actor groups, 300 cybercrime groups, 200 influence operations groups, and hundreds of others.

Microsoft assigned about 34,000 full-time equivalent engineers to security initiatives last year, the company said, in response to the growing cyber threat landscape.

Microsoft said this team is dedicated to enhancing defenses, developing phishing-resistant MFA, enhancing the corporate network, and more. Microsoft also has about 15,000 partners with specialized security expertise for its cloud, Azure, Dynamics 365, Microsoft 365, and more.

In the last year, Microsoft says it’s seen more than 600 million cyberattacks per day, about 300 million of which were phishing attempts. These attacks include nation-state activity, cybercrime, and more.

The Microsoft Digital Defense Report 2024—which is over 130 pages long and can be downloaded—is divided into five chapters: “Evolving cyber threat landscape,” “Centering our organizations on security,” “Early insights: AI’s impact on cybersecurity,” “The global picture,” and “Looking ahead.”

The first chapter dives into the evolving cyber threat landscape, which Microsoft says has become more complex and dangerous over the past year.

For one, Microsoft tracked a 30% year-over-year increase in financially motivated nation-state threat actors, with these groups increasingly seeking to disrupt organizations’ operations and steal money. Microsoft also observed a 2.75x year-over-year increase in human-operated ransomware-linked encounters or instances in which at least one device in a network was targeted with ransomware.

At the same time, the percentage of organizations that are ultimately ransomed has decreased more than threefold over the past two years, likely because of the increased focus on Zero Trust security models, which only give users access to the apps and data they need to do their jobs.

You can read more about it on Microsoft’s blog post or download the full report. It’s worth noting that starting 2023, many of the cyberattacks employ AI which makes them more sophisticated and harder to spot, and counterattack.