Your PC will restart several times during updates [Full Fix]

Some Windows 10 users experienced this problem after downloading and installing Windows updates.

Namely, when the update is almost complete, the screen shows the familiar Windows loading animation with a notification that Working on updates 99%; Don’t turn off your PC. This will take a while, and Your PC will restart several times at the bottom of the screen.

However, nothing happens and the PC keeps displaying this message.

This problem could be as a result of corrupt directories, malware infection, and incomplete updates.

If you are wondering how to fix the Your PC will restart several times issue, his guide puts you through 7 solutions to resolve it.

How to fix Your PC will restart several times error?

  1. Run an SFC scan
  2. Run a DISM command
  3. Scan your device with an antivirus
  4. Run the Windows Update troubleshooter
  5. Run System Restore in Safe Mode
  6. Reset the PC
  7. Reset Windows Updates components

1. Run an SFC scan

Sometimes, the updating process fails due to missing or bad system files. That’s why the System File Checker scans for the corrupt or missing files and repairs them.

  1. Go to Start, type cmd, then right-click on Command Prompt and select Run as Administrator.your pc will restart several times
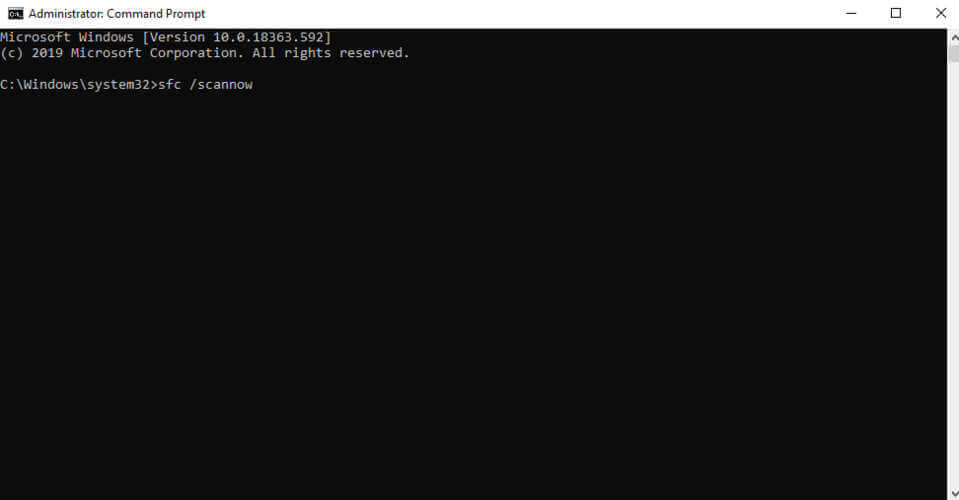
  2. Now, type the sfc /scannow command.run sfc to fix updating problem
  3. Wait for the scanning process to complete and then restart your computer. All corrupted files will be replaced on reboot.

2. Run the DISM command

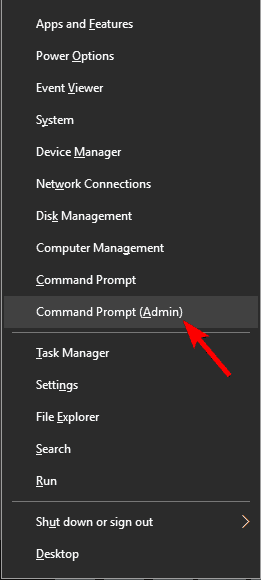
  1. Press Windows key + X and run Command Prompt (Admin).
  2. Copy and paste the following command on the command line: DISM.exe/Online /Cleanup-image /Restorehealthrun dism command to fix update process
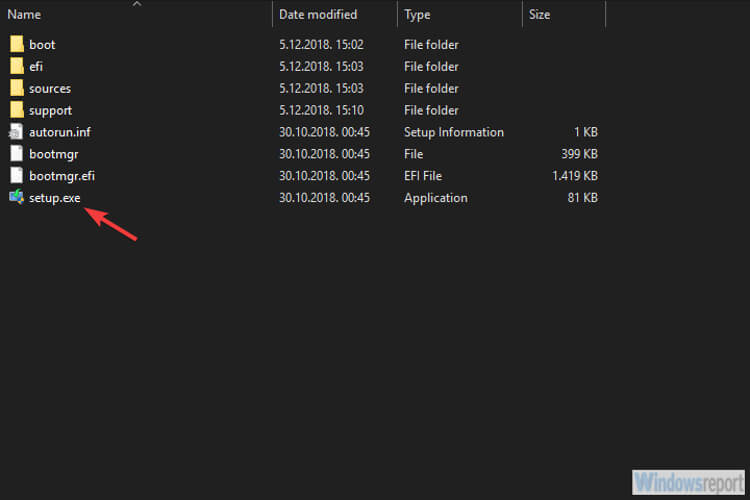
  3. In case the DISM can’t obtain files online, try using your installation USB or DVD. Insert media and type following command: DISM.exe/Online /Cleanup-Image /RestoreHealth /Source:/C:RepairSourceWindows /LimitAccess
  4. Be sure to replace the C:RepairSourceWindows path of your DVD or USB.

Just like the SFC scan, DISM (Deployment Image & Servicing Management) is also a tool for dealing with various system errors, although more advanced errors. Therefore, if the SFC scan didn’t get the job done, your chances are better with DISM.

3. Scan your device with an antivirus

Malware can infect your PC registry leading to the above-mentioned problem. Hence, we recommend using a powerful third-party antivirus to perform an in-depth scan.

So, if the updating process fails to complete, restart your device and install an antivirus tool that is compatible with your PC.

A good antivirus solution will provide you with triple-layer, real-time protection, along with screening signatures for all types of malware anomalies. Any detected malware is quarantined and then neutralized before the infection can even begin.

If the error persists, you should move to the next steps.

4. Run the Windows Update troubleshooter

If you’re running a newer version of Windows 10 or the Windows 10 Creators Update, you can definitely use the Windows Update troubleshooting tool. This tool is suitable for fixing several system-related issues most especially Windows Update problems.

Meanwhile, if you’re not sure how to use the new troubleshooter in Windows 10, just follow the instructions below:

  1. Go to Settings
  2. Head over to Update & Security, then Troubleshoot.
  3. Go to the Additional troubleshooter option.
  4. Find Windows Update, and click Run the troubleshooter.
    run troubleshooter for updates
  5. Follow further on-screen instructions.
  6. Restart your computer.

5. Run System Restore in Safe Mode

  1. In the search bar, type system restore.
  2. The PC will prompt you to choose a restore point. Open the menu and, in the System Protection tab, click on System Restore.
  3. Choose one of the available dates.use system restore to fix update problem
  4. Follow the prompts to revert back to a certain restore point.
  5. Wait for the process to complete, and then reboot.

Safe Mode is a diagnostics mode in Windows that starts your PC in a limited state, with only basic files and drivers running.

However, you can perform a system restore in safe mode to revert back to a certain restore point before the Your PC will restart several times error problem.

Note: Make sure you are able to identify the restore point before the error message display. Also, System restore does not affect any of your files, documents, and personal data.

6. Reset the PC

  1. Open Settings, then Update & Security and go to Recovery.how to reset PC
  2. The Reset this PC option should be the first you see. Click on Get started to proceed.

This option is an advanced recovery option that restores your PC to its factory state.

In a similar manner, but running in Safe Mode you should also be able to revert to a previous version of Windows. An intact Windows.old file (stored in C:Windows.old) is the important precondition for the downgrade.

7. Reset Windows Updates components

Disclaimer: This solution contains steps that are part of modifying the registry. Please note that serious problems may occur if you do this incorrectly. Hence, follow these steps correctly, and carefully.

We highly recommend that you back up the Registry before you modify it. Also, you can restore your PC to a working state in case a problem occurs.

Here’s how to manually reset the Windows Updates Components:

  1. Right-click Start.
  2. Select Command Prompt (Admin).your pc will restart several times
  3. Click Yes when asked for permissions.
  4. Stop the BITS, Cryptographic, MSI Installer, and Windows Update Services by typing the following commands in command prompt (hit Enter after each command you type):
  • net stop wuauserv
  • net stop cryptSvc
  • net stop bits
  • net stop msiserver
  1. Rename the SoftwareDistribution and Catroot2 folder by typing the commands below in the Command Prompt then press Enter after each command you type:
  • C:Windows/softwareDistribution/SoftwareDistribution.old
  • C:Windows/System32/catroot2/Catroot2.old
  1. Restart the BITS, Cryptographic, MSI Installer, and Windows Update Services by typing the following commands in Command prompt:
  • net stop wuauserv
  • net stop cryptSvc
  • net stop bits
  • net stop msiserver
  1. Type Exit in the Command Prompt to close it.

After trying out the steps above run Windows Updates again and follow the prompts to complete Windows Update process.

However, some Windows users reported getting Access Denied prompts when trying the step above. Here’s what to do if your access is denied:

  1. Log in first as administrator or use administrator user account
  2. Stop the Windows Update service and try to rename Software Distribution folderyour pc will restart several times
  3. Right-click on Start.
  4. Select Run.
  5. Type services.msc and press OK or enter.
  6. Scroll down and locate Windows Update service.
  7. Right-click and select Properties.
  8. Stop the service.
  9. Follow the steps again to reset Windows Update Components.

After you complete the process, go to Services window again, now start Windows Update service, and then restart the computer.

Note: We highly recommend that you check the Give me updates menu for other Microsoft products when using Windows update option. Windows Updates downloads and installs updates required to run Windows efficiently.

Let us know if any of these solutions helped fix Your PC will restart several times problem.
Windows 10 build 20161 is out in the Dev channel with big changes for the Start Menu and Taskbar

It was quite a long wait, but Microsoft has finally released a new Windows 10 Insider build with some new features and noticeable changes today. Even the Windows Insider website is getting a new look, though it’s currently only available in en-us English for now.

So, the Windows 10 Insider build 20161 is now available to download in the Dev channel, and it includes several important changes. However, the Windows Insider team said that only a subset of Insiders will see the new features for now so the team can “quickly identify issues that may impact performance and reliability.”

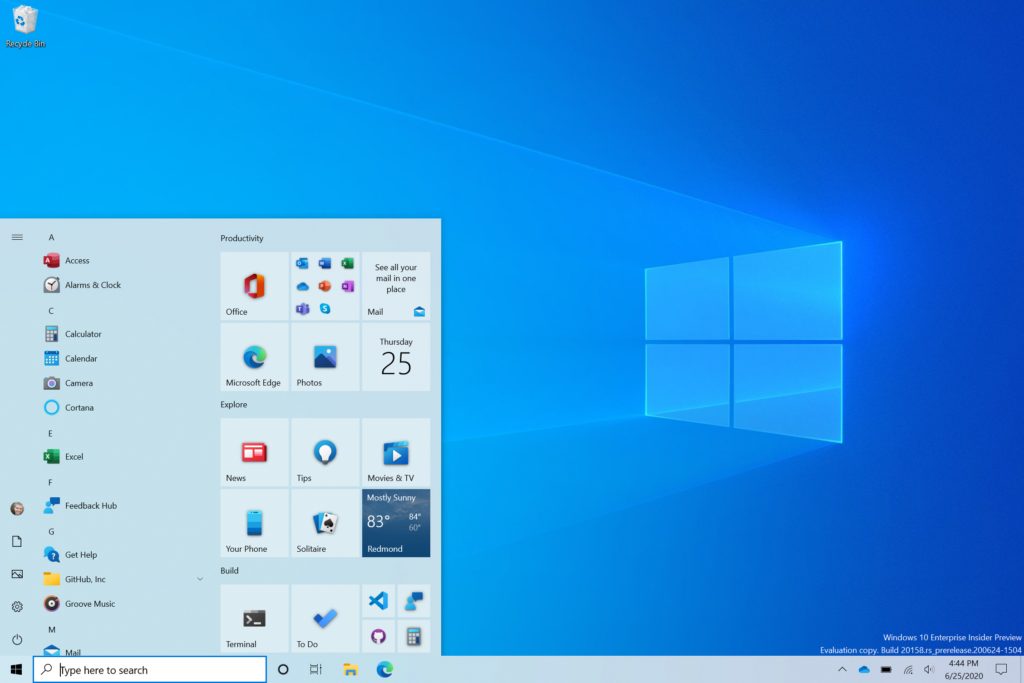
Anyway, the first big change in this build is that the Start Menu is getting Theme-aware tiles, which will replace the solid color backplates that didn’t always look good depending on your accent color. “This refined Start design looks great in both dark and light theme, but if you’re looking for a splash of color, first make sure to turn on Windows dark theme and then toggle “Show accent color on the following surfaces” for “Start, taskbar, and action center” under Settings > Personalization > Color to elegantly apply your accent color to the Start frame and tiles,” the team explained.

Before and After: Windows 10 Start menu in dark theme.

The second big change in this build is that the Alt + Tab experience will now include all tabs open in Edge. You can turn this off in Settings > System > Multitasking if you prefer the classic experience, or you can choose to only show your last three or five tabs when you hit Alt + Tab. This feature will also require a Canary or Dev build of Microsoft Edge (version 83.0.475.0 or higher), Microsoft said today.

All tabs open in Microsoft Edge will start appearing in Alt + TAB!

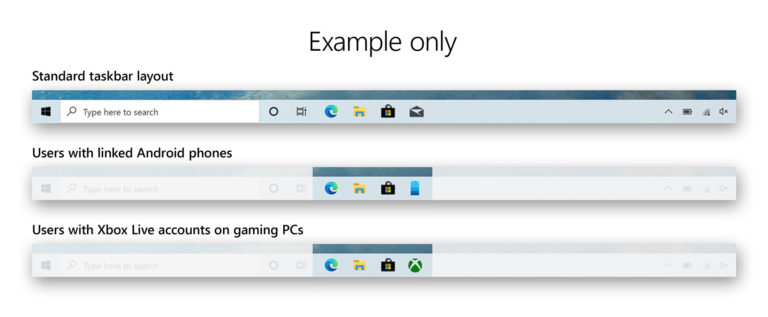
Starting with this build, Microsoft is also introducing a Programmable taskbar during the out-of-box experience. The idea is to offer a more personalized Taskbar for new users with linked Android phones, or those with Xbox Live accounts on gaming PCs, so the taskbar will add useful shortcuts to Your Phone or the Xbox app when they boot up their new PC.

“Please note that this experience is limited to new account creation or first logon scenarios. We will not use Programmable Taskbar to alter the Taskbar layout on existing accounts,” the Windows Insider team clarified. You can see some examples of this Programmable Taskbar below.

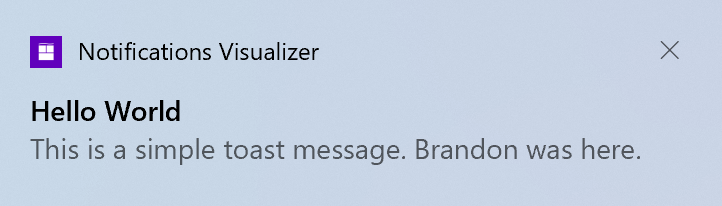
Microsoft has also changed how notifications look like in this new build, with a new app logo at the top showing which app has sent you the notification. Moreover, Microsoft has also turned off the Focus Assist notification and summary toast you usually see after Focus Assist has been automatically turned on. However, Insiders will still be able to revert to the previous behaviour if they prefer seeing these notifications.

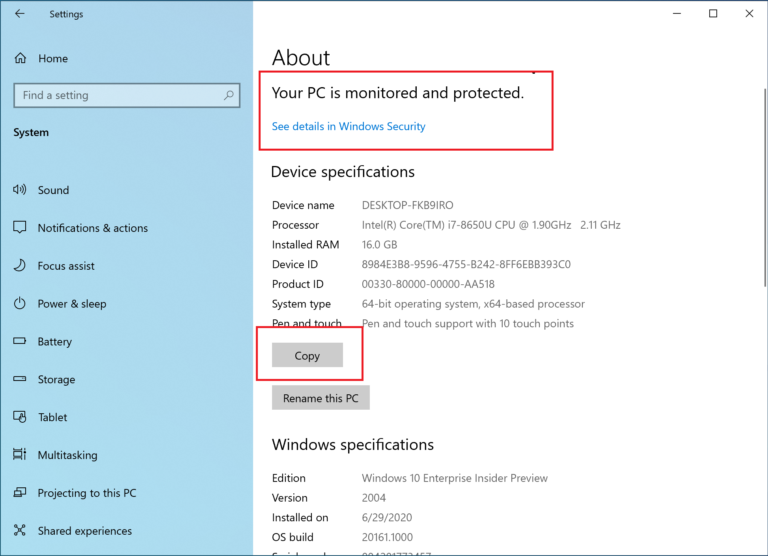
The Settings app is also getting more information from the Legacy Control Panel in this build, though the Windows Insider team said that this is still a work in progress. Moreover, it will now be possible to copy your device specifications, and Microsoft has also streamlined information about Windows Security in the Settings app.

The last big change in this build is related to the tablet experience for 2-in-1 devices: The new tablet posture experience that debuted in the May 2020 Update will now be the default when you detach the keyboard on a 2-in-1 device, and users will no longer see the notification asking them if they want to switch into tablet mode. Again, Insiders will be able to change this setting in System > Tablet if they prefer the old experience.

There are two other important things to note about the tablet experience for 2-in-1 devices in this build: Microsoft has removed the tablet mode quick action on non-touch devices to prevent any confusion, and tablet users will also boot into the appropriate mode depending on the presence of the keyboard, or the last mode they were using.

That’s a lot of changes for a single build, but keep in mind that these are all experimental features that may not end up in a future Windows 10 Update. The build 20161 also comes with several fixes and known issues, and you can find the full list below:

Fixes

  • We fixed an issue resulting in Insiders experiencing bug checks when connecting and interacting with an Xbox controller.
  • We’ve fixed an issue causing some games and applications to crash at launch or fail to install.
  • We fixed an issue resulting in Microsoft Edge not navigating to websites when WDAG was enabled on the last 2 flights.
  • We fixed an issue which was increasing log off time in recent builds.
  • We fixed an issue with the Chinese Pinyin IME where after setting your preferred IME toolbar orientation, you may not be able to change it again after rebooting your PC.
  • We fixed an issue causing Reset this PC to always show the error “There was a problem resetting this PC” when launched from Settings in the last few builds.
  • We fixed an issue resulting in some Bluetooth devices no longer showing their battery level in Settings in the last few builds.
  • We fixed an issue where Settings would crash if you went to Settings > Privacy > Microphone while a win32 app was recording audio.
  • We fixed an issue where if Sound Settings showed “no input devices found” in the input dropdown and you clicked it, then Settings would crash.
  • We fixed an issue where when adding a printer, the dialog might crash if you navigated through to the “Add a printer driver” dialog in recent builds.
  • We fixed a graphics related issue resulting in some users experiencing bugchecks.

Known issues

  • We’re working on a fix for an issue causing some systems to crash with a HYPERVISOR_ERROR bugcheck.
  • We’re looking into reports of the update process hanging for extended periods of time when attempting to install a new build.
  • We’re aware of an issue where Notepad might fail to reopen files which were automatically saved during a PC restart (if that option is enabled in Settings). Documents can be recovered from %localappdata%Notepad.We’re investigating reports of the screen becoming dimmer after upgrading to the previous build.
  • We’re aware of an issue where Task Manager reports 0.00 GHz CPU usage in the Performance tab.
  • We’re investigating reports that when you press space while using the Korean IME in certain apps, the last character is deleted.
  • We’re working to fine tune the tile animations in Start to avoid flashes of color.

It’s nice to finally get new features to play with, even though we remind you that only a subset of Insiders who install this build will see them at first. If you’re not an Insider, the Windows Insider team also announced today that the new Windows Calculator graphing mode feature that was released to Insiders in January is now rolling out to the public. We’re getting some existing Insider news a little bit later in the day than usual this week, but we hope the team will soon be back with more new features later this month.

How to fix Bitdefender update failed errors on Windows 10/11

Without a doubt, Bitdefender is one of the best antivirus solutions for both personal devices and PCs. But it needs to be regularly updated for the best results.

Now, a lot of times users have complained of encountering various Bitdefender update errors forcing them to abandon the update process and risking their Windows 10 PCs.

The good news is that you don’t have to give up since most of these errors are easy to fix. Here is how to maneuver around various Bitdefender update errors.


What can I do if the Bitdefender update fails?

1. Make sure Bitdefender update has been properly set up

  1. Open your Bitdefender main window.
  2. Click on the gear Settings.
  3. Click on the Bitdefender’s Update tab and make sure it indicates the correct update location as shown here.Fix Bitdefender update failed errors on Windows 10

This applies to some Bitdefender versions, especially the older ones. Note that for the latest editions, Bitdefender auto-update file location is configured automatically during installation.


2. Try out a different antivirus solution

Users looking for an error-free antivirus experience will most likely appreciate our pick for today.

No matter if you are a regular user or a hardcore gamer, this software offers you the best protection against different types of online threats.

It is an excellent choice for protecting your privacy and is useful for when you use the Internet to shop, for online banking, to work, and to communicate. Use it for your Windows, Mac, Android, and Linux devices.

When it comes to sensitive data, passwords, online payments, webcam,s and smart devices, all of them are secured with this powerful antivirus.

When it comes to online banking, this software offers you a high level of protection so you won’t have to worry about unauthorized access to your computer.

TotalAV

TotalAV protects your computer against viruses, malware, spyware, and unauthorized access.
Check Price Visit Website

3. Verify that Bitdefender isn’t being blocked by the firewall

  1. Click on Bitdefender’s Protection.
  2. Go to the Firewall module then click on the gear/Settings icon to confirm that the firewall is OK.Bitdefender not updating
  3. First, under the Network Adapters option, your network adapter should be set to home/office. Bitdefender failed to update
  4. The next edit is on stealth mode. Still, in the firewall tab, click the edit Stealth settings and set it to off.Bitdefender update error
Note icon NOTE
NOTE: The Firewall module is not available in the Bitdefender Antivirus Plus edition.

Bitdefender comes with its own built-in powerful firewall and thatu2019s should be your next stop if Bitdefender has reported an update error. Here is how to check if the firewall is set and running right:

4. Turn off other firewalls

Well, in some cases, the problem fails to go away even after implementing the first two recommendations so it’s time to turn our attention to other Firewall software.

And here the remedy is straightforward: Just turn off or uninstall any other Firewall software (Including Windows own Firewall) and see if you’ll get lucky.


5. Verify that your proxy settings are properly set up

  1. Open the normal Bitdefender window.
  2. Click on the gear/Settings icon to access the Settings options.
  3. Select the shown Advanced tab.
  4. On the proxy usage option, click on the on/off switch to turn on the proxy.bitdefender free error
  5. Now click on the manage proxies hyperlink to specify how Bitdefender should access the required proxy settings.
  6. Click import proxy settings from the default browser to have Bitdefender automatically detect the current user’s proxy settings from the default browser. Here you might be required to re-enter your username and password to proceed. This is the easiest option route to take although it occasionally refuses to work meaning in you may be forced to specify the settings manually. You will proceed to step 7 to do it manually.bitdefender free update error 2019
  7. Click Custom proxy settings (to manually configure your proxy). Here is the information you will be asked for:
  • Address– this is the IP address of your proxy server.
  • Port– this is the port that Bitdefender will be using to connect to your proxy server.
  • Username– this is the username that the proxy recognizes.
  • Password– this is the password for the specified user account.
  1. Save the changes by clicking OK.Bitdefender update failed error

Bitdefender will now use the specified proxy settings to connect to the Internet for update purposes.

If you use a proxy to connect to the Internet, you must have properly configured Bitdefender with the correct proxy settings for the Bitdefender program updates to work.

In general, Bitdefender antivirus should automatically detect and import the existing proxy server settings from your system.

But there is no guarantee that it will always do this so sometimes a manual configuration is necessary.


6. Manually update Bitdefender

  1. First, download the weekly.exe file and save it on your local hard disk.
  1. Double-click the downloaded file to commence the setup wizard.
  2. Click next to run the programs/updates installation process.
  3. Select I accept the program terms and click Next.
  4. Click Install to start the installation.
  5. Click Finish to wind up the installation.

Bitdefender releases its combined virus definitions (and scan engine updates) on a weekly basis (every Friday) in form of the weekly.exe application and you could still use it though this should everything else prove unsuccessful.

That’s all. Your Bitdefender should now be up to date.


7. Uninstall and reinstall Bitdefender

  1. Use this link to uninstall the program.
  2. Reinstall your BitDefender version.
  3. Now attempt to update (if necessary).

If you are not yet lucky, try uninstalling your BitDefender version then restart the computer.


8. Upgrade to a newer version

  1. Go to the website and download Bitdefender (The latest version).
  2. Install the download and see how it behaves.
Note icon NOTE
NOTE: Run the trial version if your subscription is expired.

You can always upgrade to the newest version of Bitdefender. The process should be free as long as your subscription is still valid.


9. Contact Bitdefender’s support

  1. Open the usual Bitdefender’s interface.
  2. Under the Settings menu, click the Notifications.
  3. Now click the Critical tab to see the exact Bitdefender error message.Bitdefender update in progress stuck

Contacting Bitdefender’s highly professional technical support team could be the way to go if the said Bitdefender update errors still remain.

You need to open a ticket to do this. The technical team will then request the exact error message which you can obtain as described above.


How can I fix Bitdefender Free Update Failed Error 2024?

1. Scan your PC for errors

  1. Click the Start button.
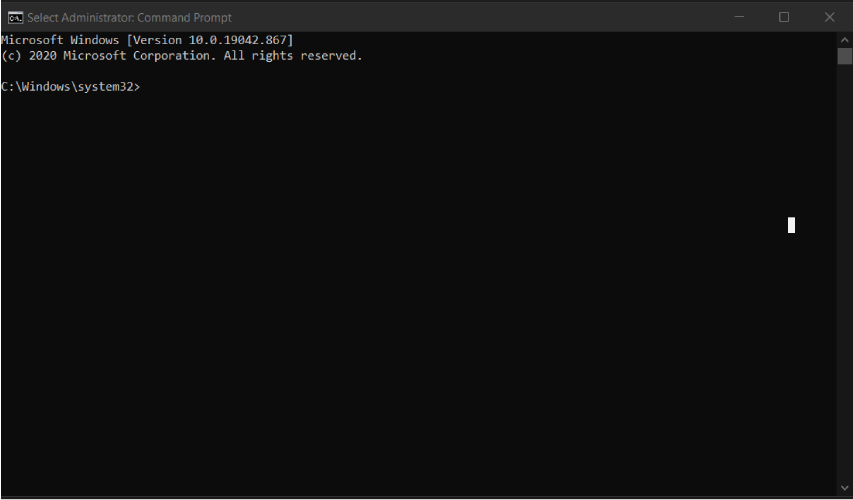
  2. Then get into the search bar and type exe then press enter to search for the command prompt. Right-click and choose run as administrator.
  3. Once the black command screen appears, type the following command and press Enter: sfc/scannow
  4. The system will be scanned and healed of any errors hindering the update.

2. Free up space

Empty the Temp Folder

  1. Click the Start button.
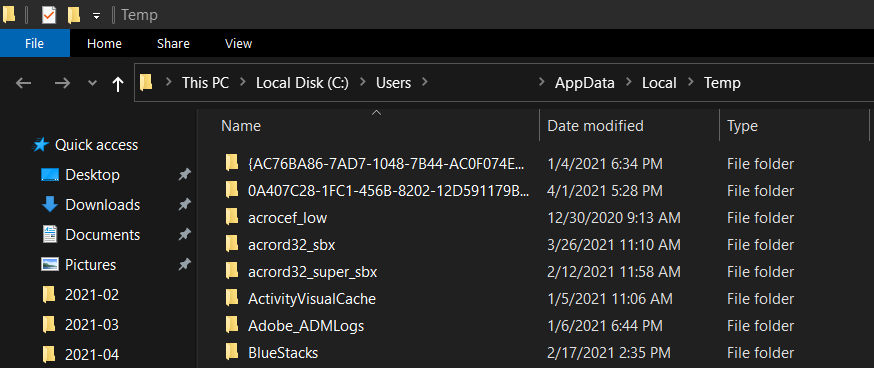
  2. Then get into the search bar and type %temp% then enter to search for the temporary files.
  3. Once the Temp folder opens, select (CTRL+A) to delete all the files here. This could create enough memory space for the update to be executed.

Empty The Prefetch

  1. Click the Start button.
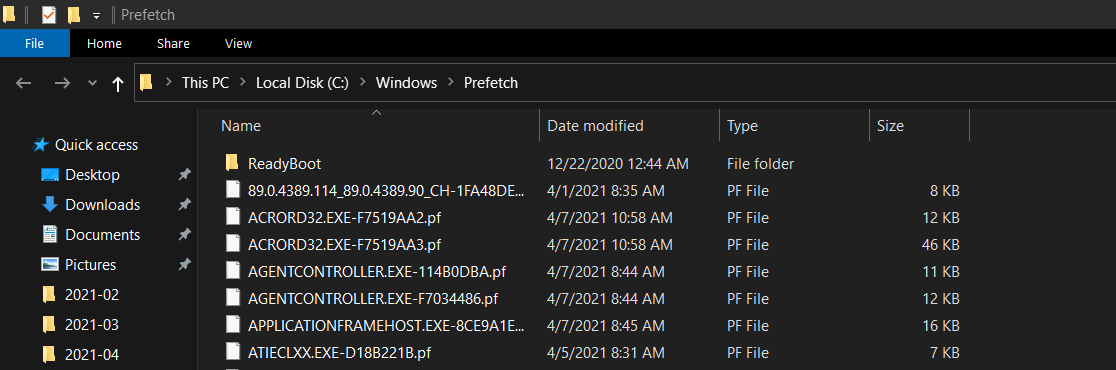
  2. Get into the search bar, type the following command, and press Enter: prefetch
  3. Now delete all the files found here (if any).

3. Manual update

You can as well try to update the Bitdefender virus definition files manually using the steps I highlighted earlier (download the weekly.exe file).

Most of the Bitdefender Update errors are triggered by Internet connectivity issues.

For instance, your connection may have temporarily failed, your proxy settings are wrong, or you have a firewall blocking an ongoing Bitdefender update.


Luckily, as you have seen, all these are problems you can easily beat using the above solutions. Try the above fixes and alert us (via the comments section) if you encounter further problems.

Teams meetings now let you chat with up to 300 people

If you’re currently a remote worker, then you appreciate the significance of cloud-based workforce collaboration tools today. As more and more people work from home due to the COVID-19 situation, organizations are turning to such tech solutions, for example, Teams meetings and chats, to communicate and collaborate.

Instant messaging tools too have become a highly-sought resource as the demand for real-time business communication skyrockets.

Sometime back, Microsoft revealed that 91% of Fortune 100 corporations use Teams. Daily users of the platform have also tremendously increased.

But Microsoft Teams had to develop its capacity to start accommodating the rising demand for remote collaboration tools and digital workspaces.

Little wonder then that the Teams Meetings feature has grown in a few months to the point of supporting up to 300 participants.

Teams meetings support up to 300 participants today

According to a tweet by Mike Tholfsen, Product Manager, Microsoft, the Teams meetings’ limit has increased.

So, as Teams’ capacity for collaborative work increases, the Office 365 tool now lets you have a corporate meeting with up to 300 people. All these participants can take part in chats or they may call in to attend your meeting.

Of course, there’s much more room for improvement in Teams meetings. It’s obviously playing catch up to Zoom’s Large Meeting feature, which under a special license, may allow between 500 and 1000 participants.

Similarly, there are reports that Teams’ gallery view for video conferencing will soon receive an expansion. Teams video will show up to 49 participants at the same time if the improvement comes to fruition.

Besides Zoom, Microsoft Teams faces stiff competition from Slack, which continues to expand its third-party app integrations. The collaboration platform recently got integrated with several AWS resources, including Chatbot, AppFlow, and Key Management Service.

Are you satisfied with the expanded Teams meetings capacity of up to 300 people? Feel free to share your views in the comments section below.

[wl_navigator]

The new Firefox 78.0 helps you protect your privacy

Mozilla wants to catch up with Google and Microsoft by releasing Firefox 78.0, the most important update in a long time for the old browser.

The new version, Firefox 78.0 is available for Windows, macOS, and Linux, and is accompanied by Firefox ESR 78.0, the first major update for the Extended Support Release browser since Firefox 68.

What’s new in Firefox 78.0?

Firstly, the Privacy Protections screen was renamed to Protections Dashboard. But this is not only a cosmetic thing. It also comes with two new interesting features:

  • You will be able to track the number of resolved breaches directly from the dashboard,
  • You can actually check to see if any saved passwords have been exposed in a data breach.

To access the Protections Dashboard, either type about:protections or just click on the little shield from the left of the address bar and select Protections Dashboard from the drop-down menu.

Firefox 78 protection dashboard

They also added a new Refresh button to the uninstaller. You don’t need to uninstall and reinstall Firefox to fix any problems. The Refresh button will reset all add-ons and settings.

Another new improvement, or more like a patch, is that your screen saver will not interrupt WebRTC calls on Firefox anymore.

If you’ve got an Intel GPU and a Windows 10, you’ll be able to enjoy WebRender for improved graphics performance.

Another interesting addition is within the context menu when right-clicking a tab. If you do that you will see the Close Tabs to the Right and Close Other Tabs into a sub-menu called Close Multiple Tabs.

Firefox 78 close multiple tabs

What are the Firefox 78.0 ESR improvements?

We list some of the Firefox 78 ESR improvements as listed by Mozilla:

  • Kiosk mode
  • Client certificates
  • Service Worker and Push APIs are now enabled
  • The Block Autoplay feature is enabled
  • Picture-in-picture support
  • View and manage web certificates in about:certificate

Do you use Firefox? What do you think about the new version? Leave us your opinion in the comments section below.

[wl_navigator]

Microsoft launches emergency security updates to fix codecs

Usually, security updates come in the notorious Patch Tuesday (the second Tuesday of the month), but Microsoft just released two new, out-of-bound security updates.

That is two weeks before Patch Tuesday and gives us some idea about the CVE vulnerabilities importance and the urgency of the updates.

CVE-2020-1425 and CVE-2020-1457 are two security vulnerabilities or remote code execution vulnerabilities as Microsoft calls them.

The vulnerabilities affect the Windows Codecs Library for all Windows 10 versions and Windows Server versions.

How can CVE-2020-1425 and CVE-2020-1457 be exploited?

Both vulnerabilities exploit a vulnerability in the way that Microsoft Windows Codecs Library handles objects in memory.

CVE-2020-1425 is a critical vulnerability and the attacker who would exploit it could obtain information to further compromise the user’s system.

CVE-2020-1457 is listed just as important but it sounds just as dangerous as the attacker who exploits this vulnerability could execute arbitrary code.

Microsoft specifies that the vulnerabilities were not publicly disclosed, have not been exploited, and are less likely to be exploited.

What is the exploitation method for the vulnerabilities?

Apparently, to benefit from this bug, the attacker sends a specially crafted image file that needs to be processed by a program on your computer.

The good news is that you don’t need to do anything to patch your system. The Windows Media Codec will be updated automatically through the Microsoft Store.

Affected customers will be automatically updated by Microsoft Store. Customers do not need to take any action to receive the update.

Alternatively, customers who want to receive the update immediately can check for updates with the Microsoft Store App; more information on this process can be found here.

What do you think about Microsoft’s latest updates? Tell us all about it in the comments section below.

[wl_navigator]

FIX: Webcam not working on Windows 10/11 [Logitech, Dell]

It is very likely that your webcam won’t work after the upgrade to Windows 10. Luckily, this issue is minor and it could be solved in a few simple steps, buy installing the right driver.

Windows 10 is already a good and stable operating system. We can only expect it to behave like a fully-finished operating system.

Even so, Windows 10 still lacks a lot of drivers and features that are necessary for everyday use of the computer.

Many users enjoy their webcam frequently, but sometimes certain issues with the webcam can appear.

Speaking of webcam problems, users reported the following issues:

  • We can’t find your camera Windows 10 – This is a relatively common problem with Windows 10. If Windows can’t find your camera, try reconnecting it or reinstalling its drivers.
  • Webcam not in Device Manager – If your webcam isn’t listed in Device Manager, it’s possible that it’s disabled. Many laptops support a keyboard shortcut that allows you to disable your webcam, so be sure to look for it.
  • Integrated webcam not working – This is another problem that many users have with their webcam. If the webcam isn’t working, be sure to update your drivers to the latest version and check if that helps.
  • Webcam upside down – Several users reported that their webcam is upside down. This is a minor problem, and we covered a similar issue in our Skype camera is upside down article, so be sure to check it out.
  • Webcam used by another application – Sometimes you might get this message on your PC. If you’re having this problem, be sure to disable all startup applications and check if that helps.
  • Webcam not working, detected, recognized, turning on, showing up – There are various webcam problems that can occur, but you should be able to solve most of them by using one of our solutions.

What can I do if the webcam is not working on Windows 10?

1. Make sure that apps are allowed to use your webcam

  1. Open the Settings app. You can do that quickly by pressing Windows Key + I shortcut.
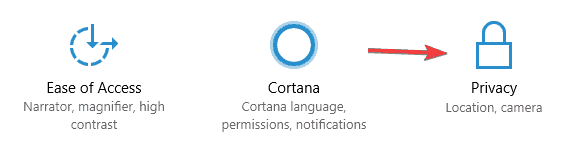
  2. When the Settings app opens, go to the Privacy section.
    Integrated webcam not working
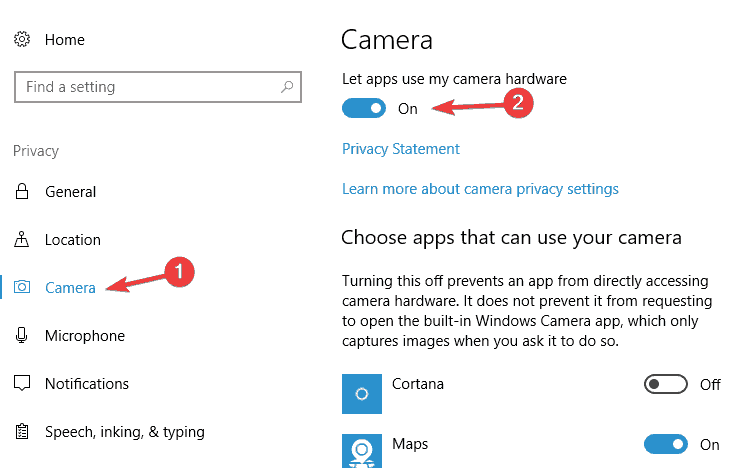
  3. In the left pane, choose Camera. Now make sure that Let apps use my camera hardware option is checked. If the problem appears only with a specific app, check the Choose apps that can use your camera list and make sure that the camera is enabled for that app.
    Webcam upside down

Webcam problems can occur if applications aren’t allowed to use your webcam. Windows 10 added a privacy feature that allows you to choose which applications can access your webcam.

To fix this problem, you need to check your privacy settings by doing as described above. After that, your apps should be able to access your webcam without any problems.

2. Update your drivers

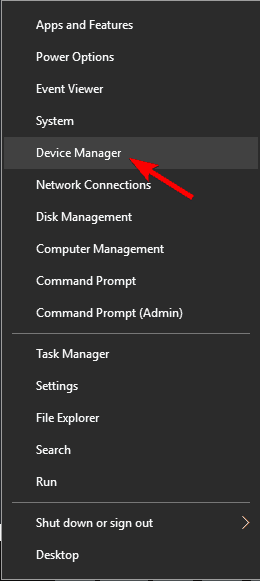
  1. Press Windows Key + X to open Win + X menu. Now choose Device Manager from the list.
    Webcam used by another application
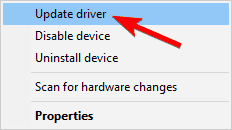
  2. When Device Manager opens, locate your webcam on the list and choose Update driver.
    Webcam not in Device Manager
  3. Now choose Search automatically for updated driver software.
    Integrated webcam not working

Sometimes webcam problems can be caused by outdated or missing drivers. If you’re having this problem, we advise you to try updating your drivers.

You can do that in several different ways. The easiest method is to use the automatic update. Windows will now automatically search and download the suitable driver for your PC.

In some cases, you might have to install the driver manually.

Windows 10 comes with a set of default drivers and you can install them by doing the following:

  1. Repeat Step 1 and 2 from above.
  2. Now choose Browse my computer for driver software.
    Webcam upside down
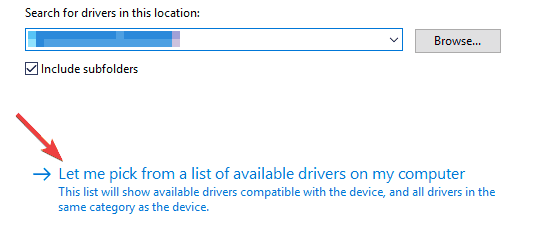
  3. Select Let me pick from a list of available drivers on my computer.
    Webcam used by another application
  4. Select the brand of your webcam and model and follow the instructions on the screen to install the driver.

If that doesn’t work, you might want to try rolling back to the older driver. This is rather simple and you can do it by following these steps:

  1. Open Device Manager, locate your webcam and double click it.
  2. When the Properties window opens, navigate to the Driver tab. Now choose the Roll Back Driver option.
    Webcam not working

If this option isn’t available, you won’t be able to roll back to the older driver.

Although these methods are simple to use, the best way to update your webcam driver is to download the driver for it manually. Simply visit the manufacturer’s website and download the latest driver for your model.

Update drivers automatically (third-party tool suggested)

Downloading drivers manually can put your system at an unnecessary risk: getting the wrong driver installed. This may lead to serious malfunctions.

The safer and easier way to update drivers on a Windows computer is by using an automatic tool that identifies each device on your computer and matches it with the latest driver versions from an extensive online database.

3. Check if your webcam is enabled

Many laptops allow you to enable or disable your webcam by using a keyboard shortcut. To check if your laptop supports this feature, look for a key that has a webcam picture on it.

To disable or enable your webcam, simply press the Fn key and that key together. On some laptops that keyboard shortcut is Fn + F6, but it might be different on your laptop.

To see if your laptop supports this feature and how to properly enable or disable your webcam, be sure to check your laptop’s instruction manual.

4. Check your antivirus settings

If you’re having webcam problems, the issue might be caused by your antivirus software. These tools tend to block your webcam in order to prevent hackers from spying on you.

Webcam blocking is a useful feature. However, it can cause issues with your webcam. To fix that, you should check your antivirus configuration and disable the webcam protection feature.

If that doesn’t help or if you can’t find this setting, you can try disabling your antivirus completely. Sometimes, in order to fix this problem, you need to remove your antivirus software completely.

Since it’s not safe to use a PC without an antivirus, consider switching to a different antivirus solution that its impact on system performance is hard to notice.

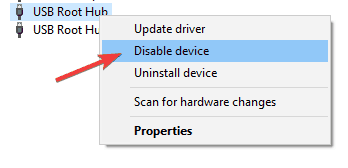
5. Disable all USB hubs

  1. Open Device Manager and expand Universal Serial Bus controllers section.
  2. Now locate USB Root Hub, right-click it and choose Disable from the menu.
    We can't find your camera Windows 10
  3. A confirmation dialog will now appear. Click Yes to disable the device.
    Webcam not in Device Manager
  4. Repeat the last two steps for all available USB hubs. Keep in mind that by disabling USB hubs you’ll cause other USB devices, including your mouse and keyboard to temporarily stop working.
  5. After disabling all USB hubs, restart your PC.
  6. Once your PC restarts, go back to Device Manager and enable all USB hubs.

According to users, sometimes your USB hub device can cause webcam problems to appear. However, you can easily fix this problem by disabling all USB hubs.

This is rather simple and you can do it by following the above steps.  After doing that, your webcam should start working again.

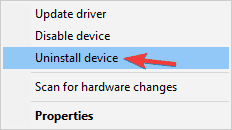
6. Install the default driver

  1. Open Device Manager.
  2. Locate your webcam on the list, right-click it, and choose Uninstall device.
    Webcam not detected
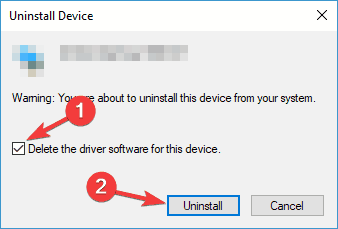
  3. When the confirmation dialog appears, check Delete the driver software for this device if available. Now click the Uninstall button.
    Webcam not recognized
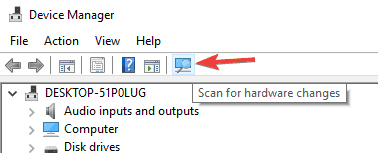
  4. After uninstalling the driver, click Scan for hardware changes icon.
    C:UsersmetalPicturesWork pictureswebcam problems
  5. Windows will now install the default driver. If for some reason the default driver isn’t installed, restart your PC and check if that solves the issue.

Another way to fix this problem is to install the default driver. This is rather simple and you can do it by following the given steps.

After installing the default driver, the problem should be resolved and your webcam will start working again.

7. Rename SoftwareDistribution and catroot2 directories

  1. Start Command Prompt as administrator. You can do that by pressing Windows Key + X and choosing Command Prompt (Admin) from the menu. If the Command Prompt isn’t available, you can also use PowerShell (Admin).
    Webcam upside down
  2. When Command Prompt starts, enter the following commands:
    • net stop wuauserv
    • net stop cryptSvc
    • net stop bits
    • net stop msiserver
    • ren C:WindowsSoftwareDistribution SoftwareDistribution.old
    • ren C:WindowsSystem32catroot2 catroot2.old
    • net start wuauserv
    • net start cryptSvc
    • net start bits
    • net start msiserver

According to users, you can fix webcam problems simply by renaming SoftwareDistribtion and catroot2 directories. This is relatively simple and you can do it by running several commands.

After doing so, check if your webcam is working again.

If you’re still facing the webcam problem, besides checking for updates and installing necessary drivers, reach for the comments section.

We will do our best to help you further in order to solve your problem.
Xbox Game Bar for Windows 10 gets new widgets, including from 3rd parties

Microsoft’s Xbox Game Bar for Windows 10 is becoming more versatile this year thanks to third-party widgets. The new Widget store launched for all Windows 10 users in beta last month, but it’s getting an official launch today along with some important widgets updates.

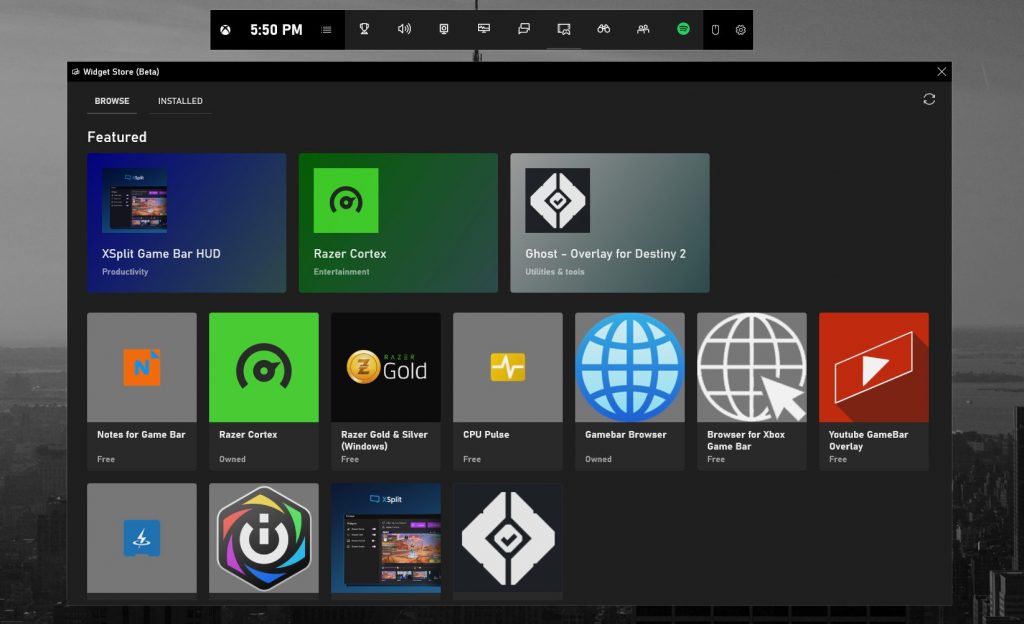
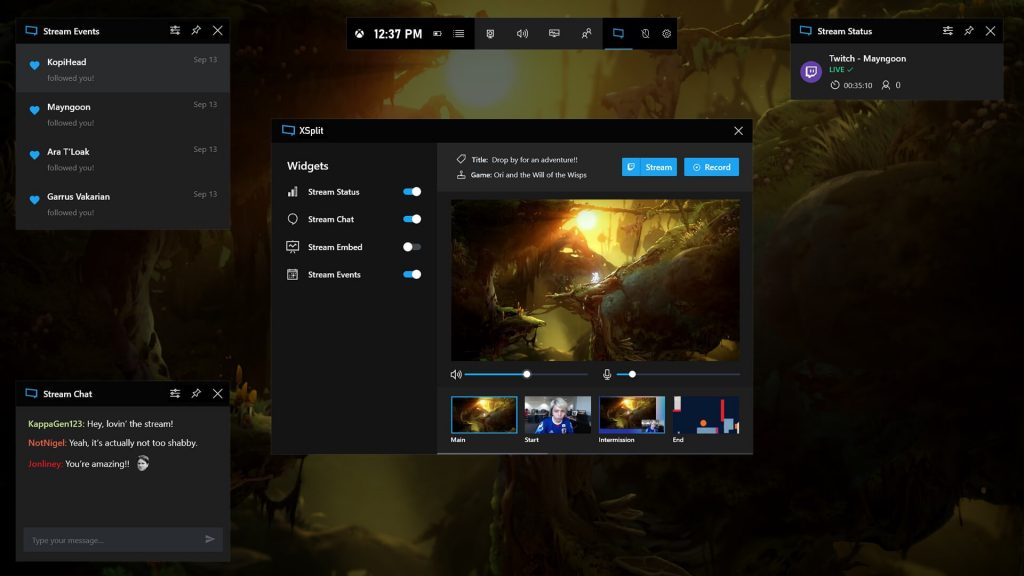
First of all, the version 1.0 XSplit’s Game Bar HUD widget is available from the Game Bar Widget Store today, and it brings support for XSplit’s Broadcaster video mixing software, as well as new Gamecaster controls for the XSplit Gamecaster desktop app. Overall, this widget is a great replacement for the built-in Mixer feature that Microsoft removed from the Game Bar recently, when we still didn’t know Mixer would shut down in July.

The Xbox Game Bar Widget Store has also welcomed Corsair’s iCUE Widgets for customizing lighting effects on the company’s iCUE devices (the iCUE desktop app version 3.30 is required), as well Razer’s Chroma RGB for Twitch Streamers and THX Spatial Audio widgets. Other new additions include the Intel Graphics Command Center, as well as a third-party YouTube Gamer Overlay for watching videos when you’re playing games.

To access the new Widget Store, you’ll need to click on the Widget Menu on the left side of the Game Bar. Microsoft the Game Bar SDK developer hub to help developers brings more widgets to the Xbox Game Bar, and we hope to see more new additions soon.

Could Microsoft’s next-gen “Lockhart” console look more like Xbox One X than the Xbox Series X?

More information is starting to pour in about Lockhart, the second next-gen Xbox console that Microsoft is reportedly planning to launch along with the Xbox Series X later this year. Microsoft is reportedly planning to unveil the cheaper next-gen SKU in August, and while we already know some details about Lockhart’s specs, the design remains a mystery so far.

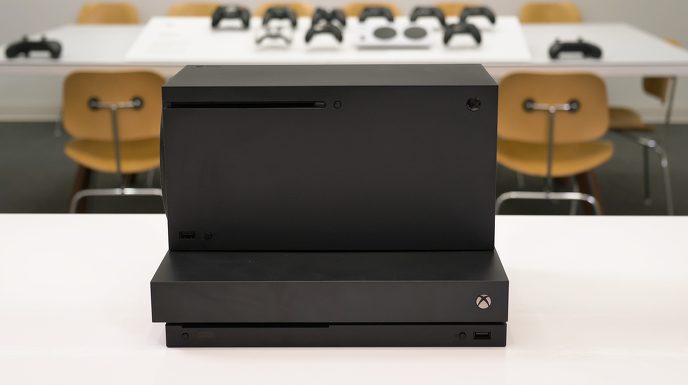
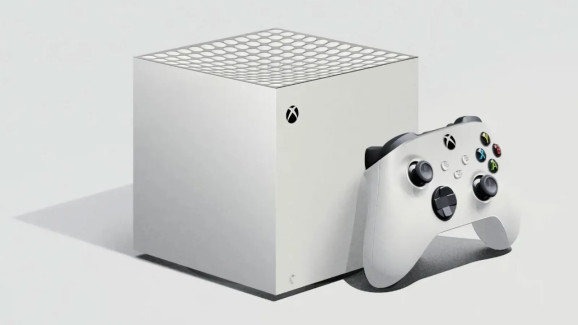
You have probably already seen Lockhart/Xbox Series S mockups inspired by the Series X design, with a white discless console that would be roughly half the size of the Series X. However, Brad Sams from Thurrott.com hinted yesterday that the console could actually look more like the existing Xbox One X.

Image Credit: Jiveduder.

According to Sams, Microsoft employees that need to travel with Lockhart/Xbox Series S prototypes have been asked to hide them in cases that look like existing Xbox One consoles. On the other hand, Xbox Series X reportedly need to be hidden by employees in larger cases, such as PC towers:

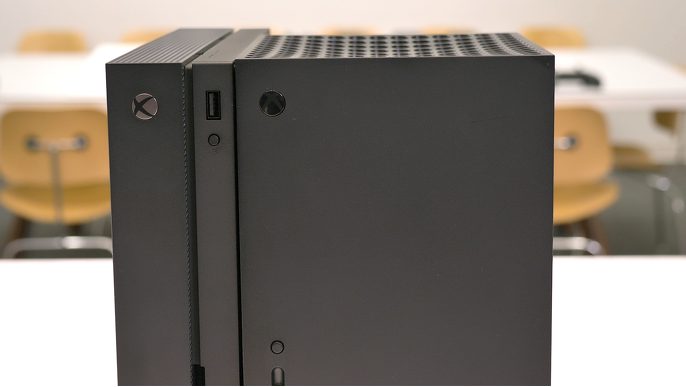
One thing that Microsoft mandates is when they let employees/third-parties travel with the hardware, they ask them to disguise the product. This is a standard practice in the industry but for the Anaconda, Microsoft recommended employees put the hardware in a PC tower, subwoofer, or something else that is quite large. For Lockhart, Microsoft has said that the hardware should be disguised by using Durango or Scorpio covers which means the device is not the same shape as the series X.

Sams also emphasized that using the split motherboard design from the Xbox Series X on the cheaper Lockhart SKU doesn’t make a lot of sense, as the two motherboards on the Series X are more complex and expensive to manufacture. “To make a split motherboard and to make it smaller than the series X to achieve the smaller design, would increase cost, not reduce it,” argued Sams.

It could make more sense for Microsoft to just re-purpose its existing Xbox One X manufacturing capabilities for Lockhart consoles, which could feature a similar design though with the omission of a disc drive to cut costs. The Xbox One X design is still pretty great in 2020, and it’s actually the smallest Xbox console ever created by Microsoft. And it still looks good next to the Xbox Series X, as we’ve seen in the different side-by-side pictures from Digital Foundry.

Image credit: Digital Foundry.

If you’ve been worried about Lockhart being underpowered next to the Xbox Series X, the PlayStation 5, or even the Xbox One X, it looks like this won’t be the case. Even if the console comes with a 4 teraflops GPU that doesn’t support 4K, this GPU will reportedly support ray-tracing and probably other next-gen features. Moreover, the console’s CPU will apparently be the same as the one in the Xbox Series X.

We did a poll on Twitter yesterday to ask our readers if they preferred Sony’s approach with 2 almost identical PlayStation 5 consoles, with one model just lacking a disc drive, or Microsoft’s approach with two consoles with quite different specs. As of this writing, 73.9% of respondents gave a thumbs up to Microsoft’s approach, even though launching two different next-gen consoles later this fall appears a bit risky next to Sony’s easier to understand PlayStation 5 lineup.

Microsoft has been emphasizing for months that it will have the most powerful console on the market with the Xbox Series X, and Lockhart/Xbox Series S could well dilute Microsoft’s messaging. Moreover, Microsoft also unveiled an official “Optimized for Xbox Series X” badge that should appear on game packaging as well as the digital Xbox Store, so the question remains about games optimized for Lockhart/Xbox Series S.

Xbox Series X Optimized badge

Could Microsoft use another “Optimized for Xbox Series S” badge that may well cause confusion among gamers, or will the company need to explain that games optimized for the Xbox Series X will also be optimized for Lockhart/Xbox Series S, though to a lesser degree? The whole thing sounds like a marketing nightmare, and a problem that Sony won’t have with its simpler PlayStation 5 lineup. I wrote before that the PlayStation 5 Digital Edition was the perfect answer to Microsoft’s Lockhart/Xbox Series S, and I still think that a discless Xbox Series X would have been better for consumers and developers than Lockhart.

However, if Microsoft manages to clearly explains to gamers what Lockhart is, and price it lower than the PS5 Digital Edition, then maybe this cheaper SKU could make sense. Maybe Microsoft can market Lockhart/Xbox Series S as the next-gen console for people who have yet to buy a 4K TV or monitor, and that’s certainly a big market. But again, maybe Microsoft will struggle to explain why it needs another next-gen console after praising the Xbox Series X’s superior specs for so many months.

How to open multiple Microsoft Teams channels in separate windows

Microsoft Teams recently picked up the ability to pop-out chats into separate windows, but you might be wondering when you’ll be able to do the same for your Teams channels. While that currently isn’t officially possible, there is a nifty workaround that you can use to help you skip out having to click back and forth to check messages.

Noted in a video created by Microsoft employee Kevin Stratvert, the trick involves setting up a Progressive Web App (PWA) version of Teams. In this guide, we’ll show you how you can do that, and get you in the multitasking workflow.

Step 1: Sign in with your Teams account on the Microsoft Teams Web App

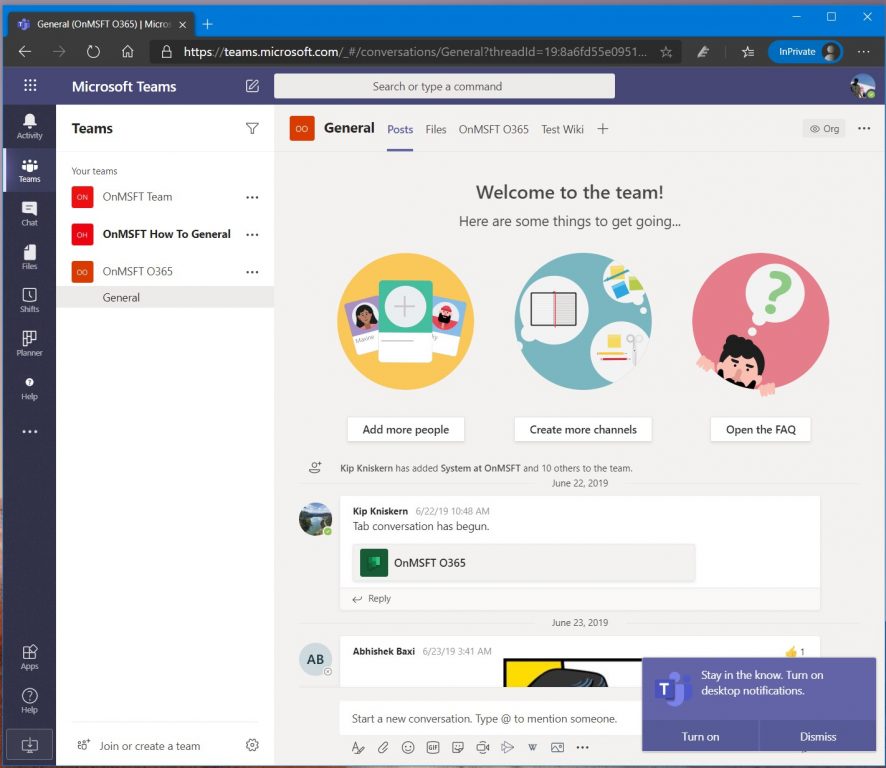
The first step in this process is to visit Microsoft Teams on the web in your browser of choice. You’ll want to sign in with the same account that you’re currently using with the dedicated Teams app on the desktop app. When signing in, you might get a message suggesting you download the Teams desktop app. You can ignore this. Simply click the Use the web app instead button. This will open up your default Teams channel, just as you’d normally see it on your desktop. Make sure to turn on notifications, too, and click the Turn on Desktop Notifications button.

Step 2: Create a PWA for Teams and add it to your Taskbar

Next up, we’ll be creating a Progressive Web app for the Teams web experience. The steps will vary depending on your web browser. This works best on Google Chrome and the new Microsoft Edge in Windows 10, so we’ll be focusing on that here.

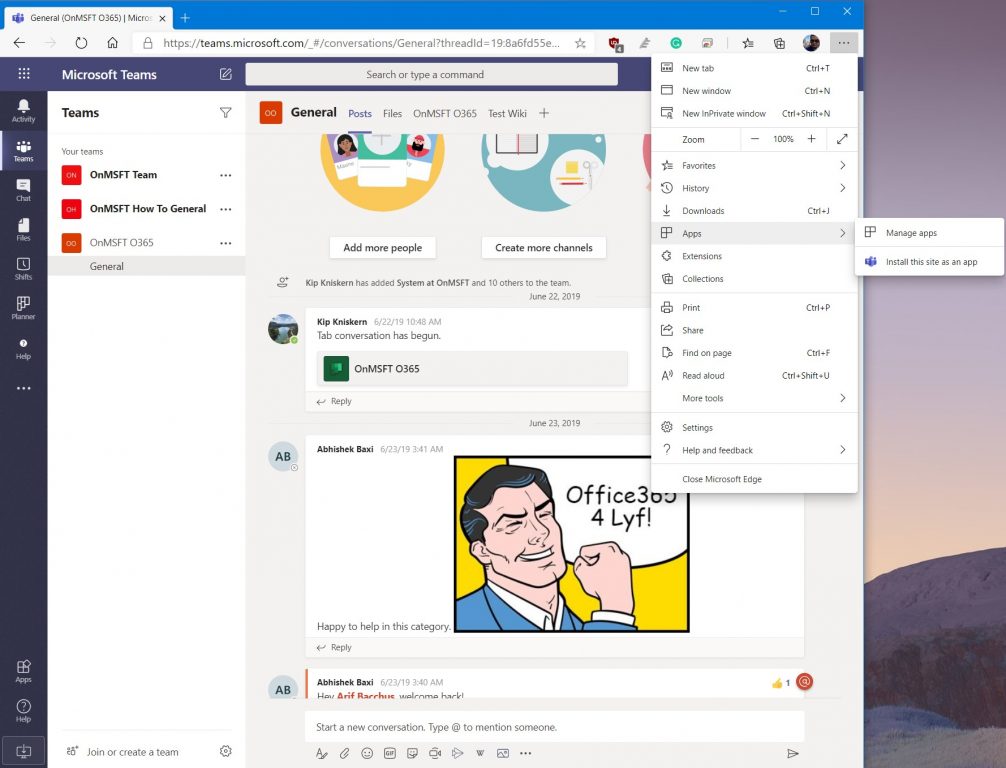
First, there’s Microsoft Edge. With Teams open in Edge, you’ll want to click the . . . button in the top right corner of the screen. After that, click where it says Apps. You’ll then see the Teams logo, and you’ll want to click Install this site as an app. This will then pop-out Teams into its own window, with a purple title bar, and experience similar to the native desktop app.

Be sure to click the channel you want open in a separate window, and pull it up alongside the native Teams desktop app. Also, keep in mind that you’ll want to right-click on the active PWA in your Taskbar, and choose the option to Pin to Taskbar. This will keep Teams pinned there, every time you want to open the PWA or a separate channel in its own window.

As for Google Chrome, the process is a bit different. You’ll still want to visit Teams on the web. Next, click to allow desktop notifications. Then, click the downward-facing dots in the top right corner of the screen. After that, click More Tools, followed by Create Shortcut. Be sure to click the Open as window checkbox, and then click Create. Again, be sure to right-click on the newly created PWA in the Taskbar, and then choose Pin to Taskbar. You’re now free to open up a separate channel alongside any channel on the Teams desktop app.

Other tips

If you have a macOS machine, then the process will be a bit different for you. While the menus will be the same as we describe above, after creating a PWA in Edge or Chrome on a Mac, you’ll see that the Teams PWA will auto-open alongside a new Finder window that says Edge Apps or Chrome Apps. You’ll notice the icon for Teams here. If you want quick access to it, you can click and drag it to your dock, to keep it pinned there. When you no longer want the shortcut, drag it to the trash.

Also, keep in mind that when you’re using the Microsoft Teams PWA alongside the desktop app, you might end up getting double notifications. If this bothers you, be sure to change your notifications settings in Edge by clicking Site Permissions in Settings and revoking Microsoft Teams notifications. You also can do the same in Chrome by going to settings and choosing Site Permissions. 

All in all, this is a nice workaround to see more than one channel at a time in Microsoft Teams. Do you think you’ll check it out? Let us know in the comments below.


Microsoft starts rolling out its new Edge browser to Windows 10 Education and Enterprise devices

Last month, Microsoft started the automatic rollout of its Chromium-based Microsoft Edge for some Windows 10 devices, with the new browser replacing the legacy version to become the default browser on these PCs. However, the automatic rollout was only happening on PCs running Windows 10 Home and Pro so far, and now Microsoft is all set to expand its availability to Business and Education versions of the OS in the coming weeks after July 30.

“Beginning no earlier than July 30, 2020, Microsoft will update Microsoft Edge Legacy to the new Microsoft Edge browser by Windows Update on Windows 10 devices in education and business,” Microsoft explained in a blog post this week. “This update will not impact devices in education and business updated by Windows Update for Business (WUfB) or by Windows Server Update Services (WSUS). Updates will target education devices first to accommodate back-to-school timing. We will share a business timeline at a later date.”

According to Microsoft, “no action is required” at users’ end to get the automatic update. However, the company has provided some additional instructions to help K-12 educational institutions configure their devices to receive the update, as well as a blocker toolkit to block it for those who don’t want to update. In addition, Microsoft noted in the blog post that these devices can continue to run Internet Explorer 11 when the new Edge is installed, and the browser “will respect your previously established default browser choice”.

Microsoft has already confirmed that the upcoming feature update (Windows 10 20H2), to be available later this year, will be the first Windows 10 version to ship with the new Chromium-based Edge. Have you already received the new Microsoft Edge via Windows Update on your PC? Let us know in the comments down below.

Minecraft Dungeons: Jungle Awakens DLC is now available for Xbox One and Windows 10 gamers

The first downloadable content (DLC) expansion for the Minecraft Dungeons video game, Jungle Awakens, is now live on both Xbox One consoles and Windows 10 devices in addition to the Nintendo Switch and PlayStation 4 consoles.

The Minecraft Dungeons: Jungle Awakens expansion adds new locations, new missions, new enemies, and new weapons, artifacts, and armour to unlock.

Here’s the official store description:

As threats roar to life beneath the jungle canopies, it’s up to you to save these leafy lands. Take on new missions, battle new mobs, and fight the mighty Jungle Abomination!

A source of unbelievable power has crash-landed among the twisting vines of a distant, dangerous jungle. This mysterious power has spread its influence through vile vines, and now new terrors bloom – such as the Leap leaf and Whisperer. Trek through three new missions that will take you to the heart of the jungle where you’ll find new weapons, armour, and artifacts. This journey is meant for the bravest of heroes, for all twisted vines and paths lead to the source of corruption: the Jungle Abomination. This beast must be dealt with to restore balance to the jungle, so strike true and move swiftly.

  • Fight through 3 new missions.
  • Battle the Leapleaf and Whisperer.
  • Take on the Jungle Abomination.
  • New weapons, armour, and artifacts.

Minecraft Dungeons launched just over a month ago and has been generally well received by gamers and critics. The game is a fresh take on the traditional dungeon crawler genre designed for beginners but with a lot to unlock for advanced players. A variety of future DLC is promised for Minecraft Dungeons and its soundtrack is now available to listen to on Spotify.

Have you had a chance to play the Jungle Awakens DLC yet? Share your thoughts on it with the community in the comments below and then follow us on Pinterest and Twitter for more Minecraft content. Looking for all of the latest Xbox gaming news? We’ve got you covered in our Xbox news hub here.


Minecraft Dungeons
Minecraft Dungeons
Developer:
Xbox Game Studios
Price:
Free


TDSSKiller won’t run in Windows 10/11 [Easy Fix]

TDSSKiller is a Kaspersky utility for removing rootkits, such as TDSS. However, some users have said on the Kaspersky forum that they can’t run the TDSSKiller program.

Consequently, TDSSKiller doesn’t work, but don’t worry. This guide will provide you with a variety of solutions to fix this issue once and for all.

How can I fix TDSSKiller if it’s not working?

1. Run a malware scan

The tool not working can be caused by malware infection. We recommend you run a full PC scan and remove any threats that your antivirus detects.

As a first step, you can scan with the built-in Windows Defender, but for best results, we recommend you use a third-party antivirus with a high detection rate.

Dedicated antiviruses are generally more accurate and are able to remove threats before they cause any damage. Luckily, many of these tools come with free trials so you can try out a few before you decide which is your favorite.

2. Run TDSSKiller as an administrator

  1. Press the Windows key + E hotkey.
  2. Open the folder that includes TDSSKiller.
  3. Right-click the TDSSKiller.exe to open its context menu.
    Run as administrator tdsskiller won't run
  4. Then select the Run as administrator context menu option.

3. Run TDSSKiller in safe mode

  1. Click the Power button on the Windows 10 Start menu.
  2. Hold down the Shift key and click Restart.
  3. Next, select Troubleshoot on the Choose an option menu.
    Choose an option menu tdsskiller won't run
  4. Select the Advanced options and Startup Settings buttons.
  5. Then press the Restart button.
    Startup Settings tdsskiller won't run
  6. After the restart, press the 4 key to select Enable Safe Mode on the Startup Settings menu.
  7. Thereafter, try running TDSSKiller within safe mode.

4. Clean boot Windows

  1. Right-click your Start menu.
  2. Click Run to open the window for that accessory.
  3. Input msconfig and click OK to open the window in the shot directly below.
    The General tab tdsskiller won't run
  4. Click Selective Startup on the General tab.
  5. Deselect the Load startup setting.
  6. Make sure you’ve selected the Load system services and Use original boot configuration settings.
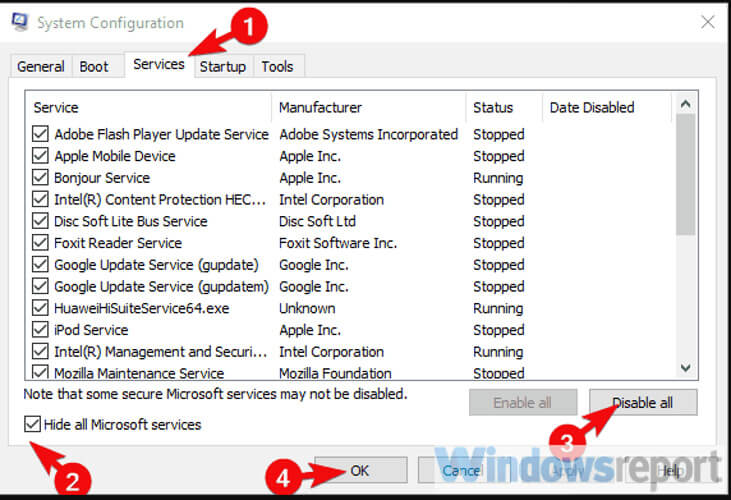
  7. Open the Services tab in the MSConfig window.
    The Services tab tdsskiller won't run
  8. Select the Hide all Microsoft services checkbox.
  9. Then click Disable all, which will deselect selected third-party services.
  10. Press the Apply option.
  11. Click OK to exit MSConfig.
  12. Select the Restart option on the dialog box.
  13. Run TDSSKiller after clean-booting Windows. If it works, other software was probably conflicting with TDSSKiller.

5. Disable third-party antivirus utilities

Avast shield control settings tdsskiller won't run

To disable an antivirus utility, right-click its system tray icon to select a disable option that will temporarily deactivate the software. Or you can uninstall antivirus software via Programs and Features.

6. Reinstall TDSSKiller

  1. Open the Run window.
  2. Type appwiz.cpl in the Open box, and select the OK option.
  3. Select TDSSKiller within the Programs and Features window.
  4. Click the Uninstall option for it, and select Yes on any confirmation prompts.
    Programs and Features applet tdsskiller won't run
  5. Alternatively, you can uninstall TDSSKiller with the unins000.exe uninstaller within its folder.
  6. Restart Windows before reinstalling TDSSKiller.
  7. Click the Download Now button on the TDSSKiller page to get the installer for the latest version. Then reinstall the software with the downloaded installer.

So, that’s how you can kick-start TDSSKiller when it doesn’t run. This thorough article also includes some resolutions that could feasibly TDSSKiller startup issues.

You can browse through a multitude of handy troubleshooting guides at our Fix Hub.

Check out our Antivirus section to browse through other useful and easy-to-follow guides.

5 best antivirus solutions for Windows 10/11 [UNBIASED LIST]

Are you planning to upgrade to top-level antivirus software or simply update your current antivirus version?

Read this post to learn what’s new in the most popular antivirus software department.

ANTIVIRUS
STRONG POINTS
DOWNLOAD IT IF YOU…
bitdefender 2019 best antivirus 2019– Built-in VPN
– Windows compatibility
– Game mode
– Safe online banking
1. Run the latest Windows 10 OS
2. Use online banking&shopping
3. Spend time on social media
panda antivirus 2019 best antivirus 2019– Built-in password manager
– Built-in firewall
– Premium VPN
– 20GB free cloud storage
1. Spend a lot of time browsing
2. Need cloud storage
best antivirus 2019 avira– Adware&spyware cleaner
– Blocks fake and malware-ridden websites
– Home network protection
– Next-gen AI
1. Download software from the Internet
2. Own IoT and smart devices
best antivirus 2019 avast– Do Not Disturb mode
– Wi-Fi inspector
Rescue Disk (boot infected PC)
1. Allow multiple devices to connect to Wi-Fi
2. Use your PC for work (DnD mode)
best antivirus 2019 kaspersky logo– Separate protection layers
– Secure Connection VPN
1. Need an antivirus with a low impact on your PC resources
best antivirus 2019 avg antivirus logo– Image recognition
– Scans PC for performance issues
– Personal data extra security layer
1. Store sensitive data on your PC
2. Use an old PC without the latest Windows 10 version
best antivirus 2019 bullguard antivirus logo– Online payments 100% safe
– Backup and encrypt your files
1. Need a versatile antivirus with great parental controls.
best antivirus 2019 norton antivirus logo– world’s largest live threat monitoring networks
– Silent updates
– Easy upgrade
1. Need email spam protection
2. Need a PC tune-up capable antivirus.
– Device Control
– IoT protection
– Highly customizable
1. Want to manually customize antivirus settings

Looking for the best antivirus for external HDD? Here are our top picks.


What are the best antivirus software to use today?

BullGuard

Bullguard

If BullGuard if the antivirus that you prefer to use on your Windows 10 computer, you should also know that the latest version is now available for download.

BullGuard is now even more powerful allowing you to block virtually all the threats menacing your computer.

Install this top-notch antivirus solution and your machine will become immune to malware, phishing attempts, spyware, ransomware, and all the other malicious codes lurking on the Internet.

Let’s quickly look at its key features:

  • If you often use your computer for internet banking operations and online shopping, BullGuard has got your back.
  • With this security solution, you are fully protected against credit card frauds and identity theft attempts and all your online payments are 100% secured.
  • Moreover, you can back up your files and encrypt them at the same time so that your documents remain safe at all times.
Bullguard Internet Security

Bullguard Internet Security

Get premium, real-time protection powered by BullGuard for all OS versions.
Get it free Visit website

Bitdefender

Bitdefender

The new Bitdefender Antivirus solutions are now up for grabs.

Many independent antivirus tests have awarded Bitdefender the title of the best cybersecurity solution in the world.

These results confirm that Bitdefender can fully protect your Windows 10 computer against the latest cyber threats so that you can surf the Internet without worrying about malware or virus attacks.

Let’s quickly look at its key features:

  • Complete data protection
  • Multi-layer ransomware protection to block all ransomware attacks
  • Anti-phishing, anti-fraud and anti-theft protection
  • Secure browsing and safe online banking
  • Global protective network to detect and nip the latest threats in the bud
  • Full webcam protection
  • File shredder, so that you no longer need to download a file shredder solution
World's best antivirus
bitdefender 2019 product image
  • Great price plan
  • VPN included
  • Best Windows compatibility
  • Awesome customer support

⇒ Check out our review of BitDefender Total Security

Panda Antivirus

Panda

The latest Panda Antivirus version lands on our list as one of the best Windows 10 antivirus software to install today.

It comes in four different versions, each suitable for your particular cybersecurity needs.

Let’s quickly look at its key features:

  • Panda Essential: This antivirus version comes equipped with a built-in firewall and keeps you safe while browsing or shopping online.
  • Panda Advanced: This version protects your computer against ransomware attacks and offers your additional features such as parental control, app locker, and more.
  • Panda Complete: This tool protects your data, device location, and features a password manager as well.
  • Panda Premium: As its name suggests, this is the most complex Panda Antivirus version that you can install on your Windows computer. It comes packed with a Premium VPN software and 20GB of free cloud storage.
Recommended antivirus
panda dome
  • Real-time monitoring
  • Personal firewall
  • Device management
  • USB Protection

Kaspersky Antivirus

Kaspersky

The latest generation of Kaspersky Lab is using basic options and multiple techniques to keep your system safe from malware programs:

Let’s quickly look at its key features:

  • Scan – the core antivirus engine and most important feature;
  • System Watcher monitors the behavior and can spot even brand new, unknown threats;
  • Separate layers to protect your computer from network attacks, malicious and phishing links, even dangerous email attachments.
  • Another enhancement worth mentioning is about machine learning used by an intelligent behavioral model to detect threats upon their behavior.

Kaspersky’s bonus features include Kaspersky Secure Connection.

This is a simple VPN based on Hotspot Shield, and you can use it for free without registration, but limits the transfer data to 200MB per day.

The company claims it has improved massively in speed tests and that can be seen in almost every area of the package, using fewer resources and running faster.

Essential for Windows
kaspersky website logo
  • Blocking ransomware, cryptolockers & more
  • Preventing cryptomining malware infections
  • Real-time protection

Enhance your computer’s protection with the best antivirus with a firewall.


AVG Antivirus

The company upgrades its main security product AVG Antivirus version for PC to deliver better protection against today’s most rampant threats.

The free version of AVG Antivirus gets new features that will protect you against phishing scams.

Let’s quickly look at its key features:

  • Machine learning combined with image recognition makes it able to detect whether a website is safe or malicious and warns you before you click on those fake ones.
  • Premium protection gets even better with Sensitive Data Shield that protects your most private files.
  • This new feature takes the place of AVG Data Safe in the former privacy menu.
Protects your PC forever
AVG Antivirus website logo
  • Block unsafe links, downloads, & email attachments
  • Stop viruses, spyware, ransomware
  • Real time-security updates

Avoid annoying ads with these ad-free antivirus tools.


All the tools listed are perfectly capable of protecting your Windows 10 machine, the difference may be given by the additional features that each solution brings, the interface, and of course, the price.

Check out all of the products on our list and compare what each of them can offer you before closing the deal.

As soon as you make your decision, feel free to share what convinced you via the comments section below.

[wl_navigator]

Evernote to OneNote Importer not working [Fixed]

Migration between similar applications should be a simple task. This, sadly, isn’t the case for users who try to import their Evernote notes to Microsoft OneNote. These apps are quite comparable and the whole process shouldn’t be a drag. Especially since there’s a dedicated tool provided by Microsoft which automatizes the transition. Except, it seems that Microsoft Evernote to OneNote Importer won’t work.

We have a few solutions, so make sure to check them out. Hopefully, they’ll help you address the problem.
However, a short disclaimer is necessary.

The Microsoft Evernote to OneNote Importer is not the best piece of software you’ll ever run into. The discrepancy between the updates of two respective applications is more than a problem. And frequent Evernote updates might’ve broken the connection between the two, which is responsible for how Importer works.
So, take these steps with the pinch of salt, since we can only guess possible fixes.

Table of contents:

  1. Scan for malware
  2. Sign out/sign in and disable encryption
  3. Re-download the Importer tool
  4. Disable Sync temporarily
  5. Export notes as an ENEX file
  6. Update Evernote for Windows and OneNote
  7. Reinstall OneNote and Evernote for Windows

How do I get Evernote to OneNote Importer to work?

1. Scan for malware

There are, literary, dozens of threads on this topic. This means that the problem affected lots of users. And, also, that there’s no defined solution.

One user has successfully managed to resolve the error with Microsoft Evernote to OneNote Importer by cleaning his PC from malicious software.

There’s a good chance that there are some potentially unwanted programs that affect the import of notes.

Consequently, we can give you a robust solution to detect various malware types that may block your OneNote from working properly.

The most suitable antivirus for this issue would be TotalAV Essential.

You can use this lightweight antivirus that will not interfere with your system at all, and also provide multilayered security against new cyber threats online.

TotalAV will also offer smart threat detection and secure your operating system and network for all your devices.

With comprehensive features against complex malware, it provides support for phishing protection, ransomware attacks, and other viruses that can compromise your sensitive data.

Moreover, using machine learning technology, the software can detect advanced malware locally on your device, and on the cloud as well to give you privacy during browsing activities.

2. Sign out/sign in and disable encryption

Having eliminated the scanning option, we can move on to other steps.

The following one is to sign out and sign in again with your Microsoft Account associated with OneNote.

Then, disable the encryption on your OneNote notebooks or individual notes. This helped some people avoid error or speed up the importing process. Which is, judged by reports, a lot slower than one could expect.

3. Re-download the Importer tool

The importer might be affected by some other third-party programs or it needs more permissions in order to access your notes. Also, there’s a chance that you misconfigured the setup.

With that in mind, after you’ve prepared Evernote for Windows and OneNote for the transfer, we suggest re-downloading the Importer tool. This might resolve your problem but don’t your hopes high.

If the issue is persistent, move to the next step.

4. Disable Sync temporarily

Official instructions suggest syncing all notes prior to using the Microsoft Evernote to OneNote Importer.

We would go a step further and suggest disabling the Sync during the procedure. If the Evernote for Windows syncs in the background all the time, it might disrupt the exporting of notes.

When you’re sure everything is OK, start the procedure. As mentioned above, we don’t advise to use of a web-based Evernote application. Download Evernote for Windows, here.

Wait until it syncs all notes to local storage, and only then use the Microsoft Evernote to OneNote Importer tool.

5. Export notes as an ENEX file

Instead of trying to directly transfer notes from Evernote to OneNote, you can try to export them in the ENEX format to your PC and import them that way.

This worked for some users, while others experienced a sudden halt and the application crashed. This is a common way of exporting notes and it completely diminishes the use of the Importer, but it is what it is.

If you’re still unable to resolve the problem this way, move onward to the next steps.

6. Update Evernote for Windows and OneNote

As we already said, Evernote developers are not exactly eager to meddle with reverse engineering and optimize Evernote to work with OneNote.

So the best thing you can do to reduce the discrepancy between the two is to update both and hope for the best. Make sure to keep them both up to date and try exporting notes again.

7. Reinstall Evernote for Windows

Finally, if none of the previous steps helped you successfully export notes from Evernote to OneNote (or vice-versa), the only thing we can recommend is the reinstallation of Evernote (since OneNote already comes in Windows 10).

If that doesn’t help, send your ticket to Microsoft or contact Live Support and ask for the resolution.

With that said, we can wrap up this article. Don’t forget to share your thoughts about the problem in the comments section below.

Posted in Fix

Microsoft Edge gets your Firefox data without permission?

Microsoft Edge sometimes behaves like a coin with two sides. While it recently received a whole bunch of nice features that would make any browser user happy, it also tends to ruffle feathers in certain situations.

Consider the latest user backlash that Edge attracted based on how it handles importing rival browser data. Just the other day, some users complained that Microsoft was too aggressive with its Edge promos in Windows.

Microsoft Edge data importing controversy

Over the past few days, a good number of Microsoft Edge users gathered on Reddit to express their frustration with how the browser imports data from Chrome or Firefox during setup. Many claimed that the Chromium-based browser first accessed their browsing data before asking for permission to import it.

One user laments:

Are we going to get treated to spam popups advertising Edge and having it duplicate our data from Firefox without asking every time Microsoft decides to update it from now on?

Another added:

I just installed Edge today for testing, and I noticed my bookmarks from Firefox appear in the background/browser BEHIND the import acceptance dialog. The bookmarks disappeared after I said I didn’t want it to import anything. Obviously it still went looking before asking!

Based on these comments, it appears that Edge doesn’t end up importing your browsing data without your permission. But at least it looks for and finds the data before offering you the option to discard it, which raises valid user privacy concerns.

The folks at Windows Central contacted Microsoft about this issue. The company replied that it acknowledges customers’ rights to their browsing data. It added that Edge, just like other browsers, gives users the option to import data during setup.

In short, Microsoft doesn’t deny that Edge accesses your Firefox or Chrome browsing data before offering you the opportunity to import or discard it.

Do you think Microsoft Edge’s approach to importing browser data constitutes a breach of user privacy? Feel free to express your views in the comments section below.

[wl_navigator]

Microsoft 365 Personal vs Microsoft 365 Family [Review]

Microsoft 365 Personal and Microsoft 365 Family are paid subscription services that give you access to Microsoft 365 software applications. They were formerly known as Office 365 Personal and Office 365 Home, respectively.

If you’re interested in purchasing one of these subscription services, we’re here to help set the record straight and highlight the differences between Microsoft 365 Personal and Microsoft 365 Family.

What’s the difference between Microsoft 365 Personal and Family?

  • Price: Microsoft 365 Personal costs $69.99/year (or $6.99/month) while Microsoft 365 Family $99.99/year (or $5.99/month).
  • Free trial: You can try Microsoft 365 Family for 30 days for free, but Microsoft 365 Personal doesn’t have a free trial.
  • Number of users: Only 1 can use Microsoft 365 Personal, but up to 6 people can use Microsoft 365 Family.
  • OneDrive cloud storage: Microsoft 365 Personal offers 1 TB, while Microsoft 365 Personal provides 1 TB for each user (up to 6 TB).

Microsoft 365 Personal and Family features

the Microsoft 365 products and services
  • Office
    • Download and use Microsoft Office applications for Windows 10 and Mac.
    • Edit documents both online and offline.
    • Take advantage of advanced grammar and style formatting in Microsoft Editor.
    • Use advanced layouts with premium content suggested by PowerPoint Designer.
    • Monotone pitch, originality, and speech refinement in PowerPoint Presenter Coach.
    • More than 300 templates, 8000 images, 175 looping videos, 300 fonts, and 2800 icons.
    • Use Money in Microsoft Excel.
  • OneDrive
    • Deep integration with Office and Windows 10.
    • Use on-demand files and PC folder backups.
    • Unlimited storage for the Personal Vault (within your storage quota).
    • File protection provided by anti-ransomware and data recovery.
    • Shared links with expiration date and password protection.
  • Outlook
    • Download and set up Outlook desktop apps for Windows 10 and Mac.
    • Play My Emails.
    • 50 GB storage quota on Outlook.com with calendar integration, custom email domain, and advanced security.
  • Skype
    • Unlimited storage for voice and video calls for up to 50 people (Skype to Skype only).
    • Call recording, guest links, subtitles, and live captions.
    • 60 minutes per month for mobile phone and landline calls.

Premium subscription plans for individuals and households

Considering everything, you can buy Microsoft 365 Personal or Family, whether you’re an individual looking for a 1-user account or a family with up to 6 members.

Microsoft 365 Personal and Family allow easy use of Office products, OneDrive, Outlook, and Skype for non-commercial purposes. Besides, you can use Microsoft 365 in a web browser so that you don’t have to install anything on your PC or Mac.

If you want to try out the services first, get the trial subscription first, and in case you don’t like it, you can cancel the plan anytime.

Desktop unavailable after Windows 10/11 update [Fixed]

Since Microsoft started distributing Windows as a service, we had more than one opportunity to see how their update system is flawed. There’s a variety of issues orbiting around Windows Update, many critical.

One of those issues is the Desktop is unavailable error or, to be exact, C:WINDOWSsystem32configsystemprofileDesktop is unavailable error.

This problem prevents users from seeing the desktop and taskbar, which makes Windows Explorer inaccessible. We come with some solutions below and you can follow them right away, or wait for Microsoft to sort this out.

How to fix Desktop is unavailable after Windows 10 update?

1. Scan for malware

This is a long-shot solution as the probable reason for the error lies in the fault update sequence. However, we can’t omit the negative impact a possible malware infection can have on the system.

That’s why you always need a high detection antivirus that can provide reliable support for detecting and removing malware from your PC.

Hence, a good idea is to get valuable antivirus features that can prevent any dangerous cyberattacks such as ransomware or system damaging viruses.

Plus, it’s most likely to find a lightweight option that can shield the system without interfering at all with other services, having a light impact on your power usage.

Therefore, an ideal way to benefit from this is by taking the most efficient antivirus software with powerful features to protect your PC.

If the error persists, you can move to the next steps.

2. Try with the Clean Boot

  1. Press Windows key + R.
  2. In the command line, type msconfig and press Enter.
  3. Under the Services tab, check the Hide all Microsoft services box.
  4. Click Disable all to disable all active third-party services.clean boot windows 10
  5. Reboot your PC.

We recommend this step because installing a major update makes significant changes to the system and it’s analogous to a fresh installation. Therefore, some third-party applications might start misbehaving which, consequently, might disrupt the performance.

3. Copy default Desktop to system configuration

  1. Open the File Explorer and enable Hidden items in the View tab.
  2. Navigate to C:UsersDefault.reveal hidden items file explorer
  3. Copy the Desktop folder located in the Default folder.
  4. Now, navigate to C:Windowssystem32configsystemprofile and paste the copied folder there. This implies re-establishing the desktop parameters in the Systemprofile configuration.
  5. Restart your PC.

Note that your system partition might not be C.

4. Sign with a new local administrative account

  1. Press Windows key + I to open Settings and choose Accounts.
  2. Under Your info, click on the Sign in with a local account instead.local account windows 10 settings
  3. Enter the current password assigned to your Microsoft Account.
  4. Save everything you were doing as this action will take log you off so you can log in with the local account.

If you’re initially signed with the Microsoft Account instead of the local one, switching to the latter option might help resolve the Desktop is unavailable error.

Even if it doesn’t, you’ll at least get access to Windows Explorer which seems to crash when the system is administered by a Microsoft Account.

5. Uninstall a third-party antivirus

Indeed, in the first step, we recommended installing or activating a third-party antivirus, and we stick to it.

However,  sometimes, these applications tend to break already vulnerable, half-baked, and unreliable major updates.

uninstall antivirus

So at least temporarily, until the system errors stop, we recommend that you uninstall the antivirus, by going to Settings, then Apps and Apps& features.

Once you’ve removed the antivirus, restart your PC and check for improvements.

6. Run SFC/DISM

  1. Open Task Manager (Ctrl + Shift + Esc), click File, and run a new task.
  2. Type cmd and press Enter to start the Command Prompt with administrative permissions.
  3. In the command-line, type sfc/scannow and press Enter.fix desktop unavailable
  4. After its done, type the following command and press Enter after each:
    • DISM /online /Cleanup-Image / ScanHealth
    • DISM /Online /Cleanup-Image /RestoreHealth
  5. Reboot your PC when everything ends.

If the system resources get corrupted (everything points towards that here), the SFC (System File Checker) and the DISM (Deployment Image Servicing and Management) should cover it.

7. Update Windows 10 manually

Some users report that updates weren’t even administered properly and the problems appeared. Others experienced a boot loop, while others were able to boot but the aforementioned error appeared or Windows Explorer wouldn’t start.

For them, the update failed and they were automatically rolled back to the previous version.

If you fall into the second category, we suggest trying to update the system manually. For that, you’ll be needing a bootable USB flash drive and Media Creation Tool. Since the affected PC is barely usable, an alternative PC would come in handy for creating a bootable media.

After you’ve successfully created a bootable media, here’s how to update the system with the external drive:

  1. Insert bootable drive and access it over the File Explorer.
  2. Double-click Setup.update windows 10 with bootable drive
  3. Choose to Update your system and follow through with that. Have in mind that this might take some time.

8. Roll back to the previous Windows 10 version

  1. Open Settings.
  2. Choose Update & Security.
  3. Choose Recovery from the left pane.
  4. Click Get started under the Go back to the previous version of Windows 10 section.get back to the previous version of windows 10

Resetting the system (clean, without preserving file) or reinstalling it can help, too. But, you’ll lose all your data in the process and will need to reconfigure everything from scratch, which is an overwhelming job.

That’s it. Don’t forget to tell us whether these solutions helped you or not in the comments section below. Your feedback is more than valuable.

Windows 10 Earliest Code Testers Move to Dev Channel

Microsoft confirmed that the restructuring of the Windows Insider Program is already underway, with Windows 10 insider rings changing to channels.

While the improvements are currently rolling out, insiders don’t have to do anything to get started on their fresh beta testing platforms. Microsoft has got everything mapped so that testers may continue accessing their insider accounts as if nothing has changed.

Windows 10 Fast ring insiders shift to Dev Channel

Dev Channel

Exactly two weeks ago, Microsoft announced that it would overhaul the Windows Insider Program with a focus on quality improvements. The company has now revealed that the changes are rolling out over the next few days.

Today, we have begun rolling out the Channels naming to the Windows Insider Program Settings page under Settings > Update & Security > Windows Insider Program. The rollout will happen over the course of the next few days.

As a result of the restructuring, insider rings have changed as follows:

  • Fast ring to Dev Channel: Earliest code testers, usually the tech-savvy ones, will now be using the Dev Channel. Right now, this Channel hosts Windows 10 Insider Preview Build 20150.
  • Slow ring to Beta Channel: This is for early adopters comfortable working with more stable versions of Windows 10 that are still a work in progress.
  • Release Preview ring to Release Preview Channel: Sign up here for early access to upcoming Windows releases prior to general deployment. Products at this stage have no substantial rough edges.

Previously, choosing a specific insider ring determined the frequency with which you’d be receiving prerelease Windows builds. That is no longer the case with the new insider Channels.

Apart from that, Microsoft announced that it would eventually align the new insider Channels with Office Channels.

If you’re an insider, have you seen the new channels yet? Feel free to let us know or ask any question via the comments section below.

PowerToys version 0.19.0 released, focused on fixes

Microsoft has just released PowerToys version 0.19 for Windows 10 with quality and stability improvements. The latest version of the app specifically addresses over 100 issues across all of its utilities and brings tons of PowerToys Run search improvements, an improved threading model for FancyZones, as well as an improved installer.

Here’s the full list of improvements, fixes, and known issues in PowerToys version 0.19:

Known issues still for PT Run

  • Newly installed apps can’t be found #3553
    • We have a fix but came in too late for 0.19
  • CPU / Memory, still investigating #3208
    • We fixed one item and have leads on other improvements
  • WinKey remapping for PT Run can be quirky #4578

PowerToys Run

  • Now using low level hooks so can remap Alt+Space to a WinKey based shortcut #2325
  • PWAs correctly reconginized #3199
  • Dev mode apps can’t be found #3330
  • Duplicate results due to romaing profile data #3180
  • Steam games not found #3425
  • Hidden files not in results #3449
  • Theming improvements #3485
  • Missing icons #3541
  • Supress Alt-F4 #3796
  • Network paths don’t work #4096
  • Search enivornment path by default #4200
  • Search desktop by default #4056
  • Can’t find Terminal #3974
  • Can’t find ClickOnce apps #4025
  • Start typing text is visible then disappears on cold start #2974
  • Tabbing highlight issue for context menu #2559, #3483
  • Context menu buttons showing up when hovering with mouse #2420
  • Placement shutters with monitors #3535, #3018](#3018)
  • blank result box when there’s nothing on search query #3186
  • Result box sizing issue #2456

PowerRename

  • Detect when pattern matching is used #1002

FancyZones

  • Outlook new email windows snapped to last used zone #1192
  • Teams notifications don’t snap #1931
  • Improved multi-thread design. #961
  • Multiple Virtual Desktop Fixes. #2725, #2684, [#2678]#2678), #2633

Keyboard manager

  • Key remappings stay active when flipping to Japanese IME #3397
  • Tab fix when remap Ctrl/Alt #3294
  • Fix remapping to alt-tab/win+space style shortcuts #3331
  • Fixed remapping to Extended keys (Home, End, Ins, Del, Pg, Arrow keys) #3478
  • Games having incorrect key mapping #3647
  • Fixed numlock remap #3277
  • Stability fixes

Settings

  • Settings v2 is blanked #3384
  • “Check for update” actually checks for update vs goes to GH page #2535
  • Docs point to redirection URL now so we can update without updating app #3088
  • Multiple UX improvements
  • Start at login not being respected #3875
  • Now using low level hooks so can remap Alt+Space to a WinKey based shortcut #2325
  • Warning added for invalid input in hotkeys for [#3992](FZ Settings #3992)

Installer

  • Can uninstall via control panel #2012
  • After 0.19.0, Explorer won’t restart #2730
  • Multiple build system improvements to reduce conflicts #3809, #3812, #3867, #3948

According to Microsoft, you will see some parts of the improved installer experience online in 0.19 and 0.20. Moreover, it will be the last time that you will see Windows Explorer flash during the upgrade, and the .NET Core install experience should be much smoother in PowerToys version 0.20. For anyone interested in downloading the latest version of the tool, head to the release page on GitHub.

Windows 10 Mail client is deleting your Gmail sent items

According to several users posting on Microsoft Answers forum, the Windows 10 Mail client is deleting the replying sent e-mails.

I have been facing an issue with the Windows 10 Mail app linked to a Google account. I have noticed that when I respond to emails, the email I send disappears and cannot be found in sent items, outbox, bin, spam, or anywhere actually.

The disappeared email cannot be found on gmail‘s web interface either. It appears that it is automatically deleted and erased from the server.

Microsoft has a syncing issue with Gmail

After the problem was exposed, more and more users listed problems, not only with the Windows 10 Mail client but also with Outlook:

After changing my google password, I can no longer send/receive gmail emails on my laptop via my outlook app. When I sync, it states that my gmail account is not available. I can still send/receive on my phone & laptop browser with no issue.  Help please!

A Windows Insider connected this wave of issues to the May 28 update of the Mail and Calendar App (to Version 16005.12827.20200.0) that broke the Gmail Account integration.

How can I fix the syncing issue with Gmail?

For the moment, there is no acknowledgment of this problem from Microsoft let alone an official fix.

However, a user picked up a workaround for the e-mail disappearing issue:

According to the user, you need to go to Setting in your gmail.com account, and click on Filters and blocked addresses.

Next, click on Create a new filter, put your email address into the From field, and hit the Create filter. On the next page, select Never send it to Spam and click on Create filter.

The only problem with this workaround is that it creates 2 sent items in Windows Mail.

Of course, another temporary workaround is to avoid using any Microsoft client on your Windows 10 computer and only check your e-mail in other e-mail clients or a browser.

Therefore, it’s ideal to find a more effective email client that can offer powerful collaboration options or uninterrupted syncing. For that, we advise you to consider Mailbird.

Have you had this problem? Tell us your story in the comments below.

Microsoft launches global skills initiative to bring new skills to 25 million people, includes new Teams learning app

There’s no doubt that COVID-19 is still spreading around the world. Even with limited or phased reopening plans now going into effect in some countries and states, the jobs, businesses, schools, and life as we know it, are shaping up to be different due to the impacts of social distancing and the virus.

As a result, Microsoft has announced a new global skills initiative. Aimed at bringing more digital skills to 25 million people worldwide by the end of the year, the initiative includes a new Microsoft Teams learning app and will cover three specific goals.

According to Microsoft President Brad Smith, the initiative brings together all kinds of Microsoft resources. That includes LinkedIn, GitHub, and more. For goal one, Microsoft is aiming to use data to identify in-demand jobs and the skills needed to fill them. As part of the second goal, the company also hopes to provide free access to learning paths and content to help people develop the skills they need for it. Finally, Microsoft is seeking to offer low-cost certifications and free job-seeking tools. These tools are launching today as part of the digital skills initiative.

  • Data and analytics to better understand in-demand skills and jobs: Linkedin will share free real-time labor market data and skills insights.
  • Free access to learning paths and comprehensive resources to help people develop the skills needed for in-demand jobs: LinkedIn Learning paths will be free to the end of March 2021.  Microsoft is also enabling job seekers pursuing developer roles to access the GitHub Learning Lab to practice their skills.
  • Connecting skills to opportunities through industry recognized certifications and powerful job seeker tools:  Microsoft will offer low-cost access to industry-recognized Microsoft Certifications based on exams that demonstrate proficiency in Microsoft technologies.

In addition, to support the broader parts of this vision, Microsoft believes in providing what it calls a “connected system of learning.” This is because many Microsoft customers have found that the learning experience for their employees is highly fragmented.

The fruits of this will be a new learning app in Microsoft Teams. According to Microsoft, the Teams Learning app will “allow employers to integrate world-class content from LinkedIn Learning, Microsoft Learn, a customer’s own content, and other content providers all in one place.” According to ZDNet, the app will roll out in preview and will become generally available later this calendar year. It builds on the chat and other existing functionalities of Teams.

Microsoft’s blog post also covers some other topics, showing the statistics behind unemployment, how it impacts women, and which types of jobs are more at risk. The blog even looks at how the Coronavirus lockdown accelerated digitization and the specifics of how Microsoft hopes to put its plans into effect.

New Office 365 policy can now block guest access for new files with sensitive information

Microsoft is rolling out a new Office 365 policy that will let admins automatically block guest access to new files in OneDrive for Business and SharePoint Online until they have been fully scanned for sensitive information. According to Microsoft, this new Data Loss Prevention (DLP) policy is rolling out now and will be available for all commercial customers in mid-July.

It is worth noting that enabling guest access (external sharing) for OneDrive for Business and SharePoint is entirely optional, but this new Data Loss Prevention policy aims to prevent guests from accessing sensitive content. When DLP is enabled, external access to new files in SharePoint Online and OneDrive for Business will be automatically blocked until those files have been scanned for any sensitive information.

This new DLP policy won’t affect existing restrictions on guest user access to sensitive files. However, Office 365 admins will need to change a tenant property using PowerShell and a cmdlet to mark new files sensitive by default.

While Office 365 Data Loss Prevention has now started rolling out, admins can already get prepared by checking this support page. Do you think this new policy is a welcome change for OneDrive for Business and SharePoint? Sounds off in the comments below.

How to “WinGet” your software today with Windows’ new package manager

Microsoft captured developers’ attention at its Build virtual conference last month by announcing WinGet, a new way to install software on Windows. WinGet is a command line package manager that lets you quickly find and download apps from central “repositories,” removing the need to trawl through ad-riddled websites.

Package managers are a fact of life on Linux systems where they’re integrated into the platform and are the default way of adding software. Until now, Windows users have only had third-party options available – we’ve covered Chocolatey and Scoop in the past.

Installing WinGet on Windows 10

With WinGet, Microsoft is baking its own package manager into Windows. It will host a primary repository of applications, while also enabling third-parties to make their own source lists available. Software that’s in the repository will be installable with a single PowerShell (or Command Prompt) command.

WinGet will debut in a future Windows 10 update. You can try it out today by manually installing it. Head to the winget-cli GitHub releases page and find the latest release (at the top of the page). Click the “appxbundle” file under “Assets” to download the WinGet installer.

Installing WinGet on Windows 10

Run the installer and click the “Update” button which appears. You’ll need to repeat this process each time a new WinGet version is released. Once WinGet is distributed with Windows, you’ll be able to forget about manually installing the utility.

You can now open PowerShell or Command Prompt to start interacting with WinGet. Begin by running winget without any other parameters – you’ll see the help text detailing all the available commands. The list is rather limited at present, with WinGet’s initial release restricted to basic package search and installation capabilities.

Using WinGet on Windows 10

To find new software, use the winget search query command, replacing query with your search term. Although aimed at developers, there’s already a growing roster of popular Windows applications. Here, we can see that WinRAR, VLC and LibreOffice are downloadable via WinGet – no website visit or graphical installation process required.

Using WinGet on Windows 10

Let’s go ahead and download VLC. Type winget install app, replacing app with the name of the app you want to install. Here, winget install vlc will suffice, although sometimes you may need to be more precise in your identification if there’s multiple matches for a term.

You’ll see a download progress bar appear in your terminal. Once downloaded, the program will install itself – there’s no need for any human intervention. This means WinGet installs are ideal for use in scripts when provisioning new devices. Once the install completes, VLC will appear on your machine as if you’d installed it manually. You’re ready to start using the app!

Using WinGet on Windows 10

Unfortunately, this is where WinGet’s functionality currently ends. The remaining commands let you inspect the details of packages and validate their integrity. There’s no support for checking for outdated apps, or even for removing installed packages. All of this should be coming in the future.

While limited at present, WinGet is a valuable addition to the Windows software ecosystem. It’s a developer-first tool that’s also of use, once learnt, to the majority of Windows users. With an app catalogue that’s already rapidly growing, WinGet offers a simpler, safer and more streamlined way to get software onto your PC.

Microsoft’s head of Xbox Live leaves after 15 years in the company’s Xbox department

Microsoft’s Dan McCulloch announced via his personal Twitter account this morning that he would be stepping down as head of Xbox Live after 15 years working for the company’s Xbox division.

“After 15 years at XBOX, I announced today that I would be leaving,” his tweet reads. “I made so many friends, learned so much and truly had a blast! I’m extremely excited about the next opportunity in my career and I will be announcing that very soon, you all will be pumped! ? Thank you!!!”

It’s unclear if he’ll be transitioning to another area within Microsoft or if he’ll be changing companies, or even industries, altogether. As his tweet says though, he’ll reveal what the future holds for him very soon.

After more Xbox news? Check out our Xbox news hub here and then follow us on Pinterest and Twitter for more gaming content.

How to Fix PS4 Error Su-30625-6, SU-42481-9 [Update errors]

PS4 releases new updates to fix issues with system security and stability. However, while installing the updates, you may encounter the PS4 error Su-30625-6 and error SU-42481-9.

According to Sony, these errors occur if the system software update file is not recognized by the PS4 system and has failed.

To fix the error, Sony recommends installing the system software update using safe mode.

In this article, we have listed a couple of troubleshooting tips to help you resolve the PS4 Error Su-30625-6, PS4 Error SU-42481-9 errors.

How to fix PS4 Error Su-30625-6, PS4 Error SU-42481-9

1. Perform a power cycle

  1. Power off your PS4 by pressing the power off button on the front of the device.
  2. Once the console is fully shut down, disconnect the power cable from the outlet.
  3. Press and hold the Power button for at least 30 seconds to discharge the remaining power.
  4. Leave the console idle for a few minutes.
  5. Press the power button again to turn on the device.
  6. Try connecting to the PlayStation Network to see if the updates can be downloaded.

Performing a power cycle can fix any temporary issues with the system. It also clears system cache that can be triggering the error.

2. Update using Safe Mode

PS4 Error SU-42481-9
  1. Press the power button on your PS4 at the front to turn off the system.
  2. Once turned off, press and hold the power button until you hear two beeps. You may have to keep the button pressed for about 7 seconds to hear the second beep.
  3. To enter the Safe Mode, connect the PS4 controller with a USB cable to the PlayStation.
  4. Press the PlayStation button on the DualShock 4 controller. The PS4 will now boot into safe mode.
  5. Select the Update System Software option from the menu.
  6. Wait for the system to download and install the updates.

Updating the system software in safe mode can work if a third-party service is causing the update to fail. In safe mode, PlayStation loads only essential files for the system to run.

3.  Manually update PS4 using an external storage device

  1. Connect a USB device to your computer.
  2. Create a new folder on the storage device named PS4.
  3. Inside the PS4 folder, create another folder named UPDATE.
  4. Download the PS4 update file.
  5. Move the downloaded file to the UPDATE folder.
  6. Rename the downloaded files as PS4UPDATE.PUP.
  7. Make sure the PS4 folder is at the root of the USB storage device and not inside any other folder that you may have on your storage device.
  8. Connect a DualShock4 controller to your PlayStation using a USB cable.
  9. Power off the PlayStation.
  10. Next, press and hold the Power button on your PS4 for 7 seconds.
  11. Release the button when you hear two beeps. This will enter the system into safe mode.
  12. In Safe Mode, select the Update System Software option.
  13. Select Update from USB Storage Device.
  14. Select OK to initialize the update process.

The update process may take a few minutes to hours, depending on the file size and hard drive type. If the PS4 fails to recognize the update file, check the folder name and file name for accuracy.

Make sure to enter the folder names and file names in single-byte characters using uppercase letters.

If the error persists, you may have to initiate the PS4 system. PS4 initializing process is similar to factory resetting the device. Here is how to do it.

4. Initialize the PS4 system

PS4 Error Su-30625-6

Note: Initializing a PS4 system will delete all the data stored on the device. We recommend you to create a backup before proceeding with the steps.

  1. From the PlayStation home screen, open Settings.
  2. Go to Initialization.
  3. Select Initialize PS4.
  4. Follow the on-screen instructions to factory reset your PS4.

If you are unable to access the Settings screen, do the following to perform initialize from Safe mode.

PS4 Error SU-42481-9
  1. Turn off the PS4 system by pressing the power button on the front panel. The power indicator will blink for a few moments.
  2. Once the system is off, press and hold the power button again for seven seconds.
  3. Release the button once you hear two short beeps.
  4. Connect the DualShock4 controller with a USB cable to your system.
  5. Once you are in Safe Mode, select Initialize PS4.
  6. Follow on-screen instructions to complete the process.

Once the system is successfully restored, try performing a software update before restoring your data backup.

The PS4 Error Su-30625-6, PS4 Error SU-42481-9 error in PlayStation usually occurs due to a glitch that can be fixed by performing a power cycle. If the issue persists, try installing updates using Safe mode.

If everything fails, initialize PS4 and then install the update manually. Do let us know which method helped you resolve the issue in the comments.

The Windows 10 Amazon Prime Video app is now available to download and use

The Amazon Prime Video for Windows app, which was recently spotted in the Microsoft Store, is now available to download and use on Windows 10 devices.

The app is completely free to download though an Amazon Prime subscription is naturally needed to view premium content.

Here’s the official app description:

Watch movies and TV shows recommended for you, including Amazon Originals like The Boys, Hunters, The Marvelous Mrs. Maisel, Tom Clancy’s Jack Ryan, and much more.

App Features:

  • Download videos to watch offline – anywhere, anytime.
  • Rent or buy thousands of titles including new release movies, popular TV shows, and more (not available in all countries/regions).
  • With Prime Video Channels, Prime members can subscribe to more than 150 premium and specialty channels like HBO, SHOWTIME, STARZ, and Cinemax. Only pay for the channels you want, no cable required, cancel anytime (not available in all countries/regions).
  • With X-Ray, view IMDb information about the actors, songs, and trivia for videos as you stream.

While Windows 10 users can view Amazon Prime Video content in a web browser, this app does feature more functionality such as offline viewing which is incredibly useful when traveling for extended periods of time.

Have you tried this app yet? Share your impressions with the community in the comments below and then follow us on Twitter and Pinterest for more Windows 10 app news.

PlayStation 4 Error Codes CE-34878-0, CE 30005-8 [Full Fix]

If something goes wrong with your games, Play Stations will display an error message to help you troubleshoot the problem. Two of these general errors are error code CE-34878-0 and CE 30005-8.
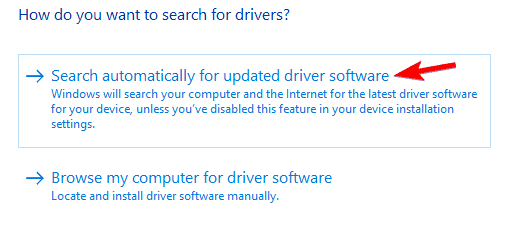
CE-34878-0 is a general error that can occur due to temporary issues, software, and game problem as well as hardware problems. The error code CE 30005-8, on the other hand, can occur if the Play Station 4 is having difficulty reading the hard drive or DVD drive.

In this article, we explore how to fix the PlayStation 4 error codes CE-34878-0, CE 30005-8 in detail.

CE-34878-0: PS4 Update File error [Fix]

1. Close and restart the game / Update PlayStation

CE-34878-0

  1. Highlight the game that is encountering the error from the dashboard.
  2. Press the Options button.
  3. Close the game.
  4. Restart the game and see if the error is resolved.

Update the game

CE-34878-0

  1. Make sure the console is connected to the internet.
  2. Highlight the game that you want to update from the dashboard.
  3. Press the Options button on your DualShock 4 controller.
  4. Press Check for Updates.
  5. PlayStation will scan and download any pending updates for the game.
  6. Install the updates.
  7. Once installed, relaunch the game to see if the error is resolved.

Update PlayStation

CE-34878-0

  1. Go to Settings.
  2. Select System Software Update.
  3. Select Upgrade Now.
  4. PlayStation will scan and download any pending updates for the console.
  5. Once the download is complete, select Accept.
  6. Press the X button to confirm your choice.
  7. You can also update the PlayStation 4 manually using an external storage device.

Once the game and the console are updated, try to launch the game and check if the error CE-34878-0 is resolved.


2. Check your hard disk drive for issue

CE-34878-0

If you have upgraded the hard disk drive in your PlayStation 4 console, check the new hard disk drive for problems. Try installing the original HDD to see if the error is due to your new HDD.

Ask for a replacement if the HDD is found to be faulty and is under warranty.


3. Restore PlayStation 4 to factory default

CE-34878-0

  1. Make sure to create a back up of your saved data in an external hard drive.
  2. Next, go to Settings.
  3. Select Initialization.
  4. Choose Initialize PS4.
  5. Follow on-screen instructions to restore your PS4 to factory default.

Performing a factory reset can fix many issues with your PS4. Once the device is reset, restore the saved data using a backup drive. Launch the game and check for any issues.


4. Disable Face Recognition

CE-34878-0

Note: Follow these steps if you have PS Camera connected to your system.

  1. Disconnect the PS Camera connected to your console.
  2. Restart the system.
  3. Go to Settings.
  4. Select User.
  5. Select Login Settings.
  6. Uncheck Enable Face Recognition option.

Relaunch the game and check if the error is resolved.


CE 30005-8: Cannot Start Application – PS4 Error Fixed

1. Perform a power cycle

Cannot Start Application

  1. Press and hold the PS button for at least 1 second.
  2. Select Turn off PS4 on the screen that is displayed.
  3. Once turned off, press and hold the power button on the front for 7 seconds.
  4. Release the button once the system beeps twice.
  5. Restart the console and check if the error is resolved.

2. Check if the game disc is damaged

  1. Eject the disk from the Play Station console pressing the Eject button.
  2. Clean the disc carefully.
  3. Check the underside of the disc for any scratches or smudges.
  4. Wipe the disc using a clean, soft cloth.
  5. Insert the cleaned disk back into your console.
  6. Launch the game to see if the error is resolved.

3. Rebuild the database

Cannot Start Application

  1. Hold the Power button to turn off PS4 entirely.
  2. Press and hold the power button again until you hear two beeps.
  3. Once the system is in the Safe Mode, connect the DualShock 4 controller to the system.
  4. Press the PS button on the controller.
  5. Select the Rebuild Database option.

The database rebuilding can take longer depending on the data stored in your system. Wait for the database to rebuild. Once done, launch the game to check if the error is resolved.

The CE 30005-8 is usually related to the hard drive disc or the game disc. However, the CE-34878-0 error is a general error that can occur due to many reasons. Follow the steps in the article to resolve the issue and let us know which method helped you fix the errors in the comments.


[wl_navigator]

VMware: Cannot find a valid peer process to connect to [FIX]

Upgrading your OS with everything it includes should improve the device’s overall performance, solve various operating bugs, and so on.

However, the reality is sometimes different – after upgrading you find out that your system is not functional, out of the blue. And this is very frustrating.

It often happens to VMware Fusion users who upgrade the macOS version or just the virtual machine version. On rare occasions, it has also been reported by Windows users.

After upgrading, the users are not able to open the virtual machine (or install new machines) and get the following message: Cannot find a valid peer process to connect to.


How to fix Cannot find a valid peer process to connect to VMWare Fusion?

Cannot find a valid peer process to connect VMware on macOS

1. Reinstall the official VMware version (and run First Aid)

  1. Reboot your Mac.
  2. Manually uninstall VMware (to delete all VMware related files).
  3. Reinstall the latest version of Fusion that you can find in our review. Follow the download button to get to the official Fusion download tool.
  4. Drag the VMware Fusion icon onto the Applications folder icon, open it, and double-click to start the installation.
  5. Allow the app administrative privileges to complete the process.
    reinstall vmware fusion
  6. Use the  Fusion serial number to register, then follow the prompts to finish.
  7. Then, install or update VMware Tools in your virtual machine.
  8. See if the problem is solved; if otherwise run the first aid on the Mac hard disk, by opening the /Application/Utilities folder, then clicking on Disk Utility. Here, select the system hard drive and click on the First Aid button.

The issue is known by VMware and they offer this general troubleshooting advice. However, many users complained that after performing all of these, they still got the error.

So try the next steps.


2. Allow VMware extensionallow vmware extension

After reinstalling the virtual machine, a pop-up might warn that the VMware extension will be blocked.

So what you need to do is to open System Preferences, then go to Security and Privacy. Here, click on General and click on the allow option for the VMware extension.

Additionally, look for the lock files and remove them.  Open the VMware file with all containing files, look for files with a .lck extension and delete them.


Cannot find a valid peer process to connect VMware on Windows 10

  1. Open the Registry Editor by typing Regedit in the search bar.
  2. Delete the TitleObjectServer file you find in the following path: HKEY_LOCAL_MACHINESOFTWAREMicrosoftWindows NTCurrentVersionProfileNotificationTDL.

fix vmware tartup issue
It is possible that you might first have to get Admin permission to perform this action.

If you can’t see such a file, it means that the problem lies elsewhere.


Hopefully, these guidelines will help you fix the problem. Use the comments section below to tell us if our recommendations worked for you.
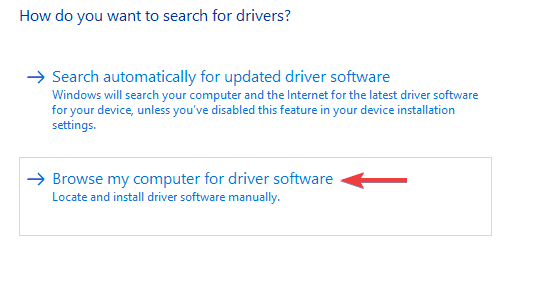

[wl_navigator]

The Sims 4 error code 3: game failed to load [Safe Fix]

The Sims 4 error code 3 is an issue some players have posted about on EA’s support forum. When those players launch The Sims 4, an error message pops up that states: The game failed to load. Error Code 3. Players can’t play the game when that error arises.

How can I fix The Sims 4 error code 3?

Select the Repair option for Sims 4 in Origin

  1. A few players have confirmed that Origin’s Repair option can fix The Sims 4’s error code 3. Open the Origin software.
  2. Click My Games in Origin.
    Repair Game option sims 4 error code 3
  3. Right-click The Sims 4 to select a Repair Game option for it.

Remove Sims 4 mods

  1. Removing Sims 4‘s mod items is another potential fix for error code 3. To do that, open your The Sims 4 folder within File Explorer.
  2. Next, select the Mods subfolder in The Sims 4 folder.
  3. Click the Move to button on Explorer’s Home tab.
    Move to button sims 4 error code 3
  4. Then select a folder, such as Desktop, to move the Mods folder to.
  5. Restart Windows before launching Sims 4 again.

Rename the Sims 4 folder to reset files

  1. Resetting Sims 4 user files, by renaming the game’s folder, might also resolve error code 3. To do that, open Documents > Electronic Arts in File Explorer.
  2. Back up the Sims 4 folder in the Electronic Arts directory. You can do that by saving it to a USB stick or another HDD folder.
  3. Next, right-click the Sims 4 folder and select Rename.
    Rename option sims 4 error code 3
  4. Enter Sims4_Backup as the new title for the folder.
  5. Then launch The Sims 4 again.

Move the Sims 4 folder to the desktop

  1. Alternatively, try moving the Sims 4 folder to the desktop to generate a new one. To do that, open File Explorer’s window.
  2. Open Documents > Electronic Arts.
  3. Select your Sims 4 folder within the Electronic Arts directory.
  4. Click the Move To button, and select Desktop on the drop-down menu.
  5. Next, start your game, and then immediately exit it.
  6. Thereafter, move the saves, screenshots, tray, and custom music folders from the Sims 4 folder on the desktop into the new Sims 4 subfolder in the Electronic Arts directory.
  7. Select the Replace the files option when moving content.
    Replace or Skip Files window sims 4 error code 3
  8. In addition, move the options.ini file from Sims 4 desktop folder into the new Sims 4 directory within the Electronic Arts folder.

These are some of the most likely fixes for The Sims 4 error code 3.

You can also get further potential resolutions for error code 3 by sending a Sims 4 support case to EA from its Contact Us page.


[wl_navigator]

RDP password attacks increase since COVID-19 onset

Recent ESET telemetry data indicates an increase in RDP password attacks from December 1, 2019 to May 1, 2020. Over the same duration, COVID-19-related restrictions have compelled hundreds of millions of employees to work from home.

The vast majority of these workers have to remotely connect to their employers’ IT systems. Sadly though, their connections to corporate networks have become highly vulnerable attack vectors.

For example, attackers recently sent phishing emails to remote workers that connected to their organizations’ networks via VPNs.

Windows Remote Desktop Protocol (RDP) is also a target for cyber gangs, according to the ESET report.

RDP password attacks on the rise

Hackers are increasingly breaching RDP password security by launching multiple brute-force attacks. They’re targeting remote workers that use Windows RDP to connect to corporate IT systems.

In particular, the criminal gangs take advantage of weak password protection policies, says ESET.

That is probably also the reason why RDP has become such a popular attack vector in the past few years, especially among ransomware gangs. These cybercriminals typically brute-force their way into a poorly secured network, elevate their rights to admin level, disable or uninstall security solutions and then run ransomware to encrypt crucial company data.

ESET adds that most of the IPs it blocked between January and May 2020 were France, China, Russia, Germany, and US-based.

On the other hand, many of the IP addresses that the cyber gangs targeted in their brute-force attacks were Hungary, Russia, Germany, and Brazil-based.

Once they gangs have obtained an organization’s RDP login credentials, they start elevating their system privileges to admin level. From there, they can have a field day deploying their malicious payloads.

Typically, brute-force attacks can pave the way for the deployment of ransomware or potentially unwanted apps, such as cryptominers.

If your organization runs any web-facing system, consider requiring strong or complex passwords to minimize the success chances of brute-force attacks. Also, be sure to have ransomware protection in place.

Have you ever fallen victim to a brute-force attack? Tell us your experience in the comments section below.

[wl_navigator]

3 Best VPNs to Fix Grim Dawn Multiplayer Lag

If you’re having trouble playing Grim Dawn in multiplayer mode due to lag, you can use a VPN to fix this issue fast and easily.

Developed and published by Crate Entertainment, Grim Dawn is an action RPG with a dark universe inspired by the Victorian era.

You can play it on Windows and Xbox One. It’s also available on Steam. Although it has a single-player mode, the game is best played with friends in LAN or online co-op.

Unfortunately, a lot of users report multiplayer lag spikes and high ping when trying to enjoy the co-op version.

Fortunately, you can use a VPN to improve your ping and gameplay. A virtual private network tool is an excellent choice for optimizing your Internet traffic for gaming.

What are the best VPNs to fix Grim Dawn multiplayer lag?

NordVPN – Top speed gaming connection

NordVPN is a popular VPN for gaming, and it works great when it comes to reducing Grim Dawn multiplayer lag.

Created by Tefincom & Co., it comes with numerous VPN servers worldwide, including obfuscated VPN servers for bypassing VPN blocks. And it can fix network congestion.

NordVPN reroutes your Internet traffic through its VPN servers using OpenVPN. It’s compatible with all popular platforms and can also be installed on a router to share VPN traffic with all connected devices.

Moreover, NordVPN has an exclusive malware blocker called CyberSec, which ensures the security of all your web browsers.

It comes with a built-in kill switch, too, which can turn off your VPN automatically in case of an emergency.

More about NordVPN:

  • +5,100 VPN servers in 59 countries
  • No logs or leaks
  • 6 simultaneous device connections
  • 30-day money-back guarantee (no free trial)

NordVPN

Effortlessly fix Grim Dawn multiplayer lag by resorting to this dependable VPN.
Check price Visit website

Private Internet Access – Highest speed servers

Made by Kape Technologies, Private Internet Access (PIA) is the best VPN for gaming and for fixing packet loss.

It provides you with numerous VPN servers worldwide, DDoS protection, and extra security features.

PIA is one of the few VPNs that support port forwarding, which is a required feature if you want to host game servers with a VPN.

It also has split tunneling, a kill switch, private DNS, ad, and malware blocker, along with SOCKS5 and Shadowsocks proxy.

You can choose between the OpenVPN and WireGuard protocols to encrypt your Internet traffic, as well as fix Wi-Fi packet loss.

And, if you encounter technical difficulties, you can resort to 24/7 live chat support.

More about PIA:

  • +3,300 VPN servers in 48 countries
  • 10 simultaneous connections
  • No logs or leaks
  • 30-day money-back guarantee (no free trial)

Private Internet Access

Quickly fix Grim Dawn multiplayer lag with the aid of this speedy and safe VPN.
Check price Visit website

CyberGhost VPN – Rich dedicated IPs

An alternative solution for lowering your ping and fixing multiplayer lag in Grim Dawn is CyberGhost VPN.

Also owned by Kape Technologies, this VPN service has the largest network of VPN servers on this list. And you can use it to minimize jitter.

CyberGhost VPN has VPN servers ready for gaming, streaming, torrenting, and secure browsing.

It supports split tunneling, a kill switch, exclusive DNS servers, together with an integrated malware blocker. It’s a great way to circumvent geoblocks.

This VPN tool ensures your privacy and anonymity using the OpenVPN protocol. It can redirect your entire network traffic through VPN as well as speed up your Internet connection to enhance your gameplay experience.

More about CyberGhost VPN:

  • +6,500 VPN servers in 89 countries
  • No-logging policy, no leaks
  • 7 simultaneous device connections
  • 45-day money-back guarantee (1-day free trial)

CyberGhost VPN

Significantly reduce your ping time in Grim Dawn co-op mode by using this reliable VPN.
Check price Visit website

To summarize, you can reduce Grim Dawn multiplayer lag with minimum effort by using a VPN to improve your ping and gameplay.

Besides, you can also minimize packet loss with a VPN. All you have to do is connect to an optimal VPN server and then play the game as usual.

Lastly, you can join our VPN Troubleshooting Hub to fix any VPN-related problems. If you have high ping and packet loss issues in other games, visit our Gaming VPN area.

AMD graphics cards get GPU scheduling support for Windows

Two AMD graphic cards series now have graphics scheduling support for Windows 10 version 2004. AMD recently released drivers for this feature to beta testers.

The Windows 10 May 2020 Update, which started shipping on May 27, came with hardware-accelerated GPU scheduling capabilities. To work, the technology requires GPU support, which major graphic cards, from Intel and NVIDIA to AMD, never offered at that time.

AMD graphics cards to offer GPU scheduling support

AMD has released drivers for Radeon RX 5600 and Radeon RX 5700 series graphics cards, which should support Windows 10 2004’s GPU scheduling capabilities.

Typically, the feature lets graphics cards manage their own memory without relying on system software. In turn, the GPUs become more efficient.

Such technology is appropriate for graphics-intensive applications, especially gaming. Likewise, GPU scheduling is suitable for compute-intensive applications, such as deep learning in AI.

AMD is excited to provide beta support for Microsoft’s Graphics Hardware Scheduling feature. By moving scheduling responsibilities from software into hardware, this feature has the potential to improve GPU responsiveness and to allow additional innovation in GPU workload management in the future. This feature is available on Radeon RX 5600 and Radeon RX 5700 series graphics products.

NVIDIA too supports this feature. It recently released the GeForce Game Ready driver, which is compatible with DirectX 12 Ultimate. On top of that, the company revealed that the driver version 451.48 supported hardware-accelerated GPU scheduling.

But before you download the Radeon drivers with GPU scheduling support, keep in mind that the package includes some known issues.

According to AMD, enabling hardware scheduling may cause Oculus VR headsets to malfunction. Similarly, a black screen may come up on certain games and system configurations with Enhanced Sync on.

The driver may also trigger a video playback bug for Microsoft Edge users on a multi-display system.
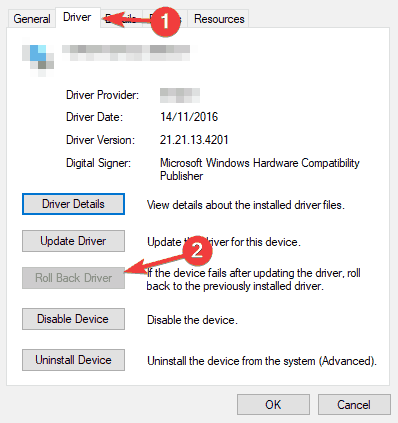
Do you use AMD graphic cards, especially Radeon GPUs, and are you excited about their newly acquired hardware-accelerated scheduling feature? You may let us know via the comments section below.
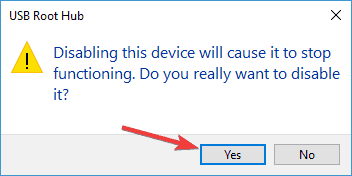
[wl_navigator]

How to Watch TF1 in the US [4 Expert Vetted Methods]

TF1 is a free and public French TV channel. However, you can only access it if you’re in France.
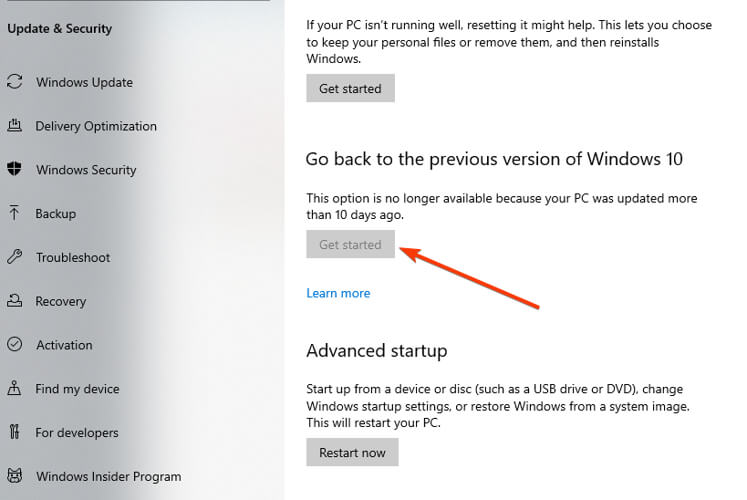
If you want to watch TF1 in the USA or any other part of the world, we’re here to guide you with the 4 perfect solutions for evading geoblocks.

You can unblock TF1 streaming in the USA, no matter what device you use. You just need a stable Internet connection and the right tool for the job.

Can I watch TF1 online?

You can have TF1 streaming platform that has the French TV content in one place. The bad news is that you don’t have access from other regions than France.

In spite of that, you’re able to watch TF1 live with a reliable VPN connection that has server locations in France and its cities.

The only action you need to do is to connect your VPN for another IP address located in France regions and start streaming your favorite TF1 content online.

How can I watch TF1 outside France?

1. Use streaming-optimized VPN

  1. Download Private Internet Access (PIA).
  2. Unpack PIA and install it on your computer.
  3. In the systray, click the PIA icon and then VPN Server.
  4. Search for France and select this entry.
    Private Internet Access is connected to the French VPN server
  5. Press the big power button to connect to France.
  6. Launch your browser and visit TF1 Direct (see the best web browsers for streaming).
  7. If you have an ad-blocker enabled, disable it for this website.disable AdblockPlus for TF1
  8. Sign in with your My TF1 account*.
  9. Start watching TF1 live streaming.watch TF1 live streaming

*If you don’t already have a My TF1 account, you can either log in with your Facebook account or create a new account using your email address (no confirmation is required, so you can use any email).

A reliable VPN solution like PIA is the best way to watch TF1 in USA and other countries. Made by Kape Technologies, PIA offers superior connection speeds, doesn’t cause buffering, and also protects your online privacy.

Plus, you can do a lot more with PIA. For example, you can watch French TV on Netflix and bypass censorship.

In addition, speed up your Internet connection for gaming and find cheaper flights. And, if you ever stumble upon any issues, you can take advantage of the 24/7 live chat support.

Private Internet Access

Unblock TF1 with PIA and watch the French TV channel whether you’re in USA or somewhere else.
Check price Visit website

2. Use Mobdro

  1. On your Android device, allow the installation of apps from unknown sources.
  2. Download and install Mobdro.
  3. In Mobdro, tap Search streams and look for TF1.search for TF1 in Mobdro
  4. Select TF1 and wait until it loads the stream.tap TF1 in Mobdro
  5. Start watching TF1 live streaming.watch Mobdro TF1 live streaming

*You can also download BlueStacks and use the Android emulator to install and run Mobdro.

NOTE: If you’re experiencing buffering when trying to watch TF1, use PIA and connect to the French VPN server to optimize your Internet traffic for streaming and eliminate delays.

Mobdro is an excellent choice to help you watch TF1 in the USA and other countries.

It’s free to use, and you don’t have to log in with a My TF1 account. Although it’s exclusively made for Android, you can get it working on other operating systems by using an Android emulator.

This requires extra steps, however. Also, you might occasionally encounter buffering issues, or the stream might be temporarily unavailable.

So you can’t get rid of the in-app ads unless you’re willing to share your system’s resources with a third party.

3. Use IPTV software

  1. Download ProgDVB and install it on your PC.
  2. In the main window of ProgDVB, switch to the FreeWorldTV tab.
  3. Search for TF1 and select this entry from the list of results.watch TF1 on ProgDVB
  4. Start watching TF1 live streaming.

An IPTV software solution like ProgDVB is a great choice for watching TF1 in the USA. You don’t have to log in with a My TF1 account, and you can use it to unlock other TV channels or Internet radio stations, too.

But it doesn’t always work the way it should. And you can rarely find a free IPTV program that meets your expectations.

4. Use an Internet circumvention tool

  1. Download Psiphon and install it on your device.
  2. Launch Psiphon and go to Settings > Psiphon Server Region.go to Psiphon server region
  3. Select France and click Apply Changes.select the Psiphon France server region
  4. Using your browser, go to TF1 Direct (check out the best web browsers for streaming).
  5. Disable your ad-blocker for TF1 if it’s activated.disable AdblockPlus for TF1
  6. Sign in with your My TF1 account*.
  7. Start watching TF1 live streaming.watch TF1 live streaming

*Unless you have already registered for an My TF1 account, you can log in with a Facebook account or set up a new account immediately. You just need to enter an email address and password (no email confirmation necessary).

An Internet circumvention tool like Psiphon is a solid choice for unblocking websites, getting past geo-restrictions, and watching TF1 in the USA.

And it delivers excellent connection speed. But, if you’re a privacy-concerned user, it’s not a solution for you since Psiphon cannot preserve your online anonymity.

Is TF1 free to air?

Yes, it is. Any user can access this satellite television without additional costs and benefit from other free channels like TMC, TFX, TF1 Series Films.

However, if you like this channel and want to watch it online, it’s only possible with a fast and stable VPN connection. These are some VPN examples that can provide you effective support:

  • NordVPN TF1
  • ExpressVPN TF1
  • CyberGhost VPN TF1

And, if you can’t decide between the 4 options, we suggest going with PIA since it’s built for more than just streaming.

You might also be interested in the Best VPNs for streaming. Also, check out our How-to section for more VPN-related workarounds.

We would like to mention that we strongly advise against free VPNs (like Hola VPN) because they aren’t made to maintain your online privacy.

More, free VPNs are notorious for collecting and sharing VPN traffic with third parties. On the other hand, premium VPNs are worth it.

In conclusion, there are many solutions to help you watch TF1 in the USA or other countries, but we think that these 4 are the best the Internet has to offer.

If you are interested in other streaming platforms like HBO, check out this in-depth list of the best VPN to watch HBO GO in France, researched by the security and privacy experts at VPN Central.

Fix: ProxFlow can’t unblock this video because it is blocked

ProxFlow is quite a useful web browser extension that can help you unblock geo-restricted content straight from your web browser. You just have to install the extension, make sure it’s active, and start browsing your favorite content.

On the downside, nowadays even VPN traffic gets detected and blocked by popular multimedia streaming services (such as YouTube), let alone proxy servers.

Usually, proxy servers are static and it’s not exactly difficult to pinpoint it and assign it a Proxy tag (as a streaming service). VPNs, on the other hand, are more versatile and have entire ranges of IPs they cycle through.

So it should come as no surprise that ProxFlow, a proxy-based service, can sometimes be detected and blocked by YouTube.

ProxFlow can not unblock this video because it is blocked in the US

Does this situation look familiar? Did you ever encounter it in your attempt to watch some content that’s been region-restricted by YouTube? A lot of users believe in free, unrestricted Internet, but in reality, things are a bit different.

A lot of content comes from the US, and ironically, the US is one to impose the most geographical restrictions. Take Netflix, for instance. It’s no secret that there’s a special version of Netflix reserved for US residents only.

However, it seems that other regions have their own set of restrictions, as well. So what do you do when, as a US resident, you can’t access certain content on YouTube? You turn to specialized geoblock-bypassing tools, such as ProxFlow.

Sometimes, this tool works like a charm, and it’s hassle-free, too. You just install it on your browser, activate it, and forget it’s even there. But what if ProxFlow can no longer grant you access to the content you yearn for?

How to unblock YouTube videos blocked in the US?

1. Use a VPN

  1. Download Private Internet Access
  2. Install it on your PC
  3. Launch it and log into your account
  4. Connect to a suitable server (*)
  5. Check if you can access the content

(*) – try to connect to a server where the content is already freely available. For instance, if a clip is only available in Germany, try picking a server in Germany.

Private Internet Access is an awesome VPN brought to you by Kape Technologies. It can help you tackle a broad range of issues regarding geo-restrictions, privacy, and online security.

Private Internet Access

Private Internet Access

ProxFlow can't unblock videos? Try PIA instead.
$2.85/mo. Buy it now

Sometimes, if all the stars are aligned, it can also improve your in-game ping, decrease packet loss, and help you bypass network congestion.

These only work if there’s something wrong on your ISP’s side, such as bandwidth throttling or improper routing.

2. Use a Smart DNS service

Smart DNS services replace the DNS that’s been assigned to you by your ISP with another address. This new address has its metadata stripped, so that there’s no info on your real geo-location.

Additionally, it intercepts any requests to the website you want to access and replaces sensitive data that might leak your geo-location with spoofed one so that it seems you’re in a non-restricted country.

Using a Smart DNS might prove to be even more effective than using a VPN for a few reasons. For starters, there’s no encryption, and your IP address never changes.

As a result, your speed doesn’t drop. On the other hand, your real info as well as your network traffic will be exposed.

So, for the purpose of accessing geo-restricted content, a Smart DNS service can be better than a VPN, but at the expense of privacy and security.

ProxFlow might not work every time

To wrap it up, it goes without saying that using proxy servers to bypass geo-restrictions is somewhat outdated.

ProxFlow might still work in some cases, but recently big names in the streaming industries have started putting more and more effort into blocking users who try to circumvent geo-restrictions.

Therefore, your safest bet in this situation is to use a VPN or a Smart DNS.

[wl_navigator]

Windows Defender erroneously scans its PUP scan records

Windows Defender is one of the W10 V2004 components that received important upgrades. But it turns out that the security feature scans its own PUP History by default, which may lead to false alarm situations with every scan.

The May 2020 Update came with multiple security features, including Windows Hello in safe mode. Windows Defender itself got enhancements in areas such as firmware protection to prevent bad actors from compromising devices.

Notably, Microsoft updated Windows Defender with the ability to sniff out potentially unwanted programs (PUPs).

Windows Defender flags the same PUP multiple times

When a PC scan identifies and neutralizes a PUP threat, you don’t expect to encounter the same PUP in future scans.

But, according to Microsoft, its Windows security tool keeps highlighting the same blocked PUP as a threat many times over. As you’d expect, other scanners don’t detect the same threat on a PC after it’s been removed.

Microsoft recently revealed the source of the problem: Windows Defender looks into its own protection history, which is where it keeps information about all detected and blocked threats. That’s how it keeps finding PUPs it has already resolved in previous scans.

It appears that the default remediation that Windows Defender applies to PUPs is to Block them, then leave them in Protection History. Windows Defender is defaulted to scan its own “Scans/History,” resulting in the discovery of the PUP over and over again.  Even though, other scanners see no evidence of the PUP on the PC.

It seems that Microsoft isn’t ready to start quarantining the PUPs. Until then, you can configure Windows Defender not to search for PUPs in Protection History. That setting will stop the multiple false alarms.

Microsoft Edge was also updated with the ability to block potentially unwanted apps (PUA).

Is the Windows security tool flagging the same PUP multiple times on your PC even after neutralizing the threat? You can let us know via the comments section below.

[wl_navigator]