If you see the error code 0x8004de8a while trying to log into your OneDrive app, it means that, for now, you will not be able to access your online data.
This isn’t the only error you can encounter, and we already covered the 0x8004e4c3 OneDrive error code in the past. However, today we’ll focus strictly on the error at hand.
What does error code 0x8004de8a mean?
This OneDrive error occurs due to glitches with the OneDrive application.
Sometimes certain settings can lead to this and other similar errors.
Issues with your Microsoft account can sometimes result in this error.
How can I fix the 0x8004de8a error code in OneDrive?
1. Close and restart your OneDrive app
Close all OneDrive-related processes:
Press the Win+X keys to open the Start menu.
Select Windows PowerShell(Admin) from the list.
Type the following command inside the command prompt window: taskkill /f /im OneDrive.exe
Run the command by pressing the Enter key.
Re-launch OneDrive:
Use the Cortana search box and type OneDrive.
Choose to launch the first option from the top by clicking it.
Utilize the same login data to log into your OneDrive account.
Follow the instructions found on the screen to complete the login successfully.
2. Reset OneDrive
Follow the steps mentioned above to close all running instances of the OneDrive application.
Open the Run dialog by pressing the Win+R at the same time.
Write or paste this command inside the Run dialog box: %localappdata%\Microsoft\OneDrive\onedrive.exe /reset
Restart your PC.
Launch OneDrive again and check to see if this method has proven useful.
It is worth mentioning that by resetting the OneDrive application, you will lose the app data stored on your PC, and the pre-set options will also be affected. After the process is completed, you can re-configure your settings.
3. Use the Manage your account option in Windows settings
Press the Win+X keys on your keyboard and click Settings.
Inside the Settings window and navigate to Accounts.
Choose the option Access Work or School.
Click the option Manage Your Account.
This will open a web browser. Click your account image and click Logout.
Right-click the OneDrive icon inside the system tray and click Settings.
Inside the Account tab you need to re-add your work account.
The OneDrive error on shutdown problem has been encountered by a wide range of users with different computer configurations.
OneDrive has proven to be a very important and efficient hosting service that gives you the power to easily back up your important files, documents, and photos.
Because it is part of the Office suite, this application’s utility increases even more, offering you access to all the other office tools from Microsoft.
Some users have reported that they see the OneDrive error on Windows 10 shutdown, and this prevents Windows 10 from properly closing.
As it appears on the pop-up box when trying to Power Off my Laptop. I don’t even use OneDrive – and this stops my laptop from shutting down, despite following the option to Shut Down Anyway.
“The exception Breakpoint
A breakpoint has been reached.
(0x80000003) occurred in the applications at locations 0x0000000075FB82B2.
Click on OK to terminate the program …… I do this and as previously noted above it doesn’t shut down my laptop.
It seems that this error message could be related to some application files that have become corrupted or a possible incorrect setting inside the app.
Because we understand how frustrating this error can be, in today’s fix guide we will explore some of the best-proven methods to solve this issue. Follow the steps carefully in order to fix this issue as soon as possible.
How do I fix the OneDrive shutdown error?
1. Restart the OneDrive application
Right-click the Windows taskbar -> select Task Manager from the menu.
Select the Processes tab -> search for the Microsoft OneDrive app in the list -> right-click it -> click the End Task option -> close the Task Manager.
Click on the Start Menu -> search for the OneDrive app -> open it.
Check to see if this method helped and if not, follow the next methods.
2. Reset the OneDrive app to its default settings
Press the Win+R keys on your keyboard to open the Run dialogue.
Copy-paste this command inside the box: %localappdata%MicrosoftOneDriveonedrive.exe /reset
Press Enter to run it -> wait for the process to be completed (the OneDrive icon will disappear from your taskbar)
After a few minutes, restart your computer and try to see if the issue persists.
Note: If the OneDrive icon doesn’t appear in the taskbar after you restarted your PC, follow step 1 from this method, and run the following command in order to start it:%localappdata%MicrosoftOneDriveonedrive.exe
3. Check the Security Permissions of your OneDrive folder
Follow steps 1 and 2 from the first method described above -> close the OneDrive app from the Task Manager.
Open Windows Explorer and navigate to the location of your OneDrive folder (C:/User/%Username%).
Right-click the folder -> choose Properties.
Inside the Securitytab -> click Advanced.
Make sure that System, Admin, and your personal account have Full Control.
Check the box next to the option Replace all child object permission entries with inheritable permissions from this object -> click Ok.
Note: If error messages are produced after trying to apply this method, click Ignore and take note of the files that had errors. You will then have to copy these files to another location on your hard drive, change the Security permissions as above, and then move them again inside the original OneDrive folder.
4. Uninstall and reinstall the OneDrive app
To uninstall:
Press the Win+X keys -> choose Windows PowerShell (Admin).
Run this command -> taskkill /f /im OneDrive.exe
Copy-paste the following commands depending on the version of Windows you use:
It can be extremely frustrating to encounter the Server execution failederror message while trying to sync your files to OneDrive.
Not being able to sync your files to the cloud can be even more problematic if you need to do this in order to share files related to your work, or back up your important files for later use.
Because this error has been reported by a large number of users, in today’s fix article we will discuss some of the best methods to try in this situation.
Please make sure to follow the steps presented in this guide in the order they were written (from the least to the more invasive), in order to ensure that no other problems can appear.
How can I fix the server execution failed error in OneDrive?
1. Check if you can access OneDrive online
Right-click the OneDrive cloud icon found in the taskbar, next to the clock (click the arrow ‘Show hidden icons’ if you can’t see the icon)
Click More -> View online.
If you can log in without any problems, then it means that the problem is caused by a local issue.
Please follow the next methods to fix it.
Note: If you can’t sign into OneDrive online, please check the Service Health portal to make sure that theMicrosoft Office Online Services are running properly.
2. Update your PC and OneDrive to the latest versions
4. Temporarily disable antivirus and firewall protection
Because performing this method will come down to what antivirus software you’re using, the exact steps can not be exemplified, but a Google search relating to this subject will help you do it.
Note: It is worth mentioning that resetting OneDrive will disconnect your sync connections, but you won’t lose any of the files in the process.
In today’s fix article we discussed some of the best methods that can help you solve the Server execution failed error in OneDrive. We hope that you found this guide helpful and that now you can easily sync your files with the OneDrive servers.
Please feel free to let us know if you have any suggestions by leaving a comment in the section found below this article.
It’s a nice thing to change the profile in Google Chrome, especially if all the members of the family use the same computer. You don’t have to fight a second more for who closed which tab and why.
Google added the option to select a certain profile when you start the browser, just like when you select a profile on Netflix.
How can I enable the Profile Picker in Google Chrome?
If you want to enable the Profile Picker in Google Chrome follow these steps exactly:
Open Google Chrome and type chrome://flags/#enable-new-profile-picker in the address bar.
The top option will be exactly the New profile picker. Click on the button from the right to enable it.
Press the relaunch button from the bottom right corner of the screen.
After you press the button, you will see all the profiles that exist on Google Chrome and you will be able to choose between them.
Of course, after you click the profile, Chrome will start with all the tabs the profile had opened the last time.
How can I add another profile in Google Chrome?
If you enabled the Profile Picker, it’s as easy as to press the Add person from the bottom right corner of the starting window. Next, just type a name and pick a profile image for it just like in the picture below.
You can also create a shortcut for the profile on the desktop if you leave the checkmark on the bottom-left corner.
How can I add a profile without Profile Picker?
If you didn’t enable the Profile Picker, it’s still pretty easy to add a profile.
Click on the profile picture on the top right corner of the screen.
Now click on the Add button from the bottom of the profile window. You will see the same window for adding a profile exactly as you see it if you want to add a profile from Profile Picker.
The Profile Picker is available now, but only for the Google Chrome Canary version.
Do you like the Profile Picker? How do you feel about it? Leave us your thoughts in the comments below.
Working with domains and hostnames can be a tricky business. Sometimes, it can be infuriatingly tougher than actually designing and building your website.
Domain or hostnames are essentially IP addresses in disguise. Resolving a domain name means converting it into an IPAddress. Your domain name needs to point at the right IP address in order to work correctly.
So what should you do when your domain name isn’t resolving correctly? The following guide will answer that question for you.
What to do if my domain name isn’t resolving to the correct IP Address?
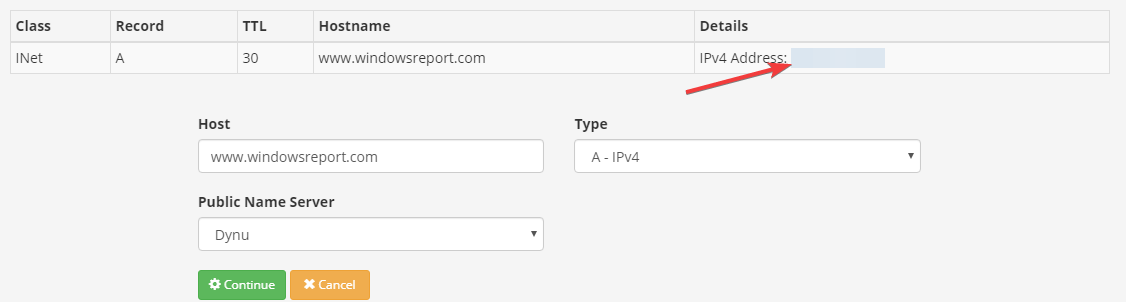
First things first, you need to ascertain if your domain name is truly pointing at the wrong IP Address. The easiest way to do this is by using a DNS lookup tool.
All you need to do is enter your fully qualified domain name in the Host textbox and then click on the Continue button.
The next screen will show you the hostname (your domain name) and the IP address next to it. You need to ensure that the IP address is correct.
If the DNS lookup tool produces no results, it could mean that there’s something wrong with your domain name or IP address.
After you’ve determined that the problem indeed lies within a misunderstanding between your domain name and IP address, you can begin troubleshooting it.
1. Fixing a domain registrar issue
Double-check that your Domain name is fully registered.
The easiest way to do this is by using a domain lookup such as Whois.net.
You may find that you have to purchase the domain before using it.
If you find any issues with the domain or domain name, you’ll need to contact your registrar to get it sorted.
If your domain has been registered and fully paid for and it has been a year or two since registry, your domain name may be expired.
Use the lookup tool to check if your domain has expired.
If it has and you’re still in the grace period, you may be able to renew it.
If not, you’ll have to wait until the domain name is dropped or released before you can purchase it again.
If it’s not registered or expired, it may be that it’s suspended for some reason.
Look through the text result from the domain name to spot any abnormalities.
2. Fixing a DNS hosting provider issue
If the IP address on your DNS service provider’s control panel or database differs from the address you see when you perform a DNS look, you’ll have to update the name servers for your domain and point them towards your DNS provider.
You can learn how to do this through your DNS provider’s help documents.
Alternatively, you can contact them.
Make sure that the only name servers you’re using are your DNS providers.
If you’re using name servers from two different providers, this may cause random IP Adress resolution errors.
If you’ve recently migrated from one DNS provider to another or changed IP addresses, there may be a propagation delay.
If that’s the case, you’ll need to wait for a minimum of 24-hours before the changes go through.
A little patience will resolve the issue for you.
If you’re using a subdomain, you need to ensure that it’s pointing to your DNS provider’s name service.
3. Flush DNS Cache
Open the Windows Power User Menu (Win + X).
Click on Command Prompt (Admin) / Windows PowerShell (Admin).
In the console window, type in the following command: ipconfig /flushdns.
The above steps will flush and reset the DNS resolver cache. This should help fix all DNS related problems, including domain name resolution issues.
We hope the above guide helps you resolve your resolution errors. Which method worked for you? Don’t hesitate to leave a message down in the comment box.
When you think of Microsoft, you probably think of Windows 10, PCs, and laptops. But, as of recent, the company has entered into a new market with two new products: Surface Headphones and Surface Earbuds.
Even with the Surface branding, you might be wondering if a company which is all about software and computers, could make the perfect pair of wireless earbuds. Well, after a week and a half of using the Surface Earbuds in my daily life and workflow, I can’t help but say that you shouldn’t be concerned.
From comfort, design, and so much more, the Surface Earbuds are truly amazing and are a true competitor to Apple’s Airpods.
Fit and design: It fits like a glove and invites you in for a touch
The most important part of the Surface Earbuds is the fit and design of the buds themselves. With a large touch surface on the side for controlling music and comfortable silicone tips for your ears, this is where they’re best.
Looking at the overall design of Surface Earbuds, you’ll see that Microsoft put a lot of focus on the exterior touchpads. Admittedly, the Earbuds might look a bit weird when in your ears for this reason. They’ll take up almost your entire ear canal and will draw attention, but it’s important to understand that this design has a purpose — for gestures and touch controls.
As for those touch controls, there is a total of 8 gestures you can use to your advantage. This includes a triple-tap to access a random song on Spotify on Android, and a tap and hold to bring up your voice assistant. That can be Siri on iOS, Google Assitant, or Cortana on Android or Windows 10. Other touch controls give you volume controls and options to skip songs.
This is a bit more advanced than just the double-tap gesture you get from Apple’s Airpods, and the four gestures you get on the Airpods Pro, or the 6 on Google’s Pixel Buds. The Surface Earbuds gesture are not customizable, though, but Microsoft still really went for something cool. If you want a similar touchpad on premium earbuds, you’ll have to give up another $100 on the Sennheiser Momentum True Wireless 2 (which are $300.)
Still, those gestures are really useful when you’re at your computer working through the day. I am a person that plays music from my phone when working. Thanks to the Earbuds, I didn’t need to go reaching to my phone to switch songs, change the volume, or answer my calls. I didn’t even need to ‘go digging” and move my hands around the Earbuds to see where I was touching, either. The large touchpads of the Surface Earbuds are designed for you to reach up and control your music. It isn’t too sensitive, either and I never experienced accidental touch.
Just be aware that there is no in-built Cortana in the Surface Earbuds. You still get a generic voice telling you which device you’ve connected to, or when you’re ready to pair, but all of the in-built Cortana functions of the original Surface Headphones are now gone. If you want Cortana, you’ll need to pair it with your PC. Not surprising, as Microsoft has repositioned the assistant.
Moving to the inside of the Surface Earbuds, you’ll find two microphones on each earbud, and the acoustic mesh grill which plays your music, It’s a really nice look, inside and out. Even replacing the tips is easy, with Microsoft giving you medium, small, and large tips to choose from. They stay secure and don’t easily fall out, unlike Apple’s Airpods Pro. The also company told me last October that the Earbuds can fit 95% of all ears, so there is a fit for you.
For the overall fit, the Surface Earbuds are amazingly comfortable. If you choose the right silicone tip, the Earbuds will feel very natural in your ear, without any pain sensations during long-haul use. That’s mainly because the buds do not sit tightly or directly enter your ear canal. Its silicone tips rather “rest” openly on the inside of your ears, relieving the pressure you otherwise get from similar noise-canceling earbuds or “canned” headphones. Its also to allow ambient noises in, as we get into later.
This is different from Google’s Pixel Buds, Apple’s Airpods Pro, or Samsung’s Galaxy Buds, all of which fit deeper inside your ear. To get a good fit, you put Surface Earbuds in with the tip facing down and then “screw” it upwards to secure. Microsoft says the Earbuds make contact with four points of your ear, but if you push hard enough you can get an air-tight seal to make the Earbuds go into your ear canal, but that obviously isn’t recommended.
Before getting the product I was initially worried that the Earbuds would fall out of my ears as I use them, but that wasn’t the case. The “small” tips create a nice fit in my ear that is quite secure. I tested out how this would work in a couple of ways. I went for a 2-minute jog around my block and the Earbuds stayed secure. I did a set of situps in my room, and the Earbuds stayed secure. I rode my bike around the yard and the Earbuds stayed secure.
The Surface Earbuds never fell out of my ears, even during routine productivity things like Microsoft Teams calls, or the process of listening to music while writing this review. They fit snug, secure, and will feel just as natural as your ears themselves as you wear them throughout your day.
Just be aware, Microsoft isn’t marketing these as fitness earbuds. They’ll work for fitness purposes if you want them, but as you get sweaty, be prepared to push them back into your ears after a short period of use. Keep the Earbuds for productivity, only, even if they are IPX4 rated.
Sound quality: Your music will sound good
Of course, sound quality is the most important thing, and this is yet another place where the Surface Earbuds don’t disappoint. From Electic Dance Music, Jazz, Pop, and more, your music will sound good with Surface Earbuds. Just don’t expect noise cancellation, mainly because of the open-ear design.
To get this level of sound quality, Microsoft is using what it is calling a “Surface Omnisonic sound profile” with “custom-designed drivers and precision tuning.” The company also says the tuning is “inspired by listening to the world’s best live music venues and most advanced audio equipment.” Importantly the SBC and aptX Bluetooth codecs are supported, too, for higher quality music on supported devices.
For me, this meant that at medium volume. the highs in the lyrics and the bass in Kygo’s Happy Now was great. The same applies when I listened to Rihanna’s We Found Love. Even a softer song like Capital City’s Safe and Sound was excellent sounding. Simply put, Surface Earbuds will be great for any lyrical music you listen to, though the bass isn’t as great as you’ll get with in-ear earbuds like Apple’s Airpods Pro.
But again, since the Earbuds are open-ear and sit on your ear canal and aren’t noise-canceling, you won’t (and can’t) really get a truly “outside-noise muted out” experience when listening to music. Those ambient sounds from around you will still go into your ear. You’ll need to keep the volume on the Earbuds to around 80% if you want to mute these ambient sounds out, but even then those around you might be able to get a peek at what you’re listening to due to the noise-bleed of the open-design on the Earbuds.
This ambient noise and lack of noise cancellation wasn’t a problem for me in my work from home environment, but if you’re outdoors, or in noisy environments, you’ll need to put the volume up to high levels to get a bit more immersed in your music. But again, if you want noise-canceling headphones, just buy the Surface Headphones 2 instead.
Again, this lack of noise cancellation isn’t a flaw and it shouldn’t be a reason not to buy Surface Earbuds. It’s all rather all by design. Microsoft says that Surface Earbuds are to “help you stay productive throughout your day.” Productivity often involves hearing the world around you and chatting with coworkers, friends, or family. So without noise-canceling features, you can keep the Surface Earbuds on all day instead of constantly pull them on and off just to talk to somebody. It’s also probably why I think the Earbuds lack an auto-stop feature when you pull them off, too, which many have complained about.
Even Apple’s Airpods Pro has software-based “Transparency mode” that lets you listen to the world around you without taking the earbuds off. Microsoft does this without software, but rather with the open-ear design. It is much more convenient.
To further try the productivity aspect, I tried the Earbuds on a 1-hour long Microsoft Teams call. I found that the person on the other end of my call sounded just as if they were in the same room as me. The microphones also enhanced my voice, too. When I asked the person on the call, he said that a lot of the background noise from me typing and taking notes wasn’t coming through and there was extra emphasis on my voice.
I found this quite interesting, as while wearing the Earbuds, I was still able to hear myself typing, and talking. It’s something you can’t get with earbuds that are noise-canceling, and I see the Earbuds as your best buds for our new work-from-home life.
Battery life and charging case: Designed to pick up and get going
Like I said when I first unboxed the Surface Earbuds, the highlight of Microsoft’s wireless earbuds is its charging case. With an oval “traffic light” shape and clean glacier color, this is unlike anything you’ll get from other wireless earbud makers. It’s clean and simple, down to the hidden pairing button on the bottom, the subtle LED light inside the case, and even the gray Surface Logo on the lid.
Sure, there’s the iconic white “floss” case for Apple’s Airpods or even the clean black cylindrical case for the Razer Hammerhead, but the Surface Earbuds are really unique in their own way. It’s designed to pick up and get you going throughout your workday, without worrying about the charge levels.
Coming in at 2.96 x 1.31 x 0.98 inches, and 40.7 grams in weight, the Surface Earbuds case is very indifferent from Apple’s Airpods. Apple’s is quite small, with a 2.11 x 1.74 x 0.84-inch dimension and 40.4-gram weight. With a tall and long build, this means Surface Earbuds case isn’t something you can easily fit in the little pocket in your jeans. It’s rather designed to slide into your big pocket, or your bag or purse. There is, though, perhaps a reason for this design — battery life.
Microsoft’s Surface Earbuds charging case can hold up to 24 hours of battery life with a single charge. That’s the same as Apple’s Earpods, but the Earbuds have one edge. They can last for 8 hours per change for continuous listening. On paper, that is longer than Apple’s Airpods, which only get you up to 5 hours of listening time per charge, according to this specs sheet.
In my week with the Earbuds (it typically makes up a 5-day a week 5-hour per day writing shift) I found myself that the change really held up. I only charged the case once. Your mileage might vary, but if you’re at home, in an office, or one of those essential workers going for a commute, the Surface Earbuds will be a good travel companion.
You’ll always have a charge in the Earbuds when you need it. Plus, you also don’t have to worry about the case breaking, either. It is plenty durable, and the lid isn’t too flimsy as you open and close it. The buds are also plenty secure when you slot them in the case and don’t move around as you shake the case thanks to some pretty strong magnets.
But nothing is perfect. The Surface Earbuds case does not support QI charging. That might be a deal-breaker for you, but Microsoft says that a 10-minute charge with the included USB-C cable can provide one hour of battery life. So, you can still prop the case in a USB-C plug to get a quick burst of juice for your commute or job it the battery is dead. That falls a bit short of the 3 hours of listening time you can get with a 15-minute charge in Apple’s Airpods case.
Integrations with Microsoft 365, multi-platform use, switching devices
Surface Earbuds go beyond just music. There’s an integration with Microsoft 365, too. They can be used to dictate in Word, and PowerPoint. You also can use them to live caption PowerPoints or translate your spoken words to another language with text on the screen. Finally, on iOS you can use the Earbuds to play your emails aloud. There’s even a feature coming that will let you swipe on the touch surface to control your PowerPoint slides.
I explained this in a separate post, and it’s quite nice to see Surface Earbuds pair up with Microsoft’s other services, too. But these features can still all work otherwise without the Earbuds, and with other Bluetooth headsets. It’s not exactly an exclusive.
Anyway, the Earbuds are still designed for multi-platform use. You can pair them with your iPhone, Android device, Windows 10 PC, and even on MacOS. Microsoft certifies the Surface Earbuds for iOS, Android, and Windows, but it’ll work on macOS too, though I found the touch controls won’t work on Apple’s desktop operating system. I paired the Earbuds to my Surface Laptop 3, MacBook Pro, Pixel 3 XL, Pixelbook Go, iPhone, and my Galaxy Tab S6. Thanks to Swift Pair, pairing is as easy as opening the lid and following the on-screen prompts on Android and Windows.
If you download the Surface Audio app for iOS, Android, and Windows, you’ll also have additional audio controls for the Earbuds and ways to update the firmware. You’ll be able to use an equalizer to change the low, mid bow, mid, medium-high, and the highs. There are also preset settings for Flat, Classic, Jazz, and Rock. It’s great that you have this level of control, but I do wish it was built into the system in Windows 10, where I mainly ended up using the Earbuds.
The small gripes, the bugs, and missing things
As much as I praised the Surface Earbuds, there are some bugs and gripes that I need to bring up. These don’t ruin the experience but are some things worth mentioning to avoid disappointment if you’re thinking of buying.
First off, the left earbud relies on the right one for pairing and connectivity. Another missing thing from the Earbuds is a charging status or light for the Earbuds case itself. While it is great that they get 24 hours charge, but there’s no real way of knowing how much battery is in them, asides from a red LED on the case. The Surface Audio software doesn’t show you, at least, not yet and I hope it gets introduced in a future software update.
Finally, the Surface Earbuds do not support Bluetooth multipoint. It’s a small inconvenience, but for $200 it is a let down to see that if I want to jump from using the Earbuds with both my PC and phone, I need to turn Bluetooth on and back off again on the device I want to use it on.
Still worth it, but there are alternatives if you want
If you’re considering buying the Surface Earbuds, they’ll be worth it for $200. The touch surface is absolutely unique, and the fit and audio quality and comfort will be great for daily use. However, there are still lots of alternatives right now which are worthy of mention.
You can find Google’ Pixebuds 2 for $179, which offers up some of the same touch controls and a more compact build and design. There’s also the Airpods Pro, which is $249, or the regular second-generation Airpods which are $200.
Of course, there are many other cheaper earbuds which I won’t get into, but the overall comfort, the touchpads, the design of Surface Earbuds are hard to beat and make the Surface Earbuds a nice shot at Apple Airpods. Good job, Microsoft.
Sometimes, when trying to launch a game on Xbox you may encounter Xbox One error 0x87de2712. It occurs when the user tries to launch a game and the full error reads:
Please try again. Sorry, we couldn’t start the game name. If you have a disc, insert it now (0x87de2712).
This error can occur due to multiple reasons including Xbox Live server issues, incorrect alternate address as well as firmware related issues.
If you are also troubled by this error, here are a couple of troubleshooting tips to help you resolve the Xbox One error 0x87de2712 so that you can complete your gaming session without any issues.
How do I fix Xbox One error 0x87de2712?
1. Check Xbox Live server status
If you are using digital media. That is, if you don’t have access to the game disc or if it’s a multiplayer game that requires internet access, it may show some errors if the Xbox Live server is facing issues.
Xbox Live server can go down due to scheduled maintenance or if there is a hardware failure.
Microsoft notifies the users if there is a service outage on its live status page.
Visit the Xbox Live status page and check if there are issues with the Xbox service.
Under the Gameand Apps section, go through the apps that are listed as affected by some issues and are down.
If found, you can’t do much about it. Microsoft will fix and change the status when the issue is resolved.
2. Change the network mode
If in the earlier assessment your game is found to be listed in the Xbox Live Status is under maintenance, try changing the network mode.
Press the Xbox button on your controller to open the Guide menu.
From the menu, navigate to Settings > System.
Select Settings and choose Network.
From the Network menu, open Network Settings.
Access Go Offline section.
This will put your console in Offline Mode.
Restart the console to apply the changes.
After the restart, try launching the game with the error and check if the error is resolved.
While some games may require the internet to complete synchronization, most of the games are designed to work offline. By putting your Xbox in Offline Mode, the games will temporarily suspend any process that requires access to the internet and let you play.
3. Clear alternate MAC address
Press the Xbox button on your controller.
From the Guide menu, select Settings > All Settings.
Open the Settings tab.
Choose Network option from the left pane and select Network setting.
From the Network menu, select the Advanced settings option.
Navigate and select the Alternate MAC address option.
In the Alternate Wire MAC address menu and select the Clear button.
Choose the Restart button to apply the changes.
After the reboot, check if the Xbox One error 0x87de2712 is resolved.
4. Perform a power cycle
Press and hold the Power/Xbox button on the console for 10 seconds.
Release the button once the LEDs on the front stop flashing.
Leave the console turned off for a few minutes.
Disconnect all the cables connected to the console including the power cord.
After a few minutes, reconnect the power cable and other cables.
Power on the Xbox console by pressing the Power button.
After the restart, try launching the game and check if the error is resolved.
The Xbox One error 0x87de2712 error can occur due to service outage. However, we have listed a few workarounds to help you resolve the error and resume playing the game.
If you’ve been unable to play Minecraft Dungeons on your PC after the game officially launched today, you’re not alone. Many PC gamers have been encountering “Unable to Verify Game Ownership” messages when launching the game today, and developer Mojang said that it was working on a fix.
“The issues around “Unable to Verify Game Ownership” in Minecraft Dungeons on Windows are still ongoing for some players but many are getting in and playing now. Thanks for your patience as server health improves,” the company said in a tweet published a couple of minutes ago.
Minecraft Dungeons has been released on Xbox One, PlayStation 4, Nintendo Switch, and Windows today, but only PC gamers seem to have trouble playing the game on launch day. The PC version is available from both the Windows 10 Microsoft Store and the standalone Minecraft Dungeons launcher for older versions of Windows. You can also play the game for free with Xbox Game Pass for PC and Console.
If you haven’t done in yet, we invite you to read our Minecraft Dungeons review published yesterday. If the dungeon crawler looks promising so far, it does feel a bit unfinished with a lack of support for cross-saves and cross-play multiplayer at launch.
Vudu is a popular streaming service offering on-demand movies and TV shows to the users. However, several users have reported the Vudu failed to connect error code 28 when trying to use the app.
This error can occur if your system’s firewall is blocking the connection or if there is a glitch with the app.
If you are also troubled by this error, here are a couple of tips to help you troubleshoot Vudu failed to connect error code 28 in Windows and get back to watching your favorite show on time.
How do I fix Vudu failed to connect error code 28?
1. Disable your firewall
Click on Start and select Settings.
Go to Update and Security.
Click on Windows Security.
Open Firewall and Network Protection.
Click on your currently active network,
Scroll down and toggle the switch to turn off Windows Firewall.
Close the Settings window.
If you are using a third-party antivirus with firewall, disable that as well.
Open Vudu and check for any improvements.
If the app works without any error, you may have to add the application to the whitelist.
Add Vudu to the exception list
Press Windows Key + R to open Run.
Type control and click OK.
Click on System and Security.
Click on Windows Defender Firewall.
From the left pane, click on Allow an app or feature through Windows Defender Firewall option.
Click the Change settings button. It may require administrative access.
Scroll down and click on Allow another app button.
In the Add an app window, click the Browse button.
Navigate to the Vudu installation directory and select the Vudu.exe file.
Click Open and then click Add.
Once added, make sure you check both Public and Private box.
Click OK to save the changes.
Close the Control Panel window.
Make sure you enable Windows Defender Firewall before launching the Vudu app. If everything went right, you should be able to use the app without the error.
2. Reset your internet modem
Unplug the power cable from the modem and also unplug it from the wall outlet.
If the modem has any batteries, remove the batteries as well.
Wait for a minute and leave the modem idle in the meantime.
Reinsert the batteries (if available) and connect the power cable.
Wait for a few minutes after connecting the power to complete the reset process. The modem lights should be solid.
Connect your device to the internet and check if the Vudu app is working without any issues.
If you are using a modem with a separate WiFi router make sure you reset the WiFi router as well.
3. Reinstall Vudu
Click on Start and select Settings.
Go to Apps.
Search for Vudu in the installed apps tab.
Select Vudu and click on Uninstall.
Confirm the action by clicking on Yes.
Download and install the app from the Microsoft Store.
The Vudu failed to connect error code 28 usually occurs if the antivirus or firewall is blocking the connection. By following the steps in this article can fix the error and get back to binge-watching your favorite shows on Vudu.
As of this writing, the Windows 10 May 2020 Update (or version 2004) release information page indicates no known issue for this major update, though this is probably temporary. The Windows 10 May 2020 update is projected to release at any point between today, May 26 and May 28, and we’ll have to check this page to keep track of any known issues.
The Windows 10 May 2020 Update introduces several new features including a new Cortana app that will be updated through the store, the Windows Subystem for Linux 2 (WSL2), an improved Bluetooth pairing experience, and much more. If you haven’t done it yet, we invite you to check out our hands-on video.
After building your website and choosing a host, you may find that the domain name of your dreams is taken. Instead of choosing another one, you may opt to wait for a couple of months until it expires.
Alternatively, you may have had a domain name before but you were unable to renew it before expiry.
However, just because a domain name is expired, doesn’t necessarily mean you can renew it or purchase it. You may be wondering why this is the case. In the following guide, we’ll explain why and how you can solve this.
How do I fix an unavailable domain name after expiry?
Expired domain name cycles all vary. When a domain name expires, most registrars will offer a grace period for the original registrant to renew an expired domain name(s).
During this period, the website (and email) will still be functional.
For most registrars, after the grace period comes a redemption period. During this period, the website and email become seize to function. After this period, there will be a short deletion pending period.
As soon as the deletion period is over, your registrar will delete and release/drop the domain name.
After the domain name’s release/drop, you’ll be able to scoop it up again, provided that someone hasn’t reserved it for backorder it or scooped it first.
A good example of this is ICANN, whose grace period is dependant on how long you’ve owned the domain name. In addition to this, each domain name extension has its own registry rules. This can impact the renewal process.
If you’re a domain name owner, who plans on keeping your domain for a long time, you need to prevent it from releasing after expiry. As the adage goes ‘prevention is better than cure’.
1. Auto-renew your domain
Go to your host‘sregistrar’s Renewal andor Billing page.
Log in if you haven’t already.
Select the domain name you want to auto-renew and click on the Auto-Renew On button.
The auto-renewal date should appear next to the domain name.
The above steps should work for most registrars and hosts such as GoDaddy. If the above steps didn’t work for you, you can find information on how to auto-renew your domain name on the registrar’s website. You’ll have to find the necessary documentation or help resources.
If you’re not the current owner or previous owner of the domain, you can grab the expiring domain before other users do. During or after the redemption period, the domain name may be put on expired domain auction where anyone can bid for it, even the previous owner.
Alternatively, it may be available for backorder on a first-come, first-serve basis.
Sometimes, the domain name registrar may not auction out domains. In that case, you’ll need to backorder the domain.
Once, you find the auction house, make sure that you keep track of the domain name.
Alternatively, you can hire a backorder service to keep track of the domain and bids for you.
You can either place a backorder or wait for the bidding to start on the domain.
Although, you can forgo this and wait for the domain name to be released or dropped while monitoring it carefully.
The latter option is a big gamble unless your domain name is undesirable.
If you’re the ex-domain owner and you’re trying to get your domain back after the grace period, you’ll have to wait a few days after the deletion period to buy it back.
Either way, waiting is your best option. If you have any questions or frustrations, please share them in the comment section below.
So you’ve got the Windows InstallerError 0x80300002. That means that the system cannot be installed on the partition you indicated because there is something wrong with the partition or the media you’re installing the system from.
If you got the 0x80300002 error, you probably see this on your screen: We couldn’t install Windows in the location you choose. Please check your media drive. Here’s more info about what happened: 0x80300002.
Sounds serious and complicated but don’t panic. The computer can feel your panic and use it against you. Of course not! We will fix this together in no time.
How can I fix Windows Installer Error 0x80300002?
1. Check the media
The first thing you need to check is the media from which you are installing the Windows system. If you are doing it from a bootable DVD, a scratch, or just an old disk could be the smoking gun here.
A more subtle approach would be to check if there are any compatibility issues between the media and the BIOS.
If you are installing Windows 10 from an external HDD or SDD, and that is based on GPT (GUID Partition Table), then your BIOS should be set on UEFI and if the media is based on MBR (Master Boot Record), your BIOS has to be set on Legacy.
Sounds complicated but if you don’t know either of them, the most simple way to fix it is by toggling your BIOSboot mode. You will find the option in the Boot section.
Open Command Prompt by pressing the Windows Button + R, then type cmd.
When the new window opens type diskpart to run the disk partitioning tool.
In the new window type list disk to find all the drives on your computer and the external media.
Of course, the point of this is for you to identify the correct drive.
Type disk X (where X is the correct number of the drive) to select it and then enter clean to erase all the configuration information and data from the drive.
To create another partition on the drive type create part pri, then select part 1 to select it.
The next step is to format it, so enter the command format fs=ntfs quick.
To activate the newly formatted partition type active.
Presuming that you have the image for Windows 10 ready, save it to the root of the USB storage device.
If you need any additional info on how you can create a Windows 10 UEFI bootableUSB, follow the simple steps from this handy guide.
3. Recreate all partitions
If nothing you’ve read until now worked, you will need to start from scratch and that means recreating all the partitions again. Don’t worry because it’s not so complicated.
Just restart the installation until you find the part where the system asks you where to install Windows (Where do you want to install Windows?).
There you will have the options to delete the partitions and that’s what you need to do. Delete all the partitions, then use the New button to create fresh partitions.
You only need one primary partition to install the new system so you don’t need to get too deep in creating the others. You can do that after you successfully install the new system.
Of course, go on with the installation and hopefully jump for joy at the end. If you have any more questions or suggestions, leave them in the comments section below and we’ll be sure to check them out.
Some users have posted on game support forums about an An existing connection was forcibly closederror message. The full error message states:
Internal Exception: java.io.IOException: An existing connection was forcibly closed by the remote host.
The error arises when users try to play games that require connection with a server, such as Minecraft. As a result, players can’t join the games’ servers.
How do I fix the connection forcibly closed error?
Users have confirmed they were able to fix the remote host error by selecting the Enable operating system’s restricted environment option.
To do that, press the Windows key + R keyboard shortcut.
Enter Control Panel in Run’s text box, and press the Return keyboard key.
Click System Security and Programs to open a list of applets for that category.
Then click Java to open the window in the shot directly below.
Select the Advanced tab on that window.
Then select the Enable operating system’s restricted environment option shown directly below.
Select the Apply option.
Click OK to exit.
2. Turn off antivirus software
The remote hosterror might be due to third-party antivirus software blocking a game’s connection with server. So, turning off antivirus software might resolve the issue for some users.
To disable an antivirus utility, right-click the system tray icon for it and select a disable or turn off option on its context menu.
If the utility’s context menu includes a disable firewall setting, select that option as well. Then try playing the game with the antivirus software disabled.
Restart your router after flushing DNS. You do that by unplugging the router, or pressing its on/off button.
Minecraft players can also try connecting with the Stuck.hypixel.net server, which might help fix the issue.
Those are some of the resolutions that have fixed the remote hosterror for players. They aren’t entirely guaranteed resolutions for all software the error arises for, but Minecraft players have confirmed those fixes.
Let us know which of these solutions allowed you to play Minecraft again without any issues.
Do so by leaving your feedback in the comments section below.
If ExpressVPN won’t launch in Windows 10 or is unable to start service, you’ll have to take a closer look at your VPN client’s application.
Users also complain about the fact that everything seemed to work just fine and the VPN suddenly stopped launching in Windows 10.
These issues will leave your traffic data unencrypted and you won’t be able to access any geo-locked platforms without the VPN, but we got your back.
Use the solutions below if ExpressVPN won’t launch or see an ExpressVPN engine unavailable message.
Why is my ExpressVPN not opening?
If your ExpressVPN is not starting and instead displays an error message such as Engine Unavailable, Service Unreachable, or Unable to start service, it’s possible that:
You run an outdated version of the VPN
The VPN application installed on your PC has corrupt files
The operating system you have is outdated
System permissions prevent the VPN app from running all its essential processes
You can fix all of these within minutes if you follow the correct workarounds.
Select Windows on the left-side menu and then click Download on the right.
Set up your app.
Set up the app
Find the download file and double-click on it.
The setup process will begin with a Welcome screen. Click Install.
If you get a popup dialogue asking you Do you want to allow this app to make changes to your device? Click Yes.
Wait while the app is being installed on your PC.
During installation, you may be asked to close any running instances of ExpressVPN, click OKto close running instances of ExpressVPN, and proceed with the installation.
You’ll need to install the ExpressVPN TAP driver as part of the app installation process. When you see the Windows Security screen for ExpressVPN Network adapters, click Install.
You will be notified when the installation process has successfully completed. The app will automatically launch once the process is finished.
Click Close to exit the Setup Wizard and launch ExpressVPN.
You can also launch ExpressVPN by locating the ExpressVPN shortcut on your desktop and double click the icon to launch ExpressVPN.
Did this help fix the problem? If not, try the next solution.
Some Internet Explorer users have posted on support forums about an Automation server error that arises within that browser. When those users try to open certain websites in IE, an Automation server can’t create object error message pops up.
Double-click Administrative Templates, within Computer Configuration, on Group Policy Editor’s navigation pane.
Then click Windows Components > Internet Explorer > Internet Control Panel > Security Page > Internet Zone within Group Policy Editor.
Double-click the Initiate and script ActiveX controls not marked as safe for scripting policy in Group Policy Editor.
Select Enabled for that policy.
Select the Apply option, and click the OK button to exit.
You’ll need to restart Windows for the new setting to take effect.
3. Reset Internet Explorer
Users have also confirmed they’ve fixed the Automation server error by resetting Internet Explorer. So, open Internet Explorer.
Click Tools to open the menu shown directly below.
Click Internet Options to open that window.
Click the Advanced tab.
Then press the Reset button to open the window in the shot directly below.
Select the Delete personal settings check box.
Select the Reset option.
Restart Windows after resetting Internet Explorer.
4. Try browsing with Edge
This isn’t exactly a fix, but you can always browse with Edge instead. Internet Explorer is a dated browser that Microsoft Edge has replaced as the default one for Windows 10.
So, try opening the same websites the Automation server error arises for in Edge instead. The websites might open without any issues in that browser.
There aren’t that many confirmed fixes for the Automation server error. However, the resolutions above are widely confirmed to fix that error. So, they’ll probably fix the issue for most users.
Let us know which one worked for you by leaving us a message in the comments section below.
The security database error arises for some users when they try to log in to domain servers with domain accounts via Windows 10. The full error message states:
The security database on the server does not have a computer account for this workstation trust.
Consequently, users can’t log in with domain accounts. However, they can still log in with local administrator accounts.
How can I fix the security database error?
1. Restart your domain connection
Restarting the domain connection is among the most widely confirmed fixes for the security database error.
First, log in with your local administrator account.
Next, press the Windows key + X hotkey to open a menu.
Select Run to open its window.
Input sysdm.cpl in Run’s text box box and click OK to open the window shown directly below.
Press the Change button on the Computer Name tab.
Select the Workgroup radio button.
Type WORKGROUP in the text box for that option.
Press the OK option.
Click OK on the dialog box that opens.
Then click OK again on the next Domain Changes dialog box.
Press the Close button on the System Properties window.
Select the Restart Now option on the dialog box that opens.
Thereafter, you’ll need to rejoin the domain.
Open the Computer Name/Domain Changes window again.
Select the Domain option.
Then enter your domain name in the text box for that setting, and click the OK button.
Enter you domain administrator account within the login window that opens, and click the OK button.
After rejoining the domain, you’ll need to restart Windows again.
2. Check Windows 10’s date and time settings
Check that Windows 10’s date & time settings (for the client) are right for your time zone.
Click the Type here to search button on the left of the taskbar.
Input date in the search box.
Then click Change the date and time to open the Settings window as shown directly below.
If the date and time isn’t quite right for you, select the Set time automatically option if that’s not enabled.
If Set time automatically is already enabled, turn that option off.
Click the Change button.
Enter the right date and time for your time zone in the window shown directly below, and click the Change option.
In addition, check the Time zone setting is correctly configured.
3. Enable Network Discovery
Make sure Network Discovery is enabled. To do so, input cmd in the Type here to search box.
Open an elevated Prompt window by right-clicking Command Prompt and selecting the Run as administrator option.
Then input this command in the Prompt’s window:
netsh advfirewall firewall set rule group=”network discovery” new enable=yes.
Don’t forget to press the Enter key to initiate the command.
4. Reset DNS Addresses
In addition, resetting the DNS addresses might help fix the issue.
Open an elevated Command Prompt as outlined for the third resolution.
Input ipconfig/flushdns in the Command Prompt and press Enter to flush the DNS cache.
Then type ipconfig /registerdns in the Prompt’s window, and press the Return button.
The above resolutions might fix the security database error so that you can log in with your domain account again. They’re not necessarily 100 percent guaranteed for everyone, but there’s a pretty good chance they’ll fix the issue.
Let us know which of the methods helped you by leaving your feedback in the comments section below.
Google Sheets is among the best freely available spreadsheet app alternatives to Excel. Sheets includes a SUBSTITUTE formula that enables you to replace a specific letter (or text string) in one cell with a word.
The cell that includes the SUBSTITUTE formula can display the replaced text for one cell.
However, the SUBSTITUTE formula can’t display replaced text output for a range of cells. If you include a cell range within it, the formula’s cell will display an Array value could not be found error message as shown in the snapshot directly below.
If you’re wondering how to fix that error so that SUBSTITUTE can be applied to a range of cells, check out the resolutions below.
How can I fix the array value error for SUBSTITUTE?
1. Turn the SUBSTITUTE formula into an array formula
To fix the Array value could not be founderror, you need to incorporate SUBSTITUTE within an array formula. An array formula is one that can return multiple output for a range of cells.
Thus, users who need to replace text in range of cells and then display the output in another range need to utilize an array formula.
So, what you need to do is add ARRAYFORMULA to the beginning of the SUBSTITUTE formula. To do that, select the cell that includes the SUBSTITUTE formula.
You must click in the formula bar, enter ARRAYFORMULA just after the equals (=) sign as shown in the snapshot directly below.
Then your SUBSTITUTE formula will display replaced text output for a range of cells instead of an array error.
In the example shown in the snapshot directly below, the formula replaces Y in three column cells with Yes and displays the output across three other cells below them.
2. Enter the REGEXMATCH formula instead
Alternatively, you could combine REGEXMATCH with an array formula for the same output.
To do that, open the Sheet spreadsheet you need to add the formula to.
Select a cell to include the formula in (it will display output across multiple cells).
Then copy this formula with the Ctrl + C hotkey: =ArrayFormula(if(REGEXMATCH(B2:B4,”^Yes|yes|Y|y”)=true,”Yes”)).
Click inside Sheets’ formula bar.
Paste the REGEXMATCH formula into Sheet’s formula bar by pressing Ctrl + V.
That formula replaces Y with Yes for the cell range B2:B4.
You’ll need the change the Y and Yes text in the formula to whatever you need for it.
In addition, you’ll need to change the cell reference in that formula to match your own requirements.
3. Enter the REGEXREPLACE formula
REGEXREPLACE is another alternative you can try when your SUBSTITUTION formula doesn’t return the expected output.
Open Sheets in a browser.
Select a cell for the REGEXREPLACE formula.
Copy this formula: =ArrayFormula(regexreplace(” “&B2:B4&” “,” Yes | Y | Y “,” Yes”)).
Click within the formula bar, and press the Ctrl + V hotkey to paste the formula.
Thereafter, edit the REGEXREPLACE formula’s referenced Y and Yes text to whatever text you need to substitute.
Change that formula’s cell reference to meet the requirements of your spreadsheet.
So, that’s how you can fix the Array value could not be founderror in Google Sheets. The overall resolution is to combine SUBSTITUTE, REGEXREPLACE, or REGEXMATCH with array formulas so that they display replaced (or substituted) text output across a range of cells.
Let us know if you found this tutorial to be useful by leaving us a message in the comments section below.
You can click Download on the PUBG Lite website to install the PUBG Launcher for that game. However, PUBG Lite is not available in all regions. However, you can circumvent that problem fairly easy.
How can I fix the PUBG not available in your region error?
1. Check your clock and region system settings
If you are in one of the serviced regions, and still can’t play PUBG Lite, then your laptop’s or desktop’s clock and region settings might not be right.
First, press the Windows key + R hotkey to launch Run.
Enter Control Panel in the Open box, and click the OK button.
Click Clock and Region and Region to open the window shown directly below.
Select your own region (country you’re in) on the Format menu if the right one isn’t selected there.
Click Apply and OK.
Click Date and Time on the Clock and Region Control Panel applet.
Select the Show this clock option on the Additional Clocks tab.
Select the time zone you’re in.
Select the Show this clock option and your time zone for clock 2 also.
Then click the Apply option.
Click Change time zone on the Date and time tab.
Then select the time zone you’re in on the window directly below.
Click the OK button.
2. Connect to Thailand server with VPN software
Those who aren’t in a PUBG Lite serviced region can still play the game by connecting with a VPN.
First, press the Windows key + S hotkey.
Input time in the Type here to search box and click Change the date and time to open the window directly below.
Turn off the Set time automatically option
Toggle the Set time zone automatically option off.
Select (UTC +07:00) Bangkok, Hanoi, Jakarta on the Time zone drop-down menu, which is Thailand’s time zone.
Click Download SoftEther VPNclient, which is freeware VPN software, on the VPN Gate client download page.
After installing and opening that software, select VPN Gate Public VPN Relay Servers to open a server list.
Double-click on a Thailand server with an uptime less than six hours to connect with it.
When connected with VPN server, open the PUBG Launcher to play the game.
So, that’s how you can fix the PUBG not available in your region error to play the game in both non-serviced and serviced PUBG Lite regions. Did you know you can check the PUBG latency to see how strong is your connection to the server?
For several reasons, when you try to log in to your Microsoft account on your Xbox One, the your account has been locked 0x80a40014 Xboxerror shows up on your screen.
With this error, you cannot get your game data or access your games.
The error comes with no prior warning, and you feel like your Microsoft account is locked for no reason. It may be locked after multiple failed logins or a bug in the system.
Also, the your account has been locked 0x80a40014 Xboxerror could show up when you violate Microsoft’s ToS. We won’t dwell on the causes but offer you quick fixes to this issue. Read this guide to the end.
How do I unlock my Xbox One account?
1. Confirm that the Xbox Live servers are online
Before proceeding with the other fixes, the first thing you should note is that due to server challenges, Microsoft can block several accounts that give false positives.
The screenshot above shows that there is no issue with the Xbox Live servers. However, if you identify a problem, then it means that the problem is beyond your control.
You can only wait until Microsoft resolves their server problem.
While waiting for the fix, you can still enjoy your Xbox One by putting it on Offline mode. In this mode, you cannot enjoy multiplayer games or stream or access your digital content.
Learn how to enter the Offline mode in the solution below.
2. Use your Xbox One in Offline mode
Power on your console and open the guide menu by pressing the Xbox button on your controller.
In the guide menu, go to Settings > System > Settings > Network to open the network menu.
Next, from the left panel, click on the Network settings menu.
Select Go Offline and then hit the A button to activate the Offline mode.
If it prompts you to confirm the action, click Yes.
Restart your Xbox One console, and the your account has been locked 0x80a40014 Xbox error will disappear.
3. Delete your profile and perform a power cycling procedure
Power on your console, and once again, open the guide menu by pressing the Xbox button on your controller.
Next, go to Settings > All Settings and press A.
In the Settings menu, click on the Accounts tab and select the Remove accounts option.
After opting to remove your accounts, the next step is to select the profile to delete and confirm it when you are asked to do so.
Next, close this menu and get back to your dashboard.
Now, press and hold the Xbox button on your console until the console is completely off, and the LED no longer flashes.
Finally, power on the console to complete the power cycling procedure.
You should see the Xbox animation when the console is about to come on.
4. Reach out to the Xbox support
If you delete your account and perform a power cycling procedure, but then your account has been locked 0x80a40014 Xbox error still does not disappear, you may need to speak with the Xbox support.
Visit the following website https://beta.support.xbox.com/contact-us, click on Ask a question, and let them know that your Microsoft account locked for no reason.
The your account has been locked 0x80a40014 Xbox error pops up randomly, even if you do not remember violating any of Microsoft’s Terms of Service. Microsoft’s support team can help you unlock your account when you reach out to them.
In the meantime, you can follow the steps here to put your console in the Offline mode and cut off yourself from Microsoft’s services to enjoy your games.
Another solution for resolving this issue when it seems your Microsoft is account locked for no reason is to delete your profile and perform a power cycling procedure.
If any of the fixes here worked for you, do let us know in the comments below.
Unfortunately, when it comes to printing XPS documents (XML Paper Specification), users have reported the XPS Print Error: Memory allocation failure error.
Mismatch issues oftentimes cause the error in the operating system related to the printer driver. Consequently, the successful solution applied in this case proved to be changing the default XPS driver or class driver with the manufacturer’s PS printer driver or a PCL printer driver.
Note that when you install a printer, if you allow Windows to do all the settings, it will automatically install the XPS driver.
How do I fix an XPS print error?
1. Install the correct driver from the manufacturer website
On your device, open Settings.
Click on Devices > Printers & Scanners > your printer > Manage Printer >Printer Properties > Advanced tab.
If you don’t see an alternative to the printer driver (i.e. if you did not install PCL or PS driver components during the printer installation) > go to your printer‘s manufacturer site.
Search for the universal printer driver or PostScript driver.
Download and install. Make sure it is the v3 version, not v4, since v3 is more flexible.
During the installation, you might be prompted to provide your IP address so have it at hand.
You might have to reboot the computer.
2. Disable Print to file or Print as image
Assuming you’re already on the Print dialog box, click on the Printer drop-down menu and select the correct printer from the list.
Click on the Properties button next to the printer’s name.
Now, click on the Advanced tab.
Look for an option called Print to file or Print as image and uncheck it.
Click on OK to save your changes and close the dialog box.
Finally, click on the Print button to print your document and see if the XPS Print Error persists.
Additionally, we recommend changing the PDL settings (Printer Drive Language) from PCL XL to PCL 5e (also found in Printer Properties, as shown above).
Many of our readers stumbled across the Memory allocation failure on Kyocera. If you’re in the same situation, follow the highlighted dedicated guide for tested fixes.
We hope that this solution helped you fix the XPS printing error. If you have any further suggestions, please submit them in the comments section below.
Error 0x80070021 arises for some users when they try to copy (or back up) Outlook’s PST file to another folder.
Sadly, this isn’t the only issue you can encounter, and many reported Outlook error 0x80040600 as well. Today, let’s see how we can fix the error at hand, shall we?
Why does error 0x80070021 appear in Outlook?
Issues with third-party software, such as MS Office Communicator, can cause this problem.
Add-ins, such as Search Email Indexer, may lead to this issue in Outlook.
In some instances, the startup applications can interfere with Outlook.
How do I fix error 0x80070021?
1. Check if Outlook is running
To check if Outlook is running, right-click your taskbar to select Task Manager.
Select the Processes tab.
Select Outlook if it’s listed under Apps, and press the End task button.
If Outlook isn’t listed under Apps, look through Background processes to check if it’s listed there and then use End task button.
Some users have also confirmed that closing Skype via Task Manager fixes error 0x80070021. So, repeat the above steps for the Skype app.
2. Uninstall MS Office Communicator
To uninstall MS Office Communicator app, press the Windows key + R.
You can open the uninstaller window by entering appwiz.cpl in Run and clicking OK.
If MS Office Communicator is listed in Programs and Features, select that software.
Click Uninstall to remove Office Communicator.
Restart Windows after uninstalling Office Communicator.
After doing that, check if error 0x80070021 is gone.
3. Clean Boot Windows
Open Run, which you can do with the Windows key + R keyboard shortcut.
Input msconfig in Run and press Enter to open the window shown directly below.
Click the Selective startup option on the General tab.
Deselect the Load startup items check box.
Select the Load system services and Use original boot configuration settings.
Make sure the Hide all Microsoft services option is selected on the Services tab.
Then click Disable all to deselect all the third-party services.
Click Apply,OK, and then Restart on the dialog box that opens.
Thereafter, copy the Outlook PST after clean booting.
Then you can restore your original startup configuration.
After doing that, check if error 0x80070021 in Outlook is gone.
To do that, hold the Shift key and click Restart on Windows 10’s Start menu.
After restarting, select Troubleshoot and select Advanced options. Next, go to See more recovery options and choose Startup Settings.
Click the Restart button.
When the Startup Settings list appears, press the 4 key to select Enable Safe Mode.
Once you enter safe mode, check if error 0x80070021 still appears.
5. Remove Outlook’s Search Email Indexer add-in
To remove that add-in, click File in Outlook.
Click Options to open the options window.
Click Add-ins on the left of the window.
Select Com Add-ins on the Manage drop-down menu, and click the Go button.
Select the Search Email Indexer add-in, and click the Remove button.
Those are some of the confirmed resolutions for error 0x80070021 that have fixed the issue for Outlook users.
So, the resolutions above will usually fix the error. Aside from those fixes, rolling Windows 10 back to a restore point might also resolve the issue.
We also have to mention that there are many other issues that you can encounter, such as Outlook not sending emails, but we covered that one in a separate guide.
Let us know what troubleshooting steps you used to fix this Outlook issue. Do so by leaving us a message in the comments section below.
USB drives have entirely replaced floppy disks as the standard portable storage medium. Even though cloud storage has become a viable alternative, lots of users still utilize USB sticks. Most USB sticks (or flash drives) are formatted with FAT32.
An item can’t be copied error message will pop up for users when they try to transfer files larger than 4 GB to FAT32 USB sticks. The same issue arises on both Windows and Mac platforms, but with different error messages. Those error messages are:
The item <ITEM NAME> can’t be copied because it is too large for the volume’s format.
The file <FILE NAME> is too large for the destination file system.
The first is the Mac error message, and Windows displays the second error message. The issue arises because 4 GB is the max file size limit for FAT32 USB drives. Therefore, users can’t save files larger than 4 GB on USB sticks.
How can I fix the item can’t be copied error?
1. Convert the USB Drive’s format to NTFS
Windows users need to change their USB drives’ formats to NTFS to fix the file is too large error.
First, back up your USB drive (the content will be erased).
2. Convert the USB Drive’s format to Mac OS Extended (for Mac users)
Mac users can fix the item can’t be copied error by changing their USB drives‘ formats to Mac OS Extended.
Make sure you back up you flash drive’s files first.
Insert your USB drive into the Mac.
Open your Mac’s search utility.
Enter disk utility in the search box.
Then click Disk Utility to open that tool.
Select the connected USB drive on the left of the window.
Click the Erase option.
Select OS X Extended (Journaled) on the drop-down menu.
Press the Erase button.
Click Erase again if you need to confirm.
3. Compress the file
If the file you’re trying to transfer to a USB stick isn’t much larger than 4 GB, you might be able to compress it to less than 4 GB.
After reducing a file to less than 4 GB, you can save it on the FAT32 USB drive without needing to change the USB storage.
You can compress videos with numerous software and web utilities. The video compression software post provides further details for some of the best Windows 10 video compression software.
The Personalize feature in Windows 10 allows the users to customize their desktop. You can change the desktop background, customize colors, lock screen, themes , and more. Some users have reported that Windows 10 won’t open personalize from the desktop issue.
According to a user report in the Microsoft Community, after right-clicking on the desktop and select Personalize an error message pops-up.
I have Windows 10 Insider Preview build 10074, and when I try to personalize, (Right click desktop screen > Personalize) It won’t open.
If you are also troubled by this error, here are a couple of troubleshooting tips to help you fix Windows 10 won’t open personalization in Windows.
How do I fix the Windows 10 personalization issue?
1. Check Windows activation
One reason why some functionalities of Windows may not work is that the Windows version is not activated.
Click on Start and select Settings.
Go to Update and Security.
From the left pane, click on Activation.
On the right side, check if the “Windows is activated” message is displayed. If it says Windows is not activated, you may have to activate your license to access the Personalize option.
Microsoft periodically releases new updates to fix bugs in the OS. Check if any updates are pending and require installation.
Click on Start and select Settings.
Go to Updates and Security.
Click on Windows Updates.
Check if any updates are available for download.
If not, click on Check now to find available updates.
Download and install any pending updates.
Check if the Windows 10 won’t open personalize issue is resolved.
3. Try System Restore Points
When enabled, Windows automatically creates a system restore point. If the issue occurred after installing an update or app, you can use Restore Point to restore the PC.
Press the Windowskey and type restore in the search bar.
Click on the “Create a Restore Point” option.
In the System Properties window, click on “System Restore” button.
Click Next to proceed.
Check the “Show more restore points” box. This will display all the available restore points.
Select the most recently created restore point and click Next.
Read the on-screen message and click on Finish to proceed.
Wait for the system to restore the computer to the earlier point when it was working without any issues.
After the system restore is complete, check if you can open Personalize in Windows 10.
4. Reset this PC
If the issue persists, try resetting the PC. There are two options to reset your PC.
Click on Start > Settings.
Go to Recovery.
Under “Reset this PC” click on Get Started.
Under “Choose an option” you have the following options: Keep my files: First, select this option. It will uninstall the apps and settings but will keep your personal files. Remove everything: If the first option doesn’t work, select this option. This will remove all of your apps, settings, and personal files and the PC will be reset to factory settings.
Once done, right-click on the desktop and select Personalize.
In case the issue persists, you may have to fresh install Windows 10. Create a bootable USB drive and perform a clean install.
Microsoft confirmed the existence of an update KB4556799 connectivity bug. When the company released the CU weeks ago, it meant to fix a couple of Windows 10 issues, including app security.
But as always, things did not go according to plan, and users started complaining about errors with the update. Some of the earliest complaints touched on issues like installation failure.
Microsoft’s looking into the KB4556799 connectivity bug
Some users are still reporting being unable to connect to the internet after installing KB4556799.
If you are experiencing this issue, you can breathe a sigh of relief. Microsoft is now aware of it, and is working to resolve it.
After installing this update on a Windows 10 device with a wireless wide area network (WWAN) LTE modem, reaching the internet might not be possible. However, the Network Connectivity Status Indicator (NCSI) in the notification area might still indicate that you are connected to the internet.
At the same time, the company confirmed having seen social media and news reports about multiple KB4556799 issues.
One Reddit user recently shared their awful experience with the update to the Windows Subreddit. The user reported performance issues, including browser crashes, after installing build CU KB4556799.
Another user got error 0x800f0988 after attempting to install the CU. When this bugshows on your screen, you just cannot install the update without fixing it first.
Still, other Windows 10 users have reported audio and graphics issues after installing the May 12, 2020 update.
It may be interesting to note that Microsoft’s official customer feedback channels are not receiving a lot of these complaints. Most likely, affected users are sharing their concerns through social media without directly engaging the Redmond-based corporation.
The company, though, said it is actively engaging customers who have raised any issue with the update.
Are you are still getting error 0x800f0988 when you attempt to install KB4556799 files? Try these easy steps to solve the problem.
Meanwhile, if you’ve discovered any Windows 10 update bugs lately, let us know via the comments section below.
Some Xbox app (now Xbox Console Companion) users have started threads on Microsoft’s forum about a microphone error that arises for that app.
When those users try to set up a party within the Xbox app, it displays an error message that states:
The sample rate for your microphone isn’t supported. Here are some potential resolutions for users who need to fix the Xbox app’s microphone isn’t supported error.
How do I fix the microphone sample rate error?
1. Open the Recording Audio troubleshooter
First, try fixing the microphone isn’t supported error with the Recording Audio troubleshooter.
Click Windows 10’s Type here to search taskbar button to open its search tool.
Input troubleshoot in the search utility’s text box, which finds Troubleshoot settings.
Click Troubleshoot settings to open that tab.
Select Recording Audio on the Troubleshoot tab.
Press the Run the troubleshooter button for Recording Audio.
Select the microphone you need to fix the issue for.
Thereafter, the troubleshooter will open and might provide a potential fix. If so, click the Apply this fix option.
2. Check microphone permissions for the Xbox app
Check that the Xbox app has the required microphone permissions.
Enter the keyword microphone permissions in the search utility.
Select Choose which apps can access the microphone to open Settings as in the snapshot directly below.
Toggle the Xbox Console Companion’s microphone permission on if it’s off.
3. Reinstall the microphone’s drivers
Try reinstalling your microphone’s drivers.
To do so, launch Run with the Windows key + S keyboard shortcut for it.
Input mmsys.cpl in the Open text box and click OK.
Click the Recording tab on the Sound window that opens.
Select your microphone on that tab.
Click Properties to open the window in the image directly below.
Press the Properties button within the Controller Information box on the General tab.
Then click the Driver tab on the next properties window that opens.
Click the Uninstall Device option.
Press the Uninstall button on the dialog box that opens.
Thereafter, click the Restart option on your Start menu.
Then Windows will install a generic microphone driver.
The comdlg32.ocx file is an ActiveX control for Visual Studio 6. Thus, it is part of the Visual suite, and numerous programs need it.
Some software might display this error message when users try to launch them: Component comdlg32.ocx or one of its dependencies not correctly registered: a file is missing or invalid.
That error arises when the comdlg32.ocx file a program needs is missing or corrupted.
How can I fix the comdlg32.ocx error?
1. Download a new comdlg32.ocx file
Users have fixed the comdlg32.ocx error by downloading a new comdlg32.ocx file to replace a missing or corrupted one.
Right-click the comdlg32.ocx file and select the Copy option.
Open this path on 64-bit Windows platforms:
C:>Windows>SysWOW64. On 32-bit Windows, open this folder: C:>Windows>System32.
Right-click within the folder to select Paste, which will copy the comdlg32.ocx file into the open folder.
Press the Windows key + R keyboard shortcut, which will open Run.
Input cmd in the Run accessory, and press the Ctrl + Shift + Enter key.
For 64-bit Windows platforms, enter the command shown in the snapshot directly below.
Remember to press the Return key after entering commands.
Those with 32-bit platforms will need to enter the command in the image directly below.
2. Reregister an existing comdlg32.ocx file
If the comdlg32.ocx is not missing, try reregistering the current file. To do so, open the Command Prompt as administrator. Then enter regsvr32 comdlg32.ocx in the Prompt, and press the Return key.
3. Run the software in compatibility mode
Try running the software the error arises for in compatibility mode.
Right-click the icon for the program that returns the comdlg32.ocx error message and select Properties.
Click the Compatibility tab in the window that opens.
Select the Run this program in compatibility mode for check box.
Select an older Windows platform than your current one.
Click the Run this program as administrator option to select it.
Select the Apply option, and click OK to close window.
4. Reinstall the software
Reinstalling the software the comdlg32.ocx error arises for might also fix the issue for some users.
To do so, open Run.
Open the uninstaller window by entering appwiz.cpl in Run and clicking OK.
Select the software you need to fix the comdlg32.ocx error for.
Click Uninstall and Yes to remove the software.
Restart Windows before reinstalling the software.
Then reinstall the latest version of the uninstalled software.
The article above contains plenty of troubleshooting steps, but we would like to know which one helped you the most. Please let us know by leaving a message in the comments section below.
The DiskPart utility helps the users to manage their PC’s drives. However, sometime when using the tool you may encounter the ‘There are no fixed disks to show’ DiskPart error.
This error can occur due to multiple reasons including an improperly connected HDD, missing drivers or even corrupted BCD data.
If you are also troubled by this error, here are a couple of troubleshooting tips to help you resolve the ‘There are no fixed disks to show’ DiskPart error in Windows.
How do I fix There are no fixed disks to show DiskPart error?
1. Check your HDD for a loose connection
If you recently made any hardware modifications to your computer, you may want to check if the HDD connections are properly connected.
Turn off your computer and make sure you disconnect the system from any power source.
Access the computer internals and unplug the hard drive.
Restart your computer and wait for the system to detect no hard disk is connected.
As soon as you get an error saying no hard disk is connected, turn off the computer and connect your hard disk.
Make sure you have connected them firmly.
Once done, reboot the computer and check for any improvements.
Plugin a USB flash drive to your computer (the one on which the partition tool is downloaded). Make sure the USB flash drive has sufficient space.
Launch AOMEI Partition Assistant and click on Make Bootable Media from the left pane.
Click Next.
Select the USB Boot Device option and select your USB flash drive.
Click Proceed.
Click Yes to confirm the action.
Once the Bootable drive is ready, unplug the USB drive.
Rebuilding MBR
Connect the bootable USB flash drive to the computer with the error.
Restart the computer.
Make sure you boot from the connected bootable drive. If required, change the boot order in BIOS.
Next, you will boot into AOMEI Partition Assistant’s main interface.
Right-click on the system disk (where the Windows is installed) and select Rebuild MBR.
In the Rebuild MBR window, click the drop-down menu for Set the type of MBR for the current OS and select the correct version of your OS.
Click OK to proceed.
Click Apply and Proceed to complete the process.
Once the process is complete, unplug the USB drive and restart the computer.
3. Check for corrupt Boot Configuration Data
Boot from a bootable flash drive or Windows installation media. If you don’t have an installation media, here is how to create one.
Once on the installation screen, click on Repair your computer.
In the Advanced Options screen, click on Command Prompt.
In the Command Prompt window, enter the following command and hit enter to execute: Bootrec /scanos Bootrec /fixMBR Bootrec /fixBoot Bootrec /rebuildBCD
Make sure you execute all the commands one by one.
Close the Command Prompt once the command is executed and restart the computer.
4. Perform Windows Startup Repair
Insert the Windows installation DVD or flash drive and restart your computer. If you don’t have an installation media, check Method 2 – step 1.
When the message Press any keyto boot from CD or DVD appears, press any key.
On the installation screen, click on Repair your computer in the bottom left corner.
Next, select Troubleshoot > Advanced Options.
Select the Automatic Repair option.
Choose the operating system to proceed.
Windows will scan the system for any issues and corrupt system files that may require repairing.
Once done, restart your computer and check for any improvements.
The ‘There are no fixed disks to show’ DiskPart error occurs if the system detects issues with the hard drive or if the Windows installation is corrupt. Follow all the steps in this article to resolve the computer to resolve the issue.
However, if the issue persists, check if the hard disk is damaged or corrupted. You can do that by connecting the hard disk to another computer and trying to boot from it.
The access control entry is a corrupt error that can arise for some users when trying to change the owners for folders via Advanced Security Settings. One user said this in a forum post:
So I was trying to change the (folder) owner in the Advanced Security settings… When I go into the Permission Entry for that specific owner, it shows the error message, This access control entry is corrupt.
These are some of the confirmed resolutions for the access control entry is corrupt error.
How do I fix the access control entry error?
1. Run a system file scan
First, try running a System File Checker scan, which might, or may not, fix the issue.
Open the Run accessory by pressing the Windows key + R keyboard shortcut for it.
Type cmd in the Open text box, and press the Ctrl + Shift + Enter key combination.
Click Yes on the UAC prompt that might open.
Before initiating the SFC scan, enter DISM.exe /Online /Cleanup-image /Restorehealth; and press the Return key.
Thereafter, enter the sfc /scannow command and press Return to run an SFC scan.
When the SFC scan is done, restart Windows if the scan repaired files.
2. Close all Universal Windows Platform apps
If the first resolution doesn’t fix the access control entry error, try closing all UWP (Universal Windows Platform) apps with Task Manager.
Right-click your taskbar and select Task Manager on the menu.
On the Processes tab, close everything listed under Apps.
You can do that by right-clicking apps and pressing the End task button.
Have a good look through Background processes for any processes that might be for UWP apps.
Close all background processes for UWP apps listed there, such as Calculator, Mail, Edge, Photos, Candy Crush, etc.
Thereafter, close Task Manager. Then try to adjust the permissions for the folder the error arises for.
3. Take full ownership of the folder
This is one of the most widely confirmed fixes for the access control entry error.
First, right-click the folder you need to fix the error for and select Properties.
Then select the Security tab.
Press the Advanced button on the Security tab.
Next, click the Change option to open a Select User Group window.
EnterUsers within the object names text box.
Press the Check Names button, which will modify the syntax a bit.
Click the OK button to close the Select User Group window.
Click Apply to save the changes.
Those are three of the best ways to fix the access control entry error. Users who have fixed the same error with other methods are welcome to share their fixes below.
Error 0x800700d8 is one of numerous Windows Update error codes. The error 0x800700d8 messages states:
There were problems installing some updates, but we’ll try again later.
Consequently, users can’t install certain updates when error 0x800700d8 arises. The potential fixes for that issue are pretty similar to other Windows Update error codes that share the same error message.
How do I fix Windows 10 error 0x800700d8?
1. Run the Windows Update troubleshooter
Some users have said that the Windows Update troubleshooter can fix error 0x800700d8.
To open that troubleshooter, click the Type here to search taskbar button.
Enter troubleshoot in the Type here to search box.
Then select Troubleshoot settings to open a list of troubleshooters in Settings.
Select the Windows Update troubleshooter.
Click Run the troubleshooter to open the Windows Update troubleshooter.
If the troubleshooter provides a resolution, click Apply this fix.
2. Uninstall third-party antivirus software
There might be a third-party antivirus utility blocking Windows updates from installing.
To open the Windows uninstaller, enter appwiz.cpl in Run and click OK.
Select your third-party antivirus utility.
Click the Uninstall option.
Select the Yes option to confirm.
The antivirus utility might leave behind some residual files.
The How to remove software leftovers guide provides further details for erasing residual files.
Before uninstalling an antivirus utility, you can try disabling it first. To do so, right-click the antivirus utility’s system tray icon and select a disable or turn off option on its context menu.
If that doesn’t fix error 0x800700d8, uninstall the antivirus software to ensure it isn’t blocking updates.
3. Turn off deferred upgrades
Some users have confirmed they’ve fixed error 0x800700d8 by turning off deferred upgrades in Windows 10.
Press the Windows key + S keyboard shortcut to open the Type here to search box.
Enter the keyword Windows Update in search box.
Then click Windows Update settings to open the window shown directly below.
Click the Advanced options to open further update settings.
In more recent Windows 10 versions, you’ll need to select 0 values in both the Choose when updates are installed deferral drop-down menus.
In older Windows 10 builds, you’ll need to uncheck a selected Defer upgrades check box.
Restart Windows after disabling deferred updates.
4. Reset Windows Update components
Reset Windows Update components can fix WU glitches.
Right-click Command Prompt to expand a context menu on when you’ll need to select Run as administrator.
Next, enter these commands separately and press Return after each:
net stop wuauserv
net stop cryptSvc
net stop bits
net stop msiserver
Press the Windows key + E hotkey to open File Explorer.
Go to C: > Windows in File Explorer.
Right-click the SoftwareDistribution folder and select Rename.
Enter SoftwareDistribution.old as the new title for that subfolder, and press the Return key.
Open the C: > Windows > System32 folder in File Explorer.
Then right-click catroot2 and select Rename to change its folder title to Catroot2.old.
Open the Command Prompt as administrator.
Input these commands to restart the previously stopped services:
net start wuauserv
net start cryptSvc
net start bits
net start msiserver
Restart your desktop or laptop after resetting Windows Update.
Those potential resolutions for error 0x800700d8 are worth a shot. Note that you can manually download required updates from the Microsoft Update Catalog.
Enter the KB numbers for updates in the search box there, and then install any downloaded updates. You can also utilize the Update Assistant to update Windows 10 to a new build version.
Let us know if the solutions above helped you by leaving us your feedback in the comments section below.
Many users reported iTunes error 9006 on their Windows 10 PC. This error usually appears when trying to download something from Apple’s servers, and in today’s article, we’ll show you how to fix it.
What to do if iTunes error 9006 appears on Windows 10?
1. Use a different USB port or USB cable
iTunes error 9006 can appear while downloading files to your iOS device. To fix this issue, users are suggesting to connect the iOS device to a different USB port and check if that works.
In addition, you might want to try using a different USB cable and check if that helps. Also, it’s advised to use Apple-certified cables for the best results.
2. Disconnect your phone and reconnect it
According to users, sometimes you can fix this problem simply by disconnecting your iOS device while the update is downloading.
To do that, follow these steps:
Put your iOS device in the Recovery Mode and let the iTunes download the update.
While iTunes is downloading, disconnect your iPhone.
Once the update is close to finishing, connect your iPhone again and the update should be installed.
Other users claim that you need to do the following:
Enter DFU mode on your device and select Restore > Restore and Update.
Pause the download on iTunes and remove the iOS device.
Restart the iOS device and resume the download.
Connect the iOS device to your computer and put it back into DFU mode.
Wait for the process to finish and choose the Restore option.
3. Check your antivirus and firewall
According to users, sometimes your antivirus or firewall can cause iTunes error 9006 on Windows 10. To fix it, it’s advised that you add iTunes as an exception in Windows Firewall.
To do that, follow these steps:
Press Windows Key + S and enter windows defender firewall.
Select Windows Defender Firewall from the list of results.
From the left pane, select Advanced settings.
Right-click Inbound Rules and choose New Rule.
Select Program and locate iTunes.
Select As rule Applies and select all options.
Save changes.
After doing that, check if the problem is still there. Alternatively, you might want to try disabling your antivirus or firewall temporarily and check if that helps.
There you go, these are just a couple of simple solutions that should help you fix iTunes error 9006 on your Windows 10 PC.
Let us know which solution is the best at fixing this issue by leaving us your feedback in the comments section below.
Sometimes you might encounter iTunes error 4013 on Windows operating system. This issue usually appears when you’re trying to restore your iOS device using iTunes, and in today’s article, we’ll show you how to fix this problem once and for all.
1. Make sure that iTunes and your system are up to date
If you’re getting iTunes error 4013 on your Windows PC, you need to ensure that you have both the latest versions of Windows and iTunes installed.
To check for updates, you just need to do the following:
Press Windows Key + I to open the Settings app.
Navigate to the Update & Security section.
Now click the Check for updates button.
After installing the latest updates, check if the problem is still there. Alternatively, you can update iTunes to the latest version and check if that solves the problem.
To do that, follow these steps:
Open iTunes.
Navigate to Help > Check for Updates.
After updating iTunes, check if the problem is still there.
2. Forcibly restart your iOS device
Sometimes the only way to fix this error is to restart your iOS device by force. This process is relatively simple, but it differs depending on the model.
iPad with Face ID
Press and quickly release the Volume Up button.
Press and quickly release the Volume Down button.
Press and hold the Top button until the device restarts.
iPhone 8 or newer
Press and quickly release the Volume Up button.
Do the same with the Volume Down button.
Now press and hold the Side button until the Apple logo appears.
iPhone 7, iPhone 7 Plus, and iPod touch (7th gen)
Press and hold both the Side/Top button and Volume Down button.
Do this until you see the Apple logo.
iPad with Home button, iPhone 6s or older, and iPod touch (6th gen)
Press and hold both Side/Top button and the Home button.
Keep the buttons pressed until you see the Apple logo.
3. Try using a different cable, USB port, or a computer
Sometimes the issue can be caused by your USB cable or USB port. Try switching the USB port and check if that helps. You might also want to try using a different USB cable. Keep in mind that you need to use official or Apple-certified cable in order to avoid additional issues.
Lastly, you can try to perform this process on a different computer and check if that helps. If the problem is still there, try using the Update option instead of Restore and check if that solves the problem.
There you go, a couple of simple solutions that should help you fix iTunes error 4013 on your Windows PC.
What method did you use to get rid of this annoying error?
Let us know what worked for you by leaving us a message in the comments section below.
When trying to set a different search engine or making other changes to your Google Chrome browser, you may encounter ‘this setting is enforced by an extension / your administrator‘ error.
This error can occur due to multiple reasons, including conflicting Chrome extensions, local Chrome policy, as well as a malicious registry key.
If you are also troubled by this error, here are a couple of troubleshooting tips to help you resolve the ‘this setting is enforced by an extension/your administrator‘ error in Windows.
How do I fix this setting is enforced by an extension/your administrator Chrome error?
1. Disable Google Docs Offline extension
Launch Google Chrome.
Click the menu icon (three horizontal bars).
Select Tools and then click on Extensions.
This will list all the Chrome extensions installed for the browser.
Locate Google Docs Offline extension and toggle the switch to turn off the extension.
Restart Google Chrome and check if the error is resolved.
If the error persists, remove the Google Docs Offline extension.
To remove the extension, open the Extensions option.
Click the Remove button under Google Docs Offline.
Restart Google Chrome and check for any improvements.
2. Check for malware attack
Before messing with registry files, check if your system is infected with malware or adware.
If you have an antivirus installed, perform a complete scan of your system to find any hidden browser hijacker.
Malwarebytes is known for its malware finding capabilities and can perform a deep scan to find browser hijackers as well as viruses.
After performing a deep scan, remove all the trojans, malware, and potentially unwanted programs.
Restart Google Chrome and check for any improvements.
Your PC can get infected by malware and browser tool hijackers if you have downloaded software and media contents from suspicious sites. By running a deep scan, you can remove suspicious programs from your computer.
3. Change the policy via Command Prompt
Press the Windows key.
Type cmd.
Right-click on Command Prompt and select Run as Administrator.
If prompted by the UAC, click Yes to proceed.
In the Command Prompt, enter the following command one by one and hit enter to execute: RD /S /Q “%WinDir%System32GroupPolicyUsers” RD /S /Q “%WinDir%System32GroupPolicy” gpupdate /force
Once the commands are successfully executed, close Command Prompt.
Restart Google Chrome and check if the error this setting is enforced by an extension/your administrator is resolved.
By executing these commands you can update the policies that may have been changed by the malware or third-party extensions resulting in the error.
4. Delete the policy from Registry Editor
Press the Windows Key + R to open Run.
Type regedit and click OK to open Registry Editor.
When prompted by the UAC to give administrator rights, click Yes to proceed.
In the Registry Editor, navigate to the following location: HKEY_LOCAL_MACHINESOFTWAREPoliciesGoogleChrome
You can copy-paste the above path in the Registry Editor to access it as well.
In the right pane, select all the values that look suspicious.
Right-click on the values and select Delete.
Once all the suspicious values are deleted, close the Registry Editor.
Restart Google Chrome and check if the error is resolved.
The ‘this setting is enforced by an extension/your administrator‘ Google Chrome error occurs due to an incorrect policy being added in the Registry Editor or by a hostile extension creating conflict with the browser. By following the steps in this article, you can fix the problem and make the necessary changes to your browser.
While downloading any software or media content from suspicious sites, take precautions as the attackers can hide malware and browser hijacking tools in the software.
Whitelisting, respectively blacklisting, have been both great protection measures. When it comes to networking and permissions, creating a virtual “guest list” for trusted devices is much safer than relying on just using passwords.
As a rule of thumb, any password can be cracked on stolen, it’s just a matter of time and ingenuity. However, fully replicating a device, in addition to guessing a password, is much more difficult.
Many online services rely on this technique. For instance, geo-blocking services use blacklisting/whitelisting to keep things in order. VPNs are another great example of whitelist/blacklist-friendly products.
Some VPNs such as Private Internet Access let you exclude some programs from going within the secure tunnel. Or you can set them to always use the VPN connection, no matter what. And that’s exactly what blacklisting and whitelisting are about.
The difference between blacklist and whitelist
What is blacklisting?
The principle of blacklisting relies on blocking certain individuals, whether they’re devices, services, IP addresses, or entire regions, from gaining access to your resources.
If you operate a service that’s widely available, generally speaking, blacklisting is more common. That’s mainly because it can help you keep at bay only specific individuals instead.
This can also be useful if you operate a game server and you encounter cheaters, for instance. You put their IP address/username/MAC address on a blacklist, and they no longer have access to your game server.
In short, blacklisting is when you deny access to specific individuals to your resources.
What is whitelisting?
Whitelisting is, as you’d expect, an exact opposite of the blacklisting technique. You define a list of trusted entities that can access your resources, and the service remains unavailable to everyone that’s not on the list.
Running an operation that needs to be accessible only to certain entities is an excellent opportunity to use whitelisting. For instance, if you own a business and need to keep the internal network private, only to be available for employees.
You create a whitelist from your employees’ IDs, IP addresses, MAC addresses, or anything you want to identify them after, and they’ll be the only ones able to access your network.
Quite simple, right?
Whitelisting vs blacklisting
When it comes to keeping your resources secure, you need to make the best choice. Whether it’s blacklisting or whitelisting you’ll choose, the principle stays the same: both techniques restrict your resources from general access.
However, in some situations, one is better than the other. Additionally, choosing the wrong method usually leads to wasting precious time and losing efficiency.
For that reason, we’ll tell you when it’s best to use whitelisting, and in which cases its counterpart (i.e. blacklisting) is more fit.
Whitelisting: blocking spam, administrating a private network, managing trusted device within your own network or at home, running a beta testing campaign
Blacklisting: blocking offenders, removing trust from a previously trusted device, terminating accounts, avoiding contact with certain entities
Both whitelisting and blacklisting can be handy if used right
The bottom line is that either technique can come in handy, as long as you use the right one according to your needs. As a rule of thumb, the wider the access you want for your service, the brighter the color of your list should be.
Some services, such as firewalls and VPNs, offer this option inherently. The purpose of these services is to restrict or allow access to certain resources for some entities. Therefore, it makes sense that they make use of these blocking techniques.
Nowadays, if you’re not careful, you get yourself a slew of unwanted notifications from a lot of sites. Microsoft Edge not only has the possibility to block them but also hide them.
Follow our step-by-step guide to learn how to do that.
How can I get rid of website notifications in Microsoft Edge browser?
Launch the Microsoft Edge browser, click on the three horizontal dots from the top right corner, and select Settings from the drop-down menu.
Next, click on the Site permissions option from the left pane, and then on the Notifications option from the right.
Now you have two options: to block notifications altogether just turn off the Ask before sending option. To quiet down the notifications, turn on the Quiet notification requests option.
Of course, if you change your mind about this and you really need those notifications, you can always go back to change them to your liking.
How can I block notifications from websites selectively?
If you don’t want to silence the notifications or block all the notifications, there’s a third option, to block only the notifications from certain sites.
Do do that, click on the Add button from the Block option like in the picture below, then paste the link in the new tab.
This way, only the notifications from the selected websites will be blocked. If you change your mind, just click on the three dots from the website you blocked and select Allow or Delete.
We hope this guide is useful to you. If you have any suggestions or questions, drop us a comment below.
When working with files, you may encounter an error message stating Not enough quota is available to process this command.
This happens when you try to copy files from your computer to network folders. Sometimes it will be accompanied by the error code 0x80070718 in Windows 10.
Use this article to perform the below troubleshooting steps. Follow the steps in the presented order.
How do I fix the Not enough quota available to process this command error?
1. Close applications
If you have a number of applications running on your computer, at the same time, they will consume most of your system resources, including the quota.
As a result, you can close all the unnecessary applications and then check if the error is fixed.
2. Change the Default Save Location
PressWindows key + Rto open up aRun dialog box. Inside the text box, typems-settings:savelocationsand pressEnter to open theDefault Save Locations window of theSettings app.
Change, the default drive that is used for saving, from your SSD to the traditional HDD. Use the drop-down menu associated with every type of folder found inside theDefault Save Location window.
Click theApply button for each folder that has the default location changed.
Restart your computer and see if the issue is resolved.
The steps above can be followed if the file showing the error is hosted on an SSD drive.
3. Change Disk Usage settings
Type control panel in theSearchbox and then click Control Panel.
Set theView by Small icons and then click Sync Center.
Click Manage offline files to open theOffline Files window.
Go to theDisk Usage tab and then chooseChange limits.
Drag the sliders to increase theMaximum amount of space all offline files can use and theMaximum amount of space temporarily files can use. Then, click OKto save the changes.
Click ApplyandOKon theOffline Files window and then close it.
Reboot your computer to see if the error persists.
4. Change paging file size in the Virtual Memory settings
You also get this error when the paging file size in the Virtual Memory settings is small. To change the settings in Windows 10, follow these steps:
Open Control Panel, setView by Small icons and then click System.
Click Advanced system settings and then go to theAdvanced tab.
Click Settings…under thePerformance section.
In thePerformance Options window, go to theAdvanced tab, and click Change….
Uncheck the box next toAutomatically manage paging file size for all drives.
Choose Custom size, enter theInitial size(you can enter theRecommended side showed at the bottom), and theMaximum size(a larger amount than theinitial size). Click Set andOK to save the changes.
Reboot your computer and check if the error is fixed.
The error code 0x80070718 is pretty common in Windows 10. Many users managed to fix this issue by following the above-mentioned solutions.
If you have any other questions or suggestions, don’t hesitate to reach for the comments section below.
You may now download the latest Intel Bluetooth driver update that addresses a range of connectivity issues.
Bluetooth devices, from PC accessories like keyboards to headsets and speakers, are part and parcel of your everyday life. They make it much easier to connect to devices like smartphones and PCs without any of the usually messy cables.
But a driver issue can cause these wirelessly-connected devices to malfunction when you are performing certain tasks on your Windows 10 PC.
If you have been experiencing such a bug with your Bluetooth gadget, try installing the Intel drivers to fix it.
Intel Bluetooth driver update solves HID mouse lag problems
It is difficult to accomplish anything with a Bluetooth input device that has a lag glitch. Seemingly, some Windows 10 users had this problem with their HID mouse while playing music on their PC.
Also, some users reported the lagging or disconnection of their HID mouse or keyboard with Wi-Fi connectivity on in certain cases.
Fortunately, the latest Intel Bluetooth driver update fixes that problem. The software package (version 21.90.2) addresses these other concerns:
On some systems Bluetooth device may stop working while continuously used for a very long period of time.
On some systems with certain Bluetooth headsets, the audio may come out discontinuously while streaming video online over Wi-Fi.
The update offers more than just bug fixes, so you may want to download and install it even if you have not experienced any of the above problems.
Included in the package are functional enhancements, which will definitely impact your Bluetooth experience. Likewise, the update delivers security fixes.