Fix: DirecTV Error Eode 775

The DirectTV error code 775 occurs if your receiver has trouble communicating with the satellite dish. The error leaves the screen pixelated or frozen.

The error can occur for many reasons, including a loose connection between your receiver or TV, issues with the SWiM power inserter, and even heavy rain and storms.

If you are also troubled by this error, here are a couple of troubleshooting tips to help you resolve the DirectTV error code 775.


How do I fix the DirectTV error code 775?

1. Check your DirectTV receiver for connection issues

  1. Take out the DirectTV receiver. It is usually placed on the TV unit.
  2. Check the back of the receiver for any connection, such as the Satellite-In that might be loose.
  3. Ensure all the cables on the back of your DirectTV receiver are firmly connected.
  4. Try unplugging all the cables and then reconnect them to be on the safe side.

A loose connection is one of the common reasons for the DirectTV error code 775. Make sure you check the receiver for any connection issues and correct them to fix the error.


2. Check your SWM power inserter

DirectTV error code 775
  1. Locate the SWM power inserter plugged into the power outlet and unplug it.
  2. Leave the power inserter idle for a few minutes.
  3. Plug back the power inserter back to the power outlet.
  4. Make sure everything is connected correctly.
  5. Disconnecting and reconnecting the SWM power inserter will reset the device.
  6. Power on your DirectTV receiver and the TV to see if that resolves the error.

DirectTV users take advantage of the SWM power inserter to ensure enough power for all the devices connected to the dish.

Earlier, the receiver itself was powering the dish. So, ensuring the SWM power inserter is properly functioning is key to resolving any issues with your DirectTV.


3.  Other solutions to try

DirectTV error code 775
  • Wait out the storm
    • The error can also occur due to natural occurrences like heavy rain and a solar storm that may create interferences.
    • If the error is occurring during these times, you may have to wait for the DirectTV services to be back online.
  • Disconnect and reconnect the lines
    • If you are comfortable in getting your hands dirty, try unplugging and reconnecting the wired lines.
    • Find the DirectTV box located outside the house, and unscrew every line ran into it, including the mainline.
    • Reconnect the cord and check for any improvements.
  • Contact the support
    • If everything fails, the issue can be due to DirectTV hardware failure.
    • You may contact the DirectTV help to resolve the issue.
    • The tech help can visit your residence and take a look at the issue.

The Direct TV error code 775 is a common connection error that gets resolved automatically in several hours. However, you can try the steps listed in this article to fix the issue if the error is not resolved automatically.

Also, find out what to do if YouTube is not working on DirecTV.

Microsoft To Do app updates on Windows 10 with support for Windows Information Protection

The Windows 10 version of Microsoft To Do updated this week that adds some extra security for work accounts and improvements to the rescheduling process.

Here’s the full release notes:

  • We added support for Windows Information Protection for enterprise work accounts.
  • We also added support for proper rescheduling when you rename a task.
  • We squashed a number of accessibility bugs.

Microsoft To Do is a free task management service that’s available for anyone to use via the web or a first-party app on iOS, Android, and Windows 10 devices. All versions of the Microsoft To Do app update on a very regular basis with the recent batch of updates adding several new features and fixes across the board.

Do you use Microsoft To Do on your device? Let us know which version you use in the comments below and then follow us on Twitter and Pinterest for more app news.

Fresh new Xbox tees, hoodies, and more added to the Official Xbox Gear online store

Several new products have recently been added to the official Xbox Gear section of the online Microsoft Store to offer even more fresh looks for gamers and tech enthusiasts to sport during their COVID-19 lockdown.

Of particular note are the new women’s and men’s long sleeve tees with the Wave Sphere style Xbox logo (see above image) and the Curvilinear Xbox hoodie which are being promoted as part of Xbox Gear’s spring collection.

Other recent additions to the Xbox Gear store include a Halo 2 Anniversary mousepad, a mug and t-shirt celebrating the 30th anniversary of Microsoft Solitaire, a Mixer long sleeve tee, and a new black t-shirt featuring the word “Xbox” in green lettering.

While all of these official products (and more) are readily available for North American consumers on the Microsoft website, those in other regions may need to import or search in local stores that stock geek culture clothing. In Australia, for example, Jay Jays has been known to sell Xbox Gear t-shirts.

Do you own any Xbox Gear? Let us know what your favorite item is in the comments below and then follow us on Pinterest for more Xbox content.

Is Your Photoshop Toolbar Missing? Here’s What to Do

Adobe Photoshop comes loaded with many useful tools for selecting areas, cropping images, and many more, which you can pick quickly by clicking on them from the toolbar. However, the Photoshop toolbar might go missing for some reason.

While this might be frustrating, getting the toolbar back is straightforward with the right troubleshooting steps. And we will show you how to do it in this guide.

Why did my toolbar disappear in Photoshop?

Below are some of the reasons your Photoshop toolbar might have disappeared:

  • Outdated app: If the Photoshop app is outdated, it might start misbehaving, leading to some missing features. The solution to this is to update the app to the latest version.
  • Full-screen mode: Another possible cause of this issue is running the app in full-screen mode. This takes away the toolbar to allow you to use the full area of your workspace. You can exit the full-screen mode by pressing the Esc key.

How to get back Photoshop Toolbar that disappeared? 

1. Use keyboard shortcuts to restore panels.

  • Brushes: F5
  • Color: F6
  • Layers: F7
  • Info: F8
  • Action: ALT + F9

The above are the default keyboard shortcuts to Photoshop panels. The tools with no keyboard shortcut dock with those with shortcuts.

For instance, the Style and Swatches panels in Photoshop dock with the Color panel do not have keyboard shortcuts. The Tools panel has no shortcut also but cannot dock with other panels.

However, you can transform it from a single-column strip to a two-column toolbox arrangement by clicking the arrow with double heads above Tools.

In Photoshop Creative Suite 2, this can act as the toolbox arrangement permanently.

2. Change the commands

  1. On the Photoshop window, click on Edit and select Keyboard Shortcuts. Or press Alt +Shift + Ctrl + K.
  2. In the Keyboard Shortcuts and Menus dialog box, navigate to the Application Menu Command section.
  3. Next, expand the Window area and select Tools to open a shortcut field.
    window photoshop toolbar missing

In this field, you assign Tools to shortcuts to elements in the interface. Simply press the combination and select a tool to invoke. You can tweak the pre-assigned shortcuts, also.

3. Use SHIFT + TAB and the Windows Menu

  1. Make the panels visible/invisible using the Windows menu.
  2. Right-click on the title bar on the specific panel.
  3. Select Close. On clicking close, the panels disappear.
  4. To make them visible, press the Tab key.
  5. You can also use the Shift + Tab key combination to toggle all the panels on and off.

4. Customize the toolbar

  1. Click on Edit, select Toolbar, and navigate to the Customize Toolbar.
    • Alternatively, click the three dots icon on the left panel.
      dots photoshop toolbar missing
  2. Locate the missing tool(s) from the list under Extra Tools to the right.
    extra tools
  3. Finally, drag the tool to the Toolbar list and hit Done.

5. Create a new workspace

  1. Hit the Window menu button.
  2. Select Workspace and click New Workspace.
  3. Give the workspace a name.
  4. Next, check the Keyboard Shortcuts, Menus, and Toolbar boxes.
    new workspace
  5. Finally, save the workspace.

You can only add custom menu layouts and shortcuts for a particular set of tasks to a workspace.

Therefore, create multiple workspaces, which will contain custom arrangements to fix the issue of the toolbar not showing in Photoshop.

6. Use workspace tools

  1. Switch to the new workspace by going to Window > Workspace.
  2. Next, select your workspace and click on the Edit menu.
  3. Select Toolbar. You may need to scroll further down by clicking the downward-facing arrow at the bottom of the list on the Edit menu.
  4. Finally, hit Restore Defaults.
    restore defaults photoshop toolbar missing

If you had workspaces set up, but for some reason (ex., An upgrade), some tools may get missing from the toolbar. In this case, follow the steps above to restore the missing tools.

7. Reset the Essentials workspace

  1. Click Window and then select Workspace.
  2. Next, choose Essentials (Default).
    workspace essentials
  3. After that, click on Reset Essentials below.

The solutions in this page serve for both when the toolbar is not showing in Photoshop. You will also find fixes for when specific tools are missing.

In case your Excel toolbar is also missing, check our detailed guide on the topic to restore it quickly.

Feel free to let us know the solution that helped you fix this issue in the comments below.

Fix: Not all data was successfully written to the registry

When you try to carry out some operations on the Windows Registry, you get an error that says not all data was successfully written to the registry. Some keys are open by the system or other processes.

Examples of registry operations that can bring up this error are merging, importing, or restoring a file in the registry.

Many permissions are involved, and it’s possible that (even though you made the backup, for example), you have insufficient permissions to perform the desired operation.


What do I do when I get the registry data writing error?

1. Try again in Safe Mode

  1. Press the Windows key and click on the Power button to reveal the shutdown options.
  2. The next step is to click Restart but to enter the Advanced Troubleshooting Tools utility, hold SHIFT while clicking Restart.
  3. Your PC will now restart and take you to the Advanced Troubleshooting Tools utility. Next, click on Troubleshoot to continue.
  4. On the following screen, click Advanced options.
  5. Now click the Startup Settings (Windows Startup Settings on older Windows versions).
  6. Finally, hit Restart and press 4 to Enable Safe Mode.
    • For older Windows versions, you have to wait till the PC restarts before selecting the Safe Mode option.use safe mode to fix not all data was successfully written to the registry error

Now, the computer boots with no drivers loaded. Attempt the registry operation once more to see if it still throws the not all data was successfully written to the registry error.


2. Change the registry key permissions

  1. Press the Windows key + R to open the Run dialog box.
  2. Enter Regedit and hit Enter to open the Windows Registry Editor.
  3. Navigate to the key of interest, right-click on it, and select Permissions.
  4. Click Advanced and click on the Change link beside the Owner label.change registry owner not all data was successfully written to the registry
  5. On the next screen, type your user account name or Administrator and hit Check names.
  6. The user account name or Administrator you entered on the last step will now change to the full system name.
  7. Finally, hit OK to save.

Here, we changed the owner of the registry key to allow Administrator users to perform critical tasks on the registry.


3. Perform a repair upgrade on you Windows

  1. Download the Windows media creation tool.
  2. To begin the installation, accept the Windows license terms.
  3. Next, click on Create installation media for another PC.
  4. On the next screen, choose your language, architecture (32-bits or 64-bits), and Windows 10 version.
  5. The screen that follows is where you select the media for the installation.
    • Click on the ISO option for the system to begin downloading the corresponding ISO for your Windows version.
  6. When the download completes, open the folder containing the file and switch to the Manage tab of Windows Explorer.
  7. Click Mount to mount the ISO file.
  8. Go to the mounted drive, open it, and double-click Setup.
  9. To begin the installation, accept the Windows license terms.
  10. Here, on the Change what to keep screen, select Keep personal files and apps.
  11. Hit Install. This takes a while to complete; so, you may need to wait on this screen for a while.
  12. On completion of the installation, sign in and finish up the process.

These steps solve the not all data was successfully written to the registry error by repair upgrading your system. However, this method reverts your computer to a state with no latest updates installed.

To keep your updates and not lose them, make sure that your PC stays connected to the internet in the course of the upgrade.

The error that says not all data was successfully written to the registry can pop up on different scenarios. Most users encounter the issue when attempting to merge or import a file into a directory.

The general solution is to change the ownership of the file to either yourself or the Administrator. However, before doing that, we recommended that you try performing the registry operation again, but in Safe Mode.


[wl_navigator]

WebOS vs Android TV: Which is Better?

When buying a TV, one of the things you need to consider is the OS. Being among the leading smart TV operating systems, users keep wondering what a Web OS vs Android TV comparison will look like.

Suppose you are confused as to which smart TV as to which to choose among these two, this is the comparison you need.

In this WebOS vs Android TV comparison, we have detailed everything you need to know about these two smart TVs, from their suitability to their strong points and features.

WebOS vs Android TV: How do they compare?

1. LG webOS

AndroidTV vs WebOS


LG’s webOS is a Linux-based smart TV operating system that is usually shipped with the LG smart TVs. It comes pre-installed with popular content streaming apps like Netflix, Hulu, Amazon Prime Video, and YouTube.

The USP of webOS has been its intuitive user interface. LG has been slowly refining the OS since 2014, supporting new web technologies as well as developing new apps.

WebOS uses a launch bar to give access to all its properties and functionalities. Clicking on the launch bar gives you access to all the apps and settings. Users can also customize the launcher as per their needs.

The operating system works with all Bluetooth peripheral devices like headphones, smartphones, or even wireless speakers. For screen mirroring and content casting, WebOS comes with Miracast support out of the box.

In addition, the users also get Live apps, an OLED image gallery, and 360-degree video playback support. LG’s voice integration is best in the business thanks to LGs own voice recognition software as well as Google Assistant support.

So, all is good with the WebOS? While there isn’t much to complain about, compared to AndroidTV, WebOS’s apps gallery is not the best in the business, and this is where Android TV shines.

2. Android TV

AndroidTV vs WebOS

AndroidTV is the most common Smart TV OS that you can find across brands. Most of Chinese brands prefer to use AndroidTV for their smart TVs to offer the most value for money.

Talking about the big brands, Sony is one of the premium brands that use AndroidTV OS for its Bravia lineup.

Depending on the TV manufacturer, your Smart TV experience will be different as most of the manufacturers tend to use their own skin on top of AndroidTV.

On the brighter side, AndroidTV comes with Chromecast support out of the box. You can stream content from your Android phone or tablet with ease.

For voice command, AndroidTV, with no surprises, supports Google Voice Assistant. If you are buying Sony’s Android TV, you will get both Google Chromecast and Google Assistant out of the box.

AndroidTV can also help you to monitor other home devices such as Google Hello and other Internet of Things.

The biggest advantage of AndroidTV has to be its app catalog. With direct access to Google Play service, users can download and install all the mainstream apps and some games with ease.

What OS is best for you?

While both Android TV and Web OS are great platforms for Smart TVs, WebOS offers the best user experience with support for major content streaming platforms as long as you are not looking for tons of apps and games.

Android TV, on the other hand, offers a lot of functionalities and is recommended if you are a serious Google fan.

To wrap it up, if you need a list of the best browsers you can install on your Google TV to explore the internet with speed, our detailed guide contains the top options you can choose from.

How to Efficiently Use Microsoft 365 in a Web Browser

The Microsoft 365 suite includes some well-known bundles of tools meant to organize and increase your productivity. The tools in the Microsoft 365 suite can be used online or offline.

Working with any Microsoft 365 tool in your web browser implies a good Internet connection, as all your work will be automatically saved in the dedicated OneDrive space. Additionally, you can install the Office extension for quick access to all your documents.

A Microsoft account is mandatory; you’ll have to sign in before using any tools online.

How can I use Microsoft 365 in a web browser?

1. Easy access to all your work with OneDrive

office onedrive

After signing in to your Microsoft account, you will see the dashboard with all the available apps in your suite. You can either open a specific document format or directly launch OneDrive and create documents in the cloud.

Once you’re in OneDrive > click Create > select the desired file type. As you start editing a document, changes are saved automatically.

If you need to edit a document at a later date, open OneDrive > Files > select file > Edit > Edit in (document type) for the web. No need to save the changes.

OneDrive supports many file formats and allows you to create, edit, and share documents on the go, with no need for other back-up or emailing actions. It also saves a lot of storage space on your devices.

Editing documents at a later date is accessible from any device, and you can also see the comments immediately if anyone else is viewing the document you’re using.

You can also improve the online editing experience by managing background sync behavior, and this guide on how to disable Microsoft Office Upload Center helps you control unwanted prompts while working in Microsoft 365.

2. Installing the Office browser extension

  1. Go to the Chrome web store and to Extensions.use office extension for web browser
  2. Search for Office and click Add to Chrome.
  3. Confirm that you want to install the extension by selecting Add extension.

For a faster setup and better browser integration, you can also install Microsoft Office Web Apps on Windows 11 to access Word, Excel, and PowerPoint directly from your desktop.

3. Working on the web using the Office extension

  1. Open the office extension from the upper right-hand corner of your browser.office for the web
  2. Sign-into the extension with your Microsoft account (or a school account if you’re using the free package available for the Educational sector).
  3. Open the app that you want to work with (or open OneDrive and work as shown above).

In today’s guide, we explored the best information available regarding using Microsoft 365 inside your browser. This can come in handy especially during collaboration where you might encounter the someone else is working in the document preventing you from making changes until they’re done.

Also, find out how to delete documents in Microsoft 365 and free up storage space.

Before you leave, check our guide on how to download Microsoft Office for free on Windows 11.

If you want to get in contact with us, don’t forget to leave a comment in the section found below this article.

Azure App Service helps creating and hosting static web apps

Nowadays, web apps are more and more adopting static front-end design patterns with client-side processing powered by JavaScript.

The idea is not to rely on web servers and consequently require a new structure of supporting cloud resources.

At this year’s Build event, Microsoft announced that the Azure App Service has been expanded with a new hosting offer specially designed for static web apps.

How can I use Azure App Service to host my static web app?

Microsoft is offering now a preview version of the App Service Static Web Apps for developers who want to build JavaScript web apps with static front-ends and optional dynamic back-ends powered by serverless APIs.

The advantages of Static Web Apps are that developers can deploy apps in minutes and they save money by using serverless technologies.

What are the advantages of using the App Service Static Web Apps?

A developer details the characteristics in an Azure blog:

Pre-rendering static content (including HTML, CSS, JavaScript, and image files) and leveraging global content distribution to serve this content removes the need for traditional web servers generating the content with every request.

Moving dynamic logic to serverless APIs unlocks dynamic scale that can adjust to demand in real-time and can empower developers to access the benefits of microservices as they evolve and extend individual app components.

The service is designed for developers using frameworks like Angular, React, Svelte, and Vue or static site generators like Gatsby looking for a simple interface to deploy the cloud resources.

How can I start using the Static Web Apps?

Microsoft added all the links for documentation in the presentation blog.

[wl_navigator]

FIX: Overwolf server connection error

Overwolf is a popular software platform that allows the developers to create extensions for video games which are often available through the Overwolf App Store.

However, some developers have reported server connection error during Overwolf installation. Overowlf installer error usually occurs due to a third-party security program creating conflict with the software.

If you are also troubled by this error, here are a couple of troubleshooting tips to help you fix Overwolf server connection error in Windows.


How do I fix the Overwolf server connection error?

1. Check your anti-virus and firewall

Overwolf server connection error

  1. Your Anti-virus program can prevent the Overwolf installer from installing on your computer.
    • Since the program is safe to download and install, try disabling your anti-virus program temporarily.
  2. From the taskbar, right-click on the Anti-virus program icon and select close/disable.
  3. Run the installer and check if the installation is completed.

Disable Windows Defender Firewall

Overwolf server connection error

  1. Disable the Firewall that is built-into your anti-virus program.
  2. To disable Windows Defender Firewall, do the following.
  3. Click on Start and select Setting.
  4. Go to Updates and Security.
  5. Click on Windows Security tab.
  6. Click on Firewall and Network Protection option.
  7. Select the currently active network. You will see the Active tag for the network.
  8. Under Windows Defender Firewall click the toggle switch to turn it off.
  9. Run the Overwolf installer and check if the server connection error is resolved.
  10. Make sure you enable the Windows Defender Firewall after installing the app.

Overwolf’s overlay doesn’t stay on top? Read this articles to find a solution.


2. Check for internet/service issue

  1. The server connection error can occur if the Overwolf servers are malfunctioning.
    • Contact the support or open a ticket to check the service status.
  2. If the Overwolf servers are down, wait and try again after a while.
  3. Check your internet connection for issues.
    • Overwolf installer requires a stable internet connecting to install the program.

3. Clean Overwolf data folder

Overwolf server connection error

  1. If you are trying to update the app, try cleaning the local app data folder to fix the issue.
  2. Open File Explorer and navigate to the following location:

    • C:UsersusernameAppDataLocal
  3. Locate the Overwolf folder and delete it.
  4. Run the installer and check if the issue is resolved.

4. Reinstall Overwolf 

  1. If the issue persists, try reinstalling Overwolf from the official website.
  2. Press Windows Key + R to open Run.
  3. Type control and click OK.
  4. From the Control Panel, go to Programs > Programs and Features.
  5. Select Overwolf and click on Uninstall.
  6. Wait for the program to uninstall successfully.

Overwolf server connection error is common and can occur due to several reasons including unstable internet connection, Overwolf server issues, anti-virus, and Firewall programs blocking access or even file corruption.

By following the steps in this article, you can fix the Overwolf installer error and start using the game extensions again.


[wl_navigator]

Microsoft simplifies Teams Chatbots with Power Virtual Agents

Chatbots in Microsoft Teams are not a new thing. And while the Chatbots are very useful for enterprises using them for inside help and information for their employees or for their clients.

However, they were not so easy to create and manage. That’s about to change soon because Microsoft partnered with the newest component of the Power Platform, the Power Virtual Agents, a low-code chatbot platform.

Power Virtual Agents help enterprises and developers creating Chatbots easier

Power Virtual Agents is a chatbot service that was built on the Microsoft Power platform and the Bot Framework.

According to Microsoft, the Power Virtual Agent development is a lot easier, because it uses a guided, no-code, graphical interface approach. 

That makes it simple for everyone to create and maintain an intelligent virtual agent without learning to code.

You will be able to create your chatbot in the Power Virtual Agents portal, and afterward, you will be able to integrate it with Microsoft Teams just by pressing a single button.

how to publish an inteligent agent

 If you’re a developer, Microsoft also published the documentation on how exactly to create the chatbot.

How does the Microsoft Teams Chatbot works?

Michael Chow, Senior Program Manager for Microsoft describes an actual example of usage in a blog post:

An employee who has just joined Contoso asks a few questions related to office reopening, new employee orientation, and uploading documentation.

Then, he moves on to ask for support with special accommodations, specifically ergonomic furniture. The bot needs to connect him with an HR expert to understand the situation better.

The bot gathers some information to create a request ticket and submits it to the Onboarding channel in Teams where HR experts can see the request and handle it.

Since there is a longer than normal wait time today, the employee checks his request status with the bot to make sure it is still active.

Chatbot in Microsoft Teams case

An onboarding expert sees the notification in the Expert assistance channel in Teams and reaches out to the employee. After helping the employee out, he returns to the Expert channel and closes the ticket.

The employee can also check the status of his requests again and confirm that it has been closed.

[wl_navigator]

FIX: Next You’ll setup your Account installation problem

Installing Windows 8.1 update on a Windows 8 based device should be an easy thing to do as the firmware is free distributed and can be anytime downloaded from Microsoft Store.

Anyway, in case you don’t know all the installation tricks you might end up having important and annoying problems such as the following freeze message: Next you’ll setup your account.installing windows 8.1
So, in a few words, while applying the Windows 8.1 firmware you might experience a freeze error that will make you abort the update process. Basically the flashing process will stop once the Next you’ll setup your account message is being displayed on your device.

From that point you won’t be able to do anything else and rebooting your machine will restore the Windows 8 OS. In case you are dealing with such a problem you should check the guidelines detailed below.

Troubleshoot the Windows 8.1 Installation freeze within a minute or less

First of all, you should know that this freeze problem that will make you abort the Windows 8.1 update process is referring to a network problem. When Microsoft will try to set up your account, the operation will enter in a loop stage and you won’t be able to complete the Windows 8.1 flashing procedure.

Mainly the issue is caused when you don’t actually have a Live Microsoft account, thus you are using a local account instead.

But, the same problems have been recently reported even by users who are owning an official Microsoft account, so what it would appear as an isolated Windows 8.1 bug, now it is a general issue that is interfering with more and more users.

So let’s see how to resolve this annoying and stressful issue by checking the steps below.

  1. If you are getting the Next you’ll setup your account Windows 8.1 installation freeze problem you will have to disconnect your network connection.
  2. You can go back a few screens (from the Next you’ll setup your account window) and you can choose to disable all network connections.
  3. Also, turn off your router and any other WiFi networks that might have access to your computer.
  4. Now your device will have to use your Local account.
  5. From the Next you’ll setup your account freeze screen, choose cancel.
  6. Enter your username and password when prompted.
  7. Click next and resume the Windows 8.1 installation process.

So, there you have it; now you know how to easily and quickly resolve Windows 8.1 Next you’ll set up your account installation freeze problem. Do share your experience and results with us and share your thoughts with our readers by using the comments field from below.

How to move iTunes library to Dropbox

Dropbox is a place where all your team’s content comes together and is one of the best cloud storage solutions on the market.

Because of its multitude of features, Dropbox can help you manage your business’s data without too much trouble. Having the ability to store all your music, pictures, and even iTunes libraries in the cloud, allows your PC to store only the necessary data on the local hard drive, thus becoming more efficient.

To find out more details about how to move the iTunes library to Dropbox, check the solutions found below.


How can I move my iTunes library to Dropbox?

1. Share a library/playlist from iTunes via Dropbox

  1. Open iTunes and find a playlist you want to share.
  2. You can select all files and drag them to the desktop.
  3. Close iTunes.
  4. Select again all files from your desktop and right-click the highlighted items and compress them.
  5. Once an archive is created you can rename it.
  6. After this go to Finder, select Dropbox, and drag and drop the archive you’ve created.
  7. Once uploaded go to the dropbox app, right-click on the uploaded archive and select Dropbox.

You can now share this link with your friends.


2. Backup and restore your iTunes Media folder 

1. Consolidate your iTunes library

  1. Open iTunes.
  2. On the menu bar at the top of your computer screen or at the top of the iTunes window, select File > Library > Organize Library.
  3. Select Consolidate files and click OK.
    Organize library

2. Back up your library and media files

  1. Quit iTunes.
  2. Find your iTunes folder.
    locate itunes folder
  3. Right-click on your iTunes folder, then choose Copy.
  4. Go to your external hard drive, then right-click and choose Paste.

When you consolidate, copies of any files that were outside of your iTunes Media folder are added to your iTunes Media folder.

To save space on your hard drive, you might want to delete the original files after you make sure that the copies are in your iTunes Media Folder. You will also need to backup your iTunes Media folder. Check the next steps for finding the iTunes Media folder.


3. Find the iTunes Media folder

By default, your iTunes Media folder is in your iTunes folder. To find it, go to User > Music > iTunes > iTunes Media.

If you can’t find in the above location, check the steps below to locate it:

  1. Open iTunes.
  2. From the menu bar at the top of the iTunes window, choose Edit > Preferences.
  3. Click the Advanced tab.
  4. Look in the box under the iTunes Media folder location for the location of your iTunes Media folder.advanced preferences

4. Restore your library from a backup

  1. Quit iTunes.
  2. Go to This Computer, then select your external drive.
  3. Select your iTunes folder, then right-click and choose Copy.
  4. Go to the location on your computer where you want your iTunes library, then right-click and choose Paste.
  5. Hold down the Shift key while opening iTunes.
  6. When you see a message that asks you to Choose iTunes Library, click Choose Library.
    choose itunes library
  7. Choose the location where you copied your iTunes folder.
  8. Click Open.
  9. Choose the iTunes Library.itl file inside.

The new Keyboard Manager utility helps you map your keyboard

Microsoft released the first preview of the new PowerToys application in September 2019. Since then, developers improved it and integrated new tools inside PowerToys.

Tools like Power Rename, an Image Resizer, Fancy Zones, or Window Walker were added throughout time.

Keyboard Manager helps you remap your keys and shortcuts

At the Build 2020 event, Microsoft added two new utilities inside PowerToys, and the first notable one is Keyboard Manager.

Keyboard Manager

To select the KeyBoard manager just click on the utility from the left pane. On the right you will see a button to turn it Off (by default it is On), a Remap a key button and a Remap a shortcut button.

how to remap a key

If you press the Remap a key button, you will see a window where you will be able to remap a key to a new one really easy. They even explain the functionality in a few clear words. After you change the keys, press OK for the changes to take effect.

how to remap a shortcut

With the shortcut remapping it’s exactly the same except that instead of simple keys, you will use shortcut keys like Ctrl + C and Ctrl +V.

PowerToys Run, better quick launcher

The second new utility is the PowerToys Run, a quick launcher faster and better than the classic Run.

the new powertoys run

To launch it, you will have to press Alt + Space. Whereas for the classic Run, you had to know the name of the possible application to run, the PowerToys Run has a very handy search function that gives you possible application suggestions while you type your queries.

PowerToys Run

In this example, when we enter com, for instance, PowerToys detected Command Prompt but also Google Chrome and Remote Desktop Connection.

From the PowerToys app, you can set-up how many results you want to see when you search. By default, there are 4 but you can set as many as you like.

PowerToys is still in the Preview stage but you can still install it manually from the GitHub release.

[wl_navigator]

We answer: Why is a zipped Excel file not smaller?

Some Excel users might need to reduce their spreadsheet file sizes so they can attach them to emails. Compressing an Excel file into a ZIP with the likes of WinZip might seem the most obvious way to do that. However, users who try zipping their Excel XLSX files are surprised to find that has little to no impact on the files’ sizes. In an MS support forum post, one user stated:

I am trying to send some data to a colleague, whose email server has a 10 MB limit on attachments. The Excel file is 18 MB and was downloaded from an external source. I have tried removing any extraneous data, and zipping the file, but the size does not reduce.

File compression software, such as WinZip, has little impact on Excel XLSX files as they’re already compressed files. Thus, the XLSX format already utilizes ZIP compression. The format consists of zipped XML files that you can explore by changing the Excel file’s format to ZIP in File Explorer. Therefore, compression utilities can’t significantly compress the XLSX file much more.

So, users need to find alternative methods for either reducing Excel file sizes or sharing spreadsheets. One of the best ways to reduce an XLSX file is to save it as an XLSB instead. XLSB is the binary file format for Excel spreadsheets, which takes up less hard drive storage space.

How to save an Excel spreadsheet as an XLSB

  1. To save an XLSX as an XLSB, open the Excel application.
  2. Then click File > Save As to open the window in the snapshot directly below.Save As window zipped excel file not smaller
  3. Select Excel Binary Workbook (*xlsb) in the Save as type drop-down menu.
  4. Enter a new title for the file.
  5. Click the Save option.

How to share an Excel file via Google Drive

  1. If saving the file as an XLSB doesn’t reduce the file’s size enough to attach it to email, you can share the spreadsheet via Google Drive instead. To do so, click Create a Google Account button on the Google Account Help page.
  2. Then fill out the text boxes to set up a Google Account if you don’t have one.
  3. Log in to your Google Account.
  4. Click Go to Google Drive on the GD page to open the cloud storage in a browser.
  5. Click New > File upload, and select the Excel spreadsheet file you need to share.
  6. Click the Open button.
  7. Right-click the Excel file and select Share.
    Share with others box zipped excel file not smaller
  8. Click Advanced on the window that opens.
  9. Click Change to open the options below.
  10. Select the On – Anyone with the link option.
    The On - Anyone with the link setting zipped excel file not smaller
  11. Click Save.
  12. Enter an email address to share the file within the text box.
  13. Press the Send button.

So, don’t waste your time trying to zip XLSX files. Instead, save them as XSLB files to reduce their size. If the file is far too big for email attachments, you’ll need to share the spreadsheet via cloud storage, such as Google Drive or OneDrive.

[wl_navigator]

Microsoft supports Linux GUI apps to Windows 10

In 2016, Microsoft was announcing Windows Subsystem for Linux – WSL. Many remember that episode as the bash on Ubuntu on Windows.

For those who are unfamiliar with WSL, the subsystem allows Windows users to run native, unmodified Linux command-line tools and apps directly in Windows, just like they were jun on a Linux machine.

According to Microsoft, WSL usage has grown to more than 3.5 million monthly active devices nowadays. Basically, Microsoft makes it much easier for developers to run their Linux tools without switching or booting up to Linux.

Microsoft is improving WSL 2

One year ago, Microsoft unveiled the first preview of WSL 2, which came with new capabilities in Windows’ Hypervisor Platform to run distros and tools in containers. And that was running on a Linux kernel image built by Microsoft.

The virtual machine is booting from cold in less than 2s! WSL 2 delivers full system call compatibility with a real Linux kernel and is 3-6x faster compared to earlier versions of WSL.

According to the Microsoft Deb Blog, if you want to set the version of any WSL distro to be using WSL 2 with the command: wsl.exe –set-version <distroName> 2.

How do I install WSL with a single command?

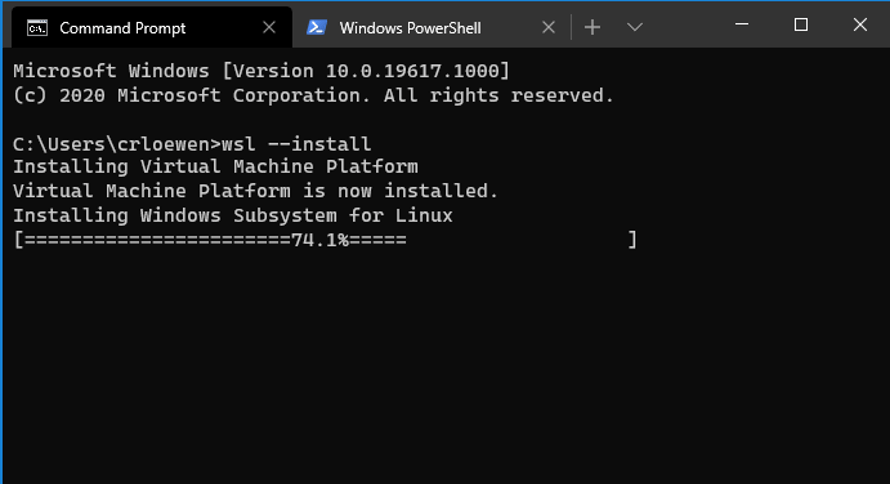
Just open a Windows Terminal and type wsl.exe –install.

Installing WSL with a sigle command

After the install, the WSL optional components will be enabled, and after a restart, your specified distro will be downloaded and installed automatically.

The first releases of this feature will happen the next few months in the Windows Insiders Fast Ring.

WSL is coming with GPU Compute workflows

According to the Microsoft Developer Blog,

AddingCUDAand/orGPU Compute supportto WSL has been our #1 most requested feature since our first release! Over the last 3+ years, the WSL, Virtualization, DirectX, Windows Driver teams, and our silicon partners have been working hard on a complex engineering feat to deliver this capability.

This is why we’re thrilled to announce that we will start previewing GPU compute support for WSL in Windows 10 Insider builds within the next few months!

[wl_navigator]

How to install PyTorch on Windows [Step-by-Step]

PyTorch is a popular machine learning library, easier to learn than other similar deep learning tools, according to specialists.

Before installing PyTorch, you must make sure you meet some prerequisites. Namely, to run Windows 7 or greater, Windows Server 2008 r2 or greater.

It is also recommended to have already installed the Anaconda auxiliary package for PyTorch 3.x (the only version compatible with Windows).

In short, installing PyTorch involves two steps: getting the auxiliary packages (included in the Anaconda Python package manager) and then run the install command that the developer offers on their official page, depending on your settings.


How do I install PyTorch?

1. Download and install  Anacondainstalling pytorch

  1. Go to the official Anaconda site and find the right installer.
  2. Click on it to download and then hit Run.
  3. You can accept default settings and follow the prompts to finish the installation.

2. Install PyTorchcan i install pytorch on windows

  1. Use the official PyTorch local installation instructions.
  2. Choose your configuration. Note that there is no need to install CUDA separately, but you have to select a version of CUDA if your system supports Nvidia GPU.
  3. Run the recommended command to complete the installation.

The process doesn’t take long, but if it fails, you’ll get a specific error message. Most of the time, it’s a version compatibility issue.


3. Verify the installation

You should verify if the installation was successful, open a command shell , and enter python to launch the Python interpreter, then type the following:verify pytorch installation

Additionally, you can check if your GPU driver and CUDA are enabled, with the following command:

import torch
torch.cuda.is_available()

That’s about it! We hope you found this article useful. If you have anything that you might want to add for this installation process, please use the comments section below.


[wl_navigator]

FIX: Authentication token manipulation error on Raspberry Pi

Oftentimes we forget or misspell login passwords we use for various accounts and there’s usually a method to recover them. But what if the system won’t accept the default credentials?

This can be the case with Raspberry Pi users. Sometimes, at the first login, the system won’t recognize the default passwords (eg. pi, for Linux OS, or ubuntu, for Ubuntu OS).

The common error message is Authentication token manipulation error. The only successful solution reported by the Raspberry community members is to tweak the password file in the image.

You will need another machine that runs on Windows, Mac, or Linux, where you can insert the SD card.


How do I fix authentication token manipulation error?change password raspberry pi

1. Modify the password file for Linux OS

  1. Insert the SD card in another device
  2. The card should contain a file named cmdline.txt
  3. Open it in Notepad (or other .txt file reader)
  4. Edit the text to have init=/bin/sh at the end. It should look like this:
  5. dwc_otg.lpm_enable=0 console=serial0,115200 console=tty1 root=PARTUUID=04ceb741-02 rootfstype=ext4 elevator=deadline fsck.repair=yes rootwait init=/bin/sh
  6.  
  7. Save and exit > Insert the SD card into the Raspberry Pi
  8. When prompted type: mount -o remount, rw / (and repeat if an error message appears)
  9. Type passwd pi
  10. Type the new password
  11. Then type sync
  12. Type exec /sbin/init
  13. Safe exit Raspberry Pi

Then put the card into the PC again and delete the init=/bin/sh combination you added. Save the changes and insert the card into the Raspberry Pi. You should be able to use the new password.


Modify the password file for Ubuntu

  1. Insert the SD card in another device
  2. Look for the firmware directory > user-data file (in YAML format).
  3. Look for the following line: chpasswd: expire: true
  4. Change to expire: false
  5. Save and exit.

Insert the SD card into the Raspberry Pi and you should be able to log in using the ubuntu username and password.

We hope that one of these solutions was helpful. If you have any suggestions related to this topic, please leave a comment in the dedicated section below.


[wl_navigator]

Safe ways to fix Raspberry Pi EXT4-fs error

There is little information on how to get around the most common errors on Raspberry Pi, even on forums or withing the Raspberry community.

One such error is  EXT4-fs error, often followed by additional details such as bad extra_isize or reading directory_iblock, but other messages can appear as well.

Users have reported this error after using the device for a few hours, without changing anything, or right after installing the OS and upon trying to install other apps. Also, the error occurs on any PI model.


How do I fix the EXT4-fs error?

It was suggested that sometimes the error disappears when rebooting, but if it doesn’t, it means that there’s a problem with the external hardware, since a fault with the CM board would mean that the same error affects all users of the respective model.

Consequently, Raspberry Pi community followers suggest mainly two reasons: a corrupt SD card and an improper connection to the power source (including a faulty USB cable).wrong power source raspberry pi

First of all, checking the power supply source is the simplest thing to do. But it is very important when the error appears.

If it occurs some right after first power on, checking again the cables and changing the power source/adapter should do the thing. If it happens sometime after booting, then you should check for another cause, most likely the SD card.

In this sense, many users warned about corrupted or fake SD cards, which might work for a while, but the damage the system. The only solution here is to change the card.

If you’re sure the card is reliable, you should try with another card, mounting a fresh image on it.

You can also use the fsck command hoping that it an correct any corrupted files, but, according to the forums, while it did correct some things, the users still could not use the device.

Any other solutions to the above-mentioned error are welcomed in the comments section below.


[wl_navigator]

Microsoft is opening up Xbox Insider Alpha and Skip Ahead Rings – apply now!

Microsoft is allowing more Xbox Insiders to join its invite-only Alpha and Alpha Skip-Ahead rings this week. The Xbox team uses these two rings to test preview rings of future Xbox One system updates, and they’re pretty much the equivalent to the Fast and now-deprecated Skip Ahead rings for the Windows Insider program.

If you want to join the Alpha or Alpha Skip- Ahead ring, all you have to do is to complete the “Joining new Rings” survey in the Xbox Insider Hub. Not everyone will be invited, but your participation lets us know you’re interested,” the Xbox team said, adding that you’ll receive an Xbox Live message in case your application has been accepted.

Both the Alpha and Alpha Skip Ahead rings are currently testing “2006” preview builds for the next Xbox One system update coming in June. Microsoft has yet to detail the new features coming in this release, but the company is likely continuing to work on the Xbox Guide improvements that have been in testing since March.

How to Compare Folders and Copy Missing Files

Think of the following situation: you have your own site and want to tweak it to improve its appearance. But in doing this, you mistakenly and unknowingly delete some code lines.

Then, upon your next login, you realize that the interface has crashed, and you only suspect something is missing. You can only restore the site by reentering the missing lines. If only you knew what those were!

Luckily, you have a backup of your site stored in the cloud (and perhaps on some external HDD). What you need to do now is to make sure you get the exact information back on the site.

Since simply copy/pasting doesn’t necessarily do the trick, you’d better use an app that could help you identify whatever is missing.

So, in this article, we’ll look at a few free tools that can help you compare the contents of and copy whatever files are missing from one location to another.

How do you compare two folders?

1. Windiff.exe 

  1. Download and open Windiff.exe.
  2. On the File tab > Compare Directories.
  3. Enter, in turn, the location address for each folder.
  4. Click OK.
compare folders using windiff

The app will tell you if it found differences and where. To view the differences, click the Expand button in the right upper corner and double-click the reddened result in the window.

To current the differences, click again on File > Copy Files > choose where you want to copy from (left or right) + Different files > OK.

2. WinMergewinmerge to compare folders

  1. Download and open WinMerge.
  2. In the File tab > click Open.
  3. Browse for the folders you want to compare.
  4. Click Compare.

The missing files will be highlighted in a different color.

To have the same information in both folders, go to the Merge tab > Copy All to Left or Copy All to Right, depending which information is complete.

3. FreeFileSyncfree file sync to compare folders

  1. Download and open FreeFileSync.
  2. Choose the folders you want to compare by browsing in their locations or with the drag&drop option.
  3. Click Compare.

FreeFile Sync is an excellent tool to use if you want to compare a local folder versus Google Drive, or a local folder versus a folder your FTP server recursively using FTP or SFTP connection.

Then, to copy from one source to another, click on Synchronize and choose one of the options.

Perhaps the best ones are Two-way sync, which will identify and apply changes on both sides or Mirror, which means that the two folders will become a mirror copy.

Looking for a cloud solution to store large folders? Check out our article for some recommendations.

4. ExamDiff

  1. Download and open ExamDiff.
  2. In the Files table > select Compare.
  3. Select the folders by entering the file path, drag&dropping, or browsing.
  4. Click Compare.
use examdiff to compare folders

As in the previous solutions, the differences bear a different color.

Then, to sync the content, go to Edit > Replace Block in Second File from First or Edit > Replace Block in Second File from the Second.

ExamDiff also has a Pro version, which is paid, and which adds the possibility to compare directories and binary files, compare a local folder to the one on FTP server using built-in plug-ins, or synchronize files and folders between your PC and external media.

5. Use Total Commander

  1. Download and open Total Commander.
  2. From the Commands tab > click Synchronize dirs…
  3. Check the boxes for options Subdirs,  and by content.
  4. In the Show section > disable Equal and enable the other three buttons.
  5. Enable the Singles and Duplicates options.
  6. Click Compare.
total commander to compare files

To synchronize the two folders, in the compare window, select the files you want to copy, then click on the checkbox between the columns and click Synchronize.

As mentioned, these are just some of the free tools available, not an exhaustive list. Also, there are more options, including tools offering free trials and paid plans.

In case you don’t want to use these advanced tools, you can always automatically copy files from one folder to another using built-in apps on Windows.

If you recommend a similar tool, drop us a line in the comments section below.

FIX: HBO Go content not available error

When watching an HBO Go movie or a TV show on your Android and other devices, you may encounter the content not available error. The full error reads:

Content Not Available, The item you requested is not currently available.

As the error indicates, the content you are trying to watch is not available. This error is usually a temporary issue and gets resolved automatically.

However, if the issue persists, you may try the troubleshooting steps provided in the article. In this article, we have listed a couple of troubleshooting steps to help you resolve the HBO Go content not available error.


How do I fix the HBO Go content not available error?

1. Check for service outage

HBO Go content not available error

One of the most common reasons for the HBO Go content not available error is a service outage. If the HBO Go app is experiencing a service outage, the content will not be available temporarily.

Try accessing the HBO Go app from other devices that you own to see if the error exists. If the issue persists on all the devices, wait for the issue to resolve automatically.

If the error occurs when playing a specific TV show or a movie, contact HBO support as it is an issue with the service itself.


2. Sign out of HBO Go

The item you requested is not currently available

  1. Open the HBO Go app on your device.
  2. Tap on the Profile icon (upper left corner).
  3. Select Sign out.
  4. Select Sing Out Now again.
  5. Once logged out, close and relaunch the HBO Go app.
  6. Enter the login details and sign in to see if the error is resolved.

Update HBO Go app

HBO Go content not available error

  1. Try updating the HBO Go app to fix any issues that are occurring due to using an outdated version of the app.
  2. Open the Play Store on your Android device. Open App Store for iOS device.
  3. Search for HBO Go.
  4. Open and tap on Update to install the pending updates.
  5. Relaunch the app and check for any improvements.

3.  Perform a power cycle

HBO Go content not available error

  1. Power off your streaming device, including your TV.
  2. Unplug the power from the wall outlet.
  3. Leave the devices idle for a minute.
  4. Reconnect the power cord to the wall outlet.
  5. Turn on the devices.
  6. Launch HBO Go to see if the error is resolved.

Restart home network

The item you requested is not currently available

  1. Unplug the power from the modem or WiFi router to turn it off.
  2. Disconnect the ethernet cable connected to the router.
  3. Wait for a minute and then reconnect the cable and power on modem and router.
  4. Wait till all the indicator lights stop blinking.
  5. Connect your streaming device to your Network and trying streaming HBO.

Xfinity HBO Go not working? Try these solutions


4. Reinstall HBO Go

4.1. Android TV

The item you requested is not currently available

  1. Go back to the home screen and launch Google Play Store.
  2. Click the menu icon and select My Apps & Games.
  3. Locate and open HBO App from the list.
  4. Select Uninstall, and then OK to confirm.
  5. Search for the HBO Go app in Play Store.
  6. Select Install to install the app.

4.2. Android smartphone/tablet

The item you requested is not currently available

  1. Open the apps menu.
  2. Locate the HBO Go app.
  3. Tap and hold the HBO Go app icon for 2 seconds.
  4. Tap on Uninstall, then tap OK.
  5. Open Google Play Store and reinstall HBO Go.

4.3. Roku TV

The item you requested is not currently available

  1. From the home screen, highlight the HBO Go app.
  2. Press the Star * button your remote.
  3. Select Remove Channel > Remove Channel.
  4. Once removed, reinstall HBO Go from Channel Store.

The HBO Go content not available error usually resolves itself automatically after some time. However, if the issue persists, follow the steps in the article to diagnose issues with the app or your streaming device and fix it.


[wl_navigator]

FIX: HBO Now service error

When streaming HBO Now content, you may encounter the HBO Now service error. This error can occur due to multiple reasons, including HBO Now app glitch, bad cache issues, an unstable internet connection, etc.

Several users have reported similar errors in the Reddit community forum as well.

Error while attempting to stream true detective.
App is not working on Apple TV.

In this article, we explore a couple of troubleshooting tips to help you resolve the HBO Now service error on your device.

How do I fix the HBO Now service error?

1. Update the HBO Now app

  1. Open the app store on your device.
  2. Search for HBO Now and open it.
  3. Tap on the update button to download and install the update.
  4. Once installed, relaunch the HBO Now app and check for any improvements.

2. Sign out of HBO Now

  1. Open the HBO Now app.
  2. Choose the Profile icon on the top right corner.
  3. Tap the Setting icon.
  4. Open Manage Devices.
  5. Tap on Sign Out of All Devices.
  6. Choose Sign Out to confirm the action.
  7. Relaunch the HBO Now app and check if the service error is resolved.

3. Restart your device

  1. If the issue persists, performing a quick restart can help you resolve the issue.
  2. Power off the streaming device that you are using to watch HBO Now.
  3. Disconnect the device from the power outlet.
  4. Wait for a minute and reconnect the cable.
  5. Power on the device and try streaming HBO Now.

4. Play another show or movie

  1. Launch the HBO Now app.
  2. Try playing another show or movie and check if the error is a show specific.
  3. If the issue is limited to a particular show or movie, reach out to HBO support for better assistance.

Try another device

  1. Open the HBO Now app on another device. If you have a PC, you can access it using your web browser.
  2. Play the title that was displaying the error to see if it is a device-specific error.
  3. If it is a device-specific error, proceed with the next set of steps.

5. Clear HBO Now data

5.1. Amazon Fire TV

HBO Now service error
  1. Make sure you have the latest version of HBO Now installed. Also, check your device for pending firmware updates and install them.
  2. Try rebooting your device if you haven’t done it already.
  3. Use an internet speed testing tool to check internet speed.
  4. Go to Settings > Applications > Managed Installed Applications.
  5. Select HBO Now.
  6. Select Clear Data > Clear Data. Restart your device.

5.2. Android TV

HBO Now service error
  1. From the home screen, go to Settings.
  2. Select Apps.
  3. Open HBO Now.
  4. Select Clear data, and then select OK to confirm.

5.3. Android phone/tablet

HBO Now service error
  1. Open Settings.
  2. Go to Apps and open HBO Now.
  3. Tap on Storage.
  4. Tap on Clear Data, then select OK.
  5. Choose on Clear cache.
  6. Relaunch the app from the apps menu.

6. Reinstall HBO Now

6.1. Amazon Fire TV

HBO Now streaming error
  1. Go to Settings and select Applications.
  2. Open Manage Installed Applications.
  3. Select HBO Now from the list of applications and select Uninstall.
  4. You can reinstall the app from the Amazon Store.

6.2. Android smartphone

  1. Open the Apps menu.
  2. Tap and hold the HBO Now icon.
  3. Tap on Uninstall.
  4. Open Google Play Store and search for HBO Now.
  5. Install the app and check for any improvements.

6.3. Android TV

  1. From the home screen, open Settings.
  2. Select Apps, and then select HBO Now.
  3. Select Uninstall, and select OK to confirm.
  4. Open Google Play Store and search for HBO Now.
  5. Select Install.
  6. Relaunch the app and see if the error is resolved.

6.4. Apple TV

  1. From the home screen, highlight the HBO Now app.
  2. Press and hold the Touch Surface for two seconds.
  3. Next, press the Play/Pause
  4. Choose Uninstall.
  5. Open the App Store and reinstall HBO Now.

6.5. Roku TV

HBO Now Roku TV error
  1. From the home screen, highlight the HBO Now
  2. Press the Star * button.
  3. Choose Remove Channel, and again Remove Channel to confirm.
  4. Once removed, reinstall the HBO Now channel from the Stream Channels section.

7. Restart your home network device

  1. Unplug the power from your router and modem.
  2. Wait for a minute.
  3. Reconnect the power to your modem and wait for the indicator lights to stop blinking.
  4. Connect your streaming device to the network and try playing HBO now content to see if the problem is resolved.

The HBO Now service error can occur if you have an unstable internet connection, glitchy HBO app, service outage, or even bad cache.

Follow the steps in the article one by one to fix the service error and continue streaming your favorite show without any error.

Fix YouTube TV error 400 on smart TVs with just one trick

The YouTube TV video streaming service is available on most of the best known smart TVs out there, among them Samsung, LG, Apple, Fire, or Roku.

From time to time, when trying to stream YouTube on your smart TV, you get stuck to error 400: Your client has issued a malformed or illegal request. And that’s all they know!

Since the error message doesn’t prompt you to do anything, there are a few things that you can try.


Why isn’t YouTube TV working on my smart TV?

The one main thing to do to to get YouTube TV working on your smart TV is to clear cached data and start over with a clean app. So depending on the smart TV you’re using, scroll down and find the right solution for you.

For Apple TV you need to uninstall and reinstall the app to clear cache and data.

  1. Go to your apps > click and hold the YouTube app until it begins jiggling.
  2. Press the Play/Pause button > Delete.
  3. To re-install the app, go to the Play Store > download it on your device.

For Roku:delete cache roku

  1. Select Home in the main menu.
  2. Then, on the remote controller press Home 5 times + press Up + press Rewind 2 times + press Fast Forward 2 times.
  3. It should take a few seconds to clear the cache.

For Samsung TVs:

  1. Press the Home button on your remote > Broadcasting.
  2. Select Expert Settings.
  3. Select HbbTV Settings.
  4. Select Delete Browsing Data and follow the prompts to clear any saved data.

For LG TVs:clear cache lg tv

  1. From Home screen > Apps > Settings > Application manager.
  2. Look for YouTube TV > Storage.
  3. Tap Clear cache.

For Android TVs:

  1. Press the Home button on your remote > Settings.
  2. Under TV > Apps.
  3. Under System apps > YouTube TV.
  4. Select Clear cache > OK.

For HiSense TV, you have to restore the device to factory settings.

  1. From the Home screen > Settings.
  2. Select Suport > Reset to default > OK.

For Fire TV:

  1. Press the Home button > Settings.
  2. Select Applications > Manage Installed Applications.
  3. Select YouTube TV > Clear cache.

We hope we’ve covered all smart TV options. If you have further suggestions, please leave them in the comments section below.


[wl_navigator]

How to fix Spectrum error code RLC-1000 on Roku

You can get the Spectrum error code RLC-1000 if you attempt to watch the Spectrum change on your Roku while on a poor internet connection.

However, although the error message points out, the connection is not always the cause.

Other causes of the Spectrum error code RLC-1000 include a corrupt DNS cache and an outdated Channel app. Regardless of why the Spectrum app is not working on Roku, the solutions here will resolve the issue.


How do I fix the Spectrum error code RLC-1000?

1. Reset the network connection

reset-the-connection-spectrum-error-code-rlc-1000

When you get the Spectrum error code RLC-1000, your first course of action should be to reset your connection. Don’t just restart your router; follow these steps to reset your connection properly.

  1. First, power off your WiFi router and Roku device. Leave these off for around 15 seconds before turning them back on.
  2. If the first step fails to fix the error, unplug your Roku from the network connection, reconnect it and try again.
  3. You can now reset the entire connection if both steps above fail.
    • To do this, unplug the TV, router, and Roku from both the power source and the internet. Connect them all back after around 1 minute.

2. Fix Spectrum error code RLC-1000 by power-cycling the devices

  1. First, unplug the router, Roku, and modem from the power supply and internet service.
  2. Next, with all three devices disconnected, press, and hold the Power button of the router for around 30 seconds.
  3. After that, plug the devices back to the power source.
    • Connect them in this order: Modem first, the router next, and your Roku last.
  4. After connecting one device, allow it to boot completely before you connect the next one.
  5. Next, allow the router to get access.
  6. Check if the Spectrum error code RLC-1000 message still shows up after this.

Most times, cache building up inside your machine could be the cause of the Spectrum app not working on Roku. So, this solution repairs the issue by clearing the cache for the devices in the loop.


3. Uninstall and reinstall the Spectrum TV channel manually

reinstall-spectrum-tv-spectrum-app-not-working-on-roku

  1. On the Roku, go to My Channels.
  2. Next, locate the Spectrum TV channel from the list and then press the asterisk (*) button on the Roku remote.
  3. Go to the Remove Channel button on the options and hit OK on the remote.
  4. After that, using your Roku remote, open the Roku Channel Store.
  5. Next, click on Search, then search for spectrum TV, and click Install.
  6. Sign in to your account and agree to the terms and conditions next.
  7. Finally, launch the channel and try to recreate the Spectrum error code RLC-1000.

The Spectrum error code RLC-1000 is mainly caused by your internet connection, and the solutions above have helped loads of users resolve the problem.

However, if you try the methods and Spectrum app is not working on Roku still, then you should try reaching out to Roku‘s customer support.

They will do some remote troubleshooting, and if need be, send someone over to check out your setup.


[wl_navigator]

Microsoft Edge WebView2 gets updates for UWP and more

Microsoft Edge WebView2 is a powerful tool that lets developers embed HTML, JavaScript, and other web technologies in native applications.

During the first day of the Build 2020 event, it has emerged that the control has got new options for development in .Net and UWP (WinUI 3.0).

Microsoft Edge WebView2 updates

The Edge WebView2 preview now enables you to work with WinForms. This open-source GUI is a component of the Microsoft .Net Framwork.

Today, we’re expanding the preview with new options for .NET and UWP (WinUI 3.0) development, enabling you to embed a Chromium-based Edge WebView in WinForms, WPF, and UWP (WinUI 3.0) applications.

Also supported is the embedding of the preview in WFP and UWP applications.

The announcement is music to the ears of developers that prefer a hybrid application approach. Now, they do not necessarily have to choose between creating web and native apps.

With the Edge WebView2 control, they can reuse the bulk of their code on pretty much any platform. They will still be able to tap into the full capabilities of native applications.

Other Edge devtools updates

Microsoft announced that it is working on enhancing the accessibility of Edge extensions at its online store.

The improvement focuses on making it easier for developers to deliver Chromium-based extensions into the Microsoft store. The second objective is to streamline the in-store experience for Edge end-users.

As such, Edge adds-on site will feature new categories and better ways to look up and find extensions. Additionally, Microsoft wants to add a visually-appealing layout to the store.

Microsoft Edge began shipping earlier this year. Since launch, it has been receiving enhancements catering to the interests of both users and developers.

A recent upgrade to the browser’s devtools allows developers to create solutions in up to 10 localized languages, including Japanese and Russian.

What is your experience with Microsoft Edge WebView2? Feel free to share it or ask any question in the comments section below.

[wl_navigator]

Fix error 0x80041006 on your Windows PC

When playing online games from different websites like Yahoo or even Facebook, and you’re using Internet Explorer as your browser, you’ve probably noticed that the games may not play as they’re expected to.

When you play or attempt to play an online game, it may fail to download, not launch, not load completely, or some functionality may not work. The game may also freeze while you’re playing, the screen may go black or you may be dropped from a game or the website while playing.

One of the problems that arise is error 0x80041006, which gives the following message: A network error occurred while communicating with the game server. This is commonly caused by a missing or outdated add-on needed to play the game.

Some games are based on Silverlight, Java, or Flash and require Internet Explore add-ons to function.

Some of the troubleshooting methods you can try include restarting your computer, installing Windows updates and updating your browser. If error 0x80041006 persists, then try some of the recommended solutions in this article.

FIX: Error 0x80041006 in Windows

  1. Download and install the latest Internet Explorer/Silverlight/Java/Adobe Flash/Adobe updates
  2. Temporarily disable your security software
  3. Use Disk Cleanup
  4. Check in Safe Mode with Networking
  5. Perform a clean boot
  6. Run Memory Diagnostic Test
  7. Uninstall and reinstall the game
  8. Create new user profile
  9. Reset your Internet Protocol (TCP/IP)

Solution 1: Download and install the latest Internet Explorer/Silverlight/Java/Adobe Flash/Adobe

If you use a pre-released version of IE 9, download and install the released version and then apply relevant and applicable updates offered by Windows Update. If you’re using ActiveX filtering or tracking protection, some games or videos may be disabled.

For games that use Silverlight, update to the latest version of Silverlight and enable it in Internet Explorer. Do the same thing for games that need Java add—ons by updating the add-ons to the latest versions.

Here’s how to enable add-ons in Internet Explorer:

  • Start Internet Explorer
  • Click Tools icon
Sticky Notes crashing in Windows 10
  • Click Internet Options
error 0x80041006
  • Click Programs tab
error 0x80041006
  • Click Manage add-ons button
error 0x80041006
  • From the Show dropdown selection, select Run without Permission
error 0x80041006
  • Look for the add-ons (Microsoft Silverlight, Shockwave ActiveX Control, Shockwave Flash Object, Java Plug-in) in the displayed list and ensure the Status is listed as Enabled

Solution 2: Temporarily disable your security software

You can temporarily disable your antivirus program and see if error 0x80041006 persists or not. If nothing happens, you may need to check your firewall settings.

Enable your antivirus back on once you’re done as it is not recommended to disable these settings on your computer.

If disabling solved the issue, now would be a great time to reconsider your options for protection and security.

SSL virus detection is provided in TotalAV to assist you with a thorough check and fix the error 0x80041006 on your Windows PC. The test may cause your computer to slow down somewhat, but as soon as the scan is completed, your computer will be back up and running.

Other scanning options may need to be turned on based on your browsing patterns.

On a more serious note, do you actually need TotalAV? The fact is that you need it because it assists you in a challenging task. If you have sensitive information and need to visit unsafe internet sites for games on a frequent basis, you certainly require specialized software such as TotalAV.

Solution 3: Use Disk Cleanup

  • Search for Disk cleanup from the taskbar and select it from the list of results.
  • Under Files to delete, select the file types to get rid of. To get a description of the file type, select it.
  • Select OK.
  • If you need to free up more space, you can also delete system files. In Disk cleanup, select Clean up system files.
  • Select the file types to get rid of. To get a description of the file type, select it.
  • Select OK.

This deletes unnecessary files so you can continue with gameplay.

Solution 4: Check in Safe Mode with Networking to see if error 0x80041006 persists or not.

  • Restart your computer
  • When the sign-in screen is displayed, hold down SHIFT key while you select Power then Restart
  • After the computer restarts to Choose an option screen
  • Select Troubleshoot
error 0x80041006
  • Click Advanced options
error 0x80041006
  • Click Startup Settings
error 0x80041006
  • Click Restart
  • Once it restarts, you will see a list of options. select 5 or F5 for Safe Mode with Networking

This starts Windows in safe mode, including the network drivers and services you need to access the internet or other computers on the same network.

Once you’re in safe mode, you can perform a System File Checker (SFC) scan, which checks all protected system files, and then replaces the incorrect versions, with the genuine, correct Microsoft versions.

Here’s how to do this:

  • Click Start
  • Go to the search field box and type CMD
  • Right click Command Prompt and select Run as Administrator
typing lag/slow keyboard response in Windows 10
  • Type sfc/scannow
wifi wont connect to router
  • Press Enter
  • Restart your computer

Do the following to exit Safe Mode:

  • Right click Start button
  • Select Run
typing lag/slow keyboard response in Windows 10
  • Type msconfig
wifi wont connect to router
  • A pop up will open
  • Go to the Boot tab
error 0x80041006
  • Deselect or uncheck Safe Boot option box
error 0x80041006
  • Restart your computer

Solution 5: Perform a clean boot

  • Log on as administrator
  • Go to the search box
  • Type msconfig
error 0x80041006
  • Select System Configuration
  • Find Services tab
error 0x80041006
  • Select Hide all Microsoft services box
error 0x80041006
  • Click Disable all
error 0x80041006
  • Go to Startup tab
  • Click Open Task Manager
typing lag/slow keyboard response in Windows 10
  • Close Task manager then click Ok
  • Reboot your computer

Performing a clean boot for your computer reduces conflicts related to software that can bring up the root causes of error 0x80041006. These conflicts can be caused by apps and services that start and run in the background when Windows starts normally.

You will have a clean boot environment after all these steps are carefully followed, after which you can try and check if error 0x80041006 goes away. If not, try the next solutions.

Solution 6: Run Memory Diagnostic Test

This works with Microsoft Online Crash Analysis to detect crashes that may be caused by failing memory. It provides guided support, and prompts you to schedule a memory test the next time you restart your computer.

To run the Memory  Diagnostic Test, go to Start, type ‘memory diagnostic’ and then double click on the first result. Follow the on-screen instructions to complete memory scanning.

Solution 7: Uninstall and reinstall the game

  • Right click Start
  • Select Programs and Features
error 0x80041006
  • Click Turn Windows features on or off
error 0x80041006
  • From the list, find Games and click to expand it. Turn off Games by unchecking its box, then wait till it is disabled, click OK and restart your computer
  • Once you restart, turn on the Games using these same steps but check the Games box

You can always uninstall, then clean your system, and reinstall the game back again.

Solution 8: Create new user profile

  • Click Start
  • Select Settings
  • Select Accounts
error 0x80041006
  • Click Family and other users
error 0x80041006
  • Click Add someone else to this PC
error 0x80041006
  • Fill in the form with the user name and password. Your new user account will be created.
  • Click on Change account type
  • Click the drop down arrow and choose Administrator to set the account to administrator level
  • Restart your computer
  • Login to the new account you just created

Create a new user profile then change settings to administrator privileges, and check if the problem persists.

If the error 0x80041006 goes away, then it may mean your other user profile is corrupted, so do the following:

  • On your new account, use it to downgrade your usual account
  • Click Apply or Ok
  • Raise back your old account to its default admin level
  • Rinse and repeat a few times as this will help to remove any corruption
  • Leave your account on as Administrator

If the problem disappears, then you can either fix the old user account or migrate to the new account.

Solution 9: Reset TCP/IP

  1. Go to Start > type cmd > right-click on Command Prompt > select Run as Administratorreset tcp ip windows 10
  2. Enter the following commands and hit Enter after each one:
    • netsh int ip reset
    • netsh int ipv6 reset
    • netsh winsock reset
  3. Restart your computer and launch the problematic games again.

Check out the Browser Games section for news and guides of online games that you can play anytime.

The performance of games and websites is influenced by your browser – keep yourself informed about them by visiting our Browser Hub.

Has any of these solutions worked for you? Let us know in the comments section below.

[wl_navigator]

FIX: Xbox Live Purchase and Content usage

Many Xbox One users reported Purchase and Content Usage network error on their Xbox. Here’s how one user describes the problem on Microsoft Answers forums:

I need help. My network on my Xbox One is saying that my purchase and content usage is “experiencing issues.” However, when I go to the Xbox live status on the website, it said it has been down since June 22. This is a big issue for me since I put $40.00 USD into my account for a DLC.
If anyone knows how to fix this, please let me know.

This is a network error, and it will prevent you from downloading new content, so in today’s article, we’ll show you how to fix it once and for all.

How do I fix the Purchase and Content Usage on Xbox One?

1. Check if the Xbox services are running properly

xbox live status Purchase and content usage network error

  1. Check the Xbox Live Status.
  2. If there’s an issue with Purchase and Content Usage service, you’ll see the current status of the service.
  3. Since this is a server-side issue, there’s not much you can do, so you’ll have to wait for Microsoft to fix it.
  4. If you want to get notified as soon as the issue is fixed, click the Notify me button.

Xbox stopped working after power outage? Be sure to try these fixes!


2. Power cycle your console

power cycle xbox one Purchase and content usage xbox service not working
This is an unlikely solution, but a few users reported that it worked for them. You can power cycle the console by doing the following:

  1. Press and hold the Power button on your console for 10 seconds.
  2. Once your Xbox turns off, disconnect it from the power outlet.
  3. Leave it like that for a minute or two.
  4. Now connect the console to the power outlet and turn it back on again.

Purchase and Content Usage network error is almost always caused by server problems, and in most cases, you just have to wait for Microsoft to fix the problem.

If you’re tired of waiting, you can contact Microsoft support and let them know about the issues you’re having.


New Definitive Editions of Mafia II and Mafia III video games are now live on Xbox One consoles

The recently announced Definitive Editions for Mafia II and Mafia III are now both available for download on Microsoft’s Xbox One consoles while the Definitive Edition of the first Mafia video game can now be pre-ordered ahead of its August 28th release date.

A Mafia: Trilogy bundle, containing all three titles, also went live today and can be purchased right now though players will only gain access to the second and third Mafia games and will need to wait until the first one is released until they can to play it.

These three Mafia video games represent three generations of Xbox consoles. The first game came out on the original Xbox console back in 2004, the second on the Xbox 360 in 2010, and the third on the Xbox One in 2016.

The Mafia: Definitive Edition is a complete rebuild of the original game which is why it’s not due out for a few more months. Mafia II: Definitive Edition boasts an HD upgrade of the second title while Mafia III: Definitive Edition contains the base Mafia III Xbox One game plus all of its post-launch downloadable content. All three Definitive Editions support 4K Ultra HD when played on an Xbox One X console and Microsoft’s upcoming Xbox Series X.

The Mafia: Trilogy bundle doesn’t contain any extras but it is a cost-effective choice for those planning on playing all three games as it costs just $59.99 while Mafia: Definitive Edition on its own will set gamers back $39.99 and the second and third games are currently selling at $29.99 each.

Which Mafia video games are you planning on buying? Share your thoughts with the community in the comments below and then follow us on Pinterest and Twitter for more Xbox gaming news.

Mafia: Definitive Edition Pre-Order
Developer:
2K
Price:
Free


Mafia II: Definitive Edition
Developer:
2K
Price:
$29.99


Mafia III: Definitive Edition
Developer:
2K
Price:
$29.99


Mafia: Trilogy
Mafia: Trilogy
Developer:
2K
Price:
Free

Microsoft Project Reunion unifies the existent APIs

In March 2020, Microsoft crossed the line of 1 billion devices running Windows 10. And we’re talking about active devices.

And now, with the Coronavirus pandemy, according to Microsoft, users are spending more than 4 trillion minutes on Windows 10 a month, a 75% increase year-over-year.

It’s really easy to understand why Microsoft wants to make it easier for developers to create more apps for Windows 10.

Project Reunion unifies the Win32 and UWP

The whole big thing about Project Union is to unify access to the existing Win32 and UWP APIs and take them out from the operating system. 

We’re bringing together the combined power of Win32 and UWP, so developers no longer have to choose, because we’re unifying these existing APIs, decoupling them from the OS. And so the developers are confident that as they use these APIs, they will work across all of Windows.

And Project Reunion allows developers to not only modernize their app so it runs efficiently, locally, on a physical Windows machine, but it can also deliver a great experience when streamed from the cloud.

And so you’re now running Windows, not only on Windows, but iOS and Android and Mac and Linux from the cloud.

, explained Kevin Gallo, Vice President, Windows Developer Platform at Microsoft during Microsoft Build 2020.

Project Reunion components

Right now, Project Reunion has only two components. One is WinUI 3 Preview 1, the latest preview version of Microsoft’s user interface framework for Windows.

The other is a new preview of WebView2, which allows the developers to embed a Chromium-based WebView into Windows Forms, WPF and UWP/WinUI 3 apps. 

[wl_navigator]

Azure Synapse Link new Microsoft tool for big data analytics

According to Microsoft, 95% of the Fortune 500 companies use Microsoft Azure. Right now, Microsoft has 61 data Azure regions throughout the world while they added new regions in Israel, Mexico, Poland, and New Zeeland.

What is Azure Synapse Link?

Azure Synapse Link is a new Microsoft tool that enables data analytics on live operational data. It basically enables companies to use the same database system for analytical and transactional workloads on a single system.

Synapse Link is built on the Synaps Analytics, which Microsoft announced last year and takes it a step further.

They took out the barriers between Azure’s operational databases and Synapse Analytics, so that the companies can immediately benefit from the data in the databases without going through a data warehouse in the first place. 

If you’re saying Azure Synapse Link, you’re saying big-data management because according to Microsoft, Synapse can query data at petabyte-scale, directed by lines of SQL.

When is Synapse Link making its appearance?

Azure Synapse Link will launch in the coming weeks together with new Azure Synapse features in preview and Project Cortex.

What we are announcing with Synapse Link is the next major step in the same vision that we had around reduced the time to insight.

And in this particular case, a long-standing barrier that exists today between operational databases and analytics systems is these complex ETL (extract, transform, load) pipelines that need to be set up just so you can do basic operational reporting

,said Rohan Kumar, Microsoft’s corporate VP for Azure Data.

[wl_navigator]

Windows Package Manager aka Winget installs packages faster

Today, during Microsoft Build 2020, we got the first preview for the new Windows Package Manager.

The Windows Package Manager is a tool designed to help you quickly and easily search, show, and install packages. How easy? Using one command, winget install <tool> you can install your favorite tool.

How does Windows Package Manager works?

It all works through GitHub. The developers list their applications in a GitHub repository and the package manager gets them and installs them right away. 

It’s as simple as that.

So, while for the preview version, you can search, show, and install packages, they are planning to update the Windows Package Manager with uninstall, list, and update.

Where do I download the Windows Package Manager from?

You can download and annually install the preview for the Windows Package Manager from the GitHub releases.

However, you can also get it through automatic updates from the Microsoft Store that contain the client, but for that, you will have to install a Windows 10 Insider build and join the Preview flight ring by signing up in the insider program.

Winget commands

If you install the Windows Package Manager these are the winget commands and options for the preview:

  • install Installs the given application
  • show Shows info about an application
  • source Manage sources of applications
  • search Find and show basic info of apps
  • hash Helper to hash installer files
  • validate Validates a manifest file
  • –help Provides command line help
  • –info Provides addition data, helpful for troubleshooting
  • –version Provides the version of the client

[wl_navigator]

Windows Terminal 1.0 has GPU support, tabs and panes

During Microsoft Build 2020, the most important event of the year for Microsoft and developers, they launched the new Windows Terminal.

The Windows Terminal is a modern, fast, efficient, powerful, and productive terminal application for users of command-line tools and shells like Command Prompt, PowerShell, and WSL.

Its features include multiple tabs, panes, Unicode and UTF-8 character support, a GPU accelerated text rendering engine, and custom themes, styles, and configurations.

Windows Terminal 1.0

Microsoft finally released Windows Terminal 1.0, which was in Preview mode until now. The 1.0 version signals the fact that it’s stable enough for everybody to use.  You can download the new Windows Terminal directly from the Microsoft Store or you can go through the GitHub where you can also see some details about it.

Tabs and Panes

tabs and panes

You will be able to run any command-line application inside tabs and panes in Windows Terminal. Other improvements include creating profiles for each of your command line applications and opening them side-by-side, and each of your profiles can now be uniquely customized to your liking.

Also, the terminal will create profiles for you automatically if you have Windows Subsystem for Linux distributions or additional PowerShell versions installed on your machine.

GPU Accelerated Rendering

Windows Terminal utilizes the GPU to render its text which provides a faster experience from the command line. It also provides support for Unicode and UTF-8 characters.

You will even be able to display your emojis while using the terminal in a variety of languages.

[wl_navigator]

How to activate a Microsoft 365 product key in a few steps

Microsoft 365 is a set of productivity and collaboration tools among them Word, Excel, Skype, or Outlook. The tools can be tried individually for free, for 30 days. Afterward, subscribing to a paid plan is mandatory to further use the service.

Whether you purchased a Microsoft 365 suite from the official Microsoft store, or a third-party provider, the product comes with a 25-digit license key.

Upon installing one of the features, from the Microsoft page, at a certain point, you are also required to enter the product key.

In today’s guide, we will discuss the fastest way to activate a Microsoft 365 account. Read on for more details.


How can I activate and use Office 365?

Office 365 Activation with license key

  1. Visit the Microsoft 365 dedicated setup pages.
  2. Sign in with the Microsoft account that you used previously.Office website
  3. Enter your license key found on the purchase confirmation email or receipt, and click Next.how to sign in in microsoft 365
  4. Install the apps you need by following the on-screen instructions.

Note: The product key is necessary just for the first upgrade to the paid plan. Further upgrades for each tool are done by signing in to your Microsoft account.

Activate Microsoft 365 with a renewal key


If you have renewed your Microsoft subscription, you only have to sign-in to your Microsoft account and enter the new product key.

Alternatively, Microsoft might prompt you for a new key since it will detect that your subscription has expired. Once you enter the new key, the subscription will be automatically renewed across all tools.


We hope that this guide has proven useful for you. If you have any questions or suggestions, don’t hesitate to leave us a comment by using the section found below this article.

[wl_navigator]

How to Get the Cheapest Price for Microsoft 365

Regarding software, there’s nothing wrong with shopping around for the most affordable price. There are no surprises as long as the reseller is reliable and you get precisely what you paid for.

When it comes to Microsoft 365, it is recommended to get a paid plan straight from the developer. Microsoft subscription plans are flexible enough so that everyone can find a suitable package.

Of course, buying Microsoft 365 from a third party is possible, perhaps at a slightly different price than the official ones advertised by Microsoft. Still, you’ll undoubtedly trade off a few dollars for access to support or updates.

Which is the best deal for Microsoft 365?

Microsoft 365 comes in a few packages designed for two lines of business: personal/home and business. They also have a separate line for the Education segment.

paid plans for office 365

On this note, for home users, perhaps the Office Home & Student plan is the cheapest price since it’s a one-time payment. It allows access for lifetime use, from one PC to the most used Microsoft tools – Word, Excel, and PowerPoint.

Monthly plans are available for all packages, starting from 5.99$ in the home line for the Personal plan, and 5$ in the business line for Business Basic, for instance.

It all depends on the features you need and the number of devices or persons using the service.

Who gets the cheapest price?

Students and teachers can get Office 365 Education for free. It includes Word, Excel, PowerPoint, OneNote, Microsoft Teams, plus additional classroom tools. All that’s needed is a valid school email address to get on enrolled in the program.


When can I find the best deals?

As they say, timing is everything. Of course, Microsoft advertises a list of official prices, but depending on the time of the year and other seasonal events (Black Friday, for instance), you can easily find some good bargains.

Once you subscribe, you will always be in for special deals whenever renewal approaches. Don’t forget about annual tech events such as DeveloperWeek or Microsoft Ignite, for which Microsoft designs special deals.

As previously mentioned, the official Microsoft store displays up-to-date official prices for all packages. However, you can also look for deals with third-party resellers offering a Lifetime Microsoft 365 subscription.

If you don’t find better deals to continue the subscription, you can always cancel it using the easy steps mentioned in this post.

Before deciding to get Microsoft 365, check out this guide to understand the differences between Office 2021 and the subscription model.

The only thing you need to do now is take some time shopping.

Razer Synapse network not available? Fix it in 3 easy steps

Razer makes some of the most premium computer gaming peripherals. It also offers the Razer Synapse software to the users. However, sometimes the Razer Synapse software may generate errors like Network not available when trying to login to Razer synapse.

How do I fix the Razer synapse network not available?

1. Run the Windows troubleshooter to check network issues

Run troubleshooter
  1. Press Windows + I to open Settings.
  2. Click on Update & Security.
  3. From the left pane, click on Troubleshoot.
  4. Select Internet Connections.
  5. Click the Run the troubleshooter button.
  6. Follow on-screen instructions and apply any recommended fixes.

2. Uninstall and Reinstall all the Razer Devices

Device manager
  1. Press Windows Key + R.
  2. Type devmgmt.msc and click OK to open Device Manager.
  3. Select the Razer device you have installed and expand.
  4. Right-click on the specific driver and select Uninstall Device. Click Yes to confirm the action.
  5. Restart the computer, and Windows will reinstall the device driver.

Reinstalling the device drivers will fix any issues the Razer Synapse app may be experiencing due to a temporary glitch or driver corruption.

3. Check Razer Synapse

Check for updates

Razer Synapse not detecting keyboard
  1. Launch Razer Synapse if not already running.
  2. Expand the system tray and right-click on the Razer icon.
  3. Select Check for updates from the options menu.
  4. Razer will scan for any pending updates and install them.
  5. Re-launch Razer Synapse.

Repair Razer Synapse 

Razer Synapse not detecting keyboard
  1. Press the Windows key, type control, and open Control Panel.
  2. Click on Uninstall a program.
  3. Select Razer Synapse and click on Change.
  4. Click the Repair button.
  5. Razer Synapse will scan the app for file corruption and fix them if required.
  6. Re-launch the app and check if it works.

Reinstall Razer Synapse

Razer Synapse not detecting keyboard
  1. Press Windows Key + R to open Run.
  2. Type appwiz.cpl and click OK.
  3. In Control Panel, go to Programs > Programs and Features.
  4. From the list of installed programs, select Razer Synapse.
  5. Click Uninstall and then click Yes to confirm the action.
  6. Once uninstalled, reboot the computer.
  7. Download the latest version of Razer Synapse from the Razer website.
  8. Run the installer and install the app.
  9. Check if the issue is now fixed.

The Razer Synapse network not available issue usually occurs if you are running an outdated version of Razer Synapse. In that case, updating to the latest version of Razer Synapse should help.

However, the issue can also occur due to other reasons, such as corrupt installation or hardware failure.

We hope that this guide has helped you solve your Razer Synapse issue. If you want to get into contact with us, don’t hesitate to use the comment section found below this article