CPU-Z is Not Showing Ram: 7 Ways to Fix it

CPU-Z, although an extremely useful tool, often runs into issues. One of the common problems is CPU-Z not showing RAM or displaying a limited number of slots. Also, there are times when CPU-Z detects RAM, but BIOS and Windows don’t!

The Memory tab in CPU-Z is greyed out usually due to missing permissions, misconfigured BIOS settings, a bug in the installed version of the tool, or incompatible or damaged memory modules.

Before you move to the solutions, reboot the PC, install all pending Windows updates, or if the problem started recently, uninstall the Windows update downloaded around the same time!

What can I do if CPU-Z is not showing RAM or SPD?

1. Run CPU-Z as an administrator

  1. Right-click on CPU-Z’s launcher (.exe file), and select Properties.
  2. Go to the Compatibility tab, and tick the checkbox for Run this program as an administrator. administrator to fix cpu z not showing ram
  3. Click on Apply and OK to save the changes.

In 3 out of 5 cases when CPU-Z is not showing RAM or the Memory tab is blank, it’s the missing permissions to blame. And running the tool with administrative privileges fixes things in no time!

2. Check the SPD tab

Sometimes, the Memory tab in CPU-Z is greyed out, but the SPD tab lists the information. So, if you just want a brief overview of the connected RAM modules, simply go to the SPD tab, navigate through the different slots, and gather all the information you need.

spd tab in CPU-Z
SPD tab in CPU-Z

Remember, this is not a solution but a workaround that allows you to access the RAM-related information quickly without worrying about fixing CPU-Z.

3. Enable XMP in BIOS

  1. Turn off the PC, then power it on, and as soon as the display brights up, repeatedly press the F1, F2, F10, F12, Esc, or Del key to access the BIOS, depending on the system manufacturer.
  2. Now, you will find an XMP or XMP Profile option either on the home screen or in the Advanced tab. Under this option, select Enabled.xmp profile
  3. Save the changes, exit the BIOS, and check for improvements.

If CPU-Z is not showing correct RAM speed or the one it displays is lower than what was advertised for the memory module, you must enable XMP (Extreme Memory Profile) in BIOS. Switching to XMP also fixes things when RAM is not running at full speed.

4. Reinstall another version of CPU-Z

  1. Press Windows + R to open Run, type appwiz.cpl in the text field, and hit Enter.
  2. Select CPU-Z from the list of applications, and click on Uninstall.reinstall to fix cpu z not showing ram
  3. Follow the on-screen instructions to complete the process.
  4. After you are done, restart the computer, go to CPUID’s official website, and download an earlier or, if available, a newer version of CPU-Z. Make sure to get the setup instead of the ZIP file for quick and easy installation.cpu-z choose version
  5. Finally, check for improvements.

CPU-Z often leaves behind some files after a quick removal, which might trigger conflicts during reinstallation. That’s why experts recommend using a top-rated uninstaller software to delete all leftover files, app cache, and Registry entries.

5. Reconnect the memory modules

Often, when CPU-Z is not showing the correct RAM size or doesn’t display anything at all, it’s likely that the RAM modules are not connected properly and need to be reseated.

Simply disconnect each one of the modules and then seat them in the respective slots, as specified by the system manufacturer. You can refer to the computer’s manual for the ideal arrangement of the RAM modules.

6. Look for compatibility issues

If CPU-Z shows more RAM than Windows, it’s because the connected modules are not compatible with your PC. The RAM size displayed in CPU-Z is the total connected, while Task Manager and BIOS list the RAM size currently in use (Total RAM – Incompatible RAM = Usable RAM).

So, that’s why you have different RAM sizes in CPU-Z and Task Manager/BIOS!

ram

The best solution in this case is to check the manufacturer’s official website, identify the RAM type compatible with your PC, and get more of the same sticks.

7. Check the memory sticks for damage

In case CPU-Z detects RAM but BIOS and Windows don’t, check the modules for damage and scratches. A damaged, unreadable module is most likely to trigger this problem.

If you have spare RAM sticks (compatible with the PC), connect them and check for improvements. Because if it works now, the earlier modules were damaged and have to be replaced.

With these methods, you can fix things when CPU-Z is not showing RAM or displays the incorrect memory size and speed. In my experience, it’s usually the missing permissions or the disabled XMP profile that are to blame for such inconsistencies.

Before you leave, discover expert tips to force Windows to use all RAM and witness a significant boost in performance!

For any queries or to share more fixes with our readers, drop a comment below.

Can You Still Get Microsoft Rewards Without a Phone Number?

Many want to know how to redeem Microsoft rewards without a phone number, and if this is possible to do. This guide will explain everything you need to know about it, so keep on reading.

How do I redeem Microsoft Rewards without a phone number?

Can I get Microsoft Rewards without a phone number?

No, it’s not possible to redeem Microsoft Rewards without a phone number anymore. Even Microsoft states that it’s necessary to use a landline or mobile phone to authenticate before redeeming.

Using a VoIP number won’t work since the verification can only be performed with a real phone number.

Why does Microsoft Rewards want my phone number?

To prevent users from exploiting the Microsoft Rewards system, Microsoft is demanding all users who use this feature verify their identity, and the phone number is the fastest way to do that.

This will dissuade scammers and other users from exploiting the system for their gain.

Can you use the same phone number for multiple Microsoft Rewards?

No, using the same on multiple accounts for claiming Microsoft Rewards violates Microsoft Terms of Service, and if you do this, your account will likely get banned.

Can you use an alt account for Microsoft Rewards?

Using more than one account to claim Microsoft Rewards isn’t allowed, and it will result in a ban. To learn more, we have a guide on what to do if your Microsoft Rewards account is suspended, so don’t miss it.

Can I transfer Microsoft Rewards to another account?

It’s not possible to transfer Microsoft Rewards to another account, so you must redeem them on the account on which you earned them.

As you can see, Microsoft has some strict rules when it comes to redeeming Microsoft Rewards without a phone number to prevent scammers from abusing the system.

It’s not possible to bypass this limitation anymore, so be sure to verify your account and only use a single account to claim the rewards.

If you want to learn more, we have a great guide on how to earn more Microsoft Rewards as well an article on how to get maximum points per day on Microsoft Rewards.

Keep in mind that this service isn’t available everywhere, so you might get Microsoft Rewards is not available message if you try to use it.

Dynamic Audio Normalizer Download Windows 10 – Quick Guide

Looking for a Dynamic Audio Normalizer download for Windows 10? It’s great for balancing the volume in your audio files and smoothing out inconsistencies.

This software automatically adjusts audio to prevent sudden changes in loudness, making it perfect for music enthusiasts, podcasters, or video editors. I’ll show you how to get it and install it on Windows 10.

Let’s jump right into it!

How To Download Dynamic Audio Normalizer for Windows 10

Follow the below steps:

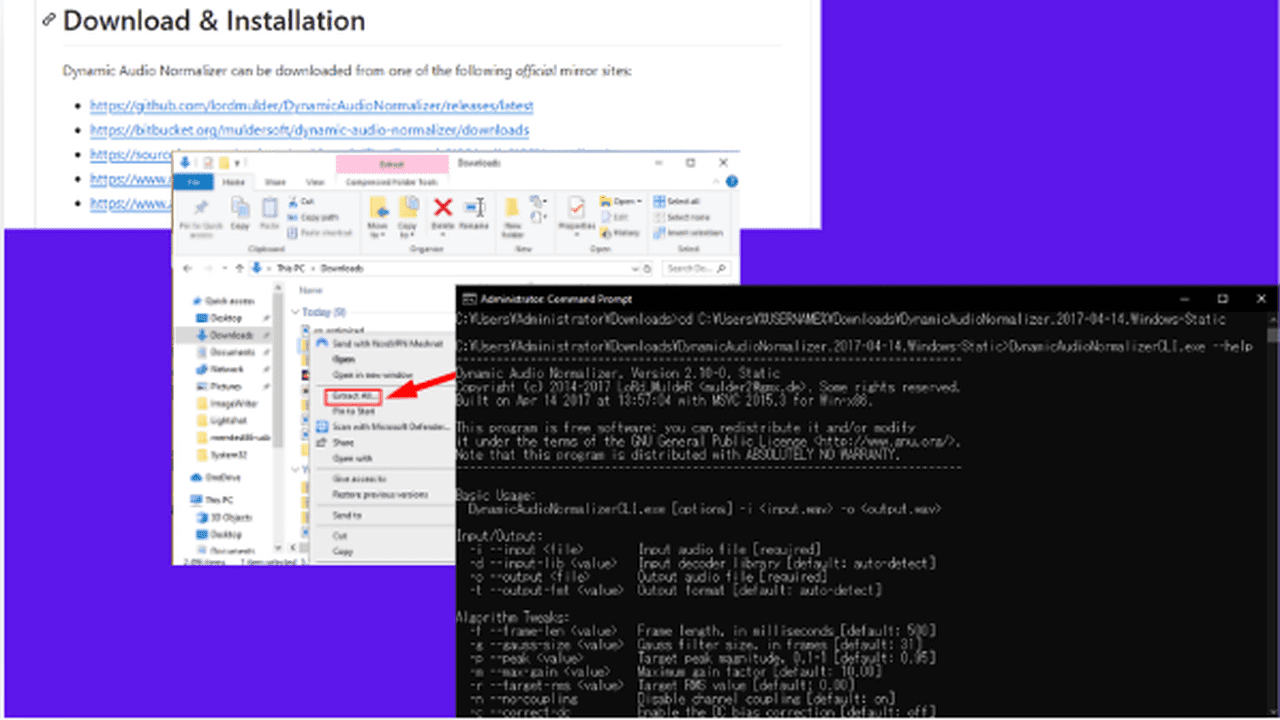
  1. Go to GitHub and scroll down to the Download & Installation section. Click on any official mirror site. I’ll pick the GitHub source.
Download and installation
  1. Tap the Static version, and the download process will start automatically.
Static version
  1. Go to Downloads on your computer, right-click on the zipped file, and tap Extract All to unzip it. 
Extract all
  1. Select a folder and tap Extract.
Extract the files
  1. Note down your file path. You’ll need it since Dynamic Audio Normalizer is a command line-based program.
  2. Run Windows Command Prompt as Administrator. I’ll use my example.
  3. Type ”cd C:\Users\user\Downloads” and press Enter. You should type your file type here instead.
  4. Type ”cd C:\Users\user\Downloads\DynamicAudioNormalizer.2017-04-14.Windows-Static” and hit Enter.
  5. Type “DynamicAudioNormalizerCLI.exe –help” and press Enter. This will show you a list of all the possible functions and commands you can use.
command prompt dynamic audio normalizer

The Dynamic Audio Normalizer download process for Windows 10 is pretty simple overall. It can improve the audio quality of your files.

Also, you can check out dedicated audio calibration software for more options. Moreover, learn what to do when you keep getting an error message saying no audio output device is installed and how to fix multimedia audio controller driver errors.

With less than a year until its EOS, Windows 10 still dominates the Windows market share

With less than a year until its EOS, Windows 10 still dominates the Windows market share. According to the latest stats from StatCounter, 62,7% of all Windows users are still on Windows 10 today, while Windows 11 barely reached 33% three years after its release. On the other hand, Windows 7 still has a loyal 2.8% base.

This is still a shocker, considering that 62.7% of Windows users must migrate to Windows 11 in a year unless they want to pay for Extended Security Updates for three years.

Despite the better gaming performances and the AI capabilities Microsoft has spent so many resources on (Copilot), users seem unconvinced at all.

Windows 11 is not without controversies, that’s true. The upcoming Recall is shady, but the Redmond-based tech giant says it has made it optional, and users can remove it from the OS altogether.

Still, users are not convinced. On Reddit, a threat that discusses Windows 10’s dominance, hundreds of users expressed their opinions. Some agree that Windows 11 doesn’t officially support much existing hardware.

Others upgraded to Windows 11 recently only to regret it, and the inability to position the taskbar vertically is one of the main reasons.

Others agree that Microsoft tried to make Windows 11 look more like Apple’s MacOS, sacrificing functionality for a better-looking UX. Others say it’s not sustainable, and recently bought laptops, or devices cannot even be upgraded to Windows 11.

As the company recently stated, Microsoft agrees that Windows 11 24H2 works best on new PCs. Some users say Windows 11 feels intrusive and invasive while not catering to the current market.

Microsoft will need to develop a solution, as most Windows 10 users probably won’t update to Windows 11, and the Windows Market share won’t change that much in a year. The 3-year ESU planned to start right after Windows 10 officially reaches EOS might not be enough.

Windows 11 might need to adapt. Otherwise, users might not adapt to it at all.

How to Fix ERROR_WAIT_NO_CHILDREN 128 (0x80)

The Error code 128 (0x80), comes with the message ERROR_WAIT_NO_CHILDREN and indication There are no child processes to wait for. The issue occurs when a software is waiting for a child process that doesn’t exist. This usually happens due to software bugs, outdated drivers or system malfunctions. Usually, before the BSoD, you may experience application crashes, system freezing, or operation delays.

Before committing to any more advanced tweaking, try restarting the PC and checking for software and OS updates. Reinstalling the app that triggers the error is also a good solution.

How do I fix ERROR_WAIT_NO_CHILDREN?

1. Run SFC and DISM scans

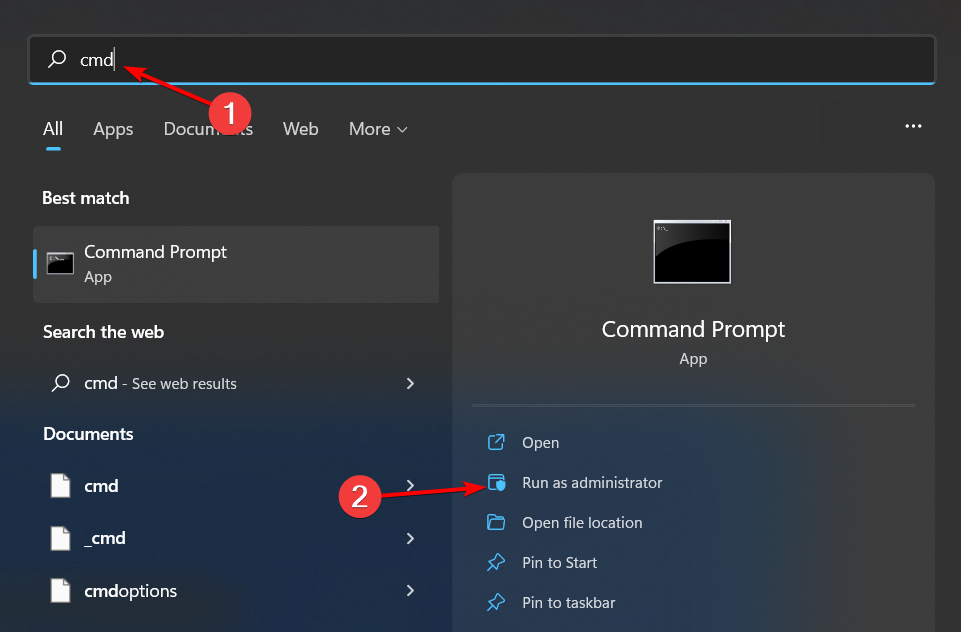
  1. Click the Start button, type cmd and select Run as administrator from the results.
  2. In the console window, type or paste the following command and press Enter: sfc /scannow
  3. After the scanning is complete, type or paste the following command and press Enter: dism /online /cleanup-image /restorehealth
  4. Wait until the scan is complete and restart your PC.

The SFC and DISM scans will repair any corrupted system files and the OS image. It’s the first software troubleshooting option when dealing with a BSoD and in most cases, it will fix the problem.

2. Update the device drivers

  1. Right-click the Start button and select Device Manager.
  2. Extend each section and look for any yellow exclamation marks that signal a problem with the driver.
  3. If you can’t find any exclamation marks, extend the graphics, network and chipset drivers.
  4. Inside, right-click the respective drivers and select Update driver.
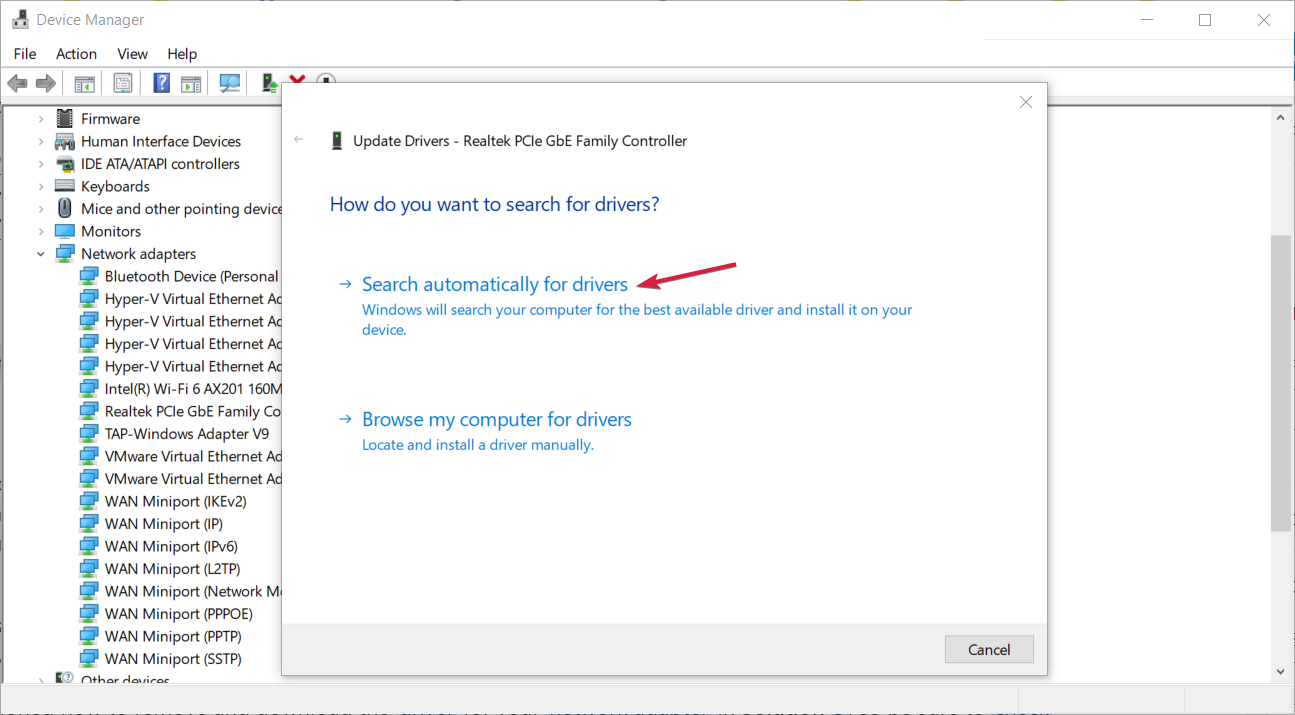
  5. Next click on Search automatically for drivers. If the system finds any new ones, it will install it.

If you installed any new drivers prior to this ERROR_WAIT_NO_CHILDREN manifested, right click it in Device Manager and select Properties. Then, go to the Driver tab and click on Roll Back Driver to restore the previous version. If the option is grayed out, that means there is no previous version of the driver.

This action may be a bit tedious and time consuming so you might want to check our list of the best driver updater tools that perform these actions automatically with just a few clicks.

3. Use System Restore

Note icon NOTE
By restoring your system to a previous point in time you will lose any apps you installed between that moment and present.
  1. Click the Start button, type system restore, and select Create a restore point from the results.
  2. Click on the System Restore button.
  3. In the next window, select a restore point dated before the ERROR_WAIT_NO_CHILDREN event and click Next.
  4. Follow the on screen instructions to restore your system.

If the ERROR_WAIT_NO_CHILDREN was caused by a software conflict or system corruption, restoring your system will resolve the issue. If the System Restore is not working, click the highlighted link to check the proper solutions to fix it.

4. Check the disk for errors

  1. Click the Start button, type cmd and select Run as administrator from the results.
  2. In the console window, type or paste the following command and press Enter: chkdsk /f /r
  3. Wait for the scan to complete and restart your system.

The Check Disk utility will find and fix any potential disk errors that might be causing this issue.

5. Inspect the hardware components

If possible, open the case of your PC and check any hardware components for any signs of damage or loose connections.

Make sure that they are seated properly, especially the RAM modules. Also, if you have any hardware diagnostic tools provided by your PC manufacturer, run them to detect any possible component malfunctions. You may also look at our list of the best hardware diagnostics tools and use one that fits your requirements.

We remind you that typically, BSoD errors signal hardware problems, so if the ERROR_WAIT_NO_CHILDREN problem persists, and none of the solutions above work, ask the help of professional repair shops.

Did you manage to fix the ERROR_WAIT_NO_CHILDREN Error code 128 (0x80) by using our solutions? Let us know in the comments below.

CPU-Z is Not Working: 4 Ways to Fix it

Many use CPU-Z to check their system information, but others reported that CPU-Z is not working, so today we’re going to show you how to fix this issue.

Why is CPU-Z not working?

The most common cause is the lack of privileges, but the issue can be caused by glitches in the app, outdated drivers, or outdated BIOS.

What can I do if CPU-Z is not working?

1. Run the app as an administrator

  1. Locate the CPU-Z shortcut and right-click it.
  2. Next, choose Run as administrator.
  3. Check if the problem is gone.

2. Use the latest version of the software

  1. Download CPU-Z from the official website. Be sure to use the latest version.
    cpuz download
  2. Next, try to run the application again.
  3. If the issue persists, try using an older version instead.

3. Reinstall your graphics drivers

  1. Download Display Driver Uninstaller.
    display driver uninstaller download
  2. Next, use Display Driver Uninstaller to remove your drivers.
  3. Once removed, install the latest driver version and try CPU-Z again.

If you’re not familiar with this tool, we have an in-depth guide on how to use Display Driver Uninstaller, so don’t miss it.

4. Update your drivers and BIOS

  1. Visit your motherboard manufacturer’s website and download the latest drivers.
  2. Once the motherboard drivers are up to date, check if the problem is gone.
  3. If not, go ahead and download the latest BIOS version for your motherboard and update it.

For more information, don’t miss our guide on how to update BIOS on Windows 11.

If CPU Z is not working, you won’t be able to check your hardware, but hopefully, you managed to fix this issue by running the software as administrator or with our other solutions.

This isn’t the only error you can encounter, and many reported CPU-Z error code 0x5, but we have a guide that addresses it.

If you’re not familiar with this software, don’t miss our guide on how to use CPU-Z and learn more about it.

Error Code 1006 in Throne and Liberty: Fix Steam Verification Failed

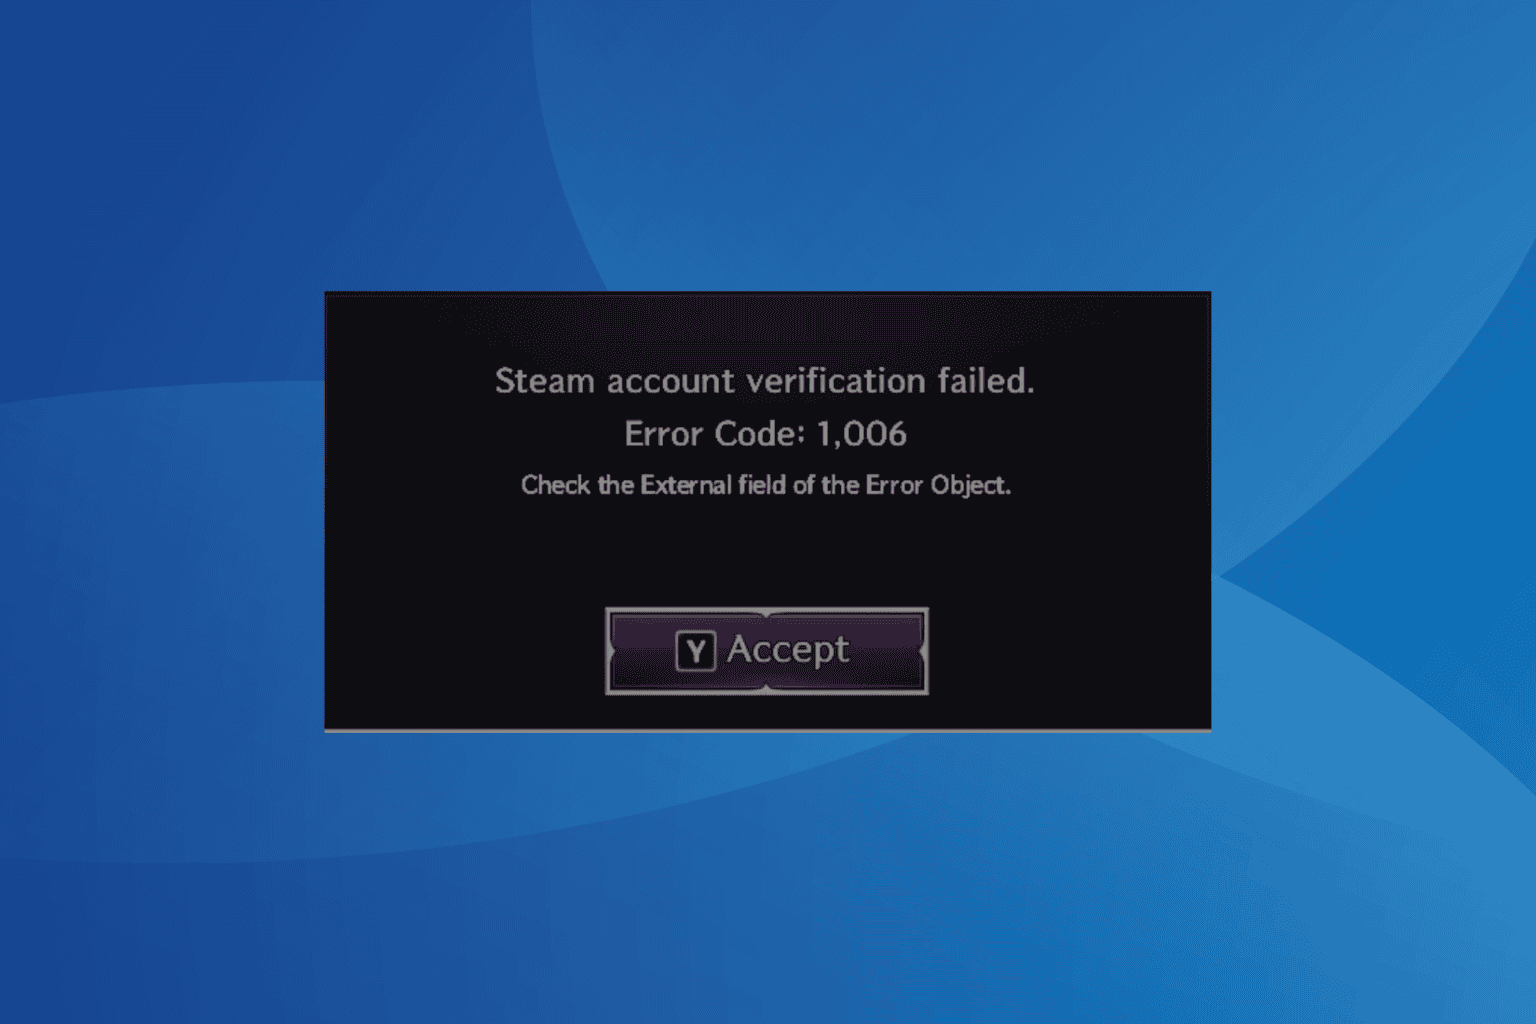
If you received Error Code 1006 in Throne and Liberty, it usually points to server downtime or network and game-related issues at your end. The message reads, Steam account verification failed. Error Code 1,006. Check the External field of the Error Object.

When Error Code 1006 last appeared on October 10, 2024, it was a planned 5-hour maintenance to blame. The outage affected thousands worldwide, who flocked to forums in search of a solution. More than the error itself, it was the vague error message that infuriated users.

However, server downtime is not always the underlying cause, and it could be a misconfiguration on your end. Before you proceed to troubleshooting, restart the PC, disconnect any active VPN, update the Steam app, and switch to another network, preferably a wired connection or a mobile hotspot.

How to fix Error Code 1006 in Throne and Liberty?

1. Check Throne and Liberty’s server status

When faced with Error Code 1006, your primary approach should be to check the status of Throne and Liberty servers. Simply select your region, verify the server status, and if it’s down or under maintenance, wait for 4-12 hours.

server status
Throne and Liberty’s server status (Image source: Game’s official website)

Remember, even when the official website shows an active status after scheduled server maintenance, it might take up to an hour for Throne and Liberty to be up and running for all.

Also, since it’s a Steam account verification error, you must check Steam’s server status using a real-time monitoring platform like Downdetector.

2. Verify the integrity of game files

  1. Launch the Steam app, go to Library from the top, then right-click on Throne and Liberty, and select Properties.properties
  2. Go to the Installed Files tab and click on Verify integrity of game files.verify game files to fix error code 1006 throne and liberty
  3. Once done, reboot the PC, launch Throne and Liberty, and then check for improvements.

3. Change the DNS server

  1. Press Windows + R to open Run, type ncpa.cpl in the text field, and hit Enter.
  2. Right-click on the active network adapter, Wi-Fi or Ethernet, and select Properties.network-adapter-properties
  3. Select Internet Protocol Version 4 (TCP/IPv4) from the list, and click on Properties.IPv4 properties
  4. Select the Use the following DNS server addresses entry, and enter the following in the fields underneath:
    • Preferred DNS server: 8.8.8.8
    • Alternate DNS server: 8.8.4.4
  5. Tick the checkbox for Validate settings upon exit, and click OK to save the changes. change DNS to fix error code 1006 throne and liberty
  6. Launch Throne and Liberty and verify whether Error Code: 1006 is resolved.

For many users, switching to DNS server addresses offered by Google or Cloudflare did the trick. Although, you can always set the fastest DNS server near you to boost the Internet speed!

4. Update the network drivers

  1. Press Windows + X to open the Power User menu, and select Device Manager from the list.
  2. Expand the Network adapters entry, right-click on the active adapter, and select Update driver.latest network driver to fix error code 1006 throne and liberty
  3. Click on Search automatically for drivers and wait for Windows to install the best locally available version.automatic driver search
  4. Finally, restart the PC to apply the changes.

Often, the Steam account verification failed error in Throne and Liberty arises due to network-related issues, and updating the network driver should fix things.

If Windows can’t find a better version, go to the manufacturer’s website, search for the newest release, and then manually install the latest driver.

5. Reset the network settings

  1. Press Windows + S to open Search, type Command Prompt in the text field, and then click on Run as administrator.command prompt
  2. Click Yes in the UAC prompt.
  3. Paste the following commands individually and hit Enter after each: ipconfig /release ipconfig /flushdns ipconfig /renew netsh int ip reset netsh winsock resetreset network to fix error code 1006 throne and liberty
  4. Finally, reboot the PC and verify whether Error Code: 1006 Steam account verification failed is fixed.

6. Reinstall Throne and Liberty

  1. Press Windows + R to open Run, type appwiz.cpl in the text field, and hit Enter.
  2. Select Throne and Liberty from the list of apps, and click on Uninstall.uninstall to fix error code 1006 throne and liberty
  3. Follow the on-screen instructions to complete the process.
  4. Now, restart the PC, then launch Steam and reinstall Throne of Liberty.

In 2 out of 5 cases, reinstalling Throne of Liberty fixes Error Code: 1006 when the servers are running fine. Since a quick removal doesn’t always get rid of all the data, I recommend using a top-rated software uninstaller to delete leftover files, cache, and Registry entries.

7. Contact support

When nothing else works, the last option is to contact Throne and Liberty support. If it’s scheduled maintenance to blame, the team will inform you of how long it will take.

As for issues related to your PC or active network, they shall be able to share a list of curated solutions targeting the error code.

In the end, fixing Error Code: 1006 in Throne of Liberty isn’t that tricky, and more often than not, you shall have the game up and running automatically within a few hours. And if that doesn’t happen, you now know how to fix things!

Before you leave, discover expert tips to optimize Windows for gaming and get superior performance and gameplay!

For any queries or to share which fix worked for you, drop a comment below.

Microsoft will add a new AI administrator role to the 365 Admin Center

Microsoft will add yet another role in the 365 admin center, the AI administrator. As the name suggests, this role will deal with everything AI, from managing Copilot to checking the usage reports for the AI model.

The Redmond-based tech giant says the new AI administrator in the 365 admin center won’t have the other privileges of the Global admin permissions, and Microsoft almost describes it as a perk.

And for good reason, though. Admins worldwide are complaining that Microsoft is adding too many new capabilities and roles to the 365 Admin Center that they can’t keep up with. The good thing is that Microsoft wants you to know that as an AI administrator, you’ll only manage Copilot activity within your organization.

Here’s what the entry says:

We are introducing a new admin role for AI and Microsoft Copilot administration. Admin users assigned with the AI Administrator role can efficiently manage Microsoft Copilot without the vast privileges of Global admin permissions.

The new AI administrator will be added to the 365 Center in November 2024.

What’s your take on this? Are you ready for a new role?

New Dev Channel update 131.0.2875.0 for Microsoft Edge makes managing different profiles way easier

Microsoft has frequently released new features for Microsoft Edge. The latest Dev Channel update, version 131.0.2875.0, has just been released on Edge. Here’s a look at what’s new.

One of the new features in this Dev Channel update is a “Linked Account & Online Accounts” row in the multiple profile settings page. This might make it a little easier to manage different profiles in Edge.

A new banner also pops up whenever you install a custom theme in Edge’s Gamer Mode. The idea is to create a more immersive experience when gaming and browsing simultaneously.

Here’s what’s improved in this latest Edge Dev Channel build:

  • Browser Crash Fixes: Microsoft has resolved an issue in Edge where the browser would crash when playing media and closing the previous window.
  • Tab Center Tweaks: Microsoft has tweaked the behavior of Edge’s Tab Center, the vertical tab UI. Specifically, Microsoft has resolved an issue extending the Tab Center to the top of the window in both restored and maximized modes.
  • Dark Mode Fixes: There’s a fix for a problem where the return, close, and pin buttons were abnormal in Edge’s favorites menu under Dark mode.
  • Split Screen Mode Fixes: Microsoft has resolved an issue where the browser would display a white screen after restarting in split screen mode on specific devices.
  • Search Box Fixes: Microsoft has resolved a few issues with Edge’s search box, including a problem where pressing Enter should move the focus to the first result with an appropriate announcement under downloads.

This Edge Dev Channel build also includes some platform-specific updates. On Android, Microsoft has resolved an issue where the Dark Reader extension wasn’t selected during the extension FRE process. On iOS, Microsoft has fixed an issue where clicking “Find on Page” and then “Print” caused the Find on Page feature to appear on the print page.

You can read Edge Dev 131.0.2875.0’s full changelog here.

Happy 10 to Windows Insider Program with New Wallpapers

Microsoft is celebrating the 10th anniversary of the Windows Insider Program with new wallpapers and a blog post highlighting the growing number of Insiders.

The Program was announced on September 27, 2014, and launched on October 1, 2014, to gather public feedback during the development of Windows 10.

By January 2015, Microsoft had already signed up 1.7 million people for the program. Since then, the program has expanded to include testing of Windows 11 builds and Windows apps and services.

Microsoft says the Windows Insider Program has “continuously evolved” over the years, adding new preview experiences and features such as different preview rings and channels.

The blog post adds that the company “remains committed” to listening to Insiders and pushing the boundaries of what’s possible with Windows.

Finally, Microsoft has created unique edition wallpapers to celebrate the program’s 10th anniversary. The Microsoft Design team can download the light and dark wallpapers here.

Are you part of the Windows Insider Program Community? What’s your experience with it? Let us know in the comments section below.

Chrome’s AI History Search getting even better: Answers coming Soon

Google is building on the AI History Search feature for Chrome to allow users to ask questions about their browsing history and get “answers” directly from the search results page.

Google Chrome has a history Search powered by AI built-in. This feature is optional; once you enable it, it uses artificial intelligence to help you find specific pages or information within your browsing history.

Google is now adding answers to Chrome’s AI History Search results. The feature is being tested behind a flag named “History Embeddings Answers”; when enabled, the “feature may answer some queries”.

History Embeddings Answers aka Chrome AI history search with Answers flag. Image Credit: WindowsReport

Chrome AI History Search Will soon Answer Your Questions

Back in August this year, Google announced, it will bring improved Google Lens Search for Chrome on desktop, tab compare, and History AI Search with answers that will be available first in the U.S.

So in the future, you’re going to search in Chrome for past visited sites using conversational way rather than by just typing keyword and waiting for the results.

Chrome AI History Search with Answers will show an answer at the top, followed by best matches and other relevant search results.

Image Credit: WindowsReport

“Use everyday language to search your browsing history. You can also ask questions and get answers based on your browsing history. Answers and search results are based on the content of a page.”

“This gives you improved results, whether you’re searching browsing history in the address bar using “@history” or from the History page. Only sites you visit after turning on this feature are shown in AI-powered history search results.” new strings spotted by us, WindowsReport, in a commit message, reveal.

When you search your browsing history in Chrome, the AI will analyze the content of relevant pages to provide more accurate and relevant results.

You can also ask questions directly in the search bar, and Chrome will use its understanding of your browsing history to provide answers based on the content of the pages you’ve visited.

For example, if you remember seeing an article about a new restaurant but can’t recall the exact name, you could search for something like “that cool new Italian place I saw last week.” The AI would then analyze your browsing history and suggest relevant results.  

The feature will only analyze pages visited after it is enabled, and user data will be encrypted and stored locally on the device.The AI-powered history search feature may have a slight impact on Chrome’s performance.

While the feature is currently behind a flag, it’s expected to be rolled out more widely in the near future. Soon you’ll see updated History Search with answers setting and a new description to reflect the changes.

Apart from this, Google is integrating AI features into Chrome for generating themes and organizing tabs. Additionally, the company is planning to allow Chrome extensions to collect data to improve AI features.

Microsoft will enhance the Xbox Android App to allow Game Downloads and Playtime

Microsoft recently announced new features for its Xbox Android application, including the ability to purchase and download games directly from the app. The functionality is expected to launch in November.

The announcement comes as Google prepares to comply with a legal requirement to allow third-party app stores on its Android operating system.

A U.S. court ruled in September that Google must permit Android users in the U.S. to download apps from outside the Google Play Store, and that ruling will take effect on November 1st.

Assuming it holds up through an appeal from Google, the decision could force changes to the standard app distribution model on Android. Microsoft’s mobile games store, which was initially expected to arrive in July, was delayed and hasn’t yet launched.

Also, Microsoft’s Sarah Bond, the corporate vice president of Xbox Game Creator Experience and Ecosystem, said this week that the company would extend the time mobile gamers can play free-to-play cloud games via Xbox Cloud Gaming without paying.

Currently, players can access a limited selection of games for free for a set period before they’re prompted to sign up for a $14.99/month Xbox Game Pass Ultimate subscription. The expanded free-to-play time will be available to Android users in 40 countries starting in October.

In other news, starting this November, the Xbox Game Pass app will no longer be downloadable.

KB5044380 introduces a new Gamepad keyboard layout for Windows 11

Windows 11 Build 22631.4387 (KB5044380) is now available to members of the Release Preview Channel. This release introduces several new features and enhancements into gradual and regular groups.

One of the most notable new features is the ability to access content on your smartphone directly from the Start menu on your PC. Initially, only Android users connected using the Phone Link feature will be able to take advantage of this, with iOS support coming later.

Another new feature is a revised Gamepad keyboard layout for the on-screen keyboard. With this update, you can use an Xbox controller to move around the screen and type, and there are new button accelerators, including the X button for backspace and the Y button for the spacebar. In addition, the “All apps” list in the Start menu has been renamed to just “All.”

Similar to the Release Preview Channel, on the notifications front, you can now prevent app notifications from suggesting that you turn off notifications. If you receive a notification that includes a suggestion to turn off notifications from the app, you can select the ellipses in the notification to turn the suggestion off. You can also go to Settings > System > Notifications and turn off notification suggestions for individual apps.

Microsoft has changed the name of the Tailored Experiences setting to Personalized Offers in the out-of-box experience (OOBE) and moved it to the Privacy & Security page in Settings. This setting allows you to opt out of experiences tailored to your device.

KB5044380 also includes a new Copilot key configuration setting beginning to roll out on new devices with the dedicated Copilot key. The key opens the Copilot app by default, but with this update, you can configure it to open Microsoft 365, another app, or Search instead.

This release fixes a number of key issues. For example, Microsoft says it’s resolved a problem that caused some devices to use more battery power than expected while in Modern Standby.

Other fixes address issues with Teams meetings on Windows 11, system stability, printing over USB, and more.

KB5044380 should now be available for devices in the Release Preview Channel. The full changelog is here.

With KB5044384, Windows 11 can finally turn off notifications from specific apps for good

Microsoft has begun rolling out Windows 11 Build 26100.2152 (KB5044384) to Insiders in the Release Preview Channel. The update contains new features and improvements, including changes to the Start menu, notifications, Windows Sandbox Client Preview, detach functionality for virtual hard disks, the Wi-Fi password dialog, and more.

In the gradual rollout category, Microsoft is adding the ability for Windows 11 users to directly access content on their Android device from their PC’s Start menu. The feature will let users check their phone’s battery status, check notifications, including voice calls, view photos from their device, and more. The feature will only be available to Android users connected to Windows 11 via the Phone Link app, and Microsoft says support for iOS devices will be coming later.

Additionally, Windows 11 users are getting a new option to stop suggestions to turn off notifications from specific apps. Users can toggle off the suggestions by selecting the ellipses in a notification or heading to Settings > System > Notifications.

The Windows Sandbox Client Preview is also being introduced to Windows 11 Build 26100.2152. This preview adds the ability to copy and paste text between the host and guest, control audio and video input, share folders with the host at runtime, and more.

KB5044384 introduces a detach button for virtual hard disks in the Settings app and the Windows 11 visual design for the Wi-Fi password dialog in the Network & Internet section of the Settings app.

Among the features and improvements available to all users immediately is the ability to configure the Microsoft Copilot key on the keyboard to open the Microsoft 365 app or another app. Microsoft Copilot is a code-writing AI that suggests code completions and helps write functions.

This update also addresses an issue that prevented users from viewing some parts of the UI when running certain apps and fixes a problem with HTA optional components (OC) not being in ARM64 Windows PE.

KB5044384 further resolves a bug that caused win32kbase.sys to create live kernel debug files, a stop error that occurred during the shutdown, an issue that prevented users from signing into their account from the web, and errors when running the sfc /scannow command.

This release also adds drivers to the list at risk of Bring Your Own Vulnerable Driver (BYOVD) attacks and includes an optional update that can be manually downloaded from the Microsoft Update Catalog.

You can read KB5044384’s full changelog here.

Roku Error 004: 5 Simple Ways to Fix it

Keeping your apps updated ensures compatibility and minimizes errors. That being said, when you update your Roku device, you may consistently be hit with the error 004.

The worst part is that the update may start and once it hits 100%, it gets stuck. The main cause of this error is your network connection. It may be too slow, intermittent or misconfigured.

How do I fix the Roku error 004

1. Switch to a faster network band

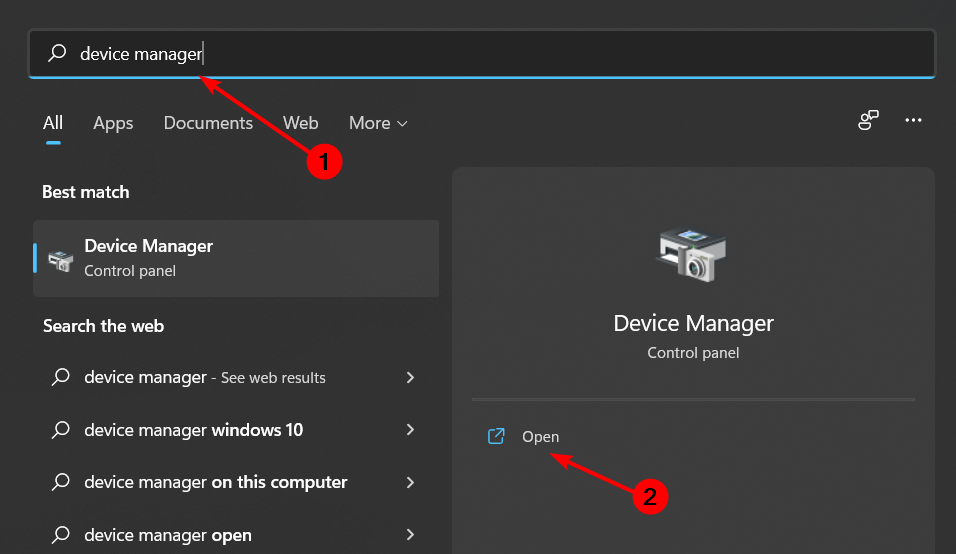
  1. Click on the Start Menu icon, type Device Manager in the search bar, and click Open.
  2. Navigate to Network adapters and double-click to expand.
  3. Right-click on your network adapter and select Properties.
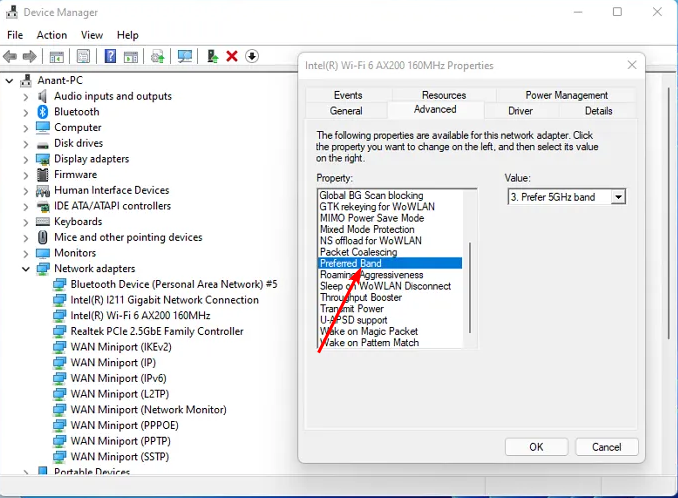
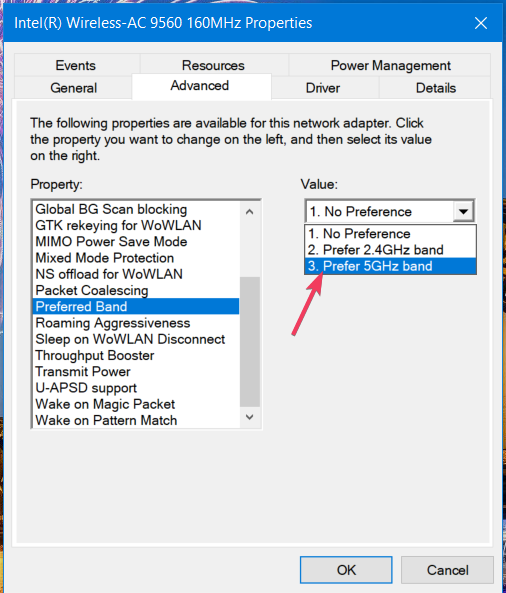
  4. Click on the Advanced tab and locate the Preferred Band.
  5. In the Value drop-down menu, select Prefer 5GHz band then hit Enter.
  6. Restart your PC/TV.
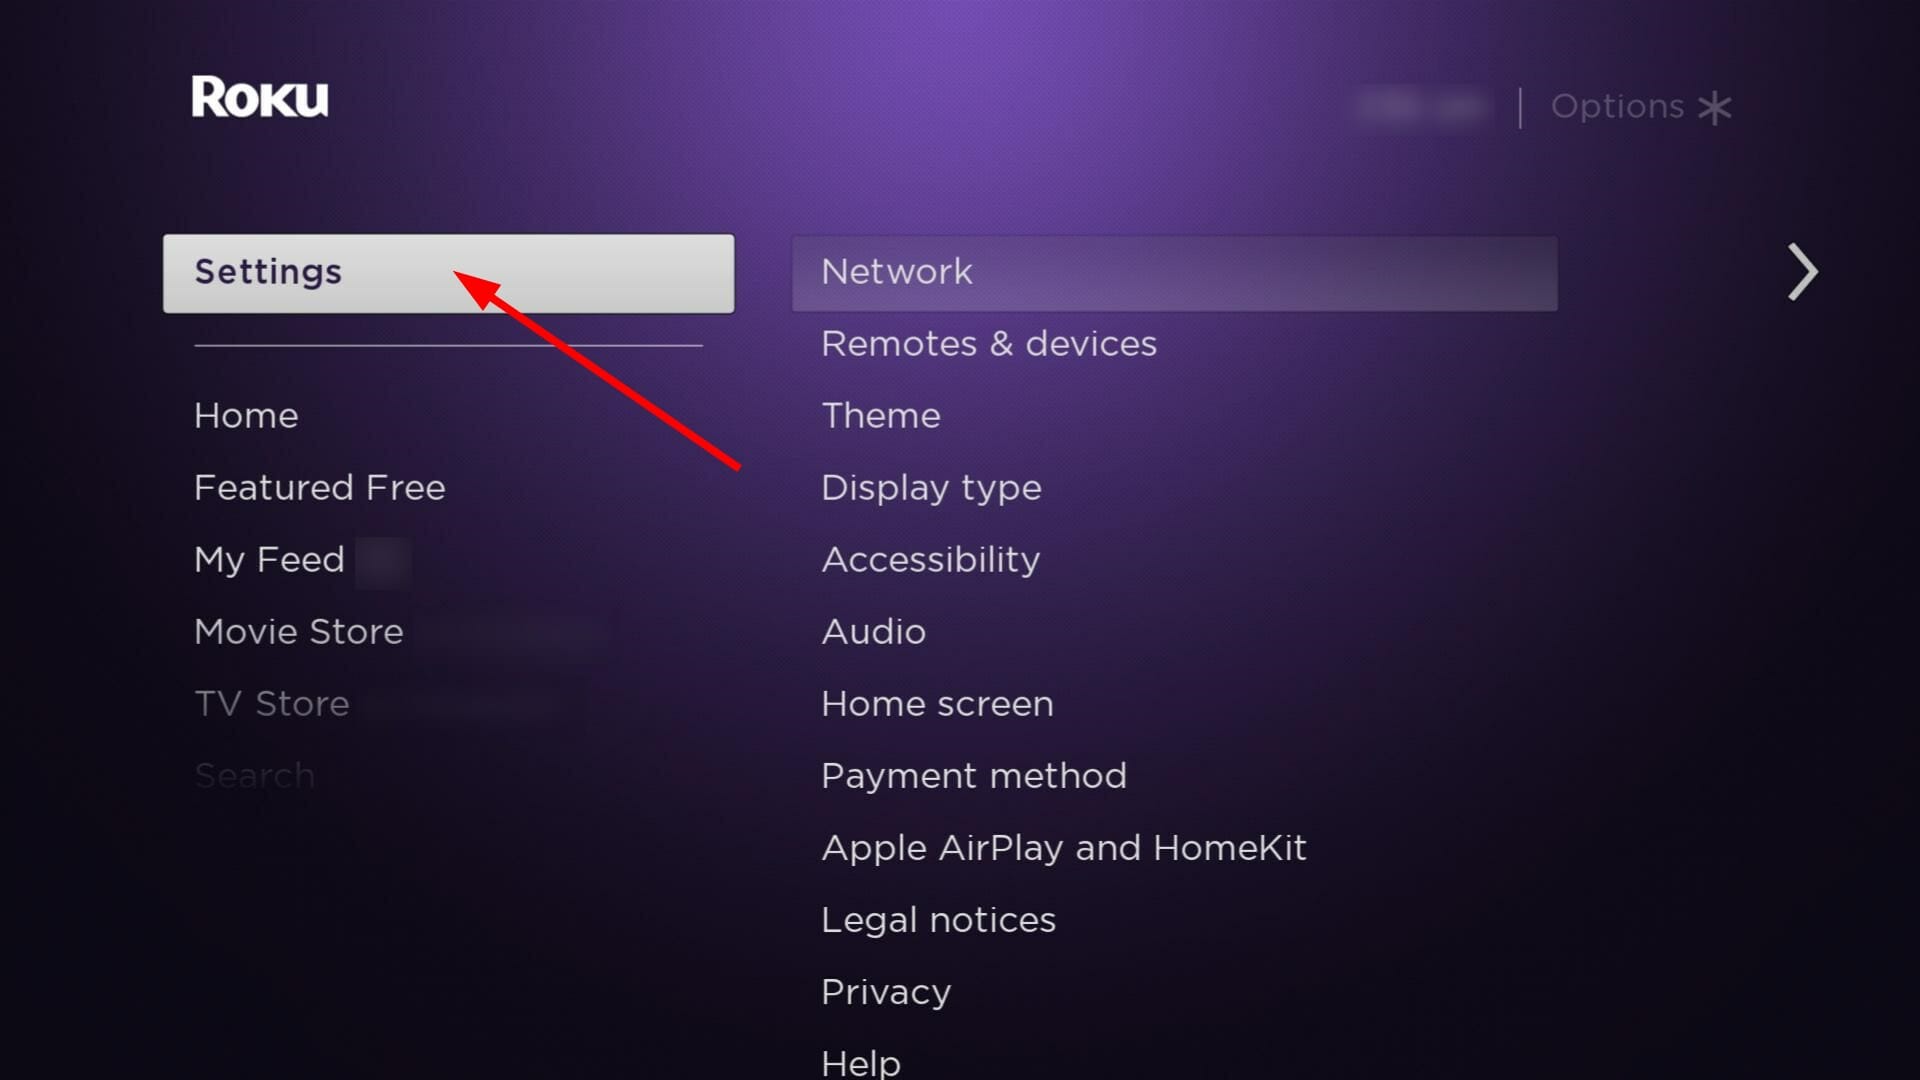
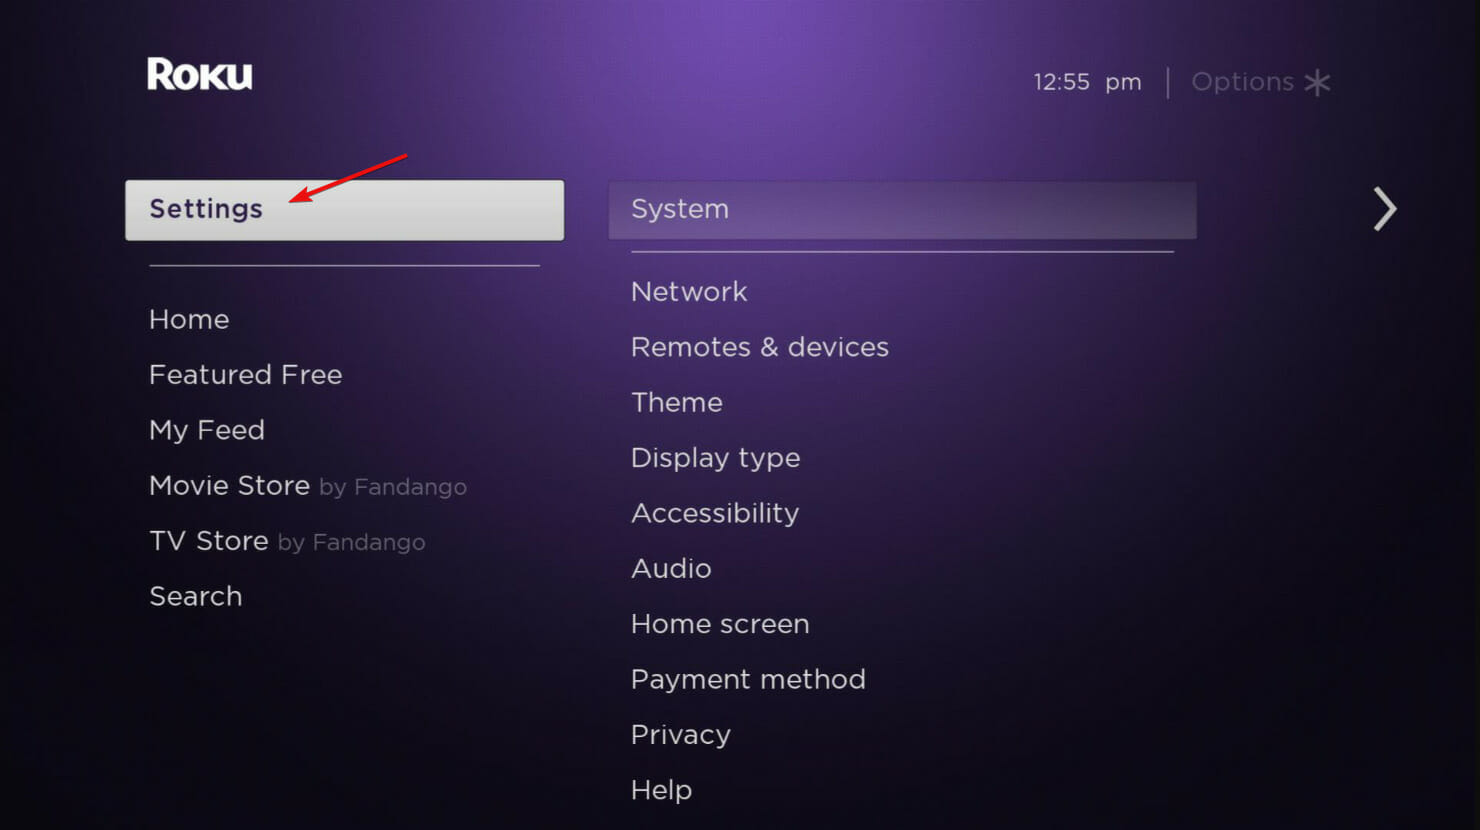
  7. Press the Home button on your Roku remote.
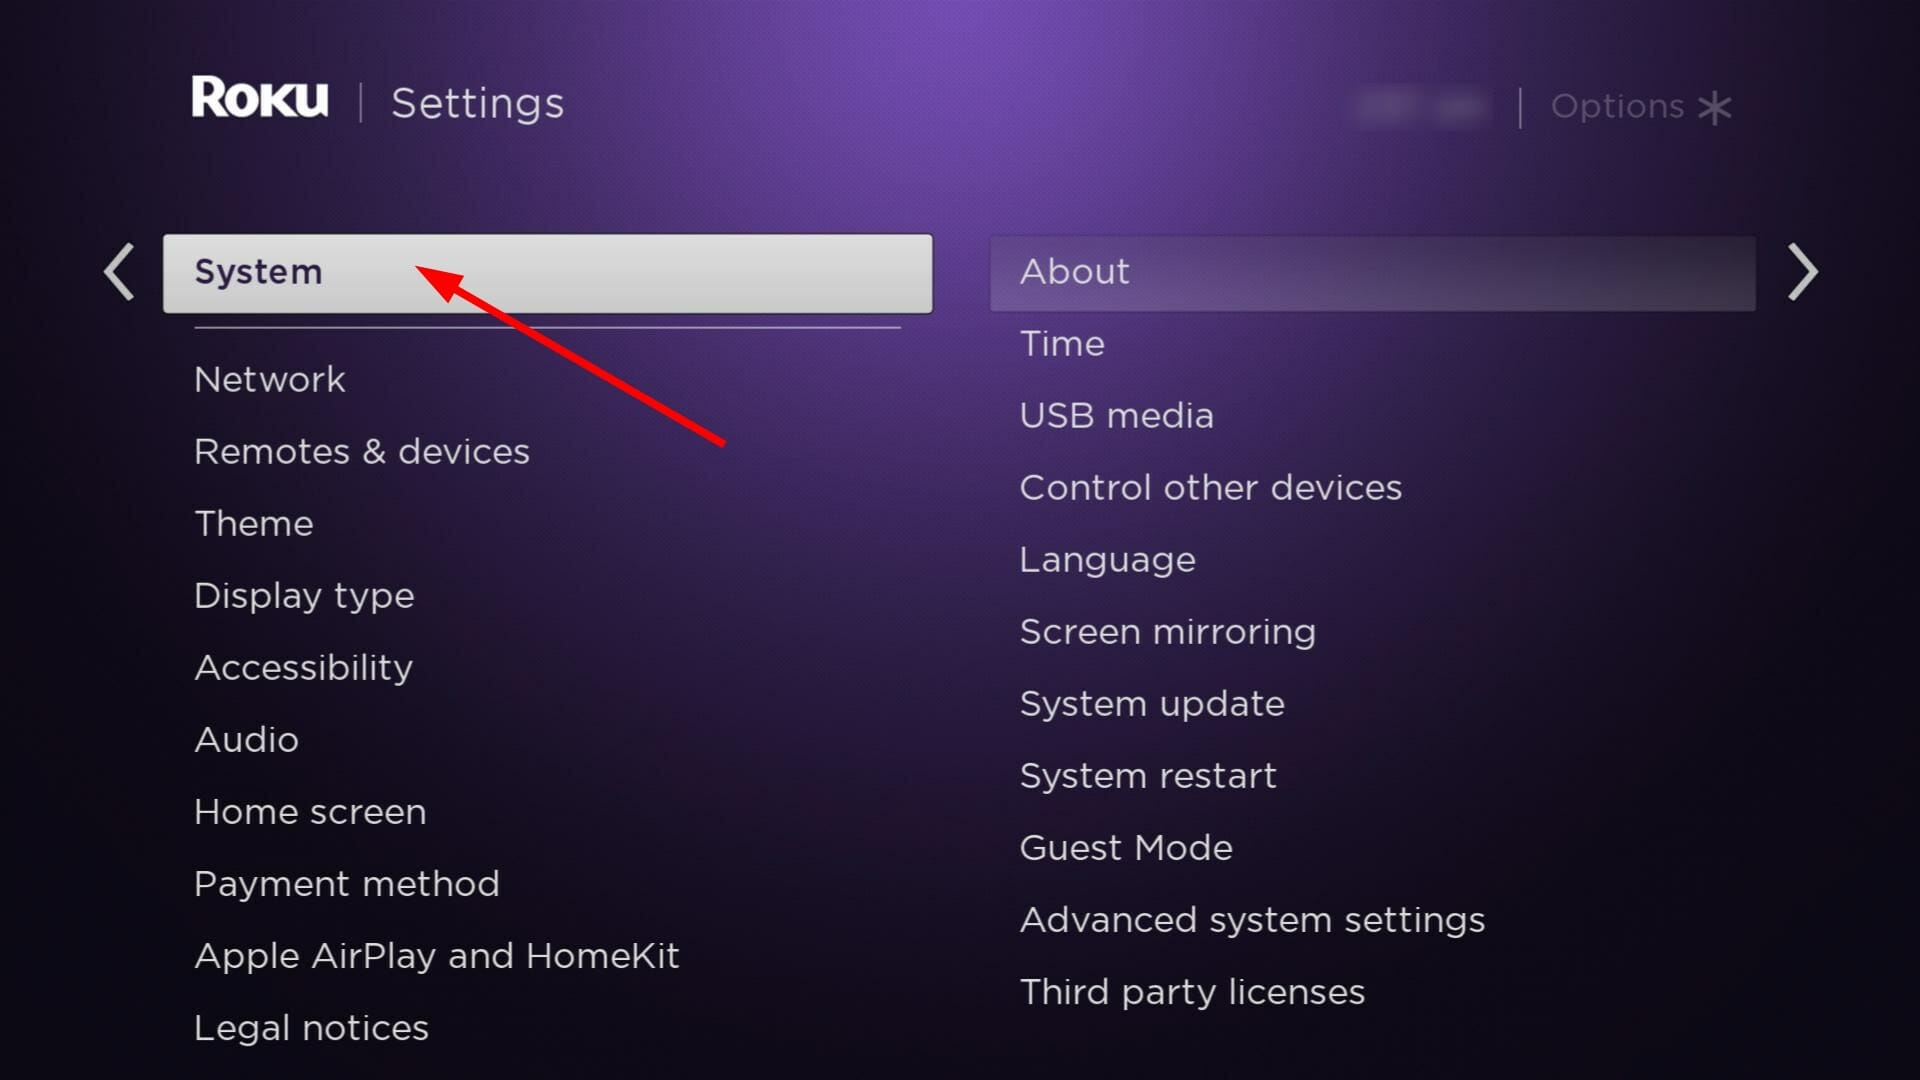
  8. Select Settings.roku connected to Wi-Fi but not working restart
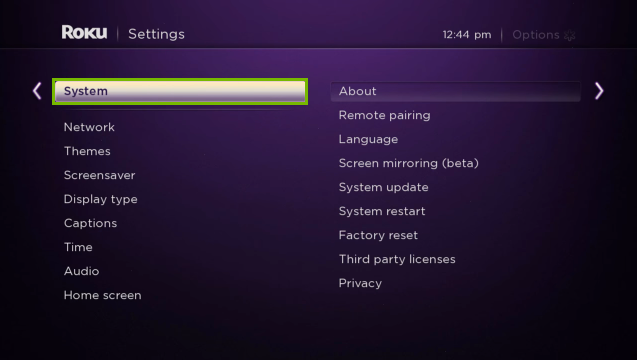
  9. Choose System.roku connected to W-fi but not working system
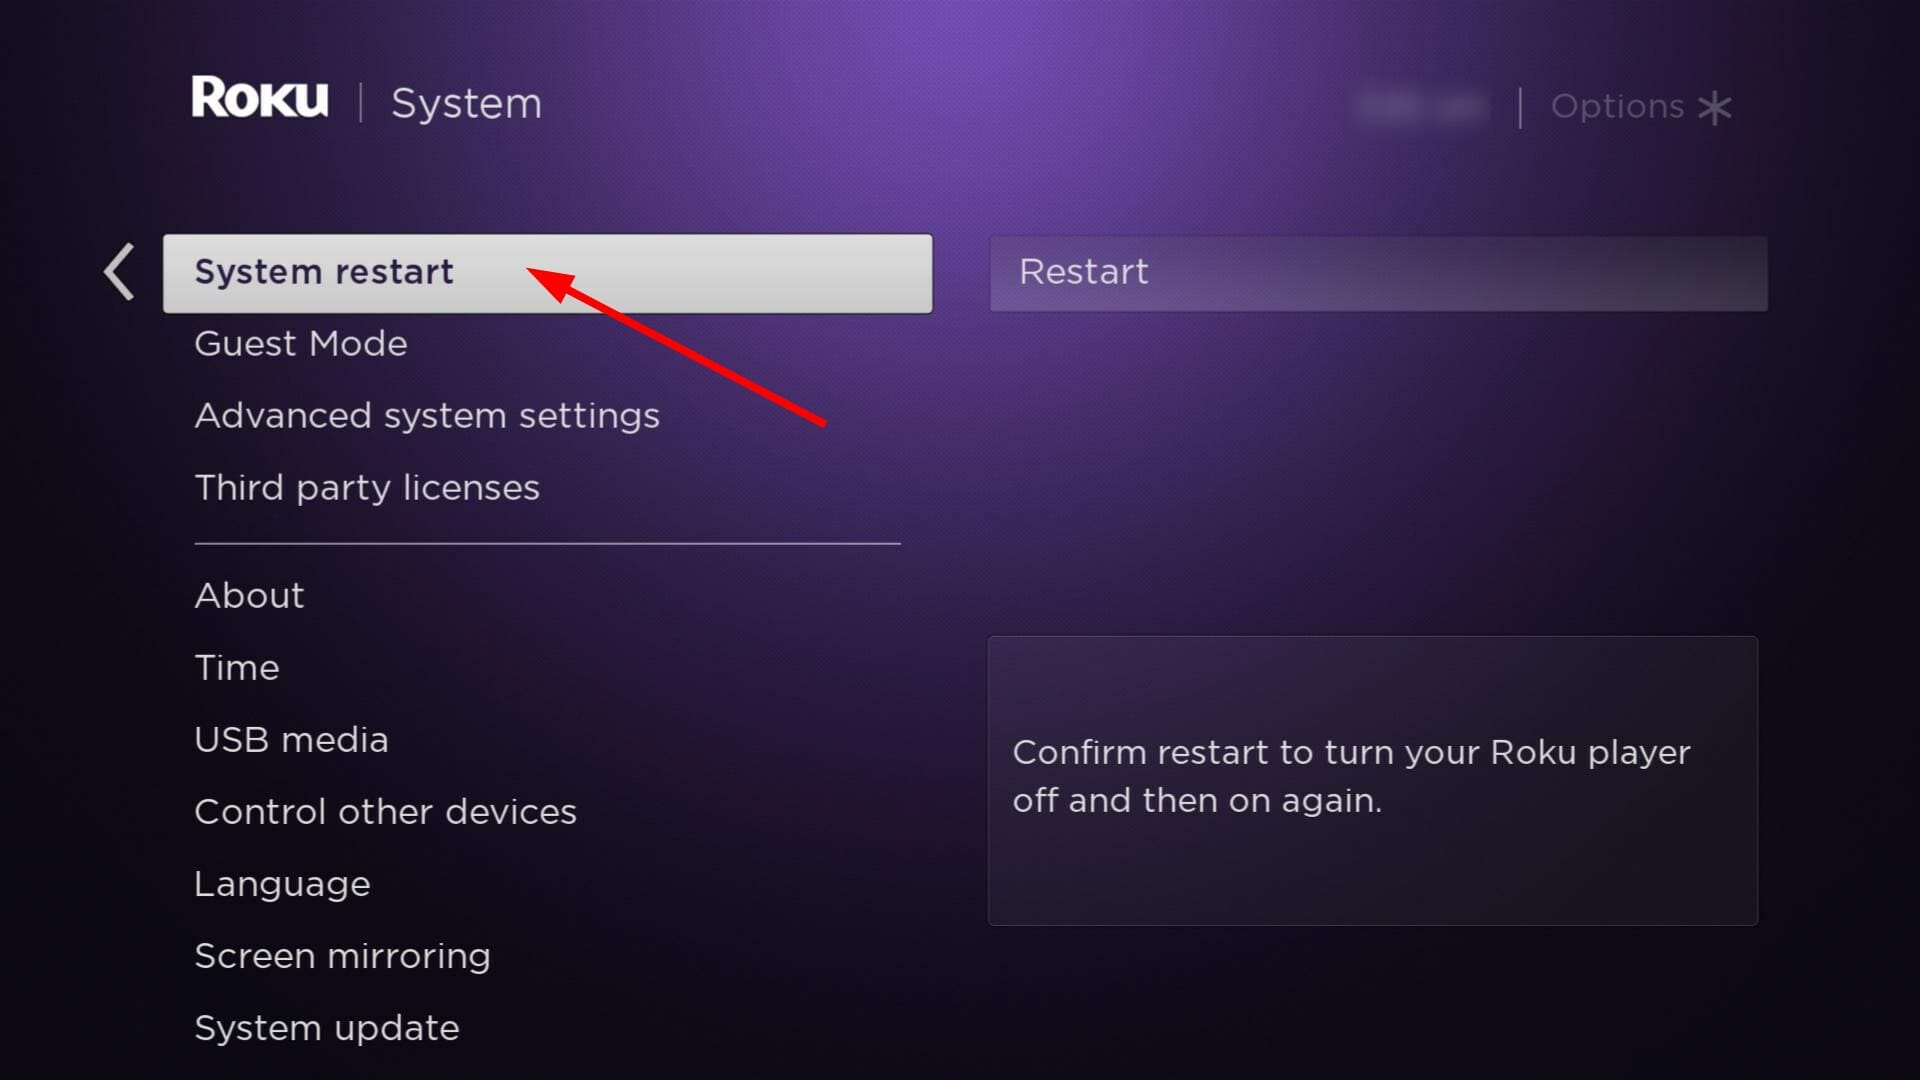
  10. Select System Restart.roku connected to wi-fi but not working system restart
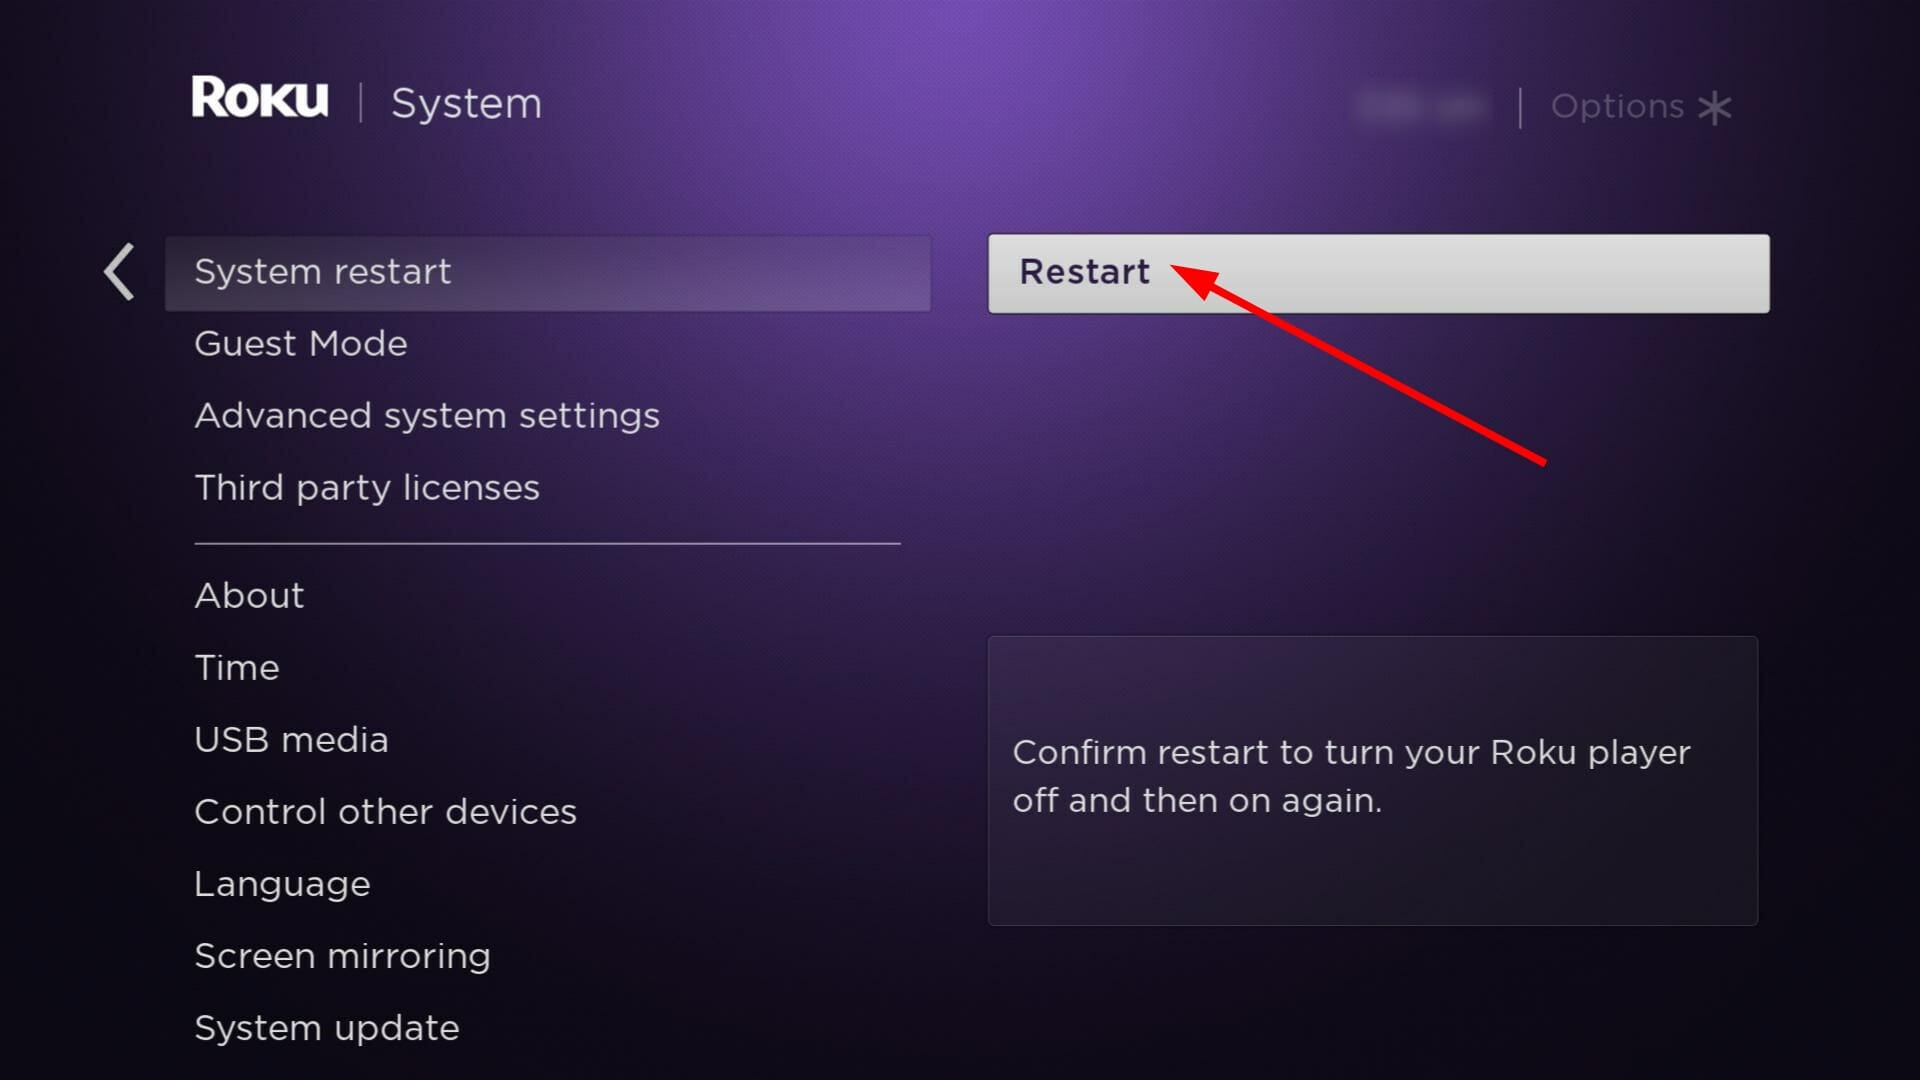
  11. Finally, choose Restart and try again.restart roku

A faster network band can reduce latency and allow Roku to connect to the servers and download updates seamlessly. You can also try switching to another connection like a mobile hotspot and see if you get faster network speeds that will allow you to update seamlessly.

2. Update your Network driver

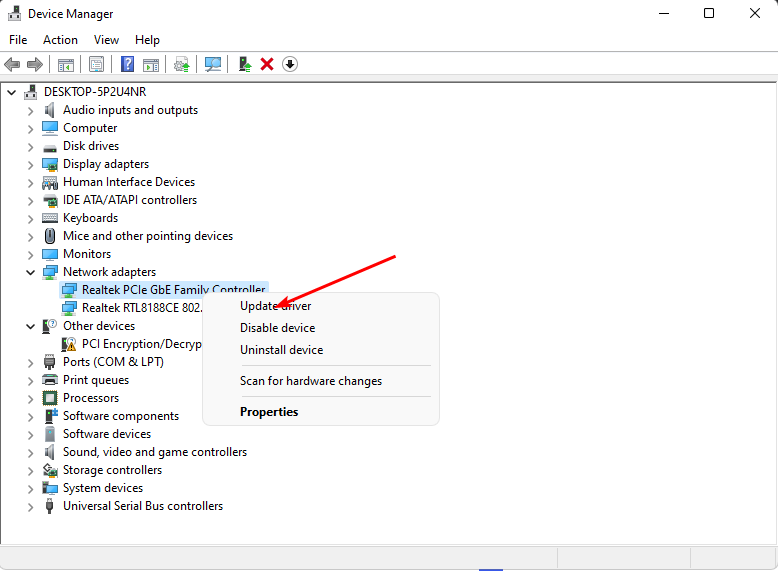
  1. Hit the Windows key, type Device Manager in the search bar, and click Open.device manager w11
  2. Navigate to your Network adapter, right-click on it, and select Update driver.
  3. Select Search automatically for updated drivers.

3. Forget your network and reconnect

  1. Hit the Windows key, type cmd in the search bar, and click Run as administrator.
  2. Click on the Yes button if you are prompt by a user account control message.
  3. In the command prompt window, type in the following and hit Enter : netsh wlan show profiles
  4. The Command prompt window will display a list of all available Wi-Fi networks.
  5. Look for the name of the wireless network you wish to disable.
  6. Write in the command prompt window the following and hit Enter: netsh wlan delete profile name="name of the network
    Note: Instead of the name of the network from the command above you will need to write the actual name of the network you wish to disable.

Forgetting your network and reconnecting it erases any network settings that may have been misconfigured and throwing the error code 004. Sometimes, your Roku may be connected to Wi-Fi but not working preventing you from updating your Roku device.

4. Factory reset Roku

  1. Press the Home button on the Roku remote.
  2. Go to Settings.
  3. Select System.
  4. Select Advanced system settings.
  5. Choose Factory reset.
  6. Select Factory reset everything and follow the on-screen instructions.
  7. If you can’t access the settings, Press Home five times and press Fast Forward three times.
  8. Next, press Rewind twice and you should be able to factory reset.

5. Update Roku manually

  1. Navigate to your browser and go to the Roku update site.
  2. Select your TV brand and enter the TV hardware ID and serial number. You can find this information in Settings > System > About on your TV (depending on your model).
  3. Hit Download Software, locate the executable Roku file from your downloads folder, and insert a USB flash drive.
  4. Copy the executable file to the USB drive and once the transfer is complete, plug the USB flash drive into your TV.
  5. Press the Home button home button on your Roku remote then go to Settings > System > System update > I can’t connect.
  6. Wait for your TV to validate the file on the USB flash drive and it will display a 12-digit code on the TV screen. Enter this code on your PC.
  7. A new 6-digit code appears on your computer screen which you’re to enter on your TV.
  8. A Contents of the update file are invalid message means your TV is already running the latest software version while an Update file could not be opened. Please try again message means the file is corrupted or your USB flash drive is not recognized.
  9. Once you’ve successfully entered the codes, the update will begin and once finished, your TV will restart.

Other odd but surprisingly workarounds include taking out your MicroSD and then try updating your Roku. Once updated, you can reinsert the MicroSD card.

However, if the error 004 is persistent after you’ve connected to an Ethernet cable, gotten rid of all network interferences and moved your Roku device close to the router, we recommend that you contact Roku customer support.

There are many Roku remote issues that can appear, and we also covered fixes for the specific case of roku remote back button not working.

Finally, if you’ve been able to resolve this issue, let us know in the comment section which solution worked for you. We also welcome any other solutions not mentioned here but worked out for you.

How to Download MetaDefender Endpoint for Free on Windows 10

With the rise in cyberattacks in the last few years, your device is not truly safe, unless protected from all fronts. While you may exercise caution when downloading apps, over time, as these apps become outdated, they pose a serious risk. And that’s why many now download MetaDefender Endpoint on Windows 10!

MetaDefender Endpoint quickly scans your PC, identifies out-of-date and potentially risky applications that pose a threat, and provides you with measures to mitigate the risks, if any are applicable.

Developed by OPSWAT, MetaDefender Endpoint can prove to be a really helpful tool if you work with a wide array of applications that are not always downloaded from official sources.

How can I download MetaDefender Endpoint for Windows 10?

  1. Go to OPSWAT’s official website, and click the Download button for MetaDefender Endpoint.metadefender endpoint download windows 10
  2. Next, go to the Downloads folder on your PC, and then run the OPSWAT_Free_Client.exe file. Remember, this is the free version of the utility.
  3. Click Yes in the UAC prompt.
  4. In the MetaDefender Endpoint Installer, click on Install and wait for the process to complete.install metadefender endpoint
  5. After running a quick scan, MetaDefender Endpoint will launch and display an overview of the results. Or, you could manually run it from the system tray.scan results
  6. Click on Security Score, and it will now provide you with a clear outline of the vulnerabilities.security score after metadefender endpoint download windows 10
  7. In the Vulnerable Application tab on the left, MetaDefender Endpoint lists all the applications that pose a risk to your PC. vulnerable apps
  8. You can directly update or remove the app from here. Simply click the ellipsis near the top right of the app entry, and choose Update or Remove, depending on how you want to deal with it.vulnerable apps metadefender endpoint
  9. Similarly, you can head to the Patch Management, OS Updates, AppRemover, and Malware Scan tabs to further improve the PC’s security.

As you can see, it’s easy to download MetaDefender Endpoint on Windows 10. Besides, the app’s interface is user-oriented, allowing easy navigation from one section to another as well as streamlined execution of tasks.

What I liked the most about MetaDefender Endpoint is that it can detect vulnerable applications and quickly update them. As for malware scan, the functionality is already included in the OS through Windows Security. Also, you can use a top-rated antivirus solution.

In all, MetaDefender Endpoint would be a great addition to your PC, boosting its security and protecting your data!

For any queries or to share your review of MetaDefender Endpoint on Windows 10, drop a comment below.

CPU-Z Error Code 0x5: How to Fix it

If you recently installed CPU-Z or upgraded to a newer version and are repeatedly getting error code 0x5 upon launching the utility, the problem is common and easily fixable.

Error code 0x5 on CPU-Z usually arises due to missing permissions, an outdated or corrupt graphics driver, conflicts triggered by the active antivirus, low storage space, and improper app installation.

Before you start troubleshooting things, make sure to restart the PC and install all pending Windows updates. For most of you, this alone should fix the error!

How can I fix CPU-Z error code 0x5?

1. Run CPU-Z with administrative privileges

  1. Right-click on the CPU-Z launcher (.exe file), and select Properties.
  2. Go to the Compatibility tab, and tick the checkbox for Run this program as an administrator.administrator to fix cpu z error code 0x5
  3. Finally, click on Apply and OK to save the changes and then check for improvements.

If the CPU-Z error code 0x5 is due to missing privileges, you will have to launch the program as an administrator. This will grant it the required permissions to effectively run on the PC!

2. Reinstall the graphics driver

  1. Press Windows + X to open the Power User menu, and select Device Manager from the list.
  2. Expand the Display adapters entry, right-click on the active graphics adapter, and select Uninstall device.uninstall graphics driver to fix cpu z error code 0x5
  3. Tick the checkbox for Attempt to remove the driver for this device, and click Uninstall.uninstall
  4. Now, head to the adapter or computer manufacturer’s official website, locate the latest driver version, and download the setup.
  5. Run the driver setup and follow the on-screen instructions to complete the installation.update driver
  6. Finally, reboot the PC to fully apply the changes.

In 2 out of 5 cases, it was an outdated, corrupt, or buggy graphics driver to blame for the CPU-Z error code 0x5. So, all you have to do is update the graphics driver!

I recommend manually installing the latest graphics driver from the manufacturer’s official website since this gets you the newest version each time. Here are the direct links to the driver downloads page for each:

3. Whitelist CPU-Z in Windows Security

  1. Press Windows + S to open Search, type Windows Security in the text field, and click on the relevant result.
  2. Click on Virus & threat protection.windows security
  3. Click on Manage settings under Virus & threat protection settings.
  4. Now, scroll down and click on Manage Controlled folder access.manage
  5. Click on Allow an app through Controlled folder access.allow app to fix cpu z error code 0x5
  6. Click Yes in the UAC prompt.
  7. Next, click on Add an allowed app and then choose Browse all apps from the menu.add an allowed app
  8. Go to this path: C:\Program Files\CPUID\CPU-Z
  9. Select the cpuz.exe file and click on Open.whitelist to fix cpu z error code 0x5
  10. Finally, restart the computer and verify whether CPU-Z error code 0x5 is fixed.

4. Clear storage space on the PC

  1. Press Windows + S to open Search, type Disk Cleanup in the text field, and click on the relevant result.
  2. Select the drive where CPU-Z is stored from the dropdown menu, and click OK.disk cleanup to fix cpu z error code 0x5
  3. Select the file types you want to delete from the list and click on OK.delete files
  4. Click on Delete Files in the confirmation prompt.
  5. If the error message persists, run Disk Cleanup again for the same drive, and this time, click on Clean up system files.clean up system files to fix cpu z error code 0x5
  6. Again, select the drive and click OK.
  7. Now, select the file types that you want to delete, click on OK, and then confirm the change.disk-cleanp-system files
  8. Finally, reboot the PC and check for improvements.

Often, the CPU-Z error code 0x5 shows up on Windows when your PC has low available storage. In this case, you can run Disk Cleanup and free up storage space.

Also, I recommend enabling Storage Sense, which automatically deletes non-critical files on a regular basis.

5. Install another version of CPU-Z

  1. Press Windows + R to open Run, type appwiz.cpl in the text field, and hit Enter.
  2. Select CPU-Z from the list of applications, note down the currently installed version, and click Uninstall.uninstall to fix cpu z error code 0x5
  3. Follow the on-screen instructions to complete the process and then reboot the PC.
  4. Now, go to the official download page for CPU-Z, scroll down, select another version from the list, and then download its setup.download
  5. Finally, run the setup and install CPU-Z, and the error code 0x5 shouldn’t appear anymore.

If a quick removal doesn’t work, I recommend using a top-rated software uninstaller to get rid of all leftover files, cache, and Registry entries before beginning the reinstall process.

One of these solutions should have, in all likelihood, fixed the CPU-Z error code 0x5 on Windows.

Before you leave, read our comprehensive review of CPU-Z to find out whether it’s the best option or if you should go with a reliable CPU-Z alternative!

We also have a guide on what to do if CPU-Z is not working, so don’t miss it if you encounter any other problems.

For any queries or to share more solutions with us, drop a comment below.

Hulu Error Code P-DEV340: 6 Quick Ways to Fix it

If you’re streaming a show on Hulu but can’t quite get past the loading stage and instead get hit with the error code p-dev340, there may be a playback issue. it could be a problem with your device or internet connection. A quick restart should fix this but sometimes, the issue is way too complex.

Usually a problem with loading means you’re getting an intermittent connection but for Hulu, this could also mean compatibility issues with your HDMI cable. You can try another HDMI port to check whether it’s your HDMI port that’s not working or the Hulu servers are down at the moment.

To check whether Hulu servers are down, visit the official Hulu Support page on Twitter for any official communication from the company.

How can I fix Hulu error code P-DEV340?

1. Change to HDMI 1.4 mode

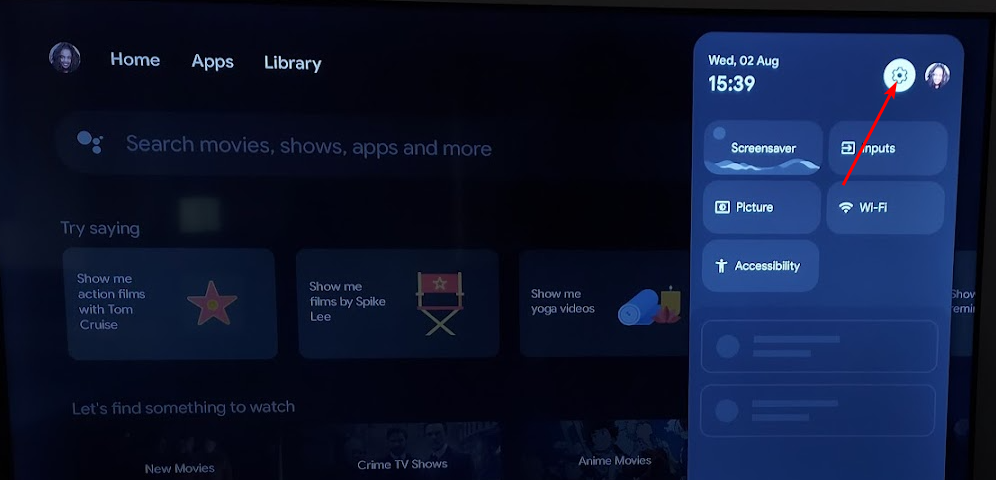
  1. Open Settings on your device.
  2. Select About.
     about android tv
  3. Locate the Build number and select it several times until the developer mode is unlocked.
  4. Next, go to Developer options and set HDMI to 1.4 mode.
    developer options android TV

Most newer devices support 4K resolution. However, if you’re using an older HDMI cable with a capped internet connection, it may not be capable of properly handling the bandwidth required for streaming high-quality content.

You can downgrade to the 1.4 mode or upgrade to a high-speed HDMI cable for a smoother streaming experience.

2. Clear cache

2.1 Android app cache

  1. Tap on settings on your phone.
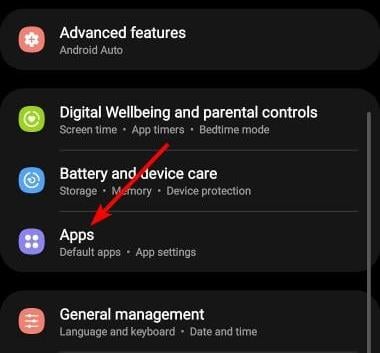
  2. Next, tap on Apps.
  3. Find the Hulu app and tap on it.
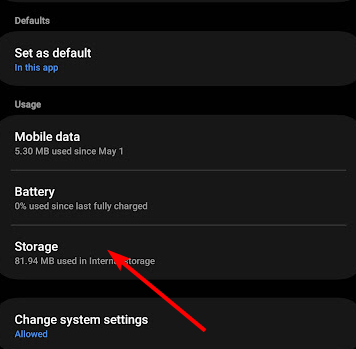
  4. Scroll down and select Storage.
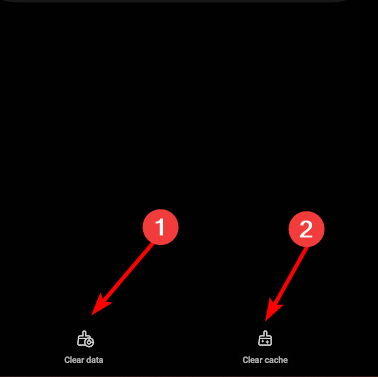
  5. Tap on Clear data and Clear cache, then try again.

2.2 Android TV cache

  1. On your TV, find your Settings.
  2. Go to Apps and select Hulu.
  3. Scroll down and hit Clear data and Clear cache.

2.3 Browser cache

  1. Open Opera GX and click the Opera icon in the upper left corner to open Settings.opera gx settings
  2. Select Privacy and Security.opera gx privacy and security settings
  3. Scroll down to Clear browsing data.scroll down to clear browsing data
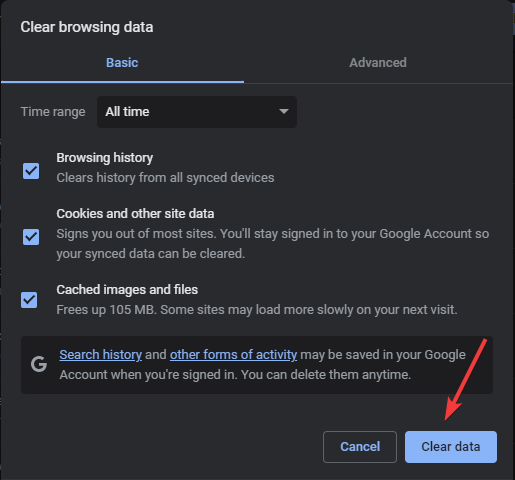
  4. Select the type of data you want to clear, and the time range, then click Clear data.clear data opera gx

3. Disable IPV6

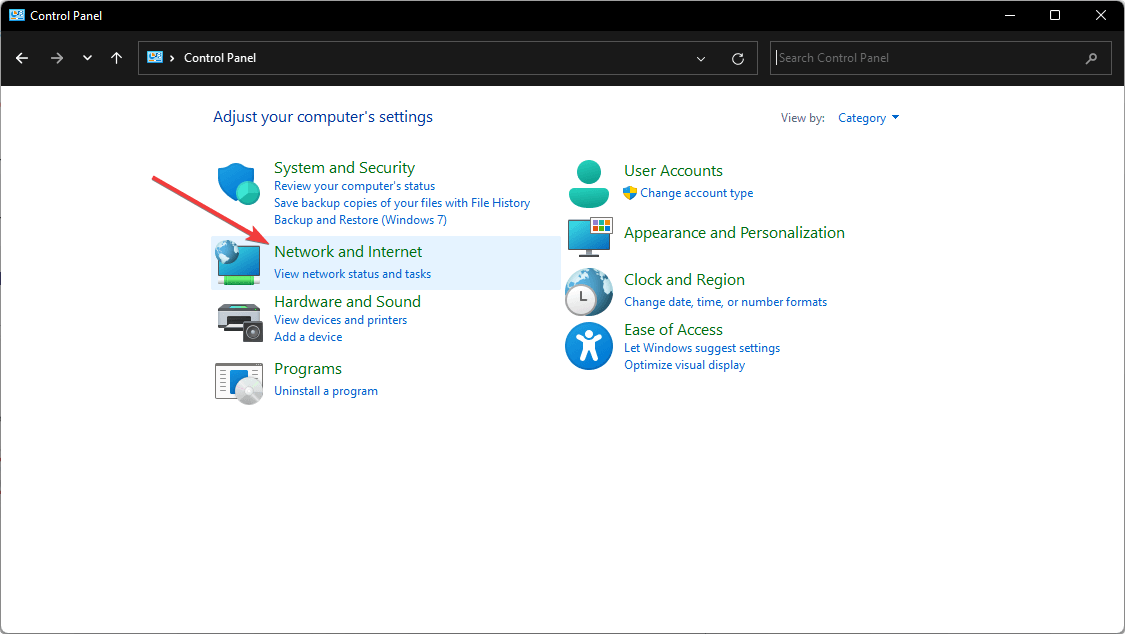
  1. Hit the Windows key, type Control Panel in the search bar, and click Open.control-panel-search fallout new vegas runtime error
  2. Click on Network and Internet.going network and internet control panel
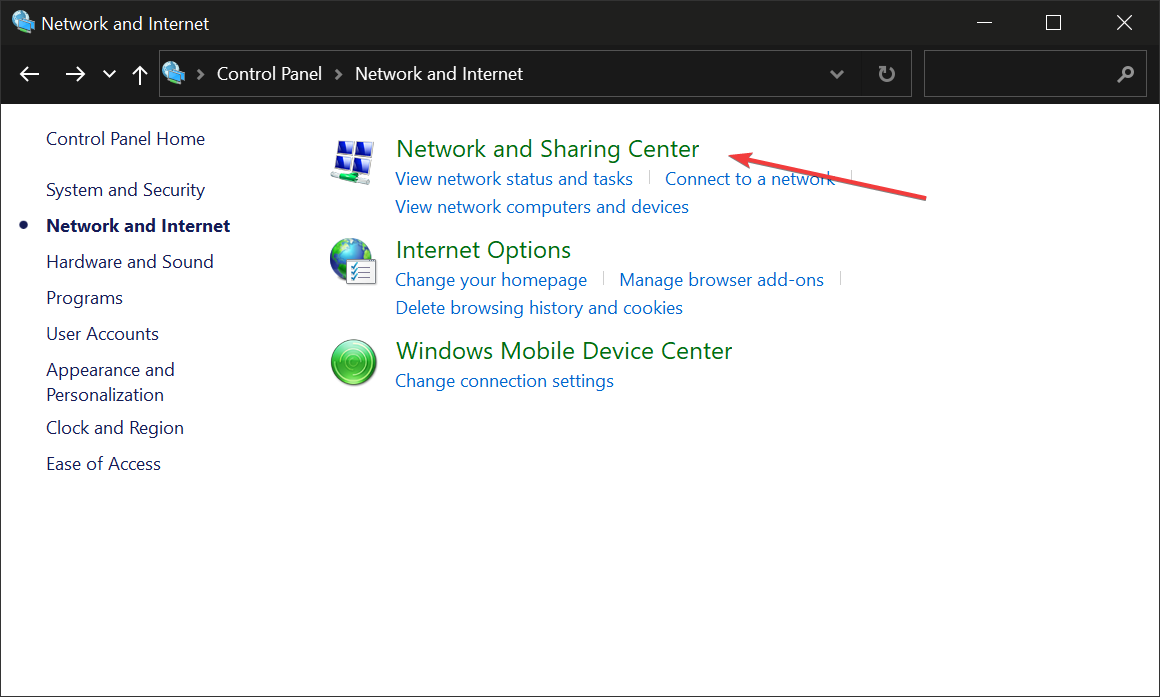
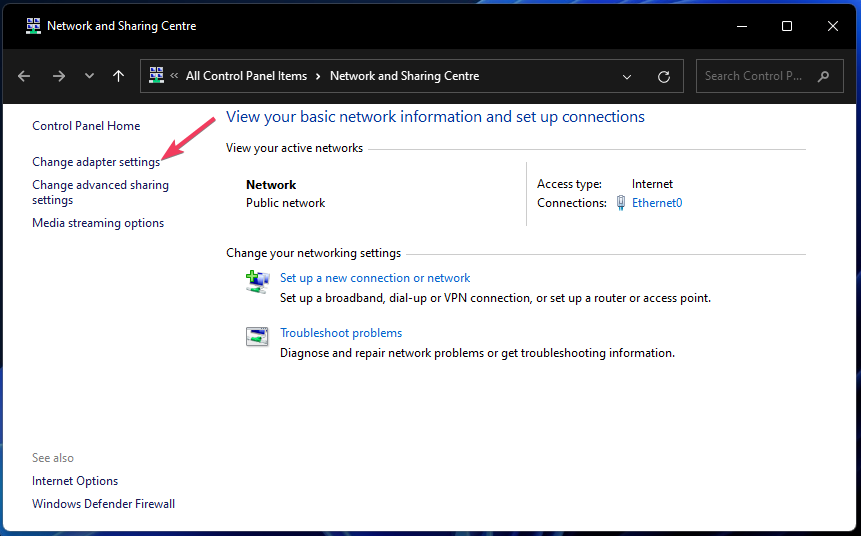
  3. Navigate to Network and Sharing Center.
  4. Select Change adapter settings.
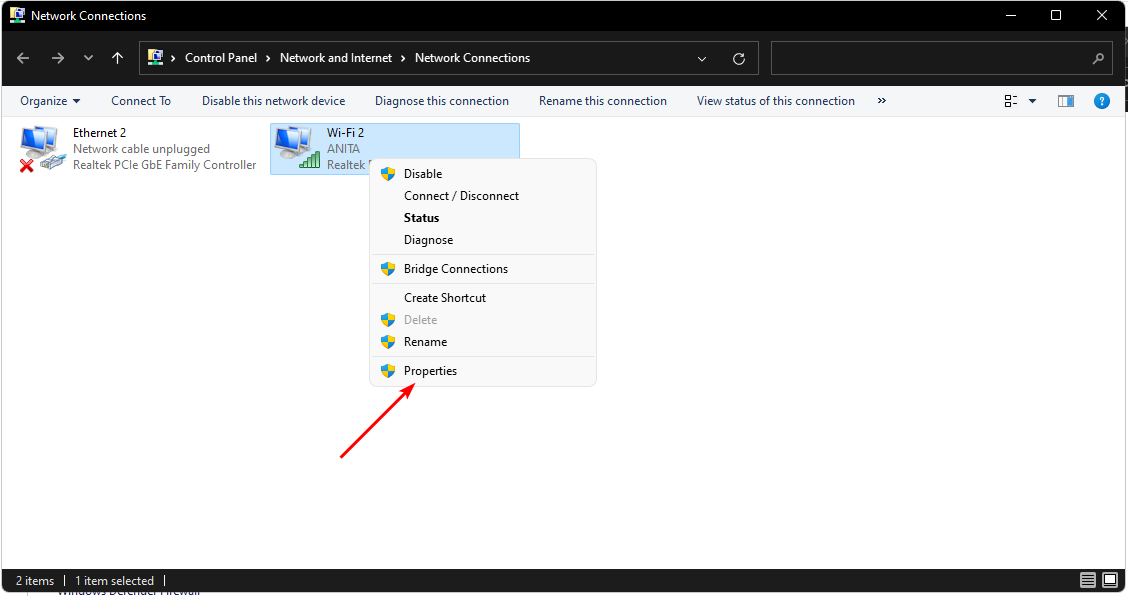
  5. Right-click on the connection you wish to disable IPV6 and select Properties.
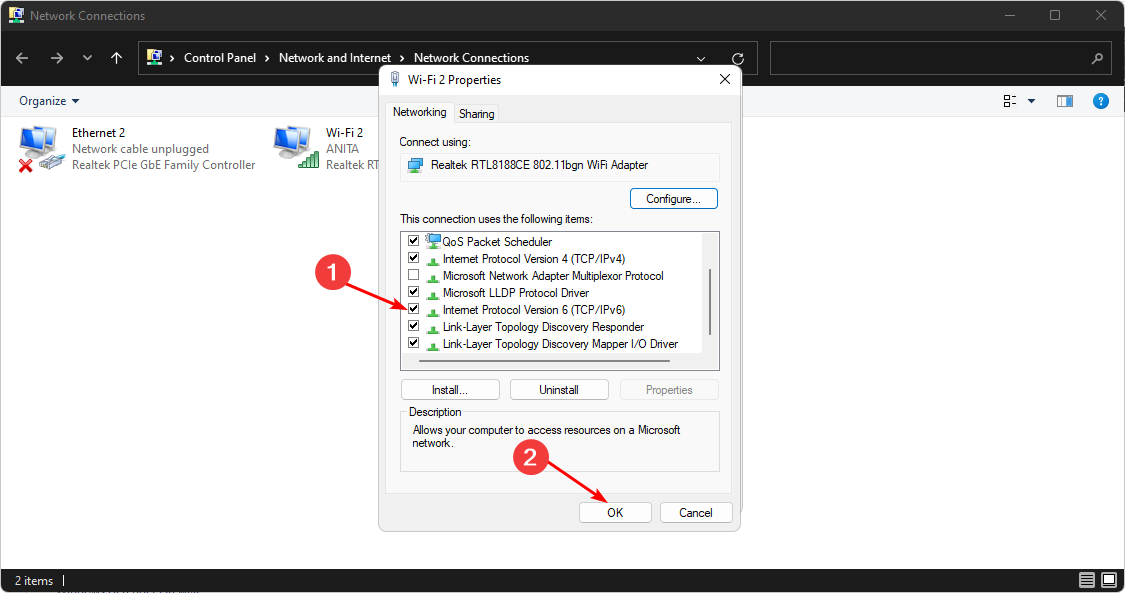
  6. On the Network properties dialog that pops up, uncheck the box beside Internet Protocol Version 6 (TCP/IPv6), then click OK.

The IPV6 internet protocol ensures smooth streaming for most programs but if a specific program’s network configuration was not designed for IPV6, there may be compatibility issues. For Hulu, you can try switching it off and see if the error code P-DEV340 disappears.

4. Reset the Hulu app

  1. Hit the Start Menu icon on the Taskbar and click on Settings.settings windows 11
  2. Click on Apps on the left pane, then select Apps & features on the right pane.
  3. Navigate to Hulu app, click on the three ellipses and select Advanced options.
  4. Scroll down and select Reset.
  5. Follow the on-screen prompts and try again.

5. Reinstall the Hulu app

  1. Hit the Start Menu icon on the Taskbar and click on Settings.settings windows 11
  2. Click on Apps on the left pane, then select Apps & features on the right pane.
  3. Navigate to Hulu app, click on the three ellipses and select Uninstall.
  4. Launch the Microsoft Store, search for the Hulu app, and click Install.
  5. Follow the on-screen prompts and try again.

6. Factory reset your TV and update it

6.1 Factory reset

  1. Press the Home button on your remote control.
  2. Now go to Settings.
  3. Under Storage & Reset select Factory data reset.
    fix sony smart tv is not working
  4. Choose Erase everything and confirm by selecting Yes.

6.2 Power cycle your router

  1. Once you’re done, perform a power cycle on your router by powering off the device you are using to watch Hulu.
  2. Next, power off the modem and router and unplug the equipment from the power source.
  3. Take a moment and let the devices idle for a few minutes.
  4. Reconnect all the devices back to their power sources.
  5. Restart your modem as well as your TV/stream devices.

6.3 Update your TV’s firmware

  1. For this solution, we shall be using the TCL model.
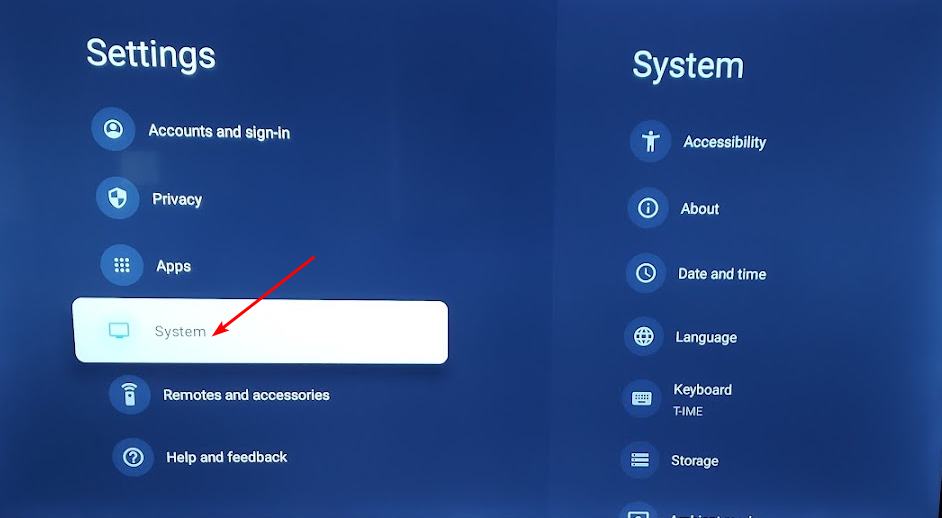
  2. On your TV, find your Settings.
  3. Go to System.
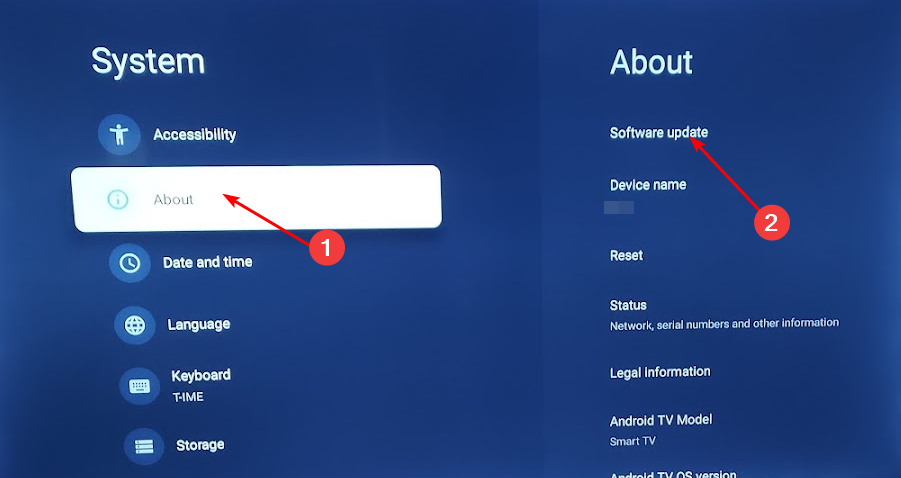
  4. Click on About then select Software update.
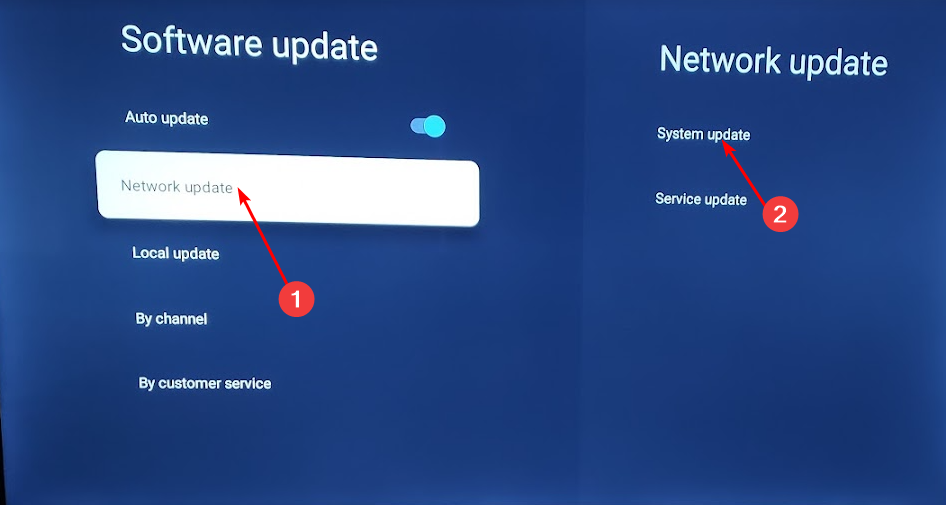
  5. Select Network update and click on System update.
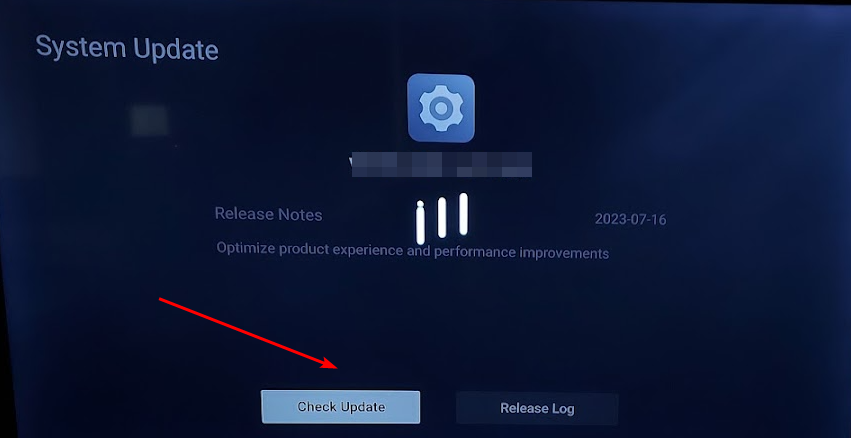
  6. Now click on Check Update. Your system will scan for any available updates.
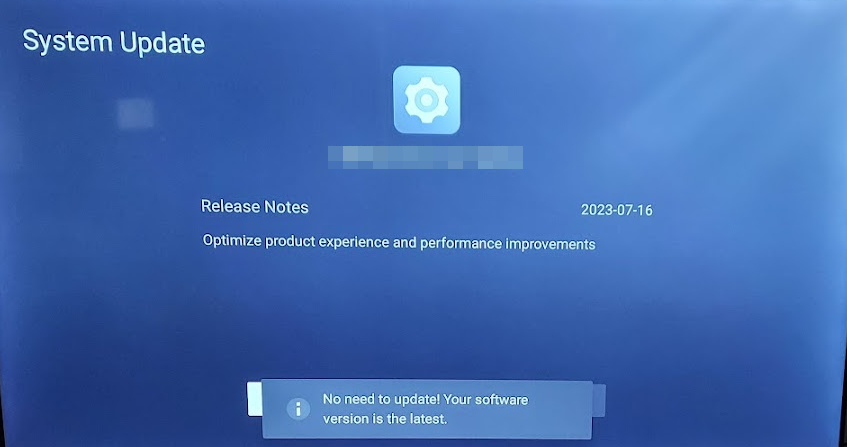
  7. You’ll either start downloading updates or get a message that your TV is already up to date.

If you’re using a Windows or Android device to stream Hulu, also ensure the OS is up-to-date.

Unfortunately, the P-DEV340 is just one of the many Hulu connection errors that may appear when you launch the app or try to stream but at least it’s not a Hulu black screen. You can try playing another video just to make sure it’s not an isolated case and an error playing this video issue.

If none of the solutions come to your aid, try Hulu’s customer support. We’ve also covered errors in the same family like Hulu P-DEV310 and P-DEV336 errors so check out our guides for more tips.

Meanwhile, as you wait for a fix, we encourage you to explore other streaming apps. Disney+ for instance also has the Hulu app so you can switch to it and see if the error still shows up here.

That’s all we had for this article but do share any other solutions that may have worked for you in the comment section below.

Microsoft Lists Vs. Planner: A Detailed Comparison

Microsoft offers tools to enhance productivity and streamline workflows, such as Microsoft Lists and Microsoft Planner. Both applications provide unique features tailored to different organizational needs, but if you are wondering which one to choose for your business, we will help you. In this guide, we will explore Microsoft Lists vs. Planner, which will help you make an informed decision based on your needs.

Understanding the basics of Microsoft Lists & Microsoft Planner

Microsoft Lists

Microsoft Lists

Microsoft Lists is an intelligent information tracking tool that allows you to track information, organize work, and configure lists to organize events, issues, and assets better. Here are the things that you can do using Lists:

  • It comes with ready-made templates, which makes creating a list easier.
  • Easily track your recent and favorite lists, and manage and share them whenever possible.
  • It has rules, reminders, and comments to track all the essential things.
  • Allows you to view your lists in the calendar, grid, gallery, or a custom view. 
  • Configure basic form elements and highlight important details with conditional formatting.
  • Allows you to use Lists as a data source to build custom productivity apps

If you want to learn how to create a new list from scratch using Microsoft Lists, we have a detailed guide for you; don’t forget to check it out.

Microsoft Planner

Microsoft Planner

Microsoft Planner is a task management tool that can help you manage all your work on a single platform, stay on track, and enhance productivity. Here are the things that you can do using Planner:

  • Allows you to manage your tasks, to-do lists, plans, and projects across Microsoft 364 apps in one place online
  • Keep track of your daily tasks with a view that can help you focus on what needs to be done on priority
  • You can navigate through your tasks via three main views: My Day, My Tasks, and My Plans
  • It can be used to do Sprint Planning or create a simple or complex plan for a project.
  • Allows integration with Microsoft Loop, Teams, Outlook, and Viva Goals.

Microsoft Lists Vs. Planner: Key differences

FeatureMicrosoft ListsMicrosoft Planner
PurposeOrganize and track informationTask and project management
InterfaceList-based interface with customizable viewsKanban-style boards with cards
Task managementPrimarily focuses on dataComprehensive task management features, including checklist functionality, comments, collaboration, progress tracking, labels, categories, etc.
CustomizationHighly customizable columns (text, choice, date, etc.) and views (filtered, sorted, grouped)Customizable task cards with labels, categories, and assignment options
IntegrationCan integrate with SharePoint, Power Apps, Power Automate, and TeamsCan integrate with Microsoft Teams for collaboration, Outlook for task assignments, and other Office 365 tools
CollaborationAllows comments, sharing, and co-authoring; and also will enable you to collaborate on listsSupports real-time collaboration on tasks, including file attachments and comments on task cards
TemplatesBasic permission settings allow sharing with specific users or groups; advanced permissions through SharePoint.Various templates for lists, such as asset tracking, issue tracking, and event planning
User Roles and PermissionsBasic permission settings allow sharing with specific users or groups; advanced permissions are available through SharePoint.Team members can get tasks assigned or granted editing rights based on their roles via role-based permissions.
Task AssignmentsDoesn’t have many task assignment capabilities; it mainly focuses on data instead of individual tasks.Tasks can be assigned to team members efficiently, which allows clear accountability.
NotificationsAllows for limited notifications for changes made to lists; users may need to check for updates manually.Offers automated notifications and reminders for task deadlines and changes, which keeps the team members updated.
Search FunctionalityPowerful search features to find specific entries within lists.Comes with basic search functionality to locate tasks and visual management via boards.
Due Dates and RemindersIt comes with limited reminder options like setting due dates, as it is more focused on data trackingYou can set due dates, assign reminders, and track the completion status of the tasks efficiently.
Reporting and AnalyticsComes with basic filtering, sorting, and grouping options; you can create simple views to analyze data.Options for visual charts and graphs showing task progress, assigned tasks, and overall project status.
Mobile AccessYou can access it via mobile apps and create and manage lists on the go.You can manage, view, and update tasks on your mobile phone
Pricing plansBusiness Plans start from $6.00  user/month to $22.00 user/month
Enterprise plans start from $8.00 user/month and goes up to $54.75 user/month
Planner in Microsoft 365: Free
Planner Plan 1: $10.00 user/month
Planner and Project Plan 3: $30.00 user/month
Planner and Project Plan 5: $55.00 user/month

What are the pros and cons of using Microsoft Lists and Planner?

Microsoft Lists (Pros and cons)

Pros Cons
Support for attachments and comments with @mentionsThere is no in-built integration with other applications, so task assignments can’t be tracked easily.
It can be customized with endless additional metadata that your task list may requireDoesn’t allow users to get a holistic view of their tasks across individual Lists
Support for attachments, and comments with @mentionsSub-tasks are not built-in, and are also not easy to implement
You can view the information in multiple ways, including by plan, by bucket, by progress, or any other metadata you create
Task can be assigned to multiple people
It comes with options to centralize tasks across lists with minor changes.
Create automation of tasks through Power Automate

Microsoft Planner

Pros Cons
Supports Kanban task boardNo significant updates for some time
Integrates well with our views in To Do, Teams, and OutlookAPI is very poor
Support for buckets, progress, labels, assignees, dates, priority, sub-tasks, attachments, commentsDoesn’t have the ability to create automation of tasks through Power Automate
You can view information by plan, by bucket, or by progress.Little to no extensibility or customization
Tasks can be assigned to multiple people.No option to consolidate across Planner plans
You can copy or move tasks to other plans.
It supports for a checklist within a task.

Cons – Planner

  • No consolidation across planner plans
  • Little to no extensibility or customization beyond out of the box configuration
  • The API is very poor
  • Ability to create automation of tasks through Power Automate

Which tool should I use and when?

You can use Microsoft Lists when:

  • Detailed data management: Used to manage complex data sets like inventories, assets, and project specifications or to deal with custom fields and structured data tracking
  • Customization: If your projects demand tailored views, filters, and rules to manage information effectively
  • Integration with SharePoint or Power Apps: If you need to use SharePoint for document management or automate workflows with Power Apps
  • Reporting capabilities: You can use it to analyze data trends and generate detailed reports
  • Collaboration on structured information: If you need to collaborate on lists that contain detailed information

You can use Microsoft Planner when:

  • Focus on task management: You want to manage team tasks, deadlines, and project workflows.
  • Visual task organization: If you use a Kanban-style layout that gives an overview of task statuses (To Do, In-Progress, and Completed)
  • Simple task assignments and progress tracking: Assigning tasks, setting due dates, and tracking progress without complex data structures.
  • Team collaboration on tasks: To enhance communication between team members, you can use task comments, assignments, and updates in real-time.
  • Integration with Teams and Outlook: When managing tasks alongside team discussions and email communications.

In short, you should choose Microsoft Lists if you need to perform detailed data management and customization and have reporting needs. If you have decided to use Microsoft Lists, here is a guide to learn how to get started. In case you are looking for a way to use Microsoft Lists within Microsoft Teams, check out this guide.

However, if you want a tool for task management, visual organization, and better team collaboration, Microsoft Planner should be your choice.

If you want to learn how to create and use the Microsoft Planner templates; we have a separate guide with step-by-step instructions. You can also check out this article to learn how to create custom fields in Planner.

Which tool, Microsoft Lists Vs. Planner, do you prefer for business needs? Share your thoughts with our readers in the comments section below.

How To Use CPU-Z to Check Your Motherboard Information

CPU-Z is a well-known system information software, but if you’re not familiar with it, in this guide we’ll show you how to use CPU Z and everything else you need to know about it.

How can I use CPU-Z?

What does CPUID CPU-Z do?

CPU-Z gathers your system information, such as CPU, motherboard, and memory information, and displays them in an easy-to-use interface. It can also benchmark your CPU.

How do I check my system information with CPU-Z?

  1. First download and install CPU-Z.
  2. Start the application.
  3. When you start it, you’ll see a CPU tab and there you can see all your CPU information such as CPU model, core speed, multiplier, cache, etc.
     cpu information cpuz
  4. The Mainboard tab hosts all your motherboard info, such as manufacturer name, model number, bus information, chipset, BIOS information, GPU width, and more.
    mainboard cpuz
  5. The Memory tab allows you to see relevant memory information, such as the total memory, channel, frequency, and other information.
    memory cpuz
  6. Next, there’s an SPD tab that lets you inspect each memory slot, so can see the timings for each module, its serial number, or model.
    spd cpuz
  7. Lastly, there’s a Graphics tab that shows you the memory size of your GPU, memory frequency, model, and other information.
    graphics cpuz

How to do a CPU-Z test?

  1. Open CPU-Z and go to the Bench tab.
    bench cpu-z
  2. Choose your Benchmark and select the option to Bench CPU or Stress CPU.
    benchmark select cpuz
  3. You can even select a reference CPU to see how your processor compares to it.

Does CPU-Z show temperature?

No, this software won’t show you the temperature of your components. For that purpose, you need to use temperature monitoring software instead.

Is CPU-Z accurate?

Yes, the software is rather accurate in regards to showing your CPU, memory, and motherboard information. However, the software might not be reliable for GPU information and benchmarking.

Is it safe to use CPU-Z?

Yes, the application is free from any malware and we have used it for years without any issues.

How to use CPU-Z to overclock?

CPU-Z doesn’t support overclocking, but it can give you CPU and RAM information, so you can check if your overclocking settings have been applied properly.

How much does CPU-Z cost?

CPU-Z is freeware, meaning that it’s completely free to use.

We hope that you found our guide informative and that you now better understand how to use CPU-Z.

If you want to learn more, we suggest visiting our CPU-Z review for more in-depth information. In case you encounter any issues, we have a guide on what to do if CPU-Z is not working, so don’t miss it.

Microsoft Teams might soon be able to record meetings retroactively

Microsoft Teams might soon be updated to allow participants to record virtual meetings in their entirety after they have already started. While there’s no definitive date on when this will be released, the Redmond-based tech giant is clearly thinking about it because it has patented this technology in a recently published paper.

Suggestively called Retroactive Recording of a Meeting, the tech describes a system that lets you start recording a virtual meeting even after it has already begun.

Users are encouraged to start recording a Microsoft Teams meeting anytime. Imagine you’re in a virtual meeting and realize halfway through that you need a recording. This system lets you start recording from the beginning or any earlier point in the meeting, even if you decide to record after the meeting has started.

The tech uses a system that divides the meeting into small parts, each linked to a specific time and participant. For example, if three people talk at different times, the system creates separate segments for each person’s contributions and the time they spoke.

These segments will be stored on a server as blockchain, a secure and unchangeable digital ledger. The record becomes tamper-proof by storing the meeting segments on a blockchain, ensuring that the meeting content remains unaltered.

Users can play back the meeting from any point as long as everyone agrees to be recorded. This means you can review specific meeting parts without watching the entire recording.

For example, in response to receiving an indication that the meeting has started, the server may operate to automatically start recording received meeting content streams of a meeting in a stealth mode. When operating in stealth mode, for example, the server may automatically, without informing the user/attendees and/or receiving user/attendee consent, process received meeting content streams as described above and store the received meeting content streams as a plurality of data segments.

The server, operating in stealth mode, will capture everything, from audio streams to chat messages, presentations, slideshows, etc. The patent also describes the server as being able to generate time-stamped transcripts from those audio streams, similar to the current Teams’ Intelligent Recap feature.microsoft teams record meetings

The patent has a solution for consent, especially in Stealth Mode, which includes removing or making content segments inaccessible if a single participant doesn’t agree to be recorded.

According to an example, when operating on stealth mode, if, during the meeting or within a predetermined grace period after the meeting, an option to record the in-progress or ended meeting is not received from a user/attendee, the recorded meeting content streams may be deleted or otherwise made inaccessible.

There is a high chance Microsoft might actually implement this technology in future, as it uses capabilities already known to Teams users. As we mentioned earlier, the Intelligent Recap feature already uses AI to generate transcripts of meetings, determine relevant timestamples, and even suggest recommendations.

And with the controversial Windows Recall capability, which basically records everything on Windows 11 (although it stores it locally, and Microsoft says it’s not a security issue), finally coming to PCs in November, the Redmond-based tech giant has everything it needs to make this a reality.

You can read the paper here.

However, would you trust it? What’s your take on this?

How to Download Alfred Camera for Windows 10

Alfred Camera is a web app that allows you to use the webcam on PC as a security camera. If you install the AlfredCamera Android app and log in with the same account on both devices, You will get a notification on your phone anytime the webcam detects any motion. Long story short, here’s how to download Alfred Camera for Windows 10 and use it.

How do I download Alfred Camera for Windows 10?

  1. Open a browser and go to the Alfred Camera website, then hit the Get started button.
  2. Next, create an account or use a Google or Apple ID account to sign in.
  3. Now, click on the button on the screen to turn on and allow access to the webcam connected to your PC.
  4. Make a movement so to identify and turn on motion detection.
  5. At the next step, you will have to access your mobile phone and download the AlfredCamera app from Google Play or Apple Store.
  6. Open the app and log in with the same account you used on the PC.
  7. You will also have to give permissions to the app to use some capabilities of your phone.
  8. The two apps will sync automatically and you will see the live feed from the webcam.

Is Alfred Camera any good?

Although Alfred Camera is a free app for PC and mobile, this free version is pretty limited. You can’t add more than one camera, you can’t record anything from your phone and the video resolution is SD.

However, the motion detection works seamlessly and the phone notifies you whenever the webcam detects any motion so you can watch live what’s happening.

To eliminate all these shortcomings and switch to HD quality, you will have to upgrade to a Premium plan for $2.49 a month.

Also, since it’s a web app for Windows, you first need to make sure that your browser, computer or webcam don’t go to sleep after you leave home. Also, obviously, you need a steady internet connection, otherwise the webcam will not be able to stream anything to your phone app.

So, this is how you download Alfred Camera for Windows 10, although we would add that it works on Windows 11 as well. It’s not a professional security solution for your home, at least not in it’s free version, but it would work perfectly if you want to be notified when your toddler wakes up and needs attention.

If you’re serious about home security, here’s our list of the best security cameras and a list of the top webcam security software.

Did you use Alfred Camera? Tell us about your experience with the app in the comments below.

How to Download PerfMonitor on Windows 10

If you are looking for a processor performance monitoring tool, PerfMonitor is a great choice, according to many. And if you have been planning to download PerfMonitor for Windows 10, remember there’s a new version available now, PerfMonitor 2.

PerfMonitor 2 includes all the functions of PerfMonitor but has a user-friendly interface and is easy to understand. Using the tool doesn’t require advanced knowledge of hardware, and anyone can use this Windows performance monitor. All you have to do is download PerfMonitor 2!

How can I download PerfMonitor 2 on Windows?

Note icon NOTE
I am using the official website to download PerfMonitor 2. Although, you can also download it from CNET Download, a platform hosting a wide array of third-party software.
  1. Go to CPUID’s official website, scroll down the list of releases, select the latest version (currently Perfmonitor 2 2.04), and then choose Setup.perfmonitor setup download
  2. Click the Download Now button.
  3. Once done, go to the Downloads folder, and run the perfmonitor-2_2.04.exe file.
  4. Click Yes in the UAC prompt.
  5. Click on Next to proceed.
  6. Set the desired installation path, and click on Next.install path perfmonitor download windows 10
  7. Set the location for the shortcut, and click Next.
  8. If you don’t want a desktop shortcut for PerfMonitor 2, untick the checkbox Create a desktop icon and click Next.perfmonitor-2_2.04 desktop shortcut
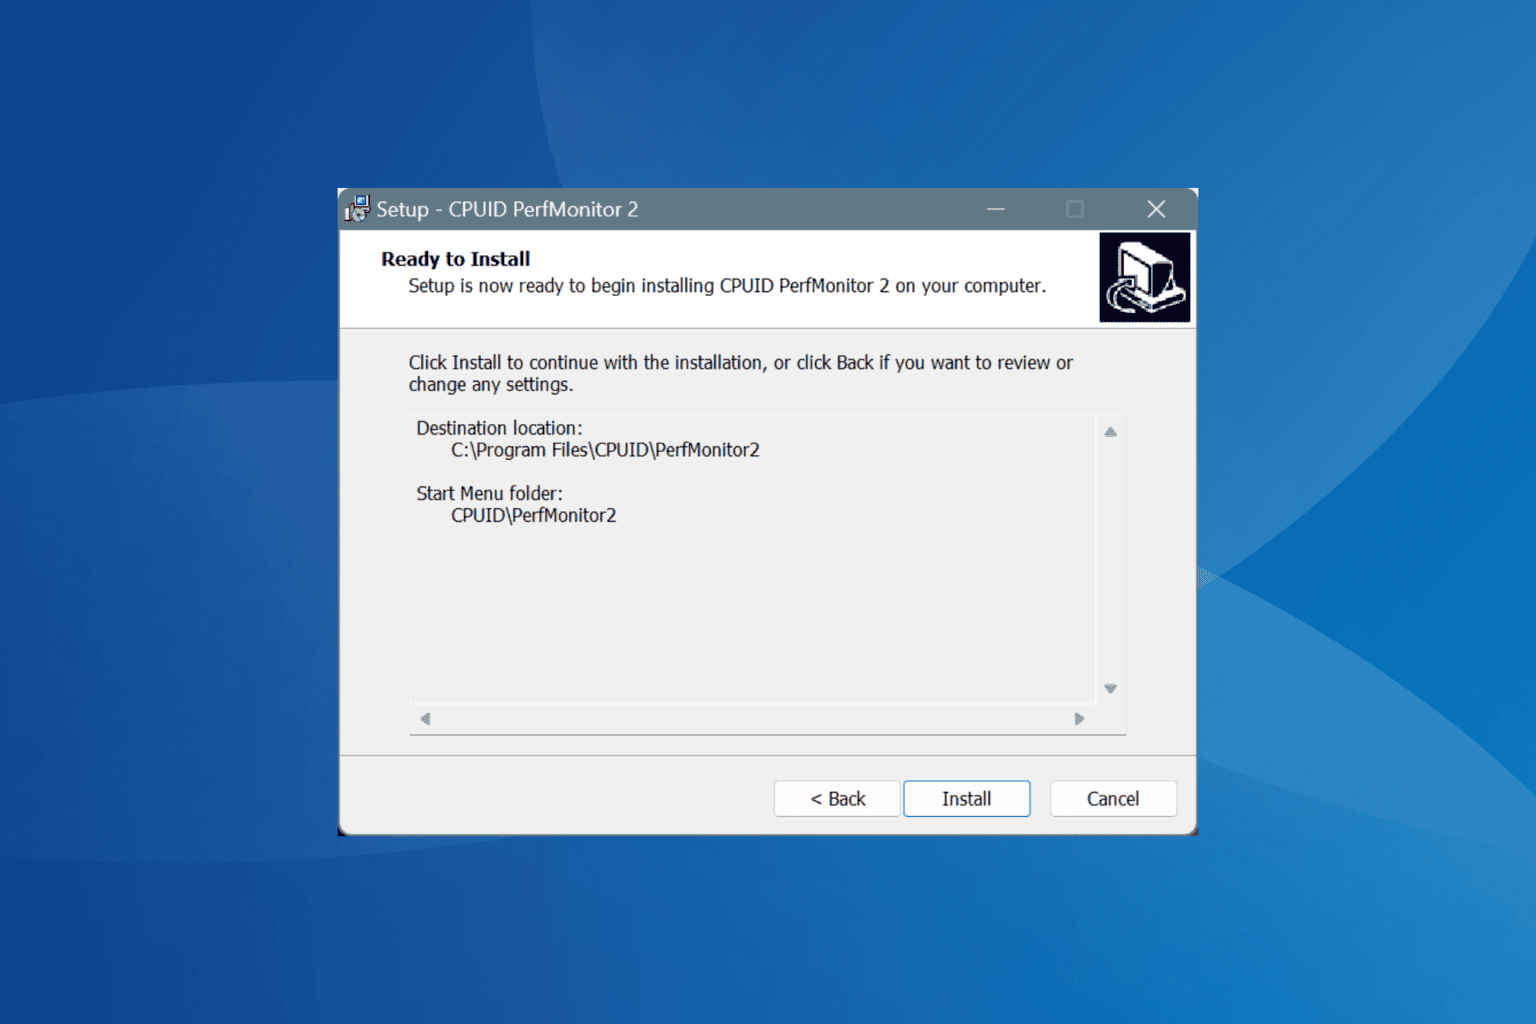
  9. Verify the installation settings and click on Install.perfmonitor install
  10. After the installation is completed, you can run the PerfMonitor 2 and start monitoring the processor performance on your PC.running perfmonitor after download windows 10

Both PerfMonitor and PerfMonitor 2 are known for their easy-to-understand interface and effective functioning. PerfMonitor 2 allows you to select the relevant processor and monitor all the counters under it quickly. Besides, it also provides basic information about the processor.

However, the best thing about the tool is its compatibility with all iterations of the OS. According to the official website, PerfMonitor 2 works on Windows 2000, Windows XP, Windows Vista, Windows 7, Windows 8, and Windows 10.

You can also download PerfMonitor on Windows 11.

But if you have yet to pick PerfMonitor as your go-to tool, I recommend checking our top picks for Windows computer performance monitoring software and easily track every critical parameter!

For any queries or to share your review of PerfMonitor on Windows, drop a comment below.
How to Download and Install CPU Z on Your PC

Have you heard about CPU Z? It’s a small and useful tool that can help you check your system hardware, and in today’s guide we’ll show you how to download CPU Z on your computer.

How do I download and install CPU-Z?

Use the official website

  1. Visit the CPU-Z download page.
  2. Select the version you want, ZIP or Setup.
     cpuz download
  3. Once the file is downloaded, run the setup file and follow the instructions.
  4. If you’ve downloaded the ZIP version, just open it, extract all files on your PC, and run the cpuz_x64.exe file.
    cpuz 64 bit

Does CPU-Z show RAM speed?

Yes, CPU-Z can show you the RAM speed. Simply go to the Memory tab and look for the DRAM Frequency value.

Is CPU-Z free?

Yes, the software is freeware so you can use it without any restrictions.

Is it safe to download CPU-Z?

Yes, CPU-Z is perfectly safe to use. We have been using it for years, and it has never triggered our antivirus. However, to ensure that your software is safe, always use the official download links.

Is CPU-Z any good?

Yes, it’s a small and incredibly useful tool that can give you a lot of information regarding your motherboard, CPU, and RAM. It might not be as advanced as other motherboard diagnostic software, but it will get the job done.

To learn more, we suggest visiting our CPU-Z review for detailed information. We also have a new guide on how to use CPU-Z, so don’t miss it.

And if you encounter any problems, don’t miss our guide on what to do if CPU-Z is not working. If you like this software, don’t miss out guide on how to download Perfmonitor on Windows 7, since the same company is developing it.

This is a small but incredibly useful software, and if you haven’t used it before, we suggest you download CPU-Z and test it for yourself.

Microsoft Teams will automatically detect phishing attacks in its messaging app

Microsoft Teams will become better at spotting phishing attacks thanks to a new enhancement released next month.

According to the latest entry in the Microsoft 365 Roadmap, this new enhancement, due for a release in November, will equip Teams with the ability to identify if an external user is indeed impersonating a brand targeted by phishing attacks.

The Brand impersonation protection will happen in Teams Messaging during the initial contact with an enterprise.

Here’s what the entry says:

Identify if an external user is impersonating a brand commonly targeted by phishing attacks, during their initial contact with an enterprise user via Teams messages.

Mac and Windows desktop devices will support the new capability, and it’s a welcoming addition to one of the most targeted apps in the world. Impersonating brands is quite common in cyberattacks, and hackers are using intelligent ways to deceive users, including using the rnicrosoft typing error.

To combat such attacks, the Redmond-based tech giant has developed Copilot for Security, an AI that responds to malware and phishing attacks. However, the company advises users of its products and services to keep a close eye on everything that seems suspicious, including emails.

Recognizing a standard phishing attack on Microsoft Teams is fairly easy, although cyberattacks have also started using AI, and some traditional methods might not be as effective as they once were.

In other news, around the same time, Microsoft Teams will be enhanced with an Improved People Search capability that will only showcase relevant content suggestions and people when looking for specific users.

Teams will also feature the ability to teach users how to pronounce names correctly. Microsoft teased this a while ago, but it’s finally coming in November.

Ultimately, the platform will also make it easier for users to insert hyperlinks by just selecting the text and pasting the URL, as opposed to having to open a hyperlink dialogue box.

Off the Grid for Xbox: Everything you Need to Know

Off the Grid for Xbox is what happens when you get the film director Neill Blomkamp (District 9, Elysium and Chappie) to join a team of developers and make a game. And the result is epic, to say the list. A more pragmatic description of the game is battle royale multi-player action shooter, but it’s a lot more than that.

All about Off the Grid for Xbox

1. The story

I’m an old timer who started FPS gaming with Heretic and Doom, but Off the Grid is the first one who really justifies respawning in a game.

The whole story revolves around a Hunger Games or Squid Games type of reality game: 150 players enter a very wide arena and who survives at the end gets 100 M dollars. Cool, right?

Yeah, but all the players must undergo surgery and augment their bodies with cyber limbs and gadgets to basically get some super human powers. So, we’re talking about mostly robocops out there. And if you die in battle, no problem, they can reconstruct you from a piece of tissue from your body.

We don’t know how they get that right tissue from a mass of scraps in the battlefield, but let’s just say that in this dystopian future, everything is monitored.

Well, it actually is, because all this show is broadcasted for everyone else to enjoy from their couches at home.

That is the front story, but behind the scenes, there is a pretty intricate story that revolves around the Teardrop Island’s shattered history and every decision you make in the game will influence it.

About Neill Blomkamp’s implication of this, it’s a lot to talk about, but almost at any moment, you feel like you’re in a movie. And I’m not only talking about amazing cut scenes that are extremely cinematic and professionally done, but also within the game itself. The movements, the visual effects, the environment, the sounds around you are immersive, and it feels like there’s a whole crew behind filming everything for what’s about to become a Hollywood action blockbuster.

There’s even a virtual streamer called Cobra, that comments everything that happens in the arena and it’s supposed to be your guide in the game. The devs say that actually about 30% of what you hear from him might actually help you.

For now, Off the Grid is an early access free game for PC, Xbox and PS5, so the actual story is under development, but what I’ve seen so far looks more than promising.

2. Gameplay

As I’ve mentioned above, the gameplay itself is not that complicated and matches all the latest FPS you’ve seen lately. However, the options of limb and weapon customization is pretty extensive.

Here’s a relevant description of the game from the Gamezilla devs:

In Off The Grid, your mission is simple: Survive. Loot. Dominate. Jump into Early Access and experience the mayhem first-hand as we unleash new locations, weapons, and cybernetic limbs to build your ultimate warrior. Whether you’re battling it out in the heart of a high-stakes Battle Royale or unravelling the immersive narrative of Teardrop Island’s shattered history, every decision you make could be your last… or your path to victory.

Gear up with custom cyberlimbs and hundreds of weapon combos, modifying your body and arsenal mid-fight. Extract high-value loot, outsmart your enemies, and transform into a force of destruction. You’re not just fighting to survive—you’re fighting to be the last one standing.

Right now, there are over 30 limb upgrades and over 300 weapon combinations. Yeah, you can customize every aspect of your weapon, from the sight to magazine, everything can help you overcome your opponents in PVP or PVE combat missions.

3. Graphics

It looks like the devs squeezed every ounce of power from Xbox Series X for this game because it looks amazing. And if you’re going to play it on PC, everything goes even better. We’ve laid out the minimum and recommended requirements for PC below, just in case.

The details in the game are mind-blowing. The explosions, the reflections, the impact of all the objects seems as real as being right there on the battlefield. The environment is changing as you are messing with it and the bullets splash in the water creating waves and actually producing the right sounds every time.

It’s actually pretty hard to describe it, but you can join the early access and download the game for free just to see it for yourself. You will find it in the Xbox Store or on the Epic Store for PC.

What are the Off the Grid game requirements for PC?

Minimum requirementsRecommended specs
Memory16 GB32 GB
Graphics cardNVIDIA GeForce RTX 3060NVIDIA GeForce RTX 4070
CPUIntel Core i5-9400Intel Core i7-12700K
Storage space10 GB15 GB
OSWindows 10 64-bit or higherWindows 11

That’s about all we know about Off the Grid, but we’ll keep up with the game as it develops further. We remind you that it’s an early access, but you can still have a lot of fun with it.

One last thing: There is a rumor out there that Off The Grid is and NFT game. It’s not! The game has an optional NFT element. You can try it, but you don’t have to.

Did you play Off the Grid on Xbox? Let us know about your experience in the comments below.

Vanguard Error VAN 128: How to Fix it in LoL and Valorant

Many, in recent years, were kicked out of Valorant and League of Legends during an ongoing game, and the screen read, Vanguard Error: VAN 128. The message underneath stated, An unexpected error with Vanguard has occurred and the client will now close!

The VAN 128 error typically arises due to a server downtime at Vanguard’s end, misconfigured network settings, critical services not running, issues with the vgkbootstatus.dat file, and problems with the current security infrastructure on the PC.

If you faced Vanguard Error: VAN 128 in League of Legends on October 9, 2024, it was a widespread issue caused by Vanguard servers. So, your primary approach should be to check Vanguard’s server status using a real-time monitoring service like Downdetector. Also, look at the Riot Client Service Status for any game-specific downtime!

How do I fix Vanguard error code VAN 128?

1. Delete the vgkbootstatus.dat file

  1. Sign in with an administrator account, then press Windows + E to open File Explorer, paste the following path in the address bar, and hit Enter: C:\Windows
  2. Locate and select the vgkbootstatus.dat file, and then hit Delete.delete file to fix vanguard error van 128
  3. Click Continue in the confirmation prompt.
  4. Restart the computer and check for improvements.

When Vanguard Error: VAN 128 last hit thousands of players worldwide, the official support team recommended deleting the vgkbootstatus.dat file to get things up and running. Remember, if you are on a non-admin account, switch to an administrator account on Windows to delete the file.

2. Run the VGC service

  1. Press Windows + S to open Search, type Services in the text field, and click on the relevant result.
  2. Scroll down, right-click on the Vgc service, and select Properties.VGC properties
  3. Choose Automatic from the Startup type dropdown menu, and then click the Start button under Service status if the service is not running. run to fix vanguard error van 128
  4. Click on Apply and OK to save the changes.
  5. Restart the computer and then relaunch League of Legends or Valorant.

In 3 out of 5 cases, the Vanguard Error: VAN 128 was triggered when the Vgc service was not running. And while you can simply start it, I recommend setting the startup type to Automatic to prevent similar errors from reappearing.

3. Disable Sonic Studio Virtual Mixer

  1. Press Windows + X to open the Power User menu, and select Device Manager from the list.
  2. Double-click to expand the Sound, video and game controllers entry. device manager
  3. Right-click on Sonic Studio Virtual Mixer, and then select Disable device.disable device to fix vanguard error van 128
  4. Click Yes in the confirmation prompt.
  5. Restart your Windows PC and check for improvements.

4. Turn off Debug Memory Dump

  1. Press Windows + R to open Run, type sysdm.cpl in the text field, and hit Enter.sysdm.cpl
  2. Now, go to the Advanced tab, and click on Settings under System and Recovery.settings
  3. Select None from the Write debugging information dropdown menu, and click on OK.no debugging to fix vanguard error van 128
  4. Similarly, click OK on all previous windows to save the changes.
  5. Restart the PC and verify whether Vanguard Error: VAN 128 in League of Legends is fixed.

5. Reconfigure the security settings

  1. Press Windows + S to open Search, type Command Prompt in the text field, and click on Run as administrator.
  2. Click Yes in the UAC prompt.
  3. Paste the following two commands individually and hit Enter after each: bcdedit /set TESTSIGNING off bcdedit /set nointegritychecks OFFdisable testsigning to fix vanguard error van 128
  4. Restart the computer and check for improvements.

6. Reset the network settings

  1. Press Windows + R to open Run, type cmd, and hit Ctrl + Shift + Enter.command prompt
  2. Click Yes in the UAC prompt.
  3. Paste the following commands one at a time and hit Enter after each: ipconfig /release ipconfig /flushdns ipconfig /renew netsh int ip reset netsh winsock resetreset network
  4. Once done, reboot the PC and verify whether Vanguard error code 128 is resolved.

7. Uninstall conflicting third-party apps

  1. Press Windows + R to open Run, type appwiz.cpl in the text field, and hit Enter.
  2. If you have any of the following applications installed, select them individually, and click Uninstall:
    • EaseUS
    • CryptoPro Cloud CSP
    • Fasoo
    • Avast
    • Nortonuninstall to fix vanguard error van 128
  3. Follow the on-screen instructions to complete the process.
  4. Finally, restart the computer.

Remember, most antivirus solutions can trigger the Vanguard error, but Norton and Avast were commonly found to be the underlying cause. In case you don’t want to uninstall the app, there’s always the option to add an exception for the affected game(s) in the antivirus.

If the Vanguard Error: VAN 128 persists, use a top-rated software uninstaller to completely remove the app, including deleting any leftover files, cache, and Registry entries, because these can, sometimes, trigger conflicts post-uninstall.

Besides, if none of these solutions work, I recommend you contact Riot Games support and ask them for a fix. Or, if it’s due to a problem at their end, you will receive an estimated resolution timeline.

Before you leave, discover expert tips to improve the gaming experience on Windows and make your games run faster!

For any queries or to share more fixes with us, drop a comment below.

Vimium Firefox Extension: How to Download & Use it

If you’re a programmer you might be familiar with Vim. But did you know that there’s a Vimium extension for Firefox? That’s right, and today we’re going to show you how to use it.

How do I use Vimium on Firefox?

How do I install the Vimium Firefox extension?

  1. Visit the Vimium extension page.
  2. Next, click on the Add to Firefox button.
    add to firefox vimium
  3. Click on the Add button to confirm the installation.

How to navigate with Vimium?

To navigate you need to use Vimium shortcuts in Firefox. Here are the most used ones:

  • j,k – scroll down or up
  • gg – scroll to the top of the page
  • r – reload page
  • yy – copy URL to clipboard
  • p, P – open the clipboard URL in the current tab, or new tab
  • gi – focus on the first input field
  • f, F – open the link in current tab, open link in new tab
  • t – create a new tab
  • o, O – open URL, open URL in new tab
  • J, K – go to the left or right tab
  • x, X – close current tab, restore closed tab
  • ? – show all keyboard shortcuts

How to configure Vimium?

  1. Click the Vimium icon in the top right.
    vimium icon
  2. Click the Options link.
    vimium options
  3. The options page will now appear which you can use to configure Vimium.

How do I turn off Vimium?

  1. Press Ctrl + Shift + A.
  2. Locate the Vimium extension and click the switch next to it.
    vimium extension disable
  3. If you ever want to enable it, repeat the same steps.

Unfortunately, Vim doesn’t have an option to toggle it on or off, so your only option is to disable the extension entirely.

Is Vimium open source?

Yes, Vimium is an open-source project, and you can inspect its code on the Vimium GitHub page.

As you can see, it’s pretty simple to install the Vimium extension on Firefox, but if you’re not a Vim user, it might take you a bit to learn all the shortcuts.

If you’re looking for more extensions, we recently wrote about the Mozbar Firefox extension as well as One Tab Extension.

Before you leave, don’t miss our guide on the best tab reloader extensions for Firefox, for more useful tools.

Microsoft introduces Focus Cell in Excel, which makes sheets more visible to users

Microsoft Excel is finally making sheets more visible by adding a brand-new feature called Focus Cell. This feature applies a vibrant highlight to the associated row and column of the active cell, increasing the cell’s border thickness to make it stand out more than before.

The feature can be toggled on and off by simply clicking the Focus Cell button on the View tab of Excel. Users can change the color of the highlights by clicking the arrow next to the Focus Cell button and selecting a new color.

The command can be added to the Quick Access Toolbar for quicker access. After the command is added, users can simply click the corresponding icon at the top left of the Excel window to toggle the feature.

In a blog post, Microsoft says the Focus Cell feature is available to Beta Channel users running Version 2410 (Build 18118.20000) or later, and it should be coming to the Stable Channel sometime in the following months.

The feature will also automatically activate when using Find & Replace commands in Excel for Windows, making it easier to locate the active cell as it shifts positions. This behavior can be changed by selecting View > Focus Cell > Show Auto-Highlight.

For now, however, Microsoft says Excel’s Focus Cell is not supported while Freeze Panes or Split Panes are used.

Excel for Mac and Web users will have to wait longer for the feature, as it’s not yet available for those platforms.

In other news, the Redmond-based tech giant recently updated Excel with the TRIMRANGE and trim references, allowing users to clean spreadsheets of unnecessary columns in just a few seconds.

Microsoft will enhance Outlook with an offline mode

Starting this month, new Outlook for Windows and Web users will be able to access the platform offline, as Microsoft will enhance it with an offline app boot capability. According to the latest entry in the Microsoft 365 Roadmap, users not connected to the Internet can open or restart the new Outlook for Windows.

However, offline mode access will only be supported when Outlook is already running and then goes offline.

Here’s what the entry says:

This introduces Windows users to the ability to open or restart the new Outlook when not connected to the internet. Previously, you needed a connection to the internet to open or restart the new Outlook. Offline access is only supported when the app is already running and then goes offline. Opening and restarting the app while offline will be introduced with this rollout. #newoutlookforwindows

The Redmond-based tech giant introduced offline mode for platforms naturally web-inclined earlier this year with OneDrive for Web.

With Outlook’s offline mode, Microsoft might be looking to make to streamline workloads even in uncertain situations.

What do you think about this new capability?

The Copilot key, which uses a combo from the 80s, cannot be remaped anymore

(Image credit: James R. Maynard III , CC BY-SA 4.0 , via Wikimedia Commons)

Microsoft marked this year as the start of the AI PC with a physical Copilot key. Let’s move away from the elephant in the room and not question why we actually need a physical key to start the AI bot when it’s all over in Windows.

Tom’s Hardware tested the  Dell XPS 14 and XPS 16 and they used the AutoKey macro scripting app to see what is the actual key combination that is performed when you press the physical Copilot key.

Well, according to their post it’s Ctrl + Win + F23. Yeah, where is F23, right? Well, don’t look for it on your keyboard because you won’t find it. A modern full-sized keyboard has 12 function keys.

IBM introduced the two-row function key keyboard, Model M, in 1985. It had 122 keys and included 24 function keys. The last keyboards with this configuration were discontinued sometime in the 1990s.

Can I remap the Copilot key to perform other functions?

Microsoft chose this odd key combination because they wanted to make sure that no one on the planet has this scan code assigned. Another would be that they want to make it harder for us to remap, but you will see that it’s not that hard.

It’s less important why this happen. The good news is that you can easily remap your keys, including the Copilot one to perform other functions. We have a list of the best key mapper software, but Microsoft also launched Keyboard Manager that will probably help you with that as well.

However, for now, it’s impossible to remap the Copilot Key, at least in the latest Beta build, as Microsoft took down to feature to polish it, according to the updated blog post.

[ADDED] We have temporarily disabled the ability to configure the Copilot key that began rolling out with Build 22635.4225 to address some issues and refine the experience. We plan to bring it back soon.

But once it’s back, you should definitely try to remap the it, if you don’t use Copilot.

Now, most of the key remapping software ask you to enter the key combination you want to change and that is impossible for the F23 key. However, it’s important to know that you can still action the F23 key by pressing Shift + F11. So, if you want to access the F13 – F24, you can press Shift and the corresponding F key from the row.

Once you know that, you can remap the Copilot key to another combination, open a website, an app, just like any other smart key on modern keyboards.

The folks from Tom’s Hardware have an interesting guide on how to do that as well.

Want to win a gold-kissed Indiana Jones Xbox Series X console? Here’s what you have to do

Bethesda Softworks and Microsoft have teamed up to bring fans of the Indiana Jones franchise a unique experience. They have designed a custom Xbox Series X console and wireless controller with a theme based on Indiana Jones and The Great Circle.

The console and controller are designed to look like they’ve been through quite a few adventures themselves, with a patina that looks like it’s been handled by the adventurer himself.

The big twist is that the console has been encased in a “puzzle box” inspired by Indiana Jones and The Great Circle. The box is adorned with symbols from the game and even has hidden compartments to discover, making it a multi-layered challenge. It’s all inspired by the game’s themes of forgotten ruins, enigmatic puzzles, and hidden treasure.

Suppose you want to look at the console and controller in person. In that case, Microsoft Experience Centers in London, Sydney, and New York will run Indiana Jones-themed displays from November 12 through January 6. You’ll even be able to enter a sweepstakes to win the console by solving a puzzle at these locations.

If you can’t physically travel to one of these locations, you will have another chance to win the puzzle box console via Bethesda’s social channels.

The Indiana Jones Xbox Series X console will be available in limited quantities. The console and wireless controller will also be available for purchase separately.

Indiana Jones and The Great Circle launches on Xbox Series X|S and PC on December 9 and will be available with Xbox Game Pass on day one. However, given Microsoft’s willingness to port Xbox games to Sony consoles, it might also come to PlayStation consoles.

More details about the Indiana Jones Xbox Series X console are here.

How to Turn Off Gemini Apps Activity on PC, Android, iOS

First, you should know that you can’t turn off Gemini Apps activity or delete your activity if you’re using the feature with a work or school account. However, you can turn off the Gemini Apps activity for your personal account and force the AI bot forget about all your prompts. Remember, if you’re 18+ years old, the Gemini Apps activity is turned on by default.

How do I turn off Gemini Apps activity on PC?

  1. Open your browser and log into your Google account.
  2. Go to the Gemini Apps Activity page.
  3. Here, click on the drop down menu for Gemini Apps Activity and you have 2 choices, to turn the feature off or turning it off and deleting activity at the same time.
  4. If you just turn it off, you can still delete the activity with the Delete drop down menu. Here you can select the time interval or delete it for the current hour, day or the entire history.
  5. If you scroll down before deleting the activity, you will see app the Gemini prompts you have been using with the current Google account.

You may also turn off the Gemini Apps activity by accessing your Gemini app page and clicking on the Manage Activity button. You will get at the same page as you reach on Step 3 of the solution above.

Also, you don’t need to do that on all your devices. Turning off this feature will disable it on any devices you’re using the Google account with.

How do I turn off Gemini Apps activity on Android?

  1. Open the Gemini app on your Android phone.
  2. Tap on your profile picture from the top-right corner and select Gemini Apps Activity.
  3. Click on the Gemini Apps Activity option and select Turn off or Turn off and delete activity.

The method is identical to the one on PC. If you don’t have the Gemini app installed on your device, you may also use a browser and go to the Gemini app page, just like we instructed in the PC method above.

How do I turn off Gemini Apps activity on iOS?

  1. On your iPhone, open the Google app.
  2. At the top, tap the Gemini icon. 
  3. At the top right, tap your profile picture and select Gemini Apps Activity.
  4. In the new window, you can turn off and delete the activity.

How do I change the auto delete Gemini Apps activity period?

Gemini Apps automatically deletes activities that are older than 18 months, but you can change that period to 3 or 36 months.

  1. Open a browser and go to the Gemini app page.
  2. Click on Manage Activity.
  3. Near the top, click Deleting activity older than … months or Choose an auto-delete option.
  4. Now, you get to choose between 3, 18, or 36 months, or select Don’t auto-delete activity.
  5. Click Next and follow the on-screen instructions.

That’s it! Now you know how to turn off Gemini Apps activity on any platform you may use the app. Just remember that turning it off on any of the devices will turn it off on all the devices you use that Google account.

Tell us in the comments below if you managed to turn off the Gemini activity on your device using our solutions.

CPU Z Review: Everything You Need to Know

CPU Z can be likened to the built-in Windows SysInfo tool that comes in handy when you want some extra information on your device, troubleshooting or even optimizing the overall performance.

The SysInfo tool offers basic information such as checking the health of your computer but if you’re a technical user and need to dive deeper, the CPU Z tool can be a better alternative. There’s more to a CPU than getting its temperature or checking its usage.

Is CPU-Z any good?

Using the CPU Z tool will give you detailed information on:

  • CPU – Aside from your CPUs name, you also get to know how many cores it has as well as the thread count. When using the Task Manager for instance, all CPU cores may not be visible.
  • Clock speed – It’s well known that the higher the clock speed, the better the performance. However, Windows has no native way of letting you know the correct recommended speed so you could be overclocking or underclocking. With CPU Z, you get real-time clock speeds and even as you increase your CPU load, you can see how it affects its performance then decide whether to overclock or underclock.
  • Graphics Card info – Windows offers built-in ways to check your graphics card info but aside from the basics, like name, model and size, CPU Z allows you to monitor its performance in real-time. If your GPU is crashing, you can see what’s causing the performance bottleneck and resolve the issue.
  • RAM – Your system’s memory is important to monitor at all times because it keeps your system running. If you notice your PC slowing down, you probably need to free up your memory or check whether all your RAM slots are being used. CPU Z provides you with this info so that you can check whether there’s a problem and plan for an upgrade.
  • Motherboard and BIOS – The CPU Z will also give info on your motherboard. Such details like the manufacturer and model come in handy when you want to upgrade so that you can get a similar one. The BIOS version will also help keep your BIOS up-to-date and maintain system stability.

How does CPU Z compare to other tools?

CPU Z is simple yet comprehensive. Its comprehensiveness is however dependent on the user as some say its exhaustive while others say it is limited especially in benchmarking capabilities.

It’s a strong contender among other system information tools so all you need is to list down what PC specs you need to check and compare with the rest to pick one that meets them. For us, the fact that it can also be used on your Android phone was a winning feature.

You can download CPU Z form the play store to your phone and get to understand its hardware specs and capabilities. Most users just know basic troubleshooting when it comes to phone so this can be a handy tool.

If it’s not your cup of tea, check out CPU-Z alternatives and you may find your match.

That brings us to the end of this article but keep the conversation going. Have you tried the CPU Z tool? If you want to test it out, don’t miss our guide on how to download CPU-Z and another guide on how to use CPU-Z, so don’t miss them.

Would you say it’s better than other SysInfo tools? And if so, what features do it for you? Let us know in the comments section below.

5 Best Free Fill & Sign PDF Tools to Download

Many are looking to download software that can fill and sign PDF documents on Windows 10, and in this guide, we’re going to show you our top picks, so let’s get started.

What is the best fill and sign software to download for Windows 10?

1. PDFgear – Best overall

pdfgear

This is a full-fledged PDF editor that allows users to read and edit PDF documents. With it, you can easily add or remove any text, make scanned PDFs editable, insert new objects and more.

Annotations are available as well, allowing you to easily highlight important segments, and add lines, shares or stamps. PDFgear also supports file conversion, so you can easily convert files to PDF or PDF files to other formats.

Lastly, we have to mention that the software allows you to sign documents both manually or by using electronic signatures. It also lets you change text in PDF forms, so you can easily fill them.

PDFgear offers so much more than signing and filling documents without any other hidden costs or locked features, so be sure to try it out.

Other great features:

  • Completely free
  • Available on most PC and phone platforms
  • Editing and annotation support
  • Document filing
  • Support for electronic signatures

⇒ Get PDFgear

2. Okular – Open-source solution

okular

This is a document viewer, and it can handle various formats, such as PDF, EPub, CBR, CBZ, images, and more.

Okular can be used for annotating PDFs, so you can add lines, highlights and various objects easily. It can select and view any text, so you can copy it freely. It also has a useful thumbnail panel for quick navigation.

As for signature support, you can view digital signatures of PDF files, and you can even sign PDFs yourself. Unfortunately, the filling feature doesn’t seem to be available, but that’s expected from a document viewer.

Overall, it’s a great open-source viewer that can sign documents, so you might want to take it for a test ride.

Other great features:

  • Open-source and free
  • Available on both Windows and Linux
  • Annotations
  • Ability to copy any selected text
  • PDF signing

⇒ Get Okular

3. Sejda PDF – Easy to use

sejda pdf

Sejda is a PDF editor that allows you to edit your PDFs any way you like. You can edit or move text, change the font size or style, and delete or insert pages.

It also supports signatures and it allows you to fill forms with ease. As for editing, you can crop documents, add watermarks, add passwords, compress files, and convert them with ease.

While Sejda sounds great, it does have certain limitations in the free version, and it can only perform 3 tasks per day, which might not be enough for more advanced users.

Other great features:

  • Allows you to edit PDF documents
  • Support for signatures and filling
  • Ability to add watermarks or lock documents
  • Available on Windows, Mac, and Linux

⇒ Get Sejda PDF

4. PDF-XChange Editor – Advanced features

PDF-XChange Editor

There are several versions of this software, but with the free version, you won’t be able to edit or add any new content. However, you can add audio comments, shapes and other objects.

This version can also certify documents, add digital signatures, or signatures as images to the documents. Unfortunately, there’s no option to create or edit fillable forms, as it’s only available in the Pro version.

PDF-XChange Editor offers very limited editing options, but it supports signatures in the free version, so it’s worth checking out.

Other great features:

  • Ability to view documents
  • Support for comments
  • Adding images, shapes, and signatures
  • Support for digital signatures

⇒ Get PDF-XChange Editor

5. UPDF – Most versatile

updf

UPDF is a powerful PDF editor that lets you view PDFs, edit them, or convert them to various formats. Annotations are also available so you can easily highlight important parts of documents.

The application allows you to protect PDFs, and easily organize them. UPDF also supports batch processing, but you’re limited to two files in a batch.

Signing and filling of documents is also available, but keep in mind that the free version will add a watermark when saving files, so this is why this application is our last pick. To learn what features the full version offers, visit our UPDF review.

Other great features:

  • Built-in AI assistant
  • Ability to edit PDFs
  • File converter
  • Annotation support
  • For filling and signing support

⇒ Get UPDF

As you can see, most fill and sign software for Windows 10 are PDF editors that have the feature to do so. While there are many paid solutions, these are completely free to use, so don’t hesitate to try them.
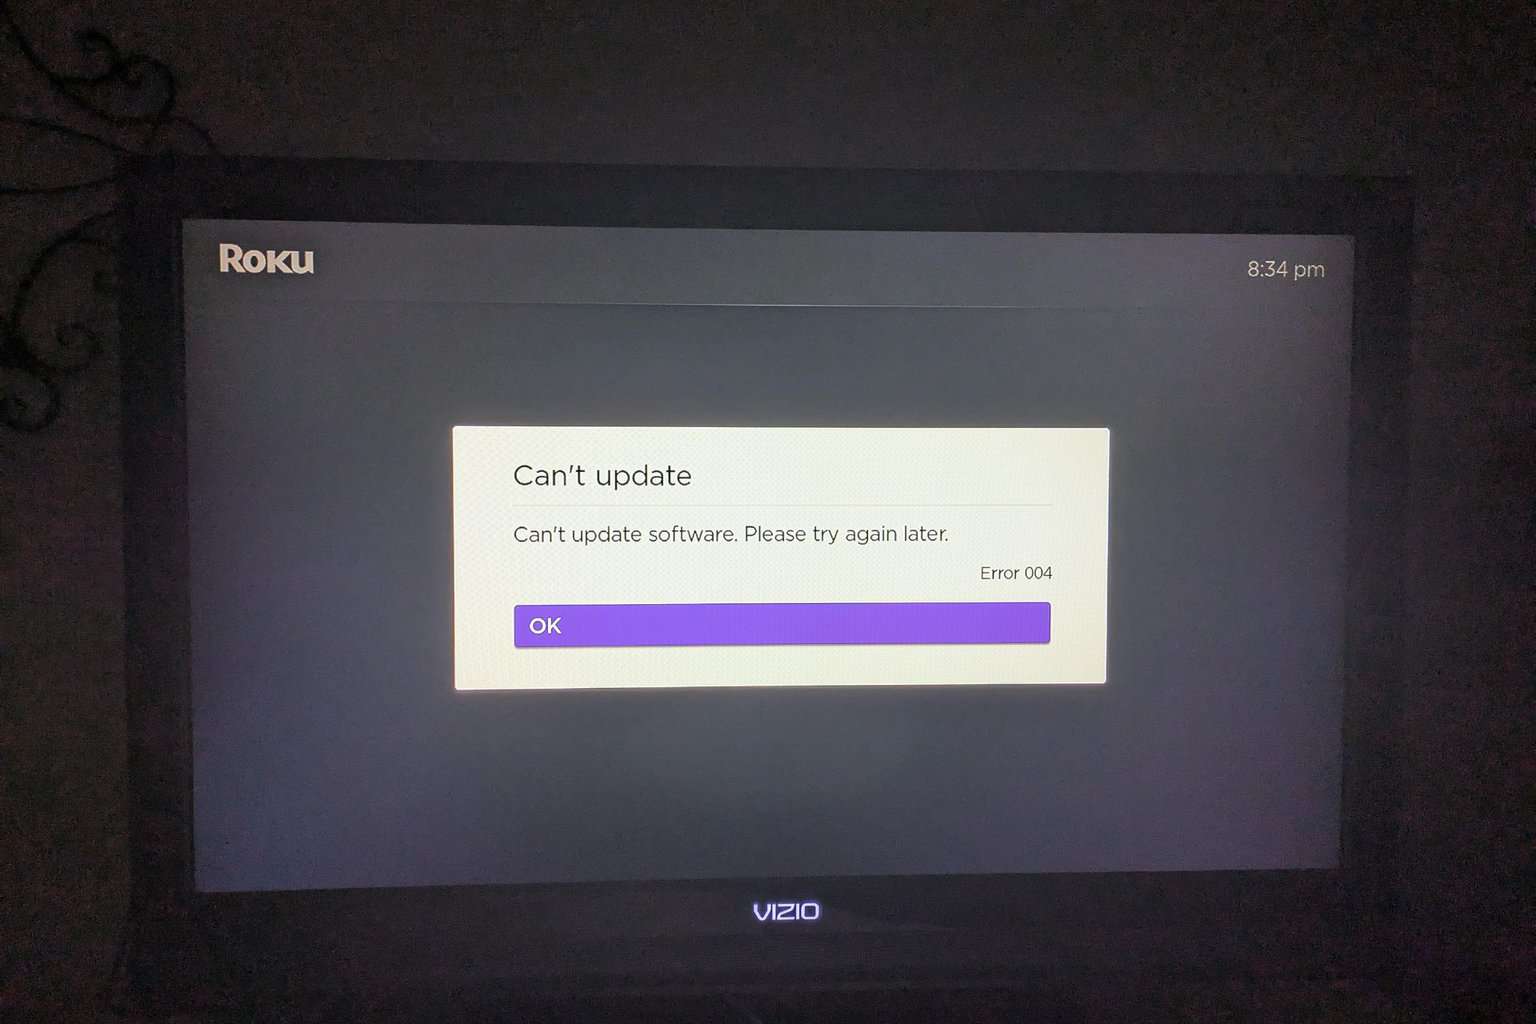

In case you’re looking for something different, we have great guides on PDF editors for Chrome as well as a guide on best read-only PDF converters, so feel free to check them out.

How To Go Live on YouTube PC – Step-by-Step Instructions

Wondering how to go live on YouTube PC? It’s a great way to engage directly with your audience in real time. You can instantly share events, tutorials, and gaming sessions or host Q&A sessions.

I’ll show you how to achieve this with just a few steps to reach your viewers and create interactive experiences.

Let’s get into it!

How To Go Live on YouTube PC

Follow these steps:

  1. First, check that you haven’t had any streaming restrictions in the last 90 days and verify your account. 
  2. Go to YouTube and click on your profile, then tap YouTube Studio.
YouTube Studio
  1. Tap Create on the top right corner of your screen.
Tap Create
  1. Select Go live from the drop-down menu.
Select Go live
  1. If this is your first live stream, the session may take up to 24 hours to get access. Tap Request. 
Tap Request

So, now you know how to go live on YouTube from your PC. This opens up exciting opportunities for engaging with your audience in real-time.

Before you start streaming, make sure you are signed in; use this quick guide to login to YouTube so you can access YouTube Studio and go live on your PC.

Once you’ve verified your account, you can instantly broadcast events, share tutorials, or interact with your viewers. Also, learn to fix YouTube if it doesn’t play sound and how to stop the screen from flickering. Moreover, you can learn how to make a YouTube Short from your computer.