How to Check Whether Your Graphics Card is DirectX 12 Compatible

Most people associate DirectX 12 technology with gaming and hence getting the latest version will also require a compatible graphics card.

Although its purpose extends beyond gaming, other areas such as video editing or 3D modelling heavily depend on your GPU so either way, you’ll still need a powerful and compatible graphics card.

How do I check if my graphics card is compatible with DirectX 12?

  1. Hit the Windows + R keys to open the Run command.
  2. Type diaxg in the search box and hit Enter or click on OK to launch the DirectX Diagnostic Tool. 
  3. In the DirectX Diagnostic Tool window that opens, navigate to the System tab.
  4. Here, you can see what version of DirectX is supported by your PC under System Information.

Aside from the Windows built-in tool to check compatibility, you can also use one GPU Info and Diagnostics tool that not only displays this information but comes with more advanced features that can help troubleshoot issues with your graphics card.

How do I get my graphics card to support DirectX 12?

1. Reinstall your drivers offline

  1. Use our article on how to download drivers offline, preferably the one where you download and copy the drivers to a USB hard drive.
  2. Disconnect your PC from the Internet.
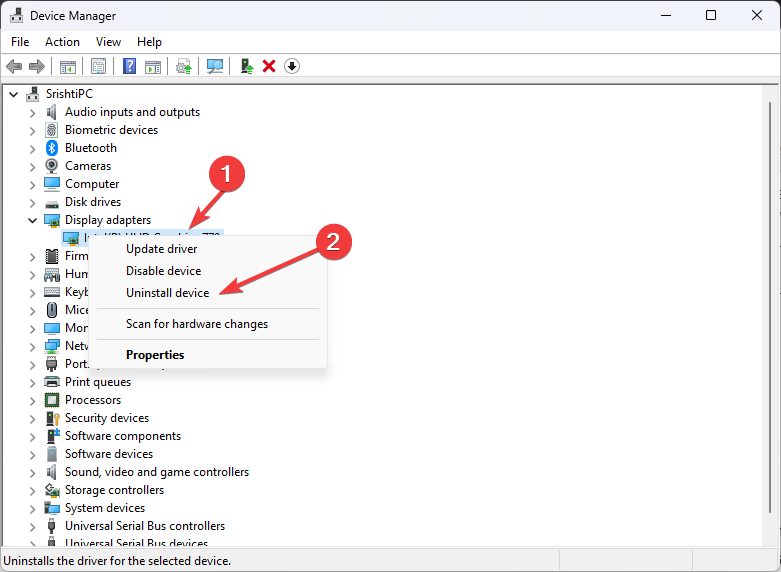
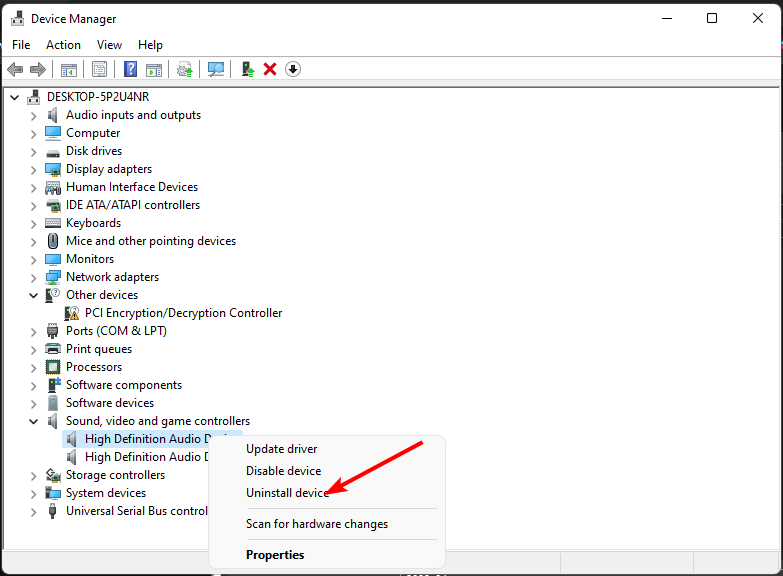
  3. Hit the Windows key, type Device Manager in the search bar, and click Open.device manager w11
  4. Navigate to the Display driver section, locate your graphics card driver, right click and select Uninstall device.Uninstall graphics driver dcom error 1084
  5. Repeat this step for Processors and Chipset drivers too. Remember not to restart your PC when prompted.
  6. Now restart in BIOS mode.
  7. Proceed to update your PC’s BIOS.
  8. Next, install the corresponding drivers as saved in your USB drive as uninstalled in step 4.

2. Enable hardware acceleration

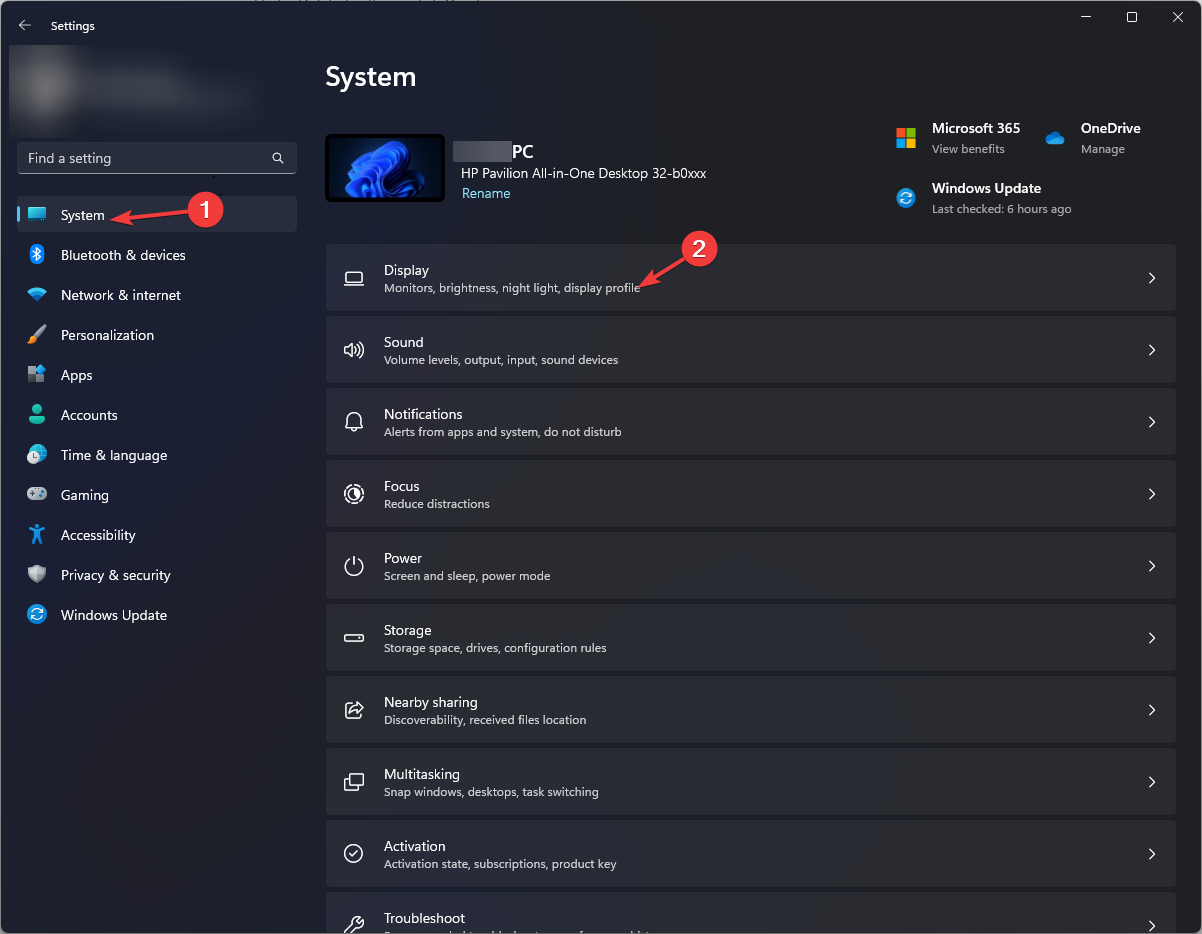
  1. Hit the Windows key and select Settings.settings windows 11
  2. Click on System on the left pane, then Display on the right pane.Settings - System - Display High CPU usage New World
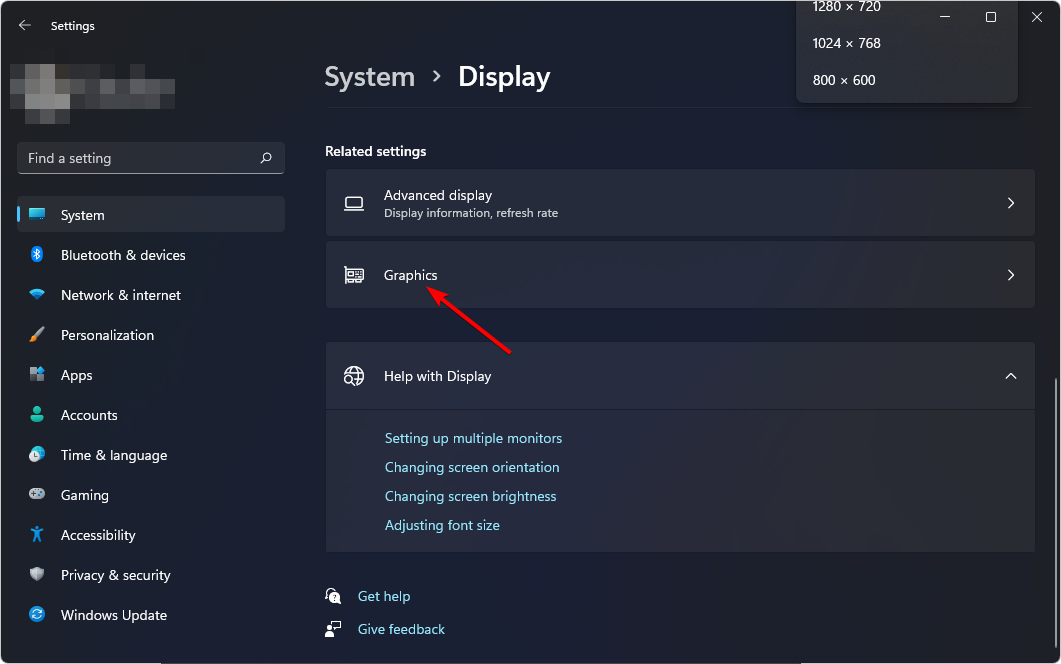
  3. Scroll down and select Graphics.
  4. Select the Change default graphics settings option.
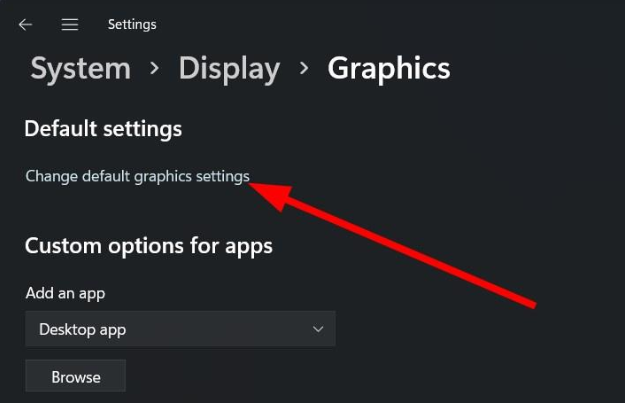
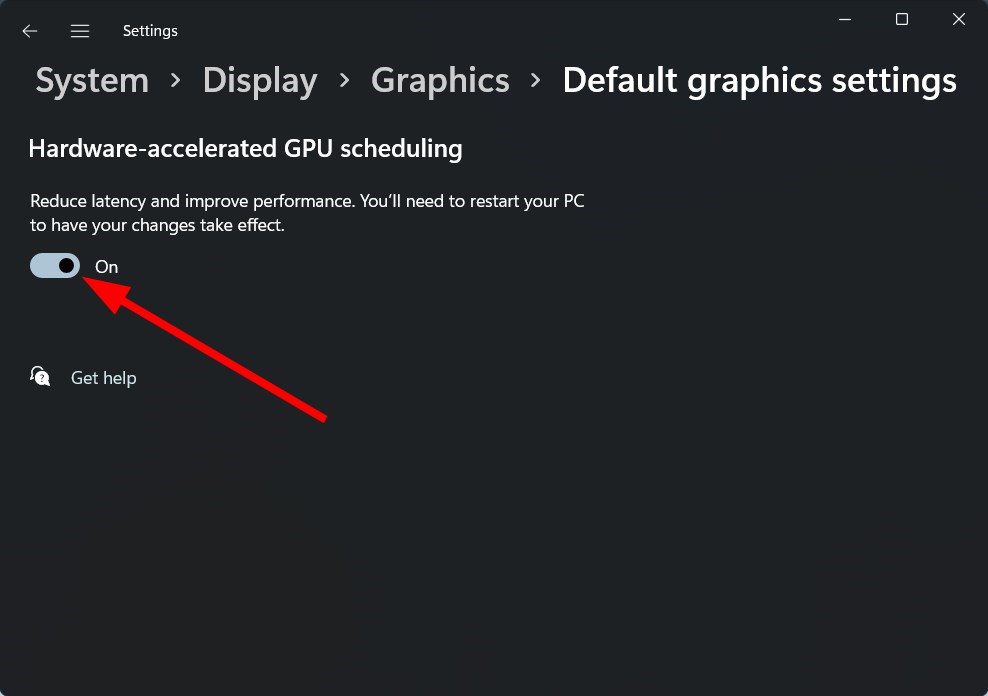
  5. Now, toggle on the Hardware-accelerated GPU scheduling option.disable Hardware-accelerated GPU scheduling

3. Disable your integrated GPU

  1. Click on the Start Menu icon, type Device Manager in the search bar, and click Open.device manager w11
  2. Navigate to Display adapters to expand, right-click on your graphics card, and select Disable device.
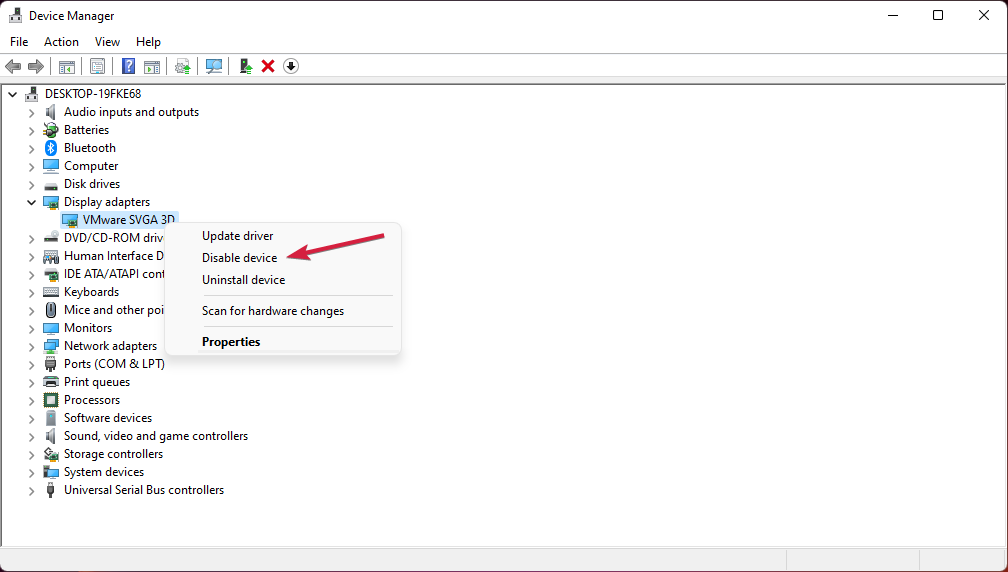
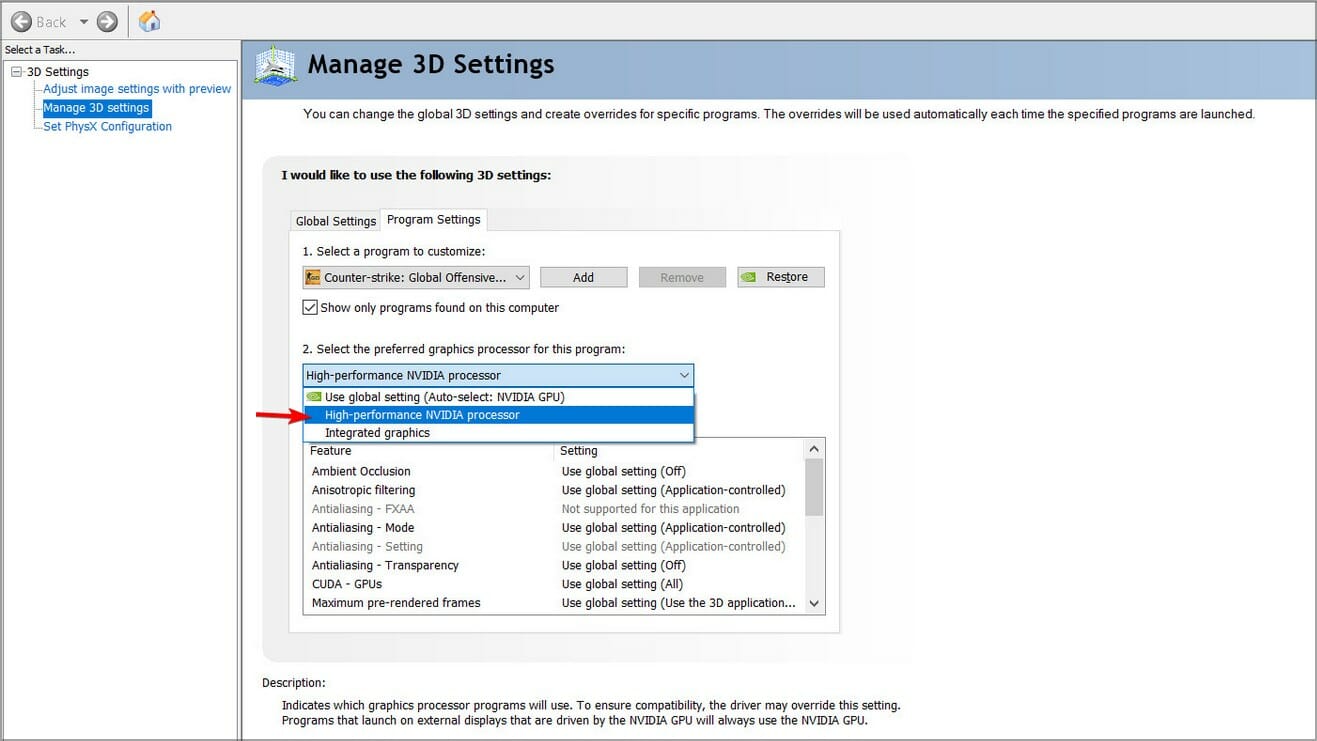
  3. Next, launch your dedicated graphics card control panel (In this case, Nvidia Control Panel).
  4. Select Manage 3D settings from the navigation pane on the left.manage 3d settings in nvidia.
  5. Choose a High-performance NVIDIA processor from the Preferred graphics processor dropdown menu.
Unfortunately, DirectX 12 is supported on newer Windows versions and modern graphics cards but with a little adjustment, you can force it to support the technology.

While it may work, you may experience some problems. There may be limited support and some DirectX 12 features may not work ultimately degrading overall performance. Nevertheless, you can always upgrade your graphics card to one that supports and is compatible with DirectX 12.

Additional tips when choosing a graphics card compatible with DirectX 12

  • Performance – While budget constraints play a huge role here, newer graphics cards that have been manufactured to support DirectX12 don’t come cheap. However, they are efficient because they have lower CPU overheads. So if you can get a second-hand HDD, you can also do the same with a GPU.
  • Memory and VRAM – Getting a compatible graphics card must be accompanied by sufficient resources. You’re going to be dealing with high resolutions when gaming so you’ll need as much memory as possible to avoid an insufficient memory error.
  • PSU – Your GPU will obviously be handling resource-intensive tasks and this can push your cooling system to its limits. Your power supply unit needs to provide stable power delivery at all times and PSU test software can help you keep this in check.
  • CPU cores – DirectX 12 is designed for systems with multiple GPUs so having a multi-core system also helps in reducing the burden on individual cores and improving overall performance.

DirectX 12 is the latest technology with more modern variations like DirectX 12 Ultimate but other older versions also come in handy especially if you want to play older games that haven’t been upgraded for years and aren’t compatible with newer technology.

If you’re conflicted about which version to use, we have a detailed article on DirectX 11 vs DirectX 12 comparison as well as their benefits. We also have another similar article on DirectX 9-compatible graphics cards.

Should you face any issues, you can reinstall DirectX and see if its performance improves. We also have a great guide on DirectX 12 on Steam Deck, so check it out if you’re a Steam Deck owner.

Have you checked whether your graphics card is compatible with DirectX 12? If not use our tips above when shopping for a new one then let us know how it performs. We also have a new guide on what to do if DirectX 12 is not supported on your system, or when it throws a black screen so you might want to check it out.

If you’re using a legacy system, we also have a great guide on DirectX 12 on Windows 7, so you can learn more.

We also have a great guide on how to enable DirectX 12 Ultimate, so don’t miss it.

Services.msc Remembers Last Computer: How to Forget It

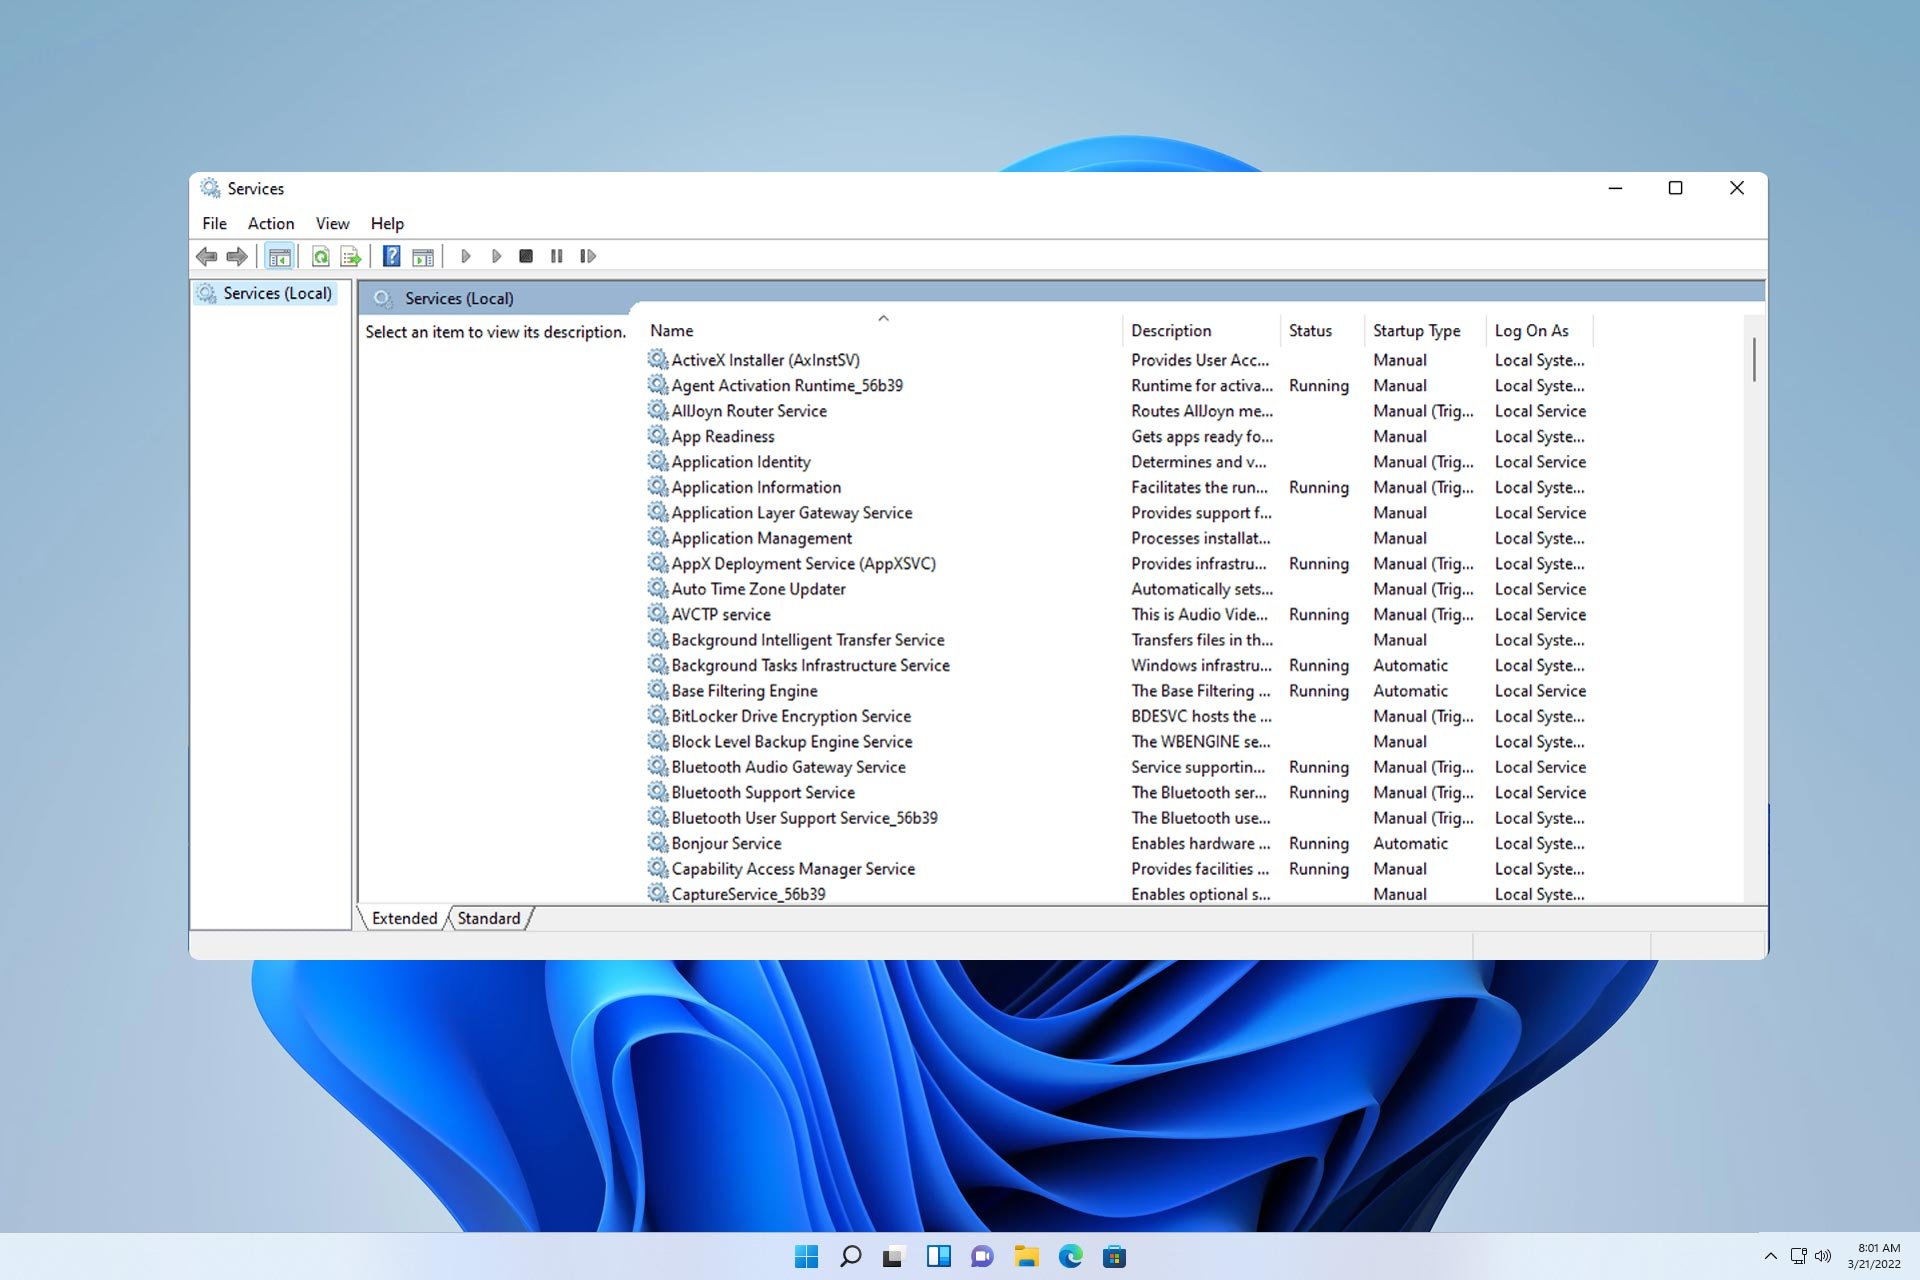
Services.msc can be used on remote computers, and many reported that services.msc remembers the last computer that was connected to, so today we’ll show you how to fix that.

What can I do if services.msc remembers the last computer?

1. Delete services.msc files

  1. Press Windows key + R and type services.msc. Click OK.
    services.msc run window
  2. When the Services window opens, go to File and select Options.
    options services window
  3. Next, click on Delete files.
     delete files services window options
  4. Click on Yes to confirm.
    services delete files confirmation dialog
  5. Restart the Services window.

Keep in mind that if you connect to a remote computer again, the issue will reappear.

2. Delete files manually

  1. Make sure Services is closed.
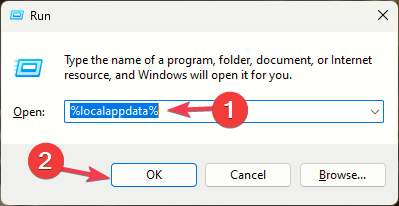
  2. Press the Windows key + R and type %appdata%.
    %appdata% run window
  3. Navigate to the following folder: Microsoft\MMC
    delete services file context menu
  4. Delete the services file.
  5. Open the Services window again.

To prevent this issue from occurring, you need to change the attribute of the services file by doing the following:

  1. Follow steps 1-3 from above.
  2. Right-click the services file and choose Properties.
     services file properties context menu
  3. Check Read-only and click on Apply and OK.
    read only checked, apply button

What is the difference between Task Manager services and services MSC?

The Services tab in Task Manager allows you to easily start or disable a service. Services.msc allows more control such as the ability to change the startup type or see the dependent services.

You can also use services.msc to connect to another computer, if needed.

If services.msc remembers the last computer, it might try to connect to it, causing it to time out and make managing services on your local PC harder. Unfortunately, this is by design, but luckily our solutions will help you prevent that.

We also have a guide on how to reset services.msc to default, so you might want to check it out. Do keep in mind that issues with Services can appear, and many reported Services.msc has been blocked message, but we tackled this issue in another guide.

Caps Lock Exits Game: 7 Ways to Fix it

On several Lenovo, Asus, and Dell devices, pressing Caps Lock exits the game or tabs you out to the desktop. This problem often appears out of the blue, with no indications of the underlying cause.

So, when Caps Lock is acting like Alt-Tab or you see a notification each time you press the key, it’s usually the active processes, a third-party software, keyboard accessibility features, or a problematic device/driver to blame.

What can I do if pressing Caps Lock exits game?

1. Terminate the Csr Bluetooth process

  1. Press Ctrl + Shift + Esc to open Task Manager and look for the Csr Bluetooth OSD Settings process.
  2. If listed, select the Csr Bluetooth OSD Settings process and click on End task.Csr Bluetooth OSD Settings
  3. Now, go to the Startup apps tab, select Csr Bluetooth OSD Settings from the list, and click Disable near the top right.disable startup to fix caps lock exits game
  4. Once done, terminate any instances of Lenovo Utility in the Task Manager and disable the app from loading at startup.

2. Uninstall Dell Peripheral Manager

  1. Press Windows + R to open Run, type appwiz.cpl in the text field, and hit Enter.appwiz.cpl
  2. Select Dell Peripheral Manager from the list of applications, and click Uninstall.uninstall to fix caps lock exits game
  3. Follow the on-screen instructions to complete the uninstall.
  4. Similarly, uninstall the Logi+ Options app on your Windows PC.

When I checked with affected users and went through forums, Dell Peripheral Manager and Logi Options+ were the two apps found responsible for the Caps Lock key exiting or minimizing games. Uninstalling the apps does the trick!

Remember, you can independently disable the Caps Lock notifications in both these apps, but it often re-enables after a reboot or update. Here are the steps to disable Caps Lock notifications:

  • Dell Peripheral Manager: Open the app > click the Settings icon near the top right > untick the checkbox for Enable lock key notifications.
  • Logi+ Options: Launch the app > open Settings from the top-right corner > disable the toggle for Caps lock, Num lock, Scroll lock and Fn lock notifications.
caps lock notifications
Disabling Caps Lock notifications in Dell Peripheral Manager

3. Remove any external Bluetooth adapter and uninstall the driver

  1. Unplug any external Bluetooth dongle or adapter from the PC.
  2. Next, press Windows + X to open the Power User menu, and select Device Manager from the list of options.
  3. Click the View menu and select Show hidden devices.show hidden devices in device manage
  4. Expand the entry this adapter relates to, right-click on it, and select Uninstall device.uninstall device to fix caps lock exits game
  5. Tick the checkbox for Attempt to remove the driver for this device, and click Uninstall.confirm

If you have an Asus Bluetooth Micro USB or another Bluetooth adapter, you might find Caps Lock closing out or exiting the game. Also, after completely removing the device, make sure to uninstall any adapter-related software.

4. Turn off sticky keys

  1. Press Windows + I to open Settings, go to Accessibility from the left pane, and click on Keyboard under Interaction.
  2. Now, turn off the toggle for both Sticky keys and Filter keys.sticky keys
  3. Restart the PC and check for improvements.

5. Disable Lenovo Fn and function keys service

  1. Press Windows + R to open Run, type services.msc in the text field, and click OK.
  2. Right-click on the Lenovo Fn and function keys service, if available, and then select Properties.
  3. Choose Disabled from the Startup type dropdown menu, and click on the Stop under Service status.disable service to fix caps lock exits game
  4. Click on Apply and OK to save the changes.

If Caps Lock tabs you out of the game, be it in Valorant or Call of Duty, disabling Lenovo Fn and function keys service will work. By doing so, you are effectively disabling the Caps Lock on/off notifications, which minimizes the active game.

6. Disable the Caps Lock key via Registry

Tip icon Tip
Since the process involves editing the Registry, I recommend you create a restore point beforehand. This gives you the ability to revert the changes if things inadvertently go wrong.
  1. Press Windows + R to open Run, type regedit in the text field, and hit Enter.registry editor
  2. Click Yes in the UAC prompt.
  3. Paste the following path in the address bar and hit Enter: Computer\HKEY_LOCAL_MACHINE\SYSTEM\CurrentControlSet\Control\Keyboard Layout
  4. Right-click on the Keyboard Layout key in the navigation pane, hover over the cursor over New, choose Binary Value, and name it Scancode Map.Scancode Map
  5. Double-click the Scancode Map entry.
  6. Now, place the cursor at the beginning under Value data and enter 00, 00, 00, 00, 00, 00, 00, 00, 02, 00, 00, 00, 00, 00, 3A, 00, 00, 00, 00, 00. It should look like in the screenshot below. Once done, click OK to save the changes.edit to fix caps lock exits game

While this is not the ideal solution, if Caps Lock continues to exit the game, you can always disable the Caps Lock key itself.

To re-enable Caps Lock, simply right-click on the Scancode Map entry > select Delete > confirm the change.

7. Remap the Caps Lock key

If you don’t want to disable the Caps Lock key outright, perhaps consider using an effective keyboard mapping software. With it, you can reconfigure how Caps Lock turns on or off (adding another key along with it), thus eliminating the likelihood of inadvertently enabling Caps Lock.

One of these solutions should help if Caps Lock exits games after showing an on-screen indicator or notification. Remember, for most users, it was a third-party process or software that triggered the issue. So, that’s what you should focus on!

Before you leave, discover some quick tips to optimize the PC for gaming and get the best experience.

Which fix worked for you? Share with our readers in the comments section.

This Alienware x14 R2 is now $600 OFF, and it’s a deal you don’t want to miss

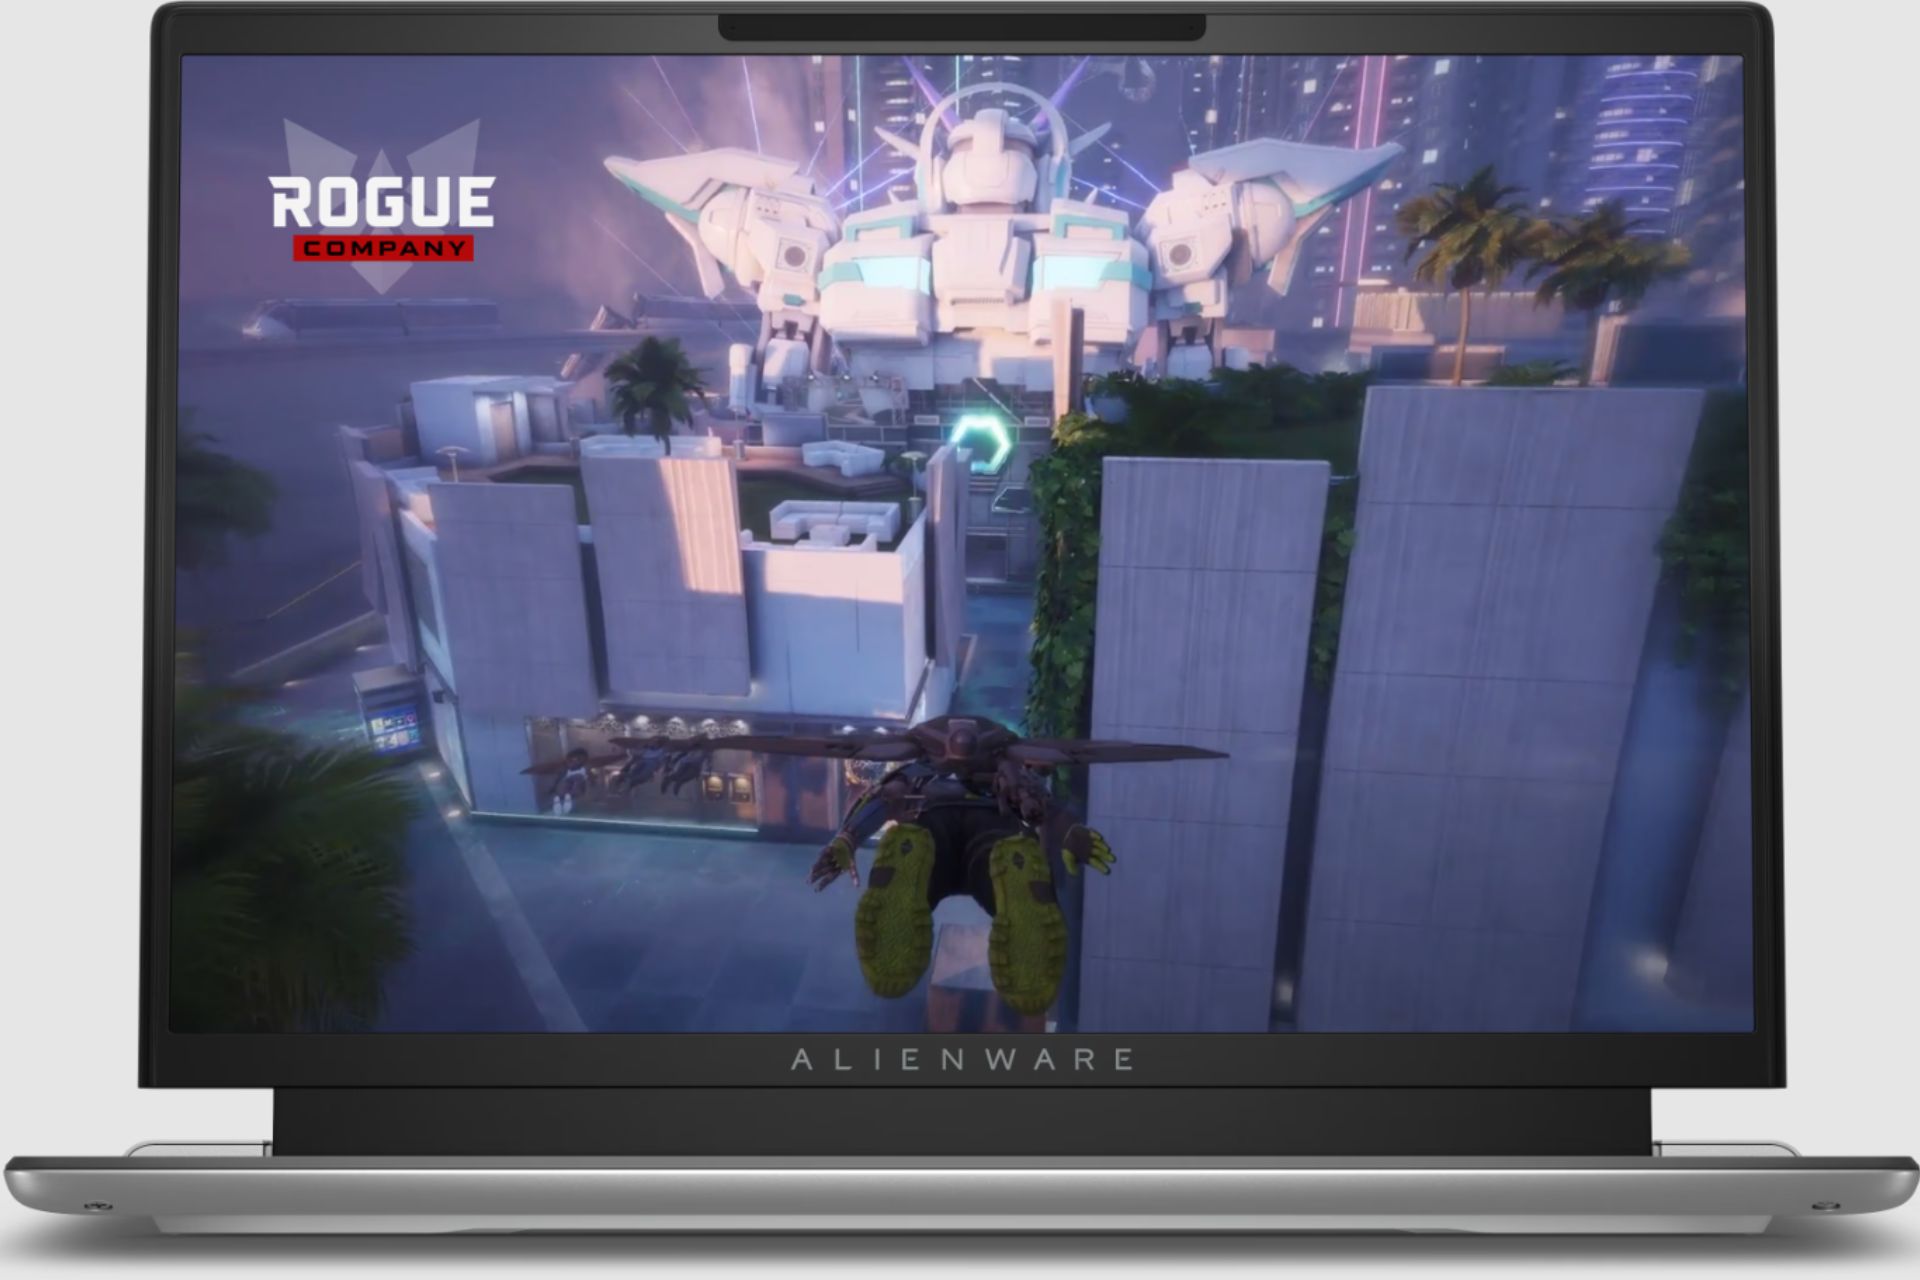
Do you ever feel like a gaming laptop that doesn’t make you carry a mini desktop is needed when on the move? Well, it appears the Alienware x14 R2 might be your answer for mobile gaming prayers. Especially considering this recent deal, which is too good to pass up: its price has been reduced by $600.

It’s a steal if anyone wants to play games while traveling without spending too much money.

The Alienware x14 R2’s value doesn’t just come from its smaller size; it’s loaded with features that make it a good option for gaming and more. With an RTX 4060 GPU at its core, this laptop can handle 2K gaming quite well – offering a smooth playing experience of around 60-70fps.

Maybe you won’t put your games on the highest settings possible, but there is a nice balance between medium and high, which looks good and runs well, too. This makes it good for not only the most demanding games but also casual or indie titles, as well as well-known free-to-play games such as Rocket League and League of Legends.

But what about the thinking part? The laptop uses an Intel Core i7-13620H processor and 32GB of DDR5 RAM. It can handle playing games, programming work, or handling CAD tasks. Also, we have a 14-inch QHD+ display screen.

It can refresh at a rapid pace of 165Hz and reaches its brightest level with 300 nits, which makes it flexible for different lighting situations.

So, why should you think about getting this deal? The Alienware x14 R2 provides a mix of features that are not easy to find at such a price. It is portable, strong, and versatile.

For $1,400, it is definitely worth it for a gaming laptop that can be carried around conveniently. Other gaming laptop deals may be of interest to you if you are looking for something stronger. However, for many people, the Alienware x14 R2 is just right in terms of performance and portability.

Get it from here.

And if we’re here, if you want to get the ThinkPad Yoga Gen 3 at a staggering 67% discount, you can do it now while you still can.

DirectX 12 Exclusive Full Screen: 7 Ways to Get the Best Out of it

Getting your game to run in true DirectX 12 exclusive full screen mode can be a bit tricky, but it’s well worth the effort. Many gamers have reported issues like input lag and stuttering when games default to borderless fullscreen mode. Let’s see how we can unlock that true exclusive fullscreen experience.

How do I optimize the DirectX 12 Exclusive Full Screen?

1. Disable fullscreen optimizations

  1. Right-click on the game executable (.exe) file.
  2. Select Properties from the context menu.
  3. Navigate to the Compatibility tab.
  4. Check the box next to Disable fullscreen optimizations.
  5. Click Apply, then OK.

Disabling fullscreen optimizations forces the game to run in a more traditional exclusive fullscreen mode, similar to the one from DirectX 11. This can help reduce input lag and stuttering that might be occurring due to borderless fullscreen in DirectX 12.

2. Kill Windows Explorer Process

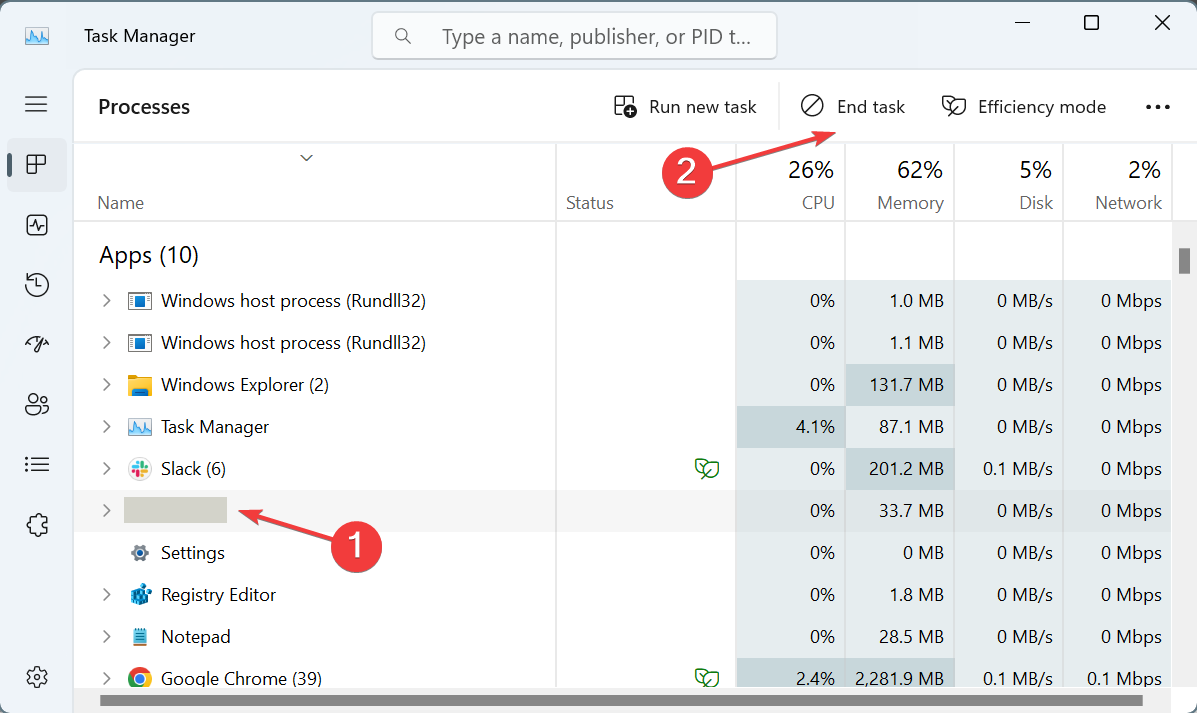
  1. Open Task Manager by pressing Ctrl + Shift + Esc.
  2. Scroll down to find the Windows Explorer process.
  3. Right-click on it and select End Task.
  4. Open your game.

To restore the Windows Explorer process:

  1. Open Task Manager again using Ctrl + Shift + Esc.
  2. Click on File in the top-left corner and select Run new task.
  3. Type explorer.exe and press Enter.

This method forces the game into true exclusive fullscreen by removing the Windows Explorer interface, which can prevent overlays from appearing. This will reduce the input lag and other issues related to borderless fullscreen.

3. Use the DirectX 11 mode

  1. Open the game’s settings menu.
  2. Navigate to the graphics settings.
  3. Find the DirectX version settings and switch from DirectX 12 to DirectX 11.
  4. Restart the game for the changes to take effect.

Switching to DirectX 11 can resolve issues with exclusive fullscreen since DirectX 11 supports it natively, ensuring lower input lag and potential improvements in frame pacing.

4. Utilize game-specific commands

For some games, you can use launch commands to force exclusive fullscreen mode.

  1. Open the game launcher (Steam, Epic Games, etc.).
  2. Right-click the game in your library and select Properties.
  3. Under the General tab, find Launch Options.
  4. Type in the command -fullscreen or -exclusive (it is different from one game to another).

Using launch options can help ensure the game starts in exclusive fullscreen mode, bypassing default settings that might force borderless fullscreen.

5. Update the graphics drivers

  1. Open your browser and go to the website of your graphics card manufacturer (NVIDIA, AMD, Intel).
  2. Navigate to the drivers section.
  3. Download and install the latest drivers for your graphics card.
  4. Restart your computer.

Updating your graphics drivers ensures compatibility with the latest DirectX features and can help mitigate performance issues when running games in fullscreen mode.

6. Use the Registry Editor (for advanced users)

  1. Press Win + R to open the Run dialog.
  2. Type regedit and press Enter to open the Registry Editor.
  3. Navigate to the following key: HKEY_CURRENT_USER\System\GameConfigStore
  4. Find the GameDVR_FSEBehaviorMode registry key and change its value to 2.
  5. Find the GameDVR_HonorUserFSEBehaviorMode registry key and change its value to 1.

Editing the registry can enforce system-wide fullscreen optimization settings, helping to achieve true exclusive fullscreen mode even for DirectX 12 titles.

7. Use the Game Bar settings

  1. Press Win + G to open the Xbox Game Bar.
  2. Navigate to the settings by clicking the gear icon.
  3. Go to the Gaming section.
  4. Disable Record game clips, screenshots, and broadcast using Game Bar.

Disabling the Xbox Game Bar prevents unnecessary overlays and can help reduce input lag and performance issues in fullscreen games.

Implementing any of these solutions can help achieve a more immersive and responsive gaming experience by enforcing true exclusive fullscreen mode, even in DirectX 12 games that default to borderless fullscreen.

Some users reported that DirectX 12 is not using the GPU. If you’re facing the same problem, the highlighted link will help you fix that.

Remember to keep your system and drivers updated, and always check for game-specific tweaks that might help you get the best performance. Happy gaming!

Gamescom 2026 is all about Xbox, with no PlayStation or Nintendo in sight

In a world where gamers look forward to big events, Gamescom 2024 is exciting. This year, there’s talk about Xbox returning with no PlayStation or Nintendo rivals—it feels as if the stage has been set for Xbox to take up all of Cologne’s attention from August 21st until August 25th and show off its biggest booth yet. Imagine the scale of that!

Xbox’s declaration has added fuel to the fire, showing an interesting array of games, like the remaking of Age of Mythology and Diablo IV titled Vessel of Hatred. This is quite daring since PlayStation decided not to attend Gamescom starting in 2019, followed by Nintendo this year. Truly, the world of gaming is transforming, and Xbox appears prepared for it.

So, what does all this mean for the gamers? First and foremost, it is a golden chance to see some of the most awaited titles up close.

Xbox’s promise of its largest booth ever is related to the area and signifies its intention—showing off immersive experiences it is preparing in advance. However, we must not overlook the possible unexpected elements. With several weeks remaining before this occasion, there is always a chance for additional declarations.

The non-appearance of PlayStation and Nintendo at Gamescom carries weight for those who are watchful in the gaming world. It prompts inquiries about the plans of these significant gaming players and how they aim to interact with their audiences in the future.

At the same time, Xbox’s strong effort at Gamescom 2024 may alter things significantly by establishing fresh norms for how gaming firms depict themselves during such events.

The excitement for Gamescom 2024 is building. This event looks to be a big moment for Xbox and is full of delights for gamers all around the globe. If you love Xbox deeply or enjoy games and are curious about what is coming next, Gamescom 2024 appears to be an event that should not be skipped. Now, are you prepared for the gaming feast that Xbox awaits?

VyprVPN Not Connecting on Windows 10 – 7 Ways To Resolve It

If you’re experiencing issues with VyprVPN not connecting on Windows 10, you’re not alone. It can stem from various reasons, including protocol mismatches, server issues, DNS conflicts, or interference from antivirus programs. Fortunately, there are several steps you can take to resolve these problems and get your VPN up and running again.

But before we begin, try out these quick fixes:

  • Check if you’re connected to the internet.
  • Reinstall or update the VyprVPN app.
  • Reboot your PC.
  • Confirm if you added the right credentials.
  • Contact VyprVPN support.

If the above steps don’t help with the connectivity issues, try the solutions below.

How To Fix VyprVPN Not Connecting on Windows 10

Here’s how to deal with this problem easily:

Use a Different Protocol

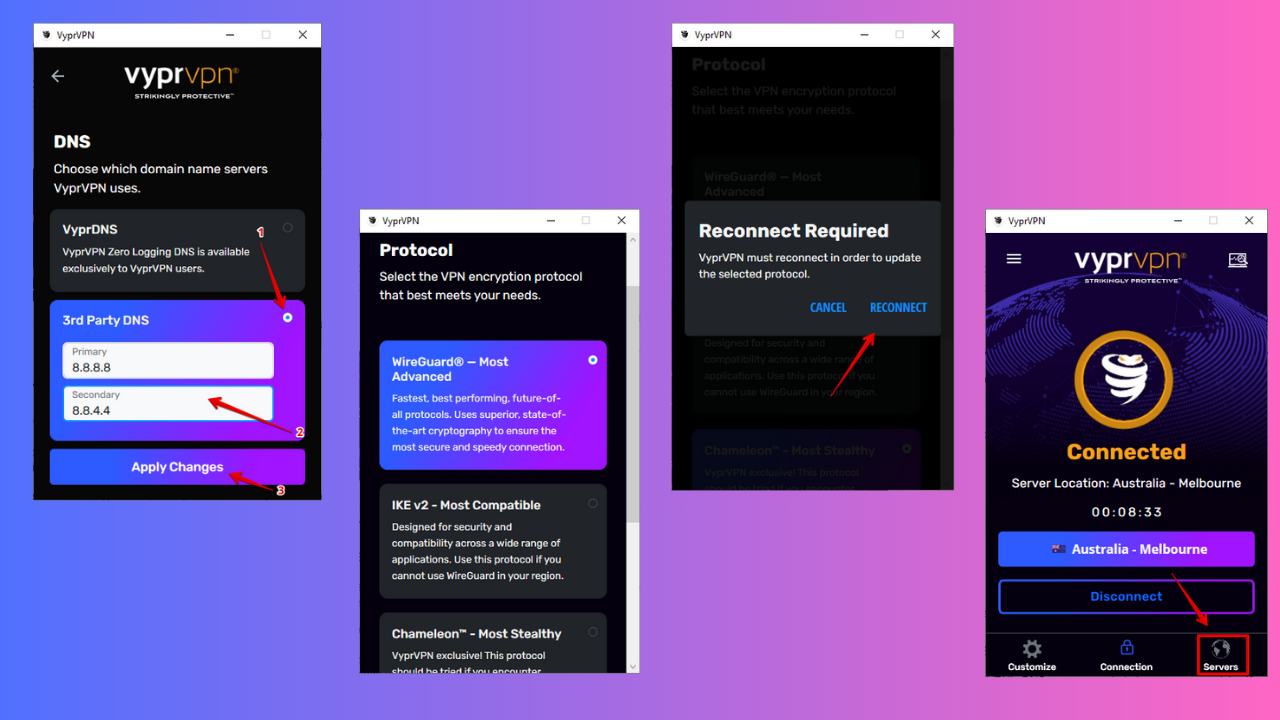
VyprVPN supports multiple protocols including WireGuard, OpenVPN, Chameleon, or IKEv2, and sometimes switching to a different one can solve connectivity issues. Here’s how to do it:

  1. Open VyprVPN and tap the Customize button.
Customize VpryVPN settings
  1. Go to the “Protocol” section and tap the side arrow.
Protocols
  1. Select a different protocol.
Select Protocol
  1. Tap “Reconnect.”
Reconnect
  1. The app will disconnect and reconnect automatically.
Reconnect automatically

You should now enjoy a smooth connection. 

Change Servers

Sometimes, the server you’re trying to connect to might be experiencing congestion issues or it could be banned. Switching to a different server can often solve the problem:

  1. Open VyprVPN and log in then tap the server button.
Server button
  1. Choose a different server from the list or use the search button for easy access.
Choose a different server
  1. Tap on any server and it’ll connect automatically.
Choose a different server

Change VyprVPN DNS

VyprVPN in the US utilizes its own DNS servers for connections. However, they can sometimes cause connectivity and performance issues. To resolve this, you can try switching to Google’s public DNS (8.8.8.8 and 8.8.4.4) instead of the default one.

Follow the below steps:

  1. Open VyprVPN and click Customize.
Customize settings
  1. Scroll to locate the “DNS” section then tap the expand arrow.
DNS settings
  1. Select “3rd Party DNS,” enter Google’s public DNS (8.8.8.8 and 8.8.4.4), and tap “Apply Changes.”
3rd Party DNS
  1. Confirm if the DNS changed from VyprVPN to 3rd Party.
3rd Party DNS

Flushing the DNS Cache

Flushing your DNS cache can clear any potential conflicts and improve your connection. Here’s how to do it:

  1. Press Window + R, type “cmd,” and press Enter to open the Command Prompt.
Open the Command Prompt
  1. Type “ipconfig /flushdns” and press Enter.
Type “ipconfig /flushdns”
  1. Wait for the confirmation message.
Confirmation message

Restart your Windows 10 and try connecting to VyprVPN again.

Add an Exception for VyprVPN to Your Antivirus and Firewall

Antivirus and firewall programs can sometimes treat VPN apps as threats and block connections. However, I don’t recommend disabling the antivirus and firewall because it’ll expose your PC to risks like malware and viruses. Instead, you can add VyprVPN as an exception. 

Adding an Exception on Antivirus

Here’s how to do it:

  1. Type “Windows Security” in the search bar beside the Windows Icon, then press Enter.
  2. Tap “Virus & threat protection.”
Virus & threat protection
  1. Click “Manage settings” under the “Virus & threat protection settings” section.
Manage settings
  1. Locate the “Exclusions” section and tap “Add or remove exclusions.” If prompted to allow your computer to make changes, hit “YES.”
Add or remove exclusions
  1. Click “Add an exclusion,” then choose “VyprVPN” from the list.
Add an exclusion

Adding an Exception on Firewall

Follow the below steps:

  1. Type “Control Panel” on the search bar beside the Windows Icon and press Enter.
  2. Tap “System and Security.”
System and Security
  1. Click “Windows Defender Firewall.”
Windows Defender Firewall
  1. Tap “Advanced Settings” available on the left menu.
Advanced Settings
  1. Click “Inbound Rules.”
Inbound Rules
  1. Tap “New Rule” available on the right menu.
New Rule
  1. Select “Program” and then hit “Next.”
Select Program
  1. Tap “Browse,” select the VyprVPN app, then click “Next.”
Browse
  1. Pick “Allow the connection” and click “Next.”
Allow the connection
  1. Select when to apply the rule by ticking “Domain,” “Private,” or “Public,” or select all, then click “Next.”
Select when to apply the rule
  1. Provide a name and description for the rule, then click “Finish.”
Name the rule

Change Adapter Settings

Incorrect adapter settings can also cause VyprVPN connectivity issues on Windows 10. Adjusting these settings might help:

  1. Press Win + X and select “Network Connections.”
  2. Click “Change adapter options” under “Advanced network settings.”
Change adapter options
  1. Right-click on your active network adapter, and select “Properties.”
Click Properties
  1. Select “Internet Protocol Version 4 (TCP/IPv4)” and click “Properties.”
Internet Protocol Version 4 (TCP/IPv4)
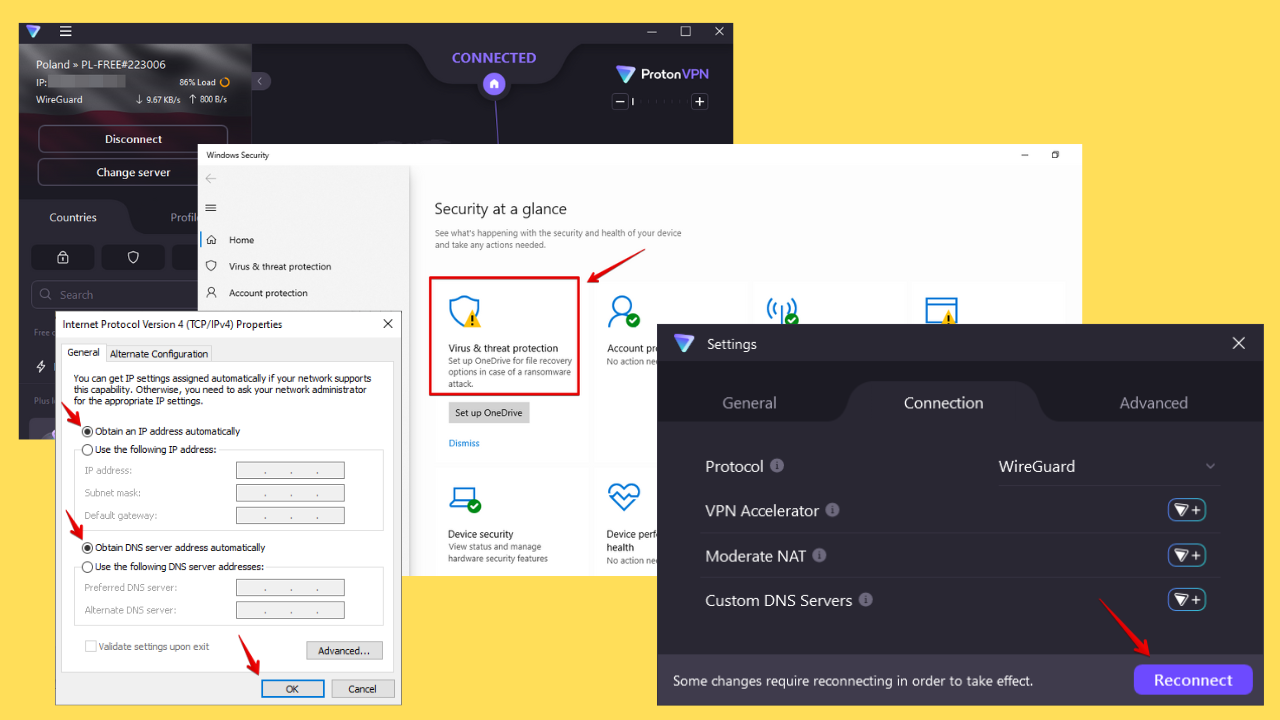
  1. Ensure that “Obtain an IP address automatically” and “Obtain DNS server address automatically” are selected then tap “OK.”
Select automatic

Restart your PC and check if VyprVPN connects now.

Try an Alternative VPN Provider

If none of the above solutions work, it’s time to switch to an alternative VPN provider. A VPN service like NordVPN is better optimized for Windows 10 and might offer more stable connections. 

Here’s how to set it up on your PC:

  1. Visit the NordVPN website and create an account.
  2. Go to the “Download VPN” section and get the Windows version.
Download VPN
  1. After downloading it, open the file to Install the application and follow the on-screen instructions.
  2. Launch the NordVPN app and add your account details to log in.
Log into NordVPN
  1. Tap “Quick Connect” to get the nearest and fastest server or pick any server from the list.
Connect to a server

These fixes should be able to resolve VyprVPN not connecting on Windows 10. If you’re encountering a similar issue with Proton , Opera, or McAfee VPN we’ve got you covered.

Whether it’s changing protocols, switching servers, or tweaking settings, you can get your VPN back up and running smoothly. However, if none of these work, consider using an alternative VPN provider.

Wi-Fi 7 is going to be fully available to Windows users with the 24H2 release

In this quick-moving technology era, Microsoft is again making the news with its fresh update, Windows 11 version 24H2. This new feature update for Arm-based Copilot+ PCs isn’t a usual upgrade.

It introduces Wi-Fi 7, which vows to alter the way we connect wirelessly by offering quicker rates, superior safety, and a broader range of coverage. But if you are keen on experiencing the full strength of Wi-Fi 7, getting Windows 11 24H2 might be the key.

Maybe you are thinking, “Why Wi-Fi 7 is very important?” Let me explain. As the tech experts say, Wi-Fi 7, or IEEE 802.11be EHT (Extremely High Throughput), is not an ordinary update.

In the domain of wireless connections, it’s similar to going from a cycle to a high-speed sports vehicle. Wi-Fi 7 lets devices employ multiple bands simultaneously, guaranteeing that you don’t get trapped in sluggish progress due to network blockage.

Picture this: an ultra-wide bandwidth of 320 MHz in the 6 GHz band that doubles your device’s speed. It’s true, just as you heard. The wide bandwidth is very important, especially for high-bandwidth applications such as AR/VR.

For those who enjoy streaming or video meetings, Wi-Fi 7’s 4096-QAM modulation enhances data transmission by 20%, making video quality smoother than before.

You might ask yourself, “Do I need to upgrade?” Here is the thing: Wi-Fi 7 becomes available with Windows 11, version 24H2.

So, upgrading appears to be a smart selection if you desire to keep up with new developments and fully benefit from them. Plus, who doesn’t want a more secure and efficient Wi-Fi connection?

But before you rush to join this upgrade trend, you will require a few things. Initially, according to official Microsoft support documents, you will need a router capable of supporting Wi-Fi 7, Wi-Fi 6/6E, and/or WPA3. To ascertain if your current router can handle these new standards, simply go to the manufacturer’s website.

Naturally, your PC must have Windows 11 and be updated to the newest version so that every feature can function without issues.

Use a command prompt to check for everyone who wonders how they are set up. It will show if your network adapter is prepared for Wi-Fi 7.

You need to type netsh wlan show drivers and look at the “Radio types supported” section if you see 802.11be (Wi-Fi 7) or 802.11ax (Wi-Fi 6/6e). This action resembles checking the car’s engine area to see if it’s ready for a race.

The jump to Windows 11 24H2 and welcoming Wi-Fi 7 could be the improvement your digital life requires.

With quicker speeds, superior area coverage, and improved safety measures, this is an opportunity to move into the coming era of wireless connections. So now, are you prepared for this leap?

How to Download Thrustmaster Control Panel and My Thrustmaster Panel

Getting your Thrustmaster racing wheel set up can be a breeze if you know where to start. Whether you’re a seasoned racer or just getting into the game, downloading the Thrustmaster Control Panel or the My Thrustmaster Panel are essential for fine-tuning your wheel’s performance.

How do I download and install Thrustmaster Control Panel?

1. Downloading My Thrustmaster Panel for Windows

  1. Open a browser and go to the official My Thrustmaster Panel download page.
  2. Enter your email address and hit the Download button.
  3. You don’t need to check the Thrustmaster news button, but you may do so.
  4. After download completes, launch the installer and click on Install when the window pops out.
  5. Make sure you also connect your Thrustmaster controller (wheel, joystick, gamepad etc.), otherwise the app won’t detect it.

The Thrustmaster Control Panel aka My Thrustmaster Panel will help you customize the controls for your controller for the games you want to play, but it also needs the data from the device driver in Window to identify it. That brings us to the next step: installing your controller.

It’s important to mention that My Thrustmaster Panel’s compatibility on PC is pretty limited. The list includes only T818, T-GT II, TS-XW, TS-PC, T300, TX, T248, T128, T150, TMX and T-LCM.

2. Download the correct firmware for your Thrustmaster controller

  1. Open a browser and go to the official Thrustmaster support website.
  2. Navigate to the section of your device category (Racing Wheels, Gamepads, Joysticks etc.). We picked the Racing Wheels because Thrustmaster has more such products.
  3. Select your specific racing wheel model. For example, if you have a T80, click on the appropriate link.
  4. Find the Drivers tab and click the download button for your OS. This is usually located within the page dedicated to your specific racing wheel model.
  5. After the download finishes, run the installer and connect your device when you are prompted to do so.
  6. Restart your computer if prompted. This ensures that all components are correctly installed.

By following these steps, you’ll have the Thrustmaster device installed on your PC, which allows you to manage settings and updates for your racing wheel. Some driver packages also contain the Thrustmaster Control Panel, others may not.

However, if you installed My Thrustmaster Panel as instructed in the first solution, you will see the compatible device in the app. Now, if your device is not compatible with My Thrustmaster Panel, you will still be able to access its Control Panel after installing its driver and firmware so move to the next solution.

3. Accessing the Thrustmaster Control Panel from your installed driver

  1. Connect your Thrustmaster racing wheel to your PC. Ensure it’s properly plugged in via USB.
  2. Open the Control Panel on your computer by clicking on the Start menu and typing Control Panel into the search bar.
  3. If you installed the device as instructed in the previous solution, the Thrustmaster Control Panel will pop up in the search.
  4. From there, just select your controller (if you have more installed) and click on its properties to configure.

This method leverages your existing installation to access the control panel directly through Windows settings. We also have a complete guide on how to access the Thrustmaster Control Panel in Windows with other methods.

The My Thrustmaster Panel app provides a convenient way to adjust settings on the fly without interrupting your gaming experience.

By following these steps, you’ll be able to download, access, and utilize the Thrustmaster Control Panel effectively, ensuring your racing wheel functions optimally. If the Thrustmaster Control Panel is not working, hit the highlighted link to fix it.

Always remember to keep your drivers and firmware updated to avoid any compatibility issues in the future. Happy racing!

Microsoft introduces Custom Tone for Copilot in Teams, allowing users to request multiple text modifications simultaneously

Have you been in a Teams chat, typing your message and then pausing to think if it’s clear or effective? Microsoft probably has something that could solve this for you. They have added a new function to their Copilot generative AI assistant in Teams to aid you in creating an ideal text message.

This is Custom Tone, a fresh inclusion focusing on providing messages with an added touch of character or precision.

Microsoft’s Copilot is receiving much attention, and it’s no wonder. It aims to help us in our digital communications. Even before Custom Tone, Copilot had functions such as Rewrite, which could refine your message for improved clarity and influence, and Adjust, which customizes the tone depending on who you’re communicating with—be it a colleague or someone from your family.

According to Microsoft, with Custom Tone, Copilot goes beyond this by giving you the power to define how you want your message to be rephrased without any limitations on requesting several modifications simultaneously.

While having Copilot do the work with those pre-set adjustment options is a great, no-prompt way to rewrite your messages quickly and efficiently, there is a new feature that allows you to tell Copilot exactly how you want to turn your writing into the best version of itself: Custom tone.

Microsoft

If you are looking for a way to make your message more persuasive, or if you want to add a specific tone to give off the right impression, Custom Tone can help. Likewise, when you need to condense a long explanation into a short bulleted list before sharing it with the team, Custom Tone makes this easy. All you have to do is type in a prompt that explains the alteration you desire, and Copilot does the rest.

But, if you are contacting a worldwide team and language is causing difficulties, Copilot in Teams has a solution with Custom Tone. You can request Copilot to interpret your message in another language by giving guidelines such as “make it longer and cheerful in Spanish.” This function is a “wow” element for worldwide communication, letting you connect with your coworkers from across the globe.

If you are unsure about using this strong feature, Microsoft has made a Copilot Lab webpage with many ideas for good prompts. It is a helpful place to learn how to use Custom Tone well and ensure your messages are always effective.

In a world where much of our workday is spent in text-based communication, tools like Copilot’s Custom Tone cannot be overstated. They assist us in making our thoughts understood better and guaranteeing that the messages we send are received as intended by others.

When you react to an inundation of messages or attempt to ensure your immediate request gets noticed, Copilot can help you communicate more efficiently and effectively.

Therefore, when you question a message in Teams, remember that Custom Tone can assist. Simply tapping a few times converts your text to its finest form, making your digital communication more polished and effective.

Microsoft Loop’ workspaces can now be joined with a link

Have you ever found yourself tangled in the slow process of adding team members to a collaborative workspace, one by one? Microsoft has been listening to the collective sigh of frustration and has rolled out a nifty solution for its Loop users.

Now, joining or sharing a Microsoft Loop workspace is as simple as sharing a link. Imagine the ease of copying a link and sending it to your team via email, Teams, or any other communication platform.

We’ve been listening to your feedback, and we understand: having to add users to a Loop workspace one at a time can be slow and frustrating. That’s why we’ve created Loop workspace links. Now you can quickly grant access to a workspace by copying these links and sharing them in Teams, Outlook, or another communication platform.

Microsoft

Once your teammates click on the link, they’ll pop up as pending members, and you can welcome them aboard with just a click. It’s a game-changer, especially for those who thrive on efficiency.

According to the official blog post, this feature streamlines the process of growing your workspace community and extends its convenience to both the web version of Loop and its mobile counterparts on Android and iOS.microsoft loop workspaces

However, keep in mind a couple of limitations. For now, personal Microsoft accounts are left out of the party, and those workspaces created during the Loop Private Preview won’t be able to use this feature. Plus, there’s a bit of a hiccup with notifications – or the lack thereof – regarding pending members and acceptance into workspaces.

Despite these small bumps, introducing workspace links is a significant step forward. It’s available to all Loop users with an Azure Active Directory login and is rolling out gradually to ensure a smooth experience.

And while not everyone might have access to this feature just yet, Microsoft is keen on gathering feedback. So, if you’re one of the lucky ones, don’t hesitate to share your thoughts. After all, your input could help shape the future of collaborative workspaces.

In a world where efficiency and collaboration are key, features like these are more than welcome. They not only save time but also enhance the fluidity of teamwork. So, remember this little trick next time you’re setting up a workspace in Loop. It might just make your day a tad easier.

How to Exclude Folder in SyncToy & Stop it From Syncing

Despite its discontinuation, SyncToy is still widely used. Speaking of which, in today’s guide we’re going to show how to exclude a folder in SyncToy, so without further ado, let’s get started.

How can I exclude the folder in SyncToy?

Change pair options

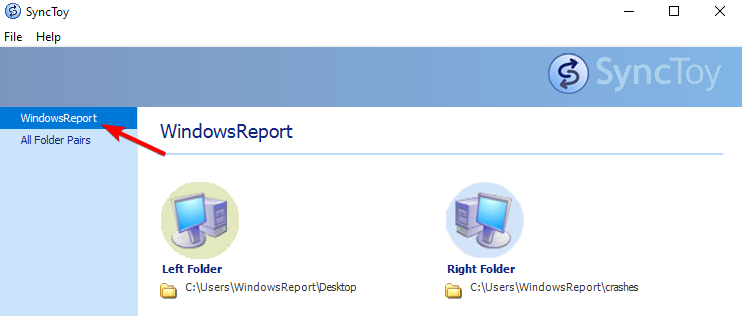
  1. Open SyncToy and select your folder pair.
    select folder pair synctoy
  2. Next, click on Change options.
    change pair options synctoy
  3. After that, click on Select subfolder.
    select subfolder synctoy settings
  4. Uncheck folders that you wish to exclude.
    unselect folders synctoy
  5. Save changes.

Can SyncToy run automatically?

The software doesn’t have the option to automatically sync files, so you’ll have to manually run the sync. You can create a task in Task Scheduler that will sync with SyncToy automatically as a workaround.

To achieve this, you first need to create a SyncToy batch script, and then create a reoccurring task in Task Scheduler.

Where are SyncToy settings stored?

You can find all your SyncToy settings in the SyncToyDirPairs.bin file in C:\Users\WindowsReport\AppData\Local\Microsoft\SyncToy\2.0

Just be sure to replace WindowsReport with your Windows username.

Where does SyncToy store folder pairs?

SyncToy stores its folder pairs in the same location where it stores its settings.

Is there a SyncToy for Windows 11?

No, SyncToy was never released for Windows 11, and the software was discontinued in early 2021. However, the application can run if you install an older .NET Framework, but it does have a few bugs.

What is the replacement for SyncToy?

Although the software is discontinued, there are many great SyncToy alternatives that you can use on Windows 11 with FreeFileSync being the most popular choice.

As you can see, it’s pretty simple to exclude a folder in SyncToy, and it only takes a few clicks. Due to its simplicity, it’s no wonder that many are using SyncToy for file backup.

Since the tool is discontinued, you might run into some issues, but we have a great guide that can help you if SyncToy is not working, so try it out.

KB5039304 to the Release Preview Channel enhances Windows 11 with many security features

Windows 11 Release Preview Insiders are now offered version 24H2, build 26100.994 (KB5039304), and it is a powerful potion for your PC.

This update, still warm from the pot, mostly aims to crush those annoying bugs hiding in corners. However, it also brings a little bit of enhancement for users with specific mobile operators on their OS.

Now, you could be asking why this update is important. Well, it indeed deals with an issue related to Windows Defender Application Control (WDAC) that was not able to verify policies for certain apps. It’s similar to having a more effective shield against unwelcome intruders.

Additionally, if you’ve observed a slight stutter during your animations or Task View occasionally drops some frames, this update could improve the situation. It’s similar to applying lubrication on the noisy parts of your system for smoother functioning and enhanced performance.

According to the official blog post, for people who depend on their mobile connection, this update ensures that Country and Operator Settings Asset (COSA) profiles are current for specific operators. It is similar to adjusting your radio for improved reception in far-off places.

Lastly, a situation with Windows Management Instrumentation (WMI) API calls to shut down or restart a system throwing access denied exception has been tackled for the tech protectors. It feels like getting control over the castle at last.

For those who have experienced the annoyance of DWM.exe suddenly stopping, this update could be the hero you’ve been waiting for. It tackles the problem directly and possibly saves you from needing a force restart. Additionally, there’s good news about the Unified Write Filter (UWF) fix. If you have been struggling with access denied exceptions, this update might solve your problem.

So, how do you obtain this magical mixture? If you are a Windows 11 Release Preview Insider, it is as easy as checking for updates. If not, perhaps it’s about time to ponder joining the club. Who doesn’t wish to stay at the forefront of this digital era?

These updates show how we continually work to improve our digital lives. Sometimes, they might not have exciting new elements, but these changes are like the silent workers who keep everything going well. Thus, let us celebrate this newest update – hoping for stability, safety, and a touch of enchantment in your Windows 11 journey.

In other news, the Canary Channel also received a big update this week, with Canary Insiders getting many quality-of-life features on Windows 11. You can take a look at the most important ones here.

You can read KB5039304’s full changelog here.

Microsoft will deprecate SharePoint News Connector later this summer

Modifications are expected in the constantly changing technology world, especially within communication and collaboration tools.

In a blog post, Microsoft shared a crucial update that will impact Teams business and enterprise users dependent on SharePoint News Connector. This feature, which smoothly incorporates news from SharePoint sites into Teams channels, is scheduled for retirement in the summer of this year.

But there is no need for concern. Microsoft is not abandoning users. They are providing options to ensure that sharing and working together can continue without hitches.

Retiring the SharePoint News Connector aligns with Microsoft’s strategy of improving collaboration in Teams and SharePoint. Thanks to the progress made on these platforms, Microsoft believes it can provide better integration and prompt updates and discussions within Teams channels.

From July 22 onward, they will stop supporting new additions of SharePoint News connectors while old ones are being phased out until August 26. This change will be managed by Microsoft, so teams and SharePoint admins don’t need to worry about it.

Curious about what happens after the SharePoint News Connector? Microsoft has prepared three alternatives for the smooth continuation of shared news connections.

These are Viva Connections News notifications, Viva Amplify, and creating your workflows in Teams. Every option here provides an exclusive method for maintaining the news flow in your Teams channels.

We encourage you to explore our robust alternatives to SharePoint News connector, such as Teams Workflow, Viva Connections and Viva Amplify, which offer a more integrated and feature-rich news experience that continues to share SharePoint site news within your Teams’ channels.

Microsoft

Like a conductor, Viva Connections brings news notifications straight to Microsoft Teams. When you tap on the notification, it links you with the Viva Connections app. Similarly, Viva Amplify acts as a center for internal communication.

It lets you create content and distribute it through various platforms, such as SharePoint, email, and Teams, all in one place. If you want more personalization options, setting up your Teams workflow could be better suited.

When the retirement dates approach, Microsoft asks admins to ensure their team users know about this change and update any related documentation. This advanced communication will help guarantee a successful shift to the new options.

Additionally, Microsoft is dedicated to aiding users during this alteration by providing assistance and materials for managing the transition properly.

In the bigger picture, the SharePoint News Connector retirement may appear like a minor event. Yet, it indicates how the technology we use every day constantly changes. We can keep utilizing these instruments to improve efficiency and teamwork if we are aware and flexible. So, let’s embrace these changes and explore their new possibilities.

Microsoft updates Windows’ Photos app with the next-level Dynamic Zoom Slider

In the world of ever-changing technology, Microsoft has brought some new changes to its Microsoft Photos app for Windows 11.

For people familiar with it or those participating in the Windows Insider Program’s Canary and Dev channels, an exciting thing is happening: Microsoft has released a fresh edition of its Photos app with improvements mainly focused on enhancing viewer and import functionalities.

Now, I hear your thoughts. You may ask, “What do I get out of it?” Let me explain.

Firstly, accessing key photo actions is simpler than ever before. You no longer need to go through an overflow menu to start a slideshow or share what you like best about the photos with others—these choices are now prominently displayed on the main viewing screen.

If you prefer to stay within the Microsoft family of products, there is an area specifically for Microsoft app shortcuts. This signifies that it is easy for you to move quickly into the complete photo gallery, open images in Clipchamp, or save them on OneDrive without any effort at all.

But, one more thing. Have you ever looked at a photo and wished you could zoom in just a bit further? The Photos app now has an adjustable zoom slider, which lets users view their images from 10% to 800% of their initial size.

The slider is not ordinary. It’s a draggable and convenient tool that assures simple adjustment to reach your preferred picture size.

For those who pay attention to details, the app now shows photo metadata information at the bottom of the screen. Size, dimensions—whatever you want to know about a picture is displayed there. Many users requested this feature, and Microsoft has included it in this update.

Transferring photos and videos from a local device has been improved with fresh device import options. Now, you can select and handle when to start moving your media, offering you better control of the procedure.

In case you were annoyed with the slow loading speed, the newest update has multi-process performance enhancements that increase viewer loading time by 2.1 times. So now, there will be no more delay in seeing your pictures.

You may ask yourself, “How can I receive these updates?” The answer is straightforward: update your Photos app to version 2024.11060.20004.0 or higher. However, it’s important to note that this update is still being distributed and might not be accessible to everyone.

Microsoft has made some new changes in the Photos app for Windows 11. These are focused on improving how you view and add photos.

It doesn’t matter if you do photography for a living or enjoy taking pictures of life’s events; these enhancements will surely make an impact with their practicality and visual appeal. So why not give them a try?

Microsoft released TypeScript 5.5: Here’s everything you need to know

In the field of programming, Microsoft has brought about a major change with TypeScript 5.5. This is an important update to the language used for building on JavaScript, and it provides many new characteristics and improvements aimed at enhancing the coding experience for developers.

You can easily install this update using NuGet or npm. The focus is on making TypeScript more strong and adaptable as a tool in software development. If you have been using Visual Studio or VS Code for your JavaScript projects, then all this time, you were actually working with TypeScript, too, due to its strong editor tooling, including features such as auto-completion, code navigation, and refactorings.

In the official Microsoft Dev blog post, the newest version of TypeScript 5.5, an assortment of upgrades is showcased that includes inferred type predicates, control flow narrowing for constant indexed accesses, and support for new ECMAScript Set methods, which many people have been waiting for.

These features not only claim to amplify software development projects but also render the language more intuitive and effective in use. The comprehensive announcement from Microsoft gives a thorough explanation of every new characteristic along with code samples, which can help developers comprehend these changes better and incorporate them into their work more easily.

For the future, Microsoft is already working on TypeScript 5.6, which seems to be released in early September. This forward-thinking strategy also involves an open invitation for developers to try out the nightly versions of TypeScript 5.6, although there’s a warning that they should expect some bugs because these builds were not tested as thoroughly yet.

If you are excited about exploring this option, getting TypeScript nightly ready with your IDE is easy thanks to detailed instructions provided in the documentation – it ensures programmers can keep up-to-date with advances made in creating programming languages.

This news is not only about fresh traits; it shows Microsoft’s commitment to constantly bettering TypeScript, making it a stronger and easier tool for all developers worldwide.

Whether you are an experienced user of TypeScript or someone who just started using this language, the arrival of TypeScript 5.5 brings interesting chances to improve your coding projects and make your development work more efficient.

StartAllBack is Not Working [Solved]

In the past few months, StartAllBack has started triggering errors on Windows 11 and is often found not working. Mostly, this is due to changes in recent Windows updates, but we can’t rule out the possibility of corrupt system files and an improper installation.

Before we begin troubleshooting, update the PC and make sure you don’t have a conflicting tool installed on the PC. If there’s another Windows customization app, remove it using an effective software installer and check for improvements.

What can I do if StartAllBack is not working?

1. Update StartAllBack

  1. Launch StartAllBack and go to the About tab.
  2. Click on Check for updates, and if a newer version is available, install it.update to fix startallback not working

When Windows 11 22H2 was first released, countless issues were reported with StartAllBack and ExplorerPatcher. Soon, the developers rolled out StartAllBack v3.5.6 with patches that eliminated the conflict between the app and the OS. A similar situation may arise again!

2. Repair the corrupt system files

  1. Press Windows + S to open Search, type Command Prompt in the text field, and click on Run as administrator.command prompt
  2. Click Yes in the UAC prompt.
  3. Paste the following DISM commands individually and hit Enter after each: DISM /Online /Cleanup-Image /CheckHealth DISM /Online /Cleanup-Image /ScanHealth DISM /Online /Cleanup-Image /RestoreHealth
  4. Next, run the SFC scan using this command: sfc /scannowsfc scan to fix startallback not working
  5. Once done, reboot the computer to apply the changes.

When the system files are corrupt, changes made via StartAllBack won’t reflect, giving the impression that it’s not working. In this case, run the DISM commands and SFC scan to fix things!

3. Reinstall StartAllBack

  1. Press Windows + R to open Run, type appwiz.cpl in the text field, and hit Enter.appwiz.cpl
  2. Select StartAllBack from the list of installed applications, and click Uninstall.uninstall app
  3. Follow the on-screen instructions to complete the uninstallation process, and then restart the computer.
  4. Finally, download the StartAllBack setup from the official website, then reinstall the app, and check for improvements.

4. Uninstall the recent Windows update

  1. Press Windows + I to open Settings, go to Windows Update from the left pane, and click on Update history.update history
  2. Scroll down and select Uninstall updates.
  3. Click Uninstall next to the update installed around the same time StartAllBack first stopped working.uninstall to fix startallback not working
  4. Again, click Uninstall in the confirmation prompt.
  5. Finally, restart the computer for the changes to apply and check for improvements.

Last year, we saw how KB5028182 conflicted with StartAllBack, triggering a wide array of errors. Similar issues may arise in the future, and uninstalling Windows updates should do the trick!

5. Perform a system restore

  1. Press Windows + S to open Search, type Create a restore point in the text field, and click on the relevant result.
  2. Click on System Restore.restore
  3. Select the Choose a different restore point option, and click on Next.choose a different restore point
  4. Pick a restore point created before the issue first appeared and click Next.restore to fix startallback not working
  5. Finally, verify the restore details, click on Finish, confirm the change, and then wait for the process to complete.

If nothing else worked, the last option is to perform a system restore. This way, you can revert the system to a previously stable configuration when StartAllBack was working. Remember, a restore also helps when StartAllBack triggers a black screen.

Also, did you know that it’s possible to reset StartAllBack’s free trial, and the entire process takes less than a minute!

Which fix did the trick for you when StartAllBack was not working? Share with our readers in the comments section.

Brave Leo gets Brave search integration, Quick Answers, and more improvements

Brave browser update added a series of improvements to AI Assistant, Leo. Leo also works now better with Google Docs and image-heavy PDFs.

Brave Browser’s AI assistant, Leo, gets a major upgrade with Brave Search integration! Now you can use the privacy-focused search engine directly within Leo for more accurate and secure answers to your questions. All supported large language models –Mixtral, Calude 3 Haiku, and LIama 3 8b–, can now use Brave Search.

Leo is now able to offer users more complete and current responses to their queries. By directly accessing information from Brave Search, Leo can quickly provide relevant data in real time, making it an even more effective research tool.

Brave Search used by Leo in Brave

Quick actions are accessible through the “/” symbol under the Brave Leo. This allows you to quickly perform various tasks without leaving your current page such as generating summaries, translating content, and more.

Brave browser has re-added the Safety check feature to brave://settings/privacy to check unused permissions. Brave performs regular security checks on your browser settings. You’ll be notified if any changes are needed.

Initially, Media Router was not enabled by default on Desktop but was on Android. The Media Router feature, which can be toggled in brave://settings/extensions, enables users to cast a Brave tab on a smart TV. After fixing a privacy issue, Brave browser has now enabled Media Router (cast) by default.

Some PDFs have text that can’t be accessed because they’re based on images. Leo struggles to summarize or comprehend these PDFs. Leo can now summarize image-based PDFs without any problems.

Brave’s Leo now supports full Google Doc page summarization.

Brave browser desktop stable update has also added the following changes and improvements

  • Brave has introduced Dark Mode Scrollbars for the New Tab Page on Windows to address the issue of light-mode scrollbars always appearing on the NTP, regardless of the OS theme.
  • Replaced LIama 2 with the latest LIama 3
  • Discontinued Claude Instant model
  • Brave now encourages free users to test Leo for 7 days when they reach the limit. Before, it displayed an upgrade prompt.

How to Change Folder Path In SyncToy & Sync Files Again

SyncToy is a popular choice for syncing files on their PC, and many are wondering how to change the SyncToy folder path. Today we’ll check if that’s possible, so let’s get started.

How can I change the folder path in SyncToy?

Recreate folder pair

  1. In SyncToy, select the pair that you want to change.
    select folder pair synctoy
  2. Next, click on the Delete Folder Pair button.
    delete folder pair synctoy
  3. Confirm that you want to delete the folder pair.
  4. Next, click on Create New Folder Pair.
     create new folder pair button synctoy
  5. Select the folders you want to sync.
  6. Choose the sync method.
    sync method select synctoy
  7. Enter the name for the sync pair and that’s it.
    synctoy folder pair name

Unfortunately, SyncToy doesn’t allow you to change the folder path in the folder pair, so your only option is to recreate the folder pair from scratch.

Where are SyncToy folder pairs stored?

You can find all SyncToy folder pairs in the following location:

C:\Users\WindowsReport\AppData\Local\Microsoft\SyncToy\2.0

Just be sure to replace WindowsReport with the name of your user account.

How do you sync folders with SyncToy?

  1. Open SyncToy.
  2. Select the folder pair you wish to sync.
  3. Click on Run.
  4. Alternatively, go to All Folder Pairs, select the pairs you wish to sync, and click on Run All.

To learn more, we have a great guide on how to use SyncToy, so don’t hesitate to check it out. We also have a great guide on how to create a SyncToy batch script so you can sync files in the background.

Has SyncToy been discontinued?

Yes, SyncToy has been discontinued since January 2021, however, you can still install SyncToy and we have a great guide on how to do that.

What replaces SyncToy?

Microsoft has moved to OneDrive and cloud syncing, but if you want to sync files locally, there is a wide array of SyncToy alternatives you can use.

It’s impossible to change the folder path in SyncToy once the pair is created, so you’ll just have to rely on this workaround.

StartAllBack on Windows: A Great Way to Personalize your PC Experience

Windows 11 came with an innovative design, look, and feel, but not everyone likes the way it looks. If you are one of them, you should know about StartAllBack, which is a simple way to customize your Windows with features like the Classic Start menu and transparent taskbar. In this guide, we will review StartAllBack and how it can be helpful for you.

What is StartAllBack in Windows 11?

StartAllBack is a customization tool that lets you enhance the Windows experience by adding the old elements from the previous iterations of Windows with a modern touch. It transforms your Windows experience by blending contemporary functionality and nostalgia to cater to normal and power users.

StartAllBack Review: What I like about StartAllBack?

You can revamp your Windows PC’s Start Menu, taskbar, and desktop environment according to your preferences. Here are the primary features of StartAllBack:

1. Tons of customization options and flexibility

StartAllBack lets you customize the layouts and designs to evoke the days of Windows XP or Windows 7. The app lets you choose between modern variations and classic styles, organize apps and shortcuts, and change the title sizes to suit your workflow.

You can customize the taskbar’s appearance, pin frequently used apps, or change taskbar behavior settings, including auto-hide and transparency. With StartAllBack, configuring system tray icons, managing desktop icons, and enhancing context menu options has become easier.

The customizable search filters improve search functionality and allow you to enable quick access to apps, settings, and files.

So, if you think StartAllBack is for those who need a feature-rich environment, you are right, but that doesn’t mean it doesn’t cater to those who need a minimalistic interface.

For playful desktop personalization, try Shimeji on Windows 11 to add animated pets that complement your StartAllBack setup.

2. Usability and user interface

With an intuitive interface, StartAllBack is an app for users of all skill levels. The interface looks familiar, resembling the classic Windows Start Menus.

The settings panel on the app has comprehensive options, which are categorized into various sections, like Desktop, Start Menu, Search, and Taskbar, which lets you customize the desktop experience as you like.

Navigating through the app is easier, as the features are accompanied by tips on how to use the tool. You can also preview the changes in real time, which helps you refine your desktop environment without hassle.

3. Stability and performance

With minimal system impact, StartAllBack can deliver reliable performance and works well in the background, ensuring the customization doesn’t affect the overall performance of your device.

It has responsive taskbar interactions, smooth navigation and responsiveness in the Start menu, and effortless integration with system processes, ensuring stability

StartAllBack is lightweight and can work seamlessly with other apps and utilities on your computer without any performance issues.

4. File Explorer looks better

With Windows’s dark mode introduced in 2015, File Explorer also got dark mode. However, the dialog box for copying or moving files, deleting files, the properties window, and the Format dialog box are still in Light mode.

Not anymore; with StartAllBack, you get all of them in dark mode. You can also select the Windows 11 commands bar or the Windows 7 command bar with the Windows 10 Ribbon menu, and it will blend perfectly with the current operating system.

5. Compatibility and integration

StartAllBack can be used on Windows 11, Windows 10, Windows 8, and 7. It seamlessly integrates with the native Windows interface and offers various customization options while preserving core functionalities.

6. Availability and price

StartAllBack was made available in 2021 when Windows 11 was launched. It is a successor to the StartIsBack app and is available on the official website.

The app costs $5 for one PC, $9 for two PCs, and $12 for three PCs. If you want to buy it for your organization, you can get up to 2000 licenses for $4000.

If you already have a license for its previous iteration, StartIsBack, you can upgrade to the new one for $2 only.

StartAllBack Review: What I don’t like about StartAllBack?

StartAllBack indeed comes with many customization features, but are they enough? In comparison to the Start11 app, which has more options, including the ability to create folders, tabs, and pages to organize your icons, StartAllBack is limiting. With the Start11 app, you can make any icon behave like a menu. Furthermore, there are more design styles, too.

However, if you are happy with the basic functions and design styles, StartAllBack is the right tool for your computer.

Along with this, the slower response times by customer support, dependency on Windows updates, learning curve, and limited demo version are also some aspects that the app could improve on.

To conclude, StartAllBack is a user-friendly tool that allows you to customize your desktop experience without hampering the overall performance. It is a blend of functionality, familiarity, and performance, which seems to be working to fix all the wrongs of Windows 11.

If you still have doubts about StartAllBack, we have a detailed guide to help you understand if the app is safe to use.

If you are already using StartAllBack and are facing black screen issues on Windows 11, try updating the app or disabling taskbar customizations. For more, read this guide. Moreover, if you’d like to look into viable alternatives, we’ve got you covered.

Have you tried using StartAllBack, and is this review helpful? Share your view with our readers in the comments section below.

Gpedit.msc vs. Secpol.msc: What is the Difference?

Gpedit.msc and Secpol.msc configure system policies and security settings, respectively. However, they serve distinct purposes and are used for different aspects of Windows management. Let’s learn more about the distinctions between gpedit.msc vs. secpol.msc.

Gpedit.msc vs. Secpol.msc: What is the difference?

What is gpedit.msc?

Gpedit.msc, or Group Policy Editor, is a Windows tool for managing group policies within a Windows environment. Group policies are set of rules that administrators apply to users and computers in a network to change security settings, system behavior, and more.

Main functions of gpedit.msc:

  • Allows IT admins to define and enforce group policies across multiple devices in a domain.
  • Provides better control over Windows settings, including software installation policies and system maintenance schedules.
  • Centralized console for configuring policies, which can be then distributed to client machines within the network.

What is secpol.msc?

Secpol.msc or Local Security Policy only focuses on the security settings of the local machine and is usually for standalone PCs or non-domain-joined systems.

Main functions of Secpol.msc:

  • Enables IT professionals to configure security settings, such as audit policies, account policies, user rights, and other security options specific to a local machine.
  • Allows you to import and apply the security templates to streamline the configuration of security settings across multiple machines.
  • Comes with tools for auditing security events and monitoring compliance with security policies at the local level.

Gpedit.msc vs. Secpol.msc: Quick comparison

Feature / Toolgpedit.msc secpol.msc
PurposeManages group policies across network domains.Manages security settings on a standalone/local machine.
ScopeNetwork-wide policy managementLocal machine security configuration
Administrative AccessYou need admin rights and domain controller access.You need local admin rights on the computer.
ConfigurationConfigures group policies that can be applied to multiple users/computers.Configures security settings for a local machine.
Security SettingsIt mainly relies on predefined policies and has a limited focus on security settings.It comes with significant control over security settings at the local level.
Usage ScenarioIt is suitable for managing uniform policies across large networks or domains Allows you to customize security settings on standalone or non-domain-joined computers.

1. Objective

Group Policy Editor lets you manage group policies within a network domain. It is a centralized tool for admins to define and enforce policies across multiple users.

Security Policy Editor lets you configure the security settings of a local machine and is usually employed on standalone computers.

2. Scope

Group Policy Editor or gpedit.msc focuses on network-wide policy management, which ensures consistency in settings, including system behavior and security options across all devices in the domain.

The Security Policy Editor, or Secpol.msc, allows you to customize security settings for a local machine, ensuring the security configurations meet a PC’s specific requirements.

3. Administrative Access

IT admins need administrative rights and access to domain controllers to use the Group Policy Editor and change policies that affect users and computers within the network.

To access Security Policy Editor, you need local administrative rights on the computer on which you have to configure and manage the security settings.

4. Configuration

Group Policy Editor or gpedit.msc lets admins manage and configure various policies, including software installation restrictions, user permissions, and system maintenance schedules.

Whereas Security Policy Editor or Secpol.msc allows IT admins to set local security policies, including password requirements, logging settings, and user permissions on a device.

5. Usage scenarios

Group Policy Editor is useful for IT admins to manage policies across large networks or domains, ensuring consistency and uniformity with organization policies.

On the other hand, secpol.msc works for admins to manage security configurations on one machine or small networks, where there is no need for a centralized policy.

To conclude, both the Security Policy Editor and the Group Policy Editor have important roles in security and Windows management, but their focus and usage differ.

If you have Windows 10 or 11 Home Edition and want to install Group Policy Editor, we have a separate guide.

However, if you have the Professional Edition of Windows and still can’t find Gpedit.msc, then you need to follow the steps mentioned in this guide.

On the other hand, if you can’t find secpol.msc on your Windows 11, you can follow these simple methods to add it to your OS.

If you want to learn more, we have a great guide on how to use gpedit.msc on Server Core, so don’t miss it.

Do you have any confusion about gpedit.msc vs. secpol.msc? Mention them in the comments section below, and we will try to answer them.

How to Change Path To Executable in Windows Services

If you want to change or update the Path To Executable of a service’s properties in Services.msc without reinstalling the application, this guide can help!

How can I change Path To Executable in services.msc?

  1. Press Windows + R to open the Run dialog box.services.msc change path to executable
  2. Type services.msc and click OK to open Services.
  3. Now go to the service for which you want to change Path to Executable, double-click it, and open the Properties.PAth
  4. Press Windows + R to open the Run dialog box.
  5. Type regedit and click OK to open Registry Editor.Regedit
  6. Navigate to this path: Computer\HKEY_LOCAL_MACHINE\SYSTEM\CurrentControlSet\Services\[ServiceName]
  7. Locate the Image Path string object, right-click it, and select Modify.Image path chnage
  8. Under Value data, change the path and click OK.

Once you’ve done this, the path will be changed, and you don’t need to restart your computer. You can check the services.msc and go to Services, then double-click it to open its properties, and you will see the new path mentioned under Path to executable.

If services.msc is not opening on your computer, it could be due to a corrupted registry or a bug in the Windows update; read this guide to learn more.

You can check out this article to learn which Windows services you can disable to boost your computer’s performance for gaming or enhance security.

Were you able to change the path to executable in the Windows Services app? Share your thoughts and views in the comments section below.

Bing Chat History Disappeared? 6 Quick Ways to Get it Back

The beauty of having a Bing chat history is to refer back but what do you do when it has disappeared and is no longer accessible?

First, it is important to ensure you’ve turned on the chat history button. Next, ensure you have enough RAM on your device. Still, you can do all these but if Microsoft servers are overloaded, down or have a glitch, your Bing chat history will disappear regardless.

You can try Bing Chat on other browsers to ascertain that the issue is not browser-specific. Also, note that Bing cannot save your chat history if you’re using a private or incognito browser tab or you’re not signed in with your Microsoft account

What can I do if my Bing chat history has disappeared?

1. Restart the Chat search history

  1. Launch the Microsoft Edge browser on your PC sign out then sign back into your Microsoft account.
  2. Type Bing or Copilot in the search bar.
  3. Click the Copilot tab to launch Bing AI Chat or Copilot.Copilot - bing ai chat history
  4. Click the Hamburger menu and select Search history from the context menu.Search history- Copilot tab - bing ai history
  5. Toggle off the Show new searches here option on the search history page.turn off - Copilot tab - bing ai history
  6. Click Turn off.

2. Clear Microsoft Edge browser cache and cookies

  1. Launch the Microsoft Edge browser on your PC, and then click three dots to open the Menu and select Settings.
  2. Go to Privacy, search, and services from the left sidebar.
  3. Click the Choose what to clear button under the Clear browsing data tab.
  4. Check the box for the Cached images and files and cookies and other site data options, then click the Clear now button.
  5. Restart Microsoft Edge to check if the problem with Bing Chat not working is fixed.

3. Sync your Edge data manually

  1. Launch Microsoft Edge.
  2. Click the Menu icon in the top right corner and choose Settings from the menu.
    internet options in Edge
  3. On the left pane, select Profiles, then select Sync from the right pane.
  4. You will find a self-explanatory menu with all the data you can sync on all your Microsoft devices, including passwords, settings, and favorites.

4. Remove browser extensions

  1. Launch the Microsoft Edge browser and click the three dots in the top right corner to open the Menu. Go through and click on Extensions.
  2. Select from the list of Extensions and click on Manage Extensions.
  3. Toggle off the Extension switch to disable it and check if the error persists.
  4. Repeat the above steps for all Extensions to find the cause of the Bing Chat problem.
  5. After finding the faulty one, click the Remove button to uninstall the extensions causing the error.

5. Repair Microsoft Edge

  1. Press Windows + I to open Settings, then navigate to Apps, followed by Apps and features.apps-features where is the chrome menu button
  2. Search for Microsoft Edge from the apps list, click the three vertical dots next to it, and select Modify.edge-modify windows 11 edge not working
  3. Choose Yes when you’re asked if Do you want to allow this app to make changes to your device?Yes
  4. Ensure you’re connected to the Internet, then click the Repair button. The Windows 11 Edge problems that you encountered will now be fixed.repair-edge windows 11 edge not working

6. Install a chat history extension

  1. Launch your Edge browser, click on the vertical ellipsis then go to Extensions.
  2. Next, click on Get for Microsoft Edge extensions.
  3. Type Bing Chat History in the search box on your left, then click Get on the desired add-on.
  4. There are also other options such as Bing chat saver so make sure you read reviews and go for one with a more positive rating or try them both and see how they perform before settling on one.
  5. Click on Add extension.

While this extension is extremely helpful, note that it is limited in the content from your chat history it can save. Images and hyperlinks are not included but any text can be saved and retrieved at a later date. Still, it is a very good backup option when Microsoft servers prove unreliable.

And if you’re looking to better manage your Bing Chat history, or what to do when you reach your Bing chat limit, we have a masterclass on how to go about it. Of course, there will be chat error codes from time to time but we also have quick fixes for that.

When you’re not troubleshooting errors, there are also so many other Bing Chat features that we think you should know about to ensure you’re getting the most out of it.

If you’ve encountered this issue before, we’d like to get your feedback. What solution fixed it for you? Any other tips you can recommend? Let us know in the comment section below.

How to Reset the StartAllback Free Trial

StartAllBack, a popular Windows customization tool, now comes with a 100-day free trial. Earlier, it was only 30. But even as the new period comes into effect, many look for ways to reset the StartAllBack trial. Surprisingly, you can do it within minutes!

How do I reset the StartAllBack trial?

Tip icon Tip
The following steps detail editing the Registry, a critical part of Windows. So, I recommend you create a restore point beforehand to be able to revert the PC to the previous stable configuration in case things inadvertently go wrong.
  1. Press Windows + R to open Run, type regedit in the text field, and hit Enter.registry
  2. Click Yes in the UAC prompt.
  3. Paste the following path in the address bar and hit Enter:HKEY_CURRENT_USER\Software\Microsoft\Windows\CurrentVersion\Explorer\CLSIDpath
  4. Locate the {yyyy yyyy} key, right-click on it, and select Delete. The key to delete may be different in your case.delete for startallback trial reset
  5. Click Yes in the confirmation prompt.
  6. Relaunch StartAllBack and you will find that the trial period has been reset to 100 days.

Although most of the online tutorials and guides mention that the key follows the {xxxxxxxx-xxxx-xxxx-xxxx-xxxxxxxxxxxx} format, in my case, it turned out to be {yyyy yyyy}.

The critical factor to remember is that the key you have to delete won’t have any subkeys and will use lowercase, as opposed to other keys that will have a DefaultIcon subkey and use uppercase.

For anyone wondering how this works, StartAllBack creates a Registry key at the time of installation and then uses it to identify when the trial period ends. If you delete the key, StartAllBack will create another one but with the present date, thus resetting the trial period.

You can use the trick as many times as you want until the developers find a way around it. But if you can, get the paid license key. It’s only $4.99 and helps the developers keep the app up and running and release regular updates!

As for anyone wondering about the security and privacy of the app, our experts found StartAllBack to be completely safe. However, since Microsoft is coming down hard on Windows customization tools, you may occasionally come across issues with StartAllBack.

Were you able to reset the StartAllBack free trial? Share with us in the comments section.

The new Surface laptops have no recovery image, says Microsoft

Microsoft’s new Surface devices are expected to make an impact in the market due to their advanced features and competitive prices. Including Qualcomm Snapdragon X processors could be seen as a move towards enhancing the devices’ performance efficiency, which might challenge Apple Inc.’s MacBook Air for dominance within this sector.

There is a small problem you need to be aware of. If you own one of these devices, it might be best to handle it extra gently. But why do I say this? Microsoft hasn’t released the recovery images for these ARM-powered Surface beauties yet.

Recovery images are quite important. They work like a kind of safety net for your device. If you ever get into a situation where the device won’t boot or starts behaving oddly, these images can be seen as your savior.

If your Surface won’t start—or if the recovery info has been removed—you can use your USB recovery drive to access recovery tools and solve problems. Your Surface comes with Windows recovery info that allows you to refresh it or reset it to its factory condition. If your Surface does turn on, see Restore or reset Surface.

Microsoft

They help return the device to its initial state without sending it again to Microsoft for repair. Typically, you can get these images from the official Microsoft website. However, it is strange that the images for both Surface Pro 11 and Surface Laptop 7 are still missing in action (MIA), even after two days of their big unveiling on the market.

This suggests that if your device’s software becomes angry for some reason – perhaps it is having a bad day – you could be in a difficult situation. The worst situation would be if the device does not function at all. It could be quite frustrating, particularly because many of us are excited to experience and test these devices.

But hey, don’t let this prevent you from thinking about these gadgets. They still have many possibilities, and past actions by Microsoft indicate that the recovery images will probably become accessible at some point.

Meanwhile, it might be smart to proceed cautiously and perhaps postpone any software tests you planned on carrying out on your fresh Surface Pro 11 or Laptop 7.

A tip for the clever ones is to keep your Surface Pro 11 and Laptop 7 safe until such recovery images from Microsoft are available. It’s always better to be safe than sorry.

Windows 11 YouTube Playing no Sound? Fast Ways to Fix it

YouTube is one of the largest video repositories so it can be a real inconvenience if there’s no sound coming from your Windows 11 device during playback.

If you’re lucky, it will be something as simple as turning up your volume or switching to another audio jack if you’re using headphones. However, if the issue stems from, a damaged audio jack, outdated or missing sound card drivers, you’ll have to address this issue.

But before you start with advanced troubleshooting, check whether no sound is system-wide and test your mic to ensure it is working.

How to fix Windows 11 YouTube’s no sound?

1. System-specific sound issues

1. Run the audio troubleshooter 

  1. Press the Start Menu key and select Settings.settings windows 11
  2. Click on System on the left pane, then Troubleshoot on the right pane.Open system troubleshooter
  3. Select Other troubleshooters.other troubleshooters
  4. Locate the Playing Audio troubleshooter, and click on the Run button next to it.running playing audio troubleshooter windows 11 settings

2. Restart Windows Audio Services

  1. Right-click the Windows logo in the left-hand corner and click Run.
  2. Type in services.msc and hit Enter on your keyboard.
  3. Scroll down and locate the Windows Audio entry.
  4. Right-click Windows Audio, then select Restart.
  5. Right-click it again and select Properties.
  6. Click the Startup Type menu. Change the entry to Automatic.
  7. Click Apply, then OK to finish.

Sometimes, the audio service may stop running especially if your PC has recently been infected by malware or you installed a faulty update. restarting may potentially fix sound issues on YouTube.

3. Reinstall audio drivers 

  1. Hit the Windows key, type Device Manager in the search bar, and click Open.device manager w11
  2. Navigate to Sound, video, and game controllers to expand, right-click on your audio device, and select Uninstall device.
  3. Confirm on Uninstall.
  4. Restart your device, and the drivers will automatically reinstall themselves.

4. Update audio drivers 

  1. Hit the Windows key, type Device Manager in the search bar, and click Open.device manager w11
  2. Navigate to Sound, video, and game controllers to expand, right-click on your audio device, and select Update driver.
  3. Select Search automatically for drivers.
  4. Restart your PC and try reconnecting.

5. Change the Sound Enhancement Settings

  1. Right-click the Sounds icon in the bottom right corner of the desktop and select Sounds.
  2. Click the Communications tab at the top.
  3. Now, tick the radio button for Do nothing and click OK.
    communications do nothing pc volume goes down by itself
  4. Next, click the Playback tab.
  5. Right-click on Speakers/Headphones and select Proprieties.
    speaker properties pc volume goes down by itself
  6. Go to the Enhancements tab.
  7. Now, tick the box next to Disable all sound effects and click OK.
    disable all sound effects pc volume goes down by itself
  8. Lastly, check to see if this change had any impact.

6. Enable exclusive mode for other apps

  1. Right-click on the sound icon at the bottom right corner and select Open volume mixer.
  2. Click on your playback device and select Properties.
  3. Navigate to the Advanced tab, check Allow applications to take exclusive control of this device option, and click OK.

7. Disable audio enhancements

  1. Press the Win + R keys to open the Run dialog. Type mmsys.cpl and hit Enter to open the Sound dialog. run mmsys.cpl command
  2. In the window pop-up, right-click on your audio device, and select Properties. sound properties
  3. Next, in the Properties dialog, go to the Enhancements tab, and check the box next to Disable all enhancements. Press Apply and OK. disable all enhancements

2. Browser-specific sound issues

8. Clear the browser cache

  1. Launch your browser, and for this step, we shall be using Google Chrome.
  2. Click the three horizontal dots and select Settings.Settings CHrome
  3. Go to Privacy and security and click Clear browsing data.
  4. Select Browsing history, Cookies and other site data, & Cached images and files, then click Clear data.

9. Disable browser extensions

  1. Launch your Chrome browser, and in a new tab, enter the following address:chrome://extensions/
  2. Peruse through your extensions and toggle the Disable button for any suspicious-looking ones. Adblockers are common culprits so start with these.
  3. Repeat this step until you find the culprit.

10. Reset your browser 

  1. Open your Chrome browser and click on the three vertical ellipses at the top right corner.
  2. Select Settings.
  3. Next, click on Reset and cleanup, then select Restore settings to their original defaults.
  4. Confirm Reset settings in the next dialog box.

If it doesn’t work, switch to another browser or try YouTube for PC app on your Windows 11. Sometimes, certain browsers have temporary bugs and may present such issues as no sound.

And if other apps can playback sound and only YouTube has no sound, it may be app-specific. Get in touch with YouTube support and report the issue.

Should you encounter other audio-related issues such as YouTube sound too low, we’ve already addressed tested fixes in our detailed guide so feel free to check it out. For the best listening experience, consider installing YouTube volume boosters for sound enhancement.

That’s all we have for this article but if you have any other reliable and proven solutions that worked for you, please share them with us in the comment section below.

Windows 11 introduces the ability to turn off HDR, saving more battery life

In the lively field of technology, Microsoft has revealed a development that is causing a great deal of excitement among insiders from the Canary channel. They have introduced the Windows 11 Insider Preview Build 26241, and this isn’t just any regular update.

In an environment full of technological progress and sometimes disputes, this build includes a feature that could be both straightforward and revolutionary for us constantly searching for methods to lengthen our desktop’s battery life.

Do you ever ponder over the amount of power your HDR display uses? Microsoft has been thinking about it, and they are trying out a fresh setting that might help to change things.

This fresh inclusion, discovered by Windows enthusiast @PhantomOfEarth under System > Power > Energy recommendations in the Settings app, allows users to disable HDR to save energy in Windows 11. For individuals who may not be aware of it yet, HDR (High Dynamic Range) boosts the color and contrast on your display on Windows 11 devices, resulting in more power being used.

It could be seen as an exchange that many people might not have considered up until this point. However, Microsoft recognizes that power-saving efforts can be made in all aspects.

What’s interesting is that this feature is still being tested. Not everyone updated to Build 26241 will have the option yet. It’s similar to a small treasure hunt for those in the Canary Channel, giving a peek into the possible future of energy saving on Windows 11.

We should remember that this happens when Microsoft strongly promotes its Copilot+ PCs. This includes the fresh Surface Laptop 7, which has an OLED display that can handle HDR and similar features. So, it’s understandable how Microsoft is considering balancing tech advancements against energy usage for regular use.

Now, what significance does this hold for you and me? We live in a time where we handle many gadgets at once and attempt to extend the life of every piece of battery power.

Every tiny increment has its value, so this characteristic shows a move towards better energy use in computing while still maintaining the standard of our experience. It’s a gentle hint that sometimes, the most powerful alterations result from reconsidering small things.

So, if you enjoy exploring each Windows 11 build with excitement or have a longer-lasting battery life, this update is an encouraging indication. It’s about making technology work smarter rather than tougher and ensuring our devices can match our hectic lives.

And maybe? This is possibly merely the start of an array of energy-saving characteristics that will make our tech involvement more effective and eco-friendly. In the constantly changing world of technology, any outcome is possible.

Copilot+ PCs are fast, smooth, and run incredibly well, according to users’ reviews

If you’ve ever wondered why the tech world appears to be simmering down on assessing new Copilot+ PCs—such as the much-talked-about Surface Pro 11 and Surface Laptop 7—there is a justification for this uncommon quietness.

The answer? Microsoft, the company making this product, caused a delay, so tech enthusiasts who are potential buyers have been waiting for these important reviews.

Microsoft’s decision to postpone the Windows Recall feature has caused a ripple effect, delaying shipping review units of Copilot+ PCs to media outlets. This action created a new ZDP (Zero Day Patch) to eliminate the problematic Recall feature and implement the required fixes.

Consequently, most reviewers got their review units on June 18th, 2024, when some of these Copilot+PCs were launched.

But not everything is quiet and waiting. Some reviews have started to appear, especially of the ASUS VivoBook S 15 that reviewers received before its official release. This device, which runs on a Snapdragon X Elite chip, has been appreciated for its performance, battery life, and unexpected affordability. The Snapdragon X Elite appears as strong as it boasts, performing well in different types of work.

So, what about the Surface Pro 11 and Surface Laptop 7? Well, as they say, patience is a virtue. Writing a complete review requires some time, and with review units only recently arriving in reviewers’ hands, it could take a little time before we see detailed analysis on these devices.

However, the initial hands-on reviews and box openings will soon be available. This may provide an early look at these new Copilot+ PCs. Until then, you can always go to Reddit and read the reviews of those who have already tested the devices.

Just got my hands on the Surface Laptop 7, X Elite 12 core (16GB RAM) 13.8inch. Here are the details:

  • It’s incredibly smooth (is like an M3 Pro experience on a MacBook).
  • I’ve never seen photoshop run so well (even on my desktop PC with an RTX 4080, 32 Giga ram, 7800x3d it’s not as smooth).
  • Chrome runs smoother than ever, even with over 20 tabs open.
  • Geekbench (Perfomance Mode) (note: this is without updating the software).
  • 512GB storage feels a bit limited; after setup, I’m left with only 413GB (without any additional apps installed).
  • In terms of build quality, this new Surface Laptop has better finishing than its predecessors.
  • This is X1E80100 (X Elite 4.01 Ghz) on Surface Laptop
  • Update: AI: The majority of the AI features are available (paint, live caption, Studio effects camera) Recall is disable and not available for the moment
  • Update: Studio effects camera, live caption working OFFLINE
  • Update: Another big update has just dropped, now Copilot looks more like chat GPT (like the demo) (no more on the right)
  • Update: Lot of small new AI feature hidden on Snapshot and orther microsoft app
  • Speaker: Better than the MacBook Air and previous Surface, though slightly less powerful than the MacBook Pro.
  • Screen: We feel the 120hz, so sad they don’t provide OLED screen.
  • Battery: After 8h30 on battery, I have 36% left. On normal usage without run big software you can expect 12h full online work. If you only use Word and Microsoft app i think you can expect to reach 15h
  • Sleep Mode: it’s the same effect as on a Mac, as soon as you open the screen you are in the desktop (in fact it’s more impressive, because Windows Hello unlocks itself in less than 0.5 seconds). You don’t even have time to blink your eyes you Surface is ready
Reddit user

The delay has elicited a range of reactions. Some, like the Reddit user above, are enthusiastic about witnessing the performance of the new hardware, but some express doubt regarding AI characteristics and where Copilot+ PCs are heading in general.

The postponement of introducing Copilot+ PC reviews shows how difficult it can be to release new technology in today’s fast-moving society. As reviewers understand these fresh devices, the technical community eagerly awaits their opinions. Will Surface Pro 11 and Surface Laptop 7 fulfill their claims? Only time and the forthcoming reviews will tell.

Exception During Preview Error in SyncToy: 3 Ways to Fix it

SyncToy is Microsoft’s native software that allows you to sync files and create backups. But ever since the app was discontinued, many have been facing problems, including the Exception during preview error in SyncToy.

The message reads, Exception during preview: Failed to create the provider and the syncing operation fails altogether. Since there will be no further updates for SyncToy, you can’t wait for the developers to roll out a patch. So, let’s get straight to the fixes!

How do I fix the Exception during preview error in SyncToy?

1. Repair Microsoft Sync Framework 2.0

  1. Press Windows + R to open Run, type appwiz.cpl in the text field, and hit Enter.appwiz.cpl
  2. Select Microsoft Sync Framework 2.0 Core Components (x64) ENU from the list, and click on Change. If you have the 32-bit version of the program, the entry will mention (x86) instead of (x64).Microsoft Sync Framework 2.0 Core Components (x64) ENU
  3. Choose Repair and then click on Finish.repair to fix synctoy exception during preview
  4. Wait for the repair to complete.
  5. Similarly, repair the Microsoft Sync Framework 2.0 Provider Services (x64) ENU component.
  6. Once done, reboot the computer and check whether the error is fixed.

Many SyncToy users who took to forums to report the Exception during preview error confirmed that repairing Microsoft Sync Framework 2.0 Core Components (x64) ENU and Microsoft Sync Framework 2.0 Provider Services (x64) ENU does the trick!

This also helps if SyncToy is not working in Windows.

2. Install .NET Framework 3.5

  1. Press Windows + S to open Search, type Control Panel in the text field, and click the relevant result.
  2. Click on the Programs option.control panel
  3. Click on Turn Windows features on or off under Program and Features.
  4. Tick the .NET Framework 3.5 (includes .NET 2.0 and 3.0) entry and then click on Install to download the relevant files.install .NET framework to fix synctoy exception during preview
  5. Once done, reboot the PC and check whether SyncToy starts working.

3. Run SyncToy in compatibility mode

  1. Right-click on the SyncToy shortcut you use to launch the app and choose Properties.
  2. Go to the Compatibility tab, tick the checkbox for Run this program in compatibility mode for, and then select Windows 7 from the dropdown menu.run in compatibility with Windows 7
  3. Click Apply and OK to save the changes, reboot the PC, and check whether SyncToy can now sync files without throwing an error.
  4. If not, try running the tool in compatibility mode with another Windows iteration.

Since SyncToy is not officially supported on Windows 11, running in compatibility mode with a supported iteration may help get rid of the Exception during preview error.

If nothing else works, I recommend you take a look at our top picks for SyncToy alternatives and get one that works best. The tool has long been out of support and is not available via any official channel. So, troubleshooting issues will always be a challenge!

Which fix worked for you? Share with our readers in the comments section.

Use Services.msc to Connect to Another Computer [How to]

Services are essential on every PC but did you know that you can use services.msc connect to another computer? To learn how to do that, keep on reading.

How can I use services.msc to connect to another computer?

Use Services window

  1. Press Windows key + R and type services.msc. Click OK.
    run services.msc command
  2. Click on Action and choose Connect to another computer.
     connect to another computer services window
  3. Click on Browse.
    browse computer services remote access
  4. Select the desired device from your network and click OK.

How to view services remotely?

1. Use Command Prompt

  1. Press the Windows key + S and type cmd. Locate Command Prompt and choose Run as administrator.
    run command prompt as administrator
  2. Next, run the following command: sc \\192.168.1.7 query
    sc query command command prompt
  3. The list of all services on that PC will now appear.

2. Use PowerShell

  1. Press Windows key + S and type powershell. Right-click PowerShell and choose Run as administrator.
    run windows powershell as administrator
  2. Run the following command: Get-Service -ComputerName “192.168.1.7”
    Get-Service -ComputerName powershell command
  3. A list of all services will now appear.

Be sure to replace the IP address with the one that matches the remote PC. Alternatively, you can use the Services window.

As you can see, it’s pretty simple to use services.msc to connect to another computer. Do keep in mind that for this feature to work, both PCs need to be configured properly.

If you want to learn more, we have a whole on how to use services.msc, so don’t miss it. While services are necessary for Windows to work, many reported that the Startup type in Services is grayed out, but we have a guide for that as well.

Keep in mind that services.msc remembers last computer that was connected to if you use this feature, but that can be easily fixed.

Windows Server Datacenter preview build 26236 is now available in Azure

The Windows Server Datacenter: Azure Edition preview build 26236 is now available in Azure, causing quite a stir among the tech community. The technology gods have given us a new toy, particularly for Windows Server Insiders – a few weeks after Windows Server 2025 Preview Build 26227.

This fresh release is not an ordinary update; it has been optimized for Azure. So, if you are already familiar with the Azure environment, this version is a good match for you. If you prefer the Desktop experience or the Core one, both have surprises stored in them.

Now, you may ask, what makes this build so unique? The answer is that it’s crafted to enhance Azure operations. This build could be perfect if you want a smoother and more effective experience with your Azure-managed services.

Microsoft wants everyone to have a chance to try it out, so it’s offering a preview of what’s coming in Windows Server 2025 Datacenter: Azure Edition.

For those interested, there is much information on Microsoft Docs about Azure Automanage under the preview section: Windows Server VNext Datacenter (Azure Edition). If you like to be up-to-date and know first, looking at the announcement in the Microsoft Community Hub may help you get a jumpstart.

This release is an update and a preview of the future of server management in Azure. So, if you’re as interested as me, why not give it a go? Who knows, this might be the update that changes how you handle servers in Azure. Keep in mind, though, that it is only a preview build. While it is an exciting look at what’s to come, some issues still need ironing out.

But isn’t this a fun part? You can test, give feedback, and shape the future of Windows Server Datacenter: Azure Edition. Let’s start exploring what this build offers!

Proton VPN Not Connecting – How To Fix It in 6 Simple Ways

Proton VPN not connecting can be frustrating, especially when you rely on it for secure and private internet access. Common reasons for this issue include server overload, incorrect protocol settings, interference from antivirus or firewall software, and DNS configuration issues. 

Fortunately, you can easily solve the problem with the right steps. Before we begin, try these quick fixes:

  • Turn off the battery saver.
  • Reinstall and update the Proton VPN app.
  • Check device limit.
  • Contact customer service.

If none of the quick fixes work, read on for more.

How To Fix Proton VPN Not Connecting

Now, try these solutions in this order:

Switch Servers

Server problems or heavy traffic can lead to Proton VPN connection issues. Here’s how to switch servers:

  1. Open ProtonVPN and log in to your account.
Proton VPN connected
  1. Tap on the Countries button, and search for the server you want to switch to, or use the scroll button to locate one.
Proton VPN servers
  1. Tap on a country to display servers in the region then select a new one.
Select a server
  1. You’ll be connected to a new server. Check if the connection stabilizes.
Server changed

Change Protocols

Proton VPN supports multiple protocols including Smart, WireGuard, and OpenVPN (UDP and TCP). Switching Protocols can sometimes bypass network restrictions or compatibility issues. Follow these steps to change them:

  1. Open Proton VPN and log in.
Proton VPN connected
  1. Tap on the hamburger menu and click on Settings.
Settings
  1. Click the Connection button and tap on the drop-down menu alongside Protocol. Select a different protocol.
Proton VPN Protocols
  1. Then, tap Reconnect to save the changes.
Reconnect

Add an Exception for Proton VPN to Your Antivirus

Sometimes, antivirus software can block VPN connections. However, it’s not recommended to disable it completely since it protects your PC from different risks. You can add Proton VPN as an exception instead:

  1. Click the Windows button and type “Windows Security” in the search bar, then press Enter.
  2. Choose the “Virus & threat protection” option from the menu.
Virus & threat protection
  1. Click on “Manage settings” under the “Virus & threat protection” section.
Manage settings
  1. Scroll down to the “Exclusions” section and click on “Add or remove exclusions.” If you’re asked to allow the computer to make changes, tap Yes.
Add or remove exclusions
  1. Select “Add an exclusion,” then choose “Proton VPN” from the list.
Add an exclusion

Your Proton VPN app should now connect without interference from your PC’s antivirus.

Add an Exception for ProtonVPN to Your Firewall

Firewalls can also block VPN traffic just like antivirus. Instead of disabling it, add an exception so that ProtonVPN can connect smoothly while maintaining your Windows security.

Follow these steps:

  1. Press the Windows key, type “Control Panel,” and press Enter.
  2. Select “System and Security.”
System and Security
  1. Click on “Windows Defender Firewall.”
Windows Defender Firewall
  1. Choose “Advanced Settings” from the left menu.
Advanced Settings
  1. In the window that appears, click “Inbound Rules.”
Inbound Rules
  1. Select “New Rule” from the right-hand pane.
New Rule
  1. Choose “Program” and then click “Next.”
Choose Program
  1. Click “Browse,” find and select the Proton VPN application, then click “Open.”
Browse
  1. Click “Next.”
Tap Next
  1. Choose “Allow the connection” and click “Next.”
Allow the connection
  1. Specify when to apply the rule by checking “Domain,” “Private,” or “Public,” or selecting all, then click “Next.”
Specify when to apply the rule
  1. Enter a name and description for the rule if desired, then click “Finish.”
Enter a name and description

Adjust TAP Adapter DNS Addresses

Incorrect DNS settings in the TAP adapter can cause Proton VPN connection failures. To prevent this, modify your TAP adapter’s DNS settings to obtain an IP address automatically. Here’s how:

  1. Hit the Windows key on your keyboard, type “Control Panel,” and press Enter.
  2. Tap “Network and Internet.”
Network and Internet
  1. Click “Network and Sharing Center.”
Network and Sharing Center
  1. Click on Change adapter settings on the left sidebar.
Change adapter settings
  1. Double-click on the active network, tap Properties, and select Internet Protocol Version 4 (TCP/IPv4), then click Properties again.
select Internet Protocol Version 4 (TCP/IPv4)
  1. Select “Obtain an IP address automatically” and “Obtain DNS server address automatically.”
Modify settings
  1. Click OK to save the changes and close the dialog boxes.
  2. Restart Proton VPN and try connecting again.

Try an Alternative VPN Provider

If Proton continues to have connectivity issues, you can try another VPN provider like NordVPN. It has over 6,000 servers in 100+ countries for better connectivity options and less congestion. The Nordlyx protocol also provides a more stable connection.

Here’s how to set up NordVPN on your PC:

  1. Go to the NordVPN website and sign up for an account.
  2. Download the application for your operating system.
Download the NordVPN
  1. Install the application by following the on-screen instructions.
  2. Open NordVPN and log in with your account details.
NordVPN log in screen
  1. Select a server from the list and click Connect. You can also tap Quick Connect to get the nearest and fastest server.
NordVPN connected

Apart from speed, NordVPN includes features like Double VPN for extra security, CyberSec for ad blocking and malware protection, and Onion over VPN for additional privacy.

All things considered, you can resolve Proton VPN not connecting using the above fixes for uninterrupted safe internet access. If these methods fail, you should consider an alternative provider like NordVPN. Moreover, if you’re encountering a similar problem with Opera VPN, VyprVPN, or McAfee VPN we’ve got you covered.

So, which trick has worked for you in the end? Feel free to share it in the comments.

Creatures of Ava, a Palworld-inspired Xbox and PC exclusive game, is coming later this summer

Do you imagine a world where the hero fights alongside monsters to save the planet? This dream is becoming true with Creatures of Ava, and it will be available on Xbox and PC very soon. 

Picture yourself as Vic, an explorer in space who lands on the beautiful world called Ava only to discover that it’s endangered by a destructive disease known as ‘the withering.’ Your mission is clear: to heal the land and befriend its magical wildlife so you can discover a cure for Ava. 

This game offers a new twist on the monster-catching genre by offering peaceful and cooperative gameplay different from others with more combative themes.

According to the new trailer, Creatures of Ava will be released on August 7, 2024. The game offers a different approach to the usual style. Rather than capturing creatures by fighting them, you will use your powers of healing and negotiation to win over the people and animals in Ava. 

This involves solving puzzles and overcoming obstacles while exploring this beautiful world. The game asks, “Can you save Ava with your special powers?”

For those who enjoy games like Pokémon but are seeking something slightly different, Creatures of Ava stands out. It’s not just about rescuing monsters; it’s about exploring Ava’s stunningly varied biomes. Get ready to embark on an exciting journey of discovery. 

And what’s more? It will be on Xbox and PC Game Pass from the start, meaning many people can easily play this non-violent journey.

As a person who likes to play games and is interested in their storytelling and world-building aspects, I find the idea behind Creatures of Ava very interesting. It’s not only about doing quests or exploring new places for fun; it’s also about creating connections and impacting this nearly destroyed world. 

When Creatures of Ava comes out soon, it will be ready to inspire and win over gamers who want a purposeful yet enjoyable journey.

Then, put a reminder in your calendar for 7th August 2024, and get ready to start saving Ava. If you have experience with games where you catch monsters (Palworld, maybe?) or if this is your first time trying one out, Creatures of Ava is full of chances to explore new things – make friends, and save the planet. Will you join?

5 Ways to Optimize Thrustmaster Control Panel for Xbox

When it comes to getting the most out of your Xbox gaming experience with a Thrustmaster wheel, optimizing settings and ensuring everything is up-to-date can make a world of difference. Here are some key steps to help you enhance performance using the Thrustmaster Control Panel and other tools.

How can I improve Thrustmaster Control Panel?

1. Update the Thrustmaster Firmware

  1. Download Firmware Package: Visit the Thrustmaster support site and download the latest firmware package for your specific wheel model.
  2. Connect the Wheel to PC: Use a USB cable to connect your Thrustmaster wheel to your PC.
  3. Open Firmware Update Tool: Launch the firmware update tool included in the package you downloaded.
  4. Follow On-Screen Instructions: The tool will guide you through the process of updating the firmware. Make sure to follow each step carefully.
  5. Verify Firmware Version: After the update, check the firmware version displayed on the update tool to ensure it matches the latest version.

Updating the firmware ensures your Thrustmaster wheel has the latest features and improvements, enhancing compatibility and performance on both PC and Xbox.

2. Adjust settings in Thrustmaster Control Panel

  1. Install Thrustmaster Drivers: Download and install the latest drivers for your wheel from the Thrustmaster support website.
  2. Open Control Panel: Click on the Start menu, type Control Panel and press Enter.
  3. Access Thrustmaster Control Panel: In the Control Panel, look for Thrustmaster and click on it.
  4. Adjust Settings: You can adjust various settings such as dead zones, wheel sensitivity, force feedback strength, etc. Save your changes.

The adjustments made in the Thrustmaster Control Panel on the PC can optimize your wheel’s performance on Xbox, as these settings are often retained by the wheel’s firmware. We also have a complete guide on how to access the Thrustmaster tool and use it.

3. Reset to default settings

  1. Open Thrustmaster Control Panel: Navigate to the Thrustmaster Control Panel as mentioned above.
  2. Select Default Profile: Click on the default profile button to reset all settings to the factory defaults.
  3. Save Changes: Confirm and save the changes.

Resetting to default settings can resolve any configuration issues that may be affecting your wheel’s performance on Xbox.

4. Check game compatibility

  1. Consult Compatibility List: Visit the Thrustmaster support site and look up the compatibility list for your wheel model.
  2. Check for Specific Games: Verify if the games you are having issues with are listed as compatible with your wheel.
  3. Adjust In-Game Settings: For games that are compatible, make sure to adjust the in-game settings to match the recommendations provided by Thrustmaster.

Ensuring compatibility with your games can prevent performance issues and provide a smoother gaming experience on your Xbox.

5. Perform Hardware Calibration

  1. Open Thrustmaster Control Panel: As detailed in Solution 2, open the Thrustmaster Control Panel on your PC.
  2. Navigate to Calibration: Find the calibration option within the control panel.
  3. Follow Calibration Steps: Follow the on-screen instructions to calibrate your wheel and pedals accurately.
  4. Save and Test: Save the calibration settings and test the wheel on your Xbox.

Hardware calibration can resolve alignment and sensitivity issues, ensuring your wheel responds accurately during gameplay.

By following these steps, you’ll be well on your way to optimizing your Thrustmaster wheel for the best possible Xbox gaming experience. Remember to regularly check for firmware updates and adjust settings as needed to keep everything running smoothly.

Microsoft is refunding all people who bought the Redfall ‘Bite Back’ Edition

In an interesting update, Microsoft is giving money back to people who bought the Redfall ‘Bite Back’ Edition. This has become a subject of interest for gamers and those observing the industry. Redfall is a game that offers exciting actions for killing vampires, but it doesn’t deliver as expected.

Arkane Austin created it, and it was anticipated to be a new kind of cooperative shooter with good graphics; however, many players were not pleased with its rough development and dull gameplay experience.

Microsoft shut down Arkane Austin because the game could not attract an audience, which also resulted in them canceling the promised ‘Bite Back’ Edition of the DLC. According to Jez Corder of Windows Central, Microsoft is refusing all the people who bought the Redfall ‘Bite Back’ Edition.

Microsoft is taking responsibility for this situation by offering refunds to people who bought the Fallout 76 Power Armor Edition.

This refund process seems clear for those who own a digital copy—some have already received their money back, and others are told to check their emails (even junk) for possible updates on refunds.

For individuals holding physical copies of the game, there seems to be more work ahead, as they need to contact the Bethesda Customer Support team.

For fans who anticipated great things from Redfall, this conclusion is a mix of sadness and satisfaction. The idea behind the game was interesting, aiming at a market segment that hasn’t been fully explored – vampire-themed games.

Even though it received certain improvements after its release, such as adding 60 FPS mode to the list of features, these adjustments were not sufficient to rescue its image. Microsoft shutting down Arkane Austin and other studios is a clear example of how unpredictable the gaming business can be. But by giving these refunds, Microsoft is showing that they still care about making their customers happy, even if it’s after a bad experience.

For those affected, looking in their linked email accounts for refund notifications could be helpful. Even though this action doesn’t make up for the loss of what could have been a game that stands out from others, it does show some level of responsibility on Microsoft’s side.

In relation to Arkane, the studio continues its existence through its Lyon branch, which is presently engaged in creating a Blade-themed game; this provides light at the end of the tunnel for fans who appreciate the developer’s distinct style in making games.

This story of Redfall warns us about the difficulties faced in creating games and how crucial it is to keep your commitment to gamers.

How to Reset Services.msc to Default Settings in Windows

Dealing with misconfigured services in Windows can be a real headache. If you’re looking to reset services.msc to its default settings, I’ve got you covered with a few straightforward methods. Let’s dive into some practical solutions to get your services back on track.

How do I reset the Services to default?

1. Using System Restore

  1. Click on the Start menu, type System Restore and select Create a restore point.
  2. Click on System Restore.
  3. Now, select a restore point from a date before changing the services status that is causing the problem.
  4. Follow the prompts to restore your system, then restart your PC.

The best way to restore the Services back to their original state is by using System Restore. It’s like a time machine for Windows that will revert your computer to a previous state, which can fix service-related issues caused by recent changes.

2. Run the System File Checker tool

  1. Click on the Start menu, type cmd, and click on Run as administrator from the result.
  2. Type or paste the following command and press Enter to run it: sfc /scannow
  3. After the scan is completed, restart your computer.

If there is something wrong with the services, the SFC scan will also fix those and any system files that may have been corrupted.

3. Use ESET SysInspector

  1. Download the ESET SysInspector from the official ESET website for free.
  2. Run the tool and scan your system.
  3. After that, you will get an exact status of all the services on your computer.

The ESET tool is specifically designed to fix commonly used services that might have been corrupted or changed, making it a reliable choice for addressing a range of service issues.

Now, you will find indications online to download Batch files or Registry files with the default settings of the services. While there might be helpful files, we don’t recommend downloading such files from third-party websites and forums. In the worst case scenario, make sure that you properly sandbox those files for scanning before using them.

By following these steps, you should be able to reset services.msc to its default settings and resolve any issues you’re facing. The ultimate option is to reset Windows 11 and that will give you a clean state of the Services and Registry.

These steps can come in handy if services.msc remembers the last computer and not your own, so don’t hesitate to try them.