Minecraft’s Better Together Update begins rolling out on Xbox One, Windows 10, & Mobile

It looks as if the beta for Minecraft’s Better Together Update has no finished and the full, proper, public launch of the new unified Minecraft is ready to rollout.

https://twitter.com/Chupacaubrey/status/910213343528419328

According to Mojang’s Aubrey Norris, the update has already begun to roll out to Xbox One consoles and will continue in waves throughout the rest of the week while the Windows 10 and mobile versions will update tomorrow. The Nintendo Switch version will apparently update later in the year as Mojang is still testing this new version on that console.

After the update has been installed, all versions of the game will be renamed as simply, Minecraft (i.e. no Minecraft: Windows 10 Edition-type titles), and a load of new changes will be implemented. You can read a comprehensive of what will be new here. The biggest new feature will be the ability to play with other players on different platforms. As long as they’re running the latest version of the game that is.

Minecraft will be getting another big update later in the year with its Super Duper Graphics Pack which will add 4K graphics and higher resolution imagery (pictured above).

Are you excited to play this new version of Minecraft? Let us know in the comments below.

Xbox 360’s Fable Anniversary is coming to Xbox One

Microsoft’s Phil Spencer has confirmed in a tweet that the popular Xbox 360 video game, Fable Anniversary, will indeed be coming to the Xbox One family of consoles via the system’s backwards compatibility feature. While no estimated release date was announced, Spencer did state that it’s being worked on right now so fans shouldn’t have to wait too long.

Fable Anniversary was a re-release of Fable: The Lost Chapters for the Xbox 360 and contained a variety of improvements such as better graphics and Xbox Achievements. The game came out relatively recently in early 2014.

Do you enjoy playing Xbox 360 games on your Xbox One via backwards compatibility? Let us know your favorites in the comments below.

USB Drive Not Mounting in Windows 10: How to Fix it

Have you ever tried to plug in your external USB drive to your computer, but it’s not mounting in Windows?

This can be problematic, especially when you urgently need the files saved in the drive or your drive is the only tool you have to save your files for use elsewhere.

The first instinct would be to unplug and plug it back through another port. However, if this doesn’t resolve the issue, then either your external USB drive has a problem, and if not, there are various solutions you can use to resolve it. Keep reading to find out!

What can I do if USB drive is not mounting in Windows 10?

Before we head to the slightly complex solutions, try these quick ones:

  • Restart the computer.
  • Unplug any USB hub connected to your computer and remove other devices.
  • Check for any pending updates from Windows Update.
  • If the external USB drive has a power switch, power it on.
  • Try your external USB drive on a different computer. If it still isn’t working, then the drive has a problem.
  • Sometimes Windows may ask you to format the external USB drive. Don’t do it yet because you may lose all your files. It is possible your drive was formatted on a different operating system, so you can either read it on a different OS or choose a third-party program to help you read its contents. Otherwise, if you don’t need the files, choose Format disk and proceed.

If none work, head to the fixes listed next.

1. Scan for hardware changes

  1. Right-click the Start button.
  2. Select Run.
  3. Type devmgmt.msc.
  4. The Device Manager will open, then select the USB entry.
  5. Go to the Action tab, and select Scan for hardware changes.scan or hardware change to fix usb drive not mounting windows 10

If this still doesn’t resolve the issue with your external USB drive, then the next solution.

2. Uninstall and reconnect the external USB drive

  1. Right-click the Start button and select Device Manager.
  2. Select Disk Drives.
  3. Right click on the problematic external USB drive, and click Uninstall device.uninstall device
  4. Unplug the external USB drive, then wait for about a minute and reconnect it again.

Once you do the above, the drive should load automatically.  To be sure it has been recognized, go to Windows/File Explorer and check for it.

3. Reinstall USB controllers

  1. Right-click the Start button.
  2. Select Device Manager.
  3. Find Universal Serial Bus controllers and click to expand it.
  4. Right-click on the device.
  5. Click Uninstall device.uninstall
  6. Rinse and repeat for all other problematic devices.
  7. Reboot your computer.

Once you do the above, the drive should load automatically.

4. Disable USB selective suspend

  1. Click on the battery icon from the taskbar and select Power and sleep settings.
  2. Click on Additional Power settings.
  3. Next to your current power plan, choose Change plan settings.change plan settings to fix usb drive not mounting windows 10
  4. Click on Change Advanced Power Settings.
  5. A pop up will appear.
  6. Find USB settings, and expand it.
  7. Expand USB Selective Suspend.
  8. Click on the drop down menu, and choose Disabled.disable to fix usb drive not mounting windows 10
  9. Click Apply, then OK.

Ensure you have a system restore point created first, and if these solutions do not yield any results, remember to restore your old settings back.

5. Update the drivers

  1. Right-click the Start button.
  2. Choose Control Panel.
  3. Under Hardware and Sounds, click View Devices and Printers.
  4. Your computer will start scanning for available devices.
  5. Check for any entry on any Unidentified USB device or Unknown Device.
  6. Open the Properties of the unknown or unidentified external USB drive.update
  7. Update the driver if there’s an update available.

6. Prevent computer from turning off device

  1. Right-click the Start button.
  2. Select Device Manager.
  3. Click on Universal Serial Bus Controllers to expand the list.
  4. Select the USB Root Hub for your drive.
  5. Right-click and select Properties.
  6. A popup box will appear. Navigate to the Power Management tab.
  7. Uncheck the Allow the computer to turn off this device to save power option, and click OK.disable setting

In case the USB drive is still not mounting in Windows 10, head to the next method.

7. Update the USB drive drivers

  • Right click Start button
  • Select Device Manager
  • Click on Universal Serial Bus Controllers to expand the list
  • See whether there are any devices with either a yellow exclamation mark, question mark, down-arrow mark, or an error notification or code.
  • If the driver has a yellow exclamation mark on it, double-click on it, then open Properties
  • Under Drivers tab, choose Update Driver, and follow the on-screen instructions to complete the process.update to fix usb drive not mounting windows 10

Perhaps your computer cannot identify or see the external USB drive, but it is visible on other computers. This indicates that something is wrong with your USB drive drivers. In this case, updating the drivers will do the trick.

And if the USB drive was not mounting earlier, it should be listed both under the Device Manager and File Explorer now.

Hope these solutions worked. But let us know your experience.

Something Went Wrong in Microsoft Office 2013: Error 30088-4

Error Code 30088-4 is a generic error that pops up when you try to install Office 2013. Oftentimes, You can’t fix this error by uninstalling Office and trying to install it again. Here you’ll find a few ways you can deal with it.

Something Went Wrong in Microsoft Office 2013 [FIX]

This error is particularly prone to happen on operating systems that have had Office installed on them before. Sometimes, the built-in uninstaller just doesn’t cut it; it doesn’t delete everything and leaves some files on your computer, and those cause issues on subsequent installs of Office.

Solution 1 — Completely uninstall Office using Microsoft’s tool

Thankfully, Microsoft has provided a tool that was specifically made to help you uninstall Office. You can follow these steps to download and use the tool:

  1. Download the tool from here.
  2. When it has finished downloading, double-click on it and open it.Uninstall Tool for Office
  3. Click on next on the first screen. Wait a bit until the next screen shows up that gives you a yes or no choice. Click on Yes to remove office.
    Click on Yes to remove Office
  4. Wait for the tool to do its job.

You should try installing Office again to see if the error code 30088-4 still persists. Hopefully, it won’t, but If it does, you should try the next method.

Solution 2 — Completely uninstall Office manually

Deleting all of Office’s files manually consists of many steps. But before we start, you have to make sure your computer displays hidden files and folders. Do so by following these steps:

  1. Open Start and search for File Explorer Options. Click on the first choice.
  2. Go to the View tab.
  3. Under Advanced Settings, you’ll two radio buttons. Make sure to select ‘Show hidden files, folders, and drivers’.
    Show hidden files and folders
  4. Uncheck the ‘Hide extensions of known file types’ checkbox and hit OK.
    uncheck hide extensions for known file types Error Code 30088-4

Now that you can see hidden files on your system, it is time to delete the ones related to Office.

Read also: How to run Microsoft Office Picture Manager on Windows 10.

Stop Office’s service

Microsoft Office has a service named Office Source Engine Service, and this should be stopped before proceeding further. It locks Office files on your computer, and if you attempted to delete them, your computer will only show a “File in use by another process” error.

  1. Search for Services in Start and select the option with a gear icon.
  2. After the Services window opens, search for Office Source Engine and right-click on it. If the Stop option is available, click it. If it’s not, that means it wasn’t running, to begin with, and you should move forward.Stop Office Source Engine Error Code 30088-4

Uninstall Office packages

  1. We first have to navigate to the Installer folder to delete all of Office’s installer packages. You can do this by simply copying this address ‘C:\WindowsInstaller’ and pasting it in your Windows Explorer’s address bar (note: this address may not work with some locales, in which case you should simply navigate to the folder).
  2. Open the View tab by clicking on (it’s on the top right corner). In the Layout section, you should make sure Details is selected. This will display more information about each file and help you locate the Office 13 ones.
  3. While still on the View tab, click on Add columns and then choose Choose columns.
    Choose columns photo Error Code 30088-4
  4. A window should pop up. Scroll down until you find an option titled Summary and check it.
  5. Before clicking OK, you should make sure that the Width of selected column (in pixels) box has a value over 350. This will help you see all of the summary, which is vital to know which files are the Office installers.Width of selected column photo Error Code 30088-4
  6. Sort the files by their summary by clicking on the Summary in the Column Headings.
  7. Find any file that starts with “Microsoft Office” and ends with “2013”. These are all related to Office 13 but don’t delete them by simply pressing the delete button. You must right-click on each one and select Uninstall.

Delete the leftover Office files

Depending on whether you are running A 64-bit version of Windows or a 32-bit, the locations you need to search will differ. The ‘(x86)’ part of each address is only required if you have a 64-bit system, and you should omit it if you have a 32-bit one.

  1. Navigate to “C:\Program Files (x86)\Common Files\Microsoft Shared”. This is the folder where Microsoft stores files of several of its flagship programs.
  2. Locate the folders “Office 15” (which is Office 2013‘s official version number) and “Source Engine” and delete both of them.
  3. Now, navigate to “C:\Program Files(x86)\Microsoft Office”. This folder is specifically for Office files.
  4. Delete the “Office 15” folder here too.
  5. Finally, You might find a folder named “MSOCache” at the root of each of your hard disk drives. Open each one and search for a folder named “All Users”. Type “0FF1CE}- ” in the search bar and delete everything that turns up.

You may need to repeat step 5 a number of times depending on how many drives you have. One time for each hard drive. 

Finishing touches

  1. Navigate to “C:\Users\[username]\AppData\Roaming\Microsoft”. You should replace [username] with your specific username on the computer.
  2. Open the templates folder and delete both Normal.dotm and  Welcome to Word.dotx files.
  3. Go back and then go into the Document Building Blocks folder.
  4. You’ll find a folder with four digits as its name. Open it and you may find a file titled ‘Building blocks.dotx’ delete it. If you didn’t find it, you may find a “15” folder. Open it and delete the Building Blocks.dotx there.

Delete Office keys in the Registry

A word of warning, deleting Registry keys is quite risky to do and you might make your computer unfunctional. You should attempt this as a last resort and make sure you backup your Registry before doing it.

  1. Open Registry by searching for regedit in Start.
  2. Navigate to “HKEY_LOCAL_MACHINE\SOFTWARE\Microsoft\Office15″. 
  3. Delete that folder and all of its keys.

Solution 3 — Use the offline installer

If you are using an online installer for your Office installation, switching to the offline counterpart might help. There are a lot of unknown variables like firewalls and ISP specific settings that might cause the error. The offline installer will eliminate those uncertainties and, hopefully, help you install Office successfully.

Conclusion

In this article, we looked at three ways you can deal with the stubborn error code 30088-4. We hope that as you are reaching this point in the article, your Office is happily installing without any issues.

Use the comments section below to tell us about the problems you’ve faced when trying to install Office, and whether this article helped you resolve the error code 30088-4, or if there was a method we overlooked and didn’t mention.

RELATED STORIES TO CHECK OUT:

pCloud: what it is and how to install it [Windows, Mac]

Are you looking for personal storage space for all your files and folders? Then pCloud is your friend.

pCloud is a personal cloud storage space where you can keep away all your folders, files, and any other documents.

What’s more, its interface is user-friendly and shows you where everything is located, as well as what each item does. Plus, you can get it on almost any device and operating system such as Windows (10, 8, 7, Vista and XP), or get it as a mobile app, or web extension (this is the latest feature on pCloud).

Once you install it on your computer or device, the app, which works pretty much like Google Drive, creates a well-secured virtual drive that enlarges your local storage space.

Each change made instantly reflects on your computer, or device, and synchronizes them so you can access any updates made.

Some of the main tasks you can fulfill with pCloud include:

  • Sharing files and folders

You get instant access to all your files and easily share with anyone (up to 150 times), anywhere in three ways:

  1. Share a link by creating a link to files or folders in your account and share the link. This works whether they have their own pCloud accounts or not. They can view and download your files.
  2. Invite others to a folder for collaboration. You can control who can edit or view files on your pCloud storage.
  3. Upload links by providing a link to your folders where others can upload their content to.
  • Instant file synchronization

You can sync all your files instantly between your computer, phone, and tablet using pCloud Drive, then sign in with the same login credentials across all the devices. If you have it already, every change you make is synced on all your devices so you can access from any device, anywhere, anytime.

Note: you need the app on your other devices in order to access and synchronize your files.

You can register for the app on your mobile device as well. When you install and launch it, you’ll either use an existing account or create a new one. This comes with most pCloud features and 10 GB storage space for free! You can only have one app installation per device, linked to a single account, which means you cannot use multiple accounts.

pCloud key features include:

  • Sharing download and upload links
  • File versioning
  • Data recovery
  • Upload your files and data remotely, or work offline (by adding your files to Favorites – click on the star sign next to your files, and you can use any files, photos, videos or audios while offline).
  • Preview documents while online
  • Restore files using Rewind feature
  • Have an extension for your HDD
  • Get detailed statistics for your shared links, including number of downloads
  • Save 5 copies of files on different servers, and you have an option for extra encryption
  • Automatic uploads of photos (including camera roll)
  • Create backups from various platforms such as Dropbox, Facebook, Instagram, OneDrive and/or Google Drive

Types of pCloud applications available

There are three types of applications available:

  • pCloud for Desktop
  • pCloud for Mobile
  • pCloud for Web

pCloud for Desktop

This can be used on almost any operating system including Windows. It creates a virtual drive that you can use the way you use your hard drive but doesn’t take up any space on your computer. It secures your data using pCloud Crypto – this is a new feature that requires a Crypto pass to encrypt and decrypt your files.

pCloud for Mac

pCloud works seamlessly on all Mac operating systems, offering quick access to its functions without affecting your hard-drive in any way. It does this in the same way as on the Windows platform, by creating a virtual drive, thus offering a sandbox-environment which can not affect your system even if it gets corrupted.

pCloud for Mobile

Once you install the app on your device, you can use its mobile features to preview, upload, download, or share files on the go. The pCloud Automatic Upload feature also backs up your photos and videos from your device to the cloud.

pCloud for Web

pCloud’s web platform on my.pCloud.com allows you to preview, upload, and download any files. You can share them with anyone, and do more in any web browser.

How to get pCloud for your computer

To get pCloud on your computer, there are quick yet simple steps you can follow as outlined below:

pCloud website

  • On the top right-hand side, click Download

pCloud download

  • You will see a variety of operating systems and devices to which you can install the app
  • Click on Windows

pCloud Windows

  • Point on the ‘Choose another version’, and select your version of Windows

pCloud download Windows

  • If using Windows 10, click on it
  • Your download should start immediately

pCloud download

How to install pCloud on your computer

To install the app, take the following steps:

  • Go to the folder in which the pCloud download (.exe file) was saved

pCloud download exe

  • Double click on the .exe file OR right click and select Openpcloud download exe
  • A setup box will appear
  • Read the terms and conditions, then check the box to agree

pCloud setup

  • Click Install
  • Windows will ask whether you want to continue with the installation: Click Yes or Allow
  • The set up will begin processing your installation request

pCloud setup process

  • A pop up will appear asking “Would you like to install this device software”, click Install

pCloud install prompt

  • You will receive a confirmation that your setup was successfulpcloud set up successful
  • A little blue cloud icon with the letter P on it will appear on your taskbar. That means the app has been installed and appears as a virtual drive on your computer

pCloud icon taskbar

  • Click Launch

pcloud set up launch

  • The login window will appear. You can sign in with your existing account or create one

pcloud login

  • Upon successful signing in, pCloud will send a welcome message.

Once set up and installation is complete, and you’re logged in, you can proceed to save your files to pCloud.

pCloud pros and cons

Pros

  • Easy file backup
  • Guaranteed security/Password protection
  • User-friendly interface
  • Easy to navigate File Manager
  • You can connect using your Facebook profile if the email addresses match
  • Easy sharing (with advanced features)
  • Set expiration date on shared files/links
  • You can track the number of link downloads
  • Rewind feature lets you restore files
  • Comes with 50 GB storage for a free account (has premium accounts as well). You can get additional free space when yours is used up, by inviting other users to register for pCloud. Each registration expands your storage space with 1GB when either the user has uploaded 1GB to pCloud, or has signed in from a device or virtual file system. You can also backup your documents to pCloud and get additional free space.
  • Comes with a free version before upgrading to paid or premium versions

Cons

  • For users on the free version, accounts are deleted after 12 months of inactivity, permanently deleting the files (and account) altogether
  • Some users have noted that the app constantly pulls some processor time after a while
  • Users on the free version can only restore deleted files within the first 24 hours upon deletion, though the files are held in the Trash folder for 15 days. An upgrade to the Premium version is required to restore these files, and other files deleted more than 24 hours ago.

Have you tried pCloud or do you use it? Share your experience with us in the comments section.

RELATED STORIES TO CHECK OUT:

Convert LibreOffice documents to Word file format with these converters

ODT is the default text document format of the OpenOffice and LibreOffice suites. However, not every MS Word application supports ODT; and those versions that do don’t always exactly preserve the original ODT page formatting. Thus, it’s better to convert a ODT file to either a DOC or DOCX format before opening it in Word. Here are a few file converters that you can convert the ODT and DOC formats with.

Best ODT to DOC converters

Doxillion Document converter Software

Doxillion Document Converter Software is a program that you can convert numerous document file formats with. The software has a freeware version that supports a more limited range of file formats than the Pro version, which is retailing at $14.99. Doxillion is compatible with 64-bit Windows platforms from XP up. Press the Download Now button on this website page to add Doxillion to Windows.

Doxillion supports the ODT, DOC, DOCX, PDF, TXT, HTML, RTF, XML and EPUB document formats among others. As such, you can convert various file formats with this software. Doxillion users can convert multiple ODT documents to DOC formats with the software’s batch file converter. This program also adds options to context menus in Windows Explorer so that you can select to convert documents by right-clicking their files.


MultiDoc Converter

MultiDoc Converter is a freeware ODT to DOC converter with which you can convert a batch of documents to alternative file formats. You can run this software on both 32 and 64-bit Windows platforms from Vista to 10. Click Setup.exe on this website page to save the program’s installer to Windows.

This software is primarily a batch conversion tool with which you can select to convert a group of ODT documents within a specified folder path. It includes filters that you can select to convert just one file format within a specified folder.

MultiDoc users can then select to convert their files to DOC, DOCX, RTF, XML, HTML, TXT or EPUB formats. This program doesn’t have a huge range of additional options, but it’s a straightforward batch-processing tool with which you can quickly convert multiple files to other formats.


Soft4Boost Document Converter

Soft4Boost Document Converter is a freeware file conversion utility that has a few novelties. The main novelty is the that software is a file viewer and converter wrapped into one. The program works on Windows 10, 8.1, 8, 7 and Vista; and you can save its setup wizard by pressing the Download S4B Document Converter button on this website page.

You can convert ODT documents to DOC, PDF, DOCX, TXT, RTF and HTML formats with Soft4Boost Document Converter. Unlike some alternative file converter software, S4B Document Converter also displays selected documents in its window and includes a Print option.

You can select to convert multiple documents at once, and the program also supports drag and drop so that its users can drag files onto its window. S4B Document Converter users can also modify the output file titles and select to extract images from the documents.


AVS Document Converter


AVS Document Converter is a utility designed specifically for converting ODT, DOC, PDF, DOC X, TXT, EPUB, HTM and HTML file formats. The software is freely available, but the non-activated version adds watermarks to converted output files. To remove the watermarks, you’ll need a $39 access subscription. Press the Download AVS Document Converter button on this page to save the installer to Windows.

AVS Document Converter’s UI bears an uncanny resemblance to S4B Document Converter. In fact, the UI design is almost something of a copy as it also incorporates document tab previews within its window and shares similar rename, extract images and format settings options. AVS Document Converter users can batch convert documents, and the software includes a Create Archive option with which you can compress output files. This software also includes a command line mode that users can convert and merge files with.


Total Doc Converter

Total Doc Converter is software that you can convert ODF files to the DOCX format with, which is the default file format for more recent Word versions. Total Doc Converter users can also convert DOCX to a format more compatible with earlier Word versions. This software is retailing at $49.90, and you can try out a one month trial package.

Total Doc Converter supports 10 output file formats, which include RTF, DOCX, PDF, TXT and HTML. The software has a preview panel that displays the selected document, and you can print out the files. Total Doc Converter users can batch process their documents and merge PDF and DOC output files. This program also has additional options for adding header or footer logos, digital signatures, page counters and dates to output documents.

Those are five file converters that support the ODT, DOC and DOCX formats. With those programs, you can quickly convert multiple ODT documents to MS Word’s DOC or DOCX default formats. That will ensure the documents retain their original formatting and layout when you open them in Word.

RELATED STORIES TO CHECK OUT:

NBA 2K18 players bothered by microtransactions

NBA 2K18 is finally here! The hype is still real but the game itself might actually kill the excitement for some players. According to the very first 1500+ reviews on Steam (around 1,600 reviews), players are quite unsatisfied with the game.

The main problem? Microtransactions, an aspect of the game that has angered gamers for years in general and with NBA 2K releases in particular. Almost every Steam review says that the game has become pay-to-win and comment on how the balance between buying VC for actual money and earning has been disrupted.

Here’s what some of the players say:

“AAA price tag for a game that has more pay-to-win microtransactions than 99% of mobile games. They’re probably going to charge you VC to be able to skip cutscenes in an upcoming patch too,” said user Zyrrac.

“I fear that in NBA 2k20, 2k will demand VC for every step we take. It’s ridiculous to ask money for even hairstyles that were available for free last year. Even f2p games don’t ask for this much money for in-game items and the game itself is expensive in the first place. For God’s sake, what does it take to satisfy 2k’s greed,” asked Kuraf.

Players indeed have a point on this one. It would make sense for free-to-play games to as many transactions as developers need at least some money from players. But doing the same thing with an AAA title is unfair towards players, to say the least.

What do you think about the whole concept of the game? Is it really pay to win now? Let us know in the comments below.

RELATED STORIES YOU NEED TO CHECK OUT:

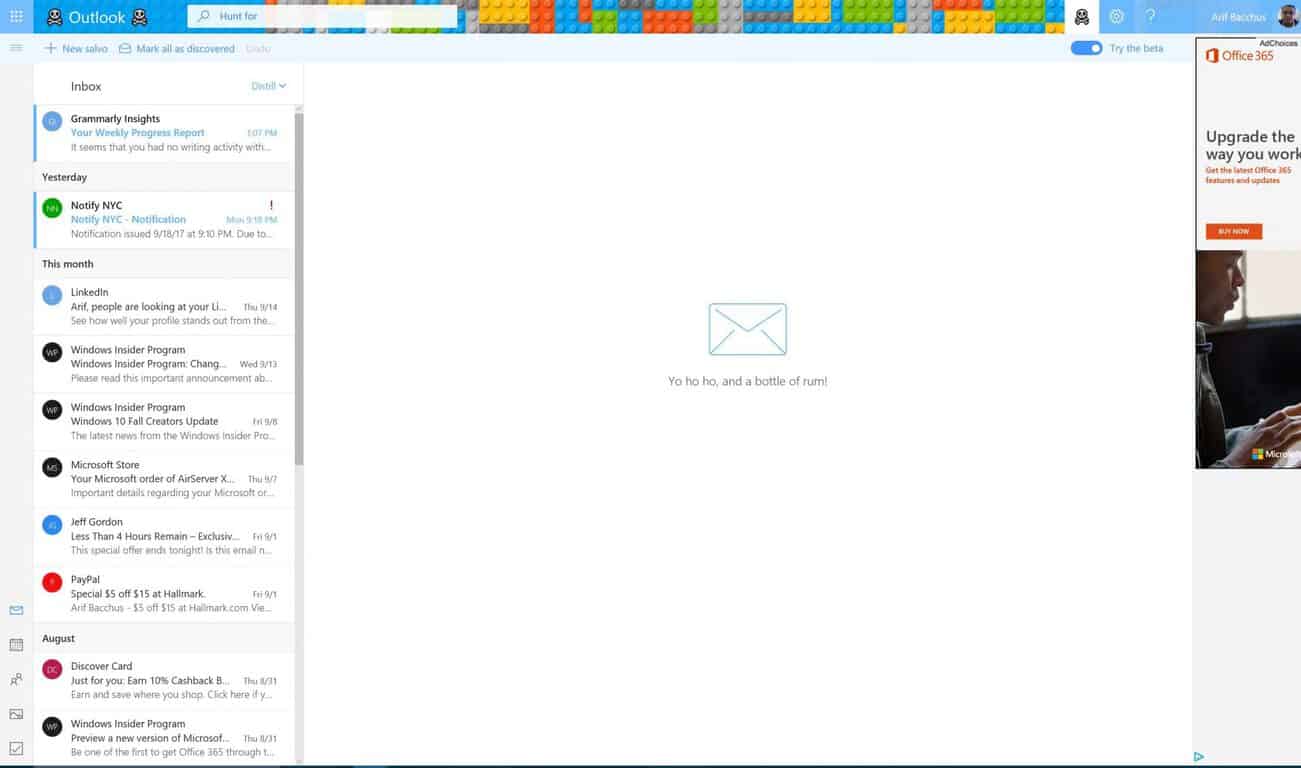
‘Pirate Speak’ mode transforms your Outlook.com account on International Talk Like a Pirate Day

Today, September 19th marks International Talk Like a Pirate Day, and of course, Microsoft is getting into the fun. A temporary ‘Pirate Speak’ mode is now showing up on Outlook.com Beta accounts, allowing you to have a couple of laughs and celebrate the day dedicated to pirates (via Windows Central.)

If you’ve enabled the Outlook.com beta, you can find the button to toggle the Pirate Speak mode by looking for the skull and crossbones icon in the upper right-hand side of your inbox. After you click and toggle this switch, the text in Outlook.com will transform into a Pirate-type language. Here is a list of what you can expect if “ye be so brave enough” to toggle the button and “walk the plank” down into the world of Pirate talk.

  • Your Favorites heading will be marked as “Loot.”
  • Your Folders will be marked as “Treasure Troves.”
  • The search button will be labeled as “hunt for.”
  • New mail will be marked as “New Slavo.”
  • Delete will be “Throw Overboard.”
  • Send will be “Fire away.”
  • CC will be “Expand Crew”
  • BCC will be “Stow Away”

Several other areas of the Outlook.com Beta experience also see language changes when “Pirate Speak” mode is enabled. And, if you don’t like the mode, you can disable it by clicking on the skull and crossbones icon again.  We’ll let you explore the other changes on your own, so have fun, and let us know your favorite part of the Pirate Speak mode by dropping us a comment below.

Steam Inventory Helper reportedly spies on users

If you installed the Steam Inventory Helper on your computer, you may want to uninstall it as soon as possible: recent reports suggest this extension used to buy and sell digital goods on Steam is spying on its users.

Redditor Wartab made a thorough analysis of the tool and reached the following conclusions:

  • The spyware code tracks your every move starting from the moment you visit a website until you leave. It also tracks where you are coming from on the site.
  • Steam Inventory Helper tracks your clicks, including when you are moving your mouse and when you are focusing on an input.
  • When you click a link, it sends the link’s URL to a background script.
  • Fortunately, the code does not monitor what you type.

The purpose of this spyware is to collect data about gamers for promotional purposes.

Steam spyware

Here’s what Wartab wrote on Reddit:

I have just analyzed the current code of Steam Inventory Helper. Step by step what it does:

On every single page you visit, SIH executes code at document_start (meaning as soon as the page is opened). It even executes on your about:blank page and in all sub-frames on the currently visited site! The code executed is js/common/frame.js […]

What this script does is very nasty. First of all, it monitors EVERY SINGLE HTTP request you make. […] It will then send to their own server a summary of this HTTP request if some condition is met (promoteButter?). […]

Bottom line is: they are monitoring what sites you visit and may be sending a lot of your online activity to their own server. I couldn’t figure out when they do it, yet, but it seems to be for promotional stuff. More importantly, in the future, even if what they do now is legit, you will not be informed about any changes to their permissions, because it basically already has every permission it can get in that regard. Therefore I strongly suggest uninstalling and reporting this extension.

Steam has yet to issue any comment on this matter.

Users fear Steam could go into full tracking mode

This entire debacle has unsurprisingly let many users down and put them on edge, fearing that Steam could include something harmless to enable the permission at first and later enable a full-on tracking mode in a later update. However, it’s not likely Steam would ever resort to such a move considering the negative reaction to the spyware that was just discovered.

As a result of this news, many users have decided to uninstall many other Steam-related apps and extensions, fearing these programs might be spying on them as well. All in all, this revelation deals a devastating blow to Steam’s reputation.

Back to the user data privacy debate

There have been many revelations concerning the breaching of user data lately, like reports revealing that Netgear routers collect analytics data,  Windows 10 Enterprise ignores user privacy settings, and the infamous advanced NSA backdoor infection that affected tens of thousands of Windows computers.

How can users prevent companies and other organizations from collecting data on their digital behavior and preferences? It seems that in the era of no privacy, VPN software could be the answer. However, any tool claiming to protect your online privacy isn’t 100% bulletproof and ultimately, there is no perfect solution to this quandary. With an increasing number of users becoming more aware and subsequently concerned about their data privacy, we’re sure developers will focus more on creating software that helps them defend the integrity of user privacy.

Just like the antivirus industry boomed after malware started to invade the internet, we’re sure companies that develop user data privacy software will become very successful in the future. No matter where you fall — consumer, developer, or hacker — the battle to keep user data private has only just begun.

What do you think about Steam spying on its users? How does this revelation affect your online behavior? Let us know in the comment section below!

RELATED STORIES TO CHECK OUT:

Phil Spencer promoted to Executive VP as Xbox gains a seat on Microsoft’s Senior Leadership Team

Phil Spencer has just received a promotion to Executive Vice President of Xbox, and a seat on the Senior Leadership Team. First noted by Microsoft watcher Mary Jo Foley, the promotion suggests that Microsoft may be taking its Xbox and gaming incentives more seriously moving forward.

Now that Phil Spencer has moved up to an EVP position, Microsoft has a total of 16 members in the Senior Leadership team— including CEO Satya Nadella, Terry Myerson, Brad Smith, and others. Spencer will continue to be responsible for Microsoft’s gaming incentives across all of its platforms, such as Xbox HoloLens, and Windows. He is well known by Xbox fans and was previously the head of Microsoft Studios before he was promoted to Executive Vice President of Gaming at Microsoft.

The change in position is effective immediately was shared with employees today by Satya Nadella. Along with this, he also shared the news that the Enterprise Mobility and Security (EMS) team is moving from the Cloud and Enterprise unit to Windows and Devices. The new team is being renamed to “Enterprise Mobility and Managment” and members will report to Corporate Vice President Brad Anderson and Windows and Devices chief Terry Myerson.

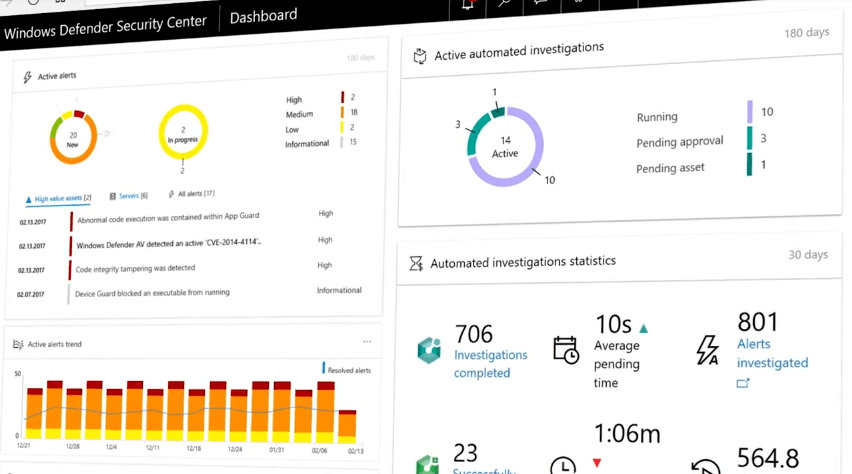
Windows Defender ATP to add AI-based automated threat responses

By launching Windows Defender Advanced Threat Protection last year, Microsoft gave enterprise customers a new tool that can detect, investigate, and respond to advanced attacks on their networks. The upcoming Fall Creators Update will further improve Windows Defender ATP with new prevention capabilities, but Microsoft’s recent acquisition of security automation company Hexadite will add another much important brick to the wall.

“We are happy to announce we have successfully integrated Hexadite’s innovative security automation technology into Windows Defender ATP,” Microsoft announced today. “This enables Windows Defender ATP customers to leverage state of the art AI technology to solve their alert volume challenges by letting Windows Defender ATP automatically investigate alerts, apply artificial intelligence to determine whether a threat is real and to determine what action to take, going from alert to remediation in minutes at scale.”

You can see how Hexadite’s security automation technology will improve Windows Defender ATP in the video below:

The Redmond giant says that the new automated response capabilities in Windows Defender ATP will be available in preview later this year. “With this addition, Windows Defender ATP now covers the end-to-end threat lifecycle from detection to investigation and response automatically,” Microsoft added.

US Navy to control submarine periscopes with an Xbox Controller

You’re probably familiar with using your Xbox Controller to play Call of Duty or Forza in your living room, but the government has come up with another (much cooler) use for the device. Noted by Digital Trends, the US Navy is looking to replace the joystick controllers on their new Virginia-class submarines with Microsoft’s Xbox controller.

The reasoning behind the switch to the Xbox Controller is rather complex, but it is mainly due to the fact that some junior officers found the current joystick control system too clunky and heavy. Basically, the current joystick system (valued at $38,000) which are used to control the periscopes, photonic masts, and 360-degree cameras on board the submarine is not working out well for some crew members.

As a result, Lockheed Martin experimented with other systems like multi-touch tables and Kinect, but the $30 Xbox Controller was the winner amongst sailors and the government.  Senior Chief Mark Eichenlaub explains.

“That joystick is by no means cheap, and it is only designed to fit on a Virginia-class submarine…I can go to any video game store and procure an Xbox controller anywhere in the world, so it makes a very easy replacement.”

The Navy has extensively tested the system and plans to put it into use on the USS Colorado in November, and other Virgina-class submarines in the future. While a bit more serious than using the controller to battle it out on Call of Duty, using the Xbox Controller to control an actual real-life submarine is a boy’s dream come true. Do you envision any other uses for Xbox Controller? Let us know your thoughts below!

Outlook.com is back up and running in Europe

Yesterday, Microsoft’s Outlook.com was hit by a service outage in Europe, which prevented many users to access the service or send and receive emails. After investigating the issue and deploying a fix, Microsoft confirmed on the Office 365 Service Health page today that the consumer email service is now back up and running in Europe.

“We’ve verified that new mails are being sent and received as expected, and the previous queue has returned to normal,” explained Microsoft in the latest update published earlier today. “A very small number of messages sent during the incident may be delivered over the next few hours as the last remaining messages are processed.”

Have you been affected by the outage yesterday, and if so are you now able to use Outlook.com as usual ? Let us know below.

Play NBA 2K18 right now on Xbox One

NBA 2K18 is now available to play on the Xbox One family of gaming consoles. The latest entry in the NBA game franchise features several significant visual and gameplay upgrades in addition to a variety of new modes such as The Neighborhood which allows players to connect with others online. Here’s the official game description:

We are excited to announce that NBA 2K18’s free demo, The Prelude, will be available to fans this Friday, September 8 at 12am ET on Xbox One and PlayStation 4. Fans can get an early taste of NBA 2K18 with this free, downloadable experience that begins their journey into The Neighborhood, the groundbreaking new way to play NBA 2K. The Neighborhood brings together the most loved elements of NBA 2K together into a shared world for players to truly experience the life of an NBA athlete, both on the court and off.

Buy NBA 2K18 on Xbox One

Gamers interested in sampling NBA 2K18 before buying the full game should check out NBA 2K18: The Prelude, a free demo of the title designed to introduce the game’s mechanics and modes to new players.

Have you played NBA 2K18 yet? Share your impressions with the community in the comments below.

Fix: Cortana ”Ask Me Anything” not working in Window 10

A story about Cortana is a story about ups and downs. It started strong, others caught up, and now it’s still a force to be reckoned with, but not as popular or praised as it was back in the days. The main reason is a lackluster support (especially for the Windows Mobile platform) and an inclination towards bugs. One of those bugs is a critical stall of Cortana in Windows 10 which occurs in different variations. Basically, Cortana ”Ask me anything” feature doesn’t work as intended.

Luckily, there are a lot of ways you can address this or similar issues with Cortana. For that purpose, we advise you to follow the instructions below and we’ll overcome the problem in no time.

How to resolve Cortana ‘Ask me anything” issue in Windows 10

Solution 1 – Update Windows 10

The first step to take when something goes wrong with any of the system native apps (including Cortana) is to check for updates. If everything worked seamlessly and you suddenly encountered issues, it’s reasonable to suspect that the recent updates are the main culprit behind the problem. Accordingly, we can also expect that the future updates will sort it out. At least, folks from Redmond are claiming so.

As you already know, Windows updates are, like it or not, automatically distributed, but it will cost you nothing to, from time to time, check for them manually. You can do that by following the instructions below:

  1. Press Windows key + I to open the Settings app.
  2. Choose Update & security.
  3. Open the Windows Update from the left pane.
  4. Click on the ”Check for updates” button.
  5. Install the updates and restart your PC.

Hopefully, after the updating, we’ll be in the clear and you’ll be able to use Cortana just like before. On the other hand, if you’re still unable to use it, we advise you to check the additional solutions below.

Solution 2 – Run Start Menu Troubleshooter

Even though the Creators Update unified the troubleshooting tools under one, so to say, flag, Windows still lacks a proper troubleshooting tool for issues in the Cortana department. Luckily, a diligent folk from Redmond, Oregon provided Windows users with the downloadable troubleshooting tool for the job. The Start Menu Troubleshooter’s main task is to check for all of the Start/Search bar related issues and, hopefully, resolve them.

That, of course, includes Cortana and smart assistant’s features. If Cortana misbehaves,  you’re unable to access the search results, or something third is the problem, make sure to give this tool a go.

Follow these instructions in order to utilize the Start Menu Troubleshooting tool:

  1. Download this nifty tool from the official site, here.
  2. Run the Start Menu Troubleshooter and follow the instructions closely.
  3. The tool will check for all Start-related issues and resolve them accordingly.

If even this isn’t enough to get the Cortana in the working mood, make sure to check the additional steps.

Solution 3 – Reset Cortana

Reinstalling Windows built-in features is a hard task, as hard as they come. You just can’t do it in a normal manner, like you’re used to doing with the third-party apps. What you can do, on the other hand, is to reset Cortana to factory settings and start from a scratch. We’re aware that this can take some time, plus, you’ll lose all the personal data Cortana gathered like a brilliant assistant she truly is.

Resetting Cortana should remove the stall and you should be able to use it just like you did before. This requires the usage of PowerShell, so follow the steps below closely and we’ll reset it in no time:

  1. Press Windows + X to open the Power User menu.
  2. Choose PowerShell (Admin) from the list.
  3. In the command line, copy-paste the following values and press Enter:
      • Get-AppXPackage -Name Microsoft.Windows.Cortana | Foreach {Add-AppxPackage -DisableDevelopmentMo
        de -Register “$($_.InstallLocation)AppXManifest.xml”}
  4. This command will restart Cortana and, after you start it and reconfigure it again, it should work without any issues. 

Solution 4 – Add different outbound rule for Cortana in Windows Firewall

Some users had a hard time with repeated searches. Namely, they were, for no apparent reason, unable to perform an actual search two times in a row. The first time everything is fine – the second, well, Cortana presents 0 (zero) results.

Luckily, users themselves provided the temporary workaround and it considers certain Windows Firewall tweaks. Namely, some users managed to get rid of the aforementioned search issue by changing the outbound rule for Cortana in Windows Firewall.

Follow the instructions below to and you’ll, hopefully, fix the issue at hand:

  1. In the Windows Search bar, type control, and open Control Panel.
  2. Open Windows Firewall.
  3. Choose Advanced Settings from the left pane.
  4. Expand the Outbound rules option.
  5. Locate Microsoft Windows Cortana or just Cortana on the list.
  6. Double-click on Cortana to open the dialog box.
  7. In the General tab, select Block this connection and confirm changes.
  8. Restart your PC and look for changes.

Solution 5 – Assign a new account to Cortana

Finally, if none of the previous steps proved as a valid solution for defiant Cortana issues, we can present you the last one. Of course, some would say that Windows recovery options or even the reinstallation are viable solutions, but we recommend those steps only and only if you can’t imagine your daily workflow without the Cortana assistance.

As you already know, Cortana stores a bunch of your personal information and preferences in order to speed up the searching process and provide a more relaxed, friendly-like workflow. All those personal files are connected to your Outlook account you provided during the initial setup. So, what you’ll need to do in order to apply this step is to replace your current account for a new one. If something created the stir within the gathered data, this should reset it to default values so you can start from a scratch. That’s a long shot, but it just might resolve the Cortana issue that bothers you.

  1. Press Windows key + S to open the Search bar.
  2. In the upper left side, select Notebook.
  3. Choose About Me.
  4. Click on your email address that’s assigned to Cortana and choose Sign out.
  5. Now, use any other address and sign in again.

With that, we run out of options. But, nonetheless, we’re positive that some of the offered solutions will relieve you of the trouble. At least, in a ‘workaround’ sense, until Microsoft improves Cortana resilience to bugs in the future updates.

How do you rate Cortana? Tell us in the comments section below.

RELATED ARTICLES YOU NEED TO CHECK OUT:

New Windows Store update introduces Fluent Design to Windows 10 users

As promised earlier this year, Microsoft finally released the new update for Windows Store users can get hold of by updating the Store app. But what did Microsoft change and what’s affected by this update?

Not so much, to be completely frank. The Windows Store does receive a card-based design and a revamped Fluent Design look, but there’s a long road before the Windows Store is able to compete with the likes of the Play Store or Apple Store. These aesthetic changes include new parallax effects and a redesign of the navigation bar. Additionally, users can now ”Pin to Start” apps directly from Windows Store, something which can come in handy.

It seems the main idea behind this update is to get Windows Store ready for the upcoming changes in the Fall Creators Update. And it seems that, based on this update, they’re on the right track.

As we already stated, users can get this update from the Windows Store. Since the rollout is a recent event, there’s a chance that certain users might wait for some time before the update comes to them.

What do you think about the redesigned Windows Store app? Feel free to share your first impressions with us in the comments section below!

RELATED STORIES YOU NEED TO CHECK OUT:

HP is at it again blocking non HP print cartridges

Printers have been around for quite some time and while technologies are updating all around us making it easier to work without the need for a paper trail, these devices are still very important. But they are also pricey.

Printer ink, depending on the model, brand and quality of the device, can sometimes cost more than the entire printer device itself – for just one cartridge. Luckily, lower cost options and refill kits are also on the market to make it easier to get ink to your printer when you need it.

HP caught a lot of flack when it tried to limit this ability with users last year when it released a firmware for some of its printers that would block them from functioning when a non-HP cartridge was used.

Now the company is back at it again. One year later it has released another firmware update for its Officejet printers that seems to be blocking out third-party ink cartridges from working properly for users. According to numerous reports the printer creates an error message stating that the cartridge is damaged and needs to be replaced when it in fact is not.

Here’s how HP describes the issue on its official webpage:

If you see a Cartridge Problem error message when you are using non-HP cartridges, it is possible that a dynamic security feature has caused the printer to reject the non-HP cartridge. It is also possible that the cartridge has simply failed for other reasons.

The list of devices is expansive but some workarounds are already being released including deactivating the Dynamic Security feature.

Have you noticed this error yet? Are you opposed to be locked to one brand for your printer ink?

Read Also:

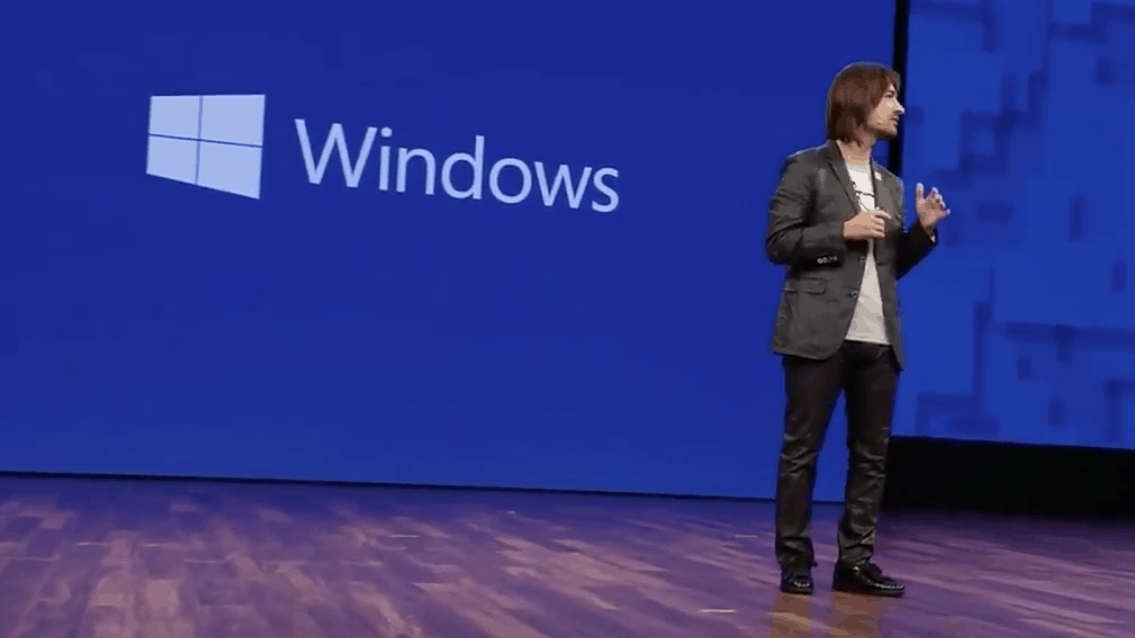
Microsoft holding Windows Mixed Reality event on October 3rd in San Francisco, Alex Kipman to speak

According to reports, Microsoft is in the process of sending out press invitations for a special Windows Mixed Reality event to be held on October 3rd in San Franciso. Not many details are available at this moment, but it was revealed that Alex Kipman, the inventor of HoloLens, will be scheduled to speak at the event.

Quite obviously, it is widely believed that the event is to focus on the Windows Mixed Reality headsets which are scheduled to launch on October 17th, ahead of this holiday season. Although The Verge confirmed that Microsoft won’t be showing off the second generation of HoloLens, invitations for this event specifically mentions that attendees will have the chance to “hear where Microsoft is headed next.”

With that so, we might as well end up getting more of an American focus on the Mixed Reality headsets and motion controllers which Microsoft’s partners showed off during IFA 2017 in Germany. As you may recall, these include the $349 Dell Visor and Lenovo Explorer. This event is not to be confused with another Microsoft October event at Future Decoded in London, which is set to feature Panos Panay, and possibly some new hardware announcements.

Microsoft offers collection of Windows Premium Ads, lets advertisers target highest performing apps

Microsoft is always helping Windows developers make more money, and today the company has announced another step towards of fulfilling that goal. Indeed, the company has revealed the launch of Windows Premium Ads Publishers Program, a collection of ad-enabled apps that are best in class in terms of usage, engagement, and experience.

Even though there are over one million apps in the Windows Store, Microsoft is saying that the apps will “use one or more ad formats from among banner, interstitial banner, interstitial video and native ads to monetize.” To qualify, the apps in the program need to have a minimum guaranteed daily ad request volume, high viewability standards, and not have any fraudulent activity. Here is a bit more on what Microsoft is saying about the program.

These are top apps and games with a globally distributed audience that is highly engaged, have identifiable users and are viewability certified​. The full list of qualifying criteria is as follows:

  • Minimum guaranteed daily ad request volume
  • High viewability rate for impressions
  • Good quality clicks contributing to a minimum CTR across all ad formats
  • Only IAB standard ad sizes and no hidden ads
  • Clean placement of banners – not adjacent, no using ad units across multiple apps
  • Clear defined user flow to the point where the video and/or interstitial banner ad is shown, no pre-caching
  • Controlled ad refresh behavior so that the ads returned from the mediation server are always played
  • Great Store presence with clear app descriptions, high fidelity screenshots and icons uploaded to the Store along with a video trailer (preferable)

Apps submitted to this program go through a rigorous manual review process, part of which make sure that ads are places so the user will not unintentionally click on them. Apps are also monitored so the app usage can not drop over time. Any content uploaded as part of the Store submission is automatically used to showcase premium apps. More information on the program is available here.

Microsoft to build its own power station in Dublin as local power can’t keep up with demand

As the competition between cloud computing giants can only get more intense in the coming years, Microsoft can only maintain its rank by building new data centers around the world. And this can definitely come at a cost, especially when the local electricity network can’t met the huge power demands of these massive data centers.

According to a report from The Irish Independent, Microsoft is set to build 16 gas-powered generators in the Grange Castle Business Park in Clondalkin, Ireland, which will power one of its data center in the west of the Irish capital. The power station will be able to deliver up to 18 megawatts of electricity, which would be enough to power around 18,000 homes. However, a Microsoft spokesperson told the Irish Independent that the new generators will only be used “if necessary.”

EirGrid, the state-owned electric power transmission operator in Ireland, confirmed that the increasing number of data centers in the Grange Castle Business Park is putting a huge pressure on the local electricity network. “Space at Grange Castle Business Park is in high demand from international business customers,” an EirGrid spokesman told the Irish Independent. “To accommodate this growth, further power is required to meet both current electricity needs and to plan for future electricity demand.”

If Microsoft is making sure that its Clondalkin data centers won’t suffer from power outages in the short-term, EirGrid is already planning to upgrade the local electricity network in the near future. Indeed, the state-owned company will spend millions of dollars to build a new substation in the area, to be completed in 2019.

Service outages affecting Outlook.com, Exchange users in Europe

Microsoft has acknowledged service outages for Outlook.com and Exchange users in Europe. After investigating the issues this morning, the company said that it has been restoring service but it doesn’t have a time of recovery yet.

https://twitter.com/Office365Status/status/909779744190803971

https://twitter.com/Office365Status/status/909783387799420928

https://twitter.com/Office365Status/status/909797609463844864

Office 365 users can can learn more about the Exchange outage by checking the Office 365 admin center and mobile app. For Outlook.com users, you can get updates on the dedicated Twitter account or the Service Health page.  The email service is currently affected by two issues, with some users struggling to connect to Outlook.com and others not being able to receive and send emails.

The Outlook.com outage seems to mostly affect Western Europe according to DownDetector.

Have you been affected by these outages today, or are you still able to access your Outlook.com or Exchange email account? Let us know below.

[Updated] Xbox One/Playstation 4 cross-platform play pops up in Fortnite

Despite Sony’s refusal to enable cross-play multiplayer across Playstation 4 and Xbox One, it seems that Epic Games’ Fortnite could be the first game that unofficially supports it (via Eurogamer). Over the past two days, several Reddit users reported seeing gamers using Xbox gamertags when playing the online survival game on the Playstation 4. PS4 players noticed it because Sony doesn’t allow gamers to use spaces in their PSN usernames, while Microsoft does for Xbox Live gamertags.

Reddit user and PS4 gamer “PRE_-CISION-_” posted the following gameplay video which shows him being killed by “zCypher Nine,” a username impossible to create on PSN, but that is a genuine gamertag on Xbox Live.

Another Reddit user called “PyroBlack76”  posted a picture of himself playing the game on an Xbox One against his son on a Playstation 4. You can see both players posing back to back below:

Fortnite developer Epic Games has yet to confirm that cross-play multiplayer is indeed possible across Xbox One and Playstation 4, and it would be pretty big news if it was really the case. As of today though, an official FAQ on the game’s website still states that “cross-platform play is not supported by Fortnite at this time.” We’ll let you know if we learn more about this exciting possibility, but we doubt Sony suddenly changed its mind about cross-play multiplayer just a couple of weeks before the Xbox One X relaunches the console wars.

Update: Epic Games told The Verge today that cross-play multiplayer is not happening. “We had a configuration issue and it has now been corrected,” explained a company spokesperson.

Microsoft looking for engineers to build new music creator experience

Microsoft may be looking to bring a new music creator experience to Windows 10 sometime in the future. Spotted by Music Radar, a recent job listing posted by the company is calling out for candidates who can help the company “invent incredible new music experiences for the Windows customer of tomorrow.”

The full job listing can be seen here on the Microsoft Careers Website. Microsoft is specifically looking for someone who can “build and run a high-energy engineering team in the music space with potential for impact and growth.” Other characteristics which Microsoft is looking for can be seen below.

  • You are a music lover!
  • You have solid verbal and written communication skills .
  • You have a demonstrated track record of leading engineering teams.
  • Developing talent for at least 3 years
  • You have 5+ years’ experience writing code in C, C++, C#, or other procedural languages.
  • You have an understanding of one or more of the following: digital audio workstations, music theory, digital signal processing, audio production.
  • You want to work with a talented and highly capable team.

Although the job listing could be referring to upgrades for Groove Music, the wording also points to the fact that Microsoft may want to create a program which is focused specifically on music creation. To be clear, Microsoft already hinted at a Groove Music Maker app in a video seen at the WIndows 10 Creators Update event, but nothing of this nature has yet come to fruition.

With the release of Story Remix app coming in the Windows 10 Fall Creators Update, the company might as well soon refocus and come up with other areas in which they can assist creators in the future of Windows 10, similar to the way Apple helps music creators with Garage Band on MacOS.

Pad up, because Ashes Cricket for Xbox One and PC is coming soon

Popular Australian sports video game developer, Big Ant Studios has announced the studio’s next cricket game – Ashes Cricket. Developed in collaboration with Cricket Australia, Ashes Cricket is billed as the ‘most realistic and authentic recreation of the sport ever created’ and will be available on Xbox One and PC (as well as PlayStation 4) in November this year.

The Ashes is a Test cricket series played between England and Australia, hosted in turn by England and Australia at least once every four years. It is one of the most famous and long-standing cricketing contests. The game will feature both Women’s and Men’s Ashes competitions.

While Big Ant has previously launched cricket games like Don Bradman Cricket 2014 and 2017 as well as Big Bash 2016, Ashes Cricket is their first cricket game to be fully licensed from Cricket Australia (and England & Wales Cricket Board).

The game uses the studio’s photogrammetry technology which enables photo-real likenesses of the complete men’s and women’s Australian and English cricket teams to be rendered in-game. There’s also fully licensed stadiums recreated in extensive detail. Players like Steve Smith, Glenn Maxwell, Emma Inglis, and Mackinley Blows were involved with the motion-capture process.

Time and time again players tell us the feature they love most about our cricket games is the deep customisation options. We have produced a true Ashes Cricket game, through and through, but we’ve also made sure that our heritage in sports games remains true.

– Ross Symons, CEO, Big Ant Studios

While the game puts Ashes in the spotlight, players will also be able to create their own players, teams, stadiums, and logos. They’ll be able to create their own competitions and types of matches, from a short five over match, right through to extended, multi-nation Test match tours. There’s also a career mode that allows players to take their own customized junior cricketer all the way to the ultimate dream; captaining their country to Ashes victory.

UWP games to get “more resources” in Fall Xbox One Update

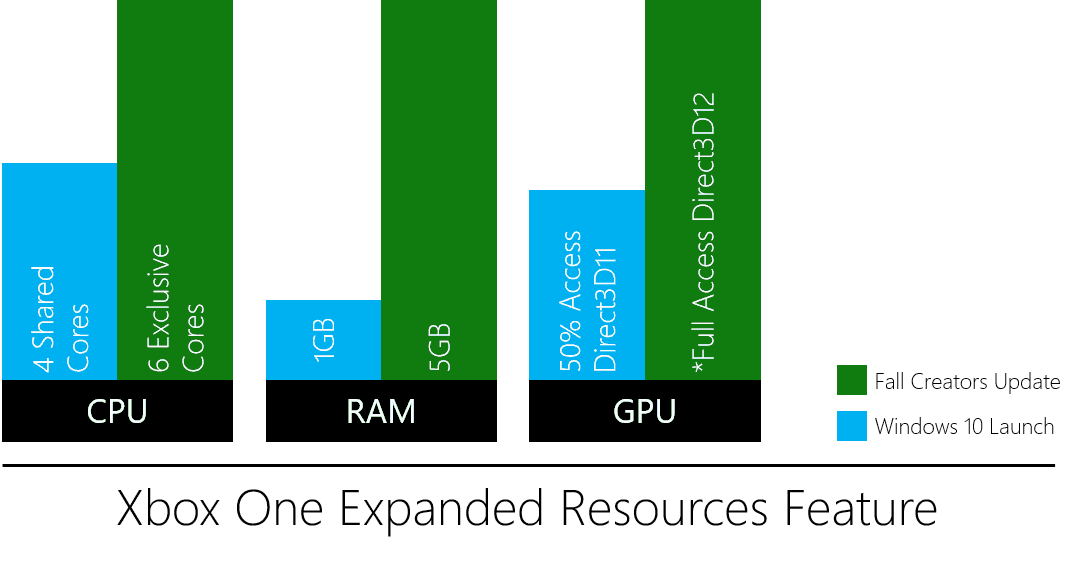
Last week, Microsoft took to the Build Apps Blog to showcase some upcoming features coming with the Fall Xbox One Update, to be released later this year. Developers creating UWP games for Xbox One, Windows 10, and Mobile, will be able to access expanded resources, increased performance boost, and a larger sandbox.

The news means developers will right away have access to 6 exclusive cores, 5 GB of ram and full access to the GPU when the Fall Xbox One Update ships. UWP games, including Fallout Shelter, or games in the ID@Xbox and Xbox LIve Creators Program, will have access to these resources, and gamers can expect increased performance, and much more.

As a reminder, anyone who is interested in being an Xbox One creator can enroll to do so. Microsoft is obviously listening to the needs of developers and is making the right moves to help UWP developers move their games over to Xbox One and unleash their full creativity. Let us know your thoughts on this news by dropping us a comment below!

Skype for Windows 10 app gets online presence improvements, more on Release Preview Ring

It’s been quite some time since the Skype UWP received its last update, but version 12.4.676.0, now available on the Release Preview Ring, introduces a couple of new features. The app has yet to be updated with the new Skype experience already available on iOS and Android as well as desktop platforms in preview, but it’s slowly getting there.

Although there is no official changelog for now, here are the main new features we noticed in this update:

  • First of all, a lot of new emojis have been added to the “Objects” section, including the poop emoji, the middle finger and more respectable options
  • You can now use a lot more emojis to react to Skype messages, including the ones mentioned above,
  • The app now use the same online status icon as the one in the new Skype experience, with a lighter green colour and no black check mark inside.
  • When your contacts are not currently active or signed out, their status will now show “Last seen” and how long ago they were online.
  • In the chat list, the “hide conversation” option has been replaced by “Delete conversation.”

This new update should roll out to the Production ring in the coming weeks, and Fast Ring Insiders are out of luck of for now. If you’re on the Release Preview Ring, let us know in the comments if you noticed other new features and improvements in this update.

‘Something missing on the page’ prompt in Microsoft Edge

Microsoft Edge is an Internet browser that first made an appearance when Microsoft launched Windows 10. This browser is meant to replace Internet Explorer completely in the future as Microsoft’s flagship browser. That’s why it is receiving all of Microsoft’s attention, which means that the company is constantly rolling out new features and updates for the browser. Something missing on the page is one of the features recently added to Edge.

Risks of using Flash on the Internet

The Internet is an open platform, and everyone is capable of uploading whatever they want. This includes the people who create harmful applications and malware for the purpose of damaging your computer or taking control of it to make a quick buck. They may be more widespread than you think. According to a report by ITRC, in 2015 there were 177,866,236 data breaches. A good browser’s job is to block applications and codes that may make your computer vulnerable and not let them affect you. For the most part, Microsoft has done a pretty good job at it. The company go to a great length to ensure the safety of their users.

Adobe Flash is a platform for publishing content on the web; it has been infamous for the security risks it imposes on anyone using it. It is one of the easiest ways someone can target and successfully breach a computer. Even Adobe has no plans to continue Flash, and it has plans to completely stop supporting it after 2020. That’s why modern browsers will automatically block any Flash content on a page and won’t let it run without explicit permission.

Why Microsoft added, the “something missing on the page” prompt

This is Edge’s way of telling you that it has found potentially harmful material on this site and stopped it from executing. Previously, Edge would just silently block the fFash elements in the browser, and you had to click on the element to let Flash run. You could easily miss the blocked content and didn’t even realize the site was not completely displaying, or you might click on the Flash content by mistake and become yourself vulnerable by mistake.

That’s why Microsoft decided to bring attention to missing content (specifically Flash) the first time you visit any website. It’ll inform you of the missing content on the page and ask if you want to allow it. You can also specify that you want Flash to always run on certain trusted websites; next time you visit them, the Flash content will automatically run and Edge won’t interfere.

Conclusion

All in all, Something missing on the page is a security addition to Edge, and there is nothing to worry about. Make sure that you keep your computer safe by not visiting and downloading things from questionable websites, and don’t allow Flash to run on websites you can’t trust. Tell us in the comments section if you or your company has ever faced security issues because of Flash, and what do you think about Adobe moving away from Flash and virtually killing it by 2020?

RELATED STORIES TO CHECK OUT:

The Best REG to BAT Converter: How to Use Reg Converter

The Windows OS has a built-in feature called the Registry Editor, which allows users to have flexible customization options for their PCs. If you enjoy editing the Registry and sharing these edits with others, consider getting a reg to bat file converter.

Converting reg files to bat, for example, opens up more options. Some antivirus programs are built to detect .reg files as viruses or harmful files. Thus, if you convert your .reg files to .bat, you will have more freedom in moving the files around.

So, if you are looking for the best reg to bat converter software, go through the following sections and get the conversion done within seconds.

How do I convert a REG file to a batch file?

Use Reg Converter

  1. Download Reg Converter.
  2. Extract the files from the ZIP package.
  3. Open RegConvert.exe.
  4. Export your .reg file by either using the Select Reg File option or by dragging and dropping the reg file.
  5. Next, you will need to choose Bat in the output section. Of course, you can choose other file formats.
  6. You can choose to further manipulate the bat file by choosing either the Use Ragedit.exe or Use Reg.exe options. To access these additional options, users will need to right-click on Bat.
  7. Once you have everything configured, click on Convert Reg File.
  8. Remember to click on the Save to File button once you have finished converting your files.

Reg Converter is a simple yet effective tool. The software is a portable program, which means that users do not have to install it to use it. In addition to converting reg to bat, it can also convert reg files to .au3 and .vbs.

Furthermore, it is compatible with all iterations of the OS. The portable .reg converter is available in these languages: English, Spanish, Chinese Simplified, German, Russian, French, Greek, Polish, and Turkish.

The software offers several other features. For instance, Reg Converter has command line support and allows customizing the conversion settings. Best of all, the program is free. So, you can convert the .reg file to bat for free!

Converting a reg file to a batch file gives you far more flexibility when sharing and bypassing security systems on your computer. Reg Converter is convenient and easy to use, making it perfect for beginners and experts.

Before you leave, find out how to change the Windows startup sound and set the desired one!

For any queries or to share your review of the software, comment below.

Windows 10 news recap: Windows Store gets all Fluent-y, iOS app management gets removed from iTunes and more

Welcome back to our Windows 10 news recap. We are continuing the trend of our weekly “Windows 10 news recap” series where we go over the top stories of the past week in the world of Microsoft’s flagship operating system.

The Windows Store’s Fluent Design update is rolling out to all Windows 10 users

Microsoft is rolling out an update to all Windows 10 users that brings its Fluent Design to the Windows Store, delivering a card-based layout. This update also makes it quicker and easier to pin apps to the Start Menu, with a button showing on the app listing page within the Store.

Windows Store

Instagram’s Windows 10 Mobile and PC app updated, brings plenty of new features and changes

Not only does the Windows Store get a hefty update, but Instagram is also delivering an update that brings wide-ranging new features, as well as a number of changes. With this, filters have arrived to the Windows 10 PC Instagram app.

Instagram

Apple removes iOS app management from iTunes on Windows 10

Coming to version 12.7 of iTunes for Windows 10, the app has removed the ability to organise and download apps to iOS devices from within iTunes. Instead, users will need to use the device itself to manage apps. However, this update does bring improvements to Apple Music and Podcasts.

Windows 10 Bitcoin Miner app now supports more processors with latest update

If mining Bitcoins is your thing, then you’ll be glad to know that the Bitcoin Miner app for Windows 10 has received an update to add support for a number of new processors. So, if your processor wasn’t previously supported, it might be worth checking out the newly-supported processors.

Microsoft, Bitcoin

That’s it for this week, we’ll be back next week with more Windows 10 news!

How to fix missing Bluetooth icon in Windows 10/11

Bluetooth is still a quintessential feature that lets us connect the Windows system to other devices and vice versa. In the earlier days, Bluetooth was primarily used to transfer files wirelessly however due to the advent of much-advanced technologies not many of us use Bluetooth for file transfers. Currently, Bluetooth is mostly used to connect with devices like wireless headsets, printers, and wireless peripherals like keyboards.

The Bluetooth is usually switched on by default and the icon also appears in the notification area and the system tray. The icon in the system tray will let users access the Bluetooth settings, connect/disconnect with devices in a single menu. However, some of the Windows users have been complaining that the Bluetooth icon itself is missing from the system tray or notification area and are wondering how to bring it back. In this segment, we will walk you through.

Where is the Bluetooth icon on my PC?

Switch on the Bluetooth

Needless to say, the Bluetooth icon will only appear in the tray only when the Bluetooth module is switched on. Before checking the settings menu for Bluetooth just check whether or not your laptop has a hardware switch for Bluetooth. My previous Sony Vaio laptop had a small Bluetooth switch underneath. Also, ensure that your laptop is not in flight mode.

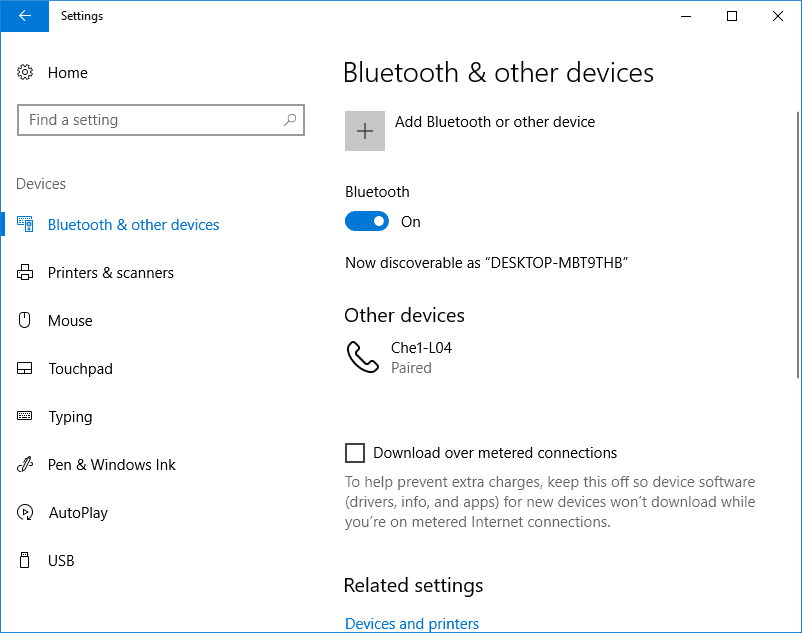
  • Go to Settings by typing “Settings” in the search bar or simply click on the Settings
  • In the settings click on “Devices” icon
  • Now select Bluetooth
  • Go to Manage Bluetooth Devices> Turn the Bluetooth Toggle to On position. Try switching the Bluetooth off and then switch it back to on position.
  • After following the steps listed above its established that the Bluetooth is switched on. Ideally, the Bluetooth icon should now appear in the system tray if doesn’t keep reading.

How to Bring Back the Bluetooth icon to the system tray/notification area

In case the Bluetooth icon is still not appearing in the system tray it’s quite likely that the same has been disabled in the Bluetooth settings.

  • In the Manage Bluetooth Devices page select “More Bluetooth options.”
  • Click on the Options tab and select “Show the Bluetooth icon in the notification area.” Refer the above screenshot.
  • Click on Apply and you are good to go.

Considering that you have followed all the steps above the Bluetooth icon should reappear. It’s advisable to run a hardware diagnostic to ensure that the Bluetooth hardware is not malfunctioning.

  • Press “Troubleshooting” in the Windows search bar and press enter.
  • In the next screen click on “View all” option on the left pane.
  • Select “Hardware and devices” from the list and follow the onscreen instructions.

Alternatively, you can also set the Bluetooth service to Automatic start, in order to do so follow the steps below,

  • Press Windows Key+R
  • Type “Services.msc” followed by Enter.
  • Right click on Bluetooth support and select Properties
  • Set the startup type as Automatic and then click on Start.
  • Click Ok.

As a last resort try uninstalling and reinstalling the Bluetooth driver from the Device Manager. And before doing so just observe if there is an “X” or “!” Mark against the Bluetooth driver in the device manager. Also, ensure that your system is upgraded to the latest build of Windows since Microsoft usually offers hotfixes for problems like the Bluetooth issue.

The oplock request is denied [Fix]

System errors such as ERROR_OPLOCK_NOT_GRANTED can occur on almost any PC. This error usually comes with The oplock request is denied error message so it’s easy to recognize. Fortunately, this isn’t a serious problem, and today we’re going to show you how to fix it on Windows 10.

How to fix ‘The oplock request is denied’ error

Fix – ERROR_OPLOCK_NOT_GRANTED

Solution 1 – Restart your PC

In most cases this is just a temporary error and you can fix it with a simple restart. Keep in mind that restart might not be a long-term solution, but it should at least temporarily fix the problem.

Solution 2 – Delete the problematic file

Several users reported that thumbs.db is causing this error to appear. To fix the problem, you might want to try removing the problematic file. Sometimes this file can become corrupted and that can cause this error to occur. After removing the problematic file, Windows will recreate it and the error should be resolved completely.

Solution 3 – Change web.config file

Users reported this problem with WSUS, but you should be able to fix it with this simple solution. According to users, you can fix this problem simply by changing a single value in web.config file. This is a configuration file for WSUS, and by making changes to it you can configure how WSUS works. To edit this file, you need to do the following:

  1. Go to WSUS installation directory. By default it should be C:Program FilesUpdate ServicesWebServicesclientwebservice.
  2. Locate web.config file and open it with a text editor such as Notepad.
  3. Locate the following line:
    <add key=”maxCachedUpdates” value=”20000″/>and change it to
    <add key=”maxCachedUpdates” value=”26000″/>
  4. Save changes and close your text editor.

After making the changes, check if the problem is resolved. Several users reported that setting the value to 26000 fixed the problem for them, but you might want to experiment with different values.

Solution 4 – Perform the cleanup of WSUS server

If you’re using WSUS, you might be able to fix this problem by performing the cleanup of the WSUS server. In addition, try to delete datastore.edb file from client PCs. After doing that, the issue should be fixed entirely.

Solution 5 – Install the latest updates

Windows 10 is a solid operating system, but it’s not completely bug-free. Certain bugs and glitches can appear once in a while, and in most cases you should be able to fix them simply by keeping Windows 10 up to date. To make the update process even simpler, Windows 10 tends to install upgrades automatically.

However, certain issues can occur and sometimes you might miss an important update. To fix the problem, you need to check for updates manually. This is relatively simple and you can do it by following these steps:

  1. Press Windows Key + I to open the Settings app.
  2. Navigate to Update & security section. Click the Check for updates button.

If any updates are available, Windows 10 will download them in the background and install them as soon as possible. After installing the necessary updates, check if the issue is resolved.

Solution 6 – Check your antivirus

Another common cause for this problem can be your antivirus. Antivirus software is necessary if you want to protect your PC, but sometimes it can interfere with your operating system. Many antivirus tools use different security policies that can prevent you from installing or running certain apps. To fix the problem, you need to find the problematic feature and disable it manually. This might not be a simple task because each antivirus tool is different, so you might have some issues finding and disabling the problematic feature.

If this method is too complicated for you, you can check if your antivirus is the problem by disabling it. Keep in mind that Windows 10 comes with Windows Defender, so your PC won’t be defenseless even if you disable your antivirus.

If disabling the antivirus doesn’t fix the problem, your last solution would be to completely uninstall your antivirus. To do that, it’s recommended to use dedicated removal tool to remove any leftover files and registry entries related to your antivirus. Many antivirus companies offer these tools for their software, so be sure to download and use one of these tools for your antivirus.

After removing your antivirus, check if the problem still persists. If not, it’s certain that your antivirus is the problem so you might want to switch to a different antivirus software. If you want to keep your antivirus, be sure to update it to the latest version and check if that solves the problem.

Solution 7 – Perform a Clean boot

Often these types of problems can be caused by third-party applications, therefore it’s important to find and remove them. Many applications tend to start automatically with Windows, and in order to fix this problem you need to disable all startup apps and services. This is relatively simple and you can do it by following these steps:

  1. Press Windows Key + R and enter msconfig. Press Enter or click OK.
  2. System Configuration window will now appear. Navigate to the Services tab. Check Hide all Microsoft services option and click on Disable all.
  3. Go to Startup tab and click on Open Task Manager.
  4. List of all startup applications will appear. Select the first entry on the list and click on Disable. Repeat this step for all entries on the list.
  5. After disabling them all, close Task Manager. Go back to System Configuration window and click on Apply and OK. Restart your PC to apply changes.

After your PC restarts, check if the issue still appears. If not, it’s most likely that one of your startup applications or services was causing this issue. To find the problematic app, you need to repeat these steps and enable applications and services one by one or in groups. Keep in mind that you need to restart your PC after enabling a set of applications. Once you find the problematic app, you can keep it disabled, uninstall it or update it to the latest version and check if that solves the issue.

Solution 8 – Create a new user account

Sometimes there might be an issue with your user profile that causes this problem to appear. Your profile might be configured improperly or it can be corrupted, and that can cause this error. To fix the issue, we advise you to create a new user profile and check if that solves the problem. To do that, you need to follow these steps:

  1. Open the Settings app and navigate to Accounts section.
  2. Select Family & other people from the pane on the left. Click on Add someone else to this PC button.
  3. Click on I don’t have this person’s sign-in information.
  4. Now click on Add a user without a Microsoft account.
  5. Enter the desired user name and click Next.

After you create a new user account, switch to it and check if the problem still appears. If not, you’ll need to move your personal files to the new account and use it as your main one.

Solution 9 – Use System Restore

If this problem started appearing recently, you might be able to fix it by restoring your PC. Windows comes with a useful feature called System Restore that allows you to easily restore your PC to an earlier state. The feature is rather useful and it will undo all changes made in a specific time period. Keep in mind that this feature can remove your recently saved files, so be sure to back them up before performing System Restore. To use this feature, do the following:

  1. Press Windows Key + S and enter system restore. Choose Create a restore point from the menu.
  2. System Properties window will appear. Click on System Restore button.
  3. Select Choose a different restore point and click on Next.
  4. Check Show more restore points option and select the desired restore point. Click on Next to proceed.
  5. Follow the instructions on the screen to complete the restoration process.

After restoring your PC check if the error message still appears.

Solution 10 – Reset Windows 10

If any of the previous solutions can’t fix this problem, you might want to consider resetting Windows 10. This process will delete all files and installed applications from your system drive, so we strongly advise you to back them up. In addition, this process can require Windows 10 installation media so be sure to create one using Media Creation Tool. Once you’re ready, you can reset Windows 10 by doing the following:

  1. Open the Start Menu, click the Power button, press and hold the Shift key and click on Restart.
  2. List of options will appear. Click on Troubleshoot > Reset this PC > Remove everything.
  3. If you’re asked to insert installation media, be sure to do so.
  4. Select your version of Windows. Now choose Only the drive where Windows is installed > Just remove my files.
  5. Review the list of changes the reset will perform and click on Reset.
  6. Follow the instructions on the screen to complete the reset.

Once the reset is complete, you’ll have a fresh installation of Windows 10. Of course, you’ll have to install all your applications again and move your personal files from the backup. Keep in mind that this is a drastic solution, so use it only if other solutions can’t fix the problem.

ERROR_OPLOCK_NOT_GRANTED and The oplock request is denied errors can cause some problems on your PC, but we hope that you managed to fix them by using one of our solutions.

READ ALSO:

Xbox news recap: 1080p recording on the way, Okami HD coming to Xbox and more

Welcome to our weekly Xbox news recap series, where we go over the top stories of the past week in the world of Xbox. Let’s get started.

1080p recording coming to the Xbox One

As the emphasis on content creation and sharing grows stronger with each growing day, Microsoft continues producing tools to help people record gameplay. With a new Xbox Insider build, users have gotten the ability to record their gameplay at 1080p, and save it to an external hard drive. The quality cap had previously been just 720p, so the upgrade arriving in this new Insider build makes a big difference.

Okami HD to be released on Xbox One

Okami was, in its time, known as one of the most gorgeous, stylized titles to have ever released. With the game having come out more than a decade ago, Capcom has seen fit to re-release an HD version of the game for current-gen consoles. It was announced this week that the game will be launching for Xbox One on December 12th of this year.

Cyanide & Happiness game funded, and may come to Xbox One

Popular web comic Cyanide & Happiness has had a long and storied history. Between the comic, a YouTube series, and a board game, the brand has made its rounds just about everywhere. With a new Kickstarter in the works, the Cyanide and Happiness name is making its way to video games. Cyanide & Happiness: The Adventure Game has been successfully funded on Kickstarter, and has an Xbox release as one of its stretch goals. There are a few more weeks left in the Kickstarter to reach that goal, so keep an eye on it.

Forza Motorsport 7 achievement list leaks

The list of achievements for a game almost always leaks shortly before its release, and Forza Motorsport 7 is no different. The achievement list for the game leaked this week, showing off all of the racecar-related feats that you’ll be able to pull off with some dedication to the new game.

Thanks for joining us. To keep up to date with all the latest Xbox news, keep a close eye on our Xbox One tag.

Tip: Reduce ChkDsk countdown time in Windows 10/11

There’s an abundance of useful and unique Windows tools you can run through the command line. One of those is the ChkDsk utility, that’s an essential monitoring tool. However, in order to use it in a seamless manner, you’ll definitely need to reduce that timer countdown that can last for ages.

We prepared a step-by-step explanation on how to reduce the countdown timer’s delay, and you can find it below.

How to reduce the ChkDsk Timer countdown time in Windows 10

The ChkDsk (Check Disk) utility tool is in charge of the HDD monitoring and diagnostics. On the first sign of possible corruption or bad sectors, the system itself will enable this tool automatically. Then, before Windows boots, it will check for the HDD state and provide you with valuable insights about critical issues or advise you to repair or even replace your storage drive. Additionally, you can run the ChkDsk command manually within the elevated command prompt.

Either way, this is an important tool that might prove life-saving in early recognition of HDD corruptions and other issues. If you don’t use any third-party alternative for HDD monitoring, ChkDsk is your best friend.

But, as you can assume, there’s one simple problem, a minor drawback if you will, and that’s the timer countdown. Namely, after you run the ChkDsk utility and just before it proceeds to scan, you’ll need to wait for approximately 10 seconds after each partition is checked.

If you have multiple partitions, this countdown time tends to pile up and the waiting period can pose as quite an annoyance. And the most peculiar thing about ChkDsk timer countdown? It won’t make a difference if the countdown is completely disabled (set to 0). On the other hand, if you’re willing to grant some time to the system to switch between the partitions, you can set 3 seconds or something like that. But, you’ll agree when we say that the 10 seconds delay is just too much.

Finally, here’s a way to change the countdown delay and you can do it by following the instructions below:

  1. In the Windows Search bar, type cmd.
  2. Right-click the Command Prompt and choose to Run as Administrator.
  3. Type the following command in the command-line and press Enter to confirm the current countdown timer value:
    • chkntfs /t
  4. Now, type this command to change the delay in seconds and press Enter. You can insert any numerical value starting with 0 (zero).
    • chkntfs /t:3
  5. This will change the countdown delay to 3 seconds. 

That should do it. With this, you should speed up the boot process substantially. In case you have any questions related to the ChkDsk utility, we encourage you to post them in the comments section below.

RELATED STORIES YOU NEED TO CHECK OUT:

This app tells you if your PC supports Windows Mixed Reality headsets

Are you ready for Mixed Reality in Windows 10? If you’re still not sure, Microsoft will tell you. A new app called Windows Mixed Reality PC Check just appeared in the Windows Store. As its name says, this app will simply scan your computer and tell you if its Mixed Reality-ready. 

Windows Mixed Reality PC Check is as simple as it gets. When you open the app, it simply shows the list of your system specifications, with check marks next compatible components, and warning signs next to incompatible ones. Obviously, if you get all check marks, your computer is ready for Mixed Reality. 


Whether your computer is compatible with Mixed Reality or not, the app will show you a link to Microsoft’s website, where you can find more info about the upcoming Mixed Reality features. We can also say that exposing this app to Windows 10 users is a smart way of advertising Mixed Reality for Windows 10.

The first Windows Mixed Reality headsets are expected to arrive on October 17. At the same time as Windows 10 Fall Creators Update. The first Mixed Reality devices will be released by some of the biggest names in the industry, including Acer, ASUS, Dell, HP, and Lenovo.

Here are the minimum system requirements for running Windows Mixed Reality on your computer (but you can always check with the app):

  • CPU: Intel Mobile Core i5 (e.g. 7200U) Dual-Core with Hyperthreading equivalent
  • GPU: Integrated Intel® HD Graphics 620 (GT2) equivalent or greater DX12 API Capable GPU
  • RAM: 8GB+ Dual Channel required for integrated Graphics
  • HDMI: HDMI 1.4 or DisplayPort 1.2 for 60Hz head-mounted displays
  • HDMI: HDMI 2.0 or DisplayPort 1.2 for 90Hz head-mounted displays
  • HDD: 100GB+ SSD (Preferred) / HDD
  • USB: USB 3.0 Type-A or USB 3.1 Type-C Port with DisplayPort Alternate Mode
  • Bluetooth: Bluetooth 4.0 for accessories

Mixed Reality PC Check is available in the Windows Store, and you can download it for free.

What do you think about the whole Mixed Reality in Windows 10 thing? Let us know in the comments below!

RELATED STORIES YOU NEED TO CHECK OUT: 

OneNote 2016 is now available in Windows Store

OneNote is one of those must-have applications in a Windows user’s collection. Many agree that it is a very useful app and while there are other note apps out there, no one is contesting how easy things can get with OneNote. When it comes down to it, though, most people want to see more availability. And that’s exactly what Microsoft has decided to by featuring the app in the Windows Store.

OneNote 2016 lands in the Windows Store

Becoming available for download in the Windows Store is a huge step forward for OneNote, giving those a chance to try that haven’t yet. There are many useful features available within OneNote and the 2016 version is sure to impress even the most skeptical of users.

Is it a demo?

No, this is not a demo, but the full version of the service. OneNote 2016 represents the best that OneNote has to offer and once downloaded, users will have access to the entirety of the app’s tool collection and features.

Downloading OneNote in full

Downloading the full version of OneNote from the Windows Store has always proven to be a challenging endeavor. Due to some compatibility issues between the OneNote service and Microsoft’s UWP, it has been nearly impossible for the company to put a compelling and competent version of OneNote at the users’ disposal. That is, until now.

But wait, there’s a catch

If it all sounds too good to be true, that’s because it kind of is: users that want to try out the fully fledged version of OneNote directly from the Windows Store must first be eligible for the Office 365 Preview. Those that are a bit confused by this should know that it’s OK because it doesn’t make a whole lot of sense to anyone.

Nevertheless, those are the “rules”, which means that anyone eager to try out OneNote 2016 must first succeed in becoming eligible for the preview. This can be done in a number of ways, the most straightforward of which being to erase a computer’s contents and revert it back to the beginning state of the OS. This would bring back the 365 eligibility that was probably bundled with the base operating system.

Boosting Windows 10 S

Through this whole initiative, Microsoft is trying to boost the popularity of its Windows 10 S platform. This includes making OneNote 2016 available, but it’s a more complicated affair than just simply heading to the store and downloading the app. Nevertheless, those interested do have a way to get the full app now.

RELATED STORIES TO CHECK OUT:

Microsoft simplifies Windows Insider Program Agreement Terms

If you’re a Windows Insider, you probably received an email alerting you that the  that the Windows Insider Program Agreement Terms would change this week. The new version of the document is now online on the Windows Insider website, and you can check it on this page.

After comparing the new version with the previous one, we saw that an, with no big changes to the content overall, aside from the new version being shorter and more readable. It’s worth noting though that the Confidentialiy/NDA terms have disappeared, which makes sense as Windows 10 Insider builds are public and accessible to everyone. But other than that, it’s business as usual: Microsoft makes it clear that you’re volunteering to test and provide feedback about pre-release software, and that participation is at your own risk. And of course, that you can leave the program whenever you want.

We’re well aware that most people never take the time to read these types of documents, but kudos to the Windows Insider team for trying to make the Agreement Terms a bit more intelligible.