Valley confirmed for August Xbox One release

The first-person adventure Xbox One video game, Valley, is now available for pre-order ahead of its August 24th release date. The game is developed by the same studio who made Slender: The Arrival, Blue Isle Studios. Here’s the official description:

Explore the vast and beautiful world of Valley using the power of the L.E.A.F. suit: a fierce exoskeleton that grants exceptional speed and agility along with the phenomenal ability to manipulate the life and death of all living things. Experience the adventure of a lifetime.

Valley is a First-Person adventure unlike any other. Hidden deep within a remote region of the Rocky Mountains, you find yourself bewildered within a secluded valley. With the power of a recently discovered L.E.A.F. suit (Leap Effortlessly though Air Functionality), run and jump your way through beautiful forests, dangerous ruins and vast environments; all the while utilizing the power to control life and death to uncover the startling secrets of the mysterious valley.

Pre-order Valley on Xbox One

Have you pre-ordered Valley yet? Let the community know in the comments below.

Fix: Windows 10 Anniversary Update causes 100% disk usage

System resources are valuable, and in order to achieve maximum performance users tend to minimize resource usage. If you’re concerned about your PC’s performance, you should know that number of users reported 100% disk usage after installing Windows 10 Anniversary Update.

Anniversary Update causes 100% disk usage, how to fix it?

As we already mentioned, system resources are extremely valuable, and sometimes certain updates or third-party applications can cause increased resource consumption. If certain Windows 10 process is using 100% of your hard disk, you might experience performance issues such as slowdowns, freezes and in some cases crashes.

If you’re not running any demanding application, it’s rather unusual to see that a system process is using 100% of your hard drive constantly. Due to increased disk usage you might not be able to run more demanding applications, and you’ll experience decreased performance. This is especially important for gamers that play the latest video games on their computer because high disk usage can drastically influence the performance of a certain video game.

Some users reported that Windows 10 Anniversary Update actually fixed the disk usage problems, but unfortunately many reported lower performance due to the high disk usage after installing the Build 1607. As you can see, 100% disk usage can be a major problem, but fortunately there are few solutions that you can try.

Solution 1 – Use Resource Monitor to find the problematic application

Resource Monitor is a useful Windows tool that allows you to see a detailed report regarding your computer resources. With this tool you can see how much CPU, memory, disk or network is certain process using. This tool is perfect for finding the problematic processes and applications, and in order to do that, you need to follow these steps:

  1. Press Windows Key + S and enter resource. Select Resource Monitor from the list.
    anniversary-update-100-disk-usage-resource
  2. When Resource Monitor opens, go to Disk tab.
  3. Sort the processes by number of Total bytes used.
  4. Locate the process that is using most of your hard drive resources. You can also check it if you want to see only process that are related to it.
  5. In Disk Activity section sort the processes by Total bytes used.
    anniversary-update-100-disk-usage-monitor
  6. After finding the problematic process, you can easily see which application is using it, so you can remove it from your PC.

Some users reported problems with TiWorker.exe, and since this application is related to Windows Update, the problem with TiWorker.exe was fixed after installing the latest updates. On your PC the problematic process probably won’t be TiWorker.exe, so you’ll have to do some research before you can remove the application that is responsible for it. Bear in mind that you shouldn’t remove any files that are related to core Windows 10 processes unless you want to cause stability issues.

Solution 2 – Stop the problematic application from starting

Sometimes the best way to fix the disk usage problems is to find the problematic application and prevent it from starting. Simplest way to do that is to disable it from startup by using Task Manager. To do that follow these steps:

  1. Press Ctrl + Shift + Esc to open Task Manager.
  2. When Task Manager starts, go to Startup tab, find the problematic application, right click it and select Disable from the menu.
    anniversary-update-100-disk-usage-disable

You can also disable any services that are related to that application by following these steps:

  1. Press Windows Key + R and enter msconfig. Press Enter or click OK.
    anniversary-update-100-disk-usage-msconfig
  2. When Windows Configuration window opens, go to Services tab.
  3. Check Hide all Microsoft services.
    anniversary-update-100-disk-usage-services
  4. Locate the service that is related to the problematic application and uncheck it.
  5. When you’re done, click Apply and OK buttons.

Users reported that MSI Command Center was causing high disk usage on their Windows 10 PC, but bear in mind that almost any third-party application can cause this error to appear.

High disk usage can negatively impact your PC performance, and if you’re having 100% disk usage after installing the Anniversary Update, be sure to try some of our solutions. If none of these solutions fixed your problem, you might want to uninstall Windows 10 Anniversary Update and switch back to the previous build.

READ ALSO:

BlueStacks emulator won’t open in Windows 10 Anniversary update

The Anniversary Update is not an emulator-friendly OS, according to the latest user reports. BlueStacks users are complaining they can’t get their emulator to work after installing Windows 10 version 1607 on their machines.

Bluestacks is one of the best Android emulators for Windows, allowing Windows users to run Android applications and games on their Windows devices. Although Windows users can request compatible apps from Android developers, the latter is not really interesting in Microsoft’s platform. In other words, the best way for Windows users to experience Android apps is by using emulators.

Users are complaining BlueStacks won’t open in Anniversary Update

I use the Bluestacks app (an android emulator) on my Surface Pro 3.  It works great – or at least it used to.  After build 1607, it will not open and my best efforts cannot resolve the problem.  Does anyone have a suggestion on how this might be fixed?   I use this app a lot and am considering uninstalling the latest build.

For the time being, uninstalling the latest Windows version and rolling back to the previous OS version seems to be the best solution. Uninstalling and then reinstalling BlueStacks doesn’t solve this problem for all users, although some were lucky and managed to get their emulator to work after uninstalling it.

In case you really need an Android emulator, there are plenty of emulators for Windows you can choose from, such as Droid4x, AMIDuOS, Andy, or Windroy. Read the description and select the emulator which meets your needs.

As always, in case you’ve found a permanent fix for this BlueStacks issue, you can help the Windows community by sharing it in the comment section below.

RELATED STORIES YOU NEED TO CHECK OUT:

Installing KB3176493 update for Windows 10 seems impossible for some

Microsoft pushed three cumulative updates on Patch Tuesday, but it appears that installing KB3176493 is really an impossible mission for Windows 10 users. This update brings reliability improvements, bug fixes, and security patches, so installing it is a must if you want to better protect your system against threats.

Unfortunately, thousands of users haven’t been able to install KB3176493 because the installation process suddenly stops. The bad news is that apparently there is no fix for this bug, as users confirm they’ve already tried all the workarounds they could find on the mighty internet.

Users are complaining they can’t install cumulative update KB3176493

I have tried all the methods I can find online but this update still wont install. Since this has been happening my computer is taking 15 min to start up because it is constantly trying to install the update and failing. I know I cant turn off auto updates but this is getting ridiculous. I have even set a specific date to attempt the install and the update still doesn’t work. I don’t want to revert to the preious operating system of 8.1 if I don’t have to. Please help.

In this situation, the best solution would be for Microsoft to officially acknowledge the issue and push out a hotfix as soon as possible.

This is not the first time users have reported severe issues after they installed the Anniversary Update. Some users have been luckier, managing to install all three cumulative updates — but soon finding out these updates break the Start Menu and Cortana.

We’ll keep on searching for a fix to help you install KB3176493, and we’ll update this article as soon as possible.

RELATED STORIES YOU NEED TO CHECK OUT:

Windows 10 Anniversary Device Manager issues reported

Many users were anxiously waiting for the Windows 10 Anniversary Update, but it seems that part of them are now regretting their decision to install this major update on their computers.

A user by the name of mccainmw reported that after installing the Windows 10 Anniversary update on three machines, only one seems to have updated without issues. One of the machines experienced an issue causing the lock screen to go black when returning from sleep. He also said he already posted about the two issues on other forums and noticed that other users who are dealing with them.

However, the third computer that received the Windows 10 Anniversary Update experienced another issue he didn’t find in forums. According to mccainmw, once the update finished installing, he noticed that “#2” was added to the network adapter display name in the Device Manager. He has no idea why this happened, and doesn’t know how to remove the #2 from the end of the network adapter display name. The user also claimed he tried to uninstall it, but that didn’t change the name, and the #2 designation repeated after the adapter was re-installed.

It seems that a Windows Insider by the name of thecreator found a fix to this issue and we’ll explain his method below:

  • Boot in Safe Mode
  • Click on Start->Run, type “regedit” and press Enter button
  • Once Regedit opens you will need to search Local Machine for the exact name of the connection and rename it (or delete it)
  • After that, restart your computer, let it boot normally into Windows 10 OS and the problem should be fixed.

The same Windows Insider added this issue occurred often in Windows XP and this fix was the same even with that version of Windows.

RELATED STORIES TO CHECK OUT:

Fix: KB3176495 install fails or remains stuck in reboot loop

Microsoft has rolled out the first public cumulative update for the Anniversary Update, under the code name KB3176495. This security update brings important improvements and fixes for Windows 10 Version 1607, addressing a series of vulnerabilities in the OS.

KB3176495 patches severe Internet Explorer and Edge security vulnerabilities allowing remote code execution, as well as Windows authentication weaknesses allowing elevation of privilege. Taking into account the severity of these threats it’s vital that users install this update on their machines.

Unfortunately, many users are reporting they can’t install the cumulative update KB3176495 because the installation process fails or simply remains stuck in a reboot loop.

 Users are complaining KB3176495 download fails, installation remains stuck in reboot loop

  • “The KB3176495 began to download and it is now stopped at 61% and not advancing. I tried closing and then going back into Settings and it still shows the same 61%.”
  • “I allowed KB3176495 to install on one of my machines today, a very new Z170 chipset machine.  Upon reboot, the machine would immediately go into attempting auto repairs, but fail that and reboot again with no stop to that cycle. [..] saw the error on “aistora.sys”.
  • “I have tried all the methods I can find online but this update still wont install. Since this has been happening my computer is taking 15 min to start up because it is constantly trying to install the update and failing.”

Fix KB3176495 download and installation fails

Solution 1 – Run the Windows Update Troubleshooter

Download the Windows Update Troubleshooter, run the tool and then try to install KB3176495 again.

Solution 2 – Delete the content of the SoftwareDistribution folder

  1. Go to C:WindowsSoftwareDistributionDownload folder and delete everything in that folder.
  2. Launch Command Prompt Admin > run the command wuauclt.exe /updatenow
  3. Wait for the command execution to complete > go to Control Panel > Windows update > Download Windows 10 update.

Solution 3 – Perform a clean boot

  1. Type System Configuration in the search box > hit Enter
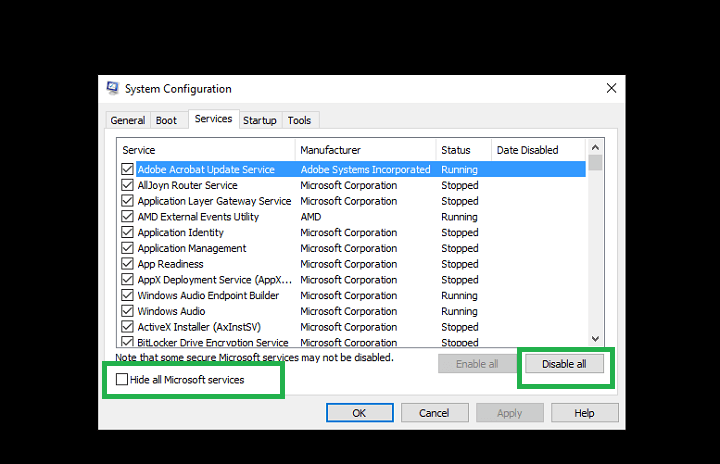
  2. On the Services tab >  select the Hide all Microsoft services check box > click Disable all.

hide all microsoft services windows 10


3. On the Startup tab > click on Open Task Manager.

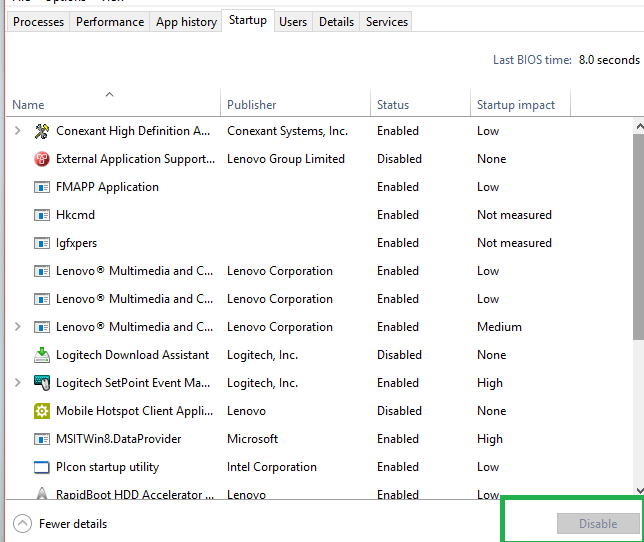
4. On the Startup tab in Task Manager > select all items > click Disable.

disable start up items windows 10

5. Close the Task Manager.

6. On the Startup tab of the System Configuration dialog box >click OK > restart your computer.

Solution 4 – Restart the BITS, Cryptographic, MSI Installer and the Windows Update Services.

  1. Launch Command Prompt (Admin)
  2. Type the following commands to stop the BITS, Cryptographic, MSI Installer and the Windows Update Services. Press ENTER each command.

net stop wuauserv
net stop cryptSvc
net stop bits
net stop msiserver

3. Type the following commands to rename the SoftwareDistribution and Catroot2 folder. Hit ENTER after you type each command.

ren C:WindowsSoftwareDistribution SoftwareDistribution.old
ren C:WindowsSystem32catroot2 Catroot2.old

4.Type the following commands to restart the BITS, Cryptographic, MSI Installer and the Windows Update Services. As always, hit ENTER after you type each command.

net start wuauserv
net start cryptSvc
net start bits
net start msiserver

5. Type Exit > restart your computer > try again to install the cumulative update KB3176495.

RELATED STORIES YOU NEED TO CHECK OUT:

Fix Windows 10 Anniversary Update mouse and keyboard lag

After installing the Windows 10 Anniversary Update, many users started experiencing various problems and they complained on Microsoft’s forums, where they asked for help. A user named Aindriu80 who installed the AU on the 2nd of August on his laptop has noticed that the device slowed down and he got regular freezes that lasted ten seconds. His biggest concern is related to the mouse and keyboard, which are very laggy and he wanted to know if there’s a solution to his problem.

Aindriu80 said that he owns a Dell XPS 15 laptop with 16GB Dual Channel DDR4 2133Mhz (8GBx2), an NVIDIA® GeForce® GTX 960M with 2GB GDDR5 and 512GB PCIe Solid State Drive. Like any other Windows 10 user, he was anxious to install the new Windows 10 Anniversary Update and enjoy its new features and improvements, but instead, his laptop feels now like a five-year old machine. “My mouse and keyboard are very laggy.

I have to move the mouse a while before it responds and when it does its like I am trying to run a massive graphical game.  I can nearly finish a word on my keyboard before it appears on screen. It feels like Windows 10 Anniversary Update was not designed to run on my laptop.” He asked the guys from Microsoft if there’s a way to stop the crashes and to improve the responsiveness of his keyboard and mouse.

His problem came to the attention of Vashi, Microsoft Support Engineer, who offered him two solutions. The first method involves running the system maintenance troubleshooter by:

  • pressing Windows Key + R to open the run command;
  • typing control and press enter to open control panel;
  • typing troubleshooting in the control panel search box to open it;
  • then clicking “view all” on the left panel.

If this method fails, then there’s the second solution: to place the system in Clean Boot, in order to identify if any third party applications or startup items are causing the issue.

Another guy named NGWin got rid of this problem by simply rolling back the AU using windows recovery and he said that everything is back to normal now. He believes that the Windows AU/incompatible Nvidia driver is the culprit.

RELATED STORIES TO CHECK OUT:

Fix: Anniversary Update causes high CPU temperature

A week has passed since Microsoft rolled out the Windows 10 Anniversary Update, yet user complaints keep on coming in. As intriguing as this may sound, some Windows users are still struggling to install the update, while others are so disappointed they’ve decided to uninstall Windows 10 version 1607.

Recent user reports have also revealed the Anniversary Update causes a rise in CPU temperature, slowing down overall system performance. High CPU temperature doesn’t occur only on the day of install, but rather it’s a constant issue.

Users are complaining about high CPU temps on Windows 10 version 1607

Anyone noticing hotter computer temps since updating to the Anniversary update? I was running in the 30/40’s according to Core temp prior and now I am in the 50’s. I also noticed higher temps when I was a beta tester for 10 but never figured out what caused them. Any ideas?

High CPU temperatures constitute a serious issue as they can damage your computer in time. You should fix this issue as quickly as possible to avoid potential consequences to your system. Before performing any troubleshooting, first check your CPU fan and clean it because high CPU temperature issues are often triggered by specks of dust caught there.

Fix high CPU temperature in the Anniversary Update

Solution 1 – perform a clean boot

  1.  Type System Configuration in the search box
  2. Go to the Services tab > check the Hide all Microsoft services check box > click on Disable all.

system configuration anniversary update

3. Go to the Startup tab > click on Open Task Manager.

task manager anniversary update

4. For each startup item> select the item > click on Disable.

disable task manager item anniversary update

5. Close Task Manager.

6. On the Startup tab of the System Configuration, click OK > restart the computer.

 Solution 2- Upgrade your computer

Not all hardware is compatible with the Anniversary Update. In this case, the best solution would be to roll back to your previous Windows version or upgrade your computer. To see if your computer is ready for the Anniversary Update, check out this article.

RELATED STORIES YOU NEED TO CHECK OUT:

Fix: Windows 10 Anniversary Update slowing down internet speeds

Microsoft  finally released the Windows 10 Anniversary Update, but it seems that more and more issues are being found by users after installing it on their computers. Today, we will talk about the internet speed issue being caused by the new major update and how you can fix it.

In concordance with GHacks, the Window Auto-Tuning feature been introduced in Windows Vista (which is also available in Windows 10) might be responsible for this issue. To fix this problem, you will need to disable it.

The Window Auto-Tuning feature handles programs receiving TCP data over a network in order to improve the performance of processes in charge of these transfers. Unfortunately, the Windows 10 Anniversary Update is messing up this feature and this is causing the internet speed to be very slow.

How To Disable Windows Auto-Tuning Feature

Keep in mind that in order to disable this feature, you will just need to type in a simple command in the Command Prompt window (using administrator privileges) as follows:

  • Press Windows key+X and select “Command Prompt (admin)”
  • Once the command prompt opens, you will need to write the following command: netsh interface tcp show global
  • After you type this command, look for “Receive Window Auto-Tuning Level” and in case it is “normal”, you will need to disable it
  • To disable it, type the following command: netsh int tcp set global autotuninglevel=disabled

After doing this, perform an internet speed test to see if you notice any improvements. If after disabling the “Receive Window Auto-Tuning Level” you don’t notice any improvements, you can enable it by typing the following command in the Command Prompt (admin): “netsh int tcp set global autotuninglevel=normal” (without “).

If this doesn’t fix your internet speed issue after updating to Windows 10 Anniversary Update, you should look for processes that are using more network connection than usual (such as torrents applications), firewalls or security software.

RELATED STORIES TO CHECK OUT:

Top 5 Windows 10 Ultrabooks to Buy in 2016

Laptops are a much more productive piece of equipment than a tablet, but unlike a tablet they can get quite heavy at times. That’s where Ultrabooks come in. An Ultrabook is merely a specification guideline by Intel that manufacturers can follow, but make no mistake though,: these guidelines are extremely strict and push the boundaries of what can be achieved with current manufacturing technologies. This is why Ultrabooks can get quite expensive, which is why you need to separate the good ones from the bad. This list will help you do so.

Dell XPS 13

windows ultrabooks-dell xps 13

Looking at the laptop, the first thing you will notice is the screen: how thin the bezel is and how big the screen is for the size of the laptop. Dell has managed to fit a 13” screen in what is usually an 11-inch laptop size. The laptop itself is only 0.6 inches thick and weighs only 1.2 kg while giving you an experience of a Core i7 CPU and an NVME SSD — three times faster than a normal SATA SSDs. That thin bezel 13” screen is Full HD as well, and the battery is big enough to last for 12 hours. All in all, if you have $799 lying around, it is quite a beauty.

Lenovo Yoga 900

windows ultrabooks- lenovo yoga 900

Lenovo might not have much of a reputation after the recent privacy fiasco, but they still do make gorgeous hardware. The Lenovo Yoga 900 is the laptop equivalent of a convertible. One moment it is a laptop, the next moment you have a Windows 10 tablet. It features a 4K13.3-inchh screen and an Intel Core i7 powering a 512 GB SSD. This is quite possibly the best convertible Ultrabook you can buy at a price of $1,199. It will run eights hours on a full charge.

(READ ALSO: This Windows 10 tablet has a built-in gaming controller, retails for 150 GBP)

Razer Blade 2016

windows ultrabooks-razer blade 2016

Ultrabooks are already cutting edge technology, but the Razer Blade pushes these boundaries further and sets a new bar for other manufacturers. The Razer Blade is a gaming ultrabook that features a Core i7 6700HQ CPU with 16GB of DDR4 RAM and an Nvidia 970M GPU with 6GB of VRAM: top of the line specs while weighing a mere 2kg.

It also features an individually backlit full RGB keyboard. Every key has an LED lighting it up, and each LED can produce any colour for any individual key. While this might be the best ultrabook you could buy in terms of sheer performance, it also costs you $2000, so it might not be within the budget of a lot of people.

One thing about the Razer Blade unique to it is its Thunderbolt 3 port which you can use to attach another Razer product known as Razer Core, or a housing for an external graphics card. You can connect a full desktop-sized graphics card to the laptop via the Razer Core and further boost your performance — albeit at the cost of portability and price.

(READ ALSO: Windows 10 Business Laptops Unveiled: VAIO S And VAIO Z)

Asus ZenBook UX305

windows ultrabooks-asus zenbook ux305

The Asus ZenBook UX305 does not have a catchy name, but it comes with an aluminium body and a 13.3-inch Full HD display that can be powered for nine hours on a full charge battery. The laptop runs on an Intel Core M and you get a 256GB SSD. It weighs only one kilogram and has a sleek aluminium finish that makes the laptop look more premium than it is.

Compared to other laptops on this list, this one is a bit underpowered. It doesn’t even have a backlit keyboard, and the speakers seem a bit underpowered considering they were made with the help of Bang & Olufsen. But it’s the price that differentiates this one the most from others on this list. It costs only $699. That price might seem a lot if you are looking for a good laptop, but it is very affordable if you are looking for a good ultrabook.

(READ ALSO: What to do if Your Laptop is Plugged In, But Not Charging)

Lenovo ThinkPad X1 Carbon 3rd Gen

windows ultrabooks-lenovo thinkpad x1 carbon 3rd gen

Anyone who has used the ThinkPad keyboards of the old knows of the little red dot that controls the mouse cursor, otherwise TrackPoint. It’s something unique to the ThinkPad and something fans of it are willing to pay anything for. The Lenovo ThinkPad Carbon 3rd Gen might not have the best names but it stays true to it: its body is built with carbon fiber, it features a 4K 14-inch screen, and weighs 1.3kg while packing enough battery to last you 10 hours.

It also runs off of a Core i7 processor using 8GB of DDR3 RAM. Granted, the specs aren’t the most amazing, but it’s the price you have to pay for the little red nub for the mouse and the carbon fiber body. It’s priced at $1199.

These were five of the best Ultrabooks money can buy for you. While Ultrabooks aren’t the most affordable laptops out there, they deliver a better experience. A thin and light laptop that packs a punch is what an Ultrabook strives for, and Intel keeps the specification as tight as possible to keep the innovation going, so you know you are getting the best whenever you buy one.

Fix: Windows 10 Anniversary Update destroys boot loader in dual-boot config

If you’re running a dual-boot system, you should think twice before installing the Windows 10 Anniversary Update. Users are reporting that Windows doesn’t boot after Windows 10 version 1607 is installed, as their computers simply display an error message informing them the file system is unknown.

According to user reports, after the download is completed, Windows doesn’t boot in the first re-boot phase. Instead, a message appears, informing users the system is going to enter the GRUB rescue mode:
error: unknown filesystem.
Entering rescue mode …
grub rescue>

At the end of the process, the GRUB rescue utility lists the partitions, but shows them all as “unknown filesystem”. Many users would rush in to say it’s normal to have this error message since Linux and GRUB Boot Loader are not supported in dual boot configurations with Windows. In reality, many users have been running Grub with Linux and Windows for years.

Anniversary Update is destroying boot loader in dual-boot config

My laptop upgraded to the Anniversary update last night. The download took 7 hours! […] After the download completed, and it got to its first re-boot, Windows would no longer boot.[…]

My system was set up with a single drive, a 160GB SSD, with Windows 10 Home Edition installed in one partition, and Ubuntu 16.04 LTS in a separate partition. When Ubuntu is installed, it installs the GRUB bootloader, which up till now has had no problem handling Windows and Ubuntu installed on the same drive; it gives me a boot menu that allows me to select which OS to boot (Ubuntu selected as the default). However, after the Anniversary update, all I got was the above ‘unknown filesystem message’.

Fortunately, all hope is not lost as the boot-repair Ubuntu utility can fix this issue. You can download this free tool from Ubuntu’s website.

How to repair boot loader error in Linux and Windows dual-boot configuration

  1. Install the Boot-Repair tool in Ubuntu from an Ubuntu live-session or from your installed Ubuntu session
  2. Connect to the Internet
  3. Open a new Terminal > type the following commands and press Enter after each line:

sudo add-apt-repository ppa:yannubuntu/boot-repair
sudo apt-get update
sudo apt-get install -y boot-repair && boot-repair

4. Launch Boot-Repair from either the Dash or by typing boot-repair in a terminal.
5. Click on the Recommended repair button. When the repair process is finished, note the URL (paste.ubuntu.com/XXXXX) on a piece of paper.
6. Reboot > check if your dual-boot OS has recovered.

RELATED STORIES YOU NEED TO CHECK OUT:

Excel files won’t open in Anniversary Update

The Anniversary Update can generate many errors, starting from the moment users download it. If your Windows 10 version 1607 is running properly, consider yourself lucky: some users are still trying to install the update on their machines while others can’t use any apps.

According to recent user reports, Excel files have also been plagued by various errors triggered by the Anniversary Update. Judging by the volume of user complaints we see every day, we’re starting to think that it’s better to delay the Anniversary Update install.

For one, users are reporting they can’t open xls. files due to a strange error message:

The file could not be accessed. Try one of the following:

– Make sure the specified folder exists.
– Make sure the folder that contains the file is not read-only.
– Make sure the file name does not contain any of the following characters: < > ? [ ] : | *.
– Make sure the file/path name doesn’t contain more than 218 characters.

The dot from the third item on the list is the classic error displayed for files longer than 255 characters. However, the users who have reported this bug also confirm their files have less than 255 characters.

According to user experiences, it appears this error is triggered by missing licences for RAMDisk apps. The app creates a tmpfile in RAM and directs the TMP and TEMP variables there. When the anniversary Update is installed, it drops the licence and the system no longer finds the tmpfile location. Installing the licence into the RAMDisk software should fix this problem.

RELATED STORIES YOU NEED TO CHECK OUT:

Microsoft already testing new features in latest Windows 10 “canary ring” builds

Yesterday was quite a busy day for Windows Insiders as the company released two cumulative updates for Windows 10 Anniversary Update aka Redstone 1. As you may already know, cumulative updates only bring bug fixes and improvements to your current Windows 10 version, which means that they’re not always the most exciting kind of updates to install for Windows enthusiasts wanting to play with new features.

However, if you’re still enrolled in the Windows Insider Fast Ring, you will soon be allowed to test the first Redstone 2 build, which is the next major iteration of Windows 10 to be released in 2017. In the meantime, we guess that many Microsoft employees are already testing internal builds and Carmen Crincoli, Storage IHV partner manager at Microsoft just shared a quick tease of what’s to come:

If you’re not familiar with it, the “Canary” ring is one of Microsoft’s internal testing rings along the “Operating Systems Group” (OSG) and “Microsoft” rings that the company uses to test Windows 10 builds internally. As we previously reported, Microsoft employees who are members of the Canary ring have opted in to test anywhere from daily to slower monthly released and validated builds. Once this “dogfooding” is done, preview builds which are considered good enough for the Windows Insider program are then pushed to Windows Insiders enrolled in the Fast ring.

It’s still not clear what cool features Crincoli is talking about in his tweets, but while we can’t wait to learn what’s coming in the next Windows 10 major upgrade, you should be aware that the first Redstone 2 Insider builds are not expected to be that exciting. Head of the Insider program Dona Sarkar explained yesterday:

With the new builds we release from our Development Branch, you won’t see any big noticeable changes or new features just yet. Just like we did after the release of the November Update, we are focusing on making some structural improvements to OneCore. If you recall – OneCore is the shared core of Windows across PC, tablet, phone, IoT, Hololens and Xbox. It is essentially the heart of Windows.

Let us know in the comments if you’re still excited by the upcoming Redstone 2 builds and stay tuned to Winbeta to get all the details in the coming weeks!

SSX available now for free on Xbox One via EA Access

EA Access is a good way to play some games without laying out a bunch of extra cash. A number of titles are available on EA Access for no additional cost above and beyond the $4.99 monthly (or $29.99 annual) subscription. Today, according to reddit (via Windows Central), another title, namely the snowboarding game SSX, is available on the service even though it’s not been officially announced.

According to our description of SSX when it was added to Xbox One Backward Compatibility:

SSX is the 2012 reboot of the 2000 game of the same name, and marked the return of a beloved franchise when it hit store shelves. Featuring thrilling snowboarding gameplay with a bit of over-the-top action, SSX revolves around tossing the player into massive tracks in places like Antarctica and the Himalayas, focusing its gameplay on doing tricks to rack up points. If you’ve got a copy of SSX lying around or want to pick one up from a bargain bin, it’s well worth blowing the dust off and spending a night in the snow.

It’s Backward Compatibility that EA is using to make the game available on the Xbox One via EA Access, and Windows Central was able to verify that the game does indeed install for free. Let us know in the comments if you’re an EA Access subscriber and will be pulling out your snowboard.

How to prepare for Windows 10 Redstone 2 Insider build updates

The Windows 10 Anniversary Update is here and has left Windows Insiders a bit on edge since there hasn’t been an update in quite some time due to the release of the new update and Microsoft working on Redstone 2.

We know that Redstone 2 is set to hit Windows 10 devices in early 2017 and should address many problems facing Windows 10 Mobile. After that, Microsoft aims to release Redstone 3 in the same year around August or September.

This has led many to wonder when Microsoft will begin releasing Redstone 2 builds to Windows Insiders. Well, we do know there are plans to kickstart the release of Redstone 2 builds within the next two weeks or so, meaning by the end of August or some time in September the first Redstone builds will be sent out to the Fast Ring.

How to prepare for Redstone 2

Go to Settings>Update & security>Windows Insider Program, then click the Get Started button. After doing that, follow the instructions then restart your system when prompted. Finally, once your system is up and running again, return to the same window and make sure you are set to receive updates from the Fast Ring.

Enrolling now should allow you to receive the first wave of Redstone builds early. Enrolling on the day will make it so that it will take a while before the build is available for download. This is because Microsoft must first provision your system, and this takes a few days at most.

Note that Insider builds are usually not fully stable, so do not enroll a computer used for work or personal use. Instead, use a computer that won’t cause you to lose your mind if things go awry.

RELATED STORIES YOU NEED TO CHECK OUT:

Want to design body parts, or collect space junk? Microsoft report identifies 10 jobs of the future

If you ever turn back the clock by taking a trip down memory lane, you will probably realize that technology has come a very far way since your younger days.  It turns out, apparently, that jobs are going this way too, and will become more technologically advanced as time progresses. So, in line with this, Microsoft Surface teamed up with The Future Laboratory to look at and report the creative jobs which modern students will be chasing after by the year 2025.

Overall, the “Tomorrow Jobs” report finds 10 new job titles for the future, ranging from Spacejunk Archaeologists,  Memory Storage Specialists, Battery Innovators, and even Human Parts Designer. We’ve given a few of the most interesting titles a look and have included Microsoft’s descriptions for you below.

  1. Space Junk Archaeologists will locate and explore debris orbiting our planet. These specialists will conduct guided tours of abandoned spacecraft and defunct satellites, while also collecting, archiving and deciphering each recovered item.
  2. Memory Storage Specialists will help people to use these systems to increase the storage capacity of their over-stretched minds, providing services that allow them to dip in and out of treasured memories and experiences at will.
  3. Rewilding Stategists will reintroduce plants and animals that have been extinct in a region for centuries – so wolves and beavers could make a comeback in Britain – and manage assisted migrations in order to create resilient and vibrant landscapes in the face of advancing climate change.
  4. Human Parts Designers will combine a design aesthetic and skill set with bio-engineering know-how to create a huge range of customised human limbs, either to perfectly match the existing skin tone, musculature and colour of the rest of a person’s body, or to provide new fashionable looks or enhanced functionality for particular jobs or sport.

For the complete list of future fields of work, you can check out the official Microsoft post by clicking here. The list is rather intriguing and also includes the necessary skills for these jobs, so be sure to let us know your thoughts by dropping us a comment below.

Fix Windows 10 error 0x80070019

Microsoft Windows has always managed to fascinate professionals with its outstanding Work/Office functionality and productivity. Microsoft is planning to take over the mobile market with Windows 10 Mobile. In the recent update pushes, Microsoft had played hard on the code which resulted in the breakdown of Apps like Alarm/Clock, WhatsApp and Messaging services.

The affected apps would gray off and give a code 0x80070019 on updating. If you are having a similar problem as stated here, then you are just at the right place. In this post, we will guide you to fix the most annoying 0x80070019 error in Windows 10 Mobile.

Basically, we have 3 fixes. If you don’t get it right with the first fix proceed with the next one.

How to fix Error Message 0x80070019

Solution #1: Updating from Old Store

  • Go to Store Beta app and tap on the Settings icon.
  • Disable Auto Updates by tapping on the option
  • Make sure you are on working Internet connection so that your settings get saved in the setting’s synchronization process.
  • Then, open old Store app and install the updates which failed in Store Beta. If the app still gives update bug, then simply uninstall and install it afresh.

Have you tried this process and if it still didn’t bust your issue, then follow the soft reset method as mentioned below.

Solution #2: Performing a Soft Reset

Soft Reset is the quickest possible method to fix all around system bugs with minimum to no data loss.

  • To Soft Reset, you just have to press Power Off + Volume Down button and hold it for a moment. Once you feel the vibration, let your device rest for a bit.
  • Now what you need to do is leave your device alone for a good amount of time, say 10-20 minutes. It has just encountered a trauma. Give it space.
  • After a while, it should boot up and ready to rock and roll as it were before.

Most of the cases might be fixed at this point. If you still didn’t get a way around this bug, then the ultimate method is posted just for you. Never say Never.

Solution #3: Performing a Hard Reset

Oh, well. Here we are on the edge. A Hard reset always settles things around. Make sure you have backed up the data well before you go for this mobile-nuclear deterrent. Back up your photos, important files and to mention that expressively adorable selfies.

Note: In case you just rolled your eyes over the paragraph and landed on this note. It’s just to inform you that all your data will be wiped off via following method. The Author won’t hold any responsibility regarding data loss and Mad Max Fury device behaviors.

  • To perform a Hard Reset, go to Settings and tap on About.
  • Then Select, Reset your phone and Yes after reading the warning.
  • After Hard Reset completes you can set-up your phone all over again.

That’s all for now. If you have queries then post them in the comments below. Also, don’t forget share this post among your fellow mates. Happy Bug fixing!

Minecraft releases newest experimental Snapshot with internal changes, improvements and “some new bugs”

The Minecraft team is always hard at work to improve their game for the community. A testament to this is the fact that the folks over at Mojang have released another Snapshot which reveals all the latest internal changes, improvements, bug fixes, and new bugs.

Overall, the changes are very comprehensive in length, but Mojang still is calling for your help to find bugs and report bugs in time for the next snapshots.  Mojang also notes that bigger features are planned as a surprise for Minecon, happening September 24-25 in Anaheim, California, but smaller changes will make it into snapshots in the coming week.  Please find the biggest changes below:

Notable Changes:

  • Some mobs are now more afraid to get wet in the water
  • There are now more spawn eggs for many different mobs and this time they are working properly, so we’ll keep them
  • Mob types are now separated
  • Changed the duration of hunger and saturation effects
  • Broke some bugs so they should not happen anymore
  • Resource pack format changed slightly, it’s now using version 3
  • Most commands can now use blockstate definitions instead of a numerical metadata value
  • Snowmen are now 10% less derpy
  • More robust handling of invalid items and hopefully less duping bugs due to this change
  • Lightning storm will now attract less skeleton horses

Again, the snapshot also includes a very long list of other bug fixes, a few of which can be seen below.

  • [Bug MC-90191] – Armorstands, silverfish and endermites in boats spin rapidly
  • [Bug MC-4] – Item Drops Sometimes Appear at the Wrong Location
  • [Bug MC-679] – Compass points wrong direction after returning from nether.

For the complete details on all the bug fixes, you can check out Mojang’s official blog post by clicking here. As always, please be sure to come back to WinBeta and let us know what you think of these bug fixes by dropping us a comment below.

Matchmaking to get an overhaul in Titanfall 2 on Xbox One

The developer studio Respawn is learning from their past mistakes, and taking an intense look at the way their first game was put together. Matchmaking for Titanfall 1 was notorious for having games that weren’t full and overrun with players outside of their skill levels. With the creation of Titanfall 2, Respawn wants to completely overhaul and improve the system so that all players can have a more rewarding experience in multiplayer lobbies.

Mike Kalas joined Jon “Slothy” Shiring in the latest ‘Inside Development’ video to talk more about how matchmaking will work in Titanfall 2. Alongside the most recent blog post published on the game’s website, Kalas explained how he felt the flaws of Titanfall’s matchmaking would significantly improve the new one. Players would often come and go in lobbies, leaving the players stacked onto one side without any clear idea what the system was attempting to do. It always leaves a bad taste behind for gamers that are solo on their team against higher skilled or more players on the other side.

Kalas says that Titanfall 2’s system will be quicker and the skill levels will be closer together. The Skill Based Matchmaking isn’t the only improvement, though. Formerly, wins and losses defined a player’s score. While they’ll still play a large part, the player’s individual contribution will also add to the overall experience. All of these goals led to some key points to keep in mind while developing:

  • We decided we needed the ability to find a new match for any player after every match.
  • When you now have 100% of your playerbase entering matchmaking after every match, we could now create matches much more quickly than before. That would also let us make sure those matches are interesting matches for everyone ­ getting stuck in a bad match won’t continue on. We can also make sure that these matches are full much more often.
  • When it’s fast to make matches, it doesn’t make sense to make players sit and watch teams being formed around them anymore. You’ll be hanging out in your active Network instead, prepping for the next match.
  • We decided not to sell maps, so we could have the fastest and best quality matchmaking possible. On Titanfall 2, all of the maps will be free.

Respawn is inviting everyone to come to the multiplayer Tech Test to try out the massive amount of servers across multiple cloud providers. “The whole idea for the tech test is to make sure the simulator is doing what it should,” he explained to Slothy. The tech test will also be a test for the matchmaking system to make sure that it is measuring skill accurately and flowing like it should. Unfortunately, Respawn hasn’t announced exactly when the tech test will take place yet but interested parties can sign up to their newsletter.

Titanfall 2 is a highly anticipated sequel for fans of the original. The game is expected to launch for PC, Xbox One, and PlayStation 4 on October 28th. Don’t forget to pre-order early to be one of the first soldiers on The Frontier battlefield.

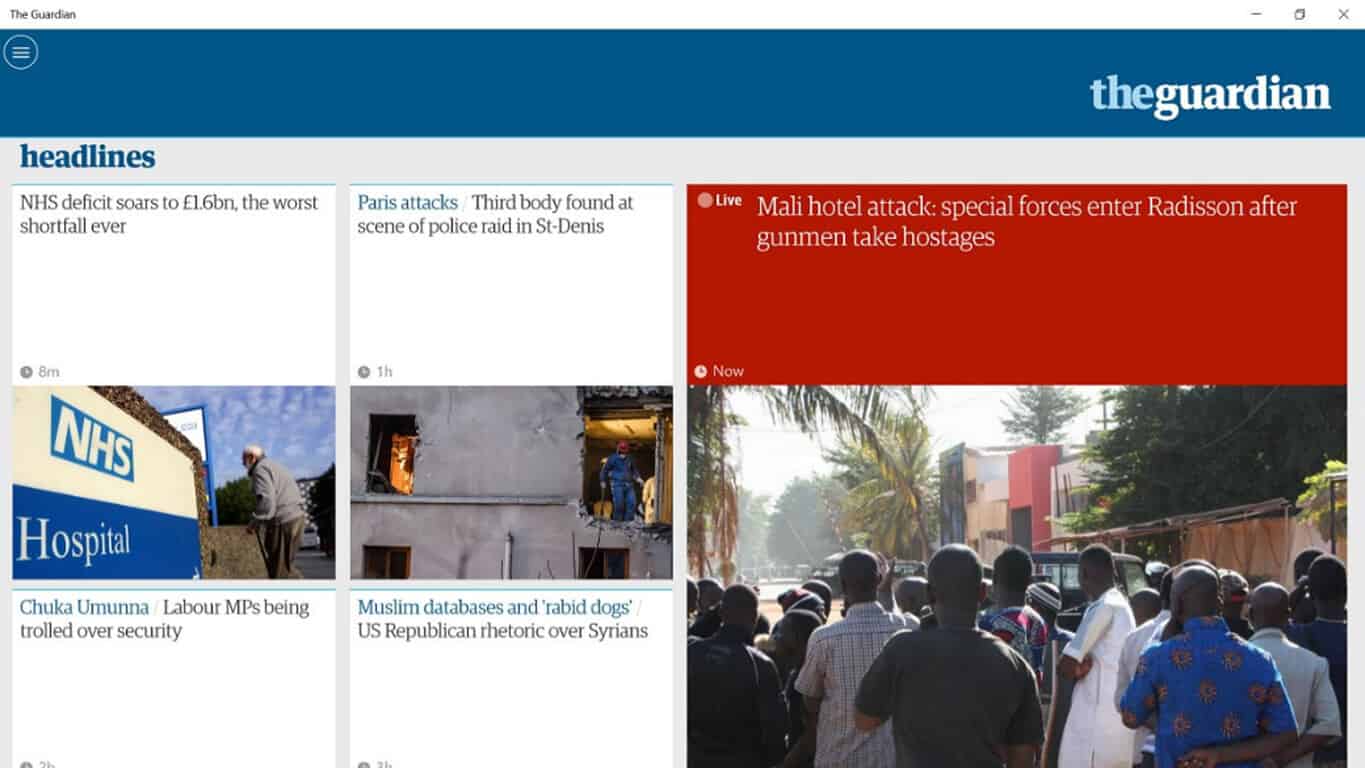
The Guardian’s Windows 10 app gains Surface Pen support

Known for keeping users up to date on the latest breaking news, The Guardian continues to improve its already sleek design and accessible award-winning content. The latest update for the UWP app brought two new important features:

  • NEW Football tables now available for most major European leagues. Find it under Football / Tables on the main menu
  • NEW for Surface users! Inking: tick cards to automatically save them for later or cross them to un-save.

Now users can take a Surface pen to the newspaper application, easily marking stories to save for later or to get rid of them. Add that to the handy search feature and offline browsing, The Guardian is cementing itself as one of the more versatile news and media applications for Windows 10.

Be sure to check it out by downloading The Guardian for free by clicking the link below.

The Guardian
The Guardian
Price:
Free

How to fix ‘Can’t upgrade to Windows 10/11 because of BIOS’

Microsoft played a bold move by offering the Windows 10 upgrade for free to every genuine Windows 7 and 8.1 user, but as it happens with every Windows iteration – it came with its own problems.

Windows 10 is an incredible improvement over Windows 8, and is well worth to effort you would put into an upgrade – if the official Microsoft upgrade tool lets you commit to it. The tool might tell you that your BIOS is not supported with Windows 10 – this is an issue not easily fixable, and it might not even have a fix at all but it is worth a shot to try some things.

BIOS is a computer’s very basic firmware – it is what drives the computer before you the operating system gets its hands on it. The BIOS is essential to a system, as without it you wouldn’t even get to the stage of booting into an operating system, and therefore compatibility between the BIOS and the operating system is crucial. There are various acronyms for BIOS features that let an operating system talk with it, and many of them are necessary for Windows 10 but one of them is something called the “NX Bit”.

One of the reasons the Windows 10 upgrade tool can tell you that your CPU or BIOS is not supported is because of the NX Bit, and so we can attempt a fix if it is supported by your CPU – and it is an easy one. Simply follow these steps:

  • Open the Start Menu and type “cmd.exe”, then right click on the top result and click on Run as Administrator.Screenshot_19
  • Once you have the command prompt opened as administrator, type this exactly as it is as the command.
  • exe /set {current} nx AlwaysOn
  • Now press Enter and it should do its magic.Screenshot_20
  • After the process is complete you will have to shutdown the computer and start it again – do not use the restart option of Windows for this.

Now try running the Windows 10 Upgrade tool once more – in all likelihood it should now say you are good to go for a Windows 10 upgrade.

If this however did not work, you must attempt something that is not very easy to follow. You can try to update your BIOS – a process that is extremely delicate and could result in complete loss of your computer if done wrong, so you must be very careful with it.

Unfortunately, it is also a process very hard to describe because it is different for every motherboard manufacturer. The steps henceforth are not necessarily how you should do the upgrade on your PC but it gives you a general idea of how to do it.

  • Open the Start Menu and type “cmd.exe”, and open the first result.Screenshot_21
  • Now type this exact command in the command prompt and press Enter.
  • wmic baseboard get product,Manufacturer,version,serialnumber
  • This should give you your motherboard’s manufacturer and model number.Screenshot_22
  • Use the manufacturer and model number to Google the exact steps for upgrading the BIOS on that specific motherboard.

While this is a complicated procedure with a lot at stake – Windows 10 is worth it and you get the added bonus of performance improvements with the new BIOS firmware if you succeed in the upgrade process..Staying up to date with the latest technology and standards can get hard and sometimes expensive but it is important to do so for security and stability.

Roundup: Most common Edge problems in Anniversary Update

One week after the Anniversary Update’s release, one thing is sure: the latest Windows 10 version is far from perfect. Of course, no piece of hardware or software can ever be perfect, but taking into account all the publicity Microsoft built around the Windows 10 Anniversary Update, and we really had high expectations for this OS.

Microsoft also hopes the Anniversary Update makes the Edge browser more popular among users. In a certain sense, the company managed to reach its goal as Microsoft Edge now has a 5.09% market share. However, judging by the plethora of issues affecting Microsoft’s favorite browser, we expect many Edge users to switch to another browser pretty quickly.

Roundup: Edge problems in the Anniversary Update

1. Microsoft Edge can’t play audio on certain websites, although everything was working perfectly fine before the upgrade. If you’re experiencing audio issues when watching Youtube on Edge, you can use the workarounds listed in this fix article to solve this problem.

“Microsoft: Please fix Edge so it plays audio on this website: https://portevergladeswebcam.com/. Edge worked fine on these PZTtv sites prior to the Anniversary Update.  Now…no Audio.”

2. Users can’t install extensions. Users are informed that some apps experience some problems, and are then kindly invited to uninstall the apps in order to repair them. However, this action doesn’t solve the problem. For more information about the Edge extension issue in the Anniversary Update, check out our fix article.

“Here is the problem: This app encountered a problem. Please reinstall it to repair. Same circle. Reinstall and same message pop up. Cannot get out.  This problem only applied for extension in Window Store. Any other app installed and worked fine. This problem is driving me crazy. 4 months waiting and nothing but pain.”

3. The Anniversary Update deletes the Favorites list in Microsoft Edge. Users have long complained about this issue, but Microsoft hasn’t done anything to solve it yet. The tech giant’s only suggestion is to import favorites from Internet Explorer. You can also use Edge’s “Sync your content” feature, perform a backup and then restore your favorites.

“When I installed the win 10 anniversary edition, it lost all my favorites and my favorites bar.  according to ms, installing the anniversary edition is just like a new clean install of windows Edge 11.  This is crazy, as some of the favorites I cannot replace.”

4. Edge can’t close down multiple tabs. If you’ve got a lot of tabs open in your Edge browser, the only way to close them is to actually close each individual tab.

“After the Windows 10 August Anniversary Update the Microsoft Edge browser does not working properly now. It will not close down with multiple tabs. […] The normal shut down button (X) doesn’t work. It asks if you want to close “Close All”, which you click, and nothing happens.”

5. Edge opens and closes all the time. Many users are complaining they can’t use Edge because the browser constantly opens and closes despite all the workarounds they’ve used.

“Since updating to the anniversary update Edge will not stay open… I’ve searched and tried it all, from deleting the folder in app data and running power shell to changing the registry…. Please help!!! anyone!!!”

6. Tabs are disappearing in Microsoft Edge. Users are complaining that some of their tabs randomly disappear when they have multiple tabs opened, except for the current tab.

“[…] when I have multiple tabs opened they will randomly disappear along with the “x” to close the window and the “-” minimize button. All I can see is the current tab I am on with no way to click and view other opened tabs. […] When I reopen edge the “x and -” to close or minimize are back and I can open new tabs and view them for a while then they disappear again and I have to start all over closing it down again.”

7. Microsoft Edge is slow. Users are reporting that Edge is extremely slow and sometimes even unresponsive. Running AdBlock speeds up the browser, but this not enough to stop users from migrating to Google Chrome.

“Did The Windows 10 Anniversary Update Which Was Suppose To better The Edge Browser,But Nothing Has changed its useless With Constant Slowness and Being Non-Responsive,Without Doubt the Worst Web Browser Ever,Thank god For Google!!. I Can See Google Has No Competition From Edge.”

If you’ve encountered other issues when using Microsoft Edge, you can tell us more about your experience in the comment section below.

RELATED STORIES YOU NEED TO CHECK OUT:

Digital board game, Armello, coming to Xbox One with new DLC

The critically acclaimed digital board game, Armello, will be launching on Microsoft’s Xbox One video game console on August 30th, the same day its first downloadable content (DLC) will be arriving on its existing versions on other platforms.

Armello is a fusion of board and card games with a fantasy twist and supports up to four players at once. The game also contains numerous roleplaying game elements such as levelling, items, and dungeon exploring and has earned itself a loyal fan base since its launch in late 2015.

Here’s the official game description: Armello is a hybrid digital board and card game for four players. Each player takes control of a hero in a quest to unite the Kingdom under the banner of their respective Clans, with the impending death of the King of Armello as a result of the Rot. How the player chooses to do this will be influenced by their talents, luck of the draw, and by the actions of other competing players.

Players begin in their Clan Grounds, located in one corner of a procedurally-generated, hex-based map. They spend Action Points (AP) to move and interact with their environment (exploring dungeons for resources, followers and treasure , questing, claiming settlements etc.) and engage other heroes / characters in combat.

The game ends and a victor is declared when the Rot-infected King is either slain (either as a result of the Rot or the aggression of a hero) or cured of the Rot (but banished from Armello forever) by the mysterious power of the Spirit Stones.

The DLC, which is also launching on Xbox One on August 30th, is called Armello: Usurpers Hero Pack. It adds four new characters to the game, Elyssia, Wardress of Warrens (Rabbit Clan), Sargon, the Death Teller (Rat Clan), Magna, the Unbroken (Wolf Clan), and Ghor, the Wyldkin (Bear Clan). Four new ring items will also be made available for DLC owners. These rings are, Tanzanite, Rainbow Quartz, Rubellite, and Aquamarine.

Are you a fan of Armello and will you be buying it on Xbox One? Let us know in the comments below.

Unable to activate Windows 10 after the Anniversary Update

If you’re running a genuine, fully activated version of Windows 10, there’s no need to activate anything upon installing the Anniversary Update. However, due to a couple of reasons and errors, your system might actually require you to activate it once again, or even worse, tell you that you’re not able to activate your copy of Windows 10, even if it’s completely legal and genuine.

When Windows 10 asks for activation, you basically just need to enter a product key, and it should be activated. But, sometimes, due to various errors and causes, entering a product key is not enough, as Windows 10 won’t accept. In that case, try some of the solutions listed below, and you should be able to have your Windows 10 once again.

How to deal with Windows 10 Anniversary Update activation problems

Solution 1 – Use a digital license

Perhaps the best solution for activation problems is using a digital license associated with your Microsoft Account. Microsoft made Windows 10 activation a lot easier when it introduced this feature, because it allows you to activate your Windows 10 PC without entering a product key, but just with signing in to your Microsoft Account.

To activate your system using this method, do the following:

  1. Go to Settings
  2. Go to Update & security > Activation
  3. You’ll find the Add Microsoft Account section, and click on Add Accountanniversary update activation fails4
  4. Just sign in with your valid Microsoft Account, and your system should be activatedanniversary update activation fails5

However, if you already tried signing in with your Microsoft Account, and it didn’t solve a problem, you can try with some of the solutions below.

Solution 2 – Use the activation troubleshooter

Another useful feature that Microsoft introduced with the Anniversary Update is the Activation troubleshooter for Windows 10. This feature basically helps you address various activation problems in the system, and might be helpful in your case, as well. To run the Windows 10 update troubleshooter, do the following:

  1. Open the Settings app
  2. Go to Update & security > Activation
  3. Click on Troubleshooteranniversary update activation fails2

Once you initiate a process, a troubleshooting wizard will start, and it will scan your Microsoft Account for a digital license. If the troubleshooter finds a digital license associated with your account, it will automatically activate your system, and you’ll be able to normally use it, once again.

Solution 3 – Make sure antivirus doesn’t conflict with activation

Just like we wrote about how a certain antivirus software might cause BSODs in the Anniversary Update, the same thing can actually prevent your system from being activated. In case a certain antivirus program conflicts with the Anniversary Update, there’s a chance that it will leave your system inactivated.

You don’t have to delete your antivirus software right away, just to check if it conflicts with the Anniversary Update. Disabling the software would be enough first, and if you notice that it really prevents the activation, remove it completely. Once you activate your system, download the latest version of your favorite antivirus program, but make sure it’s compatible with the update first.

Solution 5 – Make sure you didn’t install a wrong version of Windows 10

If you installed the Anniversary Update manually, there’s a small chance that you actually installed the wrong version. Although this is very unlikely, small errors happen from time to time, all in all, we’re just humans. To check out your current Windows 10 version, go to the Settings app > Update & security > Activation, and your currnet Windows 10 version will be listed there.

In case you really installed the wrong version of Windows 10, the only thing you can do to activate your system is to re-install it. Once you make sure that you actually have the right Windows 10 version installed on your computer, try to activate it again.

Solution 5 – Activate using Microsoft chat support

If using none of previous features and solutions didn’t help you to get your Windows 10 activated after the Anniversary Update, you can try one more old-fashioned workaround. And that is  solution is to simply contact Microsoft’s support, and explain your problem.

Windows 10 contains a feature that allows you to get in touch with Microsoft’s support team, which can help you to activate your system again. To contact Microsoft’s support in Windows 10, do the following:

  1. Go to Search, write contact support, and open the Contact Support app
  2. In the app, go to Windows, Office, Services & Apps
  3. Now, go to Windows, and click on Setting up
  4. Now, just click on Chatanniversary update activation fails6

Once you click on Chat, the app will connect you with someone from Microsoft’s support team, who will give you more instructions about how to activate your Windows 10. This method can be used for solving other problems in Windows 10, but a lot of users actually seek for Microsoft’s help when facing activation issues.

That’s about it, we hope at least some of these solutions helped you to address the problem with inactivated Windows 10 after the Anniversary Update. If you have any comments, questions, or suggestions, just write them down below.

RELATED STORIES YOU NEED TO CHECK OUT:

New File Explorer UWP app for Windows 10 on the horizon?

By now, it’s obvious Microsoft wants to change the whole look and feel of Windows. Several changes have been made with Windows 10, and even more after the Anniversary Update. There is still work to be done, and from what we have come to learn, Microsoft could be working on a UWP file explorer app to replace what we have right now.

According to a source who spoke with WindowsBlogItalia, users will be able to do all the basic things currently available in the default File Explorer experience. Users should be able to access files that are available in Quick Access, sort items by date, size, or name, and navigate between files and folders. It should also be possible to rename files and folders, move content from one area to the next, along with viewing their properties with the updated version.

The source claims the app is not yet publicly available for download but could arrive within the next few months. With that as a possibility, interested parties can download and sideload the app right now. Bear in mind the app is untested which means there will likely be a ton of bugs and even be malicious content, so keep an eye out.

We originally thought Microsoft would just make changes to the File Explorer app available for Windows 10 Mobile, make it UWP, and then throw it out to Windows 10 users. Now, it appears this is not the case as it seems to have been built from the ground up.

At the end of the day, Peter Skillman, General Manager of Core UX for Windows desktop, stated back in March of this year that Microsoft is hard at work on a “total update” for the File Explorer, even if he did not give a date as to when users should look out for it.

RELATED STORIES YOU NEED TO CHECK OUT:

Hybrid sleep missing on Windows 10 after a major update

Hybrid sleep is a combination between sleep and hibernation, allowing your computer to write out all its RAM to the hard drive, and then go into a low power state that keeps RAM refreshed. This state allows users to quickly resume their computers from sleep, and also restore them from hibernation in case there’s a power failure.

It appears that the Anniversary Update doesn’t get along well with the hybrid sleep state, as many users are reporting this feature is missing altogether from the power option list.

Hybrid sleep is missing in the Anniversary Update

Can anybody explain why and how to get it back?
I go to power options –> advanced settings and under sleep I only get Hibernate after where as before update I got Hybrid sleep option as well. Before Anniversary Update I got the above. I now only see Hibernate after.

It is worth mentioning that certain motherboards and BIOS systems don’t support the hybrid sleep feature. To see that power states your computer supports, run the command powercfg –availablesleepstates in Command Prompt.

Hybrid sleep is missing – how to fix this

Solution 1 – Restore the default settings in the power plan

Sometimes, a personalized power plan may disable a series of features. To enable the default power plan, follow these steps:

  1. Go to Control PanelHardware and SoundPower Options
power options anniversary update

2. Check the Balanced plan > select Change plan settings > Restore default settings for this plan.

restore default settings power plan anniversary update

Solution 2 – Update your drivers

Make sure both your hardware and software drivers are updated – you can use Windows Update. If there are any new drivers available, install them, restart your computer and then check to see if the hybrid sleep option is available.

All your drivers need to be updated, but doing it manually might be annoying, so we recommend you to use a dedicated third-party tool (100% safe and tested by us) to do it automatically.

Solution 3 – Tweak the Registry Editor

  1. Open the Registry > go to  HKEY LOCAL MACHINE\SYSTEM\CurrentControlSet\Control\Power.
power states registry editor

2. Right-click and export HiberFileType as a backup.

3. Now delete the HiberFileType file (if it’s available on your computer).

4. Make sure the value for the HiberbootEnabled file is 1.

5. Restart your computer. Hybrid sleep should now appear in your options and work properly.

RELATED STORIES YOU NEED TO CHECK OUT:

Fix: Homegroup problems after installing Anniversary Update

If you have two or more computers in your home, you’re probably sharing files between them using Homegroup. This is one of the simplest ways to connect two computers and to share files between them, but unfortunately users reported issues with Homegroup after installing Windows 10 Anniversary Update.

How to solve Homegroup problems after Anniversary Update?

Probably one of the most anticipated updates for Windows 10 was the Anniversary Update. This update brought many major improvements, but unfortunately there are also certain problems with Anniversary Update. According to users, after installing the Anniversary Update the Homegroup doesn’t work at all.

Users reported that after installing the Anniversary Update all Homegroup settings were lost. In addition to lost Homegroup settings, there are reports of Windows can’t find any Homegroup on this PC error message. As for missing Homegroup settings, users reported that options to view Homegroup password or to leave the Homegroup are completely missing.

According to some users, they can create a new Homegroup and get the Homegroup password, but they are unable to join it from a different PC since the other PC can’t see the new Homegroup. Instead of the option to join the Homegroup, other PCs only have the option to create a new Homegroup.

Another problem that users reported is the inability to leave the Homegroup. According to them, it appears that PCs are connected to a Homegroup, but they can’t leave it or create another one. This can be a big problem, especially if you use Homegroup to share files and printer with other users on the same network.

Solution – Remove Anniversary Update and try to install it again

According to users, problems with Homegroup can occur if your Anniversary Update isn’t properly installed, and the only solution is to rollback to the previous version. Rolling back to the previous version is quite simple, and to do that you can use the Settings app or Advanced startup. For detailed information on how to uninstall Windows 10 Anniversary Update we advise you to check some of our previous articles. Rollback procedure is usually straightforward, but it won’t be a bad idea to create a backup just in case anything goes wrong.

Users reported that after rolling back to the previous version problems with Homegroup were resolved and everything started working normally. Since this problem only occurs with Anniversary Update installed, you might want to consider using the previous version until this issue is resolved. If you want, you can also try to install Anniversary Update again and check if that fixes the problem. So far, users reported that only workaround is to switch to the previous Windows 10 build. We know that this isn’t the best option for many, but if you frequently use Homegroups and share your printer and files with other members of your network, you might want to stick to the previous build until this problem is resolved.

We assume that Microsoft is aware of this issue and that developers are working on it, and we hope to see an official fix available in near future. Homegroups are a big part of Windows 10 and a key component for file sharing, therefore we strongly believe that Microsoft will address this issue soon.

Many users were excited about Windows 10 Anniversary Update, but unfortunately, this update brought various issues. Among the issues is the inability to log in after installing the Anniversary Update, app crashes, Xbox One controller issues and many others. As you can see, installing the Anniversary Update isn’t always a problem-free process, so you might want to wait a bit until Microsoft fixes some of the major issues with the Anniversary Update. These are just some of the many issues that were reported by the users, and we hope that Microsoft will address them in near future.

If you have issues with Homegroup after installing the Anniversary Update, we suggest that you roll back to the previous build and wait until Microsoft releases an official fix for this problem.

READ ALSO:

Windows team preps Windows 10 Insiders for future OneCore improvements

Not much has been leaked about what new features users can expect from the next big update to Windows 10 or when it may even arrive, but several sources from within the Windows team have hinted at a renewed focus on mobile in upcoming build releases.

With that being said, the pace of feature development for Windows 10 on the PC side appears to be slowing, at least, for the time being. In an announcement post highlighted in the Windows 10 Feedback app, Windows 10 Insiders are warned that the Windows team will be focusing on under-the-hood refinements for now.

While the news may be sobering for Insiders who have been testing and playing with the Windows 10 Anniversary Update for months now, the bigger story nestled within the announcement was the detail of OneCore refactoring in upcoming Redstone 2 development branch builds. The Windows team appears set to hammer out and optimize its One OS engineering a bit more in the coming months.

cumulative update KB3176495

Along with further fixing Windows 10’s plumbing, Insider are also being warned of a similar shift back to a staggered roll out of builds that more resemble last year’s Insider program experience. For those new to the Insider program, leading up to the July 2015 release of Windows 10, preview participants for both mobile and PC underwent a very staggered release cycle of builds that had, at one point, offered two or three PC updates to every one mobile version.

The switch back to staggered releases may not be as lengthy an in-between process as it previously was in 2015 with the Windows team explaining that Mobile preview builds should start hitting devices once again in a few weeks.

Either way, parse the Windows team’s words for yourself if you like:

We are now getting ready to start releasing new builds from our Development Branch to Windows Insiders in the Fast ring again. Just like we did after the release of the Windows 10 November Update – we will start off by releasing PC builds from our Development Branch first and then start releasing Mobile builds a few weeks after.

With the new builds we release from our Development Branch, you won’t see any big noticeable changes or new features just yet. Just like just like we did after the release of the November Update, we are focusing on making some structural improvements to OneCore. If you recall – OneCore is the shared core of Windows across PC, tablet, phone, IoT, Hololens and Xbox. It is essentially the heart of Windows.

We’re doing some code refactoring and other engineering work to make sure OneCore is optimally structured for teams to start checking in new features and improvements in a few months. As a result, these builds may include more bugs and other issues that could be slightly more painful for some people to live with. If this makes you uncomfortable, you can change your ring by going to Settings > Update & Security > Windows Insider Program and moving to the Slow or Release Preview rings for more stable builds.”

It is interesting to see a return to staggered roll outs even as Windows spokespeople have pointed to Redstone 2 being a more mobile-focused update cycle. Perhaps, the under-the-hood improvements coming down the pipe for Redstone 2 are just paving the way for a ramp up of mobile features later this year and early next.

Fix: Laptop screen takes a minute to turn on after Windows 10 Anniversary Update

More and more issues are found by users after they’ve installed the Windows 10 Anniversary Update on their computers/laptops. Today we will talk about an issue which makes a laptop to load up the new Windows 10 OS (version 1607) within a minute. The user claims that he has enough RAM and storage space and it doesn’t make any sense why it takes so long for the laptop to load up the new version of Windows 10 OS.

Method 1

The first method that a Microsoft technician has suggested was to “Run maintenance task”. In order to this, you will need to right click on the Start Menu->Control Panel->Troubleshooting and select “Run maintenance task”.

However, it seems that this method didn’t work for that user.

Method 2

The second method that the Microsoft technician suggested was to do a “Clean” boot. In order to do a clean boot, you will have to click on the “Start” button, search for “msconfig” and start the “System Configuration” tool. On the “Services” tab, you will need to check the “Hide all Microsoft services” and, after that, click on “Disable all”. Then, click the “Startup” and select “Open Task Manager”. Here, you will need to make sure that you select “Disable” to all the Startup items. Finally, close the Task Manager, click OK on the “Startup” tab and restart your computer.

Unfortunately for our user, this method didn’t fix the issue, either.

Method 3

The third method that the Microsoft technician has suggested was to perform a system file checker. In order to do this, you will firstly have to press the Windows key + X and select “Command Prompt (Admin)” from the list of apps. Then you will need to enter the “sfc /scannow” command and press enter. Once you do this, the Windows 10 OS will start scanning all protected system files and replace the corrupted files with a cached copy of them that are located inside your computer.

Until now, the user who has reported the issue hasn’t replied, but hopefully, this method fixed his problem.

RELATED STORIES TO CHECK OUT:

Windows 10 Anniversary Update is creating “defaultuser0” profiles

After upgrading to the Anniversary Update, many users have noticed that apart from their regular user accounts, the OS also creates a new Defaultuser0 account. The most interesting part is that this unusual profile cannot be deleted even after performing a clean install.

The Defaultuser0 account bug has been haunting Windows users for a long time. Nobody knows exactly why this account is being created or how users can prevent its creation. The commonly accepted hypothesis suggests the Defaultuser0 profile is created when something goes wrong during the profile creation phase of the main account, and it should be harmless.

According to user reports, it appears that not even Microsoft’s Level Two Technical Support team can offer a clear answer to these questions, let alone a solution.

The Anniversary Update automatically creates the Defaultuser0 profile

Yesterday I performed a clean install of my Windows 10 laptop (64-bit, Pro version) to get the Anniversary Update (#1607). […] But when I logged in with my local user account I noticed something very strange: Under C:/ Users/ there is now an additional user profile called “defaultuser0.” I tried doing another format followed by a clean install, and again it was there.

[…] I decided to go back to the previous version of Windows 10 (#1511) and again did a full format with clean install, using the Windows Media Creation tool I made a few months ago. It installs fine, but when I log in, guess what I see? This darn “defaultuser0” account! […] Now today I have gone back and once again formatted the partitions of my laptop and have clean installed the Anniversary Update (#1607). STILL THERE…

How to get rid of the Defaultuser0 profile

Solution 1 – simply delete the Defaultusers0 account

Go to Control Panel > User accounts > Delete the profile

Solution 2 – Enable the hidden admin account

  1. Start your computer using your Windows 10 DVD or USB
  2. Select the correct time and keyboard type
  3. Click on Repair your computer
  4. Select Choose an option > Troubleshoot
  5. Click on Command Prompt > type the command net user administrator /active:yes
  6. Restart your computer > delete the Defaultuser0 account.

The second solution removes most of the traces left behind by the Defaultusers0 profile, but it can’t delete every trace the account has created. For the time being, Microsoft hasn’t officially acknowledged this bug, but we’ll update this article as soon as new information is available.

RELATED STORIES YOU NEED TO CHECK OUT:

Microsoft Research utilizes the cloud to enhance secure data exchange

With more people hurtling down the path of using cloud storage and computing as they continuously store and transfer photos, videos, documents and data via their devices to one another, the need for greater security measures during exchanges is increasing.

Fortunately, most companies are looking into, and applying safety measures to such an evolution of cloud usage, among those seeking to secure user data, is Microsoft. Within the halls of Microsoft’s business lay a dedicated team of researchers from its Microsoft Research division, which have devised a way to enable secure data exchange in the cloud.

Microsoft researcher and writer John Roach penned an article today discussing the various situations and current day implementations of decrypting cloud data that has led the research group to its ultimate breakthrough in securing data exchanges via cloud repositories.

New research from Microsoft aims to unlock the full value of encrypted data by using the cloud itself to perform secure data trades between multiple willing parties in a way that provides users full control over how much information the exchange reveals.

What we are trying to do is keep the data private and, at the same time, get the value out of it,” says Ran Gilad-Bachrach, a researcher in the Cryptography Research group within Microsoft’s research organization and co-author of a paper released in June that describes the protocol, or set of rules, for this system to securely exchange data.”

Day one of the Microsoft Research Faculty Summit on July 13, 2016. (Photography by Scott Eklund/Red Box Pictures)

Roach further clarifies researchers discoveries into secure data exchanges by highlighting the key cornerstones to their research in securing data exchanges which include talk of multiparty computation, test driving data, real world applications and data handoff’s.

The idea behind the use of multiparty computation seems straightforward enough as Roach explains it,

The exchange is based on the idea of a secure multiparty computation, where two or more parties agree to evaluate their data in a way that one or more of the parties gets a result but none of the parties learns anything about the others’ data, except for what can be inferred from the result.

The multiparty computation is akin to a group of employees who want to know where their individual salary ranks in relation to the group as a whole, but none of them wants to reveal their pay to the group.”

Adding to the use of multiparty computation is the idea of tacking on decryption, the use of decryption in multiparty computation would help encrypted data for computing “without actually revealing anything to anyone except the results of the computation.”

As a declarative light on the research, Roach uses a final example of researchers from various medical centers sharing, what amounts to anonymized detailed patient data, to cross examine the outcomes of different treatment plans, without revealing the exact medical center and its current treatment plan.

While only a research project at the moment, the potential of securing data exchanged through the cloud with a combination of decryption and multiparty computation could be huge. No longer would people, businesses and industries worry about their cloud-stored data being up for grabs, but the research could usher in a wave of free flowing data that contains the necessary bits for exchange while not compromising the sender or receiver.

Windows 10: Two major updates (Redstone 1 and 2) coming in 2017

When the year 2017 comes around, Microsoft will be making plans to release two important updates. For quite some time, we’ve been hearing rumors of such plans, and now Microsoft’s Nathan Mercer has stated as such in a recent blog post.

The rumored updates are Redstone 2 and Redstone 3. We’ve heard that one will focus more on the mobile side of things, while the other will tend to the desktop. We expect Redstone 2 to be the mobile centric update designed to make Windows 10 Mobile competitive as an operating system.

We should also hear more about the rumored Surface Phone as well, but expect that before the release of Redstone 2. Furthermore, it should be noted that the Windows 10 Anniversary Update is the final major update of 2016. This shouldn’t come as much of a surprise seeing as Microsoft has been working on making this update possible since 2015.

Here’s what Mercer had to say via a blog post:

“Today’s release of Windows 10, version 1607 is initially considered the Current Branch (CB) and will become Current Branch for Business (CBB) in about four months from today. For a list of Windows 10 versions by servicing option, see Windows 10 release information. For more information about these servicing options, see Windows 10 servicing options for updates and upgrades. Windows 10, version 1607 is our third Windows 10 feature update released. Based on feedback from organizations moving to Windows 10, this will be our last feature update for 2016, with two additional feature updates expected in 2017.”

Redstone 2 is expected in the early parts of 2017, while Redstone 3 should be released around August to September of the same year.

RELATED STORIES YOU NEED TO CHECK OUT:

How to install the Anniversary Update on 32GB devices

The Windows 10 Anniversary Update is coveted by many users, but unfortunately not all of them have been able to install the OS due to hard disk space limitations. In order to install Windows 10 version 1607, you need a minimum hard disk space of 16GB, and this can be quite a major problem for low budget laptop owners.

This situation has created much discontent among users, who are very upset they can’t upgrade to the Anniversary Update. When you use a 32GB laptop, freeing enough space to install the update can become quite a challenge.

Actually, this is not the first time when Microsoft imposes memory limits for users. Windows phone owners using 512 MB terminals have been the first to be excluded from the Windows 10 club. According to the tech giant, phones with 512MB of RAM cannot properly run Windows 10 Mobile, as the minimum requirement in terms of RAM is 1 GB.

Users are reporting they can’t install the Anniversary Update on 32GB eMMC devices

I have two budget laptops (a Lenovo S21e-20 and a HP Stream 11 Pro) that both have non-expandable, non-replaceable 32GB (30GB usable in real life) eMMC storage. Windows 10 won’t upgrade to the Anniversary Edition on these laptops as there isn’t 20GB available space on them (64bit systems). This means there is no upgrade in Windows Update when I trigger a manual check, and the upgrade app you can download from https://support.microsoft.com/en-us/help/12387/windows-10-update-history says there isn’t enough free space.

As for the 32GB laptops, the good news is that you can use one particular workaround to install the Anniversary Update, provided that you have 8GB of free memory.

How to install the Anniversary Update on 32 GB devices

  1. Free 8GB of space on your computer.
  2. Download the media creation tool from Microsoft
  3. Run the MediaCreationTool.exe
  4. Click on Upgrade this PC now
  5. Select Keep personal files and apps
  6. Once the installation is complete, you’ll have the Anniversary Update up and running.

As surprising as this workaround may be, it really works, as users confirm it:

Oddly, I had only 8gb of  open space when I began this process.  When I finished the second install process, I had 15gb of open space, more than my Lenovo had on the day I first purchased it.  During the Anniversary installation, older versions of Windows 10 were removed and then I removed the 3.63gb of files left behind  by the failed installation of the Anniversary update to reach 15gb of open space.

Tell us in the comment section below if this solution worked for you and don’t forget to spread the word.

RELATED STORIES YOU NEED TO CHECK OUT:

Office 365 enables cross-classroom collaboration to help student scientists act as teachers

Cheryl McClure is a science teacher for the 6th and 7th grades at the  International School in Bellevue, Washington. She is also a Microsoft Innovative Educator Expert and the guest writer for the most recent educational blog post on the Microsoft Office blog. For Cheryl’s classes, she aims to merge technology and science for her students. The use of Office 365 tools such as Sway, Powerpoint, OneNote Class Notebooks, and Skype have all opened up fields of exploration for their science department. So when the opportunity arose for her students to become the teachers, she encouraged them to look towards the tools at hand.

McClure’s 7th-grade class studied the shift from solid to liquid and liquid to gas. Then went into further depth by experimenting with amorphous solids for clearer understanding. All of which is typical of their age level. To retain their knowledge, they were then tasked with teaching the 1st-grade class all about the States of Matter. The lesson revolved around helping the younger students to understand what a molecule was.

The trick was to explain the concepts of science in a simple yet scientifically correct way. With their OneNote Class Notebook, they began to organize their work into notes, observations and creating tasks. The OneNote Collaboration Space let all of the students work together seamlessly as they put together the lesson. In or out of the classroom, everyone was able to partake and submit their own contributions.

Lessons were then put together into videos, Sway slide shows, or PowerPoint Office Mix and uploaded to Docs.com to share with the younger students across the town. Thanks to the summaries on Docs.com, it was easy for the 1st-grade students to know exactly what they were starting to learn. As a conclusion, both classes found the experience both beneficial and fun.

Technology has bridged the gaps in education and significantly improved the classroom experience for many students and educators. The tools available at our disposal have helped to essentially remove much of the hassle that teachers had spent on time and resources unnecessarily. With Microsoft Office 365 development towards incorporating more learning tools, students using the software are bound to aim higher and achieve more.

Select the Default Storage Location in Windows 10 Anniversary Update

The Windows 10 Anniversary Update is finally here and it comes with many new features and options. Today we will talk about how you can select the default storage locations on your computer that has just received the Windows 10 Anniversary Update.

Not many know, but it is very important to have the ability to have a secondary hard drive where you are able to store your important data in case you have a corrupted drive or any other hardware problems with your main hard drive.

If you are using a tablet that has less than 32GB of internal storage, a secondary storage will be very useful, as you will have more free space available in your main hard drive.

Accessing And Changing The Storage Settings

First of all, you will need to open the Windows Settings app and then select System->Storage. After that, you will need to select a default storage location for individual file types such as:

– Apps
– Documents
– Photos and Videos
– Movies and TV
– Music.

As expected, the default storage location for the mentioned file types is C:\, but you can change it to D:\, E:\ or in any other hard drive. After you made the changes, you just need to close the Windows Settings app and you’re done.

HINT: Keep in mind that the setting page will only display storage locations that can be used by these types of files. In other words, if you don’t see a hard drive among the options, then this means that it can’t be used as a default storage location.

What are your thoughts about the Windows 10 Anniversary Update and the new features and options that it comes with? Are you using the default storage location option to save files on a secondary hard drive?

RELATED STORIES TO CHECK OUT:

Microsoft deprecates RC4 in both Internet Explorer 11 and Edge

Security remains one of Microsoft’s most important goals in Windows 10. The company has been working on improving security in Windows for quite some time now, and their efforts have resulted in a Windows 10 that is perceived by many (including the company’s corporate clients) as more secure. Today, Microsoft announced another effort at improving Windows 10 security, specifically the removal of support for the RC4 cipher from Internet 11 and Edge.

Microsoft released KB3151631 as part of today’s Patch Tuesday set of updates that will disable RC4 in both Internet Explorer 11 on Windows 7 and later and in the Edge browser on Windows 10. As the company describes things:

RC4 is a stream cipher that was first described in 1987, and has been widely supported across web browsers and online services. Modern attacks have demonstrated that RC4 can be broken within hours or days. The typical attacks on RC4 exploit biases in the RC4 keystream to recover repeatedly encrypted plaintexts. In February 2015, these new attacks prompted the Internet Engineering Task Force to prohibit the use of RC4 with TLS.

Previously, Microsoft Edge and Internet Explorer 11 allowed RC4 during a fallback from TLS 1.2 or 1.1 to TLS 1.0. A fallback to TLS 1.0 with RC4 is most often the result of an innocent error, but this is indistinguishable from a man-in-the-middle attack. For this reason, RC4 is now entirely disabled by default for Microsoft Edge and Internet Explorer users on Windows 7, Windows 8.1 and Windows 10.

Most users won’t even know the update has been applied. However, if you’re responsible for a web site that utilizes RC4, then you’ll need to make some changes. Microsoft outlines the details in Security Advisory 2868725.