Solved: FSRTL_EXTRA_CREATE_PARAMETER_VIOLATION

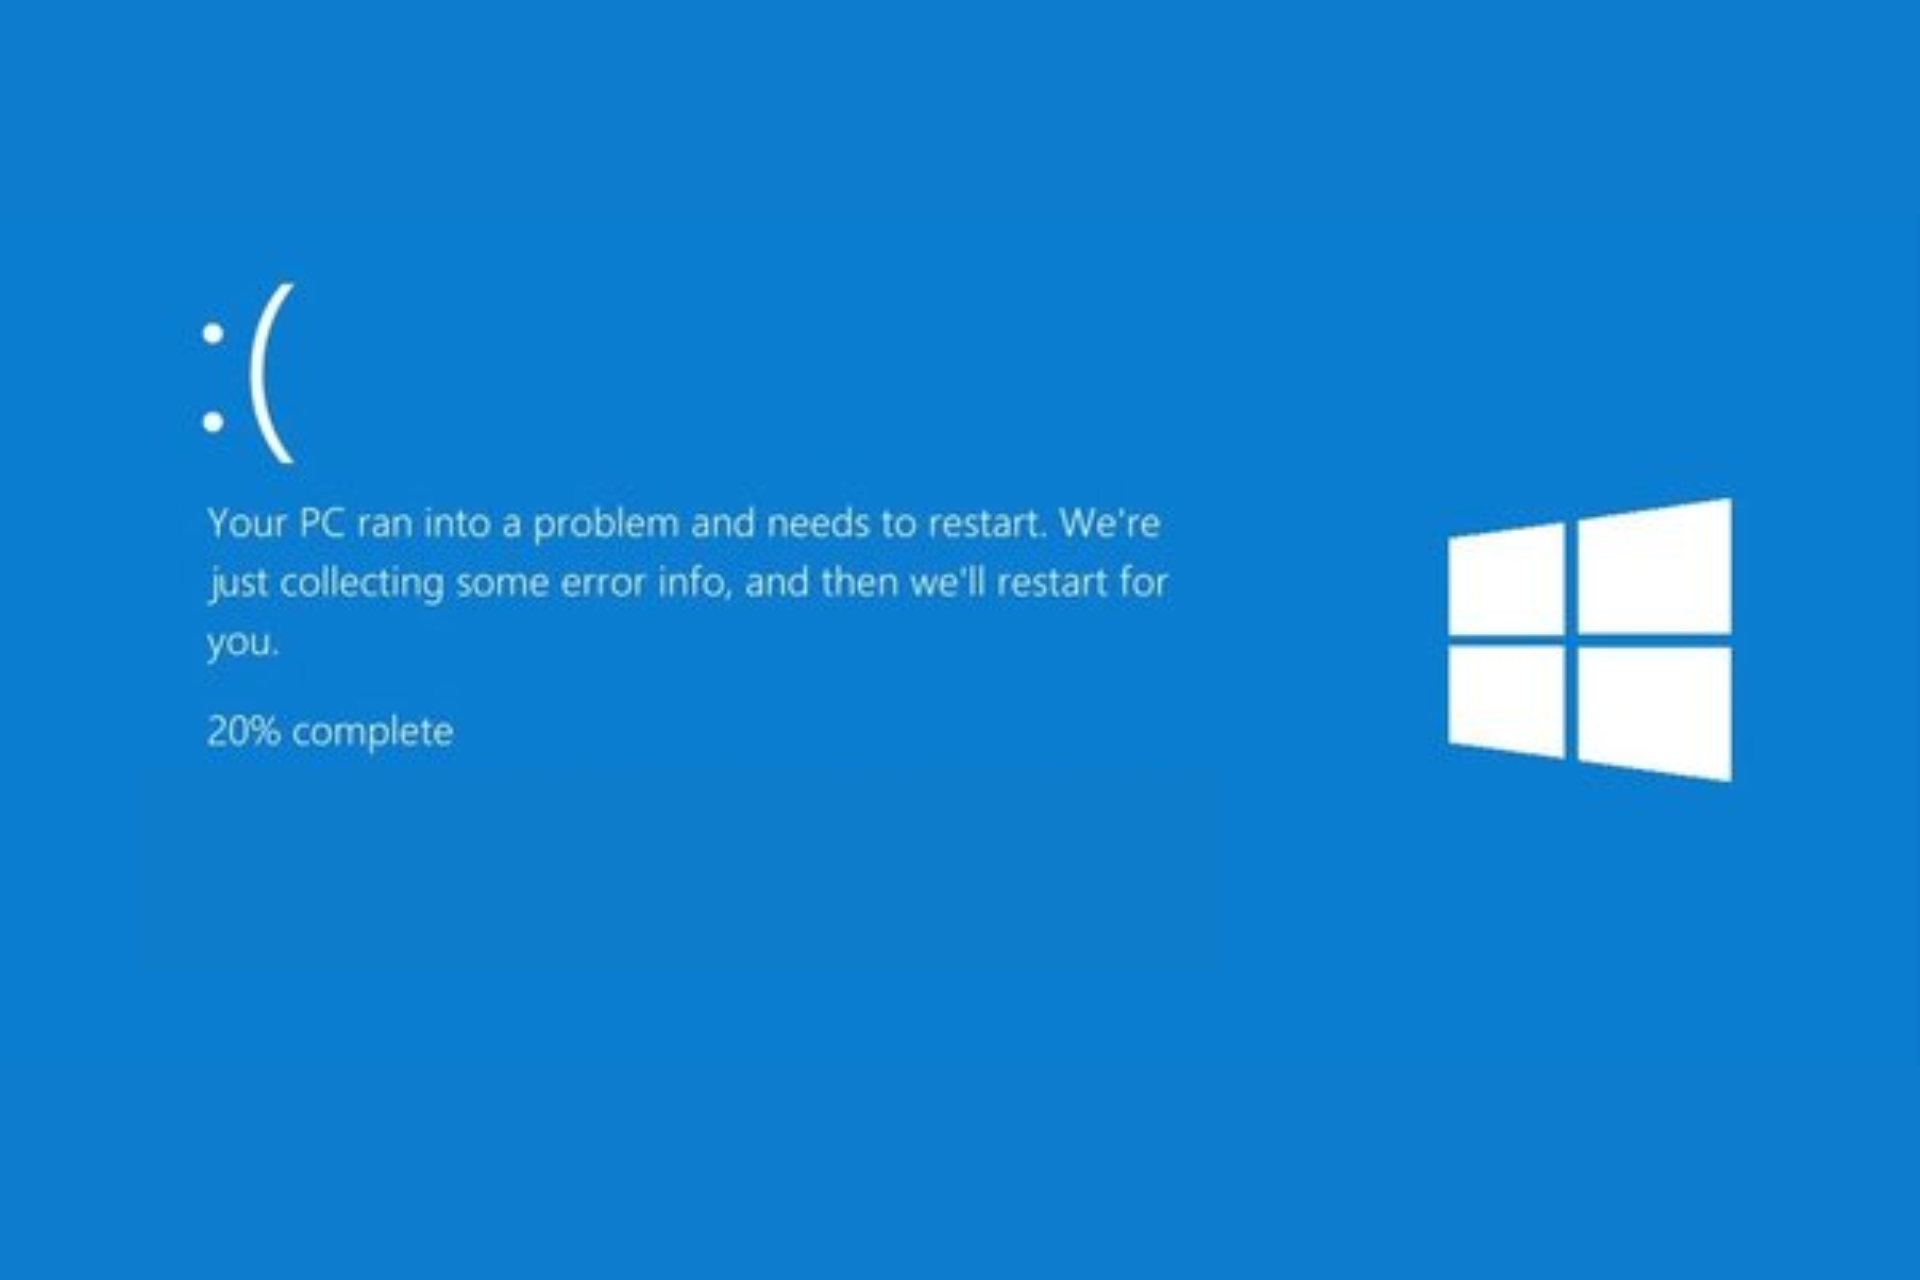
The FSRTL_EXTRA_CREATE_PARAMETER_VIOLATION error is related to file system operations on the Windows operating system. It indicates a problem with the parameters used to create a file.

This error can appear when the file system driver encounters invalid parameters, problems with the disk or file system, or conflicts arise with software or drivers that manage file operations. First, run a malware scan using a reliable antivirus tool.

How can I fix the FSRTL_EXTRA_CREATE_PARAMETER_VIOLATION error?

1. Run the CHKDSK scan

  1. Press the Windows key, type cmd in the search bar, and click Run as administrator to launch Command Prompt with elevated rights.CMD elevated - FSRTL_EXTRA_CREATE_PARAMETER_VIOLATION
  2. Copy & paste the following command to check the integrity of the file system after replacing C with the system drive and hit Enter: chkdsk C: /fCHKDSK scan -
  3. If the drive is in use, you will be prompted to schedule this volume to be checked the next time the system restarts; type Y and hit Enter.

The command will scan for errors, looking for corrupted files or bad sectors. If it detects any problems, it will attempt to fix them. Once the scan and repair are complete, CHKDSK will provide a report of the errors found and fixed.

2. Update the device drivers

  1. Press Windows + R to open the Run window.Device Manager Run command - FSRTL_EXTRA_CREATE_PARAMETER_VIOLATION  
  2. Type devmgmt.msc and click OK to open the Device Manager app.
  3. Go through each driver category, expand them one by one, and look for a driver with a yellow triangle and an exclamation mark on its icon.
  4. Once you locate one, right-click it and select Update driver.Graphics Driver update
  5. Click Search automatically for drivers.Search automatically - FSRTL_EXTRA_CREATE_PARAMETER_VIOLATION
  6. Follow the on-screen instructions to install the latest version of the driver.

3. Run for SFC scan

  1. Press the Windows key, type cmd in the search bar, and click Run as administrator to launch Command Prompt with admin rights. CMD elevated - FSRTL_EXTRA_CREATE_PARAMETER_VIOLATION
  2. Type the following command to scan for and repair corrupted system files and hit Enter: sfc /scannow
  3. Wait for the command to complete and restart your PC to let the changes take effect.

4. Disable fast startup

  1. Press the Windows key, type control panel in the search box, and click Open.Control Panel start menu - FSRTL_EXTRA_CREATE_PARAMETER_VIOLATION  
  2. Select Large icons for View by, then click Power Options.Power options Large icons
  3. Click Choose what the power buttons do.Choose what the power buttons do
  4. Click the Change settings that are currently unavailable link.
  5. Under Shutdown settings, remove the checkmark next to Turn on fast startup(recommended).Power options 4
  6. Click Save changes.

5. Boot your computer into Safe Mode

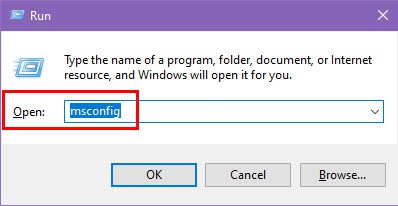
  1. Press Windows + R to open the Run window.msconfig - Restart  Safe boot -  FSRTL_EXTRA_CREATE_PARAMETER_VIOLATION  
  2. Type msconfig and click OK to open the System Configuration window.
  3. Navigate to the Boot tab, under Boot options, place a checkmark next to Safe boot and Network.
  4. Click Apply, then OK to save the changes.Safe boot network
  5. Click Restart.Restart  Safe boot -  RESOURCE_MANAGER_EXCEPTION_NOT_HANDLED 0x0000010F

Now, your computer will restart in safe mode with networking, letting you connect to the Internet while accessing only essential functionality. Check which driver or app is causing the issue so that you can deal with it accordingly.

6. Restore your computer to the previous version

  1. Press the Windows key, type control panel in the search box, and click Open.Control Panel start menu - FSRTL_EXTRA_CREATE_PARAMETER_VIOLATION
  2. Select Large icons for View by, then click Recovery.Recovery - Category  
  3. Click the Open System Restore link.Open system restore FSRTL_EXTRA_CREATE_PARAMETER_VIOLATION
  4. Select Choose a different restore point and click Next.Choose a different restore point  --
  5. On the following page, you will see a list of restore points. Select the restore point created before the FSRTL_EXTRA_CREATE_PARAMETER_VIOLATION error appeared, and click Next. Select a restore point
  6. Click Finish to initiate the process.Finish  FSRTL_EXTRA_CREATE_PARAMETER_VIOLATION

Windows will restart and restore your system settings to the selected point. If you see the System Restore didn’t complete the error successfully, we suggest you check out this detailed guide for solutions.

7. Reinstall Windows

Note icon NOTE
Before proceeding, create a backup of important data and ensure you have the product key or access to your Microsoft account for Windows activation. Also, make sure you have an 8 GB USB drive to create bootable installation media.

7.1 Create installation media

  1. Visit the Microsoft Windows 11 download page.Download now
  2. Click Download Now to download the Media Creation tool on your PC.
  3. Once the Media Creation executable file is downloaded, connect the USB drive, double-click it to run it, and click Yes on the UAC prompt.
  4. Click Accept to agree to the license terms and agreements.
  5. Select a language, edition, and architecture (32-bit or 64-bit) for Windows 11 before clicking Next.
  6. Select USB flash drive and click Next.USB Setup Windows 11 step 3 - NPFS_FILE_SYSTEM
  7. Select the flash drive you want to use, and click Next.
  8. Follow the on-screen instructions to create a USB bootable media, then click Finish.

7.2 Install Windows 11

  1. Plug the USB drive into the targeted computer, and press Windows + I to open Settings.
  2. Go to System, then click Recovery. System - recovery
  3. Navigate to Advanced startup, and choose Restart now.Recovery Advanced Startup - NPFS_FILE_SYSTEM
  4. On the blue screen, select Use a device. If you don’t find it, you need to boot your computer in BIOS mode and select a USB device to boot.Choose-an-option usb SELECTED
  5. Choose language and other suitable options on the first screen, and click Next.
  6. Place a checkmark next to the I accept box, then click Install now.
  7. Choose Custom: Install Windows only (advanced)
  8. On the following screen, you will see a list of drives and partitions. Select the one you want to remove, then click Delete. Once you have done this, click OK if you see a Windows Setup prompt.
  9. Click Next.
  10. The installation process will start now; your device will restart once complete.

7.3 Configure Windows settings

  1. Once the installation is done, select the region and keyboard layout.
  2. Connect to the Wi-Fi network when prompted.
  3. Next, sign in with a Microsoft account or create if needed.
  4. Choose the privacy settings, then follow other prompts to set up other features.
  5. Once the setup is complete, go to Windows + I to open Settings.
  6. Go to Windows Update.Check for updates - NPFS_FILE_SYSTEM
  7. Click Check for updates, then Download & install to download the latest updates.

If you encounter any BSoD error on Windows 10 and want to fix it via a clean install, check out this detailed guide on performing a Windows 10 repair upgrade.

In conclusion, to fix the FSRTL_EXTRA_CREATE_PARAMETER_VIOLATION error, you need to boot your computer into safe mode, update the device drivers, disable fast startup, run the SFC scan, perform a system restore or reinstall Windows.

If you have any suggestions or questions about the error, feel free to mention them in the comments section below.

Fix: RESOURCE_MANAGER_EXCEPTION_NOT_HANDLED

The RESOURCE_MANAGER_EXCEPTION_NOT_HANDLED error, especially with the code 0x0000010F, indicates a problem with system resources, often associated with the graphics driver. The error signifies that the resource manager within Windows has encountered an exception that it cannot handle, disrupting normal operations.

You might encounter this error during system startup, application launch, or while performing resource-intensive tasks. It can result in system crashes, unexpected reboots, or decline in system performance.

How can I fix the RESOURCE_MANAGER_EXCEPTION_NOT_HANDLED error?

1. Reseat components

First, reboot your computer, unplug it from the power source, and open the cabinet case. Locate the RAM sticks on the motherboard and release the clips on either side of the RAM module to remove them.

Reinsert the RAM firmly back into place. Now, identify the graphics card in the PCIe slot, remove it from the slot, and reinsert it.

You can also check the Power Supply Unit for signs of physical damage and ensure all the cables from the PSU to the motherboard and components are properly connected.

2. Boot into Safe mode & update the graphics driver

  1. Press Windows + R to open the Run window.msconfig - Restart  Safe boot -  RESOURCE_MANAGER_EXCEPTION_NOT_HANDLED 0x0000010F  
  2. Type msconfig and click OK to open the System Configuration window.
  3. Go to the Boot tab, under Boot options, select Safe boot and Network.
  4. Click Apply, then OK to save the changes.Safe boot network
  5. Click Restart.Restart  Safe boot -  RESOURCE_MANAGER_EXCEPTION_NOT_HANDLED 0x0000010F

Now, your computer will restart in safe mode with networking, allowing you to connect to the Internet while accessing only essential functionality. Follow these steps to update the graphics driver:

  1. Press Windows + R to open the Run console.Device Manager Run command RESOURCE_MANAGER_EXCEPTION_NOT_HANDLED 0x0000010F
  2. Type devmgmt.msc and click OK to open the Device Manager app.
  3. Locate Display adapters and click it to expand.
  4. Right-click the graphics driver and select Update driver from the context menu.Graphics Driver update - RESOURCE_MANAGER_EXCEPTION_NOT_HANDLED 0x0000010F
  5. Click Search automatically for drivers, then follow the onscreen instructions to update the driver.Search automatically

3. Rollback the graphics driver

  1. First, restart your computer in safe mode using Step 1, then press Windows + R to open the Run console.    Device Manager Run command RESOURCE_MANAGER_EXCEPTION_NOT_HANDLED 0x0000010F
  2. Type devmgmt.msc and click OK to open the Device Manager app.
  3. Locate Display adapters and click it to expand.
  4. Right-click the graphics driver and select Properties from the context menu.Properties
  5. Go to the Driver tab, and select the Roll Back Driver button.Roll back driver 1
  6. Select a reason to roll back in the following window and click Yes to confirm.Roll back driver 2

4. Check for Windows Updates

  1. Restart your computer in safe mode using Step 1, then press Windows + I to open the Settings app.
  2. Go to Windows Update, then click the Check for updates button.Windows Update Check for updates - RESOURCE_MANAGER_EXCEPTION_NOT_HANDLED 0x0000010F
  3. If an update is available, click Download & install to install the latest version.
  4. Once done, restart your computer.

5. Run the SFC scan

  1. Restart your computer in safe mode using Step 1, then press the Windows key, type cmd in the search box, and click Run as administrator to launch Command Prompt with admin rights.CMD admin rights  - RESOURCE_MANAGER_EXCEPTION_NOT_HANDLED 
  2. Type the following command to scan and repair any corrupted system files, and hit Enter: sfc /scannow
  3. Wait for the process to complete, then restart your computer to let the changes take effect.

6. Perform a system restore

  1. Boot your PC in safe mode using Step 1, then press the Windows key, type control panel in the search box, and click Open.Control Panel start menu - RESOURCE_MANAGER_EXCEPTION_NOT_HANDLED
  2. Select Large icons for View by, then click Recovery.Recovery - RESOURCE_MANAGER_EXCEPTION_NOT_HANDLED  
  3. Click Open System Restore.Open system restore
  4. Select Choose a different restore point and click Next.Choose a different restore point  -- RESOURCE_MANAGER_EXCEPTION_NOT_HANDLED
  5. You will get a list of restored points. Select the restore point created before the RESOURCE_MANAGER_EXCEPTION_NOT_HANDLED error appeared, and click Next. 
  6. Click Finish to start the process.Finish

Windows will restart and restore your system settings to the selected point. If you see the System Restore didn’t complete the error successfully, we suggest you check out this detailed guide for solutions.

7. Reset your PC

  1. Press Windows + I to open the Settings app.
  2. Go to System, then click Recovery.System - Recovery Windows 11 - RESOURCE_MANAGER_EXCEPTION_NOT_HANDLED
  3. Under Recovery options, locate Reset this PC, and click the Reset PC button.RESET
  4. On the Choose an option screen, select Keep my files.Keep my files   
  5. Next, on How would you like to reinstall Windows page, select Cloud download.Cloud download - RESOURCE_MANAGER_EXCEPTION_NOT_HANDLED
  6. On the Additional settings page, check the Current settings. If you want to make any changes, click Change settings. Once you’ve done this, click Next.Additional settings
  7. Click Reset to initiate the process.Reset settings RESOURCE_MANAGER_EXCEPTION_NOT_HANDLED

Windows will download the latest version from the cloud and reinstall the operating system while preserving your files. Your device will automatically restart several times, guiding you through the initial setup and taking you to the login screen. Once done, you need to check for Windows updates and reinstall applications that you like.

In conclusion, to fix the RESOURCE_MANAGER_EXCEPTION_NOT_HANDLED error, you can try reseating the hardware components, booting into safe mode, updating the graphics driver, checking for Windows Updates, running the SFC scan, performing a system restore or resetting your PC.

We also covered Error_not_joined recently, so don’t miss it for more information.

If you have any suggestions or questions about the error, feel free to mention them in the comments section below.

Fix: ERROR_NEGATIVE_SEEK 131 (0x83)

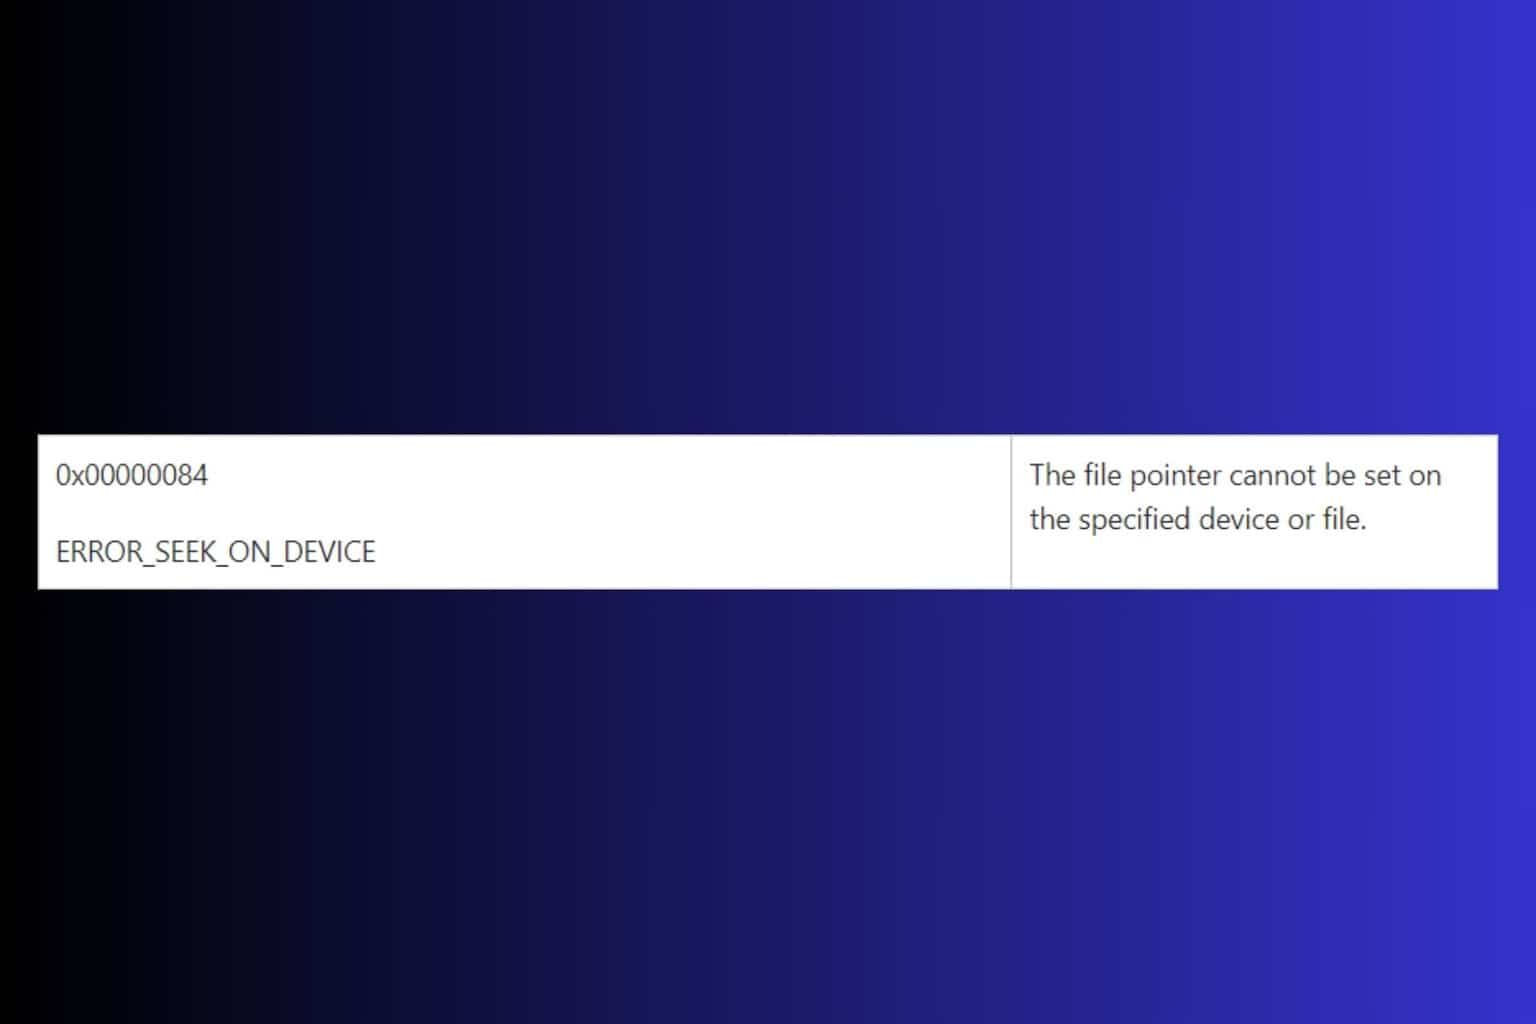
Often, while opening, editing, saving, or transferring a file, you get ERROR_NEGATIVE_SEEK with code 131 (0x83). The error message reads, An attempt was made to move the file pointer before the beginning of the file!

This usually happens when the concerned file/app is corrupt or broken, there isn’t enough storage space, critical permissions are missing, or the PC is infected with malware. Before you start troubleshooting, restart the PC and install all pending Windows updates.

How do I fix the ERROR_NEGATIVE_SEEK system error?

1. Redownload the affected file

When you can’t open or edit a file and repeatedly get the An attempt was made to move the file pointer before the beginning of the file message, this means that the file is corrupt or broken.

In this case, simply re-download the file from its original source. As for app-related files throwing ERROR_NEGATIVE_SEEK, you may reinstall the entire app.

2. Clear storage on the affected drive

  1. Press Windows + S to open Search, type Disk Cleanup, and click on the relevant result.
  2. Select the affected drive from the dropdown menu, and click on OK.disk cleanup
  3. After Disk Cleanup is done assessing the non-critical files, tick the checkboxes for the ones you want to delete, and click on OK.disk cleanup to fix ERROR_NEGATIVE_SEEK
  4. Now, click on Delete Files in the confirmation prompt.
  5. If ERROR_NEGATIVE_SEEK persists, run Disk Cleanup for the same drive again, and, this time, click on Clean up system files.system files
  6. Select the non-critical system files you want to delete from the list, click on OK, and confirm the change.clear storage to fix ERROR_NEGATIVE_SEEK

For 3 out of 5 users facing 131 (0x83) An attempt was made to move the file pointer before the beginning of the file during backups, it was low available storage to blame.

In this case, you can use Disk Cleanup to clear some space, or to automatically delete non-critical files on a regular basis, configure Storage Sense.

3. Check the file permissions

  1. Right-click on the affected file, and select Properties.
  2. Go to the Security tab, and make sure the current user account has all permissions for the file, including Full Control.full control
  3. If that’s not the case, you will have to take full ownership of the file to fix ERROR_NEGATIVE_SEEK.

4. Scan the PC for malware

  1. Press Windows + S to open Search, type Windows Security in the text field, and click on the relevant result.
  2. Click on Virus & threat protection.windows security
  3. Click on Scan options.
  4. Select the Full scan entry and then click on Scan now.malware scan to fix ERROR_NEGATIVE_SEEK
  5. Wait for the process to complete. It typically takes 15-30 minutes.

If Windows Security can’t detect any threats, I recommend using a top-rated antivirus solution to quickly identify and eliminate all malware and viruses on the PC.

5. Uninstall/reinstall conflicting programs

  1. Press Windows + R to open Run, type appwiz.cpl in the text field, and hit Enter.
  2. Select the affected/conflicting application from the list, and click on Uninstall.uninstall app
  3. Follow the on-screen instructions to complete the process.
  4. Reboot the PC and check for improvements.

If you get the ERROR_NEGATIVE_SEEK An attempt was made to move the file pointer before the beginning of the file message while loading a game, say World of Warcraft, uninstall the app and then reinstall it from the official source.

As for problems opening, editing, or saving files, check for any programs that may block the process, say a third-party antivirus software, and remove it. In this case, you should use an effective software uninstaller for Windows to get rid of any leftover files, app cache, and Registry entries.

While you are here, discover expert tips to optimize your Windows PC and prevent such errors from reappearing! We also have a new guide on ERROR_IS_JOIN_TARGET, so don’t miss it for more information.

Which fix worked for you? Share with our readers in the comments section below.

6 Ways to Fix the IEShims.DLL Missing Error

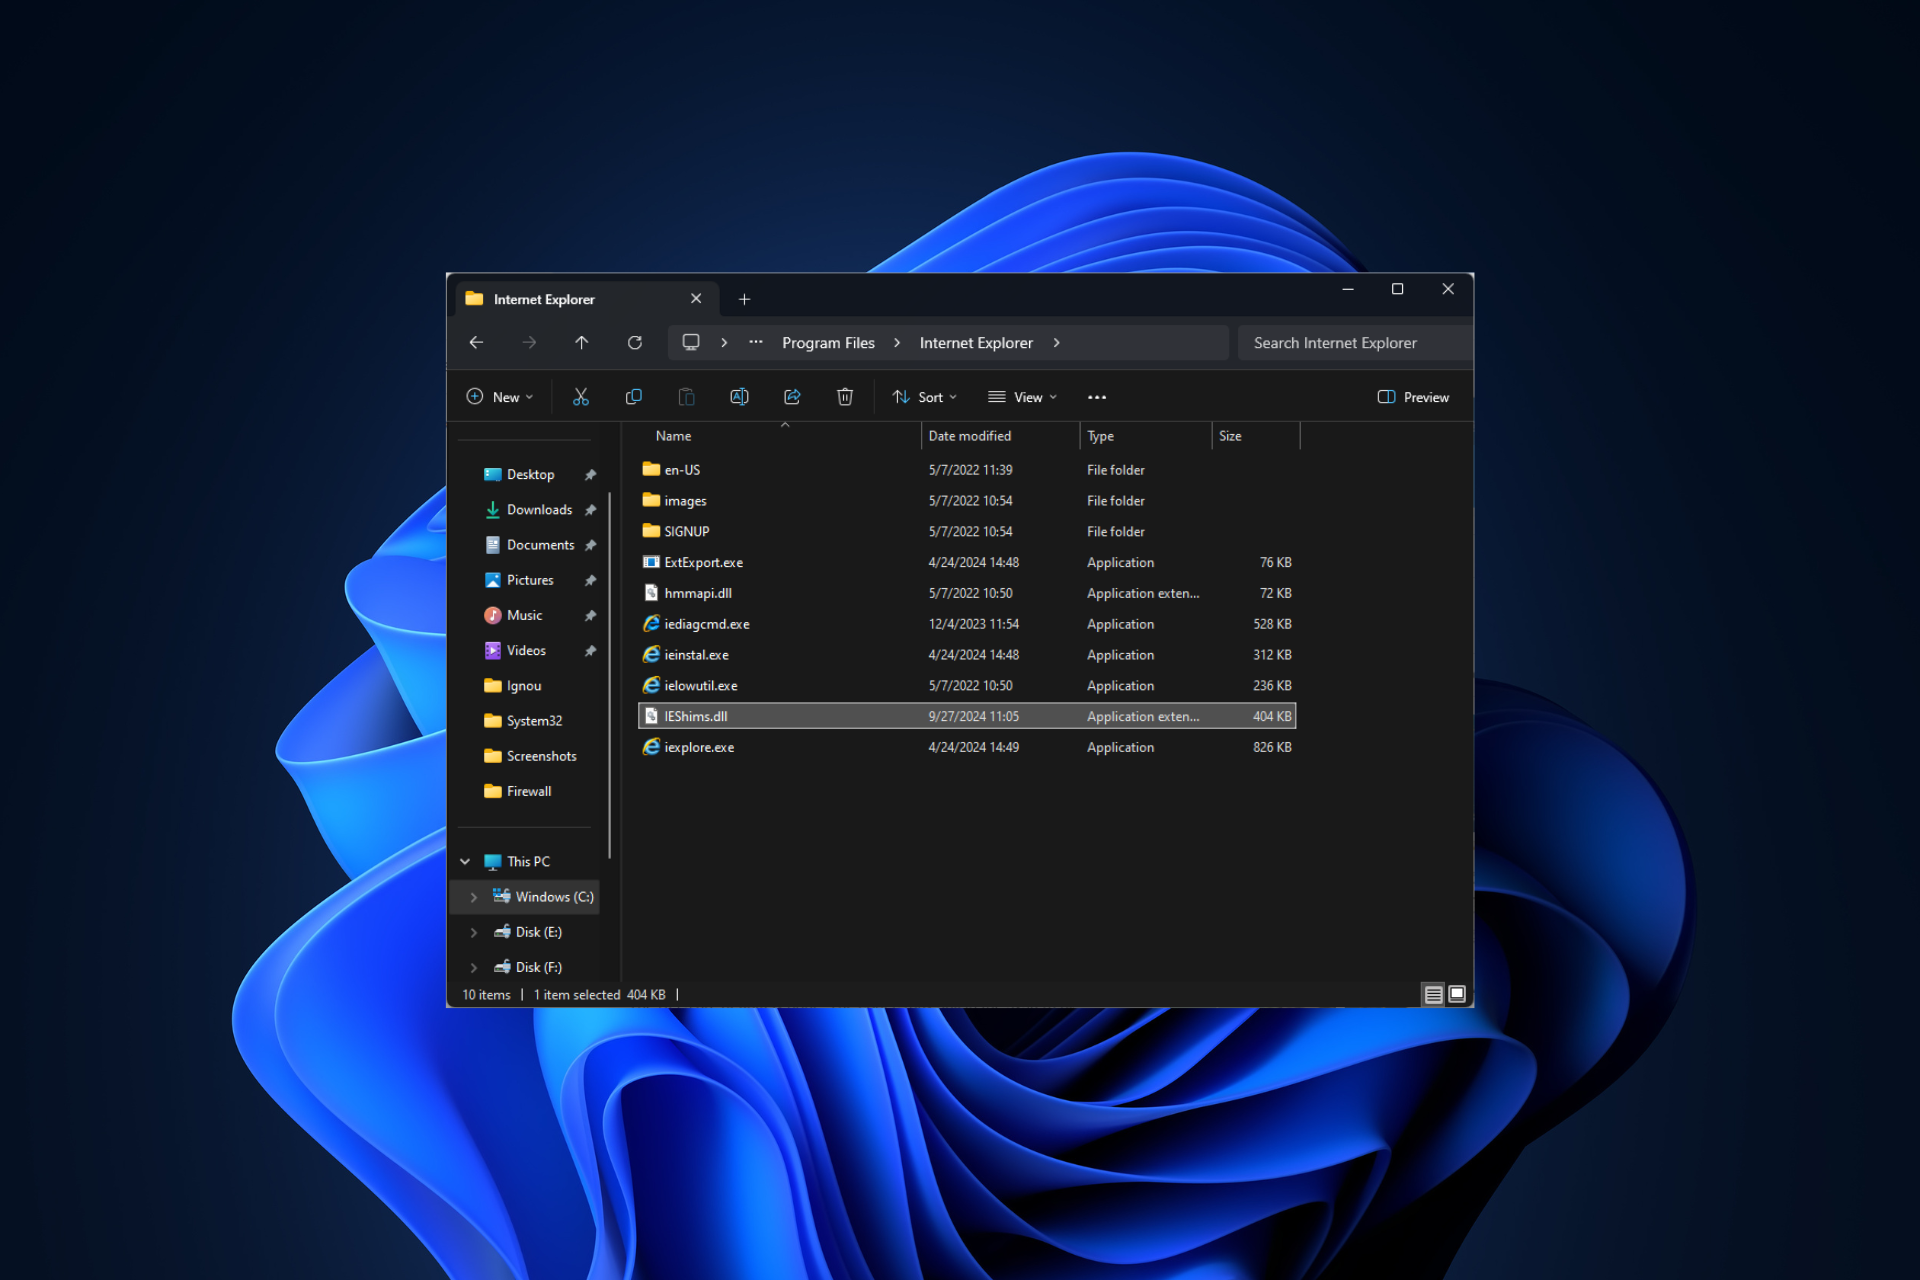
Many of our readers have reported encountering the IEshims.DLL missing error while trying to launch an older app or perform an operation on their Windows computer. This error could have occurred for various reasons, including corrupted or deleted DLL files, missing system files, virus infection, or failing hardware.

What is IEShims.DLL?

IEshims.dll is a dynamic link library (DLL) file on Windows associated with Internet Explorer that helps older programs work on newer versions of Windows. It acts as a compatibility tool that ensures the older apps can run smoothly.

This DLL file is another example of Microsoft’s efforts to ensure that legacy applications can function as intended, even on the latest version of Windows.

To begin with, restart your computer, run a malware scan using reliable antivirus software, and ensure you have the latest version of Windows.

How can I fix the IEShims.DLL missing error?

1. Use a third-party DLL fixer

DLL files like IEShims.DLL are essential for the proper functioning of many apps on your computer; therefore, it is important to restore them correctly. To avoid any issues, you should use a third-party DLL fixer tool.

These software can help you restore or recover DLL files like IEShims.DLL in a simpler way. All you need to do is download and install the tool and run it to do the magic. It can add the missing DLL files and resolve conflicts between OS and third-party apps to optimize your device’s performance.

2. Reregister the DLL file

  1. Press the Windows key, type cmd in the search bar, and click Run as administrator to invoke Command Prompt with admin rights.CMD elevated  rights ieshims.dll
  2. Type the following command to register the IEShims.DLL and hit Enter: regsvr32 IEShims.DLL
  3. Click OK when prompted and reboot your PC.

Reregistering a DLL file can refresh the registration of the file within the Windows system, thereby fixing the corrupted or missing DLL file problem.

3. Repair/Reinstall the affected app

  1. Press Windows + I to open the Windows Settings app.
  2. Navigate to Apps, then click Installed apps.Apps - installed apps - ieshims.dll  
  3. Locate the app, click the three dots icon, and choose Advanced options from the context menu.Advanced options
  4. Scroll down to the Reset section, and click the Repair button. Repair the app - ieshims.dll
  5. Follow the on-screen instructions to complete the process.

If repairing the app doesn’t fix the issue, try reinstalling it. For that, follow these steps:

  1. Go to the Installed apps list in Windows Settings again.
  2. Locate the affected app, click the three dots icon, and choose Uninstall.Uninstall  ieshims.dll 
  3. Click Uninstall on the following prompt and follow the on-screen instructions to complete.uninstall confirmation app
  4. Open the Microsoft Store or the app’s official website, and click Download or Get to reinstall the app.
  5. Once done, restart your computer.

4. Run SFC & DISM scans

  1. Press the Windows key, type cmd in the search box, and click Run as administrator.CMD elevated ieshims.dll 
  2. Type the following command to repair or restore the Windows system files and hit Enter:sfc/scannowSFCSCANNOW CMD
  3. Wait for the scan to execute, copy & paste the following command to restore Windows OS image files, and hit Enter:Dism /Online /Cleanup-Image /RestoreHealth Restore Health
  4. Once the scan is complete, your computer will connect to the Windows Update service to download and replace the corrupt files.
  5. Restart your computer to let the changes take effect.

Read more about this topic

5. Perform a System Restore

  1. Press Windows + R to open the Run window.    
  2. Type sysdm.cpl and click OK to launch the System Properties window.
  3. Navigate to the System Protection tab and click the System Restore button.
  4. Select Choose a different restore point on the System Restore window, then click Next.
  5. A list of available restore points on your PC. Select the restore point created before encountering the missing DLL error and click Next.
  6. Click Finish to start the restoration process.

Windows will restart and restore to the chosen version. If you see the System Restore didn’t complete the error successfully, we suggest you check out this detailed guide for solutions.

6. Download the file manually & replace it

Note icon NOTE
Using an untrusted website to install a DLL file can be dangerous for your computer. Therefore, it is recommended that you use sites like DLL-FILES, which has been verified and tested by the WR experts.
  1. Click the DLL-FILES website to access the IEShims.dll page, then click Download.
  2. Double-click the downloaded folder to open, locate, and copy the .dll file.
  3. Go to this path and paste the DLL file. Don’t forget to replace C with your system drive letter if it is not C for you: C:\Program Files\Internet Explorer\IEShims.dll
  4. Restart your PC to save the changes.

This is how you can fix the IEShims.dll missing error. However, if you are facing the same issue due to any other DLL file, this guide can help you quickly recover the DLL file.

If you want to learn more about the causes of missing DLL files on Windows, we have a separate guide for you. You can also fix a similar issue with the Invagent.DLL guide.

Before you go, don’t forget to check out our latest guide on what to do if libgcc_s_dw2-1.dll was not found on your computer.

Did we miss a step that helped you fix this missing DLL error? If so, share the method in the comments section below, and we will add it to the list.

Ws2_32.dll is Missing: 3 Ways to Restore it

If ws2_32.dll is missing, you won’t be able to run certain applications on your PC, but in today’s guide, we’re going to show you how to fix this problem.

What is the ws2_32.dll?

This file is associated with Winsock API and it allows applications to connect and communicate over the Internet.

How to fix missing ws2_32.dll?

1. Use System Restore

  1. Press Windwos key + R and type rstrui. Press Enter.
    rstrui command run window
  2. Follow the instructions on the screen and select an earlier restore point.
    restore point
  3. Wait for the process to finish.

2. Run the disk scan

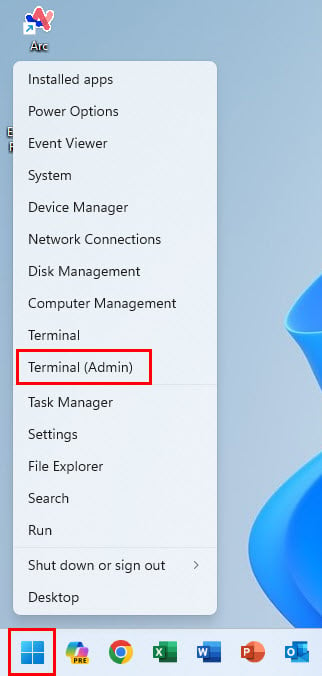
  1. Press the Windows key + X and choose Terminal (Admin).
    terminal admin windows 11
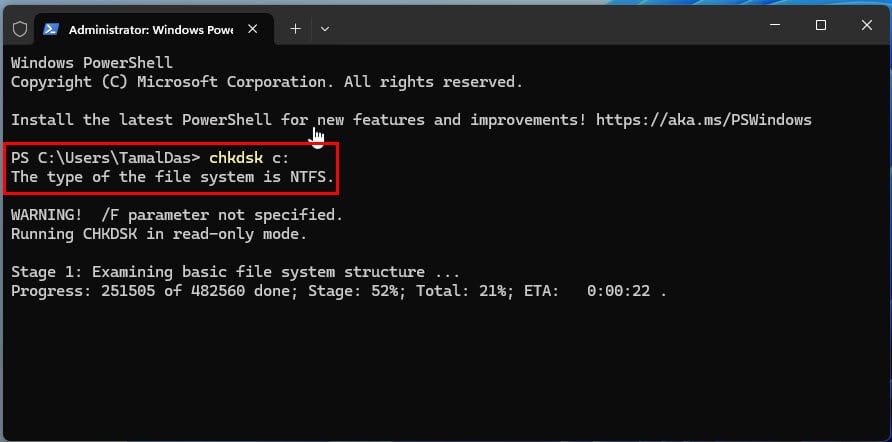
  2. Run chckdsk C: /r
    run chkdsk
  3. Wait for the scan to finish.
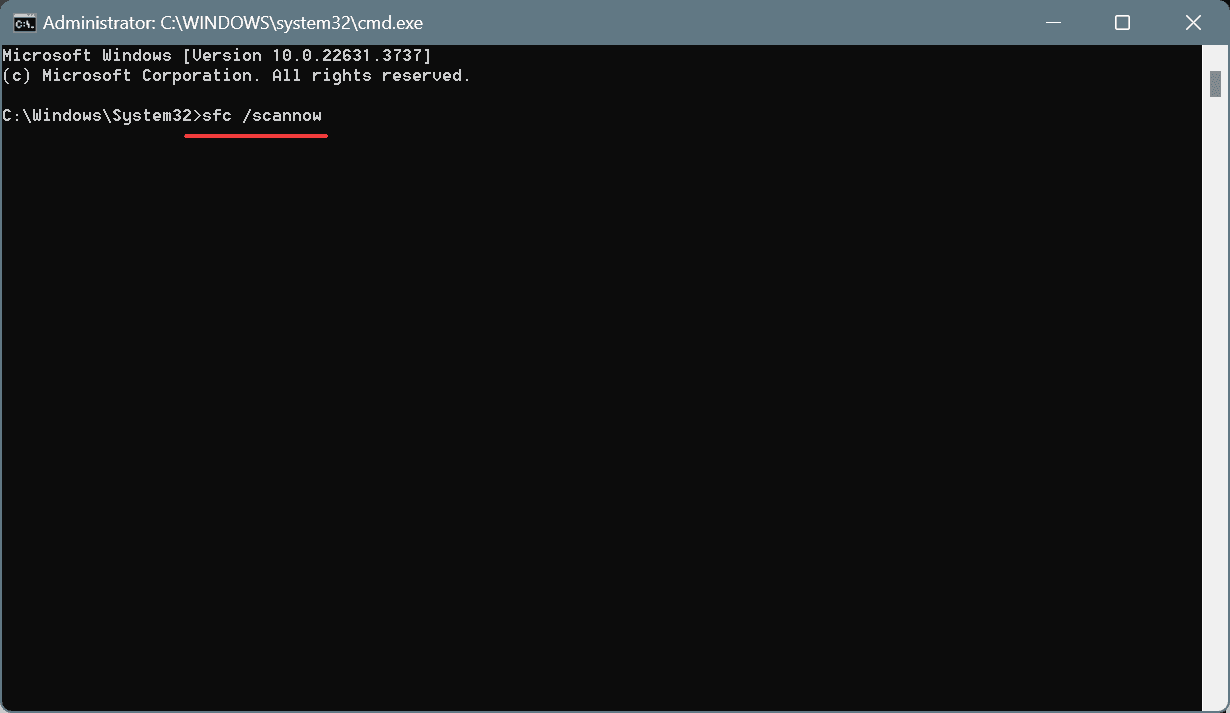
  4. Additionally, run the sfc /scannow
    sfc scan

The first command will try to repair damaged files on your drive, while the second one will repair your installation.

3. Manually copy the file

  1. On another PC, locate ws2_32.dll. It should be located in C:\Windows\System32
  2. Copy the file to the System32 directory on the affected PC.
  3. Check if the problem is resolved.

Keep in mind that downloading DLL files from third-party websites might not be safe, so avoid doing that.

These methods should help you if the ws2_32.dll is missing. If nothing else works, you might have to factory reset Windows 11 if this error is constantly giving you trouble.

This isn’t the only issue you can encounter, and we already wrote about missing wsock32.dll in our earlier guides, so don’t miss it.

Espressif Device On My Network: Is This Dangerous?

Did you notice an unknown Espressif device on your network?

First, check if it’s a family member or an employee on your home or business network. If you still can’t identify it, it’s time to protect yourself from hacking attempts.

I’ve listed below all the tried and tested methods to prevent a mysterious Espressif device from accessing Wi-Fi routers.

What Is an Espressif Device?

Espressif is the out-of-the-box name for most SOCs, modules, devkits, and equipment Espressif Systems. It’s a China-based semiconductor manufacturing company. It fabricates essential electronics for IoT devices, AI/ML hardware, communication equipment, and AIoT devices.

Its chips and modules are abundant in Chinese thermostats, door locks, AI security cameras, smart lights, robotic vacuum cleaners, and pet-care IoT products. So, if you’ve connected a new smart home device containing an IoT board that uses SOCs or other hardware from this manufacturer, it’s not alarming to see an unknown device.

What To Do When There Is a Espressif Device On Your Network?

Now, let me introduce you to the DIY troubleshooting ideas, protective measures, and their steps to protect your Wi-Fi internet network against intruders or mysterious robotic devices.

Check if a Legitimate Device Auto-Updated

Most likely, a previously known smart home device has changed its default SSID to Espressif, and the firmware updated automatically.

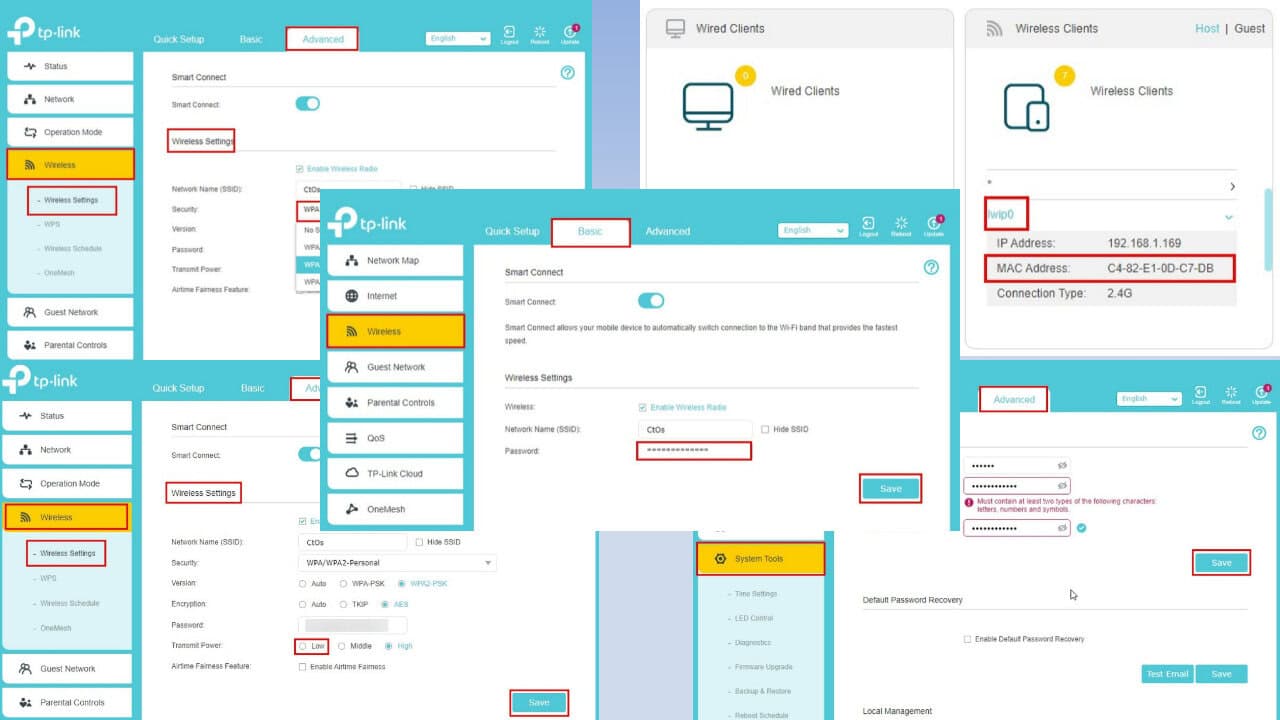
For instance, let’s say you have a smart light that’s been broadcasting the lwip0 SSID so far. But, one day you see a new device displaying the Espressif SSID. The earlier, lwip0 is still there. Is it possible that the Espressif device is the updated name of the smart light?

To test this, follow these steps:

  1. Log in to your router console by entering 192.168.1.1. This is the IP address for most home and office Wi-Fi routers.
  2. Go to the Advanced tab.
  3. Now, click on the Security menu in the left-side navigation panel.
  4. It’ll expand into more sub-menus.
  5. Choose Access Control.
Access control
  1. Normally, the Access Control feature should be disabled.
  2. Click on the toggle button to activate it if it’s deactivated.
  3. Now, locate the suspected old SSID and click on the Block button below the Modify column.
  4. Hit the Save button.
  5. Refresh the router console by pressing F5.
Enable access control
  1. Now, do you notice any smart home device in your home or office isn’t functioning?
  2. If no, apply the same steps for the new device SSID that shows Espressif.
  3. Do you now notice any IoT devices not working?
  4. If yes, this is the smart electronic appliance changing its SSID automatically.

This is completely okay! You can ignore the change and continue using the Espressif smart home device.

Remove/Block the Espressif Device From Your Network

If you can’t determine if any smart home appliance has auto-updated its firmware, it’s best to remove it from your router. Here are the steps to follow:

  1. Go to the Access Control tab on your router’s administrator page.
  2. Activate the Access Control feature.
  3. Now, locate the Espressif device in the list of connected SSIDs.
  4. Click the Block button in the Modify column.
  5. Hit the Save button.
Disable Espressif device SSID

Disable SSID Broadcasting

If someone else knows your Wi-Fi network’s identification name (SSID) and password, they can connect again by changing the device name or MAC address. In that case, you can stop broadcasting your network SSID so they can’t locate it. Here’s how:

  1. Access the router admin website. This is probably the IP address: 192.168.1.1.
  2. Log in using your user ID and password.
  3. Go to the Wireless menu.
  4. Checkmark the Hide SSID option.
save hide ssid

Create a New Wi-Fi Access Passphrase

Change the network password so the device can’t access your internet router anymore:

  1. Access the router admin page.
  2. Navigate to the Wireless menu in the left-side panel.
  3. On the right, you should see the Wireless Settings.
  4. Here, you can change the Wi-Fi connectivity passphrase.
  5. Type in the new password and hit the Save button.
Change password
  1. Refresh the router admin page.

Now, the Espressif device won’t be able to automatically get into your Wi-Fi internet network unless someone adds it again by entering the updated password.

Change the Router’s Log-In Password

If you suspect that someone else has the password to the router’s admin page and they’re adding unknown devices, do the following:

  1. Visit the router console using a web browser.
  2. Select the Advanced tab on the top.
  3. You’ll now find the System Tools menu in the left-side navigation panel.
  4. Click on System Tools.
advanced system tools
  1. A sub-menu will open.
  2. There, select Administration.
administration system tools
  1. Below the Account Management section, enter the old password to authenticate your admin role.
  2. Then, you may enter a new passphrase and confirm it.
  3. Hit the Save button.
save new log in pass

Enable WPA2/WPA3 Encryption Protocols

Did you set the Wi-Fi router to No Security mode and have forgotten to re-engage the security system? It becomes easier for hackers and unknown robotic devices to target your network. Here’s how you can activate it again:

  1. Go to the Advanced tab after logging into the router console.
  2. Click on the Wireless option in the left side panel.
  3. You should now see the Wireless Settings section on the right.
  4. Click on the Security drop-down menu and choose WPA2/WPA3-Personal.
select wpa 2
  1. The Version should be set automatically to Auto mode.
  2. Click Save.
select wpa 2

Enable MAC Address Filtering

If you don’t wish to make massive changes in your Wi-Fi network and still want to keep unwanted Espressif devices away, do the following:

  1. Go to the router console and click on the Advanced tab.
  2. On the left, select the Status menu.
  3. Scroll down on the right side until you see the Wireless Clients.
locate wireless clients
  1. Click on the Espressif device to find its MAC address.
mac address
  1. Now, go to the Access Control menu through Advanced > Security.
  2. Enable Access Control and Save the modification.
  3. Now, go to the Devices in Blacklist table.
  4. Click on the Add button.
  5. Enter the device name along with its MAC address.
  6. Hit the Save button.
Devices in blacklist

Disable WPS

Anyone with physical access to your Wi-Fi router can easily add a foreign device. They can do so by using the WPS button or default PIN at the back of the router, printed on a sticker.

However, if you make the following changes from the router console, WPS won’t work:

  1. Go to the System Tools menu through Advanced in your router’s admin portal.
  2. On System Tools, click on the System Parameters link.
  3. Scroll down on the right side until you find the WPS section.
  4. Uncheck Enable WPS.
  5. Click Save.
save wps disable

Update Router Firmware Regularly

Router manufacturers often release updated firmware to fix bugs that might allow unknown devices to slip in.

Before trying this method, ensure you’re connected to an uninterrupted power supply. If the power cuts off during the firmware upgrade, your router might get bricked.

  1. Sign in to your router’s admin panel.
  2. Open the System Tools menu from the Advanced tab.
  3. Select the Firmware Upgrade option in the System Tools tree.
  4. Click the Upgrade button on the right side, below the Online Upgrade section.
upgrading firmware

Reduce Wi-Fi Signal Range

You can also throttle the signal strength of your Wi-Fi router to reduce the possibility of hackers trying to hack into your network from a distant location. Most modern routers come with this option. Here’s how you can achieve this on a TP-Link router:

  1. Go to the router control web page.
  2. Click on the Advanced tab.
  3. Now, go to the Wireless Settings menu in the left-side navigation panel.
  4. Below the Wireless Settings section, select Low or Medium for the Transmit Power field.
  5. Click Save.
Low transmit power

Summary

So, now you know how to protect your home or business hotspot if you ever see an Espressif device on your network. Try these troubleshooting methods in the order they appear to fix the issue in the least possible time.

If this article helped you identify and prevent unknown smart devices from spying on you, leave a comment below.

You can also learn what to do with unidentified Shenzhen devices.

THIRD_PARTY_FILE_SYSTEM_FAILURE BSoD 0x108 [Solved]

The THIRD_PARTY_FILE_SYSTEM_FAILURE BSoD (Blue Screen of Death), with error code 0x00000108, is caused due to issues in the file system or the storage disk.

This typically happens when you use outdated or corrupt drivers, there aren’t enough available resources, the disk or RAM malfunctions, or a third-party program conflicts with Windows.

Before you move to the solutions, restart the PC, disconnect non-critical peripherals, install pending Windows updates, and if the THIRD_PARTY_FILE_SYSTEM_FAILURE error appears after downloading one, uninstall the recent Windows update. For most, these basic checks should fix things!

How do I fix THIRD_PARTY_FILE_SYSTEM_FAILURE error?

1. Update the problematic driver

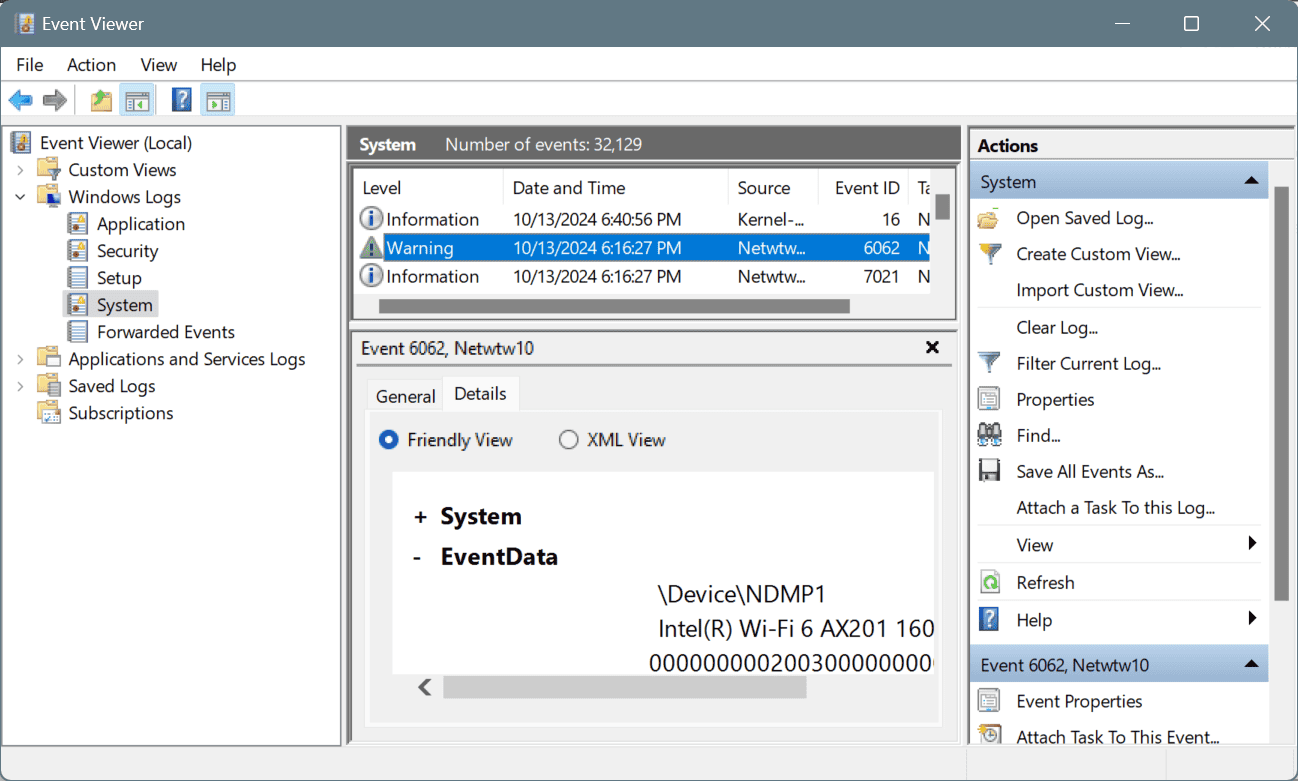
  1. Open the Event Viewer, and check the error logs to identify whether a driver is triggering the BSoD. If so, update it using the steps listed next. Even otherwise, update all the drivers.event viewer logs
  2. Press Windows + X to open the Power User menu, and select Device Manager.
  3. Expand the different entries here, right-click on the problematic device, and select Update driver.update driver to fix THIRD_PARTY_FILE_SYSTEM_FAILURE
  4. Click on Search automatically for drivers and let Windows install the best locally available version.install
  5. Finally, restart the PC to apply the changes.

In 2 out of 5 cases, updating the disk driver should fix the THIRD_PARTY_FILE_SYSTEM_FAILURE BSoD in Windows 11. Remember, the error is also sometimes caused by corrupted SCSI and IDE drivers. So, check those as well!

If Windows can’t find a better version, head to the manufacturer’s website, locate the newest release, and then manually install the latest driver.

2. Check the disk and RAM for issues

2.1 Repair the hard disk

  1. Press Windows + S to open Search, type Command Prompt in the text field, and click on Run as administrator.
  2. Click Yes in the UAC prompt.
  3. Paste the following Check Disk command and hit Enter: chkdsk /r
  4. If asked to schedule the scan for the next reboot, press Y, hit Enter, and then restart the PC.check disk to fix THIRD_PARTY_FILE_SYSTEM_FAILURE

According to Microsoft, bad sectors on the hard disk can cause THIRD_PARTY_FILE_SYSTEM_FAILURE. To fix things, repair the hard disk and run built-in utilities like Check Disk.

2.2 Check the RAM

  1. Press Windows + R to open Run, type mdsched.exe in the text field, and hit Enter.
  2. Click on Restart now and check for problems.Windows Memory Diagnostic
  3. Wait for the scan to complete, and then check the mdsched error logs.

When Windows Memory Diagnostic can’t find any faults, I recommend using an advanced RAM testing tool like Memtest 86+. It’s open-source and runs a wide array of scans on individual RAM modules, identifying even the trickiest of the problems!

Also, if possible, disconnect all the RAM modules, wipe them to clear any carbon deposits, and then reseat memory sticks in their respective slots.

3. Increase the virtual memory

  1. Press Windows + S to open Search, type View advanced system settings, and click on the relevant result.
  2. In the Advanced tab, click on Settings under Performance.performance
  3. Again, navigate to the Advanced tab, and click on Change under Virtual Memory.change virtual memory to fix THIRD_PARTY_FILE_SYSTEM_FAILURE
  4. Untick the checkbox for Automatically manage paging file size for all drives, select the No paging file entry and click on Set.no page file
  5. Confirm the change.
  6. Now, select the Custom size option, and enter the page file using the following formula, depending on the available RAM:
    • Initial size: 1.5 x Available physical memory x 1024
    • Maximum size: 3 x Available physical memory x 1024
  7. Click on Set and then OK to save the changes.increase to fix THIRD_PARTY_FILE_SYSTEM_FAILURE

The THIRD_PARTY_FILE_SYSTEM_FAILURE error also arises due to low nonpaged pool memory. In this case, you have two options, either increase the virtual memory or increase the physical RAM by adding additional memory modules.

4. Uninstall conflicting third-party apps

  1. Press Windows + R to open Run, type appwiz.cpl in the text field, and hit Enter.
  2. Select the conflicting app from the list, and click Uninstall.uninstall to fix THIRD_PARTY_FILE_SYSTEM_FAILURE
  3. Follow the on-screen instructions to complete the process.
  4. Similarly, uninstall any other apps that may conflict with Windows.

Apps like disk defragmenters, hard drive optimization tools, third-party antiviruses, and backup software that continuously run in the background are often the underlying cause behind THIRD_PARTY_FILE_SYSTEM_FAILURE on Windows 10. And uninstalling the app should fix the BSoD!

5. Reinstall Windows

When nothing else works, the last option is to reinstall Windows. I recommend you move all critical personal files to external storage beforehand to avoid data loss.

reinstall windows
Reinstalling Windows

To reinstall Windows, go to Microsoft’s official website > download the Media Creation Tool > use it to create a bootable USB drive > connect the flash drive to the affected PC > change the boot order to the flash drive > run the setup to install Windows.

After a reinstall, you shouldn’t encounter THIRD_PARTY_FILE_SYSTEM_FAILURE on Windows anymore.

Before you leave, learn the causes of BSOD in Windows and implement measures to prevent such errors from reappearing!

For any queries or to share which fix worked for you, drop a comment below.

Govee AI Sync Box Kit 2 Review: Extended Gaming Immersion

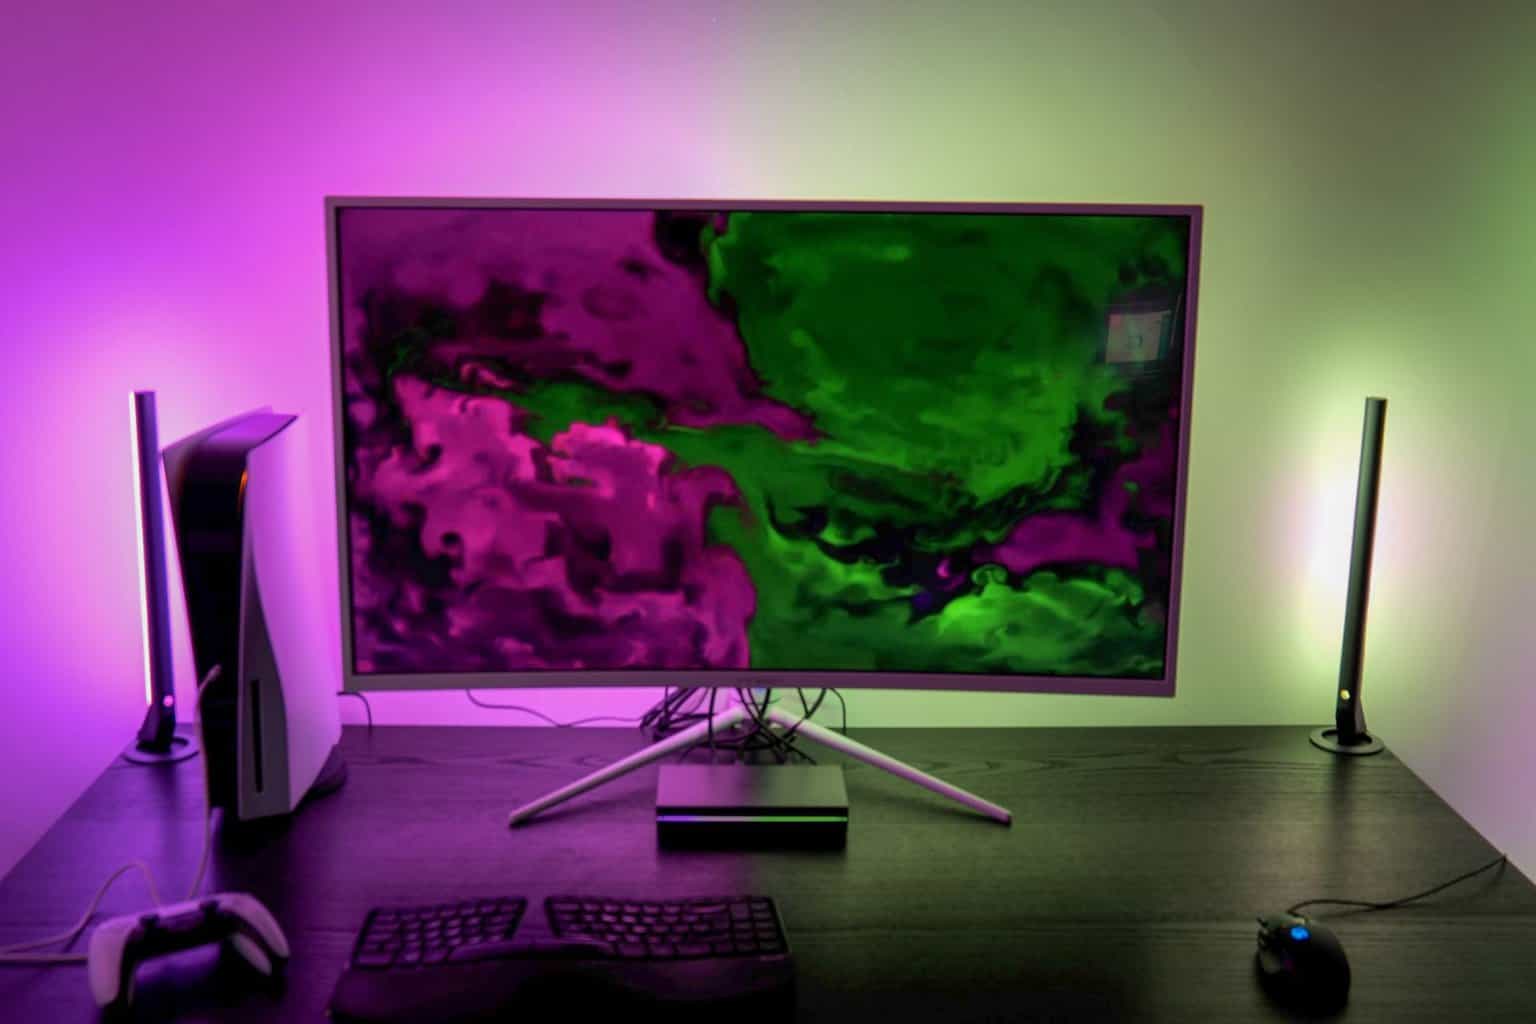
Bias lighting, backlighting, or Ambilight systems can be a bit of a love-or-hate affair. They take what’s on your TV or monitor, and extend it to colored LEDs at the back. Some love the immersion it adds to gaming and movie watching; others find it distracting.

The Govee AI Sync Box Kit 2 is an HDMI 2.1 hardware solution for zero-latency signal analysis up to 8K resolution. It allows you to extend the experience to all your Govee lights for a stunning room-scale experience with enhanced AI effects that react to your game state. It’s the ultimate upgrade for any gamer.

The AI Sync Box Kit 2 is available from October 14th, starting at $280.

What is the Govee AI Sync Box Kit 2, and how does it work?

The Govee AI Sync Box Kit 2 is a TV or monitor bias lighting system that uses HDMI signal analysis rather than relying on software on your PC or a camera to watch the screen content, recognizing the colors and repeating them to a set of LEDs on the back of your monitor, as well as some side lighting bars. This means it works with any source, and you get an accurate zero-latency analysis of on-screen content without any performance loss from running software on your machine.

If you’ve never tried a dynamic bias lighting system before, it’s a good idea to have a go with a basic system before jumping into a full hardware option like the AI Sync Box Kit 2. Govee offers free desktop software which you can download and connect to any number of compatible Govee lighting fixtures. It’s not nearly as elegant, will lose you a few FPS for the processing, won’t have all the features, and only works with Windows… but it lets you get a feel for the experience without buying new hardware.

The AI Sync Box Kit 2 comes with LEDs suitable for different monitor and TV sizes; I’m reviewing the kit for 27 to 34-inch screens, though I’ve stretched it a bit to fit my 40-inch monitor. Govee will soon offer sizes for larger TVs up to 85 inches. The kit also includes two lighting towers for each side of your desk, the Sync Box itself, and two nicely braided HDMI cables.

Installation tips and getting started

Attaching the LEDs to the back of my monitor was tricky until I remembered a tip from assembling wargaming miniatures: use a craft knife to scratch the adhesive surface. I guess this increases the surface area. Make sure you also clean the monitor surface with the provided alcohol wipes first, and use the included clips to secure the strips—especially at the corners.

For optimal effect, place the LEDs as close to the edge of the monitor as possible. While this setup works on larger monitors, the closer the lights are to the edge, the more noticeable and accurate the effect will be.

The Govee AI Sync Box Kit 2 features four HDMI inputs, so it also acts as a signal switcher, with one output for your monitor or TV. There are also a couple of USB-C ports to connect the backlight LEDs and lighting bars. Since it’s a hardware solution, it’s incredibly simple to set up—just plug in the cables and turn it on. You’ll need to add the device to the Govee Home app to access various scene modes, but a basic setup requires minimal configuration.

Aside from video analysis and backlighting, the system acts as a generic LED lighting system with multiple scene modes, color cycling, and music-reactive lighting, all controlled through the app.

There are two buttons on the side of the sync box: one for power (it will pass through the signal even without being powered on) and one for input switching. Each input is color-coded with the central LED strip on the box itself, so you can quickly cycle through the inputs. But if you only have one source activated (even if multiple ones are connected), you don’t need to switch, as it’ll default to the active input.

AI Scene Recognition

Ambilight systems aren’t new—whether they use HDMI signal analysis, a camera to watch your screen, or software—so what makes the Govee AI Sync Box 2 better than the rest? The first big differentiator is AI scene recognition.

In supported games (on any platform), the system recognizes your achievements, game status, and team wins or losses, and responds accordingly with lighting effects. For example, if your team wins, the lights might flash in celebration. If your health is low, the lights might turn red. These effects override the usual color sync from your monitor, and revert back once the state has finished.

Unfortunately, the list of supported games isn’t extensive, but if you play one of the supported titles, most of which are team-based RTSes, this is a compelling reason to buy the system.

I tested it using the Call of Duty: MW2 Warzone profile (which also works with MW3), and found effects for:

  • Red flashing for safe zone shrinking or incoming mortar strike
  • Orange when our vehicle was being shot at
  • Blue when being revived
  • A cornucopia of colored lights when I won (though sadly, I only won once and didn’t record it!)

Using the AI effects is not compulsory, of course, but it adds a bit of drama to the experience. I would struggle to say it benefited my gameplay though; I sucked just as much without it.

Extending the system with Govee DreamView

The other standout feature of the Govee AI Sync Box Kit 2 is its compatibility with Govee DreamView, which allows you to sync up multiple Govee lights.

Most backlighting kits are limited to LEDs on the back of your TV; some might include additional side lighting bars, but very few go beyond that. The original Philips Amblight allowed you to create an Entertainment Zone which extended the experience to your colored Hue lighting, though the choice of additional lighting fixtures is very limited.

Govee DreamView extends the Sync Box 2 Kit capability to nearly any other Govee lights, like wall fixtures, LED strips, or floor lamps.

For example, I’ve linked my Govee Hexa Glide lights on the left wall, a Floor Lamp 2 on the right, and even a Christmas tree with String Lights 2 (yes, in mid-October—such is the life of a hardware reviewer). DreamView gives you the ultimate immersive experience by extending synced gaming lights throughout your room.

When you’re done with DreamView and turn off the sync box, the lights revert to their previous stat.

How does it compare to the original Govee AI Gaming Sync Box?

There are two major improvements over the original:

HDMI 2.1 support: The first AI Gaming Sync Box was limited to HDMI 2.0, capping it at 4K 60Hz, which disappointed many gamers. The AI Sync Box Kit 2 supports HDMI 2.1, allowing for 8K resolution, 4K at 144Hz, and other higher refresh/lower resolution modes.

Matter over Wi-Fi compatibility: Matter is a new cross-platform smart home standard that allows devices to work with Apple HomeKit, Amazon Alexa, Google Assistant, and more. The Govee AI Sync Box Kit 2 is Matter-compatible using the pairing code from the app, meaning you can control basic features like color and brightness through any Matter smart home system. For more advanced features, you’ll still need the Govee Home app.

Should you buy the Govee AI Sync Box Kit 2?

Apart from the tricky installation of the LED strips, I can’t fault the Govee AI Sync Box Kit 2. Govee addressed the biggest concern—HDMI 2.1 support—and even added Matter compatibility.

This system is brilliant fun and adds an incredible level of immersion to your gaming experience without negatively impacting performance. And if you already have other Govee lights in your gaming room, the AI Sync Box 2 becomes a control hub, extending the immersive experience to all your lights.

What do you think about Govee AI Sync Box Kit 2? Tell us your opinion in the comments below.

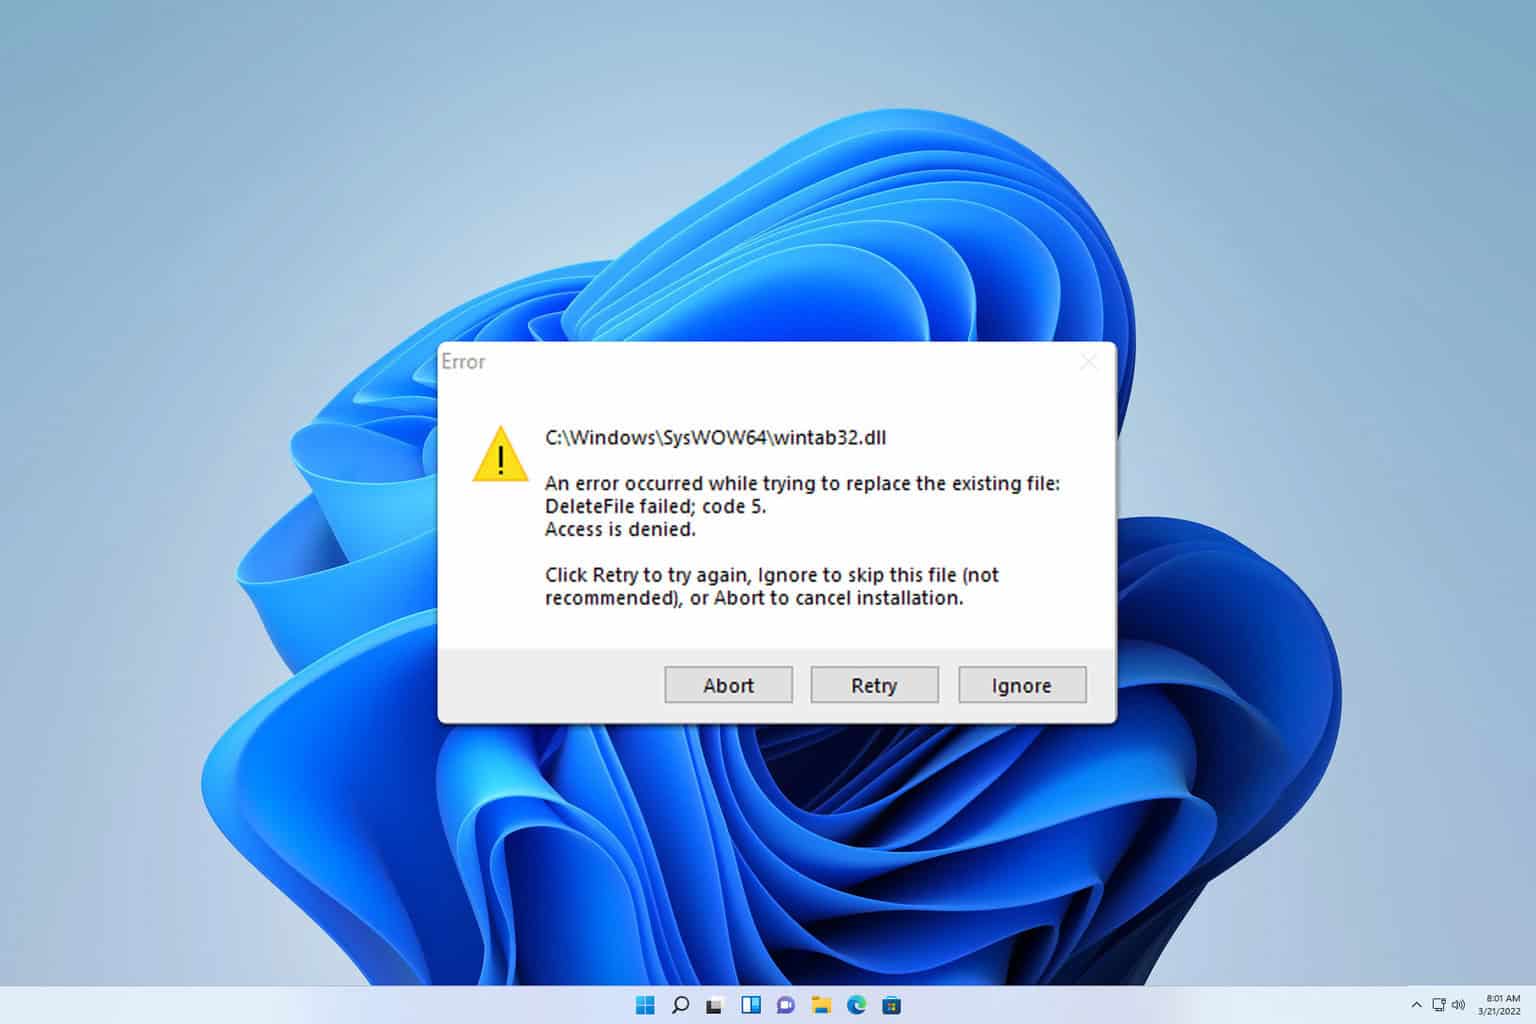
Wintab32.dll Error: How to Repair it

Many users reported issues with the wintab32.dll file, and in today’s guide, we’re going to take a closer look at this file and show you how to fix any problems that you might have.

What does wintab32.dll do?

This DLL file is associated with the tablet driver and is essential if you want to use your drawing tablet on a PC.

How do I fix the wintab32.dll error?

Before we start, ensure that your drawing tablet drivers are up to date.

1. Remove the file manually

  1. Open File Explorer and go to C:\WINDOWS\System32
    system32 folder windows 11
  2. Locate wintab32.dll and remove it.
    delete file windows 11
  3. Next, go to C:\WINDOWS\SysWOW64
  4. Delete wintab32.dll.
  5. Check if the problem is gone.

2. Move the DLL file to System32 and SysWOW64 directories

  1. Download the wintab32.dll.
  2. Paste the downloaded file to both System32 and sysWOW64 directories:
    C:\WINDOWS\System32
    C:\WINDOWS\SysWOW64
  3. Check if the problem is gone.

If you’re concerned about downloading this file, it was suggested by Huion support, so it’s most likely safe.

Can I delete wintab32.dll?

Yes, you can delete this file. However, if you encounter any permission issues we have a guide on how to unlock a file in Windows before you can remove it.

Where to find wintab32.dll?

This file is usually located in the System32 and SysWOW64 directories. We have given you the full path in the solutions above.

We hope that this guide helped you fix the wintab32.dll was not found and other errors. Speaking of drawing tablets, we have a guide on what to do if the Wacom pen pressure is not working.

This file is associated with other brands, and we have a guide on what to do if Huion pren pressure isn’t working, so don’t miss it.

APP_TAGGING_INITIALIZATION_FAILED: 7 Ways to Fix it

The APP_TAGGING_INITIALIZATION_FAILED BSOD (Blue Screen of Death), which crashes Windows, has a bug check value of 0x0000010A.

The error is encountered due to corrupted system files, outdated drivers, disk issues, malware infection, running incompatible apps, and misconfigured Windows settings.

Before we start troubleshooting, restart the PC, install all pending Windows updates, and disconnect any non-critical hardware. For most of you, these basic checks should fix the blue screen error!

How can I fix the APP_TAGGING_INITIALIZATION_FAILED BSOD?

1. Update all the installed drivers

  1. Press Windows + X to open the Power User menu, and select Device Manager from the list.
  2. Expand all the entries here, right-click on the devices listed underneath individually, and select Update driver.update driver to fix APP_TAGGING_INITIALIZATION_FAILED
  3. Now, click on Search automatically for drivers and wait for Windows to install the best locally available version.install driver
  4. Similarly, update all the other drivers and then restart the PC.

If you are getting APP_TAGGING_INITIALIZATION_FAILED on Windows 11 due to outdated or corrupt drivers, updating the drivers will fix things in no time. And when the OS can’t find a better version, head to the manufacturer’s website, locate the newest release, and then manually install the driver!

2. Repair the corrupted system files

  1. Press Windows + S to open Search, type Command Prompt, and click on Run as administrator.command prompt
  2. Click Yes in the UAC prompt.
  3. Paste the following DISM commands individually and hit Enter after each: DISM /Online /Cleanup-Image /CheckHealth DISM /Online /Cleanup-Image /ScanHealth DISM /Online /Cleanup-Image /RestoreHealth
  4. Now, run this command for the SFC scan: sfc /scannow sfc scan to fix APP_TAGGING_INITIALIZATION_FAILED
  5. Finally, reboot the PC and verify whether repairing the corrupted system files fixed things.

3. Repair the disk

  1. Press Windows + R to open Run, type cmd, and hit Ctrl + Shift + Enter.
  2. Click Yes in the UAC prompt.
  3. Paste the following Check Disk command and hit Enter: chkdsk /r
  4. If asked to run the scan upon the next reboot, press Y, then hit Enter, and restart the PC.chkdsk to fix APP_TAGGING_INITIALIZATION_FAILED

If it’s the bad sectors to blame for APP_TAGGING_INITIALIZATION_FAILED in Windows 10, you will have to repair the hard disk. To do that, an easy option is to run the built-in Check Disk utility.

4. Run a malware scan

  1. Press Windows + S to open Search, type Windows Security in the text field, and click on the relevant result.
  2. Click on Virus & threat protection.windows security
  3. Click on Scan options.
  4. Select the Full scan entry and then click the Scan now button.malware scan to fix APP_TAGGING_INITIALIZATION_FAILED
  5. Wait for the scan to complete. It may take 15-45 minutes.

5. Uninstall conflicting third-party apps

  1. Press Windows + R to open Run, type appwiz.cpl in the text field, and hit Enter.
  2. Select any app downloaded around the same time the BSOD first appeared, and click Uninstall.uninstal to fix APP_TAGGING_INITIALIZATION_FAILED
  3. Follow the on-screen instructions to complete the process and then restart the PC.
  4. Verify whether the problem is resolved. If not, uninstall other apps that may be conflicting with Windows.

Sometimes, a quick app removal doesn’t work, and the data left behind can still trigger the APP_TAGGING_INITIALIZATION_FAILED blue screen error. In such cases, I recommend using a top-rated software uninstaller to delete all leftover files, app cache, and Registry entries!

6. Turn off fast startup

  1. Press Windows + S to open Search, type Control Panel in the text field, and click on the relevant result.
  2. Click on System and Security.control panel
  3. Now, click on Change what the power buttons do under Power options.
  4. Click on Change settings that are currently unavailable.
  5. Untick the checkbox for Turn on fast startup, and then click Save changes.turn off fast startup to fix APP_TAGGING_INITIALIZATION_FAILED
  6. Finally, restart the PC and check for improvements.

7. Perform an in-place upgrade

Note icon NOTE
The steps listed here are for Windows 11. If you are running the previous iteration, learn how to perform an in-place upgrade on Windows 10.
  1. Go to Microsoft’s official website, select the OS edition and language, and then download the Windows 11 ISO.
  2. Next, right-click on the ISO file, select Mount, and then click on Open in the confirmation prompt.Windows 11 iso
  3. Run the setup.exe file.
  4. Click Yes in the UAC prompt.
  5. Click on Next to proceed.windows 11 setup
  6. Now, click Accept to agree to Microsoft’s license terms.
  7. Finally, make sure the setup reads, Keep personal files and apps, and then click on Install.in-place upgrade to fix APP_TAGGING_INITIALIZATION_FAILED
  8. Wait for the process to complete. It typically takes 45-90 minutes.

If it’s a problem with Windows itself, you will have to perform an in-place upgrade to fix the APP_TAGGING_INITIALIZATION_FAILED BSOD. Don’t worry, your files and apps remain unaffected during the process!

In case this, too, fails, the last option is to reinstall Windows. That will, in all likelihood, get rid of the blue screen error.

Before you leave, discover what causes BSOD on Windows and prevent such errors from reappearing!

For any queries or to share more fixes with our readers, drop a comment below.

6 Easy Ways to Solve The Wc-40383-8 PS4 Error Code

Now and then you may visit the PS4 store to purchase new games, add-ons or check out what’s new but may get hit with the wc-40383-8 error code with a message that says The service is currently undergoing maintenance.

Usually, this isn’t an issue and when you check back later, you can access the store. However, if the error persists, it may indicate a deeper issue like especially if you’ve checked the PSN status and everything is OK.

Something may be wrong with the latest PlayStation update or your internet connection is unstable and preventing access to the store.

How do I solve the wc-40383-8 error code in my PS4?

1. Run the necessary troubleshooters

1.1 Run the Network adapter troubleshooter

  1. Hit the Windows key and click on Settings.settings windows 11
  2. Click on System, then select Troubleshoot.Open system troubleshooter
  3. Select Other troubleshooters.other troubleshooters
  4. Locate the Network Adapter troubleshooter and click on the Run button next to it.Network Adapter Run IPv6 No Internet Access

1.2 Run the Internet Connections troubleshooter

  1. Hit the Windows key and click on Settings.settings windows 11
  2. Go to System, and click Troubleshoot.System - Troubleshoot wifi keeps disconnecting windows 11
  3. Now click Other troubleshooters. Other troubleshooters
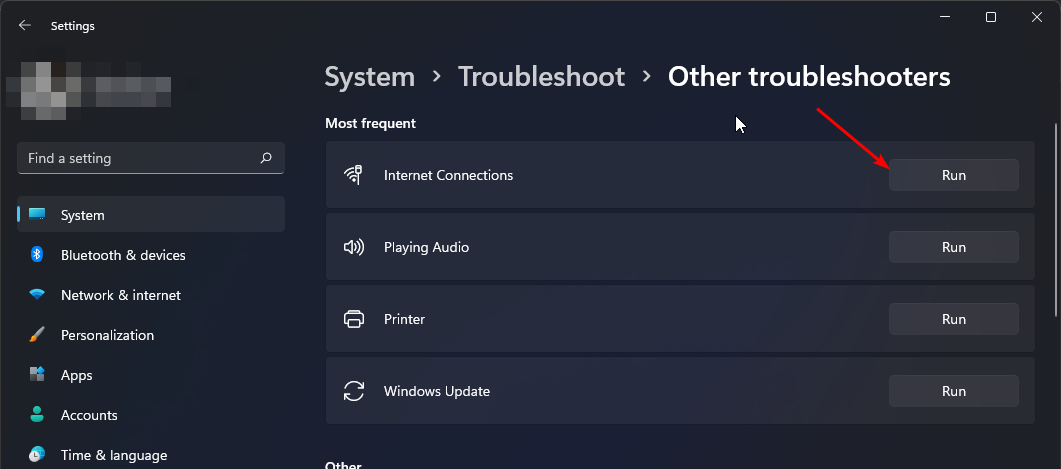
  4. Locate Internet connections, and click Run. 
  5. Follow the onscreen prompts to complete the process.  

2. Test the console’s Internet connection

  1. Select Settings from the console’s Home Menu.
  2. Click on Network from the drop-down window.
  3. Select Test Internet Connection and wait till the test completes.
  4. Follow the on-screen instructions and check if the wc-40383-8 error code persists on your PS4.
  5. Press the PS button on your controller and select the Power option.
  6. Choose Restart PS4.Restart PS4-nw-31194-8
  7. Once the console is rebooted, check if the error still shows up.

3. Power cycle your router and re-enable the SSID broadcast

  1. Switch off your router and disconnect it from its power source. This includes removing batteries if it uses any.  
  2. Wait a minute before hooking it up on power and switching it on again. 
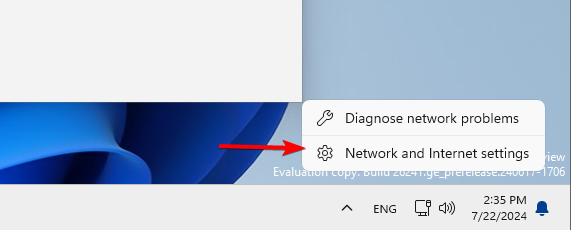
  3. Right-click the network icon in your Taskbar and choose Network & Internet settings.network and internet settings
  4. When the new window appears, click on Network and Sharing Center.Network and Sharing Center
  5. Network and Sharing Center window will now appear. Click on Set up a new connection or network.
  6. Now select Manually connect to a wireless network and click Next.
    Hidden WiFi network setup
  7. Enter the required information such as Network name, Security type, and Security Key. Keep in mind that you need to enter the correct information or else you won’t be able to find and access your network.
  8. Also, be sure to enable Connect even if the network is not broadcasting and Start this connection automatically options. Once you’re done, click Next to proceed.
    Discover hidden WiFi network
  9. Try connecting your PS4 with an ethernet cable this time around and see if it works. 

4. Change DNS on the console

  1. Go to Settings on the home screen.
  2. Select Network.Network
  3. Click Set Up Internet Connection.Set up internet connection - nw-31194-8
  4. Choose Wi-Fi or LAN Cable, depending on the option you are using.Wi-fi or LAN cable
  5. Click Custom, choose Automatic for IP address settings, then choose Do Not Specify for DHCP host name.Custom -  
  6. On the DNS Settings screen, select Manual.
  7. For Primary DNS, type 8.8.8.8, and for the Secondary DNS, type 8.8.4.4. DNS settings
  8. Once done, test the network connection.

If your DNS is slow, the connection request may keep getting a time out.

5. Update your console firmware

  1. Download the update file from the PS4 System Software Update page.
  2. Connect the USB flash drive on your computer and press Windows + E to open File Explorer.
  3. Navigate to the USB drive, click New, then Folder from the drop-down menu, and name it PS4.
  4. Double-click the PS4 folder to open it, then click New Folder, and name it UPDATE.
  5. Double-click the UPDATE folder and copy & paste the file you downloaded in the first step in the folder. Ensure the name of the file is PS4UPDATE.PUPFolder - file - nw-31194-8
  6. Go to the system tray, right-click the pen, and choose to Eject it safely.
  7. Now plug the USB drive into your PS4 console.
  8. Press and hold the power button, and release it after you hear a second beep to start the PS4 in safe mode.
  9. Connect the DualShock 4 controller to the console with its USB cable, and press its PS pairing button.
  10. Choose System Software Update.System Software Update
  11. Select Update from USB Storage Device, then click OK.USB storage - nw-31194-8
  12. Choose Next to continue and follow the on-screen instructions to complete the process.

6. Uninstall the recent update file and retry in Safe Mode

  1. Go into the Menu of PS4, select Notifications from the PS4 function area.
  2. Highlight the update file and press the OPTIONS button, then select Delete.
  3. Turn off your PS4 completely.
  4. Press and hold the power button until you hear two beeps (one immediately and one after about 7 seconds).
  5. Connect your DualShock 4 controller using a USB cable and press the PS button.
  6. In Safe Mode, select Update System Software.
  7. Choose Update Using Internet to download the latest update directly from the PlayStation servers.
  8. If this doesn’t work, you can try Update from USB Storage Device if you have the update file downloaded on a USB drive.
  9. If updating the system software doesn’t resolve the issue, go back to Safe Mode.
  10. Select Rebuild Database. This option scans the drive and creates a new database of all content, which can fix data corruption issues.

Most users said the wc-40383-8 error code on their PS4’s started immediately they updated the firmware so removing it and reinstalling it in Safe Mode may resolve the issue if the installation file was corrupted somehow.

Unfortunately, the wc-40383-8 error code on your PS4 is just one off the many server errors. You may also encounter the ws-44750-0 ps4 error which prevents connection between your console and the server.

Speaking of connection errors, your PS4 may lose connection to the server so we detail how to re-establish it in our fix guide. For other connection errors like ce-33743-0 that only affect your PS4, we also have a workaround.

If you have any additional thoughts on this error code, share your thoughts with us in thee comment section below.

Celtx Free Download for Windows 10: 2 Safe Methods

Are you looking for Celtx free download options for Windows 10? Keep reading!

The popular screenplay tool has recently transitioned to a completely web-based interface. It’s now promoting the cloud app over the standalone version citing simplicity and ease of use. However, you might have been highly accustomed to the desktop edition and would like to stick to that.

Not to mention, running Celtx as a web app will require you to keep your browser open all the time. This practice puts an additional load on the PC resources.

So, I’ve researched to figure out how to get the Celtx standalone tool. Here’s what I found out!

Celtx Free Download for Windows 10: 2 Methods

It can be challenging for you to find the right installer package. Luckily, the following methods are effortless and reliable:

Get It From the Microsoft Store

  1. Click on the Start menu button and type Store.
  2. The Microsoft Store app will show up below the Best match section.
Best match
  1. Click on the Microsoft Store icon.
  2. Go to the Search apps field on the top and type Celtx.
  3. Hit Enter.
  4. The Celtx Screenplay app will show as the top search result. Click on that.
Best match
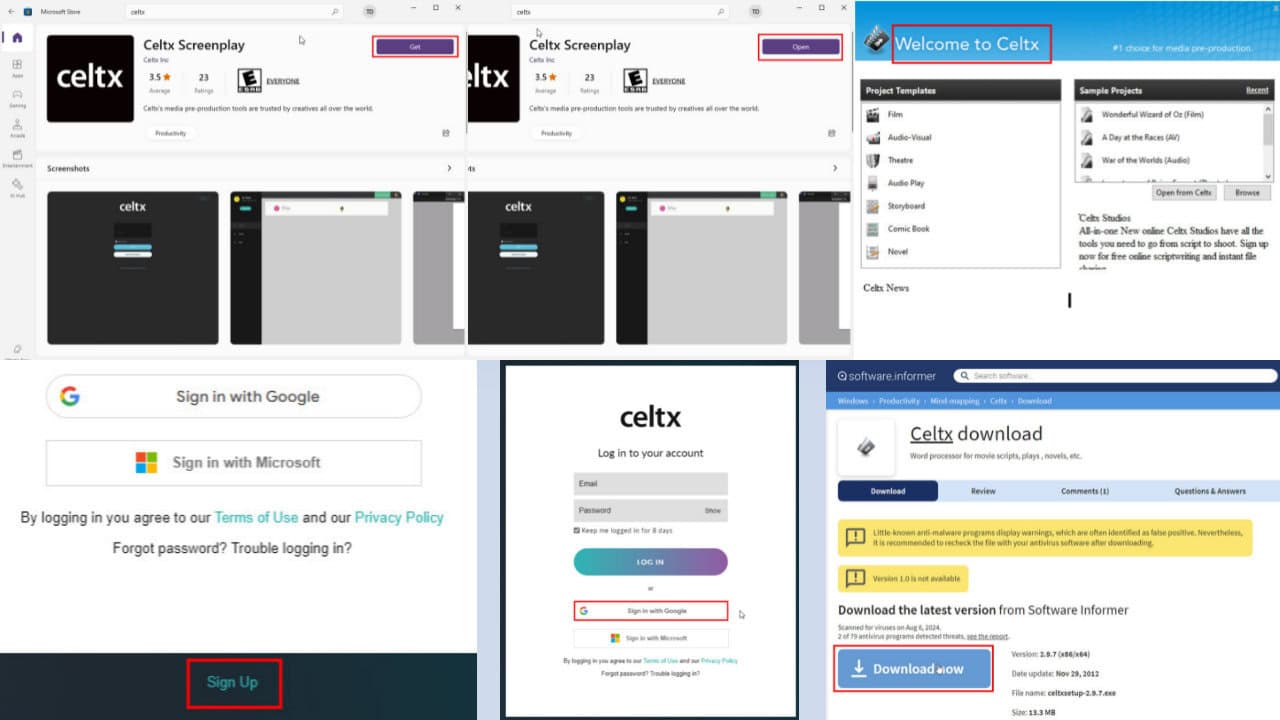
  1. Click on the Get button in the top right corner.
Get celtx
  1. Allow Microsoft Store to download and install the app.
  2. Once it’s installed, the Open button will show in the top-right corner.
  3. Click Open.
open celtx
  1. The Celtx login screen should open.
  2. You can now use any of the following sign-in methods:
    • Email and password
    • Sign in with Google
    • Sign in with Microsoft.
celtx sign in screen
  1. If you’re new to Celtx, click Sign Up.
  2. Follow on-screen instructions for Log In or Sign Up.
Sign Up link

Get It From Third-Party Software Depositories

If you can’t find Celtx Screenplay in the Microsoft Store or the app won’t open or work properly, follow this workaround. Here, I’ll show you how to download the installer file from reliable online sources.

I recommend:

So let’s say, you want to download the tool from Software Informer. Click on the above link and you’ll see its Celtx free download for Windows 10 page. Click on the Download now button.

download now

It might take up to two minutes to download the Celtx installer. The complete package size is 13.3 MB. However, since you’re downloading from one of the mirror servers, the speed may be throttled.

When it’s complete, go to the Downloads folder. Double-click the celtxsetup-2.9.7 EXE file to start installing.

Celtx setup

Follow the instructions provided by the Install Shield Wizard to complete it.

Here’s what the Home Screen looks like:

Celtx home

Summary

Now you know all the possible methods for Celtx free download for Windows 10. You can also follow the same steps on a Windows 11 PC.

Were you able to install it thanks to this guide? You can comment below to share your feedback. If you also happen to know a better way to download it, don’t forget to mention that.

Moreover, you might want to learn how to download Pikashow for Windows 11, the YouTube desktop app for PC, and iTunes Download for Windows 11 to get the relevant app.

Reddit experienced a major outtage and it’s all because of the No Healthy Upstream error

If you’ve been trying to access Reddit today, you might have encountered the No Healthy Upstream error, which prevents anyone from accessing the social media network. While strolling through it, we also encountered this error, and it seems the issue is affecting users worldwide.

The error makes browsing anything on Reddit impossible, and it’s currently ongoing. Expired certificates, issues of scalability, or bugs with servers usually cause the No Healthy Upstream, which can usually be fixed by logging in and logging out, but it did not work in this case.

However, you can try different methods to fix this issue independently in our guide, but please note that it might not be your fault, at all. Reddit’s servers might be the culprit, and in some cases, simply refreshing the page seems to do the trick, as this Reddit user points out. DownDetector also confirms this.Reddit no healthy upstream

Same here, the server is apparently having some trouble and/or is overloaded. Refreshing the page after a while helps.

Have you experienced the No Healthy Upstream error on Reddit today? Let us know below. Meanwhile, try to implement the solutions from our guide, and wait.

Updating your Internet browsers might fix the issue, but not entirely. Reddit might open some posts, while the No Healthy Upstream error keeps showing up when trying to access other posts. It’s always good to update the browser, so make sure you do so.

Others also say that for now, one solution is to access the https://new.reddit.com instead of the regular https://www.reddit.com.

Edit: Reddit appears to be fully functional now, and it can be accessed from any browser without any issues, but it wss unavailable for many for a couple of hours, this morning. In our cases, we tried accessing on Edge, Chrome, and Opera, and it worked on all of them, but some users might still be affected, as DownDetector still reports some complains.

Are you still facing this issue? Let us know.

Build 27723 to the Canary Channel might make some Nvidia-based Windows 11 devices unresponsive

Microsoft has released Windows 11 Insider Preview Build 27723 for the Canary Channel. The new build enhances voice access, spelling experience, and the taskbar search function.

The updated build introduces the ability to share local files directly from the search results in the taskbar. This feature will eventually be available to Windows Insiders in the Dev and Beta Channels.

Microsoft says it has made improvements to the spelling and corrections experience in voice access, which is designed to help people with mobility impairments control a PC using only their voice.

The new build also introduces a new simplified Chinese font called Simsun-ExtG, which adds 9,753 ideographs supporting Unicode Extensions G, H, and I. As a fun bonus, the font includes the character for Biangbiang noodles, which Microsoft says is “the most complicated Chinese character.” However, Microsoft cautions that some applications may not be able to display the new extension characters yet.

Microsoft has acknowledged that Windows 11 preview releases can cause problems such as black screens and system hangs on PCs with older Nvidia graphics cards. The company advised affected users to roll back to a previous build of Win11.

The issues are associated with Windows 11 preview build 27723, which Microsoft started rolling out to testers in the Dev Channel last week. According to a note added to the release notes for the build, some Insiders with PCs that have older Nvidia GPUs, like the GTX 970 or Quadro K620, are experiencing problems where their displays appear stuck on a black screen and unresponsive or where their GPUs show errors in Device Manager and don’t work correctly.

The company is working on a permanent fix, but until then, Windows Insiders are advised to roll back to the previous version.

The detach virtual hard disk (VHD/VHDx) button added in Build 27686 has been temporarily disabled in Settings > System > Storage > Disks & Volumes as of Build 27718. Microsoft says it’s working to re-enable the feature in a future build.

The new build has a few known issues, including a bug that causes some games, including Microsoft Solitaire & Casual Games, to crash on launch. Another issue causes some Windows Insiders to experience rollbacks (with error code 0xc190010) when attempting to install the latest Canary builds.

Additionally, some Windows Insiders are still unable to open the Emoji Panel and Clipboard History in certain apps, including Registry Editor.

To get build 27723, navigate to Settings > Windows Update > Windows Insider Program and select Check for updates. Make sure you have the latest build installed before updating, as the expiration date for Insider Preview builds flighted to the Canary Channel has been updated to September 15, 2025.

You can read Build 27723‘s full changelog here.

AGP_INVALID_ACCESS 0x104: How to Fix This BSoD Error

The AGP_INVALID_ACCESS error represented by the code 0x104, implies an issue affecting your device’s GPU’s memory access.

Usually, when your GPU is overworking, it may overexert itself and attempt to access a memory resource that has not been allocated properly or use it improperly.

The AGP is meant for rendering complex graphic tasks so when accessed improperly especially to unallocated memory, it can trigger a BSoD error, system instability and even a PC crash.

How do I fix the AGP_INVALID_ACCESS 0X104 error?

1. Perform DISM and SFC scans

  1. Hit the Start Menu icon, type cmd in the search bar, and click Run as administrator.cmd-run-admin-w11 unexpected kernel mode trap windows 11
  2. Type the following commands and press Enter after each one:DISM.exe /Online /Cleanup-Image /Restorehealth sfc /scannow

2. Address graphics card issues

2.1 Update video card driver

  1. Press the Windows key + X and select Device Manager.
    device manager
  2. Double-click the Display adapters option to expand it and right-click the device there.
  3. Now, select Update driver.
    update driver
  4. Finally, click Search automatically for drivers and install any available updates.
    search auto

2.2 Disable graphics card

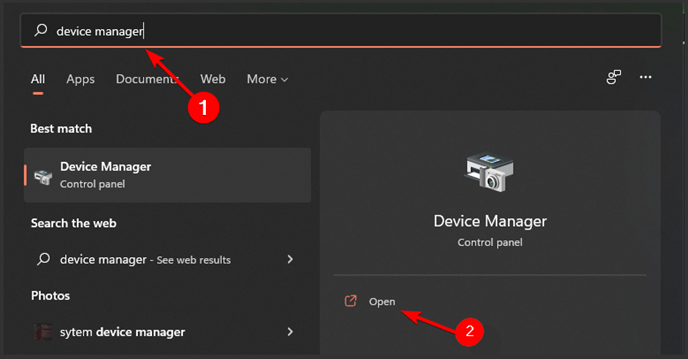
  1. Click the Search icon, type Device Manager in the search bar, and click Open.device manager w11
  2. Navigate to Display adapters to expand, right-click on your graphics card and select Disable.
  3. Restart your PC then repeat steps 1 to 2 only this time, select Enable device.Enable graphics driver

2.3 Reinstall the device driver 

  1. Hit the Windows key, type Device Manager in the search bar, and click Open.device manager w11
  2. Navigate to Display adapters to expand, right-click on your graphics card and select Uninstall device.Uninstall graphics driver -the ue4 game has crashed fatal error
  3. Click on Uninstall in the next pop-up box.
  4. Restart your device, and your drivers will automatically be installed.

2.4 Roll back the driver

  1. Press the Windows + X keys and choose Device Manager from the list.
  2. Select the driver that you want to roll back and double-click on it.
  3. In the new window, navigate to the Driver tab and click on Roll back driver.
  4. Now follow the on-screen instructions to complete the process.

2.5 Use a dedicated GPU 

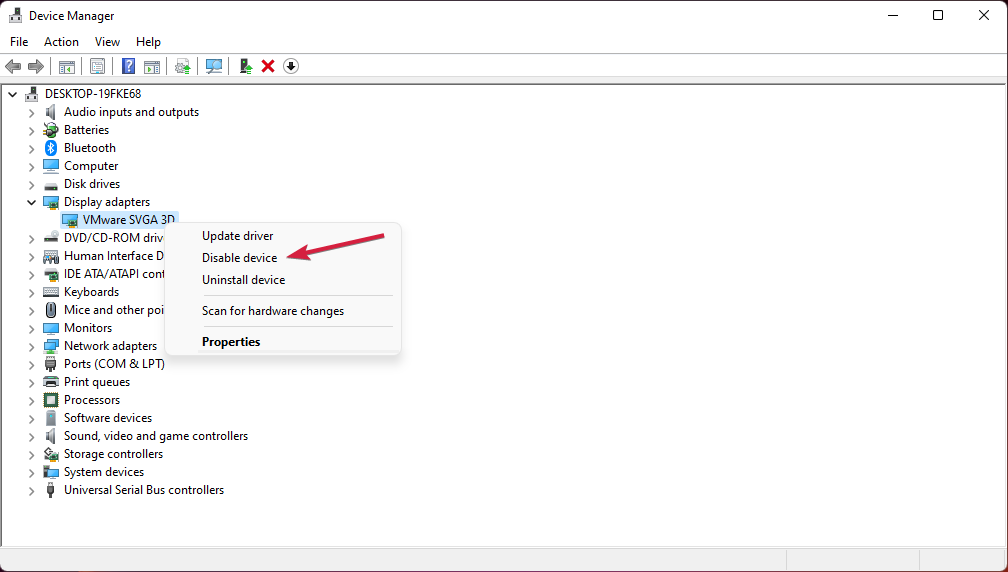
  1. Click on the Start Menu icon, type Device Manager in the search bar, and click Open.black-screen-installing-graphics-card-driver
  2. Navigate to Display adapters to expand, right-click on your graphics card, and select Disable device.
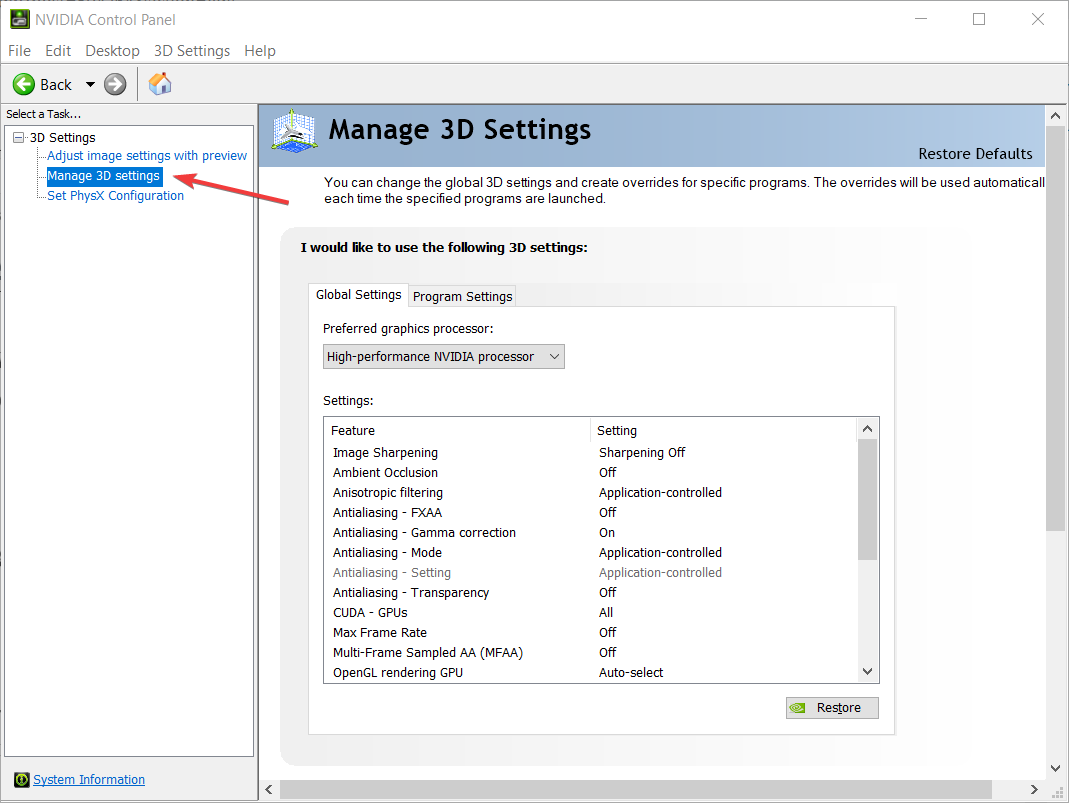
  3. Next, launch your dedicated graphics card control panel (In this case, Nvidia Control Panel).
  4. Select Manage 3D settings from the navigation pane on the left.manage 3d settings
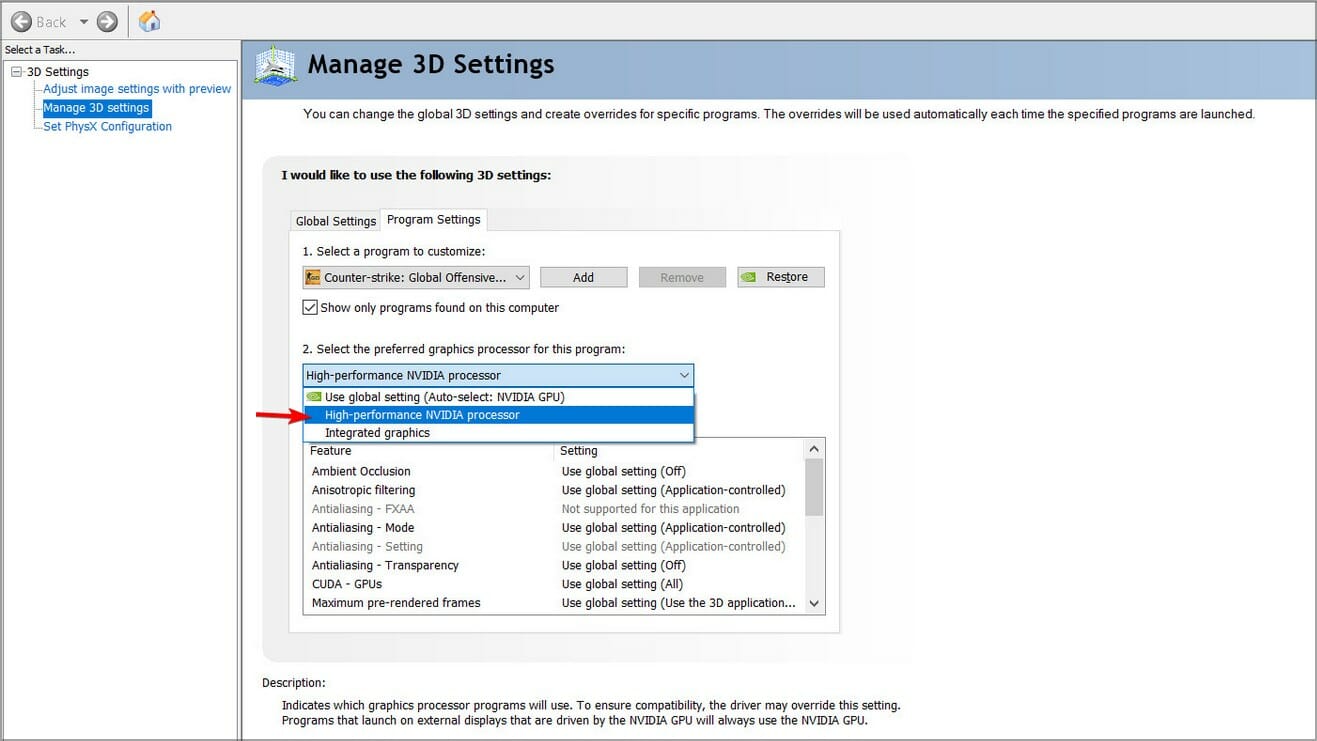
  5. Choose a High-performance NVIDIA processor from the Preferred graphics processor dropdown menu.

A dedicated GPU has better performance metrics than the integrated one. If available switch to your discrete GPU and check whether the memory issues caused by the AGP_INVALID_ACCESS 0X104 error disappear.

3. Run the Windows memory diagnostic tool 

  1. Press the Windows key, type Windows Memory Diagnostic, and click Open. 
  2. Click Restart now and check for problems.memory-diag-tool 3 easyanticheat.sys
  3. The computer will restart and the tool will run the memory test. memory-diag-tool
  4. You can change the test options by pressing F1.
  5. Once the scan is complete, you can check for errors under Event Viewer. 

4. Update BIOS

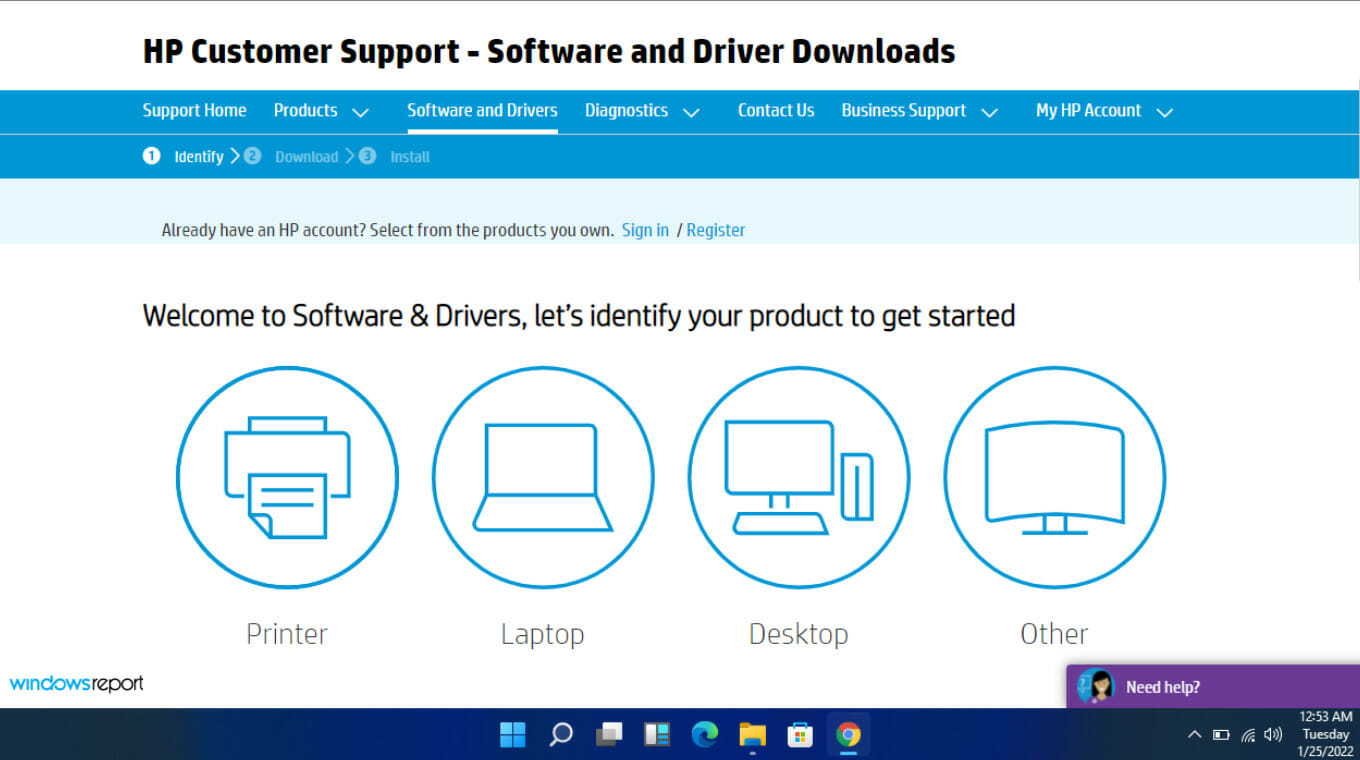
  1. The process of updating BIOS will differ depending on your motherboard. For this step, we shall be updating the HP motherboard.
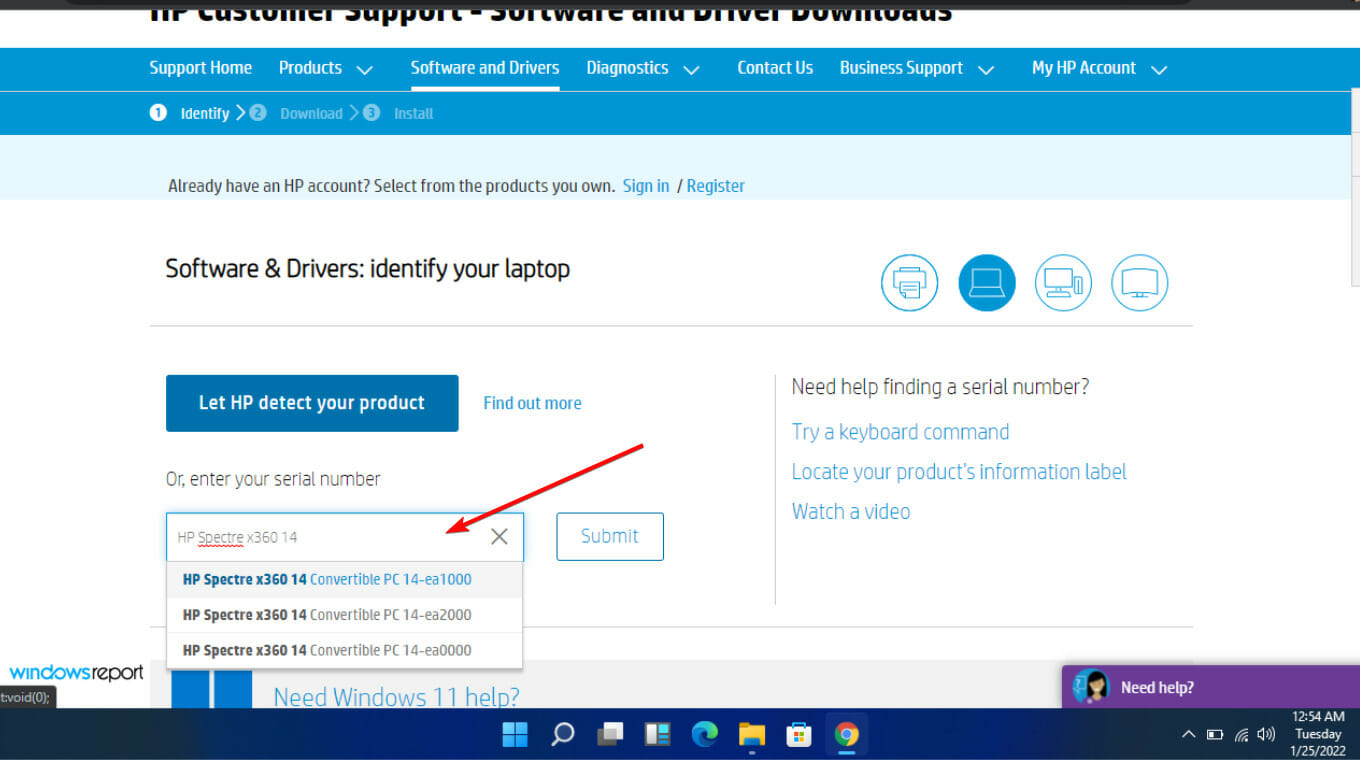
  2. Navigate to the HP driver and software download website.
  3. Choose laptop or desktop, depending on the type of computer you’re using.
  4. Enter your exact serial number or your exact computer model.
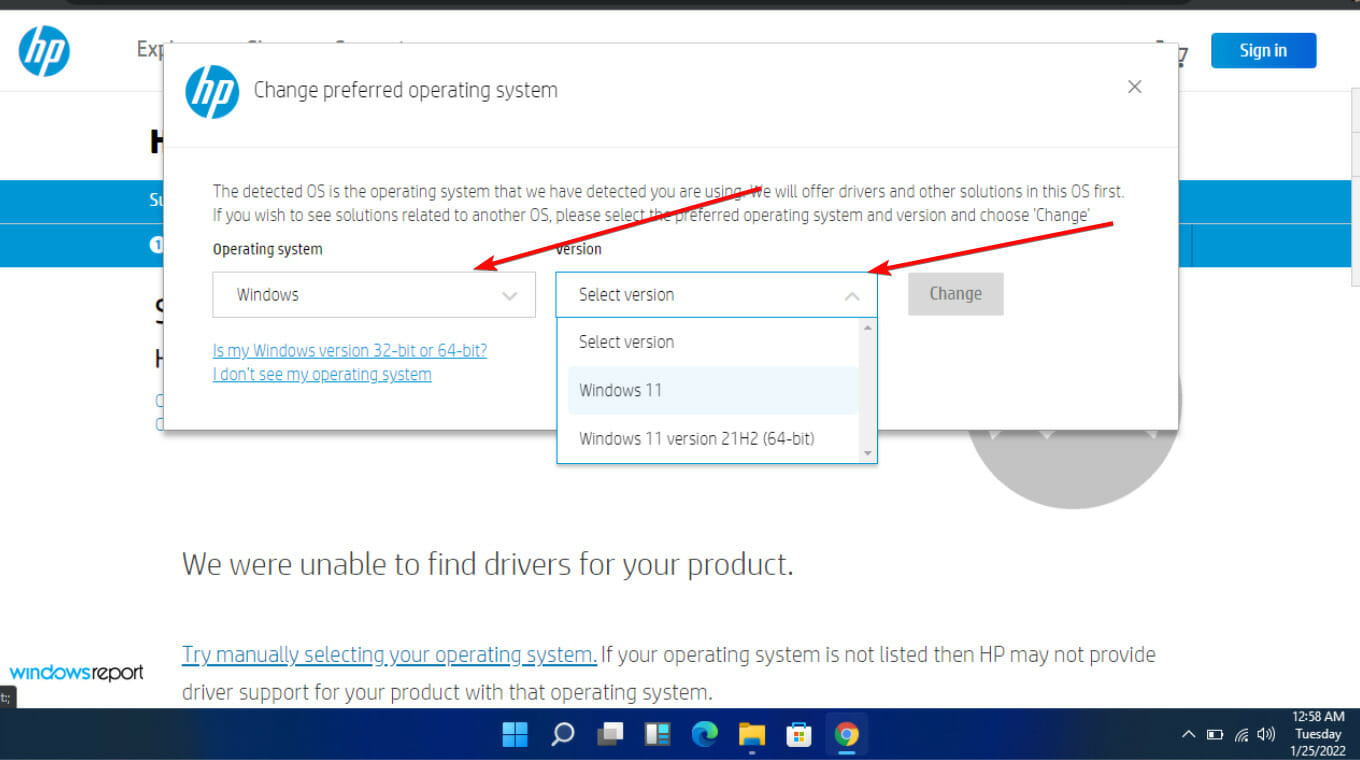
  5. Select your OS and OS version, then click Submit.
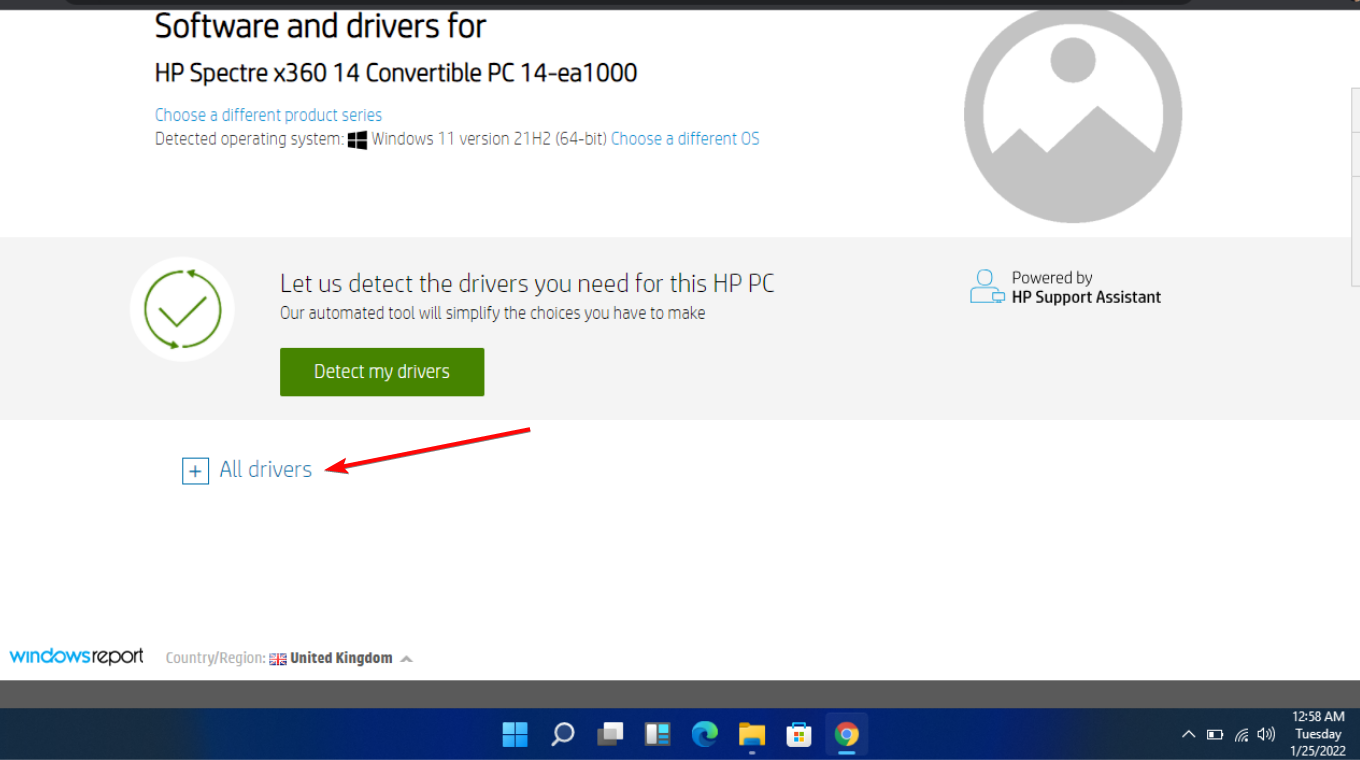
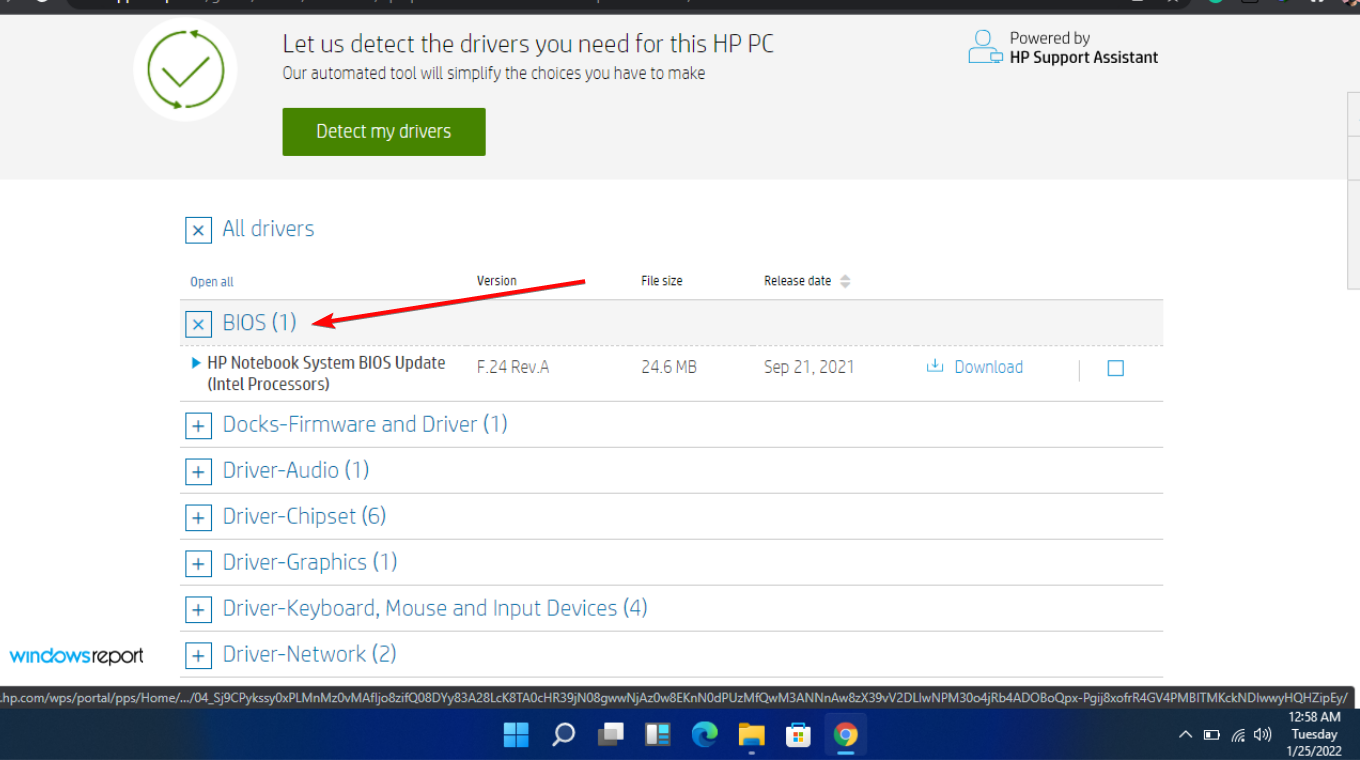
  6. Click on All drivers and then expand BIOS to see available updates.
  7. Click the download icon.
  8. Install the .exe file, following the on-screen instructions.
  9. Restart your PC.

Updating your BIOS often fixes issues with access like the AGP_INVALID_ACCESS and the INVALID_REGION_OR_SEGMENT.

5. Perform System Restore

  1. Press the Windows key, type Control Panel, and click Open.control-panel-search fallout new vegas runtime error
  2. Select View by as Large icons and click Recovery.Recovery Control Panel
  3. Click Open System Restore.Open system restore
  4. On the System Restore window, select Choose a different restore point and click Next.easyanticheat.sys Next Choose a different restore point
  5. Now select the restore point and click Next. Choose a point
  6. Click Finish.Finish Restore point

Other solutions worth mentioning include disabling overclocking. However, if it is absolutely necessary to overclock your system, install overclocking stress test software to help notify you when you’ve gone overboard.

Finally, remember to keep your drivers updated and your processes at a minimum especially when running resource-intensive tasks.

Aside from the AGP_INVALIDACCESS 0X104 error, you may also run into other like errors like the DRIVER VIOLATION error or PCI_VERIFIER_DETECTED_VIOLATION. If so, feel free to check our comprehensive guides for quick fixes.

And should you ever run into other BSoDs, consider a BSoD fixer to do the heavy lifting for you and skip all the multiple steps. If you’re a more tech-savvy user, check the BSOD crash logs and identify the problematic components triggering the error and take the necessary steps to fix them.

In our latest article we wrote about ERROR_ACCESS_AUDIT_BY_POLICY, so don’t miss it for more information.

That brings us to the end of this article but do let us know if you have successful in resolving this error in the comment section below.

Windows Server 2026 Preview Build 26304 brings new installation experiences for this OS

Microsoft has announced the latest Windows Server 2025 Preview Build 26304. This is a new build of the upcoming Windows Server Long-Term Servicing Channel (LTSC) Preview, which brings both the Desktop Experience and Server Core installation options for Windows Server 2025 Datacenter and Standard editions, along with the Windows Server 2025 Annual Channel preview for Container Host and Azure Edition.

The new 26304 build includes updated branding for Windows Server 2025. Windows Server Insiders signed up for Server Flighting should receive this build automatically.

Windows Defender Application Control for Business (WDAC) is a new feature that adds a software-based security layer to reduce the attack surface by enforcing an explicit list of software allowed to run. For Windows Server 2025, Microsoft has provided a ‘default policy’ that can be applied to the server via PowerShell cmdlets.

Also new is the Windows Server 2025 Security Baseline Preview, which provides over 350 preconfigured Windows security settings to apply and enforce granular security settings that support best practices recommended by Microsoft and industry standards. This continues the security improvements the Redmond-based tech giant started, a version earlier when it made VMs the safest they’ve ever been.

The security baseline content is organized into three categories based on server role: Domain Controller (DC), Member Server, and Workgroup Member. It’s important to note that you should only preview the security baseline on test systems, as not all configurations can be reversed.

In addition, the new Feedback Hub app is now available for Windows Server Desktop users. The app should automatically update with the latest version, but if it does not, simply check for updates in the app’s settings tab.

As always, this build has a number of known issues, and the full list is available on the Windows Server Insider Preview blog post.

If you have yet to do so, you can download the new build now from the Windows Server Insider Preview page.

How to Fix the VPShellRes.dll Could Not be Found Error

The VLShellRes.dll could not be found error occurs after uninstalling an antivirus such as McAfee or Symantec Endpoint Protection. The pop-up window with the error appears when you try to right-click any file and that’s because the antivirus is trying to scan it. Here’s how to get rid of it for good.

How do I fix the VLShellRes.dll could not be found error?

1. Remove the leftover keys from the Registry

  1. Press Win + R to start the Run console, type regedit and press Enter.
  2. Click on File > Export and save a copy of your Registry in case something goes wrong.
  3. Now, go to the following locations and delete the values from the keys:
    • HKEY_LOCAL_MACHINE\SOFTWARE\Classes\*\shellex\ContextMenuHandlers\LDVPMenu
      HKEY_LOCAL_MACHINE\SOFTWARE\Classes\Drive\shellex\ContextMenuHandlers\LDVPMenu
      HKEY_LOCAL_MACHINE\SOFTWARE\Classes\Folder\shellex\ContextMenuHandlers\LDVPMenu
      HKEY_LOCAL_MACHINE\SOFTWARE\Classes\LDVPCTLS.LDVPActionsCtrl.1
      HKEY_LOCAL_MACHINE\SOFTWARE\Classes\LDVPCTLS.LDVPEditCtrl.1
      HKEY_LOCAL_MACHINE\SOFTWARE\Classes\LDVPCTLS.LDVPExtensionsCtrl.1
      HKEY_LOCAL_MACHINE\SOFTWARE\Classes\LDVPCTLS.LDVPResultsCtrl.1
      HKEY_LOCAL_MACHINE\SOFTWARE\Classes\LDVPCTLS.LDVPVirusDetailsCtrl.1
      HKEY_LOCAL_MACHINE\SOFTWARE\Classes\LDVPDLGS.LDVPAboutDlgCtrl.1
      HKEY_LOCAL_MACHINE\SOFTWARE\Classes\LDVPDLGS.LDVPCompressedCtrl.1
      HKEY_LOCAL_MACHINE\SOFTWARE\Classes\LDVPDLGS.LDVPEmailNotifySettingsCtrl.1
      HKEY_LOCAL_MACHINE\SOFTWARE\Classes\LDVPDLGS.LDVPMessageConfigCtrl.1
      HKEY_LOCAL_MACHINE\SOFTWARE\Classes\LDVPDLGS.LDVPSchedule2Ctrl.1
      HKEY_LOCAL_MACHINE\SOFTWARE\Classes\LDVPDLGS.LDVPScheduleCtrl.1
      HKEY_LOCAL_MACHINE\SOFTWARE\Classes\LDVPDLGS.LDVPStorageViewCtrl.1
      HKEY_LOCAL_MACHINE\SOFTWARE\Classes\LDVPDLGS.LDVPThreatExclusionsDlgCtl.1
      HKEY_LOCAL_MACHINE\SOFTWARE\Classes\LDVPUI.LDVPUICtrl.1
      HKEY_LOCAL_MACHINE\SOFTWARE\Microsoft\Windows\CurrentVersion\Controls Folder\Display\shellex\PropertySheetHandlers\LDVP Shell Extensions
  4. Now, go to HKEY_LOCAL_MACHINE\SOFTWARE\Microsoft\Windows\CurrentVersion\Shell Extensions\Approved and delete the {8BEEE74D-455E-4616-A97A-F6E86C317F32} value from the right.
  5. Restart your PC after the changes.

Yes, there are a lot of values to delete and it’s a tedious job. That’s why we recommend checking our list of the best Registry cleaners and using one of these automated tools. They will help you clean your Registry of any unused keys and values with just a couple of clicks.

2. Reregister the VLShellRes.dll file

  1. Click the Start button, type cmd and select Run as administrator from the results.
  2. Run the following command and replace the path and version with the one you have on your PC: Regsvr32.exe <SEP client install path\version>\Bin64\vpshell2.dll
  3. Here’s an example of a complete command for 14.3 RU4: regsvr32.exe "C:\Program Files (x86)\Symantec\Symantec Endpoint Protection\14.3.7393.4000.105\Bin64\vpshell2.dll"

Although it’s less likely, the VLShellRes.dll could not be found error can also occur due to the DLL file not being registered. The solution above helps you reregister vpshell2.dll, that is used by VLShellRes.dll, thus avoiding this error.

If you’re running an old machine on Windows 10 and you’ve experienced the VLShellRes.dll could not be found error, the file might also be a remnant of Norton Internet Security. In this case, you should run the Norton Remove and Reinstall tool for Windows which you can find on the official Norton website. The tool will help you uninstall the antivirus completely and get rid of the leftovers that are causing this issue.

You may also be interested in reading our guide on how to remove software leftovers from Windows.

We hope that our solutions helped you fix the VLShellRes.dll could not be found error and now you can use your PC without any disturbance from this pop-up.

KB5044373 to the Windows 11 Beta Channel enhances File Explorer with Windows 10’s context menu

Microsoft has released Windows 11 Insider Preview Build 22635.4367, KB5044373, to the Beta Channel. This version includes various features and changes to improve users’ overall experience and a number of fixes.

The most recent beta update for Windows 11 improves the ability to share files to apps that support sharing in Windows. Users can now share files directly through the context menu in File Explorer or on their desktop.

If you can’t see it yet, you can enable it with a special command using the third-party ViveTool app, as spotted by Windows enthusiast, @phantomofearth.

vivetool /enable /id: 45286384, 52800817

KB5044373 addresses several issues, including one that caused live captions to crash on launch for some Insiders in the last two builds. Another fix resolves an issue where if you had multiple windows open for an app on your taskbar, pressing WIN + multiple times didn’t cycle between the windows.

The update also resolves an issue for uncombined taskbar users where app icons unexpectedly show instead of the window’s icon next to the window name.

You can read KB5044373’s full changelog here.

How to Fix ERROR_SEEK_ON_DEVICE on LoadLibrary

Coder are dealing with the ERROR_SEEK_ON_DEVICE message that comes with the 132 (0x84) The file pointer cannot be set on the specified device or file description when addressing the LoadLibrary() function.

This error occurs when the program or the system can’t access a DLL library in the resources folder.

How do I fix the ERROR_SEEK_ON_DEVICE issue?

1. Check the hDll == NULL condition

Make sure to include the hDll == NULL condition to avoid this error. Here’s an example of code that includes it:

CString sDll = _T("c:\\my projects\\test\\debug\\test.dll");
HMODULE hDll = ::LoadLibrary(sDll);
if(hDll == NULL)
{
// failed to LoadLibrary!
DWORD dwErr = GetLastError();
.....
}
else
{
// work with the Dll
..........
}

2. Include the needed DLLs in your project folder

You must include all the DLLs that are used on your project in the same folder with your exe file. That ensures that the DLLs are found and your program will not have any issues with the LoadLibrary function.

Not surprisingly, if you include the DLLs in the Windows directory, the ERROR_SEEK_ON_DEVICE will not show up because the system will find them while addressing the OS.

However, in our research, we also found that including LOAD_WITH_ALTERED_SEARCH_PATH as the last parameter for LoadLibraryEx() fixes this problem and you will not get ERROR_SEEK_ON_DEVICE if all the other prerequisites are met.

We hope that our solutions helped you fix the ERROR_SEEK_ON_DEVICE 132 (0x84) error code and now your compiling shows no issues. Let us know in the comments below if you have any other possible solutions for this problem.

Olecnv32.dll is Missing or Possibly Corrupt [Solved]

The olecnv32.dll file is a part of Microsoft OLE (Object Linking and Embedding) for Windows and is usually found on Windows XP and Windows Server 2003. The DLL is used to run older programs using OLE. Newer iterations of the OS don’t necessarily require the functionality.

But you may still get the olecnv32.dll missing or corrupt error message. Also, it sometimes leads to a crash with the message reading, olecnv32.dll, which is possibly corrupt. The header checksum does not match the computed checksum. In either case, you will have to download a fresh copy of the DLL!

Now, there’s another problem. The olecnv32.dll is tied to a critical remote code execution vulnerability, CVE-2017-8487, that allows threat actors to execute malicious code on the computer. This, however, has been patched by Microsoft. So, updating Windows will secure your PC.

What can I do if olecnv32.dll is missing or corrupt?

Tip icon Tip
While several websites claim to host olecnv32.dll for download, you should avoid that due to security reasons. DLLs downloaded from third-party websites often infect the PC with malware.

1. Use a dedicated DLL repair tool

When the olecnv32.dll file is missing, your primary approach should be to use a top-rated DLL repair tool!

These scan the PC, identify any missing or corrupt DLLs, fetch a fresh copy from their database, and then automatically add it to the relevant directory, thus eliminating the error message.

2. Manually copy olecnv32.dll

If you have another PC running the same Windows architecture and iteration, you can also get a copy of the DLL from it. The olecnv32.dll file is usually stored in either of these locations: C:\Windows\System32 C:\Windows\System32\dllcache

olecnv32.dll
System32 folder

So, on another PC, head to these locations > transfer a copy of olecnv32.dll to a flash drive > then move the DLL to the same path on the affected computer.

You should also move it to the dedicated directory for the program that is throwing the error. If a copy of the DLL is already stored, rename it and then transfer the new file.

3. Run the DISM and SFC scans

  1. Press Windows + S to open Search, type Command Prompt, and click on Run as administrator.command prompt
  2. Click Yes in the UAC prompt.
  3. Paste the following commands individually and hit Enter after each: DISM /Online /Cleanup-Image /CheckHealth DISM /Online /Cleanup-Image /ScanHealth DISM /Online /Cleanup-Image /RestoreHealth
  4. Now, run this command and hit Enter: sfc /scannowsfc scannow to fix olecnv32.dll
  5. Finally, restart the PC to fully apply the changes.

Since olecnv32.dll is a protected system file, running the DISM (Deployment Image Servicing and Management) and SFC (System File Checker) scans should fix any corruptions with the file!

4. Check the RAM and hard disk for issues

4.1 Check the RAM

  1. Press Windows + R to open Run, type mdsched.exe in the text field, and hit Enter.
  2. Click on Restart now and check for problems.memory diagnostic
  3. Once the scan is done running, check the mdsched logs and look for any issues with the RAM.

In case the built-in utility is unable to identify problems, use an advanced open-source RAM testing tool like Memtest86+ to check for problems with the individual modules. The scan takes 4-8 hours, so it’s best to let it run overnight!

Also, for a few users, simply reseating the RAM in their respective slots also helped fix the olecnv.dll is possibly corrupt error. So, you should try that as well.

4.2 Check the disk

  1. Press Windows + R to open Run, type cmd, and hit Ctrl + Shift + Enter.
  2. Click Yes in the UAC prompt.
  3. Paste the following Check Disk command and hit Enter: chkdsk /r
  4. When asked to schedule the scan for the next reboot, press Y, hit Enter, and then restart the PC.chkdsk /r
  5. After the PC restarts, verify whether the problem is resolved.

5. Reinstall the affected program

  1. Press Windows + R to open Run, type appwiz.cpl in the text field, and hit Enter.
  2. Select the program throwing the missing olecnv32.dll error message, and click on Uninstall.uninstall to fix olecnv32.dll
  3. Follow the on-screen instructions to complete the process and then restart the PC.
  4. Finally, reinstall the program from a reliable source, i.e., either the official website or Microsoft Store.

If a quick removal doesn’t work, use an effective software uninstaller for Windows to delete all leftover files, app cache, and Registry entries. Because these can often trigger conflicts even after uninstalling the app.

In case everything else fails, as a last resort, you can always reinstall Windows to get things up and running. When doing so, also make sure to get the latest Microsoft Visual C++ Redistributable.

Before you leave, learn how to fix missing DLL errors and prevent such issues from reappearing!

For any queries or to share which fix worked for you, drop a comment below.

With KB5044374 in the Windows 11 Insider Dev Channel, Snipping Tool can copy information from tables in screenshots

Microsoft released the Insider Preview Build 26120.2122, KB5044374, to the Windows 11 Dev Channel. This build has brought many changes and dozens of fixes to the operating system, including one that allows Snipping Tool to extract information from tables in screenshots.

The updated Snipping Tool (version 11.2409.22.0 and newer) is now out to Insiders in the Canary and Dev Channels. It introduces a new “Copy as table” feature that allows users to copy structured table data from screenshots into an email, document, or spreadsheet.

To use the feature, capture a screenshot with table data, select “Text actions,” and then select “Copy as a table.” However, the feature works best with screenshots containing one table. This comes a few weeks after Microsoft finally allowed users to save their Snipping Tool screenshots wherever they pleased.

KB5044374 also refreshes previews when users mouse over or hover over apps on the taskbar. Based on feedback from insider testers, the animations associated with these previews have been made smoother.

Within the Task Manager, the design of the Disconnect and Logoff dialogs now supports dark mode and text scaling. In the Performance section, the listed disks are now labeled with their type.

Some of the fixes that are being released gradually to the Dev Channel with the feature rollout toggle enabled include:

  • A fix for an issue that could cause the screen to go black for a few seconds for some users when using ALT + Tab.
  • This update fixes the Windows Insider Program issue where some Insiders encountered error 0x800f0825 when trying to install the latest Dev Channel builds.
  • A fix for an issue causing the Remote Desktop Gateway Service to stop responding. As a result, clients using the service would disconnect.

KB5044374 includes a fix for an issue that could cause the Start menu’s All Apps list to break when users click or tap on a letter. Users encountering this issue should try rebooting or restarting explorer.exe to resolve it.

Another fix addresses a new issue introduced in a recent build, causing live captions to crash when users attempt to use them.

As usual, the new build comes with a list of known issues. They include an issue where the All apps list may break if users click or tap on a letter and another issue causing live captions to crash.

Microsoft says it’s investigating an issue with the gestures for switching between Virtual Desktops.

You can read KB5044374’s full changelog here.

Msvcp120d.dll is Missing: 5 Ways to Get it Back

Many software developers reported that msvcp120d.dll is missing on their PC, and this error will prevent them from compiling their code, so let’s see if there’s a way to fix this error.

What can I do if msvcp120d.dll is missing?

1. Make sure you’re using the correct DLL folder

  1. If msvcp120d.dll is missing, you need to use Visual Studio 2013 to compile.
  2. Users that use OpenCV need to use the right DLL directory, for example, if you use Visual Studio 2013, you need to use vc12. Users that use Visual Studio 2012, need to use the vc11 folder.
  3. After changing the DLL folder to the correct version, check if the problem is gone.

2. Build your project in Release mode

  1. Locate the build configuration in the toolbar.
  2. Change it from Debug to Release.
  3. Build the project again.

3. Use Multi-threaded debug

  1. Go to your Project’s Debug configuration.
  2. Select C/C++ and then go to Code Generation.
  3. Set Runtime Library to Multi-threaded Debug (/MTd).
    multi-threaded debug enable
  4. Save changes and check if the problem is gone.

4. Reinstall Visual Studio

  1. Press Windows key + S and search for Visual Studio Installer. Select the application. You can also find it at the following location: C:\Program Files (x86)\Microsoft Visual Studio\Installer\setup.exe
    vs installer
  2. Next, click on More and choose Repair.
    vs installer repair
  3. Follow the instructions on the screen to complete the process.
  4. Be sure to select to choose to install all available features during the repair process.

If this doesn’t work, you can try uninstalling and installing Visual Studio again.

5. Manually download the missing files

  1. Search for the msvcp120d.dll online.
  2. Once you download the file, move it to the Debug folder of your project.
  3. Check if the problem is resolved.

Downloading DLLs from third-party sources isn’t advised since the files can be modified or unsafe, so use extra caution if you choose to do this.

As you can see, a missing msvcp120d.dll is usually caused if you’re compiling the application in Debug mode without having Visual Studio 2013 installed.

This isn’t the only error you can encounter, and many users reported that msvcr120.dll wasn’t found, as well as msvcp140.dll missing error, so don’t miss our guides that cover these subjects.

How to Install Cygwin1.dll if it’s Missing or Not Found

Cygwin1.dll is a library of GNU and Open Source tools that provide Linux distribution functionality for Windows. However, some users encounter the error The program can’t start because cygwin1.dll is missing from your computer. Try reinstalling the program to fix this problem.

It’s mostly needed for programming purposes and we’re going to show you how to get it safely for your project.

How do I get cygwin1.dll?

1. Include cygwin1.dll to your system path

You, most likely have already installed cygwin1.dll and by default, you can find it in the C:\cygwin\bin or C:\cygwin64\bin folder. However, Windows needs it too and it can’t find it because you didn’t included it into the system path of your project.

The easiest way to fix this problem is to copy the cygwin1.dll file wo the Windows directory or in the root folder of your project, together with the executable.

2. Get cygwin1.dll from the source

  1. Open the browser of your choice and go to the official Cygwin website.
  2. Click on the setup-x86_64.exe file to download and install Cygwin.

However, as we mentioned in the first solution, you still have to copy the cygwin1.dll from C:\cygwin64\bin to your path or the Windows folder to make it available by the system.

Be aware that cygwin1.dll can be found on several other third-party websites. However, we provided the direct link to the official source and we recommend using it to avoid any security issues.

Hopefully, by following our solutions, you were able to get cygwin1.dll and now your program can access it properly.

Let us know in the comments below if you’ve managed to make cygwin1.dll work by applying the solutions above.

How to Fix The Invagent.DLL Missing Issue on Windows 11

Many users have reported encountering the Invagent.DLL missing error message while using an app or performing an action on Windows 11. This DLL file is a part of Windows system files; the issue could occur when the Invagent.DLL file is corrupted, or any other system file dependent is missing or deleted accidentally.

To begin with, you can reboot your computer, run a malware scan, and ensure there are no pending updates on your Windows.

How can I fix the Invagent.DLL missing error?

1. Use a third-party DLL fixer

DLL files are essential for a computer’s functioning; therefore, you need to be very careful while restoring them. To avoid any issues, it is advised to use a third-party DLL fixer tool.

These tools can recover or restore all Windows DLL files, like Invagent.DLL, without hassle. Thus, they resolve conflicts between third-party apps and the operating system and enhance PC performance.

2. Reregister the DLL file

  1. Press the Windows key, type cmd in the search bar, and click Run as administrator.CMD elevated invagent.dll
  2. Copy & paste the following command to register the Invagent.DLL and hit Enter: regsvr32 Invagent.DLL
  3. Click OK when prompted and restart your computer.

3. Repair/Reinstall the affected app

  1. Press Windows + I to open the Settings app.
  2. Go to Apps, then click Installed apps.  
  3. Locate the app, click the three dots icon, and select Advanced options.
  4. Click Repair and follow the on-screen instructions to complete the process.

If the repair process doesn’t work, try reinstalling the app. For that, follow these steps:

  1. Press Windows + I to open the Settings app.
  2. Go to Apps, then click Installed apps.
  3. Locate the affected app, click the three dots icon, and select Uninstall.Uninstall 
  4. Click Uninstall and follow the on-screen instructions to complete.invagent.dllv uninstall confirmation app
  5. Open the Microsoft Store or the app’s official website, and click Download or Get to initiate the installation.
  6. Once done, reboot your PC.

4. Run SFC & DISM scans

  1. Press the Windows key, type cmd in the search box, and click Run as administrator.CMD elevated invagent.dll 
  2. Copy & paste the following command to repair the system files and press Enter:sfc/scannowSFCSCANNOW CMD
  3. Wait for the scan to complete, type the following command to restore Windows OS image files, and hit Enter:Dism /Online /Cleanup-Image /RestoreHealth
  4. Once the scan is completed, your computer will automatically connect to the Windows Update service to download and replace the corrupt files.
  5. Restart your computer to let the changes take effect.

Read more about this topic

5. Perform a System Restore

  1. Press Windows + R to open the Run window.    
  2. Type sysdm.cpl and click OK to open the System Properties window.
  3. Go to the System Protection tab and click the System Restore button.
  4. On the System Restore window, select Choose a different restore point, then click Next.
  5. You will get the list of available restore points on your PC. Select the restore point created before encountering the DLL missing error and click Next.
  6. Click Finish to initiate the restoration process.

Windows will restart and restore to the chosen version. If you see the System Restore didn’t complete successfully error, we advise you to check out this informative guide for solutions.

6. Download the file manually & replace it

Note icon NOTE
If you use an unreliable website to install a DLL file, it can be dangerous for your computer. Therefore, it is recommended that you use sites like DLLME, which has been verified by the WR experts.
  1. Click the DLLME website to get to the invagent.dll page, then click Download.
  2. Double-click the downloaded folder to open, locate, and copy the .dll file.
  3. Navigate to this path and paste the DLL file. Don’t forget to replace C with your system drive letter if it is not C for you: C:\Windows\System32
  4. Restart your computer to save the changes.

This is how you can fix the invagent.dll missing error. However, if you are facing the same issue due to any other DLL file, this guide can help you recover the DLL file with ease.

If you want to learn more about the causes of missing DLL files on Windows, we have a separate guide for you. You can also fix a similar issue with the Ws2_32.dll is Missing guide.

Before you go, don’t forget to check out our latest guide on what to do if Msvcp120d.dll is Missing from your computer.

Did we miss a step that helped you fix this missing DLL error? If so, share the method in the comments section below, and we will add it to the list.

4 Ways to Fix The Guitar Error on Destiny 2

If you have encountered the Guitar error while launching or playing Destiny 2, it could occur when too many items aren’t picked up off the ground in an activity, such as Gambit.

To quickly fix the issue, ensure that items including Orbs of Power, Ammo (Primary, Special, Heavy), Glimmer, Destination Materials, and Engrams (Rare, Legendary, Powerful, etc.) are picked up off of the ground in those activities. If this doesn’t help, restart your device, then check your internet connection and follow the methods mentioned below.

How can I fix the Guitar Error on Destiny 2?

1.  Check the server status

  1. Launch your preferred browser and visit Bungie Help.Help - destiny 2 guitar error
  2. Look for announcements or news related to server maintenance or outages.
  3. You can also check the official X account of Bungie Help to get updates.

2. Clear the cache

Console

  1. Power down the console and wait until it is completely powered down.
  2. Remove the power cord from the back of the console and wait for 5 minutes before plugging it back.
  3. Once you plug it in, power on the console and relaunch the Destiny 2 game.

Steam

  1. Press the Windows key, type steam in the search bar, and click Open.Steam Open destiny 2 guitar error
  2. Click Steam from the Steam Client app and select Settings from the drop-down menu. Settings destiny 2 guitar error
  3. Go to the Downloads tab on the Settings panel and look for Clear Download cache.
  4. Click the Clear Cache button.Clear cache

Epic Games launcher

  1. On Epic Games Launcher, locate and click the arrow pointing up from the bottom right corner.
  2. Right-click the Epic Game Launcher icon from the pop-up window and select Exit.
  3. Press Windows + R to open the Run window.localappdata
  4. Type %localappdata% and click OK to open the Local App Data.
  5. The File Explorer window will open, look for the EpicGamesLauncher folder.
  6. Locate and double-click the Saved folder.
  7. Now, locate the following files and click the Delete icon to remove them:
    • webcache
      webcache_4147
      webcache_4430

    Deleting the app cache can also help you fix the stuck on the Initializing screen issue on the Destiny 2 game; read this guide to learn more solutions.

    3. Check the port forwarding settings

    PlayStation

    1. Go to the Settings menu on your console.
    2. Navigate to Network, then select View Connection Status.
    3. Locate the IP address in the connection status menu and note down the IP address.

    Xbox

    1. Press the Xbox button to open the Guide, then go to Settings.
    2. Go to Network, then choose Network settings.Network Settings destiny 2 guitar error
    3. Choose Advanced settings and make a note of the IP address.

    PC

    1. Press the Windows key, type cmd in the search box, and click Open.ipconfig 
    2. Type the following command and hit Enter: ipconfig
    3. Locate the Ethernet adapter option if you have a wired connection or Wireless LAN adapter for Wi-Fi, and note the IPv4 address.

    Now you need to open the router settings on your PC and follow these steps:

    1. Open your preferred browser and type your router’s IP address in the address bar; it usually is something like 192.168.1.1 or similar. Then, enter your router credentials, which are located at the back of your router.
    2. Locate these options from the main menu or sidebar: Port Forwarding, Applications, or Gaming.
    3. To create a rule for each port you want to forward, name it Destiny 2.
    4. For Protocol, select TCP, UDP, or Both (depending on the port).
    5. Enter the external port number TCP: 1935, 3074, 3097, then enter the same number in UDP or internet port.
    6. Enter the local IP address you noted on your console or PC.
    7. Click OK or Save to confirm the changes.
    8. Reboot your router to let the changes take effect.

    Changing router settings can also help you fix packet loss issues while playing Destiny 2; read this guide to learn more.

    4. Change the DNS settings

    PlayStation

    1. Go to the Settings menu on your console.
    2. Navigate to Network.network - destiny 2 guitar error
    3. Select Set Up Internet Connection.set up internet connection - destiny 2 guitar error  
    4. Select Wi-Fi or LAN as per your network and choose Custom.Custom - destiny 2 guitar error   
    5. Select Manual for Primary DNS: 8.8.8.8 and for Secondary DNS: 8.8.4.4.DNS settings - Manual
    6. Click Save or OK to confirm the changes.

    Xbox

    1. Navigate to Settings on the console.
    2. Go to Network, then Network Settings.
    3. Click Advanced settings, then select DNS settings.DNS settings
    4. Choose Manual, then enter the Primary DNS: 8.8.8.8 and for Secondary DNS: 8.8.4.4.
    5. Click OK to save the changes.

    PC

    1. Press Windows + R to open the Run window.   ncpa.cpl
    2. Type ncpa.cpl and click OK to open the network connections window.
    3. Right-click the active connection and choose Properties from the context menu.Internet Protocol Version 4(TCPIPv4) Properties
    4. Choose Internet Protocol Version 4 (TCP/IPv4) and click the Properties button.Network Connection properties destiny 2 guitar error
    5. Select Use the following DNS server addresses, type 8.8.8.8 for the Preferred DNS server, and 8.8.4.4 for the Alternate DNS server, and click OK.DNS server - destiny 2 guitar error
    6. Click OK.

    Changing the DNS server settings can also fix other issues like Error code Weasel, check out this guide to learn other fixes.

    In short, to fix the Guitar error on Destiny 2, ensure you have a reliable internet connection, then check the server status. Next, you can try to clear the cache on the device.

    Are you facing other Destiny 2 error codes, like network codes, server problems, account or platform issues, you can check out this guide to learn the solutions.

    If you have any suggestions or questions about the Guitar error on Destiny 2, feel free to mention them in the comments section below.

    How to Fix The Dexcom Clarity Network Error

    With the increase in the number of people with diabetes, it is essential to manage it and check your glucose level. Hence, there is reliance on tools like Dexcom Clarity. If you see a network error on your Dexcom Clarity on browser, Android, or iOS devices, it could be due to a slow internet connection, outdated app cache, or browser cache.

    To begin with, restart the Dexcom Clarity app or your device, ensure you have a reliable internet connection (try switching to a better network), and check if the Dexcom server is up. Also, update your device to the latest operating system version to avoid additional issues.

    How can I fix the Dexcom Clarity network error?

    1. Update the app

    Android

    1. Launch the Google Play Store from the home screen or app drawer.
    2. Tap the profile icon from the top right corner and select Manage apps & devices.
    3. Under the Overview tab, tap on Updates available, and look for Dexcom Clarity, then tap the Update button.
    4. If you want to update other apps, you can click Update all. Once the update is complete, you will see the Open button next to the app.

    If the Google Play Store doesn’t let you update the app on your device, we have a detailed guide to help you resolve the issue.

    iOS

    1. Click the App Store icon on your home screen.App store - dexcom clarity network error
    2. Tap the profile icon from the upper right corner and click Apps.Apps 
    3. Select My Apps.My apps
    4. Scroll through the list of apps, look for Dexcom Clarity, and click the Update button if it is available.Update app

    You can turn on the automatic updates option on your Android or iOS phone to ensure the app is always updated to the latest version.

    Did you know you can download and run iOS apps on your Windows computer; to learn more about it, check out this guide.

    2. Clear cache

    Android

    1. Locate and tap the Settings app on your device.
    2. Go to Apps, then tap Apps Management.
    3. Scroll through the list of apps, then locate and tap Dexcom Clarity.
    4. Click Storage.
    5. Look for Clear cache and tap it to delete the cache from your phone.
    6. Click OK to confirm.

    iOS

    1. Locate and tap the Settings app on your device.   Settings
    2. Tap General.general dexcom clarity network error
    3. Click iPhone Storage.iPhone storage - dexcom clarity network error
    4. From the list of apps, locate and tap Dexcom Clarity.
    5. Click the Offload App option to remove the app and keep its data.Offload app
    6. You can reinstall the app to clear the cache.

    PC

    1. Launch the preferred browser; here, we are using Google Chrome to demonstrate the steps.
    2. Click the three dots icon and select Settings.Settings CHrome dexcom clarity network error  
    3. Select Privacy and security, and click Delete browsing data.Delete browsing data dexcom clarity network error
    4. Select the Time range as All time from the drop-down, then place a checkmark next to Browsing history, Cookies and other site data, Cached images, and files.Delete data
    5. Click Delete data to remove the browser cache.

    3. Reinstall the app

    Android

    1. Locate and tap the Dexcom Clarity app on your mobile.
    2. Select the Uninstall option.
    3. Now launch Google Play Store from the home screen or app drawer, then search for Dexcom Clarity and click Install.
    4. Wait for installation to complete, then relaunch the app to check if the issue persists

    iOS

    1. Locate and tap the Dexcom Clarity app on your phone.
    2. Select Remove App from the drop-down.Remove app 
    3. Tap on the Delete app option to confirm.Delete app
    4. Launch the App Store, type Dexcom Clarity in the search bar, locate the correct app, and tap the Get button to download it.
    5. Once installed, tap Open to launch the app.

    4. Add Dexcom to trusted sites (PC)

    1. ress Windows + R to open the Run window.inetcpl.cpl - dexcom clarity network error
    2. Type inetcpl.cpl and click OK to open the Internet Options.
    3. Go to the Security tab, then select Trusted sites.
    4. Click the Sites button.Trusted sites - Sites
    5. Copy & paste the following websites one by one in the box and click Add after each of them, then click Close:Add
      https://*.dexcom.com
      https://*.sweetspotdiabetes.com
      https://agent.mydiabetesdata.com
    6. Click Apply, then OK to save the changes.

    5. Configure the Local Intranet settings

    1. Press Windows + R to open the Run window.inetcpl.cpl - dexcom clarity network error  
    2. Type inetcpl.cpl and click OK to open the Internet Options.
    3. Go to the Security tab, then select Local intranet.
    4. Click the Sites button.Local intranet - sites
    5. Remove the checkmark next to Include all sites that bypass the proxy server.Inclde all the sites that bypass the proxy server - dexcom clarity network error
    6. Click OK to close the window.
    7. Click Apply, then OK to confirm the changes.

    If nothing has worked for you, you can try contacting customer support and explaining the whole issue and the steps you took to fix the problem for further assistance.

    Did we miss a step that helped you fix the Dexcom Clarity network error? Please feel free to share with our readers in the comments section below.

    5 Ways to Fix Error Code 403 on Palia

    Many users have encountered Login Error Code: 403 – Oops, you’re not eligible for this playtest while setting up or logging into an account on Palia. It usually occurs when you try to play the game before it’s available, the servers are overloaded, or you don’t have an invitation to play.

    First, check the game’s Discord channel or the official server status to see if the server is down. Also, ensure the internet connection is stable, restart your browser, and reboot your PC.

    How can I fix the error code 403 in Palia?

    1. Restart the game

    1. Press Ctrl + Shift + Esc to open the Task Manager app.
    2. Go to the Processes tab, locate Palia, and select End task.end task palia error 403
    3. Relaunch Palia from your game launcher (Steam, Epic Games, etc.) and check if the error persists.

    2. Verify your account & login with the same email

    If you have logged into the game, log out of your account via the Settings many, then close the game, re-open it, and log back in with the correct credentials.

    If you log in with a different email address than the one you registered with, you cannot access it. Double-check the email address and enter the correct password to log in.

    Ensure you have not added extra letters, numbers, or special characters when entering your email address and password. If the password you entered is incorrect or you have forgotten, you can reset it by clicking the Forgot Password link and following the prompts.

    3. Restart your router

    1. Unplug your router from the power source and outlet.
    2. Wait for 15-30 seconds, then plug the wire back in, then let the lights stabilize to ensure the connection is working.

    4. Clear cache (for PC)

    1. Press Windows + R to open the Run window.local appdata palia error 403
    2. Type %localappdata% and click OK to open the AppData folder.
    3. Look for the folder named Palia and double-click to open it.
    4. Locate cache files, select them, and click the Delete icon.

    5. Verify the game files on Steam

    1. Press the Windows key, type steam in the search box, and click Open.Steam Open error code 403
    2. Go to Libary, then right-click Palia and choose Properties.
    3. Go to the Installed Files tab and click Verify Integrity of Game Files. Steam will try to restore the missing or corrupted files.Verify integrity  Steam Open palia error code 403 

    6. Check the Firewall settings

    1. Press the Windows key, type control panel in the search box, and click Open.Control Panel start menu Error Code 403 on Palia
    2. Select Category as View by and select System and Security.System & Security palia error 403
    3. Click Windows Defender Firewall.   Windows Defender
    4. Now click Allow an app or feature through Windows Defender Firewall.Allow an app
    5. Click the Change settings button, then click the Allow another app button.Change app palia error 403
    6. Click the Browse button and go to the Palia executable file’s location, then click Add. Browse palia error 403
    7. Place a checkmark next to both Private and Public, then click OK.

    If you cannot change the Firewall settings, it could be due to corrupted Windows files, malware, or firewalls managed by third-party software; read this guide to learn about solutions.

    7. Update or reinstall the app

    Steam

    1. Press the Windows key, type steam in the search box, and click Open.Steam Open error code 403
    2. Click the Library tab, locate Palia, and click the Update button next to the game.
    3. If this doesn’t help, right-click on Palia, choose Manage, and then select Uninstall.Uninstall
    4. Confirm to remove the game, then locate Palia in Steam library and Install button to download and reinstall the game.

    Epic Games launcher

    1. Press the Windows key, type Epic Games launcher in the search box, and click Open.
    2. Go to Libary, then locate Palia, and if an update is available, click the Update button.
    3. Click Update again to initiate the process.
    4. If this doesn’t work, go to the Library again, search for Palia, click the three-dot icon, and choose Uninstall.
    5. Once uninstalled, find Palia in your game library, and click the Install button to reinstall the game.

    8. Send in a support ticket

    If you are invited to the stress test or closed beta or are playing during the Open Beta period and can’t get access, go to Palia’s Discord channel or through the official Palia help center. Enter the issue, your email address, and other details on the Submit report page, then click Submit.

    In conclusion, to fix error code 403 in Palia, you can first ensure you have a reliable internet connection, then check Palia’s Discord channel for server status and verify the email address you are using.

    If you ever wonder why your games take up so much space on your computer, we have a separate guide to help you understand.

    Do you want to access games and servers outside your region and check out the exclusive content? Here is a quick guide to help you do that.

    Did we miss a step that helped you fix the error code 403 issue? Share the solutions with our readers in the comments section below.

    5 Ways to Fix the ERROR_INVALID_NAME

    The ERROR_INVALID_NAME typically occurs in Windows systems when an app or operation encounters a file or directory name that is not valid.

    First, determine when the error occurs, whether during file operations, application installation, or any other action. Then, closely check the error message, which can tell you about the file or directory causing the issue.

    How can I get rid of the ERROR_INVALID_NAME?

    1. Check file/directory name

    Windows doesn’t allow certain characters in file or directory names, including \ / : * ? ” < > | so make sure you don’t use any of these. Also, refrain from using reserved names like CON, PRN, AUX, NUL, COM1 to COM9, LPT1 to LPT9.

    If you can access the file/directory, right-click it, choose Rename, and remove invalid characters or reserved names. Also, ensure the total path length is less than 260 characters.

    2. Check the permissions

    1. Right-click the problematic drive or file and select Properties from the context menu.
    2. Go to the Security tab. You will see a list of groups and user names that have permission to access the drive or file. Look for your user account or the group you belong to and select it.
    3. Now, under Permissions for (User Account Name), you will see:
      • Full Control: Complete control over the file/folder.
      • Modify: Allows you to edit and delete the file/folder.
      • Read & Execute: View and execute file but can’t modify/delete it.
      • Read: Can only view the file/folder.
      • Write: Can add files & subfolders but not delete existing ones.
    4. If you need to change permissions, you can click the Edit button.Edit
    5. On the Permissions window, find your user account in the list, and check or uncheck the Permissions that you want to change. If you select Full Control to give complete control over the file, then click Apply, then OK to save the changes.ERROR_INVALID_NAME - app permissions
    6. Click OK to close the window.

    If you don’t see your user account in the list of groups and user names, you need to add it. For that, follow these steps:

    1. In the Permissions window, click the Add button.
    2. In the Enter the object names to select field, enter the user name and click Check Names to validate it.
    3. After adding your account, it will appear in the list; then you can set the desired permissions.
    4. Once done, click Apply and OK twice to save the changes.

    If you face any other issues related to file permissions such as files not inheriting permissions from parent folder; you can check out this detailed guide.

    3. Using the Command Prompt

    1. Press the Windows key, type cmd in the search box, and click Open.cmd - ERROR_INVALID_NAME
    2. Ensure you copy the file path you want to rename, as you need to navigate to the folder or file you want to rename.
    3. If you need to change the directory, type the name of the drive with a colon and hit Enter: E:
    4. Copy & paste the following command after replacing C:\Users\YourUsername\Documents with the file path you copied and press Enter: cd "C:\Users\YourUsername\Documents"
    5. Type the following command to list all files and folders in the drive, then hit Enter: dirDIR command
    6. From the list, note down the exact name of the file you want to rename, copy & paste the following command after replacing OldName.ext with the existing file name with extension and NewName.ext with the name you want to use and press Enter: ren "OldName.ext" "NewName.ext"

    4. Run the SFC scan

    1. Press the Windows key, type cmd in the search box, and click Run as administrator. CMD elevated ERROR_INVALID_NAME
    2. Type the following command to restore the missing system files and press Enter: sfc /scannowSFCSCANNOW CMD
    3. The scan will start looking for missing Windows system files and try to repair them.
    4. Once done, restart your computer to let the changes take effect.

    Running the SFC scan can also help you fix the ERROR_WAIT_NO_CHILDREN 128 (0x80); read this guide to learn more.

    5. Using the Safe mode

    1. Press Windows + R to open the Run window.  Safe boot ERROR_INVALID_NAME
    2. Type msconfig and click OK to open the System Configuration window.
    3. Go to the Boot tab, and under Boot options, select Safe boot, then place a checkmark next to Network.Safe boot - ERROR_INVALID_NAME
    4. Click Apply, then OK to save the changes.
    5. Click Restart.Restart  ERROR_INVALID_NAME

    Your computer will restart in safe mode with networking, allowing you to connect to the Internet while accessing only essential functionality. Try renaming the file.

    6. Check for Windows Updates

    1. Press Windows + I to open the Settings app.
    2. Go to Windows Update, and click Check for Updates.Windows Update Check for updates ERROR_INVALID_NAME
    3. If an update is available, click Download & install to update your Windows version.

    In conclusion, to fix the ERROR_INVALID_NAME, validate the file or drive name, check the file’s permissions, use Command Prompt to rename the file, run the SFC scan to restore missing files, or use Safe mode.

    Before you leave, you might be interested in our guide on Error_Invalid_Cap or a guide on ERROR_ORPHAN_NAME_EXHAUSTED error.

    Did we miss a step that helped you fix the issue? If so, share it with our readers in the comments section below. We will add it to the list.

    Solved: ERROR_NO_VOLUME_LABEL

    The ERROR_NO_VOLUME_LABEL 125 appears with 125 (0x7D) The disk has no volume label and it indicates that the disk or drive that you are trying to access doesn’t have a volume label assigned to it. This can occur for various reasons, such as the drive being unformatted or improperly initialized.

    To fix it, first check if the drive is properly connected and detected by your computer.

    How can I fix ERROR_NO_VOLUME_LABEL?

    1. Assign a volume label

    1. Press Windows + R to open the Run window.DISKMGMT RUN COMMAND - ERROR_NO_VOLUME_LABEL
    2. Type diskmgmt.msc and click OK to open the Disk Management app.
    3. Right-click the problematic drive and select Change Drive Letter and Paths from the context menu.  Change drive letter and paths
    4. Click the Change button.Change ERROR_NO_VOLUME_LABEL
    5. In the following window, select Assign the following drive letter, then click the drop-down menu and choose a label for the driver.Changing drive letter ERROR_NO_VOLUME_LABEL
    6. Click OK to save the changes.

    2. Format the drive

    Note icon NOTE
    Before you format your drive, back up all of your essential data, as formatting the drive will erase all data and change its file system.
    1. Press Windows + E to open the File Explorer window.
    2. Go to This PC to see all your drives. Locate and right-click the problematic drive and select Format.
    3. Select the file system from these three: NTFS (suitable for Windows), FAT32 (Compatible with more devices but limited to files up to 4 GB), and exFAT (ideal for larger files and compatible with Windows and macOS).
    4. Place a checkmark next to Quick Format.quick format ERROR_NO_VOLUME_LABEL
    5. Click the Start button.
    6. You will see a warning message telling you the data will be erased. Click OK to proceed.
    7. Once formatting is complete, you will get a confirmation message; click OK to close the format window.

    In case Windows cannot format this drive, you can use the Diskpart command or the hard format method; check out this guide for detailed steps.

    If you are trying to format an external hard drive that is not visible, it could be due to malware or corrupt drive; read this guide to learn more.

    3. Scan for disk errors

    1. Press the Windows key, type cmd in the search box, and click Run as administrator. CMD elevated ERROR_NO_VOLUME_LABEL
    2. Type the following command to repair the disk after replacing C with the system drive letter you want to check and hit Enter: chkdsk C: /fCHKDSK
    3. The F parameter will fix all the errors it finds. If the drive is in use, you will see a message indicating that it can’t lock the drive; therefore, it will ask you to check it the next time the system restarts.
    4. Type Y and press Enter.
    5. If prompted, restart your computer to allow chkdsk to run and fix errors on the drive.

    If your Windows is stuck during the hard drive scan, you can run disk cleanup or use the chkdsk/spot fix command; check out this guide to learn the detailed steps.

    4. Use the Command Prompt

    1. Press the Windows key, type cmd in the search box, and click Run as administrator.CMD elevated ERROR_NO_VOLUME_LABEL
    2. Type the following command and hit Enter: diskpart
    3. To see the list of all drives, copy & paste the following command and press Enter: list volumeDISKPart
    4. Type the following command after replacing X with the volume number and hit Enter: select volume X
    5. To assign a volume label, copy & paste the following command after replacing NewLabel with the name you prefer and press Enter: label="NewLabel"
    6. Type exit and press Enter to close the Diskpart tool.

    In conclusion, ERROR_NO_VOLUME_LABEL can be fixed by assigning the drive label, formatting the problematic drive, scanning the disk for errors, or using the Command Prompt.

    Our latest guide covers Error_Label_Too_Long, so don’t miss it for more information. We also have a guide on ERROR_UNDEFINED_CHARACTER, so you might want to visit it.

    If you have any questions or suggestions about the subject, feel free to mention them in the comments section below.
    5 Ways to Fix ERROR_DIRECT_ACCESS_HANDLE

    The ERROR_DIRECT_ACCESS_HANDLE with the error message 130 (0x82) Attempt to use a file handle to an open disk partition for an operation other than raw disk I/O usually occurs there is an attempt to use a file handle associated with an open disk partition for an operation that isn’t allowed.

    First, check whether you are using the right handle for the operation. For example, if you are performing a file operation, ensure you are using a file handle; similarly, use a raw disk handle for disk operations.

    How can I fix the ERROR_DIRECT_ACCESS_HANDLE?

    1. Check the disk access mode

    When accessing a disk partition for raw I/O in Windows, it is important to use the correct access modes and flags. You can use GENERIC_READ and GENERIC_WRITE to enable reading and writing. However, to ensure direct communication with the hardware, you must include FILE_FLAG_NO_BUFFERING to disable system caching and FILE_FLAG_RANDOM_ACCESS to optimize non-sequential operations.

    2. Run the app with admin rights

    1. Locate the app from the desktop or start menu, right-click it, and choose Run as administrator from the context menu.
    2. Click Yes on the UAC prompt to allow the app to run with elevated rights.

    3. Update the disk driver

    1. Press Windows + R to open the Run window.Device Manager Run command ERROR_DIRECT_ACCESS_HANDLE
    2. Type devmgmt.msc and click OK to open the Device Manager app.
    3. Go to Disk Drives, and click it to expand.
    4. Right-click the drive and select Update driver from the context menu.  Update driver - ERROR_DIRECT_ACCESS_HANDLE 
    5. Click Search automatically for drivers.Search automatically
    6. Follow the on-screen prompt to complete the process.

    If this doesn’t help or there is no update for the driver, try reinstalling it. For that, follow these steps:

    1. Open Device Manager, go to Disk Drives, and expand it.
    2. Right-click the drive and select Uninstall device from the context menu.Uninstall device
    3. Click Uninstall on the following window.
    4. Once the process is complete, go to Action and select Scan for hardware changes.Action scan for hardware changes
    5. Windows will scan and reinstall the driver; restart your computer to save the changes.

    4. Run the CHKDSK scan

    1. Press the Windows key, type cmd in the search box, and click Run as administrator.CMD elevated - ERROR_DIRECT_ACCESS_HANDLE
    2. Type the following command to repair the disk after replacing C with the system drive letter you want to check and hit Enter. The F parameter in the command will fix all the errors it finds: chkdsk C: /f 
    3. If the drive is in use, you will see a message indicating that it can’t lock the drive; therefore, it will ask you to check it the next time when the system restarts. Type Y and press Enter.CHKDSK
    4. If prompted, restart your computer to allow chkdsk to run and fix errors on the drive.

    5. Uninstall the third-party disk management tool (if any)

    1. Press Windows + I to open the Settings app.
    2. Go to Apps, then click Installed apps.Apps - Installed apps
    3. Locate the third-party disk management app, click the three dots icon, and select Uninstall.Uninstall - the ERROR_DIRECT_ACCESS_HANDLE
    4. Click Uninstall and follow the on-screen instructions to complete, then check if the issue persists.
    5. If it does, then you can reinstall the software from its official website.

    To conclude, you must use the proper file handle for an operation, run the app with admin rights, and ensure your device drivers are updated. You can also run the SFC and CHKDSK scan to ensure nothing wrong with the disk and system files.

    To avoid issues like ERROR_DIRECT_ACCESS_HANDLE, you can use built-in Windows tools like Disk Management and Command Prompt. Disk Management can help you perform tasks like formatting and partitioning without issues, and Command Prompt lets you take care of low-level disk operations.

    Also, it would help if you temporarily disabled your security software, as it could sometimes interfere with disk operations.

    In case you have other disk-related errors, like repairing disk errors, this might take an hour; the first step is to wait for the process to complete, and you still see errors, read this guide to learn the solutions.

    We also have a guide on ERROR_ACCESS_AUDIT_BY_POLICY, so you might want to check it out.

    If you have any other questions or suggestions about ERROR_DIRECT_ACCESS_HANDLE, feel free to mention them in the comments section below. We’re happy to help!

    Fixed: ERROR_CHILD_NOT_COMPLETE

    The ERROR_CHILD_NOT_COMPLETE 129 (0x81) error states that the %1 application cannot be run in Win32 mode, which usually occurs when you try to run a 16-bit application on a 64-bit version of Windows. This error indicates that the app you are trying to run is incompatible with the current version of your Windows operating system.

    How can I fix the ERROR_CHILD_NOT_COMPLETE?

    1. Change the application compatibility

    You must check if the application you are trying to run is 16-bit. To do that, follow these steps:

    1. Right-click the application executable (.exe) file and select Properties.
    2. Go to the Compatibility tab, under Compatibility mode, and place a checkmark next to Run this program in compatibility mode for. Select Windows 95, Windows 98, or Windows XP from the drop-down menu.Compatibility mode ERROR_CHILD_NOT_COMPLETE
    3. Click Apply and OK save the changes. Once done, try launching the app.

    2. Use a virtual machine

    If you want to run the 16-bit application, you can download and install virtualization software such as Oracle VirtualBox, VMware, or Hyper-V, available for the latest Windows versions.

    Once downloaded, you can create a new virtual machine and install an older version of Windows, such as Windows 98 or Windows XP, that supports 16-bit applications.

    If you encounter issues, such as a fatal error during installation, while installing Oracle VirtualBox, this guide has solutions.

    Remember, creating any virtual machines may be impossible due to Hyper-V not having enough memory; to learn more, check out this guide.

    3. Use a third party app (DOSBox)

    1. Visit the official DOSBox website.
    2. Click Download Now, double-click the downloaded file, and follow the on-screen instructions to complete the installation.
    3. Launch the DOSBox, and you will see a command window that looks like a DOS prompt.
    4. Press Windows + E to open the File Explorer. Navigate to the path to the directory where your application is located, then copy the app’s location.
    5. In the DOSBox command window, type the following command after replacing C:\Path\To\Your\App with the app’s location you copied and hit Enter: mount C C:\Path\To\Your\App
    6. Copy & paste the following command to switch to the newly mounted drive and press Enter: C:
    7. To list all the files in the mounted directory, type the following command and hit Enter: dir
    8. If the application is located in a subfolder, copy & paste the following command to navigate to that folder after replacing SubfolderName with the folder’s actual name and press Enter: cd SubfolderName
    9. Next, to run the application, type the name of the application executable and hit Enter: myapp.exe
    10. Type exit and press Enter to close DOSBox.

    4. Look for updated versions

    If nothing worked for you, you must check for 32-bit or 64-bit versions of the app you want to run. You can visit the official application website or check the software repositories to see if the updated versions that support 32-bit or 64-bit environments are available. Download and install the updated version to run the latest version of the app.

    If you can’t find the latest version of the app, you can look for alternatives that can provide similar functionality.

    By following the steps mentioned above, you can address the ERROR_CHILD_NOT_COMPLETE issue and successfully run your application.

    In case you are facing other issues, like the app you are trying to install is not Microsoft verified, check out this guide for solutions.

    If you have any suggestions or questions about the error, feel free to share them with our readers in the comments section below.

    Google Chrome’s AI Settings getting a Privacy-focused redesign

    Google is revamping the “AI Settings” Page in the Chrome browser in the Canary version with more clarity on privacy and other implications of using Chrome’s AI features.

    After integrating Gemini into Chrome address bar, Google has started adding and making AI features available one by one, that can help you get things done faster on the web.

    One thing to take note of is that these are all experimental features in development, and may not always be right. Google makes Chrome features optional to try out in the “Experimental AI” section of settings.

    The experimental AI Settings page features a Tab organizer that allows it to automatically create tab groups based on tabs open, History Search, powered by AI that gives answers to your questions based on browser history.

    There are other Chrome AI features available such as Help Me Write, Create themes using AI, Tab Compare, new Google Lens on desktop. But these are offered to users in different ways, but may not be via via Experimental AI Settings.

    The AI Settings give a warning before you enable AI features to warn that they “are in early development, and won’t always get things right.” Each AI feature will have its description and toggle to enable or disable.

    Present Chrome AI Settings Page. Image Credit: WindowsReport

    For instance, when you consider “History Search, powered by AI”, it informs you with clear text what happens “When (its) on” – that is, you get AI-powered History search results including Answers to your questions. Chrome also cautions the user with a “Things to consider” message: your search history will be “sent to Google and may be seen by Human reviewers to improve this feature.”

    History Search Powered by AI. Image Credit: WindowsReport

    Regarding security, the AI history search description confirms, “page contents are encrypted and saved to your device.” The feature may also affect Chrome’s performance.

    Google is redesigning Chrome AI Settings Page

    If you see that the above wordings or phrases are not highlighted with Privacy and security headings, and if all other AI features such as Help Me Write and Tab Compare are being brought under one place to enable and access.

    New Chrome AI Settings Page. Image Credit: WindowsReport
    Image Credit: WindowsReport

    Chrome may be doing that now with the ‘AI Page Settings refresh’ flag in canary, which ‘enables a revamp of the existing AI Settings page’ for Chrome on Mac, Windows, Linux, ChromeOS, and Lacros.

    Chrome AI settings Page refresh flag. Image Credit: WindowsReport.

    We have included the present and new Experimental AI settings Page screenshots for comparison above.

    Apart from this, Google Chrome on the desktop is getting a Tab Declutter feature, a translate screen option in Google Lens, the ability to let extensions collect user data for AI, improved multi-monitor support for the recently available Windows 11 24H2, and the ability to offer separate themes for local and Google Accounts.

    Firefox Error “Platform Version Is Not Compatible” [Fixed]

    Are you having trouble with a Firefox error saying the platform version is not compatible? This can prevent you from opening the browser. It usually occurs due to a corrupted installation or when the installed Firefox version doesn’t match the platform requirements.

    Luckily, it’s fairly straightforward to fix. You just need to rerun the Firefox installer to update or repair the current version. I’ll show you how!

    How To Fix Firefox Error “Platform Version Is Not Compatible”

    You don’t need to uninstall Firefox. Simply running the installer will handle the update. Follow the below steps:

    1. Open a different browser and visit the official Mozilla Firefox website.
    2. Tap the “Download Firefox” button.
    Download Firefox
    1. Go to your Downloads, locate, and double-click the installer file.
    Installer file
    1. The installation process will start automatically. This will update the existing version or repair any corrupted files.
    Firefox Installing
    1. Once the installation is complete, launch Firefox to see if the error is resolved. In most cases, this simple step should resolve it.
    Launch Firefox

    Running the installer is an effective fix because it replaces outdated or corrupted files without affecting your settings or browsing data. This ensures that the browser is fully compatible with the platform it’s running on, eliminating the cause of the error.

    Also, learn how to block a website and fix YouTube if it’s not working on Firefox. Moreover, we can help you resolve the XULRunner error if it happens while reinstalling or updating the browser.

    HTMLayout.dll Cannot Be Loaded: 9 Best Fixes

    Resolve the “HTMLayout.dll cannot be loaded” error with these DIY troubleshooting ideas.

    The Windows OS stores commonly use software codes and data as DLL files. Thus, all third-party apps don’t need to write and deploy their own copies of those frequently used functionalities. They can just use the DLL files to borrow already available codes and functions.

    You’ll encounter an error when any such file goes missing and you attempt to install software that needs it. I recreated the issue in a test environment and tried various troubleshooting approaches.

    Here are the ones that worked for me!

    What Is the “HTMLayout.dll Cannot Be Loaded” Error?

    The HTMLayout.dll file allows any Windows software to load, display, and interact with web-like content directly on the app interface. It facilitates all the necessary codes and infrastructure so you don’t need to navigate to a web browser. This DLL file works in the background to facilitate the use of web-like buttons, text fields, context menus, etc.

    However, when a Windows app can’t locate this file, the “HTMLayout.dll cannot be loaded” error shows up. This incident is common when installing third-party apps, like Avast and AVG. A few users have also reported that some PC game titles also show this message.

    HTMLayout dll Cannot Be Loaded

    The reason could be anything ranging from corruption in the Windows System32 directory, someone accidentally deleting the HTMLayout.dll file, or the third-party app not importing a copy in its installation directory.

    How To Fix “HTMLayout.dll Cannot Be Loaded”

    I’ve arranged the troubleshooting methods from the simplest to the most complex. Follow the steps in the order listed below:

    Replace Corrupted HTMLayout.dll File

    1. Visit the DLL-Files.com website and download a fresh copy of the HTMLayout.dll file.
    download dll
    1. Create a new folder in the Downloads directory and move the downloaded DLL file archive there.
    2. Now, extract it.
    3. Select the HTMLayout.dll file and press Ctrl + C to copy it.
    copy dll file
    1. Go to the following Windows installation directories and paste the file by pressing Ctrl + V:
    C:\Windows\System32
    C:\Windows\SysWOW64
    paste dll file

    Most tools, like AVG or Avast, should be able to pick this up automatically. However, some game apps might require you to place the file in a specific directory.

    After copying and pasting the new DLL file into the Windows System32 folder, follow these steps. This is to help ensure that the OS has successfully integrated the DLL file.

    1. Press the Windows + X keys together to launch the Power User menu.
    2. Click on the Windows PowerShell (Admin) option.
    3. The PowerShell command line interface will open.
    4. There, enter the following command and hit Enter:
    Test-Path "C:\Windows\System32\HTMLayout.dll"
    test path
    1. The command will return False if the file isn’t accessible and True if it’s available.

    Sometimes, you might also need to register the newly pasted DLL file to ensure Microsoft and third-party apps can use it. Here’s how to do it:

    1. Open the PowerShell CLI in admin mode.
    2. Run the commands listed below in the order they appear:
    regsvr32 "C:\Windows\System32\HTMLayout.dll"
    & "$env:windir\System32\regsvr32.exe" "C:\Windows\System32\HTMLayout.dll"
    & "$env:windir\SysWOW64\regsvr32.exe" "C:\Windows\SysWOW64\HTMLayout.dll"
    1. If you get the ‘The module was loaded” message in the RegSvr32 dialog, the DLL file has been registered.
    RegSvr32

    In the installation directory for those apps, look for sub-directories like vcredist, lib, x86, x64, redist, runtime, etc. Place the DLL files in any of the folders that match these names.

    Use an Earlier Installation Package

    If you’re specifically facing the “HTMLayout.dll cannot be loaded” error when installing or running Avast and AVG antivirus, follow these steps:

    1. Navigate to the Oldversion.com website and look up the app you want to install.
    Download old version
    1. Download an earlier version and install it.
    2. You can now update the app from the software interface to the latest edition.

    Check for Security Access to the File

    The system has likely changed the security access to the DLL file from your user account. To regain access, follow these steps:

    1. Go to the following directory and find the HTMLayout.dll file.
    C:\Windows\SysWOW64
    1. Select, right-click, and choose Properties.
    properties
    1. Navigate to the Security tab in the HTMLayout.dll Properties dialog box.
    2. Select your account in the Group or user names table.
    3. Click Edit.
    Edit account
    1. Again, select your user account in the new dialog box.
    2. Checkmark the boxes below the Allow column.
    3. Click OK and Apply on both of these dialog boxes.
    OK Apply

    Update the Windows OS

    1. Press the Windows + I keys together to launch the Settings app.
    2. Scroll down to find the Update & Security or the Update menu. Click on that.
    3. Click on the Resume updates or the Check for updates button on the right side.
    resume updates
    1. Wait until the Windows OS updates itself.
    2. Your device might restart once or twice.
    3. Follow any onscreen prompts during the process.

    Update Microsoft Visual C++ Redistributable Runtime

    1. Visit the official download portal for Microsoft Visual C++ Redistributable.
    2. Scroll down to the Latest Microsoft Visual C++ Redistributable Version section.
    3. You should see the following MS Visual C++ runtime options in a table format:
      • ARM64: For embedded ARM-based devices.
      • X86: For 32-bit PCs.
      • X64: For 64-bit PCs.
    visual c
    1. Click on the appropriate link according to your system.
    2. Once the file is downloaded, access it in the Downloads directory.
    3. Install Microsoft Visual C++ runtime.
    4. Restart the PC.

    Perform a Clean Boot

    If you’ve already replaced the corrupted file and you’re still seeing the error, other third-party system services are probably continually accessing it. To rule out such interference, you should clean boot the PC:

    1. Press the Windows + R keys together to launch the Run dialog box.
    2. There, type msconfig and hit Enter.
    run msconfig
    1. The System Configuration tool will open. Go to the Services tab.
    2. Checkmark the box for the Hide all Microsoft services option.
    3. Now, hit the Disable All button.
    disable all services
    1. Go to the Startup tab.
    2. Click on the Open Task Manager hyperlink.
    open task amanger
    1. You’ll be redirected to the Startup tab of the Task Manager.
    2. Disable all non-essential startup apps.
    3. Select one process, right-click, and choose Disable.
    Disable startup
    1. Repeat the same steps for the rest of the unnecessary processes.
    2. Go back to the System Configuration tool.
    3. Click on the Apply button.
    Apply services
    1. Restart the PC.
    2. Now, try to install or run the app that’s showing the DLL file error.

    Run Microsoft Safety Scanner to Detect Malware

    Malware might keep the HTMLayout.dll file busy so other apps won’t be able to access it. So, you’ll need a trusted malware scanner and removal tool. One such option is the Microsoft Safety Scanner.

    It’s free, on-demand, and developed by Microsoft. It performs a comprehensive scan of the whole system to pinpoint and remove malware. Here’s how to get and run it:

    1. Visit the Microsoft Safety Scanner Download website.
    2. Click on any of the following options depending on your PC architecture:
      • Download Microsoft Safety Scanner (32-bit)
      • Download Microsoft Safety Scanner (64-bit)
    Microsoft Safety Scanner Download
    1. Once downloaded, run the app. It doesn’t require any installation.
    2. Accept the terms on the first dialog box and click Next.
    accept terms
    1. Again, click Next on the new screen.
    Confirm Next
    1. Choose the Full scan option in the Scan type dialog box. Click on Next.
    Full scan
    1. Microsoft Safety Scanner will start scanning your Windows PC.
    2. When it’s complete, restart the PC.
    Scan progress
    1. Replace the existing HTMLayout.dll file with a new one downloaded from the DLL-Files.com website.
    2. Try to install or run Avast, AVG, or any other app you were trying to use.

    Perform a System Restore

    If you’re certain that the software installer package is completely okay and it’s an issue with your PC, you can revert its state to the last known good configuration.

    However, you can only follow this method if you’ve recently created a system restore point or installed an app that triggered such an action. So, let’s figure it out by following these steps:

    1. Go to the Start menu and type Restore.
    2. Click on the Create a system restore point option under Best match.
    create a restor epoint
    1. You’ll be redirected to the System Protection tab on the System Properties dialog box.
    2. Click on the System Restore button.
    system restore button
    1. You should now see the Restore system files and settings wizard.
    2. You’ll see any of the following two or both of these:
      • Recommended restore
      • Choose a different restore point
    3. Let’s say you want to select Choose a different restore point.
    choose a different restore point
    1. In the next dialog box, you’ll see a list with details, like time, date, description, etc.
    2. Choose one restore point from this table and click Next.
    select restore points
    1. You’re now all set to restore the PC to the last known good configuration. Hit Finish.
    finish
    1. Wait until the Windows System Restore tool completes its tasks.
    2. Follow all further onscreen instructions to restore the PC successfully.

    Once it reboots, try to install the app again. This method should fix the HTMLayout.dll cannot be loaded error for good.

    Uninstall and Re-Install the Affected Program

    This method is mostly applicable to games and other third-party apps that create a copy of the HTMLayout.dll file in its dedicated installation folder.

    1. Press the Windows + I keys to open Settings.
    2. Click on the Apps button.
    3. Type in the name of the software you want to remove into the Search this list field.
    4. Click on the app name card to expand its options.
    5. Hit the Uninstall button.
    Search app

    Now, install it again from its official portal or a trusted source. Don’t forget to disable background apps in your Windows PC to allow for error-free installation.

    Summary

    The “HTMLayout.dll cannot be loaded” error usually happens when the apps requiring this DLL file are unable to access it or it’s corrupted. However, you can easily fix the problem by following along with the methods in this guide.

    Moreover, learn what to do in similar situations, when Dwmapi.dll, Mfc120.dll, or Libgcc_s_dw2-1.dll goes missing.

    Did any of the above fixes help you? Do you know of a better troubleshooting trick? Share your suggestions in the comment box.

    Mfc120.dll is Missing in Windows: 7 Ways to Download the DLL

    Often, when running a program, especially .exe files for codes developed using Visual Studio, you get a mfc120.dll missing error. The complete message reads, The program can’t start because mfc120.dll is missing from your computer. Try reinstalling the program to fix the problem!

    The mfc120.dll file, developed by Microsoft, is a part of the Visual C++ Redistributable library and is, by default, stored in the System32 folder on the C: drive. Programs and games that utilize the DLL may also have a copy in their specific directory.

    When mfc120.dll is not found, it’s usually due to missing Visual C++ Redistributables, inadvertent deletion of the DLL, corrupted system files, and third-party apps triggering conflicts. Before you start with troubleshooting things, check for mfc120.dll in the Recycle Bin and install all pending Windows updates!

    What can I do if mfc120.dll is missing in Windows?

    1. Use a top-rated DLL repair tool

    The easiest solution when mfc120.dll is missing is to use a reliable DLL repair tool. These scan the PC, identify any corrupt or missing DLLs, fetch a fresh copy from their database, and download it on the computer.

    This won’t just help you now but prevent similar missing DLL issues from arising in the future!

    2. Install Visual C++ Redistributables

    1. Go to Microsoft’s official website, and download the Visual C++ Redistributable installer. For the 64-bit version of Windows, get both the x86 and x64 redistributables, while for the 32-bit Windows version, only x86 is required.download Microsoft Visual C++ Redistributable
    2. Run the downloaded setup (.exe file), and follow the on-screen instructions to install the Visual C++ Redistributable.install to fix mfc120.dll missing
    3. Reboot the PC and check for improvements.

    In 4 out of 5 cases, installing the latest Microsoft Visual C++ Redistributable should download the missing mfc120.dll file in Windows. If that doesn’t work, you can download Visual C++ Redistributable 2013.

    3. Manually copy the file from another PC

    For missing DLLs developed by Microsoft, you can always get a copy from another Windows PC and transfer it to the relevant folder on the affected one. Just make sure that both PCs have the same OS architecture, i.e., 32-bit or 64-bit.

    Simply go to the following path on another computer > copy mfc120.dll to a flash drive > connect the flash drive to the affected PC > move the file to the same folder: C:\Windows\System32

    mfc120.dll
    mfc120.dll in the System32 folder

    If the error remains unresolved, also transfer a copy of the DLL to the program’s directory.

    4. Run the DISM and SFC scans

    1. Press Windows + S to open Search, type Command Prompt, and click on Run as administrator.command prompt
    2. Click Yes in the UAC prompt.
    3. Paste the following DISM commands individually and hit Enter after each: DISM /Online /Cleanup-Image /CheckHealth DISM /Online /Cleanup-Image /ScanHealth DISM /Online /Cleanup-Image /RestoreHealth
    4. Execute this command to run the SFC scan: sfc /scannowsfc to fix mfc120.dll missing
    5. Finally, restart the computer and verify whether the missing DLL is restored.

    Since mfc120.dll is a protected system file, running the DISM (Deployment Image Servicing and Management) and SFC (System File Checker) scans should replace it with a cached copy in case any corruptions are found or the DLL is altogether missing.

    5. Reinstall the program throwing the error

    1. Press Windows + R to open Run, type appwiz.cpl in the text field, and hit Enter.
    2. Select the program throwing the error, and click on Uninstall.uninstall to fix mfc120.dll missing
    3. Follow the on-screen instructions to complete the process.
    4. Restart the computer, and then reinstall the program from a reliable source, say the official website or Microsoft Store.

    6. Temporarily disable your antivirus or security software

    If you have a third-party antivirus or similar security software installed, temporarily disable it and verify whether the affected program still throws the missing mfc120.dll error.

    In case that works, I recommend either whitelisting the app in your antivirus, switching back to Windows Security, Microsoft’s native security solution, or downloading an effective antivirus software.

    7. Perform an in-place upgrade

    Note icon NOTE
    The steps listed below are for Windows 11. In case you are using the previous iteration, learn how to perform an in-place upgrade on Windows 10.
    1. Go to Microsoft’s website, select the OS edition and language, and then download the Windows 11 ISO.download Windows 11 iso
    2. Right-click on the ISO file, select Mount, and then click Open in the confirmation prompt.
    3. Run the setup.exe file.setup.exe
    4. Click Yes in the UAC prompt.
    5. Click on Next.
    6. Check Microsoft license terms and click on Accept to proceed.accept
    7. Make sure the setup reads, Keep personal files and apps, and then click on Install.in-place upgrade
    8. Wait for the in-place upgrade to complete. It may take 30-90 minutes.

    A Windows in-place upgrade will, in all likelihood, fix the missing or corrupt mfc120.dll error. The process is akin to reinstalling Windows, but this way, you don’t lose personal data.

    While you are here, discover expert tips to make your Windows PC faster than ever! Also, don’t miss our latest guide on the msdia80.dll file for more information.

    For any queries or to share which fix worked for you, drop a comment below.

    How to Download Perfmonitor on Windows 7

    Ensuring that your PC is working properly is important, even on legacy systems. Speaking of which, in today’s guide we’ll show you how to download Perfmonitor for Windows 7, so let’s get started.
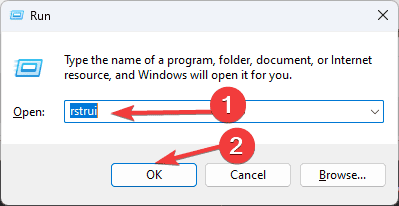
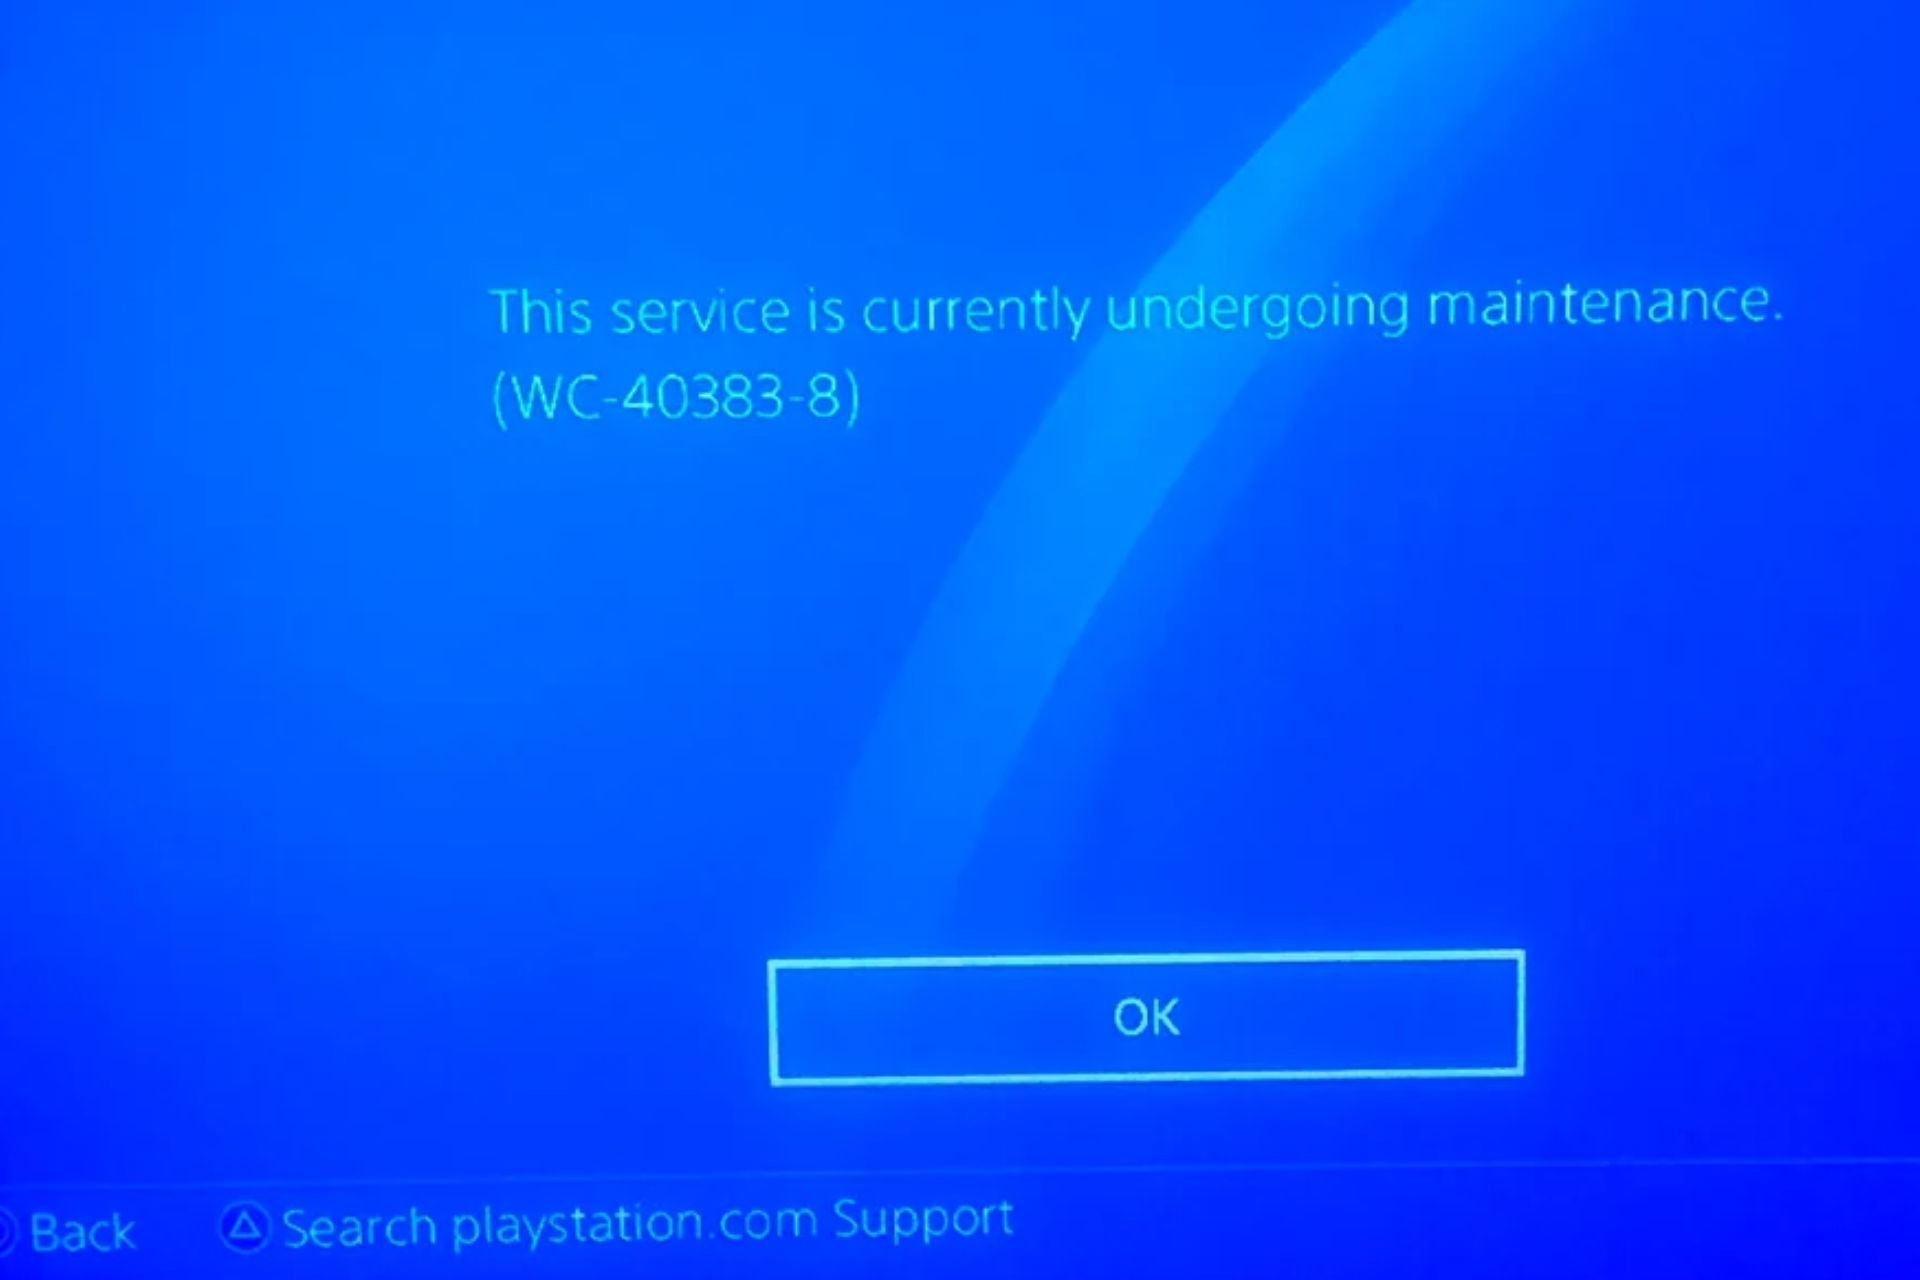
    How can I download Perfmonitor for Windows 7?

    Use the official website

    1. Visit the Perfmonitor download page.
    2. Next, select the version you want to use.
      perfmonitor download
    3. Once downloaded, run the setup file and follow the instructions on the screen.
    4. After the installation is finished, run Perfmonitor.

    If you choose the ZIP version, simply open it, extract the files, and run the Performintor exe file.

    How to check CPU performance in Windows 7?

    There are several ways to do that, but the easiest is by using Task Manager by following these steps:

    1. Press Ctrl + Shift + Esc to open Task Manager.
    2. Go to the Performance tab.
      performance task manager
    3. You should now be able to track your performance with ease.

    Alternatively, you can use PC monitoring software, just ensure that it’s compatible with your version of Windows.

    How do I access Windows Performance Monitor in Windows 7?

    1. Press the Windows key + R.
    2. Enter perfmon.
    3. Press Enter.

    Although the original Perfmonitor has been discontinued, Perfmonitor 2 is its successor and it’s still available for various platforms, including Windows 7. Of course, you can still download Perfmonitor for Windows 11 and newer systems.

    If you’re looking for similar software, we also wrote a guide on how to download CPU-Z, so don’t miss it for additional information.