Antivirus Market Share: Complete Statistics & Trends in 2026

The antivirus market is bolstered by a number of vendors and a variety of service offerings. But what is the exact value of this growing industry and how large is it?

In this report, we’ll focus on getting complete insights into the antivirus industry, including its growth, trends, statistics, and future forecasts.

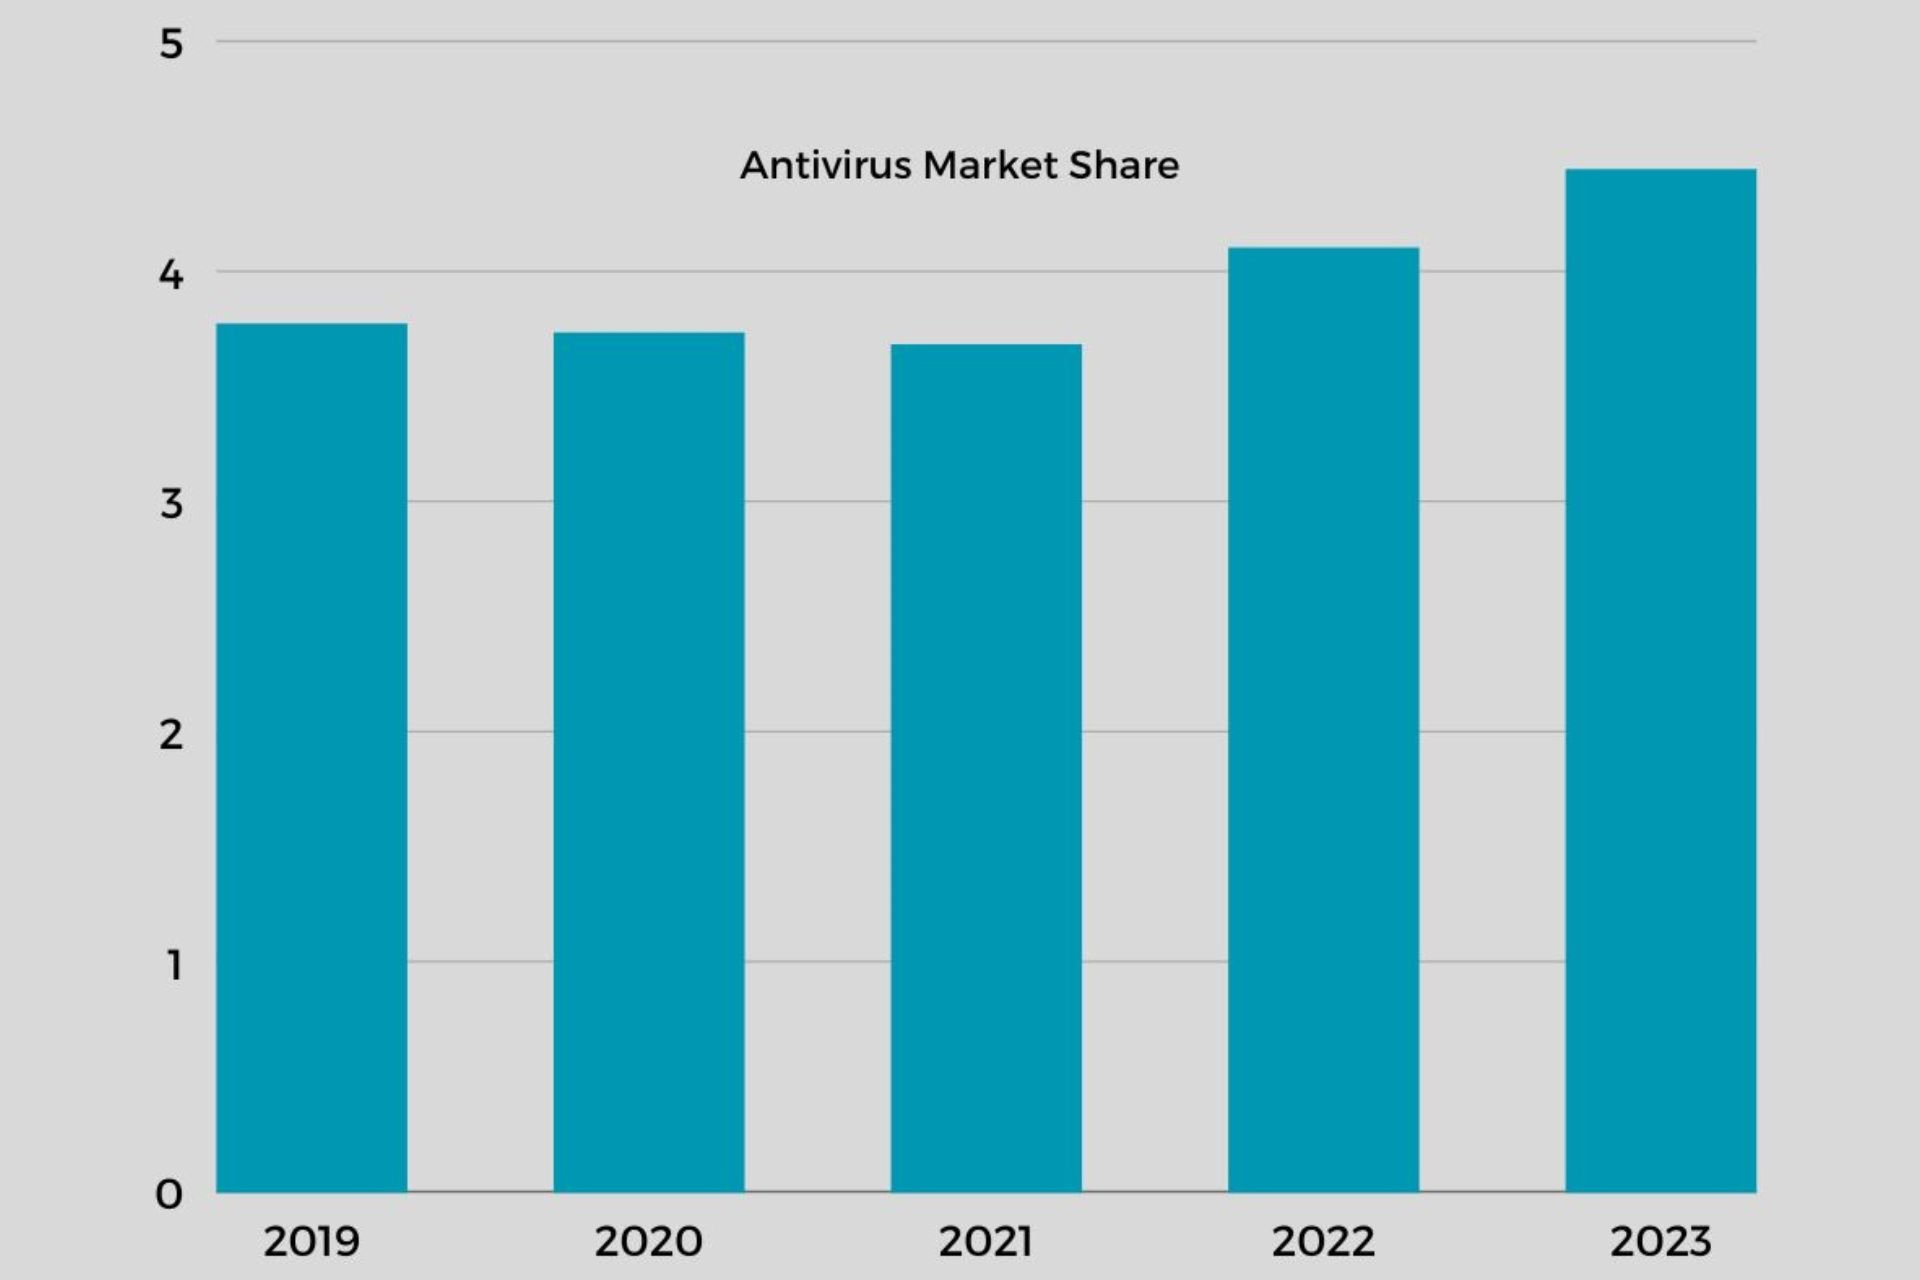
As of 2023, the antivirus market is valued at $4.444 billion. In recent years, the need for various types of protection has increased considerably, and different companies have presented their products so as to supply this demand.

The COVID-19 period most notably catapulted this growth, given the number of people working from home and staying online for other activities. According to research from Statista, a 3.6% growth was registered between 2021 and 2022.

What is the current Antivirus software market share?

1. North America Antivirus Market Share

The North American region is the largest market share holder in the antivirus software industry. And while it is not the region with the largest population, it has a good number of active computers.

More computers mean more viruses and malware, which translates to more people using security software. Another reason is that North America also hosts the top first-world countries, meaning the demographic has a lot of disposable income.

Most companies that sell software will target their products in countries with high demand for their products, and their users are more than willing to pay for extra security features and services.

2. South America Antivirus Market Share

The antivirus market in South America has been witnessing substantial growth over the last few years due to the increasing adoption of mobile devices and growing focus on the Internet of Things (IoT).

Other factors, such as rising awareness about cyber security and increasing internet penetration rate in the region, have also played a role.

A compound annual growth rate of 12.83% is expected by 2027 which makes it a region to watch out for.

3. Global Antivirus Market Share

The antivirus market is highly competitive, and there are many products available. Even as various regions boast of controlling the market share on a global scale, these numbers are highly dependent on the digital population.

The more people active on the internet, the more likely they are to install an antivirus program.

The number of internet users is not the only driving force. For one, there are more devices than ever connected to the internet. This leaves them more vulnerable to cyberattacks than ever before.

If we’re looking at the screen time statistics, the average internet user spends at least two hours online every day and uses multiple devices: computers, smartphones, tablets, and smartwatches. This means that you will need an antivirus installed on all your devices.

So, how many people use an antivirus?
people use antivirus - Latest Antivirus Statistics with 8 Most Grossing Facts

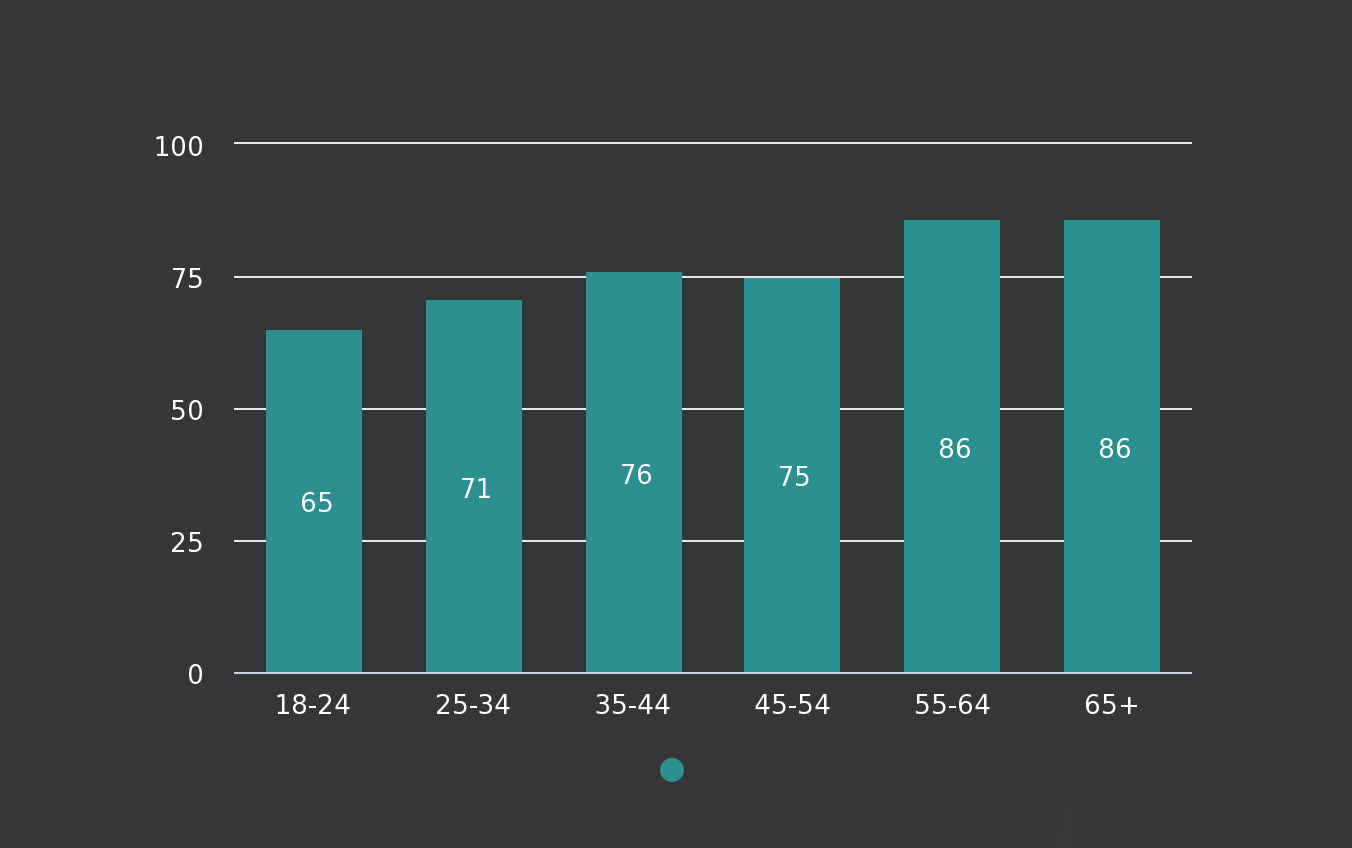
Desktop users seem to be the largest demographic using antiviruses, as a whopping 89% were registered to have installed an antivirus on their PCs. The number declines when it comes to mobile phones and drops to 49%.

This means that mobile users need to be sensitized to the importance of an antivirus. Still, all is not lost because if the projected growth is anything to go by, these numbers will shift towards an upward trend sooner rather than later.

Who are the key antivirus market players?

1. Norton 360

The antivirus market is dominated by Symantec Corp., a U.S. antivirus software company. Its technology and services are designed to protect against sophisticated threats across endpoints, networks, and cloud.

This versatility makes it control a huge chunk of the market. Its credibility and customer satisfaction are well embedded in its achievements. Norton 360 has consecutively scooped the best protection and security award in the last six years.

⇒ Get Norton 360

2. McAfee

McAfee is the second largest security software company in the world, after Symantec. The company’s flagship antivirus product is called McAfee Antivirus Plus, and it is available for Windows, macOS, and Android devices.

In addition to its core antivirus products, McAfee offers several other security suites that include additional features like backup and device control. Its extensive catalog puts it ahead of its competitors, and its subscriber base is continuously growing.

For instance, at the end of 2022, the total revenue was $2.9 billion which is a 10% increase from the previous year.

⇒ Get McAfee

3. ESET HOME Security Essential

ESET is a market leader in the cybersecurity industry with a global reputation for innovation, reliability, and trustworthiness. One of the factors that make a product successful is consistent profits, and ESET has a proven track record in this area.

For instance, in 2020, it registered a 13% profit increase. This not only implies a satisfied consumer base but also an increase in market share.

⇒ Get ESET HOME Security Essential

While these are the top contenders overall, Some products perform better as standalone that are worth mentioning. According to a Help Net Security report, some companies with a wide subscription base include:

AntivirusMarket Share
Norton 36097.5
McAfee96.3
Eset Internet Security96.3
Microsoft Security Essentials96.0
COMODO92.0

What does the forecast period for the global Antivirus Software Market look like?

The market for antivirus software is always changing. The introduction of cloud-based antiviruses is a huge step in offloading the PC. However, in equal measure, data privacy concerns and security threats still hamper this market’s growth over the forecast period.

The threats are becoming more sophisticated. For instance, between 2021 and 2022, the number of malware attacks increased from 5.4 to 5.5 billion.

And as the number of developed countries continues to soar, the number of users is also growing. Tech companies are also not left behind as they strive to meet the growing demand for devices. This means the number of computers in the world will continue increasing.

However, only the active and connected to the Internet devices will be affected. As of 2023, there are at least 15.4 billion active devices.

And since the number of active devices is projected to hit the 29 million mark by 2030, the antivirus market is also expected to experience exponential growth. In turn, this increases the number of potential entry points for malware.

Since reports from the cyber attack statistics indicate that businesses are at a higher risk of ransomware attacks, they are investing more money into securing their systems by employing better security measures.

Individual users are also not left behind as they are no longer asking whether your Windows 11 needs an antivirus. They have become aware of the risks involved in using a computer without an antivirus installed and securing their devices.

Ultimately, the consumer segment will continue to grow, but businesses will overtake personal users since they are more concerned about data protection.

What are the key drivers for the Global Antivirus Software Market Shares?

  • The growing popularity of mobile devices and the increasing usage of smartphones and tablets.
  • Increased use of the internet and the popularity of social networking sites have birthed numerous hacking techniques.
  • Dynamic and rising malware, viruses, spyware, and adware threats.
  • Growing popularity of cloud computing necessitates the development of better data protection technologies.

As antivirus companies strive to provide the most powerful and effective program, achieving this in today’s market can be difficult. The sheer variety of available products complicates the purchasing decision, even for tech-savvy consumers.

You only need to install an antivirus that meets your needs. For instance, if it is based on operating systems, you can choose the best antivirus for Windows 10 or the best antivirus for Windows 11. Ultimately, it boils down to user needs and preferences.

What’s more, antiviruses can be hacked, so it’s important to be vigilant about security. You can employ a multi-layered approach, such as firewalls and a proxy, to get all-rounded protection.

There you have it. What do you think of the growth in the antivirus industry? Is there something that needs to be done to get everyone on board to secure their devices? Share your thoughts with us in the comment section below.

Is OneLaunch Malware? Everything You Need to Know

Many reported that their interface is changed due to OneLaunch software. Of course, many users were converted and are left wondering if OneLaunch is malware.

In today’s guide, we’re going to take a closer look at this tool and tell you everything you need to know about it.

What is OneLaunch?

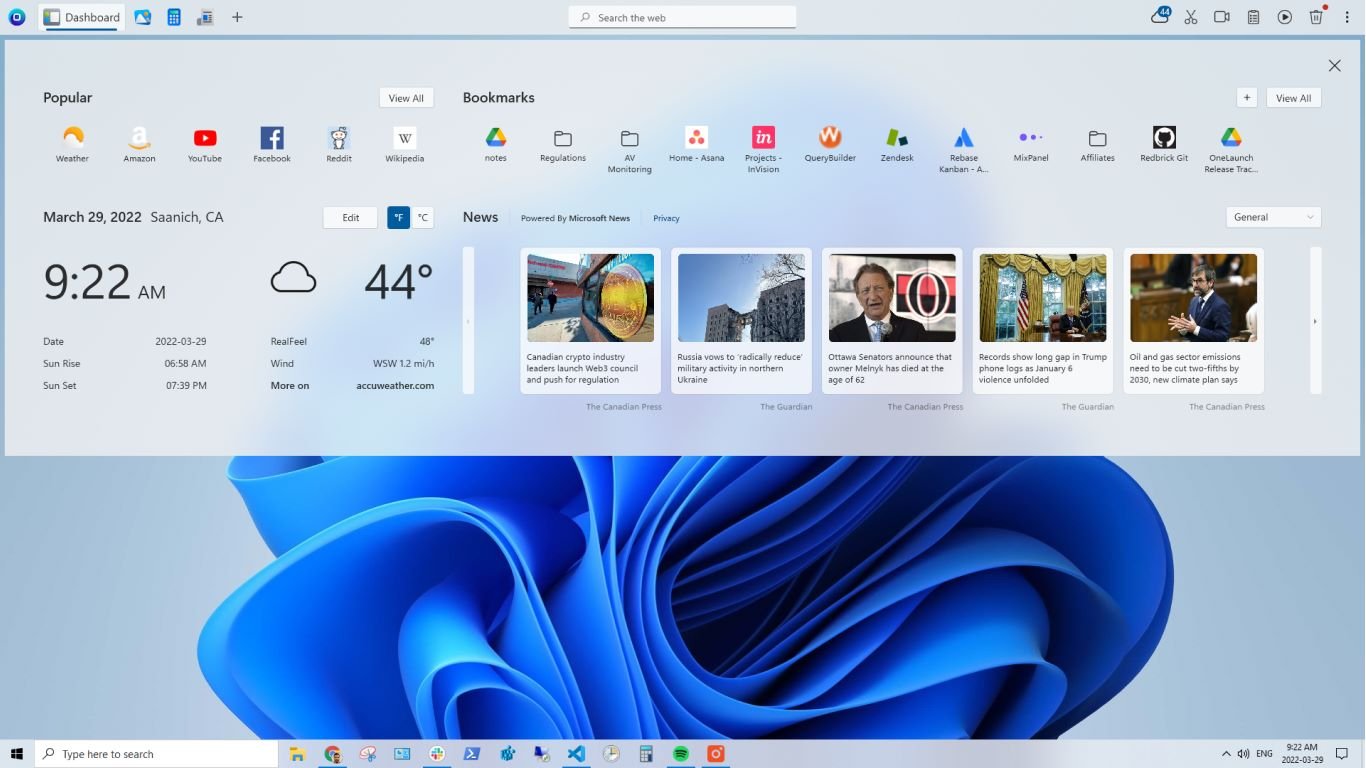
OneLaunch is a productivity software meant to improve the Windows experience. It has a dedicated dashboard, a search bar, a custom browser, lists recent items, displays clipboard history, and more. 

OneLaunch’s interface (Image source: Microsoft Store)

Is OneLaunch a malware?

As per experts, OneLaunch can’t be categorized as malware, but it’s an unwanted program and falls in the same set as Windows bloatware.

But anyone concerned about security, privacy, and discreetness should know the ins and outs of OneLaunch and the effects it has on the PC.

What is OneLaunch used for?

OneLaunch works as a customization software that allows users to personalize the desktop and ensure a seamless experience. Be it accessing recent files or searching the web directly from any screen!

But its after-effects are concerning. The application has numerous permissions, it has it’s own startup task in Task Scheduler, and it can slow down your PC.

Besides, as per OneLaunch’s Terms of Use, it stores user data and uses it to serve pop-up ads or promote third-party services.

Searching with OneLaunch (Image source: Microsoft Store)

Types of malware related to OneLaunch

  • Adware software: The software presents many ads, some of which are intrusive and may redirect users to suspicious sites.
  • Browser hijackers: OneLaunch may change your PC’s default browser or search engine and set its own.
  • Rogue software: OneLaunch, though developed by a reputable company, is an unwanted software, given its functioning.
  • Search engines with unwanted extensions: The custom OneLaunch browser is not as safe as the other popular browser options, though its integration is user-oriented.

Potential dangers of having OneLaunch installed

  • Data security risks: When any program stores data, there’s always the risk of a breach, no matter how secure their system is.
  • Reduced computer performance: Based on user feedback, the primary disadvantage of OneLaunch is reduced PC performance.
  • Increased risk of infection from malicious software: Third-party programs can always result in suspicious files, malware attacks, and a wide array of security threats.

How do I get rid of OneLaunch on my computer?

  1. Press Windows + I to open Settings, go to Apps from the navigation pane, and click Installed apps on the right.installed apps
  2. Locate OneLaunch from the list, then click on the ellipsis next to it, and select Uninstall.uninstall OneLaunch malware
  3. Again, click Uninstall in the confirmation prompt.

While this will remove the app, we recommend using an effective uninstaller tool to get rid of any leftover files and registry entries. And if Windows keeps installing apps without permissions, fix that too. It’s a major security threat!

By now, you should understand whether the software is a virus or the OneLaunch browser a malware. Our take, it poses no immediate threat or critically affects the PC directly.

The security aspect can be further solidified, given that OneLaunch is available on the Microsoft Store. The apps listed here undergo several security checks, as detailed in this official guide. So, if you want to install OneLaunch, get it from the Microsoft Store instead.

You can also use PUP remover tools to ensure that this and other applications never appear on your PC again. We also have a guide on how to block potentially unwanted apps on your PC, so don’t miss it.

For any queries or to share your thoughts on OneLaunch, drop a comment below.

Demystifying Windows on Arm: A comprehensive 2023 guide

If you’re currently in the market for a new laptop or tablet, you might have encountered various options falling within the Windows on Arm ecosystem. But what exactly does ‘Arm’ refer to? In simple terms, it’s a computer processor architecture that powers numerous portable electronics, including your smartphone. However, it hasn’t yet made a significant impact in the desktop PC arena.

Demystifying Windows on Arm

windows on arm

Windows on Arm refers to Microsoft’s Windows operating system running on computers powered by Arm processors, in contrast to the dominant x86 chips provided by Intel and AMD. This platform initially brought Windows 10 to Arm-powered laptops and tablets back in 2017, and it has since been updated to support Windows 11 as well.

Compared to traditional Windows laptops, Windows on Arm promises superior battery life, lasting more than a day, and constant internet connectivity through 4G or 5G. It also boasts lightning-fast boot times and offers chipset-level support for security features like Windows Hello. However, it’s essential to consider some platform limitations, including limited gaming support, occasional driver issues, and software emulation that may not cover all your needs.

Essentially, Windows on Arm means Microsoft Windows running on Qualcomm’s 4G and 5G laptop-tier processors. Currently, Qualcomm is the exclusive system-on-a-chip (SoC) vendor offering Windows on Arm chipsets. These belong to their Snapdragon 7c, 8c, and 8cx families, which have been adopted by various manufacturers. Even Microsoft’s processors in the Surface Pro X are essentially modified versions of Qualcomm’s Snapdragon 8cx lineup.

Windows on Arm vs. Traditional Windows x86

windows on arm

In terms of the Windows user experience, Windows on Arm is functionally equivalent to traditional Windows 10 and Windows 11. This isn’t a return to the days of Windows RT, which had a limited app ecosystem.

With Windows on Arm, you can run virtually all your favorite apps. While an increasing number of apps are built specifically for this platform, you can also emulate x86 applications. We’ll explore the implications of software emulation in the following sections.

The move to Arm isn’t just about CPU power; it’s also linked to the growing divide between traditional CPUs and SoCs (System-on-Chip) that offer a more comprehensive platform. Arm-based SoCs integrate graphics, modems, machine learning capabilities, image processing, sensor hubs, and security technologies into a single package. In contrast, Intel and AMD processors still require additional external components for broader use cases, such as 5G networking.

In other words, Arm-based SoCs provide integrated solutions with benefits beyond performance and energy efficiency.

Emulating older apps with Windows on Arm

windows on arm

The core Windows experiences, including the Start menu and File Explorer, are all designed to run natively on Arm chips, ensuring maximum performance. They operate directly on the processor without translation or emulation, similar to how they function on an x86 PC.

Windows also supports native applications optimized for Arm hardware. The list of native apps continues to grow and includes popular names like Microsoft Edge, Firefox, Adobe Photoshop, Netflix, VLC, and Zoom.

However, for apps that don’t have native Arm support, emulation becomes crucial. Emulation takes software compiled for one architecture (e.g., x86) and converts it into machine code compatible with a different processor architecture, in this case, Arm. While this enables compatibility with a wide range of older applications, there is a slight performance penalty associated with emulation.

Windows 10 on Arm initially provided emulation for 32-bit (x86) apps but couldn’t run non-native 64-bit applications. Windows 11 introduced 64-bit (x86-x64) emulation, expanding the range of compatible applications significantly.

Should you make the switch to Windows on Arm?

windows on arm

Is Windows on Arm the right choice for you? Windows on Arm offers several advantages, but it may not be suitable for every use case, at least not yet. It struggles with playing demanding games and resource-intensive software like CAD applications. However, it excels in portability, delivering ample performance for tasks like document editing and web browsing while offering all-day battery life. If you need a device for on-the-go work, Windows on Arm is a compelling choice.

Devices running Windows on Arm

The Windows on Arm ecosystem is relatively small, with a few notable options, including:

  1. Microsoft Surface Pro X (discontinued/merged into Surface Pro line)
  2. Microsoft Surface Pro 9 (SQ3 5G variant only)
  3. Lenovo ThinkPad x13s

You can also check the Snapdragon website for more hardware options on Windows 11. Please note that some older models, like the HUAWEI Matebook E 2019, Lenovo Flex 5G, Lenovo Miix 630, and Lenovo Yoga C630, have been discontinued.

The future of Windows on Arm

windows on arm

Windows on Arm represents a promising shift in the world of computing, offering a host of advantages over traditional x86 architecture. With enhanced power efficiency, longer battery life, and sleek, portable designs, Arm-based devices are well-suited for on-the-go professionals seeking productivity and connectivity. While there are some limitations, such as gaming support and occasional software emulation challenges, the future of Windows on Arm appears bright.

As the ecosystem continues to grow, with notable devices like the Microsoft Surface Pro X laying the groundwork, users have more choices today than ever before. Ultimately, the decision to switch to Windows on Arm depends on your specific needs and priorities. If portability and everyday productivity are high on your list, Windows on Arm could be the perfect fit, ushering in a new era of computing convenience and efficiency.

How to stop Outlook from opening email links in Edge

Back in February, Microsoft announced a pretty major change for Microsoft 365 Outlook and Teams. The Redmond company said that Outlook, and in the future Teams, would open browser links by default on Microsoft Edge.

Microsoft later explained in detail why it was making such a change in a support article, so there was no confusion.

  • To improve your experience between email and browsing—letting you see them both at the same time, in the same place. No more switching back and forth between apps.
  • To provide a unique experience—at Microsoft, we strive to create the best customer experience across our products.
  • To reduce task switching and improve workflow and focus—by opening browser links in Microsoft Edge, the original message in Outlook can be viewed alongside web content to easily access, read, and respond to the message, using the matching authenticated profile.

So, the emails will open in the Outlook app in the Edge sidebar. Links will open in Microsoft Edge even if it is not the system’s default browser in Windows. But there is a way to stop it. With just a few clicks, you can set up your Outlook to open links with your system’s default browser.

Here’s how to stop Outlook from opening email links in Edge

Before we start, you should know that only links set to open via a web browser are affected. Links that are set to open in a client app or within Outlook itself will continue to do so.

  1. On your Outlook app, click on the View panel, and then select View Settings. outlook edge link
  2. On the Setting page, head over to Advanced, then Link Handling, and select the Open hyperlinks from Outlook option.
  3. Select your preferred or default browser.

That’s it. From now on, your default browser will open up any hyperlinks that come in your emails. While it is frustrating that Microsoft would only want you to use Edge when handling emails on Outlook, at least the Redmond-based tech giant is giving you the option to actually choose your default browser.

In many ways, Edge is a very performant browser, especially due to all the features that Microsoft has been pouring into it. However, Edge is not yet popular, and many people prefer to use alternatives such as Chrome, Opera, or Firefox.

So this sort of feature is can frustrating, considering you’ll have to look up a guide, such as this one, on how to change Edge for your default browser.

A simple search on Reddit, for example, would show you a lot of users who are mad and upset about it, and rightfully so.

But even so, Microsoft has not listened to the community, and the Redmond-based tech giant keeps on pushing its products and apps on every corner of their software.

What do you think about this feature in particular? Do you mind if Edge is the one browser opening up your Outlook hyperlinks, or not? Let us know your opinion.

MW 2 isn’t working in Windows 11 Insider, but here’s a trick

Update: Modern Warfare 2 should work now in Windows 11 Insider

Call of Duty: Modern Warfare 2 is one of the most popular Activision games on PCs, and gamers everywhere predominately play it on Windows devices. Sure, the game has its fair share of issues when running it on Windows: from being stuck on the loading screen, to not working on Steam Deck, or causing GPU issues, they can all be fixed.

However, it seems that some Modern Warfare 2 has not working in the Windows 11 Insider Program, ever since the last update patch to the channel. Many users reported this issue, and it seems that the problem is a general one. Activision is looking into fixing it, as we speak.

When trying to open Modern Warfare on Windows 11, while being enlisted in the Windows Insider Program, you’ll get hit with a pop-up saying that your Windows 11 is not supported by Modern Warfare 2.

Your operating system Windows 11 is not supported by Call of Duty: Modern Warfare II. We recommend upgrading to Windows 10, version 1909 or newer. Would you like to visit Activision Support for more information?

If you run into this problem, apparently there is a quick fix, until there is an official solution that will handle it.

Uninstalling the May Beta updates fixed the problem for some of our readers so you should try that before anything else.

Modern Warfare 2 not working in Windows 11 Insider? Here’s what you can do

If you’re enlisted in the Windows Insider Program, and you have installed the Windows 11 Insider Preview 10.0.22623.1180 (ni_release) build, then a Reddit user who faced the same issue, solved by uninstalling the latest updates.modern warfare 2 not working in windows 11

I found a fix and it works for me. I’m on Windows 11 Insider Preview 10.0.22623.1180 (ni_release). Settings > Windows update > Update History > Uninstall Updates. I uninstalled all updates, and restarted the PC and the game is working for me

Others have tried this method, and it seems it’s working.

Yup, just turn off Windows Insider (Next Update Option), go where Hot_Relief9611 said and just uninstall any that say Beta Build in their name. There are different levels of preview builds, so they may be named differently for Dev Builds and the other levels Microsoft Offers. I had to uninstall 4 different Beta KBs and reboot and it worked. It isn’t either company’s fault, btw. These are Beta Builds. Can’t expect everyone to adopt Beta Builds, since they are subject to change anyway. That would just be a lot of extra work.

You can also opt out of the Windows Insider Program, which can solve the issue altogether, as builds released there tend to be quite experimental and may not always work properly.

If you try these solutions, let us know if they worked for you.

10 Best PowerToys Utilities to Use on Windows 11

Microsoft is adding various features to Windows via the PowerToys app, and if you aren’t familiar with this software, today we’ll show you the best PowerToys utilities to use.

Many of these features will make your workflow faster and allow you to multitask better, so be sure to keep on reading to learn more about the best PowerToys features.

What are the best PowerToys utilities I should use?

Always On Top – Keep any window on top

Using this feature you can easily keep any window at the top. To activate it, simply select the desired window and press Ctrl + Windows key + T. You can use the same shortcut to disable it.

The feature has several customization options:

  • The ability to change the size, opacity, and color of the border.
  • Exclusion list for apps.
  • Sound notification whenever this feature is enabled/disabled.

Awake – Ignore your power plan and keep your PC awake

With Awake, you can prevent your PC or monitor from going to sleep and ignore PC sleep settings. This feature has its icon in the system tray, so you can easily configure it.

As for configuration, the following options are available:

  • Ability to turn the monitor off or keep it on.
  • Keep the monitor or PC awake until the specified date, time, or interval.
  • You can quickly turn the selected power mode on or off.

Peek – Preview files without opening them

With Peek, you can preview any file simply by using Ctrl + Space shortcut. The file will be opened in a new window so you can easily see its contents.

This feature can do the following:

  • It supports a wide array of file formats.
  • Instantly closes as soon as you click away.
  • Can be configured to stay open even if you click away.
  • Has a button to open the file using the default software

PowerToys Run – Launch any application instantly

PowerToys Run works as a quick launcher for files and applications, and you can start it instantly by using the Alt + Ctrl shortcut. The search is fast and in our opinion more handy than Windows search.

Regarding other features, this feature can do the following:

  • Ability to perform web searches.
  • Can be used to run system commands.
  • Supports registry searching.
  • Can search and start services.
  • Supports various plugins.

PowerRename – Rename multiple files from File Explorer

With this feature, you can rename multiple files easily. Simply select the files, right-click them, and choose the PowerRename option from the menu.

The feature offers the following:

  • Support for regular expressions.
  • Ability to perform text formatting.
  • Preview of original and renamed file names.
  • Placeholders for date, time, and counters.

Image Resizer – Resize and optimize images quickly

Using the image resizer, you can quickly and easily resize images without using image editors. To resize pictures, simply select them and choose Resize Pictures from the context menu. It’s that simple.

These are the available features:

  • Ability to configure custom resizing presets.
  • Support for multiple encoding types.
  • Image compression.
  • Creates resized images as copies.

Fancy Zones – Create custom window layouts

Fancy Zones works as a window manager and it allows you to create and customize layouts. This works better than the default snapping feature since you can make an unlimited number of presets, columns, and rows. To activate this feature, simply drag the window while using the Shift key.

Other features that we need to mention:

  • Ability to override Windows Snap shortcuts.
  • Zone color and opacity can be easily adjusted.
  • Support for layout switching with shortcuts.

Color Picker – Get color codes from your screen

If you’re a designer, you’ll find this feature incredibly helpful. Simply press Ctrl + Windows key + C and pick the color from the screen. The color editor will now open and you’ll be able to customize it or copy it in one of many available formats.

Other features of Color Picker:

  • Ability to see the color name when picking a color.
  • You can instantly copy the color code without using the editor.
  • Support for 14 color formats.

Screen Ruler – Measure distance between elements easily

Another useful tool for designers is the Screen Ruler. You can start this tool with the Windows key + Shift + R. After that, just select what you want to measure, move the mouse cursor to the desired location and you’ll get the distance between the elements.

Screen Ruler comes with the following features:

  • Ability to measure bounds.
  • The feature can measure both horizontal and vertical spacing.
  • You can adjust the pixel detection tolerance and ruler color.

File Locksmith – Unlock files with a single click

If you can’t end a certain process because another file is using it, File Locksmith is here to help. Right-click the file in the File Explorer and select What’s using this file from the context menu to see all the information.

Other features of File Locksmith:

  • Ability to see the process ID and the user that uses it.
  • The process can be easily ended with a click of a button.
  • If necessary, you can restart the process with administrative privileges right from there.

Top 5 reasons to use PowerToys utilities on Windows 11

  • It bundles individual tools from several developers into a single software.
  • The software lets you improve your productivity by adding additional functionality to Windows.
  • You can access most features with keyboard shortcuts instantly.
  • Some functions are added to the context menu and can be accessed natively.
  • The software is free and published by Microsoft.

What are the alternatives to PowerToys utilities?

While there’s no alternative for PowerToys software as a whole, there are alternatives for the following utilities:

Microsoft is frequently updating this tool, and speaking of updates, you might want to check PowerToys 0.61.0 update changes.

Now that you know about the best utilities this tool offers, go and install PowerToys for Windows 11 and try them yourself!

What are your favorite features of this software? Let us know in the comments section below.

Fix: Screen Goes Off When Plugging in the Charger on Windows 11

Displays are the second most affected aspect of the PC, only next to performance. Speaking of which, many users found that their Windows 11 screen goes black for a second when the AC adapter is plugged in or unplugged.

It appears as if the laptop turned off, but the display brights up within a few seconds. And for users who don’t always have the power cord plugged in, this is a major problem.

Why does my laptop screen go off when I plug in the charger?

  • A damaged cord can affect the power supply 
  • The laptop screen goes black when plugged in due to a bug, as reported in Windows 10.
  • Outdated, corrupt, or incompatible graphics driver
  • Windows 11 HDR settings are set to optimize for battery life

What can I do if my laptop screen turns off when charging?

Before we head to the slightly complex solutions, try these quick ones first:

  • Make sure the power cable is not damaged and the power source is not faulty. If possible, use another cord or plug the adapter into another socket.
  • In case an external monitor goes black for a few seconds when plugged into charging, reconnect it or revert to the default monitor configuration.
  • Check for any pending Windows updates and install them. Also, increase the brightness level on the laptop.
  • Discharge the battery, press the power button to turn off the PC, unplug the battery, then put it back in, and turn on the PC.

If none work, move to the fixes listed next.

1. Switch to another power plan

  1. Press Windows + I to open Settings, and click on Power & battery on the right in the System tab.power & battery
  2. Select Best performance or Best power efficiency from the Power mode dropdown menu.change power plan to fix screen turns off when charger plugged in windows 11
  3. Restart the computer when done.

When you plug in the charger and the laptop screen turns off on Windows 11, switching the power plan may help. Also, use the Ultimate Performance power plan for best results and to get rid of the issue.

2. Reset power plan settings to default

  1. Press Windows + R to open Run, type cmd, and hit Ctrl + Shift + Enter.cmd
  2. Click Yes in the UAC prompt.
  3. Paste the following command and hit Enter to reset the power plan configuration:powercfg -restoredefaultschemesrestore defaults to fix screen turns off when charger plugged in windows 11

3. Set a uniform refresh rate

Certain apps, especially those that come pre-installed on the Windows 11 device, change the refresh rate when the laptop is plugged in, and the display, subsequently, blacks out momentarily. This includes the MSI Action Center and Intel Graphics Command Center.

You will have to reconfigure the display and advanced power settings in these two. Here’s how:

  • MSI Action Center: Open Settings > go to Features > turn off Display Power Saver.display power saver
  • Intel Graphics Command Center: Disable Auto-refresh or the equivalent setting. 

If that doesn’t work, uninstall the app, whichever is installed on the PC, and check for improvements. 

4. Change Windows HDR settings

  1. Press Windows + I to open Settings, and click Display on the right.display
  2. Click on HDR.
  3. Now, under Battery options, choose Optimize for image quality.optimize for image quality to fix screen turns off when charger plugged in windows 11

When you have Optimize for battery life selected under Battery options, it will disable HDR when running on battery power, and this sudden change in refresh rate might cause the Windows 11 laptop screen to turn off when the charger is plugged in.

5. Reinstall the graphics driver

  1. Press Windows + X to open the Power User menu, and select Device Manager from the list of options.
  2. Expand the Display adapters entry, right-click on the active graphics adapter, and select Uninstall device.uninstall device
  3. Tick the checkbox for Attempt to remove the driver for this device, and click on Uninstall.reinstall driver
  4. Once done, restart the computer and let Windows install a fresh copy of the driver.

6. Update the graphics driver

  1. Press Windows + R to open Run, type devmgmt.msc in the text field, and hit Enter.
  2. Locate the active graphics adapter under the Display adapters entry, right-click on it, and select Update driver.update driver to fix screen turns off when charger plugged in windows 11
  3. Now, choose Search automatically for drivers and let Windows search the computer for the best available version and install it.search automatically
  4. After the new driver is installed, reinstall the computer for the changes to apply.

If the screen is turning black when you plug or unplug the charger, updating the graphics driver will help. When the OS can’t find a newer version, check Windows Updates or head to the manufacturer’s website, locate the latest version, and manually install the driver.

7. Perform an in-place upgrade

  1. Go to Microsoft’s official website, choose the product language and edition, and then download the Windows 11 ISO.windows 11 ISO
  2. Double-click the ISO file and click Open in the prompt.
  3. Run the setup.exe file.setup.exe
  4. Click Yes in the UAC prompt.
  5. Click on Next in Windows 11 Setup to proceed.in-place upgrade to fix screen turns off when charger plugged in windows 11
  6. Now, click on Accept to agree to Microsoft’s license terms.
  7. Verify the setup reads, Keep personal files and apps, and click Install to start the in-place upgrade.install

An in-place upgrade takes a few hours to complete, so let the process run unhindered. Remember, it’s like a Windows reinstall, but you don’t lose any installed apps or stored files. And it should fix things when the monitor turns off and goes black for good!

Tip icon Tip
If none of the fixes work, the problem, in all likelihood, arises due to a hardware issue. In this case, we recommend you contact the manufacturer or get the PC inspected by a professional.

Why is my laptop underperforming when charging?

If the laptop underperforms when plugged into charging, it could be the high temperature to blame. Batteries tend to warm up when charged, which might increase the CPU temperature. To fix the problem, put your laptop into sleep mode while charging.

Besides, you could be using an adapter that delivers higher power compared to your laptop’s specifications. Check that as well!

If the screen turns off when the charger is plugged in on Windows 11, be it a laptop or a desktop, it’s usually a driver issue or a problem with the power options. But things are a lot different when the laptop screen goes black on connecting an external monitor.

Remember, similar misconfigurations can also trigger the PC screen to turn off with the fan running, but that, too, is easily fixable.

For any queries or to share what worked for you, drop a comment below.

KJM K3 Certified JBL & Netflix Projector Review: A crazy amazing entertainment deal

Starting at: $275 (early bird special)

Since the pandemic, I’ve reevaluated the convenience of a traditional glass flat screen tv viewing experience versus the flexibility projector systems offer, and until recently the single prohibitive obstacle to making the modern leap has boiled down to price.

Between the absorbent price of a projector hardware itself, auxiliary sound equipment, projector screens and stands, and dedicated streaming sticks or services, switching to projector viewing experience it typically a costly investment, which was until I reviewed the KJM K3 Certified JBL & Netflix Projector.

Specs

KJM K3
HDR Type HDR10
IR Receiver Support, 1 in the front and 1 in the back
Controller Bluetooth Controller
Noise 35db@1m
Picture Type JPEG
BMP
GIF
PNG
Audio Type mp3/wav/asf/wmv/divx/mkv/3gp/mp4/mov/m4a/trp/mpeg/mpg

/vob/dat/mka/eac3/web,/ac4/mts/m2ts

Video Type IPS 2.4″ Smart Easy Read Display with color screen
Power Input: 100-240V, 50/60Hz,3A Max:
Output: 35V, 6.85A 240W
Working Temperature 0° – 40°
Storage Humidity 30% – 70% RH
Working Humidity 30% – 70% RH
Size PU foaming black
Seatpost 28.2*28* 16.9cm
Weight 4.08KG
8.99LBS

Design and features

Unlike most home theater projectors in the market currently, the KJM K3 ops for a more natural and inviting design that emphasizes a rounded-corner aesthetic and part fabric material back versus the angular fiber glass and metal construction of most.

The KJM K3 can tend to resemble an oversize Nest Max speaker with a single glowing circular light facing out depending on where it’s positioned in the home. The discreet design allows the mini subwoofer-sized projector to blend into a modern home aesthetic with its two-tone dark grey coloring and minimal lines with relative ease.

As with many other projectors, the KJM K3 tucks its ports in the upper back of the device which houses 2 HDMI, 2 USB-A, USB-C, DC-IN, ethernet jack, 3.3mm audio, and IR receiver.

Kjm K3 Parts Accessories

The KJM K3 doesn’t host very many tactile or manual controls on the device itself, so much of the tweaking and navigation of the projector comes from the included control. However, the first thing the KJM K3 does when plugged in and the lens cap is taken off is auto focus based on distance, projector screen size and suggested clarity.

The autofocus process can take as long as 20 seconds or as few as 3 depending on your own personal set up.

Once focused, the next thing users are greeted with is the overly simplistic Linux-powered menu system that walks viewers through a three-selection prompt journey to setting up their system which the projector stores options in memory.

Kjm K3 Front

Once the settings are in place, it’s off to the races with content features that include Netflix, Prime Video and YouTube support out of the box. There are other streaming apps that are included in the content menu but are much smaller in scale and notoriety than the big three such as TikiLive, and TC for kids.

For those who haven’t invested in a streaming stick or just want to use their preferred apps over the ones included with the KJM K3, there is the screen casting feature that connects the projector to a smartphone with a three-button selection. Android, iPhones, Windows and MacOS platforms are all supported and appear instantaneously and present an almost lag free viewing experience.

The smart controller included with the KJM K3 looks like a standard app-enabled handheld with dedicated buttons for quick access to Netflix, YouTube, Prime Video, and casting alongside a four-area navigation wheel as well as buttons for power, Home, and volume.

KJM K3 Port Selection

Another distinguishing feature of the KJM K3 is its actual weight. While the projector is not as light as a pillow, it is surprisingly light for its appearance, enough so that my five-year-old could effortlessly move the device around the house at will. The roughly eight-pound projector evenly distributes its weight between the speaker arrangement and lens design which makes positioning or transitioning the projector around the house, backyard, or park environments pretty easy.

Image and Soud quality

The out-of-the-box set up process for the KJM K3 was about as streamlined as any traditional flat panel TV, which consisted mostly of connecting a power source, attaching a streaming box or stick (if desired) and selecting some settings info from the three prompts that appear in sequential order on the screen.

A lot of projectors opt for Dolby Vision support rather than HDR10 but when using the KJM K3, the slightly upscaled DV support wasn’t missed as the projectors HD10 images were vibrant and as close to DV support one can get without having to tweak and tune their settings out of the box.

Coupled with expansive color gamut and contrast ratio, the KJM K3 also boasts one of the brightest pictures available at 1500 ANSI Lumens for an LCD projector at this price. Watching content in both dark and lit rooms was easy and convenient and didn’t require a secondary light filter or adjustment moment for the KJM K3 as some other projectors may need when transitioning between lighting scenarios.

Kjm K3 Apps Platform

Admittedly, this is still a projector so daylight viewing is still obscured a bit by outside light and dark scenes can still tend to be washed out when viewing, despite its high Lumens count, but the HDR contrast helps salvage some of that viewing experience.

Some other convenient features of the KJM K3 include its Keystone correction, which is done electronically and, on the fly, to clear up some of the fuzzy edges that can appear when readjusting the distance between the projector and the screen.

In addition to lens correction, another key feature I found very useful was the speed at with the KJM K3 auto focused out of the box are anytime the positioning of the image was affected. Again, with an antsy five-year-old in the house, a projector can get bumped or displaced accidentally, but the KJM K3 was able to auto focus in under 3 seconds to maintain its clear picture throughout viewings.

Kjm K3 Auto Focus

There are viewing modes in the settings that offer a bit more tweaking that include a Gaming Mode, Sports, and Cinema, but they’re mostly a gradient of shading. The picture quality between the options doesn’t fluctuate much, which would be an issue if the out-of-the-box clarity needed more adjustments.

The KJM K3 is a forward-facing light projector with a large 3.4-inch lens that provides one of the clearest HDR10 supported images out of the box. The image from the KJM K3 can scale from 50 to 200-inch surfaces with a native 1080p resolution.

The biggest selling point of the KJM K3 is its JBL certified audio that delivers, especially when considering the cost of a home audio setup.

In addition to the JBL tuned speaker arrangement, the KJM K3 also supports Dolby Digital sound technology that ramps up the clarity of sounds and offers a facsimile of a three-point surround sound setup. Depending on where the KJM K3 is positioned in a room, viewers can experience a pretty immersive soundscape just from the speakers onboard the projector, however, there is support for 3rd party wired and wireless audio.

Kjm K3 Screen Casting

The sound from the KJM K3’s Speaker Mode is full and robust. The KJM K3 may lack a bit of the bass as dedicated subs, but it’s more than suitable for a single-family living room viewing experience as well as eliminating any lag that comes from directing video and audio through multiple sources.

Netflix shows like the Witcher, Bodyguard, and Luther: The Fallen Sun were all particularly good test beds for KJM K3 as they fluctuate between light and dark scenes as well as annoyingly soft whispers and loud action arrangements and the KJM K3 handily all with ease.

The biggest downside is the fan noise coming from the KJM K3. It’s loud and noticable when sitting next to the projector. If you happen to be privilaged enough to have the space to position it a few feet away, the fan noise becomes less of an issue.

The air filter in the KJM K3 is relatively thick and may be contributing to the loud fan noise as the projector tries to suck in and vent air through the device’s body.

Summary

When most home projector units’ range between $500 and $3,000, the KJM K3 is a steal with an early bird special price of $279. Even at a normal price of $558, the KJM K3 checks all the basic features list items as well as including some extras such as JBL tuned speakers, auto focus, Dolby Sound support and HDR 10 out of the box.

If you’re looking to replace an aging projector or if this is your first projector, I’d recommend giving this Indiegogo project a look. I’ve managed to use the KJM K3 at a park for my daughters Girl Scouts movie night and at home in various rooms for both gaming and movies.

If you’re considering a living room renovation and replacing your 50 to 60-inch flat screen with something a bit more flexible, the KJM K3 at $279 is a great testing device in my opinion.

MSI resolves Windows 11 ‘UNSUPPORTED_PROCESSOR’ BSoD issue with BIOS updates

MSI has identified and resolved the “unsupported processor” Blue Screen of Death (BSOD) issue with their Intel 700 and 600 Series motherboards. This issue seemed to be related to firmware settings associated with Intel Hybrid Architecture, and it only affected Intel’s 13th Gen Core i9 processors with specific versions of Windows 11 and Windows 10 updates.

2023 09 06 21 17 10

According to a report from last month, after updating to Windows 11 KB5029351, certain MSI motherboard users have experienced a “Blue Screen of Death” error. Upon installing the update, some Windows 11 users have been confronted with this error message: “UNSUPPORTED_PROCESSOR.”

The Blue Screen of Death (BSoD) is a screen of error that appears unexpectedly on a Windows computer. It is caused by a fatal error in Windows that prevents the computer from continuing to run.

MSI has taken action to resolve a problem by releasing BIOS updates for affected motherboards. These updates contain an update to the Intel CPU uCode, which will prevent any further “UNSUPPORTED_PROCESSOR” error messages. If you’re experiencing this issue, you can expect the updates to be available on MSI’s official website. All affected motherboard models will receive updates by the end of September.

via The Verge

Russia uses internet to stir global political instability, Microsoft claims

The digital world is not just about social connectivity or endless repositories of information, it’s a versatile battlefield where countries wage silent wars.

Microsoft Threat Analysis Center (MTAC) has shared an alarming example by publishing a report that underscores how Russia uses the internet to fuel political instability worldwide.

Today we are sharing a report from the Microsoft Threat Analysis Center (MTAC) on Russian influence operations in Africa, principally focused on the Niger coup. We believe it is vital there is a wider understanding of the ways in which the Internet is being used to stoke political instability around the world.

MTAC’s recent focus has been Africa, a continent stained by a rash of military coups in nations like Mali, Guinea, Burkina Faso, Niger, and Gabon.

One of the pointed-out events was the palace coup in Niger. The leaders cherry-picked oppressive measures to consolidate power – suppressing protests in Niamey, instating a curfew, and sealing the borders.

However, counter-protests emerged, proliferating pro-Russian sentiments and blaming France for the unrest. Behind the screens of these demonstrations, two distinctly pro-Russian organizations drew attention — PARADE Niger and the Union of Pan-African Patriots.

PARADE Niger, appearing to be a construct of the Russian Ministry of Foreign Affairs, masquerades as a local group, and the Union of Pan-African Patriots serves as a political vessel for one individual.

These entities have vociferously defended the coup, promoting a stronger allegiance with Russia while orchestrating and amplifying offline protests.

In the grand scheme of things, MTAC identified six primary ingredients in Russia’s “African coup cookbook.”

  1. Long-term Influence Campaigns: Russia and its African allies consistently churn out content that maligns France and glorifies Russia, focusing on polarising colonial-era issues.
  2. Alliance with the Putschists: Upon a coup’s occurrence, Russian entities rapidly announce support for the coup leaders, often through intermediaries.
  3. Narrative Control: Post-coup, Russian communicators monopolize the plot, exploiting the information vacuum by eulogizing the military and coup heads while derogating France.
  4. Amplifying Affiliates: With Africa being a longstanding playing field for Russian influencers, it’s easy to mobilize an array of figures to amplify their narrative and drown out competing discourse.
  5. Supporter Mobilization: Pro-coup demonstrations waving Russian flags to project an illusion of a widespread alliance between the masses, the coup, and Russian interests.
  6. Media Blackout: The immediate silencing of Western French-language news outlets like Radio France International and France 24 guarantees the repression of opposing narratives.

The report paints a grim picture of cyberspace hijacked for geopolitical maneuvering. With this revelation uncovered by MTAC, one can only hope that this insight could strengthen global cybersecurity measures and counter similar influence operations effectively in the future.

Upcoming Game Pass releases Payday 3, Party Animals will each have open betas this weekend

Two upcoming Xbox Game Pass games will have free open betas this weekend. Each open beta will be live between September 8-11—that is, between Friday and Monday.

The Payday 3 open beta begins 7am PT/10am ET/3pm BST. Besides being a great promotional tool, the beta will server as a server stress test. You can learn more, including where to sign up, over on the game’s official website. Payday 3 releases on September 21 for Windows, PlayStation 5 and Xbox Series X|S.

PAYDAY 3
PAYDAY 3
Developer:
Deep Silver
Price:
Free

As for the Party Animals open beta, this will be on a limited basis, so you’ll need to act quick if you want to take part. The beta opens at 5am PT/ 8am ET/1pm BST on Friday. The game launches on September 20. To learn more, including preorder info, check out this press release.

Party Animals
Party Animals
Developer:
Source Technology
Price:
Free

So will you be checking out either of these open betas this weekend? Let us know down in the comments section below.

Featured image via Charlie Intel. 

EU’s Digital Markets Act (DMA) targets Microsoft, Apple, four more

The European Union has announced new digital rules, the Digital Markets Act (DMA), to regulate online companies’ market power. These rules target six major tech companies, which have been classified as “online gatekeepers.” The six companies include Apple, Amazon, Microsoft, Google’s parent company Alphabet, Facebook’s owner Meta, and TikTok’s parent company ByteDance.

Gatekeepers? The DMA focuses on the most prominent digital platforms within the EU, commonly called “gatekeepers.” These encompass online search engines, app distribution platforms, and social media networks.

Things have barely begun, and Microsoft and Apple are already claiming that Bing and iMessage shouldn’t be considered “gatekeepers” as they are not big enough. Bing has a market share of 3% in the EU. In contrast, iMessage potentially has around 1 billion global users, though Apple has not disclosed recent figures.

Under the DMA, these gatekeeper companies will face the highest scrutiny within the EU. The DMA outlines regulations to prevent tech giants from dominating digital markets. It includes the possibility of imposing substantial fines and even requiring Big Tech companies to divest parts of their businesses to continue operating in Europe.

The Digital Markets Act (DMA) is a set of rules that will force these companies to make changes to the way they operate, such as:

  • Not stopping consumers from connecting with businesses outside their platforms.
  • Requiring messaging services to work with each other.
  • Banning platforms from ranking their products or services higher than their rivals’ in search results.
  • Not combining a user’s data to build a profile for targeted advertising.
  • Not installing essential software or apps, such as web browsers and the operating system, by default.

Companies that violate these rules may be fined up to 10% of their annual global revenue. Repeat offenders could face fines of up to 20% or divestiture.

via The Washington Post

Revolutionizing AI: Microsoft introduces a ‘Heavy Metal Quartet’ of Compilers

In a world where technology continues to lead every aspect of our lives, Microsoft takes another leap forward. The tech giant has recently upped the ante by unveiling a trailblazing suite of four new artificial intelligence compilers.

Clad in the appellation of the Heavy Metal Quartet: Rammer, Roller, Welder, and Grinder, these tools are certain to elicit a headbanging response in technology.

The fresh batch of compilers has been forged in the foundry of Microsoft Research in synchrony with various esteemed academic institutions. These new tools are formulated to optimize AI models’ performance by redefining the compilation process.

The compilation, fundamentally, is the transformation from source code—the human-readable—into machine code—the computer-executable, or a series of ones and zeros.

Microsoft Research blog post gleams with the breakthrough achievements of these AI compilers. Jilong Xue, Principal Researcher at MSR Asia, elucidates their functions.

The AI compilers we developed have demonstrated a substantial improvement in AI compilation efficiency, thereby facilitating the training and deployment of AI models.

In the future, these large-scale models themselves may inherently assist in achieving optimization and compilation.

The Heavy Metal Quartet: Optimizing AI Workloads

Each member of Microsoft’s “Heavy Metal Quartet” tackles distinct conundrums in the sphere of AI workload optimization.

  1. Rammer: This system maximizes hardware parallelism, a pivotal component in performance. Consider it like many hands working simultaneously to lighten the load and enhance efficiency.
  2. Roller: Roller focuses on fast-tracking the compilation process using a rapid construction algorithm. It is designed to create the AI program you need in seconds, not hours.
  3. Welder: It is the band’s memory conserver. Welder aims to mitigate memory-related overheads by connecting operators in a concentrated pipeline.
  4. Grinder: Grinder syncs control-flow execution with data flow, resulting in optimization across control flow boundaries—a maestro of sorts.

Testing of these compilers shows an impressive advantage over existing solutions. Rammer and Roller outperformed their competition by 20x and reduced time frames by orders of magnitude, respectively. Welder left its peers, including PyTorch, trailing with up to 21x efficiency on GPUs. Grinder, not left behind, accelerator models with control flow by an outstanding 8x.

Microsoft’s ‘heavy-metal quartet’ represents the company’s pioneer advancements in the AI industry. With the ongoing growth of the AI sector, these four tools could potentially solidify the company’s standing as a significant contender in the tech world.

Starfield’s full release goes live today – here’s everything you need to know to get started

The grueling wait for one of the most highly anticipated games in recent memory is finally over as Starfield’s release date is at last upon us. The early access period is over and the reviews are in. While it isn’t a complete blowout for Starfield in terms of the critical reception, overall the game has been received very positively. No doubt legions of gamers are raring to dive into Bethesda’s epic space RPG. If you happen to be one of them, then here are some things you need to know before playing Starfield.

How to Play Starfield

Starfield is available for Xbox Series X|S and Windows PC. It is a day one release on both console and PC versions of Xbox Game Pass. Various upgraded editions are also available on Xbox.com and other retailers.

Starfield
Starfield
Developer:
Bethesda Softworks
Price:
Free

Starfield release time in various regions

The early access period for those who purchased the Premium Edition started on September 1. For the rest of us, today’s full general release is here at last. The following are the release times for various time zones.

  • 5pm PST
  • 8pm (Tuesday, September 5) EST
  • 1am BST
  • 2pm CEST

Starfield Release Times Map

You need 125Gb SSD storage to install Starfield

That right: those 1,000 planets to explore will require a hefty chunk of storage. 125GB of it to be more precise, and an SSD will be required. The preinstall has been available for some time now, and if you haven’t started the download you need to do that yesterday.

And on that same note, below are the minimum PC specs you’ll need if you are playing the Windows version.

  • OS: Windows 10
  • Processor: AMD Ryzen 5 2600x, Intel Core i7-6800K
  • Memory: 16 GB RAM
  • Graphics: AMD Radeon RX 5700, NVIDIA GeForce 1070 Ti
  • Network: Internet connection required
  • Disk Space: 125 GB available space
  • Direct X: Version 12
  • Additional notes: SSD Required
  • Architecture: Requires a 64-bit processor and operating system

Starfield Early Access Custom

Some essential gameplay tips for Starfield beginners

  • Get in the habit of hard saving your game. Its a dangerous galaxy out there, and you never know when things might go sour. Don’t rely on the autosave feature.
  • Scan everything. As in similar games like No Man’s Sky, you can use your helmet sensor to scan things with a tap of the LB shoulder bumper including flora, fauna and entire planets. Use it.
  • Rest often. Like with past Bethesda RPGs, you can sleep to pass time and heal your character. Sleeping also bestows the “well-rested” buff which grants more XP. Don’t underestimate how much this will cumulatively add up if you rest often.

  • Remember to map favorite weapons and items. Also with other Bethesda titles, namely those in the Elder Scrolls and Fallout franchises, you can map weapons and items to the D-pad. This will make your life in Starfield much easier, especially in the midst of a firefight.
  • Put your companions to work for you. While they can be used a pack mules, companions can also be useful as fighting comrades if you take the care to manually equip them with some solid gear and weaponry.

  • Don’t be afraid to explore, but don’t forget the main storyline either. There are some worthwhile side quests with some worthwhile loot to be found. And since explorations is such a core part of Starfield, it would be a shame to miss out on what the game has to offer by simply sticking to the main quest. That said, the main quest is upwards of around 40 hours long. So it’s probably best to not get lost in those 1,000 or so planets to the point where you forget about the main objective. Rather, try to alternate between the main quest and gaining more XP and abilities through completing side missions and pure exploration for a smooth experience.

And there you have it—just a few essential tips that will prove particularly helpful for anyone who hasn’t experienced a Bethesda RPG before. Lastly is the most important tip of all: have fun out there in space.

Are you playing Starfield? What are your first impressions? Let us know in the comments below.

How to stop Microsoft Edge from automatically capturing screenshots of the web pages you visit – 2 concise solutions

Microsoft Edge frequently introduces fresh enhancements to enhance user satisfaction and bolster security. However, some of these additions might initially appear perplexing, such as the innovative “Save Screenshots of Sites for History” feature, which automatically captures and stores screenshots of the websites you visit.

In this blog, we will see how to stop Microsoft Edge from automatically capturing screenshots.

How does it operate?

The “Save Screenshots of Sites for History” feature in Microsoft Edge Microsoft Edge 117, currently accessible in the Canary, Dev, and Beta channels, incorporates a feature that captures a screenshot of every website you visit and appends it to your browsing history. This allows you to conveniently revisit a site by simply hovering over it in your history and selecting the thumbnail of the screenshot.

Nevertheless, the name and description of this feature have induced some confusion among users. The term “Save Screenshots of Site for History” might give the impression that the browser will automatically snap screenshots of every webpage you explore. However, Microsoft has not issued any statements to confirm this. 

Microsoft has not yet announced a release date for this feature in Edge Stable. Hopefully, they will introduce it in a refined form, along with an option to prevent the browser from capturing screenshots of specific websites.

How to stop Microsoft Edge from automatically capturing screenshots of the web pages you visit

Not everyone would want to have this feature, especially those who are content with the old history browsing method; if you’re one of those, do this:

1. Disabling Edge’s Screenshot Capture by Adjusting Edge Settings

The “Save Screenshots of Sites for History” feature remains deactivated by default in preview channels. However, suppose you have inadvertently enabled it, or Microsoft will retain it in the stable version. In that case, you can turn it off by following these steps:

  1. To launch Edge, click on the three horizontal dots at the window’s top-right corner.
  2. Select Settings. 3 Dots And Settings
  3. Navigate to Privacy, Search, and Services in the left sidebar.
  4. Toggle off the switch next to Save Screenshots of Site for History.How to stop Microsoft Edge from automatically capturing screenshots of the web pages you visit

That’s all there is to it! Microsoft Edge will no longer take screenshots of every website you visit.

2. Disabling Edge’s Screenshot Capture via Registry Editing

You can also prevent Edge from capturing screenshots of all the websites you visit by editing the Windows registry. Here’s how to do it:

Please be aware that editing the registry carries inherent risks, as a single incorrect edit can potentially destabilize your computer. Therefore, it is essential to back up the Windows registry and create a restore point on Windows before proceeding with the following steps:

  1. Press the Win + R keys simultaneously to open the Run dialog box.
  2. Type in the word “regedit” in the search bar and tap “OK.” bing chat button in microsoft edge
  3. In the Registry Editor, go to this location: Computer\HKEY_LOCAL_MACHINE\SOFTWARE\Policies\Microsoft
  4. Right-click the “Microsoft” key, hover over “New,” and select “Key.” 
  5. Name the key “Edge.”
  6. Right-click the “Edge” key, hover over “New,” and choose “DWORD (32-bit) Value.” Dword
  7. Name the value “ShowHistoryThumbnails.”
  8. Double-click the “ShowHistoryThumbnails” value in the right pane, set its value to “0,” and click “OK.” Then, restart your computer to apply the changes. Edit Dvalue

After rebooting your computer, you notice a lock icon next to the “Save Screenshots of Site for History” toggle. Hovering your cursor over the lock icon will reveal the message, “Your organization manages this setting.”

To reverse these changes, set the “ShowHistoryThumbnails” value back to “1” and click “OK.”

Preventing Microsoft Edge From Capturing Your Online Activity

The “Save Screenshots of Sites for History” feature is still in testing and has garnered mixed user reviews. Hopefully, Microsoft Edge will introduce a more polished version of this feature in its stable release. You can download Microsoft Edge from here.

Additionally, suppose it is enabled by default in the stable version of Edge. In that case, you can easily turn it off using the steps outlined above.

Note: as pointed out by Leopeva64, there’s actually a third way to turn these screenshots off, by opening the History Hub and toggling the “Turn off images on hover” button.

Tip of the Week #1: That function key most Office users don’t know about

Introducing Tip of the Week

Welcome to the first Tip of the Week article here at OnMSFT! I have recently joined the team having recently retired from Microsoft after more than 25 years. Since December 2009, I’ve been writing a weekly email that went out to thousands of ‘softies internally, and eventually made its way online and to LinkedIn. The Tips have always been about sharing something that readers might not have seen or known about previously, usually to do with Windows & Office, browsing and mobile. The tone is slightly irreverent and Tips are often peppered with links to funny or impudent links to other stuff, as well as referencing content that expands on a topic.

I’m delighted to bring the format here, and would love to hear your feedback or even ideas for future tips that we could share!

Every power user loves a function key or keyboard shortcut, right? Windows 11 has plenty of them, from the simple and venerable (Win+L to lock your computer, for when you’re in a shared space) to the more modern and esoteric (Win+Alt+B, to turn HDR on and off). Next time your laptop inexplicably has a blank screen yet you can tell it’s still running as the keyboard lights are still working, you could try force-restarting the graphics driver by pressing Win+CTRL+SHIFT+B. Yes, I bet you won’t remember that for the one time in a blue moon that you actually need it.

Press ALT in an Office app to see what keys you could combine to invoke menu commandsOf course, many apps have lots of shortcuts too – press the ALT key on its own in Microsoft Office apps and you’ll see, next to menu options, which key you could combine with ALT to invoke that command. Note that in the Quick Access Toolbar at the top, the commands can be started by pressing ALT+number, corresponding to each icon’s position in the toolbar.

A similar principle applies in all kinds of other places, too – in Outlook and Teams, for example, CTRL+number will jump to the nth option on the vertical bar to the left side (so unless you’ve reordered things, in Outlook, CTRL+1 normally willl give you mail, CTRL+2 calendar etc).

24 Function Keys on IBM terminal keyboard
T. Cowart – Flickr

Fn Function Keys

Of course, shortcut keys were predated with physical function keys, 12 of which are typically arrayed along the top of a standard PC keyboard. IBM used to have 1 or 2 rows of 12 “Programmable Function” or PF keys on their mainframe terminals, and applications could assign regular functions to each – which explains why the Function keys made it across to PCs, and even some of the default functions carried over – F1 for Help, for example.

Some function key combos go back to the very early days of Windows – like ALT+F4 to close an app or CTRL+F4 to close a window (other combinations were considered).

Function Key on Surface LaptopFunction Key lockFunction keys are a bit less relevant in the modern era since more users interact with mouse or touch than relying on shortcut keys, and lots of laptops have dispensed with dedicated function keys, preferring instead (like the Surface line) to double up F1-F12 with other keys dedicated to things like volume or screen brightness control.

And of course, when you want to use the actual Fn key, you need to make sure the Fn lock button is lit up on Surface laptops and the likes.

Still, if you can suffer the need to remember to enable Fn rather than turn the volume up, F4 on its own has a long and yet surprisingly little-known history in some Office applications – it repeats the last thing you did, if possible. It’s most useful for formatting tasks, like applying a specific color to a selected cell in Excel, or setting a style on a block of text in Word, especially when you need to repeatedly apply the same thing throughout a document.

Repeat the last command

Use cases for the “repeat command” function might be a little niche – if you wanted to make text bold or delete a line, it’s pretty straightforward to do it with other keyboard shortcuts, and it’s possible to use the Format Painter feature to apply the style of one block of text to another. Excel font dialogBut things like setting the same table style, or removing entire lines in Excel (for which there is no single-shot function or shortcut… there are several steps to invoke it and if you were taking out the occasional line throughout a large sheet, it can be pretty laborious).

Also, the “last command” is literally that – so if you made 2 or 3 changes to a shape or a block of content, then it would only apply the last one… unless all the changes were in a single dialog, like the Font dialog in Word (where you’d set numerous options on choice of font, size, color etc) or Format Cells dialog in Excel – if you apply a set of designs and Apply them, that will collectively count as a single action so F4 can be used to repeatedly assign them to whatever else you select elsewhere in the document.


Screen Time: Worrisome Statistics & Facts [Longterm Data]

Whether you are a teen or a septuagenarian, we all enjoy spending time in front of screens. Mobile phones, tablets, laptops, TVs, and computers are the most popular screens.

With the advancement of technology, it has become essential to explore the ever-evolving digital landscape and the alarming rates of screen usage.

This comprehensive guide will shed light on screen time statistics over the years with long-time insights, facts, and data supporting how it has affected our lives.

According to the American Academy of Pediatrics, a child between 2 and 5 should only be allowed to use the screen for 1 hour per weekday & 3 hours per weekend.

The younger kids should not have screen time at all. The school children’s daily screen time limit should be only 2 hours for non-school work.

According to a study by the National Heart, Lung, and Blood Institute, adults should limit their screen time to two hours or less per day outside work.

Screen Time Statistics (2013-2022)

Global Average Hours of Screen Time per Day

In 2022, the average time spent on screen worldwide is 6 hours 37 minutes, and since 2013, the daily screen time has increased by 28 minutes per day.

This is a report issued by GlobalWebIndex (GWI) indicating the rise and fall of screen time from 2013 to 2022:

YearTime ( HH: MM)Relative Y-o-Y change (%)
201306:09–
2014 06:233.8
201506:20-0.8
201606:292.4
201706:464.4
201806:480.5
201906:38-2.5
202006:554.3
202106:570.5
202206:37-4.8

With the COVID-19 pandemic, the world was in lockdown, and there was a striking surge in device usage and daily screen time globally.

It increased to 6 hours and 55 minutes in 2020, rose to 6 hours and 57 minutes in 2021, but decreased to 6 hours and 37 minutes in 2022 as everything started to normalize, a minute less than the time in 2019.

Another alarming impact of the lockdown was a 52% increase in average screen time consumption among kids, primarily due to online classes and their home confinement.

A study by JAMA Pediatrics shows that pre-pandemic, screen time, including televisions, computers, and smartphones, was an average of 162 minutes per day, which jumped to 246 minutes during the pandemic (more than 4 hours).

Mobile Device Usage Statistics

According to the Jan 2023 DataReportal report, the average mobile screen time of a user worldwide based on all activities is 5 hours per day.

If this average is to hold true, then we collectively spend 10 trillion hours on our mobile devices every year, which equates to 1.1 billion years of entire human existence.

The Indonesians spend 5 hours and 39 mins, the highest, and Chinese people spend 3 hours and 33 minutes, the lowest of all countries. Here is the complete data:

CountryTime spent (HH: MM)
Indonesia05:39
Brazil05:19
Saudi Arabia05:18
Singapore05:18
Average05:01
South Korea04:59
Mexico04:56
Australia04:54
India04:51
Japan04:48
Thailand04:40
Canada04:38
U.S.A04:21
Turkey04:18
U.K.04:14
France 03:52
Argentina03:51
Germany03:36
China03:33

An average user spends 30% of their waking lives using their smartphones.

According to Statcounter, in 2013, only 14.35% of the total web visits were by mobile, and it has surged to 55.45% as of August 2023, which is truly remarkable.

A survey conducted by Deloitte in 2022 says an average person in America checks their phone 47 times a day.

Social Media App Usage Statistics

According to Statista, in January 2023, Facebook, with 2958 million monthly active users, remains on the top of the chart, followed by YouTube with 2514 million and WhatsApp with 2000 million.

Here are the most popular social networks globally ranked by active users per month:

Users in the US spend 55.8 minutes on TikTok in 2023, making it the most-used app in the region. Here are the details for all popularly used apps:

With this, in January 2023, according to DataReportal, TikTok is also the most used social media app globally, with 23.5 hours of time spent per month. Here are the details:

Social media appTime spent in hours/month
TikTok23.5
YouTube23.1
Facebook19.7
WhatsApp Messenger17.3
Instagram12.0
Line11.0
Twitter5.5
Telegram4.0
Snapchat3.2
Facebook Messenger3.1

The highest social media usage was recorded in the Philippines at 4 hours and 12 mins, followed by Brazil at 3 hours and 39 mins, Columbia at 3 hours and 34 mins, and Nigeria at 3 hours and 26 mins. Here are the top 15 countries with social media usage in hours:

CountryTime spent (HH: MM)
Philipines 04:12
Brazil 03:34
Columbia03:31
Indonesia03:26
Argentina03:18
Nigeria03:17
Mexico03:12
Thailand03:11
Ghana03:07
Egypt03:04
Malaysia03:04
UAE03:01
Kenya02:59
South Africa02:59
Turkey 02:53

In 2013, digital users were spending an average of 1 hour and 37 minutes per day on social media, and it increased to 2 hours and 31 mins in 2022.

Video Game Usage Statistics

As per the Global Overview Report by DataReportal, the percentage of people playing games worldwide is 81.9%. Here is the list of countries with the same data:

Country Percentage of people playing video games
Philippines95.8%
Indonesia94.8%
Vietnam93.1%
Thailand93%
Turkey92.3%
India91.9%
Mexico91.3%
Taiwan91.3%
Saudi Arabia90.1%
South Africa89.7%
Brazil88.4%
U.A.E88.2%
Chile87.6%
Malaysia87.4%
Greece86.3%
Colombia84.8%
Portugal84.7%
Egypt83.4%
Romania83.3%
Hong Kong83.1%
U.S.A82.9%
Singapore81.7%
Poland80.9%
France80.8%
Italy80.6%
Argentina80.2%
Spain79.8%
Canada79.5%
Russia79.5%
Sweden78.4%
Israel78.3%
South Korea77.9%
Switzerland77.6%
New Zealand75.9%
Czechia75.5%
Austria75.2%
Netherlands75%
Australia74.6%
Germany74.3%
Denmark72.7%
U.K.72.4%
China72.1%
Ireland72.1%
Belgium69.5%
Japan66.4%

Don’t you think every country on the list should take a preventive measure, given the long-term adverse effects?

If we talk about the age distribution of individuals playing video games on any device, 89.7% of males and 87.3% of females between the age of 16-24 are leading the statistics. Here is the complete data as of January 2023:

US vs. The Rest of the World Screen Time Statistics

In 2022, upon segregating the daily screen time for users aged 16 to 64 on any device across different countries, it was found that South Africa had the highest screen time, i.e, 10 hours 46 mins, while Japan had the lowest, with 4 hours 26 mins, and the U.S.A with 7 hours 5 mins.

However, the latest report from GWI in January 2023 indicates that the numbers are going down, suggesting that the pandemic impact is slowly wearing off.

The updated average screen time by country statistics shows the United States at 6 hours 59 mins, South Africa still leading with 9 hours and 38 minutes, Japan still maintaining its position at 3 hours and 45 minutes, while the global average time spent is 6 hours and 37 minutes, which is 21 minutes less than in 2022. Here is the latest data for all countries:

CountryTime spent (HH: MM) (2022)Time spent (HH: MM)(2023)
South Africa10:4609:38
Brazil10:1909:32
Philippines10:2709:14
Argentina09:3809:01
Colombia10:0309:01
Mexico08:5508:07
Malaysia09:1008:06
Thailand09:0608:06
Russia07:5007:57
Indonesia08:3607:42
Egypt08:0207:41
Portugal07:5607:37
U.A.E.08:3607:29
Turkey08:0007:24
Saudi Arabia08:0507:20
Taiwan08:0707:14
Israel07:3507:08
Romania07:0907:03
U.S.A.07:0506:59
Singapore07:2906:59
Poland06:3906:42
Canada06:4506:35
Hong Kong06:4606:26
India07:1906:23
Vietnam06:3806:23
New Zealand06:2306:12
Sweden06:2206:02
Greece06:0606:00
Ireland06:3005:59
Italy06:0905:55
Australia06:1305:51
U.K.06:1205:47
Spain06.0405:45
Switzerland05:4405:38
Belgium05:4505:27
Netherlands05:1105:27
France05:3405:26
China05:1205:25
Austria05:4205:22
South Korea05:2905:21
Germany05:2205:12
Denmark05:0204:58
Japan04:2603:45

The average time spent has decreased for most of the countries except China (5:25) and the Netherlands (05:27).

On an average, Americans check their smartphones every 4 minutes.

With a whopping 44.39% daily screen time, Indians use social media the most, followed by Indonesians, i.e, 42.86%, while the average screen time worldwide is 38.04%

And, with an average of 2 hours and 16 minutes, Americans use 32.46% of their screen time with social media, followed by the British, whose 1 hour and 56 minutes are taken up using social media platforms.

A US teenager spends 7 hour 30 minutes in front of a screen every day.

Based on Pew Research conducted from Jan 2021 to Feb 2021, this study also indicates that 31% of Americans are always online, and 48% go online several times a day. Here is the data:

Digital Device Usage by Age Group (Children)

According to a Children and Parents: Media Use and Attitudes 2023 report by Ofcom, mobile phones (69%) and tablets (64%) were the most used devices to go online among kids aged between 3-17 years.

Approixmately 49% of 0 to 2-year-olds engage with smartphones

68 percent of children between the age of 7-18 own or have access to different devices, including mobile phones, tablets, gaming consoles, and handheld players. Here is the detailed data

DevicesAccess Own
Tablet74%59%
Laptop or Notebook67%43%
Games console/player77%68%
Smart speaker56%35%
Desktop 51%23%

The majority of children aged 3-17 (85%) watched programs or movies using a TV set, but a substantial portion (80%) also accessed the content via other devices, including 50% of them using tablets and 46% a mobile phone. Here are the details:

DevicePercentage used to watch TV or films
Television set85%
Tablet50%
Mobile46%
Games Console26%
Computer23%

US teen (13-18) spends an average of more than 8 hours per day on screen for entertainment; tweens (8-12) are reported to be looking at the screen for approximately 5 hours daily, apart from their school work.

Despite YouTube claims that it is intended for aged 13 or older, 76% of 8 to 12 years old watch videos on the site, the rest mentioned using the YouTube Kids app.

As the device most used by kids, we have divided them into five groups 3-4-year-olds, 5-7-year-olds, 8-11-year-olds, 12-15-year-olds, and 16-17-year-olds. Here are the details:

Age groupMost used deviceGoing onlinePlaying gamesWatching TV
3-4-yearTablets75%50%67%
5-7 yearTablets86%67%67%
8-11 yearTablets70%69% used consoles instead 55%
12-15 yearMobile phone96%68%63%
16-17 yearMobile phone97%67% used consoles instead67%

Kids spending more time on screens can be perturbing for their parents; therefore, monitoring their activities can help them control screen time and ensure a healthier balance in their daily lives.

Increase in Mobile Phone, Tablet, and PC Use During the Pandemic

According to GWI report 2022, the pandemic profoundly impacted global television habits, and popular online streaming platforms like Netflix and Disney+ took up to 45% of the total TV viewing time of working-age internet users.

However, traditional television (cable channels and broadcast) still occupies the other half.

According to DataReportal Global Overview report in January 2023, 56.9% of daily time spent on the Internet by users aged 16 to 64 globally is via mobile while 43.1% is on computers.

Research by the National Library of Medicine indicates that Americans in their early twenties spent an average of 28.5 hours per week on their smartphones in 2020, 2.6 hours more than in 2018.

A broad survey by GWI in 2021 indicates that despite the decline in ownership of laptops and desktop, it is still used the most to go online; here is the data to specify the time spent on devices over the years:

Devices Used 202120222023
Mobile Phone (Any)97.1%96.6%92.3%
Smartphone96.6%96.2%91.0%
Laptop/Desktop64.4%63.1%65.6%
Connected Television14.4%15.5%31.9%
Smart Watch or Smart Wristband23.3%27.4%28.6%
Tablet device34.3%34.8%27.3%
Smart Home device 12.3%14.1%15.4%
Games console21.4%20.8%12.7%
Feature phone9.0%8.8%5.2%

Negative Effects of Too Much Screen Time

The latest screen time statistics show that the amount of time spent in front of a screen decreases to an extent as the world adjusts to the new normal.

However, the numbers are still concerning, as excessive screen time could have harmful effects, especially if it becomes a habit. Some of the adverse effects are:

  • Poor posture and eye strain.
  • Increases the risk of cyber threats.
  • It might disrupt your sleep as the blue light may interfere with melatonin production, making it difficult to slow.
  • Symptoms of anxiety, depression, or feeling lonely.
  • May reduce face-to-face conversation, affecting interpersonal & social skills.
  • Replaces the physical activities, leading to a sedentary lifestyle.

Decreasing screen time is important for our mind and body’s health and development. If you can’t control your screen time, use an app to help you remind you or switch from normal mode to focus on your device to avoid distractions.

You can also check the latest technology addiction statistics so that you know how important it is to use devices responsibly.

In case you are interested in more such statistics, like how many computers are in the world, check out this guide.

If you have any questions about the data presented or want more information about screen time statistics, please mention them in the comments section below.

3 Quick Ways to Disable Transparency Effects on Windows 11

Transparency effects enhance the visual appeal of Windows 11, especially the Taskbar, Start Menu, and sign-in screen. But we all have different preferences. And for those who don’t like it, disabling transparency effects in Windows 11 won’t take much time.

When disabled, the background colors won’t influence the color scheme of the OS components, and it would take a rather opaque form. Besides, here are the primary benefits of disabling transparency effects in Windows 11:

  • Transparency effects in Windows 11 may affect performance and slow down older PCs.
  • Increased power consumption and reduced battery life, though it’s not noticeable in most cases.
  • Animations feel smoother and seamless.

How do I turn off transparency effects on Windows 11?

1. From the Personalization settings

  1. Press Windows + I to open the Settings app, go to Personalization from the navigation pane, and click on Colors.colors
  2. Turn off the toggle switch for Transparency effects, and you should immediately notice the taskbar or search bar change color.disable transparency effects in Windows 11

2. Via the Accessibility settings

  1. Press Windows + I to open Settings, select Accessibility from the left, and then click on Visual effects.visual effects
  2. Disable the toggle for Transparency effects.

When you turn off transparency effects in Windows 11, the Settings app becomes slightly dull and loses that default bright appearance, and the same applies to taskbar transparency.

3. Modify the Registry

Tip icon Tip
Before you proceed, create a restore point to be able to revert the changes in case something goes wrong.
  1. Press Windows + R to open Run, type regedit in the text field, and hit Enter.regedit
  2. Click Yes in the UAC prompt.
  3. Paste the following path in the address bar and hit Enter: HKEY_CURRENT_USER\Software\Microsoft\Windows\CurrentVersion\Themes\Personalizepath
  4. Double-click the EnableTransparency DWORD on the right, enter 0 under Value data, and click OK to save the changes.change to disable transparency effects in windows 11
  5. Re-login to the user account or restart the PC for the changes to come into effect.

If you want to re-enable the transparency feature, simply change the Value data for EnableTransparency to 1 or modify the dedicated setting. 

Remember, you don’t necessarily have to disable transparency effects across Windows 11. You can have a transparent taskbar while other elements remain translucent or opaque, achievable through the Registry Editor.

Also, a feature linked to transparency, Windows Aero, can be enabled for better animations. If that doesn’t do the job, check some reliable Windows 11 extensions that will help customize components and personalize the OS. 

For any queries or to share your thoughts on the transparency feature and color settings in Windows 11, comment below.

Microsoft Teams unveils $0.03 per-minute ‘Recording and Transcript’ APIs for meeting insights

Microsoft Teams is introducing Recording and Transcript APIs to enhance the meeting experience and provide valuable insights for developers and users.

Developers can use these APIs to quickly generate meeting summaries, including key points, action items, and questions, and even capture meeting highlights. This feature can ensure that important information from meetings is not lost and can be easily referenced later.

These APIs can help you understand how people in a meeting feel and how engaged they are. It’s like understanding whether they are happy, excited, or bored during the conversation. This information can help determine how well the meeting is going and how people react to the discussion.

By analyzing previous meeting content, these APIs enable the generation of insights for follow-up actions. For example, in a sales context, the API could suggest what topics or strategies to discuss in the next sales call based on the outcomes of previous meetings. In the case of interviews, it can provide insights for improving the interview process.

The pricing for the Microsoft Teams Recording and Transcript APIs, as of September 1, 2023, is as follows:

  1. Recording API: This API is priced at $0.03 per minute. This pricing applies to fetching and managing meeting recordings programmatically using the API.
  2. Transcription API: The Transcription API is priced at $0.024 per minute. Transcription involves converting spoken words in the meeting into text, making it searchable and accessible.

The pricing seems to be reasonable. These features ultimately aim to make meetings more productive by automating tasks like note-taking and action item tracking, allowing users to focus on collaboration and problem-solving. 

Microsoft to build an AI and Copilot Extensibility Dev Program, scouts Dona Sarkar as lead

In a development planned to buoy tech developers, Microsoft is set to infuse new life into its Copilot services. The tech giant recently announced its latest endeavor – the “AI and Copilot Extensibility Dev Program.” This initiative is aimed at supporting developers as they delve into and expand Microsoft’s AI-based Copilot services.

At the heart of this innovative program will be a well-recognized face—Dona Sarkar. Renowned for her leadership at the Windows Insider Program, Sarkar spilled the beans on her new role through a LinkedIn post.

I started writing code in 1998 (!) and over the past 25 years (!!) I have seen the magical things that being a developer can do…I’m headed back to my dev roots.

The role will see Sarkar report directly to Microsoft’s office of its Chief Technology Office and all of Copilot’s owners. Designed to facilitate third-party developers, the program is intended to broaden access and enhance the functionality of Copilot services.

According to her, the goal is to enable developers to leverage their data to create AI-fueled products.

A Sneak Peek Into Future Endeavors

In anticipation of progress, Sarkar promised:

You will be seeing a lot of tutorials, blogs, videos, code samples, skilling stuff and experimental content from me in the upcoming weeks culminating in a big launch moment at MS Ignite on November 15th.

The official program launch is planned for Microsoft’s Ignite conference scheduled for November 15.

Sarkar’s leadership of the Windows Insider Program spanned over three years until her transition in 2019 to oversee the advocacy and evangelism for the Microsoft Power Platform. She made another strategic move in 2021, assuming the role of Director of Tech for Microsoft Accessibility.

Balancing Excitement and A Tinge of Sadness

While expressing immense excitement about this new opportunity, Sarkar also revealed a sense of sadness. She remarked:

I have loved my 2.5 years in Accessibility. I have never learned so much about the human impact of tech before, and you know I will forever focus on making sure that people with disabilities, neurodiversity, and mental health have equitable access to tech.

Developers intrigued by the possibilities of extending Copilot services are invited to take part in a poll. Sarkar encourages participation, as it provides valuable insights to inform her AI developer strategy.

The move presents an exciting new chapter at the intersection of AI and the developer community. Stay tuned for more updates as the story unfolds.

Zoom revamps AI features, introduces the AI Companion and Zoom Revenue Accelerator

In a recent press release, Zoom revealed exciting updates to its AI-powered assistant Zoom IQ now rebranded as the AI Companion.

The update aims to provide users with an improved, immersive communication experience by integrating AI Companion into the Zoom ecosystem, including Zoom Whiteboard, Zoom Team Chat, and Zoom Mail, Tech Crunch Reported.

Zoom’s goal is to invest in AI-driven innovation that enhances user experience and productivity while prioritizing trust, safety, and privacy.

Initially, the AI Companion will function as a ChatGPT-like bot, expected to launch in spring 2024. The conversational interface integration allows users to directly chat and question the AI Companion about past meetings and chats or even perform actions on their behalf.

For example, users can inquire about the project’s status or ask for meeting summaries.

Apart from this, the AI Companion offering suggestions in Team Chat is another anticipated feature that will provide real-time evaluations of users’ presence in meetings and coaching on their conversational and presentation skills.

However, considering potential privacy concerns, Zoom assures that these real-time feedback services can be activated or deactivated by an account owner or administrator according to their preference.

Complementing Zoom’s messaging app, Zoom Team Chat, users will soon be able to summarize chat threads through the AI Companion. Moreover, by early 2024, auto-complete chat sentences will be incorporated, providing an experience similar to Microsoft Teams and Google Meet’s AI-generated replies.

Zoom Whiteboard, the company’s collaborative whiteboarding tool, will also receive an AI-infused update by spring 2024, where the AI Companion will populate templates and generate images. However, what AI model will power this feature remains unclear.

In terms of email client Zoom Mail, users will receive AI-generated email suggestions from the AI Companion by early fall, similar to the previous provision by Zoom IQ. Furthermore, the feature to add meeting summaries and summarize SMS threads from Zoom’s VoIP service, Zoom Phone, is expected by spring 2024.

The AI Companion features will primarily be accessible from Zoom’s app’s side panel. However, the catch here is that only paying Zoom customers will be able to take advantage of them.

Zoom also announced the rebranding of ‘Zoom IQ for Sales’ to ‘Zoom Revenue Accelerator.’ Initially poorly received due to controversial sentiment analysis algorithm usage, Zoom shifted its focus towards more common use cases.

New features include a “virtual coach” to simulate conversations for onboarding and training the sales team, deal risk signals, and competitor mention trends.

With these cutting-edge updates, Zoom is undoubtedly trying to regain its video-communication market share, leveraging advanced AI technology to enhance the virtual experience of its users. Time will tell how well these new features, especially the AI Companion, will be adopted by users worldwide.

Minecraft to get an Xbox Series X|S upgrade

It looks like Minecraft will finally be getting a current-gen upgrade. That’s according to an ESRB rating for the game on the Series X|S platform which has recently appeared.

A similar rating has also shown up for Germany’s USK ratings board, as was reported a few weeks back. In each case the rating description details some gameplay aspects, but does not divulge any new features that might be included with a current-gen version.

Minecraft Rtx Ray Tracing Demo Screenshot 2

One new graphical enhancement that Minecraft fans would likely expect to see is ray-tracing. This has already been demoed, and the results were pretty spectacular. The feature is already available in the Windows version of Minecraft.

At this point it remains unclear if the new current-gen upgrade for Minecraft would become available on other platforms like the PlayStation 5. Though at this point it’s worth noting that nothing whatsoever has been officially announced regarding a native Xbox Series X|S Minecraft version by either Microsoft or developer Mojang Studios.

Microsoft doubling the OneDrive photo storage count: A change on the horizon?

In an anticipated shift in OneDrive’s storage policies, Microsoft unveiled its new approach to managing photos across its cloud-based storage platform. Starting Oct. 16, 2023, each picture uploaded to OneDrive will count twice against the user’s storage quota. The move, Microsoft stated, is aimed at “improving your Microsoft 365 experience.”

The specifics of the change were outlined in an email shared by Dr. Windows, illustrating that the data from photos saved in the “Gallery” and in the “Albums” features would count separately against the storage quota. The result is an unexpected doubling of the apparent storage taken up by the same photo.

For the unfamiliar, the Gallery feature is OneDrive’s default destination for all uploaded images. Meanwhile, the Albums feature, an optional addition, allows users to construct customized collections of pictures.

In response to potential concerns about increased data consumption, Microsoft offered a reassuring message in its email. To soften the transition period, users will receive a one-year storage boost to help adapt to the new storage policies.

Nonetheless, specifics surrounding the size of this storage boost and how it will be distributed were left unsaid. Users should be mindful that the additional storage is temporary and will expire one year after it is assigned to the account.

However, there’s a potential benefit hidden in this change. This alteration implies that users can keep photos in Album even if they choose to remove them from Gallery, and also the other way around – a level of flexibility users might appreciate.

The company’s drive for change doesn’t seem to stop at this policy shift. Recently, a leaked video hinted at an upcoming OneDrive-related announcement set for October 3rd.

In conclusion, while these changes may initially seem odd to OneDrive users, Microsoft’s decision may offer nuanced benefits. The one-year storage boost should provide a fair buffer period for users to adjust their cloud storage practices, while the potential AI upgrade may open up new avenues of user experience.

Stay tuned with us for more updates on these developments.

Microsoft Teams Exploratory: Everything You Need to Know

Microsoft Teams can be improved with Microsoft Teams Exploratory which gives you a trial access to some of the Microsoft apps. The list includes 18 different services, such as Exchange, Sway, Forms, Planner, StaffHub, Power Apps, Insights, and more.

Before you can use it, you need to have an active and managed Azure AD domain email address and a paid subscription to Office 365.

You also can’t have an active Teams license or be a tenant where a license assignment policy was created. Also, users who have used a trial license or a part of Syndication Partner Customer or a GCC, GCC High, DoD, or EDU are ineligible.

How do I get a free exploratory license for Teams?

1. Steps for administrators

  1. Navigate to your browser and log in to the Microsoft 365 Admin Center.
  2. Click on Settings then select Org settings.
  3. Navigate to the Services tab and check the Let users start trials on behalf of your organization option.

2. Steps for users

  1. Navigate to your desktop app or web browser and sign in to your Teams account. Remember to use your Azure Active Directory credentials. (Mobiles are not supported).
  2. You’ll be assigned a license automatically, and your organization admin will get a notification.

Remember that once the first user in an organization has signed up, the 12-month period also begins for all other users, regardless of whether they’ve started using it or not.

What are some of the benefits of the Exploratory Trial?

  • You’ll get a fully functional version of Microsoft Teams, and your team can use it for free for up to a 12-month trial period.
  • The exploratory experience gives you a sense of how well Microsoft Teams works with your current hardware and software environment before committing to an upgrade. For instance, you can try Teams on Chromebook and observe if there are any issues.
  • You can install the software on multiple devices with up to 100 users.
  • Allows for cost-saving as the grace period time frame is enough to cover an entire financial year that would have otherwise been used to try out new products with shorter trial periods.

What happens when Microsoft Teams exploratory trial expires?

Once your trial period elapses, Microsoft is gracious enough to give you another 30-day grace period, but you will lose access to the Office 365 apps.

Thereafter, you have another 30 days, and failure to renew your license within 60 days after the expiration will result in your data being deleted.

This offer put Teams way ahead of its other noteworthy competitor Skype. You can check out our comprehensive side-by-side comparison of Teams vs Skype if you’re still not convinced.

Before you leave, don’t miss our guide on how to create and manage teams in Microsoft Teams. We also have a guide on how to enable Microsoft Teams Together mode.

Have you gotten to testing the Microsoft Teams Exploratory experience yet? What are your thoughts, and would you consider upgrading your subscription after the trial period? Let us know in the comment section below.

How to Migrate Your Emails From Hotmail to Outlook

Hotmail was the name of Microsoft’s email service, but it has since been replaced by Outlook, so it’s no surprise that many users want to change their account from Hotmail to Outlook.

There are several reasons why you should make the change, and we’re going to go over them before we show you how to migrate to Outlook.  

Why migrate from Hotmail to Outlook?

  • Hotmail service has been discontinued, so your email address might look outdated to some.
  • Outlook address looks more professional.
  • There are no security or functionality benefits since Outlook is the successor to Hotmail and it uses the same infrastructure.

How do I transfer my emails from Hotmail to Outlook?

1. Create an alias

  1. Navigate to Outlook’s web page and log in with your current Hotmail account.
  2. Next, click your profile icon in the top right corner and choose My Microsoft account to edit your mail settings.
     
  3. Navigate to Your info and then select Edit account info to edit email properties.
  4. You should now see your Outlook email address. In the Account alias section click on Add email.
  5. From the list of options, you need to pick Create a new email address and add it as an alias. Enter an original email address and click Add alias.
  6. After doing that, you’ll have an alias ready that you can use instead of your primary address.

2. Export the emails manually

  1. Make sure that your Hotmail account is properly added to Outlook.
  2. Next, navigate to File and select Import and Export. Lastly, choose the Export to a File option.
  3. Access the data file and choose the desired account.
  4. Choose the save location.
  5. Configure Outlook for Exchange Online.
  6. Lastly, add the required PST files and copy them to the Exchange account. After that, the emails will be moved to the current email address.

3. Use Directory Synchronization

  1. Enable Directory Synchronization in Microsoft Online.
  2. Start the Microsoft Online Services Migration Tool and install it.
  3. Next, go to All Programs and choose Online Microsoft Service.
  4. Select Sign in and enter the following data as follows:
    • Set your Hotmail email account as Sourceidentity and SourceLoginID.
    • Next, set the Microsoft Online Services email address as Targetidentity
  5. After entering the email ID and password, the sync should be complete.

How do I merge Hotmail and Outlook?

It’s not possible to merge Hotmail and Outlook accounts into a single account. If you want to move your emails from Hotmail to Outlook, it’s best to use an alias.

Alternatively, you can manually migrate Hotmail to Outlook, or use email migration software.

While it’s possible to move emails from Hotmail to Outlook manually, Microsoft advises using the alias instead since you’ll get a new Outlook address while keeping all your emails, calendars, and other data.

Migrating from Hotmail to Outlook is seamless, but emails might get lost, and if that happens, we have a guide on recovering old Hotmail emails from Outlook. In case you’re using Gmail, migrating from Gmail to Office 365 can be more complex, but we have a guide for that as well.

Do you know any other method for switching from Hotmail to Outlook? Don’t hesitate to let us know in the comments below.

Could an AI-enhanced WordPad be coming with Windows 12?

As you might already know, Microsoft decided that WordPad had a long life, but now it’s time to move on. On September 1, the Redmond-based tech giant released a note announcing that WordPad will be removed in a future release of Windows.

WordPad is no longer being updated and will be removed in a future release of Windows. We recommend Microsoft Word for rich text documents like .doc and .rtf and Windows Notepad for plain text documents like .txt.

Microsoft

Microsoft advises you to use Microsoft Word and Windows Notepad when you work with documents from now on, efficiently taking away the free text editor in lieu of Word (which has to be paid in order to use) and Notepad (which doesn’t have the capabilities of WordPad, but hey, autosave will be coming to it soon).

In other words, if it’s free, it has no purpose, otherwise, there are no other reasons why is Microsoft killing one of its most useful apps. If this is a way Microsoft is forcing people to pay for a subscription to use Microsoft Word, then by all means, it will be working. Unless Google Docs somehow becomes more popular.

Or, but this is just a theory: Microsoft might actually retire WordPad, so it can release an improved version of it, under another name, which will have AI capabilities. Is this too much? We think not. Here’s why.

An AI-enhanced WordPad in Windows 12?

A future release of Windows basically means Microsoft intends to retire WordPad in Windows 12. So far, all we know about Windows 12 is that this operating system will heavily feature AI capabilities. What we also know is that we’ll get the first hints of it in 2024, so just a few more months until then.

However, think of all the AI coming to Windows 12: we’re going to have Windows Copilot, Microsoft Edge, and Microsoft 365 apps with AI-enhanced features. AI will basically be everywhere.

But here’s the catch: While Windows Copilot and Microsoft Edge might be free to use, we’ll still need to use Word if we want to process texts. However, if you don’t use Word that much, and you don’t want to pay for it, you currently have WordPad, which can help you with a lot of text processing for free. wordpad windows 12

Windows 12 won’t have WordPad anymore, so you will basically have no other options to process your texts, other than using Google Docs or actually paying for a Microsoft 365 subscription. Wouldn’t it be nice if Microsoft released an AI-enhanced WordPad with Windows 12?

It would be free, of course, and its AI capabilities would be limited: suggestions, corrections, and some layout editing here and there. This WordPad on Windows 12 would be a total winner. Plus, if they want to, then Microsoft can add several other features in a Premium one-purchase edition. But at least, we would have a free text processor.

What if Microsoft is actually thinking about adding an AI-enhanced WordPad in Windows 12? I wouldn’t be surprised. What about you? What do you think?

4 Ways to Share a Contact Group or Distribution List in Outlook

Outlook remains one of the most popular webmail services, hosting a wide array of additional features. Given the over-reliance on it for day-to-day tasks, it’s imperative to know how to use some of these. And today, we will explore all the ways to share a contact group in Outlook.

Previously known as a Distribution List, the contacts folder or group is used to send an email to several people at once. And when you share the contact list with others, they, too, can send emails to the same set of email addresses. So, let’s find out how you can share Outlook’s contact group.

How can I forward a contact group in Outlook?

1. Drag and drop

  1. Open Outlook, go to the Home menu, and click on New Email.new email
  2. Go to the People tab, select the contact group you want to forward, and then drag and drop it to the subject section of the email message window.
  3. Fill out the various details, if required, and send the email.
  4. If facing issues with the drag-and-drop functionality, you could use Snap Layouts to open both the contact folder and the email message side-by-side.snap layout

2. Use the Forward functionality

  1. Open Outlook, go to People from the navigation pane, and locate the contact group you want to share.people
  2. Right-click on the desired distribution list, hover the cursor over Forward Contact, and select As an Outlook Contact from the context menu.share contact group as an Outlook contact
  3. Enter the recipient’s email address, include a subject or add a message body if required, and click the Send button.share contact

An easy way to share individual contacts or the entire address book is to utilize the Forward functionality. You can only share the groups as an Outlook contact, while for personal contacts, there’s also the option to forward them as a Business Card. 

3. Share from the contact group’s dedicated settings

  1. In Outlook, go to the People tab from the left, and double-click the contact group you want to share.
  2. Click on Forward Group, and select either In Internet Format (vCard) or As an Outlook Contact from the menu. In the Internet format, it’s shared as a text file (.txt), while for Outlook contact, the format is Outlook item.forward
  3. Once done, fill out the other details, including the email address of the receiver, a subject, and the message body (if required), then click Send.

4. Insert the contact group into an email

  1. Open Outlook, click the Home menu at the top left, and then select New Email.
  2. Go to the Insert menu, and click on Outlook Item.outlook item
  3. Choose Contacts under Outlook Data File, then select the distribution list you want to share, and click OK.share share contact group in outlook
  4. Fill out the other vital details, and send the email with the list of contacts.

For those wondering how to forward a contact group in Outlook, you can share the entire distribution list in one go in an email. Just load the contacts, and you are good to go! Besides, you can always share a single contact as an email attachment.

Why can’t I share a contact group in Outlook?

  • Local misconfiguration: Often, misconfigured settings at the user’s end trigger issues when sharing a contact group in Outlook.
  • Missing folder permissions: Sometimes, we can’t share data in Outlook due to the absence of critical permissions.
  • Corrupt user profile: When the profile is corrupt, you are bound to face issues working on the email client. An easy solution is to rebuild the Outlook profile. 
  • Issues with Outlook installation: A few users reported problems with the app installation to be the underlying cause. Simply reinstalling Outlook does the trick!
  • Policies set by the administrator: If you can’t share stuff in Outlook, check with the system administrator because they may have configured policies to restrict this action.

To sum up, you can share a distribution list in Outlook with peers in no time. And if you are the one receiving, it’s just as simple to download Outlook contacts. Besides you can also export the Outlook distribution list to Gmail if you prefer the latter for sharing.

Amongst the host of features, we recommend adding a shared inbox in Outlook as it will boost the team’s productivity.

For any queries or to share your favorite method to share Outlook’s contact group with us, drop a comment below.

How to Open Multiple Outlook Windows on Windows 11

If multitasking, sometimes you need to open multiple Outlook windows to optimize your workflow, and in today’s guide, we’re going to show you how to do that properly.

This has several benefits, so let’s take a closer look at them before we see how to use this feature.

Why open multiple Outlook windows?

  • Improved multitasking by having two or more emails opened simultaneously.
  • Ability to have a separate window for each folder.
  • Faster switching between open windows.
  • Ability to use Windows window management features such as snapping.

How do I open multiple Outlook windows at the same time?

1. Use the Open in New Window option

  1. Open Outlook and right-click the folder that you want to open.
  2. Choose Open in New Window from the menu.
  3. The folder will now open in a new window and you can easily switch to it.

2. Create a new shortcut

  1. Right-click on Desktop, choose New, and then select Shortcut.
     
  2. Click on Browse and locate the Outlook exe file. We used the following path as an example: C:\Program Files (x86)\Microsoft Office\Office15\
  3. Now add one of the following flags at the end to open Outlook in a separate window:
    /select Outlook: Inbox
    /select Outlook: Calendar
    /select Outlook: Contacts
    /select Outlook: Tasks
  4. Add the desired name for the shortcut and click on Finish.

By using shortcuts, you can set Outlook to open multiple windows automatically.

3. Open the email in a new window

  1. Locate the email message you want to open in a new window.
  2. Double-click it and it should open in a separate window.
  3. If that doesn’t work, select the email message and click Open in the new window icon.

As you can see, if you want to open emails in separate windows, you don’t need to start another instance of Outlook.

Now that you know how to open two Outlook windows at the same time, you can easily view multiple calendars in Outlook, or add multiple email accounts to Outlook.

If you want to take your Outlook knowledge to another level, we have a great guide on how to send Outlook invite with multiple times, so be sure not to miss it.

What method do you use to open multiple Outlook windows? Don’t hesitate to let us know in the comments section.

How to Watch Australian Survivor in Canada

Australian Survivor streams are geo-blocked. So if you try to watch it outside Australia, you’ll get an error message.

But there’s a way past that. We’ll explain below how streaming platforms learn your location and what you can do to trick them.

We’ll show how to watch the show on 10 Play because it’s fairly easy to unblock and broadcast all seasons for free.

Let’s get started.

How to watch Australian Survivor in Canada?

All you need to watch Australian Survivor in Canada is a VPN. It encrypts your internet traffic and routes it through local servers in your selected country.

Therefore, by connecting to an Australian server, sites like 10 Play will think you’re located in Australia.

For an error-free experience, we recommend you:

Use CyberGhost

CyberGhost has over 200 servers in Australia and offers fast and secure connections.

Here are the simple steps to get set up:

  1. Subscribe to CyberGhost VPN. Choose a plan that suits your needs.
subscribe to cyberghost vpn
  1. Download and install the CyberGhost app.
  2. Launch the app and log in in with your credentials.
cyberghost login window
  1. Connect to an Australian server.
cyberghost Australian servers
  1. Once connected, you can visit 10 Play and watch Australian Survivor live or on-demand, just like viewers Down Under!

Now you will be able to watch all seasons of Australian Survivor without any restrictions.

Moreover, thanks to its extensive server coverage, CyberGhost has the ability to unlock other Australian platforms like 7plus.

CyberGhost

Enjoy unrestricted access to Australian Survivor with this streaming-optimized VPN!
Check price Visit website

Why do you need a VPN to watch Australian Survivor in Canada?

You need a VPN to watch Australian Survivor in Canada because it helps you bypass geo-restrictions placed by streaming channels.

To be precise, the show airs on Network 10 in Australia. But this channel’s streaming platform, 10 Play, blocks anyone from accessing it outside the country.

Therefore, if you try to watch the show on 10Play from Canada, you might receive an error message saying: Sorry 10Play is available for Australian residents only’ or ‘access is blocked.

10 play geo restriction message

Thankfully, using a VPN grants you access. The tool hides your real IP address and replaces it with one from Australia.

Summary

With its gripping survival competition format and exotic setting, Australian Survivor is a must-watch for reality TV fans.

Thanks to VPNs, you know how to watch Australian Survivor in Canada despite the geo-blocking barriers. 

Connecting to an Australian server lets you access 10 Play and stream new episodes live or watch past seasons on demand.

Don’t miss out just because you’re located in Canada! Follow the steps above to gain access today.

10 Best Minecraft Shaders for Windows 11

Minecraft, the iconic building block video game, has still managed to keep gamers hooked with its limitless creativity and charming visuals.

Despite the visual appeal of the game, gamers often find ways to enhance the in-game experience; and in the case of Minecraft, Shaders are the go-to tool.

In this comprehensive guide, we will list some of the popular Minecraft Shaders for Windows 11 to breathe new life into your blocky adventure.

Installing Minecraft shaders can improve your gaming experience in many ways. Some of the benefits of using it are:

  • Adds realistic shadows, lightning, and reflections and makes the game more immersive.
  • Comes with customization options to adjust settings as per preferences.
  • Offers texture enhancements, enhancing the look of in-game blocks & objects.
  • Allows you to capture screenshots & create cinematic videos.
  • Adds a layer of immersion to make you feel more connected to the virtual world.

Which are the most popular Minecraft Shaders for Windows 11?

BSL Shaders – Realistic Lightning and Shadows

High customization and optimization are the key features of BSL Shaders, which help bring the world to life in a picturesque way.

This shader for Minecraft Java edition includes volumetric light, bloom, real-time shadows, customizable clouds & water, and in-built anti-aliasing.

With effects like depth of field, specular, motion blur, normal mapping, world curvature, and Cel Shading, BSL Shaders improve the visuals drastically.

The recommended video settings, like choosing Graphics as Fancy, Render Distance 8 or more, Smooth Lighting to the maximum, and Smooth Lightning Level to 100%, help you bring a dreamy vision to your Minecraft world.

Whether you want a realistic or artistic view, you can choose any with various presets or customize settings to get the desired look and enhance the gaming experience. You can use this shader on various hardware, including NVIDIA, AMD, Intel, and Apple (M1/M2).

More features of BSL Shaders:

  • Dynamic shadows that change in real-time
  • Add atmospheric effects like fog to enhance depth & realism
  • High-quality texture packs
  • Makes the game look immersive with a cinematic blur effect on distant objects

⇒ Get BSL Shaders

Sonic Ether’s Unbelievable Shaders (SEUS) – Stunning visual enhancements

This shader pack for Minecraft is used with OptiFine or GLSL Shaders, works with Minecraft JAVA 1.19.4, and is compatible with NVIDIA and AMD systems.

SEUS deploys traditional rasterization-based rendering methods to bring quality with reasonable performance.

The shader is famous for providing a natural and authentic feel, with crystal-clear water, vibrant and life-like plants, and realistic cloud formations instead of yellow squares.

It focuses on performance optimization, but the main emphasis is on realistic lightning and effects, which means you may need robust hardware resources.

One of the key features of Sonic Ether’s Unbelievable Shaders is the advanced global illumination effect that simulates realistic light interactions, giving you dynamic lighting.

Some other features of Sonic Ether’s Unbelievable Shaders:

  • Sky textures enhance the visual appeal of the game
  • 3D lighting
  • High-resolution shadows
  • Realistic water reflections and wave animations

⇒ Get Sonic Ether’s Unbelievable Shaders (SEUS)

Solas Shader – A balance between realism & artistic style

Solas Shader for Minecraft Java edition is compatible with NVIDIA and AMD systems and provides a lot of customization options to help you create stunning visuals.

This popular shader can enhance water with realistic reflections, animations, and ripples, creating natural-looking water surfaces.

It strives to deliver breathtaking visuals while maintaining smooth performance, catering to a wide range of hardware.

The shader pack comes with 3D volumetric clouds and volumetric light, adding depth & realism to Minecraft lightning and sky.

Solas Shader features vibrant lightning and global illumination, which significantly improves Minecraft’s lightning effects, enhancing the overall gaming experience.

Some key features of Solas Shader

  • Cinematic post effects, TAA, chromatic aberration, bloom, depth of field
  • Water light refraction & absorption
  • Sky effects:  Milky Way, Ender vortex, Aurora borealis, Ender nebula and more
  • Enhanced vanilla ambient occlusion, specular highlight, & variable penumbra shadows


⇒ Get Solas-Shader

Vanilla Plus Shader – A visual upgrade

The shader pack comes with a realistic and dynamic shadow effect, which creates real-time shadow effects for in-game entities and objects.

The Volumetric Vanilla-Style clouds mimic the original look of Minecraft clouds but add volume and realism, making them appear three-dimensional and immersive.

To provide smoother and refined edges, the Minecraft shader uses temporal anti-aliasing, making the entire game’s visuals appealing. It is compatible and usable on both NVIDIA and AMD systems.

The Vanilla Plus Shader improves how light interacts with objects and surfaces, making them more dynamic and giving you an immersive lighting experience.

You can customize water textures and screenspace reflections, enhancing the realism of both and adding reflecting surfaces, thus improving it visually, as per your preferences and hardware capabilities.

Some other features of Vanilla Plus Shader:

  • Screenspace godrays
  • Several color profiles to imitate looks or older shaderpacks
  • Optional lens effects, like lens flares, depth of field, and vignette
  • Supports resource pack materials based on the labPBR standard

⇒ Get Vanilla Plus Shader

Nostalgia Shader – Reproduce the look & feel of old shaderpacks

As the name suggests, the shader pack was originally released to recreate the aesthetics of the first-generation shaders, which may no longer work with new versions of Minecraft.

However, it comes packed with a few advanced features & visual effects to improve the overall gaming experience and is compatible with both AMD and NVIDIA systems.

The Nostalgia Shader allows you to give a personal touch to Minecraft by letting you customize the appearance of the game’s skybox and lighting colors, creating visually appealing landscapes.

Add Volumetric fog to introduce a sense of depth and mood in diverse settings & biomes and make the landscape more enthralling.

The shader-based vanilla-styled clouds improve cloud visuals and atmospheric effects while maintaining the game’s familiar aesthetics.

Other amazing features of Nostalgia Shader:

  • Temporal Anti-Aliasing
  • Auto exposure for consistent lightning
  • Simulate realistic foliage movements in the wind
  • Dynamic shadows that change in real-time

⇒ Get Nostalgia Shader

ProjectLUMA Shader – Stunning godrays

With photorealistic skyboxes, ProjectLUMA Shader makes the game more visually appealing, providing you with breathtaking skies that add realism to the Minecraft world.

To create a cinematic lightning effect, the shader incorporates the godrays effect, which simulates rays of sunlight and other light sources as they pass through objects & other atmospheric elements.

It supports Physically Based Rendering (PBR), which makes sure that Minecraft’s textures and materials behave realistically, thereby providing an overall immersive experience. The shader is compatible and can be used on systems with AMD, NVIDIA, Intel, and Apple.

ProjectLUMA Shader comes with ambient occlusion, a rendering technique that helps enhance the realism of shading & shadows, making in-game objects life-like.

With realistic water wave effects, the shader enhances the water bodies’ appearances making them more realistic and visually appealing.

More features of ProjectLUMA Shader:

  • Add bump mapping effects automatically to create the illusion of surface relief and depth
  • Parallax Occlusion Mapping to make objects appear three-dimensional
  • Motion blur to smoothen in-game movements
  • Mirrors in-game elements on reflective surfaces

⇒ Get ProjectLUMAShader

Complimentary Reimagined Shaders – Crafting Minecraft’s unique style

A high-quality shader pack, Complimentary Reimagined, designed for Minecraft Java Edition, delivers stunning visual enhancements, improving the overall graphics quality.

The main aim of this shader is to preserve Minecraft’s iconic aesthetics and original charm while enhancing the graphics. It is compatible with a wide range of hardware, including NVIDIA, AMD, Intel, and Apple (M1/M2) systems.

With features like Atmospheric Sky, Realistic Sky, Volumetric Clouds, Moving Clouds, Realistic Water, and Parallax Water, it allows you to customize sky, clouds, and water, to personalize the in-game experience.

It allows you to increase the lighting and shadows of the game, which results in improved visuals that respond dynamically to every movement, like raindrops and falling leaves.

The shader comes with realistic water reflections, which enhance the visual fidelity of water bodies, making them look real.

Some key features of Complimentary Reimagined:

  • Volumetric lighting
  • Godrays can appear underwater
  • Simulated wind and enhanced particle effects
  • Offers support on the Discord community for settings optimization

⇒ Get Complimentary Reimagined Shaders

Continuum Shaders – Brings perfection to Minecraft visuals

With Global Illumination, Continuum Shaders can simulate the scattering of light throughout the Minecraft world, which ensures light interacts with in-game elements in a more natural way.

The Volumetric Clouds feature adds depth and realism to the sky, generating dynamic cloud formations and providing a more immersive in-game experience.

With the PCSS Soft Shadows feature, you can enhance the shadows to make them look softer and more realistic, elevating the overall Minecraft experience.

This Minecraft shader with ray tracing makes water surfaces look life-like with light refraction, enhancing the realism of the game.

This popular shader pack comes with a dynamic weather system that changes daily, so you can experience diverse weather conditions, including snow, sunshine, and rain, adding variety to your gaming atmosphere.

Other amazing features of Continuum Shader:

  • Compatible with Nvidia GeForce GTX 1080 / RTX 2070 or AMD RX 5700* or above
  • High-quality reflections and lighting with PBR
  • 3D light shafts
  • Extended shadow distance

⇒ Get Continuum Shaders

Sildur’s Shaders – Compatible with most operating systems

Inspired by SEUS and Chocapic shaderpack, Sildur’s Shaders come in four versions, Sildur’s Vibrant Shaders, Sildur’s Enhanced Default Shaders, Sildur’s Fabulous Shaders and Sildur’s Basic Shaders.

The Sildur’s Vibrant Shaders version stands out as it revamps the entire graphics by adding advanced effects like bloom, ambient occlusion, volumetric lighting, and reflection.

It defines the way light interacts with the in-game objects and elements in the game world. It is compatible with NVIDIA, AMD, Intel, and Apple GPUs

With realistic shadows and lighting, Sildur’s Shaders aims to improve the overall appearance of the Minecraft Bedrock or JAVA edition.

You can choose Lite, Medium, High, High-MotionBlur, & Extreme editions from Sildur’s Vibrant Shaders that suit your needs and hardware resources to achieve a visual masterpiece, making it the best Minecraft shader for low-end PCs.

Some key features of Sildur’s Shaders

  • Lens flare effect
  • Transforms the sky and sunset by adding vibrant colors & smooth transitions
  • Realistic water effects
  • Works without a powerful graphics card

⇒ Get Sildur’s Shaders 

Oceano Shaders – Unique water effects

Oceano Shaders can be installed on NVIDIA, AMD, Intel, and Apple M1/M2 systems. The shaderpack uses Ambient Occlusion, a rendering technique that simulates the way light interacts with elements and surfaces.

It also comes with Cel Shading, which imparts a cartoon-like look to your Minecraft world. This effect simulates the look of hand-drawn animation by segmenting lighting into distinct levels and applying shading to 3D models.

With motion blur, the shader mimics the way fast-moving elements blur in the real world to infuse a cinematic and visually stunning atmosphere into the Minecraft world.

You can personalize multiple things in the game’s visuals, including the sun’s brightness, water, sky color, foliage, and additional customization options.

This Minecraft Bedrock and Java Editions shader can replicate the appearance of the light reflection on the water’s surface, especially underwater, resulting in a captivating gaming experience.

Other amazing features of Oceano Shader

  • Volumetric light
  • Depth of field
  • Realistic sun and better-looking reflections
  • Parallax Occlusion Mapping

⇒ Get Oceano Shader

In case you want to tweak the gameplay mechanics and add new content to Minecraft, you must check out the best Windows 11 mods listed in this post.

How to install Minecraft Shaders on Windows 11?

Before downloading any shader, download and install OptiFine and JAVA on your computer. Choose any shader from the list, and download it on the PC that has Minecraft. Double-click the file to initiate the installation.

Once it is installed, Minecraft will launch & start the import process. Wait for it to complete. Now, launch Minecraft, and click Play, then click Create New.

On the next page, select Create New World, then click Resource Packs. Go to My Packs, select the Shader, and click Activate. You can also change other settings related to the shader to get the desired output, then click Create.

Just like you make sure to download the compatible version of Minecraft on Windows 11, keep that in mind when choosing shaders to avoid any performance issues.

Also, remember to always keep the Minecraft game software up to date; if you want to know how to do that, take a closer look at our article.

Did we not include your preferred shader? Don’t hesitate to tell us about it in the comments section below; we will add it to the list!

2 Quick Ways to Always Show Scrollbars on Windows 11

Windows 11 has been a massive upgrade from the previous iterations, both in terms of functioning and UI. But changes to the scrollbar behavior don’t seem to go well with the users. Many want to configure things such that the scrollbar always shows up in Windows 11.

This is useful if you rely on the Settings app, the Search menu, or even some third-party Microsoft Store apps where Windows 11 hides the scrollbar after inactivity. Remember, this is an intentional change from Microsoft, and simply hovering the cursor over the vertical scroll bar should activate it.

Keep reading to find out the two ways you can always show the Windows 11 scrollbar.

How do I force Windows 11 always to show scrollbars?

https://youtu.be/5u2qyMvO5II

1. Change the Accessibility settings

  1. Press Windows + I to open the Settings app, go to Accessibility from the navigation pane, and click on Visual effects.visual effects
  2. Now, enable the toggle switch for Always show scrollbars.always show scrollbar in Windows 11

To enable inactive scrollbars and get rid of the default behavior, reconfigure the Windows 11 scrollbar settings and get it to always show up. This is, by far, the simplest method and should be the preferred approach.

2. Modify the Registry

Tip icon Tip
Before you start making the changes, make sure to create a restore point to be able to revert the changes in case things don’t work out correctly. 
  1. Press Windows + R to open Run, type regedit in the text field, and click OK.registry to always show scrollbar in windows 11
  2. Click Yes in the UAC prompt.
  3. Paste the following path in the address bar at the top, and hit Enter: HKEY_CURRENT_USER\Control Panel\Accessibilitypath
  4. Now, check whether the DynamicScrollbars DWORD exists on the right. If not, right-click on the empty portion, hover the cursor over New, select DWORD (32-bit) Value, and name it DynamicScrollbars.DWORD
  5. Double-click the DynamicScrollbars DWORD, enter 0 under Value data, and click OK to save the changes.value data
  6. Make sure to restart the computer or re-sign in for the changes to come into effect. 

When the Always show scrollbar setting in Windows 11 is not working, another option is to reconfigure the Registry Editor. These changes tend to override any inconsistencies and force show the vertical scrollbar in Windows 11.

How do I change the scroll behavior in Windows?

When it comes to the scrollbar, there are a wide array of customizations available in Windows. You can change the scrollbar size in Windows 11 or even configure the scroll direction.

Besides, many prefer the Smooth Scrolling feature for browsers, which makes the task feel more natural and seamless. Lastly, you can choose how many lines to scroll at a time or get inactive windows to respond when you hover the cursor over them.

The two methods listed here will allow you to have the Windows 11 scrollbar always show up. This also applies to the scrollbar for applications. But we recommend you go with the default setting since that’s best for productivity!

Apart from the scrollbar, there are several other changes to make Windows 11 faster. So, do check them out and witness a drastic improvement in performance.

If you face any issues with the process, drop a comment below, and we will get back at the earliest.

Microsoft Edge’s ‘Web Preview’ feature catches the eye on Reddit

The “Web preview” feature, as found on Reddit, in Microsoft Edge seems to be an experimental or unreleased feature that allows users to copy and paste links with a preview of the linked webpage. This feature appears to be aimed at enhancing the link-sharing experience by providing a preview of the webpage when you paste a link into a text field.

In the Settings menu, you can find an option named “Web preview,” which allows you to turn this feature on or off. Furthermore, the context menu has a “Copy preview link” option, which implies that users can select to copy the link as a typical URL or as a “Web preview” link.

The behavior of the “Web preview” feature may vary depending on the website you’re trying to share. Some websites may not support this feature, resulting in the option being grayed out or not providing the expected preview.

The Reddit post mentions that this feature doesn’t work on platforms like Twitter, Reddit, and Disqus, possibly because these platforms have not integrated or do not support the “Web preview” feature.

To this post, Neowin reported:

Regardless of whether Microsoft will ship “Web preview” to the public, it is not the first (and probably not the last) feature that makes you question Edge’s promise to keep you safer and more private.

This statement by Neowin has been bashed by @Leopeva64, a Microsoft Edge enthusiast, who originally posted this article on Reddit, stating Microsoft makes no such bold claim regarding privacy, and neither has it not been in the Reddit post.

He also revealed earlier that Microsoft working on redesigned password management for Edge.

It’s worth noting that the information provided is based on a Reddit post, and the availability and functionality of this feature may have changed. Users interested in this feature should watch Microsoft Edge updates for future enhancements or broader availability.

Microsoft 365 and Azure face outages in Australia, root cause revealed

A severe lightning storm hit Sydney, Australia, on the evening of August 30, causing major cloud providers, including Oracle Cloud, NetSuite, and Microsoft’s Azure, to suffer outages. It affected Microsoft 365 and Power Platform services as well. A similar outage happened in July as well.

Microsoft’s post-incident analysis report attributed the blackout to a combination of a couple of factors.

Cooling Systems Stopped Working

Because of the power problem, cooling units in one data center within one Availability Zone to go offline. The data center’s systems shut down automatically to prevent the computers from getting too hot and potentially being damaged. This made it impossible for people to use Azure and Microsoft 365 services.

Not Enough Staff at Night

There weren’t enough people working at the data center during the nighttime. This made it hard to fix the cooling systems quickly. To fix this problem, Microsoft hired more people temporarily to work at the data center at night.

Both this leads Microsoft to improve the automation game. Microsoft acknowledged the need to enhance automation within the data center to make it more resilient to various voltage sag event types. This includes evaluating the sequence in which servers and chillers are restarted to ensure that the highest-load servers and their corresponding chillers are prioritized.

The outage resulted from a combination of factors, including a power sag, cooling unit failure, and an automated shutdown triggered by rising temperatures. Insufficient nighttime staffing was also a contributing factor.

via NetworkWorld

Microsoft Priva announces 3 major enhancements

Microsoft is making notable enhancements to Microsoft Priva, focusing on strengthening its capabilities. These enhancements give organizations more powerful tools to address data protection and privacy requirements.

Microsoft Priva is a comprehensive privacy risk management solution designed to assist organizations in identifying, assessing, and mitigating privacy risks within their Microsoft 365 environment. It offers a centralized view of personal data, enables establishing and enforcing data protection policies, and automates the management of subject rights requests.

Here are the enhancements:

Deeper data viewpoints

Before, Microsoft Priva took a long time to show certain information about how data is handled. Now, it can provide important insights about data much faster, within just a few days. This helps organizations understand their data trends better and make smart decisions about data privacy.

Better integration with Compliance Manager

Microsoft Priva and Compliance Manager work together to improve overall compliance score. Compliance Manager provides insights and advice on staying compliant, now available in Microsoft Priva for easier privacy rule-following.

Fulfill more request types

Microsoft Priva simplifies managing personal data requests, including data deletion, with easy approval and summary tracking.

These solutions help organizations navigate the complex landscape of data protection and privacy, ensuring compliance with regulatory requirements and enhancing data privacy practices.


Microsoft Bing Chat Enterprise now answers maps and direction related queries

Bing Chat Enterprise (BCE) has recently improved by providing directions and map-related information, which is now also available on Edge Mobile. When you ask Bing Chat Enterprise for directions, it will now offer more detailed and helpful responses.

Once you’ve described your preferences, it will present you with a recommended route using Bing Maps. This feature can help you navigate and plan your journey more efficiently.

Example Query 

For instance, you can ask BCE,

“Can you give me the best directions from downtown Redmond to SeaTac Airport?” 

And expect to receive comprehensive directions along with a recommended route.

E71D8427 841E 4673 A3E1 C33804568797

This enhancement could make your navigation experience with BCE more informative and user-friendly, allowing you to access directions and maps conveniently.

Apart from the Maps and Directions feature, it’s important to mention that Bing Chat Enterprise on Windows Copilot has been launched in preview. This feature assures data protection and privacy for organizations using Windows Copilot, offering a secure environment for chat interactions. Microsoft added that eligible organizations that have enabled Bing Chat Enterprise can now use it seamlessly on Bing.com and Windows Copilot without needing additional steps.

How to move between your PC and Cloud PC using Windows 365 Switch in 4 easy steps

Windows 365 Switch provides a seamless transition between a Windows 365 Cloud PC and a local desktop. With Windows 365 Cloud PC, you can access your personal applications, content, and configurations directly from the Microsoft Cloud on any device. Being a cloud-based solution, you can resume your work from where you left off without any hassle. This means you can work efficiently and without worrying about losing your progress. In this post, this is precisely what we are going to show you: to move between my PC and Cloud PC using Windows 365 Switch.

To easily switch between your local and Cloud PC, use familiar keyboard shortcuts, mouse clicks, or four-finger swipe gestures. This is especially helpful when connecting your Windows device to a securely managed company-owned Cloud PC.

The Windows 365 Switch feature will become accessible once the following prerequisites are met:

  • Usage of Windows 11-based endpoints, specifically Windows 11 Pro and Enterprise editions.
  • Enrollment in the Windows Insider Program (Beta Channel).
  • Possession of a valid Windows 365 Cloud PC license.

How to set up a PC for using Windows 365 Switch

Enabling the Windows 11 Beta channel

As previously mentioned, your cloud and local PCs must run Windows 11 Beta channels. To obtain this channel, you must enroll in the Insider Program and specifically select the Beta channel. 

  1. Open the “Settings” menu and navigate to “Windows Update” within the menu.
  2. Locate and click on the “Windows Insider Program” option.
  3. Click on “Get Started” to initiate the enrollment process. Our PC was already in the program. Insider Setting 1
  4. At this point, you will need to log in using your Microsoft or Azure account.
  5. Select the “Beta Channel” option from the list of available versions and then click “Continue.”
  6. Make sure to restart your device to ensure that everything is updated properly.
  7. Finally, check for updates and install the Beta updates when available.

Installing Windows 365 app

You may proceed without completing this step if you currently possess the Windows 365 app. However, if you do not have the app in question, several methods are available to acquire it. This guide will focus on downloading it through the Microsoft Store. To install the Microsoft 365 app from the Microsoft Store, follow these steps:

  1. Launch the Microsoft Store application
  2. Search for “Windows 365 app.”
  3. Tap on the ‘Get’ button.Windows 365
  4. You can also opt to download the app from windows365.microsoft.com directly.

How to move between your PC and Cloud PC using Windows 365 Switch

Launch the Windows 365 application on your local PC. Here, you’ll find a list of your Windows 365 Cloud PCs. Choose the specific Cloud PC you wish to switch to and click on the user actions menu, represented by the three-dot icon at the upper right corner of the Cloud PC card.3 Dots

Click Add to Task view from the menu to activate Switch.

Add To Task View

Move your cursor over the Task view icon on the Windows 11 taskbar.

It resembles a rectangle with two vertical lines adjacent to it. A thumbnail of your Cloud PC will appear; click on it to initiate your Cloud PC within the native Windows 11 environment. Go To Cloud Pc

You’ll now be directed to your Cloud PC desktop, where you can perform your tasks as usual.

A status indicator in the screen’s bottom right corner will show that you are currently using your Cloud PC.

How to move between my PC and Cloud PC using Windows 365 Switch

To return to your local PC, simply hover over the Task view icon on the Windows 11 taskbar.

On the left side of the Task view screen, locate an option labeled “Local Desktops” and click on it to switch back to your local PC’s desktop.Return To Local Device

In conclusion, by following these steps, you can use your Cloud PC using Windows 365 Switch app, making it very easy to transition between a work PC and a work-from-home PC.