FIX: HP laptop failed short DST hard drive error

While restarting your HP laptop you may get the HP laptop start-up test – hard disk DST failed error. This error is usually caused by a faulty hard disk that may need replacement.

Fix this error by following the steps below.


How do I fix my HP hard drive error?

1. Check hard disk for errors

  1. Use the Windows media driver to insert a bootable CD or Flash Drive.
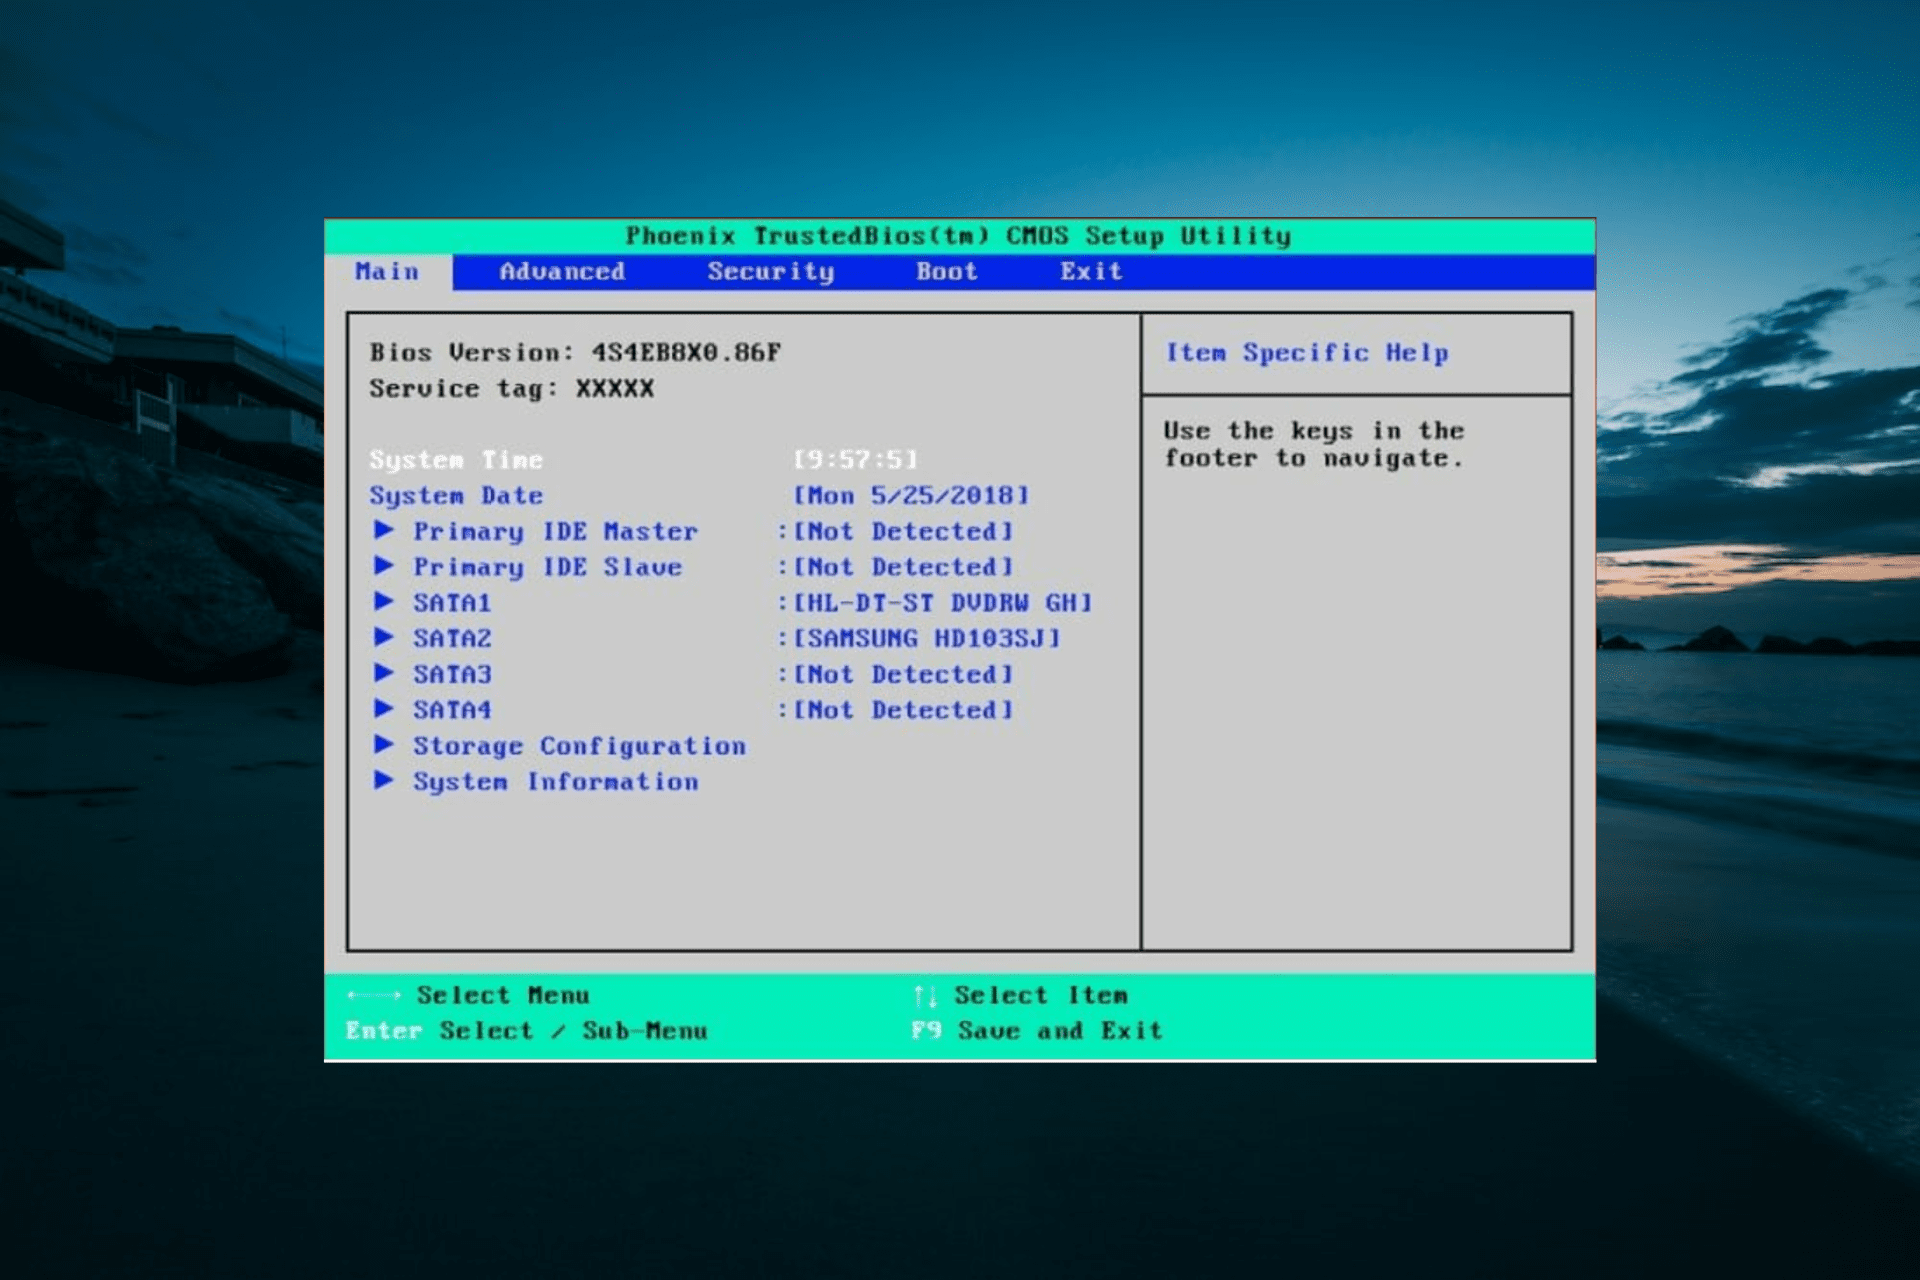
  2. Change the boot preference from your hard drive to recovery drive in the BIOS.
  3. Boot from your recovery drive.
  4. In the setup window, select your language and click Next.
  5. At the bottom left corner, click on Repair your computer .
  6. Choose Troubleshoot from the Advanced Options, select Command Prompt.
  7. When the command prompt appears, enter the following command and hit enter to execute it
    chkdsk /r

The check disk utility will scan the system for any bad sectors in the hard drive and try to repair them if necessary.

After the repair is done, exit the Command Prompt window and shut down the system.

You should remove the recovery drive and try to boot from the hard drive.  If repaired, the short DST failed error should be solved.


2. Check for conflicting software

If you have an antivirus program installed, try to disable it temporarily. If that does not work, you can also try to uninstall the antivirus program completely from the system.

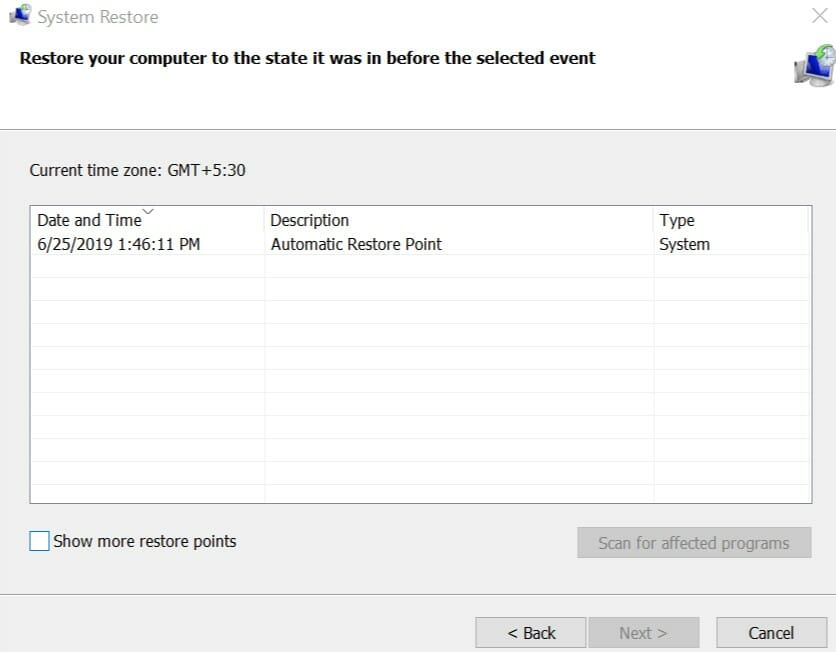
You can also use the Restore Point option to restore your PC to an earlier point. For this, you again need the recovery drive if you are unable to login to your PC.

Now all you have to do is select any of the previously created restore points to fix this issue.


3. Replace hard drive

The most common cause for when the hard drive short DST check failed on your HP, is a defective hard drive due to corruption or damage.

If the laptop is new, you can contact the service center and claim the warranty.

Before that try to connect the hard drive to any other computer and see if it recognizes it.

However, if the laptop is out of warranty, you may need to purchase a new hard drive for your laptop.

You can recover your data from the old hard drive using a USB-SATA Adapter.


As you can see the solutions for how you can fix the hard drive short dst check failed error are easy to follow.

Even if your hard drive is not functioning properly as you’ve seen there is a way to recover your data.

We want to hear more from you on this subject so please drop us a comment in the section below.


How to set up and connect to Synology VPN on Windows 10

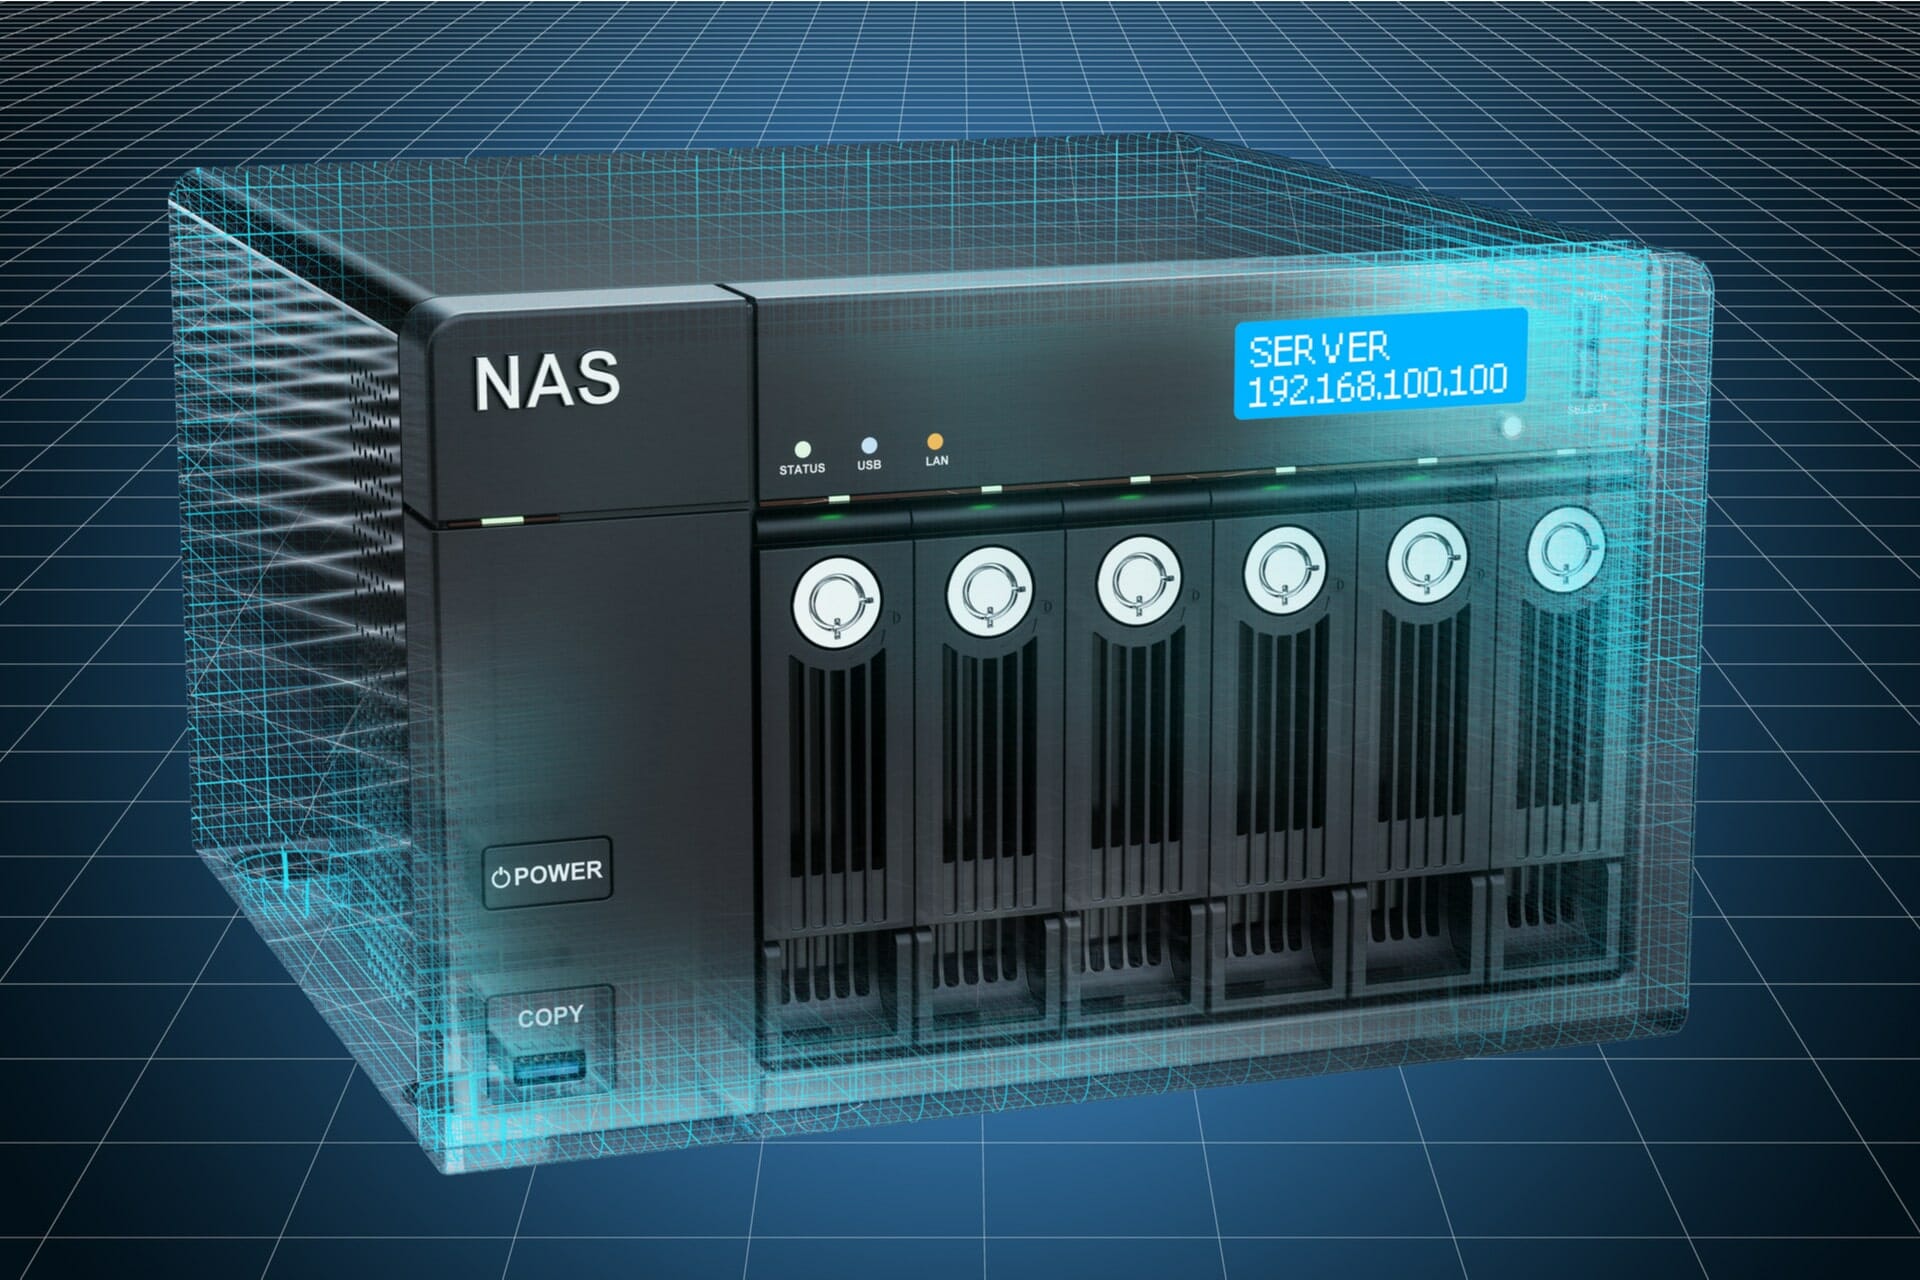
A NAS is a data storage server that you can connect to your home or office network.

You can use it to save all essential data in a single place, including photos and videos, without having to rely on cloud storage.

Anyone can access these files through the Internet using a web browser or mobile app: you, your family, or your team members.

If you have a Synology NAS, it means that you can turn it into a VPN server on your Windows 10 PC.

This way, users can remotely connect to the NAS device and perform file transfers, safe from hacker interceptions.

Check out our complete step-by-step guide below to find out how to easily set up and connect to Synology VPN on Windows 10.

Before getting started

When setting up the Synology VPN server, you have to choose a VPN protocol from PPTP, L2TP/IPsec, and OpenVPN.

Keep in mind that the VPN clients must apply identical configurations to their devices in order to establish a successful connection.

Furthermore, any modifications made to the VPN configuration must be also updated in the VPN clients.

That means you should take into account the devices and operating systems used by the VPN clients.

At the same time, you need to ensure anti-hacker VPN protection, so you can’t set the bar low for security.

Which VPN protocol should I use?

Most platforms and operating systems have native support for PPTP, so it’s really easy to set it up without installing additional software.

However, PPTP has weak security and is mostly considered obsolete because of this. Also, some old routers block the GRE protocol (IP protocol 47), which is required for VPN connections over PPTP.

L2TP/IPsec provides better security than PPTP and has good compatibility with most devices, including Windows, Mac, Linux, and mobile.

It requires DSM 4.3 or newer. If you make any changes to the L2TP/IPsec VPN server, this can be easily applied at the VPN clients, too.

OpenVPN offers the best security among the three, but it’s not built into operating systems. That means that VPN users must install an OpenVPN client (free to use).

On top of that, you need to export the OpenVPN configuration every time you make changes and share it with the VPN clients. Plus, OpenVPN server mode doesn’t support bridge mode for site-to-site connections.

We suggest using OpenVPN for best security or L2TP/IPsec for good security and native integration.

How do I set up a Synology NAS VPN server on Windows 10?

For PPTP

enable PPTP VPN server for Synology NAS
  1. Click VPN Server on your Synology NAS
  2. Select PPTP on the left side
  3. Check the Enable PPTP VPN server box
  4. Set the Dynamic IP address*
  5. At Maximum connection number, you can limit the number of simultaneous VPN client connections
  6. The Maximum number of connections with same account field is similar to the one before, but it refers to users logged in under the same VPN account
  7. Set Authentication to MS-CHAP v2 to encrypt the VPN client passwords
  8. Set Encryption to Require MPPE
  9. Leave MTU to default (1400)
  10. Leave Use manual DNS unchecked to push the Synology NAS DNS server to the VPN clients
  11. Click Apply

For L2TP/IPsec

enable 2TP IPsec VPN server on Synology NAS
  1. Open VPN Server and go to L2TP/IPsec on the left side
  2. Check the Enable L2TP/IPsec VPN server box
  3. Enter the Dynamic IP address*
  4. Set Maximum connection number to the total simultaneous VPN client connections you allow
  5. Set Authentication to MS-CHAP v2
  6. Leave MTU to default (1400)
  7. Leave Use manual DNS unchecked to push the Synology NAS DNS server to the VPN clients
  8. At IKE authentication, enter and confirm the pre-shared key.
  9. Click Apply

For OpenVPN

enable OpenVPN server on Synology NAS
  1. Launch VPN Server and select OpenVPN on the left side
  2. Check the Enable OpenVPN server
  3. Set the Dynamic IP address*
  4. Limit the Maximum connection number
  5. At Enable compression on the VPN link
    • Tick it if you want to apply data compression and speed up file transfers
    • Leave it unchecked if you don’t want it to consume additional system resources (lower speed).
  6. Enable Allow clients to access server’s LAN
  7. Tick Enable IPv6 server mode only if you want VPN clients to connect using IPv6 instead of IPv4
  8. Click Apply

*The dynamic IP address is taken into account by the VPN server when it assigns the virtual IP addresses to all connected clients. It should not be identical to any local IP addresses used by your devices in LAN. You can use the arp -a command in CMD to view all local IP addresses.

Many routers have VPN server support for PPTP and L2TP/IPsec.

To avoid conflicts caused by occupied ports, make sure that the VPN server isn’t enabled on your router if you want to set up a Synology VPN server over PPTP or L2TP/IPsec.

Furthermore, you should use a router that allows VPN pass-through.

How do I connect to Synology VPN on Windows 10?

For PPTP

Here’s how to add a VPN connection, edit VPN properties, and connect to the Synology VPN when using the PPTP protocol.

  1. Create a VPN connectioncreate a PPTP VPN connection for Synology on Windows 10
    • Click the Windows 10 Start button, type VPN settings, press Enter
    • Click Add a VPN connection
    • Set VPN provider to Windows (built-in)
    • At Connection name, set a preferred display name.
    • At Server name or address, type the public IP address of the Synology NAS
    • Set VPN type to Point to Point Tunneling Protocol (PPTP)
    • Specify your User name and Password required for login
    • Click Save
  2. Change VPN properties
    • Right-click Start and go to Network Connections
    • Click Change adapter options
    • Righ-click the new VPN connection and go to Properties
    • Go to the Security tabedit PPTP security properties for Synology VPN on Windows 10
      • Set Data encryption to Require encryption (disconnect if server declines)
      • Select Allow these protocols
      • Enable Challenge Handshake Authentication Protocol (CHAP)
      • Enable Microsoft CHAP Version 2 (MS-CHAP v2)
    • Switch to the Networking tabedit VPN security properties for Synology NAS on Windows 10
      • Enable Internet Protocol Version 4 (TCP/IPv4)
      • Enable Client for Microsoft Networks
    • Click OK
  3. Connect to the VPNconnect to the Synology VPN server on Windows 10
    • Click the network icon in the systray
    • Select the VPN connection
    • Press Connect

For L2TP/IPsec

When it comes to the L2TP/IPsec protocol, start by making a minor registry tweak

Then, you can add your VPN connection, edit L2TP/IPsec settings, and connect to the Synology VPN.

  1. Start with a registry tweak*add AssumeUDPEncapsulationContextOnSendRule to regedit
    • Press Ctrl+R, write regedit, hold down Shift, and press OK
    • Click Yes if prompted by UAC (User Account Control)
    • Delete the text shown in the address bar
    • Paste the following code and press Enter: HKEY_LOCAL_MACHINESYSTEMCurrentControlSetServicesPolicyAgent 
    • You should now be in the PolicyAgent folder
    • Open the Edit menu > New submenu and click DWORD (32-bit) Value
    • Paste AssumeUDPEncapsulationContextOnSendRule as the value name
    • Right-click AssumeUDPEncapsulationContextOnSendRule and select Modify
    • Set Value data to 2
    • Set Base to Hexadecimal
    • Click OK
    • Restart your computer
  2. Create a VPN connectioncreate an LT2P/IPsec for Synology VPN on Windows 10
    • Click the Start button, click VPN settings, press Enter
    • Click Add a VPN connection
    • Set VPN provider to Windows (built-in)
    • Set Connection name to any VPN display name you prefer
    • At Server name or address, type the public IP address of the Synology NAS
    • Set VPN type to L2TP/IPsec with pre-shared key
    • Enter the Pre-shared key
    • Specify your User name and Password
    • Click Save
  3. Change VPN propertiesedit L2TP/IPsec properties for Synology VPN on Windows 10
    • Right-click the Start button and go to Network Connections
    • Click Change adapter options
    • Right-click your VPN connection and go to Properties
    • Switch to the Security tab
      • Set Data encryption to Require encryption (disconnect if server declines)
      • Select Allow these protocols
      • Check Challenge Handshake Authentication Protocol (CHAP)
      • Check Microsoft CHAP Version 2 (MS-CHAP v2)
    • Go to the Networking tab
      • Check Internet Protocol Version 4 (TCP/IPv4)
      • Check Client for Microsoft Networks
    • Click OK
  4. Connect to the VPNconnect to the Synology VPN server on Windows 10
    • Click the network icon in the system notifications area
    • Choose the VPN connection and click Connect

*This part is required for Windows 7 and newer to avoid receiving a VPN connection error. It’s an easy registry hack to make Windows 10 connect to L2TP VPN. A faster way to achieve the same results is by adding a single line of code in CMD (click the link to see how).

For OpenVPN

The OpenVPN option is the most complicated because you have to install an OpenVPN client (no operating system has native support for OpenVPN).

Before doing that, you have to get the OpenVPN configuration settings ready. Once everything is set up, you can connect to the Synology OpenVPN server.

  1. Prepare the OpenVPN configuration
    • On the Synology VPN server, select OpenVPN from the left side
    • Click Export configuration
    • Copy the ZIP archive to the VPN client PC
    • Unzip the archive and open the openvpn.ovpn file with any text editor
    • Replace YOUR_SERVER_IP with the public IP address of the Synology NAS
  2. Set up the OpenVPN client
    • Download OpenVPN GUI and install it on your PC
    • Go to the config subfolder of the OpenVPN directory. The default location is: C:Program FilesOpenVPNconfig
    • Copy the Synology OpenVPN configuration files (ca.crt and openvpn.ovpn) to this location
  3. Connect to the OpenVPN serverconnect to Synology OpenVPN server on Windows 10
    • Launch OpenVPN GUI as admin
    • Right-click the OpenVPN GUI icon in the systray
    • Select the Synology OpenVPN profile and click Connect

Synology VPN troubleshooting

To avoid VPN connection issues, it’s a good idea to check port forwarding and if the required ports are opened in the firewall on the Synology NAS and router, for both the VPN server and clients.

  • PPTP requires port 1723 over TCP
  • L2TP/IPsec needs ports 1701, 500, and 4500 over UDP
  • OpenVPN needs port 1194 over UDP

Conclusion

To sum up, you can turn your Synology NAS into a VPN server and then connect to it from any part of the world to access files.

It’s a time-consuming process, but it’s not difficult at all if you follow the instructions accurately.

You just need to set up the right VPN protocol for your home or office. No matter what you choose, you can change the VPN settings anytime to try something else.

[Fixed] Audacity Could Not Find Any Audio Devices Error

Audacity is a free, open-source, cross-platform audio software that offers excellent audio manipulation options. However, when launching the app, you may encounter the Audacity could not find any audio devices error.

This error can occur due to several reasons, including a third-party audio software installed on your system, issues with the audio drivers, or a problem with the audacity software.

At times the error can occur due to a temporary glitch. To fix the problem, try restarting your Windows 10 system and check if the error is resolved.

If the issue persists, here are a few troubleshooting steps to help you resolve the Audacity could not find any audio devices error in Windows 10.

How do I fix Audacity could not find any audio devices error?

1. Update audio drivers

Audacity could not find any audio devices
  1. Press the Windows Key + R to open Run.
  2. Type devmgmt.msc and click OK to open Device Manager.
  3. In the Device Manager window, expand the Sound, video, and game controllers section.
  4. Right-click on your audio device and select Update Driver.
  5. Select Search automatically for updated drivers option.
  6. Follow on-screen instructions to download and install any pending audio driver updates.
  7. Next, expand the Audio input and output option and check if your audio device is listed.
  8. If you see the audio device listed, check if any driver update is available for the device as well.
  9. After the update is installed, reboot the computer and check if the error is resolved.

If the error Audacity could not find any audio devices – you will not be able to play or record audio persists, try reinstalling the affected audio device from Device Manager to fix the problem.

1.1 Update audio drivers automatically

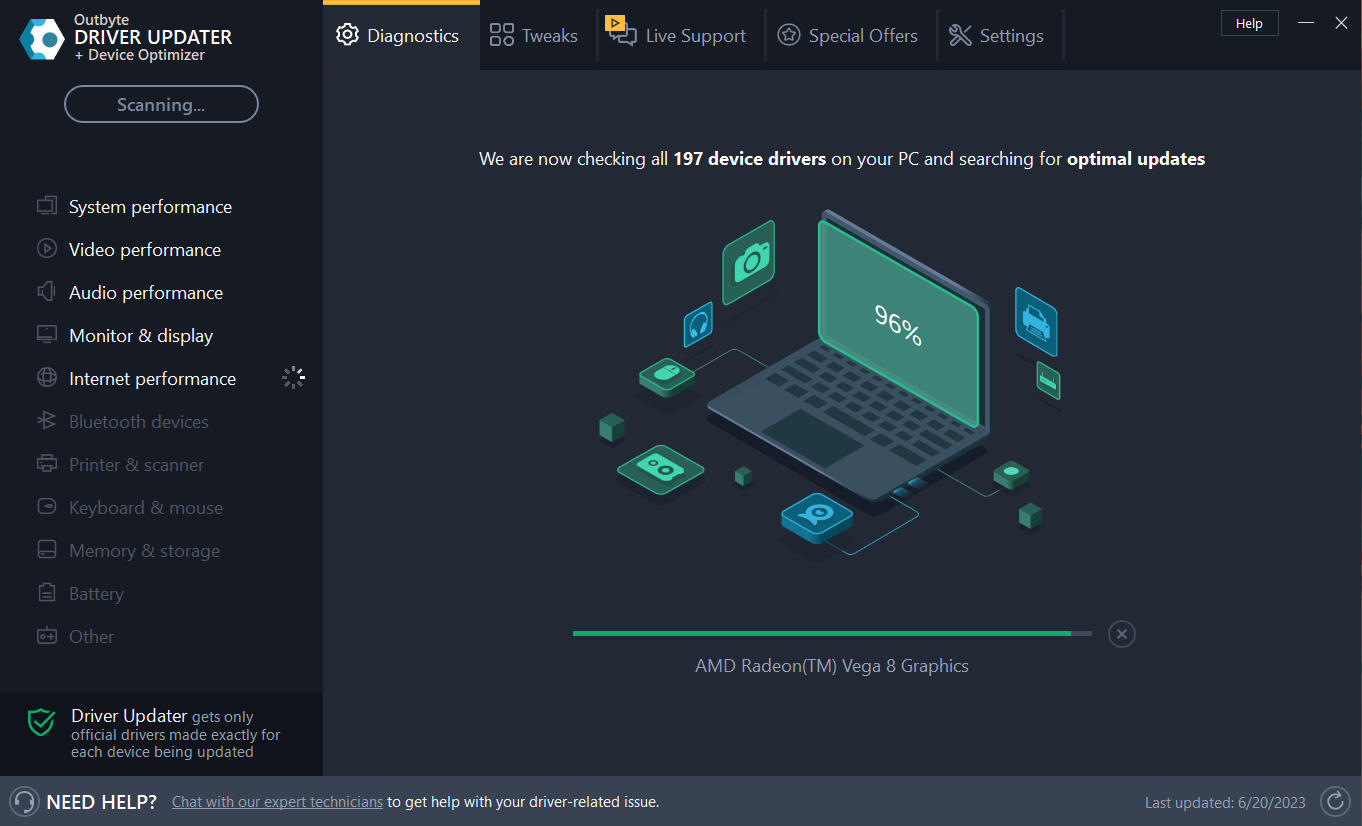
Incompatible or outdated drivers can cause the could not find any audio devices error when launching Audacity. Update all the audio drivers with Outbyte Driver Updater to resolve the error.

Upon installation, the app scans the system for outdated drivers. You can choose to update one or all the drivers at once. It also comes with a driver backup manager to backup and save all of your drivers to a compressed zip file.

⇒ Get Outbyte Driver Updater

2. Uninstall the audio device 

Audacity could not find any audio devices
  1. Open Device Manager.
  2. Expand the Sound, video, and game controllers section.
  3. Right-click on your audio device and select Uninstall. Confirm the action and clicking on Uninstall.
  4. Once uninstalled, reboot the computer. Windows will automatically reinstall the missing device drivers upon restart.
  5. Lauch Audacity and check if the error is resolved.

3. Check for third-party audio software conflict 

Audacity could not find any audio devices
  1. Click Start and search Control.
  2. Locate and click on Control Panel.
  3. In Control Panel, go to Programs, and then open Programs and features.
  4. Here, find any other audio recording and editing tool that you may have installed.
  5. Select the app and click on Uninstall. Confirm the action when prompted by UAC.

The Audacity could not find any audio devices internal port audio error can occur if you have multiple audio recording and editing tools installed. Unformatenly, there is no way to know which app is causing the error. 

Try to make a good guess and start with uninstalling the most recently installed audio recording and editing software from your PC. Do it until the error is resolved.

4. Reinstall Audacity 

Audacity could not find any audio devices
  1. Press the Windows key + R.
  2. Type appwiz.cpl and click OK to open Control Panel.
  3. Select Audacity from the list of installed apps and click on Uninstall.
  4. Once uninstalled, restart the computer.
  5. After the restart, download the latest version of Audacity and install the app.

The Audacity could not find any audio devices error in Windows 10 usually occurs if there are multiple audio recording and editing software installed.

Uninstall third-party programs to fix the error. If the issue persists, update the audio device driver or reinstall Audacity. 

Take a look at the (almost) complete UI for Windows 10X

Several videos related to the long-awaited Windows 10X interface have transpired recently on several Twitter accounts.

At least one of the videos shows a full setup, while other sources point toward areas of the home screen such as the settings and the start menu.

At a first look, the UI is the very much simplified single-screen version Microsoft has promised and that fans have had the chance of seeing in bits in several leaks over the past months.

The first single screen PCs with Windows 10X installed are expected to be shipped this spring.

Centered icons on the taskbar, clean home screen

A first picture showing the home screen was published by Zac Bowden, with the promise to come with further details.

A few hours later, the first videos also appeared. Starting with the booting screen, the design looks minimalist, as seen from the video posted by ALumia.

The initial screen is followed by a few set-up screens in which the user is invited to choose region, keyboard, agree to the terms of use and purpose of use. The process takes only a couple of minutes, depending on the loading time. According to the Tweet posted by Albacore, this setup comes with Windows 10X build 20279.

Fans are even invited to test the interface themselves in a virtual machine using a specific set-up file which the account-owner provides.

It’s important to know that, as Tom Warren points out, the set up can be completed only with a Microsoft account and an active Internet connection

Similarities with Chrome OS

Getting to the home screen, we can see that the taskbar comes with centered icons, very much like on Chromebooks, rather than being populated from left-to-right as on Windows 10.

From the looks of various pictures, the icons for your most used apps can be placed on the taskbar, similarly to the current OS.

However, no files or apps are seen on the main screen, at least in the leaked images and videos. Everything is grouped in one place – the launcher.

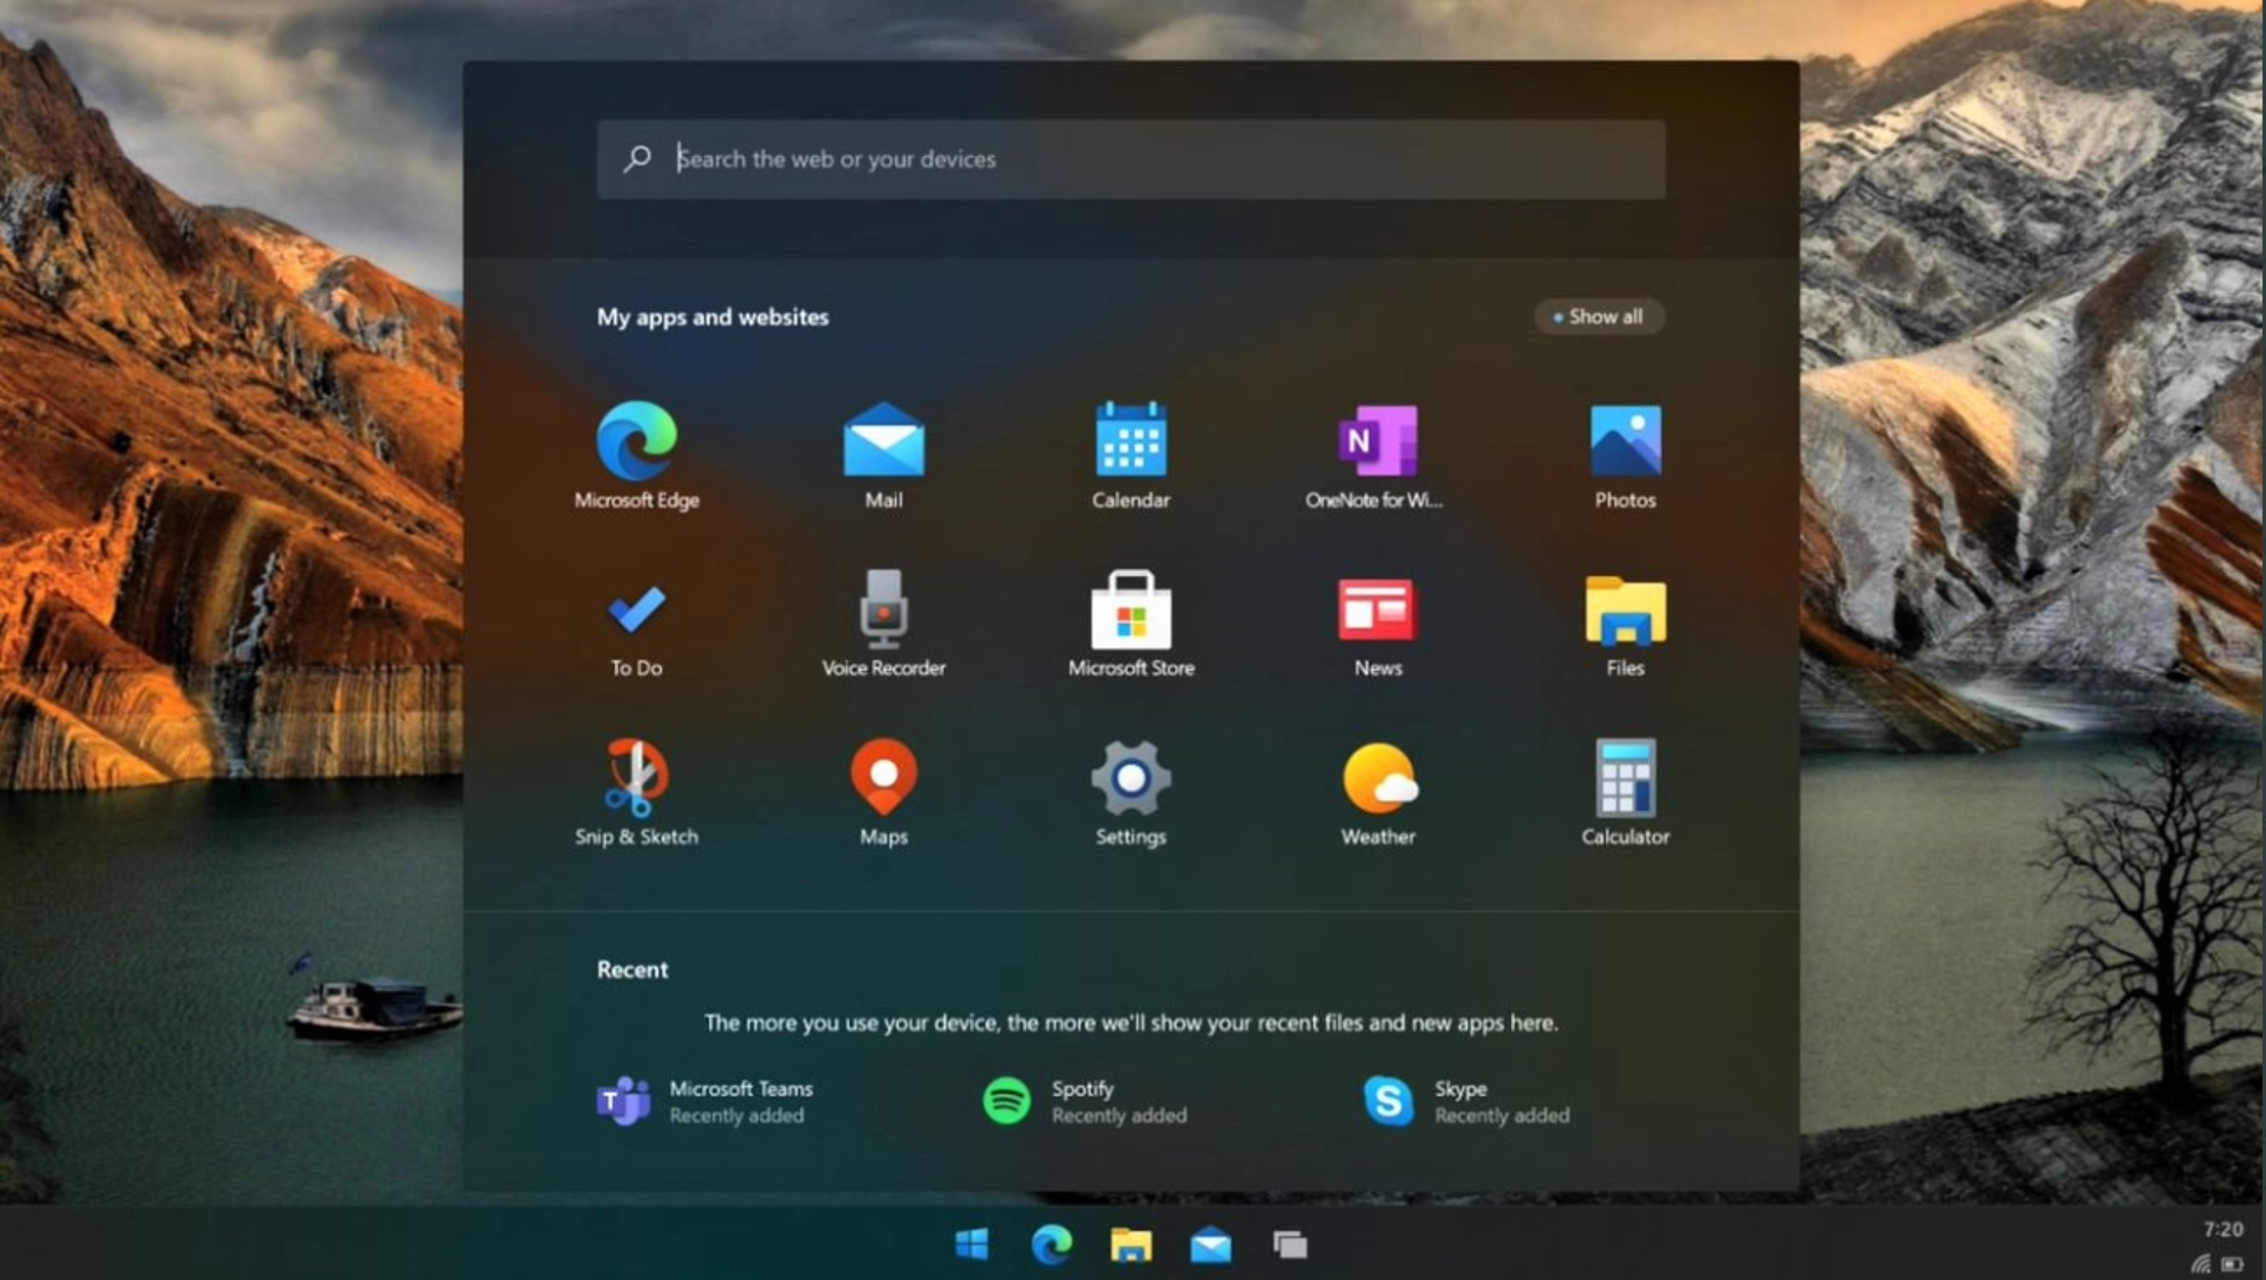
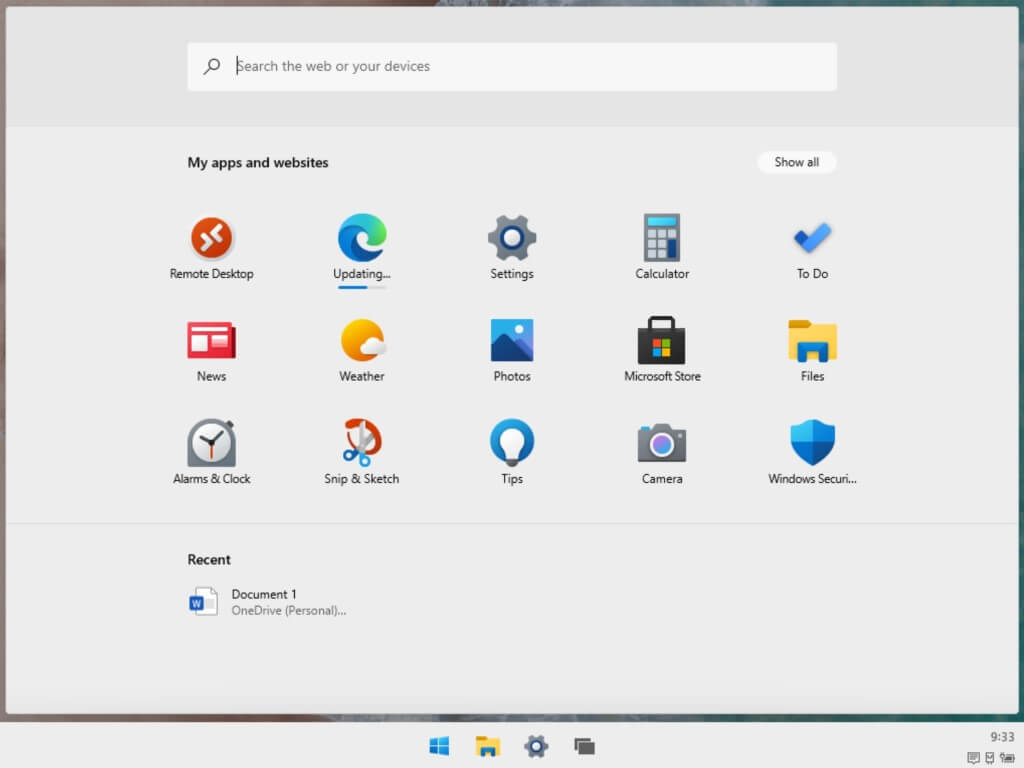
Here, the user will be able to search the web or the device for a specific item, open installed apps and programs, and view recently opened documents.

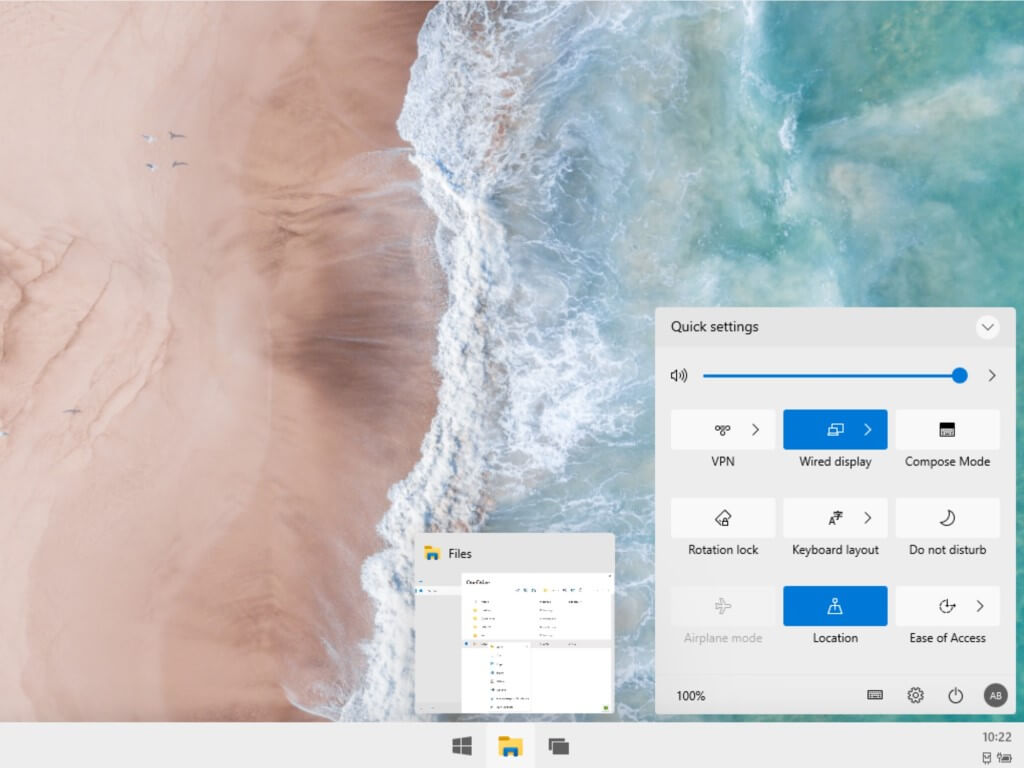
In the bottom-right corner, when clicking on the clock, the Quick settings menu pops up. Here, users can adjust volume, activate the VPN, change the keyboard layout, and more.

The notifications will also be displayed in this area, with a button to clear them if considered unnecessary.

With all these details, similarities with Chrome OS are striking. While some can’t get over the fact that Microsoft has copied their rival way too much, others see the new OS as quick, clean and fluid.

Initially designed for dual-screen devices, Windows 10x will come on single-screen ones, given the shift in user consumption trends last year. As mentioned, the first models are expected soon, and that’s when we should also see the final version of the UI.

Star Wars: Squadrons, Dragon Ball FighterZ, and Yooka-Laylee are free to play with Xbox Live Gold this weekend

There’s another Free Play Days event for Xbox Live Gold members this weekend. Starting today through Sunday, January 14, Star Wars: Squadrons, Dragon Ball FighterZ, and Yooka-Laylee will be free to play with Xbox Live Gold, and limited-time discounts are also available on the Xbox Store.

Star Wars: Squadrons allows you to take control of iconic starfighters such as the X-wing and TIE fighter. The game occurs after the events of Return of the Jedi, and you can learn what it means to be a pilot whether you fight for The New Republic or The Empire. In addition to the short single-player campaign, the game supports cross-play multiplayer with PC and PlayStation 4 players.

Dragon Ball FighterZ is a fighting game that takes all the things you love about the Dragon Ball series and packs it into an intense fighting game. As for Yooka-Laylee, it’s a light-hearted open-world platformer where you can explore huge colorful worlds with up to three friends on your console.

If you’re already an Xbox Live Gold subscriber, we remind you that you can still upgrade to Xbox Game Pass Ultimate for just $1. Xbox Game Pass Ultimate includes all the benefits of Xbox Live Gold, plus unlimited access to a catalog of over 200 high-quality Xbox and PC games, as well as the EA Play catalog.

NRDC invites Microsoft and Sony to reduce power consumption on Xbox Series X and PlayStation 5

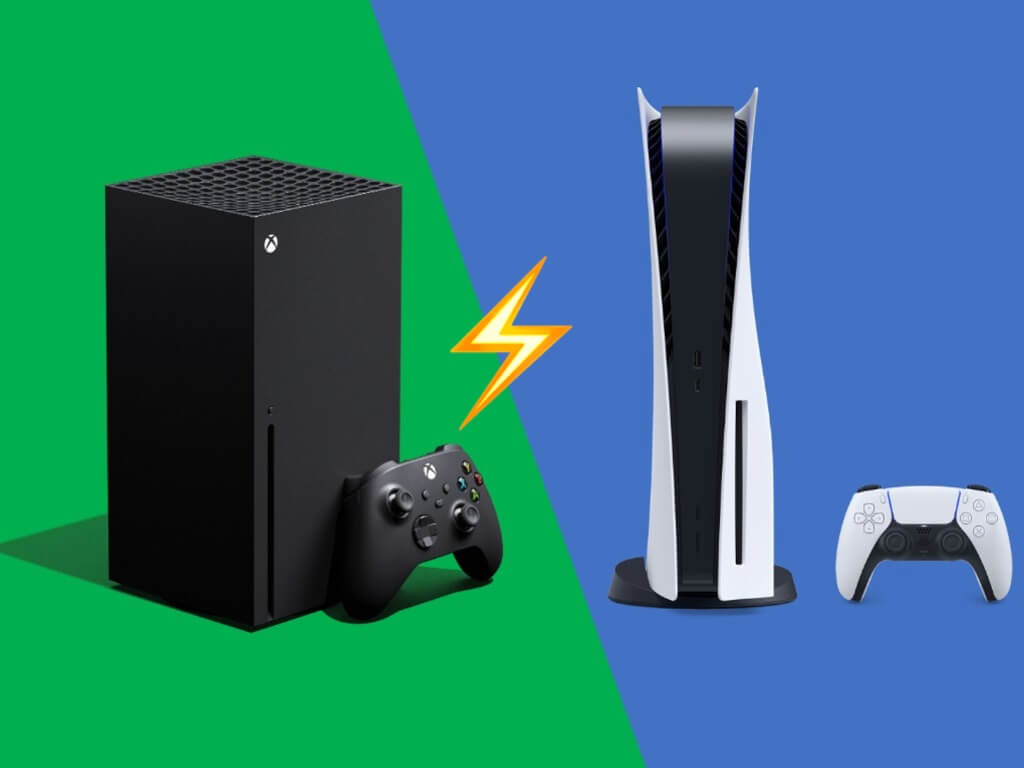
Following the launch of Microsoft’s Xbox Series X|S and Sony’s PlayStation 5 consoles in November, the Natural Resources Defense Council (NRDC) published a report yesterday that focuses on the power consumed by the two machines. Microsoft once again claims to have the most powerful console on the market with the Xbox Series X, but the US energy agency has criticized the company’s decision to ship the console with its not eco-friendly “Instant On” setting.

As you may know, Microsoft’s Xbox One received similar criticism back in the day as the console also shipped with this Instant-on mode enabled by default. This choice was made to allow Xbox One consoles to be able to instantly respond to Kinect commands such as “Xbox On,” and Microsoft has kept enabling the Instant-on mode by default on newer consoles even though Kinect has now been deprecated.

“Based on modeling NRDC performed through 2025, this one seemingly inconsequential decision by Microsoft could result in the equivalent of one large (500 MW) coal-burning power plant’s worth of annual electricity generation and cost new U.S. Xbox owners roughly $1 billion on their electricity bills,” the NRDC emphasized yesterday.

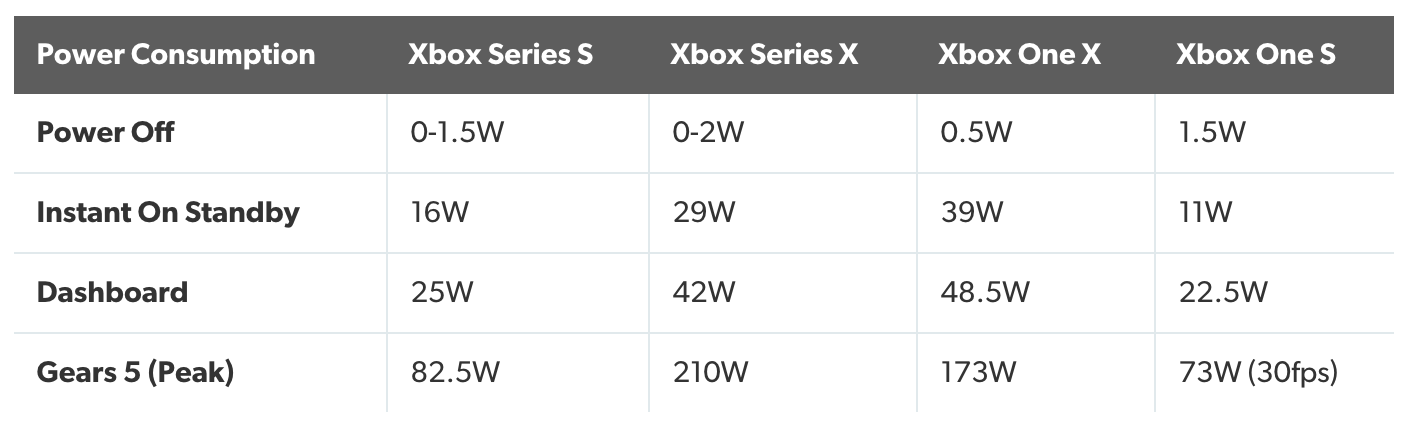
To be fair, Europe is the only region where Xbox Series X|S consoles ship with the “Energy Savings” setting to comply with local efficiency requirements. According to the NRDC’s measures, “Instant On” consumes 9 to 10 watts on Xbox Series X, while the “Energy Saving” setting draws less than 1 watt. The latter also still allows Xbox Series X|S consoles to check and wake for updates during sleep, with a very acceptable resume time of 10 to 15 seconds thanks to the new SSDs.

When playing games, the NRDC observed that the Xbox Series X and PlayStation 5 can draw between 160 and 200+ watts, which is slightly more than previous generation consoles. However, next-gen consoles are more power efficient than previous gen hardware when playing backward compatible games, something that Digital Foundry and other publications also confirmed. The NRDC also confirmed that the less powerful Series S used the less amount of energy during gameplay, with the US agency noting a 53 to 57 watts consumption when playing games like Moto GP20, Descenders, and Call of the Sea.

Digital Foundry Xbox Series X|s Power Consumption
Source: Digital Foundry.

If the main purpose of game consoles remain to play games on a TV, many consumers are also using them as media centers, even though doing that can also use a lot of energy. “The console will draw between 30 and 70 watts—about 10 to 25 times more power than a streaming device like Apple TV, Roku box, or Amazon Fire Stick to watch the same show. We have repeatedly urged Sony and Microsoft to include a dedicated low-power chip for video playback in their consoles, and this request is even more important today given the potential for long hours of “binge watching” via the console,” the NRDC explained in the report.

Overall, the US energy agency believes that both Sony and Microsoft can do more to reduce power consumption on their next-gen consoles, and the first step would be to “make further improvements in implementation of auto power down and standby modes to reduce overall annual console energy use.” The suggestion to add low-power chips to use for video playback is also interesting, though it would likely require some re-engineering work that both Sony and Microsoft may not be willing to do in the short term.

It’s worth reminding that even though the new Xbox and PlayStation consoles are quite power hungry, they’re still much more power efficient than high-end gaming PCs. A top of the line GPU like the new NVIDIA RTX 3090 will require a PC with 750W power supply, while the Xbox Series X ships with a 315W power supply. All things considered, the Xbox Series X isn’t really much more power hungry than the Xbox One X, though we have yet to see games that really take advantage of the new hardware.

If the NRDC is right to push both Microsoft and Sony to improve the efficiency of the Xbox Series X and PlayStation 5, it’s worth reminding that console manufacturers usually ship a “slim” version of their new consoles after three or four years that are also more power efficient. It remains to be seen if this will also happen for the Xbox Series X and the PlayStation 5, though Microsoft already has the Series S as a more environment-friendly option.

Hands-on with Windows 10X for single screen PCs: It’s like Microsoft’s own version of Chrome OS

A more recent version of Windows 10X “leaked” online, thanks to the work of the community. Available as a VHD file, this “leaked” version of Windows 10X is a bit different from what we last saw from Microsoft when the operating system was being designed for dual-screen PCs back in January of 2020.

While it’s been confirmed that Windows 10X has now been tweaked a bit (and will only be included on new and lightweight single-screen PCs only,) Microsoft hasn’t officially shared much about the project. Thanks to the “leaked” build, though, we’re able to go a bit closer with the upcoming operating system.

Again, the “leaked” build isn’t final or the RTM version of Windows 10X, some things can change in it between now and when we see the first 10X devices, but this is the closest to final as we’d get. Here’s a hands-on look at the experience, and why it’s like Microsoft’s own version of ChromeOS.

The setup experience and mandatory Microsoft Account

As many on Twitter have pointed out, and as the rumors had originally indicated, this leaked version of Windows 10X comes with a new out of box experience. Unlike regular Windows 10, there’s no Cortana here to help you through things. In place of that, you get helpful and colorful visuals and icons, representative of which step you’re in the setup process. You’ll also need to be connected to the internet for setup, as the leaked version requires you to sign in with a Microsoft Account. Do note that Windows 10X comes with a new startup sound and splash screen, too.

App support and Microsoft Edge

An important note about this leaked Windows 10X build comes in regards to app support. This can change between now and when we get an official release, but in my tests, it looks as though this leaked version of Windows 10X doesn’t support Win32 apps. It also doesn’t have a “windowed” mode to window and move apps around like in regular Windows 10. All apps in Windows 10X appear to only support split-screen or full-screen. That’s just like how it was with Microsoft Store apps in Windows 8 and 8.1

This was the leading rumor, anyway, so it does make a lot of sense. Windows 10X is intended to be lightweight, so it cuts out a lot of the legacy Windows features such as Command Prompt, Powershell, etc in favor of Microsoft Edge and apps in the Microsoft Store.

I tried downloading and installing Chrome, but the .exe file simply would not work. I ended up using Microsoft Edge and creating PWAs for things like Spotify, or Twitter. It’s nothing new to me, as I’m familiar with using Windows 10S, which is also this “locked down” and, as I last argued, isn’t all that bad.

Anyway, it looks as though there is a setting to allow you to install “All Apps” and well as developer options to enable Win32 app development, but I wasn’t able to get these to work as the check box for the feature is disabled.

The Start Menu and Action Center

If you played with the original version of Windows 10X intended for dual-screen PCs, then the Start Menu and Action Center should look and feel familiar. It’s not changed very much between dual-screen and single-screen 10X. Much like what Google has done with the Chrome OS launcher, we’ve lost Live Tiles and a traditional “list” of apps from Windows 10 in favor of a static row of icons. The Start Menu also has a search bar on the top, too, allowing you to search for applications and files, or search the web. You’d also see a list of your most recent files on the bottom half of the Start Menu, too.

As for the Action Center, it also has not changed between dual-screen and single-screen Windows 10X. It’s much more modern and has more elements of Fluent Design compared to Windows 10’s. There’s a slider of volume and quick toggle buttons for location, rotation lock, and more. You even have access to power options, and the ability to summon the keyboard and settings from Action Center, too.

The Taskbar

If you have an eagle-eye like me, then you might have noticed that the Taskbar in this single-screen version of Windows 10X has changed a bit from when we last tried Windows 10X. While the dual-screen version has “levers” which let you pull up the Taskbar from a minimized state when not needed, this single-screen leaked version drops that out. Instead, the Taskbar is always persistent.

Otherwise speaking, icons in the Taskbar in Windows 10X are centered, unlike in regular Windows 10. Pressing the Start Menu button lights it up in Blue. Hovering over an app shows a preview, and there’s a multitasking button on the right side, to show you open apps, and enable split-screen (we’ll have more on that later.) Clicking the Task view icon also lights it up in blue and “expands” the tiles which represent it. Overall, it’s very reminiscent of what we see in Windows 10 Teams OS, which runs on Surface Hub.

Of course, you can also pin open apps to the Taskbar in this leaked version of Windows 10X, too. And, you can see a “preview” of any open app in the Taskbar. The preview window and most things in this leaked version of Windows 10X now has more touches of Fluent Design and has rounded corners, too. When put together, all of these small touches are quite cool.

The Modern File Explorer

As I tweeted before, unlike the original dual-screen version of WIndows 10X, Microsoft looks to be shipping just a “modern” File Explorer in this “leaked” build of 10X. It’s designed almost exactly like the Files app on an iPad with its column view and sidebar. There’s also updated modern iconography in the top right corner for opening files, copying files, and changing views. This matches with the new icons we’ve seen make their way to Windows 10.

Overall, though, the Modern File Explorer seems to put emphasis on the cloud and OneDrive, just like Google does with Chrome OS and Google Drive. In this release, the Modern File Explorer has no “My PC” or “Documents” and “Photos,” rather the only thing you see in it is your “Downloads” folder, just like in Chrome OS.

The split-screen as well as the animations

Windows 10X has a lot of cool animations here and there, as well as the same snap assist feature from regular Windows 10. Opening and app cause the icon to “bounce” upwards in the Taskbar, a bit similar to what we see in MacOS. Minimizing an app, meanwhile also causes the icon to do a little “shake.” Closing it, meanwhile, will cause the icon to fade down and away in the Taskbar This is quite the nifty little touch, which I didn’t notice in the original version of Windows 10X.

As for split-screen, in this release, it functions just like it does in the original version of Windows 10X, except it is designed for single-screen setups. You can drag an app from the top with the title bar to the side of the screen you want it on, and have Windows 10X suggest other open apps to snap to the other side. You can also summon all open apps with the Task view button, to help you switch between which one you want to put forward and use. Note that the windows for the previews and the Task view all have rounded corners, which is big in Windows 10X.

Try it yourself!

If you want to try this out for yourself today at your own risk, you can check out the original file from Albacore (@thebookisclosed) on Twitter. You’ll need to have Windows 10 Pro, as well as download and install 7Zip to extract the VHD. You’ll also need to create a virtual machine in Hyper V, which Microsoft explains how to do here. We do warn you though, you’d be doing so at your own risk.

At any rate, it’s still great to see this leaked version of Windows 10X in the wild. It’s not much different from the original dual-screen version we saw last year, but the small touches like the splash screen, new animations, as well as Fluent Design, and the new Start Menu breathe new life into Windows. Even if it’s just like what we see in Chrome OS, this could be the start of a new era for Windows.


The new Approvals app is now generally available in Microsoft Teams, here’s how it works

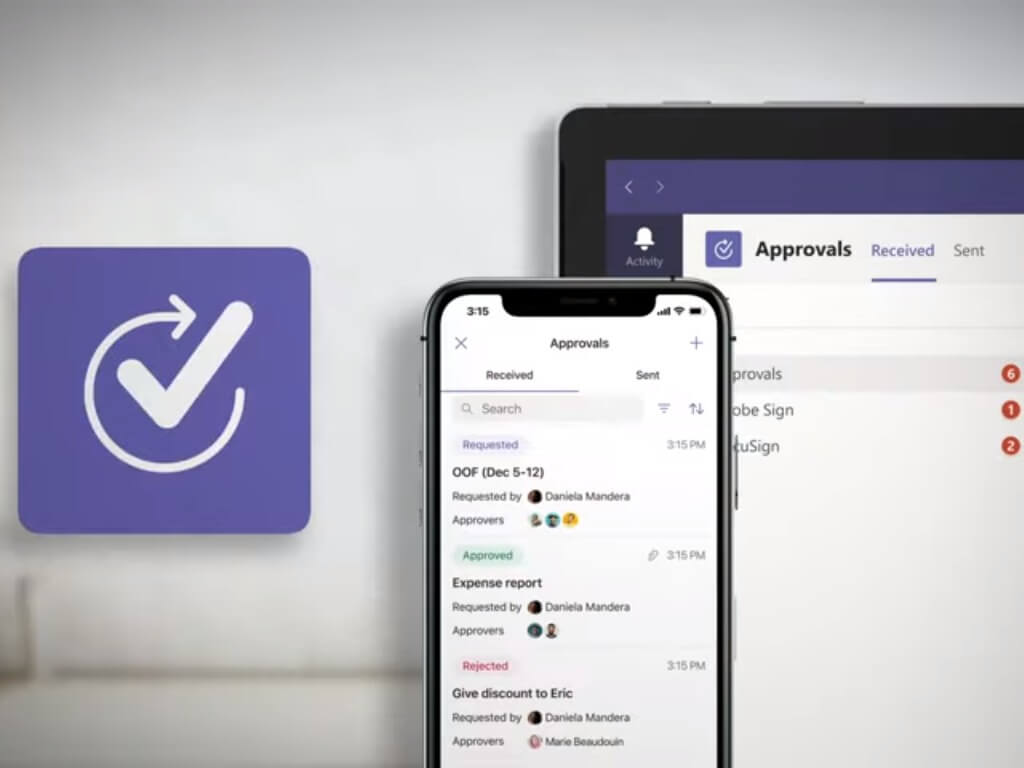
Microsoft has announced that the new Approvals app is now generally available in Microsoft Teams. The new workflow tool was first announced back in September 2020, and it started rolling out earlier this week. As the name suggests, it streamlines requests and processes with partners and helps to create and manage requests within the Teams collaboration platform.

“Approvals in Microsoft Teams lets you easily create, manage, and share approvals directly from your hub for teamwork. You can quickly start an approval flow from the same place you send a chat, in a channel conversation, or from the Approvals app itself. Just select an approval type, add details, attach files, and choose approvers. Once submitted, approvers are notified and can review and act on the request,” the company explained.

Microsoft says that Approvals is a native Teams application, and it’s turned on by default if Power Automate is already enabled in your organization. To be clear, these approvals leverage the Power Automate infrastructure to trigger an approvals action directly and doesn’t require a flow to work within the Teams app.

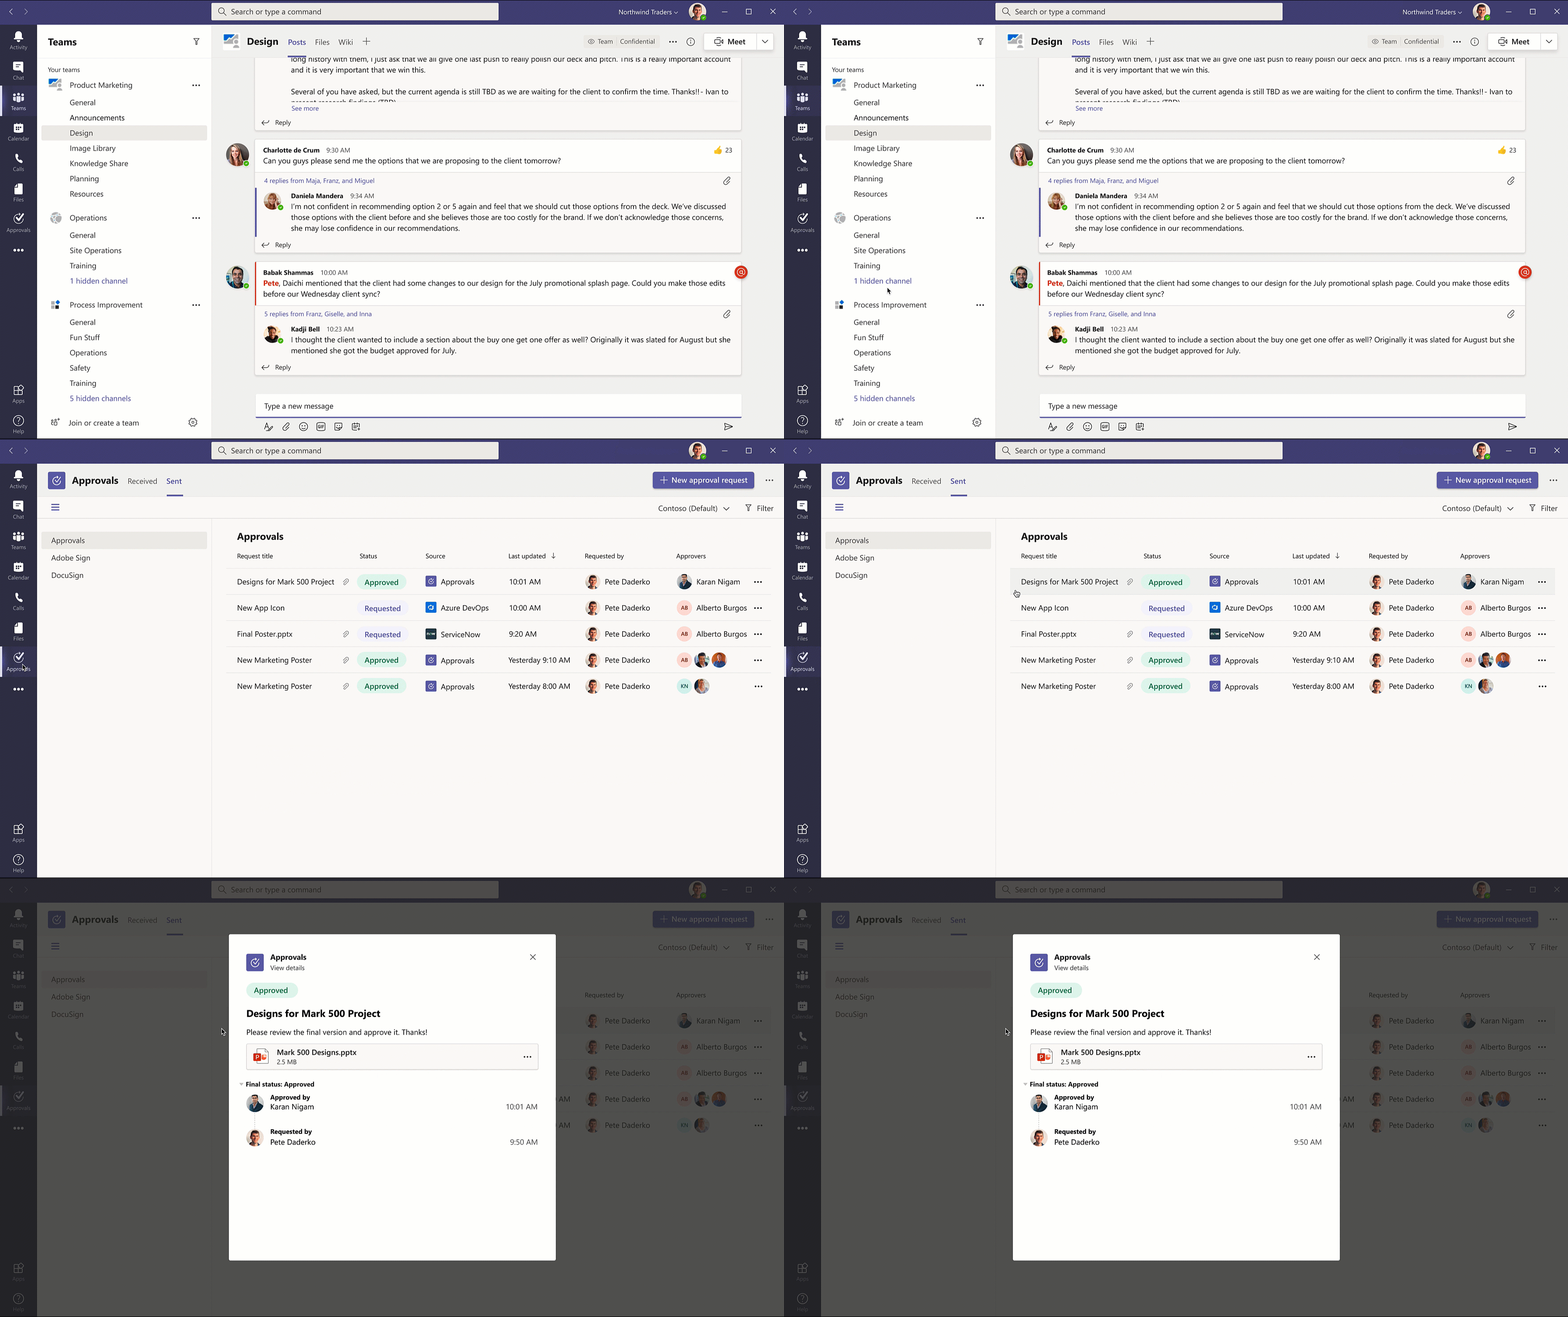
For those of you who are interested in trying out the new Approvals app, users need to have an F3 license to be able to use this feature. To access the app in Teams, click the three dots icon (. . .) available on the sidebar, type “Approvals” in the search box, and click on it to open the app. Here’s how users can create, view, track, and manage their approval requests directly from Microsoft Teams:

Create an approval request

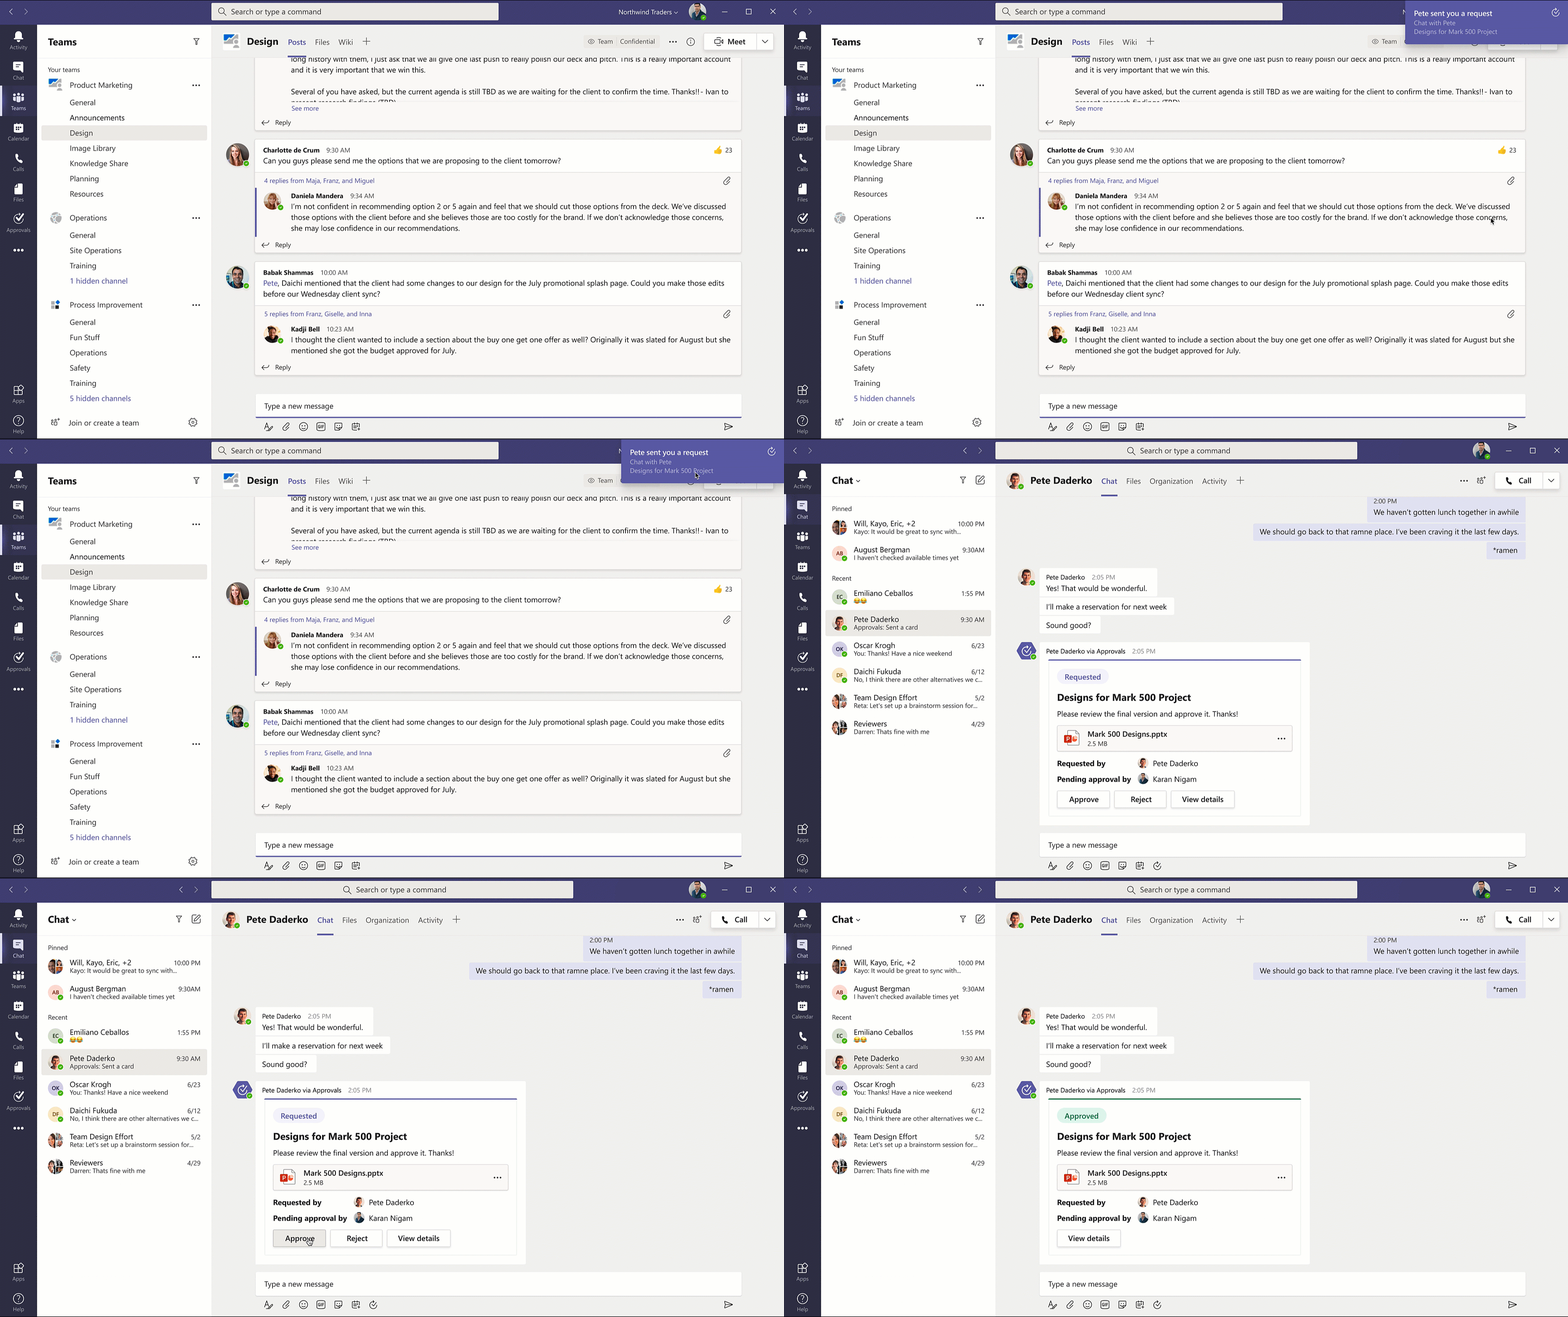
To create an approval in a chat or a channel conversation, click the “Approvals” icon and enter all the required details. These details include the name of the request, approver, and relevant information. Finally, upload an attachment if needed and click the “Send” button.

Approve or reject a request

Once a request is submitted by the user, Microsoft Teams will automatically notify the approvers to take appropriate actions. They will be able to quickly review the details and relevant attachments included in the approval request to approve or reject it. The approvers will see an approvals card along with all the relevant actions related to the requests that are submitted in a chat or a channel.

Track and manage approvals

As mentioned above, the Approvals app in Teams will allow users to view and manage all your approvals from one place. Users will be able to see important details, including the status, source, along with the name of the requestor, and approvers with each request. However, they need to click on a specific approval request to track its progress and see additional details.

The ability to use Approvals in Teams is a welcome addition, and it can help to improve productivity in the workplace. The company is also planning to add an option to create an electronic signature approval natively within the Approval app, and the feature will be available in the coming months. We invite you to check out this support article for additional details on managing the Approvals app in Teams.

Windows 10X build “leaks,” providing what could be a near-final look at the single-screen version of the OS

A more recent version of Windows 10X, different from the original dual-screen emulator for developers that was officially released by Microsoft, has “leaked” online. As uploaded by Albacore (@thebookisclosed) this build comes in at 20279 (and isn’t an RTM candidate,) but does offer what could be considered a near-final look of the upcoming operating system.

It’s important to note that this “leaked” version of Windows 10X which has circulated isn’t technically a final build from Microsoft. And, as far as we know, Windows 10X is still only for new light-weight devices only, meaning you still can’t download an ISO. The leak is a VHD, or a virtual hard drive containing the operating system. We went hands-on with it here.

However, noted by Rafael Rivera, since Microsoft is officially hosting the files on its update platform, the community used this as a chance to put together a combination of files which makes it possible to try out the experience in a virtual machine on any Windows 10 Pro device. This means it doesn’t reflect any actual features or what we will see when Windows 10X actually ships. Things we’re seeing in this leaked build could still come and go.

Still, there are some interesting changes between this version of Windows 10X, and the original dual-screen version from Microsoft. For one, we’re getting a closer look at the Modern File Explorer, which in Windows 10X only appears to have access to OneDrive and downloads. This version also behaves similarly to Chrome OS, in that files save to your downloads folder, and there’s no way to access “My PC,” and other legacy areas of Windows 10. Other new things include the ability to change the desktop background, as well as do split-screen multitasking. There are also some new animations and touchpad gestures for navigation here and there, too.

Though you’d be doing so at your own risk, you can try the emulator today by downloading the image from Albacore, unzipping it with 7Zip, and setting up a virtual machine in Hyper-V Manager in Windows 10. You’d need Windows 10 Pro to do this, however. The leaked build is set up as a virtual hard drive, and not an ISO which according to Albacore, only works with Hyper-V. We’re planning a hands-on look at this leaked build soon, so be sure to stay tuned.

PSA: Microsoft’s Xbox Gear Shop now ships internationally

Ever since Microsoft launched its US-based Xbox Gear online storefront back in 2018, international gamers had been clamouring for news concerning a possible expansion to other regions. Shipping to Canada and some European countries was added later in 2018 but there really hadn’t been any major news regarding support for additional regions since.

Imagine my surprise this morning when I saw a tweet from MissDeusGeek, an Xbox Ambassador from Australia, who casually mentioned in a tweet that the Xbox Gear Shop now shipped internationally. Shocked, I asked her how long this had been happening for and she confirmed that international shipping had been supported since late-2020.

This was a genuine surprise as there doesn’t seem to have been any kind of official announcement made about this via the main Xbox social media channels or on the Xbox Gear Shop website itself. I did find a tweet by Xbox’s James Monosmith who announced this expansion on his personal Twitter account. This tweet confirms that international shipping was added in November at the same time as the Xbox Gear Shop’s design refresh and the plethora of new merch that was added for the holiday season.

As someone who was looking longingly at several items in the store in December, I do kind of wish they had added some kind of notification to the site saying something along the lines of “Hey, you can actually order this now!”

Regardless, it’s great that Xbox gamers in more regions can finally order products from the Xbox Gear Shop which had some legit high quality clothing and merchandise inspired by the Xbox brand and a number of video game franchises. Tell your friends!

VJoy failed to install on Windows 10/11 [Fixed]

VJoy is popular software that lets you emulate a controller on your PC, but many users reported that VJoy failed to install on their PC.

This can be a problem since without VJoy you won’t be able to use your controller. However, there might be a way to fix this problem once and for all.

How to fix VJoy failed to install?

1. Make sure that you have the latest version of VJoy

  1. Download the latest version of VJoy from the developer’s website.
  2. Once you download it, run the setup file and follow the instructions.

If the problem still appears and VJoy is not installing, try installing it as administrator by following these steps:

  1. Right-click the setup file.
  2. Choose Run as administrator.
    run as administrator vjoy failed to install


2. Remove any older versions of VJoy

  1. Open the Settings app and go to the Apps section.
    apps section vjoy failed to install
  2. Locate VJoy on the list, select it, and click Uninstall.
    uninstall vjoy failed to install
  3. Follow the instructions on the screen to remove the software.
  4. Once the software is removed, install the latest version of VJoy.

This workaround can be helpful if VJoy isn’t working on Windows 10 since sometimes two different versions can come into conflict with one another.


3. Disable Driver Signature enforcement

  1. Open the Settings app and go to the Update & Security section.
  2. Select Recovery from the left pane and click on the Restart now button.
    recovery vjoy failed to install
  3. Select the Troubleshoot option. On the next screen choose Advanced options.
  4. Now go to Startup Settings and click Restart.
  5. When the PC restarts, you’ll be presented with a list of options. Select Disable driver signature enforcement by pressing the corresponding keyboard key.
  6. After booting to Windows, try to install VJoy again.

This is a useful workaround, and it can be helpful especially if Vjoy failed to install on Windows 10 1903 or newer.

VJoy is a useful tool, but if VJoy fails to install on your PC, perhaps our solutions could come in handy. Did you find a solution to this problem on your own? Share it with us in our comments section.

How to Fix NordVPN Kill Switch Not Working [6 Quick Methods]

NordVPN’s kill switch is kind of a big deal, so if you notice that it’s not working, you need to act immediately.

A VPN’s kill switch is a nifty feature that blocks Internet traffic if no VPN traffic is detected.

To put it in simple terms, if your VPN connection suddenly drops without your knowledge, your PC won’t be able to revert to your default, insecure Internet connection.

You can probably see why it’s important to have this feature on at all times.

NordVPN is one of the most popular VPN services on the market, and we wouldn’t expect its kill switch to stop working.

However, these things happen and there’s no way to prevent them. However, you may be able to do something about restoring it.

Does NordVPN’s kill switch work?

Yes, this VPN kill switch should work fine on your device. In any case, this functionality may have errors for specific devices or operating systems.

For instance, the users complained about this VPN kill switch crashing on platforms such as Linux or macOS.

How can I fix NordVPN’s kill switch?

Before proceeding to our troubleshooting guide, you should perform the following actions on your device:

  • Restart your modem/router
  • Try using NordVPN’s kill switch on another device (to rule out provider-side issues)
  • Use a wired connection instead of Wi-Fi
  • Make sure you’re not connected to multiple networks (disable your Wi-Fi when using Ethernet and vice-versa)
  • Perform a clean install of your Windows 10 OS
  • Try using an external network adapter

After checking all these quick fixes, you’re ready to go for our detailed solutions below to fix the NordVPN kill switch.

1. Switch protocols

  1. Launch the NordVPN client.
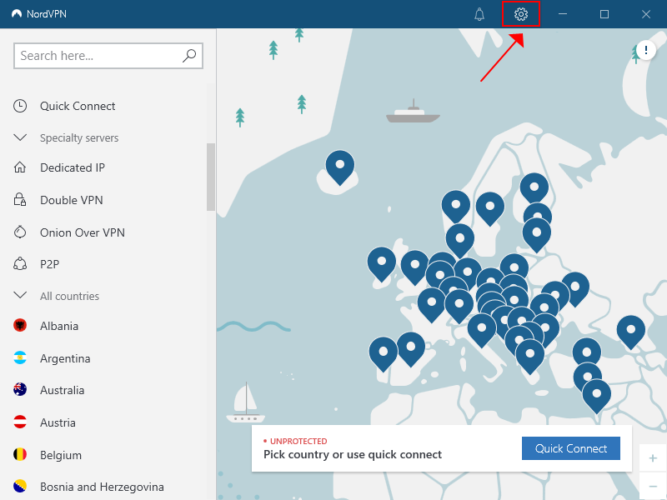
  2. Click the gear-shaped button.
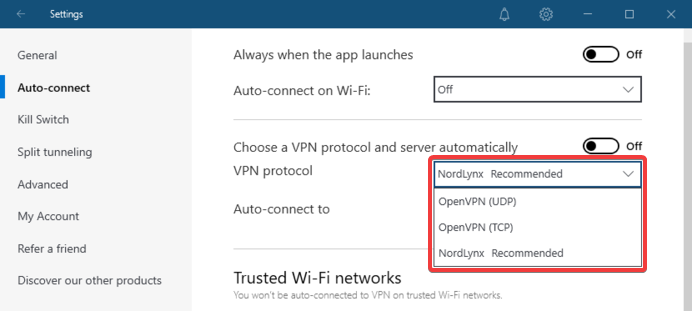
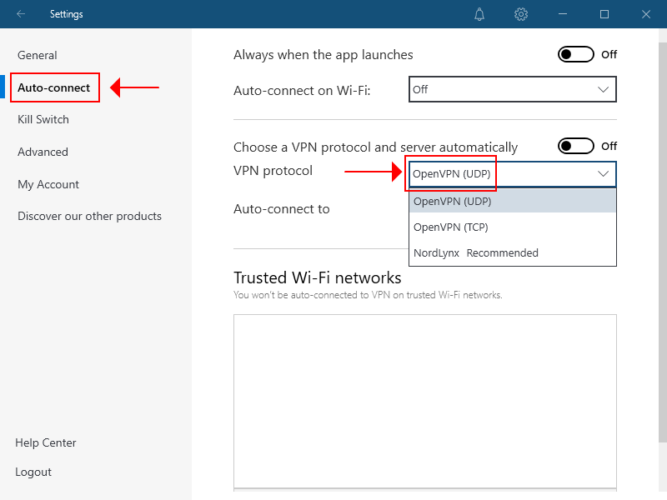
  3. Go to the Auto-connect category.
  4. Locate the auto protocol & server selection option.
  5. Toggle it off.
  6. Choose a different option in the VPN protocol combo menu.
  7. Check if NordVPN’s kill switch started working as intended.

It may sound a bit counter-intuitive, but choosing certain protocols may affect NordVPN’s functionality.

We haven’t been able to replicate the kill switch issue with any of NordVPN’s protocols.

However, some users have been able to fix the issue by simply switching from NordLynx to OpenVPN.

Currently, NordVPN automatically chooses the NordLynx protocol for you, and changing it is also a bit confusing.

2. Change the kill switch mode

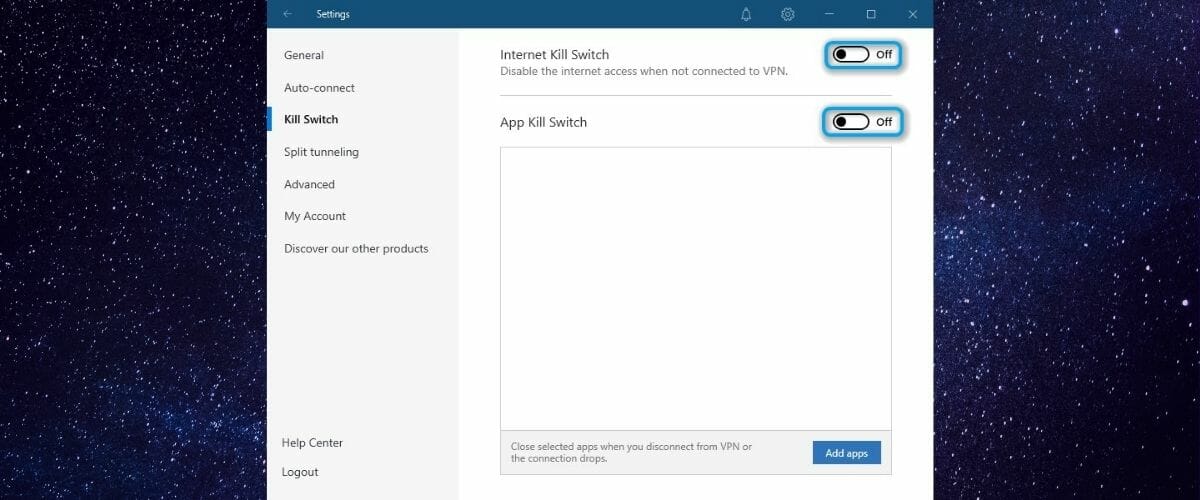
Instead of using the global VPN kill switch, you should give a try to the app kill switch.

It does the exact same thing as the Internet kill switch, but only for specific apps.

So, for instance, you could enable the app kill switch for your torrenting client, or web browser.

In case the VPN connection suddenly drops, your PC will still have Internet access, but those specific apps won’t be able to get back online without the VPN.

You can also toggle the global kill switch if you notice that the app kill switch doesn’t do a great job and fails frequently.

3. Check your antivirus/firewall

Sometimes, security software on your PC can do more harm than good if not configured properly.

For instance, your firewall or antivirus software can block or restrict certain apps or services, either completely or partially.

Check your firewall for any connection rule that may block or restrict NordVPN in any way. Modify them so NordVPN isn’t blocked.

Then do the same with your antivirus/antimalware, if necessary.

4. Use an enhanced VPN

  1. Get an ExpressVPN subscription plan (we tested it and worked).
  2. Download and install the new VPN on your PC.
  3. Launch the VPN client.
  4. Log in to your account.
  5. Access the VPN’s configuration screen.
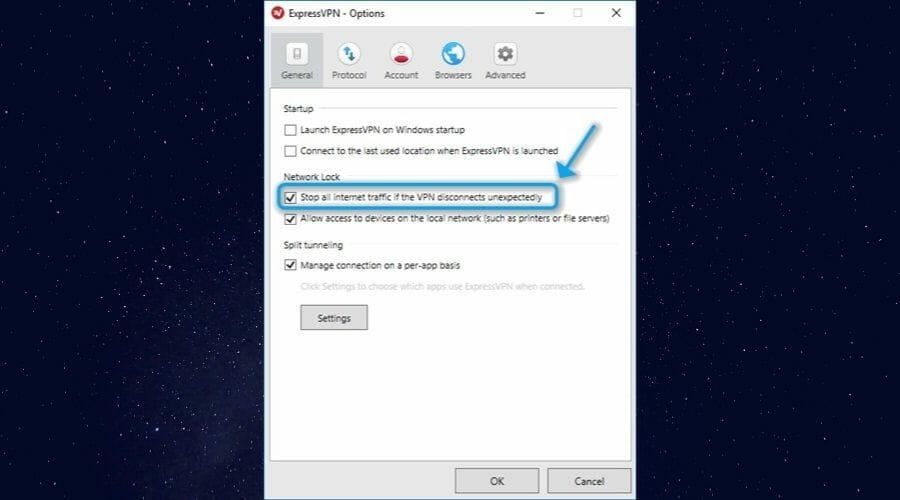
  6. Make sure that the VPN kill switch feature is enabled.
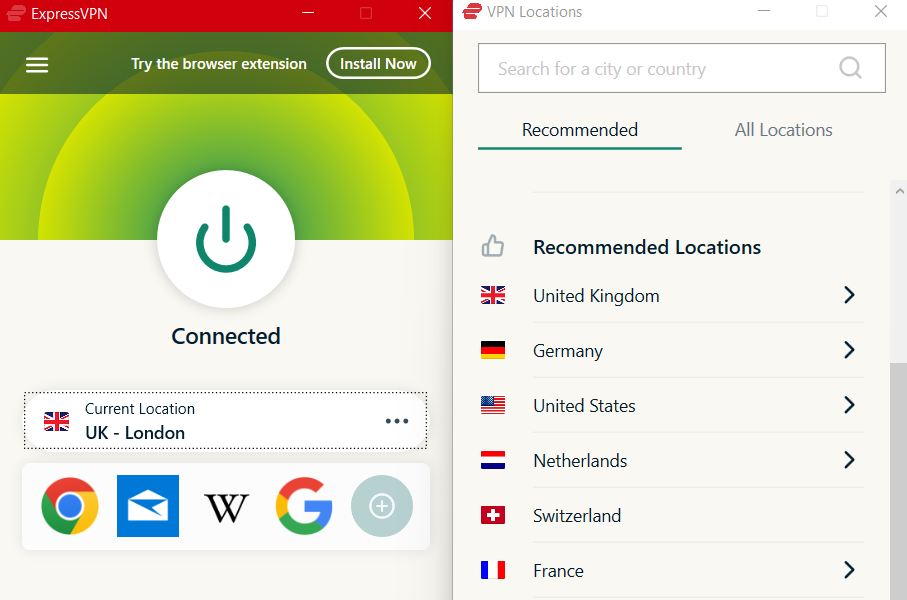
  7. Connect to any server.
  8. Check if the new VPN’s kill switch works.

This VPN comes with advanced tools that can increase your privacy and digital safety when navigating online.

Plus, ExpressVPN comes with a built-in kill switch that you can toggle on and off to your heart’s choice. You can give it a try using its 30-day free trial in order to see if it suits your privacy needs.

If it doesn’t work in your case, the issue may be hardware-related, and you might need to replace your network card.

Besides that, there are other VPN tools with a kill switch feature you can consider to replace the NordVPN service.

5. Install/run NordVPN as Administrator

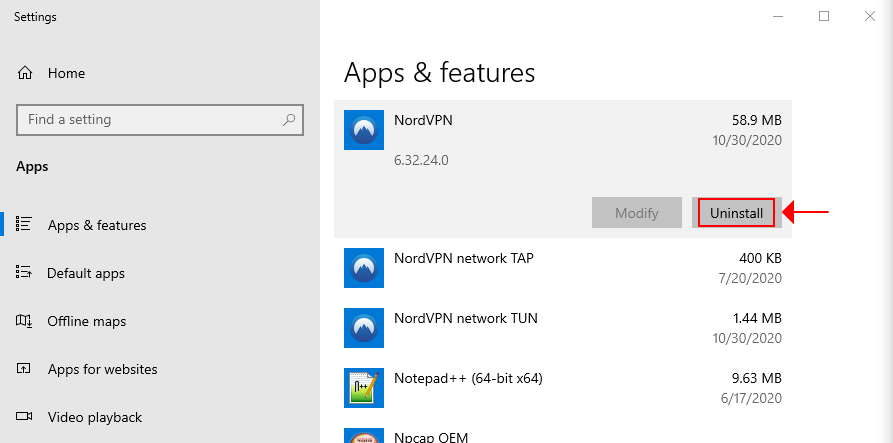
  1. Make sure to uninstall NordVPN from your PC.
    uninstall NordVPN
  2. Download the latest version of NordVPN.
  3. Right-click the installer executable.
  4. Select Run as administrator.
  5. Go through the installation steps.
  6. At the end of the setup, right-click NordVPN’s tray icon.
  7. Select Quit App.
  8. Locate NordVPN’s executable (not the shortcut) on your PC.
  9. Right-click it and select Properties.
  10. Go to the Compatibility tab.
  11. Enable the Run this program as an administrator option.
  12. Click Apply, then OK.
  13. Launch NordVPN.
  14. Check if the kill switch is now working properly.

Certain services on your PC need to make some important changes to your system and need proper privileges.

Since NordVPN cutting your Internet access with its kill switch is quite important, you’ll need to elevate its privileges.

Therefore, installing and running NordVPN as an administrator might just do the trick.

6. Restart the NordVPN service

  1. Disconnect from NordVPN’s server.
  2. Right-click NordVPN’s tray icon.
  3. Select Quit App.
  4. Press the Win key on your keyboard.
  5. Type services.
  6. Select the Services app.
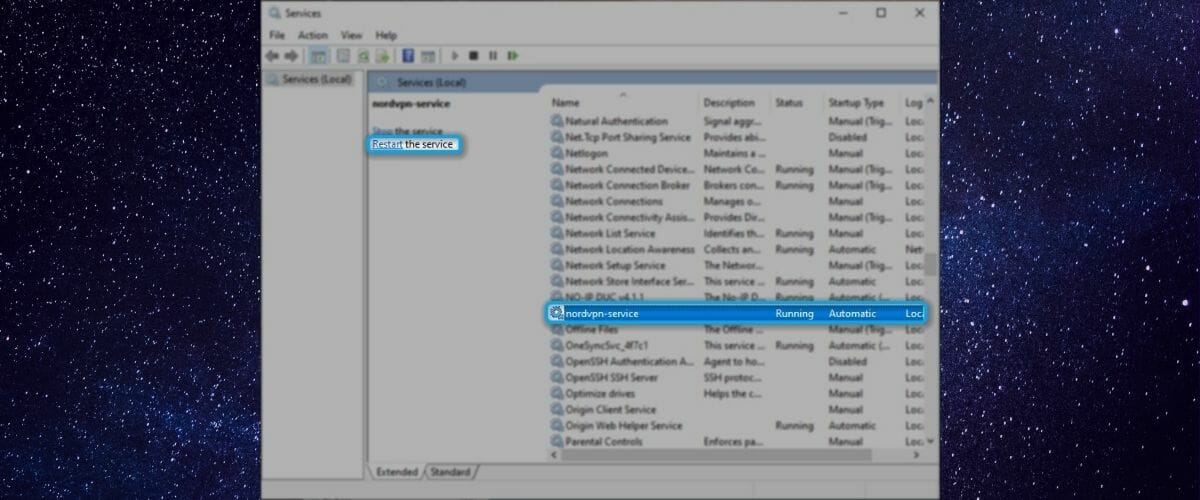
  7. Locate nordvpn-service in the right section of the window.
  8. Right-click it and select Properties.
  9. Make sure its Startup type parameter is set to Automatic.
  10. If it is, close the Properties window.
  11. Make sure that nordvpn-service is selected.
  12. Click the Restart hyperlink to the upper left.
  13. Launch NordVPN.
  14. Check if the kill switch works as it should.

Much like many other VPNs, NordVPN has a proprietary service that needs to be running so it can function.

We need to make sure that the service is running properly, so we’ll simply restart the service. Don’t worry, we’ll tell you how to do it.

NordVPN kill switch not working on Mac

The kill switch functionality on NordVPN should work for Mac in the same way as for Windows devices. Be aware that the kill switch feature for macOS should be enabled by default in the VPN app’s settings.

In case it’s not working from the beginning, you can try applying the same methods described in this guide.

Conclusion

All in all, not being able to benefit from NordVPN can be a huge drawback.

Thankfully, this isn’t a common issue on Windows 10 computers, so you might not even stumble upon it.

However, if it happens, we recommend you go through all of our suggested fixes.

You may just find the one that does the trick quickly and without significant effort.

DisplayPort to VGA Adapter not working / no signal [Fixed]

A multi-monitor setup can help you improve your productivity. As a result, most of the monitors come with two or more interface options.

If you are using an old monitor, chances are that the monitor features a VGA port.

If your computer supports multiple DPs, you can use a DisplayPort to VGA adapter to create a multi-monitor setup.

However, several users have reported a DisplayPort to VGA adapter not working issue when trying to connect their DisplayPort compatible PC with a VGA enabled monitor.

This issue can occur due to several reasons including incorrect adapter, faulty DisplayPort or VGA port, or even issues with the monitor. If you are working with a VGA projector, read our article on how to fix a VGA projector.

In this article, we explore a few troubleshooting steps to help you resolve the DisplayPort to VGA not working problem and fix the No signal error.

How do I fix the DisplayPort to VGA adapter not working problem?

1. Update your display card driver with Outbyte Driver Updater

Outbyte Driver Updater automatically update drivers

Corrupt, buggy, or incompatible display card or GPU driver can also issue with a multi-monitor setup. Try updating the display drivers with Outbyte Driver Updater to fix the problem.

Outbyte Driver Updater is a premium Windows utility that allows you to update all your drivers with one click and enjoy better gaming performance. With a massive database of over 18 million driver files, Outbyte Driver Updater can update almost all the hardware components installed on your PC.

Upon installation, Outbyte Driver Updater scans your system for missing and outdated drivers. You can choose a single device driver to update or choose to download and install all of your out-of-date device drivers.

Additionally, it comes with a download manager, and a driver backup and schedule manager to automate working drivers’ backup.

Key features of Outbyte Driver Updater:

  • Massive database of over 18 million drivers
  • Built-in download manager 
  • Backup and schedule manager 
  • Intuitive user interface 
Outbyte Driver Updater

Outbyte Driver Updater

Resolve the DisplayPort to VGA Adapter problem by updating your drivers with this amazing tool.
Check priceVisit website

2. Check your adapter compatibility 

DisplayPort to VGA Adapter not working

If you have a DisplayPort to VGA adapter, it is important that you connect your DisplayPort compatible computer source to a VGA enabled monitor.

A DisplayPort to VGA adapter will not work from a VGA enabled computer source going to a DisplayPort enabled monitor. 

Unplug your newly connected DisplayPort to VGA adapter and check if it is compatible with your computer. Refer to the adapter manual included in the package to check the compatibility as well as operating instructions.

If you are connecting the adapter to a DisplayPort enabled computer to a VGA enabled monitor and the problem persists, proceed with the additional steps below.


3. Check if the adapter is faulty

DisplayPort to VGA Adapter not working

Try connecting the DisplayPort to VGA adapter to a different monitor using the same system to see if the adapter is faulty. If not, check if the VGA port on your monitor is faulty. In some instances, the problem can also occur if your computer’s DisplayPort is malfunctioning.

The best way to check your computer’s DisplayPort issues is to connect a DisplayPort enabled monitor to your system.

In case the ports are working, contact the adapter manufacturer to seek a replacement.


4. Perform a monitor power cycle 

No signal error
  1. Power off your PC and unplug the power cord from the wall outlet.
  2. Next, remove your monitor’s power cord.
  3. Disconnect all the input sources connected to the monitor and computer and leave the devices idle for a few monitors.
  4. Plug in the computer and monitor power cord to the wall outlet directly.
  5. Power on the devices and check for any improvements.

If you are still experiencing issues with your DisplayPort to VGA adapter, consider upgrading your monitor. New-gen monitors come equipped with DisplayPort and HDMI ports. 

The DisplayPort to VGA adapter not working issue can occur due to a faulty adapter, issues with the monitor or computer port or even incompatibility with the system. You can apply the fixes recommended in this article to fix the issue.

Windows 10 Insider build 21292 brings fixes to news and interests on the taskbar

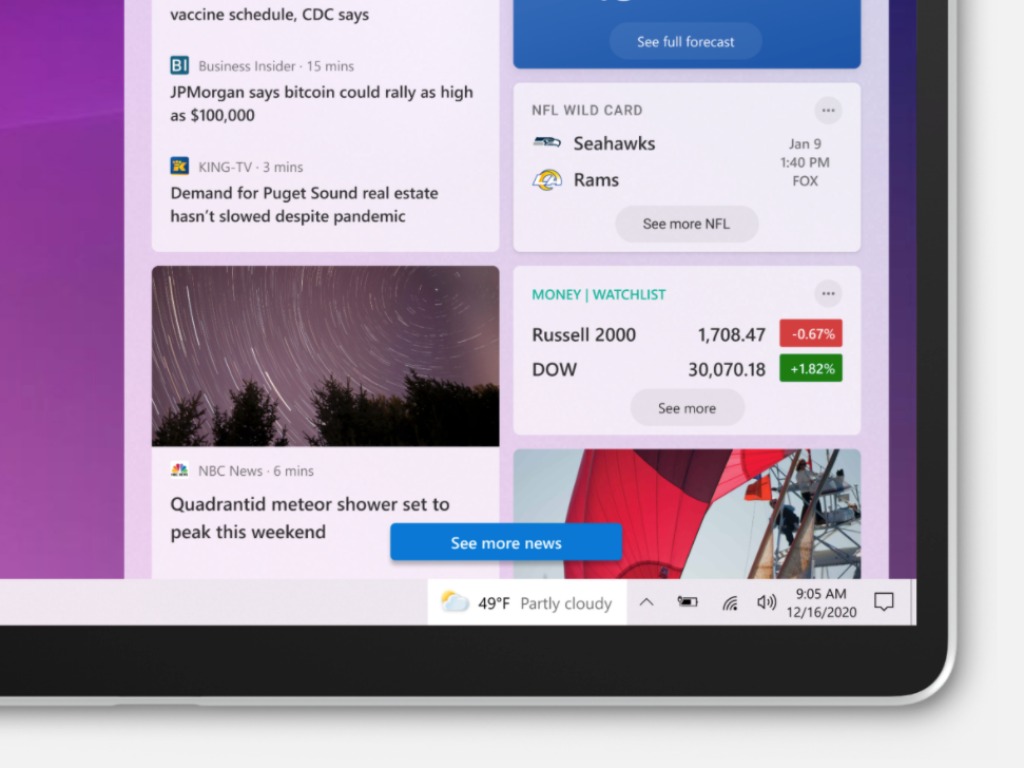
Microsoft has just released the Windows 10 preview build 21292 for Insiders in the Dev channel, which brings various fixes to the new shortcut for news and interests on the taskbar. This feature made its debut with last week’s build 21286, and it remains only available to select Insider in the US, Canada, , Australia, India, and the UK .

This new build also brings improvements to x64 emulation on ARM64 devices, fixing bugs and crashes in apps like Your Phone, Steam, or Serif Affinity Photo. You can find the full list of changes, fixes and known issues in the build 21292 below:

Improvements to news and interests on the taskbar

Thanks for all the feedback on news and interests, which we announced in last week’s blog post. The team has been reading it all! We’re continuing to improve the experience and this week are happy to announce a handful of fixes:

  • We fixed multiple issues impacting performance and reliability.
  • We fixed an issue where an empty flyout would be shown after opening news and interests.
  • We fixed an issue where the text on the taskbar button wasn’t being read by screen readers and some tooltips were missing.
  • We fixed an issue where news and interests in the taskbar was not displaying correctly when using small taskbar icons.
  • We fixed an issue where the news and interests button would temporarily show no content.
  • We fixed an issue where the news and interests flyout would not dismiss by tapping outside the window or again on the taskbar button.
  • We fixed an issue where the content of the taskbar button would look blurry.
  • We fixed an issue where news and interests would not show fresh content after toggling the background apps setting.
  • We fixed an issue where the flyout would not dismiss when you hover off the right edge.
  • We fixed an issue where it was not possible to navigate into the flyout using keyboard.
  • We fixed an issue where the news and interests taskbar setting would be reset to show icon and text after updating to a new windows version.

Changes and Improvements

  • Based on feedback, we’re updating Settings > System > Sounds to now display a message when microphone permissions have been turned off for the whole system or for all apps, with a link to the microphone privacy settings page.

Fixes

  • We’re continuing to work on improving x64 emulation on ARM64 thanks to your feedback. This build fixes issues in several apps, including crashes in Zwift, Serif Affinity Photo, and Your Phone as well as blank pages in Steam.
  • We fixed an issue resulting in an increase in Insiders seeing a message saying “Critical Error: Your Start menu isn’t work” in recent builds.
  • We fixed an issue from the last two builds where explorer.exe / the Windows shell was hanging and or crashing, particularly after interacting with audio/video.
  • We fixed an issue where NTFS was logging false positive torn write events.
  • We fixed an issue resulting in Microsoft Teams and certain other apps unexpectedly displaying as just “Program” (instead of the app name) in Task Manager’s Startup tab.
  • We fixed an issue where it wasn’t possible to sort processes in Task Manager by Status.
  • We fixed an issue that could result in not seeing notifications following WIN + Shift + S shortly after clean installing or resetting your PC.
  • We fixed an issue from the previous build where when Xbox Game Bar was launched from Start or via the Windows key + G when using a text editor, the computer might appear unresponsive.
  • We fixed an issue where when using Windows with scaling greater than 100% in recent builds, if you opened and closed Task View, open windows would appear unexpectedly large in the transition back to the desktop.
  • We fixed an issue where typing “-“ on a number pad when using the Japanese IME wasn’t taking into consideration whether the IME was in full width or half width mode.
  • We fixed an issue where Hanja word conversion with the Korean IME wasn’t working in Excel when the Korean Language pack for Office was installed.

Known issues

  • We’re working on a fix for an issue Insiders have reported where certain games like State of Decay 2, or Assassin’s Creed, may hang or crash when launching.
  • We’re investigating an issue where Call of Duty: Modern Warfare and Call of Duty: Black Ops Cold War may not launch starting with this build. If you play these games, you may wish to pause updates until the issue is resolved.
  • You may experience some rendering / graphic issues after resizing certain app windows. If you minimize all your app windows and open them again it should resolve the issue (Press the Windows key plus D twice).
  • We’re investigating an issue where some 32-bit systems may lose network connection after taking this build. If you are running a 32-bit version of Windows, you may wish to pause updates until the issue is resolved.
  • Miracast users may experience very low frame rates in this build.
  • We’re looking into reports of the update process hanging for extended periods of time when attempting to install a new build.
  • Aero Shake is disabled in this build. To enable it, you will need to go here in Registry Editor and create a new DWORD entry named DisallowShaking with a value of 0:
    • HKCUSoftwareMicrosoftWindowsCurrentVersionExplorerAdvanced
  • Live previews for pinned sites aren’t enabled for all Insiders yet, so you may see a grey window when hovering over the thumbnail in the taskbar. We’re continuing to work on polishing this experience.
  • We’re working on enabling the new taskbar experience for existing pinned sites. In the meantime, you can unpin the site from the taskbar, remove it from the edge://apps page, and then re-pin the site.
  • [News and interests] Upgrading to this build will cause your news and interests taskbar setting to be reset to “Show icon and text”. This is fixed going forward.
  • [News and interests] Sometimes the news and interests flyout cannot be dismissed with pen.
  • [News and interests] News and interests uses more taskbar space on the left than expected.
  • [News and interests] The taskbar button can show stale information each time the user signs into their Windows session.
  • [News and interests] The news and interests flyout shows content in a single column before quickly switching to double column.
  • [News and interests] Text in taskbar button can look pixelated in high resolution screens.
  • [News and interests] The taskbar context menu and news and interests overlap.
  • [News and interests] In certain circumstances, news and interests uses 100% of CPU when first launched.
  • [News and interests] Attempting to share content dismisses the flyout.
  • [ARM64] Insiders who installed the preview version of the Qualcomm Adreno graphics driver on the Surface Pro X may experience reduced brightness of the display. This will be addressed in a future update.

In today’s blog post, the Windows Insider team shared more details about how to get started with news and interests in the taskbar, explaining how to get quick access to the latest headlines and weather, real-time traffic conditions, and more. “We’re continuing to improve the experience,” the team said today, and we’re hoping to see the experience coming to more markets in the next couple of weeks.

Microsoft Teams users can now test PowerPoint Presenter View to keep their meetings on track

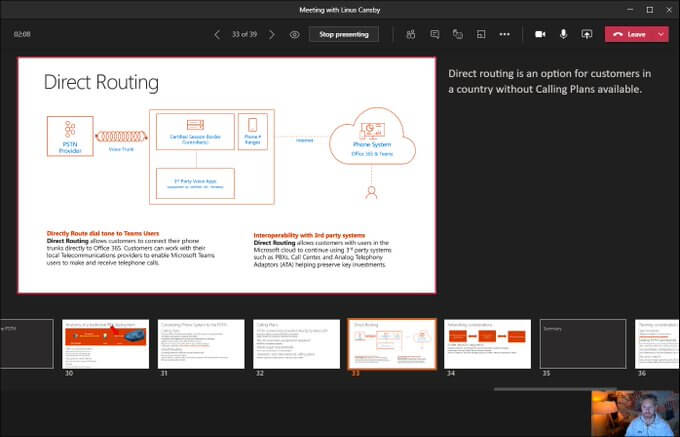
Microsoft Teams is now testing a new feature that will make virtual communication more engaging and impactful than ever before. This week, Linus Cansby, a Microsoft MVP, spotted that the company has rolled out the PowerPoint Presenter View for Teams meetings in preview.

For those unfamiliar, Microsoft Teams already supports a built-in presentation mode but with certain limitations. Currently, presenters can’t enable the PowerPoint View to change the way slides are presented to other participants in a meeting. It makes it impossible for them to see their notes and move between slides out of order, but this should change soon.

With the new addition, presenters will be able to view the current slide, the slide notes, and a thumbnail strip of all the slides during ongoing meetings. For starters, this should enable them to discuss the meeting notes as needed and move back and forth between slides to provide a quick recap. This change will help presenters to keep their meetings on track.

Microsoft Teams Presenter View

To get started, you need to opt into the public preview program for Microsoft Teams. To use this feature, users need to click the Share icon available besides the Leave button in the meeting window. Then select a recent PowerPoint file from the Teams Share Tray or browse for a local/OneDrive file to automatically open the Presenter View.

It is important to note that only the presenter needs to enable the new meeting experience in the Teams desktop app Settings to use Presenter View, and it only works in multi-window meetings. While the new functionality is currently available in public preview, it will start rolling out to the general public later this month.

Hands-on video: Microsoft Flight Simulator 2020 in VR is a mind blowing experience

Towards the end of last year, Microsoft Flight Simulator 2020 was updated to make it compatible with the most popular VR headsets. Oculus, Valve, HTC, and even Windows Mixed Reality headsets all now allow you to experience the simulator from an entirely new perspective.

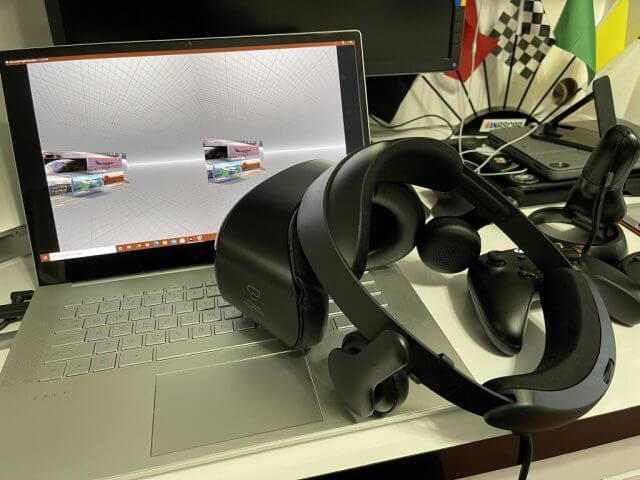
I recently got my hands on a Samsung Odyssey HMD+ Windows Mixed Reality headset so I could try out the experience, and it was truly breathtaking. I took the skies over my hometown of New York City and playing Flight Simulator 2020 in Virtual Reality really felt like piloting an actual airplane.

But just my words won’t do justice as to how real it felt. Watch the video above to see for a hands-on look at the experience, and why it’s so real that you might need a pilot’s license.

Editor’s Note: You might notice a “black bar” effect and some slight lag as I turn my head in certain parts of this video. This black bar isn’t noticeable to me when I had the headset on, it’s just the hardware limit, and the effect of recording the preview of the Windows Mixed Reality feed in the background for this video so you can get the same view that I have through the headset.

The Specs

Windows Mixed Reality Heaset

Before getting into anything, I’ll mention the minimum specs for VR in Microsoft Flight Simulator 2020. You’ll need to have a PC with at least an Nvidia GTX 1080 or equivalent, 16GB of RAM, 150 GB of free space on an SSD or HDD, as well as Direct X11 installed.

I played on my HP Envy 15, which I previously reviewed. I’m able to get *decent* framerates at 30-40 frames per second on high settings, and beyond that on medium, but your experience might depend on your hardware.

My specs include the following — Nvidia GeForce RTX 2060 Max-Q GPU with 6GB GDDR6 VRAM. 16GB DDR4-2933 SDRAM. and the 6-core Intel Core i7-10750H processor. If you’re hoping to run Flight Sim in Virtual Reality, I suggest you open and run the Windows Mixed Reality Portal to see if your PC is compatible. It will give you a checklist of things, and suggestions on how to improve your PC for maximum VR compatibility. You also can check out the Flight Simulator forums, where people are posting about their setups and what’s working and what’s not.

The initial setup

Launching Microsoft Flight Simulator 2020 in virtual reality is a multi-step process. First, I needed to set up my headset through the Windows Mixed Reality portal. From there, once everything is set up, I took my headset off and booted up Microsoft Flight Simulator on my desktop. With the game fully loaded at the menu, I needed to press CTRL+TAB to toggle the simulator into VR mode. This caused my headset to “reboot” and open Flight Sim as an application.

When this happens, I put the headset on, and see the menus in a virtual space. It’s suggested to press the spacebar key on the keyboard to center the headset and the images for the best possible experience. Once in VR, I also suggest pausing the simulator, heading into the graphics settings menu, and going to VR graphics options, and tweaking the settings for your graphics card and your PC. Don’t overload the settings if you know your PC can’t handle VR that well.

Note that Windows Mixed Reality controllers currently aren’t supported by Simulator 2020. I needed to connect my Xbox controller to my PC via Bluetooth and use it for navigation, as well as controlling the airplane. You can also use a flight stick, too, if you have one.

The pre-flight-checks and initial experience

The first time I booted into Flight Simulator in Virtual Reality, my mind was instantly blown away. I felt like I was standing on the runway next to an actual airplane. The Robin Cap10 I was sitting in front of me before my eyes on one of the shorter runways at JFK International Airport. I moved my head left and right, and it was like I was standing on the tarmac next to the airplane getting ready to board it.

But that was just the start. Right away, I switched views to the cockpit mode. I moved my head forward, and back, the simulator moved with me in the game. It knew I was looking closer at the dashboard and it zoomed in for me. I was able to perform pre-flight checks, move forward to check all my gauges, look outside the window at the wings, and even turn my head back and check out the tail of the airplane. The tracking in Windows Mixed Reality headsets is spot-on, despite only using sensors built-in on the headset itself.

As a side note, I want to mention that you can use a keyboard and mouse to touch these gauges and tweak certain settings if need be, too. It would have been great to see support for the WMR controllers, but I can see the technical issues of making that happen.

Anyway, it’s not like the gauges were blurry. The closer I moved my head to the dashboard of the airplane, the more real the gauges looked. I was able to spot the carbon emissions sticker, check the mileage on the airplane, check the buttons, look at the frequency on the radio, and explore the cockpit in all its glory.

The takeoff and flying experience

I thought that seeing the gauges and looking at the airplane on the ground was amazing, but as soon as I started my takeoff roll down the runway at JFK, it got even better. Thanks to spatial audio and the built-in speakers in the Samsung HMD Odyssey + my ears were blessed with the greatness of aviation that is usually only reserved for real pilots.

I heard the tires screeching as they lifted off the runway. I heard the gears in the engine start to turn up as I pumped up the throttle, and I even heard and saw tiny dirt particles hit the windshield as I started climbing. It’s truly a breathtaking experience.

What was even more breathtaking was turning my head and looking out the window. As I slowly pulled back on the analog stick to gain altitude, I felt the sense of speed as the airport was getting smaller under me. I even could see a departing airplane taxi on the runway, too. Even the radio on the dashboard reflected my change in altitudes, and the switch in radio frequencies as my flight got handed off from Kennedy Ground to Kennedy Departure. It doesn’t get more real than this!

The exterior views, and the flight

Just like the main game, Microsoft Flight Simulator 2020 in VR isn’t just limited to the cockpit view. Once in flight, I switched to the exterior view as I approached some of the tourist sites in New York City after I departed JFK Airport. This experience itself is also something that’s quite unique, too.

In the exterior view, you’ll be placed behind your plane in the flight, and are free to look around by turning your head. You can get a “birds-eye view” of anywhere you’re flying, and look down on the world as if you were in a glass helicopter. I did this when I was playing over New York City’s Central Park, the trees and the water looked so realistic. Even looking down at the West Side and East Side of Manhattan looked real, especially when approaching the MetLife building. It’s like I was a bird flying over my own city. I could make made out the smallest of details.

A great simulator, that shows Windows Mixed Reality at its best

After spending more than a week doing virtual flights in Microsoft Flight Simulator, I must say that this should be the new hallmark game for virtual reality. The way Flight Sim pulls from Bing Maps and the high level of details in the airplanes and environments and the head tracking make for a truly realistic experience. I’ve tried other titles such as Project Cars 2, and Starwars Squadrons, but flight Simulator has the perfect combination of everything to equate for realism.

If your laptop or desktop is capable, I highly suggest you download the game, invest in a Windows Mixed Reality headset or other VR headset, and give the game a go. You won’t regret it, and you won’t need a pilot’s license.

Windows 10 “Sun Valley” update may introduce floating Start Menu and other UI changes

The Windows Insider team came back from the holidays last week with the first Windows 10 Insider build of 2021, which brought an interesting addition to the OS. Select Insiders in the Dev Channel can now see a new shortcut for news and interests the Windows 10 Taskbar, right next to the system tray. It had been a while since we last saw a significant new feature make its way to the Dev channel, but the Windows Insider team could have a lot more to share with Insiders.

Indeed, it has been previously reported that a big Windows 10 redesign codenamed “Sun Valley” could be planned for the Windows 10 21H2 update coming in the second half of 2021. Microsoft’s Panos Panay himself announced last year that the company was “going to accelerate innovation in Windows 10”, and a recent Microsoft job listing teased “a sweeping visual rejuvenation of Windows experiences.”

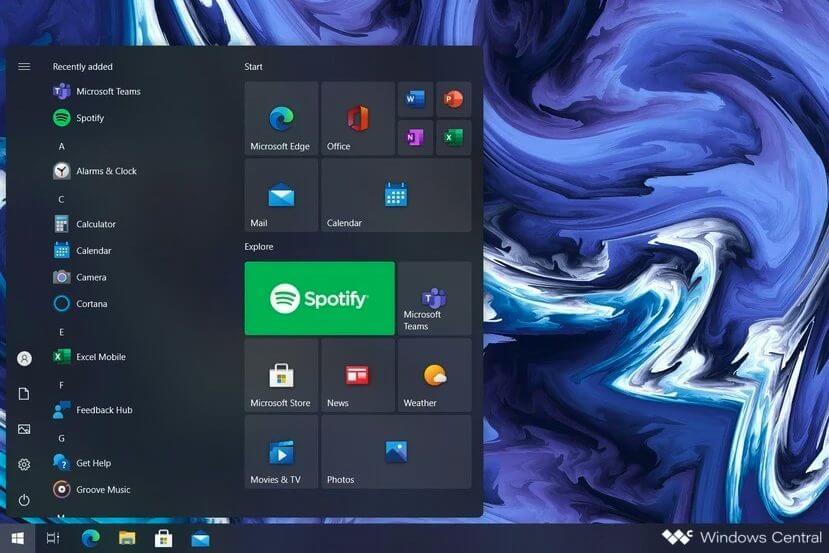
While Microsoft has yet to discuss these design updates in more detail, Zac Bowden from Windows Central shared today a couple of mockups showing new features and UI changes that could be part of this “Sun Valley” redesign effort. The first mockup below represents a rounded Start Menu that would appear as a floating windows above the taskbar.

Windows 10 Redesigned Start Menu Sun Valley Mockup Windows Central

The second mockup shared by Windows Central represents improvements to the Snap assist view, with Microsoft Edge tabs being separated from app windows. “I’m also told that snap assist will be getting an update to make it more reliable when docking to and from a larger display, now remembering which apps are snapped where instead of forgetting once you connect or disconnect,” Bowden explained.

Windows 10 Redesigned Snap Assist Sun Valley Windows Central Mockup

Bowden also mentioned several other new features and improvements that Microsoft could be planning to deliver as part of the “Sun Valley” update, including a simplified Taskbar inspired by the one on Windows 10X, as well as a new battery usage chart in the Settings app. The Task view area could also welcome a new “dashboard” feature highlighting key information on personal or work/school Microsoft accounts, including recent Office documents and upcoming calendar events.

It remains to be seen if any of the new features described in the report will soon be available for Insider testing. Again, Microsoft has yet to officially discuss this Sun Valley update, and the Windows Insider team keeps saying that new Insider builds and their new features are not tied to a specific release.

Still, the upcoming release of Windows 10X on Chromebook-like devices should be the start of a new era of Windows 10 design. It’s going to be interesting to see if Chief Design Officer Panos Panay will be able to leave his mark on Microsoft’s operating systems, and we hope that the company will implement consistent design guidelines across Windows 10X and the regular Windows 10.

9 Best Hack and Slash Games for PC [Gamers Guide]

The Hack and Slash gaming franchise has a devoted following among avid gamers and casual ones alike.

The concept of the game is easy enough to follow so that you don’t need much gaming experience to get into it, and that makes the genre accessible to a larger crowd.

The Hack and Slash games are generally based around the idea of a solitary hero that has to deal with hordes of enemies coming at them from all directions.

The hero would run from room to room or from level to level and clear them of bandits, demons, beasts and whatever the game developers decide to throw at them.

In this article, we are taking a look at what are some of the best Hack and Slash games you can play on a Windows PC, so sorry console fans.

While some of these games might also be available on consoles, which we aren’t purposefully trying to leave out, these picks are specifically oriented for Windows PC compatibility.

What are the best Hack and Slash games for PC?

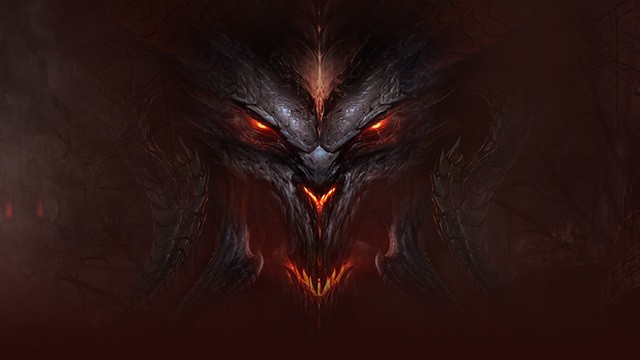
Diablo 3

The latest game in the Diablo franchise came out a couple of years ago but it is still played by many people to this day. It’s a single player adventure but it has multiplayer and online elements that allow you to play and compete with friends online of the solo adventure gets too scary, hard or boring at any point.

Diablo has also received a heft expansion set and is constantly getting new updates that make the game better.

The game lets you choose from multiple classes so that you can play what fits your style most. Begin the adventure by crawling through dungeons in need of a good purging.

This game is made by Blizzard, the company behind Warcraft and Starcraft, and the story is also pretty good.

⇒ Get Diablo 3 from Kinguin

⇒ Get Diablo 3 from G2A

Nier: Automata

NierR: Automata is the sequel to a game not many people have played or appreciated, but it definitely started a cult following with its original take on the genre. The game is not a pure Hack and Slash as it incorporates heavy RPG elements.

That being said, you do get to run around as a female cyborg with her own assistant-like companion, shooting robots and cutting them with your swords.

The element that sets this game apart from the crowd most is its setting. The premise of the game is that humanity has lost a war against the machines and is now fighting to regain control of the planet.

The aftermath of this conflict spawns some amazing scenery that the game developers fully expose in artistic detail.

It’s definitely a game that you want to get lost in thanks to its captivating and immersive nature. The game did come out as a PS4 game, but the developer promised a PC version that would release later on.

⇒ Get Nier: Automata from Kinguin

⇒ Get Nier: Automata from G2A

⇒ Get Nier: Automata from Green Man Gaming

DMC: Devil May Cry

DMC: Devil May Cry represents a soft reboot of the widely successful series which has been around for more than a decade.

The game is based around the protagonist Dante and his various missions throughout the different games in the series. In this soft reboot, Dante gets a complete makeover starting with his iconic silver hair all the way to his attitude.

One thing that doesn’t change however is the gameplay which has you running around and killing all kinds of demons and monstrosities.

There are multiple types of weapons that you will use throughout the game, ranging from fast cutting blades to heavy hitting maces.

You also have two guns which you use intermittently with your melee weapon attacks to create awesome combos.

The game series is known for its dynamic and slightly cartoonish combat where you can keep enemies suspended in the air with multiple attacks, making for some really interesting combos.

Additionally, the visual effects make it a real treat as the various weapons combined during battles make for some real eye candy.

⇒ Get Devil may Cry from Kinguin

⇒ Get Devil may Cry from G2A

Devil May Cry 4

The original games in the series are also worth your time, and they can be a really fun experience for people that have only played the newest, rebooted title, which we mentioned previously.

The first games are the ones that set the tone for the franchise and explore the story of Dante as he was originally portrayed.

The games are packed with gory action and an intricate story revolving around brotherly feud and an effort to save the world from destruction, all compressed in one game, but with its essence spread across 3 more sequels.

The difference in production will be pretty visible between the originals and the rebooted title but the core of the game will still be there and enjoy one side means there are super high chances you’ll enjoy the other one.

If you’ve played and enjoyed DMC: Devil May Cry, it’s definitely worth looking into its older brothers.

⇒ Get Devil may Cry 4 from Kinguin

⇒ Get Devil may Cry 4 from G2A

⇒ Get Devil may Cry 4 from Amazon

Darksiders

Darksiders is a game where players assume the role of War, one of the four horsemen. 

For those that aren’t familiar with the biblical theme of the Four Horsemen, they are War, Famine, Death and Pestilence, and it is said that when the world ends, they will be the harbingers of the Last Judgment.

Now that the lesson’s over, it’s time to get on to the good part: the game.

In Darksiders, War, which is you, the player, is summoned to fulfill his duties in the aftermath of an error. The apocalypse is triggered way to soon and humanity perished under a battle between demons and angels.

War must battle both sides and usher in his element (war) through humanity’s final hour.

Of course, you’ll have to play the game to find out what happens to our planet, but we can tell you that you’ll have a lot of hacking and slashing to do.

You’ll enjoy the multiple combos and a super God of War-inspired combat which combines free flow with finisher moves and even transformations and power-ups that give you small time windows in which your powers get cranked to 11.

⇒ Get Darksiders from Kinguin

⇒ Get Darksiders from G2A

⇒ Get Darksiders from Green Man Gaming

⇒ Get Darksiders from Amazon

Darksiders II

We continue the small tradition of sequels in the list started by Devil May Cry with the sequel to the aforementioned Darksiders. It’s a bit hard to explain the synopsis without spoiling the first game, but the main idea is that War, the protagonist from the first game is in trouble.

This time around, you take on the role of Death, another one of the Four Horsemen, and War’s brother. You set out on a journey to save War and you have plenty of opportunities for epic battles along the way.

The game builds on what the original Darksiders had to offer, bringing more dynamic and more variety in the game.

You also get new toys and some sweet weapons you can use to demolish the hordes of enemies coming your way.

This is another Hack and Slash game with an intriguing story that might interest you. If not, the combat gameplay on its own is enough to pick up this game as well as its predecessor, if you’re looking for a good Hack and Slash game.

⇒ Get Darksiders II from Kinguin

⇒ Get Darksiders II from G2A

⇒ Get Darksiders II from Green Man Gaming

⇒ Get Darksiders II from Amazon

Metal Gear Rising: Revengeance

At heart, the Metal Gear franchise is a tactical, stealth-based series which has you playing a silent, calculated and deadly protagonist. That’s why anyone that knows a little bit about the series but hasn’t heard about this game might be a little confused.

Metal Gear Rising: Revengeance is a spinoff to the original game series and it differs a whole lot from what fans have been used to up until its point.

This game follows a protagonist called Raiden, which is a Katana wielding cyborg.

It is, of course, a Hack and Slash game, which makes it eligible for this list, but it is also one of the most interesting and unique Hack and Slash games out there, which is why it is actually featured on the list.

The thing that makes this game so different is the fact that it has a free slicing blade mode which lets the player slice through anything they want from cars to buildings and anything else they can find in the environment.

It is an extremely gory game, action-packed and full of cool moments throughout the adventure.

It’s Hack and Slash at its finest but also with a personal touch which will make players specifically remember it and differentiate it from other games in the genre.

⇒ Get Metal Gear Rising: Revengeance from Kinguin

⇒ Get Metal Gear Rising: Revengeance from G2A

⇒ Get Metal Gear Rising: Revengeance Green Man Gaming

Grim Dawn

Grim Dawn is the answer for anybody looking for a really gritty looking game. It has all the elements you find in a game like Diablo and it incorporates RPG elements as well.

It’s definitely a game worth playing if you’ve enjoyed the earlier Diablo games like Diablo 2 for instance.

This game definitely has a darker tone to it but the various Diablo-like elements such as picking a class and attributing skills to building up a character as you progress is very reminiscent of the aforementioned Blizzard game.

The story in Grim Dawn is also very dark, so if you are generally into shadier narratives, this might be the game for you.

⇒ Get Grim Dawn from Kinguin

⇒ Get Metal Gear Rising: Revengeance from G2A

Vikings: Wolves of Midgard

This game also resembles Diablo a bit but only as far as the camera angle is concerned. With a top overview perspective, you are launched into the world of Vikings as you battle hordes of enemies to reach your destination and complete your quests.

If you are into norse mythology and love giving a proper beatdown to large packs of enemies ranging from beasts to monsters and giants, then this game might be your cup of tea.

It has great graphics and little details such as the fact that you leave footprints in the snow, or that you start freezing after spending some time on snowy mountaintops bare-chested give it a really special feeling.

There are many such classy elements in this game and the overall experience is great.

You can even get a friend to tag along in a co-op, 2-man adventure which makes things even more fun if you have a mate to go do Viking stuff with.

You don’t have classes in the classical sense of the word, but more like orientations towards a certain specialization.

What that means is that you can choose what kind of weapon you start with and what you’re most proficient with at the very beginning.

As you progress you can level up and spend your points accordingly so that you can master the use of any weapon you want. That’s not only great for your first playthrough, but it also adds tons more replay value than if there were traditional classes in the game.

⇒ Get Vikings: Wolves of Midgard from G2A

⇒ Get Vikings: Wolves of Midgard from Green Man Gaming

⇒ Get Vikings: Wolves of Midgard from Amazon

There you have it, these are the best Hack and Slash games you can play on PC. Regardless of whether you don’t spend that much time playing games or you just don’t like consoles, you definitely have a nice collection to dive into.

While all these games have some similar elements between them which bind them to the Hack and Slash genre, they all possess something unique and provide a lot of diversity among them as well.

There are other games out there pertaining to the genre, but it’s safe to say that you’ll be having your hands full for quite some time with this selection of the best Hack and Slash PC games.

We’d like to hear more about your experiences in the gaming realm so drop us a comment in the comment section below.

Fix: World of Warcraft error BLZBNTAGT00000BB8

World of Warcraft is one of the most popular multiplayer online games in the world, with millions of active players. Overall, the game is very stable and reliable, but sometimes there are various error messages that occur, limiting or even blocking the gaming experience.

In this article, we’re going to focus on the annoying fWoW BLZBNTAGT00000BB8 error and we’ll show you how to fix it.

When users launch the Battle.net app, they are invited to update their games. When they select the update option, error BLZBNTAGT00000BB8 appears on the screen.

BLZBNTAGT00000BB8 error
Since this weekend (don’t kis know precisely when, las time I played was Thursday), I’m getting this error.
I open the BNet client, the blue button instead of play says Update and then as I click a box containing this error code pops.

How do I fix the WoW BLZBNTAGT00000BB8  error?

1. Scan and Repair your WoW client

  1. Open the Battle.net app
  2. Go to WoW and click on Options
  3. Select Find in Explorer > open the Data file
  4. Delete the Indices file.
  5. Open again the Battle.net app, then go to Options
  6. Click on Scan and Repair, and then wait
  7. Close the app and launch it again as Admin. You should now be able to play WoW on your Windows computer.

2. Disable or temporarily uninstall your antivirus

Your antivirus may mistakenly identify the login module as a security threat and may prevent the game from updating, or launching.

Once you’ve done that, make sure that you restart your PC and try launching WoW again.

Additionally, you could try using a different antivirus tool, one that is easier to switch on and off, and that allows better filtering of wanted and unwanted apps.

There are many Windows 10 compatible antivirus software that offer great real-time protection and have lower false-positive rates.

We recommend looking for an antivirus that is easy to use and has a small resource usage. Additionally, make sure to pick a security tool with a large threat database and a powerful firewall.

Once you’ve installed it, perform a full system scan to remove any viruses or malware.

3. Optimize your wireless internet connection.

Since WoW is an MMORPG, a stable online connection is crucial for updating, launching, and playing the game.

If you notice that your wireless connection is pretty weak in general, you could try some minor troubleshooting steps, or switch to a wired connection altogether.

If you still prefer a wireless connection, you could try moving closer to the router, and making sure that there are as few obstacles between you and it as possible.

4. Check out your proxy settings

Since WoW needs constant online connectivity, using proxies and VPNs the wrong ways can cause a wide range of issues, not just this particular error message. It can lead to lag, packet losses, and more.

That being the case, disable any proxies that may interfere with the login module.

Additionally, you should try playing WoW while your VPN is disabled, or you can try an entirely new VPN. Look for a VPN with a large number of servers and good global coverage because these offer great connections almost all the time.

Another useful feature that is provided by some of the best VPN services is split tunneling. This may be especially helpful if you like gaming because you can use it to prioritize your traffic towards your game.

5. Other troubleshooting solutions

If the above solutions don’t work, you should also try the following:

  • Run the game in Administrator Mode to eliminate any start-up errors.
  • Uninstall and reinstall the Battle.net app.

As always, if you’ve come across other workarounds to fix WoW error BLZBNTAGT00000BB8, you can list the troubleshooting steps in the comments section below.

91 vulnerabilities discovered in January during Patch Tuesday

2020 has been a rocky year for Windows 10 and Adobe users, with a record-breaking number of CVE’s discovered each month.

For comparison, 2020 had more discovered CVEs than the entire of 2019 by the end of August, with numbers finally showing a decrease in December.

Speaking of which, here is a brief summary of how many CVE’s were detected each month:


2021 starts off with a total of 91 CVEs discovered in January

Vulnerabilities found in Adobe products

This month only 9 CVEs were found, and they affected the following Adobe products:

Adobe Campaign Classic, Photoshop, Illustrator, Animate, InCopy, Captivate, and Bridge.

Fortunately, the only Critical CVE found this month was the one affecting Adobe Illustrator.


Vulnerabilities found in Microsoft products

On the other hand, the bulk of the discovered CVEs are comprised of those that affect Microsoft products, being found in the following:

Microsoft Windows, Edge (EdgeHTML-based), ChakraCore, Office and Microsoft Office Services and Web Apps, Visual Studio, Microsoft Malware Protection Engine, .NET Core, ASP .NET, and Azure

The CVEs were classified based on their severity, as follows:

  • 10 were classified and Critical
  • 73 were listed as Important in severity

Which were some of the most severe CVEs?

As always, there are CVEs that are to be taken a lot more seriously than the others, and in the case of this month’s updates, they are the following:

  • CVE-2021-1647
    • Microsoft Defender Remote Code Execution Vulnerability
  • CVE-2021-1648
    • Microsoft splwow64 Elevation of Privilege Vulnerability
  • CVE-2021-1677
    • Azure Active Directory Pod Identity Spoofing Vulnerability
  • CVE-2021-1674
    • Windows Remote Desktop Protocol Core Security Feature Bypass Vulnerability

2020 finished off with 1250 total detected CVEs, and it looks like 2021 will follow the trend, with almost 100 from the very first month.

Remember that if you use any of the affected products mentioned above, even if the vulnerability is not rated as being Critical or Important, it is highly advised that you get the latest patches immediately.

Speaking of which, if you have no idea how Patch Tuesday works, check out this detailed guide where we will explain everything to you.

Additionally, you can even download the updates directly from this detailed guide, and even read up on all the changes that have come.

What do you think about this month’s number of detected CVEs? Tell us all about it in the comments section below.

[wl_navigator]

January Patch Tuesday updates fix intranet server vulnerability

The January Patch Tuesday have arrived, and with them come a variety of new changes and fixes for all versions of Windows 10.

There are currently 9 different versions of the OS still actively receiving Patch Tuesday updates, and with so many versions still available, the cumulative updates themselves vary in terms of what they bring.

However, sometimes a vulnerability that is very critical is detected, and all cumulative updates address that particular issue, and that is precisely the case with this month’s updates


A severe vulnerability issue with intranet servers was fixed

According to the official Microsoft changelog, e very serious security vulnerability was fixed that targeted HTTPS-based intranet servers:

Addresses a security vulnerability issue with HTTPS-based intranet servers. After installing this update, HTTPS-based intranet servers cannot, by default, use a user proxy to detect updates.

Scans using these servers will fail if you have not configured a system proxy on the clients. If you must use a user proxy, you must configure the behavior using the policy Allow user proxy to be used as a fallback if detection using system proxy fails.

To ensure the highest levels of security, also use Windows Server Update Services (WSUS) Transport Layer Security (TLS) certificate pinning on all devices.

This change does not affect customers who are using HTTP WSUS servers. For more information, see Changes to scans, improved security for Windows devices.

Additionally, these update also address a security bypass vulnerability that affected the Printer Remote Procedure Call (RPC) binding handles authentication for the remote Winspool interface.


All things considered, it is solely up to you whether to update your Windows 10 PC or not, as you can easily pause your Windows Update menu from automatically downloading them for you.

However, due to the fact that this update does bring a lot of security fixes, including 91 CVEs, our advice is that you update as soon as possible.

If you have no idea how to prepare your PC for Patch Tuesday updates, then here is a list of best practices for Patch Tuesday that you should follow every month before applying these updates.

This is so that the update process goes flawlessly, so that you won’t encounter any Windows 10 Update errors, and get the latest protective features as soon as possible.

Let us know if you decided on applying the latest cumulative update on your PC by leaving us a message in the comments section below.

[wl_navigator]

KB4598229 and KB4598242 affect system and user certificates

With the arrival of the first Patch Tuesday updates of the year, users already had big expectations for what was to come, especially considering how eventful 2020 was.

Well, the January Patch Tuesday updates weren’t a let-down at all, as it brought many fixes to all major version of Windows 10, from version 1507 to version 20H2.

As always, each cumulative update is different than the other, since each version of Windows is different from one another.

Because of this, it’s only natural that some cumulative updates stand out because of what new features they bring, or what system-breaking bug they fix, and that is definitely the case with KB4598229 and KB4598242.


KB4598229 and KB4598242 may affect user certificates

According to Microsoft’s own changelog:

System and user certificates might be lost when updating a device from Windows 10, version 1809 or later to a later version of Windows 10.

Devices will only be impacted if they have already installed any Latest cumulative update (LCU) released September 16, 2020 or later and then proceed to update to a later version of Windows 10 from media or an installation source which does not have an LCU released October 13, 2020 or later integrated.

This primarily happens when managed devices are updated using outdated bundles or media through an update management tool such as Windows Server Update Services (WSUS) or Microsoft Endpoint Configuration Manager.

This might also happen when using outdated physical media or ISO images that do not have the latest updates integrated.

However, Microsoft wanted it to be noted that devices using Windows Update for Business or that connect directly to Windows Update are not impacted.

They added that all devices connecting to Windows Update should always receive the latest versions of the feature update.

They also provided users with a workaround to this feature suggesting that users simply perform a system rollback to before they applied the update.

They also went ahead and provided users with a detailed guide on how to do so too.


Given the changes, we recommend that anyone running Windows 10 v1903/v1909 should postpone the update of their PC until a fix is found.

If you don’t have much experience with how Patch Tuesday works, we’ve prepared an in-depth article where we will guide you every step of the way with useful information.

Additionally, if you don’t want to wait for Patch Tuesday to become available in your region and want it right away, we have created this amazing article that acts as both a changelog and a source of download links from the Windows Update Catalog.

[wl_navigator]

Windows 10 January Patch Tuesday [DIRECT DOWNLOAD LINKS]

2021 is here, and with it, the promise of new features and improvements come to Windows 10 as an OS.

The first steps in that direction is the current January Patch Tuesday updates, as they are the first round of major updates of the year.

Nothing much has changed in terms of update delivery, or at least Microsoft didn’t announce anything regarding the matter, so the January Patch Tuesday updates have arrived according to schedule.

Because there are many versions of Windows 10, both newer and older, still in use, each individual cumulative update is a bit different from the rest.

That is precisely why we compiled this dedicated article where will we will be providing you with a changelog for all cumulative updates that will be arriving this month.

As a bonus, we will also provide you with direct downlaod links towards each cumulative update, straight from the Windows Update Catalog!


Changes included in the January Patch Tuesday Updates

Windows 10, version 20H2

As of the writing of this article, Windows 10 v20H2 is the latest major version of Windows 10, and as such has the most experimental features on it.

Fortunately, most bugs that were first present when it was first made available have been weeded out, and this version of Windows 10 is far more stable.

That being said, you should upgrade to this version as soon as possible if your hardware allows it (the system requirements are the same as with Windows 10 v2004).

If you haven’t updated to Windows 10 v20H2, know that it is easiest to update if you already have Windows 10 v2004. Check out this in-depth guide on how to get Windows 10 v20H2 as fast as possible.

Cumulative update name:

Improvements and fixes:

  • Addresses a security vulnerability issue with HTTPS-based intranet servers. After installing this update, HTTPS-based intranet servers cannot, by default, use a user proxy to detect updates. Scans using these servers will fail if you have not configured a system proxy on the clients. If you must use a user proxy, you must configure the behavior using the policy “Allow user proxy to be used as a fallback if detection using system proxy fails.” To ensure the highest levels of security, also use Windows Server Update Services (WSUS) Transport Layer Security (TLS) certificate pinning on all devices. This change does not affect customers who are using HTTP WSUS servers. For more information, see Changes to scans, improved security for Windows devices.
  • Addresses a security bypass vulnerability that exists in the way the Printer Remote Procedure Call (RPC) binding handles authentication for the remote Winspool interface. For more information, see KB4599464.
  • Security updates to Windows App Platform and Frameworks, Windows Media, Windows Fundamentals, Windows Kernel, Windows Cryptography, Windows Virtualization, Windows Peripherals, and Windows Hybrid Storage Services.  

Known Issues:

  • System and user certificates might be lost when updating a device from Windows 10, version 1809 or later to a later version of Windows 10. Devices will only be impacted if they have already installed any Latest cumulative update (LCU) released September 16, 2020 or later and then proceed to update to a later version of Windows 10 from media or an installation source which does not have an LCU released October 13, 2020 or later integrated. This primarily happens when managed devices are updated using outdated bundles or media through an update management tool such as Windows Server Update Services (WSUS) or Microsoft Endpoint Configuration Manager. This might also happen when using outdated physical media or ISO images that do not have the latest updates integrated.
    • Note Devices using Windows Update for Business or that connect directly to Windows Update are not impacted. Any device connecting to Windows Update should always receive the latest versions of the feature update, including the latest LCU, without any extra steps.
  • When using the Microsoft Japanese Input Method Editor (IME) to enter Kanji characters in an app that automatically allows the input of Furigana characters, you might not get the correct Furigana characters. You might need to enter the Furigana characters manually.
    • Note The affected apps are using the ImmGetCompositionString() function.

[DIRECT DOWNLOAD LINK]


Windows 10, version 2004

Windows 10 v2004 shares the same core system as Windows 10 v20H2, so all updates, fixes and improvements applied to one is the same with the other.

Cumulative update name:

KB4598242

Improvements and fixes:

  • Same As Windows 10 V20H2

Known Issues:

  • Same As Windows 10 V20H2

[DIRECT DOWNLOAD LINK]


Windows 10, version 1909

Windows 10 v1909 shares a core structure, core operating system, and an identical set of system files with Windows 10 v1903.

Because of this, all cumulative updates that apply to one version are available to the other as well.

Cumulative update name:

Improvements and fixes:

  • Addresses a security vulnerability issue with HTTPS-based intranet servers. After installing this update, HTTPS-based intranet servers cannot, by default, use a user proxy to detect updates. Scans using these servers will fail if you have not configured a system proxy on the clients. If you must use a user proxy, you must configure the behavior using the policy “Allow user proxy to be used as a fallback if detection using system proxy fails.” To ensure the highest levels of security, also use Windows Server Update Services (WSUS) Transport Layer Security (TLS) certificate pinning on all devices. This change does not affect customers who are using HTTP WSUS servers. For more information, see Changes to scans, improved security for Windows devices.
  • Addresses a security bypass vulnerability that exists in the way the Printer Remote Procedure Call (RPC) binding handles authentication for the remote Winspool interface. For more information, see KB4599464.
  • Addresses an issue that might damage the file system of some devices and prevent them from starting up after running chkdsk /f.
  • Security updates to Windows App Platform and Frameworks, Microsoft Graphics Component, Windows Media, Windows Fundamentals, Windows Kernel, Windows Cryptography, Windows Virtualization, Windows Peripherals, and Windows Hybrid Storage Services.

Known Issues:

  • System and user certificates might be lost when updating a device from Windows 10, version 1809 or later to a later version of Windows 10. Devices will only be impacted if they have already installed any Latest cumulative update (LCU) released September 16, 2020 or later and then proceed to update to a later version of Windows 10 from media or an installation source which does not have an LCU released October 13, 2020 or later integrated. This primarily happens when managed devices are updated using outdated bundles or media through an update management tool such as Windows Server Update Services (WSUS) or Microsoft Endpoint Configuration Manager. This might also happen when using outdated physical media or ISO images that do not have the latest updates integrated.
    • Note Devices using Windows Update for Business or that connect directly to Windows Update are not impacted. Any device connecting to Windows Update should always receive the latest versions of the feature update, including the latest LCU, without any extra steps.

[DIRECT DOWNLOAD LINK]


Windows 10, version 1903

Windows 10 v1903 shares a core structure, core operating system, and an identical set of system files with Windows 10 v1909.

Because of this, cumulative updates that apply to one version are available to the other as well.

Cumulative update name:

Improvements and fixes:

  • Same as Windows 10 v1909

Known Issues:

  • Same as Windows 10 v1909

[DIRECT DOWNLOAD LINK]


Windows 10, version 1809

According to Microsoft, users that still have the Home, Pro, Pro for Workstation, and IoT Core editions of Windows 10 V1809 should know that it reached End of Service back in November 2020.

That is why it is advised that you update your OS to a newer, supported version.

Cumulative update name:

Improvements and fixes:

  • Addresses a timing issue on print servers that might send print jobs to the wrong print queue. 
  • Addresses a security vulnerability issue with HTTPS-based intranet servers. After installing this update, HTTPS-based intranet servers cannot, by default, use a user proxy to detect updates. Scans using these servers will fail if you have not configured a system proxy on the clients. If you must use a user proxy, you must configure the behavior using the policy “Allow user proxy to be used as a fallback if detection using system proxy fails.” To ensure the highest levels of security, also use Windows Server Update Services (WSUS) Transport Layer Security (TLS) certificate pinning on all devices. This change does not affect customers who are using HTTP WSUS servers. For more information, see Changes to scans, improved security for Windows devices.
  • Addresses a security bypass vulnerability that exists in the way the Printer Remote Procedure Call (RPC) binding handles authentication for the remote Winspool interface. For more information, see KB4599464.
  • Addresses an issue that might damage the file system of some devices and prevent them from starting up after running chkdsk /f.
  • Security updates to Windows App Platform and Frameworks, Microsoft Graphics Component, Windows Media, Windows Fundamentals, Windows Kernel, Windows Cryptography, Windows Virtualization, Windows Peripherals, and Windows Hybrid Storage Services.

Known Issues:

  • After installing KB4493509, devices with some Asian language packs installed may receive the error, “0x800f0982 – PSFX_E_MATCHING_COMPONENT_NOT_FOUND.”

[DIRECT DOWNLOAD LINK]


Windows 10, version 1803

Microsoft first announced that Windows 10 v1803 will reach the end of mainstream support, and starting with July there wouldn’t be any more optional, non-security releases for this version of Windows 10.

Because of the current global pandemic, as well as user feedback, Microsoft decided to extend the support for Windows 10 v1803 up until 2021.

Cumulative update name:

Improvements and fixes:

  • Extends Microsoft Defender for Endpoint support to new regions.
  • Addresses a security vulnerability issue with HTTPS-based intranet servers. After installing this update, HTTPS-based intranet servers cannot, by default, use a user proxy to detect updates. Scans using these servers will fail if you have not configured a system proxy on the clients. If you must use a user proxy, you must configure the behavior using the policy “Allow user proxy to be used as a fallback if detection using system proxy fails.” To ensure the highest levels of security, also use Windows Server Update Services (WSUS) Transport Layer Security (TLS) certificate pinning on all devices. This change does not affect customers who are using HTTP WSUS servers. For more information, see Changes to scans, improved security for Windows devices.
  • Addresses a security bypass vulnerability that exists in the way the Printer Remote Procedure Call (RPC) binding handles authentication for the remote Winspool interface. For more information, see KB4599464.
  • Security updates to Windows App Platform and Frameworks, Microsoft Graphics Component, Windows Media, Windows Fundamentals, Windows Kernel, Windows Cryptography, Windows Virtualization, Windows Peripherals, and Windows Hybrid Storage Services.

Known Issues:

  • Microsoft is not currently aware of any issues with this update.

[DIRECT DOWNLOAD LINK]


Windows 10, version 1703

Note: Windows 10, version 1703 has reached the end of service for  Home, Pro, Pro for Workstation, and IoT Core editions.

In order to continue receiving quality and security updates, Microsoft recommends that you get the latest possible version of Windows 10 installed.

Cumulative update name:

Improvements and fixes:

  • Addresses a security vulnerability issue with HTTPS-based intranet servers. After installing this update, HTTPS-based intranet servers cannot, by default, use a user proxy to detect updates. Scans using these servers will fail if you have not configured a system proxy on the clients. If you must use a user proxy, you must configure the behavior using the policy “Allow user proxy to be used as a fallback if detection using system proxy fails.” To ensure the highest levels of security, also use Windows Server Update Services (WSUS) Transport Layer Security (TLS) certificate pinning on all devices. This change does not affect customers who are using HTTP WSUS servers. For more information, see Changes to scans, improved security for Windows devices.
  • Addresses a security bypass vulnerability that exists in the way the Printer Remote Procedure Call (RPC) binding handles authentication for the remote Winspool interface. For more information, see KB4599464.
  • Security updates to Windows App Platform and Frameworks, the Microsoft Graphics Component, Windows Media, Windows Fundamentals, the Windows Kernel, Windows Cryptography, Windows Virtualization, Windows Core Networking, Windows Peripherals, Windows Hybrid Storage Services, and the Windows Remote Desktop.

Known Issues:

  • Microsoft is not currently aware of any issues with this update.

[DIRECT DOWNLOAD LINK]


Windows 10, version 1607

Note: Windows 10, version 1607 has reached the end of service for all of its available editions. Update to the latest version of Windows 10 in order to keep your system protected.

Cumulative update name:

Improvements and fixes:

  • Adds the ability to set a Group Policy to show only the domain and username when a user signs in. 
  • Addresses an issue that delays authentication traffic because of Netlogon scalability issues. 
  • Addresses an issue in which a principal in a trusted MIT realm fails to obtain a Kerberos service ticket from Active Directory domain controllers (DC). This occurs on devices that installed Windows Updates that contain CVE-2020-17049 protections and configured PerfromTicketSignature to 1 or higher. These updates were released between November 10, 2020 and December 8, 2020. Ticket acquisition also fails with the error, “KRB_GENERIC_ERROR”, if callers submit a PAC-less Ticket Granting Ticket (TGT) as an evidence ticket without providing the USER_NO_AUTH_DATA_REQUIRED flag. 
  • Addresses a security bypass vulnerability that exists in the way the Printer Remote Procedure Call (RPC) binding handles authentication for the remote Winspool interface. For more information, see KB4599464.
  • Addresses a security vulnerability issue with HTTPS-based intranet servers. After installing this update, HTTPS-based intranet servers cannot, by default, use a user proxy to detect updates. Scans using these servers will fail if you have not configured a system proxy on the clients. If you must use a user proxy, you must configure the behavior using the policy “Allow user proxy to be used as a fallback if detection using system proxy fails.” To ensure the highest levels of security, also use Windows Server Update Services (WSUS) Transport Layer Security (TLS) certificate pinning on all devices. This change does not affect customers who are using HTTP WSUS servers. For more information, see Changes to scans, improved security for Windows devices.
  • Addresses an issue in the Remote Desktop Protocol (RDP) redirector (rdpdr.sys) that causes a stop error.
  • Security updates to the Windows App Platform and Frameworks, Microsoft Graphics Component, Windows Media, Windows Fundamentals, Windows Cryptography, Windows Virtualization, Windows Peripherals, and Windows Hybrid Storage Services.

Known Issues:

  • After installing KB4467684, the cluster service may fail to start with the error “2245 (NERR_PasswordTooShort)” if the group policy “Minimum Password Length” is configured with greater than 14 characters.

[DIRECT DOWNLOAD LINK]


Windows 10, version 1507

Note: Windows 10, version 1507 is the oldest version of Windows 10 still active, and it has reached the end of service for some time now.

If your hardware allows it, update to a much newer version of Windows 10.

Cumulative update name:

Improvements and fixes:

  • Addresses a security vulnerability issue with HTTPS-based intranet servers. After installing this update, HTTPS-based intranet servers cannot, by default, use a user proxy to detect updates. Scans using these servers will fail if you have not configured a system proxy on the clients. If you must use a user proxy, you must configure the behavior using the policy “Allow user proxy to be used as a fallback if detection using system proxy fails.” To ensure the highest levels of security, also use Windows Server Update Services (WSUS) Transport Layer Security (TLS) certificate pinning on all devices. This change does not affect customers who are using HTTP WSUS servers. For more information, see Changes to scans, improved security for Windows devices.
  • Addresses a security bypass vulnerability that exists in the way the Printer Remote Procedure Call (RPC) binding handles authentication for the remote Winspool interface. For more information, see KB4599464.
  • Security updates to Windows App Platform and Frameworks, Microsoft Graphics Component, Windows Media, Windows Management, Windows Fundamentals, Windows Cryptography, Windows Virtualization, Windows Peripherals, and Windows Hybrid Storage Services.

Known Issues:

  • Microsoft is not currently aware of any issues with this update.

[DIRECT DOWNLOAD LINK]


That wraps up our complete changelog covering the changes from this month’s round of updates.

Keep in mind that these aren’t the only updates that are coming, since smaller tweaks and fixes are most likely to come in the following days, and another set of updates will arrive in about two weeks.

Remember that the main purpose of these updates is to improve your security, so we advise you to update as soon as they arrive in your region.

By doing so, you should be better prepared for unofficial events like Exploit Wednesday or Uninstall Thursday, a term that describe the days that follow the updates where hackers target those that haven’t applied the latest patches.

To learn more about Patch Tuesday and how you can better prepare for applying them, check out this detailed guide.

Have you updated your PC with the latest cumulative updates? Let us know if the experience went smoothly by leaving us your feedback in the comments section below.

[wl_navigator]

FIX: NordVPN Double VPN not connecting (7 solutions)

NordVPN supports multi-hop VPN connections. It means that, instead of connecting to a single VPN server, you connect to two. The feature is known as Double VPN.

The way Double VPN works is simple enough: it encrypts your traffic and diverts it to the first server, then encrypts it again and redirects it to the second server. This results in better online privacy.

Unfortunately, many NordVPN users claim that Double VPN is not connecting on their devices. The error could be the result of the heavy toll that Double VPN takes on the connection speed.

Since it applies encryption twice, it results in increased overhead. So you might be experiencing slow connections.

Don’t worry about it since we’re here to help.

What do I do if NordVPN’s Double VPN feature is not working?

Connect to the nearest Double VPN server

connect to the fastest Double VPN server in NordVPN
  1. Click the … button next to Double VPN
  2. Set Country and Server to Fastest
  3. Click Connect

With the instructions above, you are allowing NordVPN to automatically connect to the nearest country and server by taking into account your current location.

Normally, this ensures the best possible speed, so you shouldn’t have Double VPN connection issues anymore.

But it only works if there’s a problem with the NordVPN server. Otherwise, proceed to the following solutions.

Update NordVPN to the latest version

update NordVPN

It’s critical to keep NordVPN to the newest edition. So, if there are any pending in-app updates, make sure to allow them in the NordVPN interface.

Restart the client afterward and try to connect to a Double VPN server again.

Change the VPN protocol

There are three VPN protocols available in the NordVPN desktop app: OpenVPN TCP, OpenVPN UDP, and NordLynx.

If you have trouble connecting to Double VPN, change the VPN protocol:

  1. Access the settings area of NordVPNaccess NordVPN settings
  2. Go to the Auto-connect section
  3. Set VPN protocol to OpenVPN (UDP)change NordVPN protocols
  4. Return to the main window
  5. Connect to a Double VPN server

OpenVPN (UDP) is faster than OpenVPN (TCP). But if it doesn’t work either, try using NordLynx.

NordLynx is a modded version of the WireGuard protocol, built for security and speed.

Set custom DNS servers

NordVPN runs traffic through its private DNS servers as soon as you connect to a VPN server. However, if the VPN provider has slow DNS problems, then you have to change the DNS resolver.

Thankfully, NordVPN supports custom DNS servers, which means that you can directly input any other DNS server addresses within the app.

Here’s how you can do that:

  1. Go to the settings section of NordVPN
  2. Select the Advanced section
  3. Click Set a DNS server address
  4. Replace 0.0.0.0 with 8.8.8.8set a custom DNS server address in NordVPN
  5. Click Set a DNS server address again
  6. Replace 0.0.0.0 with 8.8.4.4
  7. Set Custom DNS to Onenable custom DNS in NordVPN
  8. Head back to the main window
  9. Try to connect to a Double VPN server

In the instructions above, we used Google Public DNS because the DNS server addresses are free, public, safe, and super secure.

If you keep having Double VPN connection problems after this step, we suggest changing the Windows 10 DNS servers so that your Internet connection can use the Google Public DNS servers even outside of the VPN.

Reinstall NordVPN

Remove NordVPN from your computer and then reinstall it. This should solve any application errors that cause Double VPN connection problems.

Here’s how:

  1. Right-click the Windows 10 Start button and select Apps and Featuresaccess Apps and Features in Windows 10
  2. Locate and select NordVPN in the Apps & features listuninstall NordVPN
  3. Click Uninstall and then again to confirm
  4. Follow the on-screen instructions to uninstall NordVPN
  5. Download NordVPN app for Windows 10 (newest version)
  6. Install the app
  7. Log in with your NordVPN credentials
  8. Try to connect to Double VPN

Check your Internet connection

If your Internet connection is too slow, it won’t be able to handle the overhead of double encryption provided by the Double VPN features.

Here are a few things you can try:

Switch VPN providers

PIA

If Double VPN is still not connecting in NordVPN after trying everything we listed above, perhaps it’s not the right fit for you.

Consider dropping NordVPN and replacing it with another VPN service that supports two simultaneous VPN connections.

We recommend using Private Internet Access. It supports Shadowsocks proxy, which redirects your VPN connection to a secondary server. Plus, unlike NordVPN, PIA lets you choose both servers.

Here’s how you can set up a VPN server chain in PIA:

  1. Sign up for a PIA subscription plan
  2. Download and set up PIA on your PC
  3. Launch PIA and log in with your premium credentials
  4. Access the Settings sectionaccess Private Internet Access settings
  5. Go to the Proxy area, select Shadowsocks, and click Configureconfigure Shadowsocks in PIA
  6. Select the second VPN location from the list (or Choose automatically)select a Shadowsocks server for PIA
  7. Click the PIA systray icon and click VPN Serverselect a VPN server in PIA
  8. Choose a VPN server from the list (or Choose automatically)
  9. Press the big power button to connectconnect to a VPN server and Shadowsocks at the same time in PIA

More about PIA:

  • No logs or leaks
  • 24/7 live chat support
  • 30-day money-back guarantee (no free trial)
  • Pay with a credit card, PayPal, or crypto
Private Internet Access

Private Internet Access

Stop facing Double VPN connection issues in NordVPN when you can easily use PIA with Shadowsocks.
Check priceBuy it now

Conclusion

To recap, if the Double VPN feature is not connecting in NordVPN, get started by trying to connect to the nearest Double VPN server.

You should also update NordVPN to the most recent version, change the VPN protocol, use custom DNS servers, and reinstall NordVPN.

Check the quality of your Internet connection to see if it’s capable of handling the overhead resulted from double encryption.

However, if everything fails, it’s time to drop NordVPN and replace it with Private Internet Access (buy here). You can easily connect to a second VPN location in PIA using a Shadowsocks proxy.

Did you get the Double VPN feature to work on your computer? What solution worked for you? Let us know in the comment section below.

FIX: uTorrent not working with ExpressVPN [5+ solutions]

Torrenting is among the most popular reasons why people jump on the VPN bandwagon.

The fact that you can download a plethora of content via torrenting while you’re entirely anonymous is awesome.

However, from time to time, certain VPN services may fail to work with some torrenting clients.

For instance, you may find yourself among the unlucky few for which uTorrent is not working with ExpressVPN.

If you look this issue up, you may be able to find it mentioned on numerous forums, which tells us that it’s not exactly uncommon.

Don’t fret just yet. In this guide, we’ll teach you how to fix things if uTorrent doesn’t seem to work with ExpressVPN on your system.

How can I fix uTorrent not working with ExpressVPN?

Try another VPN server

Sometimes, certain ExpressVPN servers may become overcrowded.

As a result, your torrenting capabilities might be affected.

Therefore, if you notice that uTorrent suddenly stopped working with ExpressVPN, you may want to change servers and try again.

Furthermore, certain VPN providers can even block torrenting traffic in certain areas, such as the US.

Although ExpressVPN doesn’t mention this specifically in its ToS or Privacy Policy, it may be why you can’t use uTorrent.

For that reason, choose a server in an area with more relaxed laws concerning torrenting, such as the Netherlands.

Switch VPN protocols

If you tinkered with ExpressVPN‘s protocols before, you may know that they can behave wildly different.

For that reason, we recommend you to try going through all protocols before calling it quits.

For the moment, ExpressVPN offers the following protocols:

  • IKEv2
  • PPTP
  • L2TP/IPsec
  • Lightway

SSTP and WireGuard are not supported.

To switch protocols, just open ExpressVPN‘s Options window, and navigate to the Protocol tab.

switch ExpressVPN protocols

Select a different protocol, click the OK button, connect to a stable server, and check again.

Use a stealth VPN server

Your ISP may be blocking or restricting your VPN traffic, and as a result, you may not be able to use uTorrent.

Luckily for us, many VPN providers have obfuscation capabilities that hide VPN traffic and make it look like regular traffic.

ExpressVPN makes no exception in this case.

However, there’s a catch: as opposed to other VPN providers, ExpressVPN doesn’t let you toggle the obfuscation feature on and off.

Instead, it offers built-in obfuscation in the form of stealth servers. And here’s the other catch: stealth servers aren’t highlighted in any way.

Therefore, you may need to experiment with various servers or simply contact ExpressVPN’s customer support and ask them for a list of stealth servers.

Flush your DNS

Cached data build-ups can have a negative impact on your connection.

Therefore, it makes sense why getting rid of it may restore the balance of things and make uTorrent work with ExpressVPN once more.

The most common fix is flushing your DNS, which sounds a bit like technical gibberish but trust us, it’s simple.

All you have to do is follow these steps:

  1. Launch a CMD instance with Administrator rights
  2. Type the following commands, in this order, each followed by the Enter key:
    • ipconfig /flushdns
    • ipconfig /registerdns
    • ipconfig /release
    • ipconfig /renew
    • netsh winsock reset
  3. Restart your PC

Now launch ExpressVPN, connect to a fast server, launch uTorrent, and check if there’s any improvement.

Use another VPN

  1. Purchase a VPN subscription (we recommend Private Internet Access)
  2. Download and install the VPN on your PC
  3. Launch the VPN client
  4. Log in to your account
  5. Connect to an appropriate server (PIA supports P2P on all its servers)
  6. Launch uTorrent
  7. Enjoy torrenting without restrictions

Although some VPNs may advertise torrenting support, in reality things may be a bit different.

If you notice that ExpressVPN just doesn’t work with uTorrent, you should try contact the customer support.

Often times, tech support can offer you great troubleshooting advice.

However, if not even ExpressVPN‘s customer support can help you with your uTorrent issue, maybe it’s time to switch providers.

Private Internet Access is a great alternative that provides you with P2P support on all of its servers.

More so, it has over 22,000 servers (and counting) you can choose from in case your current one doesn’t seem to work.

Check out PIA’s main features:

  • Over 22,000 high-speed servers all over the world
  • P2P support on all servers
  • Built-in kill switch to avoid accidental data leaks during torrent connection issues
  • Zero-logging policy
  • Supports OpenVPN and WireGuard protocols
  • Military-grade encryption
  • Split tunneling support
Private Internet Access

Private Internet Access

Need a VPN that works well with uTorrent? Why not give PIA a try?
Check priceBuy it now

Disable IPv6

If IPv6 is enabled on your system, you may be leaking IPv6 traffic that your ISP can use to throttle your connection.

As a result, you may experience various issues, such as uTorrent suddenly not working with ExpressVPN.

Although VPNs often boast about their IPv6 data leak prevention features, many fail to prevent these leaks.

Here’s how you can disable IPv6 on your Windows 10 PC:

disable IPv6 in Windows
  1. Right-click your Start Menu
  2. Go to Network connections
  3. Click the Change adapter options button
  4. Right-click your default Internet connection
  5. Select Properties from the context menu
  6. Make sure Internet Protocol Version 6 (TCP/IPv6) is deselected
  7. Click OK
  8. Restart your PC

Now go to ExpressVPN, open its Options window, and navigate to the Advanced tab. Here, you need to make sure the IPv6 leak prevention option is enabled.

Technically, it should do the same thing as disabling IPv6 on your system to prevent leaks.

However, as we’ve mentioned before, VPNs can sometimes leak IPv6 data, so the best way to avoid that is to disable it altogether from your PC.

Other suggestions

  • Restart uTorrent
  • Reboot your PC
  • Unplug your router/modem from the power line for a minute then plug it back in
  • Reinstall uTorrent
  • Make sure your ExpressVPN client is up to date
  • Enable ExpressVPN’s kill switch
  • Make sure you’re running the latest version of uTorrent
  • Check if your firewall/antivirus isn’t restricting either uTorrent or ExpressVPN

Conclusion

All things considered, if you notice that uTorrent isn’t working with ExpressVPN, there are plenty of things you could do about it.

We recommend you to try our suggested fixes one by one; we’re confident that you’ll find the one that does the trick.

TWINUI not working? Try these solutions [Fixed]

TWINUI is a core component of Windows 10, but many users reported that TWINUI isn’t working for them. Since TWINUI is a core component, it can cause a wide array of issues.

In today’s article, we’re going to show you the best methods that you can use to fix TWINUI and all its related problems.

How do I fix my Twinui problem?

1. Install the latest updates

  1. Open the Settings app and go to the Update & Security section.update and security twinui not working
  2. Now click on the Check for updates button.
    check for updates twinui not working

If any updates are available, they will be installed automatically. Many users reported that updating Windows helped them remove TWINUI from default apps, so be sure to try that first.


2. Reregister TWINUI

  1. Press Windows Key + X and select Windows PowerShell (Admin).
    powershell admin twinui not working
  2. Run the following command: Get-AppXPackage | Foreach {Add-AppxPackage -DisableDevelopmentMode - Register "$($_.InstallLocation)\AppXManifest.xml"}

After the command is executed, TWINUI will be reregistered, and the problem with default windows apps showing as TWINUI will be resolved.

Keep in mind that this method can lead to other issues, so it might be a good idea to create a System Restore point before trying it.


3. Remove contents of LocalState folder

  1. Press Windows Key + R and paste the following:
    %appdata%\..\Local\Packages\Microsoft.Windows.Photos_8wekyb3d8bbwe\LocalState
  2. Click OK or press Enter.
    run window twinui not working
  3. Select all files inside of LocalState folder and delete them.LocalState twinui not working

After doing that, all problems with TWINUI and the Photos app should be fixed.


4. Try using System Restore

  1. Press Windows Key + S and enter system restore. Select Create a restore point from the list.
  2. In the System Properties window, click the System Restore button.
    system restore twinui not working
  3. Click the Next button to proceed.
  4. Check Show more restore points option, if available. Choose your restore point and click Next to proceed.
    select restore point twinui not working
  5. Follow instructions on the screen to complete the process.

Once your computer is restored, the TWINUI problems will be resolved. If the problem is still there, you might want to consider performing a factory reset of Windows 10.

There you go, these are some of the solutions that will surely help you if TWINUI isn’t working or if you’re having other issues with TWINUI.

Is GTA Online Loading Forever? Try out These 5 Solutions

Some users have reported the GTA Online stuck on loading screen issue when playing the game. According to the developers, the issue can occur due to invalid login attempts or connection issues. We have listed some of the best troubleshooting steps to help you resolve the GTA Online stuck on the loading screen on PC.

What do I do if GTA is stuck on the loading screen?

1. Quit and restart

If the game takes more than 3 minutes to load, then you should quit and try again. Waiting any longer usually shows an error forcing you to restart the online session again.

If that fails, try to start a solo session, and once online try to join the crew option. You can further reduce the time if you use the invite-only session to play with other known players instead of waiting to join public lobbies.

2. Try another character slot

According to Rock Star, changing to another character slot can fix the issue. Try loading another character slot to determine whether the problem is happening only on that specific character.

3. Check GTA Online status

Next, be sure to check if you are trying to play GTA Online during the maintenance period.

To check this, go to the RockStar Games service status page and look through the list of games. Under Grand Theft Auto Online, check if the game is highlighted in red for your device.

Also, do a GTA 5 latency test to see if you have a strong connection with the server in your area.

4. Check for update

Firstly, open the game so you can check the version. Click on the 3 dots near the launch game button, and at the end of the menu drop you can see the game version.

GTA updates automatically when you launch the game. However, at times the update can fail. Manually checking for the update can fix any issues that can be causing GTA Online stuck on the loading screen issue.

You can also force an update on Steam. On the Game library, locate and right-click on GTA then select Properties. On the Local Files tab click Verify the Integrity of Game Files.

Steam will check for any issues with the game files and download any pending updates.

5. Reset your respawn location (PS4 / Xbox)

  1. Log into the social club page using your console.GTA Online loading error
  2. Select Settings from the top right corner.
  3. Select Linked Accounts.
  4. Next, unlink the PSN ID or Gamertag or that you have linked to the Social Club account.
  5. Login to the character you were having an issue with and set your spawn location to Last Known Location.
  6. Re-Link the PSN ID or Gamertag to the Social Club account.

Note: Resetting your respawn location is helpful if the first GTA Online load screen gets stuck, but there is still animation, and you can access Xbox Home, etc.

6. Restart your home network

Restarting the router is always a good step to start your troubleshooting when you’re dealing with network issues.

It is a very simple procedure and you can not damage anything. This implies to turn off your router, then unplug all the cables connected to it. After a few minutes, reconnect all the cables as they were before.

Restart your computer, connect again to the internet and check to see if the issue is resolved.

7. Reset your router

If restarting your network did not resolve the issue, try resetting your network device.

Resetting your router should be done as a last resort, as it will delete all the settings including port forwarding configuration, and set it to factory default.

Locate the Reset button on the back of your router and make sure the router is powered on. Use a paperclip or a SIM ejector tool (any pointy object) to press and hold the Reset button for 15 seconds.

Release the button once you see the lights blinking and wait for the router to fully reset and power on.

Once done, reconnect GTA Online to see if the error is resolved.

The GTA Online stuck on the loading screen usually occurs due to connectivity problems or a glitch in the game. Following the steps in this article, one by one should help you to resolve the issue.

Please let us know what worked better for you and what are problems do you face with GTA game.

Get the Windows 10 January Patch Tuesday updates today

The second Tuesday of January is finally here, and this means everyone is expecting Microsoft to roll out their first round of monthly updates for the year 2021.

While 2020 was quite eventful in terms of the development of Windows 10, with Windows 10 v2004 and the 20H2 hitting live and already taking a big chunk of the market share.


A summary of Patch Tuesday updates in 2020

Many things transpired back in 2020, some of which can almost be called historic in nature:

  • Windows 7 came to the End of Service
  • The month of may came with the most popular version of Windows 10 of the moment: Windows 10 v2004
  • The months that followed fixed a variety of issues with the new OS version, as they were expected anyway.
  • October came in with another major update, this time called Windows 10 20H2, or the October update.
  • 202 saw the end of Patch Tuesday updates for Windows 10 v1709, so anyone still using it are advised to upgrade to a newer version.
  • Lastly, 2020 broke the record for the number of CVEs detected, as it already surpassed the numbers from 2019 by the time August arrived.

As a general note, the global pandemic also caused Microsoft to postpone many of their deadlines, and end-of-services, most of them now rescheduled in 2021.


Patch Tuesday in 2021: what to look forward to?

All in all, Microsoft had nothing to say regarding the update process in 2021, or if they plan on changing anything.

However, there are a few other versions of Windows 10 that will meet their end in 2021, like Windows 10 v1803, as stated by Microsoft:

IMPORTANT We have heard your feedback and understand your need to focus on business continuity in the midst of the global pandemic.

As a result, we have decided to delay the scheduled end-of-service date for the Enterprise, Education, and IoT Enterprise editions of Windows 10, version 1803. 

The final security update for these editions of Windows 10, version 1803 will be released on May 11, 2021 instead of November 10, 2020


The updates will be made available, as always at 10:00 AM PST, and you will soon be prompted to update your PC sometimes afterwards.

Alternatively, don’t forget that there are other methods through which you can update your Windows 10 OS. this includes:

  • Using the WSUS (Windows Sevrer Update Service)
  • Downloading each update directly from the Windows Update Catalog
  • Having your System Administrator manually scheduling the update via Group Policies
  • and more…

Are you excited about the first batch of updates of 2021? Let us know what you expect these updates will bring by leaving us your feedback in the comments section below.

[wl_navigator]

FIX: Counter-Strike available memory less than 15MB error

We all love a good first-person shooter, especially when we can play it online. And, when we discuss about first-person shooter games, Counter Strike is still among our top preferences.

However, system errors that can mess your Counter-Strike gaming experience should be addressed as soon as possible. And that’s why today we will detail the Available memory less than 15MB error and the methods in which it can be fixed.

In most situations, this error is not actually caused by a low memory situation. You will most likely receive the alert even when there is sufficient RAM or system memory left on your computer.

In fact, the issue is describing an incompatibility situation between your Windows platform and the Counter-Strike software. So, the troubleshooting process must address this incompatibility issue.

This can be completed differently, depending on each situation – that’s why during the following steps we will try to review the most common methods that can fix the Counter-Strike Available memory less than 15MB error.


How do I fix the Counter-Strike memory alert?

1. Use the default Windows compatibility mode

  1. Go to where you have placed the Counter-Strike executable file, or where the game shortcut is located.
  2. Right-click on that icon.
  3. From the list that’s displayed click on Proprieties.
  4. Switch to the Compatibility tab.
  5. Check the Run this program in Compatibility mode for field.
  6. Select the Windows XP SP2 option.
  7. Save your changes and reboot the system.
  8. Now your game should run without further problems.

2. Use the latest files for your Counter Strike game

If your game is outdated, or some of its patches are not properly updated, you can experience this Counter-Strike Available memory less than 15MB error.

In this case, a solution is to download the latest files for your game and replace the ones that are saved on your computer. For example, users reported that the depositfiles.com/files/7165571 package should replace the original hw.dll file in the CS home directory.

If you don’t know from where to download these patches for your Counter-Strike version, another solution is to reinstall the game from the beginning

If you reinstall the game, make sure you keep all your recent saves and to download the executable file that’s compatible with your Windows system.

3. Check for system updates

  1. Press the Win+I keyboard hotkeys in order to launch System Settings.
  2. From System Settings click on Update & Security.42127 cab archive corrupted
  3. Switch to Windows Update tab and apply any pending patches.
  4. If your Counter-Strike game stopped working after you applying a new Windows update, you can manually remove this patch for fixing the error.
  5. Go to the Windows Update section as shown above and click on the View installed update history link.
  6. From the next window, select Uninstall an update.
  7. In this new window, just select the update patches that you want to remove from your computer and click on uninstall.

Note: Even it’s quite unlikely, a system update might automatically resolve the Available memory less than 15MB error


4. Look for outdated drivers

Outbyte Driver Updater automatically update drivers

An outdated driver might cause compatibility issues on your computer. So, you should make sure that all your drivers are working properly.

The easiest solution to keep your computer drivers up to date is to use software that does this automatically. Outbyte Driver Updater is the best option for the job.

After installation, the tool will start to scan your computer for any outdated drivers. Then, it will download and install the newest patches so you can enjoy better gaming performance.

Outbyte Driver Updater has over 18 million driver files available and new ones are added daily. Also, you can use the schedule manager to perform regular scanning in order to ensure that you always have the newest drivers.

To learn more about this great app, you can check our Outbyte Driver Updater guide.

Outbyte Driver Updater

Outbyte Driver Updater

Update your drivers with one of the best tools and solve the Counter-Strike memory alert.
Check priceVisit website

5. Reinstall Counter Strike

As already outlined, the Available memory less than 15MB error is related with an incompatibility problem. So, a good solution is to uninstall the game from your computer and reinstall it afterwards.

Of course, you should get the Counter-Strike version that has been optimized for your particular Windows platform. Once you do that, everything will work like a charm.

So, there you have it, that’s how you can successfully fix the Available memory less than 15MB error which won’t let you play Counter-Strike on your Windows 10 based computer.

If you have questions, or if you want to share your own experience with us, don’t hesitate and just fill out the comments form available below.

BIOS Code 99: How to Fix it Effectively

If you try to boot or reboot your Windows device, but you get stuck on a black screen with the motherboard or BIOS error code 99 displayed in the bottom right corner, it means that something isn’t functioning as it should.

No, it’s not a Windows system malfunction but a hardware issue that is preventing the OS from loading properly, and that’s why the boot/reboot sequence cannot be completed.

Simply put, the Windows OS cannot be initiated. The motherboard 99 code is not even an actual error. It shows what stage it’s currently running, and in this case, we are discussing problems within Super IO Initialization.

Of course, the motherboard can cause the issue, but it might be something with the BIOS setup too. In this article, we will try to find the proper fix for PC error code 99 and kidiconnect error code 99, so keep reading.

How can I fix the BIOS error code 99?

Before delving into the solutions in this section, try the troubleshooting steps below:

  • Verify the supply cables and make sure that HDD SATA is properly connected.
  • Check all the other connections from your motherboard and make sure that everything is working by the book.
  • Go to BIOS and check if the HDD is detected or not; if the HDD isn’t shown, you might have a faulty HDD.
  • Disconnect the peripherals before initiating a new reboot – just remove any external devices attached to your Windows device.
  • Try to boot up only the motherboard – unplug everything else besides your keyboard. Also, remove RAM and anything else that might not be required for an initial boot (including audio and USB from the motherboard). Please note that sound cards and NIC cards should be also disconnected.
  • If you built your own PC, make sure that everything is connected as it should and that you didn’t forget anything else. Again, don’t hesitate and ask for an experienced opinion, depending on your own system configuration.

If the issue persists, proceed to the solution below:

1. Set the SATA mode into AHCI

  1. Press the Windows key, and type cmd.
  2. Right-click on Command Prompt, and select Run as Administrator.
    cmd bios code 99
  3. In the Command Prompt, enter the following command and hit the Enter key: bcdedit /set {current} safeboot minimal (ALT: bcdedit /set safeboot minimal)
  4. Restart your PC, and enter BIOS Setup.
  5. Set the SATA mode to AHCI instead of IDE or RAID.
  6. Select Save and exit.
  7. Now, launch Command Prompt as an admin again.
  8. Type the following command, and hit the Enter key: bcdedit /deletevalue {current} safeboot (ALT: bcdedit /deletevalue safeboot)
  9. Restart your PC once more, and Windows will automatically start with AHCI enabled.

If you can go to BIOS, you should start the troubleshooting process by ensuring that the SATA mode is set into AHCI instead of IDE. Moreover, the boot order should follow the UEFI protocol by default.

2. Verify the Time and Date from BIOS

  1. While your PC boots, keep pressing Del or a certain F key to enter BIOS. Usually, there will be a message saying to press a certain key (F1, F2, F10) to enter SETUP. If you can’t find this key, check your motherboard manual.
  2. Once you get to the Main menu, you have to locate the Time and Date section. Navigate to the section by using the arrow keys, and verify the time and date.
    time bios code 99
  3. Select Save and Exit to exit.

3. Reset or update CMOS

You can even choose to reset or update CMOS, as this can easily fix the error code 99. Do note that depending on each manufacturer, the BIOS options might differ.

Updating BIOS without booting into Windows is possible only for newer motherboards, while making a reset can be done by accessing factory settings.

You can also reset the motherboard by removing and re-applying the BIOS battery, though this is a complex process that will imply disassembling your PC, so be careful and try not to mess things up even worse.

Don’t be afraid to ask for more experienced help if you are not a tech expert.

As already outlined, the debug code 99 describes Super IO Initialization issues. So, the fixes should focus on this particular field.

We hope that we managed to fix this problem with the help of the solutions listed above.

If you have any other suggestions or questions, please feel free to access the comment section below, we are very happy to hear from you.

Nearly all of Microsoft’s services are now powered by Azure

Seems no better way to sell you cloud services and products than to use them yourself. Mary Jo Foley over a ZDNet is reporting Microsoft’s chief technology of Azure Mark Russinovich recently spoke about how the company has followed through on its decade long journey to host its own cloud services on its Azure cloud platform.

“Most of Microsoft 365 services, including Teams, SharePoint Online and Office online, as well as Xbox Live services run primarily on Azure infrastructure today. Mailbox storage for Exchange Online and Outlook.com is also in the process of moving to standard Azure infrastructure.”

Russinovich’s statement comes after some digging on Foley’s part to clarify what of Microsoft’s services were precisely running on Azure after a handful of Microsoft ran blogs claimed “all” of its services were running on the cloud platform back in the summer of 2020.

Aside from invoking confidence in its own product, Microsoft’s move to standardize its Office 365, Xbox Live, and Bing Services onto Azure also serves as both a cost-cutting measure and a way to closely monitor outages, inconsistencies, standards compliance, and bugs.

With that being said, there are still significant outliers that Microsoft needs to migrate over to Azure that include Exchange Online and SharePoint which currently run-on Autopilot.  Much of the day-to-day management of these holdouts can be done via virtual machines or other custom instances of Azure, but the underlying databases and mailboxes servers still need to be ported over.

In the grander picture, however, Microsoft is closer than it’s been in almost ten years to actualizing one of its broader sweeping goals, and the feat is impressive, to say the least. Now we’ll just have to check in on CEO Satya Nadella’s goal of having people “love Windows” is going.

Microsoft VP Brad Anderson is leaving the company to join Qualtrics

Microsoft corporate vice president of Commercial Management Experiences, Brad Anderson, is leaving the company after 18 years. As noted in a post on ZDNet, Anderson will join Qualtrics as President of Products & Services. Anderson posted about his decision to leave Microsoft in a post on LinkedIn.

“My new role, as President of Products & Services at Qualtrics brings an opportunity to dig in, learn more & contribute to the category of Experience Management (XM) that Qualtrics is defining and building. It also presents an opportunity to return to my hometown in Utah & help accelerate the growth of the tech sector of Silicon Slopes in addition to Seattle.”

Qualtrics shares two co-headquarters, one in Seattle, Washington and another in Provo, Utah, where Anderson will be moving to join Qualtrics. Harv Bhela, corporate vice president of Microsoft 365 Security and Compliance is rumored to take Anderson’s place. Bhela is another Microsoft veteran, with over 24 years at the company. Anderson will join another former Microsoft employee already working at Qualtrics; Julie Larson-Green left Microsoft in 2017 and now serves as the chief experience officer at Qualtrics. Qualtrics chief executive officer Zig Serafin is another former Microsoft employee.

Microsoft Planner starts rolling out custom background images for plans

Microsoft Planner users can now try out a new Smart Backgrounds feature that brings the ability to personalize Planner boards. The company has announced that the feature is currently rolling out to all users in the Planner web experience, allowing users to add custom background images to their plans.

“Smart backgrounds is powered by the same Designer feature that suggests creatively designed templates in PowerPoint. Designer works in the background, trying to match the title of your plan with relevant and unique high-quality background images, like a coffee scene for your Coffee Store plan, a business backdrop for your Online Marketing plan, or a city skyline for your Town Hall Meeting plan,” the company explained.

thumbnail image 1 of blog post titled Personalize your plans with smart backgrounds

To try smart backgrounds, you’ll need to click the ellipsis (…) menu and head to “Plan settings.” In Planner settings, select the General tab and choose one of the backgrounds available in the recommendation list. Currently, users can not upload their own images, but we hope that the company will add this capability soon.

Furthermore, the company has also introduced a new Settings UI for Microsoft Planner. The revamped Settings menu is now divided into three different groups, including General, Group, and Notifications. The change makes it easier for users will now be able to find relevant settings. Have you spotted this feature on your PCs? Sound off in the comments down below.

How to split large folder into multiple folders [Full Guide]

These days, it is common to have files that run into 100s of Megabytes or even Gigabytes due to increased media quality. With great quality comes large file sizes that are a bit difficult to move around.

While the compression tools can squeeze a large file into a smaller one, the process is time consuming and can be a little tedious.

Now, what if you want to move large files? Well, one way is to split a large folder into multiple folders.

Splitting large folders into multiple folders is particularly helpful if you are trying to upload files to a file-sharing service that only accepts smaller-sized files.

In this article, we have listed a few tools that can help you large folder into multiple folders on your Windows 10 and other systems.

If you are working with large files, check our detailed guide on how to split large files in Windows 10 instead.

So, without further ado, let’s get started.

How do I split large folder into multiple folders?

WinZip

split large folder into multiple folders

WinZip is a premium file management tool that is popular for its compression and archive capabilities. However, it also offers a split tool that you can use to split large folders into multiple folders.

Apart from its file splitting capabilities, WinZip can unzip all the major formats including GZIP, RAR, Zipx and more. It can also be used as a complete file management solution to move and share files, protect the document with read-only attribute, and share the files with cloud integration.

To split large folders, do the following.

  1. Launch WinZip.
  2. Using the file panel, select the zip folder that you want to split.
  3. Click Add to Zip and select the split option.
  4. Choose the save location and split the folder.

Key features of WinZip:

  • Excellent file split features
  • Compress folder, PDF, and repair zip file
  • Unzip all major file formats
  • Cloud integration with Dropbox, Google Drive, OneDrive and more
WinZip

WinZip

Always easily split large folder into multiple files by using this amazing software today!
Check priceVisit website

Icecream PDF Pplit & Merge

split large folder into multiple folders

Icecream PDF Split and& Merge is a premium file splitting utility that can split large PDF files into smaller files. It is an excellent utility if you extensively work with large PDF documents and move them around frequently.

  1. Download and install Icecream PDF Split & Merge.
  2. Launch the tool and click on the Splitter tab.
  3. Click the Input File button and select a PDF file to split.
  4. Next, you can choose how to split the file. Click Split Equal parts or choose to split the file using the Split Volume option.
  5. Press the Split button to split the files into smaller PDFs.

Key features of Icecream PDF split and& Merge:

  • Split files by a group of pages or volume
  • Combine any PDF documents
  • Supports 50+ languages
  • Encrypt sensitive documents with password
IceCream PDF Split & Merge

IceCream PDF Split & Merge

Transform your large folders into smaller parts by trying the powerful IceCream PDF Split & Merge.
Check priceVisit website

GSplit

split large folder into multiple folders

GSplit is one of the best file splitter available for Windows platform. This lightweight utility can split up large files with ease. However, similar to other splitting software, you can either split a large file directly or create a zip file of your large folder and then split them into pieces.

  1. To split a large folder, make sure to create a zip file for that folder.
  2. Next, download and install GSplit.
  3. Launch the app, click on Browse and select a large file or zip folder.
  4. Next, click on Type and Size menu. Here, you can set the number of pieces you want to create or define volume size.
  5. Once done, click the Split button and select the Destination folder. Depending on the folder/file size, the splitting process may take some time.

GSplit also comes with a GUnite tool that you can use to reassemble the files. Launch the tool, select the folder and click on Unite to merge the file or folder again.

⇒ Try GSplit


Pine File Splitter

split large folder into multiple folders

Don’t want to install a third-party file splitter program on your PC? Take a look at Pine Tool’s file splitter. Split File is an online app that allows you to split large files into multiple pieces.

  1. To split a file or a zipped folder, go to Split Files Online and click on Choose File.
  2. Browse and select the file from your computer and click OK. The file splitter will show the original size of the file.
  3. Under Options, you can choose the criteria to split the files in number or size.
  4. Under the information screen, you can see the information related to the number of pieces of files that will be created.
  5. Click the Split File button to begin. Once done, you can download the files to your computer.

⇒ Try PineTools File Splitter


7Zip

split large folder into multiple folders

7Zip is a popular file manager and compression utility that also comes with File Splitting capabilities. Similar to other mentions here, 7Zip can split a large zip file into multiple files or folders.

  1. To split a folder, download and install 7Zip.
  2. Launch the tool and create a zip archive of your large folder.
  3. Using 7Zip, navigate to the save location and select your file.
  4. Right-click on the file and select Split.
  5. Select a destination and then choose Split to volumes depending on your size requirement.
  6. Click OK to split the file.

⇒ Try 7Zip


Sharing large files over the internet can become difficult if the sharing website has limitations on file sizes. You can use file splitter software to split large folders into smaller folders and share them easily in such a situation.

The recipient can use similar software to unite the files after downloading them.

All the software listed in this article can help you split large archived folders with ease. Go through the list and let us know your favorite tool in the comments below.

Star Wars Jedi: Fallen Order is now optimized for Xbox Series X|S consoles

Star Wars Jedi: Fallen Order is the latest EA and Respawn Entertainment game title optimized for Microsoft’s new Xbox Series X|S consoles. This optimization update improves Xbox’s Backward Compatibility, increased framerate, and improved dynamic resolution range. Star Wars Jedi: Fallen Order launched back in November 15, 2019 on Xbox One and other console platforms. Both the Xbox Series X and Xbox Series S get a better framerate of 60 FPS (up from 45 FPS). However, the Xbox Series S only gets the framerate boost. The Xbox Series X benefits the most from the Jedi Fallen order game optimization update as seen below.

Xbox Series X Performance mode

Framerate has been increased to 60 FPS
Dynamic resolution added in the range of 1080p to 1440p

Xbox Series X Normal mode (non-performance mode)

Postprocessing has been increased to 4K
Dynamic resolution in the range of 1512p to 2160p

The EA Play library is currently available free as part of an Xbox Game Pass Ultimate subscription, and provides access to over 80 EA games including FIFA 20, Titanfall 2, and Star Wars Jedi: Fallen Order, as well as some of EA’s most popular franchises including Battlefield, Mass Effect, and more. Xbox Game Pass Ultimate is a great value for just $14.99/month, and new subscribers can still get their first month of subscription for just $1.

Xbox Game Pass Ultimate

Meeting recap in Microsoft Teams will begin rolling out later this month

Microsoft is adding a new “Meeting recap” feature to its Teams collaboration platform later this month, according to the Microsoft 365 Admin Center. Indeed, the feature is currently set to begin rolling out by the end of January and will be available to all Microsoft Teams users in mid-February.

Originally announced in September 2020, this new meeting experience will allow participants or people unable to attend the meeting to access meeting content after it has ended. Microsoft Teams will automatically share the meeting recording, transcript, chat, shared files, and more in the meeting’s details tab.

Meeting summary invitee view

The recap feature could prove extremely useful for Teams users in learning scenarios, making it easier to find everything they need to catch up instead of contacting the organizer of the meeting. The recaps will be accessible for users in Microsoft Teams and from the meeting event in their Outlook calendar.

In addition to this, Microsoft has also confirmed another important update that is in development for Teams. The company is introducing a new Teams meeting lobby setting to enable meeting organizers to ensure that only Calendar meeting invited users will be allowed to bypass the lobby after a new meeting is scheduled.

New Lobby settings in Teams

The Microsoft 365 roadmap listing for the feature indicates that it’s currently in development and is scheduled to release in February. At launch, the feature will be available for both Production and GCC environments. This is a minor update, but it should help Teams meeting organizers to have greater control over their meetings.