Xbox Canada teases players with a one-of-a-kind denim Xbox controller

The Xbox Canada Twitter account caused a bit of a storm on social media the other day when it shared a photo of what looked like a denim cover for an Xbox video game controller.

The controller design proved pretty popular with gamers in numerous regions. You can check it out below.

While the tweet does state that the denim Xbox controller is a “one-of-a-kind” product and is unlikely to be mass-produced and sold to the everyday consumer, it also asks Twitter users to share what kind of Canada-themed Xbox controllers they would like to see and implies that some of the coolest or most-popular ideas may in fact be made in the future.

Of course, if enough people tell Xbox Canada that the denim controller cover is in fact a good idea, they might release it after all but we’ll have to wait and see.

The Xbox Australia and New Zealand Twitter account has also been rather creative recently and is currently giving away Xbox merch inspired by the new Xbox Series X and S consoles.

Have you seen any cool Xbox merch lately? Have you bought anything from the Xbox Gear online store now that it ships internationally? Share your thoughts with the community in the comments below and then follow us on Twitter for more Xbox gaming news.

How to access Windows 10 without a Microsoft account

Installing Windows 10 is not hard as you only have to complete the default installation wizard and to follow the on-screen prompts which will easily guide you through the flashing process.

After Windows 8 was introduced, Microsoft also released Windows Store, which implies in using a Live Microsoft account in order to access and download apps.

This is similar with what we have on Android or on iOS where when you first start using a new Android or iOS powered device you have to sign in with your account in order to access Google Play or Apps Store.

Thus, when installing Windows 10 you will be prompted with the following message “Sign in to your Microsoft Account”.

But, what should you do if you don’t want to use your personal Live Microsoft account when installing a new OS?

Let’s say that you just want to perform a clean install for a friend, at work or in any other circumstance where using your Microsoft account isn’t recommended.

In that matter you should take a look over the guidelines below in which we’ll explain how to install windows 10 without Microsoft account.


How can I set up Windows 10 without using a Live Microsoft Account

Create a local user account

person using a computer windows 10 without microsoft account
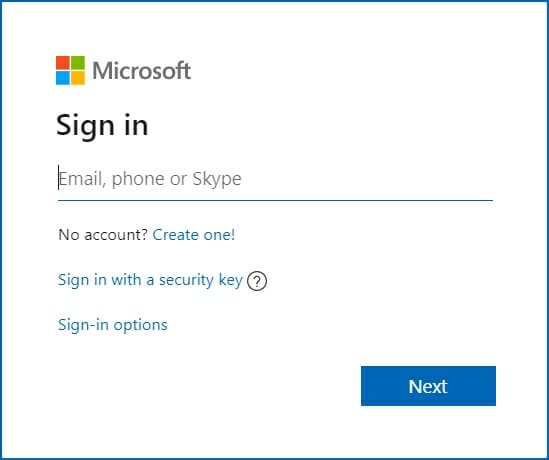
  1. By following the installation wizard, at some point you will be prompted with the Microsoft authentication sequence.
  2. At that point, from the main window choose Create a new account (located at the bottom left side of the same window).
  3. You will be taken to the registration page from where you need to choose sign in without a Microsoft account (also located at the bottom left side of the window).
  4. Up next create your local account by following the on screen prompts.
  5. Do note that there might be added some restrictions as you will not have full access to Windows Store and to other in built features while using a local account (you can switch to your Live Microsoft account afterwards though).

Another thing you might do in order to skip the registration sequence will be to temporarily disable (during the installation or update process) your Internet connection.

Of course you will be then prompted to sign is with your Microsoft account as soon as the internet connection is being established, but still this is a trick that you might use.

So, that’s how you can create a local account when installing Windows 10 for being able to apply the OS without using the Live Microsoft Account.

On the other hand, if you want to set up windows 10 with Microsoft account, be sure to enter your Microsoft account credentials during the setup.

If you have something to share with us, don’t hesitate and use the comments field from below in that matter.

Microsoft is giving gamers in Australia & New Zealand a chance to win Xbox Series X and S merch

The Australian and New Zealand wings of Microsoft’s Xbox department are currently holding a special competition for local gamers celebrating summer and the ability to play Xbox video games outside due to the recently launched Xbox Cloud Gaming service.

This prize is a Summer of Xbox: Let’s Play Kit which includes an Xbox Series X and S-branded backpack, hat, and towel in addition to a can of V Energy Drink and a can of Pringles. 50 Let’s Play Kits are up for grabs and all participants need to do is reply to the below tweet and explain how they “plan to be gaming everywhere this Summer!”

The Xbox Australia and New Zealand teams have a history of holding fun competitions such as this with genuinely cool Xbox prizes like the recent Xbox skateboard, the famous Xbox Onesie, and the Xbox controller floaty.

Are you planning on entering this competition on Twitter? While you’re there, give us a follow and stay tuned for more Xbox gaming news.

How to play Harry Potter and the Sorcerer’s Stone on Windows 10

Released in 2001 on PC, Harry Potter and the Sorcerer’s Stone is a popular adventure video game with platform elements published by EA.

However, due to the copy-right protection feature in the game, users are unable to play Harry Potter and the Sorcerer’s Stone on Windows 10.

Users can successfully install the game using the game disc. However, when launching the game, nothing happens. This usually happens due to the copy-right protection driver not working on your PC.

Still wondering whether you can play Harry Potter and Sorcerers’ Stone on Windows 10 PC? Yes, it is possible. You can play many old games on Windows 10 using third-party tools like GoG.

In this article, we explore a few workarounds to play this popular Harry Potter game on your Windows 10 PC.


How do I play Harry Potter and the Sorcerer’s Stone on W10?

1. Run the game in compatibility mode 

Play Harry Potter and the Sorcerer's Stone on Windows 10
  1. Locate and right-click on the Harry Potter and Sorcerer’s Stone game shortcut.
  2. Select Properties.
  3. Open the Compatibility tab.
  4. Check Run this program in compatibility mode box under the Compatibility Mode section.
  5. Choose Windows XP Service Pack 3 from the OS list.
  6. Click Apply, and OK to save the changes.
  7. Once the changes are saved, double-click on the game shortcut to see if it works.

Windows 10 comes with a built-in compatibility mode that allows you to run apps made for an older version of Windows on the newer version of Windows. 

If the issue persists, check if you have a secdrv.sys in the game‘s folder. You can also check the properties of the games‘ .exe file for more information.

With Starforce, Macrovision and Securom are some of the protection drivers rejected by Windows 10. This problem usually occurs if you are trying to install the game from a CD. 


2. Install the game with a patch 

Play Harry Potter and the Sorcerer's Stone on Windows 10
  1. Before we proceed with how to use the patch, make sure you have the original disc and a valid serial number of the game.
  2. Insert the disc and install the game.
  3. Make sure to create a game shortcut on your desktop.
  4. Once you have installed the game, don’t run it. 
  5. If a shortcut is not placed automatically, go to the game installation folder, right-click on the exe file and select Create a Shortcut.
  6. Download these patched files to your computer:
    New Patch 
    Old patch 
  7. Extract the downloaded files into the game’s folder.
  8. To find the game’s folder, right-click on the shortcut, and click Open File Location.
  9. Once all the files are extracted, run the game from the shortcut on your desktop.

The first start may take a while. If it asks which 3D device to use, choose Direct3D Support. 

If you get into a black screen, one of our readers suggested to run HP.exe from the new patch in compatibility mode for Windows XP Service Pack 3.

Once the game is loaded, go to Options and change the resolution to 1024 x 768 and the color depth to 32-bit.

To increase the game resolution, you need to edit the games‘ ini file. However, editing the file can make the game crash.

Harry Potter and Sorcerer’s Stone is a popular action-adventure game based on the popular Harry Potter series and novel.

Did our solutions help you solve the problem? Leave us your answer or maybe other suggestions for solving it in the comment section below.

FIX: Calculating the time required to copy the files error

Copying files from one partition to another or from external media to your local storage should be so easy like a walk in a park. However, even the simplest of all operations can, occasionally, prove to be challenging.

That’s wany Windows 10 users reported that the Calculating the time required to copy the files error on their screen takes ages to finish, or it won’t finish at all.

Therefore, they’re forced to unplug media or restart the PC since the operation can’t be canceled. In order to fix this or at least find a workaround, we recommend checking the steps we enlisted below.

What to do if the screen is stuck on calculating the time required to copy files?

1. Wait for some time

A lot of users identify Windows time calculation as part of the copying process. Thus, they concur that this operation slows down the copying process and want to disable it.

That’s not the case, and you can’t disable it. This is just a standard calculation, and it’s approximate, not precise. What indeed slows down the calculating time to copy files is the copying itself.

For example, extra-large chunks of data, a lot of files in a different format, or the overall read and write speeds of the medium are the ones that make the system take a lot of time while copying.

When the File Explorer is stuck in the Calculating the time required to copy the files error screen, and it takes more than usual, just wait it out. Of course, don’t wait for hours as that won’t lead anywhere.

Also, try making some changes. Don’t just copy-paste the folder with 100 GB of raw data. Split it up in, say, 10 GB chunks. In addition, consider the number of files.

If you count files in tens of thousands, it’ll certainly take more than copying a few files which equal in size.

Regarding external storage, try changing the USB port. If you’re transferring files from/to your phone, avoid MTP protocol and stick with Mass Storage.

In addition, try using Wi-Fi to transfer your files. There are a lot of programs/apps available that allow wireless transfer. If you’re copying files from a DVD/CD, make sure that the disk and ROM are in a good state.

If you’re past that, but the issue is persistent and Explorer takes ages to calculate the data, make sure to continue with the steps provided below.

2. Check storage for errors

windows 10 error the current active partition is compressed
  1. Type cmd in the Windows Search bar.
  2. Right-click on Command Prompt, and run it as an administrator.
  3. In the command line, type the following command and press Enter:
    • chkdsk c: /r
  4. If your system partition isn’t C, replace c: with an alternative letter assigned to your system partition.
  5. Restart your PC, and try copying files again.

Now, the aforementioned steps should help you speed up the copying process substantially, but the prerequisite condition is fully functional storage.

If your internal/external HDD or USB is damaged or corrupted, the calculation and processing files will take a lot more time than needed.

In the worst-case scenario, you won’t be able to manipulate files at all. This is a clear sign of the upcoming HDD failure, and we recommend backing up your data as soon as possible.

But, what we don’t want is to rush to conclusions. Instead of that, you have various ways to check the storage for errors.

There are a lot of tools for doing so – some of the built-in utilities in Windows 10 and other third-party solutions.

3. Disable your antivirus temporarily

Even though Windows 10 comes with the fairly competitive Windows Defender, the majority of Windows users still place their trust in third-party antimalware solutions. And rightfully so.

However, certain third-party antivirus suits don’t work well with Windows 10. They are, arguably, better than their peers in many regards.

They can slow down the system and affect the performance of the simplest of operations – this includes copying.

Namely, the real-time protection of certain antivirus solutions will try to scan the files while they’re being transferred.

And if you already have issues with the lackluster hardware or system bugs, that’s certainly something you don’t need.

So, we recommend disabling the antivirus for the remainder of the data transfer. Once you copied everything, you can perform a localized scan to check for the virus presence.

After the operation is completed, consider switching to more dependable antivirus software that will not interfere with your Windows 10 system.

4. Use alternatives

There are a lot of different third-party File Transfer tools which might just work. The majority of those (if not all) are free to use and rather simple to handle.

  • FastCopy – fast multi-thread copying tool, not the best design, though.calculating-the-time-required-to-copy-the-files
  • Copy Handler – fast and well-designed, lacks data verifier.calculating-the-time-required-to-copy-the-files

Finally, if you’re repeatedly unable to go past the Calculating the time required to copy the files error screen, but you can confirm that the storage media is healthy, maybe the Explorer is the problem.

We hope one of the above solutions helped you solve the annoying error. In case you have an alternative solution or questions regarding the enlisted ones, feel free to tell us in the comments section below.


Windows XP Optimizer: 5 Best to Use in 2026

Windows XP still has a solid user base, but fewer tools support it as it ages. That means fewer PC optimizers work well on XP compared to newer Windows versions.

The best optimization software for XP helps boost startup times, speed up processing, and fix system errors. Here are five top all-in-one options to improve your XP PC’s performance.

What are the best system optimization tools for Windows XP?

Fortect – Best Overall

If you are using Windows XP, then you probably don’t get much support from the optimization programs available on the market.

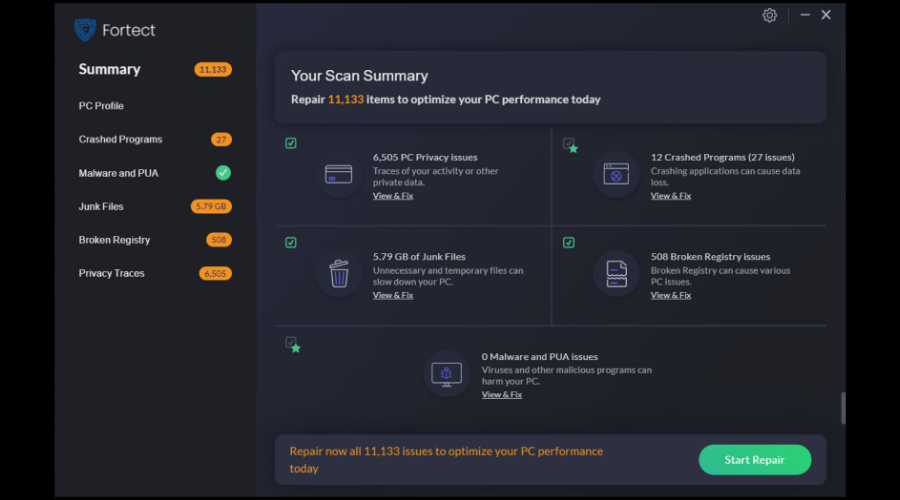
Fortect is a universal system optimization and repair tool whose main function is to repair and rebuild Windows. This program can be used from Windows XP up to and including Windows 10.

Fortect offers great tools to solve most of the worst things that can happen to your system. It not only detects the issue withing the system but it replaces the broken or missing files with original ones from it’s own vast library.

Even tough it can’t operate with 3rd party programs, Fortect it’s still a great tool due to features like, it’s ability to identify broken hardware which may cause the dreaded blue screen of death.

Also in case you were to late to protect your system, with this software it’s really easy to turn that around and restore your system to it’s pre infected state.

Since this amazing software is as lightweight as possible, it runs without problems even on older PCs.

Main features:

  • repairs damaged DLL’s
  • identifies broken hardware in case of the Blue Screen of Death
  • restores system to pre infected state in case of viruses
  • operating system recovery

Fortect

Lightweight optimization, repair and diagnosis tool that runs even on older systems.
Free Trial Download now

System Mechanic Ultimate Defense – Real-time registry repair

Iolo System Mechanic Professional has had rave reviews, but that doesn’t run on Windows XP. However, Iolo still provides a customized System Mechanic Classic version specifically designed for Windows XP and Vista.

SMC is comparable to System Mechanic 15.5 as it includes the same tools within that version. As mentioned, System Mechanic Classic is much the same as the 15.5 version, which is also compatible with XP.

It includes the Overview tab on its dashboard that provides system status details and fixes detected issues with its Repair Now button.

You can give Windows XP a quick boost with System Mechanic’s LiveBoost tab that frees up system resources.

System Mechanic Classic is a great repair toolkit thanks to its ActiveCare which provides real-time hard drive and registry repair.

The Classic version also includes an enhanced registry tuner, program accelerator, SSD accelerator, and net booster.

System Mechanic Ultimate Defense

Enhance your Windows XP PC with this excellent repair tool.
Free Trial Download now

AVG PC TuneUP – Highly rated program

avg free pc optimization software

AVG PC TuneUp is a highly rated system optimizer that’s compatible with XP SP3 and other Windows platforms along with OSX 10.8 Mountain Lion.

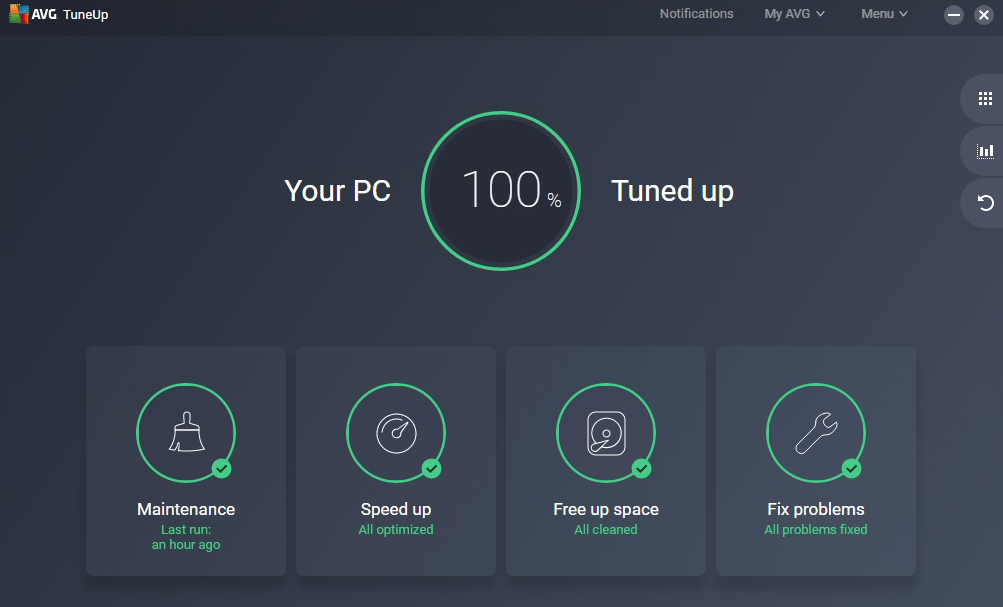
AVG PC TuneUp is an all-in-one system optimizer that can speed up Windows, fix crashes, boost laptop batteries and free up more HDD storage space.

The software provides 1-Click Maintenance, which users can schedule, that cleans the registry, cleans up browser files, cleans the system cache, optimizes the system startup and shutdown, defrags the hard drive and erases invalid shortcuts.

Users can also check for third-party software updates, restore deleted files, delete file duplicates, adjust Windows settings, check for disk errors and uninstall unused software with AVG PC TuneUp.

There are about 17 optimization tools in AVG PC TuneUp, which is more than most system optimizers include. Another great thing about AVG PC TuneUp is its turbo and economy modes.

The software’s Turbo Mode gives Windows a quick speed boost by postponing scheduled maintenance, minimizing visual effects and turning off background services to optimize system resources.

The Economy Mode reduces energy consumption to extend laptop battery duration. The publisher claims that AVG PC TuneUp can extend laptop battery duration by 108%.

AVG TuneUP

Tune up your computer and let AVG handle the situation.
Free Trial Visit Website

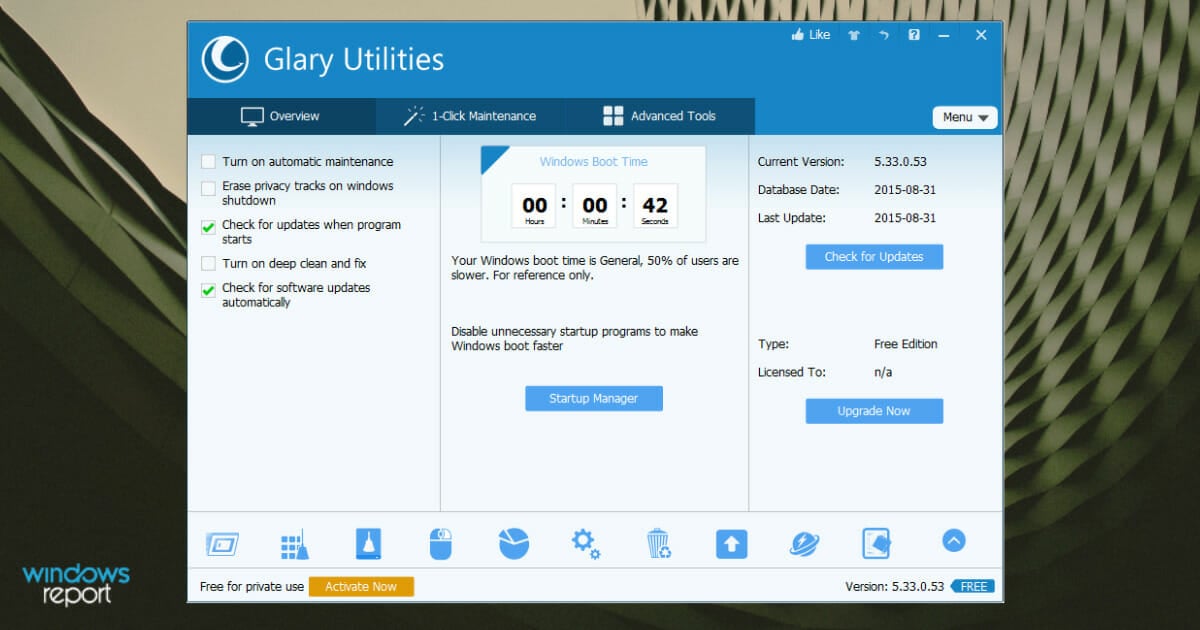
Glary Utilities Pro 5 – Restore deleted files

glary utilities 5 screenshot

Glarysoft claims that Glary Utilities Pro 5 can make Windows 800% faster. You can run the software on Windows platforms from XP to 10.

However, you can also utilize a freeware version, which includes most of the tools in Glary Utilities Pro 5.

The main difference between the versions is that GUP 5 is for commercial use and enables users to schedule 1-click Maintenance and Web Update.

Whether Glary Utilities Pro 5 makes Windows 800% faster might be debatable. However, the software undoubtedly boosts system performance more than most of the alternatives.

It incorporates more than 20 system maintenance utilities, which include a disk cleaner, disk defragmenter, registry fixer, uninstall manager, startup manager, file shredder, RAM optimizer, shortcut fixer, and more besides.

The software’s file management tools enable users to split files and restore deleted files. Glary Utilities even packs in a malware scanner.

So Glary Utilities Pro is one of the most comprehensive optimization software for Windows.

Glary Utilities Pro 5

Get Glary Utilities and optimize your system within minutes.
Free Trial Visit Website

Norton Utilities – 1-Click Optimization

Norton Utilities can deliver a genuine speed enhancement for Windows XP. It is one of the few system optimizers that supports 32-bit Windows XP (Service Pack 3), but you can’t utilize it on 64-bit XP platforms.

Norton Utilities includes most of the essential system optimization tools, and those utilities give Windows a notable boost.

The software includes a registry cleaner, disk defragger, startup manager, file recovery, file shredder, duplicate file finder, repair drives, and uninstaller tools.

The best thing about Norton Utilities is its new System Dashboard that tells you if your system is in good shape or not and includes a 1-Click Optimization option.

NU provides recommended actions that make some system maintenance suggestions, and it also includes a Disk Doctor that can fix error messages.

The software’s disk-cleaning options are a little limited, but NU is still a system optimizer worth noting.

Norton Utilities

Norton Utilities

Boost your XP’s speed with Norton Utilities now!
Check price Visit website

Wrapping up

Keeping your Windows XP system secure and running smoothly takes more than just antivirus software. Along with choosing the best antivirus software for Windows XP SP2, it’s important to use a reliable browser optimized for Windows XP to ensure safe and fast internet access.

Pairing your antivirus with quality antimalware tools for Windows XP adds an extra layer of protection against emerging threats. For better privacy online, consider using a VPN client designed for Windows XP.

And to keep your PC in top shape, the right system optimization software for Windows XP can boost performance and fix errors. Together, these tools create a stronger, safer XP experience tailored to the challenges of an older operating system.

How to turn DDC/CI: on or off [Gaming guide]

Here’s how to turn DDC/CI on or off on a gaming monitor. Enabling this feature allows better communication between your monitor and PC. You can adjust brightness easier and enhance visuals.

Let’s get right to it:

How do I turn DDC/CI on or off

How to enable Display Data Channel/ Command Interface

turn DDC CI on off

Note: Below guide is for BENQ monitors. However, this should also work if you are using HP, Lenovo, Dell, or any other monitor.

  1. Press any of the physical control buttons on your monitor. You can find the control buttons, usually at the bottom of the display panel on the right side. In some monitors, the buttons are located at the back of the panel.
  2. When the context menu appears, press the appropriate button to open the Menu.
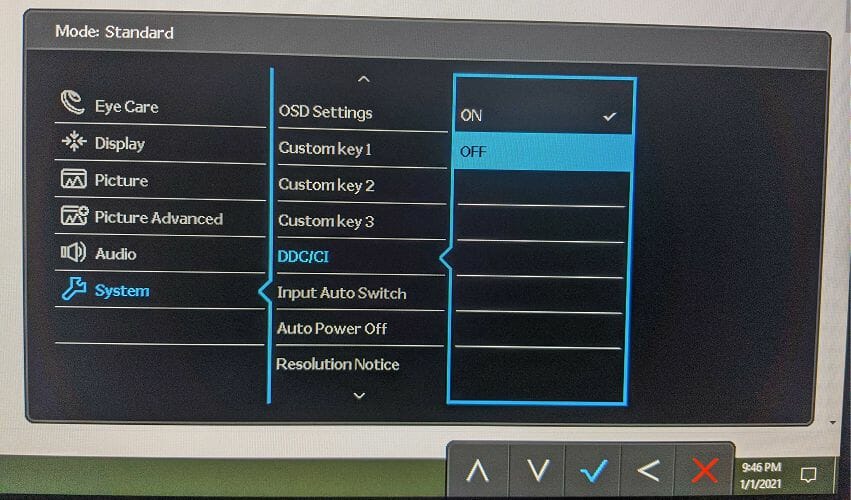
  3. Use the physical button to scroll down and select System.
  4. Use the forward navigation button and highlight the DDC/CI option.
  5. Next, use the forward navigation button and highlight ON.
  6. Press the OK/Check button to turn on DDC/CI and save the changes.

That’s it. You have successfully enabled the DDC/CI option on your computer.

However, If you have a multiple monitor setup where the monitors are from a different manufacturer, you can use a third-party tool like ClickMonitorDDC to manage DDC/CI settings.

How to disable Display Data Channel/ Command Interface

turn DDC CI on off
  1. Press any physical control button on your monitor.
  2. Press the appropriate button to open the Menu.
  3. Use the navigation button to scroll down and select System.
  4. Press the forward navigation button and then scroll down to the DDC/CI option.
  5. Press the forward navigation button and then select OFF to disable it.
  6. Next, press the OK/Check button to save the changes.

Now you have all the information you need to turn DDC/CI on and off. This handy feature lets your monitor and computer work together for easy adjustments like brightness.

Most monitors come with it enabled, but if it’s ever turned off, you can quickly switch it back on in your settings.

Best VPNs for Windows Vista That Still Work in 2022 [Free]

Microsoft ended support for Windows Vista on April 11, 2017, and most VPN services followed the course.

It meant that PC users could no longer use their favorite VPN apps unless they upgraded to a newer Windows edition.

But finding a VPN that works with Windows Vista can be challenging but not impossible.

However, a limited number of VPN companies continue to support Windows Vista today, despite that most businesses focus on VPN solutions for Windows 10 and Windows 11.

If you’re a Vista user, you know that you’re exposed to security risks. But you can get equipped with a reliable VPN to secure your connections and protect your online privacy.

Why use a third-party VPN for Windows Vista?

It is possible for any Windows Vista user to connect to a VPN software that is compatible with this Windows version. Hence, this is why you would need a 3rd party VPN on your device:

  • It protects your network connection with other IP addresses
  • Hides the personal data used on different websites
  • Unblocks restricted content from other regions

With that said, we handpicked and tested the best VPN app for Windows Vista which still works today. We’re also guiding you through every step of the installation process.

What’s the best VPN for Vista that actually works?

1. CyberGhost VPN – Winner VPN for Windows Vista

CyberGhost should be your first pick for Windows Vista operating system as it offers comprehensive VPN safety online.

This VPN software can be installed on multiple devices and delivers the fastest connection speed, having thousands of servers in many countries worldwide.

You will benefit as well from robust encryption for personal data stored online, protocols like OpenVPN for Windows Vista connection, or dedicated IP addresses for responsible digital navigation.

It’s worth noting that CyberGhost offers a free trial period for you to test drive the software and protect your PC. So, you have 45 days trial period with a money-back guarantee.

Key features of CyberGhost:

  • VPN protocols for high-speed connection
  • Fast server locations in 94 regions
  • Unlock streaming content restrictions
  • Public Wi-Fi high security

CyberGhost VPN

Utilize this most-valued VPN on Windows Vista to entirely shield your device.
Free trial Visit website

2. Windscribe

Windscribe is one of the best free VPN for Windows Vista

Made by Windscribe Limited, Windscribe is an ideal free VPN for Windows Vista. It’s one of the few services that are actually good and offer a free version (no credit card, only email address).

The only downside is that only the Windscribe old version works with Vista, so you can’t benefit from the latest features and improvements. Windscribe also offers a VPN for Windows XP.

Windscribe comes with its own firewall, secure hotspot, and split tunneling. It can unblock the Netflix US and UK libraries using Windflix. Furthermore, the Vista VPN app supports torrenting.

What else you need to know:

  • OpenVPN, IKEv2, SOCKS, AES-256, port forwarding
  • Servers in 110 cities across 63 countries
  • No identifying logs

Does Windows Vista have a VPN?

Yes, Windows Vista OS has an included VPN. You can thus perform a manual configuration to connect a VPN on your computer.

In any case, this process concerns some know-how regarding network settings and it’s more secure to use professional VPN software.

How to install CyberGhost VPN on Windows Vista

  1. Get a VPN account for CyberGhost.
  2. Download CyberGhost VPN software.
    Screenshot of CyberGhost install option
  3. Save and open the installation file.
  4. If UAC asks for permission to run the tool, allow it
  5. Follow the setup process to complete the installation.
  6. Launch the VPN interface once the setup is finished.

Conclusion

It’s not easy to find a VPN for Windows Vista that works since most businesses currently offer VPN apps for Windows 7 and newer.

But you can’t go wrong with CyberGhost VPN, especially if you’re a casual user. Besides, it offers a free trial version to use a VPN on Vista.

It’s definitely more convenient than going through OpenVPN manual configuration mode, which requires advanced skills.

And, if you’re not ready to upgrade to Windows 10, you can check out the best VPN apps for Windows 8 and 8.1.

Microsoft clarifies its practices for voice data collection

Microsoft has started rolling out some important updates to give users more control over how their voice data is used to improve its speech recognition technology. The new setting will allow users to choose if the company can use their voice recordings to enhance the performance of its voice-enabled products and services.

Microsoft’s data collection practices came under the radar back in 2019. A report revealed that the company was using human contractors to listen to voice conversations done with Cortana and Skype Translator. Last year, the software giant officially acknowledged it on its privacy policy and product support pages and stopped storing voice clips processed by its speech recognition technologies over privacy concerns.

The latest announcement comes in response to these privacy concerns about the use of audio content. From now on, the software giant will no longer force users to share voice clips, and it will roll out a new update for various products and services that use the speech recognition technology. The list includes Microsoft Translator, Windows, Skype voice translation, HoloLens, Cortana, SwiftKey, and Mixed Reality.

A graphic illustrates how the new settings for voice data will appear to users. Text boxes explain why Microsoft asks users to contribute voice clips, how user identity is protected and the people who use the contributed data.

In the blog post, the company now explains that it’s introducing an opt-in program for customers to submit voice recordings to improve the performance of its services. If people choose to opt-in, the human contractors and Microsoft employees may transcribe the voice content, and it will be retained for up to two years. Those customers who don’t want to participate in this program will still be able to use the company’s services.

“While Microsoft employees and contractors will only listen to voice clips with user permission, the company may continue to access information associated with user voice activity, such as the transcriptions automatically generated during user interactions with speech recognition AI. The details of how that works are described in the terms of use for individual Microsoft products and services, the company said,” the blog post reads.

Microsoft noted that personal data and personal identifiers (including email addresses, telephone numbers, and social security numbers) will be removed from voice clips before processing them. The company added that human contractors don’t use audio data collected from certain enterprise-focused speech recognition features.

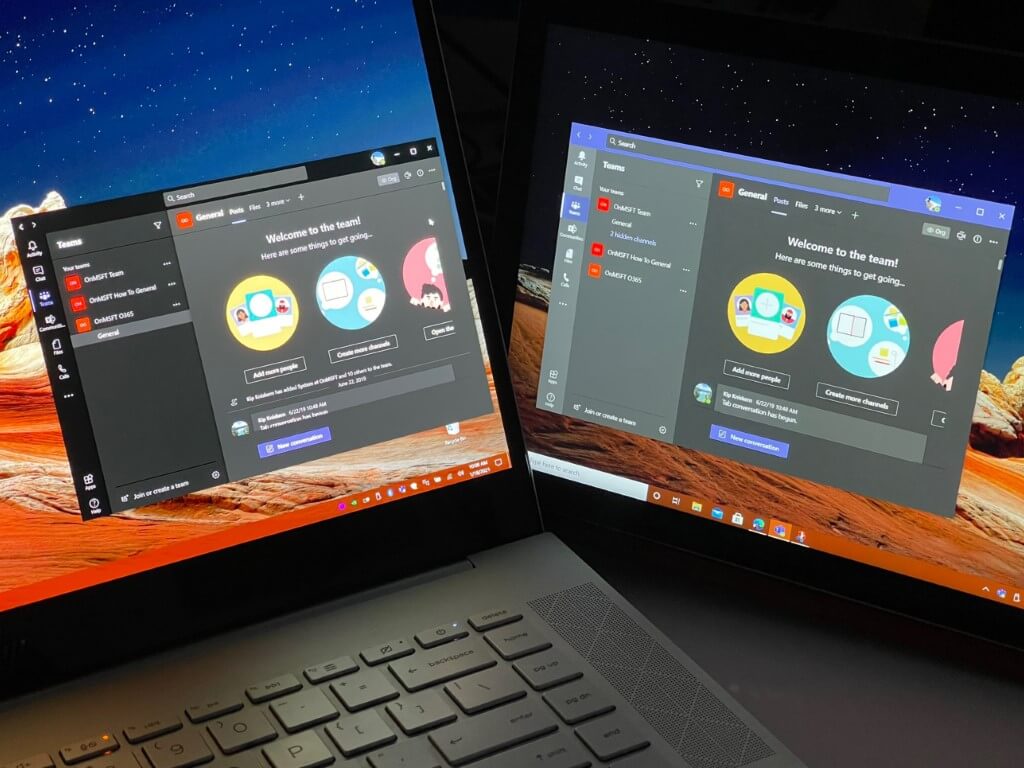
Hands-on with the newly redesigned Microsoft Teams public preview: A cleaner dark mode, and more

Since its introduction in 2017, Microsoft Teams hasn’t really seen a lot of visual or design changes. The app has largely kept the same look, with gray and purple-colored sidebars, and a purple title bar.

Towards the end of 2020, though, Microsoft announced some changes for Teams, including new Fluent icons and subtle color changes. It recently became possible to try out some of these changes in public preview, which is exactly what we did. Here’s a hands-on look at the experience, and some of the changes you’ll notice when it rolls out to you.

How to try the new Teams design

New Teams Design

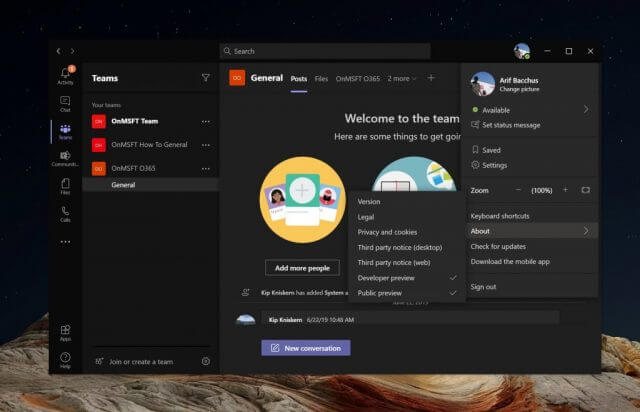
Before jumping into anything, we’ll explain how you can try out this new design for yourself. You’ll need to enroll your Teams app in the public preview program to proceed. To do so, select your profile picture at the top, then choose about, and then Public preview. You’ll then see a notice which will alert you to switching to a public preview. You might be signed out, and will be required to sign back in. If at any time you want to switch back to the old teams, you can follow these steps in reverse.

The biggest change is dark mode

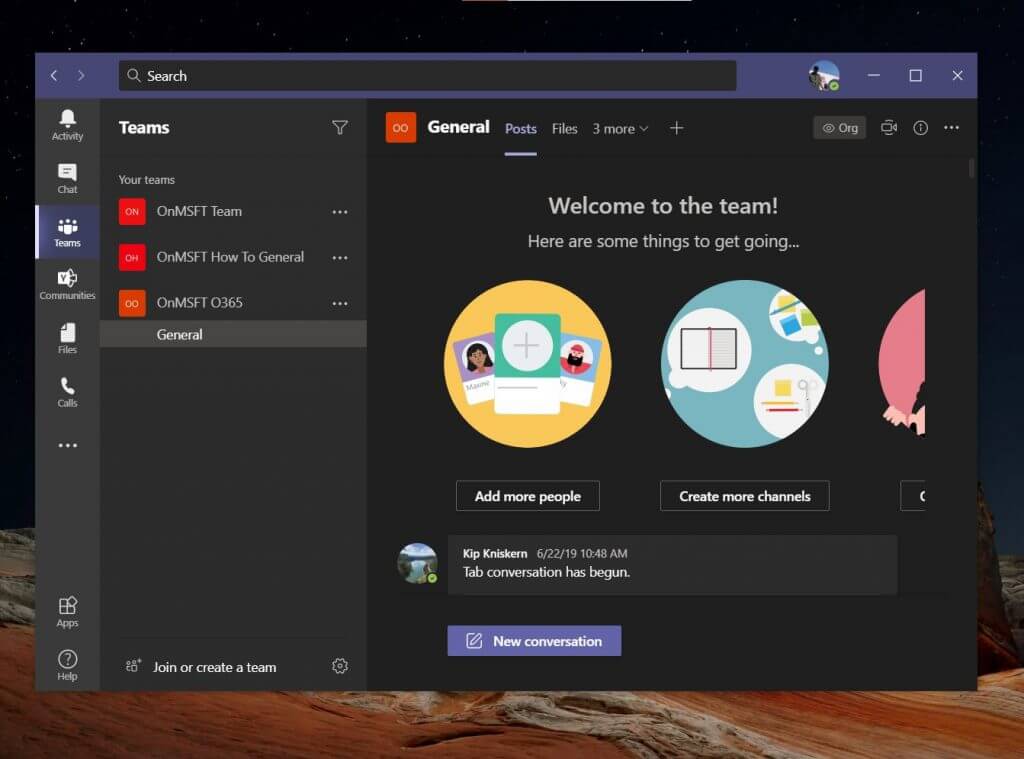
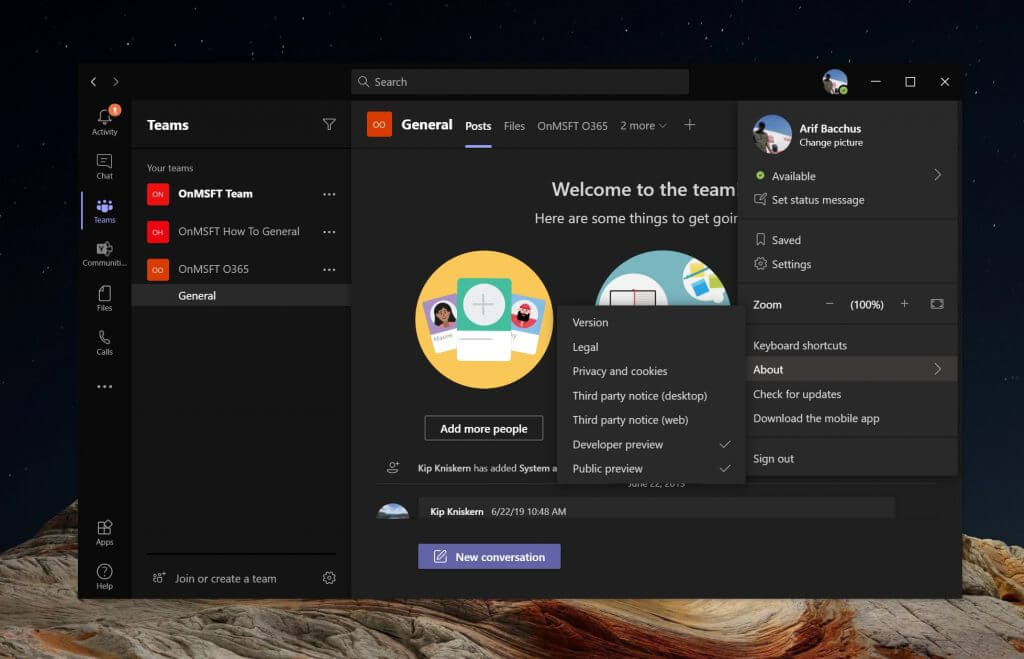
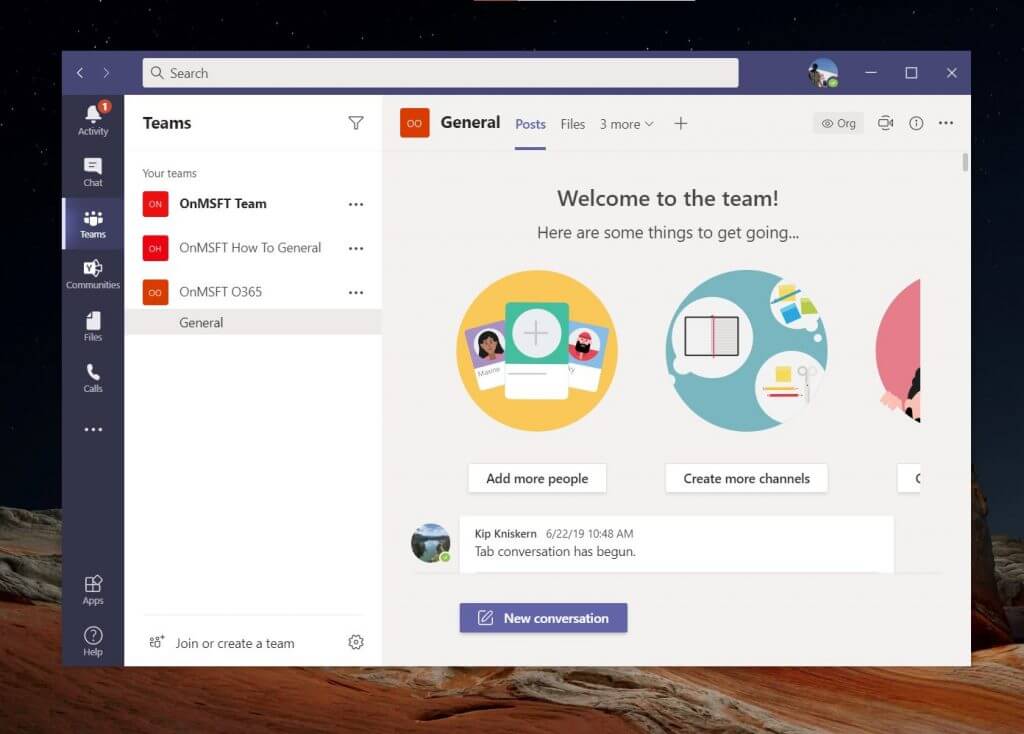
One of the biggest changes in this public-preview version of Microsoft Teams is the dark mode. Unlike before, the dark mode in this Teams version is now more representative of the experience of Windows 10 apps. It’s a lot cleaner than what we’ve seen before.

Overall, this new Teams look drops out a lot of the purple shades that have been present in the current non-preview version of the app. The title bar is now all black, as is the search bar. Microsoft also dropped out the gray shadows in the sidebar, too, changing it over to a pure black color. The white text from messages, as well as icons now stand out more in the improved dark mode.

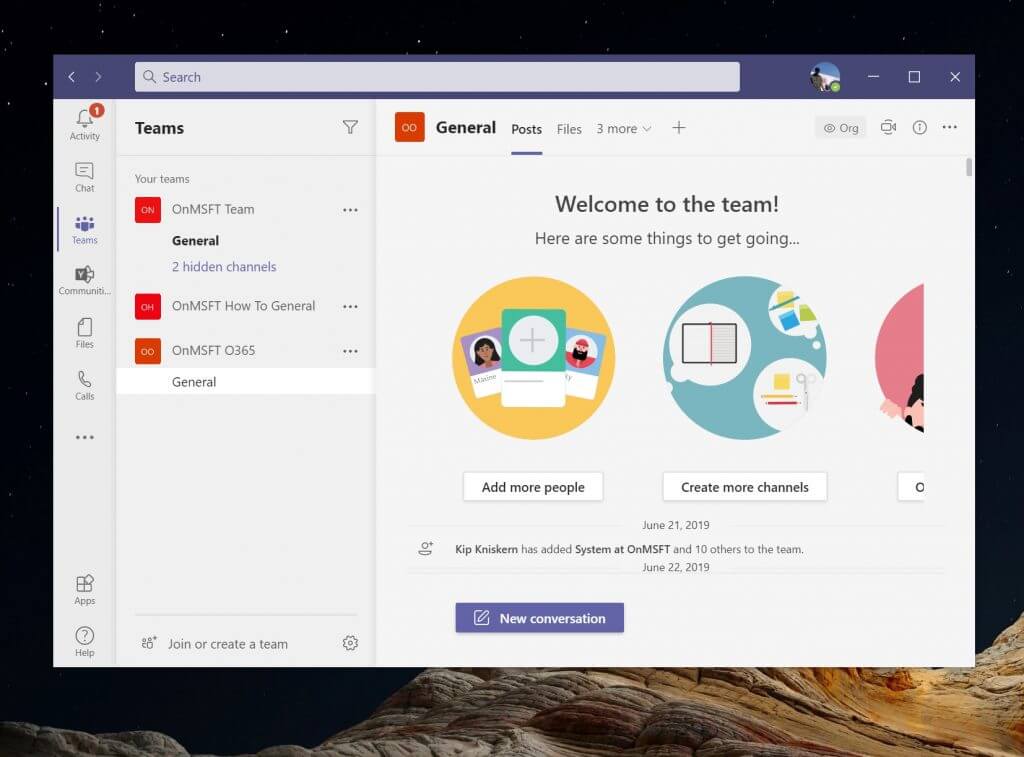
See the changes for yourself in the slider above! The first slider is the original version of Teams. The second is the current public preview version of Teams. Let us know what you think in the comments.

The regular light theme looks different, too

If you’re not a fan of dark mode, then you should be happy to know that the standard light theme in the public preview version of Teams looks a bit different, too. Just like the dark mode, Microsoft has made changes to the title bar as well as the sidebar in Teams, all designed to be easier on your eyes.

Generally speaking, there’s a couple of visual tweaks. You’ll see a lot more of Fluent Design aspects. Teams now has more of an acylic look to it, though not as much as other stock Windows 10 apps. What that means is that instead of being all white, UI elements in Teams is rather a lighter gray color.

While the public preview version of the standard light mode theme in Teams still preserves the purple title bar, you should now notice that the sidebar has lost its purple in favor of that lighter gray. The icons in the sidebar also have a more subtle gray-black look, complete with drop-shadows, helping them stand out more.

Overall, it’s a great look for readability in the sidebar. Chats, calls, and channels are now much easier on the eyes.

Other changes on the way

As we noted when we reported on the news, this is just the start of what is to come in Teams. It’s just a new coat of paint for now, but Microsoft is also planning to roll out new icons, too. The new icons in Teams will be rounded, to match Microsoft’s new Microsoft 365 icons, and what we’ve seen in the leaked Windows 10X build. So, what do you think? Do you like this new look? Let us know in the comments below.

Windows 7 Optimizer: Best Tools to Use in 2023

Has your Windows 7 PC become slower, reduced in performance, and declined in efficiency? Do not panic! This post is meant for you.

Sometimes, due to reasons like invalid registry entries, malware, fragmented hard disk, loads of running startup/background apps, and more; your Windows 7 computer may perform slowly.

However, the only way to fix these problems is by performing system optimization so as to maintain your PC for continued usage.

Meanwhile, Windows built-in system maintenance tools are numerous but you may consider using third-party optimization software to supercharge your Windows 7 PC.

What’s the best optimization software for Windows 7 PCs?

Fortect – Best optimization overall

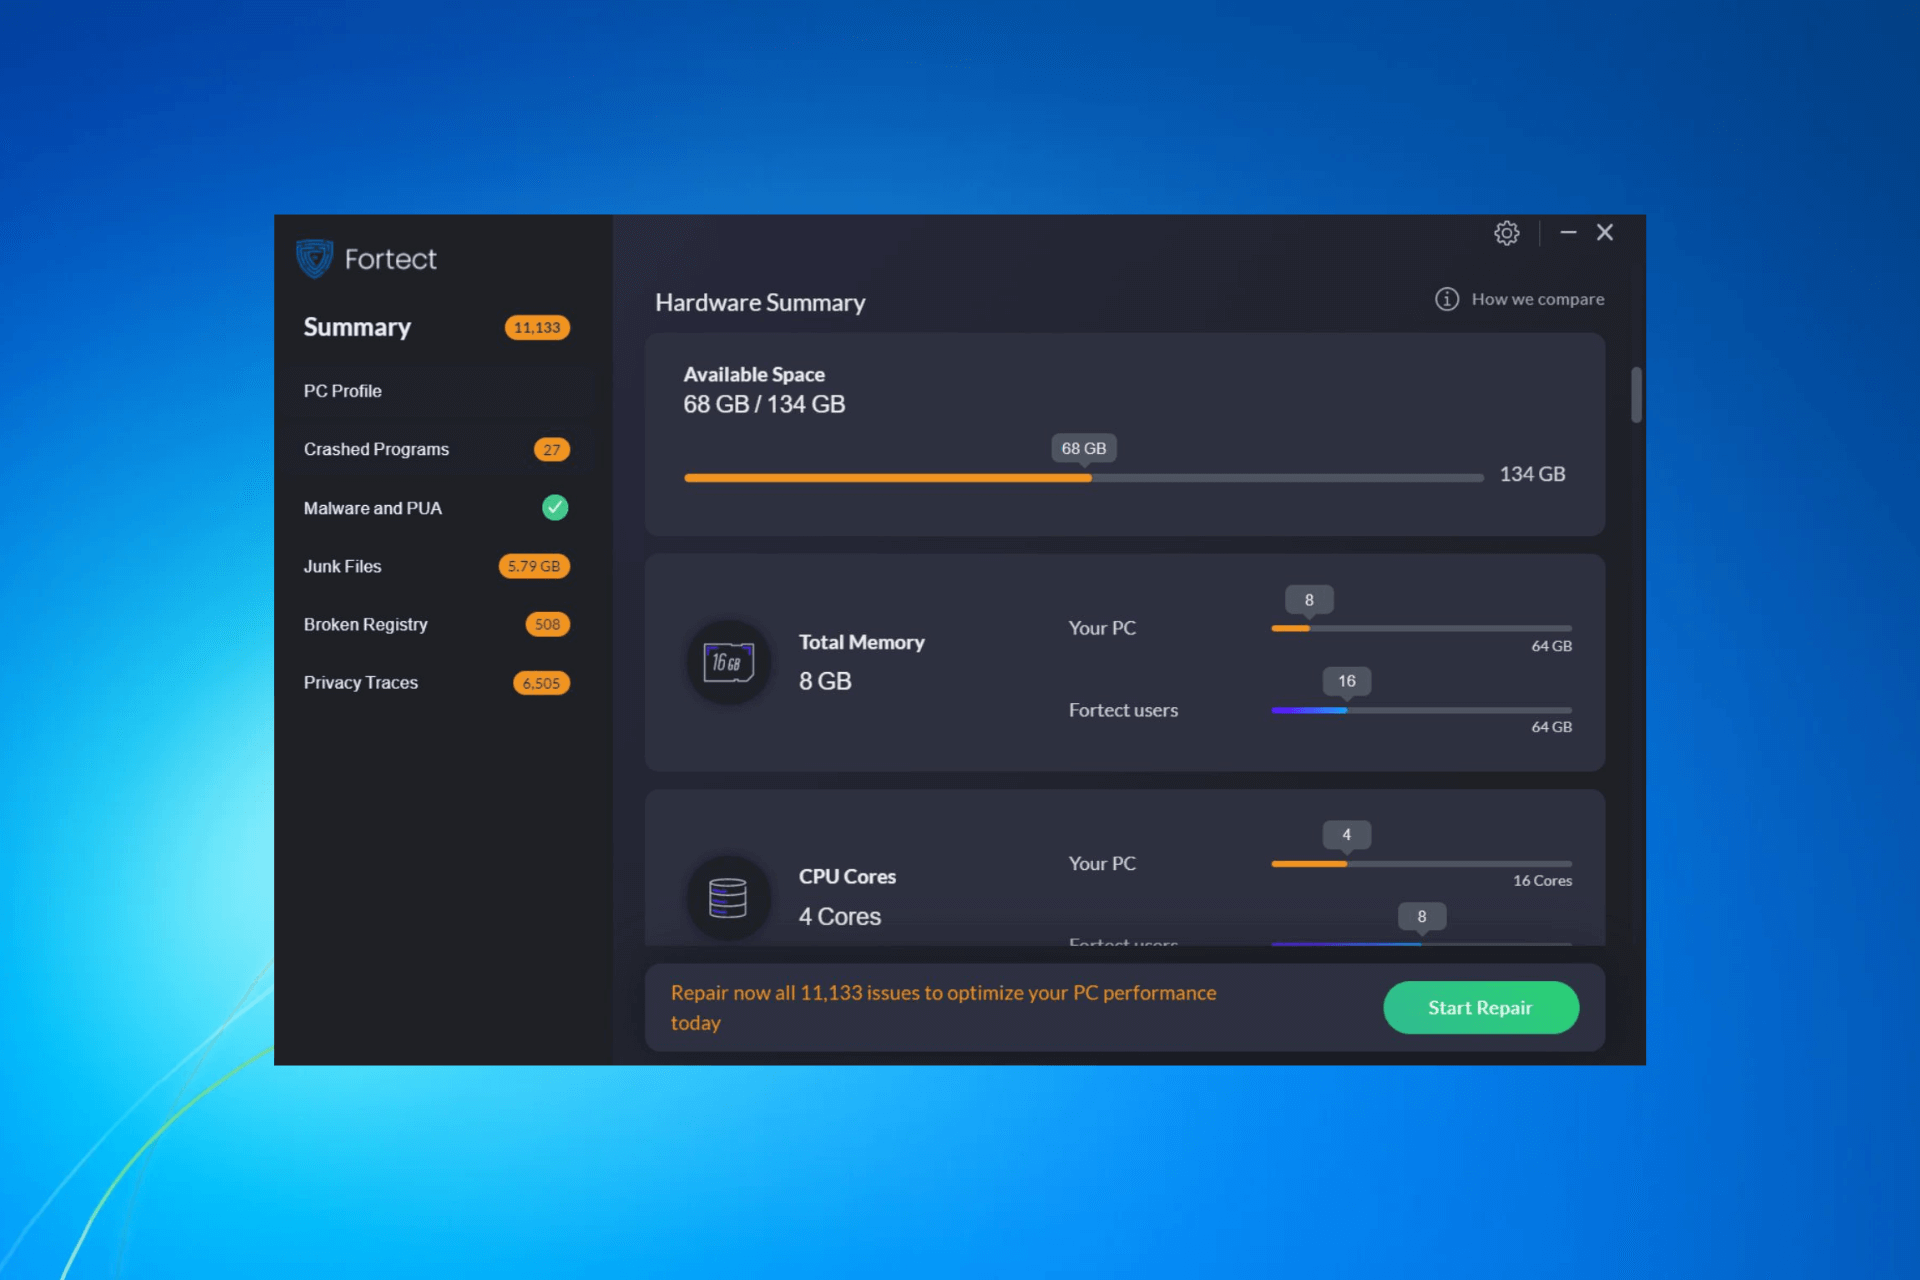
Fortect is an all-in-one PC optimization utility that takes care of everything. From junk files to registry entries, damaged system files, and browser cleanup, it can do it all in just a few clicks.

Despite being a new product, Fortect supports all Windows versions, including Windows 7. Using it will be no hassle even on older machines, thanks to its light file size.

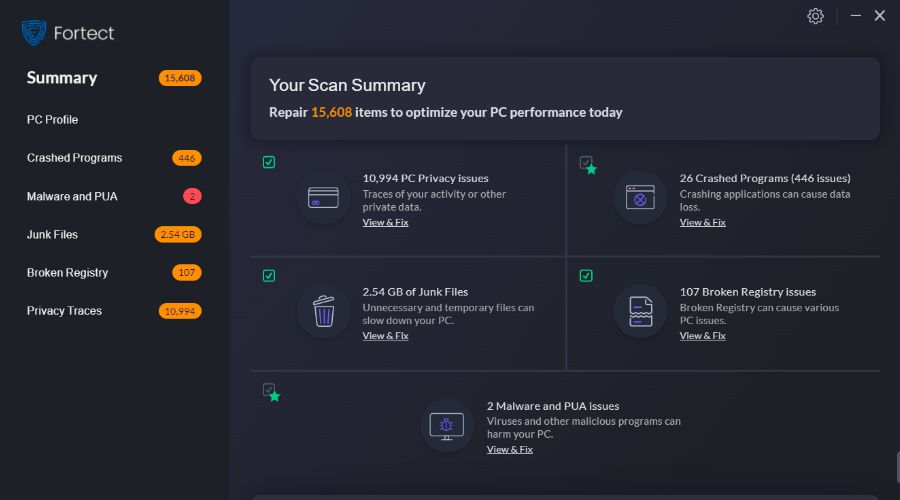
Fortect uses a quick but thorough scanner to detect any issues with your PC.

It displays a report of everything that needs improvement. You can select if you want to fix all issues or take care of specific ones.

The utility is able to optimize your registry, detect stability issues that cause your PC to freeze, remove malware or malware traces, and take care of useless junk that takes up memory space.

Other key features of Fortect include:

  • Monitors downloads and installs for viruses & threats
  • Cleans your browser
  • Fixes BSOD
  • Restores damaged Windows files

All in all, Fortect is a great utility that will help you keep your entire system in check. Once you install it, it will perform a preliminary scan to detect the current issues with your PC, then help you quickly fix them.

Fortect

Fortect

Make the most out of your Windows 7 PC with this simple but powerful optimization utility.
Free trial Download now

CCleaner – Most used cleanup tool

With more than two billion downloads, CCleaner is an award-winning optimization software ideal for Windows 7 users.

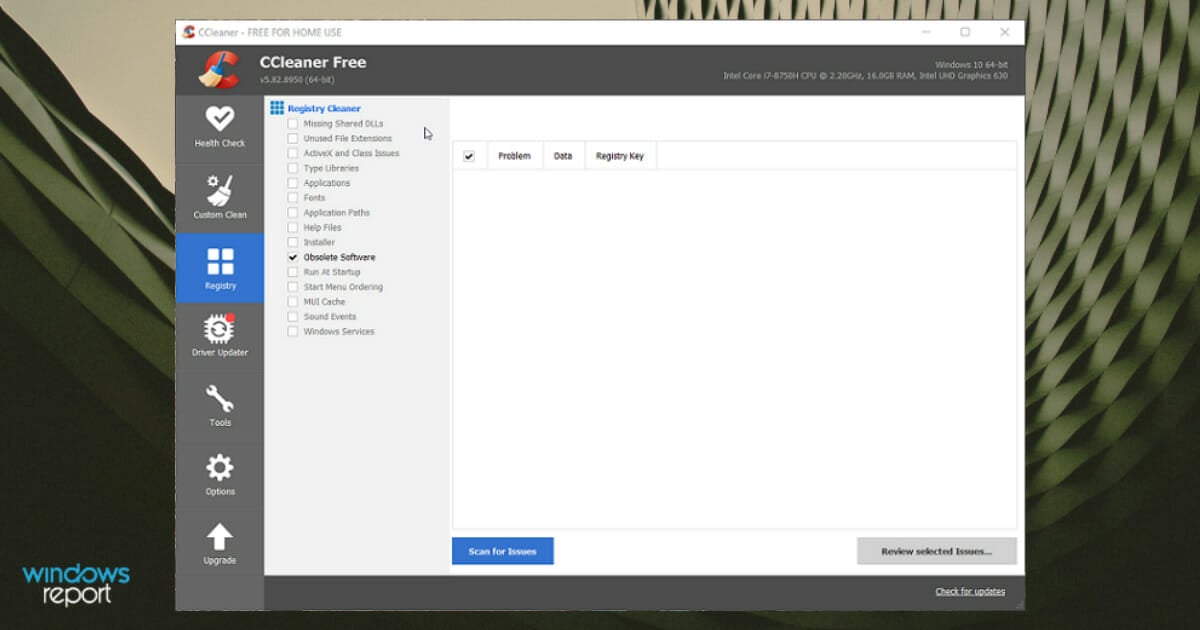
CCleaner is an uninstallation and Registry cleanup software for your PC.

You may have to download, install, and use CCleaner to optimize your PC performance. It can delete files and modify or clean the Registry of your OS.

The software has a free version for budget users, as well as premium options, such as Professional and Professional Plus, which come with extra useful features.

CCleaner can help you keep your system clean and organize with its built-in registry cleaner and program uninstaller utilities. Easily remove unnecessary clutter for maximum optimization.

Some CCleaner key features include:

  • Startup monitoring
  • Duplicate finder
  • Disk analyzer
  • System restore
  • Browser plugins cleaner
  • Drive wiper
  • File shredder
  • Cookies/cache cleaner
  • Cleaner scheduler

Moreover, you can use it to delete your browsing data and also remove your internet activity, which is useful when using the internet in public places.

IObit Advanced SystemCare – Efficient system cleaning

IObit Advanced SystemCare is one of the best optimization software tools on the current market.

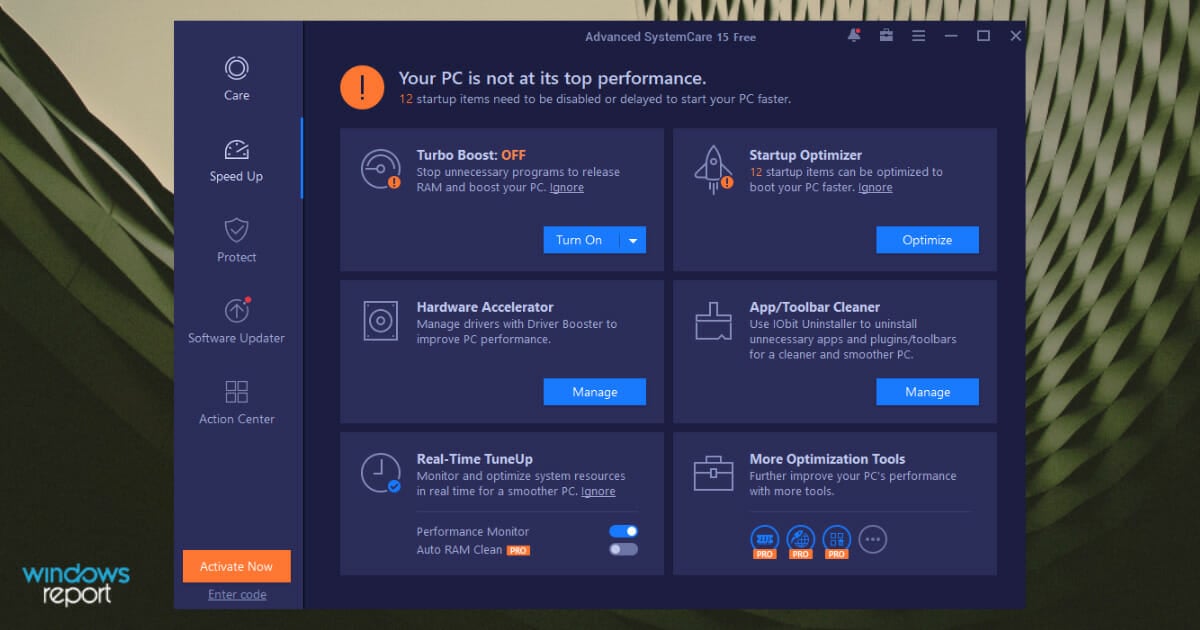
You can use the scanner to check for traces of junk files, startup items, incorrect registry entries, and spyware threats.

As its name suggests, your PC is being handled with care to ensure it is up and running.

The IObit Advanced System Care has a specialized AI that will scan your computer for any problems and malfunctions, then fix them for you.

Startup Optimizer improves startup components in Windows to improve boot speed. This allows you to manage your startup items, services, scheduled tasks, and browser startups.

Other key features of IObit Advanced SystemCare include:

  • Basic System Clean, Fix, and Optimization
  • Ultimate System Tuneup for Top Performance
  • Up to 300% Internet Speedup with Internet Booster
  • Capture intruders automatically with FaceID
  • Auto RAM Clean with Real-time Optimization
  • Hard Disk optimization
  • Fix System Weakness to Prevent Hacking with 1-click
  • Remove Infections and Protect against Various Threats
  • Auto Online Privacy Trace Clean with Browser Anti-Tracking
  • Redesigned Performance Monitor Monitors and Boosts Your PC
  • Up to 200% Quicker PC Startup

In addition, Advanced System Care can clean your saved passwords, keeping you and your precious data safe.

Lastly, the software also comes with an Internet Booster, a feature that can boost your internet speed.

Ashampoo WinOptimizer – Fastest cleaner technology

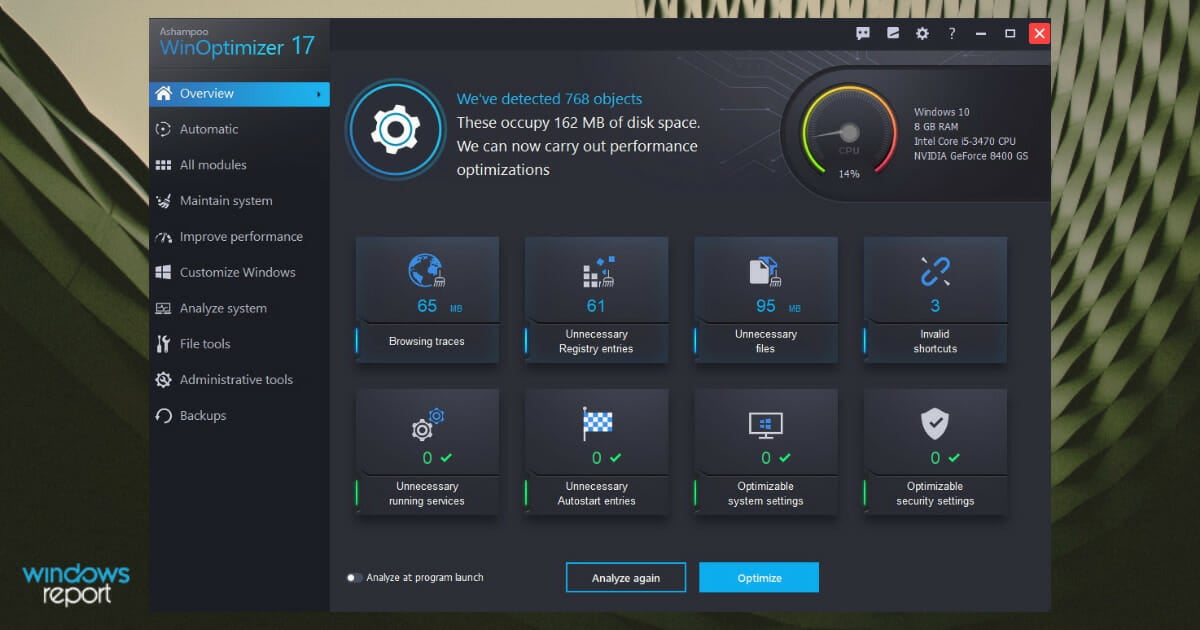
Ashampoo WinOptimizer is user-friendly optimization software for Windows 7 PC. The program can significantly improve your PC boot time up to 50x.

In addition, Ashampoo WinOptimizer can increase your overall system performance on an OS that has been utilized for a while.

The software also allows you to eliminate any browsing traces, which is useful when browsing the internet in public places.

Game Booster is also a fantastic addition. It stops non-essential background processes while your game is running to give your game a boost and resumes them when you’re through playing so you can go back to work.

When you quit your browser or application, this totally automated broom sweeps everything that doesn’t belong off your disks, such as temporary files.

Ashampoo WinOptimizer’s also allows you to encrypt and recover data with ease.

Key features of Ashampoo WinOptimizer 15 include:

  • Registry cleaner
  • Drive cleaner
  • Startup Tuner
  • Task scheduler
  • Internet cleaner tools
  • Icon saver
  • File Encrypter
  • File Splitter and many more

Thanks to increased accessible RAM, you may reclaim system resources and enjoy speedier startup times and a smoother overall Windows experience.

Moreover, the program has built-in AntiSpy features that will protect your PC from spyware, adware, and bloatware.

System Mechanic Ultimate Defense – All-around optimization

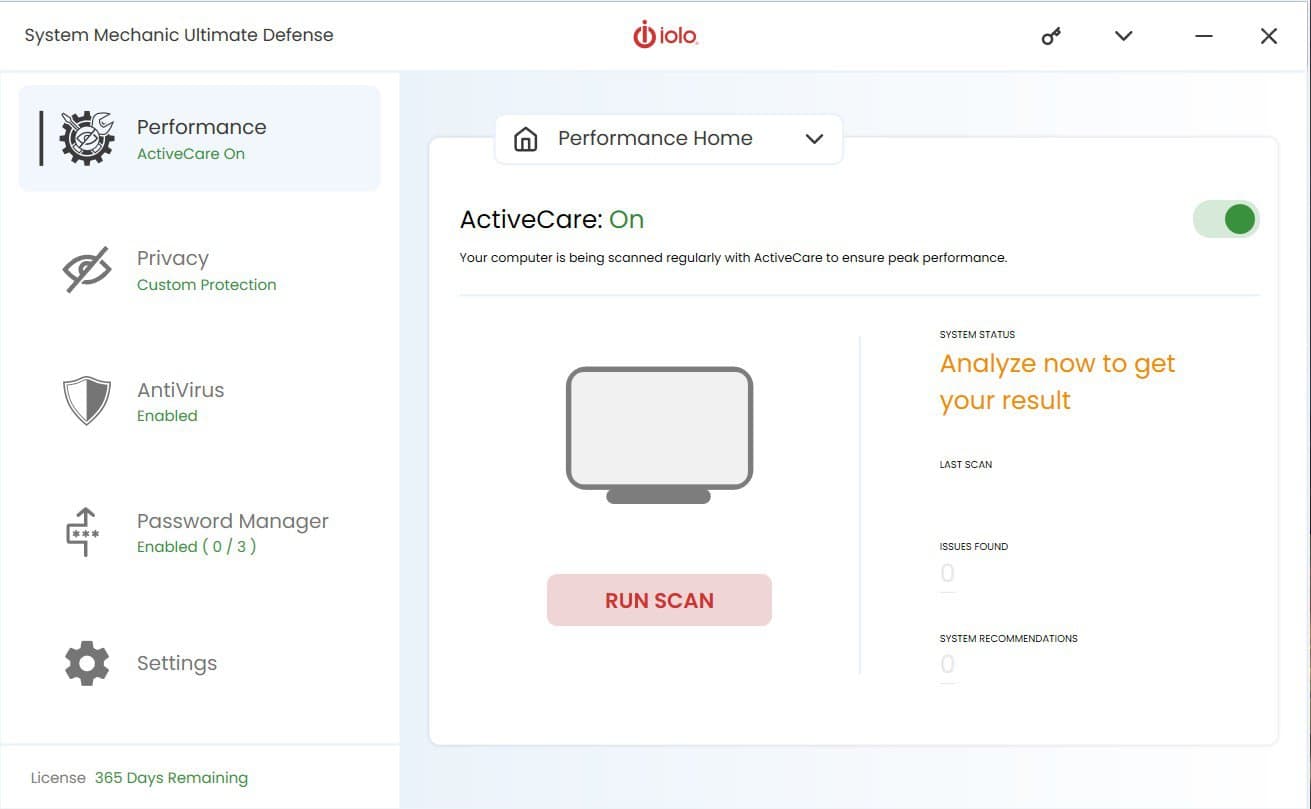
System Mechanic Ultimate Defense is one of the best optimization programs for Windows 7. This program has an appealing GUI which initiates the software’s tools and options.

The software improves your PC performance by defragging your hard drive, tweaking your CPU and GPU performance, and adjusting your RAM usage.

Its main advantages are its comprehensive system scan and real-time performance increase features, which work well combined with the Malware Remover, Privacy Guardian, and ByePass password manager.

In addition, if you buy the software’s license, you can install it on as many computers as you’d like for no additional charges, and you also get a system status overview indicating issues that need to be fixed.

Some key features of System Mechanic Ultimate Defense include:

  • Registry cleaner
  • Junk files/temporary files removal
  • Hard drive defragmenter
  • Cleanup tool
  • Registry cleaner
  • Startup manager
  • Ram optimizer
  • Internet connections tweaker

Overall, System Mechanic Ultimate Defense is a fantastic option for power applications.

Iolo System Mechanic

Iolo System Mechanic Ultimate Defense

Iolo System Mechanic helps you optimize your PC, improve computer speed, and fix crashes. Don’t hesitate to try it out!
Free Trial Visit Website

Glary Utilities 5 – Intuitive UI

Glary Utilities 5 is an easy-to-use optimization software. The program’s interface is packed with appealing visuals and is also highly customizable.

The toolkit includes over 20 system programs to boost computer speed and examines and analyzes PC problems.

You can run a custom 1-click maintenance scan utilizing several system tools within the program. Glary Utilities 5 comprises several optimization tools for your Windows 7 PC.

Glary packs a plethora of features in a single software, allowing you to remove junk and bloatware, uninstall useless and leftover programs, as well as improve privacy and security.

Some great tools included within Glary Utilities 5 are:

  • Registry cleaner
  • Disk cleaner
  • Disk defrag
  • Startup manager
  • Uninstall manager
  • Ram optimizer
  • File management tools, and other optimization tools

Glary Utilities also provides a toolbox with a File Shredder and an Open Space Wiper for wiping just free space. You can rewrite the data in one to ten cycles.

Glary Utilities 5

Make sure your device works at full capacity with easy-to-use computer management tools.
Check Price Visit Website

Tweaking Windows Repair – Reliable optimizing tools

The next entry on our list is a software utility that may look like it was created specifically for graphics, but we assure you that if you also own a Windows 10 PC, it will handle that just as well.

Whichever OS you are running, problems will always persist, be it from registries, DLL, bad RAM, high CPU use, and more.

That is precisely when a reliable software tool like Tweaking Windows Repair is recommended since it can easily handle all of the above and more.

Besides, the program is available in both a free and a Pro version, with the Pro version having a much wider toolset that caters to both beginner and advanced users.

Other key features of Tweaking Windows Repair include:

  • Fixes Windwos Firewall problems
  • Browser cleanup and optimization
  • Registry backups

Whichever the case, if you’re running Windows 7 because your hardware is old, or if you just love the old OS, Tweaking Windows Repair is something you should definitely have.

⇒ Get Tweaking Windows Repair

In conclusion, any of these software tools is what you need for your Windows 7 PC optimization.

Do share with us your experience in using any of the software we mentioned above. Let us know by commenting below.

5 Best Encrypted Messaging Software

Millions of people exchange messages every day throughout the world, but how many of them really know what truly happens to their messages once they send them? Will these be intercepted by third-parties?

The unfortunate truth is that we do live in a world and age in which data logging and Internet surveillance are happening.

End-to-end encryption is the solution because it involves the fact that the service provider does not keep copies of the messages that you send from their server and only people with whom you are communicating can access them.

Thankfully, there has been a rise in the area of secure messaging apps, and we gathered five of the best open-source privacy software that will make sure to keep your messaging a safe and intimate process.

Check out their sets of features and choose the best program for your needs. The software is equally useful if you were looking for a secure messaging software.


What is the best encrypted messaging app?

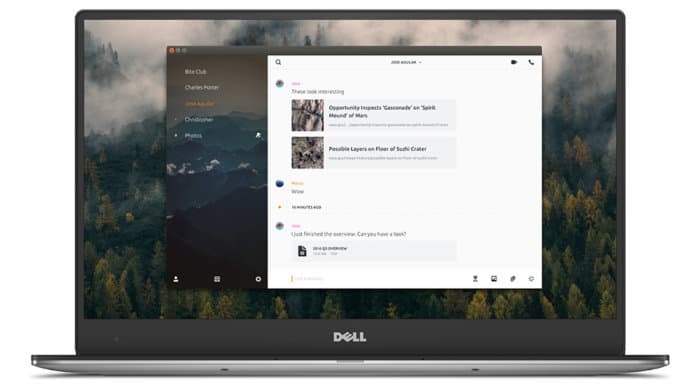
Signal

Signal is a mobile application created by Open Whisper Systems. This is one of the few apps in the world to claim an endorsement from Edward Snowden.

Signal has made itself a secure place among the safest messaging applications for mobile users, as well as desktop users.

The software is based on the end-to-end encryption in order to secure the messages you share with other users. This app is free and extremely easy to use, and the best thing about it is that it’s open-source.

This means that the experts can easily inspect the application’s code for potential security flaws. One of the greatest things about this app is that the messaged can self-destruct after you set the desired amount of time.

While using Signal, you will be able to send high-quality group, text, video, voice, document and picture messages all over the world without the hassle of MMS or SMS fees.

You can also get the chance to make crystal clear voice and video calls to the people who live across your street but also across the ocean.

The messages and calls you’ll make via Signal are end-to-end encrypted and engineered in such a way to keep your communication safe.

One the best security features is that the platform itself cannot read your messages, and it cannot see your calls either. You will also be able to keep your chat clean with messages that you can set to disappear.

To use Signal, you will not require any PIN codes or other login credentials.

⇒ Get Signal


Wire

Wire is another app for secure messaging, and it was developed by Wire Swiss GmbH. Using this app, you will be able to exchange end-to-end encrypted instant messages and also make voice and video calls.

This is another fantastic free and open-source app, enabling all users to check out the security by auditing its code.

One of the most awesome characteristics is that Wire combines strong encryption with a robust feature set. You will be able to add and remove people as a team administrator and access and remove the history.

You will get to use unlimited group chats with 128 people, and you can also delete messages for everyone. The app allows you to make crystal clear voice calls and group call with up to ten people.

The video calls are encrypted as well, making sure you stay safe at all times. Wire allows you to share your files securely and all the file types are supported.

You can share your screen with up to ten people, and this makes the app ideal for collaboration. Your files and chats can also be synced between your devices, and the app is available on all essential platforms.

Wire lets you enjoy rich conversations by using emojis, GIFs, embedded videos and more. The messages will self-destruct when the timer runs out, and this means that the app is just perfect for sharing sensitive data.

⇒ Get Wire


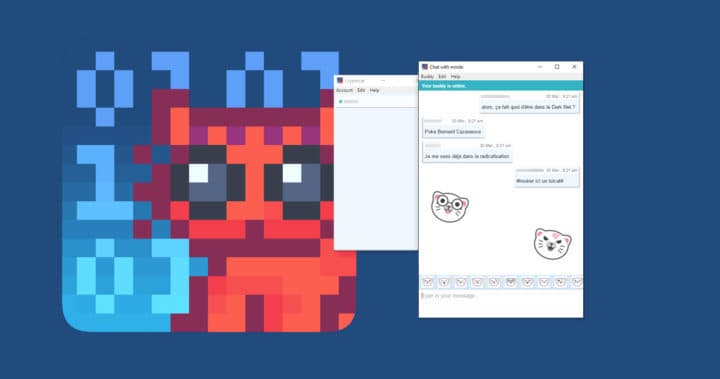
Ricochet

Ricochet can also become your sidekick regarding safe messaging because it makes safety and intimacy its priorities. The app uses the Tor network in order to reach your contacts without relying on messaging servers.

The app will create a hidden service that will keep your IP secure. The app comes with a different approach to instant messaging that doesn’t trust anyone to protect the users’ privacy.

While using Ricochet, no one will ever know who you are, who you talk to and what you are saying. You’ll be able to share anything you want without disclosing your location and identity to third parties.

There will be no servers in the middle to monitor your activity, censor or hack. You can see when your contacts are online and send them messages safely.

The list of contacts will only be known by your computer, and it’s never exposed to network traffic monitoring.

On the app’s official website, we are noticed of the fact that Ricochet is still an experiment and as we all know security and anonymity and slippery topics so we should carefully evaluate the risks and exposure that come with any software.

⇒ Get Ricochet


Viber

Viber is a free open-source software that aims at allowing its users to securely chat with their buddies in privacy. This is what everyone wants these days, and Viber delivers it sucessfully.

The advanced security features make this app stand out among others, especially thanks to the encryption keys that exist only on your own personal device.

This means that the personal information you share is fully protected and not even the provider has access to it. You can even exchange secret keys with your contacts, just to make sure of their identity.

In addition you can edit or delete seen messages so it’s never tool late to change your mind when it comes to getting your point across, a feature that works even in group chats.

Erase any traces of the messages you sent with the self-destructive feature that allows you to set a certain timer for your messages before they disappear.

Some other fun perk are the customizable gifs and stickers that keep the communication process fun and dinamic.

⇒ Get Viber


Kontalk

This is another innovative way of messaging that comes for free, and it’s also open-source. The software makes sure to maintain your privacy and intimacy.

Kontalk assures users that both client-to-server and server-to-server channels are fully encrypted, so the risks for your data to leak is almost zero.

You will definitely be safe with end-to-end encryption and servers will never be able to decrypt your data. The app is run by the community for the community as you can see on its official website.

Kontalk is run by a community of volunteers who are splitting the costs among them and offering their servers. All the software that is used in the app’s network, both the client and the server is entirely open-source, and Github hosts it.

The app uses your phone number to identify yourself among the contacts without the hassle of remembering the user IDs and usernames.

⇒ Get Kontalk


All of these free open-source applications are guaranteed to allow you to maintain your intimacy and safety while chatting online. The y come in handy when apps like Telegram are not working on your PC.

They all come with extended and unique sets of features, so the best thing that you can do is head over to their official websites and check out their in-depth functionalities and advantages in order to be able to make an informed decision and the best one for your safety and messaging needs.

We’d like to hear more from you on this subject so feel free to drop us a comment in the dedicated section below.


Windows Update Cannot Currently Check for Updates

If you get the Windows update can’t check for updates because settings on this PC are controlled by administrator message, it is usually because you don’t have the necessary privileges to perform a Windows Update.

Although this seems like a big problem, you should be able to fix it using one of our solutions.

Sometimes, Windows Update won’t be able to download certain updates. This can happen for various reasons, and speaking of issues, here are some common problems that users reported:

  • Windows Update cannot currently check for updates because the service is not running – This problem can occur if the necessary services aren’t running, but you can enable them right from the Services window.
  • Windows Update administrator permission – This issue can sometimes appear due to your group policy settings, but you can modify the settings to fix the problem.
  • Windows Update cannot currently check for updates because you must first restart – Sometimes, this problem can appear if there’s an issue with Windows Update components. Restart these components and check if that solves the issue.

How to fix Windows Update cannot currently check for updates?

1. Use PC repair third-party software

Specialized repair tools are able to fix important files that are required for your system to run. They replace any missing data, such as indispensable Windows files and any corrupted ones.

Installing one of these tools will repair your Windows to stop giving you errors while updating.

2. Make changes to the Group Policy

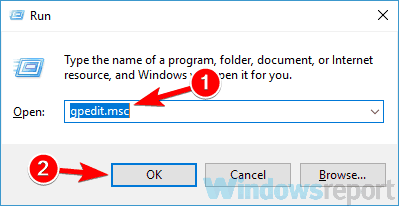
  1. Press Windows Key + R and enter gpedit.msc. Now press Enter or click OK.
    Windows Update cannot currently check for updates because the service is not running
  2. In the left pane, navigate to the following paths: Computer ConfigurationAdminstrative TemplatesWindowsComponetsWindows Update User ConfigurationAdminstrative TemplatesWindows ComponetsWindows Update
  3. make sure that non-administrators can access them.
  4. After making the changes, close the Group Policy editor.

According to users, sometimes your settings can interfere with Windows Update and cause Windows Update cannot currently check for updates.

To fix the problem, it’s advised to change your group policy settings. This is quite simple, and you can do it by following the steps above.

If everything is in order, you can download updates once again.

Note icon NOTE
Several users claim that they fixed the problem simply by settings certain services to Not Configured. To do that, follow these steps:
  1. Open Group Policy Editor.
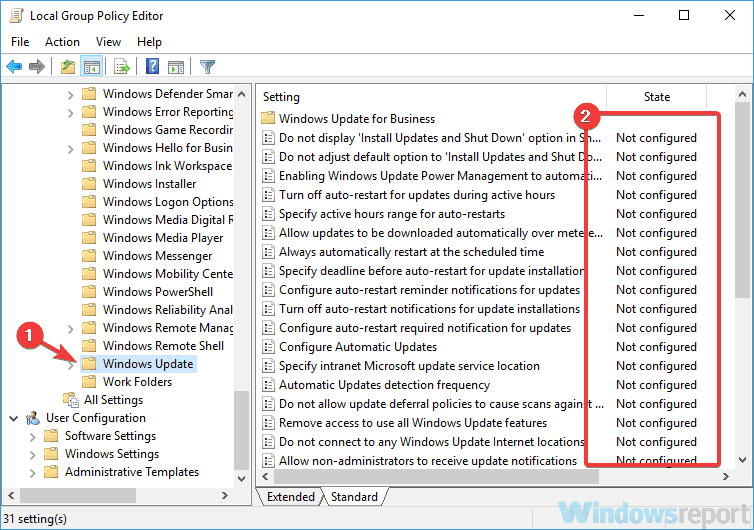
  2. In the left pane, go to: Computer ConfigurationAdministrative TemplatesWindows ComponentsWindows Update
  3. In the right pane, make sure that all policies are set to Not configured. If a certain policy isn’t set to Not configured, simply double-click it and change its state. Do so for all available policies.
    Windows Update administrator permission
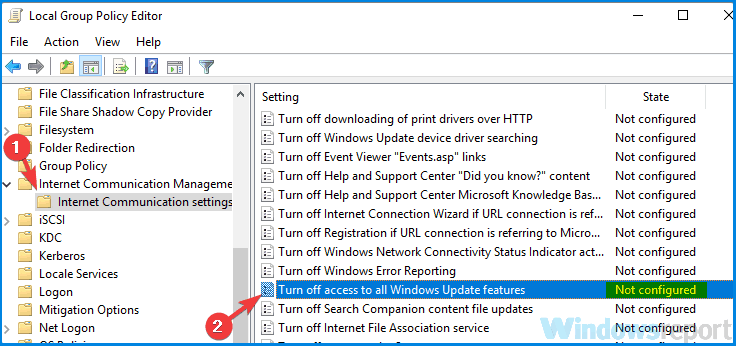
  4. In the left pane, navigate to: Computer ConfigurationAdministrative TemplatesSystemInternet Communication ManagementInternet Communication settings
  5. In the right pane, locate Turn off access to all Windows Update features and make sure that it’s set to Not configured.
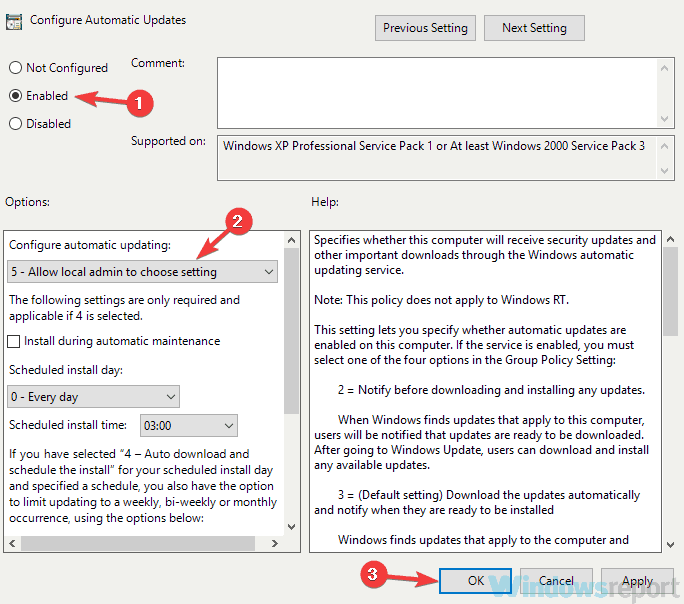
  6. Now go back to the same path from Step 2. In the right pane, double-click Configure Automatic Updates.
  7. Choose Enabled from the menu. Now set Configure automatic updating to 5 – Allow local admin to choose setting and click Apply and OK. Several users reported that you can also keep this policy Not Configured, so you can skip this step if you want.
    Windows Update cannot currently check for updates because the service is not running
  8. Lastly, check Remove access to use all Windows Update features policy, and make sure that it’s set to Not configured. If not, change it accordingly.

After doing that, the problem with Windows Update should be completely resolved and everything will start working again.

3. Modify your registry

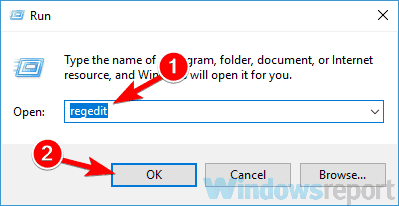
  1. Press Windows Key + R and enter regedit. Now press Enter or click OK.
    Windows Update administrator permission
  2. In the left pane, navigate to: HKEY_LOCAL_MACHINESOFTWAREPoliciesMicrosoftWindowsWindowsUpdate key
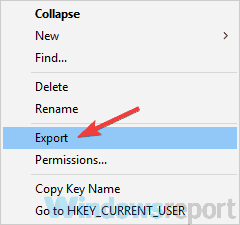
  3. Right-click the Windows Update key and choose Export.
    Windows Update cannot currently check for updates because you must first restart
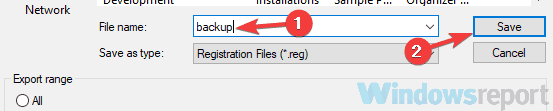
  4. Enter the desired file name, choose a save location, and click the Save button.
    Windows Update cannot currently check for updates because the service is not running
  5. After doing that, right-click the Windows Update key and choose Delete. Click Yes to confirm.

After removing this key, try to run Windows Update once again and check if the problem is still there.

Sometimes this problem can occur due to your registry and its settings.

If you’re getting Windows Update cannot currently check for updates messages, you might be able to solve this problem simply by removing a single key from your registry.

If any new issues occur after removing the Windows Update key, be sure to run the file that you created in Step 4 to restore your registry to the original state.

Note icon NOTE
Users also reported that you might be able to fix this problem simply by modifying a single DWORD. To do that, just follow these steps:
  1. Open Registry Editor.
  2. In the left pane, navigate to: HKEY_CURRENT_USERSoftwareMicrosoftWindowsCurrentVersionPoliciesExplorer
  3. If you see NoWindowsUpdate value in the right pane, set it to 0.

After doing that, you should be able to perform Windows Update once again.

4. Check if the necessary services are running

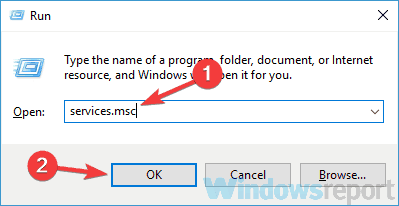
  1. Press Windows Key + R and enter services.msc. Now press Enter or click OK.
    Windows Update administrator permission
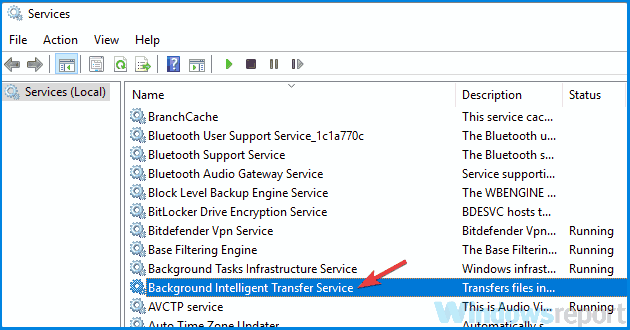
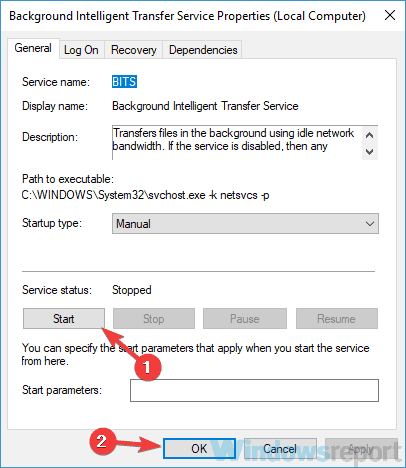
  2. When the Services window opens, you need to locate Background Intelligent Transfer Service and double-click it to open its properties.
  3. When the Properties window opens, click the Start button to start the service. Now click Apply and OK to save changes.
    Windows Update cannot currently check for updates because the service is not running
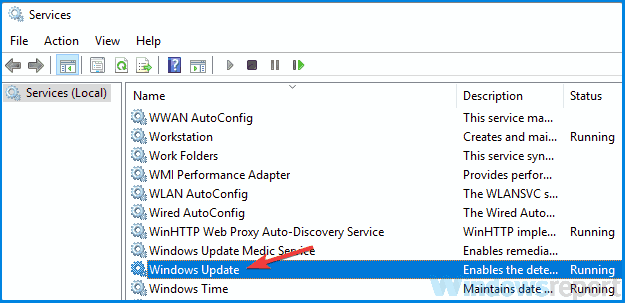
  4. Now locate Windows Update service and make sure that it’s running.

After both of these services are running, check if the problem with Windows Update is still there.

In order for Windows Update to work, you need to have certain services enabled.

If you’re getting Windows Update cannot currently check for updates error, it’s advised to check your services and make sure that the required services are working properly.

5. Run Windows Update troubleshooter

  1. Open the Settings app. To do that quickly, you just have to press Windows Key + I shortcut.
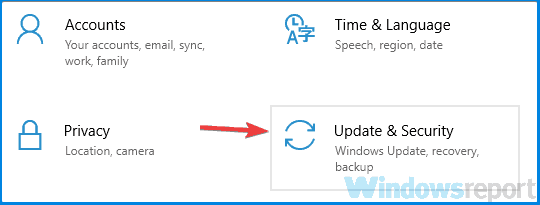
  2. The Settings app will now appear. Go to the Update & Security section.
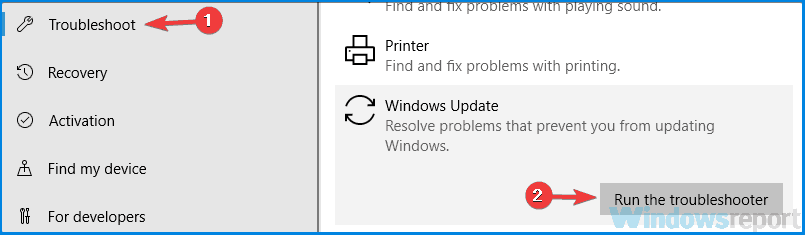
  3. Pick Troubleshoot from the menu on the left. Now you just have to select Windows Update from the list and click the Run the troubleshooter button.
  4. Follow the instructions on the screen to complete the troubleshooter.

After the troubleshooter is finished, check if the problem is still there. This isn’t the most reliable solution, but several users claim that it works, so be sure to try it out.

According to users, if you’re getting Windows Update cannot currently check for updates error, you might be able to fix the problem simply by running a Windows Update troubleshooter.

Windows comes with various built-in troubleshooters that can fix various issues, and if you have problems with Windows Update, you can fix them easily.

Running the troubleshooter can help you fix other issues like Windows Update error code 0xd000034; read this guide to learn more.

6. Reset Windows Update components

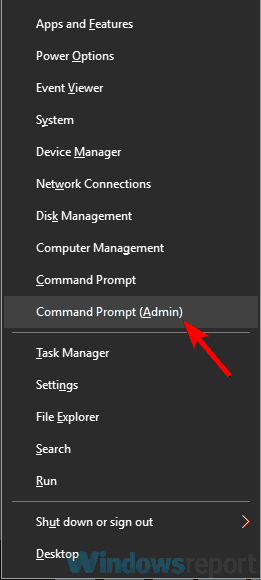
  1. Open Command Prompt as administrator. You can do that by pressing Windows Key + X and choosing Command Prompt (Admin). You can also use PowerShell (Admin) as an alternative.
    Windows Update administrator permission
  2. When Command Prompt opens, run the following commands:

net stop wuauserv

net stop cryptSvc

net stop bits

net stop msiserver

Ren C:WindowsSoftwareDistribution SoftwareDistribution.old

Ren C:WindowsSystem32catroot2 Catroot2.old

net start wuauserv

net start cryptSvc

net start bits

net start msiserver

After running these commands, the problem with Windows Update should be resolved.

Another cause for Windows Update cannot currently check for updates error can be Windows Update components.

Sometimes certain files or services can interfere with Windows Update and that can cause this problem to appear.

Running all these commands manually can be a bit tedious, but you can always create Windows Update Reset script and run all these commands automatically.

7. Create a new administrator account

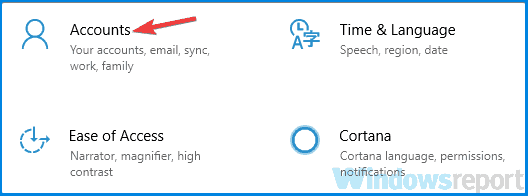
  1. Open the Settings app and go to the Accounts section.
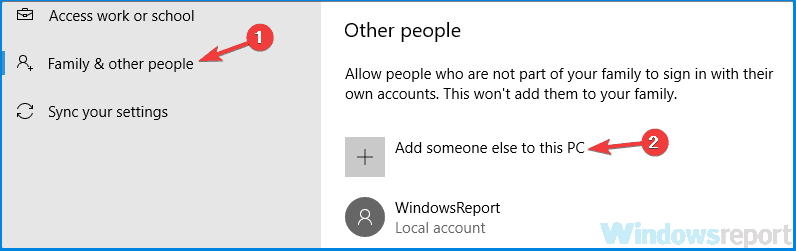
  2. Select Family & other people from the left pane. Click Add someone else to this PC button.
  3. Pick I don’t have this person’s sign-in information.
    Windows Update administrator permission
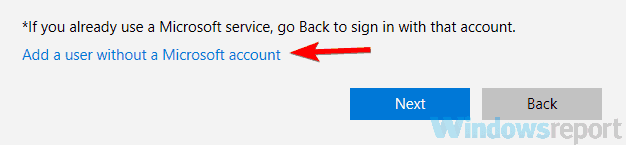
  4. Now choose Add a user without a Microsoft account.
    Windows Update cannot currently check for updates because you must first restart
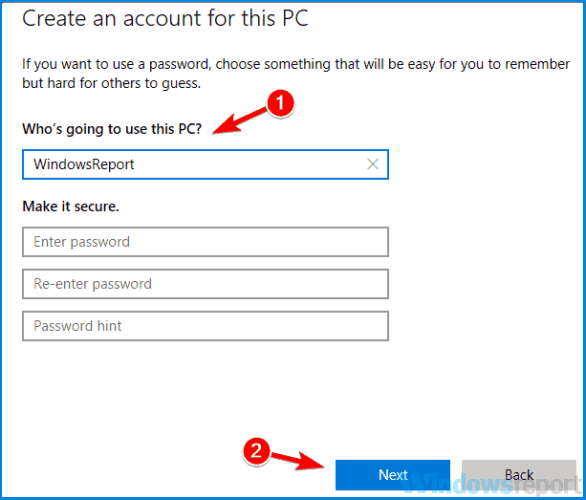
  5. Enter the desired username and click Next.

According to users, sometimes Windows Update cannot currently check for updates message can appear if you don’t have the administrative privileges.

However, you should be able to fix that by creating a new administrative account. You can do that by following the steps above.

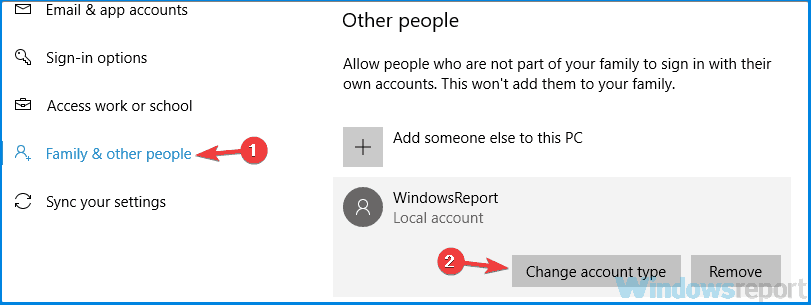
Now you’ll have a new account ready. However, this account doesn’t have administrative privileges, but we can change that by doing the following:

  1. Go to Settings app > Accounts > Family & other people.
  2. Locate the account you want to change, select it, and choose the Change account type.
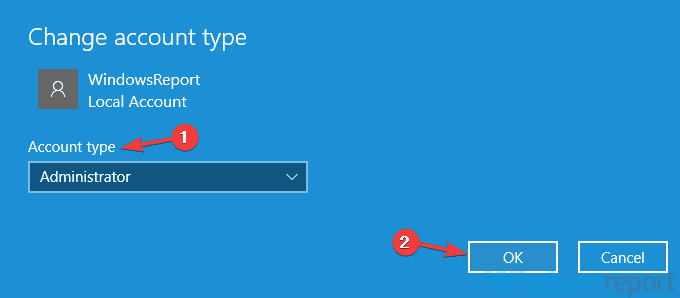
  3. Set Account type to Administrator and click OK.
    Windows Update cannot currently check for updates because you must first restart

After creating a new user account, switch to it and check if the problem is still there.

Windows Update cannot currently check for updates messages can be problematic, but we hope you managed to solve this problem using one of our solutions.

Make sure you give us any kind of feedback regarding the subject in the comment section below.

Fix: Computer is Not Authorized to Run iTunes

To play and sync media content in the iTunes media player, you need to authorize a Windows desktop or laptop for an Apple ID.

Some iTunes users have stated that computer not authorized error messages pop up when playing or syncing media content with the media player.

Those error messages pop up for some users even when they’ve already authorized an Apple ID with the Authorize This Computer option on the Store menu. Consequently, they can’t play or sync selected music or video in iTunes.

How do I fix iTunes saying computer is not authorized when it is?

1. Log out of iTunes

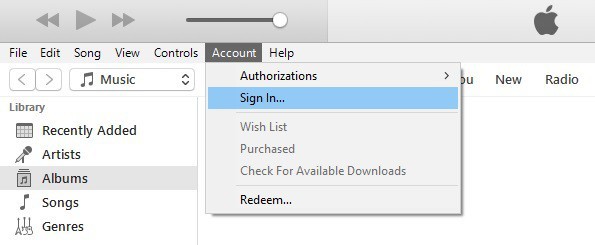
  1. To log out, open the media player’s library, click Account, and select the Sign Out option.
  2. Then click Account > Sign In, and enter your Apple ID to log back in.

If iTunes says that your computer is not authorized, but it actually is, the cause of the problem might be a glitch easily fixed by logging out and logging in to iTunes again.


2. Check what user account purchased the media file

  1. Open the iTunes media player.
  2. Select the music (or other media content) you need to check the Apple ID in the Library.
  3. Click Edit and select Get Info on the menu.
  4. Then click the File tab, including the Apple ID for the person who obtained the media content to the purchase right. That’s the Apple ID you need to sign in for and authorize your desktop or laptop to play the music with.

Note that iTunes might request authorization when you select to play DRM media files that weren’t purchased with the Apple ID you’re signed in with.

Thus, somebody else who also utilizes iTunes on the same laptop or desktop might have purchased media content with a different Apple ID than the one you’re logged in with.

Or you might have downloaded DRM media content with another ID yourself. If so, you must sign in with the account ID that the music was purchased with to play it.


3. Deauthorize computers linked with iTunes

  1. First, open iTunes and sign in with your Apple ID if required.
  2. Click Account and select View My Account on the menu.
  3. Input your password and press Enter to open an Account info page. There you can scroll to Apple ID Summary that tells you how many computers you’ve authorized to play media content.
  4. Press the Deauthorize All button on the right of the summary.
  5. Then restart the iTunes media player.
  6. Click Account and Account Authorizations to expand a submenu.
  7. Select the Account Authorization option to authorize the PC for Apple ID.

You can only authorize a maximum of five PCs for your Apple ID. Thus, you can’t authorize a computer if you’ve already authorized the maximum number of PCs for your iTunes account.

As such, reauthorizing desktops or laptops for an Apple ID might fix the computer not authorized message in iTunes.


4. Reinstall iTunes

Some users have also stated that they’ve fixed computer not authorized error messages by reinstalling iTunes.

You can manually reinstall iTunes like any other app, but if you want to remove it completely, we suggest using IObit Uninstaller.

This application is designed for software removal, and it will completely uninstall any software you want to remove, including all associated files and registry entries.

IObit Uninstaller is simple to use, and it offers in-depth removal, unlike the regular uninstall process in Windows, so you should check it out.

Other great features:

  • In-depth software removal
  • Can remove stubborn applications
  • Can remove Windows 10 Universal apps
  • Automatic system monitoring
  • Automatic leftover file removal
IObit Uninstaller

IObit Uninstaller

To remove any application along with all of its associated files, be sure to use IObit Uninstaller.
Check priceVisit website

5. Delete the SC Info folder

  1. Press the File Explorer button on the taskbar.
  2. Then click the View tab shown in the snapshot directly below.
  3. Click the Options button to select Change folder and search options.
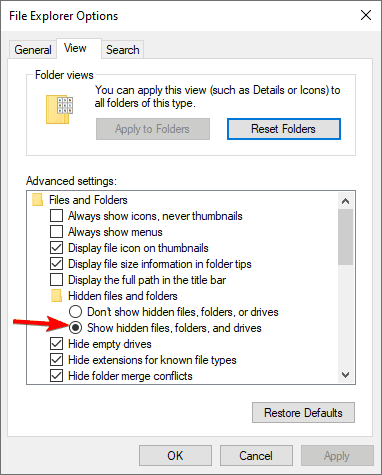
  4. Select the View tab on the Folder Options window that opens.
  5. Select the Show hidden files, folders and drives option.
    folder options hidden files  computer not authorized itunes
  6. Click the Apply button, and select OK to close the window.
  7. Enter this path in File Explorer’s folder path bar: C:ProgramDataApple ComputeriTunes
  8. Select the SD Info folder there, and press the Delete button.
  9. Then restart the Windows OS.
  10. After that, you’ll need to authorize the computer for your Apple ID again, as you erased the SD Info folder.

The iTunes computer not authorized error can be to due to a corrupted SD Info folder. Thus, deleting that folder can potentially fix the issue as iTunes will recreate SD Info.


6. Reset User Account Controls

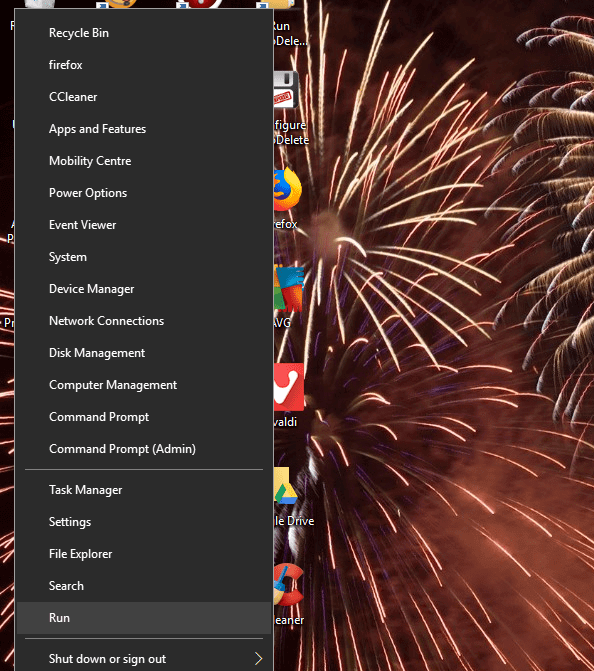
  1. Resetting the User Account Controls in Windows might also fix some iTunes authorization issues. To do that in Windows 10, right-click the Start button and select Run.
    run computer not authorized itunes
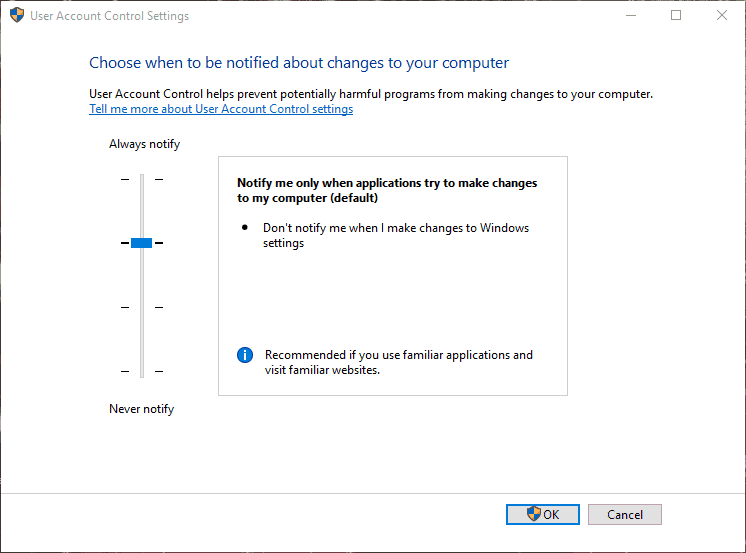
  2. Then enter UserAccountControlSettingsin Run and press Return.
  3. Move the bar slider to Never notify.
    user account control settings computer not authorized itunes
  4. Press the OK button.
  5. Click Yes to confirm.
  6. After that, restart your desktop or laptop and open the User Account Control Settings window.
  7. Drag the slider up the bar to turn UAC back on. You can also leave the UAC off if you wish.
  8. Click the OK button.

If iTunes says that your computer is not authorized, but it is, adjusting User Account Control settings might be able to help you.


These are a few fixes that will probably resolve most iTunes computer not authorized error messages. If you encounter any issues with iTunes, it probably concerns the distnoted.exe file, so check for any errors.

Note that most of the above resolutions might also fix unauthorized issues for the Apple Mac iTunes software and its Windows counterpart.

An update to Adobe Flash Player is available message [FIX]

If you noticed a pop-up message saying An update to Adobe Flash Player is available, and you’re not sure if it’s legit or not, you’re not the only one. A great number of users have reported encountering this message.

At first glance, this pop-up seems to be an official Adobe update notice, but not all these pop-ups are what they seem to be.

Because Adobe Flash Player used to be one of the most popular web plug-ins, so people that develop malware are sometimes using this platform as a disguise.

They can send very similar-looking pop-ups to users’ PCs, and once a link is clicked, different types of malware can be installed on the computer.

In today’s day and age, malware attacks on personal PCs have reached an all-time high and this is clearly a case that requires your attention because Adobe pulled their support for the Flash Player from December 31st, 2020.

That means that you can completely exclude the possibility of a legitimate message from Adobe and be on alert because there have also been other attempts from wrongdoers to install malware by using Adobe Flash.

For these reasons, in today’s article, we will discuss some of the best ways to make sure that the Adobe Flash Player update pop-up on your screen is not trying to steal your information. Read on to find out more details.

What to do if An update to Adobe Flash Player message appears?

Adobe will not send any more update notifications to users since the software was discontinued.

However, it is very important to understand some of the differences between the original Adobe installer notice, and other third-party entities who are trying to gain access to your PC.

Here are some of the best markers of a false update pop-up:

  • The installer package is distributed as a ZIP file (and not with the original Adobe format – a DMG image).
  • How it looks – if the installer package is presented to you as a generic orange installer without having the Adobe icons and formats, the text contains typos, or interface elements that are not aligned, etc.
  • If the pop-up appears on your screen while browsing the Internet.

Note: Because of the skills that malware developers have gained in time, they can now create perfect replicas of the installer. In order to make absolutely sure that your computer will not be hacked, read the next section carefully.

What to do if you see a pop-up that doesn’t seem to be original?

The best way to deal with a situation like this is to always be skeptical of any automatic updates pop-ups that appear on your screen.

If you see a pop-up like the one mentioned above appear, the safest way to deal with the situation is to visit the official Adobe website (or other original software developers) and download the updated version yourself.

Doing this allows you peace of mind that the download you performed is coming from the original creators and not some other third-party malware creators who imitate the installer.

Try using a browser that supports Flash

As we mentioned before, Adobe pulled the plug on its Flash Player so it won’t receive any more updates. However, if you still have Flash content on your PC, you can still open it by using the Opera One browser.

This excellent software not only is fast and well adjusted to Windows 10, but it also offers a built-in VPN, Ad blocker and AI. And they are completely free, like the browser itself.

Even though Opera One doesn’t come anymore with Flash Player support, you can still enable it in the browser and access websites that still use Flash support.

You should first allow the Flash web plugin to run in the Opera One browser. With lots of integrated apps, this browser will surely support such playing content.

On the other hand, you must be aware that very few websites still use Flash support for various content online. According to the Opera forum, the users managed to activate Flash support in the Opera GX browser.

Opera One

Opera One

Opera One still offers native support for Flash content but it’s also a fast and reliable free browser.
Free Download Visit website

In this article we explored some of the most common differences between original software update pop-ups and fake ones, and also discussed a fail-safe method to deal with this situation.

Before you go, don’t miss our guide that explores if it’s still possible to download Adobe Flash Player for Windows 10.

Please let us know if this guide helped you by using the comment section below.

How to update BIOS on Lenovo [Safe guide]

BIOS ( Basic Input Output System), is a small piece of code contained on a chip on your system board. BIOS works like a bridge between your system hardware and the operating system during the boot process.

Similar to other laptops, Lenovo laptops also come equipped with BIOS that allows you to change boot process order and different hardware settings.

Updating your motherboard’s BIOS can help in many ways. The update can bring new features and functionalities, support new CPUs, fix bugs, and refresh a corrupted UEFI environment.

This article explores a few ways to update BIOS on Lenovo laptops and desktops with ease.

How do I update BIOS on Lenovo laptops and desktops?

1. Update BIOS through Windows executable file 

update BIOS on Lenovo
  1. Open your Internet browser and go to Lenovo Support.
  2. Type your product name, serial number, or machine type into the search box and then select your computer model from the drop-down list. Make sure that you have chosen the correct system.
  3. Open the Drivers and software tab to bring up a list of drivers available for your system.
  4. Click the drop-down menu labeled Operating System and select your OS.
  5. Click the Components drop-down menu and select the BIOS/UEFI from the list. It will display a list of BIOS files available for download.
  6. Click the Download button beside the more recent update and download BIOS to your computer.
  7. Right-click on the downloaded BIOS file and select Run as Administrator.
  8. When self-extracting windows appear, click the Install button.
  9. Click the Flash BIOS button. Make sure you have connected to a reliable power source.
  10. Click the OK button and the BIOS flashing program will run automatically.

Note: When the BIOS is successfully updated, the system will reboot automatically.

Updating Lenovo BIOS running Windows 10 using the executable file is easy.

However, at times this method can fail. You can check out alternative ways to update BIOS in the next set of steps.

2. Update BIOS using Lenovo System Update

update BIOS on Lenovo

Note: make sure to run a Windows update and install the pending updates before running System Update on a Lenovo system.

  1. Launch your web browser and go to the Lenovo Support page.
  2. Type your product name or serial number and select your system from the drop-down list.
  3. Click the Drivers and Software tab from the left pane. This will display the list of update available for your system.
  4. Scroll down and locate System Update.
  5. Click the down arrow icon to download System Update.
  6. Run the System update installer and follow the instructions during install until the update is fully installed.
  7. Once the installation process is over, you can delete the System Update file safely.

3. Update BIOS through Lenovo Vantage 

update BIOS on Lenovo
  1. Launch the Lenovo Vantage app on your system. If you don’t have the app installed, download it from the Lenovo website here.
  2. Under the Device option, click on the System Update option. If you don’t see the option, toggle the menu button, and select System Update.
  3. Click the Check for Update button to see any pending updates available for your system.
  4. Once the scan is complete, scroll down and locate the BIOS update.
  5. Press the Install Selected Updates button.
  6. Click OK to reboot the computer and install the update.
  7. Lenovo Vantage will download the update and initiate the installation process.
  8. Select the update BIOS option on the Flash Update Utility.
  9. Once done, you will be prompted to reboot the computer. Click on Reboot and then follow on-screen instructions.

The Lenovo Vantage is a handy tool. Apart from allowing you to download and install a system update, the app helps you get most of your device.

You can also tweak battery optimization, fast charge, always charge from USB and check your system’s health using the app.

Is it safe to Update BIOS?

There are some risks involved in updating the BIOS and requires the user to take extra precaution when updating the BIOS.

System manufacturers offer dedicated tools to update system BIOS. Make sure to use the recommended tool to update your BIOS.

In most cases, you may not need to update your BIOS regularly. However, in case some system functionalities stop working, you can use the methods listed in this article to update your BIOS.

There you have it—three ways to update BIOS on your Lenovo laptop and desktop.

Whether you want to update Lenovo BIOS for Linux or Windows, it is important to do it right. Make sure to follow the steps in this article carefully to update your Lenovo BIOS for laptops and desktops.

S/MIME control isn’t available error [Solved]

If you are using Outlook Web Access (OWA) in Internet Explorer, you may encounter the S/MIME control isn’t available error. Due to the issues, users are unable to open email or download attachments.

The error seems to be occurring on systems that don’t have S/MIME installed. However, in some instances, the error can also occur due to incorrect configuration of Internet Explore or permissions issues.

If you are also bugged by this error, here are a few troubleshooting steps to help you resolve the S/MIME control isn’t available error in Windows 10, 8 and 7 running systems.

How do I make S/MIME control available?

1. Add your OWA in Trusted Sites

S/MIME control isn't available
  1. Launch Internet Explorer. You can search in the Start menu to find and launch the app.
  2. In Internet Explorer, click the Gear icon and select Internet Options.
  3. In the Internet Options window, open the Security tab.
  4. Select Trusted Sites and then click the Sites button.
  5. Paste the link to your OWA page and click the Add button.
  6. Next, uncheck Require service verification (https:) for all sites in this zone’ box.
  7. Click Close and go back to the Internet Explorer home page.
  8. Click the Gear icon and select Compatibility View Settings.
    S/MIME control isn't available
  9. Enter the same OWA page link in the Add this website field and click the Add button.
  10. Leave other settings as it is and click the Close button.
  11. Try to download the attachment or access the email to see if the error is resolved.

Adding your OWA page into Trusted Sites and Compatibility View seem to have fixed the error for many users. Make sure to add the OWA pages into both Trusted Sites and Compatibility View to resolve the issue.


2. Run Internet Explorer as Administrator

S/MIME control isn't available
  1. Type Internet Explorer in search.
  2. Right-click on Internet Explorer from the search result and select Run as Administrator.
  3. Try to access your email and check if the S/MIME control isn’t available error is resolved. If the error is resolved, change the Internet Explorer property to run the app as administrator always.
  4. Open File Explorer and navigate to the following location:
    C:UsersTashreefAppDataRoamingMicrosoftWindowsStart MenuProgramsAccessories
  5. Right-click on Internet Explorer shortcut and select Properties.
  6. Click the Advanced button.
  7. Check the Run as an Administrator box.
  8. Click OK to save the changes.

Next time you run Internet Explorer, it should launch with administrative privileges. Sometimes the app may require the user to have administrative permission over the browser.


3. Install S/MIME

S/MIME control won't install
  1. Open your OWA client and sign in with your credentials.
  2. Click the Options button on the top right side of the screen.
  3. Select See All options from the context menu.
  4. In the Options window, click on Settings.
  5. Click the S/MIME tab from the menu.
  6. Click on the hyperlink Download the S/MIME control to download the package.
  7. Once the download is completed, run the download file.
  8. Follow on-screen instructions to install S/MIME.
  9. Once installed, refresh the browser, and you should see a pop-up message saying This website wants to run the following add-on.
  10. Right-click on the message and choose Run Add-on on All Websites.
  11. Click Run when an Internet Explorer Security Warning appears.

Note: You may need to reinstall S/MIME if the installation is broken due to a Windows update that may have reset settings. Follow the steps to install S/MIME and fix S/MIME control won’t install error.


4. Disable Encrypted Pages to Disk option

S/MIME control won't install
  1. Launch Internet Explorer.
  2. Click the Gear icon and select Internet Options.
  3. In the Internet Options window, open the Advanced tab.
  4. Scroll down to the Security section.
  5. Uncheck the Do not save encrypted pages to disk option.
  6. Click Apply and OK to save the changes.
  7. Close Internet Options and restart Internet Explorer.
  8. After the restart, check if the error S/MIME control isn’t available is resolved.

How do I enable S/MIME in Chrome?

S/MIME control won't install
  1. Press the Windows key + R.
  2. Type regedit and click OK to open Registry Editor.
  3. In Registry Editor navigate to the following location:
    HKEY_CURRENT_USERSoftwarePoliciesGoogleChromeExtensionInstallForcelist
  4. Right-click anywhere on the right pane and select New and choose String Value.
  5. Enter 1 for the value name and make sure the value type is REG_SZ.
  6. Right-click on the newly created value and select Modify.
  7. In the Data field, enter the following data depending on your Office application:
    Office 365: 
    maafgiompdekodanheihhgilkjchcakm;https://outlook.office.com/owa/SmimeCrxUpdate.ashx
    Exchange On-Premises:
    maafgiompdekodanheihhgilkjchcakm;https://<your owa url>/owa/SmimeCrxUpdate.ashx
  8. Make the necessary changes in the above value like adding your OWA URL and click OK to save the changes.
  9. Close Registry Editor and restart your Chrome browser.
  10. After the restart, you will see the Outlook icon next to the address bar indicating that the extension is enabled.
  11. Next, you need to install S/MIME control for the extension to work properly. For Office 365 you can download the S/MIME control from here.
  12. Run the downloaded file to install the control.
  13. Restart the browser to configure additional S/MIME settings in Outlook on the web.

The S/MIME control isn’t available error when accessing email or attachments can occur due to several reasons. Follow all the steps in this article one by one to fix the error.

Windows 10 news recap: Apple testing Podcasts and Apple Music app for Windows 10, Windows 10X build leaks, and more

Welcome back to our Windows 10 news recap, where we go over the top stories of the past week in the world of Microsoft’s flagship operating system.

Apple is reportedly testing new Music and Podcasts app for Microsoft platforms in private beta

A new report suggests that Apple is testing apps for Apple Music and its Podcasts service, currently in private beta, for Windows 10 and/or Xbox consoles.

Apple Music Podcasts Logo

Microsoft to fix critical NTFS vulnerability on Windows 10 PCs

A critical NTFS vulnerability can cause users’ hard drives to be corrupted. Now, Microsoft is working on a fix for the flaw. The flaw can be exploited by simply opening a HTML file, a Windows shortcut, or even by extracting a zip folder.

Windows 10X build “leaks,” providing what could be a near-final look at the single-screen version of the OS

A more recent build of the upcoming Windows 10X operating system has leaked, which shows what could show a near-final look of what Windows 10 X could be, though features could come and go, and this is in no way what the final version will necessarily be.

Windows 10 “Sun Valley” update may introduce floating Start Menu and other UI changes

With a Windows 10 redesign expected on the horizon, codenamed “Sun Valley”, we’re starting to get a glimpse of what the redesign could bring to Windows 10. New mockups show that there could be a floating Start Menu, along with Snap assist improvements, and more.

Windows 10 Redesigned Start Menu Sun Valley Mockup Windows Central

That’s it for this week. We’ll be back next week with more Windows 10 news.

NVIDIA GeForce driver error code 0x0003 [Fixed]

NVIDIA GeForce Experience is a handy utility for NVIDIA GPU users. However, at times this software utility can run into problems and trigger an error. One such error is NVIDIA GeForce driver error code 0x0003.

The full error reads:

Something went wrong. Try rebooting your PC and then launch GeForce Experience. Error Code: 0x0003

A quick search result will return multiple reasons for this error. Some of the usual suspects are permission issues, disabled NVIDIA services, corrupted NVIDIA drivers, and your network adapter issues.

In some cases, the error presented to you by Nvidia GeForce will be a little different than in the case presented in this guide. Check out how to fix the error code 0x0001.

In this article, we have listed a few troubleshooting steps to help you fix the NVIDIA GeForce driver error code 0x0003 on your Windows 10 system.

How do I fix the NVIDIA GeForce driver error code 0x0003?

1. Update Graphics drivers with Outbyte Driver Updater

Outbyte Driver Updater automatically update drivers

The error try rebooting your pc and then launch GeForce Experience 0x0003 can occur due to corrupted drivers. Update Nvidia GPU with Outbyte Driver Updater to see if that resolves the error.

Outbyte Driver Updater is a premium Windows utility to update system drivers with one click. It features a massive database of over 18 million driver files. You can update individual drivers or all the drivers in batches after the scan.

For backup and automatic updates, Outbyte Driver Updater comes with a backup manager and update scheduler. It will create a backup and save the existing drivers in case you need to restore the drivers.

Key features of Outbyte Driver Updater:

  • One-click updates of graphics and other system drivers 
  • Lightning-fast scans
  • Download manager 
  • Driver backup and schedule manager
Outbyte Driver Updater

Outbyte Driver Updater

Resolve the NVIDIA GeForce driver error code 0x0003 easily by using this powerful software today.
Free trialDownload

2. Allow Nvidia Telemetry services to interact with desktop

NVIDIA GeForce driver error code 0x0003
  1. Press the Windows key + R to open Run.
  2. Type services.msc and click OK to open Services.
  3. In the Services window, scroll down and locate Nvidia Telemetry Container.
  4. Right-click on the service and select Properties.
  5. In the Properties window, open the Log On tab.
    NVIDIA GeForce driver error code 0x0003
  6. Check Allow services to interact with desktop box.
  7. Click Apply and OK to save the changes.
  8. Go back to the Services window and locate the following services:
    Nvidia Display service
    Nvidia Local System Container
    Nvidia Network Service Container
  9. Repeat the steps to enable the Allow service to interact with desktop option for all the services listed.
  10. Once all the services are enabled, try accessing NVIDIA GeForce Experience and check if the error is resolved.

Nvidia Telemetry services are required to run the software without any issues. Allowing the service to interact with desktop seems to have resolved the issue for many users. If the error persists, apply other fixes.


3. Reset the network adapter

NVIDIA GeForce driver error code 0x0003
  1. Press the Windows key, and type cmd in the search.
  2. Right-click on Command Prompt and select Run as Administrator.
  3. In the Command Prompt window, type the following command to reset network adapter:
    netsh Winsock reset
  4. Wait for the command to complete.
  5. Once the command is processed, restart your computer and check for any improvements.

The GeForce error code 0x0003 can occur due to network issues. In that case, you can reset network adapter to fix network problems on your Windows 10 computer. If these steps didn’t fix the problem, try reinstalling the graphics driver manually.


4. Reinstall graphics drivers manually

NVIDIA GeForce driver error code 0x0003
  1. Press the Windows key + R to open Run.
  2. Type control and click OK to open the Control Panel.
  3. Go to Programs and click Programs and Features.
  4. Locate all the programs and installations associated with Nvidia.
  5. Right-click on one of the Nvidia GPU related app and click on Uninstall. Click Yes when prompted by UAC.
  6. Repeat the steps and uninstall the Nvidia related apps and GPU drivers.
  7. Once uninstalled, restart your computer.
  8. After the restart, go to the Nvidia download center.
  9. Select your graphics card model, series, and operation system version and language. Download the latest drivers available for your GPU.
  10. Run the installer and follow on-screen instructions to install the software and update the drivers.
  11. Make sure to restart your PC once the updates are installed.

Reinstalling Nvidia graphics drivers manually can fix many issues that may cause the GeForce Experience software to stop working.

If manually updating the driver, did not resolve the issue, try reinstalling Nvidia GeForce Experience and other software to see if that helps you resolve the Nvidia GeForce driver error code 0x0003.


The NVIDIA GeForce driver error code 0x0003 is usually triggered due to the Nvidia Telemetry services not running.

If starting the services did not help, try reinstalling the software. You may also try creating a new user account to fix the problem.

Netflix Error Code Tvq-st-131 [Complete Fix]

As one of the most popular apps for streaming movies, Netflix has gained a lot of enthusiastic users since it has been launched.

Unfortunately, as with many other popular apps, Netflix is not without problems or errors. Whenever users try to connect to the Netflix app, they get the error code tvq-st-131 without even passing through the initial login page.

In this article, we will explore what are some steps you can take to solve this error code when trying to play Netflix.

How can I fix the Netflix error code tvq-st-131?

1. Check your network

Because many types of networks can have limited speed and be slow, especially if many people are using them, it’s important to make this verification.

If you use a phone device to connect to the Internet or a satellite Internet connection, try using a different network and see if this solves the problem.

Otherwise, if you are using public Wi-Fi at your hotel or a public place, make sure to check that Netflix is allowed. It is not uncommon for these networks to block streaming video on purpose.

2. Restart your home network

  1. Turn off your device.
  2. Next, unplug both the modem and the router. Make sure to wait 30 seconds.
  3. Plug in your modem and check for the indicator lights to start blinking.
  4. Reconnect your router, and proceed as above.
  5. Connect your device again and try playing Netflix.

3. Improve your Wi-Fi signal

It is suggested that you move your router to a new location to try to improve signal strength. Usually, when the router is placed in a central location, there is better reception.

Moreover, make sure that your router is placed a considerable distance from cordless phones or microwaves, as wireless interference from these devices can create issues when trying to connect over Wi-Fi.

It’s also indicated to place your Wi-Fi elevated from the floor. If you place it on top of a bookshelf or a desk, you will probably see some improved reception.

4. Restore your default connection settings

If you’ve made some custom settings on your streaming service, it is recommended that you restore your internet provider’s default setting.

If you are connected using a VPN, disable it and connect directly to your home internet. Likewise, if you have changed the DNS settings, reset the device.

Once you have checked all the above, try opening Netflix again and checking if the error is still there.

We hope that one of our solutions helped you fix the error code tvq-st-131 and that your Netflix app is working perfectly now. We also have a guide on fixing aip-703 error on Netflix for Chromecast and TV, so don’t miss it.

If you have additional suggestions or recommendations, please leave us a message in the comments section below.

No sound on Nvidia GameStream? Here’s the fix

Every player dreads the lack of audio while playing. Without sounds, the gaming experience is not complete.

Unfortunately, Nvidia GameStream is affected by such an issue. The error is with GameStream, as users reported that YouTube and other media channels are working properly.

Nevertheless, the issue has a quick a few quick solutions. Today we will show you what to do to have sound again in GameStream, so keep reading.

Quick Tip:

Not having sound on Nvidia GameStream ruins the gaming experience for many players. Make sure you don’t have an overall issue with your sound.

If this is the case, we recommend you use a lightweight and simple repair tool, that can increase your PC’s performance!

How do I fix NVIDIA GameStream no sound issue?

1. Change a few settings in GameStream

  1. Open Playback Devices (with the option Show Disabled Devices checked off, but the one Show disconnected unchecked).
  2. When you enable any game stream, very briefly a new one would pop up and disappear. Try a few times to click Enable during that brief window.
  3. Right-click Set as default, disconnect GameStream and connect it again.

2. Update GeForce Experience

This issue often appears when GeForce Experience is outdated. Don’t forget to update it to avoid this error.

While you’re at it, update the sound driver as well. You can do this easily with one of these driver updating tools from our fresh list.

Also, remember to update your drivers as often as possible to avoid similar issues.

3. Disable your antivirus

Several users reported that this problem is related to the antivirus. Disable your antivirus while playing. You can enable it back after you’re done.

Keep in mind that this is only a workaround. This issue should not appear if you have antivirus.

Also, you can try another tool to protect your computer from cyberattacks. You can try one of these antivirus tools from our new list.

If this error is specific for GameStream, try our methods above. Twitch some options in Playback Devices to solve the issue. You can disable your antivirus as well.

However, this will leave your PC vulnerable. If this works, consider installing another antivirus.

Did our article help you solve this problem? Do let us know in the comments section below!

Remove Scan drive for errors notification in Windows 10

Nothing is scary as receiving the warning that you should scan the drive for errors in the midst of using your PC or when rebooting.

First, your PC may completely refuse to boot meaning you will have to spend time troubleshooting the PC instead of working.

Even worse, your hard drive stores important data whose loss can be devastating to your organization.

Of course, one of the most important system maintenance routines for perfect hard disk health is running a disk check regularly.

Strangely, even disks that have all along seemed to be in the best condition are not spared and may suddenly display the irritating scan drive for errors in Windows 10 notification.

Well, despite its stubbornness, this is a solvable problem and I will show you how shortly. But just before that, let’s look at its likely triggers.

Potential causes of the scan drive for errors issue

  • Natural wear and tear: During the course of using your PC, the hard drive may suffer mechanical damage or get logical errors. Such incidences may lead to a corrupted file system, bad or irregular sectors, or a complete disk breakdown meaning there is a risk of data loss.
  • Shutting down a PC improperly: Moreover, you may notice the error notification when booting if you had previously shut down your system improperly.
  • Installation of new programs: You may experience the error when restarting after installing a particular program/game.
  • Other boot-related challenges: Additionally, you could receive the notification to scan drive for errors in case your PC encounters other boot-related problems, for example, a virus attack.

How do I remove the scan drive for errors notification?

1. Use the GUI error checking tool

  1. Click the File Explorer icon on the taskbar (as shown). The explorer opens up. chkdsk
  2. Locate the disk you would like to scan for errors from the left menu, and right-click it.
  3. Choose Properties.
  4. Click Tools, then select Check. scan and repair drive windows 10
  5. Choose Scan drive.hard drive scan and repair

Type your administrator password and provide confirmation if you’re prompted. It is advisable that you can run the scan for each drive (if you have multiple drives) to be on the safe side.

Just right-click on each in turns.

2. Perform chkdsk in Command Prompt

  1. Click Start, and type cmd in the search dialogue box.
  2. Right-click Command Prompt, and choose Run as administrator.scan and fix hard drive
  3. In the command line type chkdsk /x: (x is the drive letter), and press Enter.windows found errors on this drive that need to be repaired
  4. Press Y if you’re prompted to check your disk during the next restart.
  5. Restart your PC.

Compared to the GUI option, the cmd process offers more advanced options when scanning your drives for errors.

The error scanning operation also tries to repair any bad sectors meaning you might lose data during the scan/repair process.

Subsequently, always backup your data before running it to avoid suffering a costly data loss.

3. Boot your PC from Windows installation media

  1. Insert your Windows installation DVD or USB Recovery Disc/ System Repair Disc in the relevant drive.
  2. Force your PC to shut down by long-pressing the power button.
  3. Now power on your PC, and press any key to boot from CD or DVD.
  4. Select your keyboard layout, time and language, and click Next.
  5. Press R or click Repair your computer.
  6. Choose Troubleshoot from the Choose an option window.
  7. Click Command Prompt.
  8. Type chkdsk c: /f/r then press Enter (c is the drive letter).

What to do if the Windows 10 scanning and drive repairing error hangs

  1. Insert your Windows 10 Installation disc.
  2. Restart the PC.
  3. To boot from the CD or DVD, press any keyboard key.
  4. Choose your keyboard layout, time and language, and click Next
  5. Select Repair your computer.
  6. Click on Troubleshoot.Scan Drive For Errors
  7. Click on the Advanced options, and select Command Prompt.
  8. Type the command sfc /scannow and press Enter.

Sometimes Windows 10 seemingly freezes before completing the process of scanning and repairing drive errors.

When this happens, the procedure of repairing drive C: becomes stuck at a certain percentage for hours on end.

In such cases, you can first try the system file checker (SFC). This may help as it also scans and restores any corruption in system files that could be causing the freeze.

You can retry the scan after your computer completes the sfc tests.

You may even be forced to reinstall Windows 10 if the freeze doesn’t go away even after implementing the above suggestions.

What to do if your disk is found to have errors

If at the end the tool finds errors, the system will request you to restart right away to allow it to fix the errors.

There is also the alternative to schedule the restart to later. We would recommend that you reboot right away.

Once in a while, Windows 10 persists in telling you to scan the drive for errors even after you have restarted. Well, this could mean several things with each calling for a different action.

Here are some probabilities and suggested fixes:

  • Your disk has been affected by a vicious malware attack: Try to scan your PC with an updated antivirus.
  • There’s a problem with Windows update: Try to download and install the latest updates.

4. Perform a regular disk check using a third-party app

In order to maintain the good health of your hard drive, you need to perform a regular disk check.

We recommend you use a universal system optimizer that can fix both system and application crashes. With this kind of tool, you’ll benefit from automatic error repair, since this software is completely automated.

We hope that our solutions helped you to solve the scan drive for errors in Windows 10 notification. If you have any other solution suggestions or questions, you can write to us in the comment section below.

FIX: Adobe Creative Cloud Issues on Windows 10/11

Adobe software is used by millions of users, and it’s also expensive software. It’s common to be concerned if you have issues with Adobe Creative Cloud products on Windows 10. 

Users report that after installing Adobe Creative Cloud, multi-core applications such as Photoshop, for example, don’t load, or load but don’t work well.

As you can imagine, this is a big problem especially if you’re using Adobe software professionally.

If you’re having these issues there’s no need to worry, because we have a few solutions that can help you. The steps below will help you fix Adobe Creative Cloud issues with ease, so keep reading.

How can I fix the Adobe Creative Cloud issues?

1. Update your Creative Cloud desktop app to the latest version

  1. Press the Windows Key.
  2. Open the Adobe Creative Cloud app.
  3. Select the Account  icon on the upper-right corner
  4. Then select the Apps tab.
  5. Afterward, do the following: 
    • Turn on Auto-update if you want to update all apps.
    • Turn on only the specific apps you wish to update, then click Done.

Whenever you have to fix Adobe Creative Cloud issues, the first thing to do is to update the app to the latest version. Adobe is constantly putting out bug fixes and most issues are solved when the new version comes out.

Of course, this is not exclusive to Adobe, as all the software you run should be up to date to ensure maximum protection against security vulnerabilities.

Moreover, you get access to the latest features and apps that Adobe has to offer.

Here’s what you get when you download Adobe Creative Cloud:

  • Photoshop – arguably the best photo editing software available
  • Premiere Pro – the industry standard for video editing, used from YouTube to Hollywood
  • Illustrator – the tool for creating vector graphics that can be scaled to any size without losing quality
  • InDesign – for when you want to create beautiful posters, flyers and magazines intended for printing
  • Over 20 tools which can be used across platforms and on multiple devices, including mobile

You can delete the Creative Cloud desktop app and reinstall it via Adobe’s official website in some situations, such as a corrupted Creative Cloud desktop app or difficulty installing some Creative Cloud apps.

Before you start the uninstaller, make sure that all of your files are already synced. It’s possible that files that aren’t linked to your Creative Cloud account will be lost.

2. Make sure that your Windows 10 is up to date

  1. Press the Windows Key.
  2. Go to Settings.
  3. Select Update and Security.
    Update and security - Paint 3D no export option
  4. Choose Windows Update.
  5. Then, select Check for updates.
  6. Allow Windows to check for any new versions.
  7. If it does find updates to install, follow the instructions.

Users confirm that issues with Adobe Creative Cloud are usually resolved after updating Windows 10 to the latest version.

If Adobe Creative Cloud is not working, Microsoft is aware of this issue, and it’s working hard to fix any incompatibility issues that you might have with Adobe software, so the first step is to update your Windows 10 to the latest version.

3. Download Microsoft Visual C++ Redistributable

If your application still cannot start, you might need to reinstall Microsoft Visual C++ Redistributable. Adobe applications rely heavily on Microsoft Visual C++ Redistributable, so you will have to install it.

According to Microsoft, Adobe applications require the latest version of Microsoft Visual C++ Redistributable, and you can download it from Microsoft’s website for free.

Just make sure that you download and install both x86 and x64 versions if you’re using a 64-bit operating system.

Just remember to restart your PC after you’ve installed Visual Studio Redistributable, so the changes can be applied.

4. Delete the OOBE folder

  1. In the Search bar type Control Panel, and click on the result.
  2. Go to Appearance and Personalization.
  3. Under File Explorer Options, click on Show hidden files and folders.
  4. Check Show hidden files, folders, and drives, and then click Apply.

Now you need to delete the contents of the OOBE folder:

  1. Close Creative Cloud desktop app.
  2. Go to the following path:  C:>Users>[user folder]>AppData>Local>Adobe>OOBE
  3. Delete all the files in the OOBE folder.
  4. Restart your PC, and then the Creative Cloud app.

Because the content in the OOBE folder will be rebuilt, you will have to wait a little longer than usual for the app to load. Don’t panic, just leave the app to do its thing for a few minutes.

This will fix any Adobe Creative Cloud issues you might have encountered.

As you can see, fixing these issues is relatively easy. You just need to keep your Windows 10 up to date, your app up to date, and to have Visual Studio installed.

If you have any more questions or concerns about the Adobe Creative Cloud, feel free to share them in the comments section below.

Firefox add-ons not working? How to restore & fix

Firefox is a great browser, mainly due to its flexibility when it comes to how much customization a user can bring to it. When you are searching for ways to change how Firefox works, extend its functionality, or customize the appearance, add-ons are the ones making it possible.

Many users have recently faced an issue with the Firefox browser, regarding the fact that no add-ons were working.

It appeared as though all extensions were disabled and re-enabling them was not even possible, which of course created a lot of frustration for all users.

In this article we will explore a few easy ways to solve this issue, so make sure to keep on reading.

How do I restore Firefox add ons?

1. Enable Studies

Make sure that before making any of the below steps, you have ensured that the Studies option is checked. In order to do that, open the Firefox browser and go to Options.

In here go to Privacy and look for the Allow Firefox to install and run Studies option. Make sure to check the box if it is not already.

You can also change the automatic update settings from the general menu, in the Options section by choosing Firefox Updates.


2. Update Mozilla

Most of the time, checking to see if you have the latest version of the browser installed, will solve the issue with the add-ons.

There are different problems, already known and most of them are being solved with the new version release.

In order to update your browser to the latest available version, make sure to go to the menu and select About Firefox. After you pressed this button, Firefox will search for updates and download the latest one available.


3. Check out the Firefox blog

As seen on previous times, it can turn out that the reason Firefox add-ons stopped working has nothing to do with something from the end user side.

In the Firefox Add-ons Blog, you can easily check and see if that’s the case and also see most of the existing bugs and issues accompanied with ways to fix them as well.

In case it’s confirmed that the error was on Firefox side, then there is not, as it has in this type of situations, there is not much you can do, unless to wait for them to fix the problem.


This are our suggestions on how you can fix the Firefox add-ons not working and it implies making a few easy steps.

In general, this sort of issue has nothing to do with something that may have gone wrong on your side and it solves itself since it’s a bug from them.

Microsoft Teams keeps restarting [Fixed]

Many companies are using Microsoft Teams as their communication tool with their employees. It’s easy to use and with plenty of features but as with many good tools, it does come with its share of issues.

Recently, many users started to complain that Microsoft Teams keeps restarting while using it which has caused a lot of frustration for everyone.

We have put together a list that will help you solve this issue in no time, so make sure to keep on reading.

What can I do if Microsoft Teams keeps restarting?

1. Check your Antivirus

First, before starting to make any other verifications make sure that your Antivirus is not blocking the app or causing it to crash constantly.

Users are frequently reporting on the Microsoft community that once they have chance laptops or disabled the firewall, everything started to work just fine.


2. Check Microsoft Teams service status

Microsoft Team may crash if the service is down for maintenance. It’s very easy to check the status of the service by accessing the admin panel on your Office 365 account.

Launch Office 365 admin center and simply go to Service Health. In here you will be able to see what is the status of the service and if any measures are being taken in order to solve it.

Make sure that you have admin access otherwise you won’t be able to check the service status. If that’s the case, make sure to contact the admin.

Also, on twitter you can follow the Microsoft Office 365 Status handle and get all the details there.

Most of the time, all service-related issues are solved automatically in a few hours to a day by the Microsoft Team.


3. Delete local cache

  1. Open File Explorer.
  2. Make sure to navigate to the following location:
    C:\Users\username\AppData\Roaming\Microsoft
  3. Locate the Teams folder and delete it.
  4. Relaunch Microsoft Teams.

4. Uninstall and Reinstall Microsoft Teams

Uninstall your graphics card driver

If none of the above solutions worked, then you may have to reinstall Teams in order to fix the app crashing.

If the error is caused by an issues with the Microsoft Teams’ faulty code or corrupted files, then uninstalling it will clear all the bad files from your hard drive.

In this case, when you reinstall Microsoft Teams, the version you’ll be running should be fully functional.

Once the reinstallation process is completed, it’s advised that you restart your device. Then, make sure to log in to your Microsoft Teams account, and test the account to see if the problem has been fixed.


With this, we conclude our list of suggestions on how you can fix the Microsoft Teams crashing issue. We also have a great guide on what to do if Microsoft Planner is not working, so you might want to check it out.

If you have additional suggestions or recommendations please let us know in the comments section below.

Hulu not working on Chrome? [Complete Fix]

Hulu is an on-demand streaming service that allows its users to watch movies, television shows, and plenty of media and trailer clips from NBC, Fox, ABC, TBS, and many other networks and studios.

It’s quite a popular service, especially since it releases some pretty interesting original programs, and it currently gathers more than 35 millions subscribers.

Unfortunately though, it seems as though some of the users are not bale to play Hulu on their Chrome browser.

In this article we will explore how you can fix this problem by following some really easy steps, so make sure to keep on reading.

How can I get my Hulu to work?

1. Update your Browser

  1. Launch the Chrome browser and click on 3 vertical ellipses (3 vertical dots near the top right of the screen).
  2. Now, from the menu, click on Settings.
  3. Next, in the left pane of the window, click on About Chrome.
  4. Press on the check if an update is available, then update the browser.
  5. After this is done, make sure to press on Relaunch.

2. Update your OS

  1. Press the Windows key and type in the Search box Updates.
  2. Next, select the Check for updates option from the list.
  3. In the Windows update setting click again on Check for updates.
  4. Restart your device once the update process is finished.

3. Disable Chrome Extensions

disable Intel SpeedStep Technology in BIOS
  1. Launch the Chrome browser.
  2. Next, click on the Extensions icon (near the top right of the screen).
  3. Now, in the menu shown, click on Manage Extensions.
  4. Disable all the extensions by toggling their respective switches to the off position.
  5. Relaunch the browser and check if Hulu is working fine in chrome.

Note: If after disabling the extensions, Hulu is working, you can try and enable the extensions one by one, and see which is the problematic one.


4. Update Adobe Flash Player

  1. Launch the Chrome browser.
  2. Enter the following command: chrome://components/
  3. Locate Adobe Flash Player and then click on the Check for Update button
  4. Refresh the page and reopen Hulu.

Because Adobe flash player is used for playing multimedia files in the Chrome browser, is advised to check if you have the latest version available installed.

Users have reported that an outdated Adobe flash player is causing troubles with Hulu streaming which means that updating it may solve the issue.


With this we conclude our list of suggestions, and we hope that one of them will help you solve any Hulu streaming issue you may experience.

If you have additional suggestions or recommendations, please let us know in the comments section below.

Hands-on video: Our look at the future of Windows and the leaked Windows 10X build in action

If you missed it, earlier this week, a “leaked” version of Windows 10X for single-screen PCs surfaced on the internet. Thanks to a tweet from Albacore (@thebookisclosed) and the work of the Windows community (fellow Windows activists,) we took the “leaked” VHD file and installed it on a virtual machine.

It should be noted that the leaked version isn’t considered final and many things could change between now and when 10X becomes official. Still, though, it offers an interesting peek at the future of Windows.

Watch our video as we tour you through some of the new things in Windows 10X. We’ll tour you through the Action Center, the Start Menu, as well as showcase some of the new animations. We’ll even open some of the stock apps, and showcase split-screen multitasking, too.

We also invite you to check out our initial hands-on post from a few days ago, In that post, we go a bit more in-depth and showcase how it’s a bit more like ChromeOS.

Larry Hyrb, known to all of us as Major Nelson, celebrates 20 years at Microsoft

Larry Hyrb, known far and wide by his Xbox gamertag Major Nelson, is celebrating 20 years at Microsoft. Starting out before that even as a vendor managing communities for MSN (which was far more a social network than a news site at the time), Hyrb was offered a job in 2000 to come to Redmond and serve as Editor-in-Chief at MSN Music. As he details in a thoughtful blog post, Hyrb joined the company of 38,000 (Microsoft now employs over 163,000) on January 15th, 2001.

Serving as Editor in Chief at MSN Music, luckily for Hyrb, placed him basically right next door to the nascent Xbox team, still almost a year away from launching the first Xbox. As he has been an avid gamer ever since his Mom brought home a Sears Video Arcade, Hyrb landed a job at Xbox, where he’s been ever since.

For many of us, Major Nelson is the face of Xbox, appearing on webcasts and at conferences to showcase the latest and the greatest for the game console franchise. It’s worth taking the time to read his blog post on MajorNelson.com, as Hyrb offers some sound advice he’s learned over these last 20 years.

Here’s hoping that the best is yet to come for Major Nelson and Xbox, with the Xbox Series X, a new Halo, Cloud Gaming, and more, it should be an exciting time. As Hyrb’s wife says, “the best things we’ve ever done are going to happen here.”

Good job, Larry, and keep up the great work!

Microsoft to fix critical NTFS vulnerability on Windows 10 PCs

Microsoft is working to fix a critical NTFS vulnerability on Windows 10 that can corrupt users’ hard drives when they open an HTML file, a Windows shortcut, or extract a Zip file that contains a one-line command (via The Verge). When the vulnerability is triggered, users will see a pop up saying that they need to restart their PC to repair drive errors, and doing so will initiate the Windows check disk utility on reboot to repair the corrupted disk.

The vulnerability was actually discovered two years ago by Will Dorman, a security researcher at the CERT Coordination Center. If Dormann believed that Windows 10 versions older than 1803 may not be affected, Bleeping Computer is reporting today that the NTFS issue also impacts older versions of Windows XP.

This vulnerability is pretty serious as it can be hidden in a random file and corrupt your hard drive instantly. Worse, Bleeping Computer discovered that it can also be triggered when the Windows File Explorer simply displays a corrupted shortcut hiding the malicious command in a folder. “To do this, Windows Explorer would attempt to access the crafted icon path inside the file in the background, thereby corrupting the NTFS hard drive in the process,” the report explained.

Microsoft has finally acknowledged this critical vulnerability in a statement to The Verge, promising a fix in a future update. “We are aware of this issue and will provide an update in a future release,” a Microsoft spokesperson said. “The use of this technique relies on social engineering and as always we encourage our customers to practice good computing habits online, including exercising caution when opening unknown files, or accepting file transfers.”

This is why Microsoft is ending Adobe Flash support by 2021

Adobe has finally announced that it will be ending support for Flash at the end of 2020. The company will discontinue any sort of support and security updates after 2020. However, until then, Adobe will still provide security updates and will be compatible with a majority of browsers.

In line with Abode’s announcement, Microsoft has also announced that it will be phasing out the aging standard.

Why is Microsoft ending support for Flash?

A potential threat 

Flash took the online world by storm when it was announced initially but in the recent past, online Flash content has been no less reliable.

The Flash Players’ design allows attackers to easily induce malware via unauthorized back doors. We have seen umpteen number of flash attacks on both PCs and Android smartphones.

In fact, the Flash browser version has often been criticized for its ability to accommodate malware and despite changes made by Adobe, the tool is still a potential threat.

Most of us have already moved on to HTML5 video player and I have in fact deleted the Flash player a couple of months ago. Yes, there is a fair share of web services that make use of Flash Player but the security of your system takes precedence over anything else.

It’s obsolete

Well, it’s not just Microsoft that has been ending the support for Flash content, in fact, all the other major web browsers including Google Chrome, Mozilla Firefox, and Apple Safari have already announced the same.

HTML 5 is clearly the better choice since it not only improves the overall performance of the browser but also increases security and battery life.

Quick Tip

Opera One can still support flash through some add-on. As such, Opera might be the alternative for a lot of Flash movies or games fans.

Opera One is a lightweight browser with a bunch of extremely useful built-in features that favor more productivity. Alternate workspaces and tab islands help you stay organized. The unlimited VPN keeps your identity private while you’re browsing the Internet. Plus, it comes with a native AI.

Opera One

A great browser alternative that keeps you secure while you access your favorite Flash content after 2020.
Free Download Visit website

Here’s a possible calendar of the forthcoming Flash support removal:

  • Throughout 2017 and into 2018, Microsoft Edge will continue to ask users for permission to run Flash on most sites upon the first visit. It will remember the user’s preference for subsequent visits. Internet Explorer will continue to allow Flash with no special permissions required during this time.
  • Mid to late 2018, we will update Microsoft Edge to require permission for Flash to be run each session. Internet Explorer will continue to allow Flash for all sites in 2018.
  • Mid to late 2019, we will disable Flash by default in both Microsoft Edge and Internet Explorer. Users will be able to re-enable Flash in both browsers. When re-enabled, Microsoft Edge will continue to require approval for Flash on a site-by-site basis.
  • By the end of 2020, the ability to run Adobe Flash will be removed in Microsoft Edge and Internet Explorer across all supported versions of Microsoft Windows. Users will no longer have any ability to enable or run Flash.

Additionally, it’s recommended that you uninstall Flash Player from your system, to avoid exposure to cyber-attacks, as the tool will become vulnerable.

What’s your take on Microsoft’s decision. You can drop us a line in the comments section.

How to fix Photos app file system error (-2147219196)

Are you trying to open up a picture on your Windows 10 PC and you get an error message saying File system error message with an error code (-2147219196) at the end?

This Photos app file system error issue is more common than you might think.

So in this article, we will explore some of the best methods that worked when other Windows 10 users encountered this issue.

How can I fix the file system error in Photos?

  1. Use a system debugging tool
  2. Repair the Photos app
  3. Reset Photos app
  4. Download an alternative photo viewer
  5. Use Registry Editor with Admin privileges

1. Use a sytem debugging tool

System and app errors usually occur due to corrupted files and various OS bugs that take a lot of time to decipher and fix. Here is where professional repair software comes in handy.

These tools allow you to scan your system, identify any files that have issues, and either try to fix them or replace them completely with fresh ones from their online databases.

2. Repair the Photos app

  1. Click on Start > Settings.
  2. Navigate to Apps.
  3. Search for the Microsoft Photos app in the list, select it, and click on Advanced options.file system error advanced options
  4. In the Advanced options window, scroll down and select Repair.repair photos app file system error
  5. The process of repairing your Photos app will start, and as soon as it is over, you will see a checkmark next to the Repair button.repair complete file system error
  6. This should resolve the Photos app File System error. If that’s not the case, move to the next step.

3. Reset Photos app

  1. Follow steps 1 to 3 from the first solution.
  2. In the Advanced options window, scroll down and select Reset.photos app reset
  3. After this process is complete, you can try once again to open up the Photos app.
  4. This should resolve the Photos app File System error for good.

4. Download an alternative photo viewer

If you’re tired of Microsoft Photos, then you might as well for an alternative photo viewer, one great alternative is Adobe Lightroom.

  1. Download Lightroom for free here.
  2. Install Adobe Lightroom on your PC.
  3. Reboot your PC.
  4. Press Start.
  5. Select Settings.
  6. Go to Apps.
  7. Navigate to the Default Apps tab.
  8. In the Photo viewer section choose Adobe Lightroom as the default program.

By following these steps, not only will you have a new photo viewer installed, but you’ll also have an image editor included, one that is almost as good as Adobe Photoshop.

5. Use the Registry Editor with Admin privileges

  1. Click on Cortana search box, and type regedit.
  2. In the list of results, right-click on it, and choose Run as administrator.run as administrator file system error photos app
  3. This will open up the Registry editor.
  4. Navigate to this key by using the navigation tree to the right of your screen.
    • HKEY_CURRENT_USERSOFTWAREClasses
      • Local Settings/Software/Microsoft/Windows
        • CurrentVersion/AppModel
          • Repository/Families/Microsoft.Windows.Photos
            windows photos registry file system error
  5. In this folder, check for the date of each of the entries by checking the date found in the name of the folders.registry editor
  6. The number of folders present under the Microsoft Windows Photos folder will vary depending on the number of uninstalls you performed in the past.
    • In this case, there are only 3 folders available, each with the same version number.
    • In some cases, there could be up to 8 entries of which some will have an older version.
  7. Delete the outdated entries found in the Microsoft Windows Photos folder ( the entries with smaller version numbers), and Restart your PC.

Note: In order to be able to delete the outdated key entries, you will need to follow these steps:

  1. Right-click on each entry > go to Permissions.permissions registry editor file system error
  2. Click Advanced.advanced permissions file system error
  3. Change owner from System to Administrator (by typing in Administrator and pressing OK.enter the object name
  4. Set all rights to the key to be accessible by Administrator. Doing this will allow you to delete the keys.
  5. Repeat steps 1 to 3 of  Note 3 for each of the outdated keys found in the folder Microsoft Windows Photos in the Registry Editor.
  6. After you’ve deleted all older versions of the keys, restart your computer and try using the Photos app again.

Note: It is recommended that you perform a backup of your system before attempting to change any information in the Registry editor to avoid any issues

Note 2: Some of the information presented in this solution will vary on your PC depending on the number of times the app was uninstalled, reset, etc.

There you go, these are just a couple of solutions that can help you fix File system error in the Photos app. Alternatively, you can contact Microsoft Support and ask for the resolution.

Let us know if this article helped you fix your issue by using the comment section below.

Microsoft Teams introduces new color and styling changes in public preview

Back in October, Microsoft detailed a new Theme and Fluent icon update that would soon make its debut on the Teams collaboration platform. Microsoft Teams users have been waiting for these changes for quite some time now, and this new experience is now available for testers with the newly-released update for the public preview program.

If you are enrolled in the Microsoft Teams public preview program, you’ll notice that the company has updated the default and dark themes in Teams with new background colors and introduced subtle design changes. As seen in the screenshot above, Microsoft Teams has finally picked up an improved dark mode experience, with the UI elements appearing a bit more on the darker side.

Updated design

The default theme is also getting similar treatment, and a shade of white has replaced the bright purple color in the app bar. The other noticeable changes in this update are the new drop shadow effect that has been applied between panels and the new rounded corners for various UI elements.

Overall, this is a nice coat of paint and a seamless transition to keep the UI of Teams consistent with the overall Microsoft 365 design vision, which was revealed in July 2020. Keep in mind that this release doesn’t include the Fluent icon update, and the company plans to ship it to testers in mid-February. Have you spotted these changes on your PCs? Let us know in the comments down below.

How to buy the Surface Pro 7+ directly from Microsoft

Microsoft dropped a surprise to the start of 2021 and announced Surface Pro 7+. This latest entry to the Surface Family, though, is different. It isn’t designed for consumers to buy, but rather Microsoft’s business and education customers. That doesn’t mean you can’t have one for yourself though. Here’s a look at how to buy the Surface Pro 7+.

Just like every other Surface product, Surface Pro 7+ has its own page at Microsoft. If you visit this webpage, you’ll see the listing and specs on the device. As a reminder, that includes Intel’s 11th Gen core processors under the hood, a removable SSD M.2 SSD just like on the Surface Pro X, and LTE support. There’s also an internal battery that should provide up to 15 hours of battery life, too. Otherwise speaking, this Surface Pro 7+ is the same as the Surface Pro 7.

Anyway, from this product page, you can technically buy the Surface Pro 7+. You don’t need to be an education or a commercial customer. Just click the “Where to buy” link and you’ll be taken to another page, where you can scroll down to the bottom to find “Buy online at the Microsoft Store.”

Now, for the real part. There, you’ll see Surface Pro 7+ for Business in the middle. You’ll then be taken to this product listing page where you can directly from the Microsoft Store here via “Surface for Business.” Just click the “Configure now” link, configure your device, and check out the same way you would a normal Surface.

That’s all to it. Much like Surface Laptop 3 for Business (which has Intel processors inside), you don’t need anything special to buy Surface Pro 7+. Happy shopping, and let us know if you purchased Surface Pro 7+ by dropping us a comment below!

FIX: Can’t add Bluetooth device to Windows 10

With Bluetooth continuing to be extremely relevant for short-distance communications, it sure pays to have the thing up and running on all of your devices.

However, that often has not been the case with Windows 10 as many users encountered Bluetooth connectivity issues.

Other users reported that Bluetooth is not detecting their devices. If you have the same problems, you can sort them out with the help of this useful guide.

Why can’t I add a Bluetooth device to Windows 10? Here are some of the most common Bluetooth issues on Windows 10, along with ways to get past them.

How do I fix common Bluetooth connectivity issues in Windows?

1. Bluetooth is not working

  1. Press the Window key + X and select Device Manager from the list.
  2. Locate Bluetooth from the list and click on it.
  3. Locate the specific Bluetooth adapter installed in your system, right-click on it, and select Properties.
  4. Click on the Driver tab and then click on Update Driver. Once that is done, you should be able to use the Bluetooth feature on your laptop as desired.

One of the most common causes for this problem is that the Bluetooth drivers in your device might be outdated and you need to install the latest version.

For this tedious task, it’s better to use automated software that can install any drivers rapidly, plus find the latest versions available. Hence, get it done efficiently using Outbyte Driver Updater.

2. Bluetooth not showing in Device Manager

  1. This happens if the Bluetooth driver is not compatible with Windows 10. In this case, launch Device Manager again as instructed in the previous solution.
  2. This time expand Other Devices.
  3. Right-click or long-press on Unknown device and select Properties from the menu that appears.
  4. Select the Details tab followed by Hardware IDs from the Property section.
  5. This will show the ID (an alphanumeric value) of the Bluetooth radio that your device comes with.
  6. Copy it by right-clicking or long-pressing on it and do an online search to find more info about the Bluetooth radio in your device.
  7. Try locating the official site of the Bluetooth radio manufacturer and download the latest drivers from there that are compatible with Windows 10.

3. Bluetooth not showing in Device Manager and there are no Unknown Devices

This pertains to that scenario when Device Manager is neither showing Bluetooth nor Other Devices. Things would be a little more tedious here as you need to expand every device under Device Manager that has the remotest possibility of hosting Bluetooth under them.

Once you have successfully located the Bluetooth device as well as its Parent device, try updating the driver.

This can be done either by right-clicking/long pressing on the parent device and selecting Update driver from the menu shown, followed by Search automatically for updated driver software.

If this does not work, try uninstalling the device. Right-click/ long-press the device and select Uninstall device. Restart the PC. This will make Windows make a fresh installation of the default device driver.

The other option for you will be to locate the manufacturer’s website and download the latest drivers.

Next right-click/long-press the parent device and select Update Driver, then Browse my computer for driver software and manually select the driver you downloaded.

4. Bluetooth not working after upgrading to the latest Windows 10 version

This happens to be another common issue with Windows 10 devices and is more prevalent if the device is using a customized Bluetooth profile. In that case, just pair the Bluetooth device again and you will be good to go.

If you’re still unable to add the Bluetooth device in Windows 10, you should also check the device that you want to pair with another PC and see if it works.

We hope that the solutions listed above helped you fix the Bluetooth issues that you encountered. If you’ve come across other workarounds to fix this problem, you can list the troubleshooting steps in the comments section below.

Assassin’s Creed Valhalla video game’s 1.1.1 update is now live on Xbox Series X and Xbox One

Update 1.1.1 has begun to roll out to the Assassin’s Creed Valhalla video game on Microsoft’s Xbox One and Xbox Series families of consoles in addition to other supported platforms.

Not major new features were added to the game with this latest update though a very large number of bug fixes and improvements have been made.

Among the more notable changes include the addition of Ubisoft Connect achievements, some improvements to daily quests, damage balancing, and numerous refinements to the game’s graphics.

The full release notes can be read here. Warning: They are extensive.

This Assassin’s Creed Valhalla update should automatically install on Xbox consoles though, if it doesn’t, it can usually be manually triggered by opening the game or restarting the console.

Assassin's Creed® Valhalla
Developer:
UBISOFT
Price:
Free